1 A B F M L H E C D K I G G N 5 19 2 1 3 23 9 4 20 10 17 18 21 15 2214 13 1 2 3 6 4 7 8 9 0 04 05 06 G2 01 02 03 G1 07 08 09 G3 10 11 12 G4 13 14 15 G5 16 17 18 G6 5 1611 126 8 7

Welcome message from author
This document is posted to help you gain knowledge. Please leave a comment to let me know what you think about it! Share it to your friends and learn new things together.
Transcript

1
A
B
F
M
LH
E
C
D
K I
G
G
N
5 19 2 1 3 23 9
42010
17 18 21 15 221413
1 2 3
64
7 8 9
0
04 05 06 G2
01 02 03 G1
07 08 09 G3
10 11 12 G4
13 14 15 G5
16 17 18 G6
5
1611 12 6 8 7

2GB TF 610TOSHIBAWelcome to your fax machine
Welcome to your fax machineA Cover
B Control panel
C Document exit
D Exit tray wire
E Recording paper cassette
F Control panel lock
G Interface for Computer printer cable
H Document guides
I Recording paper exit tray
K Tray wire
1 LCD DisplayDisplays indications about theoperating modes of your faxmachine. Your control monitor forall function settings.
2 Fault LEDLights up if a malfunction occurs orto indicate paper out or toner out.
3 Busy LEDFlashes or lights up when the faxmachine connects to the line or isjust transmitting or receiving.
4 Job StatusQueries the status of the enteredjobs.
5 Menu keysUse these keys to start the menu orselect a particular menu item.
6 Cancel keyDeletes jobs in the memory ordeletes the last entry duringprogramming.
7 GroupUse this key for group selection.
8 One Touch Dialing keysSends documents at the push of abutton.
9 CopyMakes a copy of your original.
10 OptionWhen document hsa been inserted intomachine, press to select special settingsfor document transmission.
11 StartIndicates the sending and receivingoptions, confirms entries.
12 StopClears error messages and terminatesinput.
13 Redial/pauseActivates the previously dialled numberand inserts a dialling pause.
14 HandsetUsed for on-hook dialling.
15 Dial KeypadUsed for entering telephone numbers.
16 ABB. DIAL /ALPHABETPress this key in order to select a storedalphabet dial number or a name.
17 RCV KEYSwitches between automatic andmanual reception.
18 Resolution KeyChanges the scan resolution of theloaded originals.
19 InputActivates selected menu items andterminates data input.
20 Direct transmitPress this key to send thedocument directly from thedocument feeder (avoiding thestack memory).
21 ContrastFor adjusting the scanning of darkor light documents.
22 TX reportThe settings for printing out the TXreport can be adjusted individually.
23 ON LINELights up to indicate data beingtransmitted from the PC.
L Document tray wire
M Document tray
N Telephone connection

3 GBTOSHIBATF 610 Contents
ContentsPreparation
Unpacking ................................................... 4Remove transport fittings: ........................... 5Insert process unit ....................................... 5To make a good impression:a new toner cartridge ................................. 6Insert recording paper ................................. 7Make connections: ..................................... 8Install recording paper tray ......................... 8Insert memory card ..................................... 9Safety instructions ...................................... 9
Installation
The menu system ..................................... 10Set language ............................................ 11Enter terminal ID ....................................... 12Enter the user name ................................. 13Setting dialling method ............................. 14Connection to PABX,obtaining a public line ............................... 15Connection to PABX, further settings ........ 17Set date and time ..................................... 18
Reception of documents
Manual reception ...................................... 19Automatic reception ................................. 19Set standby mode ..................................... 19Telephone/fax switch ................................ 20Fax/TAD switch .......................................... 20Setting the TAD time ................................ 21Set remote reception (manual reception) . 22Reception reduction ................................. 23Local copy ................................................ 24Set call counter ........................................ 25Memory reception ..................................... 25Cancel reception ...................................... 26
Transmit documents
Document format ..................................... 27Stack mode .............................................. 28
Direct transmission ................................... 29Automatic fax messages ........................... 30Transmission with alphabet dialling ........... 31Transmission with one-touch dialling ......... 31Transmission with telephone(manual transmission) ............................... 32Long Dialling ............................................. 32Transmission with directory function ......... 33Monitoring ................................................ 34Set resolution ........................................... 35Redial ....................................................... 35Delayed transmission ................................ 36Single multi-address transmission ............. 37Stored broadcast ...................................... 38Polling ....................................................... 39Reserve polling .......................................... 40Reduce transmission speed ...................... 41Stop transmission ..................................... 42
Store numbers
Alphabet dial memory ............................... 43One-touch dial keys ................................... 45Group keys ................................................ 45
Report prints
Activate printing report ............................. 48Transmission report ................................... 48Transmission and reception journal ........... 49The multitransmission report ..................... 50Number list ............................................... 50Group list .................................................. 50Jobs in progress ........................................ 50The function list ........................................ 51
Advanced settings
Functions .................................................. 52Connection to PABX .................................. 56Receive footer on/off ................................ 56Change speaker volume ............................ 57Adjust ringing tone/key beeps ................... 58Set transmission report output .................. 59
Temporarily activate TX report .................. 60Remote maintenance (COMLINE) ............. 60Power saver .............................................. 61Switch off error correction ....................... 62
Possible problems
Error codes in journal ................................ 63Error messages in the Display ................... 64Transmission problems .............................. 65Receiving problems ................................... 66How to clear a paper jam ......................... 67How to clear a recording paper jam... ...... 67
Handling faxes on your PC
System requirements ................................ 68Features .................................................... 68Connection to the PC ................................ 68Scanning documents into the PC ............. 69Sending fax messages from the PC .......... 69Sending faxes to the PC ........................... 70
Your fax machineused asa PC Printer
Introduction ............................................... 71Connection to the PC ................................ 71Install printer driver ................................... 72Settings of the printer driver ..................... 74Printout ..................................................... 76Delete printer driver .................................. 77
UK Connection information
EPA ENERGY STAR ................................... 78Reset ........................................................ 78
Index
Index ......................................................... 79

4GB TF 610TOSHIBA
1. Fax machine
2. Power cable
3. Telephon cable(not supplied in allcountries)
4. Instruction manual-fax machinePC printer manual
5. Process unit and tonercartridge
6. Fixer cleaner
7. Progam disk withWindowsTM printerdriver
UnpackingWhen unpacking your machine, please check that all parts shownhere are present and in perfect condition.
Preparation
Preparation
If anything is missing, or damaged,please connect your dealer immediately.
The correct locationfor your fax machine is:
• near a 230 V AC socket*,
• near a telephone connection, ideallywith a single line reserved for your faxmachine.
* No other equipment with high powerconsumption (such as a photocopier) orequipment which generates electricalnoise (such as a radio, computer, radiotransmitting and receiving equipment)should be connected to this mainssupply.
AC powerYou will find the mains connection on theback of the machine.
Please protect your machine from:
vibration
directsunlight
dust
humidity
heat
8. Cleaner
9. Local language label
10. One-touch dialling index
11. Document exit tray(with wire)
12. Recording paper exittray (with wire)
13. Wire for document tray

5 GBTOSHIBATF 610
Remove transportfittings:
PreparationBefore you start to use your fax machine,please remove all transport fittings asillustrated.
Insert process unit: In order to transport or movethe machine the toner pack andthe process unit has to beremoved.
When installing the machine for the first timeand later when CHANGE PROC. UNIT isdisplayed, insert the new process unit asdecribed below.
Open the control panel and housingcover as illustrated.
1. The fixer cleanerThis is inserted when installing your machinefor the first time and each time the processunit is replaced:Open the control panel cover to the front. Slidethe cleaner underneath to the right, lift andremove.
Insert the new cleaner first on the right, thenpress down firmly on the left.
2. Prepare the process unitPlace a sheet of paper on an even surface andlay the process unit on this. Remove the seal.When holding the protective foil, be sure toavoid contact with any toner.
The print volume achieved with thefirst filling of the toner cartridge is lessthan that achieved with subsequentfillings.
Preparation
Transport fittings
Transport fittings
Transport fittings
Transport fitting
6GB TF 610TOSHIBA
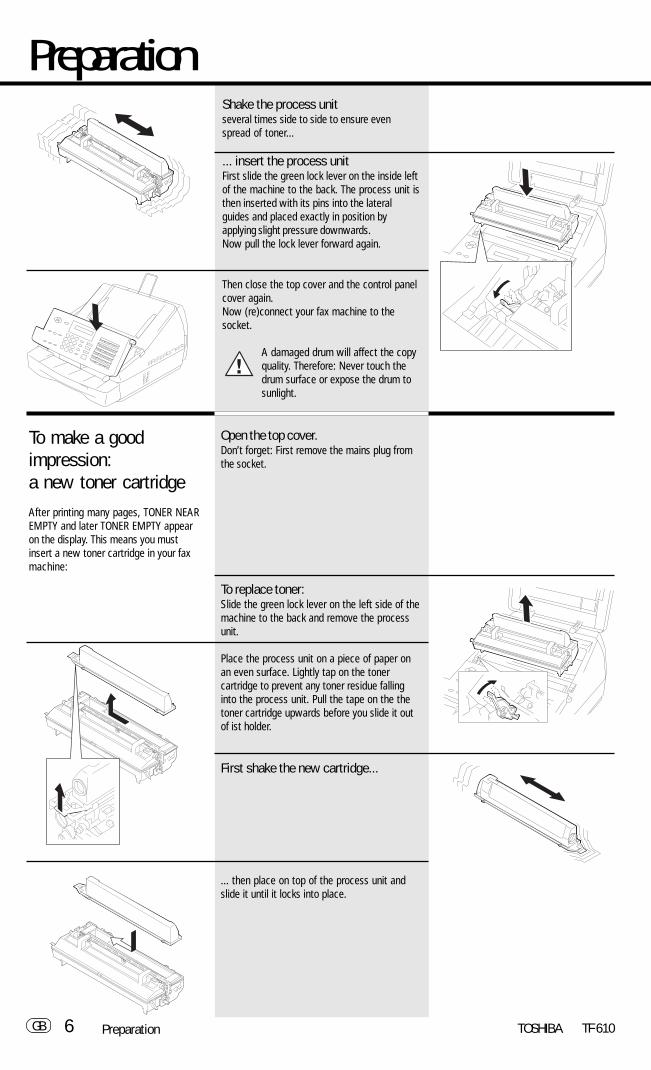
Shake the process unitseveral times side to side to ensure evenspread of toner...
... insert the process unitFirst slide the green lock lever on the inside leftof the machine to the back. The process unit isthen inserted with its pins into the lateralguides and placed exactly in position byapplying slight pressure downwards.Now pull the lock lever forward again.
Then close the top cover and the control panelcover again.Now (re)connect your fax machine to thesocket.
A damaged drum will affect the copyquality. Therefore: Never touch thedrum surface or expose the drum tosunlight.
To make a goodimpression:a new toner cartridgeAfter printing many pages, TONER NEAREMPTY and later TONER EMPTY appearon the display. This means you mustinsert a new toner cartridge in your faxmachine:
Open the top cover.Don’t forget: First remove the mains plug fromthe socket.
To replace toner:Slide the green lock lever on the left side of themachine to the back and remove the processunit.
Place the process unit on a piece of paper onan even surface. Lightly tap on the tonercartridge to prevent any toner residue fallinginto the process unit. Pull the tape on the thetoner cartridge upwards before you slide it outof ist holder.
First shake the new cartridge...
... then place on top of the process unit andslide it until it locks into place.
Preparation
Preparation

7 GBTOSHIBATF 610
Now: remove the seal.When holding the protective foil, be sure toavoid contact with any toner residue.Now shake the process unit several timeshorizontally before you..
... install the process unit again.Insert the pins into the lateral guides and then,by applying slight pressure, lower the unit intothe correct position.
Now pull the lock lever forward again.Never allow hair or dust to get into the processunit as this will block the proper supply of toner.
Then close the top cover and the control panelcover.You can now connect your fax machine to themains again.From time to time:clean the housing
Never using abrasive materials toclean your fax machine - the couldcause damage.
Remove the paper cassette
Press down the cassette plate until it locks intoplace.
Insert a stack of A4 paperPrepare the recording paper by flexing andfanning out the stack to separate the sheets.
Place the paper so that it lies straight in thecassette with the side to be printed face-downand don’t forget:
The paper cassette holds a maximum250 sheets (80 g/m2).
Then: Slide the cassette into the slotuntil you hear it lock into place.
Do not use damp, wrinkled or tornpaper.
Insert recording paper
Preparation
Preparation

8GB TF 610TOSHIBA
Install recording papertray
Recording Paper Exit Tray:Insert the Recording Paper Exit Tray Wire intothe holes on the Recording Paper Exit Tray, thenpull down.
The following steps may be performedmore easily with the Recording PaperCassette removed from the facsimiliemachine.
Install the Recording Paper Exit Tray underneaththe Recording Paper Cassette.
Document Exit Tray:Inster the Document Exit Tray into theRecording Paper Exit opening.
Flip out the folded Tray Wire as shown.
RecordingPaper ExitTray
Wire
Telephone connectionConnect your fax machine (LINE) to thetelephone socket.
Make connections:
Connecting the AC powerThe power connector is located on the rearright of the machine.
Connect the machine to the mainsonly after you have installed theprocess unit and the fixer cleaner.
Phone Plug-in
Line cordto the wallsocket
AC power cord
Preparation
Preparation

9 GBTOSHIBATF 610
Insert memory card 1. Pull the plug out of the mains socket.
2.2.2.2.2. Remove the cover for the memory module(on the rear of the FAX machine) byloosening the retaining screw.
3.3.3.3.3. Press the retaining lug into the hole on themotherboard.
4. Position the memory expansion on theconnector of the motherboard and presscarefully until it snaps into place.
5. Close the cover of the memory module andtighten the retainer screw again.
In case you come into contactwith toner:
Preparation
Preparation
Safety instructions
When your fax machine isopen, always keep thefollowing in mind:
• Do not touch any parts inside the faxmachine other than those described here.The fixer cover can be very hot - even afterthe machine has been switched off.
• You should install the process unit as quicklyas possible as exposure to strong light candemage the drum and reduce the life of theprocess unit.
• Never throw old toner cartridges into anopen fire and ensure proper disposal ofpacking from exchanged parts as organicwaste.
• Wash hands in cold water and cleanthoroughly with soap.
• Wash eyes with plenty of water.• If you have inhaled toner, breathe deeply
in the open air.• If toner gets in your mouth, wash it out
with plenty of water.• In an emergency, call a doctor.

10GB TF 610TOSHIBA
Installation
Installation
The menu systemYou fax machine has a wide range ofsettings. The various settings arepresented to the operator via a menusystem in the display.A special group of keys is used foractivating the menu and also fornavigating within the various menu levels:
The M - key activates the menu andmoves up through the menu
The N - key moves down through themenu
The P - key selects the correspondingsubmenu level.
The O - key selects the higher menulevel.
As soon as a menu item is displayed, usethe ENTER key to select thecorresponding function.
Use the following example to get to knowthe menu system: The machine prints outthe menu list menu list menu list menu list menu list with the complete menustructure of your fax machine.
*) Instead of using the ENTER key, youcan alternatively also use the STARTkey
The fax machine automaticallyswitches over to the standbymode if the pause between
entries is longer than one minute. In thiscase, entered data are NOT stored.
Standby mode
Page through the menu...
...until you reach this menu item
Select submenu
Page through the menu...
...until you reach this menu item
Confirm with ENTER *)
Menu list is printed out
15-03 19:56 M 100%
REPORTS
ACTIVITY REPORT
ENTER
PRINTING
MENU LIST
2x

11 GBTF 610 TOSHIBA
2 x
15-03 19:56 M 100%
PROGRAM SETUP DATA
STOP
Standby mode
Start the menu
Select submenu (2x)
Make your selection
Enter function number
Confirm with ENTER
Set language
Page through the menu...
...until you reach this menu item
Confirm with ENTER
Press STOP, return to standbymode
Installation
Installation
LANGUAGE ?????
ENTER
ENTER
PARAMETER NUMBER =_
Set languageYour fax machine is set to English. Pleasecarry out the following menu steps if youwish to use another language for themenu and the list prints.
LANGUAGE ENGLISH

12GB TF 610TOSHIBAInstallation
Enter terminal IDThe terminal ID which is part of thetransmissing header contains the numberunder which your fax machine can bereached. The number should be enteredin the international format:
Example:+44 1932 12345678
Fax numberSpace(to improve legibilitly)Area code (without initial0)Country code
Plus symbol (for theinternational form)
To enter the characters:
Character Key to be pressed+ ❊-keyHyphen P - key
Enter the actual figures via the dial keypad(as usual).
If you have entered a wrongnumber, you can delete thisnumber by means of theCANCEL key.
In Germany, the terminal ID entryis mandatory!
15-03 19:56 M 100%
PROGRAM SETUP DATA
LOCAL ID NUMBER
+44 1932 12345678
STOP
Standby mode
Start the menu
Select submenu
Page through the menu...
...until you reach this menu item
Confirm with ENTER
Make your selection
Enter the terminal ID(see Infotext)
Terminal ID is complete
Confirm with ENTER
Press STOP, return to standymode
ID:
Installation
ENTER
ENTER
2x

13 GBTF 610 TOSHIBA
Installation15-03 19:56 M 100%
PROGRAM SETUP DATA
LOCAL NAME
NAME:
NAME: TOSHIBA
STOP
Enter the user nameThe transmission header not only containsthe terminal ID but also the user name.This can contain up to 20 characters.Each digit features several characterswhich can be activated by repeatedlypressing the corresponding key. If youhave found a character of your choice,press the „P“ key to got to the nextposition. Use the „O“ key to got backone letter and make any corrections. Usethe „0“ key to select special characters.If you enter too many characters, pressthe CANCEL key to delete the unwantedcharacters.When the name is complete, press theENTER-key.Example: TOSHIBA
Standby mode
Start the menu
Select submenu
Page through the menu...
...until you reach this menu item
Confirm with ENTER
Make your selection
Enter the nameExample: TOSHIBA1 x 8 = T # 3 x 4 = I #3 x 6 = O # 2 x 2 = B #4 x 7 = S # 1 x 2 = A2 x 4 = H #
Name is complete
Confirm with ENTER
Press STOP, return to standymode
Installation
ENTER
ENTER

14GB TF 610TOSHIBAInstallation
15-03 19:56 M 100%
PROGRAM SETUP DATA
STOP
2 x
Setting dialling methodThere are two dialling methods. Thepulse-dialling method is normally used inthe public switched telephone network. Ifyour fax machine is connected to aPABX*, the DTMF dialling method mayalso be used. As the public network ismodernised, this dialling method may alsobe used in the public network. If you arein any doubt, first try the pulse-diallingmethod (basic setting).
If the dialling procedure fails, try DTMPdialling. How ever DTMF is the mostefficient.
✽ ) This function may not be available inmachines in certain countries.
Standby mode
Start the menu
Select submenu (2x)
Make your selection
Enter function number
Confirm with ENTER
Set dial methodExample: Tone
Page through the menu...
...until you reach the desired menu itemExample: 10PPS
Confirm with ENTER
Press STOP, return to standymode
DIAL METHOD 10PPS
DIAL METHOD TONE
Installation
ENTER
ENTER
PARAMETER NUMBER =_
✽

15 GBTF 610 TOSHIBA
15-03 19:56 M 100%
PROGRAM SETUP DATA
ACCESS OFF
2 x
Connection to PABX,obtaining a public lineThe TF 610 can be connected not only tothe public switched telephone network(public line) but also to a PABX. In thiscase, additional parameters have to beentered.With PABXs, the public line is obtained invarious ways:
• Number Dial one digit (or severaldigits) in order to obtainthe public line
•Earth key Earth potential isconnected to the voicewire(s) in order to obtainthe public line
• Flash key With this method ofobtaining the public line,the connection circuit isinterrupted briefly.
When the method of obtaining apublic line has been entered, youmust always press the key ”❊”
before the actual number when you dialyour fax partner. This is also applicable forsaving the fax numbers (see page 43).
If you have problems if yourmachine is connected to anextension, please read the
“Comments concerning connection toPABXs” under “Further settings” (page 56).
Standby mode
Start the menu
Select submenu (2x)
Make your selection
Enter function number
Confirm with ENTER
Set public line
Page through the menu...Public line Flash: Flash functionPublic line Earth key: Earth key functionPublic line Digit: Code (see next page)
...until you reach the desired menu item
Confirm with ENTER
Press STOP, return to standymode
Installation
Installation
STOP
ENTER
ENTER
............
PARAMETER NUMBER =_

16GB TF 610TOSHIBAInstallation
Installation
PROGRAM SETUP DATA
ACCESS CODE = 0
2 x
ACCESS CODE =
Start the menu
Select submenu (2x)
Make your selection
Enter function number
Confirm with ENTER
Make your selection CODE
Enter the code(s)(Example: 0)
...until you reach the desired menu item
Confirm with ENTER
Press STOP, return to standymode
STOP
ENTER
ENTER
Only with CODE setting
PARAMETER NUMBER =_

17 GBTF 610 TOSHIBA
Installation
PROGRAM SETUP DATA
LINE = PUBLIC LINE
2 x
Start the menu
Select submenu (2x)
Make your selection
Enter function number
Confirm with ENTER
Current setting
The fax machine waits for thedial tone sent by the exchangebefore dialling starts.
Page through the menu...
...until you reach the desired menu itemThe setting INIT WAIT X SECinvolves a pause of X secondsbefore dialling starts. The faxdoes not not not not not check the presence of
a dial tone.
Confirm with ENTER
Press STOP, return to standymode
LINE = PBX
Installation
STOP
ENTER
ENTER
PARAMETER NUMBER =_
Connection to PABX,further settingsIf you wish to connect your fax machineto a PABX, further settings are necessary.The following menu procedure setsdefault values for connecting a faxmachine to PABXs. If the machine doesnot operate perfectly, please refer to page56 for explanations concerningconnection to PABXs.

18GB TF 610TOSHIBA
Installation
PROGRAM SETUP DATA
DATE & TIME
DD-MM-YY HH:MM
15.03.98 19:56
15-03 19:56 M 100%
4 x
Set date and timeEnter the current date and time at thispoint so that all details relating to dateand time is correct. The internal clock ofyour fax machine then runs automatically- even in the event of a power failure.
Standby mode
Start the menu
Select submenu
Page through the menu...
...until you reach this menu item
Confirm with ENTER
Make your selection date & time
Enter date and timeExample: March 15th, 19.56 hours
Confirm with ENTER
Press STOP, return to standymode
Installation
STOP
ENTER
ENTER

19 GBTF 610 TOSHIBA
Reception of documents
If the line is reserved exclusively for faxoperation.
Set standby modeIf your fax machine is connected to thePSTN or the PABX, there are four differentways of receiving documents.
The fax machine switches over toreception as soon as the line rings (seepage 25).
The fax machine is alwaysactivated, even if the call isinitiated by a voice partner.
Reception of documents
If the line is used primarily for telephone trafficManual reception
Press the AUTO key.
The call must be accepted manually; thefax machine is not activated when theline rings. If you wish to transmit adocument, you must press the START keyof the fax machine.
Ensure that any fax calls canindeed be accepted; it is alwaysnecessary to press the STARTkey.
AUTO lamp on:AUTO lamp on:AUTO lamp on:AUTO lamp on:AUTO lamp on:The following reception modes can bealternatively set by individual setting offunction 38function 38function 38function 38function 38 (see page 52 et seq.):• Fax reception mode• Telephone/fax mode• Fax/TAD mode
AUTO lamp off:Manual reception
Automatic reception
Key functions:
••••• Function 37Function 37Function 37Function 37Function 37Number of rings before the faxmachine picks up the call (1-10)
••••• Function 38Function 38Function 38Function 38Function 38Setting of automatic reception
Press the AUTO key.
The standby mode is indicated with the AUTOLED. Press the AUTO key to change betweentwo different reception modes (these areindicated by the AUTO LED):
LED “AUTO” is lit
LED “AUTO” off

20GB TF 610TOSHIBA
Reception of documentsIf the line is used for telephone and also foroperation and if you are usually present in thesame room.
Incoming calls are automaticallydistinguished between fax- and voicecalls:If the call is a voice call the fax rings viathe loudspeaker to notify the user. At thistime the caller will hear a Ring whichindicates that the partner is beeingcalled.In this case take up the handset undpress STOP on the fax machine.
If the call is from another fax machinethe document will be receiverdautomatically without ringing.
Ensure that there is alwayssomeone present in this modeto accept the call. As soon as
ringing tone is generated, the connectionis established and the caller incurscharges.
If the line is operated with a TAD or radiotelephone and if you wish to collect the callfrom other rooms.
This mode enables you to receiveincoming fax messages and also toanswer telephone calls. There are twosituations:You are present:Switch off the call answering equipmentand collect the call at any point. If thecaller is a fax machine, your fax machinewill take over the call and print out thefax message.You are absent:Switch on the call answering equipment.The call answering equipment records alltelephone calls. Your fax machineautomatically receives any incoming faxmessages.
You must always ensure thatthe TAD is connected in thisreception mode. Otherwise, fax
messages cannot be received when theline is called.
Fax/TAD switch
Key functions:
• Function 38Function 38Function 38Function 38Function 38Set the fax/TAD switch• Function 44Function 44Function 44Function 44Function 44Specify the time in which the faxmachine identifies a partner fax (TADtimer / 1-99 sec.)
Press the AUTO key
Reception of documents
LED “AUTO” is lit
LED “AUTO” is lit
Telephone/fax switch
Key functions:
• Function 38Function 38Function 38Function 38Function 38Setting of telephone/fax switch• Function 37Function 37Function 37Function 37Function 37Number of rings until the fax machinepicks up the call (1-10)• Function 36Function 36Function 36Function 36Function 36Number of rings (synthetic ringing tone)from the loudspeaker (1-10)
Press the AUTO key.

21 GBTF 610 TOSHIBA
Reception of documents15-03 19:56 M 100%
PROGRAM SETUP DATA
FAX/TAD TIMER = 35
2 x
Setting the TAD timeIf you wish to use your fax machine in thefax/TAD mode, you also have to set theTAD time.This is the “listening-time” during whichthe fax machine responds to a partnerfax.
TAD time = length of recorded message+ 10 seconds.
Standby mode
Start the menu
Select submenu (2x)
Make your selection
Enter function number
Confirm with ENTER
Set TAD time
Enter the new time
Confirm with ENTER
Press STOP, return to standymode
Reception of documents
STOP
ENTER
ENTER
PARAMETER NUMBER =_

22GB TF 610TOSHIBA
15-03 19:56 M 100%
PROGRAM SETUP DATA
RMT ACTIVATION OFF
RMT ACTIVATION ON
ACTIVATION CODE =**
2 x
Set remote reception(manual reception)If you have connected a (cordless)telephone to your fax line (as described onpage 19), you may occasionally collect acall (in the manual reception mode) whichwas meant for your fax machine. This canfor instance be heard in the form ofperiodic whistle. Enter a two-digit code inyour telephone (only DTMF) to activateyour fax machine (virtually by remotecontrol).This function can be activated ordeactivated:
Standby mode
Start the menu
Select submenu (2x)
Make your selection
Enter function number
Confirm with ENTER
Set remote reception
Page through the menu...
...until you reach the desired menu item
Confirm with ENTER
Make your selection
Enter function number
Confirm with ENTER
Preset key code
Enter the 2-digit key code(Delete the preset code with the CANCELkey)
Confirm with ENTER
Press STOP, return to standymodeSTOP
ENTER
ENTER
ENTER
ENTER
Reception of documents
Reception of documents
PARAMETER NUMBER =_
PARAMETER NUMBER =_

23 GBTF 610 TOSHIBA
Standby mode
Start the menu
Select submenu (2x)
Make your selection
Enter function number
Confirm with ENTER
Current setting
Change setting
Confirm with ENTER
Press STOP, return to standymode
15-03 19:56 M 100%
2 x
RX REDUCTION AUTO
RX REDUCTION OFF
Original (A4)
STOP
ENTER
ENTER
Reception of documents
Reception of documents
PARAMETER NUMBER =_
Reception reductionYour fax machine uses A4 paper. Fortechnical reasons the entire length of thispage cannot be used. So the fax machinereduces the length of the incomingdocument. This means that the receivedimage may be slightly compressed.In general, this effect is notproblematical. However, if the sizes of thedocuments must be absolutely identical, itis necessary to deactivate the receptionreduction facility. In this case, that partof the copy which no longer fits on thepage is printed out on a second page.
Reception reduction: ON

24GB TF 610TOSHIBA
COPY
15-03 19:56 M 100%
DOCUMENT SET
NUMBER OF COPY =
COPY
Standby mode
Load originalRemember:Printed side face down
Document ready
PRESS COPY KEY
Make your selection(if only one copy is to be made, pleasenow press the START key)
Enter number of copies
Confirm with START
Copies are printed *)The FINE resolution is used for the copy. Ifyou wish to copy a photograph or acolour document, please select thePHOTO resolution (see page 35).
START
Reception of documents
Reception of documents
Local copyYou can use your fax machine to makeone or more copies (up to 99).
*) The copy is reduced to 96% due totechnical considerations.

25 GBTF 610 TOSHIBA
/
15-03 19:56 M 100%
PROGRAM SETUP DATA
AUTO DELAY 01
AUTO DELAY XX
2 x
Standby mode
Start the menu
Select submenu(2x)
Make your selection
Enter function number
Confirm with ENTER
Set number of rings
Page through the menu...
...until you reach the desired value
Confirm with ENTER
Press STOP, return to standymode
No paper, memory full
Paper out
Incoming copy is printed out
ERROR flashes
STOP
ENTER
ENTER
ADD PAPER M 86%
Reception of documents
Reception of documents
Set call counterIf your fax machine is set to automaticreception (FAX, TEL/FAX, see page 20), itwill switch on as soon as it is called.Under these circumstances, it is thus notpossible for the call to be intercepted bythe telephone.However, it is possible for your faxmachine to be set in such a way that - inthe event of a telephone call - it isactivated after a specific delay. The callcounter is used for this purpose. You canuse this facility to set the number ofincoming calls (max. 10) before the faxmachine connects to the line.
Memory receptionUnder certain circumstances, themachine cannot print out any furtherincoming copies:• If there is no recording paper• If there is a paper jamIn order to prevent problems withreception, the remaining pages arebuffered in the memory of your faxmachine. Once the problem has beensolved, the document is printed outautomatically.
Do not switch off the powersupply as otherwise the contentsof the memory will be lost.
PARAMETER NUMBER =_

26GB TF 610TOSHIBA
CANCELED
CANCEL OK ?
Cancel receptionIt is not immediately evident whether yourfax machine is transmitting or receiving adocument, as the BUSY lamp does notprovide specific information in thisrespect. Press the CANCEL key to displaythe job currently being processed by thefax machine.
Standby mode
The fax machine is in the transmission orreception mode
Press CANCEL
Display message indicates currentreception
Confirm with ENTER
Are you sure?
Confirm with ENTER
Current reception is cancelled
ENTER
ENTER
BUSY flashes
CANCEL
15-03 19:56 M 66%
Reception of documents
Reception of documents
RECEIVING JOB

27 GBTF 610 TOSHIBA
Transmit documents
Problem documents ...
May not feed. This applies to• torn, wrinkled or damp pages• folded pages or pages with holes• transparent pages or pages with a smooth,
shiny finish• textile or metallic douments
There are two ways of avoiding this problem:... by photocopying or using a carrier
sheet.Your TOSHIBA dealer can supply youwith the necessary carrier sheets.
Use of carrier sheets:Place your document face-up on the carriersheet under the transparent cover. Carriersheets can be used like normal documentsexcept for one restriction: only one carriersheet can be fed at one time.
How to load documents correctlyRemove any paper-clips, staples and similarobjects before transmitting the document. Nowplace your documents on the document tray -up to 20 at one time - as shown.
All documents must be located with theprinted side face down!
Transmit documents
Document formatThe following table gives you an idea ofwhich documents your fax machine canhandle.
Please note:
• Documents longer than 381 mm canonly be loaded manually.
• If you load severeal sheets at onetime, they should all be of the samesize and paper quality.
Single sheet 2 or more sheets
Document size (max) 216 mm (W) x 1000 mm (L) 216 mm (W) x 381 mm (L)
Document size (min) 148 mm (W) x 105 mm (L)
Effective scanning width 210 mm
How many sheets stacks up tocan be loaded at 20 sheet A4one time?
Thickness of paper 0,05 ~ 0,15 mm 0,06 ~ 0,1 mm
Quality of paper Uncoated on both sides

28GB TF 610TOSHIBATransmit documents
Transmit documentsStack modeA frequently encountered problem withfax machines is that the document tray isblocked while a document is beingtransmitted; no other documents can betransmitted while the fax machine istransmitting or receiving documents. Thisis different with your fax machine: Alldocuments are read into the memory andare then transmitted from this memory.Incoming documents are also read intothe memory before they are printed out.The advantage of this method is that thedocument tray is virtually always free andthat documents can be transmittedalmost irrespective of the transmission orreceiving status of the fax machine.Each procedure is known as a job. A jobmay consist of one or more documentswhich you can transmit to your partners.A job can also be a multi-addresstransmission or a delayed transmission.Your fax machine is able to manage 15such jobs. Each of these jobs is placed ona stack, from where they are processed insequence. Your fax machine accepts jobseven while it is transmitting or receivingdocuments; this means that thedocument tray is always ready. With everyprocedure, the fax machine assigns areference number to the job; this numberis available via the job list (see Page 50).This number can also be used for deletinga specific job.
JOB NBR. 11
JOB NBR. 10JOB NBR. 9JOB NBR. 8JOB NBR. 7JOB NBR. 6JOB NBR. 5JOB NBR. 4JOB NBR. 3JOB NBR. 2
JOB NBR. 1
INPUT
MAX
. 15
JOBS
AUSGABELINETRANSMISSION

29 GBTF 610 TOSHIBA
Transmit documents
DOCUMENT SET
15-03 19:56 M 100%
DIRECT SEND READY
TEL: 123456789
START
Load originalRemember:Printed side face down
Document ready
Press DIRECT SEND
Enter fax numberor enter alphabet dialling or one-touchdialling
Confirm with START
Document is transmitted
Transmit documents
DIRECT SEND
Direct transmissionIn the normal transmission mode your faxmachine reads all documents into thememory before they are transmitted. Ifthe documents are too large for thememory or if you have too manydocuments, you can also send directlyfrom the document tray without readingthe documents into the memory.
If you find that the memory isfrequently too small, ask yourdealer for a memory expansion!

30GB TF 610TOSHIBA
DOCUMENT SET
15-03 19:56 M 100%
TEL: 123456789
DOC.READING M98%
JOB ACCEPTED NO.007
15-03 19:56 M 100%
15-03 19:56 M 98%
START
Transmit documents
Transmit documents
LINE flashes
Automatic faxmessagesTo send fax messages in the traditionalmanner: Insert document(s), enter the faxnumber and the connection isautomatically established.Your benefit: Your documents will leavethe fax immediately. (Refer to page 28)If you decide to use the listening-inversion (see page 34) , you can alsoacoustically monitor the callestablishment process. This is usefulwhenever you have problems withestablishing a connection. The reason isfrequently a wrong number, or a faxmachine which is not ready to receive.
With the listening-in alternative,the document is not read intothe memory; it is retained on thetray until the receiving faxmachine has been contacted.
Residual memory depends onthe size of the stack!
Load originalRemember:Printed side face down
Document readyIf you have inadvertently taken the wrongdocument, press the STOP key beforeremoving the document from thedocument feed.
Enter fax number
The entered fax number is displayed. Usethe CANCEL keys to make anycorrections, or press the STOP key todelete the complete number. Press theSTOP key again if you wish the machineto eject the document(s) without beingprocessed.
Confirm with START
While the document is being read:current memory capacity is displayed.
When the document is read into themachine, the job number is brieflydisplayed.
Dialling the fax partnerThe flashing LINE lamp alwaysindicates when your faxmachine is transmitting orreceiving a document.
After transmission:Change to standby display: the job isdeleted from the stack memory (can beidentified by means of the changedmemory display).

31 GBTF 610 TOSHIBA
15-03 19:56 M 100%
DOCUMENT SET
ABB :
TOSHIBA
15-03 19:56 M 100%
DOCUMENT SET
TOSHIBA
ABB/ALPHA
Transmit documents
Transmit documents
Transmission withalphabet diallingAlphabet dialling enables you to enter adouble-digit “address” instead of the(frequently-long) fax number of yourpartner. The real fax number ispermanently stored under this “address”.The alphabet dialling facility enables youto save time with frequently used faxnumbers.
Please refer to page 43 fordetails of how to save alphabetdialling numbers.
Transmission with one-touch dialling
One-touch dialling provides you with a veryeasy method of dialling the number ofyour partner. Your can assign any faxnumbers to 18 keys. You need to press akey only once in order to reach yourpartner.
Please refer to page 45 fordetails of how to store one-touchdialling numbers.
Load originalRemember:Printed side face down
Document ready
Activate the alphabet dial facility
Make your selection: alphabet dialnumber
Enter the alphabet dial number
The name is displayed
The connection is established (forprocedure, see page 30, Automatic faxtransmission).
Load originalRemember:Printed side face down
Document ready
Press a one-touch dial key
The name is displayed
The connection is established (forprocedure, see page 30 , Automatic faxtransmission).

32GB TF 610TOSHIBA
15-03 19:56 M 100%
DOCUMENT SET
START
Transmit documents
Transmit documentsTransmission withtelephone (manualtransmission)The call in this case is established with atelephone which is additionally connectedto the wall socket. You can thus speak tothe other party before you send the faxmessage.
Load originalRemember:Printed side face down
Document ready
Dialling with telephoneIf you have agreed the transmission withyour fax partner, or if you hear the faxtone at the other end:
Confirm with START
Transmission commences(You can replace the handset, as the faxmachine has now assumed control).
Load originalRemember:Printed side face down
Document ready
Press the one-touch diallingkey *)
The name which is stored under the one-touch dialling key is briefly displayed, orthe stored fax number is displayed.
Enter additional number• Speed dialling key• Alphabet dialling number• User-defined number
Press the START key
START
15-03 19:56 M 100%
DOCUMENT SET
TOSHIBA
Long diallingWith the long dialling facility, a faxnumber which is stored under a speeddialling key is combined with an additionalfax number. The additional fax numbercan be a further speed dialling number, analphabet dialling number or a user-definednumber.For instance, access numbers to privatetelephone companies can be easilycombined with other stored fax numbersat the push of a button.
Criteria for long dialling:• The first fax number is stored on a
speed dialling key (see page 31)• The first fax number is terminated with
PAUSE (see page 2)• Further numbers may be speed dialling
numbers, alphabet dialling numbers oruser-defined numbers
The long dialling facility is alsocompatible with the listening-infunction (see page 34). In thisway, you can listen to anymessages, etc. between thenumbers.
*) Example of a long dialling number:✽ 01234- (the number is terminatedwith PAUSE)

33 GBTF 610 TOSHIBA
15-03 19:56 M 100%
DOCUMENT SET
ALBRECHT
BAUER
BLUME
NO ENTRY
2 x
*)
ABB/ALPHA
START
Transmit documents
Transmit documents
SELECT NAME
Load originalRemember:Printed side face down
Document ready
Activate directory function
You can now enter the initial letter ofyour fax partner.(see letter input, page 13) *).(Example: ,B“)
Key „2“
The first name of the corresponding letter(here "A") is displayed.
Key „2“
Presse the key "2" to display the nextletter (here "B") which is stored under thiskey.
Use the keys ▲ and ▼ to select thedesired fax partner with identical startingletters.
Confirm with START
The connection is established (forprocedure, see page 30, Automatic faxtransmission).
*) This display appears if no name isstored under the selected letter.
Transmission withdirectory functionThis type of dialling is similar to searchingin a telephone directory. Enter the initialletter of your partner to search for thecorresponding fax number in the alphabetdialling memory. This type of dialling isparticularly useful if you know the name ofa specific partner

34GB TF 610TOSHIBA
15-03 19:56 M 100%
DOCUMENT SET
TEL: 12345
Piiiiep
TEL:
START
MONITOR
Transmit documents
Transmit documentsMonitoringIn case of transmission problems, thisfunction is very helpfull. Check dialling bythis method allows you to detect wrongnumbers and busy parties also.
With the listening-in alternative,the document is not not not not not read intothe memory; it is retained on the
tray until the receiving fax machine hasbeen contacted.
Load originalRemember:Printed side face down
Document ready
Activates monitoring
Make your selection
Your entry(or alphabet dial number, or one-touchdial number)
Dialling starts
If another fax machine can be heard(beep)
Confirm with START
The connection is established(for procedure, see page 30,Automatic fax transmission).
If no connection is established,press the STOP key todisconnect the fax machinefrom the line.

35 GBTF 610 TOSHIBA
Set resolution
In its basic setting, your fax machine useshigh resolution for transmitting or copyingyour documents. You can however alsoadjust the resolution to suit the particulardocuments. Use the following as a roughguide:
STD (basic setting) For hand-writtenor typewritten documents
FINE For documents with small typesuch as newspapers anddiagrams
SF For documents with very smalland detailed diagrams
GREY 64 grey stages for photographsor colour documents
Higher resolution has an impacton transmission time!
To change the resolution, pressthe MODE key several times. TheLEDs above this key indicate the
set mode:
LED litLED litLED litLED litLED lit mode setmode setmode setmode setmode set
FINE fine resolution
S-FINE superfine resolution
GREY STAGE grey-stage mode
all off standard resolution
RedialIf it was not possible for your fax messageto be sent, this may be due to variousreasons (please read page 65). Onereason may be that the other fax machineis busy. In this case, it would make senseto call your partner again at a later time.This is done automatically by your fax; itattempts to send the fax message againapprox. every three minutes.The quantity of last number redialattempts and the relevant intervalsbetween attempts can be set in the userfunctions (see page 52).
If you have established aconnection via the MONITORkey, you can redial a numberusing the REDIAL/PAUSE key.
Transmit documents
Transmit documents

36GB TF 610TOSHIBA
TX TIME --:--
ABB/ALPHA
15-03 19:56 M 100%
DOCUMENT SET
SET DELAYED TX TIME
ENTER TEL NUMBER
START OR TEL NO.
COMM.OPTION
1 x
Load originalRemember:Printed side face down
Document ready
Activate send options
Page through the menu...
...until you reach this menu item
Confirm with ENTER
Make your selection for start time
Enter start time
Confirm with ENTER
Make your selection for fax number
Enter the fax number directly, orvia alphabet dialling or via one-touch dialling
Confirm with ENTER
Make your selection for further faxnumbers (max. 20 numbers)-or-
Confirm with ENTER
The documents are read into the memoryand sent to the various users.
Max. 5 jobs can beprogrammed with a delay.
ENTER
ENTER
ENTER
ENTER
Transmit documents
Transmit documentsDelayed transmissionYou are able to define a certain time atwhich the documents will be transmitted;this enables you to overcome theproblems involved with different timezones or will enable you to transmitdocuments at off-peak ratesThe benefit of reading into the memory is,that your ADF can be used for the nexttransmission.

37 GBTF 610 TOSHIBA
15-03 19:56 M 100%
DOCUMENT SET
MANUAL BROADCAST
ENTER TEL NUMBER
COMM.OPTION
Load originalRemember:Printed side face down
Document ready
Activate send options
Confirm with ENTER
Make your selection
Enter the fax number directly, orvia alphabet dialling, or via one-touch dialling
Confirm with ENTER
Make your selection for further faxnumbers (max. 20 numbers)
-or-
Confirm with ENTER
The documents are read into the memoryand transmitted to the individual users.
ENTER
ABB/ALPHA
START OR TEL NO.
ENTER
ENTER
Transmit documents
Transmit documents
Single multi-addresstransmissionIf you wish to send one document toseveral partners without spending a lot oftime, this function can be used to createa group on one single occasion. Thegroup is deleted after the procedure hasbeen completed. Up to 20 users can begrouped together from one-touch diallingnumbers, alphabet dialling numbers orstandard numbers.
FAXNO. FAXNO. FAXNO.
or or or
+ +
ABB ABB ABB
or or or
ONETOUCH
ONETOUCH
MANUAL BROADCAST
ONETOUCH

38GB TF 610TOSHIBA
DOCUMENT SET
SUPERGROUP
15-03 19:56 M 100% Load originalRemember:Printed side face down
Document ready
Press the dark group dialling key
The group name is displayed briefly
The connection is established (forprocedure, see page 30, Automatic faxtransmission).
Stored broadcastIf you have a fixed group of fax partnersto whom you frequently have to sendbroadcast fax messages, the storedbroadcast facility is just what you need.You can compose 6 groups of yourchoice. These groups are then availableat the push of a button (use the dark greyone-touch dialling keys).
Please refer to page 45 fordetails of how to programpermanent groups.
Transmit documents
Transmit documents
ABB 1 ABB 2 ABB 3+ +
GROUP BROADCAST 1

39 GBTF 610 TOSHIBA
15-03 19:56 M 100%
RX POLLING
COMM.OPTION
4 x
Standby mode
Activate send options
Page through the menu...
...until you reach this menu item
Confirm with ENTER
Confirm with ENTER
Make your selection for fax number (fromwhich a document is to be polled)
Enter the fax numbervia the keyboard, or via alphabet dialling,or one-touch dialling
Confirm with ENTER
The document is polled
POLLING
ENTER
ABB/ALPHA
ENTER
ENTER
ENTER TEL NUMBER
Transmit documents
Transmit documents
PollingA type of self-service facility enables youto fetch documents from another partnerif your partner has prepared this function.“Fax on demand”, i.e. obtaininginformation from mailboxes such asweather reports, traffic reports or stockmarket reports, is also possible with thisfunction.

40GB TF 610TOSHIBA
15-03 19:56 M 100%
DOCUMENT SET
POLLING
POLLING STANDBY
4 x
COMM.OPTION
Standby mode
Load originalRemember:Printed side face down
Document ready
Activate send options
Page through the menu...
...until you reach this menu item
Confirm with ENTER
Page through the menu...
...until you reach this menu item
Confirm with ENTER
The document is read into the memoryand is available for the next pollingprocedure
1 x
ENTER
ENTER
Transmit documents
Transmit documentsReserve pollingOther fax partners can poll informationfrom your fax machine if you set up thisfacility with this function.Your document which you reserve forpolling is read into the memory of themachine so set the document tray is notblocked.This reserve polling facility is unprotected.This means that any fax machine with apolling facility will be able to poll thedocument.When the document has been polled, it isdeleted from the memory.
Only one document can bereserved for polling
41 GBTF 610 TOSHIBA
15-03 19:56 M 100%
DOCUMENT SET
5 x
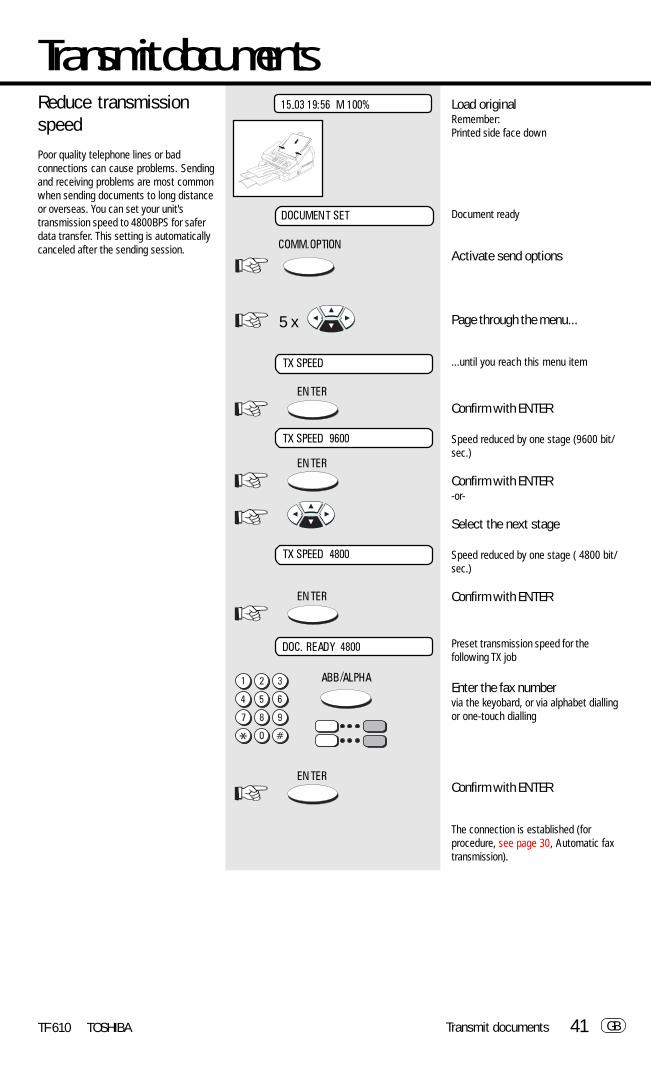
COMM.OPTION
Load originalRemember:Printed side face down
Document ready
Activate send options
Page through the menu...
...until you reach this menu item
Confirm with ENTER
Speed reduced by one stage (9600 bit/sec.)
Confirm with ENTER-or-
Select the next stage
Speed reduced by one stage ( 4800 bit/sec.)
Confirm with ENTER
Preset transmission speed for thefollowing TX job
Enter the fax numbervia the keyobard, or via alphabet diallingor one-touch dialling
Confirm with ENTER
The connection is established (forprocedure, see page 30, Automatic faxtransmission).
TX SPEED
ENTER
TX SPEED 9600
ENTER
TX SPEED 4800
ENTER
DOC. READY 4800
ABB/ALPHA
ENTER
Transmit documents
Transmit documents
Reduce transmissionspeedPoor quality telephone lines or badconnections can cause problems. Sendingand receiving problems are most commonwhen sending documents to long distanceor overseas. You can set your unit'stransmission speed to 4800BPS for saferdata transfer. This setting is automaticallycanceled after the sending session.

42GB TF 610TOSHIBA
15-03 19:56 M 100%
JOB NR. 005 18:11
CANCEL
JOB NO.007 19:32
ENTER
ENTER
Transmit documents
Transmit documentsStop transmissionYou may inadvertently dial the wrongpartner or you may enter a wrongnumber. You then have to interrupt thisprocedure. It is possible for this procedureto be situated between other jobs. As aresult of stack mode, it is possible for thecurrent transmission not to be directlyrelated to the actions of the operator.These procedures are deleted by „paging“through the job stack; search for theappropriate job and delete the specificjob.As the display indicates only the jobnumbers and the time, it is advisable forthe job list to be printed out (see page 50)in order to obtain a more preciseallocation.
Standby mode
Activate CANCEL
The first job is displayedThe time indicated after the jobnumber is the time at which thejob was entered.
Page through the various jobs
...until you reach the desired job
Confirm with ENTER
Are you sure?
Confirm with ENTER
The job is cancelled
JOB NBR. 15
JOB NBR. 9JOB NBR. 8
JOB NBR. 6JOB NBR. 5JOB NBR. 4JOB NBR. 3JOB NBR. 2JOB NBR. 1
JOB NBR. 7
JOB DELETE
JOB CANCELED
DELETED
DELETE OK ?

43 GBTF 610 TOSHIBA
Store numbers
DELETEGo to B
ENTERGo to A
15-03 19:56 M 100%
ENTER DIAL NUMBER
ENTER ABB DIAL
A ENTER
NAME:_
Standby mode
Page through the menu...
...until you reach this menu item
Select submenu
Confirm with ENTER
Decision:Enter: Go to ADelete: Go to B
Select a menu item
Make your selection for alphabet dialnumber
Enter alphabet dial numberExample: 1
Confirm with ENTER
Make your selection for fax number *)
Enter fax number
Confirm with ENTER
Make your selection for the name(press START to skip)
Alphabet dial memoryThe alphabet dial facility enables you toenter a short “address” instead of the(frequently long) fax number of yourpartner.The real fax number is stored under this„address“. With frequently used faxnumbers, the alphabet dial facility enablesyou to save time.120 alphabet dial memories are availableand the name as well as the number ofyour partner can be stored in thismemory. You can use up to 15 charactersof your choice in this memory.
Use the numeric keys for entering thealpha-numeric characters. Each digitfeatures several characters which can beactivated by repeatedly pressing thecorresponding key. If you have found acharacter of your choice, press the E keyto go to the next position. Use the „F“key to go back one letter and make anycorrections. Use the CANCEL key todelete the left-hand character.
Please note that you must pressthe „❊“ button before the actualfax number if your fax machine
is connected to a PABX.
ENTER ABB NUMBER =
TEL:_
TEL: 123456789
Store numbers
ENTER
ENTER
ENTER
ENTER:1 DELETE:2
ENTER ABB NUMBER =1
ABB NO. 120 09154/87823 BROWN
ABB NO. 119 024/8768 EVENS
•••
ABB NO. 003 054/938734 IRVING
ABB NO. 002 04544/6723 MARKS
ABB NO. 001 054/376014 MILES
3x

44GB TF 610TOSHIBA
DELETED
Store numbers
Store numbers
B DELETE
NAME: TOSHIBA
PRESS OT OR START
ENTER ABB NUMBER =
ENTER ABB NUMBER =
STOP
Enter the name(Example TOSHIBA)T= 1 x 8 # I= 3 x 4 #O= 3 x 6 # B= 2 x 2 #S= 4 x 7 # A= 1 x 2 #H= 2 x 4 #
Confirm with ENTER
Input option: one-touch dial key (see page45)-or-
Confirm with ENTER
Make your selection for the next alphabetdial number-or-
Press STOP, return to standymode
Select a menu item
Make your selection for the alphabet dialnumber to be deleted
Enter alphabet dial numberExample: 01
Confirm with ENTER
The name stored under alphabet dial isdisplayed.
Confirm with ENTER
Alphabet dial deleted
Make your selection for further alphabetdial numbers to be deleted
Press STOP, return to standymode
ENTER ABB NUMBER =
ENTER
ENTER
STOP
ENTER
ENTER
ABB :TOSHIBA

45 GBTF 610 TOSHIBA
Store numbers
PRESS OT OR START
ENTER ABB NUMBER =
15-03 19:56 M 100%
ENTER DIAL NUMBER
ENTER ABB DIAL
ENTER GROUP DIAL
The procedure is the same as thatdescribed on page 43(alphabet dialling)If alphabet dial numbers have alreadybeen entered, simply press the STARTkey until you arrive at this point in themenu:
Input option: one-touch dial key
Press one-touch dial key
Make your selection for the next alphabetdial number-or-
Press STOP, return to standbymode
Standby mode
Page through the menu...
...until you reach this menu item
Select submenu
Page through the menu...
...until you reach this menu item
Confirm with ENTER
Decision:Enter: Go to AErasing the wholegroup: Go to BErasing single numbersfrom the group: Go to C
ENTER
Go to A
Group keysIf you have a fixed number of partners towhom you frequently send broadcasttransmissions, the stored broadcastfacility is just what you need. There are 6methods of creating groups of yourchoice. You can also assign four of thesegroups to four special keys so that abroadcast transmission can be initiated atthe push of a button. If a permanentgroup is to be defined, all users of agroup must be already be in the alphabetdial directory.
STOP
ENTER
1 x
Store numbers
One-touch dial keysThe one-touch dial facility is a very easymethod of dialling your partner. You canstore fax numbers on 16 keys. You needonly press one key in order to dial yourpartner.It is essential that the number has alreadybeen stored under an alphabet dialnumber previously.
ONE TOUCH NBR. 16
ONE TOUCH NBR. 15
ONE TOUCH NBR. 2
ONE TOUCH NBR. 1
ABB 1 ABB 2 ABB 3+ +
GROUP BROADCAST 1ENTER:1 DELETE:2
ERASINGTHE WHOLE
GROUP
Go to B
ERASINGSINGLE
NUMBERSFROM THE
GROUP
Go to C
3x
ABB NO. 120
ABB NO. 119
•••
ABB NO. 003
ABB NO. 002
ABB NO. 001

46GB TF 610TOSHIBAStore numbers
A ENTER
Store numbers
ABB :
NAME: TOSHIBA
ABB :
NAME:
STOP
Select a menu item
Make your selection for the group button
Press the desired group button
Make your selection for the alphabet dialnumber to be assigned to the group
Enter the alphabet dial numbers
Confirm with ENTER
The corresponding name is displayed
Confirm with ENTER
Make further selection of alphabetdialnumber to be assigned to the group
-or-
Confirm with ENTER
Make your selection group name
Enter the group name(Example of entry: see page 13)
Confirm with ENTER
Press STOP, return to standymode
ENTER
ENTER
ENTER
ENTER
SELECT GROUP BUTTON

47 GBTF 610 TOSHIBA
TOSHIBA
TOSHIBA
Store numbers
/
12345678 ect.
Store numbers
ENTER
STOP
ENTER
STOP
ENTER
ENTER
SELECT GROUP BUTTON
SELECT GROUP BUTTON
DELETE OK ?
DELETE OK ?
ENTER:1 DELETE:2
B ERASING THEWHOLE GROUP
Select a menu item
Make your selection for the group buttonto be deleted
Press the desired group button
The corresponding name is displayed
Confirm with ENTER
Are you sure?
Confirm with ENTER
Press STOP, return to standbymode
C ERASING SINGLENUMBERS FROMTHE GROUP
Select a menu item
Make your selection for the group buttonto be deleted
Press the desired group button
The corresponding name is displayed
Select the appropriate numbers
Confirm with ENTER
Are you sure?
Confirm with ENTER
Further changes- or -
Press STOP, return to standbymode

48GB TF 610TOSHIBAReport prints
The lists are retrieved as follows:
Standby mode
Page through the menu...
...until you reach the desired menu item
Confirm with ENTER
The first menu item is displayed
Page through the menu...
...until you reach the desired menu item
Confirm with ENTER
The list is printed out
Report prints
15-03 19:56 M 100%
REPORTS
ACTIVITY REPORT
*** SUCCESSFUL TX REPORT ***
01-04-98 01:19 ID:+44193212345678TEG FT TF610
JOB NBR. ------------- 001START TIME ------------- 01:19ID No. ------------- 111RESOLUTION ------------- STANDARDTOTAL PAGE ------------- 00MACHINE ENGAGED ------------- 00'28INFORMATION ------------- OK
Activate printing reportNot all reports are printed outautomatically; they have to be requestedspecially. These lists can provideinformation concerning the current stateof the fax machine. The following reportscan be printed:
• Transmission report• Multitransmission report• Transmission and reception journal• ABB Number list• Group list• Function list• List of jobs in memory
Transmission reportThis report can be printed after everytransmission or in the event of a defectivetransmission. It provides information aboutthe most important transmission data.Please refer to page 59/60 for switchingON/OFF.
............
ENTER
ENTER
2x

49 GBTOSHIBATF 610
Report prints
OK
OK_ECM
STOP
001-360
OK-PCOK PEC
Transmission andreception journalYour fax machine will record messageswhich you transmit or receive in the formof transmission and reception journals.These lists are printed out automaticallyafter every 20 transmissions or receptionsor at your request.The journal also informs you of thenumber of copies printed per process unit(drum counter) or all copies (total printedpages).
Report prints
a b c d e f g h
*** ACTIVITY REPORT ***
01-04-98 15:02 ID: +44 1932 12345678FAX/TELECOM MKTGDRUM COUNTER = 000002SCAN PAGE = 000245
No. DATE START IDENTIFICATION PAGE TIME INFO JOB No.:
TRANSMISSION
01 11-08 08:00 00 00'00 008 00102 11-10 09:17 12345678 00 00'35 STOP 00203 11-00 09:24 987654321 01 00'30 OK ECM 004
RECEPTION
04 11-08 14:17 +04965321 01 00'36 OK ECM05 21-08 06:00 00 00'45 01106 15-10 14:30 543 2101 04 01'58 OK ECM
Group without any errors
ECM
the operator has stoppedthe transmission
description of thetransmission error(see page 59)
transmission as PC Fax
a NO. Lists the communications in the order theyoccurred.
b DATE Date of transmission
c START Start of transmission
d IDENTIFICATION Number pf faxpartner
e PAGE Gives the number of pages per transmission orreception.
f TIME Time of transmission
g INFO Result of transmission (see 58, 59)
h JOB NO. Current job number

50GB TF 610TOSHIBAReport prints
Report prints*** BROADCAST REPORT***
01-04-98 09:15 ID: +44 1932 12345678 NAME: TOSHIBATF610
JOB No. 050
NO. TELEPHONE NUMBER ENTRY INFO.01 11 NG02 12 NG03 13 OK04 14 OK
The multitransmissionreportAfter a broadcast transmission (groupdialling), the machine prints out a list offax partners who have been reached orwho have not been reached by groupdialling. This list is always printed outwhen group dialling has been completed.
Number listThis list contains all numbers andcorresponding names in the alphabet dialmemory. The list also sets out theassignation of the various one-touch dialkeys.
Group listThis is a list of the alphabet dial numbersallocated to the particular groups.
Jobs in progressThis list indicates which jobs are stillstored by the fax machine or which jobsstill have to be progressed. Thisinformation may be useful if you havestored any urgent jobs or if you wish todelete a particular job.
*** ABBREVATED DIAL LIST ***
01-04-98 09:15 ID: +44 1932 12345678 NAME: TOSHIBA
No. OT No. NAME TELEPHONE NUMBER01 OT01 ALBRECHT 0101010102 OT02 BAUER 0202020303 OT03 BLUME 0303030304 OT04 MEIER 040404040506
*** GROUP LIST ***
01-04-98 09:15 ID: +44 1932 12345678 NAME: TOSHIBA
GROUP1 NAME: SUPERNo. ENTRY NAME TELEPHONE NUMBER01 ABB01 ALBRECHT 012345602 ABB02 BAUER 654321003 ABB03 BLUME 987654321
GROUP2 NAME:No. ENTRY NAME TELEPHONE NUMBER0102
*** PENDING JOBS LIST ***
01-04-98 09:15 ID: +44 1932 12345678 NAME: TOSHIBA
JOB No. CONTENTS TIMER ACCEPT REMOTE TELEPHONE NUMBER /NAME003 TRANSMISSION 16:14 OT02 BAUER004 BROADCAST 16:15 GROUP1 SUPER007 POLLING STANBY 16:21

51 GBTOSHIBATF 610
Report printsThe function listThis list provides information concerningall settings of the fax machine. Theycorrespond with the settings which youhave made (For explanations, see page53).The following operating data were alsodisplayed:
No. CONTENTS
51 NOT USED52 NOT USED53 NOT USED54 NOT USED55 PAPER SIZE A456 DEFAULT RES. STD57 COPY REDUCT. 96%58 POWER SAVE ON59 DOC. LENGTH 1 M60 NOT USED61 CALENDAR DD-MM-YY62 LANGUAGE ENGLISH63 SCAN CNT. DEF NORMAL64 NOT USED65 RX REDUCTION AUTO66 NOT USED67 NOT USED68 NOT USED69 NOT USED70 NOT USED
No. CONTENTS
01 ECM FUNCTION ON02 CONFIRMATION OFF03 FIRST PAGE IMAGE OFF04 HEADER PRINT INSIDE05 RECEIVE FOOTER ON06 TX SPEED 1440007 RCV SPEED 1440008 NOT USED09 NOT USED10 NOT USED11 NOT USED12 NOT USED13 RDC ACCEPTANCE ON14 NOT USED15 NOT USED16 NOT USED17 NOT USED18 NOT USED19 NOT USED20 DI AL METHOD TONE21 REDIAL TIMES 522 REDIAL INTERVAL 2 MIN23 DUAL INTERVAL 5 MIN24 BUSY TONE ON25 INITIAL WAIT26 PAUSE WAIT 3 SEK27 ACCESS DIGIT28 ACCESS CODE =029 NOT USED30 NOT USED31 NOT USED32 NOT USED33 NOT USED34 NOT USED35 NOT USED36 PSEUDO RING TIMES 0437 AUTO DELAY 0138 RCV MODE= FAX/TAD39 TEL DELAY 0640 NOT USED41 RMT ACTIVATION OFF42 ACTIVATION CODE = * *43 DEACTIVATION CODE = ##44 FAX/TAD TIMER =3545 SILENT DETECTION46 PC TRANSFER DEF. OFF47 CNG DETECTON ON48 NOT USED49 NOT USED50 NOT USED
Report prints
DRUM COUNTER:Number of pages printed per process unit
TOTAL PRINT COUNTER:Total number of pages printed by the faxmachine
TOTAL TX PAGES:Total number of pages transmitted
TOTAL RX PAGES:Total number of pages sent
TOTAL COPY PAGES:Total number of copied pages
OPTION MEMORY:Memory expansion available?
123...ABC...:Operating software version
Keep this list for any service work whichmay be necessary.
DRUM COUNTER = 00000TOTAL PRINT COUNTER = 00000TOTAL TX PAGES = 00000TOTAL RX PAGES = 00000TOTAL COPY PAGES = 00000OPTION MEMORY = NO0200KFNMOESBJa DE
*** OPTIONS REPORT ***
01-04-98 09:15 ID: +44 1932 12345678 NAME: TOSHIBATF610
USER OPTIONS
✽

52GB TF 610TOSHIBA
15-03 19:56 M 100%
2 x
Standby mode
Start the menu
Select submenu (2x)
Make your selection for function number
Enter function number
Confirm with ENTER
Function is displayed
Change the function value, depending onthe particular type, by paging or byentering data via the numeric keypad
Confirm with ENTER
Enter further data
-or-
Press STOP, return to stanbymode
SELECT OPTIONS
FunctionsThis functions are used to setup how yourfax machine operates. The actual settingscan be viewed by printing a function list(see page 51).
The following sheme shows you how tochange each setting:
ENTER
ENTER
STOP
Advanced settings
Advanced settings
PARAMETER NUMBER =_
PARAMETER NUMBER =_

53 GBTOSHIBATF 610
The following functions (Parmeter)are available:
Description
Error correction (ECM) is as follows:ON: ActivatedOFF: Deactivated
Transmission report is produced:ON: After every transmissionCONFIRMATION OFF: Only aftertransmission errors.
A part of the document (to recognize it)can be printed on the report.REPORT VISUAL ON: printREPORT VISUAL OFF: print not
Select, if the TX header will be transmittedto te other party.ON: Is transmittedOFF: Is not transmitted
Select, if the actual date and time will beprinted on the footer line of receiveddocuments.ON: Is printedOFF: Is not printed
Preset transmission speeds, transmissionBPS = BIT / Sec.9600 BPS, 7200 BPS, 4800 BPS, 2400 BPS
Preset transmission speed, receptionBPS = BIT / Sec.9600 BPS, 4800 BPS
Actual COMLINE statusON COMLINE enabledOFF COMLINE disabledONE only one COMLINE session
Dialling method: DTMFPULSE DIALLING
Number of redial attempts if transmissionis not successful02 2 twice~10 10 times
Period between redial attempts iftransmission is not successful30 SEC 30 seconds~1 MIN2 MIN3 MIN10 MIN20 MIN 20 minutes
Period between redial attempts if line isbusy1 MIN 1 minute~10 MIN 10 minutes
Function no.
01
02
03
04
05
06
07
13
20
21
22
23
Function
ECM
CONFIRMATION
FIRST PAGE IMAGE
HEADER PRINT
RECEIVE FOOTER
TX SPEED
RCV SPEED
RDC ACCEPTANCE
DIAL METHOD TONE
REDIAL TIMES
REDIAL INT.
DUAL INTERVAL
Advanced settings
Advanced settings
]
✽ ) This function may not be available in machines in certain countries.

54GB TF 610TOSHIBA
Function no:
24
25
26
27
28
36
37
38
39
Function
BUSY TONE
PUBLIC LINE
PAUSE WAIT TONE
ACCESS
ACCESS CODE
CALLING TIMES
AUTO DELAY
RCV MODE=
TEL DELAY
Advanced settings
Advanced settings
Description
The successful detection depend on thePBAX.ON: activeOFF: not active
Type of connectionPUBLIC LINE: Before dialling a tone checkis made, PABX tones are not acceptedPABX: Dialling after a delay of 3 sec., notone check before begin of diallingINIT WAIT 4 SEC: Dialling after a delay of4 sec., no tone check before begin ofdialling~INIT WAIT 6.0 SEC: Dialling after a delayof 6 sec., no tone check before begin ofdialling
Procedure after obtaining public line/pause waitPAUSE WAIT TONE: Further dialling onlyafter line access dial tone, PABX tonesare not acceptedPAUSE WAIT 3.0 SEC: Dialling after adelay of 3 sec., no tone check, afterobtaining public line/pause wait~PAUSE WAIT 6.0 SEC: Dialling after adelay of 6 sec., no tone check, afterobtaining public line/pause wait
Procedure for obtaining public line(*-key)NO PUBLIC LINEPUBLIC LINE FLASH:Flash-FunctionPUBLIC LINE EARTH KEY:Earth key FunctionPUBLIC LINE DIGIT: Public lineobtained via code
Enter a (max.) 4-digit code for obtainingpublic line. (only useful by ACCESS DIGIT)
Number of synthetic ring signals set inthe TEL/FAX mode1 SYNTH. RING TEL/FAX 1 ring~10 SYNTH. RINGS TEL/FAX 10 rings
Number of rings before the fax machineconnects to the line in the automaticreceive mode (AUTO lamp is lit)1st RING~10th RING
Reception type in automatic mode (AUTOLED is lit)TEL/FAX TEL/FAX modeFAX/TAD FAX/TAD mode
Not relevant for European models

55 GBTOSHIBATF 610
Description
Activate the fax machine with a DTMFremote control codeON EnabledOFF Disabled
Enter the sequence of characters to beused as the remote control code
Enter the sequence of characters to beused to disconnect the fax machine fromthe line.
Period during which the fax machine candetect another fax machine (in FAX/TADmode)
Minimum length of pause in speechbefore fax machine switches into the FAXmode (with FAX/TAD mode)
Fax dates are transferred to theconnected PCON OFF
To realize another fax in the FAX/TAD-Mode.ON OFF
Paper sizes for PC printer operation:A4 DIN A4 sizeLETTER Letter sizeLEGAL Legal size
Preset resolutionSTD Standard resolutionFINE Fine resolution
Reduction for copyOFF 100%96%92%90%86%83%72%
Power saver (heater turns off)ON / active OFF / not active
Max. length of documents1m / 1meter 10m / 10meter
Format of date in display and in the lists(example: March 15th, 1998)YY-MM-DD 99-03-18DD-MM-YY 15-03-98MM-DD-YY 03-15-98
To select a language for display and lists.
Default contrast setting for a scanningdocumentBRIGHTER Low coverage on
documentNORMAL Normal coverage on
documentDARKER High coverage on
document
Reduction of received documentsOFF: no reductionAUTO: dynamic reduction
Function no:
41
42
43
44
45
46
47
55
56
57
58
59
61
62
63
65
Advanced settings
Advanced settings
Function
RMT ACTIVATION
ACTIVATIONCODE=
DEACTIVATION CODE
FAX/TAD TIMER=
SILENT DETECTION=
PC TRANSFER
CNG DETECTION
PAPER SIZE
DEFAULT RES
COPY REDUC.
POWER SAVE
DOC. LENGTH
CALENDAR
LANGUAGE
SCAN CONTRAST
RX REDUCTION

56GB TF 610TOSHIBA
15-03 19:56 M 100%
RECEIVE FOOTER OFF
RECEIVE FOOTER OFF
STOP
2 x
Standby mode
Start the menu
Select submenu (2x)
Make your selection for the functionnumber
Enter function number
Confirm with ENTER
Current setting
Change setting
Confirm with ENTER
Press STOP, return to standbymode
Receive footer on/off
As proof of the date on which thedocument is received, your fax machinecan print the local date and time as anadditional line on the received document.If this facility has been activated, thereceive footer is printed at the bottom ofthe received document.
Connection to PABXIf the TF 610 is connected to a PABX, thefunctions have to be modified. Thestandard setting for this case is describedstarting on page 14. If any problems ormalfunctions occur, please consider thefollowing items; you may have to discussthese items with the operator of the PABX:
• Does the PABX have public linecapability?
• Does the PABX have DDI capability?• Have you entered the ”❊” key before
the actual fax number?• How is the public line obtained (earth
key, flash, number)?• What dialling method is used (pulse-
dialling, DTMF dialling)?• Is function 25 set to EXTENSION?• Is function 26 set to TONE CHECK
PAUSE BUTTON*?• Is the correct dialling method set in
function 20?• Has the correct method of obtaining
a public line been set in function 27?• Have the correct codes for obtaining
a public line been set in function 28(if the public line is obtained via acode)?
• Is line access made with "❊"-key?*) Alternatively, you can set function 26
to 4 seconds.
ENTER
ENTER
Advanced settings
Advanced settings
PARAMETER NUMBER =_

57 GBTOSHIBATF 610
15-03 19:56 M 100% Standby mode
Start the menu
Select submenu
Page through the menu...
...until you reach the desired menu item
Confirm with ENTER
Current volume is displayed and indicatedacoustically
Change the volume
Confirm with ENTER
2 x
SELECT OPTIONS
ENTER
Advanced settings
Advanced settings
SPEAKER VOLUME
SPEAKER VOL. >>>
ENTER
Change speaker volumeIf you listen into a fax transmissionprocess, the call establishment procedureis relayed via the built-in speaker. Thismeans that you can also listen to theactual call establishment process. Thevolume can be adjusted as follows:

58GB TF 610TOSHIBA
15-03 19:56 M 100%15-03 19:56 M 100% Standby mode
Start the menu
Select submenu
Page through the menu...
...until you reach the desired menu item
Confirm with ENTER
The current volume is displayed andindicated acoustically
Adjust the volume
Confirm with ENTER
SELECT OPTIONS
ENTER
ENTER
Advanced settings
Advanced settings
RINGER VOLUME
RINGER VOL. >>>
Adjust ringing tone/keybeepsThe volume of the ringing signal (syntheticringing) in the TEL/FAX mode can beadjusted as follows. This setting alsoaffects the key beep. No beeps aregenerated if the volume is set tominimum.

59 GBTOSHIBATF 610
15-03 19:56 M 100%
2 x
Standby mode
Start the menu
Select submenu (2x)
Make your selection for the functionnumber
Enter function number
Confirm with ENTER
Current status
Change the status as followsON Transmission reported printed
after every transmissionOFF Transmission report printed only
for errored transmissions
Confirm with ENTER
Make your selection for the functionnumber
Enter function number
Confirm with ENTER
Current setting
Change setting
Confirm with ENTER
Press STOP, return to standbymode
STOP
FIRST PAGE IMAGE ON
FIRST PAGE IMAGE OFF
ENTER
ENTER
ENTER
ENTER
CONFIRMATION ERROR
Advanced settings
Advanced settings
PARAMETER NUMBER =_
PARAMETER NUMBER =_
Set transmission reportoutputThis report can be printed after everytransmission or only for erroredtransmissions. It provides informationconcerning the most importanttransmission data.It is also possible to print part of the firstdocument of the job in the transmissionreport.

60GB TF 610TOSHIBA
Temporarily activate TXreportIf output of the TX report is restricted withfunction 02function 02function 02function 02function 02 (see page 59), a generalprintout of the TX report can be requestedfor a set transmission job.
Load originalRemember:Printed side face down
Document ready
Press TX report key
Preparation of TX report printout
Enter fax numberor enter alphabet dial or one-touch dialnumber
Confirm with START
Document is transmitted, and TX report isthen printed out
TX REPORT
DOCUMENT SET
TX REPORT ON
ENTER TEL NUMBER
TEL: 12345
START
Advanced settings
Advanced settings
15-03 19:56 M 100%
2 x
RDC ACCEPTANCE OFF
RDC ACCEPTANCE ONE
PARAMETER NUMBER =_
STOP
ENTER
ENTER
Standby mode
Start the menu
Select submenu (2x)
Make your selection for the functionnumber
Enter function number
Confirm with ENTER
Current setting
Change setting
Confirm with ENTER
Press STOP, return to standbymode
Remote maintenance(COMLINE)Your fax machine permits remotediagnosis. This means that the internalsettings can be read and changed via atelephone line. In order to ensure thatdata protection is assured, COMLINE ispossible only after you enable yourmachine for this facility.

61 GBTOSHIBATF 610
Power saverThe printing unit of your fax machinerequires a heat source of approx. 170°Celsius to be able to print spontaneously.This heat source is heated at certainintervals in order to maintain thetemperature at the required level. Thisconsumes electricity, and the fan also hasto run constantly. If you wish to savepower or prevent the fan noise, you canswitch off the constant heating facility.The heating would then only be activatedwhen a fax is received. The delay involvedbefore the fax document is printed out isapprox. 1 minute.
Standby mode
Start the menu
Select submenu (2x)
Make your selection for the functionnumber
Enter function number
Confirm with ENTER
Current setting
Change setting
Confirm with ENTER
Press STOP, return to standbymode
15-03 19:56 M 100%
2 x
POWER SAVE OFF
POWER SAVE ON
STOP
ENTER
ENTER
Advanced settings
Advanced settings
PARAMETER NUMBER =_

62GB TF 610TOSHIBA
15-03 19:56 M 100%
2 x
ECM FUNCTION ON
ECM FUNCTION OFF
STOP
ENTER
ENTER
Advanced settings
Advanced settings
PARAMETER NUMBER =_
Standby mode
Start the menu
Select submenu (2x)
Make your selection for the functionnumber
Enter function number
Confirm with ENTER
Current setting
Change setting
Confirm with ENTER
Press STOP, return to standbymode
Switch off errorcorrectionYour fax machine is equipped with anerror correction facility (ECM). If your faxpartner also has an error correctionfacility, this permits error-free faxtransmission. One effect linked with ECMis that the transmission time increases ifthere are any problems on the line. Thismay involve very high costs with overseescalls. For this reason, the error correctionfacility can be temporarily disabled.

63 GBTOSHIBATF 610 Possible problems
Possible problemsError codes in journalThe display message transmission error isexpained by the indicated error code.The same code if shown also in the in thejounal and transmission repot.
Press STOP to clear error messages.
Code Number
STOP
OK
001
002
003
005-007
008
009-011
014
020
100-103
104-106
111
112-126
141
142-157
252-355
Cause
The transmission is interrupted by the stopbutton.
The document has been transmitted withoutany errors.
Top cover or rear cover open
Paper jam or document too long. Is thememory full? Ask your dealer for a memoryextension.
Recording paper jam or recording papercassette is empty
Line error
Line error
Line error
Printing error
Errors on the line mean that parts of thedocument are difficult to read; however, thedocument is transmitted completely.
Line error
Unsuccessful polling
Mailbox transmission
Line error
Line error
Line error
A remote control error occurs
How to correct
Try again
This is how it should be
Close all parts
Remove the document. See also page 67Send the document from the documentfeed
Remove jammed paper or load newpaper without switching off the machine,see page 67
Repeat transmission, try switching over to4800 BPS.
No telephone line was detected.
Repeat transmission, try switching over to4800 BPS.
Check toner, process unit and papertransport
No special measures necessary. If thisfrequently occurs with one particular faxpartner, switch over to 4800 BPS.
Repeat transmission, try switching over to4800 BPS.
An incorrect password has been used, orno document was loaded for polling
An attempt has been made to transmit adocument to a box or relay. Checkwhether a TF 861/831/631 is installed atthe far end.
Repeat transmission, try switching over to4800 BPS.
No telephone line was detected.
Repeat transmission, try switching over to4800 BPS.
Consult your dealer

64GB TF 610TOSHIBA
Possible problems
Possible problems
Error messages in theDisplayYour fax machine reports an operatingerror or fails to perform the requiredfunction. Before you make an unnecessarycall on your service technician, take yourtime and see if you can help yourself. Thischecklist will helpyou recognise and eliminate errors.
Display
DOCUMENT JAM
ADD PAPER
PAPER JAM
CLOSE TOP COVER
NO PROCESS UNIT M100%
PROCESS UNIT NEAR END
CHANGE PROCESS UNIT
TONER NEAR EMPTY
TONER EMPTY
MEMORY FULL
CHECK CARTRIDGE M100%
NO DOCUMENT
PC COMM. ERROR M100%
SYSTEM ERROR XXX
COMM. FX XXX
Cause
Documents are jammed in the document tray.
The recording paper cassette is empty.
The recording paper is jammed.
The top cover is open.
The process unit is not installed.
The process unit is running out.
The process unit is empty.
The toner is running out.
There is not enough toner for printing.
The memory is full.
There is no ink cartridge, or the ink cartridgehas not been inserted correctly.
No document present
Communication to the PC has failed
The fax machine has malfunctioned
The fax machine has malfunctioned
Corrective action
Press STOP key and remove the paper
Load a new recording paper in thecassette (see page 7). Do not switch themachine off! or any data in the memoryare lost.
Remove the jammed paper (seeinstructions on page 67).
Close the top cover. Have you insertedthe process unit correctly?
Install the process unit correctly. Pull thelock lever forward.
Order a new process unit from yourTOSHIBA dealer.
Replace the process unit.
Order a new toner cartridge. Install a newtoner cartridge. About 100 sheets can beprinted after this is displayed. See page6.
Install a new toner cartridge. See page 6.
Contact your dealer, as a memoryexpansion unit is availiable. Use thedocument tray to transmit documents.
Insert the cartridge correctly. See page 5.
The action requires a document
Try to remedy by pressing the STOPbutton
Contact your TOSHIBA dealer
Attempt to clarify the problem unsing thefollowing pages.

65 GBTOSHIBATF 610 Possible problems
Possible problemsTransmission problems Your fax machine reports an operating error or
fails to perform the required function. Beforeyou make an unnecessary call on your servicetechnician, take your time and see if you can
help yourself. This checklist will helpyou recognise and eliminate errors.
Problem
Your document is not automatically pulledinto the feeder.
The line LED does not flash when youpress the START button
The document is damaged during sendingor copying.
Your fax machine performed transmissioncorrectly but the message was notreceived by the receiver.
The receiver received a blank sheetinstead of the document sent.
The receiver reports: The documenttransmitted is difficult to read.
Abbreviated or one-touch dialling do notwork.
No dial tone is heard when handset is off-hook.
Your call does not arrive although youhave dialled the correct number.
possible causes ...
Your machine displays an error.
The display is blank.
Document size or thickness of paper are notacceptable.
The operator control panel is not firmly locked.
You replaced the receiver before pressingSTART.
Document format or paper thickness not asspecified.
The document guides are not properly adjustedto the paper size.
The other machine is out of paper.
You loaded your document in the machine withthe image face-up.
Your machine’s document reader is dirty ordamaged.
RESOLUTION and CONTRAST are not setcorrectly.
The telephone connection is poor.
Abbreviated or one-touch dialling number is notcorrectly stored.
The telephone is not correctly connected.
The fax machine is not correctly connected.
Your fax machine has been set to the wrongdialling mode.
If you are connected to a PABX: You have setthe wrong line type.
Your fax machine is not connected to thePSTN.
... and solutions
If the display gives an error message,clear the fault and delete the display withSTOP.
Check there is power on the machine.The machine must be switched on (seepage 8).
Use acceptable documents only (seepage 27).
Close the cover. It should be firmly lockedin place on both sides.
Try again. Replace the receiver only whenyou have pressed START.
Use acceptable documents only (seepage 27).
Adjust the document guides accordingly.
Ask the receiver to put paper in hismachine.
Send your document again: the imagemust be face-down on your documentfeeder.
Make a copy of your document on yourfax machine (see page 24). If your copy isalso difficult to read, clean the documentreader.
Make a copy on your fax machine (seepage 24) and adjust the settings to yourdocument. You can also improvedocument quality: By making the print onthe photocopy darker, enlarging orreducing. (see page 35). Then sendagain.
Redial. You may get a better connection.
Check and correct stored numbers (seepage 43).
Check that your telephone is connectedcorrectly to the socket (see page 8).
Plug the connecting cable of your faxmachine into the socket (see page 8).
Switch to the correct dialling procedure:DTMF or pulse-dialling (see page 14).
Set the line types to EXTENSION (seepage 15).
Plug the connecting cable of your faxmachine into the socket (see page 8).

66GB TF 610TOSHIBA
Possible problems
Possible problems
Receiving problems Your fax machine reports an operating error orfails to perform the required function. Beforeyou make an unnecessary call on your service
Problem
You press START to receive an document.But you receive nothing.
Your recording paper is not fed out.
The dcoument received is difficult to read.
You receive a completely blank document.
The document received is partially printed.
... and solutions
If the display shows an error message,eliminate the fault and delete the displaywith STOP.
Check the wiring. See page 8.
Check there is power to the machine.The machine must be switched on (seepage 8).
Press STOP and remove the document.
When receiving the next fax, be sure toreplace the handset only after you havepressed START.
Close the cover. Both sides of the covermust be firmly locked in place.
Remove the jammed paper (see page67).
Ask the sender to reset the resolution andcontrast or improve the quality of thedocument e.g. by making the print on thephotocopy darker, enlarging or reducing.Then have it send again.
Ask the sender to transmitt the documentagain (see Page 7).
Check whether the sender loaded in thecorrect manner.
Close the cover. Both sides of the covermust be firmly locked in place.
possible causes ...
Your have an error displayed.
The fax machine is not correctly connected.
The display is blank.
There is still a document in the feeder.
Your fax machine is set in manual receivingmode and you replaced the handset beforepressing START.
The operator control panel is not closed.
The recording paper in your machine isjammed.
Document quality is poor.
The telephone connection is poor.
The sender made a mistake when loading thedocument.
The operator control panel of your fax machineis not closed properly on both sides.
technician, take your time and see if youcan help yourself. This checklist will helpyou recognise and eliminate errors.

67 GBTOSHIBATF 610
Possible problems
Possible problems
How to clear a paperjam...When documents are fed in andrecording paper fed out, this can lead tominor problems from time to time which,however, you can easily put right yourself.Just one point to remember: your faxmachine should not be switched off asthis would delete all the stored faxmessages.*
* If you switched off your fax machine bymistake and thus deleted any fax messagestored in the memory, ask for a receptionreport to be printed out. This gives thesender and you can ask him to send themessage again.
How to clear arecording paper jam
How to clear a document jamPress the release buttontop open the control panel cover.
Keep the power ON!
The jammed documentcan be carefully removed.
Do not try to send the jammeddocument again. Use a carrier sheetor make a photocopy and transmit thisinstead.
Close the control panel.Take care that the cover locks firmly into place.
Now by pressing STOP delete the errormessage.
After openingthe rear cover of the housing or the top cover,you will see whether paper has jammed here.Carefully remove any jammed paper withoutapplying force. Don’t forget to firmly close theback cover again!
If paper has jammed under the process unit, liftthe paper guide upwards and remove theprocess unit. You can then easily free anyjammed paper without applying force.
Has the recording paper jammed around thefixer unit?Then - if necessary - press the release lever ofthe fixer unit downwards and at the same timecarefully pull out the jammed paper.
Caution: HOT!
When closing the machine,ensure that all covers firmly lock into place.
Do not touch any parts inside themachine other than those describedhere. The header cover may be very
hot - even when the machine is switched off.Never open the recording paper cassette whenpaper is jammed.

68GB TF 610TOSHIBAHandling faxes on your PC
Handling faxes on your PCSystem requirementsYou can also use the features of your faxmachine your PC. The fax functions canalso be used in addition to the printerfunction. The following minimumrequirements are essential in this respect:• IBM compatible PC with i80486
processor or higher• 8 MB RAM or higher• Serial (V.24) interface for connection
to the TF 610• Microsoft Windows 3.11 / 95
operating system• Fax software TOSHIBA SmartLinkTOSHIBA SmartLinkTOSHIBA SmartLinkTOSHIBA SmartLinkTOSHIBA SmartLink
Mode Description
PC scanner Scans documents into the PC via the document feeder of the faxmachine.
PC fax, transmission Files created under Windows can be transmitted directly via thefax machine (i.e. without being printed out)
PC fax, reception Incoming faxes are transferred to the PC as an image file via thefax machine without being printed out. If the PC is not switchedon, the pages are automatically printed out.
OCR Received faxes or scanned texts are converted into readableASCII text with the OCR module.
1. Switch off the PC and the TF 610.
2. Connect the 25-pin sub-D connector to thecorresponding socket on the fax machine,and secure the connection with theconnector screws.
Connection to the PC
FeaturesThe following features are available inconjunction with the software TOSHIBASmartLinkSmartLinkSmartLinkSmartLinkSmartLink:
The PC fax interface complieswith the fax class1fax class1fax class1fax class1fax class1 standard
Pin assignment of serial cable
Sub-D 9 pin socket (female)
Sub-D 25 pin socket (male)
3. Connect the cable to the serial interface ofyour PC.
PC-FaxConnect the TF 610 before theinstallation.
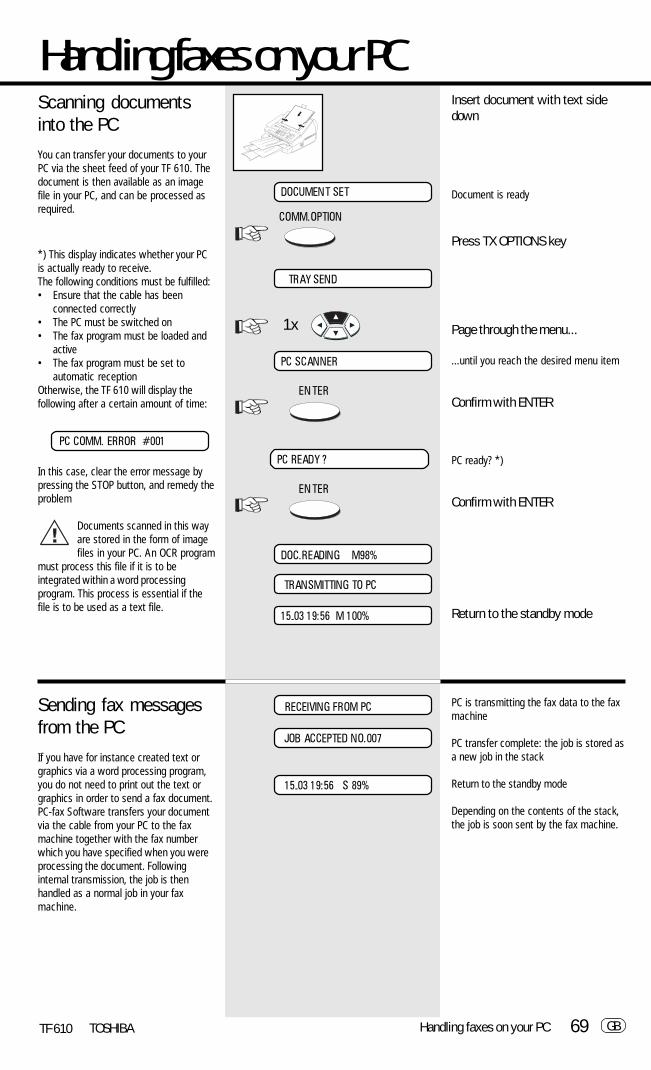
69 GBTOSHIBATF 610
Scanning documentsinto the PCYou can transfer your documents to yourPC via the sheet feed of your TF 610. Thedocument is then available as an imagefile in your PC, and can be processed asrequired.
Insert document with text sidedown
Document is ready
Press TX OPTIONS key
Page through the menu...
...until you reach the desired menu item
Confirm with ENTER
PC ready? *)
Confirm with ENTER
Return to the standby mode
Handling faxes on your PC
DOCUMENT SET
COMM.OPTION
TRAY SEND
1x
PC READY ?
PC SCANNER
DOC.READING M98%
TRANSMITTING TO PC
15-03 19:56 M 100%
*) This display indicates whether your PCis actually ready to receive.The following conditions must be fulfilled:• Ensure that the cable has been
connected correctly• The PC must be switched on• The fax program must be loaded and
active• The fax program must be set to
automatic receptionOtherwise, the TF 610 will display thefollowing after a certain amount of time:
In this case, clear the error message bypressing the STOP button, and remedy theproblem
Documents scanned in this wayare stored in the form of imagefiles in your PC. An OCR program
must process this file if it is to beintegrated within a word processingprogram. This process is essential if thefile is to be used as a text file.
Sending fax messagesfrom the PC
If you have for instance created text orgraphics via a word processing program,you do not need to print out the text orgraphics in order to send a fax document.PC-fax Software transfers your documentvia the cable from your PC to the faxmachine together with the fax numberwhich you have specified when you wereprocessing the document. Followinginternal transmission, the job is thenhandled as a normal job in your faxmachine.
PC COMM. ERROR #001
PC is transmitting the fax data to the faxmachine
PC transfer complete: the job is stored asa new job in the stack
Return to the standby mode
Depending on the contents of the stack,the job is soon sent by the fax machine.
JOB ACCEPTED NO.007
15-03 19:56 S 89%
Handling faxes on your PC
ENTER
ENTER
RECEIVING FROM PC

70GB TF 610TOSHIBA
Handling faxes on your PCSending faxes to the PCIf you have connected a PC to your faxmachine, you can send documentsdirectly to your PC.
The following requirements are essentialfor this process:• Function number 46 (receive to PC) is
set to ON (for setting, see page 55).• The fax software is loaded and
activated.• The connection to the PC has been
established.
The following error message is displayed ifyour fax machine cannot reach the PC:
In this case, the incoming fax documentis printed out on the fax machine. Theerror message does not affect the abilityof the fax machine to receive furtherdocuments.
A fax document received in thisway is stored in the form of animage file in the PC. An OCR
program must process a file before anyreceived text can be integrated in a wordprocessing program. This is essential ifthis file is to be used as a text file.
PC COMM. ERROR #001
Handling faxes on your PC

71 GBTOSHIBATF 610
Your fax machine used as a PC printer
Your fax machine used as a PC printer
IntroductionYour fax machine can be used as a PCprinter under Microsoft Windows 3.11 /95 / N. For this purpose, you have toinstall a printer driver on the supplied disk.The printout speed very much depends onthe performance of the connected PC.If software is to be updated from Win3.11 to Win 95, we recommend that youdeinstall the TOSHIBA printer driver beforethe update (see page 27).
The printer driver can bereinstalled when the softwarehas been successfully updated
to a higher Windows version.
Connection to the PCYou need a bidirectional parallel printercable (IEEE 1284-1994 standard) for theconnection to the PC.
1. Switch off the PC and the faxmachine
2. Connect the PC and the fax machinewith the printer cable
3. Switch the fax machine on, and thenswitch the PC on
4. Start Windows

72GB TF 610TOSHIBA
Your fax machine used as a PC printer
Your fax machine used as a PC printer
Install printer driverThe illustrated examples refer to theWindows 95 interface.
• Insert the installation disk in the driveof your PC
• Click on “Start“• Select “Run” in the menu
• Click on the “Browse“ button
• Select the drive containing theinstallation disk
• Open the directory with the languageof your choice
• Double click on the “Setup“ entry
• Click on OK to start the installation

73 GBTOSHIBATF 610
• Click on “Next“
• Select the printer port (LPT) where thefax machine is connected. LPT1 is thedefault setting.
• If you wish, you can change theproposed printer name.
• If the fax machine is to be defined asthe standard printer in Windows, clickon “Yes“
• Click on “Finish“A new program group is created
• Remove the installation disk from thedrive.
Your fax machine used as a PC printer
Your fax machine used as a PC printer

74GB TF 610TOSHIBA
Settings of the printerdriverThe printer driver has a wide range ofsettings for providing the best results invarious print applications.The following examples illustrate some ofthe most important settings.
Access the settings of the printerdriver:• Click on “Start“• Select the menu item “Settings“• Select the submenu item “Printers“
• Double click on the THOSHIBA printerdriver.
• Click on the “Printer“ menu• Select the menu item “Properties“The system opens the “PropertiesPropertiesPropertiesPropertiesProperties“window of the printer driver.
The “PropertiesPropertiesPropertiesPropertiesProperties“ window consists ofregisters which can be selected with amouse click. The printer functions arecontrolled by the registers “General“ and“Details“, which are automatically createdduring installation and contain technicalprogram parameters, and also by theregisters “Paper“, “Graphic“ and “DeviceOptions“ .These three registers are available in anyWindows application; simply select thecorresponding printer device in theprogram’s own “File“ menu.
Your fax machine used as a PC printer
Your fax machine used as a PC printer

75 GBTOSHIBATF 610
Contents of the “Paper“ register:
Paper Size:Size of the print paper
Orientation:Landscape or portrait output
Paper Source:Choice of paper cassette (permanentsetting in TF610)
Copies:Number of copies to be printed per page
More Options, Output Bin:Facility for defining the printout sequence
Contents of the “Graphics“register:
Resolution:Choice of resolution (permanent setting inTF610)
Dithering:Type of grey scale reproduction
None:No grey scale reproduction
Coarse:Coarse rastering
Fine:Fine rastering
Line Art:Grey reproduction with special patterns
Error Diffusion:Airbrush effect, best grey reproduction
Processing speed various withthe choice of grey scalereproduction.
Intensity:Use this slide bar to regulate the intensityof the printer (click on and drag the slidebar). Only meaningful for reproducing greyscales.
Your fax machine used as a PC printer
Your fax machine used as a PC printer

76GB TF 610TOSHIBA
Contents of the “Device Options“register:
Print Quality:Quality of printout (permanent setting inTF610)
PrintoutDocuments are generally printed out withthe “Print“ command in the particularapplication.As soon as the print job has been sent tothe printer driver, the status window of theprinter driver is displayed (depending onthe particular setting, you have to click onthe small rectangular symbol in the statusline).
This window provides detailed informationconcerning the current print status. Youare also notified of the current operatingstatuses of the printer; the currentsituation is indicated by graphicalelements.Use the “Pause“, “Resume“ and “Cancel“keys to monitor the print job at any time.
Your fax machine used as a PC printer
Your fax machine used as a PC printer

77 GBTOSHIBATF 610
Delete printer driverIn order to delete the printer driver fromthe operating system, please proceed asfollows (example from Windows 95):
••••• Click on the entry “Click on the entry “Click on the entry “Click on the entry “Click on the entry “TTTTTOSHIBAOSHIBAOSHIBAOSHIBAOSHIBAWindows Printer“ in the task lineWindows Printer“ in the task lineWindows Printer“ in the task lineWindows Printer“ in the task lineWindows Printer“ in the task line.
• Double click on the “Uninstall“ iconYou are subsequently informed of thedeinstallation procedure. The printer driveris deleted when the system is nextstarted.
If there is no entry in the taskline, select the “Uninstall“ iconvia your program library
Your fax machine used as a PC printer
Your fax machine used as a PC printer

78GB TF 610TOSHIBAUK Connection information
UK Connection information
This TOSHIBA FacsimileTransceiver is intended forconnection to publictelecommunication services asfollows:
By using the cable described asTEL LINE CABLE in the packaginglist of the instruction manual. Thiscable plugs into the socket on theleft hand side of the TF 610 whichis marked LINE and the other endinto the standard PSTN analoguesocket found in the UK.
This terminal equipment complies withthe following requirements:Group 3 fax modemAutomatic call initiationStorage of telephone numbers forretrieval by a predetermined codeAutomatic diallingAutomatic repeat attemptsCall progress monitorSeries connection facilityLD or MF diallingOperation with or without dial tonebeing present.
Any other usage will invalidatethe approval of the apparatus if asa result, it then ceases to conformto the standards against whichapproval was granted.
EPA ENERGY STAR
Addendum to the TF610 Operator’s Manual
The United States Environmental Protection Agency (EPA) has introduced a voluntary program, the ENERGY STARProgram, to encourage the widespread and voluntary use of energy-efficient technologies that enhance theworkplace, improve product performance, prevent pollution, and reduce your energy costs. As an ENERGY STARPartner, to Toshiba Europa (I.G.) GmbH has determinded that this facsimile model meets the ENERGY STARguidelines for energy efficiency. ENERGY STAR guidelines require that all ENERGY STAR facsimiles maintain very lowpower consumption during idle state or have a „Power Saver“ feature that will automatically stand-down to an idlestate after a period of inactivity.
For more information on the ENERGY STAR Program, please contact:
ENERGY STAR Printers/Fax MachinesUS EPA (62021)Washington, DC 20460
ENERGY STAR is an U.S. registered mark.
We declare, that TOSHIBA is using mark in compliance withEN 50 082-1, EN 55 022/B andEN 60 950
ResetYou can restore the original factorysettings or reset your fax machine if youare unable to eliminate the error code bytaking the action suggested on pages 63-66.
Switch off your fax machine.
Keep START and STOP pressed down
while switching your machine back on.
As soon as a message is displayed,release.
After reset, repeat the installationprocedure (see page 10).
The abbreviated numbers, dateand time will NOT be erased.
15.03.98 19:56
STOPSTART

79 GBTOSHIBATF 610
Alphabet dial memory ............................... 43Alphabet dialling ....................................... 31
Broadcast report ....................................... 50Broadcast, single ...................................... 37Broadcast, stored ...................................... 38
Call counter .............................................. 25Cleaner ....................................................... 5Code ......................................................... 16Comline .................................................... 60Copy ......................................................... 24
Date .......................................................... 18Dialling method ......................................... 14Document jam .......................................... 67Documents ............................................... 27Drum counter ........................................... 51
Earth key ................................................... 15ECM .......................................................... 62Error codes ............................................... 63Error correction ......................................... 62Error messages ......................................... 64Establish connections .................................. 8
Fax class1 ................................................. 68Flash key ................................................... 15Function list ............................................... 51Functions .................................................. 52
Group dialling ...................................... 37, 38Group keys ................................................ 45Group list .................................................. 50
ID .............................................................. 12
Journal ..................................................... 49
Key beeps ................................................. 58Key beeps, volume ................................... 58
Language .................................................. 11Last number redial .................................... 35List, functions ........................................... 51List, groups ............................................... 50List, numbers ............................................ 50List, reservation ......................................... 50Long dialling .............................................. 32
Memory card .............................................. 9Memory expansion .................................... 51Memory reception ..................................... 25Memory .................................................... 29Menu ........................................................ 10
Number list ............................................... 50
Obtain outside line .................................... 15One-touch dialling keys ............................. 45One-touch dialling ..................................... 31
PABX ......................................................... 15PABXs ........................................................ 56Paper jam ................................................. 67PC ............................................................. 68Polling ....................................................... 39Power saver .............................................. 61Printer driver ............................................. 72Printer ....................................................... 71Problems, receiving ................................... 66Problems, transmission ............................. 65Process unit ................................................ 5Provider ..................................................... 32
IndexReceive footer .......................................... 56Reception problems .................................. 66Reception reduction ................................. 23Reception, automatic ............................... 19Reception, manual ................................... 19Recording paper exit tray, install ................. 8Recording paper, insert ............................... 7Reports, broadcast ................................... 50Reservation list .......................................... 50Reservation, polling ................................... 40Reset ........................................................ 78Resolution ................................................. 35Ring, volume ............................................. 58Ringer ....................................................... 58
Scanning .................................................. 69Screening volume ..................................... 57Screening ........................................... 34, 57SmartLink .................................................. 68Stack memory .......................................... 28Switch, TAD .............................................. 20Switch, telephone ..................................... 20
TAD time ................................................... 21Telephone companies ............................... 32Telephone directory ................................... 33Telephone ................................................. 32Time ......................................................... 18Toner cartridge ............................................ 6Toner change .............................................. 6Transmission problems .............................. 65Transmission speed ................................... 41Transmission, delayed ............................... 36Transmission, stop ..................................... 42Transport ..................................................... 5Transport fittings ......................................... 5TX report ....................................... 48, 59, 60
User name ................................................ 13
Index
Related Documents