INJURY & ILLNESS PREVENTION PROGRAM FOR CONSTRUCTION A R M Environmental Services, Inc. Client Number A75987_02 29 CFR § 1903.1 – The Purpose and Scope of OSHA The OSH Act requires, in part, that every employer covered under OSHA to furnish to his employees a place of employment which is free from recognized hazards that are causing or are likely to cause death or serious physical harm to his employees. OSHA also requires that employers comply with occupational safety and health standards and that employees comply with standards, rules, regulations, and orders issued which are applicable to their own actions and conduct. Key Points of the OSH Act The United States Congress finds that personal injuries and illnesses arising out of work situations impose a substantial burden upon, and are a hindrance to, interstate commerce in terms of lost production, wage loss, medical expenses, and disability compensation payments. The United States Congress declares it to be its purpose and policy, through the exercise of its powers to regulate commerce and to provide for the general welfare, to assure so far as possible every working man and woman in the Nation safe and healthful working conditions and to preserve our human resources in the following manner: By encouraging employers and employees in their efforts to reduce the number of occupational safety and health hazards at their places of employment and to stimulate employers and employees to institute new and to perfect existing programs for providing safe and healthful working conditions. By providing that employers and employees have separate but dependent responsibilities and rights with respect to achieving safe and healthful working conditions. By authorizing the Secretary of Labor to set mandatory occupational safety and health standards applicable to businesses affecting interstate commerce. By building upon advances already made through employer and employee initiative for providing safe and healthful working conditions. By providing medical criteria which will assure insofar as practicable that no employee will suffer diminished health, functional capacity, or life expectancy as a result of his work experience. By providing for the development and promulgation (Enacting into Law) of occupational safety and health standards. By providing an effective enforcement program which will include a prohibition against giving advance notice of any inspection and sanctions for any individual violating this prohibition. By encouraging the States to assume the fullest responsibility for the administration and enforcement of their occupational safety and health laws. By providing for appropriate reporting procedures with respect to occupational safety and health which procedures will help achieve the objectives of OSHA and accurately describe the nature of the occupational safety and health problem. By encouraging joint labor-management efforts to reduce injuries and disease arising out of employment.

Welcome message from author
This document is posted to help you gain knowledge. Please leave a comment to let me know what you think about it! Share it to your friends and learn new things together.
Transcript

INJURY & ILLNESS PREVENTION PROGRAM FOR CONSTRUCTION
A R M Environmental Services, Inc. Client Number A75987_02
29 CFR § 1903.1 – The Purpose and Scope of OSHA
The OSH Act requires, in part, that every employer covered under OSHA to furnish to his
employees a place of employment which is free from recognized hazards that are
causing or are likely to cause death or serious physical harm to his employees. OSHA
also requires that employers comply with occupational safety and health standards and that employees comply with standards, rules, regulations, and orders issued which are
applicable to their own actions and conduct.
Key Points of the OSH Act
The United States Congress finds that personal injuries and illnesses arising out of work situations impose a substantial burden upon, and are a hindrance to, interstate
commerce in terms of lost production, wage loss, medical expenses, and disability
compensation payments.
The United States Congress declares it to be its purpose and policy, through the exercise
of its powers to regulate commerce and to provide for the general welfare, to assure so far as possible every working man and woman in the Nation safe and healthful working
conditions and to preserve our human resources in the following manner:
By encouraging employers and employees in their efforts to reduce the number of
occupational safety and health hazards at their places of employment and to
stimulate employers and employees to institute new and to perfect existing programs for providing safe and healthful working conditions.
By providing that employers and employees have separate but dependent
responsibilities and rights with respect to achieving safe and healthful working
conditions.
By authorizing the Secretary of Labor to set mandatory occupational safety and
health standards applicable to businesses affecting interstate commerce. By building upon advances already made through employer and employee initiative
for providing safe and healthful working conditions.
By providing medical criteria which will assure insofar as practicable that no employee
will suffer diminished health, functional capacity, or life expectancy as a result of his
work experience. By providing for the development and promulgation (Enacting into Law) of
occupational safety and health standards.
By providing an effective enforcement program which will include a prohibition
against giving advance notice of any inspection and sanctions for any individual
violating this prohibition. By encouraging the States to assume the fullest responsibility for the administration
and enforcement of their occupational safety and health laws.
By providing for appropriate reporting procedures with respect to occupational safety
and health which procedures will help achieve the objectives of OSHA and accurately
describe the nature of the occupational safety and health problem.
By encouraging joint labor-management efforts to reduce injuries and disease arising out of employment.
29 USC 654 – Duties (The General Duty Clause)
Each employer will furnish to each of his employees employment and a place of
employment which are free from recognized hazards that are causing or are likely
to cause death or serious physical harm to his employees.
Each employer will comply with occupational safety and health standards
promulgated under OSHA.
Each employee will comply with occupational safety and health standards and all rules, regulations, and orders issued pursuant to OSHA Act which are applicable to
his own actions and conduct.
NOTE: From 29 USC 652 “Definitions” – The term "occupational safety and health standard" means a standard which requires conditions, or the adoption or use of one or
more practices, means, methods, operations, or processes, reasonably necessary or
appropriate to provide safe or healthful employment and places of employment.
Safety Program Procedures
1. Post the General Safety Rules in a prominent location at each location as well as your main facility.
2. Provide a copy of the Safety Program for all workplaces.
3. Add map of facility and evacuation route to the Emergency Response Program.
4. Post the Request for Training in a conspicuous location.
5. Note Accident Investigation Forms are included.
6. Note OSHA Log 300 included (On CD).
7. Bloodborne Pathogen section is included (annual training needs to be done for
employees).
8. CPR & First Aid section included (this information is general in nature; no
individual should ever exceed their level of first aid training).
9. Sample Material Safety Data Sheet included. Be sure to compile SDSs for any chemicals the Company uses and make available to all employees in the office and
at the workplace. Your Company is responsible for maintaining a current chemical
inventory list.
10. Orientation Checklist - Initial Orientation must be conducted for all employees.
(English/Spanish Orientation included). These forms are to be included and signed by all new hires. (Make copies for employees to sign at the orientation meeting.)
11. Safety Meeting Minutes. After any Safety Training, have employees sign the
training roster, 3-hole punch the form, and file it in the manual.

TABLE of CONTENTS 1) Company Policy Statement & Program Components
2) Safety Committee Policy Statement
3) General Safety Rules & Code of Safe Practices
4) Accident Investigation Policy
5) Emergency Response Plan & Fire Prevention Procedures
6) Medical Services & First Aid
7) Bloodborne Pathogens
8) Job Hazard Assessment
9) Workplace Violence Prevention Program
10) Hazard Communication Program
11) Personal Protective Equipment
12) Respiratory Protection Program
13) Hearing Conservation
14) Hand & Power Tool Safety
15) Lockout/Tagout-Controlling Hazardous Energy
16) Ladder Safety
17) Fall Protection
18) Scaffolds & Work Platforms
19) Confined Spaces Policy
20) Driver Safety Policy
21) Forklift Safety Policy
22) Log 300 Recordkeeping Forms
23) New Hire Orientation Contracts
24) Safety Meeting Minutes
25) Attachments


© Safety Services Company 1-1
Chapter 1
Company Policy Statement and Program Components
A R M Environmental Services, Inc.
1210 1st. Street South Ext.
Columbia, South Carolina 29209
The designated safety coordinator for A R M Environmental Services, Inc. is:
Andy Wilson
Injury & Illness Prevention Policy Statement The safety and health of our employees is the first consideration in operating this
business. Without question, it is every employee’s responsibility at all levels.
It is the intent of this Company to comply with all laws. To do this, we must constantly be aware of conditions in all work areas that can produce injuries. No employee is
required to work at a job they know is not safe or healthful. Your cooperation in
detecting hazards and, in turn, controlling them, is a condition of your employment.
Inform your supervisor immediately of any situation beyond your ability or authority to
correct.
Prevention of occupationally-induced injuries and illnesses is of such consequence that it
will be given precedence over operating productivity, whenever necessary. To the
greatest degree possible, management will provide all mechanical and physical activities
required for personal safety and health, in keeping with the highest standards.
We will maintain an occupational safety and health program conforming to the best practices of organizations of this type. To be successful, such a program must embody
proper attitudes towards injury and illness prevention on the part of supervisors and
employees. It also requires cooperation in all safety and health matters, not only
between supervisor and employee, but also between each employee and their co-
workers.
Our objective is a safety and health program that will reduce the number of injuries and
illnesses to an absolute minimum, not merely in keeping with, but surpassing, the best
experience of operations similar to ours. Our goal is zero accidents and injuries.
Our safety and health program includes:
Providing mechanical and physical safeguards to the maximum extent possible.
Conducting a program of safety and health inspections to find and eliminate unsafe
working conditions or practices, to control health hazards, and to fully comply with
OSHA safety and health standards for every job.
Training all employees in good safety and health practices. Providing necessary personal protective equipment, and instructions for proper use
and care.
Developing and enforcing safety and health rules, and requiring that employees
cooperate with these rules as a condition of employment.
Investigating, promptly and thoroughly, every accident to find out what caused it,
and correct the problem so it will not happen again.

1-2 © Safety Services Company
We recognize that the responsibilities for occupational safety and health are
shared:
This employer accepts responsibility for leadership of the safety and health program,
for its effectiveness and improvement, and for providing the safeguards required to
ensure safe work conditions.
Supervisors are responsible for developing proper attitudes toward safety and health
in themselves and in those they supervise, and for ensuring that all operations are performed with the utmost regard for the safety and health of all personnel involved,
including themselves.
Employees are responsible for wholehearted, genuine operations of all aspects of the
safety and health program – including compliance with the rules and regulations – and
for continuously practicing safety and health while performing their duties.
A R M Environmental Services, Inc. will see that all employees are properly instructed
and supervised in the safe operation of any machinery, tools, equipment, process, or
practice which they are authorized to use or apply while at work.
Production is never so urgent that we cannot take the time to do our work safely.
Program Goals
The primary goal of A R M Environmental Services, Inc. is to continue operating a
profitable business while protecting employees from injuries or illness. This can be
achieved by delegating responsibility and accountability to all involved in this Company’s
operation.
Responsibility: Having to answer for activities and results.
Accountability: The actions taken by management to insure the performance of
responsibilities.
To reach our goal of a safe workplace everyone needs to take responsibility and be held
accountable.
Owner Name Signature Date

© Safety Services Company 1-3
Benefits of achieving our goals are:
Minimizing of injuries and accidents.
Minimizing the loss of property and
equipment.
Elimination of potential fatalities.
Elimination of potential permanent
disabilities.
Elimination of potential OSHA fines.
Reductions in Workers’ Compensation
costs.
Reductions in operating costs.
Having the best “Safety and Health”
conditions possible in the workplace.
This Company is committed to building an effective safety and health plan, putting it in writing, and integrating it into the entire operation.
Management Commitment
The management of A R M Environmental Services, Inc. is committed to the Company's
safety policy, and to provide direction and motivation by:
Appointing Safety Coordinator(s) and/or Safety Committee Chairmen. Establishing Company safety goals and objectives.
Developing and implementing this written Safety and Health program.
Ensuring total commitment to the Safety and Health program.
Facilitating employees’ safety training.
Establishing responsibilities for management and employees to follow.
Ensuring that management and employees are held accountable for performance of their safety responsibilities.
Establishing and enforcing disciplinary procedures for employees.
Reviewing the Safety and Health program annually, and revising or updating as
needed.
Labor & Management Accountability
All employees, both labor and management, need to understand their responsibilities
under OSHA rules and be held accountable for complying with the rules as well as the
Company’s related policies.
Remember, it is the employer’s responsibility to provide a safe and healthful work
environment for their employees. However, holding everyone accountable for their part
in workplace safety and health is critical for a successful injury and illness prevention
plan.
Assignment of Responsibility
The Safety Coordinator(s)
It will be the duty of the Safety Coordinator to assist the Supervisor/Foreman and all
other levels of Management in the initiation, education, and execution of an effective safety program including the following:
Introducing the safety program to new employees.
Following up on recommendations, suggestions, etc., made at the “Weekly” safety
meetings. All topics of safety concerns must be documented accordingly.
Assisting the personnel in the execution of standard policies.
Conducting safety inspections on a periodic basis. Addressing all hazards or potential hazards as needed.
Preparing monthly accident reports and investigations.
Maintaining adequate stock of first aid supplies and other safety equipment to
insure their immediate availability.
Making sure there is adequate number of qualified “First Aid Certified” people on the work site.
Becoming thoroughly familiar with OSHA regulations and local and state safety
codes.
1-4 © Safety Services Company
Defining the responsibilities for safety and health of all subordinates and holding
each person accountable for their results through the formal appraisal system and
where necessary, disciplinary procedures. Emphasizing to employees that accidents create unnecessary personal and
financial losses.
Safety Committee and Safety Meetings
The Committee will consist of representatives from management and non-management
employees with the scheduled person as the chairman. The committee is a forum,
created for the purpose of fostering safety and health through communication.
The responsibilities of Safety Committee Members include:
Discussing safety policies and procedures with management and making
recommendations for improvements. Reviewing accident investigation reports on all accidents and “near-misses”.
Identifying unsafe conditions and work practices and making recommendations for
corrections.
NOTE: Refer to the succeeding section for instructions on Safety Committee protocols.
All employees of A R M Environmental Services, Inc. will attend and participate in the
“Weekly” safety meetings. The safety meeting will be conducted by the designated
Safety Coordinator/Supervisor/Foreman. Problems that have arisen, or that are
anticipated, will be discussed along with any other safety and health topics. The meeting will be kept a valuable educational experience by:
Starting and stopping according to schedule.
Keeping the meetings moving.
Using illustrated material and demonstrations to make the point.
Discussing each topic thoroughly, providing handouts if possible.
Evaluating accidents, injuries, property losses, and “near misses” for trends and similar causes to initiate corrective actions.
The designated Safety Coordinator/Supervisor/Foreman must document all aspects of
any safety and health training.
Employee Involvement
Employees are required to work in compliance with the safety rules, report all accidents
and near misses, and report all unsafe conditions or unsafe practices. To demonstrate
this employer’s commitment to support the employees in these responsibilities, the
employer will do the following:
Communication System:
Encourage employees to inform the employer about workplace hazards without fear
of reprisal.
Establish and maintain a centrally located “Safety Bulletin Board” where current, relevant information may be easily reviewed by employees.
Schedule general employee meetings at which time safety is freely and openly
discussed by those present. These meetings will be regular, scheduled, and
announced to all employees and managers to achieve maximum attendance. The
purpose of these meetings is safety, and the concentration will be on: Occupational accident and injury history at our work sites, with possible comparison
to other locations in the Company.
Feedback from the Safety Committee.
Guest speakers concerned with workplace safety and health.
When possible, brief audio-visual materials that relate to our business. Conduct training programs for communicating with employees.

© Safety Services Company 1-5
Provide a safety suggestion box so that employees, anonymously if desired, can
communicate their concerns with management.
Document all communication efforts to demonstrate that an effective communication system is in place.
Hazard Identification & Control
Periodic inspections and procedures for correction provide methods of identifying existing or potential hazards in the workplace, and eliminating or controlling them. Hazard
control is essential to an effective safety and health plan. We will be sure to look at safe
work practices and ensure that they are being followed, and that unsafe conditions or
procedures are identified and corrected properly and promptly.
Employees are encouraged to report possible hazardous situations, knowing their reports
will be given prompt and serious attention.
Workplace equipment and personal protective equipment will be maintained in good,
safe working condition.
Hazards, where possible, will be corrected as soon as they are identified. For those that
cannot be immediately corrected, a target date for correction will be set. The employer
will provide interim protection for workers while hazards are being corrected. A written tracking system will be established to help monitor the progress of the hazard correction
process.
Accident/Incident Investigation
Employers and safety committees are required to investigate or assign responsibility for
investigating accidents. Accidents/incidents will be investigated by trained individuals, with the primary focus of understanding why the accident or incident occurred, and what
actions can be taken to preclude recurrence. The focus will be on solutions and never on
blame. They will be in writing, and adequately identify the causes of the accident or
near-miss occurrence.
Worker Training
Training is another essential element of any injury and illness prevention plan. OSHA
rules require each employer to train workers for any job or task they are assigned.
Our plan includes training and instruction:
For all employees when they are first hired.
For all new employees for each specific task. For all employees given new job assignments for which training has not already
been received.
Whenever new substances, processes, procedures, or equipment are introduced
into the workplace and present a new hazard.
Whenever new personal protective equipment or different work practices are used on existing hazards.
Whenever the employer is made aware of a new or previously unrecognized
hazard.
For all supervisors to ensure they are familiar with the safety and health hazards to
which employees under their immediate direction and control may be exposed.
An effective safety and health plan requires proper job performance by everyone in the
workplace.
As the employer, we must ensure that all employees are knowledgeable about the
materials and equipment with which they work, what known hazards are present, and how they are controlled.

1-6 © Safety Services Company
Periodic Program Evaluation
A periodic review is scheduled to look at each critical component in our safety and health
plan to determine what is working well and what changes, if any, are needed. All employees are encouraged to participate by keeping the employer informed of their
concerns regarding the elements of this safety and health plan.
The success of this safety and health plan is dependent upon two things: First, the
employer must provide a safe and healthful environment in which the employee has the
opportunity to work safe, and second, the employee must choose to work safe.
Supervisor/Foreman
The Supervisors and/or Foremen will establish an operating atmosphere that insures that
safety and health is managed in the same manner and with the same emphasis as
production, cost, and quality control. This will be accomplished by:
Regularly emphasizing that accident and health hazard exposure prevention are not only moral responsibilities, but also a condition of employment.
Identifying operational oversights that could contribute to accidents which often result
in injuries and property damage.
Participating in safety and health related activities, including routinely attending
safety meetings, reviews of the facility, and correcting employee behavior that can result in accidents and injuries.
Spending time with each person hired explaining the safety policies and the hazards
of his/her particular work.
Ensuring that initial orientation of "new hires" is properly carried out.
Making sure that if a “Competent Person” is required, that one is present to oversee, and instruct employees when necessary.
Never short-cutting safety for expediency, or allowing workers to do so.
Enforcing safety rules consistently, and following Company’s discipline and
enforcement procedures.
Conducting daily job-site inspections and correcting noted safety violations.
Employees
It is the duty of each and every employee to know the safety rules, and conduct his work
in compliance with these rules. Disregard of the safety and health rules will be grounds
for disciplinary action up to and including termination. It is also the duty of each employee to make full use of the safeguards provided for their protection. Every
employee will receive an orientation when hired and receive a copy of any COMPANY
Safety and Health Programs. Employee responsibilities include the following:
Reading, understanding and following safety and health rules and procedures.
Signing the Code of Safe Practices and any other policy acknowledgements. Wearing Personal Protective Equipment (PPE) at all times when working in areas
where there is a possible danger of injury.
Wearing suitable work clothes as determined by the supervisor/foreman.
Performing all tasks safely as directed by their supervisor/foreman.
Reporting ALL injuries, no matter how slight, to their supervisor/foreman immediately and seeking treatment promptly.
Knowing the location of first aid, firefighting equipment, and safety devices.
Attending any and all required safety and health meetings.
Not performing potentially hazardous tasks, or using any hazardous material until
properly trained, and following all safety procedures for those tasks.
STOPPING AND ASKING QUESTIONS IF EVER IN DOUBT ABOUT THE SAFETY OF ANY OPERATION
© Safety Services Company 2-1
Chapter 2
Safety Committee Policy Statement
Policy Statement A R M Environmental Services, Inc. Safety Committee members are:
Andy Wilson and as designated by Andy Wilson.
The Safety Committee will meet a minimum of 4 times per year.
Introduction
A R M Environmental Services, Inc. is committed to accident prevention in order to
protect the safety and health of all our employees. Injury and illness losses due to hazards are needless, costly and preventable. To prevent these losses, a joint
management/worker safety committee will be established. Employee involvement in
accident prevention and support of safety committee members and activities is
necessary to ensure a safe and healthful workplace for all employees.
Purpose
The purpose of our safety committee is to bring workers and management together in a
non-adversarial, cooperative effort to promote safety and health in the workplace. The
safety committee will assist management and make recommendations for change.
Organization
There will be, in most cases, an equal number of employee and employer representatives. However, there may be more employee representatives than employer
representatives if both groups agree. Employee representatives will be volunteers or
elected by their peers. If no employees volunteer or are elected, they may be appointed
by management. Employer representatives will be appointed. Safety committee
members will serve a continuous term of at least one year. Committee membership terms will be staggered so that at least one experienced member is always on the
committee.
Extent of Authority
It must be clearly understood that the safety committee advises management on issues
that will promote safety and health in the workplace. Written recommendations are expected from the safety committee and they will be submitted to management. In turn,
management will give serious consideration to the recommendations submitted and will
respond in writing to the committee within a reasonable time.
Functions
Committee meetings and employee involvement.
Hazard assessment and control.
Safety and health planning.
Evaluation of accountability system.
Evaluation of management commitment to workplace safety and health.
Evaluation of accident and incident
investigation program.
Safety and health training.

2-2 © Safety Services Company
Recommendations All recommendations submitted to management must be written and should:
Be clear and concise.
Provide reasons for implementation.
Give recommended options.
Show implementation costs and
recommended completion dates.
List benefits to be gained.
Procedures
The committee’s plan of action requires procedures by which the committee may
successfully fulfill its role. Procedures developed should include but not be limited to:
Meeting date, time, and location (Safety Committee Meeting Agenda).
Election of chairperson and secretary.
Order of business. Records (Safety Committee Meeting Minutes).
Duties of each member must include, but not be limited to:
Reporting unsafe conditions and
practices. Attending all safety and health
meetings.
Reviewing all accidents and near-
misses.
Recommending ideas for improving safety and health.
Working in a safe and healthful manner.
Observing how safety and health is
enforced in the workplace. Completing assignments given to them
by the chairperson.
Acting as a work area representative in
matters of health and safety.
Others as determined by COMPANY
safety and health needs.
The Safety Coordinator(s) and/or Safety Committee Members
A R M Environmental Services, Inc. has designated: Andy Wilson as the Company Safety
Coordinator, with Company Safety Committee Members being: Andy Wilson and as
designated by Andy Wilson
Safety Coordinator Andy Wilson
Safety Coordinator
Safety Coordinator
Safety Committee Chair
Safety Committee Vice-chairman
Safety Committee Alternate Chair/Vice-chair
Their cell phone and office phone numbers are:
Safety Person’s Name Office Phone # Cell Phone #
It will be the duty of the Safety Coordinator to assist the Supervisor/Foreman and all
other levels of Management in the initiation, education, and execution of an effective
safety program.

© Safety Services Company 2-3
Safety Committee Operations
The purpose of a safety committee is to bring workers and managers together to achieve
and maintain a safe, healthful workplace. Effective safety committees find solutions to problems that cause workplace accidents, illnesses, and injuries. And fewer accidents,
injuries, and illnesses mean lower Workers’ Compensation claims costs and insurance
rates.
Understand a Safety Committee’s Seven Essential Activities
To create an effective safety committee, it must be built on a foundation of management
commitment and must be accountable for achieving its goals. The committee must do
the following:
Involve employees in achieving the
committee’s goals. Identify workplace hazards.
Review reports of accidents and near
misses.
Keep accurate records of committee
activities. Evaluate its strengths and
weaknesses.
1. Commitment
The committee will not survive without management support. Management demonstrates support by encouraging employees to get involved in achieving a safe,
healthful workplace and by acting on the committee’s recommendations.
Representatives demonstrate commitment by attending committee meetings, following
through on their assigned tasks, and encouraging other employees to get involved in
identifying hazards.
2. Accountability
Representatives should understand that the committee expects them to contribute; each representative shares responsibility for accomplishing safety committee goals, which
benefit everyone who works for the COMPANY.
The safety committee is also responsible for monitoring how management holds
employees accountable for working safely and for recommending ways to strengthen
accountability.
3. Employee Involvement
To become effective, a safety committee needs help from everyone in The COMPANY. The safety committee must have a method for employees to report hazards and to offer
safety suggestions.
Ways the safety committee can encourage employees to get involved:
Encourage employees to report hazards and unsafe work practices to a safety-
committee representative.
Act on employee suggestions and recognize their contributions to a safer workplace.
Promote the committee’s activities and accomplishments.
Make sure employees know that you are starting a safety committee. Tell them why
you are starting the committee, describe its role in the Company’s safety-and-health program, and explain management’s commitment to the committee.
You can inform employees in a memo or a newsletter, by e-mail, or – better yet –
meet with them to promote the committee and to answer questions.

2-4 © Safety Services Company
4. Hazard Identification
Ensure that representatives know how to recognize hazards and understand basic
principles for controlling them.
Focus on identifying hazards and unsafe work practices that are likely to cause
serious injuries. Conduct thorough workplace inspections at least quarterly.
Document hazards during quarterly inspections and discuss how to control them at
regular safety-committee meetings.
Include employer and employee representatives on the inspection team.
5. Accident Investigation
The committee must have a procedure for investigating all workplace accidents, illness,
and deaths. It is not necessary for the committee to conduct accident investigations or
to participate in investigations; however, the committee should ensure that management
does so. The committee should also carefully review accident reports to help management identify accident causes and determine how to control them.
6. Recordkeeping
The following documents are required for the safety committee’s file:
Accurate minutes of each safety committee meeting
Committee reports, evaluations, and recommendations
Management’s response to committee recommendations
Employee safety suggestions and hazard concerns
7. Evaluation
An effective safety committee periodically evaluates their strengths and weaknesses, and
the evaluation helps them set new goals.
At least once a year, schedule a safety-committee meeting to accomplish the following:
identify the committee’s achievements over the past 12 months, review essential
activities, and set goals for the next 12 months.
Start With Your Primary Place of Employment
When you are starting a safety committee, you should do so at your Company’s primary
place of employment - the workplace where management controls the budget and can
act on the safety committee’s recommendations.
Do you have mobile or satellite sites?
If you have workplaces that are not primary places of employment – construction sites
or field offices, for example – you can have one central safety committee at your primary
place of employment that represents all of the other workplaces.
© Safety Services Company 2-5
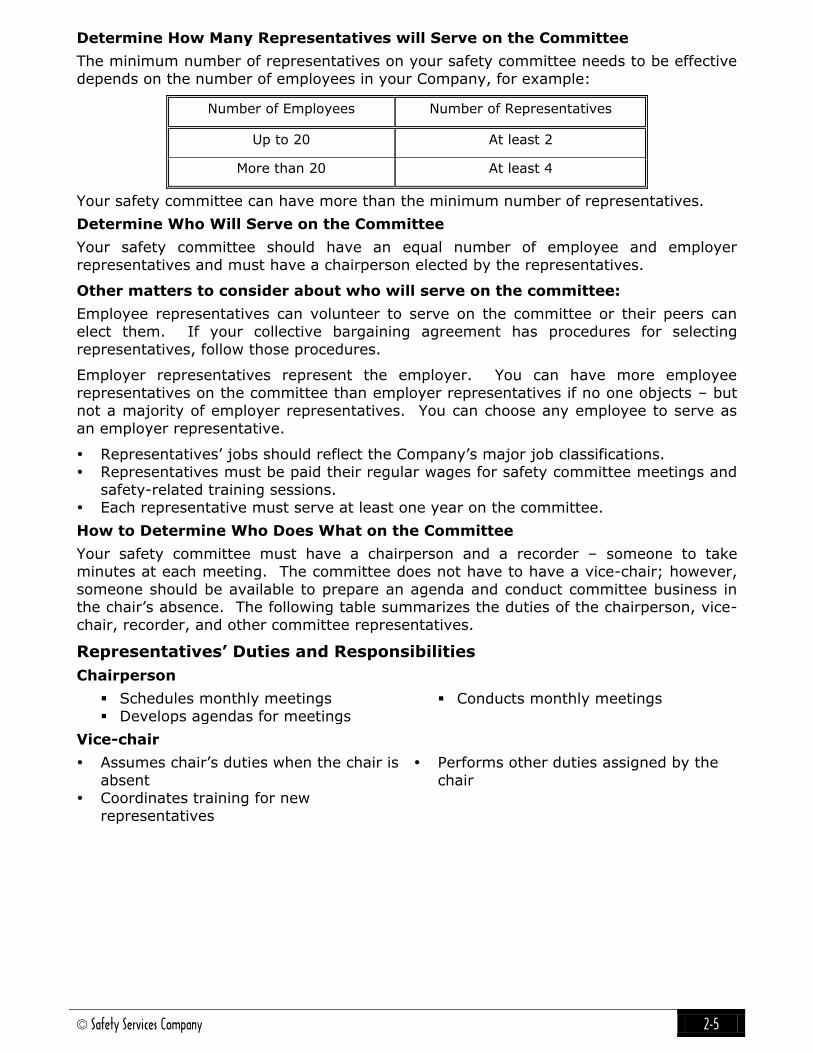
Determine How Many Representatives will Serve on the Committee
The minimum number of representatives on your safety committee needs to be effective
depends on the number of employees in your Company, for example:
Number of Employees Number of Representatives
Up to 20 At least 2
More than 20 At least 4
Your safety committee can have more than the minimum number of representatives.
Determine Who Will Serve on the Committee
Your safety committee should have an equal number of employee and employer
representatives and must have a chairperson elected by the representatives.
Other matters to consider about who will serve on the committee:
Employee representatives can volunteer to serve on the committee or their peers can
elect them. If your collective bargaining agreement has procedures for selecting
representatives, follow those procedures.
Employer representatives represent the employer. You can have more employee
representatives on the committee than employer representatives if no one objects – but
not a majority of employer representatives. You can choose any employee to serve as
an employer representative.
Representatives’ jobs should reflect the Company’s major job classifications. Representatives must be paid their regular wages for safety committee meetings and
safety-related training sessions.
Each representative must serve at least one year on the committee.
How to Determine Who Does What on the Committee
Your safety committee must have a chairperson and a recorder – someone to take
minutes at each meeting. The committee does not have to have a vice-chair; however,
someone should be available to prepare an agenda and conduct committee business in the chair’s absence. The following table summarizes the duties of the chairperson, vice-
chair, recorder, and other committee representatives.
Representatives’ Duties and Responsibilities
Chairperson
Schedules monthly meetings
Develops agendas for meetings Conducts monthly meetings
Vice-chair
Assumes chair’s duties when the chair is
absent
Coordinates training for new
representatives
Performs other duties assigned by the
chair

2-6 © Safety Services Company
Recorder
Takes minutes at each meeting
Distributes copies of minutes to
representatives
Posts minutes for other employees to
review
Maintains the safety-committee file
Keeps minutes and agendas on file
for three years
Other Committee Representatives
Report employees’ safety and health concerns to the committee Report accidents, near miss incidents, and unsafe workplace conditions to the
committee
Suggest items to include in the monthly meeting agenda
Encourage other employees to report workplace hazards and suggest how to control
them
Establish procedures for conducting quarterly workplace inspections and for making recommendations to management to eliminate or control hazards
Help management evaluate the Company’s safety-and-health program and
recommends how to improve it
Establish procedures for investigating the causes of accidents and near-miss incidents
Set Practical Goals for the Committee
Purpose and goals: put them in writing
The purpose of your safety committee is to bring workers and managers together to
achieve and maintain a safe, healthful workplace. But you will need to narrow the focus,
set goals, and specify what the committee will do.
Train the Representatives
What representatives need to know:
Representatives must understand the purpose of the safety committee, how to apply
OSHA’s safety rules, and how to conduct safety-committee meetings. They must also
have training in hazard identification and the principles of accident investigation.
Representatives should know whom to contact for information or for help on workplace safety-and-health matters. Two sources are your workers’ compensation insurance
carrier and OSHA.
Who can do the training? You can do the training if you are confident you can
accomplish the objectives, or you can choose someone who has training experience and
understands the objectives.
Hold Regular Meetings
Require Participation
Each representative must help the committee accomplish its goals. Make sure representatives understand that they will be committing to attending monthly meetings
and to participating in committee activities.
Set a Repeating Meeting Schedule
Your committee should meet at least once a month. Setting a regular time, date, and place for meetings - for example, 10 a.m.-noon, the first Tuesday of each month -
makes it easier for everyone to remember.

© Safety Services Company 2-7
Establish Ground Rules
Ground rules keep meetings orderly and efficient. All representatives should understand
them and the chairperson should enforce them. Important ground rules:
Keep the discussion focused on
agenda topics.
Listen to others and let them finish
before responding.
Cooperate to achieve effective
solutions.
Finish the meeting on time.
Follow a Written Agenda
The agenda outlines the meeting’s discussion topics. The chairperson should understand
the agenda topics and keep the discussion focused on them. Send copies of the agenda
to representatives a few days before the meeting so they can review it.
Take Accurate Minutes
Accurate meeting minutes are important because they document the committee’s
accomplishments. The representative who has this responsibility should be able to grasp
the main points of a discussion and record them quickly.
Meeting minutes should include the following:
A brief summary of the discussion of each topic
A copy of committee reports, evaluations, and recommendations
A copy of management’s response to committee recommendations
Remember to send a copy of the minutes to each representative promptly after the
meeting and to post a copy where other employees can see it. If your Company has
field offices, send a copy to each field office. Keep a copy of each meeting’s minutes on
file for three years.
Conducting the Meeting
Effective meetings start on time. Make sure the meeting room is ready; allow extra time
if you need to set up tables, rearrange chairs, or clean up after others have met. Before
getting down to business, start the meeting on the right track by doing the following:
Distribute the agenda. Make sure everyone has a copy of the agenda and any other handouts.
Review the ground rules. You may not need to review the ground rules at every
meeting, but consider doing so or the benefit of guests and new representatives.
Make introductions. No one likes to feel left out at a meeting. Welcome new
representatives and guests. Review the minutes from the last meeting. Request additions or corrections to last
month’s minutes. Update the minutes to reflect the changes.
Review the agenda topics. Give representatives and guests the opportunity to
suggest changes or to add discussion topics to the agenda.
Unless the representatives agree to continue the meeting, end it at the scheduled time.
You can discuss unfinished items during the next meeting or later with concerned
representatives. Before you finish, thank guests for coming and schedule the next
meeting.

2-8 © Safety Services Company
How to Do It
How to accomplish four important activities that helps you take care of safety committee
business.
1. How to Write Bylaws
2. How to Prepare an Agenda
3. How to Record Minutes
4. How to Identify Workplace Hazards
How to Write Bylaws
Bylaws state the committee’s purpose, define its essential activities, and describe how it conducts its regular business. Your safety committee does not have to have bylaws, but
they can give the committee stability as new representatives come on board and others
leave.
Bylaws can be as simple or as complex as you want to make them. They are usually
organized in sections; each section defines a specific committee function, as in the
following example:

© Safety Services Company 2-9
What To Include In Your Safety Committee Bylaws
Function Information to Include
Name, Purpose,
Goal, Objectives
State committee’s purpose, its goals, and its objectives. Make them
clear and keep them brief.
Membership
State how many representatives will serve on the committee.
Describe how the representatives are selected to serve on the
committee.
State how long representatives will serve on the committee.
Officers and
Representatives:
Duties and
Responsibilities
Describe duties and responsibilities of each:
The chair
The recorder
The vice-chair
The other representatives
Training State what the representatives need to know to fulfill their
responsibilities and describe how they will receive their training.
Meetings
Define the following:
The schedule for regular committee meetings.
Who must attend the meetings. The requirements for preparing and distributing the agenda and
the minutes.
The procedures for voting on committee decisions.
Employee
Involvement
State how the committee will involve employees in achieving a safe, healthful workplace.
Describe how employees should report hazards and unsafe
practices to the committee.
Describe how employees can submit ideas for controlling or
eliminating hazards.
Accident
Investigation
State the committee’s role in investigating near-misses and
accidents.
Describe how representatives will review accidents and near-
miss incidents. Describe how the committee will report recommendations for
controlling hazards.
Workplace
Inspections
State how the committee will conduct regular workplace inspections.
Include the schedule for quarterly workplace inspections.
Identify who will conduct the inspections.
Describe how the committee will report hazard-control
recommendations to management.
Evaluation State how the committee will evaluate the safety-and-health
program and assess its activities.

2-10 © Safety Services Company
Safety Committee Bylaws: An Example
Although your safety committee does not have to have Bylaws, they can give the
committee stability by stating, in writing, how the committee conducts its business. Bylaws can be as simple or complex as you want to make them. This example shows
the bylaws of the imaginary XYZ Construction Company’s safety committee.
Name
The name of the committee is the XYZ Safety Committee.
Purpose
The purpose of the XYZ Safety Committee is to bring all XYZ Construction Company
employees together to achieve and maintain a safe, healthful workplace.
Goal
The goal of the XYZ Safety Committee is to eliminate workplace injuries and illnesses by
involving employees and managers in identifying hazards and suggesting how to prevent
them.
Objectives
The XYZ Safety Committee has four objectives:
Involve employees in achieving a safe, healthful workplace.
Promptly review all safety-related incidents, injuries, accidents, illnesses, and deaths.
Conduct quarterly workplace inspections, identify hazards, and recommend methods for eliminating or controlling the hazards.
Annually evaluate the XYZ Construction Company’s workplace safety-and-health
program and recommend to management how to improve the program.
Representatives
The XYZ Safety Committee will have ten voting representatives. Five of the representatives will represent employees and five will represent management. Employee
representatives can volunteer or their peers can elect them. Management
representatives will be selected by management.
Each representative will serve a continuous term of at least one year. Terms will be
staggered so that at least one experienced representative always serves on the
committee.
Chair and Vice-chair
The XYZ Safety Committee will have two officers: chair and vice-chair. One officer will
represent labor and one officer will represent management.
Terms of Service
Chair and vice-chair will each serve a one-year term.
Duties of the Chair
Schedule regular committee meetings.
Approve committee correspondence and reports.
Develop written agenda for conducting meeting.
Supervise the preparation of meeting minutes. Conduct the committee meeting.
Duties of the Vice-chair
In the absence of the chair, assume the duties of the chair.
Perform other duties as directed by the chair.
Election of Chair and Vice-chair
The election of a new chair or vice-chair will be held during the monthly committee
meeting before the month in which the incumbent’s term expires.
© Safety Services Company 2-11
If the chair or vice-chair leaves office before the term expires, an election will be held
during the next scheduled safety-committee meeting; the elected officer will serve for
the remainder of the term.
Training
New representatives will receive training in safety-committee functions, hazard
identification, and accident-investigation procedures.
Meetings
Monthly schedule — The XYZ Safety Committee will meet the third Tuesday of each month, except when the committee conducts quarterly workplace safety inspections.
Attendance and Alternates
Each representative will attend regularly scheduled safety committee meetings and
participate in quarterly workplace inspections and other committee activities. Any
representative unable to attend a meeting will appoint an alternate and inform the chair
before the meeting. An alternate attending a meeting on behalf of a regular representative will be a voting representative for that meeting.
Agenda
The agenda will prescribe the order in which the XYZ Safety Committee conducts its
business.
The agenda will also include the following when applicable:
A review of new safety and health concerns
A status report of employee safety and health concerns under review
A review of all workplace near misses, accidents, illness, or deaths occurring since the
last committee meeting.
Minutes
Minutes will be recorded at each committee meeting and distributed via e-mail to all XYZ
Construction Company employees.
The committee will submit a copy of the minutes to the XYZ Construction Company
personnel office; the office will retain the copy for three years. All reports, evaluations,
and recommendations of the committee will be included in the minutes. The minutes will
also identify representatives who attended monthly meeting, and representatives who were absent.
Voting Quorum
Six voting representatives constitute a quorum. A majority vote of attending
representatives is required to approve all safety-committee decisions. Issues not
resolved by majority vote will be forwarded to management for resolution.
Employee Involvement
The XYZ Safety Committee will encourage employees to identify workplace-health-and-
safety hazards. Concerns raised by employees will be presented to the committee in
writing; the committee will review new concerns at the next regularly-scheduled monthly
meeting.
Safety Log
The committee will maintain a log of all employee concerns, including the date received,
recommendations to management, and the date the concern was resolved.
Response
The committee will respond to employee concerns in writing and work with management to resolve them. The committee will present written recommendations for resolving
concerns to management. Within 60 days of receipt of the written recommendations,
management will respond in writing to the committee indicating acceptance, rejection, or
modification of the recommendations.

2-12 © Safety Services Company
Incident and Accident Investigation
The XYZ Safety Committee will review new safety- or health-related incidents at its next
regularly-scheduled meeting. Safety-related incidents include work-related near misses, injuries, illnesses, and deaths. When necessary, the committee will provide written
recommendations to management for eliminating or controlling hazards.
Workplace Inspections
The XYZ Safety Committee will conduct quarterly workplace inspections of all Company
facilities in March, June, September, and December.
Written Report
The committee will prepare a written report for management that documents the
location of all health or safety hazards found during inspection. The report will
recommend options for eliminating or controlling the hazards.
Within 60 days of receipt of the written report, management will respond in writing to
the committee, indicating acceptance, rejection, or proposed modification of the recommendations.
Evaluation
The XYZ Safety Committee will evaluate the Company’s workplace-safety-and-health
program annually and provide a written evaluation of the program to management. The
committee will also evaluate its own activities each December and use the evaluation to develop an action plan for the next calendar year.
NOTE: In the “Attachments” Chapter of this Injury & Illness Prevention Manual you will
find a master copy of the following forms for Company use:
Safety Committee By-Laws
Safety Committee Checklist
How to Prepare an Agenda
The Purpose of the Agenda
The agenda, usually prepared by the safety-committee chairperson, is an outline of
topics the representatives will discuss during a monthly meeting. The agenda helps
structure the meeting and reminds representatives of their responsibilities – for
example, special reports or other assigned tasks.
Preparing the Agenda
Most meetings should follow an agenda that includes the following topics:
Introductions of new representatives and guests.
Review of last meeting’s minutes for addition or corrections. Old business – discussion of items not covered or resolved during the last meeting.
New business – discussion of new items the committee needs to address or resolve.
Employee suggestions – review and discussion of suggestions.
Recommendations to management – review and discussion of recommendations to
eliminate or control a hazard or to improve the Company’s safety-and-health
program. Next meeting – date, location, and time in preparing the agenda, ask committee
representatives if they have items to include under new business, employee
suggestions, or recommendations to management. Keep the agenda as brief as
possible.
Distributing the Agenda
Give committee representatives and other employees a chance to review the agenda
three to five days before the meeting. Send copies of the agenda to committee representatives and management.
Post the agenda where other employees can read it.

© Safety Services Company 2-13
Using the Agenda
After representatives, management, and other employees have had a chance to
comment on the agenda, prepare the final version and make enough copies for everyone
attending.
Use the agenda to guide the meeting. If you cannot cover every topic during the
meeting, schedule them for the next meeting under old business.
NOTE: In the “Attachments” Chapter of this Injury & Illness Prevention Manual you will find a master copy of the following forms for Company use:
Safety Committee Meeting Agenda
How to Take Minutes
Why Minutes are Important
Minutes are the official record of the safety committee’s activities, including
recommendations to management and accomplishments. The content should be concise, clear, and well-organized.
NOTE: In the “Attachments” Chapter of this Injury & Illness Prevention Manual you will
find a master copy of the following forms for Company use:
Safety Committee Meeting Minutes
Who is Responsible for Minutes
Your committee should have a recorder who takes minutes at each meeting and, after
the meeting, does the following:
Distributes the minutes to representatives and management.
Posts the minutes where other employees can read them.
Keeps a copy of the minutes on file for three years.
Ensures that all employees have the opportunity to respond to the minutes.
What to Include in the Minutes
Organize the minutes so that they follow the meeting agenda. Information to include in
the minutes:
Date, time, and place of the meeting.
Names of attending representatives, guests, and representatives unable to attend.
A summary of each agenda item discussed.
Employee suggestions and reports of hazards.
The committee’s recommendations to management.
Management’s response to committee recommendations.
After the meeting, review and edit the minutes. Type a clean copy and post it where
employees are likely to see it, or distribute it to all employees.
Send a copy of the minutes to employees at mobile worksites or field offices.
Keep the minutes for at least three years. You can file them in a notebook or a
computer.
How to Identify Workplace Hazards
What to Do and How to Do It
Effective safety committees prove their worth by helping management keep workplace
hazards under control. But you cannot control hazards until you identify them.
Get training on how to identify workplace hazards.
Conduct quarterly workplace inspections.
Discuss the hazards at monthly safety-committee meetings, document them in the minutes, and report them to management.

2-14 © Safety Services Company
Getting Trained
Work with a mentor. A safety-and-health specialist from your insurance carrier, for
example, will attend a safety committee meeting, answer questions, and help
representatives learn how to identify hazards.
Know the rules. Know what safety and health rules apply to your workplace. The rules
can inform you about hazards and help you determine how to control them.
Conducting Quarterly Workplace Inspections
Successful inspections involve walking, talking, listening, and writing:
Walk around the workplace. Look for hazards and unsafe work practices that are
likely to cause serious injuries. Focus on hazards rather than rule violations. Talk to employees. Ask them about hazards and unsafe conditions; be concerned
and listen carefully.
Take notes. What is the hazard? Where is the hazard? How could the hazard cause
an accident and what could be the result? Who could be affected by the hazard?
Report your findings. Organize your notes and summarize the important information in a report to the safety committee.
Getting Other Employees Involved
Concerned employees help the committee learn about workplace hazards and unsafe
practices. Encourage them to report hazards and suggest how to control them.
Discussing Hazards at Safety Committee Meetings
The safety committee receives information about workplace hazards from quarterly
inspections, from concerned employees, and from management. But the committee also
needs to discuss how that information will lead to a safer, healthier workplace and the
discussion should take place during a safety-committee meeting.
Reporting Hazards to Management
By reporting a hazard to management and recommending how to control or eliminate it, the committee acknowledges the hazard threatens a worker’s safety.
A Safety Committee Evaluation Checklist
After you get your safety committee started, use the following checklist to determine if it
is necessary to do any fine-tuning to make it more effective.
NOTE: In the “Attachments” Chapter of this Injury & Illness Prevention Manual you will
find a master copy of the following forms for Company use:
Safety Committee By-Laws
Safety Committee Checklist
Safety Committee Meeting Agenda Safety Committee Meeting Minutes

© Safety Services Company 3-1
Chapter 3
General Safety Rules & Code of Safe Practices
Andy Wilson is responsible for the implementation and enforcement of the following
safety rules. Disciplinary procedures will be enforced.
Employee Safety Training & Disciplinary Procedures
OSHA requires that employees be trained in the safe methods of performing their job. A
R M Environmental Services, Inc. is committed to instructing all employees in safe and
healthful work practices. Awareness of potential hazards, as well as knowledge of how
to control them, is critical to maintaining a safe and healthful work environment and preventing injuries. To achieve this goal, we will provide training to each employee on
general safety issues and safety procedures specific to that employee's work assignment.
Every new employee will be given instruction by their foreman in the general safety
requirements of their job.
A copy of our Code of Safe Practices will also be provided to each employee.
Tailgate or toolbox safety training will be conducted at least every 10 working days.
All training will be documented on the forms provided.
Managers, supervisors, and foremen will be trained at least twice per year on various
accident prevention topics.
Training provides the following benefits:
Makes employees aware of job hazards Teaches employees to perform jobs
safely
Promotes two way communication
Encourages safety suggestions Creates interest in the safety program
Fulfills OSHA requirements
Employee training will be provided at the following times:
All new employees will receive a safety orientation their first day on the job.
All new employees will be given a copy of the Code of Safe Practices and required to
read and sign for it. All field employees will receive training at tailgate or toolbox safety meetings held at
the jobsite.
All employees given a new job assignment for which training has not been previously
provided will be trained before beginning the new assignment.
Whenever new substances, processes, procedures, or equipment that represent a new hazard are introduced into the workplace.
Whenever the Company is made aware of a new or previously unrecognized
workplace hazard.
Whenever management believes that additional training is necessary.
After all serious accidents. When employees are not following safe work rules or procedures.

3-2 © Safety Services Company
Training topics will include, but not be limited to:
Employee’s safety responsibilities
General safety rules
Code of Safe Practices
Safe job procedures
Use of hazardous materials
Use of equipment
Emergency procedures
Safe lifting and material handling
practices
Use of boom and scissor lifts
Use of fall-protection
Contents of safety program
Documentation of Training
All employee safety training will be documented on one of the following three forms:
New Employee Safety Orientation Specialized, formal employee training plans (confined spaces, fall protection,
lockout/tagout, first aid, etc.)
Tailgate/Toolbox Safety Meeting Report
The following informal training methods will be used. Actual demonstrations of the proper way to perform a task will be used in most cases, for example:
Tell them how to do the job safely
Show them how to do the job safely
Have them tell you how to do the job safely
Have them show you how to do the job safely Follow up to ensure they are still performing the job safely
Safety Communication
Employee safety communication procedures are designed to develop and maintain employee involvement and interest in the Safety and Health Program. These activities
will also ensure effective communication between management and employees on safety
related issues that is of prime importance to The Company.
The following are some of the safety communication methods that may be used:
Tailgate/Toolbox safety training with employees that encourage participation and open, two-way communication.
New employee safety orientation and provision of the Code of Safe Practices.
Provision and maintenance of employee bulletin boards discussing safety issues,
accidents, and general safety suggestions.
Written communications from management or the Safety Coordinator, including
memos, postings, payroll stuffers, and newsletters. Anonymous safety suggestion program.
Employees will be kept advised of highlights and changes relating to the safety program.
The Foremen will relay changes and improvements regarding the safety program to employees, as appropriate. Employees will be involved in future developments and
safety activities, by requesting their opinions and comments, as necessary.
All employee-initiated safety related suggestions will be properly answered, either
verbally or in writing, by the appropriate level of management. Unresolved issues will be
relayed to Andy Wilson, The Safety Coordinator.
All employees are encouraged to bring any safety concerns they may have to the attention of management. A R M Environmental Services, Inc. will not discriminate
against any employee for raising safety issues or concerns.

© Safety Services Company 3-3
The Company also has a system of anonymous notification whereby employees who wish
to inform the Company of workplace hazards without identifying themselves may do so
by phoning or sending written notification.
Enforcement of Safety Policies
The compliance of all employees with The Company’s Safety and Health Program is
mandatory and will be considered a condition of employment.
The following programs will be utilized to ensure employee compliance with the safety
program and all safety rules:
Training programs
Retraining
Optional safety incentive programs
Disciplinary action
Training Programs
The importance of safe work practices and the consequences of failing to abide by safety rules will be covered in the New Employee Safety Orientation and at Tailgate/Toolbox
Safety meetings. This will help ensure that all employees understand and abide by The
Company's safety policies.
Retraining
Employees that are observed performing unsafe acts or not following proper procedures
or rules will be retrained by their foreman or supervisor. A Safety Contact Report may
be completed by the supervisor to document the training. If multiple employees are
involved, additional safety meetings will be held.
Safety Incentive Programs
Although strict adherence to safety policies and procedures is required of all employees,
the Company may choose to periodically provide recognition of safety-conscious
employees and jobsites without accidents through a safety incentive program.
Disciplinary Action
The failure of an employee to adhere to safety policies and procedures established by The Company can have a serious impact on everyone concerned. An unsafe act can
threaten not only the health and well being of the employee committing the unsafe act
but can also affect the safety of his/her coworkers and/or customers. Accordingly, any
employee who violates any of the Company's safety policies will be subject to disciplinary
action.
Note: Failure to promptly report any on-the-job accident or injury, on the same day as
occurrence, is considered a serious violation of The Company's Code of Safe Practices.
Any employee who fails to immediately report a work-related accident or injury, no
matter how minor will be subject to disciplinary action.
Employees will be disciplined for infractions of safety rules and unsafe work practices
that are observed, not just those that result in an injury. Often, when an injury occurs, the accident investigation will reveal that the injury was caused because the employee
violated an established safety rule and/or safe work practice(s).
In any disciplinary action, the foreman should be cautious that discipline is given to the
employee for safety violations, and not simply because the employee was injured on the
job or filed a Workers’ Compensation claim.
Violations of safety rules and the Code of Safe Practices are to be considered equal to
violations of other Company policy. Discipline for safety violations will be administered
in a manner that is consistent with The Company’s system of progressive discipline. If,
after training, violations occur, disciplinary action will be taken as follows:

3-4 © Safety Services Company
Oral warning. Document it, including date and facts on the “Safety Warning
Report” form. Add any pertinent witness statements. Restate the policy and
correct practice(s). Written warning. Retrain as to correct procedure/practice.
Written warning with suspension.
Termination
As in all disciplinary actions, each situation is to be carefully evaluated and investigated. The particular step taken in the disciplinary process will depend on the severity of the
violation, employee history, and regard to safety. Foremen and supervisors should
consult with the office if there is any question about whether or not disciplinary action is
justified. Employees may be terminated immediately for willful or extremely serious
violations. Union employees are entitled to the grievance process specified by their contract.
Note: Consistency in the enforcement of safety rules will be exercised at all times.
NOTE: In the “Attachments” Chapter of this Injury & Illness Prevention Manual you will
find a master copy of the following forms for Company use:
Disciplinary Safety Warning Code of Safe Practices Receipt
GENERAL SAFETY RULES A R M Environmental Services, Inc. employees will follow these safe practice rules, render every possible aid to safe operations, and report all unsafe conditions or practices
to their supervisor.
Failure to abide by the Code of Safe Practices may result in disciplinary action up to and
including termination.
Supervisors will insist that employees observe and obey every rule, regulation, and order
necessary to the safe conduct of the work, and will take such action necessary to obtain compliance.
If you are unsure of the safe method to do your job, STOP and ask your supervisor.
Ignorance is no excuse for a safety violation.
All employees will be given frequent accident prevention instructions. Instructions,
practice drills and articles concerning workplace safety and health will be given at least once every _______ working days.
No one will knowingly be permitted to work while the employee's ability or alertness is
impaired by fatigue, illness, and prescription or over the counter drugs. Employees who
are suspected of being under the influence of illegal or intoxicating substances, impaired
by fatigue or an illness, will be prohibited from working.
Anyone known to be under the influence of alcohol and/or drugs will not be allowed on
the job while in that condition. Persons with symptoms of alcohol and/or drug abuse are
encouraged to discuss personal or work-related problems with their
supervisor/employer.
Employees should be alert to see that all guards and other protective devices are in
proper places and adjusted, and will report deficiencies. Approved protective equipment will be worn in specified work areas.
Horseplay, scuffling, fighting and other acts that tend to have an adverse influence on
the safety or well being of the employees are prohibited. Do not run in the workplace or
in the shop or office area.

© Safety Services Company 3-5
Work will be well-planned and supervised to prevent injuries when working with
equipment and handling heavy materials. When lifting heavy objects, employees should
bend their knees and use the large muscles of the leg instead of the smaller muscles of the back. Back injuries are the most frequent and often the most persistent and painful
type of workplace injury.
Workers will not handle or tamper with any electrical equipment, machinery or air or
water lines in a manner not within the scope of their duties, unless they have received
instructions from their supervisor. Do not operate equipment that you are not familiar with. Do not attempt to use such equipment until you are fully trained and authorized.
Keep your work area clean, free of debris, electrical cords, and other hazards.
Immediately clean up spilled liquids.
Always notify all other individuals in your area who might be endangered by the work
you are doing.
A red tag system identifies equipment that is NOT to be operated, energized, or used. All lockout/tagout notices and procedures must be observed and obeyed.
Do not block exits, fire doors, aisles, fire extinguishers, first aid kits, emergency
equipment, electrical panels, or traffic lanes.
Do not leave tools, materials, or other objects on the floor that might cause others to
trip and fall.
Do not distract others while working. If conversation is necessary, make sure eye
contact is made prior to communicating.
Employees will not enter manholes, underground vaults, chambers, tanks, silos, or other
similar places that receive little ventilation, unless it has been determined that it is safe
to enter.
Materials, tools, or other objects will not be thrown from buildings or structures until
proper precautions are taken to protect others from the falling objects.
Employees will cleanse thoroughly after handling hazardous substances, and follow
special instructions from authorized sources.
Gasoline or other flammable liquids will not be used for cleaning purposes.
No burning, welding, or other source of ignition will be applied to any enclosed tank or vessel, even if there are some openings, until it has first been determined that no
possibility of explosion exists, and authority for the work is obtained from the foreman or
superintendent.
Any damage to scaffolds, falsework, or other supporting structures will be immediately
reported to the foreman and repaired before use.
Possession of firearms, weapons, illegal drugs or alcoholic beverages on Company or
customer property or the workplace is strictly prohibited.
All injuries will be reported promptly to your supervisor so that arrangements can be
made for medical and/or first-aid treatment.
3-6 © Safety Services Company
Specific Safety Rules
Electrical Safety
Only trained, qualified, and authorized employees are allowed to make electrical repairs
or work on electrical equipment or installations.
All electrical equipment and systems will be treated as energized until tested or
otherwise proven to be de-energized.
All energized equipment and installations will be de-energized prior to the
commencement of any work. If the equipment or installation must be energized for test or other purposes, special precautions will be taken to protect against the hazards of
electric shock.
All equipment will be locked out to protect against accidental or inadvertent operation
when such operation could cause injury to personnel. Do not attempt to operate any
switch, valve, or other energy-isolating device bearing a lock.
Safety grounds will always be used where there is a danger of shock from back feeding
or other hazards.
Polyester clothing or other flammable types of clothing will not be worn near electrical
circuits. Cotton clothing is much less likely to ignite from arc blast. Employees working
on live circuits will be provided Nomex or equivalent fire resistant clothing.
Suitable eye protection must be worn at all times while working on electrical equipment.
Always exercise caution when energizing electrical equipment or installations. Take
steps to protect yourself and other employees from arc blast and exploding equipment in
the event of a fault.
All power tools will be grounded or double insulated. Tools with defective cords or wiring
will not be used.
Metal jewelry should not be worn around energized circuits.
Extension and temporary power cords must be heavy duty and grounded. Frayed or
defective cords will not be used.
Suitable temporary barriers or barricades will be installed when access to opened
enclosures containing exposed energized equipment is not under the control of an authorized person.
Electrical installations must be protected from accidental contact by enclosures or tight
fitting covers.
Circuits will not be overloaded with equipment or extension cords.
Metal measuring tapes, fish tapes, ropes or other metal devices are prohibited where they may contact energized parts of equipment or circuits.
Personal Protective Equipment (PPE)
Use the correct PPE for each job assignment. If you do not know, ask.
PPE will be maintained in good condition and cleaned regularly.
PPE will be stored properly when not in use to protect it from damage.
Damaged or broken PPE must be returned to your foreman for replacement.
Hard hats must be worn on jobsites, when required.
ANSI approved safety glasses must be worn when working with power tools, compressed
air or gasses, chemicals or any other item that creates an eye injury hazard.

© Safety Services Company 3-7
Face shields with safety glasses are recommended when grinding or working with
hazardous chemicals.
Employees must wear industrial work shoes in the shop and on the jobsite. The shoes must have complete leather uppers and skid resistant soles and be in good condition.
Steel toe protection is recommended.
Athletic style shoes, tennis shoes, open toe shoes, plastic or vinyl shoes or shoes with
decorative accessories are not allowed.
Hearing protectors must be worn when working with loud equipment such as cut off saws, chain saws, air hammers or grinders.
Back support belts should be worn for heavy lifting tasks. They do not help you lift
more, but may provide some protection from back injuries.
Be sure the protective clothing you wear will not hamper or restrict freedom of
movement due to improper fit.
Long pants of heavy-duty material must be worn. No shorts or sweat pants are allowed.
Do not wear loose, torn or frayed clothing, dangling ties, finger rings, dangling earrings,
jewelry items, or long hair unless contained in a hair net, while operating any machine
that could cause entanglement.
If required, wear NIOSH approved respirators when applying adhesives, paint, welding,
grinding or working with chemicals. Read the SDS to find out which types of respirators are required. Facial hair may not be permitted in certain circumstances.
Hazardous Materials and Chemicals
Read all warning labels and Material Safety Data Sheets (SDS) before using any
chemicals. SDS contain personal protective equipment and safety information and are
available from your foreman.
Hazardous materials will be handled in accordance with the SDS and label. If protective
equipment is required, use it.
Eye protection must be worn when working with hazardous materials or chemicals.
Mixing of chemicals is prohibited at all times unless required by the label. Before you
mix - review all SDS.
Always wash your hands thoroughly after handling chemicals and before eating or
smoking, even if you were wearing protective gloves.
Never use solvents for hand cleaning. Use the non-toxic hand cleaners provided.
Store all hazardous materials properly in suitable containers that are properly labeled.
Use chemicals only in well-ventilated areas.
When using secondary containers, ensure that they are labeled as to their contents and
hazards.
Do not disturb any asbestos. STOP work and tell your foreman. If you are not sure,
STOP and ask.
Do not cut or weld stainless steel or galvanized metal without respiratory protection.
These items create toxic fumes.
Work with lead, asbestos, cadmium, and other toxic compounds require special
precautions. Do not attempt to perform this work without special equipment and
training.

3-8 © Safety Services Company
Fire Prevention and Housekeeping
Always take precautions to prevent fires which may be started, particularly from oily
waste, rags, gasoline, flammable liquids, acetylene torches, improperly installed electrical equipment, and trash.
Firefighting equipment is to be inspected on a regular basis. All discharged, damaged or
missing equipment is to be immediately reported to a supervisor. Tampering with fire
equipment is prohibited.
Access to fire extinguishers must be kept clear at all times. Make note of the location of firefighting equipment in your work area.
Never use gasoline or flammable solvents for cleaning purposes.
Smoking is prohibited within 20 feet of where flammable substances are present.
In case of fire, employees will consider the safety of themselves and other individuals
before saving property.
Keep your work areas free of debris. Remove useless material from the work area as
fast as required to help reduce tripping hazards.
Maintain awareness of potential hazards when walking about the workplace.
Keep tools, materials and equipment out of walkways and stairways at all times.
Sharp wires or protruding nails must be kept bent.
Place tools and equipment so they will not fall from elevated areas.
Tie materials down at day’s end so the wind will not blow it off the roof.
Fall Protection
Fall protection, such as standard railings or a safety harness and lanyard, will be used at
all times, when working 6 feet or more above the level below.
Floor and wall openings, unfinished balconies, elevator shafts and similar areas must be
railed, covered, or barricaded to prevent falls.
Never remove fall protection rails, covers, or barricades without permission from your
foreman and special precautions. Always replace these items when finished with your
task.
All safety harnesses will be the full body type with a shock-absorbing lanyard attached to a substantial anchorage capable of supporting twice the maximum load. Lanyards will be
attached at the wearer’s upper back. Body belts are not to be worn as fall protection.
Read and obey all manufacturers’ instructions relating to your fall arrest system (safety
harness and lanyard).
Inspect all components of your harness and lanyard prior to each use and after a fall. Defective equipment is not to be used. Lanyards must be destroyed after a fall and
never reused.
Safety harnesses and lanyards should limit free fall distance to less than 4 feet and
prevent contact with any level or objects below you.
Never use any part of a fall arrest system, such as a harness or lanyard, to hoist materials or for any other purpose.
Safety harnesses and shock absorbing lanyards are required to be worn at all times while
in boom lifts.

© Safety Services Company 3-9
Ladder Safety
Inspect the ladder before using it. If it is broken, throw it out. Never repair a broken
ladder, get a new one. Keep portable stairways, ladders, and step stools in good condition and use them only in a safe manner.
Use the proper ladder for the job. Do not use “A” frame ladders as straight ladders.
Make sure the ladder is tall enough to reach the work area. Do not use metal ladders for
electrical work.
Do not place ladders in passageways, doorways, or any location where they might be hit or jarred, unless protected by barricades or guards.
Ladders should only be placed on hard level surfaces. Make sure the ladder feet are not
placed on sandy, slippery, or sloping surfaces. Clean or sweep the area where the
ladder feet will be and make sure the rubber feet are in good shape.
Ladder rungs and steps must be kept free of grease, oil, mud, or other slippery substances.
Arrange your work so you are able to face the ladder and use both hands while climbing.
Do not carry tools or equipment while climbing a ladder. Climb the ladder, and then
hoist the tools or equipment with a line or a hoisting device.
Avoid temporary ladders. Always use a commercially made, construction grade ladder of
the proper length for the work being performed.
Secure portable ladders in place and at a pitch so the leveling indicator is in alignment or
the distance from the wall to the base of the ladder is at least 1’ for every 4’ of height.
Straight ladders will be tied off the top of the ladder to prevent slipping.
Be aware of objects below you, move or cover sharp objects in case you fall. Cap or
bend all rebar.
Do not stand on or work from the 2nd rung from the top or above. Also do not reach too
far from the ladder. Keep your belt buckle between the side rails.
Extension ladders will extend at least 36" above the level being accessed.
On all ladders, do not step on cross bracing that is not intended to be used for climbing.
Scaffolds
Scaffolds are to be erected, dismantled, altered, or repaired by the scaffold contractor
ONLY.
Inspect scaffolds prior to use and report any damage immediately to your foreman. Do
not use damaged scaffolds.
You are not permitted to ride on rolling scaffolds being moved.
Always use guard railings on all scaffolds regardless of height.
Use only high quality planking on scaffolds and be sure the planks are secure to prevent
shifting.
Always apply caster brakes and use outriggers when scaffolds are stationary.
Do not use planks, buckets, ladders. guard rails or other equipment as a temporary means of obtaining greater height off the scaffold.
Be aware of the objects below you; move or cover sharp objects in case you fall. Cap or
bend all rebar.
3-10 © Safety Services Company
Lockout/Tagout
All machinery and electrical equipment will be locked out and tagged prior to repair,
cleaning, or adjustment unless power is necessary to perform the work. If so, other precautions, specified by your foreman, will be taken.
Use your own lock and key. No one else should have a key for your lock. Destroy all
duplicate keys.
Maintain control of your key at all times to prevent unauthorized use.
Never remove another employee’s lock or energize tagged equipment.
If multiple employees are working on the same equipment, each employee should install
their own lock.
Notify all affected employees that lockout/tagout is required and reasoning.
If the equipment is operating, shut it down by the normal stopping procedure (depress
stop button, open toggle switch, etc.).
Operate the switch, valve or other energy isolating devices so that the energy source(s)
(electrical, mechanical, hydraulic, etc.) is disconnected or isolated from the equipment.
Stored energy, such as that in capacitors, springs, elevated machine members, rotating
flywheels, hydraulic systems, and air, gas or water pressure, etc. must also be dissipated
or restrained by methods such as grounding, repositioning, blocking, bleeding down, etc.
Lock-out all energy isolation devices with an individual lock.
After ensuring that no employees are exposed and as a check of having disconnected the
energy sources, operate the push button or other normal operating controls to make
certain the equipment will not operate.
CAUTION: Return operating controls to neutral position after the test. The equipment
is now locked-out. Install red lock-out tag on operating controls.
After repair is complete and the equipment is ready for testing or normal operation,
check the equipment to see that all cover plates and safety devices have been
reinstalled.
When the equipment is clear, remove all locks and tags. The energy isolating devices
may be operated to restore energy to the equipment.
Boom and Scissor Lifts
Only trained and authorized employees are allowed to use boom or scissor lifts. If you
are not trained, stay off.
Read and obey all manufacturers’ instructions and safety precautions.
Inspect all lifts prior to use. Defective equipment will not be used.
A safety harness with shock absorbing lanyard must be worn while using boom lifts.
Harnesses are not required for scissor lifts, provided guardrails are adequate and you do
not leave the work platform.
Always stay inside the platform railing. Do not use planks or ladders to extend your
reach.
Always lower the lift before moving.
Never use scissor lifts on uneven ground. They are designed for use primarily on
concrete floors.

© Safety Services Company 3-11
Hand and Power Tools
Proper eye protection must be worn when using hand and power tools.
Know your hand and power tool applications and limitations. Always use the proper tool for the job.
Inspect cords and tools prior to use. Do not use tools that are faulty in any way.
Exchange them for safe tools immediately.
Power tools must be grounded or double insulated. All power tools are to be plugged
into a grounded GFCI outlet.
Do not use power tools in damp, wet, or explosive atmospheres.
Do not lift, lower or carry portable electrical tools by the power cord.
Keep all safety guards in place and in proper working order.
Use clamps or vises to secure work pieces.
Do not force hand power tools. Apply only enough pressure to keep the unit operating smoothly.
Return all tools and other equipment to their proper place after use.
Unplug all power tools before changing bits and/or grinding disks.
Never leave chuck keys in the tool during operation.
Do not use a screwdriver as a chisel.
Before using sledges, axes, or hammers, be sure the handles are securely fastened with a wedge made of sound material.
Do not use a handle extension or ‘cheater” on any wrench.
Files should be equipped with handles and should not be used as a punch or pry.
Trenching and Excavation
All excavations and trenches 5 feet deep or greater must be shored, sloped or benched
to protect workers from hazards of moving earth. All trenching must be done in
accordance with OSHA regulations.
Always locate underground utilities before digging. Also contact regional notification
center in advance.
Do not work under loads handled by lifting or digging equipment.
Ladders will be provided for access to trenches and excavations 4 feet deep or greater.
Use them.
Keep all spoil piles a minimum of 2 feet from the edge of the trench.
Barricade trenches or use caution tape to warn others of their presence.
Inspect all trenches and excavations daily, before work, to look for signs of shifting earth.
Cranes and Rigging
No employee is permitted to ride on loads, hooks, or slings of any crane, hoist or derrick.
Do not work or stand under any suspended load. Crane operators will avoid swinging
loads over people.
Inspect all slings and chains prior to use. Do not use defective slings, chains, or rigging.

3-12 © Safety Services Company
Welding and Cutting
Make sure your welding equipment is properly installed, grounded, and in good working
condition.
Always wear protective clothing suitable for the welding or cutting to be done.
Always wear proper eye protection when welding, brazing, soldering or flame cutting.
Once you remove your welding helmet, put on safety glasses.
Keep your work area clean and free of hazards. Make sure that no flammable, volatile or
explosive materials are in or near the work area.
Handle all compressed gas cylinders with extreme care. Keep caps on when not in use.
Make sure that all compressed gas cylinders are secured to the equipment carriage, wall
or other structural supports. When compressed gas cylinders are empty close the valve,
install the cap and return to correct bottle storage area.
Store compressed gas cylinders in a safe place with good ventilation. Acetylene cylinders and oxygen cylinders should be kept at least 20 feet apart.
Do not weld or cut in confined spaces without special precautions and your foreman’s
authorization.
Do not weld on containers that have held combustibles or flammable materials.
Use mechanical exhaust ventilation at the point of welding when welding lead, cadmium,
chromium, manganese, brass, bronze, zinc or galvanized metals. These metals are highly toxic and their fumes should not be breathed.
Make sure all electrical connections are tight and insulated. Do not use cables with
frayed, cracked or bare spots in the insulation.
When the electrode holder or cutting torch is not in use, hang it on the brackets
provided. Never let it touch a compressed gas cylinder.
Dispose of electrode and wire stubs in proper containers since stubs and rods on the
floor are a safety hazard.
Use weld curtains to shield others from the light rays produced by your welding.
Make sure all compressed gas connections are tight and check for leaks. Do not use
hoses with frayed or cracked spots.
Keep your leads orderly and out of walkways. Suspend them whenever possible.
DO NOT WELD if leads or machine are in or near water.
Make sure a portable fire extinguisher is nearby.
Keep your work area clean and free of hazards. When flame cutting, sparks can travel
30-40 feet. Do not allow flame cut sparks to hit hoses, regulators or cylinders.
Use oxygen and acetylene or other fuel gases with the appropriate torches and tips only
for the purpose intended.
Never use acetylene at a pressure in excess of 15 pounds per square inch. Higher
pressure can cause an explosion.
Never use oil, grease, or any other material on any apparatus or thread fitting in the
oxyacetylene or oxyfuel gas system. Oil and grease in contact with oxygen will cause spontaneous combustion.
Always use the correct sequence and technique for assembling and lighting the torch.
Always use the correct sequence and technique for shutting off a torch.

© Safety Services Company 3-13
Company Vehicles
Only authorized employees are permitted to operate Company vehicles. Do not let
anyone else drive your Company vehicle.
Company vehicles are to be used for Company business only. Personal, off duty and
family use is prohibited.
Drive defensively and obey all traffic and highway laws.
Always wear your seat belt, whether the driver or a passenger.
Report all accidents to your supervisor as soon as possible and obtain a police report.
Keys must be removed from all unattended vehicles and the vehicles must be locked,
unless parking inside the facility.
Do not jump from the cab or bed of Company vehicles. Always use the steps or a
ladder.
Inspect your vehicle and report any defects or operating problems to your supervisor so that repairs can be made.
Smoking is prohibited during vehicle refueling.
If your driver's license is revoked or expired, immediately notify your supervisor and do
not drive.
Traffic Safety
All employees exposed to traffic hazards are required to wear orange flagging garments
(shirts, vests, jackets) at all times.
When possible, construction vehicles are to be placed between the employees and traffic
to prevent vehicles from entering the work area and hitting members of the crew.
All traffic controls will be established in accordance with the Manual of Traffic Controls for Construction and Maintenance Work Zones.
Traffic controls are to be properly maintained throughout the workday. Signs and cones
must be kept upright, visible and in their proper position at all times.
NOTE: In the “Attachments” Chapter of this Injury & Illness Prevention Manual you will
find a master copy of the following forms for Company use:
Disciplinary Safety Warning Code of Safe Practices Receipt

3-14 © Safety Services Company
Notes:
_______________________________________________________________________
_______________________________________________________________________
_______________________________________________________________________
_______________________________________________________________________
_______________________________________________________________________
_______________________________________________________________________
_______________________________________________________________________
_______________________________________________________________________
_______________________________________________________________________
_______________________________________________________________________
_______________________________________________________________________
_______________________________________________________________________
_______________________________________________________________________
_______________________________________________________________________
_______________________________________________________________________
_______________________________________________________________________
_______________________________________________________________________
_______________________________________________________________________
_______________________________________________________________________
_______________________________________________________________________
_______________________________________________________________________
_______________________________________________________________________
_______________________________________________________________________
_______________________________________________________________________
_______________________________________________________________________
_______________________________________________________________________
_______________________________________________________________________

© Safety Services Company 4-1
Chapter 4
Accident Investigation Policy
Policy Statement
A R M Environmental Services, Inc. is committed to investigating all accidents/incidents.
Andy Wilson is responsible for ensuring that accident investigation policy is followed.
This company will investigate all lost-time injuries. Fatalities and catastrophes must be
reported to OSHA within 8 hours. Serious accidents must be reported to OSHA within 24
hours.
Accidents and near miss incidents that result in personal injury, property damage,
chemical spill, or other emergency situations will be immediately reported to the
assigned supervisor at the time of the event and Emergency Medical Service, Fire
Department, or Hazmat Services will be immediately summoned. Such events will be
investigated and documented on the appropriate Company form. All forms will be fully completed and submitted to Andy Wilson for review and for discussion at the next
scheduled Safety Committee meeting. These investigations demonstrate the company’s
commitment to providing a safe and healthful work environment. Disciplinary Policy
will be enforced.
To ensure that accidents will be reported, employees must be encouraged to participate in the “fact-finding” process. The point emphasized must be that “hazardous conditions”
and “unsafe practices” are an indication of a much bigger problem with a breakdown in
the safety and health policy. The purpose of the accident investigation then becomes one
that will uncover these system problems and provide solutions that will result in long
term corrective action.
It is important to gather facts and interview witnesses as soon as possible after an accident to ensure the most accurate information is being recorded. The efficiency of the
corrective measures is determined by the accuracy of the information gathered. The
best place to conduct an interview is wherever the employee being interviewed feels
most comfortable. The most important interviewing technique you can use to ensure
accuracy is to “listen”.
Note: Consider the event a “serious accident” if an employee is admitted to a hospital
for treatment or observation as a result of injuries suffered from a workplace accident.
Accident Causes
Accidents occur when hazards escape detection during preventive measures, such as a
job or process safety assessment, when hazards are not obvious, or as the result of combinations of circumstances that were difficult to foresee. A thorough accident
investigation may identify previously overlooked physical, environmental, or process
hazards, the need for new or more extensive safety training, or unsafe work practices.
The primary focus of any accident investigation should be the determination of the facts
surrounding the incident and the lessons that can be learned to prevent future similar occurrences. The focus of the investigation should NEVER be to place blame. The
process should be positive and thought of as an opportunity for improvement.

4-2 © Safety Services Company
When Accident Investigations are Required
As a general rule, investigations should be conducted for:
All injuries (even the very minor ones).
All accidents with potential for injury.
Property and/or product damage
situations.
All “Near Misses” where there was
potential for serious injury.
Near miss and incident reporting and investigation allow you to identify and control hazards before they cause a more serious incident. Accident/incident investigations are
a tool for uncovering hazards that either were missed earlier or hazards where controls
were defeated. However, it is important to remember that the investigation is only
useful when its objective is to identify root causes. In other words, every contributing
factor to the incident must be uncovered and recommendations made to prevent recurrence.
Accident Investigation Plan
When a serious accident occurs in the workplace, everyone will be too busy dealing with
the emergency at hand to worry about putting together an investigation plan, so the
best time to develop effective accident investigation procedures is before the accident occurs.
The plan should include procedures that determine:
Who should be notified of accident? Who is authorized to notify outside
agencies? (fire, police, etc.)
Who is assigned to conduct
investigations?
Training required for accident investigators:
Who receives and acts on
investigation reports?
Timetables for conducting hazard
correction.
Secure the Accident Scene
For a serious accident, the first action the accident team needs to take is to secure the
accident scene so material evidence is not moved or removed. Material evidence has a
tendency to walk off after an accident. If the accident is quite serious, OSHA may inspect and require that all material evidence be marked and remain at the scene of the
accident.
Gather Information
The next step is to gather useful information about what directly and indirectly contributed to the accident. The following tools should be used to gather as much
information as possible:
Interview eye witnesses as soon as possible after the accident. Interview witnesses
separately, never as a group.
Interview other interested persons such as supervisors, co-workers, etc. Review related records such as:
Training records
Disciplinary records
Medical records (as allowed)
Maintenance records
OSHA 300 Log (past similar injuries)
Safety Committee records
Document the scene with photographs, videotape, or sketches AND appropriate measurements.
Develop a Sequence of Events
Use the information gathered to develop a detailed step by step description of the
accident. Make sure the accident is documented in enough detail to enable an individual
unfamiliar with the situation to envision the sequence of events. Do not just describe
the accident itself; include a description of events that led up to the accident.

© Safety Services Company 4-3
Analyze the Accident
The next step is to determine the cause(s) of the accident. This is the most difficult step
because first the events must be analyzed to discover surface cause(s) for the accident,
and then, by asking “why” a number of times, the related root causes are uncovered.
Remember, surface causes are usually pretty obvious and not too difficult to determine.
However, it may take a great deal more time to accurately determine the weaknesses in
the management system, or root causes, that contributed to the conditions and practices associated with the accident.
More on surface causes:
The surface causes of accidents are those hazardous conditions and individual unsafe employee/manager behaviors that have directly caused or contributed in some way to
the accident.
Hazardous conditions may exist in any of the following categories:
Materials Machinery
Equipment
Tools
Chemicals
Environment Workstations
Facilities
People
Workload
It is important to know that most hazardous conditions in the workplace are the result of
unsafe behaviors that produced them. Individual unsafe behaviors may occur at any
level of the organization.
Some example of unsafe employee/manager behaviors include:
Failing to comply with rules
Using unsafe methods Taking shortcuts
Horseplay
Failing to report injuries
Failing to report hazards
Allowing unsafe behaviors
Failing to train Failing to supervise
Failing to correct
Scheduling too much work
Ignoring worker stress
More on root causes:
The root causes for accidents are the underlying system weaknesses that have somehow
contributed to the existence of hazardous conditions and unsafe behaviors that represent
surfaces causes of accidents. Root causes always pre-exist surface causes.
Inadequately designed system components have the potential to feed and nurture hazardous conditions and unsafe behaviors. If root causes are left unchecked, surface
causes will flourish!
Root causes may be separated into two categories:
System design weaknesses — Missing or inadequately designed policies, programs, plans, processes, and procedures will affect conditions and practices generally
throughout the workplace. Defects in system design represent hazardous system
conditions.
System implementation weaknesses — Failures to initiate, carry out, or accomplish
safety policies, programs, plans, processes, and procedures. Defects in implementation represent ineffective management behavior.
4-4 © Safety Services Company
System Design Weaknesses
Missing or inadequate safety policies/rules
Training program not in place
Poorly written plans
Inadequate process
No procedures in place Develop Preventive Actions
System Implementation Weaknesses
Safety policies/rules are not being enforced
Safety training is not being conducted
Adequate supervision is not conducted
Incident/Accident analysis is
inconsistent Lockout/Tagout procedures are not
reviewed annually
Preventative Actions
This is the most important piece of any investigation. All of the work done to this point culminates with recommendations to prevent similar accidents from happening in the
future. Recommendations should relate directly to the surface and root causes of the
accident. These recommendations should include recommended actions such as:
Engineering controls (for example, local exhaust ventilation or use of a lift assisting
device). Work practice controls (for example, pre-plan work, and remove jewelry and loose
fitting clothing before operating machinery).
Administrative controls (e.g., standard operating procedures or worker rotation).
Personal protective equipment (for example, safety glasses or respirators).
It is crucial that, after making recommendations to eliminate or reduce the surface
causes, that the same procedure is used to recommend actions to correct the root
causes. If root causes are not corrected, it is only a matter of time before a similar
accident occurs.
Summary
A successful accident investigation determines not only what happened, but also finds
how and why the accident occurred. Investigations are crucial as an effort to prevent a
similar or perhaps more disastrous sequence of events. Research has shown that a
typical accident is the result of many related and unrelated factors that somehow all
come together at the same time. It is estimated that there are usually more than ten factors that contribute to a serious accident. Although, this combination of factors
normally makes an investigation very time consuming and resource intensive, the good
news is that the accident can normally be prevented by removing only a few of the
contributing factors.
NOTE: In the “Attachments” Chapter of this Injury & Illness Prevention Manual you will find a master copy of the following form for Company use:
Accident Incident Report

© Safety Services Company 5-1
Chapter 5
Emergency Response Plan & Fire Prevention Procedures
§1910.38 – Emergency Action Plans
§1910.157 – Portable Fire Extinguishers – Fire Protection & Prevention
§1926.150 – Fire Protection
Policy Statement
A R M Environmental Services, Inc. has implemented the following policy for the
protection of our employees against emergency situations in the workplace such as
fire/explosion hazards, and has appointed Andy Wilson to supervise Emergency Action Plans and Fire Protection/Prevention Programs:
A R M Environmental Services, Inc. will have an Emergency Action Plan whenever an
OSHA standard requires one. Emergency Action Plans will be in writing, posted in the
workplace, and available to employees for review. The names and job titles of every
person in the chain of command will be posted.
Andy Wilson will ensure that all employees at A R M Environmental Services, Inc. are
informed and trained in the following minimum elements for Emergency Action Plans:
Procedures for reporting a fire or other emergency.
Procedures for emergency evacuation for all areas of work, including type of
evacuation and exit route assignments.
Safe assembly areas designated for all work areas in the event of evacuation. Procedures to be followed by employees who remain to operate critical operations
before they evacuate.
Procedures to account for all employees after evacuation.
Procedures to be followed by employees performing rescue or medical duties.
The members in the chain of command who may be contacted by employees who need more information about the Plan or for an explanation of their duties under the
Plan.
A R M Environmental Services, Inc. will have and maintain an employee alarm system.
The employee alarm system will use a distinctive signal for each purpose.
A R M Environmental Services, Inc. will designate and train employees to assist in a safe
and orderly evacuation of other employees.
Andy Wilson will review the Emergency Action Plan with each employee covered by the
plan:
When the plan is developed or an employee is initially assigned to a job. When the employee's responsibilities under the plan change.
When any element of the Plan is changed.

5-2 © Safety Services Company
All fire extinguishers will be inspected by Andy Wilson on a monthly basis; this inspection
will be recorded and documented with the required annual maintenance check. Records
of inspection will be kept on file in the office.
Andy Wilson will ensure that all employees are trained in the proper operation of all
types of fire extinguishers provided by the company.
All employees will be trained in the hazards involved in incipient stage fire fighting.
Employees are instructed to ensure the local emergency response service (Fire
Department) is notified before attempting to extinguish any fire, and that if a fire is not immediately extinguished, or the fire recurs to evacuate immediately.
Fire Protection/Prevention training will be required on initial hiring and annually
thereafter.
Emergency Action/Response Plans
Plan for Workplace Emergencies
Emergency planning is the first step, and it can be challenging even if your workplace
has few employees. You will need to determine what emergencies could affect your workplace, who will lead and make decisions during an emergency, and what procedures
will ensure that employees respond appropriately. These elements are the foundation of
a workplace emergency plan.
Emergency planning may not prevent emergencies, but it can protect lives, equipment,
and property over the long term. This guide will help you plan for workplace emergencies so that you and your coworkers respond appropriately when an unlikely
event happens.
Does OSHA Require Employers to Have Emergency Plans?
OSHA requires most employers to have emergency plans. Those that have more than 10 employees must have written plans. Those that have 10 or fewer employees do not
have to put their plans in writing; however, they must ensure that their employees know
what procedures to follow to protect themselves in an emergency.
Managing Workplace Emergencies
The Incident-Management System
You can learn much about planning for workplace emergencies from professional
emergency responders. When someone calls 911 to report an emergency, he or she
connects with a local network of fire, police, and other emergency service professionals who will respond as efficiently as possible. This network is part of a larger incident-
management system that can respond to an emergency and accomplish the following:
Identify, locate, and determine the extent of the emergency.
Determine the resources necessary to manage and control the emergency.
Coordinate command-and-control responsibilities between police and fire
departments, hospitals and other medical service providers, government agencies, and on-site responders.
Establish and maintain communication between on-scene emergency responders and
other emergency service providers.
Provide for the safety of victims.
An Incident-Management System for Your Workplace
With thoughtful planning, you can create a small-scale version of the incident
management system used by professional responders. Your workplace will be ready to respond to any emergency – from a heart attack to an earthquake – and manage it in
the most effective, efficient way possible. The essential parts of this system are your
employees, your emergency plan, communication and emergency-response equipment,
and your workplace.

© Safety Services Company 5-3
Developing an Emergency Plan
Your goal is to create an emergency plan that ensures the well-being of everyone at your
workplace in the most effective, efficient manner possible. But if you have never had to respond to a workplace emergency, how do you begin?
You begin by involving employees in the planning process, identifying emergencies that
could affect your workplace, establishing an emergency chain of command, and
developing emergency-response policy and procedures.
Involve Employees in the Planning Process
Perhaps the most important element of emergency planning is getting employees
involved in the planning process; when employees participate, they will take the plan
seriously and be more likely to respond appropriately during an emergency. From the
start, they should be aware that the purpose of the plan is to ensure their safety.
Form a team to help you develop the plan; ask for volunteers to join the team.
Review the plan with your employees to ensure that they know the procedures to follow
to respond safely in an emergency. Each employee should have a copy of the plan or
know where to obtain one.
Encourage employees to report workplace hazards and unsafe work practices that could contribute to an emergency.
Identify Emergencies that Could Affect Your Workplace
Identify any external incident (outside your workplace) that could threaten employees or the public and any incident within your workplace that could cause an emergency.
Examples include the following:
Earthquake: external
Explosion: external or internal
Fire: external or internal
Hazardous-substance release: external or internal Medical: internal
Weather-related event (hurricane, tornado, blizzard, etc.): external
Threat of violence: external or internal
Keep in mind... Electrical, heating and cooling, and telecommunication-system failures
can disrupt workplace activities and contribute to emergencies. What effect would each
have on your workplace? Human error also contributes to many workplace emergencies;
are your employees trained to do their jobs safely?
Establish a Chain of Command
A chain of command links one person with overall responsibility for managing an
emergency to others responsible for carrying out specific emergency-response tasks. A
chain of command establishes who is in charge and ensures that everyone in the chain
responds to emergencies in an organized way.
At the top of the chain is the emergency scene commander, a trained employee who has
overall responsibility for managing emergencies.
Just below the emergency scene commander are the volunteer emergency scene
coordinators.
In an organization that has multiple buildings or workplaces, the chain of command might also include a facility manager, an emergency director, and other management
units.
At many small- to medium-sized workplaces, the chain of command consists of an
emergency scene commander and one or two volunteer emergency scene coordinators.

5-4 © Safety Services Company
The Responsibilities of the Emergency Scene Commander
The emergency scene commander has overall command of a workplace emergency,
including the following responsibilities:
Assessing incidents to determine if it is necessary to order emergency response.
Supervising emergency scene coordinators’ activities during an emergency.
Coordinating the activities of professional responders such as ambulance, police, and
fire departments. Directing shutdown of critical workplace equipment or operations.
Determining if an evacuation is necessary and managing an evacuation.
Keep in mind... The emergency scene commander should be an employee who has experience managing others, assessing complex events, and making effective decisions
under difficult circumstances.
The Role of the Emergency Scene Coordinators
Emergency scene coordinators are responsible for coordinating other employees’ activities during an emergency (guiding them to appropriate exits and safe areas during
an evacuation, for example) and for other emergency-response tasks for which they
have volunteered and been properly trained.
Generally, each coordinator should be responsible for about 20 employees within a
designated work area, as shown in the following table.
Number of Emergency Scene Responders for Typical Workplaces
Total Employees in
Workplace
Emergency Scene
Commander
Emergency Scene
Coordinator
11-19 1 1
20-49 1 1-2
50-99 1 2-5
100-249 1 5-12
250+ 1 12+
Emergency scene coordinators must know how to respond to all emergencies identified
in your emergency plan, the evacuation procedures for your workplace, and how to use
emergency communication equipment. They should also know CPR, first aid, and how to
respond to threats of violence. Their primary responsibilities include the following:
Checking rooms and other enclosed spaces for employees who may be trapped or
unable to evacuate during an emergency.
Knowing who may need assistance during an evacuation and how to assist them.
Coordinating the emergency activities of employees.
Ensuring that employees understand how to respond to workplace emergencies.
Knowing the workplace layout, appropriate escape routes, and areas that employees must not enter during an evacuation.
Verifying that employees are in designated safe areas after an evacuation.
Keep in mind... Establishing a chain of command minimizes confusion during an emergency. An effective chain of command helps ensure that responders manage an
emergency in the most efficient way possible.
Develop a Policy and Procedure for Responding to Emergencies
The Policy
Create a short written policy that states the purpose of the plan and emphasizes that
you are committed to ensuring the safety of employees and others at your workplace
during an emergency. The following is an example:

© Safety Services Company 5-5
"It is the policy of this organization to protect employees from physical harm,
harassment, and intimidation. To provide a safe working environment for all employees,
this organization is committed to establishing an effective emergency plan. The plan is based on an “Incident Management System” (IMS) that consists of volunteer employees
trained to respond to any workplace emergency. The system is modeled on the IMS
system used by fire, police, and emergency medical-service responders. It provides for
overall command and control of any emergency incident. It improves communication
between IMS personnel and the fire, police, and medical personnel who respond to a call for help. And it provides appropriate emergency assistance during the first few minutes
it takes for emergency responders to arrive."
The Procedures
Procedures are instructions for accomplishing specific tasks. Emergency procedures are important because they tell employees exactly what to do to ensure their safety during
an emergency. If your workplace has more than 10 employees, your emergency plan
must describe in writing how you will accomplish each of the following tasks:
Report emergencies to local fire and police departments.
Inform the emergency chain of command of an emergency. Warn employees about an emergency.
Conduct an orderly, efficient workplace evacuation.
Assist employees, with disabilities or limited English-speaking skills during an
evacuation.
Shut down critical equipment, operate fire extinguishers, and perform other essential
services during an evacuation. Account for employees at a designated safe area after an evacuation.
Perform rescue and first aid that may be necessary during an emergency.
Keep in mind... If your workplace has 10 or fewer employees, you do not have to put these procedures in writing; however, you must ensure that employees know what
procedures they must follow to protect themselves.
Other Critical Information
Include the following in your procedures:
The names of the emergency scene commander, the emergency scene coordinators
and others responsible for carrying out the plan, and how to contact them during an
emergency.
The name of the person who has the authority to order a workplace evacuation
(typically, the emergency scene commander). The names and phone numbers of those who understand the emergency plan and will
inform others about it (typically the emergency scene commander and the emergency
scene coordinators).
Planning Considerations
Accounting for Employees after an Evacuation
Designate a meeting area a safe distance away from the emergency site and ensure that
employees know they must meet there after they evacuate the workplace. An emergency scene coordinator should take a “Roll-Call” to identify employees not present.
Keep in mind... You will need to determine what information or assistance employees
may need if they cannot return to the workplace after an evacuation.
Alerting Employees to an Emergency
You can use a public address system, portable radio, an alarm, an air-horn, or any other
means that you know will reach and warn all employees. Alarms must be distinctive, be
recognizable by all employees, and have a back-up power supply in case the primary
power fails.

5-6 © Safety Services Company
Keep in mind... You may need alarms that employees can hear and see.
Conducting Employee Rescues
It takes more than good intentions to save lives. Would-be rescuers can endanger
themselves and those they are trying to rescue. During most emergencies, leave rescue
work to professional responders who are appropriately trained and equipped. The
exceptions? A catastrophe, such as a severe earthquake, may delay professional
emergency responders for hours or days. Also, jobs such as handling hazardous substances or working in confined spaces could result in emergencies for which fire or
police departments are not trained.
Find out what kind of emergencies local responders are trained and equipped to respond
to. If they are unable to respond to emergencies unique to your workplace, your
employees must be trained and able to respond promptly.
Coordinating with Multi-Employer Workplaces
If you share a building or worksite with other employers, consider working with them to
develop a building-wide emergency plan. If a building-wide plan is not feasible, you should ensure that your plan does not conflict with the plans of the other employers in
the building.
Developing Quick-Response Teams
A quick-response team consists of volunteer employees trained to handle workplace incidents that require immediate action, such as medical emergencies, threatening or
violent people, and hazardous-substance releases. Consider the following in developing
quick response teams:
Types of incidents that require immediate action
Roles and responsibilities of team members Communication and response procedures for the team
Educating Employees about Emergencies and Evacuations
To protect themselves during an emergency, all employees must understand the
following elements of their emergency plan:
The roles of the emergency scene commander and coordinators.
How to respond to threats and intimidation.
The method(s) for warning employees of emergencies. The method for contacting employees’ next of kin after an emergency.
The procedure for summoning emergency responders.
The location of safe meeting areas.
How to respond to an emergency and to an order to evacuate.
Educate new employees about the emergency plan when you hire them and keep all
employees informed about any changes to the plan.
Train emergency scene coordinators in first aid and CPR, bloodborne-pathogen
protection, and how to use rescue equipment.
Schedule regular drills so that employees can practice. Include outside fire and police departments in the drills when possible. Evaluate the effectiveness of each drill and
identify activities that need strengthening. Share the results with all employees.
When a workplace emergency requires an evacuation, all employees must know to leave,
what emergency exits to take, and where to meet. Employees may also need to know
how to shut down critical equipment during an evacuation.

© Safety Services Company 5-7
Establishing Evacuation Exits
Your workplace should have a primary evacuation exit and an alternate exit. Post
diagrams that show the evacuation routes and the exits where all employees will see
them. Identify the exits and the exit routes in your plan. Be sure characteristics of
exits:
Are clearly marked, well lit, and visible under emergency conditions.
Are wide enough to accommodate employees during an evacuation. Are unobstructed and clear of debris at all times.
Are unlikely to expose employees to other hazards.
Keep in mind... An essential part of your emergency plan is an evacuation diagram – a floor plan of your building that shows evacuation exits and describes the emergency
evacuation procedure. Mark the exit routes and the “Roll-Call” assembly area on the
diagram so that they are easy to see, for example:
Exit 3 Main Office & Shop
Roll Call
X Assembly
Area
EXIT 1
(Front
Parking Lot)
Exit 2

5-8 © Safety Services Company
Exit Routes
How would you escape from your workplace in an emergency? Do you know where all
the exits are in case your first choice is too crowded? Are you sure the doors will be unlocked and that the exit access behind them will not be blocked during a fire,
explosion, or other crisis? Knowing the answers to these questions could keep you safe
during an emergency.
Workplace Exit Routes
Usually, a workplace must have at least two exit routes for prompt evacuation. But
more than two exits are required if the number of employees, size of the building, or
arrangement of the workplace will not allow a safe evacuation. Exit routes must be
located as far away as practical from each other in case one is blocked by fire or smoke.
Requirements for Exits
Exits must be separated from the workplace by fire-resistant materials – that is, a one-
hour fire-resistance rating if the exit connects three or fewer stories, and a two-hour
fire-resistance rating if the exit connects more than three floors.
Exits can have only those openings necessary to allow access to the exit from occupied
areas of the workplace or to the exit discharge. Openings must be protected by a self-
closing, approved fire door that remains closed or automatically closes in an emergency.
Keep the line-of-sight to exit signs clearly visible always.
Install “EXIT” signs using plainly legible letters.
Safety Features for Exit Routes
Keep exit routes free of explosives or highly flammable furnishings and other decorations.
Arrange exit routes so employees will not have to travel toward a high-hazard area
unless the path of travel is effectively shielded from the high-hazard area.
Ensure that exit routes are free and unobstructed by materials, equipment, locked
doors, or dead-end corridors. Provide lighting for exit routes adequate for employees with normal vision.
Keep exit route doors free of decorations or signs that obscure their visibility of exit
route doors.
Post signs along the exit access indicating the direction of travel to the nearest exit
and exit discharge if that direction is not immediately apparent.
Mark doors or passages along an exit access that could be mistaken for an exit “Not an Exit” or with a sign identifying its use (such as “Closet”).
Renew fire-retardant paints or solutions when needed.
Maintain exit routes during construction, repairs, or alterations.
Design and Construction Requirements
Exit routes must be permanent parts of the workplace.
Exit discharges must lead directly outside or to a street, walkway, refuge area, public
way, or open space with access to the outside. Exit discharge areas must be large enough to accommodate people likely to use the
exit route.
Exit route doors must unlock from the inside. They must be free of devices or alarms
that could restrict use of the exit route if the device or alarm fails.
Exit routes can be connected to rooms only by side-hinged doors, which must swing out in the direction of travel if the room may be occupied by more than 50 people.
Exit routes must support the maximum permitted occupant load for each floor
served, and the capacity of an exit route may not decrease in the direction of exit
route travel to the exit discharge.
Exit routes must have ceilings at least 7 ft., 6 in. high.

© Safety Services Company 5-9
An exit access must be at least 28 inches wide at all points. Objects that project into
the exit must not reduce its width.
Providing Medical Assistance and First Aid
Is there a nearby emergency clinic or hospital that will admit victims of emergencies
from your workplace? If not, make sure that emergency scene coordinators have
appropriate first-aid training and supplies. The American Red Cross, insurance companies, and fire departments usually offer such training.
Recording Critical Employee Information
After a medical emergency, an employee may be unable to contact next of kin or other
relatives. You should have access to employees’ home telephone numbers, the names and telephone numbers of family members they want you to contact, physician names
and phone numbers, and information employees give you about their medical conditions
or medications. Many employers keep this information with employees’ permanent
employment records and update it yearly.
Reporting Fire and Other Emergencies
Your emergency plan must have a procedure for reporting fires and other emergencies to
professional responders. Report all fires by calling 911. Fires are generally not reported
to fire departments by fire alarms; most fire alarms warn only building occupants.
Keep in mind... The emergency scene commander should stay in a safe location to relay
relevant information to professional emergency responders.
Selecting and Using Personal Protective Equipment
Personal protective equipment includes clothing and equipment that protects emergency
responders against specific hazards. Examples include work gloves, goggles, hard hats,
and respirators.
Properly used, personal protective equipment offers protection against a hazard but does not eliminate the hazard. If it fails or is not appropriate for a particular task, the user
risks exposure. Appropriate, effective protection depends on selecting, wearing, and
using the equipment properly – which can be challenging. The following steps highlight
the procedures for selecting personal protective equipment:
Identify emergency-related hazards for which personal protective equipment may be necessary; for example, those responding to medical emergencies need protection
from bloodborne pathogens.
Determine which personal protective equipment will protect users from the hazards;
for example, latex gloves and face shields may be necessary to protect responders
from bloodborne pathogens. Determine who will use the equipment; it is critical that the equipment fit the user
and not cause allergic reactions or other health problems.
Determine the conditions under which responders will use the equipment; the
equipment must not fail under those conditions.
Ensure that emergency responders know how to use the equipment. Whether they
are wearing hard hats or atmosphere-supplying respirators, responders must know how the equipment will protect them and when it will not protect them. Responders
must know how to wear, use, and maintain the equipment, and how to discard
contaminated equipment.
Types of Emergencies
This section highlights emergencies that could affect workplaces and summarizes what to
do when responding to them. Consider factors such as workplace size and location,
number of employees, and the nature of their work in determining how to respond.

5-10 © Safety Services Company
Earthquake
During an earthquake, people in most workplaces are at greatest risk from collapsing
ceilings, windows, light fixtures, and other falling objects. If you are indoors, the safest
response is to take cover under sturdy furniture or to brace yourself against an inside
wall. Stay away from windows, skylights, bookcases, and other heavy objects. Protect
your head and neck.
What to do:
If indoors, stay there. Take cover under sturdy furniture or against inside walls.
Do not use elevators.
Stay away from windows, skylights, and other objects that could fall. Use stairways to leave the workplace if the order is given to evacuate.
Be ready to rescue victims; professional responders may not be able to respond;
remove victims to a triage area if possible.
Explosion
Any workplace that handles, stores, or processes flammable gasses, liquids, and solids is
vulnerable. Explosions offer no warnings, causing disorganization and panic.
What to do:
Try to establish communication with emergency scene coordinators.
Assess damage to the workplace and estimate human casualties.
Administer first aid if it is safe to do so.
Do not use elevators. Evacuate following an established procedure.
Fire
Invite a local fire department representative to your workplace to help you identify fire
hazards and to discuss how your workplace should respond to a fire. It is the byproducts
of fire – smoke and fire gasses – that kill. A quick, orderly evacuation is the most
effective response to an out-of-control fire.
What to do:
Pull the fire alarm (or set off the predetermined signal).
Call 911; tell the dispatcher the location and the nature of the emergency.
Inform an emergency scene coordinator. Do not use elevators.
Permit only trained responders to use fire extinguishers.
Keep in mind... If you permit emergency scene coordinators or other employees to use
fire extinguishers, train them or ensure that they are properly trained in their use.
Hazardous-Substance Release
Hazardous substances include solvents, pesticides, paints, petroleum products, and
heavy metals – any substance hazardous to health. Even if your workplace does not use hazardous substances, could it be affected by a nearby release or an accident on a local
freeway? If so, make sure your emergency plan describes how the scene commander
and coordinators will respond and notify fire and police departments.
What to do:
Inform the emergency scene commander.
Evacuate the area surrounding the release.
Call 911; tell the dispatcher the location and the nature of the emergency.
If your workplace uses hazardous chemicals, OSHA’s hazard communication rule requires
you to inventory them, keep the manufacturer-supplied material safety data sheets,
label the chemical containers, and train employees to protect themselves from the
chemicals’ hazards.
© Safety Services Company 5-11
If your workplace is involved in hazardous-waste operations or responds to emergencies
involving hazardous substances, you must have a written plan that describes how you
will respond to hazardous-substance emergencies.
If employees must wear personal protective equipment during an emergency – chemical
suits, gloves, hoods, boots, or respirators, for example – make sure that equipment will
be available when they need it, that it fits them, and that they know how to use it.
Medical
The most likely workplace emergency is a medical emergency. A serious medical
emergency such as cardiac arrest requires immediate attention – response time is
critical. It is essential that medical first responders know how to perform first aid/CPR.
What to do:
Call 911. Tell the dispatcher the location and the nature of the emergency.
Do not move the victim.
Notify an emergency scene coordinator for CPR or other first-aid tasks.
Inform the emergency scene commander. Assist professional medical responders when they arrive.
Inform the victim’s supervisor.
Consider purchasing an automatic external defibrillator (AED) to treat victims in cardiac
arrest. Until recently, AEDs were used primarily in hospitals and ambulances. Now they are portable, more affordable, and can be used by just about anyone after a short
training session.
Weather-Related Event
Hurricanes, tornadoes, blizzards, and floods are likely to be the cause of weather-related workplace emergencies. Many communities experience floods following warm spring
rain. Winter storms often bring strong winds, freezing rain, and snow that can cause
structural damage and power outages.
What to do:
Wait for instructions from the emergency scene commander; a power failure will
slow communication.
Tune a battery-powered radio to a station that broadcasts local news.
Do not evacuate the workplace unless ordered to do so.
Threats of Violence
Threats of violence may be delivered in any form: face-to-face, by fax, e-mail, phone, or in writing. Threats can be directed toward the workplace or toward a specific person.
Police departments, mental health professionals, and employee-assistance program
counselors offer prevention information, security inspections, and employee training that
help reduce the risk of workplace violence.
What to do:
Inform an emergency scene coordinator.
Activate a silent alarm if your workplace has one. Isolate the threatening person if it is possible to do so safely.
Inform the emergency scene commander.

5-12 © Safety Services Company
Bomb Threats
Take threats seriously. Do not use fire alarms or phones in the building – they generate
radio waves that could trigger a bomb. If someone finds a package that may contain or
that may be a bomb, he or she should note its size, shape, and whether it emits a
sound, then notify the emergency scene commander. Call 911 from outside the building
to report the emergency and determine if an evacuation is necessary. Use a
communication method that does not generate radio waves to order the evacuation.
Consider offering threat-management training to one or more emergency scene
coordinators and creating a threat quick-response team.
Terrorism
Although terrorist acts pose minimal risks to most workplaces, the devastating effects of
recent acts have changed the perception of a “secure workplace” and added a new
dimension to emergency planning. What distinguishes terrorist acts is the use of threats
and violence to intimidate or coerce. Factors to consider in emergency planning include
the following:
How do others perceive the mission of your organization in the following
contexts?
Political activities
Business activities
Economic activities
Social responsibilities
How vulnerable are your critical resources from terrorist attack?
Production machinery and equipment Mail and HVAC systems
Electronic communication, power, data, and systems hardware
Real estate and other physical property
Finance and administrative transactions
Employees at the workplace or at other locations
Do You Need an Emergency Plan?
Keep in mind... If your workplace has more than 10 employees, the plan must be in
writing. If your workplace has 10 or fewer employees, the plan does not have to be written; however, you must ensure that employees know what procedures they must
follow to protect themselves in an emergency.

© Safety Services Company 5-13
OSHA Fire Protection and Means of Egress Standards
FIRE PREVENTION PLAN
(1) Development of a Fire Prevention Plan
(a) When another OSHA standard requires an employer to develop a fire prevention
plan, the plan must comply with this section and cover each part of the workplace.
(b) The plan must be in writing, in the work area and available to employees on request;
except that an employer with 10 or fewer employees in a workplace may use a verbal
plan.
(2) Minimum Elements of a Fire Prevention Plan – A fire prevention plan must
include:
(a) a list of all major fire hazards, including proper handling and storage procedures for
hazardous materials, potential ignition sources and their control, and the type of fire
protection equipment necessary to control each major hazard;
(b) Procedures to control accumulations of flammable and combustible waste materials;
(c) Procedures for regular maintenance of safeguards on heat producing equipment to
prevent accidental ignition of combustible materials;
(d) Names or job titles of employees responsible for maintaining equipment to prevent
or control sources of ignition or fires; and,
(e) Names or job titles of those responsible for control of fuel source hazards.
(3) Employee Information – The employer must:
(a) Inform employees of the fire hazards in their work area; and
(b) Review with each employee, when first assigned to a job, those parts of the fire prevention plan necessary for self-protection.
EMERGENCY ACTION PLAN
(1) Development of an Emergency Action Plan
(a) When another OSHA standard requires an employer to develop an emergency action
plan, the plan must comply with this section and cover each part of the workplace.
(b) The plan must be in writing, in the work area and available to employees on request,
except that an employer with 10 or fewer employees in a workplace may use a verbal plan.
(2) Minimum Elements of an Emergency Action Plan – An emergency action
plan must include:
(a) Procedures for emergency evacuation, including type of evacuation and exit route assignments;
(b) Procedures to account for all employees after evacuation;
(c) Procedures for reporting a fire or other emergency;
(d) Procedures to follow for emergency operation or shut down of critical equipment
before evacuation;
(e) Procedures to follow for rescue and medical duties; and,
(f) Names or job titles of employees to contact for more information about the duties of
employees under the plan.
(3) Employee Alarm System – There must be a properly working employee alarm
system. The alarm system must use a distinctive signal for each purpose and comply with 29 CFR 1910.165.

5-14 © Safety Services Company
(4) Training – An employer must designate employees to assist in the safe emergency
evacuation of other employees. These designated employees must receive training in
emergency evacuation procedures.
(5) Employee Review – An employer must review the emergency action plan with each
employee covered by it:
(a) When the plan is new or the employee is new to the job;
(b) When the employee's responsibilities under the plan change; and,
(c) When the plan changes.
EXITS AND EXIT ROUTES
(1) Application – This subpart does not apply to mobile workplaces, such as vehicles or vessels.
(2) Definitions
(a) Exit. The part of the exit route that is a way out of the workplace (Like a door,
stairwell or vestibule).
(b) Exit Route. A continuous, unobstructed path from anywhere in a work area to the
exit.
(3) General
(a) There must be permanent, unobstructed exit routes to get out of work areas safely
during emergencies.
(b) There must be two or more exit routes depending on the size and layout of the work
area and the number of people involved. A single exit route is acceptable only if all
workers can get out through it safely during an emergency. Locate multiple exit routes
apart from each other.
(4) Design
(a) An exit must have enough openings to permit access to, or exit from, occupied
areas. An interior opening into an exit must have a self-closing fire door that remains closed. Each fire door, its frame, and its hardware must be listed or approved by a
nationally recognized testing laboratory.
Note to paragraph (a): 29 CFR 1910.155(c)(3)(iv)(A) defines "listed,” 29 CFR 1910.7
defines a "nationally recognized testing laboratory,” and 29 CFR 1910.155 (c)(3) defines
"approved."
(b) Walls or partitions that separate an exit from other areas must have at least a 1-hour
fire resistance rating if the exit connects three stories or less. Materials that separate an
exit must have at least a 2-hour fire resistance rating if the exit connects four stories or
more.
(c) Exits must open from the inside without keys, tools or special knowledge. Devices
that lock only from the outside are acceptable. There must be nothing on an exit door that could hinder its use during an emergency.
Note: You may lock or block an exit door from the inside in a mental, penal, or
correctional institution, if supervisory personnel are continuously on duty and a plan
exists to remove occupants during an emergency.
(d) An exit must lead directly outside or to a street, walkway, refuge area, or to an open space with access to the outside.
(e) Exit stairs that continue beyond the floor of exit discharge must have doors,
partitions, or other effective means at the floor of exit discharge to assure that the
direction of exit travel is clear to employees.

© Safety Services Company 5-15
(f) Use only a side-hinged exit door to connect any room to an exit route. The door
must swing out if the room can hold more than 50 persons or has highly flammable or
explosive materials in it.
(g) Each exit route must be able to handle the maximum-permitted occupant load for
each floor served by it. The capacity of a path to the exit must not decrease as people
move toward the exit.
(h) The exit route must be at least 6 feet, 8 inches high at all points.
(i) An exit route must be at least 28 inches wide at all points between handrails and wider if needed to handle the occupant load.
(j) Objects that project into the exit route must not reduce the minimum height and
width of the exit route.
(k) Repair or replace damaged or altered fire retardant coatings to keep their original
retardant effectiveness.
(5) Access
(a) There must be unobstructed access to exit routes.
(b) Exit routes must not pass through or into lockable rooms or dead ends.
(c) Exit routes must be mostly level or have stairs or ramps.
(6) Outside and Refuge Areas
(a) The street, walkway, refuge area, or open space to which an exit leads must be large
enough to accommodate all building occupants likely to use that exit.
(b) A refuge area must be:
(A) A space along an exit route protected from the effects of fire either by separation
from other spaces within the building or by its location; or
(B) A floor with at least two spaces separated by smoke-resistant partitions, in a building
where each floor is protected by an automatic sprinkler system. Automatic sprinkler
systems must comply with 29 CFR 1910.159.
(7) Outside Exit Routes
(a) Outdoor exit routes must meet the requirements for indoor exit routes and these
additional requirements:
(A) The exit route must have guardrails to protect unenclosed sides elevated above a lower surface;
(B) There must be a cover if accumulation of snow or ice is likely;
(C) The exit route must be reasonably straight, smooth, solid, level; and
(D) The exit route must have no dead ends longer than 20 feet.
(8) Condition of Exit Routes and Exits
(a) Exit routes must minimize danger to employees during emergencies.
(b) Exit routes must be free of highly flammable furnishings and decorations.
(c) An exit route must not require employees to travel toward materials that burn very quickly, emit poisonous fumes, or are explosive, unless those materials are effectively
shielded from the exit route.
(d) Exit routes must have adequate lighting.
(e) Each exit must be clearly visible and must have a distinctive sign reading "Exit."
Install additional directional signs to exits where necessary.

5-16 © Safety Services Company
(f) Exit doors must have no signs or decorations that obscure their visibility.
(g) The line-of-sight to an exit sign must be clear.
(h) If workers could mistake a “non-exit” for an exit, mark the non-exit, “Not an Exit” or mark it to indicate its real use.
(i) There must be enough reliable light on or from exit signs to allow them to be effective
during emergencies.
(j) All safeguards to protect employees during an emergency (e.g., sprinkler systems,
alarm systems, fire doors, exit lighting) must work properly.
(9) Exits during Construction and Repair
(a) Employees must not occupy an area under construction until an adequate number of
exit routes that comply with these rules are available.
(b) Employees must not occupy an area during repair or alteration unless all exits and existing fire protection remain as effective as before the work. Alternate fire protection
must provide an equivalent level of safety.
(c) Flammable or explosive materials used during construction or repair must not expose
employees to hazards not otherwise present or impede emergency escape.
(10) Alarm System – There must be an operable employee alarm system with a distinctive signal to warn employees of fire or other emergencies, unless employees can
see or smell a fire or other hazard so that it would provide adequate warning to them.
The employee alarm system must comply with the requirements of 29 CFR 1910.165.
(11) Special Circumstances - Counterweights and Cold Storage Facilities
(a) There must be an enclosure or guard around counterweights that are near enough to
passageways or work areas to cause a hazard. The guard or enclosure need only be sufficient to protect workers from contact with the counterweight when it moves.
(b) The doors on walk-in refrigerators, coolers and freezers must have latches or closer
devices that open from the inside without a key or special knowledge or effort.

© Safety Services Company 5-17
PORTABLE FIRE SUPPRESSION EQUIPMENT
§1910.157 PORTABLE FIRE EXTINGUISHERS
(a) Scope and Application – The requirements of this section apply to the placement,
use, maintenance, and testing of portable fire extinguishers provided for the use of
employees. Paragraph (d) of this section does not apply to extinguishers provided for employee use on the outside of workplace buildings or structures. Where extinguishers
are provided but are not intended for employee use and the employer has an emergency
action plan and a fire prevention plan which meet the requirements of §1910.38, then
only requirements of paragraphs (e) and (f) of this section apply.
(b) Exemptions
(1) Where the employer has established and implemented a written fire safety policy
which requires the immediate and total evacuation of employees from the workplace
upon the sounding of a fire alarm signal and which includes an emergency action plan
and a fire prevention plan which meet the requirements of §1910.38, and when extinguishers are not available in the workplace, the employer is exempt from all
requirements of this section unless a specific standard in Part 1910 requires that a
portable fire extinguisher be provided.
(2) Where the employer has an emergency action plan meeting the requirements of
§1910.38 which designates certain employees to be the only employees authorized to use the available portable fire extinguishers, and which requires all other employees in
the fire area to immediately evacuate the affected work area upon the sounding of the
fire alarm, the employer is exempt from the distribution requirements in paragraph (d)
of this section.
(c) General Requirements
(1) The employer will provide portable fire extinguishers and will mount, locate and
identify them so that they are readily accessible to employees without subjecting the
employees to possible injury.
(2) Only approved portable fire extinguishers will be used to meet these requirements.
(3) The employer will not provide or make available in the workplace portable fire
extinguishers using carbon tetrachloride or chlorobromomethane extinguishing agents.
(4) The employer will assure that portable fire extinguishers are maintained in a fully
charged and operable condition and kept in their designated places at all times except
during use.
(5) The employer will remove from service all soldered or riveted shell self-generating
soda acid or self-generating foam or gas cartridge water type portable fire extinguishers
which are operated by inverting the extinguisher to rupture the cartridge or to initiate an
uncontrollable pressure generating chemical reaction to expel the agent.
(d) Selection and Distribution
(1) Portable fire extinguishers will be provided for employee use and selected and
distributed based on the classes of anticipated workplace fires and on the size and
degree of hazard which would affect their use.
(2) The employer will distribute portable fire extinguishers for use by employees on Class A fires so that the travel distance for employees to any extinguisher is 75 feet (22.9 m)
or less.
(3) The employer may use uniformly spaced standpipe systems or hose stations
connected to a sprinkler system installed for emergency use by employees instead of
Class A portable fire extinguishers, provided that such systems meet the respective requirements of §1910.158 or §1910.159, that they provide total coverage of the area to
be protected, and that employees are trained at least annually in their use.

5-18 © Safety Services Company
(4) The employer will distribute portable fire extinguishers for use by employees on Class
B fires so that the travel distance from the Class B hazard area to any extinguisher is 50
feet (15.2 m) or less.
(5) The employer will distribute portable fire extinguishers used for Class C hazards on
the basis of the appropriate pattern for the existing Class A or Class B hazards.
(6) The employer will distribute portable fire extinguishers or other containers of Class D
extinguishing agent for use by employees so that the travel distance from the
combustible metal working area to any extinguishing agent is 75 feet (22.9 m) or less. Portable fire extinguishers for Class D hazards are required in those combustible metal
working areas where combustible metal powders, flakes, shavings, or similarly sized
products are generated at least once every two weeks.
(e) Inspection, Maintenance and Testing
(1) The employer will be responsible for the inspection, maintenance and testing of all
portable fire extinguishers in the workplace.
(2) Portable extinguishers or hose used in lieu thereof under paragraph (d)(3) of this
section will be visually inspected monthly.
(3) The employer will assure that portable fire extinguishers are subjected to an annual maintenance check. Stored pressure extinguishers do not require an internal
examination. The employer will record the annual maintenance date and retain this
record for one year after the last entry or the life of the shell, whichever is less. The
record will be available to the Assistant Secretary upon request.
(4) The employer will assure that stored pressure dry chemical extinguishers that require
a 12-year hydrostatic test are emptied and subjected to applicable maintenance procedures every 6 years. Dry chemical extinguishers having non-refillable disposable
containers are exempt from this requirement. When recharging or hydrostatic testing is
performed, the 6-year requirement begins from that date.
(5) The employer will assure that alternate equivalent protection is provided when
portable fire extinguishers are removed from service for maintenance and recharging.
(f) Hydrostatic Testing
(1) The employer will assure that hydrostatic testing is performed by trained persons
with suitable testing equipment and facilities.
(2) The employer will assure that portable extinguishers are hydrostatically tested at the
intervals listed in Table L-1 on page 23 of this section, except under any of the following
conditions:
(i) When the unit has been repaired by soldering, welding, brazing, or use of patching
compounds;
(ii) When the cylinder or shell threads are damaged;
(iii) When there is corrosion that has caused pitting, including corrosion under removable
name plate assemblies;
(iv) When the extinguisher has been burned in a fire; or
(v) When a calcium chloride extinguishing agent has been used in a stainless steel shell.
(3) In addition to an external visual examination, the employer will assure that an internal examination of cylinders and shells to be tested is made prior to the hydrostatic
tests.
(4) The employer will assure that portable fire extinguishers are hydrostatically tested
whenever they show new evidence of corrosion or mechanical injury, except under the
conditions listed in paragraphs (f)(2)(i)-(v) of this section.
(5) The employer will assure that hydrostatic tests are performed on extinguisher hose
assemblies which are equipped with a shut-off nozzle at the discharge end of the hose.

© Safety Services Company 5-19
The test interval will be the same as specified for the extinguisher on which the hose is
installed.
(6) The employer will assure that carbon dioxide hose assemblies with a shut-off nozzle are hydrostatically tested at 1,250 psi (8,620 kPa).
(7) The employer will assure that dry chemical and dry powder hose assemblies with a
shut-off nozzle are hydrostatically tested at 300 psi (2,070 kPa).
(8) Hose assemblies passing a hydrostatic test do not require any type of recording or
stamping.
(9) The employer will assure that hose assemblies for carbon dioxide extinguishers that
require a hydrostatic test are tested within a protective cage device.
(10) The employer will assure that carbon dioxide extinguishers and nitrogen or carbon
dioxide cylinders used with wheeled extinguishers are tested every 5 years at 5/3 of the
service pressure as stamped into the cylinder. Nitrogen cylinders which comply with 49
CFR 173.34(e)(15) may be hydrostatically tested every 10 years.
(11) The employer will assure that all stored pressure and Halon 1211 types of
extinguishers are hydrostatically tested at the factory test pressure not to exceed two
times the service pressure.
(12) The employer will assure that acceptable self-generating type soda acid and foam
extinguishers are tested at 350 psi (2,410 kPa).
(13) Air or gas pressure may not be used for hydrostatic testing.
(14) Extinguisher shells, cylinders, or cartridges which fail a hydrostatic pressure test, or
which are not fit for testing will be removed from service and from the workplace.
(15) (i) The equipment for testing compressed gas type cylinders will be of the water
jacket type. The equipment will be provided with an expansion indicator which operates with an accuracy within one percent of the total expansion or .1 cc (.1 ml) of liquid.
(ii) The equipment for testing non-compressed gas type cylinders will consist of the
following:
(A) A hydrostatic test pump, hand or power operated, capable of producing not less than
150 percent of the test pressure, which will include appropriate check valves and fittings;
(B) A flexible connection for attachment to fittings to test through the extinguisher nozzle, test bonnet, or hose outlet, as is applicable; and
(C) A protective cage or barrier for personal protection of the tester, designed to provide
visual observation of the extinguisher under test.
(16) The employer will maintain and provide upon request to the Assistant Secretary
evidence that the required hydrostatic testing of fire extinguishers has been performed at the time intervals shown in Table L-1.
Such evidence will be in the form of a certification record which includes the date of the
test, the signature of the person who performed the test and the serial number, or other
identifier, of the fire extinguisher that was tested. Such records will be kept until the
extinguisher is hydrostatically retested at the time interval specified in Table L-1 or until the extinguisher is taken out of service, whichever comes first.
(g) Training and Education
(1) Where the employer has provided portable fire extinguishers for employee use in the
workplace, the employer will also provide an educational program to familiarize employees with the general principles of fire extinguisher use and the hazards involved
with incipient stage fire fighting.
(2) The employer will provide the education required in paragraph (g)(1) of this section
upon initial employment and at least annually thereafter.

5-20 © Safety Services Company
(3) The employer will provide employees who have been designated to use firefighting
equipment as part of an emergency action plan with training in the use of the
appropriate equipment.
(4) The employer will provide the training required in paragraph (g)(3) of this section
upon initial assignment to the designated group of employees and at least annually
thereafter.
Appendices to §1910.157 – PORTABLE FIRE EXTINGUISHERS
1. Scope and Application – The scope and application of this section is written to apply
to three basic types of workplaces.
First, there are those workplaces where the employer has chosen to evacuate all
employees from the workplace at the time of a fire emergency.
Second, there are those workplaces where the employer has chosen to permit certain employees to fight fires and to evacuate all other non-essential employees at the time of
a fire emergency.
Third, there are those workplaces where the employer has chosen to permit all
employees in the workplace to use portable fire extinguishers to fight fires.
The section also addresses two kinds of work areas. The entire workplace can be divided into outside (exterior) work areas and inside (interior) work areas. This division of the
workplace into two areas is done in recognition of the different types of hazards
employees may be exposed to during fire fighting operations.
Fires in interior work-places pose a greater hazard to employees; they can produce
greater exposure to quantities of smoke, toxic gases, and heat because of the capability
of a building or structure to contain or entrap these products of combustion until the building can be ventilated.
Exterior work areas, normally open to the environment, are somewhat less hazardous,
because the products of combustion are generally carried away by the thermal column of
the fire. Employees also have a greater selection of evacuation routes if it is necessary
to abandon firefighting efforts. In recognition of the degree of hazard present in the two types of work areas, the standards for exterior work areas are somewhat less restrictive
in regards to extinguisher distribution. Paragraph (a) explains this by specifying which
paragraphs in the section apply.
2. Portable Fire Extinguisher Exemptions – In recognition of the three options given
to employers in regard to the amount of employee evacuation to be carried out, the standards permit certain exemptions based on the number of employees expected to use
fire extinguishers.
Where the employer has chosen to totally evacuate the workplace at the time of a fire
emergency and when fire extinguishers are not provided, the requirements of this
section do not apply to that workplace.
Where the employer has chosen to partially evacuate the workplace or the affected area
at the time of a fire emergency and has permitted certain designated employees to
remain behind to operate critical plant operations or to fight fires with extinguishers,
then the employer is exempt from the distribution requirements of this section.
Employees who will be remaining behind to perform incipient fire fighting or members of
a fire brigade must be trained in their duties. The training must result in the employees becoming familiar with the locations of fire extinguishers. Therefore, the employer must
locate the extinguishers in convenient locations where the employees know they can be
found. For example, they could be mounted in the fire truck or cart that the fire brigade
uses when it responds to a fire emergency.

© Safety Services Company 5-21
They can also be distributed as set forth in the National Fire Protection Association's
Standard No. 10, “Portable Fire Extinguishers.” When the employer has decided to
permit all employees in the workforce to use fire extinguishers, then the entire OSHA section applies.
3. Portable Fire Extinguisher Mounting – Previous standards for mounting fire
extinguishers have been criticized for requiring specific mounting locations. In
recognition of this criticism, the standard has been rewritten to permit as much flexibility
in extinguisher mounting as is acceptable to assure that fire extinguishers are available when needed and that employees are not subjected to injury hazards when they try to
obtain an extinguisher.
It is the intent of OSHA to permit the mounting of extinguishers in any location that is
accessible to employees without the use of portable devices such as a ladder. This
limitation is necessary because portable devices can be moved or taken from the place
where they are needed and, therefore, might not be available at the time of an emergency.
Employers are given as much flexibility as possible to assure that employees can obtain
extinguishers as fast as possible. For example, an acceptable method of mounting
extinguishers in areas where fork lift trucks or tow-motors are used is to mount the units
on retractable boards which, by means of counter-weighting, can be raised above the level where they could be struck by vehicular traffic. When needed, they can be lowered
quickly for use. This method of mounting can also reduce vandalism and unauthorized
use of extinguishers.
The extinguishers may also be mounted as outlined in the National Fire Protection
Association's Standard No. 10, “Portable Fire Extinguishers.”
4. Selection and Distribution – The employer is responsible for the proper selection
and distribution of fire extinguishers and the determination of the necessary degree of
protection. The selection and distribution of fire extinguishers must reflect the type
and class of fire hazards associated with a particular workplace.
Extinguishers for protecting Class A hazards – may be selected from the following types:
water, foam, loaded stream, or multipurpose dry chemical.
Extinguishers for protecting Class B hazards – may be selected from the following types:
Halon 1301, Halon 1211, carbon dioxide, dry chemicals, foam, or loaded stream.
Extinguishers for Class C hazards – may be selected from the following types: Halon
1301, Halon 1211, carbon dioxide, or dry chemical.
Combustible metal (Class D hazards) – fires pose a different type of fire problem in the workplace.
Extinguishers using water, gas, or certain dry chemicals cannot extinguish or control this
type of fire. Therefore, certain metals have specific dry powder extinguishing agents
which can extinguish or control this type of fire. Those agents which have been
specifically approved for use on certain metal fires provide the best protection; however, there are also some “universal” type agents which can be used effectively on a variety of
combustible metal fires if necessary.
The “universal” type agents include: Foundry flux, Lith-X powder, TMB liquid, pyromet
powder, TEC powder, dry talc, dry graphite powder, dry sand, dry sodium chloride, dry
soda ash, lithium chloride, zirconium silicate, and dry dolomite.
Water is not generally accepted as an effective extinguishing agent for metal fires. When
applied to hot burning metal, water will break down into its basic atoms of oxygen and
hydrogen. This chemical breakdown contributes to the combustion of the metal.
However, water is also a good universal coolant and can be used on some combustible
metals, but only under proper conditions and application, to reduce the temperature of
the burning metal below the ignition point. For example, automatic deluge systems in
5-22 © Safety Services Company
magnesium plants can discharge such large quantities of water on burning magnesium
that the fire will be extinguished.
The National Fire Protection Association has specific standards for this type of automatic sprinkler system. Further information on the control of metal fires with water can be
found in the National Fire Protection Association's Fire Protection Handbook. An
excellent source of selection and distribution criteria is found in the National Fire
Protection Association's Standard No. 10. Other sources of information include the
National Safety Council and the employer's fire insurance carrier.
5. Substitution of Standpipe Systems for Portable Fire Extinguishers – The
employer is permitted to substitute acceptable standpipe systems for portable fire
extinguishers under certain circumstances. It is necessary to assure that any
substitution will provide the same coverage that portable units provide. This means that
fire hoses, because of their limited portability, must be spaced throughout the protected
area so that they can reach around obstructions such as columns, machinery, etc. and so that they can reach into closets and other enclosed areas.
6. Inspection, Maintenance and Testing – The ultimate responsibility for the
inspection, maintenance and testing of portable fire extinguishers lies with the employer.
The actual inspection, maintenance, and testing may, however, be conducted by outside
contractors with whom the employer has arranged to do the work. When contracting for such work, the employer should assure that the contractor is capable of performing the
work that is needed to comply with this standard.
If the employer should elect to perform the inspection, maintenance, and testing
requirements of this section in-house, then the employer must make sure that those
persons doing the work have been appropriately trained and to recognize problem areas which could cause an extinguisher to fail.
The employer may also check with the manufacturer of the unit that has been purchased
and obtain guidelines on inspection, maintenance, and testing. Hydrostatic testing is a
process that should be left to contractors or individuals using suitable facilities and
having the necessary training.
Anytime the employer has removed an extinguisher from service to be checked or repaired, alternate equivalent protection must be provided. Alternate equivalent
protection could include replacing the extinguisher with one or more units having
equivalent or equal ratings, posting a fire watch, restricting the unprotected area from
employee exposure, or providing a hose system ready to operate.
7. Hydrostatic Testing – As stated before, the employer may contract for hydrostatic testing. However, if the employer wishes to provide the testing service, certain
equipment and facilities must be available. Employees should be made aware of the
hazards associated with hydrostatic testing and the importance of using proper guards
and water pressures.
Severe injury can result if extinguisher shells fail violently under hydrostatic pressure. Employers are encouraged to use contractors who can perform adequate and reliable
service. Firms which have been certified by the Materials Transportation Board (MTB) of
the U.S. Department of Transportation (DOT) or State licensed extinguisher servicing
firms or recognized by the National Association of Fire Equipment Distributors in Chicago,
Illinois, are generally acceptable for performing this service.
8. Training and education. This part of the standard is of the utmost importance to
employers and employees if the risk of injury or death due to extinguisher use is to be
reduced.

© Safety Services Company 5-23
If an employer is going to permit an employee to fight a workplace fire of any size, the
employer must make sure that the employee knows everything necessary to assure the
employee's safety. Training and education can be obtained through many channels. Often, local fire departments in larger cities have fire prevention bureaus or similar
organizations which can provide basic fire prevention training programs. Fire insurance
companies will have data and information available. The National Fire Protection
Association and the National Safety Council will provide, at a small cost, publications that
can be used in a fire prevention program.
Actual fire fighting training can be obtained from various sources in the country. Some
manufacturers of extinguishers conduct fire schools for customers in the proper use of
extinguishers.
In meeting the requirements of this section, the employer may also provide educational
materials, without classroom instruction, through the use of employee notice campaigns
using instruction sheets or flyers or similar types of informal programs. The employer must make sure that employees are trained and educated to recognize not only what
type of fire is being fought and how to fight it, but also when it is time to get away from
it and leave fire suppression to more experienced fire fighters.
Table L-1
Type of extinguishers Test interval (years)
Soda acid (soldered brass shells) (until 1/1/82) 1
Soda acid (stainless steel shell) 5
Cartridge operated water and/or antifreeze 5
Stored pressure water and/or antifreeze 5
Wetting agent 5
Foam (soldered brass shells) (until 1/1/82) 1
Foam (stainless steel shell) 5
Aqueous Film Forming Foam (AFFF) 5
Loaded stream 5
Dry chemical with stainless steel 5
Carbon Dioxide 5
Dry chemical, stored pressure, with mild steel,
brazed brass or aluminum shells 12
Dry chemical, cartridge or cylinder operated,
with mild steel shells 12
Halon 1211 12
Halon 1301 12
Dry powder, cartridge or cylinder operated with
mild steel shells 12

5-24 © Safety Services Company
A Rule-by-Rule Summary
The following rules include OSHA’s requirements for planning and responding to
workplace emergencies.
Rule What It Covers Exits and Exit Routes Requirements for exits that employees use during an emergency.
Employee Action Plan
All emergency action plans required by other OSHA rules. Requires a written plan for workplaces that have more than 10 employees; covers the written requirements, requirements for alarms, evacuations, and
training.
Fire Prevention Plan
All fire prevention plans required by OSHA rules. Requires a written plan for workplaces that have more than 10 employees; covers the written requirements, requirements for housekeeping, training, and preventive maintenance.
Fire Brigades Organizational, training, and personal protective equipment requirements
for fire brigades established by an employer.
Portable Fire Suppression Equipment
Requirements for placing, using, maintaining, and testing portable fire extinguishers for employee use. Requirements for standpipe and hose systems.
Fixed Fire Suppression Equipment
Requirements for automatic sprinkler systems.
Requirements for fixed extinguishing systems Requirements for dry chemical fixed extinguishing systems. Requirements for gaseous agent fixed extinguishing systems. Requirements for water, spray, and foam fixed extinguishing systems.
Other Fire Protective
Systems
Requirements for fire detectors and fire detection systems.
Requirements for employee alarm systems.
Process Safety Management
Requirements for controlling the of highly hazardous chemicals release of toxic, reactive, flammable, or explosive chemicals. Requires an emergency plan.
Hazardous Waste
Operations and Emergency Response.
Requires an emergency plan for employers engaged in cleanup
operations, operations at TSD facilities, and employers who respond to releases of hazardous substances.
Personal Protective
Equipment
Requirements for eye and face protection
Requirements for respiratory protection Requirements for head protection
Requirements for foot protection Requirements for hand protection
Permit-Required Confined Spaces
Requirements for entry procedures, rescue and emergency services.
Toxic and Hazardous Substances
(This section includes an extensive list chemicals)
Requirements for controlling employee exposure to hazardous substances.
Requires an emergency plan, including appropriate personal protective equipment, for airborne releases. Training requirements on the appropriate actions employees must take if they may be involved in emergencies involving blood or other potentially
infectious materials
Hazard Communication Requirements for protecting employees who may be exposed to hazardous chemicals, including information on container warning labels, material safety data sheets, and training.
Medical Services & First
Aid Requirements for workplace first aid and emergency medical services.
Where to Find More Information
Emergency management guide for business and industry; Federal Emergency
Management Agency (FEMA), www.fema.gov/library/bizindex.htm
How to Plan for Workplace Emergencies and Evacuations; U.S. Department of Labor
Occupational Safety and Health Administration, www.osha.gov
NOTE: In the “Attachments” Chapter of this Injury & Illness Prevention Manual you will
find a master copy of the following form for Company use:
Emergency Action Plan

© Safety Services Company 6-1
Chapter 6
Medical Services & First Aid
§1926.50 - Medical Services & First Aid
Medical Services & First Aid
A R M Environmental Services, Inc. is committed to the safety and health of our
employees and ensures the ready availability of medical personnel for advice and
consultation on matters of workplace health.
In the absence of an infirmary, clinic, or hospital in near proximity to the workplace
which is used for the treatment of all injured employees, a person or persons will be
adequately trained to render first aid. Adequate first aid supplies will be adequately
stocked and readily available to all employees.
First aid kits are located in/at: In the vehicles and the office.
Policy Statement
It is the policy of A R M Environmental Services, Inc. that training in first aid response is
not a general requirement for employment, but that local emergency medical services
are utilized for primary emergency medical care.
Medical services for employee evaluations, employment requirements, and special
conditions of work are provided to employees at no cost as specified by OSHA.
In areas where 911 service is not available, employees will be notified of phone numbers
to contact local emergency response medical services. Andy Wilson will be responsible
for posting of emergency phone numbers at all workplaces. The phone numbers will be
conspicuously posted in all work locations.
Injured employees are to be transported to medical facilities by emergency medical services. If emergency medical service is not available in a timely manner, the injured
employee will be transported to the nearest medical service in a company vehicle by the
job foreman.
Andy Wilson is the designated first aid provider and is responsible for rendering first aid
in the event of an injury requiring immediate response when emergency medical services are not available, and will also be responsible for first aid training of any employee
required.
Eye wash bottles are available wherever eye wash stations are not, for any employee
required to work in an environment where exposure to eye hazards may exist. Wash
facilities or drench barrels are available at each jobsite for employees.
First Aid Responsibility
A R M Environmental Services, Inc. will ensure that first-aid trained personnel are
available to provide quick and effective first aid.
Andy Wilson is responsible for making sure that first-aid training contains required
subjects.
First aid training will be kept current and documented.
Ensure appropriate first-aid supplies are stocked and readily available.
First aid stations will be provided when required.
Ensure emergency washing facilities are functional and readily accessible.
Inspect and activate emergency washing facilities.
Make sure supplemental flushing equipment provides sufficient water.
6-2 © Safety Services Company
NOTE: Some workplaces may be covered by separate, industry-specific first-aid rules.
Make sure your first-aid response plan:
Fits your work location, type of work, and environmental conditions.
Identifies the available emergency medical services and access numbers and where
they are posted. Describes the type of first-aid training employees receive, if applicable.
Identifies the location(s) of first-aid supplies and/or first-aid stations.
Identifies the contents of first-aid kits.
Describes how first-aid supplies or kits will be inspected and maintained.
Describes how injured or ill employees will have access to first-aid trained employees.
Note: Employers who require their employees to provide first aid must comply with
OSHA requirements for “Occupational Exposure to Bloodborne Pathogens”.
Keep Current and Document Your First Aid Training
You must keep a written record of your employees’ first-aid training by keeping rosters,
first-aid cards, or certificates. You may store your documentation on a computer, as long as the information is readily available when requested by OSHA personnel.
Ensure Appropriate First Aid Supplies are Readily Available
You must:
Make sure first-aid supplies are readily available.
Make sure first-aid supplies at your workplace are appropriate to:
Your occupational setting. The response time of your emergency medical services.
Note: First-aid kits from your local retailer or safety supplier should be adequate for
most non-industrial employers.
Make sure that first-aid supplies are:
Easily accessible to all your employees. Stored in containers that protect them from damage, deterioration, or contamination.
Containers must be clearly marked, not locked, and may be sealed.
Able to be moved to the location of an injured or acutely ill employee.
Determine the type and quantity of first aid supplies necessary to treat injured workers and where these supplies should be located for easy accessibility. Be sure to have an
appropriate number of kits available and do not hesitate to call your local emergency
response team.
Eyewash/Washing Facilities
Where the eyes or body of any person may be exposed to injurious corrosive materials,
suitable facilities for quick drenching or flushing of the eyes and body will be provided
within the work area for immediate emergency use.
Provide an emergency shower:
When there is potential for major portions of an employee’s body to contact
corrosives, strong irritants, or toxic chemicals.
That delivers water to cascade over the user’s entire body at a minimum rate of 20
gallons (75 liters) per minute for fifteen minutes or more.
Provide emergency eyewash:
When there is potential for an employee’s eyes to be exposed to corrosives, strong
irritants, or toxic chemicals.
That irrigates and flushes both eyes simultaneously while the user holds their eyes
open.

© Safety Services Company 6-3
With an on-off valve that activates in one second or less and remains on without
user assistance until intentionally turned off.
That delivers at least 0.4 gallons (1.5 liters) of water per minute for 15 minutes or more.
Note: You can determine whether chemicals in your workplace require emergency
washing facilities by looking at the material safety data sheet (SDS) or similar
documents. The SDS contains information about first-aid requirements and emergency flushing of skin or eyes.
Make sure emergency washing facilities:
Are located so that it takes no more than ten seconds to reach. Are kept free of obstacles blocking their use.
Function correctly.
Provide the quality and quantity of water that is satisfactory for emergency washing
purposes.
If water in emergency washing facilities is allowed to freeze, they will not function
correctly. Precautions must be taken to prevent such an occurrence.
The travel distance to an emergency washing facility should be no more than 50
feet (15.25 meters).
Training in the location and use of your emergency washing facilities is required under the employer chemical hazard communication rule.
All emergency washing facilities using “not fit for drinking” (non-potable) water
must have signs stating the water is “not fit for drinking.”
For further information on the design, installations, and maintenance of emergency
washing facilities, see American National Standards Institute (ANSI) publication Z358.1 - 1998, Emergency Eyewash and Shower Equipment.
Inspect and Activate Your Emergency Washing Facilities
Make sure all plumbed emergency washing facilities are inspected once a year to make
sure they function correctly. Inspections should include:
Examination of the piping.
Make sure water is available at the appropriate temperature and quality.
Activation to check that the valves and other hardware work properly. Checking the water flow rate.
Make sure plumbed emergency eyewashes and hand-held drench hoses are activated
weekly to check the proper functioning of the valves, hardware, and availability of water.
Make sure all self-contained eyewash equipment and personal eyewash units are inspected and maintained according to manufacturer instructions.
Inspections to check proper operation must be done once a year
Sealed personal eyewashes must be replaced after the manufacturer’s expiration
date.
Note: Most manufacturers recommend replacing fluid in open self-contained eyewashes
every 6 months. The period for sealed containers is typically 2 years.
Ensure Supplemental Flushing Equipment Provides Enough Water
Supplemental flushing equipment cannot be used in place of required emergency
showers or eyewashes.
Make sure hand-held drench hoses deliver at least 3.0 gallons (11.4 liters) of water
per minute for 15 minutes or more.
Make sure personal eyewash equipment delivers only clean water or other medically approved eye flushing solutions.

6-4 © Safety Services Company
First Aid Response Plan Considerations
Availability of emergency medical services — Would your employees dial 911 or is
there some other way to summon help?
Response time of emergency medical services — From the time an accident
happened, how many minutes would it take trained medical people to get to an injured
worker? Things to consider include:
How long would it take your employees to reach a phone to call 911? Are phones
conveniently located in the work area or would they have to go to an office to call?
How far are the emergency medical services (hospital, fire station, etc.) from your work
site?
How would emergency medical services get to your work site? They may only be 100
feet away, but if it is across a limited access road they may have go 5 miles in one
direction to turn around and come back.
How bad is traffic? Are back-ups common at certain times?
How available are emergency medical services? If there is only one ambulance and one
medical team, they may be out on another emergency. It could take a long time for
someone to respond to your call.
How large and complex is your work place? How difficult would it be for emergency
services to find the place where the injured worker is? You may want the emergency service to go to a central location (such as a reception area) and receive directions from
there.
Contact your local emergency medical service and get their answers to these questions.
You may find their responses are different from what you would expect.
Develop your First Aid Response Plan and put it in Writing
When developing and writing your first aid response plan, consider the following:
Include the site and who is responsible for managing the plan. This includes updating
the written plan as needed and making sure an adequate number of first aid trained
employees available. Make sure a method is developed for summoning emergency medical services.
Post a list of employees who are first aid trained.
Describe the procedures employees should use to request first aid.
Identify who is responsible for inspecting, stocking & maintaining first aid kits.
Train Your Employees
The First Aid Response Plan will not be effective if your employees do not know about it.
You need to make sure your employees are informed of the First Aid Response Plan and what it says. Remember to train new or temporary employees as part of their safety
orientation before they start work.
Your Responsibility
Fit the First Aid Response Plan to your Business.
Develop and Write your First Aid Response Plan.
NOTE: In the “Attachments” Chapter of this Injury & Illness Prevention Manual you will
find a master copy of the following form for Company use:
First Aid Response Plan

© Safety Services Company 6-5
First Aid Kit Contents
During any serious injury situation, the first aid kit becomes the most vitally important
toolbox at the workplace. Even if your people have had the finest first aid skills training
available, these talents are mostly negated by the lack of emergency medical supplies to
use when most needed.
The OSHA rule states: “First aid supplies will be easily accessible when required. The
contents of a first aid kit will be placed in a weather proof container with sterile, individually sealed packages for each type of item and will be checked by the employer
before being sent out on each job and at least weekly on each job to ensure that the
expended items are replaced.” In the event of an emergency medical situation caused
by a serious injury accident, proper and prompt treatment can greatly reduce the
severity of the injury and possibly prevent the death of a co-worker.
The suggested contents of an excellent first aid kit include:
Decent quality first aid handbook with illustrations. This is your important quick
reference guide.
PPE: 3-Pair latex gloves; surgical masks, dust masks, or other needed face
protection; clear eye protection or face shield. Large, sterile gauze pads (6 each: 2X2’s, 3X3’s, and 4X4’s), compress dressings
(4X8), 3 each.
Rolled gauze bandages: 2” and 3” wide, 3 each.
Woven Bandages, Knuckle Bandages, Fingertip Bandages, and large box assorted
sizes “Band-Aids.”
Two elastic wrap bandages (ace wrap). 6 burn treatment single-use packages, 0.5 g. application.
1 eye covering bandages (for two eyes)
Alcohol, peroxide, alcohol swabs, antiseptic spray and ointment, burn gel or cream,
pain relief tabs, cotton balls and Q-tips, Ammonia Inhalant.
Surgical or athletic tape; 1” and 2” wide, 2 rolls each. Self-activating cold packs, 4x5 inches
Good quality eye-wash solution, with eye cup. Liquid antiseptic hand soap.
Mouth-to-mouth barrier for CPR
Blunt-nose surgical scissors, tweezers, safety pins, and BioHazard Bags.
Although no official inventory list exists, thoughtful consideration should be given to the
specific working conditions the people will be directed to and adjustments to your
Company’s first aid supplies should be made. Knowing what to do in a medical
emergency is important, but so is knowing what not to do. Be sure you always know
where your first aid kit is.
NOTE: All personnel using CPR & First Aid techniques should be certified in an
appropriate training format before using these skills. Never exceed the level of your
first aid training.

6-6 © Safety Services Company
Notes:
_______________________________________________________________________
_______________________________________________________________________
_______________________________________________________________________
_______________________________________________________________________
_______________________________________________________________________
_______________________________________________________________________
_______________________________________________________________________
_______________________________________________________________________
_______________________________________________________________________
_______________________________________________________________________
_______________________________________________________________________
_______________________________________________________________________
_______________________________________________________________________
_______________________________________________________________________
_______________________________________________________________________
_______________________________________________________________________
_______________________________________________________________________
_______________________________________________________________________
_______________________________________________________________________
_______________________________________________________________________
_______________________________________________________________________
_______________________________________________________________________
_______________________________________________________________________
_______________________________________________________________________
_______________________________________________________________________
_______________________________________________________________________
_______________________________________________________________________

© Safety Services Company 7-1
Chapter 7
Bloodborne Pathogens
§1910.1030 – Bloodborne Pathogens
§1910.1028 – Hazard Communication Standards for Employers
Policy Statement
A R M Environmental Services, Inc. is committed to the safety and health of our
employees and prohibiting the spread of bloodborne pathogens. Therefore, the following
bloodborne pathogens safety plan has been adopted. In the event an employee is
exposed to bloodborne pathogens all measures within this program will be provided to
eliminate the spread of disease.
A R M Environmental Services, Inc. has implemented this plan to ensure that no
employee is exposed to hazardous Bloodborne Pathogens in the workplace. Andy Wilson
is the Company administrator who has the overall supervisory responsibility for the
effectiveness of this program and for maintaining medical and training records.
A R M Environmental Services, Inc. will ensure that a copy of the Exposure Control Plan is kept at the office, in the workplace (if required), and available to employees at all
times in accordance with §1910.1020(e).
Upon initial hiring, all employees will be trained in exposure awareness and
prevention techniques for bloodborne pathogens. Employees will receive refresher
training annually, or if observed to commit unsafe acts regarding potentially infectious material, or when changing job conditions or assignments warrants it.
Training records will include date of training, training content, attendance records
including job title, and will be kept on file at the office for a minimum of 3 years.
Employees with occupational exposure for the construction industry are limited to job duties that require workers to administer first aid and/or CPR when necessary.
Employees trained in first aid and CPR and designated as First Aid Responders are
considered at risk of occupational exposure due to the nature of these duties (e.g.,
assisting bleeding victims, resuscitation). Occupational exposure is defined as
reasonably anticipated contact with blood or other potentially infectious materials that may result from the performance of an employee’s duties.
The exposure determination will be made without regard to the use of personal
protective equipment. All employees who, as a result of performing their job duties,
must engage in activities where exposure to blood or other potentially infectious materials is reasonably anticipated are considered to have occupational exposure to
bloodborne pathogen. Employees will take necessary precautions to avoid direct
contact with body fluids.
Personal Protective equipment will be available at all times to prevent exposure to
infectious material for employees required to handle potentially hazardous material,
perform first aid procedures, or to perform routine duties which may bring an
employee into contact with potentially infectious material.
Employees in job classifications in which they may possibly have occupational
exposure to bloodborne pathogens, or material possibly containing bloodborne
pathogens, will be given the opportunity to participate in the hepatitis B vaccine
program.
7-2 © Safety Services Company
Universal precautions will be observed. Under circumstances in which differentiation
between body fluids is difficult or impossible, all body fluids will be considered
potentially infectious. The term “universal precautions” refers to a method of bloodborne disease control that requires all human blood and other potentially
infectious materials to be treated as if known to be infectious HIV, HBV or other
bloodborne pathogens.
Any exposed sharp edges or devices which may cause laceration or puncture on machines, tools, or equipment will be eliminated or protected to prevent injury to
personnel. All machine guards will be inspected daily to ensure that they are in place
and secure to prevent injury to personnel and the spread of bloodborne pathogens.
Any injury to personnel must be reported immediately to a supervisor, and
unauthorized personnel will be restricted from the area where the injury occurred
until it is determined that no threat of infection is present, or until properly trained
personnel can dispose of any infectious material.
If provision of handwashing facilities is not feasible, A R M Environmental Services,
Inc. will provide either an appropriate antiseptic hand cleanser in conjunction with
cloth/paper towels or antiseptic towelettes. All employees are allowed access to
proper restroom and sanitary facilities. Hand washing and disinfecting supplies are
always available to employees either at restroom facilities or upon request.
Blood-soaked bandages or other potentially infectious materials form the accident site
must be put in properly marked, leak-proof bags for handling.
Proper disposal containers for potentially infectious material are available as needed.
Any such containers will be properly marked for biohazards and disposed of properly.
Employees medical records are available to the employee to which they pertain, records will be kept confidential for company use only, unless release is authorized in
writing by the employee.
Engineering and work practice controls will be used to eliminate or minimize employee
exposure. Company assigned first aid responders will be trained in universal precautions and proper PPE use when giving first aid. Engineering controls will be examined and
maintained or replaced on a regular schedule to ensure their effectiveness.
PPE is provided to our employees at no cost to them when the possibility of occupational
exposure is present. PPE will be used unless, under rare circumstances, the employee(s)
temporarily declined to use PPE.
Training in the use of the appropriate PPE for specific tasks or procedures is provided by
A R M Environmental Services, Inc.. PPE may be obtained by contacting Andy Wilson,
who is responsible for ensuring that PPE is available.
All employees using PPE must observe the following precautions:
Wash hands as soon as feasible after removing gloves or other PPE. Remove PPE after it becomes contaminated and before leaving the work area.
Contaminated PPE must be properly handled or disposed of in properly marked,
leak-proof bags. When PPE is to be decontaminated, proper handling precautions
and procedures will be observed during this process.
Wear appropriate gloves when it is reasonably anticipated that there may be hand
contact with blood or OPIM, and when handling or touching contaminated items or surfaces; replace gloves if torn, punctured or contaminated, or if their ability to
function as a barrier is compromised.
Wear appropriate face and eye protection when splashes, sprays, spatters, or
droplets of blood or OPIM pose a hazard to the eye, nose, or mouth.
Remove immediately or as soon as feasible any garment contaminated by blood or OPIM, in such a way as to avoid contact with the outer surface.

© Safety Services Company 7-3
Exposure Determination
All employees who, as a result of performing their job duties, must engage in activities
where exposure to blood or other potentially infectious materials is reasonably anticipated are considered to have occupational exposure to bloodborne pathogen.
Employees will take necessary precautions to avoid direct contact with body fluids.
The most common concern for spread of bloodborne pathogen in non-medical
occupations is during the administration of first aid at the workplace. Employees
designated as First Aid Responders are considered at risk of occupational exposure due to the nature of these duties (e.g., performing first aid, assisting bleeding victims, and
resuscitation).
Contaminated Equipment
In order to prevent occupational exposure to blood or other potentially infectious
material, all equipment or material that comes into contact with pathogens will be decontaminated. Contaminated equipment or other contaminated items are not to be
placed or stored in areas where food is kept, and decontamination should be
accomplished as soon as possible. Decontamination is not to take place in any area
where food or drink is consumed. Cloths used to wipe contaminated equipment can be
discarded as refuse unless they would somehow become contaminated to the extent that they would be considered regulated waste. A biohazard label is to be attached to any
large contaminated equipment and is to state which portions are or remain
contaminated. For smaller pieces of equipment, the biohazard label should be attached
as above, and the piece of equipment should be placed in a bag prior to shipping.
EXAMPLES OF CONTAMINATED EQUIPMENT OR MATERIAL:
Objects that may have been bled
upon
Bandages or gauze
Equipment used during first aid
Personal Protective Equipment
Although employees are expected to avoid the handling of blood or other potentially
infectious materials as well as contact with surfaces or items contaminated with such materials during the course of first aid administration, it is likely that the employee will
be exposed to blood. Therefore, personal protective equipment such as gloves will be
provided in the first aid kit.
These gloves are not to be washed or decontaminated for reuse. First Aid Responders
are to include disposable resuscitation masks as well. Such equipment is to be used for the employee's protection in cases where the employee is expected to provide ventilator
assistance. Decontaminant will also be available to all employees to decontaminate
equipment.
Hepatitis B Vaccination and Post-exposure Evaluation and Follow-up
A R M Environmental Services, Inc. offers the hepatitis B vaccine and vaccination series
to personnel with duties that may require the employee to come in contact with blood
(i.e. first aid administration). This Company also offers post-exposure evaluation and
follow-up after an exposure incident to any employee who suffers an exposure incident
while performing duties on the job. All medical evaluations and procedures are to be made available at no cost to employees, at a reasonable time and place.

7-4 © Safety Services Company
Hepatitis B Vaccination is available to employees at any Public Health Service facility
where physical examinations are performed. All employees, whose job duties involve
occupational exposure, are to be offered the hepatitis B vaccination. The vaccine will be made available after receiving training regarding blood borne pathogens and within 10
days of initial assignment of the employee to duties with occupational exposure.
Personnel, even after training, may decline to receive the hepatitis B vaccine. In such
case, the declining employee is to sign the declination statement. The employee can
receive the vaccine after signing the declination statement if a change of mind occurs and if duties still involve those with occupational exposure. Management will assure that
each employee scheduled for immunization at a Public Health Service facility is provided
with the written opinion. These materials are to be taken by the employee to the
evaluating physician for completion. The written opinion should be returned to the
company office where the employee is assigned. A copy of medical records related to
hepatitis B vaccination should be obtained by the employee or first aid provider before departing the facility where vaccination takes place. The employee should insert this
copy of such records in a copy of Appendix D. Should an exposure incident occur,
Appendix D, including the hepatitis B related records, serves as the materials for the
Evaluating Physician and is to be given to the evaluating physician.
Post-exposure Evaluation and Follow-up — Management will instruct the compliance officer to seek medical attention in the same manner that it would be sought should any
injury occur. In the event of an exposure incident:
The employee is to immediately wash any skin with soap and water and flush mucous
membranes with water when such areas have had contact with blood or other
potentially infectious materials. The employee should then seek medical attention. It must be realized that any
exposure incident is an event for which immediate attention must be sought, as the
effectiveness of prophylaxis depends on the immediacy of its delivery.
In addition, the employee who has had an exposure incident is to report such incident
to his or her supervisor as soon as possible.
Information Provided to the Evaluating Physician — Post-exposure evaluation and
follow-up are to be provided to the employee consistent with the OSHA requirements of
29 CFR 1910.1030. Therefore, upon presenting for evaluation, the employee will give to
the physician the Materials for the Evaluating Physician. The instructions for the physician describe the requirements of 29 CFR 1910.1030 and instruct the physician to
give the physician's written opinion to the employee to return to the Company. The
evaluation results will become a part of the employee's confidential medical records.
Records regarding any exposure incidents of Technical Center personnel will be
maintained in a confidential manner.

© Safety Services Company 7-5
Communication of Hazards to Employees
Labels and Bags — Biohazard labels must be affixed to bags containing any
contaminated equipment or material. Bags will be disposed of as ordinary refuse unless in the rare instance when they are contaminated to the extent that they are considered
regulated waste as defined by the standard.
Bags should be located in first aid kits and stocked regularly.
Information and Training
This employer will ensure that all employees with occupational exposure participate in a
training program which must be provided at no cost to the employee and during working
hours.
Training will be provided as follows:
At the time of initial assignment to tasks where occupational exposure may take place.
At least annually thereafter. Annual training for all employees will be provided within
one year of their previous training.
This employer will provide additional training when changes such as modification of tasks
or procedures or institution of new tasks or procedures affect the employee's
occupational exposure. The additional training may be limited to addressing the new
exposures created.
Material appropriate in content and vocabulary to educational level, literacy, and language of employees will be used.
The training program will contain at a minimum the following elements:
An accessible copy of the regulatory text of this standard and an explanation of its
contents.
A general explanation of the epidemiology & symptoms of bloodborne diseases.
An explanation of the modes of transmission of bloodborne pathogens. An explanation of the employer's exposure control plan and the means by which the
employee can obtain a copy of the written plan.
An explanation of the appropriate methods for recognizing tasks and other activities
that may involve exposure to blood and other potentially infectious materials.
An explanation of the use and limitations of methods that will prevent or reduce exposure including appropriate engineering controls, work practices, and personal
protective equipment.
Information on the types, proper use, location, removal, handling, decontamination,
and disposal of personal protective equipment.
An explanation of the basis for selection of personal protective equipment. Information on the hepatitis B vaccine, including information on its efficacy, safety,
method of administration, the benefits of being vaccinated, and that the vaccine and
vaccination will be offered free of charge.
Information on the appropriate actions to take and persons to contact in an
emergency involving blood or other potentially infectious materials.
An explanation of the procedure to follow if an exposure incident occurs, including the method of reporting the incident and the medical follow-up that will be made
available.
Information on the post-exposure evaluation and follow-up that the employer is
required to provide for the employee following an exposure incident.
An explanation of the signs and labels and/or color coding. An opportunity for interactive questions and answers with the person conducting the
training session.

7-6 © Safety Services Company
The person conducting the training will be knowledgeable in the subject matter covered
by the elements contained in the training program as it relates to the workplace that the
training will address.
Recordkeeping
Medical Records
This employer will establish and maintain an accurate record for each employee with
occupational exposure to Bloodborne Pathogens.
This record will include:
The name and social security number of the employee.
A copy of the employee's hepatitis B vaccination status including the dates of all the hepatitis B vaccinations and any medical records relative to the employee's ability to
receive vaccination as required.
A copy of all results of examinations, medical testing, and follow-up procedures as
required.
This employer's copy of the healthcare professional's written opinion. A copy of the information provided to the healthcare professional.
Confidentiality
This employer will ensure that employee medical records required are:
Kept confidential.
Not disclosed or reported without the employee's express written consent to any
person within or outside the workplace except as may be required by law.
This employer will maintain the records for at least the duration of employment plus 30
years.
Employee Training Records
Training records will include the following information:
The dates of the training sessions.
The contents or a summary of the training sessions.
The names and qualifications of persons conducting the training.
The names and job titles of all persons attending the training sessions.
Employee training records will be maintained for 3 years from the date on which the
training occurred.
Availability
This employer will ensure that all records required to be maintained will be made
available upon request to OSHA for examination and copying.
Required employee training records will be provided upon request for examination and
copying to employees, to employee representatives, and to OSHA.
Employee medical records required will be provided upon request for examination and copying to the subject employee, to anyone having written consent of the subject
employee, and to OSHA.
Transfer of Records
Whenever this employer is ceasing to do business, this employer will transfer all records
subject to this section to the successor employer. The successor employer will receive
and maintain these records.
Whenever this employer is ceasing to do business and there is no successor employer to
receive and maintain the records, this employer will notify affected current employees of their rights of access to records at least three (3) months prior to the cessation of this
employer's business.

© Safety Services Company 7-7
Investigation of Exposure Incidents
All exposure incidents will be investigated and proper accident/incident investigation
procedures will be followed.
Evaluating Physician’s Written Opinion
To the Evaluating Physician:
After you have determined whether there are contra-indications to vaccination of this
employee with Hepatitis B vaccine, please state in the space below only:
(A) ____ If vaccine was indicated
(B) ____ If vaccine was received.
(All other findings are to remain confidential and are not to be included on this page)
Please return this sheet to this employee:
(Name of Employee)______________________________________________________
Thank you for your evaluation of this employee.
________________________________________________________ ____________
Physician's name (printed) date
Physician's signature______________________________________________________
DECLINATION STATEMENT I understand that due to my occupational exposure to blood or other potentially infectious materials I may be at risk of acquiring Hepatitis B virus (HBV) infection. I have been given the opportunity to be vaccinated with Hepatitis B vaccine, at no charge to myself. However, I decline Hepatitis vaccination at this time. I understand that by declining this vaccine, I continue to be at risk of acquiring Hepatitis B, a serious disease. If in the future I continue to have occupational exposure to blood or other potentially infectious materials and I want to be vaccinated with Hepatitis B vaccine, I can receive the vaccination series at no charge to me. Employee Signature___________________________________________ Date______________

7-8 © Safety Services Company
Instructions for the Evaluating Physician
This employee may have suffered an exposure incident to a Bloodborne Pathogen. In
accordance with the standard's provision for post exposure evaluation and follow up, the
employer submits to you for the following evaluations:
A copy of 29 CFR 1910.1030, Occupational Exposure to Bloodborne Pathogens; A description of the exposed employee's duties as they relate to the exposure
incident;
Documentation of the routes of exposure and circumstances under which exposure
occurred;
Results of the source individual's blood testing, if available; and
All medical records relevant to this employee's appropriate treatment, including vaccination status.
After completing the evaluation, please:
Inform the employee regarding the evaluation results and any follow up needed; Complete the attached written opinion form and give it to the employee. (This form
will be maintained in the office to which the employee is assigned); and
Send a copy of all evaluation results and records to:
U.S. Department of Labor - OSHA Office of Occupational Medicine Room N3653 200 Constitution Avenue, NW Washington, DC 20210 CONFIDENTIAL: MEDICAL RECORDS
These copies will be maintained as part of the employee's confidential medical record in
OSHA's Office of Occupational Medicine Medical Records Section.
Should you have any questions regarding the evaluations or medical records, please
contact OSHA's Office of Occupational Medicine at (202) 219-5003.
Date exposure incident occurred? ___________________________________________
Describe the circumstances under which the exposure incident occurred (what happened
that resulted in the incident)
______________________________________________________________________
______________________________________________________________________
______________________________________________________________________
What body fluid(s) were you exposed to? _____________________________________
______________________________________________________________________
What was the route of exposure (e.g., mucosal contact, contact with non-intact skin,
percutaneous)? __________________________________________________________
_______________________________________________________________________
Describe any personal protective equipment in use at time of exposure incident
_______________________________________________________________________
Did PPE fail? ____________If yes, how? ______________________________________
_______________________________________________________________________
Identification of source individual(s) (names) __________________________________
_______________________________________________________________________
Other pertinent information ________________________________________________
_______________________________________________________________________

© Safety Services Company 8-1
Chapter 8
Job Hazard Assessment
A R M Environmental Services, Inc. is committed to providing a safe and hazard free
workplace.
The Crew Leader and the project Manager will supervise regularly scheduled inspections
of all jobsites and facilities for hazards on a weekly basis and will also include spot
checks and random inspections.
Hazard Assessment Plan
A R M Environmental Services, Inc. performs inspections of the facility and jobsites at least weekly and documents each one for review. Hazard evaluations include inspection
of the area as well as work practices.
During the course of inspection, if a job hazard is identified it is immediately corrected.
If the hazard is not immediately correctable, all appropriate personnel are notified and
the hazard is clearly identified by signs, barricades, or other warnings.
Hazard evaluations are to be appropriately documented using the following provided
forms or any means necessary.
A R M Environmental Services, Inc. employees will be adequately trained in the hazard
identification process up to and including the care and proper use of personal protective
equipment.
What is a Job Hazard?
A Job hazard is the potential for harm. In practical terms, a job hazard is often
associated with a condition or activity that, if left uncontrolled, can result in an injury or
illness. Identifying job hazards and eliminating or controlling them as early as possible will help prevent injuries and illnesses.
A Job Hazard Assessment
A job hazard assessment is a technique that focuses on job tasks as a way to identify
hazards before they occur. It focuses on the relationship between the worker, the task, the tools, and the work environment. Ideally, after you identify uncontrolled hazards,
you will take steps to eliminate or reduce them to an acceptable risk level.
For a job hazard assessment to be effective, managers and supervisors must
demonstrate their commitment to safety and health and follow through to correct any
uncontrolled hazards identified. Otherwise, management will lose credibility and employees may hesitate to go to supervisors when dangerous conditions threaten them.
Jobs Appropriate for Hazard Assessment
A job hazard assessment can be conducted on many jobs in your workplace. Priority
should go to the following types of jobs:
Jobs with the highest injury or illness rates. Jobs with the potential to cause severe or disabling injuries or illness, even if there is
no history of previous accidents.
Jobs in which one simple human error could lead to a severe accident or injury.
Jobs that are new to your operation or have undergone changes in processes and
procedures. Jobs complex enough to require written instructions.
8-2 © Safety Services Company
Where to Begin
Involve your employees. It is very important to involve your employees in the hazard
assessment process. They have a unique understanding of the job, and this knowledge is invaluable for finding hazards. Involving employees will help minimize oversights,
ensure a quality assessment, and get workers to “buy in” to the solutions because they
will share ownership in their safety and health program.
Review your accident history. Review with your employees your workplace’s history
of accidents and occupational illnesses that needed treatment, losses that required repair or replacement, and any “near misses” – events in which an accident or loss did not
occur, but could have. These events are indicators that the existing hazard controls (if
any) may not be adequate and deserve more scrutiny.
Conduct a preliminary job review. Discuss with your employees the hazards they
know exist in their current work and surroundings. Brainstorm with them for ideas to eliminate or control those hazards.
If any hazards exist that pose an immediate danger to an employee’s life or health,
take immediate action to protect the worker. Any problems that can be corrected easily
should be corrected as soon as possible. Do not wait to complete your job hazard
assessment. This will demonstrate your commitment to safety and health and enable
you to focus on the hazards and jobs that need more study because of their complexity. For those hazards determined to present unacceptable risks, evaluate types of hazard
controls.
List, rank, and set priorities for hazardous jobs. List jobs with hazards that present
unacceptable risks, based on those most likely to occur and with the most severe
consequences. These jobs should be your first priority for assessment.
Outline the steps or tasks. Nearly every job can be broken down into job tasks or
steps. When beginning a job hazard assessment, watch the employee perform the job
and list each step as the worker takes it. Be sure to record enough information to
describe each job action without getting overly detailed. Avoid making the breakdown of
steps so detailed that it becomes unnecessarily long or so broad that it does not include basic steps. You may find it valuable to get input from other workers who have
performed the same job. Later, review the job steps with the employee to make sure
you have not omitted something. Point out that you are evaluating the job itself, not the
employee’s job performance. Include the employee in all phases of the assessment –
from reviewing the job steps and procedures to discussing uncontrolled hazards and recommended solutions.
Sometimes, in conducting a job hazard assessment, it may be helpful to photograph or
videotape the worker performing the job. These visual records can be handy references
when doing a more detailed assessment of the work.
© Safety Services Company 8-3
Identifying Workplace Hazards
A job hazard assessment is an exercise in detective work. Your goal is to discover the
following:
What can go wrong?
What are the consequences?
How could it arise?
What are other contributing factors?
How likely is it that the hazard will
occur?
To make your job hazard assessment useful, document the answers to these questions
in a consistent manner. Describing a hazard in this way helps to ensure that your efforts to eliminate the hazard and implement hazard controls help target the most important
contributors to the hazard.
Good hazard scenarios describe:
Where it is happening? (environment)
Who or what it is happening to? (exposure) What precipitates the hazard? (trigger)
The outcome that would occur should it happen? (consequence)
Any other contributing factors.
Rarely is a hazard a simple case of one singular cause resulting in one singular effect. More frequently, many contributing factors tend to line up in a certain way to create the
hazard.
Here is an example of a hazard scenario:
In the metal shop (environment), while clearing a snag (trigger), a worker’s hand
(exposure) comes into contact with a rotating pulley. It pulls his hand into the machine
and severs his fingers (consequences) quickly.
To perform a job hazard assessment, you would ask:
What can go wrong? The worker’s hand could come into contact with a rotating object
that “catches” it and pulls it into the machine.
What are the consequences? The worker could receive a severe injury and lose
fingers and hands.
How could it happen? The accident could happen as a result of the worker trying to clear a snag during operations or as part of a maintenance activity while the pulley is
operating. Obviously, this hazard scenario could not occur if the pulley is not rotating.
What are other contributing factors? This hazard occurs very quickly. It does not
give the worker much opportunity to recover or prevent it once his hand comes into
contact with the pulley. This is an important factor, because it helps you determine the severity and likelihood of an accident when selecting appropriate hazard controls.
Unfortunately, experience has shown that training is not very effective in hazard control
when triggering events happen quickly because humans can react only so quickly.
How to Correct or Prevent Hazards
After reviewing your list of hazards with the employee, consider what control methods will eliminate or reduce them. The most effective controls are engineering controls that
physically change a machine or work environment to prevent employee exposure to the
hazard. The more reliable or less likely a hazard control can be circumvented, the
better. If this is not feasible, administrative controls may be appropriate.
This may involve changing how employees do their jobs. Discuss your recommendations
with all employees who perform the job and consider their responses carefully. If you plan to introduce new or modified job procedures, be sure they understand what they
are required to do and the reasons for the changes.

8-4 © Safety Services Company
Before Starting a Job Hazard Assessment
The job procedures discussed in this chapter are for illustration only and do not
necessarily include all the steps, hazards, and protections that apply to your industry.
When conducting your own job safety assessment, be sure to consult the OSHA
standards for your industry. Compliance with these standards is mandatory, and by
incorporating their requirements in your job hazard assessment, you can be sure that
your health and safety program meets federal standards.
Review the Job Hazard Assessment
Periodically reviewing your job hazard assessment ensures that it remains current and
continues to help reduce workplace accidents and injuries. Even if the job has not changed, it is possible that during the review process you will identify hazards that were
not identified in the initial assessment. It is particularly important to review your job
hazard assessment if an illness or injury occurs on a specific job.
Based on the circumstances, you may determine that you need to change the job
procedure to prevent similar incidents in the future. If an employee’s failure to follow proper job procedures results in a “close call or near miss,” discuss the situation with all
employees who perform the job and remind them of proper procedures. Any time you
revise a job hazard assessment, it is important to train all employees affected by the
changes in the new job methods, procedures, or protective measures adopted.
When to Hire a Professional
If your employees are involved in many different or complex processes, you need
professional help conducting your job hazard analyses. Sources of help include your
insurance company, the local fire department, and/or private consultants with safety and
health expertise. In addition, OSHA offers assistance through its regional and area offices and consultation services. Even when you receive outside help, it is important
that you and your employees remain involved in the process of identifying and correcting
hazards because you are at the workplace every day and most likely to encounter these
hazards. New circumstances and a recombination of existing circumstances may cause
old hazards to reappear and new hazards to appear. In addition, you and your
employees must be ready and able to implement whatever hazard elimination or control measures a professional consultant recommends.
Hazard Control Measures
Information obtained from a job hazard assessment is useless unless hazard control
measures recommended in the assessment are incorporated into the tasks. Managers and supervisors should recognize that not all hazard controls are equal. Some are more
effective than others at reducing the risk.
The order of precedence and effectiveness of hazard control is the following:
Engineering controls. Administrative controls.
Personal protective equipment.
Engineering controls include the following:
Elimination/minimization of the hazard – Designing the facility, equipment, or
process to remove the hazard, or substituting processes, equipment, materials, or
other factors to lessen the hazard.
Enclosure of the hazard using enclosed cabs, enclosures for noisy equipment, or other means.
Isolation of the hazard with interlocks, machine guards, blast shields, welding
curtains, or other means.
Removal or redirection of the hazard such as with local and exhaust ventilation.

© Safety Services Company 8-5
Administrative controls include the following:
Written operating procedures, work permits, and safe work practices.
Exposure time limitations (used most commonly to control temperature extremes
and ergonomic hazards).
Monitoring the use of highly hazardous materials.
Alarms, signs, and warnings.
The “Buddy” system. Training.
Personal Protective Equipment
Protective equipment such as respirators, hearing protection, protective clothing, safety
glasses, and hardhats is acceptable as a control method in the following
circumstances:
When engineering controls are not feasible or do not totally eliminate the hazard.
While engineering controls are being developed. When safe work practices do not provide sufficient additional protection.
During emergencies when engineering controls may not be feasible.
Use of one hazard control method over another higher in the control precedence may be appropriate for providing interim protection until the hazard is abated permanently. In
reality, if the hazard cannot be eliminated entirely, the adopted control measures will
likely be a combination of all three items instituted simultaneously.

8-6 © Safety Services Company
COMMON HAZARDS & DESCRIPTIONS Hazards Hazard Descriptions
Chemical (Toxic)
A chemical that exposes a person by absorption through the skin, inhalation, or through the
blood stream that causes illness, disease, or death. The amount of chemical exposure is
critical in determining hazardous effects. Check Material Safety Data Sheets (SDS), and/or
OSHA 1910.1200 for chemical hazard information.
Chemical
(Flammable)
A chemical that, when exposed to a heat ignition source, results in combustion. Typically, the
lower a chemical’s flash point and boiling point, the more flammable the chemical. Check
SDS for flammability information.
Chemical
(Corrosive)
A chemical that, when it comes into contact with skin, metal, or other materials, damages the
materials. Acids and bases are examples of corrosives.
Explosion
(Chemical Reaction) Self explanatory.
Explosion
(Over
Pressurization)
Sudden and violent release of a large amount of gas/energy due to a significant pressure
difference such as rupture in a boiler or compressed gas cylinder.
Electrical
(Shock/Short Circuit)
Contact with exposed conductors or a device that is incorrectly or inadvertently grounded,
such as when a metal ladder comes into contact with power lines. 60Hz alternating current
(common house current) is very dangerous because it can stop the heart.
Electrical
(Fire)
Use of electrical power that results in electrical overheating or arcing to the point of
combustion or ignition of flammables, or electrical component damage.
Electrical
(Static/ESD)
The moving or rubbing of wool, nylon, other synthetic fibers, and even flowing liquids can
generate static electricity. This creates an excess or deficiency of electrons on the surface of
material that discharges (spark) to the ground resulting in the ignition of flammables or
damage to electronics.
Electrical
(Loss of Power) Safety-critical equipment failure as a result of loss of power.
Ergonomics
(Strain) Damage of tissue due to overexertion (strains and sprains) or repetitive motion.
Ergonomics
(Human Error)
A system design, procedure, or equipment that is error-provocative. (A switch goes up to turn
something off).
Fall
(Slip, Trip)
Conditions that result in falls (impacts) from height or traditional walking surfaces (such as
slippery floors, poor housekeeping, uneven walking surfaces, exposed ledges, etc.)
Fire/Heat Temperatures that can cause burns to the skin or damage to other organs. Fires require a
heat source, fuel, and oxygen.
Mechanical/
Vibration
(Chaffing/
Fatigue)
Vibration that can cause damage to nerve endings, or material fatigue that results in a safety-
critical failure. (Examples are abraded slings and ropes, weakened hoses and belts.)
Mechanical
Failure
Self explanatory; typically occurs when devices exceed designed capacity or are inadequately
maintained.
Mechanical Skin, muscle, or body part exposed to crushing, caught-between, cutting, tearing, shearing
items or equipment.
Noise Noise levels (>85 dBA 8 hr TWA) that result in hearing damage or inability to communicate
safety-critical information.
Radiation
(Ionizing)
Alpha, Beta, Gamma, neutral particles, and X-rays that cause injury (tissue damage) by
ionization of cellular components.
Radiation
(Non-Ionizing)
Ultraviolet, visible light, infrared, and microwaves that cause injury to tissue by thermal or
photochemical means.
Struck By
(Mass
Acceleration)
Accelerated mass that strikes the body causing injury or death. (Examples are falling objects
and projectiles.)
Struck Against Injury to a body part as a result of coming into contact of a surface in which action was
initiated by the person. (An example is when a screwdriver slips.)
Temperature
Extreme
(Heat/Cold)
Temperatures that result in heat stress, exhaustion, or metabolic slow down such as
hypothermia.
Visibility Lack of lighting or obstructed vision that results in an error or other hazard.
Weather
Phenomena
(Snow/Rain/
Wind/Ice)
Self explanatory.
© Safety Services Company 8-7
JOB HAZARD ASSESSMENT CHECKLIST The scope of your self-inspections should include the following:
Processing, Receiving, Shipping and Storage — equipment, job planning, layout,
heights, floor loads, projection of materials, materials-handling and storage methods,
and training for material handling equipment.
Building and Grounds Conditions — floors, walls, ceilings, exits, stairs, walkways,
ramps, platforms, driveways, and aisles.
Housekeeping Program — waste disposal, tools, objects, materials, leakage and spillage, cleaning methods, schedules, work areas, remote areas, and storage areas.
Electricity — equipment, switches, breakers, fuses, switch-boxes, junctions, special
fixtures, circuits, insulation, extensions, tools, motors, grounding, and national electric
code compliance.
Lighting — type, intensity, controls, conditions, diffusion, location, and glare and shadow control.
Heating and Ventilation — type, effectiveness, temperature, humidity, controls, and
natural and artificial ventilation and exhaust.
Machinery — points of operation, flywheels, gears, shafts, pulleys, key ways, belts,
couplings, sprockets, chains, frames, controls, lighting for tools and equipment, brakes, exhausting, feeding, oiling, adjusting, maintenance, lockout/tagout, grounding, work
space, location, and purchasing standards.
Personnel — experience training, including hazard identification training; methods of
checking machines before use; type of clothing; personal protective equipment; use of
guards; tool storage; work practices; and methods of cleaning, oiling, or adjusting
machinery.
Hand and Power Tools — purchasing standards, inspection, storage, repair, types,
maintenance, grounding, use, and handling.
Chemicals — storage, handling, transportation, spills, disposals, amounts used,
labeling, toxicity or other harmful effects, warning signs, supervision, training, protective
clothing and equipment, and hazard communication requirements.
Fire Prevention — extinguishers, alarms, sprinklers, smoking rules, exits, personnel
assigned, separation of flammable materials and dangerous operations, explosive-proof
fixtures in hazardous locations, and waste disposal.
Maintenance, including tracking and abatement of preventive & regular maintenance —
regularity, effectiveness, training of personnel, materials and equipment used, records maintained, method of locking out machinery, and general methods.
Personal Protective Equipment — type, size, maintenance, repair, storage,
assignment of responsibility, purchasing methods, standards observed, training in care
and use, rules of use, and method of assignment.
Transportation — motor vehicle safety, seat belts, vehicle maintenance, and safe driver programs.
Review — evacuation routes, equipment, and personal protective equipment.

8-8 © Safety Services Company
Job Safety Analysis (JSA)
Job safety analysis (JSA), also known as "job hazard analysis", is the first step in
developing the correct procedure. In this analysis, each task of a specific job is examined
to identify hazards and to determine the safest way to do the job.
Job safety analysis involves the following steps:
1. Select the job
2. Break down the job into a sequence of steps
3. Identify the hazards
4. Define preventive measures
The analysis should be conducted on all critical tasks or jobs as a first priority. Critical
jobs include:
those where frequent accidents and injuries occur those where severe accidents and injuries occur
those with a potential for severe injuries
new or modified jobs
infrequently performed jobs, such as maintenance
Job safety analysis is generally carried out by observing a worker doing the job.
Members of the joint health and safety committee should participate in this process. The
reason for the exercise must be clearly explained to the worker, emphasizing that the
job, not the individual, is being studied.
NOTE: In the “Attachments” Chapter of this Injury & Illness Prevention Manual you will find a master copy of the following form for Company use:
Jobsite Safety Inspection & Report
Job Safety Analysis Form
Hazard Tracking Log

© Safety Services Company 9-1
Chapter 9
Workplace Violence Prevention Program
Policy Statement
A R M Environmental Services, Inc. has adopted the following policy to deal with any violence that may occur on the Company’s premises and to ensure the safety of our
employees.
Andy Wilson is responsible for the implementation and enforcement of the workplace
violence prevention program. In the event this policy is violated disciplinary procedures
will be enforced and legal action taken as needed.
Threats, threatening behavior, or acts of violence against employees, visitors, guests,
or other individuals by anyone on A R M Environmental Services, Inc. property will
not be tolerated.
Any person who makes threats, exhibits threatening behavior, or engages in violent
acts on Company property will be removed from the premises as quickly as safety permits and will remain off Company premises and/or jobsites pending the outcome
of an investigation.
Reporting
Management has assigned Andy Wilson as the contact person to report all incidents pertinent to this policy.
Management and employees are responsible for notifying the contact person of any
threats they have witnessed, received, or have been told that another person has
witnessed or received. Personnel should also report behavior they regard as
threatening or violent if that behavior is job-related or might be carried out on a company-controlled site.
A R M Environmental Services, Inc. response to incidents of violence will be fully
investigated and documented as well as proper authorities being notified.
Employees who apply for or obtain a protective or restraining order that lists
company locations as protected areas must provide a copy of the petition and declarations used to seek the order and a copy of any temporary or permanent
protective or restraining order that is granted. A R M Environmental Services, Inc.
has confidentiality procedures that recognize and respect the privacy of the reporting
employee(s).
Compliance
Our safety policies are based on past experience and current standards, and are also
an integral part of the company's personnel rules. This means that compliance with
the policies is a condition of employment and must be taken seriously.
Failure to comply with the company policy regarding Workplace Violence or the Code of Safe Practices is sufficient grounds for disciplinary action up to and including
termination.
Management will conduct a risk assessment to evaluate the risks of workplace
violence and the strengths and weaknesses of the existing policies.

9-2 © Safety Services Company
Training
Management and supervisors will be trained; and this training documented in
the following areas:
How to properly deal with employee layoffs, job termination and disciplinary
procedures.
How to recognize violent/dangerous situations and the appropriate measures to take.
How to prevent violence in the workplace.
The Company security and emergency response procedures.
How to respond to conflicts and problems in a manner that doesn’t allow them to
escalate.
Employees will be trained; and this training documented in the following areas:
The rules for acceptable behavior and methods of discipline as outlined in the Company Code of Safe Practices.
Procedures for reporting workplace violence to the designated contact person.
Where to find a list of contacts and phone numbers available for all emergency
situations.
How to identify potentially violent/dangerous situations or people and the company
procedures that correspond.
Program Review
This Workplace Violence Prevention Plan will be reviewed; and these reviews
documented at least once a year or under the following circumstances:
Following a workplace violence incident or report.
Change in management.
Change of contact person. To make needed changes or improvements to the policy.
To identify new training or refresher training needs.
We here at A R M Environmental Services, Inc. believe safety is the first priority. NO
negative action will ever be taken for reporting hazardous, dangerous, potentially dangerous, or violent situations. Our employees and the information involved will
always remain confidential.
Workplace Violence Prevention Responsibilities
Andy Wilson is responsible for the implementation and enforcement of the workplace
violence prevention program. While program success depends on the involvement of everyone, from ownership to employees, these responsibilities listed will be a guideline:
Ownership/Contact Person
Administers all aspects of the workplace violence prevention program. Develops procedures to identify and remove potential risk factors of workplace
violence.
Assists in the workplace violence prevention training of employees.
Coordinate necessary training for new and existing employees.
Conducts inspections to identify high risk positions or work practices. Implement programs and activities that will develop and maintain incentives for and
motivation of employees.
Decides disciplinary action for repeat violators of prescribed procedures.
Develops and maintains incident investigation reporting procedures.

© Safety Services Company 9-3
Investigates serious or reportable incidents.
Maintains all records and reports of accidents/incidents that have taken place during
division business operations. Ensures that each employee's report of occupational injury or illness report is filed
with the Workers' Compensation office within ten days of employee's notification of
an occupational injury or illness.
Processes all paperwork associated with accidents, on-site inspections, and in-house
audits. Maintains permanent record for division and/or personnel files. Maintains all medical records, evaluations, and exposure monitoring records for the
duration of employment and at least one year after.
Managers/Supervisors
Be familiar with high risk positions and appropriate procedures related to their area of
responsibility.
Directs, implements, and coordinates program procedures and activities within area
of responsibility. Requires all employees supervised to use appropriate procedures for meeting the
public.
Ensures that engineering controls are available, maintained, and used correctly.
Ensures that all employees within area of responsibility receive workplace violence
prevention training as required.
Ensures that employees are aware of and comply with requirements for workplace violence prevention practices.
Investigates all incidents within area of responsibility. Reviews all accidents/incidents
with workers involved. Insures that corrective action is taken immediately to
eliminate the cause of the accident/incident.
Ensures accident reports and Workers' Compensation forms are completed and submitted as appropriate.
Conducts frequent and regular safety and health inspections of his/her work areas
and ensures that no unsafe conditions exist in area of responsibility.
Ensures that injuries are treated promptly and reported properly.
Acts on reports of hazards or hazardous conditions reported to them by employees.
Employees
Be familiar with and comply with all proper workplace violence prevention procedures. Notify supervisor immediately of unsafe conditions, aggressive behavior, or incidents.
Identify and assist or report "strangers" in your work area.
Treat all "customers" with respect and be polite.
In consideration of the size of a company, these responsibilities may be shared further or consolidated. The main goal of our program is to ensure that the policies, procedures
and training are followed for the safety and security of our company, its employees and
the public.
Risk Assessment/Inspections
This company has implemented procedures for conducting a risk assessment and inspection of the workplace and jobsites for compliance with this program. The purpose
of the inspection is to identify hazards and unsafe practices before they cause an
accident or incident.
The program is based on the results of the risk assessment and inspections and includes
the following procedures:
Examining past incidents.
Reviewing our OSHA 300 log.
Surveying our safety-and-health committee and workers at all levels regarding
violent incidents, reported or not.

9-4 © Safety Services Company
Discussing findings with pertinent employees. Inviting their comments, suggestions,
and particular needs.
Ensuring recommended corrections/changes are communicated and discussed. Following up on changes, corrections, and other actions necessary.
New Hire & Termination Procedures
Our company has in place new employee hiring procedures which will lower the risk of potential violence or harassment in the workplace.
Examples of procedures which can be further implemented include, yet are not limited
to:
Limiting access by former employees to the workplace.
Requiring visitors to sign in and out at reception, wear identification badges, or be
escorted. Increasing parking lot illumination or providing escorts and/or guards.
Locking doors that lead from reception areas to work areas.
Adding surveillance cameras, panic buttons, or metal detectors.
As part of our risk assessment procedures our company has put in place a screening
procedure for the hiring of new employees. Hiring the right person, no matter the
position, is an important step in preventing workplaces violence.
The following steps are considered during the hiring process, yet are not limited to
these:
Checking all work history statements made on job applications. This may be done
internally or by an outside service.
Developing open-ended job interview questions that help your interviewer make the
most thorough assessments of candidates possible.
Having an experienced interviewer or team conduct two interviews of every applicant,
including those for entry-level jobs. Developing a screening system that is equitable, that allows our company to weigh
potential liability.
Using drug screening when it’s felt necessary or required.
Screening contract personnel assigned to work at our facility.
Conversely, if our company assigns workers to other organizations, we consider their safety and security requirements.
Not all individuals distraught about job termination or layoff become violent; however,
firings the cause of most of the violence that occurs in the workplace.
Management and supervisors will be trained to identify potential problems among
workers, administer discipline as necessary, and terminate employees without causing
the terminated employee to feel that the loss of this job is the “end of the line.” Open
communication from management can help employees facing termination for whatever
reason.
Conducting exit interviews when employees retire, quit, or are transferred or terminated are also used to help identify potential violence-related problems.
A R M Environmental Services, Inc. understands that violence may best be prevented by
appropriate workplace security measures and caring for the people who work for our
company through communication, adequate training, and a system for reporting and
following up on incidents.
© Safety Services Company 9-5
Training
Training and education cannot be over-emphasized as a means of learning workplace
violence prevention procedures. Knowledge of the appropriate procedures and rules, and how and when to function under these procedures, is essential to personal safety.
Our Company has implemented these training procedures for its management and
employees.
Managers and Supervisors will be trained in:
The Company's Workplace Violence Prevention Program.
Communication skills.
Recognition of aggressive behavior.
Dealing with employee layoffs, job terminations, and discipline; how to assess the
violence potential of individuals; and how to take appropriate measures, such as arranging security.
Violence prevention, our company’s security procedures, and response procedures.
Addressing problems and conflict promptly.
Employee Training Procedures:
All new employees will read and understand our policies and procedures, and will
review them regularly.
New employees will be provided orientation training and will be furnished information and literature covering the company's Workplace Violence Prevention Program and
Code of Safe Practices.
This orientation training will be provided prior to the employee's exposure to a hostile
work environment.
Appropriate individual job/task training will be provided.
Emergency Communication Plan
A R M Environmental Services, Inc. has adopted the following elements as our Internal
Emergency Communication Plan:
Employees have a means of alerting other workers of a dangerous situation and be
able to provide information requested by emergency responders.
A list of contacts, evacuation plans, and building plans where they’re available to
emergency responders (Company Emergency Action Plan).
Keeping important phone numbers in several places (including off-site locations), available to all appropriate managers and employees.
Encouraging victims of threats and violence outside the workplace to notify their
supervisor about such incidents. Management will provide information (and a
description or picture of the alleged threatener) to receptionists and other necessary
personnel on a need-to-know basis and tell them what actions they should take if
that individual seeks entry to the workplace or seeks contact with the employee involved.
For environments with greater security risks, further measures may be added on a
case by case basis.

9-6 © Safety Services Company
Incident Reporting
A R M Environmental Services, Inc. trains its management and employees in knowing
how and where to report violent acts or threats of violence. Our policy requires employees to report all threats or incidents of violence.
The following guidelines are used in a threat-incident report, which management will use
to assess the safety of the workplace and to decide on a plan of action:
Name of the person who made the threat and that person’s relationship to the
company and to the threatened party. Names of victims or potential victims.
When and where the incident occurred and how it ended.
What happened immediately prior to the incident and what may have contributed to
the incident.
The specific language of the threat. Behavior that indicates an intention to carry out the threat.
A description of the threat-maker and his or her emotional state.
Names of others directly involved and actions they took.
Names of witnesses.
What happened to involved parties after the incident.
Names of supervisory staff involved and their response. Steps that have been taken to prevent the threat from being carried out.
Suggestions for preventing such incidents.
Incident Response
A R M Environmental Services, Inc. has adopted the following procedures for incident
response. These procedures are subject to evaluation and change to ensure the safety
and security of our employees.
When an incident occurs, necessary resources are brought together, which may
include help from outside the company. When a threat is made, available sources are consulted to help evaluate the level of
risk posed by the threat-maker.
When appropriate, fitness-for-duty evaluations are obtained for employees exhibiting
seriously dysfunctional behaviors at the workplace.
When a threat has been made or an incident has occurred, the situation is evaluated and, if warranted, potential victims and/or the police will be notified.
A R M Environmental Services, Inc. respects the privacy and confidentiality rights of
employees during investigations.
Workplace risks are reviewed to determine whether additional security measures
should be taken after a threat or violent incident.
Increased worksite protection will be provided when threats of violence have been made, such as additional police or security patrols.
Those who might be affected if the threat-maker carries out his or her threat are
promptly notified.
Increased protection to threatened employees is considered, such as new phone
numbers, relocation, loan of a cellular phone, or a quick-response distress button. Potential victims are counseled on options available to them, such as obtaining a
restraining order.

© Safety Services Company 9-7
General Communication/Workplace Procedures
These guidelines will be used to assist in training management and employees in the
implementation of our program:
BE POLITE.
Do not get excited.
Do not argue.
Request a supervisor when feeling stressed or pressured.
Utilize all training procedures. Report all incidents to the appropriate supervisor.
Be observant of "strangers" in work areas.
Be observant of persons with packages and other abnormalities.
Escort the clients to their destination.
Identify and communicate previous aggressive behavior or threats. Program emergency phone numbers into the telephone.
Maintain a log of incidents with all relevant information.
Utilize the "buddy system" when confronted with aggressive behavior.
Interact in open and public areas with potentially violent persons.
Request counseling after a stressful incident.
Inform co-workers/supervisor of activity itinerary. Provide escorts for potential victims outside of the controlled work area.
Warning signs of potentially violent individuals:
Written, oral, or implied threats or intimidation.
Fascination with weaponry or acts of violence.
Theft or sabotage of projects or equipment.
Alcohol or drug abuse in the workplace.
Expressions of hopelessness or heightened anxiety. Intention to hurt self or others.
Lack of concern for the safety of others.
Externalization of blame.
Irrational beliefs and ideas.
Romantic obsession. Displays of excessive or unwarranted anger.
Feelings of victimization.
Inability to take criticism.
New or increased sources of stress at home or work.
Productivity and/or attendance problems.
What to do
Project calmness. Move and speak slowly, quietly, and confidently. Listen attentively and encourage the person to talk.
Let the speaker know that you are interested in what he or she is saying.
Maintain a relaxed yet attentive posture.
Acknowledge the person’s feelings and indicate that you can see he is upset.
Ask for small, specific favors such as asking the person to move to a quieter area. Establish ground rules. State the consequences of violent or threatening behavior.
Employ delaying tactics that give the person time to calm down. For example, offer a
glass of water.
Be reassuring and point out choices.
Help the person break down big problems into smaller, more manageable problems.
Accept criticism. When a complaint might be true, use statements such as; “You’re probably right” or “It was my fault.”
If the criticism seems unwarranted, ask clarifying questions.
Arrange yourself so that your exit is not blocked.
Make sure there are three to six feet between you and the other person.
9-8 © Safety Services Company
What not to do
Do not make sudden movements that may seem threatening.
Do not speak rapidly, raise your volume, or use an accusatory tone.
Do not reject all demands.
Do not make physical contact, jab your finger at the other person, or use long periods
of eye contact.
Do not pose in challenging stances: directly opposite someone, hands on hips, or with arms crossed.
Do not challenge, threaten, or dare the individual. Never belittle the other person.
Do not criticize or act impatient.
Do not attempt to bargain with a threatening individual.
Do not try to make the situation seem less serious than it is. Do not make false statements or promises you cannot keep.
Do not try to impart a lot of technical or complicated information when emotions are
high.
Do not take sides or agree with distortions.
Do not invade the individual’s personal space.
NOTE: In the “Attachments” Chapter of this Injury & Illness Prevention Program you will
find a master copy of the following form for Company use:
Violent Incident Report Form
Suspect & Vehicle Identification Sheet Employee Incident Report
Record of Employee Training

© Safety Services Company 9-9
Sexual Harassment Company Policy
It is this Company's Policy that illegal sexual discrimination, unwelcome sexual advances,
requests for sexual favors, and any other verbal, visual, or physical conduct of a sexual nature is strictly prohibited.
Requiring coworkers, subordinate employees, or prospective employees to submit to
conduct of this nature, explicitly or implicitly, as a term or condition of employment, or
used as a basis for any employment decisions is forbidden.
Any and all behavior that has the purpose or effect of unreasonably interfering with an individual's work performance, or creating an intimidating, hostile, or offensive work
environment is hereby banned.
Sexual harassment can occur in a variety of circumstances, including but not limited to:
The victim as well as the harasser may be a woman or a man. The victim does not
have to be of the opposite sex. The harasser can be the victim's supervisor, an agent of the employer, a
supervisor in another area, a co-worker, or a non-employee.
The victim does not have to be the person harassed but could be anyone affected
by the offensive conduct.
Unlawful sexual harassment may occur without economic injury to or discharge of
the victim. The harasser's conduct must be unwelcome.
Prevention is the best tool to eliminate sexual harassment in the workplace. Appropriate
managers have been designated, rather than a direct supervisor, and other alternative routes provided to receive the filing of formal complaints of sexual harassment. If
possible, it is requested that any victimized employee attempt to informally resolve a
sexual harassment issue by directly informing the harasser that the conduct is
unwelcome and must stop. If informal resolution is unsuccessful, the victim should use
the formal complaint form and submit it to the designated manager of their choice. This Company will take immediate and appropriate action when any employee files a formal
complaint.
This Company recognizes that the question of whether a particular course of conduct
constitutes sexual harassment requires a factual determination. The Company also
recognizes that false accusations of sexual harassment can have serious effects on
innocent persons. If an investigation results in a finding that a person who has accused another of sexual harassment has maliciously or recklessly made false accusations, the
accuser will be subject to appropriate sanctions, including discharge.
When investigating allegations of sexual harassment, this Company will look at the whole
record: the circumstances, such as the nature of the sexual advances, and the context
in which the alleged incidents occurred. A determination on the allegations is made from the facts on a case-by-case basis. It is this Company's Policy that sexual
harassment will not be tolerated.
NOTE: In the “Attachments” Chapter of this Injury & Illness Prevention Program you will
find a master copy of the following form for Company use:
Sexual Harassment Complaint Form

9-10 © Safety Services Company
Notes:
_______________________________________________________________________
_______________________________________________________________________
_______________________________________________________________________
_______________________________________________________________________
_______________________________________________________________________
_______________________________________________________________________
_______________________________________________________________________
_______________________________________________________________________
_______________________________________________________________________
_______________________________________________________________________
_______________________________________________________________________
_______________________________________________________________________
_______________________________________________________________________
_______________________________________________________________________
_______________________________________________________________________
_______________________________________________________________________
_______________________________________________________________________
_______________________________________________________________________
_______________________________________________________________________
_______________________________________________________________________
_______________________________________________________________________
_______________________________________________________________________
_______________________________________________________________________
_______________________________________________________________________
_______________________________________________________________________
_______________________________________________________________________
_______________________________________________________________________

© Safety Services Company 10-1
Chapter 10
Hazard Communication Program
§1926.59 – Hazard Communication
Policy Statement
A R M Environmental Services, Inc. is committed to the safety and health of its
employees. To identify and control hazards presented by chemicals in the workplace, A R M Environmental Services, Inc. will have in place a hazard communication program
(HCP) to provide information to employees about any hazardous materials they are
exposed to.
If A R M Environmental Services, Inc. employees are exposed to any hazardous
chemical, A R M Environmental Services, Inc. designates Andy Wilson to ensure a written HCP is created, communicated to all employees, and maintained according to all
applicable regulations, standards and industry best practices.
Employer Responsibilities
It is the responsibility of A R M Environmental Services, Inc. (through Andy Wilson) to:
Establish a hazard communication program if employees work with or around
any hazardous or toxic substances;
Ensure that proper safeguards are in place to ensure the safety of personnel
working with or around hazardous chemicals;
Ensure all hazardous chemicals in the workplace are labeled and have a
complete safety data sheet on file and available employees;
Ensure every employee is provided training covering the hazard communication
program;
Provide support for the implementation of HCP; and
Review the HCP at least annually to evaluate the effectiveness of the program.
Safety Committee Responsibilities
It is the responsibility of the A R M Environmental Services, Inc. safety committee to:
Assist in the creation and implementation of the A R M Environmental Services,
Inc. hazard communication program;
Assist in the development and delivery of HCP training; and
Identify issues of non-compliance and hazards related to the use of hazardous
chemicals.
Recommend steps to promote safety compliance and adherence to all safety
and health policy; and
Provide an avenue for employees to share concerns and recommend changes
regarding chemicals in the workplace to help ensure a safer work environment.
Employee Responsibilities
Every A R M Environmental Services, Inc. employee is expected to:
Follow safety policy and adhere to all precautions and safety requirements
when working with or around hazardous chemicals;
Understand the hazards of the chemicals in the workplace, reviewing Safety
Data Sheets before using any hazardous chemical;

10-2 © Safety Services Company
Understand how to lessen or prevent exposure to hazardous chemicals through
safe work practices and use of personal protective equipment;
Understand emergency procedures to follow in the event of exposure to these
chemicals;
Verify the proper labeling of chemicals at the worksite, and the presence of
SDSs for each;
Report any deficiencies in hazard communication as soon as safely possible to
his or her supervisor; and
Attend and participate actively in safety trainings.
Training
A R M Environmental Services, Inc. will ensure every employee is provided training
covering the hazard communication program. This training will be provided at no cost to
the employee during working hours.
A R M Environmental Services, Inc. will use only training material that is appropriate in
content and vocabulary to educational level, literacy, and language of employees.
A R M Environmental Services, Inc. will provide training on hazardous chemicals in their
work area at the time of assignment and whenever a new hazard is introduced to the
work area.
Andy Wilson will ensure that all employees at A R M Environmental Services, Inc. are
informed and trained in the following minimum elements for hazard communication:
The requirements of regulatory bodies, industry standards and best safety
practices regarding hazardous chemicals;
Operations in the employee’s work area that involve hazardous chemicals;
The availability and location of the written HCP, list of hazardous chemicals,
and safety data sheets (SDSs);
How to detect the presence or release of a hazardous chemical in the work
area;
The classified and unclassified hazards of chemicals in the work area;
Measures employees can take to protect themselves from these hazards,
including specific procedures the employer has implemented for employee
protection; and
The details of the HCP including an explanation of all labels and SDSs, and how
employees can obtain and use the appropriate hazard information. Training
must include the order of the information on the SDS and how to obtain and
use the hazard information.
Training records will include the following information:
The dates of the training sessions.
The contents or a summary of the training sessions.
The names and qualifications of persons conducting the training.
The names and job titles of all persons attending the training sessions.
Employee training records will be maintained for 3 years from the date on which the training occurred.

© Safety Services Company 10-3
Hazard Communication Program
The hazard communication program (HCP) describes how A R M Environmental Services,
Inc. will meet all applicable requirements regarding hazardous chemical labeling, material safety data sheets and employee information and training.
The HCP also will include the following:
A list of all chemicals known to present a hazard to A R M Environmental
Services, Inc. employees; and
Methods A R M Environmental Services, Inc. will use to inform employees of
hazards presented by non-routine tasks; and
Methods A R M Environmental Services, Inc. will use to inform employees of
hazards associated with chemicals contained in unlabeled pipes in their work
areas.
A R M Environmental Services, Inc. will rely on the evaluation of the chemical manufacturer or importer of any hazardous chemicals at the worksite to provide the
identifying and safety information required for the HCP.
Labels
All hazardous material containers at A R M Environmental Services, Inc. will be labeled,
tagged or marked with the following:
The product signifier;
Signal word;
Hazard statement(s);
Pictogram(s);
Precautionary statement(s); and
Name, address, and telephone
number of the chemical
manufacturer, importer, or other
responsible party.
For unclassified hazards, the label requires supplementary information, a description of
the unclassified hazards and appropriate precautionary measures to ensure safe handling and use.
Alternatively, hazardous material containers at A R M Environmental Services, Inc. can
be labeled, tagged or marked with the product identifier and words, pictures, symbols, or
combination thereof, to provide at least general information regarding the hazards of the
chemicals, and which, in conjunction with other information immediately available to
employees under the HCP, will provide employees with the specific information regarding the physical and health hazards of the hazardous chemical.
In lieu of affixing labels to individual containers, the A R M Environmental Services, Inc.
HCP may rely on signs, placards, process sheets, batch tickets, operating procedures or
similar written materials, as long as the alternative method provides workers with the
same information.
A container for a hazardous substance into which the substance has been transferred for
immediate use does not have to be labeled.
Labels and other forms of warnings will not be removed or defaced. A R M Environmental
Services, Inc. will ensure every label is legible in English, but may present the chemical’s
hazard information in another language, as long as it is also present in English.

10-4 © Safety Services Company
Safety Data Sheets
A R M Environmental Services, Inc. will maintain at least English-language copies of
SDSs for each hazardous chemical it uses, which will include the following section numbers and headings, and the information about the chemical associated with each:
Section 1, Identification;
Section 2, Hazard(s)
identification;
Section 3,
Composition/information on
ingredients;
Section 4, First-aid measures;
Section 5, Fire-fighting
measures;
Section 6, Accidental release
measures;
Section 7, Handling and storage;
Section 8, Exposure
controls/personal protection;
Section 9, Physical and chemical
properties;
Section 10, Stability and
reactivity;
Section 11, Toxicological
information.
Section 12, Ecological
information;
Section 13, Disposal
considerations;
Section 14, Transport
information;
Section 15, Regulatory
information
Section 16, Other information,
including date of preparation or
last revision.
Andy Wilson will maintain copies of safety data sheets for each hazardous chemical in
the workplace and shall ensure they are readily accessible during each work shift to
employees when they are in their work area(s).
Where employees must travel between workplaces during a workshift, SDSs may be kept
at the primary workplace facility.
Andy Wilson will make SDSs readily available, upon request, to any employee (or their
designated representatives) and any regulatory official with the authority to demand
them.
Employee Information and Training
The HCP will be made available upon request to any employee (or their designated
representatives) and any regulatory official with the authority to demand it.
A R M Environmental Services, Inc. will provide every employee with effective
information and training on hazardous chemicals in their work area at the time of initial assignment and whenever a new chemical hazard the employees have not previously
been trained about is introduced into their work area. Information and training may be
designed to cover categories of hazards or specific chemicals.

© Safety Services Company 10-5
Special Considerations
Multi-Employer Workplaces
If employees of another employer may be exposed to hazardous chemicals, A R M Environmental Services, Inc. will ensure the HCP includes the methods to do the
following for the other employers on the site:
Provide onsite access to SDSs for each hazardous chemical to which their
employees may be exposed;
Inform their employees of any precautionary measures that need to be taken
for worker protection during normal operating conditions and foreseeable
emergencies; and
Inform their employees of the labeling system used in the workplace.
Multiple Workplaces
If employees must travel between workplaces during a shift, the HCP may be kept at only the primary workplace facility.
Non-routine Tasks
Before employees begin work on hazardous non-routine tasks, the appropriate
supervisor will give affected employees information about hazardous chemicals to which
the employee may be exposed during such activity. This information will include the following:
Specific chemical hazards;
Protective/safety measures employees can take; and
Measures A R M Environmental Services, Inc. has taken to reduce the hazards.
Hazardous Chemicals in Unlabeled Pipes
Though regulations do not require pipes for hazardous chemicals to be labeled, if there
are hazards associated with chemicals in pipes in the work area, the affected employees’ supervisor will provide information about that chemical and its hazards as though the
chemical was being used in that area.
Policy Review
All aspects of this policy and the A R M Environmental Services, Inc. hazard
communication program are subject to annual review by Andy Wilson and the safety committee to ensure the effectiveness of the policy, to guarantee a safe working
environment for A R M Environmental Services, Inc. employees, and to reflect any
regulatory changes to which the policy must respond.
On the following pages, please find the following documents:
Hazardous Chemical Labels
Chemicals Known to Present a Hazard
Hazard Communication Training Acknowledgement
Hazard Communication Training Documentation
These forms may be reproduced freely by A R M Environmental Services, Inc. for the
purposes of implementing and maintaining a safety and health program.

10-6 © Safety Services Company
HAZARDOUS CHEMICAL NAME OF CHEMICAL:
________________________________
Physical Hazards:
________________________________
________________________________
Health Hazards, Target Organs, or Systems:
________________________________
________________________________
Optional Information, such as Personal
Protective Equipment or Safe Handling:
________________________________
________________________________

© Safety Services Company 10-7
Chemicals Known to Present a Hazard
Chemical name SDS on File? Labeled?
Training
Program?
Yes No Yes No Yes No

10-8 © Safety Services Company
HAZARD COMMUNICATION TRAINING ACKNOWLEDGEMENT
This is to certify that I have been trained and informed about the hazards and
precautions associated with the use of hazardous chemicals in my work as required in
the A R M Environmental Services, Inc. written hazard communication program.
To confirm my understanding of such training and instructions, the Safety Coordinator
has reviewed them with me and he/she indicated his/her satisfaction by checking the box before each of the topics listed below:
Overview of the requirements contained in the OSHA Hazardous Chemical
Communication Rule
Chemicals present in my workplace operations.
Locations and availability of our written hazard communication program and the SDS for the hazardous chemicals.
Physical and health effects of these hazardous chemicals.
Methods used to determine the presence or release of hazardous chemicals.
How to lessen or prevent exposure to these hazardous chemicals through safe work
practices and use of personal protective equipment.
Steps A R M Environmental Services, Inc. has taken to lessen or prevent exposure to
these chemicals.
Safety emergency procedures to follow in the event of exposure to these chemicals.
How to read container labels and interpret SDS to obtain appropriate hazard
information.
Employee’s Name Signature Date
Trainer’s Name Signature Date
Note to employee: This form will be made a part of your personnel file. Please
read and understand its contents before signing.

© Safety Services Company 10-9
HAZARD COMMUNICATION TRAINING
Trainer (include qualifications):
Date:
Content of Training:
Attendees
Print Name Signature
(Retain at least 3 years)

10-10 © Safety Services Company
Notes:
_______________________________________________________________________
_______________________________________________________________________
_______________________________________________________________________
_______________________________________________________________________
_______________________________________________________________________
_______________________________________________________________________
_______________________________________________________________________
_______________________________________________________________________
_______________________________________________________________________
_______________________________________________________________________
_______________________________________________________________________
_______________________________________________________________________
_______________________________________________________________________
_______________________________________________________________________
_______________________________________________________________________
_______________________________________________________________________
_______________________________________________________________________
_______________________________________________________________________
_______________________________________________________________________
_______________________________________________________________________
_______________________________________________________________________
_______________________________________________________________________
_______________________________________________________________________
_______________________________________________________________________
_______________________________________________________________________
_______________________________________________________________________

© Safety Services Company 11-1
Chapter 11
Personal Protective Equipment
29 CFR-1910.132 - Personal Protective Equipment
The following list of personal protective equipment (PPE) is available to all employees
and will be used as required by Federal, State, or Local regulations:
Hard hats, safety glasses, work boots, steel toe boots, respirators, tevek or nomex suits,
hearing protection, gloves, and fall protection gear.
Employees can request PPE equipment from The Supervisor.
Policy Statement
A R M Environmental Services, Inc. has implemented this safety program to ensure the
protection of personnel from hazards on the job that may be safeguarded against by the
proper use of Personal Protective Equipment. The Supervisor is the supervisor
responsible for ensuring the following work practices are enforced.
The Supervisor will ensure that all employees are properly trained in the recognition and
assessment of hazards and hazardous situations, the proper selection and use of
personal protective equipment required for the hazard and to avoid, prevent, or abate
such hazards.
Employees will be trained on initial hiring to use, maintain, clean and disinfect, store, and service PPE properly. Employees will receive refresher training on PPE at least
annually, or as work requirements, changing job assignments, changing equipment, or
environment warrants it. Any employee who demonstrates a lack of knowledge or
understanding of any aspect of PPE use or maintenance will be re-trained. An employee
must verify his/her understanding of training content as a condition of employment.
The Supervisor will do a hazard assessment of each jobsite prior to commencement of
work to ascertain if hazards are present or likely to be encountered, what engineering
controls may be implemented to minimize hazards, and what PPE is necessary for the
performance of the job. Affected employees will be notified of hazards, engineering
controls needed, and PPE required.
PPE will be provided for all work required by A R M Environmental Services, Inc. and employees are required by Company Policy to use only proper company PPE at all times
when required on the job or on company property. Failure to use PPE will result in
disciplinary action against the violating employee.
PPE will be issued and fitted to each affected employee individually. Employees must
demonstrate proficiency in donning and doffing equipment, and proper techniques of cleaning and maintaining their respective equipment.
PPE must be used, stored, and maintained in a sanitary condition. All PPE must be
cleaned, disinfected, and stored according to manufacturer’s recommendations.
Defective or damaged PPE will be immediately tagged “OUT OF SERVICE”, removed from
service, and replaced with serviceable equipment. PPE will be inspected by the individual employee at the beginning of each work shift.

11-2 © Safety Services Company
OSHA Personal Protective Equipment Standards
Introduction
The Occupational Safety and Health Administration (OSHA) require that employers
protect their employees from workplace hazards that can cause injury. Controlling a
hazard at its source is the best way to protect employees. Depending on the hazard or
workplace conditions, OSHA recommends the use of engineering or work practice
controls to manage or eliminate hazards to the greatest extent possible. For example,
building a barrier between the hazard and the employees is an engineering control; changing the way in which employees perform their work is a work practice control.
When engineering, work practice and administrative controls are not feasible or do not
provide sufficient protection, employers must provide "Personal Protective Equipment"
(PPE) to their employees and ensure its use. Personal protective equipment, commonly
referred to as "PPE", is equipment worn to minimize exposure to a variety of hazards. Examples of PPE include such items as gloves, foot and eye protection, protective
hearing devices (earplugs, muffs) hard hats, respirators and full body suits.
This information will help both employers and employees do the following:
Understand the types of PPE.
Know the basics of conducting a "Hazard Assessment" of the workplace. Select appropriate PPE for a variety of circumstances.
Understand what kind of training is needed in the proper use and care of PPE.
The following information is general in nature and does not address all workplace
hazards or PPE requirements. The information, methods and procedures in this guide are based on the OSHA requirements for PPE.
Important Note: This guide does not address PPE requirements related to respiratory
protection as this information is extensive and is covered in detail in the "Respiratory
Protection" Chapter.
Requirement for PPE
To ensure the greatest possible protection for employees in the workplace, the
cooperative efforts of both employers and employees will help in establishing and
maintaining a safe and healthful work environment.
In general, employers are responsible for:
Performing a "hazard assessment" of the workplace to identify and control physical
and health hazards.
Identifying and providing appropriate PPE for employees. Training employees in the use and care of the PPE.
Maintaining PPE, including replacing worn or damaged PPE.
Periodically reviewing and evaluating the effectiveness of the PPE program.
In general, employees should:
Properly wear PPE.
Attend training sessions on PPE.
Care for, clean, and maintain PPE. Inform a supervisor of the need to repair or replace PPE.
Specific requirements for PPE are presented in many different OSHA standards,
published in 29 CFR. Some standards require that employers provide PPE at no cost to
the employee while others simply state that the employer must provide PPE.
© Safety Services Company 11-3
The Hazard Assessment
A first critical step in developing a comprehensive safety and health program is to
identify physical and health hazards in the workplace. This process is known as a "Hazard Assessment." Potential hazards may be physical or health-related and a
comprehensive hazard assessment should identify hazards in both categories. Examples
of physical hazards include moving objects, fluctuating temperatures, high intensity
lighting, rolling or pinching objects, electrical connections, and sharp edges. Examples
of health hazards include overexposure to harmful dusts, chemicals, or radiation.
The hazard assessment should begin with a walk-through survey of the facility to
develop a list of potential hazards in the following basic hazard categories:
Impact
Penetration
Compression (roll-over) Chemical
Heat/Cold
Harmful Dust
Light (optical) Radiation
Biological
In addition to noting the basic layout of the workplace and reviewing any history of occupational illnesses or injuries, things to look for during the walk-through survey
include:
Sources of electricity.
Sources of motion such as machines or processes where movement may exist that could result in an impact between personnel and equipment.
Sources of high temperatures that could result in burns, eye injuries or fire.
Types of chemicals used in the workplace.
Sources of harmful dusts.
Sources of light radiation, such as welding, brazing, cutting, furnaces, heat treating, high intensity lights, etc.
The potential for falling or dropping objects.
Sharp objects that could poke, cut, stab or puncture.
Biologic hazards such as blood or other potentially infected material.
When the walk-through is complete, supervisors should organize and analyze the data so
that it may be efficiently used in determining the proper types of PPE required in the
workplace. The employer should become aware of the different types of PPE available
and the levels of protection offered. It is definitely a good idea to select PPE that will
provide a level of protection greater than the minimum required to protect employees from hazards. The workplace should be periodically reassessed for any changes in
conditions, equipment, or operating procedures that could affect occupational hazards.
This periodic reassessment should also include a review of injury and illness records to
spot any trends or areas of concern and taking appropriate corrective action. The
suitability of existing PPE, including an evaluation of its condition and age, should be included in the reassessment.
Documentation of the hazard assessment is required through a written certification that
includes the following information:
Identification of the workplace evaluated.
Name of the person conducting the assessment. Date of the assessment.
Identification of the document certifying completion of the hazard assessment.
Selecting PPE
All PPE clothing and equipment should be of safe design and construction, and should be
maintained in a clean and reliable fashion. Employers should take the fit and comfort of
PPE into consideration when selecting appropriate items for their workplace. PPE that
fits well and is comfortable to wear will encourage employee use of PPE.

11-4 © Safety Services Company
Most protective devices are available in multiple sizes and care should be taken to select
the proper size for each employee. If several different types of PPE are worn together,
make sure they are compatible. If PPE does not fit properly, it can make the difference between being safely covered or dangerously exposed. It may not provide the level of
protection desired and may discourage employee use.
OSHA requires that many categories of PPE meet or be equivalent to standards
developed by the American National Standards Institute (ANSI). ANSI has been
preparing safety standards since the 1920s, when the first safety standard was approved to protect the heads and eyes of industrial workers. Employers who need to provide PPE
in the categories listed below must make certain that any new equipment procured
meets the cited ANSI standard. Existing PPE stocks must meet the ANSI standard in
effect at the time of its manufacture or provide protection equivalent to PPE
manufactured to the ANSI criteria. Employers should inform employees who provide
their own PPE of the employer’s selection decisions and ensure that any employee-owned PPE used in the workplace conforms to the employer’s criteria, based on the
hazard assessment, OSHA requirements, and ANSI standards.
OSHA requires PPE to meet the following ANSI standards:
Eye and Face Protection: ANSI Z87.1-1989
Head Protection: ANSI Z89.1-1986.
Foot Protection: ANSI Z41.1-1991.
For hand protection, there is no ANSI standard for gloves but OSHA recommends that selection be based upon the tasks to be performed and the performance and
construction characteristics of the glove material. For protection against chemicals,
glove selection must be based on the chemicals encountered, the chemical resistance,
and the physical properties of the glove material.
Training Employees in the Proper Use of PPE
Employers are required to train each employee who must use PPE. Employees must be
trained to know at least the following:
When PPE is necessary.
What PPE is necessary. How to properly put on, take off, adjust and wear the PPE.
The limitations of the PPE.
Proper care, maintenance, useful life and disposal of PPE.
Employers should make sure that each employee demonstrates an understanding of the
PPE training as well as the ability to properly wear and use PPE before they are allowed
to perform work requiring the use of the PPE. If an employer believes that a previously
trained employee is not demonstrating the proper understanding and skill level in the
use of PPE, that employee should receive retraining.
Other situations that require additional or retraining of employees include the following
circumstances: changes in the workplace or in the type of required PPE that make prior
training obsolete.
Eye and Face Protection
OSHA requires employers to ensure that employees have appropriate eye or face protection if they are exposed to eye or face hazards from flying particles, molten metal,
liquid chemicals, acids or caustic liquids, chemical gases or vapors, potentially infected
material, or potentially harmful light radiation.
Employers must be sure that their employees wear appropriate eye and face protection
and that the selected form of protection is appropriate to the work being performed and
properly fits each worker exposed to the hazard.

© Safety Services Company 11-5
Prescription Lenses
Employers must make sure that employees with corrective lenses either wear eye
protection that incorporates the prescription into the design or wear additional eye
protection over their prescription lenses. It is important to ensure that the protective
eyewear does not disturb the proper positioning of the prescription lenses so that the
employee’s vision will not be inhibited or limited. Also, employees who wear contact
lenses must wear eye or face PPE when working in hazardous conditions.
Eye Protection for Exposed Workers
OSHA suggests that eye protection be routinely considered for use by carpenters,
electricians, machinists, mechanics, millwrights, plumbers and pipefitters, sheet metal workers and tinsmiths, assemblers, sanders, grinding machine operators, sawyers,
welders, laborers, chemical process operators and handlers, and timber cutting and
logging workers. Employers of workers in other job categories should decide whether
there is a need for eye and face PPE through a hazard assessment.
Examples of potential eye or face injuries include:
Dust, dirt, metal or wood chips entering the eye from activities such as chipping,
grinding, sawing, hammering, the use of power tools or even strong wind forces.
Chemical splashes from corrosive substances, hot liquids, solvents or other hazardous
solutions. Objects swinging into the eye or face, such as tree limbs, chains, tools, or ropes.
Radiant energy from welding, harmful rays from the use of lasers or other radiant
light (as well as heat, glare, sparks, splash and flying particles).
Types of Eye Protection
Selecting the most suitable eye and face protection for employees should take into
consideration the following elements:
Ability to protect against specific workplace hazards. Should fit properly and be reasonably comfortable to wear.
Should provide unrestricted vision and movement.
Should be durable and cleanable.
Should allow unrestricted functioning of any other required PPE.
The eye and face protection selected for employee use must clearly identify the
manufacturer. Any new eye and face protective devices must comply with ANSI Z87.1-
1989 or be at least as effective as this standard requires.
An employer may choose to provide one pair of protective eyewear for each position
rather than individual eyewear for each employee. If this is done, the employer must make sure that employees disinfect shared protective eyewear after each use.
Protective eyewear with corrective lenses may only be used by the employee for whom
the corrective prescription was issued and may not be shared among employees.
Some of the most common types of eye and face protection include:
Safety Spectacles — These protective eyeglasses have safety frames constructed of
metal or plastic and impact-resistant lenses. Side shields are available on some models.
Goggles — These are tight-fitting eye protection that completely cover the eyes, eye
sockets and the facial area immediately surrounding the eyes and provide protection
from impact, dust and splashes. Some goggles will fit over corrective lenses.
11-6 © Safety Services Company
Welding shields — Constructed of vulcanized fiber or fiberglass and fitted with a
filtered lens, welding shields protect eyes from burns caused by infrared or intense
radiant light; they also protect both the eyes and face from flying sparks, metal spatter and slag chips produced during welding, brazing, soldering and cutting operations.
OSHA requires filter lenses to have a shade number appropriate to protect against the
specific hazards of the work being performed in order to protect against harmful light
radiation.
Laser safety goggles — These specialty goggles protect against intense concentrations of light produced by lasers. The type of laser safety goggles an employer chooses will
depend upon the equipment and operating conditions in the workplace.
Face shields — These transparent sheets of plastic extend from the eyebrows to below
the chin and across the entire width of the employee’s head. Some are polarized for
glare protection. Face shields protect against nuisance dusts and potential splashes or
sprays of hazardous liquids but will not provide adequate protection against impact hazards. Face shields used in combination with goggles or safety spectacles will provide
additional protection against impact hazards.
Each type of protective eyewear is designed to protect against specific hazards.
Employers can identify the specific workplace hazards that threaten employees’ eyes and
faces by completing a hazard assessment as outlined in the earlier section.
Welding Operations
The intense light associated with welding operations can cause serious and sometimes
permanent eye damage if operators do not wear proper eye protection. The intensity of
light or radiant energy produced by welding, cutting or brazing operations varies according to a number of factors including the task producing the light, the electrode size
and the arc current.
Head Protection
Employers must ensure that their employees wear head protection if any of the following apply:
Objects might fall from above and strike them on the head.
They might bump their heads against fixed objects, such as pipes or beams.
There is a possibility of accidental head contact with electrical hazards.
Whenever there is a danger of objects falling from above, such as working below others
who are using tools or working under a conveyor belt, head protection must be worn.
Hard hats must be worn with the bill forward to protect employees properly.
In general, protective helmets or hard hats should do the following:
Resist penetration by objects.
Absorb the shock of a blow.
Be water-resistant and slow burning.
Have clear instructions explaining proper adjustment and replacement of the
suspension and headband. Hard hats must have a hard outer shell and a shock-absorbing lining that incorporates a headband and straps that suspend the shell from
1 to 1 1/4 inches away from the head. This type of design provides shock absorption
during an impact and ventilation during normal wear.
Protective headgear must meet ANSI Standard Z89.1-1986 (Protective Headgear for
Industrial Workers) or provide an equivalent level of protection.

© Safety Services Company 11-7
Types of Hard Hats
In addition to selecting protective headgear that meets ANSI standard requirements,
employers should ensure that employees wear hard hats that provide appropriate
protection against potential workplace hazards. It is important for employers to
understand all potential hazards when making this selection, including electrical hazards.
This can be done through a comprehensive hazard assessment and an awareness of the
different types of protective headgear available.
Hard hats are divided into three industrial classes:
Class G (Old Class A) hard hats provide impact and penetration resistance along with
limited voltage protection (up to 2,200 volts).
Class E (Old Class B) hard hats provide the highest level of protection against electrical
hazards, with high-voltage shock and burn protection (up to 20,000 volts). They also
provide protection from impact and penetration by flying/falling objects.
Class C hard hats provide lightweight comfort and impact protection but offer no
protection from electrical hazards.
Another class of protective headgear on the market is called a “bump hat,” designed for
use in areas with low head clearance. They are recommended for areas where
protection is needed from head bumps and lacerations. These are not designed to
protect against falling or flying objects and are not ANSI approved. It is essential to
check the type of hard hat employees are using to ensure that the equipment provides
appropriate protection. Each hat should bear a label inside the shell that lists the manufacturer, the ANSI designation and the class of the hat.
Size and Care Considerations
Head protection that is either too large or too small is inappropriate for use, even if it meets all other requirements. Protective headgear must fit appropriately on the body
and for the head size of each individual. Most protective headgear comes in a variety of
sizes with adjustable headbands to ensure a proper fit (many adjust in 1/8-inch
increments). A proper fit should allow sufficient clearance between the shell and the
suspension system for ventilation and distribution of an impact. The hat should not bind,
slip, fall off or irritate the skin.
Some protective headgear allows for the use of various accessories to help employees
deal with changing environmental conditions, such as slots for earmuffs, safety glasses,
face shields, and mounted lights. Optional brims may provide additional protection from
the sun and some hats have channels that guide rainwater away from the face.
Protective headgear accessories must not compromise the safety elements of the equipment.
Periodic cleaning and inspection will extend the useful life of protective headgear. A
daily inspection of the hard hat shell, suspension system and other accessories for holes,
cracks, tears, or other damage that might compromise the protective value of the hat is
essential. Paints, paint thinners and some cleaning agents can weaken the shells of hard hats and may eliminate electrical resistance. Consult the helmet manufacturer for
information on the effects of paint and cleaning materials on their hard hats. Never drill
holes, paint, or apply labels to protective headgear as this may reduce the integrity of
the protection. Do not store protective headgear in direct sunlight, such as on the rear
window shelf of a car, since sunlight and extreme heat can damage them.
Helmets with any of the following defects should be immediately replaced:
Perforation, cracking, or deformity of the brim or shell;

11-8 © Safety Services Company
Indication of exposure of the brim or shell to heat, chemicals, or ultraviolet light and
other radiation (in addition to a loss of surface gloss, such signs include chalking or
flaking). It is a good idea to always replace a hard hat if it sustains an impact, even if damage is not noticeable. Suspension systems are offered as replacement parts
and should be replaced when damaged or when excessive wear is noticed. It is not
necessary to replace the entire hard hat when deterioration or tears of the suspension
systems are noticed.
Foot and Leg Protection
Situations where an employee should wear foot and/or leg protection include:
When heavy objects or tools might roll onto or fall on the employee’s feet. Working with sharp objects such as nails or spikes that could pierce the soles or
uppers of ordinary shoes.
Exposure to molten metal that might splash on feet or legs.
Working on or around hot, wet, or slippery surfaces.
Working when electrical hazards are present. Safety footwear must meet ANSI minimum compression and impact performance
standards in ANSI Z41-1991. All ANSI approved footwear has a protective toe and
offers impact and compression protection, but the type and amount of protection is not
always the same. Different footwear protects in different ways. Check the product’s
labeling or consult the manufacturer to make sure the footwear will protect the user from the hazards they face.
Foot and leg protection choices include the following:
Leggings protect the lower legs and feet from heat hazards such as molten metal or
welding sparks. Safety snaps allow leggings to be removed quickly. Metatarsal guards protect the instep area from impact and compression. Made of
aluminum, steel, fiber or plastic, these guards may be strapped to the shoes.
Toe guards fit over the toes of regular shoes to protect the toes from impact and
compression hazards. They may be made of steel, aluminum or plastic. Combination
foot and shin guards protect the lower legs and feet, and may be used in combination with toe guards when greater protection is needed.
Safety shoes have impact-resistant toes and heat-resistant soles that protect the feet
against hot work surfaces common in foundry and other hot metal industries. The metal
insoles of some safety shoes protect against puncture wounds. Safety shoes may also
be designed to be electrically conductive to prevent the buildup of static electricity in areas with the potential for explosive atmospheres or nonconductive to protect workers
from workplace electrical hazards.
Special Purpose Shoes
Electrically conductive shoes provide protection against the buildup of static electricity.
Employees working in explosive and hazardous locations such as explosives
manufacturing facilities or grain elevators must wear conductive shoes to reduce the risk
of static electricity buildup on the body that could produce a spark and cause an
explosion or fire. Foot powder should not be used in conjunction with protective conductive footwear because it reduces the conductive ability of the shoes. Silk, wool,
and nylon socks can produce static electricity and should not be worn with conductive
footwear. Conductive shoes must be removed when the task requiring their use is
completed.
Note: Employees exposed to electrical hazards must never wear conductive shoes. Electrical hazard, safety-toe shoes are nonconductive and will prevent the wearer’s feet
from completing an electrical circuit to the ground. These shoes can protect against
open circuits of up to 600 volts in dry conditions and should be used in conjunction with
other insulating equipment and additional precautions to reduce the risk of a worker
becoming a path for hazardous electrical energy.

© Safety Services Company 11-9
The insulating protection of electrical hazard, safety-toe shoes may be compromised if
the shoes become wet, the soles are worn through, metal particles become embedded in
the sole or heel, or workers touch conductive, grounded items.
Note: Nonconductive footwear must not be used in explosive or hazardous locations.
Foundry Shoes
In addition to insulating the feet from the extreme heat of molten metal, foundry shoes
keep hot metal from lodging in shoe eyelets, tongues or other shoe parts. These snug-fitting leather or leather-substitute shoes have leather or rubber soles and rubber heels.
All foundry shoes must have built-in safety toes.
Care of Protective Footwear
As with all protective equipment, safety footwear should be inspected prior to each use.
Shoes and leggings should be checked for wear and tear at reasonable intervals. This
includes looking for cracks or holes, separation of materials, broken buckles or laces.
The soles of shoes should be checked for pieces of metal or other embedded items that
could present electrical or tripping hazards. Employees should follow the manufacturers’ recommendations for cleaning and maintenance of protective footwear.
Hand and Arm Protection
If a workplace hazard assessment reveals that employees face potential injury to hands
and arms that cannot be eliminated through engineering and work practice controls,
employers must ensure that employees wear appropriate protection. Potential hazards include skin absorption of harmful substances, chemical or thermal burns, electrical
dangers, bruises, abrasions, cuts, punctures, fractures and amputations. Protective
equipment includes gloves, finger guards and arm coverings, or elbow-length gloves.
Employers should explore all possible engineering and work practice controls to eliminate
hazards and use PPE to provide additional protection against hazards that cannot be
completely eliminated through other means.
Types of Protective Gloves
It is essential that employees use gloves specifically designed for the hazards and tasks
found in their workplace because gloves designed for one function may not protect against a different function even though they may appear to be an appropriate
protective device.
Factors that may influence the selection of protective gloves for a workplace:
Type of chemicals handled. Nature of contact (total immersion, splash, etc.).
Duration of contact.
Thermal protection.
Area requiring protection (hand only, forearm, or entire arm).
Grip requirements (dry, wet, oily). Size and comfort.
Abrasion/resistance requirements.
Gloves made from a wide variety of materials are designed for many types of workplace
hazards.
In general, gloves fall into four groups:
Gloves made of leather, canvas or metal mesh.
Fabric and coated fabric gloves. Chemical- and liquid-resistant gloves.
Insulating rubber gloves.

11-10 © Safety Services Company
Leather, Canvas, or Metal-Mesh Gloves
Sturdy gloves made from metal mesh, leather, or canvas provide protection against cuts
and burns. Leather or canvas gloves also protect against sustained heat. Leather gloves
protect against sparks, moderate heat, blows, chips, and rough objects.
Aluminized gloves provide reflective and insulating protection against heat and require
an insert made of synthetic materials to protect against heat and cold.
Aramid fiber gloves protect against heat and cold, are cut- and abrasive-resistant, and wear well.
Synthetic gloves of various materials offer protection against heat and cold are cut-
and abrasive-resistant and may withstand some diluted acids. These materials do not
stand up against alkalis and solvents.
Fabric and Coated Fabric Gloves
Fabric and coated fabric gloves are made of cotton or other fabric to provide varying
degrees of protection.
Fabric gloves protect against dirt, slivers, chafing, and abrasions. They do not provide sufficient protection for use with rough, sharp or heavy materials. Adding a plastic
coating will strengthen some fabric gloves.
Coated fabric gloves are normally made from cotton flannel with napping on one side.
By coating the un-napped side with plastic, fabric gloves are transformed into general-
purpose hand protection, offering slip-resistant qualities.
These gloves are used for tasks ranging from handling bricks and wire to chemical laboratory containers. When selecting gloves to protect against chemical exposure
hazards, always check with the manufacturer or review the product literature to
determine the glove’s effectiveness against specific workplace chemicals and conditions.
Chemical- and Liquid-Resistant Gloves
Chemical-resistant gloves are made with different kinds of rubber: natural, butyl,
neoprene, nitrile and fluorocarbon (viton); or various kinds of plastic: polyvinyl chloride
(PVC), polyvinyl alcohol, and polyethylene. These materials can be blended or laminated
for better performance. As a general rule, the thicker the glove material, the greater the
chemical resistance; however, thick gloves may impair grip and dexterity, having a negative impact on safety.
Some examples of chemical-resistant gloves include:
Butyl gloves are made of a synthetic rubber and protect against a wide variety of chemicals, such as peroxide, rocket fuels, highly corrosive acids (nitric acid, sulfuric acid,
hydrofluoric acid, and red-fuming nitric acid), strong bases, alcohols, aldehydes,
ketones, esters, and nitro compounds. Butyl gloves also resist oxidation, ozone
corrosion and abrasion, and remain flexible at low temperatures. Butyl rubber does not
perform well with aliphatic and aromatic hydrocarbons and halogenated solvents.
Natural (latex) rubber gloves are comfortable to wear, which makes them a popular,
general-purpose glove. They feature outstanding tensile strength, elasticity, and
temperature resistance. In addition to resisting abrasions caused by grinding and
polishing, these gloves protect workers’ hands from most water solutions of acids,
alkalis, salts, and ketones. Latex gloves have caused allergic reactions in some
individuals and may not be appropriate for all employees. Hypoallergenic gloves, glove liners, and powderless gloves are possible alternatives for workers who are allergic to
latex gloves.

© Safety Services Company 11-11
Neoprene gloves are made of synthetic rubber and offer good pliability, finger
dexterity, high density and tear resistance. They protect against hydraulic fluids,
gasoline, alcohols, organic acids, and alkalis. They generally have chemical & wear resistance properties superior to those made of natural rubber.
Nitrile gloves are made of a copolymer and provide protection from chlorinated
solvents such as trichloroethylene and perchloroethylene. Although intended for jobs
requiring dexterity and sensitivity, nitrile gloves stand up to heavy use even after
prolonged exposure to substances that cause other gloves to deteriorate. They offer protection when working with oils, greases, acids, caustics, and alcohols but are
generally not recommended for use with strong oxidizing agents, aromatic solvents,
ketones, and acetates.
Care of Protective Gloves
Protective gloves should be inspected before each use to ensure that they are not torn,
punctured or made ineffective in any way. A visual inspection will help detect cuts or
tears but a more thorough inspection by filling the gloves with water and tightly rolling
the cuff towards the fingers will help reveal any pinhole leaks. Gloves that are discolored
or stiff may also indicate deficiencies caused by excessive use or degradation from chemical exposure. Any gloves with impaired protective ability should be discarded and
replaced. Reuse of chemical-resistant gloves should be evaluated carefully, taking into
consideration the absorptive qualities of the gloves. A decision to reuse chemically-
exposed gloves should take into consideration the toxicity of the chemicals involved and
factors such as duration of exposure, storage, and temperature.
Body Protection
Employees who face possible bodily injury of any kind that cannot be eliminated through
engineering, work practice, or administrative controls must wear appropriate body
protection while performing their jobs. In addition to cuts and radiation, the following
are examples of workplace hazards that could cause bodily injury:
Temperature extremes.
Hot splashes from molten metals and other hot liquids.
Potential impacts from tools, machinery and materials.
Hazardous chemicals.
Employers are required to ensure that their employees wear personal protective
equipment only for the parts of the body exposed to possible injury. Examples of body
protection include laboratory coats, coveralls, vests, jackets, aprons, surgical gowns, and
full body suits.
If a hazard assessment indicates a need for full body protection against toxic substances or harmful physical agents, the clothing should be carefully inspected before each use, it
must fit each worker properly, and it must function properly and for the purpose for
which it is intended.
Protective clothing comes in a variety of materials, each effective against
particular hazards, such as:
Paper-like fiber used for disposable suits protects against dust and splashes.
Treated wool and cotton adapts well to changing temperatures, is comfortable, fire-
resistant, and protects against dust, abrasions, and irritating surfaces.
Duck is a closely woven cotton fabric that protects against cuts and bruises when handling heavy, sharp, or rough materials.
Leather is often used to protect against dry heat and flames.

11-12 © Safety Services Company
Rubber, rubberized fabrics, neoprene, and plastics protect against certain
chemicals and physical hazards. When chemical or physical hazards are present, check
with the clothing manufacturer to ensure that the material selected will provide protection against the specific hazard.
Hearing Protection
Employee exposure to excessive noise depends upon a number of factors, including:
The loudness of the noise as measured in decibels (dB).
The duration of each employee’s exposure to the noise. Whether employees move between work areas with different noise levels.
Whether noise is generated from one or multiple sources.
Generally, the louder the noise, the shorter the exposure time before hearing protection
is required. For instance, employees may be exposed to a noise level of 90 dB for 8
hours per day (unless they experience a Standard Threshold Shift) before hearing protection is required. On the other hand, if the noise level reaches 115 dB hearing
protection is required if the anticipated exposure exceeds 15 minutes.
Noises are considered continuous if the interval between occurrences of the maximum
noise level is one second or less. Noises not meeting this definition are considered
impact or impulse noises (loud momentary explosions of sound) and exposures to this
type of noise must not exceed 140 dB. Examples of situations or tools that may result in impact or impulse noises are powder-
actuated nail guns, a punch press, or drop hammers.
If engineering and work practice controls do not lower employee exposure to workplace
noise to acceptable levels, employees must wear appropriate hearing protection. It is
important to understand that hearing protectors reduce only the amount of noise that gets through to the ears. The amount of this reduction is referred to as attenuation,
which differs according to the type of hearing protection used and how well it fits.
Hearing protectors worn by employees must reduce an employee’s noise exposure to
within the acceptable limits.
Manufacturers of hearing protection devices must display the device’s NRR on the product packaging. If employees are exposed to occupational noise at or above 85 dB
averaged over an eight hour period, the employer is required to institute a hearing
conservation program.
Some types of hearing protection include:
Single-use earplugs are made of waxed cotton, foam, silicone rubber, or fiberglass
wool. They are self-forming and, when properly inserted, they work as well as most
molded earplugs.
Pre-formed or molded earplugs must be individually fitted by a professional and can
be disposable or reusable. Reusable plugs should be cleaned after each use.
Earmuffs require a perfect seal around the ear. Glasses, facial hair, long hair or facial
movements such as chewing may reduce the protective value of earmuffs.
OSHA requires that employers protect their employees from workplace hazards that can
cause injury. Controlling a hazard at its source is the best way to protect employees. Depending on the hazard or workplace conditions, OSHA recommends the use of
engineering or work practice controls to manage or eliminate hazards to the greatest
extent possible. For example, building a barrier between the hazard and the employees
is an engineering control; changing the way in which employees perform their work is a
work practice control. When engineering, work practice and administrative controls are not feasible or do not provide sufficient protection, employers must provide PPE to their
employees and ensure its use.
© Safety Services Company 12-1
Chapter 12
Respiratory Protection Program
29-CFR-§1910.134 – Respiratory Protection
Policy Statement
A R M Environmental Services, Inc. has implemented this policy to ensure that no
employee is exposed to airborne hazards in excess of permissible exposure limits (PELs),
or oxygen deficient atmospheres. Andy Wilson is the supervisor responsible for ensuring the following engineering controls and work practices are enforced.
Andy Wilson is the respiratory program administrator for A R M Environmental Services,
Inc. and will be responsible for the periodic evaluation of the program. The evaluation
will be based on results of the air quality monitoring program, medical evaluations,
changing work environment, equipment changes, work requirements, and employee
responses. Respiratory equipment will be NIOSH certified only, and selection will be made by Andy Wilson based on identified and potential hazards, estimated exposures,
and contamination information.
A R M Environmental Services, Inc. will ensure that employees are trained in the proper
selection for situation and fit, use, storage, and cleaning of respiratory equipment, and
can demonstrate knowledge of at least the following:
Why the respirator is necessary and how improper fit, usage, or maintenance can
compromise the protective effect of the respirator.
What the limitations and capabilities of the respirator are.
How to use the respirator effectively in emergency situations, including situations in
which the respirator malfunctions. How to inspect, put on and remove, use, and check the seals of the respirator.
What the procedures are for maintenance and storage of the respirator.
How to recognize medical signs and symptoms that may limit or prevent the effective
use of respirators.
The general requirements of OSHA §1910.134 Respiratory Protection.
Retraining will be done annually, and when the following situations occur:
Changes in the workplace or the type of respirator render previous training obsolete. Inadequacies in the employee's knowledge or use of the respirator indicate that the
employee has not retained the requisite understanding or skill.
Any other situation arises in which retraining appears necessary to ensure safe
respirator use.
Proper respiratory equipment, replacement elements, and any parts or equipment
necessary for the functioning of the respiratory equipment will be available to employees
at no cost.
Respiratory equipment will be maintained, cleaned, stored, and serviced per
manufacturer’s recommendations. Job foremen will supervise and ensure proper methods are used.
A medical examination for employees required to use respiratory equipment is required
before use of the equipment, and will be provided at no cost to the employee. The
medical questionnaire provided in Appendix C is mandatory for employees required to
use respiratory protection.

12-2 © Safety Services Company
Fit testing of the equipment to individual employees will follow OSHA guidelines listed in
§1910.134 (f)(1-8) and is required before use of the equipment. Facial hair, glasses,
etc. which might affect the seal of the respirator face piece are prohibited, and seal must be checked each time equipment is donned.
Periodic monitoring of the air quality in work areas will be performed to determine if, or
where respiratory equipment will be required.
If employees are required to work in Immediately Dangerous to Life or Health (IDLH)
atmospheres, the following procedures and controls must be in place:
One employee or more is located outside the IDLH atmosphere.
Visual, voice, or signal line communication is maintained between the employee(s) in
the IDLH atmosphere and the employee(s) located outside the IDLH atmosphere.
The employee(s) located outside the IDLH atmosphere are trained and equipped to
provide effective emergency rescue.
Andy Wilson is notified before personnel enter the IDLH atmosphere, or before employee(s) located outside the IDLH atmosphere enter the IDLH atmosphere to
provide emergency rescue.
Employee(s) located outside the IDLH atmospheres will be equipped with:
Pressure demand or other positive pressure SCBA.
Appropriate retrieval equipment for removing the employee(s) who enter(s) these
hazardous atmospheres.
SAR and SCBA equipment will only be filled by certified refilling facilities using grade D or better air.
Where possible, ventilation will be required for all enclosed work areas to ensure that
airborne hazards do not exceed permissible limits.
The least hazardous or toxic materials which will allow the job required to be
accomplished will be used in the performance of work.
Andy Wilson will document and keep all records of the respiratory program including
medical, fit testing, air monitoring, and the current written program.

© Safety Services Company 12-3
MANDATORY INFORMATION: For employees using respirators when not
required under OSHA standards
Respirators are an effective method of protection against designated hazards when
properly selected and worn. Respirator use is encouraged, even when exposures are below the exposure limit, to provide an additional level of comfort and protection for
workers. However, if a respirator is used improperly or not kept clean, the respirator
itself can become a hazard to the worker. Sometimes, workers may wear respirators to
avoid exposures to hazards, even if the amount of hazardous substance does not exceed
the limits set by OSHA standards. If your employer provides respirators for your voluntary use, or if you provide your own respirator, you need to take certain
precautions to be sure that the respirator itself does not present a hazard.
You should do the following:
1. Read and heed all instructions provided by the manufacturer on use, maintenance,
cleaning and care, and warnings regarding the respirators limitations.
2. Choose respirators certified for use to protect against the contaminant of concern.
NIOSH, the National Institute for Occupational Safety and Health of the U.S. Department of Health and Human Services, certifies respirators. A label or statement
of certification should appear on the respirator or respirator packaging. It will tell you
what the respirator is designed for and how much it will protect you.
3. Do not wear your respirator into atmospheres containing contaminants for which your
respirator is not designed to protect against. For example, a respirator designed to
filter dust particles will not protect you against gases, vapors, or very small solid
particles of fumes or smoke.
4. Keep track of your respirator so that you do not mistakenly use someone else's
respirator.
Respiratory Program Procedures
General
All employees will be provided a medical evaluation to determine the employee's ability
to use a respirator, before the employee is fit tested or required to use the respirator in
the workplace.
The Company may discontinue an employee's medical evaluations when the employee is
no longer required to use a respirator.
General Requirements
We will identify and evaluate the respiratory hazard(s) in the workplace; this evaluation will include a reasonable estimate of employee exposures to respiratory hazard(s) and
an identification of the contaminant's chemical state and physical form.
If we cannot identify or reasonably estimate the employee exposure, we will consider the
atmosphere to be IDLH (atmospheres Immediately Dangerous to Life or Health). An
appropriate respirator based on the respiratory hazard(s) to which the worker is exposed and workplace and user factors that affect respirator performance and reliability. We will
select respirators from a sufficient number of respirator models and sizes so that the
respirator is acceptable to, and correctly fits, the user. The Company will select a
NIOSH-certified respirator. The respirator will be used in compliance with the conditions
of its certification.

12-4 © Safety Services Company
Respirator Selection
Respirators for IDLH Atmospheres
The Company will provide the following respirators for employee use in IDLH
atmospheres:
A full face-piece pressure demand SCBA certified by NIOSH for a minimum service life
of thirty minutes. A combination full face-piece pressure demand supplied-air respirator (SAR) with
auxiliary self-contained air supply.
Respirators provided only for escape from IDLH atmospheres will be NIOSH-certified
for escape from the atmosphere in which they will be used.
All oxygen-deficient atmospheres will be considered IDLH. Exception: If our
Company demonstrates that, under all foreseeable conditions, the oxygen concentration can be maintained within the ranges specified in Table II of this section
(i.e., for the altitudes set out in the table), then any atmosphere-supplying respirator
may be used.
Respirators for Atmospheres that are not IDLH
A R M Environmental Services, Inc. will provide a respirator that is adequate to protect
the health of the employee and ensure compliance with all other OSHA statutory and
regulatory requirements, under routine and reasonably foreseeable emergency situations. The respirator selected will be appropriate for the chemical state and physical
form of the contaminant.
For protection against gases and vapors, the Company will provide:
An atmosphere-supplying respirator.
The respirator is equipped with an end-of-service-life indicator (ESLI) certified by
NIOSH for the contaminant.
If there is no ESLI appropriate for conditions in the Company’s workplace, the
Company implements a change schedule for canisters and cartridges that is based on objective information or data that will ensure that canisters and cartridges are
changed before the end of their service life. The Company will describe in the
respirator program the information and data relied upon and the basis for the canister
and cartridge change schedule and the basis for reliance on the data.
For protection against particulates, the Company will provide:
An atmosphere-supplying respirator.
An air-purifying respirator equipped with a filter certified by NIOSH under 30 CFR part 11 as a high efficiency particulate air (HEPA) filter, or an air-purifying respirator
equipped with a filter certified for particulates by NIOSH under 42 CFR part 84.
For contaminants consisting primarily of particles with mass median aerodynamic
diameters (MMAD) of at least 2 micrometers, an air-purifying respirator equipped
with any filter certified for particulates by NIOSH.
Use of Respirators
This Company prohibits conditions (facial hair) that may result in face-piece seal
leakage, prevents employees from removing respirators in hazardous environments,
takes actions to ensure continued effective respirator operation throughout the work shift, and establishes procedures for the use of respirators in IDLH atmospheres or in
interior structural firefighting situations.

© Safety Services Company 12-5
Medical Evaluation Procedures
This Company will identify a physician or other licensed health care professional (PLHCP)
to perform medical evaluations using a medical questionnaire or an initial medical examination that obtains the same information as the medical questionnaire.
The medical evaluation will obtain the information requested by the questionnaire.
All medical questionnaires and examinations are confidential and handled during the
employee's normal working hours or at a time and place convenient to the employee.
The medical questionnaire is administered so that the employee understands its content. All employees are provided an opportunity to discuss the questionnaire and examination
results with their physician or other licensed health care professional (PLHCP).
Medical Determination
In determining the employee's ability to use a respirator, this Company will:
Obtain a written recommendation regarding the employee's ability to use the
respirator from the PLHCP. The recommendation will provide only the following
information.
Any limitations on respirator use related to the medical condition of the employee, or
relating to the workplace conditions in which the respirator will be used, including whether or not the employee is medically able to use the respirator.
The need, if any, for follow-up medical evaluations.
A statement that the PLHCP has provided the employee with a copy of the PLHCP's
written recommendation.
If the respirator is a negative pressure respirator and the PLHCP finds a medical
condition that may place the employee's health at increased risk if the respirator is used,
the Company will provide a PAPR if the PLHCP's medical evaluation finds that the
employee can use such a respirator; if a subsequent medical evaluation finds that the
employee is medically able to use a negative pressure respirator, then the Company is no longer required to provide a PAPR.
Program Evaluation
Employees need to be medically cleared to wear respirators before commencing use. All
respirators generally place a burden on the employee. Negative pressure respirators
restrict breathing, some respirators can cause claustrophobia and self-contained breathing apparatuses are heavy. Each of these conditions may adversely affect the
health of some employees who wear respirators. A physician or other licensed health
care professional operating within the scope of his/her practice needs to medically
evaluate employees to determine under what conditions they can safely wear
respirators. This section requires the employer to conduct evaluations of the workplace to ensure that the written respiratory protection program is being properly implemented,
and to consult employees to ensure that they are using the respirators properly.
A R M Environmental Services, Inc. will conduct evaluations of the workplace as
necessary to ensure that the provisions of the current written program are being
effectively implemented and that it continues to be effective.

12-6 © Safety Services Company
This Company will regularly consult employees required to use respirators to assess the
employees' views on program effectiveness and to identify any problems. Any problems
that are identified during this assessment will be corrected. Factors to be assessed include, but are not limited to:
Respirator fit (including the ability to use the respirator without interfering with
effective workplace performance).
Appropriate respirator selection for the hazards to which the employee is exposed.
Proper respirator use under workplace conditions the employee encounters. Proper respirator maintenance.
Medical Evaluation
Using a respirator may place a physiological burden on employees that varies with the
type of respirator worn, the job and workplace conditions in which the respirator is used, and the medical status of the employee. Accordingly, this section specifies the minimum
requirements for medical evaluation that must be implemented to determine the
employee's ability to use a respirator. Records of medical evaluations required by this
section must be retained and made available in accordance with 29.CFR 1910.1020. The
following is a synopsis of the some of the requirements of the standard.
Companies are to develop cartridge/canister change schedules based on available data
or information. Such information includes the exposure assessment and information
based on breakthrough test data, mathematically based estimates, and/or reliable use
recommendations from the Company’s respirator and/or chemical suppliers.
Reliance on odor thresholds and other warning properties will not be permitted as the primary basis for determining the service life of gas and vapor cartridges and canisters.
OSHA emphasizes that a conservative approach is recommended when evaluating
service life testing data. Temperature, humidity, air flow through the filter, the work
rate, and the presence of other potential interfering chemicals in the workplace all can
have a serious effect on the service life of an air-purifying cartridge or canister.
Follow-up Medical Examination
A R M Environmental Services, Inc. will ensure that a follow-up medical examination is
provided for an employee who gives a positive response to any question among
questions 1 through 8 in Section 2, Part A of Appendix C or whose initial medical examination demonstrates the need for a follow-up medical examination. The follow-up
medical examination will include any medical tests, consultations, or diagnostic
procedures that the PLHCP deems necessary to make a final determination.
Additional Medical Evaluations
At a minimum, A R M Environmental Services, Inc. will provide additional medical
evaluations that comply with the requirements of this section if:
An employee reports medical signs or symptoms that are related to ability to use a
respirator.
A PLHCP, supervisor, or the respirator program administrator informs the employer that an employee needs to be reevaluated.
Information from the respiratory protection program, including observations made
during fit testing and program evaluation, indicates a need for employee
reevaluation.
A change occurs in workplace conditions (e.g., physical work effort, protective clothing, and temperature) that may result in a substantial increase in the
physiological burden placed on an employee.

© Safety Services Company 12-7
Fit Testing
This Company requires that, before an employee may be required to use any respirator
with a negative or positive pressure tight-fitting face-piece; the employee must be fit tested with the same make, model, style, and size of respirator that will be used. This
paragraph specifies the kinds of fit tests allowed, the procedures for conducting them,
and how the results of the fit tests must be used.
A R M Environmental Services, Inc. will ensure that employees using a tight-fitting face-
piece respirator pass an appropriate qualitative fit test (QLFT) or quantitative fit test (QNFT) as stated in this section.
This Company will ensure that an employee using a tight-fitting face-piece respirator is
fit tested prior to initial use of the respirator, whenever a different respirator face-piece
(size, style, model, or make) is used, and at least annually thereafter.
This Company will conduct an additional fit test whenever the employee reports, or the PLHCP, supervisor, or program administrator makes visual observations of, changes in
the employee's physical condition that could affect respirator fit. Such conditions
include, but are not limited to, facial scarring, dental changes, cosmetic surgery, or an
obvious change in body weight.
If after passing a QLFT or QNFT, the employee subsequently notifies the program
administrator, supervisor, or PLHCP that the fit of the respirator is unacceptable, the employee will be given a reasonable opportunity to select a different respirator face-
piece and to be retested.
The fit test will be administered using an OSHA-accepted QLFT or QNFT protocol. The
OSHA-accepted QLFT and QNFT protocols and procedures are contained in Appendix A of
this section.
QLFT may only be used to fit test negative pressure air-purifying respirators that must
achieve a fit factor of 100 or less.
If the fit factor, as determined through an OSHA-accepted QNFT protocol, is equal to or
greater than 100 for tight-fitting half face-pieces, or equal to or greater than 500 for
tight-fitting full face-pieces, the QNFT has been passed with that respirator.
Fit testing of tight-fitting atmosphere-supplying respirators and tight-fitting powered air-
purifying respirators will be accomplished by performing quantitative or qualitative fit
testing in the negative pressure mode, regardless of the mode of operation (negative or
positive pressure) that is used for respiratory protection.
Qualitative fit testing of these respirators will be accomplished by temporarily converting the respirator user's actual face-piece into a negative pressure respirator with
appropriate filters, or by using an identical negative pressure air-purifying respirator
face-piece with the same sealing surfaces as a surrogate for the atmosphere-supplying
or powered air-purifying respirator face-piece.
Any modifications to the respirator face-piece for fit testing will be completely removed,
and the face-piece restored to NIOSH-approved configuration, before that face-piece can be used in the workplace.
Employees must pass one of the following fit test types:
QLFT Only used to fit test negative pressure air-purifying respirators that must achieve a fit factor of 100 or less may be used to test tight-fitting atmosphere-supplying
respirators and tight-fitting powered air-purifying respirators if tested in the negative
pressure mode.

12-8 © Safety Services Company
QNFT May be used to fit test a tight-fitting half face-piece respirator that must achieve
a fit factor of 100 or greater OR a tight-fitting full face-piece respirator that must achieve
a fit factor of 500 or greater OR tight-fitting atmosphere-supplying respirators and tight-fitting powered air-purifying respirators if tested in the negative pressure mode.
Face-Piece Seal Protection
A R M Environmental Services, Inc. will not permit respirators with tight-fitting face-
pieces to be worn by employees who have:
Facial hair that comes between the sealing surface of the face-piece and the face or
that interferes with valve function.
Any condition that interferes with the face to face-piece seal or valve function.
If an employee wears corrective glasses or goggles or other personal protective
equipment, the employer will ensure that such equipment is worn In a manner that does not interfere with the seal of the face-piece to the face of the
user.
For all tight-fitting respirators, the employer will ensure that employees perform a
user seal check each time they put on the respirator using the procedures in 29 CFR
1910.134 Appendix B-1 or procedures recommended by the respirator manufacturer that the employer demonstrates are as effective as those in Appendix B-1.
Continuing Respirator Effectiveness
Appropriate surveillance will be maintained of work area conditions and degree of
employee exposure or stress. When there is a change in work area conditions or degree
of employee exposure or stress that may affect respirator effectiveness, this Company
will reevaluate the continued effectiveness of the respirator.
This Company will ensure that employees leave the respirator use area:
To wash their faces and respirator face-pieces as necessary to prevent eye or skin
irritation associated with respirator use.
If they detect vapor or gas breakthrough, changes in breathing resistance, or leakage
of the face-piece; or to replace the respirator, filter, cartridge, or canister elements. If the employee detects vapor or gas breakthrough, changes in breathing resistance,
or leakage of the face-piece, the employer must replace or repair the respirator
before allowing the employee to return to the work area.
Supplemental Information for the PLHCP
The following information must be provided to the PLHCP before the PLHCP makes a
recommendation concerning an employee's ability to use a respirator:
The type and weight of the respirator to be used by the employee. The duration and frequency of respirator use (including use for rescue and escape).
The expected physical work effort.
Additional protective clothing and equipment to be worn.
Temperature and humidity extremes that may be encountered.
Any supplemental information provided previously to the PLHCP regarding an employee need not be provided for a subsequent medical evaluation if the
information and the PLHCP remain the same.
This Company will provide the PLHCP with a copy of the written respiratory protection
program and a copy of this section.

© Safety Services Company 12-9
Procedures for IDLH Atmospheres
For all IDLH atmospheres, this Company will ensure that:
Appropriate retrieval equipment for removing the employee(s) who enter(s) these
hazardous atmospheres where retrieval equipment would contribute to the rescue of
the employee(s) and would not increase the overall risk resulting from entry.
One employee or, when needed, more than one employee is located outside the IDLH
atmosphere. Visual, voice, or signal line communication is maintained between the employee(s) in
the IDLH atmosphere and the employee(s) located outside the IDLH atmosphere.
The Company or designee is notified before the employee(s) located outside the IDLH
atmosphere enter the IDLH atmosphere to provide emergency rescue.
The Company or designee authorized to do so by the employer, once notified, provides necessary assistance appropriate to the situation.
The employee(s) located outside the IDLH atmosphere are trained and equipped to
provide effective emergency rescue.
Employee(s) located outside the IDLH atmospheres are equipped with:
Equivalent means for rescue where retrieval equipment is not required.
Pressure demand or other positive pressure SCBA, or a pressure demand or other
positive pressure supplied-air respirator with auxiliary SCBA; and either.
Note: One of the two individuals located outside the IDLH atmosphere may be assigned
to an additional role, such as incident commander in charge of the emergency or safety
officer, so long as this individual is able to perform assistance or rescue activities without
jeopardizing the safety or health of any firefighter working at the incident.
Note: Nothing in this section is meant to preclude firefighters from performing emergency rescue activities before an entire team has assembled.
Maintenance and Care of Respirators
This paragraph requires the employer to provide for the cleaning and disinfecting,
storage, inspection, and repair of respirators used by employees.
To ensure continuing protection from respiratory protective devices, it is necessary to establish and implement proper maintenance and care procedures and schedules. A lax
attitude toward maintenance and care will negate successful selection and fit because
the devices will not deliver the assumed protection unless they are kept in good working
order.
Cleaning and Disinfecting
This Company will provide each respirator user with a respirator that is clean, sanitary,
and in good working order. The Company will ensure that respirators are cleaned and
disinfected using the procedures in this section, or procedures recommended by the
respirator manufacturer, provided that such procedures are of equivalent effectiveness. The respirators will be cleaned and disinfected at the following intervals:
Respirators issued for the exclusive use of an employee will be cleaned and
disinfected as often as necessary to be maintained in a sanitary condition.
Respirators issued to more than one employee will be cleaned and disinfected before
being worn by different individuals. Respirators maintained for emergency use will be cleaned and disinfected after each
use.
Respirators used in fit testing and training will be cleaned and disinfected after each
use.

12-10 © Safety Services Company
Procedures for Cleaning Respirators
Remove filters, cartridges, or canisters. Disassemble face-pieces by removing
speaking diaphragms, demand and pressure-demand valve assemblies, hoses, or any
components recommended by the manufacturer. Discard or repair any defective
parts.
Wash components in warm (110° F maximum) water with a mild detergent or with a
cleaner recommended by the manufacturer. A stiff bristle (not wire) brush may be used to facilitate the removal of dirt.
Rinse components thoroughly in clean, warm, preferably running water. Drain.
When the cleaner used does not contain a disinfecting agent, respirator components
should be immersed for two minutes in one of the following.
Hypochlorite solution (50 ppm of chlorine) made by adding approximately one milliliter of laundry bleach to one liter of water at 110° F.
Aqueous solution of iodine (50 ppm iodine) made by adding approximately 0.8
milliliters of tincture of iodine (6-8 grams ammonium and/or potassium iodide/100 cc
of 45% alcohol) to one liter of water at 110° F.
Other commercially available cleansers of equivalent disinfectant quality when used as directed, if their use is recommended or approved by the respirator manufacturer.
Rinse components thoroughly in clean, warm, preferably running water. Drain. The
importance of thorough rinsing cannot be overemphasized. Detergents or
disinfectants that dry on face-pieces may result in dermatitis. In addition, some
disinfectants may cause deterioration of rubber or corrosion of metal parts if not
completely removed. Components should be hand-dried with a clean lint-free cloth or air-dried.
Reassemble face-piece, replacing filters, cartridges, and canisters where necessary.
Recordkeeping
The Company will establish and retain written information regarding medical evaluations,
fit testing, and the respirator program. This information will facilitate employee
involvement in the respirator program, assist the Company in auditing the adequacy of
the program, and provide a record for compliance determinations by OSHA.
Storage
This Company will ensure that respirators are stored as follows:
All respirators will be stored to protect them from damage, contamination, dust,
sunlight, extreme temperatures, excessive moisture, and damaging chemicals, and
they will be packed or stored to prevent deformation of the face-piece and exhalation
valve. In addition to the other requirements of this section, emergency respirators will be.
Kept accessible to the work area.
Stored in compartments or in covers that are clearly marked as on training emergency respirators.
Stored in accordance with any applicable manufacturer instructions.
Inspection
This Company will ensure that respirators are inspected as follows:
All respirators used in routine situations will be inspected before each use and during
cleaning.
All respirators maintained for use in emergency situations will be inspected at least
monthly and in accordance with the manufacturer's recommendations, and will be
checked for proper function before and after each use. Emergency escape-only respirators will be inspected before being carried into the
workplace for use.

© Safety Services Company 12-11
This Company will ensure that respirator inspections include the following:
A check of respirator function, tightness of connections, and the condition of the
various parts including, but not limited to, the face-piece, head straps, valves, connecting tube, and cartridges, canisters or filters.
Self-contained breathing apparatus will be inspected monthly. Air and oxygen
cylinders will be maintained in a fully charged state and will be recharged when the
pressure falls to 90% of the manufacturer's recommended pressure level. The
Company will determine that the regulator and warning devices function properly. A check of elastomeric parts for pliability and signs of deterioration.
For respirators maintained for emergency use, the Company will:
Certify the respirator by documenting the date the inspection was performed, the
name (or signature) of the person who made the inspection, the findings, required remedial action, and a serial number or other means of identifying the inspected
respirator.
Provide this information on a tag or label that is attached to the storage compartment
for the respirator, is kept with the respirator, or is included in inspection reports
stored as paper or electronic files. This information will be maintained until replaced following a subsequent certification.
Fit Testing
This Company will establish a record of the qualitative and quantitative fit tests administered to an employee including:
The name or identification of the employee tested.
Type of fit test performed.
Specific make, model, style, and size of respirator tested.
Date of test.
The pass/fail results for QLFT or the fit factor and strip chart recording or other recording of the test results for QNFT.
Fit test records will be retained for respirator users until the next fit test is
administered.
A written copy of the current respirator program will be retained by the employer.
All respirators that rely on a mask-to-face seal need to be annually checked with either
qualitative or quantitative methods to determine whether the mask provides an
acceptable fit to a wearer. The qualitative fit test procedures rely on a subjective
sensation (taste, irritation, smell) of the respirator wearer to a particular test agent while the quantitative use measuring instruments to measure face-seal leakage. The relative
workplace exposure level determines what constitutes an acceptable fit and which fit test
procedure is required. For negative pressure air purifying respirators, users may rely on
either a qualitative or a quantitative fit test procedure for exposure levels less than 10
times the occupational exposure limit. Exposure levels greater than 10 times the
occupational exposure limit must utilize a quantitative fit test procedure for these respirators. Fit testing of tight-fitting atmosphere-supplying respirators and tight-fitting
powered air-purifying respirators will be accomplished by performing quantitative or
qualitative fit testing in the negative pressure mode.
Written materials required to be retained will be made available upon request to affected
employees and to OSHA or designee for examination and copying.
Repairs
A R M Environmental Services, Inc. will ensure that respirators that fail an inspection or
are otherwise found to be defective are removed from service, and are discarded or repaired or adjusted in accordance with the following procedures:

12-12 © Safety Services Company
Repairs or adjustments to respirators are to be made only by persons appropriately
trained to perform such operations and will use only the respirator manufacturer's
NIOSH-approved parts designed for the respirator. Repairs will be made according to the manufacturer's recommendations and
specifications for the type and extent of repairs to be performed.
Reducing and admission valves, regulators, and alarms will be adjusted or repaired
only by the manufacturer or a technician trained by the manufacturer.
Discarding of Respirators
Respirators that fail an inspection or are otherwise not fit for use and cannot be repaired
must be discarded.
Breathing Air Quality and Use
A R M Environmental Services, Inc. will provide employees using atmosphere-supplying
respirators (supplied-air and SCBA) with breathing gases of high purity. The Company
will ensure that compressed air, compressed oxygen, liquid air, and liquid oxygen used
for respiration accords with the following specifications and Compressed and liquid oxygen will meet the United States Pharmacopoeia requirements for medical or
breathing oxygen; and Compressed breathing air will meet at least the requirements for
Grade D breathing air described in ANSI/Compressed Gas Association Commodity
Specification for Air, G-7.1-1989, to include:
Oxygen content (v/v) of 19.5-23.5%. Hydrocarbon (condensed) content of 5 milligrams per cubic meter of air or less.
Carbon monoxide (CO) content of 10 ppm or less.
Carbon dioxide content of 1,000 ppm or less; and Lack of noticeable odor.
The Company will ensure that compressed oxygen is not used in atmosphere-
supplying respirators that have previously used compressed air.
The Company will ensure that oxygen concentrations greater than 23.5% are used only in equipment designed for oxygen service or distribution.
The Company will ensure that cylinders used to supply breathing air to respirators
meet the following requirements.
Cylinders are tested and maintained as prescribed in the Shipping Container
Specification Regulations of the Department of Transportation (49 CFR part 173 and part 178).
Cylinders of purchased breathing air have a certificate of assessment from the
supplier that the breathing air meets the requirements for Grade D breathing air.
The moisture content in the cylinder does not exceed a dew point of -50° F at 1
atmosphere pressure. The Company will ensure that compressors used to supply breathing air to respirators
are constructed and situated so as to.
Prevent entry of contaminated air into the air-supply system.
Minimize moisture content so that the dew point at 1 atmosphere pressure is 10° F
below the ambient temperature.
Have suitable in-line air-purifying absorbent beds and filters to further ensure breathing air quality. Absorbent beds and filters will be maintained and replaced or
refurbished periodically following the manufacturer's instructions.
Have a tag containing the most recent change date and the signature of the person
authorized by the employer to perform the change. The tag will be maintained at the
compressor. For compressors that are not oil-lubricated, the Company will ensure that carbon
monoxide levels in the breathing air do not exceed 10 ppm.
For oil-lubricated compressors, the Company will use high-temps. or carbon
monoxide alarm, or both, to monitor carbon monoxide levels. If only high-
temperature alarms are used, the air supply will be monitored at intervals sufficient to prevent carbon monoxide in the breathing air from exceeding 10 ppm.

© Safety Services Company 12-13
The Company will ensure that breathing air couplings are incompatible with outlets
for non-irrespirable worksite air or other gas systems. No asphyxiating substance will
be introduced into breathing air lines. The Company will use breathing gas containers marked in accordance with the NIOSH
respirator certification standard, 42 CFR part 84.
Identification of Filters, Cartridges, and Canisters
This Company will ensure that all filters, cartridges, and canisters used in the workplace
are labeled and color coded with the NIOSH approval label and that the label is not
removed and remains legible.
Training and Information
This Company will provide effective training to employees who are required to use respirators. The training will be comprehensive, understandable, and recur annually and
more often if necessary. This Company will also provide the basic information on
respirators to employees who wear respirators when not required by this section or by
the Company to do so.
This Company will ensure that each employee can demonstrate knowledge of at least the following:
Why the respirator is necessary and how improper fit, usage, or maintenance can
compromise the protective effect of the respirator.
What the limitations and capabilities of the respirator are.
How to use the respirator effectively in emergency situations, including situations
in which the respirator malfunctions. How to inspect, put on and remove, use, and check the seals of the respirator.
What the procedures are for maintenance and storage of the respirator.
How to recognize medical signs and symptoms that may limit or prevent the
effective use of respirators.
The general requirements of this section. The training will be conducted in a manner that is understandable to the employee.
This Company will provide the training prior to requiring the employee to use a
respirator in the workplace.
An employer who is able to demonstrate that a new employee has received training within the last 12 months that addresses the elements specified is not required to repeat
such training provided that, as required, “The employee can demonstrate knowledge of
those elements.” Previous training not repeated initially by the employer must be
provided no later than 12 months from the date of the previous training.
Our employees are trained sufficiently to be able to demonstrate knowledge of at least these seven elements:
1. Why the respirator is necessary and how improper fit, usage, or maintenance can
compromise the protective effect of the respirator.
2. What the limitations and capabilities of the respirator are.
3. How to use the respirator effectively in emergency situations, including situations in
which the respirator malfunctions.
4. How to inspect, put on, remove, use, and check the seals of the respirator.
5. What the procedures are for maintenance and storage of the respirator.
6. How to recognize medical signs and symptoms that may limit or prevent the effective
use of respirators.
7. The general requirements of 29 CFR 1910.134, Respiratory Protection.

12-14 © Safety Services Company
Retraining will be administered annually, and when the following situations
occur:
Changes in the workplace or the type of respirator render previous training obsolete.
Inadequacies in the employee's knowledge or use of the respirator indicate that the
employee has not retained the requisite understanding or skill.
Any other situation arises in which retraining appears necessary to ensure safe
respirator use. The basic advisory information on respirators, as presented in this section, will be
provided by the Company in any written or oral format, to employees who wear
respirators when such use is not required by the employer.
Appendices
Appendix 1—References
The following documents are helpful references:
29 CFR 1910.134, Respiratory Protection, and Appendices.
42 CFR 84, Approval of Respiratory Protective Devices.
ANSI Z88.2, Respiratory Protection.
NIOSH Guide to Industrial Respiratory Protection. NIOSH Guide to the Selection and Use of Particulate Respirators.
Mandatory Fit Testing Procedures
A. Fit Testing Procedures-General Requirements.
The Company will conduct fit testing using the following procedures. The requirements
in this appendix apply to all OSHA-accepted fit test methods, both QLFT and QNFT.
1. The test subject will be allowed to pick the most acceptable respirator from a sufficient number of respirator models and sizes so that the respirator is
acceptable to, and correctly fits, the user.
2. Prior to the selection process, the test subject will be shown how to put on a
respirator, how it should be positioned on the face, how to set strap tension and
how to determine an acceptable fit. A mirror will be available to assist the subject in evaluating the fit and positioning of the respirator. This instruction may not
constitute the subject's formal training on respirator use, because it is only a
review.
3. The test subject will be informed that he/she is being asked to select the
respirator that provides the most acceptable fit. Each respirator represents a different size and shape, and if fitted and used properly, will provide adequate
protection.
4. The test subject will be instructed to hold each chosen face-piece up to the face
and eliminate those that obviously do not give an acceptable fit.
5. The more acceptable face-pieces are noted in case the one selected proves unacceptable; the most comfortable mask is donned and worn at least five
minutes to assess comfort. Assistance in assessing comfort can be given by
discussing the points in the following item A. If the test subject is not familiar
with using a particular respirator, the test subject will be directed to don the mask
several times and to adjust the straps each time to become adept at setting
proper tension on the straps.
6. Assessment of comfort will include a review of the following points with the test
subject and allowing the test subject adequate time to determine the comfort of
the respirator.
Position of the mask on the nose.
Room for eye protection.
Room to talk.
Position of mask on face and cheeks.

© Safety Services Company 12-15
7. The following criteria will be used to help determine the adequacy of the respirator
fit:
Chin properly placed. Adequate strap tension, not overly tightened.
Fit across nose bridge.
Respirator of proper size to span distance from nose to chin.
Tendency of respirator to slip.
Self-observation in mirror to evaluate fit and respirator position.
8. The test subject will be informed that he/she is being asked to select the
respirator that provides the most acceptable fit. Each respirator represents a
different size and shape, and if fitted and used properly, will provide adequate
protection.
9. The test subject will be instructed to hold each chosen face-piece up to the face
and eliminate those that obviously do not give an acceptable fit.
10. The more acceptable face-pieces are noted in case the one selected proves
unacceptable; the most comfortable mask is donned and worn at least five
minutes to assess comfort. Assistance in assessing comfort can be given by discussing the following points. If the test subject is not familiar with using a
particular respirator, the test subject will be directed to don the mask several
times and to adjust the straps each time to become adept at setting proper
tension on the straps.
11. Assessment of comfort will include a review of the following points with the test
subject and allowing the test subject adequate time to determine the comfort of the respirator.
Position of the mask on the nose.
Room for eye protection.
Room to talk.
Position of mask on face and cheeks.
12. The following criteria will be used to help determine the adequacy of the respirator
fit:
Chin properly placed. Adequate strap tension, not overly tightened.
Fit across nose bridge.
Respirator of proper size to span distance from nose to chin.
Tendency of respirator to slip.
Self-observation in mirror to evaluate fit and respirator position.
13. The test subject will conduct a user seal check, either the negative and positive
pressure seal checks described or those recommended by the respirator
manufacturer which provide equivalent protection. Before conducting the negative
and positive pressure checks, the subject will be told to seat the mask on the face by moving the head from side-to-side and up and down slowly while taking in a
few slow deep breaths. Another face-piece will be selected and retested if the test
subject fails the user seal check tests.
14. The test will not be conducted if there is any hair growth between the skin and the
face-piece sealing surface, such as stubble beard growth, beard, mustache or sideburns which cross the respirator sealing surface. Any type of apparel which
interferes with a satisfactory fit will be altered or removed.
15. If a test subject exhibits difficulty in breathing during the tests, she or he will be
referred to a physician or other licensed health care professional, as appropriate,
12-16 © Safety Services Company
to determine whether the test subject can wear a respirator while performing her
or his duties.
16. If the employee finds the fit of the respirator unacceptable, the test subject will be given the opportunity to select a different respirator and to be retested.
17. Exercise regimen. Prior to the commencement of the fit test, the test subject will
be given a description of the fit test and the test subject's responsibilities during
the test procedure. The description of the process will include a description of the
test exercises that the subject will be performing. The respirator to be tested will be worn for at least 5 minutes before the start of the fit test.
18. The fit test will be performed while the test subject is wearing any applicable
safety equipment that may be worn during actual respirator use which would
interfere with respirator fit.
19. Test Exercises
A. The following test exercises are to be performed for all fit testing methods prescribed in this appendix, except for the CNP method. A separate fit testing
exercise regimen is contained in the CNP protocol. The test subject will perform
exercises, in the test environment, in the following manner.
1. Normal breathing. In a normal standing position, without talking, the subject will
breathe normally.
2. Deep breathing. In a normal standing position, the subject will breathe slowly and
deeply, taking caution so as not to hyperventilate.
3. Turning head side to side. Standing in place, the subject will slowly turn his/her
head from side to side between the extreme positions on each side. The head will be
held at each extreme momentarily so the subject can inhale at each side.
4. Moving head up and down. Standing in place, the subject will slowly move his/her
head up and down. The subject will be instructed to inhale in the up position (i.e.,
when looking toward the ceiling).
5. Talking. The subject will talk out loud slowly and loud enough so as to be heard clearly by the test conductor. The subject can read from a prepared text such as the
Rainbow Passage, count backward from 100, or recite a memorized poem or song.
Rainbow Passage – When the sunlight strikes raindrops in the air, they act like a prism
and form a rainbow. The rainbow is a division of white light into many beautiful colors.
These take the shape of a long round arch, with its path high above, and its two ends
apparently beyond the horizon. There is, according to legend, a boiling pot of gold at
one end. People look, but no one ever finds it. When a man looks for something beyond reach, his friends say he is looking for the pot of gold at the end of the rainbow.
6. Grimace. The test subject will grimace by smiling or frowning. (This applies only
to QNFT testing; it is not performed for QLFT).
7. Bending over. The test subject will bend at the waist as if he/she were to touch
his/her toes. Jogging in place will be substituted for this exercise in those test environments such as shroud type QNFT or QLFT units that do not permit bending
over at the waist.
8. Normal breathing. Same as exercise (1). Each test exercise will be performed
for one minute except for the grimace exercise which will be performed for 15
seconds. The test subject will be questioned by the test conductor regarding the comfort of the respirator upon completion of the protocol. If it has become
unacceptable, another model of respirator will be tried. The respirator will not be
adjusted once the fit test exercises begin. Any adjustment voids the test, and the
fit test must be repeated.

© Safety Services Company 12-17
B. Qualitative Fit Test (QLFT) Protocols
General
A. The employer will ensure that persons administering QLFT are able to prepare test
solutions, calibrate equipment and perform tests properly, recognize invalid tests,
and ensure that test equipment is in proper working order.
B. The employer will ensure that QLFT equipment is kept clean and well maintained
so as to operate within the parameters for which it was designed.
Isoamyl Acetate Protocol
A. Odor Threshold Screening. Odor threshold screening, performed without
wearing a respirator, is intended to determine if the individual tested can detect
the odor of isoamyl acetate at low levels.
Note: This protocol is not appropriate to use for the fit testing of particulate respirators.
If used to fit test particulate respirators, the respirator must be equipped with an organic
vapor filter.
1. Three 1 liter glass jars with metal lids are required.
2. Odor-free water (e.g., distilled or spring water) at approximately 25 deg. C (77
deg. F) will be used for the solutions.
3. The isoamyl acetate (IAA) (also known at isopentyl acetate) stock solution is
prepared by adding 1 ml of pure IAA to 800 ml of odor-free water in a 1 liter jar, closing the lid and shaking for 30 seconds. A new solution will be prepared at
least weekly.
4. The screening test will be conducted in a room separate from the room used for
actual fit testing. The two rooms will be well-ventilated to prevent the odor of IAA
from becoming evident in the general room air where testing takes place.
5. The odor test solution is prepared in a second jar by placing 0.4 ml of the stock
solution into 500 ml of odor-free water using a clean dropper or pipette. The
solution will be shaken for 30 seconds and allowed to stand for two to three
minutes so that the IAA concentration above the liquid may reach equilibrium.
This solution will be used for only one day.
6. A test blank will be prepared in a third jar by adding 500 cc of odor-free water.
7. The odor test and test blank jar lids will be labeled (e.g., 1 and 2) for jar
identification. Labels will be placed on the lids so that they can be peeled off
periodically and switched to maintain the integrity of the test.
8. The following instruction will be typed on a card and placed on the table in front of
the two test jars (i.e., 1 and 2): “The purpose of this test is to determine if you can smell banana oil at a low concentration. The two bottles in front of you
contain water. One of these bottles also contains a small amount of banana oil.
Be sure the covers are on tight, and then shake each bottle for two seconds.
Unscrew the lid of each bottle, one at a time, and sniff at the mouth of the bottle.
Indicate to the test conductor which bottle contains banana oil”.
9. The mixtures used in the IAA odor detection test will be prepared in an area
separate from where the test is performed, in order to prevent olfactory fatigue in
the subject.
10. If the test subject is unable to correctly identify the jar containing the odor test
solution, the IAA qualitative fit test will not be performed.
11. If the test subject correctly identifies the jar containing the odor test solution, the
test subject may proceed to respirator selection and fit testing.

12-18 © Safety Services Company
B. Isoamyl Acetate Fit Test
1. The fit test chamber will be a clear 55-gallon drum liner suspended inverted over a
2-foot diameter frame so that the top of the chamber is about 6 inches above the test subject's head. If no drum liner is available, a similar chamber will be
constructed using plastic sheeting. The inside top center of the chamber will have
a small hook attached.
2. Each respirator used for the fitting and fit testing will be equipped with organic
vapor cartridges or offer protection against organic vapors.
3. After selecting, donning, and properly adjusting a respirator, the test subject will
wear it to the fit testing room. This room will be separate from the room used for
odor threshold screening and respirator selection, and will be well-ventilated, as
by an exhaust fan or lab hood, to prevent general room contamination.
4. A copy of the test exercises and any prepared text from which the subject is to
read will be taped to the inside of the test chamber.
5. Upon entering the test chamber, the test subject will be given a 6-inch by 5-inch
piece of paper towel, or other porous, absorbent, single-ply material, folded in half
and wetted with 0.75 ml of pure IAA. The test subject will hang the wet towel on
the hook at the top of the chamber. An IAA test swab or ampoule may be
substituted for the IAA wetted paper towel provided it has been demonstrated that the alternative IAA source will generate an IAA test atmosphere with a
concentration equivalent to that generated by the paper towel method.
6. Allow two minutes for the IAA test concentration to stabilize before starting the fit
test exercises. This would be an appropriate time to talk with the test subject; to
explain the fit test, the importance of his/her cooperation, and the purpose for the test exercises; or to demonstrate some of the exercises.
7. If at any time during the test, the subject detects the banana-like odor of IAA, the
test is failed. The subject will quickly exit from the test chamber and leave the
test area to avoid olfactory fatigue.
8. If the test is failed, the subject will return to the selection room and remove the
respirator. The test subject will repeat the odor sensitivity test, select and put on another respirator, return to the test area and again begin the fit test procedure
described in (b) (1) through (7) above. The process continues until a respirator
that fits well has been found. Should the odor sensitivity test be failed, the
subject will wait at least 5 minutes before retesting. Odor sensitivity will usually
have returned by this time.
9. If the subject passes the test, the efficiency of the test procedure will be
demonstrated by having the subject break the respirator face seal and take a
breath before exiting the chamber.
10. When the test subject leaves the chamber, the subject will remove the saturated
towel and return it to the person conducting the test, so that there is no significant IAA concentration buildup in the chamber during subsequent tests. The
used towels will be kept in a self-sealing plastic bag to keep the test area from
being contaminated.
Saccharin Solution Aerosol Protocol. The entire screening and testing procedure will
be explained to the test subject prior to the conduct of the screening test.
A. Taste threshold screening. The saccharin taste threshold screening, performed
without wearing a respirator, is intended to determine whether the individual
being tested can detect the taste of saccharin.

© Safety Services Company 12-19
1. During threshold screening as well as during fit testing, subjects will wear an
enclosure about the head and shoulders that is approximately 12 inches in
diameter by 14 inches tall with at least the front portion clear and that allows free movements of the head when a respirator is worn. An enclosure substantially
similar to the 3M hood assembly, parts # FT 14 and # FT 15 combined, is
adequate.
2. The test enclosure will have a ¾-inch hole in front of the test subject's nose and
mouth area to accommodate the nebulizer nozzle.
3. The test subject will don the test enclosure. Throughout the threshold screening
test, the test subject will breathe through his/her slightly open mouth with tongue
extended. The subject is instructed to report when he/she detects a sweet taste.
4. Using a DeVilbiss Model 40 Inhalation Medication Nebulizer or equivalent, the test
conductor will spray the threshold check solution into the enclosure. The nozzle is
directed away from the nose and mouth of the person. This nebulizer will be clearly marked to distinguish it from the fit test solution nebulizer.
5. The threshold check solution is prepared by dissolving 0.83 gram of sodium
saccharin USP in 100 ml of warm water. It can be prepared by putting 1 ml of the
fit test solution (see (b) (5) below) in 100 ml of distilled water.
6. To produce the aerosol, the nebulizer bulb is firmly squeezed so that it collapses completely, then released and allowed to fully expand.
7. Ten squeezes are repeated rapidly and then the test subject is asked whether the
saccharin can be tasted. If the test subject reports tasting the sweet taste during
the ten squeezes, the screening test is completed. The taste threshold is noted as
ten regardless of the number of squeezes actually completed.
8. If the first response is negative, ten more squeezes are repeated rapidly and the
test subject is again asked whether the saccharin is tasted. If the test subject
reports tasting the sweet taste during the second ten squeezes, the screening test
is completed. The taste threshold is noted as twenty regardless of the number of
squeezes actually completed.
9. If the second response is negative, ten more squeezes are repeated rapidly and the test subject is again asked whether the saccharin is tasted. If the test subject
reports tasting the sweet taste during the third set of ten squeezes, the screening
test is completed. The taste threshold is noted as thirty regardless of the number
of squeezes actually completed.
10. The test conductor will take note of the number of squeezes required to solicit a taste response.
11. If the saccharin is not tasted after 30 squeezes (step 10), the test subject is
unable to taste saccharin and may not perform the saccharin fit test.
Note: If the test subject eats or drinks something sweet before the screening test,
he/she may be unable to taste the weak saccharin solution.
12. If a taste response is elicited, the test subject will be asked to take note of the
taste for reference in the fit test.
13. Correct use of the nebulizer means that approximately 1 ml of liquid is used at a
time in the nebulizer body.
14. The nebulizer will get thoroughly rinsed in water, shaken dry and refilled at least each morning and afternoon or at least every four hours.

12-20 © Safety Services Company
B. Saccharin solution aerosol fit test procedure.
1. The test subject may not eat, drink (except for plain water), smoke, or chew gum
for 15 minutes before the test.
2. The fit test uses the same enclosure described in 3. (a) above.
3. The test subject will don the enclosure while wearing the respirator selected. The
respirator will be properly adjusted and equipped with a particulate filter(s).
4. A second DeVilbiss Model 40 Inhalation Medication Nebulizer or equivalent is used
to spray the fit test solution into the enclosure. This nebulizer will be clearly marked to distinguish it from the screening test solution nebulizer.
5. The fit test solution is prepared by adding 83 grams of sodium saccharin to 100 ml
of warm water.
6. As before, the test subject will breathe through the slightly open mouth with the
tongue extended, and report if he/she tastes the sweet taste of saccharin.
7. The nebulizer is inserted into the hole in the front of the enclosure and an initial concentration of saccharin fit test solution is sprayed into the enclosure using the
same number of squeezes (either 10, 20 or 30 squeezes) based on the number of
squeezes required to elicit a taste response as noted during the screening test. A
minimum of 10 squeezes is required.
8. After generating the aerosol, the test subject will be instructed to perform the exercises.
9. Every 30 seconds the aerosol concentration will be replenished using one half the
original number of squeezes used initially (e.g., 5, 10, or 15).
10. The test subject will indicate to the test conductor if at any time during the fit test
the taste of saccharin is detected. If the test subject does not report tasting the saccharin, the test is passed.
11. If the taste of saccharin is detected, the fit is deemed unsatisfactory and the test
is failed. A different respirator will be tried and the entire test procedure is
repeated (taste threshold screening and fit testing).
12. Since the nebulizer has a tendency to clog during use, the test operator must
make periodic checks of the nebulizer to ensure that it is not clogged. If clogging is found at the end of the test session, the test is invalid.
Bitrex™ (Denatonium Benzoate) Solution Aerosol Qualitative Fit Test Protocol.
The Bitrex™ (Denatonium benzoate) solution aerosol QLFT protocol uses the published
saccharin test protocol because that protocol is widely accepted. Bitrex is routinely used
as a taste aversion agent in household liquids which children should not be drinking and is endorsed by the American Medical Association, the National Safety Council, and the
American Association of Poison Control Centers. The entire screening and testing
procedure will be explained to the test subject prior to the conduct of the screening test.
A. Taste Threshold Screening. The Bitrex taste threshold screening, performed
without wearing a respirator, is intended to determine whether the individual being tested can detect the taste of Bitrex.
1. During threshold screening as well as during fit testing, subjects will wear an
enclosure about the head and shoulders that is approximately 12 inches in
diameter by 14 inches tall. The front portion of the enclosure will be clear from
the respirator and allow free movement of the head when a respirator is worn. An enclosure substantially similar to the 3M hood assembly, parts #14 and #15
combined, is adequate.

© Safety Services Company 12-21
2. The test enclosure will have a ¾ inch hole in front of the test subject's nose and
mouth area to accommodate the nebulizer nozzle.
3. The test subject will don the test enclosure. Throughout the threshold screening test, the test subject will breathe through his or her slightly open mouth with
tongue extended. The subject is instructed to report when he/she detects a bitter
taste.
4. Using a DeVilbiss Model 40 Inhalation Medication Nebulizer or equivalent, the test
conductor will spray the Threshold Check Solution into the enclosure. This Nebulizer will be clearly marked to distinguish it from the fit test solution
nebulizer.
5. The Threshold Check Solution is prepared by adding 13.5 milligrams of Bitrex to
100 ml of 5% salt (NaCl) solution in distilled water.
6. To produce the aerosol, the nebulizer bulb is firmly squeezed so that the bulb
collapses completely, and is then released and allowed to fully expand.
7. An initial ten squeezes are repeated rapidly and then the test subject is asked
whether the Bitrex can be tasted. If the test subject reports tasting the bitter
taste during the ten squeezes, the screening test is completed. The taste
threshold is noted as ten regardless of the number of squeezes actually
completed.
8. If the first response is negative, ten more squeezes are repeated rapidly and the
test subject is again asked whether the Bitrex is tasted. If the test subject reports
tasting the bitter taste during the second ten squeezes, the screening test is
completed. The taste threshold is noted as twenty regardless of the number of
squeezes actually completed.
9. If the second response is negative, ten more squeezes are repeated rapidly and
the test subject is again asked whether the Bitrex is tasted. If the test subject
reports tasting the bitter taste during the third set of ten squeezes, the screening
test is completed. The taste threshold is noted as thirty regardless of the number
of squeezes actually completed.
10. The test conductor will take note of the number of squeezes required to solicit a taste response.
11. If the Bitrex is not tasted after 30 squeezes (step 10), the test subject is unable to
taste Bitrex and may not perform the Bitrex fit test.
12. If a taste response is elicited, the test subject will be asked to take note of the
taste for reference in the fit test.
13. Correct use of the nebulizer means that approximately 1 ml of liquid is used at a
time in the nebulizer body.
14. The nebulizer will be thoroughly rinsed in water, shaken to dry and refilled at least
each morning and afternoon or at least every four hours.
B. Bitrex Solution Aerosol Fit Test Procedure
1. The test subject may not eat, drink (except plain water), smoke, or chew gum for
15 minutes before the test.
2. The fit test uses the same enclosure as that described in 4. (a) above.
3. The test subject will don the enclosure while wearing the respirator selected. The
respirator will be properly adjusted and equipped with any type particulate filter(s).

12-22 © Safety Services Company
4. A second DeVilbiss Model 40 Inhalation Medication Nebulizer or equivalent is used
to spray the fit test solution into the enclosure. This nebulizer will not be clearly
marked to distinguish it from the screening test solution nebulizer.
5. The fit test solution is prepared by adding 337.5 mg of Bitrex to 200 ml of a 5%
salt (NaCl) solution in warm water.
6. As before, the test subject will breathe through his or her slightly open mouth with
tongue extended, and be instructed to report if he/she tastes the bitter taste of
Bitrex.
7. The nebulizer is inserted into the hole in the front of the enclosure and an initial
concentration of the fit test solution is sprayed into the enclosure using the same
number of squeezes (either 10, 20 or 30 squeezes) based on the number of
squeezes required to elicit a taste response as noted during the screening test.
8. After generating the aerosol, the test subject will be instructed to perform the
exercises in section I. A. 14. of this appendix.
9. Every 30 seconds the aerosol concentration will be replenished using one half the
number of squeezes used initially (e.g., 5, 10 or 15).
10. The test subject will indicate to the test conductor if at any time during the fit test
the taste of Bitrex is detected. If the test subject does not report tasting the
Bitrex, the test is passed.
11. If the taste of Bitrex is detected, the fit is deemed unsatisfactory and the test is
failed. A different respirator will be tried and the entire test procedure is repeated
(taste threshold screening and fit testing).
Irritant Smoke (Stannic Chloride) Protocol. This qualitative fit test uses a person's
response to the irritating chemicals released in the “smoke” produced by a stannic chloride ventilation smoke tube to detect leakage into the respirator.
A. General Requirements and Precautions.
1. The respirator to be tested will be equipped with high efficiency particulate air (HEPA)
or P100 series filter(s).
2. Only stannic chloride smoke tubes will be used for this protocol.
3. No form of test enclosure or hood for the test subject will be used.
4. The smoke can be irritating to the eyes, lungs, and nasal passages. The test
conductor will take precautions to minimize the test subject's exposure to irritant
smoke. Sensitivity varies, and certain individuals may respond to a greater degree to
irritant smoke. Care will be taken when performing the sensitivity screening checks
that determine whether the test subject can detect irritant smoke to use only the
minimum amount of smoke necessary to elicit a response from the test subject.
5. The fit test will be performed in an area with adequate ventilation to prevent exposure of the person conducting the fit test or the build-up of irritant smoke in the
general atmosphere.
B. Sensitivity Screening Check. The person to be tested must demonstrate his or
her ability to detect a weak concentration of the irritant smoke.
1. The test operator will break both ends of a ventilation smoke tube containing stannic
chloride, and attach one end of the smoke tube to a low flow air pump set to deliver
200 milliliters per minute, or an aspirator squeeze bulb. The test operator will cover the other end of the smoke tube with a short piece of tubing to prevent potential
injury from the jagged end of the smoke tube.

© Safety Services Company 12-23
2. The test operator will advise the test subject that the smoke can be irritating to the
eyes, lungs, and nasal passages and instruct the subject to keep his/her eyes closed
while the test is performed.
3. The test subject will be allowed to smell a weak concentration of the irritant smoke
before the respirator is donned to become familiar with its irritating properties and to determine if he/she can detect the irritating properties of the smoke. The test
operator will carefully direct a small amount of the irritant smoke in the test subject's
direction to determine that he/she can detect it.
C. Irritant Smoke Fit Test Procedure
1. The person being fit tested will don the respirator without assistance, and perform the
required user seal check(s).
2. The test subject will be instructed to keep his/her eyes closed.
3. The test operator will direct the stream of irritant smoke from the smoke tube toward
the face-seal area of the test subject, using the low flow pump or the squeeze bulb.
The test operator will begin at least 12 inches from the face-piece and move the smoke stream around the whole perimeter of the mask. The operator will gradually
make two more passes around the perimeter of the mask, moving to within six inches
of the respirator.
4. If the person being tested has not had an involuntary response and/or detected the
irritant smoke, proceed with the test exercises.
5. The exercises identified in section I. A. 14. of this appendix will be performed by the
test subject while the respirator seal is being continually challenged by the smoke,
directed around the perimeter of the respirator at a distance of six inches.
6. If the person being fit tested reports detecting the irritant smoke at any time, the test
is failed. The person being retested must repeat the entire sensitivity check and fit
test procedure.
7. Each test subject passing the irritant smoke test without evidence of a response
(involuntary cough, irritation) will be given a second sensitivity screening check, with the smoke from the same smoke tube used during the fit test, once the respirator has
been removed, to determine whether he/she still reacts to the smoke. Failure to
evoke a response will void the fit test.
8. If a response is produced during this second sensitivity check, then the fit test is
passed.
D. Quantitative Fit Test (QNFT) Protocols. The following quantitative fit testing
procedures have been demonstrated to be acceptable: Quantitative fit testing
using a non-hazardous test aerosol (such as corn oil, polyethylene glycol 400 [PEG
400], di-2-ethyl hexyl sebacate [DEHS], or sodium chloride) generated in a test chamber, and employing instrumentation to quantify the fit of the respirator;
Quantitative fit testing using ambient aerosol as the test agent and appropriate
instrumentation (condensation nuclei counter) to quantify the respirator fit;
Quantitative fit testing using controlled negative pressure and appropriate
instrumentation to measure the volumetric leak rate of a face-piece to quantify the respirator fit.
1. General
A. The employer will ensure that persons administering QNFT are able to calibrate
equipment and perform tests properly, recognize invalid tests, calculate fit factors
properly and ensure that test equipment is in proper working order.

12-24 © Safety Services Company
B. The employer will ensure that QNFT equipment is kept clean, and is maintained
and calibrated according to the manufacturer's instructions so as to operate at the
parameters for which it was designed.
2. Generated Aerosol Quantitative Fit Testing Protocol
A. Apparatus
1. Instrumentation. Aerosol generation, dilution, and measurement systems using
particulates (corn oil, polyethylene glycol 400 [PEG 400], di-2-ethyl hexyl
sebacate [DEHS] or sodium chloride) as test aerosols will be used for quantitative
fit testing.
2. Test chamber. The test chamber will be large enough to permit all test subjects to perform freely all required exercises without disturbing the test agent
concentration or the measurement apparatus. The test chamber will be equipped
and constructed so that the test agent is effectively isolated from the ambient air,
yet uniform in concentration throughout the chamber.
3. When testing air-purifying respirators, the normal filter or cartridge element will be replaced with a high efficiency particulate air (HEPA) or P100 series filter
supplied by the same manufacturer.
4. The sampling instrument will be selected so that a computer record or strip chart
record may be made of the test showing the rise and fall of the test agent
concentration with each inspiration and expiration at fit factors of at least 2,000.
Integrators or computers that integrate the amount of test agent penetration leakage into the respirator for each exercise may be used provided a record of the
readings is made.
5. The combination of substitute air-purifying elements, test agent and test agent
concentration will be such that the test subject is not exposed in excess of an
established exposure limit for the test agent at any time during the testing process, based upon the length of the exposure and the exposure limit duration.
6. The sampling port on the test specimen respirator will be placed and constructed
so that no leakage occurs around the port (e.g., where the respirator is probed), a
free air flow is allowed into the sampling line at all times, and there is no
interference with the fit or performance of the respirator. The in-mask sampling device (probe) will be designed and used to that the air sample is drawn from the
breathing zone of the test subject, midway between the nose and mouth and with
the probe extending into the face-piece cavity at least 1/4 inch.
7. The test setup will permit the person administering the test to observe the test
subject inside the chamber during the test.
8. The equipment generating the test atmosphere will maintain the concentration of test agent constant to within a 10 percent variation for the duration of the test.
9. The time lag (interval between an event and the recording of the event on the
strip chart or computer or integrator) will be kept to a minimum. There will be a
clear association between the occurrence of an event and its being recorded.
10. The sampling line tubing for the test chamber atmosphere and for the respirator sampling port will be of equal diameter and of the same material. The length of
the two lines will be equal.
11. The exhaust flow from the test chamber will pass through an appropriate filter
(i.e., high efficiency particulate filter) before release.
12. When sodium chloride aerosol is used, the relative humidity inside the test chamber will not exceed 50 percent.
© Safety Services Company 12-25
13. The limitations of instrument detection will be taken into account when
determining the fit factor.
14. Test respirators will be maintained in proper working order and be inspected regularly for deficiencies such as cracks or missing valves and gaskets.
B. Procedural Requirements
1. When performing the initial user seal check using a positive or negative pressure
check, the sampling line will be crimped closed in order to avoid air pressure leakage
during either of these pressure checks.
2. The use of an abbreviated screening QLFT test is optional. Such a test may be
utilized in order to quickly identify poor fitting respirators that passed the positive and/or negative pressure test and reduce the amount of QNFT time. The use of the
CNC QNFT instrument in the count mode is another optional method to obtain a quick
estimate of fit and eliminate poor fitting respirators before going on to perform a full
QNFT.
3. A reasonably stable test agent concentration will be measured in the test chamber
prior to testing. For canopy or shower curtain types of test units, the determination
of the test agent's stability may be established after the test subject has entered the
test environment.
4. Immediately after the subject enters the test chamber, the test agent concentration inside the respirator will be measured to ensure that the peak penetration does not
exceed 5 percent for a half mask or 1 percent for a full face-piece respirator.
5. A stable test agent concentration will be obtained prior to the actual start of testing.
6. Respirator restraining straps will not be over-tightened for testing. The straps will be adjusted by the wearer without assistance from other persons to give a reasonably
comfortable fit typical of normal use. The respirator will not be adjusted once the fit
test exercises begin.
7. The test will be terminated whenever any single peak penetration exceeds 5 percent
for half masks and 1 percent for full face-piece respirators. The test subject will be
refitted and retested.
8. Calculation of fit factors.
(i) The fit factor will be determined for the quantitative fit test by taking the ratio of
the average chamber concentration to the concentration measured inside the respirator
for each test exercise except the grimace exercise.
(ii) The average test chamber concentration will be calculated as the arithmetic
average of the concentration measured before and after each test (i.e., 7 exercises) or
the arithmetic average of the concentration measured before and after each exercise or
the true average measured continuously during the respirator sample.
(iii) The concentration of the challenge agent inside the respirator will be determined by one of the following methods:
(A) Average peak penetration method means the method of determining test agent
penetration into the respirator utilizing a strip chart recorder, integrator, or computer.
The agent penetration is determined by an average of the peak heights on the graph or
by computer integration, for each exercise except the grimace exercise. Integrators or
computers that calculate the actual test agent nitration into the respirator for each exercise will also be considered to meet the requirements of the average peak
penetration method.

12-26 © Safety Services Company
(B) Maximum peak penetration method means the method of determining test agent
penetration in the respirator as determined by strip chart recordings of the test. The
highest peak penetration for a given exercise is taken to be representative of average penetration into the respirator for that exercise.
(C) Integration by calculation of the area under the individual peak for each exercise
except the grimace exercise. This includes computerized integration.
(D) The calculation of the overall fit factor using individual exercise fit factors involves
first converting the exercise fit factors to penetration values, determining the average, and then converting that result back to a fit factor. This procedure is described in the
following equation:
Overall Fit Factor =
Number of exercises:
1/ff1 + 1/ff2 + 1/ff3 + 1/ff4 + 1/ff5 + 1/ff6 + 1/ff7 + 1/ff8
Where ff1, ff2, ff3, etc. are the fit factors for exercises 1, 2, 3, etc.
9. The test subject will not be permitted to wear a half mask or quarter face-piece
respirator unless a minimum fit factor of 100 is obtained, or a full face-piece
respirator unless a minimum fit factor of 500 is obtained.
10. Filters used for quantitative fit testing will be replaced whenever increased
breathing resistance is encountered, or when the test agent has altered the integrity of the filter media.
3. Ambient aerosol condensation nuclei counter (CNC) quantitative fit testing
protocol. The ambient aerosol condensation nuclei counter (CNC) quantitative fit
testing (Portacount™) protocol quantitatively fit tests respirators with the use of a
probe. The probed respirator is only used for quantitative fit tests. A probed respirator has a special sampling device, installed on the respirator that allows the
probe to sample the air from inside the mask.
A probed respirator is required for each make, style, model, and size that the employer
uses and can be obtained from the respirator manufacturer or distributor. The CNC
instrument manufacturer, TSI Inc., also provides probe attachments (TSI sampling
adapters) that permit fit testing in an employee's own respirator. A minimum fit factor
pass level of at least 100 is necessary for a half-mask respirator and a minimum fit factor pass level of at least 500 is required for a full face-piece negative pressure
respirator. The entire screening and testing procedure will be explained to the test
subject prior to the conduct of the screening test.
A. Portacount Fit Test Requirements
1. Check the respirator to make sure the sampling probe and line are properly attached
to the face-piece and that the respirator is fitted with a particulate filter capable of preventing significant penetration by the ambient particles used by the fit test (e.g.
NIOSH 42 CFR 84 series 100, 99 or 95 particulate filter) per manufacturer's
instruction.
2. Instruct the person to be tested to don the respirator for five minutes before the fit
test starts. This purges the ambient particles trapped inside the respirator and
permits the wearer to make certain the respirator is comfortable. This individual will
already have been trained on how to wear the respirator properly.
3. Check the following conditions for the adequacy of the respirator fit: Chin properly placed; Adequate strap tension, not overly tightened; Fit across nose bridge;
Respirator of proper size to span distance from nose to chin; Tendency of the
respirator to slip; Self-observation in a mirror to evaluate fit and respirator position.

© Safety Services Company 12-27
4. Have the person wearing the respirator do a user seal check. If leakage is detected,
determine the cause. If leakage is from a poorly fitting face-piece, try another size of
the same model respirator, or another model of respirator.
5. Follow the manufacturer's instruction for operating the Portacount and proceed with
the test.
6. The test subject will be instructed to perform the exercises in section I. A. 14. of this
appendix.
7. After the test exercises, the test subject will be questioned by the test conductor regarding the comfort of the respirator upon completion of the protocol. If it has
become unacceptable, another model of respirator will be tried.
B. Portacount Test Instrument
1. The Portacount will automatically stop and calculate the overall fit factor for the entire
set of exercises. The overall fit factor is what counts. The Pass or Fail message will
indicate whether or not the test was successful. If the test was a Pass, the fit test is
over.
2. Since the pass or fail criterion of the Portacount is user programmable, the test
operator will ensure that the pass or fail criterion meet the requirements for minimum
respirator performance in this Appendix.
3. A record of the test needs to be kept on file, assuming the fit test was successful. The record must contain the test subject's name; overall fit factor; make, model,
style, and size of respirator used; and date tested.
4. Controlled negative pressure (CNP) quantitative fit testing protocol. The CNP protocol
provides an alternative to aerosol fit test methods. The CNP fit test method
technology is based on exhausting air from a temporarily sealed respirator face-piece
to generate and then maintain a constant negative pressure inside the face-piece.
The rate of air exhaust is controlled so that a constant negative pressure is maintained in the respirator during the fit test. The level of pressure is selected to
replicate the mean inspiratory pressure that causes leakage into the respirator under
normal use conditions. With pressure held constant, air flow out of the respirator is
equal to air flow into the respirator. Therefore, measurement of the exhaust stream
that is required to hold the pressure in the temporarily sealed respirator constant
yields a direct measure of leakage air flow into the respirator.
5. The CNP fit test method measures leak rates through the face-piece as a method for determining the face-piece fit for negative pressure respirators. The CNP instrument
manufacturer, Dynatech Nevada, also provides attachments (sampling manifolds)
that replace the filter cartridges to permit fit testing in an employee's own respirator.
6. To perform the test, the test subject closes his or her mouth and holds his/her
breathe, after which an air pump removes air from the respirator face-piece at a pre-
selected constant pressure. The face-piece fit is expressed as the leak rate through
the face-piece, expressed as milliliters per minute. The quality and validity of the CNP fit tests are determined by the degree to which the in-mask pressure tracks the
test pressure during the system measurement time of approximately five seconds.
Instantaneous feedback in the form of a real-time pressure trace of the in-mask
pressure is provided and used to determine test validity and quality. A minimum fit
factor pass level of 100 is necessary for a half-mask respirator and a minimum fit factor of at least 500 is required for a full face-piece respirator. The entire screening
and testing procedure will be explained to the test subject prior to conduct of the
screening test.

12-28 © Safety Services Company
A. CNP Fit Test Requirements
1. The instrument will have a non-adjustable test pressure of 15.0 mm water pressure.
2. The CNP system defaults selected for test pressure will be set at -15 mm of water (-
0.58 inches of water) and the modeled inspiratory flow rate will be 53.8 liters per
minute for performing fit tests.
Note: CNP systems have built-in capability to conduct fit testing that is specific to
unique work rate, mask, and gender situations that might apply in a specific workplace. Use of system default values, which were selected to represent respirator wear with
medium cartridge resistance at a low-moderate work rate, will allow inter-test
comparison of the respirator fit.
3. The individual who conducts the CNP fit testing will be thoroughly trained to perform
the test.
4. The respirator filter or cartridge needs to be replaced with the CNP test manifold.
The inhalation valve downstream from the manifold either needs to be temporarily
removed or propped open.
5. The test subject will be trained to hold his or her breath for at least 20 seconds.
6. The test subject will don the test respirator without any assistance from the individual
who conducts the CNP fit test.
7. The QNFT protocol will be followed according to section I. C. 1. of this appendix with
an exception for the CNP test exercises.
B. CNP Test Exercises.
1. Normal breathing. In a normal standing position, without talking, the subject will
breathe normally for 1 minute. After the normal breathing exercise, the subject
needs to hold head straight ahead and hold his or her breath for 10 seconds during
the test measurement.
2. Deep breathing. In a normal standing position, the subject will breathe slowly and
deeply for 1 minute, being careful not to hyperventilate. After the deep breathing
exercise, the subject will hold his or her head straight ahead and hold his or her
breath for 10 seconds during test measurement.
3. Turning head side to side. Standing in place, the subject will slowly turn his or her head from side to side between the extreme positions on each side for 1 minute. The
head will be held at each extreme momentarily so the subject can inhale at each side.
After the turning head side to side exercise, the subject needs to hold head full left
and hold his or her breath for 10 seconds during test measurement. Next, the
subject needs to hold head full right and hold his or her breath for 10 seconds during
test measurement.
4. Moving head up and down. Standing in place, the subject will slowly move his or her head up and down for 1 minute. The subject will be instructed to inhale in the up
position (i.e., when looking toward the ceiling). After the moving head up and down
exercise, the subject will hold his or her head full up and hold his or her breath for 10
seconds during test measurement. Next, the subject will hold his or her head full
down and hold his or her breath for 10 seconds during test measurement.
5. Talking. The subject will talk out loud slowly and loud enough so as to be heard
clearly by the test conductor. The subject can read from a prepared text such as the Rainbow Passage, count backward from 100, or recite a memorized poem or song for
1 minute. After the talking exercise, the subject will hold his or her head straight
ahead and hold his or her breath for 10 seconds during the test measurement.

© Safety Services Company 12-29
6. Grimace. The test subject will grimace by smiling or frowning for 15 seconds
7. Bending Over. The test subject will bend at the waist as if he or she were to touch
his or her toes for 1 minute. Jogging in place will be substituted for this exercise in
those test environments such as shroud-type QNFT units that prohibit bending at the
waist. After the bending over exercise, the subject will hold his or her head straight
ahead and hold his or her breath for 10 seconds during the test measurement.
8. Normal Breathing. The test subject will remove and re-don the respirator within a one-minute period. Then, in a normal standing position, without talking, the subject
will breathe normally for 1 minute. After the normal breathing exercise, the subject
will hold his or her head straight ahead and hold his or her breath for 10 seconds
during the test measurement. After the test exercises, the test subject will be
questioned by the test conductor regarding the comfort of the respirator upon completion of the protocol. If it has become unacceptable, another model of a
respirator will be tried.
C. CNP Test Instrument.
1. The test instrument will have an effective audio warning device when the test subject
fails to hold his or her breath during the test. The test will be terminated whenever
the test subject failed to hold his or her breath. The test subject may be refitted and
retested.
2. A record of the test will be kept on file, assuming the fit test was successful. The
record must contain the test subject's name; overall fit factor; make, model, style
and size of respirator used; and date tested.
Part II. New Fit Test Protocols
A. Any person may submit to OSHA an application for approval of a new fit test
protocol. If the application meets the following criteria, OSHA will initiate a
rulemaking proceeding under section 6(b)(7) of the OSH Act to determine whether to list the new protocol as an approved protocol in this Appendix A.
B. The application must include a detailed description of the proposed new fit test
protocol. This application must be supported by either:
1. A test report prepared by an independent government research laboratory (e.g.,
Lawrence Livermore National Laboratory, Los Alamos National Laboratory, the National Institute for Standards and Technology) stating that the laboratory has tested the
protocol and had found it to be accurate and reliable;
2. An article that has been published in a peer-reviewed industrial hygiene journal
describing the protocol and explaining how test data support the protocol's accuracy and
reliability.
C. If OSHA determines that additional information is required before the Agency commences a rulemaking proceeding under this section; OSHA will so notify the
applicant and afford the applicant the opportunity to submit the supplemental
information. Initiation of a rulemaking proceeding will be deferred until OSHA has
received and evaluated the supplemental information.

12-30 © Safety Services Company
User Seal Check Procedures (Mandatory)
The individual who uses a tight-fitting respirator is to perform a user seal check to
ensure that an adequate seal is achieved each time the respirator is put on. Either the
positive and negative pressure checks listed in this appendix, or the respirator
manufacturers recommended user seal check method will be used. User seal checks are
not substitutes for qualitative or quantitative fit tests.
Face-piece Positive and/or Negative Pressure Checks
A. Positive pressure check. Close off the exhalation valve and exhale gently into
the face-piece. The face fit is considered satisfactory if a slight positive pressure
can be built up inside the face-piece without any evidence of outward leakage of air at the seal. For most respirators this method of leak testing requires the
wearer to first remove the exhalation valve cover before closing off the exhalation
valve and then carefully replacing it after the test.
B. Negative pressure check. Close off the inlet opening of the canister or
cartridge(s) by covering with the palm of the hand(s) or by replacing the filter seal(s), inhale gently so that the face-piece collapses slightly, and hold the breath
for ten seconds.The design of the inlet opening of some cartridges cannot be
effectively covered with the palm of the hand. The test can be performed by
covering the inlet opening of the cartridge with a thin latex or nitrile glove. If the
face-piece remains in its slightly collapsed condition and no inward leakage of air
is detected, the tightness of the respirator is considered satisfactory.
C. Manufacturer's Recommended User Seal Check Procedures. The respirator
manufacturer's recommended procedures for performing a user seal check may be
used instead of the positive and/or negative pressure check procedures provided
that the employer demonstrates that the manufacturer's procedures are equally
effective.

© Safety Services Company 12-31
Respirator Cleaning Procedures (Mandatory)
These procedures are provided for employer use when cleaning respirators. They are
general in nature, and the employer as an alternative may use the cleaning
recommendations provided by the manufacturer of the respirators used by their
employees, provided such procedures are as effective as those listed here.
1. Equivalent effectiveness simply means that the procedures used must accomplish the
objectives set forth in Appendix B-2, i.e., must ensure that the respirator is properly cleaned and disinfected in a manner that prevents damage to the respirator and does
not cause harm to the user.
2. Procedures for Cleaning Respirators.
A. Remove filters, cartridges, or canisters. Disassemble face-pieces by removing
speaking diaphragms, demand and pressure-demand valve assemblies, hoses, or
any components recommended by the manufacturer. Discard or repair any
defective parts.
B. Wash components in warm (43° C [110° F] maximum) water with a mild detergent or with a cleaner recommended by the manufacturer. A stiff bristle (not
wire) brush may be used to facilitate the removal of dirt.
C. Rinse components thoroughly in clean, warm (43° C [110° F] maximum),
preferably running water. Drain.
D. When the cleaner used does not contain a disinfecting agent, respirator
components should be immersed for two minutes in one of the following:
1. Hypochlorite solution (50 ppm of chlorine) made by adding approximately one
milliliter of laundry bleach to one liter of water at 43° C (110° F); or,
2. Aqueous solution of iodine (50 ppm iodine) made by adding approximately 0.8
milliliters of tincture of iodine (6-8 grams ammonium and/or potassium iodide/100 cc
of 45% alcohol) to one liter of water at 43° C (110° F); or,
3. Other commercially available cleansers of equivalent disinfectant quality when used
as directed, if their use is recommended or approved by the respirator manufacturer.
E. Rinse components thoroughly in clean, warm (43° C [110° F] maximum),
preferably running water. Drain. The importance of thorough rinsing cannot be
overemphasized. Detergents or disinfectants that dry on face-pieces may result in dermatitis. In addition, some disinfectants may cause deterioration of rubber or
corrosion of metal parts if not completely removed.
F. Components should be hand-dried with a clean lint-free cloth or air-dried.
G. Reassemble face-piece, replacing filters, cartridges, and canisters.
H. Test the respirator to ensure that all components work properly.

12-32 © Safety Services Company
Voluntary Respirator Use
Where Respirator Use is Not Required: §1910.134(c)(2)
1. An employer may provide respirators at the request of employees or permit employees to use their own respirators, if the employer determines that such
respirator use will not in itself create a hazard. If the employer determines that any
voluntary respirator use is permissible, the employer will provide the respirator users
with the information contained in Appendix D to this section (‘‘Information for
Employees Using Respirators When Not Required Under the Standard’’); and
2. In addition, the employer must establish and implement those elements of a written
respiratory protection program necessary to ensure that any employee using a respirator voluntarily is medically able to use that respirator, and that the respirator
is cleaned, stored, and maintained so that its use does not present a health hazard to
the user.
EXCEPTION: Employers are not required to include in a written respiratory protection
program those employees whose only use of respirators involves the voluntary use of
filtering facepieces (dust masks).
APPENDIX D TO § 1910.134 (MANDATORY) Information for Employees Using Respirators When Not Required Under the Standard
Respirators are an effective method of protection against designated hazards when
properly selected and worn. Respirator use is encouraged, even when exposures are
below the exposure limit, to provide an additional level of comfort and protection for workers. However, if a respirator is used improperly or not kept clean, the respirator
itself can become a hazard to the worker. Sometimes, workers may wear respirators to
avoid exposures to hazards, even if the amount of hazardous substance does not exceed
the limits set by OSHA standards. If your employer provides respirators for your
voluntary use, or if you provide your own respirator, you need to take certain precautions to be sure that the respirator itself does not present a hazard.
You should do the following:
1. Read and heed all instructions provided by the manufacturer on use, maintenance,
cleaning and care, and warnings regarding the respirators limitations.
2. Choose respirators certified for use to protect against the contaminant of concern.
NIOSH, the National Institute for Occupational Safety and Health of the U.S.
Department of Health and Human Services, certifies respirators. A label or statement
of certification should appear on the respirator or respirator packaging. It will tell you
what the respirator is designed for and how much it will protect you.
3. Do not wear your respirator into atmospheres containing contaminants for which your
respirator is not designed to protect against. For example, a respirator designed to filter dust particles will not protect you against gases, vapors, or very small solid
particles of fumes or smoke.
4. Keep track of your respirator so that you do not mistakenly use someone else’s
respirator.
Respirator Medical Evaluation Questionnaire (Mandatory)
Administration of the medical questionnaire and examinations
The medical questionnaire and examinations will be administered confidentially during
the employee's normal working hours or at a time and place convenient to the employee.
The medical questionnaire will be administered in a manner that ensures that the
employee understands its content. The employer will provide the employee with an opportunity to discuss the questionnaire and examination results with the PLHCP.

© Safety Services Company 12-33
Respirator Medical Evaluation Questionnaire (Mandatory)
To the Employee:
Can you read? (check one) Yes No
Your employer must allow you to answer the questionnaire during normal working hours,
or at a time and place that is convenient to you. To maintain your confidentiality, your
employer or supervisor must not look at or review your answers, and your employer
must tell you how to deliver or send this questionnaire to the health care professional who will review it.
Part A. Section 1. (Mandatory) The following information must be provided by every
employee who has been selected to use any type of respirator (please print).
1. Today’s Date: ____________________
2. Your Name: _________________________________________________________
3. Your Age: ______________ 4. Sex (circle one): Male Female
5. Your Height: _____________ 6. Your Weight: ___________________
7. Your Job Title: _______________________________________________________
8. A phone number where you can be reached by the health care professional who
reviews this questionnaire (include the Area Code)? ( ) ____________________
9. The best time to phone you at this number? AM / PM
10. Has your employer told you how to contact the health care professional who will review this questionnaire (check one)? Yes No
11. Check the type of respirator you will use (you can check more than one category)?
a. ________ N, R, or P disposable respirator (filter-mask, non-cartridge type only).
b. ___________other type (for example, half- or full-face-piece type, powered-air
purifying, supplied-air, self-contained breathing apparatus).
12. Have you worn a respirator (check one)? Yes No
If “yes,” what type(s): ________________________________________________
__________________________________________________________________
Part A. Section 2. (Mandatory) Questions 1 thru 9 below must be answered by every
employee selected to use any type of respirator (please check “yes” or “no”).
1. Do you now smoke tobacco, or smoked tobacco in the last month? Yes No
2. Have you ever had any of the following conditions?
a. Seizures (fits): Yes No
b. Diabetes (sugar disease): Yes No
c. Allergic reactions that interfere with your breathing: Yes No
d. Claustrophobia (fear of closed-in places): Yes No
e. Trouble smelling odors: Yes No

12-34 © Safety Services Company
a. Asbestosis: Yes No
c. Chronic bronchitis: Yes No
e. Pneumonia: Yes No
g. Silicosis: Yes No
i. Lung cancer: Yes No
k. Any chest injuries or surgeries: Yes No
l. Any other lung problem that you've been told about: Yes No
b. Asthma: Yes No
d. Emphysema: Yes No
f. Tuberculosis: Yes No
h. Pneumothorax (collapsed lung): Yes No
j. Broken ribs: Yes No
b. Stroke: Yes No
d. Heart failure: Yes No
a. Heart attack: Yes No
c. Angina: Yes No
3. Have you ever had any of the following pulmonary or lung problems?
4. Do you currently have any of the following symptoms of pulmonary or lung illness?
a. Shortness of breath: Yes No
b. Shortness of breath when walking fast on level ground or walking up a slight hill or incline: Yes No
c. Shortness of breath when walking with other people at an ordinary pace on level ground: Yes No
d. Have to stop for breath when walking at own pace on level ground: Yes No
e. Shortness of breath when washing or dressing yourself: Yes No
f. Shortness of breath that interferes with your job: Yes No
g. Coughing that produces phlegm (thick sputum): Yes No
h. Coughing that wakes you early in the morning: Yes No
i. Coughing that occurs mostly when you are lying down: Yes No
j. Coughing up blood in the last month: Yes No
k. Wheezing: Yes No
l. Wheezing that interferes with your job: Yes No
m. Chest pain when you breathe deeply: Yes No
n. Any other symptoms that might be related to lung problems: Yes No
5. Have you ever had any of the following cardiovascular or heart problems?
e. Swelling in your legs or feet (not caused by walking): Yes No
f. Heart arrhythmia (heart beating irregularly): Yes No
g. High blood pressure: Yes No
h. Any other heart problem that you've been told about: Yes No
6. Have you ever had any of these cardiovascular or heart symptoms?
a. Frequent pain or tightness in your chest: Yes No
b. Pain or tightness in your chest during physical activity: Yes No
c. Pain or tightness in your chest that interferes with your job: Yes No
d. In the past 2 years, have you noticed your heart skip/miss a beat? Yes No
e. Heartburn or indigestion that is not related to eating: Yes No
f. Any other symptoms that you think may be related to heart or circulation problems: Yes No

© Safety Services Company 12-35
b. Heart trouble: Yes No
d. Seizures (fits): Yes No
a. Breathing or lung problems: Yes No
c. Blood pressure: Yes No
b. Skin allergies or rashes: Yes No
d. General weakness or fatigue: Yes No
a. Eye irritation: Yes No
c. Anxiety: Yes No
b. Wear glasses: Yes No
d. Any other eye/vision problem: Yes No
a. Wear contacts: Yes No
c. Color blind: Yes No
a. Difficulty hearing: Yes No b. Wear a hearing aid: Yes No
c. Any other hearing or ear problem: Yes No
7. Do you currently take medication for any of the following problems?
8. If you have ever used a respirator, have you ever had any of the following problems?
(If you have never used a respirator, check the following space and go to question 9:)
e. Any other problem that interferes with your use of a respirator: Yes No
9. Would you like to talk to the health care professional who will review this questionnaire about your answers to this questionnaire? Yes No
Questions 10 to 15 below must be answered by every employee who has been selected
to use either a full-face-piece respirator or a self-contained breathing apparatus (SCBA).
For employees who have been selected to use other types of respirators, answering
these questions is voluntary.
10. Have you ever lost vision in either eye (temporarily or permanently)? Yes No
11. Do you currently have any of the following vision problems?
12. Have you ever had injury to your ears, including a broken ear drum? Yes No
13. Do you currently have any of the following hearing problems?
14. Have you ever had a back injury? Yes No
15. Do you currently have any of the following musculoskeletal problems?
a. Weakness in any of your arms, hands, legs, or feet: Yes No
b. Back pain: Yes No
c. Difficulty fully moving your arms and legs: Yes No
d. Pain/stiffness when leaning forward or backward at the waist: Yes No
e. Difficulty fully moving your head up or down: Yes No
f. Difficulty fully moving your head side to side: Yes No
g. Difficulty bending at your knees: Yes No
h. Difficulty squatting to the ground: Yes No
i. Climbing a flight of stairs or a ladder carrying more than 25 lbs: Yes No
j. Any other muscle or skeletal problem that interferes with using a respirator:
Yes No

12-36 © Safety Services Company
b. Asbestos: Yes No
d. Beryllium: Yes No
f. Aluminum: Yes No
h. Tin: Yes No
j. Tungsten/cobalt: Yes No
a. Silica (e.g., in sandblasting): Yes No
c. Other hazardous exposures: Yes No
e. Coal (for example, mining): Yes No
g. Iron: Yes No
i. Dusty environments: Yes No
Part B. Any of the following questions, and other questions not listed, may be added to
the questionnaire at the discretion of the health care professional who will review the
questionnaire.
1. In your present job, are you working at high altitudes (over 5,000 feet) or in a place
that has lower than normal amounts of oxygen? Yes / No
If “yes,” do you have feelings of dizziness, shortness of breath, pounding in your chest, or other symptoms when you are working under these conditions: Yes No
2. At work or at home, have you ever been exposed to hazardous solvents, hazardous
airborne chemicals (e.g., gases, fumes, or dust), or have you come into skin contact with hazardous chemicals? Yes No
If “yes,” name the chemicals if you know them: ________________________________
_______________________________________________________________________
Have you ever worked with any of the materials, or under any of the conditions, listed
below? (e.g., grinding or welding this material):
If “yes,” describe these exposures: __________________________________________
_______________________________________________________________________
4. List any second jobs or side businesses you have: ____________________________
_______________________________________________________________________
5. List your previous occupations: ___________________________________________
_______________________________________________________________________
6. List your current and previous hobbies: _____________________________________
_______________________________________________________________________
7. Have you been in the military services? Yes No
If “yes,” were you exposed to biological or chemical agents (either in training or combat)? Yes No
8. Have you ever worked on a HAZMAT team? Yes No
9. Other than medications for breathing and lung problems, heart trouble, blood
pressure, and seizures mentioned earlier in this questionnaire, are you taking any other
medications for any reason (including over-the-counter medications): Yes / No
If “yes,” name the medications if you know them: ______________________________
______________________________________________________________________
10. Will you be using any of the following items with your respirator(s)?
a. HEPA Filters: Yes No b. Cartridges: Yes No
c. Canisters (for example, gas masks): Yes No

© Safety Services Company 12-37
b. Emergency rescue only: Yes No
d. 2 to 4 hours per day: Yes No
f. Over 4 hours per day: Yes No
a. Escape only (no rescue): Yes No
c. Less than 5 hours per week: Yes No
e. Less than 2 hours per day: Yes No
11. How often are you expected to use the respirator(s) (check “yes” or “no” for all
answers that apply to you)?
12. During the period you are using the respirator(s), is your work effort:
a. Light (less than 200 kcal per hour)? Yes No
If “yes,” how long does this period last during the average shift: _____ hrs. ____ min.
Examples of a light work effort are sitting while writing, typing, drafting, or performing light assembly work; or standing while operating a drill press (1-3 lbs.) or controlling
machines.
b. Moderate (200 to 350 kcal per hour): Yes No
If “yes,” how long does this period last during the average shift: _____ hrs. ____ Min.
Examples of moderate work effort are sitting while nailing or filing; driving a truck or bus
in urban traffic; standing while drilling, nailing, performing assembly work, or
transferring a moderate load (about 35 lbs.) at trunk level; walking on a level surface about 2 mph or down a 5-degree grade about 3 mph; or pushing a wheelbarrow with a
heavy load (about 100 lbs.) on a level surface.
c. Heavy (above 350 kcal per hour)? Yes No
If “yes,” how long does this period last during the average shift: _____ hrs. ____ Min.
Examples of heavy work are lifting a heavy load (about 50 lbs.) from the floor to your
waist or shoulder; working on a loading dock; shoveling; standing while bricklaying or chipping castings; walking up an 8- degree grade about 2 mph; climbing stairs with a
heavy load (about 50 lbs.).
13. Will you be wearing protective clothing and/or equipment (other than the respirator) when you're using the respirator? Yes No
If “yes,” describe this protective clothing and/or equipment: ______________________
_______________________________________________________________________
14. Will you be working under hot conditions (temps. exceeding 77° F)? Yes No
15. Will you be working under humid conditions? Yes No
16. Describe the work you will be doing while using your respirator(s): ______________
_______________________________________________________________________
17. Describe any special or hazardous conditions you might encounter when you are
using your respirator(s) (for example, confined spaces, life-threatening gases)
_______________________________________________________________________
_______________________________________________________________________
18. Provide the following information, if you know it, for each toxic substance that you'll
be exposed to when you're using your respirator(s):
Name of first toxic substance: ______________________________________________
_______________________________________________________________________
Estimated maximum exposure level per shift: __________________________________
Duration of exposure per shift: _____________________________________________
12-38 © Safety Services Company
Name of second toxic substance: ____________________________________________
_______________________________________________________________________
Estimated maximum exposure level per shift: __________________________________
Duration of exposure per shift: _____________________________________________
Name of third toxic substance: ______________________________________________
_______________________________________________________________________
Estimated maximum exposure level per shift: __________________________________
Duration of exposure per shift: _____________________________________________
Name of any other toxic substances you will be exposed to while using your respirator:
_______________________________________________________________________
_______________________________________________________________________
19. Describe any special responsibilities you'll have while using your respirator(s) that
may affect the safety and well-being of others (for example, rescue, and security):
_______________________________________________________________________
_______________________________________________________________________
20. Additional Comments: _________________________________________________
_______________________________________________________________________
_______________________________________________________________________
_______________________________________________________________________
Employee Name Employee Signature Date
Physician Name Physician Signature Date

© Safety Services Company 12-39
A R M Environmental Services, Inc.
Respiratory Protection Program
Employee Acknowledgment
By my signature below, I acknowledge that I have received instruction and have read the A R M Environmental Services, Inc. Respiratory Protection Program. I have been
given the opportunity to ask questions and have received answers, instruction, and
clarification to my questions. I understand the contents of and agree to follow A R M
Environmental Services, Inc. company policy regarding this Respiratory Protection
Program.
Respiratory Protection Program received on ____________________ , 20 ___
______________________________________________
Printed Name of Employee
______________________________________________ ______________
Signature of Employee Date
______________________________________________
Social Security Number
______________________________________________
Printed Name of Trainer
______________________________________________ ______________
Signature of Trainer Date
cc: Employee file

12-40 © Safety Services Company
INFORMATION FOR EMPLOYEES USING RESPIRATORS When Not Required Under 29 CFR 1910.134
To the employer: The statement below must be read by all employees using respirators not required under the Respiratory Protection Standard
To the employee: Can you read? Yes No
Your employer is required to have you read the statement below if you are using respirators not required under the Respiratory Protection Regulation. Ensure you keep a copy of this form for your personal records.
EMPLOYEE INFORMATION
Employee Name:
Work Location:
Facility: ID/Clock Number:
Job Title: Dept./Phone:
CERTIFICATION: I certify that I have read and understand the below Respiratory Protection Statement as required by the Occupational Safety and Health Administration (OSHA).
Employee Signature: Date:
OSHA RESPIRATORY PROTECTION STATEMENT
To The Respirator User:
Respirators are an effective method of protection against designated hazards when properly selected and worn. Respirator use is encouraged, even when exposures are below the exposure limit, to provide an additional level of comfort and protection for workers. However, if a respirator is used improperly or not kept clean, the respirator itself can become a hazard to the worker. Sometimes, workers may wear respirators to avoid exposures to hazards, even if the amount of hazardous substance does not exceed the limits set by OSHA standards. If your employer provides respirators for your voluntary use, of if you provide your own respirator, you need to take certain precautions to be sure that the respirator itself does not present a hazard.
You Should Do The Following:
1. Read and heed all instructions provided by the manufacturer on use, maintenance, cleaning and care, and warnings regarding the respirators limitations.
2. Choose respirators certified for use to protect against the contaminant of concern. NIOSH, the National Institute for Occupational Safety and Health of the U.S. Department of Health and Human Services, certifies respirators. A label or statement of certification should appear on the respirator or respirator packaging. It will tell you what the respirator is designed for and how much it will protect you.
3. Do not wear your respirator into atmospheres containing contaminants for which your respirator is not designed to protect against. For example, a respirator designed to filter dust particles will not protect you against gases, vapors, or very small solid particles of fumes or smoke.
Keep track of your respirator so that you do not mistakenly use someone else's respirator.
FORM RETENTION INFORMATION ATTACHMENTS
Retention File: Location: *Yes No
Date Filed: Filed By: *See Following Pages

© Safety Services Company 12-41
RESPIRATOR INSPECTION RECORD
OWNER INFORMATION
Owner’s Name (if individually issued):
Company Name
Department
Employee ID # (if applicable) Work Phone
RESPIRATOR INFORMATION
Type of Respirator
Manufacturer Model #
Size # Respirator ID #
Date of Inspection Time
INSPECTION CRITERIA
Estimated Frequency (Check all that apply): Hourly Twice each Shift Daily Weekly Monthly Before Use After Use
This inspection is being conducted PRIOR to use. Initials
This inspection is being conducted AFTER use. Initials
COMPONENT: DEFECTS FOUND: CORRECTIVE ACTION TAKEN:
Cartridge Holder:
Cartridge Threads/Fittings:
Cartridge/Canister:
Cartridge Filter:
Connections:
Elastomeric Parts Deteriorating?
Elastomeric Parts Pliable?
Exhalation Valve Assembly:
Facepiece:
Gaskets:
Harness Assembly:
Headbands:
Hose Assembly:
Inhalation Valve:
Nose Cup Valves:
Speaking Diaphragm:
Other:
Comments
Inspector’s Name Title
Signature Date
FORM RETENTION INFORMATION ATTACHMENTS
Retention File: Location: *Yes No
Date Filed: Filed By: *See Following Pages

12-42 © Safety Services Company
RESPIRATOR CLEANING RECORD
OWNER INFORMATION
Owner’s Name (if individually issued):
Company Name
Department
Employee ID # (if applicable) Work Phone
RESPIRATOR INFORMATION
Type of Respirator
Manufacturer Model #
Size # Respirator ID #
Date of Inspection Time
CLEANING REQUIREMENTS FOR TIGHT FITTING RESPIRATIORS
Estimated Frequency (Check all that apply): Hourly Twice each Shift Daily Weekly Monthly Before Use After Use
COMPONENT CLEANING REQUIREMENTS
Cartridge Holder:
Cartridge Threads/Fittings:
Cartridge/Canister:
Cartridge Filter:
Connections:
Elastomeric Parts Deteriorating?
Elastomeric Parts Pliable?
Exhalation Valve Assembly:
Facepiece:
Gaskets:
Harness Assembly:
Headbands:
Hose Assembly:
Inhalation Valve:
Nose Cup Valves:
Speaking Diaphragm:
Respirator Cleaning Procedures (Mandatory) These procedures are provided for employee use when cleaning respirators. They are general in nature, and the employee as an alternative may use the cleaning recommendations provided by the manufacturer of the respirators, provided such procedures are as effective as those listed in 29 CFR 1910.134 Appendix B-2. Equivalent effectiveness simply means that the procedures used must accomplish the objectives set forth below. Procedures for Cleaning Respirators: A. Remove filters, cartridges, or canisters. Disassemble facepieces by removing speaking diaphragms, demand and
pressure - demand valve assemblies, hoses, or any components recommended by the manufacturer. Discard or repair any defective parts.
B. Wash components in warm (110 deg. F maximum) water with a mild detergent or with a cleaner recommended by the manufacturer. A stiff bristle (not wire) brush may be used to facilitate the removal of dirt.
C. Rinse components thoroughly in clean, warm (110 deg. F maximum), preferably running water. Drain. D. When the cleaner used does not contain a disinfecting agent, respirator components should be immersed for two
minutes in one of the following: 1. Hypochlorite solution (50 ppm of chlorine) made by adding approximately one milliliter of laundry bleach to one liter
of water at 110 deg. F. 2. Aqueous solution of iodine (50 ppm iodine) made by adding approximately 0.8 milliliters of tincture of iodine (6-8
grams ammonium and/or potassium iodide/100 cc of 45% alcohol) to one liter of water at 110 deg. F. 3. Other commercially available cleansers of equivalent disinfectant quality when used as directed, if their use is
recommended or approved by the respirator manufacturer. E. Rinse components thoroughly in clean, warm (110 deg. F maximum), preferably running water. Drain. The importance
of thorough rinsing cannot be overemphasized. Detergents or disinfectants that dry on facepieces may result in dermatitis. In addition, some disinfectants may cause deterioration of rubber or corrosion of metal parts if not completely removed.
F. Components should be hand-dried with a clean lint-free cloth or air-dried. G. Reassemble facepiece, replacing filters, cartridges, and canisters where necessary. H. Test the respirator to ensure that all components work properly.
Inspector’s Name Title
Signature Date
FORM RETENTION INFORMATION ATTACHMENTS
Retention File: Location: *Yes No
Date Filed: Filed By: *See Following Pages

© Safety Services Company 12-43
RESPIRATOR INSPECTION CHECKLIST Straps
Check connections to face piece.
Check for continued elasticity.
Check connections for neck and top of head.
Face piece
Check overall shape for deformities.
Check all metal pieces for bending.
Check sealing surfaces for elasticity.
Assure that there are no tears, scratches or other
damage to the sealing surface.
Valves
Check inhalation valves for flexibility and proper
seating.
Check exhalation valve for presence, flexibility, and
proper seating.
Assure that exhalation valve sealing surfaces are
smooth and undamaged.
Valve Cover
Check for presence of exhalation valve cover.
Check exhalation valve cover for cracks.
Gaskets
Check cartridge holders for gasket presence.
Check gasket surface for smoothness.
Check cartridge fitting/housing for cracks or anything
preventing proper cartridge seating.
Cartridges
Check that cartridge is correct cartridge for the
task/job.
Check that cartridge edge or bead that seats against
the cartridge holder gasket is smooth and undamaged.
Check that cartridge has just been removed from
sealed packaging or has adequate remaining use time for intended task/job.
Overall
Check whole assembly for damage or wear
FULL-FACE RESPIRATOR FIELD INSPECTION CHECKLIST Straps
Check connections to face piece.
Check for continued elasticity.
Check connections for neck and top of head.
Face piece
Check overall shape for deformities.
Check all metal pieces for bending.
Check sealing surfaces for elasticity.
Assure that there are no tears, scratches, or other
damage to the sealing surface.
Lens
Check lens for flaws or cracks.
Check lens holder for cracks and deformities.
Check lens holder for secure seal against lens edge.
Valves
Check inhalation valves for presence, if accessible on
this model respirator.
Check inhalation valves for flexibility and proper
seating, if accessible on this model respirator.
Check exhalation valve for presence, flexibility, and
proper seating, if accessible on this model.
Assure that exhalation valve sealing surfaces are
smooth and undamaged, if accessible.
Valve Cover
Check exhalation valve cover for presence, if accessible
on this model respirator.
Check exhalation valve cover for cracks, if accessible
on this model respirator.
Amplifier
If equipped with voice amplifier, check for continued
function.
Gaskets
Check cartridge holders for gasket presence.
Check gasket surface for smoothness.
Check cartridge fitting/housing for cracks or anything
that would prevent proper cartridge seating.
Cartridges
Check that cartridge is correct cartridge for the
task/job.
Check that cartridge edge or bead that seats against
the cartridge holder gasket is smooth and undamaged.
Check that cartridge has just been removed from
sealed packaging or that the use log on these
cartridges reflects adequate remaining use time for the intended task/job.
Canister hose
Check canister hose assembly for flexibility and wear.
Check canister hose connections for damage and wear.
Canister belt
Check canister belting and harness assembly for
damage and wear.
Check all connections for smooth operation.
Canister
Check that canister is correct canister for the task/job.
Check that the canister connection point is smooth and
damaged.
Check that the canister seal has just been removed or
that the log on this canister reflects adequate
remaining use time for the intended task/job.
If Type N canister, check that the window shows the
catalyst is still working.
Overall
Check whole assembly for damage or wear.
Inspected by:
Date: Identify Respirators Checked:

12-44 © Safety Services Company
A R M Environmental Services, Inc.
EMPLOYEE MEDICAL RELEASE
For Respiratory Protection Use
_______________________________________________________________________
Physician’s Full Name Telephone Number
_______________________________________________________________________
Street Address
_______________________________________________________________________
City State Zip
I, __________________________________________________ , examined
Physician’s Name
____________________________________________________ ,
Employee’s Name
____________________________ , on ____________________.
Employee’s Social Security Number Date of Examination
As a result of this examination, I find that this employee is:
Approved Not Approved
For:
The use of negative pressure respiratory protection.
The use of positive pressure respiratory protection.
The use of self-contained breathing apparatus.
The wearing of protective clothing such as a Tyvek suit when wearing respiratory protection.
Comments/Observations: __________________________________________________
_______________________________________________________________________
_______________________________________________________________________
_________________________________________________________ ____________
Physician’s Signature Date
cc: Personnel file

© Safety Services Company 13-1
Chapter 13
Hearing Conservation
29 CFR-§1910.95 – Occupational Noise Exposure
Policy Statement for Occupational Noise Exposure
A R M Environmental Services, Inc. has implemented this policy to ensure that no
employee is exposed to noise levels in excess of the action levels as listed in the
following regulations. The following engineering controls and work practices will be enforced.
Upon initial hiring, employees will be trained in the hazards presented by excessive noise
levels in the workplace, and the use and care of hearing protection devices. Training will
be repeated annually and updated to reflect changes in personal protective equipment
(PPE) and work requirements.
Employees will be required to wear hearing protection in work areas whenever employee noise exposures equal or exceed an 8-hour time-weighted average sound level (TWA) of
85 decibels measured on the A scale (slow response) or, equivalently, a dose of fifty
percent.
Audio monitoring will be implemented if it is believed noise levels in work areas are
approaching or exceed action level limits. If monitoring results indicate exposures equaling or exceeding safe limits, an employee will be included in a hearing conservation
program. A baseline audiogram will be done within 6 months of exposure with the
employee required to cease work and avoid high noise levels for at least 14 hours prior
to the test. An audiogram will be performed at least annually on employees in the
hearing conservation program, and if comparison indicates a standard threshold shift, the employee will be notified of this fact, in writing, within 21 days of the finding.
If a standard threshold shift occurs, the following procedures will be implemented:
Employees not using hearing protectors will be fitted with hearing protectors, trained
in their use and care, and required to use them.
Employees already using hearing protectors will be refitted and retrained in the use of
hearing protectors and provided with hearing protectors offering greater attenuation if necessary.
The employee will be referred for a clinical audiological evaluation or an otological
examination, as appropriate, if additional testing is necessary or if it is suspected that
a medical pathology of the ear is caused or aggravated by the wearing of hearing
protectors. The employee will be informed of the need for an otological examination if a medical
pathology of the ear that is unrelated to the use of hearing protectors is suspected.
Audiometric evaluation and testing conducted by a licensed physician using the guidelines contained in OSHA 1910.95 (g), is available to all employees whose work
requirements equals or exceeds an 8 hr. time-weighted average 85 decibels on a regular
basis at no cost to the employee.
Hearing protection is available at no cost to all employees upon request from the job-site
foreman or Company office.

13-2 © Safety Services Company
A record of all audio testing and monitoring will be kept at the Company office and
maintained as required. Evaluations will be done for suitable hearing protection from the
noise levels encountered in the workplace. These records, as well as information on these OSHA regulations and appendices will be available to employees upon request.
Introduction
This chapter describes what you can do at your workplace to control noise that can
damage your coworkers’ or employees’ hearing. It is about developing strategies to
prevent or control workplace noise and is organized in four sections.
Sound and Noise — gives you basic information about sound and noise.
Controlling Workplace Noise — describes noise-control tools and suggests how
to use them to develop a noise-control strategy for your workplace.
Your Program for Success — shows you how to fit a noise-control strategy into
a successful workplace safety-and-health program. Rules to Work by — gives you an overview of OSHA’s hearing conservation
requirements.
Sound and Noise: Overview
Sound
Sound is what you hear. Of course, a dog can hear sounds that you cannot and you can
feel the sound of a jet as it prepares to take off. However, most of us, in our everyday
lives, relate sound with what we hear.
Noise
Noise is sound that you do not want to hear. One person’s noise may be another
person’s music, but there is a point at which noise becomes a problem for all of us: when it is so loud that it destroys our ability to hear sounds that we want to hear.
About this Section: This section tells you about the following topics:
How is sound measured?
How does hearing work?
How loud is too loud?
What happens when noise is too loud? How can I tell if my hearing is damaged?
How can I tell when workplace noise is dangerous?
How is sound measured?
Sound is measured in two ways: decibels and frequency.

© Safety Services Company 13-3
Decibels
Decibels indicate the pressure of sound. Sound waves transfer that pressure from place
to place and are measured in units on a logarithmic scale, shown below.
Decibels Increase in Sound Intensity
100 10 x 10 x 10 x 10 x 10 x 10 x 10 x 10 x 10 x 10 = 10,000,000,000
90 10 x 10 x 10 x 10 x 10 x 10 x 10 x 10 x 10 = 1,000,000,000
80 10 x 10 x 10 x 10 x 10 x 10 x 10 x 10 = 100,000,000
70 10 x 10 x 10 x 10 x 10 x 10 x 10 = 10,000,000
60 10 x 10 x 10 x 10 x 10 x 10 = 1,000,000
50 10 x 10 x 10 x 10 x 10 = 100,000
40 10 x 10 x 10 x 10 = 10,000
30 10 x 10 x 10 = 1,000
20 10 x 10 = 100
10 10 x 1 = 10
1 1 For each 10 decibel increase in sound level, you increase sound intensity by a factor of 10.
Frequency
Frequency is related to a sound’s pitch and is measured in units called hertz (Hz), or
cycles per second. The pitch of a sound — how high or low it seems — is how you
perceive its frequency.
The higher a sound's pitch, the higher its frequency. Children usually have the best
hearing and can often distinguish frequencies ranging from the lowest note on a pipe
organ (about 20 Hz), to the trill of a dog whistle (20,000 Hz).
Human hearing is most sensitive to frequencies between 3,000 to 4,000 Hz. That is why
those with damaged hearing have difficulty understanding higher-pitched voices and other sounds in the 3,000- to 4,000-Hz range.
How does hearing work?
The ear has three main parts: the outer ear, middle ear, and inner ear. The outer
ear opens to the ear canal. The eardrum separates the ear canal from the middle ear. Small bones in the middle ear transfer sound to the inner ear. The inner ear contains
the nerve endings that lead to the brain.
Waves and Vibrations
All sounds produce waves. Sound waves, which funnel through the opening in your
outer ear, travel down the ear canal, and strike your eardrum, causing it to vibrate. The
vibrations pass the small bones of the middle ear, which transmit them to sensory cells
— called hair cells — in the inner ear. The vibrations become nerve impulses and go
directly to the brain, which interprets the impulses as sound.

13-4 © Safety Services Company
How loud is too loud?
Guidelines
People differ in their sensitivity to noise and there is no way to determine who is at risk for hearing damage. Factors such as sound pressure, frequency, and exposure time all
play a role in determining whether noise is harmful or just annoying.
You should consider your hearing at risk if noise affects you in one of the following ways:
You have to shout above noise to make yourself heard
You have ringing in your ears for several hours after exposure to noise
You have difficulty hearing normal sounds for several hours after exposure to noise
Exposure Times and Noise Levels
Most hearing specialists agree: You can damage your hearing if you are continually
exposed to noise levels greater than 85 decibels over an eight-hour period. As noise
levels rise above 85 decibels, the safe exposure time falls dramatically, as shown below.
Maximum Exposure Times, Without Hearing Protection for Common Noise
Sources
Outer Ear
Eardrum
Inner Ear
Middle Ear
(Inside are nerve cells called hair cells.)
Ear Canal
Malleus
Handle of Malleus
Incus
Long Process of Incus
Stapes
Middle Ear
Inner Ear
Anterior Semicircular
Canal
Vestibule
Lateral Semicircular
Canal
Cochlea
Posterior Semicircular
Canal
110
1
105
100
95
90
85
2 3 4 5 6 8 7
City Traffic
Chain Saw
Electric Power Saw
Snowmobile
Gas-Powered Lawn Mower
Tractor/Trailer Rig

© Safety Services Company 13-5
-10
0
10
25
400
55
70
85
100
500 1000 2000 3000 4000 6000
Exposure to loud noise will lower the
threshold.
A threshold shift is a change in the minimum decibel level at which a person can hear a specific
frequency.
What happens when noise is too loud?
Shifting Thresholds
When noise is too loud, it can
damage the sensitive hair cells in
your inner ear. Those hair cells are
the foot soldiers for your hearing.
As the number of damaged hair cells increases, your brain receives
fewer impulses to interpret as
sound. When you damage hair
cells, you damage hearing.
While a single exposure to loud noise — such as a shotgun blast —
can damage your hair cells, it
probably will not destroy them.
You may experience ringing in your
ears and some sounds may be muffled, but your hair cells will
recover and so will your hearing.
This is called a temporary threshold shift.
On the other hand, repeated exposures to loud noise — hundreds of shotgun blasts —
will damage hair cells to the point that they cannot recover. Because the damage is
permanent, the result is called a permanent threshold shift. There is no treatment — no medicine, no surgery, not even a hearing aid — that will restore it. When you destroy
hair cells, you destroy hearing.
How can I tell if my hearing is damaged?
Signs and Symptoms
Hearing loss is painless and gradual. It usually develops over several years — you might
not even notice the loss during those years. Sometimes overexposure to loud noise can
trigger ringing or other sounds in your ears, called tinnitus. While tinnitus may be a symptom of damaged hearing, it can also be caused by infections, medications, and
impacted ear wax. The only way to know for sure if noise has damaged your hearing is
to have a hearing examination by a certified audiometric technician, audiologist,
otolaryngologist, or physician.
If you can answer “yes” to any of the following questions, your hearing may be at risk.
At your workplace, are you exposed to loud noise without hearing protection?
Do you shout to a coworker at arm's length because of the noise around you?
Off the job, are you exposed to noise from firearms, motorcycles, snowmobiles,
power tools, or loud music without hearing protection?
Do you need to turn up the television or radio volume to hear it? Do you ask people to repeat sentences?
Do you feel your hearing is not as good as it was 10 years ago?
Have family members noticed a problem with your hearing?
How can I tell when workplace noise is dangerous?
Signs and Symptoms
If you are not sure whether the noise in your workplace is dangerously loud, ask
yourself: "Is normal conversation difficult because of the noise?" "Have coworkers also
complained about the noise?" These are symptoms of a noise problem.
13-6 © Safety Services Company
Sound Surveys
There is really only one way to tell when workplace noise is dangerous. Have the noise
evaluated by someone trained to do a sound survey. (Anyone trained to use a sound-level meter and a dosimeter should be able to conduct a survey.)
There are three types of sound surveys:
Basic Survey — The surveyor uses a sound-level meter to identify areas in the
workplace that may put workers' hearing at risk.
Detailed Survey — The surveyor uses a sound-level meter and a dosimeter to monitor and estimate an individual worker’s daily exposure to noise.
Engineering Survey — The surveyor measures noise levels produced by
machinery in different operating modes to find ways to eliminate or control
excessive noise.
Survey Objectives
An effective noise survey should give you enough information to understand a noise
problem — to identify it and to determine how to control it. It is important to narrow the
survey's focus so that you are not overwhelmed with more information than you need to
make a good decision.
Controlling Workplace Noise
Overview
Though some people may tell you otherwise, there is more to noise control than buying products off the shelf at your local safety-supply store. Do you really need to spend
money on noise-control products? This section describes what to consider before you
decide.
Where to Control Noise
If you have a workplace noise problem, there are three points at which you can bring it
under control:
At the source. What is causing the noise?
Along the sound path. How does sound move from the source to the listener?
At the listener. Who is affected by the noise?
How to Control Noise
There are seven tools you can use to accomplish the task:
Exposure Monitoring
Audiometric Testing
Education and Training
Engineering Controls
Administrative Controls
Hearing Protectors
Record Keeping
Developing a Strategy
This section describes each of the noise-control tools and suggests how you can use them to develop a noise-control strategy.
What You Should Know About Exposure
Monitoring
What You Should Know About
Audiometric Testing
What You Should Know About Education and Training
Using Engineering Controls
Using Administrative Controls
Using Hearing Protectors
What You Should Know About
Recordkeeping

© Safety Services Company 13-7
What You Should Know About Exposure Monitoring
Exposure Monitoring as a Noise-Control Tool
If employees are exposed to noise levels that exceed 85 decibels averaged over an
eight-hour period, then you must reduce their exposure. How do you know if the noise
levels exceed 85 decibels? Exposure monitoring can help you answer the question; it
can help you determine if noise in your workplace is too loud, where it is too loud, when it is too loud, and whose hearing may be at risk.
Anyone trained to use a dosimeter can monitor noise exposure levels for individual
employees over a specific time period, such as an eight-hour day. This person can also
use a sound-level meter to survey noise levels of work tasks and machines at specific
times during the workday.
Strategy Overview Exposure monitoring gives you the information to determine if individual employees are
exposed to noise that exceeds 85 decibels averaged over an eight-hour period. It can
help you identify the following:
The location of the noise.
The cause of the noise. The employee or employees affected by the noise.
What You Should Know About Audiometric Testing
Audiometric Testing as a Noise-Control Tool
Audiometric testing determines whether an employee's hearing is stable or getting worse
over time. The testing instrument is called an audiometer and the result of the test —
the audiogram — is a graph showing an employee's hearing ability at different sound-frequency levels. An employee's baseline audiogram establishes a baseline or reference
for comparing to the employee’s future audiograms.
Employees who are exposed to noise that exceed 85 decibels averaged over an eight-
hour day must have baseline audiometric tests.
At least annually, after the baseline test, employees must be re-tested if they are
exposed above the 85-decibel limit. The results of each employee’s annual audiogram must be compared to the baseline
audiogram to determine if the employee's hearing has changed.
If the comparison indicates a change in the employee’s hearing, the employee must
be notified within 21 days of the finding.
Only a certified audiometric technician, audiologist, otolaryngologist, or physician can perform an audiometric test.
Strategy Overview
Audiometric testing can tell you how effectively you are controlling workplace noise. If
employees are overexposed, you will see the results as threshold shifts when you compare their baseline audiograms to their annual audiograms.
If employees are overexposed, you will need to determine how and why the
overexposure is occurring.
What You Should Know About Education and Training
Education and Training as a Noise-Control Tool
Informed employees know about workplace hazards, how to recognize the hazards, and
how to control their exposure. The best way to inform them — and to keep them
informed — is through education and training.
Employees who are exposed to noise levels that exceed 85 decibels averaged over an
eight-hour period must understand the following concepts:

13-8 © Safety Services Company
Why 85-decibel-level noise can damage their hearing.
The purpose of audiometric testing.
The purpose of hearing protectors and how to use them properly.
Strategy Overview
If your workplace has noise levels that exceed 85 decibels, education and training,
exposure monitoring, and audiometric testing are probably the most important tools of
your noise-control strategy.
Education and training inform employees about noise hazards, while exposure
monitoring and audiometric testing identify the hazards. Together, these tools help you
eliminate noise hazards or keep them under control.
Using Engineering Controls
Advantages & Disadvantages
When you replace a noisy machine with a quiet one, modify it to make it quieter, or
change the sound path so that dangerous noise never reaches the listener, you are using
an engineering control.
Workplace safety-and-health specialists will tell you that engineering controls are the
best way to control noise. That is true if the engineering control is effective, practical,
and affordable for your workplace.
For example, if you have an old, noisy, electric hand drill, you can replace it with a
newer, quieter one — a practical, affordable engineering control. If you have a large, noisy chipper/shredder, however, replacing it may not be practical. Instead, you might
isolate the noise by enclosing the shredder or block the noise by constructing a barrier
between the shredder and the listener.
When you double the distance between the listener and the sound source, you
decrease the sound pressure level by six decibels. For example, a hazardous 96-
decibel noise source at five feet is a safe 84 decibels at 20 feet. When you reduce the dropping height of materials collected in bins and boxes, you
can quiet noisy material conveying systems. Also, consider the following low-cost
controls:
Match the conveyer speed to the flow of materials to keep the material from
vibrating. Use rigid containers or line them with damping materials such as plastic or rubber.
Plates dropping off a roller belt onto a stacking platform can be noisy. Reduce the
drop height and you will decrease the noise.
Strategy Overview
Applying effective, practical, affordable engineering controls to a noise problem is
challenging because there are no ready-to-order solutions — you have to tailor them to
your workplace. You are more likely to find an engineering-control solution when you
have accomplished the following:
Understand what is causing the noise. Determine how the noise is reaching the listener.
Identify the most appropriate point, or points, at which to control the noise: at the
source, along the sound path, or at the listener.
Using Administrative Controls
Advantages & Disadvantages
To administer an activity means to manage it. Unlike engineering controls — which prevent hazardous noise from reaching a worker — administrative controls manage
workers' activities to reduce exposure. Closely related to administrative controls are
work-practice controls, which emphasize safe work practices and procedures.
© Safety Services Company 13-9
Administrative and work-practice controls are usually less expensive to carry out than
engineering controls; that is because there are no significant capital costs involved in
changing or modifying equipment. In some cases, administrative controls have reduced employee exposure to noise and increased productivity by rotating employees through a
demanding, noisy task. Work-practice controls also improve employee performance by
emphasizing safe work practices.
On the other hand, administrative controls and work-practice controls usually are not as
effective as engineering controls because they do not control the noise source. Noisy machines are still noisy and the exposure hazard is still present.
Applying Administrative Controls: Examples
Examples of administrative and work-practice controls include the following:
Reducing the time employees spend working in noisy areas — for example, rotating two or more employees so that each is exposed to noise levels less than 85 decibels,
averaged over an eight-hour day.
Shutting down noisy equipment when it is not needed for production.
Ensuring that employees maintain their equipment to keep it running smoothly and
quietly. Ensuring that employees know how to perform tasks and operate equipment at safe
noise levels.
Using warning signs to identify work areas where noise exceeds safe levels.
Teaching employees appropriate methods for eliminating or controlling noise.
Encouraging employees to report noise hazards to supervisors.
Strategy Overview
If you cannot eliminate or control dangerous noise at the source or along the sound path
with an engineering control, you may be able to reduce it at the listener with an
administrative control. However, if an administrative control will not reduce employee exposures to safe levels, you will need to consider another noise-control tool: hearing
protectors.
Using Hearing Protectors
There are two types of hearing protectors: ear plugs and earmuffs. Both types decrease the pressure of sound that reaches the eardrum and are the next line of defense against
noise when you cannot reduce exposures to safe levels with engineering or
administrative controls.
Ear plugs fit in the outer ear canal. To be effective, they must totally block the ear canal
with an airtight seal. They are available in different shapes and sizes and can be custom made. An earplug must be snugly fitted so that it seals the entire circumference of the
ear canal. An improperly fitted, dirty, or worn-out plug will not seal and can irritate the
ear canal.
Earmuffs fit over the entire outer ear to form an air seal — they will not seal around
eyeglasses or long hair — and are held in place by an adjustable headband. The headband must hold earmuffs firmly around the ear.
How Effective are Hearing Protectors?
Properly fitted earplugs and muffs reduce noise levels 15 to 26 decibels. Better earplugs
and muffs are approximately equal in sound reduction, though earplugs are more effective for reducing low-frequency noise and earmuffs for reducing high-frequency
noise. Using earplugs and muffs together adds more protection against higher noise
levels (above 105 decibels) than either used alone.
Hearing protectors are effective only when employers and employees understand how to
select, wear, and care for them.

13-10 © Safety Services Company
Ensure that employees are properly fitted with appropriate hearing protectors.
Have an adequate supply of hearing protectors available.
Educate employees how to wear and care for hearing protectors. Respond promptly to employees’ questions about hearing protectors.
Replace protectors when they are damaged, dirty, or worn out.
Remember that hearing protectors control noise, they do not eliminate it — they are
effective only if you wear them for the entire time that you are exposed to hazardous noise.
How do I select hearing protectors?
Focus on the three C’s: comfort, convenience, and compatibility. Do not expect employees to wear hearing protectors that are uncomfortable, difficult to use, or that
interfere with their work. Employees should decide, with the help of a person trained in
fitting hearing protectors, which types and sizes are appropriate.
Most hearing protectors are labeled with a noise reduction rating (NRR) indicating a
protection level in decibels. However, these ratings are not reliable outside of a laboratory — which is where they received the rating — so you should not use them
solely in making a selection decision. More important are factors that favor comfort,
convenience, and compatibility:
Easy to place and remove
Simple to care for
Constructed with non-allergenic material Will not interfere with eyeglasses or hard hats
Do I have to provide hearing protectors to my employees?
If you are an employer, you must provide hearing protectors, at no cost, to employees
exposed to workplace noise that exceeds 85 decibels, averaged over an eight-hour
period. In addition, those who receive hearing protectors must have the opportunity to
do the following:
Select appropriate hearing protectors from a variety of types that are compatible with their work tasks.
Be properly fitted with the hearing protectors they select.
Be trained in the use and care of their hearing protectors.
Before you invest in hearing protectors, determine whether you can use engineering
controls or administrative controls to lower noise levels below the 85-decibel limit.
What You Should Know About Recordkeeping
Recordkeeping as a Noise-Control Tool
You cannot control workplace noise without reliable information. Accurate records
document what you have done to control noise and inform you when you may need to
change your strategy to keep noise under control.
Strategy Overview
You might think of record keeping as a separate activity, but it ties together critical
information about all the other tools you use to eliminate or control workplace noise.

© Safety Services Company 13-11
The table below summarizes the critical record-keeping information for each noise-
control tool.
Noise-Control Tool
What it Covers Critical Recordkeeping Information Retention
Period
Exposure Monitoring
Sound survey
The date of survey, instruments used, areas surveyed, noise hazards identified, employees
affected, employees with exposure levels exceeding 85 decibels over an eight-hour
period.
2 years
Audiometric
Testing
Baseline and annual
audiograms
Name and job classification of each affected
employee, employee test results, tester’s name, test date, audiometer calibration date,
test room background sound pressure level.
Until the
employee’s termination
date
Education
and Training
Hearing
conservation concepts
Names of employees who received training, training dates, who presented the training.
No
minimum period
Engineering Controls
Feasibility survey
Results of feasibility surveys, controls used,
start date, noise reduction achieved.
No
minimum period
Administrative
Controls
Feasibility survey
Results of feasibility surveys, controls used,
start date, noise reduction achieved, employees affected.
No
minimum period
Hearing Protectors
Selection and fitting
Date of initial hearing protector fitting for each employee, size and brand of hearing protector
selected, name of person who assisted with fitting.
No minimum
period
Your Program for Success
Workplace Safety-and-Health Program
A program is simply a means for achieving a goal. Your workplace program is what you
and your employees do to achieve and maintain a safe, healthful workplace. A workplace program is just a concept, but it is an important one. Think for a moment
about how you control injuries and illnesses at your workplace. Your workplace program
reflects how you manage the safety and health of your employees.
Elements of a Successful Program
Look at any business that has a safe, healthful workplace and you will find the following
elements:
Managers are committed to making the program work.
Employees are held accountable for following safe work practices.
Employees are involved in the program. Employees know how to identify and control hazards.
Employees know how to investigate near-miss incidents and accidents.
Employees and managers are educated and trained in safe work practices.
Managers review the program regularly to ensure that it stays effective.
Noise Control and Your Workplace Program
An effective workplace program covers all the bases: when you identify workplace
hazards, control them effectively, investigate accidents and avoid repeating them, and train employees how to do their jobs safely, you are already complying with most
workplace requirements. The following table shows how a noise-control strategy fits into
a successful workplace safety program.
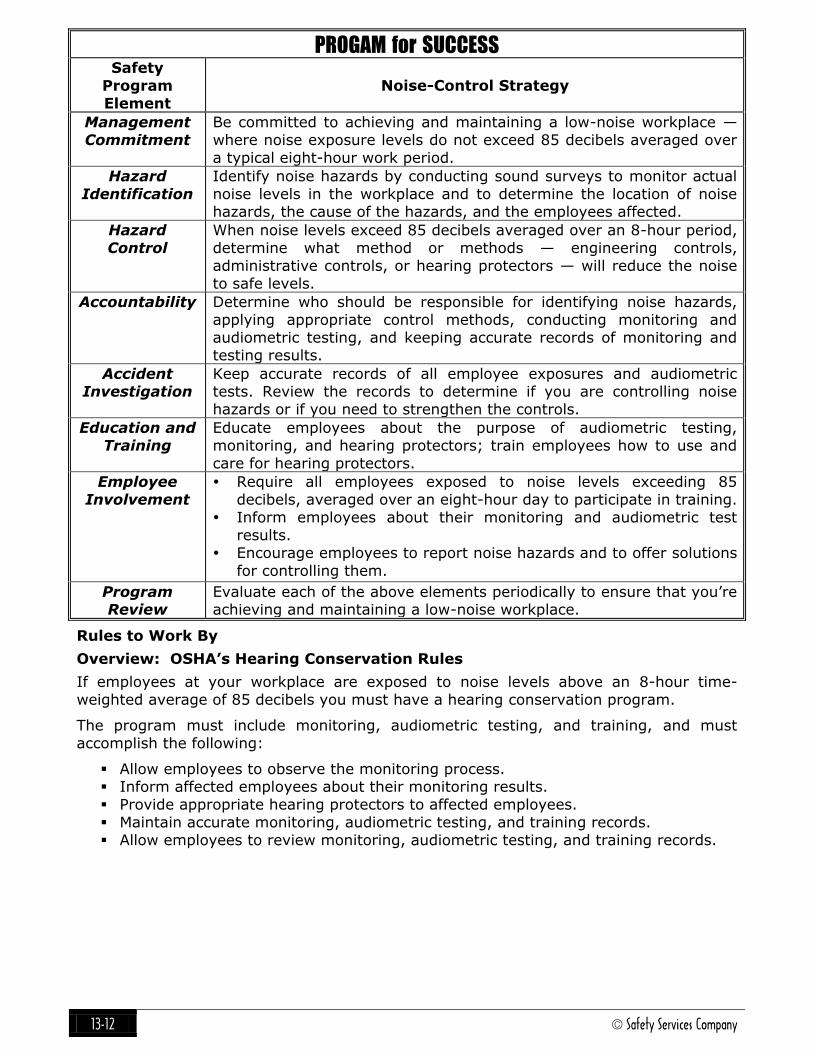
13-12 © Safety Services Company
PROGAM for SUCCESS Safety
Program
Element
Noise-Control Strategy
Management
Commitment
Be committed to achieving and maintaining a low-noise workplace —
where noise exposure levels do not exceed 85 decibels averaged over
a typical eight-hour work period.
Hazard
Identification
Identify noise hazards by conducting sound surveys to monitor actual
noise levels in the workplace and to determine the location of noise hazards, the cause of the hazards, and the employees affected.
Hazard
Control
When noise levels exceed 85 decibels averaged over an 8-hour period,
determine what method or methods — engineering controls,
administrative controls, or hearing protectors — will reduce the noise
to safe levels.
Accountability Determine who should be responsible for identifying noise hazards,
applying appropriate control methods, conducting monitoring and
audiometric testing, and keeping accurate records of monitoring and testing results.
Accident Investigation
Keep accurate records of all employee exposures and audiometric tests. Review the records to determine if you are controlling noise
hazards or if you need to strengthen the controls.
Education and
Training
Educate employees about the purpose of audiometric testing,
monitoring, and hearing protectors; train employees how to use and
care for hearing protectors.
Employee
Involvement
Require all employees exposed to noise levels exceeding 85
decibels, averaged over an eight-hour day to participate in training.
Inform employees about their monitoring and audiometric test
results. Encourage employees to report noise hazards and to offer solutions
for controlling them.
Program Review
Evaluate each of the above elements periodically to ensure that you’re achieving and maintaining a low-noise workplace.
Rules to Work By
Overview: OSHA’s Hearing Conservation Rules
If employees at your workplace are exposed to noise levels above an 8-hour time-
weighted average of 85 decibels you must have a hearing conservation program.
The program must include monitoring, audiometric testing, and training, and must
accomplish the following:
Allow employees to observe the monitoring process. Inform affected employees about their monitoring results.
Provide appropriate hearing protectors to affected employees.
Maintain accurate monitoring, audiometric testing, and training records.
Allow employees to review monitoring, audiometric testing, and training records.
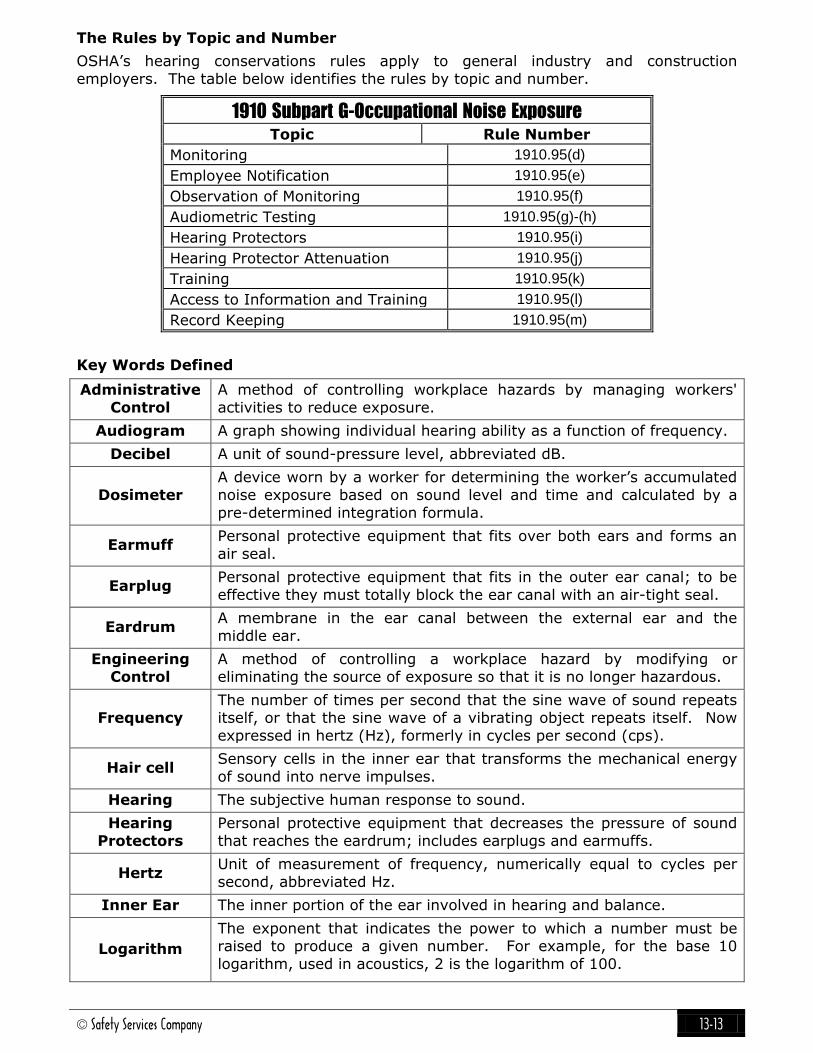
© Safety Services Company 13-13
The Rules by Topic and Number
OSHA’s hearing conservations rules apply to general industry and construction
employers. The table below identifies the rules by topic and number.
1910 Subpart G-Occupational Noise Exposure Topic Rule Number
Monitoring 1910.95(d)
Employee Notification 1910.95(e)
Observation of Monitoring 1910.95(f)
Audiometric Testing 1910.95(g)-(h)
Hearing Protectors 1910.95(i)
Hearing Protector Attenuation 1910.95(j)
Training 1910.95(k)
Access to Information and Training 1910.95(l)
Record Keeping 1910.95(m)
Key Words Defined
Administrative
Control
A method of controlling workplace hazards by managing workers'
activities to reduce exposure.
Audiogram A graph showing individual hearing ability as a function of frequency.
Decibel A unit of sound-pressure level, abbreviated dB.
Dosimeter
A device worn by a worker for determining the worker’s accumulated
noise exposure based on sound level and time and calculated by a
pre-determined integration formula.
Earmuff Personal protective equipment that fits over both ears and forms an
air seal.
Earplug Personal protective equipment that fits in the outer ear canal; to be
effective they must totally block the ear canal with an air-tight seal.
Eardrum A membrane in the ear canal between the external ear and the
middle ear.
Engineering Control
A method of controlling a workplace hazard by modifying or eliminating the source of exposure so that it is no longer hazardous.
Frequency The number of times per second that the sine wave of sound repeats itself, or that the sine wave of a vibrating object repeats itself. Now
expressed in hertz (Hz), formerly in cycles per second (cps).
Hair cell Sensory cells in the inner ear that transforms the mechanical energy
of sound into nerve impulses.
Hearing The subjective human response to sound.
Hearing
Protectors
Personal protective equipment that decreases the pressure of sound
that reaches the eardrum; includes earplugs and earmuffs.
Hertz Unit of measurement of frequency, numerically equal to cycles per
second, abbreviated Hz.
Inner Ear The inner portion of the ear involved in hearing and balance.
Logarithm
The exponent that indicates the power to which a number must be raised to produce a given number. For example, for the base 10
logarithm, used in acoustics, 2 is the logarithm of 100.

13-14 © Safety Services Company
Middle Ear The middle portion of the ear consisting of the eardrum and an air-
filled chamber lined with mucus membrane.
Noise 1. Sound that is noticeably unpleasant.
2. Sound that is undesired or that interferes with one’s hearing.
Noise-Induced
Hearing Loss
Sounds of sufficient intensity and duration that damage one's hearing
ability.
Outer Ear The external portion of the ear including the canal leading to the
eardrum.
Permanent
Threshold Shift
A permanent decrease in hearing ability a specified frequency as
compared to a previously established reference level.
Pitch The property of a sound that is determined by the frequency of the
waves producing it; the highness or lowness of sound.
Sound
1. The sensation perceived by the sense of hearing.
2. Mechanical radiant energy transmitted by waves in a material medium such as air, and the objective cause of hearing.
Sound-Level
Meter
An instrument that uses a microphone, amplifier, and output meter to
measure sound levels.
Sound Survey
Describes a variety of methods of measuring sound levels; including
basic survey, detailed survey, and engineering survey; includes
monitoring exposure levels at the listener over extended time
periods, such as an eight-hour work day.
Temporary
Threshold Shift
A temporary impairment of hearing ability.
Tinnitus
Ringing in the ear or noise sensed in the head. Onset may be due to
an acoustic trauma and persist in the absence of acoustical
stimulation (in which case it may indicate a lesion of the auditory system).
Work-Practice
Control
A type of administrative control; emphasizes safe work practices and procedures.
© Safety Services Company 14-1
Chapter 14
Hand & Power Tool Safety
OSHA 29 CFR-§1926.300 - Tools, Hand & Power
OSHA 29 CFR-§1926.301 - Hand Tools
OSHA 29 CFR-§1926.302 - Power Operated Hand Tools
ELECTRIC TOOLS
Regulation Rules To be Followed:
Electric power operated tools will either be of the approved double-insulated type or
grounded in accordance with OSHA CFR Regulations.
The use of electric cords for hoisting or lowering tools will not be permitted.
Safety Basics
Read and understand the manufacturer's instructions before operating any new or
unfamiliar electric tool.
Make sure that all electric tools are properly grounded or double-insulated. Ground fault circuit interrupters (GFCIs) must be used with any portable electric tool
operated outdoors or in wet locations.
Always disconnect the tool from the power source before making adjustments or
changing attachments,
Never remove or tamper with guards or other safety devices.
Always wear eye protection when operating electric tools. Wear hearing protection when operating tools in confined spaces or for prolonged
periods.
Hold the tool firmly and secure the material properly before turning on the tool.
DRILLS
Types
Trim carpenters will generally select a ¼ or ⅜ inch trigger-controlled variable speed drill.
Simply by increasing pressure on the trigger, you can change drill speed from 0 to 2,000
rpm.
Carpenters working in heavy structural construction such as bridges, trusses, and
waterfront piers will usually select the slower but more powerful one- or two-speed reversible ½ or ¼ inch drill.
Size of the drill is determined by the maximum opening of the chuck. For instance, a ⅜
inch drill will take only bits or attachments with a shank up to ⅜ inch wide.
For drywall screws, a drywall screw gun should be used. The driving bit should be
replaced when worn.
Attachments
Attachments such as speed-reducing screwdrivers, disk sanders, and buffers can help
prevent fatigue and undue muscle strain. A right-angle drive attachment is very useful in
tight corners and other hard-to-reach places.
Cutting and drilling attachments must be kept sharp to avoid overloading the motor.
Never crowd or push the tool beyond capacity. Such handling can burn out the motor,
ruin the material, and injure the operator in the event of a kickback.
Some attachments, such as holesaws, spade bits, and screwdrivers, require considerable
control by the operator. If you do not feed the attachment slowly and carefully into the
14-2 © Safety Services Company
material, the drill can suddenly stop and severely twist or break your arm. Stock should
be clamped or otherwise secured to prevent it from moving. This will also enable you to
control the tool with both hands and absorb sudden twists or stops caused by obstructions such as knots or hidden nails.
You must restrain the drill just before the bit or cutting attachment emerges through the
material, especially when oversized spade bits are used. Sides of the bit often become
hooked on the ragged edge of the nearly completed hole and make the drill come to a
sudden stop that can wrench your arm.
At the first sign of the bit breaking through the material, you should withdraw the drill
and complete the work from the other side. This will produce a cleaner job and prevent
the material from cracking or splintering. The same result can be obtained by clamping a
back-up piece to the material and drilling into that.
Select the bit or attachment suitable to the size of the drill and the work to be done. To
operate safely and efficiently, the shanks of bits and attachments must turn true. Make sure that the bit or attachment is properly seated and tightened in the chuck.
Some operations require the use of an impact or hammer drill. For instance, drilling large
holes in concrete or rock with a carboloy bit should be done with an impact drill
Follow manufacturer's instructions when selecting and using a bit or attachment,
especially with drills or work you are not unfamiliar with.
Working with Small Pieces
Drilling into small pieces of material may look harmless, but if the pieces are not
clamped down and supported, they can spin with the bit before the hole is completed.
If a small piece starts to twist or spin with the drill, you can be injured. Small work pieces should be properly secured and supported. Never try to drill with one hand and
hold a small piece of material with the other.
Drilling from Ladders
Standing on a ladder to drill holes in walls and ceilings can be hazardous. The top and
bottom of the ladder must be secured to prevent the ladder from slipping or sliding
when the operator puts pressure on the drill.
When drilling from a ladder, never reach out to either side. Overreaching can cause the ladder to slide or tip.
Never stand on the top step or paint shelf of a stepladder. Stand at least two steps
down from the top. When working from an extension ladder, stand no higher than the
fourth rung from the top.
Never support yourself by holding onto a pipe or any other grounded object. Electric current can travel from the hand holding the drill through your heart to the hand
holding the pipe. A minor shock can make you lose your balance. A major shock can
badly burn or even kill you.
Operation
Always plug in the drill with the switch OFF.
Before starting to drill, turn on the tool for a moment to make sure that the shank of
the bit or attachment is centered and running true. Punch a layout hole or drill a pilot hole in the material so that the bit won't slip or
slide when your start drilling. A pilot hole is particularly important for drilling into
hard material such as concrete or metal.
With the drill OFF, put the point of the bit in the pilot hole or punched layout hole.
Hold the drill firmly in one hand or, if necessary, in both hands at the correct drilling angle.
Turn on the switch and feed the drill into the material with the pressure and control
required by the size of the drill and the type of material.

© Safety Services Company 14-3
Don't try to enlarge a hole by reaming it out with the sides of the bit. Switch to a
larger bit.
While drilling deep holes, especially with a twist bit, withdraw the drill several times with the motor running to clear the cuttings.
Never support material on your knee while drilling. Material should be firmly
supported on a bench or other work surface for drilling.
Unplug the drill and remove the bit as soon as the work is finished.
When drilling into floors, ceilings, and walls, beware of wiring and plumbing. Rotary and hammer drills generate extreme torque and must be handled with
caution. Take occasional breaks to relax your arms and shoulders.
Drilling Timbers
When drilling timbers with a self-feeding auger bit, do not underestimate the physical
pressure required to maintain control of the tool. Such work calls for a heavy-duty,
low-rpm drill, ½ or ¼ inch in size.
Never attempt to drill heavy timbers by yourself, especially when working on a scaffold or other work platform. If the self-feeding auger bit digs into a hidden knot or
other obstruction, the sudden torque can twist or wrench your arm and throw you off
balance.
Other Materials
The main hazard in drilling materials other than wood is leaning too heavily on the
tool. This can not only overload and burn out the motor but also cause injury if you
are thrown off balance by the drill suddenly twisting or stopping.
Always use a drill powerful enough for the job and a bit or attachment suited to the size of the drill and the nature of the work. As at other times, punching a layout hole
or drilling a pilot hole can make the job safer and more efficient.
A drill press stand is ideal for drilling holes in metal accurately and safely. Small
pieces can be clamped in a vise and bolted to the table. This prevents the work piece
from spinning when the drill penetrates the metal. A drill press can also be used for cutting large holes in wood with a hole saw or speed
bit. The stability of the press and the operator's control over cutting speed eliminate
sudden torque.
PLANES
Electric planes are available in various types and sizes, and are operated in similar ways.
Depending on specific features adjustments between models may differ.
Planes may be equipped with:
Outfeed tables (back shoes) that are either fixed or movable
Infeed tables (front shoes) that move straight up and down or move up and down on
an angle to keep the gap between cutter head and table as small as possible Cutter heads with two or more straight blades (also called knives or cutter blades) or
cutter heads with two curved blades.
Never operate an electric plane while wearing a scarf, open jacket, or other loose
clothing. Keep long hair tied up. Always wear eye protection and practice good housekeeping.
Standard Plane
Hold with both hands to avoid contact with cutter blades. Always keep both hands on the plane until motor stops.
Use the edge guide to direct the plane along the desired cut. Never try to guide the
plane with your fingers. If the plane runs into an obstruction or starts to vibrate, your
fingers can slide into the unprotected cutter head.
14-4 © Safety Services Company
Block Plane (Electric)
Designed for use on small surfaces, the block plane is operated with only one hand. It is
more dangerous than the larger, standard plane.
You may tend to support the work with one hand while operating the block plane with
the other. Any unexpected twist or movement can force the plane or the material to kick
back and injure you. Keep your free hand well out of the way, in case the plane slips
accidentally.
Maintaining Blades
To avoid striking staples, nails, sand, or other foreign objects, make sure the work is
free of obstructions.
Keep blades in good condition and sharp. A sharp blade is safer to use than a dull
blade that requires more pressure. A dull blade will float over the work and can
bounce off, causing injury.
Use a fine-grit oilstone when sharpening blades. Blades can be re-sharpened several times if they are not nicked or cracked.
Changing Blades
Time and patience is required when raising or replacing cutter blades. Blades must be
the same weight and seated at the same height to prevent the cutter head from
vibrating. Any deviation can cause the head to run off balance. Blades can fly out, injure
you or fellow workers.
Replacing cutter blades involves two steps: Removing and Installing
Removing Blades
Disconnect the plane from the power source. Turn the plane upside down and secure it in a fixed position.
Hold the cylinder head stationary by tapping a softwood wedge between the
cutterhead and the bearing (some tools are equipped with a locking device).
Loosen all the screws and lift out one blade and throat piece.
Turn the cutter head and repeat this procedure with other blades. If necessary, clean parts thoroughly with recommended solvent
Installing Blades
Replace one throat piece and blade.
Tighten the two end screws lightly.
Take a hardwood straight edge and use the outfeed table (back shoe) as a gauge.
Raise or lower the blade until both ends are level with the outfeed table at the blade's
highest point of revolution. Tighten up the remaining screws.
Set the rest of the blades in the same way.
Turn the cylinder head and make sure that all blades are the same height.
Tighten up all the screws.
Double-check the height of all blades. Tightening can sometimes shift the set. Double-check all the screws.
Turn the tool right side up and plug it in.
Hold the tool in both hands with the cutter blades facing away from you and switch it
on.
Operation
Always disconnect the plane from the power source before adjusting or changing
blades or the cutter head. For safe operation make sure that blades (at their highest point of revolution) are
exactly flush with the outfeed table.
Make sure to support work securely for safety and accuracy.

© Safety Services Company 14-5
Use a jack (e.g. when planing doors and large pieces of plywood) to secure material
and keep edges clear of dirt and grit.
When using an electric block plane, clamp or fasten the workpiece whenever possible. Keep your free hand well away from plane and material.
When using the standard power plane, adjust the edge guide to provide desired
guidance.
Adjust depth of cut to suit the type and width of wood to be planed.
To start a cut, rest the infeed table (front shoe) firmly on the material with cutter head slightly behind the edge of the material. After finishing a cut, hold both hands
on the plane until motor stops.
ROUTERS
With special guides and bits, the portable electric router can be used to cut dadoes,
grooves, mortises, dovetail joints, moldings, and internal or external curves. Routers are
especially useful for mortising stair stringers and recessing hinges and lockplates on
doors. The router motor operates at very high speed (up to 25,000 rpm) and turns clockwise.
When starting a router with a trigger switch in the handle, keep both hands on the
tool to absorb the starting torque.
When starting a router with a toggle switch on top of the motor, hold the router
firmly with one hand and switch on power with the other, then put both hands on the
tool for control and accuracy. Always wear eye protection. Hearing protection may also be required. Remember, the
speed and power of a router requires that it be operated with both hands.
Operation
Always support and secure the work in a fixed position by mechanical means such as
a vise or clamps. Never try to hold the work down with your hand or knee. Never rely
on a second person to hold the material. Human grip is no match for the torque and
kickback that a router can generate. Make sure that the bit is securely mounted in the chuck and the base is tight.
Set the base on the work, template, or guide and make sure that the bit can rotate
freely before switching on the motor.
For work along edges such as bevels and moldings, make sure that the cutting edge
of the router bit contacts the material to the left of the cutting direction. Otherwise the router will kick back or fly away from you.
When routing outside edges, guide the router around the work counter-clockwise.
Splinters left at corners by routing across the grain will be removed by the next pass
with the grain.
Feed the router bit into the material at a firm but controllable speed. There is no rule on how fast to cut. When working with softwood, the router can sometimes be
moved as fast as it can go. Cutting may be very slow, however, with hardwood,
knotty or twisted wood, and larger bits.
Listen to the motor. When the router is fed into the material too slowly, the motor
makes a high-pitched whine. Push too hard and the motor makes a low growling
noise. Forcing the tool can cause burnout or kickback. Cutting through knots may cause slowdown or kickback.
When the type of wood or size of bit requires going slow, make two or more passes to
prevent the router from burning out or kicking back.
If you are not sure about depth of cut or how many passes to make, test the router
on a piece of scrap similar to the work. When the cut is complete, switch off power and keep both hands on the router until
the motor stops. In lifting the tool from the work, avoid contact with the bit.

14-6 © Safety Services Company
SAW SAFETY
Wear protective clothing and equipment. Eye protection is essential.
Where saws are used in confined spaces or for prolonged periods, wear hearing
protection.
Where ventilation is inadequate, wear a dust mask for protection against dust. Over
time, exposure to dust from particle board and other materials may cause respiratory
problems.
Note: With electric saws operated outdoors or in wet locations, you must use a ground
fault circuit interrupter (GFCI).
Never wear loose clothing, neck chains, scarves, or anything else that can get caught in the saw.
Leave safety devices in place and intact on the saw. Never remove, modify, or defeat
guards. Keep your free hand away from blade.
Always change and adjust blades with the power OFF. Disconnect electric saws from
the power source before making changes or adjustments.
CIRCULAR SAWS
Circular saws are either worm-drive or direct-drive. The worm-drive saw has gears arranged so that the blade runs parallel to the motor shaft. The direct-drive saw has the
blade at a right angle to the motor shaft.
The worm-drive saw periodically requires special gear oil to keep the inner gears
lubricated. This requirement is usually eliminated in the direct-drive saw, which has
sealed bearings and gears.
Both saws must be inspected regularly for defects, and operated and maintained in accordance with manufacturers’ recommendations.
Check for:
damaged cord – loose blade faulty guards – defective trigger
chipped or missing
cracked or damaged teeth casing
Safety Features
Sawdust Ejection Chute
This feature prevents sawdust from collecting in front of the saw and obscuring the
cutting line. The operator can continue cutting without having to stop the saw and clear
away sawdust.
Clutch
Some worm-drive saws are equipped with a clutch to prevent kickback. Kickback occurs
when a saw meets resistance and violently backs out of the work. The clutch action
allows the blade shaft to continue turning when the blade meets resistance. The blade
stud and friction washer can be adjusted to provide kickback protection for cutting
different materials. Check friction washers for wear.
Brake
An electric brake on some circular saws stops the blade from coasting once the switch is
released. This greatly reduces the danger of accidental contact.

© Safety Services Company 14-7
Trigger Safety
On some light-duty saws a latch prevents the operator from accidentally starting the
motor. The trigger on the inside of the handle cannot be pressed without first pressing a
latch on the outside of the handle. On heavy-duty saws a bar under the trigger switch
helps to prevent accidental starting.
Blades
Blades should be sharpened or changed frequently to prolong saw life, increase
production, and reduce operator fatigue. The teeth on a dull or abused blade will turn
blue from overheating. Cutting will create a burning smell. Such blades should be
discarded or reconditioned.
Before changing or adjusting blades, disconnect the saw from the power source.
Take care to choose the right blade for the job. Blades are available in a variety of
styles and tooth sizes.
Combination blades (rip and crosscut) are the most widely used.
Ensure that arbor diameter and blade diameter are right for the saw. Because all lumber is not new, make sure it is clean and free of nails, concrete, and
other foreign objects. This precaution not only prolongs blade life but may also
prevent serious injury.
Take special care to ensure that blades are installed in the proper rotational direction.
Remember that electrical circular handsaws cut with an upward motion. The teeth
visible between the upper and lower guard should be pointing toward the front of the saw. Most models have a directional arrow on both blade and guard to serve as a
guide.
Blade Guards
Never operate an electric saw with the lower guard tied or wedged open. The saw may
kick back and cut you, or another worker who uses the saw.
An exposed blade, still in motion, will force the saw to move, cutting anything in its path.
Make sure that the lower guard returns to its proper position after a cut. Never operate a saw with a defective guard-retracting lever.
On most saws the lower guard is spring-loaded and correct tension in the spring will
automatically close the guard. However, a spring weakened by use and wear can allow
the guard to remain open after cutting. Maintain complete control of the saw until the
blade stops turning.
Note: The guard may also be slow to return after 45° cuts.
Choosing the Proper Blade
For safety, understand the different designs and uses of blades. Blades unsuited for the
job can be as hazardous as dull blades. For instance, a saw fitted with the wrong blade for the job can run hot so quickly that blade tension changes and creates a wobbly
motion. The saw may kick back dangerously before the operator can switch it off.
Re-sharpened blades can be substantially reduced in diameter. Make sure that the blade
diameter and arbor diameter are right for the saw.
Carbide-Tipped Blades – Take special care not to strike metal when using a carbide-tipped blade. The carbide tips can come loose and fly off, ruining the blade and injuring
the operator. Inspect the blade regularly for cracked or missing tips.

14-8 © Safety Services Company
Changing, Adjusting, and Setting Blades
When changing blades, take the following precautions:
Disconnect the saw from the power source.
Place the saw blade on a piece of scrap lumber and press down until the teeth dig
into the wood. This prevents the blade from turning when the locking nut is loosened or tightened. Some machines are provided with a mechanical locking device.
Make sure that keys and adjusting wrenches are removed before operating the saw.
Proper adjustment of cutting depth keeps blade friction to a minimum, removes sawdust from the cut, and results in cool cutting.
The blade should project the depth of one full tooth below the material to be cut.
Carbide-tipped blades or miter blades should project only half a tooth below the
material. If the blade is to run freely in the kerf (saw cut), teeth must be set properly,
that is, bent alternate.
The setting of teeth differs from one type of blade to another. Finer toothed blades require less set than rougher-toothed blades. Generally, teeth should be alternately bent
½ times the thickness of the blade.
Sharp blades with properly set teeth will reduce the chance of wood binding. They will
also prevent the saw from overheating and kicking back.
Cutting
Place the material to be cut on a rigid support such as a bench or two or more
sawhorses. Make sure that the blade will clear the supporting surface and the power
cord. The wide part of the saw shoe should rest on the supported side of the cut if
possible.
Plywood is one of the most difficult materials to cut with any type of saw. The overall
size of the sheet and the internal stresses released by cutting are the main causes of
difficulty. Large sheets should be supported in at least three places, with one support
next to the cut.
Short pieces of material should not be held by hand. Use some form of clamping to hold the material down when cutting it.
NEVER use your foot or leg to support the material being cut. You can be seriously
injured by this careless act.
The material to be cut should be placed with its good side down, if possible. Because
the blade cuts upward into the material, any splintering will be on the side which is uppermost.
Use just enough force to let the blade cut without laboring. Hardness and toughness
can vary in the same piece of material, and a knotty or wet section can put a heavier
load on the saw. When this happens, reduce pressure to keep the speed of the blade
constant. Forcing the saw beyond its capacity will result in rough and inaccurate cuts. It will also overheat the motor and the saw blade.
Take the saw to the material. Never place the saw in a fixed, upside-down position
and feed material into it. Use a table saw instead.
If the cut gets off line, don’t force the saw back onto line. Withdraw the blade and
either start over on the same line or begin on a new line.
If cutting right-handed, keep the cord on that side of your body. Stand to one side of the cutting line. Never reach under the material being cut.
Always keep your free hand on the long side of the lumber and clear of the saw.
Maintain a firm, well-balanced stance, particularly when working on uneven footing.

© Safety Services Company 14-9
Plywood, wet lumber, and lumber with a twisted grain tend to tighten around a blade
and may cause kickback. Kickback occurs when an electric saw stalls suddenly and
jerks back toward the operator. The momentarily exposed blade may cause severe injury.
Pocket Cutting
Tilt saw forward.
Rest front of shoe on wood.
Retract lower guard.
Lower saw until front teeth almost touch wood.
Release guard to rest on wood. Switch on the saw.
Keep the saw tilted forward and push it down and forward with even pressure
gradually lowering it until shoe rests flat on wood.
Follow these steps with extreme care.
SABER SAWS
The saber saw, or portable jigsaw is designed for cutting external or internal contours.
The saw should not be used for continuous or heavy cutting that can be done more safely and efficiently with a circular saw.
The stroke of the saber saw is about ½ inch for the light duty model and about ¼ inch
for the heavy duty model.
The one-speed saw operates at approximately 2,500 strokes per minute. The variable-
speed saw can operate from one to 2,500 strokes per minute.
The reciprocating saw is a heavier type of saber saw with a larger and more rugged blade. The tool is often used by drywall and acoustical workers to cut holes in ceilings
and walls. Equipped with a small swivel base, the saw can be used in corners or free-
hand in hard-to-reach places. The reciprocating saw must be held with both hands to
absorb vibration and to avoid accidental contact.
Eye protection is a must. You may also need respiratory protection.
Choosing the Proper Blade
Various blades, ranging from 7 to 32 teeth per inch, are available for cutting different
materials. For the rough cutting of stock such as softwood and composition board, a blade with 7 teeth per inch will cut the fastest. For all-round work with most types of
wood, a blade with 10 teeth per inch is satisfactory.
Cutting
The saber saw cuts on the upstroke. Splintering will therefore occur on the top side of the material being cut. Consequently, the good side should be facing down. The degree
of splintering depends on the type of blade, the vibration of the material, and the feed of
the saw.
To avoid vibration, the material should be clamped or otherwise secured and supported
as close to the cutting line as possible. If the material vibrates excessively or shifts during cutting, the saw can run out of control, damaging the blade and injuring the
operator.
Before starting a cut make sure that the saw will not contact clamps, the vise,
workbench, or other support.
Never reach under the material being cut. Never lay down the saw until the motor has stopped.
Do not try to cut curves so tight that the blade will twist and break.
Always hold the base or shoe of the saw in firm contact with the material being cut.
Note: When sawing into floors, ceilings, or walls, always check for plumbing and wiring.

14-10 © Safety Services Company
External Cut
To start an external cut (from the outside in), place the front of the shoe on the
material. Make sure that the blade is not in contact with the material or the saw will stall
when the motor starts.
Hold the saw firmly and switch it on. Feed the blade slowly into the material and
maintain an even pressure. When the cut is complete, do not lay down the saw until the
motor has stopped.
Inside Cuts
To start an inside cut (pocket cut), first drill a lead hole slightly larger than the saw
blade. With the saw switched off, insert the blade into the hole until the shoe rests firmly on the material. Do not let the blade touch the material until the saw has been switched
on.
It is possible to start an inside cut without drilling a lead hole first — but only when it's
absolutely necessary. To do this, rest the front edge of the shoe on the material with the
saw tipped backward. Keep the blade out of contact with the material.
Switch on the saw and slowly feed the blade into the material while lowering the back
edge of the shoe. When the shoe rests flat on the material and the blade is completely
through, proceed with the cut. Any deviation from this procedure can cause the blade to
break and injure the operator or workers nearby.
Never try to insert a blade into, or withdraw a blade from, a cut or a lead hole while the
motor is running. Never reach under the material being cut.
CHAINSAWS
Each year in The United States, construction workers are injured while using chainsaws.
Generally the injuries result from two types of accidents:
1. The operator makes accidental contact with the revolving chain
2. The operator is struck by the object being cut, usually a tree or heavy limb.
Many of these injuries are serious. While the chainsaw is relatively easy to operate, it
can be lethal. As with all high-speed cutting tools, it demands the full attention of even the trained and experienced operator.
Requirements
Chainsaws can be powered by electric motors or gasoline engines. Both saws are designed to provide fast cutting action with a minimum of binding in the cut, even
though wood may be sap-filled or wet. Both afford about the same performance in terms
of horsepower and they are equipped with similar controls and safety devices.
Regulations require that chainsaws used in construction must be equipped with a chain
brake. Make sure that the saw is equipped with a chain brake mechanism, and not
simply a hand guard, which is similar in appearance.
Regulations also require that chainsaws used in construction must be equipped with
“anti-kickback” chains. These chains incorporate design features intended to minimize
kickback while maintaining cutting performance
© Safety Services Company 14-11
Protective Clothing and Equipment
Eye protection in the form of plastic goggles is recommended. A faceshield attached
to the hard hat will not provide the total eye protection of close-fitting goggles.
Leather gloves offer a good grip on the saw, protect the hands, and absorb some
vibration. Gloves with ballistic nylon reinforcement on the back of the hand are
recommended.
Since most chainsaws develop a high decibel rating (between 95 and 115 dBA depending on age and condition), adequate hearing protection must be worn,
especially during prolonged exposure.
Trousers or chaps with sewn-in ballistic nylon pads provide excellent protection,
particularly for the worker who regularly uses a chainsaw.
Kickback
Kickback describes the violent motion of the saw that can result when a rotating chain is
unexpectedly interrupted.
The cutting chain’s forward movement is halted and energy is transferred to the saw,
throwing it back from the cut toward the operator.
The most common and probably most violent kickback occurs when contact is made in
the “kickback zone”.
Contact in this zone makes the chain bunch up and try to climb out of the track. This most often happens when the saw tip makes contact with something beyond the cutting
area such as a tree branch, log, or the ground.
To minimize the risk of kickback:
use a low-profile safety chain run the saw at high rpm when cutting
sharpen the chain to correct specifications
set depth gauges to manufacturers’ settings
maintain correct chain tension
hold the saw securely with both hands don’t operate the saw when you are tired
know where the bar tip is at all times
don’t allow the cut to close on the saw
make sure the chain brake is functioning.
Starting
When starting, hold the saw firmly on the ground or other level support with the chain
pointing away from your body and nearby obstructions. Use a quick, sharp motion on the starter pull. Never “drop start” the saw.
This leaves only one hand to control a running saw and has resulted in leg cuts. Use the
proper grip.
Site Hazards
Take extra care when making pocket cuts. Start the cut with the underside of the
chain tip, then work the saw down and back to avoid contact with the kickback zone.
Consider an alternative such as a saber saw.
Be particularly careful to avoid contact with nails, piping, and other metallic objects.
This is especially important when making a pocket cut through framing lumber such as a subfloor or when cutting used lumber such as trench shoring, lagging, or
blocking timbers.
Use chainsaws to cut wood only. They are not designed to cut other materials.

14-12 © Safety Services Company
When using a chainsaw to trim rafter ends, take the following steps to avoid
injury:
Cut down from the top of the rafter. Don't cut from underneath.
Use a harness, lanyard, and lifeline to prevent falls or work from a secure scaffold at
eaves level.
The extension cord on an electric chainsaw should be secured on the roof above the
operator with enough working slack. This will prevent the weight of a long cord from pulling the operator off balance.
Keep both hands firmly on the saw.
Maintenance
Well-maintained cutting components are essential for safe operation. A dull or
improperly filed chain will increase the risk of kickback.
Inspect and maintain your saw according to the manufacturer's recommendations
regarding chain tension, wear, replacement, etc. Check for excessive chain wear and replace chain when required. Worn chains may break!
Select the proper size files for sharpening the chain.
Two files are necessary:
1. Flat: for adjusting depth gauge
2. Round: for sharpening cutters and maintaining drive links.
You must choose the correct round file for your chain to avoid damaging the cutters.
Consult the owner's manual or the supplier to be sure of file size. A round file used in combination with a file holder or a precision filing guide will give
the best results.
Adjusting Chain Tension
Follow the manufacturer's instructions on chain tension. In general, the chain should
move easily around the bar by hand without showing noticeable sag at the bottom.
Be generous with chain lubricating oil. It is almost impossible to use too much. Most
late model saws have automatic oilers. But operators must still remember to fill the chain-oil reservoir.
CHOP SAWS
Increasingly, carpenters and other trades are using chop saws to cut various materials.
These portable saws offer quick, efficient, and economical cutting.
Unfortunately, like all power equipment, chop saws pose serious hazards for the unwary
or untrained operator. Follow Basic Saw Safety and Safety Basics as for other power
saws.
Select the proper abrasive cutting wheel for the material being cut. For metals, use
aluminum oxide. For masonry, stone, and concrete, use silica carborundum.
Do not exceed the recommended rpm printed on the blade label.
The center hole on the blade must fit the mandril and be snugly fastened in place
with the proper washer and lock nut.
Warning: A loose or off-center blade can shatter in use.
Position material to be cut at 90º degrees to the blade. Support the other end to
prevent the blade from binding.
Do not rush cutting. Let the wheel cut without burning or jamming. When cutting is complete, let the blade stop before moving material.
Maintain the saw in good repair with the blade guard in place and working smoothly.
Tighten any loose parts and replace any broken or damaged ones.
Don't try to adjust for length on downward cutting motion. Your hand could slide into
the blade while it is spinning.

© Safety Services Company 14-13
With some large chop saws, additional precautions are required because of the
tremendous torque the saws can develop.
Beware of sparks landing on combustible material.
QUICK-CUT SAWS
Hand-held portable circular cut-off saws are commonly known as “quick-cut saws” in construction. They are widely used for cutting concrete, masonry products, sheet metal
products (both steel and aluminum), and light steel sections such as angles and
channels.
Hazards
Quick-cut saws are high-powered compared to similar tools. Hazards include high-speed
blade rotation, blade exposure during operation, and exhaust from the internal
combustion engine (the usual power source).
The saws also create clouds of dust when dry-cutting masonry and showers of hot sparks
when cutting metal products, especially steel.
These hazards can result in cuts, kickbacks, exposure to carbon monoxide fumes,
exposure to dusts (silica from concrete and masonry products in particular), burns, flying
particles hitting the eye, and other injuries from flying material when work is not secured
for cutting or when blades fly apart.
These hazards can be controlled by:
Using quick-cut saws properly and wearing the right protective equipment such as
eye, hearing, and respiratory protection as well as face shields and gloves
Keeping saws in good working condition, equipped with proper blades or disks, and
used with all guards in place Securing work to keep it from shifting during cutting
Being cautious around sharp edges left by cuts
Training
Instruct workers in the care, maintenance, and operation of quick-cut saws. Read and
understand the operating manual, review the major points.
The operating manual should be available on the job, not only for instruction but for
ready reference if something goes wrong with the saw or it must be used for work outside the operator's experience.
Time spent on instruction will reduce accidents and injuries as well as prolong the service
life of the saw.
As a minimum you should know:
care of the saw
installing disks and blades
mixing fuel and fueling the saw
starting the saw supporting and securing work to be cut
proper cutting stance and grip
proper cutting techniques for different material
respiratory protection against dusts
how to inspect and store abrasive disks.
Care
Quick-cut saws must be serviced and maintained in accordance with the manufacturers' instructions.
Replacement parts should be those recommended by the manufacturer.

14-14 © Safety Services Company
Cracked, broken, or worn parts should be replaced before the saw is used again. Guards
and air-intakes should be cleaned regularly and often. Abrasive disks should be checked
before installation and frequently during use. Correct any excessive blade vibration before trying to make a cut.
In confined areas, make sure that ventilation is adequate. Gasoline-driven saws release
carbon monoxide gas — odorless, colorless, and highly toxic.
Starting
Most of the following procedures are for gasoline-powered quick-cut saws:
Use caution when preparing the oil/gasoline mixture and when fuelling the saw. No
smoking or ignition sources should be allowed in the area where fuel is mixed or tanks are filled.
Fill the tank outdoors in a well-ventilated space at least 10 feet from the area where
the saw will be used. Spilled fuel should be wiped off the saw.
Avoid fuelling the saw on or near formwork. Gasoline spills are a fire hazard. Use a
funnel to avoid spills. Do not overfill the saw or run it without securing the fuel tank cap. Gasoline seeping
from the tank can saturate your clothing and be ignited by sparks thrown off from
metal cutting. The only cap to use is one supplied by the manufacturer.
Check the saw for leaks. Sometimes vibration makes gas lines leak.
Start the saw in an area clear of people and obstacles. Under no circumstances
should anyone be standing in front of the saw as it starts or while it's running. Put the saw on a smooth hard surface for starting.
The guard should be properly set for the type of cut beforehand.
Assume a solid well-balanced stance. Do not wrap the starter cord around your hand
— this can cause injury.
Set one foot on the rear handle, put one hand on the top handle to lift the blade off the surface, and use the other hand to pull the starter cord. Warning: Always shut
off saw before fuelling. Keep fuel container well clear of work area. Once the saw is
running, release the throttle and make sure the engine drops to idle without the disk
or blade moving.
Run the engine at full throttle and let the disk or blade run freely to make sure it turns on the arbor without wobbling or vibrating.
Support
One of the major hazards with quick-cut saws is failure to support and secure the work
to be cut.
The saw is powerful enough to throw material around unless it is securely held and
supported. Standing on material to hold it down is not recommended.
For repeated cuts of masonry or metal pieces, a jig is ideal for efficiency and safety. The jig should be designed and built to hold material in place after measurement without
further manual contact.
Stance and Grip
The quick-cut saw is a heavy, powerful tool that must be held by hand.
Operators need a secure stance with legs apart for balance and support. The saw should
be held at a comfortable, balanced location in front of you.
Grip the saw firmly with one hand on each handle. Hold your forward arm straight to
keep the saw from kicking back or climbing out of the cut.

© Safety Services Company 14-15
Cutting
Although skill in handling the quick-cut saw can only be learned through practice, some
safety considerations and operating techniques must always be kept in mind, even by
the most experienced operators.
Work should be supported so that the disk or blade will not bind in the cut. Support
heavy materials on both sides of the cut so the cut piece will not drop or roll onto the
operator's foot. Light materials can generally be allowed to fall. In all cases the cut should be as close as possible to the supporting surface.
Kickback and Pull-In
Kickback can happen extremely fast and with tremendous power. If a segment of the
disk or blade contacts the work, the disk or blade starts to climb out of the cut and can
throw the saw up and back toward you with great force.
For cutting, keep the throttle wide open. Ease the blade down onto the cut line. Don't
drop or jam the blade down hard. Move the saw slowly back and forth in the cut. Hold the saw so that disk or blade is at right angles to the work and use only the
cutting edge of the disk or blade. Never use the side of a disk for cutting. A worn disk
will almost certainly shatter and may cause severe injury.
Beware of blade run-on. The blade may continue to rotate after the cut and run away
with a saw set down too soon. Don't force the saw to one side of the cut. This will bend the disk or blade and cause
it to bind, possibly to break.
Water cooling is recommended for cutting masonry materials. It prolongs disk life and
reduces dust exposure.
Keep pressure on the saw reasonably light. Although more pressure may be necessary for hard materials, it can cause an abrasive disk to chip or go “out of
round.”
This in turn will make the saw vibrate. If lowering the feed pressure does not stop
vibration, replace the disk.
Don't carry the saw any distance with the engine running. Stop the engine and carry
the saw with the muffler away from you.
To avoid kickback, take the following steps:
Secure and support the material at a comfortable position for cutting. Make sure that
material will not move, shift, or pinch the blade or disk during cutting.
Keep steady balance and solid footing when making a cut.
Do not support the work on or against your foot or leg.
Use both hands to control the saw. Maintain a firm grip with thumb and fingers
encircling the handles. Never let the upper quarter segment of blade or disk contact the material.
Run the saw at full throttle.
Do not cut above chest height.
When re-entering a cut, do so without causing blade or disk to pinch. Pull-in occurs
when the lower part of the disk or blade is stopped suddenly – for instance, by a cut closing up and binding. The saw pitches forward and can pull you off balance.
Protective Equipment
In addition to the standard equipment mandatory on construction sites, operators of
quick-cut saws should wear snug-fitting clothing, hearing protection, eye and face
protection, and heavy-duty leather gloves.
The dry cutting of masonry or concrete products calls for respiratory protection as well.
See the chapter on Personal Protective Equipment.

14-16 © Safety Services Company
For general dust hazards, a half-mask cartridge respirator with NIOSH-approval for dust,
mist, and fumes should provide adequate protection when properly fitted and worn by a
clean-shaven person.
Disks and Blades - Disks and blades are available in three basic types:
abrasive disks
diamond-tipped blades
carbide-tipped blades
Use only the disks and blades compatible with the saw and rated for its maximum rpm.
Blades or disks may fly apart if their rpm is not matched to saw rpm. If you have any
doubts, consult the operating manual or a reputable supplier.
Abrasive Disks —Types and Uses
Type Uses Materials
Concrete
All-around use, most economical for cutting concrete and masonry. Water-cooling
recommended to increase disk life and to reduce dust.
Concrete, stone, masonry products,
cast iron, aluminum, copper, brass, cables, hard rubber, plastics
Metal Primarily for steel, not suited for masonry products. Water-cooling is not recommended with metal abrasive disks
Steel, steel alloys, other hard metals such as cast iron
Diamond Disks and Blades
Diamond disks are normally used with water cooling. They are now available for dry
cutting, which may be necessary to avoid staining some masonry products.
When dry-cutting with a diamond blade, let the blade cool for 10-15 seconds every 40-60 seconds. This can be done simply by pulling the saw out of the cut.
Types and Uses
Type Uses Materials
Diamond
Abrasive
Disk
Cuts faster than other abrasive disks and
creates less dust. Water-cooling is absolutely
necessary to prevent heat build-up that can make disk disintegrate.
Stone, all masonry and concrete products.
Not recommended for metal
Dry-Cut Diamond
Blade
Fast cuts, lots of dust, very expensive. Let blade cool for 10-15 seconds every 40-60 seconds. Continuous cutting will damage the blade.
Stone, all masonry and concrete products. Not recommended for metal.
Carbide-Tipped Blades
These blades must be used with care. If a carbide-tipped blade encounters material
harder than what it is designed to cut, the tips may fly off.
A carbide-tipped blade used with a quick-cut saw must be designed for that purpose. It
must also be used only to cut the materials specified by the manufacturer.
Inspection/Installation
Inspect disks and blades before installing them.
Make sure that contact surfaces are flat, run true on the arbor, and are free of foreign
material. Check that flanges are the correct size and not warped or sprung. Check the label to
make sure that the disk or blade is approved for use on high-speed quick-cut saws
and has a rated rpm suitable to the saw being used. A periodic service check may be
necessary to ensure that the rpm still meets the manufacturer's requirement.
Inspect the disk or blade for damage. Abrasive disks tapped lightly with a piece of wood should ring true. If the sound is dull or flat, the disk is damaged and should be
discarded.
Make sure that diamond or carbide tips are all in place. Do not use diamond or
carbide-tipped blades or disks if any tips are missing.

© Safety Services Company 14-17
Do not drop abrasive disks. Discard any disk that has been dropped.
Use the proper bushing on the arbor so that the disk runs true on the shaft without
wobbling or vibrating. Discard badly worn disks that are uneven or “out of round.”
TABLE SAWS
Types
The table saw most often used in construction is the 10-inch belt-driven tilting arbor
saw. The dimension refers to the diameter of the saw blade recommended by the manufacturer.
Although some saws are direct-drive, with the blade mounted right on the motor arbor,
most are belt-driven.
Both types are equipped with a fixed table top and an arbor that can be raised, lowered,
or tilted to one side for cutting at different depths and angles.
Basket Guards
Basket guards may be fastened to the splitter or hinged to either side of the saw on an
L-shaped or S-shaped arm.
Basket guards can protect the operator from sawdust, splinters, and accidental contact with the blade. Keep the basket guard in place for normal operations such as straight
and bevel ripping and miter cutting. When the guard is removed to permit cutting of
tenons, finger joints, rabbets, and similar work, use accessories such as feather boards,
holding jigs, push sticks, and saw covers.
Some split basket guards have a see-through cover. One side can be moved sideways
for a blade tilted to 45 degrees.
One side can be lifted up while the other remains as a protective cover.
Sheet metal baskets fastened to the splitter are less effective because you cannot see
the saw blade.
Kickback
Kickback occurs when stock binds against the saw blade.
The blade can fire the wood back at you with tremendous force, causing major injuries to
abdomen, legs, and hands.
Never stand directly behind the blade when cutting. Stand to one side. See that other workers stand clear as well.
Make sure the rip fence is aligned for slightly more clearance behind the blade than in
front. This will help prevent binding.
Use a sharp blade with teeth properly set for the wood being cut. A dull or badly
gummed blade will cause friction, overheating, and binding.
Install a splitter to keep the kerf (cut) open behind the blade. Also effective are anti-kickback fingers attached to the splitter.
Splitters
Splitters prevent the kerf from closing directly behind the blade. Ideally, they should be
slightly thinner than the saw blade and manufactured from high tensile steel. Splitters
are not always needed with carbide-tipped saw blades, whose relatively wide kerf may
provide the desirable clearance. A wide kerf alone, however, is often not enough to keep
some boards from closing behind the cut and binding against the blade.
14-18 © Safety Services Company
In general, it is impossible to predict how a board will behave during ripping. It may
remain straight, presenting no problems. On the other hand, the release of internal
stresses may make the two ripped portions behind the blade either close up or spread apart.
Disappearing splitters with anti-kickback fingers can be pushed down when in the way of
a workpiece and pulled up if necessary after the machine has been shut off.
Roller Stand
You risk injury when you try to maintain control over long pieces of stock
singlehandedly, especially if the stock begins to bind on the blade and kick back.
A roller stand provides the needed support. Adjust it to a height slightly lower than the saw table to allow for sagging of the material. Be sure to set up the stand so the roller
axis is at 90 degrees to the blade. Otherwise, the roller could pull the stock off to one
side and cause binding.
Whatever the design, a support stand should be standard equipment in every carpentry
and millwork shop. It can be used as an extension to a workbench, jointer, or bandsaw and is especially important with the table saw.
Extensions
Made of wood or metal, table top extensions installed behind and to both sides of the
machine can make the cutting of large sheets of plywood and long stock safer and more efficient.
In most cases a space must be provided between extension and saw top for adjusting
the basket guard and allowing scrap to fall clear.
Blades
Table saw blades are basically similar to those for circular saws. The teeth on carbide-
tipped, hollow-ground, and taper blades do not need setting.
Blade Adjustment
Proper adjustment of cutting depth holds blade friction to a minimum, removes sawdust
from the cut, and results in cool cutting.
Sharp blades with properly set teeth will keep the work from binding and the blade from
overheating and kicking back.
The blade should project the depth of one full tooth above the material to be cut. When using carbide-tipped blades or miter blades only half a tooth should project above the
material.
Blade Speed
The right cutting speed is important. The blade should turn at the correct rpm to yield the recommended cutting speed.
When not in motion, saw blades, especially large blades, are usually not perfectly flat
because of internal tensions. At the right operating speeds, however, the blades
straighten out as a result of centrifugal force and cut smoothly at full capacity.
Blades running too fast or too slow tend to start wobbling either before or during a cut. If cutting continues, the blade will overheat and may cause kickback, damage the
equipment, and injure the operator.
Rip Fence
The rip fence is used mainly to guide the stock and maintain correct width of cut. The fence on small saws is usually clamped down at both the front and back of the table by
pushing down a lever or turning a knob. Adjust the fence slightly wider at the back to let
the wood spread out behind the cut and reduce the risk of kickback.

© Safety Services Company 14-19
You can add a piece of hardwood to the rip fence in order to rip thin pieces of wood and
make dadoes and rabbets. The auxiliary fence can be set close to the cutters without the
risk of contact between the blade and the steel fence.
Pushsticks and Feather Boards
Narrow pieces can be cut safely and efficiently with the help of pushsticks, which should
be painted or otherwise marked to prevent loss.
To rip narrow, short pieces, a push block is the right choice. The shoe holds the material down on the table while the heel moves the stock forward and keeps it from kicking
back.
Different designs of pushsticks are required for cutting different kinds of stock.
The heel of the pushstick should be deep enough to prevent it from slipping and strong
enough to feed the stock through the saw.
You can also use one or two feather boards to rip narrow stock safely. A feather board
clamped immediately in front of the saw blade will provide side pressure to the stock
without causing binding and kickback. Use a push block to feed stock all the way
through.
Operation
Follow Basic Saw Safety.
Keep the floor around the saw clear of scrap and sawdust to prevent slipping and
tripping.
Always stop the machine before making adjustments. Before making major adjustments, always disconnect the main power supply.
Select a sharp blade suitable for the job.
Use the safety devices such as pushsticks and feather boards recommended in this
chapter.
Make sure nobody stands in line with a revolving blade. Don't let anyone or anything distract you when you are operating the saw.
Whenever possible, keep your fingers folded in a fist rather than extended as you
feed work into the saw.
Never reach around, over, or behind a running blade to control the stock.
Follow the manufacturer's recommendations in matching the motor size to the saw. Underpowered saws can be unsafe.
Table saws should be properly grounded. Check the power supply for ground and
always use a ground fault circuit interrupter. This is mandatory for saws used
outdoors or in wet locations.
Table saws should be equipped with an on-off switch so power can be shut off quickly
in an emergency. A magnetic starter switch is preferable to a mechanical toggle because it prevents the
saw from starting up again unexpectedly after an interruption in power.
When purchasing a new table saw, try to get one equipped with an electric brake. The
brake stops blade rotation within seconds of the operator turning off the saw. The
reduced risk of injury is worth the extra cost. Extension cords should be of sufficient wire gauge for the voltage and amperage
required by the saw and for the length of the run.

14-20 © Safety Services Company
RADIAL ARM SAWS
The motor and blade of the radial arm saw are suspended above the table. Because the
motor and blade assembly can be locked in different positions and can travel during the
cut, you must pay special attention to keeping fingers and hands clear.
Injuries involving radial arm saws tend to be serious. By using appropriate guards and
procedures, however, you can safely use the saw for crosscuts, miter cuts, ripping, and
dadoes.
Set-Up - The saw must be adequately powered for the work.
The saw should be installed in a well-lit area out of the way of traffic, with enough
space to store and handle long lengths of wood. Locating the machine with its back to
a wall or partition can help to keep flying pieces from hitting anyone.
Where possible, mark the floor with yellow warning lines to keep other personnel back from the saw.
Make sure all safety guards and devices are in place.
Choose the right blade for the job. A sharp tungsten carbide combination blade is
good for both crosscutting and ripping without frequent re-sharpening.
General Procedures
Follow Basic Saw Safety.
If you don't have someone to help with long stock, use a roller stand or extension table to support the work.
Always return the motor head to the column stop.
When crosscutting or mitering, keep hands at least six inches away from the blade.
Do not adjust length of cut until the motor is back at column.
Slope the table top back slightly to keep the blade at the column, thereby preventing contact with stock being placed in position.
Do not allow the blade to cut too quickly when crosscutting or mitering.
Avoid drawing the blade completely out of the cut. The cut piece, whether large or
small, often moves. When the saw is rolled back towards the column, the teeth can
grab the piece and shoot it in any direction.
Do not cut by pushing the saw away from you into the stock. The material can lift up and fly over the fence.
Ripping and Crosscutting
For regular ripping, turn the motor away from the column to the in-rip position. Feed
stock into the saw from the right side.
To cut wide stock, change the saw to the out-rip position. Feed stock into the saw
from the left side. Remember – the blade must turn up and toward you when feeding
the stock. Do not force the cut. Allow the blade through the wood at its own pace.
To avoid kickback, take the following precautions:
Maintain proper alignment of blade with fence.
Adjust anti-kickback device to ⅛ inch below the surface of stock being fed.
Use a sharp blade, free of gum deposits and with teeth properly set.
When binding occurs, stop saw and open kerf with a wedge.
After completing cut, remove stock from rotating blade to prevent overheating and possible kickback.
Always push stock all the way through past the blade.
Do not leave machine with motor running.
Use a push stick when ripping narrow pieces. Have suitably sized and shaped
pushsticks for other jobs as well. See information on pushsticks and feather boards under Table Saws, earlier in this chapter.

© Safety Services Company 14-21
Jigs
The control provided by a well-made jig is essential for making irregular cuts safely and
accurately.
Keep commonly used jigs on hand. Jigs such as those for making stair and doorframe
wedges and tapers are designed to carry stock past the blade with the saw locked in the
rip position.
When you are drawing the saw into the stock, clamp or nail jigs to the table to prevent slipping.
Re-Sawing with Blade Horizontal
The rip fence on the radial arm saw is too low for supporting material to be re-sawn on edge. Therefore the material must be laid flat on the table and the motor must be turned
so the blade is parallel to the table. The closeness of the arbor requires an auxiliary table
top and fence to re-saw thin stock.
Because the kickback fence can't be used and controlling stock is sometimes difficult, re-
sawing on the radial arm saw can be hazardous.
If no other equipment is available, rip the stock halfway through, then turn it around and
complete the cut.
On the second cut, be sure to push the two halves well past the blade once they have
been cut apart. Pushsticks and featherboards clamped to the table can reduce hazards.
Dadoes
A dado head is an essential tool for cutting grooves, rabbets, and dadoes. A groove is cut
with the grain; a dado is cut across the grain; and a rabbet is a shoulder cut along the
edge of a board.
The most common dado head consists of two outside cutters and several inside chippers between the outside cutters.
Another type is sometimes called a quick-set dado, consisting of four tapered washers
and a blade. By rotating the locking washers, the blade will oscillate and cut a groove to
the desired width.
Because of their small size, dado heads do not run at the peripheral feed speed on a big
radial arm saw. As a result, the blade feeds itself too fast, either stopping the motor or lifting the work and throwing it back. To prevent this, make several light passes,
lowering the dado head ⅛ to ¼ inch each time.
Dado heads require guards for safety. Always make sure guards are in place before
starting work.
Proper rotation of the teeth is up and toward you.
Other Accessories
Rotary accessories of various types are advertized as turning the radial arm saw into a
multifunction machine.
Remember that the saw has its limitations.
Possible problems include the following:
Shaper heads run too slowly for safe and smooth work.
Grinding stones may run too fast or slow and are not recommended.
Sanding drums tend to run too fast and may burn the wood.

14-22 © Safety Services Company
PNEUMATIC POWER TOOLS
Regulation Rules to be Followed:
Pneumatic power tools will be secured to the hose or whip by some positive means to
prevent the tool from becoming accidentally disconnected.
Safety clips or retainers will be securely installed and maintained on pneumatic
impact (percussion) tools to prevent attachments from being accidentally expelled. All pneumatically driven nailers, staplers, and other similar equipment provided with
automatic fastener feed, which operate at more than 100 p.s.i. pressure at the tool
will have a safety device on the muzzle to prevent the tool from ejecting fasteners,
unless the muzzle is in contact with the work surface.
Compressed air will not be used for cleaning purposes except where reduced to less
than 30 p.s.i. and then only with effective chip guarding and personal protective equipment which meets the requirements of Subpart E of this part. The 30 p.s.i.
requirement does not apply for concrete form, mill scale and similar cleaning
purposes.
The manufacturer's safe operating pressure for hoses, pipes, valves, filters, and other
fittings will not be exceeded, The use of hoses for hoisting or lowering tools will not be permitted.
All hoses exceeding 1/2-inch inside diameter will have a safety device at the source
of supply or branch line to reduce pressure in case of hose failure.
Airless spray guns of the type which atomize paints and fluids at high pressures
(1,000 pounds or more per square inch) will be equipped with automatic or visible manual safety devices which will prevent pulling of the trigger to prevent release of
the paint or fluid until the safety device is manually released.
In lieu of the above, a diffuser nut which will prevent high pressure, high velocity
release, while the nozzle tip is removed, plus a nozzle tip guard which will prevent the
tip from coming into contact with the operator, or other equivalent protection, will be provided.
Abrasive blast cleaning nozzles. The blast cleaning nozzles will be equipped with an
operating valve which must be held open manually. A support will be provided on
which the nozzle may be mounted when it is not in use.
Air-powered tools include:
jack hammers
chipping hammers drills
grinders
sanders
staplers
framing nailers
wrenches
brad nailers
winches air nozzles
saws
buffers
impact tools
sprayers
Run combustion engines outside or in a well ventilated area to prevent the build-up
of carbon monoxide gas. Always keep a fire extinguisher near flammable liquids.
When moving compressors to another location, ask for help or use mechanical
devices to prevent back injuries.
Eye injuries can occur when compressed air is used to blow out formwork. Wear safety goggles and respiratory protection.
Always secure hose connections with wire or safety clips to prevent the hose from
whipping except when automatic cut-off couplers are used.
Make sure hoses are clear of traffic and pose no tripping hazards.
Replace worn-out absorption pads and springs. Too much vibration of the tool can damage nerves in fingers, hands, and other body parts. This is called “white finger
disease” or Raynaud's Syndrome.
© Safety Services Company 14-23
Some tools have a high decibel rating – for instance, jack hammers and impact
drills. To prevent hearing loss, always wear hearing protection.
Never tamper with safety devices. Keep hands away from discharge area – on nailers in particular.
Match the speed rating of saw blades, grinding wheels, cut-off wheels, etc. to tool
speed. Too fast or too slow a rotation can damage the wheels, release fragments,
and injure workers.
Never use air to blow dust or dirt out of work clothes. Compressed air can enter the skin and bloodstream with deadly results.
Turn off the pressure to hoses when the system is not in use.
Turn off the air pressure when changing pneumatic tools or attachments.
Never “kink” a hose to stop air flow.
Most air-powered tools need very little maintenance. At the end of the shift, put a
teaspoon of oil in the air inlet and run the tool for a second or two to protect against
rust.
Dust, moist air, and corrosive fumes can damage the equipment. An inline regulator
filter and lubricator will extend tool life.
Before start-up, check the couplings and fittings, blow out the hose to remove moisture
and dirt, and clean the nipple before connecting the tool. Set the air pressure according
to the manufacturer's specifications and open gradually.
Compressed air can be dangerous.
Hazards include:
Air embolism-This is the most serious hazard, since it can lead to death. If compressed
air from a hose or nozzle enters even a tiny cut on the skin, it can form a bubble in the
bloodstream – with possibly fatal results.
Physical damage-Compressed air directed at the body can easily cause injuries – including damage to eyes and ear drums.
Flying particles-Compressed air at only 40 pounds per square inch can accelerate
debris to well over 70 miles per hour when it is used to blow off dust, metal shavings, or
wood chips. These particles then carry enough force to penetrate the skin.
WARNING: Make sure that air pressure is set at a suitable level for the tool or equipment being used. Before changing or adjusting pneumatic tools, turn off air
pressure.
POWDER/EXPLOSIVE ACTUATED TOOLS
Regulation Rules to be Followed:
Only employees who have been trained in the operation of the particular tool in use
will be allowed to operate a powder-actuated tool.
The tool will be tested each day before loading to see that safety devices are in proper working condition. The method of testing will be in accordance with the
manufacturer's recommended procedure.
Any tool found not in proper working order, or that develops a defect during use, will
be immediately removed from service and not used until properly repaired.
Personal protective equipment will be in accordance with Subpart E of this part.
Tools will not be loaded until just prior to the intended firing time. Neither loaded nor empty tools are to be pointed at any employees. Hands will be kept clear of the open
barrel end.
Loaded tools will not be left unattended.
Fasteners will not be driven into very hard or brittle materials including, but not
limited to, cast iron, glazed tile, surface-hardened steel, glass block, live rock, face brick, or hollow tile.
14-24 © Safety Services Company
Driving into materials easily penetrated will be avoided unless such materials are
backed by a substance that will prevent the pin or fastener from passing completely
through and creating a flying missile hazard on the other side. No fastener will be driven into a spalled area caused by an unsatisfactory fastening.
Tools will not be used in an explosive or flammable atmosphere.
All tools will be used with the correct shield, guard, or attachment recommended by
the manufacturer.
Powder-actuated tools used by employees will meet all other applicable requirements of American National Standards Institute, A10.3-1970, Safety Requirements for
Explosive-Actuated Fastening Tools.
Hazards
Flying Particles – This is the major hazard. On impact, materials may break up, blow
apart, or spall off. This often happens when fasteners are fired too close to a corner of
masonry or concrete or when they strike materials such as glazed tile, hollow tile, or thin
marble tile.
Ricochets – These usually result when the tool is not held at right angles to the base
material, or the fastener hits a particularly hard material such as stone or hardened
steel. Always check the base material to ensure that it can safely accept the fastening
device.
Noise – Powder-actuated tools create an extreme pulse of sound when fired. Operators
and others in the area should wear hearing protection – especially when the tool is operated in a confined space.
Sprains and Strains – These injuries usually result from using the tool repeatedly in
awkward, cramped, or unbalanced positions. You should try to work from a balanced
position on a solid surface.
Explosions – There is always the risk of explosion or fire when the tools are used in atmospheres contaminated by flammable vapor, mist, or dust. The work area must be
ventilated – mechanically if necessary.
Blow-Through –When the base material does not offer enough resistance, the fastener
may pass completely through and fly out the other side. This is particularly dangerous
when fasteners penetrate walls, floors, or ceilings where others may be working. If necessary, areas behind, around, and under material should be kept clear of people.
Protective Equipment
In addition to the standard personal protective equipment required on construction
projects, you should wear hearing protection, eye protection, and a face shield. Heavy shirts and pants provide some protection against ricochets and flying fragments of
material and fasteners.
Tool Types
High-Velocity — High-velocity powder-actuated tools use the expanding gases from the
exploding cartridge to propel the fastener. The gases push directly against the fastener.
These tools are rarely used in construction, except in special cases to penetrate thick
steel or very hard material — they are usually used in military, salvage, or underwater
applications. No one should operate high velocity tools without special training.
Low-Velocity — Most powder-actuated tools used in construction are low-velocity. The expanding gases from the exploding cartridge push against a piston which in turn drives
the fastener into the base material.

© Safety Services Company 14-25
Many different low-velocity tools are available, from single-shot models to semi-
automatic models using multiple cartridges in strip or disk holders. Some tools are
specific to one size of fastener or type of cartridge. Most can be fitted with various pistons, base plates, spall stops, and protective shields for different jobs.
Pistons
Specialized pistons are available for different fasteners. Such pistons are designed for
the fastener and should not be used with other types. Misusing a tool with a specialized piston can result in under- or over-driven fasteners or fasteners leaving the barrel
misaligned, leading to ricochets. Some general-purpose tools can take various types of
pistons.
Fasteners
Fasteners used with powder-actuated tools are made of special steel to penetrate
materials without breaking or bending. Never use any kind of substitute for a properly
manufactured fastener.
Generally pins and studs should not be used on hard, brittle, or glazed materials such as cast iron, marble, tiles, and most stone. The fastener will either fail to penetrate and
ricochet or the base material will shatter.
Materials whose hardness or ductility is unknown should be tested first. Try to drive a pin
into the material with a normal hammer. If the pin point is blunted or fails to penetrate
at least 1/16", a powder-actuated tool should not be used.
Fasteners are invariably fitted with a plastic guide device. Its purpose is twofold. When the fastener is inserted into the barrel the guide keeps the fastener from dropping out. It
also aligns the fastener inside the barrel so it will penetrate the base material at right
angles.
There are two basic types of fasteners – pins and studs.
Pins are fasteners designed to attach one material to another, such as wood to
concrete. They resemble nails, but there the similarity stops. Ordinary nails cannot be
used as fasteners in powder-actuated tools.
Head diameters for pins are available between ¼" and ⅜". Lengths vary from ½" to
3".Washers of various types and diameters are available for different applications.
Pins should be selected for appropriate length, head size, and application. As a general
rule, pins need not be driven into concrete more than 1". Using a longer pin is generally
unnecessary and also requires a stronger cartridge.
Follow the manufacturer's directions on length, penetration, and appropriate material.
For example, one cut-nail fastener is available for fastening drywall to relatively soft base materials, but is recommended for virtually no other application. Testing may be
necessary on some masonry materials that vary widely in hardness and durability.
Studs are fasteners consisting of a shank which is driven into the base material and an
exposed portion to which a fitting or other object can be attached. The exposed portion
may be threaded for attachments made with a nut.
Studs are also available in an eye-pin configuration for running wire through the eye.
Clip Assemblies - Fastening to the base material is done by a pin, but the pin is
attached to a clip assembly configured to secure a uniquely shaped item. Clip assemblies
are available, for instance, to hold conduit. One ceiling configuration comes with pre-tied
12 gauge wire.

14-26 © Safety Services Company
Cartridges
Manufacturers recommend certain cartridges for certain applications. Because
recommendations cannot cover every possibility, testing may be required with unfamiliar
base materials.
Cartridges come in .22, .25, and .27 caliber sizes. Larger calibers hold more powder
which drives the fastener further – or into harder base materials. In addition, all three
calibers are available with different levels of powder charge. For some tools there may be as many as six different powder charges available. Some manufacturers produce tools
that use a long-case version of the .22- caliber cartridge. It is critical that you
understand cartridge selection and cartridge identification systems.
COLOR NUMBER CARTRIDGE POWER
Grey 1 Lowest
Brown 2
Green 3
Yellow 4
Red 5
Purple 6 Highest
Shots may be packaged/loaded as single cartridges, strips of ten in a plastic holder, or a
round disk holding ten cartridges. The tool model will determine the caliber and how the tool is to be loaded.
Number identifications are printed on the outside of cartridge packages. Cartridge tips
are color-dipped for identification. Some strip cartridges are held in a plastic strip the
same color as the cartridge tips.
The general rule is to start with the weakest cartridge and increase one cartridge color/load number at a time to reach the penetration required. Too strong a charge may
cause shattering, ricochets, or blow-through. Too weak a cartridge will keep the fastener
from seating itself properly.
Tool Power Controls
Many tools feature a “power control” device. This allows an operator to make a tool
adjustment so that either all or only part of the available cartridge power is used. Power
controls may ultimately let manufacturers market only one cartridge in each caliber.
The goal would be to handle every application which the caliber is capable of performing
with one cartridge, power-controlled to the appropriate driving force needed.
Fastening Steel
Low-velocity powder-actuated tools should not be used on hardened steels, tool steels,
or spring steels. Where the grade of steel is unknown, test by trying to hammer the
fastener in. If the pin is blunted, bent, or fails to enter at least 1/16", do not use a low-velocity powder actuated tool – it's not up to the job.
Don't try to fire a fastener any closer than ½" to the free edge of steel. Keep in mind
that this applies only to steel. When fastening steel to concrete, you must consider the
allowable margin for concrete as well: 2½".
When fastening two pieces of thin sheet steel to a base material, hold the sheets together. Gaps caused by bending may lead to ricochets.
Special spall stops or protective shields are required for applications such as fastening
sheet metal to masonry or sheet metal to structural steel. Consult the operating manual
or the manufacturer to ensure that the right components are being used for the job.

© Safety Services Company 14-27
Fastening Concrete and Masonry
Concrete and masonry materials are not always uniform in consistency or hardness. As a
result, they may spall, chip, or cause a ricochet when the fastener strikes a spot or layer
harder than the rest. Use the spall guard recommended by the manufacturer.
Once material is spalled or left with a ricochet hole, do not fire a second pin any closer
than 2" to the damaged area. The area may be weakened and spall further or cause a
ricochet off its sloped edge.
Pins tend to cause breaks near the edges of concrete and masonry. Don't drive pins
closer than 2½" to a free edge.
Misfires
With misfired cartridges, follow the procedures stated in the operating manual for the
tool you are using. Because of the wide variety of tools available, procedures for misfires
may differ.
When such information is not available, take the following steps:
Continue to hold the tool against the base material for at least 30 seconds. This
protects against a delayed discharge of the cartridge.
Remove the cartridge from the tool. During removal keep the tool pointed safely
toward soft material such as wood. Never use any kind of prying device to extract the
cartridge from the chamber. If the cartridge is wedged or stuck, tag the tool “DEFECTIVE and LOADED” and lock it in its storage container. Never try to dismantle
a tool with a cartridge stuck or wedged in it. Again, tag it “DEFECTIVE and LOADED,”
lock it away, and call the manufacturer's representative for help.
Place misfired cartridges in a container of water.
Keep the misfired cartridge separate from unused cartridges and return it to the manufacturer for disposal. Never throw misfired cartridges in the garbage.
Be cautious. The problem may be a misfired cartridge, but the tool may also be
defective. Check the tool for obvious damage, perform function tests, and use the
tool only if it operates properly.
General Safeguards
Make sure that the tool is not loaded. This action must become instinctive and be
carried out before anything else is done with the tool. Even after watching someone else handle the tool before passing it on, make sure that it's not loaded.
Powder-actuated tools should be used, handled, and stored properly.
Never put your hand or fingers over the end of the muzzle for any reason, even when
the tools are not loaded with fasteners.
Tools must be inspected and function-tested before work starts. Proper training and
the operator's manual will describe how to carry out both of these requirements. Know the powder-actuated tools you are using and wear all the required personal
protective equipment.
Fasteners should not be fired through pre-drilled holes for two reasons:
1. Unless the fastener hits the hole accurately, it will probably shatter the edge.
2. The fastener derives its holding power from compressing the material around it. A
pre-drilled hole reduces this pressure and therefore the fastener's holding power.
(This is why studs and pins driven into steel should penetrate completely through the metal. Otherwise the compressed steel trying to regain its original position can loosen
the fastener by pushing against the point. With the tip completely through the metal
the same pressure only works to squeeze the pin tighter.)

14-28 © Safety Services Company
Firing explosive-actuated tools from ladders is not recommended. From a ladder it
can be difficult to press the tool muzzle against the base material with enough
pressure to fire. For tasks overhead or at heights, work from a scaffold or another approved work platform to ensure solid, balanced footing. As an alternative use a
manufacturer's pole accessory if the reach is normal ceiling height (8-10 feet). The
pole secures the tool and permits firing by the operator standing below.
Do not leave the tool unattended unless it's locked in a box.
Load the tool immediately before firing. Don't walk around with the tool loaded. Do not use powder-actuated tools in areas where there may be exposure to
explosive vapors or gases.
Maintenance
Tools in regular use should be cleaned daily. Tools used intermittently should be
cleaned after firing.
All parts of the tool exposed to detonation gases from the cartridge should be cleaned
and lightly oiled according to the manufacturer’s instructions. The cartridge magazine port, cartridge chamber, and piston sleeve should be wiped clean but never be oiled.
The tool brush supplied is adequate for most fouling.
Stubborn carbon should be loosened with a manufacturer's spray detergent oil. Tools
being checked for immediate use should be wiped dry of oil.
Failure to clean the tool as recommended can lead to corrosion, pitting, fouling, and
failure to work properly. Ideally, the tool should be cleaned before being returned to storage.
Tools with a power control adjustment will accumulate additional powder residue from
firing–especially when the control is set to restrict the amount of cartridge strength
being used. Semi-automatic tools may also accumulate powder residue. These tools
need to be cleaned more often. Sluggish performance may indicate that a tool needs cleaning. Tool action will slow to
the point where a competent operator can detect the difference. Most manufacturers
recommend major maintenance, inspection, and cleaning every six months. This
involves stripping, inspecting, and cleaning parts not covered in daily maintenance.
Storage
Regulations require that both the tool and the cartridges be stored in a locked container
with explosive loads of different strengths in separate containers. Cartridges should only be removed from the locked container when they are going to be used immediately.
The tool must require two separate actions before it will fire:
1. pressure against the surface of the material
2. action of the trigger.
Explosive-actuated tools must be stored in a locked container when not in use or when left unattended.
The tool must not be loaded until ready for immediate use.
Whether loaded or unloaded, the tool must never be pointed at anyone.
Cartridges must be marked or labeled for easy identification. Cartridges of different
strengths must be stored in separate containers.
Misfired cartridges must be placed in a container of water and be removed from the project.

© Safety Services Company 14-29
FUEL OPERATED TOOLS
Regulation Rules to be Followed:
All fuel powered tools will be stopped while being refueled, serviced, or maintained,
and fuel will be transported, handled, and stored in accordance OSHA CFR
Regulations.
When fuel powered tools are used in enclosed spaces, the applicable requirements for concentrations of toxic gases and use of personal protective equipment will be
followed
HYDRAULIC POWER TOOLS
Regulation Rules to be Followed:
The fluid used in hydraulic powered tools will be fire-resistant fluids approved under
Schedule 30 of the U.S. Bureau of Mines, Department of the Interior, and will retain
its operating characteristics at the most extreme temperatures to which it will be exposed.
The manufacturer's safe operating pressures for hoses, valves, pipes, filters, and
other fittings will not be exceeded.
HAND TOOLS
Regulation Rules to be Followed:
Employers will not issue or permit the use of unsafe hand tools.
Wrenches, including adjustable, pipe, end, and socket wrenches will not be used when jaws are sprung to the point that slippage occurs.
Impact tools, such as drift pins, wedges, and chisels, will be kept free of mushroomed
heads.
The wooden handles of tools will be kept free of splinters or cracks and will be kept
tight in the tool.
Hand Saws
Select the right saw for the job. A 9 point is not meant for crosscutting hardwood. It can jump up and severely cut the worker's hand or thumb.
For this kind of work the right choice is an 11 point (+).When starting a cut, keep your
thumb up high to guide the saw and avoid injury.
For cutting softwood, select a 9 point (-). The teeth will remove sawdust easily and keep
the saw from binding and bucking.
Ripping requires a ripsaw.
Wood Chisels
Most injuries with this tool can be prevented by keeping the hand that holds the work behind, not in front of, the chisel.
A dull or incorrectly sharpened chisel is difficult to control and tedious to work with.
Chisels not in use or stored in a toolbox should have protective caps.
Wood chisels are tempered to be very hard. The metal is brittle and will shatter easily
against hard surfaces.
Never use a chisel for prying. Repeatedly striking the chisel with the palm of your hand may lead to repetitive strain
injury.
With chisels and other struck tools, always wear eye protection. Gloves are
recommended to help prevent cuts and bruises.

14-30 © Safety Services Company
Cold Chisels
Cold chisels are used to cut or shape soft metals as well as concrete and brick.
In time the struck end will mushroom. This should be ground off. Don't use chisels with
mushroomed heads. Fragments can fly off and cause injury.
Axes and Hatchets
In construction, axes are mainly used for making stakes or wedges and splitting or
shaping rough timbers.
Unless it has a striking face, don't use the hatchet as a hammer. The head or the
wooden handle can crack and break.
Hatchets with striking faces are meant only for driving common nails, not for striking chisels, punches, drills, or other hardened metal tools.
Never use an axe or hatchet as a wedge or chisel and strike it with a hammer.
Most carpenters prefer a hatchet with a solid or tubular steel handle and a hammer
head with a slot for pulling nails.
Sledgehammers
Sledgehammers are useful for drifting heavy timbers and installing and dismantling
formwork. They can knock heavy panels into place and drive stakes in the ground for bracing.
Sledgehammers can also be used to drive thick tongue-and-groove planking tightly
together. Use a block of scrap wood to prevent damage to the planks.
The main hazard is the weight of the head. Once the hammer is in motion it's almost
impossible to stop the swing. Serious bruises and broken bones have been caused by
sledgehammers off-target and out of control. Missing the target with the head and hitting the handle instead can weaken the stem.
Another swing can send the head flying.
Always check handle and head. Make sure head is secure and tight. Replace damaged
handles.
As with any striking or struck tool, always wear eye protection. Swinging a sledgehammer is hard work. Avoid working to the point of fatigue. Make
sure you have the strength to maintain aim and control.
Claw Hammers
These are available in many shapes, weights, and sizes for various purposes. Handles
can be wood or steel (solid or tubular). Metal handles are usually covered with shock-
absorbing material.
Start with a good quality hammer of medium weight (16 ounces) with a grip suited to the size of your hand.
Rest your arm occasionally to avoid tendinitis. Avoid overexertion in pulling out nails.
Use a crow bar or nail puller when necessary.
When nailing, start with one “soft” hit, that is, with fingers holding the nail. Then let
go and drive the nail in the rest of the way. Strike with the hammer face at right angles to the nailhead. Glancing blows can lead
to flying nails. Clean the face on sandpaper to remove glue and gum. Don't use nail
hammers on concrete, steel chisels, hardened steel-cut nails, or masonry nails.
Discard any hammer with a dented, chipped, or mushroomed striking face or with
claws broken, deformed, or nicked inside the nail slot.

© Safety Services Company 14-31
Utility Knives
Utility knives cause more cuts than any other sharp-edged cutting tool in construction.
Use knives with retractable blades only.
Always cut away from your body, especially away from your free hand. When you're
done with the knife, retract the blade at once. A blade left exposed is dangerous,
particularly in a toolbox.
Screwdrivers
Screwdrivers are not intended for prying, scraping, chiseling, scoring, or punching holes.
The most common abuse of the screwdriver is using one that doesn't fit or match the
fastener. The results are cuts and punctures from slipping screwdrivers, eye injuries
from flying fragments of pried or struck screwdrivers, and damaged work.
Always make a pilot hole before driving a screw. Start with one or two “soft” turns, that
is, with the fingers of your free hand on the screw. Engage one or two threads, make
sure the screw is going in straight, then take your fingers away.
You can put your fingers on the shank to help guide and hold the screwdriver. But the
main action is on the handle, which should be large enough to allow enough grip and
torque to drive the screw. Power drivers present obvious advantages when screws must
be frequently or repeatedly driven.
Note: All cross-point screws are not designed to be driven by a Phillips screwdriver.
Phillips screws and drivers are only one type among several cross point systems. They
are not interchangeable.
Hand Planes
Hazards include the risk of crush and scrape injuries when the hand holding the plane strikes the work or objects nearby. Cuts and sliver injuries are also common.
The hand plane requires some strength and elbow grease to use properly. The hazards of
overexertion and tendinitis can be aggravated by using a dull iron or too short a plane.
Only use a plane suited to the job and keep the iron sharp.
For long surfaces like door edges, use a fore plane 18" long and 2 ⅜" wide or a jointer plane 24" long and 2 ⅝" wide.
For shorter surfaces, use a jack plane 15" long and 2 ⅜" wide or a smoothing plane
10" long and 2 ⅜" wide.
Remember that sharp tools require less effort and reduce the risk of fatigue,
overexertion, and back strain. Work can also be easier with a door jack and supports on your work bench.
Plumb Bobs
The weight of a mercury-filled plumb bob will surprise you. Designed for use in windy
conditions, the bob has considerable weight in proportion to its surface area.
The weight and point of the bob can make it dangerous. Ensure that all is clear below
when you lower the bob.
Don't let it fall out of your pocket, apron, or tool bag. The same goes for the standard solid bob.
Crow Bars
Any steel bar 10-60 inches long and sharpened at one end is often called a crow bar.
The tools include pry bars, pinch bars, and wrecking bars. Shorter ones usually have a curved claw for pulling nails and a sharp, angled end for prying.

14-32 © Safety Services Company
Nail Pulling
Pulling out nails can be easier with a crow bar than a claw hammer.
In some cases, a nail-puller does the job best. The hand holding the claw must be kept
well away from the striking handle.
Lifting - Loads levered, lifted, or shifted by bars can land on fingers and toes.
Make sure to clear the area and maintain control of the load.
Have enough rollers and blocking ready. Never put fingers or toes under the load.
General
Try to avoid prying, pulling, wedging, or lifting at sharp angles or overhead.
Wherever possible, keep the bar at right angles to the work.
Wear eye protection and, where necessary, face protection.

© Safety Services Company 15-1
Chapter 15
Lockout/Tagout-Controlling Hazardous Energy
29 CFR-§1910.147 – The Control of Hazardous Energy
Company Policy for the Control of Hazardous Energy
A R M Environmental Services, Inc. has adopted this program for Lockout/Tagout
procedures for the control of hazardous energy threats.
A R M Environmental Services, Inc. will enforce the following engineering controls and work practices in order to eliminate or minimize the hazards of an unexpected release of
hazardous energy:
A R M Environmental Services, Inc. will provide training to ensure that the purpose and
function of the energy control program are understood by employees and that the
knowledge and skills required for the safe application, usage, and removal of the energy
controls are acquired by employees.
Training will include the following:
Each authorized employee will receive training in the recognition of applicable hazardous
energy sources, the type and magnitude of the energy possible in the workplace, and the methods and means necessary for energy isolation and control.
Each employee will be instructed in the purpose and use of the energy control procedure.
All other employees whose work operations are, or may be, in an area where energy
control procedures are utilized, will be instructed in the procedure, and about the
prohibition relating to attempts to restart or reenergize machines or equipment which
are locked out or tagged out.
Retraining will be provided for all employees whenever there is a change in their job
assignments, a change in machines, equipment or processes that present a new hazard,
or when there is a change in the energy control procedures. Additional retraining will
also be conducted whenever a periodic inspection reveals, or when the employer has
reason to believe, that there are deviations from or inadequacies in the employee's knowledge or use of the energy control procedures. The retraining will reestablish
employee proficiency and introduce new or revised control methods and procedures, as
necessary.
The employer will certify that employee training has been accomplished and is being
kept up-to-date. The certification will contain each employee's name and dates of training.
The Lockout /Tagout procedures for A R M Environmental Services, Inc. are administered
by Andy Wilson and will be those described in the procedures defined in this chapter.
Each employee is responsible for ensuring that proper procedure is used on his/her
specific job, the program is under the direct supervision of the job foreman at each work location.

15-2 © Safety Services Company
In situations in which lockout or tagout devices must be temporarily removed from the
energy isolating device and the machine or equipment energized to test or position the
machine, equipment or components, the following sequence of actions will be followed:
Clear the machine or equipment of tools and materials.
Remove employees from the machine or equipment area.
Remove the lockout or tagout devices.
Energize and proceed with testing or positioning.
De-energize all systems and reapply lockout according to proper procedure to continue the servicing and/or maintenance.
When service or maintenance is performed by a crew or other group, they will use the
job foreman’s lock for lockout procedure to ensure a level of protection equivalent to that
provided by the implementation of a personal lockout or tagout device. Each member of the crew will attach his/her personal lock to the foreman’s lock at the beginning of the
procedure required, and remove their personal lock as their part in the procedure is
complete. In the event a shift change is required during a lockout procedure, the
affected employee will secure his/her lock on the control before removal of the
previously used lock.
Failure to comply with proper Lockout/Tagout procedures is grounds for disciplinary
action. It will be grounds for immediate termination of employment with A R M
Environmental Services, Inc. for any unauthorized removal of warning tags or lockout
devices. The performance of Lockout/Tagout procedures will be inspected/evaluated at
least annually by Andy Wilson for compliance with company policy. Inspections will be
documented and date, equipment, and employee(s) reviewed will be recorded.
Lockout procedures are to be utilized over tagout procedures, where possible.
Locks used for (LOTO) will be clearly marked with identification of the employee applying
the device.
Purpose
This procedure establishes the minimum requirements for the lockout of energy isolating
devices whenever maintenance or servicing is done on machines or equipment. It will be
used to ensure that the machine or equipment is stopped, isolated from all potentially
hazardous energy sources and locked out before employees perform any servicing or
maintenance where the unexpected energization or start-up of the machine or
equipment or release of stored energy could cause injury.
Compliance with this Program
All employees are required to comply with the restrictions and limitations imposed upon
them during the use of lockout. The authorized employees are required to perform the
lockout in accordance with this procedure. All employees, upon observing a machine or
piece of equipment which is locked out to perform servicing or maintenance will not attempt to start, energize, or use that machine or equipment.
© Safety Services Company 15-3
Company Lockout/Tagout Policy
Purpose
A R M Environmental Services, Inc. has established this “Lockout/Tagout Policy and
Procedure” to provide maximum safety protection to our employees whenever they must
service or perform maintenance on machinery and equipment.
Scope
These procedures must be used by all employees authorized to service or maintain our equipment to ensure that machines or equipment is completely isolated from all
potentially hazardous energy sources. All employees affected in any way by servicing
and maintenance activities must also be knowledgeable of lockout/tagout procedures.
Application
These procedures must be followed whenever unexpected energizing, star-up or release of stored energy could cause injury. These procedures do not apply when servicing or
maintenance of equipment during normal production operations unless:
Guards, or other safety devices, must be removed or bypassed.
An employee places him/herself in an area where work on materials, etc., is actually
being performed. An employee places him/herself in any area considered dangerous during the normal
operating cycle.
Compliance
All supervisors are responsible and accountable for the use of safe lockout/tagout procedures by all employees under their supervision. Compliance with lockout/tagout
procedures is mandatory. Non-compliance with these procedures is considered a
violation of an employee’s condition of employment.
Authorization
Employees who are properly trained and certified on equipment maintenance and
lockout/tagout procedures, and approved by the facility manager, are authorized to
implement lockout/tagout procedures as appropriate.
15-4 © Safety Services Company
Lockout/Tagout Procedures
Preparation for Lockout
Review
Prior to lockout, the authorized employee(s) will review the lockout/tagout procedures
for each machine/piece of equipment. As a minimum the following information will be
reviewed:
Types and magnitudes of energy.
Hazards posed by that energy.
Methods to effectively control the energy.
Particularly close attention must be given to energies (such as gravity, electrical, high
pressure) that can be stored or re-accumulated after shut-down.
Notification
Prior to shutdown all affected employees will be notified to clear their work area and/or any other area that might be hazardous.
Lockout/Tagout
Shutdown
Machinery and equipment will be shut down in an orderly manner using the shutdown
checklist procedures on the associated lockout;/tagout procedures for each
machine/piece of equipment. If more than one authorized employee is involved in
shutdown, the maintenance team leader will make sure all assistants have accomplished
their tasks and are aware that shutdown will occur.
Isolation
All energy isolation devices will be located and operated to completely de-energize and
isolate the equipment. The authorized employee, or team leader will verify operation of
each energy isolation device.
Applying Lockout/Tagout Devices
Lockout devices — will be used to secure energy isolating devices unless the
machinery or equipment is not capable of being locked out. Only authorized employees
will affix lockout/tagout devices. Lockout devices must be able to hold energy isolation
devices in a “safe” or “off” position.
Tagout devices — will be used only if machinery or equipment is not capable of being
locked out. Tags will clearly state that moving energy isolating devices from the “safe”
or “off” position is strictly prohibited. If a tag cannot be affixed to the energy isolating
device, it will be located as close as safely possible to the device so that the tag is
obvious to anyone attempting to operate the device.
Lockout/Tagout materials and hardware — will be provided by the employer. Each
lockout/tagout device will be used only for lockout/tagout.
Lockout devices will have the following characteristics:
Capable of withstanding harsh environments Standardized within the Company. Same color, shape, size, etc.
Prevent removal without excessive force
Singularly identify the user
Uniquely keyed

© Safety Services Company 15-5
In addition, tagout devices will also have the following characteristics:
Non-reusable
Attachable by hand Self-locking
Non-releasable with not less than 50 LB locking strength
Design/characteristics at least equivalent to a one-piece, all environment-tolerant
nylon cable tie.
Stored Energy — Immediately after applying lockout or tagout devices, the authorized
employee will ensure all potentially hazardous stored or residual energy is relieved,
disconnected, restrained, and otherwise rendered safe.
If stored energy can be re-accumulated, the authorized employee will verify that the
energy is isolated until maintenance is complete or the energy no longer exists.
Verification of Isolation — Before starting work on a machine or equipment that is
locked or tagged out, the authorized employee will verify that the machinery or
equipment is actually isolated and de-energized.
Release from Lockout or Tagout
The authorized employee will follow the procedures below prior to removing lockout or tagout devices and restoring energy:
Equipment — Make sure machinery or equipment is properly re-assembled. Inspect
machinery or equipment to make sure nonessential items have been removed.
Employees — Make sure all employees are safely positioned outside danger zones.
Notify affected employees that lockout/tagout devices have been removed and that energy is going to be re-applied.
Removing lockout/tagout devices — Only the authorized employee who applied
the lockout/tagout device may remove that device. Exception: When the authorized
employee is not at the facility and all reasonable efforts have been made to inform
the employee that their lockout/tagout device has been removed:
The owner is authorized and will remove the device following procedures in this
section.
Each owner will be trained in proper lockout/tagout procedures.
The owner will ensure the authorized employee has this knowledge before he/she resumes work.
Testing/Positioning Machines or Equipment
Whenever lockout/tagout devices are removed to test or position machines and equipment, or their components, the authorized employee will complete the following
procedures in the sequence presented:
Clear the machine or equipment of tools and materials.
Remove employees from danger zones.
Remove lockout/tagout devices. Energize and proceed with testing or positioning.
De-energize all systems and re-apply lockout/tagout devices.
15-6 © Safety Services Company
Outside Personnel (Contractors, etc.)
Outside servicing personnel contracted to perform maintenance or other services
covered by these lockout/tagout procedures will not begin work until the owner is satisfied that their lockout/tagout procedures are at least equivalent to Company
procedures.
The owner will also ensure Company employees understand and comply with
contracted personnel lockout/tagout procedures.
Shift/Personnel Changes
When a shift change occurs during a lockout/tagout procedure, the following procedures
will be followed:
The on-coming authorized employee(s) will attach lockout/tagout devices and verify complete isolation.
The on-coming authorized employee(s) will receive a comprehensive briefing on the
maintenance being performed from the off-going authorized employee(s).
The off-going authorized employee(s) will remove their lockout/tagout devices.
Special Procedure: In the event that communication between off-going and on-coming
authorized employee(s) is impossible and work is to be done on the
equipment/machinery by the on-coming authorized employee(s), then the following
procedures must be followed:
The off-going authorized employee(s) will each check out a “department” lock from the maintenance department and record in the checkout log the status and
condition of the equipment in question.
The off-going authorized employee(s) will attach the “department” lock to the
equipment/machinery and remove their personal lock.
The on-coming authorized employee(s), upon realization the there is a “department” lock in place on the equipment/machinery to be worked on, will go
to the maintenance department and read the checkout log, and sign for the
appropriate key.
The on-coming authorized employee(s) will attach their personal lock to the
equipment/machinery and remove the “department” lock.
The on-coming authorized employee(s) will immediately return the “department” lock and key to the maintenance department and sign in the key and lock.
Training
Training in Lockout/Tagout — will be provided to all employees who may be in an area where energy control procedures are used. This training will make sure that the
purpose and function of the energy control program are understood and that employees
gain the needed knowledge and skills to safely apply, use, and remove energy controls.
As a minimum, training will include:
Authorized employees must be able to recognize: hazardous energy sources, type and magnitude of energy in the workplace, and methods and means necessary to
isolate and control the energy.
Affected employees must be able to recognize: purpose and use of the energy
control procedures.
Other employees must be able to recognize: procedures and prohibitions of the energy control program.
Training for Tagout Devices — Further training on tagout systems need to emphasize
that:
Tags are warning devices only and do not provide a physical restraint that lockout devices provide.
© Safety Services Company 15-7
Tags must not be removed without the authorized employee’s approval, and should
never be bypassed, ignored, or otherwise defeated.
Tags must be legible, and understandable by all employees. Tags must be able to withstand environmental conditions in the workplace.
Tags may give employees a false sense of security.
Tags must be securely attached to prevent being accidentally detached during use.
Retraining — Employees will be retrained at the following times:
Initial assignment.
Change in job assignment.
Change in machinery or equipment.
Change in operating procedures.
Inspections
Annual inspection on lockout/tagout procedures will be conducted by an authorized
employee other than the one(s) using the control procedure being inspected.
The purpose of the inspection is to correct any deviations or inadequacies in the procedures.
The inspector and authorized employee must review responsibilities under the energy
control procedure.
The owner will certify that the inspection was conducted. Elements of the
certification include:
Identification of equipment or machinery.
Date of inspection.
Employees included in the inspection.
Person performing inspection.
Purpose
This procedure establishes the minimum requirements for the lockout of energy isolating devices whenever maintenance or servicing is done on machines or equipment. It will be
used to ensure that the machine or equipment is stopped, isolated from all potentially
hazardous energy sources and locked out before employees perform any servicing or
maintenance where the unexpected energization or start-up of the machine or
equipment or release of stored energy could cause injury.
Compliance with this Program
All employees are required to comply with the restrictions and limitations imposed upon
them during the use of lockout. The authorized employees are required to perform the lockout in accordance with this procedure. All employees, upon observing a machine or
piece of equipment which is locked out to perform servicing or maintenance will not
attempt to start, energize, or use that machine or equipment.
__________________________________________________________ ___________
CEO/Owner Signature Date

15-8 © Safety Services Company
What is “Lockout/Tagout”?
“Lockout/Tagout” refers to specific practices and procedures to safeguard employees
from the unexpected energization or startup of machinery and equipment, or the release of hazardous energy during service or maintenance activities. This requires, in part, that
a designated individual turns off and disconnects the machinery or equipment from its
energy source(s) before performing service or maintenance and that the authorized
employee(s) either lock or tag the energy-isolating device(s) to prevent the release of
hazardous energy and take steps to verify that the energy has been isolated effectively. If the potential exists for the release of hazardous stored energy or for the
reaccumulation of stored energy to a hazardous level, the employer must ensure that
the employee(s) take steps to prevent injury that may result from the release of the
stored energy.
Lockout devices hold energy-isolation devices in a safe or “off” position. They provide protection by preventing machines or equipment from becoming energized because they
are positive restraints that no one can remove without a key or other unlocking
mechanism, or through extraordinary means, such as bolt cutters. Tagout devices, by
contrast, are prominent warning devices that an authorized employee fastens to energy-
isolating devices to warn employees not to reenergize the machine while he or she
services or maintains it. Tagout devices are easier to remove and, by themselves, provide employees with less protection than do lockout devices.
FORMS OF HAZARDOUS ENERGY Energy Form Description
Potential
Stored energy that can be drawn upon to do work. Suspended loads,
compressed springs, and pressurized hydraulic systems are examples.
Potential energy can be converted to kinetic energy and many of the
other energy forms below.
Kinetic
Energy resulting from moving objects such as released loads and
uncoiling springs. When these objects are released, their potential
energy is converted to kinetic energy.
Flammable Energy converted from the combustion of gasses, liquids, solid
chemicals, and vapors.
Chemical
The capacity of a substance to do work or produce heat through a
change in its composition. Chemical energy can be converted from
gasses, liquids, solid chemicals, and vapors.
Electrical
Energy generated through the conversion of other forms such as mechanical, thermal, or chemical energy. Energy stored between
plates of a charged capacitor is an example of potential electrical
energy. Typical electrical energy sources include open buss bars,
motors, and generators.
Thermal
Energy transferred from one body to another as the result of a
difference in temperature. Heat flows from the hotter to the cooler
body. Sources include mechanical work, radiation, chemical reactions,
and electrical resistance.

© Safety Services Company 15-9
Lockout/Tagout Concerns
Employees can be seriously or fatally injured if machinery they service or maintain
unexpectedly energizes, starts up, or releases stored energy. OSHA’s standard on the Control of Hazardous Energy (Lockout/Tagout) spells out the steps employers must take
to prevent accidents associated with hazardous energy. The standard addresses
practices and procedures necessary to disable machinery and prevent the release of
potentially hazardous energy while maintenance or servicing activities are performed.
Two other OSHA standards also contain energy control provisions. In addition, some standards relating to specific types of machinery contain de-energization requirements
(requiring the switches to be “open and locked in the open position” before performing
preventive maintenance on overhead and gantry cranes). These provisions apply in
conjunction with the other machine-specific standards to assure that employees will be
adequately protected against hazardous energy.
When OSHA Standards Apply
If your employees service or maintain machines where the unexpected startup,
energization, or the release of stored energy could cause injury, the standards likely
apply to you. The standards apply to all sources of energy, including, but not limited to:
mechanical, electrical, hydraulic, pneumatic, chemical, and thermal energy.
Controlling hazardous energy in installations for the exclusive purpose of power
generation, transmission, and distribution, including related equipment for
communication or metering, is covered by 29 CFR 1910.269.
When OSHA Standards do not Apply
The standard does not apply to general industry service and maintenance activities in the following situations, when:
Exposure to hazardous energy is controlled completely by unplugging the equipment
from an electric outlet and where the employee doing the service or maintenance has
exclusive control of the plug. This applies only if electricity is the only form of
hazardous energy to which employees may be exposed. This exception encompasses many portable hand tools and some cord and plug connected machinery and
equipment.
An employee performs hot-tap operations on pressurized pipelines that distribute gas,
steam, water, or petroleum products, for which the employer shows the following:
Continuity of service is essential.
Shutdown of the system is impractical.
The employee follows documented procedures and uses special equipment that
provides proven, effective employee protection.
The employee is performing minor tool changes or other minor servicing activities that are routine, repetitive, and integral to production, and that occur during normal
production operations. In these cases, employees must have effective, alternative
protection.

15-10 © Safety Services Company
CRITERIA FOR LOCKOUT & TAGOUT DEVICES Criterion Description
Singularly
Identified
This means that any employee who sees a lockout or tagout device recognizes it and does not mistake its purpose. Each lock or tag
must identify the employee who attached it and can only be used
on an energy-isolating device. Each lock must have a unique key
or combination; this means that only the employee who uses the
lock must have the key or the combination to that lock.
Durable
Lockout devices must work under the environmental conditions in
which they are used. Tagout device warnings must remain legible
even when they are used in wet, damp, or corrosive conditions.
Standardized
Lockout and tagout devices must be designated by color, shape, or
size.
Tagout devices must have a standardized print and warning
format.
Substantial
Lockout devices and tagout devices must be strong enough that
they cannot be removed inadvertently. Tagout devices must be
attached with a single-use, self-locking material such as a nylon
cable tie.
Lockout/Tagout Requirements that Apply to Service & Maintenance Operations
The standard applies to the control of hazardous energy when employees are involved in
service or maintenance activities such as constructing, installing, setting up, adjusting,
inspecting, modifying, and maintaining or servicing machines or equipment. These
activities include lubricating, cleaning or unjamming machines, and making adjustments or tool changes, where the employees may be exposed to hazardous energy.
If a service or maintenance activity is part of the normal production operation, the
employee performing the servicing may be subjected to hazards not normally associated
with the production operation itself. Although machine guarding provisions cover most
normal production operations, workers doing service or maintenance activities during normal production operations must follow lockout/tagout procedures if they:
Remove or bypass machine guards or other safety devices
Place any part of their bodies in or near a machine’s point of operation
Place any part of their bodies in a danger zone associated with machine operations
Work involving minor tool changes and adjustments or other servicing activities that are
routine, repetitive, and integral to the use of the production equipment and that occur
during normal production operations are not covered by the lockout/tagout standard.
This exception is limited, however, and applies only when economic considerations
prevent the use of prescribed energy-isolation measures and when the employer provides and requires alternative measures to ensure effective, alternative protection.
Whenever the standard is applicable, the machinery must be shut off and isolated from
its energy sources, and lockout or tagout devices must be applied to the energy-isolation
devices. In addition, the authorized employee(s) must take steps to verify that he or
she has effectively isolated the energy. When there is stored or residual energy, the authorized employee(s) must take steps to render that energy safe. If the possibility
exists for reaccumulation of stored energy to hazardous levels, the employer must
ensure that the worker(s) perform verification steps regularly to detect such
reaccumulation before it has the potential to cause injury.

© Safety Services Company 15-11
OSHA’s Requirements
OSHA’s standard establishes minimum performance requirements for controlling
hazardous energy. The standard specifies that employers must establish an energy-control program to ensure that employees isolate machines from their energy sources
and render them inoperative before any employee services or maintains them.
As part of an energy-control program, employers must:
Establish energy-control procedures for removing the energy supply from machines
and for putting appropriate lockout or tagout devices on the energy-isolating devices to prevent unexpected re-energization. When appropriate, the procedure
also must address stored or potentially re-accumulated energy.
Train employees on the energy-control program, including the safe application,
use, and removal of energy controls.
Inspect these procedures periodically (at least annually) to ensure that they are being followed and that they remain effective in preventing employee exposure to
hazardous
If employers use tagout devices on machinery that can be locked out, they must adopt
additional measures to provide the same level of employee protection that lockout devices would provide. Within the broad boundaries of the standard, employers have
the flexibility to develop programs and procedures that meet the needs of their individual
workplaces and the particular types of machines being maintained or serviced.
PROCEDURE FOR SHUTTING DOWN EQUIPMENT AND CONTROLLING HAZARDOUS ENERGY Critical Step Action
1
Prepare to shut down the equipment — Each authorized employee who
shuts down equipment must know the type and magnitude of the
energy, its hazards, and how to control the energy. All affected employees must know that the equipment is being serviced and that it
will be shut down and locked out for the duration of the service work.
(An authorized employee is one who locks out or tags out the energy-
isolating device and services the equipment. An affected employee may
use the equipment or work in the area where the equipment is being
serviced under a lockout or tagout procedure.
2 Shut down the equipment — If the equipment is operating, shut it down
as you normally would.
3
De-energize the equipment: isolate or block the hazardous energy —
The method(s) you use depends on the form of energy and the
means available to control it.
To isolate the energy Disconnect motors that power the equipment.
De-energize electrical circuits by disconnecting the power source from
the circuit.
To block the energy
Block fluid flow in hydraulic, pneumatic, or steam systems with control valves or by capping or blanking the lines.
Block equipment parts that could be moved by gravity.

15-12 © Safety Services Company
4
Dissipate any potential (stored) energy — Some forms of energy must also be dissipated after equipment has been de-energized. Capacitors;
coiled springs; elevated machine members; rotating flywheels; and air,
gas, steam, chemical, and water systems are sources of hazardous
stored energy. If the energy could return to a hazardous level, you must
make sure that it remains isolated from the equipment until all service work is finished.
Vent pressurized fluids until internal pressure levels reach
atmospheric levels.
Discharge capacitors by grounding them.
Release or block tensioned springs.
Ensure that all moving parts have stopped completely.
5
Lock out or tag out the energy-isolating device — If you can lock out
the energy-isolating device, then you must lock it out. If you tag out
the device, you must ensure that your tag will be as effective as a
lock. To lock out the device — Attach your lock and a personal
identification tag to the device.
The lock must hold the energy-isolating device in a “safe” or “off ”
position.
To tag out the device — Attach the tag to the device or as close to it
as possible. The tag must clearly state that changing the energy-
isolating device from the “safe” or “off ” position is prohibited.
6
Verify that the equipment is isolated from the hazardous energy —
Before servicing locked-out or tagged-out equipment, verify that the
equipment is, in fact, de-energized and isolated from all energy
sources. Verify that the equipment is isolated or disconnected from all energy
sources.
Verify that no one is near the equipment.
Push the start button or engage the normal operating control(s) to
make certain the equipment will not operate. Return operating control(s) to neutral or “off ” position after verifying
that the equipment does not start.
What Energy-Control Procedures Must Include
Employers must develop, document, and use procedures to control potentially hazardous
energy. The procedures explain what employees must know and do to control hazardous
energy effectively when they service or maintain machinery. If this information is the
same for the various machines used at a workplace, then a single energy-control procedure may suffice. For example, similar machines (those using the same type and
magnitude of energy) that have the same or similar types of control measures can be
covered by a single procedure. Employers must develop separate energy-control
procedures if their workplaces have more variable conditions such as multiple energy
sources, different power connections, or different control sequences that workers must
follow to shut down various pieces of machinery.
The energy-control procedures must outline the scope, purpose, authorization, rules, and
techniques that employees will use to control hazardous energy sources, as well as the
means that will be used to enforce compliance. These procedures must provide
employees at least the following information:

© Safety Services Company 15-13
A statement on how to use the procedures.
Specific procedural steps to shut down, isolate, block, and secure machines.
Specific steps designating the safe placement, removal, and transfer of lockout/tagout devices and identifying who has responsibility for the lockout/tagout
devices.
Specific requirements for testing machines to determine and verify the effectiveness
of lockout devices, tagout devices, and other energy-control measures.
What Workers Must Do Before Beginning Service or Maintenance Activities
Before beginning service or maintenance, the following steps must be accomplished in
sequence and according to the specific provisions of the employer’s energy-control procedure:
Prepare for shutdown.
Shut down the machine.
Disconnect or isolate the machine from the energy source(s).
Apply the lockout or tagout device(s) to the energy-isolating device(s). Release, restrain, or otherwise render safe all potential hazardous stored or
residual energy. If a possibility exists for re-accumulation of hazardous energy,
regularly verify during the service and maintenance that such energy has not re-
accumulated to hazardous levels.
Verify the isolation and de-energization of the machine.
What Workers Must Do Before Removing Lockout/Tagout Device(s) and Re-
energizing Machinery or Equipment
Employees who work on de-energized machinery may be seriously injured or killed if someone removes lockout/tagout devices and reenergizes machinery without their
knowledge. Thus, it is extremely important that all employees respect lockout and
tagout devices and that only the person(s) who applied these devices remove them.
Before removing lockout or tagout devices, the employees must take the following steps
in accordance with the specific provisions of the employer’s energy-control procedure:
Inspect machines or their components to assure that they are operationally intact and
that nonessential items are removed from the area.
Check to assure that everyone is positioned safely and away from machines.
After removing the lockout or tagout devices but before reenergizing the machine, the
employer must assure that all employees who operate or work with the machine, as well
as those in the area where service or maintenance is performed, know that the devices
have been removed and that the machine is capable of being reenergized. In the rare
situation in which the employee who placed the lockout/tagout device is unable to
remove that device, another person may remove it under the direction of the employer, provided that the employer strictly adheres to the specific procedures outlined in the
standard.

15-14 © Safety Services Company
PROCEDURE FOR REMOVING LOCKOUT OR TAGOUT DEVICES AND RE-ENERGIZING EQUIPMENT Critical Step Action
1 Inspect the repair or maintenance work — Make sure you have all your work tools and that you have replaced all equipment components.
2 Tell coworkers that you are removing the lockout or tagout device —
Check the work area to ensure that all workers are clear of the area.
3 Check the equipment power controls — Verify that the equipment power
controls are in a neutral or off position.
4 Remove the lockout or tagout device — The person who attached the
device must also remove it.
5 Re-energize the equipment.
How and When to Use Lockout
You must use a lockout program (or tagout program that provides a level of protection
equal to that achieved through lockout) whenever your employees engage in service or
maintenance operations on machines that are capable of being locked out and that
expose them to hazardous energy from unexpected energization, startup, or release of
stored energy. The primary way to prevent the release of hazardous energy during service and maintenance activities is by using energy-isolating devices such as manually
operated circuit breakers, disconnect switches, and line valves and safety blocks.
Lockout requires use of a lock or other lockout device to hold the energy-isolating device
in a safe position to prevent machinery from becoming reenergized. Lockout also
requires employees to follow an established procedure to ensure that machinery will not be reenergized until the same employee who placed the lockout device on the energy-
isolating device removes it.
Determine if the Energy-Isolating Device Can Be Locked Out
An energy-isolating device is considered “capable of being locked out” if it meets one of the following requirements:
Is designed with a hasp or other part to which you can attach a lock such as a
lockable electric disconnect switch.
Has a locking mechanism built into it.
Can be locked without dismantling, rebuilding, or replacing the energy-isolating device or permanently altering its energy-control capability, such as a lockable
valve cover or circuit breaker blockout.
If Equipment Can Not Be Locked Out
Sometimes it is not possible to lock out the energy-isolating device associated with the
machinery. In that case, you must securely fasten a tagout device as close as safely
possible to the energy-isolating device in a position where it will be immediately obvious
to anyone attempting to operate the device. You also must meet all of the tagout provisions of the standard. The tag alerts employees to the hazard of re-energization
and states that employees may not operate the machinery to which it is attached until
the tag is removed in accordance with an established procedure.
Other Options
If it is possible to lock out an energy-isolating device, employers must use lockout
devices unless they develop, document, and use a tagout procedure that provides
employees with a level of protection equal to that provided by a lockout device. In a
tagout program, an employer can attain an equal level of protection by complying with
all tagout-related provisions of the standard and using at least one added safety measure that prevents unexpected reenergization. Such measures might include

© Safety Services Company 15-15
removing an isolating circuit element, blocking a controlling switch, opening an extra
disconnecting device, or removing a valve handle to minimize the possibility that
machines might inadvertently be reenergized while employees perform service and maintenance activities.
When Tagout Devices Can Be Used Instead of Lockout Devices
When an energy-isolating device cannot be locked out, the employer must modify or
replace the energy-isolating device to make it capable of being locked out or use a
tagout system. Whenever employers significantly repair, renovate, or modify machinery or install new or replacement machinery, however, they must ensure that the energy-
isolating devices for the machinery are capable of being locked out.
Tagout devices may be used on energy-isolating devices that are capable of being locked
out if the employer develops and implements the tagout in a way that provides
employees with a level of protection equal to that achieved through a lockout system.
When using a tagout system, the employer must comply with all tagout-related
provisions of the standard and train employees in the limitations of tags, in addition to
providing normal hazardous energy control training for all employees.
Limitations of Tagout Devices
A tagout device is a prominent warning that clearly states that the machinery being
controlled must not be operated until the tag is removed in accordance with an
established procedure.
Tags are essentially warning devices and do not provide the physical restraint of a lock.
Tags may evoke a false sense of security. For these reasons, OSHA considers lockout devices to be more secure and more effective than tagout devices in protecting
employees from hazardous energy.
Requirements for Lockout/Tagout Devices
Whether lockout or tagout devices are used, they must be the only devices the employer
uses in conjunction with energy-isolating devices to control hazardous energy. The employer must provide these devices and they must be singularly identified and not used
for other purposes. In addition, they must have the following characteristics:
Durable enough to withstand workplace conditions. Tagout devices must not
deteriorate or become illegible even when used with corrosive components such as
acid or alkali chemicals or in wet environments.
Standardized according to color, shape, or size. Tagout devices also must be
standardized according to print and format. Tags must be legible and understandable
by all employees. They must warn employees about the hazards if the machine is
energized, and offer employees clear instruction such as:
“Do Not Start”
“Do Not Open”
“Do Not Close”
“Do Not Energize”
“Do Not Operate”
Substantial enough to minimize the likelihood of premature or accidental
removal. Employees should be able to remove locks only by using excessive force
with special tools such as bolt cutters or other metal-cutting tools. Tag attachments
must be non-reusable, self-locking, and non-releasable, with a minimum unlocking
strength of 50 pounds. Tags must be attachable by hand, and the device for
attaching the tag should be a one-piece nylon cable tie or its equivalent so it can withstand all environments and conditions.
Labeled to identify the specific employees authorized to apply and remove them.

15-16 © Safety Services Company
What Employees Need to Know About Lockout/Tagout Programs
Training must ensure that employees understand the purpose, function, and restrictions
of the energy-control program. Employers must provide training specific to the needs of
“authorized,” “affected,” and “other” employees.
“Authorized” employees are those responsible for implementing the energy-control
procedures or performing the service or maintenance activities. They need the
knowledge and skills necessary for the safe application, use, and removal of energy-isolating devices. They also need training in the following:
Hazardous energy source recognition.
The type and magnitude of the hazardous energy sources in the workplace.
Energy-control procedures, including the methods and means to isolate and control
those energy sources.
“Affected” employees (usually machine operators or users) are employees who operate
the relevant machinery or whose jobs require them to be in the area where service or
maintenance is performed. These employees do not service or maintain machinery or perform lockout/tagout activities.
Affected employees must receive training in the purpose and use of energy-control
procedures. They also need to be able to do the following:
Recognize when the energy-control procedure is being used.
Understand the purpose of the procedure.
Understand the importance of not tampering with lockout or tagout devices and not starting or using equipment that has been locked or tagged out.
All other employees whose work operations are or may be in an area where energy-
control procedures are used must receive instruction regarding the energy-control procedure and the prohibition against removing a lockout or tagout device and
attempting to restart, reenergize, or operate the machinery.
In addition, if tagout devices are used, all employees must receive training regarding the
limitations of tags.
TRAINING FOR AUTHORIZED & AFFECTED EMPLOYEES Employees The Nature of Their Work What Their Training Must Include
Authorized
Those who lock out or tag out
the equipment and who do the
maintenance work on the
equipment.
How to find and recognize
hazardous energy sources.
The types and magnitudes of energy used in the workplace.
How to isolate energy sources.
Affected
Those who may use equipment
serviced under lockout or tagout
procedures and other employees
who work in area affected by the procedures.
(An affected employee becomes
an authorized employee when
that employee’s duties includes
service or maintenance work on equipment.)
The purpose of energy-control
procedures.
How energy-control procedures
are applied. How energy-control procedures
will protect them.
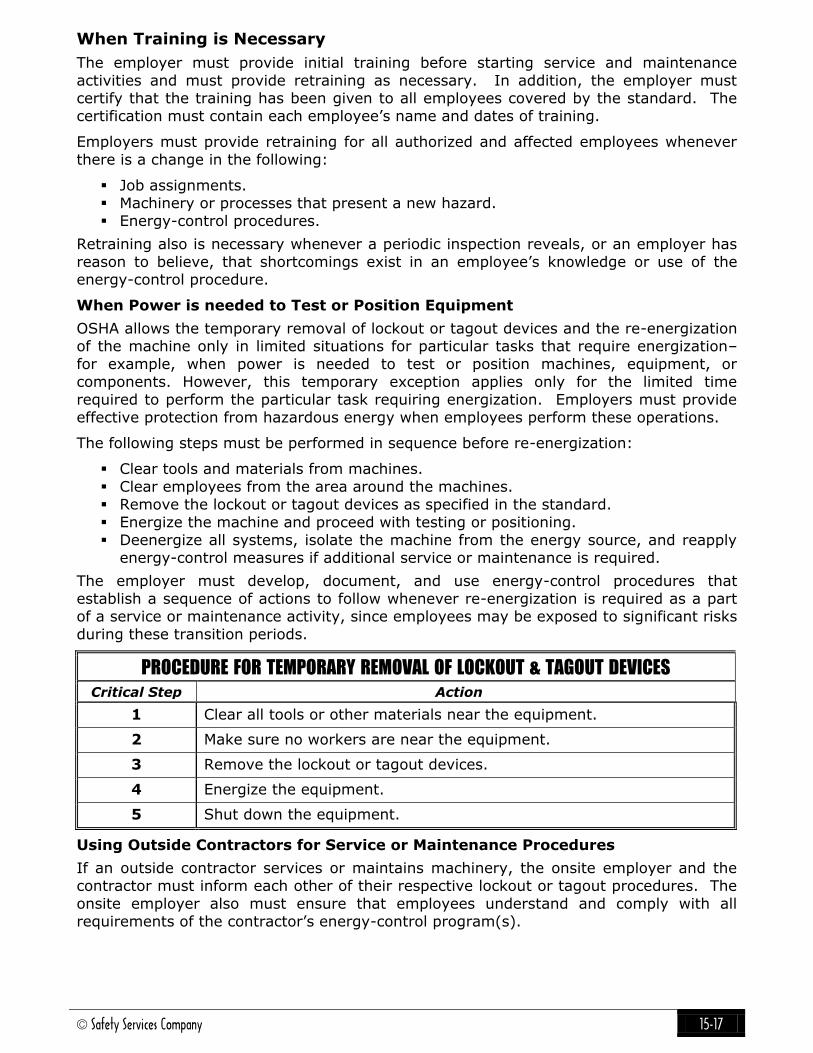
© Safety Services Company 15-17
When Training is Necessary
The employer must provide initial training before starting service and maintenance
activities and must provide retraining as necessary. In addition, the employer must certify that the training has been given to all employees covered by the standard. The
certification must contain each employee’s name and dates of training.
Employers must provide retraining for all authorized and affected employees whenever
there is a change in the following:
Job assignments. Machinery or processes that present a new hazard.
Energy-control procedures.
Retraining also is necessary whenever a periodic inspection reveals, or an employer has
reason to believe, that shortcomings exist in an employee’s knowledge or use of the energy-control procedure.
When Power is needed to Test or Position Equipment
OSHA allows the temporary removal of lockout or tagout devices and the re-energization of the machine only in limited situations for particular tasks that require energization–
for example, when power is needed to test or position machines, equipment, or
components. However, this temporary exception applies only for the limited time
required to perform the particular task requiring energization. Employers must provide
effective protection from hazardous energy when employees perform these operations.
The following steps must be performed in sequence before re-energization:
Clear tools and materials from machines.
Clear employees from the area around the machines.
Remove the lockout or tagout devices as specified in the standard.
Energize the machine and proceed with testing or positioning.
Deenergize all systems, isolate the machine from the energy source, and reapply energy-control measures if additional service or maintenance is required.
The employer must develop, document, and use energy-control procedures that
establish a sequence of actions to follow whenever re-energization is required as a part of a service or maintenance activity, since employees may be exposed to significant risks
during these transition periods.
PROCEDURE FOR TEMPORARY REMOVAL OF LOCKOUT & TAGOUT DEVICES Critical Step Action
1 Clear all tools or other materials near the equipment.
2 Make sure no workers are near the equipment.
3 Remove the lockout or tagout devices.
4 Energize the equipment.
5 Shut down the equipment.
Using Outside Contractors for Service or Maintenance Procedures
If an outside contractor services or maintains machinery, the onsite employer and the
contractor must inform each other of their respective lockout or tagout procedures. The
onsite employer also must ensure that employees understand and comply with all
requirements of the contractor’s energy-control program(s).

15-18 © Safety Services Company
When a Group Performs Service or Maintenance Activities
When a crew, department, or other group performs service or maintenance, they must
use a procedure that provides all employees a level of protection equal to that provided
by a personal lockout or tagout device. Each employee in the group must have control
over the sources of hazardous energy while he or she is involved in service and
maintenance activities covered by the standard. Personal control is achieved when each
authorized employee affixes a personal lockout/tagout device to a group lockout mechanism instead of relying on a supervisor or other person to provide protection
against hazardous energy.
GROUP LOCKOUT-THE GROUP LOCKBOX VARIATION Step Activity
1 An authorized employee secures each energy-isolating device with a personal
lock.
2 The same authorized employee places the key that fits each lock in a group lock
box with a multi-lock hasp.
3 The other authorized employees in the group secure the lockbox – they attach
their personal locks to the box – before beginning their service work.
4 After each employee finishes service work on the equipment, that employee
removes his personal lock from the lockbox.
5
After all the employees have finished their service work and removed their personal locks from the lockbox, the authorized employee who placed the key in
the box removes it.
6 The authorized employee uses the key to remove the locks on the energy-
isolating devices.
When a Shift Changes During Machine Service or Maintenance
Employers must make sure that there is a continuity of lockout or tagout protection.
This includes the orderly transfer of lockout or tagout device protection between outgoing and incoming shifts to control hazardous energy. When lockout or tagout
devices remain on energy-isolation devices from a previous shift, the incoming shift
members must verify that the machinery is effectively isolated and deenergized.
Review of Lockout/Tagout Procedures
Employees are required to review their procedures at least once a year to ensure that they provide adequate worker protection. As part of the review, employers must correct
any deviations and inadequacies identified in the energy-control procedure or its
application.
What a Review Should Involve
The periodic inspection is intended to assure that employees are familiar with their
responsibilities under the procedure and continue to implement energy-control
procedures properly. The inspector, who must be authorized and not involved in the
particular control procedure being inspected, must be able to determine the following:
Employees are following steps in the energy-control procedure. Employees involved know their responsibilities under the procedure.
The procedure is adequate to provide the necessary protection, and what changes, if
any, are needed.

© Safety Services Company 15-19
For a lockout procedure, the periodic inspection must include a review of each authorized
employee’s responsibilities under the energy-control procedure being inspected. Where
tagout is used, the inspector’s review also extends to affected employees because of the increased importance of their role in avoiding accidental or inadvertent activation of the
machinery. In addition, the employer must certify that the designated inspectors
perform periodic inspections. The certification must specify the following:
Machine or equipment on which the energy-control procedure was used.
Date of the inspection. Names of employees included in the inspection.
Name of the person who performed the inspection.
Commonly Used Terms
Affected Employee — An employee whose job requires him/her to operate or use a machine or equipment on which servicing or maintenance is being performed under
lockout or tagout, or whose job requires him/her to work in an area in which such
servicing or maintenance is being performed.
Authorized Employee — A person who locks out or tags out machines or equipment in
order to perform servicing or maintenance on that machine or equipment. An affected employee becomes an authorized employee when that employee’s duties include
performing servicing or maintenance covered under the standard.
Capable of Being Locked Out — An energy-isolating device is capable of being locked
out if it has a hasp or other means of attachment to which, or through which, a lock can
be affixed, or it has a locking mechanism built into it. Other energy-isolating devices are capable of being locked out, if lockout can be achieved, without the need to dismantle,
rebuild, or replace the energy-isolating device or permanently alter its energy control
capability.
Energized — Connected to an energy source or containing residual or stored energy.
Energy-Isolating Device — A mechanical device that physically prevents the transmission or release of energy, including but not limited to the following: a manually
operated electrical circuit breaker; a disconnect switch; a manually operated switch by
which the conductors of a circuit can be disconnected from all ungrounded supply
conductors, and in addition, no pole can be operated independently; a line valve; a
block; and any similar device used to block or isolate energy. Push buttons, selector
switches and other control circuit-type devices are not energy-isolating devices.
Energy Source — Any source of electrical, mechanical, hydraulic, pneumatic, chemical,
thermal, or other energy.
Hot Tap — A procedure used in the repair, maintenance, and services activities, which
involve welding on a piece of equipment (pipelines, vessels, or tanks) under pressure, in
order to install connections or appurtenances. It is commonly used to replace or add sections of pipeline without the interruption of service for air, gas, water, steam, and
petrochemical distribution systems.
Lockout — The placement of a lockout device on an energy-isolating device, in
accordance with an established procedure, ensuring that the energy-isolating device and
the equipment being controlled cannot be operated until the lockout device is removed.
Lockout Device — A device that uses a positive means such as a lock, either key or
combination type, to hold an energy-isolating device in the safe position and prevent the
energizing of a machine or equipment. Included are blank flanges and bolted slip blinds.

15-20 © Safety Services Company
Normal Production Operations — The utilization of a machine or equipment to
perform its intended production function.
Servicing and/or Maintenance — Workplace activities such as constructing, installing, setting up, adjusting, inspecting, modifying, and maintaining and/or servicing machines
or equipment. These activities include lubricating, cleaning or unjamming machines or
equipment and making adjustments or tool changes where the employee may be
exposed to the unexpected energization or startup of the equipment or release of
hazardous energy.
Setting Up — Any work performed to prepare a machine or equipment to perform its
normal production operation.
Tagout — The placement of a tagout device on an energy-isolating device, in
accordance with an established procedure, to indicate that the energy-isolating device
and the equipment being controlled may not be operated until the tagout device is
removed.
Tagout Device — A prominent warning device, such as a tag and a means of
attachment, which can be securely fastened to an energy-isolating device in accordance
with an established procedure, to indicate that the energy-isolating device and the
equipment being controlled may not be operated until the tagout device is removed.

© Safety Services Company 15-21
Company Lockout/Tagout Audit
This audit covers the servicing and maintenance of machines and equipment in which the
unexpected start up of the machines or equipment, or release of stored energy could
cause injury to employees. Mark your item choices in the boxes: Y=Yes, N=No.
Energy Control Program
Y/N
Has the employer established an energy control program consisting of energy
control procedures, employee training and periodic inspections?
Is a responsible person appointed to monitor the effectiveness of the energy control
program?
Lockout/Tagout
Is a tagout system used only if an energy isolating device is not capable of being locked out?
Can the employer prove that the utilization of a tagout system will provide full
employee protection?
Whenever replacement or major repair, renovation or modification of a machine or
equipment is performed, and whenever new machines or equipment are installed, are energy isolating devices for such machine or equipment designed to accept a
lockout device?
Energy Control Procedure
Are written procedures in place, documented and used for the control of potentially
hazardous energy?
Exception: The employer need not document the required procedure for a particular
machine or equipment, when all of the following elements exist:
The machine or equipment has no potential for stored or residual energy or re-
accumulation of stored energy after shut down which could endanger employees. The machine or equipment has a single energy source which can be readily identified
and isolated.
The isolation and locking out of that energy source will completely de-energize and
de-activate the machine or equipment.
The machine or equipment is isolated from that energy source and locked out during servicing or maintenance.
A single lockout device will achieve a locked-out condition.
The lockout device is under the exclusive control of the authorized employee
performing the servicing or maintenance.
The servicing or maintenance does not create hazards for other employees. The employer, in utilizing this exception, has had no accidents involving the
unexpected activation or re-energizing of the machine or equipment during servicing
or maintenance.
Do procedures clearly and specifically outline the scope, purpose, authorization, rules and techniques to be utilized for the control of hazardous energy, and the
means to enforce compliance? Do procedures include:
A specific statement of the intended use of the procedure.
Specific procedural steps for shutting down, isolating, blocking and securing
machines or equipment to control hazardous energy. Specific procedural steps to place, remove, and transfer lockout devices/ tagout
devices and the responsibility for them.

15-22 © Safety Services Company
Specific requirements for testing a machine or equipment to determine and verify
the effectiveness of lockout devices, tagout devices, and other energy control
measures.
Protective Materials and Hardware
Y/N
Are locks, tags, chains, wedges, key blocks, adapter pins, self-locking fasteners, or
other hardware provided by the employer for isolating, securing or blocking of
machines or equipment from energy sources?
Are lockout devices and tagout devices singularly identified; the only device(s) used
for controlling energy, and not used for other purposes?
Are lockout and tagout devices capable of withstanding the environment to which
they are exposed for the maximum period of time that exposure is expected?
Are tagout devices constructed and printed so that exposure to weather conditions
or wet and damp locations will not cause the tag to deteriorate or the message on
the tag to become illegible?
Are tags made so that they will not deteriorate when used in corrosive
environments such as areas where acid and alkali chemicals are handled and
stored?
Are lockout and tagout devices standardized within the facility in at least one of the
following criteria: color; shape; or size; and additionally, in the case of tagout
devices, print and format
Are lockout devices substantial enough to prevent removal without the use of
excessive force or unusual techniques, such as the use of bolt cutters or other
metal cutting tools?
Are tagout devices, including their means of attachment, substantial enough to
prevent inadvertent or accidental removal?
Are the means of attaching tagout devices of a non-reusable type, attachable by
hand, self-locking, and non-releasable with a minimum unlocking strength of no
less than 50 pounds?
Is the general design and basic characteristics of the means of attachment at least
equivalent to a one-piece, all environment-tolerant nylon cable tie?
Do lockout devices and tagout devices indicate the identity of the employee
applying the device(s)?
Do tagout devices warn against hazardous conditions if the machine or equipment
is energized and include a legend such as the following: Do Not Start. Do Not
Open. Do Not Close. Dot Not Energize. Do Not Operate?
Does each person’s lock have either a key or combination which is unique to that device?
Periodic Inspection
Does the employer conduct a periodic inspection of the energy control procedure at least annually?
Is the periodic inspection performed by an authorized employee other than the
one(s) utilizing the energy control procedure being inspected?
Is the periodic inspection conducted to correct any deviations or inadequacies
identified?

© Safety Services Company 15-23
Does the periodic inspection include a review, between the inspector and each
authorized employee, of that employee’s responsibilities under the energy control
procedure being inspected?
Does the employer certify in writing that the periodic inspections have been
performed?
Note: The certification must identify the machine or equipment on which the energy
control procedure was being utilized, the date of the inspection, the employees included
in the inspection, and the person performing the inspection.
Training and Communication
Y/N
Does the employer provide training to make sure that the purpose and function of
the energy control program is understood by employees, and that the knowledge and skills required for the safe application, use, and removal of the energy controls
are acquired by employees?
Does the training include the following:
Authorized employees. The recognition of applicable hazardous energy sources,
the type and magnitude of the energy available in the workplace, and the methods and means necessary for energy isolation and control.
Affected employees. The purpose and use of the energy control procedure.
All other employees. General lockout/tagout program and procedures, and the
prohibition relating to attempts to restart or re-energize machines or equipment
which are locked out or tagged out.
When a tagout system is used, employees should be trained that:
Tags are essentially warning devices affixed to energy isolating devices, and do not
provide the physical restraint on those devices that is provided by a lock.
When a tag is attached to an energy isolating means, it is not to be removed without authorization of the authorized person responsible for it, and it is never to
be bypassed, ignored, or otherwise defeated.
Tags must be legible and understandable by all authorized employees, affected
employees, and all other employees whose work operations are or may be in the
area, in order to be effective. Tags and their means of attachment must be made of materials which will
withstand the environmental conditions encountered in the workplace.
Tags may evoke a false sense of security, and their meaning needs to be
understood as part of the overall energy control program.
Tags must be securely attached to energy isolating devices so that they cannot be
inadvertently or accidentally detached during use.
Employee Retraining
Is retraining provided for all authorized and affected employees whenever there is a
change in their job assignments, a change in machines, equipment or processes
that present a new hazard, or when there is a change in the energy control
procedures?
Is additional retraining conducted whenever a periodic inspection reveals, or
whenever the employer has reason to believe that there are deviations from or inadequacies in the employee’s knowledge or use of the energy control procedures?
Does retraining re-establish employee proficiency and introduce new or revised
control methods and procedures, as necessary?

15-24 © Safety Services Company
Does the employer certify that employee training has been accomplished and is
being kept up-to-date, and does the certification contain each employee’s name
and dates of training?
Energy Isolation
Y/N
Is lockout or tagout performed only by the authorized employees who are
performing the servicing or maintenance?
Notification of Employees
Are affected employees notified by the employer or authorized employee of the
application and removal of lockout or tagout devices?
Is notification given before the controls are applied, and after they are removed
from the machine or equipment?
Application of Controls
Are established procedures for the application of energy control (the lockout or tagout procedures) being accomplished in proper sequence?
Step One: Preparation for shutdown
Does the authorized employee have knowledge of the type and magnitude of the energy, the hazards of the energy to be controlled, and the method or means to
control the energy before turning off a machine or equipment?
Step Two: Machine or equipment shutdown
Are machines or equipment turned off or shut down using orderly, established procedures?
Step Three: Machine or equipment isolation
Are all energy isolating devices needed to control the energy to the machine or equipment physically located and operated in such a manner as to isolate the
machine or equipment?
Step Four: Lockout or tagout device application
Are lockout or tagout devices affixed to each energy isolating device by authorized employees?
Are lockout devices affixed in a manner that will hold the energy isolating devices in
a “safe” or “off” position?
Are tagout devices, where used, affixed in such a manner as will clearly indicate
that the operation or movement of energy isolating devices from the “safe” or “off” position is prohibited?
Where tagout devices are used with energy isolating devices designed with the
capability of being locked, is the tag fastened at the same point at which the lock
would have been attached? (Remember using tags is not allowed unless full
employee protection can be proved.)
Where a tag cannot be affixed directly to the energy isolating device, is the tag
located as close as safely possible to the device, and in a position that will be
immediately obvious to anyone attempting to operate the device?
Following the application of lockout or tagout devices to energy isolating devices, is
all potentially hazardous stored or residual energy relieved, disconnected,
restrained, and otherwise rendered safe?

© Safety Services Company 15-25
If there is a possibility of re-accumulation of stored energy to a hazardous level, is
isolation verification continued until the servicing or maintenance is completed, or
until the possibility of such accumulation no longer exists?
Prior to starting work on machines or equipment that have been locked out or
tagged out, does the authorized employee verify that isolation and de-energizing of
the machine or equipment have been accomplished?
Release from Lockout or Tagout
Y/N
Before lockout or tagout devices are removed and energy is restored to the
machine or equipment, are the following actions taken?
The work area is inspected to ensure that non-essential items have been removed
and that machine or equipment components are operationally intact. The work area is checked to make sure all employees have been safely positioned
or removed.
Before lockout or tagout devices are removed and before machines or equipment
are energized, affected employees are notified that the lockout devices have been
removed. After lockout or tagout devices have been removed and before a machine or
equipment is started, affected employees are notified that the lockout or tagout
device(s) have been removed.
Is each lockout or tagout device removed from each energy isolating device by the employee who applied the device?
When the authorized employee who applied the lockout or tagout device is not
available to remove it, is the device removed under the direction of the employer
using specific procedures? Do those procedures include:
Verification by the employer that the authorized employee who applied the device is not at the facility;
Making all reasonable efforts to contact the authorized employee to inform them
that their lockout or tagout device has been removed; and
Ensuring that the authorized employee has this knowledge before he/she resumes
work at that facility.
Testing or Positioning of Machines, Equipment or Components Thereof
When lockout or tagout devices must be temporarily removed to test or position the machine, equipment or component, is the following sequence of actions followed:
Clear the machine or equipment of tools and materials.
Remove employees from the machine or equipment area.
Remove the lockout or tagout devices.
Energize and proceed with testing or positioning. De-energize all systems and reapply energy control measures to continue the
servicing and/or maintenance.
15-26 © Safety Services Company
Outside Personnel (contractors, etc.)
Y/N
Whenever outside servicing personnel are to be engaged in activities, does the on-
site employer and the outside employer inform each other of their respective
lockout or tagout procedures?
Does the on-site employer make sure that his/her employees understand and
comply with the guidelines and restrictions of the outside employer’s energy control program?
Shift or Personnel Changes
Are specific procedures used during shift or personnel changes to ensure continuity of lockout or tagout protection?
Do shift change procedures include the orderly transfer of lockout or tagout device
protection between off-going and on-coming employees?
Inspector’s Name
Date

© Safety Services Company 16-1
Chapter 16
Ladder & Stairway Safety
§1926.1053 - Ladders
§1926.1060 - Training Requirements
Andy Wilson is responsible for the implementation and enforcement of the following
safety rules as they apply to ladder & stairway safety.
A R M Environmental Services, Inc. will ensure that each employee has been trained by a
competent person in the following areas.
The nature of all fall hazards in the work area.
The maximum intended load-carrying capacities of ladders and the correct
procedures for erecting, maintaining, and disassembling the fall protection systems to be used.
The proper construction, use, placement, and care in handling of all stairways and
ladders.
Introduction
Most ladder falls involve portable ladders that move, tilt, or shift while a worker is
climbing or descending. Unstable or slippery base surfaces are the primary reasons
ladders fail.
Other reasons include a misstep or a slip of the foot, loss of balance, an overreach, and
being struck by a vehicle or other object.
Workers can reduce ladder fall risks by doing the following:
Frequently inspect & maintain ladders.
Match tasks to appropriate ladders.
Set up ladders correctly.
Climb & descend ladders properly.
Employers, too, have a responsibility for training workers so they understand these safe
work practices and can use them effectively. This chapter will help promote safe work practices for portable ladders, and we encourage you to use it as a basic reference.
Ladder Ratings
There are many types of portable ladders, but they all receive one of four ratings, based
on their maximum working load (the maximum weight they can safely support). Before you use a ladder, check its rating and be sure not to subject it to a load greater than its
rated capacity.
Rating Working Load
Extra heavy duty (I-A) 300 pounds
Heavy duty (I) 250 pounds
Medium duty (II) 225 pounds
Light duty (III) 200 pounds

16-2 © Safety Services Company
Types of Portable Ladders
Portable ladders are either non-self-supporting (such as the straight ladder) or self-
supporting (such as the standard step ladder). Within one of these two categories, you are likely to find the right size, shape, and type of ladder to accomplish your task.
Non-Self-Supporting Ladders
Single Portable or Straight Ladder
The single portable or straight ladder is indispensable for general use. It is the most
common type of portable ladder and has the widest range of applications. When used on
slippery surfaces, this ladder must have slip-resistant feet or be secured to prevent it
from sliding.
Rubber or neoprene ladder shoes are recommended for smooth, dry surfaces, and spikes are recommended for snow or ice. Single portable ladders must not be longer than 30
feet and are intended for use by only one worker at a time. Such ladders are available
in wood, metal, and reinforced fiberglass.
Extension or Section Ladder
Extension ladders offer the greatest length in a general purpose ladder. The ladder
consists of two or more sections that travel in guides or brackets, allowing adjustable
lengths. The sections must be assembled so that the sliding upper section is on top of
the lower section. Each section must overlap its adjacent section a minimum distance,
based on the ladder’s overall length.
The overall length is determined by the lengths
of the individual sections, measured along the
side rails. The table shows the minimum
overlap for ladders up to 60 feet long.
Note: Install positive stops on individual ladder sections to ensure the required overlap.
Extension ladders are made of wood, metal, or reinforced fiberglass. Wood ladders
cannot have more than two sections and must not exceed 60 feet. Metal and fiberglass
ladders can have as many as three sections; however, the overall length must not
exceed 72 feet. Individual sections of any extension ladder must not be longer than 30
feet. Extension ladders are for use by only one person at a time.
Make sure extension ladders have non-slip bases if there is a chance the ladder can slip. Cord-face ladder shoes are recommended for wet surfaces, rubber or neoprene ladder
shoes for smooth dry floor surfaces, and steel spikes for ice or snow. Be careful if you
use an extension ladder on oily, metal, or concrete surfaces. Place the ladder securely
and tie it off to prevent it from slipping.
Self-Supporting Ladders
Standard Stepladder
The standard stepladder, a general purpose ladder, has flat steps and a hinged back. It
is self-supporting and nonadjustable. An industrial model, designed for heavy service demands, has oversize back legs, heavy-duty flat steps, and knee braces that increase
rigidity and durability.
Standard stepladders should be used only on surfaces that offer firm, level footing such
as floors, platforms, and slabs. They are available in metal, wood, or reinforced
fiberglass versions, and are intended to support only one worker at a time. Remember not to stand on, or work from, the top step. The ladders must have a metal spreader or
locking arms. They cannot be longer than 20 feet, measured along the front edge of the
side rails.
Ladder Length Overlap
Up to and including 36 feet 3 feet
Over 36 through 48 feet 4 feet
Over 48 through 60 feet 5 feet

© Safety Services Company 16-3
Two-Way Stepladder
The two-way stepladder is similar to the industrial standard stepladder; however, each
side of this ladder has a set of steps. The extra set of steps offers convenience and
versatility: One person can work from either side or two people can work from the
ladder at the same time — one on each side.
Platform Ladder
The platform ladder is a special-purpose ladder that has a large stable platform from
which you can work at the highest standing level. The ladder’s length is determined by
the length of the front edge of the side rail from the bottom of the ladder to the base of
the platform. The length of a platform ladder cannot exceed 20 feet.
Trestle Ladder
A trestle ladder is a self-supporting portable ladder that has two sections hinged at the
top, forming equal angles with the base. A variation of the trestle ladder, the extension
trestle ladder, includes a vertically adjustable single ladder that can be locked in place. (The single extension section must lap at least three feet into the base section.) Trestle
ladders are used in pairs to support planks or staging. The rungs are not intended to be
used as steps.
The angle of spread between open front and back legs must be 5 ½ inches per foot of
length. The length cannot be more than 20 feet, measured along the front edge of the side rails. Rails must be beveled at the top and have metal hinges to prevent spreading.
Metal spreaders or locking devices are also required to keep the rails in place.
Selecting Ladders
Ladders come in different types because workers who use them have different needs. In
the previous section, major types of portable ladders were identified and the tasks for which they are appropriate. However, many of the special-purpose ladders were
omitted, which are usually variations of general purpose ladders, designed to meet a
special need.
Examples include: platform, trolley, side-rolling, shaft, and manhole ladders. The
important point: You are likely to save time and energy and reduce your risk of injury if you choose the right ladder for your task or job.
Using Ladders
Ladders are easier and safer to use when you match them with the appropriate task.
Still, most portable-ladder accidents happen when workers do one or more of the
following: fail to inspect ladders regularly, place ladders inappropriately, or ignore safe practices when climbing or descending. The guidelines below address each of these
issues.
At the Beginning of Each Job
Select the appropriate ladder for your task or job. Inspect the ladder before you use it. Make sure it is in sound condition — clean
and undamaged.
Placing a Ladder
Move the ladder near the work you are doing.
Angle the ladder properly. The base should extend not less than one-fourth the
ladder’s length. The minimum slope should be 50 degrees.
Place a solid rest for the rail tops across window openings.
Protect the base of a tall, occupied ladder if it could be struck by vehicles or pedestrians.

16-4 © Safety Services Company
Avoid
Never place a ladder in front of an unlocked, unguarded door.
Never place a ladder on boxes, tables, trucks, or other moveable objects.
Securing a Ladder
Nail or lash a ladder in place if it will be used repeatedly in the same spot. Select a ladder that will extend at least 36 inches above the access area it is
serving.
Avoid
Working on ladders in exposed areas during a severe storm or strong wind.
Working on ladders covered with ice or snow.
Using a portable ladder if an approved stairway could be used instead.
Ascending and Descending
Face the ladder at all times.
Grasp the side rails with both hands; you have a better chance of avoiding a fall if
a rung or step fails. Raise and lower heavy, awkward loads with a hand line or hoist.
Attach light, compact tools or materials to the ladder or to yourself.
Avoid
Sliding down the ladder.
Climbing when your hands or shoes are slippery.
Using your hands for carrying items.
Carrying awkward loads when ascending or descending a ladder. Placing tools or materials on a ladder if they could fall off.
Metal Ladders
Make sure steps and rungs have a skid-resistant surface that minimizes the risk of slipping. (“Skid resistant” means corrugated, knurled, dimpled, or coated with skid-
resistant material.)
Avoid
Using any ladder with conductive side rails near exposed, energized equipment. (Such
ladders must be permanently, legibly marked with the words, “WARNING — Do Not
Use Around Energized Electrical Equipment.”
Precautions
Place both feet firmly on the ladder rungs and steps.
Make sure only one person stands on, or works from, a standard ladder. (Use a
scaffold or a second ladder if two or more people are doing the same task.)
Immediately inspect any ladder that has collapsed, tipped over, or been exposed to
oil or grease. Clean and repair the ladder if necessary. Remove defective ladders from service. Tag or mark defective ladders with the
words: “Dangerous, Do Not Use.”
Make sure an extension ladder extends at least 36 inches above an access landing.
Keep the area around the top and bottom of a ladder free of debris.
Keep the load on the ladder (including yourself) below its maximum load capacity.

© Safety Services Company 16-5
Do Not
Do not paint ladders. Paint conceals defects. Use transparent preservatives
instead.
Do not use ladders with broken, patched, oily, or cracked rails, rungs, or steps.
Do not reach out over the side rails, lean, or turn excessively on a ladder.
Do not use a ladder as guy, brace, or skid.
Do not stand or sit on the top two steps of a stepladder. Do not use a self-supporting ladder without first opening it up and securing the
metal spreader or locking device.
Do not load a ladder beyond its maximum load capacity.
Transporting Ladders
Some ladders are easier to move than others. Here are a few guidelines to help you
protect ladders and the people who use them.
When you hand-carry a ladder, keep the front end elevated, especially around blind
corners, in aisles, and through doorways. You will reduce the chance of striking another person with the front of the ladder.
When you transport a ladder in a truck or trailer, place it parallel to the bed. Avoid
tossing, throwing, or dropping it in the bed.
If you transport a long ladder on a short truck bed over long distances, support the
ladder so it will not sag or bend.
Drive slowly over rough terrain. Tie the ladder securely to eliminate nicking, gouging,
chafing, and road shock.
Storing Ladders
Another way to prolong a ladder’s life is to store it properly. Here are some useful
storage tips:
The storage area should be well ventilated.
Wood ladders should not be exposed to moisture or excessive heat. Avoid storing
ladders near stoves, steam pipes, or radiators.
Store straight or extension ladders in flat racks or on wall brackets. Make sure there
are enough brackets to support the ladder so that it does not sag. If the ladder rails
have a lateral curve, the wall brackets should match the curve. Store stepladders vertically, in a closed position, to reduce the risk of sagging or
twisting. Secure stored ladders so that they will not tip over if they are struck.
Store ladders, especially wood ladders, promptly after using them. Exposure to
moisture and sun will shorten the life of a wood ladder.
Maintaining and Repairing Ladders
Neglected ladders quickly become unsafe ladders. Step bolts slacken, step sockets and
other joints work loose, hole sizes increase — eventually the ladder becomes twisted and
unstable.
Periodic maintenance extends a ladder’s life and saves replacement costs. Maintenance
includes regular inspection of the ladder, repairing damage and tightening step bolts and
other fastenings.
Replace lower steps on wooden ladders when one-fourth of the step surface is worn
away. Typically, the center of a step receives the most wear. (Mineral abrasive or other skid-resistant material reduces wear.)
Do not use cleats to repair rung ladders.
Do not paint a wood ladder — paint conceals defects.

16-6 © Safety Services Company
Consider stocking repair parts if you use different types of ladders. Typical parts include
ladder bolts, related hardware, and lower steps or rungs (which wear out faster than
upper steps or rungs).
Improving Slip Resistance
Slip-resistant materials are often used on industrial ladder treads. Notable is the anti-
slip treatment on metal platform ladders used in file and parts rooms, tool cribs, and
frozen-food lockers. The obvious benefit of slip-resistant material is that it reduces fall risks when a worker is climbing or descending.
Ladder Hazards Checklist
Begin your work with a ladder that will not let you down. Use the checklist below to
make sure the ladders you use are hazard free.
Are ladders kept in good condition?
Are the joints between steps and side rails tight, all hardware and fittings securely
attached, and movable parts operating freely without binding or excessive play?
Are non-slip safety feet on each single or multiple-section portable rung-type ladder?
Are ladder rungs and steps kept free of grease and oil?
Are workers instructed to face the ladder when ascending/descending it?
Are workers prohibited from using ladders that have missing steps, rungs, cleats,
broken side rails, or other faulty parts?
Are workers instructed not to stand or step on the top step of any portable ladder?
When portable ladders are used to reach elevated platforms and roofs, does the
ladder extend at least 36 inches above the elevated surface?
Are portable metal ladders legibly marked with signs reading “CAUTION — Do Not
Use Around Electrical Equipment” or equivalent wording?
Are steps, rungs, or cleats of ladders spaced no more than 12 inches apart?
Are portable ladders secured or lashed to prevent displacement when they are used?
Are wood cleats attached to the side rails of job-made ladders in one of the following
ways:
By housing the cleats into the side rails by at least one-half inch.
By securing wood strips (same thickness as the cleats) to the side rails between
each cleat.
By securing the cleats to the side rails with bolts.
Is there at least seven inches of space behind the cleats to allow secure footing?
Ladder Training
Employers have a responsibility to ensure that their employees understand how to
inspect and use ladders correctly. Use the following checklist to evaluate the training
employees receive.
Have you provided a training program for each employee who uses a ladder?
Does the training enable each employee to recognize and minimize ladder hazards?
Has each employee been trained by a competent person in the following areas, when
applicable?
The nature of fall hazards in the work area?
How to correctly use, place, handle, and maintain ladders?
The maximum load-carrying capacities of ladders used?
OSHA requirements for the types of ladders that will be used?

© Safety Services Company 16-7
Safety Requirements for Stairways
The rules covering stairways and their components generally depend on how and when
stairs are used. Specifically, there are rules for stairs used during construction and stairs used temporarily during construction, as well as rules governing stair rails and handrails.
Stairways Used During Construction
The following requirements apply to all stairways used during construction:
Stairways that will not be a permanent part of the building under construction must
have landings at least 30 inches deep and 22 inches wide at every 12 feet or less of
vertical rise.
Stairways must be installed at least 30 degrees —and no more than 50 degrees—
from the horizontal.
Variations in riser height or stair tread depth must not exceed one-quarter inch in any stairway system, including any foundation structure used as one or more treads of
the stairs.
Doors and gates opening directly onto a stairway must have a platform that extends
at least 20 inches beyond the swing of the door or gate.
Metal pan landings and metal pan treads must be secured in place before filling. Stairway parts must be free of dangerous projections such as protruding nails.
Slippery conditions on stairways must be corrected.
Workers must not use spiral stairways that will not be a permanent part of the
structure.
Temporary Stairs
The following requirements apply to stairways used temporarily during construction.
Except during construction of the stairway:
Do not use stairways with metal pan landings and treads if the treads and/or landings
have not been filled in with concrete or other materials unless the pans of the stairs
and/or landings are temporarily filled in with wood or other materials. All treads and
landings must be replaced when worn below the top edge of the pan.
Do not use skeleton metal frame structures and steps (where treads and/or landings will be installed later) unless the stairs are fitted with secured temporary treads and
landings.
Note: Temporary treads must be made of wood or other solid material and installed the full width and depth of the stair.
Stair Rails
The following general requirements apply to all stair rails:
Stairways with four or more risers or rising more than 30 inches in height –
whichever is less – must be installed along each unprotected side or edge. When the top edge of a stair rail system also serves as a handrail, the height of the top edge
must be no more than 37 inches nor less than 36 inches from the upper surface of
the stair rail to the surface of the tread.
Top edges of stair rail systems used as handrails must not be more than 37 inches
high nor less than 36 inches from the upper surface of the stair rail system to the surface of the tread. (If installed before March 15, 1991, not less than 30 inches).
Stair rail systems and handrails must be surfaced to prevent injuries such as
punctures or lacerations and to keep clothing from snagging.
Ends of stair rail systems and handrails must be built to prevent dangerous
projections, such as rails protruding beyond the end posts of the system.

16-8 © Safety Services Company
In addition:
Unprotected sides and edges of stairway landings must have standard 42-inch
guardrail systems. Intermediate vertical members, such as balusters used as guardrails, must not be
more than 19 inches apart.
Other intermediate structural members, when used, must be installed so that no
openings are more than 19 inches wide.
Screens or mesh, when used, must extend from the top rail to the stairway step and along the opening between top rail supports.
Handrails
Requirements for handrails are as follows:
Handrails and top rails of the stair rail systems must be able to withstand, without failure, at least 200 pounds of weight applied within 2 inches of the top edge in any
downward or outward direction, at any point along the top edge.
Handrails must not be more than 37 inches high nor less than 30 inches from the
upper surface of the handrail to the surface of the tread.
Handrails must provide an adequate handhold for employees to grasp to prevent falls. Temporary handrails must have a minimum clearance of 3 inches between the
handrail and walls, stair rail systems and other objects.
Stairways with four or more risers, or that rise more than 30 inches in height –
whichever is less – must have at least one handrail.
Winding or spiral stairways must have a handrail to prevent use of areas where the tread width is less than 6 inches.
Midrails
Midrails, screens, mesh, intermediate vertical members or equivalent intermediate structural members must be provided between the top rail and stairway steps to the
stair rail system. When midrails are used, they must be located midway between the top
of the stair rail system and the stairway steps.
Employers must train all employees to recognize hazards related to ladders and
stairways, and instruct them to minimize these hazards. For example, employers must
ensure that each employee is trained by a competent person in the following areas, as applicable:
Nature of fall hazards in the work area;
Correct procedures for erecting, maintaining and disassembling the fall protection
systems to be used;
Proper construction, use, placement and care in handling of all stairways and ladders; and
Maximum intended load-carrying capacities of ladders used.
Note: Employers must retrain each employee as necessary to maintain their understanding and knowledge on the safe use and construction of ladders and stairs.

© Safety Services Company 16-9
Ladder & Stairway Glossary
Check — A lengthwise separation of the wood that occurs across the rings of annual
growth.
Cleat — A rectangular ladder crosspiece placed on edge, upon which a person may step
while ascending or descending.
Competent person — A person who can identify existing and predictable hazards in the
work environment and who has authorization to take prompt measures to eliminate the
hazards.
Decay — Disintegration due to action of wood-destroying fungi. Also known as dote or
rot.
Extension ladder — A non-self-supporting portable ladder that is adjustable in length.
It consists of two or more sections in guides or brackets that permit length adjustment.
Length is designated by the sum of the lengths of each section, measured along the side rails.
Extension trestle ladder — A self-supporting portable ladder that is adjustable in
length, consisting of a trestle ladder base and a vertically adjustable single ladder with
means for locking the ladders together. Length is designated by the length of the trestle
ladder base.
Failure — Load refusal, breakage or separation of components.
Fastening — A device that attaches a ladder to a structure, building, or equipment.
Handrail — A rail used to provide employees with a handhold for support.
Job-made ladder — A ladder that is fabricated by employees, typically at the
construction site; non-commercially manufactured.
Load refusal — The point where the structural members lose their ability to carry the load.
Ladder — An appliance usually consisting of two side rails joined at regular intervals by
crosspieces called steps, rungs, or cleats on which a person steps when ascending or
descending.
Platform ladder — A self-supporting ladder of fixed size with a platform at the working level.
Point of access — All areas used by employees for work-related passage from one area
or level to another.
Riser height — The vertical distance from the top of a tread or platform/landing to the
top of the next higher tread or platform/landing.
Rungs — Ladder crosspieces of circular or oval cross-section on which a person steps
when ascending or descending.
Safety feet — means a safety device placed on the foot of the side rails to reduce the
likelihood of the base slipping. Safety feet may be flat pads covered with a nonslip
material, pointed metal projections, or spur wheels.
Sectional ladder — A non-self-supporting portable ladder, nonadjustable in length, consisting of two or more sections that function as a single ladder. Its length is
designated by the overall length of the assembled sections.

16-10 © Safety Services Company
Single (or straight) ladder — A single section non-self-supporting portable ladder,
nonadjustable in length. Its length is measured along a side rail.
Special-purpose ladder — A general-purpose portable ladder with modified features for specific uses.
Step ladder — A self-supporting portable ladder, nonadjustable in length that has flat
steps and a hinged back. Length is measured along the front edge of a side rail.
Steps — The flat crosspieces of a ladder on which a person steps when ascending or
descending.
Temporary service stairway — A stairway where permanent treads and/or landings
are to be filled in at a later date.
Tread — The horizontal member of a step.
Tread depth — The horizontal distance from front to back of a tread, excluding nosing,
if any.
Tread width — The horizontal distance from front to back of the tread, including nosing.
Trestle ladder — A self-supporting portable ladder, nonadjustable in length, which
consists of two sections hinged at the top to form equal angles with the base. Length is
measured along the front edge of a side rail.

© Safety Services Company 17-1
Chapter 17
Fall Protection Program
§1926.501 – Duty to have Fall Protection
§1926.502 – Fall Protection Systems – Criteria and Practices
§1926.503 – Training Requirements
Company Policy for Fall Protection
A R M Environmental Services, Inc. has implemented this policy to ensure that proper
safe work practices and procedures are followed to protect employees from the fall
hazards. Andy Wilson is designated as the Program Administrator responsible for managing and supervising the Fall Protection Program. The following work practices,
procedures, and engineering controls will be enforced as an integral part of our Company
safety policy:
Our Company will provide to our employees at no cost fall protection such as
guardrails, safety nets, or personal fall arrest systems whenever our employees are exposed to potential falls to lower levels from heights of six feet or greater. This
includes work near and around excavations.
Exception: When the standard methods of protection are not feasible or a greater
hazard would be created. Scaffolds, ladders, or vehicles will only be used when appropriate fall protection is in place.
This Company provides a training program for each employee who might be exposed
to fall hazards. Training will enable each employee to recognize the hazards of falling
and will instruct each employee in the procedures to follow to minimize these hazards. Andy Wilson will maintain written certification records showing the
following:
Who was trained, the types of training, and dates of training. Signature of person providing training and the date it was determined training was
deemed adequate.
Andy Wilson will ensure that all employees who participate in work where fall hazards
are present are trained in recognition of fall hazards, fall protection procedures, equipment, and work practices. Employees will be certified upon completion of
training in the following areas:
The nature of fall hazards in the work area. The correct procedures for erecting, maintaining, disassembling, and inspecting the
fall protection systems to be used.
The role of each employee in the safety monitoring system when this system is
used.
The use and operation of guardrail systems, personal fall arrest systems, safety net systems, warning line systems, safety monitoring systems, personal fall
restraint systems, slide guard systems, positioning devices, and other protection to
be used.
The limitations on the use of mechanical equipment during the performance of
roofing work.
The correct procedures for the handling and storage of equipment and materials and the erection of overhead protection.
The role of employees in the fall protection work plan.
Fall protection will be required at all times for employees working at heights of 6 feet or above. The fall protection system used will be appropriate for the specific work
location or situation where it is required.

17-2 © Safety Services Company
Andy Wilson is designated the competent person in charge of the Company Fall
Protection Program and will specify a fall protection system for each worksite. Andy
Wilson will supervise implementation of the fall protection system and inspect the system prior to use.
A “Safety Monitoring System” will be implemented where no alternative measure is
feasible. In the event a conventional fall protection system is deemed inappropriate,
Andy Wilson will designate the work area a controlled access zone, and will assign a competent person to monitor the safety of other employees and will ensure that the
safety monitor complies with the following requirements. The assigned safety
monitor will:
Be competent to recognize fall hazards.
Warn the monitored employees when it appears they are unaware of a fall hazard
or is acting in an unsafe manner.
The safety monitor will be on the same walking/working surface and within visual
sighting distance of the employees being monitored. The safety monitor will be close enough to communicate orally with the employee
being monitored.
The safety monitor will have no other responsibilities that could take his/her
attention from the monitoring function.
Any accidents or incidents involving A R M Environmental Services, Inc. employees
will be reported immediately to the supervisor for the work location. All
accidents/incidents will be investigated under the guidelines of the Company Accident
Investigation Program and changes will be implemented to the Fall Protection Plan as
necessary.
All materials and equipment purchased and used for fall protection will comply with
ANSI and ASTM standards required for that equipment.

© Safety Services Company 17-3
What is Fall Protection?
You accomplish fall protection by doing the following:
Make fall protection part of your workplace-safety-and-health program. Identify and evaluate fall hazards.
Eliminate fall hazards, if possible.
Train workers to recognize fall hazards.
Use appropriate equipment to prevent falls and to protect workers if they do fall.
Inspect and maintain fall protection equipment before and after using it. Become familiar with Subpart M fall protection rules.
Preventing and Controlling Falls
What is a fall protection system?
What to consider when selecting a fall
protection system
Personal fall-arrest systems
Personal fall-restraint systems Positioning-device systems
Guardrail systems
Safety-net systems
Warning-line systems for roofing work
Safety monitoring for roofing work
Catch platforms
Covers for holes
Fences and barricades
Protecting workers from falling objects
What is a Fall Protection System?
If workers will be exposed to fall hazards that you cannot eliminate, you will need to
prevent falls from occurring or ensure that if workers do fall, they are not injured. A fall
protection system is designed to prevent or arrest falls. The table below shows the fall protection systems covered in §1926.500 – Subpart M.
FALL PROTECTION SYSTEMS
Type of fall protection system What it does
Personal fall-arrest system Arrests a fall
Personal fall-restraint system Prevents a fall
Positioning-device system Positions a worker and limits a fall to two feet
Guardrail system Prevents a fall
Safety-net system Arrests a fall
Warning-line system for roofing work Warns a worker of a fall hazard
Slide-guard system for roofing work Prevents workers from sliding down sloped roofs
Other Fall Protection Methods
The following methods may also be appropriate for preventing falls:
Safety monitoring for roofing work – A method in which a person – rather than a
mechanical system – warns roofers when they are in danger of falling. The monitor,
who must be a competent person, is responsible for recognizing the hazards and
warning workers about them.
Catch platforms – Though not covered in Subpart M, catch platforms are an
acceptable method of protecting workers from falls.
Covers for holes – Simple and effective when they are properly installed, rigid
covers prevent workers from falling through temporary holes, openings, and skylights
in walking/working surfaces.
Fences and barricades – Use a fence or similar barricade to keep people away from
wells, pits, and shafts.

17-4 © Safety Services Company
What to Consider When Selecting a Fall Protection System
Appropriate fall protection systems have the following characteristics:
They are affordable.
They offer the least interference with workers’ tasks or activities.
They prevent falls or protect workers who do fall.
Wherever possible, eliminate fall hazards. Identify hazards that you cannot eliminate
and evaluate each one. The evaluation will help you determine appropriate fall protection systems for your work site. Consider the following:
What is the fall distance from the walking/working surface to the next lower level?
How will the workers move – horizontally, vertically, or in both directions – to do their tasks?
How will workers be promptly rescued if they are suspended in a personal fall-arrest
system?
How many workers are exposed to the hazard?
What tasks and work areas are associated with the hazard?
Are secure anchorages available or can they be easily installed near the hazard?
Are there other hazards near the work area, such as overhead power lines?
Personal Fall-Arrest Systems
A personal fall-arrest system consists of an anchorage, connectors, and a full-body
harness that work together to stop a fall and to minimize the arrest force. Other parts of the system may include a lanyard, a deceleration device, and a lifeline. The personal
fall-arrest system is effective only if you know how all of the components work together
to stop a fall.
Before using a personal fall-arrest system, workers must be instructed in the
following:
How to select and install a secure anchorage.
How to select and use connectors.
How to put on and use a full-body harness.
How to correctly attach and use a lanyard.
When a deceleration device is necessary.
How to erect and use a lifeline.
The correct procedures for using retractable devices.
How to estimate fall distances.
How to avoid swing falls.
How to inspect and maintain the system.
How you will be promptly rescued if you fall.
The Anchorage
An anchorage is a secure point of attachment for lifelines, lanyards, or deceleration
devices. How can you be sure that an anchorage is secure? An anchorage for a
personal fall-arrest system must support at least 5,000 pounds. Anchorages that cannot support 5,000 pounds must be designed and installed under the supervision of a
qualified person and must be able to maintain a safety factor of at least two – twice the
impact force of a worker free-falling six feet. If you do not know how much weight an
anchorage will support, have a qualified person check it before you trust your life to it.
Anchorage strength is critical, but is not the only factor to consider. Also important:

© Safety Services Company 17-5
Anchorage connector – Unless an existing anchorage has been designed to accept a
lanyard or lifeline, you will need to attach an anchorage connector – a device that
provides a secure attachment point. Examples include tie-off adapters, hook anchors, beam connectors, and beam trolleys. Be sure that the connector is compatible with the
lanyard or lifeline and appropriate for the work task.
Attachment point – The anchorage can be used only as the attachment point for a
personal fall-arrest system; it cannot be used to support or suspend platforms.
Location — The anchorage should be located directly above the worker, if possible, to reduce the chance of a swing fall.
Fall distance — Because a personal fall-arrest system does not prevent a fall, the
anchorage must be high enough above a worker to ensure that the arrest system, and
not the next lower level, stops the fall. Consider free-fall distance, lanyard length,
shock-absorber elongation, and body-harness stretch in determining the height of an
anchorage. Free-fall distance is the distance a worker falls before a personal fall-arrest system begins to stop the fall.
Connectors — An anchorage, a lanyard, and a body harness are not useful until they
are linked together. Connectors do the linking; they make the anchorage, the lanyard,
and the harness a complete system. Connectors include carabiners, snap hooks, and D-
rings.
Carabiner — This high-tensile alloy steel connector has a locking gate and is used
mostly in specialized work such as window cleaning and high-angle rescue. Carabiners
must have a minimum tensile strength of 5,000 pounds.
Snap hook — A hook-shaped member with a keeper that opens to receive a connecting
component and automatically closes when released. Snap hooks are typically spliced or sewn into lanyards and self-retracting lifelines. Snap hooks must be high-tensile alloy
steel and have a minimum tensile strength of 5,000 pounds. Use only locking snap
hooks with personal fall-arrest systems; locking hooks have self-locking keepers that will
not open until unlocked.
D-ring — D-rings are the attachment points sewn into a full-body harness. D-rings
must have a minimum tensile strength of 5,000 pounds.
The full-body harness — The full-body harness has straps that distribute the impact of
a fall over the thighs, waist, chest, shoulders, and pelvis. Full-body harnesses come in
different styles, many of which are light and comfortable. Before you purchase
harnesses, make sure that they fit those who will use them, that they are comfortable,
and that they are easy to adjust. A full-body harness should include a back D-ring for attaching lifelines or lanyards and a back pad for support. Never use a body belt as part
of a personal fall-arrest system.
When purchasing a full-body harness for a personal fall-arrest system.
Keep the following in mind:
The harness must be made from synthetic fibers.
The harness must fit the user. It should be comfortable and easy to adjust.
The harness must have an attachment point, usually a D-ring, in the center of the
back at about shoulder level. The D-ring should be large enough to easily accept a
lanyard snap hook.
Chest straps should be easy to adjust and strong enough to withstand a fall without
breaking.
Use only industrial full-body harnesses (not recreational climbing harnesses).

17-6 © Safety Services Company
The harness must be safe, reliable, and it should meet ANSI standards for product
design, development, and production.
Lanyards
A lanyard is a specially designed flexible line that has a snap hook at each end. One
snap hook connects to the body harness and the other connects to an anchorage or a lifeline. Lanyards must have a minimum breaking strength of 5,000 pounds. They come
in a variety of designs, including self-retracting types that make moving easier and
shock absorbing types that reduce fall-arrest forces. Do not combine lanyards to
increase length or knot them to make them shorter.
Deceleration Devices
Deceleration devices protect workers from the impact of a fall and include shock-
absorbing lanyards, self-retracting lifelines or lanyards, and rope grabs.
Shock-absorbing lanyard – A shock absorber reduces the impact on a worker during
fall arrest by extending up to 3.5 feet to absorb the arrest force. Subpart M rules limit the arrest force to 1,800 pounds but a shock-absorbing lanyard can reduce the force
even more – to about 900 pounds. Because a shock-absorbing lanyard extends up to
3.5 feet, it is critical that the lanyard stops the worker before the next lower level. Allow
about 20 vertical feet between the worker’s anchorage point and the level below the
working surface. Always estimate the total distance of a possible fall before using a shock-absorbing lanyard.
Example: Lanyard length (6 feet) + deceleration distance (3.5 feet) + worker’s height
(6 feet) + safety margin (3 feet) = 18.5 vertical feet from anchorage to lower level.
Never use a shock-absorbing lanyard if the shock absorber is even partially extended or
if the lanyard has arrested a fall.
Self-retracting lanyard/lifeline – Self-retracting lanyards and lifelines offer more
freedom to move than shock-absorbing lanyards. Each has a drum-wound line that
unwinds and retracts as the worker moves. If the worker falls, the drum immediately
locks, which reduces free-fall distance to about two feet – if the anchorage point is
directly above the worker. Some self-retracting lanyards will reduce free-fall distance to
less than one foot. Self-retracting lanyards are available in lengths up to 20 feet.
Self-retracting lifelines, which offer more freedom, are available in lengths up to 250
feet. Self-retracting lanyards and lifelines that limit free-fall distance to two feet or less
must be able to hold at least 3,000 pounds with the lanyard (or lifeline) fully extended.
Self-retracting lanyards that do not limit free-fall distance to two feet must be able to
hold at least 5,000 pounds with the lanyard (or lifeline) fully extended. Beware of swing falls! If you use a self-retracting lanyard or lifeline, work below the anchorage to avoid a
swing fall. The farther you move away from the anchorage, the farther you will fall and
the greater your risk of swinging back into a hard object.
Swing falls are hazardous because you can hit an object or a lower level during the
pendulum motion.
Rope grab — A rope grab allows a worker to move up a vertical lifeline but
automatically engages and locks on the lifeline if the worker falls. When using a rope
grab, keep the following in mind:
The rope grab must be compatible with the lifeline.
The rope grab must be correctly attached to the lifeline (not upside down).
Keep the lanyard (between the rope grab & body harness) as short as possible.
Keep the rope grab as high as possible on the lifeline.

© Safety Services Company 17-7
Lifelines
A lifeline is a cable or rope that connects to a body harness, lanyard, or deceleration
device, and at least one anchorage. There are two types of lifelines, vertical and
horizontal.
Vertical lifeline – A vertical lifeline is attached to an overhead anchorage and must be
connected directly to a worker’s full-body harness, lanyard, retractable device, or rope
grab; it must have a minimum breaking strength of 5,000 pounds.
When a worker needs to move horizontally, however, a vertical lifeline can be hazardous
due to the potential for a swing fall – the pendulum motion that results when the worker
swings back under the anchor point. A swing fall increases a worker’s risk of striking an
object or a lower level during the pendulum motion.
Horizontal lifeline – Unlike a vertical lifeline, the horizontal lifeline stretches between two anchorages. When you connect a lanyard or rope grab to the horizontal lifeline, you
can move about freely, thus reducing the risk of a swing fall. However, horizontal
lifelines are subject to much greater loads than vertical lifelines. If horizontal lifelines
are not installed correctly, they can fail at the anchorage points. For this reason,
horizontal lifelines must be designed, installed, and used under the supervision of a qualified person.
Horizontal lifelines and sag angles – Any load on a horizontal lifeline will cause it to
deflect, or sag. The sag angle is a horizontal lifeline’s angle of deflection when it is
subjected to a load, such as a falling worker. Reducing the sag angle (making a
horizontal lifeline too tight) actually increases the force on the line during a fall. As you
tighten a horizontal lifeline, you increase the impact load dramatically!
Example: When the sag angle is 15 degrees, the force on the lifeline and anchorages
subjected to a load is about 2:1. However, if you decrease the sag angle to five
degrees, the force increases to about 6:1. To reduce loads on a horizontal lifeline,
increase the sag angle or connect to the lifeline with a shock-absorbing lanyard.
Safe Practices for Personal Fall-Arrest Systems
Do not tie knots in rope lanyards and lifelines; knots can reduce strength by 50
percent.
Do not tie lifelines or lanyards directly to I-beams; the cutting action of beam edges can reduce the rope’s strength by 70 percent.
Know how the “sag angle” of a horizontal lifeline can affect arrest forces on the
anchorages.
Remember that horizontal lifelines must be designed, installed, and used under the
supervision of a qualified person.
Think about the potential for a swing fall whenever you connect a lifeline to a
personal fall-arrest system.
Remember that a shock-absorbing lanyard will elongate before arresting a fall. The
fall distance includes lanyard length (before the shock absorber extends), deceleration distance (shock-absorber extension), worker height, and a safety margin
(allow three feet).
Personal Fall-Restraint Systems
Unlike the personal fall-arrest system, which is designed to stop a fall, a personal fall-
restraint system prevents a worker from reaching an unprotected edge and thus
prevents a fall from occurring. The system consists of an anchorage, connectors, and a
body harness or a body belt. The attachment point to the body belt or full body harness can be at the back, front, or side D-rings.

17-8 © Safety Services Company
The anchorage for a fall-restraint system must support at least 3,000 pounds or be
designed and installed with a safety factor of at least two. If you are not sure how much
an anchorage will support, have a qualified person evaluate it.
Positioning-Device Systems
Positioning-device systems make it easier to work with both hands free on a vertical
surface such as a wall or concrete form. Positioning-device systems are also called Class
II work-positioning systems and work-positioning systems. The components of a positioning-device system – anchorage, connectors, and body support – are similar to
those of a personal fall-arrest system. However, the systems serve different purposes.
A positioning-device system provides support and must stop a free fall within two feet; a
personal fall-arrest system provides no support and must limit free-fall distance to six
feet.
Anchorage – Positioning-device systems must be secured to an anchorage that can
support at least twice the potential impact of a worker’s fall or 3,000 pounds,
whichever is greater.
Connectors – Connectors must have a minimum strength of 5,000 pounds. Snap
hooks and D-rings must be proof-tested to a minimum load of 3,600 pounds without
deforming or breaking.
Body support – A body belt is acceptable as part of a positioning-device system. However, it must limit the arresting force on a worker to 900 pounds and it can only
be used for body support. A full-body harness is also acceptable and must limit the
arrest force to 1,800 pounds. Belts or harnesses must have side D-rings or a single
front D-ring for positioning.
Guardrail Systems
A guardrail system consists of a top rail, mid-rail, and intermediate vertical member.
Guardrail systems can also be combined with toe-boards that prevent materials from rolling off the walking/working surface.
Retrieval/Rescue of Suspended Workers
Responding to Falls – Prompt Rescue is Required
The best strategy for protecting workers from falls is to eliminate the hazards that cause
them. When you cannot eliminate the hazards, you must protect workers with an
appropriate fall protection system or method. If a worker is suspended in a personal
fall-arrest system, you must provide for a prompt rescue.
“Prompt” means without delay. A worker suspended in a harness after a fall can lose consciousness if the harness puts too much pressure on arteries. A worker suspended in
a body harness must be rescued in time to prevent serious injury. If a fall-related
emergency could happen at your work site, you should have a plan for responding to it
promptly. Workers who use personal fall-arrest systems must know how to rescue
themselves immediately after a fall or they must be promptly rescued.
Emergency Response Plan
The following guidelines explain plans for responding promptly to falls and other
emergencies.
Effective plans do not need to be elaborate. The plan must show that you have thought about how to eliminate and control hazards and that workers know how to
respond promptly if something goes wrong.
Get others involved in planning. When other workers participate, they will contribute
valuable information, take the plan seriously, and be more likely to respond effectively
during an emergency. Key planning objectives:

© Safety Services Company 17-9
Identify the emergencies that could affect your site.
Establish a chain of command.
Establish procedures for responding to the emergencies.
Identify critical resources and rescue equipment.
Train on-site responders.
Identify emergencies that could affect your workplace. Identify any event that could
threaten worker safety or health. Two examples:
A worker suspended in a full-body harness after a fall.
A worker on a scaffold who contacts an overhead power line.
Identify critical resources and rescue equipment. Prompt rescue will not happen
without trained responders, appropriate medical supplies, and the right equipment for
the emergency.
First-aid supplies. Every worksite needs medical supplies for common injuries.
Does your site have a first aid kit for injuries that are likely to occur? Store the
supplies in clearly marked, protective containers and make them available to all
shifts.
Rescue equipment. Identify on-site equipment that responders can use to rescue a
suspended worker. Extension ladders and mobile lifts are useful and available at
most sites. Determine where and how each type of equipment would be most
effective during a rescue. Make sure the equipment will permit rescuers to reach a
fall victim, that it is available when rescuers need it, and that rescuers know how to use it. Will your longest ladder reach a suspended worker? If not, what equipment
will reach the worker? When equipment is needed for a rescue, will workers know
where it is and how to use it? Think about seasonal and environmental conditions
and how they may affect rescue equipment and those who use it. Equipment that
works for summer rescues may not work for winter rescues.
Train on-site responders. An effective emergency-response plan ensures that on-site
responders know emergency procedures, know how to use available rescue equipment,
and – if necessary – know how to contact off-site responders. Workers who use personal
fall-arrest systems and who work alone must know how to rescue themselves. Those who work at a remote site may need a higher level of emergency training than those
who work near a trauma center or a fire department.
Establish a chain of command. All workers must know their roles and responsibilities
during an emergency. A chain of command links one person with overall responsibility
for managing an emergency to those responsible for carrying out specific emergency response tasks. Ensure that back-up personnel can take over when primary responders
are not available.
Establish procedures for responding to emergencies. Procedures are instructions
for accomplishing specific tasks. Emergency procedures are important because they tell
workers exactly what to do to ensure their safety during an emergency. Your emergency response plan should include the following procedures – preferably in writing – that
describe what people must know and do to ensure that a fallen worker receives prompt
attention:
How to report an emergency.
How to rescue a suspended worker.
How to provide first aid.
After an emergency, review the procedures; determine if they should be changed to
prevent similar events and revise them accordingly.
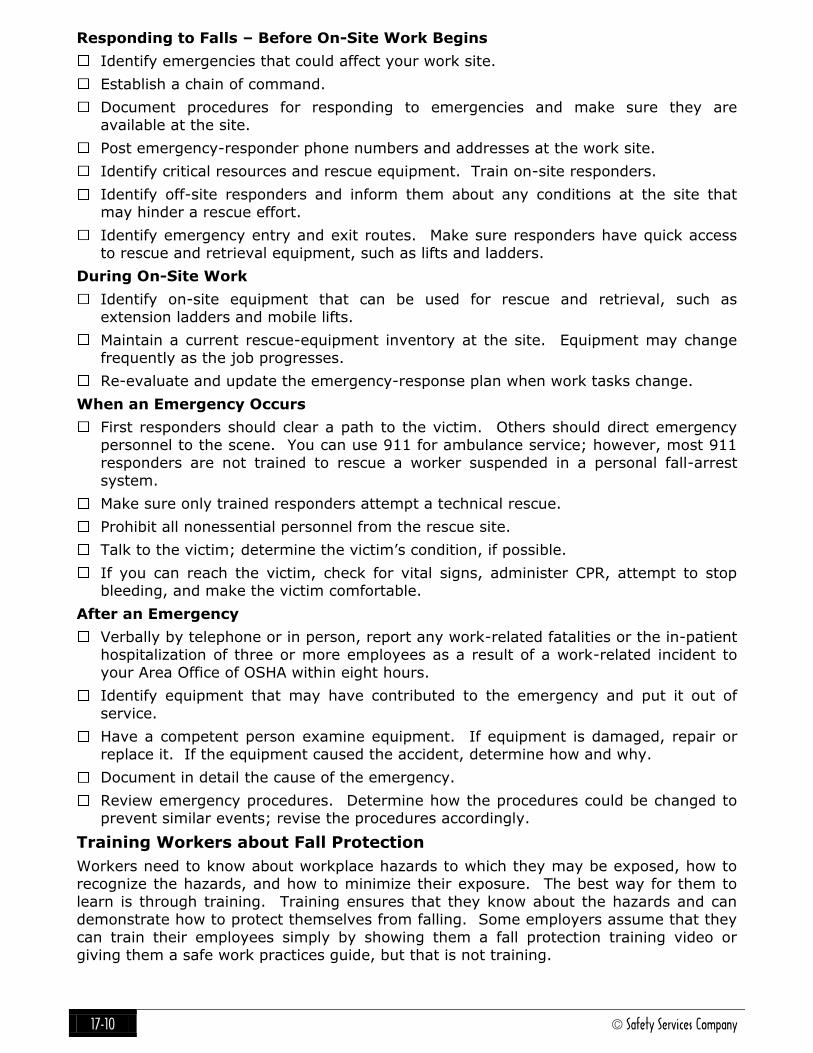
17-10 © Safety Services Company
Responding to Falls – Before On-Site Work Begins
Identify emergencies that could affect your work site.
Establish a chain of command.
Document procedures for responding to emergencies and make sure they are
available at the site.
Post emergency-responder phone numbers and addresses at the work site.
Identify critical resources and rescue equipment. Train on-site responders.
Identify off-site responders and inform them about any conditions at the site that may hinder a rescue effort.
Identify emergency entry and exit routes. Make sure responders have quick access
to rescue and retrieval equipment, such as lifts and ladders.
During On-Site Work
Identify on-site equipment that can be used for rescue and retrieval, such as
extension ladders and mobile lifts.
Maintain a current rescue-equipment inventory at the site. Equipment may change
frequently as the job progresses.
Re-evaluate and update the emergency-response plan when work tasks change.
When an Emergency Occurs
First responders should clear a path to the victim. Others should direct emergency
personnel to the scene. You can use 911 for ambulance service; however, most 911
responders are not trained to rescue a worker suspended in a personal fall-arrest
system.
Make sure only trained responders attempt a technical rescue.
Prohibit all nonessential personnel from the rescue site.
Talk to the victim; determine the victim’s condition, if possible.
If you can reach the victim, check for vital signs, administer CPR, attempt to stop bleeding, and make the victim comfortable.
After an Emergency
Verbally by telephone or in person, report any work-related fatalities or the in-patient
hospitalization of three or more employees as a result of a work-related incident to
your Area Office of OSHA within eight hours.
Identify equipment that may have contributed to the emergency and put it out of
service.
Have a competent person examine equipment. If equipment is damaged, repair or
replace it. If the equipment caused the accident, determine how and why.
Document in detail the cause of the emergency.
Review emergency procedures. Determine how the procedures could be changed to prevent similar events; revise the procedures accordingly.
Training Workers about Fall Protection
Workers need to know about workplace hazards to which they may be exposed, how to recognize the hazards, and how to minimize their exposure. The best way for them to
learn is through training. Training ensures that they know about the hazards and can
demonstrate how to protect themselves from falling. Some employers assume that they
can train their employees simply by showing them a fall protection training video or
giving them a safe work practices guide, but that is not training.

© Safety Services Company 17-11
Employers Responsibility
Employers are responsible for ensuring that employees can recognize fall hazards and
that they know how to protect themselves before they are exposed to fall hazards. You cannot assume they know how to protect themselves from falls. If they are starting
work on a new site, for example, they might not recognize fall hazards or know how to
protect themselves unless they are properly trained.
Required Training for Employees Exposed to Fall Hazards
Workers who could be exposed to fall hazards must be trained to recognize the hazards and to know the procedures that minimize the hazards.
The training format – As an employer, you can determine the training format. What is
important is that, through training, your employees can recognize fall hazards and know
procedures to minimize the hazards.
Who can do the training – It is important that the trainer knows the hazards at the work site, knows how to eliminate or control the hazards, and knows how to teach
workers to protect themselves. That is why the trainer must be a competent person.
(Recall that a competent person is one who can identify work-site hazards and who has
management authority to control them.) The trainer must know and be able to explain
the following:
The nature of fall hazards at the work site.
Procedures for erecting, maintaining, and disassembling fall protection systems.
How to use and operate fall protection systems.
The role of each employee who may be affected by a safety-monitoring system.
The restrictions that apply to mechanical equipment used during roofing work.
The procedure for handling and storing materials and for erecting protection from
falling objects.
Rescue/retrieval procedures for fall suspended workers.
The requirements of OSHA 1926.500 Subpart M.
When to train – Employees must be trained before they begin tasks that could expose
them to fall hazards or before they use fall protection systems. They must be retrained
when you have reason to believe they do not recognize fall hazards, when they do not
follow safe practices for using fall protection systems, and when changes in the workplace or in the fall protection systems used make their previous training obsolete.
A R M Environmental Services, Inc. has a written Company Safety and Health Program
that details its responsibilities under OSHA’s Fall Protection regulations, §1926.500
Subpart M. In accordance with §1926.503, all employees of A R M Environmental
Services, Inc. will be trained by a competent person prior to any job assignment where fall protection is required. The training will enable each employee to recognize fall
hazards and to follow appropriate procedures that minimize the hazards.
This record certifies that the following employees have been trained to recognize fall
hazards and to use appropriate fall protection systems and methods to minimize
exposure to the hazards.

17-12 © Safety Services Company
FALL PROTECTION TRAINING LOG Employee
Name Training
Date Trainer’s Signature
Type of Training

© Safety Services Company 17-13
Inspecting and Maintaining Equipment
Caring for Equipment
When you use ladders, scaffolds, aerial lifts, and fall protection systems you expect to
get your job done safely, but do you pay attention to the condition of the equipment.
Inspect personal fall arrest equipment frequently, keep it clean, store it properly, and it will not let you down.
Inspecting fall-arrest, fall-restraint, and positioning-device systems — Each time
you use a personal fall-arrest, restraint, or positioning-device system, inspect the
components for damage or excessive wear. Replace any component that looks
damaged. Do not use a personal fall-arrest system that has arrested a fall unless a competent person has determined that the system is safe to use.
Harness, lifeline, and anchorage — Inspect these components regularly. The table
below highlights what to look for.
Inspecting Harness, Lifeline, and Anchorage
Component What to look for Harness webbing Frayed edges, broken fibers, pulled stitches, cuts, burns, and chemical damage
Harness D-rings Cracks, breaks, and rough or sharp edges; the D-ring should pivot easily
Harness buckles Excessive wear, frayed or cut fibers, broken stitching
Harness grommets Loose, bent, or broken grommets, & punched holes not made by the manufacturer
Lifelines Wear or deterioration
Anchorages and
anchorage connectors
Look for abrasion and damaged threads or swages. Inspect stitching and loops on
synthetic slings for cuts, cracks, or frayed and broken stitching. Look for excessive kinks or damaged steel fibers.
Snap hooks — Look for cracks, excessive wear, and corrosion. The snap-hooks should open easily and close firmly. Keeper locks must prevent it from opening when closed.
Lanyards — Inspect each time before use. The table below shows what to look for.
Inspecting Lanyards
Type of lanyard What to look for Wire rope lanyard Cuts, frayed strands, or excessive wear
Web lanyard Cuts, discoloration, cracks, frayed or broken stitching
Rope lanyard Frayed or cut fibers. The entire length of the rope should have the same diameter.
Shock-absorbing
lanyard
Cuts, discoloration, cracks, frayed or broken stitching. Remove a lanyard from
service if any part of the warning label is exposed.
Self-retracting lifelines — Look for cuts, frayed strands, or excessive wear in the line
and damage to the housing. If the unit needs service, check the manufacturer’s
recommendations. Do not try to repair it yourself.
Guardrail systems — Frequently inspect manila, plastic, or synthetic rope used for top
rails or mid-rails to ensure that the rope meets the minimum strength and rail height
requirements of Subpart M. [See §1926.502(b)]
Summary: Inspecting, Cleaning, and Storing Equipment
Always follow manufacturers’ instructions and warnings.
Always inspect equipment before using it. Look for damaged or missing parts.
Labels, warnings, and other instructions should be readable.
If equipment looks like it needs repair, remove it from service and have a competent
person examine it.
Have a competent person regularly inspect equipment.
Mark equipment with a unique code or item number. I. D. numbers make it easier to
keep track of the equipment and to document maintenance or repair.
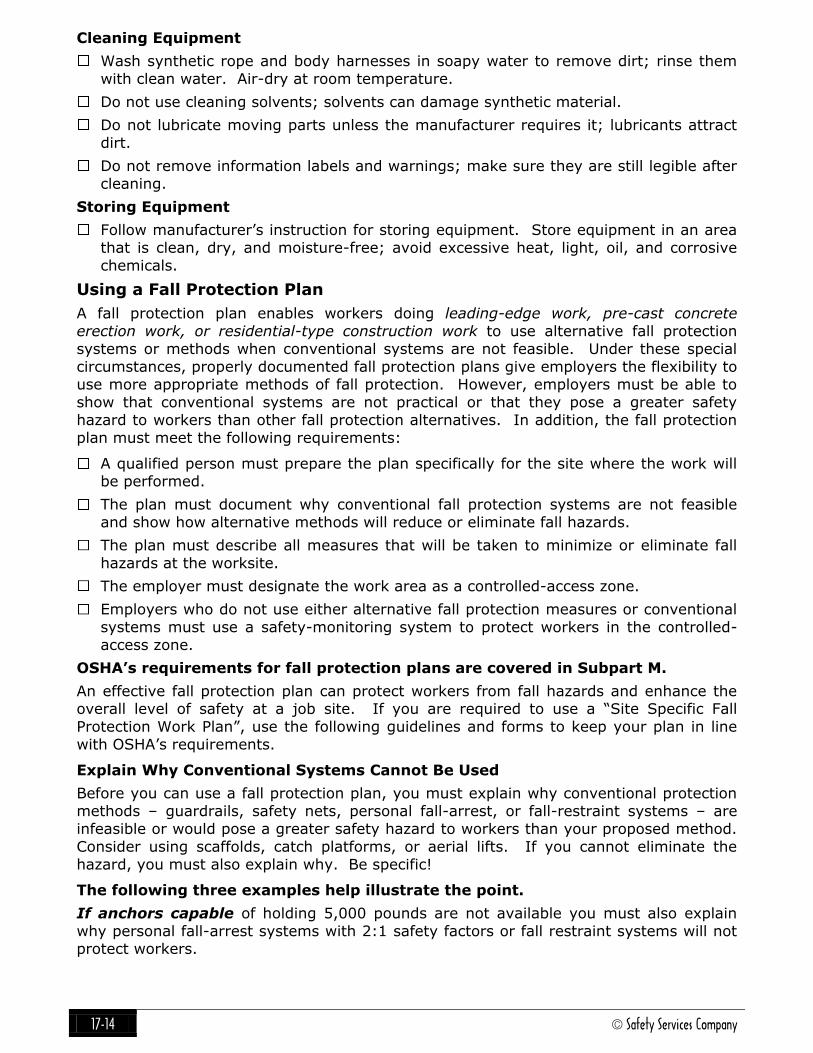
17-14 © Safety Services Company
Cleaning Equipment
Wash synthetic rope and body harnesses in soapy water to remove dirt; rinse them
with clean water. Air-dry at room temperature.
Do not use cleaning solvents; solvents can damage synthetic material.
Do not lubricate moving parts unless the manufacturer requires it; lubricants attract
dirt.
Do not remove information labels and warnings; make sure they are still legible after cleaning.
Storing Equipment
Follow manufacturer’s instruction for storing equipment. Store equipment in an area
that is clean, dry, and moisture-free; avoid excessive heat, light, oil, and corrosive
chemicals.
Using a Fall Protection Plan
A fall protection plan enables workers doing leading-edge work, pre-cast concrete
erection work, or residential-type construction work to use alternative fall protection
systems or methods when conventional systems are not feasible. Under these special
circumstances, properly documented fall protection plans give employers the flexibility to use more appropriate methods of fall protection. However, employers must be able to
show that conventional systems are not practical or that they pose a greater safety
hazard to workers than other fall protection alternatives. In addition, the fall protection
plan must meet the following requirements:
A qualified person must prepare the plan specifically for the site where the work will be performed.
The plan must document why conventional fall protection systems are not feasible
and show how alternative methods will reduce or eliminate fall hazards.
The plan must describe all measures that will be taken to minimize or eliminate fall
hazards at the worksite.
The employer must designate the work area as a controlled-access zone.
Employers who do not use either alternative fall protection measures or conventional
systems must use a safety-monitoring system to protect workers in the controlled-
access zone.
OSHA’s requirements for fall protection plans are covered in Subpart M.
An effective fall protection plan can protect workers from fall hazards and enhance the overall level of safety at a job site. If you are required to use a “Site Specific Fall
Protection Work Plan”, use the following guidelines and forms to keep your plan in line
with OSHA’s requirements.
Explain Why Conventional Systems Cannot Be Used
Before you can use a fall protection plan, you must explain why conventional protection
methods – guardrails, safety nets, personal fall-arrest, or fall-restraint systems – are
infeasible or would pose a greater safety hazard to workers than your proposed method.
Consider using scaffolds, catch platforms, or aerial lifts. If you cannot eliminate the
hazard, you must also explain why. Be specific!
The following three examples help illustrate the point.
If anchors capable of holding 5,000 pounds are not available you must also explain
why personal fall-arrest systems with 2:1 safety factors or fall restraint systems will not protect workers.
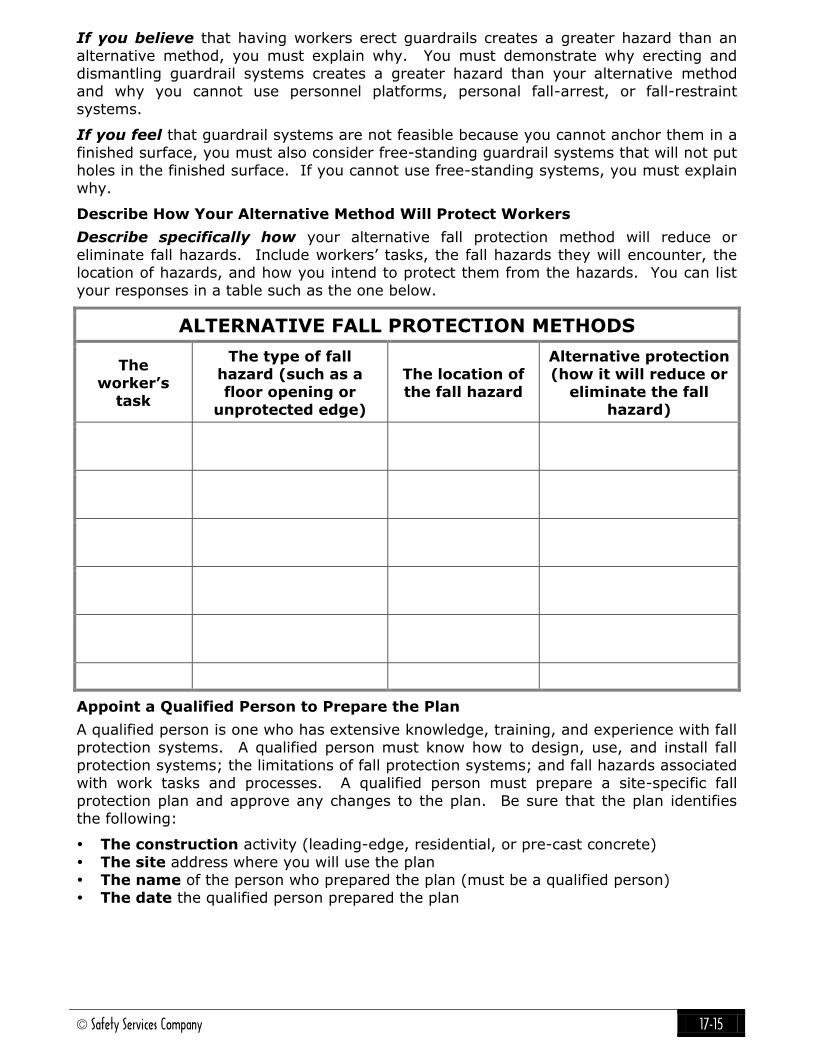
© Safety Services Company 17-15
If you believe that having workers erect guardrails creates a greater hazard than an
alternative method, you must explain why. You must demonstrate why erecting and
dismantling guardrail systems creates a greater hazard than your alternative method and why you cannot use personnel platforms, personal fall-arrest, or fall-restraint
systems.
If you feel that guardrail systems are not feasible because you cannot anchor them in a
finished surface, you must also consider free-standing guardrail systems that will not put
holes in the finished surface. If you cannot use free-standing systems, you must explain why.
Describe How Your Alternative Method Will Protect Workers
Describe specifically how your alternative fall protection method will reduce or
eliminate fall hazards. Include workers’ tasks, the fall hazards they will encounter, the location of hazards, and how you intend to protect them from the hazards. You can list
your responses in a table such as the one below.
ALTERNATIVE FALL PROTECTION METHODS
The
worker’s
task
The type of fall hazard (such as a
floor opening or
unprotected edge)
The location of
the fall hazard
Alternative protection (how it will reduce or
eliminate the fall
hazard)
Appoint a Qualified Person to Prepare the Plan A qualified person is one who has extensive knowledge, training, and experience with fall
protection systems. A qualified person must know how to design, use, and install fall
protection systems; the limitations of fall protection systems; and fall hazards associated
with work tasks and processes. A qualified person must prepare a site-specific fall
protection plan and approve any changes to the plan. Be sure that the plan identifies the following:
The construction activity (leading-edge, residential, or pre-cast concrete)
The site address where you will use the plan
The name of the person who prepared the plan (must be a qualified person)
The date the qualified person prepared the plan

17-16 © Safety Services Company
Establish Controlled-Access Zones
Where Conventional Protection Cannot Be Used
Your fall protection plan must identify each area where you cannot use guardrails, safety
nets, or personal fall-arrest systems, and you must designate those areas as controlled-
access zones. In addition, you must do the following:
Describe how you will limit access to controlled-access zones, including procedures
that authorize workers to enter controlled-access zones.
Describe how you will identify controlled-access zones and how you will separate them from other work areas.
Identify all workers who will enter controlled-access zones.
Assign Supervisory Responsibility to a Competent Person
A competent person is someone who can identify hazardous conditions and appropriate
applications for a fall protection system and who has authority to correct hazards. A
competent person must know the site-specific fall protection plan, how to perform work tasks safely, and the hazards associated with those tasks. You must designate a
competent person to implement the fall protection plan.
Document Accountability
Your fall protection plan must describe how workers and supervisors will comply with its
requirements.
Establish a Training Program
Everyone covered by a fall protection plan must be trained by a competent person. Be sure to document the names of those who receive fall protection training and their
training dates. The training program must cover the following:
Fall hazards that workers will encounter.
Types of systems that will protect workers from falls.
Workers’ responsibilities under the fall protection plan.
Procedures for assembling, maintaining, and dissembling personal fall arrest systems.
How workers should comply with the plan.
Retraining procedures when the plan changes, tasks change, or when workers are not
following the plan.
Update the Plan When Site Conditions Change
When worksite conditions change and affect how workers are protected from falling,
you must update your fall protection plan so that it addresses the changes. An on-
site qualified person must approve the changed plan. The updated plan must:
Describe the site-condition changes that required the update.
Include the qualified person’s reasons for the update.
Include the date the qualified person approved the plan changes and the person’s
signature.
Investigate Accidents
If a worker covered by the fall protection plan fell or had a “near miss” incident, you
must investigate the accident and, if necessary, change the plan so that similar events
will not happen again. The plan must describe near misses or accidents and how to prevent future incidents.

© Safety Services Company 17-17
Keep the Plan at the Job Site
A copy of the fall protection plan must be kept, with all approved changes, at the job
site.
NOTE: A blank “Site Specific Fall Protection Work Plan” follows this section.
Fall Protection Systems, Criteria, and Practices — 1926.502
The requirements in 1926.502 cover installing, constructing, and using these fall protection systems and methods:
Guardrail systems — 1926.502(b)
Safety-net systems — 1926.502(c)
Personal fall-arrest systems — 1926.502(d)
Personal fall-restraint systems — 1926.760
Positioning-device systems — 1926.502(e)
Warning-line systems for roofing work — 1926.502(f)
Covers for holes in walking/working surfaces — 1926.502(i)
Protection from falling objects — 1926.502(j)

17-18 © Safety Services Company
SITE-SPECIFIC FALL PROTECTION WORK PLAN This Fall Protection Work Plan enables workers performing operations with fall
hazards to use alternative fall protection systems or methods when conventional systems are not feasible. Under these special circumstances, properly documented fall protection
plans give A R M Environmental Services, Inc. the flexibility to use more appropriate
methods of fall protection when conventional systems are not practical or that they pose
a greater safety hazard to workers than other fall protection alternatives. This fall
protection plan meets the following requirements:
A qualified person prepared the plan specifically for the site where the work will be
performed.
The plan documents why conventional fall protection systems are not feasible and
show how alternative methods will reduce or eliminate fall hazards.
The plan describes all measures that will be taken to minimize or eliminate fall
hazards at the worksite.
This Fall Protection Work Plan is specific for the following project:
Location of Job: _________________________________________________________
Date plan prepared or modified: ____________________________________________
Plan prepared by: ________________________________________________________
Plan approved by: _______________________________________________________
Plan supervised by: ______________________________________________________
Statement of Company Policy: A R M Environmental Services, Inc. is dedicated to
protecting employees from workplace injuries and illnesses. Company management and
supervisors are responsible for identifying and correcting hazards on the job. All
employees are responsible for working safely. This plan supplements our existing “Safety and Health Program.”
This Plan addresses the use of conventional fall protection at a number of areas on this
project and identifies specific activities that require unconventional means of fall
protection. These activities include:
____________________________________________________________________
____________________________________________________________________
____________________________________________________________________
____________________________________________________________________
Each employee will be trained in these procedures and will strictly adhere to them except
when doing so would expose the employee to greater hazards. If, in the employee’s
opinion, this is the case, the employee is to notify the competent person of his or her
concern and have the concern addressed before proceeding.
It is the responsibility of ___________________________________, Competent Person
to implement this Fall Protection Work Plan. Work operations will be checked frequently and safety policy and procedures will be enforced.
The Crew Foreman, _______________________________________, is responsible for
correcting unsafe practices or conditions immediately.
Designated “First Aid Trained” personnel on this site include: ______________________
______________________________________________________________________.
In the event of serious injury, company personnel are directed to call 911 or local
Emergency Medical Services at: ____________________________________________.

© Safety Services Company 17-19
It is the responsibility of Andy Wilson to ensure that all employees understand and
adhere to the procedures of this plan and follow the instruction of the crew supervisor.
It is the responsibility of the employee to alert management to unsafe or hazardous conditions or practices that may cause injury to employees.
Any changes to the Fall Protection Work Plan must be approved by the Qualified Person,
____________________________________________.
Appropriate fall protection systems will be used on this job when the risk of fall exists.
These processes will be conducted by employees trained to do this type of work and trained to recognize the fall hazards. This plan details how fall-hazards will be minimized
by A R M Environmental Services, Inc.. Following are the specific requirements for fall
protection on this project:
This Fall Protection Plan must be kept at the jobsite at all times when operations are
in progress.
The implementation of the fall protection plan will be under the supervision of a
competent person.
The personal fall arrest system will include, but not limited to, an anchorage,
connectors, and a body harness used to arrest an employee in a fall from the working
level.
A personal fall-restraint system will be used to prevent a worker from reaching an unprotected edge and thus prevent a fall from occurring. The system will consist of
an anchorage, connectors, and a body harness or a body belt. The attachment point
to the body belt or full body harness will be at the back, front, or side D-rings.
An anchorage will be used to secure a point of attachment for lifelines, lanyards or deceleration devices. The anchorage will be located directly above the worker, if
possible, to reduce the chance of a swing fall. The anchorage will be high enough
above a worker to ensure that the arrest system, and not the next lower level, stops
the fall. This will make the anchorage, the lanyard, and the harness a complete
system. Connectors include carabiners, snap hooks, and D-rings.
A body harness will be secured about the person in a manner that distributes the fall
arrest forces over at least the thighs, pelvis, waist, chest, and shoulders with a
means for attaching the harness to other components of the fall arrest system.
A connector will be used to couple (connect) parts of the personal fall arrest system
or positioning device system together.
A deceleration device such as a rope, grab, ripstitch lanyard, specially woven lanyard,
tearing or deforming lanyards, automatic self-retracting lifelines/lanyards will be used
to dissipate a substantial amount of energy during a fall arrest, or otherwise limit the
energy imposed on an employee during fall arrest.
A lanyard (flexible line of rope, wire, or strap that generally has a connector at each
end) will be used for connecting the body harness to a deceleration device, lifeline, or
anchorage.
A lifeline (compact consisting of a flexible line for connection to an anchorage at one
end to hang vertically, or for connection to anchorages at both ends to stretch
horizontally), will be used as a means for connecting other components of a personal
fall arrest system to the anchorage.
A body belt, which will only be used as a positioning device, will be secured about the
waist and attached to a lanyard, lifeline, or deceleration device.
A positioning device system (body harness system) may be used to allow an employee to be supported on an elevated vertical surface and work with both hands
free while leaning backwards.

17-20 © Safety Services Company
A rope grab (deceleration device that travels on a lifeline and automatically, by
friction, engages the lifeline and locks) will be implemented to arrest a fall.
A self-retracting lifeline/lanyard (deceleration device containing a drum-wound line
which can be slowly extracted from, or retracted onto, the drum under minimal
tension during normal employee movement and which, after onset of a fall,
automatically locks the drum) may be used to arrest the fall.
In the event an employee falls, the employer will investigate the circumstances of the
fall to determine if the fall protection plan needs to be changed (e.g. new practices,
procedures, or training) and will implement those changes to prevent similar types of
falls.
Work on or from scaffolds will be prohibited during storms or high winds unless a
qualified person has determined that it is safe for employees to be on the scaffold and
those employees are protected by a personal fall arrest system.
Appropriate Personal Protective Equipment, such as hard hats, will be worn at all
times when falling objects hazards exist.
________________________________________________________________
________________________________________________________________
________________________________________________________________
________________________________________________________________
________________________________________________________________
________________________________________________________________
Additional Information:
_______________________________________________________________________
_______________________________________________________________________
_______________________________________________________________________
__________________________________________________________________
This Fall Protection Work Plan approved by:
Name: __________________________________________ Title: _________________
(Please Print)
Signature: ____________________________________________ Date: ____________
Fall Protection Work Plan must be kept at the jobsite at all times when operations are in progress.
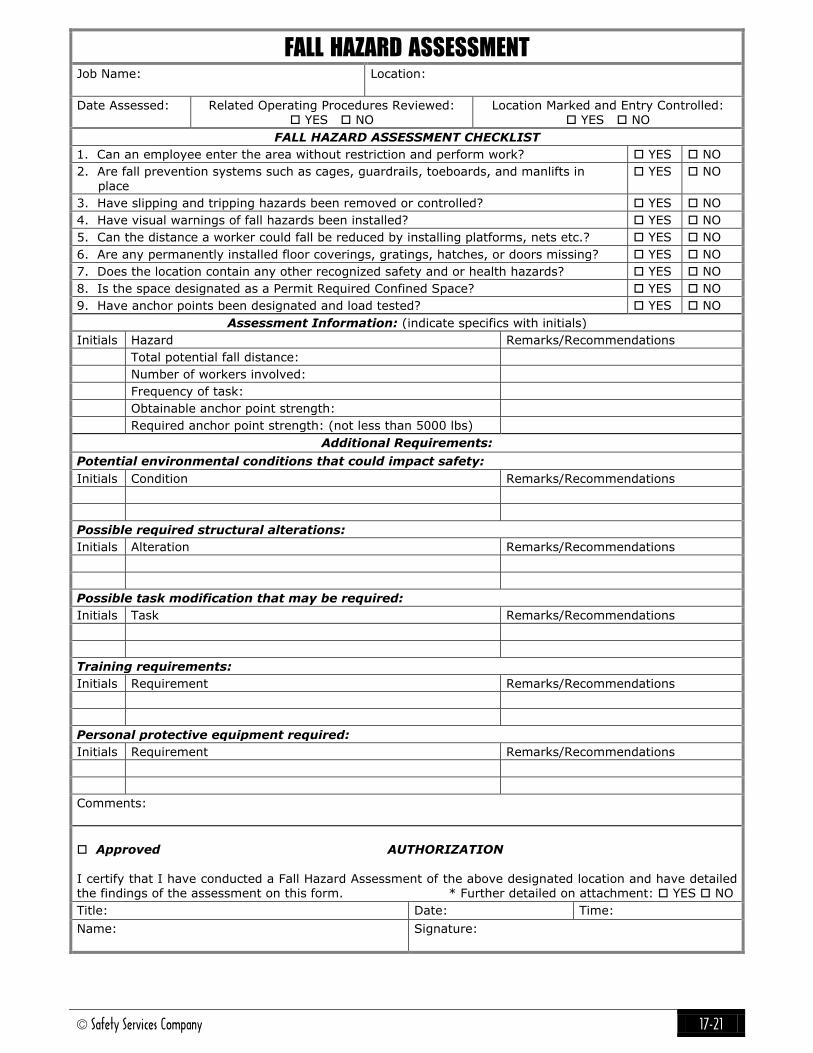
© Safety Services Company 17-21
FALL HAZARD ASSESSMENT Job Name:
Location:
Date Assessed: Related Operating Procedures Reviewed: YES NO
Location Marked and Entry Controlled: YES NO
FALL HAZARD ASSESSMENT CHECKLIST
1. Can an employee enter the area without restriction and perform work? YES NO
2. Are fall prevention systems such as cages, guardrails, toeboards, and manlifts in
place
YES NO
3. Have slipping and tripping hazards been removed or controlled? YES NO
4. Have visual warnings of fall hazards been installed? YES NO
5. Can the distance a worker could fall be reduced by installing platforms, nets etc.? YES NO
6. Are any permanently installed floor coverings, gratings, hatches, or doors missing? YES NO
7. Does the location contain any other recognized safety and or health hazards? YES NO
8. Is the space designated as a Permit Required Confined Space? YES NO
9. Have anchor points been designated and load tested? YES NO
Assessment Information: (indicate specifics with initials)
Initials Hazard Remarks/Recommendations
Total potential fall distance:
Number of workers involved:
Frequency of task:
Obtainable anchor point strength:
Required anchor point strength: (not less than 5000 lbs)
Additional Requirements:
Potential environmental conditions that could impact safety:
Initials Condition Remarks/Recommendations
Possible required structural alterations:
Initials Alteration Remarks/Recommendations
Possible task modification that may be required:
Initials Task Remarks/Recommendations
Training requirements:
Initials Requirement Remarks/Recommendations
Personal protective equipment required:
Initials Requirement Remarks/Recommendations
Comments:
Approved AUTHORIZATION
I certify that I have conducted a Fall Hazard Assessment of the above designated location and have detailed the findings of the assessment on this form. * Further detailed on attachment: YES NO
Title: Date: Time:
Name: Signature:

17-22 © Safety Services Company
FALL PROTECTION PROGRAM
EMPLOYEE ACKNOWLEDGEMENT
By my signature below, I acknowledge that I have received instruction and have read
the A R M Environmental Services, Inc. Fall Protection Program. I have been given the opportunity to ask questions and have received answers, instruction, and clarification to
my questions. I understand the contents of and agree to follow A R M Environmental
Services, Inc. policy with regard to the Fall Protection Program.
Fall Protection Program received on ____________________ , 20 ___
Printed Name of Employee
______________________________________________ ______________
Signature of Employee Date
______________________________________________
Social Security Number
______________________________________________
Printed Name of Trainer
______________________________________________ ______________
Signature of Trainer Date
cc: Employee Personnel File

© Safety Services Company 17-23
CERTIFICATION
Employee Training For Fall Protection
A R M Environmental Services, Inc. certifies that the following employee has been
trained in the understanding, knowledge, and skills necessary for the safe performance of duties assigned in areas of fall protection hazards.
_______________________________________________ has demonstrated proficiency
in the following areas of fall protection:
The nature of fall hazards in the work area.
The correct procedures for erecting, maintaining, disassembling, and inspecting the
fall protection systems to be used.
The use and operation of guardrail systems, personal fall arrest systems, safety net
systems, warning line systems, safety monitoring systems, personal fall restraint
systems, slide guard systems, positioning devices, and other protection to be used.
The role of each employee in the safety monitoring system when this system is used.
The limitations on the use of mechanical equipment during the performance of roofing work.
The correct procedures for the handling and storage of equipment and materials and
the erection of overhead protection.
The role of employees in the fall protection work plan.
_________________________________________________ ________________
Employee Trained By Date of Training
_________________________________________________ ________________
Signature of Trainer Date
_________________________________________________ ________________
Employee Signature Date
cc: Employee Personnel File

17-24 © Safety Services Company
Notes:
_______________________________________________________________________
_______________________________________________________________________
_______________________________________________________________________
_______________________________________________________________________
_______________________________________________________________________
_______________________________________________________________________
_______________________________________________________________________
_______________________________________________________________________
_______________________________________________________________________
_______________________________________________________________________
_______________________________________________________________________
_______________________________________________________________________
_______________________________________________________________________
_______________________________________________________________________
_______________________________________________________________________
_______________________________________________________________________
_______________________________________________________________________
_______________________________________________________________________
_______________________________________________________________________
_______________________________________________________________________
_______________________________________________________________________
_______________________________________________________________________
_______________________________________________________________________
_______________________________________________________________________
_______________________________________________________________________
_______________________________________________________________________
_______________________________________________________________________

© Safety Services Company 18-1
Chapter 18
Scaffolds & Work Platforms
§1926.450 – Subpart L – Scaffolds
§1926.451 – General Requirements
§1926.454 – Training Requirements
Policy Statement
A R M Environmental Services, Inc. has implemented this policy to ensure that no
employee is exposed to hazards while doing work requiring the use of scaffold. Andy Wilson is the supervisor responsible for ensuring the following engineering controls,
training requirements, and safe work practices are enforced to protect our employees
from hazards associated with the erecting and use of scaffolds:
Andy Wilson will ensure that each employee who performs work on a scaffold is trained
by a person qualified in scaffold safety. The training will enable employees to recognize the hazards associated with the type of scaffold being used and to understand the
procedures to control or minimize the hazards. Training includes the following applicable
areas:
The nature of any electrical hazards, fall hazards, and falling object hazards in the
work area. The correct procedures for dealing with electrical hazards and for erecting,
maintaining, and disassembling the fall protection systems and falling object
protection systems being used.
The proper use of the scaffold and the proper handling of materials on the scaffold.
The maximum intended load and the load-carrying capacities of the scaffolds used.
Any other safety topics deemed pertinent to the particular work-site, scaffold system, or fall protection systems being used.
Andy Wilson will ensure that each employee involved in erecting, disassembling, moving,
operating, repairing, maintaining, or inspecting a scaffold is trained by a competent person to recognize any hazards associated with the work in question. Training includes
the following applicable topics:
The nature of scaffold hazards.
The correct procedures for erecting, disassembling, moving, operating, repairing,
inspecting, and maintaining the type of scaffold being used.
The design criteria, maximum intended load-carrying capacity, and intended use of the scaffold.
Any other safety topics deemed pertinent to the particular work-site, scaffold
system, or fall protection systems being used.
Retraining is required when Andy Wilson has reason to believe that an employee lacks
the skill or understanding needed to safely perform work that involves the erection, use,
or dismantling of scaffolds. The employee will be retrained so that the required
proficiency is regained. Retraining is required in all of the following situations:
Where changes at the worksite present a hazard about which an employee has not been previously trained.

18-2 © Safety Services Company
Where changes in the types of scaffolds, fall protection, falling object protection, or
other equipment present a hazard about which an employee has not been
previously trained. Where inadequacies in an affected employee’s work involving scaffolds indicate
that the employee has not retained the required skill, knowledge, and proficiency
for the work involved.
A scaffold will be designed, constructed, erected, and used in accordance with OSHA requirements. All scaffold used at A R M Environmental Services, Inc. will be designed
by a qualified person.
Scaffold will not be erected, moved, dismantled, or altered, except under the supervision
of a competent person.
A scaffold and its components will be capable of supporting, without failure, not less than 4 times the maximum intended load.
A scaffold will not be loaded to more than the designed working load.
Andy Wilson will ensure that all scaffolding systems, components, and fall protection
systems used will be inspected for visible defects by a competent person prior to use,
before each work shift begins, after erecting or moving, periodically throughout the work day, and after any occurrence that could affect a scaffold’s structural integrity. Any
scaffold, including accessories such as braces, brackets, trusses, screw legs, ladders, or
platforms, that is damaged or weakened from any cause will be immediately repaired or
replaced. Any scaffold or accessories that are repaired will have at least the original
designed strength of the scaffold or accessory.
Any system or component of a system which is found to have a defect in manufacturing or design, damage, excessive wear, weathering, or corrosion will be immediately
removed from service and tagged to indicate that it is not to be used with a prominent
tag which states:
An employee on a scaffold who is exposed to an overhead hazard of falling
material will be protected with overhead protection sufficient to prevent injury.
All load-carrying wood members of scaffold framing will be a minimum of 1,500 psi
fiber stress value.
The poles, legs, or uprights of scaffolds will be plumb and will be securely and rigidly braced to prevent swaying and displacement.
The support for a scaffold will be sound, rigid, and capable of carrying the maximum
intended load without settling or displacement. Leveling jack adjusting screws, when
used, will not extend more than 18 inches below the base of the scaffold.
Scaffold poles, legs, posts, frames, and uprights will bear on base plates and mud
sills or other adequate firm foundation. Scaffold components that are not compatible will not be intermixed.
Unstable objects, such as barrels, boxes, pallets, brick, or concrete blocks, will not be
used to support a scaffold or work platform.
Makeshift devices such as boxes and barrels will not be used on top of scaffold
platforms to increase the working level height of employees.
Ladders will not be used on a scaffold to increase the working level height of employees,
except on a large area scaffold where Andy Wilson has required the following procedures
and conditions are satisfied:
When the ladder is placed against a structure that is not a part of the scaffold, the
scaffold will be secured against the sideways thrust exerted by the ladder.
The platform units will be secured to the scaffold to prevent the units from moving.
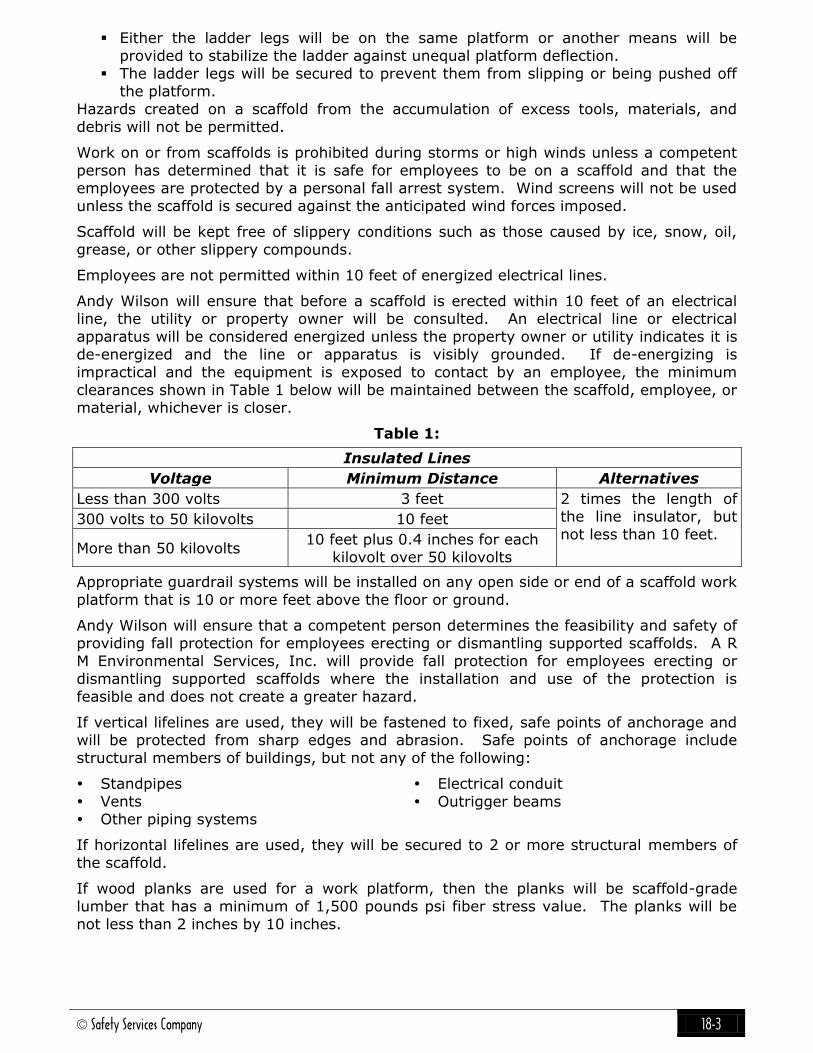
© Safety Services Company 18-3
Either the ladder legs will be on the same platform or another means will be
provided to stabilize the ladder against unequal platform deflection.
The ladder legs will be secured to prevent them from slipping or being pushed off the platform.
Hazards created on a scaffold from the accumulation of excess tools, materials, and
debris will not be permitted.
Work on or from scaffolds is prohibited during storms or high winds unless a competent
person has determined that it is safe for employees to be on a scaffold and that the employees are protected by a personal fall arrest system. Wind screens will not be used
unless the scaffold is secured against the anticipated wind forces imposed.
Scaffold will be kept free of slippery conditions such as those caused by ice, snow, oil,
grease, or other slippery compounds.
Employees are not permitted within 10 feet of energized electrical lines.
Andy Wilson will ensure that before a scaffold is erected within 10 feet of an electrical line, the utility or property owner will be consulted. An electrical line or electrical
apparatus will be considered energized unless the property owner or utility indicates it is
de-energized and the line or apparatus is visibly grounded. If de-energizing is
impractical and the equipment is exposed to contact by an employee, the minimum
clearances shown in Table 1 below will be maintained between the scaffold, employee, or material, whichever is closer.
Table 1:
Insulated Lines
Voltage Minimum Distance Alternatives
Less than 300 volts 3 feet 2 times the length of the line insulator, but
not less than 10 feet. 300 volts to 50 kilovolts 10 feet
More than 50 kilovolts 10 feet plus 0.4 inches for each
kilovolt over 50 kilovolts
Appropriate guardrail systems will be installed on any open side or end of a scaffold work
platform that is 10 or more feet above the floor or ground.
Andy Wilson will ensure that a competent person determines the feasibility and safety of providing fall protection for employees erecting or dismantling supported scaffolds. A R
M Environmental Services, Inc. will provide fall protection for employees erecting or
dismantling supported scaffolds where the installation and use of the protection is
feasible and does not create a greater hazard.
If vertical lifelines are used, they will be fastened to fixed, safe points of anchorage and will be protected from sharp edges and abrasion. Safe points of anchorage include
structural members of buildings, but not any of the following:
Standpipes
Vents
Other piping systems
Electrical conduit
Outrigger beams
If horizontal lifelines are used, they will be secured to 2 or more structural members of
the scaffold.
If wood planks are used for a work platform, then the planks will be scaffold-grade
lumber that has a minimum of 1,500 pounds psi fiber stress value. The planks will be
not less than 2 inches by 10 inches.

18-4 © Safety Services Company
The platform will consist of a minimum of 2 planks laid side by side. Each platform on all
working levels of scaffolds will be fully planked or decked between uprights where
practicable. Spaces between the platform and the uprights will not be more than 9 ½ inches.
Platform planks will be laid with their edges together so the platform is tight and does
not have spaces through which tools or fragments of materials can fall.
Planking will extend over the end bearer not less than 6 inches, but not more than 12
inches and will be cleated or otherwise fastened to prevent shifting and will be uniform in thickness. Where planks are lapped, each plank will lap its bearer not less than 6 inches
to provide a minimum overlap of 12 inches. Hook-on type manufactured platforms may
be used if secured to the bearer.
Where a scaffold turns a corner, the planks will be laid to prevent tipping. The planks
that meet the corner bearer at an angle will be laid first and will extend over the
diagonally placed bearer far enough to have a good bearing, but not far enough to tip. The planks that run in the different direction will be laid so as to extend over the rest on
the first layer of planks.
When moving a platform to the next level, employees will leave the old platform
undisturbed until the new platform supports have been set in place and are ready to
receive the platform planks.
Wood platform components will not be covered with opaque finishes. Platform edges
may be covered or marked for identification. A platform may be coated periodically with
wood preservatives, fire-retardant finishes, and slip-resistant finishes. Such coating may
not obscure the top or bottom wood surfaces.
The front of a platform will not be more than 14 inches from the face of the work unless a guardrail system is erected along the front edge, or unless a personal fall arrest
system is used. Exception: The maximum distance from the face of the work for
plastering and lathing will not be more than 18 inches.
When scaffold is occupied by employees, slippery conditions that occur on the platform
will be eliminated as soon as possible after the condition occurs.
Andy Wilson will ensure that in addition to wearing a hard hat, employees on a scaffold will be provided additional protection from falling hand tools, debris, and other small
objects through the installation of toeboards, screens, or guardrail systems or the
erection of debris nets, catch platforms, or canopy structures that contain or deflect the
falling objects.
If there is a danger of tools, materials, or equipment falling from a scaffold and striking employees below, then one of the following provisions will apply:
The area below the scaffold to which objects can fall will be barricaded and
employees will not be permitted to enter the hazard area.
Toeboards will be erected along the edge of a platform that is more than 10 feet
above lower levels. The toeboards will span a distance sufficient to protect employees below. If toeboards are used, they will satisfy the following requirements:
Be capable of withstanding, without failure, not less than 50 pounds of force
applied in any downward or horizontal direction at any point along the toeboard.
Be not less than 3 ½ inches high from the top edge of the toeboard to the level of the walking/working surface.
Toeboards will be securely fastened in place at the outermost edge of the platform
and have not more than ¼ inch of clearance above the walking/working surface.

© Safety Services Company 18-5
Toeboards will be solid or have openings of not more than 1 inch in the greatest
dimension.
If tools, materials, or equipment are piled to a height higher than the top edge of the
toeboard, then paneling or screening extending from the toeboard or platform to the
top of the guardrail will be erected for a distance sufficient to protect employees
below.
A guardrail system will be installed with openings small enough to prevent the passage of potential falling objects.
A canopy structure, debris net, or catch platform that is strong enough to withstand
the impact forces of potential falling objects will be erected between the falling object
hazard and employees.
Only qualified and competent personnel are permitted to make repairs or modifications
to a scaffold system or its components. Non-qualified personnel may create more
hazards. Disciplinary action for non-qualified repair or modification will be enforced.
Any violation of the above policy, misuse of scaffolds, or misconduct while working on scaffolds will be subject to disciplinary action within the scope of company policy, up to
and including termination of employment.
General Scaffold Safety Policy
It will be the responsibility of all users to read and comply with the following common sense guidelines which are designed to promote safety in the erecting, dismantling and
use of Scaffolds. These guidelines do not purport to be all-inclusive nor to supplant or
replace other additional safety and precautionary measures to cover usual or unusual
conditions. If these guidelines in any way conflict with any state, local, federal or other
government statute or regulation, said statute or regulations will supersede these guidelines and it will be the responsibility of each user to comply therewith.
A Quick Tour of §1926.450 – Subpart L
§1926.450 – Subpart L requirements identify what workers and employers need to know
to use all types of scaffolds safely. Specifically, the requirements:
Regulate the design, construction, and use of scaffolds.
Update previous scaffolding standards.
Set performance-oriented criteria to protect workers from injury.
Cover specific types of scaffolds.
Allow employers flexibility in using fall protection systems. Extend fall protection to erectors and dismantlers.
Strengthen training for workers.
Identify conditions under which workers must be retrained.

18-6 © Safety Services Company
Subpart L covers all scaffolds used in construction, alteration, repair, and demolition
work, but does not apply to crane- or derrick-suspended personnel platforms covered in
Subpart N. The table on the next page shows how Subpart L is organized and what requirements are covered under each of its major parts.
Sub Paragraph Requirements Covered
1926.450 Scope & Application — Definitions
1926.451
General Requirements
Capacity
Scaffold platform construction
Supported scaffolds
Suspension scaffolds
Access
Use
Fall protection
Falling object protection
1926.452
Additional Requirements for Specific Scaffold Types
Pole
Tube and coupler
Fabricated frame
Large area
Bricklayers’ square
Horse
Form & carpenters’ bracket
Roof bracket
Pump jack
Ladder jack
Window jack
Crawling boards
Trestle ladder
Single-point adjustable
Two-point adjustable
Multi-point adjustable
Catenary
Float
Interior hung
Needle beam
Multi-level suspended
Mobile
Repair bracket
Stilts
1926.453
Aerial Lifts
General requirements
Specific requirements
Manually propelled elevating aerial platforms
Boom supported elevating work platforms
Self-propelled elevating work platforms
1926.454
Training Requirements
All workers
Erectors & dismantlers
Retraining
Qualified person
Competent person
Non-
Mandatory
Appendices
A -Guidelines and tables
B -Guidelines for erectors and dismantlers C -National consensus standards
D -Training topics, erectors and dismantlers E -Drawings and illustrations
Subpart L frequently refers to Competent Persons and Qualified Persons. The terms
apply to persons who have special skills and are given specific responsibilities.
Competent Person
A competent person can identify hazardous working conditions and has authorization to
take prompt corrective measures to eliminate them. The competent person, who has
primary responsibility for supervising and directing all scaffolding erection, dismantling,
and altering work, must:
Know Subpart L requirements applicable to the types of scaffolds used.
Be able to identify and correct hazards encountered in scaffold work.
Be trained in the structural integrity of the types of scaffolds used.
Have authority to promptly abate hazardous worksite conditions.

© Safety Services Company 18-7
A competent person’s duties can be shared as long as each person is qualified to perform
the duty and has authority to promptly abate hazards. Only Competent Persons will:
Determine feasible safe access for persons erecting and dismantling scaffolds. Inspect scaffolds and components for hazards before each work shift and after any
event that could affect the scaffolds’ structural integrity.
Supervise and direct all scaffold erection, dismantling, and altering work.
Determine the feasibility of providing fall protection for each scaffold erection and
dismantling operation. Determine whether it is safe to work on scaffolds during storms or high winds.
Determine whether scaffold components made from different metals can be used
together.
Determine whether scaffold components made by different manufacturers can be
used together.
Identify the cause and significance of a deteriorated scaffold component and correct the hazard.
Inspect ropes used in suspension scaffolds and identify defects.
Inspect manila or synthetic rope used for toprails or midrails to make sure it meets
the 200-pound capacity requirements.
NOTE: Many organizations offer training programs on Subpart L scaffolding
requirements. However, attending one of these programs does not necessarily make
one competent (or a competent person). Competency must be demonstrated; it is
usually the result of many hours of in-class training and on-the-job experience.
Qualified Person
A qualified person has a recognized degree, certificate, or professional standing - or by
extensive knowledge, training, and experience, has successfully demonstrated the ability
to solve problems related to the subject, the work, or the project.
Scaffolds must be designed by a qualified person but not necessarily by an engineer.
Exceptions: connections for mason’s adjustable multi-point suspension scaffolds, pole
scaffolds more than 60 feet high, coupler and fabricated-frame scaffolds more than 125
feet high, and outrigger scaffolds must be designed by a registered engineer.
Scaffold Capacities
Scaffolds must be able to support their own weight and at least four times the maximum
intended load applied to them. Unless otherwise noted in Subpart L, scaffold
components have to meet the 4-to-1 safety factor too, but only for that portion of the
maximum intended load applied to them. The maximum intended load for a component depends on the scaffold type and its configuration. Note that scaffolds and components
must be able to support four times the maximum intended load – not the rated load. The
intended load includes workers, equipment, and supply loads. The intended load should
never exceed the rated load unless the design is approved by an engineer and the
manufacturer.
Direct Connections
Direct connections and counterweights used to balance adjustable suspension scaffolds
must resist at least four times the tipping force of the scaffold. A competent person who
directs the rigging of the scaffold must calculate the potential loads. Safety factors for the counterweights, riggings, direct connections to roofs, floors, and suspension ropes of
adjustable suspension scaffolds should be based on the rated load and the stall load of
the hoist, not the maximum intended load.

18-8 © Safety Services Company
Suspension Ropes, Hardware, and the Maximum Intended Load
Suspension ropes and connecting hardware on non-adjustable suspension scaffolds must
be able to support, without failure, at least six times the maximum intended load applied
to them.
Stall Loads
The stall load of any scaffold hoist cannot exceed three times its rated load. This safety
factor ensures that suspension scaffold support systems are not overloaded.
Design by a Qualified Person
Scaffolds must be designed by a qualified person and must be constructed and loaded in
accordance with that design.
Working Safely on Scaffolds
Platform Construction
All scaffold platforms, except walkways and platforms used by erectors and dismantlers,
must be fully decked or planked between the front uprights and the guardrail supports.
The opening between the uprights and the planking cannot exceed one inch unless the
employer demonstrates that a wider opening is necessary. (The maximum opening
cannot exceed 9½ inches.)
Platform Gaps
Platform units must be placed so that the spaces between the units do not exceed one
inch — unless more space is necessary; for example, fitting around uprights with side
brackets to extend platform width. The maximum opening cannot exceed 9½ inches.
Platform and Walkway Widths
Platforms and walkways must be at least 18 inches wide. If work areas are too narrow
for 18-inch platforms or walkways, workers can use narrower platforms but they must be protected from fall hazards by guardrails and/or personal fall arrest systems. OSHA
allows 12-inch widths for ladder jack, top-plate bracket, roof bracket, and pump-jack
scaffolds.
Front Edge of Platforms
The front edge of a scaffold platform cannot be more than 14 inches from the face of a
structure unless guardrails or personal fall arrest systems are used to protect workers
from falling between the structure and the platform. There are two exceptions:
1. The front edge distance for outrigger scaffolds must be no more than 3 inches.
2. Scaffolds used for plastering and lathing work can be no more than 18 inches from
the face of a structure.
Platform Lengths
A platform 10 feet or less in length must extend at least 6 inches, but no more than 12
inches, beyond its support unless the excess length is guarded or can support workers
and material without tipping. A platform longer than 10 feet can extend no more than
18 inches beyond a support unless the excess length is guarded or can support workers
and material without tipping.
Abutted Planks
When platform planks are abutted to create a long platform, each abutted end must rest
on a separate support. Abutted planks touch end to end on separate support surfaces; they do not rest on one another.

© Safety Services Company 18-9
Overlapped Planks
Platform planks overlapped to create a long platform must overlap at least 12 inches
over supports unless the planks are nailed together or otherwise restrained so they do
not move.
Direction Changes
Any platform that rests on a bearer at an angle other than a right angle must be laid
first. Platforms that rest at right angles over the same bearer must rest on top of the
first platform. Ensure platform planks are fully bearing to eliminate potential instability.
Paint (opaque) Finishes
Wood platforms cannot be covered with opaque finishes, because opaque finishes cover
defects in wood. Wood platform edges, however, may be marked for identification.
Preservatives or slip-resistant and fire-retardant finishes are acceptable as long as the
finish does not cover structural defects or make them hard to spot.
Mixed or Modified Components
Scaffold components made by different manufacturers cannot be mixed unless they fit
together easily and do not change the scaffold’s integrity. Components made by
different manufacturers cannot be modified to intermix unless a competent person approves.
Components Made From Different Metals
Scaffold components made from different metals cannot be used together unless a
competent person approves. If a competent person determines that mixing components made from different metals could reduce their strength, the employer must take
corrective action. If a competent person cannot make the determination, then different
metals must not be used.
Access to Scaffolds
Employers must provide all workers with safe access to scaffolds and scaffold platforms.
Workers must use ladders or stairways to reach platforms that are more than 2 feet
above or below the access point. Do not use cross braces as a means of access. Note
that permanent stairways or portable ladders must meet the requirements of Subpart X
(Stairways and Ladders) of the construction safety and health code.
Bottom Rung or Step
The bottom step or rung of hook-on ladders, attachable ladders, and stairway-type
ladders must be no more than 24 inches above or below the scaffold supporting level.
Rest Platforms
Hook-on and attachable ladders on supported scaffolds more than 35 feet high must have rest platforms at 35-foot intervals; stairway-type ladders must have rest platforms
every 12 feet. Integral prefabricated scaffold-access frames must have rest platforms
every 35 feet.

18-10 © Safety Services Company
Erecting and Dismantling
Erectors and dismantlers must comply with the requirements summarized below:
Means of access must be determined by a competent person. The competent person,
designated by the employer, must determine if safe access is feasible at each stage
of the erecting and dismantling process.
Hook-on or attachable ladders must be installed as soon as possible after scaffold
erection begins. End frames of tubular welded frame scaffolds that have parallel, level horizontal
members may be used for access.
Cross bracing is not an acceptable means of access.
Protecting Workers from Falling Objects
Workers on scaffolds must wear hardhats and be protected by toeboards, screens,
guardrail systems, debris nets, catch platforms, or canopies when falling objects are a
potential hazard.
Hardhats cannot be the only means of protecting workers from falling objects. Be sure to
secure all large objects that could fall onto a scaffold. Note that workers must wear
hardhats only if falling objects are a potential hazard. If there is no hazard from falling
objects, then hardhats are not required.
Persons Working Below
If tools, materials, or equipment could fall from a scaffold and strike persons below, the
area below the scaffold must be barricaded or a toeboard must be placed along the edge
of the scaffold platform.
When tools, materials, or equipment are piled higher than the top edge of the toeboard, paneling or screening must protect persons below. Alternatively, guardrail systems,
canopies, or catch platforms may be installed to retain materials.
Protecting Workers from Falling
Workers on scaffolds more than 10 feet above a lower level must use fall protection.
The employer has the option, in many cases, of protecting workers with guardrails or
personal fall arrest systems.
On single-point or two-point adjustable suspension scaffolds, however, guardrails and
personal fall arrest systems are required. On other types of scaffolds only personal fall arrest systems are allowed. Fall protection requirements for those who install
suspension scaffold support systems on floors, roofs, and other elevated surfaces are
included in 1926, Subpart M.
Remember, when you work from a scaffold more than 10 feet above a lower level, you
must be protected from falling. The following table shows fall protection required by
Subpart L for various types of scaffolds.

© Safety Services Company 18-11
FALL PROTECTION REQUIRED TYPE OF SCAFFOLD
Personal Fall-Arrest System Boatswain’s Chair Catenary Scaffold
Float Scaffold
Needle Beam Scaffold Ladder Jack Scaffold
Guardrails
Self-contained adjustable scaffold when platform is supported by the frame structure
Walkways located within a scaffold
Personal Fall-Arrest System
and Guardrails
Single-point adjustable suspension scaffold Two-point adjustable scaffold
Self-contained adjustable scaffold when platform is supported by ropes
Personal Fall-Arrest System,
Guardrails, or Grab-line Crawling Board (chicken ladder)
Personal Fall-Arrest System
or Guardrails
Overhand bricklaying on a supported scaffold All other types of types of scaffolds not identified in this
table
Personal Fall-Arrest Systems
A personal fall arrest system consists of an anchorage, connectors, and a body harness. It may also include a lanyard, deceleration device, or lifeline. Persons who work from a
boatswain’s chair, catenary scaffold, float scaffold, needle beam scaffold, or ladder jack
scaffold must be protected by a personal fall arrest system.
Personal Fall-Arrest Systems and Guardrails
Workers on single-point or two-point adjustable suspension scaffolds must be protected
by personal fall arrest systems and guardrail systems. Workers must also use personal
fall arrest systems and guardrails on self-contained adjustable scaffolds that are
supported only by ropes (with no safety catch to support the platform if the rope fails). The top edge of top rails on supported scaffolds and on all suspended scaffolds where
both a guardrail and a personal fall arrest system are required must be between 38
inches and 45 inches above the platform surface.
Cross Bracing
Cross bracing is acceptable in place of a midrail when the crossing point of two braces is
between 20 inches and 30 inches above the work platform. Cross bracing can be used
as a toprail when the crossing point is between 38 inches and 48 inches above the work
platform. The end points at each upright must be no more than 48 inches apart. Cross
bracing can be substituted for either the toprail or the midrail on a scaffold system – but not both. The crossing point must be at the appropriate toprail or midrail height.
Personal Fall-Arrest Systems for Erectors and Dismantlers
Workers who erect or dismantle supported scaffolds must, if feasible, use fall protection.
A competent person, designated by the employer, must make the feasibility determination at each stage of the erecting and dismantling process.
Lanyards and Personal Fall-Arrest Systems
Personal fall arrest systems used on scaffolds must be attached by a lanyard to a vertical lifeline, horizontal lifeline, or structural member that will hold at least 5,000 pounds. A
competent person should decide the most appropriate connection. All personal fall arrest
systems must meet the requirements specified in Subpart L. When a lanyard is
connected to a horizontal lifeline on a single-point or two-point adjustable suspension
scaffold, the scaffold must have independent support lines and automatic locking devices
that can stop the scaffold if the suspension ropes fail.

18-12 © Safety Services Company
Aerial Lifts - Fall Protection
Type Of Lift Fall-Protection Required
Vehicle-mounted
elevating and rotating work platforms
(ANSI A92.2 devices)
Platforms other than buckets or baskets must include guardrail systems – guardrails, a midrail, and toeboards. Each person who
works on a boom-supported platform must wear a body harness/belt and lanyard attached to the boom or basket. (Body
belts may be used only for fall restraint.)
Manually propelled
elevating aerial platforms (ANSI A92.3 devices)
The platform must have a guardrail at least 42 inches ±3 inches above the floor, a midrail, and toeboards at least 4 inches high.
Boom-supported elevating work platforms
(ANSI A92.5 devices)
The platform must have a guardrail at least 42 inches ±3 inches above the floor, a midrail, and toeboards at least 4 inches high.
Each worker on the platform must wear a body harness/belt and lanyard attached to the boom or platform.
Self-propelled elevating
work platforms
(ANSI A92.6 devices)
The platform must have a guardrail 42 inches ±3 inches above the floor, a midrail, and toeboards at least 4 inches high.
Safe Work Practices
Damaged Scaffolds and Components
Any part of a damaged scaffold or component must be removed from service until it is
repaired or replaced.
Erecting, Moving, Dismantling
Scaffolds must be erected, moved, dismantled, or altered only under the supervision of a
competent person. The competent person must be on the worksite to direct and
supervise all scaffold erecting, dismantling, altering, and moving operations. Work must
be performed only by trained, experienced persons selected by the competent person.
Horizontal Movement
A scaffold cannot be moved horizontally when a worker is on it unless it has been
designed by a registered professional engineer specifically for horizontal movement.
Load Capacities
Scaffolds and scaffold components must not be loaded over their maximum intended
loads or rated capacities. Remember that the maximum intended load for a component
depends on the scaffold type and configuration. Scaffolds and components must be able
to support four times their maximum intended load — not the rated load. The intended load includes workers, equipment, and supply loads. The intended load should never
exceed the rated load unless the design is approved by an engineer and the
manufacturer.
Ladders and Large Area Scaffolds
Ladders can be used only on large area scaffolds; they cannot be used on other types of
platforms to increase the working height. Large area scaffolds include pole scaffolds,
tube and coupler scaffolds, systems scaffolds, or fabricated frame scaffolds erected over
an entire work area.
Power Lines
Workers must stay clear of power lines and any conductive material on the scaffold. The
minimum clearance is 10 feet for all uninsulated lines and insulated lines more than 300
volts. The minimum clearance for insulated lines less than 300 volts is three feet.
Scaffold Inspection
Scaffolds and components must be inspected by a competent person before each work
day and after any incident that could weaken them.
© Safety Services Company 18-13
Shore or Lean-To Scaffolds
Shore or lean-to scaffolds are prohibited. They are not properly designed and are a
potential safety hazard for anyone who works on them.
Slippery Scaffolds
Working on a scaffold coated with snow, ice, or other slippery material is prohibited unless it is necessary to remove the slippery material.
Storms and High Winds
Working on a scaffold is prohibited during storms or high winds unless a competent person has determined that it is safe to be on the scaffold and workers are protected by
personal fall arrest systems or wind screens.
Suspension Ropes
Suspension ropes must be protected from heat and acids or other corrosive substances or be made from material that will not be damaged by corrosive substances.
Tag Lines
When a scaffold might be struck by a swinging load, tag lines or equivalent means must
be used to control the load.
Supported Scaffolds
OSHA defines a supported scaffold as one or more platforms supported by outrigger
beams, brackets, poles, legs, uprights, posts, frames, or similar rigid support.
Height to Smallest Base Dimension
Supported scaffolds with a height-to-smallest base-width ratio of more than 4-to-1 (including outrigger supports) must be restrained from tipping by ties, guys, braces, or
equivalent means. “Equivalent means” refers to other designs, materials, or methods
that provide an equal or greater degree of safety for workers.
Guys, Ties, and Braces
Guys, ties, and braces must be installed where horizontal members support both inner
and outer legs. They must be installed according to the manufacturer’s
recommendations or at the closest horizontal member to the 4-to-1 height and repeated
vertically at least every 20 feet if the scaffold is up to 3 feet wide; every 26 feet if the
scaffold is greater than 3 feet wide.
Be sure to use vertical and horizontal tie-ins to keep the scaffold from falling into or
away from a structure. A qualified person must design the tie-ins.
Support Surface
Poles, legs, posts, frames, and uprights must bear on base plates and mud sills or a firm
foundation. The scaffold structure must be plumb and braced so that it does not sway.
Footings must offer full support without settling. Base plates are always required on
supported scaffolds; however, a concrete slab is considered a firm foundation and can be
substituted for mudsills.

18-14 © Safety Services Company
SAFE PRACTICE CHECKLIST
Access
Maintain a safe access to scaffolds and scaffold platforms.
Do not climb cross braces to reach a scaffold platform. Use ladders or stairways to reach platforms that are more than 2 feet
above or below the access point.
Components
and
Connections
Never use damaged scaffold components. Repair or replace them
immediately. Make sure a competent person inspects the components before each work shift.
Do not modify components.
Do not mix components made by different manufacturers. Never use damaged wire rope.
Environment Watch for electrical hazards, slippery platforms, and strong winds.
Erecting,
Dismantling,
and Moving
Have only trained and experienced workers erect suspension scaffolds.
Never roll a scaffold by yourself while you are on it. Never use wood outrigger systems.
Fall-Protection
and Falling
Objects
Match fall protection systems with the appropriate type of scaffold. Make sure platforms are guarded to keep workers and equipment from
falling. Do not drop anything from a scaffold.
Inspection Inspect components, connections, planks, and structures regularly for
hazards.
Ladders Do not use ladders for any reason on a standard scaffold platform.
Leveling
Keep the scaffold level, plumb, and square.
Do not use bricks, blocks, barrels or other unstable objects to level a scaffold.
Platforms
Do not work on slippery platforms. Never use a stage that is too long or too short for the job.
Planking must be sound and meet OSHA requirements. Do not use makeshift methods to increase the working height of a scaffold
platform.
Rough-terrain Forklift Scaffolds
You can use a forklift to support a platform only if the entire platform is attached to the
forks and the vehicle is not moved when someone is on the platform. Attached means
the platform is fastened to the forks with bolts or by an equally safe method. All scaffold
capacity, construction, access, use, and fall protection requirements apply.
Follow these requirements for safe personnel lifting operations:
Before an employee is elevated on a rough terrain forklift scaffold, a pre-lift meeting will
be held to review the appropriate requirements and procedures to be followed. The pre-
lift meeting will be attended by all of the following personnel:
The person(s) responsible for the task to be performed.
The signalperson.
The lift operator.
The personnel to be lifted.
The scaffold platform will be attached to the forks by enclosed sleeves and will be
secured against the back of the forks with a mechanical device so that the platform
cannot tip or slip.
The lifting carriage & forks will be secured to prevent them from tipping upward.
Protection will be provided for personnel on the platform from moving parts and on lift trucks equipped with a lifting mast. The side of the platform adjacent to the mast

© Safety Services Company 18-15
will be protected by a solid or mesh guard that is sufficient in height and width to
prevent contact with moving parts of the mast. On trucks equipped with rotators, the
rotation will be deactivated.
A work platform will be in compliance with all of the following requirements:
Be of welded mild steel construction that has a minimum safety factor of 4 times the
maximum intended load.
Have a continuous guardrail system constructed as follows:
Have a top rail which is located not less than 36 inches, nor more than 42 inches,
above the platform floor and which is constructed to withstand a minimum of 200
pounds of force in any direction. Have a midrail which is installed at mid-height between the top rail and platform
floor and which is constructed to withstand a 200-pound side thrust.
Have a toeboard which is not less than 4 inches in nominal height and which is
installed not more than ¼ of an inch above the floor around the periphery of the
work platform. If the platform has a gate, then toeboard will also be installed on the gate.
Have a wood planking, steel plate, or a steel grating bolted or welded to the
bottom of the platform and be maintained free of slip or trip hazards.
Have a permanently affixed sign on the platform that specifies the maximum
number of passengers allowed, the work platform identification number, and the
maximum rated load. Be easily identifiable by high-visibility color or marking.
An employee on a scaffold who is exposed to an overhead hazard of falling material
or overhead projections will be protected with overhead protection that is sufficient to prevent injury.
The lifting mechanism will operate smoothly through its entire lift range, both empty
and loaded and all lift-limiting devices and latches will be functional.
The work platform will be level when in use.
If an employee is elevated in a platform on a variable reach lift truck, a personal fall
arrest system, including the required anchorage is required and will be worn when an employee is elevated.
The rough terrain fork truck or the lift truck will rest on firm footing. Leveling devices
and outriggers will be used where provided on equipment.
A trained operator will remain at the operator station of a lift truck to control the lift
truck while an employee is elevated. The lift truck control or controls will be in neutral and the parking brake set. The operator of the lift truck scaffold platform will
be able to see the elevated platform at all times.
A lift truck platform will be returned to the ground before a lift truck is repositioned.
The forklift will be moved as close to the work area as possible for final positioning.
An employee will exit the landed platform and reboard the platform only after the lift truck repositioning is completed.
A lift truck operator will keep his or her hands and feet clear of the controls that are
not in use.
The path that a lift truck platform travels will be clear of hazards, such as storage
racks, scaffolds, overhead obstructions, and electrical lines. Distances will be maintained from electrical lines as required.
A lift truck operator will lift and lower an employee smoothly, with caution, and either
at the employee’s request or after alerting the elevated employee of intended
movement. An operator of a lift truck that has a telescopic boom will extend or
retract the boom only at idle or near idle speed.
The combined mass weight of the platform, load, and the employee will not be more than 1/3 of the rated capacity of the rough terrain forklift truck on which the platform
is used.
18-16 © Safety Services Company
An employee will maintain firm footing on the platform floor. Railings, planks,
ladders, or other materials will not be used on the platform to achieve reach or
height. The guardrail system of the platform will not be used to support any of the following:
Materials
Other work platforms
Employees
The platform will be lowered to ground level for an employee to enter or exit, except
where elevated work areas are inaccessible or hazardous to reach. An employee may
exit the platform with the knowledge and consent of the employer. When exiting to unguarded work areas, fall protection will be provided and used as required. An
employee will not climb on any part of a lift truck when attempting to enter or exit
the platform.
A platform will not be modified if the modification is detrimental to its safe use.
Floor dimensions parallel to the truck longitudinal centerline will not be more than 2 times the load center distance listed on the rough terrain forklift truck nameplate.
The floor dimension width will not be more than the overall width of the truck
measured across the load-bearing tires plus 10 inches on either side. The minimum
space for each employee on the platform will be not less than 18 inches in either
direction.
A wood pallet will not be used as a platform for lift truck scaffolds. If arc welding is performed by an employee on the platform, then the electrode
holders will be protected from contact with the metal components of the work
platform.
The only tools that are permitted on the work platform are hand tools and portable
powered tools. Materials and tools will be secured to prevent displacement. The total weight of compressed gas cylinders will not be more than 20 pounds.
A work platform will not be used during high winds, electrical storms, snow, ice, sleet,
or other adverse weather conditions that could affect the safety of the employees on
the work platform or the operator of the truck.
An employee will keep all parts of his or her body inside the platform during raising, lowering, or repositioning of the platform.
There will be a communication system between an employee on the work platform
and the operator of the rough terrain forklift truck or a fork lift truck.
Inspection and Maintenance of Rough Terrain Forklift Trucks
Before an employee is elevated on a rough terrain forklift truck platform, a trained
operator or other qualified person will inspect all of the following items:
Tire condition & inflation pressure. Steering mechanism.
Warning devices.
Lights.
Brakes.
Lift and tilt mechanisms, load engaging means, chains, cables, and limit
switches.
Fuel systems.
Other work platforms.
A forklift truck will not be operated if an unsafe condition is found before or during
use until the truck has been restored to a safe operating condition.
A rough terrain forklift truck and forklift trucks will be maintained according to the manufacturer’s recommendations.

© Safety Services Company 18-17
Operator Training
Employers must ensure that an employee has been trained before being assigned as an
operator of a rough terrain forklift truck that is used to elevate personnel. An employee
will be trained in all of the following areas:
The capabilities of the equipment and its attachments.
The purpose, use, and limitations of the controls.
How to make daily checks.
An employee will practice operating an assigned vehicle and perform the functions
necessary for a particular job until proficiency is achieved.
Operator Permits
Some jurisdictions require that permits be issued by the company to the operator of a
rough terrain forklift performing personnel lifting operations. Follow these procedures:
Employers must ensure that an operator has a valid permit to operate a rough
terrain forklift or a forklift truck for elevating an employee. The operator will carry the permit or will have the permit available if it is requested by any regulating
department representative, during working hours.
A permit to operate a rough terrain forklift truck or a forklift truck is valid only for
work performed for the employer who issued the permit. A permit may be issued
for a period of not more than 3 years. A permit will contain:
Firm name.
Operator’s name.
Date issued.
Date expiring
Operator restrictions, if any.
If a restricted permit to operate is issued, then the permit will state the nature of the
restriction. The truck type an operator is trained on and qualified to operate.
Types of Supported Scaffolds
Bricklayer's Square Scaffolds
Wood bricklayer’s scaffolds must be reinforced with gussets on both sides of each
corner.
Install diagonal braces on all sides of each square.
Install diagonal braces between squares on the rear and front sides of the scaffold. Do not exceed three tiers in height. One square must rest directly above the
other.
Crawling Boards (chicken ladders)
Crawling boards must extend from the roof peak to the eaves when used for roof
construction, repair, or maintenance.
Crawling boards must be secured to the roof by ridge hooks or other means that
meet equivalent strength and durability criteria.
Fabricated Frame Scaffolds
When you move platforms to the next level, leave the existing platform undisturbed until the new end frames have been set in place and braced.
Frames and panels must be braced by cross, horizontal, or diagonal braces that
secure vertical members together laterally.
Join frames and panels together vertically by coupling or stacking pins.
If uplift could displace scaffold end frames or panels, the frames or panels must be locked together vertically.
Scaffolds more than 125 feet above their base plates must be designed by a
registered professional engineer.

18-18 © Safety Services Company
Form Scaffolds and Carpenter's Bracket Scaffolds
Brackets, except those for wooden bracket-form scaffolds, must be attached to the
supporting formwork or structure by: nails; a metal stud attachment device;
welding; hooking over a secured structural supporting member; or, for carpenter’s
bracket scaffolds, by a bolt extending through to the opposite side of the
structure’s wall.
Wooden bracket-form scaffolds must be an integral part of the form panel. Folding type metal brackets, when extended, must be either bolted or secured with
a locking-type pin.
Horse Scaffolds
Scaffolds must not be constructed more than two tiers or 10 feet high, whichever
is less.
When you arrange horses in tiers, place each horse directly over the horse in the
tier below. The legs of each horse must be nailed down or otherwise secured to prevent displacement. Each tier must be cross braced.
Ladder Jack Scaffolds
Platforms must not exceed 20 feet in height.
All ladders used to support ladder jack scaffolds must meet the requirements of
Subpart X, Stairways and Ladders.
Job-made ladders cannot be used to support ladder jack scaffolds.
The ladder jack must be designed and constructed to bear on the side rails and ladder rungs or on the ladder rungs alone.
Ladders that support ladder jacks must be placed, fastened, or equipped with
devices to prevent slipping.
Scaffold platforms must not be bridged one to another.
Mobile Scaffolds
When a freestanding mobile scaffold is used, the height will not be more than 4 times
the minimum base dimension. Outriggers, when used, may be considered as part of the base dimension. The
outriggers will be installed on both sides of the scaffold at each frame line.
Locking devices will be used to secure the casters to the frame or adjusting screw.
The adjusting screw will not extend more than 12 inches. The casters will be
provided with a positive locking device to prevent movement of the scaffold. The device will be used when the scaffold is in use, except where the work platform is 4
feet or less from the floor.
Vertical members of the scaffold will be braced by cross bracing and diagonal bracing.
Not less than 2 horizontal diagonal braces will be installed, 1 as close to the casters
as possible, at intervals of not more than 4 times the least-based dimension. The horizontal diagonal brace may be omitted on a scaffold that is specifically designed to
absorb racking.
A scaffold platform will cover the full width of the scaffold, except for a necessary
entrance opening. A platform will be secured in place. A platform will not extend
outward beyond the base supports of the scaffold unless outrigger frames or
equivalent devices are used to ensure stability. A ladder or stairway that is provided on a manually propelled mobile scaffold will be
affixed or built into the scaffold and will be so located that, when in use, the ladder or
stairway does not have a tendency to tip the scaffold. A landing platform will be
provided at intervals of not more than 30 feet.
Only manual force will be used to move a scaffold. The force will be applied near or as close to the base as practical, except for a scaffold with a work platform that is 4
feet or less from the floor.

© Safety Services Company 18-19
When being used, a mobile scaffold will rest upon a suitable footing and will stand
plumb. Where leveling of the scaffold is necessary, screw jacks or an equivalent
means will be used. An employer will not allow an employee to ride on a mobile scaffold, unless all of the
following conditions exist:
The floor or surface is within 3 degrees of level and is free from pits, holes, or
obstructions. The minimum base dimension of the scaffold when ready for rolling is not less than
½ of the height.
The casters are equipped with rubber or similar resilient tires.
All tools and materials are secured or removed from the platform before the mobile
scaffold is moved. The scaffold is equipped with guardrails on all sides.
Before a scaffold is moved, each employee on the scaffold will be made aware of
the move.
A mobile scaffold will be in compliance with the applicable provisions regarding
scaffold platforms and frame members.
A power system used to propel a mobile scaffold will be designed for such
applications. A forklift, truck, similar motor vehicle, or add-on motor will not be used
to propel a scaffold unless the scaffold is designed to be propelled by these types of
applications. If a power system is used to propel a scaffold, then the propelling force will be
applied directly to the wheel and will not produce a speed of more than 1 foot per
second.
Personnel will not be on any part of a powered mobile scaffold that extends outward
beyond the wheels, casters, or other supports. A powered mobile scaffold will be stabilized to prevent tipping during movement.
Outrigger Scaffolds
The inboard end of outrigger beams, measured from the fulcrum point to the extreme
point of anchorage, must be not less than 1.5 times the outboard end in length.
Outrigger beams fabricated in the shape of an I-beam or channel must be placed so
that the web section is vertical.
The fulcrum point of outrigger beams must rest on secure bearings at least 6 inches in each horizontal dimension.
Outrigger beams must be secured in place and braced at the fulcrum point against
tipping.
Securely anchor the inboard ends of outrigger beams. Use braced struts bearing
against sills that contact the overhead beams or ceiling, or use tension members secured to the floor joists underfoot.
The entire supporting structure must be securely braced to prevent horizontal
movement.
Platform units must be secured to outriggers.
Scaffolds and scaffold components must be designed by a registered professional
engineer.
Plasterer's, Decorator's, and Large Area Scaffolds
These scaffolds must be constructed in accordance with the requirements for pole
scaffolds, tube-and-coupler scaffolds, or fabricated frame scaffolds.
Pole Scaffolds
Pole scaffolds more than 60 feet in height must be designed by a registered professional engineer.
When you move platforms to the next level, leave the existing platform undisturbed
until new bearers are set and braced.

18-20 © Safety Services Company
Install cross bracing between the inner and outer sets of poles on double pole
scaffolds.
Install runners and bearers on edge. Install diagonal bracing in both directions across the entire inside face of double-pole
scaffolds that support loads of 50 pounds or more per square foot.
Extend runners over a minimum of two poles. Support by bearing blocks securely
attached to the poles.
Install diagonal bracing in both directions across the entire outside face of double- and single-pole scaffolds.
Extend bearers a minimum of 3 inches beyond the outside edges of runners.
Do not splice braces, bearers, and runners between poles.
Where you splice wooden poles, square the ends. Make sure that wood splice plates
are on at least two adjacent sides and that they extend at least 2 feet on either side
of the splice.
Pump Jack Scaffolds
Pump jack brackets, braces, and accessories must be fabricated from metal plates
and angles. Each pump jack bracket must have two positive gripping mechanisms.
Secure poles to the structure with rigid triangular bracing.
Workbenches must not be used as scaffold platforms.
Wood poles must be straight-grained and free of shakes, large loose (or dead) knots,
and other defects. Wood poles constructed in two continuous lengths must be joined together with the
seam parallel to the bracket.
If two-by-fours are spliced to make a pole, mending plates must be installed at all
splices to maintain the full strength of the member.
Roof Bracket Scaffolds
Scaffold brackets must fit the pitch of the roof and provide a level support for the
platform. Anchor brackets with nails or secure with first-grade manila rope at least ¾ inch
diameter.
Step, Platform, and Trestle Ladder Scaffolds
Scaffold platforms must not be any higher than the second-highest rung or step of
the ladder supporting the platform.
All ladders used in conjunction with step, platform, and trestle ladder scaffolds
must meet the pertinent requirements of Subpart X, Stairways and Ladders. Do not use job-made ladders.
Ladders that support step, platform, and trestle ladder scaffolds must be placed,
fastened, or equipped with devices to prevent slipping.
Scaffolds must not be bridged one to another.
Stilts
A worker may wear stilts only on a large-area scaffold.
When workers use stilts on a large-area scaffold protected by guardrails, the guardrail height must be increased an amount equal to the height of the stilts.
Stilts can be used only on surfaces that are flat and free of pits, holes, and other
obstructions.
Keep stilts properly maintained. Any alteration of the original equipment must be
approved by the manufacturer.
Tube and Coupler Scaffolds
When you move platforms to the next level, leave the existing platform undisturbed until new bearers are set and braced.
Install transverse bracing forming an “X” across the width of the scaffold, at every
third set of posts horizontally, and every fourth runner vertically.
© Safety Services Company 18-21
On straight-run scaffolds, make sure longitudinal bracing across the inner and outer
rows of posts is installed diagonally in both directions. The bracing must extend from
the base of the end posts upward to the top of the scaffold at approximately a 45-degree angle.
When you cannot attach bracing to posts, attach it the runners as close to the post as
possible.
Install bearers transversely between posts.
Extend bearers beyond the posts and runners. They must have full contact with the coupler.
Install runners along the length of the scaffold on both the inside and outside posts at
level heights.
Interlock runners on straight runs in continuous lengths and couple them to each
post. The bottom runners and bearers must be located as close to the base as
possible. Couplers must be made from a structural metal such as drop-forged steel, malleable
iron, or structural-grade aluminum.
Tube and coupler scaffolds more than 125 feet in height must be designed by a
registered professional engineer.
Window Jack Scaffolds
Scaffolds must be securely attached to the window opening.
Use the scaffold to work only at the window opening through which the jack is placed.
Do not use window jacks to support planks placed between one window jack and
another.
Suspension Scaffolds
OSHA defines a suspension scaffold as one or more platforms suspended by ropes or
other non-rigid means from an overhead structure.
Support Device Load Requirements
Support devices such as outrigger beams, cornice hooks, and parapet clamps must rest
on surfaces that can support at least four times the scaffold’s load when the scaffold
operates at the rated load of the hoist (or at least 1.5 times the scaffold load at the stall
capacity of the hoist, whichever is greater).
Outrigger Beams
Outrigger beams must be made of structural metal or material of equivalent strength
and must be restrained. The outrigger beams must be secured directly to the supporting
surface or stabilized by counterweights. Because masons’ multi-point adjustable suspension scaffolds bear heavy loads, their supporting outrigger beams cannot be
stabilized by counterweights; the supporting surface could become dangerously
overloaded.
Outrigger beams must have stop bolts or shackles at both ends and be securely fastened
with the flanges turned out when channel iron beams are used in place of I-beams.
Bearing supports must be perpendicular to the beam center line. Outrigger beams must be set and maintained with the web vertically. The shackle that attaches the rope to the
outrigger beam must be placed directly over the center line of the stirrup.
Direct Connections
A competent person must evaluate all direct connections and confirm that scaffold-
supporting surfaces can support the imposed loads. An engineer must design masons’
multi-point adjustable suspension scaffold connections.
Counterweights

18-22 © Safety Services Company
Counterweights must be used only for their intended purpose and must not be changed
or moved until the scaffold is dismantled. Sand and other flowable material cannot be
used as a counterweight. Solid materials such as large concrete or lead blocks designed to be used as counterweight are acceptable, however.
Hoists and Related Equipment
Winding drum hoists must have at least four wraps of the suspension rope at the lowest
point of scaffold travel. When other types of hoists are used, the suspension ropes must be long enough so the scaffold can be lowered without the rope end passing through the
hoist.
Gasoline-powered equipment and hoists cannot be used on suspension scaffolds.
Suspension scaffold hoists must have an operating brake and an automatic braking
device or locking pawl that engages when a hoist makes a sudden change in momentum or an accelerated over-speed.
Manually operated hoists must descend with a positive crank force.
Suspension Wire Rope
Repaired wire rope cannot be used for suspension rope. The load end of wire suspension
ropes must be fitted with properly sized thimbles and secured by eye splicing or
equivalent means. A competent person must check wire ropes for defects before each
work-shift. Damaged rope must be replaced. Swaged attachments or spliced eyes on
wire suspension ropes cannot be used unless they are made by a rope manufacturer or a
qualified person.
Securing Scaffolds
Two-point and multi-point suspension scaffolds must be secured if they could sway; a
competent person must make the determination. Window cleaners’ anchors cannot be used to secure suspension scaffolds.
Safety Devices
Emergency escape and rescue devices cannot be used as working platforms. This
requirement does not apply to systems that function as suspension scaffolds and as emergency/rescue devices.
Tiebacks
Tiebacks must be at least as strong as suspension ropes and must be secured to a structurally sound anchorage on the building or structure. Do not use standpipes, vents,
other piping systems, or electrical conduit for anchorages. Be sure to install tiebacks
perpendicular to the face of the building or structure or use opposing angle tiebacks. Do
not install single tiebacks at an angle to the face of a building or structure. Support
devices such as cornice hooks, roof hooks, or parapet clamps must also be secured by
properly installed tiebacks.
Types of Suspension Scaffolds
Catenary Scaffolds
No more than one platform can be placed between consecutive vertical pickups and no more than two platforms must be used on a catenary scaffold.
Platforms supported by wire ropes must have hook-shaped stops on each end to
prevent them from slipping off the wire ropes. These hooks must be placed so that
they will prevent the platform from falling if one of the horizontal wire ropes breaks.
Wire ropes must not be tightened so much that a scaffold load will overstress them. Wire ropes must be continuous, without splices between anchors.

© Safety Services Company 18-23
Float Scaffolds
The platform must be supported by at least two bearers, each of which must project
6 or more inches beyond the platform on both sides. Each bearer must be securely
fastened to the platform.
Rope connections must keep the platform from shifting or slipping.
Interior Hung Scaffolds
Scaffolds must be suspended only from a roof or other structural members such as
ceiling beams. Inspect overhead supporting members such as roofs or ceiling beams before erecting
the scaffold.
Connect suspension ropes and cables to overhead supporting members by shackles,
clips, or thimbles.
Multi-Level Suspended Scaffolds
Scaffolds must be equipped with additional independent support lines equal to the
number of supported points, as strong as the suspension ropes, and rigged to support the scaffold if the suspension rope(s) fail.
Independent support lines and suspension ropes must not be attached to the same
anchorage points.
Supports for platforms must be attached directly to the support stirrup and not to any
other platform.
Multi-Point Adjustable Suspension Scaffolds
When you use two or more scaffolds, they must not be bridged to one another unless
they are designed to be bridged, the bridge connections are articulated, and the hoists are properly sized.
If bridges are not used, you can go from one platform to another only when the
platforms are the same height and are abutting.
Scaffolds must be suspended from metal outriggers, brackets, wire rope slings, or
hooks.
Needle Beam Scaffolds
Scaffold support beams must be installed on edge. Use ropes or hangers for supports. One end of a needle beam scaffold, however,
may be supported by a permanent structural member.
Ropes must be securely attached to the needle beams.
The support connection must prevent the needle beam from rolling or becoming
displaced. Platform units must be securely attached to the needle beams. Cleats and overhang
are not acceptable.
Repair Bracket Scaffolds
Brackets must be secured by one or more wire ropes at least ½-inch in diameter.
Attach each bracket to the securing wire rope (or ropes) by a locking device that will
keep the bracket and the rope from separating.
Each bracket, at the contact point between the supporting structure and the bottom of the bracket, must have a shoe (heel block or foot) that will prevent the bracket
from moving laterally.
Platforms must be secured to the brackets so they do not move or separate from the
brackets.
If you place a wire rope around a structure to anchor a personal fall arrest system for workers erecting or dismantling a scaffold, the wire rope must meet Subpart M and
must be of at least 5/16-inch diameter.
Each wire rope used to secure brackets in place or as a personal fall arrest system
anchorage must be protected from damage.

18-24 © Safety Services Company
Use a turnbuckle at least 1 inch in diameter to tension wire ropes that secure
brackets in place or that anchor personal fall arrest systems.
Each turnbuckle must be connected to the other end of its rope by an appropriately sized eye-splice thimble.
Do not use U-bolt wire rope clips on any wire rope to secure brackets or to anchor
personal fall arrest systems.
Do not drop materials over the outside of the supporting structure.
Erect scaffolds only one direction around a structure.
Single-Point Adjustable Suspension Scaffolds
If two single-point adjustable suspension scaffolds are combined to form a two-point adjustable suspension scaffold, the scaffold must comply with the requirements for
two-point adjustable suspension scaffolds.
Under most circumstances, the supporting rope between the scaffold and the
suspension device must be kept vertical.
Boatswain’s chair tackle must consist of correctly sized ball bearings or bushed blocks containing safety hooks and properly “eye-spliced” minimum ⅝-inch diameter first-
grade manila rope.
Boatswain’s chair seat slings must be reeved through four corner holes in the seat,
must cross each other on the underside of the seat, and must be rigged to prevent
slippage which could cause an out-of-level condition.
Boatswain’s chair seat slings must be a minimum of ⅝-inch diameter rope that will satisfy the strength, slip resistance, and durability of first-grade manila rope.
When workers use a heat-producing process such as gas or arc welding, boatswain’s
chair seat slings must be a minimum of ⅜-inch wire rope.
Non-cross-laminated wood boatswain’s chairs must be reinforced on their undersides
by cleats securely fastened to prevent the boards from splitting.
Two-Point Adjustable Suspension Scaffolds
Platforms must not be more than 36 inches wide unless they are designed by a qualified person.
Platforms must be securely fastened to hangers.
The blocks for fiber or synthetic ropes must consist of at least one double and one
single block. The sheaves of all blocks must fit the size of the rope used.
Platforms must be ladder-type, plank-type, beam-type, or light-metal-type. Do not bridge or connect two-point scaffolds to one another when raising or lowering
them unless the bridge connections are attached and the hoists are properly sized.
You can go from one platform to another only when the plat-forms are at the same
height, are abutting, and you use walk-through stirrups specifically designed for this
purpose.

© Safety Services Company 18-25
Vehicle Mounted Elevating & Rotating
Work Platforms (Aerial Lifts)
This type of equipment falls in the Scaffold category. An aerial lift is an extensible or
articulating device designed to position workers and handle materials. Aerial lifts can be
powered or manually operated and do not necessarily rotate about a vertical axis.
Andy Wilson is designated by A R M Environmental Services, Inc. as the competent person in authority over all aerial device work procedures. Andy Wilson will ensure that
all safety measures and systems are in place and correctly installed; all safety
procedures are adhered to, and ensure regular inspections of the operational site and
aerial equipment are made. A R M Environmental Services, Inc. has implemented and
will enforce the following work practices and procedures to assure that no employee will
be exposed to hazards during aerial lift work operations:
Andy Wilson will confirm and verify that all employees are trained in and familiar with
required work practices and procedures in the use of any equipment required, proper
PPE, and safety procedures which must be followed to safeguard personnel involved
in aerial lifting operations or who work in the vicinity of aerial lifting operations.
Only trained and authorized personnel will be permitted to operate equipment. Each work platform will be inspected, maintained, repaired, and kept in proper
working order according to the manufacturer's maintenance and repair manuals.
Any work platform not in safe operating condition must be removed from service until
repaired. All repairs will be made by qualified service persons conforming to the
manufacturer's operating, maintenance, and repair manuals. Modifications or alterations of work platforms will be made only with written
permission of the manufacturer or any other equivalent entity.
Each work platform will be equipped with a mechanical parking brake, which will hold
the unit on any slope it is capable of climbing. When possible, wheel chocks will be
installed before using an aerial lift on an incline.
The following information will be displayed on all work platforms in a clearly visible,
accessible area and in as permanent a manner as possible:
Warnings, cautions, or restrictions for safe operation in accordance with ANSI
requirements. The rated work load will be clearly displayed at each entrance to the platform.
Before using the work platform, the operator must:
Read and understand the manufacturer's operating instructions and safety rules, and
be trained by a qualified person on the contents of the manufacturer's instructions
and safety rules.
Read and understand all decals, warnings, and instructions on the work platform.
On a daily basis, before the work platform is used, it must be given a thorough inspection, which must include:
Inspection for defects such as cracked welds, hydraulic leaks, damaged control
cable, loose wire connections, and tire damage.
Inspection of functional controls for proper operation.
Any suspect items discovered through inspection must be carefully examined and a
determination made by a qualified service person as to whether they constitute a safety
hazard. All unsafe items must be corrected before further use of the work platform.

18-26 © Safety Services Company
Before the work platform is used, the operator must survey the immediate work
area for hazards such as:
Untamped earth fills
Ditches.
Dropoffs or holes
Debris.
Bumps & floor obstructions.
Overhead obstructions and high-voltage
conductors
Other possible hazardous conditions
Before each elevation of the work platform, the operator must:
Check for overhead obstructions and high-voltage conductors. A minimum
distance of ten feet from energized high-voltage conductors must be maintained at
all times between the conductors and the operator and platform equipment. Ensure that the load and its distribution on the platform are in accordance with the
manufacturer's rated capacity. The manufacturer's recommended load limits must
never be exceeded.
Ensure that outriggers and stabilizers are used if the manufacturer's instructions
require their use. Ensure that guardrails are properly installed and gates are closed.
Before and during driving while the platform is elevated, the operator will:
Be required to look in the direction of, and keep a clear view of, the path of travel
and assure that the path of travel is firm and level.
Maintain a safe distance from obstacles, debris, drop-offs, holes, depressions,
ramps, overhead obstacles, or other hazards to safe elevated travel.
The operator must limit travel speed according to conditions. Conditions to be
observed are: Ground surface, congestion, slope, location of personnel, and other
factors that may create a hazard of collision or injury to personnel.
Stunt driving and horseplay is prohibited.
Personnel must maintain a firm footing on the platform while working thereon unless they are secured by safety harness and lanyard devices fixed to manufacturer-
approved anchor points. Use of railings or planks, ladders or any other device on the
work platform for achieving additional height is prohibited.
The operator will immediately report defects or malfunctions which become evident
during operation and must stop use of the work platform until correction has been made.
Altering/disabling safety devices or interlocks is prohibited.
Subpart L covers only vehicle-mounted elevation and rotating aerial lifts (ANSI A92.2
device). However, ANSI has additional rules covering three other types of aerial lifts:
Manually propelled elevating aerial platforms (ANSI A92.3 device)
Boom-supported elevating work platforms (ANSI A92.5 device)
Self-propelled elevating work platforms and scissor lifts (ANSI A92.6 device)
These additional rules require workers to have the manufacturer’s operation manual with
the lifts when they use them and to follow all operating and maintenance instructions.
Field Modifications
Aerial lifts may be “field modified” provided the manufacturer certifies in writing that
modifications conform to all applicable provisions of ANSI A92.2 and OSHA requirements.
Ladder and Tower Trucks
Aerial ladders must be secured in the lower traveling position before they can be
transported on highways.

© Safety Services Company 18-27
Extensible and Articulating Boom Platforms
Lift controls must be tested before platforms are used. Workers must stand firmly on
the floor of the basket & wear a body belt and a lanyard attached to the boom or basket.
Body belts are acceptable in this case, as part of a tether system. However, body belts
are not acceptable as part of a personal fall arrest system.
Electrical Tests
All electrical tests must conform to ANSI A92.2-1969 section 5.
Bursting Safety Factor
ANSI A92.2-1969, section 4.9, applies to all critical hydraulic and pneumatic
components. Critical components are those in which a failure would result in a free fall
or free rotation of the boom.
Welding Standards
Welding work must conform to the following standards:
Standard Qualification Procedure, AWS B3.0-41
Recommended Practices for Automotive Welding Design, AWS D8.4-61
Standard Qualification of Welding Procedures and Welders for Piping and
Tubing, AWS D10.9-69
Specifications for Welding Highway and Railway Bridges, AWS D2.0-69
Training Requirements
Each person who works from a scaffold must be trained to recognize hazards associated with that scaffold and to control or minimize the hazards. Training must cover:
Electrical hazards, such as overhead power transmission lines.
Fall hazards and methods to control the hazards.
Falling object hazards and methods to protect persons from falling objects.
How to use the scaffold's walkways, platform components, and access areas.
The scaffold’s load capacity and the types of loads appropriate for the scaffold. The requirements of Subpart L that apply to the Scaffold.
Workers Who Erect or Dismantle Scaffolds
Workers who erect, disassemble, move, or maintain a scaffold must be trained by a
competent person. Training must cover:
Scaffold hazards.
Erecting, disassembling, moving, and maintenance procedures.
Design criteria, maximum intended load-carrying capacity, and use.
Retraining
When an employer has reason to believe a worker lacks the skill or knowledge to safely
use, erect, or dismantle a scaffold, the employer must retrain the worker. Other reasons
for retraining include worksite changes that create new hazards and changes in the types
of scaffolds, fall protection, or falling object protection used.
The following table summarizes the training requirements for persons who work from
scaffolds and persons who erect or dismantle scaffolds.

18-28 © Safety Services Company
Summary of Training Requirements for Scaffold Users
Those Who Work from Scaffolds Those Who Erect and Dismantle Scaffolds
Critical Scaffold
Issues
Falling objects
Fall protection
Material handling on scaffolds
Scaffold load capacities
Scaffold design criteria Scaffold erecting, disassembling, moving, and
maintenance procedures Scaffold erecting, disassembling and, moving
hazards
Scaffold load capacities
What
They
Need to
Know
How to use appropriate fall protection systems
How to control scaffold hazards
How to use scaffold walkways, platform
components, and access
areas Maximum-intended and
load-carrying capacities of scaffolds
Subpart L requirements
Hazards involved in erecting/dismantling
Erection/dismantling planning procedures
How to deal with electrical hazards How to inspect components
Appropriate design criteria Maximum-intended and load-carrying
capacities of scaffolds Subpart L requirements
Who
Can Train
Them
Any person who has training
and experience in the above critical scaffold issues and
who can teach the issues to scaffold users.
Subpart L refers to a person with these skills as a
qualified person.
Any person who has training and experience in
the above critical scaffold issues who can teach the issues to erectors/dismantlers, and who
has authority to control scaffold hazards.
Subpart L refers to a person with these skills as a competent person.
How
Often to
Train
Them
Before beginning a new job Whenever changes at the
worksite present new hazards
Whenever they fail to demonstrate skills related to
any of the critical scaffold issues
Before they begin a new job
Whenever changes at the worksite present new hazards
Whenever they fail to demonstrate skills related to any of the critical scaffold issues
Effective training programs do not just happen. They require careful planning, explicit
goals and objectives, dedicated instructors, and motivated students. It does not matter
whether the activity is athletics, academics, or occupational safety and health.
The underlying training concepts are similar:
Design a training program
Conduct training, Evaluate training effectiveness
Improve training through feedback
1. Design a Training Program
Determine whether a worksite problem can be solved by training.
Will training solve the problem or are hazards or engineering problems causing injuries?
Training is most effective when it focuses on what workers need to know to do their jobs
safely. Training is especially helpful for inexperienced workers, new workers, and workers unfamiliar with special processes and equipment.

© Safety Services Company 18-29
Identify training needs
Establish what the worker is expected to do and identify hazardous tasks. Analyze each
task to determine what the worker must learn to do a job safely.
Design learning activities
Learning activities enable workers to demonstrate that they have acquired desired skills and knowledge. The activities should simulate actual job tasks as closely as possible.
Learning activities can be group-oriented, with lectures, role playing, and
demonstrations. Or they can be designed as self-paced activities for individual workers.
Ultimately, the design depends on the employer’s creativity and training resources.
2. Conduct the Training
Plan the training structure and format. Consider the number, frequency, and length of
sessions. Determine instructional techniques and who will do the training. Make sure the training is well-organized and has clearly defined objectives. Give workers an
overview of what they will learn. Relate training materials to tasks and jobs. Include
hands-on experience and role-playing activities, if possible. Reinforce learning by
summarizing objectives and key concepts. Be sure to let workers participate in
discussions and ask questions.
3. Evaluate Training Effectiveness
How do you know training is accomplishing your objectives? Develop a plan to objectively evaluate training effectiveness. Ask workers what they’ve learned through
training. Ask supervisors if workers are accomplishing training goals. Examine trends in
your injury or illness statistics for changes that training may have influenced.
4. Improve Training through Feedback
Collect and evaluate feedback from workers, supervisors, and others affected by the
training. When you are sifting through what people had to say about the training,
consider these questions:
Did the training focus on critical elements of the job?
Were major gaps in workers’ knowledge or skills covered?
Were the training objectives presented clearly?
Did the objectives state the performance levels expected of workers?
Did learning activities simulate actual work tasks? Were learning activities appropriate for the knowledge and skills the jobs required?
Were training materials organized and presented clearly?
Were workers motivated to learn?
Were workers encouraged to participate and to ask questions?
Adjust the training program if the feedback warrants a change.
Handling Emergencies
Employers must establish procedures to ensure that a worker who falls from a scaffold receives immediate attention. Emergency procedures should be fully documented before
workers begin work or use fall arrest or restraint systems. Emergency procedures
should identify key rescue and medical personnel, equipment available for rescue,
communications procedures, retrieval methods, and first-aid requirements.
The following lists identify safe practice guidelines for developing emergency response
planning procedures, responding to emergencies, and investigating accidents.

18-30 © Safety Services Company
Planning Guidelines – Before On-Site Work Begins
Make the fire department or emergency responders aware of the job specifications at
the site and any factors that may slow response time. Create one or more joint training sessions between key onsite personnel and
emergency responders.
Document the rescue plan and make sure it is posted at the worksite.
Mark the job site with signs and note the easiest access routes on & off the site.
As On-Site Work Progresses
Identify on-site equipment that can be used for rescue and retrieval. Examples:
boom-lifts, ladders, and forklifts. Maintain a current equipment inventory at the site. Equipment may change
frequently as the job progresses.
Evaluate and update the emergency response plan if onsite work tasks change.
Emergency Response Actions
Call 9-1-1 or other emergency numbers indicated on the emergency response plan.
Use 9-1-1 for ambulance service but remember that most 9-1-1 responders are not
trained to rescue an injured worker suspended in a personal fall-arrest system. Rescue procedures must ensure prompt response to a suspended worker. The 9-1-1
number does not ensure prompt response. First responders should clear a path to
the victim. Others should be sent to direct emergency personnel to the scene.
Make sure only qualified personnel attempt a technical rescue.
Prohibit all non-essential personnel from the rescue area. Talk to the victim; if possible, determine the victim’s condition.
If the victim is accessible: Comfort and check vital signs. If necessary: Administer
CPR, attempt to stop bleeding.
Do not attempt a solo rescue if the victim is suspended. Wait for trained emergency
responders.
Accident Investigation Guidelines
Report fatalities and catastrophes to OSHA within eight hours. Report injuries requiring overnight hospitalization to OSHA within 24 hours.
Identify all equipment associated with the accident and put it out of service until the
accident investigation is complete.
Document what went wrong, step by step.
Review the fall protection plan; determine how the plan could be changed to prevent similar accidents; revise the plan accordingly.
Have a qualified person examine equipment associated with the accident; if damaged,
repair or replace it. If it contributed to the accident, determine how and why, and
then replace it.
Do not disturb the scene of a fatality or catastrophe.

© Safety Services Company 18-31
SCAFFOLD SAFETY RULES
The following are common sense rules designed to promote safety when using scaffolding. These rules
are based on OSHA Standards and are intended to deal with some of the many practices and conditions
encountered in the use of scaffolding. The rules do not purport to be all-inclusive or to supplant or
replace other additional safety and precautionary measures to cover usual or unusual conditions. They
are not intended to conflict with, or supersede, any statute or regulation; reference to specific provisions
should be made by the user.
1. Post these scaffolding safety rules in a conspicuous place and be sure that all persons who erect, dismantle, or use scaffolding are aware of them.
2. Follow all state, local, and federal codes, ordinances, and regulations pertaining to scaffolding.
3. Inspect all equipment before using – Never use any equipment that is damaged or deteriorated in any way.
4. Keep all equipment in good repair. Avoid using rusted equipment – the strength of rusted equipment is not known.
5. Inspect erected scaffolds regularly to be sure that they are maintained in safe condition.
6. Consult your scaffolding supplier when in doubt – scaffolding is his business, Never Take Chances.
A. Provide adequate sills for scaffold posts and use base plates.
B. Use adjusting screws instead of blocking to
adjust to uneven grade conditions. C. Plumb and level all scaffolds as the erection
proceeds. Do not force braces to fit – level the scaffold until proper fit can be made easily.
D. Fasten all braces securely. E. DO NOT climb cross braces. An access
(climbing) ladder, access steps, frame designed
to be climbed or equivalent safe access to the scaffold will be used.
F. On wall scaffolds, place and maintain anchors
securely between structure and scaffold at least every 30' of length and 25' of height.
G. When scaffolds are to be partially or fully enclosed, specific precautions must be taken to
assure frequency and adequacy of ties attaching the scaffolding to the building due to increased
load conditions resulting from effects of wind
and weather. The scaffolding components to which the ties are attached must also be checked for additional loads.
H. Free standing scaffold towers must be restrained from tipping by guying or other means.
I. Equip all planked or staged areas with proper
guardrails, midrail, and toeboards along all open side and ends of scaffold platforms.
J. Power lines near scaffolds are dangerous – use
caution and consult the power service company for advice.
K. DO NOT use ladders or makeshift devices on
top of scaffolds to increase the height. L. DO NOT overload scaffolds. M. Planking:
1. Use only lumber that is properly inspected
and graded as scaffold plank. 2. Planking will have at least 12" of overlap and
extend 6" beyond center of support, or be
cleated at both ends to prevent sliding off supports.
3. Fabricated scaffold planks and platforms
unless cleated or restrained by hooks will extend over their end supports not less than
6" not more than 12". 4. Secure plank to scaffold when necessary.
N. For rolling scaffold, the following additional rules apply: 1. DO NOT ride rolling scaffolds.
2. Secure or remove all material and equipment from platform before moving scaffold.
3. Caster brakes must be applied at all times when scaffolds are not being moved.
4. Casters with plain stems will be attached to the panel or adjustment screw by pins or other suitable means.
5. DO NOT attempt to move a rolling scaffold without sufficient help – watch out for holes in floor and overhead obstructions.
6. DO NOT extend adjusting screws on rolling scaffolds more than 12".
7. Use Horizontal diagonal bracing near the bottom and at 20' intervals measured from
the rolling surface. 8. DO NOT use brackets on rolling scaffolds
without consideration of overturning effect.
9. The working platform height of a rolling scaffold must not exceed four times the smallest base dimension unless guyed or
otherwise stabilized. O. Additional rules for "Putlogs" and "Trusses":
1. DO NOT cantilever or extend putlogs/trusses as side brackets without thorough
consideration for loads to be applied. 2. Putlogs/trusses should extend at least 6"
beyond point of support.
3. Place proper bracing between putlogs/trusses when the span of putlog/truss is more than 12".
P. All brackets will be seated correctly with side brackets parallel to the frames and end brackets at 90 degrees to the frames. Brackets will not be bent or twisted from normal position.
Brackets (except mobile brackets designed to carry materials) are to be used as work platforms only and will not be used for storage
of material or equipment. Q. All scaffolding accessories will be used and
installed in accordance with the manufacturers
recommended procedure. Accessories will not be altered in the field. Scaffolds, frames, and
their components, manufactured by different companies will not be intermixed.

18-32 © Safety Services Company
Notes:
_______________________________________________________________________
_______________________________________________________________________
_______________________________________________________________________
_______________________________________________________________________
_______________________________________________________________________
_______________________________________________________________________
_______________________________________________________________________
_______________________________________________________________________
_______________________________________________________________________
_______________________________________________________________________
_______________________________________________________________________
_______________________________________________________________________
_______________________________________________________________________
_______________________________________________________________________
_______________________________________________________________________
_______________________________________________________________________
_______________________________________________________________________
_______________________________________________________________________
_______________________________________________________________________
_______________________________________________________________________
_______________________________________________________________________
_______________________________________________________________________
_______________________________________________________________________
_______________________________________________________________________
_______________________________________________________________________
_______________________________________________________________________
_______________________________________________________________________

© Safety Services Company 19-1
Chapter 19
Confined Spaces Policy
29 CFR-§1910.146 - Permit Required Confined Spaces
Policy Statement
This policy has been implemented to ensure that proper safe work practices and
procedures are followed to protect employees from the hazards associated with confined
spaces. Andy Wilson is designated as the competent person who administers the Permit-Required Confined Spaces Program. The following practices, procedures, and controls
will be enforced as an integral part of A R M Environmental Services, Inc. safety policy.
Andy Wilson will ensure that all employees with access to, or duties within, confined
spaces are trained in the understanding, knowledge, and skills necessary for the safe
performance of duties assigned in those areas. Training will be provided to each
affected employee:
Before the employee is first assigned duties under this section;
Before there is a change in assigned duties.
Whenever there is a change in permit space operations that present a hazard about which an employee has not previously been trained;
Whenever the employer has reason to believe either that there are deviations from
the permit space entry procedures required or that there are inadequacies in the
employee's knowledge or use of these procedures.
Employees must demonstrate proficiency in the following duties of entry into, or work
within confined spaces to complete and receive documented certification of training:
Know the hazards that may be faced during entry, including information on the mode, signs or symptoms, and consequences of exposure.
Properly use equipment as required.
Communicate with the attendant as necessary to enable the attendant to monitor
entrant status and to enable the attendant to alert entrants of the need to
evacuate the space if required.
Alert the attendant whenever the entrant recognizes any warning sign or symptom of exposure to a dangerous situation, or detects a prohibited condition.
Exit from the permit space as quickly as possible when an order to evacuate is
given by the attendant or the entry supervisor, the entrant recognizes any warning
sign or symptom of exposure to a dangerous situation, the entrant detects a
prohibited condition, or an evacuation alarm is activated.
Permit-required confined spaces in the workplace will be identified by Andy Wilson,
and employees will be required to obtain a permit to enter or work in those spaces.
Prior to entry, Andy Wilson will assess the conditions and hazards, and decide if workers will enter a permit space. Andy Wilson will be responsible for testing and
monitoring atmospheric conditions as required. Procedures will be initiated to
eliminate or control the hazards in the space including, but not limited to, the
following:

19-2 © Safety Services Company
Specifying acceptable entry conditions.
Providing each authorized entrant or that employee's authorized representative
with the opportunity to observe any monitoring or testing of permit spaces. Isolating the permit space.
Purging, inerting, flushing, or ventilating the permit space as necessary to
eliminate or control atmospheric hazards.
Providing pedestrian, vehicle, or other barriers as necessary to protect entrants
from external hazards, and prohibit unauthorized entry. Verifying that conditions in the permit space are acceptable for entry throughout
the duration of an authorized entry.
Canceling entry permits once the work is completed, or conditions change, so that
occupation of the confined space is no longer safe
A R M Environmental Services, Inc. will provide and maintain the following equipment
at no cost to employees, and ensure that employees use the equipment properly:
Testing and monitoring equipment required for atmospheric conditions. Ventilating equipment
Communications equipment
Personal protective equipment where engineering controls do not eliminate
hazards, or threat of hazards.
Lighting equipment
Barriers and shields as required Equipment, such as ladders, needed for safe ingress and egress by authorized
entrants;
Rescue and emergency equipment, except to the extent that the equipment is
provided by rescue services.
Any other equipment necessary for safe entry into and rescue from permit spaces.
An attendant will be designated for each area for the purpose of testing and
monitoring conditions and personnel anytime employees are assigned to confined
spaces. Personnel involved in confined space activities will be designated as
attendant, entry supervisor, or authorized entrant, and assigned specific duties relating to confined entry procedures as follows:
Authorized entrants are those permitted by an employer to enter a permit space.
Entrants have the following duties and responsibilities:
Knowing the permit-space hazards, including the symptoms and consequences of
exposure.
Using equipment properly.
Communicating regularly with the attendant.
Notifying the attendant immediately of hazardous conditions. Leaving the space immediately during a hazardous condition or when the attendant
orders an evacuation.
Authorized attendants are those who monitor entrants’ activities from outside the
space. Attendants have the following duties and responsibilities:
Knowing the permit-space hazards, including the symptoms and consequences of
exposure.
Knowing how many entrants are in permit space.
Staying out of the space during entry operations.
Keeping in contact with entrants. Ordering an evacuation for a hazardous condition.
Keeping unauthorized persons away from the space.
Activating rescue procedures.
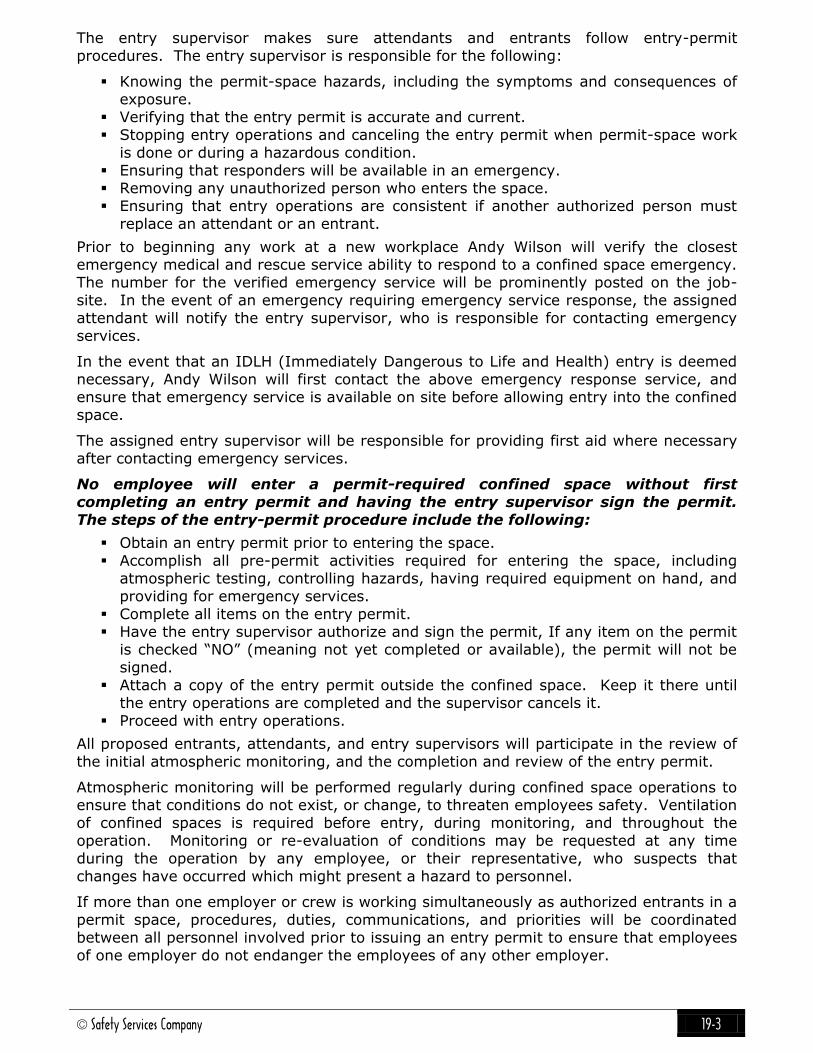
© Safety Services Company 19-3
The entry supervisor makes sure attendants and entrants follow entry-permit
procedures. The entry supervisor is responsible for the following:
Knowing the permit-space hazards, including the symptoms and consequences of exposure.
Verifying that the entry permit is accurate and current.
Stopping entry operations and canceling the entry permit when permit-space work
is done or during a hazardous condition.
Ensuring that responders will be available in an emergency. Removing any unauthorized person who enters the space.
Ensuring that entry operations are consistent if another authorized person must
replace an attendant or an entrant.
Prior to beginning any work at a new workplace Andy Wilson will verify the closest emergency medical and rescue service ability to respond to a confined space emergency.
The number for the verified emergency service will be prominently posted on the job-
site. In the event of an emergency requiring emergency service response, the assigned
attendant will notify the entry supervisor, who is responsible for contacting emergency
services.
In the event that an IDLH (Immediately Dangerous to Life and Health) entry is deemed
necessary, Andy Wilson will first contact the above emergency response service, and
ensure that emergency service is available on site before allowing entry into the confined
space.
The assigned entry supervisor will be responsible for providing first aid where necessary
after contacting emergency services.
No employee will enter a permit-required confined space without first
completing an entry permit and having the entry supervisor sign the permit.
The steps of the entry-permit procedure include the following:
Obtain an entry permit prior to entering the space.
Accomplish all pre-permit activities required for entering the space, including
atmospheric testing, controlling hazards, having required equipment on hand, and
providing for emergency services.
Complete all items on the entry permit. Have the entry supervisor authorize and sign the permit, If any item on the permit
is checked “NO” (meaning not yet completed or available), the permit will not be
signed.
Attach a copy of the entry permit outside the confined space. Keep it there until
the entry operations are completed and the supervisor cancels it.
Proceed with entry operations.
All proposed entrants, attendants, and entry supervisors will participate in the review of
the initial atmospheric monitoring, and the completion and review of the entry permit.
Atmospheric monitoring will be performed regularly during confined space operations to ensure that conditions do not exist, or change, to threaten employees safety. Ventilation
of confined spaces is required before entry, during monitoring, and throughout the
operation. Monitoring or re-evaluation of conditions may be requested at any time
during the operation by any employee, or their representative, who suspects that
changes have occurred which might present a hazard to personnel.
If more than one employer or crew is working simultaneously as authorized entrants in a
permit space, procedures, duties, communications, and priorities will be coordinated
between all personnel involved prior to issuing an entry permit to ensure that employees
of one employer do not endanger the employees of any other employer.

19-4 © Safety Services Company
The entry supervisor or program administrator will have the authority to cancel an entry
permit upon completion of the assigned task, upon finding unsuitable conditions or
preparation, or if unsuitable conditions develop. The entry supervisor will ensure that all personnel have exited the space, that equipment, tools, and materials have been
removed, and that no condition which might create a hazard has been left unresolved.
The entry supervisor will then mark the permit cancelled, sign the space provided for
cancellation, and present the cancelled permit to Andy Wilson for filing in records.
The Permit-Required Confined Space Program will be reviewed in the event of an accident/injury, or near miss, if employee protection is deemed inadequate or at least
annually using the cancelled entry permits as reference. Revisions will be made to the
program as necessary to ensure the safety of our employees.
Confined Space Program Guide
If you work in vaults, manholes, tunnels, trenches, or attics and crawlspaces, you are
probably familiar with the term, “Confined Space.” Many workplaces have confined
spaces — enclosed spaces that are difficult to enter and exit, large enough to work in,
but not designed to be occupied. Nevertheless, workers need to enter them from time to
time. For example, they may need to inspect equipment, fix leaks, do construction work, or rescue someone. The interior of a confined space may be relatively safe or it
may contain life threatening hazards — such as equipment that starts without warning,
toxic gases, corrosive chemicals, or flammable solvents.
The Purpose of this Guide
This guide focuses on confined spaces that may contain life-threatening hazards — the
so-called permit-required confined spaces, or permit spaces. Its purpose is to help you,
your coworkers, or your employees work safely in permit spaces. It answers the
following questions:
What is a permit space and how can I identify one? What is the permit required confined-space standard for general industry, and why
is it important?
What do I need to know to work safely in a permit space?
What is a permit-space program, and do I need one for my workplace?
What is a Permit-Required Confined Space?
A confined space has all of the following characteristics:
It has a restricted opening that makes entry and exit difficult. It is large enough for one to enter completely.
It is not designed to be occupied.
Characteristics of a Permit Space
A permit space is a confined space that may contain life threatening hazards. No one
can enter a permit space without first completing a written entry permit. A permit space
has all of the characteristics of a confined space and one or more of the following
characteristics:
It has – or could have – an atmospheric hazard. (A hazard that affects the air in a
permit space.)
It contains material that could trap or bury an entrant. (A person who enters a
permit space.)
It has any safety or health hazard. It is shaped so that an entrant could become trapped or asphyxiated.

© Safety Services Company 19-5
Examples of Confined Spaces:
Most confined spaces are designed to hold substances such as liquids, gases, and loose
materials, or to house equipment. Though they come in many sizes and shapes, most
can be classified in one of two ways: those with depth and open tops and those with
narrow openings.
The Meaning of “Permit Required”
Anyone who enters a permit space must first fill out a written permit that verifies that
the hazards in the space have been eliminated or controlled and that the space is safe to
enter. An entry supervisor must sign the permit and post it on the space so that
workers can see it, then cancel it when work in the space is finished.
OSHA’s Standards protect workers who enter permit spaces. It requires employers to do
the following:
Survey their workplace to identify permit spaces.
Inform employees about the location of each permit space and its hazards.
Keep unauthorized workers out of permit spaces. Develop a written program that ensures the safety of any employee who must
enter a permit space.
In 1998, OSHA revised the standard and adopted the following changes:
Gives authorized representatives’ access to the same information as employees
regarding permit spaces and the permit-space program.
Requires employers to provide employees or their authorized representatives with
the opportunity to observe monitoring of confined spaces.
Clarifies the criteria for selecting and evaluating a rescue team or service. Ensures employee participation in developing and implementing the permit-space
program.
Adds a non-mandatory appendix to guide employers in choosing appropriately
trained and equipped rescuers.
Why is the Standard important?
Permit spaces are complex environments that may contain many different hazards.
Workers can die in permit spaces because they do not know about hazards or because they use the wrong procedures to control hazards. In fact, many of those who have died
in permit spaces were trying to rescue others.
You probably would not board a commercial aircraft — even for a short flight — if you
knew that the pilot and the maintenance crew ignored take-off procedures. Nor would
you squeeze into a confined space if you knew that your coworkers had ignored procedures to eliminate or control the hazards.
The standard is important because it requires you, your coworkers, and your employees
to follow safe work practices. If you follow those practices, you will know when permit-
space hazards exist and you will use the right procedures to eliminate or control them.
If your workplace has a permit space, you will need a copy of the standard. Review it carefully. Keep in mind that this guide is intended to help you and your employees work
safely in permit spaces — it does not take the place of the standard.
This section describes eight critical activities that are part of the entry process — the
activities that take place as workers prepare to enter and exit a permit space. They are
critical activities because they ensure that those who enter a permit space can work and exit unharmed. In addition, these activities lay the foundation for an effective permit-
space program.

19-6 © Safety Services Company
What You Need to do to Work Safely in a Permit Space
Eight critical activities:
1. Identify the permit spaces
2. Identify the hazards in the spaces
3. Decide if workers will enter
4. Eliminate or control the hazards
5. Establish entry procedures
6. Train workers for entry operations
7. Make sure workers know their
responsibilities
8. Plan for emergencies
A permit space program is an employer’s plan for protecting workers within the entry process.
Identify the Permit Spaces at Your Workplace
The first thing you should do is identify all enclosures at your workplace that have the
characteristics of a confined space. (A confined space is difficult to enter and exit and
large enough for one to enter completely, but not designed to be occupied.)
Evaluate the Spaces for Hazards
Next, evaluate each confined space to determine if it is a permit space. Keep in mind
that a permit space has one or more of the following characteristics:
Contains — or could contain — an atmospheric hazard.
Contains material that could trap or bury an entrant.
Is shaped such that an entrant could become trapped or asphyxiated. Contains any safety or health hazard that could harm an entrant.
Your evaluation should identify all existing or potential hazards in each space. Be
especially careful when evaluating a confined space that could contain an atmospheric
hazard! The only way to identify an atmospheric hazard is to test for it from outside the space. Never assume a confined space is hazard-free. If you are not sure how to test
for a hazardous atmosphere, give us a call.
Inform Employees about Permit Spaces
If your workplace has a permit space, employees must know where it’s located, that it is
hazardous, and that it’s a permit space. You can post signs, such as the ones below, to
inform them.
Identify the Hazards in the Spaces
Permit-space hazards: Those who enter a permit space face two kinds of hazards:
atmospheric and non-atmospheric.
Atmospheric hazards affect the air in the space and can be flammable, toxic,
corrosive, or asphyxiating. The table below identifies common atmospheric hazards,
describes how they occur, and highlights why you should be concerned about them.
Always check atmospheric hazards in the following order: oxygen deficiencies or
displacement, flammable atmospheres, toxic atmospheres, and corrosive atmospheres.

© Safety Services Company 19-7
COMMON ATMOSPHERIC HAZARDS HAZARD HOW IT OCCURS WHY BE CONCERNED
Oxygen Deficiency (Less than 19.5%
Oxygen)
Chemical or biological reactions
consume oxygen.
Oxygen-deficient atmospheres affect heart rate, muscle
coordination, and breathing. Eventually, they lead to death.
Oxygen-enriched atmospheres increase the risk of fire or
explosions.
Oxygen Enrichment
(Greater than 23.6% Oxygen)
Results from welding tasks and
from the improper use of
oxygen for breathing air.
Flammable Atmospheres
Fuel, oxygen, and a source of ignition cause fires and
explosions.
Flammable gasses such as acetylene, butane, propane,
hydrogen, and methane are common in permit spaces.
Grain, nitrated fertilizers, and ground chemicals can produce
combustible dusts.
Toxic Atmospheres
Accumulates through some
manufacturing, biological, or
chemical reactions.
Released during work or tasks
such as welding and cleaning.
Many manufacturing processes,
stored materials, and work tasks produce toxic gases, vapors, or
dusts.
Corrosive
Atmospheres
Accumulates from some
manufacturing processes, biological or chemical
reactions.
Corrosive substances destroy living tissue. Some cause immediate
damage to skin and eyes; some have no immediate effect, but
cause cancer with prolonged exposure.
Non-atmospheric hazards, on the other hand, include many different conditions,
including mechanical dangers, loose materials, excessive noise, extreme temperatures,
low light, and difficult access. The table below identifies common non-atmospheric hazards, describes how they occur, and explains why you should be concerned about
them.
COMMON NON-ATMOSPHERIC HAZARDS HAZARD HOW IT OCCURS WHY BE CONCERNED
Engulfment
Loose materials drawn from the bottoms of storage bins can
suffocate or bury and entrant.
Liquids or materials are suddenly released into the space.
Liquid or loose materials can trap or
bury a worker in seconds.
Mechanical and Hydraulic Energy
Mechanical and hydraulic
equipment start or move unexpectedly.
Entrants servicing mechanical and hydraulic equipment can be seriously
injured or killed if the energy is not properly controlled.
Noise Permit spaces amplify sounds
produced by tools and equipment.
Noise interferes with essential communication between entrants and
attendants.
Falling Objects Objects fall into the space because topside openings are unguarded or improperly guarded.

19-8 © Safety Services Company
Extreme
Temperatures
The permit space’s location and the equipment it contains make
it very hot or cold.
Hot environments put workers at risk for heat stress, especially if they are
doing strenuous work or wearing protective clothing – cold
environments make tasks more difficult to accomplish.
Slippery Surfaces Leaks, spills, and condensation
make walking surfaces slippery.
Wet surfaces are usually slippery.
They increase the risk of falls.
Corrosive Chemicals
Corrosive chemicals are stored
in the space, or entrants use them to do tasks.
Corrosive chemicals can cause
severe eye or skin irritation if exposed workers are not wearing
protective clothing.
Access Problems Confined spaces are difficult to
enter and exit.
In an emergency, entrants may not
be able to exit quickly.
Illumination
Problems
Most permit spaces are dark places.
Poor lighting makes it difficult for
workers to enter, exit, and work in a
permit space.
Most permit-space accidents happen for the following reasons:
Workers have not been properly trained to recognize permit-space hazards.
Hazards are not eliminated or controlled before workers enter the space.
Rescuers are inexperienced or improperly trained.
Decide if Workers Will Enter a Permit Space
If you have a permit space at your workplace, will workers enter it? Are they contract
workers or your employees?
If Workers Do Not Need to Enter
Even if workers do not need to enter a permit space, you must make sure that they are
aware of the space and know about its hazards. You can do that by placing a danger
sign like this one – on the space, or permanently securing the entrance to the space —
welding it shut, for example.
If Workers Need to Enter
The table below shows what you must do before employees or contract workers enter a
permit space at your workplace.
IF THEN
Only Contract
Workers Enter
You must tell the contractor about the hazards in the space, that the
contractor must have a written permit-space program that meets OSHA
requirements, and about any special precautions necessary to protect those working in or near the space.
Contract Workers and Your
Employees Enter
You must have a written permit-space program that describes how you will
eliminate or control the permit-space hazards and ensure the safety of those who enter the space.
You must coordinate entry operations with the contractor so that the
contract workers and your employees work safely together.
Only Your
Employees Enter
You must have a written permit-space program that describes how you will eliminate or control the permit-space hazards and ensure the safety of
those who enter the space.

© Safety Services Company 19-9
Eliminate or Control the Hazards in the Space
Before allowing workers to enter a permit space, you must either eliminate all hazards in
the space or control them so that the workers can accomplish their tasks and leave the space safely. The table below summarizes the options and gives an example of each.
IF THEN EXAMPLE
The space has no atmospheric
hazards and you can
eliminate all
other hazards.
You can reclassify the space as a non-
permit space.
You must eliminate all hazards in the space before workers enter and for
the entire time they are in the space.
You must document how you eliminated the hazards and certify the
space hazard-free.
You need to enter a mixing tank that
has no atmospheric hazards but does have mixing paddles that could
start automatically.
You must lock out and/or tag out the mixing-paddle hazard before you
enter.
The space has
only an
atmospheric hazard and you
can control it with forced-air
ventilation.
Workers can enter the space under alternate procedures:
You must keep the space hazard-free
with continuous forced-air ventilation before workers enter and for the
entire time workers are in the space.
You must have test and inspection data that show forced-air ventilation
will keep the space hazard free.
You need to enter a utility vault.
You have monitored the space for
oxygen displacement and enrichment, flammable atmospheres
and toxic atmospheres. You have determined an atmospheric hazard
exists – for example oxygen
deficiency.
Your test and inspection data show
that continuous forced-air ventilation
will increase oxygen content to 19.5 percent.
You periodically monitor the
atmosphere in the space to ensure forced-air ventilation maintains safe
entry conditions.
You cannot
eliminate hazards in the
space.
You must follow your written permit-
space program.
The program must include the method for controlling the hazards, procedures
for entry operations, and an entry permit verifying that the space is safe
to enter.
You need to enter a sewer system
that contains pockets of methane
and hydrogen sulfide, but you cannot eliminate these hazards with
forced-air ventilations.
Non-permit space: The space is safe to enter and employees can work in it without a
permit as long as it is hazard free.
Alternate procedures: Specific procedures that allow workers to enter and work in a permit space without a permit if continuous forced-air ventilation controls the hazards.
Establish Entry Procedures
Before workers enter a permit space, you must have safe work procedures covering all
phases of the entry process. You must also complete an entry permit that verifies the permit space is safe for workers to enter.
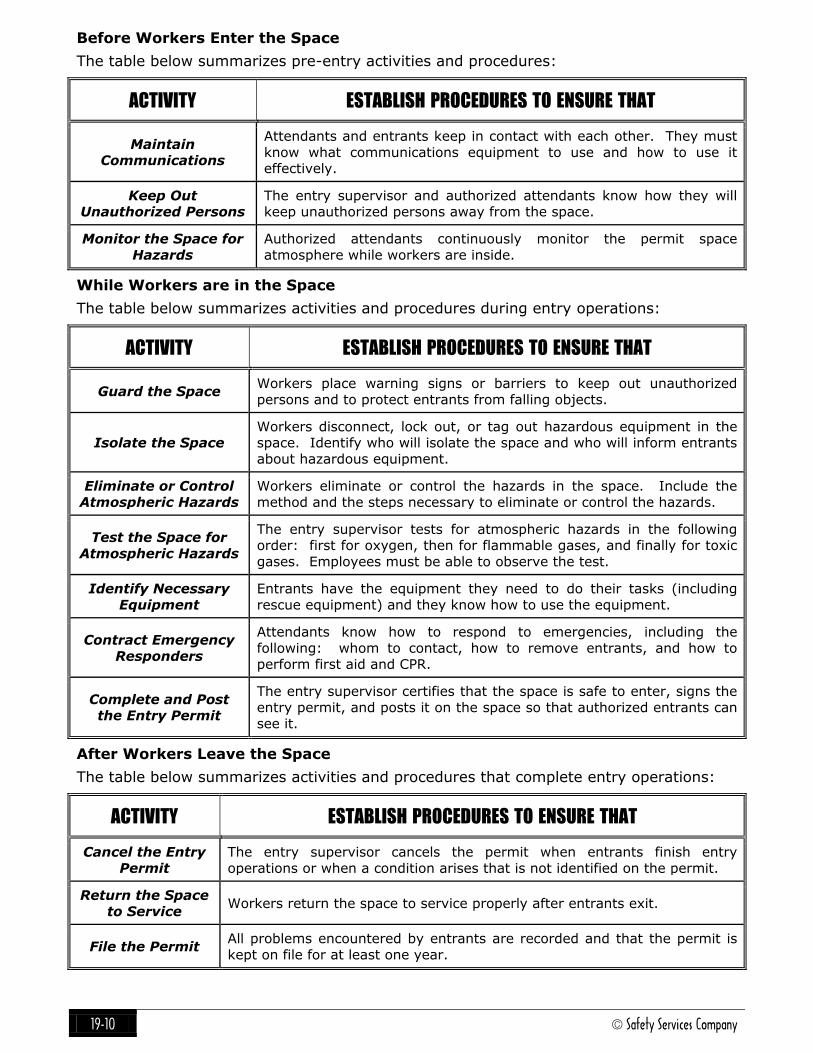
19-10 © Safety Services Company
Before Workers Enter the Space
The table below summarizes pre-entry activities and procedures:
ACTIVITY ESTABLISH PROCEDURES TO ENSURE THAT
Maintain Communications
Attendants and entrants keep in contact with each other. They must
know what communications equipment to use and how to use it effectively.
Keep Out Unauthorized Persons
The entry supervisor and authorized attendants know how they will keep unauthorized persons away from the space.
Monitor the Space for
Hazards
Authorized attendants continuously monitor the permit space
atmosphere while workers are inside.
While Workers are in the Space
The table below summarizes activities and procedures during entry operations:
ACTIVITY ESTABLISH PROCEDURES TO ENSURE THAT
Guard the Space Workers place warning signs or barriers to keep out unauthorized
persons and to protect entrants from falling objects.
Isolate the Space Workers disconnect, lock out, or tag out hazardous equipment in the space. Identify who will isolate the space and who will inform entrants
about hazardous equipment.
Eliminate or Control
Atmospheric Hazards
Workers eliminate or control the hazards in the space. Include the
method and the steps necessary to eliminate or control the hazards.
Test the Space for
Atmospheric Hazards
The entry supervisor tests for atmospheric hazards in the following order: first for oxygen, then for flammable gases, and finally for toxic
gases. Employees must be able to observe the test.
Identify Necessary
Equipment
Entrants have the equipment they need to do their tasks (including
rescue equipment) and they know how to use the equipment.
Contract Emergency
Responders
Attendants know how to respond to emergencies, including the
following: whom to contact, how to remove entrants, and how to perform first aid and CPR.
Complete and Post the Entry Permit
The entry supervisor certifies that the space is safe to enter, signs the
entry permit, and posts it on the space so that authorized entrants can see it.
After Workers Leave the Space
The table below summarizes activities and procedures that complete entry operations:
ACTIVITY ESTABLISH PROCEDURES TO ENSURE THAT
Cancel the Entry
Permit
The entry supervisor cancels the permit when entrants finish entry
operations or when a condition arises that is not identified on the permit.
Return the Space
to Service Workers return the space to service properly after entrants exit.
File the Permit All problems encountered by entrants are recorded and that the permit is
kept on file for at least one year.

© Safety Services Company 19-11
The Entry Permit
The entry permit documents acceptable entry conditions and verifies that the space is
safe for workers to enter. It must contain the following information:
Location of the space.
Purpose of entry.
Entry date and the time workers enter
the space. Authorized entrants’ names.
Authorized attendants’ names.
Entry supervisor’s name and signature.
Hazards in the space.
A list of all equipment necessary to ensure entrants’ safety.
A description of any other permits
entrants need to work in the space.
How workers will control hazards so that
the space is safe to enter.
Acceptable entry conditions.
Testing data and testers’ initials, certifying that the space is safe to
enter.
Names of emergency responders and
instructions for contacting them.
Communication procedures used by
authorized entrants and attendants.
Enter: Technically, entry occurs when any part of a worker’s body moves through the opening of the space.
On The Following Page is a SAMPLE Entry Permit

19-12 © Safety Services Company
§1910.146 Appendix D-1 – Confined Space Entry Permit Confined Space Entry Permit: ___ / ___ / ___ ___ : ___ r a.m. r p.m. ___ / ___ / ___ ___ : ___ r a.m. r p.m.
Date Issued Time Issued Date Expires Time Expires ______________________________________________________________________________________
Job Site / Space I.D.______________________________________________________________________
Job Supervisor__________________________________________________________________________ ______________________________________________________________________________________
Equipment To Be Worked On ______________________________________________________________________________________
Work To Be Performed ______________________________________________________________________________________
Standby Personnel 1. Atmospheric Checks:
Time: ___ : ___ r a.m. r p.m. Oxygen: ________ % Explosive: ________ % L.F.L. Toxic: ________ PPM 2. Tester’s signature: ________________________________________________________________ 3. Source Isolation (No Entry): N/A Yes No 4. Ventilation Modification: N/A Yes No Pumps or lines blinded, Mechanical r r r disconnected, or blocked r r r Natural Ventilation Only r r r 5. Atmospheric Check After Isolation And Ventilation Oxygen: ________ % > 19.5 % Explosive: ________ % L.F.L. < 10 % Toxic: ________ % PPM < 10 PPM H 2 S Time: _____ : _____ r a.m. r p.m. Tester’s Signature: ___________________________________________________________________ 6. Communication Procedures: ___________________________________________________________________________________ ___________________________________________________________________________________ 7. Rescue Procedures: ___________________________________________________________________________________ ___________________________________________________________________________________ ___________________________________________________________________________________
8. Entry, Standby, and Back Up Persons:
Yes
No
Successfully Completed Required Training? r r Is It Current? r r 9. Equipment: Yes No N/A Direct Reading Gas Monitor Tested? r r r Safety Harnesses And Lifelines For Entry And Standby Persons? r r r Hoisting Equipment r r r Powered Communications r r r SCBA’s For Entry And Standby Persons? r r r Protective Clothing? r r r All Electric Equipment Listed Class I, Division I, Group D and non-sparking tools? r r r 10. Periodic Atmospheric Tests: Oxygen: ___ % Time: ___ : ___ r am r pm Oxygen: ___ % Time: ___ : ___ r am r pm Oxygen: ___ % Time: ___ : ___ r am r pm Oxygen: ___ % Time: ___ : ___ r am r pm Explosive: ___ % Time: ___ : ___ r am r pm Explosive: ___ % Time: ___ : ___ r am r pm Explosive: ___ % Time: ___ : ___ r am r pm Explosive: ___ % Time: ___ : ___ r am r pm Toxic: ___ ppm Time: ___ : ___ r am r pm Toxic: ___ ppm Time: ___ : ___ r am r pm Toxic: ___ ppm Time: ___ : ___ r am r pm Toxic: ___ ppm Time: ___ : ___ r am r pm
We have reviewed the work authorized by this permit and the information contained herein. Written instructions and safety procedures Have been received and are understood. Entry cannot be approved if any squares are marked in the “No” column. This permit is not valid unless all appropriate items are completed. Permit Prepared By: (Supervisor) _________________________________________________________________________________ Approved By: (Unit Supervisor) __________________________________________________________________________________ Reviewed By: (Cs Operations Personnel) __________________________________________________________________________ _____________________________________________________ (Printed Name) (Signature) This permit to be kept at job site. Return job site copy to Safety Office following job completion. Copies: Original-(Safety Office) Copy-(Unit Supervisor) Copy-(Job Site)

© Safety Services Company 19-13
§1910.146 Appendix D-2 – Entry Permit Entry Permit:
Permit Valid For 8 Hours Only. All Copies Of Permit Will Remain At Job Site Until Job Is Completed.
___ / ___ / ___ Site Location and Description ____________________________________________________
Date ___________________________________________________________________________________________________________
Purpose of Entry ___________________________________________________________________________________________________________
Supervisor (s) in charge of crews ___________________________________________________________________________________________________________
Type of crew
(____) ____ - ______
Phone # ___________________________________________________________________________________________________________
Communication Procedures ___________________________________________________________________________________________________________
Rescue Procedures (Phone Numbers at Bottom)
*BOLD DENOTES MINIMUM REQUIREMENTS TO BE COMPLETED AND REVIEWED PRIOR TO ENTRY*
REQUIREMENTS COMPLETED Date Time
Lock Out/De-energize/Try-out ___ / ___ / ___ ___: ___ r a.m. r p.m.
Line(s) Broken-Capped-Blanked ___ / ___ / ___ ___: ___ r a.m. r p.m.
Purge-Flush and Vent ___ / ___ / ___ ___: ___ r a.m. r p.m.
Ventilation ___ / ___ / ___ ___: ___ r a.m. r p.m.
Secure Area (Post and Flag) ___ / ___ / ___ ___: ___ r a.m. r p.m.
Breathing Apparatus ___ / ___ / ___ ___: ___ r a.m. r p.m.
Resuscitator - Inhalator ___ / ___ / ___ ___: ___ r a.m. r p.m.
Standby Safety Personnel ___ / ___ / ___ ___: ___ r a.m. r p.m.
Full Body Harness with “D” ring ___ / ___ / ___ ___: ___ r a.m. r p.m.
Emergency Escape Retrieval Equipment ___ / ___ / ___ ___: ___ r a.m. r p.m.
Lifelines ___ / ___ / ___ ___: ___ r a.m. r p.m.
Fire Extinguishers ___ / ___ / ___ ___: ___ r a.m. r p.m.
Lighting (Explosive Proof) ___ / ___ / ___ ___: ___ r a.m. r p.m.
Protective Clothing ___ / ___ / ___ ___: ___ r a.m. r p.m.
Respirator(s) (Air Purifying) ___ / ___ / ___ ___: ___ r a.m. r p.m.
Burning and Welding Permit ___ / ___ / ___ ___: ___ r a.m. r p.m.
Note: Items that do not apply enter N/A in the blank.
**RECORD CONTINUOUS MONITORING RESULTS EVERY 2 HOURS**
Continuous Monitoring** Permissible
Test(S) To Be Taken Entry Level
PERCENT OF OXYGEN 19.5% to 23.5% _____ _____ _____ _____ _____ _____ _____ _____
LOWER FLAMMBLE LIMIT Under 10% _____ _____ _____ _____ _____ _____ _____ _____
CARBON MONOXIDE 35 PPM* _____ _____ _____ _____ _____ _____ _____ _____
Aromatic Hydrocarbon 1 PPM – 5 PPM _____ _____ _____ _____ _____ _____ _____ _____
Hydrogen Cyanide 4.7 PPM* (S) _____ _____ _____ _____ _____ _____ _____ _____
Hydrogen Sulfide 10 PPM+ 15PPM* _____ _____ _____ _____ _____ _____ _____ _____
Sulfur Dioxide 2 PPM+ 5 PPM* _____ _____ _____ _____ _____ _____ _____ _____
Ammonia 25 PPM 35 PPM* _____ _____ _____ _____ _____ _____ _____ _____
*Short-term exposure limit: Employee can work in the area up to 15 minutes.
+ 8 hour Time Weighted Avg: Employee can work in area 8 hrs (longer with appropriate respiratory protection
REMARKS: ________________________________________________________________________________
Gas Tester Name & Check # Instruments Used Model & / or Type Serial & / or Unit #
_________________________ ______________ ________________ ________________
_________________________ ______________ ________________ ________________
Safety Standby Person is Required for All Confined Space Work
Standby Person(s) Check# Confined Space Entrants Check #
_________________________ _______ ______________________ _______
_________________________ _______ ______________________ _______
_________________________ _______ ______________________ _______
Supervisor Authorization – All Conditions Satisfied: _________________________________________________
Department: ________________________________________________________________________________
Phone: (____) ____ - ______
Ambulance # ________ Fire # ________ Safety # _________ Gas Coordinator ________

19-14 © Safety Services Company
CONFINED SPACE ENTRY CHECKLIST Y = Yes N = No N/A = Not Applicable Y N N/A
1. Are confined spaces thoroughly emptied of any corrosive or hazardous substances, such as acids or caustics, before entry?
2. Before entry, are all lines to a confined space, containing inert, toxic, flammable, or corrosive materials valved off and blanked or disconnected and separated?
3. Is it required that all impellers, agitators, or other moving equipment inside confined spaces
be locked-out if they present a hazard?
4. Is either natural or mechanical ventilation provided prior to confined space entry?
5. Before entry, are appropriate atmospheric tests performed to check for oxygen deficiency, toxic substance, and explosive concentrations in the confined space before entry?
6. Is adequate illumination provided for the work to be performed in the confined space?
7. Is the atmosphere inside the confined space frequently tested or continuously monitored during conduct of work?
8. Is there an assigned safety standby employee outside of the confined space, whose sole responsibility is to watch the work in progress, sound an alarm if necessary, and render
assistance?
9. Is the standby employee or other employees prohibited from entering the confined space without lifelines and respiratory equipment if there are any questions as to the cause of an emergency?
10. In addition to the standby employee, is there at least one other trained rescuer in the vicinity?
11. Are all rescuers appropriately trained and using approved, recently inspected equipment?
12. Does all rescue equipment allow for lifting employees vertically from a top opening?
13. Are there trained personnel in First Aid and CPR immediately available?
14. Is there an effective communication system in place whenever respiratory equipment is
used and the employee in the confined space is out of sight of the standby person?
15. Is approved respiratory equipment required if the atmosphere inside the confined space cannot be made acceptable?
16. Is all portable electrical equipment used inside confined spaces either grounded and
double insulated, or equipped with ground fault protection?
17. Before gas welding or burning is started in a confined space, are: A. Hoses checked for leaks?
B. Compressed gas bottles forbidden inside of the confined space? C. Torches lighted only outside of the confined area? D. The confined area tested for an explosive atmosphere each time before a lighted
torch is to be taken into the confined space?
18. If employees will be using oxygen-consuming equipment--such as salamanders, torches, or furnaces,--in a confined space, is sufficient air provided to assure combustion without
reducing the oxygen concentration of the atmosphere below 19.5 percent by volume?
19. Whenever combustion-type equipment is used in confined space, are provisions made to ensure the exhaust gases are vented outside of the enclosure?
20. Is each confined space checked for decaying vegetation or animal matter, which may produce methane?
21. Is the confined space checked for possible industrial waste which may have toxic
properties?
22. If the confined space is below the ground and near areas where motor vehicles will be operating, is it possible for vehicle exhaust or carbon monoxide to enter the space?
Competent Person Signature
Date

© Safety Services Company 19-15
Train Workers for Entry Operations
Training and educating workers is the most effective way to ensure that they can identify
permit-space hazards, follow entry procedures, and respond appropriately in an emergency. Training must be certified.
Training requirements:
Those who do permit space work must understand procedures for entry, know how to control hazards, and know their roles in an emergency. They must receive training in
the following situations:
Before their permit-space duties are assigned or changed.
When there is a change in permit-space operations that presents a hazard for
which they have not been trained.
When they don’t follow entry permit procedures.
Training must be certified:
If you authorize workers to enter a permit space, you must certify that they have been
trained. The certification must contain each worker’s name, the trainer’s signature, and
the training dates. It must be available for workers or authorized representatives to
review. Trainers should understand all parts of the OSHA regulations and have
experience with the types of permit spaces employees will enter.
Ensure Workers Know Their Duties and Responsibilities
Working in permit spaces is a team effort involving authorized entrants, attendants, and
supervisors. These key players’ activities are critical to a safe, successful project.
Authorized entrants:
Authorized entrants are those permitted by an employer to enter a permit space.
Entrants have the following duties and responsibilities:
Knowing the permit-space hazards, including the symptoms and consequences of
exposure.
Using equipment properly. Communicating regularly with the attendant.
Notifying the attendant immediately of hazardous conditions.
Leaving the space immediately during a hazardous condition or when the attendant
orders an evacuation.
Authorized attendants:
Authorized attendants are those who monitor entrants’ activities from outside the space.
Attendants have the following duties and responsibilities:
Knowing the permit-space hazards,
including the symptoms and
consequences of exposure.
Knowing how many entrants are in
permit space. Staying out of the space during entry
operations.
Keeping in contact with entrants.
Ordering an evacuation for a hazardous
condition.
Keeping unauthorized persons away
from the space.
Activating rescue procedures.
The entry supervisor:
The entry supervisor makes sure attendants and entrants follow entry-permit
procedures.

19-16 © Safety Services Company
The entry supervisor is responsible for the following:
Knowing the permit-space hazards, including the symptoms and consequences of
exposure.
Verifying that the entry permit is accurate and current.
Stopping entry operations and canceling the entry permit when permit-space work
is done or during a hazardous condition.
Ensuring that responders will be available in an emergency. Removing any unauthorized person who enters the space.
Ensuring that entry operations are consistent if another authorized person must
replace an attendant or an entrant.
Plan for Emergencies
Before you authorize workers to enter a permit space, you must be sure that
experienced emergency responders will be available if an entrant needs help.
Responders must be able to reach your worksite promptly and know how to deal with the
emergency effectively. Most permit-space fatalities are caused by those who do not understand permit space hazards or who respond inappropriately during emergencies.
Most fire departments are not equipped to respond to permit-space emergencies.
Employers must tell emergency responders about any permit-space hazards they may
encounter during an emergency, must ensure that responders can reach the space
promptly, and must allow responders to practice rescues at all on-site permit spaces.
Employer’s responsibilities:
Employers must tell emergency responders about any permit-space hazards they may
encounter during an emergency, must ensure that responders can reach the space
promptly, and must allow responders to practice rescues at all on-site permit spaces.
Responders’ responsibilities:
Emergency responders have the following responsibilities:
Have the equipment necessary to perform rescues and know how to use it. Be trained as rescuers and as authorized entrants.
Practice simulated rescues at least once a year at each on-site permit space.
Keep their first-aid and CPR training up to date.
You can choose either an on-site or an off-site responder. It is important only that the responder meet your needs in an emergency. Use the following table to help you decide.
CHOOSING AN EMERGENCY RESPONDER
STEPS TO TAKE CONSIDERATIONS
Identify your needs
Do you anticipate emergencies requiring immediate action (if ventilation
fails, for example)? Or less-than-immediate action (if the most serious accident would cause a fracture or abrasion)?
Interview them Meet with the responders to find out if they can provide the emergency service you need. Posting an emergency-response number 911 for
example is not enough.
How quickly can
they reach your site?
The response time must be appropriate to the type of potential injury;
responders must be standing by when employees are working under potential IDLH (immediately dangerous to life and health) conditions.
Will they be
available when you need them?
The responders must be available any time your workers need to enter a permit space.

© Safety Services Company 19-17
How will you contact the
responders?
Do you have a way for an authorized attendant or an entry supervisor to
reach responders immediately?
Can they do
technical rescues?
Do they have the technical knowledge and equipment to perform rope
work or elevated-rescue work?
Can they do medical
Evacuations?
Do your responders have the skills and equipment for medical
evacuations?
Are they trained as
permit-space entrants?
Can the responders recognize the signs, symptoms, and consequences of
exposure to a hazardous atmosphere in a permit space at your workplace?
Do they know how
to test the
atmosphere in a permit space?
For example, do they know how to determine whether the atmosphere is
immediately dangerous to life and health?
Will they
understand the information on your
entry permit?
For example, will responders understand the ventilation and atmospheric testing data on the entry permit?
IDLH (Immediately Dangerous to Life or Health): Atmospheric concentration of
any toxic, corrosive, or asphyxiate substance that poses an immediate threat to life or would interfere with one’s ability to escape from a permit space.
What is a permit space program, and do I need one?
A permit-space program is an employer’s plan for protecting workers who need to enter a permit space. A written permit-space program documents the plan’s activities and
puts them in writing. These activities should cover all aspects of working in or near
permit spaces — from identifying the locations of the spaces to evaluating the program’s
effectiveness.
Does your workplace need a written program?
If workers need to enter a permit space at your workplace, you must have a written
permit-space program. This guide highlights the activities you should include in a
written program.
Developing a program for your workplace
Your written permit space program does not need to be a massive document. It should
clearly tell what activities and procedures will ensure the safety of those who work in
permit spaces at your workplace. It must be available for employees to review. We
have included a generic program that you can use to develop a program for your workplace. Make it an effective one. It should reflect the needs of your workplace and
ensure the safety of your coworkers or employees.
Permit-Space Program How to use this program
Policy statement Employer responsibilities
Permit-space locations and hazards
Informing employees and preventing
unauthorized entry
Entry procedures
Entry-permit procedure
Pre-entry training Duties of entrants, attendants, and
supervisors
Emergency response
Program evaluation

19-18 © Safety Services Company
How to Use This Program Your written permit-space program documents activities and procedures that will ensure
the safety of those who work in permit spaces at your workplace.
First, think about the characteristics of the permit spaces at your workplace, the
tasks that workers need to accomplish in and around the spaces, and the workers’
experience in permit spaces.
Then, use this program to help you develop, organize, and document the activities
that form your own program. Remember, this is just an outline for your program. It is not complete until you
include all the activities and procedures that make it unique to your workplace.
Policy Statement
A R M Environmental Services, Inc. Is committed to a safe and healthful workplace for its
employees. The purpose of this written program is to identify permit spaces at this
workplace and to ensure that all employees will enter, work in, and exit permit spaces
safely.
Employer Responsibilities
A R M Environmental Services, Inc. will do the following to ensure the health and safety
of those who work in and around permit spaces.
Identify all permit spaces.
Inform employees of the location and the hazards in permit spaces.
Prevent unauthorized persons from entering permit spaces.
Train entrants, attendants, entry supervisors, and in-house emergency responders.
Provide all necessary equipment for permit-space work at no cost to employees,
maintain the equipment, and ensure that employees use the equipment properly.
Inform contractors about the permit-space program and coordinate entry operations.
A R M Environmental Services, Inc. designates the following persons to implement and
manage the permit-space program:
PERSON’S NAME OR POSITION RESPONSIBILITY
Overall program. Overall implementation and maintenance of the written program, including employee
certification or training that satisfies the requirements of OSHA.
Permit-space locations. Location and identification of all confined spaces at this workplace.
Training. Ensure that authorized entrants, attendants,
entry supervisors, and on-site emergency responders are properly trained and have periodic refresher training.
Emergency response. Ensure that emergency responders are informed of all permit-required confined
spaces at the workplace and have access to the spaces for drills and other training exercises.
Equipment. Ensure that all equipment for authorized attendants and entrants is properly maintained and is
available when needed.

© Safety Services Company 19-19
Permit Space Locations and Hazards
Andy Wilson has surveyed the workplace and identified the following permit spaces, the
hazards in the spaces, and the method(s) necessary to eliminate or control the hazards.
Non-permit spaces – no atmospheric hazards
These spaces have no atmospheric hazards and all other hazards have been eliminated.
Employees can enter and work in them without a permit as long as the spaces are hazard-free.
LOCATION OF SPACE HAZARD HOW HAZARD WAS
ELIMINATED
PERSON(S) CERTIFYING THAT THE SPACE IS HAZARD FREE
Non-permit spaces – atmospheric hazards
These spaces have atmospheric hazards that can be eliminated with continuous forced-
air ventilation before workers enter. Employees can enter and work in them without a permit as long as they are hazard-free.
LOCATION OF SPACE ATMOSPHERIC HAZARD PERSON(S) CERTIFYING THAT
THE SPACE IS HAZARD

19-20 © Safety Services Company
Permit-required spaces
These spaces have atmospheric hazards that cannot be eliminated with continuous
forced-air ventilation. Employees can enter them ONLY under the entry-permit
procedures established in this written program.
LOCATION OF SPACE
HAZARDS METHOD OF RESCUE METHOD OF
CONTROLLING HAZARD
Informing Employees & Preventing Unauthorized Entry
The COMPANY will use the following methods to inform employees about each permit
space in the workplace and to prevent unauthorized workers from entering them.
LOCATION OF SPACE METHOD TO INFORM METHOD TO PREVENT ENTRY

© Safety Services Company 19-21
Entry Procedures
All employees involved in entry operations must follow the procedures below for each
phase of the entry process.
Before employees enter the space:
ACTIVITY PROCEDURES
Guarding the Space
(Identify Procedures)
Isolating the Space
(Identify Procedures)
Eliminating or Controlling
Atmospheric Hazards
(Identify Procedures)
Identifying Necessary Equipment
(Identify Procedures)
Contacting Emergency Responders
(Identify Procedures)
Completing and Posting the Entry Permit
(Identify Procedures)
While employees are in the space:
ACTIVITY PROCEDURES
Maintaining Communication
(Identify Procedures)
Keeping Out Unauthorized Persons
(Identify Procedures)
Monitoring the Space for Hazards
(Identify Procedures)
After employees leave the space:
ACTIVITY PROCEDURES
Canceling the Entry Permit
(Identify Procedures)
Returning the Space to Service
(Identify Procedures)
Filing the Permit
(Identify Procedures)
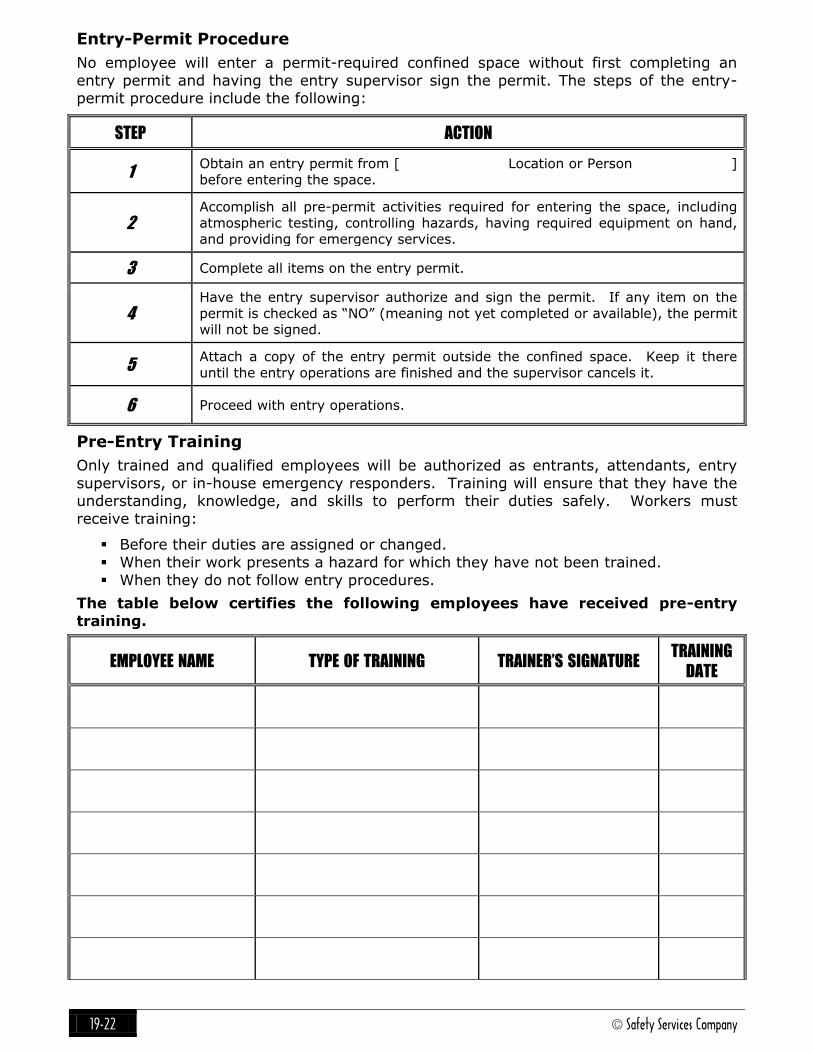
19-22 © Safety Services Company
Entry-Permit Procedure
No employee will enter a permit-required confined space without first completing an
entry permit and having the entry supervisor sign the permit. The steps of the entry-permit procedure include the following:
STEP ACTION
1 Obtain an entry permit from [ Location or Person ]
before entering the space.
2 Accomplish all pre-permit activities required for entering the space, including
atmospheric testing, controlling hazards, having required equipment on hand, and providing for emergency services.
3 Complete all items on the entry permit.
4 Have the entry supervisor authorize and sign the permit. If any item on the
permit is checked as “NO” (meaning not yet completed or available), the permit will not be signed.
5 Attach a copy of the entry permit outside the confined space. Keep it there
until the entry operations are finished and the supervisor cancels it.
6 Proceed with entry operations.
Pre-Entry Training
Only trained and qualified employees will be authorized as entrants, attendants, entry
supervisors, or in-house emergency responders. Training will ensure that they have the understanding, knowledge, and skills to perform their duties safely. Workers must
receive training:
Before their duties are assigned or changed.
When their work presents a hazard for which they have not been trained.
When they do not follow entry procedures.
The table below certifies the following employees have received pre-entry
training.
EMPLOYEE NAME TYPE OF TRAINING TRAINER’S SIGNATURE TRAINING
DATE

© Safety Services Company 19-23
Duties of Authorized Entrants, Attendants and Supervisors
Working in permit spaces is a team effort involving authorized entrants, attendants, and
supervisors. Their duties and responsibilities are shown below.
DUTY/RESPONSIBILITY ENTRANT ATTENDANT SUPERVISOR
Keep unauthorized entrants away from the
space. X X Remove unauthorized individuals who enter or who attempt to enter the permit space. X Communicate with entrants, monitor their
status, and tell them when to evacuate. X Inform the entrants and the entry
supervisor if unauthorized persons enter the
permit space. X
Communicate with the attendant regularly. X Remain outside the space during entry
operations until relieved by another attendant.
X Know the number and identity of authorized
entrants. X Use all equipment properly. X
Determine that acceptable entry conditions are maintained. X
Exit from the permit space immediately given an order to evacuate, an alarm
warning, or a sign of a hazardous condition. X
Know permit-space hazards, including the mode, symptoms, and consequences of
exposure. X X X
Notify the attendant of any signs or
symptoms of exposure to a hazardous condition.
X Terminate the entry and cancel the permit when entry operations are finished or if a
prohibited condition arises. X
Verify that entry conditions are acceptable
before signing the permit and allowing entry.
X
Perform non-entry rescues if necessary. X Verify that rescue services are available and
the means for summoning them are effective.
X Summon emergency responders when
entrants need their services. X

19-24 © Safety Services Company
Emergency Response
Non-entry rescue requirements:
Non-entry rescue is the preferred method for rescuing an entrant from a permit space.
Employees must use retrieval systems to rescue an entrant unless the equipment would
increase the entrant’s risk of injury. Employees will not enter a permit space to respond
to an emergency unless they have been properly trained and equipped. If a permit space rescue is necessary, the attendant is responsible for doing the following:
Summoning emergency responders.
Attempting to rescue entrants using only non-entry rescue equipment.
Monitoring the emergency and informing responders about the number of victims,
their condition, and the hazards in the space.
Entry rescue requirements:
Only responders designated by A R M Environmental Services, Inc. can enter a permit
space during an emergency. Each emergency responder must know how to do the
following:
Use personal protective and rescue equipment.
Perform assigned rescue duties.
Perform basic first aid and CPR.
Each rescue team member must practice a permit space rescue at least annually.
Summoning Offsite Responders:
Andy Wilson has made arrangements with the following off-site responder to provide
rescue and emergency services:
Name of responder:
Phone:
Address:
Approximate Emergency Response time:
Andy Wilson has informed [ Name of off-site rescue service ]of the hazards they may
encounter if they are summoned.
The Company Safety Coordinator has also provided the rescue service access to permit spaces to develop appropriate rescue plans and practice rescues.
Program Evaluation
Within one year of an entry operation, The Company Safety Coordinator will review canceled entry permits to identify program deficiencies. The review must be sooner if
there is reason to believe that the program does not adequately protect employees.
Actions to correct deficiencies must be documented and affected employees must be
retrained.

© Safety Services Company 20-1
Chapter 20
Driver Safety Policy
Policy Statement
At A R M Environmental Services, Inc., the safety of our employees is of utmost
importance. The selection of employees who will be required to drive full or part-time
will be done with care. Drivers of company vehicles can be considered qualified when
they meet the following criteria:
Possess a valid state driver's license of the proper class. A review of MVD record shows that they do not pose an unreasonable risk.
Driver Training
All employees driving Company owned vehicles for A R M Environmental Services, Inc.
will be trained in safe operation of assigned vehicle.
Defensive driving
Split-second decision making
Backing-up rules
Safe distances
Intersection driving
Poor condition driving in dust storms,
rain, etc.
Preventive Maintenance
Establishment of a preventive maintenance program for all COMPANY vehicles is
essential. Record jackets will be maintained on all vehicles so that a log can be
maintained on all planned maintenance, as well as repairs made from noted defects.
Vehicle Inspection
Each vehicle or piece of equipment will be inspected on a daily basis by the operator
before and after operation. Each operator is responsible for the safe condition of the
equipment. Any vehicle having steering, brake, or other safety problems is not to be operated until repairs have been made by a mechanic. Any other unsafe conditions are
to be reported to the operator's supervisor as soon as possible.
Vehicle Operation
All COMPANY vehicles and equipment are to be operated in a safe manner and operators
will adhere to all applicable laws. The operator is fully and totally responsible for the
safe operation of the equipment. The operator will report any accidents, or damage, to
the Vehicle Operations Supervisor.
Procedure
The procedures set forth in the Driver Safety Program will be the guidelines for
management adherence to this policy.
Responsibility
The supervisors at A R M Environmental Services, Inc. have the primary responsibility for
management of the Driver Safety Program.
Andy Wilson will appoint a responsible representative to report all driver information
requested by our insurance broker.
20-2 © Safety Services Company
Monitoring
Andy Wilson is also responsible for the records of the Driver Safety Program. Duties will
include, but are not limited to:
Be responsible for monitoring the driving record of those persons who operate the
Company vehicles or their own "personal" vehicle while on Company business.
Monitor the Driver's Safety Program and report to management any suggestions
for improvement or needed changes. Monitor the maintenance policy of fleet vehicles so that they are kept in safe
condition
Review each vehicle accident report or infraction with management.
Monitor renewals of insurance records.
Drivers
Drivers of vehicles that are owned, rented or leased by The Company will be required to
follow defensive driving techniques and practices. The basic defensive driving practice is to plan ahead and do everything that one can reasonably do to prevent an accident.
This is to include the use of seat belts.
The following guidelines will be followed:
Drivers for our Company must possess a valid driver's license in order to operate any
Company vehicle or their own personal vehicle on Company business. The duties of
drivers will be reviewed. The requirement will be noted by the employee's supervisor or
personnel staff at the time of hire.
The driver should be physically and mentally capable of driving the vehicle he/she is
assigned to drive, whether the vehicle is a car, van, or truck.
Pre-operation of Vehicles
Prior to the assignment of any vehicle to any employee or prior to allowing an employee
to drive "Their Own Personal Vehicle" on Company business, the following minimum standards will be implemented and records maintained to ensure that the driver is
qualified to drive the vehicle and minimize the risk of liability to our Company.

© Safety Services Company 20-3
Driver Safety Program
Introduction
The operation of vehicles is indispensable in conducting Company business. The way in
which each vehicle is handled will directly affect the loss picture of the entire Company.
Fleet losses are potentially one of the most costly losses that an operation can incur.
The types of exposure that involve the fleet program include: property damage, bodily injury, fatalities, liability suits and Workers' Compensation claims.
The insurance and other claims costs that result from vehicle accidents can be
substantial and would adversely affect successful accomplishment of COMPANY
objectives. To help prevent vehicle accidents and the type of loss exposures associated
with them, the following guidelines have been established:
Initial Assignment
Verification and recording of date any type of driver's license held and renewal date
noted. A review of the driver's state Motor Vehicle Record for the most recent three-
year period to include the following:
Review of the accident report history showing the dates and types of accident
regardless who was at fault.
Review of the traffic violations for the last three years, with evaluation of acceptable
driving records according to Company guidelines.
Confirmation of personal insurance for those driving their personal vehicle while on Company business.
Physical examinations when required by the state for the driving of specified vehicles
or by funding and licensing contract.
The driver with a major conviction will be immediately suspended from driving any
Company vehicle or their personal vehicle on Company business.
Driving a Company vehicle while under the influence of drugs or alcohol will subject the employee to disciplinary action up to and including dismissal.
Annual Review
Once each year, a request for current license information will be sent to each Company
employee. Employees who drive a Company vehicle, or if they request mileage
reimbursement for driving their personal vehicle on Company business, will have their
personal driving record reviewed. It will be the responsibility of the employee to respond
in a timely manner. Failure to respond to the request for information by personal vehicle drivers may result in the delay of mileage reimbursements.
A review of each driver's file and record will be made annually and will include all of the
criteria above as appropriate for each employee. This will not preclude request of
driver's records for review by Andy Wilson as deemed necessary.
Definitions
Major Convictions — Major convictions include, but are not limited to:
Driving while intoxicated or under the influence of alcohol or drugs; failure to stop
and report an accident.
Homicide, manslaughter or assault arising out of the operation of a vehicle. Driving during a period when license is suspended or revoked; reckless driving.
Possession of an open container of alcoholic beverage; drag or highway racing.
Attempting to elude a Peace Officer.

20-4 © Safety Services Company
Minor Convictions — Any moving traffic violation other than a major conviction except
the following:
Motor vehicle equipment, load or size requirements. Improper display or failure to display license plates provided such plates exist.
Failure to have a valid driver's license in possession.
Preventable Accident — A preventable accident is defined by the National Safety
Council as "Any vehicle accident involving a vehicle which results in property damage and/or personal injury regardless of who was injured, what property was damaged, to
what extent or where it occurred in which the driver in question failed to exercise
reasonable precaution to prevent the accident."
Vehicular Accident — Any accident occurring between a Company vehicle (or private
car when employee is on official Company business and has been formerly authorized mileage) and another vehicle, pedestrian, animal or fixed object.
SPECIAL NOTE: A R M Environmental Services, Inc. will call police to investigate all
company vehicle accidents. It is vehicle operator's immediate supervisor's responsibility
to ensure that all facts are obtained with respect to the driver. Under no circumstances
should any employee make any statement relative to liability or draw any conclusions as to the facts asserted at the scene. The occurrence of a vehicle accident may or may not
be the fault of the employee. It is important to investigate and determine the cause of
the accident and any necessary corrective action that may taken by the employee's
immediate supervisor.
Questions to Help Determine if a Vehicle Accident was Preventable
One basic question in determining preventability is: "Did our employee take every
reasonable precaution to avoid the auto accident?" If "No," our driver was not driving
defensively therefore, the accident should be judged "preventable." Please note that
legal liability or any citations should never influence the decision of determining preventability of an accident.
Answer the following questions which adhere to the given situation(s):
Intersection Accidents
YES/NO
Did our employee approach the intersection at a controlled speed that was reasonable for conditions?
Was our driver prepared to stop before entering the intersection regardless of right
of way?
Did our driver avoid entering an intersection on the amber signal?
Did our driver avoid overtaking or passing at the intersection?
At a blind corner, did our driver approach slowly, with a foot on the brake pedal?
Did our driver make certain all other drivers were stopping for a traffic light or stop
sign?
Was our driver alert for the turns of other vehicles?
Did our driver signal his/her change in direction well in advance?
Did our driver allow oncoming traffic to clear before making a left turn?
Did our driver turn from the proper lane?

© Safety Services Company 20-5
We Were Hit by another Vehicle While Stopped or Parked
Did our driver properly signal his/her intention to stop?
Did our driver avoid coming to a sudden stop?
Was our driver parked on the proper side of the road?
We Pulled from Parked Position
Did our driver look to the front and rear for approaching traffic immediately before
pulling out?
Did our driver look back, rather than depending upon the rear vision mirrors?
Did our driver signal before pulling away from the curb?
Did our driver start out only when an action would not require traffic to change its speed or direction in order to avoid our vehicle?
Did our driver continue to glance back while pulling out?
We Hit the Other Vehicle in Rear
YES/NO
Did our driver adjust speed to the conditions of the road, visibility and traffic?
Was our driver maintaining a safe following distance for conditions?
If a vehicle pulled in front of our vehicle, did our driver drop back and reestablish
the proper following distance?
Did our driver approach the green traffic light cautiously, expecting the driver
ahead to stop suddenly on a signal change?
Did our driver look ahead of the vehicle in front for possible emergencies?
We Were Backing
Was it necessary to back?
Did our driver have to park so close to the vehicle or obstacle ahead that backing was necessary when leaving the parking space?
If our driver could not see where to back:
Did the driver try to get someone as a guide?
Did the driver walk around the vehicle before getting in?
Did the driver back immediately after walking around?
If applicable, did the driver use the cone policy correctly?
Did the driver use the horn while backing?
Did the driver look to the rear without depending on the rear vision mirrors?
Did the driver back slowly?
We Skidded
Did our driver travel at a speed safe for the conditions of weather and road?
Was our driver keeping a safe following distance?
Was our driver alert for loose gravel, sand, ruts, etc.?

20-6 © Safety Services Company
Pedestrians
Did our driver tap the horn to alert pedestrians of our vehicle approach?
Did our driver pass through congested section anticipating that pedestrians might
step in front of the car?
Did our driver keep as much clearance between our vehicle and parked cars as
conditions permitted?
Did our driver interpret the pedestrian's next action or intention?
Did our driver check the location of pedestrians before staring at a green signal?
Did our driver give all pedestrians right of way?
Did our driver refrain from passing a stopped school bus?
Was our driver alert for signs of children who might run into the path (balls rolling
into street, etc.)?

© Safety Services Company 20-7
Safe Operating Guide for Company Vehicles
Preventing Collision with a Vehicle Ahead
An extremely frequent and costly accident is the collision with the vehicle ahead. There
are five steps that can be taken that will help you avoid being involved in a collision with
the vehicle ahead:
Be Alert — Watch for signs from the driver or drivers ahead as to what they intend to do. Are their turn signals on? Are their brake lights lit?
Drive Ahead of the Situation — Look beyond the vehicle ahead to see situations that
may force him to act quickly and thereby become a threat to you.
Stay Back — Allow plenty of following distance. Allow one car length (using your own vehicle as a measure) for every 10 miles of speed and allow even more distance in
adverse weather or road conditions.
Stopping Ability — This is the distance necessary to bring your vehicle to a stop that
depends on a number of factors. The first is "driver reaction time". This is the time it
takes for the driver to see the need to stop, take his foot from the accelerator to the brake pedal and begin to apply the brake. "Driver reaction distance" is based on an
average driver reaction time of ¾ of a second for a typical driver under normal driving
conditions. The distance traveled during the reaction time of ¾ of a second will depend
upon the speed of the vehicle.
The second ingredient involves "braking distance". This is the distance traveled from the time the brake is applied until the vehicle is brought to a stop. This distance will also
vary based on the speed of the vehicle. The type and condition of the pavement surface
will also affect the braking distance, the type and condition of tires, and the condition of
the brakes.
Begin to Stop Sooner — Slow down and touch your brakes the instant you see a
hazard developing. The situation may require you to stop. Failure to do this is known as "delayed braking" – a serious flaw in good defensive driving techniques. A defensive
driver should not have to make a true "panic" stop more than once a year. Stopping
ability can be expressed as a formula:
Remember, moving at 55 mph produces a travel distance of 81 feet for each second of
delay.
How to Avoid Backing Accidents
Backing can be a "dangerous maneuver". Because of the hazards of backing, the
defensive driver avoids backing whenever possible by planning an alternative maneuver or choosing another route.
The defensive driver does not back out of parking lots, driveways, or alleys when he can
avoid it. Instead, he drives in and turns around so he comes out front first. When this is
not possible, he backs in so that he can drive forwards to come out. He knows it is safer
to back out of traffic into a quiet area than to back into a heavy traffic stream.
20-8 © Safety Services Company
When backing is unavoidable, follow these rules:
"Size up the situation" thoroughly and completely, even if you have to get out of
your vehicle to do so. Then start backing promptly before the backing situation
changes.
Back slowly.
Check both sides as you back. Check your mirrors often during the backing
movement.
Do not depend entirely on your mirrors to judge distance to the rear. Mirrors help
you to spot pedestrians who may unexpectedly move into the path of your backing
vehicle, but mirrors can be deceiving in estimating or measuring distances and
clearances.
Avoid a Collision with a Following Vehicle
There are measures you can take to avoid being hit from behind:
Signal Your Intentions — Use your directional signals and your brake lights.
Stop smoothly — if you follow the rule for avoiding a collision with a vehicle ahead,
you will also reduce the chances for a collision of the vehicle following.
Keep Clear of Tailgaters — Do not let a tailgater rile you. Just slow down. Increase the following distance between your vehicle and the vehicle ahead, so you
do not have to brake suddenly if a tailgater hits you.
Avoid a Rear-End Collision When Stopped
Keep a foot on the brake pedal to activate lights.
Stay at least 6 feet away from any stopped car ahead to avoid the "domino", multi-
collision chain reaction effect.
Keep your lights on at dusk or in the rain or other poor visibility conditions.
The Technique of Passing
Any passing maneuver often entails risk. The following twelve points will help to reduce
that risk:
1. Decide if the Pass maneuver is necessary.
2. Make certain there is a safe following distance between you and the vehicle ahead.
3. Check the traffic ahead if you are moving in the oncoming traffic lane. If your
vehicle and the oncoming vehicle are both traveling at 55 miles per hour, you are
closing the gap between you at the rate of 161 feet per second. Since it takes 10 seconds to complete the task, the oncoming car should be at least 1/3 mile away.
4. Check the traffic behind you before changing lanes. First check your mirrors and
then your blind spot.
5. Signal with your left turn signal before you change lanes.
6. Move into the left lane.
7. Accelerate as you move alongside the vehicle you are passing.
8. Signal the vehicle you are passing by tapping your horn or flashing your lights if you deem this necessary – especially at night.
9. Signal your intention to return to the right lane by the use of directional signal.
10. Return to the right lane when you can see all of the passed vehicle(s) in the right
rear-view mirror.
11. Do not forget to cancel your directional signal.
12. Resume your proper cruising speed as soon as you have completed your passing
maneuver.

© Safety Services Company 20-9
Driving Emergencies
Your Brakes Fail — If there is any resistance, pump the pedal. You may be able to
work up enough pressure to help somewhat.
Most vehicles are equipped with a dual brake system. If one system fails, the back-up
system should work. If pumping the brake pedal does not help, coast in "drive" gear
and use the parking or hand brake.
If you want to slow faster, shift to lower gears which will permit engine compression to
help you slow your vehicle. Use your horn or lights to warn other drivers and pedestrians that you are in trouble and out of control.
You Go Into a Skid — If the rear of the vehicle starts to slide, take your foot off the
gas at once. Your first instinct may be to turn hard away from the direction of skid. Do
not! That will really spin you.
Turn your wheels in the same direction of the skid – but be careful, do not over-steer. You will be able to feel when the vehicle regains rolling action, and then straighten the
wheel.
"Never hit the brakes as a side skid correction". For fast stopping with the least chance
of causing a side skid, pump your brakes hard with a rapid jabbing and releasing
pressure on the brake pedal. Disc brakes require slower pumping.
You Have a Blow-Out — Keep a firm and steady grip on the steering wheel and do not over-steer to correct swerve or pull.
If a front tire fails, there will be a strong pull to the side of the blow-out. A rear blow-out
tends to cause weaving of the rear end. Do not slam on the brakes. Brake smoothly -
but easily.
Day or night, set out flares or other warning devices such as reflectors and turn on your light flashers.
You Must Stop on the Freeway — On a freeway with paved shoulders, signal and pull
off the road at near traffic speed, then slow down. Do not obscure your taillights by
standing or working behind your vehicle. Day or night, place a flare or reflector warning
device about 15 feet behind the vehicle and another at about 300 feet further back.
Seat Belts
Seat belts have been provided for your safety. They should be worn and properly
adjusted at all times when your vehicle is in motion.
Accident Reporting
When reporting a vehicle accident involving other vehicles and persons, be certain that you have all pertinent information regarding other vehicles or equipment, any persons
involved, and specific circumstances of the mishap.
Become familiar with the COMPANY reporting form and procedures. Know where to
obtain copies of the form and keep them in your assigned vehicle at all times.
Accident Scene:
Secure the scene to prevent other accidents from occurring.
Place warning cones, flashers, reflectors or flares to protect the scene.
Report injuries to emergency response services.

20-10 © Safety Services Company
Accident Data:
Date, time and location of the accident – list streets and known landmarks.
Describe in detail what & how it happened - use a diagram to illustrate the scene.
Road surface, weather and light conditions.
Names, addresses and telephone numbers of parties involved.
Determine who was injured, extent of injury and report their role in the accident.
If injured persons on scene, where were they taken and by what means of
transportation (drove self, by friend, by ambulance).
Names, addresses and telephone numbers of witnesses and their statements.
License numbers of vehicles and description of the damage.
Name and badge number of responding police officer, if available.
Take pictures of the accident scene, paying attention to injured persons and property damage. Take picture close up as well as far away that indicate cross streets,
background landmarks that can document the accident location.
In accidents not involving other vehicles or people, record the information outlined in your accident report kit and submit it to your fleet supervisor.
Accident Review
Determining Preventability
When a driver reports an accident, a COMPANY accident review committee must
determine whether the accident was preventable by the driver involved. The board
should consist of the vice president of operations, the fleet supervisor, the Company
safety director and any other person deemed necessary. Once preventability is determined, the committee should decide the disciplinary actions to be assigned to the
driver involved.
Preventable Accidents
A preventable accident is any occurrence involving an owned or operated vehicle that results in property damage and/or personal injury. This applies regardless of who was
injured, what property was damaged, to what extent or where it occurred, and whether
or not the driver in question failed to do everything possible to prevent it. The following
paragraphs are offered as a guide in determining the preventability of these accidents.
Guidelines to Determining the Preventability of Accidents
Accidents involve so many different factors that it is impossible to set hard and fast rules
to classify them as preventable or non-preventable. The accident review board will make
this determination. In making these decisions, the board will answer the question "What
standard of safe driving performance do we expect from our drivers in this Company?"
Drivers respect a strict interpretation of the rules so long as the Company takes the time and effort to ensure that these interpretations are made consistently and fairly.
Intersections
It is the responsibility of all drivers to approach, enter, and cross intersections prepared
to avoid accidents that might occur through the action of other drivers. Complex traffic
movement, blind intersections, or failure of the other driver to conform to law or traffic
control devices will not automatically discharge an accident as "non-preventable".
Intersection accidents are preventable even though the driver has not violated traffic regulations. The vehicle operator's failure to take precautionary measures prior to
entering intersections is a factor to be studied in making a decision. When a driver
crosses an intersection and the obvious actions of the other driver indicate possible
involvement, either by reason of excess speed, crossing a lane in turning, or coming
from behind a blind spot, the decision should still be a preventable accident.

© Safety Services Company 20-11
Practically any backing accident is preventable. A driver is not relieved of the
responsibility to back safely, even when a spotter is involved in the maneuver. The
spotter cannot control the movement of the vehicle; therefore, a driver must make sure all backing zones are clear.
Front-End Collisions
Regardless of the abrupt or unexpected stop of the vehicle ahead, your driver can
prevent accidents of this nature by maintaining a safe following distance, knowing the conditions of the road and the load. This includes being prepared for possible
obstructions on the roadway, either in plain or hidden view. Overdriving headlights at
night is a common cause of front-end collisions. Night speed should not be greater than
that which will permit the vehicle to come to a stop within the distance illuminated by
the vehicle's headlights.
Rear-End Collisions
Investigation will often disclose that a driver risked being struck from behind by failing to
maintain a margin of safety in his/her own following distances or making abrupt lane changes. Rear-end collisions preceded by a rollback, an abrupt stop at an intersection,
when a traffic signal changes, or when your driver fails to signal a turn or slow down
gradually should be charged as preventable.
Passing
Failure to pass another vehicle safely indicates faulty judgment and possibly failure to
follow the important factors a driver must implement before attempting to pass. Unusual
actions of the driver being passed or of oncoming traffic might appear to exonerate a
driver involved in a passing accident; however, the entire passing maneuver is voluntary
and your driver is responsible for a safe pass.
Being Passed
Sideswipes and cutoffs involving a driver while being passed are preventable when the
driver fails to yield to the passing vehicle by slowing down or moving to the right where
possible.
Lane Encroachment
A safe driver is rarely a victim of entrapment by another driver when changing lanes.
Similarly, entrapment in merging traffic is an indication of unwillingness to yield to other vehicles or to wait for a break in traffic. Blind spots are not valid excuses for lane
encroachment accidents.
Drivers must make extra allowances to protect themselves in areas of limited sight
distances. Squeeze plays causing involvement with parked cars, pillars, and other road
structures can be prevented by dropping back when it is apparent that the other driver is
forcing the issue or contesting space on the road.
Grade Crossings
Preventing collisions with rail track vehicles, such as trains, occurring at grade crossings,
in traffic, or on private property is the responsibility of the driver. When a vehicle is parked across a rail siding, the driver must first determine if it is safe and permissible.
He/she must stand by in case conditions change by the movement of railcars. Common
grade crossing accidents occur on county/country roads that lack crossing indicators,
barriers and flashing lights. At these crossings, it is important for the driver to have
clear sight, up and down the tracks in both directions, prior to crossing.

20-12 © Safety Services Company
Oncoming Vehicles
It is important to check the action of the driver when involved in a head-on or sideswipe
accident with a vehicle approaching from the opposite directions. Exact location of the
vehicles, prior to and at the point of impact, must be fully clarified during the accident
review process. Even though an opposing vehicle enters a driver’s traffic lane, it may be
possible for your driver to avoid the collision. Your driver can take actions to make their
presence known such as flashing lights or sounding the horn.
Turning
Turning movements require the most exacting care by a professional driver. Squeeze
plays on left or right turns involving other vehicles or pedestrians are the responsibility of the driver making the turn. Failure to signal, to properly position the vehicle for the
turn, to check the rear-view mirrors, to check pedestrian lanes or to take other defensive
actions should be considered during the accident review.
You may find that your driver failed to take precautionary actions from indicators given
by the other driver immediately preceding the incident. U-turns by your driver that result in a collision are considered preventable accidents.
Passenger Accidents
Passenger accidents in any type of vehicle are preventable when they are caused by the
faulty operation of the vehicle. Even though the incident did not involve a collision, it must be considered preventable when your driver stops, turns, or accelerates abruptly,
resulting in an injury to a passenger. Emergency actions taken by your driver to avoid a
collision should be reviewed to determine that the action would/did eliminate a vehicle
collision. In such cases, injury to the passenger would be considered non-preventable.
Pedestrians
Traffic regulations and court decisions generally favor the pedestrian hit by a vehicle.
Unusual route of a pedestrian at mid-block or from between parked vehicles does not
necessarily relieve the driver from accident preventability. Whether speed limits are
posted or the area is placarded with warning signs, speed too fast for conditions may be involved as contributing factors.
Weather
Adverse weather conditions are not a valid excuse for being involved in an accident. Rain, snow, fog, or icy pavements have never caused an accident. These conditions
increase the hazards but do not cause accidents. Failure to adjust driving habits to
prevailing weather conditions or to "call it a day" when necessary, should be cause for
deciding such accidents are preventable. Failure to use safety devices, such as snow
chains when required, contributes to accident preventability.
Alleys, Driveways, and Entrances
Accidents involving traffic originating from alleys, driveways, entrances, and other
special intersecting roadways should be carefully analyzed to determine what the driver
might have done to avoid the accident. Failure to slow down, sound the horn, look for hazards, or yield to others can be considered reasons to call an accident preventable.
Fixed Objects
Collisions with fixed objects are preventable. They usually involve failure to check
clearances to the side and overhead. The driver is responsible to be on the lookout for such obstacles, to proceed slowly in unfamiliar locations, and use ground-guides if
necessary.

© Safety Services Company 20-13
Parking
Unconventional parking locations, including double parking, failure to put out warning
devices, etc. generally constitute evidence for judging an accident preventable.
Rollaway accidents from parked positions normally are considered preventable. This
includes unauthorized entry into an unlocked and unattended vehicle, failure to properly
block wheels, turn them to the curb, or otherwise secure the vehicle from movement.
Mechanical Failure
Any accident caused by mechanical failure that reasonably could have been detected by
the driver, should be considered preventable. It is the driver's responsibility to report
unsafe vehicle conditions for repairs and make sure the vehicle is in safe operating condition at all times. When mechanical difficulties occur unexpectedly during a trip, the
driver is responsible to report this condition to the Company, seeking advice for
emergency service. Failure to take precautionary action that results in an accident
should be considered a preventable accident. An accident caused by mechanical failure
that results from abusive driving should be considered preventable.
Pulling Away from Curbs/Parking
Particular attention should be paid to driver's actions when leaving a parking space or
position. Many drivers do not take sufficient time to check for clearances in all
directions. This type of accident is considered preventable.
Why a Company Should Do Fleet Safety
Moral Aspect
Employee Image Public Image
Financial Aspect
Direct Costs (worker’s comp premiums, medical expenses)
Indirect Costs (lost time, productive down time, property damage)
Higher Workers' Compensation premiums
Litigation?
Customer relationships and loss of sales
Legal Aspect
Compliance with OSHA, DOT, Police, etc. Litigation
The total cost of a vehicle accident usually exceeds the amount recovered from the
insurance Company. Accident control in a large motor vehicle fleet is critical because increased insurance premiums (among other factors) reduce profits. This impact can be
as devastating, if not more, to smaller fleets! Safe vehicle operation is the result of
training, skill, planning, and action, not chance. Unfortunately, many companies fail to
pay enough attention to the safe operation of motor vehicles. The reason for this lapse
may be the difficulties of organizing an adequate safety program and providing good
driver and fleet supervision.
The majority of all motor vehicle accidents are caused by driver error or poor operating
practices including fatigue, inadequate training/retention, and alcohol/drugs use. Only a
small percentage of accidents are due to mechanical failure of vehicles or to improper
maintenance or equipment. As a result, an organization’s vehicle accident prevention
efforts should focus on both these principal accident factors - driver error and vehicle failure - because both can be controlled.

20-14 © Safety Services Company
Companies can control driver error by implementing a program of driver selection,
appropriate scheduling, effective practical training and evaluation, adequate supervision,
and alcohol/drug screening; while vehicle failure can be reduced by a systematic preventive maintenance program. As experience has shown, the unsupervised fleet
usually has higher accident costs than the supervised one.
Look at past incidences and/or other similar companies for a predictor of future
problems!
What Is A Vehicle Safety Program?
A genuine Fleet Safety Program requires a written safety policy, developed, supported,
and enforced by management, including a person designated as the Vehicle Operations
Manager to implement and administer the program and to advise management. This
person must be responsible for advising management on accident prevention and safety matters, developing and promoting safety activities and work-injury prevention
measures throughout the fleet. The Vehicle Operations Manager is responsible for:
Studying and recommending fleet safety programs regarding equipment and facilities, personnel selection and training, and other phases of fleet operations.
Evaluating driver performance and skill requirements, conducting or arranging for
effective safety training, and prepare and disseminate safety educational material.
Reviewing incidences/accidents to determine their causes and recommending
corrective actions to management, and compiling and distributing statistics on
accident-cause analyses and experience. Identifying problem persons, operations, locations, maintaining individual driver-
safety records, and administering the safe-driver award incentive program.
A driver safety program including:
Driver selection procedures
Driver training
Records of driver safety
performances
Safety-motivational activities
Proper supervision and
implementation
Accountability
Recognizing safe driving
An efficient system for accident investigation including:
Fact-Finding Mission
Effective interviewing
Detailed reporting and assessment
Determination and application of
appropriate corrective actions
Follow-up procedures to help prevent future accidents
A vehicle preventative maintenance program
Driver Safety Program
Initiate a driver training program
Proper and effective supervision
Establish performance goals to management
Establish competency and skills levels by setting objectives
Periodic evaluations/reviews of performance
Establish and communicate appropriate consequences
Develop standards to determine ways accidents can be prevented
Require immediate reporting of every accident
Compute and publish the fleet accident record
Maintain a performance record for each driver
Safety motivational activities/incentives
Initiate defensive driving training

© Safety Services Company 20-15
Selecting Drivers
Interview
Experience
References
MVR
Personal Traits
Dependability Good judgment
Courtesy
Pleasant personality
Ability to get along with others
HAZMAT transporters must abide by other regulations including OSHA, DOT, RCRA, etc.
Training is much more involved.
What Else Can Be Done?
Continually communicate with the drivers.
Involve the safety committee to establish and monitor the communication channel!
Establish incentive activities/programs.
Ensure drivers are immediately reporting problems/concerns. Delayed or unreported maintenance issues eventually cause more expense and can increase
the possibility of accident or injury to the driver.
Include accident packs in fleet vehicles (insurance proof, camera, forms, etc.)
Maintain and carry fire extinguishers and first aid kits.
Ensure vehicle safety devices are provided and maintained (i.e. signals, wipers, markings, placards, flares, blankets, radios, phones, etc.)
Continually monitor and evaluate the preventative maintenance program. Don’t
forget maintenance shop safety! Service and maintain equipment, jacks, chemicals
(HAZCOM), PPE, tire/rim servicing, fire protection, lubrication and washing
operations, battery charging, flammables, traffic control in the area, etc. Injuries also occur during loading, unloading, and handling materials. Consider
stability and weight capacities; shifting loads; fall protection; setting brakes and
chocking wheels; avoiding exposure from falling loads; prohibiting unapproved
riders; avoiding pinch points, crush areas, etc. Provide effective training in the
safe work practices when utilizing material handling equipment such as slings,
forklifts, tiebacks, etc.
Company Driver Qualifications
Establishing effective and realistic driver qualification standards is vitally important to
the successful operation of any fleet, whether it is a coast to coast interstate operation or a small incidental fleet. Driver qualifications should exist for both the professional and
incidental driver. Incidental drivers are those who do not drive as a primary job
function, but do, however, use a vehicle to perform that job. Examples of incidental
drivers are delivery persons, public utility drivers, salespeople, and field service
personnel.
By placing sufficient emphasis on selecting the best available driver, a Company helps to
avoid future financial losses resulting from accidents and abuse of the equipment.
Selecting the right driver for the position will depend on how well the selection measures
match the skills necessary for satisfactory job performance.
Depending on the type of commerce and size of the vehicles used, there are effectively three levels of driver qualification regulations to be considered:
1. State mandated driver qualifications
2. Drivers of vehicles with a gross vehicle weight rating (GVWR) of 26,001 pounds or
more; designed to transport 16 or more passengers, including the driver; or used in
the transportation of hazardous materials in a quantity requiring placarding under the
Department of Transportation's (DOT) Hazardous Materials Regulations (HMR), must
20-16 © Safety Services Company
have a single, state issued Commercial Driver's License meeting minimum Federal
requirements.
3. Drivers involved in interstate or foreign commerce in vehicles with a GVWR of 10,001
pounds or more; designed to transport 16 or more passengers, including a driver, or
used in the transportation of hazardous materials in a quantity requiring placarding under the DOT HMR, are subject to the requirements of the DOT Federal Highway
Administration's Federal Motor Carrier Safety Regulations (FMCSR).
A "driver qualification file" should be maintained, for persons hired, to permit review of
the driver's record and provide future reference to the driver's qualifications. This file
should contain all the documents completed during the hiring process and annual
updates as required. Motor carriers subject to the FMCSR must have certificates
indicating successful completion of the physical examination and road test. A written exam and certificate are no longer required to be administered and placed in the DQ file.
The sections pertaining to the written exam (Sec.391.35 and 391.37) have since been
removed from the regulations. You may wish to keep a separate confidential file
containing drug test results and related information unless the regulations stipulate
differently.
The driver selection process includes several steps including:
1. Application Form
2. Interview
3. Driver's License Verification
4. Reference Check
5. Motor Vehicle Driving Record
6. Physical Examination
7. Road Test
8. Written Test (Optional)
9. Substance Abuse and Drug Testing
If these steps are consistently followed, you should know which applicant is the most qualified to fill the position. Applicants who have shown consistently poor results in the
selection process are more likely to be problems later. The following suggestions should
help you select a driver who will be a valuable asset to your business.
1. Application Form
The application form should provide information on the applicant's driver's license(s),
driving experience, accident record, and traffic violation convictions and forfeitures for
the past 3 years, past employment (previous 3 years; 10 years for drivers required to have a Commercial Drivers License), education, and physical history. Motor carriers
subject to the Federal Motor Carrier Safety Regulations (FMCSR) are required to
obtain specific information on the application form.
For incidental fleets, you may want to suggest to the human resources department that
applications for incidental drivers include the following:
Driving Experience — Applicant's past driving experience and the type of driving license held and in which state.
Familiarity with specific equipment — The type of equipment the applicant has
driven.
Past driving record — Past driving record, including convictions.
2. Interview
Personally interview the applicant to review job requirements and qualifications in detail.
The interview should be used to resolve any questions regarding the information
obtained or omitted on the application form.
3. Driver's License Verification
Personally check and review the applicant's driver's license to determine if he/she is qualified and licensed to operate the type of vehicles you have.

© Safety Services Company 20-17
4. Reference Check
A check should be made with previous employers to develop information about the
driver's general character and professional ability. Factors such as length of
employment; job performed including operation of vehicles; accident record; ability to
get along with others; and whether the previous employer would re-hire the individual should be included.
This check can be accomplished by a telephone interview, a letter, or a personal visit.
The driver's file should verify that these checks were made with record of the responses
received. Motor carriers subject to the FMCSR are required to investigate the driver's
employment record for the preceding 3 years.
5. Motor Vehicle Record
A copy of the Motor Vehicle Record (MVR) should be obtained from each state where a driver holds a license, to ascertain that the applicant has a valid license and to review
the driver's past record. A driver required to have a CDL can only be licensed in one
state. A history of accidents and/or moving traffic violations could indicate a major
problem with the applicant.
A MVR should also be obtained annually for each driver and reviewed to determine whether remedial training is necessary. The review is conducted with the driver and
becomes part of his/her file. If you operate under the FMCSR, an annual review must be
completed in accordance with Section 391.25 of the regulations.
6. Physical Examination
The physical fitness of the driver must be considered before hiring. Your Company
should arrange for physical examinations. In addition to checking a driver's physical
condition before hiring, periodic physical examinations should be required and arranged for by your Company. Re-examinations may indicate the onset of a problem and allow
appropriate corrective measures to be taken.
Motor carriers subject to the FMCSR are required to have their drivers successfully
complete a required medical examination initially and at least every 24 months
thereafter, as well as submit to testing for the use of certain controlled substances.
7. Road Test
A road test is one of the ways to find out whether drivers can do the job expected of them. The same type of equipment to be assigned the driver should be used in the test
and the test should be sufficiently long to cover a variety of situations. The test should
not establish a passing or failing grade, but should indicate the driver's competent areas
and weak points. This will allow you to provide needed training prior to dispatching the
driver. Motor carriers subject to the FMCSR are required to verify that each driver has
been given a road test.
8. Written Test (Optional)
Some companies make use of tests to evaluate a driver’s knowledge of driving rules and
defensive driving practices. Extreme care must be taken to assure that the tests are
non-discriminatory and clearly associated with the knowledge and skills necessary to
successfully fill the position. Motor carriers subject to the FMCSR are no longer required
to administer a written test to prospective drivers. Even though this is the case,
companies still have the obligation to instruct drivers and employees about the FMCS Regulations. A written exam could be used as part of your training program. Under the
Regulations, drivers must be familiar and up to date with the regulations and the
employer must require driver compliance.

20-18 © Safety Services Company
9. Substance Abuse Programs and Drug Testing
Fleets operating with drivers having Commercial Drivers Licenses (CDL) operating
commercial motor vehicles meeting the following definition are subject to the Federal
Highway Administration's regulations on alcohol misuse and drug use prevention and
testing programs:
Has a gross combination weight rating of 26,001 or more pounds inclusive of a
towed unit with a gross vehicle weight rating of more than 10,000 pounds.
Has a gross vehicle weight rating of 26,001 or more pounds.
Is any size transporting hazardous materials requiring placards.
Drug testing should not be performed until a drug free workplace policy and supporting
procedures are in place and communicated to all employees. The rule requires pre-
employment, reasonable suspicion, random, post-accident, return-to-duty and follow-up
testing. For details on the program, refer to the FMCSR, Title 49, Part 382.
Driver Training
Regular training must supplement the driver's selection program. The amount of
training that is needed varies directly with the complexity of the job as well as with the
knowledge and experience of the new employee. Proper training reduces operational disruptions and minimizes unnecessary costs due to accidents and equipment abuse.
Your Company's driver training program should be divided into several levels:
1. Initial Training — new employee indoctrination.
2. Refresher Training — updates on routes, cargo, equipment, and regulations.
3. Remedial Training — used when there is a problem of substandard performance.
Your Company's driver training program should include the following areas:
Company rules and policies
Equipment familiarization
Routes and schedules
Defensive driving techniques
Government regulations
Cargo handling
Emergency procedures and warning
devices
Specific concerns or loss patterns
There are two approaches to training: classroom and in-vehicle. Classroom training can
be accomplished using either a one-on-one or group approach. This method is useful for Company rules, government regulations, routes and schedules, accident and emergency
procedures, basic cargo handling methods, and basic defensive driving techniques. In-
vehicle training is most effective for equipment familiarization, vehicle inspections, cargo
handling and defensive driving. In-vehicle training provides one of the best methods of
giving practical instruction to a driver under closely controlled conditions.
© Safety Services Company 20-19
Driver Selection:
Does a definite program for driver selection exist?
Is it as good as it should be and is it adhered to, or is it mostly on paper and
frequently forgotten when busy or short of drivers?
Driver Training:
Is there a definite training program or is it on a "hit or miss" basis?
Is the driver's past record checked carefully to determine whether reported
experience and knowledge are factual?
Does the program provide for retraining as necessary when unsatisfactory
performance or accidents are identified?
Driver Supervision:
Are supervisory responsibilities adequately handled, or is there overlapping and
occasional friction?
Are there areas where no one is clearly responsible?
Can relations with drivers be improved?
Can routing and scheduling procedures be improved for greater efficiency of
operation and greater safety?
COMPANY DRIVER SAFETY AUDIT
DRIVER QUALIFICATION Y N N/A
DRIVER TRAINING & MOTIVATION Y N N/A
DRIVER SUPERVISION Y N N/A
□ □ □ Job Assessment
□ □ □ Physical Qualifications
□ □ □ Recruiting System
□ □ □ Driver Qualification Files
□ □ □ Application Form
□ □ □ Interview
□ □ □ Reference Check
□ □ □ Road Test
□ □ □ Motor Vehicle Record
□ □ □ Review
□ □ □ Initial Training Program
□ □ □ Company Rules and Policies
□ □ □ Equipment Familiarization
□ □ □ Routes and Schedules
□ □ □ Emergency Procedures
□ □ □ Accident Reporting
□ □ □ Defensive Driving
Techniques
□ □ □ Regulations
□ □ □ Cargo Handling/Securement
□ □ □ Ongoing Training Program
□ □ □ Incentive Program
□ □ □ Vehicle Location Check
□ □ □ Trip Recorder Checks
□ □ □ Road Observation System
□ □ □ Logs Checked
20-20 © Safety Services Company
APPLICANT ROAD TEST Driver’s Name: ______________________________ SSN: ________________
Motor Vehicle Operator's License No. _________________________________
Type of License: _______________________ Issuing State: _______________
Type of Vehicle: __________________________________________________
INSTRUCTIONS TO EXAMINER:
Place a check mark in the appropriate box:
PRE-TRIP INSPECTION Y N N/A
□ □ □ Checks general condition of vehicle
□ □ □ Checks for proper operation of parking and service brake systems
□ □ □ Checks steering mechanism
□ □ □ Checks all lighting devices and reflectors
□ □ □ Checks condition of tires
□ □ □ Checks horn and windshield wipers
□ □ □ Checks and adjusts rear view mirrors
□ □ □ Checks emergency equipment
PLACING VEHICLE IN OPERATION
□ □ □ Uses seat belt
□ □ □ Starts vehicle properly
□ □ □ Checks air pressure in brake system
□ □ □ Shifts gears properly
□ □ □ Checks traffic conditions
□ □ □ Does not allow vehicle to roll while stopped
□ □ □ Drives with both hands on wheel
□ □ □ Steers smoothly
□ □ □ Maintains proper speed for conditions, within speed limit
COUPLING AND UNCOUPLING COMBINATION UNIT
□ □ □ Checks that fifth wheel jaws are open
□ □ □ Lines up properly with the trailer
□ □ □ Connects brake and electrical lines
□ □ □ Charges trailer brakes
□ □ □ Backs slowly
□ □ □ Visually checks for proper coupling of fifth wheel
□ □ □ Assures that fifth wheel handle is in locked position
□ □ □ Raises landing gear and removes wheel chocks
□ □ □ Applies trailer brakes and gently tries to pull away from trailer

© Safety Services Company 20-21
BACKING AND PARKING
□ □ □ Stops in correct position
□ □ □ Avoids backing from blindside
□ □ □ Gets out of vehicle and checks entire area, including overhead, before backing
□ □ □ Uses mirrors properly
INTERSECTIONS
□ □ □ Prepares to stop vehicle if necessary, even if traffic signal is green
□ □ □ Checks in all directions for traffic conditions
□ □ □ Stops vehicle in proper location when required
□ □ □ Does not allow vehicle to roll when stopped
TURNING
□ □ □ Makes sure vehicle is in proper lane for turn
□ □ □ Signals intention to turn well in advance
□ □ □ Approaches at proper speed
□ □ □ Checks traffic conditions and turns only when intersection is clear
□ □ □ Keeps vehicle in proper lane during turn
□ □ □ Does not shift gears during turn
RAILROAD CROSSING
□ □ □ Checks in all directions when approaching crossing
□ □ □ Comes to complete stop when necessary or required by law
□ □ □ Stops at a safe distance when necessary
□ □ □ Does not shift gears when crossing tracks
PASSING
□ □ □ Only passes in safe location, where legally allowed
□ □ □ Checks ahead and behind to make sure passing room is adquate
□ □ □ Warns vehicle ahead of intention to pass
□ □ □ Uses directional signals properly
□ □ □ Leaves sufficient space before cutting back into lane
□ □ □ Does not exceed speed limit
REMARKS:
QUALIFIED: □ YES □ NO
_______________________________________________________________
Examiner’s Name (please print) Title
_______________________________________________________________
Signature of Examiner Date

20-22 © Safety Services Company
COMPANY VEHICLE ACCIDENT REPORT Company:
AFTER AN ACCIDENT: 1 Stay Calm 2 If the vehicles are drivable and it is safe to do so, move them safely out of traffic 3 Apply first aid (if properly trained) 4 Call police, and if necessary, ambulance 5 Take brief notes
Vehicle Driver Name Other Vehicle Driver Name
Address
Address
Phone Driver License #
Phone Driver License #
Vehicle Type Other Vehicle Type
Vehicle license Plate # Vehicle license Plate #
Owner’s Name Owner’s Name
Address
Address
Vehicle Insurance Co. Name
Other Vehicle Insurance Co. Name
Name Policy is Under Policy #
Name Policy is Under Policy #
Passenger Info
Passenger Info Passenger Info Passenger Info
ACCIDENT DETAILS
Date of Accident Explain how the accident happened
Time of Accident am pm
Street
City
State
Approx Speed: Your MPH: Other MPH: Describe your vehicle's damage
Describe any Injuries
Describe other vehicle's damage
Investigating Officer Name
Phone Badge No.
Police Department
Investigating Officer Name
Phone Badge No.
Police Department
Witness Info
Witness Info
Report Completed By
Signature
SKETCH OF THE ACCIDENT SCENE
(try to estimate distances)

© Safety Services Company 21-1
Chapter 21
Forklift Safety Policy
§1910.178 – Powered Industrial Trucks
Policy Statement
A R M Environmental Services, Inc. will ensure that each forklift operator is competent to
operate the equipment safely, as demonstrated by the successful completion of the
training and evaluation specified in OSHA Regulations.
Operator Training for Safe Forklift Operation
Prior to permitting an employee to operate a forklift (except for training purposes), Andy
Wilson will ensure that each operator has successfully completed the training required.
Training Program Implementation
Trainees may operate a powered industrial truck only:
Under the direct supervision of persons who have the knowledge, training, and
experience to train operators and evaluate their competence. Where such operation does not endanger the trainee or other employees.
Training will consist of a combination of formal instruction (e.g., lecture, discussion,
interactive computer learning, video tape, written material), practical training
(demonstrations performed by the trainer and practical exercises performed by the trainee), and evaluation of the operator's performance in the workplace.
All operator training and evaluation will be conducted by persons who have the
knowledge, training, and experience to train powered industrial truck operators and
evaluate their competence.
Training Program Content
Forklift operators for this Company will receive initial training in the following topics.
Forklift-Related Topics:
Operating instructions, warnings, and precautions for the types of truck the operator
will be authorized to operate.
Truck controls and instrumentation: where they are located, what they do, and how
they work.
Engine or motor operation.
Vehicle capacity.
Vehicle stability.
Steering and maneuvering.
Visibility (including restrictions due to loading).
Fork and attachment adaptation, operation, and use limitations.
Vehicle inspection and maintenance the operator will be required to perform.
Refueling and/or charging and recharging of batteries.
Operating limitations.
Any other operating instructions, warnings, or precautions listed in the operator's
manual for the types of vehicle that the employee is being trained to operate.
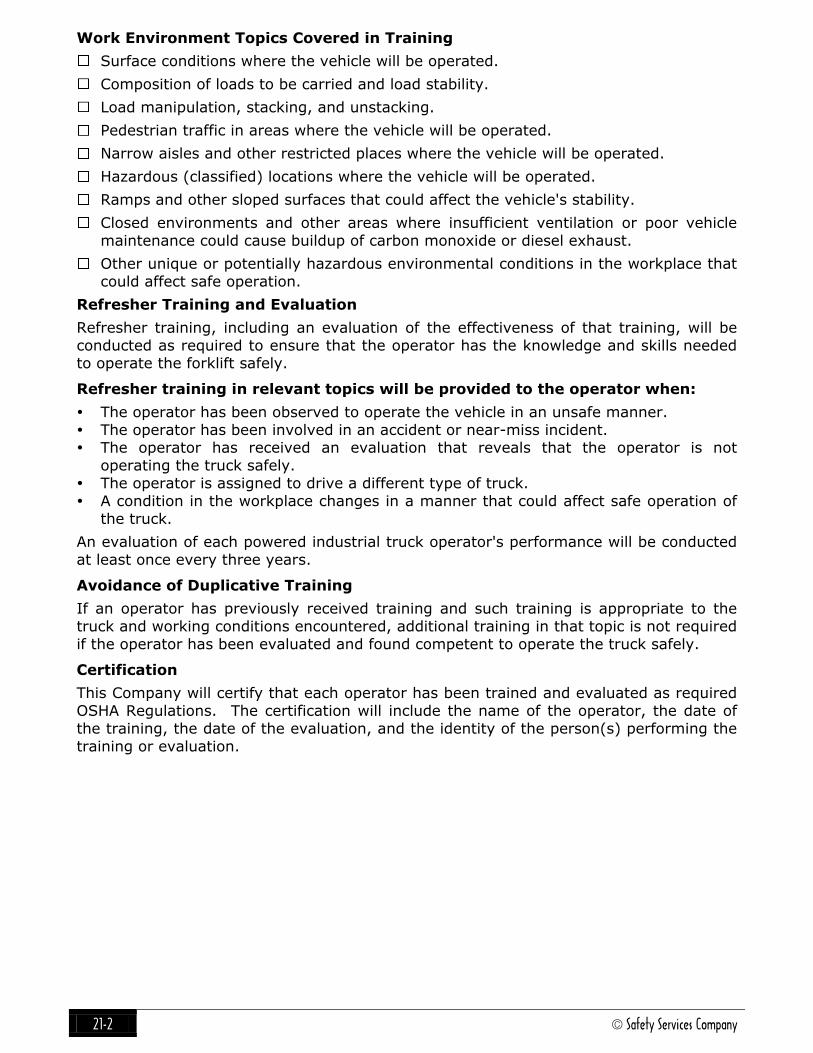
21-2 © Safety Services Company
Work Environment Topics Covered in Training
Surface conditions where the vehicle will be operated.
Composition of loads to be carried and load stability.
Load manipulation, stacking, and unstacking.
Pedestrian traffic in areas where the vehicle will be operated.
Narrow aisles and other restricted places where the vehicle will be operated.
Hazardous (classified) locations where the vehicle will be operated.
Ramps and other sloped surfaces that could affect the vehicle's stability.
Closed environments and other areas where insufficient ventilation or poor vehicle
maintenance could cause buildup of carbon monoxide or diesel exhaust.
Other unique or potentially hazardous environmental conditions in the workplace that
could affect safe operation.
Refresher Training and Evaluation
Refresher training, including an evaluation of the effectiveness of that training, will be
conducted as required to ensure that the operator has the knowledge and skills needed to operate the forklift safely.
Refresher training in relevant topics will be provided to the operator when:
The operator has been observed to operate the vehicle in an unsafe manner.
The operator has been involved in an accident or near-miss incident. The operator has received an evaluation that reveals that the operator is not
operating the truck safely.
The operator is assigned to drive a different type of truck.
A condition in the workplace changes in a manner that could affect safe operation of
the truck.
An evaluation of each powered industrial truck operator's performance will be conducted
at least once every three years.
Avoidance of Duplicative Training
If an operator has previously received training and such training is appropriate to the
truck and working conditions encountered, additional training in that topic is not required
if the operator has been evaluated and found competent to operate the truck safely.
Certification
This Company will certify that each operator has been trained and evaluated as required
OSHA Regulations. The certification will include the name of the operator, the date of
the training, the date of the evaluation, and the identity of the person(s) performing the
training or evaluation.

© Safety Services Company 21-3
NIOSH recommends that employers and workers comply with OSHA regulations and
consensus standards, maintain equipment, and follow the safety measures outlined in
this section to prevent injury when operating or working near forklifts.
Forklifts and Powered
Industrial Trucks are
divided into seven classes,
which should be used only
as a guide because some may fall into more than one
category. When in doubt,
refer to the manufacturer’s
instructions for more
detailed guidance.
General
All operators must be licensed to operate forklifts and operators are no longer separated into categories (incidental or professional). Operators are qualified to lift loads to the
rated capacity of the equipment for which they are licensed, trained, and evaluated. All
lifts will be made safely and in accordance with accepted work practices.
Mandatory Equipment
The use of safety and protective devices is an important factor in safe design and
operation of forklifts. The design of all forklifts will comply with the appropriate
American National Standards Institute (ANSI) B56 series standard. Forklifts need not be
equipped alike; however, there are certain items found on all forklifts:
Nameplate(s) and markings (e.g. Capacity information; Limitations) Warning devices (e.g., Lights or blinkers, sound-producing devices, motion alarms)
Overhead guards (required when a falling-object hazard exists for the operator)
On-board, sealed fire extinguishers (10 ABC/BC) for forklifts authorized to
transport explosives or used in areas where there are explosives.
Pre-operational Inspection
At the start of each work shift
during which the unit will be used, the assigned operator will conduct
a pre-operational inspection. If a
second operator wants to use a
forklift but cannot verify that this
inspection has been done, he/she
will complete the inspection prior to using the forklift. If any
malfunctions or defects are found
during the inspection, the forklift
will be parked (with the keys
removed) and tagged “Out of Service” using the “Danger – Do
not Operate” tag, pending repairs.
Contact supervisory personnel for
assistance, if necessary.
Each operator of a forklift is responsible for ensuring that a pre-shift inspection has been completed. This is a visual check of the
equipment that is documented on the Operator’s Pre-Shift Inspection form. The
supervisor or responsible individual will maintain the completed form for a minimum of
30 days.
Warning Light
Mast
Load Rating Label
Overhead Guard
(Canopy)
Driving Lights
Horn
Seat Belt
Backup
Alarm
Counter
Balance
Backrest Extension
Forks (Tines) Rear Wheels
(Steering Axle)
Proper Design for Forklifts
Class Forklift/Powered Industrial Truck type
I Electric motor rider trucks
II Electric motor narrow aisle trucks
III Electric motor hand trucks or hand/rider trucks
IV Internal combustion engine trucks (solid/cushion tires)
V Internal combustion engine trucks (pneumatic tires)
VI Electric and internal combustion engine tractors
VII Rough terrain lift trucks
A common forklift with some of the more common features

21-4 © Safety Services Company
Rules for Operators
The following requirements apply to all forklift operators:
Use seat belts where provided.
Operate internal combustion engine forklifts only in designated areas with adequate
ventilation.
Do not exceed the floor load rating. (Remember that the total weight of the forklift
equals the forklift’s plus the load and any attachments.) Secure (tie down) unstable loads before starting the vehicle.
Keep arms and legs inside the forklift structure, except when signaling for turns or
stops.
Do not jump from a moving forklift.
Make sure that there is adequate clearance before passing under or between structures.
Maintain indoor speed under 5 mph (8 km/hr) and outdoor speed under 15 mph (24
km/hr).
Yield to pedestrians.
Do not carry passengers, except where manufacturer-approved seats are provided. Tilt the mast back before traveling.
Stay at least three vehicle lengths back when following another forklift.
Maintain forks about 4 to 6 in. (10–15 cm) off the driving surface when traveling.
Do not attach slings, cables, or chains to the forks to lift materials or objects from
underneath them.
When forward vision is obscured, drive in reverse. Observe all traffic signals.
Do not use a forklift to tow or push other forklifts, another vehicle, or other
equipment, unless it is specifically designed to do so.
Use Class VII forklifts for irregular or rough terrain.
When traveling on streets, only use forklifts that have been recommended by the manufacturer for road use.
Solid tire forklifts (such as a Class IV forklift) should be used indoors only. Solid tire
forklifts are not designed to operate on irregular surfaces or rough roads.
Place tines as wide as possible for the load and lock them in place to prevent
sideways movement. Never add a counterweight. Know the weight of the load being lifted.
Never exceed the forklift’s rated capacity.
Do not lift material or equipment with which you are unfamiliar.
Maintain at least a 10-ft (3 m) separation from overhead power lines.
When crossing rails or other irregular areas, slow down and approach on a diagonal. Use forklifts for explosives handling only when lifting and moving items for a short
distance.
Parking
The following requirements apply when
parking forklifts:
Park on level surfaces. Lower the forks to the ground.
Tilt the mast forward.
Set the parking brake.
Place the controls in the neutral position.
Turn off the engine. Chock the wheels if the forklift must be parked on a slope.
Do not leave an unattended forklift running. A forklift is considered unattended if the
operator is out of sight of the forklift or more than 25-ft (8 m) away.
4 Parking on the Level
3 Parking Brake Set
2 Engine Off
1 Carriage Fully Lowered
Forklift Properly Set for Parking

© Safety Services Company 21-5
Special Conditions — Loading Docks and Trailers
When operating a forklift on a loading dock or in a trailer, the operator will secure
all dock plates.
Ensure that the total weight of the equipment, attachments, and load do not
exceed the floor weight capacity of the trailer. Also make sure that the trailer floor
is in good condition and is able to support the load.
Ensure trailer wheels are chocked or dock clamps are in place before driving onto or into a truck trailer.
Ensure that trailers not attached to tractors have trailer-jacks in place.
Drive the forklift slowly on wet and slippery docks.
Slow down and sound your horn when proceeding through doorways.
Ramps
When operating a forklift on ramps, the operator will point the forks up the ramp
when carrying a load, regardless of the direction of travel. Drive unloaded forklifts with the forks pointing downhill for added stability.
Obtain help to guide you when going up a ramp with a load and your vision is
blocked.
Never turn a forklift sideways on a ramp.
Exception: When operating a motorized hand truck (Class III forklift), always ensure
that the load-engaging means are facing downslope (loaded or empty).
Work Platforms
Work platforms will be used to lift personnel only when there is no other safer method. If
a work platform is used for this purpose, specific precautions and equipment will be in
place prior to the lift.
Ensure the load is against the backrest. Drive a loaded forklift
with the load on the uphill side.
Always drive an unloaded forklift with the
forks on the downhill side. Back up and drive down forward.
Never turn a forklift sideways on a ramp.

21-6 © Safety Services Company
Rough-Terrain Forklift Work Platforms
Work platforms should only be used to lift personnel when there is no other safer
method. If a work platform is used for this purpose, specific precautions and equipment
will be in place prior to the lift. Forklifts may only be used to support a platform if the
entire platform is attached to the forks and the vehicle is not moved when someone is on
the platform. Attached means the platform is fastened to the forks with bolts or by an
equally safe method. All scaffold requirements for capacity, construction, access, use, and fall protection apply.
Follow these requirements for safe personnel lifting operations:
Before an employee is elevated on a rough terrain forklift scaffold, a pre-lift meeting will be held to review the appropriate requirements and procedures to be followed.
The pre-lift meeting will be attended by all of the following personnel:
The person(s) responsible for the task
to be performed. The signalperson.
The lift operator.
The personnel to be lifted.
The scaffold platform will be attached to the forks by enclosed sleeves and will be
secured against the back of the forks with a mechanical device so that the platform cannot tip or slip.
The lifting carriage & forks will be secured to prevent them from tipping upward.
Protection will be provided for personnel on the platform from moving parts and on
lift trucks equipped with a lifting mast. The side of the platform adjacent to the mast
will be protected by a solid or mesh guard that is sufficient in height and width to
prevent contact with moving parts of the mast. On trucks equipped with rotators, the
rotation will be deactivated.
A work platform will be in compliance with all of the following requirements:
Be of welded mild steel construction that has a minimum safety factor of 4 times the maximum intended load.
Have a continuous guardrail system constructed as follows:
Have a top rail which is located not less than 36 inches, nor more than 42 inches,
above the platform floor and which is constructed to withstand a minimum of 200 pounds of force in any direction.
Have a midrail which is installed at mid-height between the top rail and platform
floor and which is constructed to withstand a 200-pound side thrust.
Have a toeboard which is not less than 4 inches in nominal height and which is
installed not more than ¼ of an inch above the floor around the periphery of the work platform. If the platform has a gate, then toeboard will also be installed on
the gate.
Have a wood planking, steel plate, or a steel grating bolted or welded to the bottom of the platform and be maintained free of slip or trip hazards.
Have a permanently affixed sign on the platform that specifies the maximum number
of passengers allowed, the work platform identification number, and the maximum
rated load.
Be easily identifiable by high-visibility color or marking.
An employee on a scaffold who is exposed to an overhead hazard of falling material
or overhead projections will be protected with overhead protection that is sufficient to
prevent injury.
The lifting mechanism will operate smoothly through its entire lift range, both empty
and loaded and all lift-limiting devices and latches will be functional.
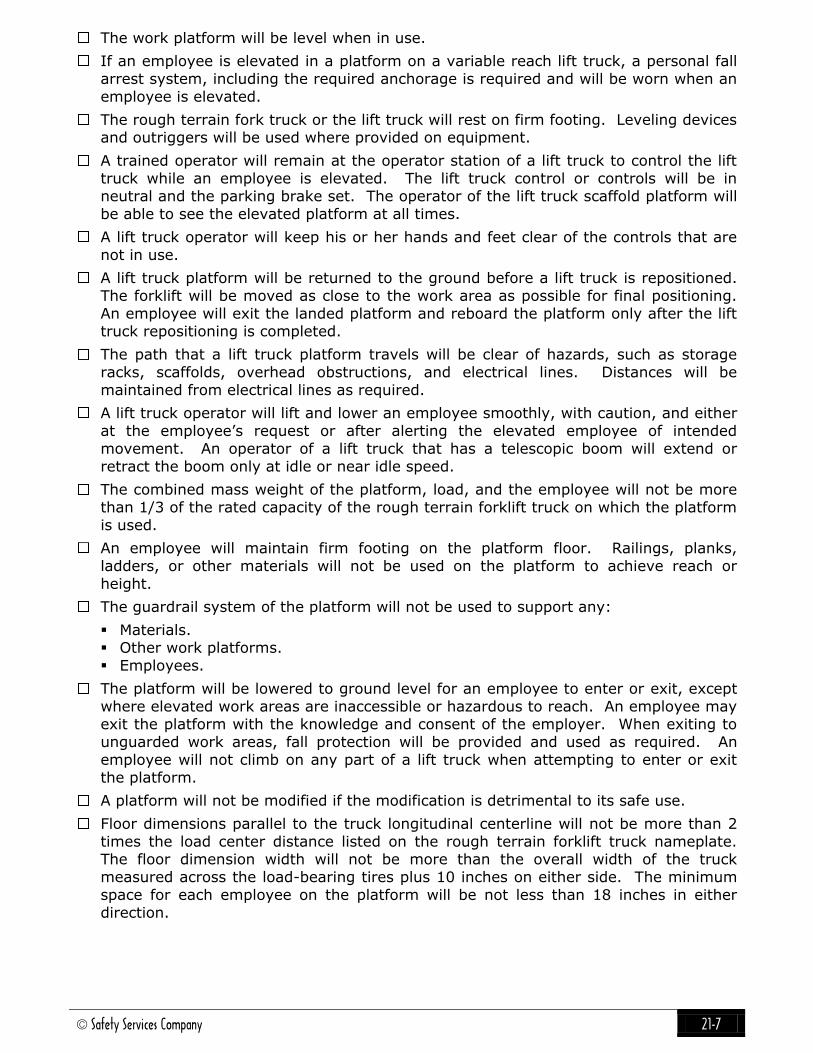
© Safety Services Company 21-7
The work platform will be level when in use.
If an employee is elevated in a platform on a variable reach lift truck, a personal fall
arrest system, including the required anchorage is required and will be worn when an
employee is elevated.
The rough terrain fork truck or the lift truck will rest on firm footing. Leveling devices and outriggers will be used where provided on equipment.
A trained operator will remain at the operator station of a lift truck to control the lift
truck while an employee is elevated. The lift truck control or controls will be in neutral and the parking brake set. The operator of the lift truck scaffold platform will
be able to see the elevated platform at all times.
A lift truck operator will keep his or her hands and feet clear of the controls that are
not in use.
A lift truck platform will be returned to the ground before a lift truck is repositioned.
The forklift will be moved as close to the work area as possible for final positioning.
An employee will exit the landed platform and reboard the platform only after the lift truck repositioning is completed.
The path that a lift truck platform travels will be clear of hazards, such as storage
racks, scaffolds, overhead obstructions, and electrical lines. Distances will be
maintained from electrical lines as required.
A lift truck operator will lift and lower an employee smoothly, with caution, and either
at the employee’s request or after alerting the elevated employee of intended
movement. An operator of a lift truck that has a telescopic boom will extend or
retract the boom only at idle or near idle speed.
The combined mass weight of the platform, load, and the employee will not be more
than 1/3 of the rated capacity of the rough terrain forklift truck on which the platform
is used.
An employee will maintain firm footing on the platform floor. Railings, planks,
ladders, or other materials will not be used on the platform to achieve reach or
height.
The guardrail system of the platform will not be used to support any:
Materials. Other work platforms.
Employees.
The platform will be lowered to ground level for an employee to enter or exit, except
where elevated work areas are inaccessible or hazardous to reach. An employee may exit the platform with the knowledge and consent of the employer. When exiting to
unguarded work areas, fall protection will be provided and used as required. An
employee will not climb on any part of a lift truck when attempting to enter or exit
the platform.
A platform will not be modified if the modification is detrimental to its safe use.
Floor dimensions parallel to the truck longitudinal centerline will not be more than 2
times the load center distance listed on the rough terrain forklift truck nameplate. The floor dimension width will not be more than the overall width of the truck
measured across the load-bearing tires plus 10 inches on either side. The minimum
space for each employee on the platform will be not less than 18 inches in either
direction.

21-8 © Safety Services Company
A wood pallet will not be used as a platform for lift truck scaffolds.
If arc welding is performed by an employee on the platform, electrode holders must
be protected from contact with metal components of the work platform.
The only tools that are permitted on the work platform are hand tools and portable
powered tools. Materials and tools will be secured to prevent displacement. The total weight of compressed gas cylinders will not be more than 20 pounds.
A work platform will not be used during high winds, electrical storms, snow, ice, sleet,
or other adverse weather conditions that could affect the safety of the employees on the work platform or the operator of the truck.
An employee will keep all parts of his or her body inside the platform during raising,
lowering, or repositioning of the platform.
There will be a communication system between an employee on the work platform
and the operator of the rough terrain forklift truck or a fork lift truck.
Inspection and Maintenance of Rough Terrain Forklift Trucks
Before an employee is elevated on a rough terrain forklift truck platform, a trained
operator or other qualified person will inspect all of the following items:
Tire condition & inflation pressure.
Steering mechanism.
Warning devices.
Lights.
Brakes.
Lift and tilt mechanisms, load engaging
means, chains, cables, and limit
switches.
Fuel systems.
Other work platforms.
A forklift truck will not be operated if an unsafe condition is found before or during use until the truck has been restored to a safe operating condition.
A rough terrain forklift truck and forklift trucks will be maintained according to the manufacturer’s recommendations.
Operator Training
Employers must ensure that an employee has been trained before being assigned as
an operator of a rough terrain forklift truck that is used to elevate personnel. An
employee will be trained in all of the following areas:
The capabilities of the equipment and its attachments. The purpose, use, and limitations of the controls.
How to make daily checks.
An employee will practice operating an assigned vehicle and perform the functions necessary for a particular job until proficiency is achieved.
Operator Permits
Some jurisdictions require that permits be issued by the company to the operator of a
rough terrain forklift performing personnel lifting operations. Follow these procedures:
Employers must ensure that an operator has a valid permit to operate a rough terrain
forklift or a forklift truck for elevating an employee. The operator will carry the
permit or will have the permit available if it is requested by any regulating department official, during working hours.
A permit to operate a rough terrain forklift truck or a forklift truck is valid only for
work performed for the employer who issued the permit. A permit may be issued for
a period of not more than 3 years. A permit will contain:
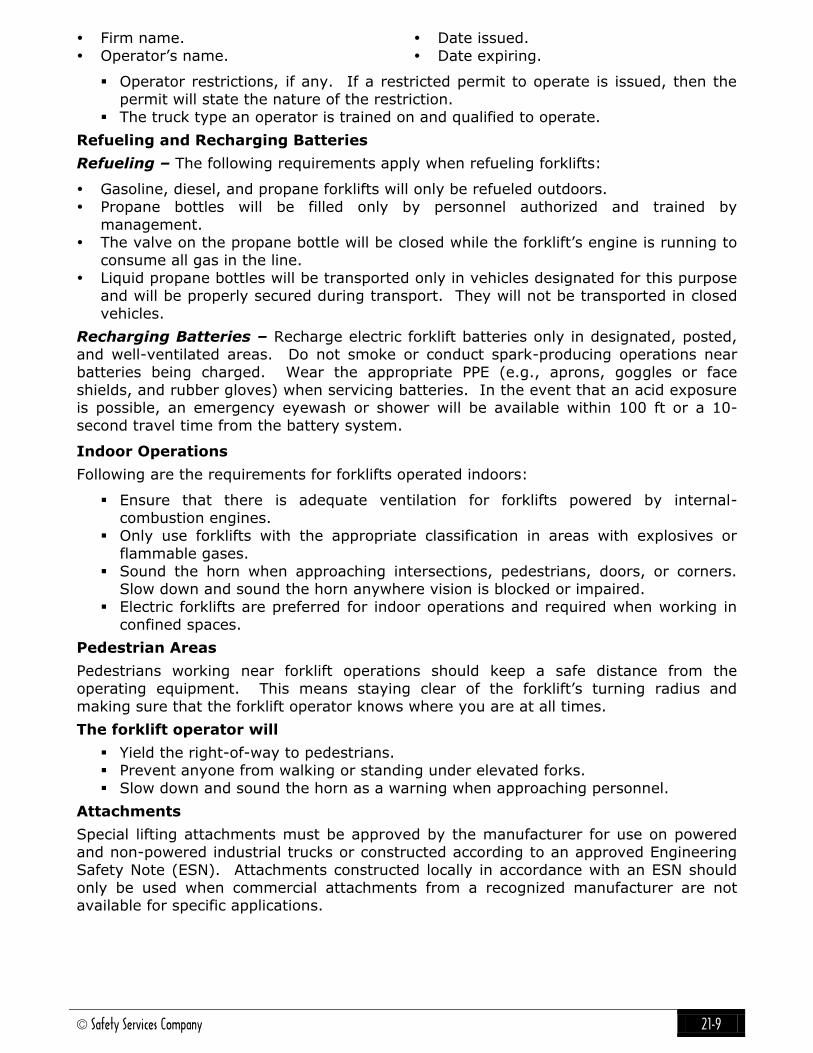
© Safety Services Company 21-9
Firm name.
Operator’s name.
Date issued.
Date expiring.
Operator restrictions, if any. If a restricted permit to operate is issued, then the permit will state the nature of the restriction.
The truck type an operator is trained on and qualified to operate.
Refueling and Recharging Batteries
Refueling – The following requirements apply when refueling forklifts:
Gasoline, diesel, and propane forklifts will only be refueled outdoors.
Propane bottles will be filled only by personnel authorized and trained by
management. The valve on the propane bottle will be closed while the forklift’s engine is running to
consume all gas in the line.
Liquid propane bottles will be transported only in vehicles designated for this purpose
and will be properly secured during transport. They will not be transported in closed
vehicles.
Recharging Batteries – Recharge electric forklift batteries only in designated, posted,
and well-ventilated areas. Do not smoke or conduct spark-producing operations near
batteries being charged. Wear the appropriate PPE (e.g., aprons, goggles or face
shields, and rubber gloves) when servicing batteries. In the event that an acid exposure is possible, an emergency eyewash or shower will be available within 100 ft or a 10-
second travel time from the battery system.
Indoor Operations
Following are the requirements for forklifts operated indoors:
Ensure that there is adequate ventilation for forklifts powered by internal-
combustion engines.
Only use forklifts with the appropriate classification in areas with explosives or
flammable gases.
Sound the horn when approaching intersections, pedestrians, doors, or corners. Slow down and sound the horn anywhere vision is blocked or impaired.
Electric forklifts are preferred for indoor operations and required when working in
confined spaces.
Pedestrian Areas
Pedestrians working near forklift operations should keep a safe distance from the
operating equipment. This means staying clear of the forklift’s turning radius and
making sure that the forklift operator knows where you are at all times.
The forklift operator will
Yield the right-of-way to pedestrians. Prevent anyone from walking or standing under elevated forks.
Slow down and sound the horn as a warning when approaching personnel.
Attachments
Special lifting attachments must be approved by the manufacturer for use on powered
and non-powered industrial trucks or constructed according to an approved Engineering
Safety Note (ESN). Attachments constructed locally in accordance with an ESN should
only be used when commercial attachments from a recognized manufacturer are not available for specific applications.

21-10 © Safety Services Company
The manufacturer’s capacity plate will be modified, or a second plate added, describing
the attachment and any related weight capacity modifications. All special-lifting
attachments that may be used with forklifts will either be load-tested and labeled to indicate the maximum rated capacity and the net weight, or have affixed to them a
manufacturer’s label indicating the maximum rated capacity.
Attachments will have a positive means of being secured to the forks or mast. The rated
capacity for the forklift and the attachment will not be exceeded.
Attachments almost always affect the rated capacity of the forklift. When a forklift is equipped with an attachment, the manufacturer will establish the rated capacity for the
forklift and the attachment. Capacity, operation, and maintenance instruction plates,
tags, or decals will be changed accordingly.
The user’s Company or organization is responsible for ensuring that attachments meet
the requirements specified in this section.
Narrow-Aisle Equipment
Narrow-aisle equipment (e.g., rider-reach forklifts, stock pickers, and stand-up counterbalanced forklifts) may present unique safety hazards. This type of equipment is
designed for specialized jobs and specific work environments. For example, there may
be a need for a narrow-aisle stock picker in a warehouse for high-reaching racks.
Fall protection devices and other PPE may be required while operating narrow-aisle
equipment.
Road Use of Forklifts
Forklifts present special hazards when operated on roadways. For that reason, the
following requirements apply:
Only forklifts recommended by the manufacturer will be used on roadways. Hard-rubber tire forklifts or “warehouse forklifts” should not be used on roadways. If hard
tire forklifts require refueling, repair, or maintenance at other locations that
necessitate travel on roadways or irregular surfaces, extreme care will be used. The
supervisor or “responsible individual” will make an assessment of this activity for the
safety hazards associated with travel on these surfaces.
A “slow-moving vehicle” sign (orange triangle) will be mounted to the rear of forklifts recommended for road use.
Forklifts will not carry loads that are wider than the widest dimension of the forklift or
attachment being used.
Forklifts being driven to a refueling point will not carry loads.
All loads will be properly secured on the forklift prior to operation on roadways to prevent inadvertent load shifting, slippage, or dropping. The supervisor or
“responsible individual” will determine proper methods of securing loads after all
safety concerns have been addressed.
Compressed gas cylinders will be carried only in approved racks or cages specifically
designed for that purpose. Forklift operators will pay particular attention to motor vehicles and pedestrians while
operating on roadways.
Forklift operators will move to the right lane when traveling on roads to allow passing
vehicles adequate clearance. Pull over and stop when necessary.
Note: The user’s organization or Company will be responsible for determining the use of
forklifts on roadways. The use of forklifts to traverse sections of roadways or parking
areas, or areas between buildings, will be determined by the user’s organization or
Company – taking into consideration all safety concerns.

© Safety Services Company 21-11
Note: When oversized loads are to be carried on roadways, the supervisor or
responsible individual will determine the proper method of transport. Forklifts should
only be used if safer methods (i.e. trailers, trucks, etc.) are not available. If trailers or trucks are not available for transport, and forklifts are to be used, safeguards will be
implemented (i.e. observers, road guards, traffic escort, etc.) to ensure forklift operator
and other vehicle operator safety.
Testing, Maintenance, and Modification
Only trained and authorized personnel will maintain and inspect forklifts. All work will be
done in accordance with the manufacturer’s specifications. Because forklifts are used
daily, it is particularly important to follow maintenance and inspection schedules.
Special attention should be given to forklift control, safety, and lifting features such as
brakes, steering, lift overload devices, safety equipment, and tilt/lift mechanism.
Modification
Modifications or additions to forklifts that affect their capacity or safe operation will not
be made without prior written approval from the manufacturer. Capacity, operation, and maintenance instruction plates, tags, or decals will be changed accordingly. Consult
management and/or supervision prior to modifying any forklift.
Non-powered Trucks/Lifts
Operators are not required to have a license to operate non-powered trucks/lifts (e.g., pallet jacks, etc.). Work supervisors will only allow trained personnel to operate these
units. At the start of each work shift during which the unit will be used, the operator will
conduct a pre-operational visual inspection. If any malfunctions or defects are found
during this inspection, the truck will be parked and tagged “Out of Service” using the
“Danger – Do not Operate” tag, pending repairs.
Special lifting attachments approved by the truck manufacturer or constructed in
accordance with an approved ESN may be used on these units. The truck
manufacturer’s capacity plate will be modified or a second plate added describing the
attachment and any related capacity modifications.
Responsibilities of Work Supervisors
Select operators based on their experience and physical qualification.
Assure that personnel under your supervision take the required training courses.
Ensure that a designated forklift proficiency instructor provides practical application
training and performance evaluations to applicants. Ensure that forklift operators under your supervision have a valid California State
driver’s license and a valid forklift operator’s license.
Monitor the performance of operators to ensure they comply with safety rules.
Ensure that forklifts under your control are approved by a nationally recognized
testing laboratory (e.g., Underwriters Laboratories or Factory Mutual Research Corporation) for the environment in which they are used.
Ensure that unauthorized persons do not operate forklifts under your control.
Monitor daily shift pre-operational inspections. Maintain completed Pre-operational
Inspection Checklists for a period of 30 days.
Ensure that forklifts are equipped with all applicable safety equipment (e.g., flashing
lights and/or audible alarms) as required by the operating environment. Ensure that forklifts are not operated if they are out of compliance with the applicable
maintenance schedule.

21-12 © Safety Services Company
General Forklift Stability
The stability of a vehicle is a critical factor in safe operation of powered industrial trucks
(forklifts). Determining the stability of a forklift is simple once a few basic principles are
understood. There are many factors that contribute to a vehicle's stability: the vehicle's
wheelbase, track, and height; the load's weight distribution; and the vehicle's
counterweight location (if the vehicle is so equipped). The "stability triangle," used in
most stability discussions, demonstrates stability simply.
Basic Principles
Whether an object is stable depends on the objects weight or momentum at one end of a
system being greater than, equal to, or smaller than the objects weight or momentum at the system's other end. This principle can be seen in the way a see-saw or teeter-totter
works: that is, if the product of the load and distance from the fulcrum (moment) is
equal to the force at the devices other end, the device is balanced and it will not move.
However, if there is a greater force at one end of the device, the device will try to move
downward at the end with the greater force.
The longitudinal stability of a counterbalanced forklift depends on the vehicle's weight
and the load’s weight. In other words, if the mathematic product of the load weight,
(the distance from the front wheels, the approximate point at which the vehicle would tip
forward) to the load’s center of gravity times the load’s weight is less than the vehicle's
weight, the system is balanced and will not tip forward. However, if the load's weight
and momentum is greater than the vehicle's weight, the greater load-moment will force the truck to tip forward.
The Stability Triangle:
Almost all counterbalanced powered industrial trucks have a three point suspension system, that is, the vehicle is supported at three points. The truck's steer axle is
attached to the truck by a pivot pin in the axle's center. When the points are connected
with imaginary lines, this three-point support forms a triangle called the stability
triangle. Figure 1 depicts the stability triangle.
Notes: When the vehicle
is loaded, the combined "Center of Gravity" (CG)
shifts toward line B-C.
Theoretically, the
maximum load will result in
the CG at the line B-C. In actual practice, the
combined CG should never
be at line B-C.
The addition of additional
counterweight will cause the truck CG to shift
toward point A and result
in a truck that is less stable
laterally.
Center of Gravity of Vehicle and Maximum Load
(Theoretical)
Vehicle Center of
Gravity (Unloaded)
A
B Figure 1
C
Typical Forklift

© Safety Services Company 21-13
When the vehicle's line of action, or load center, falls within the stability triangle, the
vehicle is stable and will not tip over. However, when the vehicle's line of action or the
vehicle/load combination falls outside the stability triangle, the vehicle is unstable and may tip over. See Figure 2.
Longitudinal Stability
The axis of rotation when a truck tips forward is the front wheels' points of contact with the pavement. When a forklift tips forward, the truck will rotate about this line. When a
truck is stable, the vehicle-moment must exceed the load-moment. As long as the
vehicle-moment is equal to or exceeds the load-moment, the vehicle will not tip over.
On the other hand, if the load moment slightly exceeds the vehicle-moment, the truck
will begin to tip forward, thereby causing the rear to lose contact with the floor or ground
and resulting in loss of steering control. If the load-moment greatly exceeds the vehicle moment, the truck will tip forward.
To determine the maximum safe load-moment, the truck manufacturer normally rates
the truck at a maximum load at a given distance from the front face of the forks. The
specified distance from the front face of the forks to the line of action of the load is
commonly called the load center. Because larger trucks normally handle loads that are physically larger, these vehicles have greater load centers. Trucks with a capacity of
30,000 pounds or less are normally rated at a given load weight at a 24-inch load
center. Trucks with a capacity greater than 30,000 pounds are normally rated at a given
load weight at a 36- or 48-inch load center. To safely operate the vehicle, the operator
should always check the data plate to determine the maximum allowable weight at the rated load center.
Although the true load-moment distance is measured from the front wheels, this
distance is greater than the distance from the front face of the forks. Calculating the
maximum allowable load-moment, using the load-center distance always provides a
lower load-moment than the truck was designed to handle. When handling unusual loads, such as those that are larger than 48 inches long (the center of gravity is greater
than 24 inches) or that have an offset center of gravity, etc., a maximum allowable load-
moment should be calculated and used to determine whether a load can be safely
handled. For example, if an operator is operating a 3000 pound capacity truck (with a
24-inch load center), the maximum allowable load-moment is 72,000 inch pounds
(3,000 times 24). If a load is 60 inches long (30-inch load center), then the maximum that this load can weigh is 2,400 pounds (72,000 divided by 30).
Figure 2
Load CG
Vertical Stability Line (Line of
Action)
Combined CG
Truck CG
The vehicle is stable This vehicle is unstable and
will continue to tip over
Vertical Stability Line
(Line of Action) Truck CG
Combined CG
Load CG

21-14 © Safety Services Company
Lateral Stability
The vehicle's lateral stability is determined by the line of action’s position (a vertical line
that passes through the combined vehicle's and load's center of gravity) relative to the
stability triangle. When the vehicle is not loaded, the truck’s center of gravity location is
the only factor to be considered in determining the truck’s stability. As long as the line
of action of the combined vehicle's and loads center of gravity falls within the stability
triangle, the truck is stable and will not tip over. However, if the line of action falls outside the stability triangle, the truck is not stable and may tip over. Refer to Figure 2.
Factors that affect the vehicle's lateral stability include the load's placement on the truck,
the height of the load above the surface on which the vehicle is operating, and the
vehicle's degree of lean.
Dynamic Stability
Up to this point, the stability of a forklift has been
discussed without considering the dynamic forces
that result when the vehicle and load are put into motion. The weight's transfer and the resultant
shift in the center of gravity due to the dynamic
forces created when the machine is moving,
braking, cornering, lifting, tilting, and
lowering loads, etc., are important
stability considerations.
When determining whether a load can be safely handled, the operator should exercise
extra caution when handling loads that cause the vehicle to approach its maximum
design characteristics. For example, if an operator must handle a maximum load, the
load should be carried at the lowest position possible, the truck should be accelerated
slowly and evenly, and the forks should be tilted forward cautiously. However, no precise rules can be formulated to cover all of these eventualities.
Daily Checklist for Forklifts
The OSHA standard for forklift training requires that an employer provide training to
truck operators on a variety of topics. Among these topics are vehicle inspection and maintenance that the operator will be required to perform. Each type of forklift is unique
and checklists pertinent to each type of vehicle should be modified accordingly. It is
recommended that the manufacturer's instructions on vehicle maintenance and owner's
and operator's responsibilities also be consulted. The OSHA standards for powered
industrial trucks should be evaluated to ensure compliance.
Develop a Forklift Operator Training Program
Before you begin developing your operator training program you should become familiar
with the OSHA standard for powered industrial trucks (Forklifts) and any operator's manual pertinent to the equipment you have in your workplace.
Identify your Operators
First, you need to determine the employees that will be required to operate forklifts in
your workplace. If an employee has other duties, but sometimes operates a forklift, training must be provided.

© Safety Services Company 21-15
Identify the Types of Forklifts You Have in Your Workplace
There are many different types of powered industrial trucks. Typically, these types of
vehicles are known as forklift or lift trucks. Some types of trucks are not capable of
being ridden by the operator. These are also covered by the OSHA standard and training
is required. Some trucks are fitted with attachments purchased from the manufacturer.
The use of these attachments may affect the manner in which the truck is handled;
therefore, training on the use of the attachment would also be required. If your employees will be expected to operate several different types of forklifts, then training is
required on the unique handling characteristics of the vehicles.
Methods of Training
Once you have identified your forklift operators and types of trucks you have in your
workplace, you should determine the methods of training you will use.
Training must consist of a combination of formal instruction and practical training. Using
both methods is the only way to ensure that the trainee receives and comprehends the
instruction and uses the information to safely operate a forklift. Note that the formal training need not take place in a classroom. Discussions can consist of the trainer
talking to the trainee and explaining the training material, either in the workplace or in
another location. The training must, however, include an explanatory element as well as
a practical element.
Formal instruction may include lectures, conferences, classroom discussions,
demonstrations, and written or oral tests. To enhance the training and make it more understandable to the employee, employers and other trainers may use movies, slides,
computers, video tapes and other visual presentations.
Using visual aids has several advantages, including:
The employees being trained remain more attentive, thereby increasing the
training's effectiveness.
The trainer can use visual presentations to ensure that the necessary information
is covered during the training.
Graphical presentations make better use of the training time by decreasing the
need for the instructor to carry on long discussions about the instructional material.
Trainees have greater retention of information learned from graphical
presentations.
While some employees can learn instructional material while seated in a classroom,
other employees may learn best by observing an operation (demonstration) and/or by
personally performing an operation (practical exercise). In most cases, a combination of
different training methods provides the best training in the least amount of time.
Once you have selected the method of training, then the content of the training program must be considered to include all pertinent training items.
Training Program Content
Because each type (make and model) of forklift has different operating characteristics,
limitations, and other unique features, a good employee training program for forklift operators should be based upon the type of vehicles that the employee will be trained
and authorized to operate. The training should also emphasize the workplace's features
that will affect how the vehicle must be operated. Finally, the training should include the

21-16 © Safety Services Company
General Forklift Operator Training Program
All operators at A R M Environmental Services, Inc. will familiarize themselves with these
characteristics of the forklift(s) they will operate:
Controls and instrumentation: location, what they do, and how they work.
Engine or motor operation.
Steering and maneuvering.
Visibility.
Fork and/or attachment adaptation, operation, and limitations of their use.
Vehicle capacity.
Vehicle stability.
Vehicle inspection and maintenance the operator will be required to perform.
Refueling or charging and recharging batteries.
Operating limitations.
Any other operating instruction, warning, or precaution listed in the Operator’s Manual
for the type of vehicle the employee is being trained to operate. All forklifts should be equipped with Operator's Manuals and Safety Manuals. Read the manuals before
operating any forklift. If the manuals are missing, contact an equipment dealer or the
manufacturer directly for more copies.
The Operating Environment
Before operating any forklift, learn as much about the work area as possible. Walk
around the worksite and inspect the surface(s) over which your will be expected to
travel. Be aware of:
Slippery Surfaces
Rocks Holes
Overhead Hazards
Slopes
Deep Ditches
Obstructed Vision
Restricted Clearances Speed Considerations
Confined Areas
Underground Utilities Powerlines
Moving equipment
Scattered materials
Pedestrian traffic
Deep mud
Oil spills
Water Hazards
Composition of probable loads and load stability.
Load manipulation, stacking, un-stacking.
Operating the truck on ramps and other sloped surfaces that would affect the stability
of the vehicle.
Operating the vehicle in closed environments and other areas where insufficient
ventilation and/or poor vehicle maintenance could cause a buildup of carbon
monoxide or diesel exhaust.
OSHA Requirements
After the training program has been completed, Andy Wilson will evaluate the trainee's
knowledge and skills and determine that the employee is competent to operate the truck
safely.
Employee Evaluation
When the employee completes the training exercises and prior to operating the truck, an
evaluation of the employee must be performed. This evaluation will determine the
adequacy of training and the ability of the employee to perform truck operations safely
in the workplace.

© Safety Services Company 21-17
The OSHA standard also requires that an evaluation of the operator's performance be
conducted at least once every three years and after refresher training.
Company management will then complete a certification of training record containing the name of the operator, the date of the training, the date of the evaluation, and the
identity of the person(s) performing the training or evaluation.
Refresher Training
During the course of forklift operations, the supervisor may observe the employee performing an unsafe act, such as riding with the load too high or traveling at an unsafe
speed. The person making the correction will point out the incorrect manner of
operation of the truck or other unsafe act being conducted, tell the employee how to do
the operation correctly, and then ensure the employee does the operation correctly.
When there have been multiple on-the-spot corrections, Company management may decide to conduct a more structured retraining program which would include the
following information:
Common unsafe situations encountered in the workplace.
Unsafe operating methods observed or known to be used.
The need for constant attentiveness to the vehicle, the workplace conditions, and the manner in which the vehicle is operated.
The preceding subject areas need to be taught so that the trainee receives all the
information needed for safe vehicle operation. Specific details may be found in the
vehicle manufacturers' literature, the national consensus standards, and the OSHA standards relating to forklift operator training.
Forklift Operator Training Program Outline
Introduction - Overview of the Program
The goal is to provide a training program based on the trainee's prior knowledge,
the types of vehicles used in the workplace, and the hazards of the workplace.
The course will utilize video, group discussion and hands-on practice. Each
operator must obtain the knowledge and skills needed to do their job correctly and safely.
Forklift Types, Features, and Physics
Each operator will familiarize themselves with the basic types and functions of forklifts.
Develop an understanding of the information shown on a data plate.
Understand the critical forklift measurements that affect safety.
Understand the forces that cause a tip-over, and the forklift design considerations
and safety ratings that help prevent them including the "stability triangle."
Inspecting the Vehicle
Understand the purpose and importance of pre-operational checkouts. Provide a basic understanding of areas covered during a pre-operational checkout.
Familiarize each operator with a checklist for pre-operational checkouts, and what
to do if a problem is discovered.
Driving the Truck
Understand the elements of safe movement of a forklift.
Understand the differences between an automobile and a forklift.
Recognize the safety hazards associated with operating a forklift.
Load Handling
Understand the elements of load lifting safety. Understand the safe operating procedures for raising and lowering loads in
confined/restricted areas.

21-18 © Safety Services Company
Refueling Gas, Diesel, and LPG Forklifts
Discuss LPG and its properties.
Understand the elements and procedures of safely refueling internal combustion
vehicles.
Describe tank components: service valve, surge valve, relief valve, etc.
Discuss related safety issues.
Battery and Charging
Understand the elements and procedures of safely changing and charging batteries.
Discuss filling procedures and maintenance.
Discuss related safety issues.
Safety Concerns
Review/reinforce potential of serious injury.
Review/reinforce safety procedures at your workplace/facility.
Specific Truck and Workplace Training/Hands-On
Review features of specific powered industrial trucks to be operated.
Review operating procedures of specific powered industrial trucks to be operated. Review safety concerns of specific powered industrial trucks to be operated.
Review workplace conditions and safety concerns of areas where powered
industrial trucks will be operated.
Learn/practice actual operation of specific powered industrial trucks to be operated
and specific workplace conditions where powered industrial trucks will be operated.
Demonstrate proficiency performing the forklift operator duties specific to the trainee's position and workplace conditions.
A R M Environmental Services, Inc. will issue a Certification of Completion of
the Course upon successful completion of the training course.

© Safety Services Company 21-19
General Operation of a Forklift
Mount the forklift using three points of contact (two hands and one foot).
Adjust the seat and mirrors.
Put the seat belt on and adjust accordingly.
Familiarize yourself with the controls.
Take into consideration all workplace hazards.
Make sure the unit is in neutral and start the engine.
Look at the gauges and make sure everything is normal.
Raise the forks two to four inches off the ground.
Make sure no pedestrians are around the forklift then proceed with caution.
Never modify a forklift without the manufacturer's written approval.
Forklift usually steer from the rear, make turns from the inside.
If a forklift begins to roll over, brace yourself and ride it out.
When traveling, pedestrians always have the right of way.
Keep a safe stopping distance at all times.
When traveling outdoors, always be aware of changing conditions.
Drive a loaded forklift with the load "uphill" (10% grade or more).
Lower forks when forklift is unattended (operator 25 feet away).
Never enter a trailer, truck, or railcar unless authorized.
Before entering a trailer, truck, or railcar, make sure it has been secured.
Before entering a trailer, make sure the trailer floor can support the truck.
Picking Up a Load
Make sure the load does not exceed the capacity of the forklift.
Center the forks to evenly distribute the weight of the load.
Make sure the load is balanced and secure.
Drop the forks to the floor.
Drive into the load as far as possible.
Check for overhead obstructions.
Tilt the load back slightly and then lift.
Sound horn, look for pedestrians, and then back out slowly.
Lower load to the safe traveling height before moving (2" – 4" above the floor).
The forklift should be completely stopped before the load is raised or lowered.
Traveling with a Load
Pedestrians always have the right-of-way.
Keep the load tilted back slightly.
Keep the forks low, 2 to 4 inches above the ground, if possible.
An operator's visibility is always restricted, even without a load, be cautious.
Always watch for pedestrians and other traffic.
If load is large and blocks operator's view, travel in reverse or get a "spotter."
Drive at a safe speed, slowing down when going around corners.
Sound the horn when approaching aisles and corners.
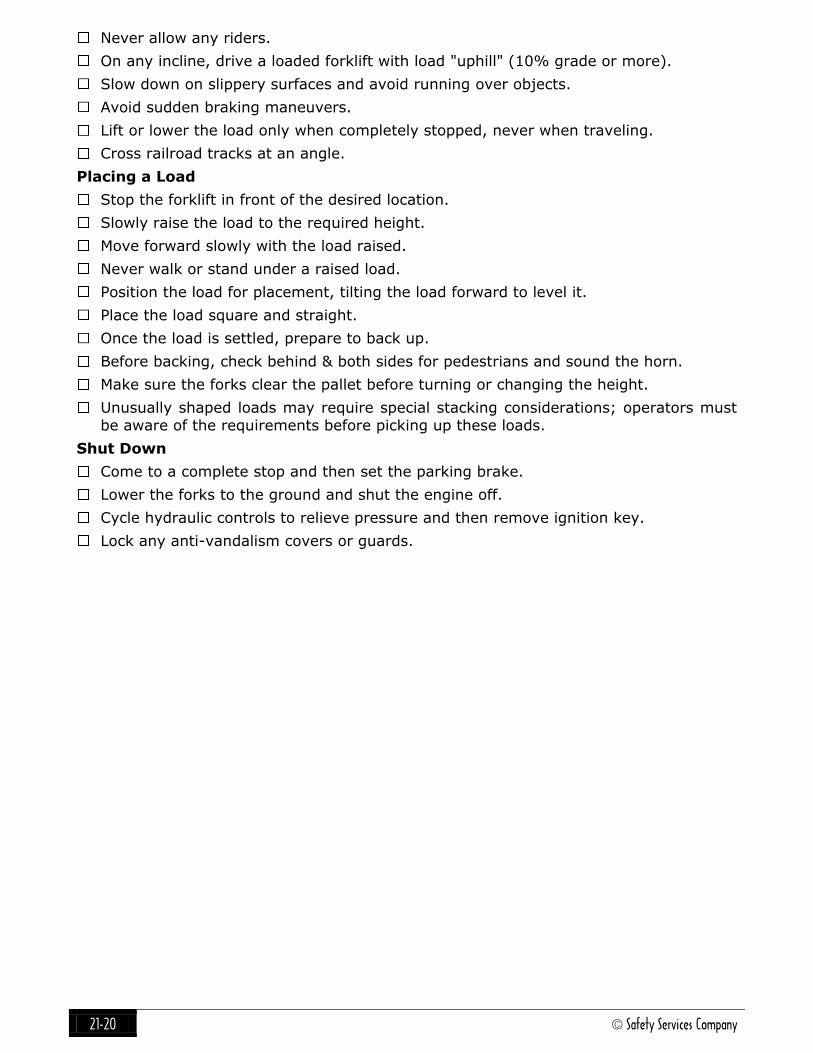
21-20 © Safety Services Company
Never allow any riders.
On any incline, drive a loaded forklift with load "uphill" (10% grade or more).
Slow down on slippery surfaces and avoid running over objects.
Avoid sudden braking maneuvers.
Lift or lower the load only when completely stopped, never when traveling.
Cross railroad tracks at an angle.
Placing a Load
Stop the forklift in front of the desired location.
Slowly raise the load to the required height.
Move forward slowly with the load raised.
Never walk or stand under a raised load.
Position the load for placement, tilting the load forward to level it.
Place the load square and straight.
Once the load is settled, prepare to back up.
Before backing, check behind & both sides for pedestrians and sound the horn.
Make sure the forks clear the pallet before turning or changing the height.
Unusually shaped loads may require special stacking considerations; operators must be aware of the requirements before picking up these loads.
Shut Down
Come to a complete stop and then set the parking brake.
Lower the forks to the ground and shut the engine off.
Cycle hydraulic controls to relieve pressure and then remove ignition key.
Lock any anti-vandalism covers or guards.

© Safety Services Company 21-21
Performance Evaluation for Forklift Operators
Employee: ____________________________________ Date: ________ Time: ______
Evaluator: ________________________________ Equipment Type: _______________
YES/NO
Shows familiarity with truck controls.
Gave proper signals when turning.
Slowed down at intersections.
Sounded horn at intersections.
Obeyed signs.
Kept a clear view of direction of travel.
Turned comers correctly - was aware of rear end swing.
Yielded to pedestrians.
Drove under control and within proper traffic aisles.
Approached load properly.
Lifted load properly.
Maneuvered properly.
Traveled with load at proper height.
Lowered load smoothly/slowly.
Stops smoothly/completely.
Load balanced properly.
Forks under load all the way.
Carried parts/stock in approved containers.
Checked bridge-plates/ramps.
Did place loads within marked area.
Did stack loads evenly and neatly.
Did drive backward when required.
Did check load weights.
Did place forks on the floor when parked, controls neutralized, brake on set, power
off.
Followed proper instructions for maintenance - checked both at beginning and end.
Comments: _____________________________________________________________
_______________________________________________________________________
_______________________________________________________________________
Total Rating: □ Excellent □ Good □ Fair □ Poor □ Fail
_______________________________________________________________________
Evaluator's Signature Date
_______________________________________________________________________
Operator's Signature Date

21-22 © Safety Services Company
DAILY INSPECTION CHECKLIST
Powered Industrial Truck
KEY OFF Procedures
The vehicle inspection
Overhead guard
Hydraulic cylinders
Mast assembly
Lift chains and rollers
Forks
Tires
Gas gauge
Check the engine oil level
Examine the battery
Inspect the hydraulic fluid level
Check the engine coolant level
KEY ON Procedures
Test the standard equipment
Front, tail, and brake lights
Fuel gauge (if diesel)
Windshield wiper
Heater
ENGINE RUNNING Procedures
Check the gauges
Oil pressure indicator lamp
Ammeter indicator lamp
Ammeter
Hour Meter
Water Temperature Gauge
Test the standard equipment
Steering
Brakes
Horn
Safety seat (if equipped)
Check the operation of load-handling attachments
Check the transmission fluid level
Overhead Guard
Mast
Tires Forks
Hydraulic Cylinders
Lift Chains and Rollers
General - Duty Forklift
Overhead Guard
Tires
Forks
Hydraulic Cylinders
Lift Chains and Rollers
Yard Forklift
Mast

© Safety Services Company 21-23
GENERAL DAILY FORKLIFT CHECKLIST
Overhead Guard
Y/N
Are there broken welds, missing bolts, or damaged areas?
Hydraulic Cylinders
Is there leakage or damage on the lift, tilt, and attachment functions of the
cylinders?
Mast Assembly
Are there broken welds, cracked or bent areas, and worn or missing stops?
Lift Chains and Rollers
Is there wear or damage or kinks, signs of rust, or any sign that lubrication is required?
Is there squeaking?
Forks
Are they cracked or bent, worn, or mismatched?
Is there excessive oil or water on the forks?
Tires - What do the tires look like?
Are there large cuts that go around the circumference of the tire?
Are there large pieces of rubber missing or separated from the rim?
Are there missing lugs?
Is there bond separation that may cause slippage?
Battery Check
Are the cell caps and terminal covers in place?
Are the cables missing insulation?
Hydraulic Fluid
Check level?
Gauges
Are they all working properly?
Steering
Is there excessive free play?
If power steering, is the pump working?
Brakes
If pedal goes all the way to the floor when you apply the service brake; that is the
first indicator that the brakes are bad. Brakes should also work in reverse. Does
the parking brake work? The truck should not be capable of movement when the
parking brake is engaged.
Lights
If equipped with lights, are they working properly?
Horn
Does the horn work?

21-24 © Safety Services Company
Safety Seat
If the truck is equipped with a safety seat is it working?
Load Handling Attachments
Is there hesitation when hoisting or lowering the forks, when using the forward or
backward tilt, or the lateral travel on the side shift?
Is there excessive oil on the cylinders?
Engine Oil
Check levels.
Engine Coolant
Visually check the level. Note: Never remove the radiator cap to check the coolant
level when the engine is running or while the engine is hot. Stand to the side and
turn your face away. Always use a glove or rag to protect your hand.
Transmission Fluid
Check levels?
Windshield Wipers
Do they work properly?
Seat Belts
Do they work?
Control Lever
Does the lever operate properly?
Comments/Observations: __________________________________________________
_______________________________________________________________________
_______________________________________________________________________
_______________________________________________________________________
Printed name and signature of person(s) conducting inspection Date
_______________________________________________________________________
Printed name and signature of person(s) conducting inspection Date

© Safety Services Company 22-1
Chapter 22
Log 300 Recordkeeping Forms & Posting Requirements
Log 300 Recordkeeping Following are the three forms needed for recordkeeping:
OSHA Form 300 — Log of Work-Related Injuries and Illnesses.
OSHA Form 301 — Injury and Illness Incident Report.
OSHA Form 300A — Summary of Work-Related Injuries and Illnesses.
These are official Federal OSHA forms with accompanying instructions and
worksheets. Make copies of the blank forms for future use.
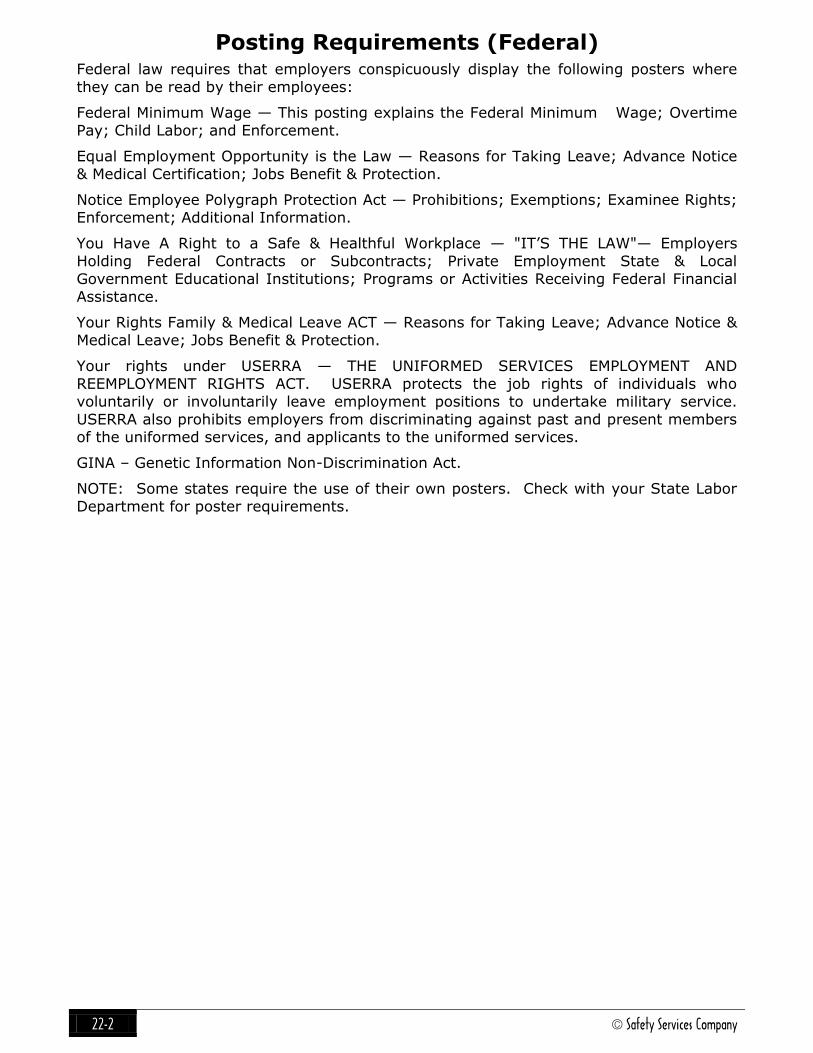
22-2 © Safety Services Company
Posting Requirements (Federal) Federal law requires that employers conspicuously display the following posters where
they can be read by their employees:
Federal Minimum Wage — This posting explains the Federal Minimum Wage; Overtime
Pay; Child Labor; and Enforcement.
Equal Employment Opportunity is the Law — Reasons for Taking Leave; Advance Notice
& Medical Certification; Jobs Benefit & Protection.
Notice Employee Polygraph Protection Act — Prohibitions; Exemptions; Examinee Rights; Enforcement; Additional Information.
You Have A Right to a Safe & Healthful Workplace — "IT’S THE LAW"— Employers
Holding Federal Contracts or Subcontracts; Private Employment State & Local
Government Educational Institutions; Programs or Activities Receiving Federal Financial
Assistance.
Your Rights Family & Medical Leave ACT — Reasons for Taking Leave; Advance Notice &
Medical Leave; Jobs Benefit & Protection.
Your rights under USERRA — THE UNIFORMED SERVICES EMPLOYMENT AND
REEMPLOYMENT RIGHTS ACT. USERRA protects the job rights of individuals who
voluntarily or involuntarily leave employment positions to undertake military service.
USERRA also prohibits employers from discriminating against past and present members of the uniformed services, and applicants to the uniformed services.
GINA – Genetic Information Non-Discrimination Act.
NOTE: Some states require the use of their own posters. Check with your State Labor
Department for poster requirements.

© Safety Services Company 23-1
Chapter 23
New Hire Orientation Contracts
A R M Environmental Services, Inc. New Hire Orientation Checklist
I have read or have had explained the Safety Policy & Program Summary. I have no further
questions regarding:
The Company’s Safety Philosophy. My safety responsibilities as an employee.
The disciplinary procedures.
______Initial
I have read or have had explained the Safety Committee portion of the Safety Program:
I am aware of who is in charge of safety if I have questions. I am aware of my ability to report my safety concerns to the Safety Coordinator.
I am aware that this Company is striving to provide a safe working environment and is committed to my safety and ability to inform the Company of unsafe working environments
without fear of reprisal.
______Initial
I have read or have had explained the General Safety Rules as pertain to the Safety Program:
I am aware of all safety rules and general codes of safe practice.
______Initial
I have read or have had explained the safety policy regarding Hand and Power Tools:
I am aware that I am required to inspect all tools before I operate the equipment.
I am aware that I can request training from my supervisor on any tool that I do not know how to operate safely.
I am aware that if I am unsure of how to operate my tools safely I am to not operate them until I receive proper training and feel that I can operate it safely.
I am aware that any tool in need of repair or out of compliance is to be reported to my supervisor.
______Initial
I have read or have had explained the process for Accident Reporting & Investigation:
I understand that I am to immediately report an accident to my supervisor.
I understand that I am to immediately stop working. I understand that if I need medical attention I am to see the clinic or hospital that is
affiliated with this Company. I understand that if I go to a different doctor or medical facility the Company may have a
right to deny or not pay my medical bill. I understand that I will be cooperative in any accident investigation.
I understand that upon any accident I may be tested for drugs and alcohol.
I understand that if I am present at my place of employment under the influence of drugs and or alcohol that I automatically self-terminate my employment with or without notice of
termination by the Company.
______Initial

23-2 © Safety Services Company
I have read or have had explained the Emergency Action Plan:
I understand where my emergency evacuation routes are located.
I understand that we are to gather at a specific determined place in order to conduct a head count.
______Initial
I have read and or have had explained the Fire Prevention Plan:
I understand that I am to report any potential fire hazards.
I am to keep all exits clear and free of obstacles. I know where the nearest fire extinguisher is to my workstation.
______Initial
I am aware of the CPR & First Aid portion of the Safety Program:
I am aware of where the first aid kits are located. I am aware that I am to report to management if the first aid kit needs restocked.
I am aware of who is trained in First Aid and CPR I am aware of where the nearest Eye Wash Station is located (if appropriate).
I am aware that I am to report all injuries immediately to my supervisor.
I am aware of where our clinic is located and will have someone drive me there in the event of an emergency (or by ambulance if appropriate).
______Initial
I have read or have had explained the Hazard Evaluation portion of the Safety Program:
I understand that I am to be familiar with the hazards that surround my workstation. I understand that I am to report any hazard that may be present in my workstation.
I understand that it is my responsibility to assist in providing a safe working environment for myself and my co-workers.
______Initial
I have read or have had explained the Bloodborne Pathogens portion of the Safety Program:
I understand that I am to wear personal protective equipment when dealing with blood or
body fluids. I understand that I am to properly dispose of any blood, body fluids, or material that has
been touched by the blood or fluid. I understand that in the event of dealing with a Bloodborne Pathogen situation it is my
responsibility to receive post exposure care by the Company’s clinic. I am aware of where my hand-washing facilities and/or disinfectant are located.
______Initial
I have read or have had explained and understand the Workplace Violence & Harassment policy of the Safety Program:
I understand The Company has ZERO TOLERANCE for workplace Violence & Harassment. Workplace Violence & Harassment includes but is not limited to: intimidation, threats,
physical attack, property damage, and includes acts of violence committed by employees, customers, relatives, acquaintances, or strangers against Company employees in the
workplace. Dangerous weapons are prohibited on Company property or in Company vehicles.

© Safety Services Company 23-3
All employees are encouraged to report to a supervisor any possibility of workplace
Violence & Harassment. All reports will be confidential.
______Initial
I have read or have had explained the Electrical Safety portion and the Lockout/Tagout
portion of the Company Safety Program:
I understand that only authorized persons are allowed to deal with electrical repairs and or issues.
I understand that I am to not touch or in any way use any equipment that is locked out or tagged out.
I understand that it is my responsibility to report any electrical hazards to a supervisor
immediately.
______Initial
I have read or have had explained the Hazard Communication & Material Safety Data Sheet
(SDS) portion of the Safety Program:
I understand what a Material Safety Data Sheet is. I have been given an orientation on how to read a SDS.
I understand that I am to report any Chemical or Hazardous Substance that does not have a label.
I understand that I can request further training on SDSs.
______Initial
I have read or have had explained the Personal Protective Equipment portion of the
Safety Program:
I understand that I am to wear my personal protective equipment as required by this
Company. I am aware of what I am required to wear for personal protective equipment at this
Company.
______Initial
I am aware of where my Company displays all of the required Employee Rights Postings.
______Initial
I am aware of where my Company "Designated Medical Provider" is located.
______Initial
I am aware that the Safety Program may contain additional written safety Programs in place
which require additional training (i.e. Confined Spaces, Fall-Protection, Excavation, Ladders, Scaffolding, Lock-Out/Tag-Out, etc.):
I understand that I may receive or request further training on any safety issues that may be appropriate for my particular job.
If I have not received adequate training or feel that I cannot conduct my job safely it is my responsibility to notify my supervisor.
______Initial
My signature certifies and verifies that I have received an orientation and have received or have read the material mentioned in the Company Safety Program. I understand completely the program and have no questions in regards to Company safety policy. I fully understand and am aware that if I have questions regarding the Company Safety Program or my personal safety, I may inquire of my supervisor for additional information and explanation.
_______________________________________________________________________________________ New Hire Name Signature Date
_______________________________________________________________________________________ Supervisor Name Signature Date

23-4 © Safety Services Company
Orientación Y Lista De Verificación He leído o me han explicado la Póliza de Seguridad y el Resumen del Programa. No tengo más
preguntas en cuanto a:
La Filosofía de Seguridad de la compañía.
Mis responsabilidades de seguridad como un empleado. El procedimiento de disciplina.
______Inicial
He leído o me han explicado la porción del Comité de Seguridad del Programa de Prevención de Lesiones y Enfermedad:
Estoy consciente de quien está a cargo de seguridad si tengo preguntas.
Estoy consciente de mi habilidad de reportar mis preocupaciones de seguridad al Comité de Seguridad.
Estoy consciente que la compañía se esfuerza para proveer un ambiente seguro para el
trabajo y esta cometido a mi seguridad y habilidad de informar a la compañía de ambientes inseguros para el trabajo sin temor de represalia.
______Inicial
He leído o me han explicado las Reglas Generales de Seguridad como pertenecen al Programa de Prevención de Lesiones y Enfermedad:
Estoy consciente de todas las reglas de seguridad.
______Inicial
He leído o me han explicado los Códigos de Seguridad y Practica para las Herramientas Manuales y Eléctricas:
Estoy consciente que debo inspeccionar toda la herramienta antes de utilizar el equipo. Estoy consciente que le puedo pedir entrenamiento a mi supervisor sobre cualquier
herramienta que no sé operar de manera segura. Estoy consciente que si no estoy seguro como operar mi herramienta de manera segura, no
la debo utilizar hasta recibir entrenamiento adecuado y sienta que la pueda utilizar de manera segura.
Estoy consciente que cualquier herramienta que necesite reparación o no este en conformidad debe ser reportada a mi supervisor.
______Inicial
He leído o me han explicado el proceso de Reportar y Investigar Accidentes.
Entiendo que debo reportar un accidente inmediatamente a mi supervisor.
Entiendo que debo parar de trabajar inmediatamente. Entiendo que si necesito tensión medica debo ir a una clínica o hospital afiliado con esta
compaña. Entiendo que si voy a un diferente doctor o clínica médica la compañía tiene el derecho de
negar o no pagar mi cuenta medica. Entiendo que debo cooperar con cualquier investigación de accidente.
Entiendo que me examinaran por drogas o alcohol por cualquier accidente.
Entiendo que si estoy presente en mi lugar de empleo bajo la influencia de drogas o alcohol puedo ser despedido automáticamente con o sin aviso de terminación por la compañía.
______Inicial

© Safety Services Company 23-5
He leído o me han explicado el Plan de Hacino de Emergencia.
Entiendo donde las rutas de evaluación de emergencia están localizadas.
Entiendo que debemos reunirnos en un determinado lugar especifico para poder conducir una cuenta de personas.
______Inicial
He leído o me han explicado el Plan de Prevención de Incendio.
Entiendo que debo reportar cualquier peligro de incendio.
Debo mantener todas las salidas libres de obstáculo. Yo sé donde el extinguidor de incendio más cercano está en mi área de trabajo.
______Inicial
Estoy consciente de la porción de Primeros Auxilios y Resucitación Cardiopulmonar CPR del Plan de Prevención de Lesiones y Enfermedad.
Estoy consciente de donde los botiquines de primeros auxilios están localizados.
Estoy consciente que debo reportar si el botiquín de primeros auxilios necesita materiales. Estoy consciente de quien está entrenado en Primeros Auxilios y Resucitación
Cardiopulmonar CPR.
Estoy consciente de donde la Estación para Lavar los Ojos está localizada (si es apropiado). Estoy consciente que debo reportar todas las heridas de inmediato a mi supervisor.
Estoy consciente de donde nuestra clínica está localizada y TENDRÉ A ALGUIEN TRANSPORTARME ALLÍ EN EL EVENTO DE UNA EMERGENCIA (o en una ambulancia si es
apropiado).
______Inicial
He leído o me han explicado la porcino de la Evacuación de Peligro en el Programa de
Prevención de Lesiones y Enfermedad.
Entiendo que me debo familiarizar con los peligros que esta alrededor de mi estaciona de
trabajo. Entiendo que debo reportar cualquier peligro que puede estar presente en mi estación de
trabajo. Entiendo que es mi responsabilidad para asistir en proveyendo un ambiente seguro de
trabajo para yo mismo u otros.
______Inicial
He leído o me han explicado la porción del Patógenos Sanguíneos en el Programa de
Prevención de Lesiones y Enfermedad.
Entiendo que debo traer puesto equipo protector personal cuando se trata de sangre o
fluidos del cuerpo. Entiendo que debo apropiadamente desechar de cualquier sangre, fluidos del cuerpo o
materiales que han sido tocados por sangre o fluidos. Entiendo que en evento de tratar con una situación donde hay Patógenos Sanguíneos es mi
responsabilidad de recibir cuidado de exposición posterior por la clónica de la componía. Estoy consciente de donde estar las facilidades para lavar las manos.
______Inicial
He leído o me han explicado y entiendo la porción de Seguridad en el Lugar de Empleo y la
porción de la Póliza de Violencia en el Lugar de Empleo del Programa de Prevención de Lesiones y Enfermedad.
Entiendo que esta compañía tiene CERO TOLERANCIA para la violencia en el lugar de empleo.
Violencia en Lugar de Empleo incluye pero no se limita a: intimidación, amenazas, ataques físicos, violencia domestica, daño a propiedad e incluye actos de violencia cometidos por
empleados, clientes, familiares, conocidos o extraños contra los empleados en lugar de empleo.
Armas peligrosas están prohibidos en la propiedad de la compañía o en los vehículos de la
compañía. Todos los empleados están animados en reportar a un supervisor o cualquier posibilidad de
la violencia en el lugar de empleo. Todos los reportes se consideraran confidenciales.

23-6 © Safety Services Company
______Inicial
He leído o me han explicado la porción de Seguridad Eléctrica y la porción de Lockout/Tagout
en el Programa de Prevención de Lesiones y Enfermedad.
Entiendo que solamente personas autorizadas están permitidos en tratar con las
reparaciones eléctricas y/o problemas. Entiendo que no debo tocar o de ninguna manera usar cualquier equipo que esta
restringido. Entiendo que es mi responsabilidad de reportar cualquier peligro eléctrico a un supervisor
inmediatamente.
______Inicial
He leído o me han explicado las porciones de Comunicación de Peligro y la Hoja Informativa
de Seguridad de Material del Programa de Prevención de Lesiones y Enfermedad.
Entiendo lo que es una Hoja Informativa de Seguridad de Material.
He recibido una orientación en como leer la hoja Informativa de seguridad de Material. Entiendo que debo reportar cualquier sustancia peligrosa o química que no tiene etiqueta.
Entiendo que puedo recibir entrenamiento adicional en la Hoja Informativo de Seguridad de Material.
______Inicial
He leído o me han explicado la porción del Equipo Protector Personal del Programa de Prevención de Lesiones y Enfermedad.
Entiendo que debo tener puesto mi Equipo Protector Personal como es requerido por esta
compañía.
Estoy consciente del Equipo Protector Personal (EPP) que esta requerido en este compañía.
______Inicial
Estoy consciente en donde mi compañía despliega todos los Letreros Requeridos de los
Derechos de Empleados.
______Inicial
Estoy consciente de donde esta la clínica de mi compañía.
______Inicial
Estoy consciente que el Programa de Prevención de Lesiones y Enfermedades puede incluir
programas adicionales por escrito que están puesto que requiere entrenamiento adicional (Respecto de: Espacios limitados, Protección de caídas, Excavación, Escaleras, Andamios,
Lock-out/Tag-out, etc.).
Entiendo que debo recibir o puedo pedir entrenamiento adicional en cualquier asunto de seguridad avanzado que pueda ser apropiado para mi trabajo en particular.
Si no he recibido adecuado entrenamiento o siento que no puedo hacer mi trabajo en una
manera seguro es mi responsabilidad notificar mi supervisor.
______Inicial
Yo certifico que he recibido una orientación o he leído el material mencionado y el Programa de Prevención de Lesiones y Enfermedad. Entiendo completamente el programa y no tengo mas preguntas tocante a la seguridad. En caso de que tenga una pregunta acerca de nuestro programa de seguridad o de mi seguridad personal estoy consciente que puedo pedir a mi supervisor para explicación adicional.
______________________________________________________________________________________ Escriba Nombre Firma Fecha
______________________________________________________________________________________ Testigo de la Compañía Titulo Fecha

© Safety Services Company 23-7
DISCLAIMER
OSHA’s Safety and Health Regulations are continuously being reinterpreted.
Therefore, Safety Services Company is unable to completely guarantee the exactness
of the information conveyed in this publication. Safety Services Company assumes no
responsibility and will be held harmless for any inaccuracies or omissions contained
within this manual and will not be held liable to any extent or form for any injury or
loss resulting from the manner in which this information is interpreted and / or
applied. Careful effort has been dedicated in order to provide a simplified,
understandable explanation of OSHA regulations based on currently available
information. This “Safety and Health Manual is distributed with the agreement that
Safety Services Company is not employed in providing legal or other specialized
business services. Should expert assistance be required, retain the services of a
competent professional.
SAFETY SERVICES COMPANY Toll Free (866) 204-4766 - Toll Free Fax (866) 556-0004
Toll Free Customer Service (866) 644-9630
e-mail: [email protected]
www.safetyservicescompany.com

23-8 © Safety Services Company
Notes:
_______________________________________________________________________
_______________________________________________________________________
_______________________________________________________________________
_______________________________________________________________________
_______________________________________________________________________
_______________________________________________________________________
_______________________________________________________________________
_______________________________________________________________________
_______________________________________________________________________
_______________________________________________________________________
_______________________________________________________________________
_______________________________________________________________________
_______________________________________________________________________
_______________________________________________________________________
_______________________________________________________________________
_______________________________________________________________________
_______________________________________________________________________
_______________________________________________________________________
_______________________________________________________________________
_______________________________________________________________________
_______________________________________________________________________
_______________________________________________________________________
_______________________________________________________________________
_______________________________________________________________________
_______________________________________________________________________
_______________________________________________________________________
_______________________________________________________________________

© Safety Services Company 24-1
Chapter 24
Safety Meeting Minutes
Other Safety Training Documents for:
A R M Environmental Services, Inc.
This section is designed to hold all Company Safety Training Documents. Any paperwork related to Company Safety Training should be 3-ring hole-punched and stored in this
section.

24-2 © Safety Services Company
Notes:
_______________________________________________________________________
_______________________________________________________________________
_______________________________________________________________________
_______________________________________________________________________
_______________________________________________________________________
_______________________________________________________________________
_______________________________________________________________________
_______________________________________________________________________
_______________________________________________________________________
_______________________________________________________________________
_______________________________________________________________________
_______________________________________________________________________
_______________________________________________________________________
_______________________________________________________________________
_______________________________________________________________________
_______________________________________________________________________
_______________________________________________________________________
_______________________________________________________________________
_______________________________________________________________________
_______________________________________________________________________
_______________________________________________________________________
_______________________________________________________________________
_______________________________________________________________________
_______________________________________________________________________
_______________________________________________________________________
_______________________________________________________________________
_______________________________________________________________________

Chapter 25
Attachments
The following is a list of forms for Company use.
Safety Committee By-Laws Form
Safety Committee Checklist
Safety Committee Meeting Agenda
Safety Committee Meeting Minutes
Disciplinary Safety Warning
Code of Safe Practices Receipt
Accident Incident Report
Emergency Action Plan
First Aid Response Plan
Job Safety Analysis Form
Violent Incident Report
Suspect & Vehicle Identification Sheet
Employee Incident Report
Record of Employee Training
Sexual Harassment Complaint Form
Hazardous Chemical List
Hazardous Communication Training Acknowledgement and Updated Training
Example SDS Sheet

SAFETY COMMITTEE BYLAWS Name
The name of the committee is the _____________________________________ Safety Committee.
Purpose
The purpose of the _______________________________________ Safety Committee is to bring all __________________________ employees together to achieve and maintain a safe, healthful workplace.
Goal
The goal of the _________________________________________ Safety Committee is to eliminate
workplace injuries and illnesses by involving employees and managers in identifying hazards and suggesting how to prevent them.
Objectives
The Safety Committee has four objectives:
Involve employees in achieving a safe, healthful workplace.
Promptly review all safety-related incidents, injuries, accidents, illnesses, and deaths.
Conduct quarterly workplace inspections, identify hazards, and recommend methods for eliminating
or controlling the hazards.
Annually evaluate the ______________________________________________ workplace safety-and-health program and recommend to management how to improve the program.
Representatives
The _____________________________________________ Safety Committee will have _____ voting
representatives. _____ of the representatives will represent employees and _____ will represent management. Employee representatives can volunteer or their peers can elect them. Management representatives will be selected by management.
Each representative will serve a continuous term of at least one year. Terms will be staggered so that at least one experienced representative always serves on the committee.
Chair and Vice-chair
The __________________________________________ Safety Committee will have two officers: chair and vice-chair. One officer will represent labor and one officer will represent management.
Terms of Service
Chair and vice-chair will each serve a one-year term.
Duties of the Chair
The duties of the chair:
Schedule regular committee meetings.
Approve committee correspondence and reports.
Develop written agenda for conducting meeting.
Supervise the preparation of meeting minutes.
Conduct the committee meeting.
Duties of the Vice-chair
The duties of the vice-chair:
In the absence of the chair, assume the duties of the chair.
Perform other duties as directed by the chair.
Election of Chair and Vice-chair
The election of a new chair or vice-chair will be held during the monthly committee meeting before the month in which the incumbent’s term expires.
If the chair or vice-chair leaves office before the term expires, an election will be held during the next scheduled safety-committee meeting; the elected officer will serve for the remainder of the term.
Training
New representatives will receive training in safety-committee functions, hazard identification, and accident-
investigation procedures.
Meetings
Monthly schedule — The ____________________________________________ Safety Committee will meet
the ___________________ of each month, except when the committee conducts quarterly workplace safety inspections.

Attendance and Alternates
Each representative will attend regularly scheduled safety committee meetings and participate in quarterly
workplace inspections and other committee activities. Any representative unable to attend a meeting will appoint an alternate and inform the chair before the meeting. An alternate attending a meeting on behalf of a regular representative will be a voting representative for that meeting.
Agenda
The agenda will prescribe the order in which the ______________________________________ Safety Committee conducts its business. The agenda will also include the following when applicable:
A review of new safety and health concerns
A status report of employee safety and health concerns under review
A review of all workplace near misses, accidents, illness, or deaths occurring since the last committee meeting.
Minutes
Minutes will be recorded at each committee meeting and posted & distributed to all employees.
The committee will submit a copy of the minutes to the _____________________________________
personnel office; the office will retain the copy for three years. All reports, evaluations, and recommendations of the committee will be included in the minutes. The minutes will also identify representatives who attended monthly meeting, and representatives who were absent.
Voting Quorum
_____ voting representatives constitute a quorum. A majority vote of attending representatives is required to approve all safety-committee decisions. Issues not resolved by majority vote will be forwarded to management for resolution.
Employee Involvement
The __________________________________________ Safety Committee will encourage employees to identify workplace-health-and-safety hazards. Concerns raised by employees will be presented to the committee in writing; the committee will review new concerns at the next regularly-scheduled monthly meeting.
Safety Log
The committee will maintain a log of all employee concerns, including the date received, recommendations to management, and the date the concern was resolved.
Response
The committee will respond to employee concerns in writing and work with management to resolve them. The committee will present written recommendations for resolving concerns to management. Within 60 days of receipt of the written recommendations, management will respond in writing to the committee indicating acceptance, rejection, or modification of the recommendations.
Incident and Accident Investigation
The __________________________________________ Safety Committee will review new safety- or health-related incidents at its next regularly-scheduled meeting. Safety-related incidents include work-related near misses, injuries, illnesses, and deaths. When necessary, the committee will provide written recommendations to management for eliminating or controlling hazards.
Workplace Inspections
The _________________________________________ Safety Committee will conduct quarterly workplace inspections of all Company facilities in March, June, September, and December.
Written Report
The committee will prepare a written report for management that documents the location of all health or safety hazards found during inspection. The report will recommend options for eliminating or controlling the hazards.
Within 60 days of receipt of the written report, management will respond in writing to the committee, indicating acceptance, rejection, or proposed modification of the recommendations.
Evaluation
The _________________________________________ Safety Committee will evaluate the Company’s
workplace-safety-and-health program annually and provide a written evaluation of the program to management. The committee will also evaluate its own activities each December and use the evaluation to develop an action plan for the next calendar year.

SAFETY COMMITTEE CHECKLIST Done To Do
Our safety committee is composed of an equal number of employer and
employee representatives.
Our safety committee is composed of an equal number of employer and
employee representatives.
Employee representatives are volunteers or are elected by their peers.
There are at least four representatives on the committee if the
workplace has more than 20 employees – at least two representatives if
the workplace has 20 or fewer employees.
The representatives elect the committee chairperson.
Representatives are paid their regular wages during safety committee training and meetings.
Employee representatives serve on the committee for at least one year.
Representatives’ terms of service are staggered so that at least one
experienced representative is always on the committee.
Reasonable efforts are made to ensure that committee representatives
represent the firm’s major work activities.
The committee meets monthly except when representatives schedule quarterly workplace inspections.
Committee meetings follow a written agenda.
The minutes for each meeting are maintained for at least three years.
Minutes are available to all employees to read.
All reports, evaluations, and recommendations are included in the minutes.
Management has a reasonable time to respond, in writing, to the
committee’s recommendations.
The committee has a method for collecting and reviewing employees’
safety-related suggestions and reports of hazards.
The committee assists management in evaluating and improving the workplace safety and health program.
The inspection team conducts workplace inspections at least quarterly.
The committee’s quarterly inspection team follows a standard procedure
for identifying safety-and-health hazards during its inspections.
The inspection team includes employer and employee representatives.
The inspection team documents, in writing, the location and identity of
workplace hazards.
The inspection team – or other persons designated by the committee –
does quarterly inspections of satellite locations.
The committee has a procedure for reviewing the team’s quarterly
inspection reports.
The committee recommends to management ways to control hazards
and unsafe work practices.
The committee makes recommendations to ensure all employees are accountable for following safe work practices.
The committee has a procedure for investigating workplace accidents,
illnesses, and deaths.
Representatives understand the purpose of their safety committee and
know how it functions.
Representatives have access to applicable OSHA safety and health rules.
Representatives have received safety training for identifying workplace hazards and investigating accidents.

SAFETY COMMITTEE MEETING AGENDA Date: __________________
To: All committee members, alternates, bulletin board
Meeting Date and Time: ___________________________________________________
Place: _________________________________________________________________
Agenda Items Person Responsible
1. Old business
a. Review last month’s recommendations ________________________
b. Follow-up on last quarterly inspection ________________________
2. New business
a. Hazard reports All
b. Accident investigation reviews _________________________
c. Recommendations review __________________________
d. ______________________________ __________________________
e. ______________________________ __________________________
f. ______________________________ __________________________
3. Safety Committee Members Training
a. ______________________________ ___________________________
b. ______________________________ __________________________
Notes:
_______________________________________________________________________
_______________________________________________________________________
_______________________________________________________________________
_______________________________________________________________________
______________________________________________________ _______________
Chair Person’s Signature Date

SAFETY COMMITTEE MEETING MINUTES Page 1 Chairperson: ___________________________________________ Date: __________
Department: ____________________________ Time meeting started: ____________
PRESENT ABSENT
___________________________________ _________________________________
___________________________________ _________________________________
___________________________________ _________________________________
___________________________________ _________________________________
___________________________________ _________________________________
___________________________________ _________________________________
___________________________________ _________________________________
Previous meeting minutes from _______________________ were read.
Date
Old Business
Review of last month’s recommendations Recommendation Not
Number Description Completed Completed Date
R-______ _________________________________ □ □ __________
R-______ _________________________________ □ □ __________
R-______ _________________________________ □ □ __________
R-______ _________________________________ □ □ __________
R-______ _________________________________ □ □ __________
R-______ _________________________________ □ □ __________
Follow-up on last quarterly inspection: _____________________________________
_______________________________________________________________________
New Business
Hazard (inspection) reports reviewed: __________________________________
Hazard Recommendation
Number Description Number
H-______ ___________________________________________ R-______
H-______ ___________________________________________ R-______
H-______ ___________________________________________ R-______
H-______ ___________________________________________ R-______
H-______ ___________________________________________ R-______
H-______ ___________________________________________ R-______

SAFETY COMMITTEE MEETING MINUTES Page 2 Accident/incident investigation reviews: Accident Near Recommendation Number Miss Description Number
A-______ □ _________________________________________ R-______
A-______ □ _________________________________________ R-______
A-______ □ _________________________________________ R-______
A-______ □ _________________________________________ R-______
A-______ □ _________________________________________ R-______
A-______ □ _________________________________________ R-______
A-______ □ _________________________________________ R-______
Safety Committee Members Training Report: __________________________________
______________________________________________________________________
______________________________________________________________________
______________________________________________________________________
Miscellaneous New Business: _______________________________________________
______________________________________________________________________
______________________________________________________________________
______________________________________________________________________
______________________________________________________________________
Activity/Assignment Report:
Description Person Assigned
__________________________________________ ________________________
__________________________________________ ________________________
__________________________________________ ________________________
__________________________________________ ________________________
__________________________________________ ________________________
__________________________________________ ________________________
__________________________________________ ________________________
Committee Remarks: _____________________________________________________
______________________________________________________________________
______________________________________________________________________
______________________________________________________________________
Meeting adjourned: _____________________ Next meeting: _____________________
Time/date Time/date
___________________________________ _________________________________
Chair Person Signature Secretary Signature

SAFETY WARNING
Employee’s Name Position
Date of Warning Violation Time □ am Violation
Date □ pm
Supervisor Department
Type of warning □ Verbal □ Written □ Serious □ Other:
Type of Violation □ Unsafe Act □ Improper Safety Attire □ Unsafe condition □ Other
Supervisor’s Statement
Employee’s Statement (Check Proper Box)
□ I agree with the Supervisor’s statement □ I disagree with the Supervisor’s statement because:
List all previous warnings and retraining below
When warned and by whom I have read and understand this warning
decision First Warning (Describe reason)
Employee’s Signature Date
Date Date retrained Supervisor’s Signature Date
Second Warning (Describe reason)
Copy Distribution
□ Employee
□ Employee’s Supervisor
□ Personnel Department
□ Safety Committee
Date Date retrained
Third Warning (Describe reason)
Date Date retrained
The Supervisor must complete this form immediately after the employee has been interviewed. A decision must be made on the following to ensure violators will not participate in the current safety incentive program.
□ No further action □ Suspension □ Other:
□ Suspension from current safety incentive program □ Dismissal
Submit this form for review at the next Safety Committee meeting
Safety Committee Notes

CODE OF SAFE PRACTICES RECEIPT This is to certify that I have received a copy of The Company Code of Safe Practices.
I have read these instructions, understand them, and will comply with them while
working for the Company.
I understand that failure to abide by these rules may result in disciplinary action and
possible termination of my employment with this Company.
I also understand that I am to report any injury to my foreman or superintendent
immediately and report all safety hazards.
I further understand that I have the following “Safety” rights:
I am not required to work in any area I feel is not safe.
I am entitled to information on any hazardous material or chemical I am exposed to
while working.
I am entitled to see a copy of The Company Safety and Health Manual.
I will not be discriminated against for reporting safety concerns.
_______________________________________________________ ______________
Employee Name Signature Date
_______________________________________________________ ______________
Supervisor Name Signature Date
cc: Employee File
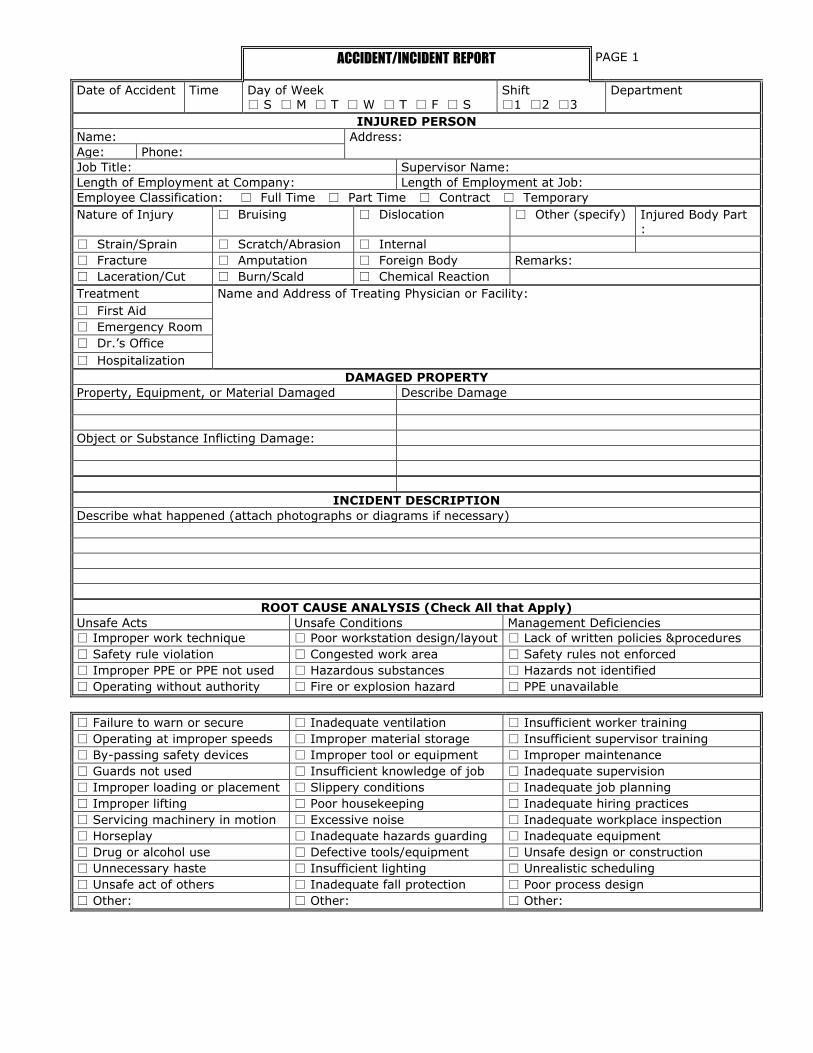
ACCIDENT/INCIDENT REPORT
PAGE 1
Date of Accident Time Day of Week □ S □ M □ T □ W □ T □ F □ S
Shift □1 □2 □3
Department
INJURED PERSON
Name: Address:
Age: Phone:
Job Title: Supervisor Name:
Length of Employment at Company: Length of Employment at Job:
Employee Classification: □ Full Time □ Part Time □ Contract □ Temporary
Nature of Injury □ Bruising □ Dislocation □ Other (specify) Injured Body Part :
□ Strain/Sprain □ Scratch/Abrasion □ Internal
□ Fracture □ Amputation □ Foreign Body Remarks:
□ Laceration/Cut □ Burn/Scald □ Chemical Reaction
Treatment Name and Address of Treating Physician or Facility:
□ First Aid
□ Emergency Room
□ Dr.’s Office
□ Hospitalization
DAMAGED PROPERTY
Property, Equipment, or Material Damaged Describe Damage
Object or Substance Inflicting Damage:
INCIDENT DESCRIPTION
Describe what happened (attach photographs or diagrams if necessary)
ROOT CAUSE ANALYSIS (Check All that Apply)
Unsafe Acts Unsafe Conditions Management Deficiencies
□ Improper work technique □ Poor workstation design/layout □ Lack of written policies &procedures
□ Safety rule violation □ Congested work area □ Safety rules not enforced
□ Improper PPE or PPE not used □ Hazardous substances □ Hazards not identified
□ Operating without authority □ Fire or explosion hazard □ PPE unavailable
□ Failure to warn or secure □ Inadequate ventilation □ Insufficient worker training
□ Operating at improper speeds □ Improper material storage □ Insufficient supervisor training
□ By-passing safety devices □ Improper tool or equipment □ Improper maintenance
□ Guards not used □ Insufficient knowledge of job □ Inadequate supervision
□ Improper loading or placement □ Slippery conditions □ Inadequate job planning
□ Improper lifting □ Poor housekeeping □ Inadequate hiring practices
□ Servicing machinery in motion □ Excessive noise □ Inadequate workplace inspection
□ Horseplay □ Inadequate hazards guarding □ Inadequate equipment
□ Drug or alcohol use □ Defective tools/equipment □ Unsafe design or construction
□ Unnecessary haste □ Insufficient lighting □ Unrealistic scheduling
□ Unsafe act of others □ Inadequate fall protection □ Poor process design
□ Other: □ Other: □ Other:

ACCIDENT / INCIDENT REPORT-PAGE 2 ACCIDENT / INCIDENT ANALYSIS
Using the root cause analysis list on the previous page, explain the cause(s) of the incident
in as much detail as possible.
Make sketches or illustrations to help describe incident:
How bad could the accident have been? □ Very Serious □ Serious □ Minor
What is the chance of the accident happening again?
□ Frequent □ Occasional □ Rare
PREVENTIVE ACTIONS
Describe actions that will be taken to prevent
recurrence:
Deadline By Whom Complete
INVESTIGATION TEAM
Name Signature Position

EMERGENCY ACTION PLAN To be posted at all Company Facilities and workplaces
Company Name: Job Location:
Street Address:
City: State: ZIP Code:
Prepared By: (Print Name of Preparer)
Title: Phone Number:
Signature: Date:
PURPOSE
This plan is for the safety and well-being of the employees of: (Name of Company)
It identifies necessary management and employee actions during fires and other
emergencies. Education and training are provided so that all employees know and
understand the Emergency Action Plan.
LOCATON OF PLAN
The Emergency Action Plan can be found at the station or office of each: (Foreman,
Supervisor, etc.)
A copy is also maintained in THE COMPANY general offices.
Upon request, an OSHA representative may obtain a copy of the plan from: (Name
and Title)
EXIT ROUTES
Draw a diagram of jobsite or facility exit routes in space below:
Locate meeting place or “Roll-Call” area on above diagram:
ACCOUNTING FOR EMPLOYEES
After exiting jobsite or facility, all employees are to assemble for “Roll-Call” at this location:
Note location on above diagram
The following persons are responsible for ensuring that employees comply with this
requirement:
Name and Title:
Name and Title:

CRITICAL OPERATIONS
To minimize damage from the emergency, the following personnel are responsible for
shutting down the listed critical operations:
Personnel Names Critical Operations
As soon as shutdowns are completed, the employees who performed critical operations
must take the nearest exit route in accordance with general emergency procedures.
RESCUE AND MEDICAL DUTIES
The following personnel are certified and trained in both CPR and general first aid.
These persons are to be contacted as specified in the “General Emergency Training”:
Name and Title Phone Number
REPORTING EMERGENCIES
The following personnel have the duty of contacting public responders to come to the
emergency scene. The personnel are listed in descending order of availability:
Name and Title Phone Number
ALARM SYSTEMS AND NOTIFICATION OF EMERGENCIES
In the event of a workplace or facility emergency, employees will be notified as follows:
Identify method(s) of notification:
TYPES OF EVACUATION
OSHA requires this Company to have an established system of types of evacuation to
follow for different emergency circumstances. The following listing represents Company
policy for various emergency situations:
PARTIAL EVACUATION: Code Yellow – 3 rings or horn blasts: RESPONDERS (trained
extinguisher personnel and trained rescue and medical personnel)
FULL EVACUATION: Code Red – 4 rings or horn blasts: RESPONDERS (n/a)
NOTE: If there is more than one evacuation type, the alarm signal for each must be
distinctive.
OTHER: (describe)
OTHER: (describe)

PUBLIC EMERGENCY RESPONSE INFORMATION
Ensure that 911 emergency services cover the area this Emergency Action Plan covers.
Local Police Department:
Local Fire Department:
Local Ambulance/EMS:
Local Hospital:
FURTHER INFORMATION
For further information or explanation about any duties under this Plan, contact:
Name and Title:
Name and Title:
This Emergency Action Plan is authorized and approved by:
(Name and Title) Signature

FIRST AID RESPONSE PLAN Company: Date:
This plan was written for: (site or location this plan covers)
The following person/position is responsible for managing our first aid response plan:
The emergency medical service to be called:
Summon the emergency medical service by doing the following:
(In most cases it will be to call 911 or some other phone number, but a direct alarm or some other method may be the preferred way.)
Emergency phone numbers are posted at the following location(s):
Other means to summon aid are at the following location:
When employees need first aid they must do the following:
Employees on site who are first aid trained:
First-aid kits (or a first aid station) are located at:
The following person/position is responsible for inspecting the first aid kits:
The Company's Designated Medical Provider is:
Person Preparing Plan:
Signature: Date:
Supervisor's Name:
Signature: Date:

Job Safety Analysis
Project
Activity:
Contract:
Location:
# Job Steps Potential Hazards Safe Procedures/Controls
1
2
3
4
5
6
7

Job Safety Analysis
# Job Steps Potential Hazards Safe Procedures/Controls
8
9
10
11
12
Equipment to be used Inspection Requirements Training Requirements
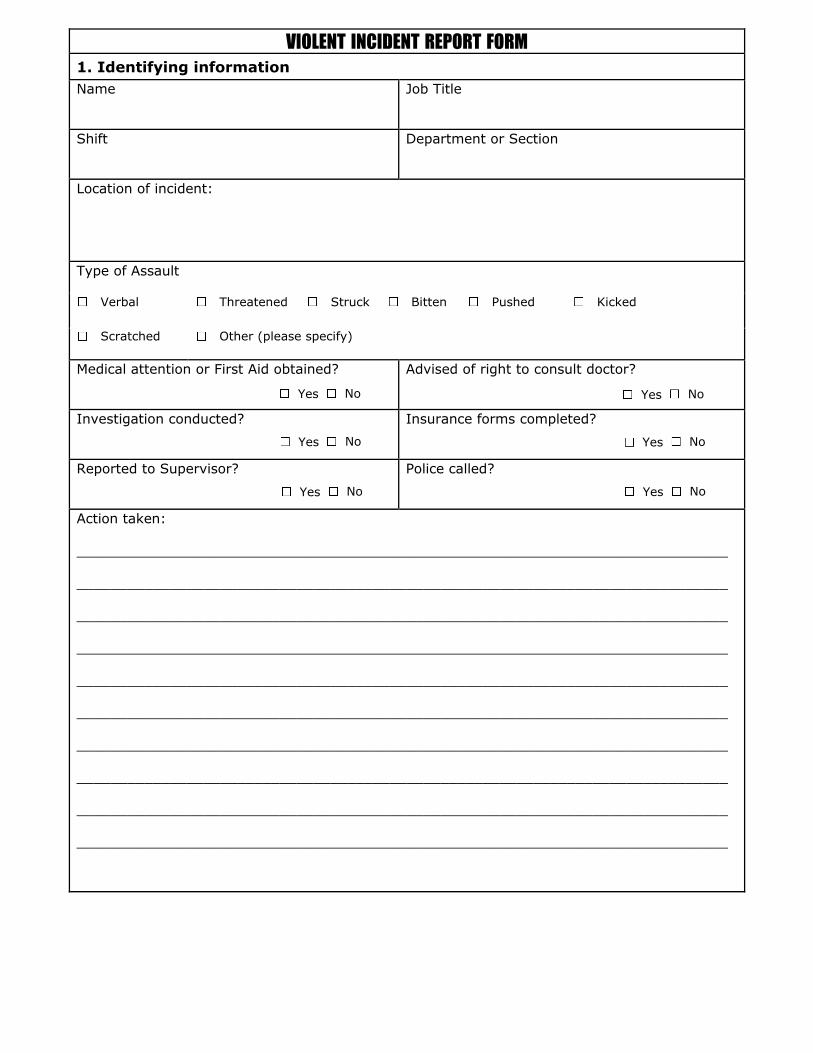
VIOLENT INCIDENT REPORT FORM 1. Identifying information
Name
Job Title
Shift
Department or Section
Location of incident:
Type of Assault
Verbal Threatened Struck Bitten Pushed Kicked
Scratched Other (please specify)
Medical attention or First Aid obtained?
Advised of right to consult doctor?
Investigation conducted?
Insurance forms completed?
Reported to Supervisor?
Police called?
Action taken:
_____________________________________________________________________________
_____________________________________________________________________________
_____________________________________________________________________________
_____________________________________________________________________________
_____________________________________________________________________________
_____________________________________________________________________________
_____________________________________________________________________________
_____________________________________________________________________________
_____________________________________________________________________________
_____________________________________________________________________________
Yes No
Yes No
Yes No
Yes No
Yes No
Yes No

2. Assailant
Description
Age
Complexion
Height
Weight
Name (if known)
3. Incident and Injury Information
Date of incident
Time
a.m. / p.m.
4. Other Information
Was the assailant involved in any previous violent incidents with staff?
Are there any measures in place to prevent a similar incident?
Please provide any other information you think is significant.
_____________________________________________________________________________
_____________________________________________________________________________
_____________________________________________________________________________
_____________________________________________________________________________
_____________________________________________________________________________
_____________________________________________________________________________
_____________________________________________________________________________
_____________________________________________________________________________
_____________________________________________________________________________
_____________________________________________________________________________
_____________________________________________________________________________
_____________________________________________________________________________
Signature: ____________________________________________________________________
Yes No
Yes No
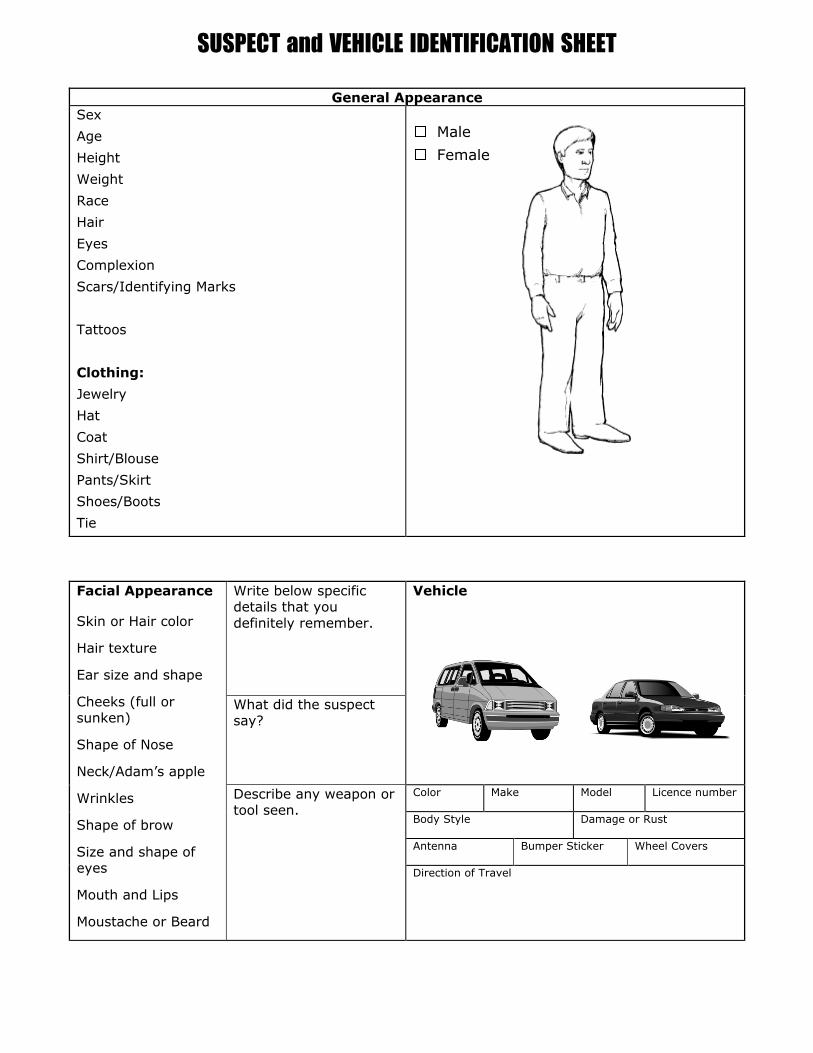
SUSPECT and VEHICLE IDENTIFICATION SHEET
Facial Appearance
Skin or Hair color
Hair texture
Ear size and shape
Cheeks (full or sunken)
Shape of Nose
Neck/Adam’s apple
Wrinkles
Shape of brow
Size and shape of eyes
Mouth and Lips
Moustache or Beard
Write below specific details that you
definitely remember.
Vehicle
What did the suspect say?
Describe any weapon or tool seen.
Color Make Model Licence number
Body Style Damage or Rust
Antenna Bumper Sticker Wheel Covers
Direction of Travel
General Appearance
Sex
Age
Height
Weight
Race
Hair
Eyes
Complexion
Scars/Identifying Marks
Tattoos
Clothing:
Jewelry
Hat
Coat
Shirt/Blouse
Pants/Skirt
Shoes/Boots
Tie
Male
Female

EMPLOYEE INCIDENT REPORT
Work site: _________________________________________________________
Manager/Supervisor: ________________________________________________
Employee name_______________________________________ Date _________
Job title ___________________________________________________________
Incident:
_______________________________________
_______________________________________
_______________________________________
_______________________________________
_______________________________________ Action taken:
_______________________________________
_______________________________________
_______________________________________
_______________________________________
CODE OF CONDUCT
Proactive management includes Supervisory leadership and control to change
unproductive activities. Conformance with safety policies, rules, and regulations is a
necessary component of our Safety Program.
Employee safety responsibilities are communicated during initial orientation. Safety rules and regulations are reviewed with employees by their supervisors and are part
of the documented Employee Safety Training Process.
Supervisors understand and enforce safety rules as a part of their job. This process
may involve coaching, counseling, verbal, or written reprimands, and discipline in the
form of suspension and/or termination. When appropriate, documented verbal warnings and reprimands are issued and carried out by supervisors.
Failure to adhere to any of the Safety Rules and Safe Work Practices will result in
disciplinary action. All discipline will be documented in the employee’s folder.
Discipline may be more severe depending on the offense.
Signature: ___________________________________________ Date: _______
Employee Signature: ___________________________________________ Date: _______
Supervisor

RECORD of EMPLOYEE TRAINING
Employees have been made aware of the risks for violence identified at this site and
have been trained in the appropriate actions as defined in the procedures of this program. Employees have been instructed on how to fill out the report form whenever a
violent incident occurs. The following list is a list of employees who have received
training on workplace violence prevention procedures.
Printed Name Signature Date

SEXUAL HARASSMENT COMPLAINT FORM
Please write legibly and fill out form completely. Submit completed form to appropriate
management personnel.
Complainant:
Alleged Harasser:
Department:
Job Title:
Department:
Job Title:
Mailing Address:
Other relevant information about Alleged
Harasser:
Home Phone:
Work Phone:
Details of Incident
What exactly occurred or was said?
When did it occur and is it still ongoing?
Where did it occur?
How often did it occur?
How did it affect you?
What response did you make when the incident(s) occurred or afterwards and how did
you react?
Has your job been affected in any way?
Was anyone present when the alleged harassment occurred? List any third party
witnesses:
Are there any persons who have relevant information?
Did you tell anyone about it?
Did anyone see you immediately after episodes of alleged harassment?

Did the person who harassed you harass anyone else?
Do you know whether anyone complained about harassment by that person?
Are there any notes, physical evidence, or other documentation regarding the
incident(s)?
Do you know of any other relevant information?
How would you like to see the situation resolved?
I am aware that false accusations of sexual harassment can have serious effects on
innocent persons.
I further understand that if it is determined, after investigation, that I have maliciously
or recklessly made false accusations, I will be subject to appropriate sanctions, including discharge.
Complainant's Signature
Date
Received by: Print Name
Signature Date

LIST OF HAZARDOUS CHEMICALS Product/Chemical Name Manufacturer Location Used

HAZARDOUS COMMUNICATION TRAINING ACKNOWLEDGEMENT This is to certify that I have been trained and informed about the hazards and precautions associated with the use of hazardous chemicals in my work as required in
the A R M Environmental Services, Inc. written hazard communication program.
To confirm my understanding of such training and instructions, the Safety Coordinator
has reviewed them with me and he/she indicated his/her satisfaction by checking the
box before each of the topics listed below:
Overview of the requirements contained in the OSHA Hazardous Chemical Communication Rule
Chemicals present in my workplace operations.
Locations and availability of our written hazard communication program and the SDS
for the hazardous chemicals.
Physical and health effects of these hazardous chemicals.
Methods used to determine the presence or release of hazardous chemicals.
How to lessen or prevent exposure to these hazardous chemicals through safe work
practices and use of personal protective equipment.
Steps A R M Environmental Services, Inc. has taken to lessen or prevent exposure to
these chemicals.
Safety emergency procedures to follow in the event of exposure to these chemicals.
How to read container labels and interpret SDS to obtain appropriate hazard
information.
Employee’s Name Signature Date
Trainer’s Name Signature Date
Note to employee: This form will be made a part of your personnel file. Please read and
understand its contents before signing.

GROUP TRAINING RECORD FOR UPDATES AND REFRESHER TRAINING
Trainer:
Date:
Content of Training:
Attendees
Print Name Signature

Notes:
_______________________________________________________________________
_______________________________________________________________________
_______________________________________________________________________
_______________________________________________________________________
_______________________________________________________________________
_______________________________________________________________________
_______________________________________________________________________
_______________________________________________________________________
_______________________________________________________________________
_______________________________________________________________________
_______________________________________________________________________
_______________________________________________________________________
_______________________________________________________________________
_______________________________________________________________________
_______________________________________________________________________
_______________________________________________________________________
_______________________________________________________________________
_______________________________________________________________________
_______________________________________________________________________
_______________________________________________________________________
_______________________________________________________________________
_______________________________________________________________________
_______________________________________________________________________
_______________________________________________________________________
_______________________________________________________________________
_______________________________________________________________________
_______________________________________________________________________
Related Documents