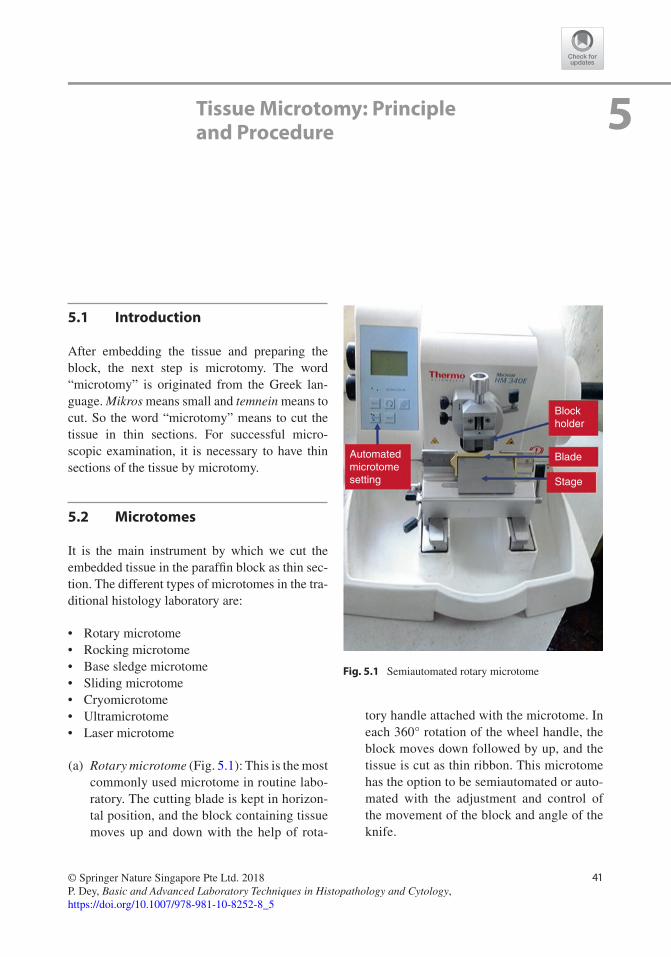
41 © Springer Nature Singapore Pte Ltd. 2018 P. Dey, Basic and Advanced Laboratory Techniques in Histopathology and Cytology, https://doi.org/10.1007/978-981-10-8252-8_5 Tissue Microtomy: Principle and Procedure 5.1 Introduction After embedding the tissue and preparing the block, the next step is microtomy. The word “microtomy” is originated from the Greek lan- guage. Mikros means small and temnein means to cut. So the word “microtomy” means to cut the tissue in thin sections. For successful micro- scopic examination, it is necessary to have thin sections of the tissue by microtomy. 5.2 Microtomes It is the main instrument by which we cut the embedded tissue in the paraffin block as thin sec- tion. The different types of microtomes in the tra- ditional histology laboratory are: • Rotary microtome • Rocking microtome • Base sledge microtome • Sliding microtome • Cryomicrotome • Ultramicrotome • Laser microtome (a) Rotary microtome (Fig. 5.1): This is the most commonly used microtome in routine labo- ratory. The cutting blade is kept in horizon- tal position, and the block containing tissue moves up and down with the help of rota- tory handle attached with the microtome. In each 360° rotation of the wheel handle, the block moves down followed by up, and the tissue is cut as thin ribbon. This microtome has the option to be semiautomated or auto- mated with the adjustment and control of the movement of the block and angle of the knife. 5 Automated microtome setting Block holder Blade Stage Fig. 5.1 Semiautomated rotary microtome

Welcome message from author
This document is posted to help you gain knowledge. Please leave a comment to let me know what you think about it! Share it to your friends and learn new things together.
Transcript
41© Springer Nature Singapore Pte Ltd. 2018 P. Dey, Basic and Advanced Laboratory Techniques in Histopathology and Cytology, https://doi.org/10.1007/978-981-10-8252-8_5
Tissue Microtomy: Principle and Procedure
5.1 Introduction
After embedding the tissue and preparing the block, the next step is microtomy. The word “microtomy” is originated from the Greek lan-guage. Mikros means small and temnein means to cut. So the word “microtomy” means to cut the tissue in thin sections. For successful micro-scopic examination, it is necessary to have thin sections of the tissue by microtomy.
5.2 Microtomes
It is the main instrument by which we cut the embedded tissue in the paraffin block as thin sec-tion. The different types of microtomes in the tra-ditional histology laboratory are:
• Rotary microtome• Rocking microtome• Base sledge microtome• Sliding microtome• Cryomicrotome• Ultramicrotome• Laser microtome
(a) Rotary microtome (Fig. 5.1): This is the most commonly used microtome in routine labo-ratory. The cutting blade is kept in horizon-tal position, and the block containing tissue moves up and down with the help of rota-
tory handle attached with the microtome. In each 360° rotation of the wheel handle, the block moves down followed by up, and the tissue is cut as thin ribbon. This microtome has the option to be semiautomated or auto-mated with the adjustment and control of the movement of the block and angle of the knife.
5
Automatedmicrotomesetting
Blockholder
Blade
Stage
Fig. 5.1 Semiautomated rotary microtome
42
Advantages: 1. Good-quality 2–3-μm-thin section is
possible. 2. Heavy and stable automated rotary
microtome reduces health hazard and gives the best-quality section.
3. Good tissue ribbon production. 4. Easy-to-cut various types of tissue: firm,
fragile, small biopsy, etc.
Disadvantages: 1. Expensive. 2. Unsuitable to cut large block. 3. Knife faces up and so may be dangerous
to the technical staff. (b) Rocking microtome: The rocking microtome is
also known as Cambridge rocking microtome. The word “rocking” is used as there is a rock-ing action of the microtome like arm move-ment. In this type of microtome, the knife is static, and the block of tissue moves in a rock-ing motion (arc-like movement of the block). This is one of the oldest designs of the micro-tome. The microtome can cut thin section with ribbons and is ideal for serial section. The sec-tions are slightly curved in this microtome.
Advantages: 1. Thin section 2. Easy to operate 3. Low-cost instrument and reliable
Disadvantages: 1. Tissue is curved and the microtome does
not provide flat section. 2. As the microtome is of light weight so
vibration may occur. (c) Base sledge microtome: In sledge microtome
the block is fixed in a static position within a steel carriage. The knife slides to and fro over the top of the block. This microtome is the best for large tissue sample or the hard tissue. The tissue sections are usually thick (more than 10 μm) in base sledge microtome.
Advantages: 1. Hard tissue can be cut. 2. Large tissue sample can be cut. 3. The best microtome for ophthalmology
and large neuropathology section.
Disadvantages: 1. Difficult to get thin section. 2. Large slides are required.
(d) Sliding microtome: In this microtome the knife is static, and the block moves horizon-tally over the knife.
Advantages: 1. Large sections can be cut. 2. Mainly used for celloidin-embedded tissue. 3. Simpler design and easy maintenance. 4. Brain sections can be cut better by this
type of microtome.
Disadvantages: 1. The knife may glide in case of hard tis-
sue and may jump. 2. Long knives are difficult to sharpen.
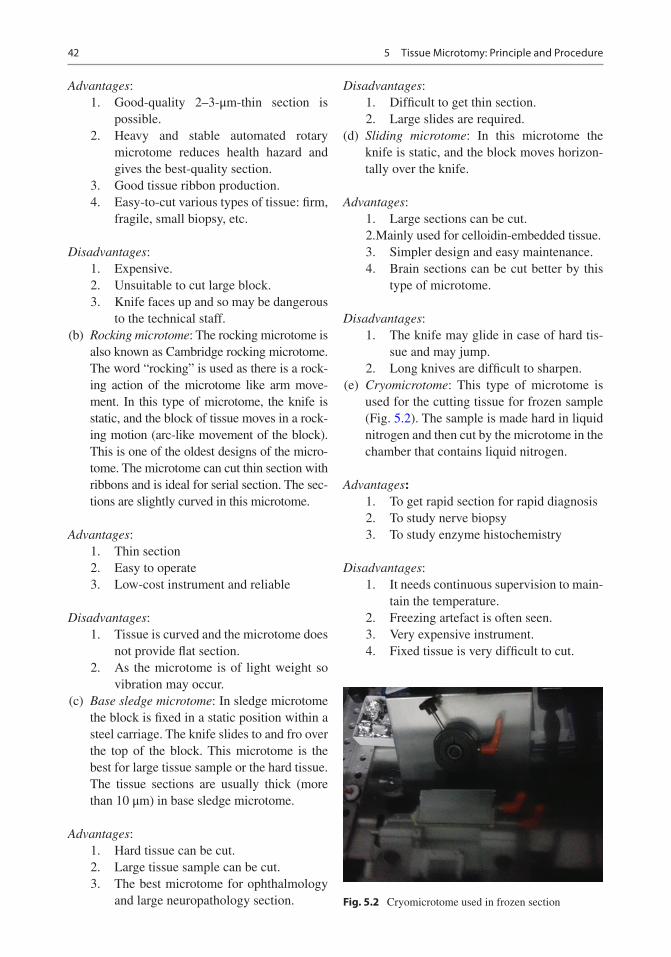
(e) Cryomicrotome: This type of microtome is used for the cutting tissue for frozen sample (Fig. 5.2). The sample is made hard in liquid nitrogen and then cut by the microtome in the chamber that contains liquid nitrogen.
Advantages: 1. To get rapid section for rapid diagnosis 2. To study nerve biopsy 3. To study enzyme histochemistry
Disadvantages: 1. It needs continuous supervision to main-
tain the temperature. 2. Freezing artefact is often seen. 3. Very expensive instrument. 4. Fixed tissue is very difficult to cut.
Fig. 5.2 Cryomicrotome used in frozen section
5 Tissue Microtomy: Principle and Procedure
43
(f) Ultramicrotome: Ultramicrotome is used to cut ultrathin sections for transmission elec-tron microscopy. Sections are cut between 40 and 100 nanomicron thickness with the help of glass knife or diamond knife. The tissue is at first trimmed to make small block of 1 × 1 mm size, and then the section is cut by this ultramicrotome with the help of optical microscope. The cut section is allowed to float on the water hold by a boat and then finally picked up on a metal grid.
(g) Laser microtome: In this ultramodern micro-tome, the laser beam is used to cut the bio-logical section without any processing or embedding the material. Infrared laser beam with ultrashort pulse duration is applied, and therefore almost no heat is generated, and the tissue is cut without any thermal effect.
5.2.1 Microtome Knife
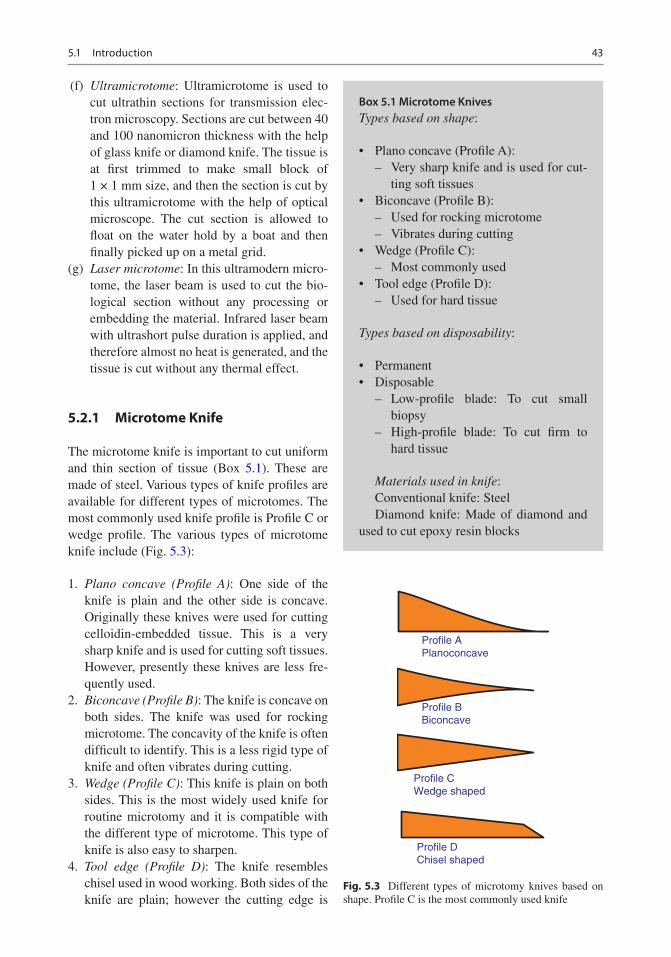
The microtome knife is important to cut uniform and thin section of tissue (Box 5.1). These are made of steel. Various types of knife profiles are available for different types of microtomes. The most commonly used knife profile is Profile C or wedge profile. The various types of microtome knife include (Fig. 5.3):
1. Plano concave (Profile A): One side of the knife is plain and the other side is concave. Originally these knives were used for cutting celloidin-embedded tissue. This is a very sharp knife and is used for cutting soft tissues. However, presently these knives are less fre-quently used.
2. Biconcave (Profile B): The knife is concave on both sides. The knife was used for rocking microtome. The concavity of the knife is often difficult to identify. This is a less rigid type of knife and often vibrates during cutting.
3. Wedge (Profile C): This knife is plain on both sides. This is the most widely used knife for routine microtomy and it is compatible with the different type of microtome. This type of knife is also easy to sharpen.
4. Tool edge (Profile D): The knife resembles chisel used in wood working. Both sides of the knife are plain; however the cutting edge is
Profile APlanoconcave
Profile BBiconcave
Profile CWedge shaped
Profile DChisel shaped
Fig. 5.3 Different types of microtomy knives based on shape. Profile C is the most commonly used knife
Box 5.1 Microtome KnivesTypes based on shape:
• Plano concave (Profile A): – Very sharp knife and is used for cut-
ting soft tissues• Biconcave (Profile B):
– Used for rocking microtome – Vibrates during cutting
• Wedge (Profile C): – Most commonly used
• Tool edge (Profile D): – Used for hard tissue
Types based on disposability:
• Permanent• Disposable
– Low-profile blade: To cut small biopsy
– High-profile blade: To cut firm to hard tissue
Materials used in knife:Conventional knife: SteelDiamond knife: Made of diamond and
used to cut epoxy resin blocks
5.1 Introduction
44
steep. The tool edge knife is mainly used to cut the hard tissue such as decalcified bone. The knife is difficult to sharpen and is not recom-mended presently.
5.2.2 Disposable Knife
Nowadays disposable blade is used in many labo-ratories to save time to sharpen. Two types of dis-posable blades are available:
1. Low-profile blade: These blades are used to cut small biopsy or soft large tissue.
2. High-profile blade: These are used to cut firm to relatively hard tissue such as the uterus, heart, etc.
Advantages: 1. Easy to replace within seconds. 2. No need to sharpen. 3. The overall cost of disposable blade system is
low as there is no need of any knife sharpener or abrasive powder to sharpen the knife.
Disadvantages: 1. They are not very rigid like ordinary knife,
and therefore vibration effect may be seen.
5.2.3 Materials Used in Knife
Conventional knife: The conventional microtome knifes are made of very high-quality carbon or steel material that are usually tempered from the edge to inside one third of the width. The desir-able hardness of the knife is in between 400 and 900 Vickers hardness scale.
The diamond knife: This is a costly knife and is used to cut epoxy resin blocks in electron micros-copy. Special care is needed to sharpen this knife.
Glass knife: This is used for ultramicrotomy to cut very hard tissue. The cutting edge of the knife is parallel to one surface of the glass.
5.2.4 Angles of Knife
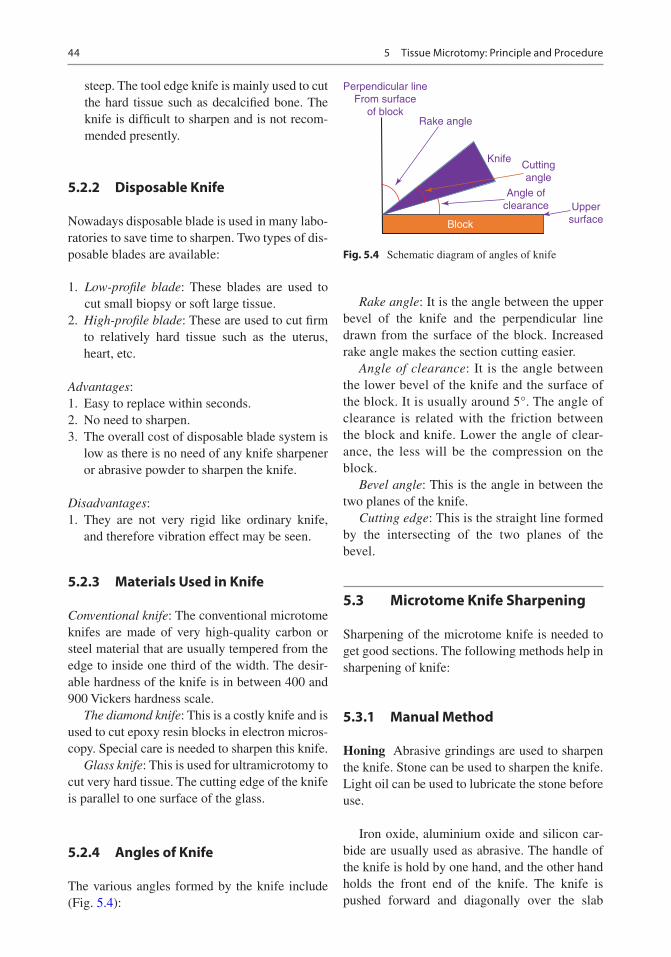
The various angles formed by the knife include (Fig. 5.4):
Rake angle: It is the angle between the upper bevel of the knife and the perpendicular line drawn from the surface of the block. Increased rake angle makes the section cutting easier.
Angle of clearance: It is the angle between the lower bevel of the knife and the surface of the block. It is usually around 5°. The angle of clearance is related with the friction between the block and knife. Lower the angle of clear-ance, the less will be the compression on the block.
Bevel angle: This is the angle in between the two planes of the knife.
Cutting edge: This is the straight line formed by the intersecting of the two planes of the bevel.
5.3 Microtome Knife Sharpening
Sharpening of the microtome knife is needed to get good sections. The following methods help in sharpening of knife:
5.3.1 Manual Method
Honing Abrasive grindings are used to sharpen the knife. Stone can be used to sharpen the knife. Light oil can be used to lubricate the stone before use.
Iron oxide, aluminium oxide and silicon car-bide are usually used as abrasive. The handle of the knife is hold by one hand, and the other hand holds the front end of the knife. The knife is pushed forward and diagonally over the slab
Perpendicular lineFrom surface
of blockRake angle
KnifeCuttingangle
Angle ofclearance Upper
surfaceBlock
Fig. 5.4 Schematic diagram of angles of knife
5 Tissue Microtomy: Principle and Procedure
45
several times. Same procedure is followed in other surface of the knife also.
Stropping It helps to polish the cutting edge of the knife that is already sharped by honing and also to remove any “burr” formed during honing. Strop is made of leather and it should be free from any dust or grit.
Automatic Knife Sharpener Presently auto-matic knife sharpener is available in the market. The knife is placed horizontally on the surface of the rotating plate made of glass or copper coated with abrasive agents.
5.3.2 Factors Involved in Cutting
1. Temperature: Lowering the temperature facil-itates section cutting.
2. Angle of rake: Higher rake angle helps in smooth flow of ribbons. Lower rake angle is used for hard tissue.
3. Consistency of tissue: Soft tissue is cut at a slow rate than the hard tissue.
5.4 Sectioning the Paraffin Block
The following instruments are essential for sec-tion cutting:
1. Microtome with blade 2. Water bath 3. Paraffin block with embedded tissue to cut 4. Ice tray 5. A blunt forceps or camel brush 6. Slide rack with slides
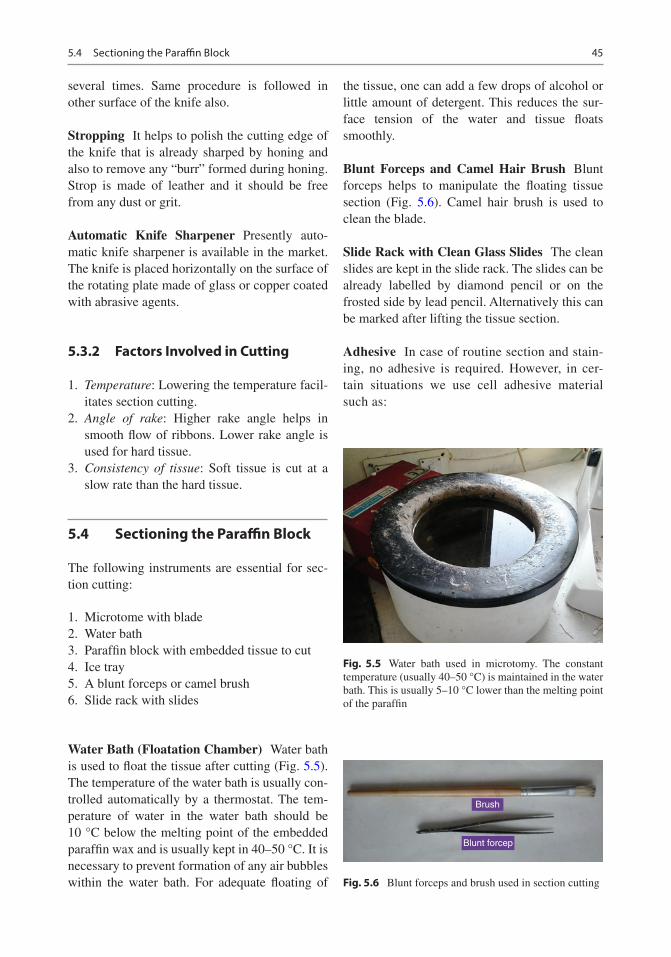
Water Bath (Floatation Chamber) Water bath is used to float the tissue after cutting (Fig. 5.5). The temperature of the water bath is usually con-trolled automatically by a thermostat. The tem-perature of water in the water bath should be 10 °C below the melting point of the embedded paraffin wax and is usually kept in 40–50 °C. It is necessary to prevent formation of any air bubbles within the water bath. For adequate floating of
the tissue, one can add a few drops of alcohol or little amount of detergent. This reduces the sur-face tension of the water and tissue floats smoothly.
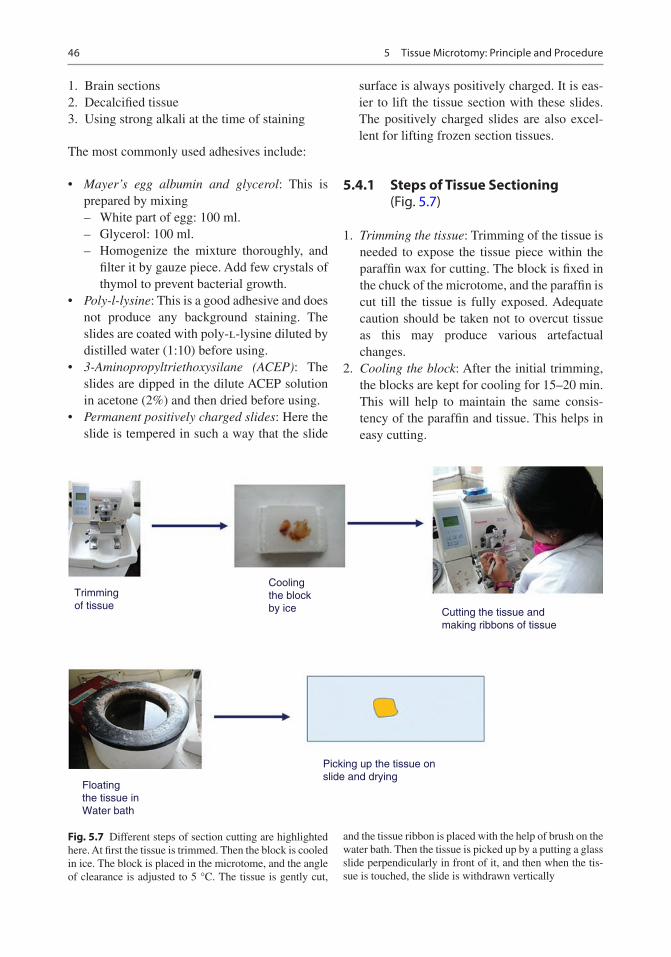
Blunt Forceps and Camel Hair Brush Blunt forceps helps to manipulate the floating tissue section (Fig. 5.6). Camel hair brush is used to clean the blade.
Slide Rack with Clean Glass Slides The clean slides are kept in the slide rack. The slides can be already labelled by diamond pencil or on the frosted side by lead pencil. Alternatively this can be marked after lifting the tissue section.
Adhesive In case of routine section and stain-ing, no adhesive is required. However, in cer-tain situations we use cell adhesive material such as:
Fig. 5.5 Water bath used in microtomy. The constant temperature (usually 40–50 °C) is maintained in the water bath. This is usually 5–10 °C lower than the melting point of the paraffin
Brush
Blunt forcep
Fig. 5.6 Blunt forceps and brush used in section cutting
5.4 Sectioning the Paraffin Block
46
1. Brain sections 2. Decalcified tissue 3. Using strong alkali at the time of staining
The most commonly used adhesives include:
• Mayer’s egg albumin and glycerol: This is prepared by mixing
– White part of egg: 100 ml. – Glycerol: 100 ml. – Homogenize the mixture thoroughly, and
filter it by gauze piece. Add few crystals of thymol to prevent bacterial growth.
• Poly-l-lysine: This is a good adhesive and does not produce any background staining. The slides are coated with poly-l-lysine diluted by distilled water (1:10) before using.
• 3-Aminopropyltriethoxysilane (ACEP): The slides are dipped in the dilute ACEP solution in acetone (2%) and then dried before using.
• Permanent positively charged slides: Here the slide is tempered in such a way that the slide
surface is always positively charged. It is eas-ier to lift the tissue section with these slides. The positively charged slides are also excel-lent for lifting frozen section tissues.
5.4.1 Steps of Tissue Sectioning (Fig. 5.7)
1. Trimming the tissue: Trimming of the tissue is needed to expose the tissue piece within the paraffin wax for cutting. The block is fixed in the chuck of the microtome, and the paraffin is cut till the tissue is fully exposed. Adequate caution should be taken not to overcut tissue as this may produce various artefactual changes.
2. Cooling the block: After the initial trimming, the blocks are kept for cooling for 15–20 min. This will help to maintain the same consis-tency of the paraffin and tissue. This helps in easy cutting.
Trimmingof tissue
Coolingthe blockby ice Cutting the tissue and
making ribbons of tissue
Floatingthe tissue inWater bath
Picking up the tissue onslide and drying
Fig. 5.7 Different steps of section cutting are highlighted here. At first the tissue is trimmed. Then the block is cooled in ice. The block is placed in the microtome, and the angle of clearance is adjusted to 5 °C. The tissue is gently cut,
and the tissue ribbon is placed with the help of brush on the water bath. Then the tissue is picked up by a putting a glass slide perpendicularly in front of it, and then when the tis-sue is touched, the slide is withdrawn vertically
5 Tissue Microtomy: Principle and Procedure
47
3. Cutting proper: The block is fixed in the chuck of the microtome. The cutting surface of the block should be parallel to the knife. The angle of clearance should be only 2–5° to have good section (Fig. 5.8). The tissue in the block is cut by gentle, smooth and slow stroke. The ribbon-like tissue sections are produced. The tip of the ribbon is held by forceps, and the end part of the ribbon is removed from the knife edge by brush. In case of any difficulty to get the flat section, the cutting surface should be gently warmed by warm water.
4. Floating the ribbon: The ribbon of the tissue is floated in the water bath, and this makes the tissue flat and removes any wrinkling of the tissue. With the help of the forceps, the indi-vidual sections are separated from each other. As mentioned before, the temperature of the water bath should be constantly maintained below the melting point of the paraffin wax. In case of temperature variation in the bath, the air bubbles may be formed that may rupture the tissue.
5. Picking up the tissue: The slide is placed verti-cally within the water bath in front of the tissue, and when the tissue is touched, the slide is withdrawn vertically from the water. The tissue pickup process must be gentle and smooth. To prevent any mix-up, the water bath should be cleaned immediately after cutting each block.
6. Drying the section: The slide containing the picked-up section is kept in slide rack. The slides are now kept in hot oven to get dry. The temperature of the oven should be slightly more than the melting point of the paraffin.
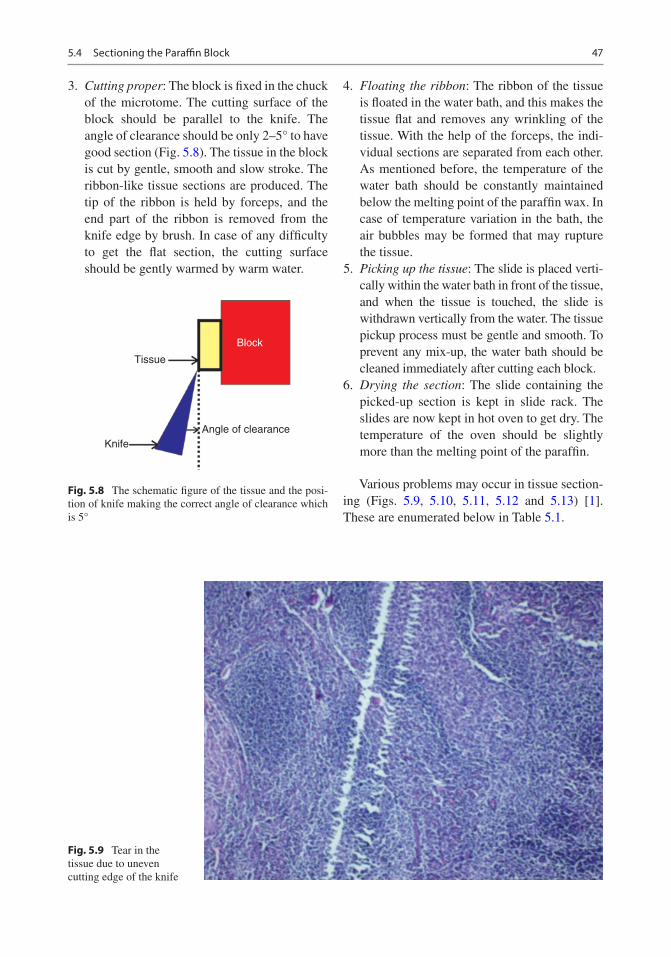
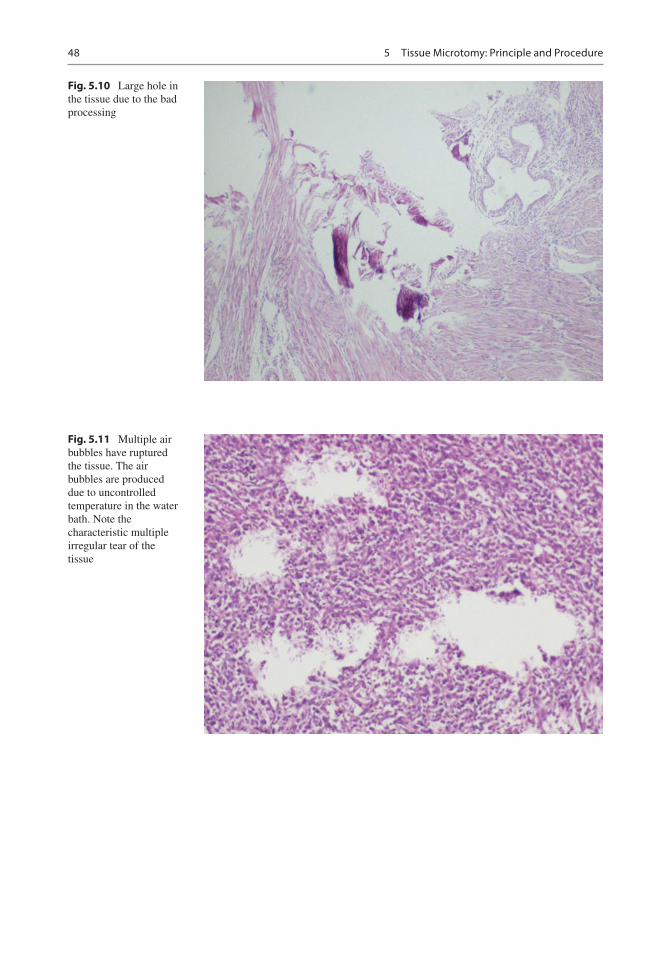
Various problems may occur in tissue section-ing (Figs. 5.9, 5.10, 5.11, 5.12 and 5.13) [1]. These are enumerated below in Table 5.1.
Tissue
KnifeAngle of clearance
Block
Fig. 5.8 The schematic figure of the tissue and the posi-tion of knife making the correct angle of clearance which is 5°
Fig. 5.9 Tear in the tissue due to uneven cutting edge of the knife
5.4 Sectioning the Paraffin Block
48
Fig. 5.10 Large hole in the tissue due to the bad processing
Fig. 5.11 Multiple air bubbles have ruptured the tissue. The air bubbles are produced due to uncontrolled temperature in the water bath. Note the characteristic multiple irregular tear of the tissue
5 Tissue Microtomy: Principle and Procedure

49
Fig. 5.12 Freezing artefact of the tissue due to immediate putting the tissue from the refrigerator to formalin. Note the regular spaces in between the tissues due to melting of ice crystals
Fig. 5.13 Uneven staining pattern due to poor deparaffinization of the tissue
5.4 Sectioning the Paraffin Block

50
Reference
1. Peachey LD. Thin sections. I. A study of section thick-ness and physical distortion produced during microt-omy. J Biophys Biochem Cytol. 1958;4(3):233–42.
Table 5.1 Troubleshooting in tissue sectioning
Faults Source of faults SolutionRibbons not formed: the tissue is twisted and curled or sticks to the knife
• Paraffin is hard• Clearance angle is incorrect: small• Dirty knife• Too cold or hot room temperature
• Select low melting point paraffin• Correct the knife alignment• Clean the blade• Adjust the room temperature
Ribbons are curved: the ribbons are not straight and are coiled
• Edges of the block are not parallel: the sides of the block and the knife edge are not in right angle
• Surface of the block is uneven• Blade is not sharp• The paraffin is too much
• The block holder should be aligned properly
• Trimming is needed• Sharpen the knife or replace the
blade• Trim and remove the excessive
paraffinRibbons are excessively compressed and wrinkled
• Block is warm• Dull blade/knife• Paraffin is soft and sticky• Knife clearance is not optimum and is
too small• Rotation of the microtome is clumsy
• Cool the block• Replace the blade or sharpen the
knife• Cool the block and then try to cut;
otherwise the paraffin should be replaced with higher melting point
• Increase the knife clearance• Needs consistent and gentle
rotation of the wheelThick and thin section (chatter) • Knife or block is loose
• Blunt knife• The clearance angle is very small• Paraffin is soft and sticks to the knife
• Tighten the knife clamps or the chucks
• Sharpen the knife or change the blade
• Adjust the clearance angle• Clean the knife and try to remove
the attached paraffinSection attaches to the block • Static electricity is generated in the
knife or ribbon• The clearance angle is defective
• Apply ionizer to remove the static charge, and/or clean the blades, holder, etc. with alcohol
• Increase the clearance angleTear or scratches in the section • Defect in the blade: a nick or jagged
knife edge• Dirt in the knife• Sharp particle in the tissue• Sharp particle in the paraffin
• Hone the knife/use other part of knife/change the blade
• Clean the blade• Decalcify the tissue• Try to remove sharp particle by
scalpelTissue disintegrate in the water bath
• Too hot water• Faulty and incomplete processing
• Temperature should be lowered down
• Reprocess the tissueLarge holes in the tissue • The underprocessed tissue ruptures
when comes in contact with warm water• Reprocess the tissue
5 Tissue Microtomy: Principle and Procedure
51© Springer Nature Singapore Pte Ltd. 2018 P. Dey, Basic and Advanced Laboratory Techniques in Histopathology and Cytology, https://doi.org/10.1007/978-981-10-8252-8_6
Frozen Section: Principle and Procedure
6.1 Introduction
The frozen section is the rapid tissue section by cooling the tissue with the help of cryostat to give immediate report of the tissue sample. This is especially needed in large hospital to diagnose the lesion or extent of the lesion at the time of operation. The cryostat is the instrument that has the arrangement to freeze the tissue and also to cut the frozen tissue for microscopic section.
6.2 Indications of Frozen Sections
The frozen section is used mainly for immedi-ate diagnosis of the lesion for management and to know the extent of the lesion [1–3] (Box 6.1). It is also helpful to do enzyme immuno-chemistry and immunofluorescence study. At
times, frozen section tissue is used for the demonstration of fat and carbohydrate in the tissue sample.
6.3 The Principle of Frozen Section
The rapid freezing of the tissue sample converts the water into ice. The firm ice within the tissue acts as embedding media to cut the tissue. Lowering the temperature makes the tissue more firm, whereas increasing temperature makes the tissue softer.
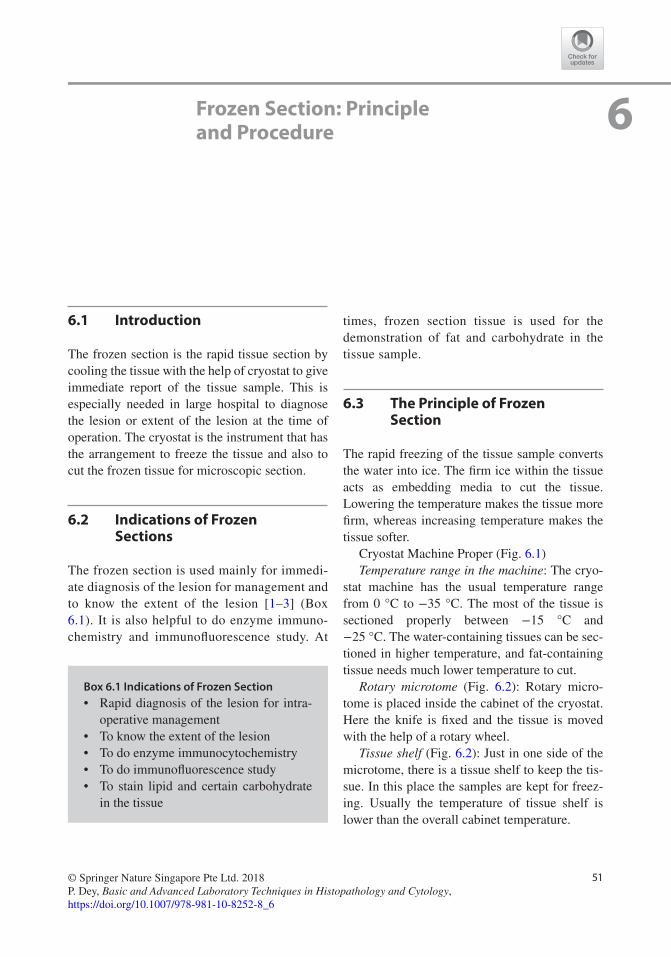
Cryostat Machine Proper (Fig. 6.1)Temperature range in the machine: The cryo-
stat machine has the usual temperature range from 0 °C to −35 °C. The most of the tissue is sectioned properly between −15 °C and −25 °C. The water-containing tissues can be sec-tioned in higher temperature, and fat-containing tissue needs much lower temperature to cut.
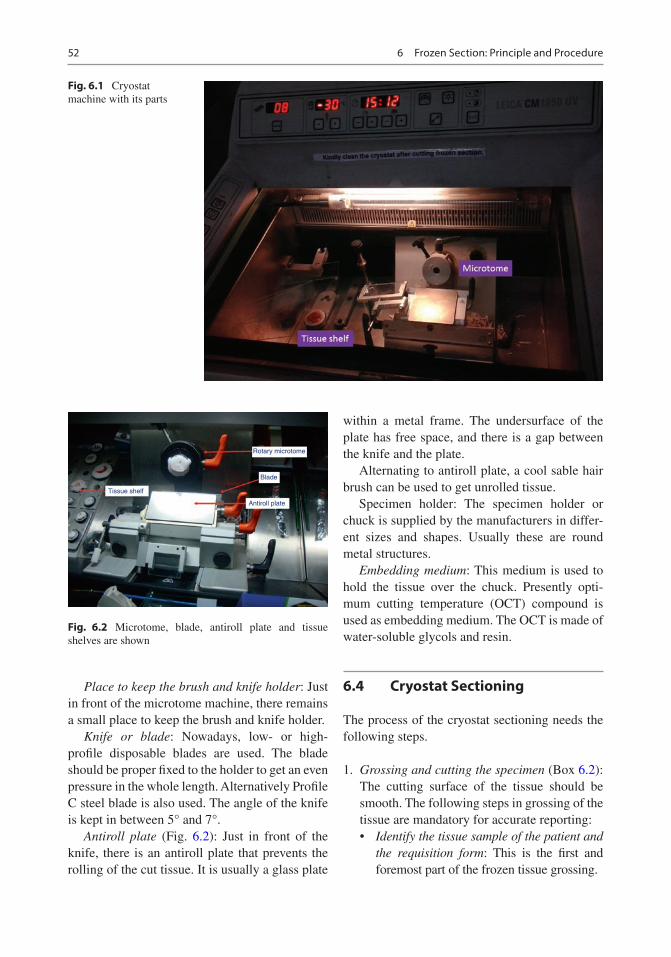
Rotary microtome (Fig. 6.2): Rotary micro-tome is placed inside the cabinet of the cryostat. Here the knife is fixed and the tissue is moved with the help of a rotary wheel.
Tissue shelf (Fig. 6.2): Just in one side of the microtome, there is a tissue shelf to keep the tis-sue. In this place the samples are kept for freez-ing. Usually the temperature of tissue shelf is lower than the overall cabinet temperature.
6
Box 6.1 Indications of Frozen Section• Rapid diagnosis of the lesion for intra-
operative management• To know the extent of the lesion• To do enzyme immunocytochemistry• To do immunofluorescence study• To stain lipid and certain carbohydrate
in the tissue
52
Place to keep the brush and knife holder: Just in front of the microtome machine, there remains a small place to keep the brush and knife holder.
Knife or blade: Nowadays, low- or high- profile disposable blades are used. The blade should be proper fixed to the holder to get an even pressure in the whole length. Alternatively Profile C steel blade is also used. The angle of the knife is kept in between 5° and 7°.
Antiroll plate (Fig. 6.2): Just in front of the knife, there is an antiroll plate that prevents the rolling of the cut tissue. It is usually a glass plate
within a metal frame. The undersurface of the plate has free space, and there is a gap between the knife and the plate.
Alternating to antiroll plate, a cool sable hair brush can be used to get unrolled tissue.
Specimen holder: The specimen holder or chuck is supplied by the manufacturers in differ-ent sizes and shapes. Usually these are round metal structures.
Embedding medium: This medium is used to hold the tissue over the chuck. Presently opti-mum cutting temperature (OCT) compound is used as embedding medium. The OCT is made of water-soluble glycols and resin.
6.4 Cryostat Sectioning
The process of the cryostat sectioning needs the following steps.
1. Grossing and cutting the specimen (Box 6.2): The cutting surface of the tissue should be smooth. The following steps in grossing of the tissue are mandatory for accurate reporting:• Identify the tissue sample of the patient and
the requisition form: This is the first and foremost part of the frozen tissue grossing.
Fig. 6.1 Cryostat machine with its parts
Tissue shelf
Antiroll plate
Blade
Rotary microtome
Fig. 6.2 Microtome, blade, antiroll plate and tissue shelves are shown
6 Frozen Section: Principle and Procedure

53
• Salient clinical information: The essential clinical information is very helpful as it guides the pathologist to reach the possible differential diagnosis.
• Tissue appearance: The gross appearance of the tissue such as colour, texture, consis-tency and any suture to mark the anatomi-cal position.
• Resection margin: It is very important to identify the resection margins of the tumour. The resection planes and margins should be inked thoroughly. The different colours of ink can be used for medial and lateral margin identification.
Cutting the tissue: The tissue should be fresh without any fixative. The tissue should be prefer-ably dry, and it should not be wrapped in gauze piece. Any suture, staple or sharp hard structure should be removed from the tissue sample. Now the tissue is cut into small pieces as it facilitates freezing. Take multiple sections of the tissue to understand the main pathology and to minimize the error. Use a new sharp scalpel blade, and first cut the most important area that needs micro-scopic examination. It is preferable to use gentle
stroke of the scalpel rather than too much pressure.
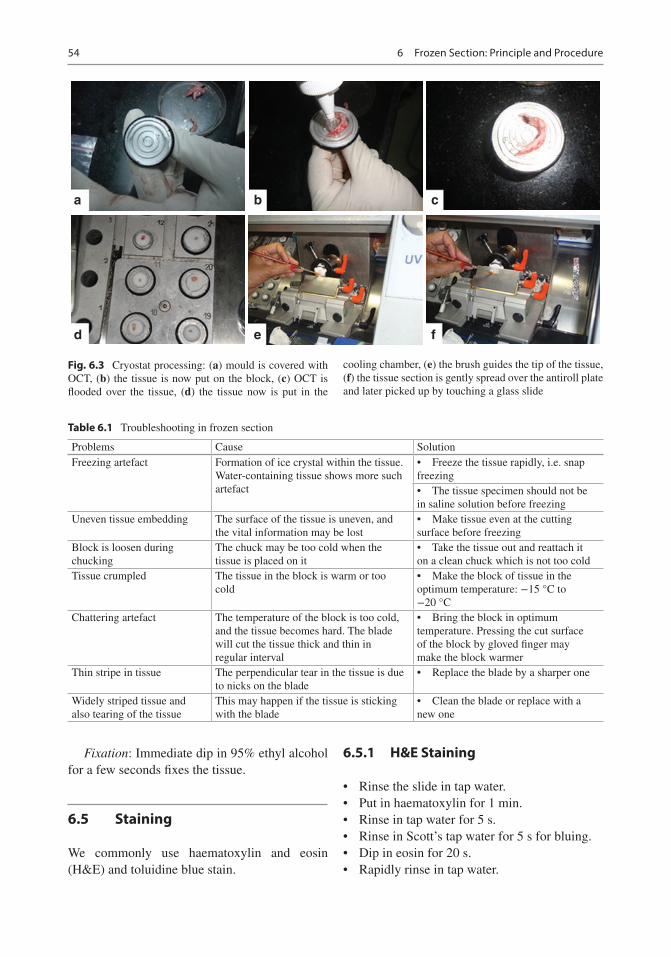
Cytology of the tissue: At times the imprint of the tissue on the slide provides good morphologi-cal details such as lymphoma of the lymph node. Similarly crushing of tissue also provides excel-lent morphological details such as in case of tis-sue of the brain tumour. 1. Tissue embedding in the mould (Fig. 6.3): The
small piece of the tissue is kept in the centre of the mould, and then the OCT is poured over it in excess. Then the tissue holder or chuck is firmly placed over the tissue with overflown OCT.
2. Tissue loading in the frozen section chamber: The tissue is now placed in the frozen section chamber, and cold spray can be used to make the process faster.
3. Loading the blade: The cutting knife or blade is now loaded and the proper alignment is done.
4. Trimming the tissue: The loss of normal or natural colour to whitish colour indicates that the tissue is frozen. The frozen tissue in the tissue holder is now placed in the holder of the microtome. The block is trimmed to remove the excess OCT and to get the smooth tissue surface for sectioning.
5. Sectioning (Fig. 6.3): The tissue is now cut gently and is spread over the antiroll plate with the help of a brush. The brush should be cooled. The tip of the tissue is guided by the brush.
6. Section lifting: The glass slide of normal room temperature is pressed firmly over the tissue section, and normally the tissue sticks immediately.
7. Fixation: The tissue should be immediately fixed in methanol for 1 min or 95% ethanol for few seconds. Rapid fixation within few sec-onds is mandatory. In case of delayed fixation, the cells are swollen, and the cytoplasmic margin may be ruptured giving hazy appear-ance of the margin of the cells.
Troubleshooting in frozen section: Various problems may arise during the cutting of frozen section tissue. This has been highlighted in Table 6.1.
Box 6.2 Grossing for Frozen Section Tissue• Identify the tissue sample of the patient.• Clinical information: provides possible
differential diagnosis.• Tissue appearance: colour, texture, nod-
ule, any suture.• Anatomy of the tissue: identify the resec-
tion planes and margins.• Colour the resection planes and
margins.• Section cutting:
– Use sharp blade. – First cut the most important area. – Give gentle pressure and avoid too
much pressure.• Cytology preparation: if needed make
– Imprint smear – Scrape smear – Crushed smear
6.4 Cryostat Sectioning
54
Fixation: Immediate dip in 95% ethyl alcohol for a few seconds fixes the tissue.
6.5 Staining
We commonly use haematoxylin and eosin (H&E) and toluidine blue stain.
6.5.1 H&E Staining
• Rinse the slide in tap water.• Put in haematoxylin for 1 min.• Rinse in tap water for 5 s.• Rinse in Scott’s tap water for 5 s for bluing.• Dip in eosin for 20 s.• Rapidly rinse in tap water.
a b c
d e f
Fig. 6.3 Cryostat processing: (a) mould is covered with OCT, (b) the tissue is now put on the block, (c) OCT is flooded over the tissue, (d) the tissue now is put in the
cooling chamber, (e) the brush guides the tip of the tissue, (f) the tissue section is gently spread over the antiroll plate and later picked up by touching a glass slide
Table 6.1 Troubleshooting in frozen section
Problems Cause SolutionFreezing artefact Formation of ice crystal within the tissue.
Water- containing tissue shows more such artefact
• Freeze the tissue rapidly, i.e. snap freezing• The tissue specimen should not be in saline solution before freezing
Uneven tissue embedding The surface of the tissue is uneven, and the vital information may be lost
• Make tissue even at the cutting surface before freezing
Block is loosen during chucking
The chuck may be too cold when the tissue is placed on it
• Take the tissue out and reattach it on a clean chuck which is not too cold
Tissue crumpled The tissue in the block is warm or too cold
• Make the block of tissue in the optimum temperature: −15 °C to −20 °C
Chattering artefact The temperature of the block is too cold, and the tissue becomes hard. The blade will cut the tissue thick and thin in regular interval
• Bring the block in optimum temperature. Pressing the cut surface of the block by gloved finger may make the block warmer
Thin stripe in tissue The perpendicular tear in the tissue is due to nicks on the blade
• Replace the blade by a sharper one
Widely striped tissue and also tearing of the tissue
This may happen if the tissue is sticking with the blade
• Clean the blade or replace with a new one
6 Frozen Section: Principle and Procedure
55
• 95% ethanol for 10 s.• 100% ethanol for 10 s.• 100% ethanol for 10 s.• Dip in xylene for 20 s.• Mount by DPX.
6.5.2 Toluidine Blue Stain
This is a very simple stain and takes only a few seconds. The drops of toluidine blue stain are put on the section, and the coverslip is put on the sec-tion. The slide is now ready to see. The histopa-thologist feels more comfortable in H&E stain than this unfamiliar toluidine blue stain.
6.6 Factors Affecting the Good- Quality Section
The common factors responsible for the good- quality smear include:
• Temperature: when the temperature falls, water within the tissue becomes frozen and gives the tissue hard consistency. The opti-mal temperature of frozen tissue is in between −15 °C and −25 °C. Warm tissue remains soft and sections crumple. On the other hand, the overcooled tissue becomes very hard and brittle and produces again bad-quality crumpled section. Moreover the hard tissue may cause “chattering” artefact and also thick and thin sections. Different tissue contains variable amount of fat and water. The consistency of different tissue varies, and therefore the optimum tempera-ture to cool the tissue varies considerably. Table 6.2 shows the optimum temperature of different organs to have good frozen section.
• Tissue consistency: other than the optimum cooling temperature, the consistency of tissue has significant effect on cutting such as: (i) Fatty tissue: It is difficult to cut the fatty
tissue in frozen section. Fat may smear
on the knife and may make problem in cutting.
(ii) Collagenous tissue: The firm collagenous tissue is difficult to cut.
(iii) Necrotic tissue: Soft necrotic tissue may create considerable problem as they may fall from the slide making hole in the sec-tion. It is preferable to take only viable tissue for frozen section.
(iv) Bony hard tissue: Hard tissue like bone or cartilage may damage the blade sig-nificantly. In this situation a new section can be processed, or new blade can be used.
• Tissue size: The size of the tissue sample should be small as the larger tissue takes much longer time to freeze.
References
1. Ayhan A, Ozler A, Dursun P, Haberal AN. Potential role of increasing number of sections in frozen sec-tion diagnosis of ovarian tumors. J Exp Ther Oncol. 2016;11(4):245–50.
2. Chambers KJ, Kraft S, Emerick K. Evaluation of fro-zen section margins in high-risk cutaneous squamous cell carcinomas of the head and neck. Laryngoscope. 2015;125(3):636–9.
3. Hatami H, Mohsenifar Z, Alavi SN. The diagnostic accuracy of frozen section compared to permanent section: a single center study in Iran. Iran J Pathol. 2015;10(4):295–9.
Table 6.2 Optimum temperature for frozen section
TissueOptimum temperature
Brain, liver, spleen −7 °C to −10 °CRectum, uterus, adrenal, muscle, skin
−12 °C to −15 °C
Heart, lung, intestine, pancreas, ovary, cervix, prostate
−16 °C to −20 °C
Bone marrow, breast −20 °C to −25 °C
References
Related Documents


![LMS - download.mastersolution.agdownload.mastersolution.ag/media/LMS/MASTERSOLUTION_LMS_FLYER.pdf · Lern Management System [LMS] – individuelle Lernplattform, Benutzerverwaltung,](https://static.cupdf.com/doc/110x72/5e1d0d435c6bc20e04570e9c/lms-lern-management-system-lms-a-individuelle-lernplattform-benutzerverwaltung.jpg)


