CHAPTER 1 TinyBlog: Building an Admin Seaside Web Interface with Magritte 1.1 Previous Week Solution You can load the solution of the previous week using the following snippet: Gofer new smalltalkhubUser: 'PharoMooc' project: 'TinyBlog'; package: 'ConfigurationOfTinyBlog'; load. #ConfigurationOfTinyBlog asClass loadWeek4Correction To test the code, you should start the Seaside HTTP server using the Seaside Control Panel tool (cf. previous week) or directly execute the following code: ZnZincServerAdaptor startOn: 8080. You might also need to create some posts: TBBlog reset ; createDemoPosts Before continuing, stop the Teapot server: TBTeapotWebApp stop 1

Welcome message from author
This document is posted to help you gain knowledge. Please leave a comment to let me know what you think about it! Share it to your friends and learn new things together.
Transcript

CHA P T E R 1TinyBlog: Building an Admin
Seaside Web Interface with
Magritte
1.1 Previous Week Solution
You can load the solution of the previous week using the following snippet:
Gofer newsmalltalkhubUser: 'PharoMooc' project: 'TinyBlog';package: 'ConfigurationOfTinyBlog';load.
#ConfigurationOfTinyBlog asClass loadWeek4Correction
To test the code, you should start the Seaside HTTP server using the SeasideControl Panel tool (cf. previous week) or directly execute the following code:
ZnZincServerAdaptor startOn: 8080.
You might also need to create some posts:
TBBlog reset ;createDemoPosts
Before continuing, stop the Teapot server:
TBTeapotWebApp stop
1

TinyBlog: Building an Admin Seaside Web Interface with Magritte
1.2 Describe your Model Data with Magritte
Magritte is a library to describe data. Using Magritte descriptions, you canthen generate various representations for your data or operations such as re-quests. Combined with Seaside, Magritte enables HTML forms and reportsgeneration. The Quuve software (cf. http://www.pharo.org/success) of De-bris Publishing company is a brilliant example of Magritte powerfulness:all HTML tables have been automatically generated. Data validation is alsodefined in Magritte descriptions and not spread in the UI code. This tuto-rial will not describe this but you can refer to the Seaside book (http://book.seaside.st) and the Magritte tutorial (https://github.com/SquareBracketAssociates/
Magritte).
This week, we will start by describing with Magritte the five instance vairablesof TBPost, then we will use these descriptions to automatically generate Sea-side components.
Magritte Descriptions
The five following methods classified in the ’descriptions’ protocol of TB-Post. Note that the name of these methods does not matter although we usenaming convention. In fact, the <magritteDescription> pragma allowsMagritte to retrieve descriptions.
A post title is a string and must be filled (required).
TBPost >> descriptionTitle<magritteDescription>^ MAStringDescription new
accessor: #title;beRequired;yourself
The text of a post is a multi-line string that is also mandatory.
TBPost >> descriptionText<magritteDescription>^ MAMemoDescription new
accessor: #text;beRequired;yourself
The category of a post is an optional string. If it is not specified, the post willbelong to the ’Unclassified’ category.
TBPost >> descriptionCategory<magritteDescription>^ MAStringDescription new
accessor: #category;yourself
2

1.3 Administration UI of TinyBlog
The creation date of a post is important to sort posts before displaying them.
TBPost >> descriptionDate<magritteDescription>^ MADateDescription new
accessor: #date;beRequired;yourself
The visible instance variable must be a boolean value.
TBPost >> descriptionVisible<magritteDescription>^ MABooleanDescription new
accessor: #visible;beRequired;yourself
Possible Enhancements
We could improve these descriptions and make them more complete. For ex-ample, ensure that the date of a new post cannot be before the current date.We could also define the category of post must be one of the already existingcategories. With richer descriptions, you can produce more complete gener-ated UI elements.
1.3 Administration UI of TinyBlog
We will now develop the Administration UI of TinyBlog. Through this exer-cise, we will show how to use session information and Magritte descriptionsto define reports. Our objective is: the user should be able to log in using alogin and a password to access the administration part of TinyBlog. The linkto log in will be placed below the list of categories.
Authentification Component
Let’s start by developing an authentification Component that will open amodal dialog asking for a login and a password. Note that such a function-nality should be part of a component library of Seaside.
This component illustrates how values can be elegantly retrieved from theuser.
WAComponent subclass: #TBAuthentificationComponentinstanceVariableNames: 'password account component'classVariableNames: ''category: 'TinyBlog-Components'
TBAuthentificationComponent >> account
3

TinyBlog: Building an Admin Seaside Web Interface with Magritte
^ account
TBAuthentificationComponent >> account: anObject^ account := anObject
TBAuthentificationComponent >> password^ password
TBAuthentificationComponent >> password: anObject^ password := anObject
TBAuthentificationComponent >> component^ component
TBAuthentificationComponent >> component: anObjectcomponent := anObject
The component instance variable is initialized by the following class-sidemethod:
TBauthentificationComponent class >> from: aComponent^ self new
component: aComponent;yourself
The renderContentOn: method defines the modal dialog.
TBAuthentificationComponent >> renderContentOn: htmlhtml tbsModal
id: 'myAuthDialog';with: [
html tbsModalDialog: [html tbsModalContent: [
self renderHeaderOn: html.self renderBodyOn: html ] ] ]
TBAuthentificationComponent >> renderHeaderOn: htmlhtml
tbsModalHeader: [html tbsModalCloseIcon.html tbsModalTitle
level: 4;with: 'Authentication' ]
TBAuthentificationComponent >> renderBodyOn: htmlhtml
tbsModalBody: [html tbsForm: [
self renderAccountFieldOn: html.self renderPasswordFieldOn: html.html tbsModalFooter: [ self renderButtonsOn: html
4

1.3 Administration UI of TinyBlog
] ] ]
TBAuthentificationComponent >> renderButtonsOn: htmlhtml tbsSubmitButton value: 'Cancel'.html tbsSubmitButton
bePrimary;callback: [ self validate ];value: 'SignIn'
TBAuthentificationComponent >> renderAccountFieldOn: htmlhtml
tbsFormGroup: [ html label with: 'Account'.html textInput
tbsFormControl;callback: [ :value | account := value ];value: account ]
TBAuthentificationComponent >> renderPasswordFieldOn: htmlhtml tbsFormGroup: [
html label with: 'Password'.html passwordInput
tbsFormControl;callback: [ :value | password := value ];value: account ]
When the user clicks on the ’SignIn’ button, the validatemessage is sentand it verifies the login/password entered by the user to access the ’admin’part.
TBAuthentificationComponent >> validate(self account = 'admin' and: [ self password = 'password' ])
ifTrue: [ ... ]
Authentication should not be the responsability of the modal dialog. It wouldbe better that it delegates this task to another model object that interactswith the backend to authenticate users. You can look for another method toachieve user authentication (using a database backend, LDAP or simply textfiles).
Moreover, the TBAuthentificationComponent component could displaythe name of the currently connected user.
Integrate Authentication
We now integrate a link in the application that will trigger the display of theauthentication modal dialog. At the beginning of the renderContentOn:method of TBPostsListComponent, we add the render of TBAuthentifica-tionComponent. We also pass to this component a reference to the compo-nent that display the posts.
5

TinyBlog: Building an Admin Seaside Web Interface with Magritte
Figure 1.1 Authentication Modal Dialog.
TBPostsListComponent >> renderContentOn: htmlsuper renderContentOn: html.html render: (TBAuthentificationComponent from: self).html
tbsContainer: [html tbsRow
showGrid;with: [ self renderCategoryColumnOn: html.
self renderPostColumnOn: html ] ]
We define a method that displays a key logo and the ’SignIn’ link.
TBPostsListComponent >> renderSignInOn: htmlhtml tbsGlyphIcon perform: #iconLock.html html: '<a data-toggle="modal" href="#myAuthDialog"class="link">SignIn</a>'.
We introduce this link below the list of categories.
TBPostsListComponent >> renderCategoryColumnOn: htmlhtml tbsColumn
extraSmallSize: 12;smallSize: 2;mediumSize: 4;with: [
self basicRenderCategoriesOn: html.self renderSignInOn: html ]
Figure 1.1 shows what is displayed when the user click on the ’SignIn’ link.
Administration of Posts
We will create two components. The first one will be a report that containsall posts and the second one will contain this report. The report will be au-
6

1.3 Administration UI of TinyBlog
tomatically generated with Magritte as a Seaside component and we couldhave only one component. However, we believe that sperating the adminis-tration component from the report is a good pratice regarding for evolution.Let’s start by the administration component.
Creating the Administration Component
TBAdminComponent inherit from TBScreenComponent to benefit from theheader and access to the blog model. It will contain the report that will cre-ate in the following.
TBScreenComponent subclass: #TBAdminComponentinstanceVariableNames: ''classVariableNames: ''category: 'TinyBlog-Components'
We define a first testing version of the renderContentOn: method:
TBAdminComponent >> renderContentOn: htmlsuper renderContentOn: html.html tbsContainer: [
html heading: 'Blog Admin'.html horizontalRule ]
We modify the validatemethod to invoke the gotoAdministrationmethoddefined in TBPostsListComponent. This latter method calls the administra-tion component.
TBPostsListComponent >> gotoAdministrationself call: TBAdminComponent new
TBAuthentificationComponent >> validate(self account = 'admin' and: [ self password = 'password' ])
ifTrue: [ self component gotoAdministration ]
Figure 1.2 illustrates what you obtain after logging in into your application.
The Report Component
The list of posts is displayed by a dynamically generated report with Magritte.We use Magritte here to create the fonctionnalities of the administrationpart of TinyBlog (list, create, edit and remove posts). For modularity pur-pose, we create a Seaside component for the report.
TBSMagritteReport subclass: #TBPostsReportinstanceVariableNames: ''classVariableNames: ''category: 'TinyBlog-Components'
7

TinyBlog: Building an Admin Seaside Web Interface with Magritte
Figure 1.2 An Empty Administration Component.
We add a class-side method named from: and pass it the blog object to use tocreate the report. Since all posts have the same magritte descriptions, we useone post object to retrieve them.
TBPostsReport class >> from: aBlog| allBlogs |allBlogs := aBlog allBlogPosts.^ self rows: allBlogs description: allBlogs anyOnemagritteDescription
We can now, add a report instance variable and its accessors to the TBAd-minComponent class.
TBAdminComponent >> report^ report
TBAdminComponent >> report: aReportreport := aReport
Since the report is a child component of TBAdminComponent, we must rede-fine the childrenmethod as follows.
TBAdminComponent >> children^ super children copyWith: self report
8

1.3 Administration UI of TinyBlog
In the initializemethod of TBAdminComponent we instanciate a TBPost-sReport and pass it the current blog object to access posts.
TBAdminComponent >> initializesuper initialize.self report: (TBPostsReport from: self blog)
We can now display the report in the renderContentOn: method.
TBAdminComponent >> renderContentOn: htmlsuper renderContentOn: html.html tbsContainer: [
html heading: 'Blog Admin'.html horizontalRule.html render: self report ]
By default, the report display all data available in posts even if some columnsare not useful. We can filter columns and only display the title, the categoryand the creation date.
We add a class-side method on TBPostsReport to select columns and wemodify the from: methode to use it.
TBPostsReport class >> filteredDescriptionsFrom: aBlogPost^ aBlogPost magritteDescription select: [ :each | #(titlecategory date) includes: each accessor selector ]
TBPostsReport class >> from: aBlog| allBlogs |allBlogs := aBlog allBlogPosts.^ self rows: allBlogs description: (selffilteredDescriptionsFrom: allBlogs anyOne)
Improve the Report
Currently, the generated report is raw. There are no titles on columns, columnsorder is not fixed (it can change from instance to another). We will modifyMagritte descriptions of posts to improve this.
TBPost >> descriptionTitle<magritteDescription>^ MAStringDescription new
label: 'Title';priority: 100;accessor: #title;beRequired;yourself
TBPost >> descriptionText<magritteDescription>^ MAMemoDescription new
label: 'Text';
9

TinyBlog: Building an Admin Seaside Web Interface with Magritte
priority: 200;accessor: #text;beRequired;yourself
TBPost >> descriptionCategory<magritteDescription>^ MAStringDescription new
label: 'Category';priority: 300;accessor: #category;yourself
TBPost >> descriptionDate<magritteDescription>^ MADateDescription new
label: 'Date';priority: 400;accessor: #date;beRequired;yourself
TBPost >> descriptionVisible<magritteDescription>^ MABooleanDescription new
label: 'Visible';priority: 500;accessor: #visible;beRequired;yourself
Figure 1.3 shows what the report looks like after logging in.
Manage Posts
We now set up CRUD (Create Read Update Delete) actions to let administra-tors manage posts. We will add a new colum (instance of MACommandColumn)in the report that will group all operations on posts using addCommandOn:.This is done during the report creation and we modify the report to have ac-cess to the blog.
TBSMagritteReport subclass: #TBPostsReportinstanceVariableNames: 'blog'classVariableNames: ''category: 'TinyBlog-Components'
TBSMagritteReport >> blog^ blog
TBSMagritteReport >> blog: aTBBlogblog := aTBBlog
10

1.3 Administration UI of TinyBlog
Figure 1.3 Administration of Posts with a Report.
TBPostsReport class >> from: aBlog| report blogPosts |blogPosts := aBlog allBlogPosts.report := self rows: blogPosts description: (selffilteredDescriptionsFrom: blogPosts anyOne).report blog: aBlog.report addColumn: (MACommandColumn new
addCommandOn: report selector: #viewPost: text: 'View';yourself;
addCommandOn: report selector: #editPost: text: 'Edit';yourself;
addCommandOn: report selector: #deletePost: text: 'Delete';yourself).^ report
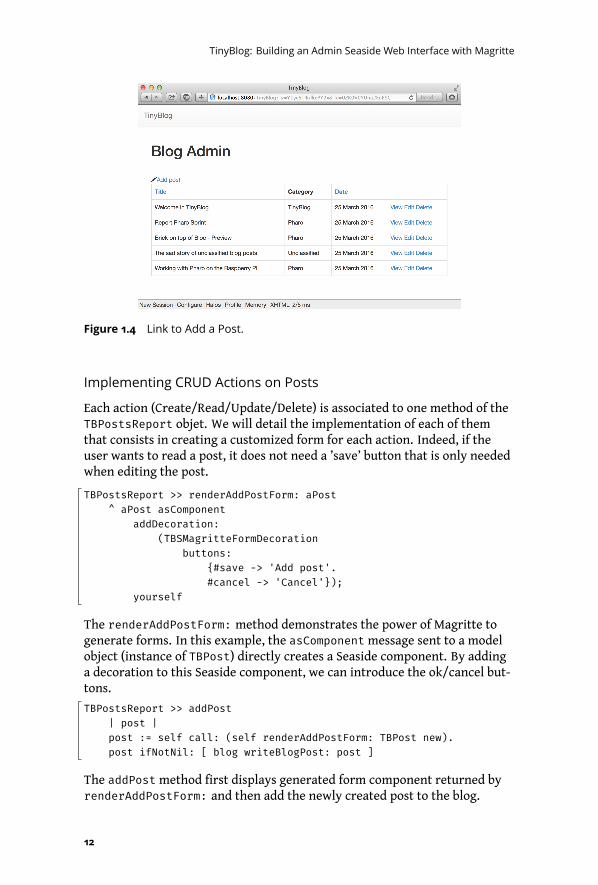
A link is displayed above the report to add a post (add). Since this link is partof the TBPostsReport component, we redefine its renderContentOn: tointroduce this add link.
TBPostsReport >> renderContentOn: htmlhtml tbsGlyphIcon perform: #iconPencil.html anchor
callback: [ self addPost ];with: 'Add post'.
super renderContentOn: html
Figure 1.4 shows the new version of the posts report.
11
TinyBlog: Building an Admin Seaside Web Interface with Magritte
Figure 1.4 Link to Add a Post.
Implementing CRUD Actions on Posts
Each action (Create/Read/Update/Delete) is associated to one method of theTBPostsReport objet. We will detail the implementation of each of themthat consists in creating a customized form for each action. Indeed, if theuser wants to read a post, it does not need a ’save’ button that is only neededwhen editing the post.
TBPostsReport >> renderAddPostForm: aPost^ aPost asComponent
addDecoration:(TBSMagritteFormDecoration
buttons:{#save -> 'Add post'.#cancel -> 'Cancel'});
yourself
The renderAddPostForm: method demonstrates the power of Magritte togenerate forms. In this example, the asComponentmessage sent to a modelobject (instance of TBPost) directly creates a Seaside component. By addinga decoration to this Seaside component, we can introduce the ok/cancel but-tons.
TBPostsReport >> addPost| post |post := self call: (self renderAddPostForm: TBPost new).post ifNotNil: [ blog writeBlogPost: post ]
The addPostmethod first displays generated form component returned byrenderAddPostForm: and then add the newly created post to the blog.
12

1.3 Administration UI of TinyBlog
Figure 1.5 Form to Add a Post.
Figure 1.5 shows the form to add a post.
TBPostsReport >> renderEditPostForm: aPost^ aPost asComponent addDecoration: (
TBSMagritteFormDecoration buttons: {#save -> 'Save post'.#cancel -> 'Cancel'});
yourself
TBPostsReport >> editPost: aPost| post |post := self call: (self renderEditPostForm: aPost).post ifNotNil: [ blog save ]
TBPostsReport >> renderViewPostForm: aPost^ aPost asComponent addDecoration: (
TBSMagritteFormDecoration buttons: { #cancel -> 'Back' });yourself
TBPostsReport >> viewPost: aPostself call: (self renderViewPostForm: aPost)
To prevent mistakes, we introduce a modal dialog to make the user confirma post removal. Once removed, the list of posts displayed by the TBPostsRe-port component should be refreshed as we will see in the following.
TBPostsReport >> deletePost: aPost(self confirm: 'Do you want remove this post ?')
ifTrue: [ blog removeBlogPost: aPost ]
We need to add a removeBlogPost: method to the TBBlog class:
13

TinyBlog: Building an Admin Seaside Web Interface with Magritte
TBBlog >> removeBlogPost: aPostposts remove: aPost ifAbsent: [ ].self save.
We must write a new unit test to cover this feature.
TBBlogTest >> testRemoveBlogPostself assert: blog size equals: 1.blog removeBlogPost: blog allBlogPosts anyOne.self assert: blog size equals: 0
Dealing with Data Update
Methods TBPostsReport >> addPost: and TBPostsReport >> deletePost:correctly modify data in the model (and the database) but the displayed dataon screen are not correctly updated. There is a mismatch between data inthe model and data displayed by the view. The view (the report) should berefreshed.
TBPostsReport >> refreshReportself rows: blog allBlogPosts.self refresh.
TBPostsReport >> addPost| post |post := self call: (self renderAddPostForm: TBPost new).post ifNotNil: [
blog writeBlogPost: post.self refreshReport
]
TBPostsReport >> deletePost: aPost(self confirm: 'Do you want to remove this post ?')
ifTrue: [ blog removeBlogPost: aPost.self refreshReport ]
Now, the form works well and it also takes into account constraints expressedin Magritte descriptions such as mandatory fields.
Improve the Form Skin
We will now modify Magritte descriptions to make form generators use Boot-strap. First, we specify that the form should be rendered inside a Bootstrapconainer.
TBPost >> descriptionContainer<magritteContainer>^ super descriptionContainer
componentRenderer: TBSMagritteFormRenderer;yourself
14

1.3 Administration UI of TinyBlog
We can now, improve the style of the input fields with Bootstrap specific an-notations.
TBPost >> descriptionTitle<magritteDescription>^ MAStringDescription new
label: 'Title';priority: 100;accessor: #title;requiredErrorMessage: 'A blog post must have a title.';comment: 'Please enter a title';componentClass: TBSMagritteTextInputComponent;beRequired;yourself
TBPost >> descriptionText<magritteDescription>^ MAMemoDescription new
label: 'Text';priority: 200;accessor: #text;beRequired;requiredErrorMessage: 'A blog post must contain a text.';comment: 'Please enter a text';componentClass: TBSMagritteTextAreaComponent;yourself
TBPost >> descriptionCategory<magritteDescription>^ MAStringDescription new
label: 'Category';priority: 300;accessor: #category;comment: 'Unclassified if empty';componentClass: TBSMagritteTextInputComponent;yourself
TBPost >> descriptionVisible<magritteDescription>^ MABooleanDescription new
checkboxLabel: 'Visible';priority: 500;accessor: #visible;componentClass: TBSMagritteCheckboxComponent;beRequired;yourself
Figure 1.6 shows what looks like a form to add a post.
15

TinyBlog: Building an Admin Seaside Web Interface with Magritte
Figure 1.6 Bootstrap-based Generated Form to Add a Post.
Session Management
A session object is associated to each instance of Seaside application. A ses-sion is dedicated to store informations shared and accessible by all compo-nents of the application such as the currently authenticated user. We willdescribe now how to use a session to manage log in.
The blog admin may want to switch between the private (admin) and public(readers) part of TinyBlog.
We introduce a new subclass of WASession named TBSession. To knowwhether a user is connected or not, we define a session object with an in-stance variable named logged that contains a boolean value.
WASession subclass: #TBSessioninstanceVariableNames: 'logged'classVariableNames: ''category: 'TinyBlog-Components'
TBSession >> logged^ logged
TBSession >> logged: anObjectlogged := anObject
16

1.3 Administration UI of TinyBlog
TBSession >> isLogged^ self logged
We initialize this instance variable to false when the session is created.
TBSession >> initializesuper initialize.self logged: false.
In the admin part of TinyBlog, we add a link to switch to the public part. Weuse here the answermessage because the administration component hasbeen called using the call: message.
TBAdminComponent >> renderContentOn: htmlsuper renderContentOn: html.html tbsContainer: [
html heading: 'Blog Admin'.html tbsGlyphIcon perform: #iconEyeOpen.html anchor
callback: [ self answer ];with: 'Public Area'.
html horizontalRule.html render: self report.
]
In the public part, we modify the behavior of the application when the userclick on the link to access the admin part. This link only opens the authenti-cation modal dialog if the user is not already connected.
TBPostsListComponent >> renderSignInOn: htmlself session isLogged
ifFalse: [html tbsGlyphIcon perform: #iconLock.html html: '<a data-toggle="modal" href="#myAuthDialog"
class="link">SignIn</a>' ]ifTrue: [
html tbsGlyphIcon perform: #iconUser.html anchor callback: [ self gotoAdministration ]; with:
'Private area' ]
The TBAuthentificationComponent component should now update thelogged instance variable of the session if the user successfully log in as anadministrator.
TBauthentificationComponent >> validate(self account = 'admin' and: [ self password = 'password' ])
ifTrue: [ self session logged: true.component gotoAdministration ]
Finally, we have to configure Seaside to use session object instance of TBSes-sion for the TinyBlog application. This is done in the initialize class-sidemethod of TBApplicationRootComponent.
17

TinyBlog: Building an Admin Seaside Web Interface with Magritte
TBApplicationRootComponent class >> initialize"self initialize"| app |app := WAAdmin register: self asApplicationAt: 'TinyBlog'.app
preferenceAt: #sessionClass put: TBSession.app
addLibrary: JQDeploymentLibrary;addLibrary: JQUiDeploymentLibrary;addLibrary: TBSDeploymentLibrary
Before testing, remember that this method must be executed manually TBAp-plicationRootComponent initialize, because the class already exists.
Possible Enhancements
• Add a ”Disconnect” button
• Manage multiple administrator accounts which implies to improvesession management and store the current user login
• Manage multiple blogs
18
Related Documents