2,3 l DOHC 16V Engine 12/96 Scorpio ’95 00-01-1 Timing Chain – Renew (21 314 0) Special Tools 15030A 15-030A Universal flange holding wrench 21147 21-147 Vibration damper remover 21168 21–168 Crankshaft locking tool ES21202 21–202 Socket, spark plugs IA21214 21–214 Installer, vibration damper Proprietary Tools Twist drill, 3,5 mm diameter Brass drift Materials Engine oil Refer to General Specifications High-temperature grease ESDM–M1C220–A Cable ties Bolt M6 X 60 Adhesive tape Remove 1. Standard preparatory measures: S Make a note of the radio keycode. S Remove the battery cover. D CAUTION: After making a note, disconnect the battery earth lead. Make a note of the preset radio stations. IAS2106022 1 2 5 3 4 2. Remove the air intake pipe. 1 Disconnect the multiplug from the intake air temperature sensor (IAT sensor). 2 Detach the air intake pipe from the air cleaner housing (two clips). 3 Disconnect the mass air flow (MAF) sensor plug. 4 Detach the air intake pipe. 5 Lift the resonator (push-fit) and remove the air intake pipe complete.

Welcome message from author
This document is posted to help you gain knowledge. Please leave a comment to let me know what you think about it! Share it to your friends and learn new things together.
Transcript

2,3 l DOHC 16V Engine
12/96 Scorpio ’95 00-01-1
Timing Chain – Renew (21 314 0)Special Tools
15030A
15-030AUniversal flange holdingwrench
21147
21-147Vibration damper remover
21168
21–168Crankshaft locking tool
ES21202
21–202Socket, spark plugs
IA21214
21–214Installer, vibration damper
Proprietary Tools
Twist drill, 3,5 mm diameter
Brass drift
Materials
Engine oil Refer to GeneralSpecifications
High-temperaturegrease
ESDM–M1C220–A
Cable ties
Bolt M6 X 60
Adhesive tape
Remove
1. Standard preparatory measures:
� Make a note of the radio keycode.
� Remove the battery cover.
�CAUTION: After making a note,disconnect the battery earth lead.
Make a note of the preset radio stations.
IAS2106022
1
25
3
4
2. Remove the air intake pipe.
1 Disconnect the multiplug from the intake airtemperature sensor (IAT sensor).
2 Detach the air intake pipe from the aircleaner housing (two clips).
3 Disconnect the mass air flow (MAF) sensorplug.
4 Detach the air intake pipe.
5 Lift the resonator (push-fit) and remove theair intake pipe complete.
2,3 l DOHC 16V Engine
12/96 Scorpio ’95 00-01-2
PZS2106107
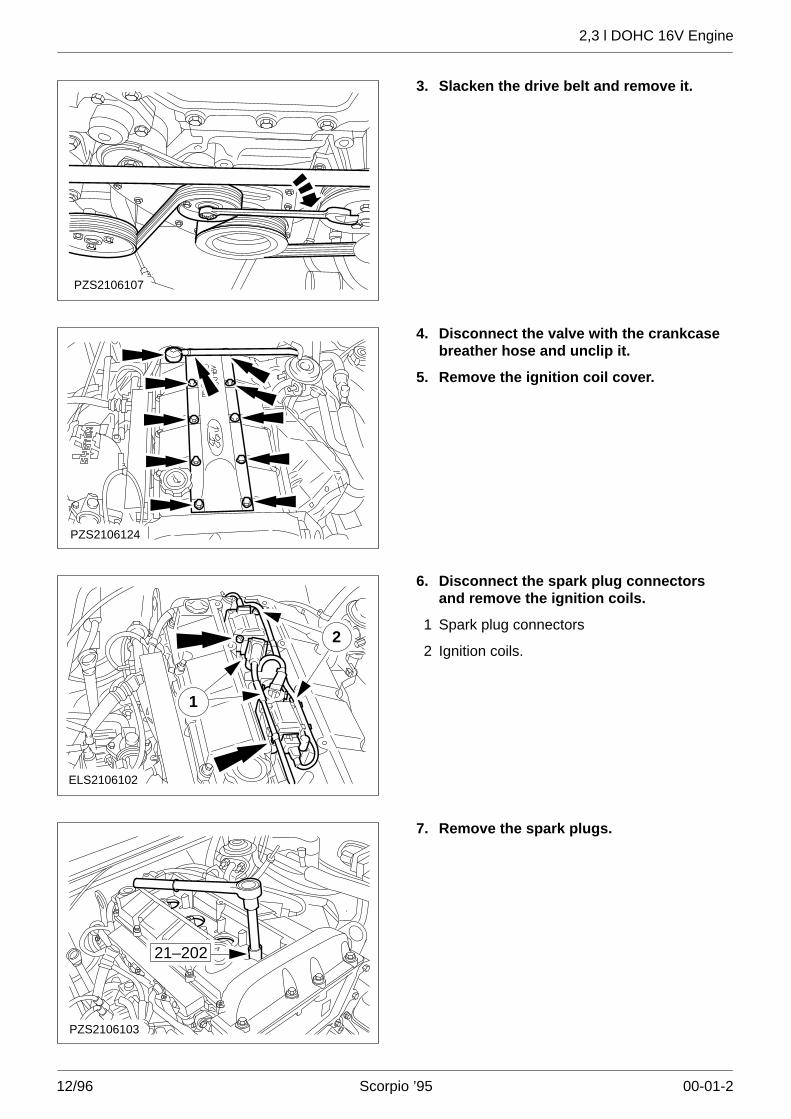
3. Slacken the drive belt and remove it.
PZS2106124
4. Disconnect the valve with the crankcasebreather hose and unclip it.
5. Remove the ignition coil cover.
ELS2106102
2
1
6. Disconnect the spark plug connectorsand remove the ignition coils.
1 Spark plug connectors
2 Ignition coils.
PZS2106103
21–202
7. Remove the spark plugs.

2,3 l DOHC 16V Engine
12/96 Scorpio ’95 00-01-3
PZS2106126
8. Disconnect the camshaft positionsensor (CMP sensor) plug.
9. Remove the cylinder head cover (elevenbolts, four nuts).
Remove the gasket.
PZS2106127
10. Remove the upper timing chain cover.
PZR2101248
2,2� 2,9�11. Set the crankshaft to the TDC position of
cylinder no. 1.
The marking on the crankshaftpulley/vibration damper should lie verticallyuppermost.

2,3 l DOHC 16V Engine
12/96 Scorpio ’95 00-01-4
PZR2104090
12. Remove the chain guide at the top.
PZR2104128
15–030A
NOTE: Counter hold them to stop them fromturning.
13. Remove the camshaft sprockets.
IAR2101249
2
1
�CAUTION: Secure the lock washer toprevent it from dropping down.
NOTE: Secure the timing chain.
14. Remove the timing chain tensioner.
1 Remove the lock washer.
2 Extract the chain tensioner pivot bolt usingan M6 x 60 bolt.
PZR2101250
�CAUTION: Do not re-use the chaintensioner plunger.
15. Remove the chain tensioner plunger.

2,3 l DOHC 16V Engine
12/96 Scorpio ’95 00-01-5
IAS2102083
16. Raise the vehicle.
17. Remove the engine undershield.
25 Nm
IAS2102080
18. Drain off the engine oil.
Tighten the oil drain plug using a new seal.
PZS2106043
3
1
2
19. Remove the starter motor.
1 Disconnect the lead.
2 Detach the bracket from the cylinder block.
3 Bolts
21–168
ELS2106108
20. Fit the special tool.

2,3 l DOHC 16V Engine
12/96 Scorpio ’95 00-01-6
PZS2106109
21. Unscrew the crankshaft pulley/vibrationdamper bolt.
21–147
ELS2106110
22. Remove the crankshaft pulley/vibrationdamper.
23. Remove Special Tool 21–168.
PZS2106111
24. Remove the lower timing chain cover(16 bolts).
PZS2106112
25. Remove the chain guides and the oilpump drive chain tensioner.
�WARNING: Wrap adhesive tape aroundthe twist drill flutes.
Compress the chain tensioner, secure it withthe 3,5 mm twist drill and remove it.
26. Remove the oil pump drive chain.

2,3 l DOHC 16V Engine
12/96 Scorpio ’95 00-01-7
PZS2106114
27. Unscrew the bottom bolt of the timingchain guide.
IAR2104081
28. Lower the vehicle.
29. Unscrew the top bolt of the timing chainguide.
30. Remove the timing chain with the timingchain guide.
ELJ2101736
21 3Install
�CAUTION: A fully or partially releasedchain tensioner plunger (whether new orused) must not be fitted.
31. Check the new chain tensioner plunger.
1 Plunger latched.
2 Plunger partly released.
3 Plunger fully released (the detent ring isvisible).

2,3 l DOHC 16V Engine
12/96 Scorpio ’95 00-01-8
ELR2101755
�CAUTION: Only use a new and latchedchain tensioner plunger.
32. Install the chain tensioner plunger.
NOTE: The only copper chain link must be atthe bottom end of the chain guide.
33. Install the timing chain with the timingchain guide.
Secure the chain with wire to prevent it fromslipping into the timing case cover.
IAR2104581
12 Nm
34. Tighten the top bolt of the timing chainguide.
PZR2104598
35. Raise the vehicle.
NOTE: The copper chain link must be acrossthe single mark on the rear sprocket.
36. Fit the timing chain at the bottom.
ELS2106614
12 Nm
37. Tighten the bottom bolt of the timingchain guide.

2,3 l DOHC 16V Engine
12/96 Scorpio ’95 00-01-9
IAR2101749
2
1
38. Lower the vehicle.
�CAUTION: Secure the lock washer toprevent it from dropping down.
39. Install the timing chain tensioner.
1 Insert the pivot bolt using the M6 x 60 bolt.
2 Fit the lock washer.
Unscrew the M6 x 60 bolt.
PZJ2101104
NOTE: The timing chain must be taut on thelong side.
NOTE: The copper chain links must line up withthe marking on the sprocket.
�CAUTION: The camshaft sprockets mustengage in the camshaft groove.
40. Fit the camshaft sprocket with the timingchain (in the TDC position).
If necessary, turn the camshaft slightly.
PZJ2101105
NOTE: The timing chain may sag slightlybetween the camshaft sprockets.
NOTE: The copper chain links must line up withthe marking on the sprocket.
41. Fit the camshaft sprocket with the timingchain (in the TDC position) (continued).
42. Tighten the bolts of the camshaftsprockets finger tight.
PZS2106122
43. Release the chain tensioner plunger witha light tap on the chain tensioner with thebrass drift.

2,3 l DOHC 16V Engine
12/96 Scorpio ’95 00-01-10
PZR2104628
15–030A
59 Nm
NOTE: Hold them in position.
44. Tighten the camshaft sprocket bolts.
J2101108
45. Set the crankshaft to TDC position ofcylinder no. 2.
NOTE: If it is necessary to correct the valvetimings, i.e. release the timing chain, a newchain tensioner plunger must be fitted asdescribed in sub-operations 31., 32. and 43.
46. Check the valve timing.
The markings on the camshaft sprocketsmust be opposite each other on the level ofthe top edge of the cylinder head.
PZR2101748
2,2� 2,9�47. Check the valve timing (continued).
Turn the crankshaft one more revolution inthe normal running direction and set it to themark.
PZR2104590
48. Install a new chain guide at the top.

2,3 l DOHC 16V Engine
12/96 Scorpio ’95 00-01-11
PZR2104587
NOTE: The crankshaft must be at the TDCposition of cylinder no. 2.
NOTE: The copper chain links of the timingchain must be across the markings on thecrankshaft sprocket and the balancer shaftsprocket.
49. Fit the oil pump drive chain.
PZS2106612
26 Nm 1
2
12 Nm
1
12 Nm
50. Install the oil pump drive chain guidesand chain tensioner.
1 Install the chain guides.
�WARNING: Wrap adhesive tape aroundthe twist drill flutes.
2 Compress the chain tensioner, secure it withthe 3,5 mm twist drill and install it.
Remove the twist drill.
ELS2106611
11 Nm
NOTE: Use a new cover with an integral gasketand radial oil seal.
51. Install a new lower timing chain coverwith a centring cap (16 bolts).
Remove the centring cap.
21–168
ELS2106108
52. Fit the special tool.

2,3 l DOHC 16V Engine
12/96 Scorpio ’95 00-01-12
PZS2106610
21–214
53. Install the crankshaft pulley/vibrationdamper.
ELS2106609
52 Nm54. Tighten the crankshaft pulley/vibration
damper bolt.
55. Remove Special Tool 21–168.
44 Nm
1
IAS210654344 Nm2
356. Fit the starter motor.
1 Bolts.
2 Attach the bracket to the cylinder block.
3 Connect the lead.
PZS2106627
11 Nm
NOTE: Use a new gasket.
NOTE: Align the top edge of the upper coverwith the cylinder head mating face (maximumdownward misalignment 0,13 mm).
57. Install the upper timing chain cover.
2,3 l DOHC 16V Engine
12/96 Scorpio ’95 00-01-13
PZS2106626
9 Nm3 Nm1
5
6
7
8
4
3
2
3
4
8
7
6
2
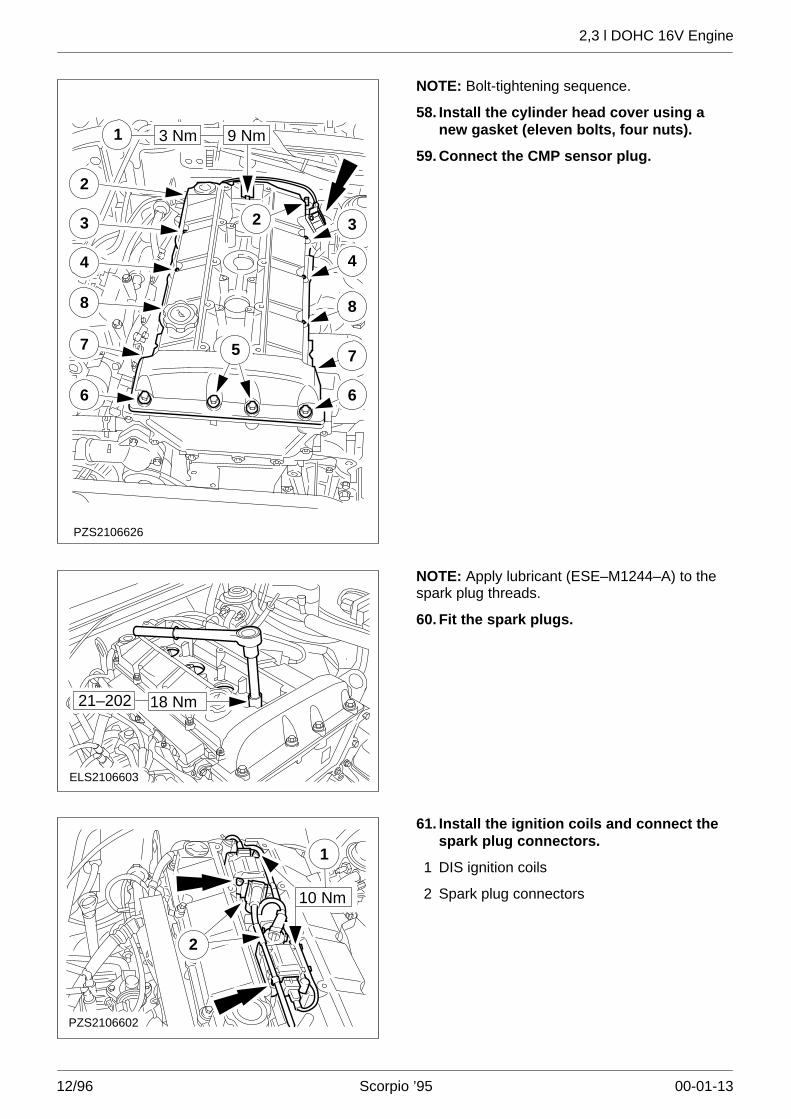
NOTE: Bolt-tightening sequence.
58. Install the cylinder head cover using anew gasket (eleven bolts, four nuts).
59. Connect the CMP sensor plug.
ELS2106603
18 Nm21–202
NOTE: Apply lubricant (ESE–M1244–A) to thespark plug threads.
60. Fit the spark plugs.
PZS2106602
2
10 Nm
1
61. Install the ignition coils and connect thespark plug connectors.
1 DIS ignition coils
2 Spark plug connectors

2,3 l DOHC 16V Engine
12/96 Scorpio ’95 00-01-14
PZS2106624
5 Nm
62. Install the ignition coil cover.
63. Connect the valve with the crankcasebreather hose and clip it into place.
PZS2106107
64. Preload the belt tensioner and fit thedrive belt.
PZS2106522
4
13
5
2
65. Install the air intake pipe.
1 Attach the air intake pipe to the air cleanerhousing (two clips).
2 Fit the air intake pipe.
3 Move the resonator into the installationposition (push-fit).
4 Connect the IAT sensor plug.
5 Connect the MAF sensor plug.

2,3 l DOHC 16V Engine
12/96 Scorpio ’95 00-01-15
66. Standard finishing operations.
� Top up with engine oil.
� Fix the wiring and hoses in place withcable ties.
� Connect the battery earth lead.
� Bring the engine to operating temperatureand check it for leaks (visual check).
� Check the fluid levels and rectify asnecessary.
� Enter the radio keycode.
� Reprogramme the preset radio stations.
� Reset the clock.
IAS2102083
67. Raise the vehicle.
68. Fit the engine undershield.
69. Lower the vehicle.
70. Carry out a road test to enable the PCmodule (EEC V) to collect data.
Related Documents