Tina Administration Documentation Tina 2020 Publication Number: ATN-ADM-PDF-EN-1020-REV1 Publication Date: October 2020

Welcome message from author
This document is posted to help you gain knowledge. Please leave a comment to let me know what you think about it! Share it to your friends and learn new things together.
Transcript

Tina Administration Documentation
Tina 2020
Publication Number: ATN-ADM-PDF-EN-1020-REV1
Publication Date: October 2020

©2020 Atempo SAS. All rights reserved.
All names and products contained herein are the trademarks or registered trademarks of their respective holders.
The information contained herein is the confidential and proprietary information of Atempo SAS. Unauthorized use of this informationand disclosure to third parties is expressly prohibited. This technical publication may not be reproduced in whole or in part, by anymeans, without the express written consent of Atempo SAS.
Atempo SAS23 Avenue Carnot91300Massy - France

ContentsCHAPTER 1 - Tina Interfaces 1
Admin App andWeb Administration Interfaces 1Documentation 1Web Server Components 1List of Features Managed from the Classic Interfaces 2
Preferences Tool 4
CHAPTER 2 - Admin App and Web Administration Interfaces 7About the Admin App and Web Administration 7Launching the Admin App 7Launching theWeb Administration 8Admin App andWeb Administration Overview 9
Tina Explorer 10Status Bar 12Menu Bar 12Toolbars 13Shortcut 15Right Pane 15
Customizing the Admin App andWeb Administration 15Filtered Tabs 16Columns 17Favorites 17Preferences 17
Performing Supervision Operations 20
CHAPTER 3 - Managing the Catalog 22About the Catalog 22Viewing Catalog Information 22
Catalog Information View 23Creating a Catalog 24Associating a Catalog with theWeb Administration 30Setting Catalog Parameters 31
Backup and Restore Settings 31Editing a Catalog 32Stopping a Catalog 33Suspending a Catalog 33Starting a Catalog 34Backing Up the Catalog 34
Catalog Application 34Backing up a Single Catalog 35
Tina Administration i

Manual Triggering of a Backup 36Creating a Catalog Application 36Editing the Catalog Application 39Viewing the Catalog Application Contents 41Backing up Several Catalogs Locally or Remotely 43
Restoring the Catalog 43Restoring the Catalog with the Boot Catalog 44Restoring Another Catalog 46Restoring the Catalog Configuration 46Resynchronizing the Virtual Library System Application 47
CHAPTER 4 - Securing TCP Connections 48About Encryption 48Tina Certificates 48
Creating and Installing Certificates 51Enabling the Encryption 54
Properties 54Prerequisite 55tina_catalog_ctrl Command 55
CHAPTER 5 - Managing Platforms 56About Platforms 56
Hosts 56Applications 56Firewalls and BackupMasters 56Mobile Platforms 58
Creating a Platform 59Creating a Host 59Creating a New Host Detected by Tina 60Creating Applications 61Enabling Platforms 64Disabling Platforms 64
Configuring Platform Settings 65Fast File Scan 65NDMP 69
Editing Platforms 69Editing Hosts 69Editing Applications 74Disabling/Enabling Drive-Host connections 77
Deleting Platforms 77Exporting the Platform List 78
ii Tina Administration
Contents

CHAPTER 6 - Configuring Users and Access Rights 80About Access Rights 80About Catalog Access Modes 80Password Policy 81Managing Users 81
About Users 81About Tina User Profiles 82User AuthenticationModes 83Creating Users 86Editing Users 87Deleting Users 88Defining or Modifying Passwords 88Changing the User Identity 88Customizing the Default Profile 89Exporting the User List 89
Managing User Groups 90Configuring Tina Access Rights 91
CHAPTER 7 - Device & Media Management 95About Devices 95Libraries 95
About Libraries 95Creating a Library Manually 96Creating a Library Using the Device Discovery Wizard 98Managing Simultaneous Access to Library Shared Drives 99
Drives 112About Drives 113Creating a Drive 115Changing theMode of the Drive 119Drive Information 120Testing Drives 122Automatically Cleaning Drives 123Manually Cleaning Drives 124Editing Drives 124Deleting Drives 128Identifying the Contents of a Drive 128Ejecting aMedia from aDrive 128Exporting the Drive List 129
Media Pools 129Creating aMedia Pool 130Editing aMedia Pool 131Deleting aMedia Pool 132
Tina Administration iii
Contents

Exporting theMedia Pool List 132Cartridges 132
About Cartridges 133Available Cartridge Operations 136ViewingMedia Information 139Exporting the Cartridge List 142Recycling a Cartridge 142Closing a Cartridge 143Reopening a Cartridge 144Deleting a Cartridge 144Erasing a Cartridge 145Duplicating a Cartridge 145Putting a Cartridge Offline 146Replacing a Cartridge 147Writing a Cartridge Label 147Reading a Cartridge Label 148Editing the Cartridge Life Cycle 148Setting the Cleaning Cartridge Parameters 148
Exporting the Lists of StorageObjects 149Deduplication Storages and Pools 150
CHAPTER 8 - Library Management 151About Library Management 151Viewing the Library Contents 151
Opening the Libraries Pane 151Library Overview 152Customizing the Library Pane 152Displaying Library Details 153
Operations on Libraries 154Editing a Library 155Reinitializing a Library 155Testing the Drive Position in the Library 156Deleting a Library 157Exporting the List of Libraries 157
Operations on Drives 157Viewing Drive Information 158Modifying a DriveMode 158Identifying the Drive Contents 159Testing a Drive 159Ejecting a Cartridge from aDrive 159
Operations onMailboxes 160ViewingMailbox Information 160
iv Tina Administration
Contents

Enabling/Disabling aMailbox 160Operations on Slots and Cartridges 161
Viewing Slot/Cartridge Information 161Enabling/Disabling a Slot 161Moving a Cartridge 162Bringing a Cartridge On/Offline 162Setting the Cleaning Cartridge Parameters 163
CHAPTER 9 - Automatic Backup Configuration 165About Tina Backup 165
Backup Types 165Parallel Backups 167Backup without Using the Cache of the Server 168Scheduling Issues 168Backup Process 169
BackupWizard 170Configuring a Backup with the BackupWizard 170
Backup Strategies 172Creating a Standard Strategy 172Manual Triggering of a Backup 174Editing Strategies 175Backup of Specific Attributes 181Deleting Strategies 183
Scheduler 184Scheduler 184Configuring the Scheduler 185Creating a Schedule 186Creating or Modifying Schedule Rules 188Examples of Schedule Creation 188Editing a Schedule 189Copying a Schedule 190Exporting a Schedule 190Deleting a Schedule 191
Backup Selections 191About Backup Selections 191Creating a Backup Selection 191Filter Syntax 194Filtering Nested Selections 197Backup Selection Representation 198Editing a Backup Selection 198Deleting a Backup Selection 199
Macro-multiplexing 199
Tina Administration v
Contents

Cache SpaceManagement 199Simple Backup without Macro-multiplexing 199Backup with Macro-multiplexing 200ConfiguringMacro-multiplexing 201
CHAPTER 10 - Agents 203Windows 203
Using the Tina Agent 203Backing up Files 203Non Backed up Files 203Restoring Files 203Registry 204Windows Agents Documentation 204
Unix 204Linux 204macOS 204
Launcher 204Non Backed up Files 205Specifics of themacOS agent 205Support of macOS 207Known Issues 207
OES Linux 209PAM 209
OS Configuration 209Tina configuration 210
Autofs 210Linux 210Solaris, AIX 211
NDMP 211Agent Job Viewer 211
CHAPTER 11 - On Demand Backup 218About OnDemand Backup 218
Limitations 218Configuring OnDemand Backup 218
Defining Users 218Defining Strategies 219Managing Load 219
Using OnDemand Backup 219Windows and Unix: Agent Job Viewer 219macOS Systems: With the DashboardWidget 221
OnDemand Backup Unavailable 222Monitoring OnDemand Backup in the Jobs View 222
vi Tina Administration
Contents

CHAPTER 12 - Tina in SAN Environments 223About Tina in SAN Environments 223
About Multiple Server Architecture 223About Storage Node Architecture 224About Mixed Architecture 224Multiple Servers or Storage Nodes 224Device Descriptor Re-allocation 225
ImplementingMultiple Server Architecture 226Prerequisites 226Configuration 226
Implementing Storage Node Architecture 227Prerequisites 227Configuration 227Creating a Shared Drive 228Modifying the Drive Connection type 228Disabling/Enabling Drive-Host Connections 228
CHAPTER 13 - Alarms 229About Alarms 229Alarm Description 229
Alarm IDs and categories 229Alarm Severity 230AlarmMessages 230
Viewing Alarms 230Alarm Properties Window 231Sorting Alarms 231Configuring a New Alarm View 231
Processing Alarms 232Exporting Alarms 233Filtering Alarms 233
CHAPTER 14 - Events 234About Events 234Viewing Events 234
Selecting the Columns to Display 235Configuring a New Event View 236
event File 240log or log_debug File 240
Purging Events 243Exporting Events 243Searching Events 244Notifying Events 244
Tina Administration vii
Contents

Audit Trail 244Prerequisites 244Installing Audit Trail 244Viewing Audit Trail Logs 245Audit Trail Log Retention 245Describing Audit Trail Logs 246Redirecting Audit Trail Logs 252Limitations 255
CHAPTER 15 - Jobs 257About Jobs 257Viewing Jobs 257
Configuring a New Job View 258Displaying Job Details 258Processing Jobs 262
Tina/HyperStream Server Consistency 262Duplicating Jobs 263Exporting Jobs 264Creating a Job Report 265Modifying Job Behavior 265
Modifying the Job VolumeDisplay Unit 265Limiting the Number of Simultaneous Jobs 266Other Modifications on Job Behavior 266
CHAPTER 16 - Media Requests 267About Media Requests 267ViewingMedia Requests Interface 267Managing Requests 268Request Status and Evolution 269
Status Evolution 269Redirecting Operator Requests 270
CHAPTER 17 - Reporting and Statistics 272Tina Reports & Statistics 272
Tina Reports & Statistics AdvancedOption 272Generating Detailed Activity Reports 273General Synthesis 274Job Synthesis 277Pool Synthesis 279Library Synthesis 279Drive Synthesis 280Platform Backup Status Synthesis 280
Managing Additional Features 282
viii Tina Administration
Contents

Daily Synthesis 284Groups Jobs Status Daily Synthesis 284Groups Weekly Synthesis 286Weekly Reports 286Monthly Reports by Group 288Volumes Synthesis 289VMware Virtual Centers 290VMware Virtual Centers Connection 291VMwareMachines Status 292Next Scheduled Jobs 292Disabled or Unscheduled Strategies 293Libraries Cartridges Synthesis 293Cartridges by Pool 293Backup Servers Connection 293Catalog Connection 294GroupMails Management 295Collects Status 296Global ConfigurationManagement 296Configuration File 297Backing Up Tina Reports & Statistics 298
Activity Information 298Configuration Reports 299
CHAPTER 18 - Backup to Disk with Virtual Library System 302About the Virtual Library System 302Configuring a Virtual Library System 302
Virtual Library System Configuration Files 302Creating a VLS 303
Editing a Virtual Library System 304VLS Environment Variables 305Cartridge File Location 306SAN Configuration 306
Managing the Virtual Library System 307Adding Spare Cartridges 307Bringing Cartridges Offline 307Bringing Cartridges Online 308Deleting the Virtual Library System 308
CHAPTER 19 - Exporting Backed up Data to Another Pool Automatically(VLSA) 309
About Virtual Library System Application 309Principles 310DuplicationMode 310
Tina Administration ix
Contents

Prerequisites 311Configuring the Virtual Library System Application 312Managing Associations 315Testing the Source Library 317Monitoring 317
Viewing the Source Library Information 318Exporting theMonitoring Report 319
Duplicating and Removing DataManually 319Emergency Data Removal 319
CHAPTER 20 - Configuring Advanced Settings 321License 321Catalog Settings 322Tunables 322
About Tunables 322Viewing Tunables 323Configuring a New Tunable View 323Setting Tunables 323Enabling/Disabling Tunables 325Displaying Tunable Details 325Editing Tunables 327Deleting Tunables 327Exporting Tunables 327Editing Tunables for a New Host 328Copying a Tunable to a Host 328
Event Notifications 329Viewing Event Notifications 329Creating Event Notifications 329Enabling/Disabling Event Notifications 335Displaying Event Notification Details 335Editing Event Notifications 338Deleting Event Notifications 339Exporting Event Notifications 339
Alarm Filters 339About Alarm Filters 340Viewing Alarm Filters 340Configuring a New Alarm Filter View 340Creating Alarm Filters 341Enabling/Disabling Alarm Filters 342Displaying Alarm Filters Details 342Editing Alarm Filters 343Deleting Alarm Filters 343
x Tina Administration
Contents

Exporting Alarm Filters 343Editing Alarm Filters for a New Host 344
Domain Filtering 344About Domain Filtering 344Viewing Domain Filters 346Creating Domain Filters 346Enabling/Disabling Domain Filters 348Displaying Domain Filter Details 348Editing Domain Filters 349Deleting Domain Filters 350Managing Privileged Hosts 350Exporting Domain Filters 350
HTTP Configuration 351
CHAPTER 21 - List Application 352About the List Application 352List File Syntax 353
Basic Rules 353Keywords 353Creating a dynamic List file 363
Backup 363Configuring Backups 363
Restore 367About User Rights Restore 367Restore with Relocation 367Using Restore & ArchiveManager 369RestoreMethods 372
Examples 373List File Examples 373Graphical Representation 376Example of Using the List Application to Back Up aMYSQLDatabase 377
CHAPTER 22 - Mapped Network Drives 379Net Disk Application 379
Backup 379Restore 382Archiving 382
Back up and Restore without the Net Disk Application 382Archiving 384
CHAPTER 23 - Filesystem Application 385About the Filesystem Application 385Backup 385
Tina Administration xi
Contents

Creating a Filesystem Application 385Creating or Editing aMedia Pool 388Creating a Backup Strategy 388Creating a Backup Selection 388
Restore 389Viewing the Application Contents 389Restoring data 389
Archiving 390
CHAPTER 24 - Additional Information 391Troubleshooting Tina 391
Advanced Environment Reporter 391Generating the Report 392Using Advanced Environment Reporter withWindows 395Sending the Environment Report by FTP 397
Advanced Library Properties 398Standard Properties 398Generic Properties 399Specific Properties 400Geometry Properties 402
Specific Library Information 402MediaManagement when Partitioning aQUANTUM Scalar i500 Library 402Atempo-Tina for ACSLS/LibraryStation 403
TCP Parameter Modification 437HP-UX 437IBM AIX 437SUN Solaris 437Linux 437Windows 438
Tina SnapBackup 438About Tina SnapBackup 438Architecture 439Snapshot Configuration 439Backup 451Restore 455
Network Ports Details 458Tina on Linux Open Enterprise Server 462
Backup of a Parent Object Larger than 64 KB 463Troubleshooting 465
xii Tina Administration
Contents

CHAPTER1-Tina InterfacesTina4.6 brings interface enhancements. These topics provide all necessary information about these changesand help you to successfully upgrade to this new version:• Admin App andWeb Administration Interfaces• Preferences Tool
Admin App and Web Administration InterfacesTina 4.6 features user administration and supervision interfaces in addition to the Administration Console.
These interfaces, the Admin App andWeb Administration, can be accessed from any platform on the networkas well as remotely, even if Tina is not installed. Both interfaces have the same appearance and features.
The Classic administration interfaces remain available (e.g., Administration Console, Library Manager), butAtempo strongly recommends to use them only to configure andmonitor certain components which have notyet been integrated in the Admin App orWeb Administration. Use the Admin App orWeb Administrationinterface whenever possible.
DocumentationFrom Tina 4.4, Atempo delivers two Administrator’s documentations:• Use this documentation, i.e., the Tina Administration Documentation for detailed information and
procedures about Tina.• Use the Tina Administration Documentation for Classic Interfaces for information about the features that
are still managed from the classic administration interfaces.
Note: TheAdministrator’s documentation for Classic Interface has not been updated from Tina 4.4new features. Please use it only for information about features not yet available in theWebAdministration.
Web Server ComponentsTheWeb Server is installed with the Tina server. It is composed of an Apache Tomcat web application serverand two web applications: a FlashWeb Administration application, and an AJAXWebRestore application.
Tina Administration 1
Tina Interfaces

This diagram provides an overview of the Tina components, including theWeb components:
Use one of these browsers equipped with at least version 11.2 of Adobe Flash Player:• Mozilla Firefox• Apple Safari• Microsoft Internet Explorer• Google Chrome
List of Features Managed from the Classic InterfacesAlthough Atempo recommends using theWeb Administrationinterface for configuration, these items can onlybe configured through the classic Administration Console:
Catalog Edition and DeletionYou cannot edit or delete a catalog in theWeb Administration:
Use the classic Administration Console or the tina_init command.
2 Tina Administration
Tina Interfaces

SeeManaging the Catalog in the Tina Administration Documentation for Classic Interfaces and the TinaCommand Line Interface Documentation.
Putting Cartridges offlineYou can put cartridges offline from theWeb Administration, but the optionRetry if mailbox full is not available.Use the classic Administration Console to use this option.
See Device andMediaManagement in the Tina Administration Documentation for Classic Interfaces.
Grouping Platforms for BackupTheWeb Administration does not enable you to drag and drop a platform onto another to create platform groupsfor backup. However, you can use filters and host or application cloning to achieve platform grouping:• Use the filters to create groups of hosts or applications in list format, based on their backup settings. You
can then edit massively the settings of all platforms in the list.• Use the host cloning or host import features to apply identical backup settings to a new host.• Use the application cloning to apply identical backup settings to a new application.
Platform groups from previous Tina versions will still be present after upgrade; modifying a platform from anexisting group in theWeb Administration will modify all the platforms of this group.
SeeManaging Platforms in the Tina Administration Documentation for Classic Interfaces.
Task ViewerThe Task Viewer is not available from theWeb Administration.
Use the classic Administration Console to have a global view of the workload for all past and future backups.
See Task Viewer in the Tina Administration Documentation for Classic Interfaces.
Security & Compliance ManagerThe Security & ComplianceManager is not available from theWeb Administration. Use the classicAdministration Console and the Security & ComplianceManager interface (tina_scm) to manage certificates,templates, and rules.
See the Tina Security & ComplianceManager Documentation.
Library Split and Library Sharing ManagerSplit definition is not available from theWeb Administration. Use the classic Administration Console to define alibrary split, and the Library SharingManager (tina_lsm) to manage the sharing of the library by severalcatalogs.
To define a library split, see Device andMediaManagement in the Tina Administration Documentation forClassic Interfaces.
Tomanage the sharing of the library by several catalogs, seeManaging Simultaneous Access to Library SharedDrives.
Virtual LibrariesYou cannot create these software controlled libraries from theWeb Administration:• QUANTUM/GRAU DAS• IBM Library Manager• Other
Use the classic Administration Console instead.
See Device andMediaManagement in the Tina Administration Documentation for Classic Interfaces.
Tina Administration 3
Tina Interfaces

Preferences ToolFrom Version 4.4, Tina Preferences are set through theWeb Administration.
See below for each individual component:
Tunables, Event Notifications, Access Filters, and Alarm FiltersFrom theWeb Administration, expand your catalog and open the Configuration node to configure tunables,event notifications, access filters (Domain Filtering pane), and alarm filters.
LicenseFrom theWeb Administration, click your catalog to open the Catalog Information View and click the License tabto configure the license settings.
ServicesFrom theWeb Administration, click your catalog to open the Catalog Information View, then click the Propertiestab. In the AdvancedOperations area, click Modify Ports to modify the TCP and UDP ports of Tina Server andAgents.
CatalogAdding catalogs in the list of catalogs allowed to back up an agent is not available through theWebAdministration or the Administration Console.
Web InterfacesSMTP Server preference. You can only declare the SMTP server during Tina installation. Setting the SMTPserver from theWeb Administration is not yet available.
See Installing Tina Server in the Tina Installation Documentation.
Protocol and HTTP port number. From theWeb Administration, expand your catalog and select Preferences Interface Preferences. Set theWeb server port number and protocol from theWeb Server Parameters area.
Advanced Indexing DatabaseExchange 2010 only. From theWeb Administration, set this preference in the Exchange Server ApplicationCreationWizard.
See the Tina for Exchange Server 2010 and 2013 Documentation.
Databases - DB2From theWeb Administration, set this preference in the Archive Folder CreationWizard.
See the Tina for DB2Documentation.
Fast File ScanFrom theWeb Administration, expand your catalog and select Platforms Hosts.
Display your Host Details and set this preference in the Fast File Scan Configuration area of the Settings tab.
NDMPFrom theWeb Administration, expand your catalog and select Platforms Hosts.
4 Tina Administration
Tina Interfaces

Display your Host Details and set this preference in the NDMP Data/Tape Server Configuration area of theSettings tab.
SharePointFrom theWeb Administration, set this preference in the SharePoint Server Application CreationWizard.
See the Tina for SharePoint 2013 and 2016 Documentation.
HyperVision Agent for VMware Deduplication StorageFrom theWeb Administration, expand your catalog and select Storage Deduplication Storages.
Set this preference in the Deduplication Storage CreationWizard.
See the Tina HyperVision Agent for VMware Documentation.
Tina Administration 5
Tina Interfaces

6 Tina Administration

CHAPTER2-Admin App and WebAdministration InterfacesThese topics describe the Tina Admin App, for which no browser is necessary, as well as theWebAdministration interface, accessible on any Web browser. Both interfaces are used to perform configuration andbackup scheduling tasks as well as tomonitor backup activities. They feature the same appearance andfunctionalities.• About the Admin App and Web Administration• Launching the Admin App• Launching theWeb Administration• Admin App andWeb Administration Overview• Customizing the Admin App andWeb Administration• Performing Supervision Operations
Note: The two other main interfaces, i.e. Restore & ArchiveManager andWebRestore, are discussed atlength in the Tina Restore Documentation
About the Admin App and Web AdministrationThe Admin App is accessible directly from the Tina section of theWindows Start menu and theWebAdministration is accessible from any Internet browser, regardless of whether Tina is installed. Once started,the two interfaces are identical and include:• A representation of your backup network: catalogs, servers, agents, databases, automated libraries,
drives, andmedia.• Access to a series of monitoring windows, such as Jobs, Hosts, Media Pools, etc.• Real time information concerning various components of the backup network.• Configuration tools to set up your backups and schedule automatic backups.
Launching the Admin App1. InWindows, you can launch the Admin App through the Start All Programs Tina Admin App
menu.2. If you are not on the Tina server, you will see aWelcomewindow. From here you canmanually enter a
URL of this type:
https://<Tina_server_name>:port_number/ <Tina_environment_name>/Example. https://dayos:25088/tina/.By default, the web environment name is tina, but you canmodify it during the setup. Ensure that youuse the correct name for your environment. Likewise, if youmodified the default port number, replace25088with the port number you specified.
3. In the User Authentication window, provide a name and password to access the Admin App.Select the language that best suits your needs or just leave the default value.
Tina Administration 7
Admin App andWeb Administration Interfaces

This table shows the permissions required according to the access level you want:
Access level User permission required
View and manage all objects Supervision permission.
Perform supervising operations onall objects
Specific permissions to all objects. Specific permissions enableyou to view and perform operations on the objects.
These are the objects for which youmay need specificpermissions:
• Platforms• Backup Destinations• Media Pools• Drives• Libraries• Users
View and perform supervisingoperations on selected objects only
Specific permissions to the selected objects, (e.g., to view, stop,or restart jobs, you need the JobOperator permission).
For more details on how to grant permissions to users, see Editing Users.
Launching the Web Administration1. In your browser, enter a URL of this type:
https://<Tina_server_name>:port_number/ <Tina_environment_name>/Example. https://dayos:25088/tina/.By default, the web environment name is tina, but you canmodify it during the setup. Ensure that youuse the correct name for your environment. Likewise, if youmodified the default port number, replace25088with the port number you specified.Windows. You can also launch theWeb Administration through the Start All Programs Tina WebAdministrationmenu.
2. In the User Authentication window, provide a name and password to access theWeb Administration.Select the language that best suits your needs or just leave the default value.This table shows the permissions required according to the access level you want:
Access level User permission required
View and manage all objects Supervision permission.
8 Tina Administration
Admin App andWeb Administration Interfaces

Access level User permission required
Perform supervising operationson all objects
Specific permissions to all objects. Specific permissionsenable you to view and perform operations on the objects.
These are the objects for which youmay need specificpermissions:
• Platforms• Backup Destinations• Media Pools• Drives• Libraries• Users
View and perform supervisingoperations on selected objectsonly
Specific permissions to the selected objects, (e.g., to view,stop, or restart jobs, you need the JobOperator permission).
For more details on how to grant permissions to users, see Editing Users.
Admin App and Web Administration OverviewThis image illustrates theWeb Administration or Admin Appmain interface:
The Admin App and interfaces consist of:• The Explorer which enables you to navigate through the Tina objects.• The status bar that indicates the current user and catalog.• Themenu bar that shows the alarms and includes the generic applicationmenus.
Tina Administration 9
Admin App andWeb Administration Interfaces

• A main toolbar that enables you to perform some operations on the highlighted object in the list, (e.g.,show object properties, enable, etc.).
• A second toolbar that enables you to define the way in which the right pane displays the Tina objects andthe way the refreshing of the display is performed.
• The right pane that gathers all the information youmust manage and supervise the application.
Tina ExplorerThe Tina Explorer occupies theWeb Administration left column. The Explorer takes the form of a tree andenables you to navigate through Tina objects and view the corresponding detailed windows in the right pane.
To gain space for the right pane, you canminimize the Tina Explorer by clicking the arrow on its top right. Youreopen the Explorer in the sameway.
On the right side of each explorer item can display two kind of indicators: alarms andmedia requests. The alarmindicator shows themost severe alarm generated on the item (see Alarms). TheMedia Request indicator candisplay next to the Job or Media Request items (seeMedia Requests).
The Tina Explorer is comprised of root nodes (i.e., Global Activity, Catalog, Preferences, and UI Tasks),second level nodes, (e.g., Current Activity or Storage), and nodes of third level or categories representingdifferent kind of information in the catalog. When clicking on one of these third level nodes or categories, thecorresponding information displays in the right pane.
This table describes the nodes that the Tina Explorer may display:
Root node Description
GlobalActivity
Gives a consolidated view of all the operator requests and jobs for all the catalogs. These arethe categories of the Global Activity node:
• Jobs. The job concept applies to several types of sessions, (e.g., Backup, Archiving,Restore, etc.).Click the Jobs category to open the Jobs pane.
• Media Requests.When amedia operation is required to perform a backup, a restore orany other function, a request is logged into the catalog and displays in theMedia Requestsinterface.Click theMedia Requests category to open theMedia Requests pane.
10 Tina Administration
Admin App andWeb Administration Interfaces

Root node Description
Catalog The navigation tree shows all the catalogs declared in Tina. In amulti-catalog environment,Tina keeps open only one catalog node at a time.
These are the second level nodes a catalogmay display:
• Current Activity. Contains the Jobs, Events, Backups Status, Alarms, andMediaRequests categories.
• Favorites. Enables you to select and display as favorite objects one or several of thesecategories: Hosts, Applications, and Drives.
• Reporting. Contains information on the catalog activity and enables you to launch anddisplay reports.
• Platforms. Contains the Hosts and Applications categories.• Data Management. Contains the Strategies, Backup Selections, Schedules, and Archive
Folders categories.• Backup Destinations. Contains theMedia Pools, Deduplication Pools, and Snapshots
categories.• Storage. Contains the Drives, Libraries, and Deduplication Storages categories.• Users. Contains the list of all Tina users with their corresponding User Group and Profile.• Configuration. Contains the Catalog Settings, Tunables, Event Notifications, Alarm
Filters, and Domain Filtering categories.
Preferences Enables you to verify and configure the graphical parameters for the user interface that applyto all catalogs. The Preferences node contains these categories:
User Preferences. Enables you to set:
• Display Option. The unit to be used for job volume, the reset of all alert messages, or theAutomatic Refresh of Explorer Alarm Indicator. See To set user preferences.
• Catalog Sort Option. Enable Catalog Sort in the Explorer. With the checkbox unchecked,catalogs are no longer sorted and appear in the same order as in the catalogs(.txt) file. SeeTo set user preferences.
• Automatic Catalog Selection Option. Automatically select the catalog when clicking onits node to expand the tree, so there will be no need to click the catalog icon itself todisplay the catalog data in the right pane. See To set user preferences.
• Confirmation dialog boxes toggle. With this option checked, confirmation dialog boxeswill be displayed. See To set user preferences.
Interface Preferences.
Enables you to:
• Catalogs. Add to the an independent catalog or a new file of catalog.txt type (see Toadd a new reference to a catalog file).
• Web Interface Parameters. Enable or disable the language selection in the login window,define a close timeout for the session in minutes, and edit the URL link to the ReportingTool (Tina Reports & Statistics). See To set Web Interface parameters.
• Web Server Parameters.Modify theWeb server port number and (http or https) protocol.See To set Web Interface parameters.
• Logs. Define both the severity and the strategy for the log files, and enable or disable theWeb server access logs. See To set Logs parameters.
• Web Restore Interfaces.Manage the URLs that theWebRestore Interfaces use.
Tina Administration 11
Admin App andWeb Administration Interfaces

Root node Description
UI Tasks Gathers all the current tasks whose execution time is too long and can then freeze the userinterface, (e.g., the library reinitialization tasks).
These kind of time-consuming tasks are treated as background tasks.
Status BarThis table describes the buttons of the status bar:
Button Description
Current user—Name of the current user. You can log out or connect to a different user by providinga new user name and password.
Clicking the disconnect symbol at right disconnects you from the interface.
Root node name—Name of the current root node, (e.g., when in the catalog node, it displays thename of the catalog you are viewing in catalog@server format).
Menu BarThis table describes the buttons of themenu bar:
Button Description
Alarms—Contains three indicators that can indicateminor (green), major (orange), or critical (red)alarms set on the objects in the current catalog. Each indicator also provides the number of existingalarms of its type.
The indicators are automatically updated. Click this icon to open the Alarms view.
In addition to the alarm icon, the Explorer may display an alarm indicator in front of each object. Thealarm indicator shows themost severe alarm generated on the object. Clicking the alarm indicatoropens the Alarms view.
See Alarms for details.
Operator Requests—Blinks to indicate that amedia request is pending in the current catalog. Tinaissues amedia request when it needs amedia that is offline to perform an operation.
Click this icon to open theMedia Requests pane.
In addition to the request icon, the Explorer may display amedia request indicator in front of eachobject. Themedia request indicator can display next to the Jobs or Media Requests objects.Clicking themedia request indicator opens theMedia Requests pane.
SeeMedia Requests for details.
Scheduler—Opens the Scheduler window of the Catalog Settings pane.
12 Tina Administration
Admin App andWeb Administration Interfaces

Button Description
Preferences—Enables you to set display preferences, specifically:
• Set and use current view as Home page. Defines the current displayed page as the page to firstsee when reconnecting to the interface.
• Use last session view as Home page. Defines the last page displayed before disconnectingfrom the interface as the page to first see when reconnecting to the interface. If there is no checkmark before the Use last session view as Home page item in themenu, it means that you havesaved a specific page as the Home page by selecting the first item of the pull downmenu.
To get more graphical preferences, click Preferences in the Tina Explorer.
To set the operating preferences for a Tina object (e.g., host, application, strategy, etc.), open theDetails window for that object.
Wizard—Enables you to open the:
• Host Discovery Wizard. See Creating a New Host Detected by Tina for details.• BackupWizard. See BackupWizard for details.• Catalog CreationWizard. See Creating a Catalog for details.
About—Displays version information on
• Tina.• Adobe Flash Player.
ToolbarsA main toolbar located on the left top corner of the right pane enables you to perform some operations, (e.g.,open the property sheet, enable/disable an object, etc.) on the highlighted object in the list. A grayed out iconindicates that you cannot apply the action to the highlighted object.
This table describes themost common icons that themain toolbar can display:
Icon Description
Details—Displays the details of the object highlighted in the right pane, and enables you to edit theobject.
Activity—Displays the activity of the object highlighted in the right pane.
New—Creates a new object in the current category.
Find—Finds a string in the visible columns.
Find next—Finds the next object of the already defined string.
Delete—Deletes the object(s) highlighted in the right pane.
Enable—Enables the object(s) highlighted in the right pane.
Tina Administration 13
Admin App andWeb Administration Interfaces

Icon Description
Disable—Disables the object(s) highlighted in the right pane.
Launch Backup—Launches the backup of the object(s) highlighted in the right pane or restarts a job.
Add to Favorites—Adds the object(s) highlighted in the right pane to the Favorites view.
Launch Host Discovery Wizard—Opens the Host Discovery Wizard.
Launch BackupWizard—Opens the BackupWizard.
LaunchWebRestore Interface—Opens the TinaWebRestore interface.
Duplicate—Duplicates the object(s) highlighted in the right pane.
Export—Exports the object(s) of the current category.
Themain toolbar may display other icons that are very specific to the view or the object. These specific iconsare described in the corresponding description of the view or object.
A second toolbar located on the right top corner of the right pane enables you to define both the way in which theviews are displayed and the way the update is performed. These are themost common icons the second toolbarcan display:
Icon Description
List view—Displays the items in the right pane as lists. Double-clicking the line opens the Detailswindow for the object.
List by Library/SAN view—Displays the items in the right pane as lists by library or by SAN. Double-clicking the line opens the Details window for the object.
OrList by Platform view—Displays the items in the right pane as lists by platform (host and application).Double-clicking the line opens the Details window for the object.
Icon view—Displays the items in the right pane as icons. Double-clicking the icon opens the Detailswindow for the object. Clicking the information symbol at its top left corner shows the object basicinformation.
Manual update—Updates the information that theWeb Administration displays.
To avoid network traffic, the update of the Events view is strictly manual.
14 Tina Administration
Admin App andWeb Administration Interfaces

Icon Description
Automatic update—Enables and disables themechanism for updating the information. This buttondisplays in some views such as Jobs, Media Requests, Hosts, Favorites, Drives, Libraries, Pools,Snapshots, etc.
A tooltip indicates whether the status of the refresh is:
• Enabled. The arrows display in green. TheWeb Administration updates the information every fiveseconds and themanual update is disabled.Or
• Disabled. The arrows display in blue.
ShortcutTheWeb Administration interface provides a shortcut to access the details of a selected strategy.
This image illustrates the shortcut allowing you to access a strategy details:
Clicking this image displays the Details window for the selected strategy (A, B, C, or D) from the Hosts orApplications view.
Standard access: Details button in the Strategies view or double-click in the strategy list.
Right PaneThe right pane gathers all the information youmust manage the application and perform supervision tasks. Bydefault, it displays amaximized and detailed view of the object highlighted in the Explorer while the otherobjects belonging to the same node display iconified at the bottom of the pane, (e.g., if you select the Jobscategory in the Explorer, the right pane displays the detailed Jobs view with the Events, Alarms, andMediaRequests icons at the bottom of the pane).• To switch to one of the other views in the same node:
Click Maximize on the category icon shown at the bottom of the pane, (e.g., to replace the Jobs view bythe Events view in the right pane, click Maximize of the Events icon).
• To open several categories that belong to a node at the same time by splitting the right pane:Click directly the object icon at the bottom of the pane, outside of theMaximize button, (e.g., to add theAlarms view to the Jobs view, click the Alarms icon).Then, you canminimize or maximize the views by clickingMinimize or Maximize on the view top right.
Customizing the Admin App and Web AdministrationThese topics explain how to customize the following elements:• Filtered Tabs• Columns• Favorites• Preferences
Tina Administration 15
Admin App andWeb Administration Interfaces

Filtered TabsThe right pane displays most of the information in lists. These lists are grouped under tabs that are the result ofa filtering operation. Each object view contains at least one default tab. You can create your own filter asneeded.
To create a new filtered tab
1. In the pane of the object for which you want to create a new filtered tab, click the + button next to thedefault tab. The View Configuration window for the object opens.
2. In the View Configuration window, enter a name for the new filtered tab in the View Name text box. Thisfield is mandatory.
3. Define the filter parameters as needed.The content of the filter varies with the item you are filtering. For more information on each filter content,see the specific item documentation.
4. Click Apply and Close to validate the creation of the new filtered tab.
The new filtered tab is created. The number of items in the list displays in parentheses as well as the
(Edit) and (Delete) buttons.
To edit a filtered tab
1. Click in the header of the filtered tab you want to edit.2. In the View Configuration window, modify the filters according to your needs.3. Click Apply and Close to validate the edition of the filtered tab.
To delete a filtered tab
1. Click in the header of the filtered tab you want to delete. After you have confirmed the deletion, the tabis deleted from the item view.
Note: You cannot delete the default filtered tabs.
To show/hide a filtered tab
1. Click the filter icon located to the right of the existing filtered tabs.2. In the list of all available filtered tabs, select the filtered tab you want to show or clear the filtered tab you
want to hide in the item view.
To sort a filtered tab
1. Click the heading of the column by which you want to sort. On the first click, sorting is ascending (uparrow).
2. Click a second time to sort in descending order (down arrow).
16 Tina Administration
Admin App andWeb Administration Interfaces

ColumnsThese are the actions you can perform on the columns display to better suit your needs:
Target Action to perform
Show/HideColumns
• Click ColumnChoice at the far right of the column headings.• In the ColumnChoice window, check/uncheck the columns you want to show/hide.• Click Close.
Default columns are always displayed.
MoveColumns
Drag the column to the left or right to move it.
AdjustColumns
Drag the right edge of the column heading to either widen or narrow it, or double-click the rightedge to adjusted to the widest element in the column.
FavoritesThe Favorites feature enables you to select and display one or several favorite objects either in the form of listsor in icon views. You can choose these objects as favorites:• Hosts• Applications• Drives
All favorites are saved in the Preferences. By default, the Favorites view only contains the server host. Use thebuttons in the upper right corner to switch between the list and icon display.
To add an object to the Favorites
1. Select one of these views: Host, Application, or Drives.
2. Select the object(s) to add and click in themain toolbar.
Alternatively, you can create additional filtered tabs in the Favorites view.
PreferencesYou can verify and configure the preferences for theWeb Administration interface that apply to all catalogs.
Preferences are divided into these categories:• User Preferences• Interface Preferences
Tina saves the preferences in a configuration file of theWeb Administration on the Tomcat server when youclose aWeb Administration session. This is the location of the configuration file:• Windows. %Tomcat_Home%\webapps\application_name\
WEB-INF\config\TinaConfiguration.xml• Unix. $Tomcat_Home/webapps/application_name/
WEB-INF/config/TinaConfiguration.xml
Tina Administration 17
Admin App andWeb Administration Interfaces

User Preferences
To set the Home page
l Click in themenu bar and select:
the Set and use current view as Home page option to define the current displayed page as the page to firstsee when reconnecting to the interface.Orthe Use last session view as Home page option to define the last page displayed before disconnectingfrom the interface as the page to first see when reconnecting to the interface.
To set user preferences
1. Select Preferences User Preferences. The User Preferences pane opens.2. In the Display, Catalog Sort, or Automatic Catalog Selection Option area, set the parameters as needed.
This table describes the parameters that you can set in the Display Option area:
Parameter Description
Job Volume DisplayUnit
Select a unit between Bytes, KiloBytes, MegaBytes, GigaBytes, orTeraBytes, or leave theMost Appropriate Unit default value.
To reactivate alertdialog boxes
Reactivates the alert dialog boxes if you have selected the DoNot ShowAgain option in any Confirm pop-up in theWeb Administration.
Automatic Refreshof Explorer AlarmIndicator
When selected, theWeb Administration updates every five seconds the alarmindicator that displays next to the objects in the Explorer.
Automatically SelectCatalog node whenexpanding it in theExplorer
With this option checked, expanding a catalog node by clicking on the(+) button will also select it: the information displayed on themain window willbe that pertaining to the catalog (Properties and License tabs). With the optionunchecked (default), clicking the (+) button will only expand the node in theexplorer window without updating themain window, and you will need to clickon the catalog icon or name tomake sure you are viewing this catalog'sinformation.
Sort Catalogs inExplorer
You can sort the Catalogs alphabetically in the Explorer. This option will beapplied on the next login.
DisplayConfirmation DialogBoxes
You can enable or disable the display of confirmation dialog boxes that appearfor many administration actions.
Interface PreferencesTo configure the Interface Preferences, youmust:• Have the rights to modify the configuration (ConfigurationMulti Catalog access rights in the
Administration and Supervision category). See Administration and Supervision Rights.Or
• Be the administrator of the Tomcat server. By default, admin for the user and admin for the password.
Note: To change the Tomcat server administrator credentials, edit the tomcat-users.xml filelocated in the Conf directory of the Tomcat server in the Tina home directory. For instance,
Windows. C:\Program Files\Atempo\AtempoWebInterfaces\apache-tomcat\conf\tomcat-
18 Tina Administration
Admin App andWeb Administration Interfaces

users.xml
Unix. /user/Atempo/AtempoWebInterfaces/apache-tomcat/conf/tomcat-users.xml
To associate a catalog with the Web Administration
The Catalogs area of the Interface Preferences pane gives you these two options:
Add a catalog to the Web Administration configuration file.
See To add a catalog to theWeb Administration configuration file for details.• Add a new reference to a catalog file.
See To add a new reference to a catalog file for details.
To set Web Interface parameters
1. Select Preferences Interface Preferences. The Interface Preferences pane opens.2. In theWeb Interface Parameters area, set the parameters as needed.
This table describes the parameters that you can set in theWeb Interface Parameters area:
Parameter Description
LanguageSelection inthe LoginWindow
Enables or disables the language selection in the login window.
Session CloseTimeout inMinutes
Defines a close timeout for the session in minutes. The default value is 120minutes,whichmeans that theWeb Administration closes after two hours of inactivity. Theminimum value is 30 minutes and themaximum value is 4,320 minutes (72 hours).
URL Link toReportingTool
Displays the URL link to the Tina Reports & Statistics tool. You canmodify this URLif you already have Tina Reports & Statistics installed on a different server, and thatyou want to point to it.
See Reporting and Statistics for details.
To set Web Server parameters
1. Select Preferences Interface Preferences. The Interface Preferences pane opens.2. In theWeb Server Parameters area, set the parameters as needed.
This table describes the parameters that you can set in theWeb Server Parameters area:
Parameter Description
Web Server PortNumber
Specifies the port number of theWeb server. The default port number is 25088.
Web Server Protocol Specifies the protocol of theWeb server:
• http: Faster and easier to use.• https: More secure but youmight need to install security certificates.
If you are using firewalls, ensure to open the http/https ports forcommunication.
Tina Administration 19
Admin App andWeb Administration Interfaces

3. If youmodify the port number and/or the protocol, youmust alsomodify:– The URLs of Tina Reports & Statistics if it is installed on the same Tomcat server (this is generally
the case),– The URL of TinaWebRestore if it is installed on the same Tomcat server (this is generally the
case).4. Reboot theWeb server as administrator to take themodifications into account.5. Check (andmodify if needed) the shortcuts that use URLs to access to the interfaces installed on this
Tomcat server, in sort that they use the proper port number and protocol.
To set Logs parameters
1. Select Preferences Interface Preferences. The Interface Preferences pane opens.2. In the Logs area, set the parameters as needed.
This table describes the parameters that you can set in the Logs area:
Parameter Description
Logs Severity Specifies the severity level for the logs.
These are the severity levels: Use default log4j settings, Debug, Info, Warning, Error,Fatal.
Logs Strategy Specifies the strategy for the log files.
These are the available strategies:
• Standard. If you are connected to Tina, logs are sent to the Tina log files of thecorresponding catalog. If not, logs are sent to a local log file on the Tomcat server.
• Local. Logs are sent to a local log file on the Tomcat server:-Windows. %Tomcat_Home%\logs\TinaWebUILogs.txt.
-Unix. $Tomcat_Home%/logs/TinaWebUILogs.
• Both. Logs are both sent to a Tina log file and a Tomcat local log file.• None. Logs are neither sent to a Tina log file nor a Tomcat local log file.
Web ServerAccess LogsActivation
Enables or disables the log tracing for theWeb Administration.
3. Reboot theWeb server as administrator to take themodifications into account.
Performing Supervision OperationsThe Current Activity node provides access to these supervision tools:• Jobs to view andmanage the jobs executed by Tina in real time.• Events to view the events issued by Tina processes.• Alarms to view andmanage the alarms raised by Tina.
In addition to the Alarm view, the first column inmost default views (i.e., Host, Application, Jobs, Drive,Library, etc.) shows an alarm indicator with a white exclamationmark when an alarm is present on theobject. These indicators are updated automatically. The alarm severity is color-coded: red for a criticalalarm, orange for amajor alarm, and yellow for aminor alarm.
20 Tina Administration
Admin App andWeb Administration Interfaces

To view alarms
l Click the alarm indicator (a red, orange, or yellow circle with a black arrow inside) on theleft-hand column of the object view.
The Last ten alarms for the object popup opens.To view all the alarms concerning theobject, double-click the object to open the object Details window. Click the Activity tab andopen the Alarms area.
l To view the details of an alarm, click the alarm indicator to display the Status, Cause, andSolution items.
l Use the alarm buttons to either delete, acknowledge temporarily, or acknowledgepermanently the alarm.
• Media Requests to view andmanage requests for media.
Tina Administration 21
Admin App andWeb Administration Interfaces

CHAPTER3-Managing the CatalogThese topics describe how tomanage the catalog:• About the Catalog• Viewing Catalog Information• Creating a Catalog• Associating a Catalog with theWeb Administration• Setting Catalog Parameters• Editing a Catalog• Stopping a Catalog• Suspending a Catalog• Starting a Catalog• Backing Up the Catalog• Restoring the Catalog
About the CatalogThe Catalog is the core Tina database. It contains all the information required to run Tina, such as theconfiguration of platforms, drives, libraries, users, cartridges, etc. It also contains themeta-data recorded in thecatalog during write operations. This meta-data consists of the description and location of all backed up files.
In most cases, Tina creates a catalog during the installation phase. Otherwise, creating a catalog is the firstoperation you have to perform to configure your Tina environment.
MulticatalogThemulticatalog functionality enables to set up backup and archiving operations with a lot of freedom (e.g., youcan reserve one catalog to back up data and another to archive data).
The different catalogs work independently from one another although they may share resources such as drivesand libraries through Library SharingManager.
In theWeb Administration, the Global Activity node (Jobs andMedia Requests categories) lets you accessseveral catalogs at the same time.
Note: To secure your Tina environment, back up each catalog on a regular basis.
Viewing Catalog InformationYou can view several catalogs in theWeb Administration (provided that they are all in the same Tina release).You can access each catalog from the corresponding root node in the Tina Explorer, but you can only see theinformation for one catalog at a time.
Note: You can only see a running catalog. If a catalog is stopped, youmust start it before you can see thedata it contains. See Starting a Catalog.
22 Tina Administration
Managing the Catalog

Catalog Information ViewWhen you select a catalog name in the Tina Explorer, the right pane displays information corresponding to thatcatalog under the Properties and License tabs.
Properties TabThis table describes the information that the Properties tab provides:
Parameter Description
General The basic data about the catalog, as its activity, connection status, name, server, andTCP/UDP ports.
When the catalog is stopped or suspended, enables you to restart the catalog. See Starting aCatalog.
CatalogSize
• Catalog Size: This graph displays the used, allocated and available sizes.• Used Catalog Size: Size currently used by the catalog for the backed up versions.• Allocated Catalog Size: Size allocated to the catalog on the disk for the odb files.• Maximum Catalog Size: Maximum size for the catalog as defined upon creating or
modifying the catalog.• Allocation Status:
Expandable indicates that there is enough disk space for the catalog to grow to itsmaximum sizeNot Expandable indicates that due to insufficient disk space, the catalog will not be ableto grow to its maximum sizeMaximum Reached indicates that the catalog size has reached its maximum value
• Objects: Number of all distinct objects (files and directories) contained in the catalog.• Versions: Number of all object versions contained in the catalog.
SpaceAllocationDetails
• Catalog Directory: Location of the catalog file(s) on disk.• Allocated Size: Size allocated to the catalog on the disk for the odb files.• Available: Free disk space in GB in the directory.• Required: Disk space required to enable the catalog to reach its maximum size
Dates All the dates concerning the catalog, such as the creation and the last restore dates.
Cache • Volume: Total cache volume as determined when the catalog was created (sums up diskandmemory cache).
• Free: Percentage of available cache.This figure actually refers to the percentage of free container in the cache, thus it willdisplay constant even if data is being processed by the cache, until it leaps to a newthreshold
• Writing: Percentage of cache used for writing sessions (e.g., during backup and archivingoperations).
• Reading: Percentage of cache used for reading sessions (e.g., during restore operations).
Tina Administration 23
Managing the Catalog

Parameter Description
AdvancedOperations
Enables the catalog administrator to perform these advanced operations on the catalog:
• Stop/Suspend the catalog. For details on these actions, see Stopping a Catalog andSuspending a Catalog.
• Restart the catalog. For details on this action, see Starting a Catalog.• Modify the TCP and UDP ports of Tina Server and Agents:
Click Modify Ports. The Service Port Configuration window displays.
Enter the new TCP and UDP ports.
Select Propagate to Agents to use the same TCP and UDP ports for both server andagents.
The agents must be enabled. If they are disabled, their TCP and UDP ports will not bemodified.
If you do not select the Propagate to Agents option, your agents will nomore be backed up asthe server and the agents will have different TCP and UDP ports.
Click OK. The Service Port Change Confirmation window displays.
Click Yes to confirm.
Youmust reboot theWeb server as administrator to take themodifications into account.
License TabThis table describes the information that the License tab provides:
Parameter Description
Licence ManagerSettings
Click Modify if you want to change your Atempo-LicenseManager. See To switchto using an Atempo-LicenseManager.
License Information Displays information about the current license:
• The license type (Evaluation for an evaluation license or Standard for a licenseserver)
• The license expiration date• The license server, if any.
Resources (licenseserver only)
Displays the resources you are authorized to access, (e.g., HSS, VMWare, etc.).
Applications (licenseserver only)
Displays the applications you are authorized to access, (e.g., Oracle, DB2, etc.).
Modules (licenseserver only)
Displays themodules (API, LSM, and Security and Compliance) that are activatedand that the catalog uses.
Creating a CatalogWhen you create a catalog, Tina automatically creates a Data.catalog_name directory in the installationdirectory, containing a series of odb, ... odb_n files that represent the catalog. Themaximum size of an.odb file is 4 GB, the default is 4 GB. Depending on the size of your catalog, 1 to 256 odb files will be created.
24 Tina Administration
Managing the Catalog

For performance reasons, youmay want to locate your odb files elsewhere than in the default directory. To doso, use the Split Catalog File (odb_translation_path_n) or Catalog File Location (global_odb_translation_path) tunables prior to creating the catalog. See the Tina Tunables Documentation.
• Youmust be the administrator of at least one of the displayed catalogs in theTina Explorer orthe administrator of theWeb Administration to create a catalog. Otherwise, the CatalogCreationWizard is not available.
• Youmust create the catalog on a local disk, not on a network disk through NFS for instance.
• If you set the tunables once the catalog has already been created, youmust imperativelymove the catalog file(s) to the new location, otherwise you will be unable to start the catalog.
To create a catalog
1. From themain applicationmenu bar, click and select Catalog CreationWizard.The Catalog CreationWizard opens.
2. Enter the parameters to create a catalog.This table describes the parameters that you can set in the Catalog CreationWizard:
Parameter Description
Catalog Server Selection.
Use a non declared catalog server Select this option if you want to create a catalog on a server that isnot declared in Tina.
Use an already declared catalogserver
Select this option if you want to create a catalog on a server that isalready declared in Tina.
Catalog Server Parameters.
This windows only displays if you have selected the Use a non declared catalog server option in theCatalog Server Selection window.
Server Name Enter the name of the server on which you want to create thecatalog.
TCP Port Enter the TCP port number of the server.
UDP Port Enter the UDP port number of the server.
Catalog Parameters.
Catalog Name Enter a name for the catalog. This name displays in the Tinainterfaces.
The catalog name is not case sensitive and always displays in lowercase. You can use these characters:
• Any letter.• Any number from 0 to 9.• Underscore “_”.
Tina Administration 25
Managing the Catalog

Parameter Description
Catalog Administrator Name Enter a name for the catalog administrator. This user needs not existat the operating system level. You can use any characters. Thedefault value is admin.
The catalog administrator is the only user that can grant accessrights to other users. The catalog administrator has all the rights toperform any operations on the catalog, except editing it. Only root ora user with OS administrator’s rights can edit the catalog.
Password and Confirm Password Enter a password for the catalog administrator and confirm it.
If you choose not to define a password at this point, you can defineone later, just as you would for any catalog user. Refer to Defining orModifying Passwords for rules on password use.
Comment Optional. Enter a comment to describe the catalog you are creating.
Cache Type.
You must define at least one type of cache. To improve performance, you can segment both cachespace types. See Cache Characteristics and Maximum Disk Cache Size.
The actual cache size of the catalog depends on the number of segments and the size of the cachecontainers (you can modify the container size in the Catalog Advanced Parameters window). Tinacomputes the cache size based on the various information you provide. As a result, the actualcache size can be slightly different from the size you ask for as it is rounded to the nearest multipleof both the number of segments and the container size.
Memory cache only Enter thememory cache parameters:
• Current Size: Specifies the size in MB of thememory cache.• Number of Cache Segments: Specifies the number of segments
for thememory cache. The number of segments depends on thememory cache size you have specified in the Current Size field.For instance, if you have specified a 64 MB size, you can choosebetween 1 or 2 segments.
Disk cache only Enter the disk cache parameters:
• Absolute File Path: Specifies an absolute path for the disk cachefile. This file must not already exist on the file system.
• Size: Specifies the size in MB of the disk cache.
Memory and disk cache Enter both thememory and disk cache parameters.
Catalog Advanced Parameters.
If you want to define advanced parameters for the catalog, click Yes.
The default container size is calculated according to the total (memory and disk) cache size youspecify in the Cache Type window. You may change the size of the containers as needed, with orwithout modifying the cache size. The container size varies between 4 MB and 256 MB. See Memoryor Disk Container Size.
26 Tina Administration
Managing the Catalog

Parameter Description
Memory cache layout is xxcontainers of yy MB
Specifies the current memory cache layout based on thememorycache information found in the Cache Type window. xx indicates thenumber of containers, yy indicates the size of each container.
New Size of Memory Containers(MB)
Enables you tomodify the size of thememory cache containers, ifthe default cache container size does not suit your needs. Choose asize between 4 MB and 256 MB.
Disk cache layout is xx containersof yy MB
Specifies the current disk cache layout based on the disk cacheinformation found in the Cache Type window. xx indicates thenumber of containers, yy indicates the size of each container.
New size of Disk Containers (MB) Enables you tomodify the size of the disk cache containers, if thedefault cache container size does not suit your needs. Choose a sizebetween 4 MB and 256 MB.
Average Number of Versions perBacked up Object
Enables Tina to optimize the catalog structure by keeping versionsof a same object in the same location. The default value is 5 (i.e.,each time a new object is backed up in the catalog, Tina reservesenough space near the object to hold 4more versions of that object).Keep the default value if you are unsure of what information youshould provide. This field only displays when you are creating acatalog, not when you are editing it.
Current Catalog Size (MB) At least 1 GB, at most 1024 GB. The default size is 1 GB. Todetermine your catalog size, be aware that the first version of abacked up object uses up approximately 1024 bytes. Subsequentinstances use up approximately 256 bytes for Unix, clients and 512bytes forWindows andmacOS clients. The difference in size is dueto the presence of security attributes and/or ACLs.
Auto-expanding catalog size. By default, the catalog size is auto-expanding. The size you provide when creating the catalog isautomatically increased as needed up to amaximum of 1024 GB (orthe value specified in theMaximum Catalog Size field), provided thatyou have enough disk space. Alarms warn you when you are closeto reach themaximun size of the catalog and when your file systemis nearly full.
Maximum Catalog Size (GB) By default, themaximum size is 1024 GB. If you want to limit themaximum size to a value lower than the default, enter it in this field.
Size of Catalog Files (MB) Size of the odb files that represent the catalog. Themaximum size ofan odb file is 4 GB. The default size is 4 GB.
Depending on the size of your catalog, 1 to 256 odb files will becreated.
3. In the Summary window, check the creation parameters and click Finish to validate the creation of thecatalog. The new catalog is displayed in the Tina Explorer.
4. Start the catalog to perform any action on it and to view its contents. See Starting a Catalog.
Tina Administration 27
Managing the Catalog

Note: You can also use the tina_init command. For more information on the tina_initcommand, see the Tina Command Line Interface Documentation.
Cache CharacteristicsThis table describes the cache characteristics for each cache type (memory or disk):
Type Characteristics Value
Memory. Maximum Size 2047MB
Minimum Size 32MB, at least 64MB recommended
MaximumNumber ofSegments
32
MinimumNumber ofSegments
0 if at least 1 disk cache segment has been defined, otherwise 1
MaximumSegment Size
Unix. 2047MB
Windows. 64MB except if the max_memory_axes_size tunable is set. See theTina Tunables Documentation for details.
If the tunable is not set, Tina automatically divides the cache size you provideinto 64MB segments and round it up to the nearest multiple of 64, (e.g., if yourequest 200MB of memory cache, Tina creates four segments).
MinimumSegment Size
32MB
Disk. Maximum Size 32GB to 512GB depending on the catalog size. SeeMaximum Disk CacheSize.
Minimum Size 1GB
MaximumNumber ofSegments
32
MinimumNumber ofSegments
0 if at least 1memory cache segment has been defined, otherwise 1
MaximumSegment Size
32GB to 512GB depending on the catalog size (seeMaximum Disk CacheSize) and on the number of segments.
MinimumSegment Size
32MB
28 Tina Administration
Managing the Catalog

Maximum Disk Cache SizeThis table describes themaximum disk cache size according to the catalog size:
If the catalog size is ... the maximum disk cache size is ....
< 2 GB 32GB
>= 2 GB and < 8 GB 128GB
>= 8 GB and < 16 GB 256GB
> 16 GB 512GB
ModifyingMemory Cache Size (macOS only)When you configure amemory cache in the Catalog CreationWizard, themaximum size enabled is proportionalto the size of the sharedmemory defined on your machine.
These are the default values defined at setup:• sysctl -w kern.sysv.shmmax=536870912• sysctl -w kern.sysv.shmmin=1• sysctl -w kern.sysv.shmmni=128• sysctl -w kern.sysv.shmseg=32• sysctl -w kern.sysv.shmall=131072
This means that, by default, you cannot create amemory cache larger than 512 MB.
However, if you want to havememory cache larger than this, you canmodify the size of the sharedmemory onyour macOS system. You can do this manually by modifying the shm values in the /etc/rc file.
To modify the memcache default values on macOS
The general principle is to set the shmmax and shmall values according to this formula:
shmmax= total size in bytes to allocate to your sharedmemory
shmall=shmmax/4096
Example. These values enable the creation of memcache of up to 1 GB:
shmmax=1073741824
shmall=262144
• Atempo recommends that you do not allocatemore than 1/4 of the systemmemory to >Tinacache, (e.g., if your server has 4 > GB systemmemory, do not allocatemore than 1 GB forTina).
• After any modification of the /etc/rc file, reboot themachine.
Tina Administration 29
Managing the Catalog

Memory or Disk Container SizeThememory or disk container size varies between 4 MB and 256 MB. This table describes the available valuesfor thememory or disk container size:
Total Cache Size 32MB
64MB
128MB
256MB
512MB
1GB
2GB
4GB
8GB
Number ofcontainers
8 16 32 64 64 64 8 16 32
Size of containers 4MB 4MB 4MB 4 MB 8MB 16MB
256MB
256MB
256MB
Associating a Catalog with the Web AdministrationTo administer a catalog that initially does not belong to your Tina environment (i.e., an independent catalog), youcan associate it with theWeb Administration. To associate such an independent catalog with theWebAdministration, either add a catalog to the configuration file or add a new reference to a catalog file.
To add a catalog to the Web Administration configuration file
1. In theWeb Administration, expand your catalog in the Tina Explorer.2. Select Preferences Interface Preferences. The Interface Preferences pane opens.3. In the Catalogs area, click Add a new catalog (+) and select the Add a catalog to theWeb Administration
configuration file option. This option associates a specific catalog with theWeb Administration. The NewCatalog window opens.
4. Set the parameters of the catalog to associate with theWeb Administration.This table describes the parameters that you can set in the New Catalog window:
Parameter Description
Catalog Name Name of the Tina catalog to be added.
Host Name of the host where the catalog is located.
Comment Optional. Enter a comment to describe the new catalog.
TCP Port TCP port of the catalog server.
UDP Port UDP port of the catalog server.
Show in Explorer? Select this checkbox for the Tina Explorer to display the catalog.
5. Click OK to validate the addition of the catalog to theWeb Administration.6. Click Apply to save the Tina configuration.
The Catalogs declared in TinaWeb Administrationconfiguration file area displays the newly addedcatalog. This area enables you to edit catalogs and to add/remove them to/from theWeb Administration.
To add a new reference to a catalog file
1. In theWeb Administration, expand your catalog in the Tina Explorer.2. Select Preferences Interface Preferences. The Interface Preferences pane opens.
30 Tina Administration
Managing the Catalog

3. In the Catalogs area, click the Add a new catalog (+) button and select the Add a new reference to acatalog file option. This option adds to theWeb Administration a file of catalog.txt type that describesseveral catalogs.
4. The New Catalog File window opens.5. Set the parameters of the catalog file to add to theWeb Administration.
This table describes the parameters that you can set in the New Catalog File window:
Parameter Description
File Path Absolute path of the catalog.txt type file to add.
TCP Port TCP port of the catalog server.
UDP Port Number of the UDP port for communication.
6. Click OK to validate the addition of the .txt file to theWeb Administration.7. Click Apply to save the Tina configuration.
The catalogs declared in the catalogs.txt area displays the added catalog. Only the TCP and UDP portscan bemodified.
Setting Catalog ParametersYou can set some parameters that apply to the whole catalog.
To set catalog parameters
1. In theWeb Administration, expand your catalog in the Tina Explorer.2. Select Configuration Catalog Settings.
The Catalog Settings pane opens.3. Set the parameters of your choice:
• Scheduler Settings.• Backup and Restore Settings.• Authentication Configuration Settings.
4. Click Apply to validate the parameter configuration.
Backup and Restore SettingsParallel RestoreYou can perform several simultaneous restore jobs. This is known as parallel restore.
Parallel restore works by initiating a father job that then handles several child jobs. These child jobs display asparallel jobs. Child jobs may also be fathers. All these jobs remain active until at least one has ended. They willonly display in the job history once all child jobs have completed.
Note: Parallel restore does not depend on having backed up the original data with a parallel backup. Youcan perform a parallel restore on data that was backed up without parallelism if the backup was done onseveral cartridges.
You can set limits to themaximum number of snapshots or cartridges to use. The limits concerning snapshotsaremostly related to your network abilities. The practical limit on cartridges is the number of drives available.The limits apply to each individual restore and not all of the current restores.
Tina Administration 31
Managing the Catalog

If a child job is interrupted or fails for some reason, the other child jobs will continue normally.
During a parallel restore job, if a file is across two cartridges, parallel performance is reduced as this requirestwo passes on the job:• A first pass to restore data from the first cartridge.• A second pass to complete the restore of data on the second cartridge for the job(s) across two
cartridges.
Note: Parallel backup only applies to hosts and filesystem applications. It does not apply to any otherapplication type including the Catalog application.
On Demand BackupSeeOnDemand Backup for details.
Backup and Restore AreaThis table describes the parameters that you can set in the Backup and Restore area of the Catalog Settingspane:
Parameter Description
Restore Parameters.
Maximum Number ofParallel CartridgeRestore Jobs
Specifies themaximum number of resources (cartridges, drives, etc.) that canbe allocated simultaneously to a single restore job. The default value is 3.
Maximum Number ofParallel SnapshotRestore Jobs
Specifies themaximum number of restore processes that a single snapshotrestore job can launch simultaneously. The default value is 3.
The job limitation is currently based on using all enabled drives. Resourcemanagement then determines what can be done with available resources.
On Demand Backup.
Maximum Number of OnDemand Backups per24h and per Host
Specifies the global maximum number of On Demand Backups that authorizedusers throughout the network are permitted to launch within a 24-hour period onany given host. The default value is 5.
Editing a CatalogOnce a catalog has been created, you can edit it.
The catalog edition is not available in theWeb Administration. Use the Classic Administration Console.
Note: If the catalog is in auto-expandingmode (default mode when creating a catalog), you do not need toincrease its size. The catalog is automatically increased when needed up to themaximum size, by default1024 GB.
Youmust stop the catalog tomodify it. See Stopping a Catalog.
32 Tina Administration
Managing the Catalog

To edit a catalog
1. According to your operating system, launch the Tina Catalog Editor.Windows. Click Start All Programs Tina Utilities Catalog Edition. If needed, select the Run asadministrator option from the right-click menu.macOS. From the Tina Launcher, click the Catalog Editor icon.Unix. Run the tina_init_gui -mode edit command.
Note: You can also use the tina_init command. For more information on the tina_initcommand, see the Tina Command Line Interface Documentation.
The Tina Catalog Editor window opens.2. For the details on the catalog edition procedure, see theManaging the Catalog topic in the Tina
Administration Documentation for Classic Interfaces.3. Restart the catalog. See Starting a Catalog
Stopping a CatalogYou can stop a catalog without stopping the Tina service or daemon.
Stopping a catalog enables you to edit that catalog. A stopped catalog remains so until it is manually started byclicking Start catalog. See Starting a Catalog.
• Only the catalog administrator is allowed to stop the catalog.
• TheWeb Administration Explorer displays in gray color the icon of a stoppedcatalog.
To stop a catalog
1. In theWeb Administration, select a running catalog in the Tina Explorer. The Catalog pane opens.2. Expand the AdvancedOptions area of the Properties tab.3. Click Stop Catalog and click Yes in the confirmation dialog box. The catalog stops.
Suspending a CatalogYou can suspend a catalog without stopping the Tina service or daemon.
Suspending a catalog enables you to edit that catalog. Unlike a stopped catalog, a suspended catalog isautomatically restarted if the Tina service or daemon is shut down and then restarted. A suspended catalog canalso bemanually restarted by clicking Start catalog. See Starting a Catalog.
• Only the catalog administrator is allowed to suspend the catalog.
• TheWeb Administration Explorer displays in gray color the icon of a suspendedcatalog.
To suspend a catalog
1. In theWeb Administration, select a running catalog in the Tina Explorer. The Catalog pane opens.2. Expand the AdvancedOptions area of the Properties tab.3. Click Suspend Catalog and click Yes in the confirmation dialog box. The catalog is suspended.
Tina Administration 33
Managing the Catalog

Starting a CatalogTheWeb Administration can display the contents of a running catalog only. Youmust start a stopped orsuspended catalog to see the data it contains or perform any action on it.
• Only the catalog administrator is allowed to start the catalog.
• TheWeb Administration Explorer displays in color the icon of a runningcatalog.
To start a catalog
1. In theWeb Administration, select a stopped or suspended catalog in the Tina Explorer. The Catalog paneopens. Only the General area of the Properties tab is enabled.
2. Expand theGeneral area of the Properties tab.3. Click Start catalog. The catalog starts.
Backing Up the CatalogThe backup and restore of the catalog are performed through the Tina Catalog application.
Note: All the catalog operations performed by the Catalog application are also available in command line.For more information on the tina_init and tina_odbsave commands, see the Tina Command LineInterface Documentation.
Catalog ApplicationThe Catalog application enables you to back up the catalog contents. When you create a catalog, the Catalogapplication is automatically created with the name <catalog_name>.cat.OnmacOS platforms, youmust havea root account to use the Catalog application.
Boot CatalogThe Catalog application copies the catalog on the backupmedia and creates a small meta-catalog file: the BootCatalog. The boot catalog contains all the necessary information to locate and restore the backed up catalogfiles. The boot catalog is saved on disk for ease of access, in a directory named Boot in the Data <catalog_name> directory.
The boot catalog files are named as follows: bootxxxx_<catalog_name>.cod. Each time a new boot file iscreated, the boot file number is incremented.
There is also an archive zipped in sidf format and named Confxxxx_<catalog_name>.tn_zip.sidf (e.g.,Conf0025_catatest.tn_zip.sidf). This archive contains the Conf directory with the catalog configurationand is located at the same location as the boot catalog:• Windows. %TINA_HOME%\Data.<catalog_name>\Boot• Unix. andmacOS. $TINA_HOME/Data.<catalog_name>/Boot
Note: This archive contains the full path of the Conf directory. If you do not want to restore the whole Confdirectory to its original location, you can provide the name of a destination directory to restore the Confdirectory to another location and then choose the files you want to restore. See Restoring the CatalogConfiguration.
34 Tina Administration
Managing the Catalog

Using environment variables (see Available Environment Variables), you can forward a copy of the boot catalogthrough email, and to perform a duplicate (mirror) backup of the boot catalog.
The Catalog application is attached to a server. It is catalog specific (i.e., it can back up only one catalog);however, youmay have several Catalog applications located in the same catalog. In this way, you cancentralize backups of different catalogs into one catalog.
Possible Configurations of the Catalog ApplicationThis image illustrates the possible configurations of the Catalog application:
You can configure the Catalog application for these cases:• Catalog application A. To back up its own catalog.
The Catalog application is installed in the catalog it is backing up.• Catalog application B. To back up a catalog located on the same server.
The Catalog application is not installed in the catalog it is backing up, but in a catalog belonging to thesame server.
• Catalog application C. To back up a remote catalog.The Catalog application is not installed in the catalog it is backing up. It is installed in a catalog belongingto a different server.
Backing up a Single CatalogBacking up the catalog is based on the same principles as the backup of any other Tina database application,such as Oracle, Microsoft SQL Server, etc.
At the application creation, Tina automatically sets a backup selection on the root meta-directory of the file tree.The default backup selection has these settings:• It is associated with all the backup strategies.• No filter is set.• No time phase is excluded.• The data format is not compressed or encoded.
Configuring the Catalog application backup consists in defining:• A backup strategy, to indicate the backup schedule.
Note: The creation of the boot catalog takes place once the backup job is complete. As a result, if apostprocessing is defined through the backup strategy, it runs prior to the creation of the bootcatalog and thus do not perform any operation on the boot catalog.
• A media pool, to indicate the backup location.
Tina Administration 35
Managing the Catalog

Once you have created the Catalog application, youmust set its environment variables and configure it forautomatic backups.
To set the Catalog application environment variables
> To set the environment variables, automatic backups, and strategies, follow the procedure described inTo edit the Catalog application.
Catalog BackupOutputThe backup of the catalog application generates these files:• A bootxxxx_<catalog_name>.cod file and a Confxxxx_<catalog_name>.tn_zip.sidf archive in the
Boot sub-directory of the Data.<catalog_name> directory.• If you have defined the TINA_SDB_SAVE_PATH variable, a savexxxx_<catalog_name>.cod file and a
Confxxxx_<catalog_name>.tn_zip.sidf archive at the specified path in the environment variable.• If you have defined the TINA_SDB_MIRROR_PATH variable, a copyxxxx_<catalog_name>.cod file and a
Confxxxx_<catalog_name>.tn_zip.sidf archive at the specified in the environment variable.• If you have defined the TINA_SDB_MAIL_TO and TINA_SDB_MAIL_SERVER variables, the bootxxxx_
<catalog_name>.cod file is sent as attachment to the TINA_SDB_MAIL_TO address.
Manual Triggering of a BackupIn addition to the automatic scheduled backups of the Catalog application, you canmanually trigger a backup.
Note: A manual backup of the Catalog application always performs a Full backup.
To manually trigger a Catalog application backup
1. In theWeb Administration, expand your catalog in the Tina Explorer.2. Select Platforms Applications. The Applications pane opens.3. Select the Catalog application.4. Click Launch Backup and, from the right-click menu, select Full backup and the strategy.5. Click Yes in the confirmation dialog box.
Creating a Catalog ApplicationThe Catalog application is automatically created, but you can create a Catalog applicationmanually, (e.g., toback up another catalog or to back up a remote catalog).
To create a Catalog application
1. In theWeb Administration, expand your catalog in the Tina Explorer.2. Select Platforms Applications. The Applications pane opens.3. Click New Application (+). The Application CreationWizard opens.4. Enter the parameters to create a new Catalog application.
This table describes the parameters that you can set in the Application CreationWizard:
Parameter Description
Host Selection.
Select the host where the application will be installed.
General Information.
36 Tina Administration
Managing the Catalog

Parameter Description
Application Name Name of the application you want to create. The application name can be edited at alater date if needed without losing backups.
Each applicationmust be given a unique name.
Application Type Type of application to create.
Select Catalog.
Comment Optional. Enter a comment to describe the application you are creating.
User Information.
User Name User who has access to the application.
Password andConfirm
Optional. Provide the user password and confirm it.
Environment Variables.
OptionalEnvironmentVariables
To add an optional variable:
1. Click Add and select Add an optional environment variable.
2. Select the variable in the Name column. The Details column displaysthe variable definition.
3. Click Apply and Close.
4. Enter the value in the Value column. The list specifies the number ofdefined optional variables in the Optional (3/16) form.
If you do not remember which value you can enter, point your mouse on the variablename to display a pop-up containing information on the variable.To edit an optional variable:
1. Click the variable value in the list.
2. Enter the new value.
To remove an optional variable:
• Select the variable in the list and click Remove.For a detailed list of the environment variables available for the Catalog application,see Available Environment Variables.
User DefinedEnvironmentVariables
A user defined variable is a variable that does not display in the existing variable list.
To add a user defined variable:
1. Click Add and select Add a user defined environment variable. Anempty field displays in the list of user defined variables.
2. Enter the name of the variable in the Name column.
3. Enter the value of the variable in the Value column.
5. In the Summary window, check the creation parameters and click Finish to validate the creation of thenew Catalog application.The Applications list displays the new Catalog application.
Tina Administration 37
Managing the Catalog

Available Environment VariablesThis table describes the environment variables you can set for the Catalog application:
EnvironmentVariable
PossibleValue[Default]
Description
TINA_SDB_BOOT_HISTORY
any integer
[7]
Maximum number of boot catalogs to keep. 0means all files are kept. Alsoindicates themaximum number of mirror copies kept, if the TINA_SDB_MIRROR_PATH variable is set.
TINA_SDB_CATALOG
Catalogname
[Currentcatalogname]
Name of the catalog to back up.
TINA_SDB_MAIL_TO
Emailaddress
Address to send the boot catalog to (e.g., [email protected]).
TINA_SDB_MAIL_FROM
Emailaddress
Address from which the boot catalog is sent.
TINA_SDB_HOME
Path
[$TINA_HOME]
Catalog backup Binaries installation directory.
TINA_SDB_LIB_PATH
Path Unix only.
Tina libraries path.
TINA_SDB_MAIL_SERVER
Server name Name of the SMTP mail server.
TINA_SDB_MIRROR_PATH
Path Destination directory of mirror copies of the boot catalog. Themaximumnumber of copies kept is determined by TINA_SDB_BOOT_HISTORY. Tinaautomatically deletes boot files with smaller sequence numbers when themaximum is reached, except if the number of the current copy is smaller thanolder copies (this could happen if you keep several catalogs boot copies inthe same directory). In that case, all copies are kept and youmust manuallyremove older copies.
OnWindows platforms, due to permissions issues, the boot catalog cannotbe located on amapped network drive.
38 Tina Administration
Managing the Catalog

EnvironmentVariable
PossibleValue[Default]
Description
TINA_SDB_RECOVER
[Yes], No Restores the catalog backup and launches a tina_init.
The variable only applies to a remote catalog (i.e., when the catalog isrestored by another catalog application). See Restoring Another Catalog.
If the variable value is Yes, the catalog is restored and reconstructed througha tina_init.
If the variable value is No, the odb file is restored in the path specified by theTINA_SDB_RESTORE_PATH variable but the catalog is not reconstructedthrough a tina_init.
TINA_SDB_RESTORE_PATH
Path
[$TINA_HOME/Bin]
Specifies the restore path of the odb file.
This variable must be defined only if TINA_SDB_RECOVER = No (case of aremote catalog).
TINA_SDB_SAVE_EVENTS
[Yes], No Specifies whether the events and parameters files are backed up duringcatalog backup
TINA_SDB_SAVE_HISTORY
any integer [3]
Maximum number of full backup disk copies to keep. 0means all files arekept.
TINA_SDB_SAVE_PATH
Path Full backup disk copy destination directory. Define this variable if you want adisk backup in addition to themedia backup.
OnWindows platforms, due to permissions issues, the catalog disk backupcannot be located on amapped network drive.
TINA_SDB_SERVICE_NAME
Servicename[Current Tinaservicename]
Service name of the catalog to back up. Set this variable to back up a catalogother than the current catalog.
TINA_SDB_SKIP_INDEX
[Yes], No Set to No if you want to back up indexes. By default, the Catalog applicationdoes not back up indexes.
Editing the Catalog ApplicationEditing the Catalog application enables youmodify the environment variables, automatic backups, andstrategies to better suit your needs.
To edit the Catalog application
1. In theWeb Administration, expand your catalog in the Tina Explorer.2. Select Platforms Applications. The Applications pane opens.3. Select the Catalog application (i.e., with the .cat extension) from the list.4. Click Application Details. The Application Details window opens.5. Set the parameters in the Application Details pane tomodify the Catalog application.
Tina Administration 39
Managing the Catalog

This table describes the parameters that you can set in the Application Details pane:
Parameter Description
ApplicationName
Name of the Catalog application, with the .cat extension.
ApplicationType
Only for information. The type is Catalog.
Host Name Host where the Catalog application is located.
User Name User who has access to the Catalog application.
Password andConfirm
Optional. Provide the user password and confirm it.
Status Select the status for the Catalog application whether Enabled or Disabled.
Comment Optional. Enter a comment to describe the Catalog application.
OptionalEnvironmentVariables
To add an optional variable:
1. Click Add and select Add an optional environment variable.
2. Select the variable in the Name tab. The variable definition displays in theDetails tab.
3. Click Apply and Close.
4. Enter the value in the Value column. The list specifies the number of definedoptional variables in the Optional (3/16) form.
If you do not remember which value you can enter, point your mouse on the variable nameto display a pop-up containing information on the variable.To edit an optional variable:
1. Click the variable value in the list.
2. Enter the new variable value.
To remove an optional variable:
• Select the variable in the list and click Remove.For a detailed list of the environment variables available for the Catalog application, seeAvailable Environment Variables.
User DefinedEnvironmentVariables
A user defined variable is a variable that does not display in the existing variable list.
To add a user defined variable:
1. In the User Defined list, select the desired variable.
2. Important. Remove the parenthesis.Otherwise, the variable is not taken into account.
3. In the value column, enter the new value.
40 Tina Administration
Managing the Catalog

Parameter Description
Strategies Enables you to create a new strategy or to edit, delete, or import an existing strategy. SeeBackup Strategies.
BackupSelections
Enables you to create a new backup selection or to edit, delete, or import an existingbackup selection.
Choose times and frequency for the backup. For the Catalog application, there is nodistinction between full and incremental backups (i.e., whether you schedule full orincremental backups, all backups will be full).
Atempo recommends backing up the catalog daily, once the last backup job has beencompleted.See Backup Selections.
6. Click Apply and Close.7. Click Yes in the confirmation dialog box to validate the edition of the Catalog application.
Viewing the Catalog Application ContentsTheWeb Administration cannot display the Catalog application contents.
To view the contents of the Catalog application backup, use the Restore & ArchiveManager instead. It displaysall the boot catalog files and various other information.
To view the Catalog application contents
1. According to your operating system, launch the Restore & ArchiveManager.The Restore & ArchiveManager opens.
2. Select Backup Application Connection. The Application Selection window opens.3. Select the Catalog application and click OK. The Log on to the Host window opens.4. Enter your credentials.
The Restore & ArchiveManager displays the Catalog application contents.
Tina Administration 41
Managing the Catalog

This image illustrates the contents of the Catalog application in the Restore & ArchiveManager:
Catalog Application Contents
• The Information directory contains details concerning the catalog and the environment variables.• The Boot catalog directory contains the boot catalog files as well as the value of the environment
variables defining the directory path and history.• The Catalog save on disk directory contains the catalog backup disk copies, if any, as well as the value
of the environment variables defining the directory path and history.
Note: Youmust define the TINA_SDB_SAVE_PATH environment variable to use this feature.
• The Configuration directory contains the Tina Adm andConf directories and enables to back up theircontents. Since the Adm directory contains all the Tina events, it could be quite voluminous. It is thusrecommended to define a backup selection on the Adm directory using the same strategies as thebackup selection set at the root of the application, with the Compressed option enabled. Use filters toexclude the Adm directory from the root backup. See Filter Syntax.If you do not want to back up the events, set the TINA_SDB_SAVE_EVENTS environment variable to no.
• The Index directory contains the indexes enabling to perform advanced search of backed up objects,(e.g., x2k_index if you are using theMS Exchange Single Object Restore feature).
42 Tina Administration
Managing the Catalog

• TheMirror boot catalog directory contains themirror boot catalog files, if any, as well as the value of theenvironment variables defining the directory path and history.
Note: Youmust define the TINA_SDB_MIRROR_PATH environment variable to use this feature.
• The catalog backup files.
Backing up Several Catalogs Locally or RemotelyUsing a single catalog, you can back up either:• Locally. Other catalogs located on the same server.
Or• Remotely. A catalog located on a different server.
To back up catalogs youmust create as many Catalog applications as there are catalogs to back up, andensure that you define the appropriate environment variables.
When you back up catalogs either locally or remotely, Tina does not create a boot catalog and does not displayall the directories in Restore & ArchiveManager.
If you have defined the TINA_SDB_SAVE_PATH variable, a savexxxx_<catalog_name>.cod file and a Confxxxx_<catalog_name>.tn_zip.sidf archive are generated at the specified path in the environment variable.
If you have defined the TINA_SDB_MIRROR_PATH variable, a copyxxxx_<catalog_name>.cod file and aConfxxxx_<catalog_name>.tn_zip.sidf archive are generated at the specified path in the environmentvariable.
OnWindows platforms, due to permissions issues, the catalog disk backup cannot be located on amappednetwork drive.
To back up several catalogs on the same server or a remote catalog
1. See Creating a Catalog Application for each catalog to back up.2. Set the appropriate environment variables.
See To edit the Catalog application.3. Set at least these environment variables. Their valuemust be that of the catalog to back up:
Mandatory Variables. TINA_SDB_CATALOGOptional Variables. Youmust set these variables only if their value for the catalog to back up is differentfrom the value for the catalog performing the backup:• TINA_SDB_HOME• Unix only. TINA_SDB_LIB_PATH
4. Repeat this procedure until each catalog you want to back up has its ownCatalog application.5. Configure each Catalog application for backups.
See To edit the Catalog application.
Restoring the CatalogThe restore procedure varies depending on the way you have been using the Catalog application (i.e., toback up the current catalog, another catalog on the same server, or a remote catalog).
Restoring a catalog involves two steps: restoring the backed up catalog file, and recreating the catalog. Theextent of the restore depends on the Catalog application configuration.
Tina Administration 43
Managing the Catalog

Closing Cartridges upon Restoring the CatalogIf you have performed some platform backups between the last catalog backup and themoment the restoretakes place, that data is not restored since it is not included in the catalog backup; however, that data is writtenon cartridges and you can retrieve it through the tina_cart command. Thus, youmay want to close allcartridges to avoid overwriting that data during future backups.
To do so, add the -close_cart option when you launch the tina_init command in the different casespresented below.
Note: Using this option closes all cartridges in the catalog. So, to reuse them youmust reopen themmanually.In addition, if all cartridges are closed, ensure that you have enough spare cartridges in your library tohandle the upcoming backups.
Restoring the Catalog with the Boot CatalogThesemethods apply only in the case where the Catalog application was used to back up its own catalog (i.e.,Catalog A in Possible Configurations of the Catalog Application), since it is the only case where a boot catalogis created.
To Restore a Catalog through the Boot Catalog
l To restore your catalog and to recreate it, enter this command in the command line:
tina_init -boot $TINA_HOME/Data.<catalog_name>/Boot/ bootxxxx_<catalog_name>.cod
• If your library has the capacity to read barcodes, the catalog restore process automaticallyincludes a barcode reinitialization.
• If your library does not support barcodes, you can include a read label reinitialization in therestore process by using this command:tina_init -boot $TINA_HOME$/Data.<catalog_name>/Boot/bootxxxx_<catalog_name>.cod -force_reinit.This option is only available for non barcode libraries, and it triggers a reinitialization of all nonbarcode libraries associated with the catalog.
Examples of the tina_init Command
This table lists examples of use of the tina_init command to restore a catalog through the Boot catalog:
To restore... ...run the command
The democat catalog • Windows. tina_init -boot \%TINA_HOME%\Data.democat\Boot\boot0023_democat.cod
• macOS - Unix. tina_init -boot $TINA_HOME/Data.democat/Boot/boot0023_democat.cod
44 Tina Administration
Managing the Catalog

To restore... ...run the command
The democat catalog installed in anLibrary Sharing Manager configuration
• Windows. tina_init -boot \%TINA_HOME%\Data.democat\Boot\boot0023_democat.cod -catalog boot_democat
• macOS - Unix. tina_init -boot $TINA_HOME/Data.democat/Boot/boot0023_democat.cod -catalog boot_democat
The democat catalog and reinitialize thenonbarcode library associated withdemocat
• Windows. tina_init -boot \%TINA_HOME%\Data.democat\Boot\boot0023_democat.cod -force_reinit
• macOS - Unix. tina_init -boot $TINA_HOME/Data.democat/Boot/boot0023_democat.cod -force_reinit
The democat catalog and close allcartridges in the catalog
• Windows. tina_init -boot \%TINA_HOME%\Data.democat\Boot\boot0023_democat.cod -close_cart
• macOS - Unix. tina_init -boot $TINA_HOME/Data.democat/Boot/boot0023_democat.cod -close_cart
To restore a catalog using a multiple writing media pool
If themedia pool containing the primary catalog backup is not available and you want to use amultiple writingmedia pool, follow this procedure:1. Perform a tina_init -file $TINA_HOME/<boot_catalog.cod> to build the boot catalog. The name of
the boot catalog is boot_tina.This step creates the Data.boot_tina file that youmust delete once the restore process is complete.
2. Start the Tina service or daemon.3. Open theWeb Administration for the newly created boot_tina catalog.4. InWeb Administration, select Storage Libraries Launch a barcode reinitialization on library.5. Open Restore & ArchiveManager for the boot_tina.catCatalog application. Restore the catalog
backup file you need.6. Stop the Tina service or execute a tina_stop to shut down the daemon.7. Perform a tina_init -file $TINA_HOME/<restored_catalog_file> to recreate your catalog.8. Remove the four lines concerning the boot_tina catalog and delete the Data.boot_tina directory in the
file corresponding to your operating system:Windows. %TINA_HOME%/Conf/catalogs.txtmacOS - Unix. $TINA_HOME/Conf/catalogs
9. Ensure that you delete all the references to the boot_tina catalog that would be present on theWebAdministration files.
• If your library has the capacity to read barcodes, the catalog restore process automaticallyincludes a barcode reinitialization.
• If your library does not support barcodes, you can include a read label reinitialization in therestore process by using this command:tina_init -file $TINA_HOME/<restored_catalog_file>-force_reinit.This option is only available for non barcode libraries, and it triggers a reinitialization of all nonbarcode libraries associated with the catalog.
Tina Administration 45
Managing the Catalog

Restoring Another CatalogIn this configuration, the value of the TINA_SDB_RECOVER environment variable determines whether the restoreincludes the reconstruction of the catalog or not. The reconstruction takes place only if the variable is set to Yes(default value).
To restore another catalog on the same server
1. According to your operating system, launch the Tina classic Administration Console.Windows. Click Start All Programs Tina Administration.If needed, select the Run as administrator option from the right-click menu.You can also run the tina_adm command to launch the Tina classic Administration Console.macOS. Open a terminal and provide the password of the administrator using the command: sudo –s.Run the tina_adm command.Unix. Open a shell window and become root using the su or sudo -s command. Run the tina_admcommand.
• Unix and macOS.Youmust specify the full path of the Tina commands you enter: $TINA_HOME/Bin/tina_admwhere $TINA_HOME is theTina installation directory.Example. /usr/Atempo/TimeNavigator/tina/Bin/tina_adm
• For more information on the tina_adm command, see the Tina Command Line InterfaceDocumentation.
The Tina classic Administration Console opens.2. In the Administration Console, right-click the Catalog application icon for the catalog to be restored and
select Restore & ArchiveManager.3. In Restore & ArchiveManager, open the file tree until you see the file representing your catalog.4. Right-click your catalog file and select Information.5. Select the version you want to restore and click Synchronize.6. If TINA_SDB_RECOVER is set to Yes, Tina restores your catalog file and recreates your catalog. No further
operation is required.7. If TINA_SDB_RECOVER is set to No, Tina only restores the catalog file. Once the restore is complete, enter
this command:
tina_init -file <restored_catalog_path>Where: restored_catalog_path corresponds to the value of the TINA_SDB_RESTORE_PATH
variable,(e.g., /home/tina/Bin/) followed by <catalog_name>.cod, (e.g., newdoc.cod).In this case the result would be /home/tina/Bin/newdoc.cod.
Note: If you are using a key that does not include the catalog name, youmust add a name for therestored catalog as a parameter in the tina_init command:tina_init -file <restored_catalog_path> -catalog <restored_catalog_name>
Formore information on restore procedures, see Tina Restore Documentation.
Restoring the Catalog ConfigurationWhen you restore the Adm or Conf configuration directories, Tina creates actually the Adm.restored andConf.restored directories. The catalog configuration restore procedure is similar to that of any file systemrestore.
For more information on restore procedures, see Tina Restore Documentation.
46 Tina Administration
Managing the Catalog

When you have lost the catalog backup job (which includes the Conf directory, with notably VLSconfigurations), you can restore the catalog configuration of the Conf directory using the archive zipped in sidfformat and named Confxxxx_<catalog_name>.tn_zip.sidf (e.g., Conf0025_catatest.tn_zip.sidf).
This archive is copied at these locations:• Always at the same location as the boot catalog:
– Windows. %TINA_HOME%\Data.<catalog_name>\Boot– Unix. andmacOS. $TINA_HOME/Data.<catalog_name>/Boot
• At the specified disk path if you have defined the TINA_SDB_SAVE_PATH variable.• At the specifiedmirror path, if you have defined the TINA_SDB_MIRROR_PATH variable.
This archive contains the full path of the Conf directory. Atempo recommends you to restore this sidf archiveto another directory and then to choose the files you want to restore:• Windows.
The tina_zip -x Conf0025_catatest.tn_zip.sidf-C:\tmp\restConf command restores the Conf directory to the C:\tmp\restConf\%$TINA_HOME%directory.
• Unix. andmacOS.The tina_zip -x Conf0025_catatest.tn_zip.sidf-C /tmp/restConf command restores the Conf directory to the/tmp/restConf/$TINA_HOME directory.
Resynchronizing the Virtual Library System ApplicationIf you use the Virtual Library System Application feature, youmust resynchronize it with the catalog after acatalog restore. Otherwise, youmay encounter backup inconsistency.
To resynchronize the Virtual Library System Application after a Catalog Restore
Note: Before performing this action, see Restoring the Catalog Configuration.
1. Rename this directory with a *.old extension, for instance:Windows. %TINA_HOME%\Conf\Vlsa\catalog_namemacOS - Unix. $TINA_HOME/Conf/Vlsa/catalog_name
2. Move the directory:Windows. %TINA_HOME%\Conf.restored\Vlsa\catalog_namemacOS - Unix. $TINA_HOME/Conf.restored/Vlsa/catalog_nameinto this folder:Windows. %TINA_HOME%\Conf\VlsamacOS - Unix. $TINA_HOME/Conf/Vlsa
Tina Administration 47
Managing the Catalog

CHAPTER4-Securing TCP ConnectionsThe Tina Security & ComplianceManager (SCM)module encrypts both the data andmetadata that it manages.
Tina also encrypts the exchanges between the server(s) and the agents over the network, including themanagement flow (e.g. jobmanagement, backup triggering, configuration operations, etc.).
The encryption of all TCP (Transmission Control Protocol) connections guarantees that nobody can interceptthe Tina communications and/or catch the passwords that Tina uses to log in to the Tina catalog, agents, andapplications.
For details on securing the TCP connections, see these topics:• About Encryption• Tina Certificates• Enabling the Encryption
About EncryptionTina encrypts all the network connections:• Between Tina server and its agents.• Between Tina agents.
To implement the encryption, Tina uses the Network Encryption Decryption (NED) certificate of the Security &ComplianceManager module. The NED certificate applies an encryption to all the connections, which isessential to Tina administration interfaces.
To enable the encryption using NED certificates, youmust perform these actions in the order given:• Create the Certificate Authority and the NED certificates.
You use the Security & ComplianceManager module.• Select the installation for the NED certificate, —not for the Certificate Authority.
You use the Tina Certificate Installer.
Important: Before proceeding, ensure that the Tina server and each agent have their own NEDcertificate.
• Activate the encryption function.You use the TinaWeb Administration.
Tina CertificatesCertificate OverviewA Tina certificate is a digitally signed statement allowing encryption and signing of data. This certificate is aX509 compliant structure that contains these elements:• The certificate identification that contains:
– A certificate name entered by the user.– A unique ID automatically generated at creation time.– An optional comment entered by the user.
• The public/private key pairs used for signature andmedia and network encryption.
48 Tina Administration
Securing TCP Connections

Private keys are password encoded when the certificate is created or installed, and can thus only beaccessed by authorized operators who have been given the password knowledge.Certificates contain public information only and can be shared across the infrastructure at no harm.
• A validity period (start and end dates).A certificate is considered valid only if:– Its validation period has started but not expired. Once expired, the certificate can no longer be used
to sign objects nor to encrypt data. However, it is still required to restore data that was backed upwith its signature.
– It is signed by a valid certificate from the hierarchy up to and including the Certificate Authority.
Certificate HierarchyCertificates are signed by their author at creation time and are organized into a certificate hierarchy.
Before creating any certificate, youmust create or import the Certificate Authority (CA) certificate for hisCertificate Authority. Alternatively, you can generate and self-sign a Certificate Authority.
The certificate hierarchy starts being built by creating the root level of certificates and by signing them with theCertificate Authority (i.e., theRootCA).
The child certificates are then created as needed and signed by the RootCA. The RootCA level can containseveral sub-Certificate Authorities (i.e., subCA). In turn, each subCA can create and sign new child certificatesuntil the full hierarchy has been set up.
At each hierarchy level, a certificate is the direct parent of all the certificates it signs (i.e., the child certificates).
Important: For the connections to work between all the Tina 4.6.3 agents and the server, it is mandatorythat at least one common certificate (i.e., at least RootCA) be present in the certificate hierarchy.Otherwise, the connection is refused by the target host, either server or agent.
Tina Administration 49
Securing TCP Connections

Certificate Hierarchy ExampleOnce you have built up your certificate hierarchy, the Security & ComplianceManager interface displays thathierarchy as shown in this image:
Certificates in the hierarchy treemay have different statuses.
This table describes the certificate statuses and the visual clue to identify them:
Visual Clue Description Example
Three yellow
stripes
Certificate Authority present in the catalog Atempo
Downward
arrow
Certificate installed on the local host and allowing for host secured backup andrestore.
Finance
Upward
arrow
Certificate present in the local host certificate repository.
Note: Do not use it to secure backups and restores for the local host.
Sales
Plaincertificate
icon
Certificate present in the Tina catalog, but not installed on the local host, norpresent in the local host certificate repository.
G&A
No-entry sign Certificate that has been revoked and can no longer be used to secure data. HR
50 Tina Administration
Securing TCP Connections

Creating and Installing CertificatesTo enable the encryption, youmust perform these steps in the order given:
Step 1 - To create a self-signed Certificate Authority
Note: To create the self-signed Certificate Authority, you can use either the Security & ComplianceManager or the tina_scm_control tool.In this example we use the Security & ComplianceManager on aWindows configuration.
1. On the Tina server, select Start All Programs Tina Monitoring Security & ComplianceManager.
The Security & ComplianceManager opens.
2. Select Certificates New Certificate Authority.
The New Certificate Authority window opens.
3. Enter the name, password, and dates for the Certificate Authority.
Tina Administration 51
Securing TCP Connections

This image illustrates the name, password, and dates for the Certificate Authority:
4. Click OK.
For details on the self-signed Certificate Authority creation, see the Tina Security & ComplianceManagerDocumentation.
Step 2 - To create a Network Encryption Certificate (NED)
Note: To create the new NED certificate, you can use either the Security & ComplianceManager or thetina_scm_control tool.In this example we use the Security & ComplianceManager on aWindows configuration.
1. On the Tina server, select Start All Programs Tina Monitoring Security & ComplianceManager.
The Security & ComplianceManager opens.
2. Select the newly created Certificate Authority and select Certificates New.
The New Certificate window opens.
3. Enter the name and password for the new certificate.
52 Tina Administration
Securing TCP Connections

This image illustrates the name and password for the new certificate:
4. In the Parameters pane - Use field select Network Encryption.
5. In the Output Certificate File pane, check the Install certificate after creation check box.
6. Click OK.
The Certificate Password window opens.
7. Enter the Certificate Authority password and click OK.
The new certificate is created in the catalog.
The certificate tree displays the new certificate with a lightning symbol beneath the CertificateAuthority.The certificate file is stored in the TINA_HOME/Certs certificate repository, and the certificate is installedon the TINA_HOME/.Certs directory.
Tina Administration 53
Securing TCP Connections

8. Copy the certificate file in a network share or a removablemedia (e.g., a USB key).
For details on the NED certificate creation, see the Tina Security & ComplianceManager Documentation.
Step 3 - To install the network encryption certificate locally
1. On theMonitoring, Security & ComplianceManager interface, select Certificates Install.
The Install Certificate - Path window opens.
2. Enter the absolute path of the certificate file to install:
• On the Tina server, it should be on the Certs directory.• On each Tina agent, it may be a network share or a USB key path.
3. Click OK.
The Install Certificate window opens.
4. Enter the certificate password.
5. Click OK.
The certificate is now installed on the Tina server %TINA_HOME%\Conf\.Certs repository.
6. Apply this procedure for the each Tina agent.
The certificates are now installed on the server and on each agent.For details on the NED certificate installation, see the Tina Security & ComplianceManagerDocumentation.
Enabling the EncryptionTo enable the encryption, set the enable_all_ned_mode tunable.
PropertiesBefore configuring the enable_all_ned_mode tunable, take into account these remarks:• Youmust set the enable_all_ned_mode tunable on the Tina server.
It is not required that the enable_all_ned_mode tunable be present on the agents.• In amulti-catalog configuration, you can set the enable_all_ned_mode tunable for each catalog with its
own value.
54 Tina Administration
Securing TCP Connections

PrerequisiteA running Tina server does not apply the enable_all_ned_mode tunable.
The enable_all_ned_mode tunable is only read at the catalog starting. Therefore, youmust ensure to start theassociated catalog after having configured its corresponding enable_all_ned_mode tunable.
tina_catalog_ctrl CommandTo stop and start the Tina catalog, youmust run the tina_catalog_ctrl command in the Command LineInterface.
User’s PermissionsOnly the root user (Unix), or a user with at least the backup operator rights (Windows) can run this commandlocally.
Tomodify a catalog located on a remote platform, any user can run the tina_catalog_ctrl command;however, the catalog administrator identity must imperatively be provided using the -identity argument.
Syntaxtina_catalog_ctrl -start|-stop| [-catalog catalog] [-identity user:password]
These are the arguments that you can use with the tina_catalog_ctrlcommand:
-start Brings the specified catalog online.-stop Stops the specified catalog.
The catalog can only be brought back online through the -start argument.[-catalog catalog] Specifies the working catalog.
This argument is mandatory if there are several catalogs.[-identity user:password]Provides the catalog administrator identity if you are remotely connecting to the
catalog.
See the Tina Command Line Interface Documentation for details on the tina_catalog_ctrl command.
ValuesEach catalog can have an enable_all_ned_mode tunable set with its own value.
You can set theses values for the enable_all_ned_mode tunable:• 0: No secure communication.• 1: Allow unsecure agents.
Important: This option offers more flexibility as Tina agents 4.6.2 or below can communicate withthe server; however, it does not ensure the highest security level.
• 2: All agents must be secure.
Important: This option guarantees themost secure environment; however, be aware that no Tinaagents 4.6.2 or below will be allowed to connect to the Tina server anymore.
Tina Administration 55
Securing TCP Connections

CHAPTER5-Managing PlatformsThese topics describe how tomanage platforms:• About Platforms• Creating a Platform• Configuring Platform Settings• Editing Platforms• Deleting Platforms• Exporting the Platform List
About PlatformsThe Platforms object represents the hosts and applications backed up by Tina. Host and application backupconfiguration andmanagement are centralized in theWeb Administration.
HostsHosts are Tina client machines; they represent themachines being backed up. Authorized users can performarchiving on hosts.
These operating systems are currently supported for hosts:• Windows• Unix• macOS
For themost up-to-date information, see the Tina Compatibility Guide.
ApplicationsApplications include databases and application software (e.g., Oracle, NDMP, VMware, Exchange Server,etc.).
For themost up-to-date information about the supported applications, see the Tina Compatibility Guide.
These Atempo proprietary applications are also available:• Filesystem. Enables you to create a clone of the host to which the application is attached. This is very
useful for creating additional backup strategies on the host and for organizing data in a thematic way,(e.g. according to applications, departments, etc.). See Filesystem Application.
• List. Enables you to create and organize objects logically regardless of their actual physical location.See List Application.
• NetDisk. Enables you to back up and restoreWindows 2003/2008/2008R2mapped network drives. SeeMapped Network Drives.
Firewalls and Backup MastersA Master is amachine designated to take on the backup process of another host. A master is useful when thehost does not have the tina_backup binaries installed, or when the host cannot connect to the server, as forinstance when the host is behind a firewall.
Themaster may be either the server itself, or another client machine. The Tina service or daemonmust berunning on themachine declared as the backupmaster.
56 Tina Administration
Managing Platforms

These diagrams show the differences in the backup process with or without a backupmaster. When a backupmaster is used, the tina_backup process runs on the backupmaster rather than on the host, and the host doesnot have to initiate a connection toward the server - as is not allowed when the host is protected by a firewall.
Backing up without a master
Backing up with a master
Formore information on assigning amaster to a host, see Creating a Platform.
Broken Connection during BackupIf the host is behind a firewall, an inactive connection between the server and the agent may be broken by thefirewall after few minutes, usually when a large file is being backed up, and this may cause backups to fail. Inthat situation, it is recommended tomodify the TCP idle timeout at the operating system level to keep theconnection alivemuch longer.
For more information onmodifying this TCP parameter on the different operating systems, see TCP ParameterModification.
Tunnel ModeThe Tina tunnel mode enables the backup of agents located in a public zone and separated from the catalogserver or storage nodes by a firewall that filters all the TCP connections.
This mode works as follows:1. The Tina agent registers locally all the TCP connections in a tunnel agent process.
Tina Administration 57
Managing Platforms

2. The server uses a tunnel server process to poll the agent in order to retrieve the registered TCPconnections. Once these connections are opened, they will be used for all the requests between theagent AND the server or storage node.
Note: The tunnel mode is not supported in NDMP andHyperStream environments.
To configure the tunnel mode on the agents located behind the firewall
1. In theWeb Administration, expand your catalog in the Tina Explorer.2. Select Platforms Hosts. The Hosts pane opens.3. Select a host in the list and click Host Details. The Host Details window opens.4. In the Properties tab, open the Advanced area and select the BackupMaster check box.5. Select Tunnel Platform.6. Click Apply and Close.7. Select Configuration Tunables. The Tunables pane opens.8. Set these tunables with the Tunable CreationWizard (New tunable (+) button):
• Basic Tunables.– activate_tunnelwith the name of all the Tina catalogs the agent must connect to.– rem_dtm_data_tcp_numwith the port number used for your RAW connection.– rem_dtm_reverse_connection to yes.
In an environment where the Use Cache on Server option is disabled for all your backups andrestores, this tunable enables the storage node to connect to the agent if the firewall closesall incoming TCP connections.
• Advanced Tunables.– event_on_client to yes.
9. Click Finish to validate your choices.10. Restart the Tina service.
To configure the tunnel mode on the server
1. In theWeb Administration, expand your catalog in the Tina Explorer.2. Select Configuration Tunables. The Tunables pane opens.3. Set this tunable with the Tunable CreationWizard (New tunable (+) button):
• Basic Tunables.– activate_tunnelwith the name of all the catalogs of the Tina server whose agents should
be accessible through the tunnel mode.4. Click Finish to validate your choices.5. Restart the Tina service.
Once you have configured the agents and the server, all the backup operations will use the tunnel mode.
• A server can also be an agent for another catalog.
• The tunnel mode requires a few seconds before the launch of anyoperation.
Mobile PlatformsFormachines such as laptop computers that are subject to being disconnected from the network regularly, Tinaincludes aMobile Platform feature, applying to both host and application. This prevents the server from trying toconnect to an absent platform, and ensures that if the platform misses a scheduled backup, the backup will runas soon as it is reconnected to the network.
58 Tina Administration
Managing Platforms

Creating a PlatformThese topics describe how to create a platform:• Creating a Host• Creating a New Host Detected by Tina• Creating Applications• Enabling Platforms• Disabling Platforms
Creating a HostUpon installing Tina, the setup automatically creates a host inWeb Administration for each client machinedeclared in the catalog. In addition, you can:• Manually create a host at any point in time.• Automatically create a newly installed host detected by Tina.
Note: The number of hosts you can create is limited by the terms of your license.
To manually create a host
1. In theWeb Administration, expand your catalog in the Tina Explorer.2. Select Platforms Hosts.
The Hosts pane opens.3. Click New Host (+).
The Host CreationWizard opens.4. Enter the parameters to create a host in the Host CreationWizard.
This table describes the parameters that you can set in the Host CreationWizard:
Parameter Description
Creation Method.
Create a Host manually Lets you create a host manually.
Clone a Host Lets you clone an existing host.
• The Host Cloning pane lets you select the host from which the new onewill be created.
• The CloneOptions pane lets you select the available options: BackupSelection, Strategies, Tunables, and Alarm Filters.
General Information.
Host Name Name of the new host. Youmust respect the case of the hostname. Thenamemust be the hostname known by the network and not an alias.
If you want to use aliases, youmust declare the aliases in the hosts file.
Host Type Type of the host to be selected from the drop-down list.
Comment Optional. Enter a comment to describe the host you are creating.
Tina Administration 59
Managing Platforms

Parameter Description
Protocol.The protocol corresponding to the selected host type is automatically checked. For mosthosts, the protocol will be TiNa.
For a Network Appliance host, the protocol will be NDMP and you will be asked to specify theNDMP version, a User name and Password.
Some hosts support both TiNa and NDMP protocols.
Advanced Options.
Storage Node Select this box if the created host is a storage node.
See Tina in SAN Environments.
Mobile Host If your host is amobile platform, i.e., a laptop computer or amachinefrequently disconnected from the network, select this box, to prevent Tinafrom issuing an alarm each time the host is not found on the network.
For more information on configuringmobile hosts, see Relaunch untilPlatform is Reachable.
5. In the Summary window, check the creation parameters and click Finish to validate the creation of thehost.The new host is displayed in the host list.
6. Select the newly created host, and click Enable Hosts.7. To verify that the newly created host is functioning, click Check Connection (checks if the selected host
is alive and Backup Service running).
Note: The Check Connection button can only be used when a single host is selected in the list. Select andcheck hosts one by one if you need to check the status of several hosts.
Creating a New Host Detected by TinaTina Server regularly polls the network in order to detect new machines hosting Tina. Such hosts consist of:• Hosts on which a Tina service or daemon is running and that are unknown to the catalog.• Hosts that are known to the catalog but whose operating system has changed.
To create a host detected by Tina
1. Check whether theWizard icon (magic wand) in themain toolbar of theWeb Administration displays a
host .2. Click this icon and select Host Discovery Wizard. The Host Discovery Wizard opens.
60 Tina Administration
Managing Platforms

3. Enter the parameters to create a host detected by Tina. This table describes the parameters that you canset in the Host Discovery Wizard:
Parameter Description
Action Select the desired action from the drop down list:
• Declare. Creates the detected host in theWeb Administration.• Ignore. Excludes the host from the creation process. The wizard ignores it.• Blacklist.Marks the host as blacklisted. The wizard does not create it and this host
does not display again as a new discovered host.Youmay blacklist a host if it is already known to another Tina catalog and you donot want to declare it in the current catalog.
Blacklisted hosts can be created in the catalog at a later stage, if needed.
Show alsoBlacklisted Hosts
Select the check box to display the hosts that weremarked as Blacklisted, to be ableto create them in the catalog if needed.
Name Name of the new host detected by Tina.
Type Operating system of the host.
Version Tina version detected on the host.
Status • New. The host has been detected but not processed.• Blacklisted. You have chosen to discard this host from the current Tina catalog.
4. Click Finish to validate the operation. The Host Creation Progress window opens and indicates if thecreation was successful.
5. Click Close. The newly created host displays in the Host list.
If you want to disable the automatic host detection feature, you can set the tunable "Disable Host AutomaticDetection" (disable_host_auto_discovery).
If you want Tina to systematically create detected hosts in the catalog without notifying the user through thegraphical interface, you can set the tunable "Automatic Creation for Detected Hosts" (create_auto_discovered_host).
See the Tina Tunables Documentation.
Creating ApplicationsYoumust create an application for each application to be backed up. The number of applications you can createis limited by the terms of your license. Some applications, for instance the Catalog application, areautomatically created.
To create an application
1. In theWeb Administration, expand your catalog in the Tina Explorer.2. Select Platforms Applications. The Applications pane opens.3. Click New Application (+). The Application CreationWizard opens.
Tina Administration 61
Managing Platforms

4. Enter the appropriate parameters to create a new application. This table describes the parameters youcan find in the Application CreationWizard:
Parameter Description
Host Selection.
Select the host where the application will be installed.
General Information.
Application Name Name of the new application. The application name isthe name given to the application backup folder.
The application name can be edited at a later date ifneeded without losing backups.
Each applicationmust have a unique name.
Application Type Type of application to create.
Application Version This field is displayed only if the applicationmusthave its version specified (e.g., Sharepoint,Exchange, Lotus Notes, etc.).
If you have specified the version at creation time, thefield is not editable.
If the version is mandatory and not specified, amenudisplays all the supported versions.
To edit an environment variable, specify the versionbefore adding or modifying an environment variable.
Comment Optional. Enter a comment to describe theapplication you are creating.
Creation Method.
Create an Application manually Lets you create an applicationmanually.
62 Tina Administration
Managing Platforms

Parameter Description
Clone an Application Lets you clone an existing application on the samehost. These are the applications you can clone:
• Filesystem• HV Agent for VMware• List• Oracle
Only the Filesystem application can be cloned both onthe same host or on a different host.• The Application Cloning pane lets you select the
application from which the new one will becreated.
• The CloneOptions pane lets you select theavailable options: Backup Selections orStrategies.You can only select both options (backupselections and strategies) when you clone aFilesystem application.
Specific Parameters.
For more information on applications, see the documentation corresponding to the application youare creating (e.g., Tina for Oracle Documentation, Tina for NDMP Documentation, etc.).
Enter the environment variables required for the application you are creating. You can also setenvironment variables using the Restore & Archive Manager. See Setting Environment VariablesThrough Restore & ArchiveManager.
5. Click Finish to validate the creation of the new application.6. Select the newly created application and click Enable Application.
Setting Environment Variables Through Restore & Archive Manager
Open the Restore & ArchiveManager corresponding to the application for which youmust edit variables. Openthemeta-tree and the Information directory. A list of Information icons displays displaying all the variables thatare available for the application.
The variables are represented in this format:VARIABLE_NAME = “value”
The color bar on the left identifies the variable status:
Color Status
Gray Variable not defined by the user:
- Variable not set in the environment
-or-
- Variable set by default, without the user defining it
Green Variable set in the environment
Tina Administration 63
Managing Platforms

Color Status
Orange - Optional variable whose value is incorrect
-or-
- Variable defined by the user while not supported by Tina
Red Mandatory variable whose value is incorrect
Note: For some applications, it is mandatory to edit the TINA_APP_LIB_PATH environment variable. Edit itthrough theWeb Administration when creating the application in Tina. This variable is needed for Tina toconnect to the application.
Editing an Environment Variable in Restore & Archive Manager
1. Ensure that the user connected to the Restore & ArchiveManager is granted the Supervision andPlatforms rights (Administration and Supervision tab in the User Details window).
2. For more information on user’s access rights, see Configuring Users and Access Rights.
3. Select the variable and select Tree Selection Properties.
4. The Properties window opens.
5. Add or modify the value of the variable.
6. Click OK to immediately update the environment.
The new value is displayed in the tree.
If you assign an incorrect value to a variable, a red or orange icon (depending on the severity) displays in thetree, followed by an error message. You can still access the list of variables andmodify the incorrect value withthe procedure above.
Information on environment variables
Select the variable and select Tree Selection Help to display information about the variable. The Helpwindow contains the variable description, the possible values and the default value, if any.
Note: You can copy and paste text from the Help window to the Properties window.
Enabling PlatformsWhen first created, a platform (host or application) is disabled. A platform must be enabled to support a backup.
To enable platforms
1. In the Host or Application list, select the host/application to enable.2. Click Enable Host or Enable Application.
Disabling PlatformsThe disabled status indicates that no backup occurs on the platform. You can temporarily disable a platform forthese reasons:• Maintenance. If you are disabling a host, it is recommended to disable the drives connected to it also.
See Changing theMode of the Drive.• To avoid removing a platform from a group if you do not wish to back it up for a short period of time, etc.
64 Tina Administration
Managing Platforms
Note: Devices connected to a disabled host, can still be used, provided that the tina_daemon process orTina service is active on the host.
To disable platforms
1. In the Host or Application list, select the host/application to disable.2. Click Disable the Host or Disable Application.
Configuring Platform SettingsPlatform settings can be defined and edited through the Host Details or Application Details window. They aredivided into these categories:• Fast File Scan• NDMP
Fast File ScanFast File Scan speeds up incremental backups on hosts and file systems. This option is available onWindowsplatforms only.
Configuring Fast File Scan consists in two steps:1. Activating the Fast File Scanmode for a strategy in the Strategy Details window.
Fast File Scan is integrated to Tina and by default is inactive.See Fast File Scan (Windows only) for details.For themost up-to-date information about the supported applications, see the Tina Compatibility Guide.
2. Activating the Fast File Scan option for a host in the Host Details window and setting up the number ofstored events and the list of excluded directories.See To configure Fast File Scan for details.
Parallel BackupsFast File Scan supports parallel backups. Parallel backups increase system performance by enabling users toback up jobs into several processes that can run simultaneously.
See Parallel Backups for details.
Limitations• Fast File Scan is supported only forWindows Filesystem applications.• Directories shared by the NFS protocol (i.e., onWindows Storage Server platforms) are not supported.• Directories located onmounted volumes are not supported. Only local volumes specified with a drive
letter are supported (e.g., D:).• As Fast File Scan information is related to events, adding a new backup selection is taken into account
only partially.Any change to the configuration (e.g. adding or renaming a selection or reducing the filter scope of the,etc.) leads to either a standard incremental backup or to a full backup.Reloading the %ELD_BIN%\parameters.xml file applies only to a whole volume.
• Renaming a backup selection which is parallelized is not supported unless a Full backup is performed.• Read-only files are detected during Fast File Scan backups.
To avoid their detection, set to yes the do_not_restore_atime_on_bck tunable.• Fast File Scan is not supported for clustered volumes.
Tina Administration 65
Managing Platforms

To configure Fast File Scan
1. In theWeb Administration, expand your catalog in the Tina Explorer.2. Select Platforms Hosts.
The Hosts pane opens.3. Select a host in the list and click Host Details.
The Host Details window opens.4. Select the Settings tab and open the Fast File Scan Configuration area.5. Click Get Fast File Scan Configuration Status.
For performance reasons, theWeb Administration gets themodule status only on demand.6. Select the Activate Fast File Scan check box.
This image illustrates the Activate Fast File Scan check box:
7. Tomodify the number of events that Fast File Scanmust keep inmemory, enter a number in theMaximum number of stored events field.The default value is 1,000,000.As Fast File Scan works in real time, the tracked events data is continuously loaded in amemory buffer.The higher the number of events stored, themore space this data occupies in memory. Before increasingtheMaximum number of stored events, ensure that your platform has enoughmemory. For instance, for a64-bit platform, Fast File Scan uses 137 MB at startup, and has an average occupation rate of 616 MB.
8. To exclude directories from Fast File Scan processing, exclude the directory using the Excluded Pathswindow.The Excluded Paths list shows the directories that Fast File Scan does not monitor. Typically, theC:\Windows\System32 and C:\Program Files directories are excluded from Fast File Scanmonitoringas they undergomany irrelevant log files changes.
To add a directory to the Excluded Paths list, click Add Item . In the Excluded Paths field, enter theabsolute path of the directory to be excluded, (e.g. C:\Windows\System32 or E:\Temp) or click ... toselect a directory path.For performance reasons youmay define up to 10 exclusions.
Note: Tina System Recovery Agent is well adapted for themonitoring of the C: drive, but it cannotuse the data collected by Fast File Scan.
66 Tina Administration
Managing Platforms

Thus, the best configuration is to assign Tina System Recovery Agent to monitor the C: drive, whileFast File Scanmonitors the remaining drives.
9. Click Apply and Close to validate themodifications.
Reloading the List of Volumes and ExclusionsIf you have added (through the eld_listened_volumes variable) or excluded (through the eld_exclude_dirsvariable) a volume to/from the parameters.xml file after the start of the ELD.exe service, youmust reload the%ELD_BIN%\parameters.xml file with your new parameters through a specific command line.
The best time to reload the ELD service is just before performing a non-synthetic full backup.
Note: The event list remains onmemory. So restarting the ELD service resets the data collection oncurrent volumes. After stopping and starting the ELD service or rebooting the workstation, the firstincremental backup becomes a standard backup, losing the time savings that Fast File Scan could bring.
To reload the Volumes and Exclusions List
1. In commandmode, go to the %ELD_BIN%\ directory.2. Enter this command:
eldsim -reload_configThe list is reloaded with your new parameters. Fast File Scan detects dynamically the new parameters.Concerning the new volume definition:• Removed volumes will not bemonitored anymore.• From now, Fast File Scan will monitor the newly added volumes.
• In addition to the volumes monitored following their activation by the parameters.xml file,some volumes can be activated by the backup selection.To check active volumes, run the eldsim -stat command.
• The Tina agents automatically send the required configuration tomonitor the backupselections to ELD (Fast File Scan).Unless you have a very specific requirement, do not define the backup selections in theparameters.xml file.
MemoryManagementFor trackingWindows events in real time, the ELD service creates an event list directly on thememory (RAM)buffer. By default, the number of stored events is set to 1,000,000. In the case of a 64-bit platform, for a listcontaining up to 1,000,000 events, Fast File Scan uses 137 MB at startup and has an average occupation rateof 616 MB on the Agent memory.
Before changing this value please contact the AtempoCustomer Care team whowill help determine the bestvalue for your configuration.
The ELD servicememory is emptied after each backup, following a Tina purge command. The purge commandis calculated from the last backup of the host. Then, the ELD service purges all previous events.
Setting Up the Fast File ScanOptional VariablesTheWeb Administration enables you to perform the configuration graphically, but you can customize Fast FileScan by editing the parameters.xml file, located in the %ELD_BIN%\ directory.
The activation of backups automatically performs themonitoring of the volumes or directories. You shouldmanually modify the parameters.xml file only if you have very specific needs. Contact the AtempoCustomerCare team whowill advise you on the best setting for these advanced parameters.
Tina Administration 67
Managing Platforms

Examples for Fast File Scan UsageTake into account these points for a Fast File Scan optimized usage. Fast File Scan is designed for large filesystems with a small change rate. Fast File Scan is optimized when backups are run frequently.
1. Before the ELD buffer gets full, Tinamust run an incremental backup using Fast File Scan andpurge thememory. If the event buffer gets full, a standard incremental backup is run, losing theFast File Scan advantages.
To avoid the ELD buffer from getting full too fast:
• If the agent has enoughmemory, you can increase the amount of memory allocated to theELD service, through theWeb Administration or by editing the parameters.xml file,located in the %ELD_BIN%\ directory.
• Youmay run incremental backups more often; however, this increases the number ofinstances in the catalog.
• If the ELD servicemust monitor toomany file system events and it is not possible toallocatemorememory to ELD, it is better not to use Fast File Scan (reset the strategyoption and stop the ELD service).
2. Strategy with a full backup only.
Do not activate the Fast File Scan option for this strategy. If Fast File Scan is activated, the event list isnot purged anymore between two full backups and it gets filled up.When the event list is full, the next incremental backup of any other strategy fails.
3. You can apply Fast File Scan to two different catalogs in the same Tina environment on an agent.
The key name is composed by the Tina environment name followed by @catalog_name.
4. Strategy that does not back up data frequently.
Should the event list increase to thememory limit, Tina will return amemory overflow. The purgingmechanism will clean-up thememory to another collect can be restarted.To avoid this scenario, increase the backup frequency.
5. Tina performs a standard incremental backup instead of a Fast File Scan incremental backup inthese cases:
• When the event buffer is full.• When a backup selection on a disk is not checked by the ELD.• After a workstation reboot.
6. Fast File Scan has no impact on the restore process.
7. Fast File Scan event corresponds to a file creation, modification, or deletion.
So the backup engine detects andmanages the removed files as usual. When the File system informsthe ELD service that a file has been removed, Tina records this information in the catalog that shows thelast instance of the removed as removed. As a result, the next backup will not include this file.To avoid a sudden ELD service saturation due to a high number of deletions, Atempo recommends you• to empty the recycle bin before performing a full backup• and to exclude all temporary directories (e.g., /tmp, TEMP, or any other temporary directory that may
have been set).To avoid generating backup events, the last access date is not reset for the files after a backup, as it isdone for the standard incremental backup.
68 Tina Administration
Managing Platforms

8. If no volume is set to bemonitored by Fast File Scan, the ELD service starts but does not collectevents.
The ELD service begins monitoring the volumes and collecting events only after Tina performs a backup.
NDMPWhen you create a NDMP Data/Tape Server, youmust activate it in the Settings tab of the Host Detailswindow.
To activate NDMP Data/Tape Server
1. In theWeb Administration, expand your catalog in the Tina Explorer.2. Select Platforms Hosts.
The Hosts pane opens.3. Select a host in the list and click Host Details.
The Host Details window opens.4. In the Settings tab, open the NDMP Data/Tape Server Configuration area and click Get NDMP
Configuration Status.For performance reasons, theWeb Administration gets themodule status only on demand.
5. Select the Activate NDMP Data/Tape Server check box.6. Click Apply and Close to validate your modifications.
See the Tina for NDMP Documentation.
Note: If you create the NDMP application before the data server, the Activate NDMP Data/Tape Servercheck box is automatically selected in the settings of the host you selected as the data server (i.e., theSettings tab in the Host Details window).
Editing PlatformsThese topics describe how to edit platforms:• Editing Hosts• Editing Applications• Disabling/Enabling Drive-Host connections
Editing HostsEditing a host enables you tomodify these parameters:• Type• Status• Comment• Advanced parameters• Strategies• Backup Selections• Protocol
Editing a host also enables you to view the Tina software version that is installed on the selected host.
You can also configure or edit some host settings like NDMP, Fast File Scan or Tina HyperVision Agent forVMware.
See Configuring Platform Settings for details.
Tina Administration 69
Managing Platforms

To edit a host
1. In theWeb Administration, expand your catalog in the Tina Explorer.2. Select Platforms Hosts.
The Hosts pane opens.3. Select the host to edit and click Host Details.
The Host Details window opens with three tabs: Properties, Activities and Settings.The Properties and Settings tabs enable you to perform changes to the host while the Activities tab onlygives information.This table describes the parameters that the Host Details pane Properties tabmay display:
Parameter Description
General Area.
Name Only for information.
Type Type of the host.
Status Enabled or disabled.
SoftwareVersion
Only for information.
FilesystemEncoding
Only for information.
Comment Comment to describe the host.
Advanced Area.
BackupMaster
Machine designated to take on the backup process of another host.
The BackupMaster may be:
• Server. The server itself.• Host. Another client machine.• Tunnel Platform. A mode that enables the backup of agents in a public zone and
separated from the catalog server or storage nodes by a firewall that filters all theTCP connections.
If a BackupMaster if selected, the binary used during backup will be running on themaster rather than on the host. This option can be very useful if a firewall is presentor if no binaries can be installed on the host.
The BackupMaster option cannot be deselected if the host type requires it.See Firewalls and BackupMasters for details on backupmasters.
Storage Node Machine designed tomanage a library or a drive, in addition to back up and restoredata.
See Tina in SAN Environments for details on storage nodes.
70 Tina Administration
Managing Platforms

Parameter Description
Mobile Host A laptop computer or amachine frequently disconnected from the network. Thisfeature prevents Tina from issuing an alarm each time the host is not found on thenetwork.
SeeMobile Platforms and Relaunch until Platform is Reachable for details onconfiguringmobile hosts.
SecuredPlatform
Check this box to encrypt and secure Tina network connections between this hostand other Tina agents.
To secure network connections, youmust have created at least one certificate.See Tina Security & ComplianceManager Documentation for details.
Strategies Area.
Strategy List Indicates the schedule dates and times for automatic backup, job priority andparallelism, snapshot, or deduplication sessions, and themedia pools to be used towrite data.
These are the Strategy List columns:
• Platform• Name• Type• Main Pool (Full) andMain Pool (Incremental)• Secondary Pool (Full) and Secondary Pool (Incremental)• Schedule (Full) and Schedule (Incremental)• Synthetic• Job Priority
StrategyButtons
Enables you to create, edit, delete, or import a strategy.
Backup Selections Area.
BackupSelection List
Indicates the directories to be backed up, as well as time phases and conditionsunder which directories are backedup.
These are the Backup Selection List columns:
• Platform• Path• Platform Category• Strategies• Protected Volume• Format
BackupSelectionButtons
Enables you to create, edit, delete, or import a backup selection.
Drive Connections Area.
Tina Administration 71
Managing Platforms

Parameter Description
DriveConnectionList
Only for information. Indicates the drives connected to the host.
These are the Drive Connection List columns:
• Drive Name• Status• Device Descriptor
Protocol Area.
The protocol corresponding to the selected host type is automatically checked.
Some hosts support both TiNa and NDMP protocols.
TiNa Formost hosts, the protocol is TiNa.
NDMP For a Network Appliance host, the protocol is NDMP and you will be asked to specifythe NDMP version, a User name and Password.
This table describes the parameters that the Host Details pane Activity tabmay display:
Parameter Description
Backup Area.
Show the last Xdays/weeks/months
Sets the period for which you get the activity data.
Enter a number and select a unit between days, weeks, andmonths.
Show the strategies Sets one or several strategies for which you get the activity data.
Update View Updates the activity information.
Job List Indicates the backup jobs associated with the host for the selectedperiod and strategies.
These are the Job List columns:
• Period• Total• Completed• Error• Suspended• Stopped• Not Started• Canceled (unreachable platform)• Success Rate• Volume
Job Button Enables you to export job statistics.
Backup Evolution Graph Displays information on the volume and duration of the backup jobs.
Select one strategy and choose between a Full or Incrementalbackup.
72 Tina Administration
Managing Platforms

Parameter Description
Information Displays information on:
• The last completed backup• Last Backup (completed or not)• Next backup
Alarms Area.
Alarm List Indicates the alarms generated for the host.
These are the Alarm List columns:
• Severity• Last Date• Object• Acknowledgment• Message
Alarm Buttons Enables you to delete, acknowledge temporarily, or acknowledgepermanently an alarm.
This table describes the parameters that the Host Details pane Settings tabmay display:
Parameter Description
NDMP Data/Tape Server Configuration Area.
Get NDMP Configuration Status Click this button to get themodule status.
Activate NDMP data/Tape Server Select this check box to activate themodule.
See NDMP for details.
Fast File Scan Configuration Area.
Get Fast File Scan ConfigurationStatus
Click this button to get themodule status.
Activate Fast File Scan Select this check box to activate themodule.
See Fast File Scan for details.
Tina HyperVision Agent for VMware Configuration Area.
Get HVA Configuration Status Click this button to get themodule status.
Activate Tina HyperVision Agent forVMware
Select this check box to activate themodule.
See Tina HyperVision Agent for VMware Documentationfor details.
4. Click Apply and Close to validate the operation.
Tina Administration 73
Managing Platforms

Editing ApplicationsEditing an application enables you tomodify these parameters:• Application Name.• Host Name.• User name and Password.• Status.• Comment.• Environment variables.• Strategies.• Backup Selections.• Snapshot Options.
To edit an application
1. In theWeb Administration, expand your catalog in the Tina Explorer.2. Select Platforms Applications. The Applications pane opens.3. Select the application to edit and click Application Details. The Application Details window opens with
three tabs: Properties, Activities and Settings. The Properties ans Settings tabs enable you to performchanges to the application while the Activity tab only gives information.This table describes the parameters you can find in the Properties tab of the Application Details pane:
Parameter Description
General Area.
ApplicationName
Name given to the application backup folder.
ApplicationType
Only for information.
ApplicationVersion
The Application Version field is displayed only for applications that must have their versionspecified, (e.g., Sharepoint, Exchange, Lotus Notes, etc.). If you have specified the versionat creation time, this field is not editable. If the version is mandatory and not specified, amenu displays all the supported versions.
Host Name
User NameandPassword
User who has access to the application and user password.
For some applications, youmust define several users (i.e., for Tina HyperVision Agent forVMware, youmust define a Vcenter user and a Backup and Indexing user. For Tina forDB2, youmust define a owner and an access user).
Status Enabled or disabled.
Comment Comment to describe the application.
Environment Variables Area.
74 Tina Administration
Managing Platforms

Parameter Description
MandatoryEnvironmentVariables
Environment variables required for running the application correctly.
For details on the application variables, see the documentation corresponding to theapplication (e.g., Tina for Oracle Documentation, Tina for NDMP Documentation, etc.).
Optional andUser DefinedEnvironmentVariables
Environment variables used tomodify the behavior of the application.
For details on the application variables, see the documentation corresponding to theapplication (e.g., Tina for Oracle Documentation, Tina for NDMP Documentation, etc.).
Strategies Area.
Strategy List Indicates the schedule dates and times for automatic backup, job priority and parallelism,snapshot, or deduplication sessions, and themedia pools to be used to write data. Theseare the columns of the Strategy List:
• Platform• Name• Type• Main Pool (Full) andMain Pool (Incremental)• Secondary Pool (Full) and Secondary Pool (Incremental)• Schedule (Full) and Schedule (Incremental)• Synthetic• Job Priority
StrategyButtons
Enables you to create, edit, delete, or import a strategy.
Backup Selections Area.
BackupSelection List
Indicates the directories to be backed up, as well as time phases and conditions underwhich directories are backed up. These are the columns of the Backup Selection List:
• Platform• Path• Platform Category• Strategies• Protected Volume• Format
BackupSelectionButtons
Enables you to create, edit, delete, or import a backup selection.
Snapshot Options Area.These are the Tina applications that integrate a snapshot mechanism: Oracle, NDMP, List, andFilesystem.
Tina Administration 75
Managing Platforms

Parameter Description
SnapshotType
Snapshot technologies supported by Tina:
• Microsoft VSS: This technology is embedded withWindows 2008 and 2012.• NetApp: This thechnology is available with NDMP applications.• LSI/Engenio: This technology is only available with Linux platforms without Logical
VolumeManager (LVM) and only with Filesystem applications.
ConfigurationButton
Enables you to configure the Snapshot ready application.
See Tina SnapBackup for details on snapshot configuration.
This table describes the parameters you can find in the Activity tab of the Application Details pane:
Parameter Description
Backup Area.
Show the last Xdays/weeks/months
Sets the period for which you get the activity data.
Enter a number and select a unit between days, weeks, andmonths.
Show the strategies Sets one or several strategies for which you get the activity data.
Update View Updates the activity information.
Job List Indicates the backup jobs associated with the application for the selected periodand strategies. These are the columns of the job list:
• Period• Total• Completed• Error• Suspended• Stopped• Not Started• Canceled (unreachable platform)• Success Rate• Volume
Job Button Enables you to export job statistics.
Backup EvolutionGraph
Displays information on the volume and duration of the backup jobs.
Select one strategy and choose between a Full or Incremental backup.
Information Displays information on:
• The last completed backup• Last Backup (completed or not)• Next backup
Alarms Area.
76 Tina Administration
Managing Platforms

Parameter Description
Alarm List Indicates the alarms generated for the application. These are the columns of thealarm list:
• Severity• Last Date• Object• Acknowledgment• Message
Alarm Buttons Enables you to delete, acknowledge temporarily, or acknowledge permanently analarm.
This table describes the parameters you can find in the Settings tab of the Application Details pane:
Parameter Description
The Settings tab is displayed only for applications that require additional configuration.
NDMP Data/Tape Server Configuration Area.
Get NDMP Configuration Status Click this button to get themodule status.
Activate NDMP data/Tape Server Select this check box to activate or deactivate themodule.
See NDMP for details.
vStorage Configuration Area.
Get vStorage Configuration Status Click this button to get themodule status.
Configured VDDK Version Enables you tomodify the VDDK version.
See Tina HyperVision Agent for VMware Documentation fordetails.
4. Click Apply and Close to validate the operation.
Disabling/Enabling Drive-Host connectionsThis feature enables you to temporarily disconnect a host from a drive without affecting other drive-hostconnections (especially in SAN systems, where a drive is accessed by several storage nodes).
See Disabling/Enabling Drive-Host Connections.
Deleting PlatformsDeleting a platform removes the platform from the network backed up by Tina. The backup strategies andselections associated with the platform are lost and all the backed up files are removed from the catalog.
When deleting a host, you can create an archive folder carrying the name of the deleted host (i.e.,host.hostname). All backed up files are thus kept in the folder and can be recovered from any other host. Thefolder belongs to the root or Administrator user.
When you delete a host, the devices connected to this host are also deleted.
Tina Administration 77
Managing Platforms

Note: The archive folder host.hostname uses media associated with the host strategies. If themediahave a recycling policy, the archive folder will be purged progressively.
For more information on restoring archived files, seeWebRestore.
To delete a platform
1. In theWeb Administration, expand your catalog in the Tina Explorer.2. Select Platforms Hosts/Applications. The Hosts/Applications pane opens.3. Select the platform (host or application) to delete and click Delete Host/Application.
If it is a host, a dialog box asks you if you want to create an archive folder to keep all backups or not.Indicate your choice by clicking the corresponding button.
Note: You cannot delete the server.
4. Click Yes in the confirmation dialog box. The platform is deleted and you can neither back up this platformnor open the Restore & ArchiveManager on it.
• Deleting a platform may take a while if it contains a large number of files.
• It is recommended to wait until the platform backups are finished, and to delete its backupstrategies before removing the platform from the network.
Exporting the Platform ListYou can export the list of hosts or applications in CSV or PDF format.
To export the list of platforms
1. In theWeb Administration, expand your catalog in the Tina Explorer.2. Select Platforms Hosts/Applications. The Hosts/Applications pane opens.3. Select one or several platforms and click Export Hosts/Applications. The Export List window opens.4. Configure the appropriate export parameters. This table describes the parameters that you can set in the
Export List window:
Parameter Description
Export Enables you to export the entire list or only the selected lines.
Format Enables you to select the format of the export file (i.e., CSV or PDF).
End of line CSV format only. Enables you to select the end of line format:
• Windows (CRLF)• Linux (LF)• Classic macOS (CR)
FieldSeparator
CSV format only. Enables you to select the field separator, either , or | or ;
EscapeCharacter
CSV format only. Enables you to select the character to use to delimit a field value if itcontains a field separator character; either “ or ‘
Select the Always Add Escape Characters check box if you want to delimit each field valuewith the escape character.
78 Tina Administration
Managing Platforms

5. Click Apply and Close to export the platform(s). The File Download window opens.6. Click Save and select a location.
Tina Administration 79
Managing Platforms

CHAPTER6-Configuring Users and AccessRightsThese topics describe how to configure users and access rights:• About Access Rights• About Catalog Access Modes• Managing Users• Managing User Groups• Configuring Tina Access Rights
About Access RightsThese are the three levels of access rights in a Tina environment:• Access to platforms. Platform access is based upon rights defined at the operating system level. To be
able to see the contents of a platform in Restore & ArchiveManager, a user must have the permission toaccess that platform. An operating system login will thus be required each time the user wants to displaya platform in Restore & ArchiveManager.
• Access to backed up or archived files. File access is based on rights defined at the operating systemlevel. In Restore & ArchiveManager, the file tree displays according to these rights, in the past as wellas the present. OnWindows, the administrator user can access all files. OnmacOS and Unix, theroot user can access all files.
• Access to Tina catalog and functionalities. All Tina operations are associated with specific profilesand rights that are defined in Tina. See About Catalog Access Modes for details.
About Catalog Access ModesRights to access the Tina catalog and functions are independent from operating system rights. They arespecific to Tina, and are recorded in the catalog. These are the three types of access modes:
Catalog Administrator ModeThe Tina catalog administrator name is defined by the administrator when a catalog is created. See Creating aCatalog for details.
By default, the catalog administrator has the rights to perform any operations except editing the catalog orcreating another catalog. Editing or creating a catalog can only be performed by the root or administratoruser. The catalog administrator's rights cannot bemodified and this user can be neither deleted nor removedfrom a user group. Changing the identity of a catalog administrator can only be performed by editing the catalog.The former catalog administrator is then assigned default user rights.
Catalog User ModeCatalog users are users that you have individually been declared in the Tina catalog. You can assign thempasswords and specific rights. Once a password is declared for a user, that password is required each time theuser wants to connect to the catalog. If you have not defined specific rights for a catalog user, that user accessis automatically assigned the Default user profile. SeeManaging Users for details.
80 Tina Administration
Configuring Users and Access Rights

Unknown User ModeAny user unknown to the catalog automatically connects with the Default user profile. By default, this profilegrants users archiving and restoring rights, provided that they have the necessary operating system accessrights to the files they want to archive or restore. It does not grant the right to open theWeb Administration.
Note: You can restrict this mode by enabling the Deny Access to UnknownUsers option, wherebyunknown users are denied any access to Tina.
Password PolicyAfter five login attempts with the wrong password, your account will be locked. This happens when you log into:• The administration console• Tina Restore• Tina web interface• Tina new web interface.
Depending on whether you are an administrator or a user, the account will not be locked for the same amount oftime:• For an administrator, it will be locked for 15minutes.• For a user, it will be locked for 30minutes.
Managing UsersTo connect to theWeb Administration with a profile other than the default profile, users must be declared andconfigured in the Tina catalog.
About UsersTina provides user management capabilities. They enable you to:• Create users and user groups• Grant users predefined profiles• Customize user access rights to Tina functionalities
Any user can be declared as a Tina user even if the user does not exist at the operating system level.
When a user tries to connect to a catalog through one of the graphical interfaces, a login is required. The userthen accesses Tina and uses it according to the rights defined for that user. See Configuring Tina AccessRights.
You can grant some users the right to open theWeb Administration and tomanage user groups. They cancreate, edit, delete users (except the catalog administrator) and user groups, move users to another groups, andmodify user passwords.
For more information on declaring users, defining users rights, see Creating Users.
System UsersPrivileges need also to be defined for system users that have to issue Tina command lines.
For instance, to execute the tina_export command, the system user must be root (Unix systems) or musthave at least the backup operator rights (Windows systems) or administrator’s rights (macOS systems).
Tina Administration 81
Configuring Users and Access Rights

Formore information on system user rights with command line, see the Tina Command Line InterfaceDocumentation.
For more information on adding a system user in a user group, see Editing Users.
LDAP UsersYou can configure Tina to delegate part of user authentication to an LDAP server (only Microsoft ActiveDirectory is supported). This enables you to benefit from the LDAP user management capabilities (e.g.,password complexity policies, connection times, denial of access).
This also enables you to grant LDAP users some specific access rights even though they have not beendeclared in the Tina catalog. For instance, if there are 1000 users in your organization, youmay want to grant allof them some specific access rights to Tina while sparing you the trouble of declaring each of them in thecatalog.
You can use these syntaxes to access Tina:• User Principal Names (e.g., [email protected])• Down-level Logon Name (e.g., DOMAIN\user)• Distinguished Name (e.g., CN=My User,OU=Users,DC=domain,DC=com)
Tomanage LDAP users in Tina, youmust configure LDAP authentication in the catalog settings. See UserAuthenticationModes for details.
Note: This functionality is supported only to configure Unix agents to make it possible to use the LDAPprotocol to connect to Microsoft Active Directory. Other directories such as OpenLDAP are not supported.
LDAP Library Prerequisites
Linux. Youmust have installed a recent OpenLDAP package on the Tina server. Check if the name of thelibrary is libldap.so. If not, create a symbolic link with this name.
macOS. OpenLDAP is present by default on the system. No further installation is needed.
HP-UX, Solaris, and AIX.Tina uses proprietary LDAP libraries. If youmust update them, contact Atempo.
About Tina User ProfilesYou can define user profiles precisely to allow or restrict access to certain operations. By default, these types ofuser profiles are predefined in Tina:• Default Profile.
By default, this profile enables to create backup selections, restore data, manage archives, and archivedata. You can customize this default profile to match your needs. See Customizing the Default Profile.If you do not assign specific rights to users, or if they are unknown to the catalog, Tina automaticallyassigns them the default profile.
Note: If you have enabled the Deny Access to UnknownUsers option, unknown users do notbenefit from the default profile and they are denied access.
• Administrator.This profile allows to perform all Tina operations, except catalog administration.
• Backup Operator.This profile allows to perform on demand backups and to restore backed up data.
• Supervisor.This profile allows to supervise Tina (Jobs, Events, Current Activity, etc.).
• User.
82 Tina Administration
Configuring Users and Access Rights

This profile allows to restore backed up data.
User Authentication ModesTina provides different ways to authenticate the users who log on to theWeb Administration:• Catalog Only• Catalog then LDAP• LDAP then Catalog
Authentication Mode OverviewThis table describes the three authenticationmodes:
Catalog Only Catalog then LDAP LDAP then Catalog
• Users defined in the catalogaccess the Web Administrationwith their individual user profiles,while the other users are grantedthe default profile.
• Use this default mode when noLDAP authentication is required.
• Optional. You can deny all accessto the users that are not defined inthe catalog.
• Tina first verifies whetherthe user is authenticatedby the catalog, thendelegates authenticationto the LDAP server.
• Use this mode to grant afew LDAP users someindividual Tina userprofiles.
• Users that are neitherauthenticated by thecatalog nor by the LDAPserver are denied access.
• Tina first delegatesauthentication to the LDAPserver, then verifies whetherthe user is authenticated bythe catalog.
• Use this mode combined withthe Deny Access to UnknownUsers option to customize thedefault profile for all standardLDAP users.
• Authentication through thismode takes longer becausethe LDAP server is remote.
Tina Administration 83
Configuring Users and Access Rights

This diagram presents the different user access situations if you select the Catalog then LDAP authenticationmode.
84 Tina Administration
Configuring Users and Access Rights

This diagram presents the different user access situations if you select the LDAP then Catalog authenticationmode.
Authentication ConfigurationYou can choose the authenticationmode through the catalog settings.
To configure the authentication mode
1. In theWeb Administration, expand your catalog in the Tina Explorer.2. Select Configuration Catalog Settings. The Catalog Settings pane opens.3. From the Authentication Configuration Area, choose the authentication settings as described in this table:
Parameter Description
Authenticationmode
Specifies how you want Tina to authenticate the users. Choose one of these options:
• Catalog Only.• Catalog then LDAP.• LDAP then Catalog.See AuthenticationModeOverview for details on eachmode.
Tina Administration 85
Configuring Users and Access Rights

Parameter Description
Deny Accessto UnknownUsers
Select this check box if you want that the users unknown to the catalog or to the LDAPserver are denied access to Tina.
The check box is checked and grayed out when you select the Catalog then LDAP mode.
LDAP Configuration.
Server Name Name of the server managing the LDAP directory.
Port Number Port of the LDAP service. The default port is 389 but you can change it if the service uses adifferent port.
Use SecureMode
Select this check box to enable secured authentication.
StartTLSMode
Select this radio button to enable TLS (i.e., Transport Level Security, formerly SSL)temporarily on an LDAP connection not initially created using TLS. TLS is then stoppedwhen it is no longer required.
LDAPS Mode Select this radio button to create a TLS (SSL) LDAP connection on port 636 (by default).The connection is encrypted for its entire duration.
4. Click Apply to validate the configuration of the parameters.
Creating UsersCreating users consists in declaring them in the Tina catalog. The users can either be known to themachineoperating system or not. You can create users specific to Tina to enhance catalog security, and youmay grantspecific access rights to those users.
Note: To create users, youmust be logged as a Tina user allowed tomanage users (Users access rightsin the Security category).
To create a user
1. In theWeb Administration, expand your catalog in the Tina Explorer.2. Select Users. The Users pane opens.3. Click New User (+). The User CreationWizard opens.4. Enter the parameters to create a user in the User CreationWizard.
This table describes the parameters that you can set in the User CreationWizard:
Parameter Description
General Information pane.
User Name Enter a name for the user.
To create an LDAP user, youmust enter the namewith the exact LDAP syntax used toauthenticate (e.g., DOMAIN\userX, [email protected]).
You cannot modify the user name at a later stage.
The domain name is taken into account when identifying Tina catalog users: the userDOMAIN\userX is not the same user as userX or as [email protected].
86 Tina Administration
Configuring Users and Access Rights

Parameter Description
Password andConfirmPassword
Define a password, if needed and confirm it. Refer to Defining or Modifying Passwordsfor rules on password use.
Group Associate the user with a user group.
A user must belong to a group. Even if you have not yet created any group in Tina, thesystem group is available by default.
Comment Optional. Enter a comment to describe the user you are creating.
User Profile pane.
Use DefaultProfile
Select this option to assign the Default profile rights to the new user.
Use a ProfileBased on
Select this option to assign predefined user rights to the new user according to usertypes: Administrator, BackupOperator, Supervisor, or User. See About Tina UserProfiles.
Customize theprofile for the newuser
If you clear this check box, the default access rights of the selected user type will beassociated with the user.
If you select this check box, the next panes of the wizard let you customize the accessrights associated with the selected user type:
• Administration and supervision• Media• Backup and restore• Archiving• SecuritySee Configuring Tina Access Rights.
If you customize a user profile, the profile type of this user change to User Definedprofile.
5. Click Finish to validate the user creation. The newly created user displays in the user list.
Editing UsersEditing users enables you tomodify these parameters:• User Password• User Group• Comment• User Profile• Access Rights
• To edit users, youmust be logged as a Tina user allowed tomanage users (Users access rights inthe Security category).
• A user cannot belong to several groups at once, but you canmove the user from one group toanother.
• The catalog administrator can only belong to the system group which is automatically created whena catalog is created. The group of the catalog administrator cannot be changed.
Tina Administration 87
Configuring Users and Access Rights

To edit a user
1. In theWeb Administration, expand your catalog in the Tina Explorer.2. Select Users. The Users pane opens.3. Select the user to edit and click User Details. The User Details window opens.4. Modify the user parameters as needed.5. Click Apply and Close to validate the user modification.
Note: If you customize a user profile, the profile type of this user change to User Defined profile.
Deleting UsersDeleting users from the Tina catalog removes all their media, and therefore all their archived files, from thecatalog. The operation can be quite lengthy.
Note: To delete users, youmust be logged as a Tina user allowed tomanage users (Users access rightsin the Security category).
To delete a user
1. In theWeb Administration, expand your catalog in the Tina Explorer.2. Select Users. The Users pane opens.3. Select the user to delete and click Delete User.4. Click Yes to confirm the deletion. The deleted users are automatically removed from the group they
belonged to.
Defining or Modifying PasswordsDefining or modifying a password requires these permissions:• Tomodify the password of the catalog administrator, youmust be logged in as the catalog administrator.• Tomodify or define the password of any user (except the catalog administrator), youmust be logged as a
Tina user allowed tomanage users (Users access rights in the Security category).• Users have the right to change their own password.
To define or modify the password of an existing user
1. In theWeb Administration, expand your catalog in the Tina Explorer.2. Select Users. The Users pane opens.3. Select a user and click User Details. The User Details window opens.4. Select Change password.5. In the Password and Confirm fields, enter the new password.
Passwords must consist of at least 8 characters and contain at least:• 1 lowercase.• 1 uppercase.• 1 digit.• 1 special character.
6. Validate the password change by entering the password of the user making the change.7. Click Apply and Close.
Changing the User IdentityYou have the option of changing the current catalog user login without disconnecting and reconnecting to thecatalog.
88 Tina Administration
Configuring Users and Access Rights

To change user identity
1. In themain application toolbar, click the arrow near the current user.
2. In the Login window, enter the new user name and password.3. Click Login to validate.
Customizing the Default ProfileAt Tina initialization, the default profile allows users to create backup selections, restore data, managearchives, and archive data.
The catalog administrator canmodify the settings of this default user profile to apply a customized template tothe Tina users.
Note: The new default profile applies to all new users and all existing users based on the default profile.
To customize the default profile
1. Log on to theWeb Administration as the catalog administrator.2. In theWeb Administration, expand your catalog in the Tina Explorer.3. Select Users. The Users pane opens.4. Click Modify Default Profile. The Default Profile window opens.5. Select the check boxes corresponding to the rights that you want to grant the default profile, and clear
those that you want to deny. See Configuring Tina Access Rights.6. Click Apply and Close.
Exporting the User ListYou can export the list of users in CSV or PDF format.
To export the list of users
1. In theWeb Administration, expand your catalog in the Tina Explorer.2. Select Users. The Users pane opens.3. Select one or several users and click Export Users. The Export List window opens.4. Configure the appropriate export parameters. This table describes the parameters that you can set in the
Export List window:
Parameter Description
Export Enables you to export the entire list or only the selected lines.
Format Enables you to select the format of the export file (i.e., CSV or PDF).
End of line CSV format only. Enables you to select the end of line format:
• Windows (CRLF)• Linux (LF)• Classic macOS (CR)
FieldSeparator
CSV format only. Enables you to select the field separator, either , or | or ;
Tina Administration 89
Configuring Users and Access Rights

Parameter Description
Escapecharacter
CSV format only. Enables you to select the character to use to delimit a field value if itcontains a field separator character; either “ or ‘
Select the Always Add Escape Character check box if you want to delimit each field value withthe escape character.
5. Click Apply and Close to export the user(s). The File Download window opens.6. Click Save and select a location.
Managing User GroupsUser groups are used to perform archiving, and to define personal access rights for users. A user must belong toa group before he can be granted personal access rights. The system default group is present in the catalog.Youmay create additional groups as needed.
Users belonging to a user group are authorized by the administrator to archive data with the drives allocated totheir group. When users must label a cartridge, archive or extract archives from a local archiving folder withRestore & ArchiveManager, they must select one drive in the list of available drives allocated to their group.The administrator thereby controls the drives a user has access to.
For more information on associating a user group with a drive, see Editing Drives.
• To create, edit and delete user groups, youmust be logged as a Tina user allowed tomanageusers (Users access rights in the Security category).
• A user cannot belong to several groups at once, but you canmove the user from one group toanother.
• The catalog administrator can only belong to the system group which is automaticallycreated when a catalog is created. The group of the catalog administrator cannot bechanged.
To manage (create, edit, and delete) a user group
1. In theWeb Administration, expand your catalog in the Tina Explorer.2. Select Users. The Users pane opens.3. Click Edit User Group List. The User Group List window opens.4. To add a user group, click Add Item, and enter the name of the user group.
OrTo edit a user group, click the user group name andmodify it.OrTo delete a user group, select the user group and click Remove Item.
5. Click OK.
90 Tina Administration
Configuring Users and Access Rights

Configuring Tina Access RightsThe rights to access Tina functionalities are divided into these categories:
Administration and Supervision RightsThis table describes the access rights for administration and supervision that you can grant to the user:
Access Right Description
Supervision Allows to access a catalog in order to display its contents in theWeb Administrationand to perform these operations:
• Process alarms. If the user does not have the Supervision right, the alarms are in aread-only mode.
• Use administration objects (such as platforms, drives, libraries, media, users,etc.).
To create, edit or delete objects, it is also necessary to have the access right to thespecific object.
Platforms Allows to perform these operations:
• Create, edit, delete platforms (hosts and applications).• Enable and disable platforms.
Jobs Allows to process jobs through the Jobs interface.
If users do not have the Jobs right, they can only modify their own jobs. With the Jobsright, users canmodify the job status.
Libraries Allows to perform these operations:
• Create, edit, and delete libraries.• Associate drives with a library in theWeb Administration.• Define a cleaning slot through the Libraries interface.
Drives Allows to create, edit, and delete manual or robotized drives.
ConfigurationMulti Catalog
Allows to configure settings (parameters, notification, WebUI, and alarm filtering) in amulti-catalog environment.
Media RightsThis table describes the access rights for themedia that you can grant to the user:
AccessRight Description
Mediapools
Allows to perform these operations:
• Create, edit, and delete media pools.• Associate media pools with drives.
Tina Administration 91
Configuring Users and Access Rights

AccessRight Description
Snapshotdeletion
Allows users to delete unwanted snapshots.
See Tina SnapBackup.
Cartridgehandling
Allows users to access all the Tina cartridges to perform cartridge operations.
This right does not allow the user to duplicate cartridges. This right is not required to give theuser access tomedia pools during backup or restore operations.
Mountrequests
Allows to perform these operations:
• Perform requests to mount cartridges.• Have access toMedia Requests interface.• Move cartridges within a library (Libraries interface).• Bring cartridges on/off line (Libraries interface).• Empty drives (Web Administration and Libraries interface).
Drive use Allows to perform these operations:
• Identify drive contents.• Clean drives.• Test drives.• Enable/disable drives.
The user must have the Drives right defined in the Administration and Supervision category.
Libraryuse
Allows to perform these operations:
• Reinitialize libraries.• Enable/disable slots.
The user must have the Libraries right defined in the Administration and Supervision category.
Backup and Restore RightsThis table describes the access rights for the backup and restore that you can grant to the user:
Access Right Description
AllowedStrategies
Allows to use the selected backup strategies to perform a backup. Youmust select atleast one strategy.
Use ofstrategies
Allows to edit or delete backup strategies for all the platforms among the strategiesselected in the Allowed Strategies right.
Restore ofbacked up data
Allows to restore data.
Restore rights are dependent on the strategies selected in the Allowed Strategies rightbecause you can only synchronize on the versions backed up by a strategy you haveaccess to.
Backupselections
Allows to create, edit, and delete backup selections that are associated with thestrategies selected in the Allowed strategies right.
92 Tina Administration
Configuring Users and Access Rights

Access Right Description
Selection of therestoredestination
Allows to select a destination directory other than the original directory when restoringdata.
Backup start Allows to start a backup only for the strategies that are selected in the Allowed Strategiesright.
Restore from aremote platform
Allows to restore data from a remote platform.
On demandbackups
Allows the end-user to perform these operations:
• LaunchOnDemand Backups from agent hosts.• Cancel On Demand Backups already in progress.
Cross-restore Allows to restore another platform’s directories and files onto your own disk.
Archiving RightsThis table describes the access rights for the archiving that you can grant to the user:
Access Right Description
Archiving enabled Allows to use the Tina archive functionality.
Create archivefolder
Allows to create archive folders.
Archiveadministrator
Allows to define a user as an archive administrator. The user has access to all theTina folders and archives.
Edit archive folder Allows tomodify archive folders.
Access to foldercontents
Allows to view archive folders.
Delete archivefolder
Allows to delete archive folders.
Allow archiving Allows to archive data.
Create archive Allows to create archives.
Allow archiverestore
Allows to restore archives.
Edit archive Allows tomodify archives.
Delete archive Allows to delete archives.
Tina Administration 93
Configuring Users and Access Rights

Security RightsThis table describes the access rights for the security that you can grant to the user:
AccessRight Description
Users Allows to perform these operations:
• Create, edit, and delete users.• Create, edit, and delete user groups.• Associate drives with user groups.
If users do not have the Users right but have the Supervision right that allows them to useWebAdministration in Supervisionmode, they will be able tomodify their own password.
Certificates Allows tomanage certificates to secure backup and restore operations.
Securitytemplates
Allows tomanage security templates.
Securityrules
Allows tomanage security rules.
You can define the access rights for Tina users when creating/editing users or customizing the default profile.SeeManaging Users.
Note: To define or modify access rights for Tina users, youmust be logged in as the Tina catalogadministrator.
94 Tina Administration
Configuring Users and Access Rights

CHAPTER7-Device &Media ManagementThese topics give information on Device & MediaManagement:• About Devices• Libraries• Drives• Media Pools• Cartridges• Exporting the Lists of StorageObjects• Deduplication Storages and Pools
About DevicesThe term devices designates libraries and drives.• Libraries may be either:
– Physical. Peripherals that use tape cartridges or other media to store externalized data, providingan automated system tomove these cartridges into drives.
– Virtual. Systems that emulate the physical structure on a hard disk, using files to represent thecartridges. Tina has a proprietary Virtual Library System, managing access to the library files ondisk directly.
• Drives connected to the libraries tomanage data transfer between the cartridges in the library slots andthe file systems of the protected computers.
Physical and virtual libraries and drives used for data backup and restore with Tinamust be recognized anddeclared within it. This can be done automatically or manually.
LibrariesThese topics list all the information about Library:• About Libraries• Creating a Library Manually• Creating a Library Using the Device Discovery Wizard• Managing Simultaneous Access to Library Shared Drives
About LibrariesTina distinguishes between several kinds of libraries, depending on the protocols used tomanage them and ontheir physical architecture.• Traditional physical Libraries. Devices using the SCSI protocol to control themounting and
unmounting of cartridges in robotized drives. A device descriptor designates the configuration SCSIparameters. These libraries consist of:– One or several drives.– Slots (from a few to several hundred). The library can contain as many cartridges as it contains
slots.– Optionally, one or several mailboxes which are used for adding or removing cartridges from the
library.
Tina Administration 95
Device & MediaManagement

• Software Controlled Libraries. (i.e., libraries havingmore than 600 slots). They are too large for theSCSI protocol to manage them. An extra software layer is added to interface between the library andTina. Tina dialogs with the software rather than directly through SCSI with the device itself. Hence, theydo not have a device descriptor, but are configured by setting parameters in the software.
• Virtual Libraries. Emulations on disk of the traditional SCSI protocol libraries. They are configured inthe sameway as physical libraries, and require a device descriptor, except for this case:Atempo’s proprietary Virtual Library Systemmust be set upmanually using its own interface. This iscovered in a separate topic of this documentation. See Backup to Disk with Virtual Library System.
Library ReinitializationInconsistency may appear followingmanual operations (e.g., cartridgemove not requested by Tina), and theactual contents of the library may no longer correspond to the contents of the catalog. The reinitialization of thelibrary is then required.
Reinitializing a library enables Tina tomatch the library logical status with its actual physical status. The logicalstatus is the image of the library Tina builds in the catalog.
Allocating a library and at least one of its drives is required. If allocation fails, reinitialization waits until a drivebecomes available.
Note: When a catalog restore is performed, youmust reinitialize the library.
Relationship between Libraries, Drives, and CartridgesA distinctionmust bemade between the use of a library and the use of the library drives.
The library is allocated when a cartridgemount request is issued. The picker (mechanical arm)moves acartridge from a slot to a drive or from a drive to a slot.
Robotized or not, a drive is allocated to a cartridge if it is used for reading or writing on cartridges. Drives may beallocated while the library is not and inversely.
You can add or remove cartridges to and from the library. These operations are known as bringing cartridges on-line and offline.
Bringing cartridges on-line requires that:• The library be allocated tomove cartridges.• A drive be allocated to read labels of cartridges added into the library. If all library drives are allocated, the
operation is cancelled.
Bringing cartridges offline only requires that:• The library be allocated tomove cartridges if a mailbox is used.• A library drive be allocated if the cartridge brought offline is located in a drive.
Configuring a Library on WindowsOnWindows platforms, if the OS library driver is set to amode other than Unknown Media Changer, Tinacannot use the library. If this is the case, youmust manually edit the OS library driver to set it to Unknown MediaChangermode, and restart themachine.
Creating a Library ManuallyNote: Before creating a library with Tina, ensure that you have installed the SCSI adapter for the library.
To create manually a library
1. In theWeb Administration, expand your catalog in the Tina Explorer.
96 Tina Administration
Device & MediaManagement

2. Select Storage Libraries. The Libraries pane opens.3. Click Create new library (+), and select New Library. The Library CreationWizard opens.4. Enter the appropriate parameters to create a new library. This table describes the parameters you can find
in the Library CreationWizard:
Parameter Description
CreationMethod
Select Create a library manually. It lets you createmanually a library.
Local HostSelection
Select a host.
GeneralLibraryInformation
Library Name. Name of the library.
Library Type. Select the library type.
Device Descriptor.
The protocol used to access the library is always the Tina protocol, even if the host accessingthe library has been set to use the NDMP protocol. As a result, the device descriptor mustalways respect the Tina format, not the NDMP format.
The colon character ":" is not allowed for the library device descriptor definition.Windows. SCSI address of the library. The Device Descriptor must be entered in cxbytzlaformat, where:
• x is the number of the SCSI controller.• y is the number of the bus.• z is the number of the SCSI target.• a is the LUN number.
The Device Descriptor information can be found in theWindows Administrative Toolsdirectory. See your operating system documentation.macOS. For example: qc0
Unix. Path of the file allowing access to the library, (e.g., /dev/qc).
Comment. Enter a comment or a description if needed.
LibraryDrives
Use Existing Drives. Select drives in the list. Click Next.
Declare New Drives. Enter the general parameters of the drives:
• Number of drives to add: Enter the number of drives associated with the library.• Drive name prefix: Enter a drive name prefix.• Drive type: Select the drive type.In the next pane, select the drives. Enter a different drive index for each selected drive. ClickNext.
5. Click Finish to validate the creation of the library.The newly created library displays in the library list.
Note: The creation and configuration of the Atempo Virtual Library System, is covered in a separatetopic of this documentation, Backup to Disk with Virtual Library System.The creation and configuration of ACSLS Software Controlled Libraries is discussed in a separatetopic of this documentation, see Atempo-Tina for ACSLS/LibraryStation.
You can now customize the library behavior by editing it. Should you decide to change any of the libraryproperties, be extremely careful as it could greatly disturb Tina functioning.
Tina Administration 97
Device & MediaManagement

See Advanced Library Properties.A library Reinitialization (barcode) is automatically performed when the library is first created. Thisreinitialization provides information to the catalog concerning the slots and drives empty/full status.See Reinitializing a Library.If you want to run the Drive position test, see Testing the Drive Position in the Library.
Creating a Library Using the Device Discovery Wizard• Before creating a library with Tina, ensure that the SCSI adapter for the library has been
installed.
• Tina only supports libraries for which it can retrieve the indexes associated with the serialnumbers of the drives.
To create a library using the Device Discovery Wizard
1. In theWeb Administration, expand your catalog in the Tina Explorer.2. Expand the Storage node, and click Libraries. The Libraries pane opens.3. Click Create new library (+), and select New Library. The Library CreationWizard opens.4. Enter the parameters to create a new library.
This table describes the parameters that you can set in the Library CreationWizard:
Parameter Description
Creation Method Select Use Device Discovery (only for devices with serial id).
Storage NodeSelection
Select themachine on which the Device Discovery will be executed.
LibraryDiscovery
Once the device discovery is completed, the list of discovered libraries displays.
Select a library.
In the Name column, you canmodify the library name.
In the Type column, you can select one of the proposed types, if any.
Library Drives Select a drive in the list.
In the Name column, you canmodify the drive name.
If there are several drives, in the Position column, you can enter a different libraryindex for each selected drive.
5. Click Finish to validate the creation of the library.The newly created library displays in the library list.
Note: The creation and configuration of the Atempo Virtual Library System, is covered in a separatetopic of this documentation, see Backup to Disk with Virtual Library System.The creation and configuration of ACSLS Software Controlled Libraries is discussed in a separatetopic of this documentation, see Atempo-Tina for ACSLS/LibraryStation.
You can now customize the library behavior by editing it. Should you decide to change any of the libraryproperties, be extremely careful as it could greatly disturb Tina functioning. See Advanced LibraryProperties.
98 Tina Administration
Device & MediaManagement

A library Reinitialization (barcode) is automatically performed when the library is first created. Thisreinitialization provides information to the catalog concerning the slots and drives empty/full status. SeeReinitializing a Library.If you want to run the Drive position test, see Testing the Drive Position in the Library.
Managing Simultaneous Access to Library Shared DrivesAtempo-Tina Library SharingManager (herein called Tina Library SharingManager) manages simultaneousaccess to library shared drives by several catalogs. The catalogs can be located on several servers. TinaLibrary SharingManager works at the library handler level.
Overview
Library
A library (or robot) manages themounting and unmounting of cartridges in robotized drives.
The library is composed of:• One or several drives• Slots to store cartridges• A picker to move cartridges• Optionally, one or several mailboxes that add or remove cartridges to/from the library.
You can dedicate all these resources to a single catalog or shared between several catalogs.
Some resources are actually shared while others belong to a specific catalog:• The picker and themailboxes are shared by all the catalogs defined in Time Navigator.• Slots must be allocated to a single catalog through the qc_split driver mechanism.• Drives are either allocated to a single catalog through the qc_split driver mechanism, or dynamically
shared between catalogs through Library SharingManager.
The Time Navigator library sharing process consists of dividing a library into a set number of logical libraries.
A logical library is composed of these subsets:• A subset of the physical library slots.
Tina Administration 99
Device & MediaManagement

• A subset of the physical library drives.
The library picker andmailboxes are shared between the logical libraries.
100 Tina Administration
Device & MediaManagement

qc_split Driver Mechanism
The qc_split driver mechanism is used to define and control the logical libraries and to assign a logical library toa catalog.
Tina Administration 101
Device & MediaManagement

Library Sharing Manager
You can share drives between several logical libraries, therefore between several catalogs that can be locatedon different servers, through Library SharingManager. Library SharingManager automatically assigns thedrives to the catalogs.
• A shared drivemust have the same name on all the catalogs.
• Catalogs sharing a set of drives may be located on differentservers.
Configuration
Prerequisites
Prior to configuring and using Library SharingManager, ensure that the driver and operating systemprerequisites aremet.
"qc" Driver
The qc driver corresponding to the Tina server operating systemmust be installed on themachine controllingthe library. The role of the qc driver is to control all the robotized components.
For some operating systems, the qc driver installation is handled by the Tina setup. If this is not the case,consult the Tina Drivers Documentation to install it.
Note: If using a virtual library, the qc driver is not necessary.
Operating Systems
Library SharingManager is only available on these operating systems:• Windows• IBM AIX
102 Tina Administration
Device & MediaManagement
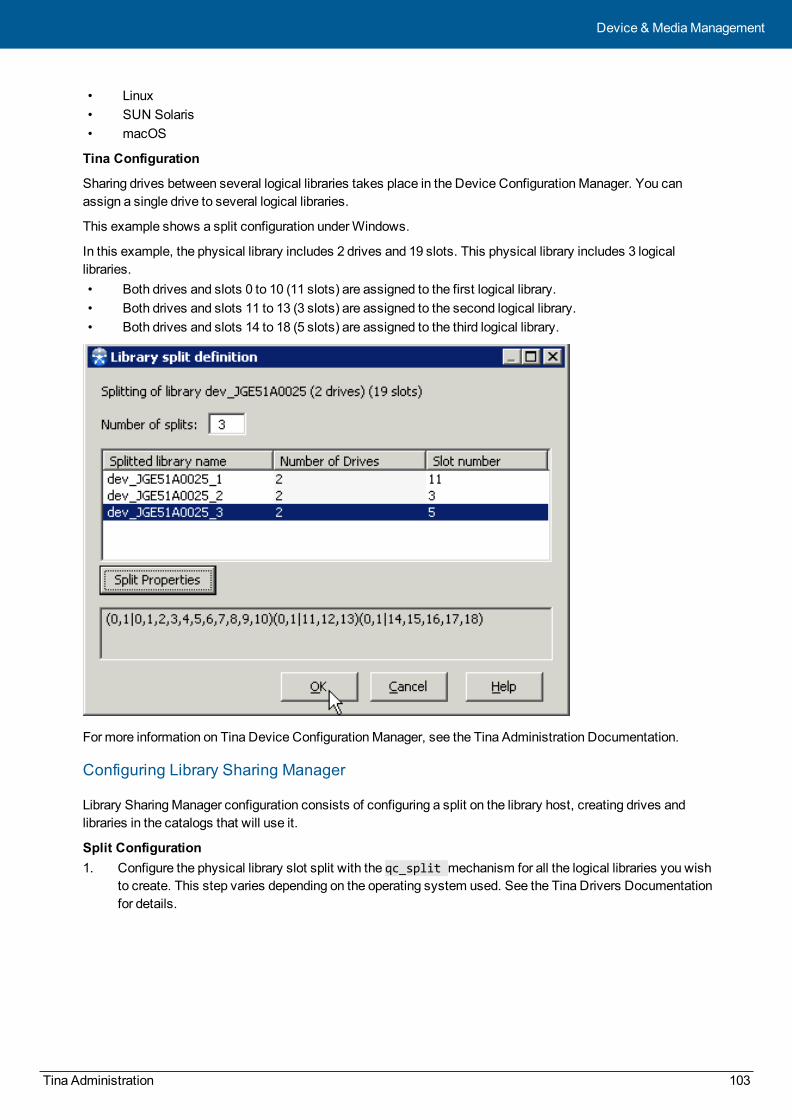
• Linux• SUN Solaris• macOS
Tina Configuration
Sharing drives between several logical libraries takes place in the Device ConfigurationManager. You canassign a single drive to several logical libraries.
This example shows a split configuration underWindows.
In this example, the physical library includes 2 drives and 19 slots. This physical library includes 3 logicallibraries.• Both drives and slots 0 to 10 (11 slots) are assigned to the first logical library.• Both drives and slots 11 to 13 (3 slots) are assigned to the second logical library.• Both drives and slots 14 to 18 (5 slots) are assigned to the third logical library.
For more information on Tina Device ConfigurationManager, see the Tina Administration Documentation.
Configuring Library Sharing Manager
Library SharingManager configuration consists of configuring a split on the library host, creating drives andlibraries in the catalogs that will use it.
Split Configuration1. Configure the physical library slot split with the qc_split mechanism for all the logical libraries you wish
to create. This step varies depending on the operating system used. See the Tina Drivers Documentationfor details.
Tina Administration 103
Device & MediaManagement

2. List the device descriptors associated with each logical library. The creation of the descriptor varies withthe operating system used.These are two examples of descriptors:Unix:/dev/qc0,0 for the first logical library,/dev/qc0,1 for the second one ... etc.Windows:cXbYtZlNs0 for the first logical library,cXbYtZlNs1 for the second one ... etc.See the Tina Drivers Documentation for details.
3. Identify and name the drives to be shared. List the device descriptors associated with the drives for eachmachine.
Library Creation
These library creation steps must be performed inWeb Administration and repeated for each catalog.
See the Tina Administration Documentation for details concerning the library creation procedure.
1. Create a library. Use the device descriptor identified in Split Configuration.
2. In the New Library window, click Advanced Properties.
3. In the Standard tab, select the Shared Library option to enable Library SharingManager. TheDismount Media after Use option is automatically selected and cannot be deselected. Click OK.
Drive Creation
These steps must be performed inWeb Administration for each shared drive. Repeat these steps for eachlogical library.
See the Tina Administration Documentation for details concerning the drive creation procedure.> Create a drive with the name and device descriptor defined in Library Creation.
Note: A drivemust have the same name in each logical library.
Declaring the Split in the Catalogs
In the second and subsequent catalogs sharing the library, it is necessary that the library be declared.
1. Note the device descriptor of the Shared Library and the names and descriptors of any shareddrives.
2. In the second catalog, if the host to which the library is attached does not yet exist, create it as aclient.
3. Select this client. Create the library (menu Devices Library New) on it. Enter the devicedescriptor of the split attributed to the catalog.
4. If you have not already done so, create the shared drive or drives on the client (menu Devices Drive New). The shared drives must have exactly the same names and device descriptors asin the shared library of the primary catalog.
5. Associate these drives with the library.
• A shared library must have the same name as the shared drives and catalogs.
• The logical indexing of the shared drives in a split begins at 0, even if they began at a higherindex in the split definition.
104 Tina Administration
Device & MediaManagement

If there is no sharing of drives, configure the library as in topic Split Configuration and Library Creation, but donot activate Library SharingManager by leaving the Shared Library box unselected in the Advanced LibraryProperties.
Cleaning Configuration of a Shared Library
When the drives of a library are being shared between several catalogs, Atempo strongly recommends that thecleaning bemanaged by only one of the catalogs.
In the catalog that manages the cleaning of the drives:
Configuring the Cleaning of a Shared Library
To configure the cleaning
• In Library Manager, in the Advanced Properties window of the Shared Library, under the Standard tab:– The library must have the property Shared Library selected.– The library must have the property Cleaning Slot selected.– A cleaning cartridgemust be present in the specified slot.
• In the Drive Properties Window (Web Administration Devices Drive Properties), under theInformation tab:The drivemust have the property Cleaningmanaged by Tina selected.
• The cleaning cartridgemust be replaced using the commands On-line andOff-line of themenu Slots Cleaning Slot of Library Manager.
• In the other catalogs:– The library must have the advanced property Shared Library selected.
Tina Administration 105
Device & MediaManagement

– No cleaning slot in the shared library Advanced Properties.– The drives must not have the property Cleaningmanaged by Tina selected in the Drive Properties
Window.
If a manual cleaning becomes necessary, it must be launched from the one catalog that manages cleaning.
Updating Library Sharing Manager
The information displayed in the Drive Status tab of Library SharingManager is automatically updated every fiveseconds.
The information displayed in the History of Usage tab of Library SharingManager is not automatically updated.Youmust use this procedure to refresh the window.
To update information of the History of Usage tab
> Select View Refresh.
Note: You can also press F5 to update information.
Library Shared between Several Instances
If your library must be shared between several Tina environments, whenmigrating your catalogs one by one to ahigher version of Tina for instance, a specific configuration is required: both environments must use the sameinformation file, so that they are synchronized with one another.
Youmust specifiy the full path of the LSM directory by adding the tunable LSM Information File Location (lsm_path) on the Library SharingManager server.
By default, the LSM directory path is $TINA_HOME/Conf/LSM on Unix and %TINA_HOME%\Conf\LSM onWindows.
Important: Spaces in the tunable values are only supported as of Tina version 4.1.0. If one of theenvironments sharing the library has an earlier version, and that there are spaces in the path, use a link onUnix and the short path name onWindows.
Drive Status and Usage
Starting the Interface
This tina_lsm programmust be started on the Tina station that controls the library.
To start Library Sharing Manager
> Execute this command in the Bin directory of the Tina installation directory:Under Unix: tina_lsmUnderWindows: tina_lsm.exeLibrary SharingManager displays.
106 Tina Administration
Device & MediaManagement

Viewing the Shared Drive Status
The Drive Status tab of Library SharingManager displays all the shared drives and their current status in a table.The tab information is automatically updated in real time.
This table indicates the information you can display in the Library SharingManager.
The five default columns are:• Drive• Catalog• Enabled• Allocated• Full
Column Choice Window
Use this window tomodify the column selection in the Drive Status tab of Tina Library SharingManager.• All: Displays all columns in the Drive Status tab.• Invert: Makes all selected columns unselected and, inversely, all unselected columns selected.• Hidden Columns: Lists the columns that are not displayed in the Drive Status tab.• Visible Columns: Lists the columns that are displayed in the Drive Status tab.• > Button: Once columns are selected in the Visible Columns list, use the > Button tomove the selected
columns to the Hidden Columns list. You can also double click columns individually to move them to theHidden Columns list.
• < Button: Once columns are selected in the Hidden Columns list, use the < Button tomove the selectedcolumns to the Visible Columns list. You can also double click columns individually to move them to theVisible Columns list.
Columns to Select
Column Description
Drive Drive logical name (namewhich displays inWeb Administration).
Catalog Name of the catalog which uses the drive.
Tina Administration 107
Device & MediaManagement

Column Description
Enabled Enabled or disabled status of the drive for ALL the catalogs.
YES: the drive is ready to be used by all catalogs.
NO: no catalog can use the drive.
Do not confuse this information with the one displayed inWeb Administration.
Enabled Since Last modification date of the enabled or disabled status of the drive:
Enabled if the Enabled column is set to YES.
Disabled if the Enabled column is set to NO.
Allocated Allocated or unallocated status of the drive.
YES: the drive is reserved by only one catalog. The catalog name displays in theCatalog column.
NO: the drive is not reserved by a catalog.
Allocated Since Last modification date of the allocated or unallocated status of the drive:
Allocated if the Allocated column is set to YES.
Unallocated if the Allocated column is set to NO.
Full Full or empty status of the drive.
YES: the drive contains a cartridge. The drive is reserved by only one catalog. Thecatalog name displays in the Catalog column.
NO: the drive is empty.
Full Since Date since the last cartridgemounting or unmounting:
Cartridgemounting if the Full column is set to YES.
Cartridge unmounting if the Full column is set to NO.
Use Since LastCleaning (Hr)
Number of hours the drive has been used since its last cleaning.
Barcode Barcode of the cartridgemounted in the drive.
Hours of Use Number of hours the drive has been used.
Volume Read Volume read in the drive since its creation.
Volume Written Volumewritten in the drive since its creation.
Number of Mounts Number of mounts performed in the drive since its creation.
Number ofCleanings
Number of cleanings performed in the drive since its creation.
Selecting Columns to View
To select columns to view
1. Select View ColumnChoice. The ColumnChoice window opens.
108 Tina Administration
Device & MediaManagement

2. Select the columns you want to view:• Click All to view all columns.• Click Invert to make all selected columns unselected and inversely, all unselected columns
selected.• Double-click columns individually to move them back and forth between the Visible
Columns/Hidden Columns.• Select columns individually or in multiple selections and use the arrow buttons (‘<’ ‘>’) to move
columns from one list to the other.3. Click Close.
Adjusting the Column Width
To adjust the column width to its contents
1. Click and drag the right edge of the column heading to widen or narrow it.2. To return all columns to their default size, select View Adjust Columns.
Sorting Drive Information by Column Content
To sort drive information by column contents
1. Double-click in the column heading you want the drive information to be sorted by.2. On the first click, sorting will be ascending.
Under Unix, an upward pointing arrow displays in the column heading's right corner.3. Click a second time to sort in descending order.
Under Unix, a downward pointing arrow displays in the column heading's right corner.
Statistics Window
Statistics Window Parameters
Use this window to display and reset the statistics of the drive you selected in the Drive Status tab of LibrarySharingManager. The drive statistics apply to ALL the catalogs sharing the drive.• Hours of Use: The number of hours the drive has been used.• VolumeRead: The volume read in the drive since its creation.• VolumeWritten: The volumewritten in the drive since its creation.• Number of Mounts: The number of mounts performed in the drive since its creation.• Number of Cleanings: The number of cleanings performed in the drive since its creation.• Use Since Last Cleaning (Hr): The number of hours the drive has been used since its last cleaning.• Reset: Changes all the values to 0.
Viewing and Resetting the Statistics of a Drive
The Drive View Statistics menu enables you to display statistics of the selected drive. The drive statisticsapply to ALL the catalogs sharing the drive.
Viewing the Statistics of a Drive
To view the statistics of a drive
1. In the Drive Status tab, select a drive in the list.2. Select Drive View Statistics.
Tina Administration 109
Device & MediaManagement

The Statistics window opens. It contains all the statistics of the selected drive.
Note: If the drive cleaning was performed by manually inserting the cleaning cartridge in the drive, you canreset the Use since Last Cleaning (Hr) field value to 0.
You can also reset all the drive statistics.
Resetting the Statistics of a Drive
To reset the statistics of a drive
1. In the Drive Status tab, select a drive in the list.2. Select Drive Reset Statistics. The values are changed to zero.
• The operation could be useful after drivemaintenance but should be usedcautiously.
• This can also be performed by clicking on Reset in the Statistics window.
Or
1. In the Drive Status tab, select a drive in the list.
2. Select Drive View Statistics. The Statistics window opens.
3. Click Reset.
For more information on resetting statistics, see Changing the Logical Status of a Drive.
Drive Logical Status
Changing the Logical Status of a Drive
Using the Drivemenu, you can reset a drive logical status. Resetting a drive logical status can be useful whenmaintenance operations are performed or when a drive fails or has been replaced.
Note: These operations do not verify the drive actual status. They should be used cautiously and are notrequired under normal conditions.
110 Tina Administration
Device & MediaManagement

To change the logical status of a drive
1. In the Drive Status tab, select a drive in the list.2. From the Drivemenu or the pop-upmenu (right click), select one of the available operations described in
this table:
Operation Description
Disabled Sets the Enabled drive status to NO. The drive is unavailable to all the catalogs.
The drive cannot be used for any job. If a job is in progress in a catalog, it will be completed. Thedrive Disabled status is taken into account when the drive is accessed and information is sent toall the catalogs.
Updates the Enabled Since date.
Enabled Sets the Enabled drive status to YES. The drive is available to all the catalogs but its status isnot updated in all the catalogs. You have to enable the drivemanually, catalog per catalog, in theWeb Administration.
Updates the Enabled Since date.
Release Sets the Allocated drive status to NO. The drive is not longer reserved by a catalog. Updates theAllocated Since date.
EjectMedia
Sets the Full drive status to NO. The drive is empty.Useful when applications managing cartridges aremalfunctioning (example: LSM internalinformation is no longer automatically updated). Updates the Full Since date.
ResetStatistics
Sets to 0 the drive statistics. The command is useful after drivemaintenance.
Viewing the Shared Drive Usage History
History of Usage
The History of Usage tab of Library SharingManager displays the current and past usage of the drives. Thewindow is composed of threemain areas:• The Drive List area: lists all the drives shared through Library SharingManager. The list of the catalogs
sharing the drive is also indicated for each drive.• The Usage area: gives a graphical representation of the shared drive usage history. The use time of each
drive for a given catalog is represented by a yellow strip.• The Time Scale area: defines the time interval in days of the usage history. The dates located on the
bottom left and right of the drive usage history represent respectively theminimum andmaximumdisplayed dates. The actual time interval shown depends on the period of time you select with theDuration sliding button located below the drive list. Themaximum duration is 30 days. The time scaleunit can vary from a second to a week depending on the duration and the window size you are using.
Tina Administration 111
Device & MediaManagement

This image illustrates the Library SharingManager interface:
You can refresh the window using the View Refreshmenu or the F5 key.
When Library SharingManager is first launched, by default the display is set to Detail View. As this mode candisplay toomany items, youmay unselect the View Detail View option. You will get a summary view withonly one line per drive.
Note: Use the Displayed LSM Historic Period (historic_period) tunable to specify the default timeinterval displayed when opening the window.For details on tunables, see the Tina Tunables Documentation (XML format).
History Purging
Purging the History of Use on Shared Drives
The history of use for the shared drives is purged on a daily basis at 16:50. At that time, all the records olderthan 28 days are removed from the history.
To Purge the History
You canmodify the time when the history cleaning is performed by using the tunable LSM History Purging Time(lsm_hist_purge_date).
You can alsomodify the number of days the records are kept in the history, by using the tunable Retention Timefor LSM Records (lsm_hist_duration).
For details on tunables, see the Tina Tunables Documentation (XML format).
DrivesThese topics give information on Drives and detail the procedures:• About Drives• Creating a Drive• Changing theMode of the Drive• Drive Information• Testing Drives
112 Tina Administration
Device & MediaManagement

• Automatically Cleaning Drives• Manually Cleaning Drives• Editing Drives• Deleting Drives• Identifying the Contents of a Drive• Ejecting aMedia from aDrive• Exporting the Drive List
About DrivesDrives are storage devices (backup and archiving). Tina supports many types of drives, (e.g., LTO, T10000,3592, DVD-RAM, etc.). You can also create a VTLDisk Drive in lieu of a regular drive to perform backups ondisk rather than on cartridges.
A user can use every declared drive, as long as he has the necessary rights to access it. A drive is available if itis enabled and not in use. When a drive is enabled, the application assumes that it will use the drive exclusively.
Local Drives vs Shared DrivesA local drive is connected to only one host (i.e., any Windows, Unix, or macOS machine that is client or serverof Tina). This host controls the drive.
A shared drive is connected to a SAN (Storage Area Network). Several hosts can control the drive through theSAN.
Several Tina catalogs can share the same drive, regardless of whether it is a local or a shared drive, using theLibrary SharingManager module.
DVD-RAM Drives
Note: DVD-RAM are supported onWindows platforms only.
• DVD-RAM drives belong to theMagneto-optical Drive category. They aremostly used for archivingpurposes.
• The device descriptor of a DVD-RAM drive is the drive letter assigned in the file system, (e.g., D:).• Youmust use amedia pool dedicated to the DVD-RAM drive.• Due to performance reasons, disabling the DVD-RAM drive cache is not supported.
WORMDrives• WORM (Write Once ReadMany) drives enable for non-rewritable, non-erasable data storage onWORM
media. They aremainly used for legal archiving purposes.• You canmount WORMmedia only in a drive declared as aWORM drive, (e.g., LTO6, Ultrium 5, etc.).
Note: Ensure that you do not mix WORM andWMRM (Write Many ReadMany) drives in the samelogical library. Tina does not support Mixing different types of media for the same drive.
• Cache and performance.To improve reading and writing performances, some optical WORM drives are equipped with a cache thatyou can enable and disable. By default, Tina disables this cache to prevent the catalog from beingdesynchronized from the actual media content, should a power cut occur. To enable the cache, at youown risk, set the "Enable optical cache on write" tunable (enable_optical_write_cache).See Tunables and the Tina Tunables Documentation.
Tina Administration 113
Device & MediaManagement

Drive Loading ModeFor amanually operated drive, you are asked tomount/unmount the cartridges (e.g., to insert a labelled, non-labelled or cleaning cartridge into the device) that Tina requires.
Note: Be aware that Tina does not support manual optical drives.
For a robotized drive, the cartridge operations needed by the application are performed without your intervention.You are only required to bring cartridges online and offline.
In both cases, mounting requests display in both the Current Activity Media Requests line (for the currentcatalog) and theGlobal Activity Media Requests line (for all catalogs).
SeeMedia Requests.
Drive CleaningIf you use old generation drives, youmust clean them on a regular basis to maintain them in good workingcondition.
Tina keeps track of the number of times a drive has been used, and uses various settings to control the drivecleaning. Tina triggers a cleaning request automatically when the Time of Use since the Last Cleaning is greaterthan the Time of use Before Cleaning parameter.
If you use new generation drives, Atempo recommends you to only clean them after an incident.
Note: Drive cleaning only applies to physical drives. Virtual drives do not require cleaning.
Drive cleaning operations have priority over any other operation requiring a drive, (e.g., backup, archiving, etc.)except if the other operation is already in progress; in these specific cases the cleaning waits for the operationto end before proceeding.
If you cancel a cleaning request, the following requested operation is performed and Tina requests the drivecleaning again the next time it is used.
The cleaning operation status (manual or automatic) depends on:• The drive loadingmode (manual or robotized).• The presence or not of a slot reserved for the cleaning cartridge.• The presence or not in the drive of a cleaning cartridge that is not worn out.
114 Tina Administration
Device & MediaManagement

This image illustrate the cartridge cleaning flow:
To automate the cleaning operation, reserve a slot in the library for the cleaning cartridge and ensure that acleaning cartridge is in the cleaning slot. Tina also handles the cleaning cartridge wear according tomanufacturer specifications and requires you to change the cleaning cartridge when it is worn.
In the case of manual cleaning, a dialog box prompts you to insert a cleaning cartridge in the device and tospecify the end of the cleaning operation.
Creating a DriveTo create a drive or to set up a disk drive that emulates drive operation from a hard disk, youmay use thisprocedure.
• Optical drives, other than DVD-RAM, do not support themanual mode. They must berobotized.
• You cannot use a Disk Drive alone with a network drive, whatever the operating system.Youmust use a Virtual Library System (VLS). For more details on creating a Virtual LibrarySystem, see Creating a VLS.
For more information on declaring a shared drive, see Creating a Shared Drive.
To create a drive
1. In theWeb Administration, expand your catalog in the Tina Explorer.2. Select Storage Drives. The Drives pane opens.3. Click New Drive (+). The Drive CreationWizard opens.4. Enter the parameters to create a drive in the Drive CreationWizard.
Most of the drives use standard parameters. For these drives, the Drive CreationWizard displays theappropriate standard panes.See Parameters to Create a Local Drive for details.Centera, Disk Drive, and HyperStream Server drives require some specific parameters. For Centera andDisk Drive drives, see Centera and Disk Drive Drives.For HyperStream Server drive, see the HyperStream Server Documentation.Additionally, you get some specific panes when you create a SAN-attached drive. See Parameters toCreate a SAN-attached Drive for details.
Tina Administration 115
Device & MediaManagement

Parameters to Create a Local DriveThis table describes the parameters that apply to most of the drives and that you can set in the standard panesof the Drive CreationWizard to create a local drive:
Parameter Description
General Drive Information.
Drive Name Name of the drive. This namemust be unique within the entire catalog.
You cannot use the colon character ":" in the name of the drive.
Drive Type Type of the drive.
Click the ... button and select the appropriate drive type.
Comment Optional. Enter a comment to describe the drive you are creating.
Cartridge LifeCycle (points)
Cartridge wear parameter, (e.g., 1,500 life points).Tina automatically enters a default value depending on your drive.
See CartridgeWear.
Local Drive(Not SANattached)
Indicates whether the drive is local or attached to a SAN (i.e., available to more than onehost).
Ensure that you check this check box.
Local hostselection
Select the host to which the drive is attached.
116 Tina Administration
Device & MediaManagement

Parameter Description
DeviceDescriptor
Enables you to enter the device descriptor for the drive.
Windows. Represents the drive SCSI address. The device descriptor must be entered inTape0 format.
The device descriptor of a DVD-RAM drive is the drive letter assigned in the file system,(e.g., D:).
The Device Descriptor information can be found in theWindows Computer ManagementTool. See your operating system documentation.macOS. For example: tape0
Unix. Absolute path of the drive descriptor.
Use a no-rewind device and specify a non Berkeley device.
These are some examples of paths:
• IBM AIX: /dev/rmt0.1• SUN Solaris: /dev/rmt/0cn• HP-UX: /dev/rmt/0mn• Linux: /dev/tape/by-id/[UUID]-nst• SGI ISSP: /dev/rmt/tps0nrvc
Drives attached to the same host have their own unique device descriptor. Do not use thesame descriptor for all drives.To check that the Device Descriptor being used is correct, perform a drive test asdescribed in Testing Drives.• The protocol used to access drives is always the Tina protocol, even if the host
accessing the drive is set to use the NDMP protocol. As a result, the device descriptormust always respect the Tina format, not the NDMP format.
If the created drive is a Disk Drive, the device descriptor matches the absolute path of thedirectory into which the data will be stored.
Library selection.
The drive isstandalone(manual drive)
Indicates that the drive is not part of any library.
The drivebelongs to alibrary
Select the library that contains the drive.
Drive index inLibrary
Mandatory. Specifies the index number assigned to the drive in the library.
Tina Administration 117
Device & MediaManagement

Parameters to Create a SAN-attached DriveThis table describes only the parameters that you can set in the standard panes of the Drive CreationWizard tocreate a drive that is connected to a SAN:
Parameter Description
General Drive Information.
Local Drive (Not shared) Indicates whether the drive is local or attached to aSAN (i.e., available to more than one host).
Ensure to clear this check box.
Drive network.
Define a new Storage Area Network (SAN) Creates a new SAN to connect the drive.
Use an existing Storage Area Network (SAN) Enables you to connect the drive to an existing SAN.
Enter the name of a new SAN Enter a name for the SAN you are creating.
Enter the comment Optional. Enter a comment to describe the drive youare creating.
Drive connection selection.
Enables you to associate hosts with the drive in a SAN environment.
Select an existing host.
OrClick New (+) to open the Drive Connection Details window and complete the appropriate fields.
Host Name of the SAN to which the drive is connected.
Device Descriptor Local device descriptor on the host.
Status Select whether the drivemust be Enabled orDisabled.
TiNa Protocol Defines a standard protocol of device connection.
Select this radio button when using thesetechnologies: SCSI, SAS, SAN/Fiber Channel, andiSCSI.
NDMP Protocol Defines the NDMP protocol of device connection.
Complete these fields:
• Network Name. Drive network name.• User. NDMP user.• Password. NDMP user password.• Version. NDMP version.Click Apply and Close.
118 Tina Administration
Device & MediaManagement

Parameter Description
OrClick Choose Device Links (<-) to launch the device discovery and open the Device Link Selectionwindow. It automatically detects all the device links on storage node hosts corresponding to thedrive type you are creating. Select one or several device links in the list and click Apply and Close.
Centera and Disk Drive DrivesThis table describes the parameters that you can set only for Centera and Disk Drive drives in the appropriatepanes of the Drive CreationWizard:
Parameter Description
General Drive Information.
Media Size (MB) Enter theminimum size amediamust have.
Disk Drive. The valid range runs from 256 MB to 200 GB.
Directory for thevirtual tape files
Manually enter the absolute directory path or click ... to browse your system for adirectory.
You cannot use Disk Drives alone if the directory for the virtual tape files is located ona network drive. Youmust use a Virtual Library System (VLS).
For more details on creating a Virtual Library System, see Creating a VLS.
Number of drivesto create
Only Disk Drive. Specify the number of drives that must be created.
5. In the Summary window, check the creation parameters and click Finish to validate the creation of thenew drive.The new drive displays in the Drives view and is linked to the selected host.
If one or several media pools, and libraries are associated with the drive, Tina displays them automatically in thecorrespondingMedia andGeneral areas of the Drive Details window.
Note: Tina does not check for the presence of the device on the network when it is created, but at eachattempt to access it.
Changing the Mode of the DriveWhen first created, a drive is in disabledmode, but you can change its mode.
Note: For a drive belonging to a shared library through the Library SharingManager module, its status inthe Library SharingManager can have an impact when changing themode of the drive.
This table describes the different modes that can apply to a drive:
Drive Mode Description
Enabled You can perform all operations.
Tina Administration 119
Device & MediaManagement

Drive Mode Description
DriveEnabled forRestore
You can perform only restore operations and non job related operations such as erasing,recycling, labeling, or identifying a cartridge; cleaning or testing the drive, reinitializing thelibrary.
During a restore, Tina uses in priority the drives in the Drive Enabled for Restoremode. Ifnone is available, it chooses another drive. In addition, if the cartridge required to perform therestore is already mounted in a drive, that drive is used for the restore regardless of the drivemode.
Disabled You cannot perform any operation.
Maintenance You can perform only a drive test, a cartridge identification, or a cartridgemove.
To change the drive mode
1. In theWeb Administration, expand your catalog in the Tina Explorer.2. Select Storage Drives. The Drives pane opens.3. Select the drive and click the appropriate button, either Enable Drive, Disable Drive, or Drive Enabled for
Restore.4. Click Yes in the confirmation dialog.
The drive list Status column displays the new mode.
Drive InformationThe Drives pane indicates whether the drive is full or empty, whether the drive is active or not. It also shows thealarms and locks applied to a drive and the drive activity, if any.
To view drive information
1. In theWeb Administration, expand your catalog in the Tina Explorer.2. Select Storage Drives. The Drives pane opens.3. If you are in list view, click Icon View in the right-hand corner. The Icon view enables you to get a great
number of information at one glance.
4. Hover themouse over the drive image at the upper left corner. A small (i) displays.
120 Tina Administration
Device & MediaManagement

5. Click (i) to display the drive summary.
The drive icon provides four kinds of information.
Drive Status
Drive Status Visual Clue
Enabled A yellow circle
Maintenance A wrench and screwdriver
Enabled for Restore Only A yellow circle with an arrow
Disabled (See Note 1:) A red circle
Except status (See Note 2:) A yellow triangle on drive icon when the drive contains a cartridge
Drive Alarms
Drive Alarm Visual Clue
Minor Alarm Yellow dot on the right of the drive icon
Major Alarm Orange dot on the right of the drive icon
Critical Alarm Red dot on the right of the drive icon
Drive Activity
Drive Activity Visual Clue
Reading Blue arrow under the drive icon
Writing Blue circle with a red dot inside at the center of the drive icon
Forwarding Two right-pointing blue arrows at the center of the drive icon
Rewinding Two left-pointing blue arrows at the center of the drive icon
Note 1:
When a drive is disabled, it indicates that the drive is unavailable. This unavailability can be of two types:• Logical unavailability: Tina decides whether a drive is available or not.
Tina Administration 121
Device & MediaManagement

• Physical unavailability: the decision resides with the library handler. The drivemay be damaged. In thiscase, the red cross on the drive is dimmed.
Note 2:
When a cartridge in the drive has an Except status, it indicates that the physical drive contents does not matchthe catalog contents. Select Storage Library and click Full Inventory to solve the inconsistency.
Drive Summary
Drive Summary Visual Clue
Name Name of the drive
Type Type of drive
Alarms Number of minor, major and critical alarms on the drive.
Cartridge Name of the cartridge located into the drive. None if the drive is empty.
Status and Activity • Recycling• Deleting cartridge• Writing Label• Cartridge Loaded• Mounting• Forwarding• Rewinding• Writing• Reading• Allocated
Testing DrivesAlthough this step is optional, Atempo strongly recommends performing this operation when the drive is usedfor the first time or any time a hardwaremaintenance operation is performed.
Testing the drive will verify that it is in working condition, that it has been properly configured and that Tinacorrectly handles that drive.
If a drive returns errors indicating that it has broken down, Tina automatically disables the drive and triggers analarm. In that case you should perform a drive test to try identifying the problem.
These are the reasons for a failed test:• There is a conflict between the driver version and the operating system.• The drive is not correctly configured.• Themedia is unavailable: it must be neither write protected, nor too “worn out” in the case of magnetic
tapes.• The driver for the drive is configured in fixed block sizemode. Tina requires that the driver be put into
variable block sizemode.For more information on the driver configuration, see the drivemanufacturers documentation and the TinaDrivers Documentation.
If you are working in a SAN environment and several hosts have access to a drive, you can select the host touse to perform the test. You should test the drive with all hosts.
122 Tina Administration
Device & MediaManagement

• This test requires a spare cartridge. The test deletes any data contained on thecartridge.
Important: Testing aWORM drive implies that theWORMmedia used becomes unusable once theoperation is complete. It is recommended that you then remove this media from the library.
To test a drive
1. In theWeb Administration, expand your catalog in the Tina Explorer.2. Select Storage Drives. The Drives pane opens.3. Select the drive and click Drive Test. Themount request of the non-labeled cartridge is initiated.4. If several hosts have access to the drive (SAN environment), select the host you want to perform the test
with in the Select Access for Drive window and click OK.5. The test begins and theOperation Progression window displays showing you the test progress. If the test
is successful, themessage: This Device works correctly is displayed. Otherwise, Tina returns one ofthese errors:• Read error• Write error• Rewinding error• Status error• Configuration error• Positioning error
Note: If you want to stop the test, click Cancel.
6. Click Close when the test is over.
Automatically Cleaning DrivesTina uses two separate components to handle automatic drive cleaning. The first component is the actualcleaning of the drive. This is the component described in this topic. The second component is the cleaningcartridgemanagement, described in Setting the Cleaning Cartridge Parameters.
Tina automatically triggers a drive cleaning according to these parameters:• Max. Use between Cleaning (hours). The value of this parameter depends on the drive type. It is set
according to the specifications of themanufacturers and corresponds to themaximum time of usebetween two cleaning sessions.
• Use before Next Cleaning (hours).When the drive is created, this parameter is by default the same asthe first parameter since the drive is supposed to have never been used. Afterward, Tina keeps track ofthe time the drive is being used, and automatically triggers a cleaning request whenever this valuecomes to 0.
This parameter is reset to its original value whenever a cleaning is performed.
TheMax Use between Cleaning parameters can be defined when you create a drive, or modified later.
To edit the drive cleaning parameters
1. In theWeb Administration, expand your catalog in the Tina Explorer.2. Select Storage Drives. The Drives pane opens.3. Select the drive and click Drive Details. The Drive Details window opens.4. In the CleaningManagement Area, select the CleaningManaged by Tina check box.5. Modify theMax. Use between Cleanings setting (e.g., 30 hours). The Use before Next Cleaning setting is
automatically updated.
Tina Administration 123
Device & MediaManagement

Note: 0 indicates that the drive cleaning is never performed.
6. Click Apply and Close to validate the operation.
Manually Cleaning DrivesIndependently from the automatic triggering, you canmanually initiate the cleaning of any drive. This may bevery useful when a drive whose cleaning is imminent is going to be used for an automatic backup. In that case,youmay clean the drive before the backup takes place.
The cleaning operation is the samewhatever its origin (manual or automatic).
To initiate drive cleaning
1. In theWeb Administration, expand your catalog in the Tina Explorer.2. Select Storage Drives. The Drives pane opens.3. Select the drive and click Clean Drive.
The cleaning operation begins if the selected drive is enabled and available.The Use before Next Cleaning parameter is reset to its original value.
Note: To actually perform automatic robotized drive cleaning, youmust also set the appropriatecleaning cartridge parameters. See Setting the Cleaning Cartridge Parameters.
To reset the parameters when performing a manual cleaning
1. After manually cleaning a drive (manually inserting a cleaning cartridge in a drive without using Tina),select the drive in the Drive pane.
2. Click Drive Details. The Drive Details window displays.3. In the CleaningManagement Area, reset theMax. Use Between Cleanings value to 0. The Use before
Next Cleaning parameter is reset to its original value.4. Click Apply and Close to validate the operation.
Editing DrivesEditing a drive enables you to check or modify these settings:• Themaximum time of use between two cleaning sessions and the time of use before cleaning to enable
Tina to automatically initiate the drive cleaning request.See Automatically Cleaning Drives.
• The life cycle of cartridges associated with a drive to enable Tina to automatically calculate the cartridgewear level.See CartridgeWear.
• The drive serial number (Tina can reset it and detect it again).• For a robotized drive, the library with which the drive is associated.• Themedia pools with which the drive is associated.• For archiving, the user groups with which the drive is associated.• The identity for device access.• For a shared drive, the hosts which can access the drive.
You cannot modify the drive name and type, as well as the host namewith which the drive is associated.
To edit a drive
1. In theWeb Administration, expand your catalog in the Tina Explorer.2. Select Storage Drives. The Drives pane opens.3. Select the drive to edit and click Drive Details.
124 Tina Administration
Device & MediaManagement

The Drive Details pane opens with three tabs: Properties, Activity and Settings. The Properties andSettings tabs enable you to perform the changes to the drive while the Activity tab only gives information.This table describes the parameters you can find in the Properties tab of the Drive Details pane:
Parameter Description
General Area.
Name Only for information.
Type Only for information.
CartridgeLife Cycle(points)
Cartridge wear parameter, (e.g., 1,500 life points).Tina automatically enters a default value depending on your drive.
See CartridgeWear.
SerialNumber
Serial number of the drive. It concerns SAN drives only. Tina automatically detects it anddisplays it when editing the drive if you have activated the Use Serial Number toDetermine Device Descriptor tunable.
Library Name of the library associated with the drive (if any).
Index Indicates the drive location inside the library. See Changing theMode of the Drive.
Connection Area.
Local Drive(not SANattached)
Select this radio button to change a shared drive into a local drive.
Host Non-modifiable field. Name of the host to which the drive is attached.
DeviceDescriptor
Local device descriptor on the host.
SharedDevice
Select this radio button to change a local drive into a SAN attached drive.
SAN Name of the SAN with which you will share the drive.
Device Links Enables you to edit, delete, enable, or disable an existing connection, or to create a newconnection for the drive to a SAN.
To create a new connection, click the + button and complete the Drive Connection DetailsWindow.
Media Area.
WritingMode checkbox
Enables you to specify if the drive can use a No-Rewritable (WORM)media, if supported.
Tina Administration 125
Device & MediaManagement

Parameter Description
Media PoolList
Only for information. Indicates the properties of themedia pools, if any. These are thecolumns of theMedia Pool List:
• Pool Name• Retention• Number of Cartridge• Drives• Comment
Identity Area.
Changeidentity toaccessdevice
Select this check box to indicate that you are providing a specific user identity to access thedrive.
User Name Name of a user who has the necessary rights to access the drive.
Passwordand Confirm
Provide the user password and confirm it.
Cleaning Management Area.
CleaningManaged byTina
Select this check box to indicate that you want that Tinamanages the cleaning of the drive.
Max. UsebetweenCleanings(Hr)
Maximum number of hours the drive can be used for between two cleaning sessions.
With a value of 0, the drive cleaning is never performed.
Use beforeNextCleaning(Hr)
Only for information. Number of hours the drive can be used for, before the next cleaning.
Tina fills in this field automatically.
This table describes the parameters you can find in the Activity tab of the Drive Details pane:
Parameter Description
Status Area.
Drive Status Enabled or disabled.
126 Tina Administration
Device & MediaManagement

Parameter Description
Drive Activity Status Action that the drive is currently performing:
• Recycling• Deleting cartridge• Writing Label• Cartridge Loaded• Mounting• Forwarding• Rewinding• Writing• Reading• Allocated
Currently MountedCartridge
Name of the cartridge that is currently in the drive.
Statistics Area.
Hours of Use Number of hours the drive was used for.
Volume Read Amount of information that the drive has read.
Volume Written Amount of information that the drive has written.
Number of Mounts Number of times a cartridge was mounted in the drive.
Number ofCleanings
Number of times the drive has been cleaned.
Use since LastCleaning
Number of hours the drive has been used for since the last cleaning.
Last Cleaning Date Date when the drive was last cleaned.
Reset Click this button to reset all drive statistics values to 0 and the cleaningmanagement values to the original values.
Default values are entered for all parameters automatically according to the drivetype.See Drive Cleaning.
Alarms Area.
Alarm list Indicates the alarms generated for the drive. These are the columns of the alarm list:
• Severity• Last Date• Object• Acknowledgement• Message
Tina Administration 127
Device & MediaManagement

This table describes the parameters you can find in the Settings tab of the Drive Details pane:
Parameter Description
User Group.
GroupName
Enables you to associate a user group with the drive. This operation is mandatory if you want torestore the local archive of a deleted platform.
To associate a user group with the selected drive, click ChooseObject to select a user group inthe list. Click Apply and Close.
To remove a user group which is associated with the selected drive, select the user group in thelist and click Remove Item.
You cannot add a new user group directly from the Settings tab. Youmust first create the usergroup from the Users pane to be able to select it from the user group list in the Settings tab. SeeManaging User Groups.
4. Click Apply and Close to validate the edition of the drive.
Note: Tina automatically updates themedia pools, libraries, and user groups areas of the DriveProperties and Settings windows if youmodify the drive information through theMedia Pools,Libraries or User Groups windows (i.e., if you create a library and associate a previously createddrive with it, the library namewill automatically displays in the Drive Properties Library field).
Deleting DrivesWhen you remove a drive from your network, youmust also remove it from Tina. Deleting a drive removes itfrom the list of available drives defined for the libraries, media pools, and user groups.
The recorded cartridges are kept and can be read on any other compatible drive.
To delete a drive
1. In theWeb Administration, expand your catalog in the Tina Explorer.2. Select Storage Drives. The Drives pane opens.3. Select the drive to delete and click Delete Drive.4. Click Yes in the confirmation dialog.
The drive is removed from the drive list.
Identifying the Contents of a DriveUse this operation to identify the cartridge located inside the drive.
To identify the contents of a drive
1. In theWeb Administration, expand your catalog in the Tina Explorer.2. Select Storage Drives. The Drives pane opens.3. Select the drive containing the unidentified cartridge and click Identify Contents.4. Click Yes in the confirmation dialog. The cartridge identity displays in the Cartridge column.
Ejecting a Media from a DriveUse this operation to eject amedia from a drive. You do not have to specify the destination slot, Tina willchoose it.
128 Tina Administration
Device & MediaManagement

To eject a media
1. In theWeb Administration, expand your catalog in the Tina Explorer.2. Select Storage Drives. The Drives pane opens.3. Select the drive you want to empty and click Unmount Media.4. Click Yes in the confirmation dialog.
Exporting the Drive ListYou can export the list of drives in CSV or PDF format. See Exporting the Lists of StorageObjects.
Media PoolsMedia pools are created tomanagemedia in a catalog. A media pool is defined by a name, a label, associateddrive(s) and amanagement policy. Once created, the pool can be associated with a backup strategy or anarchiving folder to enable data to be written on cartridges. Cartridges will be automatically added to a pool whenneeded.
It is recommended to keep automatic backup and archiving on separate pools since themedia used forautomatic backup can be recycled and reused whereas those used for archiving will most likely not be recycled.
A media pool can also be used to dedicate some drives to automatic backup and others to archiving. Mostfrequently, though, pools will have access to all available drives and Tina will decide which drive will be used fora particular backup, archiving or restore.
Storage vs. Recycling PolicyWhen creating or editing amedia pool, you can choose between twomediamanagement policies:• Infinite retention period (storage policy).• Limited retention period (recycling policy).
The storage policy consists in increasing the number of cartridges indefinitely. Once a cartridge is full, Tinaasks for a spare cartridge, labels it and fills it. It keeps on requesting spare cartridges each time the previouscartridge is full. The backup volume continuously increases and there is no automatic recycling. Theadministrator canmanually delete cartridges when he thinks that the backed up information is no longer needed.
The recycling policy keeps data on a cartridge for a limited time only. The retention period policy consists inlabeling a certain number of cartridges that are used in turn. The Retention Period parameter of themedia poolenables you to define the retention time that data is kept.
If the retention priod is equal to zero, no data retention period is guaranteed. Only the number of media availablein the pool determines the retention period.You should pre-label at least enough cartridges to complete yourmost voluminous backup since Tina will not request spare cartridges but will overwrite existing ones. If thereare nomore empty cartridges, the one which contains the oldest data will be recycled. Tina thus keeps files forseveral days or months depending on the number of cartridges, the backed up volume and the backupfrequency.
If the retention period is not equal to zero, cartridges containing data older than the retention period can berecycled. If no cartridgemeets this requirement, a spare cartridge is labelled under the name of the user in themedia pool. Thus, the data retention period is guaranteed.
Automatically Created PoolsTwo pools are automatically created when a catalog is created:• The LOST+FOUND pool, that contains lost+found cartridges, i.e., cartridges belonging to another Tina
catalog. Their label is followed by -LF<5 digit cartridge number in the pool>.
Tina Administration 129
Device & MediaManagement

• The SPARE pool, that contains spare cartridges. Tina will automatically label a spare cartridge whenneeded. The cartridge will thus no longer belong to the spare pool, it will belong to the user pool. Thespare cartridges display in the catalog as spare<5 digit cartridge number in the pool>.
These pools only display in themedia pool list if they contain cartridges. You cannot edit or delete these pools.
Creating a Media PoolA media pool is defined by a name, a label, associated drive(s), and amanagement policy. Once created, thepool will be associated with a backup strategy to enable data to be written on cartridges. See Creating aStandard Strategy.
To create a media pool
1. In theWeb Administration, expand your catalog in the Tina Explorer.2. Select Backup Destinations Media Pools. TheMedia Pools pane opens.3. Click New Pool (+). The Pool CreationWizard opens.4. Enter the parameters to create a new pool.
This table describes the parameters that you can set in the Pool CreationWizard:
Parameter Description
Pool Name Name of your choice for the pool.
The pool name can be related to the pool use (ex: backup week for the weekly fullbackups) or to the platforms backed up with the pool, etc.
Pool Label Label that displays in the name of all the cartridges belonging to the pool. It is usuallya short version of the pool name.
Comment Optional. Enter a comment to describe themedia pool. The comment is recorded inthe Tina catalog.
If youmodify the comment, specify whether you want the new pool comment to beapplied on all existing cartridges in the pool or only on the new cartridges.
RetentionPeriod andDuration
Once a cartridge is filled, defines the period of time that Tina waits to recycle thecartridge.
• Infinite. Select this option if you do not want to recycle cartridges. This option isreferred to as the storage policy. In that case, Tina does not reuse a cartridgeonce it is filled.
• Data stored during. Select this option if you want to recycle cartridges after aset period of time. This option is referred to as the recycling policy.Enter a numerical value and select a unit between Years, Months, Weeks, andDays.
For more information on the recycling policy, seeMedia Pools.
130 Tina Administration
Device & MediaManagement

Parameter Description
AssociatedDrives
• Add. Determines the drives that Tinamay use when performing a backup withthis media pool.Click Add to associate a drive with themedia pool.
• Remove. Stops a drive from being used by Tina for backups using this mediapool.
• Choose Objects. Displays all the drives that may use this media pool.Click ChooseObjects to open the Drive Name List, select a drive, and click Applyand Close. Repeat this step to associate other drives.
To perform synthetic full backups, associate at least two drives with themedia pool.
Atempo highly recommends not to associate drives from different libraries with thesamemedia pool.
5. In the Summary window, check the creation parameters and click Finish to validate the creation of thenew media pool.TheMedia Pools pane automatically displays the new media pool and this information about the pool:• The Pool Name• The Retention associated to the pool.• The Number of Cartridges belonging to the pool• The Drives associated to the pool.• The Comment if any.
Editing a Media PoolEditing amedia pool enables you tomodify these parameters:• The name of themedia pool.• The contents of the Comment field.• Themedia pool management policy (infinite or limited retention period).• The drives associated with themedia pool.
The label of themedia pool is written at the beginning of eachmedia and thus cannot bemodified.
To edit a media pool
1. In theWeb Administration, expand your catalog in the Tina Explorer.2. Select Backup Destinations Media Pools. TheMedia Pools pane opens.3. Select amedia pool in the list, then click Pool/Cartridge Details. The Pool Details window opens.
This table describes the parameters of the Pool Details window:
Parameter Description
General Area.
Name Name of themedia pool.
Label Only for information.
Tina Administration 131
Device & MediaManagement

Parameter Description
Retention Storage policy for this media pool:
Infinite if the cartridges of the pool are never recycled.
Limited if the cartridges of the pool are recycled after a set period of time.
Comment Optional. Enter a comment to describe themedia pool.
Drives. List of the drives associated to themedia pool.
Media. Only for information.
Indicates the properties of themedia, if any. These are the columns of theMedia List:
• Cartridge Name• Status• Filling Status• Filling Volume• Retention Period
4. Modify themedia pool parameters as needed and click Apply and Close.
Note: If you havemodified the comment, a dialog box asks you whether you want the new poolcomment to be applied on all existingmedia in the pool (click Yes) or only on the new media (clickNo).
Deleting a Media PoolTo delete amedia pool associated with a strategy or archive folder, youmust first delete it within the strategy orthe archive folder.
Note: A media pool cannot be deleted if it contains cartridges.
To delete a media pool
1. In theWeb Administration, expand your catalog in the Tina Explorer.2. Select Backup Destinations Media Pools. TheMedia Pools pane opens.3. Select amedia pool in the list, then click Delete Pool.
The pool is removed from the list.
Exporting the Media Pool ListYou can export the list of media pools in CSV or PDF format. See Exporting the Lists of StorageObjects.
CartridgesThese topics describe all the information and procedures on Cartridges:• About Cartridges• Available Cartridge Operations• ViewingMedia Information• Exporting the Cartridge List• Recycling a Cartridge
132 Tina Administration
Device & MediaManagement

• Closing a Cartridge• Reopening a Cartridge• Deleting a Cartridge• Erasing a Cartridge• Duplicating a Cartridge• Putting a Cartridge Offline• Replacing a Cartridge• Writing a Cartridge Label• Reading a Cartridge Label• Editing the Cartridge Life Cycle• Setting the Cleaning Cartridge Parameters
About CartridgesBackup MediaThe backupmedia that Tina uses can be of these types:• Cartridge. Refers to either amagnetic tape, a digital optical disk, or even files on a disk. With “VTL Disk
Drives” for instance, a file created on the disk simulates a cartridge.• Snapshot. Represents the contents of a volume backed up using one of the currently available snapshot
technologies. It is kept on disk. These Tina applications integrate a snapshot mechanism:– Oracle– NDMP– List– Filesystem
Cartridge IdentificationCartridges are always associated with an owner. The cartridge owner is the pool label the cartridge belongs to.
Tina offers two ways to identify a cartridge:• with the label• with the barcode
The label is an actual file written on the cartridge enabling its identification. It contains this information:• The cartridge name, composed of an optional prefix (common to all cartridges in the catalog), the
cartridge owner (identifying the pool or the user the cartridge belongs to) and a number.• The cartridge creation date.• An optional description.
To identify a cartridge, Tina reads its label, and thus requires that the cartridge bemounted in a drive.
The administrator can label cartridges for any user. In Restore & ArchiveManager, the current user can onlylabel cartridges for his own use. To do so, hemust belong to a user group containing drives.
Prior to any operation, the cartridge label is read: there is no possible identification error.
Barcodes, if supported by your library, also let Tina identify a cartridge, but without mounting it in a drive andreading its label. The library picker quickly scans all the cartridges in the library and reads their barcodes.Reading barcodes is much faster than reading labels.
Tina Administration 133
Device & MediaManagement

• Two cartridges cannot have the same barcode because identification problems will occur.
• In a client/server environment, changing the time in one platform can create an offset withthe time specified on the cartridges. When the offset is too big, a cartridge can be consideredas having reached its retention period by Tina and then bemarked as recyclable, eventhough the data are still valid.To avoid the risk of losing data following an offset error, Atempo recommends not to enablean offset of more than 2 hours between the system clocks of platforms in a network.
• Labeled and recyclable cartridges belong to a specific catalog whereas spare cartridges donot belong to any particular catalog until they are labeled.
Cartridge StatusWhen a brand-new cartridge is inserted in a library or a cartridge has just been erased, it displays as anunknown cartridge. Upon identification, a cartridge takes on one of these statuses:
CartridgeStatus Description
Spare No Tina label present on tape. The cartridge is ready to be labelled for a backup or an archiving.The cartridge is either brand new or has just been erased. It belongs to the “Spare” pool.
The spare cartridge name is of this form: spare<5 digit cartridge number in the pool>
Lost +Found
A Tina label is present on the cartridge. It is not recognized as belonging to the current catalog.This cartridge will not be used for a backup. It belongs to the “Lost+Found” pool (LF).
The Lost + Found cartridge name is of this form: old_label-LF<5 digit cartridge numberin the pool>
Known A label is present. It is recognized as belonging to the current catalog.
Cartridge AccessAccess to cartridges is controlled. No user can write on the cartridges of another user. A cartridge can only bedeleted by its owner or a cartridge administrator (any user for whom this right has been defined, or a catalogadministrator such as: root, Tina catalog administrator, administrator, etc.).
Priorities for Cartridge Use during a BackupWhen a backup starts, cartridges are selected in this order:1. Themost recently used, labeled, partially filled, non-closed cartridge.2. Any other partially filled, non-closed cartridge.3. Any labeled empty cartridge.4. Recyclable cartridges. The one with the oldest last backup will be used first, then other recycling
cartridges in the same order. See Recycle.5. Spare cartridges.
If several cartridges have the same priority status, preference will go to the one located inside the drive, ifapplicable.
If the cartridge that is next in line to be used is not present in the library, Tina automatically selects the one afterit.
134 Tina Administration
Device & MediaManagement

Job PriorityIn Tina, several jobs can be started at the same time. They are executed in this order:• If a cartridge is already mounted in the drive, all jobs using this cartridge have priority. This avoids
mounting and unmounting cartridges repetitively.• If no cartridge is mounted in the drive, restore/archiving jobs have priority over backup jobs.
Writing FormatsThese are the writing formats available on cartridges:• TiNa (proprietary format that enables data compression and encoding)• tar• cpio• sidf (System Independent Data Format) - (backup without using the cache on server, supports
compression and encoding)• none (raw format)• unknown (used for NDMP backup)
You cannot mix up different formats on a single cartridge. A cartridge begun with the tar format may onlycontain tar files; however, a cartridge with the TiNa format can contain a compressed file, then a compressedand encoded file, then a file which is neither compressed nor encoded, etc.
As the tar and cpio formats comply with POSIX standards, you can restore data from any Unix machine throughthe tar and cpio commands. In addition, you can restore on aWindows system, data backed up on a Unixsystem in the Tina tar format. See the documentation of the particular tar command you are using to find outthe options you need (i.e., youmay need to specify a no rewind option, specify the block size, create a device(mount -b option), etc.).
On aWindows 2000/2003machine, if you use the tar or cpio formats, some information is not backed up. Forexample, some data and attributes associated with files are not backed up.
The tina_cart command enables you to read data written in the TiNa format without having Tina installed onthemachine. See the Tina Command Line Interface Documentation.
Externalizing CartridgesCartridges can be put offline, externalized and stored in vaults or remote sites. This operation can be useful:• If the library capacity is not sufficient compared with the cartridge retention period.• If you want to guard your cartridges in the event of natural or human accidents.
Tina provides assistance for quickly detecting cartridges that are eligible to be put offline (out of the library). Bydefault, eligible cartridges are closed or full, and not recyclable.
This feature also enables to draw up the list of offline cartridges that have passed their retention period. Suchcartridges should be put online so that they can be recycled.
See Putting a Cartridge Offline for details.
Cartridge WearCartridge wear is used to estimate the remaining life of a cartridge. It is a percentage calculated from the usefullife of a cartridge. The total cartridge life is expressed in life points. It is common to all cartridges of a certaintype, thus it is set at the drive level.
The first time a cartridge is labeled, it receives themaximum life point for its type. Each time the cartridge labelis read by Tina (i.e., prior to rewinding, reading or writing on the tape), a life point is substracted.
Tina Administration 135
Device & MediaManagement

• As a cartridge gets closer to the end of its useful life, it is recommended to duplicate it inorder to avoid losing information. The number of life points is indicated for information only. Acartridge can be faulty with a wear level inferior to 100%.
• To perform cartridge operations, your user profile must give you permission to Edit themediapool of every user. See Defining Personal Access Rights. For manual drives, ensure thatyou insert the appropriate cartridge in the drive before proceeding.
Available Cartridge OperationsDepending on their status, several operations can be performed on cartridges. This table summarizes thepossible cartridge operations.
Operation Spare Lost + Found Known
Recycle no no yes
Close no no yes
Reopen no no yes
Delete yes yes yes
-> Spare no yes yes
Duplicate no no yes
Write Label yes no no
Offline yes yes yes
RecycleRecycling a cartridge consists in reusing a cartridge already containing backups within the samemedia pool.
Multi-cartridges jobs
When you recycle a cartridge that contains only part of a job, i.e., when a single backup usedmore than onecartridge, only that cartridge is recycled. Its status becomes Emptied. Data can still be restored from theremaining non-recycled cartridges.
However if the job is an NDMP job, and is spread on several cartridges, the job is recycled on all the cartridgesif you recycle any one of the cartridges. A partially recycled cartridge remains full until it is totally recycled. Forinstance:
If an NDMP backup job JOB1 stores data on:• Cart0001 (Full)• Cart0002 (Full)• Cart0003 (Partially filled)
And another NDMP job JOB2 stores data on:• Cart0003 (Full)• Cart0004 (Partially filled)
When you recycle Cart0001:• Cart0001 becomes Emptied• Cart0002 becomes Emptied
136 Tina Administration
Device & MediaManagement

• Cart0003 remains Full but JOB1 is no longer available in the cartridge information interface.• Cart0004 remains Partialy filled.
If you then recycle Cart0003:• Cart0001 is Emptied• Cart0002 is Emptied• Cart0003 becomes Emptied• Cart0004 remains Partially filled but JOB2 is no longer available in the cartridge information interface.
Recycling stepsRecycling takes place in two steps:a. In the catalog, all the file versions contained on the cartridge aremarked as "deleted".b. The catalog is cleaned to actually remove all the file versions marked as deleted. This step is
performed through amaintenance job. Themaintenance job is automatically launched every day atnoon by default.
The data on the recycled cartridge can no longer be restored through the catalog. However, as long as thecartridge is not used again and that the data is still physically present on the cartridge, you can recoverthe data through the tina_cart command.See the Tina Command Line Interface Documentation.Automatic vs. manual recyclingRecycling a cartridge is either an automatic or amanual operation.All known cartridges belonging to a pool with a recycling policy will eventually be automatically recycledif:• Their retention period has expired.• A cartridge is needed in the catalog and no other eligible (i.e., labelled empty or partially filled)
cartridge is available.• The cartridges do not contain the last full backup of a backup folder for a given strategy, nor any
incremental backup performed after it. This ensures that the last backup version of a backup folderremains available at all times to be restored.
When recycling is automatically performed, the cartridge with the oldest last backup, i.e, which has been“recyclable” for the longest time, will be recycled first.When the recycling is manually initiated throughWeb Administration, only Step 1 is performedimmediately. Step 2 takes place on the next scheduled catalogmaintenance job, unless it is manuallylaunched using the tina_odbgc -purge command.When the recycling is manually launched through the tina_cart_control -recycle command, bothsteps are performed in a row.
Note: The recycling operation is not available for non-rewritable cartridges (WORM).
CloseClosing a cartridge is either an automatic or amanual operation.
Only a Known cartridge can be closed. A cartridge is automatically closed if:• It is full• An error occurred during a writing session (e.g., an error such as “Media Defect”).
A cartridge can also bemanually closed by its owner or a cartridge administrator. Only labelled, empty or partlyfilled cartridges can bemanually closed.
If a cartridge is closed, Tina will not request it again for data writing. It can nevertheless be requested for restoreor a new backup if its recycling date is reached.
Tina Administration 137
Device & MediaManagement

Closing cartridges may be useful if you wish to take cartridges off site for security reasons. Since thesecartridges will no longer be physically available, closing them will prevent Tina from requesting them for abackup. Subsequent backups will be performed on new cartridges.
Closing cartridges is also very useful in case of catalog restore.
If your catalog is damaged and restored, backups C and D performed between the catalog backup and thecatalog restore will not exist in the catalog once it is restored. If cartridges are not closed upon restoring thecatalog, backup E will overwrite the data written by backups C and D. Although files backed up by backups Cand D cannot be restored by the catalog, you can access them using the tina_cart command. To avoidoverwriting this data, you should close any partially filled cartridges when you restore your catalog.
ReopenReopening a cartridge is amanual operation that consists of opening a previously closed cartridge. Any full orclosed on error cartridge is automatically reopened when recycled by Tina.
DeleteDeleting a cartridge is never automatically performed by Tina. When you delete a cartridge, you delete thecartridge object and all its content from the catalog.
Note: Deleting cartridges should be used only for cartridges that have actually been destroyed or lost, toensure that Tina will not request them at any time in the future.
The actual information contained on the cartridge, including its label, remains. If you reuse a deleted cartridge, itwill display as a Lost+Found, that is, Tina will be able to read its label but will not recognize it as belonging to thecatalog you deleted it from.
SpareErasing a cartridge is never automatically performed by Tina. When you erase a cartridge, its label is physicallyerased. The cartridge becomes “spare”. The cartridge content is removed from the catalog, but not the cartridgeobject. This enables the catalog to continue to keep track of the wear and cleaning information after thecartridge has been erased.
You should use this feature if the cartridge content is of no interest to you but you want to keep using thecartridge.
Note: The erasing operation is not available for non-rewritable cartridges (WORM).
138 Tina Administration
Device & MediaManagement

DuplicateDuplicating a cartridge is donemanually. It consists in:• Copying data from one cartridge to another.• Creating one version per duplicated object (directory or file) in the catalog. A given object can have four
versions in the catalog. The same cartridge can thus be duplicated three times.
A cartridge can be duplicated by its owner or a cartridge administrator. When the cartridge administratorduplicates a cartridge, he can copy it onto another pool of cartridges. Any cartridge can be duplicated.
Duplicating a cartridge requires the presence of two drives:• A drive for reading data.• A drive for writing data.
A cartridge can be duplicated into another set of cartridges or associated with another type of media. Severaldestination cartridges can correspond to a single source cartridge if storage capacities are different.
If a file is spread on two cartridges, the duplication of one of these cartridges will entail the duplication of thewhole file, hence themounting of the two source cartridges.
LabelLabelling only applies to Spare cartridges. Other cartridges already have a label. Once it is labelled, a cartridgecan be used to back up data. It can then be kept with no date limitations, deleted, recycled or duplicated.
Labelled cartridges are either:• Empty.• Partly filled.• Full.• Closed.
Note: For Tina, a spare cartridgemay contain information that has been“manually” backed up, outside the application. Labelling a cartridge will delete this information.
OfflineWhen you remove a cartridge from the library either manually or through amailbox, this functionality enablesyou to inform the catalog that the cartridge is offline.
Cancelling a CartridgeOperationWhen you cancel a cartridge operation, Tina finishes the cartridge in progress and only cancels the operationbeginning with the next cartridge. Thus if you cancel a single cartridge operation, the operation will becompleted.
Viewing Media InformationYou can display the characteristics of all the cartridges belonging to a givenmedia pool as well as statisticalinformation. The list can be exported to a text or HTML file. See Exporting the Cartridge List.
To view media information
1. In theWeb Administration, expand your catalog in the Tina Explorer.2. Select Backup Destinations Media Pools. TheMedia Pools pane opens.
Tina Administration 139
Device & MediaManagement

3. Select amedia pool in the list. The list of cartridges belonging to the pool displays in the lower part of thewindow. This information is available.
CartridgesParameters Description
CartridgeName
The cartridge name is automatically created by Tina. It consists at least of the pool labelfollowed by a number corresponding to the creation order of the cartridge in the pool.
Barcode Barcode of the cartridge, if any.
Status Indicates whether amedia is closed or not and why.
Fillingstatus
The possible values for the filling status are: Partly filled, Empty, Emptied, or Full.
An "emptied" cartridge indicates that the cartridge has been recycled in the catalog but its labelis not physically erased, whereas the status "empty" indicates that the cartridge label has beenerased.
FillingVolume
The amount of information currently on the cartridge. On a new cartridge that has never beenrecycled, this value will be the same as that for VolumeWritten.
RetentionPeriod
Cartridge recycling status: Infinite, Expired since (days, hours), Expires in (days, hours) orWORM (non-rewritable cartridge).
Format Writing format, either TiNa, tar, cpio, sidf, none or unknown.
LastRecyclingDate
Date of the last recycling.
LastBackupDate
Date of the last backup for the cartridge.
Comment A comment can be added for each cartridge in the selectedmedia pool. To display theComment column, click the button at the top right of the cartridge list, then tick Comment in thecolumns checklist.
4. For more detailed information, select a cartridge in the cartridge list and click Pool/Cartridge Details. Thecartridge Details window opens, providing this information:
CartridgeDetails Description
Properties tab.
Name Name of the cartridge.
Barcode Barcode of the cartridge.
Status Indicates whether amedia is closed or not and why.
FillingStatus
The possible values for the filling status are: Partly filled, Empty, Emptied, or Full.
140 Tina Administration
Device & MediaManagement

CartridgeDetails Description
Comment Enables you to enter any information about this cartridge that can be of use for later reference.The comment is recorded in the Tina catalog.
If you had already filled the Comment field when creating or editing themedia pool, the samecomment displays in the cartridge Comment field. See Creating aMedia Pool.
Activity tab.
DataIntegrity
This table lists all the jobs written on the cartridge and provides information about the cartridgerecyclability.
ID: Unique identification number for each job.
Folder: Name of the backup or archiving folder involved with the job.
Description: Contains the job type, i.e., Backup (full or incremental), Synthetic, Archiving,Restore, Cartridge Duplication or Maintenance.
Recyclable: Data recycling status:
• Yes if the data is recyclable• Data integrity if the job contains either the last full backup, or any of the incremental
backups performed after the last full backup, of a backup folder for a given strategy. Suchdata is not recyclable. This ensures that the last backup version of a backup folder remainsavailable at all times to be restored.
• Data in retention time period if the data has not yet reach themaximum retention period.Such data is not recyclable.
• Folder in maintenance if a cartridge contains data belonging to a folder in maintenance.Such data is not recyclable.
Status: Indicates the job status.
If the job is canceled on request or on error, the data is deemed unreliable to perform a restoreand it automatically displays as Recyclable data.Submit Date: Date and time when the job is submitted.
End Date: Date and time when the job is finished or canceled.
Alarms Indicates the alarms generated for the drive. These are the columns of the alarm list:
• Severity• Last Date• Object• Acknowledgement• Message
Statistics tab.
Tina Administration 141
Device & MediaManagement

CartridgeDetails Description
Use Hours of Use: Number of hours the cartridge was in use.
Last Use Date: The last date the cartridge was used.
Last Use Mode: The last use was for either writing or reading.
Number of Mounts: Number of times the cartridge was mounted in a drive.
Number of Tape Files: Number of tape files present on the tape. A tape file contains all theobjects written during the same backup session.
Number of Recyclings: Number of times the cartridge has been recycled.
Recyclable: Recycling status: Since (days, hours), In (days, hours), No (data integrity), No(worn cartridge), No (data integrity), No (unknown reason), No (WORM), No, or - (if the cartridgeis empty or belongs to the Spare or Lost and Found pool).
Recycling Risk: The reasons why a cartridge is not recyclable (data integrity, folder inmaintenance, or data in retention period).
Volume Volume Read: The amount of information that has been read from the cartridge.
Volume Written: The amount of information that has been written on the cartridge since thebeginning of its life. This value is not reinitialized when the cartridge is recycled.
Filling: The amount of information currently on the cartridge. On a new cartridge that has neverbeen recycled, this value will be the same as that for VolumeWritten.
Exporting the Cartridge ListYou can export the list of cartridge in CSV or PDF format. For additional details on this action see Exporting theLists of StorageObjects.
Recycling a CartridgeRecycling cartridges is performed automatically if you select the Data stored during option when creating orediting a pool. In that case, a cartridge is recycled, as needed, during a backup if no other cartridge is available,and if at least one cartridge has reached the end of its retention period. See Recycle.
In order to minimize drive use, cartridge recycling takes place in two steps: in the first step, a drive is allocatedtomodify the cartridge label to indicate that the cartridge becomes available for a writing session. The secondstep does not require a drive and concerns only the cleaning of the catalog.
The catalog cleaning is automatically performed every day at noon. You canmodify the time of cleaning with theCatalog Cleaning Time (date_run_catalog_gc) tunable. You can also cancel the automatic catalog cleaningjob using the Disable Daily Catalog Cleaning (disable_catalog_gc) tunable. In that case, the catalog cleaningmust bemanually performed using the tina_odbgc command.
See the Tina Tunables Documentation and the Tina Command Line Interface Documentation.
You can also recycle a cartridgemanually using this procedure.
Note: The recycling operation is not available for:- Non-rewritable cartridges (WORM).- Cartridges that have been closed by Tina following an error (cartridges closed by the user are recyclable)
142 Tina Administration
Device & MediaManagement

To recycle a cartridge manually
• If the cartridges you want to recycle contain the last full backup, or any of the incrementalbackups performed after the last full backup, of a backup folder for a given strategy, awarning displays to inform you that your operationmay corrupt data integrity. You will havethe option either to proceed with the recycling or recycle only the cartridges that do notcontain critical data. This ensures that the last backup version of a backup folder remainsavailable to be restored at all times.
• If the cartridges contain data having not yet reached themaximum retention period orbelonging to a folder in maintenance, these cartridges are not recyclable.
1. From the Tina Explorer, select Backup Destinations Media Pools.2. Select a pool in themedia pool list. The list of cartridges belonging to this pool displays.3. Select the cartridge(s) to recycle in the list and click Recycle Cartridge.
The Cartridge Recycle window opens.4. Select the cartridges that you want to recycle, and choose one of these recycling options:
Recycling Parameter Description
Recycle only selectedcartridges
Recycles only the cartridges with selected check boxes.
Recycle only cartridges withno critical data
Recycles only the cartridges that display none in the Risk column.
If the risk is Data Integrity, Data in retention period, or Folder inmaintenance, the cartridge is not recycled.
Recycle all cartridges Recycles all the cartridges in the list, regardless of whether they containcritical data.
5. Click Details to view the Cartridge Details window.6. Click OK to start the recycling operation.7. When the progress bar is full, click Close.
Note: The recycling operation described here only takes care of step 1 in the recycling process (seeRecycle). To actually complete the removal of all recycled file versions from the catalog, either wait for thenext catalogmaintenance job to occur (that job is automatically launched every day at 12:00) or launch thetina_odbgc -purge command. See the Tina Command Line Interface Documentation.
Closing a CartridgeA cartridge is automatically closed if one of these issues takes place:• It is full.• An error occurs when writing data (ex: an error such as amedia defect).
You canmanually close a partially filled or empty cartridge at any time to avoid writing on it. See Close.
To close a cartridge
1. From the Tina Explorer, select Backup Destinations Media Pools.2. Select a pool in themedia pool list. The list of cartridges belonging to this pool displays.3. Select the cartridge(s) to close in the list and click Close Cartridge.4. When the progress bar is full, click Close.
Tina Administration 143
Device & MediaManagement

Reopening a CartridgeYou can reopen a cartridge that has been previously closed.
To reopen a cartridge
1. From the Tina Explorer, select Backup Destinations Media Pools.2. Select a pool in themedia pool list. The list of cartridges belonging to this pool displays.3. Select the cartridge(s) to reopen in the list and click Reopen Cartridge.4. When the progress bar is full, click Close.
Deleting a CartridgeWhen you delete a cartridge, you delete the cartridge object and all its content from the catalog. The actualinformation contained on the cartridge, including its label, remains. If you reuse a deleted cartridge in the samecatalog, it will display as a Lost+Found, that is, Tina will be able to read its label but will not recognize it asbelonging to the catalog you deleted it from.
Note: Cartridges that have been destroyed or lost should be deleted, to ensure that Tina does not requestthem at any time in the future.
To delete a cartridge
1. From the Tina Explorer, select Backup Destinations Media Pools.2. Select a pool in themedia pool list. The list of cartridges belonging to this pool displays.3. Select the cartridge(s) to delete in the list and click Delete Pool/Cartridge. The Cartridge Delete window
opens.4. Select the cartridges that you want to delete, and choose one of these delete options:
Delete Parameter Description
Delete only selectedcartridges
Deletes only the cartridges with selected check boxes.
Delete only cartridges with nocritical data
Deletes only the cartridges that display none in the Risk column.
If the risk is Data Integrity, Data in retention period or Folder inmaintenance, the cartridge is not deleted.
Delete all cartridges Deletes all the cartridges in the list, regardless of whether they containcritical data.
5. Click Details to view the Cartridge Details window.6. Click OK to start the delete operation.7. When the progress bar is full, click Close.
• Deleting can be quite lengthy if the cartridge contains a high number of objects.
• Removing versions from the catalog is a very delicate operation that must not be interrupted.Do not quit Tina during this operation or youmay corrupt your catalog.
8. When the progress bar is full, click Close.
144 Tina Administration
Device & MediaManagement

Erasing a CartridgeWhen you erase a cartridge, the cartridge label is physically erased. The cartridge is labeled as “spare”. Thecartridge content becomes inaccessible for the catalog, but the cartridge object still exists. This enables thecatalog to keep the wear and cleaning information after the cartridge has been erased.
You should use this feature if the cartridge content is of no interest to you and you want to reuse the cartridge.
Note: This operation is not available for non-rewritable (WORM) cartridges.
To erase a cartridge
1. From the Tina Explorer, select Backup Destinations Media Pools.2. Select a pool in themedia pool list. The list of cartridges belonging to this pool displays.3. Select the cartridge(s) to erase in the list and click Spare Cartridge. The Cartridge Erase window opens.4. Select the cartridges that you want to erase, and select one of these erasing options:
Erase Parameter Description
Erase only selectedcartridges
Erases only the cartridges with selected check boxes.
Erase only cartridges with nocritical data
Erases only the cartridges that display none in the Risk column.
If the risk is Data Integrity, Data in retention period or Folder inmaintenance, the cartridge is not erased.
Erase all cartridges Erases all the cartridges in the list, regardless of whether they containcritical data.
5. Click OK to start the erasing operation.6. When the progress bar is full, click Close.
Duplicating a CartridgeDuplicating a cartridge can be divided in two operations:• The copy of data from one cartridge to another.• The creation of one version by copied object (directory or file) in the catalog.
Note: Duplicating a cartridge requires at least two drives.
To duplicate a cartridge
1. From the Tina Explorer, select Backup Destinations Media Pools.2. Select a pool in themedia pool list. The list of cartridges belonging to this pool displays.3. Select the cartridge(s) to duplicate in the list and click Duplicate Cartridge. TheMedia Pool Selection
window opens.4. Select the pool you want the duplicated cartridge to belong to then click OK to start the duplication.5. When the progress bar is full, click Close.
Tina Administration 145
Device & MediaManagement

• Duplicating a cartridge can take a long time if the number of backed up files is high. Theoperation can entail themounting of several source cartridges if a file belonging to thecartridge to be duplicated is spread out on several cartridges.
• Once the duplication is complete, the duplicated versions become the primary versions(except for VLS cartridges where the original versions always remain the primary versions),and the original versions become secondary. Thus if a restore is required Tina requests theduplicated cartridge. Youmay modify this behavior with the tunable "Use SourceMediawhen Restoring DuplicatedMedia" (see the >Tina Tunables Documentation).
Putting a Cartridge OfflineYou can put cartridges offline to externalize them and free space in the library.
The offline operation consists of:• Checking which cartridges are eligible to be brought offline.• Removing these cartridges from the library by putting them in the out mailbox.
Note: If the library is not equipped with at least one out mailbox, you have tomanually remove thecartridge from the slot, but the catalog is informed that the cartridge is no longer inside the library.
Offline Criteria
By default, Tina considers that a cartridge is eligible to be brought offline if it meets these criteria:• It is online in a library.• It belongs to amedia pool with a retention period.• It is either full or closed.• It does not contain critical data (last full backup and following incremental backups).• It will not be recyclable within 5 days.
To view eligible cartridges and put them offline
1. From the Tina Explorer, select Backup Destinations Media Pools.2. Select a pool in themedia pool list. The list of cartridges belonging to this pool displays.3. Select the cartridge(s) to put offline in the list and click Check Cartridges Offline Status. The Cartridge
Offline Status window opens.By default, cartridges aremarked as Offline Ready if they are recyclable in more than 5 days.
4. If you want to change this time period criteria, modify the Cartridges available in field, then click UpdateOffline Status. The cartridge list is updated.
5. Select the cartridges that you want to put offline, and select one of these options:
Offline Parameter Description
Put offline only selectedcartridges
Puts offline only the cartridges with selected check boxes.
Put offline all offline readycartridges
Puts offline only the cartridges that display Offline ready in the OfflineStatus column.
Put offline all cartridges Puts offline all the cartridges in the list, regardless of their offline status.
6. Click OK to start the offline operation.7. When the progress bar is full, click Close.
146 Tina Administration
Device & MediaManagement

Command Line
If you would rather view all the cartridges of the catalog instead of only the cartridges belonging to onemediapool, use the command line feature: the tina_library_control command for cartridges eligible to be broughtoffline and the tina_cart_control command for cartridges eligible to be brought online. The command optionsenable to filter and sort the list according to your needs.
See the Tina Command Line Interface Documentation.
Replacing a CartridgeDefective, worn-out or otherwise unsuitable cartridges must be replaced physically in the Library, and logicallyin Tina.
To replace a cartridge with a short retention period
1. From the Tina Explorer, select Backup Destinations Media Pools.2. Select a pool in themedia pool list. The list of cartridges belonging to this pool displays.3. Select the cartridge(s) in the list and put it offline in Tina.4. As soon as the cartridge becomes Recyclable since, delete it in Tina.5. In the time between these two actions, insert a new cartridge into the library.
To replace a cartridge with a long retention period
1. From the Tina Explorer, select Backup Destinations Media Pools.2. Select a pool in themedia pool list. The list of cartridges belonging to this pool displays.3. If the cartridge is still readable and working, duplicate it.4. After duplication, delete the original cartridge in the catalog, and remove it from the library.5. If the cartridge is only partially readable, close it and put it offline.6. As soon as the cartridge becomes Recyclable since, delete it in Tina.7. In the time between these two actions, insert a new cartridge into the library.
Writing a Cartridge LabelDuring a writing session, if a spare cartridge (not labeled) is needed, Tina will label it before writing on it. Thisprocedure is therefore optional. However you can label cartridges ahead of time.
For more information on cartridge labels, see Cartridge Identification.
• For Tina, a spare cartridge can contain information that has been “manually” backed up.Labeling a cartridge deletes this information.
• Tinamedia administrator’s rights are required to perform this operation.
To write a cartridge label
1. From the Tina Explorer, select Backup Destinations Media Pools.2. Select a pool in themedia pool list.
Themedia Pools pane opens.3. Click Write Label.
The Label cartridge for pool displays.4. Enter the number of cartridges you want to label.
They will be labeled in a row. The description field contains, by default, the catalog name. Youmaychange the field content. Whatever description you enter will be included on each cartridge.
5. Click Apply and Close.
Tina Administration 147
Device & MediaManagement

6. If the drive needs to bemanually loaded, insert the cartridge to label in the drive.The In Progress window opens. It keeps you informed of the labeling process.
7. While labeling is in progress, click Cancel to stop labeling.8. Once labeling is over, click Close.
Labeling occurs in the drive associated with the pool.
Note: An error message is displayed if the cartridge is not spare (cartridge already labeled), is writeprotected, or if themanual drive is empty.
Reading a Cartridge LabelReading the label of a cartridge can only be performed with Library Manager. See the Tina AdministrationDocumentation for Classic Interfaces.
Editing the Cartridge Life CycleThe Cartridge Life Cycle parameter indicates themaximum number of times a cartridge label can be read by adrive before being worn out. It is set at the drive level, i.e., it will be the same for all the cartridges used by aparticular drive. This parameter is set by default according to the drive type you are creating.
Note: The Cartridge Life Cycle parameter is used by Tina to calculate the CartridgeWear level.
See Creating a Drive and CartridgeWear.
Youmay edit the Cartridge Life Cycle parameter at any point.
To edit the cartridge life cycle
1. From the Tina explorer, select Storage Drives. The Drives pane opens.2. Select a drive and click Drive Details. The Drive Details window opens.3. From the Properties tab, expand theGeneral area, andmodify the Cartridge Life Cycle settings as
needed.4. Click Apply and Close to validate the operation.
Setting the Cleaning Cartridge ParametersIf you are using robotized drives and you want Tina tomanage drive cleaning automatically, youmust set theseparameters:• TheMax. Use Between Cleanings and Use Before Next Cleaning parameters in the Drive Details
window. This operation is described in Automatically Cleaning Drives.• The cleaning cartridge parameters in the Library Properties window.
To set the cleaning cartridge parameters
1. Expand your Tina catalog and select Storage Library. The Library pane displays.2. Select a library and click Library Details. The Library Details window opens.3. From the Properties tab, select Library Properties Standard Properties.4. Select the Cleaning Slot Available check box.5. Define or modify the cleaning cartridge settings:
• The Reserved Slot in the library for the cleaning cartridge. In most cases, when you create a library,the reserved slot for cleaning is 0. Enter the slot number you want to use for the cleaning cartridge.
• The Number of Cleanings already performed with the cleaning cartridge. By default, when youcreate a library, the number of cleaning is 0.
148 Tina Administration
Device & MediaManagement

• TheMaximum number of cleanings allowed with the cartridge. This is defined by the cleaningcartridgemanufacturer.
6. Click Apply and Close to validate the operation.
Note: Setting the cleaning cartridge information properly is very important since youmay damageyour drive if you use a worn cleaning cartridge.
The counter representing the number of cleanings already performed with the cartridge is automaticallyincremented each time you use the cleaning cartridge.
If you have not reserved a slot for the cleaning cartridge, youmust manually manage its wear by specifyingevery cleaning performed with the cartridge.
Tina automatically asks you to change the cleaning cartridge when the number of performed cleanings is greaterthan the cartridge life cycle. Youmust thenmanually put the cleaning cartridge in the reserved slot.
The cleaning cartridge settings can be defined when creating a library or modified when editing it.
Exporting the Lists of Storage ObjectsYou can export the list of devices, media pools and cartridges in CSV or PDF format.
To export the list of storage related objects
1. In theWeb Administration, expand your catalog in the Tina Explorer.2. From the Tina Explorer, select the object for which you want to export the list (e.g., select Storage
Drives for the list of drives, Backup Destinations Media Pools for a list of pools or cartridges, etc.) Thecorresponding pane opens.
3. Select one or several object in the list and click Export. The Export List window displays. This tabledescribes the parameters that you can set in the Export List window:
Parameter Description
Export Enables you to export the entire list or only the selected lines.
Format Enables you to select the format of the export file (i.e, CSV or PDF).
End of line CSV format only. Enables you to select the end of line format:
• Windows (CRLF)• Linux (LF)• Classic macOS (CR)
FieldSeparator
CSV format only. Enables you to select the field separator, either , or | or ;
Escapecharacter
CSV format only. Enables you to select the character to use to delimit a field value if itcontains a field separator character; either “ or ‘
Select the Always Add Escape Character check box if you want to delimit each field value withthe escape character.
4. Configure the appropriate export parameters. Click Apply and Close. A file is created in the selectedformat and you can save it in the location of your choice.
Tina Administration 149
Device & MediaManagement

Deduplication Storages and PoolsThe Deduplication Storages and Deduplication Pools enable you to store all the data of your virtual machinesthat Tina HyperVision Agent for VMware or Tina HyperVision Agent for Hyper-V have backed up. Two types ofDeduplication Storages are available:• HyperVision Deduplication Storage: This backup destination leverages the deduplication technology and
enables you to perform vault restores (i.e., full virtual machines) and file granularity restores (i.e., accessto individual files).
• External File System Storage: This backup destination enables you to access other deduplication toolson the NAS (Network Attached Storage).
For more information, see the Tina HyperVision Agent for VMware Documentation and the Tina HyperVisionAgent for Hyper-V Documentation.
150 Tina Administration
Device & MediaManagement

CHAPTER8-Library ManagementThese topics describe and explain operation on the Library Management:• About Library Management• Viewing the Library Contents• Operations on Libraries• Operations on Drives• Operations onMailboxes• Operations on Slots and Cartridges
About Library ManagementIn this topic, both terms "media" and "cartridge" are used to refer to either amagnetic tape, a digital optical disk,or files on a disk.
You can control andmanage libraries with the Library pane. This component lets you:• View the library content• Perform library operations• Perform drive operations• Perform media operations• Perform slot operations
Note: In order to take actions in the Library pane, youmust have the Library Use right enabled in yourprofile. SeeManaging Users for details.
Viewing the Library ContentsThe Library pane enables you to view andmanage the contents of a library. First, youmust have created andconfigured at least one library.
See Libraries for details on library configuration.
Opening the Libraries PaneTo open the Libraries pane
1. In theWeb Administration, expand your catalog in the Tina Explorer.2. Expand the Storage node, and click Libraries. The Libraries pane opens.3. From the library list, select the library that you want to view. The content of the corresponding library
displays in the bottom topic of the pane.
Note: You can alsomanage libraries using the tina_library command. For more information on thetina_library command, see the Tina Command Line Interface Documentation.
Tina Administration 151
Library Management

Library OverviewThis image illustrates the Libraries pane:
The Libraries pane consists of:• Three toolbars that enable you to perform some operations on the highlighted library, drive, or slot in the
lists.• The refresh toolbar that enables you to update the library pane with new information.• A library list that enables you to select a library in order to view its contents or perform operations.• A drive/mailbox/slot list that enables you to perform some operations on the highlighted item in the list.
Customizing the Library PaneWhen you open the Libraries pane, by default, only the All Libraries tab is available which displays the list of alllibraries. You can also create a new library view to filter the list of libraries according to specific criteria.
To create a new library view
1. Click the + tab. The Library Filtering window opens.2. Enter a view name.3. To set the new library view to filter events by one or several categories, expand the appropriate category
by clicking the + button to the left.4. Set the filter parameters as described in this table:
Parameter Description
Filter byName
Select one of these radio buttons to filter the libraries by their names:
Show libraries containing the following strings. Enter part of the name of the libraries thatyou want to include in this view.
Show libraries matching the following regular expression. Enter the regular expressioncorresponding to the libraries that you want to include in this view.
Show libraries with the following library name. Enter the names of the libraries that youwant to include in this view. You can either:
• Click the Plus (+) icon to enter a namemanually in the Library Name table.• Or click ChooseObject to select a library name from the list.
152 Tina Administration
Library Management

Parameter Description
Filter byAlarm
1. Select theShow libraries whosemost severe alarm is check box to filter thelibraries based on their alarms.
2. Select one or several of these alarm types:
l Minor: Includes all libraries with minor alarms as their most severe alarms.
l Major: Includes all libraries with major alarms as their most severe alarms.
l Critical: Includes all libraries with critical alarms as their most severealarms.
Filter byType
1. Select theShow libraries with the following type check box to filter the librariesbased on their types.
2. Select one or several library types. You can either:
l Click the Plus (+) icon to enter a typemanually in the Library type table.
l Or click ChooseObject to select a library type from the list.
5. Click Apply and Close to validate the creation of a new library view.
Displaying Library DetailsTo display the library details
1. Select a library in the library list.2. Click Library Details. The Library Details window opens. It includes the Properties and Events tabs.
The Properties tab provides general information for the selected library.
PropertiesTab
Description
General Area
Name Specifies the library name.
Type Specifies the library model.
Hosted by Specifies the host the library is attached to.
DeviceDescriptor
Specifies the address or path where to access the library.
SerialNumber
Specifies the serial number of the library. It concerns a library installed in a SAN environment.Tina automatically detects the serial number and displays it if you have set the tunable UseSerial Number to Determine Device Descriptor. See Device Descriptor Re-allocation.If the library is software-managed, the library type displays in this field.
Comment Comment entered at library creation.
Drives Area
Tina Administration 153
Library Management

PropertiesTab
Description
Name Specifies the names of the drives associated with the library.
Type Specifies themodel of the drives associated with the library.
DriveIndex inLibrary
Specifies the index number assigned to the drive in the library.
VTL Properties Area
For virtual libraries only. See Editing a Virtual Library System for details.
Library Properties Area
See Advanced Library Properties for details.
The Activity tab provides alarm information for the selected library:
Parameter Description
Action buttons Allow to perform these actions on alarms:
• Delete• Acknowledge temporarily• Acknowledge permanently
Last Date Specifies the date of the last occurrence of the alarm.
Object Specifies the name of the object for which the alarm occurs.
Acknowledgement Not Acknowledged. Specifies that you have not yet acknowledged the alarm.
Permanent. (No alert on next alarm). Specifies that you have acknowledged the alarmand any subsequent same version of it.
Temporary. (Alert on next alarm). Specifies that you have only acknowledged thecurrent occurrence of the alarm.
Message Describes the alarm.
3. Click Cancel to close the window.
Operations on LibrariesFrom the Libraries pane, you can perform these operations on libraries:• Editing a Library• Reinitializing a Library• Testing the Drive Position in the Library• Deleting a Library• Exporting the List of Libraries
154 Tina Administration
Library Management

Editing a LibraryOnce you have created a library, you can edit these two library parameters:• Device descriptor.• Properties.
No other parameter is editable.
To edit a library
1. In theWeb Administration, expand your catalog in the Tina Explorer.2. Expand the Storage node, and click Libraries. The Libraries pane opens.3. Select a library.4. Click Library Details. The Library Details window opens.5. Modify the Device Descriptor as needed.
• The protocol used to access the library is always the Tina protocol, even if the hostaccessing the library is set to use the NDMP protocol. As a result, the device descriptormust always respect the Tina format, not the NDMP format.
• The definition of the library device descriptor does not allow colon character ":".
Windows. SCSI address of the library. The Device Descriptor must be entered in cxbytzla format,where:• x is the number of the SCSI controller.• y is the number of the bus.• z is the number of the SCSI target.• a is the LUN number.
Note: The Device Descriptor information can be found in theWindows Administrative Toolsdirectory. See your operating system documentation.
macOS. For example: qc0.Unix. Path of the file allowing access to the library. For example: /dev/qc.
6. Modify the library properties as needed. See Advanced Library Properties.7. Click Apply and Close to validate the operation.
Reinitializing a LibraryReinitializing a library enables Tina to identify the contents of the library, especially the cartridges located in theslots, drives or mailboxes. It matches the library logical status with the library physical status. The logicalstatus is the image of the library that Tina builds in the catalog and displays in theWeb Administration. Thephysical status is the actual contents of the library.
Note: A barcode reinitialization is automatically performed when the library is created.
Tina Administration 155
Library Management

Barcode, Read Label, or Full Inventory Reinitialization
ReinitializationTypes
Barcode The Barcode reinitialization can be used even if the library does not support barcode. Inthat case, the library simply checks the full/empty and available/not available status of theslots and drives. This type of reinitialization does not involve any reading or moving of thecartridges and is thereforemuch faster than the other reinitialization types.
Read Label A Read Label reinitialization involves moving and reading every single cartridge selectedfor the reinitialization, but it may be unable to solve inconsistencies, if a cartridge has beenmovedmanually, for example.
Full Inventory A Full inventory consists in checking the full/empty and available/not available status ofthe slots and drives and in identifying the cartridges through their barcode, when this ispossible. This is the slowest type of reinitialization, but it gives the surest reading of librarystatus.
Note: A Read Label reinitialization or a Full Inventory can be quite lengthy depending on yourconfiguration. It may vary from a few minutes to a few hours.
Launching a Library Reinitialization
To launch a reinitialization
1. In theWeb Administration, expand your catalog in the Tina Explorer.2. Expand the Storage node and click Libraries. The Libraries pane opens.3. Select a library.4. Depending on the type of reinitialization that you want to perform, click Launch a Barcode Reinitialization.
OrClick Launch a Read Label Reinitialization.OrClick Launch a Full Inventory Reinitialization.
5. In the Confirm window, click Yes to start the reinitialization.
Note: You can also reinitialize a library using the tina_library_control command. For moreinformation, see the Tina Command Line Interface Documentation.
Testing the Drive Position in the LibraryThis operation consists in mounting a cartridge through each of the drives in a library to calculate their position,also known as their logical index. The Drive Position test is useful in these cases:• Where a library is unrecognized (i.e., it displays as ??? after the Device Detection has been run, implying
that no serializationmethod has been detected for its drives), and you have to declare it manually. Insuch cases, the serial numbers and positions of the drives within the library have not been automaticallyretrieved.
• When a library has been split and the drives must be reindexed.
Note: In multi-catalog environments where libraries are split and shared over several catalogs, the drivepositions are not necessarily the same in the different splits. Youmust run the test separately for eachcatalog.
156 Tina Administration
Library Management

PrerequisitesYoumust meet these prerequisites to test the position of a drive:• Drivers for the Library and drives must be installed and configured.• Each drive in the Library must have been declared in Tina and associated with the Library.• Each declared drive in the library must be inMaintenancemode.• Theremust be at least one data cartridge in the library slot.• The cleaning cartridgemust be defined in the cleaning slot.
To test the position of a drive in the library
1. In theWeb Administration, expand your catalog in the Tina Explorer.2. Expand the Storage node and click Libraries. The Libraries pane opens.3. Select the library and click Test Drive Position. The Library Drive Position Test window opens.4. Enter the number of physical drives of the library.5. Click Apply and Close. TheOperation Progression window opens.6. Once the test is complete, click Close.
Deleting a LibraryIf you remove a library from the network, youmust delete it from Tina. When you delete a library, youmodify theloadingmode of the drives associated with the library. Drives aremanually loaded again.
To delete a library
1. In theWeb Administration, expand your catalog in the Tina Explorer.2. Expand the Storage node and click Libraries. The Libraries pane opens.3. Select a library.4. Click Delete Library. The Confirm window opens.5. Click Yes to confirm.
The library is removed from theWeb Administration.The deleted library is automatically removed from the Library area of the Drive Properties window withwhich it was associated.
Exporting the List of LibrariesYou can export the list of libraries in CSV or PDF format. See Exporting the Lists of StorageObjects.
Operations on DrivesFrom the Libraries pane, you can perform these operations on drives:• Viewing Drive Information• Modifying a DriveMode• Identifying the Drive Contents• Testing a Drive• Ejecting a Cartridge from aDrive
Tina Administration 157
Library Management

Viewing Drive InformationViewing drive information
1. In theWeb Administration, expand your catalog in the Tina Explorer.2. Expand the Storage node and click Libraries. The Libraries pane opens.3. Select the library and expand the corresponding drive list from the bottom topic of the pane.
The list of drives displays this information for each drive:
Parameter Description
Alarm A colored dot at the left of the drive namemeans that Tina has issued an alarm for this drive.
• Yellow dot: Minor alarm• Orange dot: Major alarm• Red dot: Critical alarmSee Viewing Alarms for details.
Name Specifies the name of the drive.
A lock next to the drive name indicates that the drive is reserved by a Tina process.
Status Specifies the status of the drive (i.e., Enabled, Enabled for restore only, Disabled, orMaintenance).
CartridgeName
Specifies the label of the cartridge located in the drive, if any.
A lock next to the cartridge name indicates that the cartridge is reserved by a Tina process.
A colored dot next to the cartridge namemeans that Tina has issued an alarm for this cartridge.See Viewing Alarms for details.
Barcode Specifies the barcode of the cartridge located in the drive, if your library supports barcodes.
Modifying a Drive ModeWhen first created, a drive is in disabledmode, but you can change its mode.
This table describes the different modes that can apply to a drive:
Drive Mode Description
Enabled You can perform all operations.
DriveEnabled forRestore
You can perform only restore operations and non job related operations such as erasing,recycling, labeling, or identifying a cartridge; cleaning or testing the drive, reinitializing thelibrary.
During a restore, Tina uses in priority the drives in the Drive Enabled for Restoremode. Ifnone is available, it chooses another drive. In addition, if the cartridge required to perform therestore is already mounted in a drive, that drive is used for the restore regardless of the drivemode.
Disabled You cannot perform any operation.
Maintenance You can perform only a drive test, a cartridge identification, or a cartridgemove.
158 Tina Administration
Library Management

To change the drive mode
1. In theWeb Administration, expand your catalog in the Tina Explorer.2. Select Storage Libraries. The Libraries pane opens.3. Select the library and expand the corresponding drive list from the bottom section of the pane.4. From the drive list, select the drive and click the appropriate button, either Enable Drive, Disable Drive,
Drive Enabled for Restore, or DriveMaintenance.5. Click Yes in the confirmation dialog.
The drive list Status column displays the new mode.
Identifying the Drive ContentsYou can quickly identify the cartridge located inside a particular drive without reinitializing the whole library.
To identify the contents of a drive
1. In theWeb Administration, expand your catalog in the Tina Explorer.2. Select Storage Libraries. The Libraries pane opens.3. Select the library and expand the corresponding drive list from the bottom section of the pane.4. Select the drive containing the unidentified cartridge and click Identify Contents.5. Click Yes in the confirmation dialog. The cartridge identity displays in the Cartridge Name column.
Testing a DriveYou can test a drive to verify that it is in working condition, that it has been properly configured, and that Tinacorrectly handles that drive.
Note: This test requires a spare cartridge. The test deletes any data contained on the cartridge.
Important: Testing aWORM drive implies that theWORMmedia used becomes unusable once theoperation is complete. Atempo recommends that you then remove this media from the library.
See Testing Drives for details on drive testing conditions and results.
To test a drive
1. In theWeb Administration, expand your catalog in the Tina Explorer.2. Select Storage Libraries. The Libraries pane opens.3. Select the library and expand the corresponding drive list from the bottom section of the pane.4. Select the drive and click Drive Test. If your drive is shared, the Device Link Selection window displays.5. Select the host that you want to use to access the drive and click Apply and Close. Themount request of
the non-labeled cartridge is initiated.6. The test begins and theOperation Progression window displays showing you the test progress. See
Testing Drives for details on test results.
Note: If you want to stop the test, click Cancel.
7. Click Close when the test is over.
Ejecting a Cartridge from a DriveUse this operation to eject amedia from a drive. You do not have to specify the destination slot, Tina willautomatically select it.
Tina Administration 159
Library Management

To eject a cartridge
1. In theWeb Administration, expand your catalog in the Tina Explorer.2. Select Storage Libraries. The Libraries pane opens.3. Select the library and expand the corresponding drive list from the bottom section of the pane.4. From the drive list, select the drive you want to empty and click Unmount Media.5. Click Yes in the confirmation dialog.
Operations on MailboxesFrom the Libraries pane, you can perform these operations onmailboxes:• ViewingMailbox Information• Enabling/Disabling aMailbox
Viewing Mailbox InformationViewing mailbox information
1. In theWeb Administration, expand your catalog in the Tina Explorer.2. Select Storage Libraries. The Libraries pane opens.3. Select the library and expand the correspondingmailbox list from the bottom section of the pane.
The list of mailboxes displays this information for eachmailbox:
Parameter Description
Name Specifies the name of themailbox.
Status Specifies the status of themailbox (i.e., Enabled or Disabled).
CartridgeName
Specifies the label of the cartridge located in themailbox, if any.
A lock next to the cartridge name indicates that the drive is reserved by a Tina process.
A colored dot next to the cartridge namemeans that Tina has issued an alarm for this cartridge.See Viewing Alarms for details.
Barcode Specifies the barcode of the cartridge located in themailbox, if your library supports barcodes.
Enabling/Disabling a MailboxWhen you create a library, themailboxes are disabled and you cannot perform any operation on them. If youwant to use amailbox, youmust enable it.
To enable or disable a mailbox
1. In theWeb Administration, expand your catalog in the Tina Explorer.2. Select Storage Libraries. The Libraries pane opens.3. Select the library and expand the correspondingmailbox list from the bottom section of the pane.4. From themailbox list, select themailbox and click the appropriate button, either EnableMailbox or
Disable Mailbox.5. Click Yes in the confirmation dialog.
The new mode is displayed in the Status column of themailbox list.
160 Tina Administration
Library Management

Operations on Slots and CartridgesFrom the Libraries pane, you can perform these operations on slots and cartridges:• Viewing Slot/Cartridge Information• Enabling/Disabling a Slot• Moving a Cartridge• Bringing a Cartridge On/Offline• Setting the Cleaning Cartridge Parameters
Viewing Slot/Cartridge InformationViewing slot and cartridge information
1. In theWeb Administration, expand your catalog in the Tina Explorer.2. Select Storage Libraries. The Libraries pane opens.3. Select the library and expand the corresponding slot list from the bottom section of the pane.
The list of slots displays this information for each slot:
Parameter Description
Name Specifies the name of the slot.
A lock next to the slot name indicates that the slot is reserved by a Tina process.
Status Specifies the status of the slot (i.e., Enabled or Disabled).
Type Specifies the type of the slot: either slot for data cartridge slots, or cleaning slot forcleaning cartridge slots.
CartridgeName
Specifies the label of the cartridge located in the slot, if any. The name can be of this form:
• ????? - The slot contains a cartridge which has not been identified by the catalog.• - The slot does not contain any cartridge• xxxxx - The slot contains a cartridge. It displays its name. See Cartridge Status for details
on cartridge status.A lock next to the cartridge name indicates that the drive is reserved by a Tina process.
A colored dot next to the cartridge namemeans that Tina has issued an alarm for this cartridge.See Viewing Alarms for details.
Barcode Specifies the barcode of the cartridge located in the slot, if your library supports barcodes.
Enabling/Disabling a SlotYou can disable a slot to prevent the current catalog from using that slot and the cartridge it may contain.Enabling it allows the catalog to use the slot and associated cartridge.
This feature can be used to avoidmixing tapes inside the library if several catalogs are using the same library.When a slot is disabled, the catalog will view it as logically unavailable and will not attempt to use it until it isenabled again.
To enable or disable a slot
1. In theWeb Administration, expand your catalog in the Tina Explorer.
Tina Administration 161
Library Management

2. Select Storage Libraries. The Libraries pane opens.3. Select the library and expand the corresponding slot list from the bottom section of the pane.4. From the slot list, select the slot and click the appropriate button, either Enable Slot or Disable Slot.5. Click Yes in the confirmation dialog.
The new mode is displayed in the Status column of the slot list.
Moving a CartridgeThe Libraries pane enables you tomove cartridges, from a location to another empty location (e.g., from a slot toa drive, from amailbox to a slot).
Note: You cannot move the cleaning cartridge from one slot to another. You can only put it on or offline.
To move a cartridge
1. From the Libraries pane, select the library. The corresponding drive, mailbox, and slot lists display in thebottom section of the pane.
2. Select the drive, mailbox or slot where the cartridge tomove is located.3. Click Move Cartridge. The Cartridge Destination Choice window displays. The Cartridge area contains
this information:
Parameter Description
Name Specifies the label of the cartridge that you want to move.
Barcode Specifies the barcode of the cartridge, if your library supports barcodes.
Location Specifies where the cartridge is located before themove (i.e., a drive, slot, or mailbox).
Library Specifies the name of the library to which the cartridge belongs.
4. From the Destination area, select the location where tomove the cartridge.
Note: The Destination table only lists empty locations that are eligible to be a destination.
5. Click OK to validate your choice.The cartridgemoves to the selected location.
Bringing a Cartridge On/OfflineYou can put cartridges offline to externalize them and free space in the library. Then, you can put them backonline. The offline operation consists in removing a cartridge from the library. The online operation consists ofputting a cartridge in the library.
Note: If the library is not equipped with at least one out mailbox, youmust manually remove the cartridgefrom the slot, but the Tina catalog is informed that the cartridge is no longer inside the library.
Tina provides assistance for quickly detecting cartridges that are eligible to be put offline and externalized. SeePutting a Cartridge Offline for details.
You can also use the tina_library_control or tina_cart_control commands. Some option enables you tosort and filter the cartridge lists according to your needs. See the Tina Command Line Interface Documentationfor details.
162 Tina Administration
Library Management

Putting a CartridgeOnline• Only offline cartridges can be put online.
• Before bringing cartridges online, make sure you have enough empty available slots in yourlibrary.
To bring a cartridge online
1. Manually insert the cartridge in the "in" or "in/out" mailbox slot of the library.2. From the Libraries pane, select the library and perform a barcode reinitialization, to inform the catalog of
the empty/full status of themailbox slot. The cartridge displays in themailbox list. See Launching aLibrary Reinitialization for details.
3. Click Put cartridges online.The cartridge is moved to the available slot and identified. If no drive is available at the time, the cartridgeappears as unknown (????).
Putting Cartridges OfflineNote: Only on-line cartridges can be put offline.
To put a cartridge offline
1. From the Libraries pane, select the slot or drive where the cartridge is located.2. Click Put cartridges offline.
• If nomailbox is available, the task ends on error.
• If themailboxes are full, an operator request is raised to handle thesituation.
3. Empty themailbox manually.4. Perform a barcode reinitialization in order to indicate themailbox full/empty status to the catalog. See
Launching a Library Reinitialization for details.
Setting the Cleaning Cartridge ParametersIf you are using robotized drives and you want Tina tomanage drive cleaning automatically, youmust set theseparameters:• TheMax. Use Between Cleanings and Use Before Next Cleaning parameters in the Drive Details
window. This operation is described in Automatically Cleaning Drives.• The cleaning cartridge parameters in the Library Properties window.
Note: You can set the cleaning cartridge parameters at library creation, andmodify them later whenediting the library.
To set the cleaning cartridge parameters
1. In theWeb Administration, expand your catalog in the Tina Explorer.2. Select Storage Libraries. The Libraries pane opens.3. Select a library and click Library Details. The Library Details window opens.4. From the Properties tab, select Library Properties Standard Properties.5. Select the Cleaning Slot Available check box.
Tina Administration 163
Library Management

6. Define or modify the cleaning cartridge settings:• The Reserved Slot in the library for the cleaning cartridge. In most cases, when you create a library,
the reserved slot for cleaning is 0. Enter the slot number you want to use for the cleaning cartridge.• The Number of Cleanings already performed with the cleaning cartridge. By default, when you
create a library, the number of cleaning is 0. This counter is automatically incremented each timeyou use the cleaning cartridge.
• TheMaximum number of cleanings allowed with the cartridge. This is defined by the cleaningcartridgemanufacturer.
7. Click Apply and Close to validate the operation.
Note: Setting the cleaning cartridge information properly is very important since youmay damageyour drive if you use a worn cleaning cartridge. If you have not reserved a slot for the cleaningcartridge, youmust manually manage its wear by specifying every cleaning performed with thecartridge.
Tina automatically asks you to change the cleaning cartridge when the number of performed cleanings is greaterthan the cartridge life cycle. Youmust thenmanually put the cleaning cartridge in the reserved slot.
See Automatically Cleaning Drives and seeManually Cleaning Drives for details on performing drive cleaning.
164 Tina Administration
Library Management

CHAPTER9-Automatic Backup ConfigurationThese topics describe the steps required to configure your Tina environment to perform automatic backups ofyour data and supplies administration information:• About Tina Backup• BackupWizard• Backup Strategies• Scheduler• Backup Selections• Macro-multiplexing
About Tina BackupThese topics describe the different backups:• Backup Types• Parallel Backups• Backup without Using the Cache of the Server• Scheduling Issues• Backup Process
Backup TypesThis tables describes the types of backup you can perform using Tina:
Backup Description
Full Backs up the contents of all directories that have a backup selection associated with thestrategy.
SyntheticFull
This backup is built from previous full and incremental backups and does not generate anynetwork traffic.
Instead of copying objects (files and directories) from the disk, Tina finds the last backed upversion of each object in the catalog to build the synthetic full backup. For each object, Tinatakes into account themost recent version, whatever the strategy (i.e., if you perform asynthetic backup with strategy A, and the last version of a file was backed up by anincremental session with strategy B, the synthetic backup will use the version fromstrategy B).
Youmust have at least two drives available to perform Synthetic Full backups since both areading and a writing sessions are involved.
Incremental Backs up only the objects that have beenmodified or created since the last backup (either fullor incremental of the same strategy). If your very first backup is incremental, all files anddirectories are backed up as they would have been with a full backup.
This table indicates for each operating system, the elements that Tina checks to decide whether or not to backup an object during an incremental backup. If at least one of the elements has changed, Tina backs up theobject.
Tina Administration 165
Automatic Backup Configuration

Note: A change in the ACL of a file or directory does not trigger an object incremental backup.
OperatingSystem Tina checks this element
Windows • mtime (modification time)• Object type• Fuzzy object• System attributes
macOS • Object type• uid (User ID)• gid (Group ID)• mtime (modification time)• ctime (last status change time)
Tina takes this element into account only when the Use ctime as Incremental BackupCriterion tunable is set to detect extended attributes modifications.
• Mode• Physical links• Fuzzy object• DMF/BAPI: Status for DMF files• Directories: Network target if mount point• flags misc (Carbon API used)• attrlist size• flags misc (Finder Info)• cataloginfo (Carbon)• attrlist (before Carbon)
Unix • Object type• uid (User ID)• gid (Group ID)• mtime (modification time)• ctime (last status change time):
Tina takes this element into account only when the Use ctime as Incremental backupcriterion (use_ctime_as_incremental_criteria) tunable is set to detect extendedattributes modifications.
• Mode• Physical links• Fuzzy object• DMF/BAPI: Status for DMF files• File size• Directories: Network target if mount point
Fast File ScanFast File Scan speeds up incremental backups onWindows hosts and Filesystems. This option is available onWindows platforms only.
To accelerate incremental backups, the Fast File Scan specific ELD servicemonitors data changes (filecreation, modification, or deletion) on one or several volumes in real time and builds up an event list. Fast FileScan keeps inmemory the event list until the next incremental backup.
166 Tina Administration
Automatic Backup Configuration

When an incremental backup is launched and if the ELD service is activated, Tina connects to it. To determinethe objects to back up, Tina compares the events listed instead of scanning the whole drives or directories as itdoes for standard incremental backups. Thus, Tina performs faster the incremental backup as it no longerneeds tomake a comparison with the catalog.
The amount of time saved depends on the File system size. The two incremental backup types back up thesame number of files; however, Fast File Scan eliminates the time used by the File system parsing.
Fast File Scan obtains the best performances with very large file trees where few events occur.
• If Tina cannot communicate with the ELD service, a standard incremental backup isperformed instead, by comparing all the files with the information recorded in the catalog.
• Some antivirus software usemechanisms that modify files during their scan.Thesemodified files are presented for the next incremental backup, though they recorded noactual modification.
Configuring the Backup Strategies
To use Fast File Scan on an agent, youmust:• Activate Fast File Scan in theWeb Administration.
See To configure Fast File Scan.• Select the Fast File Scan option in a strategy.
See Fast File Scan (Windows only).
As Fast File Scan is applied on a strategy by strategy basis, Tinamay run Strategy A with Fast File Scanenabled and Strategy B with Fast File Scan disabled. As each strategy is independent, you can back up twoseparate volumes using two strategies. At the end of incremental backups, Tina checks all strategies todetermine the appropriated purging date per strategy.
Fast File Scan supports Tinamultienvironment, each environment being registered on the ELD service. In thisconfiguration, several Tina versions back up the same volume, but with different frequencies.
Parallel BackupsTina Parallel Backup is a functionality that increases system performance by splitting backup jobs into severalprocesses that run simultaneously. Each process backs up one backup selection.
When the parallel backup is in progress, each process is shown in JobManager as it takes place. When theparallel backup is complete, it displays as only one job.
LimitationsTheseOS, applications, or features are not supported:• AS400 operating systems.• NDMP application.• Archiving, snapshots, and synthetic backups features.
How to best use parallel backupsAs a general rule, define as many backup selections as you have drives, either virtual or physical. Definebackup selections of roughly the same size to distribute the backup load evenly. Parallelism index should beequal to the number of selections to parallelize +1.
If you use a VLS and if the backup selections and the VLS are located on the same filesystem, parallel backupswill be slower.
Tina Administration 167
Automatic Backup Configuration

Defining a parallel backup1. Create several backup selections and check the Parallelization option for each of them. See Creating a
Backup Selection.2. Create a strategy and associate all the backup selections involved in the parallel backup with this
strategy. See Creating a Backup Selection.3. Define the Parallelism Index of the strategy. This is the number of simultaneous data streams. See
Parallelism Index.To determine the Parallelism index, add 1 to the number of simultaneous data streams you want, (e.g., toget 4 simultaneous data streams, set the Parallelism index to 5).
Adjusting the Parallelism indexIf some of your drives are already used for backup/ restore operations and as a result the number of availabledrives is lower than the Parallelism index, some of the parallel backup jobs will queue up and cause a CPUstrain. To avoid this problem, adjust the Parallelism index so that it equals the number of available drives.
For more information on adjusting the Parallelism index, see Parallelism Index.
Backup without Using the Cache of the ServerA client platform (agent or storage node) can back up its data directly on a storage device that is either local orconnected to a storage node. This feature prevents data from transiting through the Tina server, and thusreduces network traffic. Only themeta-data is sent to the catalog located on the server.
When this function is enabled, only the sidf and tarwriting formats are available.
When you perform backups in this way, these Tina features are not available:• Synthetic backup with tar format.• tina_export commandwhen exporting to the same catalog.
Scheduling IssuesIncremental backups enable you to perform quick backups, minimizing the volume of data transferred; however,restore performancemay not be optimal. If data is spread out on several media, moremediamounting/unmounting are required to read data. This may lengthen the overall restore time. Time Navigationhelps optimizemediamounting and reduce the restore time of spread out data.
Full backups must be regularly performed for security reasons and to regroup data to accelerate its restore;however, they takemore time because of the large volume to back up. Performances vary according to thenetworks and platforms types being used.
Synthetic full backups do not initiate any activity on the client hosts or the network since all operations areperformed on the server where the catalog is located. They save time and avoid overwhelming a low bandwidthnetwork and putting a strain on client hosts.
They also let you back upmigrated or compressed files rapidly. It is not necessary to retrievemigrated files or todecompress files compressed on disks by the operating system (e.g., Windows) before backing them up.
Note: The synthetic full backup does not reflect the reality of the disk at the time it is performed, (e.g., filesmodified between the last backup taken into account and the synthetic session are not backed up). It isthus recommended to schedule a synthetic backup right after an incremental session.
168 Tina Administration
Automatic Backup Configuration

Backup Process
Automatic BackupsEach strategy is independent from the others. If the example file is backed up by Strategy A, modified, thenbacked up by Strategy B, the next incremental session of Strategy A also backs up the example file.
Backup strategies (defined by the administrator) are associated with backup selections (defined for each clientplatform or platform groups by the administrator or users). For each platform or platform group, backupselections determine the directories and files to back up.
The server checks every 5 minutes which platforms are to be backed up. It then runs the tina_backup programon the platforms to be backed up. The server must be able to connect to the client: the Tina service or daemonmust be running on the client.
Note: Service ends if the tina_daemon on the server is stopped. Clients will no longer be able to connect.Error messages, such as “Connection error with the host x” or “The host x does not acceptthe connection” are logged in the event file.
A backup session starts depending on the date and time defined in the strategy. For each strategy, tina_backup verifies the backup type. If you have scheduled a full session, tina_backup includes all backupselections associated with the strategy. If you have scheduled an incremental session, tina_backup includesonly the backup selections whose strategy and time settings correspond to the current session.
When a session includes a backup selection, the files and the subdirectories to back up are filtered by nameand size; by default * for the name and infinite for themaximum file size. Youmust define a backup formatfor each strategy and you can select compression and encoding.
For a given strategy and platform, only one session can take place at a time. If a session is not complete, nonew session can start. When a session starts, a “Start backup (full or incremental)” message is loggedin the event file. For each backup selection included, the beginning and the endingmessages are added to theevent file. When all backup selections have been backed up, the “End backup (full or incremental)”message is added. The session is complete, a new backup can start.
When using different strategies, you define times, recycling policies, and drives that are different for any givenplatform. Each strategy is associated with at least amain pool and eventually one or moremultiple writingmedia pools for full and incremental sessions.
Main pools enable you to specify both the drives and themedia to be used for backups, and the recyclingmode.Main pools for incremental and full sessions of a given strategy can be identical or distinct.
Multiple writing pools enable you to perform duplicate copies of the files backed up by a session. You can defineup to threemultiple writing pools.
A main pool may also be amultiple writing pool. Each file is then copied twice with the same drives, on thesamemedia pool.
Note: If you are scheduling a backup with several pools (i.e., with duplicate writing sessions), youmusthave at least one available drive per media pool, since duplicate writing sessions take placesimultaneously.
Manual TriggeringIn addition to automatic backups, you canmanually trigger a backup for any strategy, on any platform. Anincremental session initiated under these conditions takes into account all the backup selections associatedwith the selected strategy. SeeManual Triggering of a Backup.
Tina Administration 169
Automatic Backup Configuration

Backup WizardThe BackupWizard enables you to configure platforms for backup. A backup configuration consists of theseelements:• A backup selection.• A media pool.• A schedule.
The wizard automatically assigns the backup configuration to the first available strategy for the given platform.For instance, if you are configuring a backup on themyplatform platform that has no strategy defined yet, thewizard uses Strategy A. If you have already defined the strategies A and B formyplatform, then the wizardcreates Strategy C.
Configuring a Backup with the Backup WizardTo configure a backup
1. In theWeb Administration, select your catalog.
2. From themain application tool bar, click and select Backup Wizard.You can also click Launch BackupWizard from the Host or the Strategy views.
Note: If no drives or libraries have yet been declared for your backup environment, a pop-up will alertyou. From here, you will be able to launch the Library CreationWizard to discover and selectphysical devices directly, or the Virtual Tape Library (VTL) CreationWizard to declare a virtualdevice for backup to disk using the Atempo Virtual Library System (VLS).
3. Enter the parameters to configure a backup in the BackupWizard.This table describes the parameters that you can set in the BackupWizard:
Parameter Description
PlatformSelection
Select the platform that needs to be configured for backup.
BackupConfigurationCreationMode
If compatible platforms (i.e., same operating system for hosts, and same type forapplications) are already configured for backup, theWizard gives you these options:
• Configure a new backup. Youmust create a new backup.• Back up with an existing configuration. You can select the platform whose
configuration you want to use.Select the appropriate check boxes: Copy the strategies, Copy the backupselections, or both.
BackupSelection
Defines the path of the directory to back up.
Click Add Item (+) and enter directly the directory path in the Backup Selection Pathtextbox.
Or
Click the Browse (...) icon. The Browsing window opens. Enter your OperatingSystem credentials and select the directory in the file tree and click Apply and Close.
170 Tina Administration
Automatic Backup Configuration

Parameter Description
Media Pools Media Pools you associate with the backup. You can select already existingmediapools or define new ones. These are the valid options:
• Use the same media pool for incremental and full backups.The same retention period (i.e., the amount of time backed up data is kept beforethemedia is recycled) applies to both backup types and the same device backs upthem.
• Use different media pools for incremental and full backups.Youwill be asked to define a pool for full backups and a pool for incrementalbackups.
Full andIncrementalMedia Pool
These are the valid options:
• Define a new media pool. Opens theMedia Pool Parameters window for you todefine the needed new media pools.
• Use an existing media pool. Select the appropriate pool(s) from the list ofavailable pools.
Media PoolParameters
This window opens when you select the Define a new media pool option.
General Information. Enter a name and a label for the new pool.
Retention Period. These are the valid options:
• Infinite. The data is stored without limit of time.• Data stored during. Choose the number of days, weeks, months, or years during
which data will be stored. Once that time period expires, themedia will be reusedto store new data.
Associated Drives. Select the drives you want to use to back up your data.
Full andIncrementalSchedule
Defines the schedule applied to your backups.
Typically, full backups are performed weekly whereas incremental backups areperformed daily.
These are the valid options:
• Do not use any schedule. Youmust launchmanually the backup.• Define a new schedule. You can create a new schedule if none of the existing
ones fits your needs. If so, you have to choose the parameters for the newschedule.
• Use an existing schedule. Select one of the available schedules from the list.
Strategy andBackupSelectionSharing
If your catalog contains platforms that are compatible with the one you are configuring(i.e., same operating system for hosts, and same type for applications), but that arenot yet configured for backup, the wizard gives you the option to share the strategiesand/or the backup selection with theses platforms.
These are the valid options:
• Do not share this configuration. There is no platforms compatible with the oneyou are configuring or you do not want to share the strategy and backup selection.
• Share the configuration with compatible platforms. Select the compatibleplatforms with which you want to Copy the strategies and/or Copy the backupselections.
Tina Administration 171
Automatic Backup Configuration

4. In the Summary window, check the configuration parameters and click Finish to validate the creation ofthe backup and close to exit the wizard.In theWeb Administration, the platform(s) you configured now show the letter of the strategy you justdefined.
Backup StrategiesStrategies enable you to schedule dates and times for automatic backup, job priority and parallelism, snapshot,or deduplication sessions and to specify themedia pool to be used to write data.
Strategies must be defined for each platform or platform group to be backed up, snapshot, replicated, ordeduplicated. If no strategy is defined for a platform or platform group, no file will be backed up.
Strategies are referred to by the letters A, B, C, and D.
Strategy TypesThese are the types of strategy:• Standard strategy.• Deduplication storage strategy.
See the Tina HyperVision Agent for VMware Documentation and the Tina HyperVision Agent for Hyper-VDocumentation.
• Snapshot strategy. See Tina SnapBackup.
Note: Once you have chosen the strategy type, you cannot modify it (i.e., you cannot turn a snapshotstrategy into a standard backup strategy). If you do not need a particular strategy any more, delete it andrecreate a new strategy of a different type.
Simultaneous BackupsOne of the issues you have to watch out for when scheduling backups, is the number of simultaneous backups.When a session is about to be performed, a job is created on the backup server which in turn launches twoprocesses: tina_daemon and tina_backup. As a result, if you have scheduledmany backups at the sametime, all the tina_daemon and tina_backup processes could saturate the server.
If you are particularly concerned with your backup server performances, you have the option to limit the numberof simultaneous jobs through two tunables: Limit Number of Simultaneous Jobs (limit_nb_jobs) andMaximum Number of Simultaneous Jobs (max_nb_jobs).
TheMaximum Number of Simultaneous Jobs (max_nb_jobs) applies to the total number of jobs using alldefined strategies with all platforms under the control of Tina. It must not be confused with the parallelism index.
See the Tina Tunables Documentation.
Creating a Standard StrategyYou can define up to four strategies for a given platform, strategy A, B, C, and D.
172 Tina Administration
Automatic Backup Configuration

• If you needmore than four strategies for a particular platform, you can create a clone of theplatform through the Filesystem application. Then, four more strategies are available for eachFilesystem application you create on a given platform.See Creating Applications.
• The Strategy Creation procedure only takes into account the creation of a standard strategy.For more information on snapshot or deduplication storage strategy, see Tina SnapBackup,the Tina HyperVision Agent for VMware Documentation or the Tina HyperVision Agent forHyper-V Documentation.
To create a standard strategy
1. In theWeb Administration, expand your catalog in the Tina Explorer.2. Select DataManagement Strategies. The Strategies pane opens.3. Click New Strategy (+) and select New Standard Strategy. The Standard Strategy CreationWizard
opens.
Note: The Strategy CreationWizard can also be launched from the Platforms section: you can clickon one of the four (+) buttons that appear in the Strategies column of the Hosts and Applicationsmain views or, after you have double-clicked on a Host or Application to edit its properties or monitorits activity, you can expand the Strategies section and click on the (+) button.
4. Enter the parameters to create a new standard strategy.This table describes the parameters that you can set in the Standard Strategy CreationWizard:
Parameter Description
PlatformSelection
Select the platform on which you configure the strategy.
StrategyName
Select the strategy to apply (i.e., A, B, C, or D).
Media Pools Media Pools you associate with the strategy. You can select already existingmedia pools ordefine new ones. These are the valid options:
• Use the same media pool for incremental and full backups.The same retention period (i.e., the amount of time backed up data is kept before themedia is recycled) applies to both backup types and the same device backs up them.
• Use different media pools for incremental and full backups.Youwill be asked to define a pool for full backups and a pool for incremental backups.
Full andIncrementalMedia Pool
These are the valid options:
• Define a new media pool. Opens theMedia Pool Parameters window for you to definethe needed new media pools.
• Use an existing media pool. Select the appropriate pool(s) from the list of availablepools.
Tina Administration 173
Automatic Backup Configuration

Parameter Description
Full andIncrementalMedia PoolParameters
This window opens when you selected the Define a new media pool option.
Pool Name. Enter a name for the new pool.
Pool Label. Enter a label for the new pool.
Retention Period. These are the valid options:
• Infinite. The data is stored without limit of time.• Data stored during. Select the number of days, weeks, months, or years during which
data will be stored. Once that time period expires, themedia will be reused to store newdata.
Associated Drives. Select the drives you want to use to back up your data.
Full andIncrementalSchedule
Defines the schedule applied to your backups. Typically, full backups are performed weeklywhereas incremental backups are performed daily. These are the valid options:
• Do not use any schedule. Youmust launchmanually the backup.• Define a new schedule. You can create a new schedule if none of the existing ones fits
your needs. If so, you have to select the parameters for the new schedule.• Use an existing schedule. Select one of the available schedules from the list.
StrategySharing
If your catalog contains platforms that are compatible with the one you are configuring (i.e.,same operating system for hosts, and same type for applications), but that are not yetconfigured for backup, the wizard gives you the option to share strategies with thesesplatforms. These are the valid options:
• Do not share the strategy. There is no platforms compatible with the one you areconfiguring or you do not want to share strategies.
• Share the strategy with compatible platforms. Select the compatible platforms withwhich you want to share the current strategy.
5. In the Summary window, check the creation parameters and click Finish to validate the creation of thestandard strategy.In theWeb Administration, the new strategy displays in the strategy list. Either this strategy meets yourneeds, or you can also enrich it with additional features by selecting it in the list, then click StrategyDetails.
Manual Triggering of a BackupIn addition to automatically back up a host or an application, you canmanually trigger a Full or an Incrementalbackup for any strategy, on any platform.
Note: A backup session initiated under these conditions takes into account all the backup selectionsassociated with the selected strategy.
To manually initiate a backup
1. In theWeb Administration, expand your catalog in the Tina Explorer.2. Select Platforms Hosts or Applications.
The Hosts or Applications pane opens.3. Select the host or the application to back up.
Note: The platform must be enabled.
174 Tina Administration
Automatic Backup Configuration

4. Click Launch Backup and select Full or Incremental Backup.5. Select the strategy (A, B, C, or D).6. Click Yes to confirm your decision.
The backup starts if no other session of the strategy is in progress.
Editing StrategiesSome strategy properties cannot be set when creating the strategy. They can be accessed only while editingthe strategy.
To edit a standard strategy
1. In theWeb Administration, expand your catalog in the Tina Explorer.2. Select DataManagement Strategies.
The Strategies pane opens.3. Select the strategy to edit and click Strategy Details.
The Standard Strategy Details window opens.4. Set the strategy parameters as needed.
The Standard Strategy Details window contains these areas: General, Options, Advanced, and Calendar.
General areaThis table describes the parameters that you can set in the General area:
Parameter Description
Full Backup.
Defines the schedule applied to full backups. Typically, full backups are performed weekly.These are the valid options:
Main Pool Select amainmedia pool from the list of available pools.
Schedule Name of the schedule that triggers automatic backups.
Disable ScheduleTemporarily
Pauses the backups that should take place with the strategy until you clear thecheck box.
Synthetic Enables the Synthetic backupmode. See Backup Types for details.
A synthetic backup takes into account the selected backup strategies, (i.e., A,B, C, and D). If you do not want the synthetic backup to be constructed fromprevious backups of all strategies, clear the box of the unwanted strategies.
Youmust have at least two drives available to perform Synthetic backups sinceboth a reading and a writing session are involved.
Parameters set in the Advanced area do not apply to Synthetic backups.
A, B, C, and Dcheck boxes
Select the strategies that you want the synthetic backup take into account.
Tina Administration 175
Automatic Backup Configuration

Parameter Description
Incremental Backup.
Defines the schedule applied to incremental backups. Typically, incremental backups areperformed daily.
These are the valid options:
Main Pool Select amainmedia pool from the list of available pools.
Schedule Name of the schedule that triggers automatic backups.
Disable ScheduleTemporarily
Pauses the backups that should take place with the strategy until you clear thecheck box.
Options areaThis table describes the parameters that you can set in the Options area:
Parameter Description
Format of thedata written oncartridges
Defines the writing format (seeWriting Formats) that is used for backup.
By default, the TiNa format is selected.
• On aWindows machine, if you use the tar or cpio formats, someinformation are not backed up (e.g., some file attributes and some dataassociated with files are not backed up).
• If you clear the Use Cache on Server option, the only formats available aresidf and tar. By default, the sidf format is selected.
• When creating a strategy for an NDMP application, youmust use theunknown format. This is the only case when this format is used.
Backup Behavior.
Use Cache onServer
Enables you to choose whether to back up data using the cache on the Tina server. If youchoose not to use the cache, and the platform is a storage node, the library and drives canbe directly attached to it. If the platform is a Tina agent, data is backed up through astorage node.
If you select this option, the writing formats available in the Options area are TiNa, tar,and cpio.
If you clear this check box, the writing formats available are sidf and tar.
176 Tina Administration
Automatic Backup Configuration

Parameter Description
Wait for theEnd of Writingon Cartridges
Enables you to wait until data has safely been written onmedia before performing apostprocessing.
The host icon displays with a backup in progress (i.e., with blue and red gears), inWebAdministration Icon view, until data is written onmedia rather than until it is written in thecache space, as is usually the case.
For a job using Fast File Scan, selecting this check box changes the Eld servicebehavior. If you set theWait for the End of Writing on Cartridges option, the cleaning datesent to the Eld service will be the current job date. Otherwise, it will be the date of theprevious job. This will drive the Eld agent to clean its internal buffer.
Relaunch untilPlatform isReachable
Ensures that a strategy remains active until the platform can be reached.
Tina checks every 5 minutes for a list of platforms to be backed up according to theschedules defined in the various strategies. If this option is selected, an unreachableplatform remains on that list until it is actually backed up, whatever the reason for theunreachability.
This option is useful for mobile platforms.
ContinueBackup if oneof the MultipleWritingSessions Fails
Ensures that a backup job starts or continues even if one of the writing sessionscomposing the job fails or cannot start (e.g., if one of the drives fails before or during abackup inmultiple writingmode, one of the sessions stops but the other ones willcontinue).
The user can eventually perform amedia duplication at a later date if necessary.
Available forOn DemandBackup
Makes this strategy available to authorized users from agent posts to run backups ondemand, outside the schedule set by the administrator.
SeeOnDemand Backup for details.
Tina Administration 177
Automatic Backup Configuration

Parameter Description
Fast File Scan(Windows only)
Activates the Fast File Scanmode for a strategy. Fast File Scan is integrated to Tina andby default is inactive.
The Fast File Scan option speeds up incremental backups on hosts and file systems.
If you select the Fast File Scan (Windows only) check box, you can also select theWaitfor end of Writing on Cartridges check box in the Options area.
Note: When this option is active, the ELD service takes into account the actualending time of incremental backups. At the end of each backup, Tina sends apurging command to the ELD service.This is to ensure that all data has been correctly written on cartridges before purgingthe list of collected events from the ELD memory.
• For a 4.2 SP7 or 4.2 SP8 agent, Fast File Scan can be activated either by selectingthe Fast File Scan (Windows only) option or through the enable_fast_file_scanvariable.In this case, Fast File Scan is applied on a strategy by strategy basis.
• For a 4.2 SP6 agent, Fast File Scanmust be activated through the enable_fast_file_scan variable. The 4.2 SP7 Administration Console enables selecting the FastFile Scan (Windows only) check box for a backup strategy, but the 4.2 SP6 agentcannot take into account this activation.In this case, Fast File Scan is applied for all the backup strategies or for none of them.
See Fast File Scan for details.
File System Options.
Go throughNetwork FileSystems
Unix. Enables Tina to go through NFS mount points, to back up files located on otherdisks.
The root user of themachine performing the backupmust have the access rights to themachine on which NFS points have beenmounted.
To back upmapped network drives onWindows hosts, use a Net Disk application.
See Net Disk Applicationfor details.
Do not gothrough LocalFile Systems
Prevents Tina from backing up file systems mounted on a local mount point.
Only the file system designated by the backup selection is backed up.
178 Tina Administration
Automatic Backup Configuration

Parameter Description
SpecificAttributeBackup
The specific attributes include ACLs, extended attributes, and other attributes that arerelated to specific operating systems.
This option varies according to the operating system:
• Windows. ACLs (Access Control List) are backed up on tape by default.Selecting this option enables you to also back them up in the catalog. Only file ACLsare backed up both on tape and in the catalog. Directory ACLs are only backed up inthe catalog, whether you select the option or not.
Note: It is essential to select this option if youmust restore only an objectSpecific Attributes, without the data.
• Unix. Formost Unix operating systems, ACLs are backed up by default.Selecting this option enables you to back them up in the catalog.
• macOS. ACLs are backed up by default.Selecting this option enables you to back them up in the catalog. This option alsoenables to back up the FinderInfo in the catalog in addition to the tape backup that isperformed by default.
See Backup of Specific Attributes for details.
Multiplexing Options.
Sessions canbe Multiplexed
Enables you tomanage themacro-multiplexingmechanism. When several backups arestarted simultaneously, this mechanism is used to split a backup into blocks to optimizebackup duration andmedium use.
SeeMacro-multiplexingfor details
IncrementalBackups Only
Applies themacro-multiplexingmechanism to only the incremental backups.
Advanced areaThis table describes the parameters that you can set in the Advanced area :
Note: The parameters you set in the Advanced area apply to both incremental and full backups defined forthe strategy, except if you have selected Synthetic backup in the Full parameters.
Parameter Description
Multiple Writing Pools.
Incremental orTotal MediaPools
Lets you specify the pools to be used for multiple writing.
You can define up to three secondary media pools. The Add button lets you select poolsfrom the list of available pools. The Remove button deletes a pool from theMultipleWriting Pools list.
Usingmultiple writing requires having at least one drive per simultaneous backup copiesto be performed.
Multiple writing is not available for NDMP backups.
Tina Administration 179
Automatic Backup Configuration

Parameter Description
Commands.
PreprocessingorPostprocessing
Defines actions to be performed immediately before or after a backup takes place. Entereither the absolute path of the command to execute, or the absolute path of a script orexecutable file.
Preprocessing examples.
• Windows. c:\database\stop_database.cmd orc:\windows\system32\wscript.exe c:\temp\stop_database.vbs
• macOS. /Applications/database/stop_database.sh• Unix. /home/people/db/stop_database.shPostprocessing examples.
• Windows. c:\database\start_database.cmd• macOS. /Applications/database/start_database.sh• Unix. /home/people/db/start_database.sh
The pathnames for Preprocessing and Postprocessing scripts support the whitespace(spacebar) character, in addition to the alphanumeric characters already supported in Tinapathnames.
• You can use one of the post-processing variables (see Pre- andPostprocessing Variables) set by the backup process in the processingscripts.
• The commands are executed on the backed up client.ForWindows platforms, only .cmd, .vbs, or .bat scripts are allowed. The.vbs script works with an interpretor (seeWindows pre-processingexample).
• When you schedule your backup, bear in mind that the pre and/or postprocessing increases the job length, and that the following job on the samestrategy will not start until the current one is finished.
Jobs.
Priority Indicates the priority level of jobs associated with the strategy being defined.
Select the level from the list.
ParallelismIndex
Defines the number of jobs that can be performed simultaneously. Themaximum valuedepends on the number of drives available for backup operations.
A value of 0 for the Parallelism index disables the parallelism. The (default) value 1 doesnot enable parallel jobs. Theminimum value to activate parallelism is 3.Having set a parallelism index, youmust associate it with a backup selection to fullydefine a parallel backup.
See Creating a Backup Selection for details.
Retry on Incident.
180 Tina Administration
Automatic Backup Configuration

Parameter Description
Number Enter a number to specify how many times Tina will restart the automatic backup if thebackup failed.
Interval (inminutes)
Enter a number to specify in minutes the time interval between restarting attempts.
By default, a backup restarts twice with a 10 minute interval.
Calendar areaThe Calendar View enables you to view the scheduled backups at a glance in amonthly calendar.
5. Click Apply and close to validate the strategy edition.
Backup of Specific AttributesThe specific attributes include ACLs, extended attributes, and other attributes that are related to specificoperating systems.
Depending on the client operating system and on the writing format selected (i.e., tar, Tina, etc.) Tina handlesSpecific Attributes backup differently. Specific Attributes are either backed up on tape, in the catalog, or in both.Specific Attributes backup will be either systematically performed by Tina or be left up to the user.
Extended AttributesExtended attributes are an operating systemmechanism designed tomanage alternate data streams. Theyconsist of two fields: a name and data. They are visible with specific command line tools (attr on Unix, ls -l@onmacOS, runat on Solaris, add :stream_name onWindows).
Other Attributes (FinderInfo)The FinderInfo along with the ResourceFork constitute the Apple extended attributes, which are currently usedonmacOS only. In addition, there can be third party extended attributes.
Extended attributes are directly integrated in file systems (HFS, XSAN, and UFS). On UFS and XSAN, theyare stored in ._ files. ACLs are not stored as extended attributes onmacOS.
You can back up all extended attributes on tape; however, currently you can only back up the FinderInfo in thecatalog.
Operating System Extended Attributes TapeBackup
Specific Attributes Catalog Backup(Optional)[(1) including FinderInfo]
Writing Format Tina5
sidf
tar Tina5
sidf
tar
Tina Administration 181
Automatic Backup Configuration

Operating System Extended Attributes TapeBackup
Specific Attributes Catalog Backup(Optional)[(1) including FinderInfo]
Unix:
Linux (EXT3, EXT4, XFS,Lustre FS)
Solaris (UFS, ZFS)
FreeBSD (UFS)
Other Unix or File System(VxFS)
yes
yes
yes
no
no
no
no
no
yes
yes
yes
no
yes
yes
yes
no
macOS yes no yes (1) yes (1)
Windows (NTFS) yes no no no
To back up the FinderInfo in the catalog, select the Specific Attribute Backup option when defining the backupstrategy for the client.
See Specific Attribute Backup.
ACLsAn ACL (Access Control List) is an operating systemmechanism designed tomanage file and directorysecurity. ACLs offer the possibility of defining access rights for a specific user or group to a given resource(e.g., stopping the host, installing, or uninstalling a peripheral driver, etc.).
The ACLs associate an object (such as a directory or file) with an identifier and a permission: the identifierdefines the user or the group which has been granted access rights (permission) to the object.
Operating System ACL Tape Backup ACL Catalog Backup (Optional)
Writing Format Tina5
sidf
tar Tina5
sidf
tar
Unix:
Linux (EXT3, EXT4, XFS, Lustre FS)
Solaris (UFS, ZFS)
FreeBSD (UFS)
AIX (JFS)
HP-UX (UFS)
Fujitsu, Digital Unix, CRAY
Other Unix or File System (VxFS)
yes
yes
yes
yes
yes
yes
no
no
no
no
no
no
no
no
yes
yes
yes
yes
yes
yes
no
yes
yes
yes
yes
yes
yes
no
macOS yes no yes yes
182 Tina Administration
Automatic Backup Configuration

Operating System ACL Tape Backup ACL Catalog Backup (Optional)
Windows (NTFS) yes no yes yes
NDMP (Network Appliance, EMC² Celerra) yes no no no
In cases where ACLs backup is optional, the choice is made by checking the Specific Attribute Backup optionwhen the backup strategy for the client is defined. See Specific Attribute Backup.
On Linux systems, the backup of ACLs in the catalog requires the library libacl.so. This library must beavailable in the ld_library_path environment variable. This library does not always have the same namedepending on the Linux version. It could be libacl.so.1, or libacl.so.1.1, etc. In that case, youmust createa symbolic link to point libacl.so to the actual library name.
• It is essential to check the Specific Attribute Backup option if youmust restore only theSpecific Attributes of an object without the data.
• When deciding whether or not to back up Specific Attributes in the catalog forWindows,keep inmind that they couldmake your catalog quite voluminous and affect performance.Specific Attributes tape backup on the other hand has no impact on performance.
Pre- and Postprocessing VariablesThis table describes the environment variables set by the backup process that you can use in a script:
Variable Name Value
For both a preprocessing and a postprocessing script.
TINA_BACKUP_COPY_MODE incr or full according to the backup type
TINA_EVT_JOB_INFO Job number
TINA_CATALOG Name of the catalog
TINA_HOME Tina installation directory
Only for a postprocessing script.
TINA_RETCODE 0 if backup was successful, >0 if backup failed
Deleting StrategiesYou can delete a strategy. In this case, Tina no longer performs the backups scheduled with that strategy.
To delete a strategy
1. In theWeb Administration, expand your catalog in the Tina Explorer.2. Select DataManagement Strategies.
The Strategies pane opens.3. Select the strategy to delete and click Delete Strategy.4. Click Yes to confirm the deletion.
The deleted strategy is removed from the Strategy list.
Tina Administration 183
Automatic Backup Configuration

SchedulerThese topics give information and details on the Scheduler:
l Scheduler
l Configuring the Scheduler
l Creating a Schedule
l Creating or Modifying Schedule Rules
l Examples of Schedule Creation
l Editing a Schedule
l Copying a Schedule
l Exporting a Schedule
l Deleting a Schedule
SchedulerNote: If you are upgrading from a version prior to version 4.1.0, schedules are automatically created basedon the scheduling information contained in your existing backup strategies.
The Scheduler enables you to define the days and times when automatic backups should take place.
To use the Scheduler, youmust associate a schedule with the strategy for which you want to trigger automaticbackups. To define a schedule, you need one or several schedule rules.
ScheduleA schedule consists of:• A name.• A list of schedule rules.
A schedule can be either created from scratch, copied from an existing schedule, or you canmodify an existingschedule. You can also delete a schedule if you no longer need it; however you cannot delete a schedule if it isassociated with an active job.
You can share the same schedule between several strategies.
By default, when you create a catalog, Tina creates these three schedules:• A daily schedule fromMonday to Friday at 8 PM.• A weekly schedule every Saturday at 8 PM.• A monthly schedule the first Sunday of eachmonth at 8 PM.
Schedule rulesThis table describes the rule types that can apply to a schedule:
Rule Type Description
Start Enables you to define the day(s) and times of the week/month when a backup should takeplace.
184 Tina Administration
Automatic Backup Configuration

Rule Type Description
TimeFrame
Enables you to define times during the day when backups can take place.
Exclusion Enables you to define specific days when backups cannot take place.
You can use any combination of rules for a particular schedule, with at least one Start rule defined in order tolaunch backups.
Similarly to a schedule, a schedule rule can be either created from scratch, copied from an existing rule, or youcanmodify an existing rule. A rule can also be deleted if you no longer need it.
Configuring the SchedulerWhen you configure the scheduler, the configuration applies for the entire catalog.
To configure the Scheduler
1. In theWeb Administration, expand your catalog in the Tina Explorer.2. Select Configuration Catalog Settings. The Catalog Settings pane opens.3. Open the Scheduler or the Backup and Restore area to set the options you need.
Scheduler area.This table describes the options that you can set in the Scheduler area of the Catalog Settings pane:
Parameter Description
Parameters.
SchedulerActivityAccountingEvents
Enables the generation of event logs for scheduler activities.
DisableSchedulerActivity
If you disable the Scheduler, Tina cannot perform any scheduled backup in the catalog.
Send anAlarm ifScheduler isDisabled
Enables you to choose whether or not an alarm is generated when the scheduler isdisabled.
Time BeforeAlarm is Sent
Defines when the alarm should be sent.
Enter a value and select a unit between Hours, Days, Weeks, andMonths.
Activate JobLimitation
Select this check box to enable the limitation of jobs running at the same time.
The control over the number of jobs running simultaneously only takes place when ascheduled job is launched, not when youmanually launch a job; however, all jobs are takeninto account (whether launched automatically or manually) when counting the number ofjobs running.
Tina Administration 185
Automatic Backup Configuration

Parameter Description
MaximumNumber ofSimultaneousJobs
Defines themaximum number of jobs that could be running at the same time. The defaultvalue is 100.
Warn ifMaximumNumber ofJobs isexceeded
Select this check box to trigger alarms, warnings, and logs when the number of jobs runningis greater than themaximum you defined.
CancellationTimeout forScheduledjobs
Defines the timeout before scheduled backup jobs are cancelled if they cannot startbecause the agent is not connected to the server.
Enter a value and select a unit between Seconds, Minutes, Hours, and Days.
Non Working Days.
Recurrent Specifies the days of the week that are non working days.
Specific The Add (+) and Remove (-) buttons enable you to define a list of non working days througha calendar. The days chosen display in the Date column.
4. Click Apply.
Creating a ScheduleTo create a schedule
1. In theWeb Administration, expand your catalog in the Tina Explorer.2. Select DataManagement Schedules. The Schedules pane opens.3. Click New Schedule (+). The Schedule Creation wizard opens.
Note: To create a new schedule from an existing one, click Copy Schedule. Double-click the copytomodify its parameters.
4. Enter the parameters to create a new schedule.
186 Tina Administration
Automatic Backup Configuration

This table describes the parameters that you can set in the Schedule Creation wizard:
Parameter Description
ScheduleFrequency
Indicates the frequency at which Tina performs the backups. These are the valid options:
• Daily. Choose between every n days, every working or non working day, or define aspecific date when you want backups to take place.
You define the non working days in the Scheduler Configuration window. See Configuringthe Scheduler.• Weekly. Specify if it is every week or nweeks and on which day of the week you
want backups to take place.• Monthly. Specify the day of themonth/week or the day type when you want backups
to take place.• Yearly. Specify themonths, the day of themonth/week or the day type when you
want backups to take place.
ScheduleHours
Indicates the hours at which Tina performs the backups. These are the valid options:
• Hours and minutes. Use the scroll down lists to select the backup time.• Add this hour. Adds the hours andminutes selected in the hours andminutes lists to
schedule a backup.• Add the next hour. Adds the hour following the one selected in the list as a backup
time.• Add the next 15 minutes:Adds 15 minutes to the time selected in the list and
creates a new backup time.
ScheduleName
These are the valid options:
• Schedule Name. Name of the schedule rule. The namemust be unique. By default,the scheduler automatically assigns a name to the rule according to the ruleparameters.
• Comment. Leave the list of the schedule parameters or enter a comment, if needed.
TimeFrame
Select Yes if you want to define a time frame for the schedule. These are the validoptions:
• Define the start hour. Hour at which the active interval begins (i.e., no backup cantake place before this time). The earliest beginning Start Hour is 00:00.
• Continue the next day. Enables the backup to continue to the next day.• Define an end hour. Hour at which the active interval ends (i.e., no backup can take
place after this time). The latest End Hour is 23:55.Defining an End Hour is not mandatory. If you do not specify the end hour, backupscontinue according to the next day Start Hour parameter.
• Cancel the task. Specifies that if a job is still in progress while the interval end hour isreached, the job is cancelled.
• Let the task continue without alarm. Specifies that if a job is still in progress whilethe interval end hour is reached, the job is allowed to continue.
• Let the task continue with an alarm. Specifies that if a job is still in progress whilethe interval end hour is reached, the job is allowed to continue, but an alarm warns thatthe job is running outside the active interval.
5. In the Summary window, check the creation parameters and click Finish to validate the creation of theschedule.
Tina Administration 187
Automatic Backup Configuration

Creating or Modifying Schedule RulesTo create or modify schedule rules
1. In theWeb Administration, expand your catalog in the Tina Explorer.2. Select DataManagement Schedules. The Schedules pane opens.3. Select a schedule from the list and click Schedule Details. The Schedule Details window opens.4. Expand the Schedule Rules area.
You can perform these operations:• Add a new rule (Start rule, Time Frame rule, or Exclusion rule).• Modify a rule.• Copy a rule.• Delete a rule.
5. To add a new schedule rule (Time Frame rule or Exclusion rule), click New Schedule Rule(+) in theSchedule Rules area. The Schedule Rule Creation wizard opens.OrTomodify the existing Start rule, select it and click Schedule Rule Details in the Schedule Rules area.OrTo copy an existing rule, select it and click Schedule Rule Details in the Schedule Rules area.OrTo delete an existing rule, select it and click Schedule Rule Details in the Schedule Rules area.
6. Enter the schedule rule parameters in the Schedule Rule Creation wizard or in the Properties tab of theschedule rule.For each rule, the Validity parameters let you select a Start Date (date when the rule becomes valid) andan End Date (date when the rule is no longer valid), or an unlimited validity.
7. Click Apply and Close.
Examples of Schedule CreationThis table gives some examples of the creation of a schedule:
Example Backup Requirements Solution
Example1
Schedule full backups every Saturday at10 am and incremental backups everyworking day at 8 PM.
Create two schedules as follows:
• For the first schedule, define a Start rule with aweekly frequency on Saturday and select 10:00 forthe start hour.Associate that schedule with Strategy A in the Fulltab.
• For the second schedule, define a Start rule with adaily frequency every working day and select20:00 for the start hour.Associate that schedule with Strategy A in theIncremental tab.
188 Tina Administration
Automatic Backup Configuration

Example Backup Requirements Solution
Example2
Schedule full backups every Sunday at11 PM. The backupmust imperativelystop on the following day at 8 AM if it is aworking day.
Create a schedule consisting of a Start rule and aTime Frame rule:
• Start Rule:Define 23h00 as a start hour on Sunday.
• Time FrameRuleDefine an active interval from 00h00 to 08h00 forall working days and select "Cancel jobs if outsideinterval".
Example3
Schedule incremental backups everyworking day at 7 PM. Backups mustimperatively stop on the following day at8 AM if it is a working day.
Create a schedule consisting of a Start rule and an twoTime Frame rules:
• Start Rule:In the first rule, define 19h00 as a start hour forevery working day.
• Time FrameRule:Define a n active interval from 00h00 to 08h00 forall working days and select "Cancel jobs if outsideinterval".
• Time FrameRule:Define an active interval with a beginning time of19:00 and no ending time, for all working days andselect "Cancel jobs if outside interval".
Example4
Schedule a full backup the first Mondayof eachmonth at 8 PM. The backupmust imperatively stop on the followingday at 8 PM.
Create a schedule consisting of a Start rule and aTime Frame rule:
• In the first rule define 20:00 as a start hour everyfirst Monday of themonth.
• In the second rule define an active interval from00:00 to 20:00 every first Monday of themonth,with an offset of one day and select "Cancel jobs ifoutside interval".
Example5
Schedule a full backup on pool A on thelast Sunday of themonth.
Schedule full backups on pool B everySunday of themonth except the lastone.
Create two schedules as follows:
• For the first schedule, define a Start rule with amonthly frequency on the last Sunday everymonth. Choose a Start Hour.Associate that schedule with Strategy A that usesPool A for full backups.
• For the second schedule, define a Start rule with amonthly frequency every Sunday every month.Choose a Start Hour. Define an Exclusion Rule toexclude the last sunday of every month.Associate that schedule with Strategy B that usesPool B for full backups.
Editing a ScheduleNote: Editing a schedule affects all the strategies that use that particular schedule.
Tina Administration 189
Automatic Backup Configuration

To edit a schedule
1. In theWeb Administration, expand your catalog in the Tina Explorer.2. Select DataManagement Schedules. The Schedules pane opens.3. Select the schedule tomodify and click Schedule Details. The Schedule Details window opens.4. Modify the parameters as needed.5. Click Apply and Close.
Note: For the scheduling events to be logged in the Tina events file, select the Schedule ActivityEvents check box in the Advanced area. Only events concerning this schedule are recorded. Toactivate events logging for the entire Scheduler, do so in the Scheduler Configuration window.See Configuring the Scheduler.
Copying a ScheduleTo copy a schedule
1. In theWeb Administration, expand your catalog in the Tina Explorer.2. Select DataManagement Schedules. The Schedules pane opens.3. Select the schedule to copy and click Copy Schedule.4. Click Yes to confirm the copy.5. Select the copied schedule and click Schedule Details to modify the parameters if necessary.
Exporting a ScheduleTo export a schedule
1. In theWeb Administration, expand your catalog in the Tina Explorer.2. Select DataManagement Schedules.The Schedules pane opens.3. Select one or several schedules to export and click Export Schedules.4. Configure the appropriate export parameters. This table describes the parameters that you can set in the
Export List window:
Parameter Description
Export Choose to export only the selected lines or to export the entire list.
Format Select the format of the export file, either CSV or PDF.
Only for CSV format.
End of Line Select the end of line format:
• Windows (CRLF)• Linux (LF)• Classic macOS (CR)
Field Separator Select the field separator: either ,, | , or ;
Escape Character Select the Escape character: either “ or ‘
If needed, select the Always Add Escape Character check box.
5. Click Apply and Close to export the schedule(s). The File Download window opens.6. Click Save and select a location.
190 Tina Administration
Automatic Backup Configuration
Deleting a ScheduleNote: Prior to deleting a schedule, youmust unlink it from every strategy that uses that particularschedule. In addition, you cannot delete a schedule if it is associated with an active job.
To delete a schedule
1. In theWeb Administration, expand your catalog in the Tina Explorer.2. Select DataManagement Schedules. The Schedules pane opens.3. Select the schedule to delete and click Delete Schedule.4. Click Yes to confirm the deletion.
Backup SelectionsThese topics give information and details on procedure for Backup Selection:• About Backup Selections• Creating a Backup Selection• Filter Syntax• Filtering Nested Selections• Backup Selection Representation• Editing a Backup Selection• Deleting a Backup Selection
About Backup SelectionsBackup Selections specify the directories to be backed up, as well as time phases and conditions under whichdirectories are backed up. If no backup selection is defined for a platform, Tina cannot perform any backup.
Defining a backup selection consists of defining these settings:• The Time Phases allowed for incremental sessions.• The associated strategies.• The Format options (compressing and/or encoding data, only available with the TiNa or sidf format).• The Filters on the name and size of the backed up files.
During backups, Tina taken into consideration all backup selections associated with a strategy, except for anautomatically initiated incremental backup. In this case, Tina only considers the backup selections whose timephases correspond to the current session strategy times.
• If a backup selection consists of a symbolic link, backing up this selection will fail. To backup the target of a link, specify the absolute path of the link's target as the backup selection.
• Tinaautomatically excludes from the backup some files even if they are included in a backupselection. These are examples of files excluded:
Windows. The files listed in the FilesNotToBackup registry key.macOS. The files listed by the Apple TimeMachine backup utility.
Creating a Backup SelectionThe backup selection indicates the files and directories to be backed up. If you do not define any backupselection on a host, no file can be backed up.
Tina Administration 191
Automatic Backup Configuration

Note: Youmay also use Restore & ArchiveManager to define your backup selections. Select the hostand select Platform Restore & ArchiveManager. In the file tree, select the directory on which you wantto set a backup selection and select Backup BackupSelection New. In the Define Backup Selectionwindow, set the parameters as indicated in this procedure.
To create a backup selection
1. In theWeb Administration, expand your catalog and select DataManagement Backup Selections.2. In the Backup Selections pane, click New Backup Selection (+). The Backup Selection CreationWizard
opens.3. Enter the parameters to create a backup selection in the Backup Selection CreationWizard.
This table describes the parameters that you can set in the Backup Selection CreationWizard:
Parameter Description
PlatformSelection
Select the platform that needs to be configured for backup.
PathsSelection
Defines the path of the directory to back up.
Click Add Item (+) and enter directly the directory path in the Backup Selection Path textbox.
OrClick the Browse (...) icon. The Browsing window opens. Enter your Operating Systemcredentials and select the directory in the file tree and click Apply and Close.
If you do not use the browsing feature, verify that you enter the correct directory path in thePOSIX form, (e.g., /c/data and not c:\data) to ensure that your directory will actually bebacked up.
The backup feature excludes the backup selections on optical disks and ISO images.
StrategySelection
Select the strategy you want your backup selection to be backed up with. The star (*) next to astrategy indicates that the strategy has actually been defined.
If a strategy displays grayed and cannot be selected, it indicates that the current user does nothave the permission to use that particular strategy. SeeManaging Users.
Filters onNames
Filters objects according to their names. See Filter Syntax for details about the syntax to use.
To activate filtering, check the box in front of the filter type to use, Include or Exclude andspecify the filter, by either typing it or selecting it with the Choose filter button.
For instance, the * character in the Include textbox will back up all the objects. The *.old stringin the Exclude textbox will exclude all the .old files.
You can enter a list of filters separated by spaces in the Include or Exclude textbox. If the file ordirectory names contain spaces, youmust insert a backslash before the space characters toprevent Tina from interpreting them as filter separators, (e.g. hello\ world).
Some files are systematically excluded from backup. See Excluded Files for details.
Filter lists available with the Choose filter buttons contain the existing filters on all compatiblesplatforms in the catalog.
Filters onSize andDate
These filters apply only to files.
• Maximum Size of Files. Filters files according to their size by setting amaximum file size.• Do not Back up Files Older Than. Filters files according to their last modification date.
192 Tina Administration
Automatic Backup Configuration

Parameter Description
Options • Compress Files. Gives you better time performances in low data flow network since itreduces the amount of data traveling through the network; however, it requires moremachine resources. It also uses less space on storagemedia. Compression takes place onthe client machine.
• Encrypt Files. Protects data against illicit reading. When the Encrypt files box is selected,data traveling on the network is encoded and is written onmedia encoded. Encoding takesplace on the client machine.
To restore encoded data, you need the original catalog into which the data was backed up. Oryou can use the tina_cart command that enables you to automatically decode data containedon amedia.• Parallelize Backups if Possible. Enables parallel backups for the backup selection being
defined. This is used with strategy definitions to enhance backup performance. Withapplications, you can only enable backup selections that can be parallelized according to theapplication.Once you have enabled parallel backups, youmust set a Parallelism Index whosemaximumvalue equals the number of available drives.
For parallel backup details on specific applications, refer to their respective Tinadocumentation.
Parallel restore does not depend on using this option. You can use parallel restore on backupselections even if they were not backed up using the parallelized option.
BackupSelectionSharing
These are the valid options:
• Do not share the backup selections. There is no platforms compatible with the one youare configuring or you prefer not share the backup selection.
• Share the backup selection with compatible platforms. Select this radio button if yourcatalog contains platforms that are compatible with the one you are configuring (i.e., sameoperating system for hosts, and same type for applications), but that are not yet configuredfor backup. Then, select the compatible platforms to which you want to share the currentbackup selection.
4. In the Summary window, check the creation parameters and click Finish to validate the creation of thebackup selection.The backup selection list displays the new directory to back up.
Excluded FilesTina automatically excludes these files from backup, even though you do not specify any filters for them:• Tina catalog directories that are already backed up through the Catalog application:
– Windows. %TINA_HOME%\Data.catalog_name– macOS. $TINA_HOME/Data.catalog_name– Unix. $TINA_HOME/Data.catalog_name
• Windows. The files filtered through the HKLM\SYSTEM\CurrentControlSet\Control\BackupRestore\FilesNotToBackup registry key.You canmodify these files using the regedit utility.
• macOS. These files are also excluded:– The system files in the XML list:
/System/Library/CoreServices/backupd.bundle/Contents/Resources/StdExclusions.plist.
Tina Administration 193
Automatic Backup Configuration

The administrator canmodify this list using an editing tool such as vi.– Exclusions defined in the TimeMachine graphic interface (i.e., themacOS native backup tool).
Filter Syntax• Filters use Posix syntax (i.e., forward slashes rather than backslashes), regardless of the
operating system.
• macOS - Unix. The spelling of filters is case sensitive.
To select the tina, tina_adm, and tina_restore files from the directory:• Windows. /c/Program Files/Atempo/TimeNavigator/tina/Bin• macOS. /application/Atempo/TimeNavigator/tina/Bin• Unix. /usr/Atempo/TimeNavigator/tina/Bin
You can define a backup selection either:• At the root of the platform and enter these selection filters:
– Windows. /c/Program Files/Atempo/TimeNavigator/tina/Bin/tina_restore– macOS. /usr/Atempo/TimeNavigator/tina/Bin/tina– Unix. /usr/Atempo/TimeNavigator/tina/Bin/tina_admOr
• On these directories:– Windows. /c/Program Files/Atempo/TimeNavigator/tina/Bin– macOS. /usr/Atempo/TimeNavigator/tina/Bin– Unix. /usr/Atempo/TimeNavigator/tina/Binand then enter these selection filters:tina tina_adm tina_restore
The dir/file and /.../dir/file paths are equivalent since in both cases, the selection is performed in thewhole tree structure defined in the backup selection.
Conversely, the dir/file and dir/.../file paths are not equivalent.
If you specify dir/file, the selection is performed on the file file in the dir directory under the backupselection.
If you specify dir/.../file, the selection is performed on all the file files from the directory dir under thebackup selection.
The default value of the directories that can be filtered is the * sign, that represents the full directory contents.
Filters can be used in backup selections to narrow down the choice of files to back up (selection and/or rejectionlists) or in the file tree of Restore & ArchiveManager to only display the wanted files.
Advanced Inclusion FiltersThese explanations and examples are based on the sample directory tree defined in this table. This table liststhe directory names in normal type and the file names in italic:
Level 1 Level 2 Level 3 Level 4 Level 5 Level 6
1. DirRoot Dir01 Dir001 file1.txt
2. file2.txt
194 Tina Administration
Automatic Backup Configuration

Level 1 Level 2 Level 3 Level 4 Level 5 Level 6
3. Dir02 Dir002 file2.log
4. file3.log
5. Log Dir0002 file.log
6. file.txt
7. Dir03 Dir003 Dir002 Dir0002 file.log
8. file.txt
9. file.txt
10. tmp log1.log
11 data log log1.txt
Inclusion General Principles
• The asterisk * is used as a wildcard character to designate any text string.• If you begin your filter with a slash, and you want to back up files, youmust enter an absolute path. If you
begin the filter with a slash and it is not an absolute path, you will back up only the tree structure.Omitting the slash enables you to define relative paths.
• The recursive notion of one or more directory levels under the current level is designated by three dotsbetween two slashes: /.../.
Inclusion Filter Examples
• To back up one file in a tree structure, specify the whole path and name. This filter backs up the file inline 2 and the entire directory structure:
/DirRoot/Dir01/Dir001/file2.txt• To back up all files with the .log extension in the /DirRoot/Dir02/Dir002/ directory(files in lines 3
and 4). This filter also backs up the entire directory structure:
/DirRoot/Dir02/Dir002/*.log• This filter backs up the directory structure. No files with the .log extension are detected.
/Dir02/Dir002/*.log• Same as above, but this time using a relative path (i.e., no slash at the beginning of the filter). This filter
backs up files in lines 3 and 4:
Dir02/Dir002/*.log• This filter backs up files in lines 3 and 4. This filter starts with a relative directory Dir002, which it finds
on lines 3 and 7, and backs up all files with the .log extension, immediately under it. Since the directoryin line 7 has no files with .log extension immediately under it, but only other directories, the file in line 7is not backed up.
Dir002/*.log
Tina Administration 195
Automatic Backup Configuration

• By contrast, this filter backs up lines 3 and 4, and also the file in line 7. This filter starts with a relativedirectory Dir002, which it finds on lines 3 and 7, and backs up all files with the .log extension,recursively through the sub-directories.
Dir002/.../*.log• This filter backs up all files in subdirectories called Log of directories whose name begins with Dir (i.e.
lines 5, 6, and 11).
Dir*/.../Log/.../*• This filter backs up line 11 only. Files and directory.
da*/.../Log/.../*• Same as above. Files and directory.
da*/.../Log/.../• This filter backs up the directory structure under Dir03, but no files.
Dir03/• This filter backs up files directly under Dir03 and directory structure under it, but does not back up files in
sub-directories of Dir03 (i.e., backs up line 8, but not 9 or the file in line 7).
Dir03/*• This filter backs up files and directories under Dir03, recursively:
Dir03/.../*• This filter backs up all directories only:
Dir03*
Exclusion FiltersThe Exclusion textbox specifies the list of the objects not to be backed up. If the list includes directories, thefiles they contain are not backed up. By default, no object is excluded (empty list). You can use both relativeand absolute paths.
• You cannot set backup selections on subdirectories of an excluded directory within the samestrategy.
• Having exclusion and inclusion filters in backup selections on the same directory and in thesame strategy can result in permanent loss of files.
If, in a given strategy, a directory has an exclusion filter on it, none of its subdirectories can be backed up bythat strategy. Subdirectories of an excluded backup selection inherit the exclusion, nomatter what other backupselections or inclusion filters are placed on them. You can only back up them using a different strategy.
This is because Time Navigator reads a directory tree from its root to its smallest branches, detecting backupselections and applying filters as it descends. As soon as it reaches a branch with an exclusion filter on it, itstops descending and skips the branch. Therefore, Time Navigator never reads details on the subdirectories ofsuch a branch.
Example 1: Bad Practice.
Strategy A contains:• A backup selection defined on "/" with a filter excluding the "/Volumes" sub-directory.• Another backup selection set on /Volumes.
196 Tina Administration
Automatic Backup Configuration
Consequence:
Time Navigator does not back up the /Volumes sub-directory, as the filter excluding it has priority on the backupselection including it, and the whole branch is ignored.
Example 2: Bad Practice.
Strategy A contains:• A backup selection defined on "/" with a filter excluding the /Volumes sub-directory.• Another backup selection set on the /Volumes sub-directory.
Strategy B contains:• A backup selection set on the /Volumes sub-directory.
Consequence:
As soon as Strategy A is run, it is no longer be possible to restore the files in the /Volumes sub-directory.Running Strategy B will not recover the files.
Example 3: Best practice.
Strategy A contains:• A backup selection defined on "/" with a filter excluding the /Volumes sub-directory.
Strategy B contains:• A backup selection set on the /Volumes sub-directory.
This is the correct way to ensure that Tina backs up the files in the /Volumes sub-directory.
Tina Special CharactersTina uses its own special characters to filter files.These are the rules:• Absolute and relative paths are allowed.• Slashes (/) and double-slashes (//) located at the end of a path are ignored.• * : specifies any number of any characters.• ? : specifies any single character.• [ab] : specifies only one character among thosementioned (a or b).• /.../ : specifies any number of directory levels.• \ : specifies that the following character is ignored. It enables special characters to be used in filters,
such as [, ], ?, * and \.
Example: Syntax Used in Filters.• *.tmp specifies that all files with the .tmp extension are filtered.• ????.o specifies that all files with four characters followed by the .o extension are filtered.• tina_st[ao][pt] specifies that all files beginning with tina_stwith all possible combinations after st
(a or o in 3rd position and p or t in 4th position) are filtered, (e.g., tina_stop and tina_stat).• /c/users/.../temp specifies that all files or directories named temp are filtered from /c/users, (e.g.,
/c/users/temp or /c/users/fred/temp, etc). On the other hand, /temp is not filtered.
Filtering Nested SelectionsIf you have defined backup selections for two directories that are in a parent-child relationship, and that areusing the same strategy, the child backup selection inherits filters from the parent backup selection (i.e., thechild backup selection default filters are those of the parent), unless you specifically activate the child backupselection filters.
For example, if you set amaximum size of 10 MB for the parent backup selection but you want no sizerestrictions for the child backup selection, select Infinite for the size filter of the child directory backup selection.
Tina Administration 197
Automatic Backup Configuration

Example. Nested backup selections Filtering
/usr/people: filter name select “*”, exclude “core”
/usr/people/spr: filter name not checked
/usr/people/spr/project/all: filter name select “*”, exclude “”
The files/directories named “core” will not be backed up in /usr/people
nor in /usr/people/spr, but they will be backed up in the directory
/usr/people/spr/project/all (and its children).
Note: If a parent backup selection filters out the path of a child backup selection associated with the samestrategy, Tina does back up the child backup selection. For instance:- If you set a backup selection on /dir/dir1with an exclusion filter that eliminates *dir3* from thebackup, associated with StrategyA,- If you set a backup selection on /dir/dir1/dir2/dir3 (with or without filters) associated withStrategy A,
Tina does back up the /dir/dir1/dir2/dir3 backup selection since it is excluded from the parentbackup selection.
Backup Selection RepresentationOnce a backup selection has been defined, a small green ball is displayed to the left of the directory icon in thefile tree of Restore & ArchiveManager, indicating that a backup selection is set on this directory. If the backupselection is secured by Tina Security & ComplianceManager, the green ball is replaced by a small green lock.
A green arrow pointing downwards is displayed on the left of all the parent directories of a backup selection.
Editing a Backup SelectionYou canmodify the backup selections of a platform.
To edit a backup selection
1. In theWeb Administration, expand your catalog and select DataManagement Backup Selections.2. In the Backup Selections pane select the backup selection to edit and select Backup Selection Details.
The Backup Selection Details window opens with the Properties tab.3. Modify the backup selection parameters as needed, and click Apply and Close to validate the edition of
the backup selection.You cannot modify the directory name. Tomodify it, delete the backup selection and create a new one.
Note: You can also edit a backup selection with the Restore & ArchiveManager. Select the backupselection in the file tree and select Backup Backup Selection Properties.
198 Tina Administration
Automatic Backup Configuration

Deleting a Backup SelectionYou can delete a backup selection if you no longer need it. When you delete the backup selection of a directory,Tina does no longer back up its contents (unless another backup selection includes the directory).
To delete a backup selection
1. In theWeb Administration, expand your catalog and select DataManagement Backup Selections.2. In the Backup Selections pane select the backup selection to delete and click Delete Backup Selection.3. Confirm the removal.
Note: You can also delete a backup selection in Restore & ArchiveManager. Select the backupselection in the file tree and select Backup Backup Selection Delete.
Macro-multiplexingThis topic presents the basic concepts of macro-multiplexing, and how they apply to Tina features. A goodunderstanding of cachemechanisms is helpful to handlemacro-multiplexing.
Cache Space ManagementTina uses a cache space to regulate data flow during backup and restore operations. Cache space is definedupon creating the catalog. It can bemodified later on. See Editing a Catalog.
Each catalog uses its own cache space, no sharing is possible between catalogs.
AdvantagesUsing cache space provides these advantages:• It acts as a flow regulator.• It optimizes performance with parallel backups.• Themost recently processed data remains in the cache and can be accessed very quickly should it be
restored. This is referred to as the cache effect.
TypesThese are the two types of cache:• Memory cache. Varies in size between 32 MB and 256 MB. It offers very good performances. Atempo
recommends using at least 64 MB of memory cache.• Disk cache. Provides capacity from 32 MB to dozens of GB, but offers lower performances than
memory cache.
Traditionally, memory cache is used for a backup strategy with nomacro-multiplexing since it does not require abig size cache.
On the other hand, in amacro-multiplexing backup environment, more disk cache is required. In that case, it isadvisable to use amemory cache + disk cache configuration. To optimize performance, the disk cachemust becomposed of several physical disks, called cache axes.
Simple Backup without Macro-multiplexingRegardless of the backup type, data always transits through the cache space before being written on tape.
Tina Administration 199
Automatic Backup Configuration

In the non-macro-multiplexedmode, a tape and a drive remain allocated to a backup until it ends, whatever therate of data throughput.
In case of a slow data throughput backup, due to a slow network, or an incremental backup with many files toread but few files to back up, the drive use is not optimized.
When several backups are scheduled at the same time, they are processed in a linear fashion, one after theother. The total backup duration corresponds to the sum of each individual backup duration.
This image illustrates the data flow during the execution of several backups without macro-multiplexing:
Backup with Macro-multiplexingMacro-multiplexing breaks away from linear backup to enable several backups to be processed at the sametime on the same drive.
When backups start in macro-multiplexedmode, data is written on disk blocks, called containers. Each backupis assigned a different container area of the cache. Each container can hold up to 256 MB of data.
When the first container is full, it is copied on tape. The drivemay or may not remain allocated to that backup.Depending on a variety of factors, such as the speed at which data is copied into the containers, Tina decides towhich backup the drive should be allocated. Thus, backups are not processed one after the other. This systemoptimizes writing throughput and takes full advantage of fast drives.
The total backup duration is shorter than the sum of each individual backup duration.
200 Tina Administration
Automatic Backup Configuration

This image illustrates the data flow during the execution of several backups with macro-multiplexing:
Note: Depending on your environment, youmay reach a threshold where additional backup jobs lead todecreased performances, due to increased solicitation of resources, (e.g., io/cpu/memory). If this is thecase, modify your backup schedule or you backup selections to lower the number of concurrent jobs.
Configuring Macro-multiplexingCache requirement
The size of all disks cache combinedmust be at least 2 GB, otherwise, themacro-multiplexedmode isdisabled. The size of any individual disk cache however, must not exceed 2,047 MB. For performance reasons,it is recommended to havemore cache disk cache than drives (2 x n drives) with amaximum of 16 cachespaces (memory cache + disk cache).
To modify the cache space configuration
Modifying the cache space requires editing the catalog. See Creating a Catalog or Editing a Catalog.
To activate macro-multiplexing
1. In theWeb Administration, expand your catalog and select DataManagement Strategies.2. In the Strategies pane select the strategy from the list.3. Click Strategy Details. The Standard Strategy Details window opens.4. Expand theOptions area.5. Check the Sessions can beMultiplexed option to activatemacro-multiplexing on full and incremental
sessions of strategy A.6. Click the Incremental Backups Only option to activatemacro-multiplexing on incremental backups only.
This option is most interesting with fast clients machines for whichmacro-multiplexing on a full backupwould not bringmuch performance improvement. SeeMultiplexing Options..
7. In the Advanced Format area, select TiNa, since this is the only format allowed whenmacro-multiplexing is enabled.
Note: The TiNa format is only available if you chose Use cache on server in the Option area.
8. Click Apply and Close to validate the operation.9. Repeat this procedure for every strategy to bemacro-multiplexed.
Tina Administration 201
Automatic Backup Configuration

• It is advisable to enablemacro-multiplexing for incremental backups and for full backups onslow machines or networks.
• It is also recommended not to mix macro-multiplexed backups and standard ones in thesamemedia pool, or to avoid starting them during the same time phase to prevent slowerperformance due to cartridgemounting/unmounting operations.
202 Tina Administration
Automatic Backup Configuration

CHAPTER10-AgentsThese topics cover the use of the application on all supported agents. The agents can be under any of thesetypes of operating system:
l Windows
l Unix
l Linux
l macOS
l OES NetWare
l OES Linux
l PAM
l Autofs
l NDMP
l Agent Job Viewer
Windows
Using the Tina AgentThe tina_daemon.exe binary enables the Tina server to manage the file system of theWindows client, and thusto back up the client’s data by running the tina_backup.exe binary.
The Tina agent is automatically started as a service whenever theWindows machine starts.
Backing up FilesAll file attributes (read-only, system, hidden, archive) are backed up.
It is recommended not to back up these files:
l *.bak
l *.tmp
l Possibly the temporary directory temp or tmp.
Non Backed up FilesTina does not back up the files listed in theWindows registry key FilesNotToBackup. For more information onchanging or viewing the contents of the key, see theMicrosoft technote:
http://technet.microsoft.com/en-us/library/cc780819%28WS.10%29.aspx.
Restoring FilesAll file attributes and dates are recovered.
Tina Administration 203
Agents

RegistryThe registry is made up of two files: System.dat and Users.dat located in theWindows directory. They can bebacked up and restored.
Windows Agents DocumentationFormore information onWindows agents and the System State application, see the Tina System RecoveryAgent Documentation.
UnixUnix agents can perform all operations with Tina as long as X-Windows andMotif are available on themachine.
LinuxLinux agents can perform all operations with Tina as long as X-Windows andMotif are available on themachine.
Tina handles file systems controlled by DataMigration Facility (DMF) from SGI through the use of the bapi_fstunable.
For more information on the bapi_fs tunable, see the Atempo-Tina Tunables Documentation.
ACLs BackupIn order to back up ACLs, ensure that the /usr/lib/libacl.so library is present on your platform. If it islocated in a different directory or if the version is different, create a symbolic link pointing to the actual name andlocation of the library.
For instance, if you find a libacl.so.1.1.0 in the /lib directory, create this:
/usr/lib/libacl.so -> /lib/libacl.so.1.1.0
macOS
LauncherOnce the installation is complete, the Tina Launcher utility will be available from the Finder. It enables for quicklaunching of the different Tina interfaces without having to select them in the Finder individually.
The Tab.. Contains these Tina Interfaces..
Main l Restore & ArchiveManager: Launches a directory tree interface for archiving andrestore.
l Classic Administration Console: Launches the classic general management window.To launch theWeb Administration, see “Launching theWeb Administration” on page144.
204 Tina Administration
Agents

The Tab.. Contains these Tina Interfaces..
Monitoring l Classic Event Viewer: Launches an interface for viewing events related to all Tinaoperations. You can also view events through theWeb Administration.
l Classic JobManager: Launches an interface enabling you tomonitor tasks in progressand view job histories. You can alsomanage jobs through theWeb Administration.
l Library Manager: Launches an interface permitting the configuration andmanagementof libraries or automated libraries.
l Classic Media Request Console: Launches an interface for specific requests. You canalso view media requests through theWeb Administration.
l Security & ComplianceManager: Launches an interface for configuring the security ofyour backup and restore administration, if you are licensed to run this option.
l Task Viewer: Launches an interface enabling for viewing tasks scheduling.
Utilities l Virtual Library System Application: An application that lets you emulate a tape libraryon a disk.
l Certificate Installer: For users of Security & ComplianceManager, this utility lets youinstall or uninstall a certificate without having to be connected to a catalog.
l Command Line Interface: To run Tina functionalities without the graphic interfacedirectly from the command line.
l Environment Reporter: Generates a report of your Tina environment to send to Atemposupport in the event of a problem
Non Backed up FilesTina does not back up the files excluded by the Apple TimeMachine backup utility. The list of excluded files islocated in the directory:
/System/Library/CoreServices/backupd.bundle/Contents/Resources/StdExclusions.plist
Specifics of the macOS agent
File SystemTina Agent for macOS enables to back up HFS+ and UFS file systems.
Resource ForkFiles onmacOS systems are traditionally made of two parts: the data fork that contains the actual data and theresource fork that contains such information as attributes, program segments, icon bitmaps and otherparameters.
The resource forks are associated with HFS+ volumes. In newer versions of themacOS, they are being usedless and less. However, for compatibility reasons, Tina Agent for macOS enables to back up and restore theresource forks.
Note: In addition, the resource fork backup is used by Tina to handle the processing of alias.
Tina Administration 205
Agents

Backup
The version size provided by Tina includes the Data fork, the Resource fork and additional information.
Restore
Resource forks are restored only on an HFS+ file system. If you perform a cross restore from anHFS+ to aUFS file system, resource forks are lost and the restored file only contains the data fork.
Note: If you copy fileA.txt from anHFS+ to an UFS volume, the Finder keeps the resource fork in ._fileA.txt on the UFS volume.
AliasTina Agent for macOS enables to back up and restore aliases.
HFS+
On anHFS+ system, an alias is a file that contains only a resource fork and no data fork. A field in the FinderInfo indicates that the file is an alias.
All alias information is contained in the resource fork and in the Finder Info and can therefore be backed up andrestored with Tina.
UFS
An alias consists of two files: an empty file fileB.txt alias and ._fileB.txt alias.
The Tina user only sees both file andmust back up and restore both files.
Note: The restore of aliases for UFS file systems does not require the restore of the Finder Info.
Cross restoring from HFS+ to UFS
Since resource forks are not restored on a UFS file system, a cross restore from HFS+ to UFS does not allowto restore the alias. Only the empty file fileA.txt alias is restored.
Cross restoring from UFS to HFS+
Cross restore between UFS and HFS+ is not supported by Tina.
FinderInfoTina Agent for macOS enables to back up and restore the Finder Info. The Finder Info is backed up as a blockusing APIs, the detailed contents of the Finder Info is not known. The backed up Finder elements include theseitems:
l The color of a file or folder
l The Stationery Pad information of a file
l The alias of a file (for HFS+ file systems)
For more information on backing up the FinderInfo, see “Backup of Specific Attributes” on page 378.
206 Tina Administration
Agents

Support of macOS
BackupOnmacOS, the content of some system files is automatically compressed by the OS to save disk space.When Tina backs up such data, it backs up the compressed and uncompressed versions. As a result, the sizeof the backup will be greater than the size of the files on disk.
If you want to back up only the compressed version, set the tunable: Back up Compressed Version Only ofSystem Data. See the Atempo-Tina Tunables Guide.
Using this tunable improves backup time and reduces the disk space required to store backups.
RestoreBy default, Tina restores the system file data in its compressed version if the target file system allows it;otherwise, in its non compressed version.
Note: If you intend to perform cross restore to a file system that does not support compressed files, do notuse the Back up Compressed Version Only of System Data tunable as you will not be able to crossrestore your system files.
Backups performed in tar format contain only the non compressed version of system files data. As aresult, the restore will be non compressed as well. The Back up Compressed Version Only of SystemData tunable does not apply.
Known Issues
macOS LimitationFollowing an update of themacOS operating system, the Tina catalog(s) has the Deactivated status.
When you perform an operating system update, due to themacOS behavior Tina is not allowed enough time toproperly stop its services. To avoid getting the Tina catalog(s) in a wrong status, before performing amacOSsystem update youmust manually stop the Tina services.
To manually stop the Tina services
> Open a terminal and enter this command:
sudo /Applications/Atempo/TimeNavigator/tina/Bin/tina_stop
If you do not use the default environment name (i.e., tina), replace tina with your own environment name.
Work-around
If you forgot to manually stop the Tina services before amacOS operating system update and the Tina catalog(s) refuse to start up, you can fix the wrong catalog status.
To fix the wrong catalog status
> Open a terminal and for each catalog, run these commands:
sudo /Applications/Atempo/TimeNavigator/tina/Bin/tina_catalog_ctrl -maintenance catalog_name
sudo /Applications/Atempo/TimeNavigator/tina/Bin/tina_catalog_ctrl -start catalog_name
If you do not use the default environment name (i.e., tina), replace tina with your own environment name.
Tina Administration 207
Agents

Case Sensitivity in Backup
Tina for macOS automatically handles case sensitivity depending on the file system type. OnUFS, Tina takesinto account the case sensitivity, fileA is different from FileA. Both files can be located in the same directory.On HFS+, Tina is not case sensitive, fileA is the same as FileA. If you rename fileA into FileA, it will not bebacked up during the next incremental. During the next full backup, FileA will be backed up and its version willbe linked to fileA versions.
If the contents of a backup selection switches from being case sensitive to being case insensitive (or inversely)between two backups, the directory is not backed up and it is seen as a disappeared object in the catalog.
Such a switch can occur in these situations:
l The file system type of the volume backed up has changed from a sensitive to an insensitive filesystem type (or inversely).
l When using a Tina Filesystem application, the value of the FS_ROOT_DIR variable is changed from asensitive to an insensitive volume (or inversely).
l A case sensitive volume is mounted on an already backed up insensitive volume (or inversely)
Case Sensitivity in Archiving
For archiving, it is not allowed tomix case sensitive and case insensitive objects within the same archive. Thearchive only allows files that are of the same case sensitivity as the first archived object. If you try to archive acase sensitive object in a case insensitive archive, Tina generates an alarm and the object is not archived. Youmust create a new archive for that object.
Case Sensitivity in Command line
While most Tina commands work with a TinamacOS platform as they do with any other operating system, youmust be careful with these commands that use a path or a file name as a parameters:
tina_cart:
The option -files is case sensitive. Youmust use the exact case of the file names to list or extract when usingthis option.
tina_restore
The option -path_folder is case sensitive. To list the contents of a directory, youmust provide the exact case ofthe directory path even if the directory is located in a non-case sensitive file system.
tina_find
The option -path_folder (unlike the tina_restore -path_folder option), is not case sensitive.
tina_alpha
The file names specified in the command instance are case sensitive.
The object names specified in the commands add and sub are not case sensitive.
See the Atempo-Tina Command Line Interface User’s Guide.
Finder’s Comments
The Finder’s comments are located in the file .DS_Store. This file is updated only when themachine isrestarted. Thus a backup of that file may not contain the latest modifications. A solution to that issue is currentlybeing sought with themanufacturer of macOS.
208 Tina Administration
Agents

Atempo proposes this procedure to bypass that issue:
l Create a file update_finder_comments containing this script:osascript -e 'tell application "Finder" to quit'osascript -e 'tell application "Finder" to run'
l Ensure that the user performing the backup and restore operations has the permission to executeupdate_finder_comments.
l Backup: in the Strategy Window, enter update_finder_comments in the preprocessing field. The scriptwill be executed prior to any backup on themacOS agent.
l Restore: perform the restore on themacOS agent andmanually execute update_finder_comments oncethe restore is completed.
Context Sensitive Menu
The shortcut key to activate the context sensitivemenus is the apple key rather than the Ctrl key.
Cross Restoring Aliases on a Different File System
You cannot cross restore aliases from HFS+ to UFS, nor from UFS to HFS+.
OES LinuxSee the Tina Agent for Novell Documentation.
PAMThe Pluggable AuthenticationModules (PAM) is supported on these operating systems:
l Linux (only X64 and X86)
l macOS
l Solaris SPARC 9 and 10
l FreeBSD 9
Using PAM requires these configurations:
l OS Configuration
l Tina Configuration
OS ConfigurationIn the /etc/pam.d folder, create a file named atempo containing these lines:
l auth required pam_nologin.so
l auth sufficient pam_opendirectory.so
l auth required pam_deny.so
l account required pam_permit.so
Tina Administration 209
Agents

l password required pam_deny.so
l session required pam_permit.so
Note: For more information on how to create this file, runman pam on your operating system.
Tina configurationSet the tunable enable_pam_authentication to yes.
See the Tina Tunables Documentation.
AutofsTina can back up a network File Systemmounted using Autofs or ignore it. At backup time, the remote FileSystem that has beenmounted by Autofs may bemounted or unmounted. Two cases may happen:
l The user wants to back up the remote File System, but it is unmounted. In this case, Tina canmountthe remote File System.
l The user does not want to back up the remote File System, although the remote File System ismounted. In this case, Tina can ignore the remote File System.
LinuxTo enable the Autofs backup
1. Set the tunable enable_fs_type_autofs to yes.
2. Set the tunable use_proc_mounts to yes.
3. Select the Go through network file systems (NFS) option for the strategy.
a. In theWeb Administration, expand your catalog in the Tina Explorer.
b. Select DataManagement } Strategies. The Strategies pane opens.
c. Select a strategy in the list and click Strategy Details. The Strategy Details windowopens.
d. In the Properties tab, open theOptions area.
e. In the File System Options area, select the Go through network file systems checkbox.
f. Click Apply and Close to validate your modifications.
To disable the Autofs backup
1. Set the tunable enable_fs_type_autofs to no. The default value is no.
2. Set the tunable use_proc_mounts to yes.
Note: The use_proc_mounts tunable is always set to yes so as to get properly the Autofsinformation of a remote File Systemmounted or unmounted by using autofs.
210 Tina Administration
Agents

Solaris, AIXTo enable the Autofs backup
1. Set the tunable enable_fs_type_autofs to yes.
2. Select the Go through network file systems (NFS) option for the strategy.
a. In theWeb Administration, expand your catalog in the Tina Explorer.
b. Select DataManagement } Strategies. The Strategies pane opens.
c. Select a strategy in the list and click the Strategy Details button. The Strategy Detailswindow opens.
d. In the Properties tab, open theOptions area.
e. In the File System Options area, select the Go through network file systems checkbox.
f. Click Apply and Close to validate your modifications.
To disable the Autofs backup
> Set the tunable enable_fs_type_autofs to no. The default value is no.
NDMPSee the Tina for NDMP Documentation.
Agent Job ViewerAgent Job Viewer application is installed by default on a Tina agent. The application is supported on Unix andWindows. It is divided into two tabs. The first tab provides information about the backups and restoresperformed on agents, while the second tab, which displays only if the User has rights, gives access to OnDemand Backup functionality.
OnmacOS, the agent job information is displayed in a backup activity widget. See Using Tina Backup ActivityWidget.
This section discusses the default functions of Agent Job Viewer on all operating systems. For moreinformation on the optional On Demand Backup functions on Unix, macOS, andWindows, seeOnDemandBackup .
Starting Agent Job Viewer
To start Agent Job Viewer on a Unix client
l Run this executable on the command line:$TINA_HOME/Bin/tina_user_infoThe applicationmain window opens.
To start Agent Job Viewer on a Windows client
l Select Start All Programs Tina Monitoring Agent Job Viewer.Agent Job Viewer opens.
Tina Administration 211
Agents

Whenminimized, Agent Job Viewer displays as a compass icon in theWindows System Tray.
The icon appearance varies according to the service or daemon status, the catalog connection(s) and thebackup and/or restore jobs in progress.
Icon appearance Status
Red Service or daemon stopped
Blue Service or daemon running
Flashing green dots on the horizontal axis of the compass Backup in progress
Flashing green dots on the vertical axis of the compass Restore in progress
Flashing green dots on both horizontal and vertical axes of thecompass
Backup and Restore inprogress
MainWindowAgent Job Viewermain window is divided into three areas: theMenu bar, the Information area and the Statusbar.
Menu barTheMenu bar contains all the commands:
l Application-Job Details: Displays the Job Details windows.
l Application-Quit: Closes Agent Job Viewer.
l View-Refresh: Refreshes the displayed informationmanually.
212 Tina Administration
Agents

Information areaThe Information area provides this information:
l Host name of the local machine.
l Date of the last successful full or incremental backup preceded by a green diamond.
l Date of the last full or incremental backup which ended on error. The date is preceded by a red or orangediamond which indicates the error severity.
Color Error Description
Orange Backup paused or canceled on request
Red Backup canceled on error
Note: The last backup date is displayed only if the backup came after the last successful backup.The date of the failed backup is not displayed if the latest backup was successful.
l Date of the next scheduled full or incremental backup.
Note: The displayed dates do not concern application backups, only filesystem backups.
Status bar
The icons on the Status bar provides this information:
NumberedArea
Icon Description
1 Catalog connection status
The Catalog is theTina database. It contains the information required to runTina (platformconfiguration, drives, libraries, users, media, etc.), as well as the description andlocation of all backed up and archived files.
If the Catalog cannot be accessed, backups and restores cannot be
performed.
You can have several Catalogs defined for the same client platform.
The number of catalogs that remain connected is indicated on the right of the catalogicon.
If the connection to one of the catalogs fails, a red exclamationmark displays on thecatalog icon on the left of the status bar.
Tina Administration 213
Agents

NumberedArea
Icon Description
2 Tina service status The service is the process which enablesTina Server andTina Agentto run. It corresponds to theTina service onWindows and the daemon (tina_daemon) onUnix.
A green chekmark indicates that theTina service is running.
A red cross indicates that theTina service is stopped.
3 Backup or restore in progress
If a backup or a restore job is in progress, a cartridge icon is displayed on the right of thestatus bar.
Refreshing
The information area and the status bar are refreshed every twominutes if no backup or restore job is inprogress on your machine. If a job is running, the refreshing period is 30 seconds. You canmanually refresh thewindow selecting View-Refresh.
Job DetailsThe Job Details window displays additional information about complete and canceled backups, and aboutbackup and restore jobs in progress.
To view the Job Details window
1. Select Application Job Details. The Job Details window opens.
2. Click the Complete, Canceled and In Progress tabs to view successful and canceled backups aswell as current jobs.
3. Click Close to return to themain window.
Note: The Complete and Canceled tabs enable you to view the details of backup jobs. The In Progresstab also enables you to view restores.
CompleteThe Complete tab is used to display this information after a successful backup:
Columns Description
Catalog Name of the catalog into which the backup is performed
Description Job type, name of the platform, name of the strategy and backup type (incremental orfull)
Status Job status (Complete)
Date Job submission date
214 Tina Administration
Agents

Columns Description
ProcessedVolume
Processed object Volume (bytes) or Progression if the job is in progress
ProcessedObjects
Number of backed up/restored Objects
CancelledThe Cancelled tab is used to display this information after a cancelled backup:
Columns Description
Catalog Name of the catalog into which the backup is performed
Description Job type, name of the platform, name of the strategy and backup type (incremental orfull)
Status Job status (Cancelled)
Date Job submission date
ProcessedVolume
Processed object Volume (bytes)
ProcessedObjects
Number of backed up/restored Objects
In ProgressThe In Progress tab is used to display this information about running backup and restore jobs:
Columns Description
Catalog Name of the catalog into which the backup is performed
Description Job type, name of the platform, name of the strategy and backup type (incremental orfull)
Status Job status (Running)
Date Job submission date
ProcessedVolume
Processed object Volume (bytes) or Progression if the job is in progress
ProcessedObjects
Number of backed up/restored Objects
Refreshing the Displayed InformationThe information area and the status bar are refreshed every twominutes if no backup or restore job is inprogress on your machine. If a job is running, the refreshing period is 30 seconds. You can also refresh thewindow manually.
Tina Administration 215
Agents

To refresh the Displayed Information
1. Select View Refresh.
2. Click Close to go back to themain interface.
macOS
Using Tina Backup ActivityWidgetOnmacOS platforms, Agent Job Viewer is in the form of a DashboardWidget.
To start Tina Backup Activity Widget on an macOS client
1. Select Finder Application and click the Dashboard icon.
2. In the Dashboard, click the Backup Activity icon.
The widget displays.
The Backup Activity Widget displays these fields:
Parameters Description
Operation in Progress Backup or Restore (if any).
Tina Service Status Up, Down, or Unknown.
Last Status Status of the last backup: completed, paused or canceled.
Last Completed Date of the last completed backup, Unknown or N/A.
Next Scheduled Date of the next scheduled backup, Unknown or N/A.
Status Bar l Refreshing if a refreshing is in progress
l The name of theTina environment if several environments arepresent
l The icon to switch to the Backup Activity widget
216 Tina Administration
Agents

To switch to the Backup Activity widget
l Click the in the lower right corner of the widget.
The Backup Activity Widget displays these fields:
Parameter Description
RefreshingFrequency
Enables the user to set the value and unit of the refreshing period.
EnvironmentChoice
Enables the user to choose the Tina environment, if several environment are present.Otherwise the button does not display.
Viewing Jobs
JobManager displays full information about backup and restore jobs as well as all the job types found in Tinaeither finished or in progress.
To view jobs in the Job Manager
1. Click the Last Status icon.
The Catalog Login window opens.
2. Provide a user name and password to connect to the catalog.
The JobManager opens. See Jobs.
Tina Administration 217
Agents

CHAPTER11-On Demand BackupThese topics contain information OnDemand Backup and explain how configuring and using OnDemandBackup:• About OnDemand Backup• Configuring OnDemand Backup• Using OnDemand Backup• OnDemand Backup Unavailable• Monitoring OnDemand Backup in the Jobs View
About On Demand BackupOnDemand Backup is a feature in Tina that allows users to initiate backups at their convenience, outside theschedule set by the administrator. Users do not have to ask the administrator every time they need anunscheduled backup. Administrators retain control of backup access and load.
The principle of on-demand backup is straightforward:• The Tina Administrator defines:
– Which Users have the right to run anOnDemand Backup– Which Strategies on which platforms can be runOnDemand– How many OnDemand Backups can be run per strategy in a 24-hour period.
• The User authorized to run OnDemand Backup can run it:– With the Agent Job Viewer graphic interface– From the command line, with the command tina_user_info_cmd– In anmacOS, from aDashboardWidget.
Limitations• TheOnDemand Backup feature only works on hosts and on FileSystem Applications.• All On Demand Backups are incremental.
Configuring On Demand BackupFor users to be able to useOnDemand Backup, the administrator must configure some settings inWebAdministration:• Defining Users• Defining Strategies• Managing Load
Defining UsersA user having OnDemand Backup rights must already exist. Create it if necessary. For more information oncreating a user, see Configuring Users and Access Rights.
To grant On Demand Backup rights to a user
1. In theWeb Administration, expand your catalog in the Tina Explorer.2. Select Users. The Users pane opens.
218 Tina Administration
OnDemand Backup

3. Select a user in the list and click User Details. The User Details window opens.4. From the Profile Backup and Restore area, select the On demand backups check box.5. Click Apply and Close.
Defining StrategiesCreate a backup strategy for which it will be possible to run OnDemand Backups, or edit an existing one. Formore information on creating or editing a strategy, see Automatic Backup Configuration .
To set On Demand Backup on a strategy
1. In theWeb Administration, expand your catalog in the Tina Explorer.2. Select DataManagement Strategies. The Strategies pane opens.3. Click New Strategy (+) and select New Standard Strategy to create a strategy.
OrSelect a strategy in the list and click Strategy Details to edit a strategy.
4. From theOptions Backup Behavior area, select the Available for On Demand Backup check box.5. Click Apply and Close.
Managing LoadThe Administrator must set a global parameter for the entire Tina network of how many OnDemand Backupscan be run per host and per day. The default value is 5.
To set the On Demand Backup limit
1. In theWeb Administration, expand your catalog in the Tina Explorer.2. Select Configuration Catalog Settings. The Catalog Settings pane opens.3. From the Backup and Restore On Demand Backup area, modify the parameter Maximum Number of
On Demand Backups per 24h and per Host.4. Click Apply.
Using On Demand BackupThese topics explain how to useOnDemand Backup:• Windows and Unix: Agent Job Viewer• macOS Systems: With the DashboardWidget
Windows and Unix: Agent Job ViewerThe second tab of Agent Job Viewer, On Demand Backup, displays only if On Demand Backup functionality isavailable:• The user must have the rights• At least one strategy has the OnDemand Backup option activated• At least oneOnDemand Backup still can be run as defined in theMaximum per day on that host
If one of these conditions ceases to be present after the program has been launched, the second tab remains,but the Start and Cancel buttons are grayed and the label beside them reads “You don’t have access rights toOnDemand Backup” or "No platform Available for On Demand Backup".
Tina Administration 219
OnDemand Backup

Description of the On Demand Backup Tab
TheOnDemand Backup tab contains:• Two buttons, Start and Cancel to start and cancel the OnDemand Backup• A scrollable Details of my OnDemand Backup area displaying status and information for the On
Demand Backup jobs:– The List of running OnDemand Backup Jobs– The List of terminated OnDemand Backup Jobs
The tree shown in this Details area has up to four levels:• The first level is the catalogs, but it displays only in amulti-catalog environment. If there is only one Tina
catalog, the jobs become the first level.• Jobs are displayed with an icon representing their status:
– For completed jobs, a green gear.– For running jobs, a blue arrow.– For error jobs, a orange triangle.
• Under each job, the backup selections (with a yellow folder icon) and the Information icon (white i on bluecircle) are found.
• If Information is opened, the job id and the folder name display.
The tree keeps only one job per catalog, platform, and strategy. When amore recent job is created, it replacesthe old one of the same catalog, platform and strategy.
Tree Update
The tree is updated at three different rates:• 2 minutes when there is no activity.• 30 seconds when a normal backup is running.• 5 seconds when anOnDemand Backup is running.
220 Tina Administration
OnDemand Backup

An update can be forced by selecting View Refresh, or by pressing the F5 key.
To launch or cancel a backup
1. Log in as a user authorized to perform on demand backups on the platform.2. Run Agent Job Viewer.3. Click the OnDemand Backup tab.4. Click Start to launch the backup
OrClick Cancel to cancel a backup in progress.
On Demand Backup in the Windows TaskbarWhenOnDemand Backup is minimized inWindows, it can still be accessed from the taskbar at the lower rightof the screen.
If the necessary conditions are present, right-clicking on the task bar icon gives access to two items in aWindows popupmenu: Start on demand backup or Cancel on demand backup.
macOS Systems: With the Dashboard Widget
DashboardWidget Description
When connected users has OnDemand Backup rights, they can access these functionalities in the DashboardWidget.
In the bottom of the DashboardWidget, you can see an indicator near a label. If you click this indicator, a newsection of the dashboard widget opens.
This part contains:• Two buttons Start and Cancel to start and cancel the OnDemand Backup
Tina Administration 221
OnDemand Backup

• A scrollable area to display OnDemand Backup jobs status so in this part you can see:– The List of running OnDemand Backup Jobs.– The List of terminated OnDemand Backup Jobs.
To operate On Demand Backup on macOS
1. Open the Dashboard (F12).2. Run the Backup Activity DashboardWidget.3. Expand theOnDemand Backup view at bottom of DashboardWidget.4. Click Start to launch a backup.
OrClick Cancel to cancel a backup in progress.
UpgradeTo install the new DashboardWidget, remove the old one and delete all associated files.
On Demand Backup Unavailable• The Start On Demand Backup option can be unavailable (i.e., the Start button disabled, or the On
Demand Backup tab does not display on Agent Job Viewer) if:– A backup job is still active on this platform. Check in the Jobs pane in theWeb Administration
whether there are any jobs stopped on error. They must be cancelled for On Demand Backup to beavailable.
– The number of On Demand Backups launched within the last 24 hours is greater than the limit setby the administrator.
– The backup server is busy (i.e. the number of running jobs is greater than the fixed limit).– The user does not have sufficient rights.
• The Cancel On Demand Backup option can be unavailable (i.e., the Cancel button disabled, or the OnDemand Backup tab does not display on Agent Job Viewer) if:– AnOnDemand Backup is not running on this platform.– The user does not have sufficient rights.
Monitoring On Demand Backup in the Jobs ViewIn the Jobs view, the backup jobs derived from OnDemand requests are tagged as End User jobs.
Several On Demand Backup jobs can be running at once. For example, the Start of On Demand Backup startstwo backup jobs:• If the Administrator defines two separate OnDemand Backup strategies on a platform.• If the Administrator defines oneOnDemand Backup strategy on a platform. and defines another On
Demand Backup strategy on a FileSystem Application related to the platform.• In amulti catalog environment, if a platform is present in two catalogs and if each version of it has anOn
Demand Backup strategy.
222 Tina Administration
OnDemand Backup

CHAPTER12-Tina in SAN EnvironmentsThese topics describe how to configure Tina in order to implement a backup and restore solution on a dedicateddata storage network, the Storage Area Network (SAN):• About Tina in SAN Environments• ImplementingMultiple Server Architecture• Implementing Storage Node Architecture
About Tina in SAN EnvironmentsStorage Area Networks (SAN) are designed to simplify and optimize datamanagement through resourcesharing. As such, they also optimize the data backup processes, making it possible to share libraries and driveswith multiple servers over a storage-dedicated network.
Tina enables you to implement two different types of architectures to share storage resources over a SAN:• About Multiple Server Architecture• About Storage Node Architecture
For more information on choosing the architecture according to your needs and constraints, seeMultipleServers or Storage Nodes.
About Multiple Server ArchitectureAs shown in this diagram, you can share storage resources between several Tina servers connected to a SAN.Themain server managing the library controls the physical sharing of the library between each server.
The data located on the servers is backed up directly on the storage device through the SAN. Themeta-data issent to the associated catalog and do not go through the IP or the SAN network.
Tina Administration 223
Tina in SAN Environments

Formore information on the representation of this configuration inWeb Administration, see ImplementingMultiple Server Architecture.
About Storage Node ArchitectureA storage node is a client platform that can be connected to a storage device and can back up data directly,bypassing the Tina Server. Themeta-data is sent to the server catalog through the IP Network.
As shown on this diagram, several storage nodes can share the drives and library. The library is managed by theTina Server.
For more information on the representation of this configuration inWeb Administration, see ImplementingStorage Node Architecture.
About Mixed ArchitectureYou can combine both types of architecture on the same network to fit your needs:• If the catalog is full on the storage node, you can either add a catalog on the same server or add a second
server with the Tina Shared Drive Option.• You can also add NDMP file servers with dedicated catalogs to a storage node architecture.
Multiple Servers or Storage NodesThis table describes the two types of architecture. Select the appropriate type according to your needs andconstraints:
Features Multiple Servers Storage Node
Multiple writing YES YES
Media duplication YES YES
224 Tina Administration
Tina in SAN Environments

Features Multiple Servers Storage Node
Synthetic backup YES YES in sidf format
NO in tar format
cpio, and TiNa formats support YES NO
tar format support YES YES
sidf format support NO YES (dedicatedmedia pool required)
Requires to split the library YES NO
Dedicated catalog YES NO
Macro-multiplexing YES NO
tina_export command YES YES except for the export to the same catalog
Device Descriptor Re-allocationIn a SAN configuration, SCSI devices (drives and libraries) may be dynamically re-allocated during zoningoperations. The operating system device configuration is thenmodified on the platforms connected to the SAN.
Tina can get the serial numbers of the devices to identify drives and library exactly andmodify the devicedescriptors dynamically.
Tina supports this feature on these operating systems:• Windows• SUN Solaris
The drive serial number is automatically detected if the drive is created as a shared drive in theWebAdministration.On the other hand, the detection of the library serial number and the re-allocation of the device descriptorsrequire the Use Serial Number to Determine Device Descriptor (check_device_descriptor_from_serial_number) tunable to be declared.
To implement device descriptor re-allocation
1. Before performing an operation likely to modify the devices connected to the SAN (zoning), set the UseSerial Number to Determine Device Descriptor (check_device_descriptor_from_serial_number)tunable through the Configuration Tunables node in theWeb Administration. See Tunables and theTina Tunables Documentation.
2. Once the zoning operation is completed, restart the Tina server and storage nodes connected to thedrives or libraries through the SAN to update the device configuration. If you do not want to restart themachines, youmust manually update the device configuration on the operating systems.For more information on configuring devices, see the operating system administration documentation andthe Tina Drivers Documentation.
3. Perform an operation which requires access to the drives and libraries. For instance, reinitialize the libraryand read a cartridge label with the drives.This operation enables update of the device descriptor in Tina. The new descriptor displays in the Driveand Library Properties windows.
4. Remove the Use Serial Number to Determine Device Descriptor (check_device_descriptor_from_serial_number) tunable through the Configuration Tunables node in theWeb Administration. If the
Tina Administration 225
Tina in SAN Environments

tunable is not removed, requests are regularly sent to check the device descriptors and it generatesunnecessary network traffic.
Implementing Multiple Server ArchitectureThese topics describe how to implement multiple server architecture:• Prerequisites• Configuration
PrerequisitesYoumust install these Tina components:• Install Tina Server on each secondary server connected to the SAN. Run the setup and check the Tina
Server option.For more information on Tina installation.
• Install Tina Server on themain server managing the library. Youmust split the library to allocate eachserver slots in the library.SeeManaging Simultaneous Access to Library Shared Drives for more information on sharing libraries.
• When you create catalogs on the various servers, they must all be accessible by all servers. To do so,youmust manually modify the catalogs files on each server to add an entry for each catalog.
ConfigurationYoumust configure each secondary server similarly, except themain server managing the library.
Note: As library sharing configuration is not supported in theWeb Administration, some of the steps inthese procedures must be performed through the Administration Console.
To configure the main server1. Create the library.
Add the number corresponding to the library server at the end of the Device Descriptor.For example:Windows. c0b2t4l0s0macOS. qc0,0Unix. /dev/qc0,0See Creating a Library Manually andManaging Simultaneous Access to Library Shared Drives.
2. Create the drive using the Drive CreationWizard.• In the General Information window, clear the Local Drive (Not Shared) check box.• In the Drive Network window, define a Storage Area Network.• In the Drive connection selection window, add your main server host name and its device
descriptor.See Creating a Drive for details.
3. From the explorer, select Storage Drive. The Drives pane opens.4. Click the List by SAN view to display the drive attached to a SAN.
To configure the secondary servers1. InWeb Administration on the secondary server, create themain server. See Creating a Platform.
226 Tina Administration
Tina in SAN Environments

2. Create the library attached to themain server.The number corresponding to the secondary server you are configuringmust be added at the end of theDevice Descriptor. For example:Windows. c0b2t4l0s1macOS. qc0,1Unix. /dev/qc0,1See Creating a Library Manually andManaging Simultaneous Access to Library Shared Drives.
3. Create the drive(s) used by the server you are configuring through the Drive CreationWizard.• In the General Information window, clear the Local Drive (Not Shared) check box.• In the Drive Network window, define a Storage Area Network.• In the Drive connection selection window, add your main server host name and its device
descriptor.See Creating a Drive for details.
4. From the Tina explorer, select Storage Drives. The Drives pane opens.5. Click the List by SAN view to display the drive attached to a SAN.
Implementing Storage Node ArchitectureThese topics describe how to implement storage node architecture:• Prerequisites• Configuration• Creating a Shared Drive• Modifying the Drive Connection type• Disabling/Enabling Drive-Host Connections
PrerequisitesThese prerequisites must bemet before configuring Tina:• Youmust install Tina Server on the backup server. Youmust have run the setup and checked the Tina
Server option.• Youmust install Tina Storage Node on each storage node. Youmust have run the setup and checked the
Tina Storage Node option.
For more information concerning Tina installation.
ConfigurationNote: Prior to configuring Tina Storage Node onWindows platforms, ensure that the Removable StorageWindows service (NtmsSvc) is stopped. If this service is started, some conflicts may occur for mediaaccess.
To configure Tina
1. Create the library attached to the Tina Server. See Creating a Library Manually.2. Declare each storage node as a host. Select the Storage Node check box in the Advanced area of the
Properties tab in the Host Details window. See Creating a Host.3. Create the shared drives. See Creating a Shared Drive.4. Create a backup strategy on each storage node. Clear the Use Cache on Server check box in the Options
area of the Strategy Details window. See Use Cache on Server.
Tina Administration 227
Tina in SAN Environments

Note: When performing a backup without using the cache on the server, the backup format used isSIDF (System Independent Data Format - ISO/IEC 14863).
Creating a Shared Drive1. From the Tina explorer, select Storage Drives. The Drives pane opens.2. Create the drive using the Drive CreationWizard:
• In the General Information window, clear the Local Drive (Not Shared) check box.• In the Drive Network window, define a Storage Area Network.• In the Drive connection selection window, add the storage node hosts you want to be backed up
onto the drive and their device descriptors.See Creating a Drive for details.
3. Click the List by SAN View to display the drive attached to a SAN.
Modifying the Drive Connection typeThis feature enables you to quickly convert a local drive (or a shared drive) already configured inWebAdministration to a shared drive (or to a local drive).
Disabling/Enabling Drive-Host ConnectionsThis feature enables you to temporarily disconnect a host from a drive without affecting other drive-hostconnections. Practical applications are:• disconnecting amalfunctioning storage node for maintenance and repair purposes while still using the
other storage nodes• reading a 128 KB block size tape by disconnecting hosts that are not compatible with this tape format
and retaining compatible ones
To disconnect or connect a host from a drive
1. In theWeb Administration, expand your catalog in the Tina Explorer.2. Select Storage Drives. The Drives pane opens.3. Select a drive in the drive list, then select Drive Details. The Drive Details window opens.4. Expand the Connection area.5. From the Device Links list, select a host then click Disabled or Enabled.6. Click Apply and Close.
228 Tina Administration
Tina in SAN Environments

CHAPTER13-AlarmsThese topics define the alarm and explain how to view, process, export and notify alarms:• About Alarms• Alarm Description• Viewing Alarms• Processing Alarms• Exporting Alarms• Filtering Alarms
About AlarmsTina contains an internal alarm systemmanagement which simplifies the applicationmanagement.
This system displays alarms inWeb Administration. You are is thus informed, in real time, of possible problemsand can react accordingly.
Most alarms are associated with an object, (e.g., host, application, drive, library, user, or media). When it doesnot apply to a specific object (i.e., catalog backup failure), the alarm is associated with the server.
Note: Tina creates an alarm when an object belonging to a backup selection is not backed up. You canforbid the creation of such an alarm through the alarm notification which enables you tomanage alarmfilters on an object, if you know that an object will not be backed up, (e.g., opened and locked files).
Alarm DescriptionThese topics give a description of alarm:• Alarm IDs and categories• Alarm Severity• Alarm Messages
Alarm IDs and categoriesAll the alarms are referenced in Tina by a unique identification number (ID: TN_ALARM_ID030020) and sorted bycategory. This table describes the categories in which Tina can sort the alarms:
Category Refers to ...
Server catalog and site security. Alarm IDs range from 10000 to 19999.
Agent hosts and applications. Alarm IDs range from 20000 to 29999.
DataManagement
all operations about datamanagement (backup, restore, duplication, etc.). Alarm IDs rangefrom 30000 to 39999.
Storage library management and storagemanagement (queries for media, spacemanagement,etc). Alarm IDs range from 40000 to 49999.
Tina Administration 229
Alarms

Category Refers to ...
Devices andMedia
device configuration, media errors, hardware errors. Alarm IDs range from 50000 to 59999.
Security user accesses and Security & ComplianceManager (SCM). Alarm IDs range from 60000to 69999.
Administration licenses and other administration alarms. Alarm IDs range from 70000 to 79999.
Others alarms which do not belong to the categories defined above. Alarm IDs range from 200000on.
Alarm SeverityAn alarm can be of three different levels; each level has a color associated with it. This table describes theseverities that Tina can apply to an alarm:
Severity Color Description
Minor Yellow Warning with no immediate consequences on the backup process, (e.g., Previoussession not complete, full backup, strategy A ignored).
Major Orange Warning with important consequences on the process of one or several backups, (e.g.,Strategy A backup failed).
Critical Red Warning with serious consequences on the process of all backups, (e.g., Errorbacking up the catalog).
Alarm MessagesAlarmmessages are presented with their identification number (ID), their title and their help message.
The alarm helpmessage is associated with all the events of alarm severity (i.e., critical, major, andminor). Thismessage is divided into two parts:• Cause. The cause of the problem.• Action. The action youmust perform to solve this problem.
Viewing AlarmsTo view an alarm list
These are the ways to view an alarm list:• An alarm indicator (red, orange, or yellow) on an object of the Tina Explorer indicates that an alarm
concerns the object.• In themain application toolbar, the alarm indicator displays the current minor, major, and critical alarm
states using three indicators; indicators are updated automatically. Clicking on an indicator brings you tothe alarm list.
• To display the list of all alarms, select Current Activity Alarms. The Alarms pane opens.By default, the Alarms pane is updated automatically and you cannot disable this feature.
230 Tina Administration
Alarms

This image illustrates the Alarms pane:
Alarm Properties WindowThis table describes the columns that you can find in the Alarms pane:
Column Description
Severity Alarm severity: Minor, Major, or Critical.
Last Date Date of the last occurrence of the alarm.
First Date Date of the first occurrence of the alarm.
Count Number of times the alarm occurred.
Object Name of the object for which the alarm occurs.
Acknowledgement Permanent. (No alert on next alarm). Specifies that you have acknowledged the alarmand any subsequent same version of it.
Temporary. (Alert on next alarm). Specifies that you have only acknowledged thecurrent occurrence of the alarm.
Message Description of the alarm.
Sorting AlarmsYoumay sort alarms by the content of any column. To do so, double-click the heading of the column by whichyou want to sort. On the first click, sorting will be ascending. Click a second time to sort in descending order.
Configuring a New Alarm ViewWhen you open the Alarms interface, by default, only the New Alarms and Acknowledged Alarms tabs areavailable. You can also create a new alarm view.
To create a new alarm view
1. In theWeb Administration, expand your catalog in the Tina Explorer.2. Select Current Activity Alarms. The Alarms pane opens.3. Click the Create a new alarm view tab (+). The Alarm View Configuration window opens.4. Enter a view name.5. To set the new alarm view to filter alarms by one or several categories, expand the corresponding area by
clicking the + button to the left.
Tina Administration 231
Alarms

6. To activate an expanded area (i.e., category), first select the correspondingShow... check box. Then,you can select the check box of each wanted value.This table describes the categories that you can find in the Alarm View Configuration window and allavailable values:
Category Description
Filter by Status Select the Show alarms with the following status check box.
Then, select one, two, or all of these values: NOT ACKNOWLEDGED, Temporary, orPermanent.
Filter bySeverity
Select the Show alarms having the following severity check box.
Then, select one, two, or all of these values: Minor, Major, or Critical.
Filter by ObjectName
Select one, two, or all of these check boxes:
• Show only these hosts.• Show only these applications.• Show only these drives.Then, select the appropriate button to perform the wanted action:
• + tomanually add an item.• - to remove an item.• Choose. Opens a window that enables you to select an item. Once you have
selected the item, click Apply and Close.
Filter by ObjectType
Select the Show alarms with the following platform categories check box.
Select one or all of these values: Host, Application, Cartridge, or Drive.
7. Click Apply and Close to validate the creation of a new alarm view.
Processing AlarmsOnce an alarm is created, you can acknowledge, activate, or delete it:• Acknowledging an alarm permanently
The alarm is acknowledged once for all the times it is issued subsequently. This implies that you will notreceive any visual clue when this alarm is issued next. The only way to find out if the alarm has occurredagain is to check if the count has been incremented or to look in the Events interface.
• Acknowledging an alarm temporarilyOnly the current occurrence of the alarm is acknowledged. If this alarm is issued again, you will see thebuttons blinking.
• Activating an alarmAn alarm that has been previously acknowledged either temporarily or permanently will be returned to anot-acknowledged status.
• Deleting an alarmThe alarm is permanently removed from the alarm list.
To process an alarm
> In the Alarm list, right-click the severity icon of the alarm you wish to process. A popupmenu opens.Select one of the processing options. Unavailable options are grayed out.Or
232 Tina Administration
Alarms

In the Alarm list, select the alarm you want to process, then click one of the available buttons (i.e.,Details, Delete, Activate, Acknowledge Permanently, or Acknowledge Temporarily). Once the alarm isprocessed, it displays in the Acknowledged Alarms tab. The processing information is displayed in theAcknowledgment column.
Exporting AlarmsThe alarm Export function enables you to export the alarm information of your choice to a file.
To export alarms
1. Select the alarms to export.2. Click Export Alarms. The Export List window opens.3. Configure the Export List parameters. This table describes the parameters that you can find in the Export
List window:
Parameter Description
Export Choose to export only the selected lines or the entire list.
Format Select the format of the export file, either CSVor PDF.
End of Line Select the end of line format:
• Windows (CRLF)• Linux (LF)• Classic macOS (CR)
Field Separator Select the field separator: either , or ; or |
Escape Character Select the Escape character: either “ or ‘
If needed, select the Always Add Escape Characters check box.
4. Click Apply and Close. The File Download window opens.5. Click Save and select a location.
Filtering Alarms
The alarm filters enable you to define a list of directories or files that do not create an alarm if they are notbacked up. This is useful when a backup selection contains locked files that Tina does not back up (e.g. systemfiles). For more information, see Alarm Filters.
Tina Administration 233
Alarms

CHAPTER14-EventsThese topics describe the events and the different actions that can be performed on events, like searching,exporting or purging Events:• About Events• Viewing Events• Searching Events• Exporting Events• Purging Events• event File• Notifying Events• Audit Trail
About EventsThe Events interface provides insight into Tina processes. It is a very useful tool to troubleshoot incidents thatoccur with any Tina function or process.
The information displayed in the Events is kept in the event file on the server. An event file also exists on everyclient machine. See event File.
The Events interface enables the administrator to display events graphically, to apply filters and to sort them(e.g., the administrator may view all events regarding all backups for all machines, or just the restore operationson a specific machine). Each event type, information, warning, minor alarm, major alarm, etc., is displayed witha dedicated color to facilitate reading.
Viewing EventsYou can view Tina events in Connectedmode.
Youmust connect to a catalog to access the events related to that catalog.
Note: You can also view Tina events in Commandmode. For more information on the tina_eventcommand, see the Tina Command Line Interface Documentation.
To view events in Connected mode
1. In theWeb Administration, expand your catalog in the Tina Explorer.2. Select Current Activity Events.
234 Tina Administration
Events

The Events pane opens.
Note: Click Update Events Manually if needed.
Selecting the Columns to DisplayBy default, when you open the Events interface, these columns are displayed: Severity, Date (Logging), Job ID,Program, Host, andMessage.
Note: The Severity andMessage columns are always displayed, even if you do not select them.
To select the columns to display
1. Click the icon located at the right of the column headers.The ColumnChoice pane opens.
2. Select the columns to display.
Tina Administration 235
Events

This table describes the columns that the Events view can display:
Column Description
Severity Severity level of the event.
These are the values for the Severity:
• Info• Accounting• Debug• Warning• Error• Fatal• Minor Alarm• Major Alarm• Critical Alarm
Date (logging) Date when the event is recorded in the server event file.
Job ID Single identification number for each job.
PID Process Identifier.
Program A program, such as tina_adm or tina_daemon.
Date (emission) Date when the event occurred.
Development Debug information.
Host Logical host that triggers the action.
Real Host Host that performs the action.
User Logical user that triggers the action.
Real User User that performs the action.
Alarm ID Identification number of the alarm.
3. Click Close.
Configuring a New Event ViewThe Last 72h Events tab is available by default. You can also create new Event Views.
To create a new event view
1. Click the + tab.The Event View Configuration window opens.
2. Enter a view name.3. From the Sort by list, select the sorting order, either:
• Ascending emission date.Or
• Descending emission date.
236 Tina Administration
Events

4. To set the new event view to filter events by one or several categories, expand the appropriate categoryby clicking the + button to the left.
5. To activate an expanded category, select the correspondingShow... check box first.Then, select the check box that matches the wanted value.The Event View Configuration window enables you to filter the events by these categories: Severity,Class, Date, Name, ID, Development Information, and Number of Displayed Events.This table describes the parameters that you can set in the Filter by Severity category:
Parameter Description
Show eventswith theseverities
1 Select this check box to activate all the values.
2 From the first list, select one of these options:
• All severities. Includes all the values and so the check boxes aregrayed out.
• Only events with the following severities. Includes the values thatyou select.
• Except events with the following severities. Excludes the valuesthat you select.
3 Select the check box that matches the wanted value. These are the availablevalues:
• Fatal. Error that causes the program to exit (e.g., Impossible toconnect to server X).
• Error. Serious error that might cause the program to exit (e.g., Errorduring backup,retcode=6).
• Warning.Warning with no important consequences (e.g., Siloinconsistency detected).
• Information.Message of general interest (e.g., Starting tina_init).
• Debug. Diagnosis help (e.g., Network error).• Accounting. Accounting concerning backups and archiving (e.g.,
Start incremental backup, strategy A).• Audit. Information that may be used in an audit (e.g. messages
concerning the creation of a strategy)• Minor Alarm.Warning with no immediate consequences on the
backup process (e.g., Unable to connect to host "olive").• Major Alarm:Warning with important consequences on the process
of one or several backups (e.g., Error starting backup strategyA).
• Critical Alarm.Warning with serious consequences on the processof all backups (e.g., The library requires a manualoperation).
Tina Administration 237
Events

This table describes the parameters that you can set in the Filter by Class category:
Parameter Description
Showeventswith theclasses
1. Select this check box to activate all the values.
2. From the first list, select one of these options:
• All classes. Includes all the values and so the check boxes are grayed out.• Only events with the following classes. Includes the values that you
select.• Except events with the following classes. Excludes the values that you
select.
3. Select the check box that matches the wanted value. These are theavailable values:
• Standard. Standard events.• Non Uncompressed Object. Events related to objects that are restored but
not uncompressed.• End User. Events easily understandable designed to help the user in case of
error during Tina execution.• Non Restored Object. Events related to an object restore error.• Fuzzy Object. Events related to a fuzzy object, for instance an object
modified while backup was in progress or an incompletely backed up object.
The number of logs concerning fuzzy object encountered when a job is being performed islimited by default to 20, to avoid reducing performances. To specify how many fuzzyobject logs should be kept in the event file, use the accounting_max_fuzzy_objectstunable.
See the Tina Tunables Documentation.• I/O Error. Events related to an input/output error on a drive or on a backup
media.• Secure Event. Events related to security and compliance operations. For
more information on security and compliance, see the Tina Security &ComplianceManager Documentation.
• Object Not Backed Up. Events related to an object backup error.
This table describes the parameters that you can set in the Filter by Date category:
Parameter Description
Show events whose logging date iswithin the specified period
Select this radio button and slide the pointer to select a valuefrom 1 hour to 30 days, by steps of 1 hour.
Show events whose logging date isin the following interval
Select this radio button and using the calendars, set a Startand an End dates.
The interval can cover the last three days as amaximum,including the present day.
238 Tina Administration
Events

This table describes the parameters that you can set in the Filter by Name category:
Parameter Description
Show events whosemessage contains thefollowing string
1. Manually enter the string that must be present on theevent for it to be taken into account.
2. Select one, two or all of these check boxes:
3. Show only the hosts.
4. Show only the users.
5. Show only the programs.For each selected check box, from the corresponding list,select either Containing or Not containing.
6. For each selected check box, use the Add Item, RemoveItem, and/or ChooseObject buttons to specify theselected objects from the corresponding list.
This table describes the parameters that you can set in the Filter by ID category:
Parameter Description
Show only the jobsIDs and Show only thePIDs
1. Select one or both check boxes.
2. For each selected check box, from the corresponding list,select either Containing or Not containing.
3. For each selected check box, use the Add Item, RemoveItem, and/or ChooseObject buttons to specify the selectedobjects from the corresponding list.
This table describes the parameters that you can set in the Filter by Development Information category:
Parameter Description
Show only thefunctions andShow only thepackages
1. Select one or both check boxes.
2. For each selected check box, from the corresponding list, selecteither Containing or Not containing.
3. For each selected check box, use the Add Item, Remove Item,and/or ChooseObject buttons to specify the action to be displayed,(e.g., check_catalog, pre_create_job) and/or the package to bedisplayed, (e.g., TN_ADM, TN_REQ).
This table describes the parameters that you can set in the Filter by Number of Displayed Eventscategory:
Parameter Description
Number of events to displayper page
Enter the number of events you want to be displayed in one page.
Tina Administration 239
Events

Parameter Description
Max number of displayedevents
Select this check box and enter themaximum number of events youwant to be displayed.
6. Click Apply and Close to validate the creation of a new event view.
event FileAll events displaying in the Event window are kept in the event log file, located in the Adm directory. If this filedoes not exist, Tina automatically creates it.
The file provides detailed information on any incident. For each event, the tina_daemon program writes theevent in an unreadable private format:• The event file under Unix andmacOS.• The event.txt file underWindows.
Note: The event file must not be a symbolic link; however, the Adm directory can be a symbolic link toanother directory.
Only catalog administrators of the various operating systems are allowed to write in the event file (e.g., root forUnix, administrator forWindows, user with administration rights for macOS). Thus, there is no access rightsproblem.
All client events are gathered in the server event file so that you can consult the events of all client machinesfrom the server and have an overall view of the network; however, an event file is also present on every agentdeclared in Tina.
The client event file is used when the server event file is unavailable, namely when the server service is notrunning. The client event file keeps the events until they can bemoved to the server.
log or log_debug FileAnother log file is present on every host declared in Tina. The name of this file depends on the operatingsystem:• log.catalog_name or log_debug.catalog_name (with or without the catalog_name extension) under
Unix andmacOS.• log.txt or log_debug.txt underWindows.
Tina writes the events in this particular log file in two situations: if Tina cannot access the list of catalogs or ifTina cannot write in the event file.
If the log_debug.catalog_name file exists in the Adm directory, Tina uses it to record all events. If the file doesnot exist, Tina uses the log.catalog_name file (which is created if necessary) to record all events exceptDebug events.
Fields of the log or log_debug file
• Id. Specifies the process identification number. Lines are usually grouped by family number. The firstline is the lowest level and next lines display in stacking order until the program ends.
• Date. Specifies the event date.• Severity. Specifies the event severity level.• Package, Function and Position. Identify the part of the code involved in the event.
240 Tina Administration
Events

• Message. Specifies the type of event with sometimes a Tina internal return code (retcode) or thesystem error type errno.
Using these files, you can clearly diagnose a problem without performing any particular operation. Youmayrename the log.catalog_name file into log_debug.catalog_name to recordmore information.
Example of the log_debug.catalog_name file
This table displays an example of the log_debug.catalog_name file:
ID Date Severity Package, Function, andPosition
Message
21773 Tue Apr 4 09:00:372000
A "Clt:desc_dir"[2] Start backup selection "/usr..."
21773 Tue Apr 4 09:00:382000
A "Clt:desc_dir"[14] End backup selection "/usr..."
21773 Tue Apr 4 09:00:382000
A "Clt:desc_dir"[2] Start backup selection "/usr..."
21773 Tue Apr 4 09:00:392000
A "Clt:desc_dir"[14] End backup selection "/usr..."
21773 Tue Apr 4 09:00:392000
A "Clt:desc_dir"[2] Start backup selection "/usr..."
21773 Tue Apr 4 09:00:422000
A "Clt:create_sessions"[5] Create session, session_id =...
21773 Tue Apr 4 09:01:032000
A "Clt:desc_dir"[14] End backup selection "/usr..."
21773 Tue Apr 4 09:01:032000
A "Clt:archiver"[16] End incremental backup ...
21778 Tue Apr 4 09:02:162000
A "Dri:manage_sess_w"[23] End writing onmediaBCK00021...
21778 Tue Apr 4 09:02:162000
A "Vvm:log_volume_ecrit"[6] Stat folder "daisy" writing,...
21983 Tue Apr 4 09:41:362000
I "Clt:restore"[1] Start restoring backup:
21983 Tue Apr 4 09:41:362000
I Destination = "/tmp", Folder ...
21983 Tue Apr 4 09:42:252000
W "Vos:unix_chown"[2] Error chown "nmpolling", ...
Tina Administration 241
Events

ID Date Severity Package, Function, andPosition
Message
22281 Tue Apr 4 10:00:052000
A Start incremental backup...
22281 Tue Apr 4 10:00:142000
A "Clt:desc_dir"[2] Start backup selection "/usr..."
22281 Tue Apr 4 10:00:462000
A "Clt:desc_dir"[14] End backup selection "/usr..."
22281 Tue Apr 4 10:00:492000
A "Clt:desc_dir"[2] Start backup selection "/usr..."
22281 Tue Apr 4 10:01:002000
A "Clt:desc_dir"[14] End backup selection "/usr..."
22281 Tue Apr 4 10:01:012000
A "Clt:desc_dir"[2] Start backup selection "/usr..."
22281 Tue Apr 4 10:01:052000
A "Clt:desc_dir"[14] End backup selection "/usr..."
22281 Tue Apr 4 10:01:052000
A "Clt:desc_dir"[2] Start backup selection "/usr..."
22281 Tue Apr 4 10:01:062000
A "Clt:desc_dir"[14] End backup selection "/usr..."
22281 Tue Apr 4 10:01:062000
A "Clt:desc_dir"[2] Start backup selection "/usr..."
22281 Tue Apr 4 10:01:232000
A "Clt:create_sessions"[5] Create session, session_id =...
22281 Tue Apr 4 10:02:032000
A "Clt:desc_dir"[14] End backup selection "/usr..."
22281 Tue Apr 4 10:02:072000
A "Clt:archiver"[16] End incremental backup,...
22359 Tue Apr 4 10:05:222000
I "Rcy:do_recycle_cart"[10] Start recycling cartridge ...
21983 Tue Apr 4 10:05:502000
D "Vvm:xfer_file"[10] Error closing stream out
21983 Tue Apr 4 10:06:072000
I "Clt:restore"[7] Cancel restoring backup
242 Tina Administration
Events

ID Date Severity Package, Function, andPosition
Message
22359 Tue Apr 4 10:09:302000
I "Rcy:do_recycle_cart"[13] End recycling cartridge"BCK00019"
22359 Tue Apr 4 10:10:072000
A "Dri:manage_sess_w"[23] End writing cartridgeBCK00019,...
22359 Tue Apr 4 10:10:072000
A "Vvm:log_volume_ecrit"[6] Stat folder "daisy" writing, ...
23162 Tue Apr 4 10:48:032000
A "Sdb:tina_odbsave"[4] Start backup catalog
Purging EventsTina automatically purges the events every hour. The event retention is defined through the keep_event_daystunable. For more information onmodifying the tunables, see Tunables and the Tina Tunables Documentation.
Exporting EventsYou can export events to a file whenever the need arises. You can choose the type of information to be exportedand the file format.
To export events
1. In theWeb Administration, expand your catalog in the Tina Explorer.2. Select Current Activity Events. The Events pane opens.3. Select the line(s) you want to export.4. Click Export Events. The Export List window opens.5. Configure the appropriate export parameters. This table describes the parameters that you can set in the
Export List window:
Parameter Description
Export Choose to export only the selected events or all the events of the current page.
Format Select the format of the export file, either CSV, PDF, HTML, or Raw data.
Only for CSV format.
End of Line Select the end of line format:
• Windows (CRLF)• Linux (LF)• Classic macOS (CR)
Field Separator Select the field separator: either ,, | , or ;
Tina Administration 243
Events

Parameter Description
Escape Character Select the Escape character: either “ or ‘
If needed, select the Always Add Escape Characters check box.
6. Click Apply and Close to export the event(s). The File Download window opens.7. Click Save and select a location.
Searching EventsTo find a specific event and display it in the Events interface
1. Click Find Events. The Search window opens.2. Enter a string to search in the visible columns.3. Click Search Next. The first iteration of the string is highlighted in the event list.4. Click Close.
Note: Click Search Next to find the other iterations of the entered string.
Notifying EventsInformation about how to notify events are given in the Event Notifications topic.
Audit TrailAudit Trail consists of logging all configurationmodifications in the Tina environment. Modifications on securityinformation are logged but security information is not shown in clear text (e.g., sts_id, passwords).
Audit Trail contains exhaustive logging of all the configurationmodifications in the Tina catalog.
This information is not logged:• Configuration files, such as the parameters.xml file, hosts files, etc.• User and Interface Preferences.• Tunables.• Event Notifications.• Alarm Filters.• Domain Filtering.• License Settings.
PrerequisitesTo use the Audit Trail functionality, youmust upgrade Tina Server to at least Version 4.5.2. There is no need toupgrade Tina Agents.
Installing Audit TrailAudit Trail is automatically installed with Tina
244 Tina Administration
Events

Note: You cannot deactivate the Audit Trail functionality. However, Audit events may be filtered from theview.
Viewing Audit Trail LogsAudit Trail logs are written in the Tina event log file, located in the Adm directory. See event File for details.
Audit Trail events are displayed in a gray color with the "Audit" severity level in the Events interface.
To view Audit Trail events
1. In theWeb Administration, expand your catalog in the Tina Explorer.2. Select Current Activity Events.
The Events pane opens.The Last 72h Events tab is available by default and contains all the events created in the last 72 hourswhatever their severity.This image illustrates the Events window Audit Trail tab:
3. Create a new Event view to filter the events by the Audit severity.a. Click on the + Tab.
The Event View Configuration window opens.b. Enter a view name.
For instance, Audit Trail.c. From the Sort by list, select the sorting order, either Ascending emission date or Descending
emission date.d. Expand the Filter by Severity area by clicking the + button to the left.
To activate this area, select the Show events with the severities check box.e. In the drop-down list, select Only events with the following severities, then select the Audit check
box.f. Use the other filters (e.g., Filter by Date, by Name, etc.) if you want to customize your new Event
view.g. Click Apply and Close to validate the creation of the new Event view.
Audit Trail Log RetentionYou can define the event retention through the keep_event_days tunable. Its default value is 14 days.
Tina Administration 245
Events

If you want to keep Audit Trail logs longer than the default value (14 days) or the value you specified in thekeep_event_days tunable, Atempo recommends that you do not increase the tunable value because it willresult in a large file size of the event file and this may reduce Tina performance.
Atempo recommends that you perform these operations:• Redirect Audit Trail logs to another log file whose access is controlled by a privileged user of the
operating system (e.g., root, super user, or Administrator).
Note: The keep_event_days tunable does not apply to this redirection file. This file will never bepurged automatically.
• If required, archive this redirection file on a regular basis.• If required, perform a file rotation of this redirection file (e.g., every year).
For details on the keep_event_days tunable, see the Tina Tunables Documentation.
Describing Audit Trail Logs
Object TypesThis table describes all the object types contained in the catalog and supervised by Audit Trail:
Object Type Description
Global Configuration Specifies the general configuration parameters: catalog, cache, authentication,parallelism and default user profile.
Host Specifies the host parameters.
Application Specifies the application parameters.
Drive-Host Link Specifies the parameters concerning the link between a drive and a host (i.e.,drive_name-host_name), and some information including the drive status, thedevice name, the protocol used for the drive-host link, ndmp parameters if any, etc.
Network Specifies the network parameters (LAN, SAN, or Repository).
Drive Specifies the drive parameters.
User Group Specifies the user group parameters.
User Specifies the user parameters.
Media Pool Specifies themedia pool parameters.
Some of themedia pool information is stored in the User object.
Media pool retention parameters are displayed on a dedicated line: media poolretention for pool_name.
Library Specifies the library parameters including the list of drives associated with thelibrary, library geometry properties, the host associated with the library, etc.
This informationmay be displayed on one or two lines.
246 Tina Administration
Events

Object Type Description
Deduplication Pool Specifies the deduplication pool parameters.
Deduplication pool retention parameters are displayed on a dedicated line:deduplication pool retention for dedup_pool_name.
Repository Specifies the deduplication storage parameters (HVDS or External File SystemStorage).
Strategy Specifies the strategy parameters. The strategy letter is indicated after the name ofthe host or application (i.e., dayos.A for strategy A on the host dayos).
The strategy type can be: Standard, Deduplication Storage, or Snapshot.
Schedule Specifies the schedule parameters (i.e., a name and a list of schedule rules). Threeexisting schedules are available when you create the Tina catalog: daily, weeklyandmonthly. An example of a daily schedule is Daily Schedule, start fromMonday to Friday at 8 pm.
Schedule Rule Specifies the schedule rule parameters (i.e., rule types that can apply to aschedule). Three rule types can apply to a schedule: Start rule, Time Frame rule, orExclusion rule. An example of a Time Frame rule is Interval, Every 1 day(s),active from 22:00 and continue the next day.
Scheduler Specifies the scheduler parameters (i.e., enabling/disabling the scheduler and thelist of days excluded from the schedule). An example of excluded days is DayExclusion, Every month the 1st Monday.
LDAP Specifies the LDAP server connection parameters (i.e., name of themachine wherethe LDAP server is installed, LDAP Server LDAP_server_name).
Compliance Rule Specifies the security rule parameters of the Tina Security & ComplianceManagerincluding the rule retention, name, and ID, the certificate template, etc.
Certificate Specifies the certificate parameters of the Tina Security & ComplianceManager.
Policy Template Specifies the security template parameters of the Tina Security & ComplianceManager.
Backup Selection Specifies the backup selection parameters (i.e., a path).
Archive Folder Specifies the archive folder parameters.
Keyword Specifies the keyword parameter in an archive folder (i.e., keyword keyword_name).
Tina Administration 247
Events

Operation TypesThis table describes all the operation types contained in the catalog and supervised by Audit Trail:
OperationType Description
Login Specifies theWeb Administration Interface Login parameters:
• The catalog user.• The catalog name.• The IP address of themachine where theWeb Administration Interface is running.The Login Audit Trail Log is sent when the user enters a user name and password in theAuthentication window.
Example. Catalog User = Admin Catalog = catalog452 Successful Login toAdministration Interface running on 172.16.160.43
Logout Specifies theWeb Administration Interface Logout parameters:
• The catalog user.• The catalog name.• The IP address of themachine where theWeb Administration Interface is running.The Logout Audit Trail Log is sent when the user clicks Logout or tries to connect to theWebAdministration with another user name.
Example. Catalog User = Admin Catalog = catalog452 Logout from AdministrationInterface running on 172.16.160.43
Audit Trail Message ColumnWhen you open the Events interface, these columns are displayed by default: Severity, Date (Logging), Job ID,Program, Host, andMessage.
Information displayed in theMessage column is specific to Audit Trail. Information displayed in all othercolumns is common to any other severity levels of events related to the Tina catalog. For details on thesecolumns, see Viewing Events.
This table describes some information displayed in theMessage column:
Information Description
User Specifies the system user of the process that connects to Tina.
Catalog User Specifies the user (if any) who connects to the catalog to create, edit, or delete theconfiguration object.
Catalog Name Specifies the name of the catalog in which the configuration object is created, edited, ordeleted.
Operation Type For an object. Specifies the type of the operation performed: Create, Edit, or Delete.
For a login/logout operation. Specifies the result of the login/logout operation:Successful Login, Failed Login or Logout.
248 Tina Administration
Events

Information Description
Object Type Specifies the type of the configuration object (e.g., backup selection or user orapplication).
Object Name Specifies the name of the configuration object (e.g., /usr or e:\mydocuments oradministrator or sra2017).
Object Values Specifies the values of the configuration object (e.g., HostName=dayos orCryptedPassword=****, Gid=2, Uid=1, or name=spare).
When the operation type is Create or Delete, all the values are displayed.
When the operation type is Edit, only themodified values are displayed.
Examples of Configuration OperationsThese aremessage examples when performing configuration operations on these objects:• User object.• Media pool object.• Library and drive objects.• Strategy Object.
Note: In this Audit Trail version, object parameters are displayed in raw format.
Example 1: User Object
The user named test_user is created:
Audit 2016/11/08 16:28:53 dayos 08 novembre 2016 16:28User = NT AUTHORITY\SYSTEM Catalog = catalog452 Catalog User = adminCreate User test_user Values: CryptedPassword=**** Gid=-1 IsPrivilegedUser=0Name=test_user Uid=-1 UserAccess=0 - 0 - 26 - 4088 - 0 - 960
The parameters (password and access rights) of this user aremodified:
Audit 2016/11/08 16:31:54 dayos 08 novembre 2016 16:31User = NT AUTHORITY\SYSTEM Catalog = catalog452 Catalog User = adminEdit User test_user Values: CryptedPassword changed UserAccess=0 - 0 - 26 - 4088 - 0 -960> 255 - 0 - 56 - 384 - 0 - 960
This user is deleted:
Audit 2016/11/08 16:38:43 dayos 08 novembre 2016 16:38User = NT AUTHORITY\SYSTEM Catalog = catalog452 Catalog User = adminDelete User test_user Values: CryptedPassword=**** Gid=-1IsPrivilegedUser=0 Name=test_user Uid=-1 UserAccess=255 - 0 - 56 - 384 - 0 - 960
Example 2: Media Pool Object
Themedia pool named test_media_pool is created. Threemessages are created.
Tina Administration 249
Events

First, information on themedia pool retention is displayed. Retention parameters are displayed in raw format.For instance, Retention=1 - 1.1 corresponds to a limited retention of onemonth.
Audit 2016/11/08 16:41:18 dayos 08 novembre 2016 16:41User = NT AUTHORITY\SYSTEM Catalog = catalog452 Catalog User = adminCreate Media Pool Retention for test_media_pool Values: Comment= Counter=0Gacc=test_media_pool Retention=1 - 1.1 StartDate=0 Status=1 StopDate=0 Type=0Version=
Then, information on themedia pool user is displayed:
Audit 2016/11/08 16:41:18 dayos 08 novembre 2016 16:41User = NT AUTHORITY\SYSTEM Catalog = catalog452 Catalog User = adminCreate User POOL_ Values: CryptedPassword=**** Gid=-1 IsPrivilegedUser=0Name=POOL_ Uid=-1 UserAccess=0 - 0 - 0 - 0 - 0 - 0
Finally, information on themedia pool is displayed:
Audit 2016/11/08 16:41:18 dayos 08 novembre 2016 16:41User = NT AUTHORITY\SYSTEM Catalog = catalog452 Catalog User = adminCreate Media Pool test_media_pool Values: Comment=The comment of the poolDriveList= Name=test_media_pool OperationMask=4294967295
Example 3: Library Object
The VLS library named TestVLS is created with two drives named TestVLS_d0 and TestVLS_d1. Six messagesare created.
First, the VLS library is created (twomessages):
Audit 2016/11/08 17:06:48 dayos 08 novembre 2016 17:06User = NT AUTHORITY\SYSTEM Catalog = catalog452 Catalog User = adminCreate Library TestVLS Values: Comment=A comment DriveList= Name=TestVLSSerial=Atempo VLS
Audit 2016/11/08 17:06:50 dayos 08 novembre 2016 17:06 User = NTAUTHORITY\SYSTEM Catalog = catalog452 Catalog User = admin Create Librarycatalog452_TestVLS Values: CleanCartUsed=0 HostName=dayosMaxCleanCartUsed=0 Name=catalog452_TestVLS NbColumn=8 RobotType=17Slot0x=1 Slot0y=3 Slot1Dir=6 SlotCleanCart=0 SlotPerPack=0 VtlType=4
Then, the TestVLS_d1 drive-host link is created:
Audit 2016/11/08 17:06:50 dayos 08 novembre 2016 17:06User = NT AUTHORITY\SYSTEM Catalog = catalog452 Catalog User = adminCreate Drive - Host Link TestVLS_d1dayos Values: DriveName=TestVLS_d1HostName=dayos Protocol=1 RwDeviceName=C:\Program Files\Atempo\TimeNavigator\tina452*CONF_DRV@dayos State=1 TinaVersion=4.5.2
Then, the TestVLS_d0 drive-host link is created:
Audit 2016/11/08 17:06:50 dayos 08 novembre 2016 17:06User = NT AUTHORITY\SYSTEM Catalog = catalog452 Catalog User = adminCreate Drive - Host Link TestVLS_d0dayos Values: DriveName=TestVLS_d0
250 Tina Administration
Events

HostName=dayos Protocol=1 RwDeviceName=C:\Program Files\Atempo\TimeNavigator\tina452*CONF_DRV@dayos State=1 TinaVersion=4.5.2
Then, the TestVLS_d0 drive is created:
Audit 2016/11/08 17:06:50 dayos 08 novembre 2016 17:06User = NT AUTHORITY\SYSTEM Catalog = catalog452 Catalog User = adminCreate Drive TestVLS_d0 Values: Comment= CryptedPassword=**** DeviceNumber=0DhlkList=C:\Program Files\Atempo\TimeNavigator\tina452*CONF_DRV@dayos -GaccName= IsWorm=
Finally, the TestVLS_d1 drive is created:
Audit 2016/11/08 17:06:50 dayos 08 novembre 2016 17:06User = NT AUTHORITY\SYSTEM Catalog = catalog452 Catalog User = adminCreate Drive TestVLS_d1 Values: Comment= CryptedPassword=**** DeviceNumber=1DhlkList=C:\Program Files\Atempo\TimeNavigator\tina452*CONF_DRV@dayos -GaccName= IsWorm=
Example 4: Strategy Object
A strategy A is created on the host named dayos.
First, the host dayos is enabled:
Audit 2016/11/08 17:27:45 dayos 08 novembre 2016 17:27User = NT AUTHORITY\SYSTEM Catalog = catalog452 Catalog User = adminEdit Host dayos Values: MaskProperties=30 > 31
Then, the host dayos is edited:
Audit 2016/11/08 17:29:01 dayos 08 novembre 2016 17:29User = NT AUTHORITY\SYSTEM Catalog = catalog452 Catalog User = adminEdit Host dayos Values: StratList= > dayos.A -
Finally, the strategy A is created on the host dayos. Strategy parameters are displayed in raw format. Forinstance, StrategyMask=1 corresponds to the strategy A:
Audit 2016/11/08 17:29:01 dayos 08 novembre 2016 17:29User = NT AUTHORITY\SYSTEM Catalog = catalog452 Catalog User = adminCreate Strategy dayos.A Values: CartridgeFormat=9 CrossNfs=0 EndProgram=FullBackupDefined=1 FullSynthetic=0 GaccFullList=test_media_poolGaccIncrList=test_media_pool IncrementalBackupDefined=1IncrementalSynthetic=0 IsLanfree=1 JobPriority=3 ManageSpecificAttributes=0MaskProperties=1 MaxParallelStream=1 MmxMaskType=0 RetryInterval=10ScheduleFull= ScheduleIncr= StartProgram= StrategyMask=1 TryIdMax=3 Type=1WaitEndWriting=0
A second strategy C is created on the same host dayos.
First, the host dayos is edited:
Audit 2016/11/08 17:38:24 dayos 08 novembre 2016 17:38User = NT AUTHORITY\SYSTEM Catalog = catalog452 Catalog User = admin
Tina Administration 251
Events

Edit Host dayos Values: StratList=dayos.A - > dayos.A - dayos.C -
Finally, the strategy C is created on the host dayos. Strategy parameters are displayed in raw format. Forinstance, StrategyMask=4 corresponds to the strategy C:
Audit 2016/11/08 17:38:24 dayos 08 novembre 2016 17:38User = NT AUTHORITY\SYSTEM Catalog = catalog452 Catalog User = adminreate Strategy dayos.C Values: CartridgeFormat=9 CrossNfs=0 EndProgram=FullBackupDefined=1 FullSynthetic=0 GaccFullList=test_media_poolGaccIncrList=test_media_pool IncrementalBackupDefined=1IncrementalSynthetic=0 IsLanfree=1 JobPriority=3 ManageSpecificAttributes=0MaskProperties=1 MaxParallelStream=1 MmxMaskType=0 RetryInterval=10ScheduleFull= ScheduleIncr= StartProgram= StrategyMask=4 TryIdMax=3 Type=1WaitEndWriting=0
Redirecting Audit Trail LogsIf you want to increase the event retention, Atempo recommends that you redirect Audit Trail logs to another logfile, for performance reasons. To do so, you should use the Event Notifications feature.
Event notifications enable you to redirect events towards external elements (i.e., a file, an email, a commandline, snmp, or the console, etc.). You can also specify the catalog, the type of events you want to redirect, aswell as the kind of information that each event must display.
When you create event notifications through theWeb Administration, the list of event notifications is recorded inthis file:• Windows. %TINA_HOME%\Conf\logs.xml• macOS. - Unix. $TINA_HOME/Conf/logs.xml
DTD and XSL are provided with the logs.xml file in the Conf directory:• You can use the logs.dtd file to check for the validity of the xml file.• You can use the logs.xsl stylesheet to view the contents of the logs.xml file through a browser
without using Tina.
You can define several event notifications on the same Tina server.
To redirect Audit Trail logs to another log file
1. In theWeb Administration, expand your catalog in the Tina Explorer.2. Select Configuration Event Notifications. The Event Notifications pane opens.3. Click New Event Notification. The Event Notification CreationWizard opens.4. Enter the event notification creation parameters. This table describes the parameters that you should set
in the Event Notification Creation wizard to redirect Audit Trail logs to another log file:
Parameter Description
General Information
Type Select File to send the output to a file.
Name Enter the name of the event notification.
For instance, audit_trail_1.
Comment Optional. Enter a comment to describe the event notification you are creating.
252 Tina Administration
Events

Parameter Description
Disabled This check box is not selected by default. Check it if you want to disable this eventnotification once it is created. Then you can enable it manually at your convenience.
Output File
File Path Enter the destination file path. This path includes the name of the new log redirection file.
For instance, %TINA_HOME%\Adm\log.audittrail.txt forWindows and $TINA_HOME/Adm/log.audittrail for macOS and Unix.
If you want to back up this redirection file together with the catalog backups through theCatalog application, the name of the new log redirection file must contain the logword andthis new log file must be located in the Adm directory.
The keep_event_days tunable does not apply to this redirection file containing the AuditTrail logs. This file will thus never be purged automatically and its size will increaseindefinitely.
Event Notification Format
Specifies the private format of the event file. It enables you to create event sub-files based onfilters.
Raw EventFile Format
Click this radio button if you want to use the same format as the event file located in the Admdirectory of Tina.
Tina Administration 253
Events

Parameter Description
CustomizedFormat
Click this radio button if you want to specify the types of information that you want to notify.
Select the appropriate check boxes. These are the possible values:
• Text.Message of the event.• Number. Internal identifier of the function (debug information).• Function. Name of the function that has generated the event (debug information).• Binary. Program associated with the event.• Server Name. Name of the catalog server associated with the event.• Host Name. Name of the host associated with the event.• User Name. Name of the user associated with the event.• Catalog. Catalog associated with the event.• Severity Short Name. Event severity level abbreviated with letters: I for Info, A for
Accounting, D for Debug, W forWarning, E for Error, F for Fatal, m for Minor Alarm, Mfor Major Alarm, C for Critical Alarm, and a for Audit.
• Severity Long Name. Event severity level.• Logging Date. Date the event is recorded in the server event file.• Emission Date. Date when the event occurred.• Job ID. Identification number of the job associated with the event.• Process ID. Identification number of the process which has generated the event.• Alarm Object Type. Type of the object with which the alarm is associated (e.g., drive,
library, host, application, job, etc.). Only available when an alarm is notified.• Alarm Object Name. Name of the object with which the alarm is associated. If the
object is a library named takata_vls, the alarm object namewill be takata_vls. Onlyavailable when an alarm is notified.
• Thread ID. Thread number of the Tina server process.• Thread Name. Thread name of the Tina server process. Several thread names can
share the same task name.
• ask Name. Name of the task. Tina uses this information to group a set of correlatedactions. There are 3 types of tasks (i.e., TNTcpTask, TNCatStarterTask, andTNWatchDogTask) and each is correlated with one thread task of themain daemon (i.e.,respectively TNTcp, TNCatStarter, and TNWatchDog).
• Product ID. Number of the product. It indicates the product that generates the event(e.g., 1 TiNa, 2WebUI, 3 Eld, etc.).
Severities
Filter Eventsfor theSelectedSeverities
Click this radio button to limit the use of the event notification to specific severities.
Select the Audit check box to redirect all events with Audit severity.
You can also filter events on classes, alarm IDs, applications, catalogs, binaries, hosts, andusers.
5. Click Finish to validate the creation of the event notification. The newly created event notificationdisplays in the Event Notification list.Once your modifications are taken into account, the logs.xml file is updated in the Conf directory. It willbe updated automatically every time you enter amodification from theWeb Administration.
Important: Do NOT edit the logs.xml file manually. Use the Event Notification feature.
254 Tina Administration
Events

Note: For more details on the logs.xml file, you can read the logs.sample.xml file provided at theTina installation time.
6. Restart the Tina service to create the new log file (e.g., log.audittrail) in the Adm directory.
Example of the logs.xml FileThis logs.xml file contains the audit_trail_1 event notification used to redirect events of Audit severity tothe log.audittrail file located in the Adm directory of the Tina installation directory. The file format is raw andfilters are defined for catalogs and hosts to display only the events concerning the catalog catalog and thedayos host.
The logs.xml file ....
... with the corresponding xml syntax
LimitationsPlease note these limitations:• Information on application environment variables is not logged (creation, edition, and deletion).
Tina Administration 255
Events

• Some information on libraries is not logged:– Library standard, generic, and specific properties. Note that information on geometry properties is
logged.– Library optional and user-defined VTL properties.
• Information on archive keywords in an archive is not logged. Note that information on archive keywordsin an archive folder is logged.
• Information on pre and postprocessings for strategies is encrypted.• With browsers like Internet Explorer or Safari, some Logout Audit Trail logs may not be sent if you do not
use the Logout button to quit theWeb Administration Interface.
256 Tina Administration
Events

CHAPTER15-JobsThese topics describe the jobs and the different actions that can be performed on jobs, like displaying,processing or exporting jobs:• About Jobs• Viewing Jobs• Displaying Job Details• Processing Jobs• Duplicating Jobs• Exporting Jobs• Creating a Job Report• Modifying Job Behavior
About JobsJobs executed by Tina aremanaged in real time with theWeb Administration interface. The job concept appliesto several types of sessions.
Themain job types are:• Backup (incremental, full, synthetic, or snapshot)• Archiving• Restore• Media duplication• Catalogmaintenance• Export
Viewing Jobs1. In theWeb Administration, expand your catalog in the Tina Explorer.2. Expand the Current Activity node, and click Jobs.
The Jobs pane opens.
Note: You can also view jobs using the tina_job command. For more information on the tina_jobcommand, see the Tina Command Line Interface Documentation.
Tina Administration 257
Jobs

This image illustrates the Jobs pane:
Configuring a New Job ViewWhen you open the Jobs interface, by default, only the Active tab (active jobs), the Failed tab (failed jobs), andthe Completed tab (completed jobs) are available. You can also create a new job view.
To create a new job view
1. Click the + tab. The Job View Configuration window opens.2. Enter a view name.3. Configure the new job view to filter jobs by these parameters:
• Activity• Alarm• Type• Date• Host and folder names• Media pool• Number of displayed jobs
Displaying Job DetailsTo display the job details
1. Select a job in the Job list.2. Click Job Details. The Job Details window opens. It includes the Properties, Activity, and Events tabs.
Job Details Window - Properties TabThe Properties tab gives you general information for the selected job.
PropertiesTab Description
General - Information Area
Description Contains the job type, i.e., Backup (incremental, full, synthetic, or snapshot), Archiving,Restore, Media Duplication, Maintenance, or Export.
258 Tina Administration
Jobs

PropertiesTab Description
Status Themost frequently used statuses are: Complete, Cancelled on error, Cancelled on request,Running, etc. Jobs with a running status may be either active or inactive. An inactive sessionindicates that one of the resources (media, drives) required to execute the job is unavailable.The status Scheduled concerns active backup jobs only and indicates that the server createda job corresponding to a scheduled backup on an agent, and is waiting for the agent torespond. If the agent does not respond within the one hour default timeout, the status becomesCancelled without starting. If the server cannot reach the client, the status becomesCancelled (unreachable agent). The timeout can bemodified using the timeout_on_scheduled_jobs tunable.
Job ID Unique identification number for each job.
Catalog In amulti-catalog environment, indicates the catalog name.
Host Name of the host involved with the job.
User Name of the user involved with the job.
The name is displayed only if it is known by the catalog. The user must have been created inthe catalog using the graphical interface or API.
Priority Job priority as defined during the Backup Strategy creation.
Parent JobID
Unique identification number for each parent job.
Child JobID
Unique identification number for each child job.
General - Dates Area
SubmitDate
Date and time when the job is submitted.
ExecutionDate
Date and time when the job actually begins to be performed.
The Execution datemay differ from the Start Date if for instance, the job is waiting for physicalresources to become available.
Start Date Date and time when the job is ready to be performed, i.e., all jobs with higher priority have beencleared.
End Date Date and time when the job is completed or cancelled.
Specific Backup Information - Backed Up Platform Area
Name Indicates the name of the platform on which the job has been or is running.
Folder Indicates the host (or the application) backup folder name.
Format Indicates the data writing format used for the backup in question (TiNa, tar, sidf, or cpio).
Tina Administration 259
Jobs

PropertiesTab Description
Specific Backup Information - Backup Selection Processed Area
Directory Indicates the path and name of the directory backed up.
Rule Indicates the name of the security rule associated with the backup selection and whether ornot the rule is inherited from a parent backup.
For information on security rules and compliance, see the Tina Security & ComplianceManager Documentation.
Job Details Window - Activity Tab
Activity Tab Description
Progress - Volume Area
ProcessedVolume
Indicates the volume of processed data in bytes.
By default, the volume unit is gigabyte. For more information on changing the unit, see Toset user preferences.
Number ofObjectsProcessed
Indicates the number of objects involved (files or directories).
Average Rate(GB/H)
Average rate of data processed by the job since the beginning of the job. For completedjobs, the average rate is based on the total amount of data processed and the whole durationof the job.
Progress - Sessions Area
Type Is either Read orWrite.
Volume Indicates the amount of data processed by the session.
By default the volume unit is gigabyte. For more information on changing the unit, see To setuser preferences.
For sidf job duplication, the volume displayed corresponds to the compressed volume readfrom themedia (less than the uncompressed volume on the filesystem).
Date Indicates the date the session started.
Media Indicates themedia name used by the session.
Drive Indicates the drive name used by the session.
Mode Can have these values:
• Real. The session goes through the server cache.• Virtual. The session does not go though the server cache.• Resourceless. The session does not require any drive or media.
Progress - Running Area
260 Tina Administration
Jobs

Activity Tab Description
Try Number Indicates the number of times the job has been initiated and enables you to know thenumber of retries on incident already performed.
PendingRequests
Indicates the number of pending requests.
Alarms Area
Severity Alarms severity can be of three types:
• Minor (yellow).Warning with no immediate consequences on the backup process.• Major (orange).Warning with important consequences on the process of one or several
backups.• Critical (red).Warning with serious consequences on the process of all backups.
Date Indicates the date of the alarm.
Message Describes the alarm.
Job Details Window - Events Tab
Events Tab Description
Export Eventsbutton
Lets you export the selected events.
Severity These are the severity levels:
• Fatal (red): Causes program exit.• Error (orange): Might cause program exit.• Warning (yellow): An error of no important consequences.• Information (blue): General interest.• Debug (green): Diagnosis.• Accounting (violet): Concerning backups and archives.• Minor Alarm (yellow): No immediate consequences on the backup process.• Major Alarm (orange): Important consequences on the process of one or several
backups.• Critical Alarm (red): Serious consequences on the process of all backups.
Date (Logging) The date the event is recorded in the server event file.
Job ID The job ID of the event.
PID PID: Process Identifier.
Program A program, such as tina_adm or tina_daemon.
Date (Emission) The date when the event occurred.
Development Debug information.
Host Logical host that triggers the action.
Tina Administration 261
Jobs

Events Tab Description
Real Host Host that performs the action.
User Logical user that triggers the action.
Real User User that performs the action.
Alarm ID Identification number of the alarm.
Processing JobsYoumay directly intervene, at any time on the jobs in the Active jobs list to cancel, pause, or restart a job.NDMP and LAN free jobs can only be canceled. They cannot be paused nor restarted.
Note: When a job is stopped on error, it remains in the Active job list after all automatic retries areexhausted, until youmanually cancel or restart it. If you cancel it, the jobmoves to the Failed list and itsstatus becomes "Cancelled on error".
To cancel, pause, or restart a job
1. Select the job you want to process (youmay only process one job at a time).2. Click Pause, Cancel, or Restart.
Tina/HyperStream Server ConsistencyThe consistency between Tina and HyperStream Server depends on both the version of Tina you use (i.e., 4.4,4.5, or 4.6) and the reason that led to cancel the HyperStream Server job (i.e., manually canceled or canceledon error).
Manually Canceled JobWhen aHyperStream Server job is manually canceled:• Tina 4.5 or 4.6. Purges the catalog from themeta-data related to incomplete HyperStream streams.
The Tina/HyperStream Server consistency is thenmaintained.• Tina 4.4. Does not purge the catalog from themeta-data related to incomplete HyperStream streams.
This can lead to restore errors. To avoid inconsistency, enable the dedup_sync_for_canceled_jobstunable.By default, the dedup_sync_for_canceled_jobs tunable is disabled.
CanceledOn Error JobWhen aHyperStream Server job has been canceled on error:• Tina 4.4, 4.5 and 4.6. Only keep the registered HyperStream streams relatedmeta-data for Canceled
On Error HyperStream jobs. These jobs can be automatically restarted if the Retry on incident option hasbeen enabled.The Tina/HyperStream Server consistency is thenmaintained.
262 Tina Administration
Jobs

Duplicating JobsYou can duplicate data backed up by a backup or archiving job. Job duplication enables you to duplicate one orseveral jobs on one or several media, as opposed tomedia duplication which only permits duplication of acompletemedia.
Prerequisites• The status of the jobs to duplicate must be Complete.• Several jobs can be duplicated simultaneously if they belong to the same catalog.• Job types eligible for duplication are: backup, synthetic backup, archiving, andmedia duplication.
To duplicate jobs
1. Select one or several jobs to duplicate in the Completed list.2. Click Duplicate Job. The Job Duplication Parameters window opens.3. Set the parameters.
JobDuplicationWindow
Description
Media Pool.
Original Pool Themedia pool containing the data to duplicate will also be the one containing theduplicated data.
Other Pool Specify another media pool if you do not want the original pool to contain the duplicateddata.
If no drive is associated with the pool you select, the duplication is cancelled automatically.
Options.
Start onEmptyCartridge
Only enables use of empty cartridges for job duplication.
CloseDuplicatedCartridges
Enables you to close the cartridges that contain duplicated data.
If you check the Start on Empty Cartridge and Close Duplicated Cartridges options, youwill obtain a consistent media pool including only data of the current duplication.
Continue onError
Enables to continue duplication even if errors due to data occur.
4. Click OK to launch the duplication.
You can also duplicate jobs using the tina_job_control command. See the Tina Command Line InterfaceDocumentation.
Note: If you duplicate amedia or a job, you will create a second occurrence of every file version/instanceimpacted by the duplication. By design, the catalog structure limits to 4 the amount of differentoccurrences of the same version/instance of the file. Under certain circumstances, a duplication canreach this limit:
Tina Administration 263
Jobs

- If you configure toomany duplications of the same job or media. In this case, you have to set up lessduplications.
- If you re-run toomany times a duplication aborted on error. In this case, youmust contact your customersupport to purge aborted duplication jobs from the catalog.
Simultaneous Job DuplicationsBy default, even if several jobs are selected to be duplicated, duplications are performed sequentially, one afterthe other. This behavior is designed to prevent duplication operations from reserving all the available drives.
Tomodify the default behavior, you can:• Set the "Maximum Number of Simultaneous Job Duplications" tunable (max_para_job_dup).
See Tunables and the Tina Tunables Documentation.• Select the jobs to duplicate one by one instead of all at once and launch the duplication. In that case, all
duplications are launched in a row, provided that there are enough available drives to perform theduplications.For instance, to duplicate ten jobs two by two (four drives required), select a first group of five jobs, clickDuplicate Job. Then select the five remaining jobs.
Exporting JobsThe job Export function enables you to export the job information of your choice to a file.
Note: This feature concerns only job information export. To export the content of a job, youmust use thetina_export command. See the Tina Command Line Interface Documentation.
To export jobs
1. Select the jobs to export.2. Click Export Jobs. The Export List window opens.3. Configure the appropriate export parameters. This table describes the parameters that you can set in the
Export List window:
Parameter Description
Export Enables you to only export the selected jobs or all the jobs of the current page.
Format Enables you to select the format of the export file, either CSV or PDF.
End of Line Enables you to select the end of line format:
• Windows (CRLF)• Linux (LF)• Classic macOS (CR)
Field Separator Enables you to select the field separator: either , or ; or |
Escape Character Enables you to select the Escape character: either “ or ‘
If needed, select the Always Add Escape Character check box.
4. Click Apply and Close. The File Download window opens.5. Click Save and select a location.
264 Tina Administration
Jobs

Creating a Job ReportThe job report enables you to view various information concerning the jobs performed by Tina.
Note: The job accounting reports are available in command line only. The commands used to generatereports are tina_acct and tina_report. For more information on generating reports, see the TinaCommand Line Interface Documentation.
The reports available are as follows:1. Job accounting report (tina_acct).
This report generates a standard accounting report that lists all the jobs, sorted by type, that took placewithin the last 24 hours.By default, the report lists this information:• The platform name.• The job type.• The job status.• The user name.• A job description (backup type, archiving folder name, etc).• The date and time the job was submitted, began, ended.• The job ID.• The job volume (amount of processed data) in bytes.• The job objects (number of processed objects).• Themedia and drives involved as well as the backup format (Tina, Tar, Cpio) and the tape file
number.If you want a customized job accounting report, youmay use parameters to determine what information isdisplayed in the report and in what order.
2. Data Volume report (tina_report).This report produces reports concerning the data backed up, either globally for all the catalogs involved, orin amore detailled fashion. This report is invoice oriented, enabling users to be billed according to thevolume processed.
Modifying Job Behavior
Modifying the Job Volume Display UnitTo modify the job volume display unit
1. In the Tina Explorer, expand the Preferences node.2. Click User Preferences. The User Preferences pane opens.3. From the Display Option area, select a value in the Job VolumeDisplay Unit list. The possible units are:
• Bytes• Kilobytes• Megabytes• Gigabytes• Terabytes• Most Appropriate Unit: Use this option to let Tina choose the best unit according to the total volume
of data.If you change the job unit, it is changed throughout the entire Jobs interface.
Tina Administration 265
Jobs

Limiting the Number of Simultaneous JobsYou can set a limit on the number of jobs that can run at the same time. To do so, set the Activate Job LimitationandMaximum Number of Simultaneous Jobs parameters in the Scheduler window (Configuration CatalogSettings menu).
Other Modifications on Job BehaviorIn addition, a series of tunables is available to let youmodify the job behavior. Keep inmind that a tunablemodifies all jobs within a given Tina environment. See Tunables and the Tina Tunables Documentation.
266 Tina Administration
Jobs

CHAPTER16-Media RequestsThese topics describe themedia requests and the different actions that can be performed, like viewing,managing or redirecting operator requests:• About Media Requests• ViewingMedia Requests Interface• Managing Requests• Request Status and Evolution• Redirecting Operator Requests
About Media RequestsAll the requests concerningmedia are handled through theMedia Requests interface.
When amedia operation (e.g., mounting, dismounting, moving cartridges, etc.) is required to perform a backup,a restore or any other function, a request is logged into the catalog and displays in theMedia Requestsinterface. In themain application toolbar, themedia request indicator (whistle) blinks when a new request hasbeen submitted. Clicking on this indicator brings the user to theMedia Requests list.
The process that requested the cartridge operation is then paused until either an operator performs the action orthe time-out expires. Depending on the request result, the process can either resume, resend a similar request,or cancel on error.
Viewing Media Requests InterfaceTo view media requests
1. In theWeb Administration, expand your catalog in the Tina Explorer.2. Expand the Current Activity node, and click Media Requests.
TheMedia Requests pane opens.
TheMedia Requests interface is composed of these tabs:• RunningMedia Requests• TerminatedMedia Requests
Tina Administration 267
Media Requests

Formore information on using theMedia Requests through the tina_operator command, see Tina CommandLine Interface Documentation.
Managing RequestsWhenever a new request is created, it displays in the RunningMedia Requests tab. The request life cycle isdivided in two parts, the handling phase and the acknowledgment phase. Each phase has its own time-out.
Requests will go through several statuses during their life cycle (see Request Status and Evolution).
Handling a RequestDuring the Handling phase, when the request first displays in the RunningMedia Requests tab, the operator isexpected to take the request into account. However the operator must do so before the time-out expires. Thetime-out is represented by the progression bar. The remaining time displays in the bar.
If the operator does not handle the request before it is timed out, the request will bemoved to the TerminatedMedia Requests tab with a “TimedOut Handling” status.
To handle a request
1. In the RunningMedia Requests tab, select the request and click HandleMedia Request.TheOperation Progress window displays.Once this window opens, the request is considered to be “handled” and enters the acknowledging phase.A new time-out starts. It is represented by the progress bar in the Timeout column.TheMessage column gives information on which cartridge name is missing.
2. Now, you can acknowledge, or reject this request.
Responding to a RequestDuring the Acknowledging phase, the operator is expected to either perform the required action, or discard therequest if the action cannot be fulfilled.
If the operator does not acknowledge the request before it is timed out, the request will bemoved to theTerminatedMedia Requests tab with a “TimedOut Acknowledging” Status or “TimedOut Security” if therequest was never acknowledged.
To respond to a request
1. Select theMedia Request in the list.2. Click AcknowledgeMedia Request if you have performed the action required.
OrClick Reject Media Request if you cannot perform the required action
3. Close the Handling Request window.
Once a request has been acknowledged, it displays in the TerminatedMedia Requests tab.
Terminated Media RequestsThe TerminatedMedia Requests tab is a useful way to check for requests that happened in the absence of theoperator. Also consult the Jobs interface to verify the consequences of timed out requests by the processesrequesting them.
To view terminated media request detailed information
1. Select the request in the TerminatedMedia Requests tab.2. Click Media Request Details.
268 Tina Administration
Media Requests

TheMedia Request Details window opens for the selected request.
Request Status and EvolutionA particular request can display several types of statuses. Taking corrective action with respect to the declaredstatus enables request resolution and job continuation.
Status Description
Submitted This is the request initial status.
Handled The operator has taken the request into account before the handling time-out expired. Anew time-out starts, further action is required.
Acknowledged The operator fulfilled the request before the acknowledgeable time-out expired.This is a final stage, no further action is required.
Unacknowledged The operator cannot fulfill the request and indicated it to the application before theacknowledgeable time-out expired. This is a final stage, no further action is required.
Timed OutHandling
The request was not taken into account within the handling time-out. This is a finalstage, no further action is required.
Timed OutAcknowledging
The request was not acknowledged before the acknowledgeable time-out expired. Thisis a final stage, no further action is required.
Timed OutSecurity
The operator did not acknowledge the request within the security time frame. This is afinal stage, no further action is required.
Terminated Tina shut down before the request could be handled or acknowledged. This is a finalstage, no further action is required.
Status EvolutionThis table shows all the different statuses a request may go through during its life cycle.
Request Status Evolution
Submitted Handled Acknowledged
Final stage
Tina Administration 269
Media Requests

Request Status Evolution
Unacknowledged
Final stage
Timed Out Acknowledging
Final stage
Terminated
Final stage
Suspended Acknowledged
Final stage
Unacknowledged
Final stage
Timed Out Security
Final stage
Terminated
Final stage
Timed Out Handling
Final stage
Terminated
Final stage
Redirecting Operator RequestsThe operator requests asking for a VTL Disk Drive cartridge to be put online can be redirected by means of ascript prior to their being issued. The result of the script determines whether the request is processed or issued.Tina communicates with the script through these variables:• TINA_CATALOG: Name of the current catalog.• TINA_TMR_TYPE: Operator request type (possible value: ONLINE).• TINA_TMR_HOST_NAME: Name of the host where the restore is performed.• TINA_TMR_CART_LOC_FILE: Absolute path of the Disk Drive cartridge file.• TINA_TMR_CART_NAME: Cartridge name.• TINA_TMR_CART_TYPE: Cartridge type (possible value: "Disk Drive").• TINA_TMR_CART_LABEL_PREFIX: Prefix of themedia pool label.
These are the return codes of the script:• OK (0)= The request is processed and no operator request is issued.• TN_ERR_MOUNT_ABORT (55)= The request is ignored and no operator request is issued (the equivalent of
discarding a request in Media Request Console).• TN_ERR_REQ (Other)= The request is not processed and the operator request is issued.
270 Tina Administration
Media Requests

The script is activated through the Redirect Operator’s Requests (op_req_handler) tunable which defines theits absolute path.
See Tunables and the Tina Tunables Documentation.
For more information on the script, contact Atempo Professional Services.
Tina Administration 271
Media Requests

CHAPTER17-Reporting and StatisticsThese topics explain how to use the Tina Reports & Statistics option and contains this information:• Tina Reports & Statistics• Managing Additional Features• Activity Information• Configuration Reports
Tina Reports & StatisticsTina Reports & Statistics available through theWeb Administration offers high-level monitoring of the backupenvironment.
The detailed activity reports of Tina Reports & Statistics enable you tomonitor and analyze your backupconfigurations. Tina Reports & Statistics is transparently installed with Tina server, and collects informationfrom the catalogs residing on the same Tina server.
If for any reason Tina Reports & Statistics and the Tina server are not correctly associated, the Administration Backup servers connection pane enables you to fix this broken association.
• Tina Reports & Statistics is available onWindows and Linux operating systems. Otheroperating systems are presented with the standard Activity information.See Activity Information.
• In the TinaWeb Administration, the Interface Preferences Web Interface Parameters URL Link to Reporting Tool field determines the report type that is displayed. If this field hasnot been completed, the standard Activity information is displayed instead of the detailedactivity reports.See Activity Information.
• If you change the Tina server name, update the URL Link to Reporting Tool field in theWebAdministration graphical interface to reflect the new name.
From the TinaWeb Administration, select Preferences Interface Preferences WebInterface Parameters URL Link to Reporting Tool field and enter the new URL includingthe Tina server.
Tina Reports & Statistics includes the application executable files as well as the database. Ensure that youback up the whole Tina Reports & Statistics application.
See Backing Up Tina Reports & Statistics.
Tina Reports & Statistics Advanced OptionFor in-depth reporting on largemultiple server andmultiple catalog infrastructure, the Tina Reports & Statisticsoption offers additional reporting for the administrator. They include:• Delayed jobs.• Unusual values.• Backup SLA.• Associate email to event.• Thresholdmanagement.
272 Tina Administration
Reporting and Statistics

• ...
To know more about this advanced option, please contact your Atempo Sales Representative.
Generating Detailed Activity ReportsYou can generate reports containing detailed activity on your backup environment.
To launch a detailed activity report
1. In theWeb Administration, expand your catalog in the Tina Explorer.2. Select Reporting.
The Reporting and Statistics pane opens.This image illustrates the Detailed Activity Report area of the Reporting and Statistics pane:
3. From the Select a detailed activity report list, select a report type.The default value is General Synthesis.This table describes the reports that you can select from the Select a detailed activity report list:
Report Pane description
General Synthesis. It is also the Home view.
Displays a summary of these items:
• Activity over the last days.• Catalog synthesis.• Collect errors.• Alarms.
Job Synthesis. Displays the statistics for the last days, weeks, or months. The values on thelines are consolidated by catalog.
Pool Synthesis. Displays global information about each pool: strategies using it, used drives,global volume, and the number of cartridges per status.
Library Synthesis. Provides statistics on the library contents from the cartridge point of view.
Drive Synthesis. Provides statistics on the drive usage.
Platform BackupStatus Synthesis.
Displays, per platform, the last job, the last successful full job, and the lastsuccessful job for the selectedmode.
Youmay filter the information displayed.
4. Click Launch.
Tina Administration 273
Reporting and Statistics

The Tina Reports & Statistics opens in a new browser tab and displays the report that you selected in theWeb Administration.
5. Click CSV, PDF, or XLSX to export the report in the corresponding format. You can either open thegenerated file or save it.
Note: The CSV format does not export graphs but only data.
6. Click Disconnect to quit Tina Reports & Statistics.The TinaWeb Administration remains open.
Obtaining additional featuresThe connection to Tina Reports & Statistics via the TinaWeb Administration displays most of the features.
To access all the Tina Reports & Statistics features, youmust disconnect the Tina Reports & Statisticsinterface via the Log off menu, and log in again using the arrs account (password arrs).
The new interface displays these additional features:• Status VMware virtual centers connection• Administration Catalogs connection• Administration Collects status• Administration Global configurationmanagement
General SynthesisThe Home page displays a summary of the collected elements by collect status.
The Home page is automatically refreshed. The default refresh value is 2 minutes, but you can change thisfrequency by setting theRefreshFrequency parameter in the Configuration File.
You can reach the Home page at any time by clicking the icon.
The Home page contains these topics:• Summary of the activity over the last days.• Catalog synthesis.• Collect errors.• Alarms.
Synthesis: Last 3 DaysThe Summary: Last 3 days section summarizes the activity undertaken in the last 3 days.
You can select any value for the number of jobs that is greater than 0 to open a view with the details of thecorresponding jobs.
You can change the number of days by setting theNbLastDaysStats parameter in the configuration file.
The Summary displays the number of jobs successfully completed, over the total number of launched jobs. Acounter keeps track of any restore operations launched. The final column displays the global volume processedin the infrastructure.
Catalog SynthesisClickingView all alarms on the header line opens the Alarms pane.
274 Tina Administration
Reporting and Statistics

This table describes the columns that the Catalog synthesis panemay display:
Column Description
Name Name of the catalog.
Status Status of the catalog. A colored diode indicates the status.
These are the statuses that a catalog can have:
• Enabled. Displays a green diode.• Disabled. Displays a red diode.
Activity Activity of the catalog. A colored diode indicates the status.
These are the possible statuses:
• Enabled. Catalog functioning and active. Displays a green diode.• Backup in progress. Catalog backup in progress. Displays a yellow diode.• Suspended. Activity suspended. Displays a red diode.• Stopped. Catalog stopped. Displays a red diode.• Maintenance.Waiting for a repair action if damaged. Displays a red diode.• Enabling in progress. Currently being enabled (transient). Displays a red diode.• Disabling in progress. Currently being stopped. Displays a red diode.
Important: Only theEnabled status guarantees that the collects will executecorrectly. It is essential to ensure this status for the whole catalog set that you wantto monitor.
Productversion
Version of the Tina Server.
Collect Indicates the status of the collects:
• Data column. Status of the data collect.• Status column. Status of the status collect.
Hover themouse pointer over the icon to view the collect date.
Sizes Used and allocated sizes.
Protectedvolume
If the associated threshold value is exceeded, the value is in orange.
Last Backup Provides information on the last catalog backup. It displays theses columns:
• Date. Date and time at which Tina performed the last catalog backup.• Delay. Elapsed time since the last catalog backup, indicated in minutes.• Average duration. Average duration of the last catalog successful backups.The thresholds are configured by default for the formatting of the elapsed time:
• < 24 H correct elapsed time.• > 24 H default alarm threshold.If the alarm threshold is reached, youmay have to perform amanual catalog backup.
Tina Administration 275
Reporting and Statistics

Column Description
LastReorganization
Provides information on the last catalog reorganization. It displays theses columns:
• Date. Date and time at which Tina performed the last catalog reorganization.• Delay (Day(s)). Elapsed time since the last catalog reorganization, in days.If the alarm threshold is reached, you should perform amanual catalog reorganization. Thethreshold value is 45 days.
Library alarms Number of alarms detected on the libraries.
The counter represents the aggregation of all the alarms coming from devices of librarytype, as visible in the Tina Administration Console (i.e., the alarms that display a yellow,orange, or red blinking light on the object icon).
If this value is greater than 0, clicking it opens a view that displays the correspondingalarms.
Cartridges Number of cartridges that the catalogmanages.
The counter represents the aggregation of all the cartridges known to the catalog. It addsup all media from all cartridge pools (and hence implicitly from all libraries) in the catalog.
Hovering themouse pointer over the number of cartridges opens a pane that gives thecartridge pool details.
Clicking this value opens a view that displays all the catalog cartridges.
Spare Cumulative number of spare cartridges available to the catalog.
In comparison with the cumulative number of Cartridges column, the Spare columnindicates the number of blank cartridges that are available. The threshold affects how thenumber is displayed. value is 4 (i.e., each library must have at least 4 spare cartridges).
If the alarm threshold is reached for one library, youmay have to insert manually newcartridges into the physical libraries, create new media for virtual libraries, or feed thespare pool by sending recyclable cartridges to spare from the Tina AdministrationConsole.
Hovering themouse pointer over this value shows the libraries that do not have enoughspare cartridges.
Clicking this value opens a view that displays the synthesis of the catalog libraries.
Drives globalstatus
Aggregated view of drive statuses. A colored diode indicates the status.
These are the statuses that a drive can have:
• Enabled. Displays a green diode.• Disabled. Displays a red diode.• Maintenance. Displays an orange diode.• Restore only. Displays an orange diode.Hovering themouse pointer over the drive status displays the status details for each drive.The diode indicates themost critical status.
You can use the Tina Administration Console to understand the reasons for the status ofcertain drives, and to enable devices that are eligible.
276 Tina Administration
Reporting and Statistics

Column Description
Drives alarms The displayed number is the sum of the alarms of all severities on all the drives. It has thecolor of the highest severity for which there is at least one alarm.
Hovering themouse pointer over this value displays the details of the number of alarmsper drive and per severity, for the drives that have at least on alarm.
Clicking this value opens a view that displays these alarms.
Collect Status ErrorsThe Collect status errors pane displays the errors on the information collects.
Alarms of Tina Reports & StatisticsThe alarms described here do not come from Tina, but are associated with the inherent surveillance of the TinaReports & Statistics portal itself.
The Alarms pane is not intended to replace a supervision tool that is already in place. It does not include amechanism to broadcast these alarms (e.g., by SNMP or emails).
On the other hand, it permits presentation of alarms considered as pertinent, some of them associated withthresholds, and their ranking in order of their gravity.
This image illustrates an example of some alarms:
• Tina Reports & Statistics automatically deletes the alarms once corrective action has beentaken.
• You can enable and disable the visualization of this pane by setting theShowARRSAlarmsparameter in the configuration file.
• Theminimum number of days for the alarms of themissing cartridges can also be configuredby setting the LateCartMajorAlarm and LateCartCriticalAlarm parameters in theconfiguration file.
Job SynthesisThe Jobs Synthesis pane displays the statistics for the last days, weeks, andmonths, for either a group or allthe jobs.
You canmodify the number of days, weeks, andmonths that are displayed by setting theNbSummaryDays,NbSummaryWeeks, andNbSummaryMonths parameters in the Configuration File.
The Job type selection list enables you to choose the job type to display between the All, Backup, Archive,Duplication, and Restore options.
Tina Administration 277
Reporting and Statistics

This table describes the elements that the Jobs Synthesis panemay display:
Column Description
Date Date of the defined period, either a day, a week, or amonth.
Scheduled Number of scheduled jobs.
Not started Number of jobs that have not been started (i.e., scheduled in Tina but not run).
Manuallystopped
Number of jobs that havemanually been stopped.
Success Number of jobs that have successfully ended.
Number offailures
Number of jobs that have terminated on error.
Success rate A Service Level Agreement calculated over the total number of jobs.
To calculate this rate, the number of jobs successfully ended is divided by the number ofscheduled jobs.
These are the thresholds:
• > 75%Displayed in green.• < 75%Displayed in orange.• < 50%Displayed in red.
You can click any of the displayed values (if different from 0) to open the Jobs Details pane that provides detailson the concerned jobs.
Jobs DetailsThe Jobs details pane provides this information on the selected jobs:• Catalog name• Object (or platform) concerned• Display or hide the virtual machine name in addition to the platform name (JobDispVirtualMachineName
parameter)• Application type (optional display). You can display or hide this column using the JobDispPlatformType
parameter in the Configuration File.• Strategy• Mode (Full / Incremental)• Job type• Job Id. If the job has issues, clicking the Job Id opens a new tab that displays the job events.• Severity• Status• Submission time• End time (optional display). You can display or hide this column using the JobDispEndTime parameter in
the Configuration File.• Format• Number of retries (optional display). You can display or hide this column using the
JobDispShowNbRetries parameter in the Configuration File.• Duration• Volume
278 Tina Administration
Reporting and Statistics

• Throughput. You canmodify the throughput unit (1 - GB/h or 2 - MB/s) using the JobDispThruputUnitparameter in the Configuration File.
• Number of objects (optional display). You can display or hide this column using the JobDispNbObjectsparameter in the Configuration File.
• Maximum retention (optional display). You can display or hide this column using theJobDispMaxRetentionDays parameter in the Configuration File.
• Pools used (optional display). You can display or hide this column using the JobDispUsedPoolsparameter in the Configuration File.
• Cartridges used (optional display). You can display or hide this column using the JobDispCartridgesparameter in the Configuration File.
Jobs Time LineThe Jobs time line pane displays the same information as the Jobs details pane, but in the form of a timeline,describing the daily activity in 1-hour segments, as well as the sequencing of the jobs. To do that, youmustselect a 24-hour time interval using calendar, then click Jobs Time Line.
The Jobs time line pane is useful to visualize jobs running in parallel, as each job is displayed as a bar over atimeline. Hovering themouse pointer over a bar that represents a job opens a pop-up window that provides thisinformation:• Job id (Title of the pop-up window).• Type (duplication, synthetic, etc.).• Job description.• Started.• Duration.
Pool SynthesisThe Cartridge Pools Synthesis pane displays global information about each pool: strategies using it, useddrives, used libraries, global volume, and the number of cartridges per status.
Clicking a pool name opens a view that shows cartridge details for the selected pool.
Library SynthesisThe Libraries and drives pane provides a summary of the libraries and drives.
These sections of the Libraries and drives pane provide information on the libraries:• Libraries global synthesis. Lists the number of libraries for either a catalog or all the catalogs. It shows
at a glance the total number of libraries, drives with their status, cartridges, slots, spare cartridges, andalarms that compose the infrastructure.If the alarm number is greater than 0, clicking it opens a view with the details of these alarms.
• Libraries synthesis. Displays a line per library that provides the details on the library.The Spare columnwarns you when theminimum number of blank cartridges required by the library isreached. The default value is less than 4. You canmodify this value in the Administration / Thresholdmanagement pane.
The warning icon appears in the Library column to indicate that the library data displayedmay notcome from the last performed collect (e.g, if a catalog is disabled in the Administration pane).
Tina Administration 279
Reporting and Statistics

Drive SynthesisThese topics of the Librairies and drives pane provide information on the drives:• Drives global synthesis. Indicates the number of drives for either a catalog or all the catalogs, the
status information (disabled, enabled, maintenance, and restore).It also indicates the number of alarms. If the alarm number is greater than 0, clicking it opens a view withthe alarm details.
• Drives synthesis. Displays the consolidated data, letting you know the status of all the devices in theinfrastructure.This table describes the columns of the Drives synthesis pane:
Column Description
Library Library associated with the drive.
Clicking the + symbol to the left of a library, the Drive column displays the drives associatedwith the library, with all the details for each of them.
The warning icon indicates that the library data displayedmay not come from the lastperformed collect (e.g., if a catalog is disabled in the Administration pane).
Drive Drive logical name.
Type Declared drive type.
Status Drive status. This column displays these status types:
• Global status by library. These are the colors for the global status:– Green. All drives are enabled.– Orange. At least one drive in Maintenance or Restore only.– Red. At least one drive disabled.
• Individual status for each drive. These are the colors for the individual status:– Green. Enabled.– Orange. In Maintenance or Restore only.– Red. Disabled.
Catalog Catalog associated with the drive.
Minor Number of minor alarms triggered for the drive.
Major Number of major alarms triggered for the drive.
Critical Number of critical alarms triggered for the drive.
Platform Backup Status SynthesisThe Backup Status pane displays, per platform, the last backup, the last successful backup, and the lastsuccessful full backup for the selectedmode.
For the last successful backup and the last successful full backup, you can choose themaximum allowedalarm level, to avoid considering successful a backup having high alarms.
Youmay apply filters for the Backup Status pane to only display information on the platforms:• Enabled.• Whose remaining retention percentage is lower than a specified value.
280 Tina Administration
Reporting and Statistics

• Whose last backup (any, incremental only, or full only) has failed. You can select theminimum numberof failures.
This image illustrates the Backup Status pane:
This table describes the lists from which you can select criteria to filter the information that the Backup Statuspane displays:
List Description
Group Name of themonitored catalog(s). These are the valid options:
• All. Displays all the catalogs present on your environment.• (catalog). Displays the local catalog.
Maximum alarm level Level of alarms that are displayed. These are the valid options:
• None.• Minor. Displays theminor, major, and critical alarms.• Major. Only displays themajor and critical alarms.• Critical. Only displays the critical alarms.
Status These are the valid options:
• All. Displays all the platforms present on your environment.• Enabled. Displays only the platforms that are enabled.
Maximum remainingretention (%)
Period between the last full backup and the end of the retention period of themedia pool associated with the strategy.
Status of the lastbackup
Displays backups only with the specified status. These are the valid options:
• All• Most recent failed backups• Most recent failed full backups• Most recent failed incremental backups
Minimum nb. offailures
Minimum number of backups that have terminated on error.
The valid values goes from 1 to 100.
This table describes the columns that the Backup Status panemay display:
Column Description
Catalog Name of the catalog in Tina.
Platform Platform associated with the Tina catalog.
Strategy Strategy used to perform the backup.
Tina Administration 281
Reporting and Statistics

Column Description
Retention (%) The retention periodmargin is the time interval between the last full backup and the end ofthe retention period of themedia pool associated with the strategy.
Tina Reports & Statistics can trigger these types of retention alerts:
• Orange. If the retention periodmargin represents less than 20% of the total retentionperiod.
• Red. If the end of the retention period is reached.
Number offailures
Number of last jobs that have terminated on error.
Last Backup Provides information on the last catalog backup. It displays theses columns:
• Mode. Full or Incremental.• Job Id. If the job has issues, clicking the Job Id opens a new tab that displays the job
events.• Start. Time and hour of the last backup beginning.• Status. Successful, failed, on error, missing, etc.• Severity. Level of the alarm (i.e., minor, major, or critical).
Lastsuccessfulbackup
Provides information on the last successful backup. It displays theses columns:
• Mode. Full or Incremental.• Job Id. If the job has issues, clicking the Job Id opens a new tab that displays the job
events.• Start. Time and hour of the beginning of the last successful backup.• Severity. Level of the alarm (i.e., minor, major, or critical).
Lastsuccessful fullbackup
Provides information on the last successful full backup. It displays these columns:
• Job Id. If the job has issues, clicking the Job Id opens a new tab that displays the jobevents.
• Start. Time and hour of the beginning of the last successful full backup.• Severity. Level of the alarm (i.e., minor, major, or critical).
Managing Additional FeaturesTheWeb Administration enables you to generate reports containing detailed activity on your backupenvironment. The Tina Reports & Statistics application lets you generate additional reports andmonitor backupactivities.
To generate additional reports, from the Tina Reports & Statistics menu bar, select the feature you want toaccess (e.g., Status Daily Synthesis to display the Daily Synthesis).
This table describes the panes that provide information on additional features:
Feature Pane description
Status.
282 Tina Administration
Reporting and Statistics

Feature Pane description
DailySynthesis
Displays an activity summary for a given day, by default the previous day, per group.
Groups JobsStatus DailySynthesis
Displays a daily synthetic view of irregularities encountered during the backup of thegroups.
GroupsWeeklySynthesis
Displays the trend for some group attributes, on a week by week basis.
WeeklyReports
Displays graphs that represent the weekly activity by group on themonitoredinfrastructures.
MonthlyReports byGroup
Displays graphs that represent themonthly activity by group on themonitoredinfrastructures.
VolumesSynthesis
This pane is a table composed of three sections that display the history of volumesbacked up over the last days, weeks, andmonths.
VMwareVirtual Centers
Displays a synthetic view of all the VMware virtual machines known to the Tina catalogs.
VMwareVirtual CentersConnection
Enables you to declare the credentials (user name and password) to access the VirtualCenters.
VMwareMachinesStatus
Provides information on themachines of each VMware virtual center and lets you to enableand disable themachine supervision in Tina Reports & Statistics.
Jobs.
Job Synthesis Displays the statistics for the last days, weeks, or months. The values on the lines areconsolidated by catalog.
NextScheduledJobs
Displays information on upcoming scheduled tasks, provided that the Tina scheduler wasused to launch backups.
Disabled orUnscheduledStrategies
Lists the disabled strategies, including when they are associated with enabled systems. Itenables you to understand why the expected backups cannot run.
Storage.
Libraries andDrives
See LibrarySynthesis
The Libraries and drives pane provides a summary of the status of libraries and theircontents.
Tina Administration 283
Reporting and Statistics

Feature Pane description
LibrariesCartridgesSynthesis
Provides statistics on the library contents from the cartridge point of view.
PoolSynthesis
Displays global information about each pool: strategies using it, used drives, global volume,and the number of cartridges per status.
Administration.
BackupServersConnection
When there is no active backup server, enables you to associate Tina Reports & Statisticswith a Tina server.
CatalogConnection
Enables you to declare each catalog to query, especially these items:
• The name of the catalog in Tina.• The name of the Tina server, that must have been previously declared.• The local name of the catalog• The credentials of a Tina user.
GroupMailsManagement
Enables you to configure, for each group, the sending by email of daily, weekly, andmonthlyreports, dynamically. Reports are generated respectively every day, every Monday andevery first day of themonth.
CollectsStatus
Displays the latest result per type of collect.
GlobalConfigurationManagement
Defines the collect frequency, themail parameters, and the time of the database dailybackup.
Note: In Tina Reports & Statistics, a group only concerns all the platforms for a specific catalog.
Daily SynthesisThe Daily Synthesis pane displays an activity summary per group for a given day (by default it is the previousday):• Successful jobs.• JobGlobal Status (with details of failed backups).• Irregularities (with details of the jobs involved).
The irregularities for themissing jobs may be of these types:– Jobs missing in the backup window.– Jobs not started.– Skipped jobs.
For the irregularities related to skipped jobs not to be shown, set theShowSkippedJobs parameterto 0 in the Configuration File.
Groups Jobs Status Daily SynthesisTheGroups Jobs Status Daily Synthesis pane displays a daily synthetic view of irregularities encounteredduring the backup of the groups.
284 Tina Administration
Reporting and Statistics

For a group of groups, Tina Reports & Statistics displays all the groups that it contains (and not only the groupitself).
The initial and final days can be set in a sliding way or selected using calendars. You can configure the numberof days shown in slidingmode by setting theNbDispDays parameter in the Configuration File.
Group DetailsHovering themouse pointer over a group name displays the details on the group objects.
Tina Reports & Statistics displays attributes depending on the value of a configuration parameter. This tabledescribes the attributes that may be displayed and their corresponding configuration parameter:
Attribute Configuration parameter set to Yes
Number of objects JobDispShowNbObjects
Number of retries JobDispShowNbRetries
Number of retention days JobDispMaxRetentionDays
Platform type JobDispPlatformType
The used pools JobDispUsedPools
The virtual machine backed up JobDispVirtualMachine
The list of cartridges JobDispCartridges
Job end time JobDispEndTime
In addition, you can set the throughput unit by setting the JobDispThruputUnit parameter to:• 1: GB/h
Or• 2: MB/s
Clicking the platform name opens the Platform details pane.
This table describes the categories to which an irregularity may belong with the corresponding status diode:
Category Diode
EVERYTHING OK
FULL / INCREMENTAL MISSING
FULL / INCREMENTAL OUTSIDE OF WINDOW
FULL / INCREMENTAL FAILED
When at least one irregularity is detected, hovering themouse pointer over it displays the complete details for allthe irregularities.
Clicking the diode displays all the jobs performed on the group on the corresponding day.
Tina Administration 285
Reporting and Statistics

Groups Weekly SynthesisTheGroups Weekly Synthesis pane displays the trend for some group attributes, on a week by week basis.
The Attribute list enables you to select these attributes:• Volume• Duration• Number of objects• Throughput
You can use the Tolerance list to vary the display from ± 10% to ± 50% to better appreciate the trends. The iconssymbolizing the trends adapt to this configuration.
The symbol associated with each week value indicates whether it is the initial one, it is stable, has increased, orhas lowered.
For a group of groups, Tina Reports & Statistics displays all the groups that it contains (and not only the groupitself).
Clicking a value opens a new view with the details of the corresponding jobs.
Select a group to display a graph with its attribute values in a new tab. This graph also displays a trend line,letting you estimate projections over time based on current trends.
This image illustrates the graph with the values of theWeekly trend by group:
By default, this graph displays the 10 last weeks, but you canmodify this number through the graphic interface.
Weekly ReportsTheWeekly Reports panes display graphs that represent the weekly activity on themonitored infrastructures.
You can dynamically change the group, the year, and the week to view the statistics for a specific group over adefined period.
Jobs Service Level Agreement
This graph is a consolidated view of the statuses for all the jobs performed on themonitored groups over thedefined period. To ease the reading and present an easily grasped summary of the Service Level, the graphuses these two categories:• Success. Identified by the green color.• Failure. Identified by the red color.
The graph displays the total number of jobs launched by Tina. The jobs that completed successfully display, ingreen, the Success category, whereas other statuses are grouped together under the Failure category, and aredisplayed in red.
286 Tina Administration
Reporting and Statistics

Unusual Data BackupsThis graph is a consolidated view of the irregularities detected over the defined period. It distinguishes theirregularity types by using colors.
This table describes the colors used to identify the irregularity types:
Irregularity Identification Color
Jobs missing.
Within the scheduled timeframe or if Tina could not launch the job.
Jobs outside of backup windows.
Failed jobs.
Volume TrendThis graph displays the volume trend, with a linear trend line. The data is presented over 26 weeks.
This image illustrates the graph with the volumeweekly trend:
Daily Managed Volumes by Job TypeThis graph displays the volumes for each job family and the total volume as a histogram, on a weekly basis.
This graph assigns an identification color to each volume value. This table describes the colors used to identifythe volume for each family and the total volume:
Volume Identification Color
Total volume
Backups + synthetic backups
Archiving
Duplications (cartridges + jobs)
Tina Administration 287
Reporting and Statistics

Volume Identification Color
Restoring
Severity Level Identification Color
Minor
Major
Critical
Monthly Reports by GroupTheMonthly Reports panes display graphs that represent themonthly activity on themonitored infrastructures.
You can dynamically change the group, themonth, and the year to view the statistics for a specific group over adefined period.
Jobs Service Level AgreementThis graph is a consolidated view of the statuses for all the jobs performed on themonitored groups over thedefined period. To ease the reading and present an easily grasped summary of the Service Level, the graphuses these two categories:• Success. Identified by the green color.• Failure. Identified by the red color.
The graph displays the number of jobs launched by Tina. A job that completed successfully displays primarilythe Success category, whereas other statuses are grouped together under the Failure category.
Unusual Data BackupsThis graph is a consolidated view of the irregularities detected over the defined period. It distinguishes theirregularity types by using colors.
This table describes the colors used to identify the irregularity types:
Irregularity Identification Color
Jobs missing.
Within the scheduled timeframe or if Tina could not launch the job.
Jobs outside of backup windows.
Failed jobs.
Volume TrendThis graph displays the volume trend, with a linear trend line. The data is presented over 12 months.
288 Tina Administration
Reporting and Statistics

This image illustrates the graph with the volumemonthly trend:
Daily Managed Volumes by Job TypeThis graph displays the volumes for each job family and the total volume as a histogram, on amonthly basis.
This graph assigns an identification color to each volume value. This table describes the colors used to identifythe volume for each family and the total volume:
Volume Identification Color
Total volume
Backups + synthetic backups
Archiving
Duplications (cartridges + jobs)
Restoring
Severity Level Identification Color
Minor
Major
Critical
Volumes SynthesisThe Volumes Synthesis table is composed of three sections and displays the history of volumes backed upover the last days, weeks, andmonths for a given group. You canmodify the value for the number of days,weeks, andmonths that are displayed by setting theNbSummaryDays, NbSummaryWeeks, andNbSummaryMonths parameters in the Configuration File.
Each volume value is selectable. Selecting a volume value opens a new tab with the corresponding job details.
This pane displays the data as a percentage of the total volume and assigns an identification color to each jobtype.
Tina Administration 289
Reporting and Statistics

This table describes the columns and the colors used to identify the job types.
Column Description IdentificationColor
Date Date of the defined period, either a day, a week, or amonth. -
Backup Percentage and volume of backup jobs (including standard and syntheticbackups).
Archiving Percentage and volume of archiving jobs.
Duplication Percentage and volume of duplication jobs (per job or per cartridge).
Restore Percentage and volume of restore jobs (cartridges + jobs).
Globalvolume
Total of the four previous columns. -
VMware Virtual CentersThe VMware Virtual Centers pane displays a synthetic view of all the VMware virtual machines known to theTina catalogs.
The first pane is the Global backup status. This table describes the columns that the Global backup status panedisplays:
Column Description
VMwareVirtual Center
Name of the VMware virtual center.
Nb. of VMs Number of virtual machines.
Nb. ofsupervisedVMs
Number of VMs supervised by Tina Reports & Statistics.
Nb. of backedup VMs
Number of virtual machines that are backed up.
Last completebackup
The last date when all the virtual machines are backed up: all the supervised VMs havebeen backed up until this date or, in other words, from this date at least one of thesupervised VMs has not been backed up.
Last backup Date and time of the latest virtual machine backup (i.e., from this date no virtual machinehas been backed up).
Click a virtual center name to open the Backup status of VMware virtual center pane.
290 Tina Administration
Reporting and Statistics

This table describes the columns that the Backup status of VMware virtual center panemay display for a virtualcenter:
Column Description
VMware machine Name of the VMware virtual machine.
VMware DataCenter
Name of the VMware data center that contains the virtual machine.
VMware VirtualCenter
Name of the virtual center of the virtual machine.
Last backup Date of the latest backup, if any.
Job id ID of the latest backup job, if there is one and if it is recorded in Tina Reports &Statistics (the jobmay be too old).
By clicking on the job id, a view shows the latest backup jobs of the correspondingmachine.
Delay (Day(s)) The elapsed time since the last backup.
Polling Status These are the possible polling statuses:
Status Diode• EVERYTHING OK
• VIRTUAL CENTER CONNECTION ERROR
• VIRTUAL CENTER UNREACHABLE
• UNDEFINED VIRTUAL MACHINE
• NO CUSTOM FIELDS
• NO TINA_LAST_BACKUP CUSTOM FIELD
VMware Virtual Centers ConnectionThis view enables you to declare the credentials (user name and password) to access the Virtual Centers.
To add a VMware virtual center
1. Select Status VMware virtual centers connection.This image illustrates the Supervised VMware Virtual Centers pane of the administration window:
The view displays the last connection status, which tells if Tina Reports & Statistics has been able toconnect to the virtual center when collecting data.
2. You can also check the connection by clicking the corresponding Check connection button.
Tina Administration 291
Reporting and Statistics

Note: If during data collection, the Tina Reports & Statistics application identifies that a catalog is backingup a virtual center that is not yet declared, it adds this virtual center to the list with the undefinedconnection status. The catalog provides a user to connect to the virtual center, but not the password.
As long as the connection status is undefined, you cannot enable the virtual center.
Once you have created a virtual center, you canmodify it by clicking the corresponding edit icon in itsdescription.
VMware Machines StatusThe VMwareMachines Status pane provides information on themachines of each VMware virtual center andallows you to enable and disable themachine supervision in Tina Reports & Statistics.
Disabling the supervision of amachine enables you to hide it from the report views.
The VMwareMachines Status pane provides this information:• The data center.• The folder (VAT) path• The resource pool path• Is there a snapshot?• The tool status.• The CBT (Changed block Tracking) status.• The time when themachine has been registered in Tina Reports & Statistics.• The time, if any, when themachine has disappeared from Tina Reports & Statistics. This means that it
had disappeared in Tina in the previous data collect made by Tina Reports & Statistics.• The supervision status.
To access VMware Machines Status
1. Select Status VMwareMachines Status.2. Select a VMware virtual center.
This image illustrates the VMwareMachines Status pane:
Next Scheduled JobsThe Next Scheduled Jobs pane shows information on upcoming scheduled tasks, provided that the Tinascheduler was used to launch backups.
A calendar displays the days where some backups are planned. The Next Scheduled Jobs pane assigns anidentification color to each backup type. This table describes the colors used to identify the backup types:
Backup Type Identification Color
Full on a system
Incremental on a system
Full on an application
292 Tina Administration
Reporting and Statistics

Backup Type Identification Color
Incremental on an application
Clicking on a date in the calendar displays the backups scheduled for this date (the first occurrence of abackup).
Disabled or Unscheduled StrategiesThe Disabled or Unscheduled Strategies pane lists the strategies for which no jobs will be triggered, includingwhen they are associated with enabled systems. Therefore, this pane enables you to understand why theexpected backups cannot run.
Libraries Cartridges SynthesisThe Libraries cartridges synthesis pane provides statistics on the library contents from the cartridge point ofview.
The pane lets you dynamically select the desired catalog and refreshes itself automatically, displaying therequested statistics.
Cartridges by PoolThe Cartridge Pools Synthesis pane shows details about the pool cartridges.
Backup Servers ConnectionThe Backup servers connection pane enables you to associate Tina Reports & Statistics with a Tina server.
This pane is useful when, for example, due to an installation setup error, the Tina server is not correctlyassociated with Tina Reports & Statistics. You can thenmodify the backup server parameters, particularly theinstallation path, to fix the broken association. You can declare a Tina server only if there is no active backupserver.
This pane also enables you to verify the parameters of the backup servers that have been declared in TinaReports & Statistics.
To declare a Tina server
1. Select Administration Backup servers connection.The Backup servers connection pane opens.
2. To associate the Tina server, complete the fields in the Add a server section.This table describes the fields that you can complete in the Add a server section:
Field Description
Host name Name of the Tina server host.
Installation path Path of the Tina server host.
3. Once you have completed the fields, click the icon to save the configuration.If you try to add a server to an already active Tina server, the interface informs you that adding a server isnot possible.
Tina Administration 293
Reporting and Statistics

4. To correct or modify the server information, click the icon.Once you have created a server, youmust declare the catalogs.
The icon deletes the server from the list. You cannot delete a server as long as it has catalogsdeclared in Tina Reports & Statistics.
Catalog ConnectionThe Catalogs Connection pane enables you to declare for each catalog to query these informations:• Name of the catalog in Tina.• Name of the Tina server.• Local name of the catalog• The credentials of a Tina user.
• The catalogs are discovered by Tina Reports & Statistics, either when the application isinstalled or when a new catalog is added to the Tina server. So the data of a new catalog isautomatically collected.
• Conversely, removing a catalog from Tina does not remove it from Tina Reports & Statistics.You can decide to keep it in supervision to continue viewing old information.Atempo recommends to disable its collect option since it is no longer useful.
The local name of the catalog is useful as it makes displays and reports easier to understand by giving thecatalog amore user friendly name.
If the local name is not specified, the Tinacatalog name is used as local name.
During the Tina installation, a user called collector_user is created with the appropriate permissions for youto perform the collects. To verify that this default user have the appropriate permissions, follow these steps:1. In theWeb Administration, expand your catalog in the Tina Explorer.2. Select Users. The Users pane opens.3. From the list, select the collector_user user and click User Details. The User Details window opens.4. Verify that the collector_user user has at least these permissions:
• Administration and Supervision pane:– Supervision– Jobs (All operations)
• Backup and Restore pane:– Allowed Strategies: A B C D– Backup selections (declare, modify and delete)– Restore from a remote platform
To add a catalog
1. Select Administration Catalogs connection.This image illustrates the Add a Catalog pane of the Catalogs Connection window:
2. To add a catalog, complete the fields in the Add a Catalog pane.
3. Once you have entered the information, click the icon to save the configuration.
294 Tina Administration
Reporting and Statistics

This table describes the icons that the Supervised catalogs list displays:
Icon Description
enabled ordisabled
Supervision—Enables and disables the catalog supervision in Tina Reports &Statistics.
When the supervision is disabled, the icon is in red color and the line becomes lightgray and in italics.
enabled ordisabled
Collect—Enables and disables the catalog collect in Tina Reports & Statistics.
When the collect is disabled, the icon is displayed in red color.
Modify—Edits the catalog information.
Delete—Deletes the catalog from the list.
If you deleted a catalog, you can no longer view the statistics that were alreadyrecorded.
Note: Data collect is performed only for catalogs for which the collect is enabled.
Once you have added a catalog, you canmodify it by clicking the corresponding edit icon in its description.
Group Mails ManagementTheGroupmails management pane enables you to configure, for each group, the sending by email of daily,weekly, andmonthly reports, dynamically generated respectively every day, every Monday, and every first dayof themonth.
To create a report
1. Select Administration Emails management per group.2. In the Add a report pane, select a group.3. Define the contact addresses for receiving the reports.
• The To field corresponds to themain recipients.• The Copy field is for cc copies.
Note: To enter multiple successive addresses, use the semi-colon (;) as the separator.
4. Choose the file format, either PDF or XLSX.5. Select the frequency that you want by checking the Daily, Weekly, andMonthly options.6. Click Save. For the daily reports, the Details column only enables you to send the Synthesis.
The Defined reports list displays the newly created report.
Note: You can create several reports per group to be able to send different reports to differentpeople.
Once you have created a report, you canmodify it in the Defined reports list by clicking the correspondingedit icon in its description.
Tina Administration 295
Reporting and Statistics

Collects StatusThe Collects Status pane displays the latest result per type of collect. The collect errors are displayed in theHome view.
Global Configuration ManagementTheGlobal ConfigurationManagement pane enables you to define the collect frequency, themail parameters,and a new password.
Collects FrequencyManagementThe Collects Frequency Management pane enables you to define the collect time and frequency.
These are the commands used to perform the collects :• Linux. crontab.• Windows. schtasks.
These are the collect types:• Data. The information collected is an inventory of all the jobs and events, and administrative information.
The data collect may be quite long and provides information for daily analysis or for long term supervision.Thus, it is performed once a day, at a given time.
• Status. The information collected is the status of the catalogs, drives, libraries, and alarms.The status collect provides information that may require quick action. Thus, it is performed regularly in theday, usually two to four times each hour.
• Database. The information collected is the daily database backup, performed at a given time.You can set the specific time (hour andminutes) of the day at which this collect is performed.
To define the time and frequency of the collects
1. Select Administration Collects Frequency Management.2. Define the hour andminute for the data collect.3. Define the number of minutes for the status collect frequency.4. Click Save.
Mail ParametersTheMailing parameters pane enables you to define the parameters used by Tina Reports & Statistics to sendmails.
This table describes the columns that you can find in theMail Parameters pane:
Column Description
Sender name Name of the sender of themail.
In the user@domain example, user corresponds to the sender name.
Sender domain Name of the domain to which the sender belongs.
In the user@domain example, domain corresponds to the sender domain.
SMTP Server Name of the SMTP Server.
296 Tina Administration
Reporting and Statistics

Column Description
Mailing method Select themailing protocol. These are the valid protocols:
• Mail.• Sendmail.• SMTP.
Modify the Administrator PasswordWhen you generate a report from theWeb Administration, Tina Reports & Statistics creates the default userarrs, along with the password arrs. TheModify the password of the product administrator pane enables todefine a new password for the default Tina Reports & Statistics user.
This table describes the columns that you can find in theModify the password of the product administratorpane:
Column Description
User Name of the current user. By default, it is arrs.
Password Password of the current user. By default, it is arrs.
New password New password for the user.
Confirm password Enter again the new password for the user.
Save Saves the new configuration.
Configuration FileThe configuration file allows you to customize some display parameters (e.g., the number of columns displayedin the Job Details pane).
To modify a parameter in the configuration file
1. Edit the parameters.txt file in a text editor.To find the parameters.txt file, from the Atempo products directory of your file system, follow thispath: /AtempoWebInterfaces/apache-tomcat/webapps/<tina_environment>_Arrs/conf.
2. This information is present for each parameter:• The description of the parameter, including the definition, the type, and theminimum andmaximum
values.• The parameter and its value.Example. This is an example of a section of the configuration file:
## Number of days, weeks & months in the jobs & volumes summaries# Type: Integer#NbSummaryDays 7#NbSummaryWeeks 4#NbSummaryMonths 3
Tina Administration 297
Reporting and Statistics

3. Modify the value for the parameter.4. Save the configuration file.5. In the Tina Reports & Statistics interface, refresh the graphic view.
Backing Up Tina Reports & StatisticsTo back up Tina Reports & Statistics, youmust back up these data sets:• The Tina Reports & Statistics directory. It contains the application executable files and these specific
files:– Configuration– Tina Jobs events– Collected and treated information
• The Tina Reports & Statistics database.The dump of the Tina Reports & Statistics database is performed daily into the arrs_db_dump.txt file. Ifyoumust find the arrs_db_dump.txt file, from the Atempo products directory of your file system, followthis path: /AtempoWebInterfaces/apache-tomcat/webapps/<tina_environment>_Arrs.You can set the backup time via the Administration Global configurationmanagement Collectsfrequency management Database backup timemenu.
Youmust then schedule in Tina the backup frequency of the Tina Reports & Statistics home directory. Thishome directory backup includes the database backup.
Activity InformationThe Reporting node under your catalog in the Tina Explorer may display the Activity tab. This tab appears if yoursystem is not Linux orWindows, or if the URL link to the Reporting Tool parameter is not specified.
The Activity tab displays this information corresponding to your catalog:
Parameter Description
Show the last Xdays/weeks/months
Sets the period for which you get the activity data.
Enter a number and select a unit between days, weeks, andmonths.
Update View Updates the activity information.
Success Rate Calculation Select either:
• All jobs successfully completedOr
• All jobs successfully completed except suspended and canceledjobs.
Job Success Rate by Type Displays statistics in tabular form.
Job Success Rate by Period Displays statistics in tabular form.
Distribution of the writtenvolumes by job type
Displays the daily, weekly, or monthly volume.
Backup Evolution Graph Enables you to select between a Full or an Incremental backup, and anAverage or the Total value.
298 Tina Administration
Reporting and Statistics

Parameter Description
Top 10 Backups Displays the 10 biggest or longest backups of the last 4 days.
Configuration ReportsYou can generate reports containing information and statistics on your catalog.
Note: Youmust be a Tina user with either an Administrator or Catalog Administrator profile to generatereports.See Configuring Users and Access Rights.
To launch a configuration report
1. In theWeb Administration, expand your catalog in the Tina Explorer.2. Select Reporting. The Reporting and Statistics pane opens.
This image illustrates the Configuration Reports area of the Reporting and Statistics pane:
Tina Administration 299
Reporting and Statistics

3. In the Configuration Reports area, enter the appropriate parameters to generate your report. This tabledescribes the parameters you can set:
Parameter Description
Select aConfigurationReport
Select the type of report that you want to generate:
• Configuration Summary (tina_config). Extracts the information concerning theserver configuration and backup schedule from the catalog. For more informationon this report, see the tina_config command in the Tina Command LineInterface Documentation.
• Backup Report (tina_report):Extracts the information concerning the databacked up from the catalog. The report is invoice-oriented, enabling users to bebilled depending on the volume processed. For more information on this report,see the tina_report command in the Tina Command Line InterfaceDocumentation.
Enter a reporttitle
Enter the name of your report.
Launchbutton
Displays the report contents.
Backup Report option only. Opens the Backup Report Execution Parameterswindow.
BackupReportExecutionParameters
Choose the Backup report execution option (simple or detailed report) and the timeperiod covered by the Backup report:
• Detailed Report for the Last Past Month. The time period covered is onecalendar month prior to themoment the report is launched. For instance, if thereport is run on June, 10, the time period is fromMay, 1 at 0:00 toMay, 31at 23:59.
• Detailed Report for the Last Seven Days. The time period covered is sevencalendar days prior to themoment the report is launched. For instance, if the reportis run onMonday, 10, the time period is fromMonday, 3 at 0:00 to Sunday, 9at 23:59.
• Detailed Report on a Specific Period. Enables you to specify start/end datesfor the report.
• Simple Report for the Last Past Month. The time period covered is onecalendar month prior to themoment the report is launched. For instance, if thereport is run on June, 10, the time period is fromMay, 1 at 0:00 toMay, 31at 23:59.
For more information on the contents of the simple and detailed reports, see the tina_report command in the Tina Command Line Interface Documentation.
4. Click Launch. The contents of the report displays in a tab with the report title you entered.
You can also export a generated report in either PDF or Text formats.
To export a report
1. In the tab of the generated report, click Export Report. The Export Report window opens.2. Configure the appropriate export parameters.
300 Tina Administration
Reporting and Statistics

This table describes the parameters you can set in the Export Report window:
Parameter Description
Export Exports the entire text or only the selected lines.
Format Choose the format of the export file (i.e., PDF or text).
3. Click Apply and Close to export the report.The File Download window opens.
4. Click Save and choose a location.
Tina Administration 301
Reporting and Statistics

CHAPTER18-Backup to Disk with VirtualLibrary SystemThese topics explain backup to disk with Virtual Library System Application:• About the Virtual Library System• Configuring a Virtual Library System• Editing a Virtual Library System• Managing the Virtual Library System
About the Virtual Library SystemIn addition to backup to tape, Atempo also offers a disk-based backup functionality, Virtual Library System, thatuses external disks rather than cartridges as the backup target. It enables for faster backup and restore.
Virtual Library System emulates traditional tape library behavior by providing an interface that lets you configureandmanage virtual drives and cartridges.
Atempo also provides a solution to export data from disk to tape: the Virtual Library System Application enablestomigrate data backed up on disk to a tape library.
Note: The Virtual Library System Application interfaces with various types of backup to disk solutions,including Virtual Library System.
Configuring a Virtual Library SystemA Virtual Library System is represented by a virtual library to which one or several virtual Disk Drives areassociated. The library contains some virtual slots and a virtual mailbox.
The Virtual Library System configuration consists of:• Creating a library associated with a host.• Specifying the number of Disk Drives that you want to use.• Specifying the directory where the data is backed up.• Specifying the number and size of cartridge files.
Virtual Library System Configuration FilesThe Virtual Library System configuration is stored in configuration files located in the Vtl directory of the Tinainstallation directory.
A backup of this directory is automatically triggered each time the Tina catalog is backed up. If the configurationfiles disappear, Tina automatically restores the backed up version of the Vtl directory. Once the restoreperformed, it is recommended that you run a barcode reinitialization of the virtual library through the Storage Libraries menu, and click Launch a barcode reinitialization on library.
If the Vtl directory is corrupted but that it still exists, youmust delete it, so that it can be automatically restored.
Note: Only one backup version of the Vtl directory is kept. Only the last version backed up can thus berestored.
302 Tina Administration
Backup to Disk with Virtual Library System

Creating a VLSCreate a VLS using the VTL Library CreationWizard.
Create a VLS
1. In theWeb Administration, expand your catalog in the Tina explorer.2. Select Storage Libraries.
The Libraries panel opens.3. Click Create New Library New Software Controlled Library.
The VTL Library CreationWizard opens, and displays the servers and storage nodes present in thecatalog.
4. Enter the parameters to create a new VLS.This table describes the parameters of the VTL Library CreationWizard:
Parameter Description
Local HostSelection
Select a host.
GeneralVTLLibraryInformation
Library Name. Name of the library.
Library Type. Select Atempo VLS.
Comment. If needed, enter a comment.
VLSLibraryProperties
Number of Drives. Number of Virtual Disk Drives that you want to use. The defaultvalue is 2.
Cartridge Directory. Directory where the virtual cartridges will be created. By default,the cartridge directory is the %TINA_HOME% directory forWindows and the $TINA_HOMEdirectory for Unix andmacOS.
Click Browse to select another directory on your disk.
Do not store your cartridges in one of the %TINA_HOME% or $TINA_HOME sub-directoriescreated by Tina during the installation. Such directories as 3rd Party, Adm, Bin, Conf,Drv, etc. may be overwritten during a Tina upgrade.
OnWindows platforms, if the cartridge directory is located on a network drive, enter thepath with the UNC format: \\server_name\share_name\directory_nameCartridge Size (MB). Size of a virtual cartridge. The sizemust be between 256MB and200GB. The default value is 10,000MB.
Number of Cartridges. Number of spare cartridges available in the library. This numbermust be between 4 and 6000. For better performances, do not usemore than 1000cartridges in a VLS that has a long name. Increase the cartridge size to avoid a too highnumber of cartridges.
The default value is 300 cartridges.
5. Click Finish to validate the library creation.The new library displays in the library list.
Tina Administration 303
Backup to Disk with Virtual Library System

Editing a Virtual Library SystemOnce a virtual library has been created, you have the option tomodify its parameters and to set advancedparameters.
To edit a VLS
1. In theWeb Administration, expand your catalog in the Tina Explorer.2. Select Storage Libraries. The Libraries pane opens.3. Select the VLS to edit and click Library Details.
The Library Details pane opens with two tabs: Properties and Activity. The Properties tab enables you toperform the changes to the drive while the Activity tab provides the list of alarms associated with theVLS.This table describes the parameters you canmodify in the Properties tab of the Drives Details pane:
Parameter Description
General Area.
Name Only for information.
Type Only for information.
Hosted by Only for information. Name of the host the VLS is attached to.
Comment Optional. Enter a comment to describe the VLS.
Drives Area. Name and type of the drives associated to the VLS.
VTL Properties Area.
Mandatory properties Number of Drives. Number of Virtual Disk Drives.
Cartridge Directory. Directory where the virtual cartridges are stored.
Cartridge Size (MB). Size of one virtual cartridge.
Only new cartridges will take the new size. The size of existingcartridges remains the same.Number of Cartridges. Number of spare cartridges available in thelibrary.
Optional and User Defined VTLProperties
Click Plus (+) to add environment variables. See VLS EnvironmentVariables.
Library Properties. Properties that are relevant for virtual libraries. For details, seeAdvanced Library Properties.
4. Click Apply and Close to validate the edition of the library.
304 Tina Administration
Backup to Disk with Virtual Library System

VLS Environment VariablesThis table lists the available environment variables that you can set for a VLS
Advanced Tab Description
Mailbox Directory Directory in which the cartridges will be put online or offline.
Number ofmailboxes
Number of slots contained in themailbox.
Disk SpaceAllocation
Specifies whether the space allocated to the cartridges is reserved on the disk when thelabel reinitialization is performed.
• The None value does not reserve the cartridge space but allocates space ascartridges are filled.
• The Cartridges in slots value reserves the cartridge space. This option writes blocksof 100 MB.
• The DFMmethod applies toWindows platforms only. Its goal is to have files with aminimum number of fragments and to avoid the time cost of the Cartridges in slotsmethod. The advantage of having non-fragmented files is to have the highestcontinuous reading output. The DFMmethod therefore applies to datamigrationsbetween Tina and Tina Disk File Management.The results depend on the hardware configuration. The optimum result will beobserved on a single reading flow and provided that the filesystem is dedicated,unused or correctly defragmented when created.A secondary effect of this method is that it avoids fragmentation and thereforeimproves general performances.
If the backed up data is to be write protected, use the None option.
If you choose the Cartridges in Slots option, ensure that you perform a LabelReinitialization of the library. As space allocationmay take a long time, Atemporecommends that this operation be performed at a time whenWeb Administration is notbeing used.
Vtl User Name(Unix andmacOS)
Name of the user required to access the cartridge directory if it is located on an NFSmount.
Vtl UserPassword (Unixand macOS)
Password of the user required to access the cartridge directory if it is located on an NFSmount.
Additional MediaDirectories
(CART_DIR_EXTRA0)
Absolute path of an additional directory in which cartridge files are stored.
ForWindows platforms, if the cartridge directory is located on a network drive, enter thepath with the UNC format: \\server_name\share_name\directory_name
This feature is not compatible with the SAN feature and with Tina Disk FileManagement.
SAN Name Name of the network to which you want to associate the Virtual Library System.
This feature is not compatible with the additional cartridge feature.
Tina Administration 305
Backup to Disk with Virtual Library System

Advanced Tab Description
Network UserName
Name of the user required to access the cartridge directory. This informationmay berequired for instance if the cartridge directory is located on a network drive on aWindows platforms. The user must have access rights to the network drive.
ForWindows platforms, the user name format must be: domain_name\user_name.
The user allowed to access the cartridge directory must also have access to the Vtldirectory located in the Tina installation directory.
Network UserPassword
Password of the user required to access the cartridge directory.
Cartridge File LocationThe Virtual Library System cartridges are located in this directory:
Windows. CART_DIR\DiskDrives\catalog_name\device_descriptor
OS X. - Unix. CART_DIR/DiskDrives/catalog_name/device_descriptor
Where:• CART_DIR is the cartridge directory you specified when you created the library.• catalog_name is the name of the catalog where the Virtual Library System has been created.• device_descriptor is the device descriptor of the Virtual Library System.
Disk Space Allocation
If you specified at library creation that you wanted to allocate the cartridge space on disk, perform a LabelReinitialization of the library. This operation actually allocates space.
Note: As space allocationmay take a long time, Atempo recommends that this operation be performed ata time whenWeb Administration is not being used.
If you want to stop space allocation in progress, edit the library and set the Disk Space Allocation variable toNONE.
SAN ConfigurationYou can configure a Virtual Library System on a SAN architecture (Storage Area Network), except if you areperforming backups using the NDMP protocol. In this case, the use of a VLS is not supported.
Note: The SAN features cannot be used if you have defined additional cartridge directories. See VLSEnvironment Variables.
To create a Virtual Library System on a SAN
1. InWeb Administration, expand your catalog in the Tina explorer.2. Select Storage Drives. The Drives pane opens.3. Click Drive SAN List Edition to define a SAN. The Drive Network List window opens.4. Click Plus (+), and enter the name of the SAN in the text field.5. Click OK.6. Select Storage Libraries. The Libraries pane opens.7. Select your VLS, and click Library Details.8. From the Properties tab, expand the VTL Properties area.
306 Tina Administration
Backup to Disk with Virtual Library System

9. In Optional and User Defined VTL Properties, add these variables:• SAN Name• Network User Name• Network User Password
10. Click Apply and Close.The drives are now displayed under the SAN in the Drive List by SAN view.
Managing the Virtual Library SystemAs the Virtual Library System emulates a standard library, the virtual drives and cartridges can bemanagedthrough Library Manager.
DescriptionLibrary Manager is accessed through the Devices Library Operations Management menu of theAdministration Console. It provides information about the VTLDisk Drives, themailbox slots and thecartridges:• The Drive area contains all the VTLDisk Drives and indicates if they are full or empty.• TheMailbox area contains all the virtual mailbox slots.• The Slots area represents all the slots containing the cartridges present in the Virtual Library System.
See the Tina Administration Documentation for Classic Interfaces.
Virtual Library System OperationsAll the cartridge operations that can be performed with standard cartridges are also available for virtualcartridges. This section only describes operations that are specific to a Virtual Library System:• Adding Spare Cartridges in the virtual library.• Bringing Cartridges Offline• Bringing Cartridges Online• Deleting the Virtual Library System
Adding Spare CartridgesIf the number of cartridges defined at library creation is not sufficient, youmay need to add spare cartridges tothe library.
To add spare cartridges in the Virtual Library System
1. Select the library from the library list.2. Click Library Details. The Library Details pane opens.3. From the Properties tab, expand the VTL Properties area and increase the number of cartridges as
needed.4. Click Apply and Close. The library is automatically reinitialized in order to take the new cartridges into
account.
Bringing Cartridges OfflineIf you need to remove some virtual cartridges from the library to store them in another location, youmust informthe catalog that the cartridge is offline.
Tina Administration 307
Backup to Disk with Virtual Library System

To perform these operations, amailbox directory is needed that youmust define through theMailbox Directoryvariable. Youmust also specify the number of slots that you want themailbox to contain through the Number ofMailboxes variable.
For more information on VLS Parameters, see VLS Environment Variables.
To bring a cartridge offline
1. Select Backup Destinations Media Pools.TheMedia Pools pane opens.2. From the Cartridges list, select the cartridge to put offline, and click Check Cartridges Offline Status.3. Select the cartridge, and click OK. The cartridge is put offline.
Note: If you have selectedmore cartridges than there aremailboxes in the library, check the Retry ifmailbox full box.
4. Run this command to empty themailbox:tina_vls -l device_descriptor -jwhere device_descriptor corresponds to the library device descriptor.
5. Perform a barcode reinitialization to inform the catalog that themailbox slot is empty. See Reinitializing aLibrary.
Bringing Cartridges OnlineA cartridge that was removed from the virtual library may be brought online again.
To perform these operations, amailbox directory is needed that youmust define through theMailbox Directoryvariable. Youmust also specify the number of slots that you want themailbox to contain through the Number ofMailboxes variable.
For more information on VLS Parameters, see VLS Environment Variables.
To bring a cartridge online
1. Run this command to add a cartridge in themailbox:tina_vls -l device_descriptor -g -v barcodewhere device_descriptor corresponds to the library device descriptor, and barcode corresponds to thebarcode of the cartridge to bring online.
2. Perform a barcode reinitialization to inform the catalog that themailbox slot is empty. See Reinitializing aLibrary.Themailbox slot now contains the cartridge.
From Library Manager, select themailbox slot(s) containing cartridges to be brought online and select Media On-Line. See the Tina Administration Documentation for Classic Interfaces.
Deleting the Virtual Library SystemWhen you delete a VLS in the Tina interface, the cartridges are not deleted as they may contain user data.
To delete cartridges manually, youmust erase them first in the catalog (see Erasing a Cartridge) and removethe cartridge files on your file system.
308 Tina Administration
Backup to Disk with Virtual Library System

CHAPTER19-Exporting Backed up Data toAnother Pool Automatically (VLSA)These topics explain how to export backed up data to another pool automatically:• About Virtual Library System Application• Prerequisites• Configuring the Virtual Library System Application• Managing Associations• Testing the Source Library• Monitoring
About Virtual Library System ApplicationIn order to export automatically backed up data from one pool to another, Atempo designed a specificapplication: Virtual Library System Application.
While Virtual Library System Application is particularly suited to export data backed up with the Virtual LibrarySystem (see Backup to Disk with Virtual Library System), it can also interface with all the other backupsolutions: disk to disk, disk to tape, tape to tape, etc.
Tina Administration 309
Exporting Backed up Data to Another Pool Automatically (VLSA)

PrinciplesVirtual Library System Application associates a Virtual Library System or any other library type to another libraryin order to export data automatically.
Exporting data consists of these operations:• Data in the source library is first duplicated on cartridges in a target library for long term storage on a per
cartridge or per job basis, depending on the duplicationmode chosen. You can either duplicate full andincremental backups or only full backups.Duplication takes place everyday at a given time.
• Then, data is removed from the source library. The data that has been duplicated on the target library isthen removed from the source library until a specified threshold is reached. Data removal occurs when agiven filling rate is reached for the source library, starting with the cartridges that are recyclable.
Note: If you are duplicating data from anHyperStream Server, data is not removed from the source.
You can also perform an emergency data removal whenever there is a critical need for free space on the sourcelibrary.
Duplication ModeThe Virtual Library System Application (VLSA) offers these duplicationmodes:• Cartridge duplication• All jobs duplication• Full backup job duplication
310 Tina Administration
Exporting Backed up Data to Another Pool Automatically (VLSA)

Choosing the duplicationmodeIn order to choose a duplicationmode, bear in mind these elements:• If you are duplicating a lot of small jobs, Atempo recommends using Cartridge duplication to avoid
unnecessary tapemounting and unmounting which would occur with job duplication.• If you are duplicating big size objects, that may be spread over several cartridges (for instance database
backups), Atempo recommends using Job duplication. Job duplication in this case will avoid duplicatingseveral times the same data which would occur with Cartridge duplication. Cartridge duplication impliesthat all cartridges containing part of a job are duplicated when you duplicate any cartridge where the job ispresent.For instance, if you duplicate Job A that was backed up on cartridge 001 and cartridge 002, a cartridgeduplication would call for the duplication of cartridge 001 and 002. But when you duplicate cartridge 001,Tina detects that the job continues on cartridge 002 and duplicates it as part of cartridge 001 duplication.Then the duplication of cartridge 002 would also include duplicating cartridge 001. Thus you would end upduplicating each cartridge twice.
• If you are duplicating small jobs and you want to duplicate only full backup jobs, Atempo recommendsthat you use separate pools for full and incremental backups; then duplicate only the full backup pool inCartridge duplicationmode.
• In Cartridge duplicationmode, only full and closed cartridges are duplicated, but with Job duplicationbacked up data can be duplicated daily without waiting for cartridges to be full or closed.
PrerequisitesPrerequisites Description
Architecture The Virtual Library System Applicationmust be run on a Tina Server or Storage Node on themachine where the source library is located.
DeviceConfiguration
The source and target library and the drives to which data is going to be exportedmust havebeen declared in theWeb Administration:
• Create the Virtual Library System as described in Creating a VLS.• Create the library as described in To createmanually a library.• Create the drives as described in To create a drive.
User AccessRights
Windows. The system administrator of themachine onto which the Virtual Library SystemApplication is installedmust be declared as a Tina user. Hemust be granted at least thecartridge and drive permissions. It is recommended to grant the same permissions as theTina catalog administrator.
macOS. The user with administration rights on themachine onto which the Virtual LibrarySystem Application is installedmust be declared as a Tina user. Hemust be granted atleast the cartridge and drive permissions. It is recommended to grant the same permissionsas the Tina catalog administrator.
Unix. The tina_vlsa binary must be run with the root user, whomust be declared as a Tinauser. Hemust be granted at least the cartridge and drive permissions. It is recommended togrant the same permissions as the Tina catalog administrator.
For more information on declaring users in Tina, see Configuring Users and Access Rights.
Tina Administration 311
Exporting Backed up Data to Another Pool Automatically (VLSA)

Prerequisites Description
ConfigurationFile Backup
The Virtual Library System Application configuration is stored in files that are located in thedirectory:
Windows. %TINA_HOME%\Conf\Vlsa\catalog_name\virtual_library_name
macOS. $TINA_HOME/Conf/Vlsa/catalog_name/virtual_library_name
Unix. $TINA_HOME/Conf/Vlsa/catalog_name/virtual_library_name
This directory is backed up along with the Tina catalog. Ensure that your catalog is backedup on a regular basis. See Backing Up the Catalog.
ConfigurationFile Restore
After each restore of the Tina catalog, youmust resynchronize the Virtual Library SystemApplication with the catalog to avoid backup incoherences. See Resynchronizing the VirtualLibrary System Application.
RestoreConfiguration
The "Use Source Cartridge when Restoring Duplicated Cartridge" tunable (keep_primary_on_duplication) must be set to yes on the Tina Server. It must be set prior to using theVirtual Library System Application.
The tunable enables you to restore from the original cartridge of the source library rather thanfrom the cartridge on the target library. This is particularly useful when the data is present onboth the source and target libraries.
See Tunables and the Tina Tunables Documentation.
Configuring the Virtual Library System ApplicationConfiguring the Virtual Library System Application consists of these operations:
Opening the Virtual Library System ApplicationWindows. Select Start All Programs Tina Utilities Virtual Library System Application.
macOS. Open the Virtual Library System Application.app in your Tina installation folder and provide yourpassword.
312 Tina Administration
Exporting Backed up Data to Another Pool Automatically (VLSA)

Unix. Run the tina_vlsa binary located in the $TINA_HOME/Bin directory.
Installing the Schedule Service
Note: This procedure is only forWindows operating systems.
Youmust imperatively install theWindows Schedule Service, so that data duplication and removal can belaunched at the specified time.
To install the Schedule Service
1. In the Virtual Library System Applicationmain window, select Schedule Service Install.2. Click OK.
The Schedule Service (tina_vls_sched_tina4 for instance) is now installed. Ensure that it is started.
Upgrading the Schedule serviceIf you perform a Tina upgrade, youmust uninstall and reinstall the schedule service to update it.
To update the Schedule Service
1. In the Virtual Library System Applicationmain window, select Schedule Service Uninstall.2. Select Schedule Service Install.
Setting Data Duplication OptionsYoumust specify the conditions for data duplication and removal. Removal options are only for libraries, data isnot removed when you duplicate an HyperStream Server.
Note: The cartridge duplication from Virtual Library System Application to HyperStream Server is notsupported.
Tina Administration 313
Exporting Backed up Data to Another Pool Automatically (VLSA)

To set Duplication and Removal Options for a library
1. In the Virtual Library System Applicationmain window, select Library/HyperStream Edit Library or VLSDuplication. The Duplication/Removal Parameters windows displays.
2. Configure the parameters.
Parameters Description
Library Catalog Name. Name of the Tina catalog where the libraries are declared.
You will be asked to enter the Catalog Administrator Name and the Passwordto retrieve information from the catalog.Library Name. Name of the source library backing up data.
Temporarily DisableDuplications
Lets you disable duplications of the current library. If a duplication is inprogress when you select this option, the current duplication will becompleted, but new ones will not start.
Library Size Cartridge Size (MB). Size of the cartridges in the source library.
Number of Cartridges. Number of cartridges present in the source library.
Duplication/RemovalSchedule
Checking the Duplication/Removal Schedule box enables the automaticscheduling for duplication and removal operations.
Start Time. Timewhen the data duplication and removal will start every day.Use the hh:mm format.
DuplicationParameters
Time Limit. Checking this box enables you to define a deadline after whichno duplication operation will be launched. This option is useful to preventduplications to overlap with any other scheduled operations, such asbackups.
Do not Start Duplications after. Time after which you do not wantduplications to be started. Use the hh:mm format.
Example: If the backups take place during the night, you can program theduplication jobs to start at 10:00 and you can set the time limit to 19:00. If theduplication jobs for some of the cartridges has not started at 19:00, they areblocked until the following day, and the duplicated data is deleted from thesource library at once. Thus, duplication and deletion operations do notinterfere with backup operations.
If the time limit is before the start time (for instance, 7:00 and 22:00),duplication jobs will start at the specified time and go on until the time limit onthe following day.Parallelization Index. Number of associations that you want to duplicatesimultaneously. This index must not be greater than the number of drivesavailable in the target library otherwise the duplications are put on a waitingqueue. In addition, it is recommended to have a drive dedicated to otheroperations such as backing up, restoring, or archiving data.
314 Tina Administration
Exporting Backed up Data to Another Pool Automatically (VLSA)

Parameters Description
Removal Parameters Start Threshold.Maximum percentage of filling that you want your sourcelibrary to contain.For example, if you set the threshold to 90%, information will be removedwhen the source library is more than 90% full, starting with the cartridge thatare recyclable.
Stop Threshold. Percentage of when data removal will stop.For example, if you set the threshold to 80%, data will be removed until thesource library is 80% full.
If necessary, data that is still in the retention period will be removed.However, data that has not been duplicated will not be removed.
3. Click OK.
Managing AssociationsManaging associations consists of:• Defining at least one association. An association is made of a cartridge pool for the source library or
HyperStream Server (source pool) which is associated with one or two cartridge pools on the targetlibrary (target pools). It defines the global retention period policy and the type of backup and duplication.Some parameters can also be set to automatically close cartridges according to specific criteria, so thatthey can be duplicated.
Note: The source and target pools are selected from a list of existing pools in the catalog.
• Editing associations tomodify the associated pools and the closing parameters.• Deleting associations.• Defining the association priority.
To define associations
1. In the Virtual Library System Applicationmain window, select Association Create.2. Configure the parameters to create the association.
Parameters Description
Catalog Name Name of the Tina catalog where the libraries or HyperStream Server are declared.
Youmay be asked to enter the Catalog Administrator Name and the Password to retrieveinformation from the catalog.
Source PoolName
Name of the source pool to duplicate. Select the pool from the list of existing pools. Thesefields are automatically filled when you select a pool:
Label. Label of the cartridges of the source pool.
Retention. Number of days the data on the source pool will be retained before reusing thecartridge.
Drives. Name of the drives associated with the source pool.
Tina Administration 315
Exporting Backed up Data to Another Pool Automatically (VLSA)

Parameters Description
DuplicationType
Choose the duplicationmethod to use. See Choosing the duplicationmode.
Target Pool Information concerning the pool where you want data to be duplicated. The target pool canbe for a virtual library or for a tape library.
Pool. Select the target pool from the list of existing pools in the catalog. These fields areautomatically filled when you select a pool:
• Label. Label of the cartridges of the target pool.• Retention. Number of days the data on the target pool will be retained before reusing
the cartridge.
SecondaryCartridge Pool
Enables you to specify a second pool, so that data from the source library is duplicated totwo different pools. This may be useful if you want to externalize one of the copies andkeep the second one in the target library.
Pool. Select the secondary target pool from the list of existing pools in the catalog. Thesefields are automatically filled when you select a pool:
• Label. Label of the cartridges of the secondary target pool.• Retention. Number of days the data on the secondary target pool will be retained
before reusing the cartridge.
Days onwhich theduplicationsmust beperformed
Check the days when you want duplications to take place.
AutomaticCartridgeClosing
Check this box if you want to define automatic closing criteria and enter these parametersto specify what category of cartridges should be automatically closed in order to beduplicated.
Filling Rate.Maximum percentage of filling that you want your cartridge to reach beforebeing automatically closed. If you set this option to 80%, the cartridge will be closed assoon as it is 80% full.
First Backup. Time Period following the first backup and after which the cartridge will beautomatically closed. If you set this option to 5 days, the cartridge will be closed 5 daysafter the first backup. This option ensures that no data is kept for too long in the sourcelibrary without being duplicated.
3. Click OK.
To edit an association
1. In the Virtual Library System Applicationmain window, select Association Edit. The Edit Associationwindow opens.
2. In the Catalog Name and Source Pool Name lists, specify the catalog and select the source pool to edit.3. Modify the parameters as needed.4. Click OK.
316 Tina Administration
Exporting Backed up Data to Another Pool Automatically (VLSA)

To delete an association
1. In the Virtual Library System Applicationmain window, select Association Delete. The DeleteAssociation window opens.
2. In the Catalog Name and Source Pool Name lists, specify the catalog and select the source pool todelete.
3. Click Delete.
To define the association priority
If there are not enough drives in the library to perform parallel duplications of all your associations, you can sortthe associations in order of priority. For instance, the association containing themost critical data can be giventop priority and be duplicated first.1. In the Virtual Library System Applicationmain window, select Association Priority.2. Select an association in the list and use the Up and Down button to define the priority level for each
association.3. Repeat this operation as needed.4. Click OK.
Testing the Source LibraryAfter the libraries or HyperStream Server, and the associations have been configured, youmust perform a testthat will validate the consistency between the source pool and Tina.
To perform a test of the Source Library
In the Virtual Library System Applicationmain window, select Library/HyperStream Diagnosis.The VLSA Diagnosis window displays a line for each component that was tested. Inconsistencies aredisplayed in bold red type, explaining what the problem or inconsistency is.
MonitoringMonitoring libraries consists of these operations:• Displaying information about the source library and the associations• Exporting themonitoring report• Duplicating and removing datamanually• Performing emergency data removal
Note: In both cases of data removal, normal and emergency, data continues to be removed until thethreshold is reached. Data that is still in the retention periodmay be removed. However, data that has notbeen duplicated will never be removed. This is the only case where the thresholdmay not be reached.
Tina Administration 317
Exporting Backed up Data to Another Pool Automatically (VLSA)

Viewing the Source Library InformationOnce you have configured libraries or HyperStream Server, and the associations, the Virtual Library SystemApplicationmain window displays information concerning the source libraries.
Parameters Description
Catalog Select the catalog where the libraries are declared.
Youmay be asked to enter the Catalog Administrator Name and thePassword to retrieve information from the catalog.
SourceLibrary/HyperStreamServer
Select the source library or HyperStream Server that you want to monitor.
Information availableThese are the background colors for each association:
• Green: All the cartridges are duplicated (there is no partly filled cartridge)• Yellow: Some cartridges have not been duplicated even though they were duplicable• Orange: No cartridge has been duplicated
Associations Displays the source library/HyperStream Server or source pool name.
Full Cartridges Number of full cartridges.
Part. Filled Cart Number of partly filled cartridges.
Duplicated Cartridges Number of duplicated cartridges.
Duplication Progress Percentage of the duplicable cartridges that have already been duplicated.
Duplication Running Number of duplication jobs that are running.
Last Duplication Date and time of the last duplication job.
318 Tina Administration
Exporting Backed up Data to Another Pool Automatically (VLSA)

Parameters Description
Duplicable Cartridges Number of cartridges that are eligible for duplication (Full and Closedcartridges).
Empty Cart Number of empty cartridges.
Allocated Cartridges Total number of cartridges belonging to the pool.
Compact Columns Displays columns with abbreviated titles. This enables you to seemoreinformation at once.
Refresh Updates the information displayed in the report.
Exporting the Monitoring ReportThemonitoring report can be exported to a file on your disk.
To export the monitoring report
1. In the Virtual Library System Application window, click Export Report. The Export Monitoring Reportwindow opens.
2. Modify the export file path if needed.3. Click OK.
Duplicating and Removing Data ManuallyYou can duplicate and remove cartridges manually at any time, even if you have scheduled automaticduplication jobs.
Note: Removal concerns libraries only, not HyperStream Server.
To duplicate and remove data
1. In the Virtual Library System Application, select the catalog where the libraries/HyperStream Server aredeclared.
Note: Youmay be asked to enter the Catalog Administrator Name and the Password to retrieveinformation from the catalog.
2. In the Source Library/HyperStream Server list, select the source library that you want to monitor.3. Click Duplicate and Remove Data Now.
This operation first duplicates data that has not yet been duplicated. Then it removes the oldestduplicated data, according to the retention period until the threshold retention period is reached.The threshold level used is the one that was set in the Configuration window in .
Emergency Data RemovalNote: An emergency data removal should only be performed in emergency cases when there is a criticalneed for free space on the source library. It applies to libraries only, not HyperStream Server. If you findyourself performing emergency data removal on a regular basis, you should reevaluate your strategy.Performing this procedure overrides the settings made in .
Tina Administration 319
Exporting Backed up Data to Another Pool Automatically (VLSA)

To perform an emergency data removal
1. In the Virtual Library System Applicationmain window, select the catalog where the libraries are declaredin the Catalog list.
Note: Youmay be asked to enter the Catalog Administrator Name and the Password to retrieveinformation from the catalog.
2. In the Source Library list, select the source library that you want to monitor.3. In the Stop Threshold field, enter the percentage of when data removal will stop. For example, if you set
the threshold to 80%, data will be removed until the source library is 80% full.4. Click Emergency Duplication and Removal.
Data is removed from the source library until the specified threshold is reached.If the threshold is not reached by removing data that is older than the retention period, then it will continueduplicating and removing data that is within the retention period until the threshold is reached.
Maximum number of duplicationsIf you duplicate amedia or a job, you will create a second occurrence of every file version/instance impacted bythe duplication. By design, the catalog structure limits to 4 the amount of different occurrences of the sameversion/instance of the file. When themaximum number is reached, a warningmessage similar to this one issent to the event log file:
Unable to duplicate "/myfolder1/myfolder2/myfile.txt" object (nmax=4)
If your duplication reports this warning, please refer to the procedure described in the README text file locatedunder TINA_HOME\Tools\Tina\VlsaRepair to fix the issue.
320 Tina Administration
Exporting Backed up Data to Another Pool Automatically (VLSA)

CHAPTER20-Configuring Advanced SettingsThese topics describe how to configure advanced settings:• License• Catalog Settings• Tunables• Event Notifications• Alarm Filters• Domain Filtering• HTTP Configuration
LicenseNote: Modifying the license concerns Tina servers only, not agents.
The License tab of the Catalog Information View shows you whether you are currently using an evaluationlicense or a license file registered on a license server.
If you are using an evaluation license, you can switch to using a license server. If you are already using alicense server, you cannot switch to using an evaluation license.
Note: Before switching to a license server, ensure that you have retrieved and added your new license fileto the Atempo-LicenseManager configuration tool.
To switch to using an Atempo-License Manager
1. From theWeb Administration Explorer, click your catalog to open the Catalog Information View.2. Click the License tab.3. From the LicenseManager Settings field, click Modify. The License Settings window opens.4. Select the Use License Server option and enter the License server name. This is the name of themachine
where the Atempo-LicenseManager is installed.
Note: Please note that once you have chosen a license server, you cannot switch back to anevaluation license.
5. Click Apply and Close to validate your choice.6. Restart the Tina service to take your modifications into account.
To display additional information on your license
1. From theWeb Administration Explorer, click your catalog to open the Catalog Information View.2. Click the License tab to display information on your license:
• The type of license (Evaluation for an evaluation license or Standard for a license server)• The expiration date of the license• If you use a License Server:
– The name of the license server– The resources you are authorized to access, (e.g., HSS, VMWare, etc.).– The applications you are authorized to access, (e.g., Oracle, DB2, etc.).– Themodules (API, LSM, and Security and Compliance) that are activated and that the
catalog uses.
Tina Administration 321
Configuring Advanced Settings

To use a new or add-on license file
> If youmust update the license file contents with an add-on or use a new license file, use the Atempo-LicenseManager configuration tool.
Catalog SettingsThe Catalog Settings node enables you to define parameters, configure the scheduler and some backup andrestore operations.
SchedulerFor details on the Scheduler configuration, see Configuring the Scheduler.
Backup and RestoreFor details on restore parameter configuration, see Parallel Restore.
For details on the on demand backup configuration, see Configuring OnDemand Backup.
TunablesThese topics give information on tunables and describe the several procedures:• About Tunables• Viewing Tunables• Configuring a New Tunable View• Setting Tunables• Enabling/Disabling Tunables• Displaying Tunable Details• Editing Tunables• Deleting Tunables• Exporting Tunables• Editing Tunables for a New Host• Copying a Tunable to a Host
About TunablesTunables are special parameters that modify Tina behavior. They may be used to tune the application to fitspecific needs.
TheWeb Administration enables you to:• Set a tunable (define its value, the catalogs and binaries to which the tunable applies).• Enable or disable a tunable• Display the tunable details• Edit a tunable• Delete a tunable• Export a tunable• Edit a tunable for a new host• Copy a tunable to a host
For details, see the Tina Tunables Documentation.
322 Tina Administration
Configuring Advanced Settings

There are three categories of tunables:• Category I: Basic tunables that can be used without help from Customer Services.• Category II: Advanced tunables that must be used with help from Customer Services. Use them
cautiously as an inconsiderate usemay damage your configuration and prevent Tina from efficientlyprotecting your data.
• Category III: Internal tunables that can only be used by Customer Services or Research andDevelopment Department.
Note: Tina tunables are dynamic. No restarting of the Tina service is required. However, if youmodify atunable impacting a graphical application, the applicationmust be closed an opened again for the newtunable to be taken into account. See the Tina Tunables Documentation.
Viewing Tunables1. In theWeb Administration, expand your catalog in the Tina Explorer.2. Expand the Configuration node and click Tunables.
The Tunables pane opens.
Configuring a New Tunable ViewThe Tunable view contains one default tab displaying the list of the tunables set on the Tina server. You can addnew tabs to set tunables on other hosts.
To create a new tunable view
1. Click the + tab. The Host Selection window opens.2. Select or enter a hostname for the new tab view. This new tab enables you to set tunables on the
specified host.3. Click Apply and Close to validate the creation of a new tunable view.
Note: You can also use Edit Tunables for a New Host to set tunables for other hosts.
Setting TunablesWhen you set tunables through theWeb Administration, settings are recorded in this file:• Windows. %TINA_HOME%\Conf\parameters.xml• macOS. - Unix. $TINA_HOME/Conf/parameters.xml
You can create a new tunable with the same name and value of an existing tunable provided that:• The tunable can have several values at the same time.• If the tunable can only have a single value, the catalogs and/or the binaries to which the tunable applies
must be different.
Tina Administration 323
Configuring Advanced Settings

To set a tunable
1. In theWeb Administration, expand your catalog in the Tina Explorer.2. Expand the Configuration node and click Tunables. The Tunables pane opens.3. Click New Tunable. The Tunable CreationWizard opens.4. Enter the tunable creation parameters. This table describes the parameters available at each successive
step of the Tunable CreationWizard:
Parameter Description
Tunable Name
Select thetunablefrom a list
Click this radio button to select a tunable from the list of all the tunable available
Enter atunablename
Click this radio button if you know the name of the tunable to set.
Tunable (selection)
Basic,Standard,Advanced,and InternalTunables
Check one or several of the three options at the top of the list to display the basic, standard,advanced, and/or internal tunables.
The advanced tunables must be used with help from Customer Services. Internal tunablesmust only be used by the AtempoClient Support and Research & DevelopmentDepartments.
AvailableTunables
This column displays the tunables based on the above selection. Single-clicking a tunablewill display these details in a yellow pop-up window: where youmust set it (i.e., agent and/orserver), which binary file(s) it applies to (e.g., tina_daemon), and a full description. Double-clicking will take you to the next step of the wizard (Tunable Value).
GroupName
This column indicates which group the tunable belongs to: Agent, Authentication, Cache,Catalog, Command Line, Debug, Filesystem, Graphical Interface, Hardware Config,Indexing, Internal, Job Config, Logs, Lsm, Ndmp, Network, Process, Replication, Scm,Service, Snapshot, Terminal Server, or Volume Billing
Category This column displays whether each tunable is basic, advanced, or internal.
Tunable Value
Value Enter the tunable value. The tunable default value, if any, is automatically selected.
Depending on the tunable value, there are several ways to enter this value: Yes/No radiobuttons, a text or numeric field, a drop-down list to select one item or an add/remove items listto select several items.
Comment Optional. Enter a comment to describe the tunable you are creating.
Catalog Selection
324 Tina Administration
Configuring Advanced Settings

Parameter Description
Apply thistunable toall catalogs
Click this radio button if you want to apply this tunable to all catalogs (*).
By default, if you do not select any catalog, the tunable applies to all catalogs.
Apply thistunable tothe selectedcatalogs
Click this radio button if you want to limit the use of the tunable to specific catalogs or if youwant to assign different values to this tunable for different catalogs.
Click Add Item, Remove Item, and/or ChooseObject to specify the selected catalogs in theCatalog list.
Binary Selection
Apply thistunable toall binaries
Click this radio button if you want to apply this tunable to all binaries (*).
By default, if you do not select any binary, the tunable applies to all binaries.
Apply thistunable tothe selectedbinaries
Click this radio button if you want to limit the use of the tunable to specific binaries or if youwant to assign different values to this tunable for different binaries.
Click Add Item, Remove Item, and/or ChooseObject to specify the selected binaries in theBinary list.
5. Click Finish to validate the operation. The newly created tunable displays in the Tunable list.6. Select this tunable in the list and click Enable Tunable.7. Repeat this operation for all the tunables you want to define on the platform. If you want to assign different
values to the same tunables according to the binaries or catalogs it applies to, youmust define it severaltimes, for each value.
Enabling/Disabling TunablesWhen first set, a tunable is disabled. A tunablemust be enabled to be taken into account.
To enable a tunable
1. Select the tunable to enable in the Tunable list.2. Click Enable Tunable.
You can temporarily disable a tunable.
To disable a tunable
1. Select the tunable to disable in the Tunable list.2. Click Disable Tunable.
Displaying Tunable Details1. Select a tunable in the Tunable list.
Tina Administration 325
Configuring Advanced Settings

2. Click Tunable Details. The Tunable Details window opens. It includes the Properties tab that gives yougeneral information for the selected tunable.
PropertiesTab
Description
General Area
Name Indicates the name of the tunable.
Value Indicates the value of the tunable.
Status Indicates the status of the tunable (enabled or disabled).
Comment Indicates a comment, if any.
Filters Area
Catalogs Indicates to which catalogs the tunable applies.
Click Apply this Tunable to all Catalogs if you want to apply this tunable to all catalogs (*).
By default, if you do not select any catalog, the tunable applies to all catalogs.
Click Apply this Tunable to the Selected Catalogs if you want to limit the use of the tunable tospecific catalogs or if you want to assign different values to this tunable for different catalogs.
Click Add Item, Remove Item, and/or ChooseObject to specify the selected catalogs in theCatalog list.
If you want to assign different values to the same tunable according to the catalogs it appliesto, youmust define it several times, for each value.
Binaries Indicates to which binaries the tunable applies (i.e., tina_daemon, tina_init).
Click Apply this Tunable to all Binaries if you want to apply this tunable to all binaries (*).
By default, if you do not select any binary, the tunable applies to all binaries.
Click Apply this Tunable to the Selected Binaries if you want to limit the use of the tunable tospecific binaries or if you want to assign different values to this tunable for different binaries.
Click Add Item, Remove Item, and/or ChooseObject to specify the selected binaries in theBinary list.
If you want to assign different values to the same tunable according to the binaries it appliesto, youmust define it several times, for each value.
Information
Category Indicates the category of the tunable (basic or advanced).
Advanced tunables must be used with help from Customer Services. Use them cautiously asan inconsiderate usemay damage your configuration and prevent Tina from efficientlyprotecting your data.
To be seton
Indicates where the tunablemust be set on (i.e., on the agent, the server).
Group Indicates the group of the tunable (i.e., catalog, logs, JobConfig).
326 Tina Administration
Configuring Advanced Settings

PropertiesTab
Description
Defaultvalue
Indicates the default value of the tunable.
Binaries Indicates to which binaries the tunable applies (i.e., tina_daemon, tina_init).
Description Gives a definition of the tunable.
Editing TunablesEditing a tunable enables you tomodify these parameters:• The tunable value• The tunable status• The catalogs to which the tunable applies• The binaries to which the tunable applies
To edit a tunable
1. Select the tunable to edit in the Tunable list.2. Click Tunable Details. The Tunable Details window opens.3. Modify the tunable settings. See Displaying Tunable Details.4. Click Apply and Close to validate the operation.
Deleting TunablesTo delete a tunable
1. Select the tunable to delete in the Tunable list.2. Click Delete Tunable.3. Confirm your choice. The tunable is removed from the Tunable list.
Exporting TunablesThe Tunable Export feature enables you to export the tunable information of your choice to a file.
To export a tunable
1. Select the tunable to export in the Tunable list.2. Click Export Tunables. The Export List window opens.3. Configure the appropriate export parameters. This table describes the parameters that you can set in the
Export List window:
Parameter Description
Export Enables you to export:
• Only the selected lines in the Tunable list• The entire Tunable list
Tina Administration 327
Configuring Advanced Settings

Parameter Description
Format Enables you to select the format of the export file:
• CSV• PDF
Only for CSV format.
End of Line Enables you to select the end of line format:
• Windows (CRLF)• Linux (LF)• Classic macOS (CR)
Field Separator Enables you to select the field separator:
• ,• ;• |
Escape Character Enables you to select the Escape character
• “• ‘If needed, select the Always Add Escape Character check box.
4. Click Apply and Close. The File Download window opens.5. Click Save and select a location.
Editing Tunables for a New HostThe Tunable view contains one default tab displaying the list of the tunables set on the Tina server. You canspecify the name of a new host on which you can set tunables.
To edit tunables for a new host
1. Click Edit tunables for a new host. The Host Selection window opens.2. Select or enter the name of the new host on which you want to set tunables.3. Click Apply and Close.
Note: You can also use the + tab to add new tabs that enable you to set tunables for others hosts.
Copying a Tunable to a HostYou can copy one tunable from one host to another or several hosts.
To copy one tunable to another host
1. Select the tunable to copy in the Tunable list.2. Click Copy one tunable to one or more hosts. The Tunable Copy Wizard opens.3. Select the name(s) of the host(s) to which you want to copy the tunable.4. Select the Replace existing tunable check box if you want to replace the existing tunable with the tunable
you are copying.If you do not select this check box and the tunable already exists, the tunable copy is not performed.
5. Click Apply and Close. The copied tunables display in the Tunable list of the selected host(s).
328 Tina Administration
Configuring Advanced Settings

Event NotificationsThe event notifications enable you to redirect events towards external elements (a file, an email, a commandline, snmp, or the console, etc.). You can also specify the catalog, the type of events you want to redirect, aswell as the kind of information that each event must display.
Viewing Event NotificationsTo view event notifications
1. In theWeb Administration, expand your catalog in the Tina Explorer.2. Expand the Configuration node and click Event Notifications.
The Event Notifications pane opens.
Creating Event NotificationsWhen you create event notifications through theWeb Administration, the list of event notifications are recordedin this file:• Windows. %TINA_HOME%\Conf\logs.xml• macOS. -Unix. $TINA_HOME/Conf/logs.xml
DTD and XSL are provided with the logs.xml file in the Conf directory:• You can use the logs.dtd file to check for the validity of the xml file.• You can use the logs.xsl stylesheet to view the contents of the logs.xml file through a browser
without using Tina.
You can define several event notifications on the same Tina server.
To create an event notification
1. In theWeb Administration, expand your catalog in the Tina Explorer.2. Select Configuration Event Notifications. The Event Notifications pane opens.3. Click New Event Notification. The Event Notification CreationWizard opens.4. Enter the event notification creation parameters. This table describes the parameters that you can set in
the Event Notification CreationWizard:
Parameter Description
General Information
Tina Administration 329
Configuring Advanced Settings

Parameter Description
Type Select the output mode to use in the drop-down list. These are the possible values:
• Command Line. Sends the output to a command line or a script on Unix andWindows.• File. Sends the output to a file.• Email. Sends event information by email, (e.g., you can send an email to the
administrator each time a critical or major alarm is issued.• SNMP. Sends the output to SNMP onUnix andWindows.• Standard Error. Sends the output to the standard error output of a command entered on
Unix.• Standard Output. Sends the output to the standard output of a command entered on
Unix.• System Console. Sends the output to the console on Unix (i.e., /dev/console) and
Windows (i.e., Information window).OnWindows, the Information window is displayed on the screen as long as the Tinaservice is running or as long as you do not click OK to close it.
• System Logs. Sends the output to the internal log system under Unix (i.e., syslog) andWindows (i.e., Event Viewer).
Name Enter the name of the event notification.
Comment Optional. Enter a comment to describe the event notification you are creating.
Disabled This check box is not selected by default. Check it if you want to disable this eventnotification once it is created. Then you can enable it manually at your convenience. SeeEnabling/Disabling Event Notifications.
Command Line
CommandLine Path
Enter the absolute path of an executable or a script file.
If several Tina environments are present on themachine, youmust specify these commandline options to be able to use the command output along with Tina commands:-tina <environment_name> and -tina_service_name <service_name>.
Output File
File Path Enter the destination file path. This path includes the name of the new log file. For instance,%TINA_HOME%\Adm\log_bis.txt forWindows and $TINA_HOME/Adm/log_bis for macOSand Unix.
To ensure that Tina will back up this file together with the catalog backups through theCatalog application, the name of the new log file must contain the logword and this new logfile must be located in the Adm directory.
SMTP Server Enter the name of the SMTP server.
From Enter the name of the email sender.
To Enter the name of the recipient.
330 Tina Administration
Configuring Advanced Settings

Parameter Description
Cc Enter the names of other recipients, if any.
Subject Enter the subject of the email.
SNMP Parameters
SNMPManager
Enter the SNMP manager machine whichmust have a daemon receiving SNMP traps.
Community Enter the listening groups. By default, listening groups are public.
Trap PortNumber
Enter the listening port of the SNMP daemonwhich receives traps. By default, the listeningport is snmp-trap (value equal to 162) andmust be present in the services file.
Event Notification Format
Specifies the private format of the event file. It enables you to create event sub-files based onfilters.
Raw EventFile Format
Click this radio button if you want to use the same format as the event file located in the Admdirectory of Tina.
CustomizedFormat
Click this radio button if you want to specify the types of information that you want to notify.
Select the appropriate check boxes. These are the possible values:
• Text.Message of the event.• Number. Internal identifier of the function (debug information).• Function. Name of the function that has generated the event (debug information).• Binary. Program associated with the event.• Server Name. Name of the catalog server associated with the event.• Host Name. Name of the host associated with the event.• User Name. Name of the user associated with the event.• Catalog. Catalog associated with the event.• Severity Short Name. Event severity level abbreviated with letters: I for Info, A for
Accounting, D for Debug, W forWarning, E for Error, F for Fatal, m for Minor Alarm, M forMajor Alarm, C for Critical Alarm, and a for Audit.
• Severity Long Name. Event severity level.• Logging Date. Date the event is recorded in the server event file.• Emission Date. Date when the event occurred.• Job ID. Identification number of the job associated with the event.• Process ID. Identification number of the process which has generated the event.• Alarm Object Type. Type of the object with which the alarm is associated (e.g., drive,
library, host, application, job, etc.). Only available when an alarm is notified.• Alarm Object Name. Name of the object with which the alarm is associated. If the
object is a library named takata_vls, the alarm object namewill be takata_vls. Onlyavailable when an alarm is notified.
• Thread ID. Thread number of the Tina server process.• Thread Name. Thread name of the Tina server process. Several thread names can
share the same task name.
Tina Administration 331
Configuring Advanced Settings

Parameter Description
• Task Name. Name of the task. Tina uses this information to group a set of correlatedactions.There are 3 types of tasks (i.e., TNTcpTask, TNCatStarterTask, andTNWatchDogTask) and each is correlated with one thread task of themain daemon (i.e.,respectively TNTcp, TNCatStarter, and TNWatchDog).
• Product ID. Number of the product. It indicates the product that generates the event(e.g., 1 TiNa, 2WebUI, 3 Eld, etc.).
Severities
Filter Eventsfor AllSeverities
Click this radio button if you want to apply this event notification to all severities (*).
Filter Eventsfor theSelectedSeverities
Click this radio button if you want to limit the use of the event notification to specificseverities.
Select the appropriate check boxes. These are the possible values:
• Minor Alarm.Warning with no immediate consequences on processes.• Major Alarm.Warning with important consequences on one or several processes.• Critical Alarm.Warning with serious consequences on all processes.• Fatal. Error that causes the program to exit.• Error. Serious error that might cause the program to exit.• Warning.Warning with no important consequences.• Information.Message of general interest.• Debug. Diagnosis help.• Accounting. Accounting concerning backups and archiving.• Audit. Logging of configurationmodifications in the Tina environment.
Classes
Filter Eventsfor AllClasses
Click this radio button if you want to apply this event notification to all classes (*).
By default, if you do not select any class, the event notification applies to all classes.
332 Tina Administration
Configuring Advanced Settings
Parameter Description
Filter Eventsfor theSelectedClasses
Click this radio button if you want to limit the use of the event notification to specificclasses.
Select the appropriate check boxes. These are the possible values:
• Standard. Standard events. No specific class is defined for these events.• Non Uncompressed Object. Events related to objects that are restored but not
uncompressed.• End User. Events easily understandable designed to help the user in case of error during
Tina execution.• Non Restored Object. Events related to an object restore error.• Fuzzy Object. Events related to a fuzzy object, for instance an object modified while
backup was in progress or an incompletely backed up object.
The number of logs concerning fuzzy object encountered when a job is being performed islimited by default to 20, to avoid reducing performances. To specify how many fuzzy objectlogs should be kept in the event file, use the accounting_max_fuzzy_objects tunable.See the Tina Tunables Documentation.• I/O Error. Events related to an input/output error on a drive or on a backupmedia.• Secure Event. Events related to security and compliance operations. For more
information on security and compliance, see the Tina Security & ComplianceManagerDocumentation.
• Object Not Backed Up. Events related to an object backup error.
Alarm IDs
Filter Eventsfor All AlarmIDs
Click this radio button if you want to apply this event notification to all alarm IDs (*).
By default, if you do not select any alarm ID, the event notification applies to all alarm IDs.
Filter Eventsfor theSelectedAlarm IDs
Click this radio button if you want to limit the use of the event notification to specific alarmIDs.
Click Add Item, Remove Item, and/or ChooseObject to specify the selected alarm IDs inthe Alarm ID list.
Applications
Filter Eventsfor AllApplications
Click this radio button if you want to apply this event notification to all applications (*).
By default, if you do not select any application, the event notification applies to allapplications.
Filter Eventsfor theSelectedApplications
Click this radio button if you want to limit the use of the event notification to specificapplications.
Click Add Item, Remove Item, and/or ChooseObject to specify the selected applications inthe Application list.
Catalogs
Tina Administration 333
Configuring Advanced Settings

Parameter Description
Filter Eventsfor AllCatalogs
Click this radio button if you want to apply this event notification to all catalogs (*).
By default, if you do not select any catalog, the event notification applies to all catalogs.
Filter Eventsfor theSelectedCatalogs
Click this radio button if you want to limit the use of the event notification to specificcatalogs.
Click Add Item, Remove Item, and/or ChooseObject to specify the selected catalogs in theCatalog list.
Binaries
Filter Eventsfor AllBinaries
Click this radio button if you want to apply this event notification to all binaries (*).
By default, if you do not select any binary, the event notification applies to all binaries.
Filter Eventsfor theSelectedBinaries
Click this radio button if you want to limit the use of the event notification to specificbinaries.
Click Add Item, Remove Item, and/or ChooseObject to specify the selected binaries in theBinary list.
Hosts
Filter Eventsfor All Hosts
Click this radio button if you want to apply this event notification to all hosts (*).
By default, if you do not select any host, the event notification applies to all hosts.
Filter Eventsfor theSelectedHosts
Click this radio button if you want to limit the use of the event notification to specific hosts.
Click Add Item, Remove Item, and/or ChooseObject to specify the selected hosts in theHost list.
Users
Filter Eventsfor All Users
Click this radio button if you want to apply this event notification to all users (*).
By default, if you do not select any user, the event notification applies to all users.
Filter Eventsfor theSelectedUsers
Click this radio button if you want to limit the use of the event notification to specific users.
Click Add Item, Remove Item, and/or ChooseObject to specify the selected users in theUser list.
5. Click Finish to validate the creation of the event notification. The newly created event notificationdisplays in the Event Notification list.
6. Restart the Tina service to take your modifications into account.
Once your modifications are taken into account, the logs.xml file is updated in the Conf directory. It willbe updated automatically every time you enter amodification from theWeb Administration.
Note: For more information you can read the logs.sample.xml file provided at the Tina installationtime.
334 Tina Administration
Configuring Advanced Settings

Enabling/Disabling Event NotificationsAn event notificationmust be enabled to be taken into account.
To enable an event notification
1. Select the event notification to enable in the Event Notification list.2. Click Enable Event Notifications.
You can temporarily disable an event notification.
To disable an event notification
1. Select the event notification to disable in the Event Notification list.2. Click Disable Event Notifications.
Displaying Event Notification Details1. Select an event notification in the Event Notification list.2. Click Event Notification Details. The Event Notification Details window opens. It includes the Properties
tab which gives you general information for the selected event notification.
Properties Tab Description
General Area
Type Indicates the output of the event notification (Command line, File, Email,SNMP, Standard error, Standard output, System console, or System logs).
Name Indicates the name of the event notification.
Status Indicates the status of the event notification (enabled or disabled).
Comment Indicates a comment, if any.
Destination Area
Fields vary depending onthe event notification typecreated.
Indicates the parameters of the event notification output. These parametersvary depending on the type of event notification you created: Command line,File, Email, or SNMP.
Format Area
Raw Event File Format Click this radio button if you want to use the same format as the event filelocated in the Adm directory of Tina.
Tina Administration 335
Configuring Advanced Settings

Properties Tab Description
Customized Format Click this radio button if you want to use a specific format for the event file.
Field: Select the type of information that you want to notify in the drop-downlist. For details on the possible values, see To create an event notification.
Length: Indicates the length of the field. You can display the field with all thecharacters (Full) or with some characters (from 1 to 39).
Click Add to add information on the field and length in the Format textbox.Repeat the procedure for each field you want to add in the event file.
For instance, if you select Host Name in the Field drop-down list and Full inthe Length drop-down list, all the characters of the hostname are displayed inthe event file.If you select Text in the Field drop-down list and 30 in the Length drop-downlist, only the first 30 characters of the event text are displayed in the eventfile.
Format: Indicates the format of the event file. It depends on what you selectin the Field and Length drop-down lists.
For instance, if you select Host Name in the Field drop-down list and Full inthe Length drop-down list, the format is %s$hostname.If you select Text in the Field drop-down list and 30 in the Length drop-downlist, the format is %-30s$text.
Encoding: Indicates the encoding for the event file (either UTF-8 or latin1).
Severities Area
Filter Events for AllSeverities
Click this radio button if you want to apply this event notification to allseverities (*).
Filter Events for theSelected Severities
Click this radio button if you want to limit the use of the event notification tospecific severities. For details on the possible values, see To create an eventnotification.
Classes Area
Filter Events for AllClasses
Click this radio button if you want to apply this event notification to all classes(*).
Filter Events for theSelected Classes
Click this radio button if you want to limit the use of the event notification tospecific classes. For details on the possible values, see To create an eventnotification.
Filters Area
336 Tina Administration
Configuring Advanced Settings

Properties Tab Description
Catalogs Indicates to which catalogs the event notification applies.
Click Filter Events for all Catalogs if you want to apply this event notificationto all catalogs (*).
By default, if you do not select any catalog, the event notification applies to allcatalogs.
Click Filter Events for the Selected Catalogs if you want to limit the use of theevent notification to specific catalogs.
Click Add Item, Remove Item, and/or ChooseObject to specify the selectedcatalogs in the Catalog list.
Binaries Indicates to which binaries the event notification applies.
Click Filter Events for all Binaries if you want to apply this event notification toall binaries (*).
By default, if you do not select any binary, the event notification applies to allbinaries.
Click Filter Events for the Selected Binaries if you want to limit the use of theevent notification to specific binaries.
Click Add Item, Remove Item, and/or ChooseObject to specify the selectedbinaries in the Binary list.
Hosts Indicates to which hosts the event notification applies.
Click Filter Events for all Hosts if you want to apply this event notification toall hosts (*).
By default, if you do not select any host, the event notification applies to allhosts.
Click Filter Events for the Selected Hosts if you want to limit the use of theevent notification to specific hosts.
Click Add Item, Remove Item, and/or ChooseObject to specify the selectedhosts in the Host list.
Users Indicates to which users the event notification applies.
Click Filter Events for all Users if you want to apply this event notification toall users (*).
By default, if you do not select any user, the event notification applies to allusers.
Click Filter Events for the Selected Users if you want to limit the use of theevent notification to specific users.
Click Add Item and Remove Item to specify the selected users in the Userlist.
Alarm Filters Area
Tina Administration 337
Configuring Advanced Settings

Properties Tab Description
Alarm IDs Indicates to which alarm IDs the event notification applies.
Click Filter Alarms for all Alarm IDs if you want to apply this event notificationto all alarm IDs (*).
By default, if you do not select any alarm ID, the event notification applies toall alarm IDs.
Click Filter Alarms for the Selected Alarm IDs if you want to limit the use ofthe event notification to specific alarm IDs.
Click Add Item and Remove Item to specify the selected alarm IDs in theAlarm ID list.
Applications Indicates to which applications the event notification applies.
Click Filter Alarms for all Applications if you want to apply this eventnotification to all applications (*).
By default, if you do not select any application, the event notification appliesto all applications.
Click Filter Alarms for the Selected Applications if you want to limit the use ofthe event notification to specific applications.
Click Add Item and Remove Item to specify the selected applications in theApplication list.
Editing Event NotificationsEditing an event notification enables you tomodify these parameters:• The event notification name• The event notification status• The event notification comment• The event notification destination• The event notification format• The severities to which the event notification applies• The classes to which the event notification applies• The catalogs to which the event notification applies• The binaries to which the event notification applies• The hosts to which the event notification applies• The users to which the event notification applies• The alarm filters to which the event notification applies (Alarm IDs and Applications)
To edit an event notification
1. Select the event notifications to edit in the Event Notification list.2. Click Event Notification Details. The Event Notification Details window opens.3. Modify the event notification settings. See Displaying Event Notification Details.4. Click Apply and Close to validate the operation.
Themodifications of your event notification will be taken into account automatically in the logs.xml file.This file will be updated automatically every time you enter amodification from theWeb Administration.
338 Tina Administration
Configuring Advanced Settings

Deleting Event Notifications1. Select the event notification to delete in the Event Notification list.2. Click Delete Event Notifications.3. Confirm your choice. The event notification is removed from the Event Notification list.
Exporting Event NotificationsThe Event Notification Export feature enables you to export event notification information of your choice to afile.
To export an event notification
1. Select the event notification to export in the Event Notification list.2. Click Export Event Notifications. The Export List window displays.3. Configure the appropriate export parameters. This table describes the parameters that you can set in the
Export List window:
Parameter Description
Export Enables you to only export the selected lines or the entire list.
Format Enables you to select the format of the export file, either CSV or PDF.
Only for CSV format.
End of Line Enables you to select the end of line format:
• Windows (CRLF)• Linux (LF)• Classic macOS (CR)
Field Separator Enables you to select the field separator: either , or ; or |
Escape Character Enables you to select the Escape character: either “ or ‘
If needed, select the Always Add Escape Character check box.
4. Click Apply and Close. The File Download window opens.5. Click Save and select a location.
Alarm FiltersThese topics contain information about alarm filters and describe the several procedures:• About Alarm Filters• Viewing Alarm Filters• Configuring a New Alarm Filter View• Creating Alarm Filters• Enabling/Disabling Alarm Filters• Displaying Alarm Filters Details• Editing Alarm Filters• Deleting Alarm Filters• Exporting Alarm Filters
Tina Administration 339
Configuring Advanced Settings

• Editing Alarm Filters for a New Host
About Alarm FiltersThe alarm filters enable you to define a list of directories and files that do not create an alarm if they are notbacked up.
This is very useful when a backup selection contains locked files, (e.g., system files) and that consequentlyTina does not back up.
If the backup of some directories and files fails, follow these steps to specify alarm filters:• Wait for the first display of the alarms.• Create an alarm filter to add the correct names of these directories and files to the alarms_filter.xml
file.
TheWeb Administration enables you to:• Create an alarm filter• Enable or disable an alarm filter• Display the alarm filter details• Edit an alarm filter• Delete an alarm filter• Export an alarm filter• Edit an alarm filter for a new host
Viewing Alarm Filters1. In theWeb Administration, expand your catalog in the Tina Explorer.2. Expand the Configuration node and click Alarm Filters.
The Alarm Filters pane opens.
Configuring a New Alarm Filter ViewThe Alarm Filter view contains one default tab displaying the list of the alarm filters created on the Tina server.You can add new tabs to create alarm filters on other hosts.
To create a new alarm filter view
1. Click the + tab. The Host Selection window opens.2. Select or enter a hostname for the new tab view. This new tab enables you to create alarm filters on the
specified host.3. Click Apply and Close to validate the creation of a new alarm filter view.
340 Tina Administration
Configuring Advanced Settings

Note: You can also click Edit Alarm Filters for a New Host to create alarm filters for other hosts.
Creating Alarm FiltersWhen you create alarm filters through theWeb Administration, the list of the directories and files, that do notcreate an alarm if they are not backed up, are recorded in this file:• Windows. %TINA_HOME%\Conf\alarms_filter.xml• macOS. - Unix. $TINA_HOME/Conf/alarms_filter.xml
To create an alarm filter
1. In theWeb Administration, expand your catalog in the Tina Explorer.2. Expand the Configuration node and click Alarm Filters. The Alarm Filters pane opens.3. Click New Alarm Filter. The Alarm Filter CreationWizard opens.4. Enter the alarm filter creation parameters. This table describes the parameters that you can set in the
Alarm Filter CreationWizard:
Parameter Description
General Information
Filter Type Enter the filter type to use:
• File• Reparse Point
Comment Optional. Enter a comment to describe the alarm filter you are creating.
Enabled This check box is selected by default. Uncheck it to disable this alarm filteronce it is created. Then you can enable it manually at your convenience.
See Enabling/Disabling Alarm Filters.
Alarm FilterSelection Path
Click Add Item to enter the path you need to filter or click the [...] button tobrowse andmake your selection.
Youmust use the POSIX format, even onWindows platforms. For instance, ifthe path to filter is: c:\WINDOWS\system32\dhcp\dhcp.mdb, youmust enter:/c/WINDOWS/system32/dhcp/dhcp.mdb
Catalog Selection
Filter Alarms forall catalogs
Click this radio button if you want to apply this alarm filter to all catalogs (*).
By default, if you do not select any catalog, the alarm filter applies to allcatalogs.
Filter Alarms forthe selectedcatalogs
Click this radio button if you want to limit the use of the alarm filter to specificcatalogs.
Click Add Item, Remove Item, and/or ChooseObject to specify the selectedcatalogs in the Catalog list.
5. Click Finish to validate the operation. The newly created alarm filter displays in the Alarm Filter list.6. Select the Activate Alarm Filters check box above the Alarm Filter list to activate the Alarm Filter feature
on your host.
Tina Administration 341
Configuring Advanced Settings

Once your modifications are taken into account, the alarms_filter.xml file is generated in the Confdirectory. It will be updated automatically every time you enter amodification from theWebAdministration.
Note: For more information, you can read the alarms_filter.sample.xml file provided at the Tinainstallation time.
Enabling/Disabling Alarm FiltersAn alarm filter must be enabled to be taken into account.
To enable an alarm filter
1. Select the alarm filter to enable in the Alarm Filter list.2. Click Enable Alarm Filter.
You can temporarily disable an alarm filter.
To disable an alarm filter
1. Select the alarm filter to disable in the Alarm Filter list.2. Click Disable Alarm Filter.
Note: You can deactivate all the alarm filters for a host at once by clearing the Activate Alarm Filterscheck box in the Alarm Filters pane.
Displaying Alarm Filters Details1. Select an alarm filter in the Alarm Filter list.2. Click Alarm Filter Details. The Alarm Filter Details window opens. It includes the Properties tab which
gives you general information for the selected alarm filter.
PropertiesTab
Description
General Area
Path Indicates the path to filter in a POSIX format.
Filter Type Indicates the type of the alarm filter (file or reparse point).
Status Indicates the status of the alarm filter (enabled or disabled).
Comment Indicates a comment, if any.
Filters Area
Catalogs Indicates to which catalogs the alarm filter applies.
Click Apply Filter to All Catalogs if you want to apply this alarm filter to all catalogs (*).
By default, if you do not select any catalog, the alarm filter applies to all catalogs.
Click Apply Filter to Selected Catalogs if you want to limit the use of the alarm filter tospecific catalogs.
Click Add Item, Remove Item, and/or ChooseObject to specify the selected catalogs in theCatalog list.
342 Tina Administration
Configuring Advanced Settings

Editing Alarm FiltersEditing an alarm filter enables you tomodify these parameters:• The alarm filter path• The alarm filter type• The alarm filter status• The catalogs to which the alarm filter applies
To edit an alarm filter
1. Select the alarm filter to edit in the Alarm Filter list.2. Click Alarm Filter Details. The Alarm Filter Details window opens.3. Modify the alarm filter settings. See Displaying Alarm Filters Details.4. Click Apply and Close to validate the operation.
Deleting Alarm FiltersTo delete an alarm filter
1. Select the alarm filter to delete in the Alarm Filter list.2. Click Delete Alarm Filters.3. Confirm your choice. The alarm filter is removed from the Alarm Filter list.
Exporting Alarm FiltersThe Alarm Filter Export feature enables you to export the alarm filter information of your choice to a file.
To export an alarm filter
1. Select the alarm filter to export in the Alarm Filter list.2. Click Export Alarm Filters.The Export List window opens.3. Configure the appropriate export parameters. This table describes the parameters that you can set in the
Export List window:
Parameter Description
Export Enables you to export the entire list or only the selected lines.
Format Enables you to select the format of the export file, either CSV or PDF.
Only for CSV format.
End of Line Enables you to select the end of line format:
• Windows (CRLF)• Linux (LF)• Classic macOS (CR)
Field Separator Enables you to select the field separator: either , or ; or |
Escape Character Enables you to select the Escape character: either “ or ‘
If needed, select the Always Add Escape Character check box.
4. Click Apply and Close. The File Download window opens.
Tina Administration 343
Configuring Advanced Settings

5. Click Save and select a location.
Editing Alarm Filters for a New HostThe Alarm Filter view contains one default tab displaying the list of the alarm filters created on the Tina server.You can specify the name of a new host on which you can create alarm filters.
To edit alarm filters for a new host
1. Click Edit alarm filter for a new host. The Host Selection window opens.2. Select or enter the name of the new host on which you want to create alarm filters.3. Click Apply and Close.
Note: You can also use the + tab to add new tabs that enable you to create alarm filters for othershosts.
Domain FilteringThese topics describe domain filtering and the different actions that can be performed, like displaying, editing ormanaging domain filters:• About Domain Filtering• Viewing Domain Filters• Creating Domain Filters• Enabling/Disabling Domain Filters• Displaying Domain Filter Details• Editing Domain Filters• Deleting Domain Filters• Managing Privileged Hosts• Exporting Domain Filters
About Domain FilteringNote: Domain filtering concerns Tina servers only, not agents.
Domain filters enable the catalog’s administrator to define which administration objects are accessible by whichmachines or users declared in the domain. The objects are:• Hosts• Media pools• Users• Applications
Two levels of activation are available:• Hosts.
This indicates that access control to the domain is at the host level. A list of hosts is defined. Only thehosts defined in this list can access the domain and view the objects belonging to this domain. Thesehosts are the only hosts displaying in the domain.
• Hosts and Users.This indicates that a level of access control is set, not only at the level of the hosts defined for thedomain, but also at the level of the users of these hosts. A second list is defined with the names of theusers allowed to access the domain. These users are also the only ones visible in the domain. The
344 Tina Administration
Configuring Advanced Settings
visible domains are those containing at the same time the user AND the host used to connect to thecatalog.
A domain filter consists of these criteria:• The domains. They describe the various administration objects defined in the domain. These objects
can be administration hosts, hosts, media pools, users or applications.
In a domain,the parameter...
defines ...
AdministrationHosts
The IP addresses of the domain’s administration consoles. Thesemachines can accessall the catalog objects in the domain they are administering. They cannot be viewed by theother clients of the domain, unless they are defined in it.
Hosts The hosts allowed to access the domain and belonging to the domain.
Applications The applications belonging to the domain.
Pools Themedia pools belonging to the domain.
Users The users belonging to the domain, and, if the user access control is activated (if the Hostsand Users option is activated in the Domain Filtering pane), the list of users allowed toaccess the domain.
• The privileged access. These are the IP addresses of themachines allowed to view all the objects ofthe catalog. Thesemachines cannot be viewed from the domain, unless they are defined in it as hosts.
In a privilegedaccess, theparameter ...
defines ...
Name The IP addresses of themachines allowed to view all the objects of the catalog.Thesemachines cannot be viewed in the domains, unless they are defined in it ashosts.
Catalog The catalogs the hosts can access, in order to view the objects.
Important Notes and Exceptions1. If you have chosen to use the Domain Filtering feature on a server, youmust use theWeb Administration
to describe all the catalogs of the server in the domains.xml file.2. There is no filtering on the catalog.3. When the filtering is enabled, only the declared hosts can connect to the catalog. This means that an
undefined host cannot be backed up.4. These objects are always accessible for every client of a catalog:
• The Tina Server• The drives and libraries, if the host to which they are connected is accessible• The user groups• The spare and lost+foundmedia pools
5. The Tina Server has a privileged access to all the objects in all its catalogs.6. When the filtering is enabled, the server hosts file must contain the information required to correctly
define all the clients which can connect to the catalogs, especially concerning themachines’ DNS
Tina Administration 345
Configuring Advanced Settings

extensions. The server must be able to link the network name sent by the client and the host namedefined in the domain filter.For more information on the hosts file, see Time Navigator Configuration Files.
7. When the filtering is enabled and you want to create a new object in the catalog, the domains.xml filemust be updated prior to the object creation.
8. When filtering is enabled, it may happen that connection is refused to an agent, and amessage "Accessdenied" displays in the Event Logs. The Event Logs will also show these details concerning the agent oruser that was refused access:• The host name (actual name of the host, as it displays in the catalog)• The Network Alias (name of themachine as it is known on the network or in the file etc/hosts)• The IP Address• The Name of the User that attempted to connect to the catalogFrom this information, it should be possible to decide whether you wish to authorize this agent to connect.
– To grant access to an agent, youmust add it to the list of hosts that have access to thecatalog in the domain parameters.
– To grant access to a user, youmust add it to the list of users who have access to the catalogin the domain parameters.
Note: A user will only be denied access if you select the Hosts and Users option in the DomainFiltering pane of theWeb Administration. If you select Hosts, the user authorization will not bechecked.
9. When filtering is enabled, the application of a domain is not visible if the corresponding host is not in theapplication’s domain, since an application is dependent on a system.
TheWeb Administration enables you to:• Create a domain filter• Enable or disable a domain filter• Display the domain filter details• Edit a domain filter• Delete a domain filter• Manage privileged hosts• Export a domain filter
Viewing Domain Filters1. In theWeb Administration, expand your catalog in the Tina Explorer.2. Expand the Configuration node and click Domain Filtering.
The Domain Filtering pane opens.
Creating Domain FiltersWhen you create domain filters through theWeb Administration, the list of domain filters are recorded in this file:• Windows. %TINA_HOME%\Conf\domains.xml
346 Tina Administration
Configuring Advanced Settings

• macOS. - Unix. $TINA_HOME/Conf/domains.xml
To create a domain filter
1. In theWeb Administration, expand your catalog in the Tina Explorer.2. Expand the Configuration node and click Domain Filtering. The Domain Filtering pane opens.3. Click New Domain Filter. The Domain Filter Creation window opens.4. Enter the domain filtering creation parameters. This table describes the parameters that you can set in the
Domain Filter Creation window:
Parameter Description
General area
Domain Name Enter the name of the domain filter.
Catalog Name Enter the name of the catalog where the domain filter is defined.
Status Select Enabled in the drop-down list to activate the domain filter. See Enabling/DisablingDomain Filters.
Comment Optional. Enter a comment to describe the domain filter you are creating.
Administration Area
AdministrationHosts
Click Add Item to enter the name of the domain administration consoles to which thedomain filter applies.
Hosts Area
Hosts Click Add Item to enter the names of the hosts to which the domain filter applies.
OrClick ChooseObject to select from the list the hosts allowed to access the domain.
Wildcards (* and ?) are allowed for host names.
Applications Area
Applications Click Add Item to enter the names of the applications to which the domain filter applies.
OrClick ChooseObject to select from the list the applications to be included in the domain.
Pools Area
Media Pools Click Add Item to enter the names of themedia pools to which the domain filter applies.
OrClick ChooseObject to select from the list themedia pools to be included in the domain.
Users Area
Tina Administration 347
Configuring Advanced Settings

Parameter Description
Users Click Add Item to enter the names of the users to which the domain filter applies.
OrClick ChooseObject to select from the list the users to be included in the domain.
If you want to restrict access to domains to the users you define in this area, select theHosts and Users option in the Domain Filtering pane.
5. Click Apply and Close to validate the operation. The newly created domain filter displays in the DomainFilter list.Once your modifications are taken into account, the domains.xml file is generated in the Conf directory. Itwill be updated automatically every time you enter amodification from theWeb Administration.
Note: For more information, you can read the domains.sample.xml file provided at the Tinainstallation time.
Enabling/Disabling Domain FiltersA domain filter must be enabled to be taken into account.
To enable a domain filter
1. Select the domain filter to enable in the Domain Filter list.2. Click Enable Domain Filter.
You can temporarily disable a domain filter.
To disable a domain filter
1. Select the domain filter to disable in the Domain Filter list.2. Click Disable Domain Filter.
Note: You can deactivate all the domain filters for the server at once by selecting the Disabledoption in the Domain Filter Filtering Status drop-down list of the Domain Filtering pane.
Displaying Domain Filter Details1. Select a domain filter in the Domain Filter list.2. Click Domain Filter Details. The Domain Filter Details window opens. It includes the Properties tab which
gives you general information for the selected domain filter.
Properties Tab Description
General Area
Domain Name Indicates the name of the domain filter.
Catalog Name Indicates the name of the catalog where the domain filter is defined.
Status Indicates the status of the domain filter (enabled or disabled).
Comment Indicates a comment, if any.
348 Tina Administration
Configuring Advanced Settings

Properties Tab Description
Administration Area
AdministrationHosts
Indicates the administration consoles to which the domain filter applies.
Click Add Item and/or Remove Item to specify the selected administration consoles inthe Administration Host list.
Hosts Area
Hosts Indicates the hosts to which the domain filter applies.
Click Add Item, Remove Item, and/or ChooseObject to specify the selected hosts in theHost list.
Applications Area
Applications Indicates the applications to which the domain filter applies.
Click Add Item, Remove Item, and/or ChooseObject to specify the selected applicationsin the Application list.
Pools Area
Media Pools Indicates themedia pools to which the domain filter applies.
Click Add Item, Remove Item, and/or ChooseObject to specify the selectedmedia poolsin theMedia Pool list.
Users Area
Users Indicates the users to which the domain filter applies.
Click Add Item, Remove Item, and/or ChooseObject to specify the selected users in theUser list.
Editing Domain FiltersEditing a domain filter enables you tomodify these parameters:• The domain filter name• The catalog name• The domain filter status• The administration hosts to which the domain filter applies• The applications to which the domain filter applies• Themedia pools to which the domain filter applies• The users to which the domain filter applies
To edit a domain filter
1. Select the domain filter to edit in the Domain Filter list.2. Click Domain Filter Details. The Domain Filter Details window opens.3. Modify the domain filter settings. See Displaying Domain Filter Details.4. Click Apply and Close to validate the operation.
Tina Administration 349
Configuring Advanced Settings

Deleting Domain FiltersTo delete a domain filter
1. Select the domain filter to delete in the Domain Filter list.2. Click Delete Domain Filter.3. Confirm your choice. The domain filter is removed from the Domain Filter list.
Managing Privileged HostsThe privileged host is an administration console with no domain filtering. The privileged host has access to allthe domains of the catalog for which it is defined and with no user filtering.
To create a privileged host
1. Click Manage Privileged Hosts. TheManage Privileged Hosts window opens.2. Click Add to add privileged hosts in the list. The Privileged Host Edition window opens.3. Enter the privileged host creation parameters. This table describes the parameters that you can set in the
Privileged Host Edition window:
Parameter Description
Name Enter the name of the privileged host.
Status Select Enabled in the drop-down list to activate the privileged host. See Enabling/DisablingDomain Filters.
IPAddress
Enter the IP address of the host that needs access to all the objects of the catalog.
Catalogs Click Add to enter the catalogs to include in the privileged host.
Comment Optional. Enter a comment to describe the privileged host you are creating.
4. Click OK to validate the operation. The newly created privileged host displays in theManage PrivilegedHosts window.
5. Repeat the operation for as many privileged hosts as needed.
Note: Thesemachines cannot be viewed from the domains, unless they are defined in the Hostsarea of the Domain Filter Creation window when configuring domains.
Exporting Domain FiltersThe Domain Filter Export feature enables you to export the domain filter information of your choice to a file.
To export a domain filter
1. Select the domain filter to export in the Domain Filter list.2. Click Export Domain Filters. The Export List window opens.
350 Tina Administration
Configuring Advanced Settings
3. Configure the appropriate export parameters. This table describes the parameters that you can set in theExport List window:
Parameter Description
Export Enables you to export the entire list or only the selected lines.
Format Enables you to select the format of the export file, either CSV or PDF.
Only for CSV format.
End of Line Enables you to select the end of line format:
• Windows (CRLF)• Linux (LF)• Classic macOS (CR)
Field Separator Enables you to select the field separator: either , or ; or |
Escape Character Enables you to select the Escape character: either “ or ‘
If needed, select the Always Add Escape Character check box.
4. Click Apply and Close. The File Download window opens.5. Click Save and select a location.
HTTP ConfigurationYou canmodify these HTTP parameters that you configured during Tina installation:• TheWeb server port number.• TheWeb server protocol (i.e., HTTP or HTTPS)
For details on how tomodify the HTTP parameters, see To set Web Server parameters.
Tina Administration 351
Configuring Advanced Settings

CHAPTER21-List ApplicationThese topics describe the List Application:• About the List Application• List File Syntax• Backup• Restore• Examples
About the List ApplicationDefinitionA List application enables you to create and organize objects at a logical level. These objects can be located ondifferent locations on a samemachine (ex: objects located on different partitions underWindows or on differentfile systems under Unix).
The applicationmakes it possible to back up a list of objects of these types:• Regular file• Directory• Raw device• Symbolic links• Special Unix objects, such as: character or block device access, named pipe.
The List application can be used to perform cold backups of anOracle database and to back up the critical filesof an operating system (ex: passwd under Unix, win.ini underWindows).
The List application is able to back up any database product equipped with a backup utility using named pipe.
The List application does not support ACLs (Access Control Lists).
List FileThe list of the objects to back up associated with a List application is defined in a file called List file.
There are two ways to specify the List file:• You can use the Application CreationWizard inWeb Administration: Enter the file name in the Absolute
Path of the List File textbox or click Browse next to this textbox to select the file on disk.Or
• You can use the TINA_AML_SOURCE_FILE environment variable.The variable can be defined either in the Application Details window of the List application inWebAdministration, or directly in the Information directory of the file tree in Restore & ArchiveManager.
If you decide to specify the List file through the List File textbox and if the TINA_AML_SOURCE_FILE environmentvariable is also set, Tina will take into account the List file specified in the List File textbox.
See Environment Variables.
Parallel BackupWhen you perform parallel backups with the List application, the backup job is divided into several jobs,according to the degree of parallelism defined when you create the backup strategy and backup selections. Youcan define a synchronization point using theWAIT keyword, if necessary.
352 Tina Administration
List Application

List File SyntaxUsing the keywords, youmust define the list of all the objects to be backed up by the List Application. The Listfile describes the objects in a simple and easy-to-use language:• Basic Rules• Keywords• Creating a dynamic List file
Basic RulesThese are the basic syntax rules:• Keywords are not case-sensitive.• Object paths must be specified between single or double quotes (ex: "/usr/local" or ’/usr/local’)
and follow the syntax used by the operating system:(ex: "/path1/path2/file" under Unix"c:\path1\path2\file" underWindows).
• The name associated with each keyword FILE or DIRmust display between quotes if it contains aspace, ex: "my name" or my_name or "my_name" are accepted, but my name is not.
• The name associated with each keyword FILE or DIR must not contain the slash character. Forinstance, DIR "/vol/vol1" is not allowed.
• If the name of one of your files or directories happens to be a declared List application keyword, it mustdisplay between quotes (single or double), to prevent it from being interpreted as a keyword.For instance:DIR size ("/vol/vol0/DT/PROD/TESTDATA/treendmp/size") should be written:DIR "size" ("/vol/vol0/DT/PROD/TESTDATA/treendmp/size" )
• Windows. If some object paths contain non-system environment variables (ex : %TINA_HOME%/Conf),you will have to perform all Tina operations with the identity of the current Windows session user. Failingto do this will prevent the variables from being interpreted correctly.
KeywordsFor simplicity reasons, the syntax used includes a limited number of keywords. They are presented inalphabetical order.
List of available keywords:
ALARMALARM "alarm_name" "severity" ("alarm details")
The ALARM keyword enables you to send an alarm to the Tina server.
The ALARM keywordmust be included into a DIR clause (its parent must be a directory).
Possible values for severity are: MINOR, MAJOR, or CRITICAL.
Example. ALARM Keyword
DIR "First Directory" (DIR "test_list" (TREE "/tmp")FILE "my file" ("/etc/host")ALARM ".warn01" "MAJOR" ("alarm test"))
Tina Administration 353
List Application

DIRDIR name ( path | DIR | FILE )
Or
DIR name ( path | DIR | FILE | MOUNT | TREE | EXEC | LINK | PIPE | INFO )
The keyword DIR is used to define ameta-directory (like an ordinary directory) which can be composed of othermeta-directories (DIR) or meta-files (FILE). It enables for a logical organization of files to be backed up orreplicated.• name is themeta-directory name.• path is the path to a directory to be backed up.• DIR is a sub-meta-directory.• FILE is a meta-file.
Examples. DIR Keyword
[macOS]
DIR mydir (FILE myfile ("/Users/Demo/Weather.html")FILE myfile ("/Users/Demo/Movies/mymovie.avi")
)
=> Backs up the file /Users/Demo/Weather.html and /Users/Demo/Movies/mymovie.avi
DIR mydir2 (DIR mydir3 (
FILE myfile ("/Users/Demo/Pictures/image.jpeg"))
)
=> Backs up the file image.jpeg
Another use of DIR consists in directly specifying a path, whichmakes it possible to back up all regular filespresent in the directory.
DIR mypath ( "/Users/Demo/Movies" )• Backs up only the contents of the directory /Users/Demo/Movies.
[Unix]
DIR mydir (FILE hosts ( "/etc/hosts" )FILE config ( "/usr/people/lch/.cshrc" ))• Backs up the files /etc/hosts and /usr/people/lch/.cshrc.
DIR mydir2 (DIR mydir3 (FILE dummy ( "/usr/people2/file" )))• Backs up the file named file.
Another use of DIR consists in directly specifying a path, whichmakes it possible to back up all regular filespresent in the directory.
DIR mypath ( "/usr/local/bin" )• Backs up only the contents of the directory /usr/local/bin.
354 Tina Administration
List Application

[Windows]
DIR mydir (FILE hosts ( "c:\hosts\hosts.txt" )FILE config ( "c:\config\config.txt" ))• Backs up the files hosts.txt and config.txt.
DIR mydir2 (DIR mydir3 (FILE dummy ( "c:\winnt\win.ini" )))• Backs up the file win.ini.
Another use of DIR consists in directly specifying a path, whichmakes it possible to back up all regular filespresent in the directory.
DIR mypath ( "c:\Program Files\Atempo" )• Backs up only the contents of the directory c:\Program Files\Atempo.
EXECDIR name ( EXEC exec_path | DIR | FILE )
The EXEC keyword associates an executable program or script with ameta-directory.
Youmust provide the file name and path of the program to be executed by the EXEC keyword. For instance:
EXEC "/home02/rks/testsave/test_exec.sh" (Unix), or
EXEC "c:\rks\applist\test_exec.bat (Windows).
Whenever themeta-directory is backed up, depending on the script parameters, the executable is spawned forpre-processing when arriving in themeta-directory and/or for post-processing when leaving themeta-directoryat the end of the backup.
Tina launches the exec_path script with these parameters:
{ -pre | -post } -dir dir_path• The parameters -pre | -post specify the script part to be executed as a pre- or post- processing.• The parameter -dir indicates the path of themeta-directory containing the EXEC keyword.
Example. EXEC Keyword
In this example, the exec_path script is launched a first time as a preprocessing when reaching the "RakeFiles" directory, with these parameters:
-pre -dir "/First Directory/Rake Files"
The script is launched a second time as a postprocessing with these parameters:
-post -dir "/First Directory/Rake Files"
DIR "First Directory" (DIR "Rake Files" (
"/home02/rks/testdir"EXEC "/home02/rks/testsave/test_exec.sh"
)DIR "Recursive files" (
TREE "/home02/rks/testdir"EXEC "/home02/rks/testsave/test_exec.sh"
)DIR "Specific Files" (
EXEC "/home02/rks/testsave/test_exec.sh",
Tina Administration 355
List Application

FILE ".script" ( "/home02/rks/testdir/.cshrc" ),FILE ".doc" (
"/home02/rks/testdir/testdir2/testdir3/testdir4/lindberg.doc" ),LINK ".link" ( "/home02/rks/testdir/.cshrc" ),
))
Example. Executable script that can be called by the EXEC keyword
#!/bin/sh
case "$1" in'-pre')
# Stabilize the data$TINA_HOME/Bin/tina_alarm -severity acct -text "Preparing Data
in $3 meta-directory"sleep 10;;
'-post')# Release the data$TINA_HOME/Bin/tina_alarm -severity acct -text "Postparing Data
in $3 meta-directory"sleep 10;;
*)echo "Usage: $0 { -pre | -post } -dir path"exit 100;;
esac
case "$2" in'-dir')
;;*)
echo "Usage: $0 { -pre | -post } -dir path"exit 101;;
esac
exit 0
Example. Executable script called by the EXEC keyword, using the TINA_CATALOG and TINA_AML_FOLDER variables
For more information on TINA_CATALOG and TINA_AML_FOLDER variables, see Environment Variables.::::::::::::::test_exec.sh::::::::::::::#!/bin/sh
case "$1" in'-pre')
# Stabilize the data$TINA_HOME/Bin/tina_alarm -catalog $TINA_CATALOG -severity acct -text
"Preparing Data in $TINA_AML_FOLDER:$3 meta-directory"sleep 10;;
'-post')# Release the data$TINA_HOME/Bin/tina_alarm -catalog $TINA_CATALOG -severity acct -text
"Postparing Data in $TINA_AML_FOLDER:$3 meta-directory"sleep 10;;
*)echo "Usage: $0 { -pre | -post } -dir path"exit 100;;
esac
356 Tina Administration
List Application

case "$2" in'-dir')
;;*)
echo "Usage: $0 { -pre | -post } -dir path"exit 101;;
esac
exit 0
FILEFILE name ( { path, ... } OFFSET m | SIZE n | MYSELF )
The FILE keyword is mostly used to back up files and raw devices. The absolute file path is specified by path.It can also be used with mirror files. The term applies to files which are theoretically identical to one another.The concept is mainly used for databases.• name is themeta-file name.• path is the path (or a list of paths) to a file (or mirror files) to be backed up.• OFFSET is the partition address of the data to be backed up. The unit is K for KB, M for MB andG for GB.
The default value is: 0 if the OFFSET parameter is not specified.• SIZE represents the amount of data to be backed up from the OFFSET location. If SIZE=0, the amount of
data is unlimited, the entire file will be backed up. The default value is 0 if the SIZE parameter is notspecified.
• MYSELF is a keyword used to automatically back up the List file. If the MYSELF parameter is being used,OFFSET and SIZE are useless.
Note: Using the OFFSET and SIZE parameters enables you to back up part of your data if theapplication you are using shares raw devices or if you are performing operations between rawdevices of different sizes.Do not use these parameters if the data volume is subject to change during backup.
Example. FILE Keyword
FILE myfile ( "c:\winnt\system32\drivers\etc\services" )• Backs up the file services.
FILE mypartition ( "/dev/rdsk/c0t0d0s0" OFFSET 4K SIZE 23550K)• Backs up the raw device c0t0d0s0 from the 4 KB address for a size of 23550 KB.
FILE mymirror ("/mirror/file1" ,"/mirror/file2" ,"/mirror/file3" ,)• Backs up just once the three identical files file1, file2 and file3.
If the size of one of the files is different, an error message is sent to the event file(Meta-file file1 size 4012 <> mirror file3 size 2015).
FILE auto ( MYSELF )• Backs up the current List file. If the List file name is c:\temp\test_list.txt, then FILE auto (
MYSELF ) corresponds to FILE auto ("c:\temp\test_list.txt").
Note: The MYSELF keyword is replaced by the physical name of the List file. If this file contains theINCLUDE keyword, the content of the included file is not backed up. To back up the included file contents,youmust add a MYSELF keyword into the included file.
Tina Administration 357
List Application

INCLUDEINCLUDE ( file_path )
The keyword INCLUDE is used to include the contents of another List file into the list of objects to be backed upand specified in the current List file.
file_path represents the name and path of the List file to include.
Note: It is recommended not to use the keyword INCLUDE recursively (file1 including file2 that includesfile1 itself). To avoid infinite loops, the nesting level is limited to 16.
INCLUDE ( file_path GENBY exec_path)
The GENBY option specifies the script name and path to be used to generate the List file that will be included intothe current List file.
Examples. INCLUDE Keyword
INCLUDE ( "c:\temp\file_list.txt" )• Loads the file c:\temp\file_list.txt and includes it into the current list at the place occupied by the
keyword.
INCLUDE ( "/DT/DEV/people/nko/file_list.txt" GENBY "/DT/DEV/people/nko/gen.sh")• Generates the /DT/DEV/people/nko/file_list.txt file using the
/DT/DEV/people/nko/gen.sh script.
INFOINFO "info_name" ("comment")
The INFO keyword enables you to display and back up comments in the file tree of a List application in Restore& ArchiveManager.
The INFO keywordmust be included into a DIR clause (its parent must be a directory).
Example. INFOKeyword
DIR "First Directory" (INFO "info1" ("This is a comment"))
DIR "Second Directory" (INFO "info2" ("This is another comment"))
Note: If you want the INFO link to be sorted to the top of its directory, start its namewith a spacecharacter.
LINKLINK "link_name" ("target_name")
The LINK keyword enables you to create ameta-link to a file. The file data will not be backed up.
MOUNTDIR "mydir" (MOUNT path)
TheMOUNT keyword enables to back up and restore file systems with the List application in a similar fashionas the Tina Filesystem application. Symbolic links are not followed, they are backed up as a link.
358 Tina Administration
List Application
Note: TheMOUNT keyword cannot be used with the TREE keyword, but is compatible with EXEC andINFO.
Example.MOUNT keyword
DIR "Mounted files" (EXEC "/DT/DEV/dev/rks/testlist/test_exec.sh",MOUNT "/DT/DEV/dev/rks/testdir")
NOSNAPThis keyword is used only when performing snapshot of the List application. When the List application is set tosnapshot a volume, the NOSNAP keyword can be used to prevent the snapshot of a level 1 directory within thatvolume. A level 1 directory is a directory located just below the root of the List application, as defined in the Listfile.
Example 1. NOSNAP keyword
DIR "My Dir" (TREE "/usr/localuser" NOSNAP)DIR "My second Dir" (MOUNT "/usr/tmp")
In this example, the "My Dir" directory is going to be backed up on tape while the "My second Dir" directory isgoing to be snapshotted.
Example 2.
DIR "Root Dir Volume" (
TREE "C:\Temp"
)
DIR "Volume" (
FILE "add file" ("C:\14898.bmp") NOSNAP
)
The NOSNAP keyword is used to disable the snapshot on the DIR subdirectory, enabling the snapshot of the firstDIR on "Root Dir Volume" to take place correctly at the same time as the backup of "C:\14898.bmp".
PIPEPIPE "pipe_name" (GENBY|USEDBY exec_path)
The PIPE keyword enables to back up a dump through a named pipe.
The GENBY option specifies that the pipe is created by the script or the program specified by exec_path.The USEDBY option specifies that the pipe is created by the List application.
The path of the script or program (exec_path) corresponds to the path of the script or program that is run todump data into the pipe.
Tina launches the script exec_pathwith these parameters:
abs_pipe [ -backup [ -full | -incr ] | -restore ] pipe_name• The parameter abs_pipe indicates the OS path of the pipe• The parameters [ -backup | -restore ] indicate whether the operation is a backup or a restore.• The parameters [ -full | -incr ] are used only with -backup and indicates whether the backup is full
or incremental.• The parameter -pipe_name indicates the name of the tube in themeta-directory containing the PIPE
keyword.
Tina Administration 359
List Application

Note: If the GENBY option is used, the TINA_AML_IO_TIMEOUT environment variable can be set tospecify a timeout enabling an external program to create the pipe.
See Environment Variables.
Example. PIPE Keyword
In this example, the script pipe_script.sh is launched with these parameters:
"/tmp/tina_sid" -backup -full "/First Directory/Pipe_A"
DIR "First Directory" (PIPE "Pipe_A" ( USEDBY "/aml/unix/pipe_script.sh" )PIPE "Pipe_B" ( GENBY "/aml/unix/pipe_script.sh" ))
Example. Executable script called by the PIPE keyword
#!/bin/sh# This script does not create a pipe,# so it must be used with the keyword USEDBY.
case "$2" in'-backup')# Create the data$TINA_HOME/Bin/tina_alarm -severity acct -text "Backup data to $1"sleep 5echo "Silly Data" > $1;;'-restore')# Restore the data$TINA_HOME/Bin/tina_alarm -severity acct -text "Restore data from $1 to /tmp/test_pipe_$$"sleep 5cat $1 > /tmp/test_pipe_$$;;*)$TINA_HOME/Bin/tina_alarm -severity error "Usage: $0 abs_pipe [ -backup [ -full | -incr ]| -restore ] pipe_name"exit 100;;esac
exit 0
Example. Executable script called by the PIPE keyword, using the TINA_CATALOG and TINA_AML_FOLDER variables
For more information on TINA_CATALOG and TINA_AML_FOLDER variables, see Environment Variables.
::::::::::::::test_pipe.sh::::::::::::::#!/bin/sh# This script does not create a pipe,# so it must be used with the keyword USEDBY.
case "$2" in'-backup')
# Create the data$TINA_HOME/Bin/tina_alarm -catalog $TINA_CATALOG -severity acct -text
"Backup data to $1 in $TINA_AML_FOLDER"sleep 5echo "Silly Data" > $1;;
'-restore')# Restore the data$TINA_HOME/Bin/tina_alarm -catalog $TINA_CATALOG -severity acct -text
"Restore data from $1 in $TINA_AML_FOLDER to /tmp/test_pipe_$$"
360 Tina Administration
List Application

sleep 5cat $1 > /tmp/test_pipe_$$;;
*)$TINA_HOME/Bin/tina_alarm -catalog $TINA_CATALOG -severity error
"Usage: $0 abs_pipe [ -backup [ -full | -incr ] | -restore ] pipe_name"exit 100;;
esac
exit 0
SYNCHRONIZERSYNCHRONIZER no parameter
The SYNCHRONIZER keyword requires no parameter. It inserts a synchronizer object into the tree. Thesynchronizer, is ameta-file that contains no data. At each backup, Tina backs up a version of the file. Theversions show the possible entry points for restoring the List application to which this synchronizer meta-file islinked.
Note: The Synchronizer meta-file is not related to the synchronization point inserted by theWAITkeyword.
Example. SYNCHRONIZER Keyword
DIR SystemInfo (FILE "passwd "("/etc/passwd")FILE "group "("/etc/group")FILE "hosts "("/etc/hosts")
)
SYNCHRONIZER
TREEDIR name (TREE path)
The TREE keyword causes a gutter typemeta-directory to be recursively extended downwards if it contains sub-directories thus enabling the backup of a tree of files and directories, specifying only one gutter physical path.
Note: Only regular files are backed up with the TREE keyword. Symbolink links are followed to their finaldestination and backed up as files. If you want to back up symbolic links as links and perform a filesystem like backup, use theMOUNT keyword instead of the TREE keyword.
Example. TREE Keyword
DIR "First Directory" (DIR "Rake Files" (EXEC "/home02/rks/testsave/test_exec.sh",INFO " info" ( "Rake means one level only" ),"/home02/rks/testdir"
DIR "Recursive files" (EXEC "/home02/rks/testsave/test_exec.sh",INFO " info" ( "Recursive means all levels" ),TREE "/home02/rks/testdir"
DIR "Specific Files" (EXEC "/home02/rks/testsave/test_exec.sh",INFO " info" ( "Specific means named objects only" ),FILE ".script" ( "/home02/rks/testdir/.cshrc" ),FILE ".doc" ( "/home02/rks/testdir/testdir2/testdir3/testdir4/lindberg.doc" ),LINK ".link" ( "/home02/rks/testdir/.cshrc" ),
Tina Administration 361
List Application

Options
The TREE keyword can also be used with these options:• LEVEL n
This option specifies the number of subdirectory levels to display. If n is equal to 0, all subdirectories aredisplayed. If n is equal to 1, only one level of subdirectories is displayed, etc.
• INCL special_charactersOnly the files matching the special_characters criteria are going to be displayed. The syntax of thespecial characters is the same as the syntax used to filter backup selections. See Filter Syntax.
• EXCL special_charactersAll files matching the special_characters criteria are excluded from the display. The syntax of thespecial characters is the same as the syntax used to filter backup selections. See Filter Syntax.
Example. TREE Keyword with options
DIR "dddd" (DIR "L0" (TREE "/DT/DEV/people/nko/a1" LEVEL 0)DIR "L1" (TREE "/DT/DEV/people/nko/a1" LEVEL 1)DIR "L2" (TREE "/DT/DEV/people/nko/a1" LEVEL 2)DIR "Inc1" (TREE "/DT/DEV/people/nko/a1" INCL "*.c")DIR "Inc2" (TREE "/DT/DEV/people/nko/a1" INCL "*.c*" EXCL "*.cat")
VERSION (optional)VERSION number
The VERSION keyword is used to specify a version number for the List file. In case of a conflict with thesyntactic analyzer (if the analyzer is more recent), a message is displayed in the Tina event file (CurrentActivity-Events menu inWeb Administration to view events).
Example. VERSION Keyword
VERSION 1
If the List file is automatically created, it indicates that it is compliant with version 1 of the syntactic analyzer.
Note: It is advised not to specify a version number in the List file, since the version number only makessense when the List file is automatically created by an application.
# (optional)# comment
The # keyword is used to specify a comment in the List file.
The comment must be entered after this keyword and ends at the end of the line (i.e., if the comment is enteredon several lines, youmust insert the # keyword on each line).
Example. # Keyword# Backs up a system fileFILE system ("c:\winnt\system32\ntio.sys")FILE automatically ( MYSELF )FILE system ("c:\winnt\system.ini" )FILE win ("c:\winnt\win.ini" )DIR special (# backs up confidential dataDIR confidential ("d:\private\secret")FILE key ("d:\private\key.txt")
INCLUDE ("e:\list\add_list.txt")
Backs up these objects:• The system.ini file.
362 Tina Administration
List Application

• The win.ini file.• The key.txt file.• The List file specified by the MYSELF keyword.• The contents of the directory d:\private\secret.• The contents of the List file e:\list\add_list.txt specified by the INCLUDE keyword.
For more information on List application representation in Restore & ArchiveManager file tree, see UsingRestore & ArchiveManager.
WAITTheWAIT keyword implements a synchronization point. The synchronization point can be useful when youperform parallel backups of the List Application. It is an option of the DIR keyword.
When Tina encounters ameta-directory with aWAIT keyword, it waits until all themeta-directory's children andbrothers have finished their backup, and then continue the navigation in the tree for other backups.
Example.WAIT keyword
DIR "First Directory" (FILE "Sample" ("/etc/services")DIR "Dir2" ( TREE "/DT/DEV/people/nko/FF/Src")DIR "Dir3" ( TREE "/DT/DEV/people/nko/AA/Src")WAIT
DIR "Second Directory" ( FILE "Me" (MYSELF)FILE "Host" ("/etc/hosts")LINK "Link" ("/DT/DEV/people/nko/.kshrc")
Creating a dynamic List fileUsing the INCLUDE keyword presented above, you can define a dynamic List file. In that case, the processyou specify with the keyword is run prior to each backup performed by the List application. This feature is veryuseful if the structure of the backed up data changes frequently or if youmust perform a specific action prior tothe backup.
Example of Using the List Application to Back Up aMYSQLDatabase for details on using a dynamic List file.
BackupThe List Application is managed by Tina in the sameway as other applications and hosts. Youmust create atleast one backup strategy and one backup selection to back up a List application automatically. You canperform full and/or incremental backups of the application.
This section deals with the List application configuration and details the steps to follow to set up an automaticbackup.
Configuring BackupsThis procedure is performed usingWeb Administration:1. Create a List application.2. Create or edit a media pool.3. Create a standard backup strategy.
Note: If you want to perform parallel backups set the parallelism index to at least 2, in the Advancedarea of the Properties tab in the Strategy Details window.
Tina Administration 363
List Application

4. Create a backup selection if the default backup selection is not suitable.
• If you want to perform parallel backups, create at least two backup selections and check theParallelize Backups if Possible option in the Options area of the Properties tab in the BackupSelection Details window.
• All these procedures are discussed at length in previous topics. The creation of theapplication is detailed below and additional information concerning the backup selection isprovided as well.
Creating a List ApplicationYoumust define a List type application usingWeb Administration.
To create a List application
1. Connect toWeb Administration and expand your catalog in the Tina Explorer.2. Select Platforms Applications. The Applications pane opens.3. Click New Application to launch the Application CreationWizard.4. Define theList Application Parameters:
ListApplicationParameters
Description
HostSelection
Select the host with which the application is associated.
General Information
ApplicationName
Enter the name of the new application. The application name is the name given to theapplication backup folder. It can be edited at a later date if needed without losing backups.
Each applicationmust be given a different name.
ApplicationType
Select the List application.
Comment Optional: Enter a comment describing the application.
User Information
AbsolutePath of theList File
Enter the absolute path of the List file associated with the application or click Browse toselect it.
The List file can be defined using either the Absolute Path of the List File textbox, or theTINA_AML_SOURCE_FILE environment variable. If a List file is defined at both locations, Tinawill take into account the List file specified in the List File textbox.
User Name Enter the name of the user who has access to the application.
Passwordand ConfirmPassword
Provide the user password and confirm it.
364 Tina Administration
List Application

ListApplicationParameters
Description
Environment Variables
OptionalEnvironmentVariables
To add an optional variable:
1 Click Add and select Add an optional environment variable.
2 Select the variable in the Name tab. The variable definition displays in the Details tab.
3 Click Apply and Close.
4 Enter the variable value in the Value column. The number of defined optional variables isspecified in the list (i.e., Optional (3/13)).
If you do not remember which value you can enter, point your mouse on the variable name todisplay a pop-up containing information on the variable.To edit an optional variable:
5 Click the variable value in the list.
6 Enter the new variable value.
To remove an optional variable:
• Select the variable in the list and click Remove.For a detailed list of all the environment variables available for the List application, seeEnvironment Variables.
You can also set environment variables using the Restore & ArchiveManager.
UserDefinedEnvironmentVariables
A user defined variable is a variable that does not display in the existing variable list.
To add a user defined variable:
1. Click Add and select Add a user defined environment variable. An empty fielddisplays in the list of user defined variables.
2. Enter the name of the variable in the Name column.
3. Enter the value of the variable in the Value column.
5. Check the Summary of the application parameters carefully and click Finish to create the application.6. If the application has been created successfully, click Close to exit the Application CreationWizard. The
newly created application displays in the list of applications.OrIf the application creation fails, read the error messages to solve the problem.
7. Select the application you have just created in the list and click Enable Application to enable theapplication.
Once the List application has been declared inWeb Administration, youmust proceed as follows:• Logically arrange the objects to be backed up in the application folder.• Define the List file(s) associated with the application by specifying the paths of the objects to be backed
up.• Configure the application backup (see Backup Selection).
See List File Syntax.
Tina Administration 365
List Application

Environment VariablesThis table describes all the environment variables available for the List application.
EnvironmentVariable Description
PossibleValues[default]
Status
TINA_AML_DEST_FILE
Absolute path of an Appmeta-language text file defining thedestination tree with the absolute paths to be used for a restoreoperation. If this variable is not set, objects are restoredaccording to the value of the TINA_AML_SOURCE_FILEvariable. If the source text file is not found, objects are restoredto their original address.
AccessPath
Optional
TINA_AML_IO_TIMEOUT
Timeout enabling an external program to create the pipe. Integer inseconds[120]
Themaximumvalue isone day.
Optional
TINA_AML_SOURCE_FILE
Absolute path of an Appmeta-language text file defining thesource tree with the absolute paths to be used for its backup.
AccessPath
Optional
TINA_CATALOG
Specifies the name of the catalog the List application will bebacked up to or restored from. This variable can be used in ascript (see EXEC and PIPE for sample scripts).
String Automaticallyset by Tina
TINA_AML_FOLDER
Specifies the full name of the List application as defined inWebAdministration. This variable can be used in a script (see EXECand PIPE for sample scripts).
TINA_AML_FOLDER contains the "fully qualified" name of theAPPL object, starting with appl., as required by the -folder or-folder_dest parameters of the tina_restore command.
String Automaticallyset by Tina
TINA_PHASE
Specifies the current operation. Typical values are:
Full Backup
Incremental Backup
Data Restore (only for PIPE)
This variable can be used in a script with "EXEC" and "PIPE".
String Automaticallyset by Tina
TINA_STRATEGY
Specifies the strategy used to launch the current backup.Typical values are: A, B, C, D, Any Strategy (only for PIPE)
This variable can be used in a script with "EXEC" and "PIPE".
String Automaticallyset by Tina
366 Tina Administration
List Application

Backup SelectionBy default, a backup selection is automatically set on the root meta-directory of the file tree. This enables you togather objects from different locations in order to back them up easily with the List application.
This default backup selection has these settings:• It is associated with all the backup strategies• No filter is set• No time phase is excluded• The data format is compressed but not encoded
In Tina file tree, the backup selection is represented by a small green ball located on the left of the icon of a Listapplication directory.
The List application enables for amore flexible backup administration. Depending on backup requirements, youcan also define backup selections on different locations in the application folder, as in a file system.
RestoreThe List application enables you to:• Restore objects located in various locations on a samemachine in a simple and quick way.• Restore objects in a different location from the source location (standard restore) or on another machine
with a different disk configuration (cross-restore). This feature is called "relocation".
About User Rights RestoreThese keywords have different behaviors concerning user rights restore:• Using the FILE or TREE keywords enable you to restore user rights along with files.• Using the MOUNT keyword enables you to restore either:
• FilesOr• User rightsOr• Both files and user rights
Restore with RelocationIn order to relocate the List application objects, youmust use the TINA_AML_DEST_FILE environment variable.All the links representing the object restore addresses are relocated to new values. Objects whose destination
Tina Administration 367
List Application

is not specified are restored into a temporary directory.
If this variable is not defined, the object restore addresses will be those stored in the catalog without using theList file.
The TINA_AML_DEST_FILE file must have:• The same syntax than the source List file• The same tree structure
The only difference between the source List file (TINA_AML_SOURCE_FILE) and the destination List file(TINA_AML_DEST_FILE) is the physical path location.
Example. TINA_AML_SOURCE_FILE Source file:
[Windows]
DIR "Program Files" (DIR "Atempo" (
DIR "tina_server" (DIR "File_lists" (
DIR "test" (FILE "test.txt" ("c:\Program Files
Atempo\tina_server\File_lists\test\test.txt"))
))
))
[macOS]
DIR "Document" (FILE "File" ( "/Volumes/Home/Applis/oracle/Documents/my_document.doc" ))
Example. TINA_AML_DEST_FILE Destination file:
[Windows]
DIR "Program Files" (DIR "Atempo" (
DIR "tina_server" (DIR "File_lists" (
DIR "test" (FILE "test.txt" ("c:\Program Files
Atempo\tina_server\File_lists\test\restore\test.txt"))
))
))
[macOS]
DIR "Document" (FILE "File" ( "/Volumes/Home/Applis/oracle/Documents/Restore/my_document.doc" ))
When you open Restore & ArchiveManager, this information is displayed if you defined the TINA_AML_DEST_FILE:
368 Tina Administration
List Application

"Alternate restore destination in force via%TINA_AML_DEST_FILE%"
Using Restore & Archive Manager
File TreeRestore & ArchiveManager for the List application includes a file tree enabling you to view the platform statusat any given time (present or past).
In this example, a demo.txt List file is associated with the Demo list application. It backs up different objects(directories and files), together with another file_list2.txt (INCLUDE keyword) List file. It also backs up theList file itself (MYSELF keyword).
Example. Syntax of the demo.txt List File
[Windows]
$ cat demo.txtDIR "First Directory" (EXEC "g:\AppList\win32\exec_script.bat"INFO "Info 1" ("Objects example")FILE "File List" (MYSELF)
FILE "Services File"("C:\WINNT\system32\drivers\etc\services")PIPE "Pipe A" (USEDBY "g:\AppList\win32\pipe_script.bat")
PIPE "Pipe B" (GENBY "g:\AppList\win32\pipe_script.bat"))
# Includes a List fileINCLUDE ( "c:\temp\file_list2.txt" )
[macOS]
$ cat demo.txtDIR "First Directory" (EXEC "/Users/Demo/mac/exec_script.sh"INFO "Info 1" ("Objects example")FILE "Me" (MYSELF)PIPE "Pipe A" ( USEDBY "/Users/Demo/mac/pipe_script.sh")PIPE "Pipe B" ( GENBY "/Users/Demo/mac/pipe_script.sh"))# Include a list fileINCLUDE ( "/Users/Demo/mac/file_list2.txt")
[Unix]
Tina Administration 369
List Application

$ cat demo.txtDIR "First Directory" (EXEC "/aml/unix/exec_script.sh"INFO "Info 1" ("Objects example")FILE "File List" (MYSELF)
FILE "Services File" ("/etc/services")PIPE "Pipe A" ( USEDBY "/aml/unix/pipe_script.sh" )
PIPE "Pipe B" ( GENBY "/aml/unix/pipe_script.sh" ))
# Includes a List fileINCLUDE ("/tmp/file_list2.txt")
Example. Syntax of the file_list2.txt List File
[Windows]
# List FileDIR "Second Directory" (INFO "Info 2" ("Directories example")DIR "Perl site libs - 1" ("C:\Perl\site\lib")DIR "Perl site libs - 2" ( TREE "C:\Perl\site\lib"))
[macOS]
# List FileDIR "Second Directory" (INFO "Info 2" ("Directories examples")DIR "Library - 1" ( TREE "/Library")DIR "Library - 2" ("/Users/Demo/Library"))
[Unix]
# List FileDIR "Second Directory" (INFO "Info 2" ("Directories example")DIR "Librairies X11 - 1" ("/usr/X11R6/lib/X11")DIR "Librairies X11 - 2" (TREE "/usr/X11R6/lib/X11"))
370 Tina Administration
List Application

The Demo list application is represented in Restore & ArchiveManager by this file tree:
The object representation of the Demo list application in the file tree is explained in this table.
Icon Represents the List object
Closed directory
Open directory
Gutter
File
File physical link
Tina Administration 371
List Application

Icon Represents the List object
Information
Pipe
"Exec"
The location of the object physical link in the file tree complies with this rule:
the object’s physical link displays directly below the object.
• The directory gutter is a destinationmeta-link for all the objects in the directory.
• Since objects in the file tree are classified in alphabetical order, a directory gutter may notdisplay directly below the directory (ex: a file name beginning with a space could be locatedbefore the directory gutter).
Object InformationInformation on objects can be displayed by choosing Tree-Selected Object-Contents or Tree-Selected Object-Versions.
In the Directory Contents window, the file physical link displays with the file name followed by the extension:.00.
For more information on the Tree-Selected Object menu, see File TreeOperations in the Tina RestoreDocumentation.
Restore MethodsRestoring objects belonging to the List application is performed in the sameway as Tina “standard” objects.
The only difference occurs when you select the objects to be restored. The selection depends on the objecttype:• If the file is created with the FILE keyword, youmust select the file and its physical link.• If the file is created with the DIR keyword, youmust select the gutter of the directory into which the file is
located.
Twomethods can be used to restore objects:• The time navigation period.• Synchronization.
Whatever themethod chosen, a basic rule must be followed when selecting the objects to be restored: Selectan object and a destination, i.e its physical link.
TimeNavigation PeriodThe time navigation period is used to show and restore a disappeared file in a given time interval.
To restore objects with a time navigation period
1. Select a time period for showing deleted files in the lower part of the TimeNavigation area.2. Activate the time navigation period by clicking on Show deleted files.3. Select the disappeared objects and their physical links in the file tree.
The icons of these objects and their links are striped.4. Select Restore Run to restore the selected objects.
372 Tina Administration
List Application

Formore information on restoring objects with a time navigation period, see File SearchMethods in the TinaRestore Documentation.
Note: In the Restore window, the option Other Directory of the Parameters tab is not available. If you wantto restore to a different location from the source location, youmust use the Relocation functionality. SeeRestore with Relocation.
SynchronizationSynchronization is used to restore an object as it was at a given date.
To restore a file using synchronization
1. Select the file to be restored in the file tree(ex: Password for the FILE type file, parameters for the DIR type file).
2. Select Tree Selected Object Versions.The Versions in Timewindow opens. It contains the list of backups of the selected file.
3. Select one of the backed up file in the list.4. Click Synchronize.
The file tree is updated. The viewing date is the past: it is the backup date of the selected version.5. For the FILE type file, select the file physical link in the file tree (ex: /etc/passwd).
OrFor the DIR type file, select the gutter of the directory in which the file is located in the file tree (ex:/usr/tina/Conf).
6. Select Restore Run to restore the selected file.
For more information on restoring objects with synchronization, see File SearchMethods.
Note: In the Restore window, the option Other Directory of the Parameters tab is not available. If you wantto restore to a different location from the source location, youmust use the Relocation functionality. SeeRestore with Relocation.
ExamplesThis topic presents an example of the List application. This application type can be used to perform coldbackups of anOracle database, to back up the critical files of an operating system (e.g., passwd under Unix,win.ini underWindows), to perform a raw device backup etc.
List File ExamplesExample. Syntax of a List file to back up Raw devices onWindows
DIR "dump_disk" (DIR "disk_d" (
FILE "dump_d" ("\\.\d:"))DIR "disk_g" (
FILE "dump_g" ("\\.\g:"))
)
Examples. List File Syntax
[Windows]
Tina Administration 373
List Application

This example enables you to perform cold backups of anOracle database.The tina_cold_ora92.txt List file isassociated with the morpheus.ora92.cold List application and backs up these objects:• Data files (tablespaces and datafiles).• Logs (archive_logs).• Control files (control files).• Log files (redo_log files).
# Generated by Tina\-r List 4.4.0.0, App 3.2.3, Dynamic "i386_WinNTV500", Compiled Jan 152014VERSION 4DIR "ORA92" (
DIR "TABLESPACES" (DIR "DRSYS" (
FILE "file0004.dbf" ( "F:\ORACLE\ORADATA\ORA92\DRSYS01.DBF" )),DIR "EXAMPLE" (
FILE "file0005.dbf" ( "F:\ORACLE\ORADATA\ORA92\EXAMPLE01.DBF" )),DIR "INDX" (
FILE "file0006.dbf" ( "F:\ORACLE\ORADATA\ORA92\INDX01.DBF" )),DIR "SYSTEM" (
FILE "file0001.dbf" ( "F:\ORACLE\ORADATA\ORA92\SYSTEM01.DBF" )),DIR "TEMP" (
LINK "tempfile0001" ( "F:\ORACLE\ORADATA\ORA92\TEMP01.DBF" SIZE 40968K )),DIR "TOOLS" (
FILE "file0008.dbf" ( "F:\ORACLE\ORADATA\ORA92\TOOLS01.DBF" )),DIR "UNDOTBS1" (
FILE "file0002.dbf" ( "F:\ORACLE\ORADATA\ORA92\UNDOTBS01.DBF" )),DIR "USERS" (
FILE "file0009.dbf" ( "F:\ORACLE\ORADATA\ORA92\USERS01.DBF" ))
),DIR "_ARCHIVE_LOGS" (
"F:\oracle\oradata\ora92\archive\"),DIR "_CONTROL_FILES" (
FILE "control.ctl" ("F:\oracle\oradata\ORA92\control01.ctl" ,"F:\oracle\oradata\ORA92\control02.ctl" ,"F:\oracle\oradata\ORA92\control03.ctl"
),FILE "control.sql" ( )
),DIR "_REDO_LOGS" (
FILE "GROUP 03" ( "F:\ORACLE\ORADATA\ORA92\REDO03.LOG" ),FILE "GROUP 01" ( "F:\ORACLE\ORADATA\ORA92\REDO01.LOG" ),FILE "GROUP 02" ( "F:\ORACLE\ORADATA\ORA92\REDO02.LOG" )
))
[macOS]
# Generated by Tina Enterprise Edition List 4.4.0.0, App 4.0.4, Dynamic "", Compil\'e Jun30 2014VERSION 6DIR "TIGER10G" (
DIR "TABLESPACES" (DIR "SYSTEM" (
FILE "file0001.dbf" ( "/Volumes/Home/Applis/oracle/product/oradata/TIGER10G/system01.dbf" )
),DIR "UNDOTBS1" (
FILE "file0002.dbf" ( "/Volumes/Home/Applis/oracle/product/oradata/TIGER10G/undotbs01.dbf" )
374 Tina Administration
List Application

),DIR "SYSAUX" (
FILE "file0003.dbf" ( "/Volumes/Home/Applis/oracle/product/oradata/TIGER10G/sysaux01.dbf" )
),DIR "USERS" (
FILE "file0004.dbf" ( "/Volumes/Home/Applis/oracle/product/oradata/TIGER10G/users01.dbf" )
),DIR "TEMP" (
LINK "tempfile0001" ( "/Volumes/Home/Applis/oracle/product/oradata/TIGER10G/temp01.dbf" SIZE 20488K )
)),DIR "_ARCHIVE_LOGS" (
"/Volumes/Home/Applis/oracle/product/oradata/TIGER10G/archives/"),DIR "_CONTROL_FILES" (
"/Volumes/Home/Applis/oracle/product/admin/TIGER10G/udump/" ,FILE "control.ctl" (
"/Volumes/Home/Applis/oracle/product/oradata/TIGER10G/control01.ctl" ,
"/Volumes/Home/Applis/oracle/product/oradata/TIGER10G/control02.ctl" ,
"/Volumes/Home/Applis/oracle/product/oradata/TIGER10G/control03.ctl"),FILE "control.sql" ( )
),DIR "_REDO_LOGS" (
FILE "GROUP_01" ( "/Volumes/Home/Applis/oracle/product/oradata/TIGER10G/redo01.log" ),
FILE "GROUP_02" ( "/Volumes/Home/Applis/oracle/product/oradata/TIGER10G/redo02.log" ),
FILE "GROUP_03" ( "/Volumes/Home/Applis/oracle/product/oradata/TIGER10G/redo03.log" )
))
[Unix]
This example enables you to perform cold backups of anOracle database.
The tina_cold_DB73.txt List file is associated with the charlie_o73_cold List application and backs upthese objects:• Data files (tablespaces and datafiles).• Logs (archive_logs).• Control files (control files).• Log files (redo_log files).
# Generated by TinaVERSION 2DIR "DB73" (
DIR "TABLESPACES" (DIR "RBS" (
FILE "file0002.dbf" ( "/export/home/oradata/DB73/rbs01.dbf" )),DIR "SYSTEM" (
FILE "file0001.dbf" ( "/export/home/oradata/DB73/system01.dbf" )),DIR "TEMP" (
FILE "file0003.dbf" ( "/export/home/oradata/DB73/temp01.dbf" )),DIR "TOOLS" (
FILE "file0004.dbf" ( "/export/home/oradata/DB73/tools01.dbf" )
Tina Administration 375
List Application

),DIR "USERS" (
FILE "file0005.dbf" ( "/export/home/oradata/DB73/users01.dbf" ),FILE "file0006.dbf" ( "/home04/oradata/DB73/users03.dbf" ),FILE "file0007.dbf" ( "/export/home/oradata/DB73/users02.dbf" )
)),DIR "_ARCHIVE_LOGS" (
"/export/home/oracle/admin/DB73/arch/"),DIR "_CONTROL_FILES" (
FILE "control.ctl" ("/home01/oradata/DB73/control01.ctl" ,"/home02/oradata/DB73/control02.ctl" ,"/home03/oradata/DB73/control03.ctl"
),FILE "control.sql" ( )
),DIR "_REDO_LOGS" (
FILE "GROUP 02" ("/export/home/oradata/DB73/redoDB7302.log" ,"/home04/oradata/DB73/redoDB7302.log"
),FILE "GROUP 03" (
"/export/home/oradata/DB73/redoDB7303.log" ,"/home04/oradata/DB73/redoDB7303.log"
),FILE "GROUP 01" (
"/export/home/oradata/DB73/redoDB7301.log" ,"/home04/oradata/DB73/redoDB7301.log"
))
)
Graphical RepresentationThe List application is represented graphically by this file tree in Restore & ArchiveManager:
• The TABLESPACES directory contains Oracle data files.• The _ARCHIVE_LOGS directory contains Oracle logs.• The _CONTROL_FILES directory contains three versions of the same file.
376 Tina Administration
List Application

• The _REDO_LOGS directory contains two versions for each of the three files.
Note: This list is automatically generated by Tina for Oracle each time a database hot backup isperformed.
Example of Using the List Application to Back Up a MYSQLDatabaseThis example illustrates how to use the List Application to back up aMYSQL database.
The combined use of the INCLUDE, GENBY, PIPE, and USEDBY keywords enables you to dynamically generate aList file to back up a database.• These are the List file name and path set in the TINA_AML_SOURCE_FILE variable:
E:\MySqlDev\Scripts\AppGeneratorFullScript.txt• This is the List file contents:
INCLUDE ("E:\MySqlDev\Scripts\gentreeFullScript.lst" GENBY"E:\MySqlDev\V1b\MySql1bFullScript.exe")
• The MySql1bFullScript.exe script generates this file:
# Generated by : E:\MySqlDev\V1b\MySql1bFullScript.exe - version 1.35# Last update : Wed Jul 20 14:35:17 2014## (c) PTH toolsVERSION 5.0DIR "DataBase : golf "( PIPE "#cards" ( USEDBY "E:\MySqlDev\Scripts\BckRest-golfcards.cmd" )PIPE "#columns_priv" ( USEDBY "E:\MySqlDev\Scripts\BckRest-golfcolumns_priv.cmd" )PIPE "#db" ( USEDBY "E:\MySqlDev\Scripts\BckRest-golfdb.cmd" )PIPE "#func" ( USEDBY "E:\MySqlDev\Scripts\BckRest-golffunc.cmd" )PIPE "#golfs" ( USEDBY "E:\MySqlDev\Scripts\BckRest-golfgolfs.cmd" )PIPE "#host" ( USEDBY "E:\MySqlDev\Scripts\BckRest-golfhost.cmd" )PIPE "#parcours" ( USEDBY "E:\MySqlDev\Scripts\BckRest-golfparcours.cmd" )PIPE "#photo01" ( USEDBY "E:\MySqlDev\Scripts\BckRest-golfphoto01.cmd" )PIPE "#scores" ( USEDBY "E:\MySqlDev\Scripts\BckRest-golfscores.cmd" )PIPE "#tables_priv" ( USEDBY "E:\MySqlDev\Scripts\BckRest-golftables_priv.cmd" )PIPE "#user" ( USEDBY "E:\MySqlDev\Scripts\BckRest-golfuser.cmd" )
• The script MySql1bFullScript.exe also generates a cmd file for each table found in the database, asfollows:
rem Windows versionrem SHELL et WIN32remremif "%2"=="-backup" goto backupif "%2"=="-restore" goto resto
:backupC:\MySql4.1\bin\mysqldump.exe golf user >> %1
goto fin
:restotype %1 > E:\MySqlDev\Scripts\resto\golf_user3536.sql
goto fin
Tina Administration 377
List Application

:finexit 0
• To view the contents of the List application, open the Restore & ArchiveManager.
378 Tina Administration
List Application

CHAPTER22-Mapped Network DrivesThese topics explain how tomap network drives:• Net Disk Application• Back up and Restore without the Net Disk Application
Net Disk ApplicationTina enables you to back up, archive or restoreWindows mapped network drives using the Net DiskApplication, if the drives are located in the same domain as themachine they aremapped onto. Otherwise, usethe Backing up and Restoring aMapped Network Drive without the Net Disk Application procedure (see Backup and Restore without the Net Disk Application).
A network drive is a directory or drive of a remotemachine (often used as a file server) that can bemapped ontoany machine in the network. In order to access the drive on a local machine, a user must have the necessarypermissions on the remotemachine.
Note: Do not confuse network drives mapped by the Net Disk application with network drives mapped bytheWindows Explorer (with a letter) in the current session. The basic notionmay be the same, but theenvironments are distinct from one another. As an illustration, it is perfectly possible to back up networkdisks with the Net Disk application without being logged into them on theWindows server.
BackupApplications aremanaged by Tina in the sameway as hosts. Youmust create at least one backup strategy andone backup selection to back up a Net Disk application automatically. You can perform full and/or incrementalbackups of the application.
Configuring BackupsThis list details the steps for setting up an automatic backup. These procedures are performed usingWebAdministration.1. Create a Net Disk application.2. Create or edit a media pool.3. Create a backup strategy.4. Create a backup selection.
Note: All these procedures are discussed at length in previous topics. See Creating aMedia Pool, andAutomatic Backup Configuration . The creation of the application is detailed below and additionalinformation concerning the backup selection is provided as well.
Creating a Net Disk Application
Net Disk applications are defined inWeb Administration.
To create a Net Disk application
1. Connect toWeb Administration and expand your catalog in the Tina Explorer.2. Select Platforms Applications. The Applications pane opens.3. Click New Application to launch the Application CreationWizard.
Tina Administration 379
Mapped Network Drives

4. Define the Net Disk Application Parameters:
Net DiskApplicationParameters
Description
HostSelection
Select the host to which the application is connected.
General Information
ApplicationName
Enter the name of the new application. The application name is the name given to theapplication backup folder. It can be edited at a later date if needed without losing backups.
Each applicationmust be given a different name.
ApplicationType
Select the Net Disk application.
Comment Optional: Enter a comment describing the application.
User Information
Server Name Enter the name of the remotemachine where themapped drives are located. For instance ifyou havemapped X:\dredd\Documents, enter dredd in the server field.
User Name Enter the name of a local machine user who has access to themapped network drives.
The user of the local machinemust be known to the operating system of the remotemachine.To ensure full access when backing upmapped network drives, it is recommended that theuser be an administrator of the domain where themapped network drives are located.Typically, the same user as the one you used tomap the network drive through theWindowsExplorer.
Passwordand ConfirmPassword
Provide the user password and confirm it.
Environment Variables
Path to theNet DiskDynamicLibrary
Enter the Net Disk dynamic library to use. The default value is libtina_ndk.dll.
OptionalEnvironmentVariables
There is no optional variable available for the Net Disk application.
380 Tina Administration
Mapped Network Drives

Net DiskApplicationParameters
Description
UserDefinedEnvironmentVariables
A user defined variable is a variable that does not display in the existing variable list.
To add a user defined variable:
1 Click Add and select Add a user defined environment variable. An empty field displays inthe list of user defined variables.
2 Enter the name of the variable in the Name column.
3 Enter the value of the variable in the Value column.
5. Check the Summary of the application parameters carefully and click Finish to create the application.6. If the application has been created successfully, click Close to exit the Application CreationWizard. The
newly created application displays in the list of applications.OrIf the application creation fails, read the error messages to solve the problem.
7. Select the application you have just created in the list and click Enable Application to enable theapplication.
Backup Selection
In the Tina file tree of Restore & ArchiveManager, the backup selection is represented by a small green balllocated on the left of the icon of a Net Disk application object.
The Net Disk application offers a flexible backup administration of mapped network drives onWindowssystems. Depending on backup requirements, you can also define backup selections at different locationswithin the application folder, at themachine’s level, at themapped network drives’ level and even within themapped network drives. The Net Disk application also supports synthetic backups.
Note: Hidden drives, such as C$, do not display in the Net Disk application file tree and cannot be backedup by the Net Disk application.
Parallel Backup
The Net Disk application supports parallel backups. Parallel backups increase system performance by enablingusers to back up jobs into several processes that can run simultaneously.
Tina Administration 381
Mapped Network Drives

The user must select parallelism points in Tina and set themaximum number of streams in the strategy(parallelism index). When Tina encounters such a point during backup, it spawns a process to back up the nodeand its sons.
Note: A parallel backup selection defined directly on the level of network drives will not be taken intoaccount by Tina. Youmust define the backup selections on the levels beneath the drives.
To configure parallel backups
1. To create a Net Disk application.2. Creating a Standard Strategy.3. Set the parallelism index equal to the number of drives in the Advanced area of the Properties tab in the
Strategy Details window. For the parallel backupmechanism to be visible, it is recommended to set anindex greater than 2.
4. Creating a Backup Selection (at least two backup selections).5. Check the Parallelize Backups if Possible option in the Options area of the Properties tab in the Backup
Selection Details window.
RestoreThe Net Disk application enables you to restoremapped network drives onWindows.
You can restore objects that have disappeared duringmishandling or a disk crash, but also restore objects asthey were at a given date. The restore operation is performed in Restore & ArchiveManager.
• The Net Disk application does not support parallel restore.
• To ensure full access when restoringmapped network drives, it is recommended that theuser be an administrator of the domain where themapped drives are located.
For more information on restore procedures, see File Restore in the Tina Restore Documentation.
ArchivingMapped network drives can be archived through Restore & ArchiveManager.
For more information on archiving procedures, see Archiving StructureManagement and Archiving Data in theTina Archiving Documentation.
Back up and Restore without the Net Disk ApplicationIn order to back up, archive, and restore network drives mapped on aWindows machine located in a differentdomain, youmust proceed as follows:1. Tunables
From theWeb Administration, expand your catalog and select Configuration Tunables. Click NewTunable to launch the Tunable CreationWizard. Set these tunables either by entering their name or byselecting them in the Tunable list:• Network Drive Backup (force_fixed_bad_remote_disk) with the value yes as a new value• Pre-processing for Archiving Job (archive_pre_processing)• Post-processing for Archiving Job (archive_post_processing)• Pre-processing for Restore Job (restore_pre_processing)• Post-processing for Restore Job (restore_post_processing)For more information on activating tunables, see Tunables.
382 Tina Administration
Mapped Network Drives

Note: For backups, the pre and post processings are specified in the Advanced area of theProperties tab in the Strategy Details window, not through a tunable.
Tomount and unmount the network drives before and after archiving or restore, the pre-processingtunables must contain the path to amount script, and the post-processing tunables the path to anunmount script.Examples of values to define for these tunables in the Value tab:• For the archive_pre_processing tunable: c:\tina\conf\backup_pre.bat• For the archive_post_processing tunable: c:\tina\conf\backup_post.bat• For the restore_pre_processing tunable: c:\tina\conf\restore_pre.bat• For the restore_post_processing tunable: c:\tina\conf\restore_post.bat
Note: The script pathmust NOT contain any space.
2. ScriptsThe letter you use in the scripts to define the destination drive for themappingmust be different from theletter defining the source drive, andmust not be already in use for anything else.For instance, if the drive you wish to back up is mapped on F:\, map it to R:\ in the scripts and ensure thatR:\ is not used for anything else. Thus the Tinamounting/unmounting activities will not interfere with yournormal use of themapped drive.
These are two examples of themount/unmount scripts called by the tunables.Mount--------
net use s: \\tetram\dkf winnt /user:administratorif %ErrorLevel% NEQ 0 goto ErrorS
goto End
:ErrorSc:\tina\bin\tina_alarm -text "Mount error \\tetram\dkf ons:" -severity majorgoto End
:End
Unmount---------
net use s: /deleteif %ErrorLevel% NEQ 0 goto ErrorS
goto End
:ErrorSc:\tina\bin\tina_alarm -text "Error cannot unmounts:" -severity minorgoto End
:End
3. Filesystem ApplicationCreate a Filesystem application inWeb Administration on the host where the network drives aremapped.In the User Name textbox, enter the same user as the one declared in themount/unmount scripts("administrator" in the example above).
4. Backup StrategyCreate a strategy for the FileSystem application.• In the Options area of the Properties tab in the Strategy Details window, select the Go through
Network File Systems check box.
Tina Administration 383
Mapped Network Drives

• In the Advanced Commands area of the Properties tab in the Strategy Details window, enter thepath to amount script in the Preprocessing field and the path to an unmount script in thePostprocessing field.
5. Backup SelectionTo create the backup selection(s), map the network drive on the letter used in the scripts. Open Restore &ArchiveManager to view the drives in the file tree structure and set your backup selection(s). Unmap thedrive.
ArchivingNetwork drives can be archived using Restore & ArchiveManager.
For more information on archiving procedures, see Archiving StructureManagement and Archiving Data in theTina Archiving Documentation.
384 Tina Administration
Mapped Network Drives

CHAPTER23-Filesystem ApplicationThese topics explain describes Filesystem Application:• About the Filesystem Application• Backup• Restore• Archiving
About the Filesystem ApplicationThe Filesystem application enables you to go beyond themaximum of four strategies that can be created for ahost. A Filesystem application acts as a clone for a host, thus for each application created you can specify fouradditional strategies.
In addition, the root directory of the Filesystem application can optionally be defined as an environment variable,and can be different from the root directory of the host with which the application is associated. In this case,using the Filesystem application enables you to dissociate data from its actual location on the network.
Benefits of defining the root directory of the Filesystem Application• If the directory composing the root of the Filesystem application backup selection is moved to a different
location, only the value of the environment variable must be changed. Nomodification of the backupfolder of the application is required. Thus the backup history of the backup selection is maintained, andyou do not need to create a new backup selection.
• If you create several Filesystem applications associated with the same host, to back up directorieslocated on separate disks, you are able to parallelize the backup of your host, thus improving backupperformance.
BackupTo perform backups with a Filesystem application, configure Tina:1. Creating a Filesystem Application2. Creating or Editing aMedia Pool3. Creating a Backup Strategy4. Creating a Backup Selection.
Creating a Filesystem Application1. Connect toWeb Administration and expand your catalog in the Tina Explorer.2. Select Platforms Applications. The Applications pane opens.3. Click New Application to launch the Application CreationWizard.
Tina Administration 385
Filesystem Application

4. Define the Filesystem Application Parameters:
FilesystemApplicationParameters
Description
HostSelection
Select the host to which the application is connected.
If you intend to use the TINA_FS_ROOT_DIR variable to specify the root of the application,ensure that the host you select enables you to access the entire file tree you intend to backup.
General Information
ApplicationName
Enter the name of the new application. The application name is the name given to theapplication backup folder. It can be edited at a later date if needed without losing backups.
Each applicationmust be given a different name.
ApplicationType
Select the Filesystem application.
Comment Optional: Enter a comment describing the application.
User Information
User Name Enter the name of the user who has access to the application.
On Unix platforms, if you intend to use the TINA_FS_ROOT_DIR variable to specify the rootdirectory of the Filesystem application and if that path includes amount point to another host,ensure that you choose a user that has the permission to access both hosts.
Passwordand ConfirmPassword
Provide the user password and confirm it.
Environment Variables
386 Tina Administration
Filesystem Application

FilesystemApplicationParameters
Description
OptionalEnvironmentVariables
To add an optional variable:
1. Click Add and select Add an optional environment variable.
2. Select the variable in the Name tab. The variable definition displays in theDetails tab.
3. Click Apply and Close.
4. Enter the variable value in the Value column. The number of defined optionalvariables is specified in the list (i.e., Optional (3/13)).
If you do not remember which value you can enter, point your mouse on the variable name todisplay a pop-up containing information on the variable.To edit an optional variable:
1. Click the variable value in the list.
2. Enter the new variable value.
To remove an optional variable:
• Select the variable in the list and click Remove.For a detailed list of all the environment variables available for the Filesystem application,see Environment Variables.
You can also set environment variables using the Restore & ArchiveManager.
UserDefinedEnvironmentVariables
A user defined variable is a variable that does not display in the existing variable list.
To add a user defined variable:
1. Click Add and select Add a user defined environment variable. An empty fielddisplays in the list of user defined variables.
2. Enter the name of the variable in the Name column.
3. Enter the value of the variable in the Value column.
5. Check the Summary of the application parameters carefully and click Finish to create the application.6. If the application has been created successfully, click Close to exit the Application CreationWizard. The
newly created application displays in the list of applications.OrIf the application creation fails, read the error messages to solve the problem.
7. Select the application you have just created in the list and click Enable Application to enable theapplication.
Environment VariablesThis table describes all the environment variables available for the Filesystem application.
Define the variables values. For instance, for the TINA_FS_ROOT_DIR variable, enter this value to specify thepath of the directory to be used as the root of the Filesystem application:
Windows. c:\usr\people\rde
macOS. /usr/people/rde
Tina Administration 387
Filesystem Application

Unix. /usr/people/rde
EnvironmentVariable Description Status
TINA_FS_FOLLOW_MOUNT
When set to yes, specifies to follow mount points to back upmounted directoriesand files. This variable is taken into account only if you are using TINA_FS_ROOT_DIR. If not, mount points are followed by default and you need not set thisvariable.
Optional
TINA_FS_ROOT_DIR
Specifies the access path of the directory to be used as the root of the Filesystemapplication.The value of the variable must be an existing directory. If the variable is not set,the root of the Filesystem application is the root of the host.
If you set this variable, mount points are not followed. To use TINA_FS_ROOT_DIRand follow mount points, set TINA_FS_MOUNT_POINT to yes as well.
Optional
Creating or Editing a Media PoolYoumust have at least onemedia pool available to associate with your backup strategy. Your data will bewritten onmedia contained in themedia pool designated in the backup strategy.
Creating a Backup StrategyAt least one backup strategy must be defined. The strategy determines how and when data should be backedup.
• On Unix platforms, if you are setting the TINA_FS_ROOT_DIR environment variable to specifythe path of the root directory, the Go through Network File Systems option in the Optionsarea of the Properties tab in the Strategy Details window cannot be used.
• If you want to perform parallel backups set the parallelism index to at least 2, in theAdvanced area of the Properties tab in the Strategy Details window.
Creating a Backup SelectionAt least one backup selectionmust be defined. The backup selection determines what data should be backedup.
Note: If you want to perform parallel backups, create at least two backup selections and check theParallelize Backups if Possible option in the Options area of the Properties tab in the Backup SelectionDetails window.
If you are using the TINA_FS_ROOT_DIR environment variable to specify the path of the root directory, you canalso choose to set several backup selections on any sub-directories within the root directory.
Note: Once the TINA_FS_ROOT_DIR environment variable is set, only local directories can be backed up. Ifyour backup selection contains directories that aremounted or mapped onto other file systems they willnot be backed up.
388 Tina Administration
Filesystem Application

In the Tina file tree, the backup selection is represented by a small green ball located on the left of the directorydesignated as a backup selection.
RestoreThese topics describe how to view the application contents and restoring data:• Viewing the Application Contents• Restoring data
Viewing the Application ContentsThe Filesystem Application contains an Informationmeta-directory just below the root. This directory containsuseful system and parameter information. It is visible within Restore & ArchiveManager, and enablesenvironment variables to be edited or unset in that interface, in addition toWeb Administration. The informationdirectory is backed up in the catalog so that settings at themoment of any previous backup can be seen.
Tina creates a gutter meta-directory when backing up the filesystem application. The gutter enables the creationof the directories specified in the destination path if they aremissing when a restore is performed. The path ofthe gutter directory is based on the value of the TINA_FS_ROOT_DIR environment variable.
Restoring dataTo restore data with the Filesystem application, proceed as with any other Tina application.
If you have set the TINA_FS_ROOT_DIR environment variable to perform backups, the variable will alsodetermine where the data should be restored.
A Filesystem application backed up on Unix or macOS can be cross-restored to aWindows platform. To do so,first edit the Filesystem application inWeb Administration (Select the application and click Application Details)and remove any User and Password that may have been defined there. Both fields must remain blank toperform inter-system cross-restores.
Tina Administration 389
Filesystem Application

Formore information on restore procedures, seeWebRestorein the Tina Restore Documentation.
ArchivingThe Filesystem application can be archived through Restore & ArchiveManager. See the Tina ArchivingDocumentation
390 Tina Administration
Filesystem Application

CHAPTER24-Additional InformationThis topic provides additional information on:
l Troubleshooting Tina
l Advanced Library Properties
l Specific Library Information
l TCP Parameter Modification
l Tina SnapBackup
l Network Ports Details
Troubleshooting TinaThis topic presents the Advanced Environment Reporter, an essential tool for use when you cannot resolveyour problem andmust call Atempo Support for help.
Advanced Environment ReporterThese topics describe the Advanced Environment Reporter:• About Advanced Environment Reporter• Downloading and Installing Advanced Environment Reporter
About Advanced Environment ReporterThe Advanced Environment Reporter collects technical information on your backup or archiving architecture.
This comprehensive debug and troubleshooting tool gathers all technical data about your operating system andAtempo software configuration into one file Then, you can send the file to AtempoCustomer Support throughemail or FTP.
Best Practice
To improve the processing time of your calls, youmust generate and send an environment report whenever youlog an incident. The report is formatted in such a way that it can be rapidly machine-read and imported into adatabase by AtempoCustomer Support.
Confidentiality
The advanced_env_report does not extract any information of a confidential nature and Atempowill notdisclose any information collected by advanced_env_report to any other party.
Downloading and Installing Advanced Environment ReporterAdvanced Environment Reporter is installed with Tina in the appropriate directory.
Tina Administration 391
Additional Information

This table describes the directories where the Advanced Environment Reporter is installed:
Software Directory
Tina Windows. %TINA_HOME%\Tools\Tina\EnvReport
macOS. - Unix. $TINA_HOME/Tools/Tina/EnvReport
If for any reason you cannot locate the program in these paths, you can download themost recent version fromthe AtempoClient Portal.1. Click Generate an AER located:
• Windows. At the top right .• macOS. At the bottom left.When you click Generate an AER, Miria:• Creates an AER Collection job that you canmonitor from the List of Jobs in theMiria Administration
Console.• Generates an environment report of the selected archiving platform.• Adds a row to the AER table describing the new report.
Note: Miria stores the reports in the same directory regardless of the tool (i.e., graphically or runningCLI commands) used to generate them. So you can send the environment report to the AtempoSupport Service even if your machine or theMiria server do not have any Internet access.
The AER tab provides the list of all the existing environment reports.
Generating the ReportLaunching Environment Reporter on macOS or Unix
Note: Before launching this procedure, be aware that information gathering can be a lengthy process. Atany time during this process, you can use the key combination CTRL+C to cancel the report.
To generate a report in command mode
1. Navigate to the directory where Advanced Environment Reporter is installed.2. Open a shell.3. Run this command:
# ./advanced_env_report.shIf needed, enter the root user password.
Configuring the ReportUndermacOS and Unix, advanced_env_report does not have a graphic interface. When you launch the shell,all Atempo software environments present on your system are detected and presented as numbered options.
This table describes the Atempo software environments that the shell can detect:
Software Example of Launch Command
Once you have selected the software environment on which to run the report, a list of options (preset to theirdefaults) opens. These options are described in full under Description of Options.
392 Tina Administration
Additional Information

This table briefly describes these options:
Software Example of Program List
Tina ----------------------------------
Environment tinalpha_P3896 (tina) selected
----------------------------------
Using tina : ** Version 5.0 SP0 P3896 ** Linux-X64 ** Apr 12 2010
1) Generate config only: No
2) Generate a compressed file: Yes (using gzip)
3) Split the resulting file after 1900KB: No
4) Catalog selection: 2 / 2 selected
5) Catalog permissions: 0 / 2 are ok
0) Run Report !
your choice (0)
• Selecting any option toggles between the default and the alternative (e.g., selecting option 1sets it to Yes, whereas selecting option 2 sets it to No).
• To exit the Advanced Environment Reporter without running it, press CTRL+C on the commandline.
Description of OptionsThe shell presents these options preset to their defaults:
Option 1: Generate Configuration Only
If you specify option 1 at the prompt:
your choice (0)1
only files related to the system configuration are collected. No information on your Atempo software iscollected. The default is No.
Option 2: Generate a Compressed File
This option, set by default at Yes, causes the Environment Report to be compressed into a gzip file ongeneration. This action reduces the report size significantly andmakes it easier to send or upload.
Option 3: Split the Resulting File
If your file is so large that youmust send it in several parts, specify this option to split the Environment Reportinto segments of 1,900 KB. The default is No.
Tina Administration 393
Additional Information

Option 4: Catalog Selection
If you select this option, here is what happens:
your choice (0)4
Catalog List :1:aria_tina42Selected2:aria_tinaSelected
97 : Select All98 : Unselect All
99 : Return to main menu0 : Launch collection now
Under Catalog List, you see a numbered list of catalogs with their selection status. To select all catalogs,enter the value 97. To deselect all catalogs, enter the value 98. To toggle the selection of a particular catalog,enter its number:
Your choice (0)2
Catalog List :1:aria_tina42Selected2:aria_tinaNot Selected
Option 5: Catalog Permissions
If you run advanced_env_report and this line changes from something similar to:
5) Catalog(s) permissions: 2 / 2 are ok
to something similar to:
5) Catalog(s) permissions: 0 / 2 are ok
this means that a connection to one or more catalogs has failed, and could be due to catalog permissions.Possibly you are not logged in with the user and password necessary to connect to the catalog. RunOption 5 tocheck andmodify permission status:
your choice (0)5
Catalog List :1:aria_tina42:Using no specific identity2:aria_tina:Using no specific identity98 : Change Global User Access
99 : Return to main menu
0 : Launch collection now
your choice (0)
394 Tina Administration
Additional Information

In this example, when the user selects the catalog aria_tina42 by number, we find that this user does nothave archiving administrator rights on this catalog. The user must enter another identity with sufficient rights,using the format as indicated in this example.
Please enter the new global identity with the format "user":"password" :1Check access to catalog "aria_tina42":Access deniedMissing "General Tasks (Use "Administration Console", Alarms, Jobs)" access right
If the connection has been successful with this user, the terminal returns:
Check access to catalog "aria_tina42":OK
Tomodify access permissions to all catalogs at once (using one global identity), enter the option 98.
Please enter the new global identity with the format "user":"password" :tina:tina
Generating the Report under macOS and Unix
To generate the Report in command mode
1. After configuring advanced_env_report, start generation by entering option 0 at the choice prompt:
your choice (0)0As the report is generated, the list of files being collected and copied scrolls to the screen. This processcan take some time.Finally, you will see amessage similar to this one:
Please send the following files to the email address "[email protected]" :
/Applications/Atempo/TimeNavigator/Adm/AER_aria.orsay.quadratec.fr2008dec08_17h25.tar.gz (size : 216 KB)
(Do not forget to specify your Call Number)2. Send the report files to [email protected]. You can also upload these files by FTP when you open an
inquiry. See Sending the Environment Report by FTP for details.
Using Advanced Environment Reporter with WindowsLaunching and Configuring Advanced Environment Reporter
Note: Before launching this procedure, be aware that information gathering can be a lengthy process.
1. On the server of your Atempo product, select Start menu All Programs Tina Utilities Environment Reporter.OrDouble-click the advanced_env_report.exe file to run Environment Reporter.
2. If your system has UAC enabled, you are prompted for confirmation to run in administrationmode.3. Select your environment and catalogs, and set your configuration options as explained in Description of
the Environment Reporter Interface.4. When you have set up the report as desired, click Generate Report in the lowermiddle of the window.5. Notice the path in the ReadOnly field at the bottom of the interface. This is the path where you can find
the reports once they have been generated.
Description of the Environment Reporter InterfaceThe Advanced Environment Reporter interface opens.
Tina Administration 395
Additional Information

This image illustrates the Advanced Environment Reporter interface:
A pane at the top left of the window displays the names of all Atempo software environments detected on thesystem.
Depending on which environment is highlighted in the list, a second list in themiddle of the interface becomesactivate. If a Tina environment is selected, this pane contains all catalogs configured for that environment.
You can select multiple catalogs or modify the default by selecting only one. The value in the Permissioncolumn for the catalogs selected should show OK. If it does not show sufficient rights, see Change AccessUser Button.
Three read-only text fields at the top right display information on the selected service.
This table describes the read-only text fields:
Text Field Description
Status Service These are the possible statuses:
• Running• Stopped• Does not exist
Host Name The name of themachine hosting the server of the selected software environment.
Version The version and patch of the selected software environment.
Generate Configuration Only
If you select this option check box, only files related to the system configuration are collected. No informationon your software is collected.
Change Access User Button
Click this button to change the login details for accessing other catalogs. An interface opens to enable you toenter the Name and Password of the catalog privileged user. If you have selectedmultiple catalogs and each
396 Tina Administration
Additional Information

has a different username/password, youmay have to repeat this procedure for each one.
Options Button
Click Options to open a window that offers various choices on Report Packaging and Secure Report service.
This table describes the check boxes of the Options window:
Check box Action
Generate azip file
Compresses the Environment Report into a zip file upon generation. Since the compressionreduces the file size significantly, this option is selected by default.
Remove IPAddresses
Removes your network IP addresses from the report.
Generate Report Button
Once you have finished setting up all your configuration details, clicking this button generates the environmentreport.
Generating the Report under WindowsThe report generation can take some time. As it runs, different messages might warn you that some commandshave exceeded their timeout, and provide you the option to abort the current command. Wait a few minutesbefore clicking.
When report generation is finished, amessage box displays a list of the names and paths of the generated filesand instructions for various methods of sending them to Atempo. See Sending the Environment Report by FTPfor details on sending the report by FTP.
When you click OK, you are returned to the previous window, on which the Cancel button is now replaced bythe Close the window button and the Split Result button.
Split Result. Select this option to split the Environment Report into segments of desired size. The smaller filesizes speed the transmittal of the report to Atempo, so this option has a default of 2 MB.
Sending the Environment Report by FTP1. Open a command line window and position your cursor in the directory where the zip file was generated
(this should be displayed in the Finishmessage).2. Rename the file so the start of the filename is the incident number (e.g., 81145_AER_ESC-HSS_tina_
Sep30.zip).3. Upload the file to the FTP Atempo.4. Enter these credentials:
• User: welcome• Password: 2support
5. Once connected, set the transfer mode to Binary by typing the command bin at the prompt.6. Upload the file with the command mput.
Example. This is the complete procedure inWindows:
C:\Program Files\Atempo\TimeNavigator\tina\Adm > ftp ftp.atempo.comConnected to ftp.atempo.com220 Serv-U FTP Server v15.1 ready...User (ftp.atempo.com:(none)): welcome
Tina Administration 397
Additional Information

331 User name okay, need password.Password:2support230-User logged in, proceed.230 PLEASE - Add the Atempo Ticket Number or Company name to the beginning of the filename you are uploading. Thank You.ftp> bin200 Type set to I.ftp> mput 81145*mput 81145_AER_ESC-HSS_tina_Sep30.zip? y200 PORT command successful.150 Opening BINARY mode data connection for 81145_AER_ESC-HSS_tina_Sep30.zip.226 Transfer complete. 1,843,719 bytes transferred. 801.29 KB/sec.ftp: 1843719 bytes sent in 2,13Seconds 867,63Kbytes/sec.ftp>C:\Program Files\Atempo\TimeNavigator\tina\Adm >
Advanced Library PropertiesThese topics describe the Advanced Library Properties:• Standard Properties• Generic Properties• Specific Properties• Geometry Properties
Standard PropertiesBasic properties are available for all libraries. They concern Tina performance, but will not cause any majordisruption if improperly set.
Property Description
BarcodesAvailable
Indicates that the library is able to handle a barcode reader.
Does not mean that the library actually contains a barcode reader.
Dismount Mediaafter Use
Usually Tina leaves media inside the drive after an operation has been performed. If thisproperty is selected, media will be systematically put back in their original slots once ajob is completed.
This property is required for libraries that unload drives upon opening the library door.
Shared Libraryusing LSMModule
Enables Library SharingManager use and the shared drive allocation and release.
Drive AllocationLog for SharedLibrary
Activates logs if the Shared Library property is enabled.
Cleaning SlotAvailable
Indicates that a slot has been reserved in the library for the cleaningmedia.
398 Tina Administration
Additional Information

Property Description
Reserved Slot Number of the slot reserved for the cleaningmedia (0 to n).
Number ofPerformedCleanings
Number of cleanings already performed.
MaximumNumber ofCleanings
Maximum number of cleanings a cleaningmedia can perform.
Generic PropertiesGeneric properties concern the library’s handling and behavioral logic.
Note: If misused, these properties can prevent the library from working properly.
Property Description
Media ejected whenPower switched on
Enables the automatic remounting of amedia in a drive. To be used for certain librarytypes which eject media when the power is turned on. Example: MP Magstar.
Use Slot AccessStatus
When amove request is initiated, Tina verifies both the full/empty status and theaccessible/non-accessible status of a slot. For libraries not returning reliableinformation on accessible/non-accessible status, the Access status slot is notverified, and this property is unselected.
Use Drive ExceptStatus
This property is only used for Exabyte full size drives.
Store Media inInitial Slot Source
When a drive is unloaded, this property enables you to put themedia back in itsoriginal slot. This property is required for autoloaders such as PowerStore L200.Otherwise, the request is rejected and deemed illegal.
Reliable MailboxStatus
When amove request involvingmailbox slots is initiated, Tina verifies the full/emptystatus and the accessible/non-accessible status. Do not select this property iflibraries do not return reliable information on accessible/non-accessible status.Themailbox slots access status will not be verified.
Unload LibraryDrives beforeperforming IES
This property is used when a library cannot perform the Init Element Status (IES,library inventory) while amedia is mounted in a drive. Checking this property willempty all drives before the IES and replace themedia in the drives after the IES.
Use Drive AccessStatus beforeCleaning
Beforemounting a cleaningmedia in a drive, Tina verifies both the full/empty statusand the accessible/non-accessible status of a drive. For libraries not returning areliable accessible/non-accessible status information, the drive Access status in notbeing verified, this property is unselected.
Tina Administration 399
Additional Information

Property Description
Check Drive Statusafter Cleaning
Once a cleaning has been performed, Tina verifies both the full/empty status and theaccessible/non-accessible status of a drive. For libraries not returning reliableinformation on accessible/non-accessible status, the Access status slot is notverified, and this property is unselected
No Request tomove Media afterCleaning
After a cleaning, Tina systematically removes the cleaningmedia and puts it backinto the cleaning slot. However, some libraries have this function built-in. Thisproperty is designed to avoid errors due to trying tomove the cleaningmedia twice.
Picker Address isalways 0
This property is required for a library without a picker. It applies especially toautoloaders.
Eject Media beforeMoving
Activates media unloading and ejection prior to movingmedia to a slot (most cases).
Can Read Barcodein Drive
Indicates that the barcode reader can read a barcode when amedia is inside a drive.Usedmostly for DLT.
Check media indrive in Exceptstatus
For drives having a shutter-like door, it can happen that amedia located inside isignored after reinitialization. This property enables for a direct drive inquiry, especiallyfor libraries that do not use a serial line to communicate with drives.
IES with RangeSCSI CommandSupport
Indicates whether or not the library supports the "IES with Range" SCSI command.
Specific PropertiesSpecific properties concern library handling and behavior logic with a SCSI dimension.
Note: If misused, these properties can prevent the library from working properly and can force theadministrator to restart themachine connected to the library.
Property Description
Manage Pack For certain QUANTUM libraries, this property controls the loading/unloading of thelibrary silo.
Use "Position ToElement" before"Move Medium"
Positions the slot in front of the drive tomove amedia. Applies to library with amovingsilo instead of a picker.
Certain QUANTUM only.
Read Barcodeafter "MoveMedium" fromDrive or Mailbox
media operations do not necessarily warrant a barcode rereading. This property forces amedia barcode reading after amove from a drive or mailbox to a slot.
This property requires Init Element Status with Range (IESR) support.
400 Tina Administration
Additional Information

Property Description
Use "ReadyInport" tomanage themailbox
With an ATL 2640, accessing themailbox requires the activation of a switch.
ATL 2640 only.
Use "InitElement StatusWith Range"
The Init Element Status with Range (IESR) is used to perform the inventory when theInit Element Status (IES) is unusable.
3575 only.
Force BarcodeReading on "InitElement Status"
To prevent rejection of the SCSI command, a barcode reading is performed even if theInit Element Status (IES) has not required it.
7331 only.
Discard MailboxDetection
The library geometry is usually derived from information provided by the library. Thisproperty sets the number of mailboxes to 0. Useful for someQUANTUM libraries thatuse their silos as amailboxes.
QUANTUM only.
Use "Store ToImport/Export"Bit to detectMailbox
The library geometry is usually derived from information provided by the library. Withthis property, the presence of amailbox is based on a bit (STIE). Useful for the BruceHill Q serie that consider its packs as mailboxes.
Bruce Hill Q serie only.
Reset IncorrectStatus for Slotand Picker
The slot or picker status is provided by the library. This property resets the status sincethe library information is incorrect.
SomeQUANTUM only.
Able to FlipMedia
Indicates that the library is able to flip media.
Magneto-optical drives only.
Use DriveAccess Status
When amove request is initiated, Tina verifies both the full/empty status and theaccessible/non-accessible status of a drive. For libraries not returning reliableinformation on accessible/non-accessible status, the Access status slot is not verified,and this property is unselected.
(Magneto-optical drives only).
No IESCommand if aDrive is Full
This property concerns Exabyte EZ17 libraries only. It prevents IES commands frombeing sent to the library.
VTL Use "info"file
Indicates that the virtual library content comes from the vtl_info.txt configurationfile.
Applies to virtual libraries (VTL) only.
VTL Self DriveStatus Fix
If there is a conflict between the library and a drive concerning the drive empty/fullstatus, the library status prevails unless this property is activated.
Applies to virtual libraries (VTL) only.
Tina Administration 401
Additional Information

Property Description
Wait End ofMailbox Status
For libraries with removablemailboxes, this property prevents any mediamove orderfrom being issued while themailbox contents are being scanned.
Scan MailboxException
Enables the library to scan all mailbox slots in order to update their contents, if thestatus of the slot has become questionable.
Geometry PropertiesThe geometry properties define the library screen appearance in the Libraries view.
Property Description
Slot 0 Position Assign slot 0 a location in the library. Select the location from the drop down list.
Slot 1 Position Select from the drop down list:
• Same line as Slot 0: positions slot 1 on the same line as slot 0 (horizontally).• Same column as Slot 0: positions slot 1 on the same column as slot 0
(vertically).
Number ofcolumns/lines
Number of columns or lines displayed in the Library Manager, according to the Slot 1Position property.
Specific Library InformationThese topics describe the Specific Library information:• MediaManagement when Partitioning aQUANTUM Scalar i500 Library• Atempo-Tina for ACSLS/LibraryStation
Media Management when Partitioning a QUANTUM Scalar i500LibraryTheQUANTUM Scalar i500 Library enables for the partitioning of a physical library into several logical librariescalled partitions. Each partition functions as a fully-fledged library on its own. It possesses a certain number ofslots which are visible to it alone, except for themailbox slots (I/E Station in QUANTUM terminology) which areshared by all the partitions.
This particularity has two consequences onmedia import and export operations:• Whenmedia are exported and a partition places media into the slots of themailbox, these slots are seen
by other partitions with a status of "Except".• Whenmedia are imported: themedia inserted in themailbox must be assigned to a partition by the
operator. This assignment is performed from the library's Control Screen in the form of a selection of thepartition that the operator is required tomake. The selection interface is displayed until the operator hasmade a choice. You cannot reject or interrupt this choice.
However, the operator can forget to respond to the choice of partition proposed by the library. In this case, allthemedia that have been inserted in themailbox remainmarked with the "Except" status for all partitions.
402 Tina Administration
Additional Information

To ensure that operations of putting online and putting offline are correctly run in Tina:• A partitionmust absolutely be assigned tomedia newly placed in slots or having changed slots in the I/E
Station. This assignment must be performed by the operator from the Control Screen of the Library.• The operator imperatively must wait for the end of the reinitialization of the I/E Station before validating a
putting online or offline operation in Tina.
To import media with this library
Note: Some of the steps are performed from Library Manager. See the Tina Administration Documentationfor Classic Interfaces for details on Library Manager.
1. Open the drawer of the I/E Station.2. Insert themedia.3. Close the drawer of the I/E Station.4. Wait for the end of the reinitialization of the I/E Station.5. Assign each of themedia to a partition.6. InWeb Administration, reinitialize the barcodes of themailbox.7. Put themedia online in Library Manager.
With regards tomedia exports in Library Manager, the first thing to do is to reinitialize the barcodes of themailbox to detect the slots that have an "Except" flag. These slots will display hashed and be inaccessible fromLibrary Manager. You can then choose only accessible slots for the export operations.
Note: Media export from the Backup Destinations Media Pools node inWeb Administration workswithout these problems because before there is any movement towards amailbox slot, an availabilitycheck is run. Hence, when a slot is detected as having an "Except" flag, it is skipped in favor of the nextslot.
Atempo-Tina for ACSLS/LibraryStationAtempo-Tina for ACSLS/LibraryStation (herein called Tina for ACSLS/LibraryStation) is a set of programsenabling Tina to interact with various proprietary library driver interfaces.
Tina for ACSLS/LibraryStation is used to control libraries lacking a SCSI command path. With Tina forACSLS/LibraryStation, the communication between Tina and the library is handled by a series of scripts ratherthan the SCSI commands.
Tina Administration 403
Additional Information

Virtual Library Manager for ACSLS or LibraryStation
PresentationTina for ACSLS/LibraryStation is installed on an ACSLS or LibraryStation client. It communicates with theserver over the network through two interfaces: the Storage Server Interface (SSI) located on the client, and theClient System Interface (CSI) located on the server.
Tina for ACSLS/LibraryStation Components
$TINA_HOME/VTL Directory
The $TINA_HOME/Vtl directory is created during the Tina for ACSLS/LibraryStation installation. It contains the<Virtual Library> directory created automatically during the creation of a library inWeb Administration. Itsname corresponds to the concatenation of the name of the catalog and the name of the virtual library(catalogname_libraryname).
For more details about the directory content, see $TINA_HOME/VTL Directory Content for Unix and%TINA_HOME%\VTL Directory Content forWindows.
Configuration Files
404 Tina Administration
Additional Information

When you create a Virtual Library, these files are created in the $TINA_HOME/Vtl directory :
File Description
vtl_config.txt
Specifies the script extension to be used.
vtl_info.txt Virtual view of the library contents: slots, drives, and cartridges.
tina_stk.conf Contains drives andmailbox slots addresses, the pool, and the barcode range in thelibrary.
The vtl_info file is a text file which is initialized either manually or through the run -C command (whensupported). Tina updates this file.
For more information about the use of the run command, see Using tina_stk in command line.
Vtl Directory Backup and Restore
A backup of this directory is automatically triggered each time the Tina catalog is backed up. If the configurationfiles disappear, Tina automatically restores the backed up version of the Vtl directory.
If the Vtl directory is corrupted but that it still exists, youmust delete it, so that it can be automatically restored.
Note: Only one backup version of the Vtl directory is kept. Thus, you can restore only the last versionbacked up.
To restore the Vtl directory
1. Ensure that the Vtl directory is not present in the Tina installation directory. If it still exists, delete orrename the directory.
2. Perform a barcode reinitialization (menu Library Operations Reinitialization Barcodes). Tinadetects that the Vtl directory is absent and automatically restores it.
3. Run the tina_stk -l catalogname_libraryname -C command to resynchronize the vtl_info file withthe current library contents.
4. Perform a barcode reinitialization again (menu Library Operations Reinitialization Barcodes).
Supported Operating SystemsFor the up-to-date information about the operating systems supported by Tina for ACSLS/LibraryStation, seethe Atempo-Tina Compatibility Guide (Silo Support section).
The Tina for ACSLS/LibraryStation program available is tina_stk for the 93XX and 97XX StorageTek libraries.
The 93XX Libraries are controlled by an ACSLS (Automated Cartridge System Library Software) administrationsoftware or a LibraryStation software.
OnWindows, youmust install StorageTek Library Attach on the platform hosting Tina forACSLS/LibraryStation.
Installation
To install Tina for ACSLS/LibraryStation
1. OnWindows, install the LibAttach software from StorageTek.
For more information concerning LibAttach, see the Installation andOperations Guide of LibAttach byStorageTek.
2. Run the Tina installation program on themachine where you want the virtual library to be hosted.3. Complete the installation.
Tina Administration 405
Additional Information

Formore information concerning the installation procedure.
ConfigurationWhen the Tina for ACSLS/LibraryStation installation is completed, youmust:
l Choose a cartridge allocationmethod. Depending on themethod you choose, youmust set differentparameters:
– To pre-allocate cartridges to the catalog, define the POOL and RANGE parameters.To use this method and define the parameters POOL and RANGE parameters, ensure that theACSLS administrator has given you themedia pool number to choose and the barcodes of all themedias contained in the library.For more information, see Configuration Files and StorageTek documentation.
– To let ACSLS allocate spare cartridges on demand from a scratch pool to the catalog as needed,define the SPARE_POOL andMIN_NB_SPARE parameters. This method is recommended if youhave a great number of catalogs and cartridges.The SPARE_POOL value should be provided by the ACSLS administrator, it corresponds to the IDof an ACSLS media scratch pool. The ACSLS administrator should also add spare cartridges tothat media scratch pool. When you use the SPARE_POOL, Tina no longer handles sparecartridges.TheMIN_NB_SPARE parameter indicates the number of cartridges that are kept in the catalogpool instead of returning to the scratch pool when you aremanually turning older cartridges intospare ones. If you enter 0, all spare cartridges are returned to the scratch pool.
Note: Cartridges returned to the scratch pool are removed from the Tina Library Manager interfaceonce the value of MIN_NB_SPARE is reached (e.g., if MIN_NB_SPARE is set to 2, the thirdcartridge that you turn into spare is returned to the ACSLS scratch pool and no longer displays in theLibrary Manager). When a spare cartridge is requested from the scratch pool, it displays in the drive.
Important: You cannot use POOL and SPARE_POOL at the same time; youmust choose one ofthem. In addition, you cannot use a single media pool with the variable POOL for one catalog andSPARE_POOL for another catalog.
Switching Allocation Method
When switching from using POOL to using SPARE_POOL, youmust set different values for the former POOLvariable and the new SPARE_POOL one, unless youmanually remove all Tina labelled cartridges from the pooland replace them with spare cartridges, (e.g., if you were using 123 for the variable POOL, do not affect thisvalue to SPARE_POOL). Delete the POOL and RANGE variables once SPARE_POOL andMIN_NB_SPAREare set.
Switching from using SPARE_POOL to POOL is not recommended as you would have to list one by one all thecartridges currently used by the catalog in the RANGE parameter.
To switch allocation method
1. InWeb Administration, create the drives that you are going to use.2. Create a virtual library inWeb Administration.
To create a virtual library in Tina
1. In theWeb Administration, expand your catalog in the Tina Explorer.2. Select Storage Libraries. The Libraries pane opens.3. Select Create new library (+) and select New Software Controlled Library. The VLS Library Creation
Wizard opens.
406 Tina Administration
Additional Information

4. Enter the parameters to create a library in the VLS Library CreationWizard.
This table describes the parameters that you can find in the VLS Library CreationWizard:
Parameter Description
Host selection
Host Name of the host where the virtual library is going to be installed.
General VLS Library Information
Libraryname
Enter a name for the library.
Librarytype
Select the STK ACSLS/LibraryStation type from the list.
Comment Optional. Enter a comment that describes the library.
VLS Library Properties
Number ofDrives
Number of drives that Tina will use.
Number ofCartridges
Maximum number of cartridges that you are likely to use.
The default value is 300, but you can set it to amaximum of 6,000.
Do not set this variable if you choose the on demand ACSLS scratch pool cartridge allocationmethod.
Variablelist
Enables you to add ou remove an optional defined environment variable. These are thevariables you can add:
• Library Server Name. Name or IP address of the ACSLS or LibraryStation server. If youhave several servers, youmust create one Virtual Library per server.
• Number of Mailboxes. Number of mailboxes that Tina will use.• STK pool.• Barcode Range. Barcodes of the cartridges that Tina will use. These are the syntax rules:
– Items in a list are separated by a comma ",".– The beginning and end of a cartridge array is separated by a hyphen "-".
For instance, C00300-C00400,C00403-C00406,C00425means that the library contains theC00300toC00400 barcodes, the C00403toC00406 barcodes, and the C00425 barcode.
Do not set this variable if you choose the on demand ACSLS scratch pool cartridge allocationmethod.• STK Spare pool.
5. Check the Summary of the application parameters carefully and click Finish to validate the creation of avirtual library.
Tina Administration 407
Additional Information

Administration
Moving cartridges
Moving cartridges in Library Manager does not necessarily imply that the cartridges will be physical moved inthe library. Only slot to drive and drive to slot operations lead the cartridges to be actually moved. Other movingoperations are simulated.
Important: Tomove a cartridge from a drive to another drive, youmust move it to a slot first, and thenfrom the slot to the other drive.
Putting a cartridge online/offline
To bring a cartridge on/offline, youmust:• Perform the procedure in Library Manager.• Run a command to send the order to the library.
For more information about Library Manager, see the Tina Administration Documentation for Classic Interfaces.
To put a cartridge online
1. Run this command:Bin/tina_stk -l catalogname_libraryname -g [-n cap_number].The mailbox (CAP) can be accessed. Enter your cartridge and close the mailbox.
Note: The tina_stk -g command returns control only when the cartridge is physically inside thelibrary.
2. In Library Manager, select Cartridge On-line to put the cartridge online.3. Select Library Reinitialization Full Bar Code to reinitialize the library.
To put a cartridge off-line
1. In Library Manager, select Cartridge Off-line to put the cartridge off-line.2. Run this command:
Bin/tina_stk -l catalogname_libraryname -j all [-n cap_number]The mailbox (CAP) can be accessed. Take your cartridge out and close the mailbox.
Note: The tina_stk -j all command returns control only when the cartridge is physically outsidethe library.
Note: Tomake use of all the CAPS (mailboxes) for eject and enter operations, use the option -N.
3. Select Library Reinitialization Full Bar Code to reinitialize the library.
Upgrading Tina
From Version 3.5, 3.6, or 3.7 to 4.x
To upgrade Tina for ACSLS/LibraryStation from version 3.5, 3.6, or 3.7 to 4.x
1. Copy the $TINA_HOME/Vtl/<Virtual Library>/vtl_info.txt file in another directory.2. Perform the Tina upgrade with the setup program.3. InWeb Administration, delete the existing virtual library and create a new one using the configuration
procedure described in Configuration.
408 Tina Administration
Additional Information

4. If youmust use the previous version of the vtl_info.txt file, replace the new version of the $TINA_HOME/Vtl/<Virtual Library>/vtl_info.txt file by the vtl_info.txt file that you have previouslycopied.
5. Select Library Reinitialization Full Bar Code to reinitialize the library.6. Perform a barcode reinitialization (Library Operations Reinitialization Barcodemenu).
Using tina_stk in command line
Syntax
Compatibility with earlier versions
For compatibility reasons, to send commands to the library, you can still use the run.sh script on Unix andrun.cmd script onWindows located in the $TINA_HOME/Vtl/Bin directory.
In earlier Tina versions, this script has been used to call the tina_stk program.
Unix Syntax: ./run.sh catalogname_libraryname optionsWindows Syntax: run.cmd catalogname_libraryname options
tina_stk command
The tina_stk commandmust always be used with the -l option.
OPTIONS:
-l catalogname_libraryname-c Show the library contents in vtl_info format using pool definition-C Create or overwrite the vtl_info file-d DRIVEN Where DRIVEN is the name of the variable corresponding to the drive-f Force cartridge unmount. Used with -C or -c, force to ignore drive
errors-g Make CAP ready to enter cartridges-h Display help-i Display server information in tina_stk.conf format-I Create tina_stk.conf-j all Eject cartridges displayed in the mailbox-m Put a cartridge in the drive-n CAP (mailbox) number-N All CAPS (mailboxes)-s Associate cartridge barcode range to the pool-u Unmount-v volume Barcode of the cartridge
Available Commands
Bin/tina_stk -l catalogname_libraryname -m -v volume -d DRIVENBin/tina_stk -l catalogname_libraryname -u -v volume -d DRIVEN [-f]Bin/tina_stk -l catalogname_libraryname -c -fBin/tina_stk -l catalogname_libraryname -C -fBin/tina_stk -l catalogname_libraryname -j all [-n mbx_number]Bin/tina_stk -l catalogname_libraryname -j all [-n mbx_number] [-N]Bin/tina_stk -l catalogname_libraryname -iBin/tina_stk -l catalogname_libraryname -IBin/tina_stk -l catalogname_libraryname -g [-n mbx_number]Bin/tina_stk -l catalogname_libraryname -g [-n mbx_number] [-N]Bin/tina_stk -l catalogname_libraryname -sBin/tina_stk -l catalogname_libraryname -h
Examples.
Mounting a cartridge
Bin/tina_stk -l bill_library1 -m -v TMF192 -d DRIVE1
Tina Administration 409
Additional Information

Dismounting a cartridge
Note: You can only dismount a cartridge if the cartridge is offline.
Bin/tina_stk -l bill_library1 -u -v TMF192 -d DRIVE1
TroubleshootingEvents (logs) of Error and Fatal types are displayed in Event Viewer throughWeb Administration (CurrentActivity Events).
Atempo recommends to consult the other types of logs in the $TINA_HOME/Vtl/Log directory:• install file (installation logs),• event.log file (ssi logs, ACSLS client),• tina_stk.log file (tina_stk logs).
Note: The run.sh (Unix) or run.cmd (Windows) script is still supported for compatibility reasons.
Bar code reinitialization failed
First method (advisable)
1. FromWeb Administration, delete the library.
2. Recreate the library.
Second method
1. Verify the ACSLS pool on the ACSLS server by using the commands:query pool all and query scratch allor by using the command:Bin/tina_stk -l catalogname_libraryname -c. command.
2. Use the Bin/tina_stk -l catalogname_libraryname -C command.
3. Perform another barcode reinitialization by choosing Library Operations Reinitialization Barcode inWeb Administration.
Unable to connect to the ACSLS or LibraryStation server
You should verify that the server RPC component is accessible on the network.
1. Execute this command on themachine where Tina for ACSLS/LibraryStation is installed:
rpcinfo -p <ACSLS_server> | grep 300031The command should return two lines similar to:
300031 1 tcp ???? ????
300031 1 udp ???? ????Even though the tcp and udp port information is correct, it may still be impossible for tina_stk and theACSLS or LibraryStation server to communicate. In that case, try to set the CSI_TCP_RPCSERVICE orCSI_UDP_RPCSERVICE parameters to False.
2. Run this command to display server information:
Bin/tina_stk -l catalogname_libraryname -i
410 Tina Administration
Additional Information
If you get error messages such as cl_select_input: select () failed, errno=0, it means that thevirtual library cannot communicate with SSI. Ensure that SSI is started.
Unable to restart the ACSLS or LibraryStation server after a shutdown
The ACSLS contains anOracle database. After a shutdown, this databasemay not automatically restart. CallStorageTek technical support to restart the database.
The ACSLS or LibraryStation Server is down and must be reinstalled
1. Configure the ACSLS server or the LibraryStation and create the same pool that wasdefined before the server crash (same pool number).
2. Run the Bin/tina_stk -l catalogname_libraryname -s command to associate the cartridges with thepool.
3. Run the Bin/tina_stk -l catalogname_libraryname -c command to display the library contents andverify that the cartridges are detected.
The run -c command does not display cartridges
1. Check whether the pool is defined on the ACSLS or LibraryStation Server. Define a pool if needed.
2. Run the Bin/tina_stk -l catalogname_libraryname -s command to associate the cartridges with thepool.
There is no empty slot to add cartridges
1. InWeb Administration, select the virtual library and select Devices Library Properties.
2. Click Configuration.
3. Select the MAX_NB_CARTRIDGES parameter and click Edit.
4. Modify the parameter value.
Important: Ensure that there is no enter/eject operation in progress.
5. Run the Bin/tina_stk -l catalogname_libraryname -s command.
6. Run the Bin/tina_stk -l catalogname_libraryname -C command.
The tina_stk.conf file is lost
1. Ensure that a pool is declared on the ACSLS or LibraryStation server and that you know thecartridge barcodes.
2. Create a $TINA_HOME/Vtl/<virtual library>/tina_stk.conf file.
3. Run the tina_stk -i > $TINA_HOME/Vtl/<virtual library>/tina_stk.conf command to redirect thetina_stk -i output to the tina_stk.conf file.
The vtl_info file is lost
1. Ensure that the tina_stk.conf file is correct.
2. Run the Bin/tina_stk -l catalogname_libraryname -s command.
Tina Administration 411
Additional Information

3. Run the Bin/tina_stk -l catalogname_libraryname -C command.
4. Perform a barcode reinitialization by choosing Library Operations Reinitialization Barcode inWeb Administration.
ACSLS: Inconsistency between the drive contents displayed and the actual contents
With ACSLS, the actual content of a drive can be different from the displayed status.
1. Compare the results of these commands to detect such inconsistency:
Bin/tina_stk -l catalogname_libraryname -c
Bin/tina_stk -l catalogname_libraryname -i
2. If the results show that the drive status is inconsistent, run theBin/tina_stk -l catalogname_libraryname -u -f -d DRIVEN command.
3. Compare the results of the commands specified in step 1 to check whether the inconsistency hasbeen removed.
Example. The Bin/tina_stk -l fdl_test -c command returns:
s[0] N/A C00373 #STATUS_VOLUME_HOMEs[1] N/A 000399 #STATUS_VOLUME_HOME...........s[29] N/A EMPTYd[0] N/A EMPTYm[0] N/A EMPTYThe Bin/tina_stk -l fdl_test -i command returns
# DRIVE DEFINITION# driven=a,l,p,dDRIVE0=0,0,1,3 #status=STATUS_DRIVE_IN_USEThe first command indicates that the drive is empty. The second command indicates that the drive is inuse. This is an example of an inconsistency between the actual content of the drive and its displayedstatus.
LibraryStation: Cartridge mount fails with STATUS_DRIVE_IN_USE error
When attempting tomount a cartridge, this error may be raised even though the drive is physically empty:
Failure of acs_mount() status=STATUS_DRIVE_IN_USE
There is an inconsistency between the physical and logical status of the drive.
1. Put a cartridge in the drive throughMVS.
2. Run the Bin/tina_stk -l catalogname_libraryname -u -v barcode -f -d DRIVEN command.
3. Try to mount the cartridge again to check whether the problem still occurs.
412 Tina Administration
Additional Information

Timeout Error Due to Network Problems
If you have problems on your network causing timeout errors, you canmodify the value of the TINA_OPEN_TIMEOUT and TINA_REQ_TIMEOUT variables:
1. Edit the $TINA_HOME/<catalogname_libraryname>/tina_stk.env.
2. Remove the comment character # at the beginning of the lines containing the variables and settheir values to "-1" so that the timeouts be infinite.
######## tina_stk network configuration
#ACSAPI_SSI_SOCKET=enter_the_new_ssi_socket
TINA_OPEN_TIMEOUT=-1
TINA_REQ_TIMEOUT=-1
3. Save the file.
Important: These variables should only bemodified temporarily to enable you to correct your networkproblems. They must be reset to their original values as soon as possible.
ACSLS Server cannot Reach Tina Host
If your configuration is one of these:• Themachine hosting Tina has two network cards: one of them is dedicated to Tina and the other one to
ACSLS.• The network card dedicated to ACSLS is not associated with the default host name of themachine.
Youmay get these logs on the ACSLS server:
RPC TCP client connection failed, RPC: Rpcbind failure
Set the SSI_HOSTNAME environment variable to fix the problem:
1. Edit the $TINA_HOME/<catalog_libraryname>/tina_stk.env file.
2. Add the SSI_HOSTNAME variable below the CSI_HOSTNAME variable. Its valuemust be the hostname associated with the network card dedicated to ACSLS:
#### Server nameCSI_HOSTNAME=ACSLS_server_nameSSI_HOSTNAME=hostname_for_ACSLS_network_card
3. Save the file.
4. Stop and restart the SSI process.
Communication Failure to the ACSLS Server with a Firewall
After creating a Virtual Library, youmay encounter this error in the $TINA_HOME/Vtl/Log/tina_stk.log file ifthere is a firewall involved:
acs_query_server failed (retcode=14)
This topic provides some guidelines on how to troubleshoot such communication failures when a firewall isinvolved:
Tina Administration 413
Additional Information

Important: Ensure that the ACSLS server configuration is compatible with a firewall. The firewall securityoptionmust be turned on.See Turning On the Firewall-Secure Option.
First check the ACSLS logs ($TINA_HOME/Vtl/Log/event.log) to see whether the firewall works as expected.
For example, the log Errno=145 (connection timed out)means that the firewall dropped the ssi request.
Check the firewall configuration, using telnet or for advanced users tcpdump.
Example with telnet
$ telnet wismeril 62000
Trying 172.16.100.128...
If nothing happens, then the firewall dropped connection on this port.
If the connection is refused, then the port is open but is not listened to.
If a message such as Connected to xxxx displays, then the port is open both ways.
Example with tcpdump
CSI_HOSTNAME=wismeril
CSI_HOSTPORT=62000
SSI_INET_PORT=62002
SSI_HOSTNAME=daredevil
The tcpdump result should be:
(ssi sends a request to the port 62000@wismeril)
15:16:42.423767 IP daredevil.1010 > wismeril.orsay.quadratec.fr.62000: S4018787211:4018787211(0)
win 8760 <mss 1460>
15:16:42.424268 IP wismeril.orsay.quadratec.fr.62000 > daredevil.1010: S3911111999:3911111999(0) ack 4018787212 win 5840 <mss 1460>
15:16:42.424329 IP daredevil.1010 > wismeril.orsay.quadratec.fr.62000: . ack 1 win 8760
15:16:42.424496 IP daredevil.1010 > wismeril.orsay.quadratec.fr.62000: P 1:285(284) ack 1win 8760
......
(csi responds to the port 62002@daredevil)
15:16:42.427490 IP wismeril.orsay.quadratec.fr.1009 > daredevil.62002: S3910857567:3910857567(0) win 5840 <mss 1460,sackOK,timestamp 191169[|tcp]>
15:16:42.427507 IP daredevil.62002 > wismeril.orsay.quadratec.fr.1009: S4018795327:4018795327(0)
ack 3910857568 win 10136 <nop,nop,timestamp 154385375 191169,nop,[|tcp]>
15:16:42.427829 IP wismeril.orsay.quadratec.fr.1009 > daredevil.62002: . ack 1 w
414 Tina Administration
Additional Information

in 5840 <nop,nop,timestamp 191169 154385375>
15:16:42.428013 IP wismeril.orsay.quadratec.fr.1009 > daredevil.62002: P 1:329(3
28) ack 1 win 5840 <nop,nop,timestamp 191169 154385375>
15:16:42.428132 IP daredevil.62002 > wismeril.orsay.quadratec.fr.1009: . ack 329
win 10136 <nop,nop,timestamp 154385375 191169>
.........
Unable to use tina_stk on AIX-64 bits platforms
If you encounter issues when using the tina_stk command on AIX-64 bits platforms, ensure that you do nothave in your Tina environment amix of 32 bits/64 bits binaries for tina_stk and ssi. For instance, you should nothave a 32 bits tina_stk binary with a 64 bits ssi binary, and vice versa.
This may happen during frequent uninstallations and setups. To avoid these issues, Atempo recommends youchoose one of these solutions:• Upgrade your environment with a Tina 4.2 Patch 3346 version or later.
Note: If you perform an upgrade from a Tina version preceding patch 3346 to a Tina version patch3346 or later, youmust stop and restart the ssi binary. This operation fully upgrades the ssi binaryinto a 64 bits binary.
• Uninstall your 32 bits Tina version, then install a single 64 bits Tina version.• If you decide to keepmixed environments (i.e., several 32 bits and 64 bits Tina versions on the same
system, ensure that each environment has its own set of tina_stk/ssi binaries).
Configuration Files
$TINA_HOME/VTL Directory Content for Unix
Directories Files Description
Vtl Bin run.sh
vtl_close.sh
vtl_move.sh
vtl_open.sh
Scripts used to control the library. Only used for compatibility withearlier Tina versions.
Bin/ACSLS ssi
mini_el
start.sh
ACSLS client library
Generates ssi logs
ssi andmini_el starting scripts
Tina Administration 415
Additional Information

Directories Files Description
Install Unix_install.sh
Script executed to create a Virtual Library
tina_stk.conf
tina_stk.env
tina_vtl.env
vtl_config.txt
vtl_info.txt
Sample Files
Log Contains the logs.
Tmp Contains temporary files, such as lock files.
<VirtualLibrary>
tina_stk.conf
tina_stk.env
tina_vtl.env
vtl_config.txt
vtl_info.txt
There are as many directories as there are virtual libraries.
Important: Atempo highly recommends to keep a copy of the $TINA_HOME/Vtl directory on a differentdisk so that the virtual library can still be used, should an incident occur.
%TINA_HOME%\VTL Directory Content for Windows
Directories Files Description
Vtl Bin run.cmd Script used to control the library. Only used for compatibility withearlier Tina versions.
Install tina_stk.conf
vtl_config.txt
vtl_info.txt
tina_stk.env
Sample files
Log Contains the logs for the various scripts.
Tmp Contains temporary files, such as lock files.
416 Tina Administration
Additional Information

Directories Files Description
<VirtualLibrary>
tina_stk.conf
vtl_config.txt
vtl_info.txt
tina_stk.env
There are as many directories as there are virtual libraries.
Note: <Virtual Library> is a directory created automatically during the creation of a library inWebAdministration. The name corresponds to the concatenation of the name of the catalog and the name ofthe virtual library (catalogname_libraryname).
Important: Atempo highly recommends to keep a copy of the $TINA_HOME/Vtl directory on a differentdisk so that the virtual library can still be used, should an incident occur.
Configuration File DescriptionThe Virtual Library configuration files located in the $TINA_HOME/<catalogname_libraryname> directory aredescribed below. Youmay need to edit them in order to manually configure a Virtual Library.
tina_stk.env File
The tina_stk.env file contains the connection parameters.
tina_stk.env
######## ssi and mini_el configuration
#### Server nameCSI_HOSTNAME=enter_your_server_name_here
#### Default values (do not modify)ACSAPI_PACKET_VERSION=4CSI_CONNECT_AGETIME=172800CSI_RETRY_TIMEOUT=8CSI_RETRY_TRIES=15CSI_TCP_RPCSERVICE=TRUECSI_UDP_RPCSERVICE=TRUETRACE_VALUE=800000
######## tina_stk network configuration#ACSAPI_SSI_SOCKET=enter_the_ssi_socket#CSI_HOSTPORT=#export CSI_HOSTPORT#SSI_INET_PORT=#export SSI_INET_PORT#SSI_HOSTNAME=#export SSI_HOSTNAME#TINA_OPEN_TIMEOUT=30#TINA_REQ_TIMEOUT=300
export CSI_HOSTNAME ACSAPI_PACKET_VERSION CSI_CONNECT_AGETIME CSI_RETRY_TIMEOUTexport CSI_RETRY_TRIES CSI_TCP_RPCSERVICE CSI_UDP_RPCSERVICE TRACE_VALUEexport ACSAPI_SSI_SOCKET
CSI_HOSTNAME: Name of your ACSLS or LibraryStation server.For example, if the server name is "Flash", the entry should be CSI_HOSTNAME=Flash
ACSAPI_SSI_SOCKET: Number of your ACSLS or LibraryStation server socket.For example, if the server socket number is 50004, the entry should be ACSAPI_SSI_SOCKET=50004
Tina Administration 417
Additional Information

CSI_HOSTPORT: Number of the Server socket used by the client to send requests to a fixed port number ofthe server when there is a firewall involved..For example, if the server socket number is 62000, the entry should be CSI_HOSTPORT=62000
SSI_INET_PORT: Client socket (fixed port number) used to receive responses from the server when there is afirewall involved.
SSI_HOSTNAME: Client hostname or IP address used by the ACSLS server to return a response to the client.It can be used in NAT environments (Network Address Translation). By default, the local hostname is used.
For more information on environments involving a firewall, see ACSLS and Firewalls.
TINA_OPEN_TIMEOUT: Timeout for library opening. This variable must not bemodified unless you areexperiencing network problems. See Timeout Error Due to Network Problems.
TINA_REQ_TIMEOUT: Timeout for mounting and unmounting requests. This variable must not bemodifiedunless you are experiencing network problems. See Timeout Error Due to Network Problems.
Note: If you havemore than one ACSLS or LibraryStation server, set the ACSAPI_SSI_SOCKET variable inyour environment, with a different value for each server.
tina_stk.conf File
The tina_stk.conf file contains the drive, mailbox and cartridge parameters. This file can be generatedthrough the tina_stk -i command, which enables to prefill the file with some information retrieved from theACSLS or LibraryStation Server.
tina_stk.conf
######### See Virtual Library Manager manual for details.#########
# DRIVE DEFINITION# driven=a,l,p,dDRIVE0=0,0,1,0 #status=STATUS_DRIVE_AVAILABLEDRIVE1=0,0,1,1 #status=STATUS_DRIVE_AVAILABLEDRIVE2=0,0,1,2 #status=STATUS_DRIVE_IN_USEDRIVE3=0,0,1,3 #status=STATUS_DRIVE_AVAILABLEDRIVE4=1,0,0,0 #status=STATUS_DRIVE_IN_USEDRIVE5=1,0,0,1 #status=STATUS_DRIVE_IN_USE
# CAP DEFINITION# mailbox=a,l,c:number_of_mailbox_slotsMAILBOX0=0,0,0:1 #cap[0]mode=MANUAL status=STATUS_CAP_AVAILABLEMAILBOX1=1,0,0:10 #cap[1]mode=MANUAL status=STATUS_CAP_AVAILABLE
# POOL DEFINITION (pool number must be different from 0)# POOL=NumberPOOL1=111 #vol_count=2 status=STATUS_SUCCESS(0,1125)POOL2=123 #vol_count=5 status=STATUS_SUCCESS(0,2147483647)POOL3=124 #vol_count=3 status=STATUS_SUCCESS(0,1000)
# RANGE DEFINITION# RANGE=Barcode# RANGE=C00000-C00099,000034
# MAXIMUM NUMBER OF CARTRIDGES DEFINITION# MAX_NB_CARTRIDGES=NumberMAX_NB_CARTRIDGES=300
DRIVE DEFINITION section
Tina detects the drives declared on the ACSLS or LibraryStation Server, and enters their addresses in ALPDformat (ACS, LSM, PANEL, DRIVE).
The drives are represented with the driven=a,l,p,d format where n is the drive position in the library.
418 Tina Administration
Additional Information

Youmust remove the lines corresponding to the drives that are not used by this particular virtual library andmodify the ldrive positions if needed.
The status field indicates the current statuses of the drives. The drives must be available. If the status isSTATUS_DRIVE_IN_USE, youmust empty the drive before proceeding with the configuration.
CAP DEFINITION section
The CAPs (Cartridge Access Ports) correspond to themailboxes. Tina detects themailboxes and records theiraddresses in ALC format (ACS, LSM, CAP number).
Youmust remove the lines corresponding to themailboxes that are not used by this particular virtual library.
The CAP modemust be MANUAL. If it is AUTOMATIC, change themode of your CAP before proceeding with theconfiguration.
POOL DEFINITION section
Remove the lines describing the pools that are not used by this particular virtual library.
RANGE DEFINITION section
Youmust replace the sample barcode values C00000-C00099, 000034 by your own barcode values. These arethe syntax rules:• Items in a list are separated by a comma ",".• The beginning and end of an array is separated by a hyphen "-".
Example.C00000-C00099, 000034, 000038means that the library contains the C00000 to C00099 barcodes, as well asthe 000034 and 000038 barcodes.
Youmust then remove the # character (comment) from the beginning of the line.
MAXIMUM NUMBER OF CARTRIDGES DEFINITION section
Define themaximum number of cartridges that you are likely to use. By default, themaximum number is 300.Replace the default value by your own value.
For example, if you only need 50 cartridges at first but you know that you will probably need 100more in thefuture, enter 150 as themaximum number of cartridges.
Note: Themaximum number of cartridges you can set is 6,000.
tina_vtl.env File
The tina_vtl.env file contains Tina environment variables.
tina_vtl.env
######## Vtl configuration file ###############
# platform (Solaris, IbmRs, HpV10, HpV11, SgiV5, SgiV6)TINA_SYSTEM=Solaris
# module name ( stk, grau, ..)TINA_MODULE=tina_stk
# tina homeTINA_INST=~tina
# catalog nameTINA_CATALOG=fdl
# log level(0->4)TINA_LOG=0
Tina Administration 419
Additional Information

export TINA_SYSTEM TINA_MODULE TINA_INST TINA_CATALOG
. "$TINA_VTLHOME/$TINA_ROBNAME/${TINA_MODULE}.env"
Environment Variables Description
TINA_SYSTEM Operating system of themachine controlling the library
TINA_MODULE tina_stk
TINA_INST Tina installation directory
TINA_CATALOG Catalog name
TINA_LOG Event log level (0: no log to 4: all logs activated)The logs are located in the $TINA_HOME/Vtl/log directory
vtl_config.txt File
The vtl_config.txt file contains the script extension to be used.
vtl_config.txt
##V To activate the verbose mode, put "#V" at the beginning of the first line## One declaration per line and the last one is prior## " = are the separators:## NT shell = "bash.exe" is OK# NT shell bash.exe is OK# NT shell = bash.exe is OK# NT shell = "C:\Program Files\Tools\bash.exe" is OK## NT shell = ""bash.exe"" is not supported# NT shell = C:\Program Files\Tools\bash.exe is not supported
# Variables# For UNIX : UNIX shell, UNIX extension# For NT : NT shell, NT extension
UNIX extension = "sh"NT shell = "tina_stk.exe"
Add this line at the end of the file:
Unix shell = tina_stk_pathwhere tina_stk_path is the absolute path of the tina_stk.conf file.
Note: After modifying the configuration files, youmust reinitialize the virtual library. InWebAdministration, right click the virtual library icon and select Library Operations Reinitialization Barcode.
420 Tina Administration
Additional Information

ACSLS and LibraryStation
Principles
ACSLS and LibraryStation do not enable to easily view the actual contents of the library. However, you canknow the list of the barcodes associated with a pool and to simulate the contents of the library as with an SCSIlibrary (except for the number of available slots which remains unknown).
You cannot know the contents of themailbox with ACSLS and LibraryStation. However, you can simulate thefunctionalities of putting cartridges online/offline with the help of amailbox as described in the vtl_info file.
Therefore, one is able to put cartridges online/offline with Tina in the sameway as with a SCSI library.
Definition of Pools
A pool is a group of blank cartridges that youmust define on the ACSLS or LibraryStation server. It is identifiedby a number.
The pool is associated with the data storage elements. It corresponds to the library slots without the drives andthemailbox. It is used in tina_stk and is declared in the tina_stk.conf.
Important: A pool must be defined by the ACSLS or LibraryStation administrator before creating thevirtual library in Tina.
Important: Every operation of mounting/dismounting a cartridgemust be performed through Tina andthetina_stk command.
Tina Administration 421
Additional Information

Configuration of the ACSLS Server
To configure an ACSLS server and define a pool
1. Connect to the ACSLS server using the acsss user.2. Launch the command:
cmd_proc3. Define the pool.
For example:ACSSA> define pool 0 2147483647 123Define: Pool 123 createdDefine: Define completed, Success.ACSSA> q pool all2001-08-24 13:48:20 Pool StatusIdentifier Volume Count Low Water Mark High Water Mark Attributes0 0 0- 2147483647123 0 0 2147483647ACSSA>
Configuration of a LibraryStation
LibraryStation is a software communication interface feature of the StorageTek Host Software Component(HSC)MVS/ESA implementation. It resides on theMVS host system.
The LibraryStation emulates an ACSLS. These are examples of LibraryStation configurations.
Example
BROWSE $BASEPRO.BASEPRPO.SLS.PARMLIB(SLSPARMP)- Line 00000000 Col 001 080
Command -> _________________________________________________ Scroll ==> CSR
*********************************** Top ot Data *****************************
/* PARAMETRE DE LANCEMENT SLS: NE PAS SUPPRIMER CETTE CARTE */
CDSDEF DSN1 ($BASEPRO.BASEPRPS.SLS.CNTL1), -
DSN2 ($BASEPRO.BASEPRPS.SLS.CNTL2)
/* EXECP MSGPRFX(Y),E(08-),F(23) */
MNTD AU(ON),D(A),MAX(100),MO(R),S(M),VOLW(ON),F(OFF)
OPT O(M),ENT(M),V (10) , DISCMSG (SUPPRESS)
CAPPREF 9 000:00
ALLOC G(SEP)
ALLOC X02SUB(HONOR)
ALLOC XO8SUB(HONOR)
SCRPOOL NAME=HOSTDMVS,RANGE(OC0000-0C0499),LABEL=SL
SCRPOOL NAME=HOSTPROD,RANGE(N00000-N10999),LABEL=SL
SCRPOOL NAME=HOSTPRIA,RANGE(N50000-N50299),LABEL=SL
SCRPOOL NAME=POOL,RANGE(N7000-N70299,N90000-N90199),LABEL=SL
W SCR 00 SUB(HOSTDMVS) THRES(100)
W SCR 00 SUB(HOSTPROD) THRES(200)
W SCR 01 SUB(HOSTPRA) THRES(80)
422 Tina Administration
Additional Information

/* DEMARRAGE DE LS */
LSINIT NETHOST(UNLS) COMMONSP (POOL) -
COMMTYPE(RPC) -
CREQLOG(YES) -
PDF(PPRODUIT.NCS400.PDF) -
PDFX(PPRODUTT.NCS400.PDF.PATH.NAME) -
LSDEF('$BASEPRO.BASEPRPO.SLS.PARMLIB(LSDEF)')
TCPNAME(TCPIP)
/* UEXIT 01 LOAD=SLSUX01,ENABLE */
/* UEXIT 02 LOAD=SLSUXO2,ENABLE */
TREQDEF DSN('$BASEPRO.BASEPRPO.SLS.PARMLIB(TAPEREQ)')
UNITDEF DSN('$BASEPRO.BASEPRPO.SLS.PARMLIB(UNITATTR)')
VOLDEF DSN('$BASEPRO.BASEPRPO.SLS.PARMLIB(VOLATTR)')
***************** Bottom of Data ********************************
Example
EDIT $BASEPRO.BASEPRPO.SLS.PARMLIB(VOLATTR) 01,01 Columns 00001 00072
*********************************** Top ot Data *****************************
==MSG> Warning- The UNDO command is not available until you change
==MSG>your edit profi1e using the command RECOVERY ON.
000001 VOLATTR SER(0C0000-000499) MEDIA(EGART)
000002 VOLATTR SER(N00000N-10999) MEDIA(ECART)
000003 VOLATTR SER(N50000-N50999) MEDIA(STK1R)
000004 VOLATTR SER(N70000-N70299) MEDIA (STK1R)
000005 VOLATTR SER(N90000-N90199) MEDIA (STK1R)
***************** Bottom of Data ********************************
Example
EDIT $BASEPRO.BASEPRPO.SLS.PARMLIS(LSDEF) - 01.01 Columns 00001 00072
*********************************** Top ot Data *****************************
==MSG> -Warning- The UNDO command le not available until you change
your edit profile using the command RECOVERY ON.
000001 SPNUM NUM(123) SPNAME(POOL)
********************************** Bottom of Data ****************************
Tina Administration 423
Additional Information

Pool Management
All memberships to the pool are erased by ACSLS or LibraryStation if:• The cartridge is mounted in a drive• The cartridge is ejected from the library.
A cartridge is added to a pool by tina_stk in shell mode during a cartridgemovement if the destination is a slot.
See Putting a cartridge online/offline for more information about the procedure.
Management of the vtl_info file by tina_stk
The vtl_info file must be generated by tina_stk. To generate the vtl_info file, run this command:Bin/tina_stk -l catalogname_libraryname -C
Formore information concerning this command, see Using tina_stk in command line.
The vtl_info file is edited by tina_mount during:• An insertion of a cartridge, adding the barcode at the level of themailbox.• An ejection of a cartridge, removing the barcode at the level of themailbox.
A barcode reinitializationmust be performed inWeb Administration choosing Library Operations Reinitialization Barcode.
ACSLS and Firewalls
If a firewall is involved, this is the communication between the ACSLS server and the client:• The client sends requests to the CSI_HOSPORT socket of the server.• The server responds to the SSI_INETPORT socket of the client.
The socket numbers must be defined in Tina, as described in the Configuration, and the secure optionmust beturned on on the ASCLS server.
Turning On the Firewall-Secure Option
To turn on the firewall-secure option, youmust set several variables using the accessconfig utility.1. Log in as acsss.2. At the password prompt, enter the password for user acsss.3. Stop the ACSLS server.
424 Tina Administration
Additional Information

Note: Youmust shut down the ACSLS server for the new firewall-secure variables to take effect.
kill.acsss4. To run the configuration script, enter:
acsss_config
The ACSLS feature configuration window opens.5. Select option 1 - Set CSI tuning variable
Accept the default for all variables except for these variables:• Set the value to TRUE at this prompt:
Changes to alter use of the TCP protocol will not take effect until the product isrestarted. CSI support for RPC using the TCP protocol is enabled [TRUE]
Variable: CSI_TCP_RPCSERVICE
Turning on TCP insures that the TCP protocol is available for use by clients of ACSLSfor network communications. The firewall-secure feature ofACSLS supports TCP only, so clients should perform network communications using thisprotocol.
• Set the value to FALSE at this prompt:
Changes to alter use of the UDP protocol will not take effect until the product isrestarted. CSI support for RPC using the UDP protocol is enabled [TRUE] Variable:CSI_TCP_RPCSERVICE
Variable: CSI_UDP_RPCSERVICE
Important: Youmust ensure that no ACSLS clients are depending on this UDP protocol. The firewall-secure ACSLS runs on TCP only.Turning off UDP insures that no clients will access the server using this protocol. This enables to disallowall general UDP access to the ACSLS platform at the firewall, enabling only those accesses which arespecifically required in your environment.Youmust allow clients access to the UDP and TCP port 111 for portmapper access, unless those clientsimplement the firewall-secure feature, and specifically turn off their queries to the ACSLS portmapper.
• Set the value to NEVER at this prompt:
Changes to alter use of the port mapper will not take effect until the product isrestarted. Enable port mapper: (ALWAYS/NEVER/IF_DUAL_LAN_NOT_ENABLED) [IF_DUAL_LAN_NOT_ENABLED].
Variable: CSI_USE_PORTMAPPER
NEVER allows clients of ACSLS to disallow external access to the portmapper on thoseclient platforms.
IMPORTANT: This does not allow you to turn off external access to the portmapper onthe ACSLS platform; to do that, the client(s) of ACSLS must have adopted thefirewall-secure changes in the client software component(s), and this feature must beturned on in the client software component. This feature ensures that the ACSLSserver will not make any queries of the portmapper on the client platform. Thisallows any firewall which is protecting the client to disallow access to theportmapper.
• Set the value to TRUE at this prompt:Enable CSI to be used behind a firewall (user-defined inbound port) (TRUE/FALSE)[FALSE].
Variable: CSI_FIREWALL_SECURE
Tina Administration 425
Additional Information

TRUE enables you to specify the single port that ACSLS will use for accepting inbound clientcommunications (i.e. TCP connections). This variable simply enables this feature. The specific port willbe specified in the next variable.
• Set the value to an available fixed port on the ACSLS server at this prompt:
Port number used by the CSI to receive incoming ACSLS requests.
Variable: CSI_INET_PORTThis is the port used by the ACSLS CSI component for accepting incoming network connections.
IMPORTANT: Youmust configure your firewall to allow incoming connections on this port. This ensuresthat only that port is exposed for use by those outside clients wanting to initiate communications withACSLS. Youmay disallow connections on all other incoming ports except this one, and UDP/TCP port111 (unless clients have implemented the feature to eliminate their queries to the ACSLS portmapper; inthat case, port 111may also be disallowed at the firewall). The recommended default value for this port is30031. It is unlikely (but not impossible) that this port will be used by other processes onmost systems.
6. Select E to exit acsss_config.7. Restart ACSLS by entering:
rc.acsss
Your changes are saved.
ACSLS Quick Reference Guide
Throughout this quick reference, underlines show valid command and keyword abbreviations. For example, audis an abbreviation of the audit command. Brackets [] enclose optional parameters. A vertical bar (|) separatesparameter choices.
Glossary
ACS Automated Cartridge SystemThe library subsystem consisting of one LMU, and one to 24 LSMs connected to that LMU.
LMU Library Management UnitThe portion of an ACS that manages LSMs, allocates their resources, and communicates with ACSLS.
LSM Library Storage ModuleAn ACS structure that provides the storage area for cartridges, cartridge drives, CAPs, and the librarynecessary for moving them.
CAP Cartridge Access PortA bidirectional port built into the door panel of an LSM, which provides for themanual entry or automaticejection of tape cartridges (mailbox).
Configure ACSLS
To do this task Use this command or utility
Run the configuration script. acsss_config
Display values of dynamic options dv_print
Display values of static options dv_config -s
Display values of dynamic and static options dv_config -d
426 Tina Administration
Additional Information

Query Status
To do this task Use this command orutility
Display ACSLS and Iibrary status . query server
Displav ACS status query acs acs_ id...|all
Display LSM status query lsm lsm_ id...|all
query cap cap_ id...|all
query drive drive_id...| all
Display LMU and port status for both single- LMU and dual-LMU ACSconfigurations
query lmu lmu_ id...|all
Display status of media-compatible transports for a specified datavolume
query mount vol_id
Display status of media-compatible transports for a specifiedscratch pool (or volume media type within the pool)
query mount * pool_id...[media media_type|media *]
Display port status query port port_ id...| all
Display the location of a volume query volume volume_ id...|all
Display cleaning cartridge status query clean vol_ id...| all
Display the status of scratch volumes in a pool query scratch scratch_id...| all
Display scratch pool attributes query pool pool_ id...| all
Display request status query request request_id...|all
Cancel a current or pending request cancel request_id...| all
Display the lock status of a transport or volume query lock drive | volumeidentifier...| all
Manage CAPS
To do this task Use this command or utility
Display CAP status query cap cap_id...| all
Tina Administration 427
Additional Information

To do this task Use this command or utility
Set CAP’s entry mode (manual or automatic) set cap mode manual | automatic cap_id
Set CAP’s automatic selection priority set cap priority cap_priority cap_id
Make manual mode CAP ready to enter labelled carts enter cap_id
Make CAP ready to enter unlabeled carts into library enter cap_id vol_id | volrange
Manage volumes
To do this task Use this command or utility
Mount a data volume orcleaning cartridge
mount vol_id drive_id [bypass][readonl y]
Dismount a data volume orcleaning cartridge
dismount vol_id drive_id [force]
Create a volume report volrpt [-s vol | loc | use] [-d] [-f filename] [-z] [-a |-l | -v identifier list]
Set volume ownership set owner owner_id volume vol_id | vo/range
Eject volumes from the library eject cap_id vol_id | vo/range..
Move volumes to a specifiedLSM
move vol_id Ism_id
Delete a volume in an offlineLSM
del_vol vol_id -n -q
Manage scratch volumes/pools
To do this task Use this command or utility
Create or modify scratch pools define pool low_water_mark high_water_mark pool_id [overflow]
Display scratch pool attributes query pool pool_id...| all
Display the status of scratch volumes in a pool query scratch pool_id... | ail
Set volume’s scratch attribute and assign the volume to ascratch pool
set scratch pool_ id vol_id |vo/range...
Change volume from scratch to data set scratch off pool_id vol_id |vo/range
Delete an empty scratch pool delete pool pool_id... | all
Mount a scratch volume from a specified pool (single medialibraries)
mount * drive_id pool_ id
428 Tina Administration
Additional Information

To do this task Use this command or utility
Mount a scratch volume from the common pool (singlemedia libraries)
mount * drive_id
Mount a scratch volume from a specified pool with specificmedia type
mount * drive_id pool_ id mediamedia_type
Mount a scratch volume from a specific pool, media typebased on scratch preferences defined
mount * drive_id pool_id media *
Mount a scratch volume from common pool, media typebased on defined scratch preferences
mount * drive_id media *
Mount a scratch volume from common pool with specifiedmedia type
mount * drive_id media media_type
Display status of media-compatible transports for a specifiedscratch pool (or volume media type within the pool)
query mount * pool_id [media *]
media_type| media
Manage locks
To do this task Use this command or utility
Set your lock ID set lock lock_id
Display your current lock ID or user ID show lock | user
Lock a volume or drive (to your current lockID) lock drive | volumeidentifier..| all
Remove active locks (to your current lock ID) on specified drives orvolumes or all active locks
unlock drive | volumeidentifier
Remove all active and pending locks on specified drives orvolumes
clear lock drive | volumeidentifier
Clean transports
To do this task Use this command or utility
Set cleaning cartridge attributes set clean max_usage | vol_id | volrange
Set cleaning attributes back to data cartridges set clean off vol_id | volrange
Display cleaning cartridge attributes query clean vol_id.. | all
Tina Administration 429
Additional Information

Manage a dual-LMU
To do this task Use this command orutility
Display LMU and port status for both single- LMU and dual-LMU ACSconfigurations
query lmu acs_id ... |all
Manually switch ACS management from the ACS’s master LMU to thestandby LMU
switch lmu acs_id
Audit the library
To do this task Use this command or utility
Audit the entire library audit cap_id server
Audit an ACS audit cap_id acs acs_id
Audit an LSM audit cap_id lsm lsm_id
Audit an LSM panel audit cap_id panel panel_id
Audit an LSM subpanel audit cap_id subpane1 subpanel_id
Maintain the database (Unix prompt)
To do this task Use this commandor utility
Export database table data and miscellaneous database files to tape or a file.Use when reinstalling ACSLS or upgrading to a new ACSLS version usingthe same database.
db_export.sh -fdb_file
Import database table data and miscellaneous database files from the exporttape or file. Use when reinstalling ACSLS or upgrading to a new ACSLSversion using the same database.
db_import.sh -fdb-file
Back up the database bdb.acsss [--ffilenaine |tapedevice] [-o]
Start up or shuts down the database db_command start| stop |stopforce
rdb.acsss
Install optional second disk (Unix prompt)
To do this task Use this command or utility
Initialize the second disk sd_mgr.sh
430 Tina Administration
Additional Information

Vary library components
To do this task Use this command or utility
Change the state of an ACS vary acs acs_id... online | offline | diagnostic [force]
Change the state of an LSM vary lsm lsm_id... online | offline | diaonostic [force]
Change the state of a CAP vary cap cap_id ... on1ine | offline | diagnostic [force]
Change the state of a transport vary drive drive_id online | offline | diagnostic [force]
Change the state of a port vary port port_id online | offline
Command IdentifiersEach command identifier corresponds to a type and consist of one or more components separated by commas.ACSLS enables amaximum of 42 identifiers per type.
To dothis task Use this command or utility
acs_id acs(0-126)
cap_ id acs(0-126),lsm(O-23),cap(0-2)
An asterisk (*) in a cap_ id does the following:
acs,lsm,* causes ACSLS to select the highest priority available CAP in theLSM.
acs,* causes ACSLS to select the highest priority available CAP in the ACS
* for an enter request causes ACSLS to select the CAP in the ACS with themost free cells.
* for an eject request causes ACSLS to select the highest priority CAP ineach ACS with a volume designated for ejection.
cell_ id acs(0-126),lsm(0-23),panel(0-19),row(0-41),column(0-23)
drive_id acs(0-126),lsm(0-23),panel(0-19),drive(0-19)
drive_type
10 characters transport type identifier; can be any combination of numbers (0-9) or letters (A-Z).
lock_id decimal number (0-32767)
lsm_ id acs(0-126),lsm(0-23)
Tina Administration 431
Additional Information

To dothis task Use this command or utility
media_type
10 character media type identifier; can be any combination of numbers (0 9)or letters (A Z). Spaces are not allowed. Two common media types are 3480and 3490E.
paneli_id
acs(0-126),lsm(0-23),panel(0-19)
pool_ id decimal number (0-65534) Specifying an asterisk (*) for the pool_ id reassignsa volume to its current pool_id
ports_id
acs(0-126),port(0-23)
request_id
unique decimal number (0-65535) assigned by the ACSLS.
subpanel_id
aes(0-126),lsm(0-23),panel(0-19),startrow(0-41),startcolumn(0-23), endrow(0-41),endcolumn(0-23)
vol_ id Six-character identifier consisting of any combination of numbers (0-9), letters (A-Z, a-z, or mixedcase (except for use in volrpt)), dollar sign ($), pound sign (#), and spaces ( ).Use single or doublequotes to enclose vol_ ids with leading or trailing spaces. Do not specify vol_ ids with embeddedspaces.
volrange Specifies an ascending range of volumes separated by a dash. Specify only the right-mostnumeric portions of the vol_ ids as the range. All preceding characters must be identical.
CentricStorThe information provided in this appendix applies only to a CentricStor configuration created using the classicTina Administration Console.
Principles
With CentricStor, a virtual backup system is installed upstream of the library with the physical drives and datacartridges. The virtual backup system contains a series of logical drives and volumes. At its heart is a databuffer, known as the disk cache, in which the logical volumes aremade available. This guarantees extremelyfast access to the data, in most cases enabling both read and write operations to be performedmuchmoreefficiently than in conventional operation.
432 Tina Administration
Additional Information

Tina Configuration
CentricStor requires specific VTL configuration.
Important: Drive cleaningmust not be automatically performed by Tina. Unselect the CleaningManagedby Tina check box in the Edit Drive window.
To configure Tina to back up on CentricStor
1. OnUnix, set the DISPLAY environment variable.2. Open Administration Console on the host where the virtual library is going to be installed.3. Select the host icon and select Devices Library New.
A library list displays.4. Select Software Controlled Libraries and STK ACSLS/LibraryStation.
The New Software Controlled Library window opens.
The name of the host you selected in Step 1 above displays in the Host Name field.5. Enter a name for the virtual library.
The Device Descriptor field is automatically entered. It consists of the catalog name concatenated withthe virtual library name (catalogname_libraryname).
6. In the Library Management Software field, select STK ACSLS/LibraryStation.7. If you have already created the drives in Tina, associate them with the library by clicking on Add.8. Click Library Properties to set the library parameters.
In the Specific tab, the VTL only: use "Info" File must be selected.
The VTL only: self correcting drive status parameter must be selected only if the drives are likely to beemptied without Tina being aware of it.
See Advanced Library Properties for details on library properties.9. Click Configuration.
Tina Administration 433
Additional Information

The VTL Parameters window opens.
10. Provide the necessary information:
Server Name (Unix only): Network Name of the CentricStor server.
Server Socket (Unix only): Socket on which SSI listens for requests from Tina.
The other fields in this window must be filled as for an ACSLS virtual library.11. Fill in these fields:
• Library Server Name: Name or IP address of the ACSLS or LibraryStation server. If you haveseveral servers, youmust create one Virtual Library per server.
• Number of Drives: Number of drives that will be used by Tina.• Number of Mailboxes: Number of mailboxes that will be used by Tina.• Barcode Range: Barcodes of the cartridges that will be used by Tina.These are the syntax rules:• Items in a list are separated by a comma ",".• The beginning and end of an array is separated by a hyphen "-".
Example. C00300-C00400,C00403-C00406,C00425means that the library contains the C00300 toC00400 barcodes, the C00403 to C00406 barcodes, as well as the C00425 barcode.
Note: Do not set this parameter if you choose the on demand ACSLS scratch pool cartridgeallocationmethod.
• Number of Cartridges: Maximum number of cartridges that you are likely to use. By default, themaximum number is 300.
Example. If you only need 50 cartridges at first but you know that you will probably need 100more in thefuture, enter 150 as themaximum number of cartridges.
Note: Themaximum number of cartridges you can set is 6000.
• Client Socket for tina_stk (Unix Only): Client socket used to access several servers from oneclient.
434 Tina Administration
Additional Information

• Response Client Name (Unix Only): Client hostname or IP address used by the ACSLS server toreturn a response to the client. It can be used in NAT environments (Network Address Translation).By default, the local hostname is used.
• Server Socket for Firewall (Unix Only): Server socket used by the client to send requests to a fixedport number of the server when there is a firewall involved. Corresponds to the value of the CSI_HOSTPORT variable.
Client Socket for Firewall (Unix Only): Client socket (fixed port number) used to receive responses fromthe server when there is a firewall involved. Corresponds to the value of the SSI_INET_PORT variable.
See ACSLS and Firewalls for details on environments involving a firewall.12. Click OK.
The Software Controlled Library Configuration window opens. It contains the list of the VTL parameterscorresponding to the values you entered in the previous window. Some of them are already associatedwith a value.
13. Select a parameter which is not associated with a value and click Edit.The Edit Parameter window opens.
14. Select the appropriate value in the list and click OK.OrFor the DRIVE, MAILBOX or POOL parameters, click Browse on the right of the Value field. The list ofthe components that are available on the ACSLS or LibrayStation server displays:– Drive addresses are displayed in ALPD format (ACS, LSM, PANEL, DRIVE).
The number at the end of the drive variable name represents the drive position in the library.– Mailbox addresses are displayed in ALC format (ACS, LSM, CAP number).– Media pools are represented by their number.
15. Once each parameters has been set, click OK in the New Software Controlled Library window.The virtual library displays inWeb Administration.
16. Edit the $TINA_HOME/Vtl<catalogname_libraryname>/vtl_config.txt file.17. Add this line at the end of the text file:
TRUNCATE_CARTRIDGE="yes"
Tina Administration 435
Additional Information

Example.##V To activate the verbose mode, put "#V" at the beginning of the first line## One declaration per line and the last one is prior## " = are the separators:## NT shell = "bash.exe" is OK# NT shell bash.exe is OK# NT shell = bash.exe is OK# NT shell = "C:\Program Files\Tools\bash.exe" is OK## NT shell = ""bash.exe"" is not supported# NT shell = C:\Program Files\Tools\bash.exe is not supported
# Variables# For UNIX : UNIX shell, UNIX extension# For NT : NT shell, NT extension
UNIX extension = "sh"NT shell = "tina_stk.exe"TRUNCATE_CARTRIDGE="yes"
Important: The TRUNCATE_CARTRIDGE variable is mandatory if a pool (POOL) has been defined whenconfiguring the virtual library. This variable enables Tina to support the CentricStor migration from tape todisk.
18. Save the file.
Important: If the TRUNCATE_CARTRIDGE variable has not been set, migrated data cannot be restorednormally. Follow this procedure to restoremigrated data:- Set the TRUNCATE_CARTRIDGE variable.- Mount and then unmount the cartridge to remove it from the pool.- Run the vlmcmd prefetch -v lv command. See the command description in the CentricStordocumentation.
Restore Performances
Due to the CentriStor datamigration process, data needed for a restoremay not be readily available if it hasbeenmigrated, whichmight slow the restore operation.
To improve performances, you should use the Script to Run during Cartridge Allocation on Restore tunable thatenables to run a script before launching the restore, following the cartridge allocation phase. The tunablemustbe set on the host where the restore is performed. The value of the tunable is the absolute name and path of thescript.
The script can launch any operation that the user needs to perform prior to restoring files, but after the directorystructure has been restored.
The script can use these environment variables:• TINA_HOME: Directory where Tina is installed.• TINA_CATALOG: Name of the catalog you are restoring from.• TINA_DEST_FOLDER: Name of the restore destination folder, either host.xyz for a host or appl.xyz for
an application, where "xyz" is the folder name.
The list of cartridges required for the restore is sent to the script using stdin.
In the script, one cartridge label and barcode are defined per line, using the CSV format.
Example.
nm00001,C00002
436 Tina Administration
Additional Information

This script returns 0, when the restore is successfully performed. Any other value indicates that the restore iscanceled.
centricstor_prefetch.sh script
The centricstor_prefetch.sh script is provided as a sample script. It pre-launches themigration from tapeto disk of all the data to restore, in order to improve restore performances.
The script is located in the directory TINA_HOME/Vtl andmust be configured as follows:• The value of the variable CENTRICSTOR_VLP must be set to the hostname of the CentricStor disk
array.• The default access method is rsh. If you want to use ssh instead, modify that value directly into the body
of the script.
TCP Parameter ModificationIf a host is behind a firewall, an inactive connection between the server and the agent may be broken by thefirewall after few minutes, usually when a large file is being backed up, and this may cause backups to fail. Inthis situation, it is recommended tomodify the TCP idle timeout at the operating system level to keep theconnection alivemuch longer.
Use these commands to display andmodify the TCP parameter:
HP-UX• Display
/usr/bin/ndd -get /dev/tcp tcp_keepalive_interval• Modify
/usr/bin/ndd -set /dev/tcp tcp_keepalive_interval <new_value>
IBM AIX• Display
/usr/sbin/no -a | grep tcp_keepidle• Modify
/usr/sbin/no -o tcp_keepidle=<new_value>
SUN Solaris• Display
% /usr/sbin/ndd -get /dev/tcp tcp_keepalive_interval• Modify
% /usr/sbin/ndd -set /dev/tcp tcp_keepalive_interval <new_value>
Linux• Display
/sbin/sysctl -e net.ipv4 | grep tcp_keepalive_intvl (Result is in seconds)Modify/sbin/sysctl -w net.ipv4.tcp_keepalive_intvl=<new_value>
Tina Administration 437
Additional Information

WindowsOnWindows, theseOS/network settings are implemented:• Idle time threshold. Any connection idle for at least this time is a candidate for liveness checking. The
default value is 2 hours.• Maximum number (unsigned integer) of keep-alivemessages that can be sent before a connection is
declared dead. The default value is 5.• Minimum delay that is applied between keep-alivemessages. The default value is 5 seconds.• Once a connection is declared dead, any current or subsequent attempt to communicate on that
connection will fail immediately with an error.• The keep-alivemessage is a simple, low-level message. If the connection is still present, the other end
will use fundamental TCP/IP functionality to reply, without affecting the sending application. The cost ofa liveness check is negligible ; because it is implemented through an exchange of TCP/IP ACKs, thereis minimal network or processor utilization.
Windows relies on system-wide registry settings to set a single check interval for an entire machine. Evenworse, the default is to wait two (2) hours before checking for a dropped connection! This is usually inadequatefor responsive liveness checking.
Tomodify the Idle time threshold, youmust create or modify this DWORD registry key and reboot themachinefor the new settings to take effect (unit is millisecond):
HKEY_LOCAL_MACHINE\SYSTEM\CurrentControlSet\Services\Tcpip\Parameters\KeepAliveTime
Tina SnapBackupThese topics give information on Tina SnapBackup:• About Tina SnapBackup• Architecture• Snapshot Configuration• Backup• Restore
About Tina SnapBackupTina SnapBackup integrates the latest snapshot technologies to enable users to reduce the backup windowwhile accommodating the ever increasing amount of data to store, and aiming to provide continuous availabilityof data.
Note: ForWindows, please use the Tina System Recovery Agent.
Tina SnapBackup enables the user to schedule or manually trigger snapshots of their data, and to restore datavery easily and rapidly when the need arises. In addition, Tina SnapBackup offers users the possibility to createa backup of the snapshots on another media, such as a tape.
These Tina applications integrate a snapshot mechanism:• Oracle• NDMP• List• Filesystem• Huawei OceanStor
438 Tina Administration
Additional Information

ArchitectureThis image illustrates the architecture of the snapshot backup:
Tina SnapBackup environment consists of:• A Tina Server.• A Tina Agent configured with one of these applications:
– Oracle– List– Filesystem, for either:
– NTFS viaMicrosoft Shadow Copy Services (VSS)– Apple File System (APFS)– BTRFS under Linux
– NDMPThe agent must be of one of these operating systems:– Windows– Unix– Linux– macOS 10.12 Sierra or newer
In addition, depending on the selected technology, Tina SnapBackup can use Tina to snapshot volumes locatedon a NAS, (e.g., a Network Appliance filer).
Snapshot ConfigurationThese topics explain how to configure Snapshot:• Prerequisites• Supported Snapshot Technologies• Current Version Requirement• Configuration
Tina Administration 439
Additional Information

PrerequisitesTina SnapBackup does not require any specific installation as it is included in the standard product. Therefore aworking Tina environment is required on your network, including a Tina server, a catalog complete with drive(s)andmedia pool(s), and, optionally, some Tina agents and a library.
Note: For the NDMP application snapshot, youmust imperatively have at least one drive declared in thecatalog, even if you do not perform a backup of your snapshots onto another media, such as tape.
When you create the catalog, ensure that the license file you use enables you to perform snapshot for thetechnology of your choice.
If you are using theMicrosoft VSS technology, ensure that theVolume Shadow Copy service is started on theagent.
For more information on installing Tina in your environment, see Installing Time Navigator Server in the TinaInstallation Documentation
For more information on the license file, see LicenseManagement and Advanced LicenseManagement in theTina Installation Documentation.
Supported Snapshot TechnologiesTina SnapBackup supports these snapshot technologies:• Microsoft Volume Shadow Copy Services (VSS). This technology is embedded inWindows 2008 and
2012.• Network Appliance Snapshot (NetApp). The Network Appliance filer must be compatible with version 4
of the NDMP protocol, (e.g., Ontap 7.X, 8.X, or 9.X).
Note: For Ontap filers, since version 8.2, a new Storage Virtual Machine (SVM), or Virtual Server(Vserver), mode exists in addition to the node-scopemode (see Tina for NDMP Documentation). It istherefore possible to access the different nodes of the cluster via a Vserver. To configure the application,youmust give the name of the filer. This is the name of the Vserver or cluster, depending on the way thatyou have declared NDMP services on your filer. The two configurations are possible, even though it isrecommended to use the Vserver, as you could have several in a complex configuration.
• LSI/Engenio. This technology is only available with Linux platforms without Logical VolumeManager(LVM), and only with Filesystem applications.
• macOS APFS• BTRFS under Linux• Huawei OceanStor
In addition, as summarized in this table, the ability to use Tina SnapBackup varies with:• The operating system of themachine controlling the backup process. Currently, only Windows, Unix,
andmacOS are supported.• The Tina application. Youmust use the Oracle, List, Filesystem, or NDMP applications to perform a
backup with SnapBackup.
OS/Application Oracle List FileSystem NDMP
Windows 2008/2012 VSS
Network Appliance
VSS
Network Appliance
VSS Network Appliance
Unix Network Appliance Network Appliance Network Appliance
Linux Network Appliance Network Appliance LSI/Engenio Network Appliance
440 Tina Administration
Additional Information

OS/Application Oracle List FileSystem NDMP
macOS APFS
Virtual Filers
Tina SnapBackup supports virtual filers for NetApp snapshot technology using an NDMP application.
Current Version RequirementFromWeb Administration, you cannot administer snapshots on a platform with a previous Tina version.
Configuration
Microsoft Volume Shadow Copy Services Technology Prerequisites
The volumes to snapshot must not be located on amounted disk. The VSS technology does not enable to crossmount points when performing a snapshot, whether to a local or a network disk.
LSI/Engenio Technology Prerequisites
Engenio Configuration File
To use the LSI/Engenio snapshot technology, youmust imperatively create a configuration file to identify thephysical volumes on the disk array and to specify the snapshot configuration parameters.
The name and path of the configuration file must be provided in the Configuration File field of the LSI/EngenioConfiguration window. See Snapshot ConfigurationWindow - LSI/Engenio.
The Tina installation contains a sample configuration file. It is located in the $TINA_HOME/Conf/Engenio/snp_eng.sample directory. See Sample Configuration File..
Note: Youmust enter all parameters with quotationmarks.
Volume Identification.
Use the Volume keyword to define the volume.
volume:target="/dev/xxx":logicalName="lnxxx":WWname="12345 23456 4567"Where:• target is the name of the volume to snapshot as seen by the operating system through the mount
command.• logicalName is the name of the partition or logical volume to snapshot. The logical name becomes
a component of the mnt_snap_name parameter used by the OS Command (see Engenio OSCommand). For instance, if the OS Commandmounts all snapshot partitions as s# (# is thepartition number), and if the snapshotted volume corresponds to the 3rd volume partition, thelogicalNamewill be equal to "s3".
• WWname is the universal name of the volume to snapshot on the disk array (i.e., the target). You canget the WWname using the SYMdevices command provided with SANtricity StorageManager.
Example. Volume Identification
To snapshot the /DT/tests/testsnap_vg5_1 directory which is themount point for the first partition of the/dev/sdf device, use this volume identification:
volume:target="/dev/sdf1":logicalName="s1":WWname="600a0b8000019dcf100000f7443a7e33e"
Tina Administration 441
Additional Information

Snapshot Creation Parameters.
Use the SnapCreateParam keyword to define the snapshot creation parameters.
SnapCreateParam:WWname="600a0b8000019dcf100000f7443a7e33e".param=value
Where:• WWname specifies the physical volume to which the parameter applies.• param=value defines the value of the parameters.
Note: The only mandatory parameter is WWname. All other parameters have default values.
These are the available parameters:• repFullPolicy: Defines the snapshot behavior when the repository is full. These are the possible
values:– FAILWRITES. The next writing fails. This is the default value.– FAILSNAP. The snapshot is invalid.
• repCapacityRatio: Defines the size of the associated repository expressed as a percent of the originalvolume size. The default value is 10.
• warnThreshold: Defines the filling threshold of the repository generating a warning. The default value is80.
• noMapping: Specifies whether the controller should automatically assign a LUN to the snapshot (false)or not (true). The default value is true.
These parameters are used to specify the candidate volumewhere the snapshot will be created. The volumerepresenting the closest match to the selected criteria is chosen:• candidat.raidLevel: Level of RAID for the snpashot.
These are the possible values: RAID0, RAID1, RAID3, RAID5, and RAID_ALL.The default value is RAID_ALL.
• candidat.physDriveType: Type of the disk where the snapshot is created.These are the possible values: PHYS_DRIVE_TYPE_SCSI, PHY_DRIVE_TYPE_FIBRE, PHY_DRIVE_TYPE_SATA, PHY_DRIVE_TYPE_PATA, and PHY_DRIVE_TYPE_ALL.The default value is PHY_DRIVE_TYPE_ALL.
• candidat.selectionType: Selectionmode for the candidate volume. These are the possible values:– CANDIDATE_SEL_FREE_EXTENT. The snapshot is created within the free space of existing
volume groups. You can specify the volume group number with the candidat.volumeGroupparameter. If the volume group number is not specified, free space is chosen in the snapshotsource volume group in priority. This is the default value.
– CANDIDATE_SEL_MANUAL. The snapshot is created on a new volume group created fromphysical drives list specified with the candidat.drivesWWNames parameter.
– CANDIDATE_SEL_COUNT. The snapshot is created on a new volume group created fromphysical drives automatically selected by the controller.
• candidat.drivesWWNames: List of the world wide names of the disks to use to create the snapshot whenthemode is CANDIDATE_SEL_MANUAL.
• candidat.volumeGroup: Number of the volume group into which free space will be used to create thesnapshot when themode is CANDIDATE_SEL_FREE_EXTENT.
Sample Configuration File.
The Tina installation contains a sample configuration file. It is located in the $TINA_HOME/Conf/Engenio/snp_eng.sample directory.
# Snapshot Engenio configuration file# -----------------------------------
442 Tina Administration
Additional Information

## Format tmd like# entity[:att_name="value"[...]][.entite[:att_name="value"]...][="value"]### Physical volume identification:# ------------------------------# target = OS name of the volume to be snapshoted : /dev/sdx or /dev/vg/lvx# logicalName = Name of the logical volume in case of LVM use or partition name (s1 if thepartition to snapshot is slice 1)# It will be used to build the mount point of the snapshot : /$SNP_ROOT_DIR/Snp_eng_<arch_time>/logicalName# WWname = World Wide name of the volume on the storage array. If the target islocated on several physical volumes# (use of LVM) provide all the volumes world wide names.volume:target="/dev/sdx1":logicalName="s1".WWname="12345678900000000"volume:target="/dev/vg1/lv1":logicalName="lv1".WWname="12345678900000000123456789999999999"
# Snapshot creation parameters# -----------------------------# The physical volume whose snapshot creation parameters are to be# defined must be specified by the WWname attribut value:# SnapCreateParam:WWname="12345678900000000"# these parameters are: repFullPolicy, repCapacityRatio, warnThreshold,# noMapping# The following parameters are used to choose the volume candidat for the# snapshot creation: candidat.raidLevel, candidat.physDriveType, candidat.selectionType# candidat.drivesWWNames, candidat.volumeGroup.
# repFullPolicy specifies the behavior of the snapshot when its repository is full:# FAILWRITES : the write request fails on the base or snapshot volume whenthe repository is full# FAILSNAP : the snapshot itself fails when its repository is full# (See RepositoryFullPolicy in the SYMbolAPI documentation)# default = "FAILWRITES"SnapCreateParam:WWname="12345678900000000".repFullPolicy="FAILWRITES"
# repCapacityRatio specifies the size of repository given by a percent of the size of thephysical volume to snapshot# default = "10"SnapCreateParam:WWname="12345678900000000".repCapacityRatio="10"
# warnThreshold specifies the repository utilization warning threshold given by apercentage# default = "80"SnapCreateParam:WWname="12345678900000000".warnThreshold="80"
# noMapping Specifies whether or not the controller creates the mapping automatically.# true = do NOT create the mapping false = do create a default mapping# (See SnapshotCreationDescriptor in he SYMbolAPI documentation)# default = "true"SnapCreateParam:WWname="12345678900000000".noMapping="true"
Tina Administration 443
Additional Information

# Volume candidate selection parameters# -----------------------------------# These parameters must be specified as part of the "candidat" sub_entity# candidat.raidLevel specifies the RAID level for the snapshot volume (repository)# the value can be# "RAID0" "RAID1" "RAID3" "RAID5" or "RAID_ALL"# default = "RAID_ALL"SnapCreateParam:WWname="12345678900000000".candidat.raidLevel="RAID_ALL"
# candidat.physDriveType specifies the physical drive type# the value can be# "PHY_DRIVE_TYPE_SCSI" "PHY_DRIVE_TYPE_FIBRE" "PHY_DRIVE_TYPE_SATA""PHY_DRIVE_TYPE_PATA"# "PHY_DRIVE_TYPE_ALL"# default = "PHY_DRIVE_TYPE_ALL"# (See PhysicalDriveType in the SYMbolAPI documentation)SnapCreateParam:WWname="12345678900000000".candidat.physDriveType="PHY_DRIVE_TYPE_ALL"
# candidat.selectionType specifies the selection mode of the candidate volume for therepository# the value can be# "CANDIDATE_SEL_FREE_EXTENT" : Obtains the candidate volume fromexisting free extent.# The volume group where the freeextent is, is specified by the parameter# candidat.volumeGroup.# "CANDIDATE_SEL_MANUAL" : Obtains the candidate volume on anew volume group created# from a list of physical drivesspecified by the candidat.drivesWWNames# parameter.# "CANDIDATE_SEL_COUNT" : Obtains the candidate volume on anew volume group created# from drives that are selectedautomatically by the controller# default = "CANDIDATE_SEL_FREE_EXTENT"# (cf: CandidateSelectionType in the SYMbolAPI documentation)SnapCreateParam:WWname="12345678900000000".candidat.selectionType="CANDIDATE_SEL_FREE_EXTENT"
# candidat.drivesWWNames : List of the World Wide name of the physical drives to createthe candidate from, when the# candidat.selectionType = CANDIDATE_SEL_MANUAL.# It is mandatory in this case.SnapCreateParam:WWname="12345678900000000".candidat.drivesWWNames="3456780000003456790000"
# candidat.volumeGroup : volume group number from which the free extent should be choosento build the new volume# when candidat.selectionType = CANDIDATE_SEL_FREE_EXTENT.# if not specified, the volume group of the volume to snapshot isused.SnapCreateParam:WWname="12345678900000000".candidat.volumeGroup="3"
444 Tina Administration
Additional Information

Engenio OS Command
The libtina_snp_eng library launches the OS command or script. It is used tomanage specific snapshotevents such as the creation or destruction of a snapshot.
For the command to be automatically launched, the path of the file containing the commandmust be declared inthe OS Command field of the LSI/Engenio Configuration window. See Snapshot ConfigurationWindow -LSI/Engenio.
The Tina installation contains a sample korn shell OS command. It is located in the $TINA_HOME/Conf/Engenio/snp_eng.ksh directory and contains these functions:
Pre-Creating Snapshot.
command 3 -f config_file -r mnt_root_dirWhere:• 3 indicates that the command is a snapshot pre-creation.• config_file represents the name and path of the configuration file.• mnt_root_dir is the name and path of the directory where the snapshot will be located.
Post-Creating Snapshot.
command 4 -f config_file -r mnt_root_dir -o os_phys_vol_name -w snap_wwnames -n snap_create_name
Where:• 4 indicates that the command is a snapshot post-creation.• config_file represents the name and path of the configuration file.• mnt_root_dir is the name and path of the directory where the snapshot will be located.• os_phys_vol_name is the OS device of the volume to snapshot.• snap_wwnames represents the list of the world wide names of the snapshots.• snap_create_name is the generic name of the snapshots (Snp_eng_[arch_time]).
Once the post-creation command has been executed, snapshots become available through this mount point:
/mnt_root_dir/snap_create_name/logicalName
The logicalName parameter is extracted from the Engenio Configuration File. See Engenio Configuration File.
This mount point is recorded in the catalog as the mnt_snap_name parameter and is displayed in the SnapshotAdministrationWindow, inWeb Administration.
Pre-Deleting Snapshot.
command 5 -f config_file -r mnt_root_dir -m mnt_snap_name -w snap_wwnamesWhere:• 5 indicates that the command is a snapshot pre-deletion.• config_file represents the name and path of the configuration file.• mnt_root_dir is the name and path of the directory where the snapshot is located.• mnt_snap_name is the snapshot mount point as defined during the Snapshot post-creation phase
and recorded in the Tina catalog.• snap_wwnames represents the list of the world wide names of the snapshots.
The pre-deletion command ensures that the actual snapshot destruction will be harmless to the operatingsystem. For instance, it unmounts the snapshot.
Post-Deleting Snapshot.
command 6 -f config_file -r mnt_root_dirWhere:
Tina Administration 445
Additional Information

• 6 indicates that the command is a snapshot post-deletion.• config_file represents the name and path of the configuration file.• mnt_root_dir is the name and path of the directory where the snapshot is located.
Verifying Snapshot.
command 9 -f config_file -r mnt_root_dir -m mnt_snap_name-w snap_wwnames
• 9 indicates that the command is a verification.• config_file represents the name and path of the configuration file.• mnt_root_dir is the name and path of the directory where the snapshot is located.• mnt_snap_name is the snapshot mount point as defined during the Snapshot post-creation phase
and recorded in the Tina catalog.• snap_wwnames represents the list of the world wide names of the snapshots.
The verification command ensures that you can access the snapshot through the /mnt_root_dir/snap_create_name/logicalName.
Configuring Tina SnapBackup
Configuring Tina SnapBackup consists in creating a Snapshot ready application.
In the present section, we only describe the steps specific to snapshots. For more information on theprerequisites and configurations for each particular application, see these documents:• Oracle Application: See Tina for Oracle Documentation.• NDMP Application: See the “Viewing the NDMP Server File Tree in the Present” section, topic the Tina
for NDMP Documentation.• Filesystem Application: See Filesystem Application.• List Application: See List Application.
Note: Tina SnapBackup does not support parallel backup. When an application is configured to performsnapshots, the parallelism is disabled.
To create a snapshot ready application
1. InWeb Administration, expand your catalog in Tina Explorer.2. Select Platforms Applications. The Applications pane opens.3. Click New application. The Application CreationWizard opens.4. Configure the parameters of the application that supports snapshots (see Supported Snapshot
Technologies).See Creating Applications.
5. Once created, select your application in the Applications pane.6. Click Application Details. The Application Details pane opens.7. In the Snapshot Options area, select the snapshot type and click Configuration.
Note: Only the snapshot technologies available for the Host operating system display in the list.See Supported Snapshot Technologies.
The Snapshot Configuration window opens.8. The contents of this window vary with the technology selected. The parameters that youmust enter vary
according to the technology used. See:• Snapshot ConfigurationWindow -Microsoft Shadow Copy Service• Snapshot ConfigurationWindow - Network Appliance• Snapshot ConfigurationWindow - LSI/Engenio• Snapshot ConfigurationWindow - APFS
446 Tina Administration
Additional Information

• Snapshot ConfigurationWindow - NDMP (SVM-scoped NDMP mode only)• Snapshot ConfigurationWindow - Huawei OceanStor
9. Define environment variables as needed.• Variable Common to all Applications
VariableName Description
PossibleValues[Default]
Technology Status
TINA_APP_MAX_SNAP
Snapshot retention period in number of snapshots versionskept in the catalog. If it is not defined, all snapshot versionsare kept in the catalog. If a value is specified, it becomesthemaximum number of snapshot versions. When themaximum number is reached, Tina removes the oldestsnapshot prior to creating a new one.
Integer[0]
All Optional
Note: Due toMicrosoft constraints, Atempo is unable to guarantee a retention period greater thanone per volume snapshotted with the VSS technology. Even if a volume is snapshotted throughseveral applications, only one version is guaranteed, whatever the value of TINA_APP_MAX_SNAP.
• Oracle ApplicationFor the Oracle application, there are no environment variables specific to the Snapshot functionalityother than TINA_APP_MAX_SNAP.See Variable Common to all Applications.For more information on the variables available for the Oracle application, see the Tina for OracleDocumentation.
• List ApplicationFor the List application, there are no environment variables specific to the Snapshot functionalityother than TINA_APP_MAX_SNAP.See Variable Common to all Applications.For more information on the variables available for the List application, see List Application.
• Filesystem ApplicationIn addition to TINA_APP_MAX_SNAP (see Variable Common to all Applications), these variables arerequired for the Filesystem application:
Tina Administration 447
Additional Information

VariableName
Description PossibleValues[Default]
Technology Status
TINA_FS_ROOT_DIR
Specifies the access path of the volume tosnapshot, which also indicates the directoryto be used as the root of the Filesystemapplication. The value of the variable must bean existing directory.
Important: Once you have performedsnapshots, do not change the value ofTINA_FS_ROOT_DIR. If you do, youcannot restore the previous snapshotsany more.
For some technologies exist the followingrequirements:
• LSI/Engenio The volume to snapshotmust imperatively be located on an LSIcontrolled disk array.
• BTRFS The snapshot pathmust be onthe subvolume.
• Huawei OceanStor The snapshot pathmust be root (/).
Path VSS
LSI/Engenio
BTRFS (underLinux)
HuaweiOceanStor(underWindowsand Linux)
Mandatory
NDMP_DIRLIST
Enables viewing of the present time withoutusing NFS or CIFS.
YES/[NO]
Note: ForNetApponly, thedefaultvalue is[YES]
NDMP Mandatory
Formore information on the variables available for the Filesystem application, seeFilesystem Application.
• NDMP ApplicationFormore information on the variables available for the NDMP application, see the Tina for NDMPDocumentation.For the NDMP application, when the last snapshot created by a full backup is removed due toretention period constraint, the next snapshot backup is automatically a full backup even if youhave scheduled an incremental one. For instance, if you set TINA_APP_MAX_SNAP to four and youhave already performed one full backup followed by three incremental ones, the next snapshot is afull backup, regardless of the backup type that you actually scheduled.For the NDMP application snapshot, youmust imperatively have at least one drive declared in thecatalog, even if you do not perform a backup of your snapshots onto another media, such as tape.
• Huawei OceanStorFor the OceanStor application, there are no environment variables specific to the Snapshotfunctionality other than TINA_APP_MAX_SNAP.See Variable Common to all Applications.For more information on the variables available for the OceanStor application, see SnapshotConfigurationWindow - Huawei OceanStor.
10. Click OK to validate the information and close the window.
448 Tina Administration
Additional Information

Snapshot Configuration Window - Microsoft Shadow Copy Service
Target Host Name: Host where the volume to snapshot is located. By default, the host the application isattached to.
Note: The target host name cannot bemodified once defined.
Target User Name: User accessing the target host. By default, the user declared in the application window.
Password: Password for the user accessing the target host. By default same password as the one declared forthe application user. Click Password to set or modify the password.
Snapshot Configuration Window - Network Appliance
Target Host Name: Host accessing the volume to snapshot. By default, the host the application is attached to.
Target User Name: User accessing the target host. By default, the user declared in the application window.
Password: Password for the user accessing the target host. By default same password as the one declared forthe application user. Click Password to set or modify the password.
Network Appliance Snapshot Area
Filer Name: Name of the Filer where the volume to snapshot is located.
Filer User Name: User accessing the filer data.
Password: Password for the user accessing the filer. Click Password to set or modify the password.
Temporary Directory: Name of a temporary directory where the root user or the administrator is allowed to write.
Note: For NDMP applications, the temporay directory is equivalent to the TINA_TMP_DIR variable andneed not be provided.
Snapshot Configuration Window - LSI/Engenio
Storage Array: IP address of the disk array. Depending on the connectionmode, the address is either that of thearray controller (Out-of-bandmanagement), or that of themachine controling the disk array (In-bandmanagement).
WorldWide Name: Unique identifier for the storage array. TheWorldWide Namemust be provided as anhexadecimal number.
Password: Use the password defined on the disk array to protect administrative operations, if any.
Configuration file: Path of the file containing information concerning the volumes to snapshot and the snapshotcreation parameters.
OS Command: Path of a file containing a script or command launched by the library libtina_snp_eng. Thescript manages such operations as creating, deleting, or verifying snapshots.
Snapshot Location: Path of the directory hosting the root of the snapshot mount points. Once a snapshot iscreated on the storage array, it is identified on themachine that controls the array andmounted in a subdirectory of the Snapshot Location directory.
Snapshot Configuration Window - APFS
The variable TINA_SNP_LOCAL_SNAPSHOT_STORAGE=/mount/apfsmust be configured. Possible values:specifying a path is mandatory.
This path will make it possible to access the snapshot contents on the server.
Tina Administration 449
Additional Information

Snapshot Configuration Window - NDMP (SVM-scoped NDMP mode only)
Since Data ONTAP 8.2, two different “scopes” have been introduced tomanage clusters: the NDMPconfiguration is either node-scoped or Vserver-scoped. The latter is also known as Storage Virtual Machine(SVM)-scopedmode. When using this configuration, the variables TINA_SNP_VSERVER_NAME and TINA_SNP_CIFS_LIF_NAMEmust be configured.
The first is the case-sensitive name of the SVM resource, and the second the name of the logical interface usedtomanage the cluster.
See NDMP Application for details.
VariableName Description
PossibleValues[Default]
Technology Status
TINA_SNP_VSERVER_NAME
This is the name of the Vserver, which ismandatory to create a snapshot in SVMmode.This variable is case-sensitive.
text SVM-scopedNDMP configurationwith Ontap 8.2 orgreater
Mandatory
TINA_SNP_CIFS_LIF_NAME
ForWindows only, this is the LIF name or IP.Used by the file to export shares needed to getaccess to the Ontap data volumes in thepresent.
text SVM-scopedNDMP configurationwith Ontap 8.2 orgreater
Mandatory
Snapshot Configuration Window - Huawei OceanStor
Variable name Description
TINA_SNP_PHYSICAL_FILER_NAME
Address of the OceanStor disk array.
TINA_SNP_OSTOR_FILER_IP
IP address of the disk array.
TINA_SNP_OSTOR_FILER_USER
Username adopted to connect to the disk array.
TINA_SNP_OSTOR_FILER_SCOPE
Refers to selecting 0: local user or 1: LDAP user. For more information, seeCreating an LDAP User or Group.
TINA_SNP_OSTOR_FILER_PORT
Port used to connect to the disk array.
TINA_SNP_OSTOR_FILER_FS_DOMAIN
Domain used to connect to the disk array.
TINA_SNP_OSTOR_FILER_FS_NAME
Name of the FileSystem on the disk array.
TINA_SNP_OSTOR_FILER_PASSWORD
Password of the user to connect to the disk array.
450 Tina Administration
Additional Information

Access Permissions
For you to administer snapshots andmost specifically, to be able to delete snapshots, the catalog privilegeduser must grant you theMedia-Remove Snapshot permission.
BackupTina SnapBackup enables you to perform whole volume backup.
When you perform a snapshot using Tina SnapBackup, depending on the application used, not all data issnapshotted. This table summarizes the data that is snapshotted and the data that is written on the other media:
Application Data Snapshotted Data Written on Other Media
Oracle Tablespaces Redo logs, Control files
List Contents of DIRkeyword
All other data and any level 1directory marked with the NOSNAPkeyword
Filesystem All data is snapshotted N/A
NDMP All data is snapshotted N/A
HuaweiOceanStor
All data is snapshotted N/A
Huawei OceanStor for Snapshots on LinuxIf you perform a snapshot on Linux using the Huawei OceanStor application, extra mounting points may appearthat were not requested. In Tina, this may make it impossible to synchronize in the backup folder and restore anobject as it was at a given time. To avoid unrequestedmounting points, you canmodify the NFS OceanStorconfiguration.1. Connect to the Huawei OceanStor filer in CLI mode.2. Enter the following commands:
• change user_mode current_mode user_mode=developer• change service nfs_config v3_automount_switch=disable v41_automount_
switch=disable v4_automount_switch=disable3. To verify themodifications of the snapshot configuration, enter the command />show service nfs_
config.
Tina Administration 451
Additional Information

In this example, automounting is disabled for each NFS version.
Snapshot JobsFor Oracle and List applications, each time you perform a snapshot, two jobs are actually launched. One jobhandles only the snapshotted data, the second job handles the data written on the other media. For Filesystemand NDMP applications, one job per snapshot is launched.
In addition, if you choose amultiple writing pool, another job handles the copy of the snapshot to another media.
Backup StrategyTo perform snapshots, youmust create a strategy with specific parameters that can only be used to snapshotvolumes (i.e., if you want to perform both snapshots and regular backups of your application, youmust createtwo separate strategies).
Copying Snapshots to another media
To copy your snapshot, ensure that you have amedia pool available for that purpose and declare it as amultiplewriting pool in the backup strategy.
In addition, themultiple writing pool and its associated drives must be compatible with the snapshot technologyused. In particular, for Network Appliance technology, drives must be controlled by an NDMP Tape Serverequipped with this version of the NDMP protocol:• NDMP Application. The Tape Server controlling themultiple writing drives must be of the sameNDMP
version as the Data Server.• Oracle or List Application. The Tape Server controlling themultiple writing drives must be in NDMP
version 4.
Note: The use of multiplexed sessions to copy data from a snapshot to tape is not supported.
To create a snapshot strategy
To create a snapshot strategy, youmust first configure the snapshot option in a snapshot ready application, andthen configure the strategy.1. InWeb Administration, expand your catalog in the Tina Explorer.2. Select Platforms Applications. The Applications pane opens.3. Select a snapshot ready application (see To create a snapshot ready application) and click Application
Details to edit the application. The Applications Details window opens.4. Click the Snapshot Options area.5. Select the Snapshot type (i.e., Microsoft VSS or Network Appliance) and select Configuration. The
Configuration window opens.Enter your parameters in the Configuration window. This table describes the parameters you can find inthe Configuration window:
Parameter Description
All types of snapshots. Microsoft VSS, APFS, LSI/Engenio, Network Appliance.
Target HostName
Host where the volume to snapshot is located. By default, it is the host to which theapplication is attached.
Once defined, you cannot modify the target host name.
452 Tina Administration
Additional Information

Parameter Description
Target UserName
User accessing the target host. By default, the user declared in the application window.
Passwordand Confirm
Password for the user accessing the target host. By default same password as the onedeclared for the application user.
Advanced This list enables you to specify the name and value for an advanced environment variable,or to remove an unwanted environment variable.
These are the advanced environment variables you can set:
• TINA_SNP_REST_PARALLEL_INDICESet this variable to perform parallel restores. It indicates themaximum number ofrestores that you can perform at the same time. The default value is 1.
These variables are useful only if you use a virtual filer. If your primary filer is virtual, set thefour TINA_SNP_PRIMARY variables. If the secondary filer is virtual, set the four TINA_SNP_SECONDARY variables. If both filers are virtual, set all variables.
• TINA_SNP_PRIMARY_IS_VIRTUALIndicates that the primary filer is a virtual filer. The value of the variable is meaningless,as long as the variable displays in the list.
• TINA_SNP_PRIMARY_PHYSICAL_FILER_NAMEName of the primary physical filer.
• TINA_SNP_PRIMARY_PHYSICAL_USERName of the user accessing the primary physical filer.
• TINA_SNP_PRIMARY_PHYSICAL_PASSWORDPassword of the user accessing the primary physical filer.
• TINA_SNP_SECONDARY_IS_VIRTUALIndicates that the secondary filer is a virtual filer. The value of the variable ismeaningless, as long as the variable displays in the list.
• TINA_SNP_SECONDARY_PHYSICAL_FILER_NAMEName of the secondary physical filer.
• TINA_SNP_SECONDARY_PHYSICAL_USERName of the user accessing the secondary physical filer.
• TINA_SNP_SECONDARY_PHYSICAL_PASSWORDPassword of the user accessing the secondary physical filer.
Only Network Appliance Snapshot Area.
Filer Name Filer containing the data to snapshot.
For NDMP applications, it must be the same as the NDMP server.
Filer UserName
Name of the administration user of the filer.
TemporaryDirectory
Directory where the root user or the administrator is enabled to write.
For NDMP applications, the temporay directory is equivalent to the TINA_TMP_DIR variableand need not be provided.
Tina Administration 453
Additional Information

6. Click Apply and Close to close the Configuration window.7. Click Apply and Close to activate the snapshot options for the application.8. In theWeb Administration, expand your catalog in the Tina Explorer.9. Select DataManagement Strategies. The Strategies pane opens.10. Click New Strategy (+) and select New Snapshot Strategy. The Snapshot Strategy CreationWizard
opens.11. Set the parameters to create a new snapshot strategy.12. This table describes the parameters that you can set in the Snapshot Strategy CreationWizard:
Parameter Description
Platform Selection Select the platform on which you configure the strategy.
Strategy Name Select the strategy to apply (i.e., A, B, C, or D).
ComplementaryCartridge Pool
Only available for the Oracle and List applications. It is mandatory for these twoapplications since you cannot snapshot some of the data.
Full Schedule Defines the schedule applied to full backups. Typically, full backups are performedweekly. These are the valid options:
• Do not use any schedule. Youmust launchmanually the backup.• Define a new schedule. You can create a new schedule that fits better to your
needs. See To create a schedule.• Use an existing schedule. Select one of the available schedules from the list.
IncrementalSchedule
Defines the schedule applied to incremental backups. Typically incremental backupsare performed daily. These are the valid options:
• Do not use any schedule. Youmust launchmanually the backup.• Define a new schedule. You can create a new schedule that fits better to your
needs. See To create a schedule.• Use an existing schedule. Select one of the available schedules from the list.
13. In the Summary window, check the creation parameters and click Finish to validate the creation of thesnapshot strategy.
Backup SelectionDepending on the technology and the Tina application used, the rules for setting the backup selection vary:
Application Technology Rule for Setting the Backup Selection
Oracle All A snapshot can only contain the data of a single volume. If the backupselection you create contains several volumes, a snapshot is created for eachvolume.
List All A backup selection can be set on any directory in a volume. Even though theentire volume containing the directory is snapshotted, only the selecteddirectory displays in Restore & ArchiveManager. If a level 1 directory withinthe volumemust not be snapshotted, use the nosnap keyword to exclude itfrom the snapshot.
For more information on the List application, see List Application.
454 Tina Administration
Additional Information

Application Technology Rule for Setting the Backup Selection
Filesystem All The path of the volume to snapshot must be provided through the TINA_FS_ROOT_DIR environment variable (see To create a snapshot ready application).Youmust set the backup selection at the root of the application.
Backup selection filtering is not supported for Filesystem snapshots. Youcannot exclude or include files from a snapshot using backup selection filters.
NDMP All A backup selection cannot be set at the root of the application. It must onlycontain one volume. For instance, set a backup selection on Vol/Vol1 andanother one on Vol/Vol2. When using Storage Virtual Machine (SVM)-scopedmode (available with Ontap 8.2 or newer) the backup selection becomesVserver/Vol.
Backup selection filtering is not supported for NDMP snapshots. You cannotexclude or include files from a snapshot using backup selection filters.
SVM-scopedmode supports the use of the TINA_SHARE_DEFINITION variableto indicate the share path configuration, for example/share \\172.16.65.218\share. If the variable is undefined, share discoverywill take place. See the Tina for NDMP Documentation for details on TINA_SHARE_DEFINITION.
APFS All The valuemust be set to the root of the APFS volume: /Volumes/apfs.
Snapshot AdministrationTina enables you to list all the snapshots created in the catalog for a given backup folder, and to deletesnapshots.
To administer snapshots
1. InWeb Administration, select Backup Destinations Snapshots. The Snapshots pane opens.2. You can get snapshot details, and check or delete a snapshot.
RestoreThe snapshot restore procedure is identical to that of any file or directory. For more information on restoreprocedures, see Tina Restore Documentation.
Only the details specific to Snapshot restore are discussed in this section.
Viewing Snapshot VersionsIn Restore & ArchiveManager, snapshotted objects display in the samemanner as any backed up object.
Tina Administration 455
Additional Information

When you right click a snapshotted object and select Versions, theMedia column indicates the name of thesnapshot for each version.
Useful Information Concerning Symbolic Links
If the volume you are snapshotting through aWindows machine (for instance a Network Appliance filer volume)contains some symbolic links, be aware that:• These links display as regular files in Restore & ArchiveManager. Moreover the graphical display does
not distinguish file links from directory links. However, they will be correctly restored as symbolic links.• If you have both a snapshot and a tape version of a symbolic link and if you activate a time navigation
period, each version displays as a separate object. As a result, one of the versions displays as amissingfile.In this example, the snapshot version displays as a file, and the tape version displays as amissing file, itis striped.
456 Tina Administration
Additional Information

The rc1.d.SAV link has actually been deleted, both versions are striped. You can use either version torestore that link.
Restoring Snapshots
Restore Procedure
The procedure to restore a snapshot is identical to that of restoring a file.
Restore Modes
Threemodes are available to restore a snapshot. Themode is chosen by Tina and depends on the technologyused to snapshot the data.• Recover Mode Restoring is performed by a function embedded in the technology. The restore function
copies the snapshot data to the restore volume.• Copy Mode Tina reads data from the snapshot (possibly using NFS or CIFS if the technology is
Network Appliance) to write them by the same channel on the restore volume.• Rollback Mode The Rollback mode to fully restore snapshots to their original location is only available
with the Huawei OceanStor technology. Rollback will overwrite all data on disk (root and subdirectories).
Restore Mode Depending on the Snapshot Technology Used
Snapshot Technology Restore Mode
VSS • Copy
Tina Administration 457
Additional Information

Snapshot Technology Restore Mode
APFS • Recover, only if data is restored into the original volume, otherwiseCopy.
Network Appliance • Recover, only if data is restored into the original volume, otherwiseCopy.
LSI/Engenio • Copy
Huawei OceanStor • Recover• Copy• Rollback, when selecting "/" and restoring to the original location.
Permission Issue for the NDMP Application
The user launching a snapshot restore with the NDMP applicationmust have the necessary permissions tocreate directories on the filer. The root user for instance in an NFS environment does not have any permissionon the filer.
Restore Volume Calculation
For performances reasons, for NDMP and Filesystem applications the restore volume is not systematicallycalculated at the beginning of the restore. You will be asked through amessage box whether or not you want thecalculation to be performed.
Alternatively, you can set the Force the Calculation of the Restore Volume tunable to yes and the volumewill becalculated for all restore operations.
See the Tina Tunables Documentation.
Cross Restore
Currently, Tina does not support cross restoring from a snapshot.
Network Ports DetailsTina uses different ports to connect to hardware, virtual devices, and networks. This topic summarizes networkports and their connection directions.
Backup and Restore with Tina Classic Interfaces, API, and Command LineInterface (CLI)Connection between Tina Server and Tina Agent:
l 2525/TCPIncoming and outgoing on agent as well as serverConfigurable in Tina setup orWeb Administrator User Interface
l 2526/UDPIncoming on server, outgoing on agentConfigurable during Tina setup and viaWeb Administrator User Interface
458 Tina Administration
Additional Information

Agent-to-agent connection (communication between storage nodes for example):
l 2525/TCPIncoming and outgoing on both agentsConfigurable in Tina setup orWeb Administrator User Interface
Note: The bidirectional TCP port modemay be avoided by using the tunnel mode. In the latter case, it isno longer the agent that reconnects to the server but rather the server that connects to the agent and thenreverses the network to return to the initial case of data transfer from the agent to the server. This mode isan advantageous alternative to the backupmaster option, which remains available. It is then necessary toopen TCP port 2525 in outgoingmode on the Tina server. For more information, see Tunnel Mode.
Tina Backup and Restore (SIDF, RemoteMover for transfer)Tina Agent connection to Tina Storage Node:
l Dynamic TCP Port or rem_dtm_data_TCP_numIncoming on Storage Node, outgoing on Tina AgentConfigurable by setting port number parameter rem_dtm_data_TCP_num on Storage Node
Note: You canmodify the connection direction by setting rem_dtm_reverse_connection=yes on theTina Agent. It is the storage node that connects to the agent. This is available whether using tunnelmode or not, and strongly recommended in tunnel mode.
Tina Storage Node connection to Tina Agent:
l Dynamic TCP Port or rem_dtm_data_TCP_numIncoming on Tina Agent, outgoing on Tina Storage NodeConfigurable by setting port number parameter rem_dtm_data_TCP_num on Tina Agent
Synthetic and SIDF duplicationTina Server connection to the Destination Storage Node:
l Dynamic TCP Port or synth_data_TCP_numOutgoing on Tina, incoming on Destination Storage NodeConfigurable by setting port number parameter synth_data_TCP_num onDestination Storage Node
Backup and Restore with Tina for NDMPThird-party NDMP Data Server connection to NDMP Tape Server:
l Dynamic TCP Port or ndmpd_mover_tcp_numIncoming on NDMP Tape Server, outgoing on NDMP Data Server (NAS)Configurable by setting port number parameter ndmpd_mover_tcp_num on Tape Server
Tina Agent (DMA) connection to NDMP Tape Server and NDMP Data Server:
l 10000/TCPOutgoing on Tina Agent, incoming on NDMP Tape and Data ServersConfigurable by setting environment variables TINA_NDMP_SERVICE_NAME or TINA_NDMP_SERVICE_TCP_NUM. The same number is to be used on the Tape Server and Data Server.
AtempoNDMP Data Server connection to NDMP Tape Server (with third-party DMA):
l Dynamic TCP Port or ndmpd_data_tcp_numIncoming on NDMP Tape Server, outgoing on AtempoData Server (NAS)
Tina Administration 459
Additional Information

Configurable by setting port number parameter ndmpd_data_tcp_num on Tape Server
TinaWeb Administration, WebRestore, Reports & Statistics Interfaces, andTina RESTAPIWebSupervision Host to connection Tina Server and Tomcat Server in http or https:
l 25080/TCPIncoming on Tina Server, outgoing on SupervisionMachineConfigurable during setup, fromWeb Administration User Interface, or using a configuration file
Tina LicenseManagerTina Server connection to Flex License Server (if server other than Tina):
l Between 27000/TCP and 27009/TCP by default, configurable in license filesIncoming on Flex Server, outgoing on Tina ServerConfigurable port in atempo.lic license files (server and vendor)
Connection between internal FlexNet daemons:
l Dynamic TCP PortPort configurable in atempo.lic files (server and vendor)
DFM Product (TPEService)DFM Agent connection (Tina Storage Node) to DFM Server:
l 2524/TCPIncoming and outgoing on agent as well as DFM ServerSet in a configuration file of the DFM installation
Tina for SharePoint backupTina Agent connection to VSS Server Requestor:
l 19180/TCPIncoming on VSS Requestor Server, outgoing on Tina Agent
Tina for HVAVMware backupTina Agent (VMware proxy or Gateway) connection to ESX Server or vCenter Server
l 443/TCPIncoming on ESX or vCenter server, outgoing on Agent
Tina Agent (VMware proxy or Gateway) connection to ESX Server:
l 902/TCPIncoming on ESX server, outgoing on agent
Note: Port 903 is no longer necessary.
460 Tina Administration
Additional Information

Configuration Assistance (HSSSetup/Drive)Bonjour Service on Tina Server:
l 5353/UDPIncoming on Tina Server
Tina HSSDrive to use ADEDeduplicationTina Agent connection to ADE Server: for Tina HSS Drive:
l 23232/TCPIncoming on ADE Server, outgoing on Tina AgentConfigurable during ADE installation, as well as in Graphic User Interface and ADE Command LineInterface. For Tina, in the HSS drive file throughGUI.
HVDSRepository to use ADEDeduplicationTina Agent connection toward ADE Server in http: for HVDS Repository:
l 9080/TCPIncoming on ADE Server, outgoing on Tina AgentConfigurable during ADE installation, as well as in ADE Graphic User Interface and Command LineInterface. For Tina, in HVDS repository file throughGUI.
Tina Agent connection to ADE Server in https: for HVDS Repository:
l 9443/TCPIncoming on ADE Server, outgoing on Tina AgentConfigurable during ADE installation, as well as in ADE Graphic User Interface and Command LineInterface. For Tina, in HVDS repository file throughGUI.
Future port for ADE:
Tina Agent connection to ADE Server: from ADE version 4.1, to replace SOAP:
l 9081/TCPIncoming on ADE Server, outgoing on Tina AgentConfigurable during ADE installation, as well as in ADE Graphic User Interface and Command LineInterface. For Tina, in HVDS repository file throughGUI.
ADEServerWeb Administration InterfaceWebSupervisionMachine connection to ADE Server:
l 8181/TCPIncoming on ADE server, outgoing onWeb SupervisionMachineConfigurable during ADE installation, as well as in ADE Graphic User Interface and Command LineInterface.
Tina Administration 461
Additional Information

HVAutomationHV AutomationWeb Administration Interface, Web SupervisionMachine connection to HV Automation Server(Appliance):
l 8080/TCPIncoming on HV Automation Server, outgoing on SupervisionMachine
Communication Orchestrator/HV Automation, Orchestrator connection to HV Automation Server:
l 8080/TCPIncoming on HV Automation Server, outgoing onOrchestrator Machine
Tina on Linux Open Enterprise ServerTina supports backup of eDirectory using SMS onNovell Open Enterprise Server 2 systems.
To configure Tina
1. Load the tsands by entering this command:
/opt/novell/sms/bin/smsconfig -l tsandsTomake this change permanent:a. Edit the file /etc/opt/novell/sms/smdrd.conf.b. Find the tsafs autoload line.c. Add autoload: tsands.
Note: You cannot load tsands from a terminal on which the Tina variables have been set.
2. From theWeb Administration, create a dedicated Novell SMS application with an admin login. See SMSApplication Configuration for details.
To configure the Pluggable Authentication Module (PAM)
1. Configure PAM so as to be able to log in as admin.2. Create these symbolic links:
• For a 32-bit server:/usr/lib/libpam_misc.so -> /lib/libpam_misc.so.0.81.2/usr/lib/libpam.so -> /lib/libpam.so.0.81.5
• For a 64-bit server:/usr/lib64/libpam.so -> /lib64/libpam.so.0.83.1 /usr/lib64/libpam_misc.so ->/lib64/libpam_misc.so.0.82.0
3. Create a Linux file named /etc/pam.d/atempowith this content:
auth sufficient pam_nam.soaccount sufficient pam_nam.sopassword sufficient pam_nam.sosession optional pam_nam.soauth required pam_unix2.so nullok#set_secrpcaccount required pam_unix2.sopassword required pam_unix2.so nulloksession required pam_unix2.so
462 Tina Administration
Additional Information

Note: Do not use tabs, only spaces; run man pam.conf to obtain syntax information.
4. From theWeb Administration, activate PAM for Tina:Set the Enable Pluggable Authentication Modules tunable (enable_pam_authentication) to yes.Choose Configuration Tunables and select the New Tunable button to launch the Tunable CreationWizard.Youmay also activatemanually PAM for Tina by adding these lines in the /Conf/parameters.xml file:
<parameter name="enable_pam_authentication"><value>yes</value><comment></comment>
</parameter>
Note: As soon as PAM is activated, PAM authenticates all the Tina processes.
See Tunables for more information.
These topics describe this information:• Backup of a Parent Object Larger than 64 KB• Troubleshooting
Backup of a Parent Object Larger than 64 KBThis topic describes this information:
BackupParent objects larger than 64 KB are backed up using two Tina objects:• A parent-object.• The _atempo_extended_data child-object.
Note: _atempo_extended_data exists only in the past. To display it, activate TimeNavigation.
Restore based on LDAP serverTo restore a tree containing a parent object larger than 64 KB, youmust configure your LDAP server withiManager by clearing theRequire TLS for Simple Binds with password check box.
This image illustrates the Novell iManager interface:
Tina Administration 463
Additional Information

Restore without the LDAP serverYoumust restore individually each parent by selecting only the _atempo_extended_data child object.
Note: In this case, the Tina logs indicate how to proceed.
Example. This is the log for a Restore without the LDAP server:
4098|45|sms_create_obj|22|1|2|1218125145|1218125146|8551|tina_daemon_clt|fiosles|fiosles|admin|root|f410sls|fiosles|Unable to add the .OU=NORMaL.OU=MY_ORG.O=cfiosles.T=TFIOSLES parent entry due to an LDAP error, retcode=TN_ERR_REQ_INCONS|0|~|607|4098|45|sms_create_obj|22|1|2|1218125145|1218125146|8551|tina_daemon_clt|fiosles|fiosles|admin|root|f410sls|fiosles|You must first restore only the _atempo_extended_data file located in that parent directory and then restart the restore operationfrom the beginning|0|~|607|4098|45|sms_create_obj|22|1|2|1218125145|1218125146|8551|tina_daemon_clt|fiosles|fiosles|admin|root|f410sls|fiosles|The parent directories that were alreadysuccessfully restored will not be re-written|0|~|60
Objects with Names Containing a /CharacterObjects whose name includes the / character are displayed with the + character.
Example. The object that is really OU=MY_ORG.OU=MY_S/B_ORG.CN=MY_GR/UP is displayed as OU=MY_ORG.OU=MY_S+B_ORG.CN=MY_GR+UP.
464 Tina Administration
Additional Information

Troubleshooting
Pluggable AuthenticationModule Does NotWorkAn incorrect syntax in the /etc/pam.d/atempo file may generate induce in the /var/log/messages filemessages similar to this one:
Aug 13 11:12:17 vmware27 tina: PAM [error: /lib/security/pam_unix2.so : cannot open sharedobject file: No such file or directory]
Solution
Check the syntax as described in step 2. of the To configure the Pluggable AuthenticationModule (PAM)procedure.
TheRestore Fails Due to a Parent Larger than 64 KBIf the Tina logs return an LDAP error about required Confidentiality, youmust configure your LDAP server withiManager by deselecting Require TLS for Simple Binds with password.
Example. This log informs you about a LDAP error of required Confidentiality:
4098|45|sms_add_nds_obj|6|1|2|1218125145|1218125146|8551|tina_daemon_clt|fiosles|fiosles|admin|root|f410sls|fiosles|Unable to bind, dnlogin:cn=admin,O=cfiosles, ldap error:Confidentiality required|0|~|607|
Solution
Check the LDAP configuration as described in Restore based on LDAP server.
Tina Administration 465
Additional Information
Related Documents