TIME MACHINE User manual

Welcome message from author
This document is posted to help you gain knowledge. Please leave a comment to let me know what you think about it! Share it to your friends and learn new things together.
Transcript
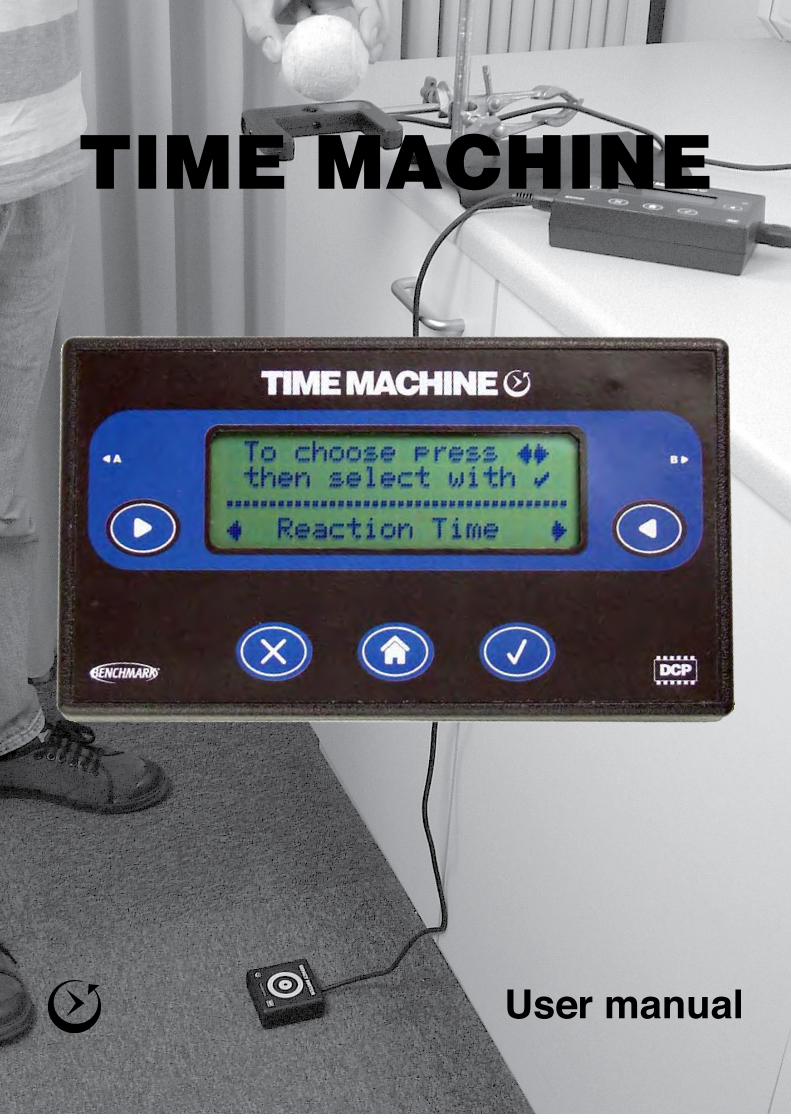
TIME MACHINE
User manual
Many physics experiments are based around time. Time Machine was designed to perform time related tasks easily in a quick, intuitive way without the need for a computer.
A range of special sensors are available for reaction timing, photogate (with visible beam) and speed of sound or you can connect your own sensors using the low cost adapter - many standard LogIT Microsense® digital sensors also work directly with Time Machine.
Although Time Machine works completely independently, the results of many experiments can be simply pasted into virtually any spreadsheet or word processor program you already use by simply linking to your computer using a USB cable - no software required!
Time Machine will run for months of normal classroom use on its built in 9V battery, so saving the normal problems of remembering to charge them before lessons or needing cumbersome mains adapters and wires.
Time Machine is very easy and intuitive to use, but to get the most from the product we recom-mend reading this handbook so that you get a better idea what it is capable of.
As with any DCP product, we genuinely welcome critical feedback, good or bad, as it helps us improve and develop new products.
David Palmer June 2010
Welcome to DCP Time Machine
Getting started with Time Machine............................ Time Machine accessories........................................Setting preferences and decimal points....................Transferring results to a computer.............................Speed........................................................................Time..........................................................................Acceleration..............................................................Frequency counter and RPM....................................Stopwatch/Counter/Countdown timers......................Reaction Timer..........................................................Simple Harmonic Motion (SHM)................................Acceleration due to gravity........................................Lap Timer..................................................................Lap timing a runner...................................................Freefall of a Tennis ball.............................................Speed of sound using 2 sound switches...................LogIT range...............................................................
Contents46789101213141516171819202122
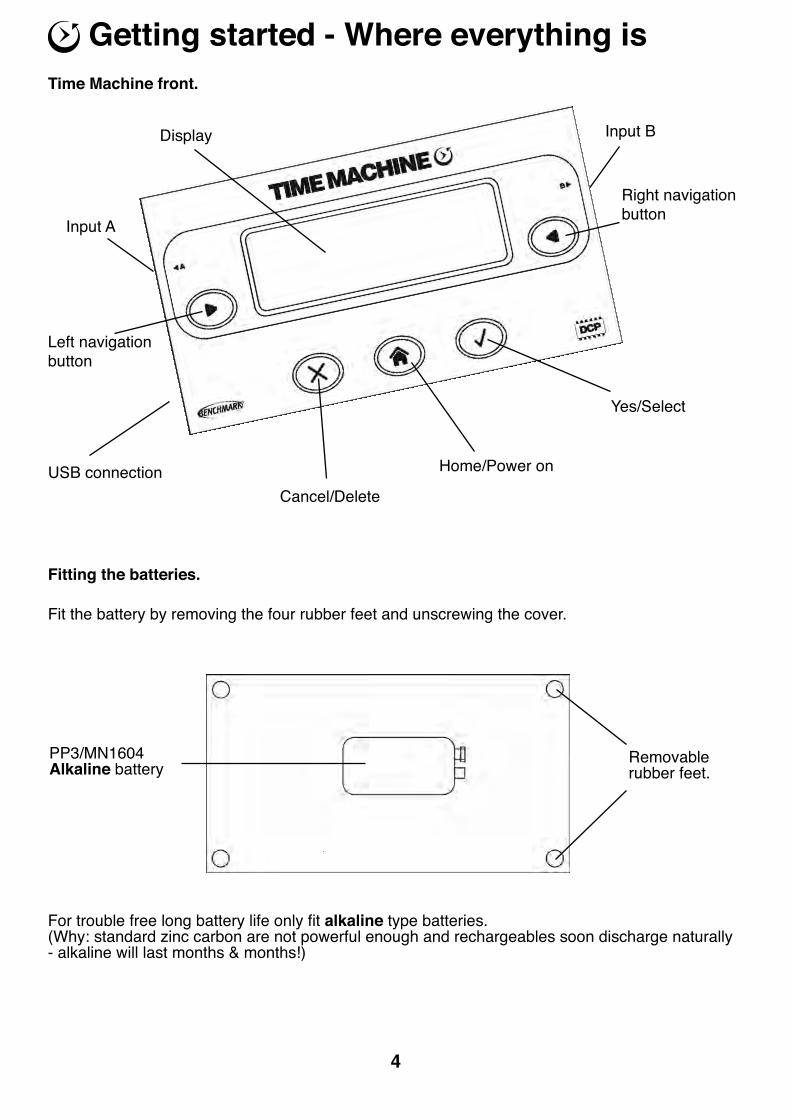
Right navigation button
Yes/Select
Input B
Left navigation button
Cancel/Delete
Home/Power on
Display
Input A
USB connection
4
For trouble free long battery life only fit alkaline type batteries. (Why: standard zinc carbon are not powerful enough and rechargeables soon discharge naturally - alkaline will last months & months!)
Fit the battery by removing the four rubber feet and unscrewing the cover.
Removable rubber feet.
PP3/MN1604Alkaline battery
Time Machine front.
Fitting the batteries.
Getting started - Where everything is
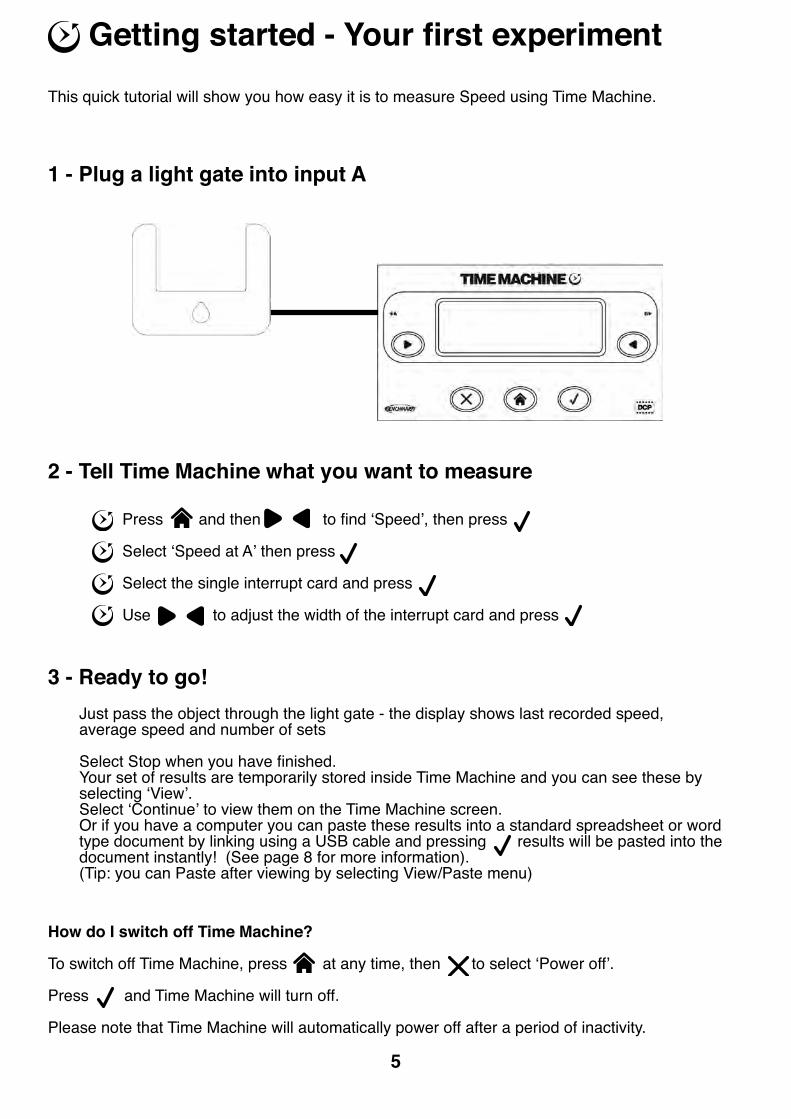
This quick tutorial will show you how easy it is to measure Speed using Time Machine.
5
1 - Plug a light gate into input A
2 - Tell Time Machine what you want to measure
3 - Ready to go! Just pass the object through the light gate - the display shows last recorded speed, average speed and number of sets
Select Stop when you have finished. Your set of results are temporarily stored inside Time Machine and you can see these by selecting ‘View’. Select ‘Continue’ to view them on the Time Machine screen.Or if you have a computer you can paste these results into a standard spreadsheet or word type document by linking using a USB cable and pressing results will be pasted into the document instantly! (See page 8 for more information).(Tip: you can Paste after viewing by selecting View/Paste menu)
How do I switch off Time Machine?
To switch off Time Machine, press at any time, then to select ‘Power off’.
Press and Time Machine will turn off.
Please note that Time Machine will automatically power off after a period of inactivity.
Press and then to find ‘Speed’, then press
Select ‘Speed at A’ then press
Select the single interrupt card and press
Use to adjust the width of the interrupt card and press
Getting started - Your first experiment
6
The following is a list of some of the digital sensors compatible with Time Machine. Most LogIT Microsense digital sensors are also compatible.
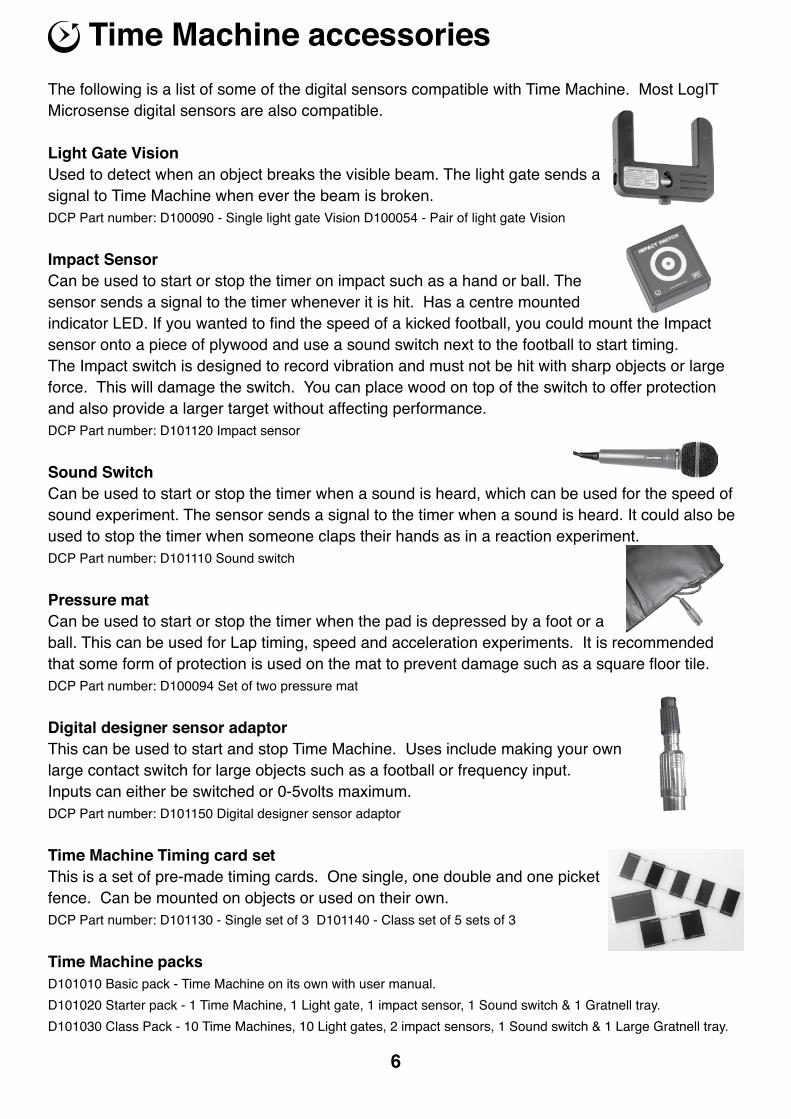
Light Gate Vision Used to detect when an object breaks the visible beam. The light gate sends a signal to Time Machine when ever the beam is broken.DCP Part number: D100090 - Single light gate Vision D100054 - Pair of light gate Vision
Impact Sensor Can be used to start or stop the timer on impact such as a hand or ball. The sensor sends a signal to the timer whenever it is hit. Has a centre mounted indicator LED. If you wanted to find the speed of a kicked football, you could mount the Impact sensor onto a piece of plywood and use a sound switch next to the football to start timing. The Impact switch is designed to record vibration and must not be hit with sharp objects or large force. This will damage the switch. You can place wood on top of the switch to offer protection and also provide a larger target without affecting performance.DCP Part number: D101120 Impact sensor
Sound SwitchCan be used to start or stop the timer when a sound is heard, which can be used for the speed of sound experiment. The sensor sends a signal to the timer when a sound is heard. It could also be used to stop the timer when someone claps their hands as in a reaction experiment.DCP Part number: D101110 Sound switch
Pressure matCan be used to start or stop the timer when the pad is depressed by a foot or a ball. This can be used for Lap timing, speed and acceleration experiments. It is recommended that some form of protection is used on the mat to prevent damage such as a square floor tile.DCP Part number: D100094 Set of two pressure mat
Digital designer sensor adaptorThis can be used to start and stop Time Machine. Uses include making your own large contact switch for large objects such as a football or frequency input.Inputs can either be switched or 0-5volts maximum.DCP Part number: D101150 Digital designer sensor adaptor
Time Machine Timing card setThis is a set of pre-made timing cards. One single, one double and one picket fence. Can be mounted on objects or used on their own.DCP Part number: D101130 - Single set of 3 D101140 - Class set of 5 sets of 3
Time Machine packsD101010 Basic pack - Time Machine on its own with user manual. D101020 Starter pack - 1 Time Machine, 1 Light gate, 1 impact sensor, 1 Sound switch & 1 Gratnell tray.D101030 Class Pack - 10 Time Machines, 10 Light gates, 2 impact sensors, 1 Sound switch & 1 Large Gratnell tray.
Time Machine accessories
7
Introduction
Time Machine allows you to specify how many decimal points are to be displayed and also whether to allow the calculation of Speed, Acceleration or the Average.This feature can be used so that the student must derive these values without Time Machine doing it for them.
Setting decimal points. • With Time Machine on, select ‘About/Options’ from the menu. • Using the right and left navigation buttons, set the number of decimal points required. • Press the select button followed by the Home button to return to the main menu.
Note: Time Machine offers a range between 3 & 6 decimal points. This menu also displays the current battery state and software/hardware version numbers.
Setting the Preferences.
In the hidden Preferences menu, the user can decide to remove Speed, Acceleration and Average calculations thus forcing the need to derive these values. This option has been hidden away to prevent changes by students etc.
To access the preferences menu, perform the following:-
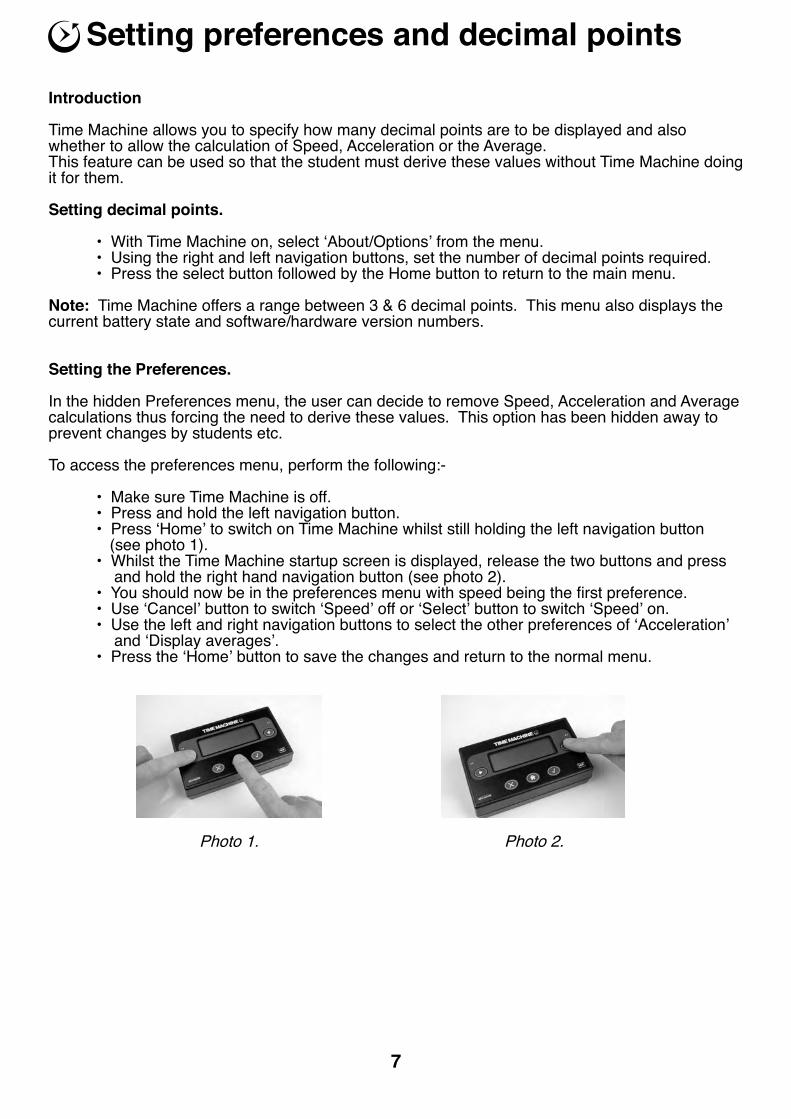
• Make sure Time Machine is off. • Press and hold the left navigation button. • Press ‘Home’ to switch on Time Machine whilst still holding the left navigation button (see photo 1). • Whilst the Time Machine startup screen is displayed, release the two buttons and press and hold the right hand navigation button (see photo 2). • You should now be in the preferences menu with speed being the first preference. • Use ‘Cancel’ button to switch ‘Speed’ off or ‘Select’ button to switch ‘Speed’ on. • Use the left and right navigation buttons to select the other preferences of ‘Acceleration’ and ‘Display averages’. • Press the ‘Home’ button to save the changes and return to the normal menu.
Setting preferences and decimal points
Photo 1. Photo 2.

Having collected a set of readings, select ‘View/Paste’ from the menu.
Hints and tipsNote that Time Machine emulates a standard USB keyboard when pasting and as a result will attempt to paste into any application which is currently open. As a result, do make sure that the application you hope to paste into is the current active window i.e. click on the window to make sure before pressing the ‘select’ button on Time Machine.
IntroductionTime Machine will store up to 80 Speed, Time, SHM, Lap time or Acceleration readings. This example shows how to paste and view these results via a spreadsheet or word processor for fur-ther study. Note, you need to select ‘View’ from the menu after finishing an experiment to save the readings ready for pasting into an application or for viewing.
RequirementsUSB equipped computer running Windows, MAC or Linux operating systemUSB A-B cable (eg DCP D100138)A Spreadsheet (Open office, Excel, Numbers etc) or word processor (Open office, Notepad, Pages, Textedit, Word etc)
Connect a USB cable to Time Machine, then connect into a suitable USB socket on your computer.
Open the application you wish to paste the readings into and press the ‘tick’ button.
To paste individual readings one at a time, press the ‘select’ button repeatedly. To paste all readings hold down the ‘select’ button for a few seconds. Time Machine will automatically move down to the next line or spreadsheet cell after each individual reading.
Transferring results to a computer
8
Hints and tipsTo decide which interrupt is best suited to a particular experiment, see page 10. Time Machine allows the Speed of many different object types to be obtained. Using a sound switch (mounted close to the ball) and impact sensor (attached to a suitable target) the speed of a kicked football can be measured.You can also print/paste the results at the end using the ‘View’ option on screen. See ‘ results’ section in this manual.
IntroductionThis section shows how you can use Time Machine to calculate the Speed of an object. Op-tions include being able to measure the object at one single point, two individual points or from one point to another. You can also specify wether to use a single interrupt, double or picket fence.
Speed at A and B - Calculates the Speed at both inputs.1. Select ‘Speed at A and B’ from the menu.2. Select which type of interrupt you wish to use. (Single, double or picket fence).3. Select the correct distance for the interrupt shown on the menu using the navigation buttons.4. Time machine will now calculate the speed of the object at both ‘Input A’ and ‘Input B’ simultaneously. To delete a false reading, press the ‘X’ button.
Speed from A to B - Calculates the Speed between 2 points.1. Select ‘Speed from A to B’ from the menu.2. Select the distance between the two recording points.3. Time Machine will now record the speed between the two points. The average speed will be displayed as more readings are taken. To delete a false reading, press the ‘X’ button.
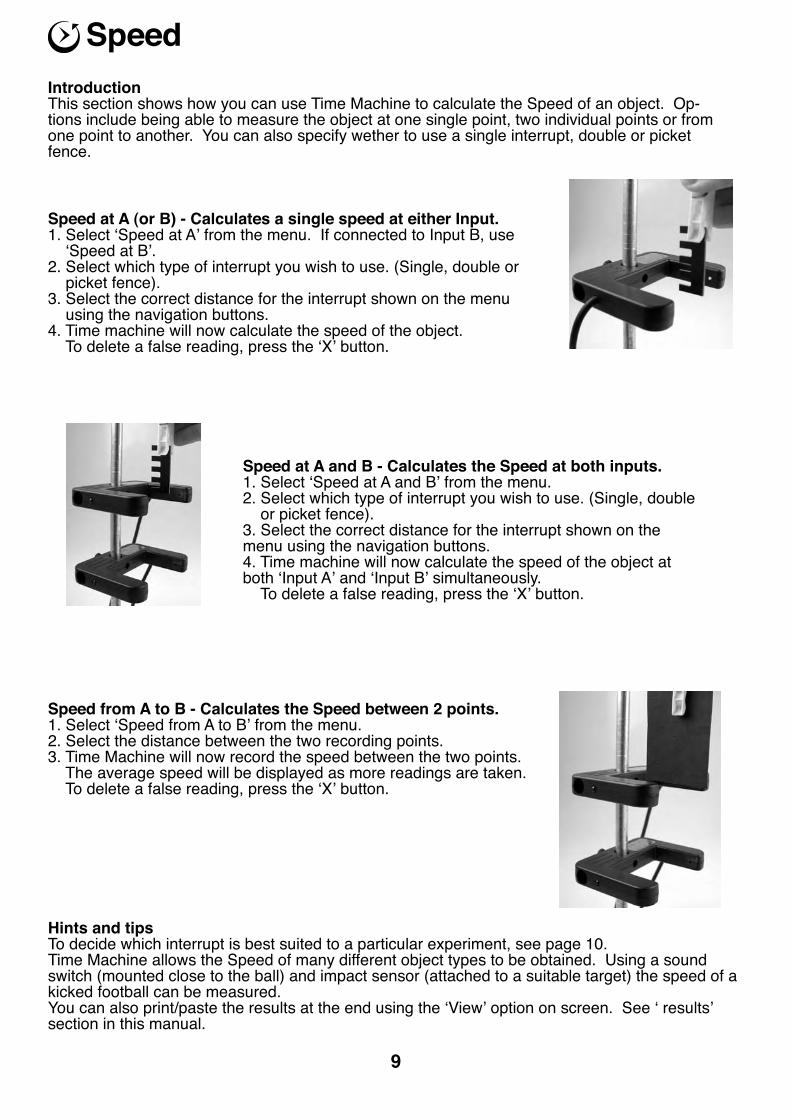
Speed at A (or B) - Calculates a single speed at either Input.1. Select ‘Speed at A’ from the menu. If connected to Input B, use ‘Speed at B’.2. Select which type of interrupt you wish to use. (Single, double or picket fence).3. Select the correct distance for the interrupt shown on the menu using the navigation buttons.4. Time machine will now calculate the speed of the object. To delete a false reading, press the ‘X’ button.
Speed
9
Which interrupt card to use.Whether to use a single interrupt or a double interrupt card is largely dependant on what is being timed. The following is a description of the time that each interrupt will allow Time Machine to measure. You can also print/paste the recorded time results using the ‘View’ option on screen.
IntroductionThis section shows how you can use Time Machine to time events. Options include being able to time the object at one single point, two individual points or from one point to another. You can also specify whether to use a single, double or picket fence interrupt.
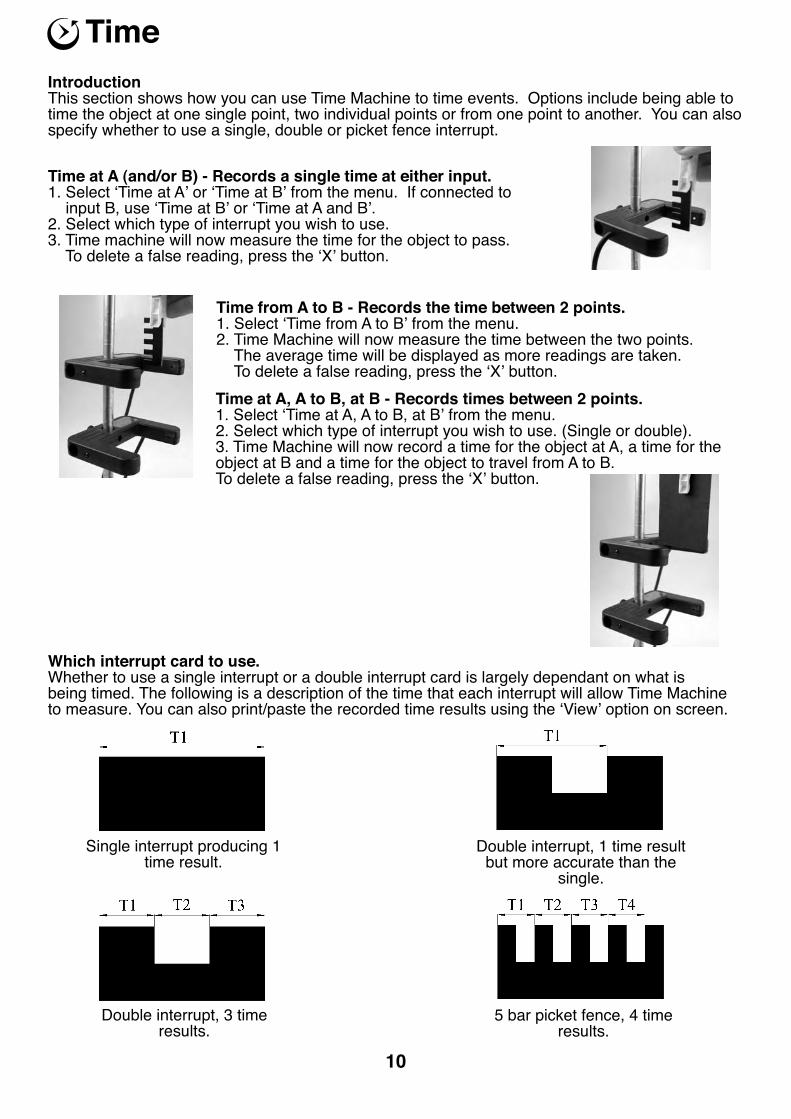
Time from A to B - Records the time between 2 points.1. Select ‘Time from A to B’ from the menu.2. Time Machine will now measure the time between the two points. The average time will be displayed as more readings are taken. To delete a false reading, press the ‘X’ button. Time at A, A to B, at B - Records times between 2 points.1. Select ‘Time at A, A to B, at B’ from the menu.2. Select which type of interrupt you wish to use. (Single or double).3. Time Machine will now record a time for the object at A, a time for the object at B and a time for the object to travel from A to B.To delete a false reading, press the ‘X’ button.
Time at A (and/or B) - Records a single time at either input.1. Select ‘Time at A’ or ‘Time at B’ from the menu. If connected to input B, use ‘Time at B’ or ‘Time at A and B’.2. Select which type of interrupt you wish to use.3. Time machine will now measure the time for the object to pass. To delete a false reading, press the ‘X’ button.
Time
10
Single interrupt producing 1 time result.
Double interrupt, 1 time result but more accurate than the
single.
Double interrupt, 3 time results.
5 bar picket fence, 4 time results.
11
Time continued
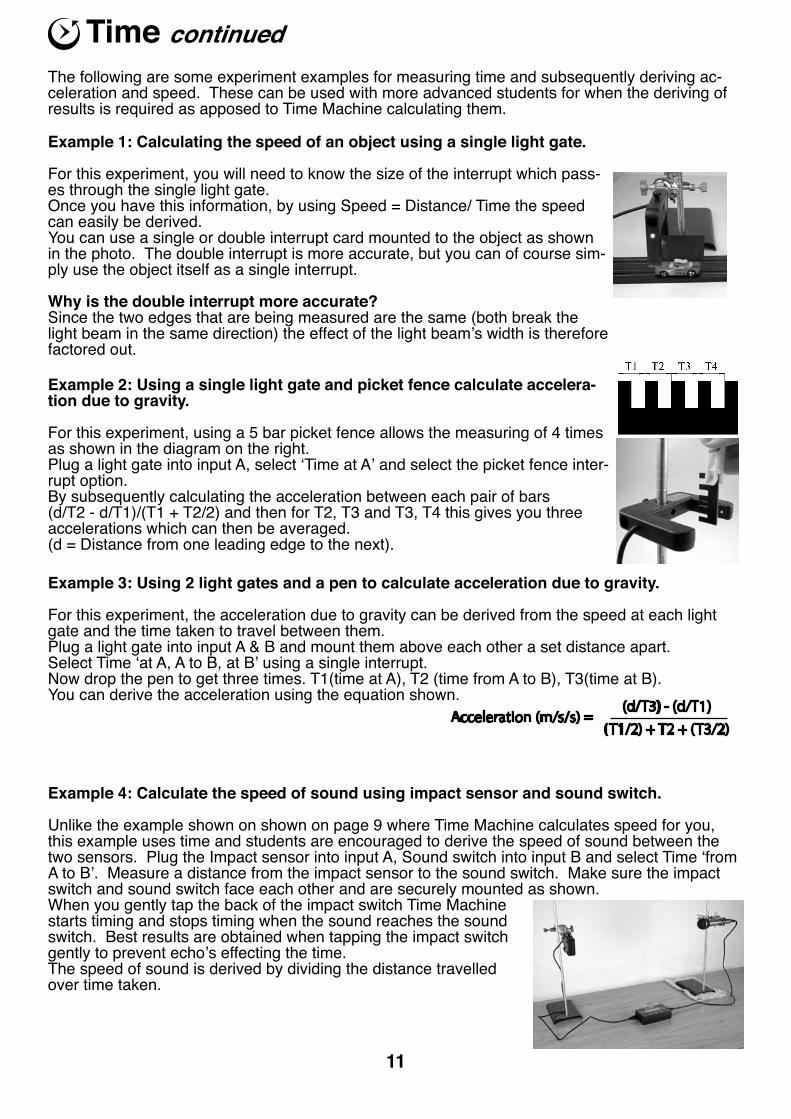
Example 2: Using a single light gate and picket fence calculate accelera-tion due to gravity.
For this experiment, using a 5 bar picket fence allows the measuring of 4 times as shown in the diagram on the right. Plug a light gate into input A, select ‘Time at A’ and select the picket fence inter-rupt option. By subsequently calculating the acceleration between each pair of bars (d/T2 - d/T1)/(T1 + T2/2) and then for T2, T3 and T3, T4 this gives you three accelerations which can then be averaged.(d = Distance from one leading edge to the next).
The following are some experiment examples for measuring time and subsequently deriving ac-celeration and speed. These can be used with more advanced students for when the deriving of results is required as apposed to Time Machine calculating them.
Example 1: Calculating the speed of an object using a single light gate.
For this experiment, you will need to know the size of the interrupt which pass-es through the single light gate.Once you have this information, by using Speed = Distance/ Time the speed can easily be derived.You can use a single or double interrupt card mounted to the object as shown in the photo. The double interrupt is more accurate, but you can of course sim-ply use the object itself as a single interrupt.
Why is the double interrupt more accurate?Since the two edges that are being measured are the same (both break the light beam in the same direction) the effect of the light beam’s width is thereforefactored out.
Example 3: Using 2 light gates and a pen to calculate acceleration due to gravity.
For this experiment, the acceleration due to gravity can be derived from the speed at each light gate and the time taken to travel between them.Plug a light gate into input A & B and mount them above each other a set distance apart.Select Time ‘at A, A to B, at B’ using a single interrupt.Now drop the pen to get three times. T1(time at A), T2 (time from A to B), T3(time at B).You can derive the acceleration using the equation shown.
Example 4: Calculate the speed of sound using impact sensor and sound switch.
Unlike the example shown on shown on page 9 where Time Machine calculates speed for you, this example uses time and students are encouraged to derive the speed of sound between the two sensors. Plug the Impact sensor into input A, Sound switch into input B and select Time ‘from A to B’. Measure a distance from the impact sensor to the sound switch. Make sure the impact switch and sound switch face each other and are securely mounted as shown.When you gently tap the back of the impact switch Time Machine starts timing and stops timing when the sound reaches the sound switch. Best results are obtained when tapping the impact switch gently to prevent echo’s effecting the time.The speed of sound is derived by dividing the distance travelled over time taken.
(d/T3) - (d/T1)
(T1/2) + T2 + (T3/2)Acceleration (m/s/s) =
Acceleration
Hints and tipsTo decide which interrupt is best suited to a particular experiment, see page 10. You can also print/paste the results at the end using the ‘View’ option on screen. See ‘Paste/View results’ section in this manual.
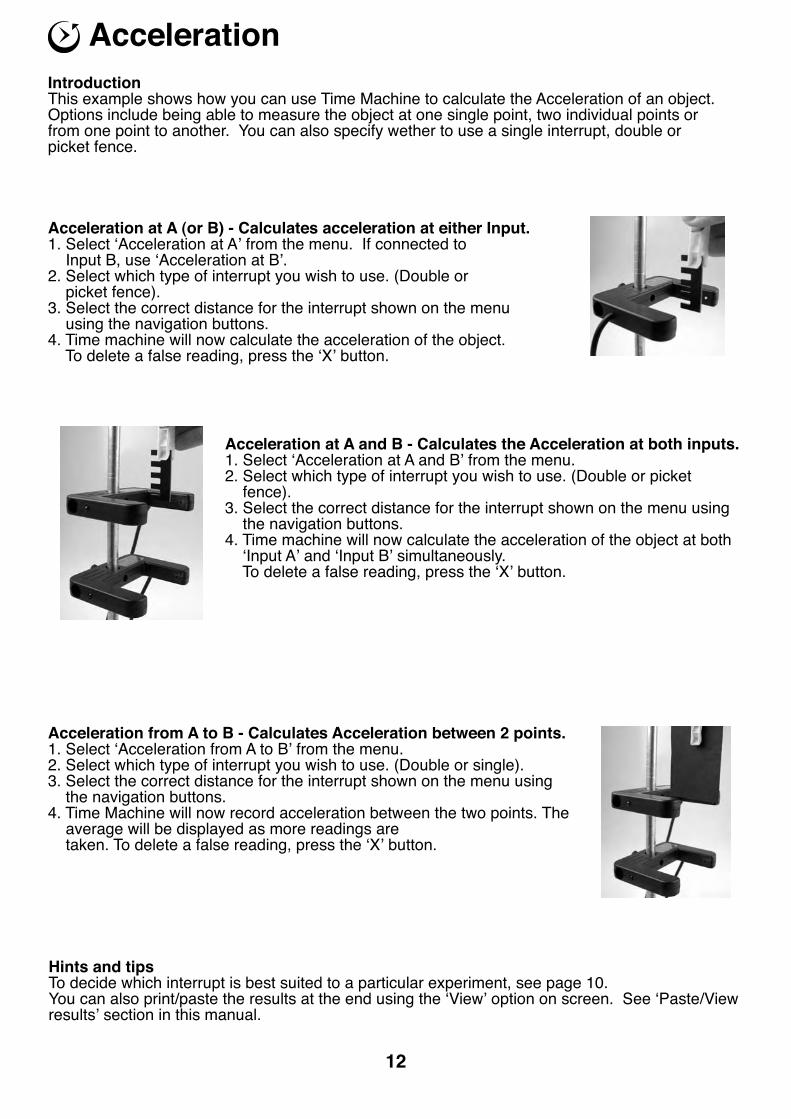
IntroductionThis example shows how you can use Time Machine to calculate the Acceleration of an object. Options include being able to measure the object at one single point, two individual points or from one point to another. You can also specify wether to use a single interrupt, double or picket fence.
Acceleration at A and B - Calculates the Acceleration at both inputs.1. Select ‘Acceleration at A and B’ from the menu.2. Select which type of interrupt you wish to use. (Double or picket fence).3. Select the correct distance for the interrupt shown on the menu using the navigation buttons.4. Time machine will now calculate the acceleration of the object at both ‘Input A’ and ‘Input B’ simultaneously. To delete a false reading, press the ‘X’ button.
Acceleration from A to B - Calculates Acceleration between 2 points.1. Select ‘Acceleration from A to B’ from the menu.2. Select which type of interrupt you wish to use. (Double or single).3. Select the correct distance for the interrupt shown on the menu using the navigation buttons.4. Time Machine will now record acceleration between the two points. The average will be displayed as more readings are taken. To delete a false reading, press the ‘X’ button.
Acceleration at A (or B) - Calculates acceleration at either Input.1. Select ‘Acceleration at A’ from the menu. If connected to Input B, use ‘Acceleration at B’.2. Select which type of interrupt you wish to use. (Double or picket fence).3. Select the correct distance for the interrupt shown on the menu using the navigation buttons.4. Time machine will now calculate the acceleration of the object. To delete a false reading, press the ‘X’ button.
12
Frequency counter and RPM
Hints and tipsRemember to enter the correct number of events per cycle (8 in this case for the wind turbine).Entering the wrong number will make the RPM/frequency reading too high or too low.
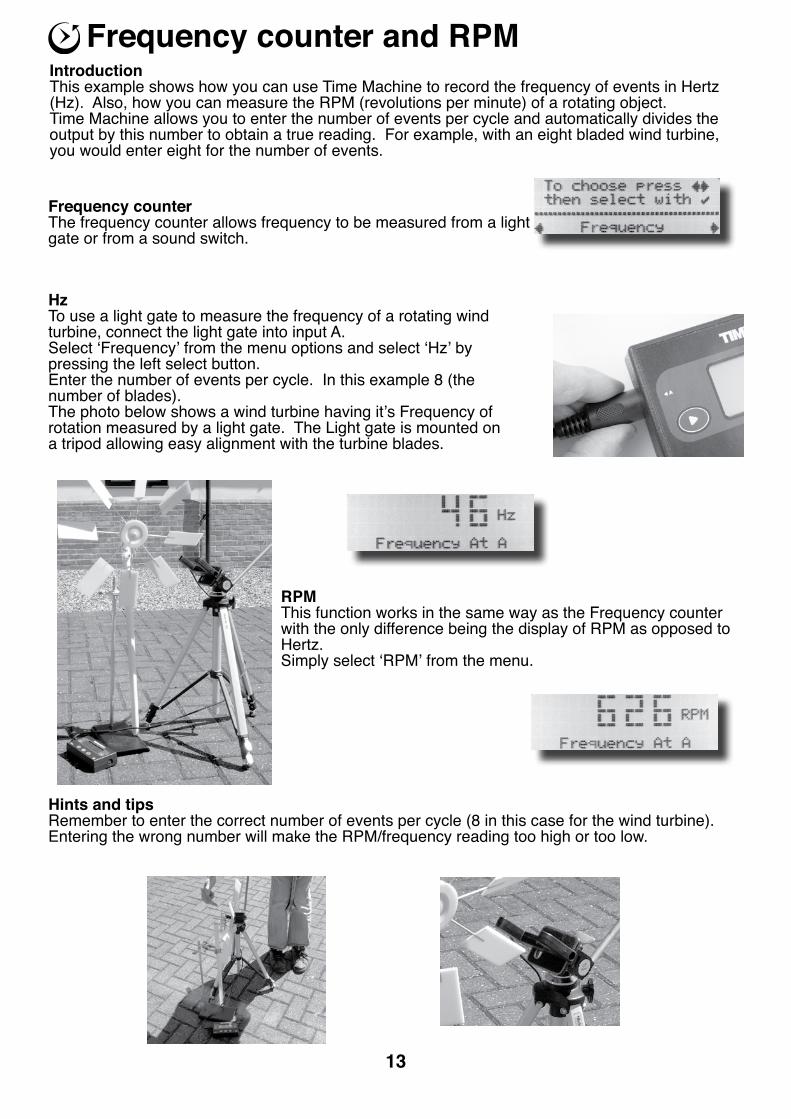
IntroductionThis example shows how you can use Time Machine to record the frequency of events in Hertz (Hz). Also, how you can measure the RPM (revolutions per minute) of a rotating object.Time Machine allows you to enter the number of events per cycle and automatically divides the output by this number to obtain a true reading. For example, with an eight bladed wind turbine, you would enter eight for the number of events.
HzTo use a light gate to measure the frequency of a rotating wind turbine, connect the light gate into input A.Select ‘Frequency’ from the menu options and select ‘Hz’ by pressing the left select button.Enter the number of events per cycle. In this example 8 (the number of blades).The photo below shows a wind turbine having it’s Frequency of rotation measured by a light gate. The Light gate is mounted on a tripod allowing easy alignment with the turbine blades.
RPMThis function works in the same way as the Frequency counter with the only difference being the display of RPM as opposed to Hertz.Simply select ‘RPM’ from the menu.
Frequency counterThe frequency counter allows frequency to be measured from a light gate or from a sound switch.
13
Stopwatch/Counter/Countdown timers
Hints and tipsThe stopwatch is a good method of recording time when measuring slow events. For example, iif using a linear air track with two light gates, an object may be moving slowly enough that Time Machine times out and does not record a value (8 seconds is the maximum when recording Speed or Acceleration). For longer events, use ‘Time’.
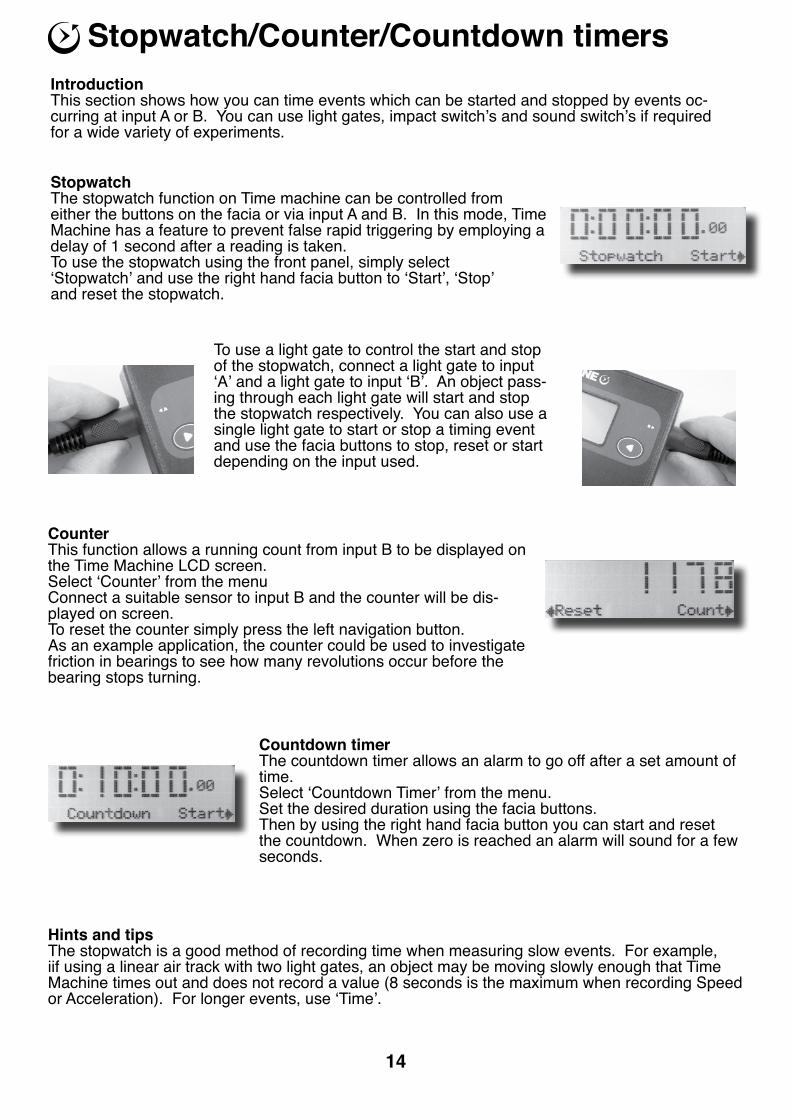
IntroductionThis section shows how you can time events which can be started and stopped by events oc-curring at input A or B. You can use light gates, impact switch’s and sound switch’s if required for a wide variety of experiments.
To use a light gate to control the start and stop of the stopwatch, connect a light gate to input ‘A’ and a light gate to input ‘B’. An object pass-ing through each light gate will start and stop the stopwatch respectively. You can also use a single light gate to start or stop a timing event and use the facia buttons to stop, reset or start depending on the input used.
CounterThis function allows a running count from input B to be displayed on the Time Machine LCD screen.Select ‘Counter’ from the menuConnect a suitable sensor to input B and the counter will be dis-played on screen.To reset the counter simply press the left navigation button.As an example application, the counter could be used to investigate friction in bearings to see how many revolutions occur before the bearing stops turning.
Countdown timerThe countdown timer allows an alarm to go off after a set amount of time.Select ‘Countdown Timer’ from the menu.Set the desired duration using the facia buttons.Then by using the right hand facia button you can start and reset the countdown. When zero is reached an alarm will sound for a few seconds.
StopwatchThe stopwatch function on Time machine can be controlled from either the buttons on the facia or via input A and B. In this mode, Time Machine has a feature to prevent false rapid triggering by employing a delay of 1 second after a reading is taken.To use the stopwatch using the front panel, simply select ‘Stopwatch’ and use the right hand facia button to ‘Start’, ‘Stop’ and reset the stopwatch.
14
Reaction Timer
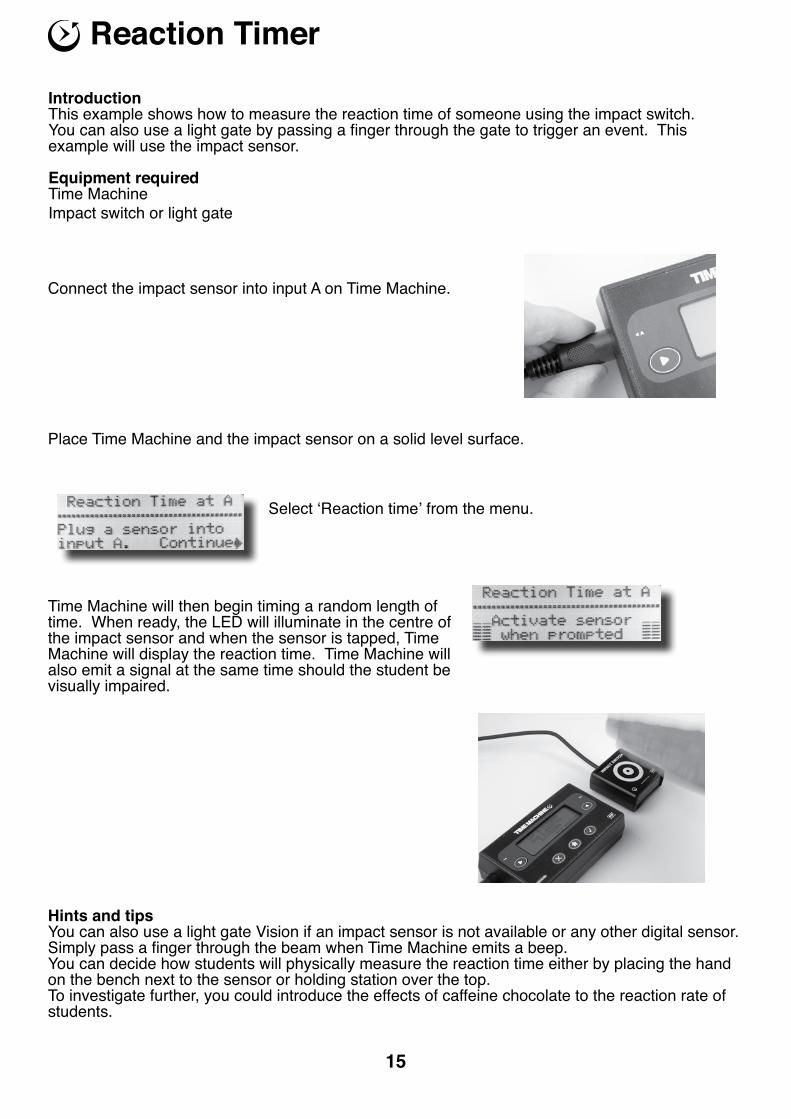
Connect the impact sensor into input A on Time Machine.
Hints and tipsYou can also use a light gate Vision if an impact sensor is not available or any other digital sensor. Simply pass a finger through the beam when Time Machine emits a beep.You can decide how students will physically measure the reaction time either by placing the hand on the bench next to the sensor or holding station over the top.To investigate further, you could introduce the effects of caffeine chocolate to the reaction rate of students.
IntroductionThis example shows how to measure the reaction time of someone using the impact switch. You can also use a light gate by passing a finger through the gate to trigger an event. This example will use the impact sensor.
Equipment requiredTime MachineImpact switch or light gate
Place Time Machine and the impact sensor on a solid level surface.
Select ‘Reaction time’ from the menu.
Time Machine will then begin timing a random length of time. When ready, the LED will illuminate in the centre of the impact sensor and when the sensor is tapped, Time Machine will display the reaction time. Time Machine will also emit a signal at the same time should the student be visually impaired.
15

16
Hints and tipsYou can hold the recorded values during the experiment by selecting ‘Hold’. Then use ‘continue’ to carry on with the experiment.You can also print/paste the results at the end using the ‘View’ option on screen. See ‘Paste/View results’ section in this manual.
Mount the pendulum and light gate onto the clamp stand as shown.
IntroductionThis example shows how to measure the timing of a swinging pendulum using a single light gate.
Equipment requiredTime MachineLight gate VisionPendulum and massesClamp stand
Connect the light gate to input A.
Select ‘SHM, Period’ from the menu.
The diagram above shows how Time Machine measures SHM:-
1. Pull back the pendulum around 5 degrees to the vertical and let go. 2. The pendulum passes through the beam and Time Machine starts timing. 3. The pendulum stops and starts the return swing. 4. Time Machine ignores the return swing of the pendulum. 5. The pendulum stops and starts the return swing. 6. Time Machine records the time and starts timing the next time period of the pendulum.
Simple Harmonic Motion (SHM)
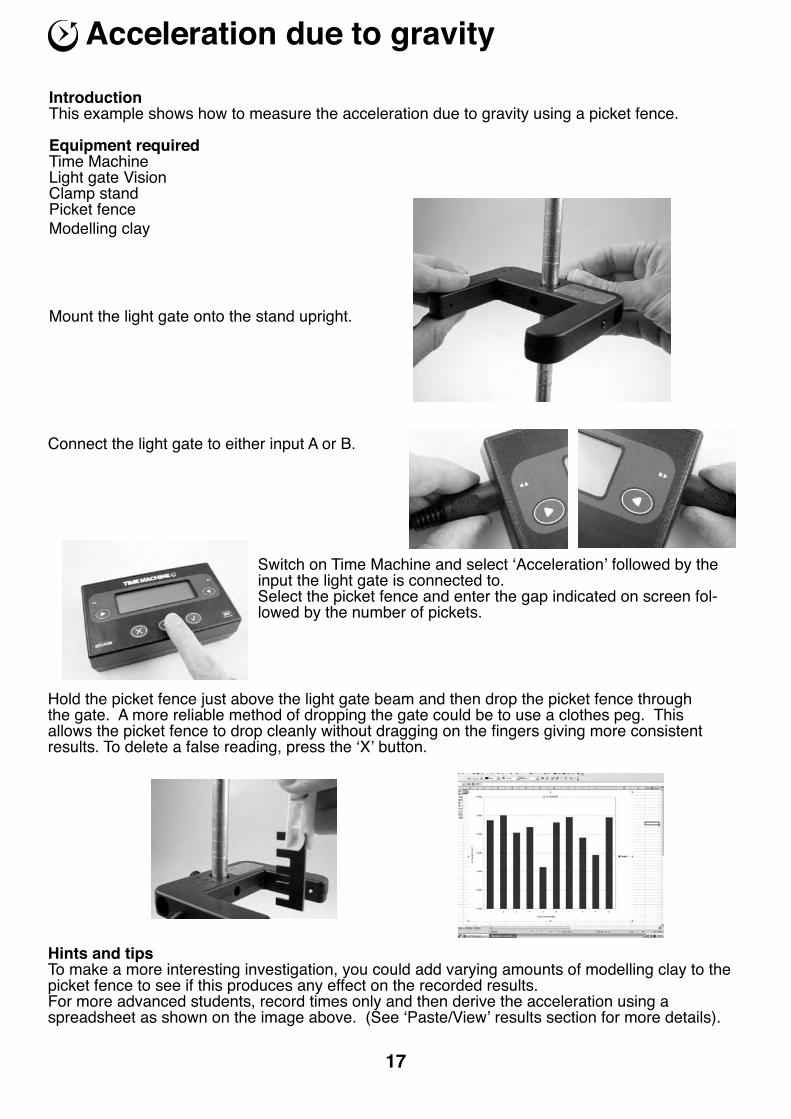
Mount the light gate onto the stand upright.
Hints and tipsTo make a more interesting investigation, you could add varying amounts of modelling clay to the picket fence to see if this produces any effect on the recorded results.For more advanced students, record times only and then derive the acceleration using a spreadsheet as shown on the image above. (See ‘Paste/View’ results section for more details).
IntroductionThis example shows how to measure the acceleration due to gravity using a picket fence.
Equipment requiredTime MachineLight gate VisionClamp standPicket fenceModelling clay
Connect the light gate to either input A or B.
Switch on Time Machine and select ‘Acceleration’ followed by the input the light gate is connected to. Select the picket fence and enter the gap indicated on screen fol-lowed by the number of pickets.
Hold the picket fence just above the light gate beam and then drop the picket fence through the gate. A more reliable method of dropping the gate could be to use a clothes peg. This allows the picket fence to drop cleanly without dragging on the fingers giving more consistent results. To delete a false reading, press the ‘X’ button.
Acceleration due to gravity
17
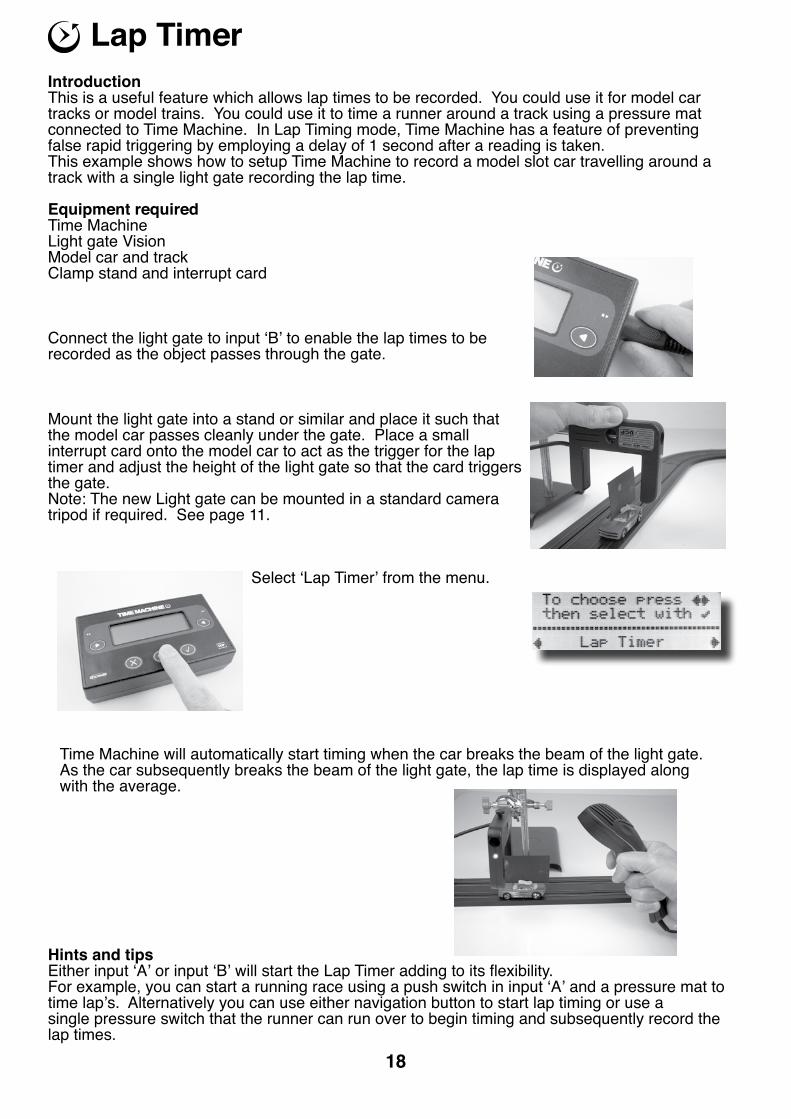
Connect the light gate to input ‘B’ to enable the lap times to be recorded as the object passes through the gate.
Hints and tipsEither input ‘A’ or input ‘B’ will start the Lap Timer adding to its flexibility.For example, you can start a running race using a push switch in input ‘A’ and a pressure mat to time lap’s. Alternatively you can use either navigation button to start lap timing or use a single pressure switch that the runner can run over to begin timing and subsequently record the lap times.
IntroductionThis is a useful feature which allows lap times to be recorded. You could use it for model car tracks or model trains. You could use it to time a runner around a track using a pressure mat connected to Time Machine. In Lap Timing mode, Time Machine has a feature of preventing false rapid triggering by employing a delay of 1 second after a reading is taken.This example shows how to setup Time Machine to record a model slot car travelling around a track with a single light gate recording the lap time.
Equipment requiredTime MachineLight gate VisionModel car and trackClamp stand and interrupt card
Mount the light gate into a stand or similar and place it such that the model car passes cleanly under the gate. Place a small interrupt card onto the model car to act as the trigger for the lap timer and adjust the height of the light gate so that the card triggers the gate.Note: The new Light gate can be mounted in a standard camera tripod if required. See page 11.
Select ‘Lap Timer’ from the menu.
Time Machine will automatically start timing when the car breaks the beam of the light gate. As the car subsequently breaks the beam of the light gate, the lap time is displayed along with the average.
Lap Timer
18
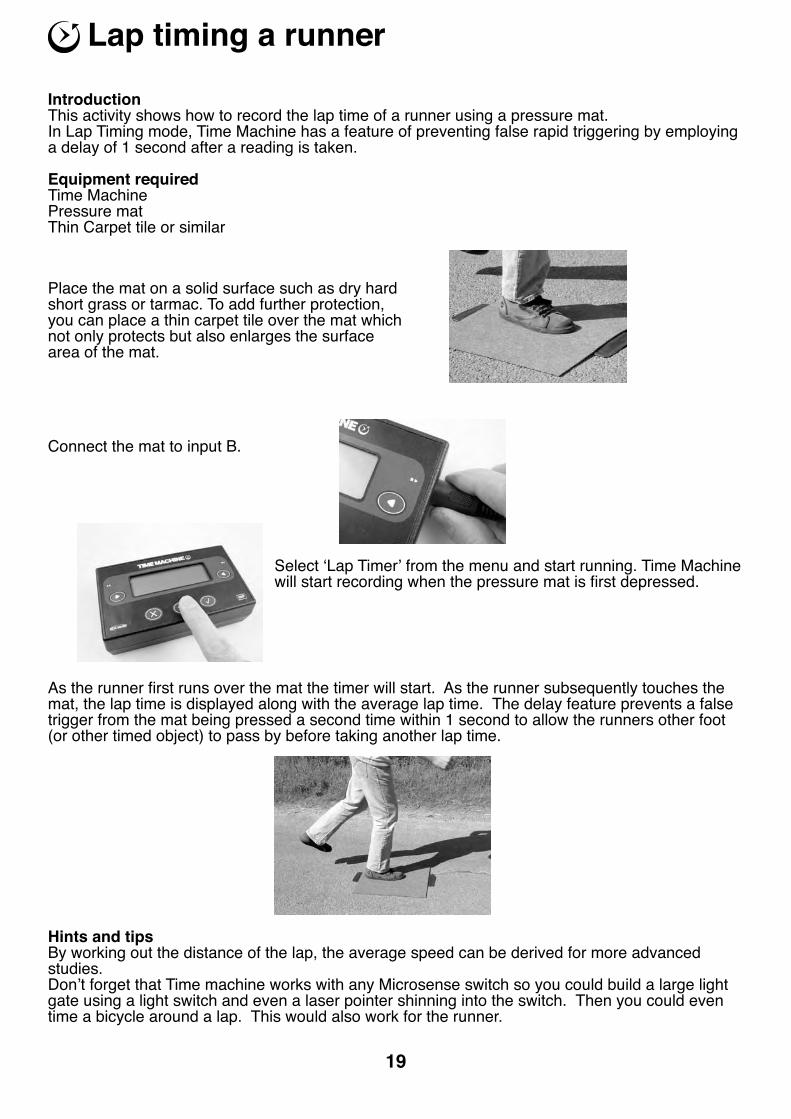
Place the mat on a solid surface such as dry hard short grass or tarmac. To add further protection, you can place a thin carpet tile over the mat which not only protects but also enlarges the surface area of the mat.
Hints and tipsBy working out the distance of the lap, the average speed can be derived for more advanced studies.Don’t forget that Time machine works with any Microsense switch so you could build a large light gate using a light switch and even a laser pointer shinning into the switch. Then you could even time a bicycle around a lap. This would also work for the runner.
IntroductionThis activity shows how to record the lap time of a runner using a pressure mat. In Lap Timing mode, Time Machine has a feature of preventing false rapid triggering by employing a delay of 1 second after a reading is taken.
Equipment requiredTime MachinePressure matThin Carpet tile or similar
Connect the mat to input B.
Select ‘Lap Timer’ from the menu and start running. Time Machine will start recording when the pressure mat is first depressed.
As the runner first runs over the mat the timer will start. As the runner subsequently touches the mat, the lap time is displayed along with the average lap time. The delay feature prevents a false trigger from the mat being pressed a second time within 1 second to allow the runners other foot (or other timed object) to pass by before taking another lap time.
Lap timing a runner
19
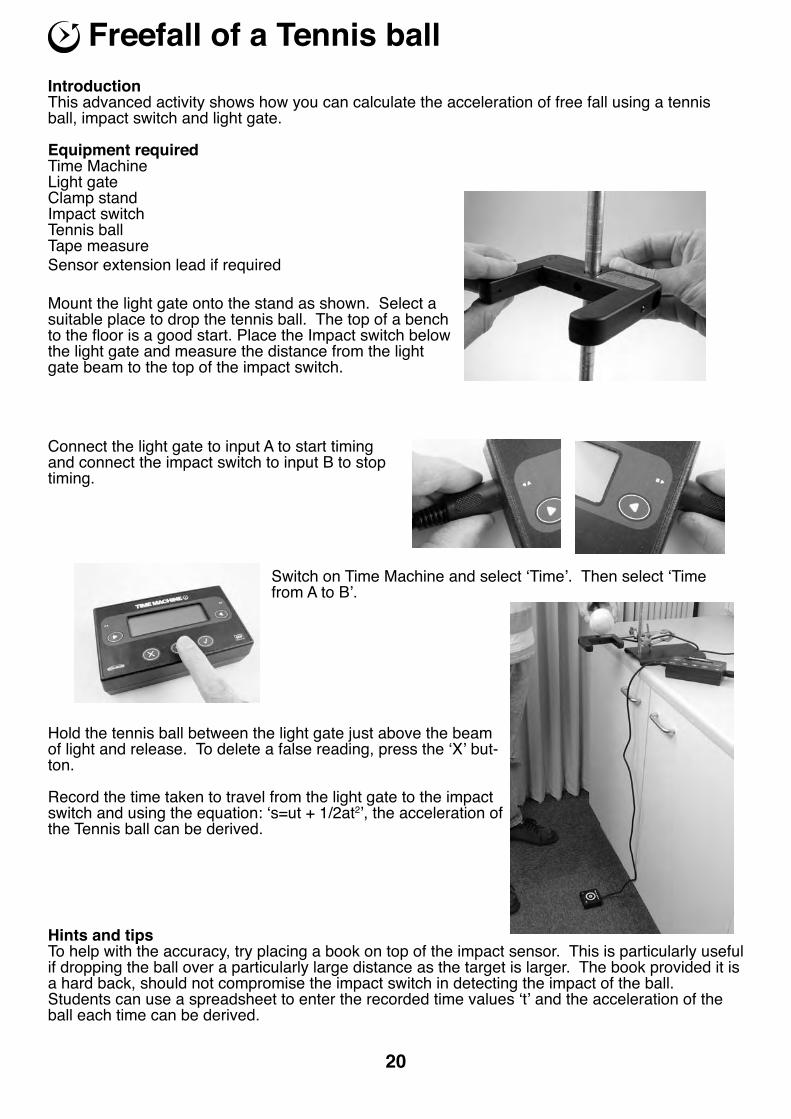
Mount the light gate onto the stand as shown. Select a suitable place to drop the tennis ball. The top of a bench to the floor is a good start. Place the Impact switch below the light gate and measure the distance from the light gate beam to the top of the impact switch.
Hints and tipsTo help with the accuracy, try placing a book on top of the impact sensor. This is particularly useful if dropping the ball over a particularly large distance as the target is larger. The book provided it is a hard back, should not compromise the impact switch in detecting the impact of the ball.Students can use a spreadsheet to enter the recorded time values ‘t’ and the acceleration of the ball each time can be derived.
IntroductionThis advanced activity shows how you can calculate the acceleration of free fall using a tennis ball, impact switch and light gate.
Equipment requiredTime MachineLight gateClamp standImpact switchTennis ballTape measureSensor extension lead if required
Connect the light gate to input A to start timing and connect the impact switch to input B to stop timing.
Switch on Time Machine and select ‘Time’. Then select ‘Time from A to B’.
Hold the tennis ball between the light gate just above the beam of light and release. To delete a false reading, press the ‘X’ but-ton.
Record the time taken to travel from the light gate to the impact switch and using the equation: ‘s=ut + 1/2at2’, the acceleration of the Tennis ball can be derived.
Freefall of a Tennis ball
20
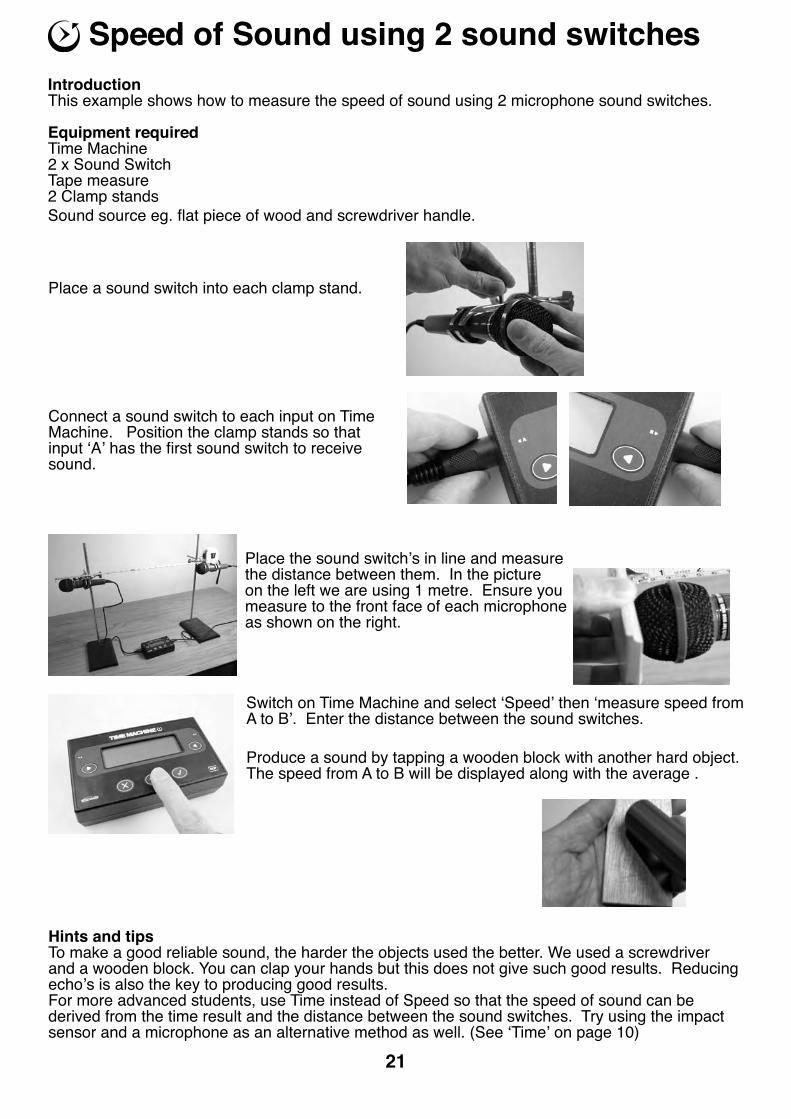
Place a sound switch into each clamp stand.
Hints and tipsTo make a good reliable sound, the harder the objects used the better. We used a screwdriver and a wooden block. You can clap your hands but this does not give such good results. Reducing echo’s is also the key to producing good results.For more advanced students, use Time instead of Speed so that the speed of sound can be derived from the time result and the distance between the sound switches. Try using the impact sensor and a microphone as an alternative method as well. (See ‘Time’ on page 10)
IntroductionThis example shows how to measure the speed of sound using 2 microphone sound switches.
Equipment requiredTime Machine2 x Sound SwitchTape measure2 Clamp standsSound source eg. flat piece of wood and screwdriver handle.
Connect a sound switch to each input on Time Machine. Position the clamp stands so that input ‘A’ has the first sound switch to receive sound.
Place the sound switch’s in line and measure the distance between them. In the picture on the left we are using 1 metre. Ensure you measure to the front face of each microphone as shown on the right.
Switch on Time Machine and select ‘Speed’ then ‘measure speed from A to B’. Enter the distance between the sound switches.
Produce a sound by tapping a wooden block with another hard object. The speed from A to B will be displayed along with the average .
Speed of Sound using 2 sound switches
21
LogIT range for High Schools and Colleges - Summary of products 2010A wide range of datalogger sets are available from under £49 including software. Products are available from a range of suppliers or direct from DCP - see www.logitworld.com E&OE. DATA LOGGER PACKSEvery new LogIT Pack which leaves the factory in 2010 includes new SensorLab multi platform datalogging software compatible with the logger supplied in the pack and Windows, Mac OS X and Linux computers at no extra cost! The CD and license also includes LogIT Lab 4 for Windows for consistency if you already use LogIT Lab. Black Box + CD, HiTemp & Smart Eye sensors, USB cable, Teachers guide, caseD102540i Black Box ONE pack (Windows/Mac OS X/Linux) D102545i Black Box FIVE packk as above +Protemp & site license D102510i Black Box only - no software, sensors or cable Voyager SX + CD, HiTemp & Smart Eye sensors, USB cable, Teachers guide, caseD102120i Voyager SX ONE pack (Windows, Mac OS X and Linux) D102125i Voyager SX FIVE pack as above +Protemp & site license Voyager SXAir -as above but with USB plus built in Class 1 Bluetooth® connectivityD102122i Voyager SXAir One (Windows, Mac OS X and Linux) D102127i Voyager SXAir FIVE Pk as above +Protemp & site license SensorLink single channel USB logger - up to 6 plugged into same computer!D103017i SensorLink with USB cable & CD (Win, Mac and Linux) D103010i eXperiment! Sensorlink, light sensor, LogIT Lab Windows D103020i eXperiment! Resource Site license CD -only for Windows LogIT DataVision CX colour graphic 6 input logger (UK,Euro or US power pack)D100350i DataVision CX only pack with power pack and case only D100390i DV Starter set:USB cable,Win/Mac/Linux CD & 2 sensorsD100395i Class set 5x CX & USB cables, Site license, Sound waveExplorer for Primary Schools- built in light,temperature & sound sensorsExplorer packs from £169 & multipack savings - for full details in Explorer catalogueDataMeter 1000 The popular 3 channel LogIT with LCD screen and serial portLogIT LIVE - Real time only serial port datalogger - runs for months on a 9V batteryWith USB now the standard interface on computers the very successful DataMeter and LIVE dataloggers are being discontinued after 14 years and over 30,000 sold!However support and service will continue indefinately and last stocks of these items are available at very special prices - ask for the DataMeter and LIVE Sale flier.LEGO NXT to LogIT Microsense Sensor adapter D100340 LogIT to NXT sensor adapter-connect any sensor to NXT MICROSENSE SENSORS - all are pre-calibrated & feature auto identificationTemperature and Light sensing D100089 HiTemp Temperature sensor -10 to 110˚C as in packs D100047 ProTemp temperature sensor -30 to +130˚C Probe type D100098 ProTemp probe + 1m extension cable bundle (saves £4) D100067 K-Type Thermocouple adapter - Range -50˚C to +1200˚C D100160 Infrared sensor - calibrated in both W/m2 and ˚C D100158 Ultraviolet light sensor - UVA and UVB sensitive D100088 General Light Level sensor Range 0-100% D100044 Light Level sensor with lens & filter set Range 0-100% D100073 LUX sensor Range 0-25000 LUX with eye response D100095 SPX LUX Sensor Wide Range 0-100,000 LUX D100159 SmartEye sensor Dual Light level 20000 LUX & timing Voltage, Current, Movement and Timing D100079 Magnetic Field sensor Range -90mT to +90mT D100045 Voltage Measurement set Range -25 to +25V dc D100068 Current Measurement probe Range -1 to +1A dc D100081 100mV signal adapter Range -100mV to +100mV D100059 Movement & position rotation - low friction Range 0-340˚ D100091 Ranger VS Vision - LED display, stand & no battery reqd D100042 Linear Accelerometer - X or Y Range -50 to + 50 m/s/s D100156 Force Sensor - mass, dynamics: Dual range 0-3N / 0-30N D100054 Light Gate Vision - visible beam & universal mounts (pair) D100090 Light Gate Vision - visible beam & universal mtg (single) D100094 Pressure mat set - pair of mats for timing experiments D100048 Light Switch sensor for timing etc-can use with IR source D100055 Infra Red Source - use with Light switch for long beam D100052 Reflective Light Switch - for counting/timing, eg Tacho D100050 Start/Mark Switch - compatible with SL & DataMeter only D100049 Push Switch - used to count or time, eg reaction timing Heart Monitoring D100148 Polar Wireless Heart Transmitter - belt fits around chest D100057 Wireless Heart Receiver - receives signal from above D100092 Pulse Monitor - with ear / finger clip. Counts & waveform Electrochemistry, Air Pressure and Environmental Sensing D100060 Sound Level sensor - 50 to 100dBA D100157 Sound Wave Sensor - show sound waveforms D100162 ElectroSmog sensor - measure & compare RF radiation D100112 pH electrode - quality electrode with resin body & cable D100056 pH amplifier - standard plug & go - not calibratable D100086 Standard amplifier and pH electrode set D100096 Adjustable pH Amplifier - allows calibration with electrode D100097 Adjustable pH Amplifier and Electrode set D100113 pH Coax to BNC adapter - adapts older electrodes D100135 DO2 Submersible probe set - with membranes and KCL D100107 Spare membrane set for DO2 probe D100161 CO2 Sensor - Range 0-2000 & 0-20,000 ppm D100083 Conductivity probe set - Range 100-20000 microsiemens D100082 Ion selective / ORP Redox electrode adapter - see below D100142 Ammonium Ion selective electrode D100141 Bromide Ion selective electrode D100143 Calcium Ion selective electrode D100144 Chloride Ion selective electrode D100145 Flouride Ion selective electrode D100146 Nitrate Ion selective electrode D100147 Sulphide Ion selective electrode
MICROSENSE SENSORS continuedD100150 Colorimeter- easy to use built-in stable wavelength LEDs D100077 HumiPro Humidity Sensor-Fast response Range 0-100% D100040 Radioactivity Probe - Sensitive Alpha, Beta & Gamma D100080 Air Pressure - with multi size nipple Range 0-200 kPa D100041 Barometric Air Pressure - Range 800 - 1100 millibar D100061 Weather Station adapter set - connects to Davis stations D100110 Stream Flow sensor - measure flow in rivers & streams LogIT Microsense Sensor Packs D102210 Physics - 2 ProTemp,Voltage,Current,Sound,Movement+ D102220 Biology - 2 ProTemp, Pulse Mon, Humidity, Barometric + D102215 Chemistry -HiTemp, pH amp & electrode, Colorimeter, Air D102225 Basic Physiology - HiTemp, Pressure mats, Heart Tx+RxD102230 Field - Temp,pH amp & electrode,DO2,Humidity,Flow, UV Connecting Balances and other equipment D100084 Balance adapter - connects Balance’s with serial output D100058 Designer sensor set of an Digital and Analogue adapter D100046 1 volt sensor adapter - for connecting other sensors D100066 Instrument adapter - for connecting instruments 0-1V D100076 4-20mA Current loop adapter for professional instrumentsSensor cables and accessoriesD100131 Sensor extension 1 - 1m with metal repairable connectorsD100132 Sensor extension 2 - 3m with metal repairable connectorsD100133 Sensor extension lead 3 - 1m moulded but non-repairable D100115 Sensor Mounting set - clips and screws to mount sensors General accessories D100074 CheckIT LCD display module for LogIT LIVE or SL only D100037 Mains Power Pack for LogIT LIVE, Radioactivity, CO2 etc D100136 Multi-Charger set - charges up to 5 DataMeter 1000’s D100375 LogIT DataVision UK Power Pack - Euro & USA available D100053 LogITLeather case for LogIT SL/LIVE only D100117 LogIT/LIVE spare carry case D100118 DataMeter spare carry case D100119 FIVE SL/LIVE/Black Box large carry case D100370 DataVision / Sensorlink carry case Teaching resources and support materials D103020 eXperiment! Multimedia Resource CD site license (WIN) D103025 eXperiment! Multimedia Resource CD single user (WIN) D100211 Ideas for Datalogging - set of copiable worksheets D100208 DataLogging in Practice book - Roger Frost D100203 IT in Secondary Science Book - Roger Frost D100202 IT in Primary Science Book - Roger Frost D100204 DataLogging and Control Book - Roger Frost LogIT Airlink adds bluetooth wireless to LogIT SL, DataMeter or DataVisionD107010 AirLink 100 100m Adaptor - plugs onto serial connector D107020 Bluetooth® Class 1 long range Adaptor for PC D107015 AirLink Set - Airlink 100 and bluetooth adapter set Cables & adapters to link computers to LogIT D100120 LogIT Serial-USB Adapter and cable with updater CD D100138 Standard USB replacement cable (A-B) D100124 PC serial link cable D100128 PC cable to LogIT adapter - for palm serial (eg. Win CE) D100125 9-25 way adapter D100126 Apple Serial Link cable for older Apple Macs & eMate 300D100127 PB1-2/Psi3-3a Link cable - Clearance! D100130 PB3/Psi3C Link cable - Clearance! Control products - use LogIT to control devices on sensor levels etcD100101 Control LED - program to light on sensor level(s) etc D100102 Control Buzzer - program to sound on sensor level(s) etc D100103 Control Relay - switch small lamps or motors from LogIT! D100062 SwitchIT - 4 relay controller for LIVE or DataMeter only D100064 AlarmIT - D Bus buzzer for LogIT SL, LIVE or DataMeter D100129 DBus extension cable - to use SwitchIT on DataMeter
DATA LOGGING SOFTWARE NEW SensorLab PLUS New software for Windows, Mac OS X and Linux as in new LogIT Packs but features extra functions & works with every LogIT model.D100530 SensorLab Plus - Single user pack for all LogIT Models D100535 SensorLab Plus - Site License pack for all LogIT Models D100537 LogIT Lab 4 Site license to SensorLab Plus Site upgrade DataSweet for MAC OSX - For Apple Mac’s running OSX 10.4+. Includes simultanoeus Video & experiment recording. Datasweet datalogging works with the following LogIT models: Explorer, Sensorlink, DataMeter, Voyager,Black BoxD100610 DataSweet Datalogging - Single user license and CD D100615 DataSweet Datalogging - 5 user license and CD D100620 DataSweet Datalogging - SITE license and CD Insight iLog Studio Software - for Windows. Latest version of Insight software by Laurence Rogers which is compatible with all LogIT dataloggers D100560 iLog Studio WIN Single User Pack with manuals & CD D100561 iLog Studio 5 User upgrade license - needs single pack D100562 iLog Studio 10 User upgrade license-needs single pack D100563 iLog Studio 20 User upgrade license-needs single pack D100564 iLog Studio 40 User upgrade license-needs single pack Insight 4 Software - for Windows and still available while stocks last D100550 Insight 4 WIN Single User Pack with manuals & CD D100551 Insight 4 WIN 5 User upgrade license - needs single pk D100552 Insight 4 WIN 10 User upgrade license - needs single pk iLog Studio upgrades from Insight - Please note upgrades only available direct from DCP - send upgrade orders with copy of license(s) or invoice for the older like for like (eg 10 user Insight license can upgrade to 10 user iLog studio)D199065 iLog Studio Upgrade -1 user pack with CD & manual
22

DCP Microdevelopments LtdBryon CourtBow StreetGreat EllinghamNorfolkNR17 1JB
Telephone: 01953 457800Fax: 01953 457888email: [email protected]
www.dcpmicro.com/timemachine
Document reference D774550
Waste electrical and electronic products must not be disposed of with household waste.Please recycle where facilities exist. Check with your Local Authority or Retailer for recycling advice.
E&OE
Related Documents