TIBCO Designer™ Add-in for TIBCO Business Studio™ User’s Guide Software Release 1.3.0 November 2010

Welcome message from author
This document is posted to help you gain knowledge. Please leave a comment to let me know what you think about it! Share it to your friends and learn new things together.
Transcript

TIBCO Designer™ Add-in for TIBCO Business Studio™
User’s GuideSoftware Release 1.3.0November 2010
Important Information
SOME TIBCO SOFTWARE EMBEDS OR BUNDLES OTHER TIBCO SOFTWARE. USE OF SUCH EMBEDDED OR BUNDLED TIBCO SOFTWARE IS SOLELY TO ENABLE THE FUNCTIONALITY (OR PROVIDE LIMITED ADD-ON FUNCTIONALITY) OF THE LICENSED TIBCO SOFTWARE. THE EMBEDDED OR BUNDLED SOFTWARE IS NOT LICENSED TO BE USED OR ACCESSED BY ANY OTHER TIBCO SOFTWARE OR FOR ANY OTHER PURPOSE.USE OF TIBCO SOFTWARE AND THIS DOCUMENT IS SUBJECT TO THE TERMS AND CONDITIONS OF A LICENSE AGREEMENT FOUND IN EITHER A SEPARATELY EXECUTED SOFTWARE LICENSE AGREEMENT, OR, IF THERE IS NO SUCH SEPARATE AGREEMENT, THE CLICKWRAP END USER LICENSE AGREEMENT WHICH IS DISPLAYED DURING DOWNLOAD OR INSTALLATION OF THE SOFTWARE (AND WHICH IS DUPLICATED IN LICENSE.PDF) OR IF THERE IS NO SUCH SOFTWARE LICENSE AGREEMENT OR CLICKWRAP END USER LICENSE AGREEMENT, THE LICENSE(S) LOCATED IN THE “LICENSE” FILE(S) OF THE SOFTWARE. USE OF THIS DOCUMENT IS SUBJECT TO THOSE TERMS AND CONDITIONS, AND YOUR USE HEREOF SHALL CONSTITUTE ACCEPTANCE OF AND AN AGREEMENT TO BE BOUND BY THE SAME.This document contains confidential information that is subject to U.S. and international copyright laws and treaties. No part of this document may be reproduced in any form without the written authorization of TIBCO Software Inc.TIB, TIBCO, TIBCO Adapter, Predictive Business, Information Bus, The Power of Now, TIBCO ActiveMatrix BusinessWorks, TIBCO Designer, TIBCO Business Studio, TIBCO ActiveMatrix are either registered trademarks or trademarks of TIBCO Software Inc. in the United States and/or other countries.EJB, Java EE, J2EE, and all Java-based trademarks and logos are trademarks or registered trademarks of Sun Microsystems, Inc. in the U.S. and other countries.All other product and company names and marks mentioned in this document are the property of their respective owners and are mentioned for identification purposes only.THIS SOFTWARE MAY BE AVAILABLE ON MULTIPLE OPERATING SYSTEMS. HOWEVER, NOT ALL OPERATING SYSTEM PLATFORMS FOR A SPECIFIC SOFTWARE VERSION ARE RELEASED AT THE SAME TIME. SEE THE README FILE FOR THE AVAILABILITY OF THIS SOFTWARE VERSION ON A SPECIFIC OPERATING SYSTEM PLATFORM.THIS DOCUMENT IS PROVIDED “AS IS” WITHOUT WARRANTY OF ANY KIND, EITHER EXPRESS OR IMPLIED, INCLUDING, BUT NOT LIMITED TO, THE IMPLIED WARRANTIES OF MERCHANTABILITY, FITNESS FOR A PARTICULAR PURPOSE, OR NON-INFRINGEMENT.THIS DOCUMENT COULD INCLUDE TECHNICAL INACCURACIES OR TYPOGRAPHICAL ERRORS. CHANGES ARE PERIODICALLY ADDED TO THE INFORMATION HEREIN; THESE CHANGES WILL BE INCORPORATED IN NEW EDITIONS OF THIS DOCUMENT. TIBCO SOFTWARE INC. MAY MAKE IMPROVEMENTS AND/OR CHANGES IN THE PRODUCT(S) AND/OR THE PROGRAM(S) DESCRIBED IN THIS DOCUMENT AT ANY TIME.THE CONTENTS OF THIS DOCUMENT MAY BE MODIFIED AND/OR QUALIFIED, DIRECTLY OR INDIRECTLY, BY OTHER DOCUMENTATION WHICH ACCOMPANIES THIS SOFTWARE, INCLUDING BUT NOT LIMITED TO ANY RELEASE NOTES AND "READ ME" FILES.Copyright © 2008-2010 TIBCO Software Inc. ALL RIGHTS RESERVED.
| iii
Contents
Preface . . . . . . . . . . . . . . . . . . . . . . . . . . . . . . . . . . . . . . . . . . . . . . . . . . . . . . . . . . . . . . . . . . . . . . . . v
Changes from the Previous Release of this Guide . . . . . . . . . . . . . . . . . . . . . . . . . . . . . . . . . . . . . . . . . . . . . . . . vi
Related Documentation . . . . . . . . . . . . . . . . . . . . . . . . . . . . . . . . . . . . . . . . . . . . . . . . . . . . . . . . . . . . . . . . . . . . . viiTIBCO Designer Add-in for TIBCO Business Studio Documentation. . . . . . . . . . . . . . . . . . . . . . . . . . . . . . . viiOther TIBCO Product Documentation . . . . . . . . . . . . . . . . . . . . . . . . . . . . . . . . . . . . . . . . . . . . . . . . . . . . . . vii
Typographical Conventions . . . . . . . . . . . . . . . . . . . . . . . . . . . . . . . . . . . . . . . . . . . . . . . . . . . . . . . . . . . . . . . . . viii
How to Contact TIBCO Support. . . . . . . . . . . . . . . . . . . . . . . . . . . . . . . . . . . . . . . . . . . . . . . . . . . . . . . . . . . . . . . x
Chapter 1 Overview . . . . . . . . . . . . . . . . . . . . . . . . . . . . . . . . . . . . . . . . . . . . . . . . . . . . . . . . . . . . . 1
Introduction . . . . . . . . . . . . . . . . . . . . . . . . . . . . . . . . . . . . . . . . . . . . . . . . . . . . . . . . . . . . . . . . . . . . . . . . . . . . . . 2
Starting TIBCO Designer Add-in for TIBCO Business Studio . . . . . . . . . . . . . . . . . . . . . . . . . . . . . . . . . . . . . . . . 3
TIBCO Designer Add-in for TIBCO Business Studio Interface . . . . . . . . . . . . . . . . . . . . . . . . . . . . . . . . . . . . . . . 4
Working with Designer Projects . . . . . . . . . . . . . . . . . . . . . . . . . . . . . . . . . . . . . . . . . . . . . . . . . . . . . . . . . . . . . . . 8
Chapter 2 Installation . . . . . . . . . . . . . . . . . . . . . . . . . . . . . . . . . . . . . . . . . . . . . . . . . . . . . . . . . . 15
Installation Overview . . . . . . . . . . . . . . . . . . . . . . . . . . . . . . . . . . . . . . . . . . . . . . . . . . . . . . . . . . . . . . . . . . . . . . 16Installation Modes. . . . . . . . . . . . . . . . . . . . . . . . . . . . . . . . . . . . . . . . . . . . . . . . . . . . . . . . . . . . . . . . . . . . . 16Installation Types . . . . . . . . . . . . . . . . . . . . . . . . . . . . . . . . . . . . . . . . . . . . . . . . . . . . . . . . . . . . . . . . . . . . . 16Supported Platforms. . . . . . . . . . . . . . . . . . . . . . . . . . . . . . . . . . . . . . . . . . . . . . . . . . . . . . . . . . . . . . . . . . . 16System Memory . . . . . . . . . . . . . . . . . . . . . . . . . . . . . . . . . . . . . . . . . . . . . . . . . . . . . . . . . . . . . . . . . . . . . . 16Installer Account . . . . . . . . . . . . . . . . . . . . . . . . . . . . . . . . . . . . . . . . . . . . . . . . . . . . . . . . . . . . . . . . . . . . . . 17Installer Log File . . . . . . . . . . . . . . . . . . . . . . . . . . . . . . . . . . . . . . . . . . . . . . . . . . . . . . . . . . . . . . . . . . . . . . 17Disk Space . . . . . . . . . . . . . . . . . . . . . . . . . . . . . . . . . . . . . . . . . . . . . . . . . . . . . . . . . . . . . . . . . . . . . . . . . . 17
Installation Prerequisites . . . . . . . . . . . . . . . . . . . . . . . . . . . . . . . . . . . . . . . . . . . . . . . . . . . . . . . . . . . . . . . . . . . 19Prerequisites. . . . . . . . . . . . . . . . . . . . . . . . . . . . . . . . . . . . . . . . . . . . . . . . . . . . . . . . . . . . . . . . . . . . . . . . . 19
Installing TIBCO Designer Add-in for TIBCO Business Studio . . . . . . . . . . . . . . . . . . . . . . . . . . . . . . . . . . . . . . 20Guidelines to Choose the Installation Environment . . . . . . . . . . . . . . . . . . . . . . . . . . . . . . . . . . . . . . . . . . . 22
Designer Add-in for Business Studio (DABS) 1.3.0 Tools . . . . . . . . . . . . . . . . . . . . . . . . . . . . . . . . . . . . . . . . . . 23generateManifest . . . . . . . . . . . . . . . . . . . . . . . . . . . . . . . . . . . . . . . . . . . . . . . . . . . . . . . . . . . . . . . . . . . . . 23enableTargetEclipse . . . . . . . . . . . . . . . . . . . . . . . . . . . . . . . . . . . . . . . . . . . . . . . . . . . . . . . . . . . . . . . . . . . 24
Uninstalling TIBCO Designer Add-in for TIBCO Business Studio . . . . . . . . . . . . . . . . . . . . . . . . . . . . . . . . . . . . 25
Chapter 3 Differences between TIBCO Designer and TIBCO Designer Add-in for TIBCO
TIBCO Designer Add-in for TIBCO Business Studio User’s Guide
iv | Contents
Business Studio . . . . . . . . . . . . . . . . . . . . . . . . . . . . . . . . . . . . . . . . . . . . . . . . . . . . . . . . . . . . . . . . 27
Menu Bar. . . . . . . . . . . . . . . . . . . . . . . . . . . . . . . . . . . . . . . . . . . . . . . . . . . . . . . . . . . . . . . . . . . . . . . . . . . . . . . . 28Differences in Version 1.2 and 1.3 . . . . . . . . . . . . . . . . . . . . . . . . . . . . . . . . . . . . . . . . . . . . . . . . . . . . . . . . . 38Differences in Version 1.1 and 1.2 . . . . . . . . . . . . . . . . . . . . . . . . . . . . . . . . . . . . . . . . . . . . . . . . . . . . . . . . . 38
Toolbar . . . . . . . . . . . . . . . . . . . . . . . . . . . . . . . . . . . . . . . . . . . . . . . . . . . . . . . . . . . . . . . . . . . . . . . . . . . . . . . . . 40Static Toolbar . . . . . . . . . . . . . . . . . . . . . . . . . . . . . . . . . . . . . . . . . . . . . . . . . . . . . . . . . . . . . . . . . . . . . . . . . 40Dynamic Toolbar . . . . . . . . . . . . . . . . . . . . . . . . . . . . . . . . . . . . . . . . . . . . . . . . . . . . . . . . . . . . . . . . . . . . . . 40
TIBCO Designer Project Tree . . . . . . . . . . . . . . . . . . . . . . . . . . . . . . . . . . . . . . . . . . . . . . . . . . . . . . . . . . . . . . . . 41
Global Variables . . . . . . . . . . . . . . . . . . . . . . . . . . . . . . . . . . . . . . . . . . . . . . . . . . . . . . . . . . . . . . . . . . . . . . . . . . 44
Debugger . . . . . . . . . . . . . . . . . . . . . . . . . . . . . . . . . . . . . . . . . . . . . . . . . . . . . . . . . . . . . . . . . . . . . . . . . . . . . . . 45
TIBCO Business Studio Features . . . . . . . . . . . . . . . . . . . . . . . . . . . . . . . . . . . . . . . . . . . . . . . . . . . . . . . . . . . . . 46Revision Control System . . . . . . . . . . . . . . . . . . . . . . . . . . . . . . . . . . . . . . . . . . . . . . . . . . . . . . . . . . . . . . . . 46Debug Launch Configuration . . . . . . . . . . . . . . . . . . . . . . . . . . . . . . . . . . . . . . . . . . . . . . . . . . . . . . . . . . . . . 46Right-click Menu to Import File System Resources to the Project Tree . . . . . . . . . . . . . . . . . . . . . . . . . . . . . 46
Chapter 4 TIBCO BusinessWorks Example . . . . . . . . . . . . . . . . . . . . . . . . . . . . . . . . . . . . . . . . . 47
Introduction . . . . . . . . . . . . . . . . . . . . . . . . . . . . . . . . . . . . . . . . . . . . . . . . . . . . . . . . . . . . . . . . . . . . . . . . . . . . . . 48Overview of Example Process . . . . . . . . . . . . . . . . . . . . . . . . . . . . . . . . . . . . . . . . . . . . . . . . . . . . . . . . . . . . 48
Prerequisites . . . . . . . . . . . . . . . . . . . . . . . . . . . . . . . . . . . . . . . . . . . . . . . . . . . . . . . . . . . . . . . . . . . . . . . . . . . . . 49
Starting the Design-time and Saving Your Project . . . . . . . . . . . . . . . . . . . . . . . . . . . . . . . . . . . . . . . . . . . . . . . . 50
Creating the TestFileOperations Process . . . . . . . . . . . . . . . . . . . . . . . . . . . . . . . . . . . . . . . . . . . . . . . . . . . . . . . 51
Testing the TestFileOperations Process . . . . . . . . . . . . . . . . . . . . . . . . . . . . . . . . . . . . . . . . . . . . . . . . . . . . . . . . 56Returning to Designer Perspective . . . . . . . . . . . . . . . . . . . . . . . . . . . . . . . . . . . . . . . . . . . . . . . . . . . . . . . . 57
Chapter 5 TIBCO Adapters Example . . . . . . . . . . . . . . . . . . . . . . . . . . . . . . . . . . . . . . . . . . . . . . 59
Overview . . . . . . . . . . . . . . . . . . . . . . . . . . . . . . . . . . . . . . . . . . . . . . . . . . . . . . . . . . . . . . . . . . . . . . . . . . . . . . . . 60Sample Adapter Project . . . . . . . . . . . . . . . . . . . . . . . . . . . . . . . . . . . . . . . . . . . . . . . . . . . . . . . . . . . . . . . . . 60
Setup for Using the Adapter Tester . . . . . . . . . . . . . . . . . . . . . . . . . . . . . . . . . . . . . . . . . . . . . . . . . . . . . . . . . . . . 64
Chapter 6 Working with a Revision Control System . . . . . . . . . . . . . . . . . . . . . . . . . . . . . . . . . . 65
Using CVS. . . . . . . . . . . . . . . . . . . . . . . . . . . . . . . . . . . . . . . . . . . . . . . . . . . . . . . . . . . . . . . . . . . . . . . . . . . . . . . 66
Index . . . . . . . . . . . . . . . . . . . . . . . . . . . . . . . . . . . . . . . . . . . . . . . . . . . . . . . . . . . . . . . . . . . . . . . . . 69
TIBCO Designer Add-in for TIBCO Business Studio User’s Guide
| v
Preface
Topics
• Changes from the Previous Release of this Guide, page vi
• Related Documentation, page vii
• Typographical Conventions, page viii
• How to Contact TIBCO Support, page x
This software may be available on multiple operating systems. However, not all operating system platforms for a specific software version are released at the same time. Please see the readme file for the availability of this software version on a specific operating system platform.
TIBCO Designer Add-in for TIBCO Business Studio User’s Guide
vi | Changes from the Previous Release of this Guide
Changes from the Previous Release of this Guide
This section itemizes the major changes from the previous release of this guide.
Copy project into workspace checkbox in TIBCO Designer Project Wizard
This functionality allows you to copy an existing TIBCO Designer project into the workspace while converting it into a TIBCO Designer Add-in for TIBCO Business Studio Project. This allows you to work on a copy of the project imported in the workspace.
TIBCO Designer Add-in for TIBCO Business Studio User’s Guide
Preface | vii
Related Documentation
This section lists documentation resources you may find useful.
TIBCO Designer Add-in for TIBCO Business Studio DocumentationThe following documents form the TIBCO Designer Add-in for TIBCO Business Studio documentation set:
• TIBCO Designer Add-in for TIBCO Business Studio User’s Guide Read this manual to TIBCO Designer Add-in for TIBCO Business Studio interface.
• TIBCO Designer Add-in for TIBCO Business Studio Release Notes Read the release notes for a list of new and changed features. This document also contains lists of known issues and closed issues for this release.
Other TIBCO Product DocumentationYou may find it useful to read the documentation for the following TIBCO products:
• TIBCO Designer™
• TIBCO ActiveMatrix BusinessWorks™
• TIBCO ActiveMatrix BusinessWorks™ Service Engine
TIBCO Designer Add-in for TIBCO Business Studio User’s Guide
viii | Typographical Conventions
Typographical Conventions
The following typographical conventions are used in this manual.
Table 1 General Typographical Conventions
Convention Use
TIBCO_HOME
ENV_HOME
DABS_HOME
Many TIBCO products must be installed within the same home directory. This directory is referenced in documentation as TIBCO_HOME. The value of TIBCO_HOME depends on the operating system. For example, on Windows systems, the default value is C:\tibco.
Other TIBCO products are installed into an installation environment. Incompatible products and multiple instances of the same product are installed into different installation environments. The directory into which such products are installed is referenced in documentation as ENV_HOME. The value of ENV_HOME depends on the operating system. For example, on Windows systems the default value is C:\tibco.
TIBCO Designer Add-in for TIBCO Business Studio installs into a directory within TIBCO_HOME. This directory is referenced in documentation as DABS_HOME. The value of DABS_HOME depends on the operating system. For example on Windows systems, the default value is C:\tibco\dabs\1.3.
code font Code font identifies commands, code examples, filenames, pathnames, and output displayed in a command window. For example:
Use MyCommand to start the foo process.
bold code
font Bold code font is used in the following ways:
• In procedures, to indicate what a user types. For example: Type admin.
• In large code samples, to indicate the parts of the sample that are of particular interest.
• In command syntax, to indicate the default parameter for a command. For example, if no parameter is specified, MyCommand is enabled: MyCommand [enable | disable]
TIBCO Designer Add-in for TIBCO Business Studio User’s Guide
Preface | ix
italic font Italic font is used in the following ways:
• To indicate a document title. For example: See TIBCO ActiveMatrix BusinessWorks Concepts.
• To introduce new terms For example: A portal page may contain several portlets. Portlets are mini-applications that run in a portal.
• To indicate a variable in a command or code syntax that you must replace. For example: MyCommand PathName
Key combinations
Key name separated by a plus sign indicate keys pressed simultaneously. For example: Ctrl+C.
Key names separated by a comma and space indicate keys pressed one after the other. For example: Esc, Ctrl+Q.
The note icon indicates information that is of special interest or importance, for example, an additional action required only in certain circumstances.
The tip icon indicates an idea that could be useful, for example, a way to apply the information provided in the current section to achieve a specific result.
The warning icon indicates the potential for a damaging situation, for example, data loss or corruption if certain steps are taken or not taken.
Table 1 General Typographical Conventions (Cont’d)
Convention Use
TIBCO Designer Add-in for TIBCO Business Studio User’s Guide
x | How to Contact TIBCO Support
How to Contact TIBCO Support
For comments or problems with this manual or the software it addresses, please contact TIBCO Support as follows.
• For an overview of TIBCO Support, and information about getting started with TIBCO Support, visit this site:
http://www.tibco.com/services/support
• If you already have a valid maintenance or support contract, visit this site:
https://support.tibco.com
Entry to this site requires a user name and password. If you do not have a user name, you can request one.
TIBCO Designer Add-in for TIBCO Business Studio User’s Guide
| 1
Chapter 1 Overview
This chapter introduces TIBCO Designer Add-in for TIBCO Business Studio.
Topics
• Introduction, page 2
• Starting TIBCO Designer Add-in for TIBCO Business Studio, page 3
• TIBCO Designer Add-in for TIBCO Business Studio Interface, page 4
• Working with Designer Projects, page 8
TIBCO Designer Add-in for TIBCO Business Studio User’s Guide
2 | Chapter 1 Overview
Introduction
TIBCO Designer Add-in for TIBCO Business Studio allows the user to work with the TIBCO Designer interface and edit TIBCO Designer projects in TIBCO Business Studio. The Designer functionality is presented in the following manner:
• The Designer view as panels are represented as views in TIBCO Business Studio.
• The Designer menu will be available in a separate menu within TIBCO Business Studio.
• The Designer toolbar is divided into a static toolbar and a dynamic toolbar. The static tool bar is integrated with the TIBCO Business Studio toolbar. The dynamic toolbar is available in the DABS Main View.
• A new Designer perspective is created in TIBCO Business Studio which contains the Designer components.
• You will be able to work with any projects created using TIBCO Designer. You can create Designer projects for Adapter and TIBCO ActiveMatrix BusinessWorks, or import existing projects into your workspace.
• DABS Synchronize button has been introduced. This button provides a shortcut to refresh the contents visible in 'DABS Main View' and synchronize them to the contents in the 'Project Tree'. You can use this button when you import files into the project using any of Eclipse import wizards. If you make changes to the project, save the project and do not refresh or synchronize.
This chapter describes the layout of the TIBCO Designer Add-in for TIBCO Business Studio interface and provides information on working with projects.
Chapter 2 describes how to install TIBCO Designer Add-in for TIBCO Business Studio on supported platforms.
Chapter 3 describes the differences in the TIBCO Designer and Designer Add-in for Business Studio graphical user interface. Though TIBCO Designer Add-in for TIBCO Business Studio provides the same functionality as TIBCO Designer, there are differences in the way in which features and components are available and used.
Chapter 4 describes the process of designing and testing a simple TIBCO ActiveMatrix BusinessWorks project using TIBCO Designer Add-in for TIBCO Business Studio.
Chapter 5 describes the process of designing and testing a simple adapter project using TIBCO Designer Add-in for TIBCO Business Studio.
Chapter 6 provides instructions on working with a revision control system (RCS).
TIBCO Designer Add-in for TIBCO Business Studio User’s Guide
Starting TIBCO Designer Add-in for TIBCO Business Studio | 3
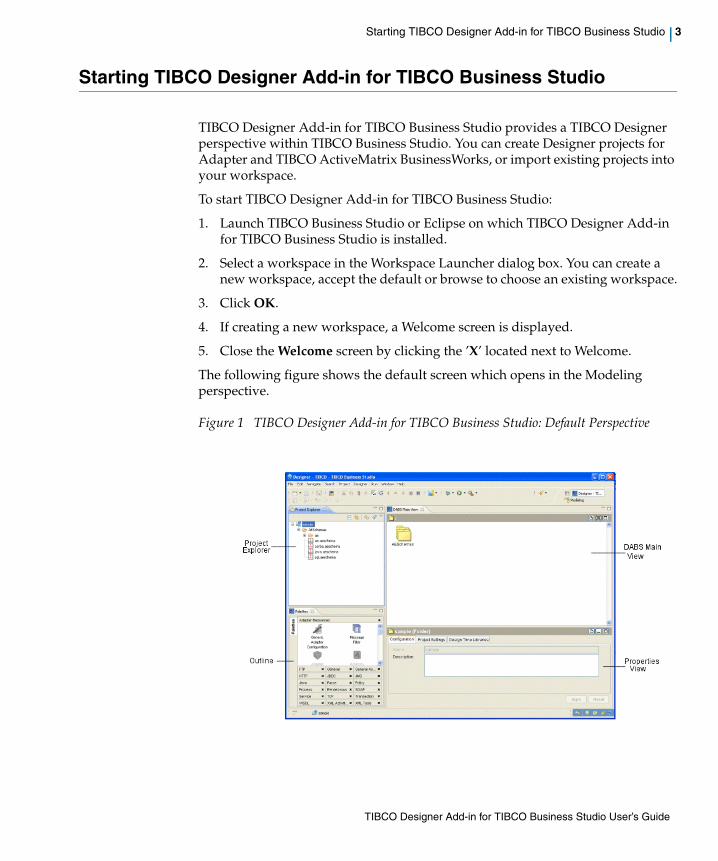
Starting TIBCO Designer Add-in for TIBCO Business Studio
TIBCO Designer Add-in for TIBCO Business Studio provides a TIBCO Designer perspective within TIBCO Business Studio. You can create Designer projects for Adapter and TIBCO ActiveMatrix BusinessWorks, or import existing projects into your workspace.
To start TIBCO Designer Add-in for TIBCO Business Studio:
1. Launch TIBCO Business Studio or Eclipse on which TIBCO Designer Add-in for TIBCO Business Studio is installed.
2. Select a workspace in the Workspace Launcher dialog box. You can create a new workspace, accept the default or browse to choose an existing workspace.
3. Click OK.
4. If creating a new workspace, a Welcome screen is displayed.
5. Close the Welcome screen by clicking the ’X’ located next to Welcome.
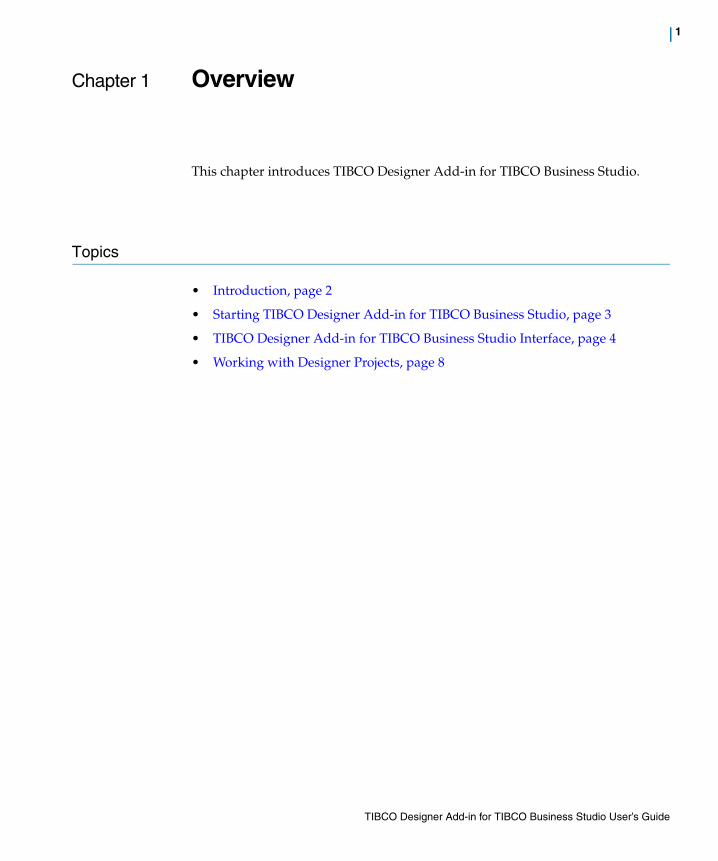
The following figure shows the default screen which opens in the Modeling perspective.
Figure 1 TIBCO Designer Add-in for TIBCO Business Studio: Default Perspective
TIBCO Designer Add-in for TIBCO Business Studio User’s Guide
4 | Chapter 1 Overview
TIBCO Designer Add-in for TIBCO Business Studio Interface
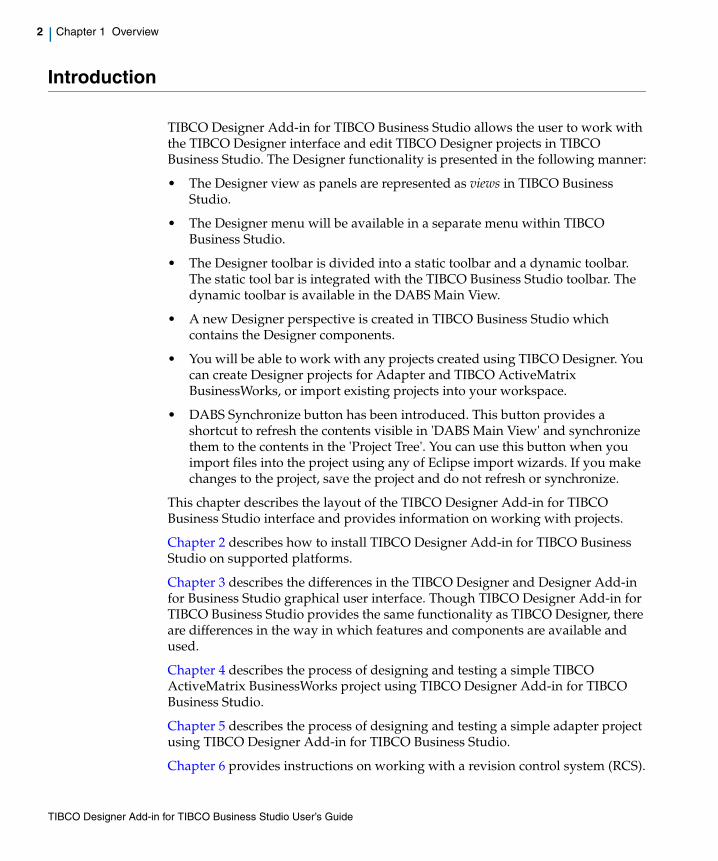
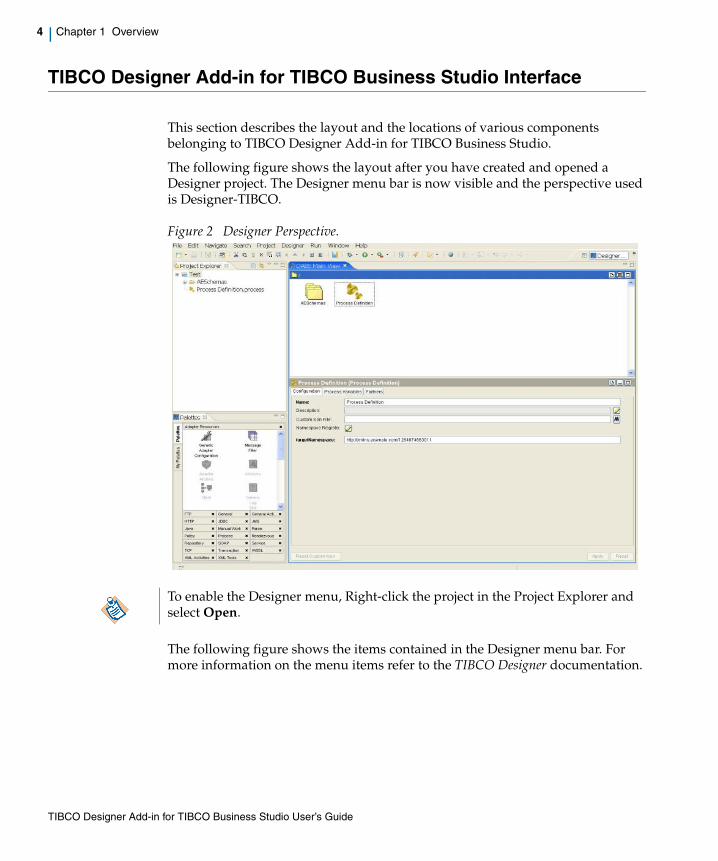
This section describes the layout and the locations of various components belonging to TIBCO Designer Add-in for TIBCO Business Studio.
The following figure shows the layout after you have created and opened a Designer project. The Designer menu bar is now visible and the perspective used is Designer-TIBCO.
Figure 2 Designer Perspective.
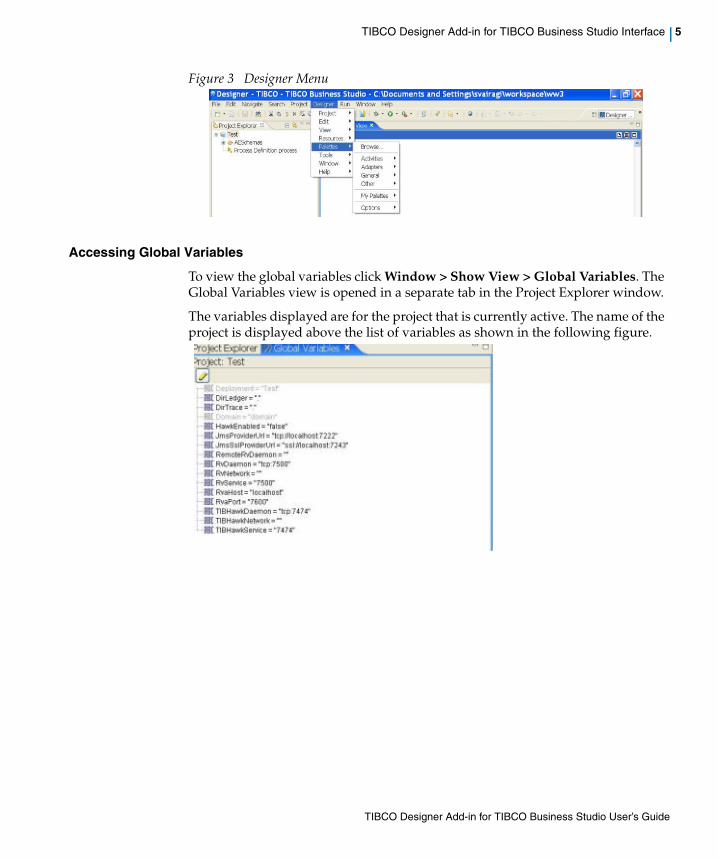
The following figure shows the items contained in the Designer menu bar. For more information on the menu items refer to the TIBCO Designer documentation.
To enable the Designer menu, Right-click the project in the Project Explorer and select Open.
TIBCO Designer Add-in for TIBCO Business Studio User’s Guide
TIBCO Designer Add-in for TIBCO Business Studio Interface | 5
Figure 3 Designer Menu
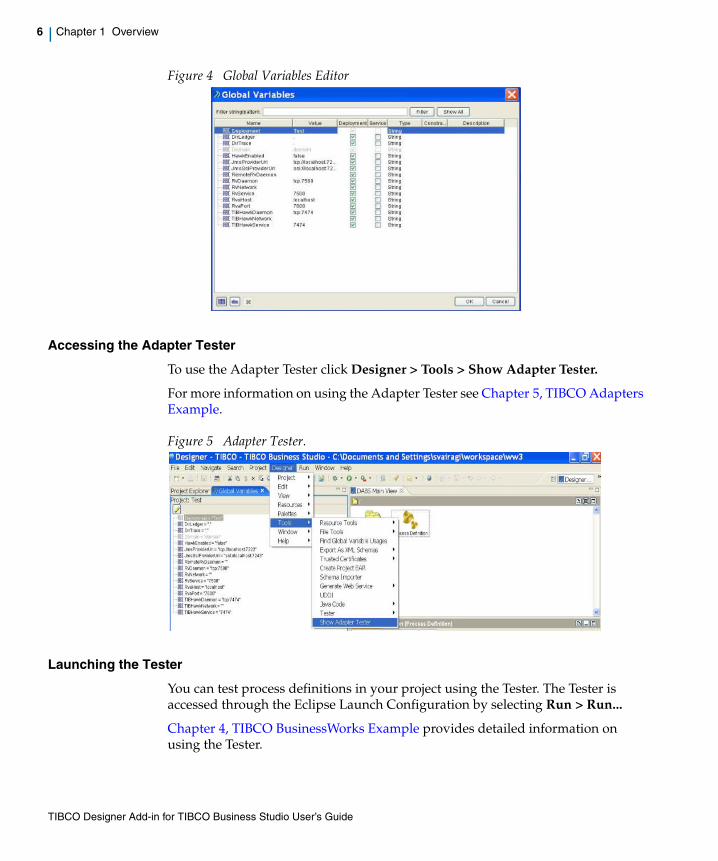
Accessing Global Variables
To view the global variables click Window > Show View > Global Variables. The Global Variables view is opened in a separate tab in the Project Explorer window.
The variables displayed are for the project that is currently active. The name of the project is displayed above the list of variables as shown in the following figure.
TIBCO Designer Add-in for TIBCO Business Studio User’s Guide
6 | Chapter 1 Overview
Figure 4 Global Variables Editor
Accessing the Adapter Tester
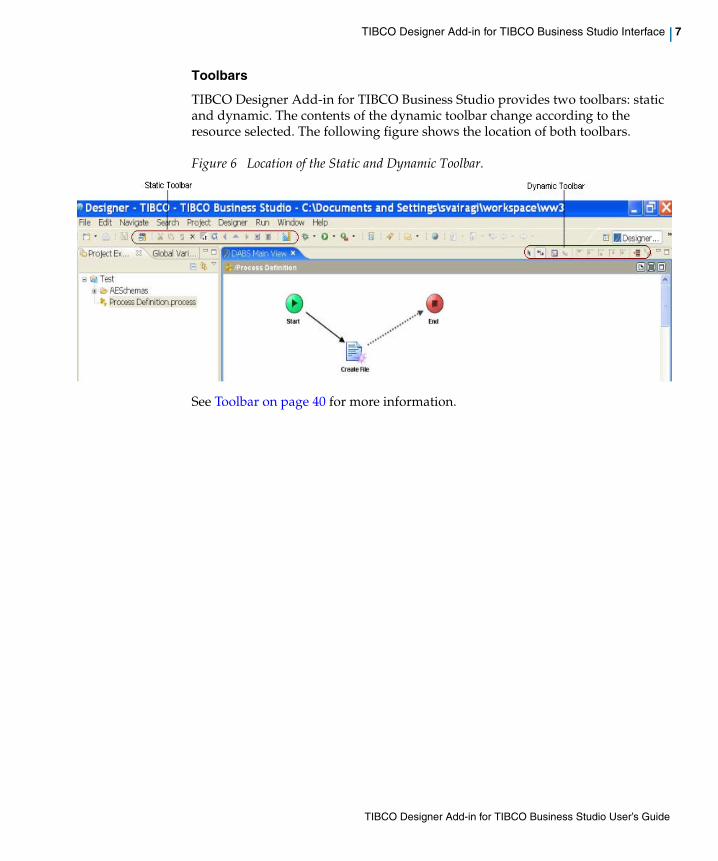
To use the Adapter Tester click Designer > Tools > Show Adapter Tester.
For more information on using the Adapter Tester see Chapter 5, TIBCO Adapters Example.
Figure 5 Adapter Tester.
Launching the Tester
You can test process definitions in your project using the Tester. The Tester is accessed through the Eclipse Launch Configuration by selecting Run > Run...
Chapter 4, TIBCO BusinessWorks Example provides detailed information on using the Tester.
TIBCO Designer Add-in for TIBCO Business Studio User’s Guide
TIBCO Designer Add-in for TIBCO Business Studio Interface | 7
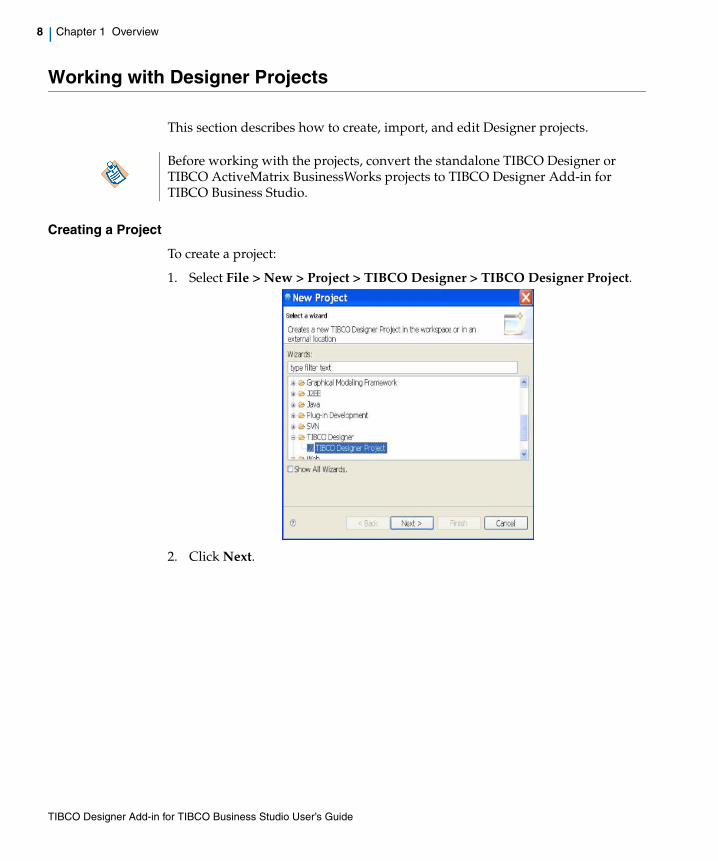
Toolbars
TIBCO Designer Add-in for TIBCO Business Studio provides two toolbars: static and dynamic. The contents of the dynamic toolbar change according to the resource selected. The following figure shows the location of both toolbars.
Figure 6 Location of the Static and Dynamic Toolbar.
See Toolbar on page 40 for more information.
TIBCO Designer Add-in for TIBCO Business Studio User’s Guide
8 | Chapter 1 Overview
Working with Designer Projects
This section describes how to create, import, and edit Designer projects.
Creating a Project
To create a project:
1. Select File > New > Project > TIBCO Designer > TIBCO Designer Project.
2. Click Next.
Before working with the projects, convert the standalone TIBCO Designer or TIBCO ActiveMatrix BusinessWorks projects to TIBCO Designer Add-in for TIBCO Business Studio.
TIBCO Designer Add-in for TIBCO Business Studio User’s Guide
Working with Designer Projects | 9
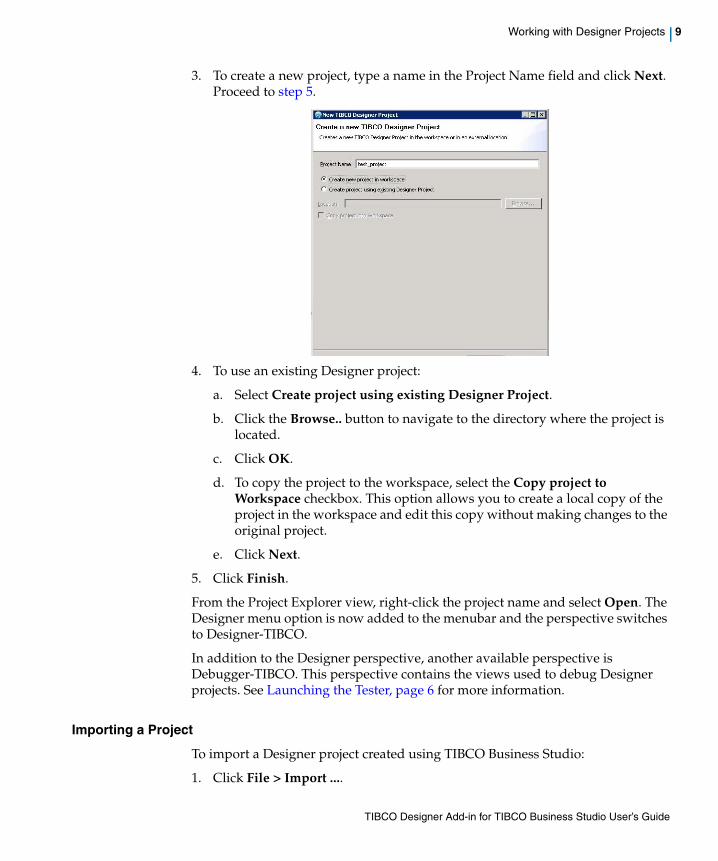
3. To create a new project, type a name in the Project Name field and click Next. Proceed to step 5.
4. To use an existing Designer project:
a. Select Create project using existing Designer Project.
b. Click the Browse.. button to navigate to the directory where the project is located.
c. Click OK.
d. To copy the project to the workspace, select the Copy project to Workspace checkbox. This option allows you to create a local copy of the project in the workspace and edit this copy without making changes to the original project.
e. Click Next.
5. Click Finish.
From the Project Explorer view, right-click the project name and select Open. The Designer menu option is now added to the menubar and the perspective switches to Designer-TIBCO.
In addition to the Designer perspective, another available perspective is Debugger-TIBCO. This perspective contains the views used to debug Designer projects. See Launching the Tester, page 6 for more information.
Importing a Project
To import a Designer project created using TIBCO Business Studio:
1. Click File > Import ....
TIBCO Designer Add-in for TIBCO Business Studio User’s Guide
10 | Chapter 1 Overview
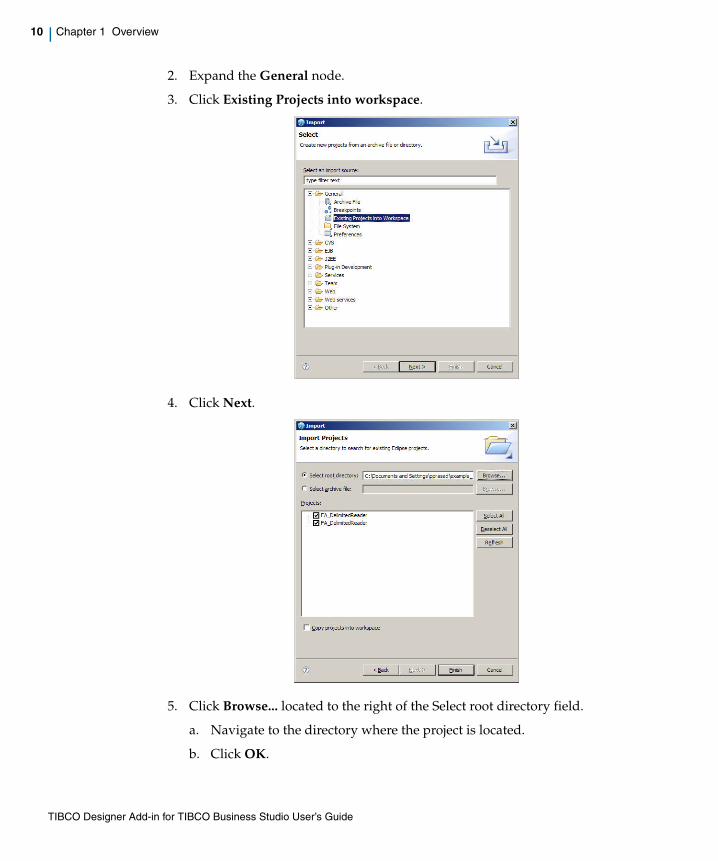
2. Expand the General node.
3. Click Existing Projects into workspace.
4. Click Next.
5. Click Browse... located to the right of the Select root directory field.
a. Navigate to the directory where the project is located.
b. Click OK.
TIBCO Designer Add-in for TIBCO Business Studio User’s Guide
Working with Designer Projects | 11
6. In the Projects area, select the checkboxes next to the projects you want to import.
7. Optional. Select the checkbox for Copy projects into workspace if you want to create a copy of the project in your workspace.
8. Click Finish.
Adding Resources to a Project
After you have created or imported a project, you can start adding resources to your project.
To add a resource to your project:
1. Select a palette from the Palette View.
2. Drag and drop a resource from the palette to the DABS Main View.
Alternatively, from the DABS Main View, right-click and select Add Resource and choose the resource from the appropriate sub-menu.
Global Variables
Select Window > Show View > Global Variables to display the Global Variables view for your project.
Click the icon to bring up the Global Variables editor.
See Global Variables on page 44 and TIBCO Designer documentation for more information.
Edit Operations
The Edit operations such as Cut, Paste, Copy, and Delete can be performed by selecting a resource and using the right-click menu.
See Differences between TIBCO Designer and TIBCO Designer Add-in for TIBCO Business Studio on page 27 for more information.
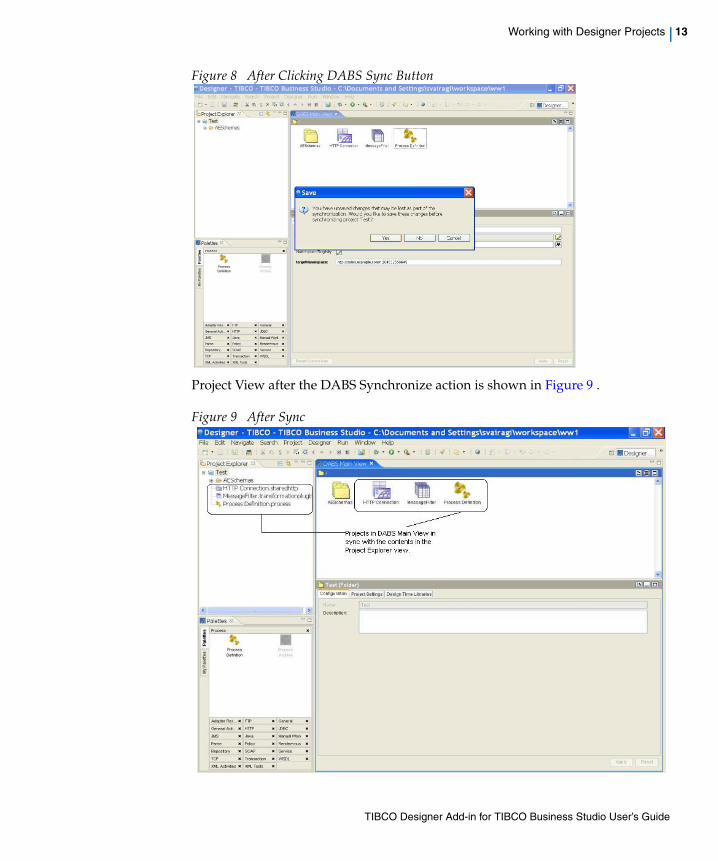
DABS Synchronize
The basic task of the button is to provide a short and consistent way to access the Designer > Resources > Refresh menu option. While performing this refresh action, it also checks for the unsaved changes in the project and prompts the user accordingly. This button should not be used as a replacement for save
On adding a resource, you must save the project for the newly added resources to appear in the Project Tree (unless auto-save has been enabled explicitly).
TIBCO Designer Add-in for TIBCO Business Studio User’s Guide
12 | Chapter 1 Overview
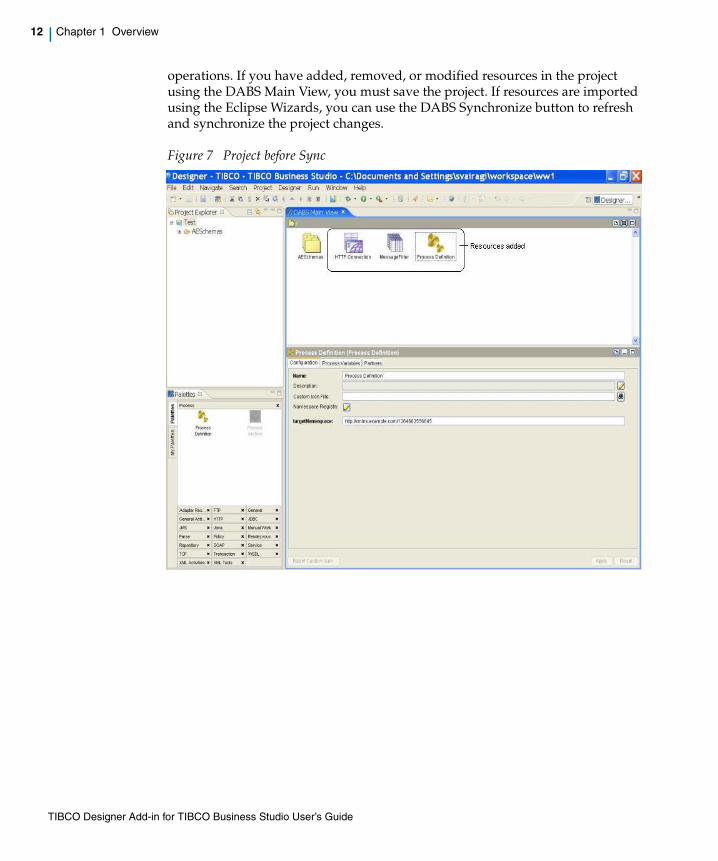
operations. If you have added, removed, or modified resources in the project using the DABS Main View, you must save the project. If resources are imported using the Eclipse Wizards, you can use the DABS Synchronize button to refresh and synchronize the project changes.
Figure 7 Project before Sync
TIBCO Designer Add-in for TIBCO Business Studio User’s Guide
Working with Designer Projects | 13
Figure 8 After Clicking DABS Sync Button
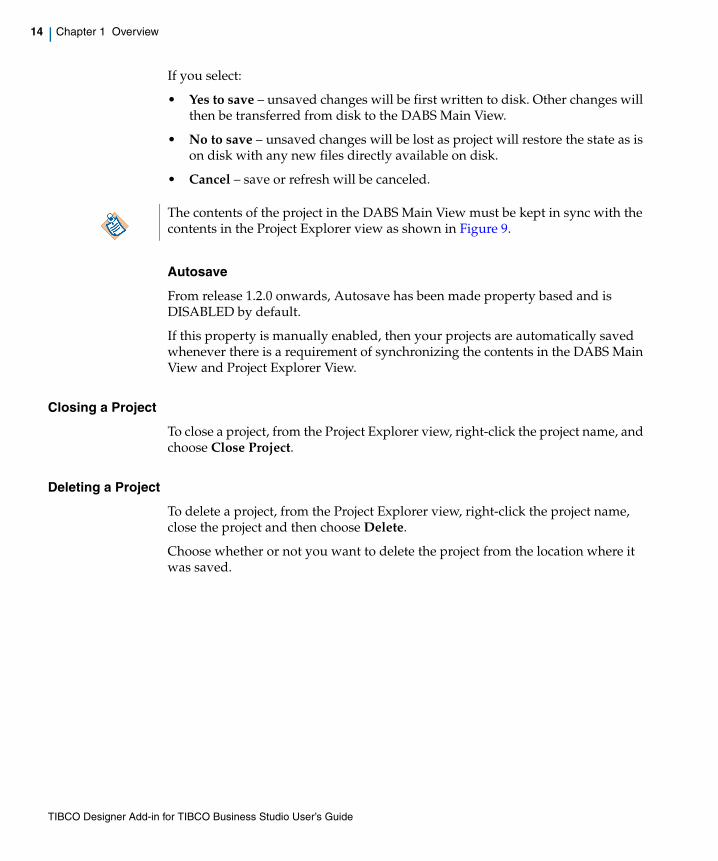
Project View after the DABS Synchronize action is shown in Figure 9 .
Figure 9 After Sync
TIBCO Designer Add-in for TIBCO Business Studio User’s Guide
14 | Chapter 1 Overview
If you select:
• Yes to save – unsaved changes will be first written to disk. Other changes will then be transferred from disk to the DABS Main View.
• No to save – unsaved changes will be lost as project will restore the state as is on disk with any new files directly available on disk.
• Cancel – save or refresh will be canceled.
Autosave
From release 1.2.0 onwards, Autosave has been made property based and is DISABLED by default.
If this property is manually enabled, then your projects are automatically saved whenever there is a requirement of synchronizing the contents in the DABS Main View and Project Explorer View.
Closing a Project
To close a project, from the Project Explorer view, right-click the project name, and choose Close Project.
Deleting a Project
To delete a project, from the Project Explorer view, right-click the project name, close the project and then choose Delete.
Choose whether or not you want to delete the project from the location where it was saved.
The contents of the project in the DABS Main View must be kept in sync with the contents in the Project Explorer view as shown in Figure 9.
TIBCO Designer Add-in for TIBCO Business Studio User’s Guide
| 15
Chapter 2 Installation
This chapter describes how to install TIBCO Designer Add-in for TIBCO Business Studio on supported platforms.
Topics
• Installation Overview, page 16
• Installation Prerequisites, page 19
• Installing TIBCO Designer Add-in for TIBCO Business Studio, page 20
• Designer Add-in for Business Studio (DABS) 1.3.0 Tools, page 23
• Uninstalling TIBCO Designer Add-in for TIBCO Business Studio, page 25
TIBCO Designer Add-in for TIBCO Business Studio User’s Guide
16 | Chapter 2 Installation
Installation Overview
This chapter explains how to install TIBCO Designer Add-in for TIBCO Business Studio.
Installation ModesThree installation modes are available: GUI, Console, and Silent. See Installing TIBCO Designer Add-in for TIBCO Business Studio on page 20 for details about installing the software in each of these modes.
Installation TypesTwo installation types are available: Development Tools and Customize Installation. The Development Tools type installs all the products in the package on the specified platform. As described next, the Customize Installation type allows you to select one or more product features to be installed.
The following product features are available:
• TIBCO Designer Add-in for TIBCO Business Studio 1.3.0
— Business Studio Designer
— Documentation
Supported Platforms
Microsoft Windows
• Microsoft Windows Server 2003 on x86
• Microsoft Windows XP Professional on x86
System MemoryA minimum of 512 MB physical memory is required.
TIBCO ActiveMatrix BusinessWorks Service Engine 5.9.0 bundles TIBCO Designer Add-in for TIBCO Business Studio 1.3.0.
TIBCO Designer Add-in for TIBCO Business Studio User’s Guide
Installation Overview | 17
Installer Account
Microsoft Windows
You must have administrator privileges for the machine on which TIBCO Designer Add-in for TIBCO Business Studio is installed.
If you do not have administrator privileges, the installer exits. You must then log out of the system and log in as a user with the required privileges, or request your system administrator to assign the privileges to your account.
If you intend to install the product on a network drive, you must ensure that the account used for installation has permission to access the network drive.
Installer Log FileThe installer log file, tibco_universal_installer.timestamp.username_install.log, is written to the User_Home\.TIBCO\install_timestamp directory. For example, on Windows the installer log is written to the C:\Documents and Settings\user-name\.TIBCO\install_timestamp directory. The installer log file captures the following information:
• Installation environment details such as user who invoked the installer, hostname, java home in the environment, Operating System details, etc.
• List of assemblies installed.
Disk SpaceWhen a TIBCO Designer Add-in for TIBCO Business Studio package is unpacked, it is extracted into a temporary folder. The installer requires approximately 100 MB of free space to extract the package to a temporary folder.
Temporary Disk Space Required by the Installer
The installer requires at least 350 MB of free space in the temporary directory. On Microsoft Windows, temporary directory location is %SystemDrive%:\Documents and Settings\user_name\Local Settings\Temp
If your system does not have sufficient disk space in the default temporary area, you can run the installer with a different temporary directory by using the following option when starting the installer:-is:tempdir /new_temp
where /new_temp has sufficient free disk space.
TIBCO Designer Add-in for TIBCO Business Studio User’s Guide
18 | Chapter 2 Installation
The installer calculates the disk space required in the product home location for the selected components before the actual installation (copying of files to system) begins. The installer will proceed only if sufficient free disk space is available in the product home location.
If the disk space required is consumed by another process while the installer is copying the files, the disk space available can be reduced. In such a case, the installer may fail and will then give a failure message.
While performing installation, it is recommended not to run other processes that consume disk space in the product home location.
Disk Space After Installation
TIBCO Designer Add-in for TIBCO Business Studio and TIBCO Runtime Agent consume about 500 MB of disk space under ENV_HOME.
TIBCO Designer Add-in for TIBCO Business Studio User’s Guide
Installation Prerequisites | 19
Installation Prerequisites
This section lists the required and optional products that work with TIBCO Designer Add-in for TIBCO Business Studio.
Prerequisites
TIBCO Runtime Agent 5.7.0 or higher
Required. TIBCO Designer must be selected while installing TIBCO Runtime Agent 5.7. The TIBCO-HOME must be the same location where you would install TIBCO Designer Add-in for TIBCO Business Studio.
TIBCO Business Studio
Recommended. TIBCO Business Studio is recommended to be installed in your environment before installing TIBCO Designer Add-in for TIBCO Business Studio. TIBCO Business Studio 3.2 and above is supported.
TIBCO Adapters
Optional. Install the 6.0 version of TIBCO Adapters in TIBCO Designer Add-in for TIBCO Business Studio.
TIBCO ActiveMatrix BusinessWorks 5.9
Optional. Install TIBCO ActiveMatrix BusinessWorks to design processes in TIBCO Designer Add-in for TIBCO Business Studio.
TIBCO Designer Add-in for TIBCO Business Studio User’s Guide
20 | Chapter 2 Installation
Installing TIBCO Designer Add-in for TIBCO Business Studio
Installing in GUI mode
To install the product in GUI mode:
1. Open the physical media or download the TIBCO Designer Add-in for TIBCO Business Studio package. For example, TIB_dabs_1.3.0_win_x86.zip for Microsoft Windows platform.
2. Extract the product’s archive file to a temporary directory.
3. Navigate to the temporary directory.
4. Run TIBCOUniversalInstaller. You can do so in one of the following ways:
— Double-click the installer icon.
— On the command prompt, provide the absolute path of the installer file on without specifying any options. The installer defaults to GUI mode.
5. The Welcome screen appears. Click Next.
6. The License Agreement screen appears. After reading through the license text, click I accept the terms of the license agreement and then click Next.
7. The Installation Profile Selection screen appears. Select Development Tools and then click Next.
8. If you selected Development Tools, proceed to step 9. If you selected Customize Installation checkbox, then select the components available for installation. By default, all the components are selected. Clear the checkboxes next to the components you don’t want installed. See Installation Types on page 16 for information about the features listed for the product. Click Next.
9. The TIBCO Installation Home screen appears. Select the Use an existing TIBCO_HOME option and select an environment from the drop-down list. Click Next.
10. Specify the location of the folder containing TIBCOBusinessStudio.exe and TIBCO Business Studio home containing the "links" directory for the enableTarget tool in the next screen.
If there is more than one version of TIBCO Business Studio installed in the same ENV_HOME, run the enableTargetEclipse tool manually. For details, refer section Designer Add-in for Business Studio (DABS) 1.3.0 Tools on page 23.
TIBCO Designer Add-in for TIBCO Business Studio User’s Guide
Installing TIBCO Designer Add-in for TIBCO Business Studio | 21
11. The Pre Install summary screen appears. Verify the list of features selected for install and then click Install. The installation location of the links depends on the TIBCO Business Studio version available in your environment.
12. The Post Install Summary screen appears. This screen summarizes the installation process. Click Finish to complete the installation process and close the installer window.
Installing in Console mode
To install the software in console mode:
1. Open the physical media or download the TIBCO Designer Add-in for TIBCO Business Studio package.
2. Extract the product’s archive file to a temporary directory.
3. Using a console window, navigate to the temporary directory.
4. Run TIBCOUniversalInstaller -console.
5. Complete the installation by responding to the console window prompts.
Installing in Silent mode
In silent mode, the universal installer does not prompt for any inputs during installation. Instead, the inputs are read from a response file that can be provided as a command-line parameter.
The TIBCOUniversalInstaller-dabs_<version>.silent file is packaged in the directory that contains the universal installer. You must edit the file with information for your environment before launching the silent installation. The file includes comments that describe the installation properties you can set. While you can use the TIBCOUniversalInstaller-dabs_<version>.silent file, it’s good practice to copy the file to a different name and use that file for the silent install.
The following procedure explains how to install a TIBCO Designer Add-in for TIBCO Business Studio in silent mode. If errors occur during installation, they will be listed in the installation log file contained in User_Home/.TIBCO directory.
While running in the console mode, you can use the following keys to move through the installation process:
Enter: Moves forward in the installer.
BackSpace or 2: Returns to the previous screen.
3: Cancels the Wizard and exits the installation or uninstallation.
5: Redisplays the current screen.
TIBCO Designer Add-in for TIBCO Business Studio User’s Guide
22 | Chapter 2 Installation
1. Open the physical media or download the TIBCO Designer Add-in for TIBCO Business Studio package.
2. Extract the product’s archive file to a temporary directory.
3. Using a console window, navigate to the temporary directory.
4. Make a copy of the TIBCOUniversalInstaller-dabs_<version>.silent file and rename the file.
5. Using a text editor, open the copied file and update the install location and features to install.
6. Run the following:
Windows TIBCOUniversalInstaller.cmd -silent -V
responseFile="myfilename.silent"
When installation completes, a line similar to the following is written to the installer log file:Install, com.tibco.installer.util.TIBCOInstaller, dbg.Debug, The installation has completed. Please check the log file for additional information.
Guidelines to Choose the Installation EnvironmentIn a multi-home environment with multiple versions of TIBCO Business Studio installed, different installation scenarios are possible.
While installing TIBCO Designer Add-in for Business Studio, you may choose to:\
1. Install over existing TIBCO Business Studio 3.2 and above.
2. Install TIBCO Business Studio 3.2 and above in a new installation environment and select the new installation environment while installing the product.
TIBCO Designer Add-in for TIBCO Business Studio User’s Guide
Designer Add-in for Business Studio (DABS) 1.3.0 Tools | 23
Designer Add-in for Business Studio (DABS) 1.3.0 Tools
The following new tools are a part of this release of Designer Add-In for Business Studio.
generateManifestThis tool generates the manifest information/metadata for the com.tibco.bsdesigner.plugin.
1. Location of the tool: <<TIBCO-HOME-WITH-DABS>>/dabs/1.x/tools/generateManifest
2. It consists of:— JAR > generateManifest.jar
— Wrapper > generateManifest.exe
— TRA File > generateManifest.tra
— TRA-TEMPLATE File > generateManifest.tra_template
3. Installer:
Installer updates the TRA and TRA-TEMPLATE files with the required information attributes for the following values. Run the tool after a normal TIBCO Designer Add-In for Business Studio installation:
— tibco.env.JVM_LIB_PATH
— tibco.env.DABS_HOME
— tibco.env.DESIGNER_HOME
4. Usage:
— Whenever there is ANY change in the designer.tra [in <<TRA-TIBCO-HOME>>/designer/5.x/bin] due to new product installation or new jars, etc. or any jar or files are added to the folders inside TIBCO-HOME, you MUST run this tool for the new products or jars to be available in TIBCO Designer Add-In for Business Studio.
— Invoking the wrapper tool requires no arguments.
— Any subsequent instance of Business Studio/Eclipse must be launched with the -clean argument.
TIBCO Designer Add-in for TIBCO Business Studio User’s Guide
24 | Chapter 2 Installation
enableTargetEclipseThis tool creates a LINK in the "Eclipse" installation directory specified as an argument while running the tool.
1. Location: <<TIBCO-HOME-WITH-DABS>>/dabs/1.x/tools/enableTargetEclipse
2. It consists of:— JAR > enableTargetEclipse.jar
— Wrapper > enableTargetEclipse.exe
— TRA File > enableTargetEclipse.tra
— TRA-TEMPLATE File > enableTargetEclipse.tra_template
3. Installer:
Installer updates the TRA and TRA-TEMPLATE files with required information attributes for the following values:
— tibco.env.JVM_LIB_PATH
— tibco.env.DABS_HOME
4. Usage - To use the installed TIBCO Designer Add-In for Business Studio Plug-ins with a new ‘Eclipse/Studio installation’:
— Run the tool only if you want to use the SAME TIBCO Designer Add-In for Business Studio with another Eclipse/Studio installation.
— Invoke the wrapper tool with one argument:
If the target Eclipse is a Studio, then the argument would be the directory containing the "links" folder.
If the target Eclipse is a non-Studio Eclipse, then the argument would be the directory containing "eclipse.exe".
TIBCO Designer Add-in for TIBCO Business Studio User’s Guide
Uninstalling TIBCO Designer Add-in for TIBCO Business Studio | 25
Uninstalling TIBCO Designer Add-in for TIBCO Business Studio
To uninstall the software:
1. Navigate to ENV_HOME\_uninstall and run universal_uninstall.
2. The wizard provides uninstall options for all the installed products. Clear the checkboxes for products you do not want to uninstall and then click Uninstall. To uninstall TIBCO Designer Add-in for TIBCO Business Studio the checkbox TIBCO Designer Add-in for TIBCO Business Studio must be selected.
When uninstalling, popup windows appear warning that an updated file needs to be deleted. Click Yes to All to remove the file and subsequent files in the assembly. Because popup windows are generated for each installed assembly, you may see multiple popup windows.
3. The summary screen appears. Click Finish to exit the uninstall wizard.
TIBCO Designer Add-in for TIBCO Business Studio User’s Guide

26 | Chapter 2 Installation
TIBCO Designer Add-in for TIBCO Business Studio User’s Guide
| 27
Chapter 3 Differences between TIBCO Designer and TIBCO Designer Add-in for TIBCO Business Studio
When working with TIBCO Designer Add-in for TIBCO Business Studio, some of TIBCO Designer’s features behave differently. This chapter describes the differences in the TIBCO Designer and TIBCO Designer Add-in for TIBCO Business Studio graphical user interface and features.
Topics
• Menu Bar, page 28
• Toolbar, page 40
• TIBCO Designer Project Tree, page 41
• Global Variables, page 44
• Debugger, page 45
• TIBCO Business Studio Features, page 46
TIBCO Designer Add-in for TIBCO Business Studio User’s Guide

28 | Chapter 3 Differences between TIBCO Designer and TIBCO Designer Add-in for TIBCO Business Studio
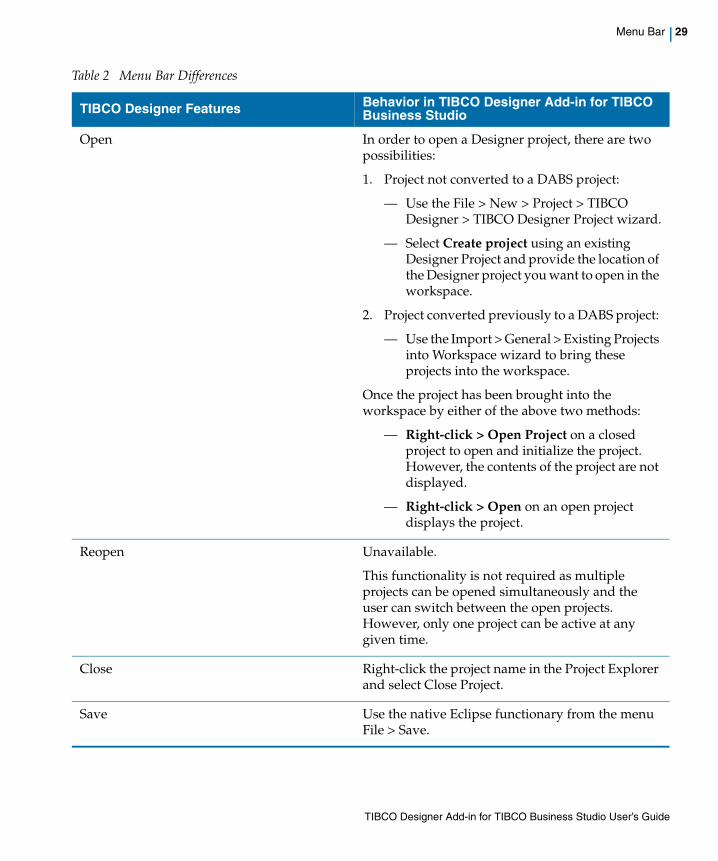
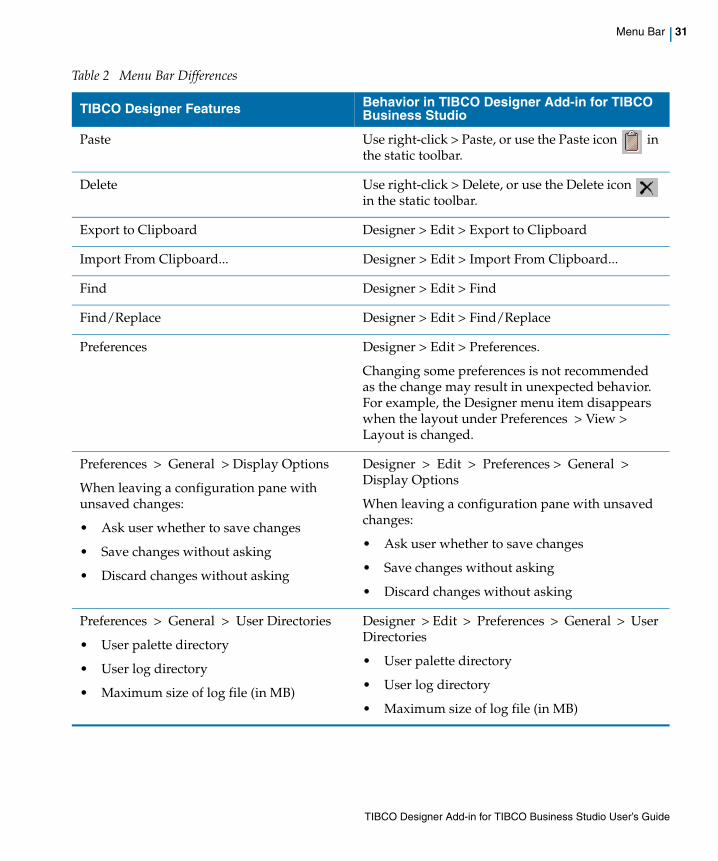
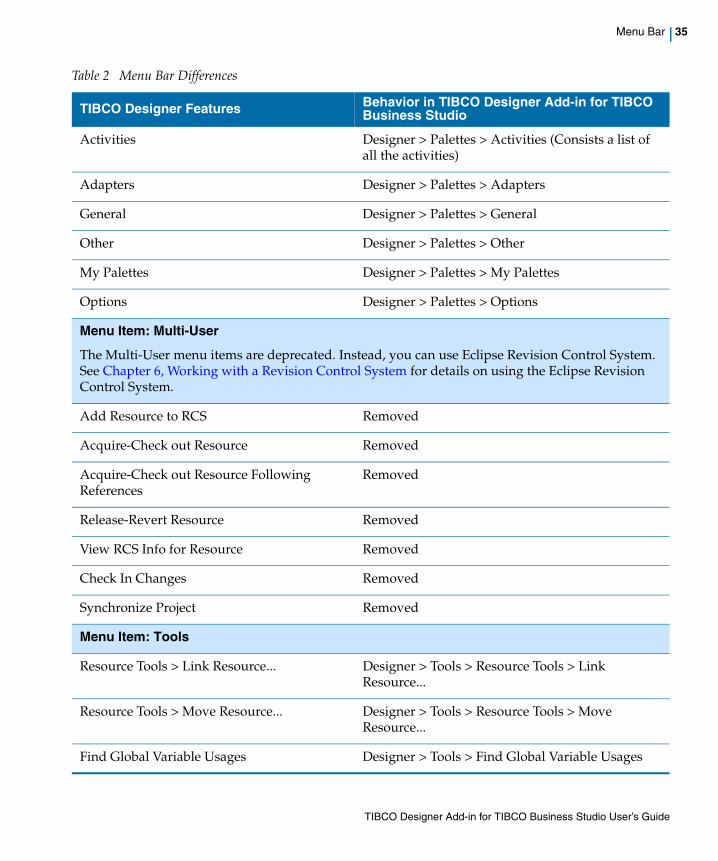
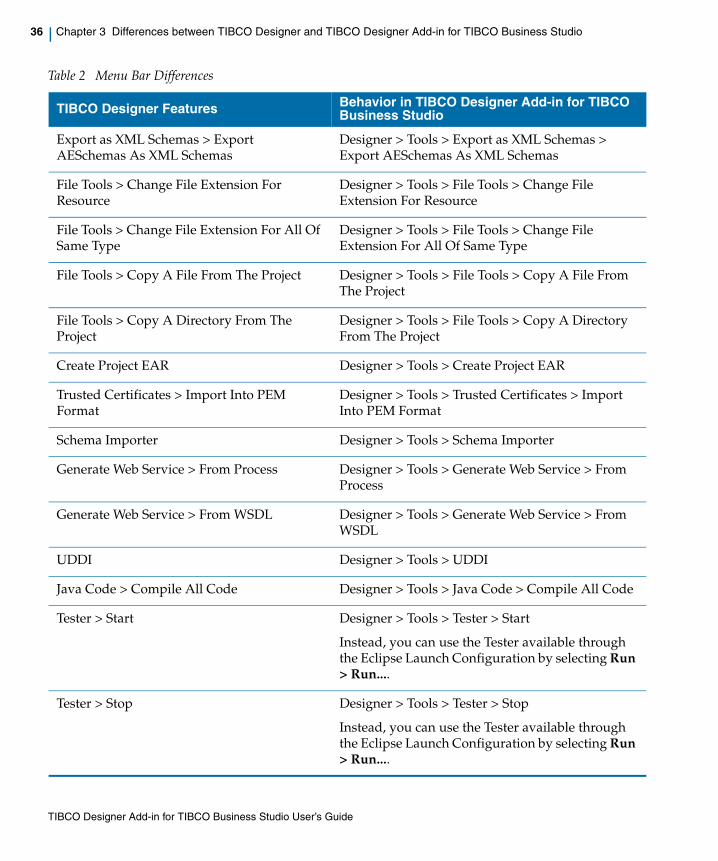
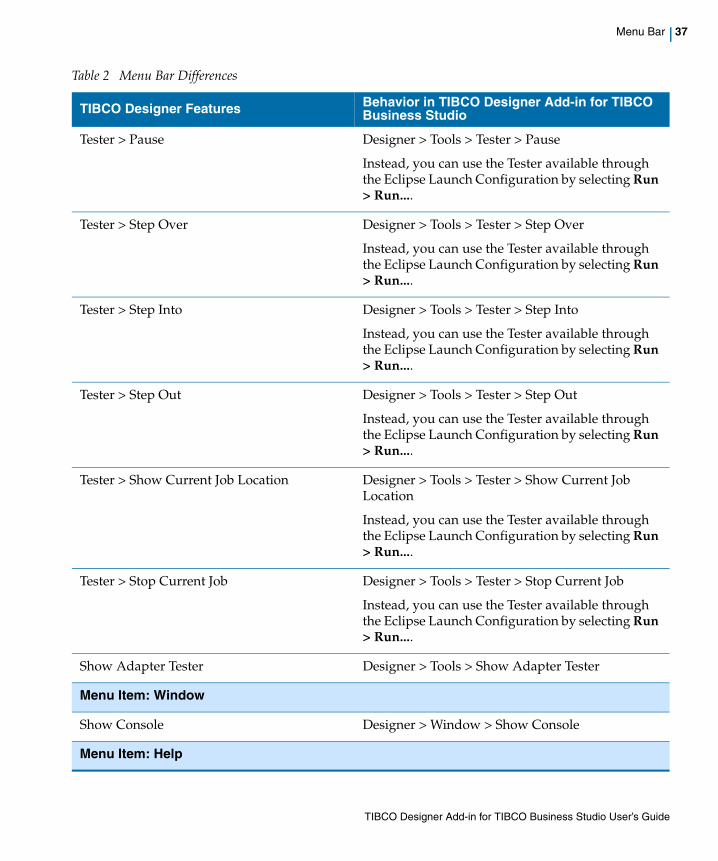
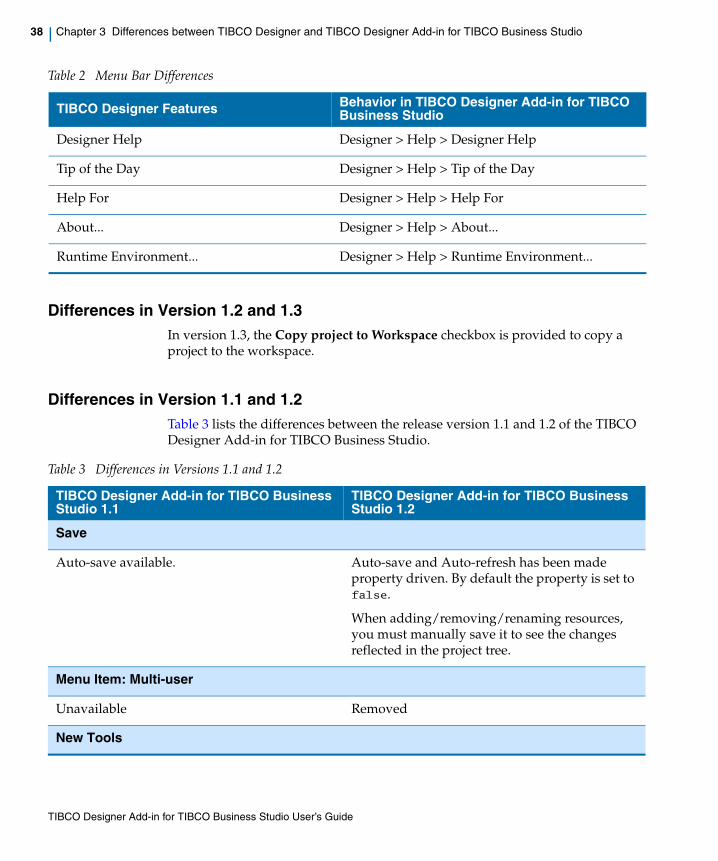
Menu Bar
The TIBCO Designer menu items are integrated with the TIBCO Business Studio menu bar and are available under the Designer menu item. Table 2 lists the differences between the menu bar items available in TIBCO Designer and those available under the TIBCO Designer Add-in for TIBCO Business Studio Designer menu.
Table 2 Menu Bar Differences
TIBCO Designer Features Behavior in TIBCO Designer Add-in for TIBCO Business Studio
Menu Item: Project
New Project > New Empty Project Available.
Navigate to File > New > Project and choose the TIBCO Designer > TIBCO Designer Project Wizard. Select the Create new project in workspace checkbox.
To copy the project to the workspace, select the Copy project to Workspace checkbox.
New Project > New from Template Unavailable
TIBCO Designer Add-in for TIBCO Business Studio User’s Guide
Menu Bar | 29
Open In order to open a Designer project, there are two possibilities:
1. Project not converted to a DABS project:
— Use the File > New > Project > TIBCO Designer > TIBCO Designer Project wizard.
— Select Create project using an existing Designer Project and provide the location of the Designer project you want to open in the workspace.
2. Project converted previously to a DABS project:
— Use the Import > General > Existing Projects into Workspace wizard to bring these projects into the workspace.
Once the project has been brought into the workspace by either of the above two methods:
— Right-click > Open Project on a closed project to open and initialize the project. However, the contents of the project are not displayed.
— Right-click > Open on an open project displays the project.
Reopen Unavailable.
This functionality is not required as multiple projects can be opened simultaneously and the user can switch between the open projects. However, only one project can be active at any given time.
Close Right-click the project name in the Project Explorer and select Close Project.
Save Use the native Eclipse functionary from the menu File > Save.
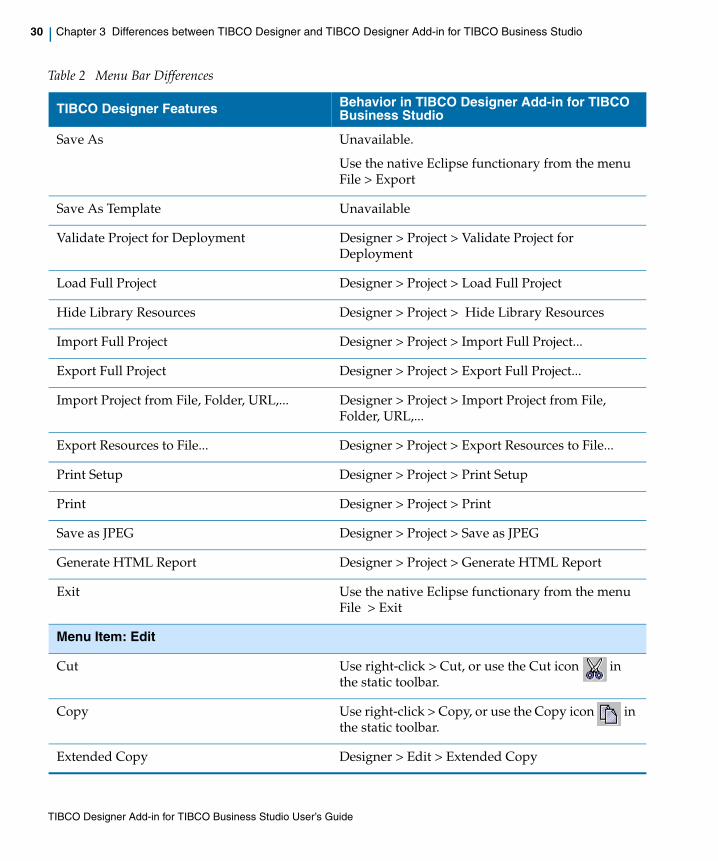
Table 2 Menu Bar Differences
TIBCO Designer Features Behavior in TIBCO Designer Add-in for TIBCO Business Studio
TIBCO Designer Add-in for TIBCO Business Studio User’s Guide
30 | Chapter 3 Differences between TIBCO Designer and TIBCO Designer Add-in for TIBCO Business Studio
Save As Unavailable.
Use the native Eclipse functionary from the menu File > Export
Save As Template Unavailable
Validate Project for Deployment Designer > Project > Validate Project for Deployment
Load Full Project Designer > Project > Load Full Project
Hide Library Resources Designer > Project > Hide Library Resources
Import Full Project Designer > Project > Import Full Project...
Export Full Project Designer > Project > Export Full Project...
Import Project from File, Folder, URL,... Designer > Project > Import Project from File, Folder, URL,...
Export Resources to File... Designer > Project > Export Resources to File...
Print Setup Designer > Project > Print Setup
Print Designer > Project > Print
Save as JPEG Designer > Project > Save as JPEG
Generate HTML Report Designer > Project > Generate HTML Report
Exit Use the native Eclipse functionary from the menu File > Exit
Menu Item: Edit
Cut Use right-click > Cut, or use the Cut icon in the static toolbar.
Copy Use right-click > Copy, or use the Copy icon in the static toolbar.
Extended Copy Designer > Edit > Extended Copy
Table 2 Menu Bar Differences
TIBCO Designer Features Behavior in TIBCO Designer Add-in for TIBCO Business Studio
TIBCO Designer Add-in for TIBCO Business Studio User’s Guide
Menu Bar | 31
Paste Use right-click > Paste, or use the Paste icon in the static toolbar.
Delete Use right-click > Delete, or use the Delete icon in the static toolbar.
Export to Clipboard Designer > Edit > Export to Clipboard
Import From Clipboard... Designer > Edit > Import From Clipboard...
Find Designer > Edit > Find
Find/Replace Designer > Edit > Find/Replace
Preferences Designer > Edit > Preferences.
Changing some preferences is not recommended as the change may result in unexpected behavior. For example, the Designer menu item disappears when the layout under Preferences > View > Layout is changed.
Preferences > General > Display Options
When leaving a configuration pane with unsaved changes:
• Ask user whether to save changes
• Save changes without asking
• Discard changes without asking
Designer > Edit > Preferences > General > Display Options
When leaving a configuration pane with unsaved changes:
• Ask user whether to save changes
• Save changes without asking
• Discard changes without asking
Preferences > General > User Directories
• User palette directory
• User log directory
• Maximum size of log file (in MB)
Designer > Edit > Preferences > General > User Directories
• User palette directory
• User log directory
• Maximum size of log file (in MB)
Table 2 Menu Bar Differences
TIBCO Designer Features Behavior in TIBCO Designer Add-in for TIBCO Business Studio
TIBCO Designer Add-in for TIBCO Business Studio User’s Guide
32 | Chapter 3 Differences between TIBCO Designer and TIBCO Designer Add-in for TIBCO Business Studio
Preferences > General > Startup Options
• Load full project
• Open most recent project on startup
• Show save dialog for new project
• Sort folders on loading
Designer > Edit > Preferences > General > Startup Options
• Load full project
• Open most recent project on startup
• Show save dialog for new project
• Sort folders on loading
Preferences > View > Font
The font preferences will be set the next time the application is launched.
• UI Font type
• Script Font type
Designer > Edit > Preferences > View > Font
The font preferences will be set the next time the application is launched.
• UI Font type
• Script Font type
Preferences > View > Layout
• Use tabs
• Use drop downs (requires document reopen)
Designer > Edit > Preferences > View > Layout
Editing the layout is not recommended.
Preferences > View > Palettes
• Minimum Selector Size
• Initiate drag-n-drop through double-clicks
Designer > Edit > Preferences > View > Palettes
• Minimum Selector Size
• Initiate drag-n-drop through double-clicks
NOTE: You may have to expand the Palette view when the minimum selector size is increased.
Preferences > References > References
• Always ask me to perform reference checks and updates
• Perform automatic reference checks and updates
• Never perform references checks
Designer > Edit > Preferences > References > References
• Always ask me to perform reference checks and updates
• Perform automatic reference checks and updates
• Never perform references checks
Table 2 Menu Bar Differences
TIBCO Designer Features Behavior in TIBCO Designer Add-in for TIBCO Business Studio
TIBCO Designer Add-in for TIBCO Business Studio User’s Guide
Menu Bar | 33
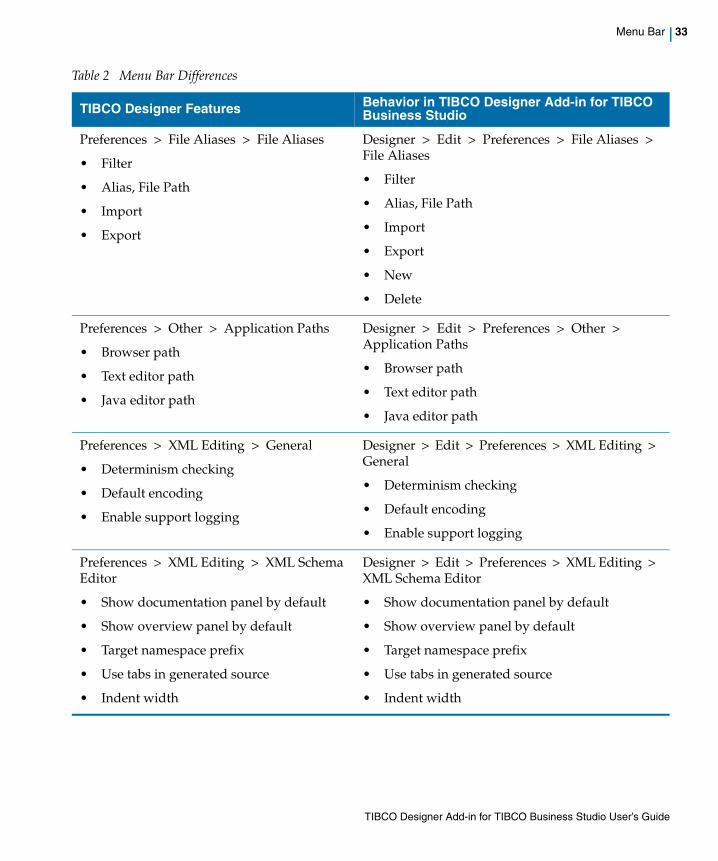
Preferences > File Aliases > File Aliases
• Filter
• Alias, File Path
• Import
• Export
Designer > Edit > Preferences > File Aliases > File Aliases
• Filter
• Alias, File Path
• Import
• Export
• New
• Delete
Preferences > Other > Application Paths
• Browser path
• Text editor path
• Java editor path
Designer > Edit > Preferences > Other > Application Paths
• Browser path
• Text editor path
• Java editor path
Preferences > XML Editing > General
• Determinism checking
• Default encoding
• Enable support logging
Designer > Edit > Preferences > XML Editing > General
• Determinism checking
• Default encoding
• Enable support logging
Preferences > XML Editing > XML Schema Editor
• Show documentation panel by default
• Show overview panel by default
• Target namespace prefix
• Use tabs in generated source
• Indent width
Designer > Edit > Preferences > XML Editing > XML Schema Editor
• Show documentation panel by default
• Show overview panel by default
• Target namespace prefix
• Use tabs in generated source
• Indent width
Table 2 Menu Bar Differences
TIBCO Designer Features Behavior in TIBCO Designer Add-in for TIBCO Business Studio
TIBCO Designer Add-in for TIBCO Business Studio User’s Guide
34 | Chapter 3 Differences between TIBCO Designer and TIBCO Designer Add-in for TIBCO Business Studio
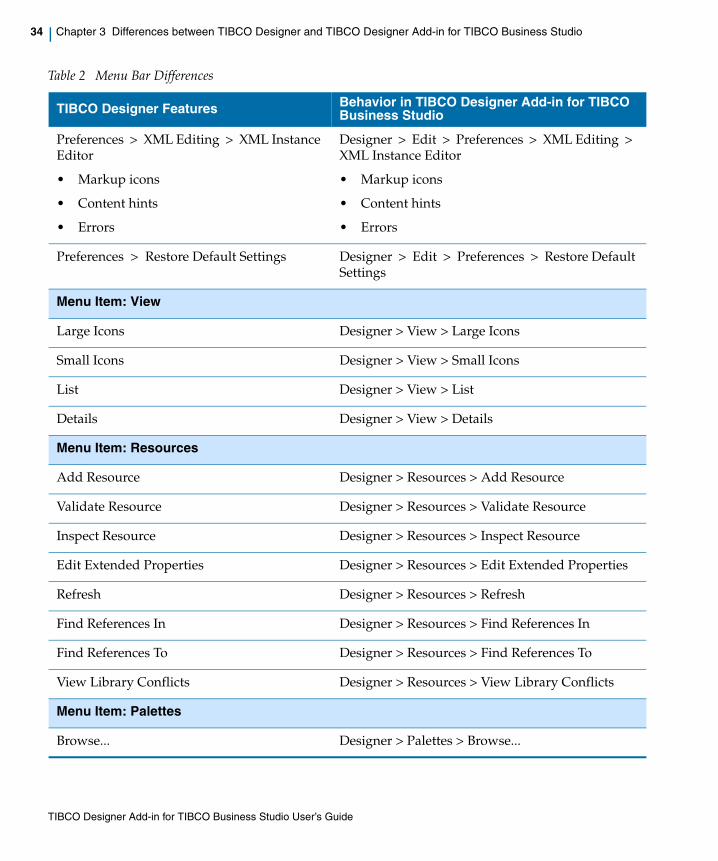
Preferences > XML Editing > XML Instance Editor
• Markup icons
• Content hints
• Errors
Designer > Edit > Preferences > XML Editing > XML Instance Editor
• Markup icons
• Content hints
• Errors
Preferences > Restore Default Settings Designer > Edit > Preferences > Restore Default Settings
Menu Item: View
Large Icons Designer > View > Large Icons
Small Icons Designer > View > Small Icons
List Designer > View > List
Details Designer > View > Details
Menu Item: Resources
Add Resource Designer > Resources > Add Resource
Validate Resource Designer > Resources > Validate Resource
Inspect Resource Designer > Resources > Inspect Resource
Edit Extended Properties Designer > Resources > Edit Extended Properties
Refresh Designer > Resources > Refresh
Find References In Designer > Resources > Find References In
Find References To Designer > Resources > Find References To
View Library Conflicts Designer > Resources > View Library Conflicts
Menu Item: Palettes
Browse... Designer > Palettes > Browse...
Table 2 Menu Bar Differences
TIBCO Designer Features Behavior in TIBCO Designer Add-in for TIBCO Business Studio
TIBCO Designer Add-in for TIBCO Business Studio User’s Guide
Menu Bar | 35
Activities Designer > Palettes > Activities (Consists a list of all the activities)
Adapters Designer > Palettes > Adapters
General Designer > Palettes > General
Other Designer > Palettes > Other
My Palettes Designer > Palettes > My Palettes
Options Designer > Palettes > Options
Menu Item: Multi-User
The Multi-User menu items are deprecated. Instead, you can use Eclipse Revision Control System. See Chapter 6, Working with a Revision Control System for details on using the Eclipse Revision Control System.
Add Resource to RCS Removed
Acquire-Check out Resource Removed
Acquire-Check out Resource Following References
Removed
Release-Revert Resource Removed
View RCS Info for Resource Removed
Check In Changes Removed
Synchronize Project Removed
Menu Item: Tools
Resource Tools > Link Resource... Designer > Tools > Resource Tools > Link Resource...
Resource Tools > Move Resource... Designer > Tools > Resource Tools > Move Resource...
Find Global Variable Usages Designer > Tools > Find Global Variable Usages
Table 2 Menu Bar Differences
TIBCO Designer Features Behavior in TIBCO Designer Add-in for TIBCO Business Studio
TIBCO Designer Add-in for TIBCO Business Studio User’s Guide
36 | Chapter 3 Differences between TIBCO Designer and TIBCO Designer Add-in for TIBCO Business Studio
Export as XML Schemas > Export AESchemas As XML Schemas
Designer > Tools > Export as XML Schemas > Export AESchemas As XML Schemas
File Tools > Change File Extension For Resource
Designer > Tools > File Tools > Change File Extension For Resource
File Tools > Change File Extension For All Of Same Type
Designer > Tools > File Tools > Change File Extension For All Of Same Type
File Tools > Copy A File From The Project Designer > Tools > File Tools > Copy A File From The Project
File Tools > Copy A Directory From The Project
Designer > Tools > File Tools > Copy A Directory From The Project
Create Project EAR Designer > Tools > Create Project EAR
Trusted Certificates > Import Into PEM Format
Designer > Tools > Trusted Certificates > Import Into PEM Format
Schema Importer Designer > Tools > Schema Importer
Generate Web Service > From Process Designer > Tools > Generate Web Service > From Process
Generate Web Service > From WSDL Designer > Tools > Generate Web Service > From WSDL
UDDI Designer > Tools > UDDI
Java Code > Compile All Code Designer > Tools > Java Code > Compile All Code
Tester > Start Designer > Tools > Tester > Start
Instead, you can use the Tester available through the Eclipse Launch Configuration by selecting Run > Run....
Tester > Stop Designer > Tools > Tester > Stop
Instead, you can use the Tester available through the Eclipse Launch Configuration by selecting Run > Run....
Table 2 Menu Bar Differences
TIBCO Designer Features Behavior in TIBCO Designer Add-in for TIBCO Business Studio
TIBCO Designer Add-in for TIBCO Business Studio User’s Guide
Menu Bar | 37
Tester > Pause Designer > Tools > Tester > Pause
Instead, you can use the Tester available through the Eclipse Launch Configuration by selecting Run > Run....
Tester > Step Over Designer > Tools > Tester > Step Over
Instead, you can use the Tester available through the Eclipse Launch Configuration by selecting Run > Run....
Tester > Step Into Designer > Tools > Tester > Step Into
Instead, you can use the Tester available through the Eclipse Launch Configuration by selecting Run > Run....
Tester > Step Out Designer > Tools > Tester > Step Out
Instead, you can use the Tester available through the Eclipse Launch Configuration by selecting Run > Run....
Tester > Show Current Job Location Designer > Tools > Tester > Show Current Job Location
Instead, you can use the Tester available through the Eclipse Launch Configuration by selecting Run > Run....
Tester > Stop Current Job Designer > Tools > Tester > Stop Current Job
Instead, you can use the Tester available through the Eclipse Launch Configuration by selecting Run > Run....
Show Adapter Tester Designer > Tools > Show Adapter Tester
Menu Item: Window
Show Console Designer > Window > Show Console
Menu Item: Help
Table 2 Menu Bar Differences
TIBCO Designer Features Behavior in TIBCO Designer Add-in for TIBCO Business Studio
TIBCO Designer Add-in for TIBCO Business Studio User’s Guide
38 | Chapter 3 Differences between TIBCO Designer and TIBCO Designer Add-in for TIBCO Business Studio
Differences in Version 1.2 and 1.3In version 1.3, the Copy project to Workspace checkbox is provided to copy a project to the workspace.
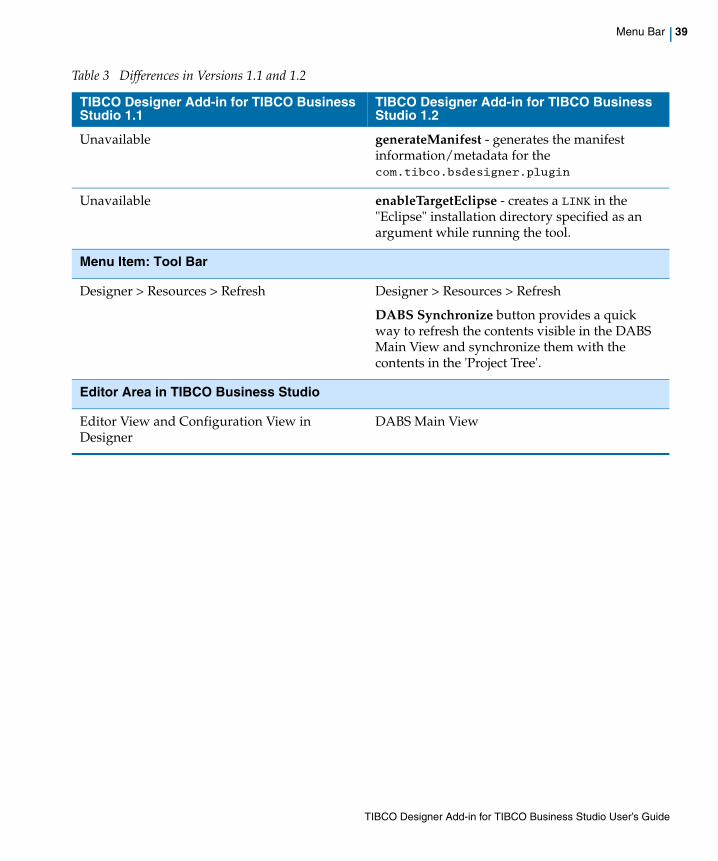
Differences in Version 1.1 and 1.2Table 3 lists the differences between the release version 1.1 and 1.2 of the TIBCO Designer Add-in for TIBCO Business Studio.
Designer Help Designer > Help > Designer Help
Tip of the Day Designer > Help > Tip of the Day
Help For Designer > Help > Help For
About... Designer > Help > About...
Runtime Environment... Designer > Help > Runtime Environment...
Table 2 Menu Bar Differences
TIBCO Designer Features Behavior in TIBCO Designer Add-in for TIBCO Business Studio
Table 3 Differences in Versions 1.1 and 1.2
TIBCO Designer Add-in for TIBCO Business Studio 1.1
TIBCO Designer Add-in for TIBCO Business Studio 1.2
Save
Auto-save available. Auto-save and Auto-refresh has been made property driven. By default the property is set to false.
When adding/removing/renaming resources, you must manually save it to see the changes reflected in the project tree.
Menu Item: Multi-user
Unavailable Removed
New Tools
TIBCO Designer Add-in for TIBCO Business Studio User’s Guide
Menu Bar | 39
Unavailable generateManifest - generates the manifest information/metadata for the com.tibco.bsdesigner.plugin
Unavailable enableTargetEclipse - creates a LINK in the "Eclipse" installation directory specified as an argument while running the tool.
Menu Item: Tool Bar
Designer > Resources > Refresh Designer > Resources > Refresh
DABS Synchronize button provides a quick way to refresh the contents visible in the DABS Main View and synchronize them with the contents in the 'Project Tree'.
Editor Area in TIBCO Business Studio
Editor View and Configuration View in Designer
DABS Main View
Table 3 Differences in Versions 1.1 and 1.2
TIBCO Designer Add-in for TIBCO Business Studio 1.1
TIBCO Designer Add-in for TIBCO Business Studio 1.2
TIBCO Designer Add-in for TIBCO Business Studio User’s Guide
40 | Chapter 3 Differences between TIBCO Designer and TIBCO Designer Add-in for TIBCO Business Studio
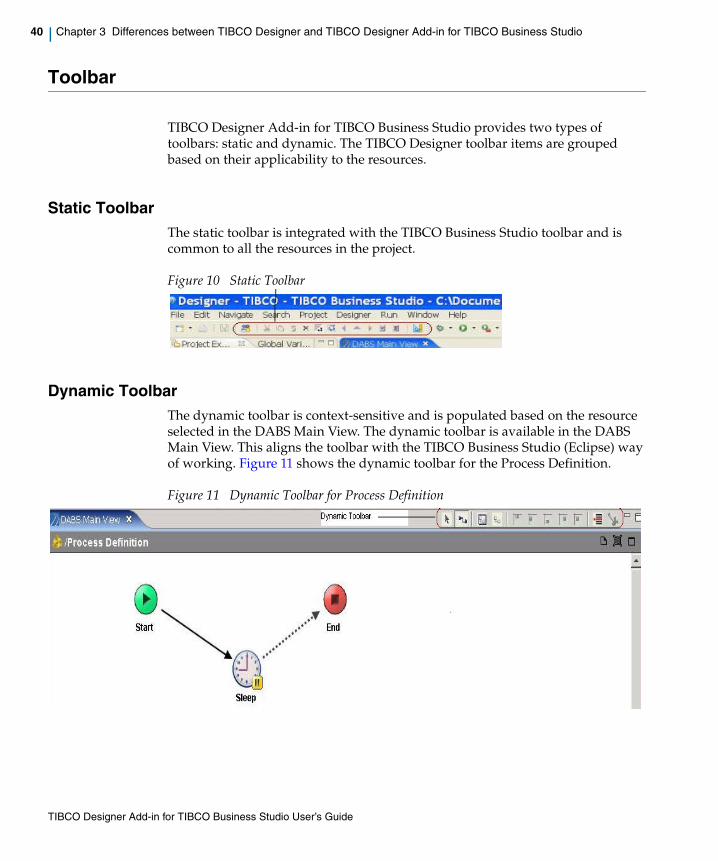
Toolbar
TIBCO Designer Add-in for TIBCO Business Studio provides two types of toolbars: static and dynamic. The TIBCO Designer toolbar items are grouped based on their applicability to the resources.
Static ToolbarThe static toolbar is integrated with the TIBCO Business Studio toolbar and is common to all the resources in the project.
Figure 10 Static Toolbar
Dynamic ToolbarThe dynamic toolbar is context-sensitive and is populated based on the resource selected in the DABS Main View. The dynamic toolbar is available in the DABS Main View. This aligns the toolbar with the TIBCO Business Studio (Eclipse) way of working. Figure 11 shows the dynamic toolbar for the Process Definition.
Figure 11 Dynamic Toolbar for Process Definition
TIBCO Designer Add-in for TIBCO Business Studio User’s Guide
TIBCO Designer Project Tree | 41
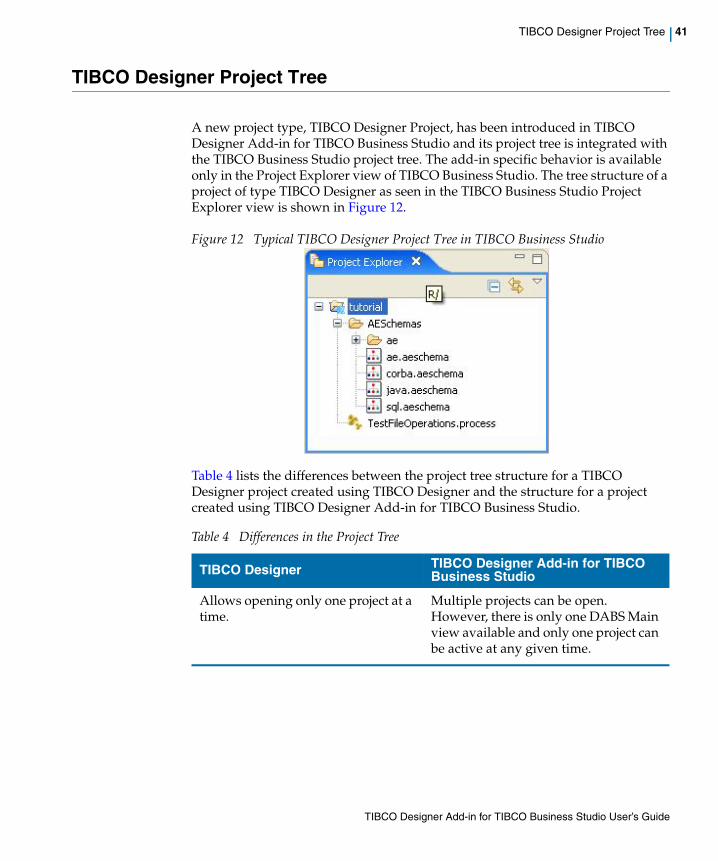
TIBCO Designer Project Tree
A new project type, TIBCO Designer Project, has been introduced in TIBCO Designer Add-in for TIBCO Business Studio and its project tree is integrated with the TIBCO Business Studio project tree. The add-in specific behavior is available only in the Project Explorer view of TIBCO Business Studio. The tree structure of a project of type TIBCO Designer as seen in the TIBCO Business Studio Project Explorer view is shown in Figure 12.
Figure 12 Typical TIBCO Designer Project Tree in TIBCO Business Studio
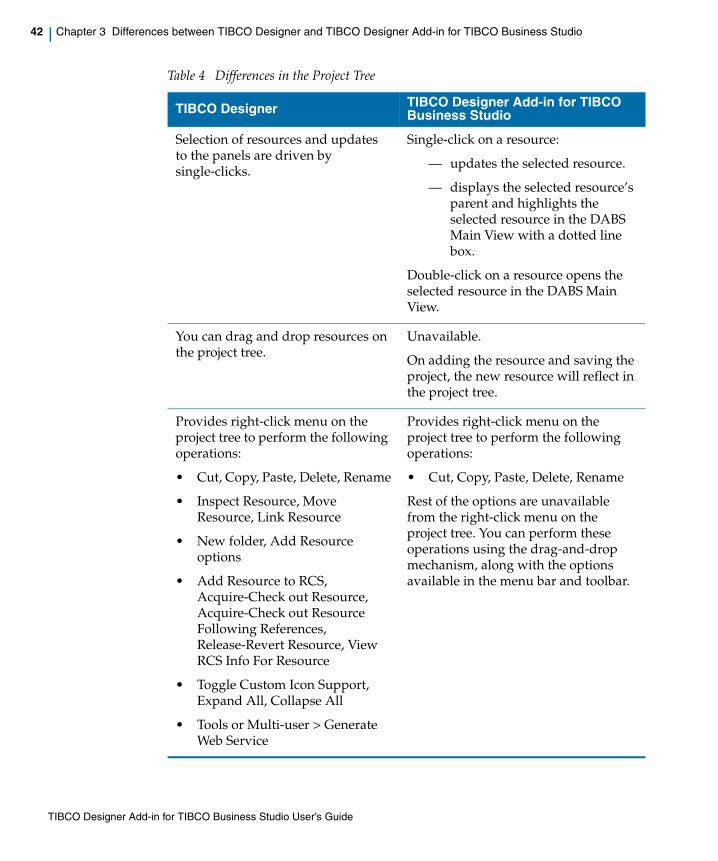
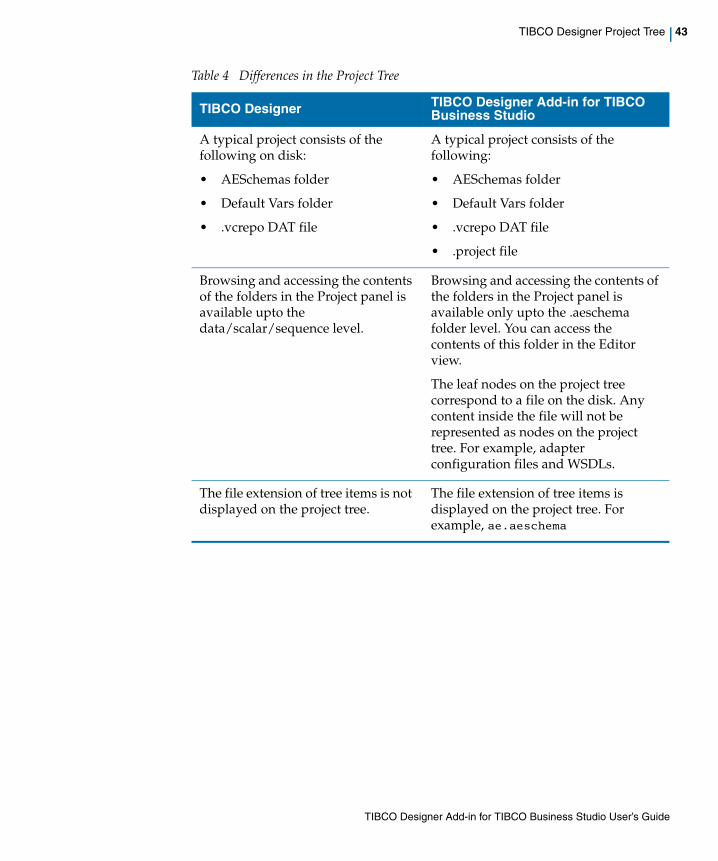
Table 4 lists the differences between the project tree structure for a TIBCO Designer project created using TIBCO Designer and the structure for a project created using TIBCO Designer Add-in for TIBCO Business Studio.
Table 4 Differences in the Project Tree
TIBCO Designer TIBCO Designer Add-in for TIBCO Business Studio
Allows opening only one project at a time.
Multiple projects can be open. However, there is only one DABS Main view available and only one project can be active at any given time.
TIBCO Designer Add-in for TIBCO Business Studio User’s Guide
42 | Chapter 3 Differences between TIBCO Designer and TIBCO Designer Add-in for TIBCO Business Studio
Selection of resources and updates to the panels are driven by single-clicks.
Single-click on a resource:
— updates the selected resource.
— displays the selected resource’s parent and highlights the selected resource in the DABS Main View with a dotted line box.
Double-click on a resource opens the selected resource in the DABS Main View.
You can drag and drop resources on the project tree.
Unavailable.
On adding the resource and saving the project, the new resource will reflect in the project tree.
Provides right-click menu on the project tree to perform the following operations:
• Cut, Copy, Paste, Delete, Rename
• Inspect Resource, Move Resource, Link Resource
• New folder, Add Resource options
• Add Resource to RCS, Acquire-Check out Resource, Acquire-Check out Resource Following References, Release-Revert Resource, View RCS Info For Resource
• Toggle Custom Icon Support, Expand All, Collapse All
• Tools or Multi-user > Generate Web Service
Provides right-click menu on the project tree to perform the following operations:
• Cut, Copy, Paste, Delete, Rename
Rest of the options are unavailable from the right-click menu on the project tree. You can perform these operations using the drag-and-drop mechanism, along with the options available in the menu bar and toolbar.
Table 4 Differences in the Project Tree
TIBCO Designer TIBCO Designer Add-in for TIBCO Business Studio
TIBCO Designer Add-in for TIBCO Business Studio User’s Guide
TIBCO Designer Project Tree | 43
A typical project consists of the following on disk:
• AESchemas folder
• Default Vars folder
• .vcrepo DAT file
A typical project consists of the following:
• AESchemas folder
• Default Vars folder
• .vcrepo DAT file
• .project file
Browsing and accessing the contents of the folders in the Project panel is available upto the data/scalar/sequence level.
Browsing and accessing the contents of the folders in the Project panel is available only upto the .aeschema folder level. You can access the contents of this folder in the Editor view.
The leaf nodes on the project tree correspond to a file on the disk. Any content inside the file will not be represented as nodes on the project tree. For example, adapter configuration files and WSDLs.
The file extension of tree items is not displayed on the project tree.
The file extension of tree items is displayed on the project tree. For example, ae.aeschema
Table 4 Differences in the Project Tree
TIBCO Designer TIBCO Designer Add-in for TIBCO Business Studio
TIBCO Designer Add-in for TIBCO Business Studio User’s Guide

44 | Chapter 3 Differences between TIBCO Designer and TIBCO Designer Add-in for TIBCO Business Studio
Global Variables
The Global Variables view is available separately and is not displayed by default. Select the menu item Window > Show View > Global Variables to display the Global Variables view.
Although multiple projects can be open at a given time, a single Global Variables view is available which displays the global variables for the currently active project, that is, the project selected in the Project Explorer. The Global Variable view is updated when a project is selected in the Project Explorer.
A label at the top of the Global Variables view displays the name of the project whose global variables have been displayed as shown in Figure 13.
Figure 13 Global Variables View
TIBCO Designer Add-in for TIBCO Business Studio User’s Guide
Debugger | 45
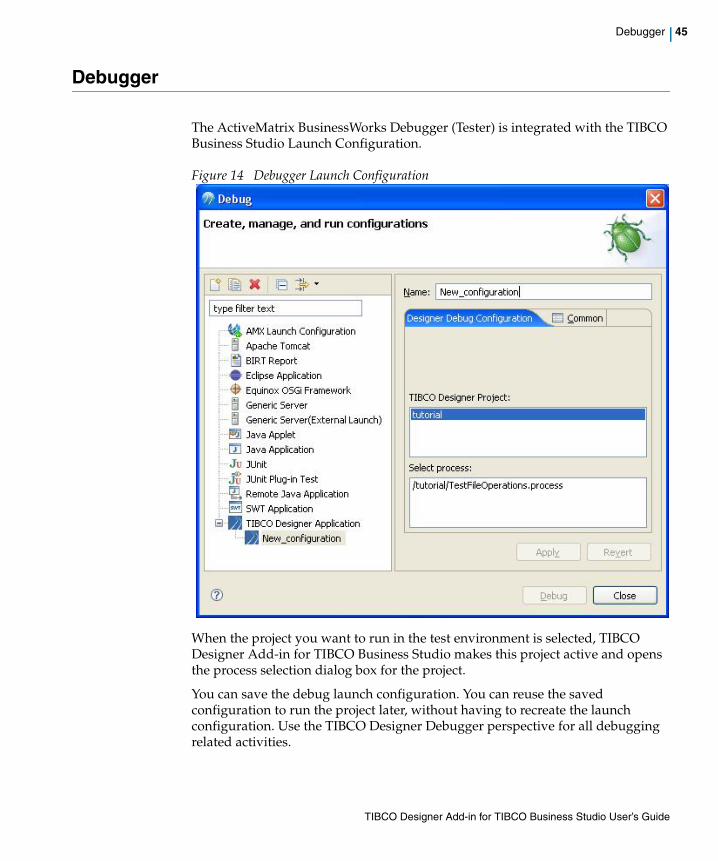
Debugger
The ActiveMatrix BusinessWorks Debugger (Tester) is integrated with the TIBCO Business Studio Launch Configuration.
Figure 14 Debugger Launch Configuration
When the project you want to run in the test environment is selected, TIBCO Designer Add-in for TIBCO Business Studio makes this project active and opens the process selection dialog box for the project.
You can save the debug launch configuration. You can reuse the saved configuration to run the project later, without having to recreate the launch configuration. Use the TIBCO Designer Debugger perspective for all debugging related activities.
TIBCO Designer Add-in for TIBCO Business Studio User’s Guide
46 | Chapter 3 Differences between TIBCO Designer and TIBCO Designer Add-in for TIBCO Business Studio
TIBCO Business Studio Features
Following are the TIBCO Business Studio features that are available when working with a project of type TIBCO Designer.
Revision Control SystemThe Revision Control System (RCS) available with TIBCO Business Studio can be used with SVN to store projects in SVN and also synchronize or checkout the projects from the SVN location. See Chapter 6, Working with a Revision Control System for details on using the Eclipse Revision Control System.
Debug Launch ConfigurationThe debug launch configuration can be saved and re-used whenever the same configuration is required; thus reducing the need to create a new debug launch configuration for every run.
Right-click Menu to Import File System Resources to the Project TreeTIBCO Business Studio allows you to import file system resources into the project tree by using the Right-click > Import menu. This feature is used to:
— Import existing TIBCO Designer Projects into the workspace.
— Import files such as WSDLs, schemas, etc into the project.
Use the DABS Synchronize button when making use of this import.
TIBCO Designer Add-in for TIBCO Business Studio User’s Guide
| 47
Chapter 4 TIBCO BusinessWorks Example
This chapter walks you through the process of designing and testing a simple project using TIBCO Designer Add-in for TIBCO Business Studio.
Topics
• Introduction, page 48
• Prerequisites, page 49
• Starting the Design-time and Saving Your Project, page 50
• Creating the TestFileOperations Process, page 51
• Testing the TestFileOperations Process, page 56
TIBCO Designer Add-in for TIBCO Business Studio User’s Guide
48 | Chapter 4 TIBCO BusinessWorks Example
Introduction
This tutorial steps you through the creation of a simple TIBCO ActiveMatrix BusinessWorks project using TIBCO Designer Add-in for TIBCO Business Studio. The goal of this tutorial is to introduce you to the TIBCO Designer Add-in for TIBCO Business Studio design-time features using the Design and Testing phases of typical project lifecycle.
The project in this tutorial is fairly simple so that you can focus on how to use the TIBCO Designer Add-in for TIBCO Business Studio design-time. Once you complete the tutorial, you should be more comfortable creating your own TIBCO ActiveMatrix BusinessWorks projects using the TIBCO Designer Add-in for TIBCO Business Studio design-time.
Before starting this tutorial, you should become familiar with TIBCO ActiveMatrix BusinessWorks terminology and basic concepts.
Overview of Example ProcessThe project you will create watches a directory for a specific file. When the file is created, modified, or deleted, a new file is created in a separate directory which contains the result files. The new file is named TestResult-action.txt.
This tutorial is not intended to illustrate every aspect of TIBCO Designer Add-in for TIBCO Business Studio, so only a subset of the available features will be used.
The tutorial steps you through the following tasks:
• Starting the Design-time and Saving Your Project
• Creating the TestFileOperations Process
• Testing the TestFileOperations Process
TIBCO Designer Add-in for TIBCO Business Studio User’s Guide
Prerequisites | 49
Prerequisites
To perform the tasks in this tutorial, you must have installed and properly configured the following software:
1. All components of TIBCO Runtime Agent (TRA).
2. All components of TIBCO Designer Add-in for TIBCO Business Studio.
3. All components of TIBCO ActiveMatrix BusinessWorks.
TIBCO Designer Add-in for TIBCO Business Studio User’s Guide
50 | Chapter 4 TIBCO BusinessWorks Example
Starting the Design-time and Saving Your Project
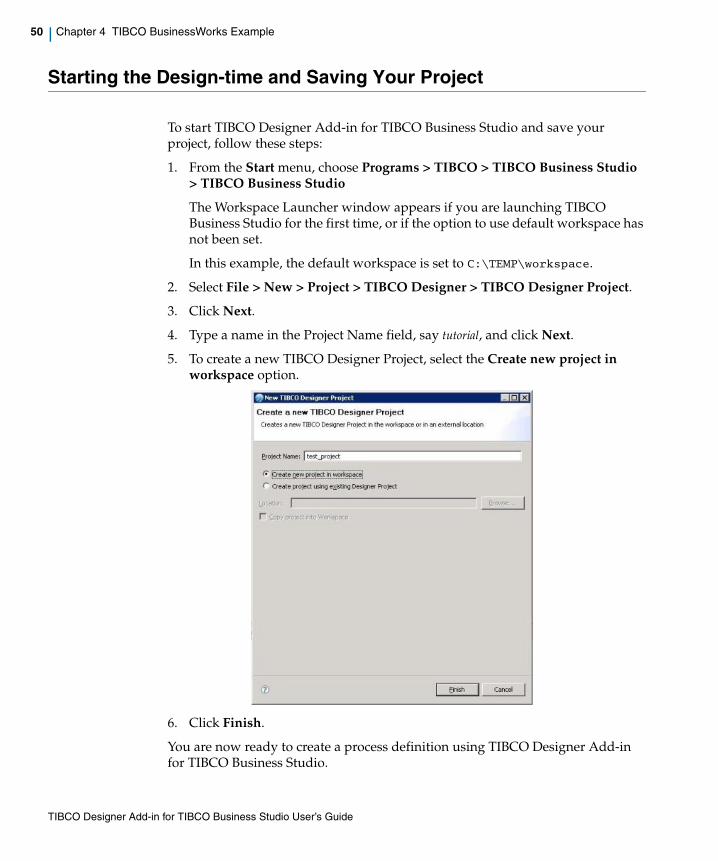
To start TIBCO Designer Add-in for TIBCO Business Studio and save your project, follow these steps:
1. From the Start menu, choose Programs > TIBCO > TIBCO Business Studio > TIBCO Business Studio
The Workspace Launcher window appears if you are launching TIBCO Business Studio for the first time, or if the option to use default workspace has not been set.
In this example, the default workspace is set to C:\TEMP\workspace.
2. Select File > New > Project > TIBCO Designer > TIBCO Designer Project.
3. Click Next.
4. Type a name in the Project Name field, say tutorial, and click Next.
5. To create a new TIBCO Designer Project, select the Create new project in workspace option.
6. Click Finish.
You are now ready to create a process definition using TIBCO Designer Add-in for TIBCO Business Studio.
TIBCO Designer Add-in for TIBCO Business Studio User’s Guide

Creating the TestFileOperations Process | 51
Creating the TestFileOperations Process
This section guides you through creating a simple process definition using TIBCO Designer Add-in for TIBCO Business Studio. The process, which will be named TestFileOperations, polls a directory for a specified file and writes a new file to a specified result directory each time the file changes. The new file’s name includes the type of change that occurred to the original file (create, modify, or remove). The contents of the changed file is then written to the new file, and the time the change in the file occurred is appended to the end of the contents. The time of the file change is represented as the number of milliseconds since January 1, 1970.
For example, if the text in the changed file is "The cherry blossoms are beautiful." the content of the new file will be "The cherry blossoms are beautiful. 1017163931036"
To create the TestFileOperations process, follow these steps:
1. Open the TIBCO Designer project created in the previous section (for example tutorial) in the TIBCO Designer perspective. You can do so in the following ways:
— Right-click the project in the Project Explorer and select Open.
— Double-click the project in the Project Explorer.
2. In the palette view, select the Process palette.
If no palettes are displayed in the palette view, select the menu Designer >Palettes > Options > Switch Palette Mode to display the palettes.
3. From the palette view, drag and drop a Process Definition resource into the DABS Main view. You can also add a resource using the Right-click > Add Resource menu in the DABS Main view.
4. In the DABS Main view, type the name TestFileOperations in the Name field to rename the process. Then click Apply.
5. Save your project by choosing File > Save from the menu or by clicking the icon in the toolbar.
Before you start to design the process, create a directory for the test data. Then create a text file with some simple content (for example, "Roses are red and violets are blue.") in the directory. This file will be needed by the File Poller activity. This example uses the directory C:\TEMP\testdata and the file PolledFileTest.txt. The result directory is specified in a global variable and can be modified before running the process.
TIBCO Designer Add-in for TIBCO Business Studio User’s Guide
52 | Chapter 4 TIBCO BusinessWorks Example
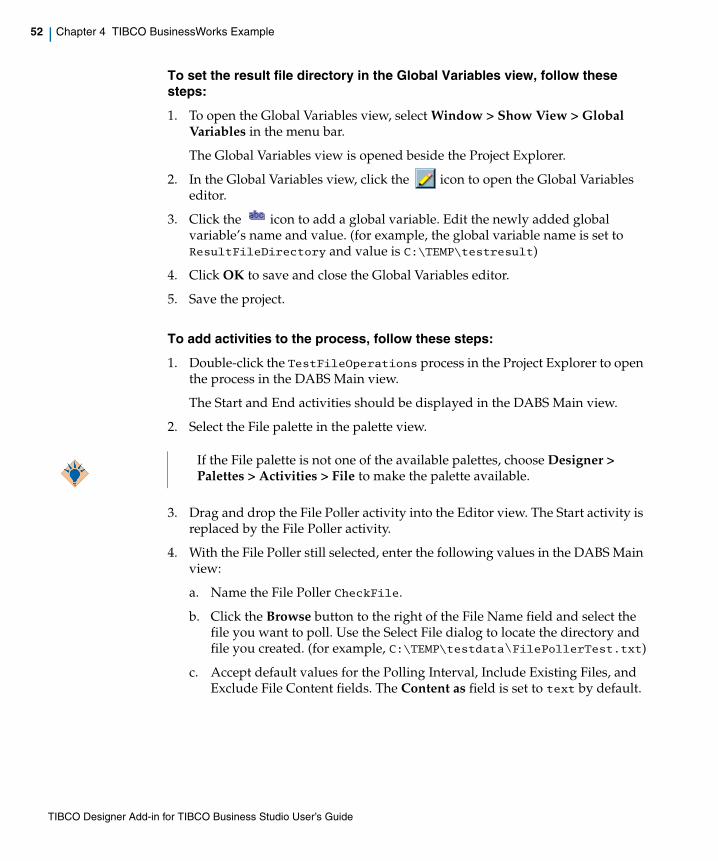
To set the result file directory in the Global Variables view, follow these steps:
1. To open the Global Variables view, select Window > Show View > Global Variables in the menu bar.
The Global Variables view is opened beside the Project Explorer.
2. In the Global Variables view, click the icon to open the Global Variables editor.
3. Click the icon to add a global variable. Edit the newly added global variable’s name and value. (for example, the global variable name is set to ResultFileDirectory and value is C:\TEMP\testresult)
4. Click OK to save and close the Global Variables editor.
5. Save the project.
To add activities to the process, follow these steps:
1. Double-click the TestFileOperations process in the Project Explorer to open the process in the DABS Main view.
The Start and End activities should be displayed in the DABS Main view.
2. Select the File palette in the palette view.
3. Drag and drop the File Poller activity into the Editor view. The Start activity is replaced by the File Poller activity.
4. With the File Poller still selected, enter the following values in the DABS Main view:
a. Name the File Poller CheckFile.
b. Click the Browse button to the right of the File Name field and select the file you want to poll. Use the Select File dialog to locate the directory and file you created. (for example, C:\TEMP\testdata\FilePollerTest.txt)
c. Accept default values for the Polling Interval, Include Existing Files, and Exclude File Content fields. The Content as field is set to text by default.
If the File palette is not one of the available palettes, choose Designer > Palettes > Activities > File to make the palette available.
TIBCO Designer Add-in for TIBCO Business Studio User’s Guide
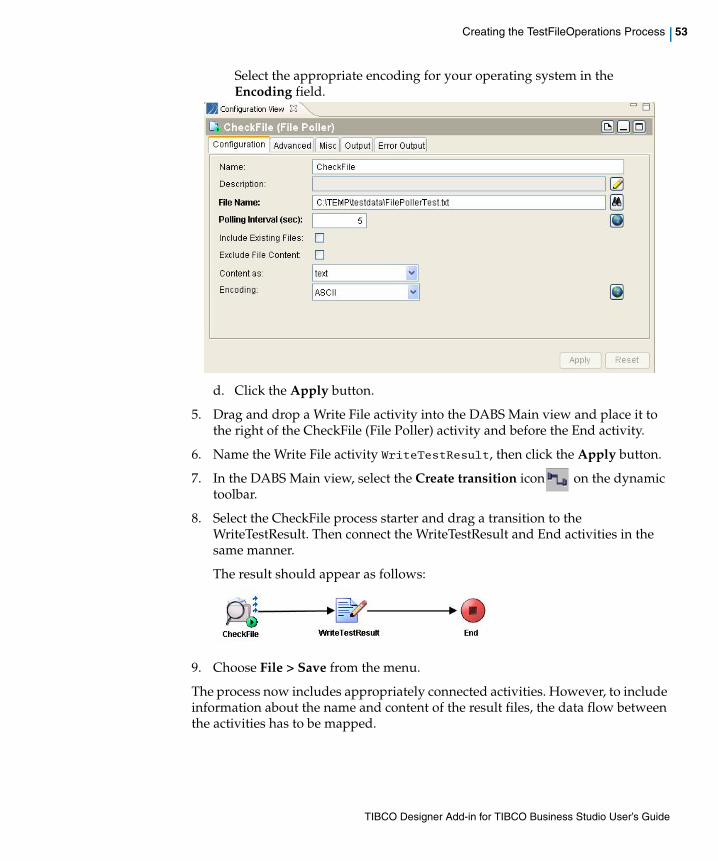
Creating the TestFileOperations Process | 53
Select the appropriate encoding for your operating system in the Encoding field.
d. Click the Apply button.
5. Drag and drop a Write File activity into the DABS Main view and place it to the right of the CheckFile (File Poller) activity and before the End activity.
6. Name the Write File activity WriteTestResult, then click the Apply button.
7. In the DABS Main view, select the Create transition icon on the dynamic toolbar.
8. Select the CheckFile process starter and drag a transition to the WriteTestResult. Then connect the WriteTestResult and End activities in the same manner.
The result should appear as follows:
9. Choose File > Save from the menu.
The process now includes appropriately connected activities. However, to include information about the name and content of the result files, the data flow between the activities has to be mapped.
TIBCO Designer Add-in for TIBCO Business Studio User’s Guide
54 | Chapter 4 TIBCO BusinessWorks Example
To map the data flow between activities, follow these steps:
1. In the DABS Main view, choose the Select icon on the dynamic toolbar, if it is not already selected.
2. Select the WriteTestResult activity, then click the Input tab in the configuration view.
3. Map the data as follows:
a. Select the fileName field in the Activity Input pane and click the XPATH Formula Builder icon .
b. In the XPath Formula Builder, drag a concat function into the XPath formula panel.
c. Add "\TestResult-" between <<string1>> and <<string2>> and ".txt" after <<string2>> so that the new file is created in the specified directory, with name TestResult-action.txt.
d. Select $_globalVariables/GlobalVariables/ResultFileDirectory and drag it over the <<string1>>.
e. Drag $CheckFile/EventSourceOuputTextClass/action over <<string2>>.
The formula should look like this:concat($_globalVariables/ns1:GlobalVariables/ResultFileDirectory,"\TestResult-",$CheckFile/ns:EventSourceOuputTextClass/action,".txt" )
f. Click the Apply button to accept the formula and dismiss the XPath Formula Builder by clicking Close.
g. Select the textContent field in the Activity Input pane and click the XPath Formula Builder icon.
h. In the XPath Formula Builder, drag a concat function into the XPath formula panel.
i. Add " ", between <<string1>> and <<string2>> so that there is a space between the two strings in the concat function.
j. In the Process Data pane, drag $CheckFile/EventSourceOutputTextClass/fileContent/textContent over <<string1>>.
k. Drag $CheckFile/EventSourceOutputTextClass/timeOccurred over <<string2>>.
The formula should look like this: concat($CheckFile/EventSourceOutputTextClass/fileContent/textContent," ",$CheckFile/EventSourceOutputTextClass/
TIBCO Designer Add-in for TIBCO Business Studio User’s Guide

Creating the TestFileOperations Process | 55
timeOccurred )
l. Click the Apply button to accept the formula and dismiss the XPath Formula Builder by clicking Close.
4. Click the Apply button on the activity’s Input tab, then choose File > Save to save your project.
You are now ready to test the project.
TIBCO Designer Add-in for TIBCO Business Studio User’s Guide
56 | Chapter 4 TIBCO BusinessWorks Example
Testing the TestFileOperations Process
You can test the TestFileOperations process directly from the Tester or by using the Eclipse Launch Configuration. This example walks you through the steps to test the process using the Eclipse Launch Configuration in TIBCO Business Studio. Running the process model in the test environment allows you to make sure the process works correctly before you deploy it. Follow these steps:
1. Click the Designer Debug Breakpoint Action icon in the toolbar.
2. In the window that appears, choose Select All, then click OK.
Breakpoints allow you to step through the process. Stepping helps you see what happens when each activity executes.
3. To load the TIBCO Debugger perspective, follow these steps:
a. Click the Run icon in the toolbar or the menu item Run > Run....
b. To create a new debug launch configuration, select TIBCO Designer Application in the Debug window and click on the New launch configuration icon .
c. The Select Designer Project pane lists all the available projects in the workspace. Select the project that is to be run in the debugger. (for example, tutorial)
d. The Select Process pane lists all the processes available in the selected project. Select the process that is to be run. (for example, TestFileOperations)
e. ClickApply and then click Run. The selected project is opened in the TIBCO Debugger perspective.
4. In the process selection window that appears, the TestFileOperations process is selected by default. Click Load and Start Current.
The process is now in Test mode.
5. Make a change to the polled file to start the process.
6. Once the CheckFile process starter is highlighted (indicating a process has started), click the Step to next activity icon to step through the process.
TIBCO BusinessWorks creates an output file named TestResult-modify.txt after you have stepped into the WriteTestResult activity and writes the appropriate text to the file.
The text should be the text of the modified file followed by the time, in milliseconds, since January 1, 1970.
TIBCO Designer Add-in for TIBCO Business Studio User’s Guide

Testing the TestFileOperations Process | 57
You can click on each activity in the process definition as you step through it. If you click on the Process Data or Output tabs for the activity, you will see the actual process data and output of the activity as the process executes.
7. Next, delete FilePollerTest.txt.
8. Step through the process once more.
TIBCO ActiveMatrix BusinessWorks creates a file TestResult-remove.txt. The content of TestResult-remove.txt is just the time of modification, because the polled file no longer exists.
9. Click the Stop Test Mode icon to stop the process running in debug mode.
Returning to Designer PerspectiveAfter stopping the running TestFileOperations process, you must remove the break points and return to the Designer perspective where you can edit the process. To clear the breakpoints and return to the Designer perspective:
1. Click the Designer Debug Breakpoint Action icon in the toolbar.
2. In the window that appears, choose Clear All, then click OK.
The break points are cleared.
3. To load the TIBCO Designer perspective:
a. Select the menu item Window > Open Perspective > Designer - TIBCO
The Designer perspective is loaded.
OR
b. Click the Designer - TIBCO perspective button available just above the Editor view’s top right corner to open the Designer perspective.
TIBCO Designer Add-in for TIBCO Business Studio User’s Guide

58 | Chapter 4 TIBCO BusinessWorks Example
TIBCO Designer Add-in for TIBCO Business Studio User’s Guide
| 59
Chapter 5 TIBCO Adapters Example
This chapter walks you through the process of designing and testing a simple adapter project using TIBCO Designer Add-in for TIBCO Business Studio.
Topics
• Overview, page 60
• Sample Adapter Project, page 60
• Setup for Using the Adapter Tester, page 64
TIBCO Designer Add-in for TIBCO Business Studio User’s Guide

60 | Chapter 5 TIBCO Adapters Example
Overview
This chapter walks you through the process of creating and testing a simple adapter project. This example uses TIBCO ActiveMatrix Adapter for Files. Some of the resources used are specific to this adapter but help illustrate the design-time environment of TIBCO Designer Add-in for TIBCO Business Studio and also the use of the Adapter Tester.
Sample Adapter ProjectThe project that will be created in the following sections will read and publish contents of the specified file. The file is c:\FileAdapter_Example\inputfile.txt. Create this folder and the input file before proceeding with the example.
Create the input file
The input file is a comma delimited file and contains the following text:
BookName,User's GuideBookName, Release Notes
Create the project
In this project, we will first create the schema for the input file, then create and configure the publication service, and lastly assign the schema to the publication service.
1. Create a project, AdapterExample.
See Chapter 1, Overview for instructions on launching TIBCO Designer Add-in for TIBCO Business Studio and creating a project.
2. Right-click the project name and select Open. The Designer menu is now added to the menubar and also the perspective changes to Designer-TIBCO.
3. Drag and drop a File Adapter Configuration from the Palettes view to the Editor View.
4. In the Logging tab, select the checkbox for Log Debug Messages.
5. Double-click the File Schemas folder and then drag and drop a Read Schema resource to the Editor View.
6. Double-click the Read Schema and then drag and drop a Delimited File Record from the Palettes View to the Editor View.
TIBCO Designer Add-in for TIBCO Business Studio User’s Guide
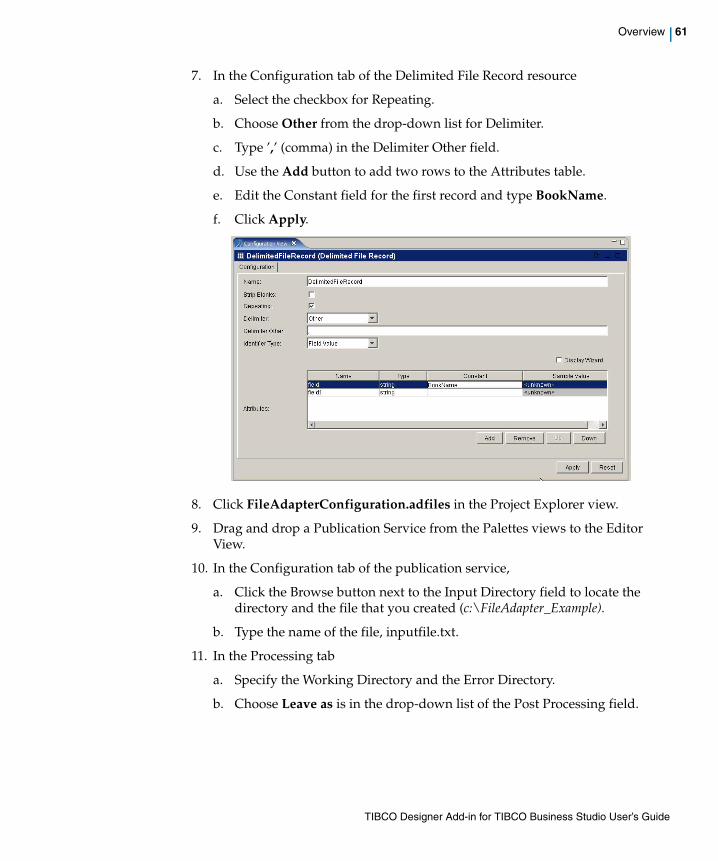
Overview | 61
7. In the Configuration tab of the Delimited File Record resource
a. Select the checkbox for Repeating.
b. Choose Other from the drop-down list for Delimiter.
c. Type ’,’ (comma) in the Delimiter Other field.
d. Use the Add button to add two rows to the Attributes table.
e. Edit the Constant field for the first record and type BookName.
f. Click Apply.
8. Click FileAdapterConfiguration.adfiles in the Project Explorer view.
9. Drag and drop a Publication Service from the Palettes views to the Editor View.
10. In the Configuration tab of the publication service,
a. Click the Browse button next to the Input Directory field to locate the directory and the file that you created (c:\FileAdapter_Example).
b. Type the name of the file, inputfile.txt.
11. In the Processing tab
a. Specify the Working Directory and the Error Directory.
b. Choose Leave as is in the drop-down list of the Post Processing field.
TIBCO Designer Add-in for TIBCO Business Studio User’s Guide
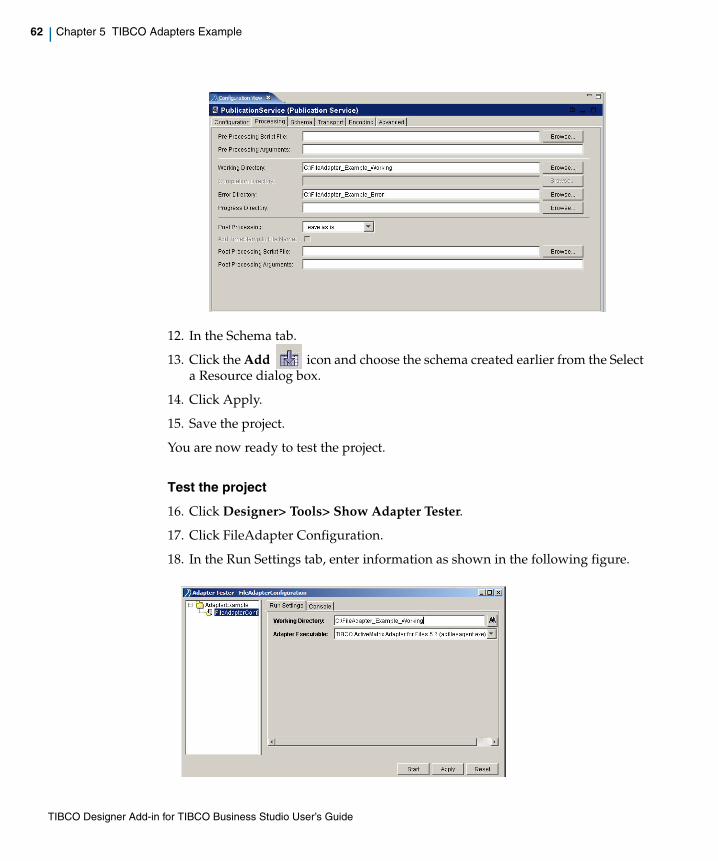
62 | Chapter 5 TIBCO Adapters Example
12. In the Schema tab.
13. Click the Add icon and choose the schema created earlier from the Select a Resource dialog box.
14. Click Apply.
15. Save the project.
You are now ready to test the project.
Test the project
16. Click Designer> Tools> Show Adapter Tester.
17. Click FileAdapter Configuration.
18. In the Run Settings tab, enter information as shown in the following figure.
TIBCO Designer Add-in for TIBCO Business Studio User’s Guide
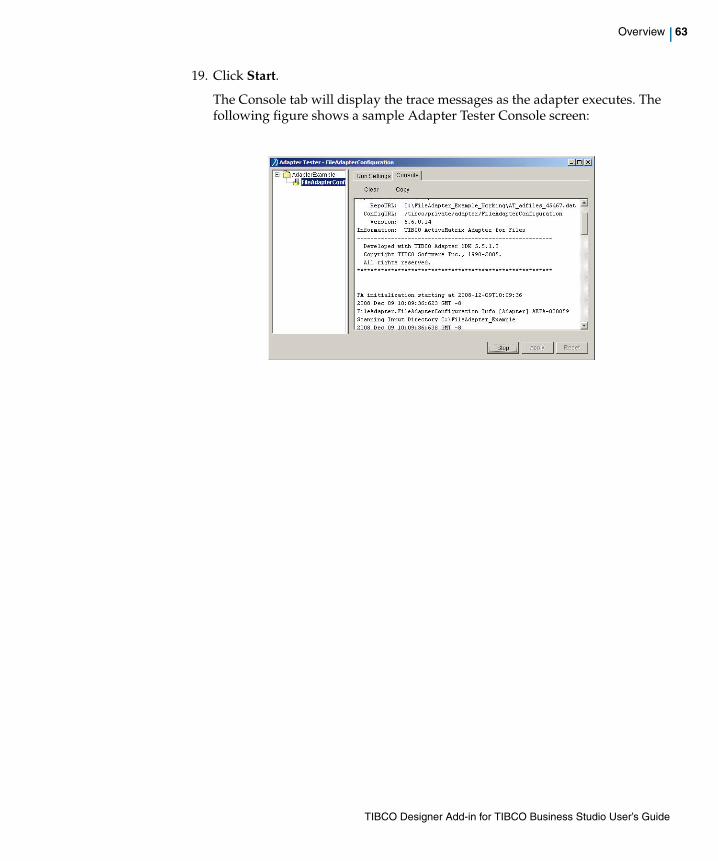
Overview | 63
19. Click Start.
The Console tab will display the trace messages as the adapter executes. The following figure shows a sample Adapter Tester Console screen:
TIBCO Designer Add-in for TIBCO Business Studio User’s Guide
64 | Chapter 5 TIBCO Adapters Example
Setup for Using the Adapter Tester
The following information has to be provided before using the Adapter Tester:
Working Directory
Working directory from which to execute the adapter. Click Browse to select the directory.
Adapter Executable
Name of the executable for the adapter. Click Browse to select the executable.
There is no change in the procedure when using custom adapters.
TIBCO Designer Add-in for TIBCO Business Studio User’s Guide
| 65
Chapter 6 Working with a Revision Control System
This chapter provides instructions on working with a revision control system (RCS).
Topics
• Using CVS, page 66
TIBCO Designer Add-in for TIBCO Business Studio User’s Guide

66 | Chapter 6 Working with a Revision Control System
Using CVS
CVS is a version control system that records the history of source files used to build a software product. CVS also allows engineers to work in their own directory, and merges the work of each engineer into a source tree.
This section shows how you can use the CVS revision control system (RCS) when using TIBCO Designer Add-in for TIBCO Business Studio.
At the RCS server repository, before starting, create a folder at the same level as your RCS Designer projects. Move the RCS Designer projects to this newly created folder. For example, if your projects are located in C:\RCS\CVS\MyProjects, move them to the directory C:\RCS\CVS\ServerCVS\MyProjects.
Though the following steps are specific to CVS, the process is similar for using any other RCS.
1. Select File > Import > CVS > Projects from CVS.
2. In the Checkout from CVS dialog box, provide details of your CVS server.
3. In the Select Module dialog box, select the checkbox for Use an existing module.
TIBCO Designer Add-in for TIBCO Business Studio User’s Guide
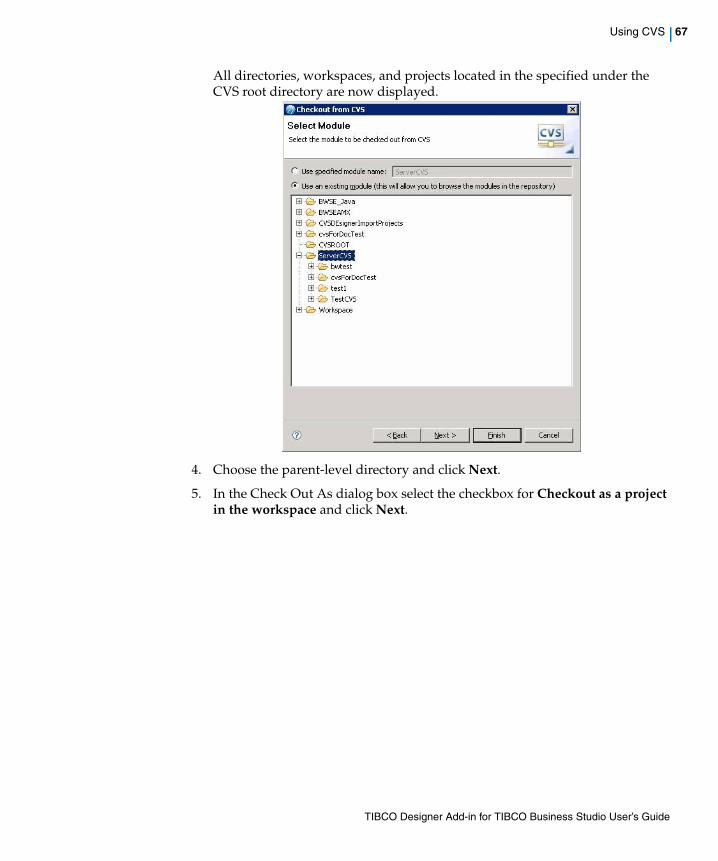
Using CVS | 67
All directories, workspaces, and projects located in the specified under the CVS root directory are now displayed.
4. Choose the parent-level directory and click Next.
5. In the Check Out As dialog box select the checkbox for Checkout as a project in the workspace and click Next.
TIBCO Designer Add-in for TIBCO Business Studio User’s Guide
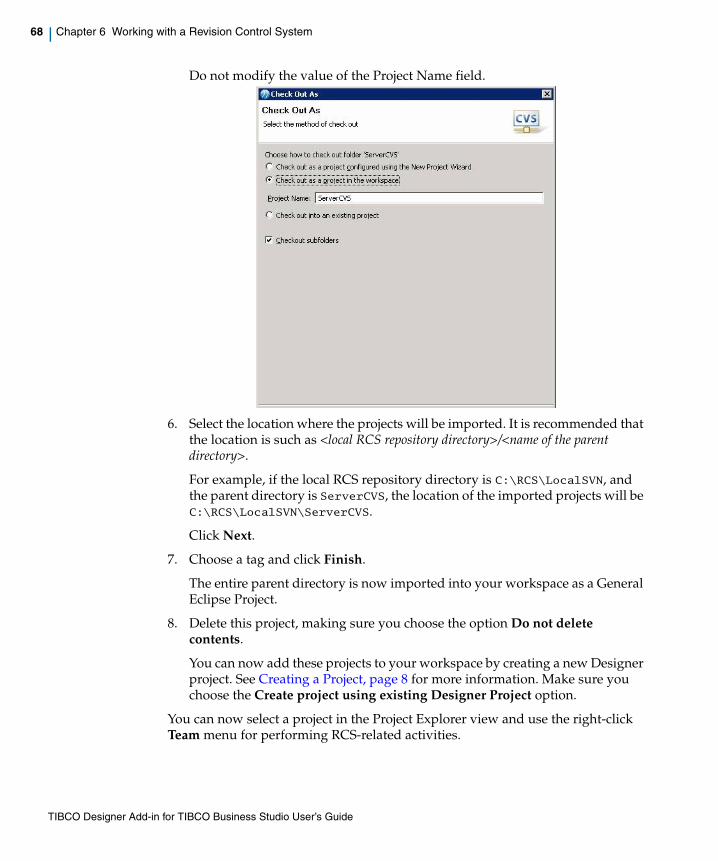
68 | Chapter 6 Working with a Revision Control System
Do not modify the value of the Project Name field.
6. Select the location where the projects will be imported. It is recommended that the location is such as <local RCS repository directory>/<name of the parent directory>.
For example, if the local RCS repository directory is C:\RCS\LocalSVN, and the parent directory is ServerCVS, the location of the imported projects will be C:\RCS\LocalSVN\ServerCVS.
Click Next.
7. Choose a tag and click Finish.
The entire parent directory is now imported into your workspace as a General Eclipse Project.
8. Delete this project, making sure you choose the option Do not delete contents.
You can now add these projects to your workspace by creating a new Designer project. See Creating a Project, page 8 for more information. Make sure you choose the Create project using existing Designer Project option.
You can now select a project in the Project Explorer view and use the right-click Team menu for performing RCS-related activities.
TIBCO Designer Add-in for TIBCO Business Studio User’s Guide
| 69
Index
A
Adapter Tester 64using custom adapters 64
Adapters Exampleabout 60create project 60test project 62
B
BusinessWorks example 47create process 51overview 48prerequisites 49return to Designer perspective 57saving the project 50start Business Studio 50test process 56
C
copy project to workspace 28customer support xCVS 66
D
differences 27debugger 45features in TIBCO Business Studio 46
debug launch configuration 46revision control system 46
right-click menu to import resources 46global variables 44menu bar 28TIBCO Designer project tree 41toolbar 40
dynamic 40static 40
disk space 17, 17
E
ENV_HOME viii
I
install modeconsole 21GUI 20silent 21
installation prerequisites 19installer account 17installer log file 17installing the software 20
P
productinstallation 16
Projectsclosing 14deleting 14importing 9
TIBCO Designer Add-in for TIBCO Business Studio User’s Guide
70 | Index
R
required and optional software 19
S
support, contacting xsupported platforms 16system memory 16
T
technical support xtemporary disk space 17TIBCO Designer Add-in for TIBCO Business Studio
adapter tester 6global variables 5interface overview 3, 4starting 1, 3working with RCS 66
TIBCO_HOME viii
U
uninstalling the software 25
TIBCO Designer Add-in for TIBCO Business Studio User’s Guide
Related Documents