Thunderbolt Display User Guide Revision 3, September 2013 Page 1 ThunderBolt™ Display by Adam Maurer, VK4GHZ Overview ThunderBolt Display is a compact plug n play stand-alone display specifically for Trimble’s ThunderBolt Disciplined Clock, providing a comprehensive indication of Thunderbolt's status, modes, and alarm conditions. Data packets appearing on Thunderbolt's serial port is HEX data in Trimble Standard Interface Protocol (TSIP), not NMEA sentences, so this display will not work with NMEA GPS units, such as Trimble's Jupiter, etc. Ideal for amateur radio applications, ThunderBolt Display shows Time Of Day (UTC or GPS time) to assist with logging contacts, and also calculates Maidenhead Grid Locator Square from the current latitude and longitude. ThunderBolt Display provides full confidence in the status of your ThunderBolt, without the need for an external PC/laptop. Features • 4 line x 20 character backlit LCD • 4 information pages • 8 page modes • Alarm outputs • DD.dddddd -or- D M S • DC Voltmeter • RS232 for PC/laptop retained • Requires: 8-15VDC < 150mA Display Page Modes 1 – Page 1: Status 2 – Page 2: Mode/Survey 3 – Page 3: Location 4 – Page 4: Alarms 5 – Auto cycle p1 p2 p3 p4 6 – Status > Alarms p1 on alarm p4 7 – Mode/Survey > Alarms p2 on alarm p4 8 – Location > Alarms p3 on alarm p4

Welcome message from author
This document is posted to help you gain knowledge. Please leave a comment to let me know what you think about it! Share it to your friends and learn new things together.
Transcript

Thunderbolt Display User Guide Revision 3, September 2013 Page 1
ThunderBolt™ Display by Adam Maurer, VK4GHZ
Overview
ThunderBolt Display is a compact plug n play stand-alone display specifically for Trimble’s ThunderBolt
Disciplined Clock, providing a comprehensive indication of Thunderbolt's status, modes, and alarm conditions.
Data packets appearing on Thunderbolt's serial port is HEX data in Trimble Standard Interface Protocol (TSIP),
not NMEA sentences, so this display will not work with NMEA GPS units, such as Trimble's Jupiter, etc.
Ideal for amateur radio applications, ThunderBolt Display shows Time Of Day (UTC or GPS time) to assist with
logging contacts, and also calculates Maidenhead Grid Locator Square from the current latitude and longitude.
ThunderBolt Display provides full confidence in the status of your ThunderBolt, without the need for an
external PC/laptop.
Features
• 4 line x 20 character backlit LCD
• 4 information pages
• 8 page modes
• Alarm outputs
• DD.dddddd -or- D M S
• DC Voltmeter
• RS232 for PC/laptop retained
• Requires: 8-15VDC < 150mA
Display Page Modes
1 – Page 1: Status
2 – Page 2: Mode/Survey
3 – Page 3: Location
4 – Page 4: Alarms
5 – Auto cycle p1 p2 p3 p4
6 – Status > Alarms p1 on alarm p4
7 – Mode/Survey > Alarms p2 on alarm p4
8 – Location > Alarms p3 on alarm p4

Thunderbolt Display User Guide Revision 3, September 2013 Page 2
What's Included?
• 1 x ThunderBolt Display assembly
• 2 x 2-pin 0.1" polarised header connectors for Power Supply and GPS Data connections
• 1 x Pre-wired Rotary Switch sub-assembly with 200mm ribbon-cable tail
Notes:
• Thunderbolt Display is tested before leaving the factory, and is "burnt in" for 12 hours.
• Do not adjust RV1 - this sets the voltmeter ADC calibration, and has been carefully adjusted so the
voltmeter is within +/- 0.02V accuracy. Adjustment should not be required.
• RV2 sets the LCD contrast, and has been preset to suit front-on viewing.
• ThunderBolt Display has static sensitive components, which can be damaged by static electricity. It is
shipped an an ESD (anti-static) bag. Observe static safe handling procedures.
Quick Start!
Remove ThunderBolt Display from the ESD protective bag.
To avoid scratching the front of the LCD, do not peel the protective plastic film off until you have determined
how you will mount the assembly to your own front panel, and are ready to actually mount it.
Using a supplied 2-pin polarised connector, wire up the GPS data feed (of a length that suits your final
installation), with connections as described on page 4 of this guide.
Using a supplied 2-pin polarised connector, wire up the power supply lead (of a length that suits your final
installation), with connections as described on page 4 of this guide.
Connect the rotary switch sub-assembly to the only 4-pin connector, J2.
Apply between 8-15VDC.
You should be greeted with the "Splash Page", and after several seconds, be presented with the page selected
on the rotary switch.
If the RS232 at the GPS end has not been wired up yet, you will see the Warning Page flash.

Thunderbolt Display User Guide Revision 3, September 2013 Page 3
Mechanical
ThunderBolt Display is available with a "standard" sized LCD, or a "Jumbo" sized LCD, and in two colour options;
1) traditional black on green, 2) inverted blue. All LCDs are backlit.
Inverted blue is not recommended for outdoor use in direct sunlight, but is an attractive "soft" display for
indoor or shaded outside environments. Black on green remains the best choice for both indoor & outdoor use.
As the controller board is smaller than the actual LCD, the LCD itself has the largest dimensions you need to
consider when mounting the ThunderBolt Display on a front panel. Allow a minimum of 40mm from the front
face of the LCD to the rear, to allow for connections to the PCB.
As user requirements will vary, no standard enclosure is supplied, reducing the cost, and allowing more
flexibility with your own custom integration.
Likewise, a rotary switch knob is not supplied, allowing the end user to provide their own knob that matches
their own equipment. The rotary switch has a standard 6mm plastic spindle, protruding 50mm from the front
mounting face, which can be cut down with a hacksaw to suit.
The rotary switch sub-assembly is supplied with a 200mm length of ribbon cable, and is prewired to the
polarised connector. Plug rotary switch assembly into 4-pin connector: J2 PAGE.

Thunderbolt Display User Guide Revision 3, September 2013 Page 4
RS-232 Serial Communication
ThunderBolt uses a DB9 connector for serial data communications. Interconnect the ThunderBolt Display, as
per figure 1, to connector: J4 RS232. A polarised 2-pin connector is supplied for this.
Table 1 – RS-232 Pinout
Pin Function
1 Not used
2 TX Data from ThunderBolt
3 Not used
4 Not used
5 Ground
6 Not used
7 Not used
8 Not used
9 Not used
Figure 1 - RS-232 Connection
ThunderBolt Display “hangs across” the TX Data feed, so it can be wired in parallel with another DB9 that
connects to a PC/laptop. ie; you can retain the ability to connect to a PC/laptop, without the need to
disconnect the ThunderBolt Display.
ThunderBolt Display only accepts data at the Thunderbolt's default serial port parameters, ie;
• 9600 baud, 8 data bits, no parity, 1 stop bit
Data Warning
A warning page is flashed if ThunderBolt
Display is not receiving the correct serial
data. Check the data feed is, as per above.
Power Supply
ThunderBolt Display requires a DC voltage between 8 - 15V @ <150mA,
to connector: J1 A polarised 2-pin connector is supplied for this.
Do not exceed 15V - DAMAGE TO THE MICROCONTROLLER WILL RESULT.
Reverse polarity protection is provided by on-board diode, D1.
Running ThunderBolt Display off the same nominal 12 - 13.8V rail as
your transverter system, allows you to monitor your transverter's
PSU voltage on Page 4 - Diagnostics.
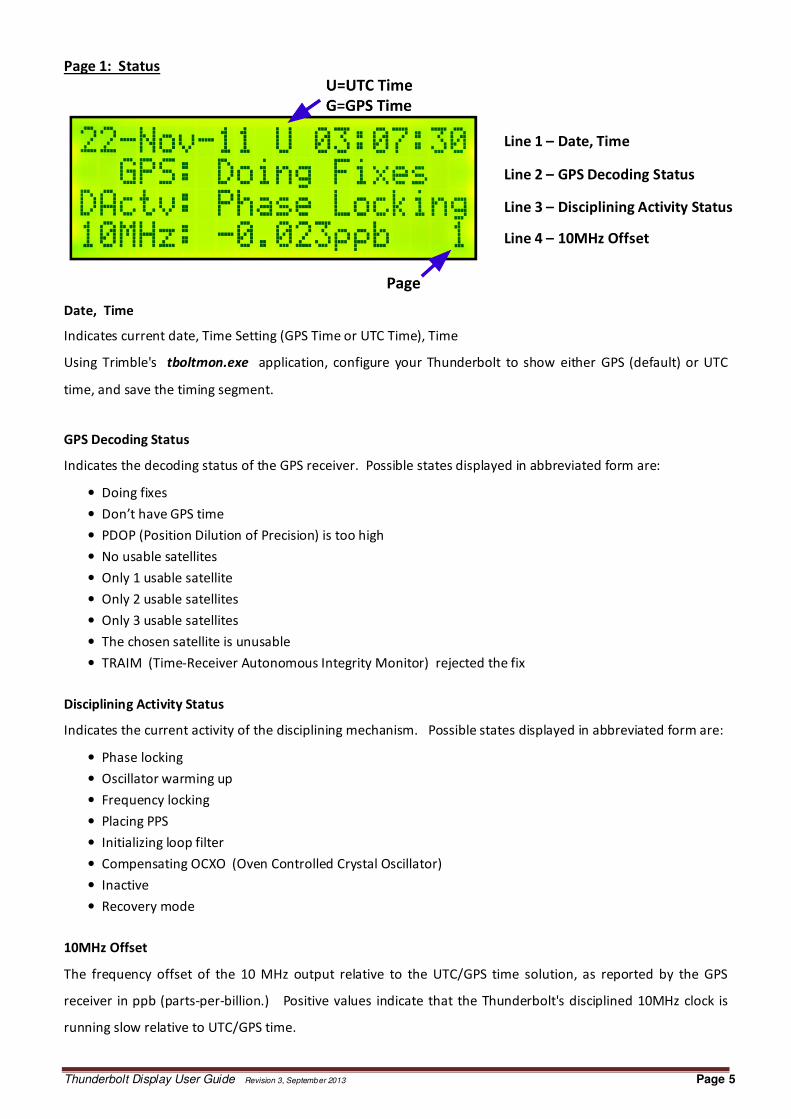
Thunderbolt Display User Guide Revision 3, September 2013 Page 5
Page 1: Status
Line 1 – Date, Time
Line 2 – GPS Decoding Status
Line 3 – Disciplining Activity Status
Line 4 – 10MHz Offset
Date, Time
Indicates current date, Time Setting (GPS Time or UTC Time), Time
Using Trimble's tboltmon.exe application, configure your Thunderbolt to show either GPS (default) or UTC
time, and save the timing segment.
GPS Decoding Status
Indicates the decoding status of the GPS receiver. Possible states displayed in abbreviated form are:
• Doing fixes
• Don’t have GPS time
• PDOP (Position Dilution of Precision) is too high
• No usable satellites
• Only 1 usable satellite
• Only 2 usable satellites
• Only 3 usable satellites
• The chosen satellite is unusable
• TRAIM (Time-Receiver Autonomous Integrity Monitor) rejected the fix
Disciplining Activity Status
Indicates the current activity of the disciplining mechanism. Possible states displayed in abbreviated form are:
• Phase locking
• Oscillator warming up
• Frequency locking
• Placing PPS
• Initializing loop filter
• Compensating OCXO (Oven Controlled Crystal Oscillator)
• Inactive
• Recovery mode
10MHz Offset
The frequency offset of the 10 MHz output relative to the UTC/GPS time solution, as reported by the GPS
receiver in ppb (parts-per-billion.) Positive values indicate that the Thunderbolt's disciplined 10MHz clock is
running slow relative to UTC/GPS time.

Thunderbolt Display User Guide Revision 3, September 2013 Page 6
Page 2: Mode/Survey
Line 1 – Date, Time
Line 2 – GPS Receiver Mode
Line 3 – Disciplining Mode
Line 4 – Survey Progress
Date, Time
Indicates current date, Time Setting (GPS Time or UTC Time), Time
GPS Receiver Mode
Indicates the configured receiver fix mode. Possible states displayed in abbreviated form are:
• Automatic (2D/3D)
• Single Satellite (Time)
• Horizontal (2D)
• Full Position (3D)
• DGPS Reference
• Clock Hold (2D)
• Overdetermined Clock
ThunderBolt spends most of its time in the Overdetermined Clock mode where it uses all available satellites to
perform the best time-only fix possible. It will not determine latitude/longitude in this receiver mode. This
can be overcome by forcing the receiver into Full Position 3D mode.
Disciplining Mode
Indicates the current disciplining state. Possible states displayed in abbreviated form are:
• Normal
• Power-Up
• Auto Holdover
• Manual Holdover
• Recovery
• Not Used
• Disciplining disabled
For information on disciplining, refer to Trimble's ThunderBolt GPS Disciplined Clock User Guide, chapter 5.
Self Survey Progress
During a self-survey, this indicates the progress as a percentage of fixes collected so far. The self-survey is
complete when it reaches 100 percent.
If a survey has not been initiated, "None" is displayed.

Thunderbolt Display User Guide Revision 3, September 2013 Page 7
Page 3: Position
Line 1 – Date, Time
Line 2 – Latitude
Line 3 – Longitude
Line 4 – Grid Square
Date, Time
Indicates current date, Time Setting (GPS Time or UTC Time), Time
Latitude
Negative values represent southern latitudes. Positive values represent northern latitudes.
Longitude
Negative values represent western longitudes. Positive values represent eastern longitudes.
Latitude/Longitude Format
Latitude and Longitude can be displayed as decimal degrees
(as shown above), or as Degrees, Minutes, and Seconds (DMS).
JP1 open: DD.ddddd
JP1 shorted: DD MMM SS.s
Note:
Present latitude and longitude will not be indicated if receiver
in is operating in Overdetermined Clock mode.
Force the receiver into Full Position 3D mode, or initiate a survey. This is easily achieved, without a PC/laptop
by using the low-cost companion ThunderBolt Commander you can build yourself.
Grid Square
Indicates 6-character Maidenhead Grid Locator Square, calculated from current latitude and longitude.
If you're located precisely on the junction of two (or more) squares, there may be a rounding error in the last
character. Move several metres either side of the junction to ascertain your exact grid square.

Thunderbolt Display User Guide Revision 3, September 2013 Page 8
Page 4: Diagnostics
Line 1 – Critical Alarms
Line 2 – Minor Alarms
Line 3 – DAC Voltage
Line 4 – Power Supply Voltage
Critical Alarms
Indicates all Critical Alarms. If more than one alarm condition exists at any one time, this line will cycle
through all applicable alarms. Possible states displayed in abbreviated form are:
• No Critical Alarms
• ROM checksum error
• RAM check has failed
• Power supply failure
• FPGA check has failed
• Oscillator control voltage at rail
Minor Alarms
Indicates all Minor Alarms. If more than one alarm condition exists at any one time, this line will cycle through
all applicable alarms. Possible states displayed in abbreviated form are:
• No Minor Alarms
• Control voltage is near rail
• Antenna open
• Antenna shorted
• Not tracking satellites
• Not disciplining oscillator
• Doing Survey - in progress
• No stored position
• Leap second pending
• In test mode
• Almanac being updated (takes 12.5 minutes for system to update almanac)
DAC Voltage
Indicates the voltage output of the Digital-to-Analogue Converter (DAC) used to produce a voltage that controls
the frequency of the 10 MHz oscillator DAC. This value will vary from -5V to +5V on a standard ThunderBolt
PSU Voltage
Indicates ThunderBolt Display's supply voltage, via a 10-bit A-to-D Converter. The voltage drop across the
reverse-power protection diode, D1, is compensated for. RV1 is the ADC calibration pot, and has been factory
set to within +/- 0.02V accuracy. Adjustment should not be required.

Thunderbolt Display User Guide Revision 3, September 2013 Page 9
Global Alarm Indicators
Both Critical and Minor Alarm conditions are indicated on all pages, with a "C" and "M" in the bottom right of
each page, before the page number. For a list of alarms, switch the display to Page 4 - Diagnostics.
Alarm Outputs
ThunderBolt Display provides separate outputs for both critical and minor alarms, which can be directly
connected to LEDs (user supplied), which can be mounted on the equipment front panel.
Alarm LEDs are directly driven from the microcontroller outputs via current limiting resistors, so external
resistors are not required.
Note polarity.
Related Documents