MALAWI TEACHER TRAINING ACTIVITY (MTTA) In collaboration with MALAWI EDUCATION SUPPORT ACTIVITY (MESA) THIRD CYCLE TRAINING HANDBOOK July – August, 2005

Welcome message from author
This document is posted to help you gain knowledge. Please leave a comment to let me know what you think about it! Share it to your friends and learn new things together.
Transcript
MALAWI TEACHER TRAINING ACTIVITY (MTTA) In collaboration with
MALAWI EDUCATION SUPPORT ACTIVITY (MESA)
THIRD CYCLE TRAINING HANDBOOK
July – August, 2005 Funded by the United States Agency for International Development under USAID Contract No. GS 10F-0112J Order No: 690-M-04-00260-00 In consortium with
Miske Witt & Associates Malawi Institute of Education Save the Children /US
2
Prepared by MALAWI TEACHER TRAINING ACTIVITY (MTTA) © Malawi Teacher Training Activity 2005 All rights reserved. No part of this publication may be reproduced, stored in a retrieval system, or transmitted in any form or by any means, electronic, mechanical, photocopying, recording or otherwise, without the permission of the copyright owner. Printed by Malawi Institute of Education P.O. Box 50, Domasi, Malawi. July, 2005
3
Table Of Contents Acknowledgement .................................................................................................................... 4 How to use this handbook......................................................................................................... 5 Introduction........................................................................................................................... 5 The content and layout of the handbook............................................................................... 5
Descriptions of the components of a unit ................................................................................. 5 SECTION 1:ENGLISH ............................................................................................................ 7 Unit 1:Listening and speaking skills..................................................................................... 7 Unit 2:Reading words ......................................................................................................... 10 Unit 3:Writing vocabulary in standards 3 - 8...................................................................... 13 Unit 4:Sample lesson plan for teaching listening, speaking, reading and writing.............. 15
SECTION 2:MATHEMATICS .............................................................................................. 17 Unit 1:Place value of number (60 minutes) ........................................................................ 17 Unit 2:Multiplication .......................................................................................................... 23
SECTION 3:SCIENCE........................................................................................................... 32 Unit 1:Common diseases .................................................................................................... 32 Unit 2:Methods of teaching Life Skills for HIV and AIDS prevention.............................. 34 Unit 3:Heat energy .............................................................................................................. 36
APPENDIX 1: SUGGESTED ANSWERS /RESPONSES.................................................... 40 Section 1:English ................................................................................................................ 40 Section 2:Mathematics........................................................................................................ 42 Section 3:Science ................................................................................................................ 42
APPENDIX 2: REFERENCES .............................................................................................. 46 Section 1:English ................................................................................................................ 46 Section 2:Mathematics........................................................................................................ 46 Section 3:Science ................................................................................................................ 46
4
Acknowledgement The Malawi Teacher Training Activity (MTTA) Secretariat would like to acknowledge the people who contributed to the production of this third cycle handbook in various ways. First, the Secretariat is thankful to the people who participated in the prioritization of topics identified in the baseline survey results, development of course outline and this training manual. The following are people who participated in the development of the handbook: Mr. Wilson Makowa Banda, Mr.Staliko J. Chibwe, Ms Kara Janigan, Mr Mathias January, Mrs. Wotchiwe Kalande, Mr. Master P. Kalulu, Mr. Harry Kamwaza, Mr. Christopher E Khoropa, Mr. Andrew Malisawa, Mr Douglas Mbingwa, Dr. Hartford Mchazime, Mrs. Sophie Mhoni, Mrs. Nerissa Boatman Phiri Mrs. Eneret Santhe, Mr. Jackson Yekha and Ismael D. Zabuloni. Mr. Rath EM Kathewera coordinated all the planning, drafting and refining workshops, and finally formatted, edited and proof read the draft of the handbook up to camera ready copy with technical support from Mr. Chaplain Katumbi and Dr. Fritz Kadyoma. Second, MTTA is sincerely grateful too to Dr. Shirley Miske for providing technical assistance and invaluable suggestions for the development of the manual and training processes. Mr Byson Majawa, Ms Rebecca Muheyeni and Ms Doreen Panje should also be thanked for their participation at planning stage of the training handbook. Third, the Secretariat acknowledges the contributions of Support Staff in the production of this manual. Deserving particular mention are Ms Linda Chauma, Mrs Esther Chirombo and Ms Jacqueline Mwale for typing the manuscripts and Mr. Nicks Phiri for reprographic services. Finally, MTTA Secretariat extends gratitude to USAID for funding the project. The Secretariat is also indebted to the Ministry of Education for professional support at various levels of the handbook development.
5
How to use this handbook Introduction One of the main aims of the Malawi Teacher Training Activity (MTTA) is to improve the competence of teachers in its target districts by conducting a series of trainings focusing on the content areas of English, Mathematics and Science. These training sessions are conducted in collaboration with Malawi Education Support Activity (MESA) whose focus is to improve teachers’ use of active learning methods in the classroom. By working together MTTA and MESA use a holistic approach as these trainings focus on increasing teachers’ content knowledge and improving teachers’ use of participatory teaching methods in class with confidence. MTTA is using a cascade method of training. For that reason, this handbook has been developed for use by trainers at the three different levels, namely, the core group of trainers or National Core Trainers (NCT), the Trainer of Trainers (TOTs) and the Cluster Trainers (CT). The training workshops have been developed using the integrated approach so that each of the three subject areas are covered during each workshop. While the main focus of this third training cycle is Science, activities should be integrated to cover aspects relating to English and Science as well. Since learners’ content knowledge is not limited to one subject area, the integration of subject areas helps the learners to see how the subjects are interrelated. Such an approach develops the learners’ skill of applying one’s content knowledge to another. It is important to understand the role of the facilitator who will lead these training workshops. The facilitator’s role is to guide rather than to dominate in the presentation and activities of the subject matter. The facilitator is the person who assists others in the acquisition of new knowledge and skills. Facilitators and teachers need to consider issues relating to gender when conducting activities and with all interactions with their learners. Facilitators and teachers need to treat all the participants/learners equally so that all will be given an equal opportunity to participate and learn. The content and layout of the handbook The handbook is divided into the following three sections: Section 1 English Section 2 Mathematics Section 3 Science Each section includes several units. Each unit in the Handbook contains the following: Topic, Introduction, Background information, Objectives, Suggested resources, Suggested methods, Suggested time, Activities Practice, Continuous assessment / assessment questions, and Summary. Each section concludes with a course assessment. The purpose of this element is to assess how much the participants have learned. Appendixes containing suggested answers/responses for each unit and references are included in the handbook. Descriptions of the components of a unit Introduction
6
This component provides brief information on the content to be covered in the unit. It also provides the rationale for including such content in this handbook. Objectives Objectives are statements that express the skills and knowledge participants should acquire after participating in a given lesson. Objectives should be simple, clear and achievable. Suggested Teaching and Learning Resources The word Suggested is used as the facilitators may use the resources given or can come up with others that may be just as effective as those suggested. Therefore, resources should suit each topic and the environment. Flexibility and common sense should be exercised. Suggested Teaching and Learning Methods Like resources, the methods contained in this component are considered possible strategies that could be used. As with all teaching situations, facilitators should not hesitate to adapt the methods to suit the needs of their learners and the teaching environment. Activities (and suggested time) These activities include simple steps or processes to achieve the objectives of each unit. The activities were developed to be learner-centered. Facilitators need to conduct the training using learner-centered, participatory methods to enable the learners learn what is covered in the unit effectively. Also included in each unit is the suggested length of time each activity and/or unit may take to be delivered. As with the methods, the length of time can be adjusted depending on the ability and needs of the learners. Practice This is work given to the learners. Learners should be given as much practice as possible orally and in written form to ensure mastery of what is being taught. Assessment questions This component ensures that facilitators/ teachers assess the learners in a continuous way. The facilitators/ teachers can adjust their activities to suit the needs of the group they are training. This could be done by asking learners a series of questions. Facilitators/teachers may be brainstorming questions aimed at finding out what participants/learners have learnt. Unit Assessment This component comprises questions intended to find out how much the learner has grasped after the unit has been taught. Unit assessment is intended to measure the performance of the facilitator. It is also intended to provide information to assist with planning to improve future trainings. Summary The summary contains a series of main points, ideas, concepts, skills or notions to be learnt. The summary emphasizes key points or messages underlying the unit. Course Assessment This is summative assessment at the end of each of the three sections. For example, there are some assessment activities for English at the end of section 1.
7
SECTION 1: ENGLISH Unit 1:Listening and speaking skills Introduction Many teachers find it difficult to teach listening and speaking skills, especially in teaching structures, such as, using language for various functions e.g., to request, to make suggestions, to and express certainty. They also find it difficult to give children practice in the structures they have introduced. Specific techniques can be used to introduce structures and to give pupils practice. These techniques include dialogues, pair work, group work and role-play. In this unit, we will look at some of these techniques, for example, dialogues. Objectives By the end of this unit, participants should be able to: � explain what a dialogue is and how it is used � demonstrate an understanding of how to teach a particular language structure using a dialogue, e.g., borrow and lend, demonstrative pronouns and demonstrative adjectives � develop a dialogue which teachers can use to teach different structures Suggested teaching and learning resources • Pentel markers • Rulers • Chart paper • Pencils � Activities with English Teacher’s Guide for Standards 3- 8 � Activities with English Pupil’s Books for Standards 3 – 8 Suggested teaching and learning methods • Brain storming • Question and answer • Pair work • Group work • Demonstration/Explanation • Role play Activity 1 (20 minutes) 1. Let participants read the following passage: A dialogue is a prepared example of a conversation. It is a very useful technique for introducing and practising a new structure orally. It enhances memory of form and meaning of structure being taught. However, too often pupils simply memorise the dialogue without understanding. The focus of this, therefore, unit is to help learners to understand what they say in English. 2. Ask participants the following question: “What is a dialogue?” 3. Participants’/pupils’ answer what a good dialogue is, like this: It is a prepared conversation. 4. Ask participants to state characteristics of a good dialogue. e.g. A good dialogue: . . .is short and easy to commit to memory; . . .sounds like a real life conversation; . . .arouses interest; . . .flows logically; and .. .is based on pupils’ experience. 5. Follow these procedures for using a dialogue: a. Write a dialogue on the chalkboard (use sample dialogue number 1 below) b. Discuss with pupils which individuals are speaking in the dialogue
8
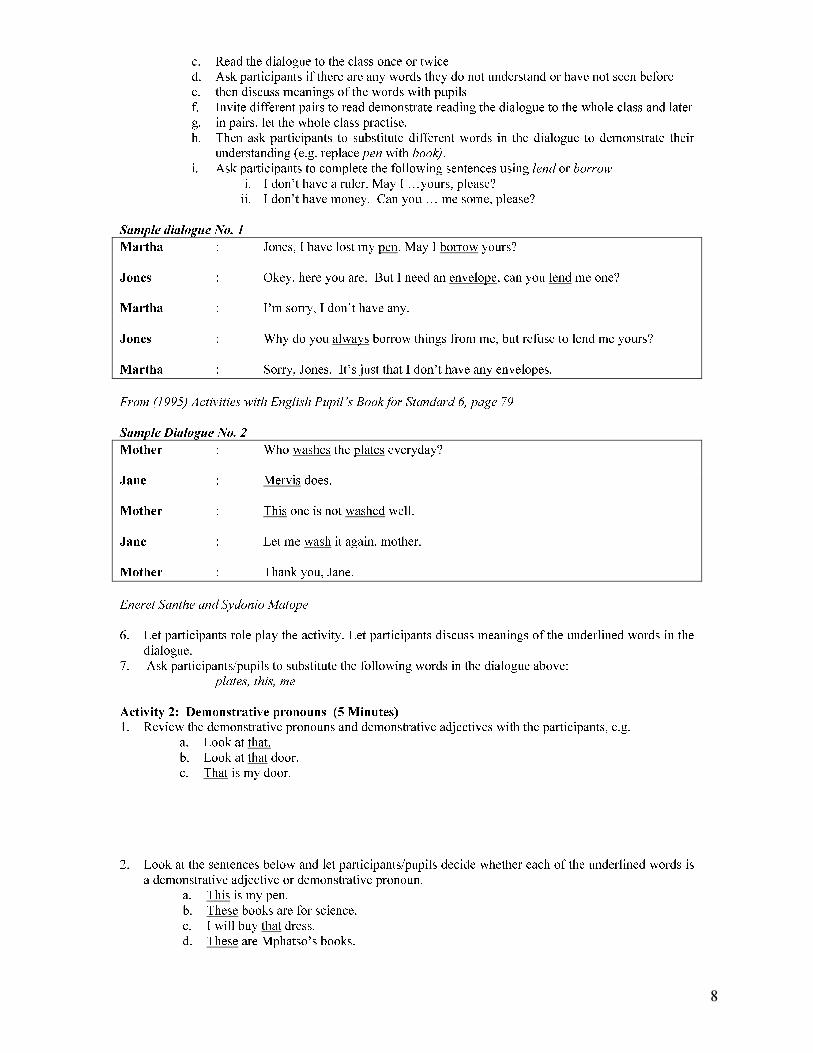
c. Read the dialogue to the class once or twice d. Ask participants if there are any words they do not understand or have not seen before e. then discuss meanings of the words with pupils f. Invite different pairs to read demonstrate reading the dialogue to the whole class and later g. in pairs, let the whole class practise. h. Then ask participants to substitute different words in the dialogue to demonstrate their understanding (e.g. replace pen with book). i. Ask participants to complete the following sentences using lend or borrow i. I don’t have a ruler. May I …yours, please? ii. I don’t have money. Can you … me some, please? Sample dialogue No. 1 Martha : Jones, I have lost my pen. May I borrow yours? Jones : Okey, here you are. But I need an envelope, can you lend me one? Martha : I’m sorry, I don’t have any. Jones : Why do you always borrow things from me, but refuse to lend me yours? Martha : Sorry, Jones. It’s just that I don’t have any envelopes. From (1995) Activities with English Pupil’s Book for Standard 6, page 79 Sample Dialogue No. 2 Mother : Who washes the plates everyday? Jane : Mervis does. Mother : This one is not washed well. Jane : Let me wash it again, mother. Mother : Thank you, Jane. Eneret Santhe and Sydonio Matope 6. Let participants role play the activity. Let participants discuss meanings of the underlined words in the dialogue. 7. Ask participants/pupils to substitute the following words in the dialogue above: plates, this, me Activity 2: Demonstrative pronouns (5 Minutes) 1. Review the demonstrative pronouns and demonstrative adjectives with the participants, e.g. a. Look at that. b. Look at that door. c. That is my door. 2. Look at the sentences below and let participants/pupils decide whether each of the underlined words is a demonstrative adjective or demonstrative pronoun. a. This is my pen. b. These books are for science. c. I will buy that dress. d. These are Mphatso’s books.
9
e. These jackets are not the ones you showed me. f. Please, don’t do that. 3. Discuss how the words have been used whether as demonstrative adjectives or demonstrative pronouns. 4. Let participants make sentences using each one of the following words as: a. Demonstrative pronouns b. Demonstrative adjectives this, that, these, those Activity 3: Prepare a dialogue (30 minutes) 1. Divide participants/pupils in two groups of five persons each. 2. Ask participants/pupils to write their own dialogues of five to six lines using the words and structures below: Borrow and lend, demonstrative pronouns and demonstrative adjectives 3. If large chart paper is available, have participants/pupils write the dialogue on the large paper. If it is not available, participants/pupils should write the dialogue in their exercise books or on paper. 4. After they have written the dialogues, let participants from each group perform their dialogue. 5. Let another pair perform their dialogue substituting new words into the dialogue following the procedure for “Using a Dialogue” written above. 6. Ask participants to practise performing their dialogues. 7. Consolidate the activity by emphasising main points. Assessment question 1. Give two reasons why dialogues are important. Summary In this unit, participants have explained what dialogues are and how they are used in various ways. They have also learnt how to use verbs lend and borrow then demonstrative pronouns and demonstrative adjectives. Unit assessment 1. Which structures were taught in dialogues 1 and 2? 2. What are some of the five characteristics of a good dialogue identified in the dialogues? 3. Explain four of the steps that were used to teach structure in this dialogue.
10
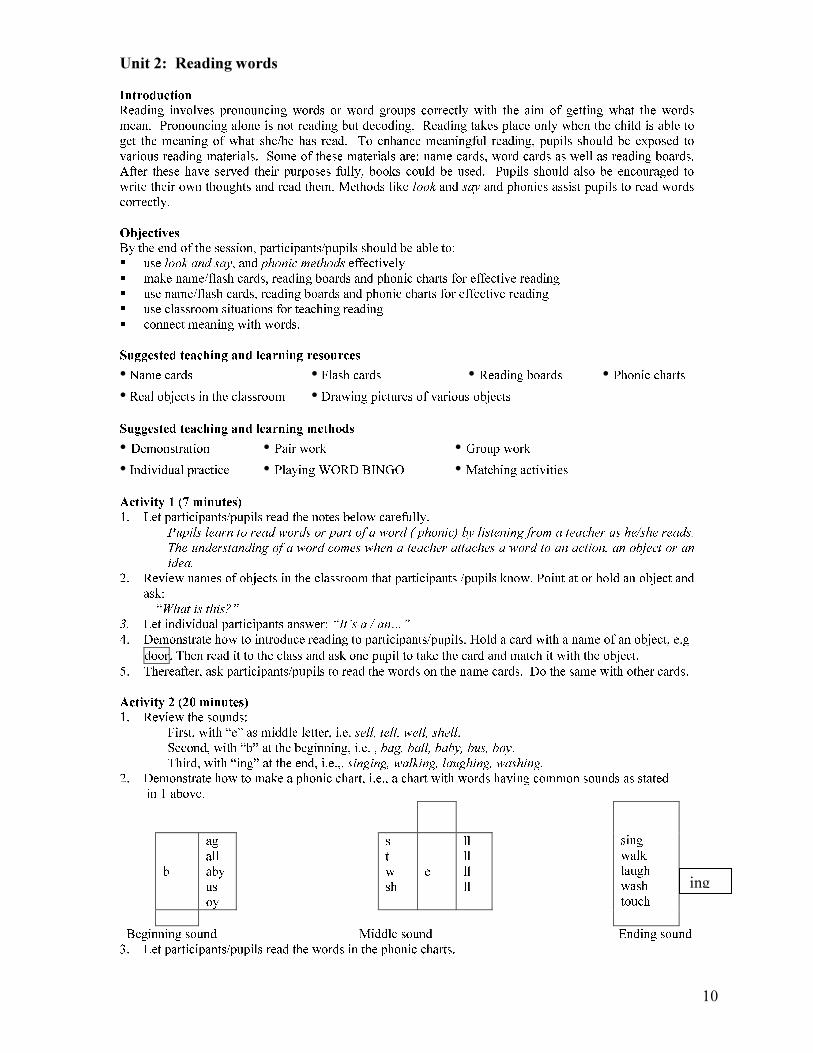
Unit 2: Reading words Introduction Reading involves pronouncing words or word groups correctly with the aim of getting what the words mean. Pronouncing alone is not reading but decoding. Reading takes place only when the child is able to get the meaning of what she/he has read. To enhance meaningful reading, pupils should be exposed to various reading materials. Some of these materials are: name cards, word cards as well as reading boards. After these have served their purposes fully, books could be used. Pupils should also be encouraged to write their own thoughts and read them. Methods like look and say and phonics assist pupils to read words correctly. Objectives By the end of the session, participants/pupils should be able to: � use look and say, and phonic methods effectively � make name/flash cards, reading boards and phonic charts for effective reading � use name/flash cards, reading boards and phonic charts for effective reading � use classroom situations for teaching reading � connect meaning with words. Suggested teaching and learning resources • Name cards • Flash cards • Reading boards • Phonic charts • Real objects in the classroom • Drawing pictures of various objects Suggested teaching and learning methods • Demonstration • Pair work • Group work • Individual practice • Playing WORD BINGO • Matching activities Activity 1 (7 minutes) 1. Let participants/pupils read the notes below carefully. Pupils learn to read words or part of a word ( phonic) by listening from a teacher as he/she reads. The understanding of a word comes when a teacher attaches a word to an action, an object or an idea. 2. Review names of objects in the classroom that participants /pupils know. Point at or hold an object and ask: “What is this?” 3. Let individual participants answer: “It’s a / an…” 4. Demonstrate how to introduce reading to participants/pupils. Hold a card with a name of an object, e.g door. Then read it to the class and ask one pupil to take the card and match it with the object. 5. Thereafter, ask participants/pupils to read the words on the name cards. Do the same with other cards. Activity 2 (20 minutes) 1. Review the sounds: First, with “e” as middle letter, i.e. sell, tell, well, shell. Second, with “b” at the beginning, i.e. , bag, ball, baby, bus, boy. Third, with “ing” at the end, i.e.,, singing, walking, laughing, washing. 2. Demonstrate how to make a phonic chart, i.e., a chart with words having common sounds as stated in 1 above. b ag all aby us oy s t w sh e ll ll ll ll
sing walk laugh wash touch Beginning sound Middle sound Ending sound 3. Let participants/pupils read the words in the phonic charts. ing
11
Exercise 1: 1. Ask participants/pupils to make sentences using the words on the chart. e.g. She has a bag He is walking 2. Ask a participant/pupil (male or female) to act “selling”. 3. Ask her/him: “What do you do?” 4. The participant/pupil answers, “ I sell books/pens/….” 5. Ask some participants/pupils to act: “What are you doing?” Participants/Pupils act: singing, walking, laughing, washing and touching. Ask others: “ What is she/he doing?” Participants/Pupils answer: He/She is singing/walking/… Exercise 2: 1. Ask participants/pupils to make examples of phonic charts using most common words. 2. At the end, ask participants/pupils to write sentences with the words on the charts and then read them to friends, e.g. I like singing. She has a shell. Activity 3 (6 minutes) 1. Review pronouns using cards, and have a male participant/pupil hold a card, He , then have a female participant/pupil hold a card, She. 2. Ask participant/pupils to read the words on the cards. 3. Then, ask individual participant/pupils, “What is John?” “He is a boy.” “What is Mary?” “She is a girl.” 4. Let participants/pupils read words from the name cards or reading boards flashed to them. 5. Ask individual participants/pupils to pick up cards whose words make a sentence. For example: “She has a book”. 6. Ask one participant/pupil to read the sentence. 7. Do the same with other words like, pencil, duster and ruler . Activity 4 (6 minutes) 1. Invite a female participant/pupil to hold a book. 2. Ask the participants/pupils: “What has she got?” Participants/pupils answer individually. “She has a book.” 3. Repeat with other objects 4. Invite a male participant/pupil to hold a ruler. 5. Ask other participants/pupils: “What has he got?” 6. Participants/pupils answer individually: “He has a ruler”. 7. Repeat with other objects like pencil, pen, shoes and paper. Activity 5 (20 minutes) 1. Divide the class into groups of five and distribute chart paper with the words: book, happy, these, teacher, school, then, her mother, my, not, they, in, does, hare, uniform, baskets, to, has, today, jump, of, it, she, pen, his, dance, door, windows, a, the, one. 2. Ask participants/pupils, in the groups to read the words, and each word read correctly be covered with a bottle top.
12
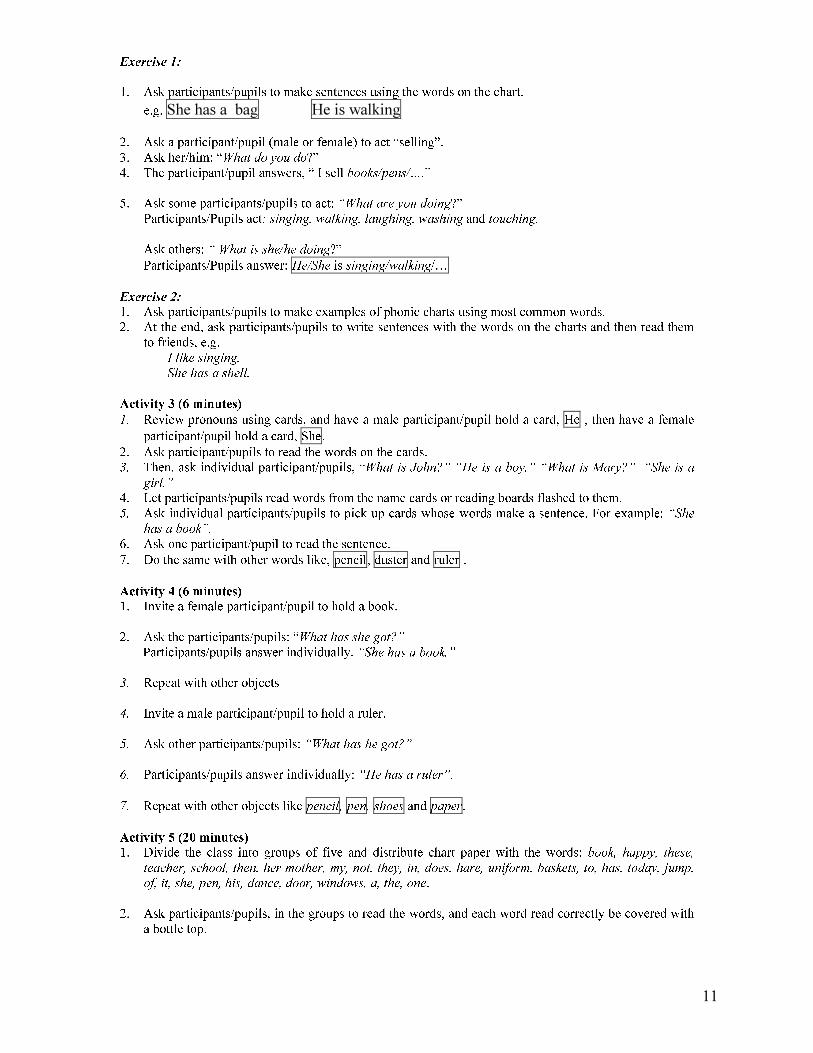
3. Let the group leaders monitor the process. 4. Let the group that finishes first covering all the words with bottle tops shout: “BINGO”. 5. Let participants/pupils play the game again using the words below. jump book of not door pen window has it she pen school of they a book
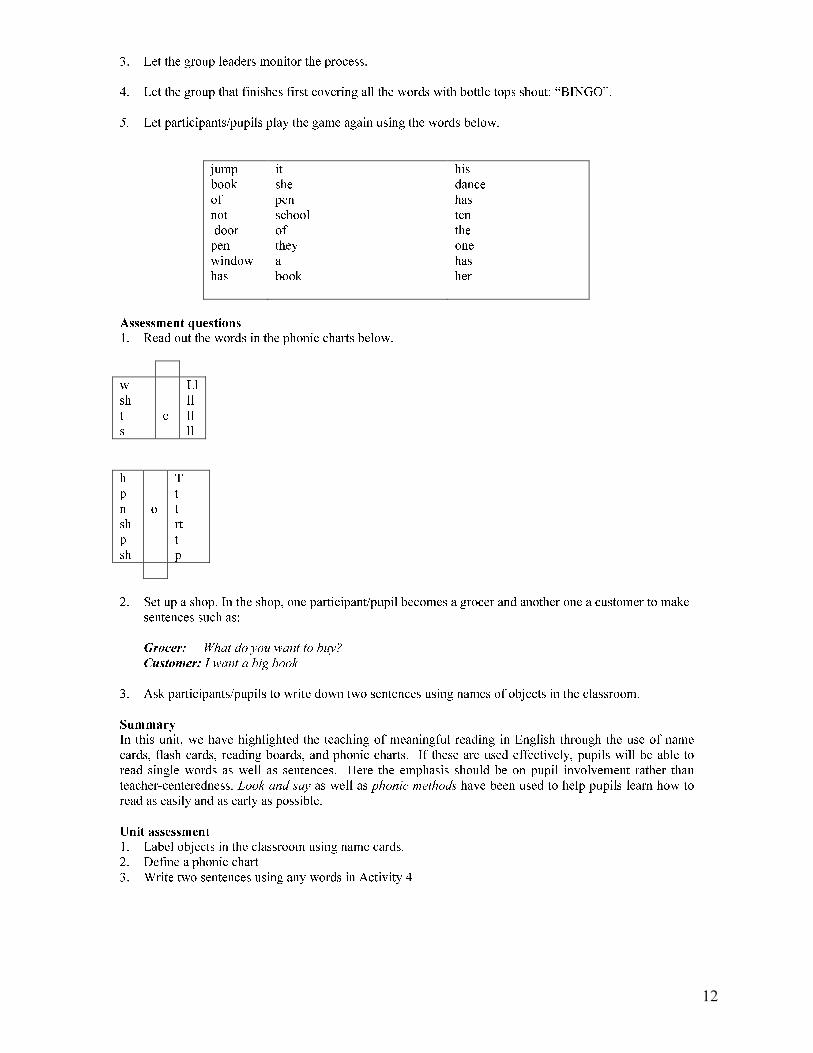
his dance has ten the one has her Assessment questions 1. Read out the words in the phonic charts below. w sh t s e Ll ll ll ll h p n sh p sh o T t t rt t p 2. Set up a shop. In the shop, one participant/pupil becomes a grocer and another one a customer to make sentences such as: Grocer: What do you want to buy? Customer: I want a big book 3. Ask participants/pupils to write down two sentences using names of objects in the classroom. Summary In this unit, we have highlighted the teaching of meaningful reading in English through the use of name cards, flash cards, reading boards, and phonic charts. If these are used effectively, pupils will be able to read single words as well as sentences. Here the emphasis should be on pupil involvement rather than teacher-centeredness. Look and say as well as phonic methods have been used to help pupils learn how to read as easily and as early as possible. Unit assessment 1. Label objects in the classroom using name cards. 2. Define a phonic chart 3. Write two sentences using any words in Activity 4
13
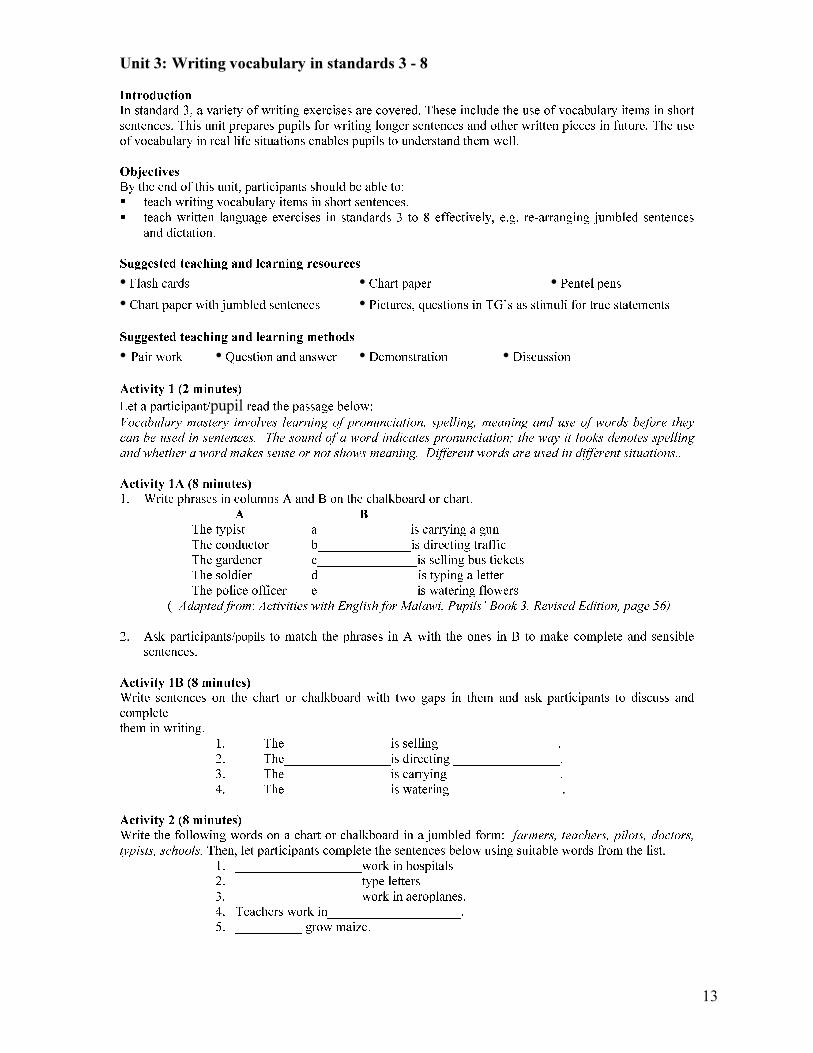
Unit 3: Writing vocabulary in standards 3 - 8 Introduction In standard 3, a variety of writing exercises are covered. These include the use of vocabulary items in short sentences. This unit prepares pupils for writing longer sentences and other written pieces in future. The use of vocabulary in real life situations enables pupils to understand them well. Objectives By the end of this unit, participants should be able to: � teach writing vocabulary items in short sentences. � teach written language exercises in standards 3 to 8 effectively, e.g. re-arranging jumbled sentences and dictation. Suggested teaching and learning resources • Flash cards • Chart paper • Pentel pens • Chart paper with jumbled sentences • Pictures, questions in TG’s as stimuli for true statements Suggested teaching and learning methods • Pair work • Question and answer • Demonstration • Discussion Activity 1 (2 minutes) Let a participant/pupil read the passage below: Vocabulary mastery involves learning of pronunciation, spelling, meaning and use of words before they can be used in sentences. The sound of a word indicates pronunciation; the way it looks denotes spelling and whether a word makes sense or not shows meaning. Different words are used in different situations.. Activity 1A (8 minutes) 1. Write phrases in columns A and B on the chalkboard or chart. A B The typist a______________is carrying a gun The conductor b______________is directing traffic The gardener c_______________is selling bus tickets The soldier d_______________is typing a letter The police officer e_______________is watering flowers ( Adapted from: Activities with English for Malawi, Pupils’ Book 3, Revised Edition, page 56) 2. Ask participants/pupils to match the phrases in A with the ones in B to make complete and sensible sentences. Activity 1B (8 minutes) Write sentences on the chart or chalkboard with two gaps in them and ask participants to discuss and complete them in writing. 1. The________________is selling__________________. 2. The________________is directing ________________. 3. The________________is carrying ________________ . 4. The________________is watering_________________. Activity 2 (8 minutes) Write the following words on a chart or chalkboard in a jumbled form: farmers, teachers, pilots, doctors, typists, schools. Then, let participants complete the sentences below using suitable words from the list. 1. ___________________work in hospitals 2. _________________ type letters 3. ___________________work in aeroplanes. 4. Teachers work in____________________. 5. __________ grow maize.
14
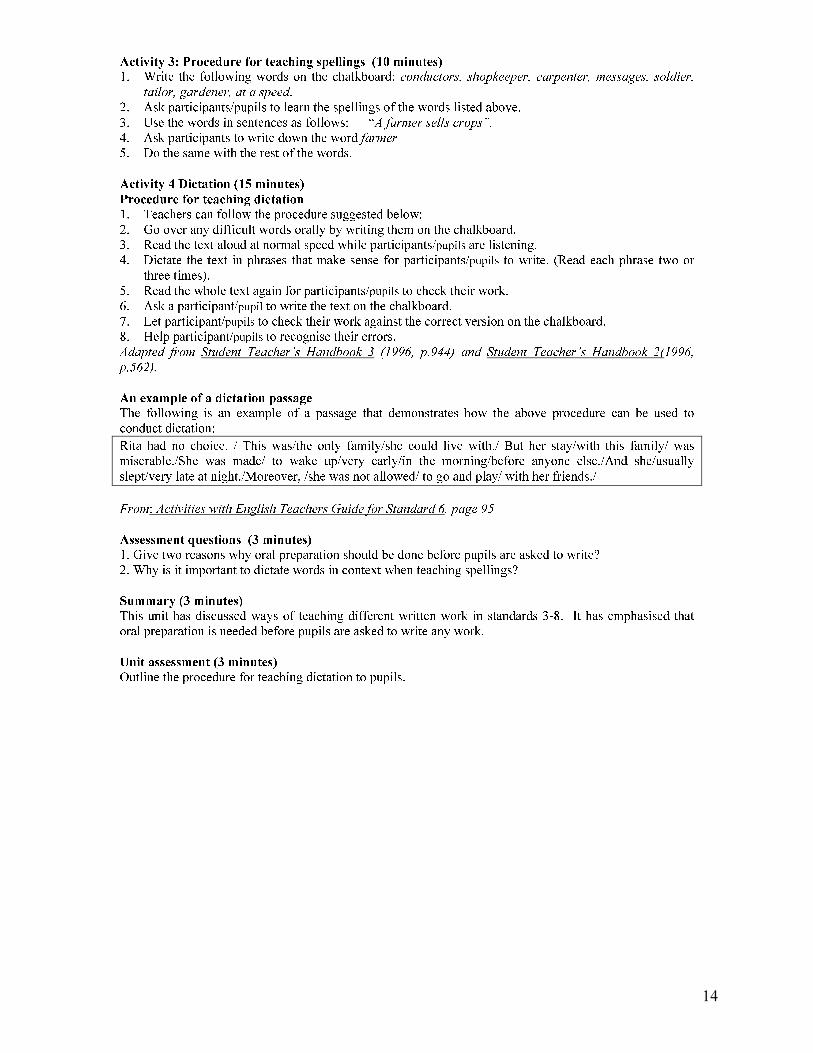
Activity 3: Procedure for teaching spellings (10 minutes) 1. Write the following words on the chalkboard: conductors, shopkeeper, carpenter, messages, soldier, tailor, gardener, at a speed. 2. Ask participants/pupils to learn the spellings of the words listed above. 3. Use the words in sentences as follows: “A farmer sells crops”. 4. Ask participants to write down the word farmer 5. Do the same with the rest of the words. Activity 4 Dictation (15 minutes) Procedure for teaching dictation 1. Teachers can follow the procedure suggested below: 2. Go over any difficult words orally by writing them on the chalkboard. 3. Read the text aloud at normal speed while participants/pupils are listening. 4. Dictate the text in phrases that make sense for participants/pupils to write. (Read each phrase two or three times). 5. Read the whole text again for participants/pupils to check their work. 6. Ask a participant/pupil to write the text on the chalkboard. 7. Let participant/pupils to check their work against the correct version on the chalkboard. 8. Help participant/pupils to recognise their errors. Adapted from Student Teacher’s Handbook 3 (1996, p.944) and Student Teacher’s Handbook 2(1996, p.562). An example of a dictation passage The following is an example of a passage that demonstrates how the above procedure can be used to conduct dictation: Rita had no choice. / This was/the only family/she could live with./ But her stay/with this family/ was miserable./She was made/ to wake up/very early/in the morning/before anyone else./And she/usually slept/very late at night./Moreover, /she was not allowed/ to go and play/ with her friends./ From: Activities with English Teachers Guide for Standard 6, page 95 Assessment questions (3 minutes) 1. Give two reasons why oral preparation should be done before pupils are asked to write? 2. Why is it important to dictate words in context when teaching spellings? Summary (3 minutes) This unit has discussed ways of teaching different written work in standards 3-8. It has emphasised that oral preparation is needed before pupils are asked to write any work. Unit assessment (3 minutes) Outline the procedure for teaching dictation to pupils.
15
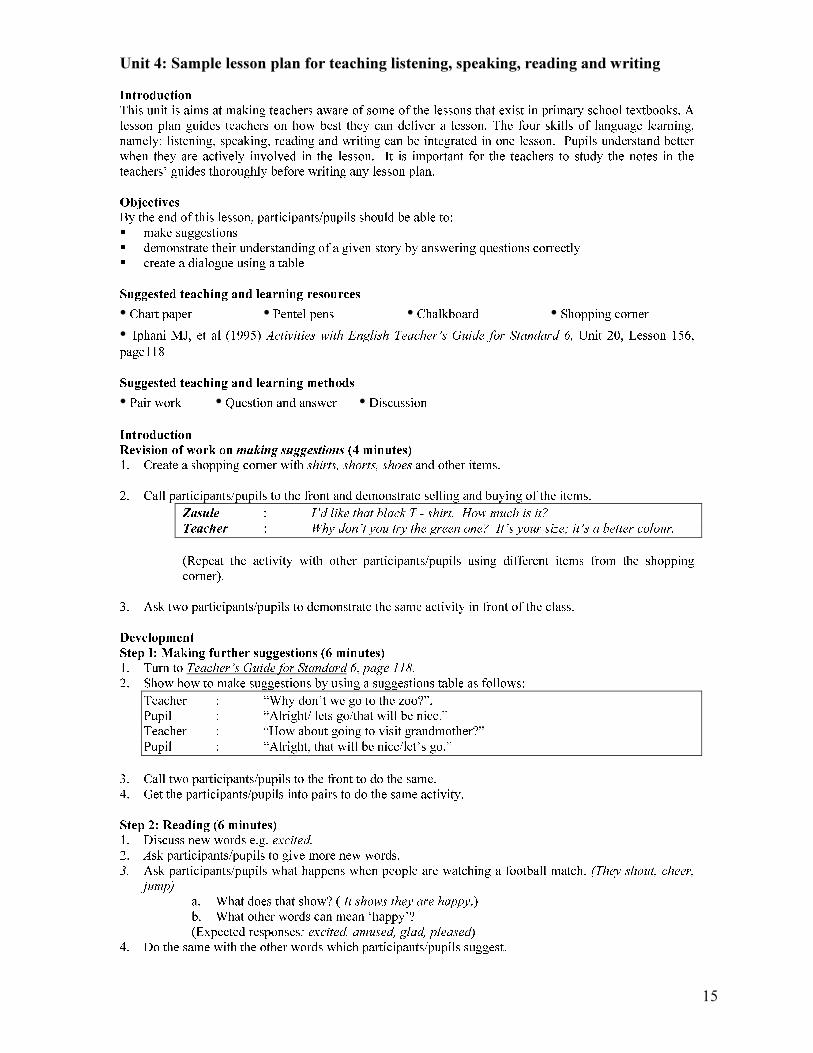
Unit 4: Sample lesson plan for teaching listening, speaking, reading and writing Introduction This unit is aims at making teachers aware of some of the lessons that exist in primary school textbooks. A lesson plan guides teachers on how best they can deliver a lesson. The four skills of language learning, namely: listening, speaking, reading and writing can be integrated in one lesson. Pupils understand better when they are actively involved in the lesson. It is important for the teachers to study the notes in the teachers’ guides thoroughly before writing any lesson plan. Objectives By the end of this lesson, participants/pupils should be able to: � make suggestions � demonstrate their understanding of a given story by answering questions correctly � create a dialogue using a table Suggested teaching and learning resources • Chart paper • Pentel pens • Chalkboard • Shopping corner • Iphani MJ, et al (1995) Activities with English Teacher’s Guide for Standard 6, Unit 20, Lesson 156, page118 Suggested teaching and learning methods • Pair work • Question and answer • Discussion Introduction Revision of work on making suggestions (4 minutes) 1. Create a shopping corner with shirts, shorts, shoes and other items. 2. Call participants/pupils to the front and demonstrate selling and buying of the items. Zasule : I’d like that black T - shirt. How much is it? Teacher : Why don’t you try the green one? It’s your size; it’s a better colour. (Repeat the activity with other participants/pupils using different items from the shopping corner). 3. Ask two participants/pupils to demonstrate the same activity in front of the class. Development Step I: Making further suggestions (6 minutes) 1. Turn to Teacher’s Guide for Standard 6, page 118. 2. Show how to make suggestions by using a suggestions table as follows: Teacher : “Why don’t we go to the zoo?”. Pupil : “Alright/ lets go/that will be nice.” Teacher : “How about going to visit grandmother?” Pupil : “Alright, that will be nice/let’s go.” 3. Call two participants/pupils to the front to do the same. 4. Get the participants/pupils into pairs to do the same activity. Step 2: Reading (6 minutes) 1. Discuss new words e.g. excited. 2. Ask participants/pupils to give more new words. 3. Ask participants/pupils what happens when people are watching a football match. (They shout, cheer, jump) a. What does that show? ( It shows they are happy.) b. What other words can mean ‘happy’? (Expected responses; excited, amused, glad, pleased) 4. Do the same with the other words which participants/pupils suggest.
16
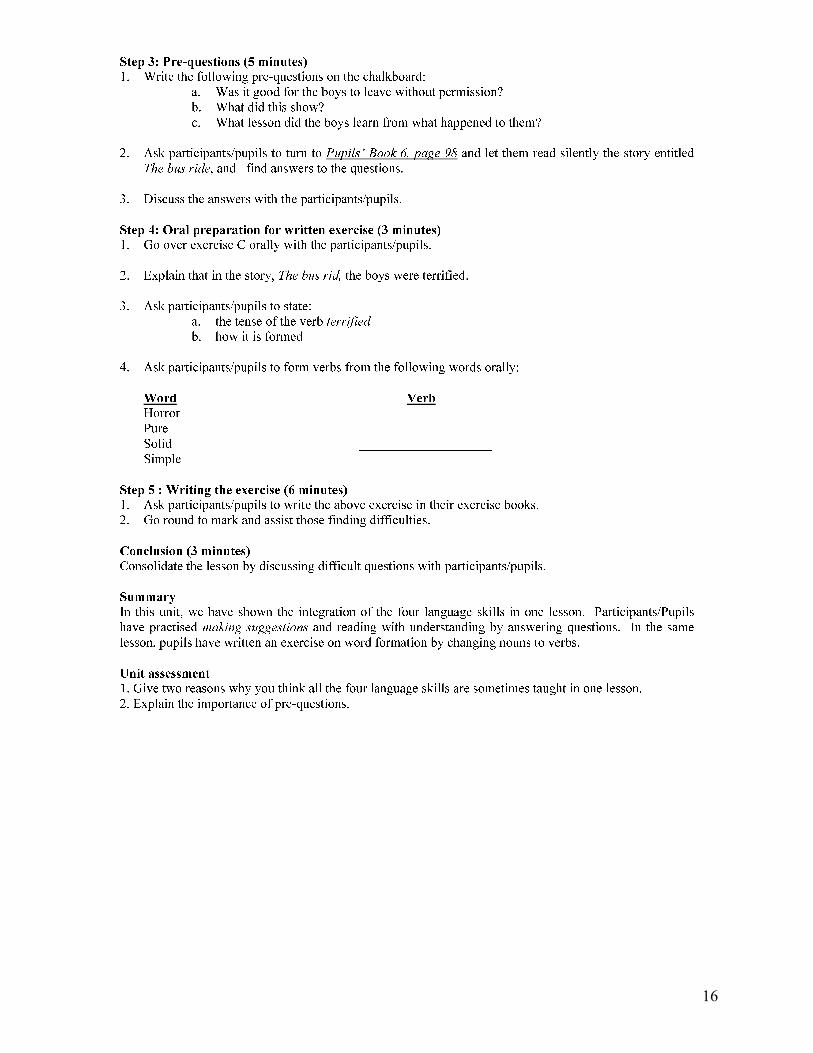
Step 3: Pre-questions (5 minutes) 1. Write the following pre-questions on the chalkboard: a. Was it good for the boys to leave without permission? b. What did this show? c. What lesson did the boys learn from what happened to them? 2. Ask participants/pupils to turn to Pupils’ Book 6, page 98 and let them read silently the story entitled The bus ride, and find answers to the questions. 3. Discuss the answers with the participants/pupils. Step 4: Oral preparation for written exercise (3 minutes) 1. Go over exercise C orally with the participants/pupils. 2. Explain that in the story, The bus rid, the boys were terrified. 3. Ask participants/pupils to state: a. the tense of the verb terrified b. how it is formed 4. Ask participants/pupils to form verbs from the following words orally: Word Verb Horror ____________________ Pure ____________________ Solid ____________________ Simple ____________________ Step 5 : Writing the exercise (6 minutes) 1. Ask participants/pupils to write the above exercise in their exercise books. 2. Go round to mark and assist those finding difficulties. Conclusion (3 minutes) Consolidate the lesson by discussing difficult questions with participants/pupils. Summary In this unit, we have shown the integration of the four language skills in one lesson. Participants/Pupils have practised making suggestions and reading with understanding by answering questions. In the same lesson, pupils have written an exercise on word formation by changing nouns to verbs. Unit assessment 1. Give two reasons why you think all the four language skills are sometimes taught in one lesson. 2. Explain the importance of pre-questions.
17
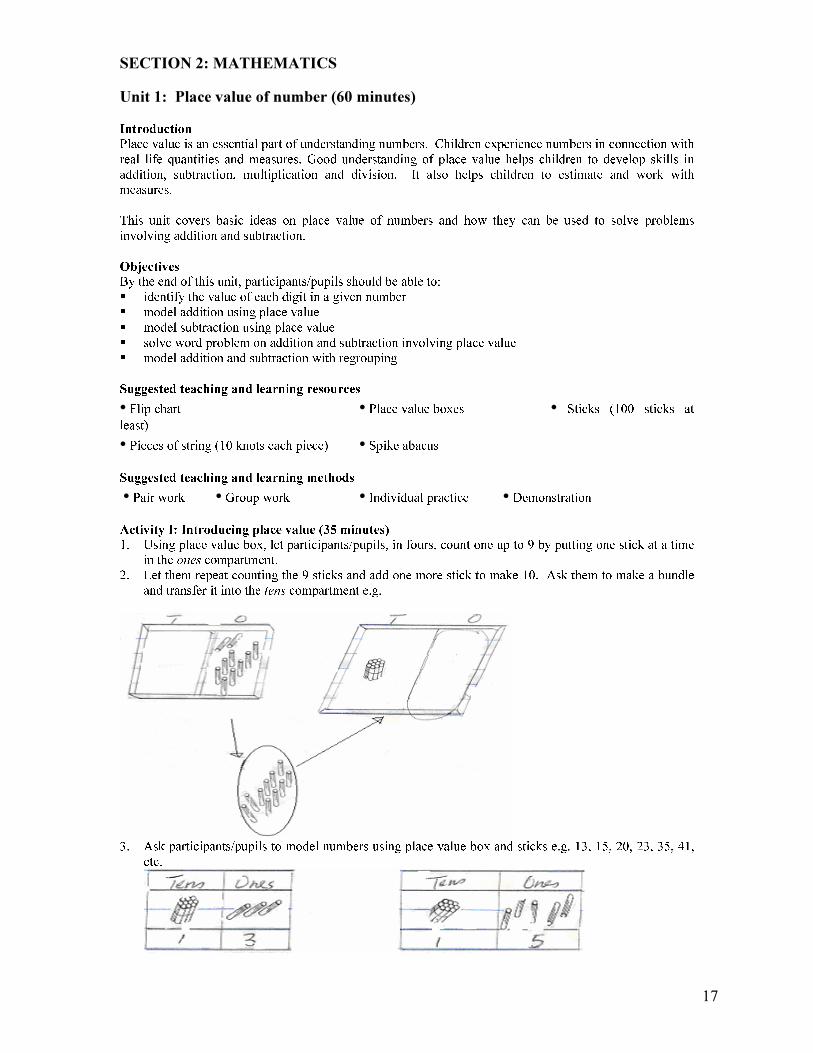
SECTION 2: MATHEMATICS Unit 1: Place value of number (60 minutes) Introduction Place value is an essential part of understanding numbers. Children experience numbers in connection with real life quantities and measures. Good understanding of place value helps children to develop skills in addition, subtraction, multiplication and division. It also helps children to estimate and work with measures. This unit covers basic ideas on place value of numbers and how they can be used to solve problems involving addition and subtraction. Objectives By the end of this unit, participants/pupils should be able to: � identify the value of each digit in a given number � model addition using place value � model subtraction using place value � solve word problem on addition and subtraction involving place value � model addition and subtraction with regrouping Suggested teaching and learning resources • Flip chart • Place value boxes • Sticks (100 sticks at least) • Pieces of string (10 knots each piece) • Spike abacus Suggested teaching and learning methods • Pair work • Group work • Individual practice • Demonstration Activity I: Introducing place value (35 minutes) 1. Using place value box, let participants/pupils, in fours, count one up to 9 by putting one stick at a time in the ones compartment. 2. Let them repeat counting the 9 sticks and add one more stick to make 10. Ask them to make a bundle and transfer it into the tens compartment e.g.
3. Ask participants/pupils to model numbers using place value box and sticks e.g. 13, 15, 20, 23, 35, 41, etc.
18
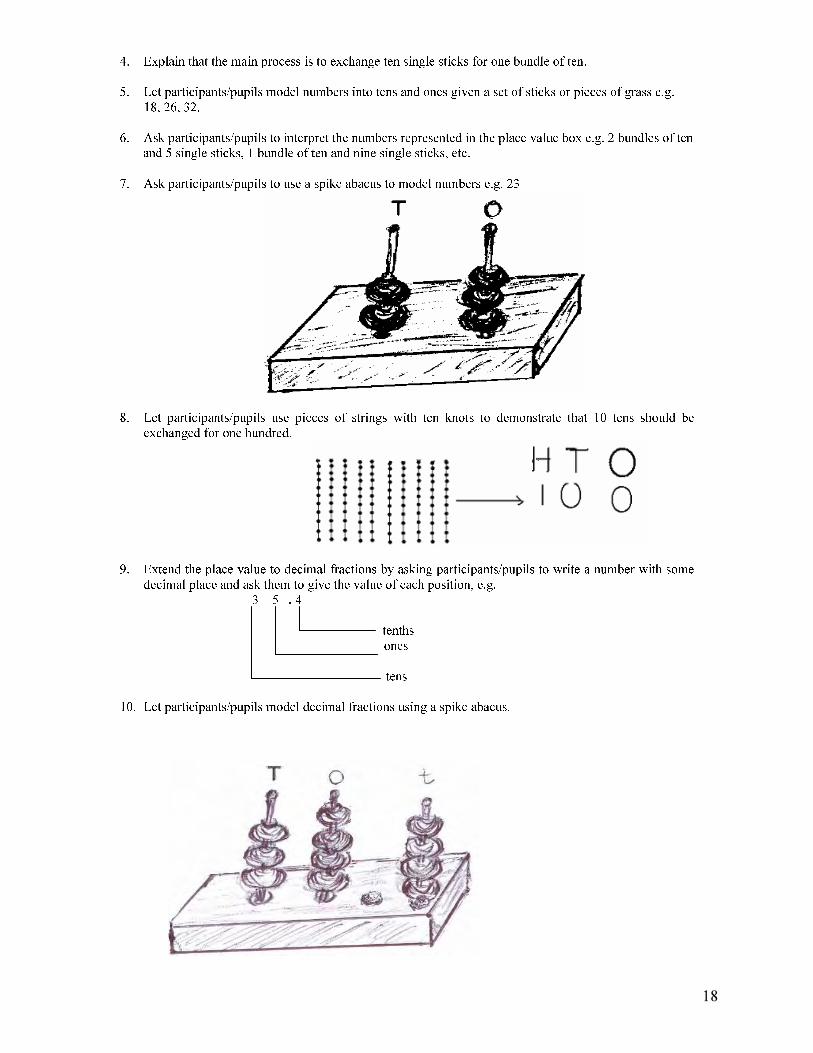
4. Explain that the main process is to exchange ten single sticks for one bundle of ten. 5. Let participants/pupils model numbers into tens and ones given a set of sticks or pieces of grass e.g. 18, 26, 32. 6. Ask participants/pupils to interpret the numbers represented in the place value box e.g. 2 bundles of ten and 5 single sticks, 1 bundle of ten and nine single sticks, etc. 7. Ask participants/pupils to use a spike abacus to model numbers e.g. 23
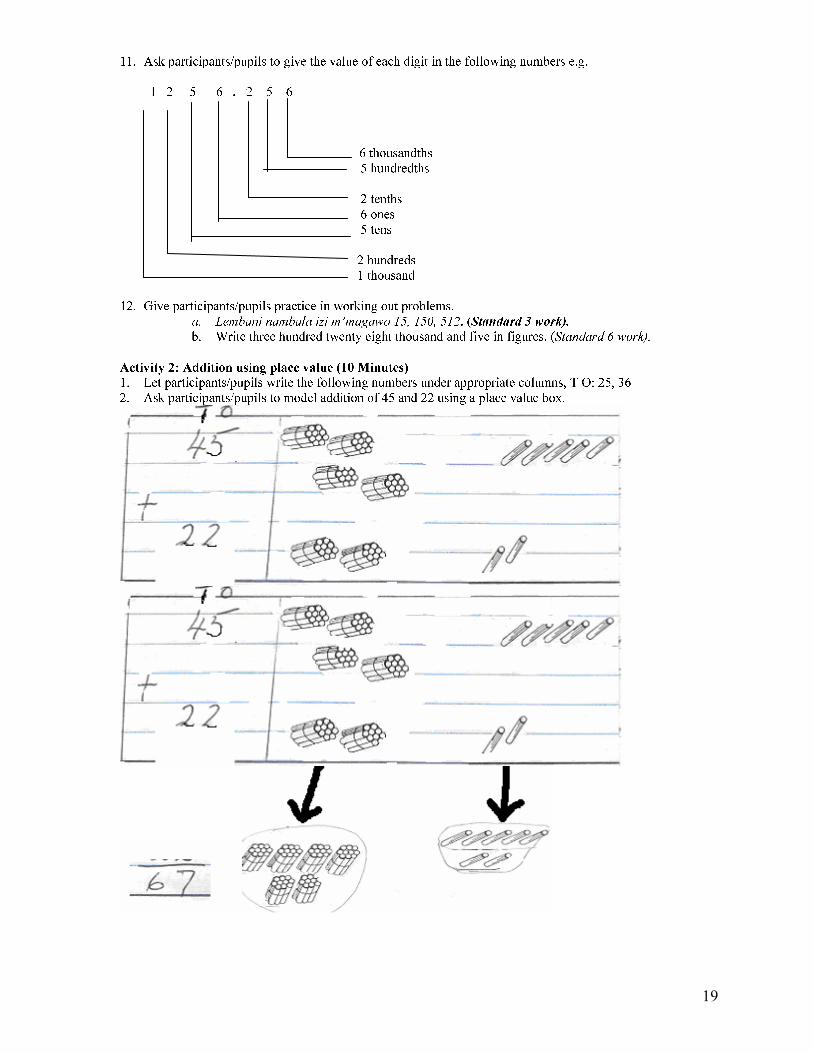
8. Let participants/pupils use pieces of strings with ten knots to demonstrate that 10 tens should be exchanged for one hundred. 9. Extend the place value to decimal fractions by asking participants/pupils to write a number with some decimal place and ask them to give the value of each position, e.g. 3 5 . 4 tenths ones tens 10. Let participants/pupils model decimal fractions using a spike abacus.
19
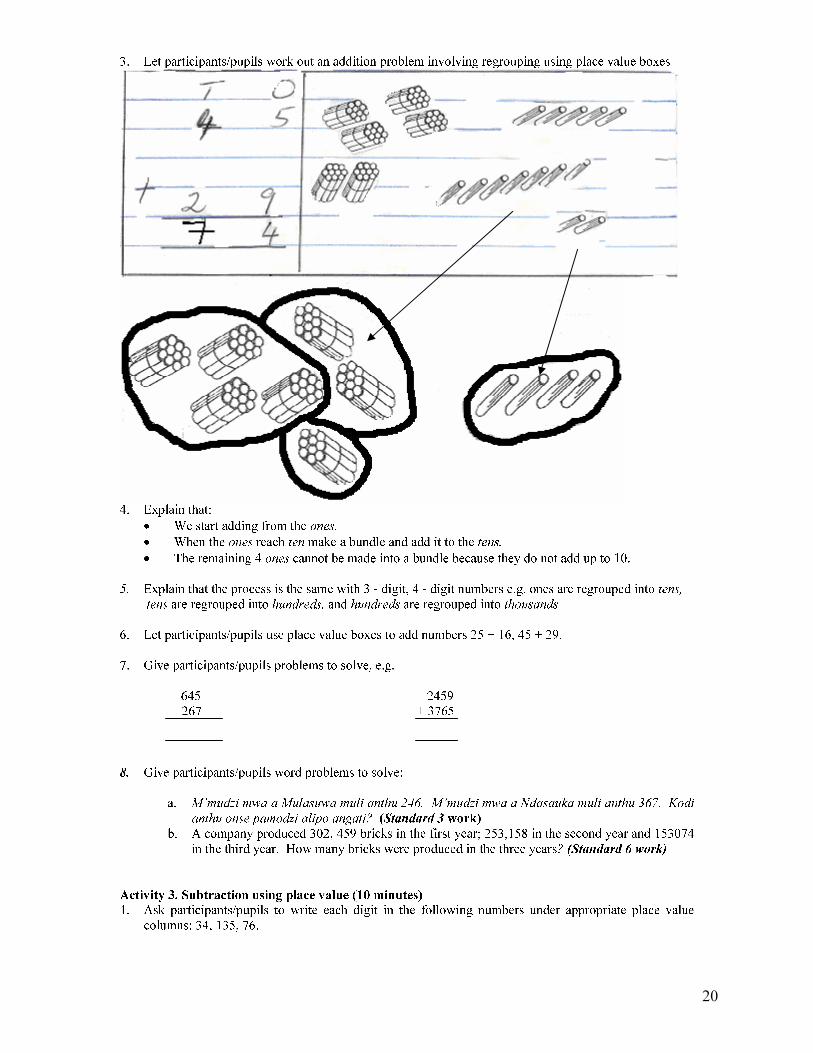
11. Ask participants/pupils to give the value of each digit in the following numbers e.g. 1 2 5 6 . 2 5 6 6 thousandths 5 hundredths 2 tenths 6 ones 5 tens 2 hundreds 1 thousand 12. Give participants/pupils practice in working out problems. a. Lembani nambala izi m’magawo 15, 150, 512. (Standard 3 work). b. Write three hundred twenty eight thousand and five in figures. (Standard 6 work). Activity 2: Addition using place value (10 Minutes) 1. Let participants/pupils write the following numbers under appropriate columns, T O: 25, 36 2. Ask participants/pupils to model addition of 45 and 22 using a place value box.
20
3. Let participants/pupils work out an addition problem involving regrouping using place value boxes
4. Explain that: • We start adding from the ones. • When the ones reach ten make a bundle and add it to the tens. • The remaining 4 ones cannot be made into a bundle because they do not add up to 10. 5. Explain that the process is the same with 3 - digit, 4 - digit numbers e.g. ones are regrouped into tens, tens are regrouped into hundreds, and hundreds are regrouped into thousands 6. Let participants/pupils use place value boxes to add numbers 25 + 16, 45 + 29. 7. Give participants/pupils problems to solve, e.g. 645 2459 +267 + 3765 8. Give participants/pupils word problems to solve: a. M’mudzi mwa a Mulasuwa muli anthu 246. M’mudzi mwa a Ndasauka muli anthu 367. Kodi anthu onse pamodzi alipo angati? (Standard 3 work) b. A company produced 302, 459 bricks in the first year; 253,158 in the second year and 153074 in the third year. How many bricks were produced in the three years? (Standard 6 work) Activity 3. Subtraction using place value (10 minutes) 1. Ask participants/pupils to write each digit in the following numbers under appropriate place value columns: 34, 135, 76.
21
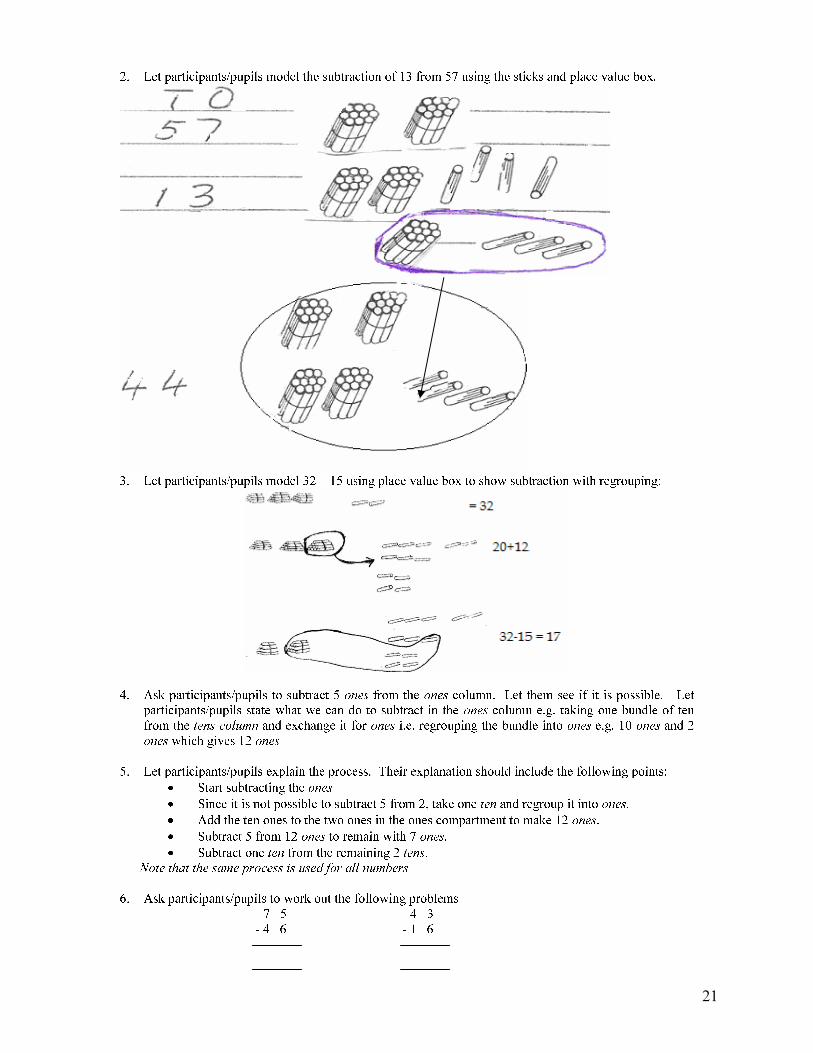
2. Let participants/pupils model the subtraction of 13 from 57 using the sticks and place value box.
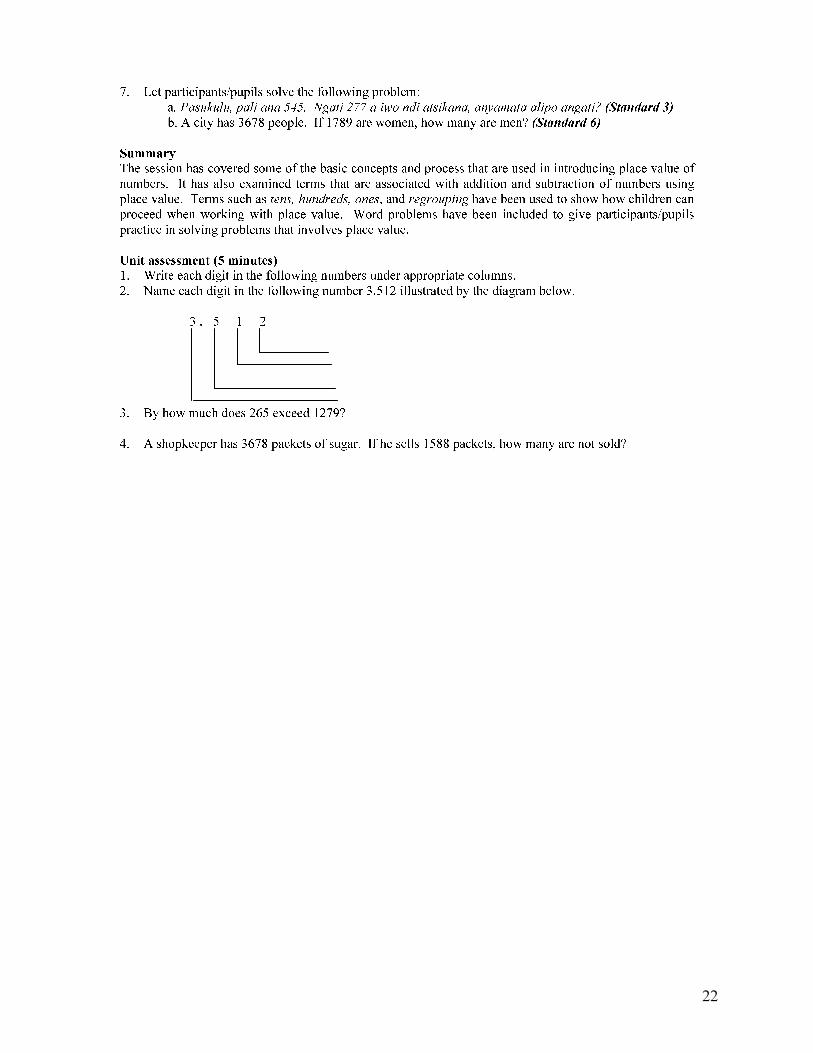
3. Let participants/pupils model 32 – 15 using place value box to show subtraction with regrouping: 4. Ask participants/pupils to subtract 5 ones from the ones column. Let them see if it is possible. Let participants/pupils state what we can do to subtract in the ones column e.g. taking one bundle of ten from the tens column and exchange it for ones i.e. regrouping the bundle into ones e.g. 10 ones and 2 ones which gives 12 ones 5. Let participants/pupils explain the process. Their explanation should include the following points: • Start subtracting the ones • Since it is not possible to subtract 5 from 2, take one ten and regroup it into ones. • Add the ten ones to the two ones in the ones compartment to make 12 ones. • Subtract 5 from 12 ones to remain with 7 ones. • Subtract one ten from the remaining 2 tens. Note that the same process is used for all numbers 6. Ask participants/pupils to work out the following problems 7 5 4 3 - 4 6 - 1 6
22
7. Let participants/pupils solve the following problem: a. Pasukulu, pali ana 545. Ngati 277 a iwo ndi atsikana, anyamata alipo angati? (Standard 3) b. A city has 3678 people. If 1789 are women, how many are men? (Standard 6) Summary The session has covered some of the basic concepts and process that are used in introducing place value of numbers. It has also examined terms that are associated with addition and subtraction of numbers using place value. Terms such as tens, hundreds, ones, and regrouping have been used to show how children can proceed when working with place value. Word problems have been included to give participants/pupils practice in solving problems that involves place value. Unit assessment (5 minutes) 1. Write each digit in the following numbers under appropriate columns. 2. Name each digit in the following number 3.512 illustrated by the diagram below. 3 . 5 1 2 3. By how much does 265 exceed 1279? 4. A shopkeeper has 3678 packets of sugar. If he sells 1588 packets, how many are not sold?
23
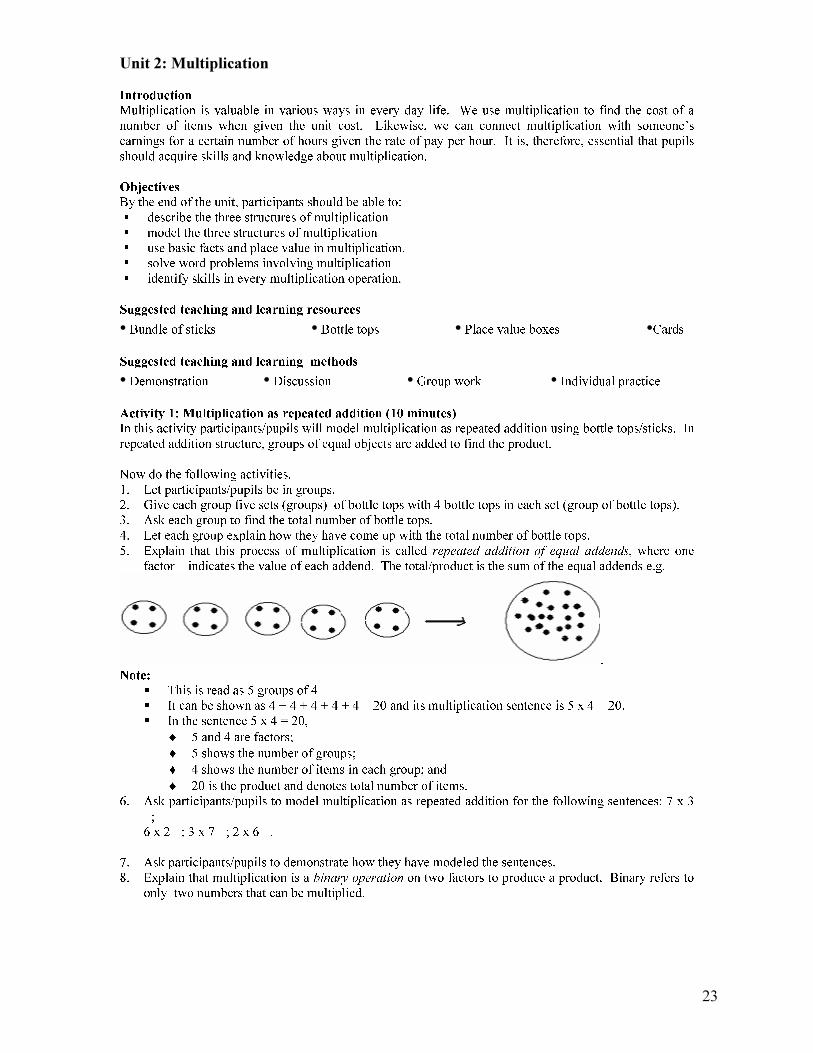
Unit 2: Multiplication Introduction Multiplication is valuable in various ways in every day life. We use multiplication to find the cost of a number of items when given the unit cost. Likewise, we can connect multiplication with someone’s earnings for a certain number of hours given the rate of pay per hour. It is, therefore, essential that pupils should acquire skills and knowledge about multiplication. Objectives By the end of the unit, participants should be able to: � describe the three structures of multiplication � model the three structures of multiplication � use basic facts and place value in multiplication. � solve word problems involving multiplication � identify skills in every multiplication operation. Suggested teaching and learning resources • Bundle of sticks • Bottle tops • Place value boxes •Cards Suggested teaching and learning methods • Demonstration • Discussion • Group work • Individual practice Activity 1: Multiplication as repeated addition (10 minutes) In this activity participants/pupils will model multiplication as repeated addition using bottle tops/sticks. In repeated addition structure, groups of equal objects are added to find the product. Now do the following activities. 1. Let participants/pupils be in groups. 2. Give each group five sets (groups) of bottle tops with 4 bottle tops in each set (group of bottle tops). 3. Ask each group to find the total number of bottle tops. 4. Let each group explain how they have come up with the total number of bottle tops. 5. Explain that this process of multiplication is called repeated addition of equal addends, where one factor indicates the value of each addend. The total/product is the sum of the equal addends e.g.
. Note: � This is read as 5 groups of 4 � It can be shown as 4 + 4 + 4 + 4 + 4 = 20 and its multiplication sentence is 5 x 4 = 20. � In the sentence 5 x 4 = 20, ♦ 5 and 4 are factors; ♦ 5 shows the number of groups; ♦ 4 shows the number of items in each group; and ♦ 20 is the product and denotes total number of items. 6. Ask participants/pupils to model multiplication as repeated addition for the following sentences: 7 x 3 =; 6 x 2 =; 3 x 7 =; 2 x 6 =. 7. Ask participants/pupils to demonstrate how they have modeled the sentences. 8. Explain that multiplication is a binary operation on two factors to produce a product. Binary refers to only two numbers that can be multiplied.
24
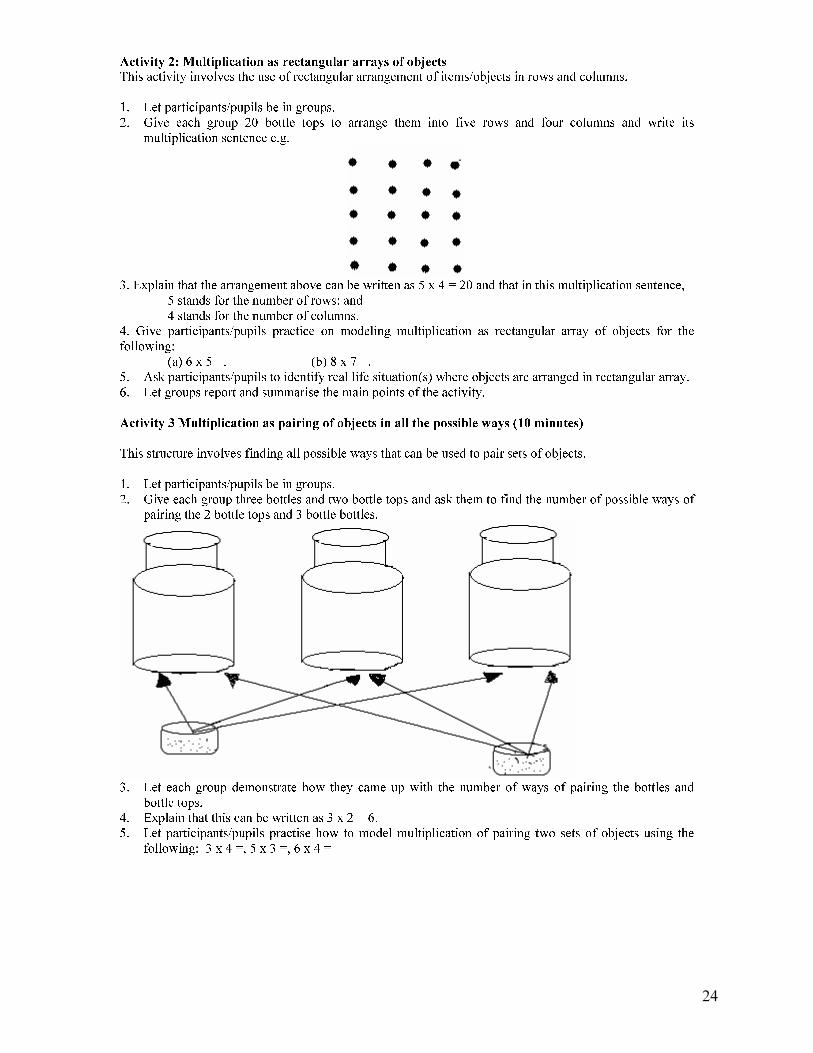
Activity 2: Multiplication as rectangular arrays of objects This activity involves the use of rectangular arrangement of items/objects in rows and columns. 1. Let participants/pupils be in groups. 2. Give each group 20 bottle tops to arrange them into five rows and four columns and write its multiplication sentence e.g. 3. Explain that the arrangement above can be written as 5 x 4 = 20 and that in this multiplication sentence, 5 stands for the number of rows; and 4 stands for the number of columns. 4. Give participants/pupils practice on modeling multiplication as rectangular array of objects for the following: (a) 6 x 5 =. (b) 8 x 7 =. 5. Ask participants/pupils to identify real life situation(s) where objects are arranged in rectangular array. 6. Let groups report and summarise the main points of the activity. Activity 3 Multiplication as pairing of objects in all the possible ways (10 minutes) This structure involves finding all possible ways that can be used to pair sets of objects. 1. Let participants/pupils be in groups. 2. Give each group three bottles and two bottle tops and ask them to find the number of possible ways of pairing the 2 bottle tops and 3 bottle bottles.
3. Let each group demonstrate how they came up with the number of ways of pairing the bottles and bottle tops. 4. Explain that this can be written as 3 x 2 = 6. 5. Let participants/pupils practise how to model multiplication of pairing two sets of objects using the following: 3 x 4 =, 5 x 3 =, 6 x 4 =
25
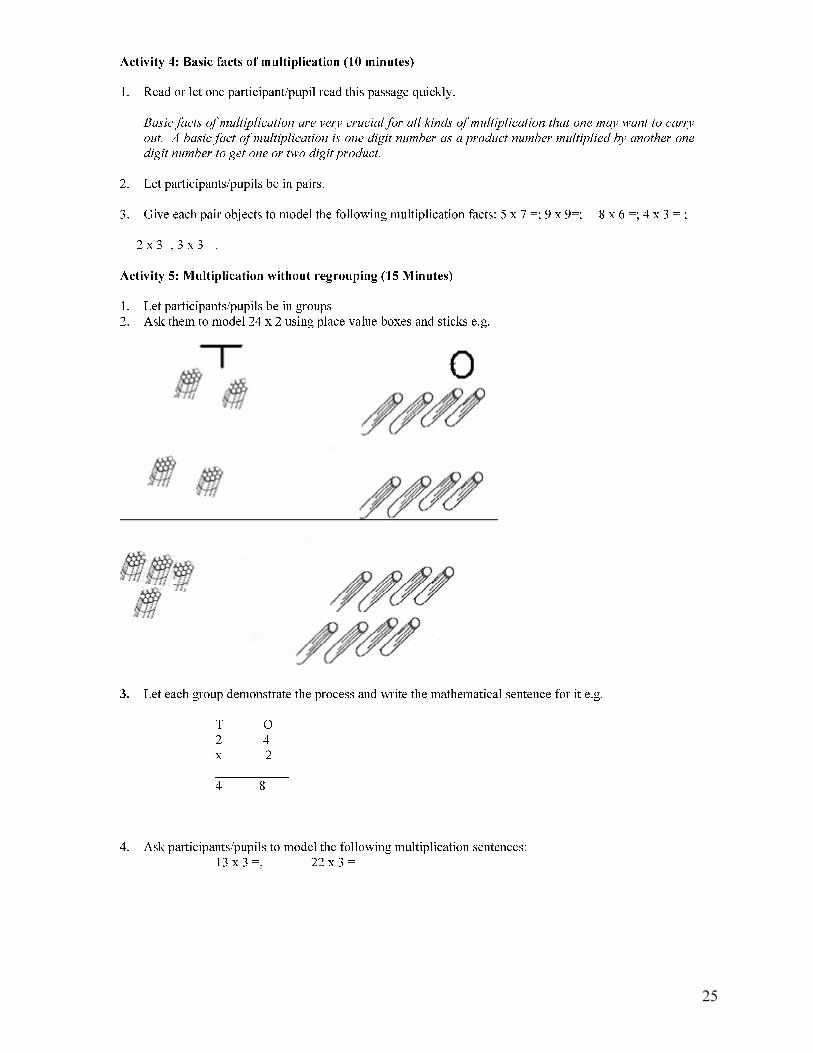
Activity 4: Basic facts of multiplication (10 minutes) 1. Read or let one participant/pupil read this passage quickly. Basic facts of multiplication are very crucial for all kinds of multiplication that one may want to carry out. A basic fact of multiplication is one digit number as a product number multiplied by another one digit number to get one or two digit product. 2. Let participants/pupils be in pairs. 3. Give each pair objects to model the following multiplication facts: 5 x 7 =; 9 x 9=; 8 x 6 =; 4 x 3 = ; 2 x 3=, 3 x 3 =. Activity 5: Multiplication without regrouping (15 Minutes) 1. Let participants/pupils be in groups 2. Ask them to model 24 x 2 using place value boxes and sticks e.g.
3. Let each group demonstrate the process and write the mathematical sentence for it e.g. T O 2 4 x 2 ___________ 4 8 ___________ 4. Ask participants/pupils to model the following multiplication sentences: 13 x 3 =, 22 x 3 =
26
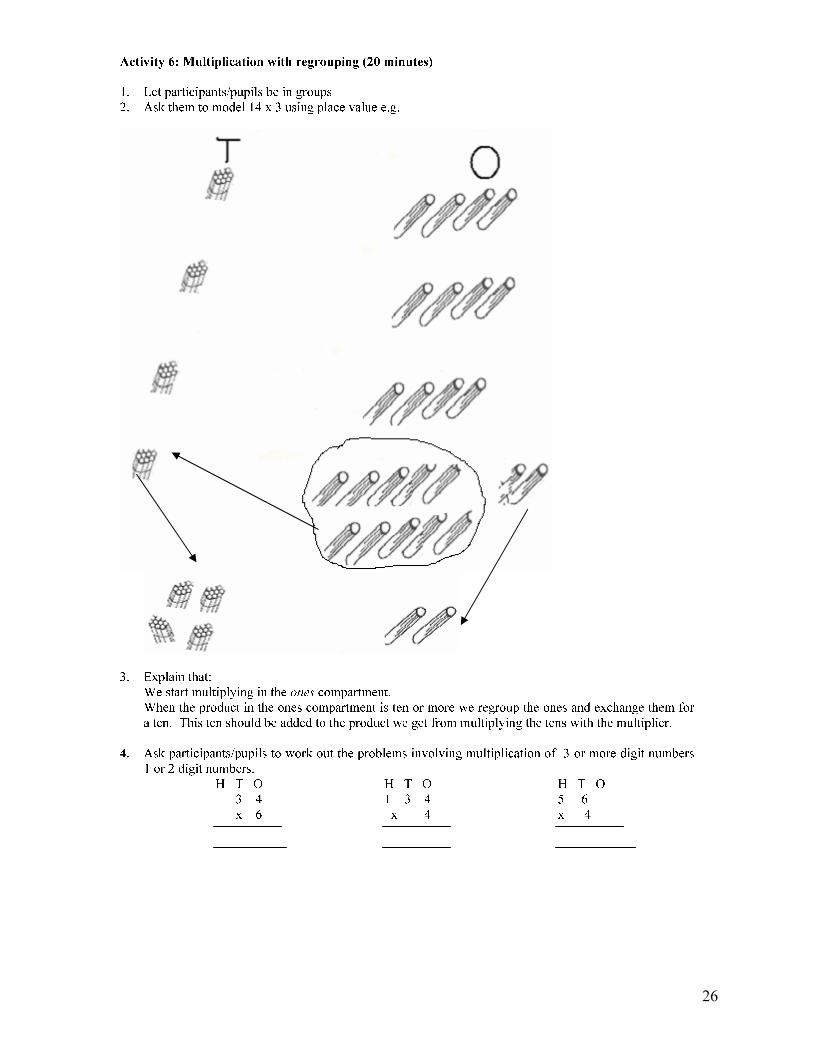
Activity 6: Multiplication with regrouping (20 minutes) 1. Let participants/pupils be in groups 2. Ask them to model 14 x 3 using place value e.g.
3. Explain that: We start multiplying in the ones compartment. When the product in the ones compartment is ten or more we regroup the ones and exchange them for a ten. This ten should be added to the product we get from multiplying the tens with the multiplier. 4. Ask participants/pupils to work out the problems involving multiplication of 3 or more digit numbers 1 or 2 digit numbers. H T O 3 4 x 6 H T O 1 3 4 x 4 H T O 5 6 x 4
27
Activity 7: Skills in multiplication (15 minutes) 1. In this activity participants/pupils should identify skills needed to carry out multiplication operations effectively in pairs. 2. Ask participants/pupils to solve the following problem in pairs. M’kalasi muli ana 27. Mwana aliyense alandira mabuku 8. Ana onse pamodzi alandira mabuku angati? (Standard 3) 3. Let the pairs identify the skills used to solve it. They should write the skills down. 4. Ask pairs to report on the skills used to solve the problem. 5. Give participants/pupils further practice using the following problems: a. Twenty five litres of paint is required to paint a house. How much paint will be required to paint 38 houses of similar sizes. b. A filling station was allowed to sell 305 litres of petrol a day. How much petrol would the filling station require for 31 days? 6. Let pairs report on skills used and summarise the main points. Summary This unit has introduced the concept of multiplication in three ways: as repeated addition, rectangular arrangement of objects and as a member of possible ways of pairing objects. An attempt has also been made to introduce basic facts of multiplication in order to help pupils master multiplication easily. In addition to this, the unit has also given some hints on how to introduce multiplication with regrouping. This unit, therefore, will help children to work with numbers beyond basic facts. Unit assessment 1. Name the three structures of multiplication. 2. Write any basic facts of multiplication. 3. Mention any 2 skills pupils need to solve this problem. H T O 1 4 4 x 3
28
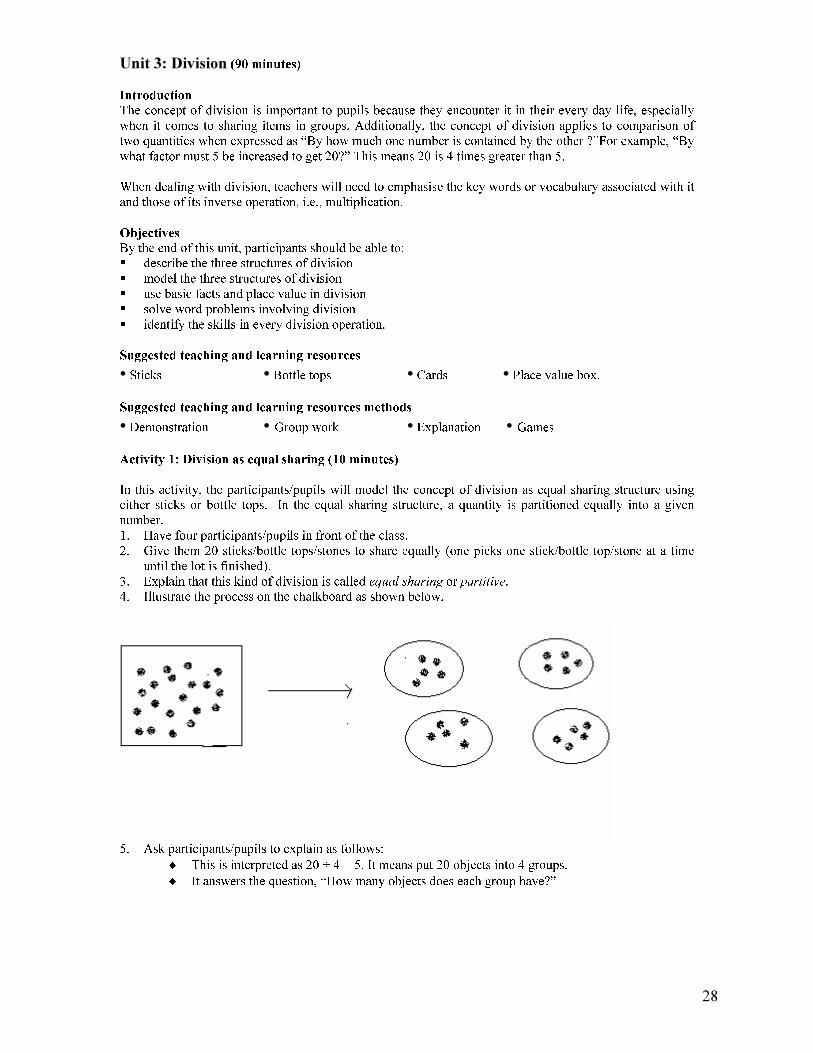
Unit 3: Division (90 minutes) Introduction The concept of division is important to pupils because they encounter it in their every day life, especially when it comes to sharing items in groups. Additionally, the concept of division applies to comparison of two quantities when expressed as “By how much one number is contained by the other ?”For example, “By what factor must 5 be increased to get 20?” This means 20 is 4 times greater than 5. When dealing with division, teachers will need to emphasise the key words or vocabulary associated with it and those of its inverse operation, i.e., multiplication. Objectives By the end of this unit, participants should be able to: � describe the three structures of division � model the three structures of division � use basic facts and place value in division � solve word problems involving division � identify the skills in every division operation. Suggested teaching and learning resources • Sticks • Bottle tops • Cards • Place value box. Suggested teaching and learning resources methods • Demonstration • Group work • Explanation • Games Activity 1: Division as equal sharing (10 minutes) In this activity, the participants/pupils will model the concept of division as equal sharing structure using either sticks or bottle tops. In the equal sharing structure, a quantity is partitioned equally into a given number. 1. Have four participants/pupils in front of the class. 2. Give them 20 sticks/bottle tops/stones to share equally (one picks one stick/bottle top/stone at a time until the lot is finished). 3. Explain that this kind of division is called equal sharing or partitive. 4. Illustrate the process on the chalkboard as shown below.
5. Ask participants/pupils to explain as follows: ♦ This is interpreted as 20 ÷ 4 = 5. It means put 20 objects into 4 groups. ♦ It answers the question, “How many objects does each group have?”
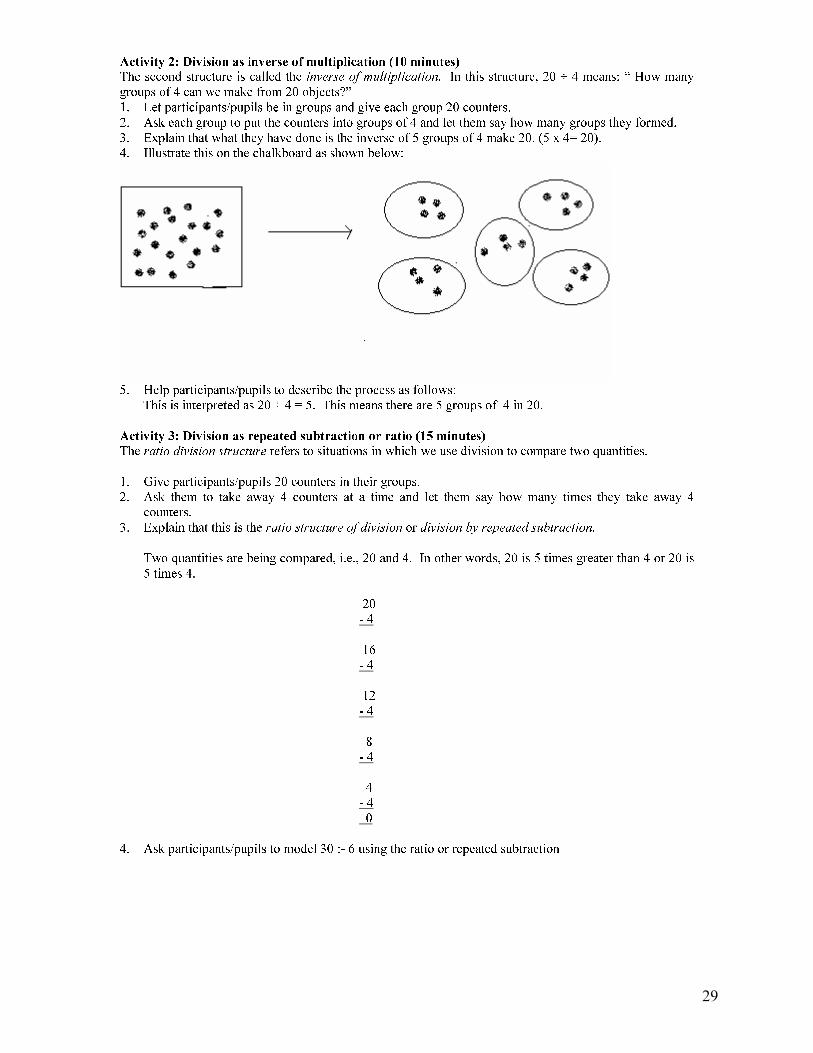
29
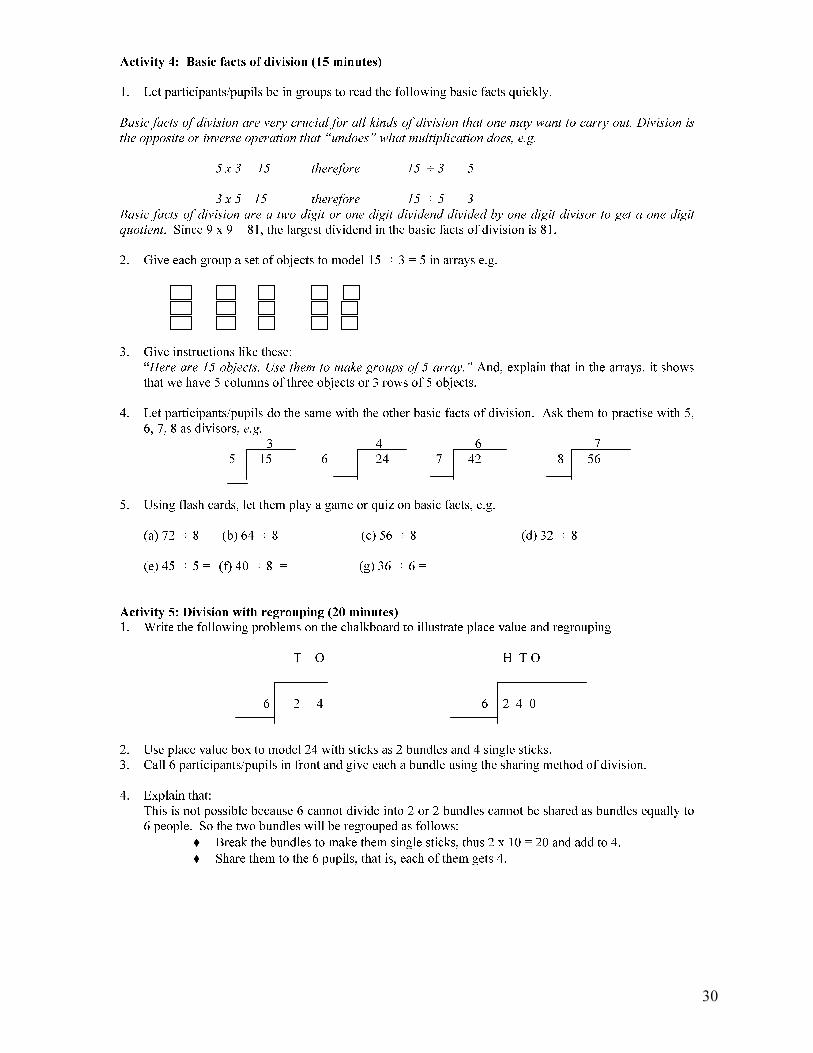
Activity 2: Division as inverse of multiplication (10 minutes) The second structure is called the inverse of multiplication. In this structure, 20 ÷ 4 means: “ How many groups of 4 can we make from 20 objects?” 1. Let participants/pupils be in groups and give each group 20 counters. 2. Ask each group to put the counters into groups of 4 and let them say how many groups they formed. 3. Explain that what they have done is the inverse of 5 groups of 4 make 20. (5 x 4= 20). 4. Illustrate this on the chalkboard as shown below:
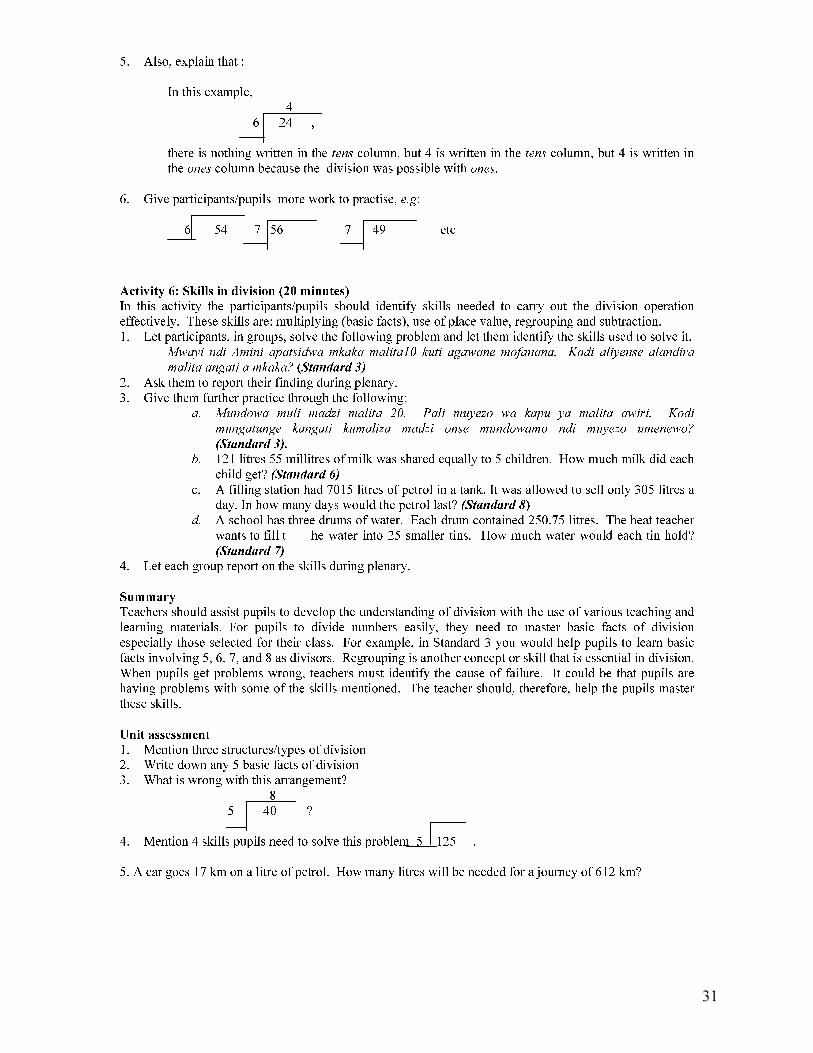
5. Help participants/pupils to describe the process as follows: This is interpreted as 20 ÷ 4 = 5. This means there are 5 groups of 4 in 20. Activity 3: Division as repeated subtraction or ratio (15 minutes) The ratio division structure refers to situations in which we use division to compare two quantities. 1. Give participants/pupils 20 counters in their groups. 2. Ask them to take away 4 counters at a time and let them say how many times they take away 4 counters. 3. Explain that this is the ratio structure of division or division by repeated subtraction. Two quantities are being compared, i.e., 20 and 4. In other words, 20 is 5 times greater than 4 or 20 is 5 times 4. 20 - 4 16 - 4 12 - 4 8 - 4 4 - 4 0 4. Ask participants/pupils to model 30 :- 6 using the ratio or repeated subtraction
30
Activity 4: Basic facts of division (15 minutes) 1. Let participants/pupils be in groups to read the following basic facts quickly. Basic facts of division are very crucial for all kinds of division that one may want to carry out. Division is the opposite or inverse operation that “undoes” what multiplication does, e.g. 5 x 3 = 15 therefore 15 ÷ 3 = 5 3 x 5 =15 therefore 15 ÷ 5 = 3 Basic facts of division are a two digit or one digit dividend divided by one digit divisor to get a one digit quotient. Since 9 x 9 = 81, the largest dividend in the basic facts of division is 81. 2. Give each group a set of objects to model 15 ÷ 3 = 5 in arrays e.g. 3. Give instructions like these: “Here are 15 objects. Use them to make groups of 5 array.” And, explain that in the arrays, it shows that we have 5 columns of three objects or 3 rows of 5 objects. 4. Let participants/pupils do the same with the other basic facts of division. Ask them to practise with 5, 6, 7, 8 as divisors, e.g. 3 4 6 7 5 15 6 24 7 42 8 56 5. Using flash cards, let them play a game or quiz on basic facts, e.g. (a) 72 ÷ 8 = (b) 64 ÷ 8 = (c) 56 ÷ 8 = (d) 32 ÷ 8 = (e) 45 ÷ 5 = (f) 40 ÷ 8 = (g) 36 ÷ 6 = Activity 5: Division with regrouping (20 minutes) 1. Write the following problems on the chalkboard to illustrate place value and regrouping T O H T O 6 2 4 6 2 4 0 2. Use place value box to model 24 with sticks as 2 bundles and 4 single sticks. 3. Call 6 participants/pupils in front and give each a bundle using the sharing method of division. 4. Explain that: This is not possible because 6 cannot divide into 2 or 2 bundles cannot be shared as bundles equally to 6 people. So the two bundles will be regrouped as follows: ♦ Break the bundles to make them single sticks, thus 2 x 10 = 20 and add to 4. ♦ Share them to the 6 pupils, that is, each of them gets 4.
31
5. Also, explain that : In this example, 4 6 24 , there is nothing written in the tens column, but 4 is written in the tens column, but 4 is written in the ones column because the division was possible with ones. 6. Give participants/pupils more work to practise, e.g: 6 54 7 56 7 49 etc Activity 6: Skills in division (20 minutes) In this activity the participants/pupils should identify skills needed to carry out the division operation effectively. These skills are: multiplying (basic facts), use of place value, regrouping and subtraction. 1. Let participants, in groups, solve the following problem and let them identify the skills used to solve it. Mwayi ndi Amini apatsidwa mkaka malita10 kuti agawane mofanana. Kodi aliyense alandira malita angati a mkaka? (Standard 3) 2. Ask them to report their finding during plenary. 3. Give them further practice through the following: a. Mundowa muli madzi malita 20. Pali muyezo wa kapu ya malita awiri. Kodi mungatunge kangati kumaliza madzi onse mundowamo ndi muyezo umenewo? (Standard 3). b. 121 litres 55 millitres of milk was shared equally to 5 children. How much milk did each child get? (Standard 6) c. A filling station had 7015 litres of petrol in a tank. It was allowed to sell only 305 litres a day. In how many days would the petrol last? (Standard 8) d. A school has three drums of water. Each drum contained 250.75 litres. The heat teacher wants to fill t he water into 25 smaller tins. How much water would each tin hold? (Standard 7) 4. Let each group report on the skills during plenary. Summary Teachers should assist pupils to develop the understanding of division with the use of various teaching and learning materials. For pupils to divide numbers easily, they need to master basic facts of division especially those selected for their class. For example, in Standard 3 you would help pupils to learn basic facts involving 5, 6, 7, and 8 as divisors. Regrouping is another concept or skill that is essential in division. When pupils get problems wrong, teachers must identify the cause of failure. It could be that pupils are having problems with some of the skills mentioned. The teacher should, therefore, help the pupils master these skills. Unit assessment 1. Mention three structures/types of division 2. Write down any 5 basic facts of division 3. What is wrong with this arrangement? 8 5 40 ? 4. Mention 4 skills pupils need to solve this problem 5 125 . 5. A car goes 17 km on a litre of petrol. How many litres will be needed for a journey of 612 km?
32
SECTION 3: SCIENCE Unit 1: Common diseases Introduction There are many types of diseases that affect people in our communities. Some of the diseases are fatal while others are curable and can be prevented. Pupils can be assisted to prevent these diseases if they develop an understanding of the ways by which diseases are caused and spread. This unit, therefore, aims, at discussing causes, spread, treatment and prevention of the common diseases. Objectives By the end of this unit, participants should be able to: � name common diseases � discuss signs of some common diseases � explain causes of some common diseases � discuss medicines administered to patients suffering from some common diseases � name some poisonous foods. Suggested teaching and learning resources • Charts •Asprin • Fansidar •Chloroquine • Penicillin • Cough syrup • Traditional herbs nkhadze and kalongonda. Suggested teaching and learning methods • Discussion • Explanation • Demonstration • Role play • Micro teaching Activity 1 (30 minutes) 1. Read this passage: There are several common diseases found in our communities such as malaria and tuberculosis. Some of them have similar signs (what we see in patients) and symptoms (what the patient feels) for example, cholera and dysentery. This activity looks at some of these common diseases. 2. Have several pictures from health centers and hang them on the chalkboard. 3. Organize participants/pupils into groups of 5 to 6 members and ask them to list down probable diseases the pictures of the patients on the charts are suffering from. 4. Using the same pictures let them complete the table below: Disease Signs and symptoms Trachoma Redness and dryness of eyes, …, pain Conjunctivitis Scabies Ringworms Diptheria Whooping Cough Tetanus Typhoid Meningitis Tuberculosis Pneumonia 5. Ask participants/pupils to list down diseases which have similar signs. 6. Ask participants/pupils to discuss causes of the following diseases: HIV/AIDS Malaria Dysentery and cholera Trachoma Conjunctivitis Scabies 7. Thereafter, let participants/pupils report their findings in a plenary
33
Activity 2: (37 minutes) 1. Read carefully the notes below: This activity looks at the drugs which are used in curing some of the common diseases. It also looks at some harmful plant, animals and how they can affect our health. Some plants are harmful to people because they are poisonous. Examples of such plants include some mushrooms nthula and some yams. 2. Organise participants/pupils into groups of 5. 3. Ask them to name diseases which can be treated with the following drugs: Fansidar Aspirin Penicillin Chloroquine Cough syrup Eye ointment 4. Ask them to write down names of plants that are harmful to people 5. Let participants/pupils discuss: a. dangers of handling drugs or eating poisonous plants. b. Dangers of eating food given by unknown persons c. Measures which can be taken when one has eaten or touched poisonous plants 6. Ask participants present their findings 7. Let participants complete the table below for any two dangers of keeping tall shrubs and grass around our houses Animal Danger Snake Mosquitoes Micro teaching: (3 minutes) 1. Divide participants into groups of 6 to prepare for a 20 minute - lesson on absorption and radiation of heat : Activity 4, pages 108 – 109 of Standard 6 Science and Health Education Teacher’s Guide. 2. Ask them to choose one member who will present the lesson on Day 2 of the training session. Summary Common diseases in Malawi include malaria, dysentery, cholera, trachoma and conjunctivitis which are all caused by germs. There are also scabies caused by a mite and bilhazhia which is caused by a worm. Some of the diseases are transmitted by insects , so, getting rid of the insects such as mosquitoes would help to prevent the diseases. Dysentery and cholera are transmitted through food and drink , so practising good environmental and personal hygiene would help as prevention. Prevention is better than cure, but once infected , medicines such as fansidar, chroloquine, cough syrup, aspirin, eye ointment and antibiotics are used for treatment . Unit assessment 1. Give common signs and symptoms of malaria. 2. Explain how you would prevent yourself suffering from dysentery. 3. Why are life skills important for HIV and AIDS prevention?
34
Unit 2: Methods of teaching life skills for HIV and AIDS prevention Introduction This unit focuses on prevention and methods of teaching life skills, HIV and AIDS. HIV and AIDS accounts for many deaths in our communities. Information about the cause and the spread of HIV has filtered down to the grass roots level. However, the majority of people are of different age groups. This is a clear indication that there is lack of behavioural change. It is, therefore, important to integrate it with life skills for HIV and AIDS prevention in order to equip our pupils with necessary life skills. Objectives By the end of this unit, participants should be able to: � list methods of teaching life skills for HIV and AIDS prevention � describe case study as a method of teaching life skills, HIV and AIDS � analyze case studies � write their own case studies � outline specific life skills, hiv and aids messages contained in each case study � use case studies in micro peer lessons on life skills, HIV and AIDS prevention � integrate HIV and AIDS and life skills in a lesson. Suggested teaching and learning resources • Life skills teacher’s guides for stds 2,3,4 and 5 • Pupils’ books for the same classes • Flip charts Suggested teaching and learning methods • Case studies • Group discussions • Micro peer teaching Activity 1: How to use case studies (60 minutes) 1. Read the passage below carefully. Case studies are a better way of teaching as real life situations and experiences are incorporated in it. It requires thorough planning in order to come up with relevant situations to the learners’ experiences and knowledge. Among other points it becomes necessary to consider suitable and appropriate language, use of fictitious names which are familiar to children. 2. Organize the participants/pupils into groups. 3. Ask them to discuss in their different groups points to bear in mind when: a. Planning for case study b. Using the case study 4. Let the participants/pupils report their findings in plenary Activity 2: Using case studies (60 minutes) 1. Read the passage below. Case studies are an effective approach to the teaching of HIV and AIDS prevention. Learners are exposed to real life situations where they are asked to analyze and appreciate how one is found in problems due to peer and adult pressure. The same analysis and appreciation reveal specific life skills that would help them avoid the problems. 2. Organize the participants/pupils into groups of 6 members.
35
3. Ask them to read and analyse the following case study. A sample case study Anjilu is a girl at your school. She is being proposed for love affair by Mr Mpondmatiki who is very rich. Mr Mpondamatiki’s two wives died of AIDS. He encourages her to drink beer and have sex with him but Anjilu is not sure what to do. (From Life skills Teacher’s Guide for Standard 4, page 92) Questions a. What choice does Anjilu have? b. What are the risks taken by each of the following: i. Anjilu? ii. Mr Mpondamatiki? c. What would be the consequences to both Anjilu and Mr Mpondamatiki? d. What advice would you give to: i. Anjilu? ii. Mr Mpondamatiki? 4. Let them answer the questions on the case study. 5. Ask them to come up with relevant life skills that the man and the girl needed in order to deal with the case study. 6. Let them provide feedback to the class on their findings in the same groups, let them develop their own case studies including questions on the following topics: a. Misconceptions and myths about HIV and AIDS b. Resisting peer and adult pressure for sexual intercourse 7. Ask them to exchange their work with another group for critiquing 8. Let them answer the questions and bring up life skills for HIV and AIDS prevention 9. Conduct a feedback session on life skills involved and lessons learned. Summary This unit has dealt with case study as a method of teaching life skills, HIV and AIDS. Case studies describe real life situations or problems that are good for discussions which bring up specific life skills for HIV and AIDS prevention. Therefore, it is important to ensure that case studies must be simple and a reflection of real life situation in order to motivate learners. Unit assessment 1. What is the most reliable means of preventing HIV infection? 2. Why are case studies ideal for teaching and learning Life skills for HIV and AIDS prevention? 3. Describe any one misconception about HIV and AIDS.
36
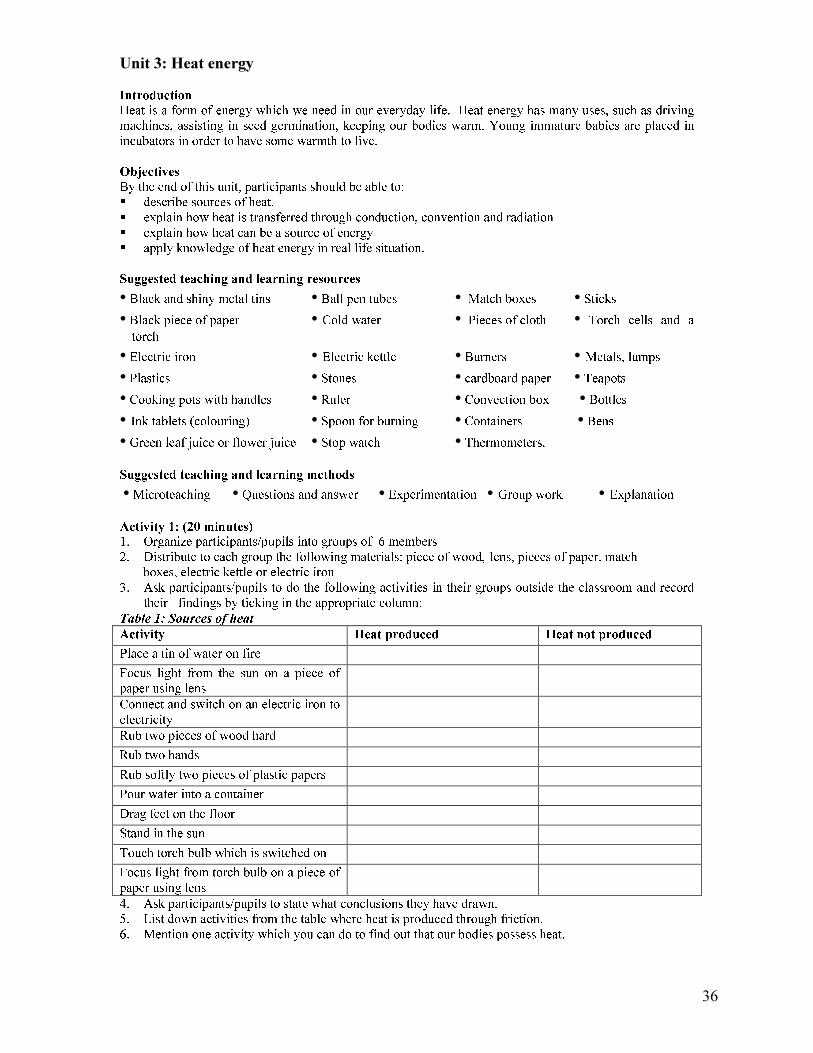
Unit 3: Heat energy Introduction Heat is a form of energy which we need in our everyday life. Heat energy has many uses, such as driving machines, assisting in seed germination, keeping our bodies warm. Young immature babies are placed in incubators in order to have some warmth to live. Objectives By the end of this unit, participants should be able to: � describe sources of heat. � explain how heat is transferred through conduction, convention and radiation � explain how heat can be a source of energy � apply knowledge of heat energy in real life situation. Suggested teaching and learning resources • Black and shiny metal tins • Ball pen tubes • Match boxes • Sticks • Black piece of paper • Cold water • Pieces of cloth • Torch cells and a torch • Electric iron • Electric kettle • Burners • Metals, lumps • Plastics • Stones • cardboard paper • Teapots • Cooking pots with handles • Ruler • Convection box • Bottles • Ink tablets (colouring) • Spoon for burning • Containers • Bens • Green leaf juice or flower juice • Stop watch • Thermometers. Suggested teaching and learning methods • Microteaching • Questions and answer • Experimentation • Group work • Explanation Activity 1: (20 minutes) 1. Organize participants/pupils into groups of 6 members 2. Distribute to each group the following materials: piece of wood, lens, pieces of paper , match boxes, electric kettle or electric iron 3. Ask participants/pupils to do the following activities in their groups outside the classroom and record their findings by ticking in the appropriate column: Table 1: Sources of heat Activity Heat produced Heat not produced Place a tin of water on fire Focus light from the sun on a piece of paper using lens Connect and switch on an electric iron to electricity Rub two pieces of wood hard Rub two hands Rub softly two pieces of plastic papers Pour water into a container Drag feet on the floor Stand in the sun Touch torch bulb which is switched on Focus light from torch bulb on a piece of paper using lens 4. Ask participants/pupils to state what conclusions they have drawn. 5. List down activities from the table where heat is produced through friction. 6. Mention one activity which you can do to find out that our bodies possess heat.
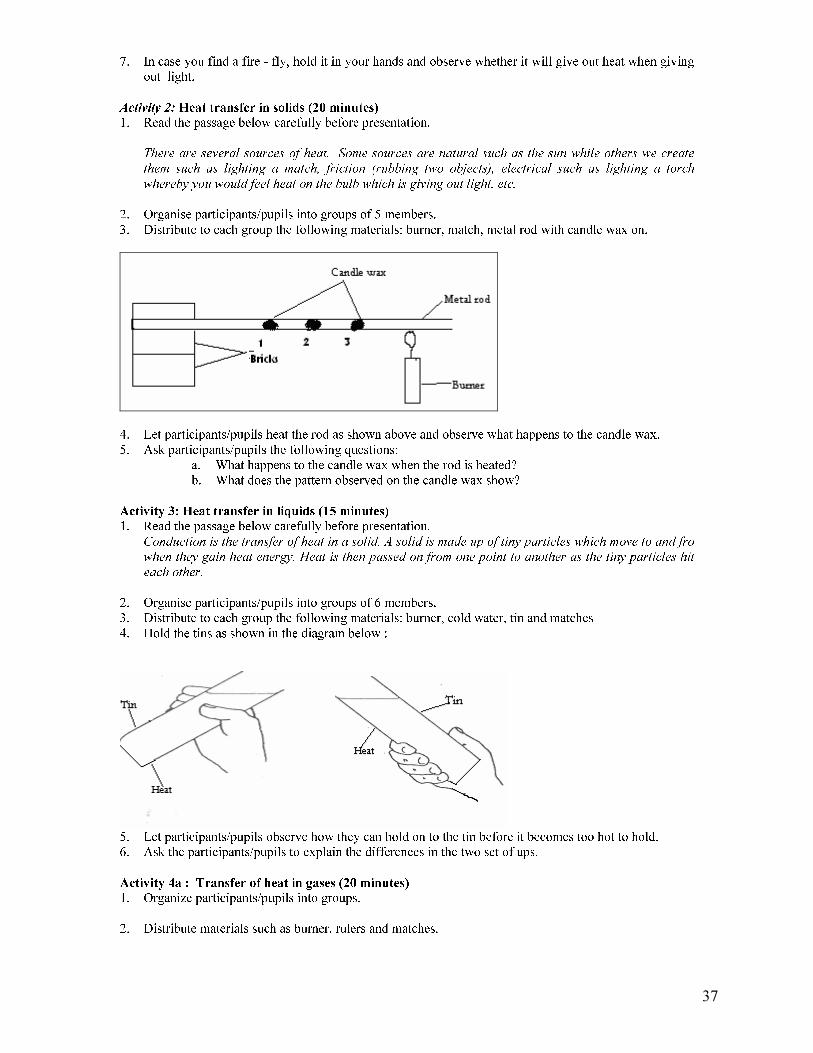
37
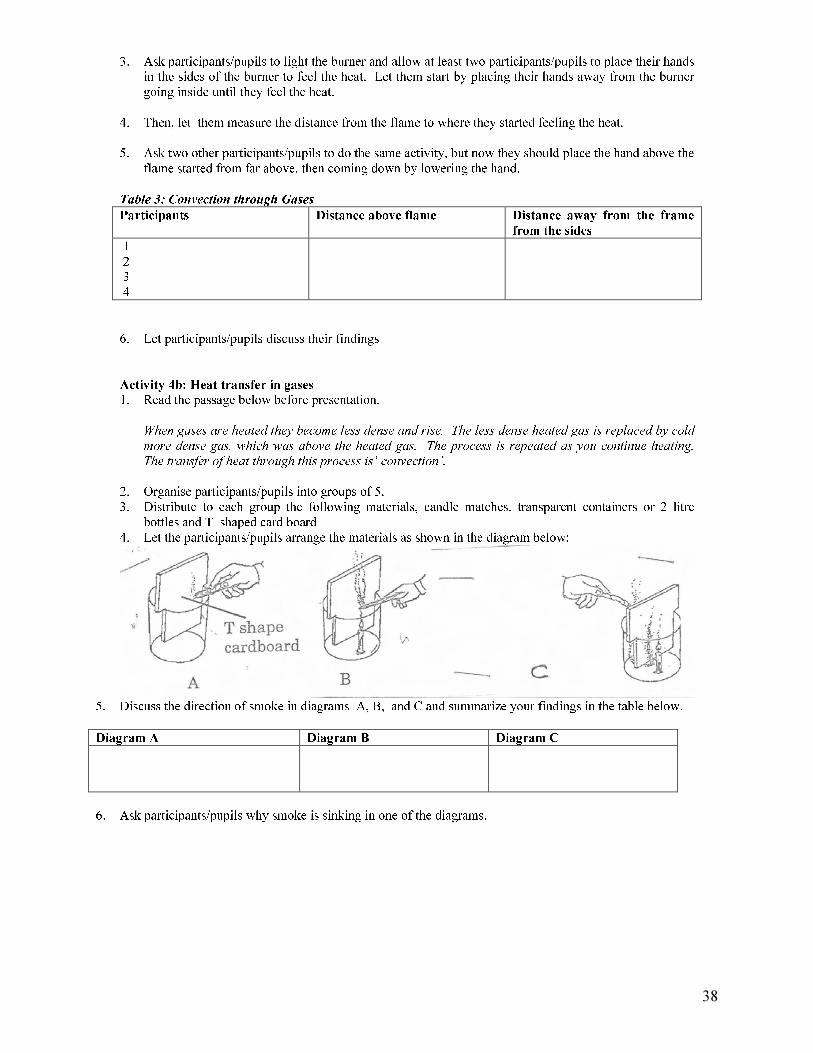
7. In case you find a fire - fly, hold it in your hands and observe whether it will give out heat when giving out light. Activity 2: Heat transfer in solids (20 minutes) 1. Read the passage below carefully before presentation. There are several sources of heat. Some sources are natural such as the sun while others we create them such as lighting a match, friction (rubbing two objects), electrical such as lighting a torch whereby you would feel heat on the bulb which is giving out light, etc. 2. Organise participants/pupils into groups of 5 members. 3. Distribute to each group the following materials: burner, match, metal rod with candle wax on. 4. Let participants/pupils heat the rod as shown above and observe what happens to the candle wax. 5. Ask participants/pupils the following questions: a. What happens to the candle wax when the rod is heated? b. What does the pattern observed on the candle wax show? Activity 3: Heat transfer in liquids (15 minutes) 1. Read the passage below carefully before presentation. Conduction is the transfer of heat in a solid. A solid is made up of tiny particles which move to and fro when they gain heat energy. Heat is then passed on from one point to another as the tiny particles hit each other. 2. Organise participants/pupils into groups of 6 members. 3. Distribute to each group the following materials: burner, cold water, tin and matches 4. Hold the tins as shown in the diagram below : 5. Let participants/pupils observe how they can hold on to the tin before it becomes too hot to hold. 6. Ask the participants/pupils to explain the differences in the two set of ups. Activity 4a : Transfer of heat in gases (20 minutes) 1. Organize participants/pupils into groups. 2. Distribute materials such as burner, rulers and matches.
38
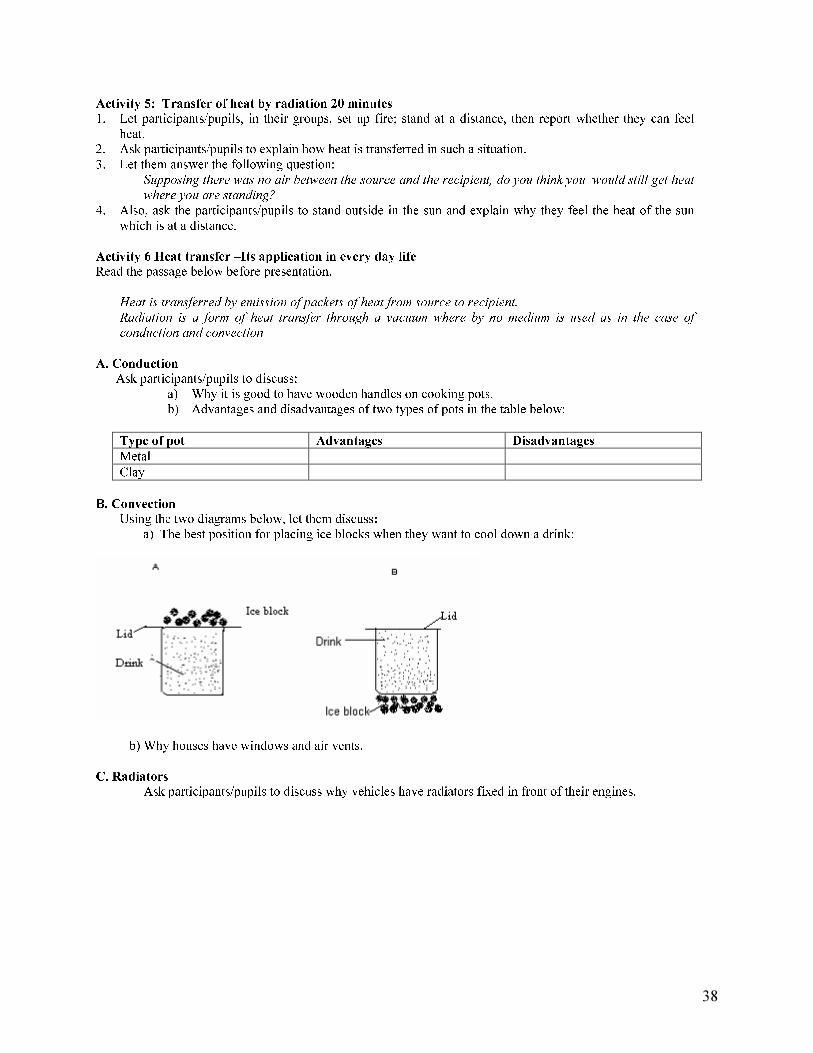
3. Ask participants/pupils to light the burner and allow at least two participants/pupils to place their hands in the sides of the burner to feel the heat. Let them start by placing their hands away from the burner going inside until they feel the heat. 4. Then, let them measure the distance from the flame to where they started feeling the heat. 5. Ask two other participants/pupils to do the same activity, but now they should place the hand above the flame started from far above, then coming down by lowering the hand. Table 3: Convection through Gases Participants Distance above flame Distance away from the frame from the sides 1 2 3 4 6. Let participants/pupils discuss their findings Activity 4b: Heat transfer in gases 1. Read the passage below before presentation. When gases are heated they become less dense and rise. The less dense heated gas is replaced by cold more dense gas, which was above the heated gas. The process is repeated as you continue heating. The transfer of heat through this process is’ convection’. 2. Organise participants/pupils into groups of 5. 3. Distribute to each group the following materials, candle matches. transparent containers or 2 litre bottles and T shaped card board 4. Let the participants/pupils arrange the materials as shown in the diagram below: 5. Discuss the direction of smoke in diagrams A, B, and C and summarize your findings in the table below. Diagram A Diagram B Diagram C 6. Ask participants/pupils why smoke is sinking in one of the diagrams.
38
Activity 5: Transfer of heat by radiation 20 minutes 1. Let participants/pupils, in their groups, set up fire; stand at a distance, then report whether they can feel heat. 2. Ask participants/pupils to explain how heat is transferred in such a situation. 3. Let them answer the following question: Supposing there was no air between the source and the recipient, do you think you would still get heat where you are standing? 4. Also, ask the participants/pupils to stand outside in the sun and explain why they feel the heat of the sun which is at a distance. Activity 6 Heat transfer –Its application in every day life Read the passage below before presentation. Heat is transferred by emission of packets of heat from source to recipient. Radiation is a form of heat transfer through a vacuum where by no medium is used as in the case of conduction and convection A. Conduction Ask participants/pupils to discuss: a) Why it is good to have wooden handles on cooking pots. b) Advantages and disadvantages of two types of pots in the table below: Type of pot Advantages Disadvantages Metal Clay B. Convection Using the two diagrams below, let them discuss: a) The best position for placing ice blocks when they want to cool down a drink: b) Why houses have windows and air vents. C. Radiators Ask participants/pupils to discuss why vehicles have radiators fixed in front of their engines.
39
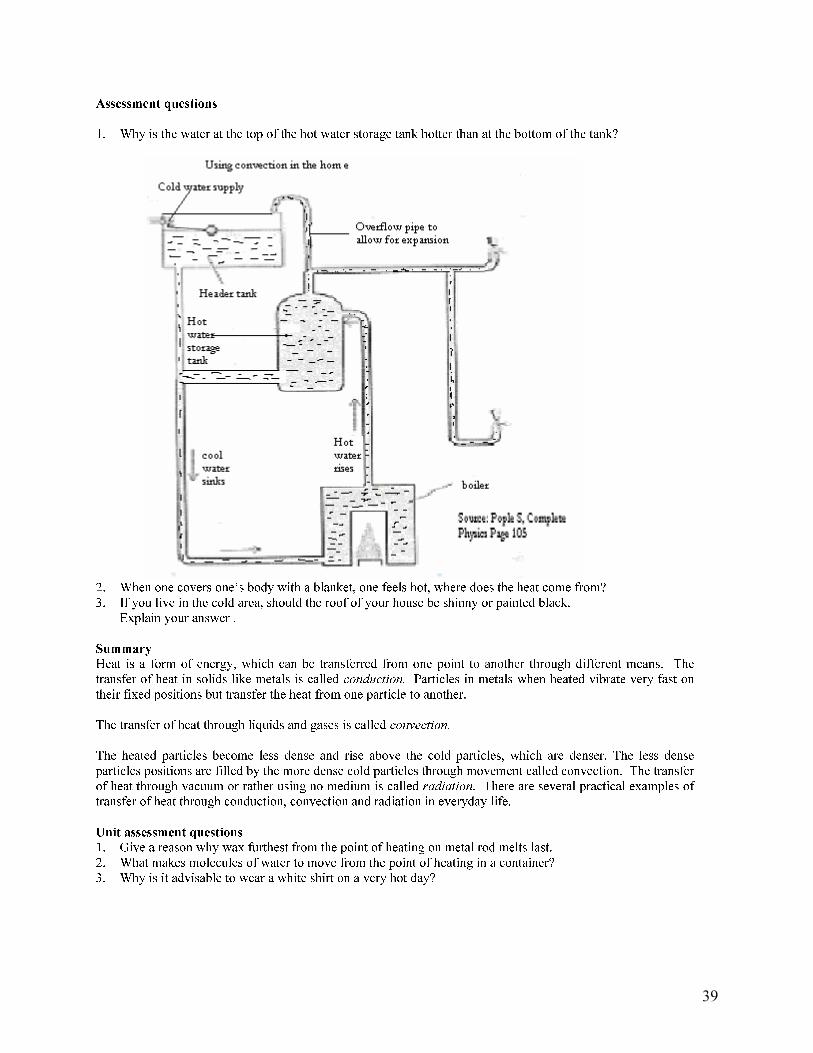
Assessment questions 1. Why is the water at the top of the hot water storage tank hotter than at the bottom of the tank?
2. When one covers one’s body with a blanket, one feels hot, where does the heat come from? 3. If you live in the cold area, should the roof of your house be shinny or painted black. Explain your answer . Summary Heat is a form of energy, which can be transferred from one point to another through different means. The transfer of heat in solids like metals is called conduction. Particles in metals when heated vibrate very fast on their fixed positions but transfer the heat from one particle to another. The transfer of heat through liquids and gases is called convection. The heated particles become less dense and rise above the cold particles, which are denser. The less dense particles positions are filled by the more dense cold particles through movement called convection. The transfer of heat through vacuum or rather using no medium is called radiation. There are several practical examples of transfer of heat through conduction, convection and radiation in everyday life. Unit assessment questions 1. Give a reason why wax furthest from the point of heating on metal rod melts last. 2. What makes molecules of water to move from the point of heating in a container? 3. Why is it advisable to wear a white shirt on a very hot day?

MTTA Cycle 3 Training Handbook, July-August 2005 40
APPENDIX 1: SUGGESTED ANSWERS /RESPONSES Section 1 English Unit 1: Listening and speaking Activity 1: Filing Gaps 7. (a). borrow (b) lend Dialogue 2: Possible substitutions of words Plate – cups, spoons, knives This – that Wash – clean Activity 2: Construction of sentences using demonstrative pronouns and adjectives 2. The words have been used in the sentences as: a. Demonstrative pronoun b. Demonstrative adjective c. Demonstrative pronoun d. Demonstrative adjective e. Demonstrative pronoun 4. Sentences with this, that these and those would be like these • This is not good. (demonstrative Pronoun) • This book is not good. (demonstrative Adjectives) • That is mine. (demonstrative Pronoun) • That house is old. (demonstrative Adjective) • These are enough. (demonstrative Pronoun) • These oranges are sweet. (demonstrative adjective) • Those plants will not grow. (demonstrative Adjective) : Activity 3: Writing a dialogue in groups • Accept any dialogue that is correct and flows. Activity 4: Role playing dialogues in plenary • Participants/pupils role play their dialogues. Assessment questions • Two reasons why dialogues are important are: a. They provide context for introducing and practicing new language items and structures. b. They enhance memory of form and meaning of the structure being taught Unit assessment (1) 1. (a) Borrow and lend (b) Demonstrative pronouns 2. (a) Short and easy to commit to memory (b) Sounds like a real life conversation Arouses interest Flows logically Is based on pupils’ experiences • The steps are: o Write a dialogue on chalkboard o Explain who are speaking o Read the dialogues to class once/twice o Invite different pairs of pupils to read the dialogue o Ask few questions to check pupils’ understanding of the structure being practised.
MTTA Cycle 3 Training Handbook, July-August 2005 41
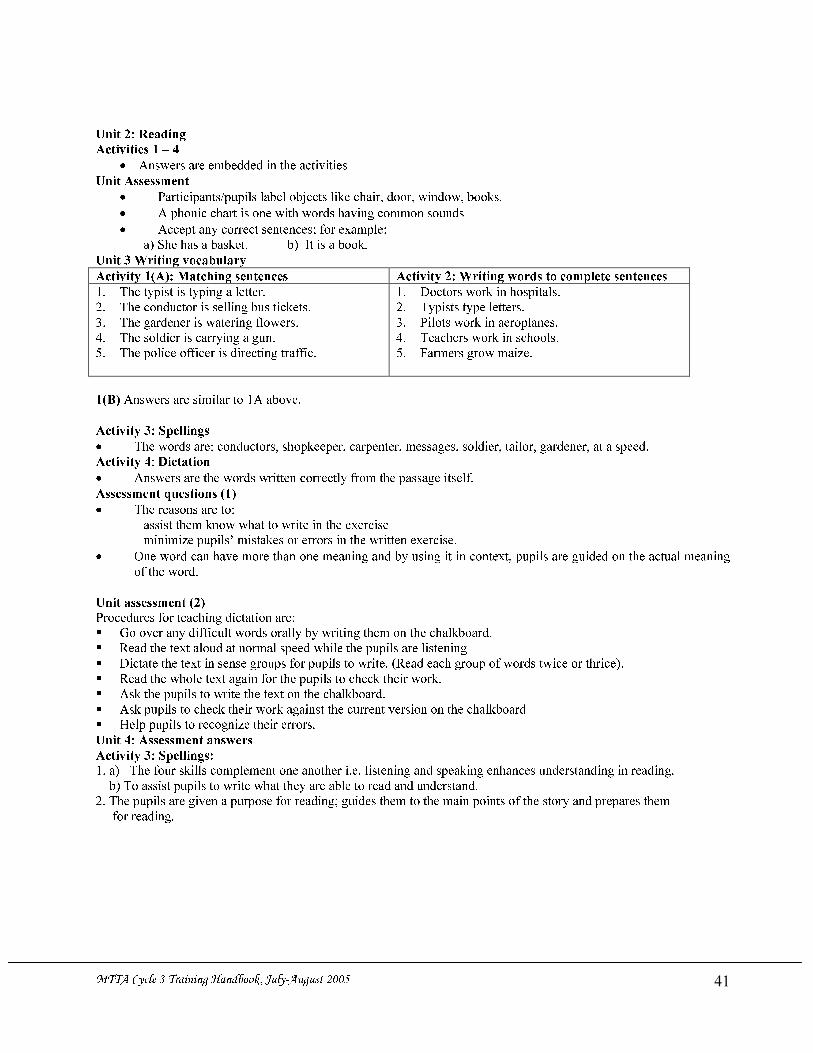
Unit 2: Reading Activities 1 – 4 • Answers are embedded in the activities Unit Assessment • Participants/pupils label objects like chair, door, window, books. • A phonic chart is one with words having common sounds • Accept any correct sentences; for example: a) She has a basket. b) It is a book. Unit 3 Writing vocabulary Activity 1(A): Matching sentences Activity 2: Writing words to complete sentences 1. The typist is typing a letter. 2. The conductor is selling bus tickets. 3. The gardener is watering flowers. 4. The soldier is carrying a gun. 5. The police officer is directing traffic. 1. Doctors work in hospitals. 2. Typists type letters. 3. Pilots work in aeroplanes. 4. Teachers work in schools. 5. Farmers grow maize. 1(B) Answers are similar to 1A above. Activity 3: Spellings • The words are: conductors, shopkeeper, carpenter, messages, soldier, tailor, gardener, at a speed. Activity 4: Dictation • Answers are the words written correctly from the passage itself. Assessment questions (1) • The reasons are to: assist them know what to write in the exercise minimize pupils’ mistakes or errors in the written exercise. • One word can have more than one meaning and by using it in context, pupils are guided on the actual meaning of the word. Unit assessment (2) Procedures for teaching dictation are: � Go over any difficult words orally by writing them on the chalkboard. � Read the text aloud at normal speed while the pupils are listening � Dictate the text in sense groups for pupils to write. (Read each group of words twice or thrice). � Read the whole text again for the pupils to check their work. � Ask the pupils to write the text on the chalkboard. � Ask pupils to check their work against the current version on the chalkboard � Help pupils to recognize their errors. Unit 4: Assessment answers Activity 3: Spellings: 1. a) The four skills complement one another i.e. listening and speaking enhances understanding in reading. b) To assist pupils to write what they are able to read and understand. 2. The pupils are given a purpose for reading; guides them to the main points of the story and prepares them for reading.
MTTA Cycle 3 Training Handbook, July-August 2005 42
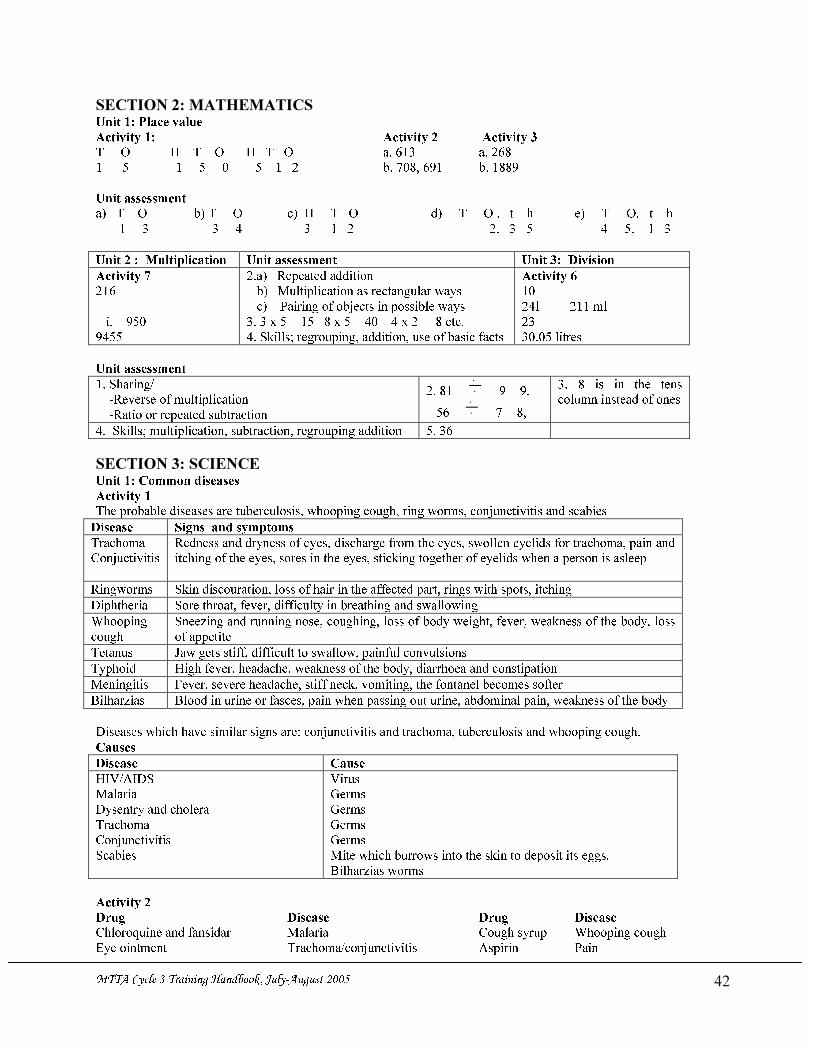
SECTION 2: MATHEMATICS Unit 1: Place value Activity 1: Activity 2 Activity 3 T O H T O H T O a. 613 a. 268 1 5 1 5 0 5 1 2 b. 708, 691 b. 1889 Unit assessment a) T O b) T O c) H T O d) T O . t h e) T O. t h 1 3 3 4 3 1 2 2. 3 5 4 5. 1 3 Unit 2 : Multiplication Unit assessment Unit 3: Division Activity 7 216 i. 950 9455 2.a) Repeated addition b) Multiplication as rectangular ways c) Pairing of objects in possible ways 3. 3 x 5 = 15 8 x 5 = 40 4 x 2 = 8 etc. 4. Skills; regrouping, addition, use of basic facts Activity 6 10 24l 211 ml 23 30.05 litres Unit assessment 1. Sharing/ -Reverse of multiplication -Ratio or repeated subtraction 2. 81 9 = 9, 56 7 = 8, 3. 8 is in the tens column instead of ones 4. Skills; multiplication, subtraction, regrouping addition 5. 36 SECTION 3: SCIENCE Unit 1: Common diseases Activity 1 The probable diseases are tuberculosis, whooping cough, ring worms, conjunctivitis and scabies Disease Signs and symptoms Trachoma Conjuctivitis Redness and dryness of eyes, discharge from the eyes, swollen eyelids for trachoma, pain and itching of the eyes, sores in the eyes, sticking together of eyelids when a person is asleep Ringworms Skin discouration, loss of hair in the affected part, rings with spots, itching Diphtheria Sore throat, fever, difficulty in breathing and swallowing Whooping cough Sneezing and running nose, coughing, loss of body weight, fever, weakness of the body, loss of appetite Tetanus Jaw gets stiff, difficult to swallow, painful convulsions Typhoid High fever, headache, weakness of the body, diarrhoea and constipation Meningitis Fever, severe headache, stiff neck, vomiting, the fontanel becomes softer Bilharzias Blood in urine or fasces, pain when passing out urine, abdominal pain, weakness of the body Diseases which have similar signs are: conjunctivitis and trachoma, tuberculosis and whooping cough. Causes Disease Cause HIV/AIDS Malaria Dysentry and cholera Trachoma Conjunctivitis Scabies Virus Germs Germs Germs Germs Mite which burrows into the skin to deposit its eggs. Bilharzias worms Activity 2 Drug Disease Drug Disease Chloroquine and fansidar Malaria Cough syrup Whooping cough Eye ointment Trachoma/conjunctivitis Aspirin Pain
MTTA Cycle 3 Training Handbook, July-August 2005 43
Penicillin Cough/venereal disease Examples of plants that are harmful to people: some mushrooms some cucumbers some flowers some types of yams, mpama nkhadze nthula chitedze kalongonda (a) Dangers of handling or eating poisonous plants: i. itching on the skin egg chitedze ii. death egg, some mushrooms, yams if eaten (b) Dangers of eating food given by unknown persons: i. poisoning of the body e.g. sweets ii. prolonged sleepy state(drowsy state) iii. death ( c) Measures which can be taken when someone has eaten or touched a poisonous plant: i. Apply chilungumwamba on skin affected by chitedze ii. washing with adequate water. iii. Drink milk if swallowed the poison plant iv. Rash to the hospital v. Drink a saturated salt solution to swift on vomiting if the poison is swallowed Items Danger Snake Mosquitoes Bite people Spread Malaria Unit 2: Methods of teaching HIV and AIDS prevention Activity 1: How to use case studies Points to bear in mind when planning for a case study: (Add the following if not brought up by the participants) • Create a situation that is relevant to the pupils • Use familiar names and places or events • Ensure that the case study is within pupils’ knowledge and experiences • Avoid using real names of people known to the pupils • Use appropriate and suitable language to the pupils • Write the case study • Write questions on lessons learnt and life skills required to deal with the situation in the case study Points to bear in mind when using a case study: (Add the following if not brought up by the participants) • Explain the group task clearly • Organize them into groups of 6 members • Provide them with written case studies on paper or in the pupils text books • Set a reasonable lengthy period of time for them to read, discuss it and answer the questions. • Ask them to give a summary of the case study if they worked on different case studies • Ask them questions that guide pupils on lessons learnt and related life skills Activity 2: Using the case study Possible responses to the case study question • Anjilu could say no to beer drinking and sex or risk contracting HIV and AIDS by accepting sex: a) Anjilu risks contracting HIV b) Mpondamatiki risks worsening his HIV/AIDS status • HIV would infect Anjilu. • Mpondamatiki would die a) Anjilu would be advised to turn down Mpondamatiki’s proposal and concentrate On school. b) Mpondamatiki would be advised to abstain from sexual activities and stop beer drinking so that he stays longer
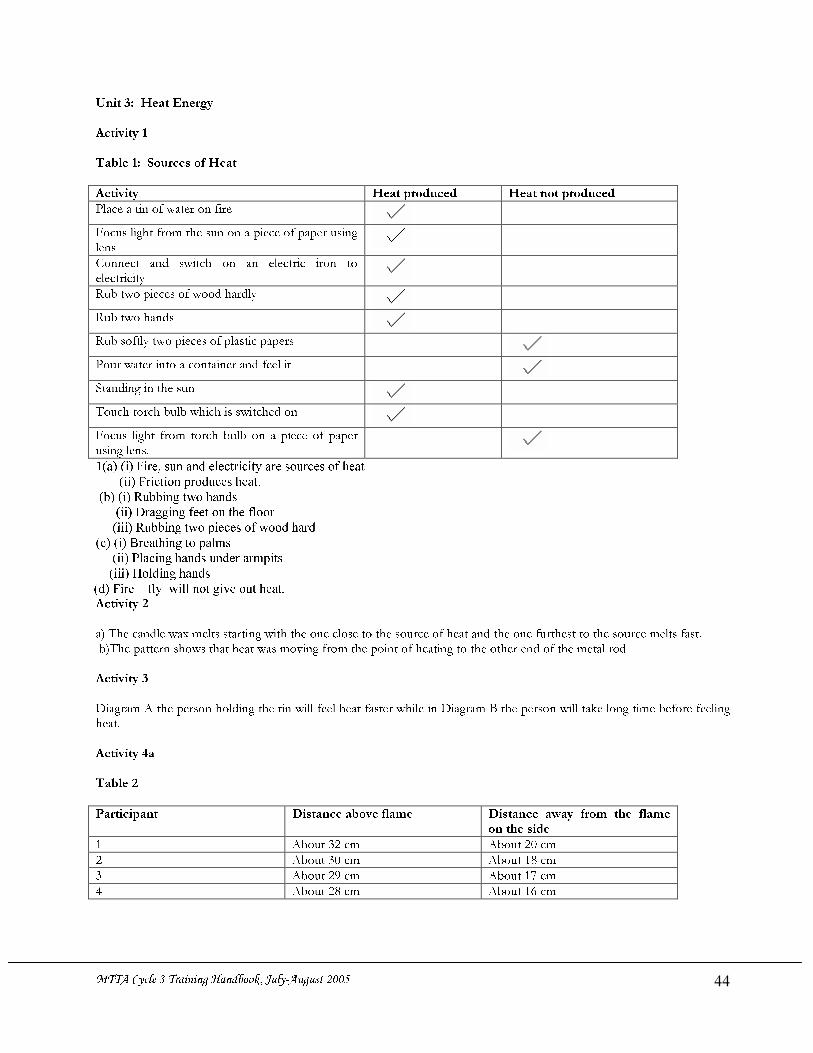
MTTA Cycle 3 Training Handbook, July-August 2005 44
Unit 3: Heat Energy Activity 1 Table 1: Sources of Heat Activity Heat produced Heat not produced Place a tin of water on fire Focus light from the sun on a piece of paper using lens Connect and switch on an electric iron to electricity Rub two pieces of wood hardly Rub two hands Rub softly two pieces of plastic papers Pour water into a container and feel it Standing in the sun Touch torch bulb which is switched on Focus light from torch bulb on a piece of paper using lens. 1(a) (i) Fire, sun and electricity are sources of heat (ii) Friction produces heat. (b) (i) Rubbing two hands (ii) Dragging feet on the floor (iii) Rubbing two pieces of wood hard (c) (i) Breathing to palms (ii) Placing hands under armpits (iii) Holding hands (d) Fire – fly will not give out heat. Activity 2 a) The candle wax melts starting with the one close to the source of heat and the one furthest to the source melts fast. b)The pattern shows that heat was moving from the point of heating to the other end of the metal rod Activity 3 Diagram A the person holding the tin will feel heat faster while in Diagram B the person will take long time before feeling heat. Activity 4a Table 2 Participant Distance above flame Distance away from the flame on the side 1 About 32 cm About 20 cm 2 About 30 cm About 18 cm 3 About 29 cm About 17 cm 4 About 28 cm About 16 cm
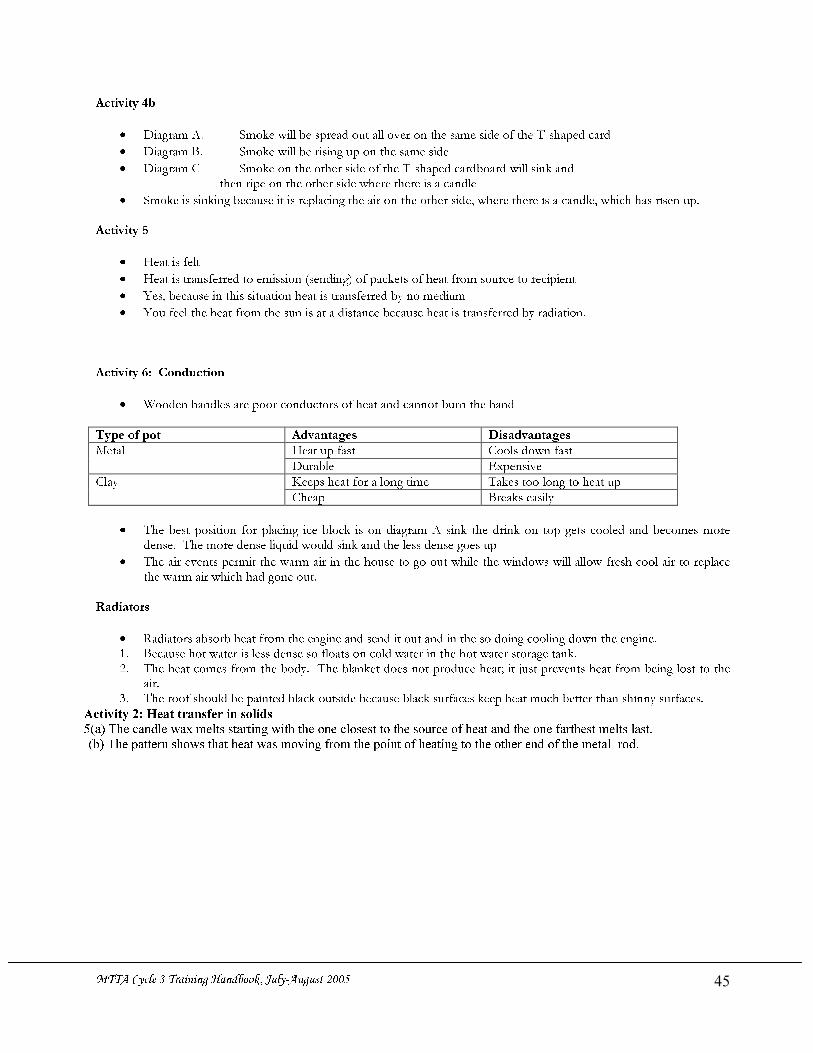
MTTA Cycle 3 Training Handbook, July-August 2005 45
Activity 4b • Diagram A. Smoke will be spread out all over on the same side of the T-shaped card • Diagram B. Smoke will be rising up on the same side • Diagram C Smoke on the other side of the T-shaped cardboard will sink and then ripe on the other side where there is a candle • Smoke is sinking because it is replacing the air on the other side, where there is a candle, which has risen up. Activity 5 • Heat is felt • Heat is transferred to emission (sending) of packets of heat from source to recipient • Yes, because in this situation heat is transferred by no medium • You feel the heat from the sun is at a distance because heat is transferred by radiation. Activity 6: Conduction • Wooden handles are poor conductors of heat and cannot burn the hand Type of pot Advantages Disadvantages Heat up fast Cools down fast Metal Durable Expensive Keeps heat for a long time Takes too long to heat up Clay Cheap Breaks easily • The best position for placing ice block is on diagram A sink the drink on top gets cooled and becomes more dense. The more dense liquid would sink and the less dense goes up • The air events permit the warm air in the house to go out while the windows will allow fresh cool air to replace the warm air which had gone out. Radiators • Radiators absorb heat from the engine and send it out and in the so doing cooling down the engine. 1. Because hot water is less dense so floats on cold water in the hot water storage tank. 2. The heat comes from the body. The blanket does not produce heat; it just prevents heat from being lost to the air. 3. The roof should be painted black outside because black surfaces keep heat much better than shinny surfaces. Activity 2: Heat transfer in solids 5(a) The candle wax melts starting with the one closest to the source of heat and the one farthest melts last. (b) The pattern shows that heat was moving from the point of heating to the other end of the metal rod.
MTTA Cycle 3 Training Handbook, July-August 2005 46
APPENDIX 2: REFERENCES Section 1: English 1. Allison McClelland, (1997) Teaching Children to Read and Write, Toronto Scarborough Board of 2. Education, page 2. 3. Chimombo M. (Mrs), et al (2003) Activities with English Teacher’s Guide for Standard 2, Domasi MIE, pages 158,162 ff 4. Chilora HG, et al (1995) Activities with English Pupils’ Book for Standard 5, Domasi, MIE, page 6 5. Macmillan, 1996, Activities with English Pupil’s Book for Standard 3, Blantyre, Malawi 6. Macmillan, 1996, Activities with English Pupil’s Book for Standard 6, page 33, Blantyre, Malawi 7. MIE, 1994, Activities with English Teacher’s Guide for Standard 3, Domasi, Malawi 8. MIE, 1994, Activities with English Teacher’s Guide for Standard 6, Domasi, Malawi 9. T.D.U., 1998 Student Teacher’s Handbook, No. 2, Malawi Institute of Education, Zomba Section 2: Mathematics 1. Chamdimba, S.V. et al (1994) Mathematics Teachers’ Guide for Standard 3: Domasi: Malawi Institute of Education 2. Chamdimba, S.V. et al (1994) Mathematics Pupils Book for Standard 3: Domasi: Malawi Institute of Education 3. Chirambo, EZ et al (1996) Mathematics Pupils’ Book for Standard 7, Domasi: Malawi Institute of Education 4. (1996) Mathematics Teachers’ Guide for Standard 7, Domasi: Malawi Institute of Education 5. Hau, S A et al. (1995) Mathematics Pupils’ Book for Standard 6, Domasi: Malawi Institute of Education 6. .(1995) Mathematics Teachers’ Guide for Standard 6, Domasi: Malawi Institute of Education 7. Haylock et al (1995) Mathematics Every Elementary Teacher should know: Toronto: Trifolian Books Inc. 8. Makillip William et al (1978) Mathematics Instruction in the Elementary Grades, Morristown , N J Silver Burdett 9. Paling D and Waddle M E (1980) Comprehensive Mathematics: Oxford: Oxford University Press. Section 3: Science 1. Banda T.J.K., Bwanali T.C. et.al. (1999) Life Skills Teachers Guide for Standard 4, Domasi, Malawi, Malawi Institute of Education 2. ___ Moyo Wabwino, Buku la Sitandade 4, Domasi, Malawi, Malawi Institute of Education. 3. Chilongozi, E.A., Feza, B.A., Gonthi, H.F. et.al. (1994) Malawi Primary Education General Studies Teachers Guide fro-Standard 3. Domasi, Malawi Institute of Education 4. Gonthi, H.F., Mhlanga A.S., Makulumiza Nkhoma, W.K. (2003) Science and Health Teachers Guide for Standard 5, Domasi, Malawi, Malawi Institute of Education 5. -. (2003) Science and Health Teachers Guide for Standard 5, Domasi, Malawi, Malawi Institute of Education 6. Kampira, L.J. Mshanga, J.I. Mwanza, A.L.D. (2001) Studies in Physical Science 2, Malawi Long man 7. Mbingwa D. and M. Chavunya (2002) HIV/AIDS in Schools Initiative: Peer Education Manual (Chichewa version) (Unpublished) 8. Mbingwa D. and M. Chavunya (2002) HIV/AIDS in Schools Initiative: Teachers manual (Unpublished) 9. Ministry of Education and Culture (1992) Malawi Primary School Teaching Syllabus: Science and Health Education: Standard 5-8 Domasi, Malawi 10. Teacher Development Unit (1998) Students Teachers Handbook 3, Domasi, Malawi, Malawi Institute of Education 11. Usher, N; Brook D; (1997) Physical Science: An Introductory course; England, Long man 12. Namathaka L. teal. (2000) Teacher Training Resource Handbook: Innovative approach to teaching and learning, Save the Children: Save the Children (US) Education Program, Malawi 13. People Stephen (1999) Complete Physics, Oxford, OUP
Related Documents


