Redbooks Front cover The Virtualization Cookbook for IBM z Systems Volume 2: Red Hat Enterprise Linux 7.1 Servers Lydia Parziale Berthold Gunreben Filipe Miranda Paul W Novak Ken Werner

Welcome message from author
This document is posted to help you gain knowledge. Please leave a comment to let me know what you think about it! Share it to your friends and learn new things together.
Transcript

Redbooks
Front cover
The Virtualization Cookbook for IBM z Systems Volume 2:Red Hat Enterprise Linux 7.1 Servers
Lydia Parziale
Berthold Gunreben
Filipe Miranda
Paul W Novak
Ken Werner


International Technical Support Organization
The Virtualization Cookbook for IBM z Systems Volume 2: Red Hat Enterprise Linux 7.1 Servers
August 2015
SG24-8303-00

© Copyright International Business Machines Corporation 2015. All rights reserved.Note to U.S. Government Users Restricted Rights -- Use, duplication or disclosure restricted by GSA ADP ScheduleContract with IBM Corp.
First Edition (August 2015)
This edition applies to Version 6, Release 3 of IBM z/VM, and Red Hat Enterprise Linux 7.1 Servers,
Note: Before using this information and the product it supports, read the information in “Notices” on page vii.

Contents
Notices . . . . . . . . . . . . . . . . . . . . . . . . . . . . . . . . . . . . . . . . . . . . . . . . . . . . . . . . . . . . . . . . . viiTrademarks . . . . . . . . . . . . . . . . . . . . . . . . . . . . . . . . . . . . . . . . . . . . . . . . . . . . . . . . . . . . . viii
IBM Redbooks promotions . . . . . . . . . . . . . . . . . . . . . . . . . . . . . . . . . . . . . . . . . . . . . . . . . ix
Preface . . . . . . . . . . . . . . . . . . . . . . . . . . . . . . . . . . . . . . . . . . . . . . . . . . . . . . . . . . . . . . . . . xiDescription of the volumes in this series . . . . . . . . . . . . . . . . . . . . . . . . . . . . . . . . . . . . . . . . xiiConventions . . . . . . . . . . . . . . . . . . . . . . . . . . . . . . . . . . . . . . . . . . . . . . . . . . . . . . . . . . . . . . xii
Font conventions that are used in this book . . . . . . . . . . . . . . . . . . . . . . . . . . . . . . . . . . . xiiCommand conventions that are used in this book . . . . . . . . . . . . . . . . . . . . . . . . . . . . . xiii
Operating system releases that are used in this book . . . . . . . . . . . . . . . . . . . . . . . . . . . . . xiiiAuthors. . . . . . . . . . . . . . . . . . . . . . . . . . . . . . . . . . . . . . . . . . . . . . . . . . . . . . . . . . . . . . . . . xiiiSpecial thanks . . . . . . . . . . . . . . . . . . . . . . . . . . . . . . . . . . . . . . . . . . . . . . . . . . . . . . . . . . . xivNow you can become a published author, too! . . . . . . . . . . . . . . . . . . . . . . . . . . . . . . . . . . .xvComments welcome. . . . . . . . . . . . . . . . . . . . . . . . . . . . . . . . . . . . . . . . . . . . . . . . . . . . . . . .xvStay connected to IBM Redbooks . . . . . . . . . . . . . . . . . . . . . . . . . . . . . . . . . . . . . . . . . . . . xvi
Summary of changes . . . . . . . . . . . . . . . . . . . . . . . . . . . . . . . . . . . . . . . . . . . . . . . . . . . . . xviiSummary of changes in this book . . . . . . . . . . . . . . . . . . . . . . . . . . . . . . . . . . . . . . . . . . . . xvii
Part 1. Red Hat Enterprise Linux 7.1 Servers. . . . . . . . . . . . . . . . . . . . . . . . . . . . . . . . . . . . . . . . . . . . . . . 1
Chapter 1. Install Red Hat Enterprise Linux on LNXADMIN . . . . . . . . . . . . . . . . . . . . . . 31.1 Install the Linux administration system . . . . . . . . . . . . . . . . . . . . . . . . . . . . . . . . . . . . . . 4
1.1.1 Prepare RHEL 7.1 bootstrap files for LNXADMIN. . . . . . . . . . . . . . . . . . . . . . . . . . 41.1.2 Install RHEL 7.1 . . . . . . . . . . . . . . . . . . . . . . . . . . . . . . . . . . . . . . . . . . . . . . . . . . . 71.1.3 Stage 2 of the RHEL 7.1 installation . . . . . . . . . . . . . . . . . . . . . . . . . . . . . . . . . . . . 81.1.4 Boot your new Linux system from disk . . . . . . . . . . . . . . . . . . . . . . . . . . . . . . . . . 111.1.5 Set up the data DASD disk after the installation process . . . . . . . . . . . . . . . . . . . 11
1.2 Configure the Linux administration system . . . . . . . . . . . . . . . . . . . . . . . . . . . . . . . . . . 151.2.1 Enable swap on virtual disks (VDISKs). . . . . . . . . . . . . . . . . . . . . . . . . . . . . . . . . 151.2.2 Copy the RHEL 7.1 installation tree to LNXADMIN . . . . . . . . . . . . . . . . . . . . . . . 161.2.3 Configure the yum DVD repository . . . . . . . . . . . . . . . . . . . . . . . . . . . . . . . . . . . . 161.2.4 Configure vsftpd . . . . . . . . . . . . . . . . . . . . . . . . . . . . . . . . . . . . . . . . . . . . . . . . . . 171.2.5 Configure IUCV Linux Terminal Server. . . . . . . . . . . . . . . . . . . . . . . . . . . . . . . . . 181.2.6 Configure kickstart . . . . . . . . . . . . . . . . . . . . . . . . . . . . . . . . . . . . . . . . . . . . . . . . 201.2.7 Configure the Virtual Network Computing (VNC) server. . . . . . . . . . . . . . . . . . . . 231.2.8 Copy the files that are associated with this book . . . . . . . . . . . . . . . . . . . . . . . . . 241.2.9 Reboot the system . . . . . . . . . . . . . . . . . . . . . . . . . . . . . . . . . . . . . . . . . . . . . . . . 25
Chapter 2. Automated Red Hat Enterprise Linux installations by using kickstart . . . 272.1 Configure LINUX1 for kickstart by using emulated DASD devices . . . . . . . . . . . . . . . . 282.2 Configure LINUX2 for kickstart by using Fibre Channel Protocol devices . . . . . . . . . . 29
2.2.1 How to IPL Small Computer System Interface over FCP (LINUX2) . . . . . . . . . . . 32
Chapter 3. Service Red Hat Enterprise Linux with Red Hat Customer Portal . . . . . . . 373.1 Register your RHEL system with the Red Hat Customer Portal by using
subscription-manager . . . . . . . . . . . . . . . . . . . . . . . . . . . . . . . . . . . . . . . . . . . . . . . . . . 383.2 Using yum . . . . . . . . . . . . . . . . . . . . . . . . . . . . . . . . . . . . . . . . . . . . . . . . . . . . . . . . . . . 40
© Copyright IBM Corp. 2015. All rights reserved. iii

Part 2. Other topics. . . . . . . . . . . . . . . . . . . . . . . . . . . . . . . . . . . . . . . . . . . . . . . . . . . . . . . . . . . . . . . . . . . 43
Chapter 4. Working with disks . . . . . . . . . . . . . . . . . . . . . . . . . . . . . . . . . . . . . . . . . . . . . 454.1 Add disk space to virtual machines. . . . . . . . . . . . . . . . . . . . . . . . . . . . . . . . . . . . . . . . 46
4.1.1 Make new minidisks or count key data DASD available in Red Hat Enterprise Linux 7.1. . . . . . . . . . . . . . . . . . . . . . . . . . . . . . . . . . . . . . . . . . . . . . . . . . . . . . . . . . . . . 46
4.1.2 Make new emulated DASD available in Red Hat Enterprise Linux 7.1. . . . . . . . . 474.1.3 Make a new zFCP LUN available in Red Hat Enterprise Linux 7.1 . . . . . . . . . . . 47
4.2 Add a logical volume . . . . . . . . . . . . . . . . . . . . . . . . . . . . . . . . . . . . . . . . . . . . . . . . . . . 494.2.1 Create a logical volume and file system . . . . . . . . . . . . . . . . . . . . . . . . . . . . . . . . 494.2.2 Update the file system table . . . . . . . . . . . . . . . . . . . . . . . . . . . . . . . . . . . . . . . . . 52
4.3 Extend an existing logical volume . . . . . . . . . . . . . . . . . . . . . . . . . . . . . . . . . . . . . . . . . 534.4 Moving a physical volume . . . . . . . . . . . . . . . . . . . . . . . . . . . . . . . . . . . . . . . . . . . . . . . 56
Chapter 5. Monitor z/VM and Linux . . . . . . . . . . . . . . . . . . . . . . . . . . . . . . . . . . . . . . . . . 595.1 Use basic z/VM commands. . . . . . . . . . . . . . . . . . . . . . . . . . . . . . . . . . . . . . . . . . . . . . 60
5.1.1 Use the INDICATE command . . . . . . . . . . . . . . . . . . . . . . . . . . . . . . . . . . . . . . . . 605.1.2 Use other basic commands. . . . . . . . . . . . . . . . . . . . . . . . . . . . . . . . . . . . . . . . . . 62
5.2 IBM z/VM Performance Toolkit . . . . . . . . . . . . . . . . . . . . . . . . . . . . . . . . . . . . . . . . . . . 635.2.1 Configure Performance Toolkit for VM . . . . . . . . . . . . . . . . . . . . . . . . . . . . . . . . . 645.2.2 Configure web browser support . . . . . . . . . . . . . . . . . . . . . . . . . . . . . . . . . . . . . . 655.2.3 Configure PERFSVM . . . . . . . . . . . . . . . . . . . . . . . . . . . . . . . . . . . . . . . . . . . . . . 665.2.4 Start IBM Performance Toolkit for VM . . . . . . . . . . . . . . . . . . . . . . . . . . . . . . . . . 695.2.5 Use IBM Performance Toolkit for VM . . . . . . . . . . . . . . . . . . . . . . . . . . . . . . . . . . 69
5.3 Collect and use raw CP monitor data . . . . . . . . . . . . . . . . . . . . . . . . . . . . . . . . . . . . . . 725.3.1 Collect CP monitor data . . . . . . . . . . . . . . . . . . . . . . . . . . . . . . . . . . . . . . . . . . . . 725.3.2 Use CP monitor data. . . . . . . . . . . . . . . . . . . . . . . . . . . . . . . . . . . . . . . . . . . . . . . 74
5.4 Monitor Linux performance and troubleshooting. . . . . . . . . . . . . . . . . . . . . . . . . . . . . . 755.4.1 Monitor Linux performance from z/VM . . . . . . . . . . . . . . . . . . . . . . . . . . . . . . . . . 765.4.2 Monitor Linux performance from inside Linux . . . . . . . . . . . . . . . . . . . . . . . . . . . . 77
Chapter 6. Configure Linux for cloning. . . . . . . . . . . . . . . . . . . . . . . . . . . . . . . . . . . . . . 816.1 Create a golden image for cloning . . . . . . . . . . . . . . . . . . . . . . . . . . . . . . . . . . . . . . . . 826.2 Clone the golden image by using DirMaint . . . . . . . . . . . . . . . . . . . . . . . . . . . . . . . . . . 826.3 Send the configuration update to the cloned system . . . . . . . . . . . . . . . . . . . . . . . . . . 836.4 IPL the cloned system. . . . . . . . . . . . . . . . . . . . . . . . . . . . . . . . . . . . . . . . . . . . . . . . . . 84
Chapter 7. Working with systemd . . . . . . . . . . . . . . . . . . . . . . . . . . . . . . . . . . . . . . . . . . 857.1 Getting started with systemd. . . . . . . . . . . . . . . . . . . . . . . . . . . . . . . . . . . . . . . . . . . . . 867.2 Using systemd units . . . . . . . . . . . . . . . . . . . . . . . . . . . . . . . . . . . . . . . . . . . . . . . . . . . 86
7.2.1 Managing services . . . . . . . . . . . . . . . . . . . . . . . . . . . . . . . . . . . . . . . . . . . . . . . . 867.2.2 Managing systemd target units . . . . . . . . . . . . . . . . . . . . . . . . . . . . . . . . . . . . . . . 89
7.3 Working with the systemd journal . . . . . . . . . . . . . . . . . . . . . . . . . . . . . . . . . . . . . . . . . 907.3.1 Getting started with the journal . . . . . . . . . . . . . . . . . . . . . . . . . . . . . . . . . . . . . . . 907.3.2 Viewing the journal . . . . . . . . . . . . . . . . . . . . . . . . . . . . . . . . . . . . . . . . . . . . . . . . 917.3.3 Filtering the journal . . . . . . . . . . . . . . . . . . . . . . . . . . . . . . . . . . . . . . . . . . . . . . . . 92
7.4 System boot process. . . . . . . . . . . . . . . . . . . . . . . . . . . . . . . . . . . . . . . . . . . . . . . . . . . 937.5 Analyzing Linux instances that use systemd. . . . . . . . . . . . . . . . . . . . . . . . . . . . . . . . . 93
7.5.1 Retrieving performance statistics . . . . . . . . . . . . . . . . . . . . . . . . . . . . . . . . . . . . . 937.5.2 Retrieving information about unit dependencies . . . . . . . . . . . . . . . . . . . . . . . . . . 95
Chapter 8. Miscellaneous helpful information . . . . . . . . . . . . . . . . . . . . . . . . . . . . . . . . 978.1 Rescue a Linux system . . . . . . . . . . . . . . . . . . . . . . . . . . . . . . . . . . . . . . . . . . . . . . . . . 98
8.1.1 Initrd shell and systemd targets . . . . . . . . . . . . . . . . . . . . . . . . . . . . . . . . . . . . . . 98
iv The Virtualization Cookbook for IBM z Systems Volume 2: Red Hat Enterprise Linux 7.1 Servers

8.1.2 Enter a rescue environment mode with RHEL . . . . . . . . . . . . . . . . . . . . . . . . . . 1018.2 Set up Memory Hotplugging . . . . . . . . . . . . . . . . . . . . . . . . . . . . . . . . . . . . . . . . . . . . 1058.3 Use the cpuplugd service . . . . . . . . . . . . . . . . . . . . . . . . . . . . . . . . . . . . . . . . . . . . . . 108
8.3.1 Determine the virtual CPUs that are used. . . . . . . . . . . . . . . . . . . . . . . . . . . . . . 1088.3.2 Generating a workload to demonstrate cpuplugd . . . . . . . . . . . . . . . . . . . . . . . . 1108.3.3 Setting memory sizes with cpuplugd. . . . . . . . . . . . . . . . . . . . . . . . . . . . . . . . . . 112
8.4 Hardware cryptographic support for OpenSSH with Red Hat Enterprise Linux 7.1 . . 1138.5 X Window System . . . . . . . . . . . . . . . . . . . . . . . . . . . . . . . . . . . . . . . . . . . . . . . . . . . . 117
8.5.1 VNC server . . . . . . . . . . . . . . . . . . . . . . . . . . . . . . . . . . . . . . . . . . . . . . . . . . . . . 1178.5.2 Using embedded SSH to forward X with Red Hat Enterprise Linux . . . . . . . . . . 118
8.6 Set up the IUCV Linux Terminal Server . . . . . . . . . . . . . . . . . . . . . . . . . . . . . . . . . . . 1198.6.1 Red Hat Enterprise Linux 7.1 configuration for IUCV Linux Terminal Server . . . 119
8.7 Issue z/VM CP commands from Linux . . . . . . . . . . . . . . . . . . . . . . . . . . . . . . . . . . . . 1198.8 Access z/VM CMS disks from Linux . . . . . . . . . . . . . . . . . . . . . . . . . . . . . . . . . . . . . . 120
8.8.1 Use the CMS file system tools . . . . . . . . . . . . . . . . . . . . . . . . . . . . . . . . . . . . . . 1208.8.2 Mount a CMS disk by using cmsfs-fuse . . . . . . . . . . . . . . . . . . . . . . . . . . . . . . . 121
8.9 Network File System mounting the LNXADMIN SFS directory from Linux . . . . . . . . . 122
Part 3. Appendixes . . . . . . . . . . . . . . . . . . . . . . . . . . . . . . . . . . . . . . . . . . . . . . . . . . . . . . . . . . . . . . . . . . 123
Appendix A. Reference sheets, cheat sheets, and blank worksheets . . . . . . . . . . . . 125Important z/VM files . . . . . . . . . . . . . . . . . . . . . . . . . . . . . . . . . . . . . . . . . . . . . . . . . . . . . . 126Cheat sheets . . . . . . . . . . . . . . . . . . . . . . . . . . . . . . . . . . . . . . . . . . . . . . . . . . . . . . . . . . . 126
XEDIT cheat sheet . . . . . . . . . . . . . . . . . . . . . . . . . . . . . . . . . . . . . . . . . . . . . . . . . . . . 126A vi cheat sheet . . . . . . . . . . . . . . . . . . . . . . . . . . . . . . . . . . . . . . . . . . . . . . . . . . . . . . 128DirMaint cheat sheet . . . . . . . . . . . . . . . . . . . . . . . . . . . . . . . . . . . . . . . . . . . . . . . . . . . 128
Blank planning worksheet . . . . . . . . . . . . . . . . . . . . . . . . . . . . . . . . . . . . . . . . . . . . . . . . . 129IBM Shopz . . . . . . . . . . . . . . . . . . . . . . . . . . . . . . . . . . . . . . . . . . . . . . . . . . . . . . . . . . 129Hardware Management Console . . . . . . . . . . . . . . . . . . . . . . . . . . . . . . . . . . . . . . . . . 129z/VM Installation Planning Panels (INSTPLAN) . . . . . . . . . . . . . . . . . . . . . . . . . . . . . . 130z/VM Networking resources . . . . . . . . . . . . . . . . . . . . . . . . . . . . . . . . . . . . . . . . . . . . . 133z/VM DASD worksheet . . . . . . . . . . . . . . . . . . . . . . . . . . . . . . . . . . . . . . . . . . . . . . . . . 133Linux resources worksheet . . . . . . . . . . . . . . . . . . . . . . . . . . . . . . . . . . . . . . . . . . . . . . 1348.9.1 Host names and IP addresses worksheet. . . . . . . . . . . . . . . . . . . . . . . . . . . . . . 135
Appendix B. Additional material . . . . . . . . . . . . . . . . . . . . . . . . . . . . . . . . . . . . . . . . . . 137Locating the web material . . . . . . . . . . . . . . . . . . . . . . . . . . . . . . . . . . . . . . . . . . . . . . . . . 138Using the web material. . . . . . . . . . . . . . . . . . . . . . . . . . . . . . . . . . . . . . . . . . . . . . . . . . . . 138
System requirements for downloading the web material . . . . . . . . . . . . . . . . . . . . . . . 138Downloading and extracting the web material . . . . . . . . . . . . . . . . . . . . . . . . . . . . . . . 138Disclaimer . . . . . . . . . . . . . . . . . . . . . . . . . . . . . . . . . . . . . . . . . . . . . . . . . . . . . . . . . . . 139
z/VM REXX EXECs and XEDIT macros . . . . . . . . . . . . . . . . . . . . . . . . . . . . . . . . . . . . . . 139CPFORMAT EXEC . . . . . . . . . . . . . . . . . . . . . . . . . . . . . . . . . . . . . . . . . . . . . . . . . . . . 139SSICMD EXEC . . . . . . . . . . . . . . . . . . . . . . . . . . . . . . . . . . . . . . . . . . . . . . . . . . . . . . . 144PROFILE EXEC for Linux virtual machines . . . . . . . . . . . . . . . . . . . . . . . . . . . . . . . . . 146REDHAT EXEC . . . . . . . . . . . . . . . . . . . . . . . . . . . . . . . . . . . . . . . . . . . . . . . . . . . . . . 146SWAPGEN EXEC. . . . . . . . . . . . . . . . . . . . . . . . . . . . . . . . . . . . . . . . . . . . . . . . . . . . . 146
Sample files . . . . . . . . . . . . . . . . . . . . . . . . . . . . . . . . . . . . . . . . . . . . . . . . . . . . . . . . . . . . 151SAMPLE GENERIC PRM files . . . . . . . . . . . . . . . . . . . . . . . . . . . . . . . . . . . . . . . . . . . 151
. . . . . . . . . . . . . . . . . . . . . . . . . . . . . . . . . . . . . . . . . . . . . . . . . . . . . . . . . . . . . . . . . . . . . . 152 . . . . . . . . . . . . . . . . . . . . . . . . . . . . . . . . . . . . . . . . . . . . . . . . . . . . . . . . . . . . . . . . . . . 152
Related publications . . . . . . . . . . . . . . . . . . . . . . . . . . . . . . . . . . . . . . . . . . . . . . . . . . . . 153IBM Redbooks . . . . . . . . . . . . . . . . . . . . . . . . . . . . . . . . . . . . . . . . . . . . . . . . . . . . . . . . . . 153
Contents v

Other publications . . . . . . . . . . . . . . . . . . . . . . . . . . . . . . . . . . . . . . . . . . . . . . . . . . . . . . . 154Online resources . . . . . . . . . . . . . . . . . . . . . . . . . . . . . . . . . . . . . . . . . . . . . . . . . . . . . . . . 154Help from IBM . . . . . . . . . . . . . . . . . . . . . . . . . . . . . . . . . . . . . . . . . . . . . . . . . . . . . . . . . . 155
vi The Virtualization Cookbook for IBM z Systems Volume 2: Red Hat Enterprise Linux 7.1 Servers

Notices
This information was developed for products and services offered in the U.S.A.
IBM may not offer the products, services, or features discussed in this document in other countries. Consult your local IBM representative for information on the products and services currently available in your area. Any reference to an IBM product, program, or service is not intended to state or imply that only that IBM product, program, or service may be used. Any functionally equivalent product, program, or service that does not infringe any IBM intellectual property right may be used instead. However, it is the user's responsibility to evaluate and verify the operation of any non-IBM product, program, or service.
IBM may have patents or pending patent applications covering subject matter described in this document. The furnishing of this document does not grant you any license to these patents. You can send license inquiries, in writing, to: IBM Director of Licensing, IBM Corporation, North Castle Drive, Armonk, NY 10504-1785 U.S.A.
The following paragraph does not apply to the United Kingdom or any other country where such provisions are inconsistent with local law: INTERNATIONAL BUSINESS MACHINES CORPORATION PROVIDES THIS PUBLICATION "AS IS" WITHOUT WARRANTY OF ANY KIND, EITHER EXPRESS OR IMPLIED, INCLUDING, BUT NOT LIMITED TO, THE IMPLIED WARRANTIES OF NON-INFRINGEMENT, MERCHANTABILITY OR FITNESS FOR A PARTICULAR PURPOSE. Some states do not allow disclaimer of express or implied warranties in certain transactions, therefore, this statement may not apply to you.
This information could include technical inaccuracies or typographical errors. Changes are periodically made to the information herein; these changes will be incorporated in new editions of the publication. IBM may make improvements and/or changes in the product(s) and/or the program(s) described in this publication at any time without notice.
Any references in this information to non-IBM websites are provided for convenience only and do not in any manner serve as an endorsement of those websites. The materials at those websites are not part of the materials for this IBM product and use of those websites is at your own risk.
IBM may use or distribute any of the information you supply in any way it believes appropriate without incurring any obligation to you.
Any performance data contained herein was determined in a controlled environment. Therefore, the results obtained in other operating environments may vary significantly. Some measurements may have been made on development-level systems and there is no guarantee that these measurements will be the same on generally available systems. Furthermore, some measurements may have been estimated through extrapolation. Actual results may vary. Users of this document should verify the applicable data for their specific environment.
Information concerning non-IBM products was obtained from the suppliers of those products, their published announcements or other publicly available sources. IBM has not tested those products and cannot confirm the accuracy of performance, compatibility or any other claims related to non-IBM products. Questions on the capabilities of non-IBM products should be addressed to the suppliers of those products.
This information contains examples of data and reports used in daily business operations. To illustrate them as completely as possible, the examples include the names of individuals, companies, brands, and products. All of these names are fictitious and any similarity to the names and addresses used by an actual business enterprise is entirely coincidental.
COPYRIGHT LICENSE:
This information contains sample application programs in source language, which illustrate programming techniques on various operating platforms. You may copy, modify, and distribute these sample programs in any form without payment to IBM, for the purposes of developing, using, marketing or distributing application programs conforming to the application programming interface for the operating platform for which the sample programs are written. These examples have not been thoroughly tested under all conditions. IBM, therefore, cannot guarantee or imply reliability, serviceability, or function of these programs.
Notices vii

Trademarks
IBM, the IBM logo, and ibm.com are trademarks or registered trademarks of International Business Machines Corporation in the United States, other countries, or both. These and other IBM trademarked terms are marked on their first occurrence in this information with the appropriate symbol (® or ™), indicating US registered or common law trademarks owned by IBM at the time this information was published. Such trademarks may also be registered or common law trademarks in other countries. A current list of IBM trademarks is available on the Web at ibm.com/legal/copytrade.shtml
The following terms are trademarks of the International Business Machines Corporation in the United States, other countries, or both:
DirMaint™DS8000®ECKD™FlashCopy®IBM®IBM z™
IBM z Systems™OMEGAMON®Power Systems™RACF®Redbooks®Redbooks (logo) ®
S/390®System z®Tivoli®WebSphere®z Systems™z/VM®
The following terms are trademarks of other companies:
Inc., and Inc. device are trademarks or registered trademarks of Kenexa, an IBM Company.
Linux is a trademark of Linus Torvalds in the United States, other countries, or both.
Microsoft, Windows, and the Windows logo are trademarks of Microsoft Corporation in the United States, other countries, or both.
Red Hat, the Shadowman logo, Red Hat Enterprise Linux, RHEL, Red Hat Network, and RHN are trademarks or registered trademarks of Red Hat, Inc. in the United States and other countries.
UNIX is a registered trademark of The Open Group in the United States and other countries.
Other company, product, or service names may be trademarks or service marks of others.
viii The Virtualization Cookbook for IBM z Systems Volume 2: Red Hat Enterprise Linux 7.1 Servers

IBM REDBOOKS PROMOTIONS
Find and read thousands of IBM Redbooks publications
Search, bookmark, save and organize favorites
Get up-to-the-minute Redbooks news and announcements
Link to the latest Redbooks blogs and videos
DownloadNow
Get the latest version of the Redbooks Mobile App
iOS
Android
Place a Sponsorship Promotion in an IBM Redbooks publication, featuring your business or solution with a link to your web site.
Qualified IBM Business Partners may place a full page promotion in the most popular Redbooks publications. Imagine the power of being seen by users who download millions of Redbooks publications each year!
®
®
Promote your business in an IBM Redbooks publication
ibm.com/RedbooksAbout Redbooks Business Partner Programs
IBM Redbooks promotions

THIS PAGE INTENTIONALLY LEFT BLANK

Preface
This IBM® Redbooks® publication is Volume 2 of a series of three books that are called The Virtualization Cookbook for IBM z Systems. The other two volumes are listed:
� The Virtualization Cookbook for IBM z Systems Volume 1: IBM z/VM 6.3, SG24-8147-01:
http://www.redbooks.ibm.com/abstracts/sg248147.html?Open
� The Virtualization Cookbook for IBM z Systems Volume 3: SUSE Linux Enterprise Server 12, SG24-8890
It is recommended that you start with Volume 1 of this series because IBM z/VM® is the base “layer” when you install Linux on IBM z Systems™. Volume 1 starts with an introduction, discusses planning, then describes z/VM installation into a two-node single system image (SSI) cluster, configuration, hardening, automation, and servicing. It adopts a cookbook format that provides a concise, repeatable set of procedures for installing and configuring z/VM by using the Single System Image (SSI) clustering feature.
Volumes 2 and 3 describe how to customize your own Linux virtual servers on IBM z Systems hardware under IBM z/VM. The cookbook format continues with installing and customizing Linux.
Volume 2 focuses on Red Hat Enterprise Linux (RHEL). It consists of the following key chapters:
� Chapter 1, “Install Red Hat Enterprise Linux on LNXADMIN” on page 3, describes how to install and configure RHEL onto the Linux Administration server, which performs the cloning and other tasks.
� Chapter 2, “Automated Red Hat Enterprise Linux installations by using kickstart” on page 27, describes how to use Red Hat’s kickstart tool to create Linux systems. This tool is fundamentally different from cloning in that an automated installation is implemented. You can try kickstart and you can also try cloning. Understand that they try to accomplish the same goal of being able to quickly get Linux systems up and running, and that you do not need to use both.
� Chapter 3, “Service Red Hat Enterprise Linux with Red Hat Customer Portal” on page 37, describes how the Red Hat Network works. It provides centralized management and provisioning for multiple RHEL systems.
Kickstart is an easy and fast way to provision your Linux guests in any supported Linux platform. It re-creates the operating system (OS) from the beginning by using the kickstart profile configuration file that installs the new OS unattended and sets up the new guest according to the definition that was previously set up in the kickstart file.
Usually, Linux administration is performed by the same team that manages Linux on all platforms. By using kickstart, you can create a basic profile that can be used in all supported platforms and customize Linux profiles, as needed.
Cloning is another technique to provision Linux guests. This technique requires a better understanding of the z/VM environment and z/VM skills. It is a fast process if you enable the IBM FlashCopy® feature in advance. It basically clones the disks from a golden image to new disks that will be used by the new Linux guest. The process can be automated by using the cloning scripts that are supplied with this book.
© Copyright IBM Corp. 2015. All rights reserved. xi

This book series assumes that you are generally familiar with z Systems technology and terminology. It does not assume an in-depth understanding of z/VM or Linux. It is written for those individuals who want to start quickly with z/VM and Linux on the mainframe, and get virtual servers up and running in a short time (days, not weeks or months).
Description of the volumes in this series
This book series consists of the following volumes:
� The Virtualization Cookbook for IBM z Systems Volume 1: IBM z/VM 6.3, SG24-8147-01, introduces the entire concept of Linux on the mainframe and the system. It is available at this website:
http://www.redbooks.ibm.com/abstracts/sg248147.html?Open
It describes the z/VM platform, and it explains the planning, installation, and configuration into a two-member SSI with z/VM 6.3.
� The Virtualization Cookbook for IBM z Systems Volume 2: Red Hat Enterprise Linux 7.1 Servers, SG24-8303-00, describes the installation and customization of RHEL.
� The Virtualization Cookbook for IBM z Systems Volume 3: SUSE Linux Enterprise Server 12, SG24-8890, describes the installation and customization of SUSE Linux Enterprise Server.
Each volume contains the following parts:
� Part 2, “Other topics” on page 43, includes chapters about the following subjects:
– Live Guest Relocation (LGR) between SSI members – Configuring the Systems Management API (SMAPI)– Enabling IBM RACF® as the External Security Manager (ESM)– Monitoring z/VM and Linux– The Linux systemd suite of system management daemons, and libraries– Miscellaneous “recipes”
� Appendix A, “Reference sheets, cheat sheets, and blank worksheets” on page 125 includes references, cheat sheets, and blank worksheets.
� Appendix B, “Additional material” on page 137.
Conventions
The following conventions are used in this book.
Font conventions that are used in this book
The following font conventions are used in this book:
Monospace and bold Commands that are entered by the user on the command line.
monospace Linux file, directories, and commands.
MONOSPACE CAPITALS z/VM files, virtual machine and minidisk names, and commands.
Monospace bold italics Values that were used to test this book, such as TCP/IP addresses. This font convention is used to signify that you need to replace the example value with the correct value for your system or enterprise.
xii The Virtualization Cookbook for IBM z Systems Volume 2: Red Hat Enterprise Linux 7.1 Servers

Command conventions that are used in this book
The following command conventions are used in this book:
� z/VM commands are prefixed with ===>� z/VM XEDIT subcommands are prefixed with ====>� Linux commands that are running as root are prefixed with #� Linux commands that are running as non-root are usually prefixed with $
Operating system releases that are used in this book
The following releases of operating systems were used in the writing of this book:
z/VM 6.3: GA code, July 2013
RHEL 7.1: GA code, March 2015
Authors
This book was produced by a team of specialists from around the world working at the IBM International Technical Support Organization (ITSO), Poughkeepsie Center.
Lydia Parziale is a Project Leader for the ITSO team in Poughkeepsie, New York, with domestic and international experience in technology management, including software development, project leadership, and strategic planning. Her areas of expertise include Linux on z Systems and database management technologies. Lydia is a Certified IT Specialist with an MBA in Technology Management and has been employed by IBM over 25 years in various technology areas.
Berthold Gunreben is a Build Service Engineer at SUSE in Germany. He has 14 years of professional experience in Linux and is responsible for the administration of the mainframe system at SUSE. In addition to his expertise with Linux on z Systems, he is also a Mainframe System Specialist that is certified by the European Mainframe Academy: http://www.mainframe-academy.de. His areas of expertise include High Availability on Linux, Realtime Linux, automatic deployments, storage administration on the IBM DS8000®, Virtualization Systems with Xen, KVM, and z/VM, and documentation. Berthold has written extensively in many of the SUSE manuals.
Filipe Miranda is the Global Lead for Red Hat Enterprise Linux for IBM z Systems and Power Systems™ for Red Hat Inc.® His key responsibility is to help shape the overall Linux on z Systems and Power Systems strategy for Red Hat. With more than 13 years of experience in Linux and Open Source technologies, he joined Red Hat Inc. 9 years ago and is based in Southern California, US. He holds two degrees. One degree is in Data Communication from University of California, Los Angeles. The other degree is in Computer Science from the University Paulista in Sao Paulo, Brazil.
Preface xiii

Paul W Novak is a member of the IBM Washington Systems Center z/VM and Linux zGrowth (formerly ATS) team in Endicott, New York. Paul came from IBM Service Delivery where he served as the IBM Global Account webmaster on a team that is responsible for the implementation of IBM WebSphere® and ICS on Linux under z/VM in the world’s largest production IBM web middleware environment. He is a Senior Certified IT Specialist with a BSBA in Management Information Systems. Paul has held positions in field services, user support, software development, enterprise hosting, and enterprise architecture. Paul is a fourth-generation IBM employee with more than 20 years of Linux and Open Source technology experience.
Ken Werner is a Linux specialist who is working for the Systems unit in IBM Research & Development, Germany. He has 7 years of professional experience with Linux on different platforms. Ken contributed to various Open Source projects, such as the GNU Debugger, libunwind, and OpenEmbedded. Currently, Ken works with the Linux on z development team on the continuous integration, providing the latest code to developers, testers, and performance evaluators.
Special thanks
Thanks to the following people for their contributions:
IBM ITSO Center Poughkeepsie
Dave Bennin, Rich Conway, and Robert Haimowitz
IBM Endicott
Bruce HaydenMarci BeachTimothy GreerEmily HugenbruchBrian HugenbruchAlan AltmarkBrian WadeSusan TimashenkaBill Bitner
IBM Böblingen
Steffen MaierPradeep ParameshwaranHendrik BrücknerDominik KleinElisabeth PuritscherVolker SameskeEkaterina Teplova
IBM Gaithersburg
Fred Bader
Red Hat Inc.
Chris MackowskiJan StodolaDan Horak
SUSE
Mike Friesenegger
xiv The Virtualization Cookbook for IBM z Systems Volume 2: Red Hat Enterprise Linux 7.1 Servers

Thanks to Michael MacIsaac for the original inception of this cookbook and for his efforts in continually moving the cookbook forward over the years.
Thanks to many others in IBM Endicott and Poughkeepsie and to the many people who answered questions on the Linux-390 and IBMVM list servers.
Thanks to the authors of the previous editions of this book:
� Authors of the previous IBM Redbooks edition, The Virtualization Cookbook for IBM z/VM 6.3, RHEL 6.4, and SLES 11 SP3, SG24-8147, which was last updated 22 February 2011: Lydia Parziale, Marian Gasparovic, Berthold Gunreben, Michael MacIsaac, Filipe Miranda, and Daniel Ruutz.
� Authors of the previous IBM Redbooks edition, z/VM and Linux on IBM System z: The Virtualization Cookbook for SLES 11 SP1, SG24-7931, which was last updated 22 February 2011: Marian Gasparovic and Michael MacIsaac
� Authors of the previous IBM Redbooks edition, z/VM and Linux on IBM System z: The Virtualization Cookbook for Red Hat Enterprise Linux 6.0, SG24-7932, which was last updated 18 February 2011: Brad Hinson and Michael MacIsaac
Now you can become a published author, too!
Here’s an opportunity to spotlight your skills, grow your career, and become a published author—all at the same time! Join an ITSO residency project and help write a book in your area of expertise, while honing your experience using leading-edge technologies. Your efforts will help to increase product acceptance and customer satisfaction, as you expand your network of technical contacts and relationships. Residencies run from two to six weeks in length, and you can participate either in person or as a remote resident working from your home base.
Find out more about the residency program, browse the residency index, and apply online at:
ibm.com/redbooks/residencies.html
Comments welcome
Your comments are important to us!
We want our books to be as helpful as possible. Send us your comments about this book or other IBM Redbooks publications in one of the following ways:
� Use the online Contact us review Redbooks form found at:
ibm.com/redbooks
� Send your comments in an email to:
� Mail your comments to:
IBM Corporation, International Technical Support OrganizationDept. HYTD Mail Station P0992455 South RoadPoughkeepsie, NY 12601-5400
Preface xv

Stay connected to IBM Redbooks
� Find us on Facebook:
www.facebook.com/IBMRedbooks
� Follow us on Twitter:
http://twitter.com/ibmredbooks
� Look for us on LinkedIn:
www.linkedin.com/groups?home=&gid=2130806
� Explore new Redbooks publications, residencies, and workshops with the IBM Redbooks weekly newsletter:
https://www.redbooks.ibm.com/Redbooks.nsf/subscribe?OpenForm
� Stay current on recent Redbooks publications with RSS Feeds:
http://www.redbooks.ibm.com/rss.html
xvi The Virtualization Cookbook for IBM z Systems Volume 2: Red Hat Enterprise Linux 7.1 Servers

Summary of changes
This summary of changes refers to the series of books. The three volumes are now:
� The Virtualization Cookbook for IBM z Systems Volume 1: IBM z/VM 6.3, SG24-8147-01:
http://www.redbooks.ibm.com/abstracts/sg248147.html?Open
� The Virtualization Cookbook for IBM z Systems Volume 2: Red Hat Enterprise Linux 7.1 Servers, SG24-8303-00
� The Virtualization Cookbook for IBM z Systems Volume 3: SUSE Linux Enterprise Server 12, SG24-8890
This section describes the technical changes that were made in this edition of the book, previous editions, and other books in the series. This edition might also include minor corrections and editorial changes that are not identified.
Summary of Changesfor SG24-8303-00for The Virtualization Cookbook for IBM z Systems Volume 2: Red Hat Enterprise Linux 7.1 Serversas created or updated on May 6, 2016.
Summary of changes in this book
The following changes were made to this book from the prior publication:
� The z/VM chapters were updated and moved to The Virtualization Cookbook for IBM z Systems Volume 1: IBM z/VM 6.3, SG24-8147-01.
� The SUSE chapters were updated and moved to The Virtualization Cookbook for IBM z Systems Volume 3: SUSE Linux Enterprise Server 12, SG24-8890.
� The chapter Red Hat Network Satellite Server was removed, mainly because Red Hat Satellite 6.0 Server is no longer available to RHEL on IBM z Systems, only on the client side. To manage systems, the RH Satellite Server will require an x86 system. After RH Satellite Server is online, it can manage all platforms: x86_64, ppc64BE/LE, and s390x.
The following topic is included for the first time:
� Systemd in Linux
© Copyright IBM Corp. 2015. All rights reserved. xvii

xviii The Virtualization Cookbook for IBM z Systems Volume 2: Red Hat Enterprise Linux 7.1 Servers

Part 1 Red Hat Enterprise Linux 7.1 Servers
It is recommended that you start with Volume 1 of this series because IBM z/VM is the base “layer” when you install Linux on z Systems. Volume 1 starts with an introduction, discusses planning, and then describes z/VM installation into a two-node single system image (SSI) cluster. Volume 1 describes configuration, hardening, automation, and servicing. It adopts a cookbook format that provides a concise, repeatable set of procedures for installing and configuring z/VM by using the Single System Image (SSI) clustering feature. After you complete the Volume 1 tasks, you are ready to install a Linux guest by performing the tasks in this book.
Part 1
© Copyright IBM Corp. 2015. All rights reserved. 1

2 The Virtualization Cookbook for IBM z Systems Volume 2: Red Hat Enterprise Linux 7.1 Servers

Chapter 1. Install Red Hat Enterprise Linux on LNXADMIN
“The most incomprehensible thing about the world is that it is at all comprehensible.”
— Albert Einstein
It is time to create the first identity or Multi-Configuration Virtual Machine (MCVM), LNXADMIN. An MCVM can be logged on to all members of the single system image (SSI) at the same time. Therefore, it is not possible to migrate an MCVM between SSI members.
This virtual machine serves many administrative purposes:
� Red Hat Enterprise Linux (RHEL) installation server: A file system tree of RPMs and other files that are required for installation are made available with File Transfer Program (FTP). See 1.2.2, “Copy the RHEL 7.1 installation tree to LNXADMIN” on page 16.
� Red Hat kickstart repository: For hosting the necessary files for automated installations. Also, see Chapter 2, “Automated Red Hat Enterprise Linux installations by using kickstart” on page 27.
� Red Hat Linux Terminal Server: To easily access any of your Linux virtual machines by using inter-user communication vehicle (IUCV), not TCP/IP. See 1.2.5, “Configure IUCV Linux Terminal Server” on page 18.
In this section, you perform the following tasks:
� “Install the Linux administration system” on page 4� “Configure the Linux administration system” on page 15
1
© Copyright IBM Corp. 2015. All rights reserved. 3

1.1 Install the Linux administration system
In this section, you install RHEL 7.1 on to the IDENTITY LNXADMIN.
1.1.1 Prepare RHEL 7.1 bootstrap files for LNXADMIN
To IPL an RHEL 7.1 installation system, four bootstrap files must be prepared and copied to the LNXADMIN virtual machine A disk. In this case, the A disk is actually the LNXADMIN directory in the LNX Shared File System (SFS) file pool (LNX:LNXADMIN). Three files will be spooled to the z/VM reader and then punched to IPL Linux:
� The kernel itself, KERNEL.IMG� A parameter file, GENERIC.PRM� An initial RAMdisk, INITRD.IMG
A fourth file is the REDHAT.EXEC, which is a small REXX script that is commonly used to clean out the reader, punch the three files, and IPL the reader.
Follow these steps:
1. Log in as LNXADMIN from the 3270 console. The PROFILE EXEC file runs when you press Enter at the VM READ prompt when you log in. It creates two virtual disks with the SWAPGEN EXEC to use later as swap spaces. Also, it accesses the TCPMAINT 592 disk, which provides access to the TCP/IP tools. It also performs other functions, including the automatic IPL of Linux:
LOGON LNXADMIN 00: z/VM Version 6 Release 3.0, Service Level 1501 (64-bit), 00: built on IBM Virtualization Technology 00: There is no logmsg data 00: FILES: 0003 RDR, NO PRT, NO PUN 00: LOGON AT 15:29:10 EDT MONDAY 04/20/15 00: Command complete 00: NIC 0600 is created; devices 0600-0602 defined 00: NIC 0600 is connected to VSWITCH SYSTEM VSW1 DMSACC724I 19E replaces Y (19E) DMSACP723I Y (19E) R/O z/VM V6.3.0 2015-04-09 09:04 DMSVML2060I TCPMAINT 592 linked as 0120 file mode Z LNXADMIN AT ITSOZVM1 VIA RSCS 2015-04-20 15:29:13 EDT MONDAY DIAG swap disk defined at virtual address 300 (64988 4K pages of swap space) DIAG swap disk defined at virtual address 301 (129980 4K pages of swap space)Do you want to IPL Linux from minidisk 100? y/n
===> N
Note: The following list summarizes the installation process:
� Copy the following files: INITRD.IMG, KERNEL.IMG, GENERIC.PRM, and REDHAT.EXEC to the target z/VM user ID by using FTP.
� Edit GENERIC.PRM file and populate it with the correct parameters.
� Start the installation process with REDHAT.EXEC.
4 The Virtualization Cookbook for IBM z Systems Volume 2: Red Hat Enterprise Linux 7.1 Servers

2. Verify that the LNXADMIN directory in the LNX Shared File System (SFS) pool (LNX:LNXADMIM) is accessed as file mode A:
===> q accessed Mode Stat Files Vdev Label/Directory A R/W 11 DIR LNX:LNXADMIN. B R/W 1 300 LXSWAP C R/W 1 301 LXSWAP S R/O 698 190 MNT190 Y/S R/O 1123 19E MNT19E Z R/O 892 120 TCM592 Ready;
Note: To view the contents of the PROFILE EXEC, use the TYPE command:
==> type PROFILE EXEC a/* PROFILE EXEC FOR LINUX VIRTUAL SERVERS -- MOD 2015-04-10 PWNOVAK *//* BOOTING FROM ECKD DASD OR MINIDISKS *//**********************************************************************/'CP SP CONS CLOSE' /* CLOSE CUR CONLOG */'CP SP CONS TO LNXADMIN START NAME 'USERID()' CONSLOG' /* CONSLOG ON */'CP SET RUN ON' /* RUN DISCONNECTED */'CP SET PF11 RETRIEVE FORWARD' /* RETRIEVE CMD FWD */'CP SET PF12 RETRIEVE' /* RETRIEVE CMD BKW */'IDENTIFY (ISODATE' /* IDENTIFY GUEST */'ACCESS 592 T' /* ACCESS TCP TOOLS */'PIPE CP QUERY' USERID() '| VAR USER' /* DETERMINE USERID */ PARSE VALUE USER WITH ID . DSC . /* CHECK IF DISCOED */ IF ( ID <> 'LNXADMIN' ) THEN /* IF USER IS NOT LNXADMIN */ DO /* IF USER IS NOT LNXADMIN */ 'ACCESS LNX:LNXADMIN. D' /* IF USER IS NOT LNXADMIN */ END /* IF USER IS NOT LNXADMIN */ 'SWAPGEN 0300 0524288' /* MAKE 256M LNXSWAP VDISK AT 0300 */'SWAPGEN 0301 1048576' /* MAKE 512M LNXSWAP VDISK AT 0301 */ IF (DSC = 'DSC') THEN /* IF USER IS DISCONNECTED */ DO 'CP QUERY TERMINAL' 'CP QUERY CONSOLE' 'CP SPOOL CONSOLE STOP' /* CONSLOG OFF */ 'CP IPL 0100' /* BOOT LINUX */ END ELSE /* USER IS INTERACTIVE SO PROMPT */ DO SAY 'DO YOU WANT TO IPL LINUX FROM MINIDISK 100? Y/N' PARSE UPPER PULL ANSWER . IF (ANSWER = 'Y') THEN DO 'CP SPOOL CONSOLE STOP' /* CONSLOG OFF */ 'CP IPL 0100' /* BOOT LINUX */ END END
Chapter 1. Install Red Hat Enterprise Linux on LNXADMIN 5

3. Transfer the bootstrap files from the external FTP server to your local A disk:
==> ftp 9.60.87.87 VM TCP/IP FTP Level 630 Connecting to 9.60.87.87, port 21 220 (vsFTPd 3.0.2) USER (identify yourself to the host): lydiap >>>USER lydiap 331 Please specify the password. Password: >>>PASS ******** 230 Login successful. Command:
cd /linux/rhel71/imagesasciiget generic.prm generic.prmget redhat.exec redhat.execlocsite fix 80binaryget kernel.img kernel.imgget initrd.img initrd.img
4. After all files are copied, edit the generic.prm file with the correct parameters:
==> listfiles * * aGENERIC PRM A1 INITRD IMG A1 KERNEL IMG A1 PROFILE EXEC A1 REDHAT EXEC A1 SWAPGEN EXEC A1 PROFILE XEDIT A1 Ready; T=0.01/0.01 12:23:26
5. Modify the REDHAT EXEC file to the following format:
==> xedit REDHAT EXEC a
/* */ 'CL RDR' 'PURGE RDR ALL' 'SPOOL PUNCH * RDR' 'PUNCH KERNEL IMG * (NOH' 'PUNCH GENERIC PRM * (NOH' 'PUNCH INITRD IMG * (NOH' 'CH RDR ALL KEEP NOHOLD' 'I 00C'
Note: If you are unfamiliar with xedit, review “XEDIT cheat sheet” on page 126.
6 The Virtualization Cookbook for IBM z Systems Volume 2: Red Hat Enterprise Linux 7.1 Servers

6. Edit the GENERIC PRM file by adding the correct parameters and system information as shown in the following example:
==> xedit GENERIC PRM a
ro ramdisk_size=40000 cio_ignore=all,!condev ip=9.12.7.96::9.12.4.1:20:vmlnx2-1.itso.ibm.com:enccw0.0.0600:none rd.znet=qeth,0.0.0600,0.0.0601,0.0.0602,layer2=1 nameserver=9.12.6.7 nameserver=9.12.6.6 inst.repo=ftp://lydiap:[email protected]//home/lydiap/linux/rhel71 rd.dasd=0.0.0100 rd.dasd=0.0.0200 vnc vncpassword=12345678
1.1.2 Install RHEL 7.1
Perform the following steps to begin the Linux installation:
1. To begin the installation program, run the REDHAT EXEC. Many windows of output scroll by:
==> redhat execredhat 00: 0000003 FILES PURGED 00: RDR FILE 0019 SENT FROM LNXADMIN PUN WAS 0019 RECS 047K CPY 001 A NOHOLD NOKEEP 00: RDR FILE 0020 SENT FROM LNXADMIN PUN WAS 0020 RECS 0006 CPY 001 A NOHOLD NOKEEP 00: RDR FILE 0021 SENT FROM LNXADMIN PUN WAS 0021 RECS 329K CPY 001 A NOHOLD NOKEEP 00: 0000003 FILES CHANGED 00: 0000003 FILES CHANGED 00: Uncompressing Linux... 00: Ok, booting the kernel. 00: [ 0.000000] Initializing cgroup subsys cpuset [ 0.000000] Initializing cgroup subsys cpu [ 0.000000] Initializing cgroup subsys cpuacct [ 0.000000] Linux version 3.10.0-229.el7.s390x ([email protected]) (gcc version 4.8.3 20140911 (Red Hat 4.8.3-7) (GCC) ) #1 SMP Thu Jan 29 18:42:38 EST 2015 [ 0.000000] setup: Linux is running as a z/VM guest operating system in 64-b ...anaconda[1685]: Starting installer, one moment... anaconda[1685]: 18:26:14 Please ssh [email protected] (9.12.7.96) to begin the install.
Chapter 1. Install Red Hat Enterprise Linux on LNXADMIN 7
2. After you log on by using a Secure Shell (ssh) session with the install user, the Virtual Network Computing (VNC) server is enabled according to the parameters that were defined in the GENERIC.PRM file. The following type of messages display:
Starting installer, one moment...anaconda 19.31.123-1 for Red Hat Enterprise Linux 7.1 started. * installation log files are stored in /tmp during the installation * shell is available in second TMUX pane (Ctrl+b, then press 2) * if the graphical installation interface fails to start, try again with the inst.text bootoption to start text installation * when reporting a bug add logs from /tmp as separate text/plain attachments18:26:16 Starting VNC...18:26:17 The VNC server is now running.18:26:17
You chose to execute vnc with a password.
18:26:17 Please manually connect your vnc client to vmlnx2-1.itso.ibm.com:1 (9.12.7.96:1) to begin the install.
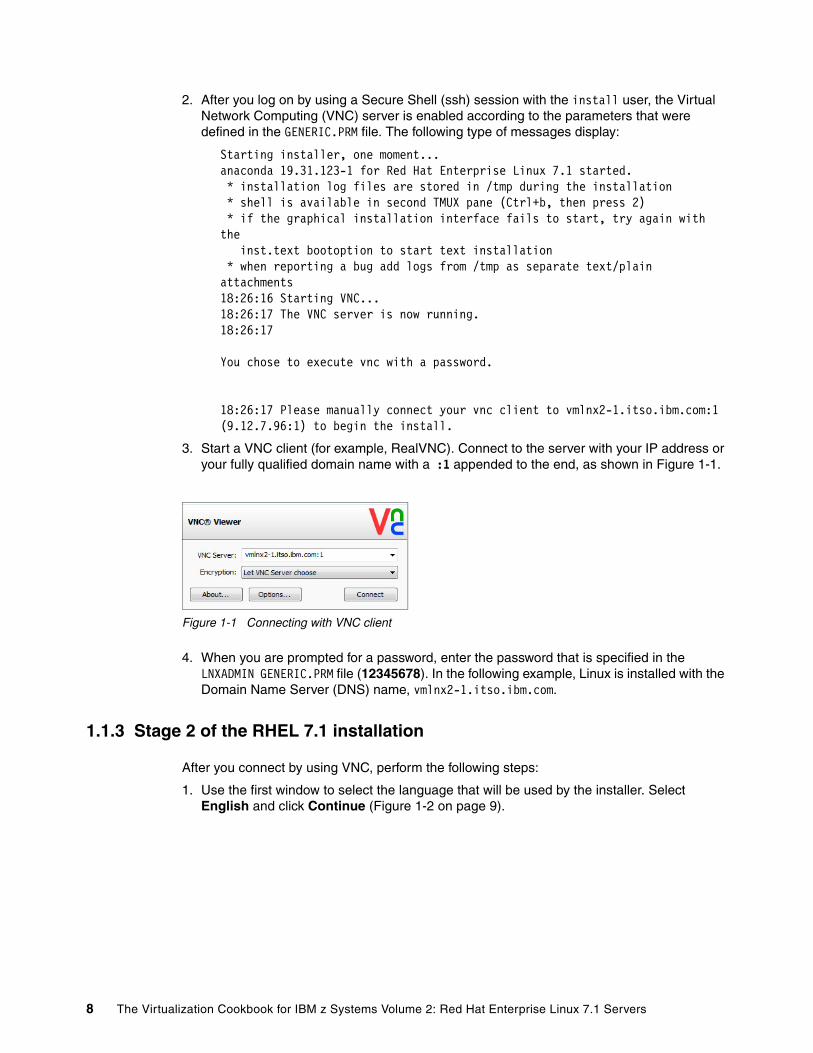
3. Start a VNC client (for example, RealVNC). Connect to the server with your IP address or your fully qualified domain name with a :1 appended to the end, as shown in Figure 1-1.
Figure 1-1 Connecting with VNC client
4. When you are prompted for a password, enter the password that is specified in the LNXADMIN GENERIC.PRM file (12345678). In the following example, Linux is installed with the Domain Name Server (DNS) name, vmlnx2-1.itso.ibm.com.
1.1.3 Stage 2 of the RHEL 7.1 installation
After you connect by using VNC, perform the following steps:
1. Use the first window to select the language that will be used by the installer. Select English and click Continue (Figure 1-2 on page 9).
8 The Virtualization Cookbook for IBM z Systems Volume 2: Red Hat Enterprise Linux 7.1 Servers

Figure 1-2 Select the installer language
2. Red Hat completely redesigned the Red Hat Enterprise Linux 7 main Installation Summary window, as shown in Figure 1-3. Click INSTALLATION DESTINATION to set up the disks to use in this step and to set up disk partitioning.
Figure 1-3 Main Installation Summary window
Chapter 1. Install Red Hat Enterprise Linux on LNXADMIN 9

3. In Figure 1-4, select the dasda disk from the Local Standard Disks menu and select Automatically configure partitioning. You will configure the other DASD, dasdb, after the installation. Click Done.
Figure 1-4 Disk selection
4. When you use Red Hat Enterprise Linux 7 or later, the unformatted DASD disks are low-level formatted by using dasdfmt from the graphical installer automatically, as shown in Figure 1-5. You do not need to format unformatted DASD from a Linux Terminal, which was required in previous versions of RHEL.
Figure 1-5 Installer dasdfmt
5. Keep the defaults for all other options. Most of the options were pre-configured by the GENERIC.PRM file. Click Begin Installation.
6. The last phase of the installer presents a window (Figure 1-6 on page 11) that shows the installation progress and provides the option to define the user root password and to add other users. At a minimum, define a secure root password. After the installation process completes, click Reboot.
10 The Virtualization Cookbook for IBM z Systems Volume 2: Red Hat Enterprise Linux 7.1 Servers

Figure 1-6 Define the user root password and reboot after the installation completes
1.1.4 Boot your new Linux system from disk
A default system is now installed onto minidisk 100. Return to your z/VM 3270 session and your newly installed system will IPL again automatically. Your system continues to boot until a login prompt is presented.
Follow these steps:
1. Disconnect from the 3270 session:
==> #cp disc
2. As the root user, start an SSH session to the new Linux administration system:
login as: [email protected]'s password:# uname -aLinux vmlnx2-1.itso.ibm.com 3.10.0-229.el7.s390x #1 SMP Thu Jan 29 18:42:38 EST 2015 s390x s390x s390x GNU/Linux# cat /etc/redhat-releaseRed Hat Enterprise Linux Server release 7.1 (Maipo)
1.1.5 Set up the data DASD disk after the installation process
Note: You will add another DASD disk, the DATA disk, to your LNXADMIN Linux to see how to add DASD disks to a running RHEL guest. This task also shows that it is easier to migrate this data to another guest, if necessary, because DATA is on a separate volume. Because DATA is on a separate volume, the DATA volume group (VG) can span multiple disks when it uses the Logical Volume Manager (LVM), therefore, easily increasing the DATA logical volume (LV) without guest disruption.
Chapter 1. Install Red Hat Enterprise Linux on LNXADMIN 11

Follow these steps:
1. Use the lsdasd command to check the DASD disks that are active in your system:
# lsdasdBus-ID Status Name Device Type BlkSz Size Blocks==============================================================================0.0.0100 active dasda 94:0 ECKD 4096 7042MB 1802880
2. Remove the device from the system blacklist by using the command cio_ignore:
# cio_ignore -r 0.0.0200
3. Enable the minidisk 200 with the chccwdev command:
# chccwdev -e 200Setting device 0.0.0200 onlineDone
4. Edit the /etc/dasd.conf to change it to persistent:
# echo '0.0.0200' >> /etc/dasd.conf
5. Use the lsdasd command to verify that minidisk 200 is enabled:
# lsdasdBus-ID Status Name Device Type BlkSz Size Blocks==============================================================================0.0.0100 active dasda 94:0 ECKD 4096 7042MB 18028800.0.0200 active dasdb 94:4 ECKD 4096 7042MB 1802880
6. To format the minidisk, use the dasdfmt command:
# dasdfmt -b 4096 -y -f /dev/dasdbFinished formatting the device.Rereading the partition table... ok
7. Create a partition for your DASD device by using the fdasd command:
# fdasd -a /dev/dasdbreading volume label ..: VOL1reading vtoc ..........: okauto-creating one partition for the whole disk...writing volume label...writing VTOC...rereading partition table...
8. Verify all of your partitions:
# cat /proc/partitionsmajor minor #blocks name
94 0 7211520 dasda 94 1 512016 dasda1 94 2 6699408 dasda2 253 0 720896 dm-0 253 1 5931008 dm-1 94 4 7211520 dasdb 94 5 7211424 dasdb1
12 The Virtualization Cookbook for IBM z Systems Volume 2: Red Hat Enterprise Linux 7.1 Servers

9. To create a re-sizable file system for the data disk, you set it up as an LVM. The following steps demonstrate how to create an LVM logical partition (LPAR) on a new volume group by using the disk dasdb1:
a. The pvcreate command initializes partitions for use by LVM:
# pvcreate /dev/dasdb1Physical volume "/dev/dasdb1" successfully created
b. Use the vgcreate command to create a volume group:
# vgcreate vgdata /dev/dasdb1Volume group "vgdata" successfully created
c. To gather more information about the volume group, use the vgdisplay command:
# vgdisplay vgdata
--- Volume group --- VG Name vgdata System ID Format lvm2 Metadata Areas 1 Metadata Sequence No 1 VG Access read/write VG Status resizable MAX LV 0 Cur LV 0 Open LV 0 Max PV 0 Cur PV 1 Act PV 1 VG Size 6.88 GiB PE Size 4.00 MiB Total PE 1760 Alloc PE / Size 0 / 0 Free PE / Size 1760 / 6.88 GiB VG UUID V8dFs4-3zK7-cPzr-O5OC-dPHQ-nUeI-YTVmVQ
d. The lvcreate command creates a logical volume:
# lvcreate -l 1760 -n lvdata vgdataLogical volume "lvdata" created
Chapter 1. Install Red Hat Enterprise Linux on LNXADMIN 13

e. Use the lvdisplay command to gather more details about the new logical volume:
# lvdisplay vgdata--- Logical volume --- LV Path /dev/vgdata/lvdata LV Name lvdata VG Name vgdata LV UUID Fuf1eA-UcvP-5vB2-JcQY-8zBx-aFht-okbsVM LV Write Access read/write LV Creation host, time vmlnx2-1.itso.ibm.com, 2015-04-14 14:25:01 -0400 LV Status available # open 0 LV Size 6.88 GiB Current LE 1760 Segments 1 Allocation inherit Read ahead sectors auto - currently set to 1024 Block device 253:2
10.Create a file system for the new logical volume:
# mkfs.xfs /dev/vgdata/lvdata
meta-data=/dev/vgdata/lvdata isize=256 agcount=4, agsize=450560 blks = sectsz=4096 attr=2, projid32bit=1 = crc=0 finobt=0data = bsize=4096 blocks=1802240, imaxpct=25 = sunit=0 swidth=0 blksnaming =version 2 bsize=4096 ascii-ci=0 ftype=0log =internal log bsize=4096 blocks=2560, version=2 = sectsz=4096 sunit=1 blks, lazy-count=1realtime =none extsz=4096 blocks=0, rtextents=0
11.Create a directory to serve as a mount point for the new XFS file system:
# mkdir -p /var/ftp/pub
12.Edit the /etc/fstab file to permanently add a mount point for the new XFS file system:
# echo “/dev/vgdata/lvdata /var/ftp/pub xfs defaults 0 0” >> /etc/fstab
13.To reload the /etc/fstab configuration, use the mount command:
# mount -a
14.Check that all file systems are mounted with the mount command:
# mount....hugetlbfs on /dev/hugepages type hugetlbfs (rw,relatime,seclabel)/dev/dasda1 on /boot type xfs (rw,relatime,seclabel,attr2,inode64,noquota)/dev/mapper/vgdata-lvdata on /var/ftp/pub type xfs (rw,relatime,seclabel,attr2,inode64,noquota)
The installation of RHEL 7.1 on the Linux administration system is now complete.
14 The Virtualization Cookbook for IBM z Systems Volume 2: Red Hat Enterprise Linux 7.1 Servers

1.2 Configure the Linux administration system
Now that your Linux administration system is installed, it must be configured. The following steps are involved:
1. “Enable swap on virtual disks (VDISKs)” on page 15” 2. “Copy the RHEL 7.1 installation tree to LNXADMIN”3. “Configure the yum DVD repository” on page 164. “Configure vsftpd” on page 17 5. “Configure IUCV Linux Terminal Server” on page 186. “Copy files associated with this book” 7. “Reboot the system” on page 25
1.2.1 Enable swap on virtual disks (VDISKs)
Each time that the LNXADMIN runs the common PROFILE EXEC, two virtual disks (VDISKs) are created at virtual addresses 300 and 301. On the Linux guest, these in-memory disks can be used as swap devices. This section explains how to use these disks as swap devices.
To enable swap on the virtual disks, perform the following steps:
1. Change the /etc/dracut.conf file by adding the following persistent policy:
# echo 'persistent_policy=by-path' >> /etc/dracut.conf
2. The following command updates the initramfs image and updates the bootloader. Because the newly generated initramfs image is the same as before, you will not need to update the zipl configuration:
# dracut -f# zipl -V
3. Activate the VDISKs:
a. Use the cio_ignore utility to remove the DASD from the list of ignored devices:
# cio_ignore -r 0.0.0300# cio_ignore -r 0.0.0301
b. Set the devices online:
# chccwdev -e 0.0.0300Setting device 0.0.0300 onlineDone
# chccwdev -e 0.0.0301Setting device 0.0.0301 onlineDone
Important: To use virtual disks (VDISKs) for swap partitions, you need to enable them manually and not during the installation process because RHEL 7.x will refer to these disks by their Universally Unique Identifiers (UUIDs), by default. Because the UUIDs of the VDISKs change every time that the PROFILE EXEC of the Linux guest is loaded, new UUIDs will be generated, therefore, making it unable to access the swap disks. This section shows how to change the default behavior of RHEL 7.x to access the swap disks on VDISKs by their paths rather than their UUIDs.
Chapter 1. Install Red Hat Enterprise Linux on LNXADMIN 15

4. Edit the /etc/dasd.conf file to change it to persistent:
# echo '0.0.0300' >> /etc/dasd.conf# echo '0.0.0301' >> /etc/dasd.conf
5. View the DASDs that are online by using the lsdasd command-line utility:
# lsdasdBus-ID Status Name Device Type BlkSz Size Blocks==============================================================================0.0.0100 active dasda 94:0 ECKD 4096 7042MB 18028800.0.0200 active dasdb 94:4 ECKD 4096 7042MB 18028800.0.0300 active dasdc 94:8 FBA 512 256MB 5242880.0.0301 active dasdd 94:12 FBA 512 512MB 1048576
6. Activate the swap partition on that disk by using the swapon command-line utility:
# swapon -p 5 /dev/disk/by-path/ccw-0.0.0300-part1 # swapon -p 4 /dev/disk/by-path/ccw-0.0.0301-part1
7. Check the activated swap devices:
# swapon --showNAME TYPE SIZE USED PRIO/dev/dm-0 partition 704M 0B -1/dev/dasdc1 partition 253.9M 0B 5/dev/dasdd1 partition 507.8M 0B 4
8. Add the swap disks to the /etc/fstab:
# echo '/dev/disk/by-path/ccw-0.0.0300-part1 swap swap pri=5 0 0' >> /etc/fstab# echo '/dev/disk/by-path/ccw-0.0.0301-part1 swap swap pri=4 0 0' >> /etc/fstab
1.2.2 Copy the RHEL 7.1 installation tree to LNXADMIN
Copy the RHEL 7.1 DVD ISO, with the other files that are associated with this book, from the external FTP server to the Linux administration system, by using the curl command. In this example, the IP is 9.60.87.87.
# cd /var/ftp/pub# curl -O ftp://ftpuser:[email protected]//ftp/linux/RHEL-7.1-Server-s390x.iso% Total % Received % Xferd Average Speed Time Time Time Current Dload Upload Total Spent Left Speed100 2559M 100 2559M 0 0 11.1M 0 0:03:49 0:03:49 --:--:-- 11.2M
This command takes time, perhaps 2 - 5 minutes.
1.2.3 Configure the yum DVD repository
Follow these steps to configure the yum DVD repository:
1. Create a directory to hold the installation tree by using the mkdir command and mount loop the DVD iso into that directory by using the mount command:
# mkdir rhel71# mount -o loop RHEL-7.1-Server-s390x.iso rhel71/mount: /dev/loop0 is write-protected, mounting read-only
16 The Virtualization Cookbook for IBM z Systems Volume 2: Red Hat Enterprise Linux 7.1 Servers

2. Create the /etc/yum.repos.d/dvd.repo file with the following content to set up a local yum repository to use to install additional packages from the DVD installation tree:
[DVD]name= RHEL7.1 DVD ISObaseurl=file:///var/ftp/pub/rhel71/enable=1gpgcheck=1
3. Install the Red Hat GNU Privacy Guard (GPG) key:
# rpm --import /etc/pki/rpm-gpg/RPM-GPG-KEY-redhat-release
4. Verify the new DVD repository:
# yum updateLoaded plugins: product-id, subscription-managerThis system is not registered to Red Hat Subscription Management. You can use subscription-manager to register.DVD | 4.1 kB 00:00:00(1/2): DVD/group_gz | 112 kB 00:00:00(2/2): DVD/primary_db | 2.8 MB 00:00:00
You are now ready to use yum to install or upgrade an RPM package. To install a package, use yum -y install <packagename>. Yum will install the specified packages and automatically resolve dependencies for you. You must not specify the package version on the command line, only the package name.
1.2.4 Configure vsftpd
Follow these steps to configure vsftpd:
1. Install vsftpd from the local yum repository:
# yum -y install vsftpdLoaded plugins: product-id, subscription-managerThis system is not registered to Red Hat Subscription Management. You can use subscription-manager to register.Resolving Dependencies--> Running transaction check---> Package vsftpd.s390x 0:3.0.2-9.el7 will be installed--> Finished Dependency Resolution...Installed: vsftpd.s390x 0:3.0.2-9.el7Complete!
2. Edit the /etc/vsftpd/vsftpd.conf file and uncomment the following lines:
ascii_upload_enable=YESascii_download_enable=YES
Note: Red Hat signs each RPM with a private GPG key, which is compared to your public key; every time a package is installed, the package manager verifies the package signature. This method ensures that the RPM is a genuine, unaltered package.
To check an RPM signature, use the command:
# rpm -K package_name.s390x.rpmpackage_name.s390x.rpm: rsa sha1 (md5) pgp md5 OK
Chapter 1. Install Red Hat Enterprise Linux on LNXADMIN 17

3. Start the vfstpd service and check the status of the vfstpd service by using the systemctl command:
# systemctl start vsftpd.service# systemctl status vsftpd.servicevsftpd.service - Vsftpd ftp daemon Loaded: loaded (/usr/lib/systemd/system/vsftpd.service; enabled) Active: active (running) since Tue 2015-04-14 15:12:32 EDT; 1s ago Process: 20407 ExecStart=/usr/sbin/vsftpd /etc/vsftpd/vsftpd.conf (code=exited, status=0/SUCCESS) Main PID: 20408 (vsftpd) CGroup: /system.slice/vsftpd.service
20408 /usr/sbin/vsftpd /etc/vsftpd/vsftpd.confApr 14 15:12:32 vmlnx2-1.itso.ibm.com systemd[1]: Starting Vsftpd ftp daemon...Apr 14 15:12:32 vmlnx2-1.itso.ibm.com systemd[1]: Started Vsftpd ftp daemon.
4. Enable the vsftpd service permanently by using the systemctl command:
# systemctl enable vsftpd.serviceln -s '/usr/lib/systemd/system/vsftpd.service' '/etc/systemd/system/multi-user.target.wants/vsftpd.service'
5. Enable the ip_conntrack_ftp kernel module:
# modprobe -i ip_conntrack_ftp
6. To permanently enable the ip_conntrack_ftp, create the /etc/sysconfig/modules/iptables.modules file with the following content to enable the kernel module at IPL:
#!/bin/shexec /sbin/modprobe ip_conntrack_ftp >/dev/null 2>&1
7. Configure iptables to allow connections on the ftp port number:
firewall-cmd --permanent --zone=public --add-port=21/tcpfirewall-cmd --reload
8. Configure SElinux boolean to allow the looped mounted DVD iso to be accessed:
# yum install -y policycoreutils-2.2.5-15.el7.s390x# setsebool -P ftpd_full_access on
The RHEL 7.1installation tree is ready to be shared over FTP on the LNXADMIN system under /var/ftp/pub.
1.2.5 Configure IUCV Linux Terminal Server
A Linux Terminal Server allows access to the console without a functioning TCP/IP stack in z/VM.
To set up the Linux Terminal Server, first you need to change z/VM as described in 8.6, “Set up the IUCV Linux Terminal Server” on page 119, and on Linux guests.
Note: The number sign (#) on the first line must be included in your file.
18 The Virtualization Cookbook for IBM z Systems Volume 2: Red Hat Enterprise Linux 7.1 Servers

For the RHEL Linux Terminal Server, you will configure IUCV to establish terminal sessions to target RHEL systems by using hypervisor console (HVC) terminal devices:
1. Add a ts-shell group to access the ts-shell:
# groupadd tsgroup
2. Add a user to access the ts-shell:
# useradd tsuser1 -m -s /usr/bin/ts-shell -g ts-shell -G tsgroup
3. Grant authorization to the ts-shell users by editing the /etc/iucvterm/ts-authorization.conf file:
# echo ‘@tsgroup = list:LINUX1,LINUX2’ >> /etc/iucvterm/ts-authorization.conf
4. Connect to the terminal server by using SSH and by using tsuser1:
# ssh [email protected] login: Thu Apr 16 11:38:54 2015 from 9.12.5.134Welcome to the Terminal Server shell.Type 'help' to get a list of available commands.tsuser1@ts-shell>
5. You can now list the systems that are allowed to be accessed by using IUCV and by using the list command:
tsuser1@ts-shell> listLINUX1LINUX2
6. To connect to the Linux system that you want, use the connect command:
tsuser1@ts-shell> connect LINUX1ts-shell: Connecting to LINUX1 (terminal identifier: lnxhvc0)...iucvconn: The target z/VM guest virtual machine is not logged on: Network is unreachablets-shell: Connection ended
The connect command failed because no Linux systems are running yet. We will install LINUX1 and LINUX2 in Chapter 2, “Automated Red Hat Enterprise Linux installations by using kickstart” on page 27.
The required changes to the RHEL target systems are specified in the kickstart file in 1.2.6, “Configure kickstart” on page 20.
After you create Linux1 and Linux2, see 2.1, “Configure LINUX1 for kickstart by using emulated DASD devices” on page 28 and 2.2, “Configure LINUX2 for kickstart by using Fibre Channel Protocol devices” on page 29. Repeat step 6 in the previous procedure now.
Connect to the Linux system that you want by using the connect command:
tsuser1@ts-shell> connect LINUX1
ts-shell: Connecting to Linux1 (terminal identifier: lnxhvc0)...
Press Enter.
Red Hat Enterprise Linux Server 7.1 (Maipo)Kernel 3.10.0-229.el7.s390x on an s390x
linux1 login:
Now, log on to LINUX1 by using IUCV.
Chapter 1. Install Red Hat Enterprise Linux on LNXADMIN 19

1.2.6 Configure kickstart
The installer generates a kickstart file at the end of every installation. The kickstart file is based on the answers that are provided during the interactive installation. This kickstart file is named anaconda-ks.cfg, and it is in the /root/ directory. This file will be used as a template for LINUX1.
Perform the following steps to set up the kickstart directory that will be shared by the FTP server:
1. Create the kickstart directory on /var/ftp/pub:
# mkdir /var/ftp/pub/kickstart
2. Copy the /root/anaconda-ks.cfg kickstart template file to /var/ftp/pub/kickstart and give the file the correct permission:
# cp /root/anaconda-ks.cfg /var/ftp/pub/kickstart/linux1-ks.cfg# chmod +r linux1-ks.cfg
3. RHEL will be installed on LINUX1 by using an automated process that uses kickstart. LINUX1 uses emulated DASD (EDEV) for the RHEL installation. EDEVs are configured on Linux in the same way that DASD is configured. Edit the kickstart file that is named linux1-ks.cfg:
#version=RHEL7# System authorization informationauth --enableshadow --passalgo=sha512
# IBM REDBOOKS RHEL7 TEMPLATE KICKSTART FOR DASD# Use network installationinstallurl --url="ftp://9.12.7.96/pub/rhel71"# Use text mode installtextignoredisk --only-use=dasda# Keyboard layoutskeyboard --vckeymap=us --xlayouts='us'# System languagelang en_US.UTF-8# Network informationnetwork --bootproto=static --device=enccw0.0.0600 --gateway=9.12.4.1 --ip=9.12.7.98 --nameserver=9.12.6.6,9.12.6.7 --netmask=255.255.240.0 --noipv6 --activate --hostname=linux1.itso.ibm.com# Root password
Note: By default, when you use Red Hat Enterprise Linux, the terminal TERM variable of all of the serial connections will be set to dumb. Log in by using the ts-shell, and then change this setting for the terminal type to the type that suits your needs:
export TERM=xterm
The changes take effect immediately.
If you are connecting to the Linux Terminal Server by using PuTTy, do not forget to set the correct terminal type in the PuTTY configuration: Terminal -> Keyboard, and then set the terminal type.
20 The Virtualization Cookbook for IBM z Systems Volume 2: Red Hat Enterprise Linux 7.1 Servers

rootpw --iscrypted $6$pr46QGx7PLwzthjk$41E7GLPSsD//jHPwbQc7/CAG2SSQSkGg/pcveQUXz2IIVL0LCXH2So8n.e1rFMjqLrfMYWifE7qY2NFfygedw/# System timezonetimezone America/New_York# Skip Xskipx# System bootloader configuration bootloader --location=mbr --append="hvc_iucv=8 console=hvc0 console=ttyS0"zerombr# Partition clearing informationclearpart --allautopart --type=lvmreboot
%packages@corekexec-tools
%end
%post --log=/root/post.log
# Enable the DVD repocat > /etc/yum.repos.d/dvd.repo <<EOF[DVD]name= RHEL7.1 DVD ISObaseurl=ftp://9.12.7.96/pub/rhel71/enable=1gpgcheck=1EOF
#import RedHat GPG key to verify packages authenticity during yum package installrpm --import /etc/pki/rpm-gpg/RPM-GPG-KEY-redhat-release
# Enable the VDISKs for swapecho 'persistent_policy=by-path' >> /etc/dracut.confdracut -fziplcio_ignore -r 0.0.0300cio_ignore -r 0.0.0301chccwdev -e 0.0.0300chccwdev -e 0.0.0301echo '0.0.0300' >> /etc/dasd.confecho '0.0.0301' >> /etc/dasd.confecho '/dev/disk/by-path/ccw-0.0.0300-part1 swap swap pri=5 0 0' >> /etc/fstabecho '/dev/disk/by-path/ccw-0.0.0301-part1 swap swap pri=4 0 0' >> /etc/fstab
# Detach CMS DASD disks for z/VM SSI LGRcat > /etc/rc.d/rc.local <<\EOF#!/bin/bash# Detach CMS DASD disks for z/VM SSI LGRfor d in 0190 019D 019E 0592; do vmcp q v $d &> /dev/null && echo -n "z/VM disk " && vmcp detach $d
Chapter 1. Install Red Hat Enterprise Linux on LNXADMIN 21

doneexit 0EOFchmod +x /etc/rc.d/rc.local
#Enable IUCV hvc0 for the Linux systemln -s /etc/systemd/system/serial-getty\@hvc0.service /lib/systemd/system/serial-getty\@.service
%end
%addon com_redhat_kdump --enable --reserve-mb='4096'
%end
4. Create the kickstart file that is named linux2-ks.cfg:
# cp /var/ftp/pub/kickstart/linux1-ks.cfg /var/ftp/pub/kickstart/linux2-ks.cfg# chmod +r linux2-ks.cfg
5. RHEL will be installed on LINUX2 by using an automated process that uses kickstart. LINUX2 uses Fibre Channel Protocol (FCP) devices for the RHEL installation. FCP devices are commonly known as Small Computer System Interface (SCSI) over Fibre Channel (FC). Modify the network parameters and comment the dasda line. You must change the lines that are marked in bold. Edit the contents of the linux2-ks.cfg file:
...#version=RHEL7# System authorization informationauth --enableshadow --passalgo=sha512
# IBM REDBOOKS RHEL7 TEMPLATE KICKSTART# Use network installationinstallurl --url="ftp://9.12.7.96/pub/rhel71"# Use text mode installtext#ignoredisk --only-use=dasda# Keyboard layoutskeyboard --vckeymap=us --xlayouts='us'# System languagelang en_US.UTF-8# Network informationnetwork --bootproto=static --device=enccw0.0.0600 --gateway=9.12.4.1 --ip=9.12.7.99 --nameserver=9.12.6.6,9.12.6.7 --netmask=255.255.240.0 --noipv6 --activate --hostname=linux2.itso.ibm.com# Root passwordrootpw --iscrypted $6$pr46QGx7PLwzthjk$41E7GLPSsD//jHPwbQc7/CAG2SSQSkGg/pcveQUXz2IIVL0LCXH2So8n.e1rFMjqLrfMYWifE7qY2NFfygedw/o...
Note: For more details about each kickstart option, see this website:
https://access.redhat.com/documentation/en-US/Red_Hat_Enterprise_Linux/7/html/Installation_Guide/sect-kickstart-syntax.html
22 The Virtualization Cookbook for IBM z Systems Volume 2: Red Hat Enterprise Linux 7.1 Servers

1.2.7 Configure the Virtual Network Computing (VNC) server
Often, applications require a graphical environment. The Virtual Network Computing (VNC) server allows for a graphical environment to be set up easily by starting the vncserver service. Perform the following steps:
1. Install the VNC server and associated packages with the following yum command:# yum -y install tigervnc* openmotif xterm xsetroot xorg-x11-xauth...Complete!
2. Copy the /lib/systemd/system/vncserver\@.service reference file to the correct location and rename it:
# cp /lib/systemd/system/vncserver\@.service /etc/systemd/system/vncserver@:1.service
3. Edit /etc/systemd/system/vncserver@:1.service and replace the <USER> lines (in bold) in the configuration file:
[Unit]Description=Remote desktop service (VNC)After=syslog.target network.target
[Service]Type=forking# Clean any existing files in /tmp/.X11-unix environmentExecStartPre=/bin/sh -c '/usr/bin/vncserver -kill %i > /dev/null 2>&1 || :'ExecStart=/sbin/runuser -l root -c "/usr/bin/vncserver %i"PIDFile=/root/.vnc/%H%i.pidExecStop=/bin/sh -c '/usr/bin/vncserver -kill %i > /dev/null 2>&1 || :'
[Install]WantedBy=multi-user.target
4. Enable the VNC server at startup:
# systemctl enable vncserver@:1.service
5. Set a VNC password with the vncpasswd command. You will need this password to connect to the VNC server:
# vncpasswdPassword: lnx4vmVerify: lnx4vm
6. Configure the firewall:
# firewall-cmd --permanent --zone=public --add-service vnc-server# firewall-cmd daemon-reload
Chapter 1. Install Red Hat Enterprise Linux on LNXADMIN 23

7. Start the VNC server:
# systemctl start vncserver@:1.service# systemctl status vncserver@:1.service
vncserver@:1.service - Remote desktop service (VNC) Loaded: loaded (/etc/systemd/system/vncserver@:1.service; enabled) Active: active (running) since Wed 2015-04-15 09:52:04 EDT; 12min ago Process: 1247 ExecStart=/sbin/runuser -l root -c /usr/bin/vncserver %i (code=exited, status=0/SUCCESS) Process: 1233 ExecStartPre=/bin/sh -c /usr/bin/vncserver -kill %i > /dev/null 2>&1 || : (code=exited, status=0/SUCCESS) Main PID: 1360 (Xvnc) CGroup: /system.slice/system-vncserver.slice/vncserver@:1.service
1360 /usr/bin/Xvnc :1 -desktop vmlnx2-1.itso.ibm.com:1 (root) -a...
Apr 15 09:52:11 vmlnx2-1.itso.ibm.com systemd[1]: Started Remote desktop serv...Hint: Some lines were ellipsized, use -l to show in full.
8. Now, you can use the VNC client to connect to the IP address of the Linux administration system with a :1 appended. A sample session is shown in Figure 1-7.
Figure 1-7 VNC client session to the VNC server
1.2.8 Copy the files that are associated with this book
To copy the files that are associated with this book to the Linux administration system, perform the following steps:
1. Change the directory to /var/ftp/pub if you are not already in that directory:
# cd /var/ftp/pub
2. Copy the files that are associated with this book from the external FTP server that is documented on your planning worksheet by using the curl command. In this example, the IP address is 9.60.87.87.
# curl -O ftp://ftpuser:[email protected]/ftp/linux/24814701.tgz
The files that are associated with this book are now copied to the Linux administration system under /var/put/pub/SG248147/.
24 The Virtualization Cookbook for IBM z Systems Volume 2: Red Hat Enterprise Linux 7.1 Servers

1.2.9 Reboot the system
Reboot the system to test the changes:
# reboot
After your system comes back (in less than a minute), start a new SSH session to the Linux administration system.
Chapter 1. Install Red Hat Enterprise Linux on LNXADMIN 25

26 The Virtualization Cookbook for IBM z Systems Volume 2: Red Hat Enterprise Linux 7.1 Servers

Chapter 2. Automated Red Hat Enterprise Linux installations by using kickstart
“We still don’t know one thousandth of one percent of what nature has revealed to us.”
— Albert Einstein
Kickstart is an automated way of installing Red Hat Enterprise Linux.
Kickstart files contain answers to all questions that are normally asked by the installation program. By using kickstart, you can create a single file that answers all of the questions that are usually asked during an interactive installation. “Kickstarting” a server gives you flexibility when you are installing multiple Linux systems. Kickstart allows different package configurations and pre-installation and postinstallation scripting.
For more information about kickstart, see this website:
https://access.redhat.com/documentation/en-US/Red_Hat_Enterprise_Linux/7/html/Installation_Guide/sect-kickstart-howto.html
In this chapter, you will kickstart LINUX1 and LINUX2 from your installation server. The Linux administration system, LNXADMIN, is now configured as an installation server that uses FTP to share the installation tree to perform automated installations over the network. The following steps are involved in installing Linux with kickstart for different types of Linux guests:
1. Configure LINUX1 for kickstart by using emulated DASD devices. 2. Configure LINUX2 for kickstart by using Fibre Channel Protocol devices.
2
Note: The kickstart files, linux1-ks.cfg and linux2-ks.cfg, are described in 1.2.6, “Configure kickstart” on page 20.
© Copyright IBM Corp. 2015. All rights reserved. 27

2.1 Configure LINUX1 for kickstart by using emulated DASD devices
Follow these steps to configure LINUX1 for kickstart by using emulated DASD (EDEV):
1. Log on as LINUX1 from the 3270 console. The REXX script loads as part of the PROFILE EXEC and presents a message that asks to IPL disk 100; for this step, answer n.
LOGON LINUX1 00: z/VM Version 6 Release 3.0, Service Level 1501 (64-bit), 00: built on IBM Virtualization Technology 00: There is no logmsg data 00: FILES: 0002 RDR, NO PRT, NO PUN 00: LOGON AT 10:02:17 EDT FRIDAY 04/17/15 00: Command complete 00: NIC 0600 is created; devices 0600-0602 defined 00: NIC 0600 is connected to VSWITCH SYSTEM VSW1 z/VM V6.3.0 2015-04-09 09:04 DMSVML2060I TCPMAINT 592 linked as 0120 file mode Z DMSACR723I D (LNX:LNXADMIN.) R/O DIAG swap disk defined at virtual address 300 (64988 4K pages of swap space) DIAG swap disk defined at virtual address 301 (129980 4K pages of swap space) Do you want to IPL Linux from minidisk 100? y/n n
2. Verify that the Shared File System pools, LNX:LINUX1 and LNX:LNXADMIN, are available to LINUX1:
===> q accessed Mode Stat Files Vdev Label/Directory A R/W 1 DIR LNX:LINUX1. B R/W 1 300 LXSWAP C R/W 1 301 LXSWAP D R/O 10 DIR LNX:LNXADMIN. S R/O 698 190 MNT190 Y/S R/O 1123 19E MNT19E Z R/O 892 120 TCM592 Ready; T=0.01/0.01 17:02:35
3. Copy GENERIC PRM from the SFS disk to your local A disk:
===> copyfile generic prm d = = a===> listfiles * * aPROFILE EXEC A1 GENERIC PRM A1 PROFILE XEDIT A1 Ready; T=0.01/0.01 14:46:17
4. Edit the GENERIC PRM file. We removed the vnc parameter.
ro ramdisk_size=40000 cio_ignore=all,!condevip=9.12.7.98::9.12.4.1:20:vmlnx2-3.itso.ibm.com:enccw0.0.0600:nonerd.znet=qeth,0.0.0600,0.0.0601,0.0.0602,layer2=1nameserver=9.12.6.7 nameserver=9.12.6.6rd.dasd=0.0.0100 inst.repo=ftp://9.12.7.96/pub/rhel71
28 The Virtualization Cookbook for IBM z Systems Volume 2: Red Hat Enterprise Linux 7.1 Servers

ks=ftp://9.12.7.96/pub/kickstart/linux1-ks.cfginst.cmdline
5. Run REDHAT EXEC to initiate the kickstart. Several initial kernel messages appear, which are followed by the rest of the installation process.
===> redhat exec
You installed Red Hat Enterprise Linux on the virtual server by using kickstart. This process can be repeated in the future for other Linux guests.
2.2 Configure LINUX2 for kickstart by using Fibre Channel Protocol devices
Follow these steps to configure LINUX2 for kickstart by using Fibre Channel Protocol (FCP) devices:
1. Log on as LINUX2 from the 3270 console. The REXX script loads as part of the PROFILE EXEC and asks to IPL disk 100. For this step, answer n.
LOGON LINUX2 00: z/VM Version 6 Release 3.0, Service Level 1501 (64-bit), 00: built on IBM Virtualization Technology 00: There is no logmsg data 00: FILES: 0002 RDR, NO PRT, NO PUN 00: LOGON AT 10:02:17 EDT FRIDAY 04/17/15 00: Command complete 00: NIC 0600 is created; devices 0600-0602 defined 00: NIC 0600 is connected to VSWITCH SYSTEM VSW1 z/VM V6.3.0 2015-04-09 09:04 DMSVML2060I TCPMAINT 592 linked as 0120 file mode Z DMSACR723I D (LNX:LNXADMIN.) R/O DIAG swap disk defined at virtual address 300 (64988 4K pages of swap space) DIAG swap disk defined at virtual address 301 (129980 4K pages of swap space) Do you want to IPL Linux from minidisk 100? y/n n
2. Verify that the Shared File System pools, LNX:LINUX2 and LNX:LNXADMIN, are available to LINUX2:
===> q accessed Mode Stat Files Vdev Label/Directory A R/W 3 DIR LNX:LINUX2. B R/W 1 300 LXSWAP D R/O 11 DIR LNX:LNXADMIN. S R/O 698 190 MNT190 Y/S R/O 1123 19E MNT19E Z R/O 892 120 TCM592
3. Copy GENERIC PRM from the shared disk to your local A disk:
===> copyfile generic prm d = = a===> listfiles * * a
Note: To automatically clear the 3270 console, issue the #cp term more 0 0 command before you run REDHAT EXEC.
Chapter 2. Automated Red Hat Enterprise Linux installations by using kickstart 29

PROFILE EXEC A1 GENERIC PRM A1 PROFILE XEDIT A1 Ready; T=0.01/0.01 14:46:17
4. Edit the GENERIC PRM file. All changes are shown in bold:
ro ramdisk_size=40000 cio_ignore=all,!condev ip=9.12.7.99::9.12.4.1:20:vmlnx2-4.itso.ibm.com:enccw0.0.0600:none rd.znet=qeth,0.0.0600,0.0.0601,0.0.0602,layer2=1 nameserver=9.12.6.7 nameserver=9.12.6.6 rd.zfcp=0.0.fc00,0x500507630500c74c,0x4010401800000000 rd.zfcp=0.0.fd00,0x500507630510c74c,0x4010401800000000 inst.repo=ftp://9.12.7.96/pub/rhel71 ks=ftp://9.12.7.96/pub/kickstart/linux2-ks.cfg inst.cmdline
5. Run REDHAT EXEC to initiate the kickstart. Several initial kernel messages appear, which are followed by the rest of the installation process.
===> redhat exec
6. After the installation is successful, log on to LINUX2 by using a Secure Shell (SSH) client:
# ssh [email protected]@9.12.7.99's password:
7. Verify the FCP configuration by using the lsluns command:
# lslunsScanning for LUNs on adapter 0.0.fc00 at port 0x500507630500c74c: 0x4010401800000000 at port 0x50050763050bc74c: 0x4010401800000000Scanning for LUNs on adapter 0.0.fd00 at port 0x500507630510c74c: 0x4010401800000000 at port 0x50050763051bc74c: 0x4010401800000000
Even though we provided only one path in the GENERIC PRM Conversational Monitor System (CMS) file, the FCP autoscan feature during the installation process automatically enabled all paths to the LUN that we wanted.
Note: The rd.zfcp parameter has three parts:
� Virtual device, for example, fc00� Worldwide port name (WWPN) of the storage, for example, 500507630500c74c� Logical unit number (LUN), for example, 4010401800000000
Note: To automatically clear the 3270 console, issue the #cp term more 0 0 command before you run REDHAT EXEC.
30 The Virtualization Cookbook for IBM z Systems Volume 2: Red Hat Enterprise Linux 7.1 Servers

Red Hat Enterprise Linux is now installed onto the virtual server by using kickstart. You now can log in to LINUX1 by using an SSH client. This process can be repeated in the future for other Linux guests.
Note: If the output of the lsluns command looks like the following output, load the kernel module sg by using the modprobe sg command:
# lslunsScanning for LUNs on adapter 0.0.fc00 at port 0x500507630500c74c: Cannot attach WLUN / LUN0 for scanning. at port 0x50050763050bc74c: Cannot attach WLUN / LUN0 for scanning.lsluns: Error: Please load/configure SCSI Generic (sg) to use lsluns.Scanning for LUNs on adapter 0.0.fd00 at port 0x500507630510c74c: Cannot attach WLUN / LUN0 for scanning. at port 0x50050763051bc74c: Cannot attach WLUN / LUN0 for scanning.
# modprobe sg# lslunsScanning for LUNs on adapter 0.0.fc00 at port 0x500507630500c74c: 0x4010401800000000 at port 0x50050763050bc74c: 0x4010401800000000Scanning for LUNs on adapter 0.0.fd00 at port 0x500507630510c74c: 0x4010401800000000 at port 0x50050763051bc74c: 0x4010401800000000
Chapter 2. Automated Red Hat Enterprise Linux installations by using kickstart 31

2.2.1 How to IPL Small Computer System Interface over FCP (LINUX2)
LINUX2 was installed directly on Small Computer System Interface (SCSI) over FCP. To IPL a a Linux guest that is installed on SCSI, perform the following steps:
1. Log on to LINUX2 by using a 3270 terminal and answer no (n) to the PROFILE EXEC REXX script:
LOGON LINUX2 00: z/VM Version 6 Release 3.0, Service Level 1501 (64-bit), 00: built on IBM Virtualization Technology 00: There is no logmsg data 00: FILES: 0003 RDR, NO PRT, NO PUN 00: LOGON AT 14:40:24 EDT WEDNESDAY 04/22/15 00: Command complete 00: NIC 0600 is created; devices 0600-0602 defined 00: NIC 0600 is connected to VSWITCH SYSTEM VSW1 DMSACC724I 19E replaces Y (19E) DMSACP723I Y (19E) R/O z/VM V6.3.0 2015-04-09 09:04 DMSWSP100W Shared S-STAT not available DMSWSP100W Shared Y-STAT not available DMSVML2060I TCPMAINT 592 linked RR as 0592 file mode Z LINUX2 AT ITSOZVM1 VIA RSCS 2015-04-22 14:40:24 EDT WEDNESDAY DMSACR723I D (LNX:LNXADMIN.) R/O DIAG swap disk defined at virtual address 300 (64988 4K pages of swap space) DIAG swap disk defined at virtual address 301 (129980 4K pages of swap space) Do you want to IPL Linux from minidisk 100? y/n n
Note: On step 4, you modified the GENERIC PRM file and added the FCP devices. You can also install RHEL by using FCP devices by specifying the FCP devices only in the kickstart file instead of in the GENERIC PRM CMS file. Follow these steps:
1. Edit the GENERIC PRM file. In this case, you do not specify the FCP devices in this file:
ro ramdisk_size=40000 cio_ignore=all,!condev ip=9.12.7.99::9.12.4.1:20:vmlnx2-4.itso.ibm.com:enccw0.0.0600:none rd.znet=qeth,0.0.0600,0.0.0601,0.0.0602,layer2=1 nameserver=9.12.6.7 nameserver=9.12.6.6 inst.repo=ftp://9.12.7.96/pub/rhel71 ks=ftp://9.12.7.96/pub/kickstart/linux2-ks.cfg inst.cmdline
2. Edit the linux2-ks.cfg file and add the following entries (in bold):
...# Use text mode installtextzfcp --devnum=fc00 --wwpn=500507630500c74c --fcplun=0x4010401800000000zfcp --devnum=fd00 --wwpn=500507630510c74c --fcplun=0x4010401800000000# Keyboard layoutskeyboard --vckeymap=us --xlayouts='us'# System language...
32 The Virtualization Cookbook for IBM z Systems Volume 2: Red Hat Enterprise Linux 7.1 Servers

2. Type the following commands to IPL the virtual FCP device. The portname is the WWPN of the storage port for fc00 and the LUN is the lun definition. They are separated in blocks of eight digits.
===> cp set loaddev portname 50050763 0500c74c lun 40104018 00000000===> cp ipl fc00cp ipl fc00 00: HCPLDI2816I Acquiring the machine loader from the processor controller. 00: HCPLDI2817I Load completed from the processor controller. 00: HCPLDI2817I Now starting the machine loader. 01: HCPGSP2630I The virtual machine is placed in CP mode due to a SIGP stop andstore status from CPU 00. 00: MLOEVL012I: Machine loader up and running (version v2.4.5). 00: MLOPDM003I: Machine loader finished, moving data to final storage location.00: Uncompressing Linux... 00: Ok, booting the kernel. 00: ...
Red Hat Enterprise Linux Server 7.1 (Maipo) Kernel 3.10.0-229.el7.s390x on an s390x linux2 login:
To automate the IPL of SCSI over FCP, use the PROFFCP EXEC REXX script from LNX:LNXADMIN. as your PROFILE EXEC on your local disk. Follow these instructions:
1. Log on to LINUX2 from a 3270 terminal. Answer n to the question.
Logon LINUX2 using 3270 terminal:LOGON LINUX2 00: z/VM Version 6 Release 3.0, Service Level 1501 (64-bit), 00: built on IBM Virtualization Technology 00: There is no logmsg data 00: FILES: 0003 RDR, NO PRT, NO PUN 00: LOGON AT 14:40:24 EDT WEDNESDAY 04/22/15 00: Command complete 00: NIC 0600 is created; devices 0600-0602 defined 00: NIC 0600 is connected to VSWITCH SYSTEM VSW1 DMSACC724I 19E replaces Y (19E) DMSACP723I Y (19E) R/O z/VM V6.3.0 2015-04-09 09:04 DMSWSP100W Shared S-STAT not available DMSWSP100W Shared Y-STAT not available DMSVML2060I TCPMAINT 592 linked RR as 0592 file mode Z LINUX2 AT ITSOZVM1 VIA RSCS 2015-04-22 14:40:24 EDT WEDNESDAY DMSACR723I D (LNX:LNXADMIN.) R/O DIAG swap disk defined at virtual address 300 (64988 4K pages of swap space) DIAG swap disk defined at virtual address 301 (129980 4K pages of swap space) Do you want to IPL Linux from minidisk 100? y/n n
2. Overwrite the PROFILE EXEC on your LNX:LINUX2. by using the PROFFCP EXEC file from LNX:LNXADMIN.:
===> copyfile proffcp exec d profile exec a (replace
Chapter 2. Automated Red Hat Enterprise Linux installations by using kickstart 33
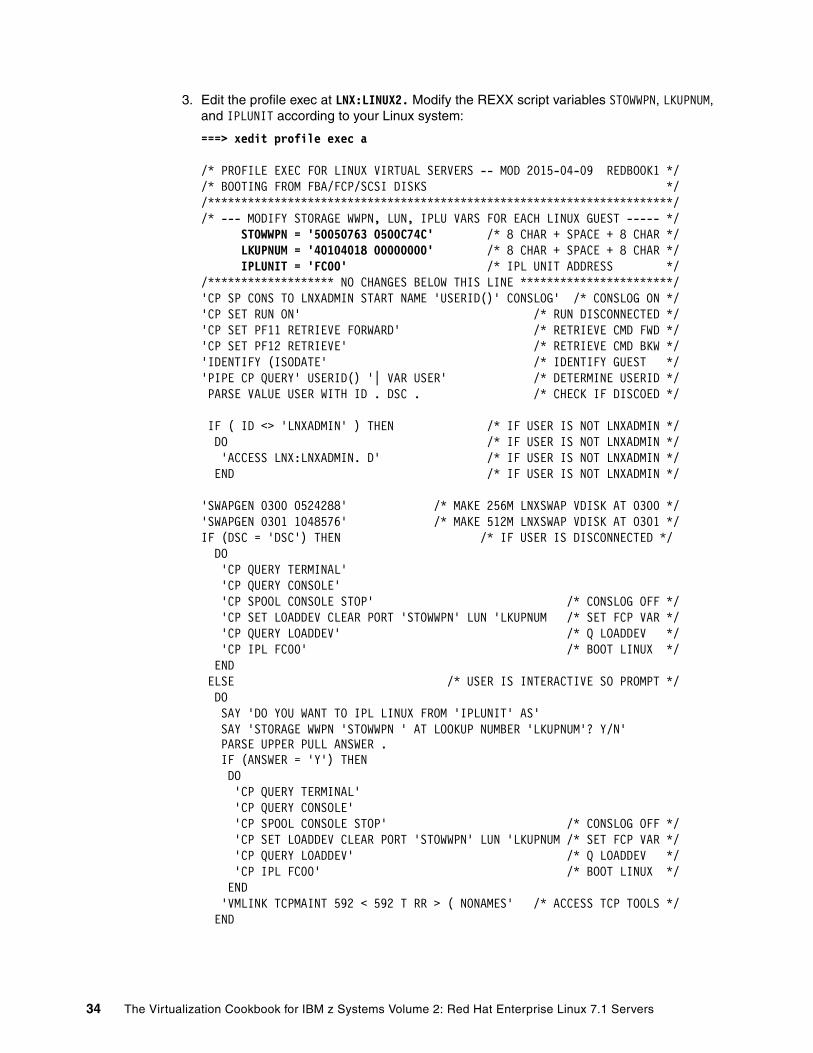
3. Edit the profile exec at LNX:LINUX2. Modify the REXX script variables STOWWPN, LKUPNUM, and IPLUNIT according to your Linux system:
===> xedit profile exec a
/* PROFILE EXEC FOR LINUX VIRTUAL SERVERS -- MOD 2015-04-09 REDBOOK1 *//* BOOTING FROM FBA/FCP/SCSI DISKS *//**********************************************************************//* --- MODIFY STORAGE WWPN, LUN, IPLU VARS FOR EACH LINUX GUEST ----- */ STOWWPN = '50050763 0500C74C' /* 8 CHAR + SPACE + 8 CHAR */ LKUPNUM = '40104018 00000000' /* 8 CHAR + SPACE + 8 CHAR */ IPLUNIT = 'FC00' /* IPL UNIT ADDRESS *//******************* NO CHANGES BELOW THIS LINE ***********************/'CP SP CONS TO LNXADMIN START NAME 'USERID()' CONSLOG' /* CONSLOG ON */'CP SET RUN ON' /* RUN DISCONNECTED */'CP SET PF11 RETRIEVE FORWARD' /* RETRIEVE CMD FWD */'CP SET PF12 RETRIEVE' /* RETRIEVE CMD BKW */'IDENTIFY (ISODATE' /* IDENTIFY GUEST */'PIPE CP QUERY' USERID() '| VAR USER' /* DETERMINE USERID */ PARSE VALUE USER WITH ID . DSC . /* CHECK IF DISCOED */ IF ( ID <> 'LNXADMIN' ) THEN /* IF USER IS NOT LNXADMIN */ DO /* IF USER IS NOT LNXADMIN */ 'ACCESS LNX:LNXADMIN. D' /* IF USER IS NOT LNXADMIN */ END /* IF USER IS NOT LNXADMIN */ 'SWAPGEN 0300 0524288' /* MAKE 256M LNXSWAP VDISK AT 0300 */'SWAPGEN 0301 1048576' /* MAKE 512M LNXSWAP VDISK AT 0301 */IF (DSC = 'DSC') THEN /* IF USER IS DISCONNECTED */ DO 'CP QUERY TERMINAL' 'CP QUERY CONSOLE' 'CP SPOOL CONSOLE STOP' /* CONSLOG OFF */ 'CP SET LOADDEV CLEAR PORT 'STOWWPN' LUN 'LKUPNUM /* SET FCP VAR */ 'CP QUERY LOADDEV' /* Q LOADDEV */ 'CP IPL FC00' /* BOOT LINUX */ END ELSE /* USER IS INTERACTIVE SO PROMPT */ DO SAY 'DO YOU WANT TO IPL LINUX FROM 'IPLUNIT' AS' SAY 'STORAGE WWPN 'STOWWPN ' AT LOOKUP NUMBER 'LKUPNUM'? Y/N' PARSE UPPER PULL ANSWER . IF (ANSWER = 'Y') THEN DO 'CP QUERY TERMINAL' 'CP QUERY CONSOLE' 'CP SPOOL CONSOLE STOP' /* CONSLOG OFF */ 'CP SET LOADDEV CLEAR PORT 'STOWWPN' LUN 'LKUPNUM /* SET FCP VAR */ 'CP QUERY LOADDEV' /* Q LOADDEV */ 'CP IPL FC00' /* BOOT LINUX */ END 'VMLINK TCPMAINT 592 < 592 T RR > ( NONAMES' /* ACCESS TCP TOOLS */ END
34 The Virtualization Cookbook for IBM z Systems Volume 2: Red Hat Enterprise Linux 7.1 Servers
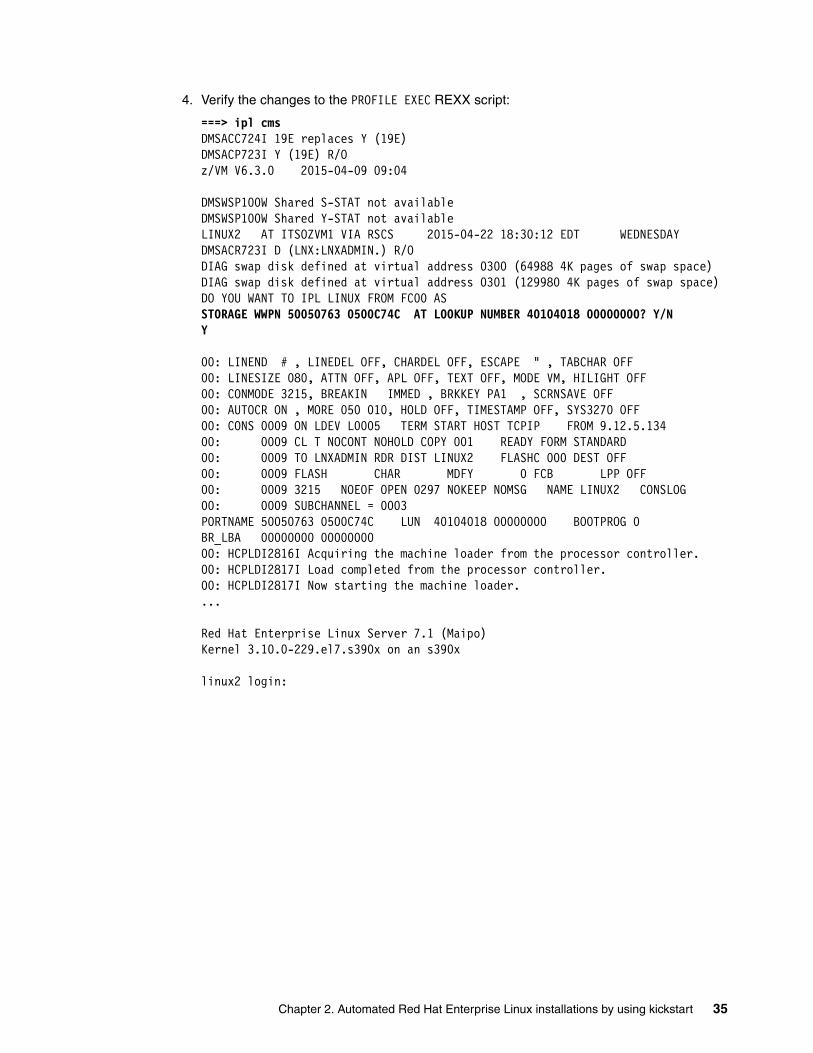
4. Verify the changes to the PROFILE EXEC REXX script:
===> ipl cmsDMSACC724I 19E replaces Y (19E) DMSACP723I Y (19E) R/O z/VM V6.3.0 2015-04-09 09:04 DMSWSP100W Shared S-STAT not available DMSWSP100W Shared Y-STAT not available LINUX2 AT ITSOZVM1 VIA RSCS 2015-04-22 18:30:12 EDT WEDNESDAY DMSACR723I D (LNX:LNXADMIN.) R/O DIAG swap disk defined at virtual address 0300 (64988 4K pages of swap space) DIAG swap disk defined at virtual address 0301 (129980 4K pages of swap space) DO YOU WANT TO IPL LINUX FROM FC00 AS STORAGE WWPN 50050763 0500C74C AT LOOKUP NUMBER 40104018 00000000? Y/N Y
00: LINEND # , LINEDEL OFF, CHARDEL OFF, ESCAPE " , TABCHAR OFF 00: LINESIZE 080, ATTN OFF, APL OFF, TEXT OFF, MODE VM, HILIGHT OFF 00: CONMODE 3215, BREAKIN IMMED , BRKKEY PA1 , SCRNSAVE OFF 00: AUTOCR ON , MORE 050 010, HOLD OFF, TIMESTAMP OFF, SYS3270 OFF 00: CONS 0009 ON LDEV L0005 TERM START HOST TCPIP FROM 9.12.5.134 00: 0009 CL T NOCONT NOHOLD COPY 001 READY FORM STANDARD 00: 0009 TO LNXADMIN RDR DIST LINUX2 FLASHC 000 DEST OFF 00: 0009 FLASH CHAR MDFY 0 FCB LPP OFF 00: 0009 3215 NOEOF OPEN 0297 NOKEEP NOMSG NAME LINUX2 CONSLOG 00: 0009 SUBCHANNEL = 0003 PORTNAME 50050763 0500C74C LUN 40104018 00000000 BOOTPROG 0 BR_LBA 00000000 00000000 00: HCPLDI2816I Acquiring the machine loader from the processor controller. 00: HCPLDI2817I Load completed from the processor controller. 00: HCPLDI2817I Now starting the machine loader. ...
Red Hat Enterprise Linux Server 7.1 (Maipo) Kernel 3.10.0-229.el7.s390x on an s390x linux2 login:
Chapter 2. Automated Red Hat Enterprise Linux installations by using kickstart 35

36 The Virtualization Cookbook for IBM z Systems Volume 2: Red Hat Enterprise Linux 7.1 Servers

Chapter 3. Service Red Hat Enterprise Linux with Red Hat Customer Portal
“The faster you go, the shorter you are.”
— Albert Einstein
This chapter describes Red Hat Network (RHN) and its ability to manage the virtual servers. By using yum, the virtual servers can be updated when Red Hat errata are released. You can also use yum to install new packages with automatic dependency resolution. Access RHN at the following link:
http://access.redhat.com
The following sections describe how to configure a Linux guest for yum, and how to manage the guest through RHN:
� “Register your RHEL system with the Red Hat Customer Portal by using subscription-manager” on page 38
� “Using yum” on page 40
3
© Copyright IBM Corp. 2015. All rights reserved. 37

3.1 Register your RHEL system with the Red Hat Customer Portal by using subscription-manager
Starting with RHEL 5.7, the Red Hat Customer Portal introduces a new system registration process that is called Red Hat Subscription Manager.
Red Hat Subscription Manager is certificate-based subscription management. With it, users can easily track subscription quantity and usage.
To learn more about Red Hat Subscription Manager access, see this website:
https://access.redhat.com
To learn more about the Subscription Manager command-line options, see this website:
https://access.redhat.com/articles/rhsm-cheat-sheet
To learn more about the differences between the Certificate-based RHN and the RHN Classic, see this website:
https://access.redhat.com/knowledge/articles/63269
You can register your systems with Red Hat Customer Portal either by using a browser or when you are connected to the system that you want to service. To register and attach a Red Hat subscription to your RHEL system by using the browser, see this website:
https://access.redhat.com/documentation/en_US/Red_Hat_Subscription_Management/1/html/Portal/portal-systems.html#web-consumer-register
To register and attach a Red Hat subscription to your system by using command-line mode, follow these instructions:
1. Start a Linux terminal on the target Linux system:
# subscription-manager register --username <username>
The system has been registered with ID: d7cc1d46-6f1e-4241-b892-f82aebb5447a
Important: Before you continue, you must already have a valid entitlement for Red Hat Enterprise Linux for z Systems.
Note: To obtain an evaluation subscription for Red Hat Enterprise Linux for z Systems, go to the following website and select TRY IT NOW:
http://www.redhat.com/en/technologies/linux-platforms/enterprise-linux
On the next panel, under the “Start your evaluation” section, select Continue in the Red Hat Enterprise Linux for Mainframe IBM System z Architecture 90-day evaluation box. Follow the instructions.
38 The Virtualization Cookbook for IBM z Systems Volume 2: Red Hat Enterprise Linux 7.1 Servers

2. After the system is registered, list the system’s status:
# subscription-manager list+-------------------------------------------+ Installed Product Status+-------------------------------------------+Product Name: Red Hat Enterprise Linux for IBM System zProduct ID: 72Version: 7.0Arch: s390xStatus: Not SubscribedStatus Details: Not supported by a valid subscription.Starts: Ends:
3. List the available subscriptions. In this example, you will attach your system to a specific subscription:
# subscription-manager list --availableSubscription Name: 90 Day Supported Red Hat Enterprise Linux for IBM System z with Smart Management EvaluationProvides: Red Hat Beta Red Hat Enterprise Linux for IBM z SystemsSKU: RH0438617Contract: 10624268Pool ID: 8a85f9814b2d5616014b2e2a57850df5Available: 100Suggested: 1Service Level: StandardService Type: L1-L3Subscription Type: StandardEnds: 04/26/2015System Type: Physical
4. Attach the subscription to your system by using its Pool ID number:
# subscription-manager attach --pool 8a85f9814b2d5616014b2e2a57850df5Successfully attached a subscription for: 90 Day Supported Red Hat Enterprise Linux for IBM System z with Smart Management Evaluation
5. Verify that your system is attached to a valid subscription:
# subscription-manager list+-------------------------------------------+ Installed Product Status+-------------------------------------------+Product Name: Red Hat Enterprise Linux for IBM System zProduct ID: 72Version: 7.0Arch: s390xStatus: SubscribedStatus Details: Starts: 01/26/2015Ends: 04/26/2015
Chapter 3. Service Red Hat Enterprise Linux with Red Hat Customer Portal 39

3.2 Using yum
The Red Hat Customer Portal suggests the use of yum:
“yum is the primary tool for getting, installing, deleting, querying, and managing Red Hat Enterprise Linux RPM software packages from official Red Hat software repositories, as well as other third-party repositories. yum is used in Red Hat Enterprise Linux versions 5 and later.”
You can access the Red Hat Customer Portal yum page at the following website:
https://access.redhat.com/solutions/9934
Before you use yum for the first time, you must import the Red Hat GNU Privacy Guard (GPG) key:
# rpm --import /etc/pki/rpm-gpg/RPM-GPG-KEY-redhat-release
You can use yum to install, upgrade, and update packages in your system. You can download and install the latest version of a package by running yum with the RPM package name. You can also specify multiple package names, which are separated by spaces, on the command line. The yum install command installs the package if it is not present. If a package has any dependencies, yum automatically downloads and installs them for you.
The following example installs the cpp package:
# yum install cppResolving Dependencies--> Running transaction check---> Package cpp.s390x 0:4.8.3-9.el7 will be installed--> Processing Dependency: libmpc.so.3()(64bit) for package: cpp-4.8.3-9.el7.s390x--> Processing Dependency: libmpfr.so.4()(64bit) for package: cpp-4.8.3-9.el7.s390x--> Running transaction check---> Package libmpc.s390x 0:1.0.1-3.el7 will be installed---> Package mpfr.s390x 0:3.1.1-4.el7 will be installed--> Finished Dependency Resolution...Install 1 Package (+2 Dependent packages)
Total size: 5.6 MTotal download size: 261 kInstalled size: 14 MIs this ok [y/d/N]: yDownloading packages:Delta RPMs disabled because /usr/bin/applydeltarpm not installed.(1/2): libmpc-1.0.1-3.el7.s390x.rpm | 49 kB 00:00(2/2): mpfr-3.1.1-4.el7.s390x.rpm | 212 kB 00:01--------------------------------------------------------------------------------Total 245 kB/s | 261 kB 00:01Running transaction checkRunning transaction test
Note: The systems that were installed during this book use an internal package repository to perform package installations. For production systems, use the RHN Satellite (or Red Hat Network Satellite) for a complete lifecycle management solution:
https://access.redhat.com/documentation/en-US/Red_Hat_Satellite
40 The Virtualization Cookbook for IBM z Systems Volume 2: Red Hat Enterprise Linux 7.1 Servers

Transaction test succeededRunning transaction Installing : mpfr-3.1.1-4.el7.s390x 1/3 Installing : libmpc-1.0.1-3.el7.s390x 2/3 Installing : cpp-4.8.3-9.el7.s390x 3/3 Verifying : libmpc-1.0.1-3.el7.s390x 1/3 Verifying : mpfr-3.1.1-4.el7.s390x 2/3 Verifying : cpp-4.8.3-9.el7.s390x 3/3
Installed: cpp.s390x 0:4.8.3-9.el7
Dependency Installed: libmpc.s390x 0:1.0.1-3.el7 mpfr.s390x 0:3.1.1-4.el7
For more information about yum, see the following website:
https://access.redhat.com/documentation/en-US/Red_Hat_Enterprise_Linux/7/html/System_Administrators_Guide/ch-yum.html
Chapter 3. Service Red Hat Enterprise Linux with Red Hat Customer Portal 41

42 The Virtualization Cookbook for IBM z Systems Volume 2: Red Hat Enterprise Linux 7.1 Servers

Part 2 Other topics
This part of the book includes the following chapters:
� Chapter 4, “Working with disks” on page 45
� Chapter 5, “Monitor z/VM and Linux” on page 59
� Chapter 6, “Configure Linux for cloning” on page 81
� Chapter 7, “Working with systemd” on page 85
� Chapter 8, “Miscellaneous helpful information” on page 97
Part 2
© Copyright IBM Corp. 2015. All rights reserved. 43

44 The Virtualization Cookbook for IBM z Systems Volume 2: Red Hat Enterprise Linux 7.1 Servers

Chapter 4. Working with disks
“Learn from yesterday, live for today, hope for tomorrow. The important thing is not to stop questioning.”
— Albert Einstein
This chapter relates to working with disks. This chapter describes both extended count key data (IBM ECKD™) direct access storage device (DASD), and Fibre Channel Protocol (FCP)/Small Computer System Interface (SCSI) tasks that you might want to perform. It concentrates on the tasks to perform on Linux.
For the z/VM perspective, see 6.2, “Considerations for disk storage types” in Volume 1 of this series in The Virtualization Cookbook for IBM z Systems Volume 1: IBM z/VM 6.3, SG24-8147-01, at this website:
http://www.redbooks.ibm.com/abstracts/sg248147.html?Open
The following topics are described:
� “Add disk space to virtual machines” on page 46 � “Add a logical volume” on page 49 � “Extend an existing logical volume” on page 53 � “Moving a physical volume” on page 56
4
© Copyright IBM Corp. 2015. All rights reserved. 45

4.1 Add disk space to virtual machines
This section describes how to add additional disk space to a Linux virtual machine. This disk space can come from different types of disks. The types of disks are described in 6.2, “Considerations for disk storage types”, in Volume 1 of this series: The Virtualization Cookbook for IBM z Systems Volume 1: IBM z/VM 6.3, SG24-8147-01:
http://www.redbooks.ibm.com/abstracts/sg248147.html?Open
4.1.1 Make new minidisks or count key data DASD available in Red Hat Enterprise Linux 7.1
After obtaining new minidisks or count key data (CKD) DASD, for example, at the addresses 0.0.0102, 0.0.0103, and 0.0.0104, make the new disks available by performing the following steps:
1. Make the disks visible with the command cio_ignore:
# cio_ignore -r 102 # cio_ignore -r 103# cio_ignore -r 104
2. Enable the disks with the chccwdev -e command:
# chccwdev -e 102 103 104Setting device 0.0.0102 onlineDoneSetting device 0.0.0103 onlineDoneSetting device 0.0.0104 onlineDone
3. Make a backup of /etc/dasd.conf, and then add minidisks 102, 103, and 104 to it:
# cd /etc# cp dasd.conf dasd.conf.orig# vi dasd.conf0.0.0301 0.0.0300 0.0.0101 0.0.0100 0.0.0102 0.0.0103 0.0.0104
Important: If you add minidisks or add them to the user directory for a certain virtual machine, you can attach them to a running Linux system without “bouncing” it.
For example, if you added a minidisk at virtual address 104, you can use the following commands to link to the disk and then enable it:
# vmcp link '* 104 104 mr'# chccwdev -e 104
46 The Virtualization Cookbook for IBM z Systems Volume 2: Red Hat Enterprise Linux 7.1 Servers
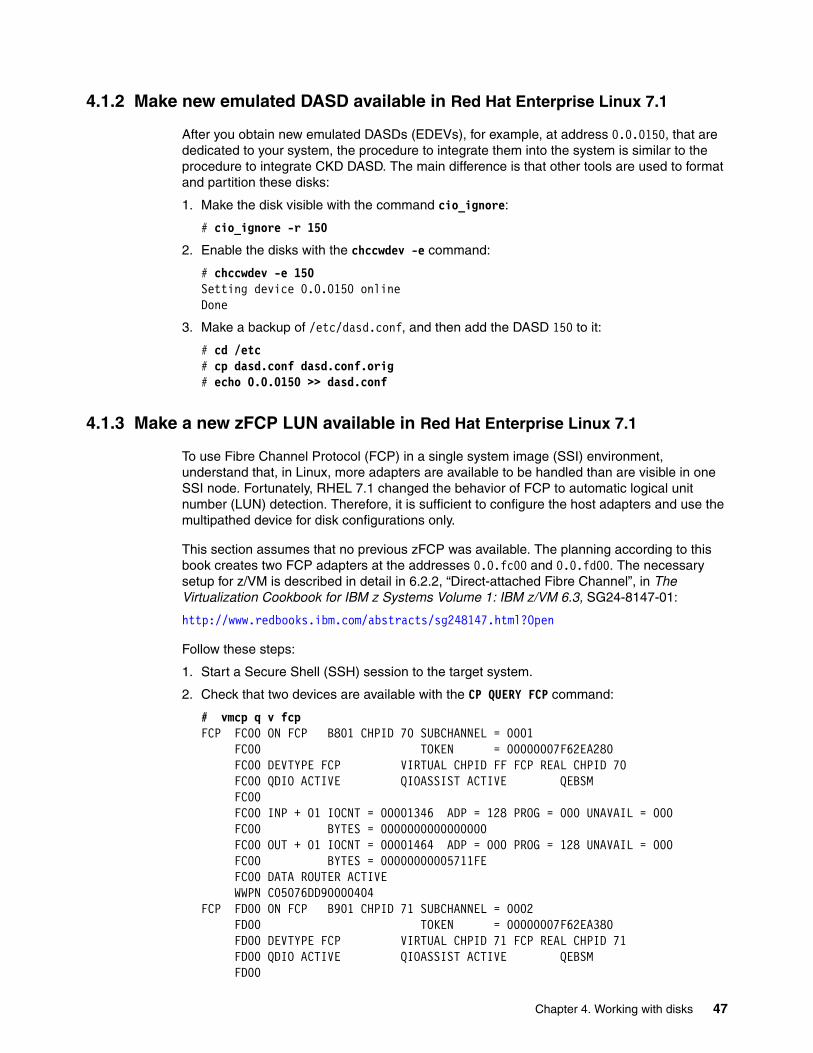
4.1.2 Make new emulated DASD available in Red Hat Enterprise Linux 7.1
After you obtain new emulated DASDs (EDEVs), for example, at address 0.0.0150, that are dedicated to your system, the procedure to integrate them into the system is similar to the procedure to integrate CKD DASD. The main difference is that other tools are used to format and partition these disks:
1. Make the disk visible with the command cio_ignore:
# cio_ignore -r 150
2. Enable the disks with the chccwdev -e command:
# chccwdev -e 150Setting device 0.0.0150 onlineDone
3. Make a backup of /etc/dasd.conf, and then add the DASD 150 to it:
# cd /etc# cp dasd.conf dasd.conf.orig# echo 0.0.0150 >> dasd.conf
4.1.3 Make a new zFCP LUN available in Red Hat Enterprise Linux 7.1
To use Fibre Channel Protocol (FCP) in a single system image (SSI) environment, understand that, in Linux, more adapters are available to be handled than are visible in one SSI node. Fortunately, RHEL 7.1 changed the behavior of FCP to automatic logical unit number (LUN) detection. Therefore, it is sufficient to configure the host adapters and use the multipathed device for disk configurations only.
This section assumes that no previous zFCP was available. The planning according to this book creates two FCP adapters at the addresses 0.0.fc00 and 0.0.fd00. The necessary setup for z/VM is described in detail in 6.2.2, “Direct-attached Fibre Channel”, in The Virtualization Cookbook for IBM z Systems Volume 1: IBM z/VM 6.3, SG24-8147-01:
http://www.redbooks.ibm.com/abstracts/sg248147.html?Open
Follow these steps:
1. Start a Secure Shell (SSH) session to the target system.
2. Check that two devices are available with the CP QUERY FCP command:
# vmcp q v fcpFCP FC00 ON FCP B801 CHPID 70 SUBCHANNEL = 0001 FC00 TOKEN = 00000007F62EA280 FC00 DEVTYPE FCP VIRTUAL CHPID FF FCP REAL CHPID 70 FC00 QDIO ACTIVE QIOASSIST ACTIVE QEBSM FC00 FC00 INP + 01 IOCNT = 00001346 ADP = 128 PROG = 000 UNAVAIL = 000 FC00 BYTES = 0000000000000000 FC00 OUT + 01 IOCNT = 00001464 ADP = 000 PROG = 128 UNAVAIL = 000 FC00 BYTES = 00000000005711FE FC00 DATA ROUTER ACTIVE WWPN C05076DD90000404FCP FD00 ON FCP B901 CHPID 71 SUBCHANNEL = 0002 FD00 TOKEN = 00000007F62EA380 FD00 DEVTYPE FCP VIRTUAL CHPID 71 FCP REAL CHPID 71 FD00 QDIO ACTIVE QIOASSIST ACTIVE QEBSM FD00
Chapter 4. Working with disks 47

FD00 INP + 01 IOCNT = 00001338 ADP = 128 PROG = 000 UNAVAIL = 000 FD00 BYTES = 0000000000000000 FD00 OUT + 01 IOCNT = 00001428 ADP = 000 PROG = 128 UNAVAIL = 000 FD00 BYTES = 000000000052EF86 FD00 DATA ROUTER ACTIVE WWPN C05076DD90000A64
3. Make the disks visible with the cio_ignore command:
# cio_ignore -r fc00 # cio_ignore -r fd00
4. Enable the FCP adapters by using the chccwdev command:
# chccwdev -e fc00Setting device 0.0.fc00 onlineDone# chccwdev -e fd00Setting device 0.0.fd00 onlineDone
5. Verify that the auto lun scan feature detected all of the paths to the LUNs:
# lslunsScanning for LUNs on adapter 0.0.fc00 at port 0x500507630500c74c: 0x4010401700000000 at port 0x50050763050bc74c: 0x4010401700000000Scanning for LUNs on adapter 0.0.fd00 at port 0x500507630510c74c: 0x4010401700000000 at port 0x50050763051bc74c: 0x4010401700000000
6. If multipathing is not yet configured, perform these steps:
a. Install the device-mapper-multipath:
# yum -y install device-mapper-multipathInstalled:
device-mapper-multipath-0.4.9-77.el7.s390x...
b. Copy the multipath reference configuration file to /etc/multipath.conf:
# cp /usr/share/doc/device-mapper-multipath-0.4.9/multipath.conf /etc/multipath.conf
c. Check the status of the multipathd daemon. If it is not started, start the service and then make it permanent:
# systemctl status multipathdmultipathd.service - Device-Mapper Multipath Device Controller Loaded: loaded (/usr/lib/systemd/system/multipathd.service; enabled) Active: active (running) since Wed 2015-04-29 08:42:02 EDT; 25s ago Process: 2962 ExecStart=/sbin/multipathd (code=exited, status=0/SUCCESS) Process: 2958 ExecStartPre=/sbin/multipath -A (code=exited, status=0/SUCCESS) Process: 2953 ExecStartPre=/sbin/modprobe dm-multipath (code=exited, status=0/SUCCESS) Main PID: 2965 (multipathd)
CGroup: /system.slice/multipathd.service
48 The Virtualization Cookbook for IBM z Systems Volume 2: Red Hat Enterprise Linux 7.1 Servers

/sbin/multipathd# systemctl start multipathd# systemctl enable multipathd
d. Verify whether multipath set the correct paths to the LUN:
# multipath -llmpatha (36005076305ffc74c0000000000001017) dm-2 IBM ,2107900size=10G features='1 queue_if_no_path' hwhandler='0' wp=rw`-+- policy='service-time 0' prio=1 status=active |- 0:0:0:1075265552 sda 8:0 active ready running |- 0:0:1:1075265552 sdb 8:16 active ready running |- 1:0:0:1075265552 sdc 8:32 active ready running `- 1:0:1:1075265552 sdd 8:48 active ready running
7. Make the FCP configuration persistent:
# lszfcp -D | awk '{ print $1 }' | sed -e 's/\// /g' >> /etc/zfcp.conf
8. Create a partition on the multipath device by using the parted command:
# parted -s /dev/mapper/mpatha mklabel msdos mkpart primary 0% 100%
4.2 Add a logical volume
Sometimes, you require more disk space than a single direct access storage device (DASD) provides. For example, if you want a shared /home/ directory, it must be of sufficient size for many users to write data to it. When the size is sufficient, you can use the Logical Volume Manager (LVM) to combine multiple DASD volumes into one logical volume. This example does not create a large logical volume, but it shows all the necessary steps.
The following sections describe a logical volume with additional DASD on a Linux guest. Use the following overall steps in adding a logical volume:
1. “Create a logical volume and file system”2. “Update the file system table” on page 52
4.2.1 Create a logical volume and file system
The following overall steps are involved in creating a logical volume:
1. Create physical volumes from the two partitions.2. Create a single volume group.3. Create a single logical volume.4. Make a file system from the logical volume.
Figure 4-1 on page 50 shows a block diagram of the LVM.
Chapter 4. Working with disks 49

Figure 4-1 LVM block diagram
Create physical volumes from two minidisksTo create physical volumes from new minidisks at virtual device addresses 102 and 103, perform the following steps:
1. Check the devices on your system with the lsdasd command.
2. The pvcreate command initializes partitions for use by LVM. Initialize the two new DASD partitions:
# pvcreate /dev/dasde1 /dev/dasdf1Physical volume "/dev/dasde1" successfully created
Physical volume "/dev/dasdf1" successfully created
3. Verify that the physical volumes were created with the pvdisplay command:
# pvdisplay /dev/dasde1 /dev/dasdf1"/dev/dasde1" is a new physical volume of "3.44 GiB"
--- NEW Physical volume --- PV Name /dev/dasde1 VG Name PV Size 3.44 GiB Allocatable NO PE Size 0 Total PE 0 Free PE 0 Allocated PE 0 PV UUID s0ugfl-hlV3-fYnf-1adW-4mOI-4HTJ-HdA0TU
"/dev/dasdf1" is a new physical volume of "3.44 GiB" --- NEW Physical volume --- PV Name /dev/dasdf1
Volume Group - homevg
Physical Extent (PE)
Physical Extent (PE)
Physical Extent (PE)
Physical Extent (PE)
Physical Extent (PE)
Physical Extent (PE)
Physical Extent (PE)
Physical Extent (PE)
Physical Volume - /dev/dasdf1Physical Volume - /dev/dasde1
Logical Volume - homelv (/dev/homevg/homelv)
ext3 or xfs file system mounted over /home/
50 The Virtualization Cookbook for IBM z Systems Volume 2: Red Hat Enterprise Linux 7.1 Servers

VG Name PV Size 3.44 GiB Allocatable NO PE Size 0 Total PE 0 Free PE 0 Allocated PE 0 PV UUID v02PJY-gy4x-M9Hj-kt51-T04J-B4n5-Ntvkje
Create a single volume groupThe vgcreate command is used to create a volume group that is named homevg from the two partitions. Use the vgdisplay homevg command to verify that the volume group was created:
# vgcreate homevg /dev/dasde1 /dev/dasdf1Volume group "homevg" successfully created# vgdisplay homevg
--- Volume group --- VG Name homevg System ID Format lvm2 Metadata Areas 2 Metadata Sequence No 1 VG Access read/write VG Status resizable MAX LV 0 Cur LV 0 Open LV 0 Max PV 0 Cur PV 2 Act PV 2 VG Size 6.88 GiB PE Size 4.00 MiB Total PE 1760 Alloc PE / Size 0 / 0 Free PE / Size 1760 / 6.88 GiB VG UUID acSF65-56Ie-kVoY-Af6I-Hma4-VVuN-ggJEs5
In this example, 1,760 physical extents (PEs) are free.
Create a single logical volumeCreate a single logical volume by using the lvcreate command:
1. The lvcreate command is used to create a logical volume. The -i (a lowercase I) specifies the number of stripes. Two stripes are specified in this case because two volumes exist in the volume group. The -l (a lowercase L) flag specifies the number of logical extents, which is 1760 in this example. The -n homelv flag specifies the name of the new logical volume. The last argument homevg specifies the name of the volume group from which the logical volume will be created:
# lvcreate -i 2 -l 1760 -n homelv homevg LUsing default stripesize 64.00 KiB Logical volume "homelv" created
Chapter 4. Working with disks 51

2. Use the lvdisplay command to verify that a single logical volume was created. The parameter is the full path of the logical volume, not merely the logical volume name:
# lvdisplay /dev/homevg/homelv--- Logical volume ---
LV Path /dev/homevg/homelv LV Name homelv VG Name homevg LV UUID qNcyDp-Eeqs-gfBl-XU5Z-Jt3K-QfvV-pf3Kos LV Write Access read/write LV Creation host, time virtcook3.itso.ibm.com, 2013-06-17 15:32:39 -0400 LV Status available # open 0 LV Size 6.88 GiB Current LE 1760 Segments 1 Allocation inherit Read ahead sectors auto - currently set to 512 Block device 253:4
Make a file system from the logical volumeCreate a file system from the new logical volume. The use of ext4 is the recommended file system. Create an ext4 file system on the new logical volume by using the mkfs.ext4 command:
# mkfs.ext4 /dev/homevg/homelv...This filesystem will be automatically checked every 26 mounts or180 days, whichever comes first. Use tune2fs -c or -i to override.
The file system that was created from the logical volume is now ready to be mounted.
4.2.2 Update the file system table
You can mount the file system manually. However, if you add the mount to the file system table file, /etc/fstab, you can effectively test the change by using the mount command with only one argument. Perform the following steps:
1. Make a backup copy of the file and then add the following line to it:
# cd /etc# cp fstab fstab.works
2. Add one line to the fstab file:
# vi fstab... // For RHEL 6.4:/dev/homevg/homelv /home ext4 defaults 0 0
3. Before you mount the file system over /home/, check that the file system is empty. If a non-root user exists and a new file system is mounted over it, the contents of the directory will be hidden. In this example, no data is in the file system:
# ls -a /home. ..
52 The Virtualization Cookbook for IBM z Systems Volume 2: Red Hat Enterprise Linux 7.1 Servers

4. Mount the /home/ file system with one argument. By using only one argument, you are testing the change to /etc/fstab. Use the df -h command to verify that the file system is mounted:
# mount /home# df -hFilesystem Size Used Avail Use% Mounted on/dev/dasdc1 1008M 184M 774M 20% /tmpfs 246M 0 246M 0% /dev/shm/dev/mapper/system_vg-opt_lv 504M 17M 462M 4% /opt/dev/mapper/system_vg-tmp_lv 504M 17M 462M 4% /tmp/dev/mapper/system_vg-usr_lv 2.0G 1.3G 617M 68% /usr/dev/mapper/system_vg-var_lv 504M 92M 388M 20% /var/dev/mapper/homevg-homelv 6.8G 144M 6.3G 3% /home
5. Test a reboot to verify that the new logical volume is successfully mounted over /home/:
# rebootBroadcast message from [email protected] (/dev/pts/0) at 15:51 ...
The system is going down for reboot NOW!
When the system comes back, the new logical volume is mounted over /home/.
4.3 Extend an existing logical volume
This section describes the process of adding a minidisk to an existing LVM. This process is useful when your logical volume runs out of space. In this example, the /var/ file system is filling up on LINUX3:
# df -h /var/Filesystem Size Used Avail Use% Mounted on/dev/mapper/system_vg-var_lv 504M 392M 88M 82% /var
A 3390-9 was added as minidisk 106 in 4.1, “Add disk space to virtual machines” on page 46.
Important: You can attach minidisks to a Linux system that is running without rebooting the Linux system. For example, if you added a minidisk at virtual address 106, from a root SSH session, use the vmcp link * 106 106 mr command to link to the minidisk. Then, use the chccwdev -e 106 command to enable the minidisk.
Chapter 4. Working with disks 53

To extend the logical volume by using this disk, perform the following steps:
1. Use the vgdisplay command to see the free space in the volume group system_vg:
# vgdisplay system_vg--- Volume group ---
VG Name system_vg System ID Format lvm2 Metadata Areas 2 Metadata Sequence No 6 VG Access read/write VG Status resizable MAX LV 0 Cur LV 5 Open LV 4 Max PV 0 Cur PV 2 Act PV 2 VG Size 5.88 GiB PE Size 4.00 MiB Total PE 1504 Alloc PE / Size 1504 / 5.88 GiB Free PE / Size 0 / 0 VG UUID 4i89gF-b0xm-dkHo-blWP-3Kca-0xCI-V6TAXk
No free extents are in the volume group.
2. Use the lsdasd command to show the enabled disks:
# lsdasdBus-ID Status Name Device Type BlkSz Size Blocks==============================================================================0.0.0100 active dasda 94:0 ECKD 4096 3521MB 9014400.0.0301 active dasdb 94:4 FBA 512 512MB 10485760.0.0300 active dasdc 94:8 FBA 512 256MB 5242880.0.0101 active dasdd 94:12 ECKD 4096 3521MB 9014400.0.0102 active dasde 94:16 ECKD 4096 3521MB 9014400.0.0103 active dasdf 94:20 ECKD 4096 3521MB 9014400.0.0104 active dasdg 94:24 ECKD 4096 7042MB 1802880
Minidisk 104 is at /dev/dasdg.
3. Make minidisk 104 a physical volume with the pvcreate command:
# pvcreate /dev/dasdg1Physical volume "/dev/dasdg1" successfully created
4. Use the vgextend command to add the minidisk to the volume group:
# vgextend system_vg /dev/dasdg1 Volume group "system_vg" successfully extended
54 The Virtualization Cookbook for IBM z Systems Volume 2: Red Hat Enterprise Linux 7.1 Servers

5. Use the vgdisplay command again to show the free extents in the volume group:
# vgdisplay system_vg--- Volume group ---
VG Name system_vg System ID Format lvm2 Metadata Areas 3 Metadata Sequence No 7 VG Access read/write VG Status resizable MAX LV 0 Cur LV 5 Open LV 4 Max PV 0 Cur PV 3 Act PV 3 VG Size 12.75 GiB PE Size 4.00 MiB Total PE 3264 Alloc PE / Size 1504 / 5.88 GiB Free PE / Size 1760 / 6.88 GiB VG UUID 4i89gF-b0xm-dkHo-blWP-3Kca-0xCI-V6TAXk
Now, 1,760 free extents are in the volume group.
6. Use the mount command to determine the name of the logical volume that is mounted over /var/:
# mount | grep "\/var "/dev/mapper/system_vg-var_lv on /var type ext4 (rw)
In this example, the name of the logical volume is /dev/mapper/system_vg-var_lv/.
7. Use the lvextend command to extend the volume group with all of the new extents:
# lvextend -l +1760 /dev/mapper/system_vg-var_lvExtending logical volume var_lv to 7.38 GiB
Logical volume var_lv successfully resized
8. Use the resize2fs command to increase the size of the EXT4file system while it is still mounted:
# resize2fs /dev/mapper/system_vg-var_lvresize2fs 1.41.12 (17-May-2010)Filesystem at /dev/mapper/system_vg-var_lv is mounted on /var; on-line resizing requiredold desc_blocks = 1, new_desc_blocks = 1Performing an on-line resize of /dev/mapper/system_vg-var_lv to 1933312 (4k) blocks.The filesystem on /dev/mapper/system_vg-var_lv is now 1933312 blocks long.
9. Use the xfs_growfs command to increase the size of the XFS file system while it is still mounted:
# xfs_growfs /dev/mapper/system_vb-var_lv
Chapter 4. Working with disks 55

10.Use the df command to show the file system size before and after you extend it, as shown in the following example:
# df -h /varFilesystem Size Used Avail Use% Mounted on/dev/mapper/system_vg-var_lv 7.3G 393M 6.6G 6% /var
The /var/ file system now has 6.6 GB of free space.
4.4 Moving a physical volume
In addition to file systems growing, you might need to move data off one or more volumes onto another volume or a target set of volumes. If your data is in LVM, the pvmove and vgreduce commands were designed for this process. They can be used with the file system online.
In this example, two physical volumes exist, /dev/dasde1 and /dev/dasdf1. Data is populated on the first volume, and later moved to the second volume. This process is performed while the file system is online.
To complete this task, perform the following steps:
1. Create a volume group from the first logical volume, which, in this example, is named homelv:
# vgcreate homevg /dev/dasde1 Volume group "homevg" successfully created
2. Observe the number of physical extents:
# vgdisplay homevg | grep "Total PE" Total PE 1760
3. Create a logical volume from the volume group. In this example, the logical volume is named homelv, and all physical extents are used:
# lvcreate -l 1760 -n homelv homevg Logical volume "homelv" created
4. Create a file system from the logical volume. In this example, the file system is type ext4:
# mkfs.ext4 /dev/homevg/homelv
5. Add the new file system to the file system table and mount it:
# vi /etc/fstab...# grep home /etc/fstab/dev/homevg/homelv /home ext4 defaults 0 0# mount /home
6. Create a sizable file on it with the dd command and show the file system usage:
# dd if=/dev/zero of=/home/bigfile bs=1M count=500500+0 records in500+0 records out524288000 bytes (524 MB) copied, 3.0718 s, 171 MB/s# df -h | grep home/dev/mapper/homevg-homelv 6.8G 644M 5.8G 10% /home
56 The Virtualization Cookbook for IBM z Systems Volume 2: Red Hat Enterprise Linux 7.1 Servers

7. Show the volume group usage with the vgdisplay command:
# vgdisplay homevg --- Volume group --- VG Name homevg
VG Size 6.88 GiB PE Size 4.00 MiB Total PE 1760 Alloc PE / Size 1760 / 6.88 GiB Free PE / Size 0 / 0 VG UUID YIQgoN-865f-3Vbf-tjH1-eXhO-Aa6W-PcxHri
All of the physical extents in the volume group are used.
8. Add a second physical volume, which will be the target of the data move, to the volume group:
# vgextend homevg /dev/dasdf1 Volume group "homevg" successfully extended
9. Show the volume group usage again:
# vgdisplay homevg --- Volume group --- VG Name homevg
... VG Size 13.75 GiB
PE Size 4.00 MiB Total PE 3520 Alloc PE / Size 1760 / 6.88 GiB Free PE / Size 1760 / 6.88 GiB VG UUID YIQgoN-865f-3Vbf-tjH1-eXhO-Aa6W-PcxHri
The volume group doubled in size. Now, an equal number of free extents exists.
10.Move the data off the source physical volume with the pvmove command. The target does not need to be specified:
# pvmove /dev/dasde1 /dev/dasde1: Moved: 0.0% /dev/dasde1: Moved: 8.0% /dev/dasde1: Moved: 18.9% /dev/dasde1: Moved: 34.2% /dev/dasde1: Moved: 49.1% /dev/dasde1: Moved: 63.2% /dev/dasde1: Moved: 77.6% /dev/dasde1: Moved: 92.7% /dev/dasde1: Moved: 100.0%
Chapter 4. Working with disks 57

11.Show the volume group usage again:
# vgdisplay homevg --- Volume group --- VG Name homevg
... VG Size 13.75 GiB
PE Size 4.00 MiB Total PE 3520 Alloc PE / Size 1760 / 6.88 GiB Free PE / Size 1760 / 6.88 GiB VG UUID YIQgoN-865f-3Vbf-tjH1-eXhO-Aa6W-PcxHri
These free and used extents are the same; however, the data was moved.
12.Show the free and used extents on the source and target physical volumes with the pvdisplay command:
# pvdisplay /dev/dasde1 /dev/dasdf1 --- Physical volume --- PV Name /dev/dasde1 VG Name homevg PV Size 6.88 GiB / not usable 2.41 MiB Allocatable yes PE Size 4.00 MiB Total PE 1760 Free PE 1760 Allocated PE 0 PV UUID Jo2fa3-5cc0-y2Xs-e0DQ-wQXc-i3er-MPcckW
--- Physical volume --- PV Name /dev/dasdf1 VG Name homevg PV Size 6.88 GiB / not usable 2.41 MiB Allocatable yes (but full) PE Size 4.00 MiB Total PE 1760 Free PE 0 Allocated PE 1760 PV UUID hme2qP-6ytn-Drg8-Wba4-rTU1-q1sV-pVZ03g
13.Remove the source physical volume:
# vgreduce homevg /dev/dasde1 Removed "/dev/dasde1" from volume group "homevg"
The source volume is now ready for reassignment, or retirement.
You moved data from one physical volume to another physical volume without taking the file system offline.
58 The Virtualization Cookbook for IBM z Systems Volume 2: Red Hat Enterprise Linux 7.1 Servers

Chapter 5. Monitor z/VM and Linux
“Not everything that can be counted counts, and not everything that counts can be counted.”
— Albert Einstein
This chapter briefly describes how to monitor z/VM and Linux. For another source about z/VM performance and monitoring, see Chapter 11, “Monitoring performance and capacity” in Getting Started with Linux on System z, SC24-6096, at the following site:
http://publib.boulder.ibm.com/cgi-bin/bookmgr/download/HCSX0C20.pdf?DT=20130528134905&XKS=hcsh2ac2
Many z/VM monitoring tools, such as CA VM:Monitor, IBM z/VM Performance Toolkit, IBM Tivoli® OMEGAMON® XE for z/VM and Linux, and products from IBM Velocity Software, are available. The IBM z/VM Performance Toolkit is briefly described in this chapter.
The following topics are described:
� “Use basic z/VM commands” on page 60� “IBM z/VM Performance Toolkit” on page 63� “Collect and use raw CP monitor data” on page 72� “Monitor Linux performance and troubleshooting” on page 75
5
© Copyright IBM Corp. 2015. All rights reserved. 59

5.1 Use basic z/VM commands
z/VM has many commands to monitor the state of the system. The CP INDICATE command is the most commonly used command. Other commands are also addressed in this book. For more information, see the z/VM Performance Resources web page:
http://www.vm.ibm.com/perf
5.1.1 Use the INDICATE command
In z/VM, use the INDICATE command. Many INDICATE command parameters can be included as command-line options. Use the HELP INDICATE command for a basic understanding and then press F11 for help on each parameter.
INIDICATE LOAD If no parameter is specified, the INDICATE LOAD command is the default option. Two versions exist, depending on whether the issuing virtual machine has privilege class G or class E. Class G users can use the INDICATE command to display recent contention for system resources, display environment characteristics, and measurements of resources that are used by their virtual machine.
The output from virtual machines with class E privilege (for example, MAINT or OPERATOR) is shown. The lines are numbered for clarity with a description of the output:
===> ind load 1 AVGPROC-000% 042 MDC READS-000068/SEC WRITES-000001/SEC HIT RATIO-099% 3 PAGING-0/SE4 Q0-00001(00000) DORMANT-000125 Q1-00000(00000) E1-00000(00000) 6 Q2-00001(00000) EXPAN-001 E2-00000(00000)7 Q3-00001(00000) EXPAN-001 E3-00000(00000) 8 9 PROC 0000-000% CP VM PROC 0001-000% CP VL10 PROC 0002-000% IFL VM PROC 0003-000% IFL VL1112 LIMITED-00000
The INDICATE LOAD command gives a snapshot of the current system performance. Except for the counts of virtual machines in various queues and the limited list, the values that you see are a smoothed average over the past 4 minutes. z/VM performance analysts tend to focus on the following areas:
� AVGPROC on line 1 gives the overall processor utilization, which is 38% in this example. The number that follows the utilization is the number of online processors, which is 04 in this example. The individual processor utilization is shown on lines 9 and 10. Glance at these lines to see whether they are somewhat balanced. Sometimes, an imbalance is acceptable, for example, low utilization scenarios or cases where insufficient users are ready to run virtual processors to keep the physical processors busy.
One of the processors is a Master. All of the other processors are Alternate. An imbalance can result from performing these functions. Another imbalance can result from vertical CPU management.
60 The Virtualization Cookbook for IBM z Systems Volume 2: Red Hat Enterprise Linux 7.1 Servers

� (MDC) statistics are on the second line. The effectiveness of MDC can be judged by the combination of the READS rate and the HIT RATIO. If both are high, many physical I/Os are avoided due to the MDC feature.
For a system that has an high I/O rate, which is composed of reads plus writes, and a high proportion of reads, and a good hit ratio for those reads (tending to 90% or greater), the real, physical I/O avoidance can be high. Cases of avoidance as high as 50% were documented. Conversely, however, a high HIT RATIO with a low value for the READS rate is not good. (One hundred percent hit ratio when you perform only 1 I/O per second (IOPS) is effectively meaningless.)
� Line 3 describes more storage (memory) management. The PAGING rate is important. Higher values often affect performance. This effect can be at least partially offset by increasing the number of page volumes, but a more thorough examination of this problem is advisable whenever it arises.
� On lines 4 - 7, you also see a series of counters that represent the users in various queues. The z/VM scheduler classifies work into three classes (1 - 3) and a special additional class that is labeled zero. So, the column of Qx values and Ex represents the virtual machines in the dispatch list and the eligible list.
The most important value to validate is that no virtual machines are in the Eligible list: E1, E2, and E3. This condition implies that z/VM stopped dispatching virtual machines to avoid overcommitting resources. This system requires further investigation, which possibly leads to tuning work, or even additional hardware in extreme cases. Do not worry about the values in parentheses.
INDICATE QUEUES EXPAnother useful command to understand the state of the system is the INDICATE QUEUES EXP command, for example:
===> ind q expMAINT Q1 R00 00001623/00001552 .I.. .0004TCPIP Q0 PS 00003496/00003178 .I.. 99999
This command is another class E command. It displays the virtual processors that are associated with a specific virtual machine (that can have multiple virtual processors), the queue (dispatch list, eligible list, or limit list) that they are in, and the state that they are in. This output is a snapshot in time.
Again, you want to check this output to ensure that no virtual machines are in the eligible list. Normal virtual processors in the dispatch list are Qx (x = 1, 2, or 3). The eligible list is marked as Ex. The third column in the example also provides the state of the virtual processor, which is helpful to identify how the virtual processors might be constrained. Virtual processors that are running during the snapshot period are marked with an RNN where NN is the processor number they are on. An R without a number means that the virtual processor is ready to run, but no processor is available.
Other states are documented in the help for the IND Q EXP command. Do not worry about the other columns unless detailed analysis is required or if IBM support requests the information.
Also, this output is only a snapshot in time so repeat this command often over time for a more accurate picture of your z/VM system. A single snapshot cannot be regarded as indicative.
Note: The virtual machine that issues the INDICATE command is always one of the running machines.
Chapter 5. Monitor z/VM and Linux 61

5.1.2 Use other basic commands
Other useful basic commands are mentioned. All of the examples that are shown are from the MAINT virtual machine. The results differ for users with fewer privileges.
Getting helpTo obtain help on the system, use the HELP command. Sometimes, it is hard to identify help for the exact command that you are looking for. The following help commands are useful:
===> help // for basic help===> help menus // for a menu of all z/VM help menus===> help cp menu // for a menu of all CP commands===> help cpquery // for a menu of all CP QUERY commands===> help cpset // for a menu of all CP SET commands
Determining who is logged onTo see who is logged on to the system, use the QUERY NAMES command, for example:
===> q nDIRMSAT2 - SSIZMAPVM62 - DSC , LINUX153 - DSC , LNXADMIN - DSC , LINUX157 - DSCVSMEVSRV - DSC , VSMPROXY - DSC , VSMREQIU - DSC , VSMREQI6 - DSCVSMREQIN - DSC , DTCSMAPI - DSC , PERSMAPI - DSC , VSMWORK3 - DSCVSMWORK2 - DSC , VSMWORK1 - DSC , FTPSERVE - DSC , VSMGUARD - DSCTCPIP - DSC , DIRMAINT - DSC , DTCVSW2 - DSC , DTCVSW1 - DSCVMSERVP - DSC , VMSERVR - DSC , VMSERVU - DSC , VMSERVS - DSCOPERSYMP - DSC , DISKACNT - DSC , EREP - DSC , OPERATOR - DSCMAINT -L0004VSM - TCPIP
Determining storage or memoryTo see how much main storage (memory) is installed and allocated to a system, use the QUERY STORAGE command, for example:
===> q storSTORAGE = 16G CONFIGURED = 16G INC = 256M STANDBY = 0 RESERVED = 0
This command output shows 16 GB of central memory (storage).
Determining processors or CPUsTo see how many processors (central processors (CPs), Integrated Facilities for Linux (IFLs), or CPUs)) are allocated at the system level, use the QUERY PROCESSORS command, for example:
===> q procPROCESSOR 00 MASTER CPPROCESSOR 01 ALTERNATE CPPROCESSOR 02 ALTERNATE CPPROCESSOR 03 ALTERNATE CPPROCESSOR 04 ALTERNATE CPPROCESSOR 05 ALTERNATE CPPROCESSOR 06 ALTERNATE CPPROCESSOR 07 ALTERNATE CPPROCESSOR 08 ALTERNATE CPPROCESSOR 09 ALTERNATE CP
62 The Virtualization Cookbook for IBM z Systems Volume 2: Red Hat Enterprise Linux 7.1 Servers

Determining software levelTo determine the control program (CP) level for your system, use the QUERY CPLEVEL command, for example:
===> q cplevelz/VM Version 6 Release 3.0, service level 1301 (64-bit)Generated at 06/28/13 14:58:28 EDT IPL at 09/04/13 10:48:34 EDT
Determining system cylinder allocationThe QUERY ALLOC MAP command shows you the system allocation of spool, paging, and directory space, for example:
===> q alloc mapEXTENT EXTENT % ALLOCATION
VOLID RDEV START END TOTAL IN USE HIGH USED TYPE ------ ---- ---------- ---------- ------ ------ ------ ---- -------------JV1030 1030 1 20 20 1 1 5% DRCT ACTIVE JV1031 1031 1 3338 600840 87022 91029 14% SPOOL JV1131 1131 - - 0 0 0 0 SHARED JP1260 1260 0 10016 1761K 27 56 1% PAGE JP1261 1261 0 10016 1761K 75 75 1% PAGE JV1032 1032 1 3338 600840 52 63 1% PAGE
Determining DASD, Open Systems Adapter, and virtual resourcesThe QUERY DASD and QUERY DASD FREE commands show you the DASD that is assigned to the system and the DASD that is free to be assigned. Similarly, the QUERY OSA and QUERY OSA FREE commands report on the Open Systems Adapter (OSA) resources. The QUERY VIRTUAL ALL command is useful. The following list shows the short form of these commands without any output:
===> q da===> q da free===> q osa===> q osa free===> q v all
5.2 IBM z/VM Performance Toolkit
To use z/VM Performance Toolkit, you must order the product. Configure the product only if you ordered it. z/VM Performance Toolkit is part of the z/VM base installation. It is installed as disabled. It is a priced feature of z/VM. For information about z/VM Performance Toolkit, see these books:
� z/VM Performance Toolkit Guide, SC24-6156, and z/VM Performance Toolkit Reference, SC24-6157, on the web on the z/VM 6.3 bookshelf:
http://publib.boulder.ibm.com/cgi-bin/bookmgr/XKS/hcsh2ac2
Search for Toolkit on that page.
� The Program Directory for Performance Toolkit for VM, GI10-0785-00:
http://www.vm.ibm.com/progdir/6vmptk30.pdf
� Linux on IBM zSeries and S/390: Performance Toolkit for VM, SG24-6059:
http://www.redbooks.ibm.com/abstracts/sg246059.html
Chapter 5. Monitor z/VM and Linux 63

We briefly describe how to set up and use IBM Performance Toolkit:
� “Configure Performance Toolkit for VM” on page 64� “Use IBM Performance Toolkit for VM” on page 69
5.2.1 Configure Performance Toolkit for VM
Performance Toolkit is installed with z/VM. The configuration is described in the Program Directory for Performance Toolkit for VM, which is at the following website:
http://www.ibm.com/eserver/zseries/zvm/library
The following steps summarize how to activate Performance Toolkit. Again, configure the product only if you ordered it.
1. Query the priced products that are enabled with the QUERY PRODUCT command:
===> q productProduct State Description IBMVMSSI Enabled IBM z/VM Single System Image Feature 6VMDIR30 Disabled 00/00/00.00:00:00.$BASEDDR DIRECTORY MAINTENANCE FACILITY (DirMaint) 6VMPTK30 Disabled 00/00/00.00:00:00.$BASEDDR PERFORMANCE TOOLKIT FOR VM 6VMRAC30 Disabled 00/00/00.00:00:00.$BASEDDR RACF Security Server 6VMRSC30 Disabled 00/00/00.00:00:00.$BASEDDR RSCS Networking
2. To enable IBM Performance Toolkit for VM, log on to MAINT630 and enter the following command:
===> service perftk enableVMFSRV2760I SERVICE processing started...VMFSUT2760I VMFSUFTB processing startedVMFSUT2760I VMFSUFTB processing completed successfullyVMFSRV2760I SERVICE processing completed successfully
A few windows of messages scroll by. Finally, the success messages are shown. Performance Toolkit is enabled for the current z/VM session.
3. The SYSTEM CONFIG file is modified by appending a line to the end of the file. Verify that this line was added with the following commands:
===> vmlink pmaint cf0DMSVML2060I PMAINT CF0 linked as 0120 file mode Z
===> type system config z... // many screens clearedPRODUCT PRODID 6VMPTK30 STATE ENABLED DESCRIPTION '06/05/13.15:22:55.MAINT630 PERFKIT Minidisk Install and Service'
64 The Virtualization Cookbook for IBM z Systems Volume 2: Red Hat Enterprise Linux 7.1 Servers
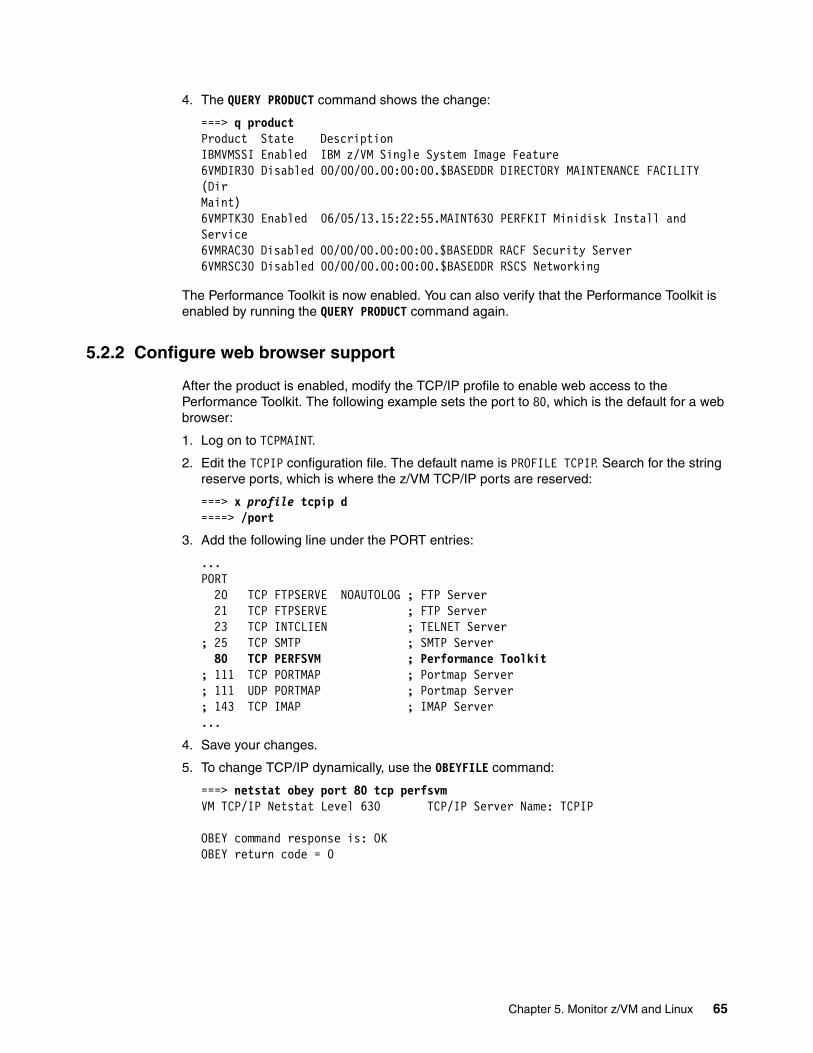
4. The QUERY PRODUCT command shows the change:
===> q productProduct State Description IBMVMSSI Enabled IBM z/VM Single System Image Feature 6VMDIR30 Disabled 00/00/00.00:00:00.$BASEDDR DIRECTORY MAINTENANCE FACILITY (DirMaint) 6VMPTK30 Enabled 06/05/13.15:22:55.MAINT630 PERFKIT Minidisk Install and Service 6VMRAC30 Disabled 00/00/00.00:00:00.$BASEDDR RACF Security Server 6VMRSC30 Disabled 00/00/00.00:00:00.$BASEDDR RSCS Networking
The Performance Toolkit is now enabled. You can also verify that the Performance Toolkit is enabled by running the QUERY PRODUCT command again.
5.2.2 Configure web browser support
After the product is enabled, modify the TCP/IP profile to enable web access to the Performance Toolkit. The following example sets the port to 80, which is the default for a web browser:
1. Log on to TCPMAINT.
2. Edit the TCPIP configuration file. The default name is PROFILE TCPIP. Search for the string reserve ports, which is where the z/VM TCP/IP ports are reserved:
===> x profile tcpip d====> /port
3. Add the following line under the PORT entries:
...PORT 20 TCP FTPSERVE NOAUTOLOG ; FTP Server 21 TCP FTPSERVE ; FTP Server 23 TCP INTCLIEN ; TELNET Server; 25 TCP SMTP ; SMTP Server
80 TCP PERFSVM ; Performance Toolkit; 111 TCP PORTMAP ; Portmap Server ; 111 UDP PORTMAP ; Portmap Server ; 143 TCP IMAP ; IMAP Server ...
4. Save your changes.
5. To change TCP/IP dynamically, use the OBEYFILE command:
===> netstat obey port 80 tcp perfsvm VM TCP/IP Netstat Level 630 TCP/IP Server Name: TCPIP OBEY command response is: OK OBEY return code = 0
Chapter 5. Monitor z/VM and Linux 65

6. Issue the NETSTAT CLIENTS command to verify your configuration. Ensure that the service that is named PERFSVM is a client. Client: PERFSVM shows after a few windows of output:
===> netstat clients...Client: PERFSVM Authorization: {none}Notes Handled: none Last Touched: 0:03:23 Vmcf error count: 0
If you are configuring central monitoring in a single system image (SSI) cluster, configuring the web server on only one of the members is sufficient. Central monitoring enables one member to monitor the other members of the SSI cluster.
5.2.3 Configure PERFSVM
The PERFSVM virtual machine is the Performance Toolkit service machine. Follow these steps to configure it:
1. Log on to PERFSVM. If you successfully enabled the product, you enter a Performance Toolkit session and see the following text at the top of the window:
FCX001 Performance Toolkit for VM Autoscroll 12 FCXBAS500I Performance Toolkit for VM FL630 16:14:15 Monitor event started -- recording is activated 16:14:15 Monitor sample started -- recording is activated
2. Press F12 twice to reach a Conversational Monitor System (CMS) prompt.
3. Copy the default configuration files, which are on the PERFSVM D disk, to your A disk:
===> copy * * d = = a
4. The main configuration file is FCONX $PROFILE. Edit that file and search for the string VMCF:
===> x fconx $profile====> /vmcf
This search takes you to line 190 where the next eight lines are comments that start with an asterisk (*). Perform the following changes:
– Uncomment the second, fourth, sixth, and eighth lines by changing *C to FC. – Change port 81 to 80 on the fourth line so that you can use a browser interface without
the need to specify port 81 on the URL (with a :81 suffix).
The modified lines will look like the following lines. Save your changes with the FILE subcommand.
* Following command activates VMCF data retrieval interface FC MONCOLL VMCF ON * Define the maximum allowed number of Internet connections FC MONCOLL WEBSERV MAXCONN 100 * Define the timeout of inactive Internet connections in minutes FC MONCOLL WEBSERV TIMEOUT 30 * Following command activates Internet interface FC MONCOLL WEBSERV ON TCPIP TCPIP 80 * Following command activates Internet interface with SSL ...====> file
66 The Virtualization Cookbook for IBM z Systems Volume 2: Red Hat Enterprise Linux 7.1 Servers
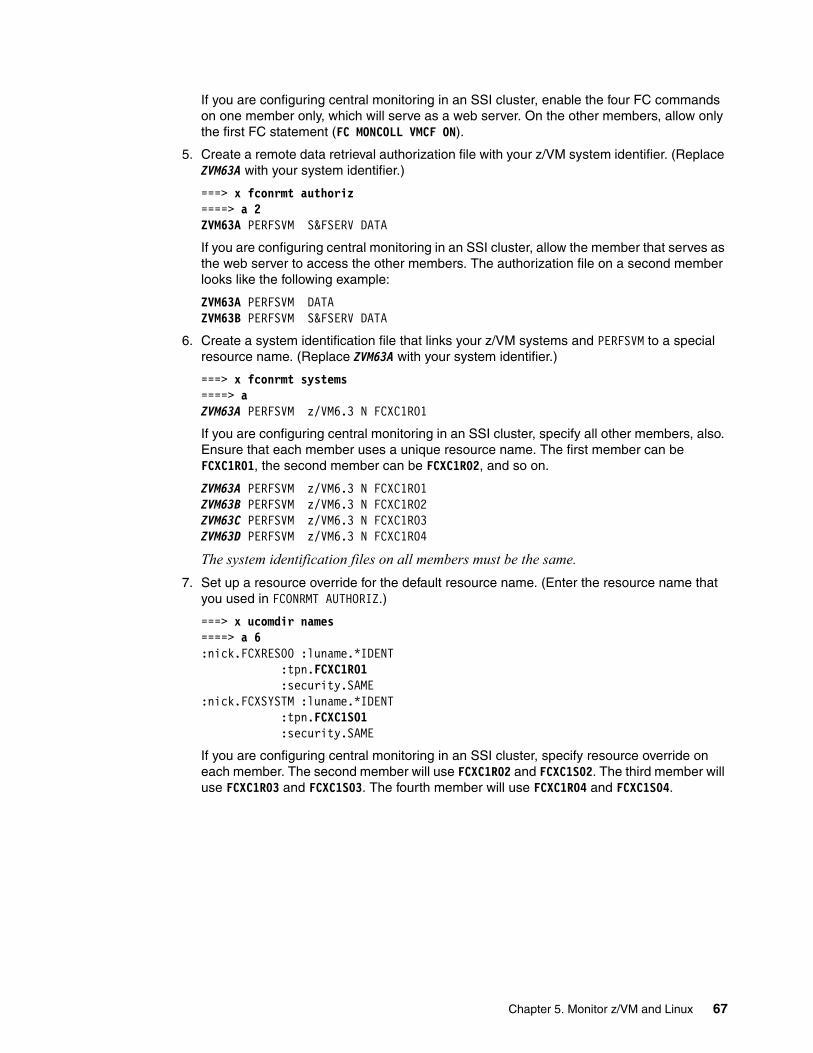
If you are configuring central monitoring in an SSI cluster, enable the four FC commands on one member only, which will serve as a web server. On the other members, allow only the first FC statement (FC MONCOLL VMCF ON).
5. Create a remote data retrieval authorization file with your z/VM system identifier. (Replace ZVM63A with your system identifier.)
===> x fconrmt authoriz====> a 2ZVM63A PERFSVM S&FSERV DATA
If you are configuring central monitoring in an SSI cluster, allow the member that serves as the web server to access the other members. The authorization file on a second member looks like the following example:
ZVM63A PERFSVM DATA ZVM63B PERFSVM S&FSERV DATA
6. Create a system identification file that links your z/VM systems and PERFSVM to a special resource name. (Replace ZVM63A with your system identifier.)
===> x fconrmt systems====> aZVM63A PERFSVM z/VM6.3 N FCXC1R01
If you are configuring central monitoring in an SSI cluster, specify all other members, also. Ensure that each member uses a unique resource name. The first member can be FCXC1R01, the second member can be FCXC1R02, and so on.
ZVM63A PERFSVM z/VM6.3 N FCXC1R01ZVM63B PERFSVM z/VM6.3 N FCXC1R02ZVM63C PERFSVM z/VM6.3 N FCXC1R03ZVM63D PERFSVM z/VM6.3 N FCXC1R04
The system identification files on all members must be the same.
7. Set up a resource override for the default resource name. (Enter the resource name that you used in FCONRMT AUTHORIZ.)
===> x ucomdir names====> a 6:nick.FCXRES00 :luname.*IDENT
:tpn.FCXC1R01:security.SAME
:nick.FCXSYSTM :luname.*IDENT:tpn.FCXC1S01:security.SAME
If you are configuring central monitoring in an SSI cluster, specify resource override on each member. The second member will use FCXC1R02 and FCXC1S02. The third member will use FCXC1R03 and FCXC1S03. The fourth member will use FCXC1R04 and FCXC1S04.
Chapter 5. Monitor z/VM and Linux 67
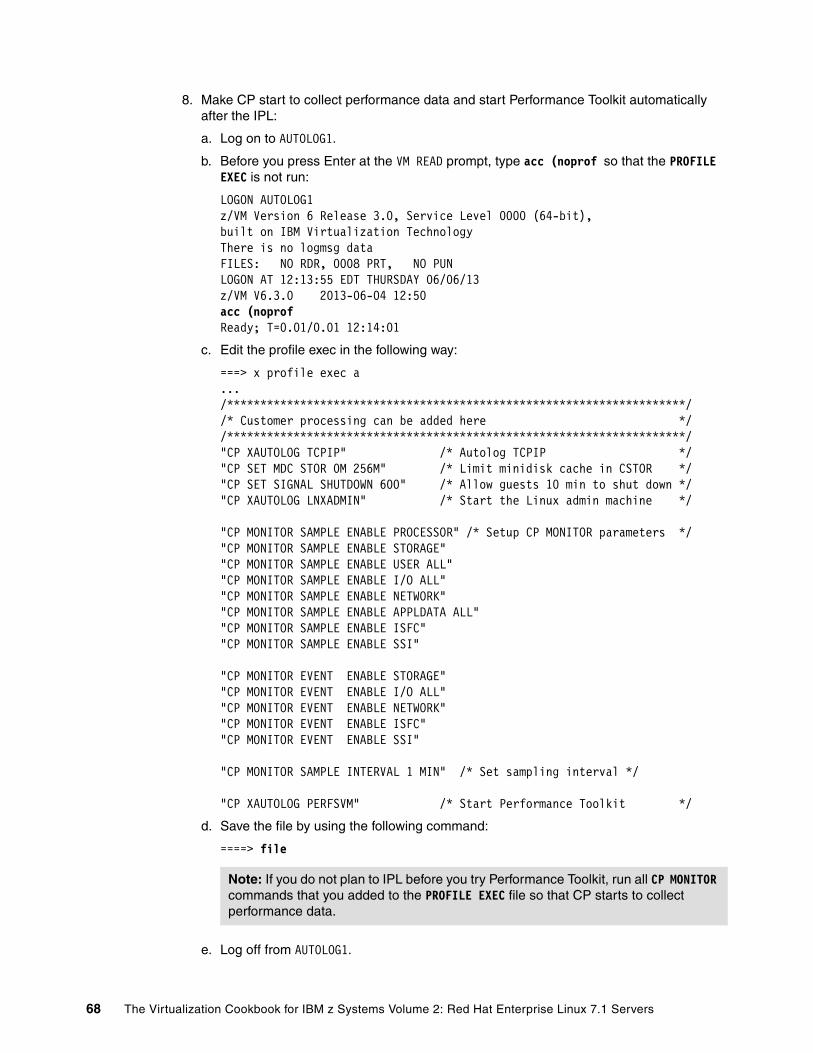
8. Make CP start to collect performance data and start Performance Toolkit automatically after the IPL:
a. Log on to AUTOLOG1.
b. Before you press Enter at the VM READ prompt, type acc (noprof so that the PROFILE EXEC is not run:
LOGON AUTOLOG1 z/VM Version 6 Release 3.0, Service Level 0000 (64-bit), built on IBM Virtualization Technology There is no logmsg data FILES: NO RDR, 0008 PRT, NO PUN LOGON AT 12:13:55 EDT THURSDAY 06/06/13 z/VM V6.3.0 2013-06-04 12:50 acc (noprof Ready; T=0.01/0.01 12:14:01
c. Edit the profile exec in the following way:
===> x profile exec a.../*********************************************************************//* Customer processing can be added here *//*********************************************************************/"CP XAUTOLOG TCPIP" /* Autolog TCPIP */"CP SET MDC STOR 0M 256M" /* Limit minidisk cache in CSTOR */"CP SET SIGNAL SHUTDOWN 600" /* Allow guests 10 min to shut down */"CP XAUTOLOG LNXADMIN" /* Start the Linux admin machine */ "CP MONITOR SAMPLE ENABLE PROCESSOR" /* Setup CP MONITOR parameters */"CP MONITOR SAMPLE ENABLE STORAGE" "CP MONITOR SAMPLE ENABLE USER ALL" "CP MONITOR SAMPLE ENABLE I/O ALL" "CP MONITOR SAMPLE ENABLE NETWORK" "CP MONITOR SAMPLE ENABLE APPLDATA ALL" "CP MONITOR SAMPLE ENABLE ISFC" "CP MONITOR SAMPLE ENABLE SSI" "CP MONITOR EVENT ENABLE STORAGE" "CP MONITOR EVENT ENABLE I/O ALL" "CP MONITOR EVENT ENABLE NETWORK" "CP MONITOR EVENT ENABLE ISFC" "CP MONITOR EVENT ENABLE SSI" "CP MONITOR SAMPLE INTERVAL 1 MIN" /* Set sampling interval */ "CP XAUTOLOG PERFSVM" /* Start Performance Toolkit */
d. Save the file by using the following command:
====> file
e. Log off from AUTOLOG1.
Note: If you do not plan to IPL before you try Performance Toolkit, run all CP MONITOR commands that you added to the PROFILE EXEC file so that CP starts to collect performance data.
68 The Virtualization Cookbook for IBM z Systems Volume 2: Red Hat Enterprise Linux 7.1 Servers

5.2.4 Start IBM Performance Toolkit for VM
To start Performance Toolkit, perform the following steps:
1. Log on to the PERFSVM virtual machine.
2. Press Enter and the Performance Toolkit starts through the PROFILE EXEC:
FFCX001 Performance Toolkit for VM Autoscroll 12 FCXBAS500I Performance Toolkit for VM FL630 12:32:15 FCXAPP530I Connected to *IDENT for resource FCXC1R01 12:32:15 FCXAPF530I Connected to *IDENT for resource FCXC1S01 12:32:15 FCXTCP571I Connected to TCP/IP server TCPIP on path 0003 12:32:15 FCXAPP527I User PERFSVM connected on path 0006 12:32:15 FCXAPC535I Connected to resource FCXC1R01 on path 0005, for S&F-Coll 12:32:15 FCXTCP575I WebServer host IP address is 9.12.7.11:00080 12:32:15 FCXTCP590I WebServer interface activated 12:32:15 Monitor event started -- recording is activated 12:32:15 Monitor sample started -- recording is activated
3. Disconnect from PERFSVM now:
Command ===> disc
Performance Toolkit is now configured and running.
5.2.5 Use IBM Performance Toolkit for VM
Performance Toolkit can be used with a web browser or 3270 interface.
Using a web browser interfaceTo use web-enabled Performance Toolkit, perform the following steps:
1. Point a browser to your z/VM system, for example:
http://9.12.7.11
2. You will see a splash window, and then the Web Server Logon window, as shown in Figure 5-1.
Figure 5-1 Performance Toolkit logon window
Chapter 5. Monitor z/VM and Linux 69

3. Enter any valid user ID and password and click Submit. In this example, we use PERFSVM.
4. The Central Monitoring System Load Overview window opens with your system identifiers (Node-ID) on the left side.
5. Click your system identifier and the Initial Performance Data Selection Menu window opens as shown in Figure 5-2.
6. From this window, you can drill down into many types of reports.
Figure 5-2 Browser interface to Performance Toolkit
70 The Virtualization Cookbook for IBM z Systems Volume 2: Red Hat Enterprise Linux 7.1 Servers

Use a 3270 interfaceYou can also use a 3270 interface. Perform the following steps:
1. Log on to PERFSVM.
2. If you disconnected, pressing Enter returns you to the Performance Toolkit command line. If the virtual machine was logged off, the PROFILE EXEC runs and returns you to the command line. Enter the MONITOR command:
Command ===> monitor
The Performance Screen Selection panel opens, as shown in Example 5-1.
Example 5-1 Performance Screen Selection panel
FCX124 Performance Screen Selection (FL630 ) Perf. Monitor General System Data I/O Data History Data (by Time) 1. CPU load and trans. 11. Channel load 31. Graphics selection 2. Storage utilization 12. Control units 32. History data files* 3. SSI data menu* 13. I/O device menu* 33. Benchmark displays* 4. Priv. operations 14. Reserved 34. Correlation coeff. 5. System counters 15. Cache extend. func.* 35. System summary* 6. CP IUCV services 16. Reserved 36. Auxiliary storage 7. SPOOL file display* 17. DASD seek distance* 37. CP communications* 8. LPAR data menu* 18. I/O prior. queueing* 38. DASD load 9. Shared segments 19. I/O configuration 39. Minidisk cache* A. Shared data spaces 1A. I/O config. changes 3A. Storage mgmt. data* B. Virt. disks in stor. 3B. Proc. load & config* C. Transact. statistics User Data 3C. LPAR logs menu* D. Monitor data 21. User resource usage* 3D. Response time (all)* E. Monitor settings 22. User paging menu* 3E. RSK data menu* F. System settings 23. User wait states* 3F. Scheduler queues G. System configuration 24. User response time* 3G. Scheduler data H. VM Resource Manager 25. Resources/transact.* 3H. SFS/BFS logs menu* 26. User communication* 3I. System log I. Exceptions 27. Multitasking users* 3K. TCP/IP data menu* 28. User configuration* 3L. User communication K. User defined data* 29. Linux systems* 3M. User wait states Pointers to related or more detailed performance data can be found on displays marked with an asterisk (*).
Drilling down into report panelsYou can now use the active report panels. To drill down into these panels, move the cursor to any of the titles that are active. (Active titles display the number or letter in white; inactive titles are green.) Several of the more useful report panels to drill down into are listed:
21. User resource usage22. User paging load23. User wait states28. User configuration29. Linux systems33. Benchmark displays
Chapter 5. Monitor z/VM and Linux 71

5.3 Collect and use raw CP monitor data
Although Performance Toolkit formats and displays current performance data, you often need to look at older data, too. Typically, you compare the current system performance to the past performance. Data must be available for troubleshooting or to generate reports.
5.3.1 Collect CP monitor data
CP monitor records are collected by the MONWRITE utility and written to a disk or tape. The resulting file contains all of the original unprocessed data. This data can be used later to generate reports. Or, Performance Toolkit can use this data in Monitor Data Scan Mode to look at historical data as though it were current:
1. Log on to the MONWRITE virtual machine.
2. Edit the PROFILE EXEC:
LOGON MONWRITE z/VM Version 6 Release 3.0, Service Level 0000 (64-bit),built on IBM Virtualization Technology There is no logmsg data FILES: NO RDR, NO PRT, NO PUN LOGON AT 10:40:31 EDT FRIDAY 06/07/13 z/VM V6.3.0 2013-06-04 12:50 Ready; T=0.01/0.01 10:40:34 ===> x profile exec ainput/* ALL MONITOR COMMANDS ARE LOCATED IN AUTOLOG1'S PROFILE EXEC */ 'MONWRITE MONDCSS *MONITOR DISK CLOSE 480' ===> file
3. Execute the REXX exec that is named profile:
===> profile HCPMOW6272I Now recording in file D060713 T110146 A1 HCPMOW6265A MONITOR WRITER CONNECTED TO *MONITOR
4. Disconnect from MONWRITE:
===> #cp disc
The CLOSE 480 statement tells MONWRITE to close the output file every 8 hours (480 minutes), starting from midnight. Therefore, regardless of when it starts recording, it will close the file at 08:00, 16:00, and at 24:00. The file name will clearly show the date and time when the recording started.
To collect MONWRITE data automatically, start the MONWRITE virtual machine when you IPL z/VM. Add a line to the PROFILE EXEC of the AUTOLOG1 191 disk (or AUTOLOG2 191 if an external security manager, such as RACF is running):
===> x profile exec..."CP XAUTOLOG MONWRITE" /* Start the MONWRITE VM */...
The MONWRITE A-disk is shipped as 300 cylinders, which is a small disk. Depending on the monitor interval activity of the system and the number of samples/events, it can fill quickly. When the disk is full, MONWRITE will not be able to write anymore.
72 The Virtualization Cookbook for IBM z Systems Volume 2: Red Hat Enterprise Linux 7.1 Servers

It is important to monitor the space on MONWRITE’s A-disk. You can also use a utility that archives old files and cleans up the space automatically. MONCLEAN is an example of this type of a utility. You can download MONCLEAN from the following site:
http://www.vm.ibm.com/download/packages/descript.cgi?MONCLEAN
Follow these steps for the MONCLEAN installation:
1. Use FTP binary to transfer MONCLEAN VMARC to the MONWRITE 191 disk.
2. Run MONWRITE VMARC by using the pipe command:
===> pipe < monclean vmarc a | fblock 80 00 | > monclean vmarc A F 80
3. Unpack the MONCLEAN VMARC file with the VMARC command:
===> vmarc unpk monclean vmarc aMONCLEAN EXEC A1. Bytes in= 4080, bytes out= 7678 ( 188%).MONCLEAN README A1. Bytes in= 1040, bytes out= 2240 ( 215%).
4. Check the documentation in MONCLEAN README.
5. Modify the PROFILE EXEC:
===> x profile exec/* ALL MONITOR COMMANDS ARE LOCATED IN AUTOLOG1'S PROFILE EXEC */'MONWRITE MONDCSS *MONITOR DISK CLOSE 60 EXEC MONCLEAN'
6. Start recording:
===> profileHCPMOW6272I Now recording in file D061213 T131724 A1HCPMOW6265A MONITOR WRITER CONNECTED TO *MONITOR
7. MONWRITE will close the output file every hour and execute MONCLEAN EXEC. If the MONCLEAN EXEC was not modified, it will remove the oldest file when the disk reaches 80% full.
8. Example 5-2 shows the MONWRITE 191 disk when MONCLEAN is running.
Example 5-2 MONWRITE 191 disk
MAINT FILELIST A0 V 169 Trunc=169 Size=19 Line=1 Col=1 Alt=0 Cmd Filename Filetype Fm Format Lrecl Records Blocks Date Time D061313 T100016 Z1 F 4096 49275 49275 6/13/13 10:29:16 D061313 T090016 Z1 F 4096 99407 99407 6/13/13 10:00:15 D061313 T080015 Z1 F 4096 99392 99392 6/13/13 9:00:15 D061313 T070015 Z1 F 4096 99348 99348 6/13/13 8:00:15 D061313 T060015 Z1 F 4096 99348 99348 6/13/13 7:00:15 D061313 T050016 Z1 F 4096 99348 99348 6/13/13 6:00:15 D061313 T040016 Z1 F 4096 99348 99348 6/13/13 5:00:15 D061313 T030015 Z1 F 4096 99348 99348 6/13/13 4:00:15 D061313 T020016 Z1 F 4096 99348 99348 6/13/13 3:00:15 D061313 T010015 Z1 F 4096 99348 99348 6/13/13 2:00:15 D061313 T000015 Z1 F 4096 99348 99348 6/13/13 1:00:15 D061213 T230015 Z1 F 4096 99348 99348 6/13/13 0:00:15 D061213 T220015 Z1 F 4096 99356 99356 6/12/13 23:00:15 D061213 T210015 Z1 F 4096 99357 99357 6/12/13 22:00:15 D061213 T200015 Z1 F 4096 99348 99348 6/12/13 21:00:15 PROFILE EXEC Z1 V 65 2 1 6/12/13 11:35:49 MONCLEAN EXEC Z1 V 75 194 2 6/12/13 11:32:13 MONCLEAN README Z1 F 80 28 1 6/12/13 11:32:13 MONCLEAN VMARC Z1 F 80 64 2 6/12/13 11:32:13
Chapter 5. Monitor z/VM and Linux 73

5.3.2 Use CP monitor data
You can use the Performance Toolkit subcommand MONSCAN to select a CP monitor file on disk or tape (that was created by the standard MONWRITE utility) as input for performance data analysis. When the specified file is located, a performance data scan mode is entered that looks almost identical to the normal real-time monitoring mode. You can use this mode to browse through the accumulated monitor data.
Because PERFSVM virtual machine is used to show the current performance data, it is better to use a different virtual machine to perform MONSCAN. The following example uses the MAINT user ID:
1. Link and access the PERFSVM 201 minidisk:
===> vmlink perfsvm 201 DMSVML2060I PERFSVM 201 linked as 0120 file mode Z
2. Link and access the MONWRITE 191 minidisk:
===> vmlink monwrite 191 DMSVML2060I MONWRITE 191 linked as 0121 file mode X
3. Check the files that are available from MONWRITE:
===> filel * * xMAINT FILELIST A0 V 169 Trunc=169 Size=4 Line=1 Col=1 Alt=0 Cmd Filename Filetype Fm Format Lrecl Records Blocks Date Time D061013 T084824 X1 F 4096 53930 53930 6/10/13 9:20:43 PROFILE EXEC X1 V 65 3 1 6/10/13 8:48:21
4. Run the MONSCAN subcommand:
===> perfkit monscan D061013 T084824 X
The Regular Performance Screen Selection panel appears.
FCX124 Performance Screen Selection (FL630 ) Monitor Scan General System Data I/O Data History Data (by Time) 1. CPU load and trans. 11. Channel load 31. Graphics selection 2. Storage utilization 12. Control units 32. History data files* 3. SSI data menu* 13. I/O device menu* 33. Benchmark displays* 4. Priv. operations 14. Reserved 34. Correlation coeff. 5. System counters 15. Cache extend. func.* 35. System summary* 6. CP IUCV services 16. Reserved 36. Auxiliary storage 7. SPOOL file display* 17. DASD seek distance* 37. CP communications* 8. LPAR data 18. I/O prior. queueing* 38. DASD load 9. Shared segments 19. I/O configuration 39. Minidisk cache* A. Shared data spaces 1A. I/O config. changes 3A. Storage mgmt. data* B. Virt. disks in stor. 3B. Proc. load & config* C. Transact. statistics User Data 3C. Logical part. load D. Monitor data 21. User resource usage* 3D. Response time (all)* E. Monitor settings 22. User paging load* 3E. RSK data menu* F. System settings 23. User wait states* 3F. Scheduler queues G. System configuration 24. User response time* 3G. Scheduler data H. VM Resource Manager 25. Resources/transact.* 3H. SFS/BFS logs menu* 26. User communication* 3I. System log I. Exceptions 27. Multitasking users* 3K. TCP/IP data menu* 28. User configuration* 3L. User communication K. User defined data* 29. Linux systems* 3M. User wait states
74 The Virtualization Cookbook for IBM z Systems Volume 2: Red Hat Enterprise Linux 7.1 Servers

Pointers to related or more detailed performance data can be found on displays marked with an asterisk (*).
5. Select an option, for example, 1 - CPU Load. The first panel does not contain any data. Enter the nexts command (next sample) and a panel with actual numbers appears. You can see the interval on the top of the panel.
FCX100 Data for 2013/06/10 Interval 08:48:40 - 08:49:40 Monitor Scan CPU Load Status or PROC TYPE %CPU %CP %EMU %WT %SYS %SP %SIC %LOGLD ded. User P00 CP 0 0 0 100 0 0 99 0 Master P01 CP 0 0 0 100 0 0 99 0 Alternate P02 IFL 0 0 0 100 0 0 ... 0 Alternate P03 IFL 0 0 0 100 0 0 ... 0 Alternate Total SSCH/RSCH 254/s Page rate .0/s Priv. instruct. 28/s Virtual I/O rate 10/s XSTORE paging .0/s Diagnose instr. 16/s Total rel. SHARE 3050 Tot. abs SHARE 0% Queue Statistics: Q0 Q1 Q2 Q3 User Status: VMDBKs in queue 1 0 1 0 # of logged on users 14 VMDBKs loading 0 0 0 0 # of dialed users 0 Eligible VMDBKs 0 0 0 # of active users 7 El. VMDBKs loading 0 0 0 # of in-queue users 2 Tot. WS (pages) 2911 0 41870 0 % in-Q users in PGWAIT 0 Reserved % in-Q users in IOWAIT 0 85% elapsed time 96.00 16.00 128.0 768.0 % elig. (resource wait) 0 Transactions Q-Disp trivial non-trv User Extremes: Average users 2.7 .8 .2 Max. CPU % LNXADMIN .1 Trans. per sec. .2 .1 .0 Reserved Av. time (sec) 18.40 12.39 16.39 Max. IO/sec MONWRITE 9.4 UP trans. time .000 .000 Max. PGS/s ........ ..... MP trans. time 12.39 16.39 Max. RESPG LNXADMIN 41923 System ITR (trans. per sec. tot. CPU) 31.3 Max. MDCIO MONWRITE .1 Emul. ITR (trans. per sec. emul. CPU) 269.2 Max. XSTORE ........ .....
5.4 Monitor Linux performance and troubleshooting
Previous sections described how the Performance Toolkit can show resource consumption of the Linux guest as measured and dispatched by the z/VM hypervisor. z/VM is not aware of the nature of the guest and it cannot understand what is happening inside the guest. For that reason, it is important to be able to measure performance data from within the Linux guest itself. To monitor Linux performance data at this level, a data gatherer process must be running within each Linux guest that you want to monitor.
Different methods exist of gathering this data. Many commercial and non-commercial solutions are available for long-term monitoring, also. This book cannot cover all of the requirements for long-term monitoring (low CPU consumption, data storage, and similar). This chapter shows how to monitor Linux performance in short periods, especially when you are troubleshooting performance problems.
Chapter 5. Monitor z/VM and Linux 75

5.4.1 Monitor Linux performance from z/VM
This section describes how to gather Linux performance data in Linux and provide this data to z/VM for a consolidated overview.
To monitor Linux performance data directly from the kernel, the following statements must be true:
1. The APPLMON option must be set in the user directory.2. Applmon data monitoring must be built into the kernel.
The first requirement will be true because the OPTION APPLMON was set for the Linux virtual machines in earlier sections. For the second requirement, this feature is built into RHEL 7.1.
The following descriptions explains how to use this built-in monitoring function:
1. Start a Secure Shell (SSH) session to a Linux system. In this example, LINUX3 is used.
2. Three modules are built into the kernel but they are not loaded, by default. They are named appldata_mem, appldata_os, and appldata_net_sum. You can verify that they are not loaded with the lsmod and grep commands:
# lsmod | grep appldata
3. No output results so no modules with the string appldata are loaded. Load those modules with the modprobe command and verify that they were loaded:
# modprobe appldata_mem# modprobe appldata_os# modprobe appldata_net_sum
4. Now, if you repeat the lsmod command, you see the following output:
# lsmod | grep appldataappldata_net_sum 1966 0appldata_os 2989 0appldata_mem 2008 0
5. The directory in the virtual /proc/ file system where the monitoring variables exist is /proc/sys/appldata/. Five files are in this directory:
timer Controls whether any data gathering is in effect interval Sets the interval, in milliseconds, in which samples will be taken mem Controls the memory data gathering moduleos Controls the CPU data gathering modulenet_sum Controls the net data gathering module
6. To turn on the built-in kernel monitoring, use the echo command to send a nonzero value into four of the five monitoring variables in the /proc/ virtual file system:
# echo 1 > /proc/sys/appldata/timer# echo 1 > /proc/sys/appldata/mem# echo 1 > /proc/sys/appldata/os# echo 1 > /proc/sys/appldata/net_sum
Built-in kernel monitoring is now turned on. Run the monitoring only for specific periods. As Linux monitoring data is captured, the Performance Toolkit’s minidisk space fills quickly.
76 The Virtualization Cookbook for IBM z Systems Volume 2: Red Hat Enterprise Linux 7.1 Servers

View performance data from the Linux kernel in Performance ToolkitAfter the system collects data for a period, use the Performance Toolkit to view Linux performance data. To view that data, drill down into menu 29, Linux systems, either from the browser interface or the 3270 interface, as shown in Example 5-3.
Example 5-3 Linux display
FCX242 CPU 2817 SER 23BD5 Linux Displays Perf. Monitor
Linux screens selection S Display Description . LINUX RMF PM system selection menu . LXCPU Summary CPU activity display S LXMEM Summary memory util. & activity display . LXNETWRK Summary network activity display
Then, type S over the period on the left side of the submenu panel in the row that corresponds to the report that you want to see. You will see a new report panel with the Linux guest systems memory overview, as shown in Example 5-4.
Example 5-4 Linux guests memory overview
FCX244 CPU 2817 SER 23BD5 Initial 14:22:57 Perf. Monitor ______ . . . . . . . . . <------------ Memory Allocation (MB) -------------> <------- SwappingLinux <--- Main ---> <--- High ---> Buffers Cache <-Space (MB)-> <-Userid M_Total %MUsed H_Total %HUsed Shared /CaFree Used S_Total %SUsed >System< 491.6 25.8 .0 .0 .0 8.6 46.3 761.6 .0 LINUX3 491.6 25.8 .0 .0 .0 8.6 46.3 761.6 .0
You can also use a web interface to view the same data.
5.4.2 Monitor Linux performance from inside Linux
Many tools are available for Linux performance monitoring. This section describes several commonly used tools. They are all platform independent and they work on Linux in general.
top commandWhen you run the top command without any parameters, it shows a system overview and the tasks that are running tasks that are similar to Example 5-5 on page 78. The output is refreshed every 3 seconds automatically. To leave the top command, press q.
Chapter 5. Monitor z/VM and Linux 77

Example 5-5 top command
top - 17:26:52 up 7:30, 1 user, load average: 0.06, 0.08, 0.05Tasks: 99 total, 1 running, 98 sleeping, 0 stopped, 0 zombie%Cpu(s): 0.0 us, 0.0 sy, 0.0 ni, 99.9 id, 0.0 wa, 0.0 hi, 0.0 si, 0.0 stKiB Mem : 1015640 total, 666560 free, 104228 used, 244852 buff/cacheKiB Swap: 1828452 total, 1828452 free, 0 used. 863024 avail Mem
PID USER PR NI VIRT RES SHR S %CPU %MEM TIME+ COMMAND 1 root 20 0 9564 6800 4016 S 0.0 0.7 0:00.81 systemd 2 root 20 0 0 0 0 S 0.0 0.0 0:00.00 kthreadd 3 root 20 0 0 0 0 S 0.0 0.0 0:00.01 ksoftirqd/0 5 root 0 -20 0 0 0 S 0.0 0.0 0:00.00 kworker/0:0H 7 root rt 0 0 0 0 S 0.0 0.0 0:00.00 migration/0...
vmstat commandAnother useful command is the vmstat command, which reports information about processes, memory, paging, block IO, traps, and cpu activity. When you run vmstat without any parameters, it shows one line that summarizes averages since the last IPL, which is not useful. Example 5-6 shows the vmstat 5 output. This version of the command shows the first line with averages since the last IPL and then writes a new line every 5 seconds with the current data, which is more useful.
Example 5-6 vmstat 5 command output
# vmstat 5procs -----------memory---------- ---swap-- -----io---- -system-- ------cpu----- r b swpd free buff cache si so bi bo in cs us sy id wa st 0 0 0 666832 4596 239924 0 0 4 1 79 126 0 0 100 0 0 0 0 0 666768 4596 239956 0 0 0 0 149 248 0 0 100 0 0 0 0 0 666752 4596 239956 0 0 0 0 149 246 0 0 100 0 0 0 0 0 666720 4596 239956 0 0 0 0 171 266 0 0 100 0 0 0 0 0 666752 4596 239956 0 0 0 0 169 258 0 0 100 0 0 0 0 0 666752 4596 239956 0 0 0 0 166 254 0 0 100 0 0 0 0 0 666752 4596 239956 0 0 0 0 160 247 0 0 100 0 0 0 0 0 666720 4596 239956 0 0 0 0 152 250 0 0 100 0 0
The wa column shows a wait time and represents a percentage of time while the system waited for I/O. The higher the percentage, the more time that tasks waste nonproductively.
The st column shows stolen time. It represents the time that the CPU was stolen from a guest by the hypervisor. This stolen time can mean several things: CPU contention at the z/VM level, heavy z/VM paging, heavy virtual switch usage, and so on. The higher the number, the more time that a guest will spend nonproductively.
The sysstat suite of resource monitoring toolsIn this section, we describe tools that are part of the sysstat package, which might not be installed automatically. Check whether the package is installed when you use Red Hat Enterprise Linux 7.1, and install it if it is not installed. Follow these steps:
1. Check whether the sysstat package is installed:
# rpm -qa | grep sysstatsysstat-10.1.5-7.el7.s390x
78 The Virtualization Cookbook for IBM z Systems Volume 2: Red Hat Enterprise Linux 7.1 Servers

2. If it is not installed, install it with the command:
# yum install sysstat...Installed: sysstat.s390x 0:10.1.5-7.el7
Dependency Installed: lm_sensors-libs.s390x 0:3.3.4-11.el7
iostat In addition to reporting overall system performance, the iostat command provides information about input/output device loading. The iostat command reports the time that the devices are active in relation to their average transfer rates. Example 5-7 shows a sample output of the iostat -x 5 2 command. The -x is the command to display extended statistics, 5 is the interval in seconds, and 2 is the number of reports. (Display extended statistics for 2 reports at 5 second intervals.)
Example 5-7 iostat command output
Linux 3.10.0-229.el7.s390x (linux1.itso.ibm.com) 04/29/2015 _s390x_ (2 CPU)
avg-cpu: %user %nice %system %iowait %steal %idle 0.01 0.00 0.04 0.01 0.00 99.93
Device: rrqm/s wrqm/s r/s w/s rkB/s wkB/s avgrq-sz avgqu-sz await r_await w_await svctm %utildasda 0.07 0.02 0.41 0.15 9.76 1.51 40.02 0.00 5.99 4.27 10.65 0.31 0.02dm-0 0.00 0.00 0.02 0.00 0.06 0.00 8.00 0.00 1.10 1.10 0.00 0.50 0.00dm-1 0.00 0.00 0.42 0.17 9.56 1.41 37.13 0.00 6.07 4.18 10.92 0.28 0.02dasdb 0.04 0.00 0.02 0.00 0.08 0.00 9.25 0.00 0.06 0.06 0.00 0.06 0.00dasdc 0.04 0.00 0.02 0.00 0.08 0.00 9.29 0.00 0.06 0.06 0.00 0.06 0.00sdb 0.00 0.00 0.02 0.00 0.07 0.00 8.02 0.00 0.23 0.24 0.00 0.23 0.00sda 0.00 0.00 0.02 0.00 0.08 0.00 8.26 0.00 0.32 0.30 2.50 0.29 0.00sdc 0.00 0.00 0.02 0.00 0.07 0.00 8.18 0.00 0.20 0.20 0.00 0.20 0.00sdd 0.00 0.00 0.02 0.00 0.07 0.00 7.98 0.00 0.23 0.23 0.00 0.20 0.00dm-2 0.00 0.00 0.03 0.00 0.14 0.00 8.30 0.00 0.23 0.23 0.00 0.23 0.00dm-3 0.00 0.00 0.00 0.00 0.02 0.00 8.00 0.00 0.49 0.49 0.00 0.49 0.00
avg-cpu: %user %nice %system %iowait %steal %idle 0.00 0.00 0.00 0.00 0.00 100.00
Device: rrqm/s wrqm/s r/s w/s rkB/s wkB/s avgrq-sz avgqu-sz await r_await w_await svctm %utildasda 0.00 0.00 0.00 0.20 0.00 0.30 3.00 0.00 0.00 0.00 0.00 0.00 0.00dm-0 0.00 0.00 0.00 0.00 0.00 0.00 0.00 0.00 0.00 0.00 0.00 0.00 0.00dm-1 0.00 0.00 0.00 0.20 0.00 0.30 3.00 0.00 0.00 0.00 0.00 0.00 0.00dasdb 0.00 0.00 0.00 0.00 0.00 0.00 0.00 0.00 0.00 0.00 0.00 0.00 0.00dasdc 0.00 0.00 0.00 0.00 0.00 0.00 0.00 0.00 0.00 0.00 0.00 0.00 0.00sdb 0.00 0.00 0.00 0.00 0.00 0.00 0.00 0.00 0.00 0.00 0.00 0.00 0.00sda 0.00 0.00 0.00 0.00 0.00 0.00 0.00 0.00 0.00 0.00 0.00 0.00 0.00sdc 0.00 0.00 0.00 0.00 0.00 0.00 0.00 0.00 0.00 0.00 0.00 0.00 0.00sdd 0.00 0.00 0.00 0.00 0.00 0.00 0.00 0.00 0.00 0.00 0.00 0.00 0.00dm-2 0.00 0.00 0.00 0.00 0.00 0.00 0.00 0.00 0.00 0.00 0.00 0.00 0.00dm-3 0.00 0.00 0.00 0.00 0.00 0.00 0.00 0.00 0.00 0.00 0.00 0.00 0.00
The avgqu-sz column shows the average queue size for a specific device. The larger the number, the more contention exists for a device.
The await column displays average wait time for a device. It includes the time that requests spent in the queue and the time that was spent servicing requests in a storage device. The higher the number, the more time is wasted by a program that waits for I/O.
Chapter 5. Monitor z/VM and Linux 79

sar and sadc commandsThe sadc command stores data in a binary file. The command is used to provide data to the sar command. Data is gathered by calling the data collector by using the sadc command. In this example, all data for all activities will be collected 60 times in 5-second intervals (5 x 60 = 300 s = 5 minutes):
# /usr/lib64/sa/sadc -S ALL -F 5 60 /tmp/sadc.out
The output that is produced by the sadc command is a binary file. The sar command is used to process the binary file and generate text output. The following example displays all of the data that is collected from the file /tmp/sadc.output and writes the results to a file called output.txt:
# sar -A -f /tmp/sadc.output > outfile.txt
The sar command generates detailed performance information.
If sar is configured as a service and gathers data automatically, its data is stored in the /var/log/sa directory. Data files are of the form sa<dd> where dd is the day of the month. Text files are of the form sar<dd>, for example:
# cd /var/log/sa# file *sa09: datasa10: datasa11: datasa12: datasa13: datasar09: ASCII textsar10: ASCII textsar11: ASCII textsar12: ASCII text
80 The Virtualization Cookbook for IBM z Systems Volume 2: Red Hat Enterprise Linux 7.1 Servers

Chapter 6. Configure Linux for cloning
“It has become appallingly obvious that our technology has exceeded our humanity.”
— Albert Einstein
Cloning is a process where new systems are created from an existing master system, which is also called the golden image. This chapter greatly simplifies the process of cloning when it is compared to the previous releases of this book. The cloning procedure benefits from several improvements to the z/VM environment, therefore simplifying the cloning process.
Linux operating systems now have more unique identifiers. For example, with the introduction of systemd, a new machine ID is added. All of these identifiers must be re-created on the cloned system. However, the process to know all of these identifiers and the process to re-create them require in-depth knowledge of the golden image. Failure to update all of these identifiers can cause unexpected problems later, including data corruption or security issues.
If you are unsure of all of the unique identifiers for your golden image, and you prefer not to follow the cloning process, see the automated installation procedures in Chapter 2, “Automated Red Hat Enterprise Linux installations by using kickstart” on page 27.
This chapter describes an example of the cloning process. A basic cleanup procedure is supplied on a best-effort basis. You must review the cleanup script. The cleanup script will require updates whenever a more specialized golden image needs to be prepared.
After the cleanup, the configuration update of the target system was prepared as an example. Depending on the services that are used, the configuration update of the target system also will need updates from the administrator. You must review the configuration update of the target system.
The following topics are described:
� “Create a golden image for cloning” on page 82� “Clone the golden image by using DirMaint” on page 82� “Send the configuration update to the cloned system” on page 83� “IPL the cloned system” on page 84
6
© Copyright IBM Corp. 2015. All rights reserved. 81

6.1 Create a golden image for cloning
A golden image is a special type of Linux installation that is used as a baseline to generate new Linux systems from it.
Before you start this configuration, ensure that all of the files that are associated with this book are available. These additional materials are in Appendix B, “Additional material” on page 137.
In this book, we assume that the user name of the z/VM guest is GOLD. Ensure that you make all necessary changes that you want to for your template system before you proceed.
To prepare the Linux system as the golden image, follow these steps:
1. Copy the prepare script to the system. It removes files that are specific to one installation:
# scp prepare_system.sh golden.itso.ibm.com:/usr/local/bin
2. Log on to the golden image and ensure that the scripts under /usr/local/bin are executable:
# ssh golden.itso.ibm.com# chmod 755 /usr/local/bin/*
3. Shut down the image by calling the prepare_system.sh script:
# /usr/local/bin/prepare_system.sh
Warning: This utility will prepare the root disk for cloning by removing some configuration files. After it has finished it will halt this systemd.
press Ctrl+C within the next 15 seconds to abort
ln -s '/etc/systemd/system/clone.service' '/etc/systemd/system/network.target.wants/clone.service'Removing SSH keysRemoving the network configurationRemoving this script (/usr/local/bin/prepare_system.sh)halt the system
4. Make a backup of the image.
6.2 Clone the golden image by using DirMaint
Use IBM Directory Maintenance (DirMaint™) for z/VM to perform the copy of the golden image to a new user. To clone the golden image to a user with user name LINUX6, use the following procedure:
1. Ensure that the necessary resources, such as disks, are already prepared. The necessary tasks are described in Chapter 6, “Planning and preparation for Linux workloads”, of The Virtualization Cookbook for IBM z Systems Volume 1: IBM z/VM 6.3, SG24-8147-01:
http://www.redbooks.ibm.com/abstracts/sg248147.html?Open
2. Log off the source system (golden).
Important: Be careful when you prepare the golden image. All unique identifiers must be updated for the resulting new Linux system, which is known as the cloned system.
82 The Virtualization Cookbook for IBM z Systems Volume 2: Red Hat Enterprise Linux 7.1 Servers

3. Log on as MAINT.
4. If the z/VM guest is not already created, use the dirmaint command to create it:
==> dirmaint add LINUX6 like LNXPROTO pw <NewPassword>
5. Ensure that the source and target systems are logged off:
==> query linux5 #query linux6query linux5 query linux6HCPCQU045E LINUX5 not logged onReady(00045); T=0.01/0.01 10:11:14HCPCQU045E LINUX6 not logged onReady(00045); T=0.01/0.01 10:11:14
6. Copy the disk 0100 from the source to the target system:
===> dirmaint for linux6 clonedisk 0100 linux5 0100dirmaint for linux6 clonedisk 0100 linux5 0100DVHXMT1191I Your CLONEDISK request has been sent for processing toDVHXMT1191I DIRMAINT at ITSOZVM1 via DIRMSAT2.Ready; T=0.01/0.01 08:41:24 DVHREQ2288I Your CLONEDISK request for LINUX6 at DVHREQ2288I * has been accepted....DVHBIU3428I Changes made to directory entry DVHBIU3428I DATAMOV2 have been placed online. DVHSHN3430I CLONEDISK operation for LINUX6 DVHSHN3430I address 0100 has finished (WUCF DVHSHN3430I 01085901).
7. Log off MAINT.
6.3 Send the configuration update to the cloned system
Before the cloned system can be operational, the cloned system needs information about its configuration. Send a configuration script to the READER of the target system, LINUX6.
For RHEL, this configuration script is called send_config_rhel.sh. To simplify the configuration, it is sufficient to create a small configuration file, which looks similar to Example 6-1.
Example 6-1 Configuration file to update network configuration of LINUX6
GENERATE_MACHINEID="1"Hostname="LINUX6"HostIP="9.12.7.103/20"Gateway="9.12.4.1"ReadChannel=0.0.0600WriteChannel=0.0.0601DataChannel=0.0.0602Domain=itso.ibm.comNameserver=9.12.6.6Layer2=1
Chapter 6. Configure Linux for cloning 83

Follow these steps:
1. Log in as root on LNXADMIN.
2. Copy the send_config_rhel.sh to /usr/local/bin:
# cp send_config_rhel.sh /usr/local/bin
3. Ensure that the scripts are executable:
# chmod +x /usr/local/bin/send_config*
4. Create a configuration subdirectory to /root:
# cd /root# mkdir /root/cnf
5. Create and adapt the additional configuration script as shown in Example 6-1 on page 83. The file name must match the USERID of the cloned system.
# vi /root/cnf/LINUX6
6. Run the send_config script with the target USERID as the argument:
RHEL: # send_config_rhel.sh LINUX6
The configuration update script is sent to the reader of LINUX6. Consider the following characteristics and requirements:
� The file name that is sent to the reader is CLONE.� The file mode that is sent to the reader is SYSCTL.� The file must be sent by LNXADMIN.� The lines of the script must not exceed 80 characters.
The script that is sent to LINUX6 is executed during the first boot.
6.4 IPL the cloned system
IPL the cloned system to activate it. You can be logged on, or if the system was set up with a common PROFILE EXEC that IPLs the system disk, a remote user with XAUTOLOG.
===> ipl 100
During the IPL, the systemd clone.service reads and executes the clone.sysclt script from the reader. The Clone.Sysctl script contains the information that is needed to finalize the target system.
Finally, reboot the system (after the IPL) to ensure that the new machine-ID is used consistently with the cloned system.
84 The Virtualization Cookbook for IBM z Systems Volume 2: Red Hat Enterprise Linux 7.1 Servers

Chapter 7. Working with systemd
“You can be discouraged by failure, or you can learn from it. So go ahead and make mistakes, make all you can. Because, remember that’s where you’ll find success - on the far side of failure.”
— Thomas J. Watson Sr.
In modern Linux installations, systemd plays a major role. Understanding the concepts and knowing the utilities that are provided by systemd are key to any Linux administrator. This chapter describes how to work with Red Hat Enterprise Linux (RHEL) 7.1 and systemd. It includes the following topics:
� “Getting started with systemd” on page 86� “Using systemd units” on page 86� “Working with the systemd journal” on page 90� “System boot process” on page 93� “Analyzing Linux instances that use systemd” on page 93
7
© Copyright IBM Corp. 2015. All rights reserved. 85

7.1 Getting started with systemd
Systemd is a system and services manager that replaced upstart in RHEL. Systemd is the first user space process that the kernel starts when booting. This process is responsible for starting all of the services and their dependencies that allow the system to act as a server. Systemd uses units that can depend on other units. Different unit types exist:
� Service units, which are used to start services� Socket units, which allow socket-based activations� Device units, which trigger reactions for devices as they appear or disappear� Mount point units, which control mount points� Target units, which allow the grouping of units to act as synchronization points
For example, before the local-fs.target is reached, the local mount units, which depend on the device units, need to be activated. By default, the system boots into the default target that pulls in all of the dependencies that are necessary to start the system. For more details about the boot process, see 7.4, “System boot process” on page 93.
The units are described in unit files in /etc/systemd/system and /usr/lib/systemd/system where systemd searches for them and loads them. Certain unit files are generated dynamically by systemd unit generators. For example, the systemd-fstab-generator parses the /etc/fstab and creates mount units for the entries, if necessary. RPM packages that provide services usually install their service unit files at /usr/lib/systemd/system. The following example shows the /usr/lib/systemd/system/sshd.service unit file:
[Unit]Description=OpenSSH server daemonAfter=network.target sshd-keygen.serviceWants=sshd-keygen.service
[Service]EnvironmentFile=/etc/sysconfig/sshdExecStart=/usr/sbin/sshd -D $OPTIONSExecReload=/bin/kill -HUP $MAINPIDKillMode=processRestart=on-failureRestartSec=42s
[Install]WantedBy=multi-user.target
7.2 Using systemd units
This section describes how to manage services and isolate systemd targets.
7.2.1 Managing services
In this section, we describe the tasks that are used to manage the services by using systemd.
86 The Virtualization Cookbook for IBM z Systems Volume 2: Red Hat Enterprise Linux 7.1 Servers

List active service units (running services)Because systemd starts all of the services, you need to know how to get a list of the available services. Use the systemctl command to control services and inspect their state:
# systemctl -t serviceUNIT LOAD ACTIVE SUB DESCRIPTIONafter-local.service loaded active exited /etc/init.d/after.local Compatibilitycpi.service loaded active exited LSB: Set Control Program cron.service loaded active running Command Schedulerdbus.service loaded active running D-Bus System Message Bus...
List failed service unitsUse the systemctl command to list the failed service units:
# systemctl -t service --state=failed
Query the status of a service unitUse the systemctl command to query the state of a service unit:
# systemctl status sshd.servicesshd.service - OpenSSH server daemon Loaded: loaded (/usr/lib/systemd/system/sshd.service; enabled) Active: active (running) since Thu 2015-04-23 16:40:03 EDT; 24h ago Main PID: 1454 (sshd) CGroup: /system.slice/sshd.service ••1454 /usr/sbin/sshd -D
Apr 23 16:40:03 linux2.itso.ibm.com systemd[1]: Started OpenSSH server daemon.Apr 23 16:40:03 linux2.itso.ibm.com sshd[1454]: Server listening on 0.0.0.0 ...Apr 23 16:40:03 linux2.itso.ibm.com sshd[1454]: Server listening on :: port 22.Apr 23 16:58:13 linux2.itso.ibm.com sshd[2906]: Accepted password for ken f...2...
In addition to the information that you expect, the output also shows the last ten log messages from the journal. If you only want to know whether a service unit is active, you can type the following command:
# systemctl is-active sshd.serviceactive
Stop, start, and restart a service unitUse the systemctl command to stop, start, and restart a service unit:
# systemctl stop vsftpd.service# systemctl start vsftpd.service# systemctl restart vsftpd.service
Note: The systemctl command attempts to fit the contents of its output into your terminal window. If the output has more lines than your terminal window can display, the systemctl command pipes the output into less, which is the default pager. You can change that behavior by adding the --no-pager option. If the width of your terminal window is too narrow to display the full contents, you can add the --full or -l option to show the full contents. Of course, the --no-pager and the --full options can be combined, if you want.
Chapter 7. Working with systemd 87

You can also omit the suffix and specify multiple units:
# systemctl restart vsftpd sshd
As a Linux administrator, you might change the configuration of a running service and want to reload its configuration without restarting the service. Service unit files can use the ExecReload= option to specify a command line (similar to sending a signal) that triggers the reload of the configuration. If your service supports it, you can trigger reload by using the following command:
# systemctl reload sshd
Not all services support that command:
# systemctl reload vsftpdFailed to reload vsftpd.service: Job type reload is not applicable for unit vsftpd.service.
To reload the configuration of services that support it and restart services that do not, type the following command:
# systemctl reload-or-restart sshd vsftpd
List the installed service unitsUse the systemctl command to see a list of installed service units:
# systemctl list-unit-files -t serviceUNIT FILE STATE after-local.service static atd.service disabledauditd.service disabledautofs.service disabled
List the enabled service unitsUse the systemctl command to list the service units that are wanted or required by another unit, such as the multi-user.target, type the following command:
# systemctl list-unit-files -t service --state=enabledUNIT FILE STATE btrfsmaintenance-refresh.service enabledcio_ignore.service enabledcron.service enableddm-event.service [email protected] enabled
Disable a serviceTo disable starting a service at boot time, use the systemctl command in the following form:
# systemctl disable vsftpdrm '/etc/systemd/system/multi-user.target.wants/vsftpd.service'
Enable a serviceTo configure a service to start automatically at boot time, use the following systemctl command:
# systemctl enable vsftpdln -s '/usr/lib/systemd/system/vsftpd.service' '/etc/systemd/system/multi-user.target.wants/vsftpd.service'
88 The Virtualization Cookbook for IBM z Systems Volume 2: Red Hat Enterprise Linux 7.1 Servers
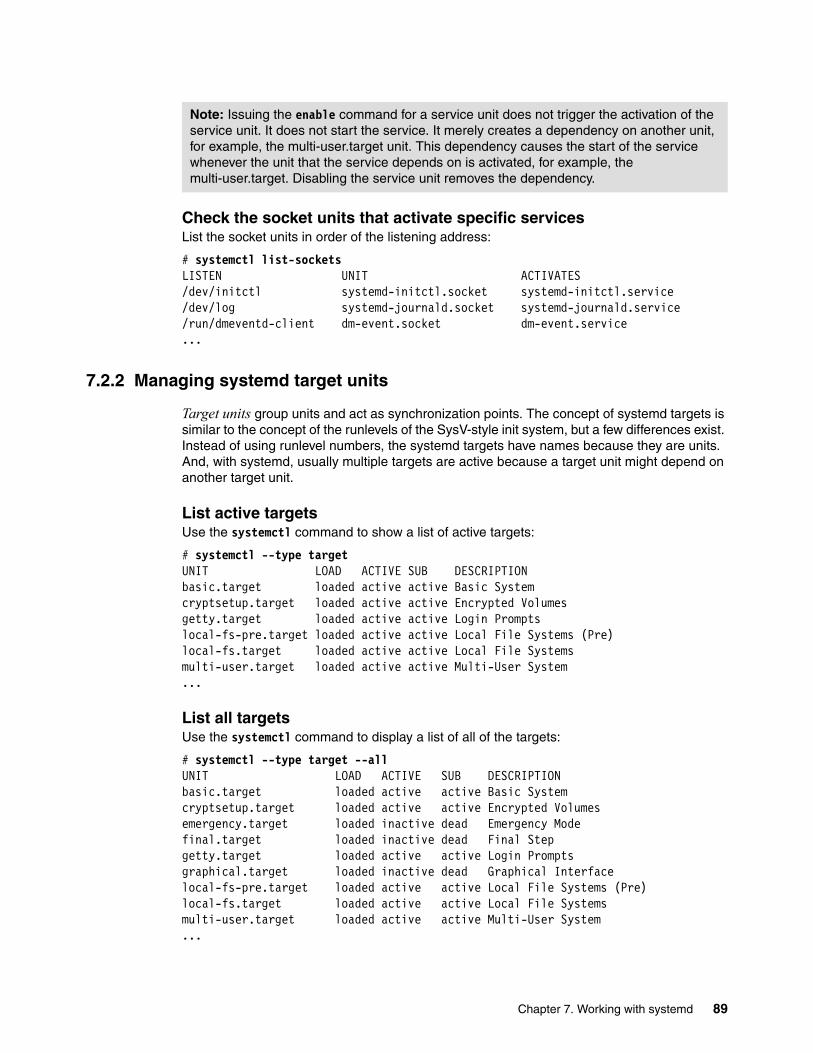
Check the socket units that activate specific servicesList the socket units in order of the listening address:
# systemctl list-socketsLISTEN UNIT ACTIVATES/dev/initctl systemd-initctl.socket systemd-initctl.service/dev/log systemd-journald.socket systemd-journald.service/run/dmeventd-client dm-event.socket dm-event.service...
7.2.2 Managing systemd target units
Target units group units and act as synchronization points. The concept of systemd targets is similar to the concept of the runlevels of the SysV-style init system, but a few differences exist. Instead of using runlevel numbers, the systemd targets have names because they are units. And, with systemd, usually multiple targets are active because a target unit might depend on another target unit.
List active targetsUse the systemctl command to show a list of active targets:
# systemctl --type targetUNIT LOAD ACTIVE SUB DESCRIPTIONbasic.target loaded active active Basic Systemcryptsetup.target loaded active active Encrypted Volumesgetty.target loaded active active Login Promptslocal-fs-pre.target loaded active active Local File Systems (Pre)local-fs.target loaded active active Local File Systemsmulti-user.target loaded active active Multi-User System...
List all targetsUse the systemctl command to display a list of all of the targets:
# systemctl --type target --allUNIT LOAD ACTIVE SUB DESCRIPTIONbasic.target loaded active active Basic Systemcryptsetup.target loaded active active Encrypted Volumesemergency.target loaded inactive dead Emergency Modefinal.target loaded inactive dead Final Stepgetty.target loaded active active Login Promptsgraphical.target loaded inactive dead Graphical Interfacelocal-fs-pre.target loaded active active Local File Systems (Pre)local-fs.target loaded active active Local File Systemsmulti-user.target loaded active active Multi-User System...
Note: Issuing the enable command for a service unit does not trigger the activation of the service unit. It does not start the service. It merely creates a dependency on another unit, for example, the multi-user.target unit. This dependency causes the start of the service whenever the unit that the service depends on is activated, for example, the multi-user.target. Disabling the service unit removes the dependency.
Chapter 7. Working with systemd 89

Query the default target that the system boots intoTo determine the target unit that is used by default, run the following command:
# systemctl get-defaultgraphical.target
Set the default target into which the system will bootTo configure the system to use a different default target unit, type the following command at a shell prompt as root:
# systemctl set-default multi-user.targetln -s '/usr/lib/systemd/system/multi-user.target' '/etc/systemd/system/default.target'
Switch to a targetTo turn off the graphical user interface and change to the multi-user.target unit in the current session, run the following command as root:
# systemctl isolate multi-user.target
The isolate command activates the specified target and all of its dependent units. All other units are stopped. By default, only a few targets can be isolated to prevent unusable system states. Table 7-1 maps important systemd targets to SysV runlevels.
Table 7-1 Mapping systemd targets to SysV runlevels
7.3 Working with the systemd journal
This section describes how to enable persistent journal data and how to view the journal.
7.3.1 Getting started with the journal
The journal is part of systemd and provides a modern logging mechanism. You can capture kernel log messages, regular syslog messages, the stdout/stderr that are written by services, and messages from the early boot stages. With the log message text, the journal stores metadata. The metadata consists of the process identifier (PID), user ID (UID), group ID (GID), executable, and so on. (For more information, enter the man systemd.journal-fields command on the Linux command line.) All of this information is indexed and can be queried by the administrator.
Systemd target SysV runlevel Notes
poweroff.target 0 Halts the system.
rescue.target 1, s, single Single-user mode that provides a base system and a rescue shell.
multi-user.target 2, 3, 4 Multi-user, non-graphical but with network and services running.
graphical.target 5 Multi-user, graphical.
reboot.target 6 Reboot the system.
emergency.target emergency Emergency shell. This target is a special systemd target unit that can be specified as a kernel command-line argument: systemd.unit=emergency.target.
90 The Virtualization Cookbook for IBM z Systems Volume 2: Red Hat Enterprise Linux 7.1 Servers

On RHEL 7.1, the data of the journal itself is not stored permanently, by default. The systemd-journald is configured to store its data on a small in-memory disk (/run/log/journal, which is a tmpfs). And, the systemd-journald is configured to forward the log messages to syslog, which means that they can be picked up by any traditional log daemon.
Both operating systems have the rsyslogd service that is enabled and that receives the messages from the journald and stores them persistently to /var/log/messages. Therefore, only the latest log data can be queried from the journal directly. To change the systemd-journald to store its data persistently on disk, create the /var/log/journal directory. When the journald is restarted, it will detect the existence of this directory and start to store the journal permanently on disk. Then, the traditional log daemon can be turned off.
Enable persistent journal data at /var/log/journalThe systemd-journald is a system service that collects and stores logging data. It creates and maintains structured, indexed journals that are based on logging information that is received from various sources. To enable it, execute the following commands:
# mkdir /var/log/journal# systemctl restart systemd-journald.service
Disable and stop the traditional log daemon (optional)This step is optional. If you want, you can use both the systemd-journald and the traditional log daemon. If you do not rely on the traditional log daemon, you can turn it off with the following command:
# systemctl disable rsyslog.servicerm '/etc/systemd/system/multi-user.target.wants/rsyslog.service'rm '/etc/systemd/system/syslog.service'# systemctl stop rsyslog.service
7.3.2 Viewing the journal
Use the journalctl utility to view and filter the journal. If the journalctl utility is executed without any parameters, it shows the entire journal in a format that is similar to traditional system log (syslog) files. The journalctl utility pipes the output into less, which is the default pager.
# journalctl-- Logs begin at Wed 2015-04-22 14:59:04 EDT, end at Wed 2015-04-22 16:44:17 EDT.Apr 22 16:43:51 linux1.itso.ibm.com systemd-journal[64]: Runtime journal is usingApr 22 16:43:51 linux1.itso.ibm.com systemd-journal[64]: Runtime journal is usingApr 22 16:43:51 linux1.itso.ibm.com kernel: Initializing cgroup subsys cpuset...
Use the following command to view the journal and request the less pager to jump to the end of the log:
# journalctl -e
Use the following command to show the last twenty log events (which is similar to the tail -n20 command):
# journalctl -n20
Chapter 7. Working with systemd 91

A live view of the journal can be obtained by using the --follow option. This option will show the last ten lines (similar to the tail -f command) and then display updates as soon as new log messages are added to the journal:
# journalctl -f
The live view can be terminated by pressing down Ctrl and pressing C to send a SIGINT signal to the journalctl process that causes the live view to end.
The default log output is intended to be legible. The following commands provide other output formats that are intended to be machine readable:
# journalctl -o verbose# journalctl -o json-pretty
7.3.3 Filtering the journal
You can filter the large collections of data to help you view what you want to view. Use the commands in this section.
Use the following command to show the log messages of the current boot (filters out the messages from previous boots):
# journalctl -b
Use the following command to show today’s log messages:
# journalctl --since today
Use the following command to show kernel messages of the current boot only:
# journalctl -b -k
Use the following command to show only errors:
# journalctl -p err
Use the following command to show the log messages of a specific unit (such as the sshd.service unit):
# journalctl -u sshd.service
Use the following command to show the messages that are logged by a specific executable:# journalctl /usr/sbin/sshd
Use the following command to show the messages that are logged by a specific PID, user ID, or group ID:
# journalctl _PID=0# journalctl _UID=0# journalctl _GID=0
For more fields, enter the man systemd.journal-fields command on the Linux command line.
Use the following command to show the space on disk that is occupied by the journal data:
# journalctl --disk-usage
Journals take up 40.0 MB on disk.
92 The Virtualization Cookbook for IBM z Systems Volume 2: Red Hat Enterprise Linux 7.1 Servers

7.4 System boot process
This section provides an overview of the boot process on Linux instances with systemd.
Boot loaderThe zipl boot loader loads the Linux kernel with the initial RAM disk image (initramfs) and the boot parameters into memory and starts the kernel. Then, the kernel unpacks the initramfs and starts /sbin/init, which is provided by the initramfs (which is usually a symlink to systemd).
Initial RAM disk imageThe initial RAM disk image (initramfs) contains the user space that is supposed to bring the disk that contains the root file system online and switch over to it. For example, if your rootfs is on a logical volume, it needs to activate the volume group. After the rootfs is mounted to /sysroot, it will be used as the new root directory. The initrd-switch-root.service executes systemctl switch-root /sysroot that switches the root directory and starts the systemd as PID 1. The job of the initramfs is done.
SystemdSystemd is a system and service manager for Linux operating systems. From now on, systemd is responsible to start your system. Its goal is to reach the default target. First, it needs to load all of the unit files. Many of the unit files are generated dynamically by generators. For example, the systemd-fstab-generator creates mount units for the entries that are in the /etc/fstab. After systemd loads the unit files, it knows the dependency tree and activates all units that are necessary for the default target.
7.5 Analyzing Linux instances that use systemd
This section shows a few commands to retrieve performance statistics and information about the dependencies between systemd units.
7.5.1 Retrieving performance statistics
Use the following command to show the time that is spent in the various stages of the boot process after the boot loader starts the kernel:
# systemd-analyze timeStartup finished in 386ms (kernel) + 904ms (initrd) + 3.005s (userspace) = 4.296s
Use the following command to show the time that it took to initialize the service units, sorted by time:
# systemd-analyze blame 537ms kdump.service 509ms firewalld.service 448ms lvm2-monitor.service 401ms network.service 363ms postfix.service 345ms tuned.service 220ms lvm2-pvscan@94:2.service 190ms auditd.service 119ms device_cio_free.service
Chapter 7. Working with systemd 93

...
Use the following command to display the time-critical chain of a systemd unit:
# systemd-analyze critical-chain default.targetThe time after the unit is active or started is printed after the "@" character.The time the unit takes to start is printed after the "+" character.
multi-user.target @3.001s••postfix.service @2.464s +363ms ••network.target @2.462s ••network.service @2.060s +401ms ••NetworkManager.service @1.941s +117ms ••firewalld.service @1.430s +509ms ••basic.target @1.429s ...
Use the following command to generate a Scalable Vector Graphics (SVG) image that is similar to the image that is shown in Figure 7-1, which shows details about the boot process:
# systemd-analyze plot > plot.svg
Figure 7-1 systemd-analyze plot
Note: SVG files can be viewed easily by using your Internet browser.
Startup finished in 387ms (kernel) + 931ms (initrd) + 2.916s (userspace) = 4.235s
0.0s 1.0s 2.0s 3.0s 4.0s
kernelinitrd
systemduser.slice
systemd-ask-password-wall.pathsystem-serial\x2dgetty.slice
system-getty.sliceremote-fs.target
slices.targetsystemd-shutdownd.socket
systemd-initctl.socketsystemd-udevd-kernel.socket
systemd-udevd-control.socketsystemd-udev-trigger.service (21ms)
systemd-sysctl.service (12ms)sys-kernel-debug.mount (30ms)
proc-sys-fs-binfmt_misc.automountkmod-static-nodes.service (45ms)
[email protected]@ttysclp0.service
multi-user.targetsystemd-update-utmp-runlevel.service (2ms)
ActivatingActive
DeactivatingGenerators
Loading unit files
......................................................................................................................................
94 The Virtualization Cookbook for IBM z Systems Volume 2: Red Hat Enterprise Linux 7.1 Servers

7.5.2 Retrieving information about unit dependencies
With systemd, two types of dependencies exist between units:
� Dependencies that affect the activation of units (Requires/Wants/Conflicts).� Dependencies that affect the order of units (After/Before).
The activation perspective (Requires/Wants/Conflicts)Use the following command to show units that the specified unit requires or wants:
# systemctl list-dependencies sshd.servicesshd.service••sshd-keygen.service••system.slice••basic.target ••firewalld.service ...
Use the following command to show units that require or want the specified unit:
# systemctl list-dependencies --reverse sshd.servicesshd.service••multi-user.target ••graphical.target
The order perspective (After/Before)Use the following command to list the units on which the specified unit has an “After” dependency. This command shows units that need to be started before the specified unit.
# systemctl list-dependencies --after sshd.servicesshd.service••sshd-keygen.service••system.slice••systemd-journald.socket••basic.target...
Use the following command to list the units on which the specified unit has a “Before” dependency. This command shows units that need to be delayed until the specified unit starts.
# systemctl list-dependencies --before sshd.servicesshd.service••multi-user.target• ••systemd-readahead-done.service• ••systemd-readahead-done.timer• ••systemd-update-utmp-runlevel.service• ••graphical.target
...
Chapter 7. Working with systemd 95

96 The Virtualization Cookbook for IBM z Systems Volume 2: Red Hat Enterprise Linux 7.1 Servers

Chapter 8. Miscellaneous helpful information
“Try not to become a man of success, but rather try to become a man of value.”
— Albert Einstein
This chapter contains miscellaneous information. These topics help facilitate administration, save time, increase functionality, or add capabilities to your systems.
The following topics are described:
� “Rescue a Linux system” on page 98
� “Set up Memory Hotplugging” on page 105
� “Use the cpuplugd service” on page 108
� “Hardware cryptographic support for OpenSSH with Red Hat Enterprise Linux 7.1” on page 113
� “X Window System” on page 117
� “Set up the IUCV Linux Terminal Server” on page 119
� “Issue z/VM CP commands from Linux” on page 119
� “Access z/VM CMS disks from Linux” on page 120
� “Network File System mounting the LNXADMIN SFS directory from Linux” on page 122
8
© Copyright IBM Corp. 2015. All rights reserved. 97

8.1 Rescue a Linux system
This section describes how to boot your Linux server into different modes for troubleshooting. It covers booting Linux into single user mode. It also describes how to enter a rescue environment when you require more advanced troubleshooting.
8.1.1 Initrd shell and systemd targets
With previous versions, Linux SysV offered special runlevels to use for specific tasks, for example, the single user mode or the emergency mode. The systemd command introduces a new concept that is called targets and offers the same functionality in a different way. For a description of target units, see 7.2.2, “Managing systemd target units” on page 89.
Use initrd shell and systemd targets with Red Hat Enterprise Linux For example, to enter single user mode or rescue.target mode on a Fibre Channel Protocol (FCP) Linux virtual machine that is named LINUX2, first IPL your Linux server from the 3270 console by using the following commands:
===> cp set loaddev portname 50050763 0500C74C lun 40104018 00000000 scpdata systemd.unit=rescue.target ===>ipl fc00
00: HCPLDI2816I Acquiring the machine loader from the processor controller. 00: HCPLDI2817I Load completed from the processor controller. 00: HCPLDI2817I Now starting the machine loader. ....es: 258048 [ 0.000000] Kernel command line: rd.znet=qeth,0.0.0600,0.0.0601,0.0.0602,layer2=1 rd.lvm.lv=rhel_linux2/root cio_ignore=all,!condev console=hvc0 root=/dev/mapper/rhel_linux2-root console=ttyS0 rd.lvm.lv=rhel_linux2/swap rd.zfcp=0.0.fd000x500507630510c74c,0x4010401800000000 rd.zfcp=0.0.fd00,0x50050763051bc74c,0x4010401800000000 hvc_iucv=8 rd.zfcp=0.0.fc00,0x50050763050bc74c,0x4010401800000000 rd.zfcp=0.0.fc00,0x500507630500c74c,0x4010401800000000 crashkernel=4096M LANG=en_US.UTF-8 systemd.unit=rescue.target...Welcome to rescue mode! Type "systemctl default" or ^D to enter default mode. Type "journalctl -xb" to view system logs. Type "systemctl reboot" to reboot. Give root password for maintenance (or type Control-D to continue):
The single user mode now asks for the root password.
In rescue.target mode, all of the file systems in /etc/fstab are mounted, but networking is not started. To exit single user mode, type exit to continue to boot normally to the default systemd target in your system.
To enter a different systemd target, from the IPL command, type the target that you want in the systemd.unit= parameter. For example, to enter the emergency.target, use LINUX2 and the following commands:
===> cp set loaddev portname 50050763 0500C74C lun 40104018 00000000 scpdata systemd.unit=emergency.target ===>ipl fc00
98 The Virtualization Cookbook for IBM z Systems Volume 2: Red Hat Enterprise Linux 7.1 Servers

If you want greater control when you IPL your Linux system, the initrd shell is a more flexible environment for advanced system administrators. To load the initrd shell, use the rd.break parameter instead of the systemd.unit= parameter, for example:
� When you use FCP Red Hat Enterprise Linux (RHEL) guests, use these commands:
===> cp set loaddev portname 50050763 0500C74C lun 40104018 00000000 scpdata rd.break ===> ipl fc00
� When you use DASD ECKD/FBA RHEL guests, use this command:
===> ipl 100 PARM rd.break
If you need to recover the root password for FCP Red Hat Enterprise Linux (RHEL) guests, you must use the following steps to recover the root password:
1. Load the proper parameters by using the 3270 terminal:
===> cp set loaddev portname 50050763 0500C74C lun 40104018 00000000 scpdata rd.break
2. IPL the virtual FCP device:
===> ipl fc00...dracut-pre-pivot[673]: Warning: Break before switch_root Generating "/run/initramfs/rdsosreport.txt" Entering emergency mode. Exit the shell to continue. Type "journalctl" to view system logs. You might want to save "/run/initramfs/rdsosreport.txt" to a USB stick or /boot after mounting them and attach it to a bug report.
Note: To load systemd targets from the IPL command when you use DASD extended count key data (ECKD)/fixed-block architecture (FBA), use the following commands from the 3270 terminal:
===> ipl 100 PARM systemd.unit=rescue 00: zIPL v1.23.0-17.el7 interactive boot menu 00: 00: 0. default (linux) 00: 00: 1. linux 00: 00: Note: VM users please use '#cp vi vmsg <input>' 00: 00: Please choose (default will boot in 5 seconds): 00: Booting default (linux)... 00: Uncompressing Linux... ...Welcome to rescue mode! Type "systemctl default" or ^D to enter default mode. Type "journalctl -xb" to view system logs. Type "systemctl reboot" to reboot. Give root password for maintenance (or type Control-D to continue):
Important: If you need to recover the root password, the rescue.target and the emergency.target cannot help you with this task.
Chapter 8. Miscellaneous helpful information 99

3. The system’s /sysroot is mounted as read-only; remount it as read/write:
switch_root:/# mount -o remount,rw /sysroot mount -o remount,rw /sysroot
4. Change the root password:
switch_root:/# chroot /sysroot passwd chroot /sysroot passwd Changing password for user root. New password: ...passwd: all authentication tokens updated successfully. switch_root:/#
5. Instruct SELinux to relabel all files on reboot because the /etc/shadow file was changed outside of its regular SELinux context:
switch_root:/# chroot /sysroot touch ./autorelabel
6. The system’s /sysroot is mounted as read/write. Remount it as read-only to exit cleanly:
switch_root:/# mount -o remount,ro /sysroot
To exit and resume the IPL process, type exit.
If you need to recover the root password for DASD ECKD/FBA RHEL guests, you must use the following steps to recover the root password:
1. IPL the virtual FCP device:
===> ipl 100 PARM rd.break...dracut-pre-pivot[507]: Warning: Break before switch_root Generating "/run/initramfs/rdsosreport.txt" Entering emergency mode. Exit the shell to continue. Type "journalctl" to view system logs. You might want to save "/run/initramfs/rdsosreport.txt" to a USB stick or /bootafter mounting them and attach it to a bug report.
2. The system’s /sysroot is mounted as read-only; remount it as read/write:
switch_root:/# mount -o remount,rw /sysroot mount -o remount,rw /sysroot
3. Change the root password:
switch_root:/# chroot /sysroot passwd chroot /sysroot passwd Changing password for user root. New password: ...passwd: all authentication tokens updated successfully.
4. Instruct SELinux to relabel all files on reboot because the /etc/shadow file was changed outside of its regular SELinux context:
switch_root:/# chroot /sysroot touch ./autorelabel
5. The system’s /sysroot is mounted as read/write. Remount it as read-only to exit cleanly:
switch_root:/# mount -o remount,ro /sysroot
To exit and resume the IPL process, type exit.
100 The Virtualization Cookbook for IBM z Systems Volume 2: Red Hat Enterprise Linux 7.1 Servers
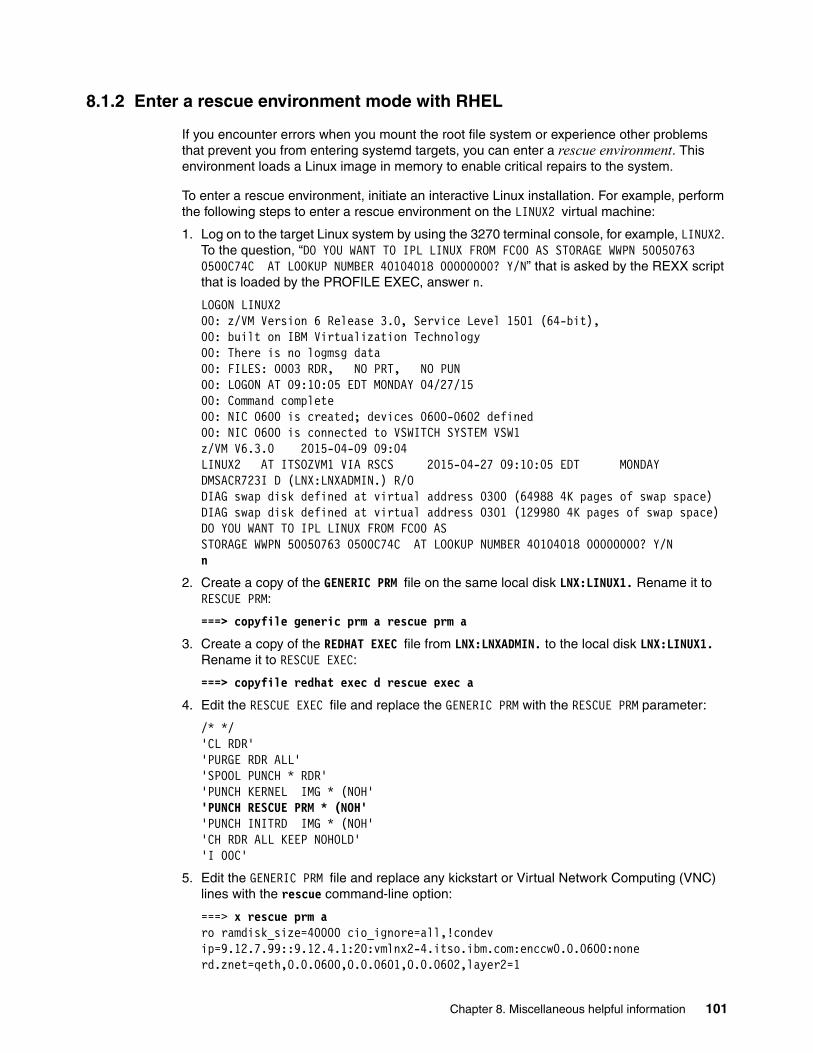
8.1.2 Enter a rescue environment mode with RHEL
If you encounter errors when you mount the root file system or experience other problems that prevent you from entering systemd targets, you can enter a rescue environment. This environment loads a Linux image in memory to enable critical repairs to the system.
To enter a rescue environment, initiate an interactive Linux installation. For example, perform the following steps to enter a rescue environment on the LINUX2 virtual machine:
1. Log on to the target Linux system by using the 3270 terminal console, for example, LINUX2. To the question, “DO YOU WANT TO IPL LINUX FROM FC00 AS STORAGE WWPN 50050763 0500C74C AT LOOKUP NUMBER 40104018 00000000? Y/N” that is asked by the REXX script that is loaded by the PROFILE EXEC, answer n.
LOGON LINUX2 00: z/VM Version 6 Release 3.0, Service Level 1501 (64-bit), 00: built on IBM Virtualization Technology 00: There is no logmsg data 00: FILES: 0003 RDR, NO PRT, NO PUN 00: LOGON AT 09:10:05 EDT MONDAY 04/27/15 00: Command complete 00: NIC 0600 is created; devices 0600-0602 defined 00: NIC 0600 is connected to VSWITCH SYSTEM VSW1 z/VM V6.3.0 2015-04-09 09:04 LINUX2 AT ITSOZVM1 VIA RSCS 2015-04-27 09:10:05 EDT MONDAY DMSACR723I D (LNX:LNXADMIN.) R/O DIAG swap disk defined at virtual address 0300 (64988 4K pages of swap space) DIAG swap disk defined at virtual address 0301 (129980 4K pages of swap space) DO YOU WANT TO IPL LINUX FROM FC00 AS STORAGE WWPN 50050763 0500C74C AT LOOKUP NUMBER 40104018 00000000? Y/N n
2. Create a copy of the GENERIC PRM file on the same local disk LNX:LINUX1. Rename it to RESCUE PRM:
===> copyfile generic prm a rescue prm a
3. Create a copy of the REDHAT EXEC file from LNX:LNXADMIN. to the local disk LNX:LINUX1. Rename it to RESCUE EXEC:
===> copyfile redhat exec d rescue exec a
4. Edit the RESCUE EXEC file and replace the GENERIC PRM with the RESCUE PRM parameter:
/* */ 'CL RDR' 'PURGE RDR ALL' 'SPOOL PUNCH * RDR' 'PUNCH KERNEL IMG * (NOH' 'PUNCH RESCUE PRM * (NOH' 'PUNCH INITRD IMG * (NOH' 'CH RDR ALL KEEP NOHOLD' 'I 00C'
5. Edit the GENERIC PRM file and replace any kickstart or Virtual Network Computing (VNC) lines with the rescue command-line option:
===> x rescue prm aro ramdisk_size=40000 cio_ignore=all,!condev ip=9.12.7.99::9.12.4.1:20:vmlnx2-4.itso.ibm.com:enccw0.0.0600:none rd.znet=qeth,0.0.0600,0.0.0601,0.0.0602,layer2=1
Chapter 8. Miscellaneous helpful information 101
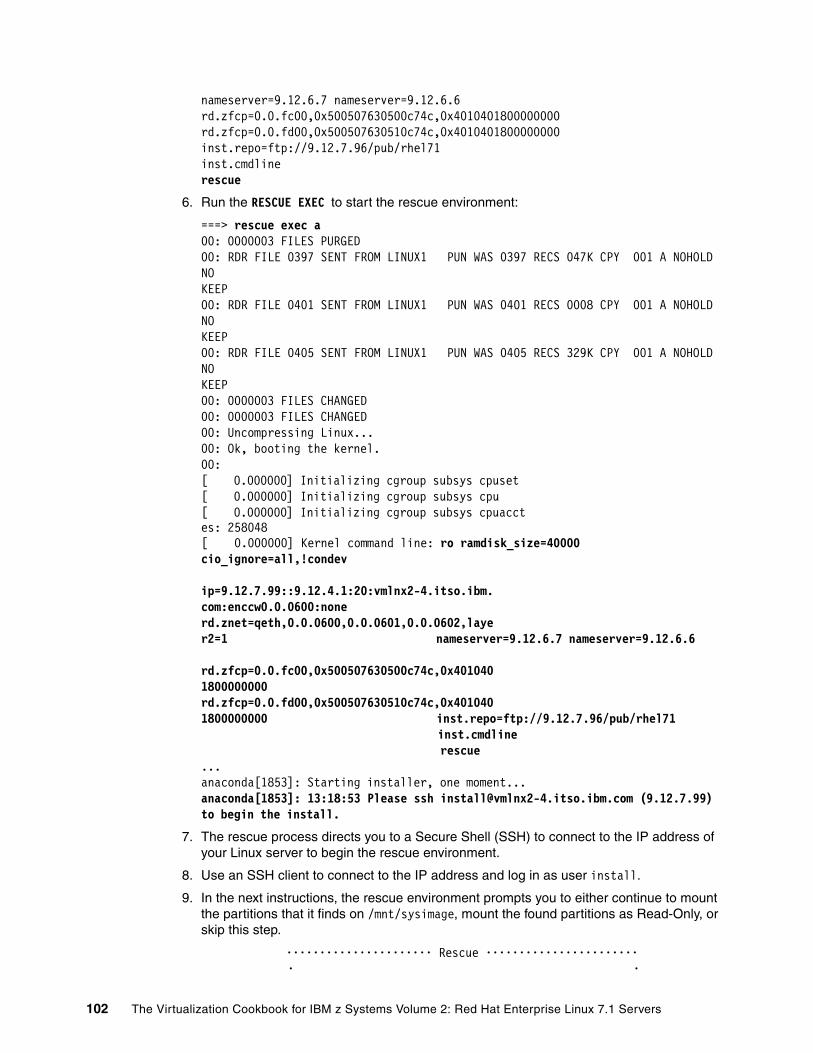
nameserver=9.12.6.7 nameserver=9.12.6.6 rd.zfcp=0.0.fc00,0x500507630500c74c,0x4010401800000000 rd.zfcp=0.0.fd00,0x500507630510c74c,0x4010401800000000 inst.repo=ftp://9.12.7.96/pub/rhel71 inst.cmdline rescue
6. Run the RESCUE EXEC to start the rescue environment:
===> rescue exec a00: 0000003 FILES PURGED 00: RDR FILE 0397 SENT FROM LINUX1 PUN WAS 0397 RECS 047K CPY 001 A NOHOLD NOKEEP 00: RDR FILE 0401 SENT FROM LINUX1 PUN WAS 0401 RECS 0008 CPY 001 A NOHOLD NOKEEP 00: RDR FILE 0405 SENT FROM LINUX1 PUN WAS 0405 RECS 329K CPY 001 A NOHOLD NOKEEP 00: 0000003 FILES CHANGED 00: 0000003 FILES CHANGED 00: Uncompressing Linux... 00: Ok, booting the kernel. 00: [ 0.000000] Initializing cgroup subsys cpuset [ 0.000000] Initializing cgroup subsys cpu [ 0.000000] Initializing cgroup subsys cpuacct es: 258048 [ 0.000000] Kernel command line: ro ramdisk_size=40000 cio_ignore=all,!condev ip=9.12.7.99::9.12.4.1:20:vmlnx2-4.itso.ibm.com:enccw0.0.0600:none rd.znet=qeth,0.0.0600,0.0.0601,0.0.0602,layer2=1 nameserver=9.12.6.7 nameserver=9.12.6.6 rd.zfcp=0.0.fc00,0x500507630500c74c,0x4010401800000000 rd.zfcp=0.0.fd00,0x500507630510c74c,0x4010401800000000 inst.repo=ftp://9.12.7.96/pub/rhel71 inst.cmdline rescue...anaconda[1853]: Starting installer, one moment... anaconda[1853]: 13:18:53 Please ssh [email protected] (9.12.7.99) to begin the install.
7. The rescue process directs you to a Secure Shell (SSH) to connect to the IP address of your Linux server to begin the rescue environment.
8. Use an SSH client to connect to the IP address and log in as user install.
9. In the next instructions, the rescue environment prompts you to either continue to mount the partitions that it finds on /mnt/sysimage, mount the found partitions as Read-Only, or skip this step.
•••••••••••••••••••••• Rescue •••••••••••••••••••••••• •
102 The Virtualization Cookbook for IBM z Systems Volume 2: Red Hat Enterprise Linux 7.1 Servers

• The rescue environment will now attempt to find • • • your Linux installation and mount it under the | • • directory /mnt/sysimage. You can then make any | • • changes required to your system. If you want | • • to proceed with this step choose 'Continue'. | • • You can also choose to mount your file systems | • • read-only instead of read-write by choosing | • • 'Read-Only'. | • • | • • If for some reason this process fails you can | • • choose 'Skip' and this step will be skipped and • • • • • •••••••••••• ••••••••••••• •••••••• • • • Continue • • Read-Only • • Skip • • • •••••••••••• ••••••••••••• •••••••• • • • • • •••••••••••••••••••••••••••••••••••••••••••••••••••••
<Tab>/<Alt-Tab> between elements | <Space> selects | <F12> next screen[anaconda] 1:main* 2:shell 3:log 4:storage-log 5:program-log
10.Choose Continue. The following instructions appear.
•••••••••••••••• Rescue ••••••••••••••••• • • • Your system has been mounted under • • /mnt/sysimage. • • • • Press <return> to get a shell. If you • • would like to make your system the • • root environment, run the command: • • • • chroot /mnt/sysimage • • • • The system will reboot automatically • • when you exit from the shell. • • • • •••••• • • • OK • • • •••••• • • •
•••••••••••••••••••••••••••••••••••••••••
<Tab>/<Alt-Tab> between elements | <Space> selects | <F12> next screen[anaconda] 1:main* 2:shell 3:log 4:storage-log 5:program-log
11.Click OK.
••••••••••••••• Rescue •••••••••••••••• • •
Note: If you use PuTTY, under Settings → Window → Translation, change “Character Set Translation on Received Data” to UTF-8 for a better user experience.
Chapter 8. Miscellaneous helpful information 103

• Your system is mounted under the • • /mnt/sysimage directory. • • • • •••••• • • • OK • • • •••••• • • • • • •••••••••••••••••••••••••••••••••••••••
12.Click OK again to load the command prompt. Your system was mounted under /mnt/sysimage.
13.The rescue environment presents a prompt command-line mode:
Starting installer, one moment...anaconda 19.31.123-1 for Red Hat Enterprise Linux 7.1 started. * installation log files are stored in /tmp during the installation * shell is available in second TMUX pane (ctrl+b, then press 2) * if the graphical installation interface fails to start, try again with the inst.text bootoption to start text installation * when reporting a bug add logs from /tmp as separate text/plain attachments
When finished please exit from the shell and your system will reboot.
To exit the rescue mode, type exit. Return to the 3270 console to type exit; otherwise, it will load the rescue environment again:
===> #CP IPL CMS
Note: If you want to use system tools to modify your system, use the chroot command line:
sh-4.2# chroot /mnt/sysimage/bash-4.2# lsbin dev home lib64 mnt proc run srv tmp varboot etc lib media opt root sbin sys usrbash-4.2#
104 The Virtualization Cookbook for IBM z Systems Volume 2: Red Hat Enterprise Linux 7.1 Servers

8.2 Set up Memory Hotplugging
With Linux Memory Hotplug, you can increase or decrease the amount of memory in a Linux system without a reboot. Standby memory must be already defined to the virtual machine in which Linux is running. You can issue the CP DEFINE STORAGE command to configure standby memory (storage).
To set up standby storage for Linux Memory Hotplug by using LINUX1 as the virtual machine, for example, perform the following steps:
1. To give the virtual machine an additional 1 GB of standby memory, you can change either the directory or each virtual machine by using Conversational Monitor System (CMS) command-line mode. The following example shows how to change a specific Linux virtual machine to define standby memory by using the CMS command. The second example shows how to change the directory and how the Linux guest loads the changes.
Note: If the rescue image cannot find your partition, you can try to mount it yourself with the mount command. For example, the LINUX1 system did not mount logical volumes (LVs) automatically. To mount failed Logical Volume Manager (LVM) systems, enter these commands:
# vgchange -a y 2 logical volume(s) in volume group "rhel_linux1" now active
# vgs VG #PV #LV #SN Attr VSize VFree rhel_linux1 1 2 0 wz--n- 9.51g 40.00m
# ls /dev/mapper/control live-base live-rw rhel_linux1-root rhel_linux1-swap
# mount /dev/mapper/rhel_linux1-root /mnt
# ls /mnt/bin dev home lib64 mnt proc run srv tmp varboot etc lib media opt root sbin sys usr
Now, you can modify the files on the rhel_linux1-root logical volume.
To chroot the /mnt so that you can use commands that affect the system on the disk (not the rescue system in memory), use these commands:
# mount -o bind /dev/ /mnt/dev# mount -t proc none /mnt/proc# mount -t sysfs none /mnt/sys# chroot /mnt# lsbin dev home lib64 mnt proc run srv tmp varboot etc lib media opt root sbin sys usr
Chapter 8. Miscellaneous helpful information 105

2. If you want this change to be temporary for this bootup of Linux only, or if you decide not to change your virtual machine’s directory entry for another reason, type the following DEFINE statement from a 3270 terminal:
===> define storage 1GB standby 1GB 00: HCPZPM003E Invalid option - 1GB Ready(00003); T=0.01/0.01 14:53:04 define storage 1G standby 1G 00: STORAGE = 1G MAX = 2G INC = 2M STANDBY = 1G RESERVED = 0 00: Storage cleared - system reset. ===> ipl 100
3. If you want this change to be permanent, you must update the user directory entry for this virtual machine. See 4.12.3, “z/VM User Directory PROFILEs” in The Virtualization Cookbook for IBM z Systems Volume 1: IBM z/VM 6.3, SG24-8147-01, at this website:
http://www.redbooks.ibm.com/abstracts/sg248147.html?Open
4. After you change the directory, log on to LINUX1. The standby memory is reported:
LOGON LINUX1 00: z/VM Version 6 Release 3.0, Service Level 1501 (64-bit), 00: built on IBM Virtualization Technology 00: There is no logmsg data 00: FILES: 0003 RDR, NO PRT, NO PUN 00: LOGON AT 15:27:29 EDT MONDAY 04/27/15 00: STORAGE = 1G MAX = 2G INC = 2M STANDBY = 1G RESERVED = 0 00: Storage cleared - system reset. 00: Command complete 00: NIC 0600 is created; devices 0600-0602 defined 00: NIC 0600 is connected to VSWITCH SYSTEM VSW1 z/VM V6.3.0 2015-04-09 09:04 LINUX1 AT ITSOZVM1 VIA RSCS 2015-04-27 15:27:30 EDT MONDAY DMSACR723I D (LNX:LNXADMIN.) R/O DIAG swap disk defined at virtual address 0300 (64988 4K pages of swap space) DIAG swap disk defined at virtual address 0301 (129980 4K pages of swap space)DO YOU WANT TO IPL LINUX FROM MINIDISK 100? Y/N Y
5. Start an SSH session as root and view the memory in the /sys/ file system. Change the directory to /sys/devices/system/memory/ and list the files:
# cd /sys/devices/system/memory# ls block_size_bytes memory1 memory3 memory5 memory7 ueventmemory0 memory2 memory4 memory6 power
6. Type the block_size_bytes file with the cat command:
# cat block_size_bytes10000000
This number is the number of bytes in hexadecimal. 10000000 in hex is 256 MB in decimal. So, the block size is 256 MB and eight blocks (memory0 - memory7) exist, which are represented as directories. Each memory block has a state, which is represented as a file.
106 The Virtualization Cookbook for IBM z Systems Volume 2: Red Hat Enterprise Linux 7.1 Servers

7. Show the state of each memory block with the following command:
# cat memory*/stateonlineonlineonlineonlineofflineofflineofflineoffline
This output shows that the first 1 GB is online and the next four blocks are offline.
8. You can also show information about memory with the free -m command:
# free -mtotal used free shared buff/cache available
Mem: 991 94 766 0 130 858Swap: 1785 0 1785
This output shows 766 MB of free memory that is available. (Part of the memory is used internally by Linux.)
9. You can turn on memory by sending the string online to the state file. Turn on an additional 512 MB of memory with the following commands:
# echo online > memory4/state# echo online > memory5/state
10.Show that the memory is now online:
# cat memory*/stateonlineonlineonlineonlineonlineonlineofflineoffline
11.Again, confirm the available memory with the free -m command:
# free -m total used free shared buff/cache available
Mem: 1503 96 1276 0 130 1367Swap: 1785 0 1785
This output shows that 1,276 MB of free memory is now available.
12.You can also return the memory by echoing offline to the state file:
# echo offline > memory4/state# echo offline > memory5/state
Chapter 8. Miscellaneous helpful information 107

13.Verify that the memory was returned:
# cat memory*/stateonlineofflineofflineoffline# free -m
total used free shared buff/cache availableMem: 991 94 768 0 129 859Swap: 1785 0 1785
We demonstrated how to configure virtual machines with standby memory and how to hot plug the memory from Linux. This function can increase your system’s performance and availability.
8.3 Use the cpuplugd service
By using the cpuplugd service, Linux can enable or disable CPUs and memory, based on a set of rules. It can improve performance by setting the correct number of processors and the correct amount of memory for Linux systems, depending on their current loads. It can also prevent the Linux scheduler from queue balancing in partial load situations.
8.3.1 Determine the virtual CPUs that are used
To start working with cpuplugd, perform the following steps:
1. Start an SSH session to the Linux system and determine the number of CPUs that Linux has online. Us the command lscpu:
# lscpuArchitecture: s390xCPU op-mode(s): 32-bit, 64-bitByte Order: Big EndianCPU(s): 2On-line CPU(s) list: 0,1Thread(s) per core: 1Core(s) per socket: 1Socket(s) per book: 1Book(s): 2Vendor ID: IBM/S390BogoMIPS: 20325.00Hypervisor: z/VM 6.3.0Hypervisor vendor: IBMVirtualization type: fullDispatching mode: horizontalL1d cache: 128KL1i cache: 96KL2d cache: 2048KL2i cache: 2048K
108 The Virtualization Cookbook for IBM z Systems Volume 2: Red Hat Enterprise Linux 7.1 Servers

2. Observe the status of the cpuplugd service:
# systemctl status cpuplugdcpuplugd.service - LSB: Start the cpu hotplug daemon for Linux on System z Loaded: loaded (/etc/rc.d/init.d/cpuplugd) Active: inactive (dead)
3. Start the cpuplugd daemon:
# systemctl start cpuplugd# systemctl status cpuplugdcpuplugd.service - LSB: Start the cpu hotplug daemon for Linux on System z Loaded: loaded (/etc/rc.d/init.d/cpuplugd) Active: active (running) since Mon 2015-04-27 16:07:50 EDT; 1s ago Process: 4814 ExecStart=/etc/rc.d/init.d/cpuplugd start (code=exited, status=0/SUCCESS) Main PID: 4821 (cpuplugd) CGroup: /system.slice/cpuplugd.service ââ4821 /usr/sbin/cpuplugd -c /etc/sysconfig/cpuplugd
4. Wait a few minutes and run the lscpu script again:
# lscpuArchitecture: s390xCPU op-mode(s): 32-bit, 64-bitByte Order: Big EndianCPU(s): 2On-line CPU(s) list: 0Off-line CPU(s) list: 1Thread(s) per core: 1Core(s) per socket: 1Socket(s) per book: 1Book(s): 1Vendor ID: IBM/S390BogoMIPS: 20325.00Hypervisor: z/VM 6.3.0Hypervisor vendor: IBMVirtualization type: fullDispatching mode: horizontalL1d cache: 128KL1i cache: 96KL2d cache: 2048KL2i cache: 2048K
The output shows that now only one of the two virtual CPUs are active. The cpuplugd service turned off the other virtual CPU.
5. The cpuplugd configuration file is /etc/sysconfig/cpuplugd. Certain middleware products recommend a minimum of two virtual processors. If most of your Linux servers will run a workload that recommends two processors, change the default for CPU_MIN to 2. The exception is when only a single physical processor is available. View the non-comments and lines that are not blank in the configuration file with the following command:
# cd /etc/sysconfig# egrep -v '^$|^#' cpuplugdCPU_MIN="1"CPU_MAX="0"UPDATE="1"CMM_MIN="0"CMM_MAX="131072" # 512 MB
Chapter 8. Miscellaneous helpful information 109

pgscan_d="vmstat.pgscan_direct_dma[0] + vmstat.pgscan_direct_normal[0] + vmstat. pgscan_direct_movable[0]"pgscan_d1="vmstat.pgscan_direct_dma[1] + vmstat.pgscan_direct_normal[1] + vmstat .pgscan_direct_movable[1]"pgscanrate="(pgscan_d - pgscan_d1) / (cpustat.total_ticks[0] - cpustat.total_tic ks[1])"avail_cache="meminfo.Cached - meminfo.Shmem"user_0="(cpustat.user[0] - cpustat.user[1])"nice_0="(cpustat.nice[0] - cpustat.nice[1])"system_0="(cpustat.system[0] - cpustat.system[1])"user_2="(cpustat.user[2] - cpustat.user[3])"nice_2="(cpustat.nice[2] - cpustat.nice[3])"system_2="(cpustat.system[2] - cpustat.system[3])"CP_Active0="(user_0 + nice_0 + system_0) / (cpustat.total_ticks[0] - cpustat.tot al_ticks[1])"CP_Active2="(user_2 + nice_2 + system_2) / (cpustat.total_ticks[2] - cpustat.tot al_ticks[3])"CP_ActiveAVG="(CP_Active0+CP_Active2) / 2"idle_0="(cpustat.idle[0] - cpustat.idle[1])"iowait_0="(cpustat.iowait[0] - cpustat.iowait[1])"idle_2="(cpustat.idle[2] - cpustat.idle[3])"iowait_2="(cpustat.iowait[2] - cpustat.iowait[3])"CP_idle0="(idle_0 + iowait_0) / (cpustat.total_ticks[0] - cpustat.total_ticks[1] )"CP_idle2="(idle_2 + iowait_2) / (cpustat.total_ticks[2] - cpustat.total_ticks[3] )"CP_idleAVG="(CP_idle0 + CP_idle2) / 2"CMM_INC="meminfo.MemFree / 40"CMM_DEC="meminfo.MemTotal / 40"HOTPLUG="((1 - CP_ActiveAVG) * onumcpus) < 0.08"HOTUNPLUG="(CP_idleAVG * onumcpus) > 1.15"MEMPLUG="0"MEMUNPLUG="0"
The default rules for the plugging and unplugging of CPUs in the configuration file are shown:
HOTPLUG="((1 - CP_ActiveAVG) * onumcpus) < 0.08"HOTUNPLUG="(CP_idleAVG * onumcpus) > 1.15"
The variables in the statements are defined:
CP_ActiveAVG The current average CPU loadonumcpus The number of online CPUsrunable_proc The current number of processes that can be runCP_idleAVG The current idle percentage
These CPU hot plugging and unplugging values will be used in the next section. In the default setup, cpuplugd changes the virtual processor configuration only. The auto-adaptive adjustment of the memory by using the cmm feature (module) is deactivated, by default, and is also unavailable when you run in a native logical partition (LPAR) environment.
8.3.2 Generating a workload to demonstrate cpuplugd
You can now generate a workload to show how cpuplugd turns on CPUs.
110 The Virtualization Cookbook for IBM z Systems Volume 2: Red Hat Enterprise Linux 7.1 Servers

Perform the following steps:
1. Put 10 looping jobs in the background with the following for loop:
# for i in `seq 1 10`> do> bash -c "cat /dev/zero > /dev/null" &> done[1] 2441[2] 2442[3] 2443[4] 2444[5] 2445[6] 2446[7] 2447[8] 2448[9] 2449[10] 2453
2. Verify that the jobs are running. (You can also use the top command.)
# pstree -G | grep cat••sshd•••sshd•••bash•••50*[bash•••cat]
3. Execute the lscpu command. The following example shows that cpuplugd started the other spare processor after a few minutes:
# lscpuArchitecture: s390xCPU op-mode(s): 32-bit, 64-bitByte Order: Big EndianCPU(s): 2On-line CPU(s) list: 0,1Thread(s) per core: 1Core(s) per socket: 1Socket(s) per book: 1Book(s): 2Vendor ID: IBM/S390BogoMIPS: 20325.00Hypervisor: z/VM 6.3.0Hypervisor vendor: IBMVirtualization type: fullDispatching mode: horizontalL1d cache: 128KL1i cache: 96KL2d cache: 2048KL2i cache: 2048K
After a few minutes, all of the CPUs are activated.
Important: Running the following command generates significant CPU use. Verify that no mission-critical workload is running on this z/VM LPAR because this test might affect it. Also, ensure that you end the processes after you see cpuplugd work.
Chapter 8. Miscellaneous helpful information 111

4. Stop the workload that was created before you use the killall command:
# killall cat[1] Exit 143 bash -c "cat /dev/zero > /dev/null"[2] Exit 143 bash -c "cat /dev/zero > /dev/null"[3] Exit 143 bash -c "cat /dev/zero > /dev/null"[4] Exit 143 bash -c "cat /dev/zero > /dev/null"[5] Exit 143 bash -c "cat /dev/zero > /dev/null"...[48] Exit 143 bash -c "cat /dev/zero > /dev/null"[49]- Exit 143 bash -c "cat /dev/zero > /dev/null"[50]+ Exit 143 bash -c "cat /dev/zero > /dev/null"...
5. Execute the lscpu command. The following example shows that cpuplugd stopped the other processor after a few minutes:
# lscpuArchitecture: s390xCPU op-mode(s): 32-bit, 64-bitByte Order: Big EndianCPU(s): 2On-line CPU(s) list: 0Off-line CPU(s) list: 1Thread(s) per core: 1Core(s) per socket: 1Socket(s) per book: 1Book(s): 1Vendor ID: IBM/S390BogoMIPS: 20325.00Hypervisor: z/VM 6.3.0Hypervisor vendor: IBMVirtualization type: fullDispatching mode: horizontalL1d cache: 128KL1i cache: 96KL2d cache: 2048KL2i cache: 2048K
8.3.3 Setting memory sizes with cpuplugd
Memory sizes can also be set by the cpuplugd service. However, unlike CPUs, no good generic default value is available. The following example is in the Linux on z Systems Device Drivers, Features and Commands book:
MEMPLUG = "swaprate > freemem+10 & freemem+10 < apcr"MEMUNPLUG = "swaprate < freemem + 10000"
However, this example is only a starting point to explain the syntactical structure of a rule. Do not use this configuration in production. You need to test any setting that you want to implement against a representative workload that your Linux systems will be running. The details are beyond the scope of this section.
112 The Virtualization Cookbook for IBM z Systems Volume 2: Red Hat Enterprise Linux 7.1 Servers

For more information about cpuplugd, see the following websites:
� For RHEL, see Device Drivers, Features, and Commands on Red Hat Enterprise Linux 7.1, SC34-2710-01, at this website:
http://www.ibm.com/developerworks/linux/linux390/documentation_red_hat.html
8.4 Hardware cryptographic support for OpenSSH with Red Hat Enterprise Linux 7.1
How to copy a test file with OpenSSH without any cryptographic acceleration is shown. Then, cryptographic acceleration for OpenSSH is enabled and the same file is copied again. A much higher throughput rate will be observed. Firmware level of Licensed Internal Code (LIC) 3863 that is installed on your z Systems central processor complex (CEC) is a prerequisite for hardware cryptography.
This section is based on the white paper First experiences with hardware cryptographic support for OpenSSH with Linux for z Systems, by Manfred Gnirss, Winfried Münch, Klaus Werner, and Arthur Winterling, which is on the web at the following website:
http://www-03.ibm.com/support/techdocs/atsmastr.nsf/WebIndex/WP101690
This section shows only one example of cryptographic acceleration. For a complete and detailed analysis, see the white paper.
To test the copy of a file with and without cryptographic acceleration, perform the following steps:
1. Start an SSH session as root to any Linux.
2. Create a 1 GB test file, which you will copy, in the /tmp/ directory:
# cd /tmp# dd if=/dev/zero of=testdata.txt bs=1048576 count=10001000+0 records in1000+0 records out1048576000 bytes (1.0 GB) copied, 13.5595 s, 77.3 MB/s
3. Copy the file locally with the scp command. Copy the file twice with specific encryption algorithms and one time without specific encryption algorithms, Prefix all of them with the time command:
# time scp -c 3des-cbc testdata.txt localhost:/dev/nulltestdata.txt 100% 1000MB 27.8MB/s 00:36
real 0m39.799suser 0m32.102ssys 0m0.829s
4. Determine whether the necessary cryptographic-related RPMs are installed:
# rpm -qa | grep openssl-ibmca
The lack of output shows that they are not installed.
Then, perform the following steps:
1. Install the RPMs with the yum install command:
# yum -y install openssl-ibmca openssl-ibmca.s390
Chapter 8. Miscellaneous helpful information 113

...IInstalled: openssl-ibmca.s390 0:1.2.0-10.el7 openssl-ibmca.s390x 0:1.2.0-10.el7
Dependency Installed: glibc.s390 0:2.17-78.el7 keyutils-libs.s390 0:1.5.8-3.el7 krb5-libs.s390 0:1.12.2-14.el7 libcom_err.s390 0:1.42.9-7.el7 libgcc.s390 0:4.8.3-9.el7 libica.s390x 0:2.4.2-1.el7 libselinux.s390 0:2.2.2-6.el7 libstdc++.s390 0:4.8.3-9.el7 libverto.s390 0:0.2.5-4.el7 nss-softokn-freebl.s390 0:3.16.2.3-9.el7 openssl-libs.s390 1:1.0.1e-42.el7 pcre.s390 0:8.32-14.el7 xz-libs.s390 0:5.1.2-9alpha.el7 zlib.s390 0:1.2.7-13.el7
Complete!
2. Verify that the RPMs are now installed:
# rpm -qa | egrep "libica|ibmca"openssl-ibmca-1.2.0-10.el7.s390xlibica-2.4.2-1.el7.s390xopenssl-ibmca-1.2.0-10.el7.s390
3. Verify that CP Assist for Cryptographic Function (CPACF) operations are supported:
# icainfoThe following CP Assist for Cryptographic Function (CPACF) operations aresupported by libica on this system:
The following CP Assist for Cryptographic Function (CPACF)operations are supported by libica on this system: function | # hardware | #software---------------+------------+-------------- SHA-1 | yes | yes SHA-224 | yes | yes SHA-256 | yes | yes SHA-384 | yes | yes SHA-512 | yes | yes P_RNG | yes | yes RSA ME | no | yes RSA CRT | no | yes DES ECB | yes | yes DES CBC | yes | yes DES CBC CS | yes | no DES OFB | yes | no DES CFB | yes | no DES CTR | yes | no DES CTRLST | yes | no DES CBC MAC | yes | no DES CMAC | yes | no 3DES ECB | yes | yes 3DES CBC | yes | yes 3DES CBC CS | yes | no 3DES OFB | yes | no 3DES CFB | yes | no 3DES CTR | yes | no 3DES CTRLIST | yes | no 3DES CBC MAC | yes | no 3DES CMAC | yes | no
114 The Virtualization Cookbook for IBM z Systems Volume 2: Red Hat Enterprise Linux 7.1 Servers

AES ECB | yes | yes AES CBC | yes | yes AES CBC CS | yes | no AES OFB | yes | no AES CFB | yes | no AES CTR | yes | no AES CTRLST | yes | no AES CBC MAC | yes | no AES CMAC | yes | no AES CCM | yes | no AES GCM | yes | no AES XTS | yes | no
4. Verify the status of CPACF:
# icastats function | # hardware | # software--------------+--------------------------+------------------------- | ENC CRYPT DEC | ENC CRYPT DEC--------------+--------------------------+------------------------- SHA-1 | 0 | 0 SHA-224 | 0 | 0 SHA-256 | 0 | 0 SHA-384 | 0 | 0 SHA-512 | 0 | 0 P_RNG | 1 | 0 RSA-ME | 0 | 0 RSA-CRT | 0 | 0 DES ECB | 0 0 | 0 0 DES CBC | 0 0 | 0 0 DES OFB | 0 0 | 0 0 DES CFB | 0 0 | 0 0 DES CTRLST | 0 0 | 0 0 DES CMAC | 0 0 | 0 0 3DES ECB | 0 0 | 0 0 3DES CBC | 0 0 | 0 0 3DES OFB | 0 0 | 0 0 3DES CFB | 0 0 | 0 0 3DES CTRLIST | 0 0 | 0 0 3DES CMAC | 0 0 | 0 0 AES ECB | 0 0 | 0 0 AES CBC | 0 0 | 0 0 AES OFB | 0 0 | 0 0 AES CFB | 0 0 | 0 0 AES CTRLIST | 0 0 | 0 0 AES CMAC | 0 0 | 0 0 AES CCM | 0 0 | 0 0 AES GCM | 0 0 | 0 0 AES XTS | 0 0 | 0 0 CCM AUTH | 0 0 | 0 0
5. Make a backup of the Secure Sockets Layer (SSL) configuration file, which is named /etc/pki/tls/openssl.cnf:
# cd /etc/pki/tls# cp openssl.cnf openssl.cnf.orig
Chapter 8. Miscellaneous helpful information 115

6. Append the sample SSL configuration file from the package documentation to the actual SSL configuration file, which is named openssl.cnf:
# cat /usr/share/doc/openssl-ibmca-1.2.0/openssl.cnf.sample-s390x >> openssl.cnf
7. Edit the appended file and search for the line with the openssl_conf variable. Move that line from the bottom of the file to the top of the file, and save the file. Correct the dynamic_path variable as shown in the following example:
HOME = .RANDFILE = $ENV::HOME/.rndopenssl_conf = openssl_defoid_section = new_oids...[openssl_def]engines = engine_section[engine_section]foo = ibmca_section[ibmca_section]dynamic_path = /usr/lib64/libibmca.soengine_id = ibmcainit = 1default_algorithms = ALL
8. Make a symbolic link to the file that is called /usr/lib64/openssl/engines/libibmca.so:
# cd /usr/lib64# ln -s openssl/engines/libibmca.so# ls -l libibmca.solrwxrwxrwx. 1 root root 27 Apr 28 11:16 libibmca.so -> openssl/engines/libibmca.so
9. Run this command to verify the encryption algorithms. Run it one time without the encryption algorithm. Prefix all of the commands with the time command:
# time scp -c 3des-cbc testdata.txt localhost:/dev/nulltestdata.txt 100% 1000MB 166.7MB/s 00:06
real 0m9.518suser 0m3.223ssys 0m0.976s
10.To verify that the CP Assist for Cryptographic Function (CPACF) was used for file transfer by using openssl (SSH), use the following command:
# icastats function | # hardware | # software--------------+--------------------------+------------------------- | ENC CRYPT DEC | ENC CRYPT DEC--------------+--------------------------+------------------------- SHA-1 | 1239 | 0 SHA-224 | 0 | 0 SHA-256 | 90 | 0 SHA-384 | 0 | 0 SHA-512 | 0 | 0 P_RNG | 7 | 0 RSA-ME | 0 | 0 RSA-CRT | 0 | 0 DES ECB | 0 0 | 0 0
116 The Virtualization Cookbook for IBM z Systems Volume 2: Red Hat Enterprise Linux 7.1 Servers

DES CBC | 0 0 | 0 0 DES OFB | 0 0 | 0 0 DES CFB | 0 0 | 0 0 DES CTRLST | 0 0 | 0 0 DES CMAC | 0 0 | 0 0 3DES ECB | 0 0 | 0 0 3DES CBC | 73144 73144 | 0 0 3DES OFB | 0 0 | 0 0 3DES CFB | 0 0 | 0 0 3DES CTRLIST | 0 0 | 0 0 3DES CMAC | 0 0 | 0 0 AES ECB | 0 0 | 0 0 AES CBC | 0 0 | 0 0 AES OFB | 0 0 | 0 0 AES CFB | 0 0 | 0 0 AES CTRLIST | 0 0 | 0 0 AES CMAC | 0 0 | 0 0 AES CCM | 0 0 | 0 0 AES GCM | 0 0 | 0 0 AES XTS | 0 0 | 0 0 CCM AUTH | 0 0 | 0 0
The throughput changed from 27.8MB/s in 00:36 to 166.7MB/s in 00:06 merely by instructing openssl to use libibmca, which accesses the mainframe’s CP Assist for Cryptographic Function (CPACF).
8.5 X Window System
For many years, UNIX operating systems used X Window System, which is also called “X”. This system was designed to provide a client/server, hardware-independent, and network-enabled graphical environment. Linux systems currently use X.Org, which is an open source implementation of X Window System.
The X communication protocol by its nature is not secure at all. Therefore, X is often used with SSH protocol, which tunnels X11 traffic by using encrypted (and therefore secure) communications.
X11 displays graphics on a raster display. If the user wants to be able to move, resize, and otherwise manage windows, a window manager is needed. Many window managers are available; several are lightweight and others are more robust. The use of a window manager is a good idea because it provides functionality, which is expected from a graphical user interface (GUI).
When Linux is installed on your workstation, a window manager is probably insufficient. You need a full desktop environment with menus, icons, taskbars, and so on, such as Gnome and KDE. Installing GNOME or KDE on System z is discouraged because they are resource intensive.
8.5.1 VNC server
The X server is run on the workstation where the mouse, keyboard, and monitor are. The VNC server provides a virtual workstation with all of these peripherals (virtual). The VNC
Chapter 8. Miscellaneous helpful information 117

server starts an embedded X server. Then, any X-based application can send its output to this X server, whether the applications are local or remote to the X server.
VNC is session-oriented, which is an advantage. If communication to the VNC server is lost, a new connection is reestablished to the session as it was. Also, applications in a disconnected VNC session still continue to run.
To set up a VNC server on RHEL, see 1.2.7, “Configure the Virtual Network Computing (VNC) server” on page 23.
8.5.2 Using embedded SSH to forward X with Red Hat Enterprise Linux
If VNC is not acceptable, you can use a standard X server on a workstation. Because Linux users usually know the X Window System, an X server that runs on Windows is described in this section.
To forward X on SSH connections, the following packages need to be installed on the target system:
# yum install -y xorg-x11-xauth xorg-x11-fonts-* xorg-x11-utils
To connect to the target system, use the following command from your Linux workstation:
# ssh -l root -X <target_system>
Using PuTTYTo use PuTTY for X11 forwarding, select Enable X11 forwarding, as shown in Figure 8-1.
Figure 8-1 Allow X11 forwarding in PuTTY
When you are connected to a remote Linux system with X11 forwarding enabled, the DISPLAY environment variable contains the special value of localhost:10.0, which tells PuTTY to forward X11 protocol over SSH to the SSH client address. PuTTY requires an X Window Server that is running on your Microsoft Windows workstation.
118 The Virtualization Cookbook for IBM z Systems Volume 2: Red Hat Enterprise Linux 7.1 Servers

Many commercial and free X Window servers are available for Microsoft Windows, which provides a free X server that is based on Cygwin.
You can achieve the same results in multiple ways. It is up to you to choose a solution that suits your purpose best.
8.6 Set up the IUCV Linux Terminal Server
Implementation of a Linux Terminal Server (LTS) that is based on z/VM Inter User Communications Vehicle (IUCV) allows access to the Linux console without a functioning TCP/IP stack on Linux.
Many IBM clients who run Linux under z/VM consider the implementation of this IUCV LTS to be a fundamental requirement for a Linux Virtual Server to be eligible for classification as a production system in their environment. Additionally, IUCV LTS is based on a character mode interface, which enables the use of traditional Linux full screen tools, such as vi.
The official documentation for this IUCV LTS setup is on IBM.com at the following URL:
http://www-01.ibm.com/support/knowledgecenter/linuxonibm/liaaf/lnz_r_rhht.html
Although the documentation offers many options to set up the IUCV LTS, this section describes the implementation by using the iucvtty command.
Implementation of the LTS includes topics that involve changes on both z/VM and Linux.
8.6.1 Red Hat Enterprise Linux 7.1 configuration for IUCV Linux Terminal Server
The IUCV ALLOW line allows virtual machines to connect to other virtual machines, such as the LTS, by using IUCV. The IUCV ALLOW line was included in the LNXPDFLT PROFILE entry, which is described in 4.12.3, “z/VM User directory profiles”, in The Virtualization Cookbook for IBM z Systems Volume 1: IBM z/VM 6.3, SG24-8147-01:
http://www.redbooks.ibm.com/abstracts/sg248147.html?Open
The LTS configuration is described in 1.2.5, “Configure IUCV Linux Terminal Server” on page 18.
To enable the target Linux system to receive IUVC connections, enable the service as described in the postinstallation section of 1.2.6, “Configure kickstart” on page 20.
Run these commands to enable hvc0 as a serial console:
# ln -s /etc/systemd/system/serial-getty\@hvc0.service /lib/systemd/system/serial-getty\@.service
8.7 Issue z/VM CP commands from Linux
The vmcp command allows z/VM control program (CP) commands to be issued from Linux, for example:
# vmcp query v dasdDASD 0100 3390 VV1569 R/W 10016 CYL ON DASD 1569 SUBCHANNEL = 0000
Chapter 8. Miscellaneous helpful information 119
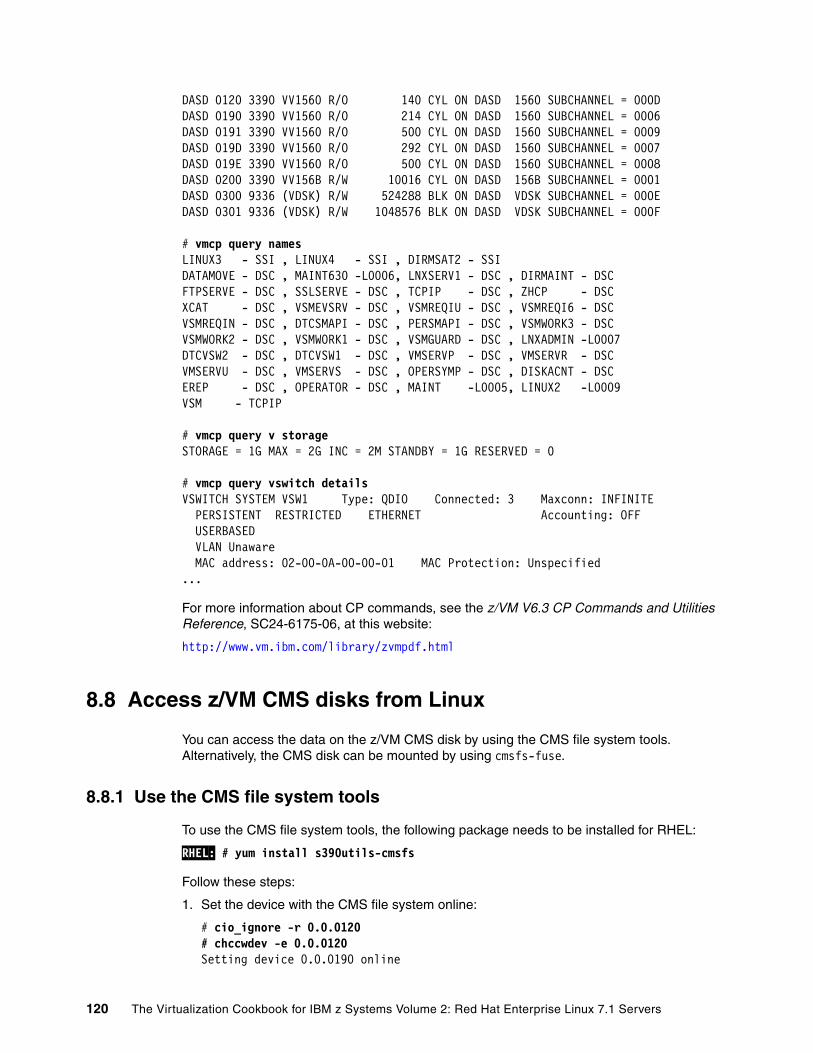
DASD 0120 3390 VV1560 R/O 140 CYL ON DASD 1560 SUBCHANNEL = 000DDASD 0190 3390 VV1560 R/O 214 CYL ON DASD 1560 SUBCHANNEL = 0006DASD 0191 3390 VV1560 R/O 500 CYL ON DASD 1560 SUBCHANNEL = 0009DASD 019D 3390 VV1560 R/O 292 CYL ON DASD 1560 SUBCHANNEL = 0007DASD 019E 3390 VV1560 R/O 500 CYL ON DASD 1560 SUBCHANNEL = 0008DASD 0200 3390 VV156B R/W 10016 CYL ON DASD 156B SUBCHANNEL = 0001DASD 0300 9336 (VDSK) R/W 524288 BLK ON DASD VDSK SUBCHANNEL = 000EDASD 0301 9336 (VDSK) R/W 1048576 BLK ON DASD VDSK SUBCHANNEL = 000F
# vmcp query namesLINUX3 - SSI , LINUX4 - SSI , DIRMSAT2 - SSIDATAMOVE - DSC , MAINT630 -L0006, LNXSERV1 - DSC , DIRMAINT - DSCFTPSERVE - DSC , SSLSERVE - DSC , TCPIP - DSC , ZHCP - DSCXCAT - DSC , VSMEVSRV - DSC , VSMREQIU - DSC , VSMREQI6 - DSCVSMREQIN - DSC , DTCSMAPI - DSC , PERSMAPI - DSC , VSMWORK3 - DSCVSMWORK2 - DSC , VSMWORK1 - DSC , VSMGUARD - DSC , LNXADMIN -L0007DTCVSW2 - DSC , DTCVSW1 - DSC , VMSERVP - DSC , VMSERVR - DSCVMSERVU - DSC , VMSERVS - DSC , OPERSYMP - DSC , DISKACNT - DSCEREP - DSC , OPERATOR - DSC , MAINT -L0005, LINUX2 -L0009VSM - TCPIP
# vmcp query v storageSTORAGE = 1G MAX = 2G INC = 2M STANDBY = 1G RESERVED = 0
# vmcp query vswitch detailsVSWITCH SYSTEM VSW1 Type: QDIO Connected: 3 Maxconn: INFINITE PERSISTENT RESTRICTED ETHERNET Accounting: OFF USERBASED VLAN Unaware MAC address: 02-00-0A-00-00-01 MAC Protection: Unspecified...
For more information about CP commands, see the z/VM V6.3 CP Commands and Utilities Reference, SC24-6175-06, at this website:
http://www.vm.ibm.com/library/zvmpdf.html
8.8 Access z/VM CMS disks from Linux
You can access the data on the z/VM CMS disk by using the CMS file system tools. Alternatively, the CMS disk can be mounted by using cmsfs-fuse.
8.8.1 Use the CMS file system tools
To use the CMS file system tools, the following package needs to be installed for RHEL:
RHEL: # yum install s390utils-cmsfs
Follow these steps:
1. Set the device with the CMS file system online:
# cio_ignore -r 0.0.0120# chccwdev -e 0.0.0120Setting device 0.0.0190 online
120 The Virtualization Cookbook for IBM z Systems Volume 2: Red Hat Enterprise Linux 7.1 Servers

Done# lsdasd 0.0.0120Bus-ID Status Name Device Type BlkSz Size Blocks==============================================================================0.0.0120 active(ro) dasde 94:16 ECKD 4096 98MB 25200
2. Print the table of contents of that CMS disk:
# cmsfslst | headFILENAME FILETYPE FM FORMAT LRECL RECS BLOCKS DATE TIME DIRECTOR P0 F 64 1134 1 4/23/2015 11:11:19 ALLOCMAP P0 F 4096 3 3 4/23/2015 11:11:19$RACLIS$ XEDIT Z2 V 248 585 5 11/04/2005 14:19:43$RACLIS$ XEDITPWD Z2 V 248 557 5 11/03/2005 10:04:35$RACPER$ XEDIT Z2 V 193 685 6 4/25/2013 9:00:51$RACPER$ XEDITPWD Z2 V 200 629 5 11/03/2005 10:04:35__CPL H Z2 V 71 83 1 9/23/2011 13:44:15__FTP H Z2 V 66 72 1 9/23/2011 13:44:16__GETIPC H Z2 V 72 517 7 9/23/2011 13:44:16
3. Show the content of a file:
# cmsfscat -d /dev/dasdd -a __CPL.H | head ??=ifndef __sys_cpl ??=ifdef __COMPILER_VER__ ??=pragma filetag("IBM-1047") ??=endif #define __sys_cpl 1 #pragma nomargins nosequence #pragma checkout(suspend) /*************************************************************** * <sys/__cpl.h> header file * * *
4. Set the device with the CMS file system offline:
# chccwdev -d 0.0.0120Setting device 0.0.0120 offlineDone
8.8.2 Mount a CMS disk by using cmsfs-fuse
To mount the CMS file system tools, the following packages need to be installed for RHEL:
RHEL: # yum install fuse s390utils-cmsfs-fuse
Follow these steps:
1. Set the device with the CMS file system online:
# cio_ignore -r 0.0.0190# chccwdev -e 0.0.0190Setting device 0.0.0190 onlineDone# lsdasd 0.0.0120Bus-ID Status Name Device Type BlkSz Size Blocks==============================================================================0.0.0190 active dasdc 94:8 ECKD 4096 150MB 38520
2. Mount the CMS disk to /mnt:
Chapter 8. Miscellaneous helpful information 121

# cmsfs-fuse -a -o ro /dev/disk/by-path/ccw-0.0.0190 /mnt
3. Access data:
# ls /mnt/EDIT.EXEC /mnt/EDIT.EXEC
# tail -n5 /mnt/EDIT.EXEC &LOOP 3 &K&IF &&I = LRECL &&I = WIDTH&IF &&I = NODISP &&I = NOSCREEN&I = &I + 1&GOTO -GO
4. Unmount the CMS disk:
# fusermount -u /mnt
5. Set the device with the CMS file system offline:
# chccwdev -d 0.0.0190Setting device 0.0.0190 offlineDone
8.9 Network File System mounting the LNXADMIN SFS directory from Linux
Although clients seldom perform this task, the authors of this book chose to include it for reference. If you take advantage of this function, we recommend that you unmount as soon as it is no longer required so that Shared File System (SFS) performance is not affected. If too many unnecessary NFS mounts are open to the file pool, SFS performance might be affected.
itsovm1.itso.ibm.com:lnx:lnxadmin,lines=nl,trans=yes,userid=linux1,password=XXXXXXXX /mnt/vmlnx/ nfs noauto,rsize=8192,wsize=8192,nosuid,timeo=14,soft,intr 0 0
122 The Virtualization Cookbook for IBM z Systems Volume 2: Red Hat Enterprise Linux 7.1 Servers

Part 3 Appendixes
This section consists of the following appendixes:
� Appendix A, “Reference sheets, cheat sheets, and blank worksheets” on page 125
� Appendix B, “Additional material” on page 137
Part 3
© Copyright IBM Corp. 2015. All rights reserved. 123

124 The Virtualization Cookbook for IBM z Systems Volume 2: Red Hat Enterprise Linux 7.1 Servers

Appendix A. Reference sheets, cheat sheets, and blank worksheets
This appendix refers to additional materials that are included for your reference, which can either be printed or downloaded from the Internet as described.
A
© Copyright IBM Corp. 2015. All rights reserved. 125

Important z/VM files
z/VM differs from Linux in the location and number of configuration files. In Linux, many configuration files are in Linux and most of them are in or under the /etc/ directory. Few configuration files are in z/VM; however, they are on many different minidisks. Table A-1 provides a summary and the location of important z/VM configuration files.
Table A-1 Important z/VM configuration files
Cheat sheets
This section contains quick references or “cheat sheets” for the XEDIT and vi editors.
XEDIT cheat sheet
XEDIT has line commands that are typed on the command line (====>) and prefix commands, which are typed over the line numbers on the left side of the window.
Line commandsDo not include the < > in your commands.
a Add a line.
a<n> Add <n> lines.
c/<old>/<new>/<n> <m>
Search for string <old> and replace it with <new> for <n> lines below the current line and <m> times on each line. An asterisk (*) can be used for <n> and <m>.
/<string> Search for 'string' from the current line.
File Location Description
SYSTEM CONFIG PMAINT CF0 This file is the operating system’s main configuration file. It defines the system name, the control program (CP) volumes, user volumes, and other settings.
USER DIRECT MAINT 2CC This file is the initial z/VM user directory. All virtual machines that are known to the system are defined here. If a directory maintenance product is in use, this file is no longer authoritative.
PROFILE TCPIP TCPMAINT 198 This file defines the resources for the primary z/VM TCP/IP stack, including the TCP/IP address, Open Systems Adapter (OSA) resources, subnet mask, and gateway. It is initially created by the IPWIZARD tool as PROFILE TCPIP.
SYSTEM DTCPARMS TCPMAINT 198 This file is created to define the TCP/IP stacks on the system. It is initially created by the IPWIZARD tool.
TCPIP DATA TCPMAINT 592 This file defines the Domain Name System (DNS) server, the domain name, and other settings. It is initially created by the IPWIZARD tool.
PROFILE EXEC AUTOLOG1 191 This file is a REXX EXEC that is run when the system starts. It is analogous to the /etc/inittab file in Linux.
126 The Virtualization Cookbook for IBM z Systems Volume 2: Red Hat Enterprise Linux 7.1 Servers

-/<string> Search backwards for 'string'.
all /<string>/ Show all occurrences of 'string' and hide other lines.
bottom Move to the bottom of the file.
top Move to the top of the file.
down <n> Move down 'n' lines.
up <n> Move up 'n' lines.
file Save the current file and exit XEDIT.
ffile Save the current file and exit but do not warn of overwrite.
save Save the current file but do not exit.
quit Exit XEDIT if no changes were made.
qquit Exit XEDIT even if changes were not saved.
left <n> Shift 'n' characters to the left.
right <n> Shift 'n' characters to the right.
get <file> Copy file and insert past the current line.
input Enable INPUT mode to insert multiple lines of text, beginning at the current line.
:<n> Move to line 'n'.
? Display last command.
= Execute last command.
x <file> Edit 'file' and put it into the XEDIT “ring”.
x Move to the next file in the ring.
Prefix commandsThe following commands are prefix commands:
a Add one line. a<n> Add 'n' lines. c Copies one line. cc Copies a block of lines. d Deletes one line. dd Deletes a block of lines. f Line after which a copy (c) or a move (m) is to be inserted. p Line before which a copy (c) or a move (m) is to be inserted. i Insert a line. i<n> Insert 'n' lines. m Move one line. mm Move a block of lines. " Replicate a line."<n> Replicate a line 'n' times. "" Replicate a block of lines.
Appendix A. Reference sheets, cheat sheets, and blank worksheets 127

A vi cheat sheet
The following small subset of vi commands shows the most commonly used commands. The vi editor has three modes:
1. Input mode: The Insert key, i, o (add a line below), O (add a line above), and other commands put you in this mode where you can type text into the file. When you are in this mode, you see the text --INSERT-- in the last line.
2. Command mode: Pressing Esc gets you out of input mode and into command mode. You can issue the following commands:
i Brings you back to input mode.dd Deletes a line and puts it in the buffer.<n>dd Delete 'n' lines.x Delete a character.dw Delete a word.p Add the buffer past the current location.P Add the buffer before the current location.o Add a line and go into insert mode./string Search for string.n Do the last command again, which can be powerful.jkl; Cursor movement.A Add text at the end of the line.<nn>G Go to line 'nn'.G Go to the last line in the file.yy Yank a line (copy into buffer).<n>yy Yank 'n' lines.
3. Command-line mode: Pressing the colon (:) key brings you to this mode at the bottom of the window. You can issue the following commands:
:wq Ssave (write and quit).:q! Quit and discard changes.:<nn> Go to line number 'nn'.:r <file> Read 'file' into the current file.:1,$s/old/new/g Globally replace 'old' with 'new'.:help Give help.
DirMaint cheat sheet
The DirMaint commands are listed:
Add Add a user or profile directory entry.AMDisk Add a minidisk.DEDicate Add or delete an existing dedicate statements.DMDisk Remove a minidisk.FILE Add or replace a DirMaint control file.RLDCode Reload DirMaint resident operating procedures.RLDExtn Reload DirMaint CONFIG* DATADVH file.REView Review a user or profile directory entry.MDisk Change the access mode and passwords for minidisks.STorage Change the logon storage size.SEND Request a copy of a DirMaint control file.SETOptn Add, change, or delete CP options.CLAss Change the CP class for a directory entry.SPEcial Add or delete an existing special statement.
128 The Virtualization Cookbook for IBM z Systems Volume 2: Red Hat Enterprise Linux 7.1 Servers

DirMaint example commandsThe following commands are examples of DirMaint commands:
� Add a 50 cylinder minidisk 200 to user ID spiedie:
DIRMAINT FORUSER SPIEDIE AMDISK 200 3390 AUTOG 50 {VOLGROUP}
� Add a link statement to the TCPMAINT 592 minidisk into the directory entry for user vmfrau:
DIRMAINT FORUSER VMFRAU LINK TCPMAINT 0592 0592 RR
Blank planning worksheet
This section contains a blank copy of the planning worksheet that was used in 2.1, “Planning for VMSSI with LGR”, in The Virtualization Cookbook for IBM z Systems Volume 1: IBM z/VM 6.3, SG24-8147-01:
http://www.redbooks.ibm.com/abstracts/sg248147.html?Open
This worksheet is included for your convenience, and hopefully organized in the order that you will need the data.
It is recommended that you specify all values that will apply to make your installation process go more smoothly.
IBM Shopz
If you are ordering z/VM by using Shopz, use Table A-2 to record the values that you will use.
Ordering z/VM by using Shopz is described in The Virtualization Cookbook for IBM z Systems Volume 1: IBM z/VM 6.3, SG24-8147-01:
http://www.redbooks.ibm.com/abstracts/sg248147.html?Open
Table A-2 Shopz data
Hardware Management Console
For more information about how to start a z/VM installation from the Hardware Management Console (HMC), see 4.3.1, “Start the z/VM installation” in The Virtualization Cookbook for IBM z Systems Volume 1: IBM z/VM 6.3, SG24-8147-01:
http://www.redbooks.ibm.com/abstracts/sg248147.html?Open
Complete Table A-3 on page 130 to record the values that you will use.
Name Value Comment
Starting URL ibm.com/shopz
User ID Customer number. (For IBM employees, it is your intranet user ID and password.)
Password
Order number
Appendix A. Reference sheets, cheat sheets, and blank worksheets 129

Table A-3 HMC values
z/VM Installation Planning Panels (INSTPLAN)
For information about the INSTPLAN command that is run from the Integrated 3270 Console, see 4.3.2, “Copy a plain z/VM system to DASD” in The Virtualization Cookbook for IBM z Systems Volume 1: IBM z/VM 6.3, SG24-8147-01:
http://www.redbooks.ibm.com/abstracts/sg248147.html?Open
The following information will be necessary.
INSTPLAN panels 1 and 2Complete Table A-4 to record the values that are required in the first two INSTPLAN panels.
Table A-4 INSTPLAN values for first two panels
Name Value
HMC host name or URL
HMC user ID
HMC password
FTP source system (if you are installing from FTP)
z/VM installation directory
Name Value Comment
Language AMENG
USENG
KANJI
AMENG (American English), UCENG (uppercase English), or KANJI.
DASD model 3390 Model-3
3390 Model-9
3390 Model-3 or Model-9 (installation to the fixed-block architecture (FBA) disk is not described in this book).
File pool name VMPSYS (default) is recommended.
System type SSI. (Non-SSI is not described in this book.)
Non-SSI system name Used for non-SSI installation only.
Number of members SSI installation only (usually 2 or 4).
Single system image (SSI) cluster name
SSI installation only.
Automatic configuration “No” is strongly recommended.
130 The Virtualization Cookbook for IBM z Systems Volume 2: Red Hat Enterprise Linux 7.1 Servers

INSTPLAN panel 3Complete Table A-5 to record the values that are required in the third INSTPLAN panel. The member names will become the z/VM system identifiers, and the logical partition (LPAR) names need to be the same names as the names on the HMC.
Table A-5 INSTPLAN values for panel 3
INSTPLAN worksheet 3Complete Table A-6 to record the volume labels and real device addresses that are required on the Installation Volume Definition INSTPLAN panel.
Table A-6 INSTPLAN values worksheet for volume definition
Slot Member name
LPAR name Comment
1 Member 1 system identifier and LPAR name
2 Member 2 system identifier and LPAR name
3 Member 3 system ID and LPAR name (optional)
4 Member 4 system ID and LPAR name (optional)
Type Default label
Chosen label
Address Comment
COMMON VMCOM1 Common volume 1
COMMON2 VMCOM2 Common volume 2
RELVOL 630RL1 Release volume 1
RELVOL2 630RL2 Release volume 2
Mem 1 RES M01R01 Member 1 residence volume
Mem 1 SPOOL M01S01 Member 1 spool volume
Mem 1 PAGE M01P01 Member 1 page volume
Mem 1 WORK M01W01 Member 1 work volume 1
Mem 1 WORK M01W02 Member 1 work vol 2 (3390-3 only)
Mem 1 WORK M01W03 Member 1 work vol 3 (3390-3 only)
Mem 2 RES Member 2 residence volume
Mem 2 SPOOL Member 2 spool volume
Mem 2 PAGE Member 2 page volume
Mem 2 WORK Member 2 work volume 1
Mem 2 WORK Member 2 work vol 2 (3390-3 only)
Mem 2 WORK Member 2 work vol 3 (3390-3 only)
Mem 3 RES Member 3 residence vol (optional)
Mem 3 SPOOL Member 3 spool volume
Mem 3 PAGE Member 3 page volume
Mem 3 WORK Member 3 work volume 1
Appendix A. Reference sheets, cheat sheets, and blank worksheets 131

INSTPLAN worksheet 4Complete Table A-7 to record the common volume and channel-to-channel (CTC) addresses that are required in the INSTPLAN panel.
Complete the worksheet in Table A-7 to document your values. For more information about this worksheet, see 4.3.2, “Copy a plain z/VM system to DASD” in The Virtualization Cookbook for IBM z Systems Volume 1: IBM z/VM 6.3, SG24-8147-01:
http://www.redbooks.ibm.com/abstracts/sg248147.html?Open
If only two members are in the SSI, you need to specify only two pairs of CTCs (from member 1 to member 2, and vice versa).
Table A-7 INSTPLAN values worksheet for volume definition
Mem 3 WORK Member 3 work vol 2 (3390-3 only)
Mem 3 WORK Member 3 work vol 3 (3390-3 only)
Mem 4 RES Member 4 residence vol (optional)
Mem 4 SPOOL Member 4 spool volume
Mem 4 PAGE Member 4 page volume
Mem 4 WORK Member 4 work volume 1
Mem 4 WORK Member 4 work vol 2 (3390-3 only)
Mem 4 WORK Member 4 work vol 3 (3390-3 only)
Real addresses for the common volume on each member LPAR:
Member 1 Member 2 Member 3 Member 4
CTC device addresses:
From member 1 From member 2
To: member 1 N/A To: member 1 _______ _______
To: member 2 _______ _______ To: member 2 N/A
To: member 3 _______ _______ To: member 3 _______ _______
To: member 4 _______ _______ To: member 4 _______ _______
From member 3 From member 4
To: member 1 _______ _______ To: member 1 _______ _______
To: member 2 _______ _______ To: member 2 _______ _______
To: member 3 N/A To: member 3 _______ _______
To: member 4 _______ _______ To: member 4 N/A
Type Default label
Chosen label
Address Comment
132 The Virtualization Cookbook for IBM z Systems Volume 2: Red Hat Enterprise Linux 7.1 Servers

z/VM Networking resources
Complete the worksheet in Table A-8 to list the networking resources that will be needed when you start the IPWIZARD and when you create a virtual switch (VSWITCH) for the Linux virtual machines.
Table A-8 z/VM and networking resources worksheet
z/VM DASD worksheet
Use the worksheet in Table A-9 to document the z/VM DASD that you will use.
Table A-9 z/VM DASD blank worksheet
Name Value Comment
TCP/IP user ID TCPIP is recommended.
z/VM host name, member 1
z/VM host name, member 2
TCP/IP domain name System domain name that is usually set in DNS.
TCP/IP gateway The router to and from the local subnet.
DNS server 1 Assigned by the network administrator.
DNS server 2/3 Optional.
Interface name
OSA starting device number Start of OSA triplet for z/VM TCP/IP stack.
Subnet mask Assigned by network administrator.
OSA device type
Maximum transmission unit (MTU) size
Check with network administrator.
Primary OSA device for virtual switch
Specify the first real device number and the next two device numbers will also be used.
Secondary OSA device for virtual switch
Ideally, it needs to be on a different channel-path identifier (CHPID)/OSA card.
Device number
Label Type Notes
Appendix A. Reference sheets, cheat sheets, and blank worksheets 133

Linux resources worksheet
Use the worksheet in Table A-10 to document the resources that are associated with the Network File Server (NFS) that will be the installation source of the first Linux on z Systems.
Table A-10 Linux NFS server resources blank worksheet
Use the worksheet in Table A-11 to document your Linux on z Systems resources.
Table A-11 Linux resources blank worksheet
Device number
Label Type Notes
Name Value Comment
TCP/IP address
User/password
NFS-exported installation directory
Name Value Comment
Linux installation password
Linux root password
Linux TCP/IP gateway
Linux TCP/IP broadcast
Linux DNS server
Virtual Network Computing (VNC) installation password
134 The Virtualization Cookbook for IBM z Systems Volume 2: Red Hat Enterprise Linux 7.1 Servers

8.9.1 Host names and IP addresses worksheet
Use the worksheet in Table A-12 to document the host names and associated IP addresses and virtual machines that you will use.
Table A-12 Host names blank worksheet
Host name IP address Virtual machine/LPAR
Notes
Appendix A. Reference sheets, cheat sheets, and blank worksheets 135

136 The Virtualization Cookbook for IBM z Systems Volume 2: Red Hat Enterprise Linux 7.1 Servers

Appendix B. Additional material
This book refers to additional material that can be downloaded from the Internet.
B
© Copyright IBM Corp. 2015. All rights reserved. 137
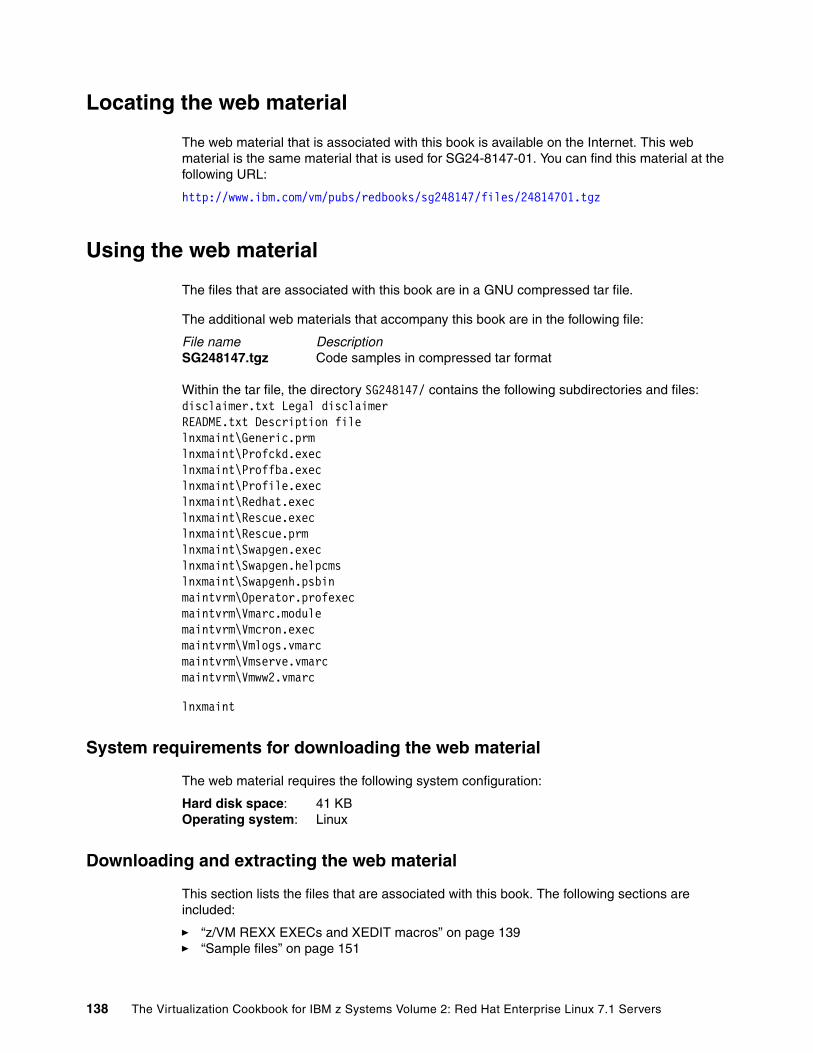
Locating the web material
The web material that is associated with this book is available on the Internet. This web material is the same material that is used for SG24-8147-01. You can find this material at the following URL:
http://www.ibm.com/vm/pubs/redbooks/sg248147/files/24814701.tgz
Using the web material
The files that are associated with this book are in a GNU compressed tar file.
The additional web materials that accompany this book are in the following file:
File name DescriptionSG248147.tgz Code samples in compressed tar format
Within the tar file, the directory SG248147/ contains the following subdirectories and files:disclaimer.txt Legal disclaimerREADME.txt Description filelnxmaint\Generic.prmlnxmaint\Profckd.execlnxmaint\Proffba.execlnxmaint\Profile.execlnxmaint\Redhat.execlnxmaint\Rescue.execlnxmaint\Rescue.prmlnxmaint\Swapgen.execlnxmaint\Swapgen.helpcmslnxmaint\Swapgenh.psbinmaintvrm\Operator.profexecmaintvrm\Vmarc.modulemaintvrm\Vmcron.execmaintvrm\Vmlogs.vmarcmaintvrm\Vmserve.vmarcmaintvrm\Vmww2.vmarc
lnxmaint
System requirements for downloading the web material
The web material requires the following system configuration:
Hard disk space: 41 KBOperating system: Linux
Downloading and extracting the web material
This section lists the files that are associated with this book. The following sections are included:
� “z/VM REXX EXECs and XEDIT macros” on page 139� “Sample files” on page 151
138 The Virtualization Cookbook for IBM z Systems Volume 2: Red Hat Enterprise Linux 7.1 Servers

Disclaimer
IBM DOES NOT WARRANT OR REPRESENT THAT THE CODE PROVIDED IS COMPLETE OR UP-TO-DATE. IBM DOES NOT WARRANT, REPRESENT OR IMPLY RELIABILITY, SERVICEABILITY OR FUNCTION OF THE CODE. IBM IS UNDER NO OBLIGATION TO UPDATE CONTENT NOR PROVIDE FURTHER SUPPORT.
ALL CODE IS PROVIDED "AS IS," WITH NO WARRANTIES OR GUARANTEES WHATSOEVER. IBM EXPRESSLY DISCLAIMS TO THE FULLEST EXTENT PERMITTED BY LAW ALL EXPRESS, IMPLIED, STATUTORY AND OTHER WARRANTIES, GUARANTEES, OR REPRESENTATIONS, INCLUDING, WITHOUT LIMITATION, THE WARRANTIES OF MERCHANTABILITY, FITNESS FOR A PARTICULAR PURPOSE, AND NON-INFRINGEMENT OF PROPRIETARY AND INTELLECTUAL PROPERTY RIGHTS. YOU UNDERSTAND AND AGREE THAT YOU USE THESE MATERIALS, INFORMATION, PRODUCTS, SOFTWARE, PROGRAMS, AND SERVICES, AT YOUR OWN DISCRETION AND RISK AND THAT YOU WILL BE SOLELY RESPONSIBLE FOR ANY DAMAGES THAT MAY RESULT, INCLUDING LOSS OF DATA OR DAMAGE TO YOUR COMPUTER SYSTEM.
IN NO EVENT WILL IBM BE LIABLE TO ANY PARTY FOR ANY DIRECT, INDIRECT, INCIDENTAL, SPECIAL, EXEMPLARY OR CONSEQUENTIAL DAMAGES OF ANY TYPE WHATSOEVER RELATED TO OR ARISING FROM USE OF THE CODE FOUND HEREIN, WITHOUT LIMITATION, ANY LOST PROFITS, BUSINESS INTERRUPTION, LOST SAVINGS, LOSS OF PROGRAMS OR OTHER DATA, EVEN IF IBM IS EXPRESSLY ADVISED OF THE POSSIBILITY OF SUCH DAMAGES. THIS EXCLUSION AND WAIVER OF LIABILITY APPLIES TO ALL CAUSES OF ACTION, WHETHER BASED ON CONTRACT, WARRANTY, TORT OR ANY OTHER LEGAL THEORIES.
z/VM REXX EXECs and XEDIT macros
This section lists all of the z/VM execs included in the associated tar file:
� CPFORMAT EXEC� SSICMD EXEC� PROFILE EXEC for Linux virtual machines
CPFORMAT EXEC
The following code is for the EXEC that formats multiple DASD by using CPFMTXA. It is described in 4.12 “Enabling basic system automation” in The Virtualization Cookbook for IBM z Systems Volume 1: IBM z/VM 6.3, SG24-8147-01:
http://www.redbooks.ibm.com/abstracts/sg248147.html?Open
/*************************************************************//* *//* This program is provided on an "AS IS" basis, without *//* warranties or conditions of any kind, either express or *//* implied including, without limitation, any warranties *//* or conditions of title, non-infringement, *//* merchantability or fitness for a particular purpose. *//* Neither recipient nor any contributors shall have any *//* liability for any direct, indirect, incidental, *//* special, exemplary, or consequential damages (including *//* without limitation lost profits), however caused and on */
Appendix B. Additional material 139
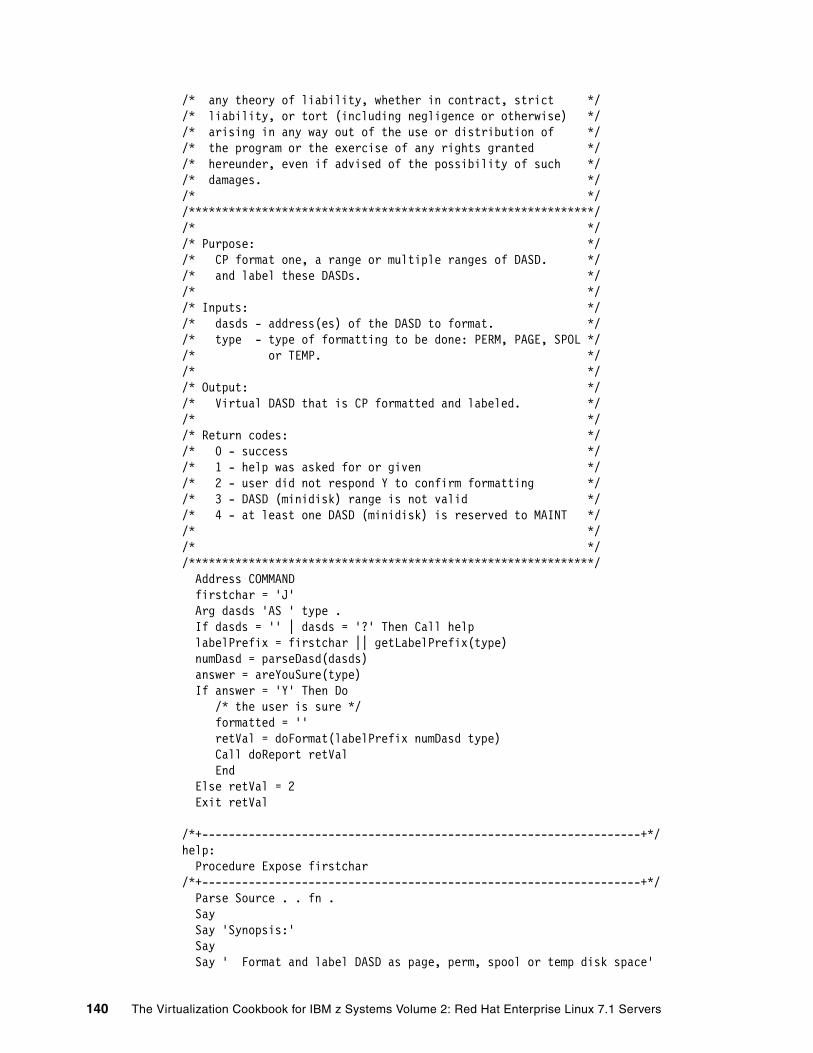
/* any theory of liability, whether in contract, strict *//* liability, or tort (including negligence or otherwise) *//* arising in any way out of the use or distribution of *//* the program or the exercise of any rights granted *//* hereunder, even if advised of the possibility of such *//* damages. *//* *//*************************************************************//* *//* Purpose: *//* CP format one, a range or multiple ranges of DASD. *//* and label these DASDs. *//* *//* Inputs: *//* dasds - address(es) of the DASD to format. *//* type - type of formatting to be done: PERM, PAGE, SPOL *//* or TEMP. *//* *//* Output: *//* Virtual DASD that is CP formatted and labeled. *//* *//* Return codes: *//* 0 - success *//* 1 - help was asked for or given *//* 2 - user did not respond Y to confirm formatting *//* 3 - DASD (minidisk) range is not valid *//* 4 - at least one DASD (minidisk) is reserved to MAINT *//* *//* *//*************************************************************/ Address COMMAND firstchar = 'J' Arg dasds 'AS ' type . If dasds = '' | dasds = '?' Then Call help labelPrefix = firstchar || getLabelPrefix(type) numDasd = parseDasd(dasds) answer = areYouSure(type) If answer = 'Y' Then Do /* the user is sure */ formatted = '' retVal = doFormat(labelPrefix numDasd type) Call doReport retVal End Else retVal = 2 Exit retVal /*+------------------------------------------------------------------+*/help: Procedure Expose firstchar/*+------------------------------------------------------------------+*/ Parse Source . . fn . Say Say 'Synopsis:' Say Say ' Format and label DASD as page, perm, spool or temp disk space'
140 The Virtualization Cookbook for IBM z Systems Volume 2: Red Hat Enterprise Linux 7.1 Servers

Say ' The label written to each DASD is' firstchar || '<t><xxxx> where:' Say ' <t> is type - P (page), M (perm), S (spool) or T (Temp disk)' Say ' <xxxx> is the 4 digit address' Say Say 'Syntax is:' Say " <---------------< " Say " >>--CPFORMAT--.-vdev--------.--AS---.-PERM-.---------><" Say " '-vdev1-vdev2-' '-PAGE-'" Say " '-SPOL-'" Say " '-TEMP-'" Say Exit 1 /*+------------------------------------------------------------------+*/areYouSure: Procedure/*| Warn the user of possible data loss and ask if it is okay to |*//*| format the DASD. |*//*| parm 1: format type for the virtual DASD |*//*| retVal: first character of response. continue if 'Y'. |*//*+------------------------------------------------------------------+*/ Arg type Say Say 'WARNING - this will destroy data!' Say 'Are you sure you want to format the DASD as' type 'space (y/n)?' Pull answer . Return 'LEFT'(answer,1) /* from areYouSure */ /*+------------------------------------------------------------------+*/getLabelPrefix: Procedure expose firstchar/*| Return the second character of the virtual DASD label |*//*| parm 1: format type for the virtual DASD |*//*+------------------------------------------------------------------+*/ Arg type . firstchar. = 0 firstchar.PERM = 'M' firstchar.PAGE = 'P' firstchar.SPOL = 'S' firstchar.TEMP = 'T' If firstchar.type = 0 Then Do /* Incorrect formatting type specified. Provide help and quit. */ Say 'Error: "AS" must be present, type must be PERM, PAGE, SPOL or TEMP' Call help End Return firstchar.type /*+------------------------------------------------------------------+*/parseDASD: Procedure Expose dasdList./*| parse all dasd into an array verifying all are attached |*//*| parm 1: dasds - the list of dasd passed in |*//*| retVal: number of DASD in dasdList |*//*+------------------------------------------------------------------+*/ Arg dasds
Appendix B. Additional material 141

numDasd = 0 dropheader = '' Say Say 'Format the following DASD:' Do While dasds <> '' Parse Upper Var dasds dasd dasds dashPos = 'POS'('-',dasd) If dashPos = 0 Then Do /* There is a singleton DASD specified. */ /* start and end of range are the same. */ startrange = dasd endrange = dasd End /* process the range of DASD */ Else Parse Var dasd startrange '-' endrange Do i = 'X2D'(startrange) To 'X2D'(endrange) numDasd = numDasd + 1 dasdList.numDasd = 'D2X'(i) 'PIPE CP QUERY MDISK' dasdList.numDasd 'LOCATION', dropheader, '|CONS' If rc <> 0 Then Do Say 'Return code from QUERY MDISK =' rc /* If RC=40, then HCPxxx40E has been issued and msg below */ If rc = 40 Then Say 'DASD' dasdList.numDasd 'is not attached.' Exit 3 End Call checkReserved(dasdList.numDasd) dropheader = '|DROP 1' End End Return numDasd /* from parseDasd */ /*+------------------------------------------------------------------+*/doFormat: Procedure Expose dasdList. formatted/*| Format all DASD specified using CPFMTXA |*//*| parm 1: labelPrefix - the two character label prefix |*//*| parm 2: numDasd - number of DASD in the array dasdList |*//*| parm 3: type - the type of DASD format |*//*| retVal: 0 = success |*//*+------------------------------------------------------------------+*/ Arg labelPrefix numDasd type /* Save the current settings for MORE */ Parse Value 'DIAG'('08','CP QUERY TERM') With ' MORE' morevalues ',' 'CP TERM MORE 1 1' /* Make MORE brief */ /* Save system identifier and SSI name */ 'PIPE CP QUERY USERID | SPEC W3 | VAR systemID' 'PIPE CP QUERY SSI | LOCATE /SSI Name/ | SPEC W3 | VAR SSIname' If (SSIname = "SSINAME") Then /* variable not set */ inSSI = 'no' Else inSSI = 'yes'
142 The Virtualization Cookbook for IBM z Systems Volume 2: Red Hat Enterprise Linux 7.1 Servers

/* Iterate through all DASD in list */ Do i = 1 to numDasd label = labelPrefix || 'RIGHT'(dasdList.i,4,'0') retVal = formatOne(dasdList.i type label) If retVal <> 0 Then Do Say 'Error from CPFMTXA on DASD' label 'rc =' retVal Leave /* error - abort this format */ End
/* add owner info for CP owned devices */ If (type != 'PERM') Then /* CP owned => owner info is needed */ If (inSSI = 'yes') Then /* add owner info */ call addOwnerInfo(dasdList.i label SSIname systemID) Else call addOwnerInfo(dasdList.i label "NOSSI" systemID) formatted = formatted label End /* Do i = */ 'CP TERM MORE' morevalues Return retVal /* from doFormat */ /*+------------------------------------------------------------------+*/checkReserved: Procedure/*| Try copying an already formatted DASD Then relabelling it |*//*| parm 1: dasd - the virtual address of the DASD |*//*+------------------------------------------------------------------+*/ Arg dasd /* Create a list of reserved virtual DASD addresses. */ /* Ensure that a system minidisk is not formatted. */ resvd = '122 123 124 190 191 193 19D 19E 2CC 401 402 990 CF1 CF3 CFD' If 'POS'(resvd,dasd) <> 0 Then Do /* MAINT minidisk - ABORT! */ Say 'Minidisk' dasd 'is a reserved MAINT minidisk' Say 'This must be formatted manually using a different vaddr.' Exit 4 End /* If dasd is reserved */ Return /* from checkReserved */ /*+------------------------------------------------------------------+*/doReport: Procedure Expose dasds formatted/*| Report on the newly labelled DASD |*//*| parm 1: formatSuccess - 0=all is well, non-0= a format failed |*//*| retVal: 0 = success |*//*+------------------------------------------------------------------+*/ Arg formatSuccess If formatSuccess <> 0 Then Say 'Error was encountered! retVal from CPFMTXA =' formatSuccess If formatted = '' Then Say 'No DASD were successfully formatted' Else Say 'DASD successfully formatted:' formatted 'CP DETACH' dasds 'CP ATTACH' dasds '*' Say
Appendix B. Additional material 143

Say 'DASD status after:' 'CP QUERY MDISK' dasds 'LOCATION' Return 0 /* from doReport */ /*+------------------------------------------------------------------+*/formatOne: Procedure/*| Format a DASD via DDR |*//*| parm 1: disk - the vaddr to be formatted |*//*| parm 2: type - PERM, PAGE, SPOL or TEMP |*//*| parm 3: label - the six character label |*//*+------------------------------------------------------------------+*/ Arg disk type label Queue 'FORMAT' Queue disk Queue '0 END' Queue label Queue 'YES' Queue type '0 END' Queue 'END' 'EXEC CPFMTXA' retVal = rc Return retVal /* from formatOne */ /*+------------------------------------------------------------------+*/AddOwnerInfo: Procedure/*| Tag PAGE, SPOL and TDSK volumes with SSI |*//*| parm 1: disk - the vaddr to be formatted |*//*| parm 2: type - PERM, PAGE, SPOL or TEMP |*//*| parm 3: label - the six character label |*//*+------------------------------------------------------------------+*/ Arg disk label SSIname systemID Queue 'OWNER' Queue disk Queue label Queue SSIname Queue systemID 'EXEC CPFMTXA' retVal = rc Return retVal /* from addOwnerInfo */
SSICMD EXEC
The following code is for the EXEC that issues control program (CP) commands on all joined members of a single system image (SSI) cluster. It is recommended to reside on the MAINT 191 disk.
/*************************************************************//* *//* This program is provided on an "AS IS" basis, without *//* warranties or conditions of any kind, either express or *//* implied including, without limitation, any warranties *//* or conditions of title, non-infringement, *//* merchantability or fitness for a particular purpose. */
144 The Virtualization Cookbook for IBM z Systems Volume 2: Red Hat Enterprise Linux 7.1 Servers

/* Neither recipient nor any contributors shall have any *//* liability for any direct, indirect, incidental, *//* special, exemplary, or consequential damages (including *//* without limitation lost profits), however caused and on *//* any theory of liability, whether in contract, strict *//* liability, or tort (including negligence or otherwise) *//* arising in any way out of the use or distribution of *//* the program or the exercise of any rights granted *//* hereunder, even if advised of the possibility of such *//* damages. *//* *//*************************************************************//* *//* Purpose: *//* Issue a command on all members of a cluster using the *//* response from QUERY SSI to find the member names. *//* *//* Inputs: *//* cmd - the CP command to issue on each member. *//* *//* Output: *//* The results from issuing the AT command. *//* *//* *//*************************************************************/ Address COMMAND/* The command is passed by the caller */ Arg cmd /* Provide help if requested or if no command is specified */ If cmd = '' | cmd = '?' Then Call Help /* Determine the members of the SSI cluster */ 'PIPE CP QUERY SSI', '| STEM MSG.', /* Save the response if error */ '| XLATE', /* Make all output upper case */ '| FRTARGET ALL /SLOT/', /* Just look after 'SLOT' */ '| LOCATE /JOINED/', /* JOINED members can do a command */ '| SPEC W2', /* Get the member names */ '| STEM SSI.' /* Save the member names */ /* If nonzero return code, show error message and exit */ If rc <> 0 | ssi.0 = 0 Then Do Say 'Error: QUERY SSI return code =' rc Say msg.1 End Else Do /* Send the command to each member of the SSI cluster */ Do i = 1 To ssi.0 Say ssi.i||":" 'CP AT' ssi.i 'CMD' cmd Say End End Exit help: /* Provide syntax information to the user */
Appendix B. Additional material 145

Say 'SSICMD cmd' Say Say 'cmd is a command to be issued on each of the members' Say ' in the SSI cluster using the AT command.' Exit
PROFILE EXEC for Linux virtual machines
This section lists the code for the PROFILE EXEC that is shared among Linux virtual machines from the LNXMAINT 192 disk.
/* PROFILE EXEC for Linux virtual servers */'CP SET RUN ON''CP SET PF11 RETRIEVE FORWARD''CP SET PF12 RETRIEVE''ACC 592 C''SWAPGEN 300 524288' /* create a 256M VDISK disk swap space */'SWAPGEN 301 1048576' /* create a 512M VDISK disk swap space */'PIPE CP QUERY' userid() '| var user'parse value user with id . dsc .if (dsc = 'DSC') then /* user is disconnected */ 'CP IPL 100'else /* user is interactive -> prompt */ do say 'Do you want to IPL Linux from minidisk 100? y/n' parse upper pull answer . if (answer = 'Y') then 'CP IPL 100' end
REDHAT EXEC
This section lists the code for the REDHAT EXEC that starts a RHEL installation. It is recommended to reside on the LNXMAINT 192 disk.
/*************************************************************//* Punch a RHEL install system to reader and IPL it *//*************************************************************/'CL RDR''PURGE RDR ALL''SPOOL PUNCH * RDR''PUNCH KERNEL IMG * (NOH''PUNCH GENERIC PRM * (NOH''PUNCH INITRD IMG * (NOH''CH RDR ALL KEEP NOHOLD''I 00C'
SWAPGEN EXEC
The following code is for the EXEC that creates Linux swap spaces from z/VM VDISKs.
/******************************************************************** Program: SWAPGEN EXEC** Original Author: Dave Jones ([email protected])
146 The Virtualization Cookbook for IBM z Systems Volume 2: Red Hat Enterprise Linux 7.1 Servers

** Description/Purpose:** Generate VDISK swap for Linux on System z guest virtual* machines** Syntax:** Issue: SWAPGEN ? for syntax etc.** Version History:...*/ address command arg vdev blks . '(' options ')' debug = 0 /* Default to quiet */ fba = 0 /* No FBA option yet */ reuse = 0 /* No reuse option yet */ do while options <> '' /* Parse the options */ parse var options option options /* Get an option */ select when option = 'DIAG' then fba = 0 /* Use DIAG driver */ when option = 'FBA' then fba = 1 /* Use FBA driver */ when option = 'REUSE' then reuse = 1 /* Reuse DASD */ when option = 'DEBUG' then debug = 1 /* Wants debug chat */ when option = 'VERSION' then signal Version /* version query*/ otherwise say 'Invalid option "'option'"' /* Else unknown */ end end minblks = 40 - 8 * fba /* Minimum number of blocks that can work */ if reuse = 1 then do parse value diagrc(8, 'Q V 'vdev) , /* Get blocks from ... */ with rc . 17 msg /* ... actual device size */ if rc <> 0 then signal BadDev parse var msg . . . . . newblks . if blks = '' then blks = newblks /* Default to detected size */ if blks <> newblks then signal WrongBlks /* Mismatch, error */ end if vdev = '?' then signal Help /* Wants Help, give it */ if vdev = '' then signal NoVdev /* Missing, error */ if blks = '' then signal NoBlks /* Missing, error */ if datatype(blks, 'W') = 0 | blks < minblks then /* Bad/too small */ signal BadBlks /* So error */ if datatype(vdev, 'X') = 0 | length(vdev) > 4 then /* Invalid */ signal BadVdev /* So error */ if fba then do /* If FBA driver, make sure we have the package */ 'NUCEXT RXDASD' /* Already got it?? */
Appendix B. Additional material 147

if rc <> 0 then 'NUCXLOAD RXDASD' /* No, try to load it */ if debug then say 'SWAPGEN: Loading RXDASD got rc=' rc if rc <> 0 then signal NoRXDASD /* That failed, so error */ end if reuse = 0 then do call diag 8, 'DETACH' vdev /* DETACH any existing device */ parse value diagrc(8, 'DEFINE VFB-512 AS' vdev 'BLK' blks) , with rc . 17 msg '15'x /* Define the V-DISK */ if debug then say 'SWAPGEN: DEFINE VDEV got rc=' rc if rc <> 0 then signal BadDefine /* That failed, so error */ end call csl 'DMSGETFM rc reacode fm' /* find a free filemode */ if debug then say 'SWAPGEN: Got filemode' fm 'from DMSGETFM' if rc <> 0 then signal NoFreeModes /* Weren't any, strange, error */ if fba then do pages = trunc((blks * 512)/4096) - 1 /* FBA case */ writeit = 'stem swap.' /* Pipe stage */ if debug then say 'SWAPGEN: Computed' pages 'for FBA disk' end else do /* Not FBA, we must FORMAT and RESERVE it */ 'MAKEBUF' /* Guard stack contents if something's there */ buf = rc /* Remember buffer number so we drop the right one */ if debug then say 'SWAPGEN: Acquired buffer' buf , 'before non-FBA format.' writeit = 'specs number 1 1-* next' , '| mdskupdate LINUX SWAP' fm 'F 512' /* Pipes stages */ queue '1' /* Yes to the format? question */ queue 'LXSWAP' /* Disk volume name */ queue '1' /* Yes to the reserve question */ 'PIPE (name SWPFORMAT)' , /* FORMAT and RESERVE the disk */ '| cms FORMAT' vdev fm '(BLKSIZE 512 NOERASE' , /* FORMAT */ '| var rs1' , /* Remember how that went */ '| hole' , /* And otherwise pitch it */ '| cms RESERVE LINUX SWAP' fm , /* Do it */ '| var rs2' , /* Remember how that went */ '| hole' , /* And otherwise pitch it */ '| state LINUX SWAP' fm , /* Look at the reserved swap file */ '| var reserveok' , /* Keep that information */ '| specs w6 1' , /* Word 6 is the number of blocks */ '| specs w1 1' , /* Calculate it modulo 8 */ 'a: word 1 .' , /* Get the token we want */ ' set #0:=a%8-2' , /* Calculate it modulo 8 minus 2 */ ' print #0 20' , /* Write it */ '| specs w2 1' , /* Just get the number of usable pages */ '| var pages' /* And remember that */ if debug then say 'SWAPGEN: Formatted' pages 'pages on disk' , fm 'in PIPE' 'DROPBUF' buf /* Not nice to leave trash lying around */ if debug then say 'SWAPGEN: Dropped buffer' buf end if debug then say 'SWAPGEN: About to write non-FBA swap signature'
148 The Virtualization Cookbook for IBM z Systems Volume 2: Red Hat Enterprise Linux 7.1 Servers

/* Must use separate Pipe to write since mdskupdate commits to 0 */ 'PIPE (name SWPWrite)' , '| var pages' , /* Get number of pages */ '| specs pad 00 w1 d2c 1.4 right' , /* Format it */ '| append strliteral x'c2x(copies('00'x, 4086-1033+1) || , '53574150535041434532'x) , /* "SWAPSPACE2" in ASCII */ '| join' , /* Build that into a nice chunk */ '| preface strliteral x'c2x(copies('00'x, 1027)'01'x) , /* 0s */ '| join' , /* Build that into a nice chunk */ '| deblock 512', /* Break into records */ '|' writeit /* And write to disk or variable, per driver type */ if debug then say 'SWAPGEN: Wrote non-FBA swap signature with rc=' rc if rc <> 0 then signal BadWrite /* If FBA, we have the values, need to use RXDASD to write them */ if fba then do i = 1 to swap.0 /* If FBA, we didn't write yet */ if debug then say 'SWAPGEN: About to write FBA signature' i rc = DASD('WRITED', vdev, i-1, swap.i) /* Write one */ if debug then say 'SWAPGEN: Wrote FBA signature' i 'with rc='rc if rc <> 0 then signal BadWrite /* Failed, so error */ end if fba then type ='FBA' else type = 'DIAG' say type 'swap disk defined at virtual address' vdev , /* Success! */ '('pages-1' 4K pages of swap space)' call Quit 0 Quit: arg rc if rc <> 0 then say 'No Swap disk was created.' exit rc NoVdev: /* User didn't give us a virtual device address */ say 'A virtual device address must be specified!' signal Help NoBlks: /* User didn't give us a number of blocks */ say 'Number of blocks must be specified!' signal Help NoFreeModes: /* No free disk modes can be found */ say 'No free disk modes are available!' say 'Please release a minidisk and try again.' call Quit 1 /* They invoked it correctly, so don't show help */ BadDev: /* REUSE tried to use bad device */ say 'The device at 'vdev' cannot be used:' say msg call Quit 24 BadBlks: /* User gave us an invalid number of blocks */ say 'Invalid number of blocks "'blks'" specified; must be' say 'at least 'minblks' 512-byte blocks.' call Quit 24
Appendix B. Additional material 149

WrongBlks: /* Supplied number of blocks does not match */ say 'REUSE requested with' blks , 'and existing disk block count is' newblks'.' call Quit 24 BadVdev: /* User gave us an invalid virtual device address */ say 'Invalid virtual device address "'vdev'" specified;' say 'must be a 1- to 4-digit hexadecimal value.' call Quit 24 NoRXDASD: /* We don't have the required FBA utility */ say 'Unable to NUXCLOAD RXDASD MODULE; this is available from:' say ' http://www.vm.ibm.com/download/packages' call Quit rc BadDefine: /* Error DEFINE-ing the VDISK */ say 'Error' rc 'from CP DEFINE VFB-512 AS' vdev 'BLK' blks':' say msg /* Display error from CP */ call Quit rc BadFBA: /* Error writing FBA block on disk */ say 'Error' rc 'from RXDASD' call Quit rc BadWrite: /* Error on FORMAT or RESERVE steps */ select /* Figure out where it went wrong */ when symbol('RESERVEOK') <> 'VAR' then do say 'Error' rc 'from CMS RESERVE LINUX SWAP' fm':' say rs2 end when symbol('RS2') <> 'VAR' then do say 'Error' rc 'from CMS FORMAT' vaddr fm '(BLKSIZE 512:' say rs1 end otherwise say 'Error' rc 'calculating swap size, contact support' end call Quit rc Help: parse source . . fn . say 'Syntax is:' say '' say fn 'vdev #blocks <( <options> <)> >' say ' or' say fn 'vdev ( REUSE <options> <)>' say '' say 'where:' say '' say 'vdev -- is a virtual device address' say '#blocks -- is a decimal number of 512-byte blocks;' say ' minimum 24 (FBA) or 32 (DIAG)' say ''
150 The Virtualization Cookbook for IBM z Systems Volume 2: Red Hat Enterprise Linux 7.1 Servers

say 'Options are:' say 'DIAG -- (Default) Use DIAG I/O (requires Linux DIAG driver)' say 'FBA -- use FBA driver instead of DIAG; requires RXDASD' say ' package, downloadable from the IBM VM download' say ' page at: http://www.vm.ibm.com/download/packages' say 'REUSE -- use existing device at vdev. WARNING: This will' say ' destroy any data on device vdev. The #blocks' say ' parameter may be omitted; the whole device will' say ' be used in that case.' say 'VERSION -- display current version number string and date' say ' of last module update.' say 'DEBUG -- display progress messages and debugging' say ' information about the program logic. ' say '' say fn 'will DETACH any existing virtual device at that address,' say 'DEFINE a new VDISK, format it, and write the Linux swap' say 'signature on the disk so Linux will recognize it.' say '' say 'If using FBA mode, SWAPGEN prepares the whole device:' say ' /dev/dasdb or /dev/dasd/0151/device' say 'so the whole device must then specified in the Linux fstab.' say '' say 'If using DIAG mode, because the V-DISK is CMS FORMATted,' say 'SWAPGEN prepares the partition:' say ' /dev/dasdb1 or /dev/dasd/0151/part1' say 'so the partition must be specified in the fstab on Linux.' call Quit 1 Version: parse source . . fn . /* These variables should be updated with each release */ version = 'SNA120601' /* Release string: SNAyymmvv */ last_update = '2012-06-20 (yyyy-mm-dd)' /* Last update date */ say 'SWAPGEN: Version' version', last updated:' last_update'.' call Quit 4
Sample files
This section lists sample files that are described in the book.
SAMPLE GENERIC PRM files
This following is a sample RHEL 7.1 configuration file for ECKD/EDEV
ro ramdisk_size=40000 cio_ignore=all,!condev ip=<n.n.n.n>::<n.n.n.n>:<n>:<HOSTNAME>:enccw0.0.0600:none rd.znet=qeth,0.0.0600,0.0.0601,0.0.0602,layer2=1 nameserver=<n.n.n.n> nameserver=<n.n.n.n> inst.repo=ftp://lydiap:[email protected]//<RHEL Install Tree> rd.dasd=<DASD> rd.dasd=<DASD2> vnc vncpassword=12345678
Appendix B. Additional material 151

This following is a sample RHEL 7.1 configuration file for FCP using Kickstart:ro ramdisk_size=40000 cio_ignore=all,!condevip=<n.n.n.n>::<n.n.n.n>:<n>:<HOSTNAME>:enccw0.0.0600:nonerd.znet=qeth,0.0.0600,0.0.0601,0.0.0602,layer2=1 nameserver=<n.n.n.n> nameserver=<n.n.n.n> rd.zfcp=<FCP1> rd.zfcp=<FCP2> inst.repo=ftp://<n.n.n.n>/<RHEL Install Tree> ks=ftp://<n.n.n.n>/<Path to kickstart file>inst.cmdline
152 The Virtualization Cookbook for IBM z Systems Volume 2: Red Hat Enterprise Linux 7.1 Servers

Related publications
The publications listed in this section are considered particularly suitable for a more detailed discussion of the topics covered in this book.
IBM Redbooks
The following IBM Redbooks publications provide additional information about the topic in this document. Several publications that are referenced in this list might be available in softcopy only:
� The Virtualization Cookbook for IBM z Systems Volume 1: IBM z/VM 6.3, SG24-8147-01
� The Virtualization Cookbook for IBM z Systems Volume 3: SUSE Linux Enterprise Server 12, SG24-8890
� Linux on IBM eServer zSeries and S/390: Performance Toolkit for VM, SG24-6059
� z/VM and Linux on IBM System z, SG24-7492
� Linux on IBM eServer zSeries and S/390: Application Development, SG24-6807
� IBM Lotus Domino 6.5 for Linux on zSeries Implementation, SG24-7021
� Printing with Linux on zSeries Using CUPS and Samba, REDP-3864
� IBM z Systems Connectivity Handbook, SG24-5444
� Deploying a Cloud on IBM System z, REDP-4711
� Installing Oracle 11gR2 RAC on Linux on System z, REDP-4788
� Linux on IBM System z: Performance Measurement and Tuning, SG24-6926
� Fibre Channel Protocol for Linux and z/VM on IBM System z, SG24-7266
� Security for Linux on System z, SG24-7728
� Advanced Networking Concepts Applied Using Linux on IBM System z, SG24-7995
� Set up Linux on IBM System z for Production, SG24-8137
� Practical Migration from x86 to Linux on IBM System z, SG24-8217
� End-to-End High Availability Solution for System z from a Linux Perspective, SG24-8233
� Security for Linux on System z: Securing Your Network, TIPS0981
� Linux on System z: An Ideal Platform to Migrate Your IT Workload, TIPS1166
� Linux on IBM eServer zSeries and S/390: Performance Toolkit for VM, SG24-6059
� Printing with Linux on zSeries Using CUPS and Samba, REDP-3864
You can search for, view, download, or order these documents and other Redbooks, Redpapers, Web Docs, draft and additional materials, at the following website:
ibm.com/redbooks
Related publications 153

Other publications
These publications are also relevant as further information sources:
� z/VM online documentation:
http://www.vm.ibm.com/library/
Under the z/VM V6.3 PDF Files link, the following books are useful:
– z/VM CP Messages and Codes– z/VM TCP/IP Messages and Codes– z/VM CP Commands and Utilities Reference– z/VM CP Planning and Administration– z/VM Getting Started with Linux on System z– z/VM TCP/IP Planning and Customization– z/VM Performance Toolkit Guide, SC24-6156– z/VM Performance Toolkit Reference, SC24-6157
Under the Program Directories link, the following books are useful:
– Performance Toolkit for VM– DirMaint– RACF Security Server for z/VM
� z/VM Performance Toolkit Guide, SC24-6156
� z/VM Performance Toolkit Reference, SC24-6157
� Getting Started With Linux on System z, SC24-6096
� Device Drivers, Features, and Commands on Red Hat Enterprise Linux 7.1, SC34-2710-01
� Device Drivers, Features, and Commands on SUSE Linux Enterprise Server 12, SC34-2745
� The Program Directory for Performance Toolkit for VM, GI10-0785:
http://www.vm.ibm.com/progdir/6vmptk30.pdf
Online resources
These websites are also relevant as further information sources:
� Linux for zSeries and S/390 portal:
http://linuxvm.org
� IBMVM list server:
http://listserv.uark.edu/archives/ibmvm.html
� Linux-390 list server:
http://www2.marist.edu/htbin/wlvindex?linux-390
� Documentation for z Systems Linux Development stream:
– http://www.ibm.com/developerworks/linux/linux390/documentation_red_hat.html– http://www.ibm.com/developerworks/linux/linux390/documentation_suse.html
� Red Hat Enterprise Linux Server no-charge evaluation download for IBM z Systems:
http://www.redhat.com/en/technologies/linux-platforms/enterprise-linux
154 The Virtualization Cookbook for IBM z Systems Volume 2: Red Hat Enterprise Linux 7.1 Servers

� Kickstart:
https://access.redhat.com/documentation/en-US/Red_Hat_Enterprise_Linux/7/html/Installation_Guide/sect-kickstart-howto.html
� z/VM publications:
http://www.vm.ibm.com/pubs
� z/VM performance tips:
http://www.vm.ibm.com/perf/tips
� z/VM VDISK for Linux swap performance tips:
http://www.vm.ibm.com/perf/tips/lxswpvdk.html
� z/VM TCP/IP planning, customization, and reference:
http://www.vm.ibm.com/related/tcpip/tcp-pubs.html
� z/VM TCP/IP cryptographic security:
http://www.vm.ibm.com/related/tcpip/vmsslinf.html
� z/VM user’s guides and command references (XEDIT, Conversational Monitor System (CMS), and others):
http://www.vm.ibm.com/library/zvmpdf.html
� XEDIT for VM/SystemProduct R3 (Historical reference):
http://ukcc.uky.edu/ukccinfo/391/xeditref.html
� RHEL documentation website:
http://www.ibm.com/developerworks/linux/linux390/documentation_red_hat.html
Help from IBM
IBM Support and downloads
ibm.com/support
IBM Global Services
ibm.com/services
Related publications 155

156 The Virtualization Cookbook for IBM z Systems Volume 2: Red Hat Enterprise Linux 7.1 Servers

(0.2”spine)0.17”<
->0.473”
90<->
249 pages
The Virtualization Cookbook for IBM z System
s Volume 2: Red Hat Enterprise Linux 7.1 Servers


ibm.com/redbooks
SG24-8303-00
ISBN 0738440914
Printed in U.S.A.
Back cover
Related Documents