www.chairsidemagazine.com 46

Welcome message from author
This document is posted to help you gain knowledge. Please leave a comment to let me know what you think about it! Share it to your friends and learn new things together.
Transcript

www.chairsidemagazine.com46

The objective of this article is to demonstrate the ben-efits of an acellular dermal matrix called PerioDerm™ Acellular Dermis (DENTSPLY Tulsa Dental Specialties;
Tulsa, Okla.) in correcting recession and adding connective tissue during periodontal-restorative comprehensive treat-ment.1,2 It has long been established that connective tissue is an integral factor in the protection of the underlying peri-odontal foundation. Connective tissue tends to be tenacious in makeup and have far less vascularization than mucosa. It prevents bacterial infiltration to the underlying support-ive periodontal tissues, and in restorative applications, it adds stability to gingival areas during impression taking and cementation of restorations. Though the quality of tis-sue is critical, it is also important that the tissue is bound down to either tooth surface or bone to serve as a support-ive mechanism for protection of the periodontium.
The benefits of connective tissue have been well document-ed since 1968, in an article by Sullivan and Atkins.3 During the early years, palatal tissue was the main donor to harvest connective tissue, and today, there continue to be instances where palatal tissue would be the recommended tissue of choice. That being said, I have found PerioDerm to be a very user-friendly material for the addition of connective tissue. The cases presented here will show that PerioDerm can be a benefit when used to cover root surfaces, or to sim-ply increase connective tissue for support of restorations.
Techniques for the use of PerioDerm that may differ from standardized procedures, such as tunneling, will also be shown.4,5 It is my opinion that visibility via flap procedures
of the recipient bed is a key factor in treating all periodontal issues that could have caused previous, or may cause future, breakdown of the periodontium. This article will illustrate the benefits of simple secondary procedures to remove any muscle fibers or mucosa present at the gingival collar, and a technique to position these tissues at the apical portion of the PerioDerm.
The benefits of PerioDerm in relation to other acellular der-mal matrices are as follows:
1. User-friendly.
2. Short hydration period.
3. Can be trimmed after moistened. It can be placed in the mouth and trimmed to the contour of each cementoe-namel junction (CEJ) using surgical scissors.
4. Sticks to the tooth and not the glove of the surgeon.
5. Suture easily passes through the material.
6. Uniform thickness of the material. I recommend using thick PerioDerm, instead of the thin variety.
7. Very compatible with existing tissue.
8. Upon reentry, the existing tissue appears to have all the characteristics of connective tissue. However, without histology, this is nothing more than a clinical observation. Though only an observation, it is a critical advantage as the tissue serves to protect the underlying periodontal tissues.
The Use of PerioDerm™ for Root Coverage and Correction of Insufficiently Attached Gingiva
– ARTICLE by Daniel J. Melker, DDS
The Use of PerioDerm for Root Coverage and Correction of Insufficiently Attached Gingiva47
TIPS TO AVOID SURGICAL FAILURE
1. Avoid perforation of the flap. Feel for any exostoses or tori; if found, a full-thickness flap should be initiated to avoid perforation of the tissue. After passing the protrusion that could cause a perforation, split the tissue, leaving the periosteum on the bone.
2. Upon releasing the flap, make sure it is tension-free when advancing it coronally. Tension could cause necrosis of the flap and possible failure.
3. When suturing the flap, sutures should be positioned to keep the flap in place without advancing it. Sutures should not place tension on the flap.
4. The graft, i.e. PerioDerm, should have 100 percent coverage by the flap.
5. The patient should avoid brushing the area with a toothbrush to prevent accidental pulling of the sutures and necrosis of the flap.
TIPS FOR HOME CARE
1. Following surgery, the patient will use 0.2% chlorhex-idine twice daily. The patient should use this liquid first thing in the morning, rinsing for one minute and then expectorating. The same procedure should be repeated before bedtime.
2. The PreviDent gel should be placed on the teeth where the teeth meet the gum line. It should be applied to these areas for one minute and then expectorated.
3. The patient can rinse with water several times a day to remove debris.
4. The patient should not eat on the side where the pro-cedure was undertaken.
5. Due to the very compatible nature of the patient’s tissue and PerioDerm, the patient can in many cases start to brush the teeth during the second week using the Braun Oral-B® toothbrush (Procter & Gamble; Cincinnati, Ohio). The patient should use the toothbrush only on the tooth surface, stopping at the gingival collar. NOTE: The key to the timing of the brushing depends on the adaptation of the flaps during healing. If the tissue appears well-adapted, the sutures can be removed and brushing initiated.
6. Flossing can begin once the sutures are removed and the flaps are closely adapted to the tooth surface.
Several of the cases presented in this article deal with the correction of furcations on natural teeth that will not be restored. Below is the protocol for dealing with sensitivity during treatment.
DESENSITIZING TREATMENTS
Surgery:
Super Seal® Dental Desensitizer Liner (Phoenix Dental, Inc.; Fenton, Mich.) should be used after suturing. The teeth must be dry. One drop is placed on each tooth and lightly air-blown dry after 30-40 seconds. Repeat three to four times. If the teeth have been severely barreled into the furcation, a drop of prednisolone 1% is also placed on the teeth.
The patient is given PreviDent® Gel (1.1% sodium fluoride) (Colgate® Oral Pharmaceuticals; New York, N.Y.) to mix with water and rinse with at home twice daily for one minute.
Week 1:
The patient is scaled with a universal implant scaler (double end) because it is made with plastic and more comfortable for the patient.
The patient is then polished with Colgate® Sensitive Pro-Relief™ desensitizing paste (Colgate Oral Pharmaceuticals). The wooden end of a cotton-tipped applicator is used to spread the paste interproximally.
If the patient cannot brush, a drop of prednisolone acetate ophthalmic suspension USP 1% is placed on the teeth. The patient rinses with Sultan Topex® in-office fluoride rinse (Sultan Healthcare; Hackensack, N.J.) for one minute. The patient is to rinse two times a day with the PreviDent solu-tion, which is expectorated after use. The patient cannot eat, drink or rinse for 30 minutes after use.
If the patient is able to start brushing, a drop of prednisolone is placed on the teeth. PreviDent® Varnish 5% sodium fluoride (Colgate Oral Pharmaceuticals) or 3M™ CavityShield™ 5% sodium fluoride (3M ESPE; St. Paul, Minn.) is also placed on the teeth. The patient is instructed to brush it off in four hours with regular toothpaste. The patient is to start brushing with PreviDent gel twice a day for one minute after they have brushed with regular toothpaste. PreviDent gel is to be expectorated after brushing and the patient cannot eat, drink or rinse for 30 minutes after use.
Following Weeks:
All treatments are based on whether the patient is allowed to brush.
If the patient cannot brush, a drop of prednisolone is placed on the teeth. The patient is to keep rinsing two times a day with PreviDent. The patient rinses with Sultan Topex in-office fluoride rinse for one minute.
www.chairsidemagazine.com48

Figure 3: Once the flap is released, visual aid is necessary to see further irregularities on the root surface. A split-thickness flap was used to release the soft tissue. Note that there are also irregularities in the bone that will need correction. Another important objective is to remove any erosion of the root surface and blend the CEJs into these areas to eliminate a ledge. Only by releasing the soft tissue can this procedure be performed.
Figure 1: This case demonstrates the steps used in placing PerioDerm on teeth with recession. For the sake of explanation, teeth #11 & #12 will be discussed in detail, though the actual treated teeth were #6–14. It should be noted that there is a gingival collar present around these teeth, which makes this and similar cases highly predictable and much easier to treat than when there is a mucosal attachment. The latter will be addressed in future cases.
Figure 4: Now that any line angles are visible, they are also smoothed with the football-shaped bur. If necessary, hand instruments are also used to create the smoothest root surface possible. Minor osseous contouring also takes place to create an osseous architecture that will mimic soft tissue healing, thus avoiding re-pocketing of the area.
Figure 2: A diamond football-shaped bur (F368-023 [Axis Dental; Coppell, Texas]) is used to smooth the root surfaces and remove all foreign bodies that would affect the stability of joining the grafting material to the tooth surface. This step is carried out before releasing the flap.
CASE 101
Connective tissue is an integral factor in the protection of the underlying periodontal foundation ... Though the quality of
tissue is critical, it is also important that the tissue is bound down to either tooth surface or bone to serve as a supportive mechanism for protection of the periodontium.
The Use of PerioDerm for Root Coverage and Correction of Insufficiently Attached Gingiva49

Figure 6: The PerioDerm is contoured to the various root surfaces and sutured in place with 5-0 Chromic Gut (Henry Schein®, Inc.; Melville, N.Y.). Not only is the PerioDerm sutured to the papilla, but sling sutures at the base of the PerioDerm are also placed into the periosteum, firmly holding the material in place and in close adaptation to the periosteum. By cover-ing the bone, the material receives a great source of blood supply. I like to use the connective tissue side of the PerioDerm as the outer surface for the flap. Dr. Randall Harris first introduced this concept to me.
Figure 8: Secondary procedures should be done at 6–8 weeks to remove any muscle fibers or mucosa and avoid any future recession. This photo-graph shows the tissue one month after positioning of the muscle fibers.
Figure 7: Once the PerioDerm is fully secured, the flap is sutured in place using 6-0 Vicryl suture (Henry Schein, Inc.). Both interrupted and sling sutures are used for each tooth to get close adaptation of the flap and full coverage of the PerioDerm. It is critical to avoid exposure of the PerioDerm; the PerioDerm needs to be fully covered by a flap.
Figure 5: Phosphoric acid 40% is used to demineralize the root surfaces and remove the smear layers. The material is left in place for 25 seconds and then thoroughly rinsed away.
01
www.chairsidemagazine.com50

Figure 2: A split-thickness flap is performed. Effort is made to leave the papilla as thick as possible, which will help to avoid any concerns over black triangles. When the tissue is reflected, further bone loss is noted. There is a significant height of contour on tooth #14 present and a furca-tion issue just below.
Figure 3: All root surfaces are thoroughly cleaned of any altered cementum or dentin. Removal of the furcation on the buccal of tooth #14 is accom-plished with diamond burs (coarse diamond bur C847-016 and superfine bur F847-016 [Axis Dental]). The coarse diamond bur is used first, followed by the superfine bur. The furcation is removed when a probe is placed at the apical portion of the furcation and moved coronally without any catching of the probe. Once this procedure is complete, phosphoric acid 40% is placed on the root surfaces for 25 seconds to remove the smear layer.
Figures 1a, 1b: This case demonstrates the use of PerioDerm for root coverage and the removal of a furcation on tooth #14. In order to effectively remove the furcation problem, a flap must be reflected. I believe that visual knowledge, instead of just tunneling, allows for a more definitive procedure to be accomplished. The patient is 30 years old. In such a young individual, all periodontal issues should be treated.
CASE 202
Figure 4: This image is critical to understanding where the initial knot is started for the placement and suturing of the PerioDerm. We are treating tooth #9 in this case, so the suture starts on the distal of tooth #8 and is tied onto the buccal surface. The suture then wraps around the lingual and out through the buccal, where it can engage the PerioDerm and stabilize the tissue in place. By suturing this way, we are preventing knots from being located under the flap, which could cause necrosis of the flap due to lack of blood supply.
1b
1a
The Use of PerioDerm for Root Coverage and Correction of Insufficiently Attached Gingiva51

Figure 5: The PerioDerm is then placed and, if necessary, trimmed to the contour of the teeth. Once this takes place, the tissue is sutured in place. Note the way the connective tissue side of the PerioDerm picks up the blood, which is important to revascularization once the flap is placed.
Figure 7: At 6–8 weeks, all muscle fibers and mucosa are positioned just apical to the PerioDerm and sutured in place. In this case, because of the patient’s age and the severity of bone loss on the mesial of tooth #14, a small submarginal graft is placed using palatal tissue. Note the very dense and tenacious appearance of the PerioDerm. Without histology, we cannot make a definitive determination, but the tissue looks exactly like dense connective tissue.
Figure 6: Once the PerioDerm is placed and all root surfaces are smoothed, the flap is sutured back in place. Each tooth has an interrupted suture on both sides and a sling suture to closely adapt the flap at the line angles. The objective is to get as close an approximation of the flap to the tissue as possible and, as stressed before, total coverage of the PerioDerm.
Figure 8: The healed area one year later. I believe that the long-term stability will be greatly enhanced because of the second procedure of positioning the muscle fibers and mucosa apically, and the addition of a small connective tissue graft over a very severe area of bone loss on the mesiobuccal root of tooth #14. Note that the barreled-in furcation of tooth #14 does not require a restoration following the removal of the furcation.
02
www.chairsidemagazine.com52

Figure 2: After the flap is laid using a split-thickness technique, the tissue is sculpted using LaGrange 4.5" scissors (Henry Schein, Inc.) to create the proper soft-tissue architecture for the flap to conform to the tooth surfaces.
Figure 3: The PerioDerm is placed on the tooth surfaces for suturing. A very user-friendly tissue, it nearly adheres to the root surface. Simple suturing is all that is necessary to stabilize the tissue in place.
Figure 4: The flap is sutured in place using 6-0 Vicryl with interrupted sutures, as well as sling sutures, to create a close adaptation of the flap to the papilla and underlying PerioDerm.
Figure 5: Following removal of muscle fibers and mucosa, note the beauti-ful contours in the overlying tissue.
CASE 303
Figures 1a, 1b: Due to recession and severe clefting, this patient will undergo surgery to correct the recession with the use of PerioDerm.
1b
1a
The Use of PerioDerm for Root Coverage and Correction of Insufficiently Attached Gingiva53
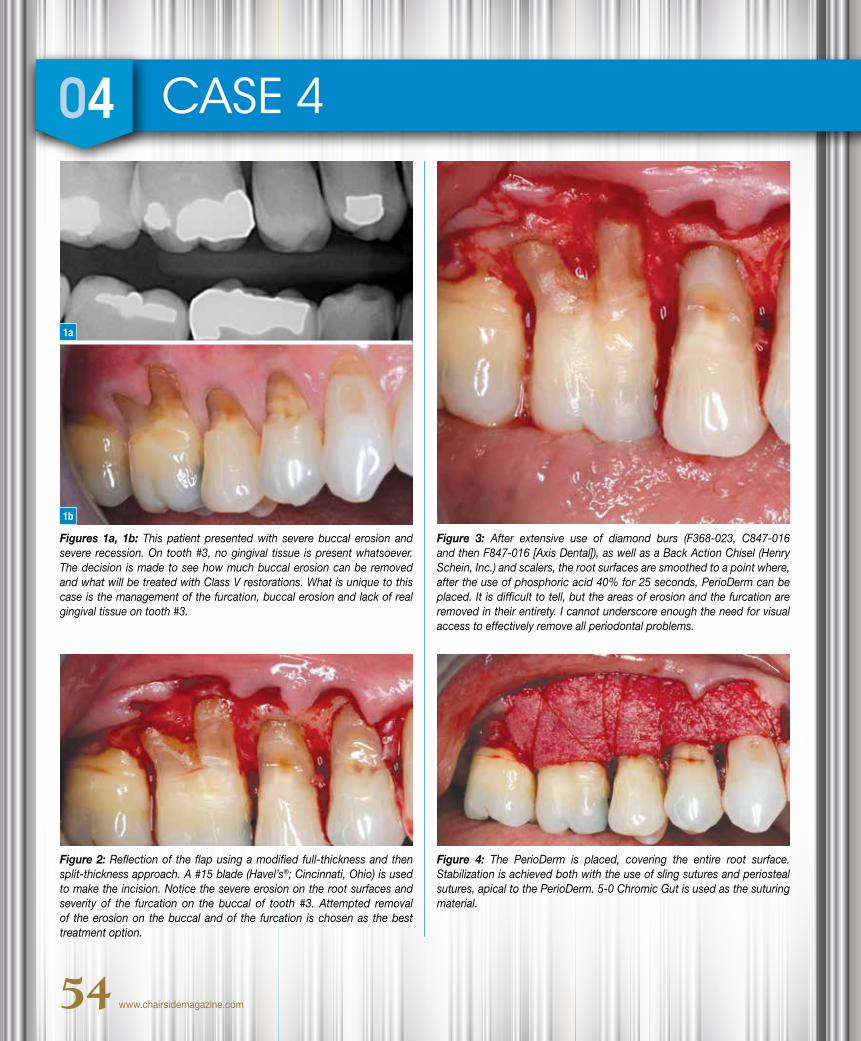
Figure 3: After extensive use of diamond burs (F368-023, C847-016 and then F847-016 [Axis Dental]), as well as a Back Action Chisel (Henry Schein, Inc.) and scalers, the root surfaces are smoothed to a point where, after the use of phosphoric acid 40% for 25 seconds, PerioDerm can be placed. It is difficult to tell, but the areas of erosion and the furcation are removed in their entirety. I cannot underscore enough the need for visual access to effectively remove all periodontal problems.
Figure 4: The PerioDerm is placed, covering the entire root surface. Stabilization is achieved both with the use of sling sutures and periosteal sutures, apical to the PerioDerm. 5-0 Chromic Gut is used as the suturing material.
Figure 2: Reflection of the flap using a modified full-thickness and then split-thickness approach. A #15 blade (Havel’s®; Cincinnati, Ohio) is used to make the incision. Notice the severe erosion on the root surfaces and severity of the furcation on the buccal of tooth #3. Attempted removal of the erosion on the buccal and of the furcation is chosen as the best treatment option.
CASE 404
Figures 1a, 1b: This patient presented with severe buccal erosion and severe recession. On tooth #3, no gingival tissue is present whatsoever. The decision is made to see how much buccal erosion can be removed and what will be treated with Class V restorations. What is unique to this case is the management of the furcation, buccal erosion and lack of real gingival tissue on tooth #3.
1b
1a
www.chairsidemagazine.com54

Figure 6: At eight weeks, we can see the excellent healing of the soft tissue. Note, though, that there is still a mucosal attachment on tooth #3, which will be treated with a small submarginal graft using palatal tissue.
Figure 8: After three weeks of healing following the touch-up procedure, note that no restoration is necessary for the furcation removed through odontoplasty on the buccal of tooth #3, and all tissue is coronal to the original location of the previous tooth collars. It is important to stress that the patient’s home care techniques were changed and he was instructed to use the Braun Oral-B toothbrush. This toothbrush is very effective and prevents the patient from trying to scrub the gums aggressively. Also, it should be noted that the patient had no occlusal factors to which reces-sion and loss of bone could be attributed.
Figure 7: A small submarginal graft is placed to remove the mucosa pres-ent and apically position the mucosa that was present on tooth #4 & #5. This step is the key to the long-term stability of the procedure.
Figure 5: The flap is sutured in place using 6-0 Vicryl sutures with inter-rupted suturing, as well as sling sutures to closely adapt the flap at the line angles.
The Use of PerioDerm for Root Coverage and Correction of Insufficiently Attached Gingiva55

CASE 505
Figure 1: This patient is ready to undergo a periodontal-restorative procedure on tooth #2 & #3. Biologic shaping will be undertaken to create a smooth root surface that is free from any irregularities. An article discussing the technique of biologic shaping was presented in a recent issue of Chairside magazine.6 Other articles discussing biologic shaping can be found in earlier issues of Chairside magazine, the International Journal of Periodontics and Restorative Dentistry, and General Dentistry.7-10
Figures 2a–2e: Biologic shaping of the tooth surface to remove all irregularities, including the furcation present on the buccal. All CEJs are removed to create a smooth surface that can easily be cleaned by the patient and hygienist. Proper osseous contouring also takes place, so that the flap will lie upon an osseous surface that is conducive to minimal probing depth.
2c
2d
2a
2b 2e
www.chairsidemagazine.com56

Figure 3: The PerioDerm that will be used to cover the root surface with severe dehiscence. Note the consistent thickness of the PerioDerm. I rec-ommend using the thick PerioDerm, instead of the thin variety.
Figure 6: The final restoration in place after positioning of any muscle fibers apically. Optimum gingival health, as well as the significant coverage of the mesiobuccal root by the location of the final restoration, is clearly visible. Thank you to Dr. John Hosner for the beautiful restorative work.
Figure 4: To date, almost all cases shown using substitutes for palatal tissue deal only with root coverage and also have papilla present to suture. Because there is a restorative component to this case, no papilla remains. The periosteum was preserved initially, so the PerioDerm is sutured in place to the periosteum.
Figures 5a, 5b: Primary closure is achieved as well as possible. Both 5-0 Chromic Gut (stabilizing the PerioDerm) and 6-0 Vicryl (stabilizing the flap) are used to suture the case. 5-0 Chromic Gut was also used to suture the flap in place.
5a
5b
The Use of PerioDerm for Root Coverage and Correction of Insufficiently Attached Gingiva57

CASE 606
Figure 1: This case is a combined periodontal-restorative procedure. Provi-sional restorations and core buildups were placed, removing all decay. It is critical for the surgeon to have vertical access when treating teeth that are going to be restored, and this can only be accomplished with provisionals.
Figure 4: After a split-thickness flap is performed, there is significant indication of the location of the existing margins present in the furcations of tooth #30 & #31.
Figure 2: Removal of the provisionals reveals the absence of decay and placement of the core with Core Paste® Enamel (DenMat; Santa Maria, Calif.).
Figure 5: This image reveals the significant presence of a horizontal com-ponent of the furcation on tooth #30.
Figure 3: Because the patient is in need of increased attached gingiva — or, more importantly, connective tissue — the retromolar tissue is removed and the connective tissue aspect is kept for placement to increase attached gingiva.
Figure 6: The connective tissue from the retromolar area is split to create more surface area to cover the surface of tooth #31, increasing the con-nective tissue.
www.chairsidemagazine.com58

Figure 7: The furcations on tooth #30 & #31 have been removed, and the teeth biologically shaped. PerioDerm is placed buccally on tooth #30 to increase the connective tissue, and the connective tissue from the retro-molar is placed on tooth #31.
Figure 10: After the secondary procedure is allowed to heal, a significant increase in tissue quality on both tooth #30 & #31 can be seen. There is scarring present at the base of the tissue, which will prevent any pulling of muscle fibers in an apical direction of the added tissue. Note that the provisionals are not properly contoured in the furcation area, as they should conform to the shaped furcations, but optimum health of the tissue-tooth interface is evident. CM
Figure 8: Primary closure is undertaken using both continuous sutures (5-0 Chromic Gut) and 6-0 Vicryl sutures placed in an interrupted fashion. Mattress sutures are also used to ensure that the flaps are closely adapted at the line angles, which will provide a blood supply to the flap and quick healing of the tissue.
Figure 9: This image demonstrates the close relationship between the patient’s own connective tissue and the PerioDerm. Clinically, the two cannot be told apart. During this visit, all muscle fibers and mucosa are positioned apically to the PerioDerm and the patient’s own connective tissue. A continuous suture is placed to position the tissue in this area.
Dr. Daniel Melker is in private practice in Clearwater, Fla., and lectures nationwide on periodontics and prosthodontics. Contact him at 727-725-0100.
REFERENCES
1. AATB Standards for Tissue Banking, American Association of Tissue Banks, McLean, Va., www.aatb.org.
2. Current Policies and Procedures of MTF, Musculoskeletal Transplant Foundation, Edison, N.J., www.mtf.org.
3. Sullivan HC, Atkins JH. Free autogenous gingival grafts. 3. Utilization of grafts in the treatment of gingival recession. Periodontics. 1968 Aug;6(4):152-60.
4. Khuller N. Coverage of gingival recession using tunnel connective tissue graft technique. J Indian Soc Periodontol. 2009 May;13(2):101-5.
5. Allen EP. Subpapillary continuous sling suturing method for soft tissue grafting with the tunneling technique. Int J Periodontics Restorative Dent. 2010 Oct;30(5):479-85.
6. Melker DJ. Biologic shaping from a restorative perspective. Chairside. 2013;8(1): 64-8.
7. Melker DJ. Periodontal photo essay. Chairside. Summer 2010;5(3):50-54.8. Melker DJ. Biologic shaping. Chairside. Spring 2010;5(2):39-42.9. Melker DJ, Richardson CR. Root reshaping: an integral component of periodontal
surgery. Int J Periodontics Restorative Dent. 2001 Jun;21(3):296-304.10. Tucker LM, Melker DJ, Chasolen HM. Combining perio-restorative protocols to
maximize function. Gen Dent. 2012 Jul-Aug;60(4):280-7.
The Use of PerioDerm for Root Coverage and Correction of Insufficiently Attached Gingiva59
Related Documents