Florida State University Libraries Electronic Theses, Treatises and Dissertations The Graduate School 2005 The Teaching Methods of Lewis Hugh Cooper Matthew Blane Morris Sr. Follow this and additional works at the FSU Digital Library. For more information, please contact [email protected]

Welcome message from author
This document is posted to help you gain knowledge. Please leave a comment to let me know what you think about it! Share it to your friends and learn new things together.
Transcript
Florida State University Libraries
Electronic Theses, Treatises and Dissertations The Graduate School
2005
The Teaching Methods of Lewis HughCooperMatthew Blane Morris Sr.
Follow this and additional works at the FSU Digital Library. For more information, please contact [email protected]
THE FLORIDA STATE UNIVERSITY
SCHOOL OF MUSIC
THE TEACHING METHODS OF LEWIS HUGH COOPER
BY
MATTHEW BLANE MORRIS, SR.
A Treatise submitted to the
School of Music
in partial fulfillment of the
requirements for the degree of
Doctor of Music
Degree Awarded:
Spring Semester, 2005
The members of the Committee approve the treatise of Matthew B. Morris defended
on 11/29/04.
Jeff Keesecker
Professor Directing Treatise
Eric Olson
Outside Committee Member
Patrick Meighan
Committee Member
Seth Beckman
Committee Member
The Office of Graduate Studies has verified and approved the above named committee
members.

The author would like to express his deep love and appreciation to his mother and father
for their love and support, and for instilling in him the hunger for learning and the inner
drive for the pursuit of excellence. The author would also like to thank his wife and
children for their patience and unwavering support during the long road toward the
completion of this degree.
iii
ACKNOWLEDGEMENTS
The author would like to express his appreciation to Professor Lewis Hugh Cooper for his
kindness and assistance in the completion of this project. Studying his life and work has
been enlightening and challenging. It is the author’s pleasure to honor his outstanding
contribution to the art of double reed playing and the music community at large with this
document. The author would also like to thank Dr. Nancy Fowler and Professor Jeff
Keesecker for their tireless support and encouragement.
iv
TABLE OF CONTENTS
LIST OF FIGURES vii
ABSTRACT ix
1... BIOGRAPHY OF LEWIS HUGH COOPER 1
Early Training 1
Beginning the Bassoon 2
High School 2
University of Michigan 2
War Time 3
University of Michigan Faculty 5
Designer and Technician 5
Service to the Musical Community 6
2... FOUNDATIONAL ELEMENTS OF BASSOON PERFORMANCE 7
Breathing 7
Embouchure 10
Tone 13
Tone Production 13
Tone Color 15
Intonation 16
Articulation 19
Mechanics of Articulation 20
Cooper’s Approach 21
Repeated Tonguing 25
Digital Technique 29
Flicking 31
Vibrato 33
Theory 33
Pedagogy 34
3... THE REED 37
Selection of the Cane 37
Preparation the Cane: A Two Step Approach 41
v
Corrective sanding and Scraping 41
Soaking 42
Profiling 44
Shaping 46
Forming the Tube 47
Beveling 47
Scoring the Cane and Establishing the Directionality 49
and Degree of Slippage
Finishing 51
Cutting in the Basic Blade Pattern 51
Cooper’s Parallel Scrape Reed 52
Cooper’s Seven Step Finishing Procedures 54
Reed Acoustics 57
The effect of the Bocal on Reed Contribution 58
4... TEACHING 61
Study Materials 61
Teachers Role 64
Developing Musicianship 64
Artistry/Interpretation 64
Additional Skills 65
SUMMARY 67
APPENDIX 69
BIBLIOGRAPHY 71
BIOGRAPHICAL SKETCH 74
vi
LIST OF FIGURES
CHAPTER 2
2.1 Bassoon Embouchure 12
2.2 Acoustics of Timbre 15
2.3 The Tongue/Reed Interface 20
2.4 Initiations 22
2.5 Articulative Nuance 24
2.6 Bassoon Tongue Position 25
2.7 The Resonant Termination 26
2.8a Choice of Syllable 27
2.8b Choice of Syllable (Cont.) 27
2.8b Choice of Syllable (Cont.) 28
2.9 Picking Fingers 31
2.10 Metered Flicking Technique 32
CHAPTER 3
3.1 Gouge Types 37
3.2 Irregularities in the Gouge Surface 40
3.3 Stepped Arrowhead 45
3.4 Reference Point for Back Thickness 46
vi
3.5 Bevel Variants 48
3.6 Four Functions of Slippage 49
3.7 Cutting in the Basic Blade Pattern 51
3.8 Reed Blade Functional Topography 53
3.9 Finishing Procedures 54
3.10 Diagram of the Coupled System 57
3.11 Influence of the Bocal Length on the Missing Volume 58
CHAPTER 4
4.1 Rotary Torquing 63
vii
ABSTRACT
This treatise examines the teaching methods of Lewis Hugh Cooper, Professor Emeritus
of Bassoon at the University of Michigan. The first chapter is a biographical sketch
detailing his early life as a boy in Pontiac, Michigan, during the depression era, and
follows his growth and development from his days as student at the University of
Michigan, his activities during WWII, and his years as a member of the University of
Michigan Faculty. The second chapter examines his pedagogical methods concerning the
basic fundamentals of bassoon performance. It details the scientific nature of his
approach and his means of quantifying the concepts of breathing technique, articulation,
intonation, digital technique, and tone. The third chapter deals with his reed making
techniques and his methods of selecting and preparing the gouged cane prior to the
finishing process. This chapter also deals with his application of acoustics in reed design
and examines the bocal/reed interface and its effect on reed dimensions and structure.
Chapter four examines the printed study materials Cooper utilized and his philosophical
criteria for selecting them. It also examines his feelings on the orchestral career path and
specific skills required. The chapter concludes by detailing his general philosophy of life
and his view of the role of the teacher in society.
ix
1
CHAPTER 1
BIOGRAPHY OF LEWIS HUGH COOPER
Early Training
Lewis Hugh Cooper was born in a back bedroom in the home of his maternal
grandparents, William and Katherine Everett, December 31, 1920, in Pontiac, Michigan.1 His
father, Lewis Cooper, was an automobile mechanic at the experimental auto division of Pontiac
Motor Car Company (Pre-General Motors) and his mother, Gladys Everett Cooper, was a
homemaker and sales manager of the infant section of the Sears and Roebuck department store in
Pontiac. By age six, Cooper began piano lessons with a local German pianist, but found his
teacher’s methods so harsh that the lessons soon ended. His next musical experience occurred
while he was attending junior high school. Grandfather Everett, who worked in various manual
trades, presented him with a Buffet sterling silver curved B-flat soprano saxophone, having
obtained the instrument on a whim at a “swap shop” by trading in some old radio parts.
Cooper had spent many hours in his grandfather Everett’s workshop as a boy, surrounded
by the assortment of tools, marveling at the various mechanical devices that filled the room.
Aware of his grandson’s curiosity, Everett thought that Hugh might be interested in the
saxophone and promised to give him the instrument if his grandson learned to play it. Cooper
loved the saxophone and found it much more enjoyable than the piano. He was so taken by its
design and mechanism, that after a short time he had completely disassembled and reassembled
the instrument. Eventually, Dale Harris, Superintendent of Instrumental Music for the Pontiac
School system and a former professional clarinetist, was contacted about providing Hugh with
instruction on his new instrument.2
Beginning the Bassoon
Although Cooper enjoyed his lessons on the soprano saxophone, Harris soon convinced
him that it was not a practical instrument and Cooper eventually saved enough money to
purchase a tenor saxophone from his mailman’s brother, formerly a member of a professional
concert band. Cooper practiced diligently on the tenor during junior high school and made
significant progress. By the time Cooper reached the 10th
grade, Harris, impressed by Cooper’s
1 Unless otherwise cited, all biographical information is from taped interviews with Lewis Hugh Cooper,
conducted by the author in his home, Ann Arbor, Michigan, Nov. 3 - 5, 2000.
2 Ronald Klimko, “New IDRS Honorary Member: Lewis Hugh Cooper,” The Double Reed, Vol. 20 no. 2
(1997): 12.

2
achievements, suggested that he consider switching to bassoon. The new instrument fascinated
Cooper. Harris first explained that the bassoon was difficult to play and that the reeds were quite
expensive, but added that there were certain advantages to playing the bassoon. Harris told him
that he would have his own unique part to play in the band and orchestra and that he could look
forward to the possibility of a playing career in one of the professional orchestras after
graduation. However, Cooper learned from Harris that the most significant aspect of playing the
bassoon was that he had an almost 100% chance of receiving some kind of financial assistance
for college tuition if he played it well. With the financial realities of the depression era, Cooper
saw the chance of receiving a college scholarship as a compelling reason to switch to bassoon.
High School
Cooper continued lessons with Harris throughout high school and steadily gained facility
on the bassoon. Although Harris was a knowledgeable musician, he was not a bassoonist and
could not always answer all of Cooper’s technical questions. Cooper was not allowed to use his
teacher’s lack of expertise as an excuse and was expected to find solutions for himself.
According to Cooper, “When the stick came down he [Harris] wanted the notes to be there, no
excuses.” He developed many of the fingerings found in his book, The Essentials of Bassoon
Technique, during high school, through the encouragement of his teacher. “Band and orchestra
were serious business,” and a student that could not meet Harris’ performance expectations was
encouraged to find another school activity to which he or she was better suited.
Harris also enforced strict standards in rehearsal decorum. Being late to rehearsal,
turning over a stand, dropping a mouthpiece cap, or dropping music could result in swift but
impersonal disciplinary action, regardless of the student’s status in the ensemble. Cooper
considers Harris’s strict discipline and unwavering commitment to excellence as the foundation
for his success as a teacher and performer.
University of Michigan
In 1938, Cooper made the decision to turn down a scholarship offered by Michigan State
University in order to attend the University of Michigan. Dale Harris had recommended the
University of Michigan program and set up an audition for Cooper with William D. Revelli, the
university’s relatively new Director of Bands. Revelli was impressed with Cooper but told him
that there was no scholarship money available and asked if he would be willing to work on
campus to earn money toward tuition. Cooper agreed and Revelli arranged for him to work as a
waiter in the University’s Michigan Union, earning 35 cents per hour, a substantial student wage
at the time. Once Cooper began attending the university, Revelli also used discretionary funds
from the Works Progress Administration to pay Cooper for copying music.3
3 United States President Franklin D. Roosevelt created the New Deal program in the 1930’s to counteract
unemployment and the problems caused by the Great Depression. As part of his New Deal policy, Roosevelt
created the Work’s Progress Administration (WPA) in 1935. Called the Work Projects Administration after 1939,
the WPA employed 9 million people in various public works projects between 1935 and 1943.
3
Cooper considers William D. Revelli to be one of the finest conductors and musicians he
has ever known and one of the major influences in his musical career.4 Like Harris, Revelli was
a strict disciplinarian and an exacting conductor.
Revelli joined the University of Michigan faculty in 1935, having established a national
reputation as a high School band director in Hobart, Indiana. Considered one of the most
influential figures in the history of the American concert band, Revelli is responsible for
establishing a number of national collegiate and school band director associations, such as the
College Band Directors National Association and the School Band Directors National
Association.5 A great champion of the concert band, Revelli was closely associated with such
figures as Percy Grainger, Karel Husa, Morton Gould, and Vincent Persichetti, associations that
led to a number of commissions for band. In 1971, after thirty-six years on the University of
Michigan faculty, Revelli retired from teaching.6 According to Cooper, “If you could satisfy
Revelli, you could play for any conductor in the world.” In his opinion, “The old recordings of
the University of Michigan Symphony Band, under Revelli, are absolute perfection.”7
During the years 1938-41, Ann Arbor had become a popular performance venue for some
of America’s foremost symphony orchestras. Since the University of Michigan was without a
bassoon instructor, Cooper would work his way backstage after a concert to “ask for advice”
from the members of the bassoon section. He lists Hugo Fox of the Chicago Symphony, Sol
Schoenbach of the Philadelphia Orchestra, and Simon Kovar of the New York Philharmonic, as
his “teachers”; they, among others, gave freely of their time and expertise.8
War Time
Around 1942, with the United States embroiled in the Second World War, Cooper, like
many young men and women of that time, was expected to support the war effort. He had held
his position in the University Union from the beginning of his college career, but, having become
a newlywed in January of 1940, he secured a second job at the University Hospital as an orderly
on the night shift. Due to Cooper’s rigorous physical schedule, his university physician ordered
him to drop out of school or quit work. In 1941, having made the difficult choice to drop out of
school to support himself and his wife, Cooper left the hospital for a higher paying job with the
Ford Motor Company at the Willow Run Bomber Plant near Ypsilanti, Michigan. He was
employed initially as a clerk in the Blue Print Crib, and then later, due to his hospital
background, he was transferred to the embryonic Flight Aero-Medical Department where Ford
Engineers were constructing a “State of the Art” decompression/cold room chamber for use in
both medical and engineering research.
As this new field was without a pool of trained technicians, Cooper and other department
members were given extensive training in the subject. This training included trips to the Mayo
4 Ibid. 5 Joseph Dobos, “Done With Joy-The Musical Adventure of William Revelli,” WWW.jewelmusic.com.,
2001. 6 Ibid.
7 Ibid.
8 “New IDRS Honorary Member,” 12.
4
Clinic for practical experience working in the chamber there. After several months of training,
Cooper was promoted to Supervisor of the Aero-Medical Department. Once the chamber at
Willow Run was completed, he became involved with numerous war related research projects,
often working in conjunction with the Air-Corp personnel from Wright Field. Cooper also
recalls numerous occasions where Charles Lindberg served as a research subject in the chamber.
According to Cooper, Lindberg was convinced that the American Military was ill prepared to
wage war against Nazi Germany. Partially as a result of Lindberg’s influence, Henry Ford took
the initiative and broke ground for construction of the Willow Run Bomber Plant months prior to
official government approval or funding. In Cooper’s words, “Ford’s insightful act ‘jump
started’ production of thousands of B-24 ‘Liberator’ bombers that ultimately played a major role
in the defeat of Hitler’s Nazi war machine.” Coopers work in the Aero-Medical unit continued
and as the physical rigors of simulated and actual high altitude flights with the Ford flight crews
required the same physical attributes as a crew member, he was granted an occupational
deferment from military service which had to be reviewed for extension on a monthly basis by
both military and Ford administrators.
During the three-year period from 1942-1945, while Cooper was working for the Ford
Company, he also found work as a free-lance musician in the Detroit area. Cooper had made the
acquaintance of local musicians who also worked at the plant, including members of the Detroit
Symphony, and was recommended by his co-workers for playing engagements. He also
performed in several Ann Arbor dance bands, playing clarinet, tenor saxophone, and bassoon.
These bands consisted mainly of students from the University of Michigan School of Music and
performed every weekend at the Michigan Union, Women’s League and other large venues; the
musicians earned about eight dollars per night for three hours work.
During the course of Cooper’s tenure on the Aero-Medical unit, he had unknowingly
suffered an Aeroembolism of his heart muscle while working at a simulated altitude of over
45,000 feet in the decompression chamber. In 1945 the Bomber plant was shut down. Due to
the loss of his research position, Cooper lost his occupational deferment and received his
induction notice. During a routine physical exam at an induction center in Detroit, the embolism
was detected and Cooper’s temporary occupational deferment became a permanent medical
deferment. Because of the nature of his work at Ford, Cooper was able to obtain a job at the
Fisher Body Plant of the General Motors Corporation in Pontiac, Michigan, assisting with
routine physical exams for potential employees.
One of the most important connections Cooper had established during his time with Ford
was his acquaintance with the principal clarinetist of the Detroit Symphony, Marius
Fossenkemper. In addition to his position with the symphony, Fossenkemper was active as a
conductor and teacher at Eastern Michigan University and was a contractor for a number of
musical organizations in the area. Fossenkemper had been impressed with Cooper’s playing and
hired him often. In the spring of 1945, Fossenkemper notified Cooper of a bassoon opening in
the Detroit Symphony and arranged for him to play for its conductor, Karl Kruger, who offered
him a position in the orchestra.
Soon after his appointment to the Detroit Symphony, Cooper learned that the University
of Michigan Symphony Band was performing in Pontiac and decided to attend the morning
rehearsal to greet Revelli. After the rehearsal, Cooper was invited to join the group for lunch.
During the walk to the restaurant, Cooper shared the news of his symphony appointment with

5
William Revelli, who promptly invited him to join the university faculty as a quarter-time
instructor of bassoon, pending the approval of then Dean Earl V. Moore.
University of Michigan Faculty
Not only did Cooper have joint responsibilities with the Detroit Symphony and the
University of Michigan, he also performed with various professional groups in the Detroit area
including the Detroit Little Symphony, Detroit Light Opera, Leonard Smith’s Concert Band, and
appeared on radio broadcasts of the Ford Sunday Evening Hour, Reichold Hour and Edison
Hour, in addition to various professional groups in the Detroit area. Between 1945-1960 he also
served as adjunct instructor of bassoon for Wayne State University while teaching bassoon at the
Teal School of Music in Detroit.9 By 1964, Cooper had achieved full-time faculty status at the
University of Michigan and the rank of Associate Professor of Music. He resigned from the
symphony that same year to fully devote himself to teaching. 10
Although Cooper had left the orchestra, he remained an active performer, appearing in
numerous concerts and recitals throughout his teaching career. These performances included
appearances with the University of Michigan Faculty Woodwind Quintet, a group he helped
establish. In addition to the Quintet appearances, he performed in the Faculty Chamber Series,
Contemporary Music Festivals, and other miscellaneous performing groups. Cooper’s activity
with the Quintet was particularly important, for it was among the first university woodwind
quintets for which load credit was generated for its members participation.
Designer and Technician
The music stores of Detroit often utilized the expertise of local musicians to assess the
quality of their inventory of instruments. Fred Merrich of Meyers Music Company called on
Cooper regularly for such service. Cooper had obtained a fine 8000 series Heckel bassoon from
principal bassoonist Charles Sirard, which had been voiced and regulated by the noted repairman
and craftsman W. Hans Moennig, and began comparing the playing characteristics and tone hole
dimensions of the new Püchner bassoons to this instrument. He would then share his
observations with Merrich, who would have the store repairmen service the instruments. Even
so, Cooper often found that he needed to correct adjustments made by the repair staff.
Dissatisfied with the work done in his shop, Merrich suggested that Cooper begin servicing the
instruments himself. Over time, Cooper began writing down his observations for Merrich, who,
in turn, gave them to the Püchner Company. By the early 1960s, impressed by Cooper’s
suggestions on tone hole placement and bore dimensions, the Püchner Company of Nauheim,
(then West Germany), began manufacturing a line of Püchner bassoons based on Cooper’s
dimensions. By 1976, the Adler-Blechlas Instrumentum manufacturing firm also began to
produce a Cooper Model bassoon.
9 Lewis Hugh Cooper, Pre-1986, Curriculum Vitae, Document in the possession of Professor Cooper, Ann
Arbor; Michigan, 1.
10 Klimko, “New Honorary IDRS Member,” The Double Reed, 12.

6
Service to the Musical Community
From the very onset of his time with the university, Cooper was active as a clinician,
lecturing throughout the United States, Canada, and Europe. In addition to teaching bassoon,
acoustics, and coaching chamber music, he served on various University Councils, the Faculty
Senate, and numerous departmental committees. Throughout his professional career, Cooper has
continued to be in demand as a lecturer on topics ranging from acoustics, wind pedagogy, and
reed making to bassoon design, repair, and maintenance.
In 1972, along with a number of key individuals, Cooper helped establish the
International Double Reed Society (IDRS) and hosted the first annual conference in Ann
Arbor.11
The IDRS continues to enlarge its membership, which includes many of the most
renowned double reed players of the twentieth and twenty-first centuries. From its earliest
publications, To the World’s Bassoonists, To the World’s Oboists and The Journal of the
International Double Reed Society, to its present publication, The Double Reed, this organization
has made it possible for students, amateurs, and professionals to gain access to a broad range of
information associated with the history, development, pedagogy, literature and performance
issues associated with double reed instruments. In addition to being a founding member of the
society, Cooper served as its Vice President from 1977-1983 and has contributed articles on
various aspects of bassoon performance and pedagogy. In 1949, Prior to the establishment of the
IDRS, he published several articles called the “Bassoons Clinic Series” in Etude Magazine.
Custom Music Company has also reprinted and distributed several major articles that originally
as appeared IDRS publications.
In 1997, after fifty-two years of meritorious service, Lewis Hugh Cooper retired from the
University of Michigan’s active faculty and assumed emeritus status. That same year, he was
named an honorary member of the IDRS. Acknowledging Cooper’s achievements in pedagogy,
research, and performance, Ronald Klimko, co-editor of The Double Reed, wrote the following:
“He exemplifies the consummate model and inspiration for all of us.”12
As of this writing,
Cooper lives in Ann Arbor with his wife, Nadillae (Nan), and maintains a relaxed schedule of
bassoon repair and private lessons. He is well-loved and cared for by his daughter, Judith Ann,
son David and his grand-children, great-grandchildren, and great-great grand children.
11 Ibid. 12 Klimko, “New Honorary IDRS Member,” 12.
7
CHAPTER 2
FOUNDATIONAL ELEMENTS OF BASSOON PERFORMANCE
Hugh Cooper characterizes his approach to fundamentals in the following way:
My approach to teaching is one that recognizes the analytical capabilities
unique to the human species. There are two kinds of musicians, those who
perform primarily by rote, and those who maintain intellectual control
over their performance. Rote response represents man’s lowest form of
learning, the way we teach animals tricks. Certainly, university students
are deserving of a more intellectual basis for their music making,
especially in view of the superior results achieved. Intellectual players,
because they are capable of adjusting to an ever-changing environment,
will always triumph over animalistic responses, no matter how adept a rote
player. If all subject matter were taught like most music performance,
mankind would not yet have invented the wheel.1 What is happening and
why? The power of observation and intellectual curiosity – the two
necessary attributes of any truly educated individual.2
The author’s goal in this chapter is to examine the specifics of Cooper’s approach
to teaching the fundamentals of bassoon playing to include: breathing, embouchure, tone
and tone production, intonation, articulation, digital technique and vibrato. For each of
these topics, the author will follow a format that begins with an overview of selected
sources on one of the above, followed by an examination of Mr. Cooper’s views and
teaching methods on the topic.
Breathing
There are differing notions concerning the physiology of proper breathing and
breath control among teachers and performers. According to science, breathing is an
involuntary act, controlled in the brain stem, and not a learned behavior. However, the
young wind player quickly realizes that the force of breath required to maintain reed
vibration or produce adequate projection is very different than normal breathing. In his
book, The Woodwinds, Everett Timm makes the following observation: “To play an
1 Gerald E. Corey, “Bassoon Teaching in the USA and Canada 1930-1992,” lecture presented at
the 21st annual conference of the International Double Reed Society, Frankfurt, Germany, August, 1992.
2 Ron Huff, “Pedagogy used in Developing Rapid Articulative Facility,” (Phone interview with
Hugh Cooper, 27 December 2000), obtained from Hugh Cooper 16 April 2004, 20.

8
instrument, we must make the following controlled changes, which are foreign to the
natural process: (1) inhalation is more rapid than normal, and (2) exhalation is slower and
is metered out under more pressure.”3 Mark Popkin concurs: “Forcing air through the
bassoon reed is an unnatural act since the reed’s diameter is considerably smaller than the
smallest portion of the human windpipe. Therefore, extra effort must be expended to
‘breathe’ through the bassoon (or any wind instrument).”4
For the wind player, the involuntary nature of breathing presents a problem.
Since breathing is automatic, most students are unaware of the musculature involved in
inhalation and exhalation. They may find it difficult to pinpoint the specific muscles
groups needed to affect the “controlled changes” suggested by Timm.
The first step in educating students is to help them to become aware of the
internal breathing apparatus. Secondly, students need to know how best to use the
musculature to combat the resistance of the unwilling and inert instrument.5 Arthur
Weisberg, author of The Art of Wind Playing, adds the following observations: “The reed
instruments by themselves have absolutely no resonance. The bodies of the instruments
are purposely made to be stiff and not to vibrate. Thus, when the tongue is applied to the
reed, the sound stops instantaneously; there being nothing about the instrument to help
keep it going.”6
As the student develops, he/she can encounter conflicting opinions regarding the
“correct” approach to proper breathing, specifically, the function of the diaphragm in the
process of expiration and control (support): The following description appears in the
2000 version of Microsoft Encarta Encyclopedia:
The process of breathing is generally divided into two phases, inspiration and
expiration. In inspiration, air is moved into the lungs. In expiration, air is forced
out of the lungs. The lungs themselves have no muscle tissue, their movements
are controlled by the rib cage and the diaphragm. During inspiration the muscles
around the rib cage contract, lifting the ribs upward and outward, and lowering
the dome of the diaphragm until it forms a nearly flat sheet. As a result of these
changes, the chest cavity expands. Because the lungs are attached to the chest
cavity, they also expand. With the enlargement of the lungs, air pressure inside
the lungs falls below the pressure of the air outside the body, creating a vacuum,
and air from outside the body rushes into the lungs.7
3 Everett Timm, The Woodwinds (Boston: Allyn and Bacon, Inc. 1964), 4.
4 Mark Popkin, Bassoon Reed Making: Including Bassoon Repair, Maintenance and Adjustment
and an Approach to Bassoon Playing (Evanston: The Instrumentalist Co., 1969), 27.
5 Timm, 4.
6 Arthur Weisberg, The Art of Wind Playing (New York: Schrimer Books, 1975), 36.
7 Microsoft Encarta Encyclopedia 2000, Microsoft Works Suite 2000, “Respiratory System.”
[CD-ROM] (Microsoft Corporation, 1983-1999).
9
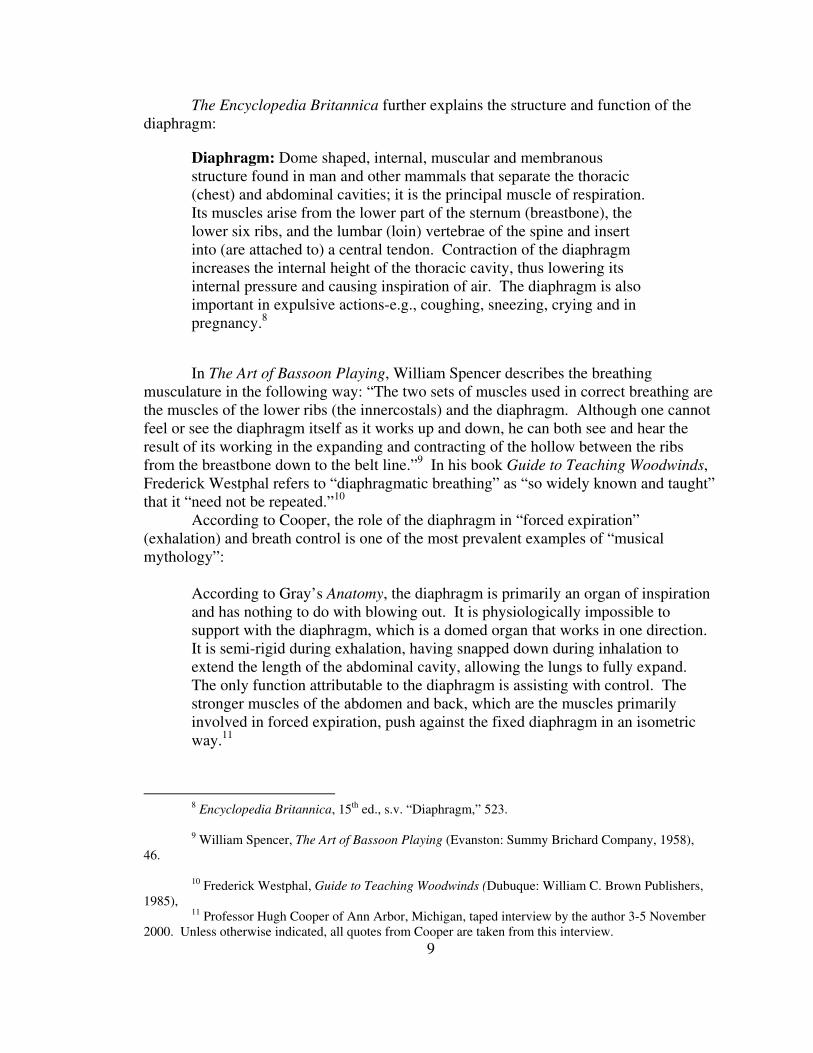
The Encyclopedia Britannica further explains the structure and function of the
diaphragm:
Diaphragm: Dome shaped, internal, muscular and membranous
structure found in man and other mammals that separate the thoracic
(chest) and abdominal cavities; it is the principal muscle of respiration.
Its muscles arise from the lower part of the sternum (breastbone), the
lower six ribs, and the lumbar (loin) vertebrae of the spine and insert
into (are attached to) a central tendon. Contraction of the diaphragm
increases the internal height of the thoracic cavity, thus lowering its
internal pressure and causing inspiration of air. The diaphragm is also
important in expulsive actions-e.g., coughing, sneezing, crying and in
pregnancy.8
In The Art of Bassoon Playing, William Spencer describes the breathing
musculature in the following way: “The two sets of muscles used in correct breathing are
the muscles of the lower ribs (the innercostals) and the diaphragm. Although one cannot
feel or see the diaphragm itself as it works up and down, he can both see and hear the
result of its working in the expanding and contracting of the hollow between the ribs
from the breastbone down to the belt line.”9 In his book Guide to Teaching Woodwinds,
Frederick Westphal refers to “diaphragmatic breathing” as “so widely known and taught”
that it “need not be repeated.”10
According to Cooper, the role of the diaphragm in “forced expiration”
(exhalation) and breath control is one of the most prevalent examples of “musical
mythology”:
According to Gray’s Anatomy, the diaphragm is primarily an organ of inspiration
and has nothing to do with blowing out. It is physiologically impossible to
support with the diaphragm, which is a domed organ that works in one direction.
It is semi-rigid during exhalation, having snapped down during inhalation to
extend the length of the abdominal cavity, allowing the lungs to fully expand.
The only function attributable to the diaphragm is assisting with control. The
stronger muscles of the abdomen and back, which are the muscles primarily
involved in forced expiration, push against the fixed diaphragm in an isometric
way.11
8 Encyclopedia Britannica, 15th ed., s.v. “Diaphragm,” 523.
9 William Spencer, The Art of Bassoon Playing (Evanston: Summy Brichard Company, 1958),
46.
10 Frederick Westphal, Guide to Teaching Woodwinds (Dubuque: William C. Brown Publishers,
1985), 11 Professor Hugh Cooper of Ann Arbor, Michigan, taped interview by the author 3-5 November
2000. Unless otherwise indicated, all quotes from Cooper are taken from this interview.
10
He suggests three approaches for developing proper breathing and breath control: (1)
breath exercisers, (2) “hissing” or “sizzling,” and (3) a pressure gauge.
The “Breath Builder” is a hollow, plastic cylinder with a ping-pong ball inside.
One end is closed, while the other end has multiple holes of graduated size in its end-cap
(three to four): the largest of these holes has a spout that allows it to be fitted with a
flexible tube, about four inches long. By taking the tube in the mouth during exhalation
and inhalation, the individual can cause the ball to rise in the cylinder by maintaining
constant air pressure. Any reduction in air pressure causes the ball to drop. Closing all
but one of the remaining holes allows the user to regulate the resistance: larger hole less
resistant, smaller hole more resistant. Devices of this nature are used in hospitals for
patients suffering from upper respiratory conditions.12
“Hissing” or “sizzling” involves blowing air through clenched teeth while
partially blocking the space between the teeth with the tongue. This practice is
comparable to an individual running with ankle weights. The procedure is as follows: the
front of the tongue is placed in the gap between the upper and lower teeth, forming an
obstruction and then the individual blows with great force. An audible hiss is created as
the air passes around the tongue and through the teeth. For maximum effect, the hissing
sound should be maintained at full volume as long as possible. This exercise conditions
the muscles to meet the resistance of the instrument in much the same way that an on-
deck batter in baseball makes his bat “light” by adding weights during warm-up swings.
The author observed the “hissing” method in use during brass sectionals of the East
Carolina University Marching Band. The section leader suggested that the technique was
designed to condition players for the extreme fortes required on the field.13
A third procedure involves the use of an apparatus consisting of a gauge designed
for measuring pneumatic pressure in inches of water pressure, a flexible plastic tube and
an inflation needle. One end of the flexible tube is attached to the input of the gauge and
the inflation needle to the other end of the tube. With the tip of the inflation needle
placed between the lips in one corner of the mouth, the player blows into the bassoon.
The reading from the gauge indicates the “playing pressure” inside the oral cavity. By
using these readings as bench-marks, Cooper found that students could determine the
amount of breath force and support needed to produce a full resonant tone for every note
of the bassoon.
Embouchure
Frederick Westphal, William Spencer, and P. Terechin describe two types of
bassoon embouchures: the hard cushion and soft cushion. The hard cushion involves
pulling the lips tightly over the teeth and pulling the corners up and back as in smiling.
In photos of prominent bassoonists from the mid-twentieth century, one can see players
with the corners of the mouth pulled up and back in the smile position. Sol Schoenbach,
12 The author has observed the use of this device in teaching and in therapeutic applications in
hospitals for patients recovering from upper respiratory infections. 13 The author observed this technique in use while a student at East Carolina University.
11
former principle bassoon Philadelphia Orchestra 1946-1964, used of this type of
embouchure.14
In the hard cushion type, the positioning of the muscles creates an embouchure
that is described by Terechin as less flexible, resulting in greater damping of reed
vibration, less endurance and involves lower lip interference with the tongue in
articulation. In the soft cushion embouchure, the corners of the mouth are pushed
forward as in whistling and the lips are kept relaxed. The lips are kept relaxed and the
jaw is staggered downward, producing an overbite. The lips are then contracted around
the reed like a drawstring. Terechin describes the position of the lips as that used when
pronouncing the word “cue,” with the lower lip turned in slightly and the upper lip laying
freely on the reed.15
Mark Popkin, Professor of Bassoon at the North Carolina School of the Arts and
co-author of Bassoon Reed Making, cautions the reader to avoid both the hard and soft
cushion embouchure and hold the lips in the “natural position.” He feels that the
traditional bassoon embouchure, with the lower jaw receding, should be avoided, for it
uses only part of the lower blade and results in a muffled, unfocused tone.16
Homer
Pence and William Spencer share Popkin’s concern regarding over-dampening the reed,
yet, like Westphal, they emphasize the whistling position of the lips, indicative of the soft
cushion embouchure.17
Cooper advocates the use of the soft cushion embouchure as described by
Westphal, also encouraging the lower jaw position suggested by Pence and Spencer. He
finds that the amount of jaw stagger will vary according to the individual lip
configuration, reed style, and register. He describes the lip position as being “in front of
the teeth, pursed, as if to whistle.” He discourages the use of the “hard” or “jaw
supported” embouchure, indicating that this approach produces too much top to bottom
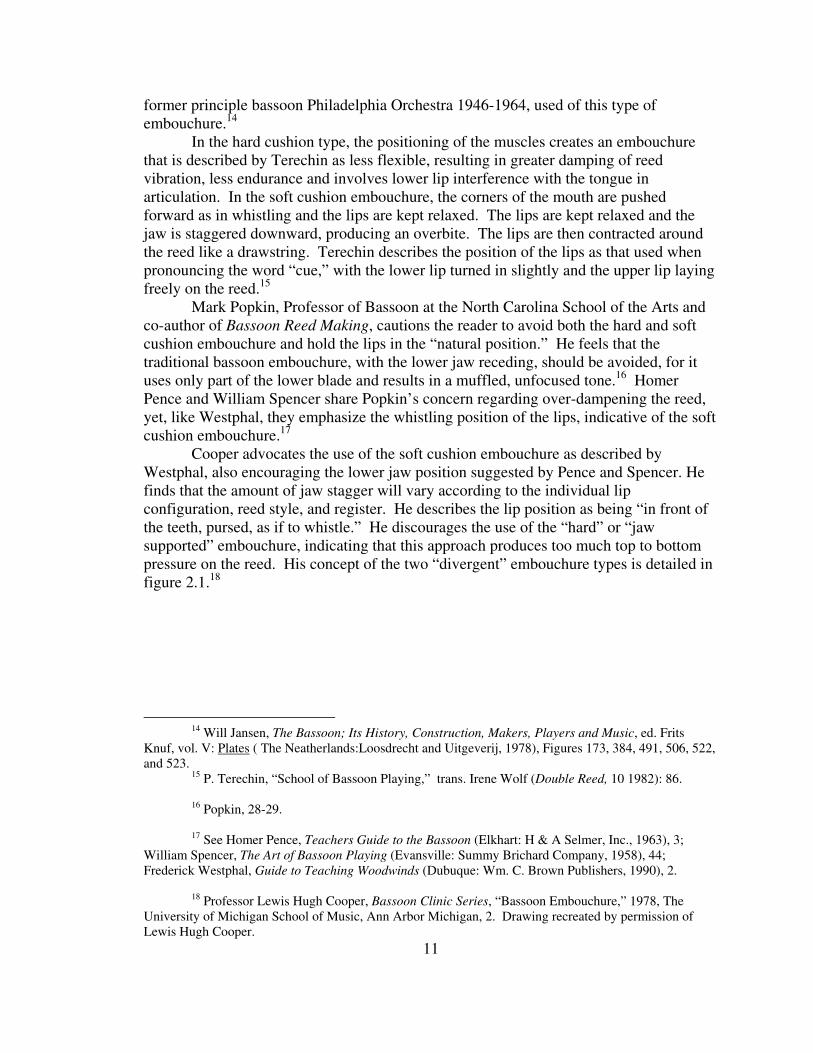
pressure on the reed. His concept of the two “divergent” embouchure types is detailed in
figure 2.1.18
14 Will Jansen, The Bassoon; Its History, Construction, Makers, Players and Music, ed. Frits
Knuf, vol. V: Plates ( The Neatherlands:Loosdrecht and Uitgeverij, 1978), Figures 173, 384, 491, 506, 522,
and 523. 15 P. Terechin, “School of Bassoon Playing,” trans. Irene Wolf (Double Reed, 10 1982): 86.
16 Popkin, 28-29.
17 See Homer Pence, Teachers Guide to the Bassoon (Elkhart: H & A Selmer, Inc., 1963), 3;
William Spencer, The Art of Bassoon Playing (Evansville: Summy Brichard Company, 1958), 44;
Frederick Westphal, Guide to Teaching Woodwinds (Dubuque: Wm. C. Brown Publishers, 1990), 2.
18 Professor Lewis Hugh Cooper, Bassoon Clinic Series, “Bassoon Embouchure,” 1978, The
University of Michigan School of Music, Ann Arbor Michigan, 2. Drawing recreated by permission of
Lewis Hugh Cooper.
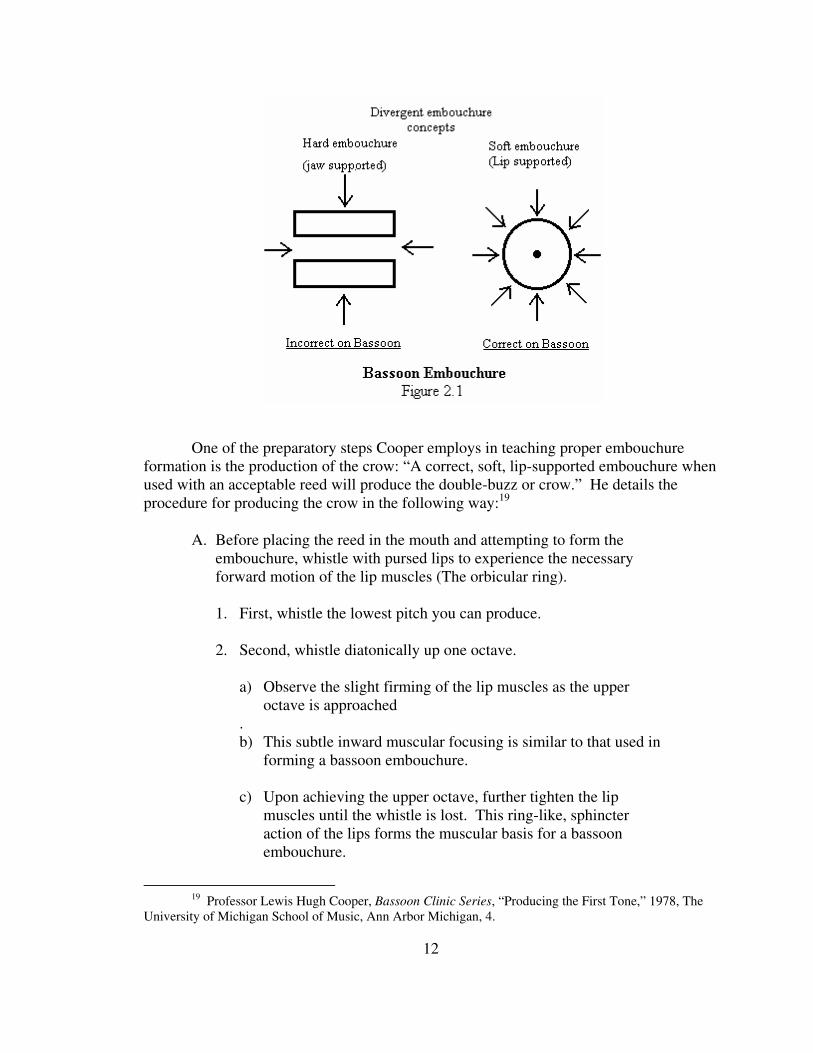
One of the preparatory steps Cooper employs in teaching proper embouchure
formation is the production of the crow: “A correct, soft, lip-supported embouchure when
used with an acceptable reed will produce the double-buzz or crow.” He details the
procedure for producing the crow in the following way:19
A. Before placing the reed in the mouth and attempting to form the
embouchure, whistle with pursed lips to experience the necessary
forward motion of the lip muscles (The orbicular ring).
1. First, whistle the lowest pitch you can produce.
2. Second, whistle diatonically up one octave.
a) Observe the slight firming of the lip muscles as the upper
octave is approached
.
b) This subtle inward muscular focusing is similar to that used in
forming a bassoon embouchure.
c) Upon achieving the upper octave, further tighten the lip
muscles until the whistle is lost. This ring-like, sphincter
action of the lips forms the muscular basis for a bassoon
embouchure.
19 Professor Lewis Hugh Cooper, Bassoon Clinic Series, “Producing the First Tone,” 1978, The
University of Michigan School of Music, Ann Arbor Michigan, 4.
12
13
B. Next, yawn to experience the feel of the jaw’s motion as it pivots
down and back from the maxillary hinge.
C. With the jaw somewhat staggered down and back, take a deep breath;
insert the blades of the reed into the mouth while holding the reed tube
with the fingers of the right hand.
D. Close the lips firmly around the reed up to the first wire position.
While in this pseudo-whistle configuration blow with firm abdominal
support as if blowing out the candles on a birthday cake (or hissing).
E. The above procedures, successfully executed, should result in the
production of a characteristic free, vibrant, multiphonic reed “crow.”
Tone
Pedagogical resources divide the discussion of tone into the physiological and the
aesthetic: “tone production” and “tone quality.” In this paper, the term “tone quality”
will refer to the issue of timbre or color, while “tone production” will refer to the physical
process of producing a sound on the bassoon.
For the development of a characteristic bassoon sound, authors such as Spencer,
Westphal, Pence, and Popkin agree that the student must first have an aural image or goal
for the tone. This image is developed by listening to recordings or live performances and
is supported by a fundamental grasp of embouchure formation, proper breathing, breath
control, breath support, and a properly adjusted reed and instrument. In addition to these
parameters, some authors emphasize the importance of an open and relaxed throat, free
breath, and intensity of air.20
Tone Production
Cooper makes the following statement regarding tone production: “Like all
double reeds, the bassoon is a WIND instrument. Without proper breathing habits and
breath support, optimum tone production cannot be achieved. Breath control is the basic
foundation for all tone production.” To prepare a student for producing his/her first
sounds on the bassoon, Cooper follows the steps outlined below:
1. “Crow” the reed several times.
2. Place the reed on the bocal alone and by using the necessary embouchure
manipulation produce the four semi-tone range of the coupled reed and
bocal system, paying special attention to the relaxed embouchure needed
to produce the B.21
20 Pence, 3; Spencer, 44; Westphal, 2.
21 Further explanation is provided in chapter three under “Bassoon Reed Criteria.”

14
3. Assemble the bassoon and assume the proper positional attitude for correct
use of the seat strap.
4. “Crow” the reed again several times.
5. Place reed firmly on the bocal, with a slight twisting motion, so that the
blade surfaces are in a horizontal plane.
6. Adjust the height and angle of the bassoon so the reed may be brought
horizontally straight back into the mouth.
7. Again, whistle and mentally recall the muscular feel involved in producing
the crow.
After the steps listed above, Cooper directs the student to proceed on to the
process of producing the first sounds:
1. Place the reed into the mouth, while fingering 2nd
space C and blow the
bassoon exactly the way the crow was produced no matter how bad it
sounds!
2. With the correct, relaxed, soft, lip supported embouchure the sound will be
very raucous and should be exactly ½ step flat!
3. If the pitch center is not ½ step flat, work again to relax the embouchure
by producing the reed crow and/or B with the reed and bocal combination.
Once the student has successfully completed these preparatory steps and achieved
the relaxed, “lip supported” embouchure depicted in figure 2.1, they are ready to produce
their first tone:
1. When a stable B can be consistently produced on the bassoon with the C
fingering, drive the sound with additional breath support until the pitch
center is raised ½ step to C. With correct support the pitch will literally
jump up the semitone. Do Not accomplish this pitch change by biting
with the embouchure.
2. Repeat the above process several times until a full, resonant, pitch
centered bassoon sound can be produced essentially with breath support.
3. IT IS IMPORTANT TO RECOGNIZE THAT PITCH LEVEL ON THE
BASSOON IS PRIMARILY MAINTAINED BY BREATH SUPPORT,
NOT EMBOUCHURE PRESSURE!! (In actuality, the above approach
somewhat exaggerates the breath embouchure relationship by using a low
register embouchure to produce the primary register; however, this
distortion is pedagogically sound as it tends to compensate for the natural
tendency to use excessive embouchure pressure without enough breath

support.). Try throughout this process, to maintain a maximum amount of
breath support, coupled with a minimum amount of embouchure pressure,
so as to produce a full, vibrant, resonant sound.
According to Cooper: “Proper adherence to the preceding procedures and concepts
should result in a full characteristic bassoon sound in a minimum length of time (usually
within the first session).”22
Tone Color
Cooper addresses the concept of tone color or timbre in the following way: “One
must learn to orient the proper mix of vibrancy (edge) and resonance (core) present in the
bassoon sound. It is important to recognize that any tonal concept on any reed instrument
will have two conceptual subdivisions.” He describes these subdivisions as (1) “The
performer's concept: that which the individual hears while producing the sound (Always
more vibrant, edgy, reedier and louder than that heard by the listener) and (2) The
listener’s concept: that which is perceived by an auditing individual in the audience
(Always darker, smoother, softer and less vibrant than that heard by the performer).”
Cooper adds “the closer the performer comes to matching his/her performer's concept to
an idealized listener's concept, the further he/she is from the goal. A desirable smooth,
dark, in-tune listener's concept is achieved by producing a vibrant, somewhat reedy, free,
full-blown performer's concept of tone. A covered, dark, restrictive, resistant,
performer's concept will result in a hard, inflexible, unexpressive and sharp listener's
concept.” The wedge in the figure 2.2 represents the core of resonance, and the wavy
line represents the vibrancy or “reediness” of the sound. As noted, a distance of fifteen to
twenty feet is the critical point at which “reediness” or edge begins to dissipate and
becomes absorbed by the “core of resonance.”23
Cooper adds the following: “In actual usage, the specific point of the mix will vary
according to the timbre and dynamic demands of the music being performed and
22 Cooper, Bassoon Clinic Series, “Producing the First Tone,” 4.
15
23 Ibid., 5.
16
precisely determined by the degree of cushioning used at the embouchure-reed
coupling.”24
Intonation
Many authors agree that the litmus test for measuring the student's mastery of all
previous concepts is his/her ability to play in tune. Intonation is a direct result of tone
production and a proper tone rests on control of the air and a well-balanced embouchure.
Others factors affecting pitch include, but are not limited to, the reed, the bocal, the
acoustical properties of the bassoon itself and the physiology of the performer. The
specific effects of the bassoon, the reed and bocal on intonation will be discussed in more
detail in later chapters.
Due to the number of factors that affect the tuning on bassoon, the most important
element in good intonation is the performer’s internal sense of pitch. Despite the mastery
of reed making, the finest bocal, the finest bassoon, and the greatest breath control, the
bassoon will still present the performer with tuning problems.
The traditional method for developing enhanced aural skills has focused primarily
on interval identification, melodic dictation, and rhythmic dictation. Cooper suggests the
introduction of musical acoustics into the traditional theory/ear training sequence,
advocating the inclusion of exercises for developing tuning acuity. He has found that
students lack an understanding of basic acoustics and the acoustics of the human ear,
displaying an uneasy reliance on the “limited capacities” of the equal tempered electronic
tuner: “Equal tempered tuners guarantee being out of tune on everything but the
fundamental and its various octaves, in comparison to the frequency requirements of our
non-linear hearing mechanism which is the final arbiter of the harmonic nature of man's
system (the natural overtone series).”
In 1991, at the 45th
annual Mid-West International Band and Orchestra Clinic in
Chicago, Cooper presented a lecture/demonstration entitled Partial Approach to
Bassooning, in which he discussed the physiological basis of sound, focusing on the
structure of the human ear. The first component he addresses is the eardrum, describing
it as a non-linear membrane (meaning not connected on all sides). Due to its structure,
the eardrum vibrates at whole number multiples of a fundamental when excited by an
external vibration traveling through the air. The second major component of the ear, the
cochlea, when uncoiled, resembles a geometric cone, which, like the non-linear
membrane, vibrates at whole number multiples of a fundamental. To explain this
phenomenon, he gives the following example:
Given a frequency of 100hz, the ear, comprised of a non-linear membrane
and a cone will, when excited by sound waves traveling through the
atmosphere, vibrate at the frequencies 100hz, 200hz, 300hz, 400hz and so
on. In acoustics, this pattern is recognized as the natural overtone series.
Therefore the harmonicity of man's music system is dictated by our
auditory receptors. The equal tempered scale represents a mathematical
24 Ibid.
17
formula designed to approximate the physiologically based acoustics of
the ear.25
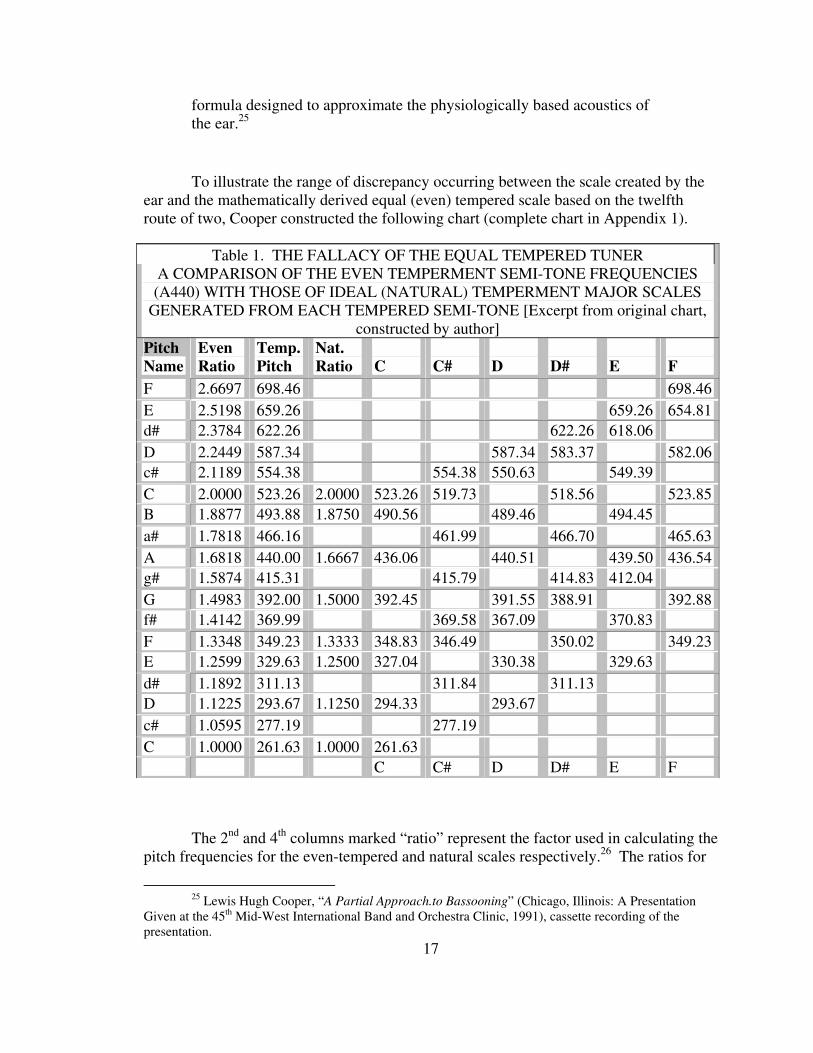
To illustrate the range of discrepancy occurring between the scale created by the
ear and the mathematically derived equal (even) tempered scale based on the twelfth
route of two, Cooper constructed the following chart (complete chart in Appendix 1).
Table 1. THE FALLACY OF THE EQUAL TEMPERED TUNER
A COMPARISON OF THE EVEN TEMPERMENT SEMI-TONE FREQUENCIES
(A440) WITH THOSE OF IDEAL (NATURAL) TEMPERMENT MAJOR SCALES
GENERATED FROM EACH TEMPERED SEMI-TONE [Excerpt from original chart,
constructed by author]
Pitch
Name
Even
Ratio
Temp.
Pitch
Nat.
Ratio
C
C#
D
D#
E
F
F 2.6697 698.46 698.46
E 2.5198 659.26 659.26 654.81
d# 2.3784 622.26 622.26 618.06
D 2.2449 587.34 587.34 583.37 582.06
c# 2.1189 554.38 554.38 550.63 549.39
C 2.0000 523.26 2.0000 523.26 519.73 518.56 523.85
B 1.8877 493.88 1.8750 490.56 489.46 494.45
a# 1.7818 466.16 461.99 466.70 465.63
A 1.6818 440.00 1.6667 436.06 440.51 439.50 436.54
g# 1.5874 415.31 415.79 414.83 412.04
G 1.4983 392.00 1.5000 392.45 391.55 388.91 392.88
f# 1.4142 369.99 369.58 367.09 370.83
F 1.3348 349.23 1.3333 348.83 346.49 350.02 349.23
E 1.2599 329.63 1.2500 327.04 330.38 329.63
d# 1.1892 311.13 311.84 311.13
D 1.1225 293.67 1.1250 294.33 293.67
c# 1.0595 277.19 277.19
C 1.0000 261.63 1.0000 261.63
C C# D D# E F
The 2nd
and 4th
columns marked “ratio” represent the factor used in calculating the
pitch frequencies for the even-tempered and natural scales respectively.26
The ratios for
25 Lewis Hugh Cooper, “A Partial Approach.to Bassooning” (Chicago, Illinois: A Presentation
Given at the 45th Mid-West International Band and Orchestra Clinic, 1991), cassette recording of the
presentation.

18
the even (equal) tempered scale are the product of multiplying by1.0595463, the twelfth
route of two. Since the octave is represented by the ratio 1:2 (expressed as 1to 2), the
number 1.0595463 is the product of dividing the octave into twelve equal parts
logarithmically.27
The even-tempered scale (column three) is constructed by multiplying
the given pitch in hertz by 1.05946328
. Notice that the first column consists of a two-
octave chromatic scale beginning on c1 and ending on c
3. Multiplying a given frequency
(261.63hz in this example) by 2 will produce the first octave above the given
fundamental. Therefore: 261.63hz (or c1) x 2=523.26hz (or c
2).
29 This pattern holds true
for all subsequent octaves above the fundamental.
The fourth column contains the ratios for the “natural” scale. Columns to the
right, read from bottom to top, are diatonic scales constructed on pitches of the even-
tempered scale as fundamental, then multiplied by the ratios from the natural scale. By
reading the chart left to right, one can track the differential between the even-tempered
pitches in column three and the same pitch name as they occur in the natural scale
(columns five through ten). One can see that when the pitches are sounded over different
fundamentals their tuning must be adjusted. In the key of C for example, the A would be
436.06hz, whereas in the key of D the A would be 441.51hz fundamental, can better
understand the necessity for constant adjustment.
Cooper suggests several methods for combating shortcomings in tuning acuity.
One approach utilizes three glass goblets. The procedure involves filling one of the
glasses with a random amount of water. After a tap pitch is established for this glass, the
second glass is filled until its tap pitch matches the pitch of the first; regulating its level
by pouring water in and out of the third glass. Cooper directs the teacher to “Repeat this
process many times, in a random way, on a daily basis until the student’s ears become
sensitized.” Cooper describes a second approach as “the beat phenomenon that occurs
when two pitches are somewhat dissimilar.” According to Cooper, the teacher should
have two students begin by holding a given pitch. Once the unison is established, the
second student bends the pitch up and down, slowly crisscrossing the zero beat point,
which represents being “in tune” with the first player: “The number of beats per second
will precisely indicate the difference in frequency.” He suggests having the students
reverse roles so that “each will have the opportunity of searching for the other.”
Cooper offers the beat phenomenon as a means for tuning not only unisons, but
wider harmonic intervals as well: “Pure octaves, fifths, fourths, major and minor thirds
and sixths will also beat when out of tune. These normally consonant intervals will beat
26 Arthur H.Benade, Horns, Strings, and Harmony, Dover Publications (New York: Dover
Publications, 1992), 253. The ratios and numeric values in hertz used in this section are taken from this
text.
27 The nomenclature 1:2 indicates that the upper pitch of the octave is twice the numeric value of
the lower pitch.
28 The reciprocal of this number, .943874396, is used to calculate intervals below a given pitch in
hertz.
29 In this paper, the author will use the system of pitch nomenclature where c1 = middle c and all
subsequent upper octaves continue the numbering sequence, i.e.,. c2, c3. Pitches below c1 will follow the
pattern of small, great, and contra octaves, in descending order.
19
when mistuned to match the demands of the Equal Tempered Tuners or misguided ears
attuned to such compromised temperament. Get rid of the beats and the interval is in
tune, regardless of what the tuner indicates.”
A third method involves the heterodyne effect, which Cooper explains as a
“numerical extension of the ‘beat’ phenomenon”:
Playing a beat free perfect fifth will produce, in the listener's ear, a
physiologic difference tone effect, equal in frequency to the root of that
specific harmonic series, occurring one octave below. The difference tone
will beat against the real root if they are not in tune. Use this phantom, but
very real reference pitch to tune the actual sounded root of the chord. Just
as in other examples of “beating” the physiologic difference tone will
“beat” against the real root if they aren’t in tune.30
Cooper also mentions “other first order heterodyne effects” that can be used to
improve aural acuity. He has observed that “any two or more adjacent overtones of a
specific harmonic series will ‘beat’ if not precise whole number multiples of each other
(in tune) and if sounded strongly, will produce a difference tone representing the
fundamental of that unique harmonic series.” He summarizes in this way:
“Superior tuning acuity is based on a student's recognition of the true basis of
‘harmonicity’ which is derived from the natural overtone series, consisting solely
of whole-numbered multiples of the fundamental. Any deviation from this
simplistic integer sequencing of the human ear's modal response to auditory
stimulus will necessarily clash (beat) against the frequencies created by the
specific non-linearity present in the mechanical portions (ear drum and cochlea)
of the human ear and thus be perceived by a listener as being out of tune.”31
Articulation
The New Groves Dictionary of Music and Musicians defines articulation as: “The
manner in which successive notes are joined to one another by a performer, in the
simplest terms, opposite kinds of articulation are staccato (detached, prominent
articulation) and legato (smooth 'invisible' articulation). In reality, articulation involves
myriad aspects of the voice or instrument that determine how the beginning and end of
each note are to sound. Articulation is a principal component (with nuances in dynamics,
tempo, timbre and intonation) of phrasing.”32
Cooper defines articulation as “How you initiate, shape, and terminate a note in
relationship with its neighbors.”33
He suggests that there is a more specific application of
30 Corey, “Bassoon Teaching,” 8.
31 Ibid.
32 The New Groves Dictionary of Music and Musicians, 1995 (PaperBack) ed., s.v. “Articulation,”
643. 33 Huff, 18.
the term: “In reality, what we incorrectly refer to as phrasing really represents
‘articulative nuance.’ Grouping musical statements in finite 2,3,4 or more bar statements
is phrasing and the sole prerogative of the composer. Areas of musical inflection – pitch,
dynamics, timbre, intensity and articulation all require subtle variants to express a
musical thought. It is this ‘articulative nuance’ that connects everything together to make
music out of a series of notes.”34
The Mechanics of Articulation
Some writers have suggested that the keys to proper tonguing/articulation are the
correct amount of breath support, a relaxed tongue, a properly adjusted reed, a well-
adjusted instrument and a properly formed embouchure. However, there are differing
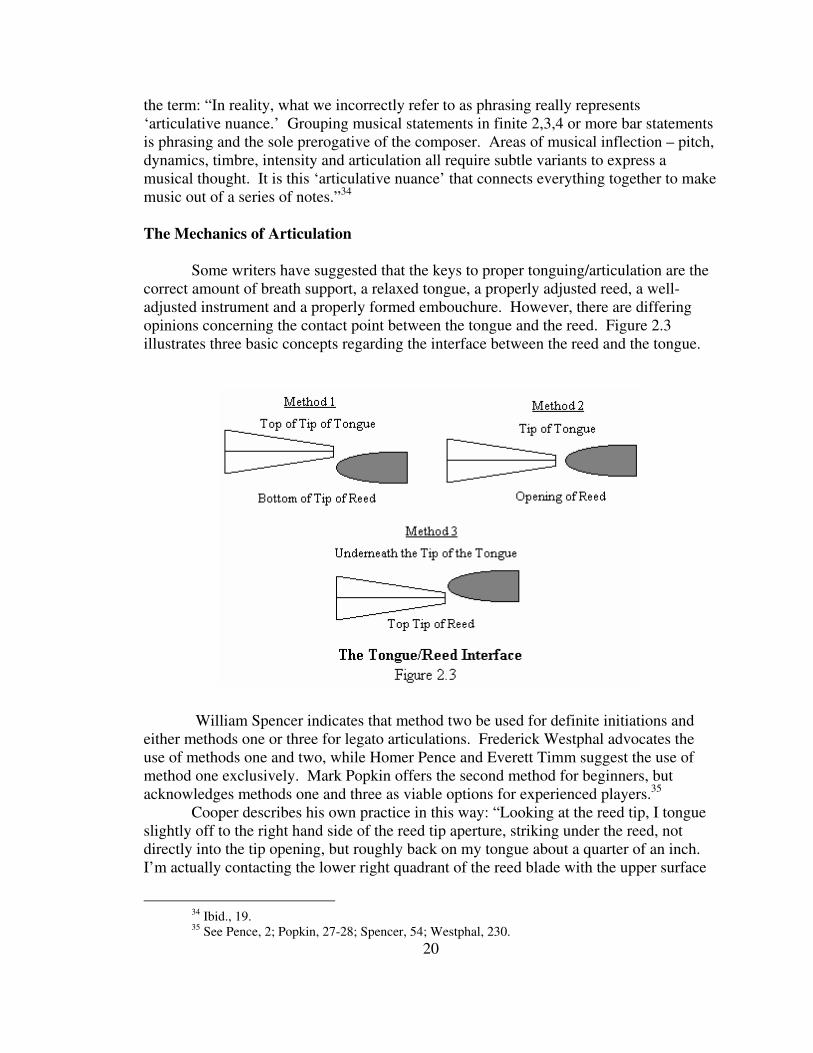
opinions concerning the contact point between the tongue and the reed. Figure 2.3
illustrates three basic concepts regarding the interface between the reed and the tongue.
William Spencer indicates that method two be used for definite initiations and
either methods one or three for legato articulations. Frederick Westphal advocates the
use of methods one and two, while Homer Pence and Everett Timm suggest the use of
method one exclusively. Mark Popkin offers the second method for beginners, but
acknowledges methods one and three as viable options for experienced players.35
Cooper describes his own practice in this way: “Looking at the reed tip, I tongue
slightly off to the right hand side of the reed tip aperture, striking under the reed, not
directly into the tip opening, but roughly back on my tongue about a quarter of an inch.
I’m actually contacting the lower right quadrant of the reed blade with the upper surface
34 Ibid., 19.
20
35 See Pence, 2; Popkin, 27-28; Spencer, 54; Westphal, 230.
21
of the tip area of the tongue. The tip of the tongue goes under the reed and past the tip of
the reed by about a quarter of an inch.”36
Cooper’s Approach
Cooper divides the traditional notion of articulation into parts (1) initiations and
(2) terminations; the beginning and ending of each note. Having noted inaccuracies in
early pedagogical sources he developed an extensive approach for teaching articulation,
taking great pains to quantify each aspect of the subject. He notes the following:
“Early on, most students have been told, in fact it is printed in most beginning
method books, that you ‘start the note with your tongue.’ As a result, most
students believe that the act of striking the reed actually initiates sound. It
doesn’t! You can strike the reed with a baseball bat, feather or tongue and it will
nothing but stop the sound. The tongue acts merely as a valve, which releases the
air. A good analogy to use when teaching is the image of water under pressure in
a pipe. You open the faucet (valve) and the water flows. You have to get the idea
across at an early stage that an initiation is really a controlled release that can be
infinitely varied through coordination of the three vectors of initiation and
termination: breath, embouchure (includes oral registration) and tongue.”
To establish a firm foundation for initiations, Cooper teaches the following
sequence: (1) Take in a breath, (2) Place the reed on the tongue, (3) Form the
embouchure, (4) Build air pressure and (5) Withdraw the tongue from the reed. He
describes his method below:37
I introduce initiations in a very disciplined and organized manner,
explaining in detail and sketching my approach in the margins of the
first lesson in Weissenborn. First, I notate a 4/4 bar containing four
quarter rests, followed by a bar line and then a whole note with fermata
(representing the note you are attempting to initiate). Then, I
count out loud, “one, two, blow, hard, tongue 2,3,4 (quarter, quarter,
quarter, quarter, whole). By the third beat of the first measure the student
has already taken their breath, placed the reed on the tongue, formed the
embouchure and built playing pressure. The tongue is on the reed and
they are actually blowing and supporting from the abdominal area for two
full beats without making a sound. When the time comes to start the note ,
they do only one thing, pull (snap) their tongue back off the reed. At first
unpredictable things will happen: no start, explosive start, sizzles, racous
sound, dead sound, etc.; however, because of the expanded time frame,
both the teacher and the student can analyze the problem and its cause
36 Huff, 5.
37 Ibid., 19.

while figuratively hearing through an aural microscope. After the student
can nail five of those two beat initiations in succession, removing the reed from
their mouth between each attempt, perhaps they are ready to move on to the next
stage. The next stage is to reduce the preparation time to only on beat: one, two,
three, blow hard, tongue; quarter, quarter, quarter, eight, eight, whole. The final
stage is: one, two, three, four, blow hard, tongue 2, 3, 4.
The procedure is illustrated in figure 2.4 :38
In the drawing above the “Blow Hard” step (building pressure) becomes compressed
rhythmically, placing it closer to the withdrawal of the tongue.
22
38 Recreated by permission of Hugh Cooper.
23
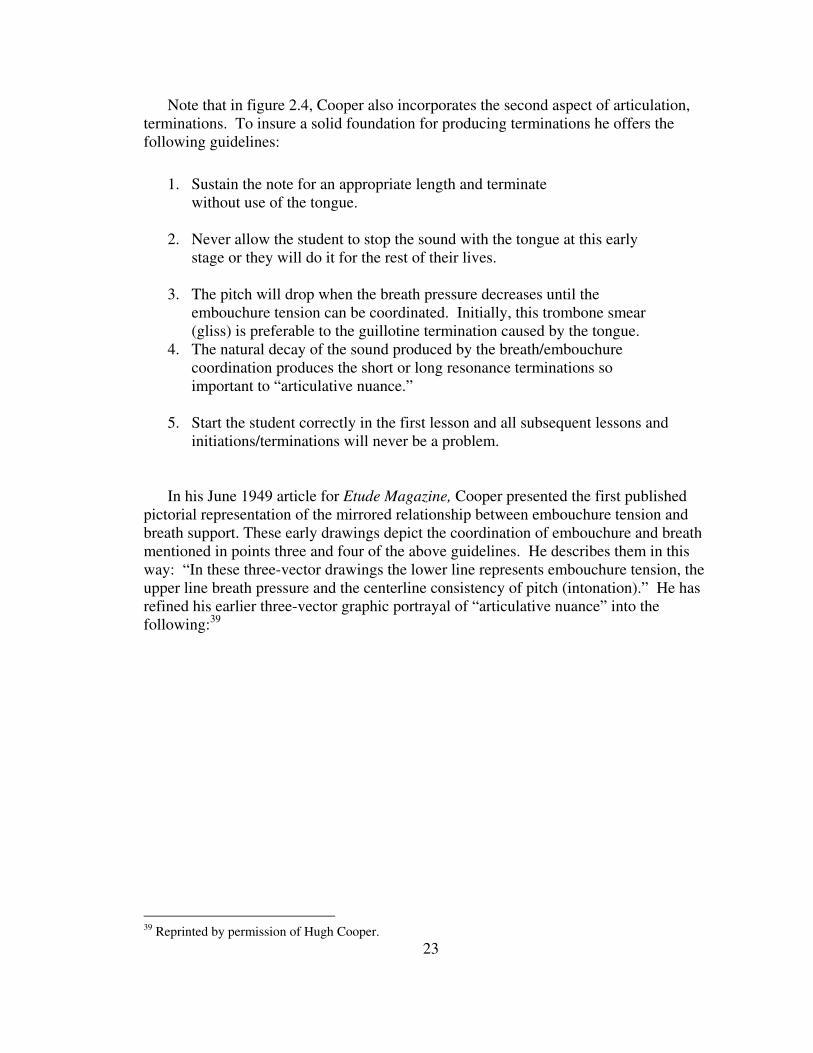
Note that in figure 2.4, Cooper also incorporates the second aspect of articulation,
terminations. To insure a solid foundation for producing terminations he offers the
following guidelines:
1. Sustain the note for an appropriate length and terminate
without use of the tongue.
2. Never allow the student to stop the sound with the tongue at this early
stage or they will do it for the rest of their lives.
3. The pitch will drop when the breath pressure decreases until the
embouchure tension can be coordinated. Initially, this trombone smear
(gliss) is preferable to the guillotine termination caused by the tongue.
4. The natural decay of the sound produced by the breath/embouchure
coordination produces the short or long resonance terminations so
important to “articulative nuance.”
5. Start the student correctly in the first lesson and all subsequent lessons and
initiations/terminations will never be a problem.
In his June 1949 article for Etude Magazine, Cooper presented the first published
pictorial representation of the mirrored relationship between embouchure tension and
breath support. These early drawings depict the coordination of embouchure and breath
mentioned in points three and four of the above guidelines. He describes them in this
way: “In these three-vector drawings the lower line represents embouchure tension, the
upper line breath pressure and the centerline consistency of pitch (intonation).” He has
refined his earlier three-vector graphic portrayal of “articulative nuance” into the
following:39
39 Reprinted by permission of Hugh Cooper.
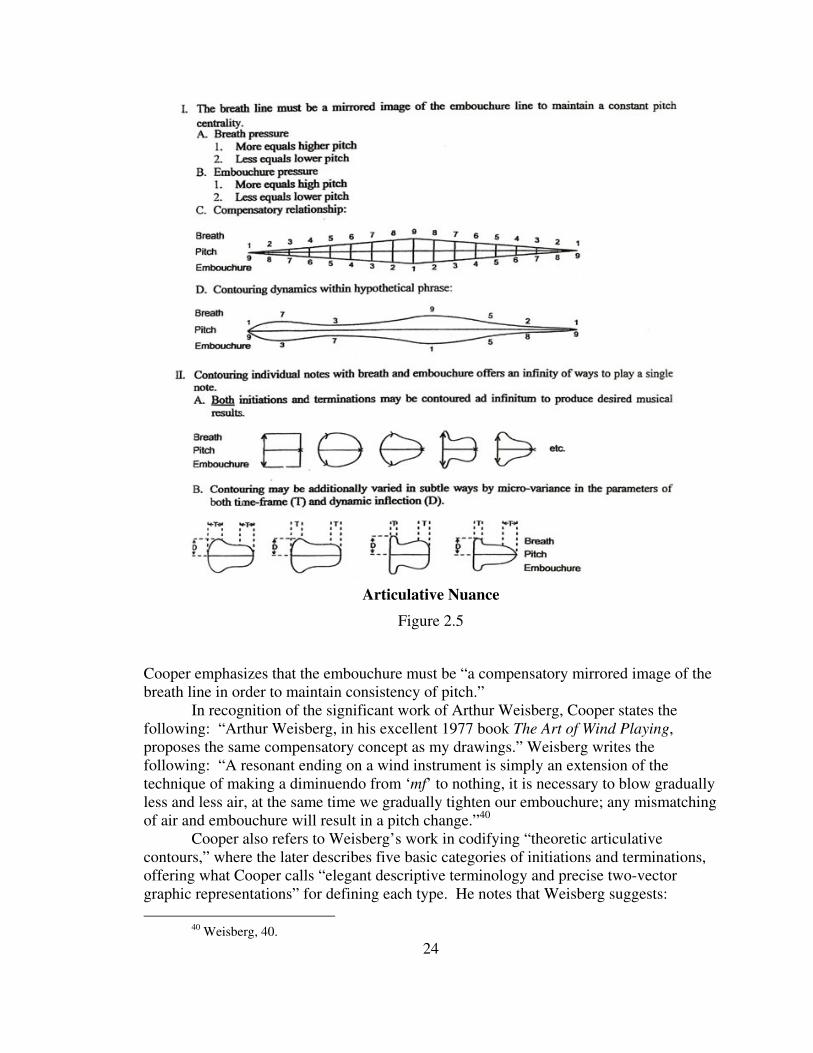
Articulative Nuance
Figure 2.5
Cooper emphasizes that the embouchure must be “a compensatory mirrored image of the
breath line in order to maintain consistency of pitch.”
In recognition of the significant work of Arthur Weisberg, Cooper states the
following: “Arthur Weisberg, in his excellent 1977 book The Art of Wind Playing,
proposes the same compensatory concept as my drawings.” Weisberg writes the
following: “A resonant ending on a wind instrument is simply an extension of the
technique of making a diminuendo from ‘mf’ to nothing, it is necessary to blow gradually
less and less air, at the same time we gradually tighten our embouchure; any mismatching
of air and embouchure will result in a pitch change.”40
Cooper also refers to Weisberg’s work in codifying “theoretic articulative
contours,” where the later describes five basic categories of initiations and terminations,
offering what Cooper calls “elegant descriptive terminology and precise two-vector
graphic representations” for defining each type. He notes that Weisberg suggests:
24
40 Weisberg, 40.

“Intermixing the five basic ‘attacks’ with the five basic ‘releases’ offers the possibility of
25 unique ways (5 x 5) to play a single note.”
Although not directly associated with articulation, Cooper suspects that tongue
position (oral configuration) also plays a role in regulating pitch, admitting that “little
clinical evidence exists in support of this premise.” He adds: “Tongue position plays a
critical role in oral registration.” He refers to the following illustration by Raymond
Wheeler in figure 2.6, taken from page 31 of Wheeler’s treatise on oral registration,
published in the September issue of The Instrumentalist41
This illustration depicts the
direct relationship of tongue position to the production of the various registers.
Tongue Positions
Figure 2.6
Cooper notes that this illustration not only demonstrates how the tongue position
must change for each register, but that even more importantly: “Counter to conventional
wisdom, the throat area is more closed for the low register and more open for the high.
According to Wheelers findings, this unconventional shift of the tongue is consistent on
all reed instruments, hence, another pedagogic myth bites the dust!”
Repeated Tonguing
Cooper separates repeated tonguing into two basic categories: Marcato
articulation or Bell-Tone Staccato and Rapid Sequential Staccato. The first type utilizes
the resonant termination and is used for individual notes at slower tempos. The short
resonant termination can also be used in rapid sequential staccato as an aid in grouping
notes. The examples in figures 2.7a and 2.7b illustrate both concepts:
41
Raymond Wheeler, “New Technology Refutes Old Techniques,” The
Instrumentalist (September 1977): 67.
25

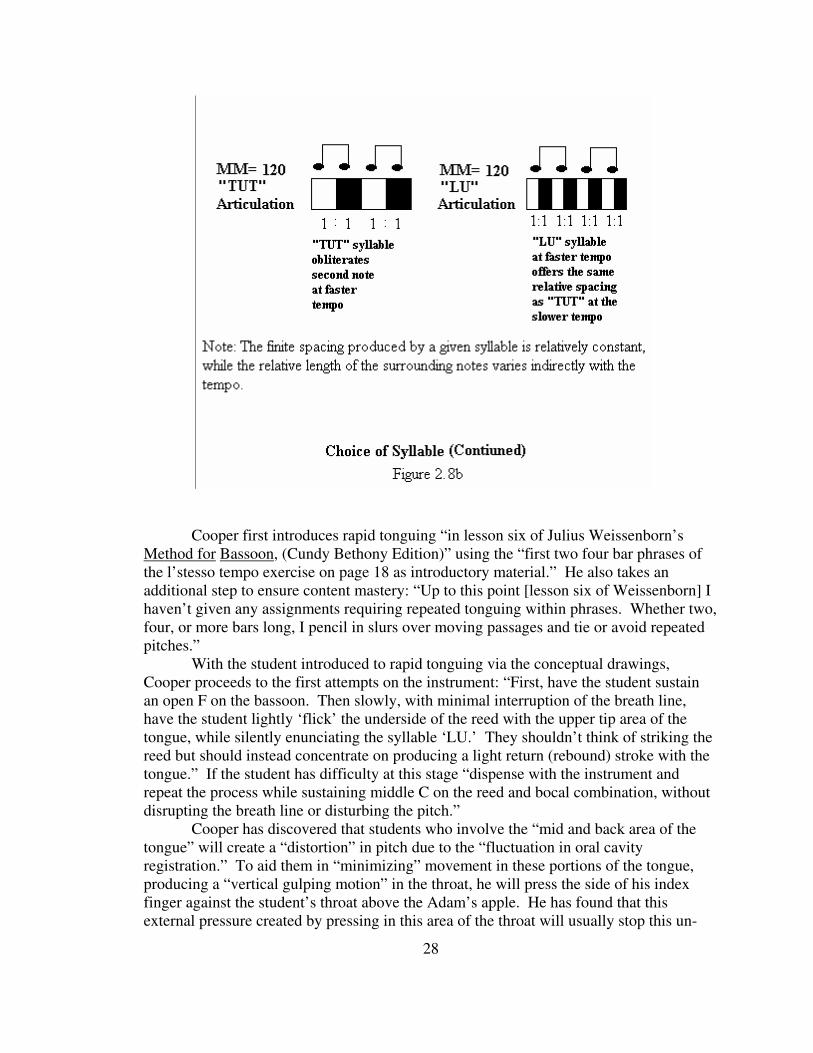
The second type of tonguing, “rapid sequential staccato,” involves initiation and
termination of individual notes by the tongue (figure 2.8b): “Rapid sequential staccato is
produced by simply withdrawing and replacing the tongue from on and off the reed while
maintaining a more or less constant breath line. In effect, rapid articulation rides on the
breath with both initiation and termination being realized by lightly ‘flicking’ the
underside of the lower reed blade with the tip of the tongue. Spacing is produced by the
period of time that the tongue remains static on the reed, which in turn is determined by
26

the choice of syllable being used.”42
Cooper used the following model to introduce
students to the concept of syllable choice, graphically plotting “both the choice of
syllables in reference to their relative degree of separation and their degree of use.”43
Cooper provides further detail with the illustration below:
42 Huff, 22. Unless otherwise indicated, all remaining quotes on articulation are taken from this
source.
27
43 Figure 2.9a and 2.9b recreated by permission of Hugh Cooper.
Cooper first introduces rapid tonguing “in lesson six of Julius Weissenborn’s
Method for Bassoon, (Cundy Bethony Edition)” using the “first two four bar phrases of
the l’stesso tempo exercise on page 18 as introductory material.” He also takes an
additional step to ensure content mastery: “Up to this point [lesson six of Weissenborn] I
haven’t given any assignments requiring repeated tonguing within phrases. Whether two,
four, or more bars long, I pencil in slurs over moving passages and tie or avoid repeated
pitches.”
With the student introduced to rapid tonguing via the conceptual drawings,
Cooper proceeds to the first attempts on the instrument: “First, have the student sustain
an open F on the bassoon. Then slowly, with minimal interruption of the breath line,
have the student lightly ‘flick’ the underside of the reed with the upper tip area of the
tongue, while silently enunciating the syllable ‘LU.’ They shouldn’t think of striking the
reed but should instead concentrate on producing a light return (rebound) stroke with the
tongue.” If the student has difficulty at this stage “dispense with the instrument and
repeat the process while sustaining middle C on the reed and bocal combination, without
disrupting the breath line or disturbing the pitch.”
Cooper has discovered that students who involve the “mid and back area of the
tongue” will create a “distortion” in pitch due to the “fluctuation in oral cavity
registration.” To aid them in “minimizing” movement in these portions of the tongue,
producing a “vertical gulping motion” in the throat, he will press the side of his index
finger against the student’s throat above the Adam’s apple. He has found that this
external pressure created by pressing in this area of the throat will usually stop this un-
28
29
necessary motion. After the anomaly has been identified, he will have the student
attempt the initial procedure again, on the open F, “holding their right index finger firmly
on their throat.” According to Cooper “This is the ‘acid test’ that students carry home to
use when practicing.” He is emphatic that this excess motion be stopped at the earliest
stages: “Usually a beginning student without pre-formed habits will grasp the legato
tonguing concept within one lesson. It is the student who has tongued incorrectly for a
prolonged period of time that presents a problem.”
After the more advanced students have successfully executed the legato “flick” of
the tongue, Cooper gradually increases the rate of speed. He found that the advanced
students, upon grasping the technique, were “amazed by how little effort is required
while tonguing correctly, often remarking that it doesn’t feel like I’m are doing
anything.”
Once the student “fully understands and can consistently execute the concept”
they begin the exercise from Weissenborn. Cooper directs them to play the passage as
slurred half notes, insisting on “strong breath support with stressing measure to measure
leading.” Following the successful completion of this step, they play the passage in a
step-by-step progression as legato half notes, quarter notes and finally eight notes. After
these steps are completed, the passage is played as written and the tempo gradually
increased.44
Cooper adds the following: “Regarding the importance of Articulation, an
astute anonymous studio teacher who, pointing a finger at the sheet music on an aspiring
student’s stand observes: ‘The black is the notes, the white is the music.’”
Digital Technique
Despite his aversion to rote learning, Cooper acknowledges that this is the most
effective way to develop digital technique: “The mind must still be involved analytically,
while the musculature involved in playing must be trained like an athlete's. For in the
mechanical sense, that is what we are. As aesthetic athletes, we must train our
musculature slowly, making positive that the habitual patterns that we are learning are
correct and precise. If not, the incorrect learned responses will be difficult or impossible
to correct later in the development of the technique. The quickest way to learn to play fast
is to play slow.”45
Weisberg also stresses repetition as the key to technical development:
The performing of an operation by habit is always smoother than one done
with concentration. The act of concentrating, which takes quite a bit of
energy, deprives the muscles of some of their speed. Concentration takes
a certain amount of time, the kind of time that does not exist in a fast
passage. Concentration is of utmost importance in the learning process,
but at a certain point it can become a hindrance. We have to learn to be
44 Exercise six appears in appendix two.
45 Corey, “Bassoon Teaching,” 2.
30
able to bring our concentration to bear on exactly that point in the passage
where it is needed, and in no other place.46
Timm states that: “Technical command depends upon much conscious repetition of
scales patterns and arpeggios, so that a performer can develop a vocabulary of well-
drilled note sequences.”47
Norman Herzberg, Professor of bassoon, The University of
Southern California, and a strong proponent of scale and arpeggio regimens, feels that
technique is built on the “solid foundation of assurance and not on taking chances with
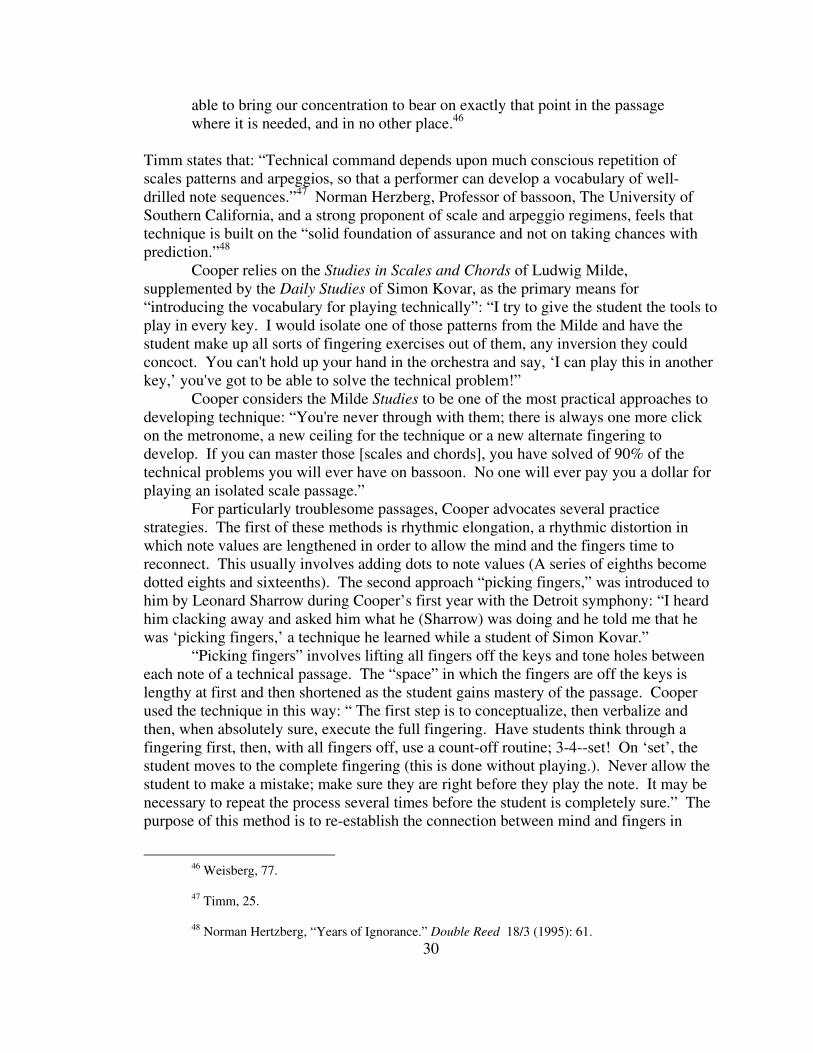
prediction.”48
Cooper relies on the Studies in Scales and Chords of Ludwig Milde,
supplemented by the Daily Studies of Simon Kovar, as the primary means for
“introducing the vocabulary for playing technically”: “I try to give the student the tools to
play in every key. I would isolate one of those patterns from the Milde and have the
student make up all sorts of fingering exercises out of them, any inversion they could
concoct. You can't hold up your hand in the orchestra and say, ‘I can play this in another
key,’ you've got to be able to solve the technical problem!”
Cooper considers the Milde Studies to be one of the most practical approaches to
developing technique: “You're never through with them; there is always one more click
on the metronome, a new ceiling for the technique or a new alternate fingering to
develop. If you can master those [scales and chords], you have solved of 90% of the
technical problems you will ever have on bassoon. No one will ever pay you a dollar for
playing an isolated scale passage.”
For particularly troublesome passages, Cooper advocates several practice
strategies. The first of these methods is rhythmic elongation, a rhythmic distortion in
which note values are lengthened in order to allow the mind and the fingers time to
reconnect. This usually involves adding dots to note values (A series of eighths become
dotted eights and sixteenths). The second approach “picking fingers,” was introduced to
him by Leonard Sharrow during Cooper’s first year with the Detroit symphony: “I heard
him clacking away and asked him what he (Sharrow) was doing and he told me that he
was ‘picking fingers,’ a technique he learned while a student of Simon Kovar.”
“Picking fingers” involves lifting all fingers off the keys and tone holes between
each note of a technical passage. The “space” in which the fingers are off the keys is
lengthy at first and then shortened as the student gains mastery of the passage. Cooper
used the technique in this way: “ The first step is to conceptualize, then verbalize and
then, when absolutely sure, execute the full fingering. Have students think through a
fingering first, then, with all fingers off, use a count-off routine; 3-4--set! On ‘set’, the
student moves to the complete fingering (this is done without playing.). Never allow the
student to make a mistake; make sure they are right before they play the note. It may be
necessary to repeat the process several times before the student is completely sure.” The
purpose of this method is to re-establish the connection between mind and fingers in
46 Weisberg, 77.
47 Timm, 25.
48 Norman Hertzberg, “Years of Ignorance.” Double Reed 18/3 (1995): 61.
order to avoid internalizing an incorrect finger pattern, thus creating a problem the
individual must battle his/her entire career. The procedure is illustrated in figure 2.10:
Everett Timm emphasizes the traditional approach, multiple repetitions of a
passage: “the player is trying to establish a series of fingerings in which each fingering
acts as a stimulus preparing the one which follows.” Cooper feels that there are
limitations to sequential patterning: “There must be an impression of a fingering alone, so
that you can go to it from any note on the horn. Instead of learning sequences, you're
learning that finite note.”49
Flicking
Slurring to certain notes near the top of the bass staff is a common problem
confronted by bassoonists worldwide, and flicking is the traditional solution. Yet, there
are differing opinions on its use. Some players view this technique as essential and a
natural part of the fingerings for the instrument, while others think that flicking is to be
used only when normal playing does not yield the desired results. Frederick Westphal
writes the following: “A word of caution: use the flick keys only when necessary. They
should never become an automatic part of the fingering, but a conscious choice in a
particular situation.”50
In contrast, Homer Pence in Teacher’s Guide to the Bassoon, Dr.
William Dietz in Teaching Woodwinds, and William Spencer in The Art of Bassoon
Playing, treat flicking as a vital part of technique and something to be introduced early in
the technical development of a bassoonist.51
Cooper teaches his students to use the flick keys only when necessary,
emphasizing that each instrument requires differing levels of flicking technique to
facilitate slurs and initiations. His own use of the technique was to facilitate wide
49 Timm, 23.
50 Westphal, 194-195.
31
51 See Pence, 14; Teaching Woodwinds; A method and a resource handbook for Music Educators,
Dr. William Dietz, Ed. (New York: Schrimer Books, 1998), 55; Spencer, 58.
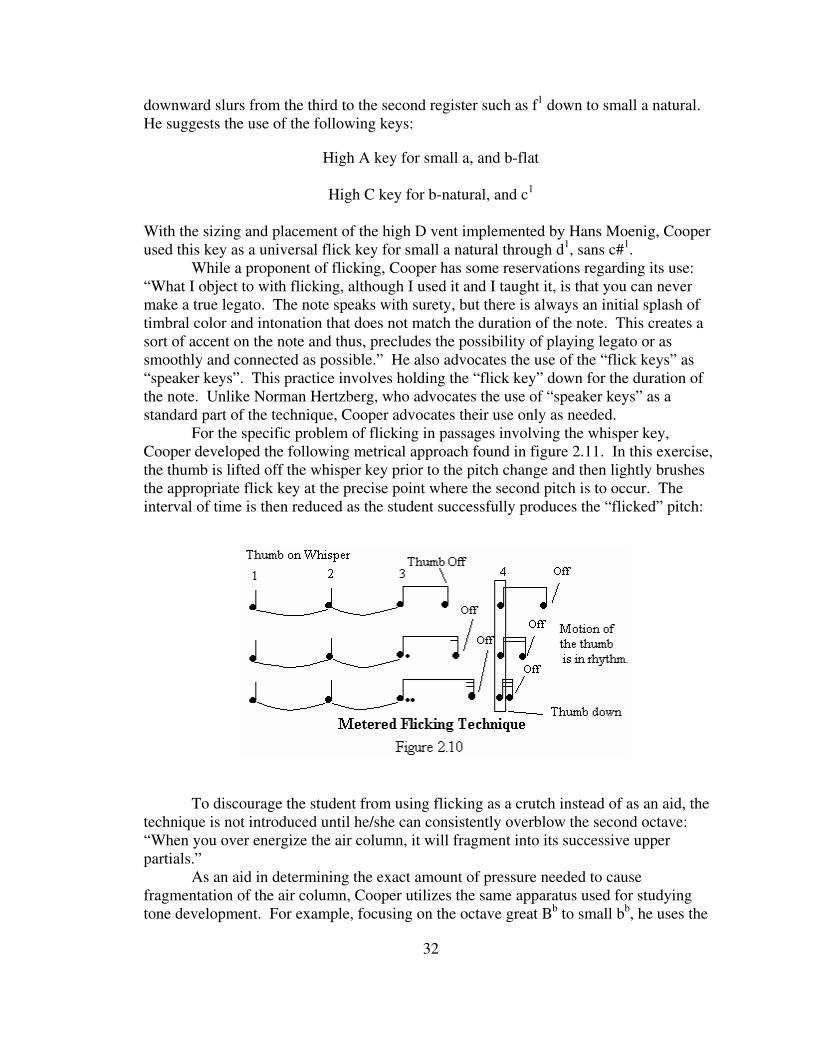
downward slurs from the third to the second register such as f1 down to small a natural.
He suggests the use of the following keys:
High A key for small a, and b-flat
High C key for b-natural, and c1
With the sizing and placement of the high D vent implemented by Hans Moenig, Cooper
used this key as a universal flick key for small a natural through d1, sans c#
1.
While a proponent of flicking, Cooper has some reservations regarding its use:
“What I object to with flicking, although I used it and I taught it, is that you can never
make a true legato. The note speaks with surety, but there is always an initial splash of
timbral color and intonation that does not match the duration of the note. This creates a
sort of accent on the note and thus, precludes the possibility of playing legato or as
smoothly and connected as possible.” He also advocates the use of the “flick keys” as
“speaker keys”. This practice involves holding the “flick key” down for the duration of
the note. Unlike Norman Hertzberg, who advocates the use of “speaker keys” as a
standard part of the technique, Cooper advocates their use only as needed.
For the specific problem of flicking in passages involving the whisper key,
Cooper developed the following metrical approach found in figure 2.11. In this exercise,
the thumb is lifted off the whisper key prior to the pitch change and then lightly brushes
the appropriate flick key at the precise point where the second pitch is to occur. The
interval of time is then reduced as the student successfully produces the “flicked” pitch:
To discourage the student from using flicking as a crutch instead of as an aid, the
technique is not introduced until he/she can consistently overblow the second octave:
“When you over energize the air column, it will fragment into its successive upper
partials.”
As an aid in determining the exact amount of pressure needed to cause
fragmentation of the air column, Cooper utilizes the same apparatus used for studying
tone development. For example, focusing on the octave great Bb to small b
b, he uses the
32
33
numeric readout from the gauge to identify the exact amount of pressure needed to cause
the air stream to fragment and produce the octave. By using the gauge, the student can
pinpoint the exact amount of air pressure required and thus recreate the results at will:
“As the student sustains the Bb, with the sports ball inflation needle of the test apparatus
gently placed between the his/her lips, instruct him/her to increase the playing pressure
until doubled, then open the whisper key vent; the octave will sound.”52
Cooper has
found that the pressure readings for each register correspond to the whole numbered
multiple formula of the natural scale.
Vibrato
Theory
In the opening paragraph of his discussion on tone production, William Spencer
lists four important factors in developing a beautiful tone on the bassoon: (1) a clear
concept of the bassoon tone, (2) correct habits of breathing, (3) correct embouchure, and
(4) an appropriate vibrato. He describes his concept of “appropriate vibrato” in this way:
“The vibrato used in artistic bassoon playing, is very close to that used by good singers.
Vibrato is a periodic pulsation or fluctuation of the pitch, intensity, and timbre of the
tone.”53
In Teaching Woodwinds, Dr. William Dietz describes vibrato as “a technique used
by vocalists and instrumentalists to expand the expressive possibilities of their sound.”
According to Dietz, “most bassoonists describe vibrato as small, controlled changes in
the pitch and intensity (dynamics) of a note.” He raises some important pedagogical
issues: “There is some discussion among bassoonists as to how vibrato is produced,
where and how it should be used, and indeed as to what elements even define vibrato.
Various schools of thought arise when considering how these changes are produced. The
standard American school of playing maintains that vibrato is produced by the
diaphragm. Vibrato production that involves jaw movement is discouraged by the
mainstream of bassoonists.”54
Arthur Weisberg also addresses these issues: “There are basic disagreements
about vibrato between the different schools of wind playing and even between individuals
of the same school. One of the reasons for this difference of opinion is that vibrato is still
relatively new for the wind instruments. Another is that there are at least three entirely
different ways of producing vibrato on a wind instrument.”55
While the abdominal muscles are treated as the root of vibrato, teachers also
acknowledge the involvement of the throat muscles in this process. Dietz adds the
following: “Recent research on the subject indicates that the large, slow-moving
diaphragm muscle alone is not capable of producing a vibrato at the most rapid end of his
52 Cooper has found that the pressure reading for each register correspond to the whole number
formula of the natural scale.
53 Spencer, 52. 54 Dietz, 20.
55 Weisberg, 57.
34
range. Many bassoonists believe that the vocal chords play an important role in vibrato
production, especially as the frequency of pulsation increases.”56
Mark Popkin advocates a diaphragm-only philosophy, while Weisberg, in
considering the three types of vibrato, states that any movement of the throat or mouth
(jaw vibrato) are “after affects” of the pressure change caused by the diaphragm and “not
in themselves a cause of vibrato.”57
Spencer speaks of the involvement of the vocal
chords as the “most common vibrato mistake.” He observes that the limitation of vibrato
involving “throat action” is that it can become “quite uncontrollable.”58
Although there is agreement on the concept of vibrato as a fluctuation in pitch
and intensity, authors hold differing opinions on the nature of these fluctuations.
Acoustically, Weisberg describes the vibrato pattern as an excursion above the pitch as
well as an increase in intensity. Everett Timm describes vibrato as an excursion above
and below the pitch, along with the change of intensity, while Weisberg feels that
excursions below the pitch should be avoided.59
The process is described by the later in
the following way: “What is happening, is that while the diaphragm is expelling the air
in a continuous stream, it is at the same time pulsating to produce the vibrato.”60
Pedagogy
Some authors use a mechanical approach toward developing vibrato. This
approach involves having the student produce bursts of air (pulsations) at regular
intervals with a metronome. With this method, the student begins pulsing quarter notes
with the metronome set at a speed of a quarter note =60 bpm (beats per minute) and
gradually increases the speed of pulsations, matching the metronome as the tempo is
increased. After the student successfully produces pulsations in quarters, he/she returns
to the slower metronome speed and begins pulsing eighths.61
The student cycles through
this process until he/she reaches the four to seven pulse per second range suggested by
Weisberg and Dietz.62
For those students who have difficulty producing pulsations, some authors
suggest referring them to familiar acts involving muscular contractions in the abdominal
region. Timm suggests emulating the type of muscular contractions that take place in the
abdominal area during coughing.63
Others use the analogy of laughing to aid the student
56 Dietz, 20.
57 See Popkin, 28; Weisberg, 58.
58 Spencer, 52.
59 Weisberg, 65.
60 ibid.
61 See Timm, 15; Spencer, 52.
62 See Dietz, 20; Weisberg, 63.
63 Timm,15.
35
in isolating and identifying the abdominal musculature associated with vibrato.
According to Spencer, some teachers prefer to let the vibrato happen as a natural
consequence of the student striving to “make the sound sing.” He suggests, “Talented
students can find the necessary muscular action without any specific instruction.”64
Cooper defines bassoon vibrato primarily as an intensity fluctuation and
secondarily as a pitch fluctuation. He contributes the pitch fluctuation to “pressure
changes produced by controlled periodic muscular contractions in the glottal area,
creating pressure fluctuations leading to minute variations in intensity and pitch.”
An important aspect of Cooper’s pedagogy for vibrato is human physiology. He
encourages his students to understand the mechanical function of each muscle group
associated with the technique in order to evaluate their practical use for producing
“musical vibrato.” His approach is rooted in scientific texts on human anatomy,
containing detailed information on the abdominal muscles, the diaphragm, the rib or chest
muscles and the vocal folds of the glottal area.
In defining the role of the abdominal muscles, Cooper refers to Gray's Anatomy:
“Forced expiration actions are performed mainly by the flat muscles of the abdomen
assisted by the rectus muscles.”65
Although large enough to exert the requisite force to
create pulsations, Cooper notes the limitations of the abdominal muscles in producing
vibrato: “These muscles are largely involuntary in function and generally considered too
massive, difficult to control, and slow to serve as a normal source of a musical vibrato.”
For this reason, Cooper avoids the traditional metric pulsing approach; he feels that
orienting the student toward the large abdominal muscles “impedes the development of
delicate, controllable, musical vibrato.”
Cooper considers “diaphragmatic vibrato” to be physiologically impossible.
Drawing on Gray’s Anatomy, he emphasizes the following: “The diaphragm represents
the principal muscle of inspiration whose musculature is singular in its directionality and
thus, not a practical source of independent oscillatory motion associated with a
characteristic vibrato.” 66
Cooper indicates that the chest or rib muscles cannot act as a primary source of
vibrato because they act in opposite direction, two sets of muscles, one to raise the chest
and one to lower the rib cage. Cooper believes that the rapid alternation required to
produce an acceptable vibrato would easily exceed the limitation of these muscles. The
videoscopic study of Chris Weait, Professor of Bassoon, Ohio State University,
confirmed Cooper’s analysis and revealed that it is not the diaphragm or the large
abdominal muscles that serve as the primary control center for “musical vibrato,” but the
epiglottal area.67
64 Spencer, 52..
65 Henry Gray, Anatomy of the Human Body (Philadelphia:Lea and Febiger, 1973), 415.
66 Ibid, 414.
67 Christopher Weait, “Vibrato: an Audio-Video-Flourographic Investigation of a Bassoonist,”
Applied Radiology (January/February 1977): 2-4.

36
Cooper describes the voluntary musculature of the epiglottis as a “valve-like
apparatus that regulates the flow of air from the lungs.” He is convinced that the
voluntary muscles of the glottal area represents “the most practical, controllable, and
musically sensitive locus” for producing a vibrato: “These sensitive voluntary muscles
control the tension and contour of the vocal folds (cords) and, therefore, determine the
size and shape of the glottal opening which lies between the folds, producing a form of
silent vocalizing when playing a wind instrument.”68
The periodic fluctuation of airflow
produced by these muscles creates the type of change in air pressure necessary to create
pulsations: “Thus, if a student can sing with vibrato, they can play with the same
vibrato.”69
According to Weait’s study, individuals convinced of the abdominal locus of the
vibrato found that they were actually generating their vibrato in the glottis; Cooper offers
the following reason for this misconception: “The vibrato, regardless of its origin, can be
felt internally and externally at any point along the pulsating air column, and students
believe what they are told. This holds true particularly if the student was taught
abdominal vibrato which, if evolved successfully, must eventually migrate up to the
glottis.”70
While he acknowledges the feasibility of jaw and/or lip vibrato, Cooper suggests
that this method, combined with the “variable reed cavity of a double reed”, produces an
excessively wide pitch excursion on bassoon or oboe and interferes with the more
“sensitive double reed embouchure.” Despite these limitations, he feels that “jaw and/or
lip vibrato is a necessary performance skill for producing the special broad vibrato used
in some contemporary music; but only for these types of special effects.”
Cooper feels that the best approach to teaching vibrato is to allow it to evolve:
“My pedagogic approach to vibrato is to ignore it as a separate entity, and simply work
with students to help them produce a free, vibrant sound. With freedom comes resonance
and the expressive natural pulsation called vibrato. Using this negative approach, I have
never failed to develop a student's vibrato; the trick is teaching them to control it after the
vibrato spontaneously appears.”71
68 Corey, “Bassoon Teaching,” 10.
69 Ibid., 11.
70 Ibid., 4.
71 Corey, “Bassoon Teaching,” 11.
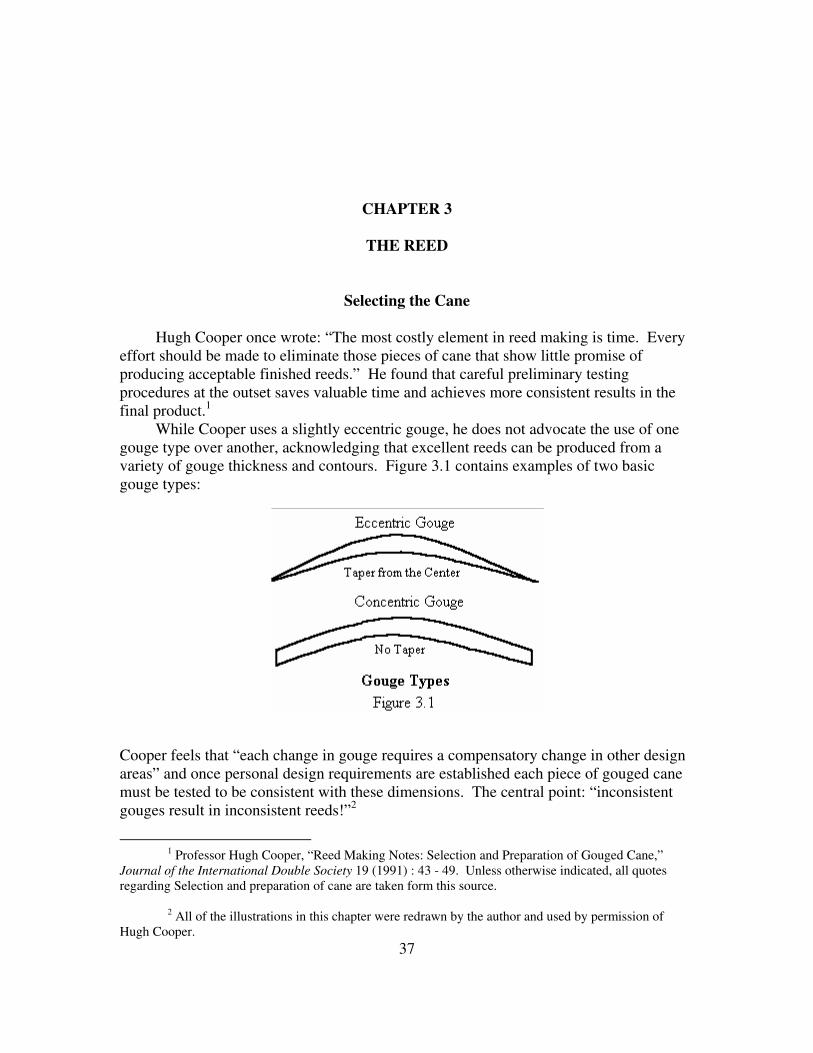
CHAPTER 3
THE REED
Selecting the Cane
Hugh Cooper once wrote: “The most costly element in reed making is time. Every
effort should be made to eliminate those pieces of cane that show little promise of
producing acceptable finished reeds.” He found that careful preliminary testing
procedures at the outset saves valuable time and achieves more consistent results in the
final product.1
While Cooper uses a slightly eccentric gouge, he does not advocate the use of one
gouge type over another, acknowledging that excellent reeds can be produced from a
variety of gouge thickness and contours. Figure 3.1 contains examples of two basic
gouge types:
Cooper feels that “each change in gouge requires a compensatory change in other design
areas” and once personal design requirements are established each piece of gouged cane
must be tested to be consistent with these dimensions. The central point: “inconsistent
gouges result in inconsistent reeds!”2
1 Professor Hugh Cooper, “Reed Making Notes: Selection and Preparation of Gouged Cane,”
Journal of the International Double Society 19 (1991) : 43 - 49. Unless otherwise indicated, all quotes
regarding Selection and preparation of cane are taken form this source.
37
2 All of the illustrations in this chapter were redrawn by the author and used by permission of
Hugh Cooper.
38
Cooper begins selection by conducting a visual inspection of the dry cane. First,
he looks at the gouged surface to determine the alignment of the grain, which should
appear as straight lines from end to end. After the visual inspection of the grain
alignment, he then tests the cane for linear consistency, laying the gouged cane, shell side
down, on a flat surface to determine if the cane contacts the flat surface along its entire
length. Cane markedly convex like a rocker or concave like an arch is discarded. He
checks for “positive or negative discontinuity of the grain,” fibers that are not continuous
through the length of the gouged cane. Points along the inner surface that appear raised
or as surface depressions can inhibit the transmission of vibration down the full length of
the reed. Gouged cane with visible deviations in thickness or grain will require
corrective procedures.
Another one of Cooper’s visual indicators is the color of the cane, particularly the
presence of discolorations in the gouge surface: “Pieces with discolorations in the woody
(parenchyme) [gouge side] portion of the cane should be avoided.” He has observed the
following:
1. Pieces with a slight overall greenish cast may be stored in a ventilated area to cure
for several months before using.
2. Those having darker greenish areas probably won't respond to additional curing
and should be discarded.
3. More concentrated green to black spots usually indicate fungal growth in the
woody (parenchyme) portion of the cane and should be discarded.
4. Thin dark lines visible in the vascular tubes indicate that mold has already
invaded the cane and will soon destroy it.
5. Pieces with a slight overall greenish cast may be stored in a ventilated area to cure
for several months before using.
6. Those having darker greenish areas probably won't respond to additional curing
and should be discarded.
7. More concentrated green to black spots usually indicate fungal growth in the
woody (parenchyme) portion of the cane and should be discarded.
8. Thin dark lines visible in the vascular tubes indicate that mold has already
invaded the cane and will soon destroy it.
Cooper makes the following general observations concerning discoloration:
“Discoloration of the shell/bark (epidermis) ranging from light brown flecks to extensive
purplish areas is normal and does not affect the cane's quality. In fact, such discoloration
is proof of the cane's maturity, as it is a resultant of certain fungal growth in the dead
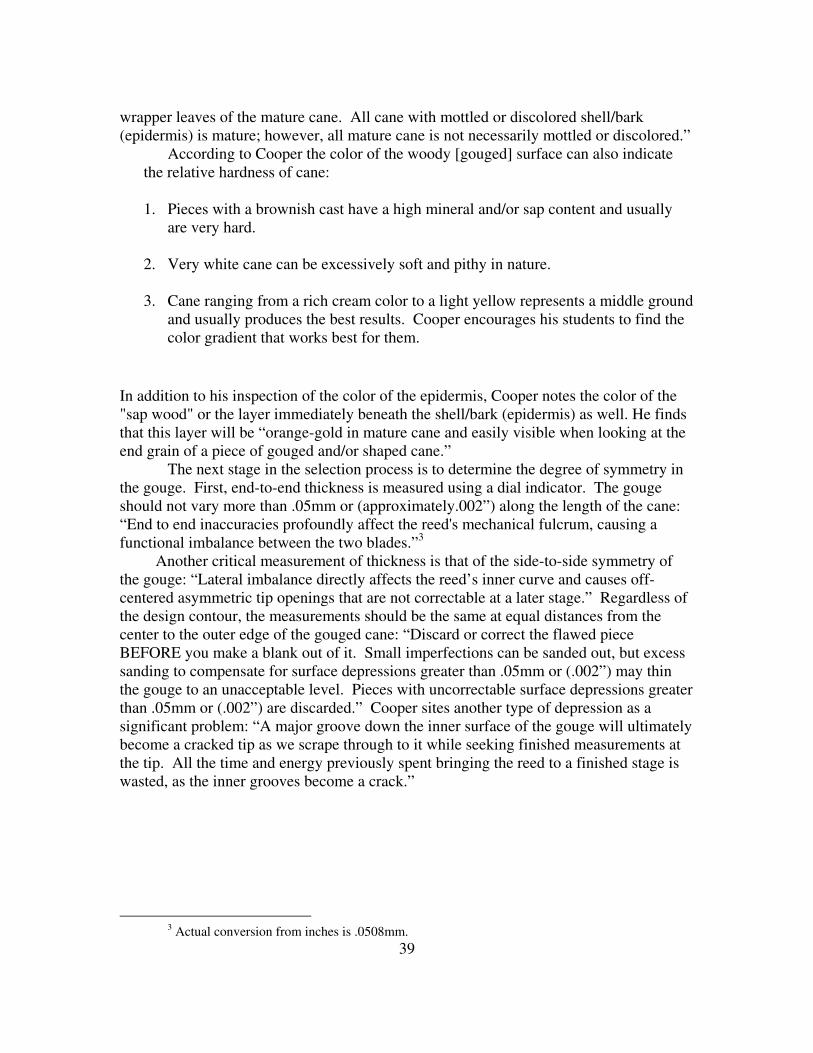
39
wrapper leaves of the mature cane. All cane with mottled or discolored shell/bark
(epidermis) is mature; however, all mature cane is not necessarily mottled or discolored.”
According to Cooper the color of the woody [gouged] surface can also indicate
the relative hardness of cane:
1. Pieces with a brownish cast have a high mineral and/or sap content and usually
are very hard.
2. Very white cane can be excessively soft and pithy in nature.
3. Cane ranging from a rich cream color to a light yellow represents a middle ground
and usually produces the best results. Cooper encourages his students to find the
color gradient that works best for them.
In addition to his inspection of the color of the epidermis, Cooper notes the color of the
"sap wood" or the layer immediately beneath the shell/bark (epidermis) as well. He finds
that this layer will be “orange-gold in mature cane and easily visible when looking at the
end grain of a piece of gouged and/or shaped cane.”
The next stage in the selection process is to determine the degree of symmetry in
the gouge. First, end-to-end thickness is measured using a dial indicator. The gouge
should not vary more than .05mm or (approximately.002”) along the length of the cane:
“End to end inaccuracies profoundly affect the reed's mechanical fulcrum, causing a
functional imbalance between the two blades.”3
Another critical measurement of thickness is that of the side-to-side symmetry of
the gouge: “Lateral imbalance directly affects the reed’s inner curve and causes off-
centered asymmetric tip openings that are not correctable at a later stage.” Regardless of
the design contour, the measurements should be the same at equal distances from the
center to the outer edge of the gouged cane: “Discard or correct the flawed piece
BEFORE you make a blank out of it. Small imperfections can be sanded out, but excess
sanding to compensate for surface depressions greater than .05mm or (.002”) may thin
the gouge to an unacceptable level. Pieces with uncorrectable surface depressions greater
than .05mm or (.002”) are discarded.” Cooper sites another type of depression as a
significant problem: “A major groove down the inner surface of the gouge will ultimately
become a cracked tip as we scrape through to it while seeking finished measurements at
the tip. All the time and energy previously spent bringing the reed to a finished stage is
wasted, as the inner grooves become a crack.”
3 Actual conversion from inches is .0508mm.
Cooper also tests the cane for porosity and has found that mature, well-cured cane
breathes. He makes the following observations: (1) air can be blown or drawn through
the end grain of seasoned dry gouged cane, and (2) air can be blown through to the vamp
of dry profiled and shaped cane producing minute bubbles on the surface of the blade or
at the end grain when immersed in water. Determining the degree of porosity also
indicates the relative hardness or density of the cane. More porous cane is softer and
cane with less porosity tends to be harder.
In addition to the indicators listed above, Cooper suggests some additional criteria
for cane selection:
1. Flexibility of the cane: twist it laterally with your fingers, to ascertain its
relative flexibility.
2. Vertical float level of the dry cane when carefully immersed in water.
Deeper = Denser/Harder Shallow = Less Dense/Softer
3. Water absorption rate of wetted cane.
Faster Rate = Harder Slower Rate = Softer
a) Cane that sinks appreciably sooner than one hour is too hard.
b) Pieces that remain buoyant substantially longer than three hours are too
soft. Either extreme should be avoided.
4. The pitch produced when a piece of dry gouged cane is dropped shell/bark
(epidermis) side down on a hard flat surface.
a) High Pitch = Harder
b) Low Pitch = Softer
(Pieces must be uniform in length, width, and thickness for this test to be
valid.)
5. Thumbnail pressure indent of the gouged surface (in an area that won't
become a part of the finished reed).
a) Deep Groove = Softer
b) Shallow Groove = Harder
40
41
In addition to the indent test on the gouged surface, a shell/bark
(epidermis) that is easily marked with the thumbnail is an indication that
the cane is too soft.
6. Use of a mechanical gauge, such as a Rockwell Superficial Hardness Tester,
that measures penetration of a probe into the outer shell.
7. Use a mechanical gauge that measures relative flexibility of cane by
suspending a given weight from a clamped piece of cane. This test indicates
hardness of a piece of cane by measuring the degree of deflection created by
the weight.4
Regardless of the test procedures used, Cooper reiterates that once personal preferences
are determined, “the consistency and accuracy of the cane and gouge are of vital
importance.”
Preparation of the Cane: A Two Step Approach
Corrective Sanding/Scraping
Corrective sanding/scraping focuses on the inner surface of the dry gouged cane
and serves two important functions. The primary function of sanding/scraping is to
correct longitudinal and latitudinal dimensional asymmetry of the gouge that exceeds the
.05mm (.002”) limit noted in the selection process. Cooper recommends using a narrow
strip of 220 grit, flexible back, wet and dry emery paper, approximately 10 to 13mm
wide. When sanding areas of raised grain or excessive gouge thickness, the paper is held
curved over the pad of the index finger and the specific areas of irregularity thinned by
lightly sanding with the emery paper. For depressions in the gouge surface, sanding
would involve the entire inner surface in order to bring the thickness of the gouge down
to the level of the depression. This operation is limited by the minimum gouge thickness.
As indicated previously, Cooper recommends the use of a precision measuring
device, such as a dial indicator (preferred) or cane gauge, for monitoring the corrective
process. “End to end inaccuracies profoundly affect the reed's mechanical fulcrum,
causing a functional imbalance between the two blades. Lateral imbalance directly
affects the reed's inner curve and causes off-centered asymmetric tip openings that are not
correctable at a later stage.”
In addition to correcting dimensional irregularities, a secondary function of
sanding is smoothing the inner surface of the gouge contour. Though Cooper believes
that the inner surface of the gouge should be “as smooth as a piece of finished furniture,”
he has found that the texture of the inner blade surface can have an effect on the timbral
characteristics of the reed. He states, “The use of fine grit sandpaper (600) throughout
this process will result in a brighter, less damped sound in the finished reed, while a more
course grit (400) will result in a more covered quality.”
4 James M. Poe, “Cane Hardness and Flexibility: Related Measurements Leading to Better
Bassoon Reeds,” The Double Reed 26, no. 2 (2003): 60-64.

42
After the gouge surface has been closely examined, dimensional irregularities
corrected, and the gouged surface finely polished, Cooper begins the final repetitive
sanding sequence:
1. Using a wetted finger, moisten the gouge surface of the sanded cane, wiping off the
excess moisture.
2. Lay the wetted cane aside to dry with the wet surface up, preferably under the heat
from a light source. The once smooth inner surface will again have a raised
corrugated surface and minor discontinuities in graining.
3. As the individual pieces dry, proceed to correctively sand, smooth and remoisten
the gouge surface, while earlier cane continues to dry.
4. Repeat the finish sanding process, using fine emery paper until the imperfections
are again eliminated. Normally, this sanding, wetting, drying cycle must be
repeated three or four times before the gouge surface will remain smooth. Only
after such stability of graining is achieved should one proceed to the next step
(soaking).
Cooper notes that some reed makers seek to maximize the grain distortion
between each step by soaking the cane overnight between each sanding and drying cycle.
While he does not find issue with this method, he has not found “enough improvement in
finished reeds to warrant the additional time involved.” The main goal for Cooper is a
consistent gouge: “The necessity of maintaining a precise consistent gouge must be
emphasized, for the gouge configuration represents the primary element that determines
the reed tip's final inner contour. Careful informed workmanship is as important (or more
so) at this critical early stage of manufacture, as it is during any subsequent procedure.
Poorly conceived, inaccurate gouges guarantee bad results. Intelligent application of the
preceding corrective techniques will significantly improve the success rate of any reed
making methodology.”
Soaking
The second stage in preparing the cane is soaking. Cooper suggests three basic
approaches:
1. Minimalists: Believe in soaking the cane for the shortest possible period. This
generally involves soaking the cane in hot water for a few minutes up to three
hours (the time needed for the cane to sink).
2. Mid-ground traditionalists: Believe in soaking the cane overnight.
3. Prolonged soaking: This method involves immersion of the cane, under controlled
circumstances, for weeks or months.

43
Through many years of reed making, he has discovered a number of advantages in
the third method. According to Cooper, prolonged soaking leaches out the soluble saps
and minerals trapped in the gouged cane's vascular structure. He feels that removing
these elements serves a number of important purposes:
1. Minimizes allergic reaction for those people who are sensitive to contact with new
cane.
2. Minimizes the break in period by removing the vegetable and mineral material
before the reed is formed. Cooper sees the loss of these elements as essential to
the stabilization of a new reed.
3. Achieves greater homogeneity of texture, color, and strength between individual
pieces of cane, thus resulting in more consistent results in finished reeds.
4. Improves the quality and workability of the cane, contributing to a greater success
rate and better final results.
Another advantage to prolonged soaking is the convenience of having soaked
cane ready for any spare moments that may arise, particularly for the studio teacher who
needs to spontaneously demonstrate a reed making technique during a lesson. The
prolonged soaking method follows these basic steps:
1. Place the sanded and pre-selected cane in a tall jar and then fill it to the brim with
distilled water. The jar should be tall enough to allow the cane to sit upright in
the jar and still allow for space for the cane to sink below the surface of the water.
Screw the lid on the top of the jar.
2. After 24 hours, pour off the now discolored water, rinse the cane, and refill the jar
with fresh water.
3. After an additional day or two, repeat the process in step 2.
4. Repeat this process until the water shows no signs of discoloration through the
leaching process.
5. Once discoloration of the water ceases, the jar is refilled and placed in a dark
location. The light-free environment and distilled water minimize the possible
growth of mold, algae, or bacteria during prolonged immersion.
To test the efficacy of this soaking methodology and to determine the optimum
soaking time for the individual, Cooper suggests the following:
1. After two to three weeks of soaking, make two or three reeds.

44
2. Continue this process, making reeds at this two to three week interval, up to
the total soak time of three months (Cooper believes this is the point at which
the cane reaches its peak quality).
Cooper has found that, up to a certain point, the quality of the finished reeds
improves the longer the cane is soaked. The maximum level of improvement is achieved
after the two to three month period. The jar should be checked periodically for any signs
of discoloration in the water or growth on the surface of the cane. If either is noticed the
water should be changed and the cane rinsed. If discoloration and surface growth persist,
one must proceed to the finishing process before major deterioration takes place. To
ensure the prevention of contamination, he suggests the following precautions:
1. Permanent soak water should never be used to clear the file of cane shavings
while working on reeds.
2. Avoid using tap water with high mineral contents. This can add more by reverse
osmosis than is being lost.
3. Avoid using city water supplies that have high concentrations of potassium
permanganate (added to mask the foul odor and taste of algae). This chemical has
a hardening effect on the cane. Use distilled water exclusively and you can avoid
these problems.
The quality of the cane improves when soaked longer because organic saps and
vegetable elements take longer to leach out than more soluble minerals. Cooper is not
sure of the exact cause of the improvement in the texture, quality, and workability of the
cane, but that the change is clearly observable. Cooper encouraged his students to use the
two to three week interval as a test to determine the best soak time for them. He
concludes the discussion of selection and preparation in the following way: “The
previous selection process and the above preparatory steps are of vital importance in the
craft of reed making. Because they involve seeming minutia, these details are often
ignored or circumvented in the headlong rush toward finalizing a reed. However, only
through meticulous attention to these and other crucial details can the craft be mastered
and the reed making process elevated to the status of an art form.”
Profiling
Although there have been numerous developments in the manufacture and design
of profiling machines, Cooper feels that hand profiling produces superior results. He
makes the following observation: “Using a profiler does nothing but guarantee
mediocrity in reeds. Geometrically the flat profiler blade is incapable of cutting a
concave curve and in additional the vertical pressure exerted by the profiler blade crushes
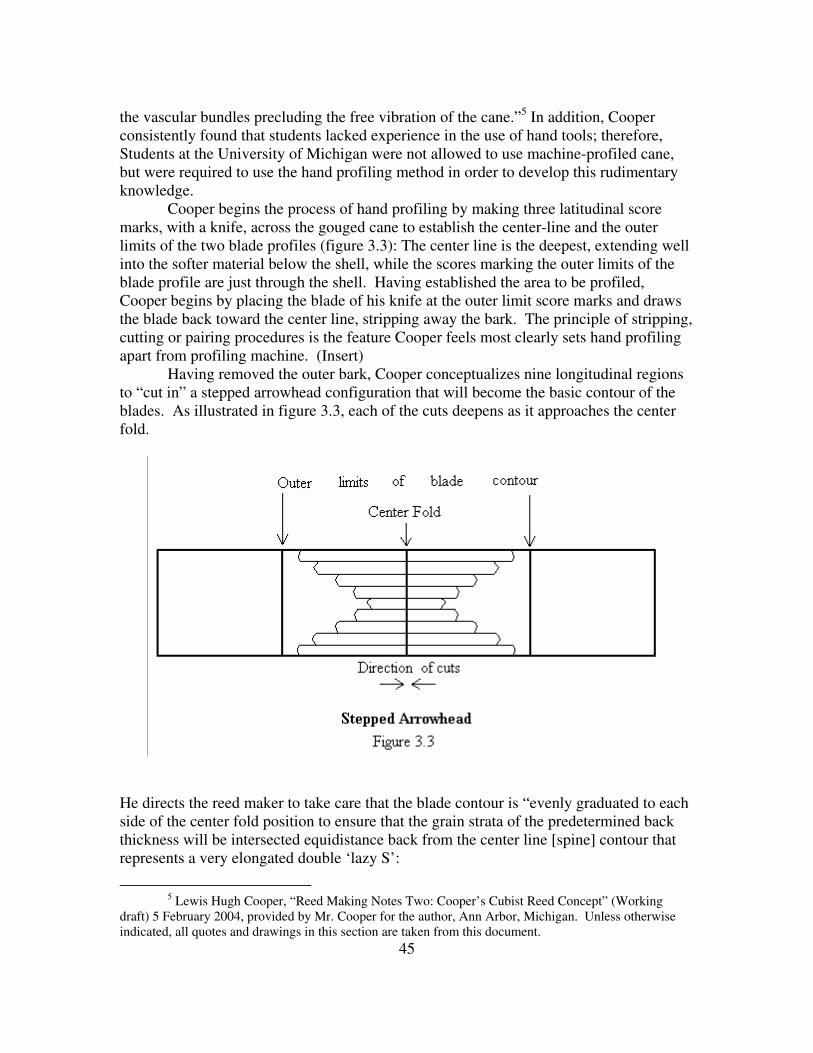
the vascular bundles precluding the free vibration of the cane.”5 In addition, Cooper
consistently found that students lacked experience in the use of hand tools; therefore,
Students at the University of Michigan were not allowed to use machine-profiled cane,
but were required to use the hand profiling method in order to develop this rudimentary
knowledge.
Cooper begins the process of hand profiling by making three latitudinal score
marks, with a knife, across the gouged cane to establish the center-line and the outer
limits of the two blade profiles (figure 3.3): The center line is the deepest, extending well
into the softer material below the shell, while the scores marking the outer limits of the
blade profile are just through the shell. Having established the area to be profiled,
Cooper begins by placing the blade of his knife at the outer limit score marks and draws
the blade back toward the center line, stripping away the bark. The principle of stripping,
cutting or pairing procedures is the feature Cooper feels most clearly sets hand profiling
apart from profiling machine. (Insert)
Having removed the outer bark, Cooper conceptualizes nine longitudinal regions
to “cut in” a stepped arrowhead configuration that will become the basic contour of the
blades. As illustrated in figure 3.3, each of the cuts deepens as it approaches the center
fold.
He directs the reed maker to take care that the blade contour is “evenly graduated to each
side of the center fold position to ensure that the grain strata of the predetermined back
thickness will be intersected equidistance back from the center line [spine] contour that
represents a very elongated double ‘lazy S’:
45
5 Lewis Hugh Cooper, “Reed Making Notes Two: Cooper’s Cubist Reed Concept” (Working
draft) 5 February 2004, provided by Mr. Cooper for the author, Ann Arbor, Michigan. Unless otherwise
indicated, all quotes and drawings in this section are taken from this document.
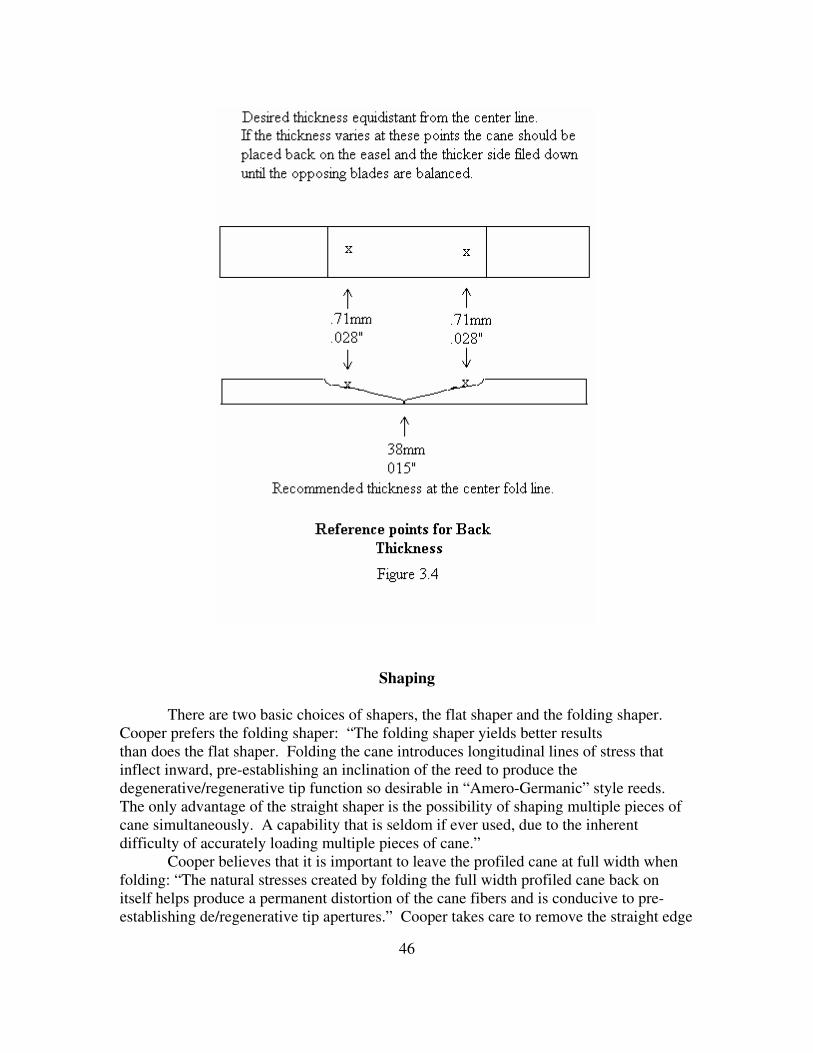
Shaping
There are two basic choices of shapers, the flat shaper and the folding shaper.
Cooper prefers the folding shaper: “The folding shaper yields better results
than does the flat shaper. Folding the cane introduces longitudinal lines of stress that
inflect inward, pre-establishing an inclination of the reed to produce the
degenerative/regenerative tip function so desirable in “Amero-Germanic” style reeds.
The only advantage of the straight shaper is the possibility of shaping multiple pieces of
cane simultaneously. A capability that is seldom if ever used, due to the inherent
difficulty of accurately loading multiple pieces of cane.”
Cooper believes that it is important to leave the profiled cane at full width when
folding: “The natural stresses created by folding the full width profiled cane back on
itself helps produce a permanent distortion of the cane fibers and is conducive to pre-
establishing de/regenerative tip apertures.” Cooper takes care to remove the straight edge
46
47
ruler used in folding before the cane is fully folded so that a mechanical fulcrum is not
created that could cause the cane to break open at the centerline. To finalize the fold, he
uses finger pressure to achieve a clean, sharp line, avoiding continued flexing of the cane,
which could also result in breaking open the fold.
Before loading the cane on the shaper, Cooper narrows the folded cane so that its
dimensions lateral conform to the approximate width of the shaper tip. This operation
helps prevent cracking that can occur when the opposing edges of the wider cane press
against one another when the locking mechanism of the shaper is fully tightened. He
then proceeds to shape the cane in the usual fashion. He does not recommend using
abrasive paper or files to smooth the edges of the cane while it is on the shaper, as it will
ultimately “destroy the contour of the shaper.”
Forming the Tube
Beveling
The first step Cooper discusses in forming the tube is beveling: “Correctly
contouring these seemingly insignificant splinters of cane to match the structural needs of
specific shapes and wire placements constitutes a critical element of successful reed
making.”6 Cooper teaches four basic functions of the bevel:
1. Corrective beveling, if needed, helps to position the reed's mechanical fulcrum at
or near the first wire placement to ensure that the reed possesses reverse wire
function and a tip opening that will resist collapse. If the reed’s mechanical
fulcrum is not correctly placed, then all remaining steps towards finishing will be
to no avail.
2. The correct bevel ensures the structural stability of the tube. The “butt” or “lap”
type joints created at the back of the reed tube are responsible for this stability.
3. The “butt” or “lap” type joints help to hermetically seal the tube and the juncture
between the bocal and reed.
4. Correct beveling can also help reinforce the degenerative-regenerative tip
function.
Cooper feels that the resultant narrowing of the reed tube’s diameter created by
beveling allows the reed maker greater flexibility and control over the finished
dimensions of the reed. He encourages his students to experiment with the shape and the
bevel to determine their own optimum design. The diagrams below define the highest,
mid and lowest ranges of bevel depth options for Symmetric and Asymmetric bevels.
6 Lewis Hugh Cooper, “Beveling: The Magic of Insignificant Splinters” January 2004, provided
by Mr. Cooper for the author, Ann Arbor, Michigan. Unless otherwise indicated all quotes in reference to
beveling are taken from this document.

Cooper gives the following description of his personal symmetric bevel contour:
“This specific bevel originates at the collar position and gradually deepens until it reaches
full 100% depth at the second wire position. The bevel then continues at full depth in
congruence with the shell/bark at the same 30 degree angle until reaching the back of the
shape.” He begins the bevel at the collar because he uses an exceptionally wide shaper.
For narrower shapers, he suggests starting the bevel further back on the tube or reducing
its depth. He also suggests options for trimming wastage that offers additional design
flexibility: “using selective beveling combined with the option of trimming wastage from
the front or back of profiled cane (in effect changing wire pattern placement) is the
equivalent of having several different shapers. Using gouged cane that is 127mm in
length allows for even more variation, due to the 6.35mm of wastage that can be removed
from the butt and/or the tip of shaped cane in any proportion. The flexibility offered by
selective beveling combined with wire pattern placement enables the reed maker to
48

achieve similar results on a variety of dissimilar shapers or diverse results on a single
shaper. This use of the bevel and trimming wastage is extremely valuable for teachers
confronted by the extreme variation in shapers owned by their students.”
Scoring the Cane and Establishing the Directionality and Degree of Slippage
For the next stage in forming the tube, Cooper makes seven score marks, one in
the middle and three on each side of center. The score marks begin at the collar and
extend to the back or butt end of the blank, dividing the tube into eight equal segments,
with the center score being most pronounced.
Cooper feels that slippage (overlapping or lateral skewing of the blades) is “an
integral part of all successful reeds and has four distinct functions.”
1. Moveable Shackle – Facilitates obligatory lateral expansion of the blades necessary to
sustain vertical oscillatory motion.7
2. Edge to plane – Mechanically easier to match edge to plane than edge to edge.
3. Damping of low frequency periodic noise factor – Region generating low frequency
periodic noise is damped out by opposing blade contact.
4. Decreases inner capacity of reed at rest– Inner contact points re-define static volume
of reed.
Cooper has observed that all players naturally torque the reed more or less when they
play and thus he suggests, “building in” proper directionally of overlap during the early
stages of manufacture to correspond to each performer’s tendency.
After the desired directional slippage is determined and set, by correctly
overlapping the “but” ends of the folded and shaped blank, the first and second wires are
49
7 Hugh Cooper, Home interview by the author, Ann Arbor, Michigan, 5 Febuary 2004.

50
applied.8 Cooper is careful to remove all “slack” from the wires using a pull and twist
method. If the slack is allowed to remain, the tube could suffer “irreparable cracks
during the forming process.”
Once the wires are securely fastened and slack is removed, Cooper inserts needle
nose pliers and grasps one of the two central segments created by the scoring process.
Then, he rotates his wrist slightly causing this segment to “pop” or separate from the
others. He continues this process until each segment has been separated. Cooper has
found that this procedure causes the tube to split open evenly at each score.
Following this operation he opens the tube by pinching the second wire from the
sides sufficiently to admit the mandrel. Then holding the reed from the sides, tightly
between the thumb and index finger of one hand, he uses the other hand to insert the
mandrel using a rocking motion of the wrist. When the mandrel has been inserted to the
proper depth he applies the third wire and then “mashes” the tube, using the circular
opening of the reed pliers from the butt end of the tube forward to the second wire.
Once the tube is sufficiently formed to the mandrel, he pulls the third wire to
tension and then rotates it 360% around the tube with the mandrel still inserted, followed
by twisting and locking the wire in its original position. He repeats the rounding
procedure, which should cause the side seams to “neck in and close”, tightens and rotates
the second wire as in the previous step. The first wire is tightened only slightly with one
quarter to one half turn and then the blank is removed from the mandrel and visually
inspected to ensure that it is perfectly rounded. Any imperfections are remedied by
repeating the rounding procedure. The butt end of the reed is then sanded until the reed
blank will stand up, butt end down, on a level flat surface. The reed blank is then placed
on a drying board mandrel for several days.
After the blank has dried, the mandrel is insert to the proper depth, which will
cause the side seams to reopen. He “works the reed tube” back of the second wire with
pliers until the seam closes and repeats the tensioning, rotating and twisting of the wires.
Again, the first wire is tightened only minimally and left loose.
Before applying the wrapping on his reeds, Cooper creates a “herring bone”
pattern of four notches diagonally across the surface of the tube, extending from the
second wire to the “butt” end of the blank. He has found that the “herring bone” notches
not only aid in locking in the wrapping but improve reverse second wire function as well.
He is emphatically against applying Duco cement or lacquers to the wood surface of the
blank: “This one misguided procedure has ruined more potentially good reeds than any
other, except the equally calamitous mistake of tightening the first wire excessively.”
After three or four coats of cement or lacquer have been applied to the wrapping
and allowed to dry thoroughly while on the drying, the butt of the reed is freed of residue
with sand paper or a file. At this point he recommends setting the blank aside for one
year before moving on to the finishing process. He has observed that: “results can
improve phenomenally.” However, when time does not always allow for this interval, he
adds that “acceptable reeds can be produced by beginning the finishing process
immediately after the wrapping is completed.”
8 Cooper, “Cubist Reed Concept.”
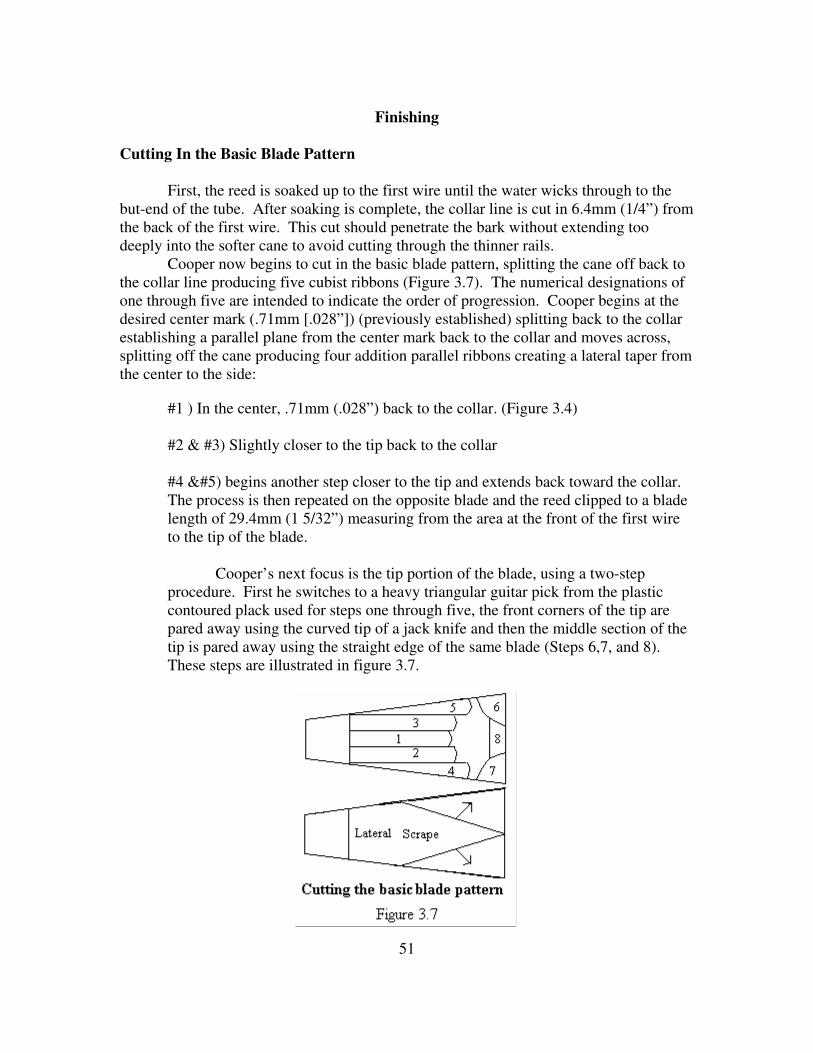
Finishing
Cutting In the Basic Blade Pattern
First, the reed is soaked up to the first wire until the water wicks through to the
but-end of the tube. After soaking is complete, the collar line is cut in 6.4mm (1/4”) from
the back of the first wire. This cut should penetrate the bark without extending too
deeply into the softer cane to avoid cutting through the thinner rails.
Cooper now begins to cut in the basic blade pattern, splitting the cane off back to
the collar line producing five cubist ribbons (Figure 3.7). The numerical designations of
one through five are intended to indicate the order of progression. Cooper begins at the
desired center mark (.71mm [.028”]) (previously established) splitting back to the collar
establishing a parallel plane from the center mark back to the collar and moves across,
splitting off the cane producing four addition parallel ribbons creating a lateral taper from
the center to the side:
#1 ) In the center, .71mm (.028”) back to the collar. (Figure 3.4)
#2 & #3) Slightly closer to the tip back to the collar
#4 ) begins another step closer to the tip and extends back toward the collar.
The process is then repeated on the opposite blade and the reed clipped to a blade
length of 29.4mm (1 5/32”) measuring from the area at the front of the first wire
to the tip of the blade.
Cooper’s next focus is the tip portion of the blade, using a two-step
procedure. First he switches to a heavy triangular guitar pick from the plastic
contoured plack used for steps one through five, the front corners of the tip are
pared away using the curved tip of a jack knife and then the middle section of the
tip is pared away using the straight edge of the same blade (Steps 6,7, and 8).
These steps are illustrated in figure 3.7.
51

52
Following the tip procedures, Cooper makes a lateral scrape that begins roughly
2/3 of the distance back from the tip, narrow at its beginning and broadening out toward
the tip. This step serves to establish the degenerative/regenerative tip function of the reed
(figure 3.7).
Having established the blade contour Cooper removes all ridges created by the
previous steps using a safire fingernail file. He then checks the tip opening for balanced
function (de/regenerative), making adjustments through additional scraping using step
four and/or by squeezing the first wire to adjust the tip opening. Next, the reed is crowed
to determine its dominant pitch center, which should ideally be E-flat. Finally, the reed is
play tested for a homogenous sound and freedom of response throughout the range of the
bassoon. It should be more vibrant and lower in pitch than a “played in” finished reed.
Cooper classifies this as a first stage reed: “playable, but lacking in refinement.”
Cooper’s Parallel Scrape Reed
The reed design Cooper uses, according to his terminology, is a parallel reed
scrape based on Knockenhauer style reeds, actually a “parallel scraped” reed. Cooper
feels that the pure wedge scrape and the pure parallel scrape “do not exist in real time
reeds”, and thus, all usable reeds will have some form of a double wedge blade contour.
Cooper describes two basic concepts of double wedge blade contours:
1) The parallel scrape (tip taper)*9 reed, based on the reeds
Knochenhauer
2) The wedge scrape (straight taper)* reed, based on the
reeds of Mechler.
The diagram below contains Cooper's representation of the structure and vibratory
characteristics of these two divergent scrapes, as described in a handout he entitled
“Basic Reed dynamics.”10
Cooper further defines the reeds vibratory nature by
conceptually dividing the blade surface into five longitudinal and three transverse
subdivisions, assigning a particular function to each.
9 James Mckay, The Bassoon Reed Manual: Lou Skinner’s Theories and Techniques.
Contributing authors, Russell Hinkle and William Woodward, (Bloomington Indiana, Indiana University
Press, 2000). Published in cooperation with the International Double Reed Society, 3.
10 Lewis Hugh Cooper, “Basic Reed Dynamics” 5 February 2004 provided by Mr. Cooper for the
author, Ann Arbor, Michigan. Unless otherwise indicated all drawings and quotes in this section are taken
from this document.
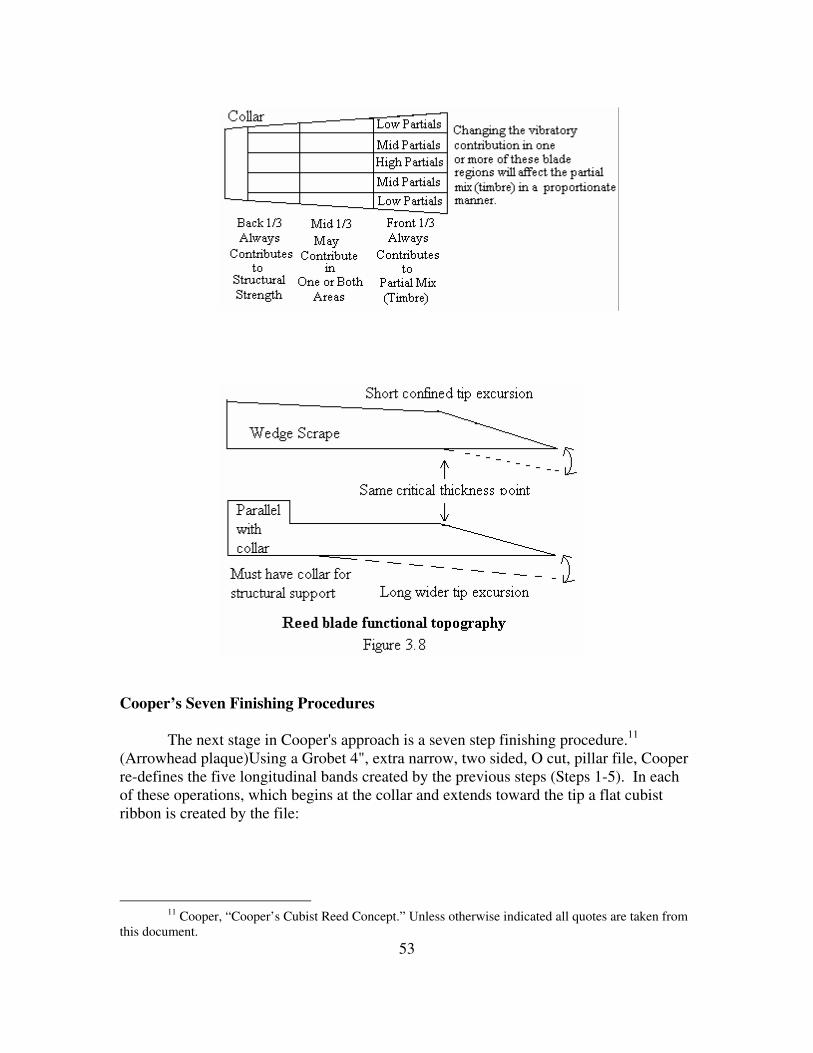
Cooper’s Seven Finishing Procedures
The next stage in Cooper's approach is a seven step finishing procedure.11
(Arrowhead plaque)Using a Grobet 4", extra narrow, two sided, O cut, pillar file, Cooper
re-defines the five longitudinal bands created by the previous steps (Steps 1-5). In each
of these operations, which begins at the collar and extends toward the tip a flat cubist
ribbon is created by the file:
53
11 Cooper, “Cooper’s Cubist Reed Concept.” Unless otherwise indicated all quotes are taken from
this document.
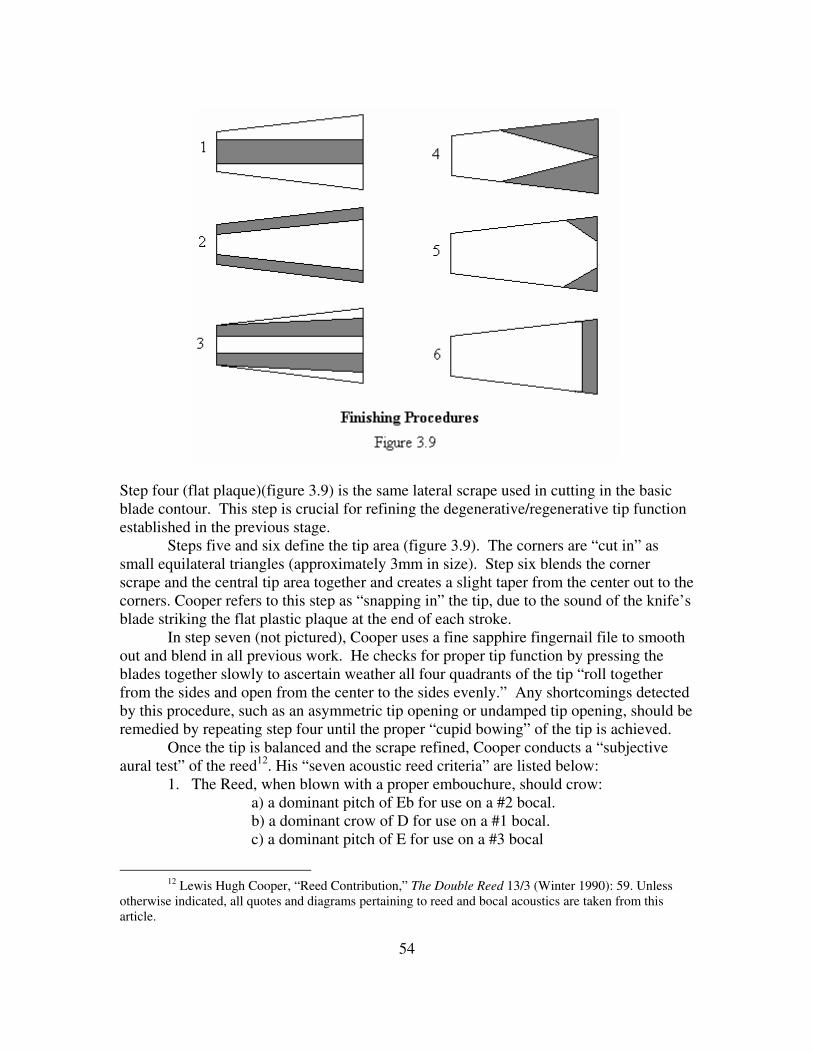
Step four (flat plaque)(figure 3.9) is the same lateral scrape used in cutting in the basic
blade contour. This step is crucial for refining the degenerative/regenerative tip function
established in the previous stage.
Steps five and six define the tip area (figure 3.9). The corners are “cut in” as
small equilateral triangles (approximately 3mm in size). Step six blends the corner
scrape and the central tip area together and creates a slight taper from the center out to the
corners. Cooper refers to this step as “snapping in” the tip, due to the sound of the knife’s
blade striking the flat plastic plaque at the end of each stroke.
In step seven (not pictured), Cooper uses a fine sapphire fingernail file to smooth
out and blend in all previous work. He checks for proper tip function by pressing the
blades together slowly to ascertain weather all four quadrants of the tip “roll together
from the sides and open from the center to the sides evenly.” Any shortcomings detected
by this procedure, such as an asymmetric tip opening or undamped tip opening, should be
remedied by repeating step four until the proper “cupid bowing” of the tip is achieved.
Once the tip is balanced and the scrape refined, Cooper conducts a “subjective
aural test” of the reed12
. His “seven acoustic reed criteria” are listed below:
1. The Reed, when blown with a proper embouchure, should crow:
a) a dominant pitch of Eb for use on a #2 bocal.
b) a dominant crow of D for use on a #1 bocal.
c) a dominant pitch of E for use on a #3 bocal
12 Lewis Hugh Cooper, “Reed Contribution,” The Double Reed 13/3 (Winter 1990): 59. Unless
otherwise indicated, all quotes and diagrams pertaining to reed and bocal acoustics are taken from this
article.
54
55
2. The reed plus bocal, when blown with primary register embouchure, should
produce a slightly flatted middle C.
3. When the embouchure is relaxed and the reed allowed to “balloon” to its
largest interior volume, the pitch of the reed plus bocal should drop to a stable
B.
4. Attempts to lower the pitch of the reed plus bocal beneath B should result in a
lower octave “crow.”
a) If the octave relationship is out of tune, the pitch relationship
between the various registers on the bassoon will be distorted in
a similar fashion
b) Pitches other than the octave will be present in the crow; but,
it is the tuning of the octave which is of prime importance.
5. The minimum range of the coupled reed plus bocal must be a minor 3rd
(e.g. B
through a slightly flattened D) This range represents the necessary degree of
reed and embouchure flexibility needed to successfully produce the various
registers of a bassoon. Although this range represents a continuum within as
well as between register, in essence:
a) B represents the low register embouchure
b) C represents the primary register embouchure
c) C# represents the second register embouchure
d) Slightly flatted D represents the high register embouchure
6. The “cut-off” frequency of the reed alone when blown must be a minimum of
a perfect fifth above the dominant crow pitch.
a) D to A, E-flat to B-flat, E to B, etc.
b) The pitch change is produced by the embouchure manipulation
and change in oral resonance cavity.
c) The “cut-off” frequency represents the highest fundamental
pitch the reed will produce under any circumstance.
7. The reed when blow alone must have a minimum range of one octave.
a) D reed = A to A, E-flat reed = B-flat to B-flat
E reed = B to B
b) An extension of this range is generally a desirable attribute.
1. An extension upward indicates that the reed has pro-
pensity for being a better high note reed.
2. An extension downward indicates that the reed has a
propensity for being a better low note reed.
3. An extension in both directions indicates that the reed
is one of those rare reeds which plays equally well in
all registers.
56
c) Melodies with a range of one octave or less can be played on the
reed alone.
1. The playing of such melodies on the reed alone should
be an integral part of first and subsequent assignments.
2. The mobility inherent in such performance is indicative
of the flexibility necessary in embouchure, oral cavity
and reed while playing the bassoon.
After the reed has been subjected to the above procedures, it is play tested on the
bassoon. Cooper instructs the reed maker to expect some of the following faults:
1) The reed is flat in pitch.
2) Third space E is somewhat unstable and drops in pitch
3) The sound is too open and lacking in focus.
4) Initiations in the high register are unsure.
5) Second space C# is unstable and drops in pitch.
Cooper finds that reeds tend to “self - correct (often over correct)as they are
played-in.” He cautions the reed maker not to rush to correct these problems by clipping
the tip, but allow time for the reed to stabilize: “Above all, don’t prematurely clip the
blades of the more vibrant examples, for in reality the above traits represent desirable
characteristics of the more promising reeds.” As the reed changes, Cooper observes the
following tendencies: “New reeds change dramatically on a daily basis in many diverse
ways, but in general as they break in become more resistant, focused in sound, higher in
pitch, and lose lows as they gain in highs.”
As the reed changes, Cooper continues to check the four quadrants of the tip for
balance and symmetry, correcting when needed by selective use of procedure four.
When he is sure of tip symmetry, he repeats the seven - step finishing procedure,
removing less and less cane as he approaches the reed’s final stage three dimensions. He
often finds it necessary to make small tip clippings and minute wire adjustments, using
the reverse wire function of the first and second wires as the finishing procedures are
repeated. Cooper feels that reverse wire function is a crucial characteristic of all
successful reeds and a “precise tool used to achieve final balance between resistance and
flexibility.”
Reed Acoustics
In addition to the traditional concerns of reed making, Cooper considers the reed’s
acoustical properties as well. According to Cooper, the bassoon functions, acoustically,
like a “Bessel horn with a flare exponent of two, whose vibratory modes correspond to
the exclusively whole- number recipe of the Natural Overtone Series.”13
However, due
to the practical need to energize the cone, the tip (bocal) must be cut off, thus distorting
the normal frequency relationships between registers. This has near exponential
13 A flare exponent of two means that for every doubling of length the diameter is doubled.
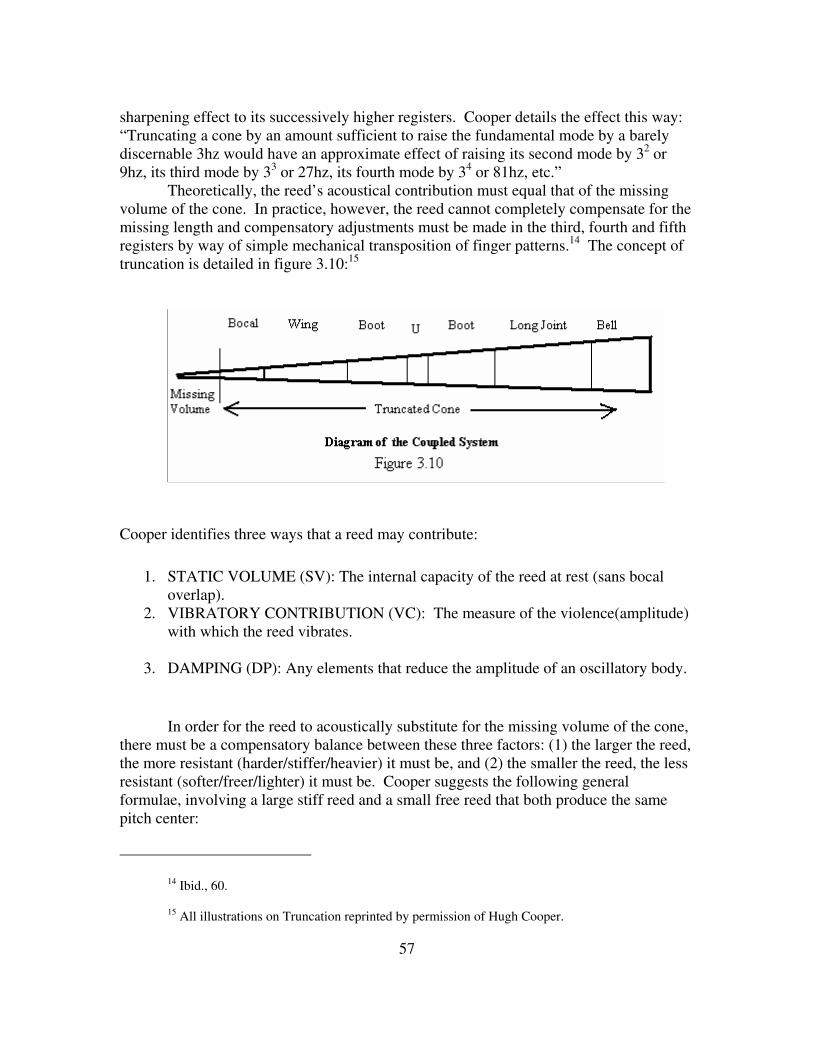
sharpening effect to its successively higher registers. Cooper details the effect this way:
“Truncating a cone by an amount sufficient to raise the fundamental mode by a barely
discernable 3hz would have an approximate effect of raising its second mode by 32 or
9hz, its third mode by 33 or 27hz, its fourth mode by 3
4 or 81hz, etc.”
Theoretically, the reed’s acoustical contribution must equal that of the missing
volume of the cone. In practice, however, the reed cannot completely compensate for the
missing length and compensatory adjustments must be made in the third, fourth and fifth
registers by way of simple mechanical transposition of finger patterns.14
The concept of
truncation is detailed in figure 3.10:15
Cooper identifies three ways that a reed may contribute:
1. STATIC VOLUME (SV): The internal capacity of the reed at rest (sans bocal
overlap).
2. VIBRATORY CONTRIBUTION (VC): The measure of the violence(amplitude)
with which the reed vibrates.
3. DAMPING (DP): Any elements that reduce the amplitude of an oscillatory body.
In order for the reed to acoustically substitute for the missing volume of the cone,
there must be a compensatory balance between these three factors: (1) the larger the reed,
the more resistant (harder/stiffer/heavier) it must be, and (2) the smaller the reed, the less
resistant (softer/freer/lighter) it must be. Cooper suggests the following general
formulae, involving a large stiff reed and a small free reed that both produce the same
pitch center:
14 Ibid., 60.
15 All illustrations on Truncation reprinted by permission of Hugh Cooper.
57
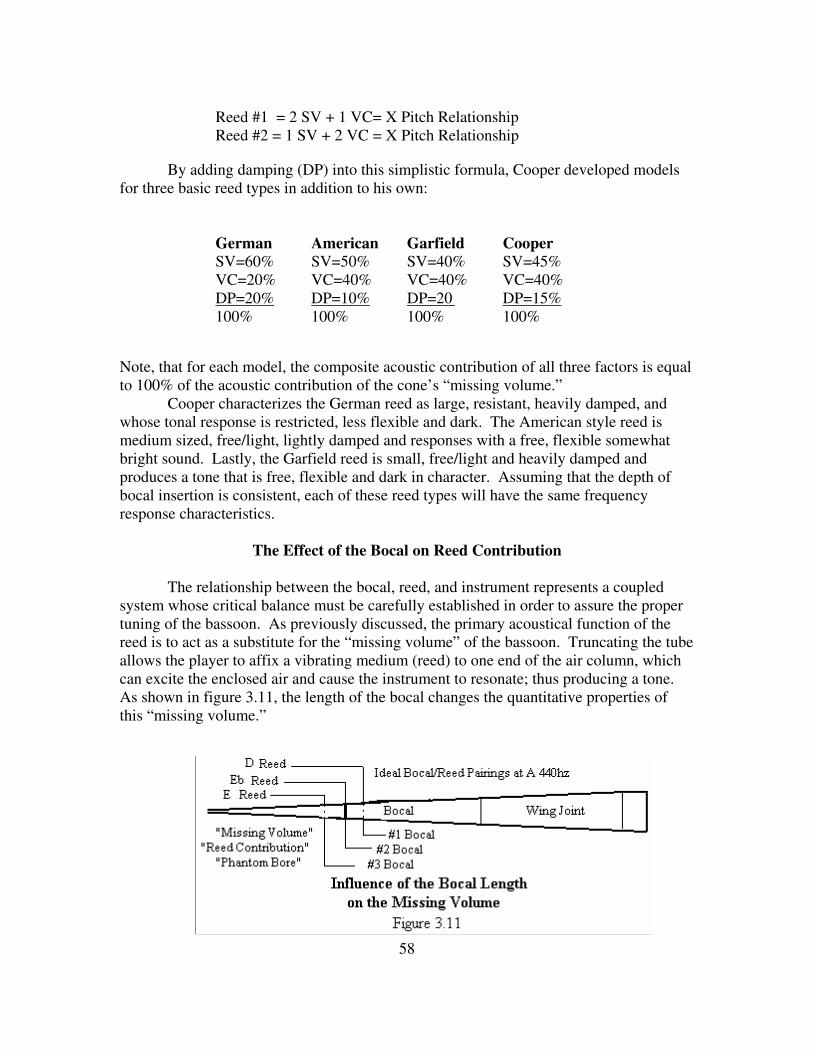
Reed #1 = 2 SV + 1 VC= X Pitch Relationship
Reed #2 = 1 SV + 2 VC = X Pitch Relationship
By adding damping (DP) into this simplistic formula, Cooper developed models
for three basic reed types in addition to his own:
German American Garfield Cooper
SV=60% SV=50% SV=40% SV=45%
VC=20% VC=40% VC=40% VC=40%
DP=20% DP=10% DP=20 DP=15%
100% 100% 100% 100%
Note, that for each model, the composite acoustic contribution of all three factors is equal
to 100% of the acoustic contribution of the cone’s “missing volume.”
Cooper characterizes the German reed as large, resistant, heavily damped, and
whose tonal response is restricted, less flexible and dark. The American style reed is
medium sized, free/light, lightly damped and responses with a free, flexible somewhat
bright sound. Lastly, the Garfield reed is small, free/light and heavily damped and
produces a tone that is free, flexible and dark in character. Assuming that the depth of
bocal insertion is consistent, each of these reed types will have the same frequency
response characteristics.
The Effect of the Bocal on Reed Contribution
The relationship between the bocal, reed, and instrument represents a coupled
system whose critical balance must be carefully established in order to assure the proper
tuning of the bassoon. As previously discussed, the primary acoustical function of the
reed is to act as a substitute for the “missing volume” of the bassoon. Truncating the tube
allows the player to affix a vibrating medium (reed) to one end of the air column, which
can excite the enclosed air and cause the instrument to resonate; thus producing a tone.
As shown in figure 3.11, the length of the bocal changes the quantitative properties of
this “missing volume.”
58

59
Cooper suggests that the combination of different bore, lengths, materials and
plating can result in well over 3500 different variants in Heckel bocals alone. His own
personal choice was the Heckel bocals of standard length, material, and platting with “C”
or “CC” in their description, such as the C, CC, CD, or VCD.16
The term “standard
material” refers to a nickel-silver base metal, with silver platting described as producing a
“darker” timbre and nickel platting described as producing “brighter” timbre. Cooper
considers #1, #2 or #3 standard lengths for the Heckel bocal, with #2 being considered
neutral, designed to play at 440hZ with a reed that produces an E-flat crow pitch. He
used special bore designs only to remedy a particular problem on a specific instrument.
In addition to Heckel, the bocals by Frank Marcus and Benjamin Bell, Püchner, and the
Fox Products Corporation are acceptable alternatives. However, he found nothing to
compare with the characteristics of a well-preserved, pre-World War II vintage, CC
Heckel bocal.17
To properly match the reed and bocal, Cooper’s formula is that a smaller reed
requires a longer bocal and visa-versa. In principle, each change in numbering within
one makers system is designed to change the overall pitch center by one tenth of a
semitone (2.5hz) up or down. Therefore, a pitch of 440hz produced on a given reed with
a #2 bocal would be lowered to approximately 437.5hz by using a #3 bocal. This change
in length is not proportionately distributed, but takes place only on the portion of the
bassoon above open F (small f). Thus, the pitch change that occurs with a change of one
bocal number, although negligible and easily correctable with the embouchure, is still
disproportionate in reference to the bassoon scale: “In theory, a change of ten bocal
numbers would raise or lower the pitch center one full semitone; however, no single
bassoon or reed style can accommodate such a disruptive change in effective length
added only at the tip of the cone without serious consequences.” For this reason, Cooper
encourages his students to avoid changing bocal length by more than one number above
or below his/her normal bocal.: “With a basic understanding of this relationship, the
students can tailor the reed to fit a particular irregularity in their instrument or overcome
certain performance problems or adapt to a particular high or low tuning pitch.”18
Borrowing from Micheal Dollendorf, one of his German students, Cooper also
called attention to a method of tuning the reed to a particular bocal involving a series of
“tap” pitches. The procedure involves tapping on the bocal, while it is suspended on one
finger at the cork area, to find its pitch; this may be done with a small ruler or pencil.
Once the bocal pitch is determined, the reed is scraped so that the tap pitch near the collar
area of one blade is ½ step lower and the tap pitch for the opposing blade near the collar
area is one whole step lower than the tap pitch of the bocal.
This method is also used to balance a reed. Tap the collar area, then tap near the
tip, the tip pitch should be a perfect fifth higher than the collar pitch for most reeds. For a
darker or smoother reed, the interval between the two pitches should be a Major or Minor
third. For the rails, the tap pitch relationship should mimic the harmonic relationship of
16 The “C” and “CC” are standard Heckel bore designs.
17 Ibid. 18 Note the compensatory relationship between the crow pitch and bocal number.
60
the higher of the two blades. The pitch 9mm or 3/8” back from the tip on the rails should
be a perfect fifth higher than the pitch of the rails near the collar.19
In the conclusion to his article “Reed Contribution” in the Double Reed, Cooper
closes with the following statement:
Finally, in essence, there are as many successful reed styles as there are successful
individual performers; however, each individual recipe, regardless of style, must
first fulfill an acoustic obligation to the specific coupled system and secondly
function efficiently within its unique musical environment. The ability to
sensitively balance the three components of “Reed Contribution” is primarily
dependent on an open mind and complete mastery of the art of reed making in all
its intricate detail. This indispensable but elusive goal represents an essential
prerequisite to achievement of success in the professional arena.
19 Hugh Cooper, Ann Arbor, Michigan, manuscript given to the author, 25 March 2003, in the
authors possession, Waco, Texas.

61
CHAPTER 4
TEACHING
Study Materials
Cooper considers himself a traditionalist regarding his preferred teaching materials:
1. Weissenborn Practical Studies - I through XXV
2. Weissenborn 50 Studies, op. 8, vol. II. (These are now published as
one book with the Practical Studies.)
3. Milde Studies in All Keys, op. 24
4. Milde Concert Studies, op. 26, vol. I and II (used in conjunction
with op. 24.)
5. Simon Kovar - 24 Daily Exercises for Bassoon (These should be
used selectively as a corrective measure.)
He considers these studies to be the books of the “bassoonist’s bible” and feels
that the serious students should be introduced to them in high school and assimilate them
at a higher level in college or the conservatory.1 To address the more advanced
contemporary repertoire encountered at the college level he suggests the following:
1. Marcel Bitsch - Vingt Etudes
2. Otto Oromszegi - Ten Modern Studies
3. Marius Piard - 16 Characteristic Studies
4. Karel Pivonka - Rhythmical Etudes
Cooper does not consider a solo career as a viable option for his students and,
thus, avoids solo repertoire as an instructional vehicle. He prefers to use this material as
a reward for reaching some landmark “bassoonistic accomplishment.” He wanted
students to associate music making with freedom of expression, an experience
1 Professor Hugh Cooper of Ann Arbor Michigan, taped interview conducted by the author 3-5
November 2001. Unless otherwise indicated, all quotes from the chapter are from that interview.

62
“unencumbered by major mechanical limitations.” He is convinced that the cause of so
many poor performances of Mozart’s Concerto by advanced bassoon students is that the
work is introduced to them before they acquired adequate musical and technical
expertise. These learned responses surface under pressure and cause numerous “beginner
level” errors during performance. He believes that the early lessons are the most
important, having a direct bearing on the future success of a performer. He feels it is
better to have students grapple with performance problems in non-performance etudes
rather than acquiring faulty responses in concert literature that may surface later as
“reflective ghosts” in a performance setting. Conceptually, a solo work that takes longer
than two weeks for a student to learn is beyond their level of accomplishment.
Cooper considers major ensemble performance the only realistic career objective
for bassoonists and insists that performance majors compile an extensive orchestral
library as early as possible. Preparation for a career as an orchestral player is a long-
term project; thus, he began assigning appropriate orchestral repertoire to his students as
soon as they were ready. Rather than relying on excerpt books, Cooper encouraged his
students to obtain complete parts. He knew that the “tutti” passages are often more
demanding than the solos and the solos could look quite different in appearance when
taken out of visual context.
Cooper feels that the teacher should pace the progress of a student to reach his/her
peek of preparation by the end of the senior year or, at the latest, the first year of graduate
study. His truly outstanding students obtained their first orchestral job after four or five
years of undergraduate study, while a few “good ones” found success after another year
or two of development. He is convinced that spending several years obtaining a doctoral
degree in performance, regardless of the teacher, rarely increases their success rate in
orchestral auditions.
Beyond the standard performance skills needed for solo and chamber music, it is
important for an aspiring orchestral player to possess rapid tonguing and extended upper
register ability. For rapid tonguing, an extremely fast single tongue is the best approach,
but new standards in articulation demand the development of double and triple tonguing:
“Due to the number of individuals who have mastered double and triple tonguing
techniques, new articulative standards have been set that must be met by all aspiring
young bassoonists. Multiple tonguing for most aspiring students is a MUST!”
According to Cooper, the traditional “ta-ka” syllables do not work well on
bassoon. The tongue is left too far back in the mouth after the “ka” syllable, thus making
it difficult to get back to the reed for the front “ta.” Cooper suggests using the syllables
“tik-kit” or “du-goo” which keep the tongue further forward on the backstroke and reduce
the distance the tongue must travel during the front to back exchange. For triple
tonguing, he recommends using the aforementioned syllables and then shifting the
accent: Du-goo-du, Goo-du-goo (Tik-kit-tik, Kit-tik-kit). He taught and used the “old
fashioned way” of repeating the “du” or “tik”: Du-goo-du, Du-goo-du (Tik-kit-tik, Tik-
kit-tik).
For upper register playing, the mastery of fingerings up to the high F is a must.
Franciax's Chamber Piece for Orchestra, Berg's Wozzeck and Bernstein’s West Side Story
all contain this pitch. Mastery of the high register is achieved by focusing on the
following:
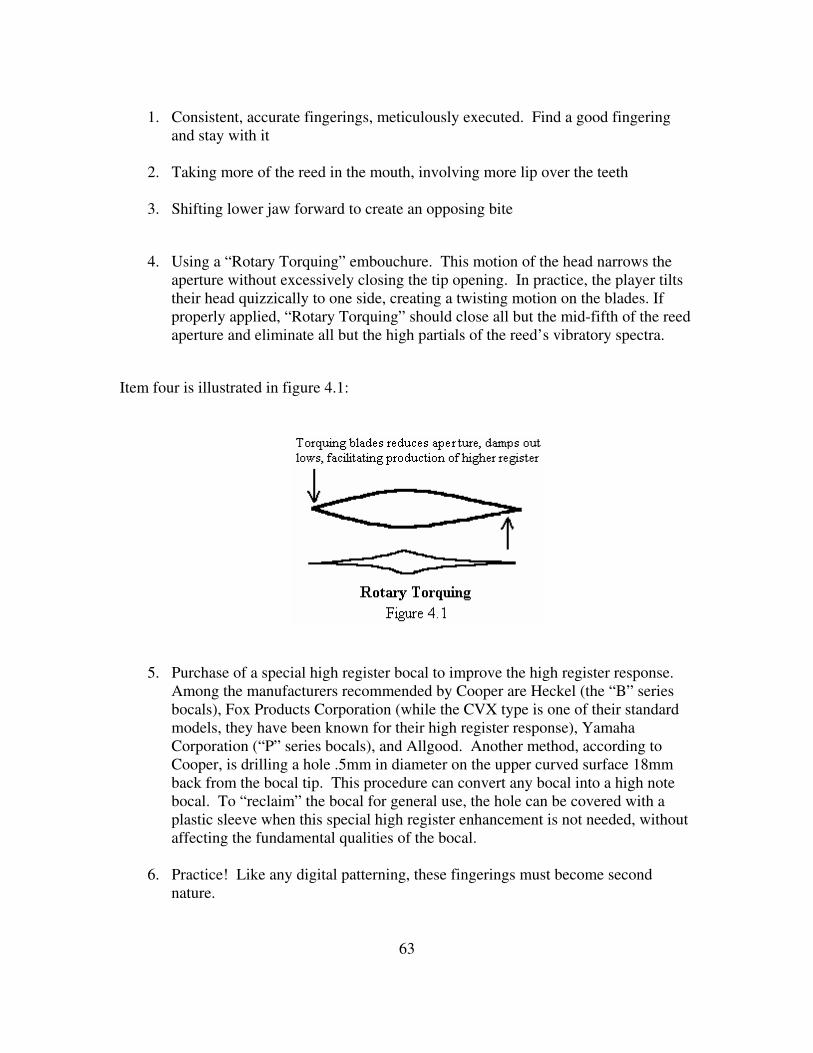
1. Consistent, accurate fingerings, meticulously executed. Find a good fingering
and stay with it
2. Taking more of the reed in the mouth, involving more lip over the teeth
3. Shifting lower jaw forward to create an opposing bite
4. Using a “Rotary Torquing” embouchure. This motion of the head narrows the
aperture without excessively closing the tip opening. In practice, the player tilts
their head quizzically to one side, creating a twisting motion on the blades. If
properly applied, “Rotary Torquing” should close all but the mid-fifth of the reed
aperture and eliminate all but the high partials of the reed’s vibratory spectra.
Item four is illustrated in figure 4.1:
5. Purchase of a special high register bocal to improve the high register response.
Among the manufacturers recommended by Cooper are Heckel (the “B” series
bocals), Fox Products Corporation (while the CVX type is one of their standard
models, they have been known for their high register response), Yamaha
Corporation (“P” series bocals), and Allgood. Another method, according to
Cooper, is drilling a hole .5mm in diameter on the upper curved surface 18mm
back from the bocal tip. This procedure can convert any bocal into a high note
bocal. To “reclaim” the bocal for general use, the hole can be covered with a
plastic sleeve when this special high register enhancement is not needed, without
affecting the fundamental qualities of the bocal.
6. Practice! Like any digital patterning, these fingerings must become second
nature.
63
64
The Teacher’s Role
The advanced teacher's primary responsibility is to prepare the few exceptional
students for professional playing careers and to gently guide the less talented ones toward
accepting their limitations and transferring out of a performance degree into an area in
which they can excel: “I consider one of my most successful periods at the University of
Michigan a time when nine former School of Music bassoon majors were happily and
productively enrolled in other schools on campus. These nine students and many others
are now successful doctors, lawyers, engineers, teachers, etc., who continue to enjoy
playing the bassoon as an avocational hobby in civic orchestras throughout the country.”
Developing Musicianship
Musical expression is the most difficult area to teach. In Cooper’s words “Those
that have it, have it.” The primary responsibility of the teacher is to remove any
mechanical obstacles that may hinder the student's natural sensitivity from being
expressed to the fullest. Cooper is convinced that all students possess the innate ability to
express themselves emotionally, but “this naturally encoded human response to
emotional stimulus has been stifled by our modern society to the point of being non-
existent. We are conditioned to believe that letting our emotions show is not an
acceptable practice.”
The central role of the school music programs should be to “offer a child the
opportunity to emotionally express their feelings, within a peer group, without fear of
ridicule.” Cooper feels that “freedom of expression” is seldom encouraged during a
child's formative years, and that our schools turn out “emotionally sterile technicians
incapable of expressively communicating with other members of their species.”
His approach to this problem is to encourage a student to “exaggerate the four
nuances (rhythm, dynamics, micro-pitch leading, and timbre) to the point of burlesque (in
the students mind).” In most cases, he found that the resulting phrases approximated the
degree of expressive shaping of the more musical students. In general, he finds that only
a few students truly fulfill their natural expressive potential.
Artistry/Interpretation
After resigning from the Detroit Symphony in 1964, Cooper attended a rehearsal
and concert of the early music ensemble “Concentus Musicus” and then realized his own
shortcomings in the area of stylistic authenticity. Having been an orchestral musician, he
had adjusted to the reality that matters of interpretation were the “prerogative of the
conductor and not the players.” As he began his full time teaching career, Cooper
realized that he needed to “assume responsibility for interpretive authenticity.” After first
reading Arnold Dolmetsch’s book Interpretation of the Music of the Seventeenth and
Eighteenth Centuriest he recalled feelings of “total inadequacy and dismay.” Determined
to “rectify the shortcoming,” he immersed himself in as many sources on interpretation
and historic performance practice as he could find. After fifty-two years in teaching,
Cooper believes that the treatises by writers contemporary with their period, such as,

65
Johann Quantz, Leopold Mozart, and C.P.E. Bach are the most important resources on
the subject.
As stated earlier, Cooper's primary focus is to help students develop an informed
approach to interpretation, rather than parroting a “big name” recording or performance.
He insists that his students study the period writings in order to discover the manner of
the music for themselves:
From a pedagogical perspective, it is important not to second-guess the music's
intended balance between emotional content and structure. Let the music speak
for itself by paying careful attention to the notational nomenclature being used by
the composer. Musical notation, analogous to a written language, is a living
entity that changes in meaning from chronological period to period, and also may
vary in usage from one geographical area to another. Notational devices that have
a specific meaning in the twentieth century may have had totally different
meaning in previous eras or geographic locations.
According to Cooper, “Intellectual players” must always confront the questions of
“why” and “how” in their music making. Pursuing the answers to these basic questions,
through the unique, “God-given,” analytical capacity of the human species, should be the
goal of any student or professional striving to be an effective re-creative artist.
In approaching avant-garde music, Cooper feels that it is important for
professional musicians to be “open-minded,” willing to “involve themselves in
experimentation.” As a guide to the extended effects of the avant-garde, he refers to New
Sounds for Woodwind by Bruno Bartolozzi, Metoda per Faggato by Sergio Penazzi and
Variations for Solo Bassoon by Chris Weait.
Additional Skills
In addition to his experience as a teacher and performer, Cooper possesses the
unique perspective of an expert repairman and acoustician. He required each of his
students to have a basic understanding of the mechanism of the bassoon and its vibratory
nature. In Cooper's view: “Anyone with sufficient motor skill to play the bassoon and/or
to make a reed can take care of an instrument!” He feels that the skills needed to change
a pad, free a sticking key, and eliminate excessive key noise are “minimum
requirements” that should be a part of the every student’s training. “Serious Woodwind
students” should be required to take a maintenance exit exam. This would involve
removing all the keys from the instrument, correcting several prearranged problems and
reassembling the instrument within an hour before a concert “or reschedule the recital
until they can!”.
As an acoustician, Cooper expects his students to develop a basic understanding
of the subject. This information is foundational, a vital resource for enhancing their own
performance and teaching. Concepts such as the physiological nature of music, the
acoustics of the human ear, reed contribution and the effect of the bocal on the tuning of
the bassoon, are concepts Cooper utilized in his own development; information essential
66
to an informed approach to teaching and performance. The “Human Perception Smear
Factor”, a concept describing the physical limitations of the sensory nervous system, is a
prime example of Cooper informed approach to make musical judgments:
The human perception smear factor (50/1000 or 1/20 sec) represents the chemo-electric
recovery (integration) rate of man’s sensory nervous system. This physiologic parameter
first determines the threshold that separates periodic noise from steady state harmonic
sound, thus playing a major role in determining what is physiologically consonant or
dissonant. Also, the perception smear factor limits the maximum speed of performance
as well as the maximum perception of separate phenomena, e.g., separate events
occurring at a rate even close to 50 milliseconds (1/20 sec) or above lose their identity as
separate events and assume a new composite identity.20
Coopers feels that if more composers and performers understood the
physiological sensory limits of our nervous system, some of the awkward and ineffective
passages in the literature might not have been written. For example, composers would
not write a one beat figure of twenty or more notes, when the pulse is sixty or more beats
per minute. Cooper points out that the same passage would probably be indistinguishable
at fifteen or sixteen evens per second. For Cooper, this kind of knowledge provides the
player with the tools to solve technical problems and adapt to the changing musical
landscape. He summarizes his approach in this way:
With all due respect to the great teachers of this and other generations, it is high
time that musicians stopped teaching music performance by rote. Without an
analytic intellectual basis for music making, it is impossible, at best, for an
aspiring student to rise above the general competence level of the teacher. As in
all human endeavors, each succeeding generation should be given the intellectual
tools that will enable them to progress beyond the accomplishments of their
predecessors. Without abstract analytic human thought, there can be no real
progress, and we, as musicians will remain stratified in our historic role as
glorified aesthetic servants to the educated aristocracy.21
20 Presentation entitled “The Four Physiologic Parameters of Man’s Music System,” I.D.R.S.
Conference Lecture, The University of Minnesota, School of Music, July 28,1983
21 Corey, “Bassoon Teaching,” 33.

67
SUMMARY
Hugh Cooper once wrote “I would like to be remembered as a truly professional
teacher who possessed broad encyclopedic knowledge in his area, and an enthusiasm for
transferring that knowledge to others.” Cooper belongs to a generation of Americans
who, through their ingenuity and determination, endured the Great Depression and the
Second World War. As a young boy, his intellectual curiosity was nurtured in his
Grandfather's workshop, watching the elder gentleman delve into the intricacies of old
radios and clocks. In Cooper’s high school ensembles, Dale Harris taught him the value
of discipline and the rewards of hard work. At the University of Michigan, Cooper found
an example of the highest standards for artistic excellence in conductor William Revelli.
The author’s goal in this paper has been to examine the life and work of Lewis Hugh
Cooper and to understand how his experiences have come together to form the basis for
his philosophy of teaching.
To teach the fundamentals of bassoon playing, Cooper utilized scientific
methodology involving precision instruments to accurately measure the physical
phenomena associated with performance. Instead of simply accepting traditional views,
he examined the basic parameters of bassoon playing using empirical data, rather than
what he considered to be the “subjective, often anecdotal theories currently governing
musical thought.” In his approach to reed making, Cooper employed the same systematic
methodology. Rather than relying on the perfect piece of cane for producing quality
reeds, he developed ways to eliminate variables in the beginning stages of the process.
Through his method of selection and preparation of gouged cane, he found that he was
able to achieve greater uniformity at the outset and ensure more consistent results.
In addition to his systematic approach to the mechanics of reed making, Cooper
also drew on the science of acoustics as a means of defining the reed’s function in
relation to the bassoon. By understanding this cause and effect relationship, he believes
that the student can make educated choices and decisions, rather than going through a
protracted period of experimentation or slavishly following the dictates of a teacher.
Training materials such as etudes, scales, and arpeggios were designed to build
technique, breath control, and dynamic control throughout the range of the instrument.
Interpretation was a matter of responsible study and self-expression was not taught, but
nurtured. Cooper felt that his role was to disseminate factual information serving to
remove technical impediments that could inhibit free expression.
Cooper has clearly defined notions regarding the career prospects of a bassoonist.
During his tenure at the University of Michigan, he spoke frankly, but without
discouragement, with each student regarding their chances for a successful career in
music, just as his teacher Dale Harris had on the day he spoke with Cooper about his
prospects on the soprano saxophone. Cooper felt a deep sense of satisfaction from
sensitively guiding the less talented students out of music performance degree programs
68
and watching them find success and happiness in other careers; he still enjoys the respect
and admiration from these students for his honesty and compassion.
Cooper feels that it is important for his students to grasp the larger picture of their
role in society as well as acquiring the skills to be a performer or teacher. Drawing
wisdom from some of the great minds of history, he shared quotes from their writings to
inspire his students to think deeply, and find a sense of purpose and meaning in their
lives. This poignant quote form Albert Einstein is one of several Cooper shared with his
students, one that underscores his philosophy of teaching and life: “The unleashed power
of the atom has changed everything save our modes of thinking, and thus we drift toward
unparalleled catastrophes.” Cooper finds profound meaning in Einstein’s words and
draws the following insight from them:
This quote by Einstein is a scary one, for unless man begins to base his decisions
on the resultants of reasoned analytic thought (unique to the human species)
instead of emotional animalistic reactions, mankind could indeed face a
‘catastrophic future.’ For Man's habitual response to international conflict
historically is war. Yet, knowing that such actions will annihilate man and the
world, as we know it, nothing has yet happened to change our ‘modes of
thinking.’ The primary goal of the teaching professional should be to challenge
our students, regardless of subject matter, to use their God-given ability to think
rationally and thus, with collective analytic wisdom, avoid such a predictable
finality of the human species.22
22 Cooper, “Interview,” 2001.

APPENDIX A
THE FALLACY OF THE EVEN TEMPERAMENT TUNER
A COMPARISON OF EVEN TEMPERAMENT SEMI-TONE FREQUENCIES (A440) WITH THOSE
OF IDEAL (NATURAL) TEMPERAMENT MAJOR SCALES GENERATED FROM EACH
TEMPERED SEMI-TONE Pitch
Name
Even
Ratio
Temp.
Pitch* Ratio
C C# D D# E F F# G G# A A# B C
c
4.0000 1046.52 1046.52
b
3.7755 987.76 987.76 981.11
a#
3.5636 932.32 932.32 926.03
a
3.3636 880.00 880.00 874.05 872.12
g#
3.1748 830.62 830.62 825.00 823.15
g
2.9966 784.00 784.00 778.71 776.95 784.89
f#
2.8284 739.98 739.98 735.00 733.35 740.82
f 2.6697 698.46 698.46 693.73 692.20 699.24 697.66
e 2.5198 659.26 659.26 654.81 653.35 660.00 658.49 654.08
d# 2.3784 622.26 622.26 618.06 616.66 622.97 621.53 617.35
d 2.2449 587.34 587.34 583.37 582.06 588.00 586.65 582.70 588.67
c# 2.1189 554.38 554.38 550.63 549.39 554.99 553.73 550.00 555.62
c 2.0000 523.26 2.0000 523.26 519.73 518.56 523.85 522.65 519.14 524.43 523.26
b 1.8877 493.88 1.8750 490.56 489.46 494.45 493.31 490.00 495.00 493.88
a# 1.7818 466.16 461.99 466.70 465.63 462.49 467.22 466.16
a 1.6818 440.00 1.6667 436.06 440.51 439.50 436.54 441.00 440.00
g# 1.5874 415.31 415.79 414.83 412.04 416.24 415.31
g 1.4983 392.00 1.5000 392.45 391.55 388.91 392.88 392.00
f# 1.4142 369.99 369.58 367.09 370.83 369.99
f 1.3348 349.23 1.3333 348.83 346.49 350.02 349.23
e 1.2599 329.63 1.2500 327.04 330.38 329.63
d# 1.1892 311.13 311.84 311.13
d 1.1225 293.67 1.1250 294.33 293.67
c# 1.0595 277.19 277.19
c 1.0000 261.63 1.0000 261.63
C C# D D# E F F# G G# A A# B C
69

THE FALLACY OF THE EVEN TEMPERED TUNER (CONTIUED)
Note: Wider pitch discrepancies
would occur if keynote frequencies
were derived from the ideal
temperament and/or differentials
between sharp vs. flat keys
acknowledged.
* Frequencies are accurate to
within 1/100 Hertz.
Relation of tempered tuning to
ideal (natural) tuning
Intervallic Relationship There is no difference.
OCTAVE The tempered pitch is 11 cents higher than
the ideal.
7th The tempered pitch is 15 cents higher than
the ideal.
6th The tempered pitch is 2 cents lower than the
ideal.
5th The tempered pitch is 2 cents higher than
the ideal.
4th The tempered pitch is 13 cents higher than
the ideal.
3rd The tempered pitch is 4 cents lower than the
ideal.
2ndThere is no difference.
In essence, except for the fundamental
and its various octaves, tuning to the
mathematically contrived scale of an
even tempered tuner (or modern
keyboard instrument) insures that the
other degrees of the scale will be out of
tune with the ideal or natural
temperament that is physiologically
generated within the non-linear human
hearing mechanism.
L. Hugh Cooper
April, 1988
ROOT
70
71
BIBLIOGRAPHY
Allison, Trueman E., III. “Approach to Practicing.” The Double Reed 13/1 (Spring 1990):
21-22.
Artley, Joe. How to Make Double Reeds. Old Greenwich: Jack Spratt, 1968.
Benade, Arthur H. Horns Strings, and Harmony. New York: Dover Publications, Inc.,
1992.
Camden, Archie. Bassoon Technique. London: Oxford University Press, 1962.
Carland, June. “An annotated Survey of Literature About Bassoon Reed Making.” The
Journal of the International Double Reed Society 16 (1988): 67-70.
Cooper, Lewis Hugh. “Bassoon Clinic Series: Bassoon Embouchure, Producing the
Crow, Producing the First Tone, Reed Criteria.” Ann Arbor: The University of
Michigan School of Music, 1978.
Cooper, Lewis Hugh. “Pedagogy Used in Developing Rapid Articulative Facility.” Phone
interview conducted by Douglas Huff, 27 December 2000: 1-43.
________. “Bassoon Clinic Series: Reed Making Notes.” Ann Arbor: The University of
Michigan School of Music, 1989.
________. “Reed Contribution.” The Double Reed 13/3 (Winter 1990): 59-68.
________. “A Partial Approach to Bassooning.” Chicago, Illinois.: A Presentation Given
at the 45th
Mid-West International Band and Orchestra Clinic, 1991.
Dietz, William. “The Teaching Methods of Sol Schoenbach.” Doctoral Treatise, Florida
State University, 1988.
________. ed. Teaching Woodwinds: A Method and Resource Handbook for Music
Educators. New York: Schirmer Books, 1998.
Duckles, Vincent. Music Reference and Research Materials, 3rd
ed. New York: Schirmer
Books, 1974.
Ewell, Terry. “A Bassoonist’s Expansions Upon Marcel Tabuteau’s ‘Drive.’” The Double
Reed 20 (1992): 27-30.
________. “A Pedagogy for Finishing Reeds for the German-System (Heckel-System)
Bassoon. The Double Reed 23/3 (2000): 99-108.
72
Gray, Henry. Anatomy of the Human Body. Edited by Charles Mayo Goss. Philadelphia:
Lea and Febiger, 1973.
Herzberg, Norman. “Years of Ignorance, Neglect and Denial: The Importance of Speaker
Key Use on the Bassoon.” The Double Reed 18/3 (1995): 53-62.
Jansen, Will. The Bassoon; Its History, Construction, Makers, Players and Music, Edited
by Frits Kunf, Vol. V, Plates. The Neatherlands: Loosdrecht and Uitgeverij,1978.
Jooste, Fanie. “An Investigation of the Physiological Effects Achieved in the Execution
of Several Vibrato Types on the Bassoon.” Double Reed 21 (1993): 25-30.
Joppig, Gunther. The Oboe and the Bassoon. Portland: Amadeus Press, 1988.
Kehlenbrink, Douglas E. “A Thoughtful Approach to Bassoon Playing.” Double Reed 15
(1987): 18-26.
Langwell, Lyndsey G. The Bassoon and Contrabassoon. New York: WW Norton and
Company Inc., 1975.
Leech, Alan. “An Approach to the Bassoon and Its Literature.” Double Reed 16 (1988):
53-60.
Lipp, Charles. “The Breathing Bassoonist.” The Double Reed 13/3 (1990): 11-14.
McKay, James R. The Bassoon Reed Manual. Bloomington and Indianapolis: Indiana
University Press, 2000.
McGlaughlin, Dennis Brian. “An Investigation of Performance Problems Confronted by
the Woodwind Specialist.” Doctoral Dissertation, Columbia University, 1985.
Moritz, Frederick. “The Art of Double Tonguing on Reed Instruments.” Double Reed 11
(1983): 14-16.
Pence, Homer. Teacher’s Guide to the Bassoon. Elkhardt: H. and A. Selmer, Inc., 1963.
Poe, James M. “Cane Hardness and Flexibility: Related Measurements Leading to Better
Bassoon Reeds.” The Double Reed 26 (2003): 60-64.
Popkin, Mark and Loren Glickman. Bassoon Reed Making: Including Bassoon Repair,
Maintenance, and Adjustment and an Approach to Bassoon Playing. Evanston:
The Instrumentalist Co., 1969.
Reid, John W. “Cane Selectivity from the field to the gouger.” Double Reed 11 (1983):
17-19.
Saucier, Gene A. Woodwinds: Fundamental Performance Techniques. New York:
Schirmer Books, 1981.
Seltmann, Werner and Günter Angerhöfer. Das Fagott, vol. I, Leipzig: Printed in the
German Democratic Republic, 1976.
Spencer, William. The Art of Bassoon Playing. Evanston: Summy-Birchard Company,
1969.

73
Timm, Everett. The Woodwinds. Boston: Allyn and Bacon, Inc., 1967.
Weait, Christopher, and John B. Shea. “Vibrato: an Audio-Video-Flourographic
investigation of a Bassoonist.” Applied Radiology (January/February 1977): 2-4.
Weisberg, Arthur. The Art of Wind Playing. New York: Schirmer Books, 1975.
Westphal, Frederick. Guide to Teaching Woodwinds, 4th
ed. Dubuque: Wm. C. Brown
Publishers, 1985.
Wheeler, Raymond L. “New Technology Refutes Old Techniques.” Instrumentalist
(1977): 64-70.
74
BIOGRAPHICAL SKETCH
Matthew Morris, Assistant Professor of Bassoon, is currently a Doctoral Candidate at
Florida State University and was a student of William Winstead, Principal Bassoon
Cincinnati Orchestra and Professor of Bassoon, the Cincinnati College Conservatory of
Music. Mr. Morris received his Bachelor of Music degree in Music Theory from East
Carolina University, studying bassoon with Jon Pederson of the North Carolina
Symphony. He earned a Master of Music degree in Performance from Baylor University,
where he was a student of Brian Kershner. Prior to his appointment at Baylor, Mr.
Morris was Professor of Bassoon and Music Theory at Valdosta State University and for
ten years was an instructor of bassoon and chamber music at the University of Virginia.
He has performed in numerous festivals, concert series and orchestral concerts in the
United States and abroad, including appearances at Carnegie Hall, the Bolshoi Theater,
and the Kennedy Center for the Performing Arts. He has presented master classes,
conducted workshops and served as an adjudicator on the junior high, senior high and
college levels.
Since 1997, Mr. Morris has been a member of the bassoon faculty of the
Masterworks Festival, which is held each summer at Grace College in Warsaw Indiana.
In the summer of 2004, he traveled to London, England, to serve on the faculty as
instructor of bassoon for the first Masterworks Europe.
Among his recordings area Klavier CD with the National Chamber players (wind
serenades of Strauss, Dvorak and Mozart), a Virginia Arts CD with the Albemarle
Ensemble (music of Walter Ross) and an AM/CAM Recordings CD with the Albemarle
Ensemble (Persichetti’s King Lear). Mr. Morris can also be heard performing the
bassoon solos in PBS “American Experience” specials: Women’s Suffrage and Jon Dos
Passos, as well as the National Geographic special Grin and Bear It. [Phone (254) – 710
4720)][E-mail [email protected]]-
Related Documents