The Principles of Forensic Photography 6 CROSS —CRIME SCENE —DO NOT CROSS —CRIME SCENE —DO NOT CROSS—CRIME 6.1 Introduction to Forensic Archiving The term ―forensic archiving‖ is a departure from the usual terminology used to refer to preserving a scene’s record. From a contemporary perspective, it is also more appropriate than the more frequently used terms: forensic photography, imaging, or documentation. Archiving has a broader scope and encompasses more than simply applying photographic, sketching, or imaging techniques because it connotes a modern relationship with a digital world. Although subsequent discussions may use the older terminology—forensic photog- raphy and documentation—they should not be confused with or equate to the broader, more relevant term forensic archiving. One might inquire why forensics should embrace a new semantic standard. The simple reason is that the current standard no longer reflects current practice. Times change and so does the professional lexicon. The American Heritage College Dictionary [1] considers ―archive‖ a noun, and defines it as: ―1. a place or collection containing records, documents, or other materials of historical interest, and 2. A repository or collection especially of information.‖ Modern computer usage considers ―archive‖ a verb in the context of backing up digital files, and PC Magazine [2] defines ―active archiving‖ as ―Moving data to a secondary stor- age medium that can be readily accessed if required.‖ While PC Magazine is a specific reference in context, in light of current crime scene practice as well as what happens after- ward, it is appropriate. With respect to preserving a crime scene, information is put into an archive, which can be a case file, a file cabinet, and/or digital photographs on a computer hard drive or a CD backup or both. In contemporary investigations, archiving usually employs a form of digi- tal media, whether photographs taken using a digital single-lens reflex (SLR) camera, a Digicam video recorder, a computer-aided design (CAD) system, software to enhance images, or three-dimensional (3D) digital imaging systems. Even the hand sketch of the scene as well as the handwritten notes of an investigator can be captured in digital format. Archiving, then, is an adequate and timely replacement that brings the practice of scene preservation into modern vernacular. The crime scene archive is, in fact, a place where the historical record of the crime scene exists. The mechanism used to archive the scene can and should include multiple techniques. Archiving is critical responsibility of the crime scene investigative unit, which must preserve the scene as found, so that investigators, attorneys, scientists, and so on, can ―see‖ in some nebulous future timeframe what the original investigators saw. Thus, capturing

Welcome message from author
This document is posted to help you gain knowledge. Please leave a comment to let me know what you think about it! Share it to your friends and learn new things together.
Transcript
The Principles of Forensic Photography 6
CROSS—CRIME SCENE—DO NOT CROSS—CRIME SCENE—DO NOT
CROSS—CRIME
6.1 Introduction to Forensic Archiving
The term ―forensic archiving‖ is a departure from the usual terminology used to refer to
preserving a scene’s record. From a contemporary perspective, it is also more appropriate
than the more frequently used terms: forensic photography, imaging, or documentation.
Archiving has a broader scope and encompasses more than simply applying photographic,
sketching, or imaging techniques because it connotes a modern relationship with a digital
world. Although subsequent discussions may use the older terminology—forensic photog-
raphy and documentation—they should not be confused with or equate to the broader,
more relevant term forensic archiving.
One might inquire why forensics should embrace a new semantic standard. The simple
reason is that the current standard no longer reflects current practice. Times change and
so does the professional lexicon. The American Heritage College Dictionary [1] considers
―archive‖ a noun, and defines it as: ―1. a place or collection containing records, documents,
or other materials of historical interest, and 2. A repository or collection especially of
information.‖
Modern computer usage considers ―archive‖ a verb in the context of backing up digital
files, and PC Magazine [2] defines ―active archiving‖ as ―Moving data to a secondary stor-
age medium that can be readily accessed if required.‖ While PC Magazine is a specific
reference in context, in light of current crime scene practice as well as what happens after-
ward, it is appropriate.
With respect to preserving a crime scene, information is put into an archive, which can
be a case file, a file cabinet, and/or digital photographs on a computer hard drive or a CD
backup or both. In contemporary investigations, archiving usually employs a form of digi-
tal media, whether photographs taken using a digital single-lens reflex (SLR) camera, a
Digicam video recorder, a computer-aided design (CAD) system, software to enhance
images, or three-dimensional (3D) digital imaging systems. Even the hand sketch of the
scene as well as the handwritten notes of an investigator can be captured in digital format.
Archiving, then, is an adequate and timely replacement that brings the practice of scene
preservation into modern vernacular. The crime scene archive is, in fact, a place where the
historical record of the crime scene exists. The mechanism used to archive the scene can
and should include multiple techniques.
Archiving is critical responsibility of the crime scene investigative unit, which must
preserve the scene as found, so that investigators, attorneys, scientists, and so on, can ―see‖
in some nebulous future timeframe what the original investigators saw. Thus, capturing
110 Crime Scene Forensics
the essence of the scene is critical because it is impossible to predict a priori when another
pair of eyes will need to review the ―original.‖ Importantly, too, no single archiving method
is sufficient, and the approaches vary from the simple process of taking notes and writing
reports to using increasingly complex technology. An agency using only 35 mm or digital
cameras coupled with sketching and measuring is not doing its job properly. Similarly,
videography alone is insufficient and inadequate as are the newer 3D archiving systems,
though they are certainly capable of providing more accurate measurements. Each
archiving method has attributes and deficiencies such that a complete and competent
archive of the scene requires a battery of techniques.
The bottom line is that pictures are not enough. The reason requires a brief discussion
of passive and active archiving and why the active process is the most appropriate approach
for archiving a scene.
6.1.1 Passive Archiving
Many authors of crime scene investigation texts use the term ―scene processing‖ to describe
what happens during the scene investigation. When the crime scene unit enters a scene for
the first time and starts getting a ―feel‖ for what happened, a myriad of thoughts echo
through each investigator’s mind. Questions like those raised in Chapter 1 are relevant.
However, once the team begins the archiving process, the actual steps involved may seem
rote and removed. This is the connotation of what the term ―scene processing‖ seems to
imply, a passive process of taking pictures. All scene investigators know they must photo-
graph and sketch the scene, which includes measuring critical items of evidence in order to
fix their location. Experienced scene investigators realize that photography, sketching, and
videography are techniques that complement each other and should not stand alone as the
only visual representation of the scene.
The investigator who goes into the scene and begins taking photographs without thinking
about what the scene is saying with respect to how the macroscene elements fit together is not
truly an active part of the investigation and, truthfully, is hardly engaged mentally. He is sim-
ply taking pictures or sketching. This is a passive activity. But is that all there is? Emphatically,
No! Then, what else, is there? The answer is to engage the brain and make it an active partner
in the process, which, with respect to this discussion, is termed active archiving.
6.1.2 Active Archiving
Active archiving is the process of combining the ―rote,‖ the passive aspect of archiving,
with an engaged brain. Taking establishing photographs (i.e., overviews) of a room with a
dead body, while simply moving from one perspective to another, is passive archiving.
What is wrong with this? Nothing, if the investigator is a robot.
For example, the forensic photographer should think about the scene elements being
captured. Is it enough to record the body lying on the floor in a pool of blood or is it also
important to ensure that the photograph also includes, say, the tip of the knife sticking out
from under the forearm of the deceased? Is the depth of field (DOF) sufficient to capture
that information and the knife sticking out from under the sofa 6 ft behind the body of the
deceased? Missing the knife from either perspective might be a critical part of the eventual
scene reconstruction because subsequent photographs might miss that angle. The single
line of blood droplets on the wall behind where the body lies might have come from blood
The Principles of Forensic Photography 111
castoff from a knife. This blood pattern must be captured in the same perspective as the
body and the knives, because it is important to understand the relationship of all items of
potentially probative evidence. This means thinking carefully about each and every
photograph.
In every sense, the forensic photographic process is the visible investigation of the
scene, and it is an essential part of an active investigation, where recreational and forensic
photography part ways. The artist wants to be creative and capture the scene from an artis-
tic sense. The forensic photographer should not care about being artistically creative but
about being creative in the forensic sense. Each photograph must capture the best perspec-
tives at the scene in order to capture its story. Like the artistic photographer who allows the
landscape to guide the artistic process, the forensic counterpart permits the scene to guide
the continuum of photographs from relevant evidence to relevant evidence. Indeed, this
might seem paradoxical because the forensic photographer must capture everything.
The following list reviews the differences between passive and active archiving. The
most important is that the photographer/sketcher uses the scientific method to ensure suc-
cess during the process.
Passive
Unthinking documentation of a crime scene using photography, sketching,
and other archival media.
No distinct evidence recognition process occurs before or at this point. The scene is archived as found.
Active
Rigorous use of the scientific method yields greater thoroughness, objectivity,
and evidence recognition.
A process to record physical evidence but which transcends rote archiving.
Uses the criminalist’s holisitic approach.
− Recognize physical evidence.
Answers relevant investigative questions.
Guarantees the most complete archive.
Minimizes bias in the investigation.
6.2 Techniques of Forensic Archiving
Archiving is classified into technology types: SLR digital photography, digital/high-defini-
tion videography, manual sketching, CAD systems that render scenes in 3D, and 3D imag-
ing systems that use infrared (IR) lasers to make the measurements. An emerging method
that has not yet gained widespread application to crime scene work utilizes 3D printing
technology. Here, the data from a 3D imaging system is sent to a ceramic printer that
prints a 3D ceramic mold of the original scene.
6.2.1 Digital Forensic Photography (Photographic Archiving)
It might seem like a mistake to consider only digital applications because it does not con- sider the vast history of photography in a forensic context. Modern scene investigators,
though, mostly use digital photography. For this reason, it is important that students and
112 Crime Scene Forensics
novice investigators understand the basic functions of the digital camera and how it is used
to photograph scenes of crimes. Certainly, any forensic student should be aware of this
interesting history, but digital applications are considered because they are more relevant
for students; digital is the present and the future.
Photography is an essential skill, and all scene scientists/investigators must be familiar
with its principles as they relate to forensic archiving. Several texts have been written on the
subject [3–7], and students should be aware of specialized texts on the subject as well as pub-
lished material on specialized aspects, for example, ultraviolet (UV) and IR applications.
After reading several of these texts, one might come away with the impression that
forensic photography is magical or a mystical manifestation of the medium. However, this
is not true. It is photography pure and simple, and, like any worthwhile endeavor, expertise
takes time and practice. The purpose of this chapter is to acquaint the forensic student and
novice investigator with the basics of photography and forensic applications so that they
can learn to archive mock scenes competently. One caveat, though. This discussion will not
consider digital evidence comparisons, software enhancements of images, or image pro-
cessing except, perhaps, as simple examples.
6.2.2 The Purpose of Forensic Photography
When asked what the purpose of forensic photography is, students generally respond with
a puzzled expression, maybe a shrug. Maybe the question is too simple or naive. Often, the
reply is, ―To document the scene.‖ The true response is not quite that simple. Forensic pho-
tography has much more far-reaching implications. The most obvious are straightforward
and listed below:
Record and preserve the as-found condition of the scene
Show the relative position of evidence at the scene Establish the relative dimensions of evidence
Cross-complement other archiving techniques
Preserve the as-found scene for future reference
Certainly the above are important reasons, but there are others. Consider the hypo-
thetical case where the defendant is convicted of a murder and sentenced to life imprison-
ment or even the death penalty. If, on appeal, the defense finds potentially exculpatory
evidence and if a judge rules that the convicted defendant should be granted a new trial, the
investigation begins anew. The first investigators—defense and prosecution—will be look-
ing for anything supporting the original conviction or an acquittal. This information might
be the original scene photographs. One might say, ―Well, those photographs were standard
operation procedures for documenting the scene.‖ Maybe, but those photographs should
bring the scene back to life and thus play an integral part in the second investigation.
But what if the photographs were not good? Maybe at trial, the only photographs of the
body shown to the jury had been taken by the medical examiner during the autopsy. This
means the jury did not see the position of the deceased at the scene relative to the evidence
there. In light of the judge’s ruling, scene scientists/investigators will be scrambling to exam-
ine all of the original scene photographs in order to find something that had not been con-
sidered carefully during the first investigation. Maybe that something turns out to be a
bloodstain pattern that had been ignored during the original investigation. Since that blood-
The Principles of Forensic Photography 113
stain pattern is no longer available, the photograph is the only record available, and if the
photograph did not have the proper forensic perspective it might be worthless as an investi-
gatory tool or as evidence. If captured properly, it could play a pivotal role in a retrial.
The importance of scene photography/archiving relates to the overriding responsibility
of the investigator to capture the details of the scene without missing anything and the
integral relationships of evidence. The paradox is that forensic photography, per se, is an
insufficient medium to capture everything. Regardless, this is the challenge.
6.2.3 Critical Aspects of Forensic Photography
Since this discussion focuses solely on digital photography, discussing categories of digital
cameras might seem important, but only two digital camera types should be used in foren-
sic work: the SLR digital camera with interchangeable zoom lenses. One other example of
a digital camera, which really is not a different category of camera, is one that has been
modified for IR and/or UV photography. Most of the commercially available digital cam-
eras can be modified for IR photography.
The first step for the student and the novice investigator is to become familiar with the
camera’s functions. Experience shows that even students who have had a course in photog-
raphy are not prepared to photograph crime scenes. For appropriate forensic photography,
the following photographic equipment is required:
An SLR digital camera having, minimally, the capability to take burst photos,
adjustable white balance (WB) choices, and a menu for manipulating the WB,
International Standards Organization (ISO) selections ranging from 100 to 6400,
manual override modes (aperture, shutter, and manual, and program priorities),
and exposure compensation. It should also have an external flash attachment.
Close-up (macro) lens—f/1.4 or f/2.8, 60 mm.
Zoom lenses: f/2.8, 18–70 and 70–200 mm, or f/3.5, 18–200 mm.
Polarizing lenses to eliminate glare.
Ball-head tripod. External flash.
Lighting slaves.
Light towers.
Appropriate filters for use with an ALS: yellow, orange, and red.
Ring flash attachment.
Scales.
6.3 The SLR Digital Camera
Several SLR cameras are available in the marketplace, most of which are upgraded periodi-
cally or discontinued as new models arrive. Once a camera is chosen, there is no need to
continually upgrade. But, why are SLR digital cameras appropriate for forensic photography?
In a word, they are versatile, and their specific attributes are listed below:
Changeable lenses are to meet specific photographic challenges
The investigator sees exactly what the lens ―sees‖ unless the camera is modified for
IR photography.
114 Crime Scene Forensics
Higher-quality digital SLRs have large image sensors and produce higher-quality
photos.
Near-zero lag time.
Operating digital SLR cameras is not complicated, although students sometimes strug-
gle to learn its functions. The basic camera operation is rather simple, as explained below,
although its advanced functions are typically software-controlled. The basic operational
aspects of the digital SLR camera are easily found on the Internet [3,4]. In most professions
technology and techniques have a specialized lexicon, and digital cameras and photogra-
phy are no exception, so it is important to understand and use the terminology. See Table
6.1 for a list of terms commonly used in digital applications.
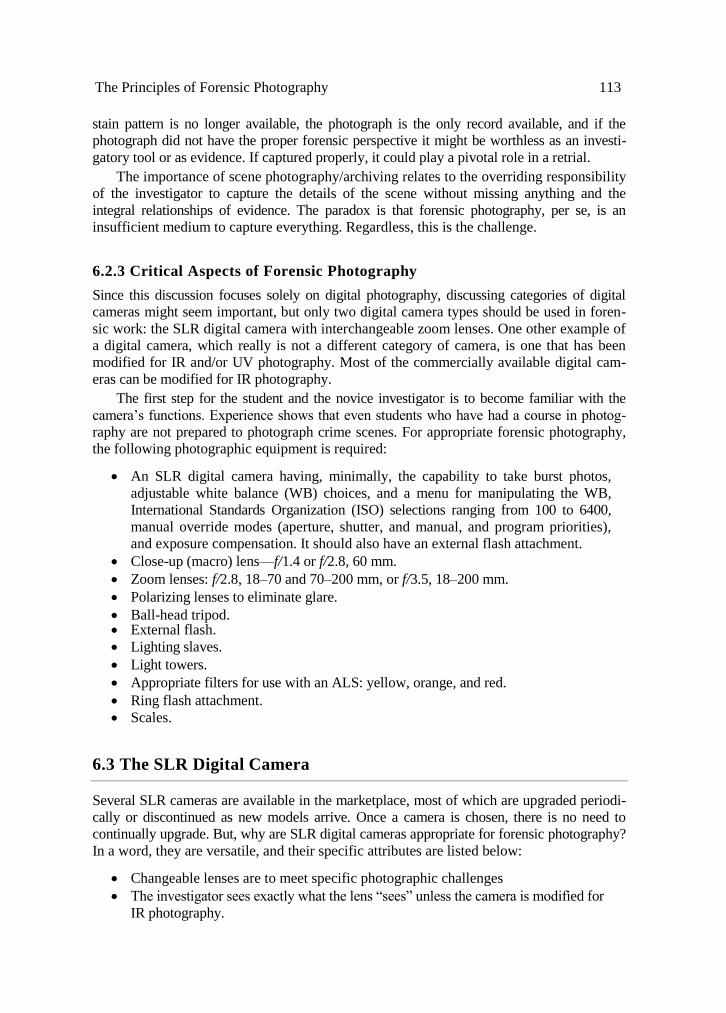
Table 6.1 Common Terms Used in Digital Applications
Term Explanation
Megapixels More megapixels give you the ability to make larger prints and to crop your
photos. They do not necessarily have higher image quality.
ISO (and image noise) Increasing the ISO, say from 200 to 800, lets you take clear photographs in dim
light without a flash, but at the expense of image degradation.
Dust control Dust on an SLR sensor appears as small black spots in photographs. Dust
control systems attempt to prevent and eliminate this.
Image stabilization Two types of stabilization: one that is included inside the camera and one that
is inside the lens.
Live view Composing photographs using the LCD screen on the back and the viewfinder.
Dynamic range SLR cameras do not match the human eye with regard to seeing details in a
scene, even when there is extreme contrast.
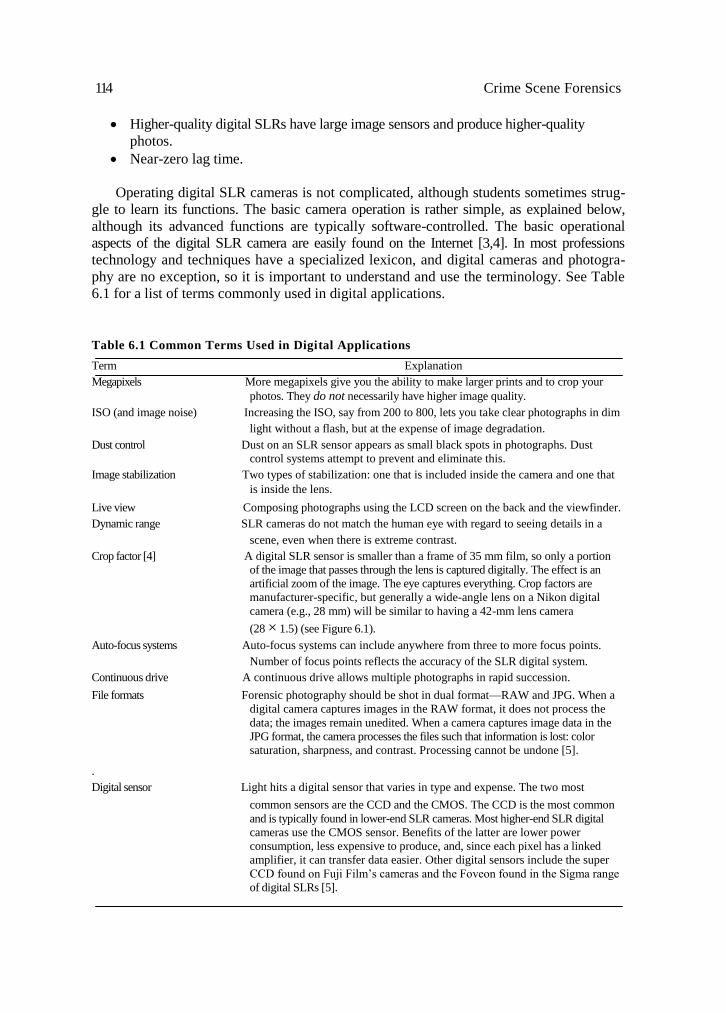
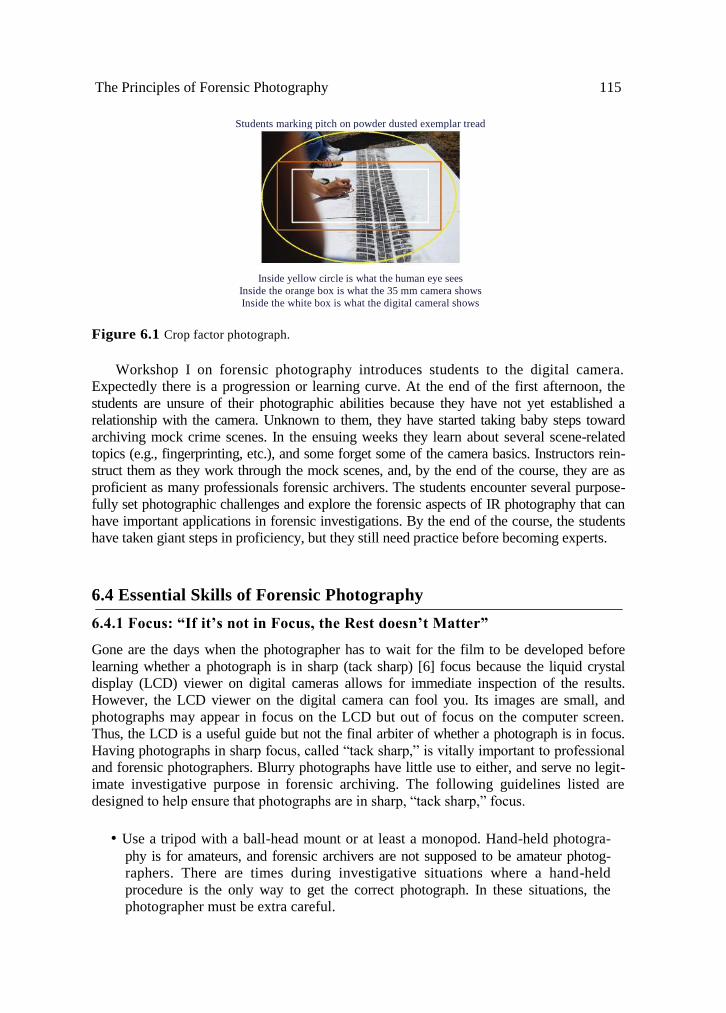
Crop factor [4] A digital SLR sensor is smaller than a frame of 35 mm film, so only a portion
of the image that passes through the lens is captured digitally. The effect is an
artificial zoom of the image. The eye captures everything. Crop factors are
manufacturer-specific, but generally a wide-angle lens on a Nikon digital
camera (e.g., 28 mm) will be similar to having a 42-mm lens camera
(28 × 1.5) (see Figure 6.1).
Auto-focus systems Auto-focus systems can include anywhere from three to more focus points.
Number of focus points reflects the accuracy of the SLR digital system.
Continuous drive A continuous drive allows multiple photographs in rapid succession.
File formats Forensic photography should be shot in dual format—RAW and JPG. When a
digital camera captures images in the RAW format, it does not process the
data; the images remain unedited. When a camera captures image data in the
JPG format, the camera processes the files such that information is lost: color
saturation, sharpness, and contrast. Processing cannot be undone [5].
.
Digital sensor Light hits a digital sensor that varies in type and expense. The two most
common sensors are the CCD and the CMOS. The CCD is the most common
and is typically found in lower-end SLR cameras. Most higher-end SLR digital
cameras use the CMOS sensor. Benefits of the latter are lower power
consumption, less expensive to produce, and, since each pixel has a linked
amplifier, it can transfer data easier. Other digital sensors include the super
CCD found on Fuji Film’s cameras and the Foveon found in the Sigma range
of digital SLRs [5].
The Principles of Forensic Photography 115
Students marking pitch on powder dusted exemplar tread
Inside yellow circle is what the human eye sees
Inside the orange box is what the 35 mm camera shows
Inside the white box is what the digital cameral shows
Figure 6.1 Crop factor photograph.
Workshop I on forensic photography introduces students to the digital camera.
Expectedly there is a progression or learning curve. At the end of the first afternoon, the
students are unsure of their photographic abilities because they have not yet established a
relationship with the camera. Unknown to them, they have started taking baby steps toward
archiving mock crime scenes. In the ensuing weeks they learn about several scene-related
topics (e.g., fingerprinting, etc.), and some forget some of the camera basics. Instructors rein-
struct them as they work through the mock scenes, and, by the end of the course, they are as
proficient as many professionals forensic archivers. The students encounter several purpose-
fully set photographic challenges and explore the forensic aspects of IR photography that can
have important applications in forensic investigations. By the end of the course, the students
have taken giant steps in proficiency, but they still need practice before becoming experts.
6.4 Essential Skills of Forensic Photography
6.4.1 Focus: “If it’s not in Focus, the Rest doesn’t Matter”
Gone are the days when the photographer has to wait for the film to be developed before
learning whether a photograph is in sharp (tack sharp) [6] focus because the liquid crystal
display (LCD) viewer on digital cameras allows for immediate inspection of the results.
However, the LCD viewer on the digital camera can fool you. Its images are small, and
photographs may appear in focus on the LCD but out of focus on the computer screen.
Thus, the LCD is a useful guide but not the final arbiter of whether a photograph is in focus.
Having photographs in sharp focus, called ―tack sharp,‖ is vitally important to professional
and forensic photographers. Blurry photographs have little use to either, and serve no legit-
imate investigative purpose in forensic archiving. The following guidelines listed are
designed to help ensure that photographs are in sharp, ―tack sharp,‖ focus.
• Use a tripod with a ball-head mount or at least a monopod. Hand-held photogra-
phy is for amateurs, and forensic archivers are not supposed to be amateur photog-
raphers. There are times during investigative situations where a hand-held
procedure is the only way to get the correct photograph. In these situations, the
photographer must be extra careful.
116 Crime Scene Forensics
Pressing the shutter while taking the photograph moves the camera. The solution
is not to press the shutter. Instead, use a cable release, the self-timer function on
the camera, or the IR wireless remote shutter.
Lock the camera’s mirror in the ―up‖ position. Normally, the camera moves the
mirror up and locks it while taking the photograph. This causes movement inside
the camera. The solution is to move the mirror up manually using the camera’s
―exposure delay mode‖ (Nikon) or ―mirror lockup‖ (Canon) before taking the pho-
tograph. According to Kelby [6], this is the second most important precaution next
to the use of a tripod to keep photographs tack sharp.
Vibration reduction (VR) (Nikon) or image stabilization (IS) (Canon) is designed
to minimize vibration that comes from pressing the shutter on the camera. This
function is resident in either the lens or the camera. Regardless, it works by look-
ing for a vibration and tries to minimize it. If the camera is on a tripod, where
there is no vibration, the VR system searches for it, during which it causes a slight
vibration.
The rules of thumb: If the camera is hand-held, activate the VR system. If the cam-
era is on a tripod, inactivate the VR system.
Shoot at the sharpest aperture of the lens. Generally, this is about two full stops
smaller than wide open. So, if the lens being used is f/2.8, the sharpest apertures
for that lens would be f/5.6 and f/8 (two full stops down from 2.8). Not always abso-
lute, this is a general rule; a place to start. Each lens has a sweet spot from which it
delivers its sharpest images. The photographer ascertains the characteristics of the
lenses used at scenes.
High-quality lenses make a difference. Use high-quality ―glass‖ for tack sharp
photographs.
Avoid high ISOs if possible. When shooting on a tripod in dim light, do not increase
the ISO. Keep the ISO at the lowest possible setting. The resulting photographs
will be sharper. If the camera is handheld in dim light, it may be impossible to get
the photograph without using a higher ISO.
Because the LCD on the camera back is an unreliable gauge of focus, use the zoom
feature on the camera to examine the photograph detail for focus.
Out-of-camera image manipulation (e.g., Photoshop) can help with focus. Software
manipulation of images for forensic purposes is not necessarily bad, but the origi-
nal image must remain with modification. In fact, there is a trend to avoid or not
even allow software manipulation of photos. If this continues, the burden is on the
photographer to capture forensically perfect photographs every time.
Hand-holding the camera in anything but direct sunlight increases the likeli-
hood of obtaining out-of-focus photographs. A trick is to use the camera’s burst
function. The chances are good that one of the resulting photographs will be in
focus.
In hand-holding situations, bracing the camera against something (e.g., a wall, a
railing, etc.) can steady it sufficiently to obtain sharp photographs.
6.4.2 The Correct Forensic Exposure
Exposure refers to the amount of light entering the camera and has been defined as, ―The
duration and amount of light needed to create an image‖ (pp. 32–33, [7]) or ―The subjection
The Principles of Forensic Photography 117
of sensitized film to the action of light for a specific period‖ (p. 266, [8]). The first definition
makes more practical sense. The basic unit of exposure is the ―stop,‖ where one stop is the
equivalent of doubling or halving the amount of light entering the camera, which the pho-
tographer controls by adjusting the aperture, shutter speed settings on the camera or the
ISO. The ISO setting plays a role in how the digital sensor handles light.
The difference between a shutter speed of 1 and 2 s is one stop and between 1 and 4 s,
two stops. Controlling exposure allows the photographer to obtain that perfect forensic
perspective, the one that tells the best forensic story. Only then does the photograph have
the correct forensic exposure. Said in another way, the correct forensic exposure allows the
perfect amount of light into the camera so that the scene can tell its ―story.‖ A challenge is
that different camera settings can allow the same amount of light to enter the camera.
These are known as equivalent exposures. For example, the following camera settings allow
the same amount of light to hit the digital sensor.
6.4.2.1 Equivalent Exposures The following camera settings allow the same amount of light into the camera, so they are
considered equivalent exposures.
f/8—f/stop and 1/4 second shutter speed
f/ 11—f/stop and 1/2 second shutter speed
f/16—f/stop and 1 second shutter speed
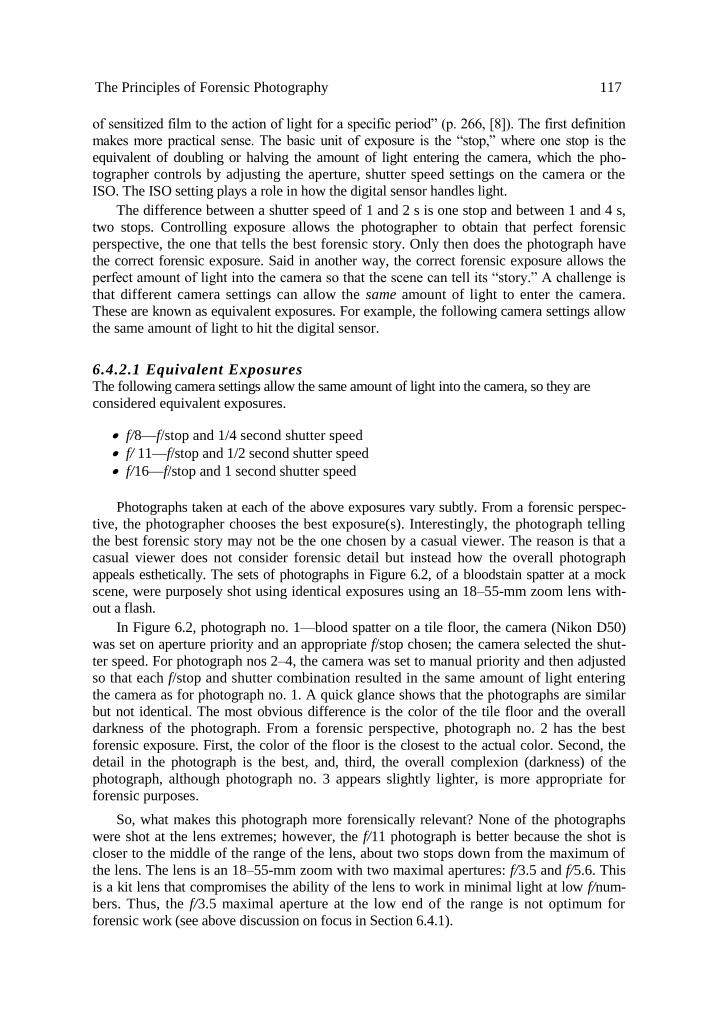
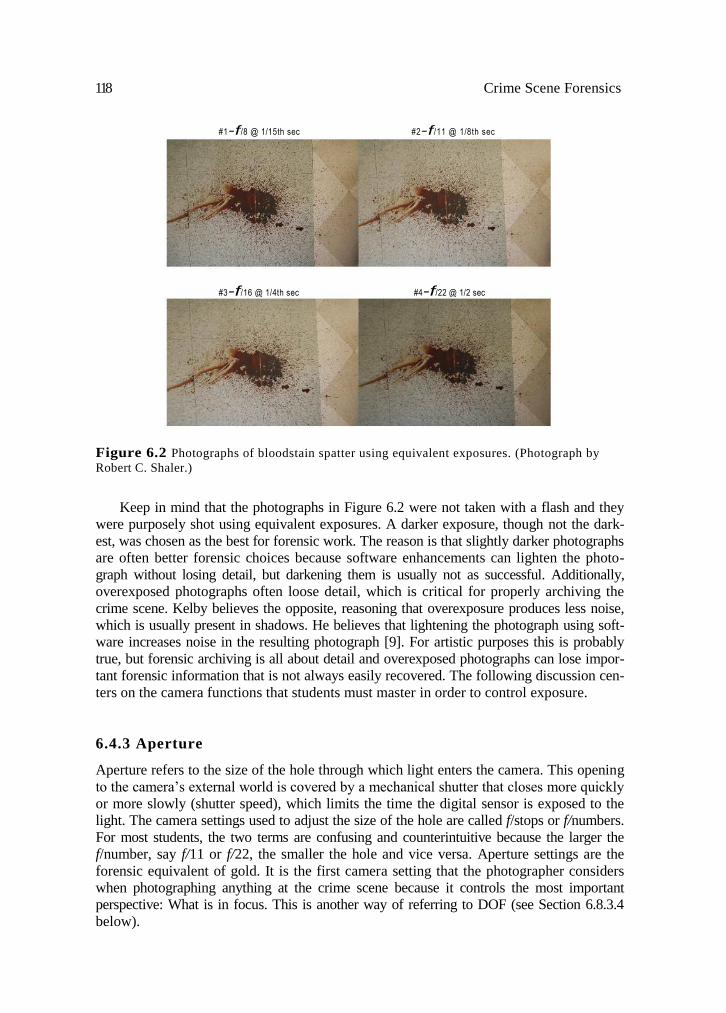
Photographs taken at each of the above exposures vary subtly. From a forensic perspec-
tive, the photographer chooses the best exposure(s). Interestingly, the photograph telling
the best forensic story may not be the one chosen by a casual viewer. The reason is that a
casual viewer does not consider forensic detail but instead how the overall photograph
appeals esthetically. The sets of photographs in Figure 6.2, of a bloodstain spatter at a mock
scene, were purposely shot using identical exposures using an 18–55-mm zoom lens with-
out a flash.
In Figure 6.2, photograph no. 1—blood spatter on a tile floor, the camera (Nikon D50)
was set on aperture priority and an appropriate f/stop chosen; the camera selected the shut-
ter speed. For photograph nos 2–4, the camera was set to manual priority and then adjusted
so that each f/stop and shutter combination resulted in the same amount of light entering
the camera as for photograph no. 1. A quick glance shows that the photographs are similar
but not identical. The most obvious difference is the color of the tile floor and the overall
darkness of the photograph. From a forensic perspective, photograph no. 2 has the best
forensic exposure. First, the color of the floor is the closest to the actual color. Second, the
detail in the photograph is the best, and, third, the overall complexion (darkness) of the
photograph, although photograph no. 3 appears slightly lighter, is more appropriate for
forensic purposes.
So, what makes this photograph more forensically relevant? None of the photographs
were shot at the lens extremes; however, the f/11 photograph is better because the shot is
closer to the middle of the range of the lens, about two stops down from the maximum of
the lens. The lens is an 18–55-mm zoom with two maximal apertures: f/3.5 and f/5.6. This
is a kit lens that compromises the ability of the lens to work in minimal light at low f/num-
bers. Thus, the f/3.5 maximal aperture at the low end of the range is not optimum for
forensic work (see above discussion on focus in Section 6.4.1).
118 Crime Scene Forensics
#1-f/8 @ 1/15th sec #2-f/11 @ 1/8th sec
Figure 6.2 Photographs of bloodstain spatter using equivalent exposures. (Photograph by
Robert C. Shaler.)
Keep in mind that the photographs in Figure 6.2 were not taken with a flash and they
were purposely shot using equivalent exposures. A darker exposure, though not the dark-
est, was chosen as the best for forensic work. The reason is that slightly darker photographs
are often better forensic choices because software enhancements can lighten the photo-
graph without losing detail, but darkening them is usually not as successful. Additionally,
overexposed photographs often loose detail, which is critical for properly archiving the
crime scene. Kelby believes the opposite, reasoning that overexposure produces less noise,
which is usually present in shadows. He believes that lightening the photograph using soft-
ware increases noise in the resulting photograph [9]. For artistic purposes this is probably
true, but forensic archiving is all about detail and overexposed photographs can lose impor-
tant forensic information that is not always easily recovered. The following discussion cen-
ters on the camera functions that students must master in order to control exposure.
6.4.3 Aperture
Aperture refers to the size of the hole through which light enters the camera. This opening
to the camera’s external world is covered by a mechanical shutter that closes more quickly
or more slowly (shutter speed), which limits the time the digital sensor is exposed to the
light. The camera settings used to adjust the size of the hole are called f/stops or f/numbers.
For most students, the two terms are confusing and counterintuitive because the larger the
f/number, say f/11 or f/22, the smaller the hole and vice versa. Aperture settings are the
forensic equivalent of gold. It is the first camera setting that the photographer considers
when photographing anything at the crime scene because it controls the most important
perspective: What is in focus. This is another way of referring to DOF (see Section 6.8.3.4
below).
#3-f/16 @ 1/4th sec #4-f/22 @ 1/2 sec
The Principles of Forensic Photography 119
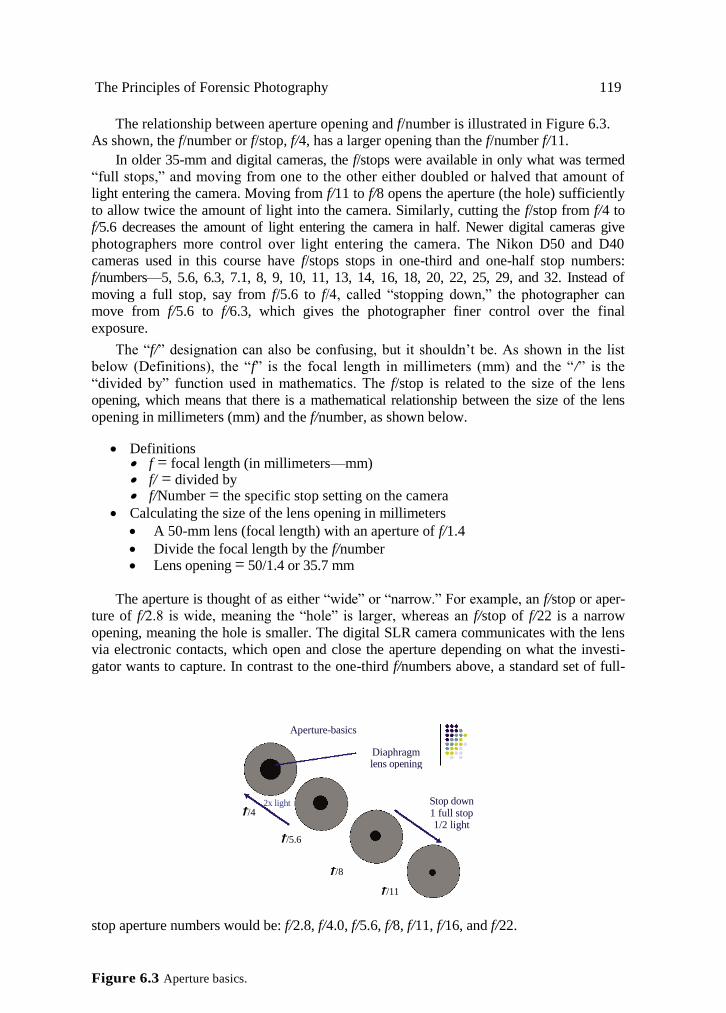
The relationship between aperture opening and f/number is illustrated in Figure 6.3.
As shown, the f/number or f/stop, f/4, has a larger opening than the f/number f/11.
In older 35-mm and digital cameras, the f/stops were available in only what was termed
―full stops,‖ and moving from one to the other either doubled or halved that amount of
light entering the camera. Moving from f/11 to f/8 opens the aperture (the hole) sufficiently
to allow twice the amount of light into the camera. Similarly, cutting the f/stop from f/4 to
f/5.6 decreases the amount of light entering the camera in half. Newer digital cameras give
photographers more control over light entering the camera. The Nikon D50 and D40
cameras used in this course have f/stops stops in one-third and one-half stop numbers:
f/numbers—5, 5.6, 6.3, 7.1, 8, 9, 10, 11, 13, 14, 16, 18, 20, 22, 25, 29, and 32. Instead of
moving a full stop, say from f/5.6 to f/4, called ―stopping down,‖ the photographer can
move from f/5.6 to f/6.3, which gives the photographer finer control over the final
exposure.
The ―f/‖ designation can also be confusing, but it shouldn’t be. As shown in the list
below (Definitions), the ―f‖ is the focal length in millimeters (mm) and the ―/‖ is the
―divided by‖ function used in mathematics. The f/stop is related to the size of the lens
opening, which means that there is a mathematical relationship between the size of the lens
opening in millimeters (mm) and the f/number, as shown below.
Definitions f = focal length (in millimeters—mm) f/ = divided by f/Number = the specific stop setting on the camera
Calculating the size of the lens opening in millimeters
A 50-mm lens (focal length) with an aperture of f/1.4
Divide the focal length by the f/number Lens opening = 50/1.4 or 35.7 mm
The aperture is thought of as either ―wide‖ or ―narrow.‖ For example, an f/stop or aper-
ture of f/2.8 is wide, meaning the ―hole‖ is larger, whereas an f/stop of f/22 is a narrow
opening, meaning the hole is smaller. The digital SLR camera communicates with the lens
via electronic contacts, which open and close the aperture depending on what the investi-
gator wants to capture. In contrast to the one-third f/numbers above, a standard set of full-
stop aperture numbers would be: f/2.8, f/4.0, f/5.6, f/8, f/11, f/16, and f/22.
Figure 6.3 Aperture basics.
Aperture-basics
Diaphragm lens opening
Stop down 1 full stop 1/2 light
f/4 2x light
f/5.6
f/8
f/11
120 Crime Scene Forensics
The lens is an important player in determining the lens opening because the quality of
the lens can limit the effective maximum opening available, called the ―maximum aper-
ture.‖ An example compares two zoom lenses having the same focal zoom, the 18–55-mm
zoom, but different maxima f/numbers. At their wide open settings, one is f/3.5 and the
other f/2.8 (usually labeled on the lens). The latter is the better of the two lenses because it
can allow nearly twice as much light to hit the digital sensor at its most wide open setting.
Thus, the f/2.8 lens is useful in dimmer light situations, which can have important forensic
implications.
Some lenses have two aperture maxima. The 18–55-mm zoom lens packaged with the
Nikon D40 is known as a kit lens and is typically of lower quality than higher-end lenses.
In the kit lens, the 18-mm focal length (wide angle) has an f/stop maximum of f/3.5 and the
55-mm (zoom) of f/5.6. Known as a variable maximum aperture, it is typical of the less
expensive lenses sold in camera kits. These lenses typically lose sharpness at the extremes,
such as at 18 mm (f/3.5) and at 55 mm (f/5.6). This is important for the forensic photogra-
pher because photographing in dimmer light can compromise the clarity and thus the
quality of the photograph.
6.4.3.1 Telling the Scene’s Story: The Importance of Aperture Although only one of the big three players in solving the correct forensic exposure puzzle,
aperture should be the first setting chosen by the photographer. The reason is that each
crime scene has its own story to tell and each photograph has a specific forensic perspective
the photographer must capture. This is a question of focus, not as in tack sharp, but that
which the photographer must decide, ―What at the scene and in my particular photograph
should be in focus?‖ The aperture setting determines this. By choosing the aperture first,
the photographer is not only determining what should be in focus but is also making a
thought-out decision after critically evaluating the scene. This is an example of active
archiving.
The concept of what is in focus in a photograph refers to a concept known as ―depth of
field‖ or DOF. In evaluating the crime scene, the photographer must consider the DOF
because it tells the scene’s story. The reason for discussing DOF at the same time as aper-
ture is that the size of the opening controls what is in focus at the scene. In simple terms,
the DOF refers to ―what is in focus.‖ An illustration of how aperture controls what is in
focus is shown in the photographs in Figure 6.4 [7]. Each photograph of the man in front
of a pink blooming tree has the same amount of light entering the camera—equivalent
exposures. What is obvious is that the background becomes progressively more in focus as
the f/stop changes from f/4 to f/5.6 to f/22; the lens opening decreases from 8.75 to 6.25 to
1.59 mm. The illustration also shows that the larger the f/number (smaller the lens open-
ing), more of the photograph will be in focus. For forensic applications this is critical
because one of the first activities of a scene investigation is to archive the scene
photographically.
In the photographs in Figure 6.4a–d, the American flag is the focal point. The tree,
the writing on the street, the vehicle behind the tree, the white building to the right of the
vehicle, and the brick building in the left top segment of the photograph are important
background elements. The photographer determines what should be in focus by changing
the lens opening—the aperture. Generally, the larger the f/stop (larger f/numbers), the
narrower the DOF and more of the background will be in focus. Conversely, smaller f/
stops mean a shallower DOF and, thus, progressively less of the background will be in
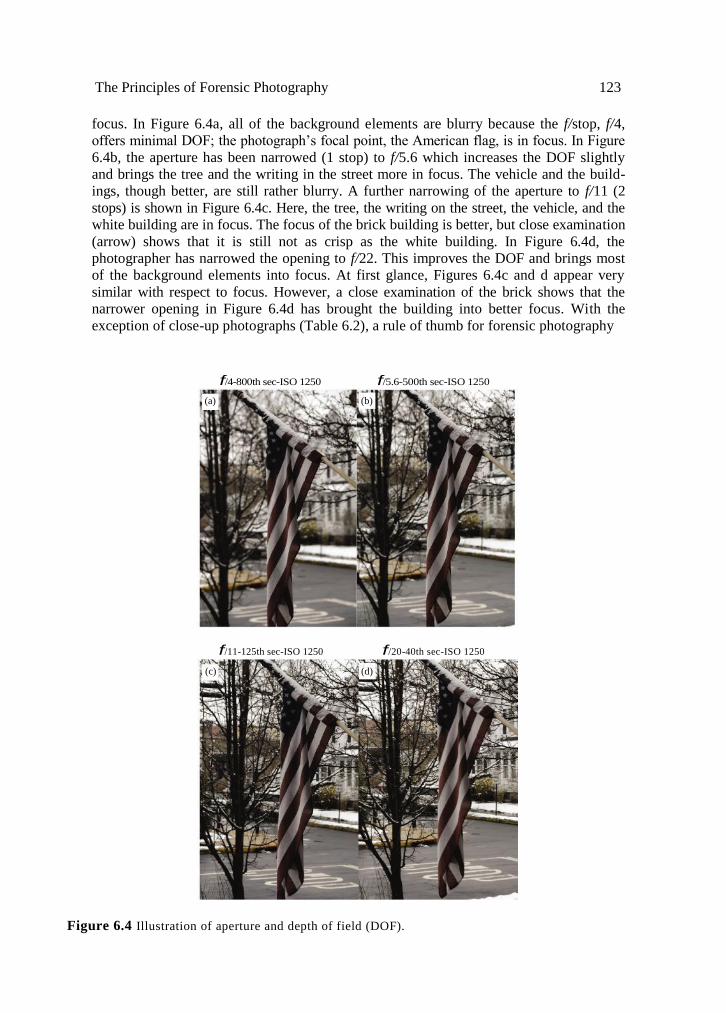
The Principles of Forensic Photography 123
focus. In Figure 6.4a, all of the background elements are blurry because the f/stop, f/4,
offers minimal DOF; the photograph’s focal point, the American flag, is in focus. In Figure
6.4b, the aperture has been narrowed (1 stop) to f/5.6 which increases the DOF slightly
and brings the tree and the writing in the street more in focus. The vehicle and the build-
ings, though better, are still rather blurry. A further narrowing of the aperture to f/11 (2
stops) is shown in Figure 6.4c. Here, the tree, the writing on the street, the vehicle, and the
white building are in focus. The focus of the brick building is better, but close examination
(arrow) shows that it is still not as crisp as the white building. In Figure 6.4d, the
photographer has narrowed the opening to f/22. This improves the DOF and brings most
of the background elements into focus. At first glance, Figures 6.4c and d appear very
similar with respect to focus. However, a close examination of the brick shows that the
narrower opening in Figure 6.4d has brought the building into better focus. With the
exception of close-up photographs (Table 6.2), a rule of thumb for forensic photography
Figure 6.4 Illustration of aperture and depth of field (DOF).
f/4-800th sec-ISO 1250 f/5.6-500th sec-ISO 1250
(a) (b)
(c) (d)
f/11-125th sec-ISO 1250 f/20-40th sec-ISO 1250
122 Crime Scene Forensics
requires a maximum DOF. For other photographs, this means shooting using large f/stops
so that the aperture is as narrow as possible. However, where DOF is unimportant or non-
existent, such as in close-ups, smaller f/stops (larger openings) are permissible, even
necessary.
Crime scene scientists/investigators take three obligatory types of photographs (some
argue there are four [10]). The commonly used types and the reasons for using them are
shown in Table 6.2.
Establishing photographs are overviews of the scene. This means that as much of the
scene should be in focus as possible. In other words, there must be a broad DOF, and larger
f/numbers (smaller aperture) are necessary. The purpose of establishing photographs is to
present the investigator with a continuous, overlapping perspective of the entire scene,
which can be accomplished only by ensuring that everything in the photograph is in focus.
Mid-range photographs are designed to capture specific areas of the scene where poten-
tially probative evidence is in the immediate area. Again, the f/stop must be chosen so that
everything in the photograph is in focus. Close-up photographs capture critical detail of
specific items of potential evidence that might have probative value. All on-scene close-up
photographs must be the last in a series of photographs that show the evidence in the con-
text of its original (scene) environment.
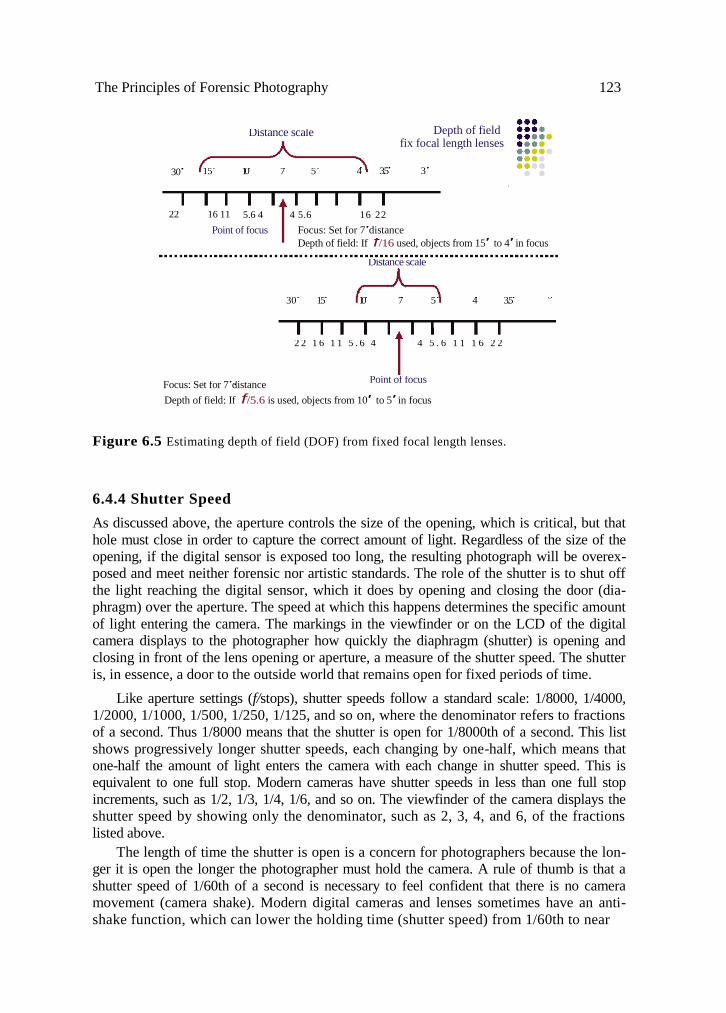
With zoom lenses, determining the DOF by examining the markings on the lens is
difficult if not impossible. It can be determined on fixed focal length lenses, however.
Figure 6.5 illustrates how to estimate the DOF from fixed focal length lenses.
In the upper part of the diagram, the camera is set at 7 ft from the object of interest and
the camera is set on an f/stop of 16 (f/16), a mid-level opening. The brackets illustrate what
will be in focus: Everything from 5 ft in front of the camera to a depth of 15 ft will be in
focus. The lower diagram shows the f/stop set at f/5.6, a wider aperture opening and typi-
cally a shallower DOF. In fact, the objects in focus will have a narrow range: 5–10 ft.
The aperture opening is the gateway to light entering the camera, which makes it an
important player in determining the exposure. How long that gateway remains open to the
outside world is also important. This is known as the shutter speed, and it, too, plays a role
in determining the correct exposure.
Table 6.2 Obligatory Forensic Photographs
Category of Photograph Reason for the Photograph
Establishing Continuous, overlapping perspective of the scene. No scales
are necessary. Maximum depth of field (f/11–22).
Mid-range Capture immediate surroundings and relative relationship of
items of potentially probative evidence. Scales may be
necessary depending on subject. If so, photographs should be
with and without scales. Maximum depth of field (f/8–16).
Close-up or microphotography Capture detail of potentially probative evidence. Photographs
with and without scales. Shallow depth of field (f/1.4–4).
Weiss [10] characterizes close-up images as a way to capture
evidence in relation to its discovered location, which for this
text is also considered as mid-range photography. Weiss
considers microphotography a way to ―document the
evidence itself.6‖
The Principles of Forensic Photography 123
Depth of field: If f/5.6 is used, objects from 10′ to 5′ in focus
Figure 6.5 Estimating depth of field (DOF) from fixed focal length lenses.
6.4.4 Shutter Speed
As discussed above, the aperture controls the size of the opening, which is critical, but that
hole must close in order to capture the correct amount of light. Regardless of the size of the
opening, if the digital sensor is exposed too long, the resulting photograph will be overex-
posed and meet neither forensic nor artistic standards. The role of the shutter is to shut off
the light reaching the digital sensor, which it does by opening and closing the door (dia-
phragm) over the aperture. The speed at which this happens determines the specific amount
of light entering the camera. The markings in the viewfinder or on the LCD of the digital
camera displays to the photographer how quickly the diaphragm (shutter) is opening and
closing in front of the lens opening or aperture, a measure of the shutter speed. The shutter
is, in essence, a door to the outside world that remains open for fixed periods of time.
Like aperture settings (f/stops), shutter speeds follow a standard scale: 1/8000, 1/4000,
1/2000, 1/1000, 1/500, 1/250, 1/125, and so on, where the denominator refers to fractions
of a second. Thus 1/8000 means that the shutter is open for 1/8000th of a second. This list
shows progressively longer shutter speeds, each changing by one-half, which means that
one-half the amount of light enters the camera with each change in shutter speed. This is
equivalent to one full stop. Modern cameras have shutter speeds in less than one full stop
increments, such as 1/2, 1/3, 1/4, 1/6, and so on. The viewfinder of the camera displays the
shutter speed by showing only the denominator, such as 2, 3, 4, and 6, of the fractions
listed above.
The length of time the shutter is open is a concern for photographers because the lon-
ger it is open the longer the photographer must hold the camera. A rule of thumb is that a
shutter speed of 1/60th of a second is necessary to feel confident that there is no camera
movement (camera shake). Modern digital cameras and lenses sometimes have an anti-
shake function, which can lower the holding time (shutter speed) from 1/60th to near
Focus: Set for 7′distance Point of focus
Distance scale
10′ 7′ 5′ 4′ 3.5′ 3′ 15′ 30′
Depth of field fix focal length lenses
22 16 11 5.6 4 4 5.6 16 22
Point of focus Focus: Set for 7′distance
Depth of field: If f/16 used, objects from 15′ to 4′ in focus
Distance scale
30′ 15′ 10′ 7′ 5′ 4′ 3.5′ 3″
2 2 1 6 1 1 5 . 6 4 4 5 . 6 1 1 1 6 2 2
124 Crime Scene Forensics
1/15th of a second. Below this value, the photographer should use a tripod or some other
way to keep the camera from moving.
6.4.5 Exposure Values
Each combination of aperture and shutter speed has what is known as an exposure value
(EV), which is essentially the value of equivalent exposures. Thus, 1/60th at f/4 has the
same EV as 1/125th at f/2.8. Different photographs can have the same exposure, but the
photographs can have subtle differences. These subtle differences make a particular scene
photograph better than another for capturing specific detail.
6.4.6 International Standards Organization
The ISO rating is the third leg of the exposure puzzle solution, and is a measure of the digi-
tal sensor’s sensitivity to light. The higher the ISO number, the more sensitive the sensor is
to light. For forensic work, the practical implication is that larger ISO numbers offer an
opportunity to shoot in dim light. The trade-off is that, as the ISO numbers increase, say
800 and higher, the resulting photograph begins to deteriorate or acquire noise, in digital
terminology. In practical terms, the more noise, the less opportunity there is to ―blow up‖
the photograph in order to observe fine detail.
ISO settings affect the exposure like aperture and shutter speed because a change in
ISO from 100 to 200, for example, effectively doubles the light available to the photograph,
or a full stop. Although more light does not come into the camera, the digital sensor is
more sensitive to light entering the camera, which in essence changes the sensitivity of the
camera significantly, a full stop.
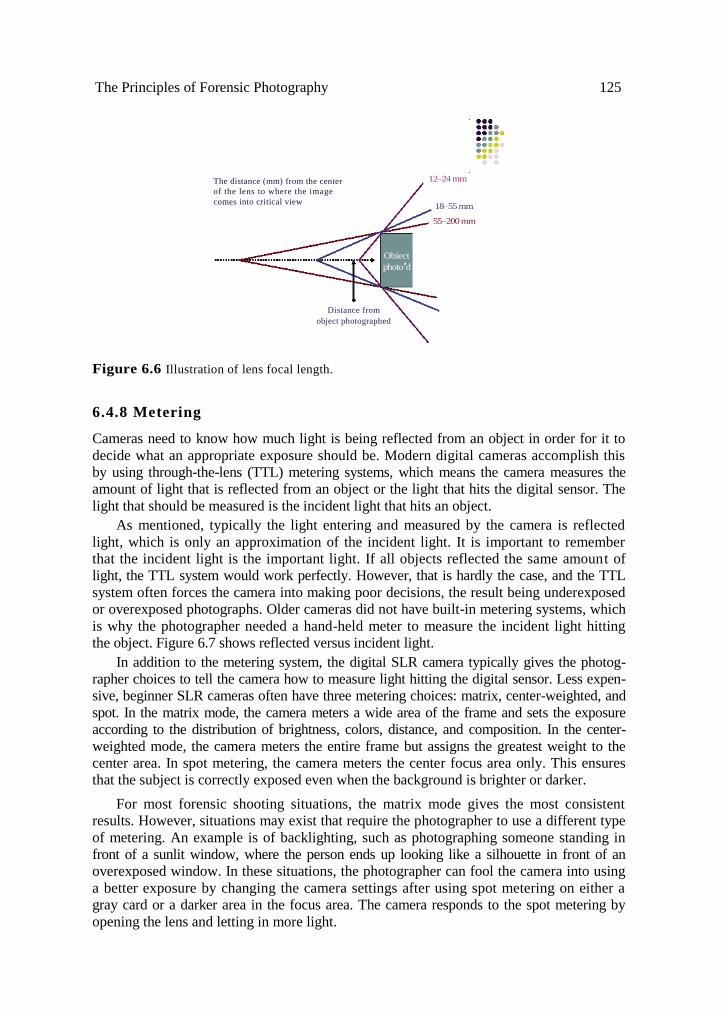
6.4.7 Focal Length
The focal length is lens dependent and, for practical applications, refers to how far (dis-
tance) an object must be from the camera lens in order for it to fill the viewfinder (photo-
graph). Figure 6.6 illustrates the point. The three lenses used in the course (Nikon D40 or
D50 cameras) are zoom lenses with focal lengths of 18–55, 55–200, and 12–24 mm. The
diagram shows that the ―normal‖ zoom lens—18–55 mm (55 mm is the closest to what the
human eye perceives) is in the middle of the range. This lens may be most appropriate for
mid-range photographs. The wide-angle zoom (12–24 mm) allows the photographer to
capture more of the scene without moving back and may therefore be more appropriate for
establishing photographs. Also, it may be appropriate in a tight space. The telephoto lens
(55–200 mm) captures detail from further away from the object photographed. These
lenses have value at outdoor scenes used as either or both a mid-range/establishing (55 mm)
and mid-range (200 mm) setting.
Digital cameras have lenses with focal lengths that based on 35-mm camera equiva-
lents, supposedly based on ―film size.‖ Actually, the focal lengths are based on the size of
the CCD or CMOS digital sensor, which differs by manufacturer. Still, the photographic
industry uses 35-mm equivalents for digital lenses, although digital focal lengths are not
equivalent to 35-mm camera focal lengths. There is a formula, however, that can convert
digital focal lengths into approximate 35-mm equivalents: Digital lens ―focal
length/0.19‖ = 35-mm equivalent.
The Principles of Forensic Photography 125
Figure 6.6 Illustration of lens focal length.
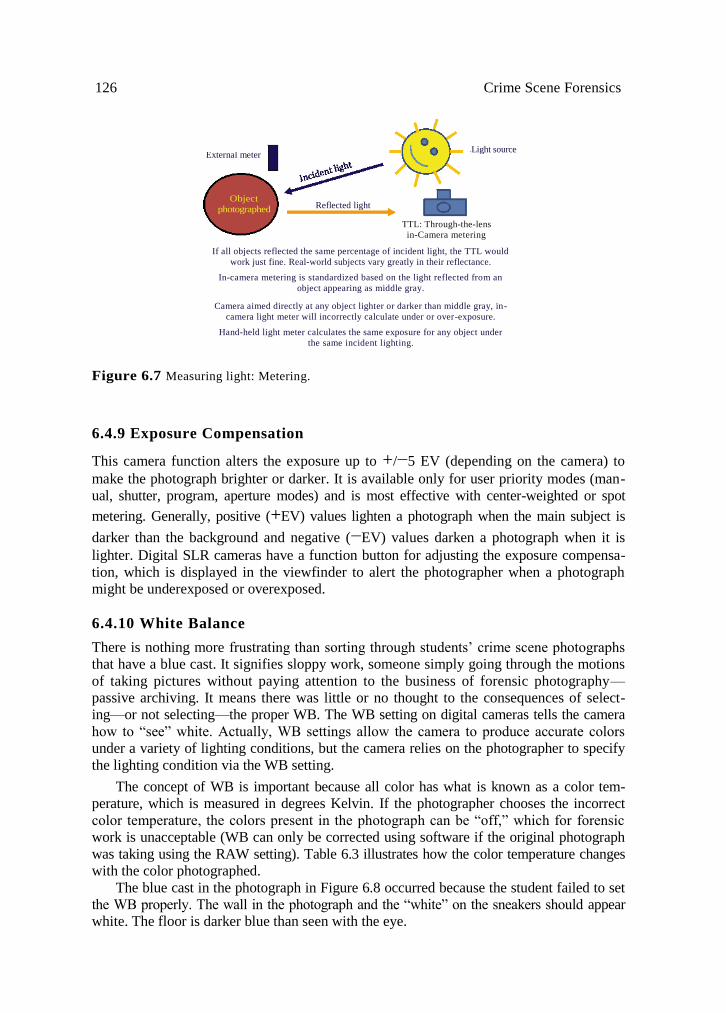
6.4.8 Metering
Cameras need to know how much light is being reflected from an object in order for it to
decide what an appropriate exposure should be. Modern digital cameras accomplish this
by using through-the-lens (TTL) metering systems, which means the camera measures the
amount of light that is reflected from an object or the light that hits the digital sensor. The
light that should be measured is the incident light that hits an object.
As mentioned, typically the light entering and measured by the camera is reflected
light, which is only an approximation of the incident light. It is important to remember
that the incident light is the important light. If all objects reflected the same amount of
light, the TTL system would work perfectly. However, that is hardly the case, and the TTL
system often forces the camera into making poor decisions, the result being underexposed
or overexposed photographs. Older cameras did not have built-in metering systems, which
is why the photographer needed a hand-held meter to measure the incident light hitting
the object. Figure 6.7 shows reflected versus incident light.
In addition to the metering system, the digital SLR camera typically gives the photog-
rapher choices to tell the camera how to measure light hitting the digital sensor. Less expen-
sive, beginner SLR cameras often have three metering choices: matrix, center-weighted, and
spot. In the matrix mode, the camera meters a wide area of the frame and sets the exposure
according to the distribution of brightness, colors, distance, and composition. In the center-
weighted mode, the camera meters the entire frame but assigns the greatest weight to the
center area. In spot metering, the camera meters the center focus area only. This ensures
that the subject is correctly exposed even when the background is brighter or darker.
For most forensic shooting situations, the matrix mode gives the most consistent
results. However, situations may exist that require the photographer to use a different type
of metering. An example is of backlighting, such as photographing someone standing in
front of a sunlit window, where the person ends up looking like a silhouette in front of an
overexposed window. In these situations, the photographer can fool the camera into using
a better exposure by changing the camera settings after using spot metering on either a
gray card or a darker area in the focus area. The camera responds to the spot metering by
opening the lens and letting in more light.
The distance (mm) from the center
of the lens to where the image
comes into critical view
Obiect
photo′d
Distance from
object photographed
12–24 mm
18–55 mm
55–200 mm
126 Crime Scene Forensics
If all objects reflected the same percentage of incident light, the TTL would
work just fine. Real-world subjects vary greatly in their reflectance.
In-camera metering is standardized based on the light reflected from an
object appearing as middle gray.
Camera aimed directly at any object lighter or darker than middle gray, in- camera light meter will incorrectly calculate under or over-exposure.
Hand-held light meter calculates the same exposure for any object under
the same incident lighting.
Figure 6.7 Measuring light: Metering.
6.4.9 Exposure Compensation
This camera function alters the exposure up to +/−5 EV (depending on the camera) to
make the photograph brighter or darker. It is available only for user priority modes (man-
ual, shutter, program, aperture modes) and is most effective with center-weighted or spot
metering. Generally, positive (+EV) values lighten a photograph when the main subject is
darker than the background and negative (−EV) values darken a photograph when it is
lighter. Digital SLR cameras have a function button for adjusting the exposure compensa-
tion, which is displayed in the viewfinder to alert the photographer when a photograph
might be underexposed or overexposed.
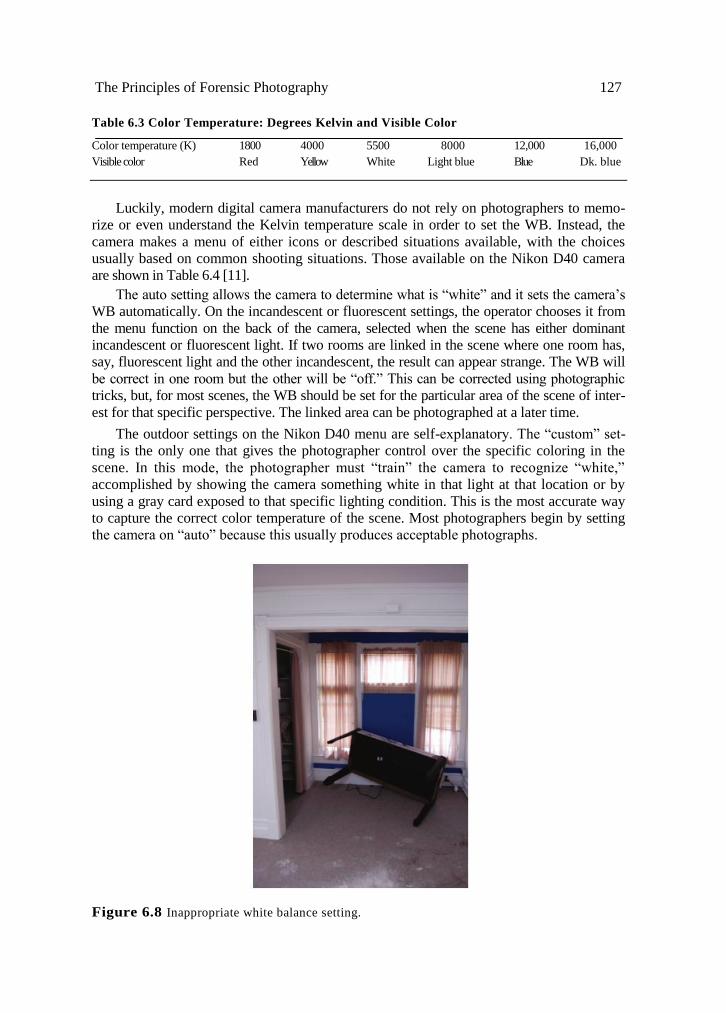
6.4.10 White Balance
There is nothing more frustrating than sorting through students’ crime scene photographs
that have a blue cast. It signifies sloppy work, someone simply going through the motions
of taking pictures without paying attention to the business of forensic photography—
passive archiving. It means there was little or no thought to the consequences of select-
ing—or not selecting—the proper WB. The WB setting on digital cameras tells the camera
how to ―see‖ white. Actually, WB settings allow the camera to produce accurate colors
under a variety of lighting conditions, but the camera relies on the photographer to specify
the lighting condition via the WB setting.
The concept of WB is important because all color has what is known as a color tem-
perature, which is measured in degrees Kelvin. If the photographer chooses the incorrect
color temperature, the colors present in the photograph can be ―off,‖ which for forensic
work is unacceptable (WB can only be corrected using software if the original photograph
was taking using the RAW setting). Table 6.3 illustrates how the color temperature changes
with the color photographed.
The blue cast in the photograph in Figure 6.8 occurred because the student failed to set
the WB properly. The wall in the photograph and the ―white‖ on the sneakers should appear
white. The floor is darker blue than seen with the eye.
Light source External meter
Object
photographed Reflected light
TTL: Through-the-lens
in-Camera metering
The Principles of Forensic Photography 127
Table 6.3 Color Temperature: Degrees Kelvin and Visible Color
Color temperature (K) 1800 4000 5500 8000 12,000 16,000
Visible color Red Yellow White Light blue Blue Dk. blue
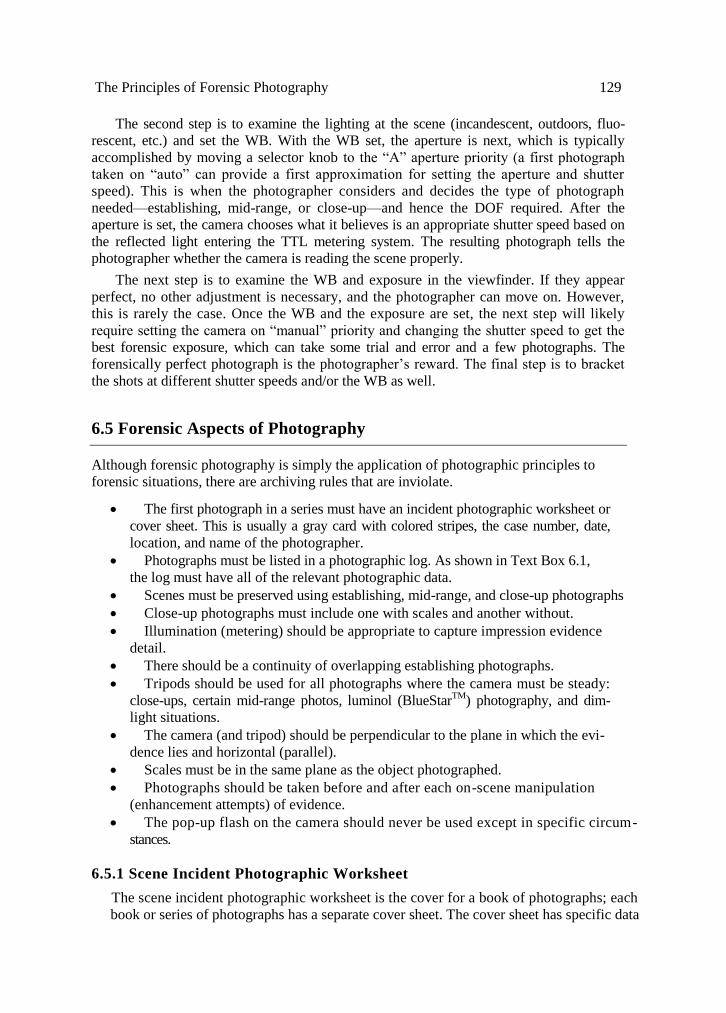
Luckily, modern digital camera manufacturers do not rely on photographers to memo-
rize or even understand the Kelvin temperature scale in order to set the WB. Instead, the
camera makes a menu of either icons or described situations available, with the choices
usually based on common shooting situations. Those available on the Nikon D40 camera
are shown in Table 6.4 [11].
The auto setting allows the camera to determine what is ―white‖ and it sets the camera’s
WB automatically. On the incandescent or fluorescent settings, the operator chooses it from
the menu function on the back of the camera, selected when the scene has either dominant
incandescent or fluorescent light. If two rooms are linked in the scene where one room has,
say, fluorescent light and the other incandescent, the result can appear strange. The WB will
be correct in one room but the other will be ―off.‖ This can be corrected using photographic
tricks, but, for most scenes, the WB should be set for the particular area of the scene of inter-
est for that specific perspective. The linked area can be photographed at a later time.
The outdoor settings on the Nikon D40 menu are self-explanatory. The ―custom‖ set-
ting is the only one that gives the photographer control over the specific coloring in the
scene. In this mode, the photographer must ―train‖ the camera to recognize ―white,‖
accomplished by showing the camera something white in that light at that location or by
using a gray card exposed to that specific lighting condition. This is the most accurate way
to capture the correct color temperature of the scene. Most photographers begin by setting
the camera on ―auto‖ because this usually produces acceptable photographs.
Figure 6.8 Inappropriate white balance setting.

128 Crime Scene Forensics
Table 6.4 Nikon D40 White Balance Settings
Camera Option Description
Auto The camera sets the white balance.
Incandescent Majority of the light comes from incandescent light
(common light bulbs).
Fluorescent Majority of the light comes from fluorescent lights.
Direct sunlight Subjects lit by sunlight.
Flash When using the built-in flash—mimics daylight.
Cloudy Daylight when the sky is overcast.
Shade Daylight for subjects in the shade.
Custom Use a gray or white object at the scene as a reference for the camera to set the white balance.
Some digital cameras allow WB bracketing, which means the photographer can shoot
a sequence of three images. One frame will be at the WB setting chosen by the photogra-
pher, one will be slightly warmer and the other slightly cooler. This gives the photographer
a better chance of accurately capturing the colors at the crime scene. Another way of set-
ting WB is to shoot the photograph using the RAW file setting and then alter the WB using
appropriate photo editing software.
6.4.11 Capturing Forensic Content Properly
After learning the basic functions of the camera, mastering the craft of forensic photogra-
phy requires practice. There is a way to speed-up the learning process. The illustration in
Figure 6.9 presents a step-wise approach to acquiring properly exposed, forensically rele-
vant photographs. The process begins with choosing the proper perspective.
As discussed, this is more than simply pointing the camera and taking a photograph.
There must be a reason for taking the photograph and the perspective considered carefully
before pushing the shutter release button. This is time when the scene scientist/investigator
decides what the scene, as reflected in that specific photograph, is going to say to future
investigators.
A roadmap Readjust WB–DOF
Figure 6.9 Capturing the perfect forensic photograph.
Choose
perspective Set WB Set aperture Take photo
Close up Establishing
DOF
Check WB & DOF
on photo
Bracket
shots
Observe & smile
Set camera to manual
Set shutter
Check
exposure
The Principles of Forensic Photography 129
The second step is to examine the lighting at the scene (incandescent, outdoors, fluo-
rescent, etc.) and set the WB. With the WB set, the aperture is next, which is typically
accomplished by moving a selector knob to the ―A‖ aperture priority (a first photograph
taken on ―auto‖ can provide a first approximation for setting the aperture and shutter
speed). This is when the photographer considers and decides the type of photograph
needed—establishing, mid-range, or close-up—and hence the DOF required. After the
aperture is set, the camera chooses what it believes is an appropriate shutter speed based on
the reflected light entering the TTL metering system. The resulting photograph tells the
photographer whether the camera is reading the scene properly.
The next step is to examine the WB and exposure in the viewfinder. If they appear
perfect, no other adjustment is necessary, and the photographer can move on. However,
this is rarely the case. Once the WB and the exposure are set, the next step will likely
require setting the camera on ―manual‖ priority and changing the shutter speed to get the
best forensic exposure, which can take some trial and error and a few photographs. The
forensically perfect photograph is the photographer’s reward. The final step is to bracket
the shots at different shutter speeds and/or the WB as well.
6.5 Forensic Aspects of Photography
Although forensic photography is simply the application of photographic principles to
forensic situations, there are archiving rules that are inviolate.
The first photograph in a series must have an incident photographic worksheet or
cover sheet. This is usually a gray card with colored stripes, the case number, date,
location, and name of the photographer.
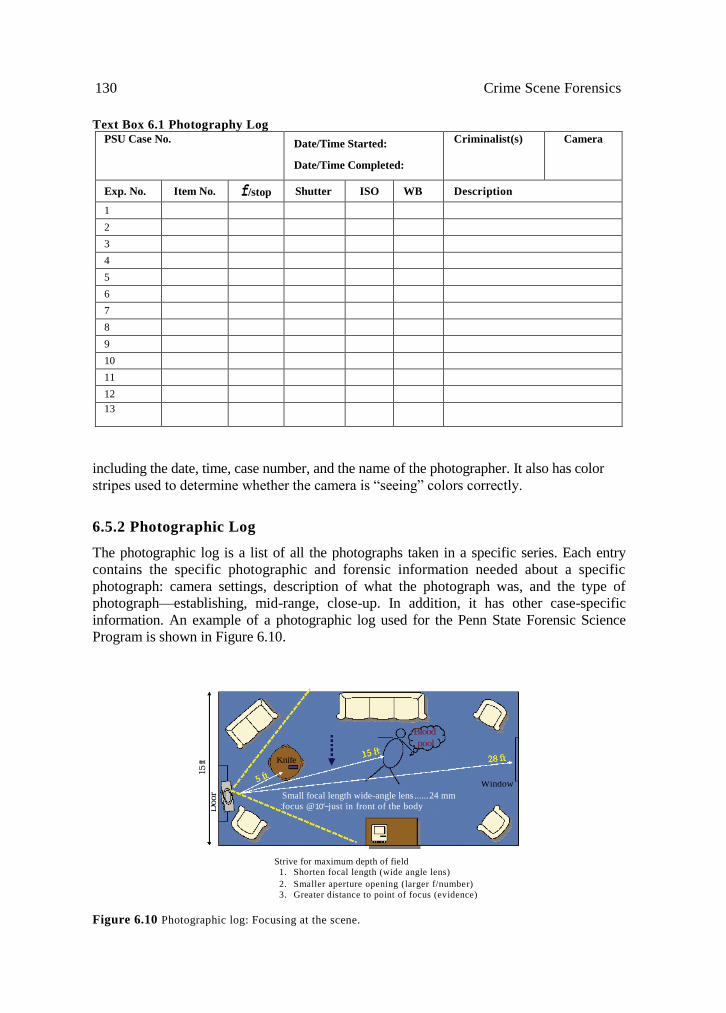
Photographs must be listed in a photographic log. As shown in Text Box 6.1,
the log must have all of the relevant photographic data.
Scenes must be preserved using establishing, mid-range, and close-up photographs
Close-up photographs must include one with scales and another without.
Illumination (metering) should be appropriate to capture impression evidence
detail.
There should be a continuity of overlapping establishing photographs.
Tripods should be used for all photographs where the camera must be steady:
close-ups, certain mid-range photos, luminol (BlueStarTM
) photography, and dim-
light situations.
The camera (and tripod) should be perpendicular to the plane in which the evi-
dence lies and horizontal (parallel).
Scales must be in the same plane as the object photographed.
Photographs should be taken before and after each on-scene manipulation
(enhancement attempts) of evidence.
The pop-up flash on the camera should never be used except in specific circum-
stances.
6.5.1 Scene Incident Photographic Worksheet
The scene incident photographic worksheet is the cover for a book of photographs; each
book or series of photographs has a separate cover sheet. The cover sheet has specific data
130 Crime Scene Forensics
Text Box 6.1 Photography Log PSU Case No. Date/Time Started:
Date/Time Completed:
Criminalist(s) Camera
Exp. No. Item No. f/stop Shutter ISO WB Description
1 2 3 4 5 6 7 8 9 10 11 12 13
including the date, time, case number, and the name of the photographer. It also has color
stripes used to determine whether the camera is ―seeing‖ colors correctly.
6.5.2 Photographic Log
The photographic log is a list of all the photographs taken in a specific series. Each entry
contains the specific photographic and forensic information needed about a specific
photograph: camera settings, description of what the photograph was, and the type of
photograph—establishing, mid-range, close-up. In addition, it has other case-specific
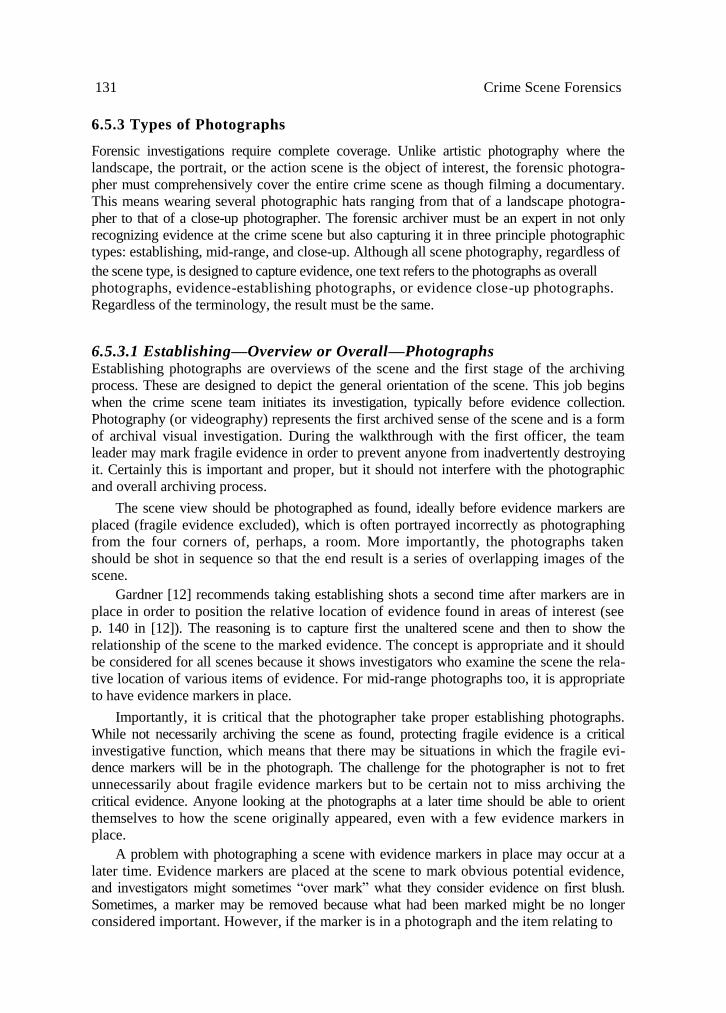
information. An example of a photographic log used for the Penn State Forensic Science
Program is shown in Figure 6.10.
Strive for maximum depth of field
1. Shorten focal length (wide angle lens)
2. Smaller aperture opening (larger f/number)
3. Greater distance to point of focus (evidence)
Figure 6.10 Photographic log: Focusing at the scene.
15 ft
Door
Knife
Small focal length wide-angle lens ...... 24 mm
focus @10′−just in front of the body
Blood
pool
Window
131 Crime Scene Forensics
6.5.3 Types of Photographs
Forensic investigations require complete coverage. Unlike artistic photography where the
landscape, the portrait, or the action scene is the object of interest, the forensic photogra-
pher must comprehensively cover the entire crime scene as though filming a documentary.
This means wearing several photographic hats ranging from that of a landscape photogra-
pher to that of a close-up photographer. The forensic archiver must be an expert in not only
recognizing evidence at the crime scene but also capturing it in three principle photographic
types: establishing, mid-range, and close-up. Although all scene photography, regardless of
the scene type, is designed to capture evidence, one text refers to the photographs as overall
photographs, evidence-establishing photographs, or evidence close-up photographs.
Regardless of the terminology, the result must be the same.
6.5.3.1 Establishing—Overview or Overall—Photographs Establishing photographs are overviews of the scene and the first stage of the archiving
process. These are designed to depict the general orientation of the scene. This job begins
when the crime scene team initiates its investigation, typically before evidence collection.
Photography (or videography) represents the first archived sense of the scene and is a form
of archival visual investigation. During the walkthrough with the first officer, the team
leader may mark fragile evidence in order to prevent anyone from inadvertently destroying
it. Certainly this is important and proper, but it should not interfere with the photographic
and overall archiving process.
The scene view should be photographed as found, ideally before evidence markers are
placed (fragile evidence excluded), which is often portrayed incorrectly as photographing
from the four corners of, perhaps, a room. More importantly, the photographs taken
should be shot in sequence so that the end result is a series of overlapping images of the
scene.
Gardner [12] recommends taking establishing shots a second time after markers are in
place in order to position the relative location of evidence found in areas of interest (see
p. 140 in [12]). The reasoning is to capture first the unaltered scene and then to show the
relationship of the scene to the marked evidence. The concept is appropriate and it should
be considered for all scenes because it shows investigators who examine the scene the rela-
tive location of various items of evidence. For mid-range photographs too, it is appropriate
to have evidence markers in place.
Importantly, it is critical that the photographer take proper establishing photographs.
While not necessarily archiving the scene as found, protecting fragile evidence is a critical
investigative function, which means that there may be situations in which the fragile evi-
dence markers will be in the photograph. The challenge for the photographer is not to fret
unnecessarily about fragile evidence markers but to be certain not to miss archiving the
critical evidence. Anyone looking at the photographs at a later time should be able to orient
themselves to how the scene originally appeared, even with a few evidence markers in
place.
A problem with photographing a scene with evidence markers in place may occur at a
later time. Evidence markers are placed at the scene to mark obvious potential evidence,
and investigators might sometimes ―over mark‖ what they consider evidence on first blush.
Sometimes, a marker may be removed because what had been marked might be no longer
considered important. However, if the marker is in a photograph and the item relating to
132 Crime Scene Forensics
that marker is not collected, someone will likely question the ―missing evidence discrep-
ancy‖ during testimony. Avoiding the problem is simple: Evidence markers in photographs
must tally with a photographic evidence log indicating any uncollected evidence and the
reason for not collecting it.
Capturing all that a scene has to offer is not easy. The relative position of all evidence
(not necessarily marked with evidence markers), even evidence not yet found, should be in
the photograph unless obscured somehow. Schematics on establishing shots designed for
photographers to capture the essence of the scene exist. These are guides and roadmaps
used for searching a scene and are designed to minimize mistakes. Regardless of how it is
accomplished, the team leader has the responsibility to archive the scene properly and
completely. The photographer does the work of visual archiving, which means, because
each scene is unique, careful and critical thought is important and necessary before
embarking on a photographic campaign.
For example, photographing from the corners or middle points in a room might cap-
ture the overview of the room’s dimensions, but this may not be sufficient to capture the
front and back of furniture. Areas with a lot of clutter will require more than four-corner
photography. The photographer decides how the essence of that room will be archived.
Generally, scales are not required for establishing photographs.
For most establishing photographs, the photographer aims to obtain maximum
DOF. This means using an appropriate lens, one capable of allowing the photographer to
set the DOF so that, when focusing about one-third of the way into the scene, the first
third and the final two-thirds are in focus. This is illustrated in the scene schematic
Figure 6.10. For this scene, the focus should be approximately 10 ft into the scene (blue
arrow), which is in front of where the body lies. Focusing on the body may bring other
areas of the scene out of focus. As an establishing shot, this photograph is not just about
the body but about the relationship of the body to everything in the specific area. The
hatched arrow in the middle of the schematic shows the first choice for focus. Experimental
photographs will help determine the optimal focal point, easy with digital SLR
cameras.
The illustration in Figure 6.10 suggests using a shorter focal length; however, too short
a focal length can cause distortion problems. Recall that the 55-mm lens is the closest the
digital camera gets to what the human eye sees. Establishing photographs should represent
as much as possible of what investigators see. If the photographer uses a wide-angle lens to
capture more of the scene, the resulting photographs can appear ―off.‖ That is, it may not
be a best representation of what investigators saw. There are circumstances, however, where
the photographer needs to use a wide-angle lens to get the entire scene into the photo-
graph. In these instances, the photographer must be wary of focal lengths less than 24 mm
and should ensure that the mid-range photographs are taken using a 55-mm lens so that
distortion is minimized.
6.5.3.2 Mid-Range Photographs After taking establishing photographs, the next step is to ―get closer‖ to the evidence pho-
tographically so that the relative position of the evidence in a specific area of the scene is
clearer. For example, the establishing shot may show a knife lying some distance from the
outstretched right arm of the deceased. It is critical to pinpoint the knife’s position perfectly,
which may require more than a single photograph encompassing multiple perspectives:
The Principles of Forensic Photography 133
taken from the feet of the deceased, from the outstretched right arm, looking from the
knife to the outstretched arm, from the left and right sides of the deceased, from the head
of the deceased, from all doorways (if they not too far away), and so on. In this way, the
knife’s position relative to the doorway, to the deceased, and to other rooms will be
preserved—archived.
A bloodstain pattern on a wall should be captured in mid-range photographs, and the
entire pattern captured. A procedure for accomplishing this is described in Chapter 15.
Establishing photographs tell an observer that the bloodstain pattern is present, but the
mid-range shot captures the size and shape of the entire pattern—evidence marker and
scales in place. Subsequent close-up photographs detail specific droplets of interest: direc-
tionality, size, those having included air bubbles, pieces of tissue, and so on. Bloodstain
patterns should never be photographed using a flash, especially using the camera’s pop-up
flash, because the flash will washout stain detail.
Generally, scales are not necessary for mid-range photographs. There are exceptions,
though, such as bloodstain patterns. Sometimes, mid-range photographs of an entire
bloodstain pattern are not possible because of its size. In these instances, sectoring is a way
to capture segments of the pattern, which are then spliced together to form an entire
pattern.
A single bloodstain pattern at a scene should not present an archiving problem, but
multiple bloodstain patterns should be labeled sequentially. That is, each pattern should
have a specific designation different from other tagged evidence. Thus, if most of the evi-
dence at the scene is tagged as, say, items 1–99, the bloodstain patterns could be tagged
using alphabet markers A–Z. Another term used is ―roadmapping‖ (attributed to Toby
Wolson, Miami Dade County Crime Laboratory, p. 161, [12] (see Chapter 14). Scales should
be present in all bloodstain pattern photographs.
6.5.3.3 Close-Up Photographs
Evidence details that have criminalistic or investigative value—knife length and width—
must be preserved photographically. An important category of evidence that should be
included is impression or pattern evidence: fingerprints, footwear impressions, tire tracks,
tool marks, and so on. The first photograph is taken without scales and the second with
scales. The scales chosen must also be appropriate: A fingerprint requires millimeter scales
while a knife on the floor does not require that much detail and can be photographed using
an inch rule. All close-ups should be shot using a tripod because any movement will blur
or obliterate critical structural detail required.
Students often question which items to photograph in close-up views. A working rule of
thumb is any evidence that will be removed from the scene that has direct comparative
value. This includes weapons, bullet fragments, bullet impact marks, shell casing, impression
evidence, fingerprints, and so on. Close-up photographs do not have a DOF issue, which
means the photographer is free to open the shutter and concentrate on focus and filling the
frame of the viewfinder with the image of the evidence. The photographic principles related to
establishing and close-up photographs with respect to DOF is illustrated below.
Close-up photographs by definition do not have a DOF because they usually represent
evidence on planar surfaces. There are instances, however, where surfaces are curved, for
example, fingerprints on door knobs. In these instances, the selection of the proper f/stop
is important.
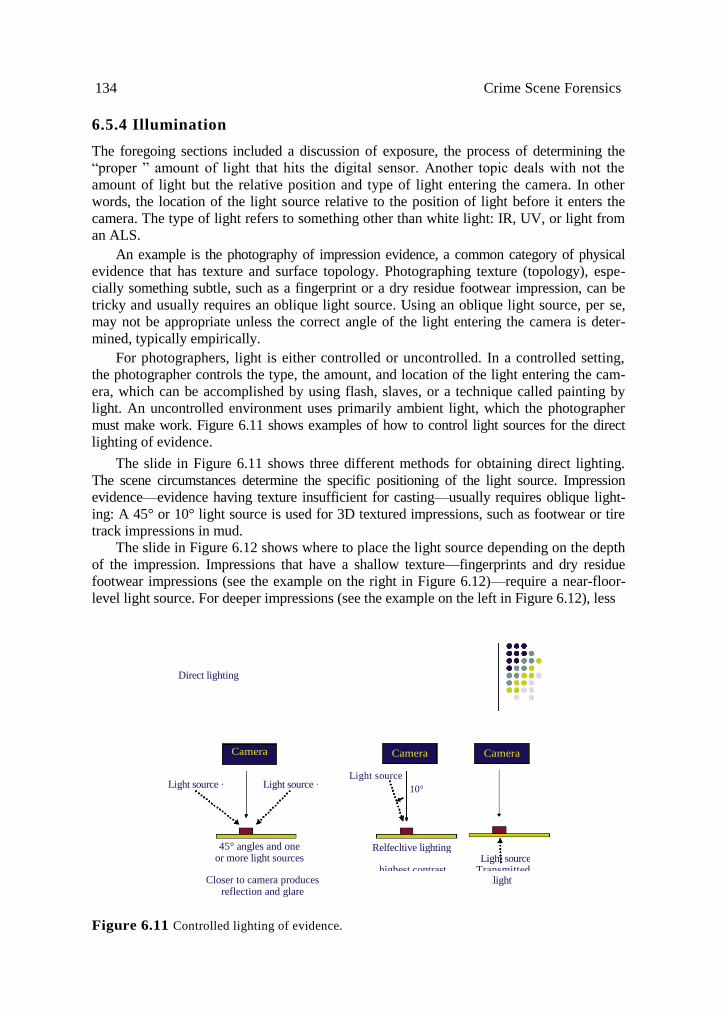
134 Crime Scene Forensics
6.5.4 Illumination
The foregoing sections included a discussion of exposure, the process of determining the
―proper ‖ amount of light that hits the digital sensor. Another topic deals with not the
amount of light but the relative position and type of light entering the camera. In other
words, the location of the light source relative to the position of light before it enters the
camera. The type of light refers to something other than white light: IR, UV, or light from
an ALS.
An example is the photography of impression evidence, a common category of physical
evidence that has texture and surface topology. Photographing texture (topology), espe-
cially something subtle, such as a fingerprint or a dry residue footwear impression, can be
tricky and usually requires an oblique light source. Using an oblique light source, per se,
may not be appropriate unless the correct angle of the light entering the camera is deter-
mined, typically empirically.
For photographers, light is either controlled or uncontrolled. In a controlled setting,
the photographer controls the type, the amount, and location of the light entering the cam-
era, which can be accomplished by using flash, slaves, or a technique called painting by
light. An uncontrolled environment uses primarily ambient light, which the photographer
must make work. Figure 6.11 shows examples of how to control light sources for the direct
lighting of evidence.
The slide in Figure 6.11 shows three different methods for obtaining direct lighting.
The scene circumstances determine the specific positioning of the light source. Impression
evidence—evidence having texture insufficient for casting—usually requires oblique light-
ing: A 45° or 10° light source is used for 3D textured impressions, such as footwear or tire
track impressions in mud.
The slide in Figure 6.12 shows where to place the light source depending on the depth
of the impression. Impressions that have a shallow texture—fingerprints and dry residue
footwear impressions (see the example on the right in Figure 6.12)—require a near-floor-
level light source. For deeper impressions (see the example on the left in Figure 6.12), less
Figure 6.11 Controlled lighting of evidence.
Direct lighting
Camera Camera Camera
Light source
10°
45° angles and one or more light sources
Closer to camera produces reflection and glare
Light source highest contrast Transmitted
light
Relfecltive lighting
Light source Light source
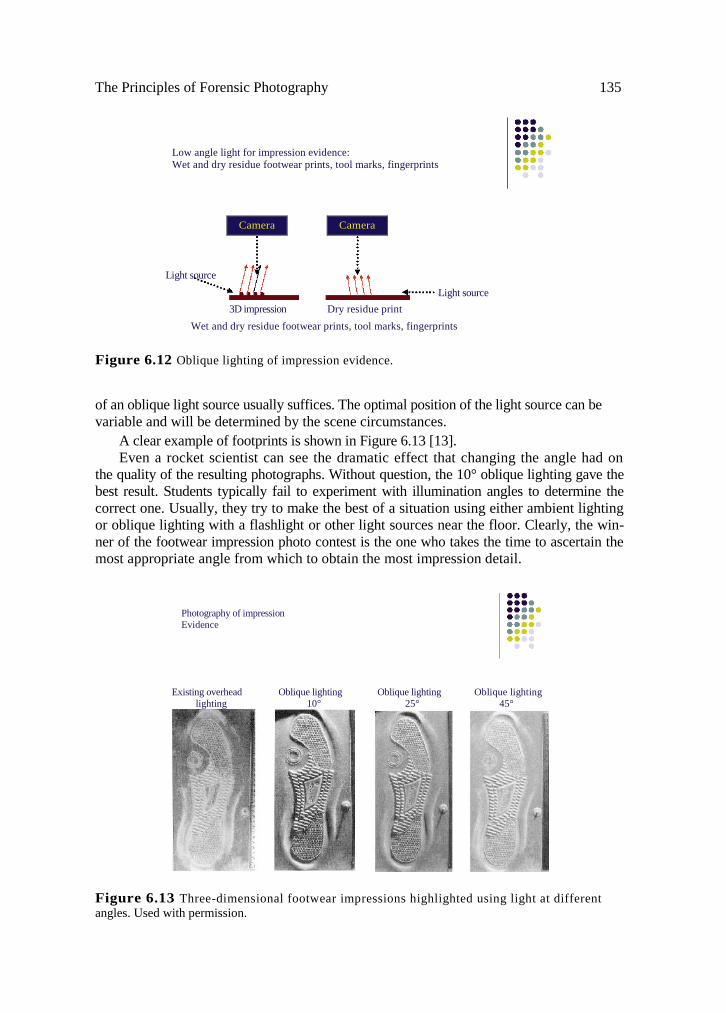
The Principles of Forensic Photography 135
Low angle light for impression evidence: Wet and dry residue footwear prints, tool marks, fingerprints
Camera Camera
3D impression Dry residue print
Wet and dry residue footwear prints, tool marks, fingerprints
Figure 6.12 Oblique lighting of impression evidence.
of an oblique light source usually suffices. The optimal position of the light source can be
variable and will be determined by the scene circumstances.
A clear example of footprints is shown in Figure 6.13 [13].
Even a rocket scientist can see the dramatic effect that changing the angle had on
the quality of the resulting photographs. Without question, the 10° oblique lighting gave the
best result. Students typically fail to experiment with illumination angles to determine the
correct one. Usually, they try to make the best of a situation using either ambient lighting
or oblique lighting with a flashlight or other light sources near the floor. Clearly, the win-
ner of the footwear impression photo contest is the one who takes the time to ascertain the
most appropriate angle from which to obtain the most impression detail.
Photography of impression
Evidence
Existing overhead Oblique lighting Oblique lighting Oblique lighting
lighting 10° 25° 45°
Figure 6.13 Three-dimensional footwear impressions highlighted using light at different
angles. Used with permission.
Light source
Light source

136 Crime Scene Forensics
Sometimes it is necessary to soften the light by bouncing it from a reflected source—
paper, glass, the ceiling, and so on—to the object being photographed. Figure 6.14 illus-
trates how to accomplish this, understanding that these are meant to be guides and do not
reflect all possible variations.
The ingenuity and experience of the photographer will ultimately determine whether
the photography is successful.
6.5.5 Filters
Filters are useful to darken, make warmer (or cooler), or eliminate glare in photographs.
The first commercial filters were made by Frederick Wratten and C. E. Mees, whose com-
pany was the forerunner of Eastman Kodak. Their filters had numbers associated with
each, and these have become the standard notation and labeling for optical filters [14].
Filters exist for most photographic applications: Some specifically block or pass visible, UV
(1A-2C), or IR (87C or 89B) light and some darken a photograph a specific number of stops
(85N3, 85N6, and 85N9). Other manufactures make special lines of filters—FujiFilm and
MaxMax—for specific UV or IR photography [15]. Most filters have limited utility. However,
some are important depending on the subject photographed. For example, polarizing
filters are used to filter out glare.
Other filters are used in conjunction with ALSs. Specific wavelengths of light interact
with matter in basic ways: The light is absorbed, transmitted, or reflected. Sometimes, the
light absorbs energy and then loses it in the form of a photon (light). In this instance, the
light is called fluorescence. However, because of the light reflected from the object, the fluo-
rescence may not be visible to the naked eye or the camera. That is, the reflected light
masks the fluorescence. Losing the reflected light means blocking it so that it never makes
it to the observer (camera and/or person). This is accomplished using barrier filters.
Figure 6.15 shows the process. The orange barrier filter blocks the reflected light (green)
from entering the camera (or the eye). The fluorescence (pink) enters the camera and is
―seen‖ by the digital sensor.
Front directional or axis ligthing
Photographing fingerprints on mirrors and into glasses or cups
Camera Camera White or
reflective surface
Front directional or axis Bounce lighting
FP′s on mirrors and into glasses/cups softer, non-glare low contrast
Figure 6.14 Fingerprint photography using bounced (reflected) light.
Light source Clear glass
45° angle
Light source
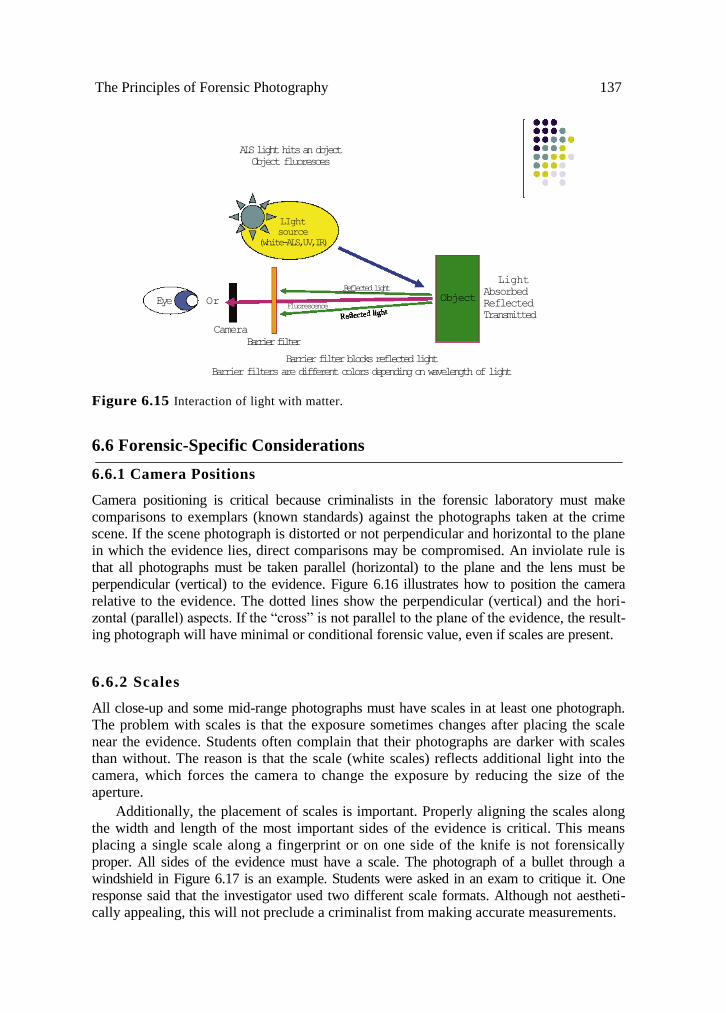
The Principles of Forensic Photography 137
Barrier filter blocks reflected light
Barrier filters are different colors depending on wavelength of light
Figure 6.15 Interaction of light with matter.
6.6 Forensic-Specific Considerations
6.6.1 Camera Positions
Camera positioning is critical because criminalists in the forensic laboratory must make
comparisons to exemplars (known standards) against the photographs taken at the crime
scene. If the scene photograph is distorted or not perpendicular and horizontal to the plane
in which the evidence lies, direct comparisons may be compromised. An inviolate rule is
that all photographs must be taken parallel (horizontal) to the plane and the lens must be
perpendicular (vertical) to the evidence. Figure 6.16 illustrates how to position the camera
relative to the evidence. The dotted lines show the perpendicular (vertical) and the hori-
zontal (parallel) aspects. If the ―cross‖ is not parallel to the plane of the evidence, the result-
ing photograph will have minimal or conditional forensic value, even if scales are present.
6.6.2 Scales
All close-up and some mid-range photographs must have scales in at least one photograph.
The problem with scales is that the exposure sometimes changes after placing the scale
near the evidence. Students often complain that their photographs are darker with scales
than without. The reason is that the scale (white scales) reflects additional light into the
camera, which forces the camera to change the exposure by reducing the size of the
aperture.
Additionally, the placement of scales is important. Properly aligning the scales along
the width and length of the most important sides of the evidence is critical. This means
placing a single scale along a fingerprint or on one side of the knife is not forensically
proper. All sides of the evidence must have a scale. The photograph of a bullet through a
windshield in Figure 6.17 is an example. Students were asked in an exam to critique it. One
response said that the investigator used two different scale formats. Although not aestheti-
cally appealing, this will not preclude a criminalist from making accurate measurements.
ALS light hits an object
Object fluoresces
LIght
source
(white-ALS,UV,IR)
Eye Or
Camera
Barrier filter
Object
Light
Absorbed
Reflected
Transmitted
Reflected light
Fluorescence
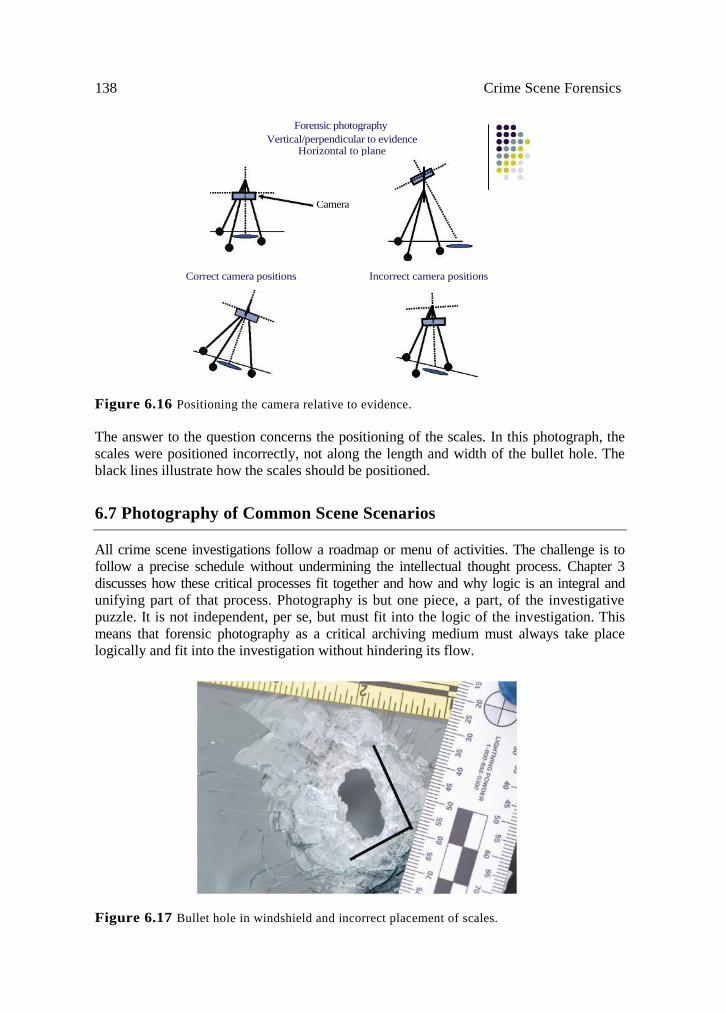
138 Crime Scene Forensics
Correct camera positions Incorrect camera positions
Figure 6.16 Positioning the camera relative to evidence.
The answer to the question concerns the positioning of the scales. In this photograph, the
scales were positioned incorrectly, not along the length and width of the bullet hole. The
black lines illustrate how the scales should be positioned.
6.7 Photography of Common Scene Scenarios
All crime scene investigations follow a roadmap or menu of activities. The challenge is to
follow a precise schedule without undermining the intellectual thought process. Chapter 3
discusses how these critical processes fit together and how and why logic is an integral and
unifying part of that process. Photography is but one piece, a part, of the investigative
puzzle. It is not independent, per se, but must fit into the logic of the investigation. This
means that forensic photography as a critical archiving medium must always take place
logically and fit into the investigation without hindering its flow.
Figure 6.17 Bullet hole in windshield and incorrect placement of scales.
Forensic photography
Vertical/perpendicular to evidence Horizontal to plane
Camera
The Principles of Forensic Photography 143
As discussed, establishing photography is one of the first activities on the agenda. This
is as it should be, but this, too, must be done logically and based on the team leader’s inves-
tigative philosophy. So, while establishing photography of the scene comes first, there is
logic with respect to the specific location where it begins and the sequence of the process.
Generally, photography should begin where most of the activity took place. Since this is
also where the crime scene team will begin its investigative efforts and where the photog-
rapher and team will spend most of their time, scheduling will be critical. If one part of the
process happens out of phase, such as photography, the investigation will be inefficient and
the team may miss critical evidence. For example, photographing the body is certainly
important, but it should be done properly and at the proper time, which will be dictated by
how the investigation moves forward and the medical examiner.
Because of how the ―Scene Processing Cascade‖ was presented, readers of Chapter 3
might have incorrectly concluded that all crime scenes are handled in the same manner.
That would be an incorrect assumption. Each crime scene is unique, and while that discus-
sion was partly philosophical, it left the responsibility of the scene management squarely
up to the team leader, with the caveat that the investigation should be a logical and system-
atic process based on the scientific method. However, it makes sense that certain crime
categories have evidence types in common. It also makes sense that students who are learn-
ing or honing their investigative craft should be aware of the array of evidence categories
present in certain crime types, at least minimally, from an archiving perspective.
If logic is the guiding principle of scene investigations, and of archiving for this discus-
sion, then defining scene types with respect to archiving might seem at odds with the
philosophy of this text. However, taking into consideration crime types is important
because certain ones, such as, vehicular accidents, homicides, sexual assaults, burglaries,
hit-and-run, suicide, arson, and bombings, have specific recurring attributes. That said,
there is always the consideration of logic and how it relates to what must be photographed
at a particular scene type. And although the following suggestions should be taken seri-
ously, there is the understanding that each scene is unique and therefore dictates the spe-
cific parameters required in order to archive it properly. Students should study these lists
to familiarize themselves with the common characteristics and the differences among
them. Hopefully, these will guide novice photographers so that they can successfully
archive new scene situations.
6.7.1 Vehicular Accidents
Vehicular accidents are complicated, are almost always outdoors, and often occur in high- traffic areas. Importantly, archiving these scenes is as much a public service as an insurance issue because the trauma and the possibility of criminal as well as civil law suits loom large. As in all crime scene photography, the forensic archiver must strive for objectivity and thoroughness in approaching these scenes. As mentioned above, this discussion is not an in-depth study of accident scene photography, but simply a list of accident scene subjects that, if present, should be captured [15]. Certainly, evidence may exist that is not in the list. In addition to capturing these macroscene elements—vehicles, vehicle impact points, blood, debris, skid marks, and so on, it is important to portray those intangible but impor- tant characteristics endemic to accident scenes: the sightlines of the divers and witnesses and obstructions that might have hindered those sightlines. Traffic controls and the rela- tive location of signals, yield and stop signs that might have or should have been observed
140 Crime Scene Forensics
by the drivers, are also important. All such photographs should be taken at drivers’ eye
level, if at all possible. For example, if one of the vehicles is a Honda Accord, the photogra-
pher must determine the sightline of that driver and then photographically portray this to
the impact point. This does not mean simply kneeling down to a height that the photogra-
pher ―believes‖ represents the drive’s sitting height in the vehicle and thus his/her sightline.
It means taking measurements so that the height of the sightline is as accurate as possible,
and the measurements should be recorded in an appropriate log. The following factors
should be considered.
How the weight of the driver may have lowered the vehicle and how that could
have affected the sightline.
The slope of the roadway and how that may have affected the driver.
Obstacles in the sightline, such as trees, signs, or other vehicles.
If the drivers are not present because of injuries or death, all measurements will be
estimates made on the fly. Information and sizes can be obtained from the medical exam-
iner. Regardless, the exact heights at which the photographs were taken must be recorded,
and, if estimates are needed, these must be recorded as well. If needed, more accurate mea-
surements can be made at a later time. Since these scenes are usually outdoor incidents,
accidents can occur because of factors outside the control of the driver; for instance, glare
from sunlight, darkness, and bad weather can cause vision problems. Capturing this infor-
mation is critical. For example, sun glare over a horizon may have temporarily blinded a
driver from seeing a traffic light, stop sign, or another vehicle. The photographer must
attempt to capture this, if possible. This means working quickly because time changes the
perspective and location of the sun. It might mean returning to the scene when the proper
conditions are present. This, of course, is an elusive target and extremely difficult to dupli-
cate exactly. Still, it is important to make an attempt and even presenting a jury with an
example of how the glare affected the driver’s vision can be important. Table 6.5 is meant
as a guide for photographing vehicular accident scenes.
6.7.2 Homicide Scenes
Homicides translate to dead bodies and bodies are an aspect of the macroscene. They are
also scenes unto themselves. They have critical evidence that can eventually help close the
investigation or provide critical probative evidence. They also tend to become a focal point.
A dead body is not necessarily a major source of fragile evidence requiring immediate
attention, and it does not need to be removed from the scene immediately. It may, in fact,
not be where most of the scene activity took place. In fact, indoor homicide scenes often
display signs of activity that carries across several rooms. The forensic archivist must cap-
ture this activity in a continuum from photo to photo (and/or video) as though the filming
took place while the crime was happening. While impossible, philosophically that is the
goal: ―Miss nothing.‖
Philosophy often gets pushed aside in favor of what is practical. In fact, the true-grit
scene investigation—fingerprinting, enhancements, trajectories, evidence collection, and
so on, cannot begin until establishing photography is concluded, which is why the place to
begin photographing (and sketching) is where most of the activity took place (struggle,
bloodstains, etc.).
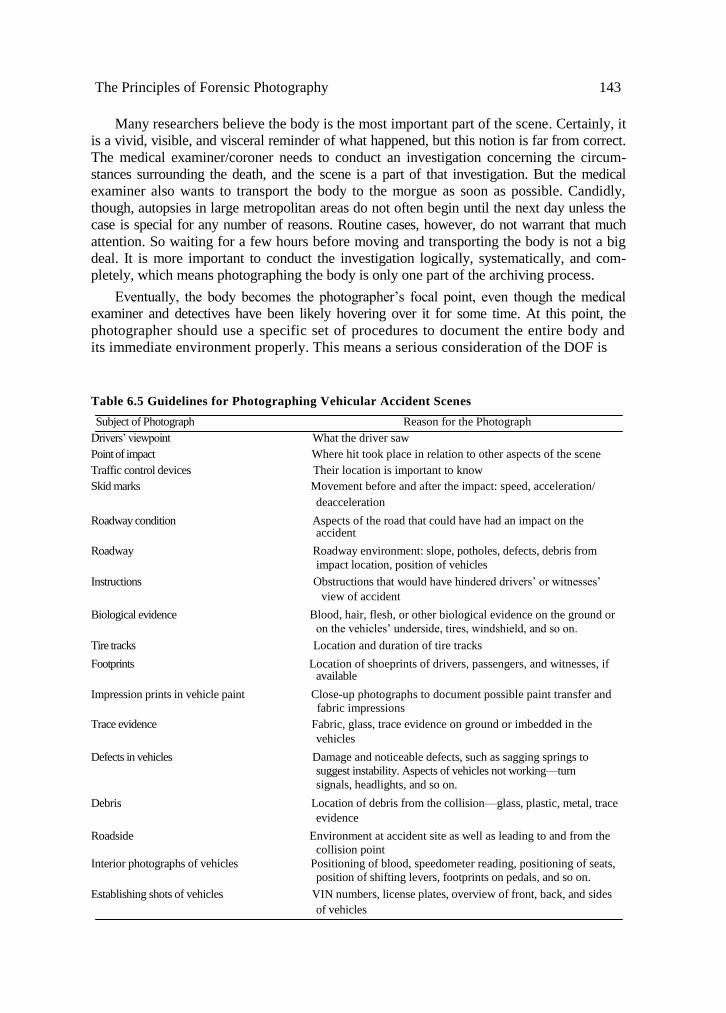
The Principles of Forensic Photography 143
Many researchers believe the body is the most important part of the scene. Certainly, it
is a vivid, visible, and visceral reminder of what happened, but this notion is far from correct.
The medical examiner/coroner needs to conduct an investigation concerning the circum-
stances surrounding the death, and the scene is a part of that investigation. But the medical
examiner also wants to transport the body to the morgue as soon as possible. Candidly,
though, autopsies in large metropolitan areas do not often begin until the next day unless the
case is special for any number of reasons. Routine cases, however, do not warrant that much
attention. So waiting for a few hours before moving and transporting the body is not a big
deal. It is more important to conduct the investigation logically, systematically, and com-
pletely, which means photographing the body is only one part of the archiving process.
Eventually, the body becomes the photographer’s focal point, even though the medical
examiner and detectives have been likely hovering over it for some time. At this point, the
photographer should use a specific set of procedures to document the entire body and
its immediate environment properly. This means a serious consideration of the DOF is
Table 6.5 Guidelines for Photographing Vehicular Accident Scenes
Subject of Photograph Reason for the Photograph
Drivers’ viewpoint What the driver saw
Point of impact Where hit took place in relation to other aspects of the scene
Traffic control devices Their location is important to know
Skid marks Movement before and after the impact: speed, acceleration/
deacceleration
Roadway condition Aspects of the road that could have had an impact on the accident
Roadway Roadway environment: slope, potholes, defects, debris from
impact location, position of vehicles
Instructions Obstructions that would have hindered drivers’ or witnesses’
view of accident
Biological evidence Blood, hair, flesh, or other biological evidence on the ground or
on the vehicles’ underside, tires, windshield, and so on.
Tire tracks Location and duration of tire tracks
Footprints Location of shoeprints of drivers, passengers, and witnesses, if available
Impression prints in vehicle paint Close-up photographs to document possible paint transfer and
fabric impressions
Trace evidence Fabric, glass, trace evidence on ground or imbedded in the
vehicles
Defects in vehicles Damage and noticeable defects, such as sagging springs to
suggest instability. Aspects of vehicles not working—turn
signals, headlights, and so on.
Debris Location of debris from the collision—glass, plastic, metal, trace
evidence
Roadside Environment at accident site as well as leading to and from the
collision point
Interior photographs of vehicles Positioning of blood, speedometer reading, positioning of seats,
position of shifting levers, footprints on pedals, and so on.
Establishing shots of vehicles VIN numbers, license plates, overview of front, back, and sides
of vehicles
142 Crime Scene Forensics
important, and shooting for the maxim DOF using an f/number of 11–32 is not unreason-
able. The top part of Table 6.6 (I: Body and Surroundings) shows how to photograph the
body and why.
Homicide scenes have other important considerations. Importantly, though, no
archiving activity should occur out of sequence (see Chapter 3). When an investigation
goes on tangents, evidence can be easily missed, and there is the real chance of botching
the investigation. The lower part of Table 6.6 (II: Ancillary Archiving) offers several sug-
gestions with respect to winding down the photographic aspect of the investigation.
These must be photographed at the proper time during the investigation. Generally,
establishing photography occurs before mid-range and that before close-up
photography.
6.7.3 Nonhomicide Sexual Assaults
Sexual assault/battery is an important crime category that, too, has a common thread of
associated evidence categories. Although usually violent, these crimes are different in that a
sexual assault survivor may be able to relate details having important investigative value.
From the forensic photographer’s perspective, details of the attack location or locations may
be critical in documenting the allegation. If the survivor was abducted from the street or on
a jogging path in the woods, archiving the physical attributes of those locations is critical:
macroscene elements, such as footprints, tire tracks, ripped clothing, and so on, photo-
graphed in situ to avoid confusion with respect to the location of the evidence. Thus, for the
forensic photographer, the survivor can be a personal video camera of the attack. The details
of what happened and where is key to locating probative evidence. A sexual assault nurse
examiner (SANE) usually performs the physical examination, collects physical evidence
from the survivor, and conducts the interview, often in the presence of the investigating
detective. This interview is critical for the crime scene team leader and the team’s
photographer.
These cases can take place inside a residence, inside vehicles, outdoors or any place
where a woman can be attacked. As suggested above, this might be along a jogger’s path in
the woods. New York City’s jewel, Central Park, for example, has the unfortunate distinc-
tion of being the location of many sexual assaults. Sometimes, the subsequent scene inves-
tigation takes place after the SANE nurse’s interview. It may be that the vehicle described
by the sexual assault survivor may not be recovered quickly or ever.
Luckily for the investigators, unless there is blood present, semen, saliva, and trace
evidence are not readily visible, especially on light surfaces, and there is good chance that
critical biological evidence might remain at the location where the assault took place. The
archivist has two responsibilities:
Capture the location of the scene—as with any scene, such as a burglary (many
sexual assaults begin as burglaries) or a homicide (many homicides are sexually
motivated).
Archive the location of biological evidence.
Appropriate archiving of biological evidence requires photography using ALS because
this is the best way to visualize semen, saliva, and urine. The photographer should have a
series of barrier filters (e.g., orange, yellow, and red) that fit onto the lens. In combination
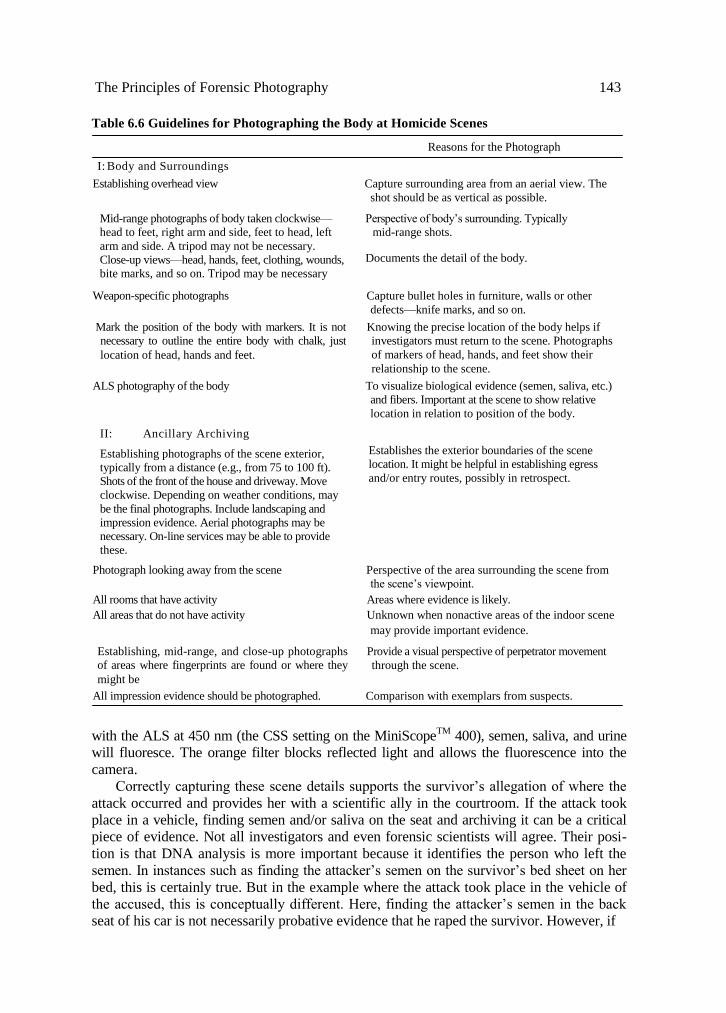
The Principles of Forensic Photography 143
Table 6.6 Guidelines for Photographing the Body at Homicide Scenes
with the ALS at 450 nm (the CSS setting on the MiniScopeTM
400), semen, saliva, and urine
will fluoresce. The orange filter blocks reflected light and allows the fluorescence into the
camera.
Correctly capturing these scene details supports the survivor’s allegation of where the
attack occurred and provides her with a scientific ally in the courtroom. If the attack took
place in a vehicle, finding semen and/or saliva on the seat and archiving it can be a critical
piece of evidence. Not all investigators and even forensic scientists will agree. Their posi-
tion is that DNA analysis is more important because it identifies the person who left the
semen. In instances such as finding the attacker’s semen on the survivor’s bed sheet on her
bed, this is certainly true. But in the example where the attack took place in the vehicle of
the accused, this is conceptually different. Here, finding the attacker’s semen in the back
seat of his car is not necessarily probative evidence that he raped the survivor. However, if
Reasons for the Photograph
I: Body and Surroundings
Establishing overhead view Capture surrounding area from an aerial view. The
shot should be as vertical as possible.
Mid-range photographs of body taken clockwise—
head to feet, right arm and side, feet to head, left
arm and side. A tripod may not be necessary.
Close-up views—head, hands, feet, clothing, wounds,
bite marks, and so on. Tripod may be necessary
Perspective of body’s surrounding. Typically
mid-range shots.
Documents the detail of the body.
Weapon-specific photographs Capture bullet holes in furniture, walls or other
defects—knife marks, and so on.
Mark the position of the body with markers. It is not
necessary to outline the entire body with chalk, just
location of head, hands and feet.
Knowing the precise location of the body helps if
investigators must return to the scene. Photographs
of markers of head, hands, and feet show their
relationship to the scene.
ALS photography of the body To visualize biological evidence (semen, saliva, etc.)
and fibers. Important at the scene to show relative
location in relation to position of the body.
II: Ancillary Archiving
Establishing photographs of the scene exterior,
typically from a distance (e.g., from 75 to 100 ft).
Shots of the front of the house and driveway. Move
clockwise. Depending on weather conditions, may
be the final photographs. Include landscaping and
impression evidence. Aerial photographs may be
necessary. On-line services may be able to provide
these.
Establishes the exterior boundaries of the scene
location. It might be helpful in establishing egress
and/or entry routes, possibly in retrospect.
Photograph looking away from the scene Perspective of the area surrounding the scene from
the scene’s viewpoint.
All rooms that have activity Areas where evidence is likely.
All areas that do not have activity Unknown when nonactive areas of the indoor scene
may provide important evidence.
Establishing, mid-range, and close-up photographs
of areas where fingerprints are found or where they
might be
Provide a visual perspective of perpetrator movement
through the scene.
All impression evidence should be photographed. Comparison with exemplars from suspects.
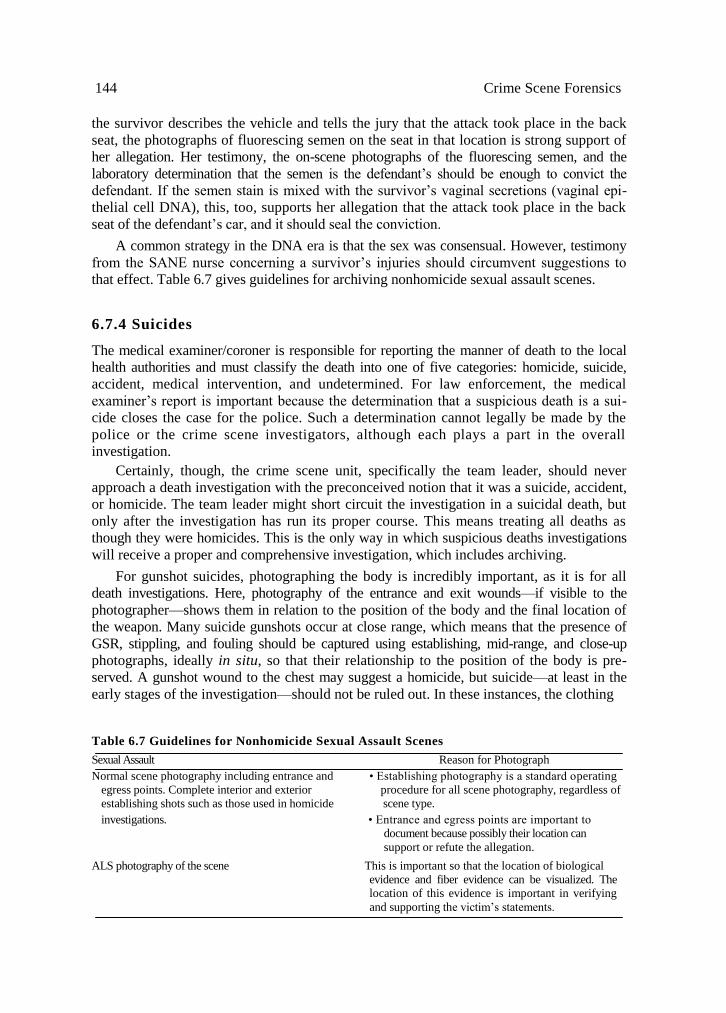
144 Crime Scene Forensics
the survivor describes the vehicle and tells the jury that the attack took place in the back
seat, the photographs of fluorescing semen on the seat in that location is strong support of
her allegation. Her testimony, the on-scene photographs of the fluorescing semen, and the
laboratory determination that the semen is the defendant’s should be enough to convict the
defendant. If the semen stain is mixed with the survivor’s vaginal secretions (vaginal epi-
thelial cell DNA), this, too, supports her allegation that the attack took place in the back
seat of the defendant’s car, and it should seal the conviction.
A common strategy in the DNA era is that the sex was consensual. However, testimony
from the SANE nurse concerning a survivor’s injuries should circumvent suggestions to
that effect. Table 6.7 gives guidelines for archiving nonhomicide sexual assault scenes.
6.7.4 Suicides
The medical examiner/coroner is responsible for reporting the manner of death to the local
health authorities and must classify the death into one of five categories: homicide, suicide,
accident, medical intervention, and undetermined. For law enforcement, the medical
examiner’s report is important because the determination that a suspicious death is a sui-
cide closes the case for the police. Such a determination cannot legally be made by the
police or the crime scene investigators, although each plays a part in the overall
investigation.
Certainly, though, the crime scene unit, specifically the team leader, should never
approach a death investigation with the preconceived notion that it was a suicide, accident,
or homicide. The team leader might short circuit the investigation in a suicidal death, but
only after the investigation has run its proper course. This means treating all deaths as
though they were homicides. This is the only way in which suspicious deaths investigations
will receive a proper and comprehensive investigation, which includes archiving.
For gunshot suicides, photographing the body is incredibly important, as it is for all
death investigations. Here, photography of the entrance and exit wounds—if visible to the
photographer—shows them in relation to the position of the body and the final location of
the weapon. Many suicide gunshots occur at close range, which means that the presence of
GSR, stippling, and fouling should be captured using establishing, mid-range, and close-up
photographs, ideally in situ, so that their relationship to the position of the body is pre-
served. A gunshot wound to the chest may suggest a homicide, but suicide—at least in the
early stages of the investigation—should not be ruled out. In these instances, the clothing
Table 6.7 Guidelines for Nonhomicide Sexual Assault Scenes
Sexual Assault Reason for Photograph
Normal scene photography including entrance and • Establishing photography is a standard operating
egress points. Complete interior and exterior procedure for all scene photography, regardless of
establishing shots such as those used in homicide scene type.
investigations. • Entrance and egress points are important to
document because possibly their location can
support or refute the allegation.
ALS photography of the scene This is important so that the location of biological
evidence and fiber evidence can be visualized. The
location of this evidence is important in verifying
and supporting the victim’s statements.
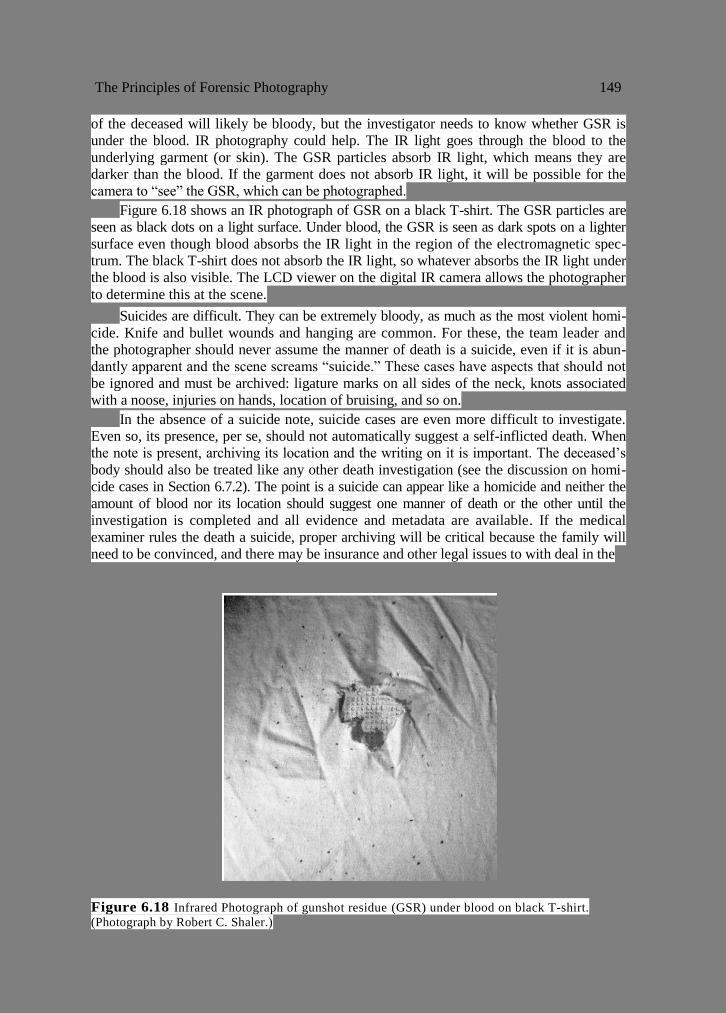
The Principles of Forensic Photography 149
of the deceased will likely be bloody, but the investigator needs to know whether GSR is
under the blood. IR photography could help. The IR light goes through the blood to the
underlying garment (or skin). The GSR particles absorb IR light, which means they are
darker than the blood. If the garment does not absorb IR light, it will be possible for the
camera to ―see‖ the GSR, which can be photographed.
Figure 6.18 shows an IR photograph of GSR on a black T-shirt. The GSR particles are
seen as black dots on a light surface. Under blood, the GSR is seen as dark spots on a lighter
surface even though blood absorbs the IR light in the region of the electromagnetic spec-
trum. The black T-shirt does not absorb the IR light, so whatever absorbs the IR light under
the blood is also visible. The LCD viewer on the digital IR camera allows the photographer
to determine this at the scene.
Suicides are difficult. They can be extremely bloody, as much as the most violent homi-
cide. Knife and bullet wounds and hanging are common. For these, the team leader and
the photographer should never assume the manner of death is a suicide, even if it is abun-
dantly apparent and the scene screams ―suicide.‖ These cases have aspects that should not
be ignored and must be archived: ligature marks on all sides of the neck, knots associated
with a noose, injuries on hands, location of bruising, and so on.
In the absence of a suicide note, suicide cases are even more difficult to investigate.
Even so, its presence, per se, should not automatically suggest a self-inflicted death. When
the note is present, archiving its location and the writing on it is important. The deceased’s
body should also be treated like any other death investigation (see the discussion on homi-
cide cases in Section 6.7.2). The point is a suicide can appear like a homicide and neither the
amount of blood nor its location should suggest one manner of death or the other until the
investigation is completed and all evidence and metadata are available. If the medical
examiner rules the death a suicide, proper archiving will be critical because the family will
need to be convinced, and there may be insurance and other legal issues to with deal in the
Figure 6.18 Infrared Photograph of gunshot residue (GSR) under blood on black T-shirt.
(Photograph by Robert C. Shaler.)
146 Crime Scene Forensics
future. The guidelines in Table 6.6 for photographing homicide scenes apply equally to
suicide scenes.
6.7.5 Hit-and-Run Cases
Like most vehicular accidents, hit-and-run cases typically occur outside, and should be
treated photographically in the same way (see Table 6.5). Unlike vehicular accidents, hit-
and-run cases run the gamut from vehicular homicide, involuntary manslaughter, to leav-
ing the scene of an accident or unintentional injury. The basic difference between a
hit-and–run case and a vehicular accident case is that the latter often involves two vehicles
while the former involves a vehicle that is missing after having fled the scene. The success-
ful solution to the case is proving that one specific vehicle had been at the scene, which
means archiving and collecting evidence at the scene, on the victim (if the victim is a per-
son), and/or on another stuck vehicle. The collected evidence is compared by criminalists
to evidence taken from the suspected missing vehicle.
One aspect of this proof is photographic. Table 6.5 for vehicular accidents is also appro-
priate for these cases. Documenting the driver’s and victim’s sightline, point of impact,
debris field, and biological evidence photographically may be critical. Microscene evidence
can be the critical parameter that leads to a conviction. Such evidence can include blood and
tissue, paint and paint chips, fabric impressions, glass, and plastic. Documenting the loca-
tion and photographically recording this evidence is critical, as is other possible forensic
characteristics of the scene—tire tracks, shoeprints, roadway surface, and so on. If the hit-
and-run case involves a pedestrian who dies at the scene, the guidelines in Table 6.6 apply.
6.7.6 Fatal Accidents: Body Inside the Vehicle
Like hit-and-run cases, accidents in which fatalities occur are similar to vehicular acci-
dents discussed above, and the guidelines in Tables 6.5 and 6.6 are appropriate for these
scenes. To be successful, scene scientists/investigators and forensic photographers should
never take a case at face value, that is, assume a case is what it appears to be. Fatal accidents
are no exceptions. The identification of the driver of the vehicle may be in question. The
position of the body may be staged. The photographic record, subsequent DNA analysis,
detective work, and criminalistics will tie the case together. The science applied should
spell out the particulars of the case.
From the forensic photographer’s perspective, then, blood and other bodily fluids
should be captured photographically. As in sexual assault cases, using ALS may be helpful
in locating and then photographing saliva and bloodstains. The interior of the vehicle in
these cases can be a particularly important source of probative evidence because this is
where the participants of the crime (if it was a crime) were located.
Sometimes pinpointing who was driving can be critical because discrepancies occur
from witness descriptions and/or descriptions by the person(s) who survived the accident.
Those who participated in the scene or even witnesses may lie to investigators. Finding
DNA evidence (blood, saliva, etc.) can help, but capturing the location where the DNA was
collected photographically may be critical as is the location of blood spatter patterns, which
an expert may need to interpret at a future time. Released airbags may also have surface
biological evidence—saliva and/or blood—and their location can also help pinpoint who
was sitting where.
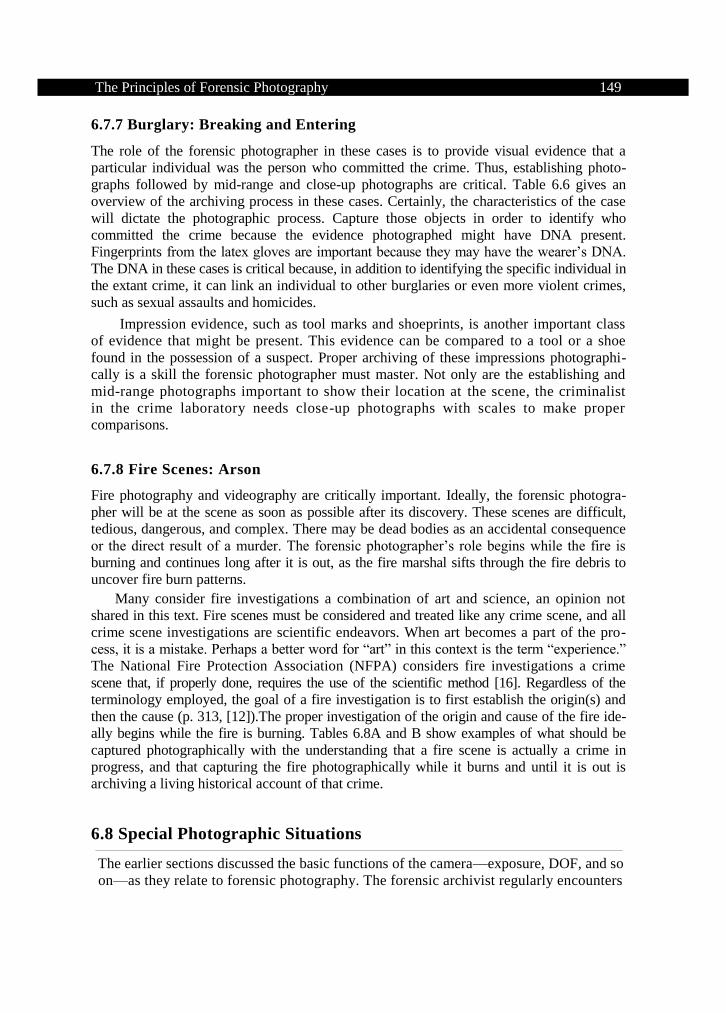
The Principles of Forensic Photography 149
6.7.7 Burglary: Breaking and Entering
The role of the forensic photographer in these cases is to provide visual evidence that a
particular individual was the person who committed the crime. Thus, establishing photo-
graphs followed by mid-range and close-up photographs are critical. Table 6.6 gives an
overview of the archiving process in these cases. Certainly, the characteristics of the case
will dictate the photographic process. Capture those objects in order to identify who
committed the crime because the evidence photographed might have DNA present.
Fingerprints from the latex gloves are important because they may have the wearer’s DNA.
The DNA in these cases is critical because, in addition to identifying the specific individual in
the extant crime, it can link an individual to other burglaries or even more violent crimes,
such as sexual assaults and homicides.
Impression evidence, such as tool marks and shoeprints, is another important class
of evidence that might be present. This evidence can be compared to a tool or a shoe
found in the possession of a suspect. Proper archiving of these impressions photographi-
cally is a skill the forensic photographer must master. Not only are the establishing and
mid-range photographs important to show their location at the scene, the criminalist
in the crime laboratory needs close-up photographs with scales to make proper
comparisons.
6.7.8 Fire Scenes: Arson
Fire photography and videography are critically important. Ideally, the forensic photogra-
pher will be at the scene as soon as possible after its discovery. These scenes are difficult,
tedious, dangerous, and complex. There may be dead bodies as an accidental consequence
or the direct result of a murder. The forensic photographer’s role begins while the fire is
burning and continues long after it is out, as the fire marshal sifts through the fire debris to
uncover fire burn patterns.
Many consider fire investigations a combination of art and science, an opinion not
shared in this text. Fire scenes must be considered and treated like any crime scene, and all
crime scene investigations are scientific endeavors. When art becomes a part of the pro-
cess, it is a mistake. Perhaps a better word for ―art‖ in this context is the term ―experience.‖
The National Fire Protection Association (NFPA) considers fire investigations a crime
scene that, if properly done, requires the use of the scientific method [16]. Regardless of the
terminology employed, the goal of a fire investigation is to first establish the origin(s) and
then the cause (p. 313, [12]).The proper investigation of the origin and cause of the fire ide-
ally begins while the fire is burning. Tables 6.8A and B show examples of what should be
captured photographically with the understanding that a fire scene is actually a crime in
progress, and that capturing the fire photographically while it burns and until it is out is
archiving a living historical account of that crime.
6.8 Special Photographic Situations
The earlier sections discussed the basic functions of the camera—exposure, DOF, and so
on—as they relate to forensic photography. The forensic archivist regularly encounters
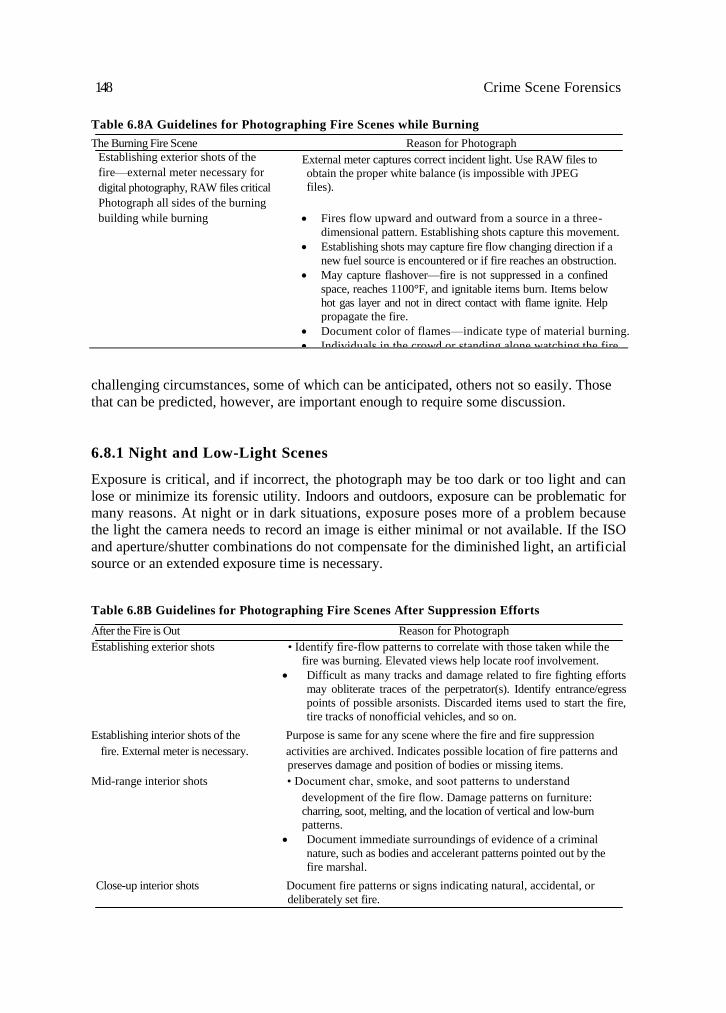
148 Crime Scene Forensics
Table 6.8A Guidelines for Photographing Fire Scenes while Burning
The Burning Fire Scene Reason for Photograph
Establishing exterior shots of the
fire—external meter necessary for
digital photography, RAW files critical
Photograph all sides of the burning
building while burning
External meter captures correct incident light. Use RAW files to
obtain the proper white balance (is impossible with JPEG
files).
Fires flow upward and outward from a source in a three-
dimensional pattern. Establishing shots capture this movement.
Establishing shots may capture fire flow changing direction if a
new fuel source is encountered or if fire reaches an obstruction.
May capture flashover—fire is not suppressed in a confined
space, reaches 1100°F, and ignitable items burn. Items below
hot gas layer and not in direct contact with flame ignite. Help
propagate the fire.
Document color of flames—indicate type of material burning.
Individuals in the crowd or standing alone watching the fire.
challenging circumstances, some of which can be anticipated, others not so easily. Those
that can be predicted, however, are important enough to require some discussion.
6.8.1 Night and Low-Light Scenes
Exposure is critical, and if incorrect, the photograph may be too dark or too light and can
lose or minimize its forensic utility. Indoors and outdoors, exposure can be problematic for
many reasons. At night or in dark situations, exposure poses more of a problem because
the light the camera needs to record an image is either minimal or not available. If the ISO
and aperture/shutter combinations do not compensate for the diminished light, an artificial
source or an extended exposure time is necessary.
Table 6.8B Guidelines for Photographing Fire Scenes After Suppression Efforts
After the Fire is Out Reason for Photograph
Establishing exterior shots • Identify fire-flow patterns to correlate with those taken while the
fire was burning. Elevated views help locate roof involvement.
Difficult as many tracks and damage related to fire fighting efforts
may obliterate traces of the perpetrator(s). Identify entrance/egress
points of possible arsonists. Discarded items used to start the fire,
tire tracks of nonofficial vehicles, and so on.
Establishing interior shots of the Purpose is same for any scene where the fire and fire suppression
fire. External meter is necessary. activities are archived. Indicates possible location of fire patterns and
preserves damage and position of bodies or missing items.
Mid-range interior shots • Document char, smoke, and soot patterns to understand
development of the fire flow. Damage patterns on furniture:
charring, soot, melting, and the location of vertical and low-burn
patterns.
Document immediate surroundings of evidence of a criminal
nature, such as bodies and accelerant patterns pointed out by the
fire marshal.
Close-up interior shots Document fire patterns or signs indicating natural, accidental, or
deliberately set fire.

The Principles of Forensic Photography 149
With respect to artificial light sources, this means using a form of flash: pop-up flash
that comes with the camera, an external flash attached to the ―hot shoe‖ on the camera,
slaves, floodlights, or other special techniques, such as painting with light or light fill.
The flash unit on top of the camera should never be used to photograph evidence
directly except in extraordinary situations. The reason is simple—washout. The direct flash
of the camera’s on-board flash can be too bright and can washout details of the evidence or
obliterate it entirely. For most digital photography—not film photography—at crime scenes,
flash should be a secondary consideration, not the first choice of light source, unless the
scene is so dark that extra light is necessary. That is not to imply that flash photography has
no forensic value. It does in specific situations.
Flash has value when the evidence and the background on which it lies are essentially
the same color, that is, when there is too little contrast. Impression evidence is an example
(see the explanation in Section 6.8.2).
6.8.1.1 Painting with Light
Painting with light is a technique for illuminating large outdoor scenes. The photographer
sets the camera on a tripod to stabilize it, opens the shutter to ―bulb (B),‖ and keeps it open
while moving a flash unit around the area photographed. A long synchronization cord is
necessary that allows the attached flash to illuminate up to 150 ft. Generally, the following
sequence will suffice [17].
Mount the camera on a tripod; up to 500 ft can be captured.
Set the camera shutter to ―B‖ (bulb setting) and the f/stop to a mid-setting, such as
f/8 to f/16.
Remove extraneous light from the scene.
Trip the camera shutter to open the shutter.
Fire flash at farthest point from the camera and repeat at various locations, chang-
ing flash angle and moving back toward the camera.
Retrip the shutter to finish the photography.
6.8.1.2 Slaves
Slaves are non-camera-attached flash units that trigger when another flash goes off. Using
slaves is similar to painting with light except that the photographer places individual flash
units in strategically located positions at the crime scene. There are two methods of using
the slaves. When the on-board flash of the camera goes off, the light triggers the slaves to
flash simultaneously. In small areas at indoor scenes and small outdoor scenes, this tech-
nique may be preferable to the painting-with-light technique.
An example of using slaves to illuminate a completely dark patio is shown in Figure 6.19.
Here, four slaves were positioned appropriately and triggered by the on-camera flash.
6.8.2 Impression Evidence Photography
Impression evidence photography is all about creating contrast between the surface on
which the impression lies and the texture of the impression. Although impression evidence
is discussed in detail in another chapter, a discussion of archiving impression evidence is
appropriate here. Generally, this requires the same technique as that used to locate
the impression evidence at crime scenes—oblique lighting. While shoeprint impression
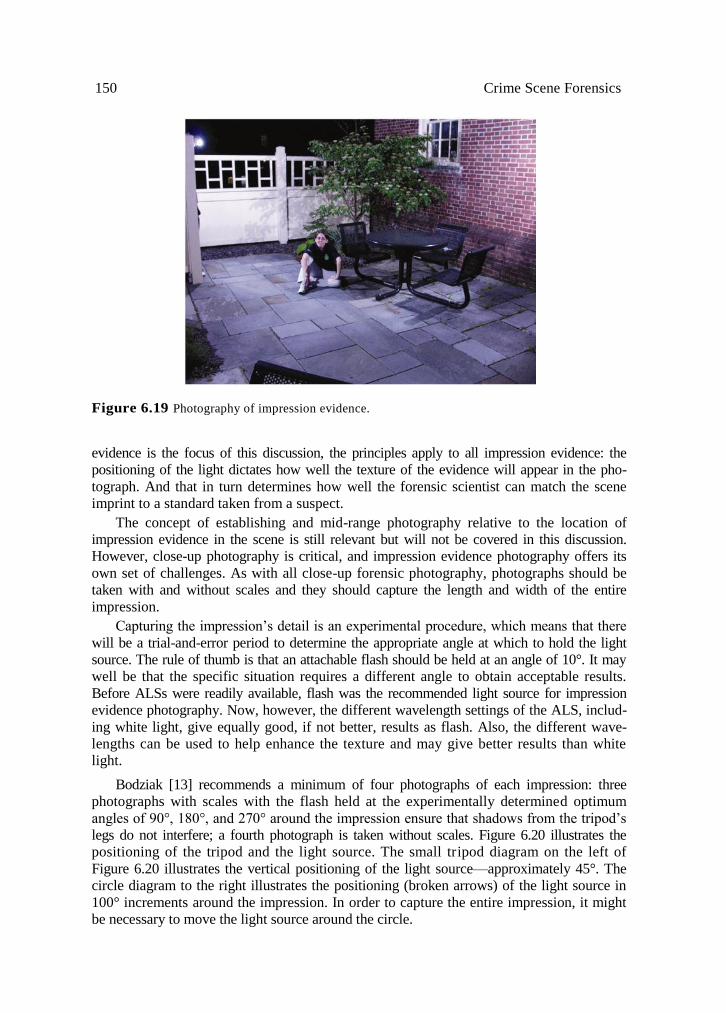
150 Crime Scene Forensics
Figure 6.19 Photography of impression evidence.
evidence is the focus of this discussion, the principles apply to all impression evidence: the
positioning of the light dictates how well the texture of the evidence will appear in the pho-
tograph. And that in turn determines how well the forensic scientist can match the scene
imprint to a standard taken from a suspect.
The concept of establishing and mid-range photography relative to the location of
impression evidence in the scene is still relevant but will not be covered in this discussion.
However, close-up photography is critical, and impression evidence photography offers its
own set of challenges. As with all close-up forensic photography, photographs should be
taken with and without scales and they should capture the length and width of the entire
impression.
Capturing the impression’s detail is an experimental procedure, which means that there
will be a trial-and-error period to determine the appropriate angle at which to hold the light
source. The rule of thumb is that an attachable flash should be held at an angle of 10°. It may
well be that the specific situation requires a different angle to obtain acceptable results.
Before ALSs were readily available, flash was the recommended light source for impression
evidence photography. Now, however, the different wavelength settings of the ALS, includ-
ing white light, give equally good, if not better, results as flash. Also, the different wave-
lengths can be used to help enhance the texture and may give better results than white
light.
Bodziak [13] recommends a minimum of four photographs of each impression: three
photographs with scales with the flash held at the experimentally determined optimum
angles of 90°, 180°, and 270° around the impression ensure that shadows from the tripod’s
legs do not interfere; a fourth photograph is taken without scales. Figure 6.20 illustrates the
positioning of the tripod and the light source. The small tripod diagram on the left of
Figure 6.20 illustrates the vertical positioning of the light source—approximately 45°. The
circle diagram to the right illustrates the positioning (broken arrows) of the light source in
100° increments around the impression. In order to capture the entire impression, it might
be necessary to move the light source around the circle.
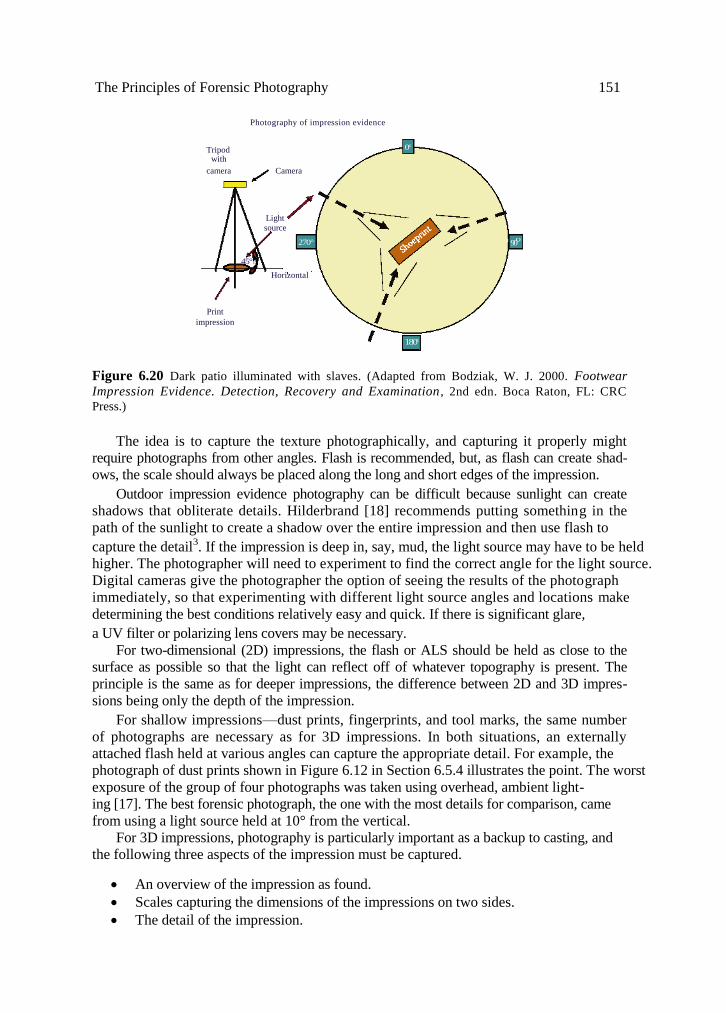
The Principles of Forensic Photography 151
Photography of impression evidence
Figure 6.20 Dark patio illuminated with slaves. (Adapted from Bodziak, W. J. 2000. Footwear
Impression Evidence. Detection, Recovery and Examination , 2nd edn. Boca Raton, FL: CRC
Press.)
The idea is to capture the texture photographically, and capturing it properly might
require photographs from other angles. Flash is recommended, but, as flash can create shad-
ows, the scale should always be placed along the long and short edges of the impression.
Outdoor impression evidence photography can be difficult because sunlight can create
shadows that obliterate details. Hilderbrand [18] recommends putting something in the
path of the sunlight to create a shadow over the entire impression and then use flash to
capture the detail3. If the impression is deep in, say, mud, the light source may have to be held
higher. The photographer will need to experiment to find the correct angle for the light source.
Digital cameras give the photographer the option of seeing the results of the photograph
immediately, so that experimenting with different light source angles and locations make
determining the best conditions relatively easy and quick. If there is significant glare,
a UV filter or polarizing lens covers may be necessary.
For two-dimensional (2D) impressions, the flash or ALS should be held as close to the
surface as possible so that the light can reflect off of whatever topography is present. The
principle is the same as for deeper impressions, the difference between 2D and 3D impres-
sions being only the depth of the impression.
For shallow impressions—dust prints, fingerprints, and tool marks, the same number
of photographs are necessary as for 3D impressions. In both situations, an externally
attached flash held at various angles can capture the appropriate detail. For example, the
photograph of dust prints shown in Figure 6.12 in Section 6.5.4 illustrates the point. The worst
exposure of the group of four photographs was taken using overhead, ambient light- ing [17]. The best forensic photograph, the one with the most details for comparison, came
from using a light source held at 10° from the vertical.
For 3D impressions, photography is particularly important as a backup to casting, and
the following three aspects of the impression must be captured.
An overview of the impression as found.
Scales capturing the dimensions of the impressions on two sides.
The detail of the impression.
Tripod with
camera Camera
0°
Light source
270° 900
45°
Horizontal
impression
180°
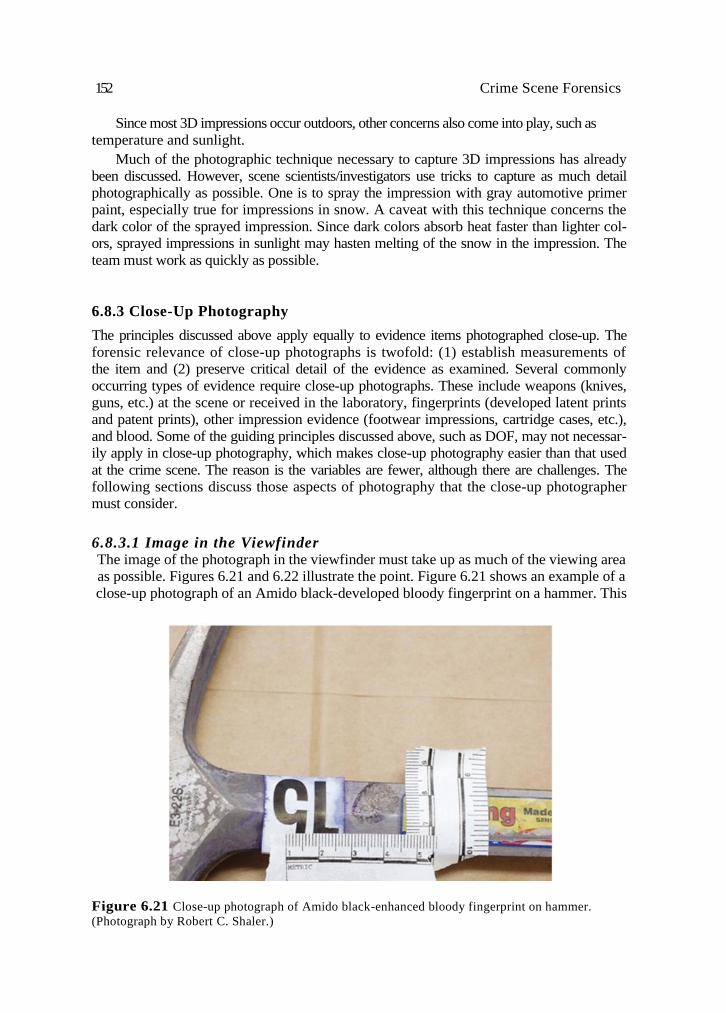
152 Crime Scene Forensics
Since most 3D impressions occur outdoors, other concerns also come into play, such as
temperature and sunlight.
Much of the photographic technique necessary to capture 3D impressions has already
been discussed. However, scene scientists/investigators use tricks to capture as much detail
photographically as possible. One is to spray the impression with gray automotive primer
paint, especially true for impressions in snow. A caveat with this technique concerns the
dark color of the sprayed impression. Since dark colors absorb heat faster than lighter col-
ors, sprayed impressions in sunlight may hasten melting of the snow in the impression. The
team must work as quickly as possible.
6.8.3 Close-Up Photography
The principles discussed above apply equally to evidence items photographed close-up. The
forensic relevance of close-up photographs is twofold: (1) establish measurements of
the item and (2) preserve critical detail of the evidence as examined. Several commonly
occurring types of evidence require close-up photographs. These include weapons (knives,
guns, etc.) at the scene or received in the laboratory, fingerprints (developed latent prints
and patent prints), other impression evidence (footwear impressions, cartridge cases, etc.),
and blood. Some of the guiding principles discussed above, such as DOF, may not necessar-
ily apply in close-up photography, which makes close-up photography easier than that used
at the crime scene. The reason is the variables are fewer, although there are challenges. The
following sections discuss those aspects of photography that the close-up photographer
must consider.
6.8.3.1 Image in the Viewfinder The image of the photograph in the viewfinder must take up as much of the viewing area
as possible. Figures 6.21 and 6.22 illustrate the point. Figure 6.21 shows an example of a
close-up photograph of an Amido black-developed bloody fingerprint on a hammer. This
Figure 6.21 Close-up photograph of Amido black-enhanced bloody fingerprint on hammer.
(Photograph by Robert C. Shaler.)
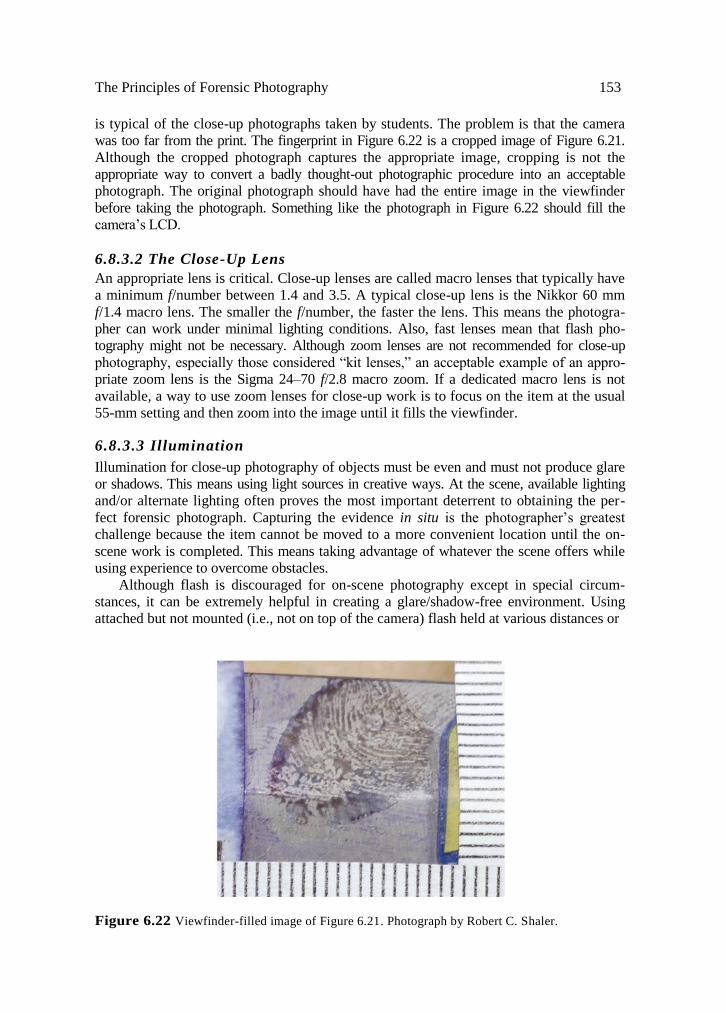
The Principles of Forensic Photography 153
is typical of the close-up photographs taken by students. The problem is that the camera
was too far from the print. The fingerprint in Figure 6.22 is a cropped image of Figure 6.21.
Although the cropped photograph captures the appropriate image, cropping is not the
appropriate way to convert a badly thought-out photographic procedure into an acceptable
photograph. The original photograph should have had the entire image in the viewfinder
before taking the photograph. Something like the photograph in Figure 6.22 should fill the
camera’s LCD.
6.8.3.2 The Close-Up Lens
An appropriate lens is critical. Close-up lenses are called macro lenses that typically have
a minimum f/number between 1.4 and 3.5. A typical close-up lens is the Nikkor 60 mm
f/1.4 macro lens. The smaller the f/number, the faster the lens. This means the photogra-
pher can work under minimal lighting conditions. Also, fast lenses mean that flash pho-
tography might not be necessary. Although zoom lenses are not recommended for close-up
photography, especially those considered ―kit lenses,‖ an acceptable example of an appro-
priate zoom lens is the Sigma 24–70 f/2.8 macro zoom. If a dedicated macro lens is not
available, a way to use zoom lenses for close-up work is to focus on the item at the usual
55-mm setting and then zoom into the image until it fills the viewfinder.
6.8.3.3 Illumination
Illumination for close-up photography of objects must be even and must not produce glare
or shadows. This means using light sources in creative ways. At the scene, available lighting
and/or alternate lighting often proves the most important deterrent to obtaining the per-
fect forensic photograph. Capturing the evidence in situ is the photographer’s greatest
challenge because the item cannot be moved to a more convenient location until the on-
scene work is completed. This means taking advantage of whatever the scene offers while
using experience to overcome obstacles.
Although flash is discouraged for on-scene photography except in special circum-
stances, it can be extremely helpful in creating a glare/shadow-free environment. Using
attached but not mounted (i.e., not on top of the camera) flash held at various distances or
Figure 6.22 Viewfinder-filled image of Figure 6.21. Photograph by Robert C. Shaler.
154 Crime Scene Forensics
angles from the object, or bouncing light from various objects (paper, ceiling, etc.) onto
the object can be helpful. The key words are experience and experimentation. There are no
set guidelines for on-scene close-up photography other than knowing how to use the cam-
era and understanding the specific situation (lighting/glare/shadows) under which the
photograph must be taken. After that, it is the photographer’s experience and ability to
create great photographs.
In-laboratory lighting is usually not an issue because laboratories have copy stands
with lights and other ways to illuminate evidence evenly. Again, flash is generally discour-
aged because of the potential for washout. However, flash or other means of creating exter-
nal lighting can be helpful. I can highlight details, especially in capturing detail on evidence
in shadows.
Since the photograph on the left of Figure 6.12 was not taken using a UV filter or polar- izing filters, the glare remains. Generally, this photograph does not meet appropriate foren-
sic photographic standards.
6.8.3.4 Depth of Field
DOF is usually shallow, which means a wide open aperture setting to the minimum
f/number permitted by the lens.
6.8.3.5 Focus
The most important reason for taking close-up photographs is to capture minute details of
the evidence for comparison. This means that close-up focus in the photographs must be
―tack sharp.‖ From a digital photography perspective, ―tack-sharp‖ means the photograph
in the viewfinder must be in focus to the maximum level the camera can zoom in on the
image in the viewfinder.
Capturing focal detail to this extent means anchoring the camera to eliminate camera
shake. Anyone who has attempted to hold a camera steady while taking close-up photo-
graphs understands how difficult this is. Certainly fast lenses help. At the scene, anchoring
the camera means using a tripod. In the laboratory, this means using a tripod, a copy
stand, or other means of steadying the camera.
One way to help focus is to use an electronic shutter-triggering mechanism. Most
modern camera manufacturers offer ways to trip the shutter without touching the camera.
Another method is to shut off the antishake mechanism. On a tripod, the anti -shake
system is not necessary, and, if it is active, it will shake the camera very slightly causing
blur.
6.8.3.6 Scales
Scales and their position are critical and must be included in close-up photographs. As
mentioned earlier, close-up photographs are taken with and without scales.
References
1. Merriam-Webster Online Dictionary. Archive. Available at: http://www.merriam-webster.com/
dictionary/archive (accessed October 29, 2010). 2. PC Magazine online. Active archiving. Available at: http://www.pcmag.com/encyclopedia_term
/0,2542,t=active+archiving&i=37447,00.asp# (accessed March 20, 2009).
3. Available at: http://www.digital-slr-guide.com/what-is-a-digital-slr.html (accessed April 1,
2009).

The Principles of Forensic Photography 155
4. Available at: http://www.digital-slr-guide.com/crop-factor.html (accessed November 1, 2010).
Used with permission.
5. H. L. Blitzer and J. Jacobia. 2002. Chapter 4: Storing and archiving images. In: Forensic Digital
Imaging and Photography. San Diego, CA: Academic Press, pp. 54–60.
6. S. Kelby. 2006. Chapter 1: Pro tips for getting really sharp photos. In: The Digital Photography
Book, Vol. 1. Berkeley, CA: Peachpit Press, p. 1.
7. B. Peterson. 2014. Understanding Exposure, Revised Edition. New York, NY: Amphoto Books,
pp. 32–33. 8. D. R. Redsicker. 2001. The Practical Methodology of Forensic Photography, 2nd edn. Boca Raton,
FL: CRC Press, p. 266.
9. S. Kelby. 2006. Chapter 8: Taking advantage of digital like a pro. In: The Digital Photography
Book, Vol. 1. Berkeley, CA: Peachpit Press, pp. 155.
10. S. Weiss. 2009. Macrophotography. Evidence Technology Magazine, pp. 14–17.
11. The Nikon Guide to Digital Photography with the D40 Digital Camera, pp. 45, 49. 12. R. M. Gardner. 2005. Practical Crime Scene Processing and Investigation. Boca Raton, FL: CRC
Press, pp. 140, 161, 313.
13. W. J. Bodziak. 2000. Footwear Impression Evidence. Detection, Recovery and Examination, 2nd
edn. Boca Raton, FL: CRC Press, pp. 47–48.
14. Wratten filters. Available at: http://en.wikipedia.org/wiki/Wratten_number (accessed April 22,
2009).
15. XNite filters. Available at: http://maxmax.com/aXNiteFilters.htm (accessed April 22, 2009).
16. National Fire Protection Association. 2008. Chapter 4: Basic methodology. In: NFPA 921 Guide
for Fire and Explosion Investigations. Quincy, MA: NFPA, pp. 921–16. 17. H. C. Lee, T. Palmbach, and M. T. Miller. 2001. Henry Lee’s Handbook of Crime Scene Investigation.
San Diego, CA: Academic Press, pp. 94–96.
18. D. S. Hilderbrand. 1999. Chapter VIII.: Recovery Through Photography. In: Footwear, The
Missed Evidence—A Field Guide to the Collection and Preservation of Forensic Footwear
Impression Evidence. Wildomar, CA: Staggs Publishing, pp. 46–47. 19. L. S. Miller, 2006. Police Photography , 5th edn. Cincinnati, OH: Anderson Publishing,
pp. 135–168.

158 Crime Scene Forensics
Workshop I Photography: Camera Basics
I.1 Introduction
The key to successful forensic photography is intimate familiarity with the modern digital
SLR camera. Digital photography has become the de facto standard for archiving the scene.
The reasons are obvious: color film and developing are no longer readily available and digi-
tal photography gives archivists the opportunity to ―experiment‖ in order to obtain the
perfect exposure and forensic perspective. Before beginning this workshop, readers should
review Chapter 6. SLR cameras are necessary for quality forensic photography. The reason
is that interchanging lenses is the key to capturing the perfect perspective offered by the
scene. The following assumes that the student is using a Nikon D40 or better camera. Other
cameras are certainly appropriate and, although the location of specific functions on the
camera can differ, all modern cameras have at least those functions considered for this
introduction to the camera.
I.2 Required Tools
Camera: Digital (12 megapixel minimum) Lenses:
Wide angle (f/2.8 24–70)
Telephoto (f/2.8 80–200)
Close-up (f/2.8 6) Detachable flash
Tripod with ball head Memory card of 8–32 gigabytes
I.3 Camera Basics
The following are the essential functions for successful forensic photography. These are the
basics, but cameras can have many sophisticated functions that can increase the quality of
the photographs.
I.3.1 File Formats
Most SLR cameras offer choices for storing photographs. Some cameras give choices: JPEG,
RAW (NEF for Nikons), TIFF (tif). For most forensic photography, the RAW + JPEG set-
ting is the best. This gives the photographer the ability to quickly review the photograph
as a JPEG and to save it as a RAW, noncompressed file. The importance of saving the
photograph in a file that is not compressed (RAW) is that compression (JPEG files) leads to
automatic loss of information. The disadvantage is that the camera chooses what informa-
tion to exclude from the file. In the RAW mode, no information is lost.
I.3.2 Camera Function Dials and Menu Options
Menu: Most digital cameras have menus that can access the same functions as the
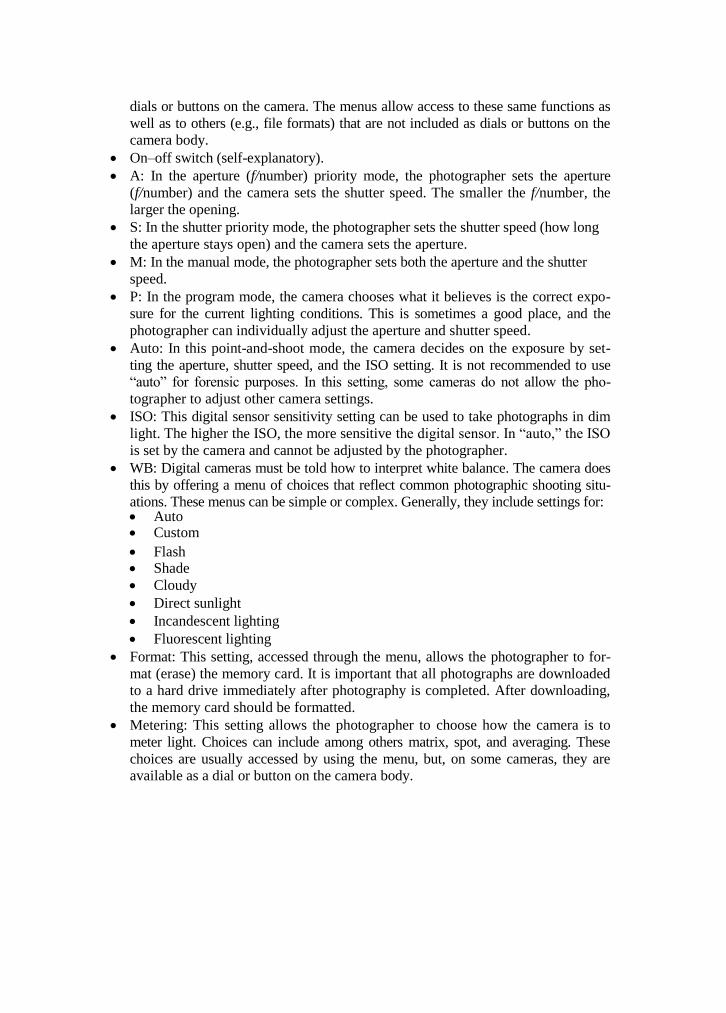
dials or buttons on the camera. The menus allow access to these same functions as
well as to others (e.g., file formats) that are not included as dials or buttons on the
camera body.
On–off switch (self-explanatory).
A: In the aperture (f/number) priority mode, the photographer sets the aperture
(f/number) and the camera sets the shutter speed. The smaller the f/number, the
larger the opening.
S: In the shutter priority mode, the photographer sets the shutter speed (how long
the aperture stays open) and the camera sets the aperture.
M: In the manual mode, the photographer sets both the aperture and the shutter
speed.
P: In the program mode, the camera chooses what it believes is the correct expo-
sure for the current lighting conditions. This is sometimes a good place, and the
photographer can individually adjust the aperture and shutter speed.
Auto: In this point-and-shoot mode, the camera decides on the exposure by set-
ting the aperture, shutter speed, and the ISO setting. It is not recommended to use
―auto‖ for forensic purposes. In this setting, some cameras do not allow the pho-
tographer to adjust other camera settings.
ISO: This digital sensor sensitivity setting can be used to take photographs in dim
light. The higher the ISO, the more sensitive the digital sensor. In ―auto,‖ the ISO
is set by the camera and cannot be adjusted by the photographer.
WB: Digital cameras must be told how to interpret white balance. The camera does
this by offering a menu of choices that reflect common photographic shooting situ-
ations. These menus can be simple or complex. Generally, they include settings for: Auto Custom
Flash Shade
Cloudy
Direct sunlight
Incandescent lighting
Fluorescent lighting
Format: This setting, accessed through the menu, allows the photographer to for-
mat (erase) the memory card. It is important that all photographs are downloaded
to a hard drive immediately after photography is completed. After downloading,
the memory card should be formatted.
Metering: This setting allows the photographer to choose how the camera is to
meter light. Choices can include among others matrix, spot, and averaging. These
choices are usually accessed by using the menu, but, on some cameras, they are
available as a dial or button on the camera body.
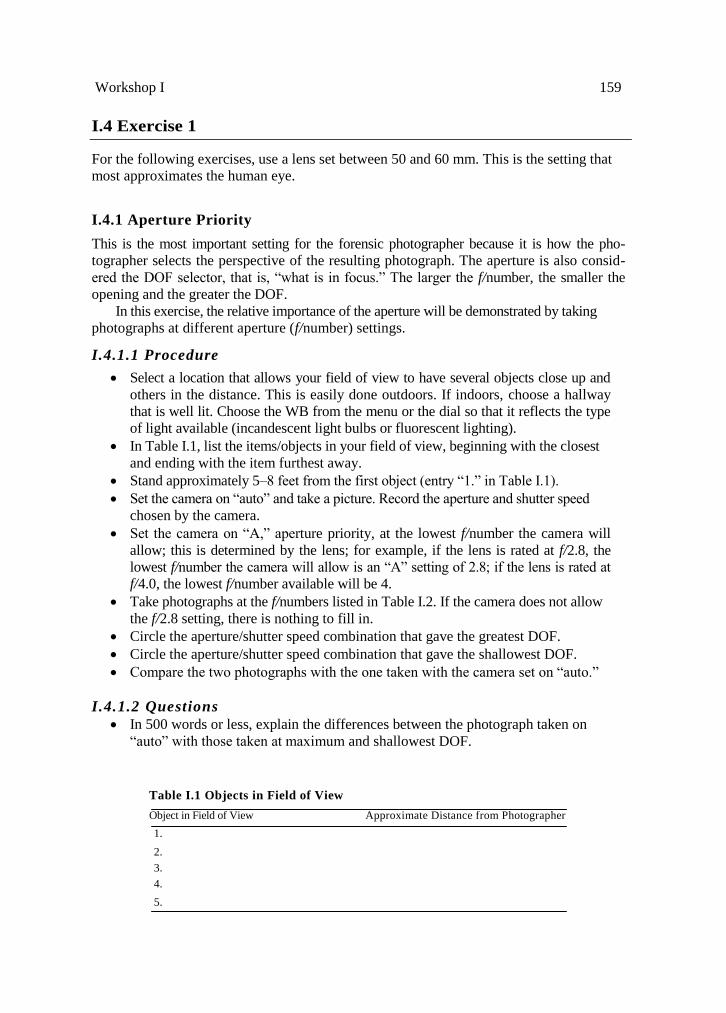
Workshop I 159
I.4 Exercise 1
For the following exercises, use a lens set between 50 and 60 mm. This is the setting that
most approximates the human eye.
I.4.1 Aperture Priority
This is the most important setting for the forensic photographer because it is how the pho-
tographer selects the perspective of the resulting photograph. The aperture is also consid-
ered the DOF selector, that is, ―what is in focus.‖ The larger the f/number, the smaller the
opening and the greater the DOF.
In this exercise, the relative importance of the aperture will be demonstrated by taking
photographs at different aperture (f/number) settings.
I.4.1.1 Procedure
Select a location that allows your field of view to have several objects close up and
others in the distance. This is easily done outdoors. If indoors, choose a hallway
that is well lit. Choose the WB from the menu or the dial so that it reflects the type
of light available (incandescent light bulbs or fluorescent lighting).
In Table I.1, list the items/objects in your field of view, beginning with the closest
and ending with the item furthest away.
Stand approximately 5–8 feet from the first object (entry ―1.‖ in Table I.1).
Set the camera on ―auto‖ and take a picture. Record the aperture and shutter speed
chosen by the camera.
Set the camera on ―A,‖ aperture priority, at the lowest f/number the camera will
allow; this is determined by the lens; for example, if the lens is rated at f/2.8, the
lowest f/number the camera will allow is an ―A‖ setting of 2.8; if the lens is rated at
f/4.0, the lowest f/number available will be 4.
Take photographs at the f/numbers listed in Table I.2. If the camera does not allow
the f/2.8 setting, there is nothing to fill in.
Circle the aperture/shutter speed combination that gave the greatest DOF.
Circle the aperture/shutter speed combination that gave the shallowest DOF.
Compare the two photographs with the one taken with the camera set on ―auto.‖
I.4.1.2 Questions
In 500 words or less, explain the differences between the photograph taken on
―auto‖ with those taken at maximum and shallowest DOF.
Table I.1 Objects in Field of View
Object in Field of View Approximate Distance from Photographer
1.
2.
3.
4.
5.

160 Crime Scene Forensics
Table I.2 Aperture Priority Exercise
Shutter Speed List the Objects in Table I.1 Describe Quality of Photograph
Aperture Setting (Set by Camera) that are in Focus (Over/Under Exposed, etc.)
2.8
4.0
5.6
8.0
11.0
16.0
22.0
Using the results from Exercise 1, in 500 words or less, discuss the concept of DOF.
To illustrate your points, include examples (photographs) that were obtained. Use
Chapter 6 as a guide.
In 500 words or less, discuss aperture priority with respect to how f/numbers affect
exposure. Use examples from Exercise 1.
In the list of aperture settings in Table I.2, which of the following would be exam-
ples of one full stop?
A: f/8.0 to f/11.0
B: f/22 to f/16
C: f/2.8 to f/8.0 D: None of the above
I.4.2 Shutter Speed
I.4.2.1 Procedure
Set the camera on ―S.‖
Take a series of photographs of the objects in Table I.1 using the shutter speeds
listed in Table I.3.
Fill in the information in Table I.3.
I.4.2.2 Questions
In 500 words or less, describe the effect shutter speed has on DOF, if any. Use
examples from your data to illustrate the discussion.
Table I.3 Shutter Speed Priority Exercise
Shutter Speed Aperture (Set List the Objects in Table I.1 Describe Quality of Photograph
(seconds) by Camera) that are in Focus (Over/Under Exposed, etc.)
10th
20th
40th
100th
200th
400th
800th

Workshop I 161
From Table II.3, which of the following is known as moving a full stop?
A: Shutter speed of 100th to 400th
B: Shutter speed of 40th to 80th
C: Shutter speed of 60th to 100th D: None of the above
If you chose ―None of the above‖ as your answer, explain why.
If you chose one of the top 3 (A, B, C) as your answer, explain why.
I.4.3 Manual Priority
I.4.3.1 Procedure
Set the WB and ISO on ―auto.‖
Set the camera on ―A‖ and choose the f/stop (f/number) that gave the greatest DOF
as listed in Table I.2.
Set the camera on ―M‖ and set the shutter speed corresponding to the aperture that
you selected above (i.e., the shutter speed that gave the greatest DOF as listed in
Table I.2).
Keeping the aperture constant, take a series of photographs using shutter speeds
that increase by one-third of a stop toward faster shutter speeds than the one
selected from Table I.1
Keeping the aperture constant, take a second series of photographs using shutter
speeds one-third of a stop slower than the one selected from Table I.3.
Fill in Table I.4.
Choose the best photograph.
I.4.3.2 Questions
Does the best photograph have the same shutter speed as the one you selected from
Table I.1 (Yes or No)?
In 500 words or less, explain why?
In 500 words or less, explain why the manual ―M‖ setting on the camera gives more
or less control of the photographic outcome than when choosing ―A,‖ ―S,‖ or ―auto.‖
I.5 Dark Environment Photography
I.5.1 ISO
ISO refers to the sensitivity of the digital sensor, which means that in darkened environ-
ments, increasing the sensitivity makes it possible to obtain photographs in dark places.
Table I.4 Manual Priority Exercise
Aperture (Set by Describe Quality of
Manual Priority Shutter Photographer—Should be Photograph (Over/ Place an ―X‖ beside
Speed (Seconds) the Same for Each Entry) Under Exposed, etc.) the Best Photograph
Shutter speed from Aperture selected from Table I.1 Table 1.1
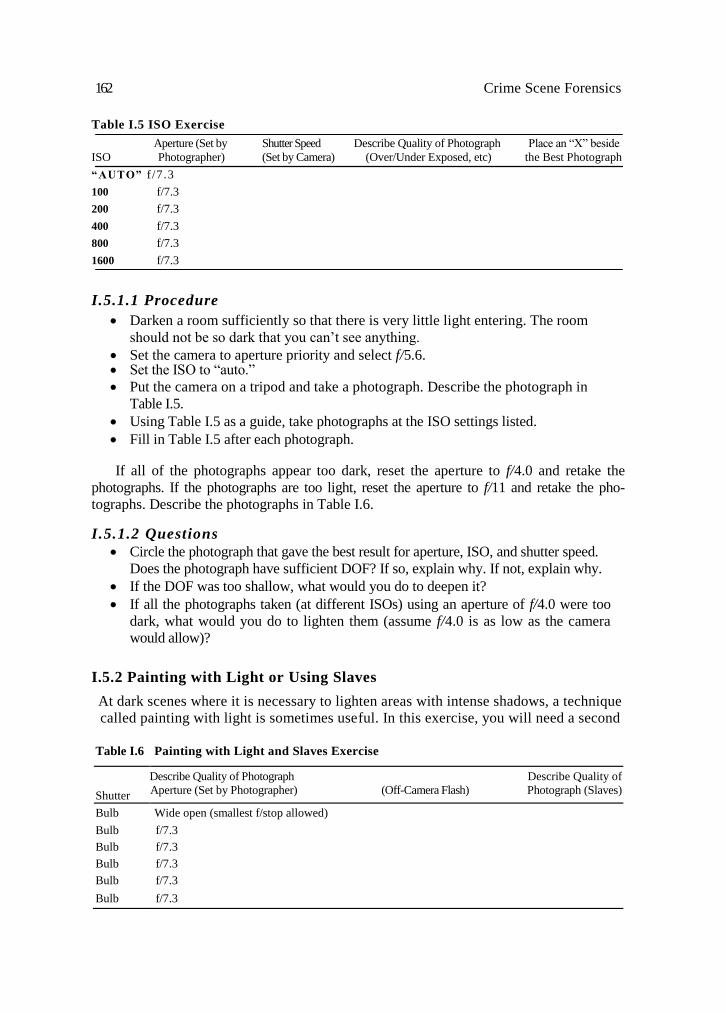
162 Crime Scene Forensics
Table I.5 ISO Exercise
Aperture (Set by Shutter Speed Describe Quality of Photograph Place an ―X‖ beside
ISO Photographer) (Set by Camera) (Over/Under Exposed, etc) the Best Photograph
“AUTO” f /7 .3
100 f/7.3
200 f/7.3
400 f/7.3
800 f/7.3
1600 f/7.3
I.5.1.1 Procedure
Darken a room sufficiently so that there is very little light entering. The room
should not be so dark that you can’t see anything.
Set the camera to aperture priority and select f/5.6. Set the ISO to ―auto.‖
Put the camera on a tripod and take a photograph. Describe the photograph in
Table I.5.
Using Table I.5 as a guide, take photographs at the ISO settings listed.
Fill in Table I.5 after each photograph.
If all of the photographs appear too dark, reset the aperture to f/4.0 and retake the
photographs. If the photographs are too light, reset the aperture to f/11 and retake the pho-
tographs. Describe the photographs in Table I.6.
I.5.1.2 Questions
Circle the photograph that gave the best result for aperture, ISO, and shutter speed.
Does the photograph have sufficient DOF? If so, explain why. If not, explain why.
If the DOF was too shallow, what would you do to deepen it?
If all the photographs taken (at different ISOs) using an aperture of f/4.0 were too
dark, what would you do to lighten them (assume f/4.0 is as low as the camera
would allow)?
I.5.2 Painting with Light or Using Slaves
At dark scenes where it is necessary to lighten areas with intense shadows, a technique
called painting with light is sometimes useful. In this exercise, you will need a second
Table I.6 Painting with Light and Slaves Exercise
Shutter
Describe Quality of Photograph Describe Quality of
Aperture (Set by Photographer) (Off-Camera Flash) Photograph (Slaves)
Bulb Wide open (smallest f/stop allowed)
Bulb f/7.3
Bulb f/7.3
Bulb f/7.3
Bulb f/7.3
Bulb f/7.3
Workshop I 163
person using an off-camera flash. On a tripod, the shutter is open. A second person takes a
flash tethered to the camera (with a long cord) and begins triggering the flash manually to
illuminate areas in shadow.
Another approach is to place slaves in strategic places. The flash from the camera will
trigger the slaves to fire simultaneously to illuminate the area.
I.5.2.1 Procedure
A dark street, alley, or patio can be used for this exercise. Set the camera on a tripod
at a strategic location. Attach an off-camera flash unit and set the camera on bulb.
Open the shutter.
A second person (or the photographer) can walk to darkened areas and trigger the
off-camera flash manually. After all the areas have been illuminated, shut the
shutter.
Repeat the exercise using slaves.
Fill in Table I.6.
I.5.2.2 Questions
Which technique gave the best results for the area you were photographing?
In your opinion, which technique is the easiest to use and which gives the best and
most consistent illumination in most circumstances?
In 500 words or less, explain why.
I.6 Close-Up Photography
In close-up photography, there are three inviolate rules: (1) The image being photographed
must take up the entire viewfinder on the back of the camera; (2) Scales of appropriate
dimensions must be used; and (3) Photographs with and without scales must be taken.
I.6.1 Procedure
Place a quarter on the floor.
Set the camera on aperture priority and set the aperture to the lowest f/stop
(f/number) the camera will allow; for close-up photographs, DOF is usually not a
concern.
Put the camera on a tripod and position it so that it is directly over the quarter and
the quarter fills the viewfinder.
Take the photograph. Examine the photograph for focus and exposure (lighting).
If the photograph is too dark, reset the camera to manual priority ―M‖ and set the
shutter speed to allow in more light.
Take the photograph and re-examine the result. Repeat the procedure until you
have the perfect exposure. Record the f/stop, shutter speed, and ISO in Table I.7.
Repeat the exercise using scales vertically and horizontally along two sides of the
quarter.
In those instances where an ALS is used to highlight fingerprints dusted with fluores- cent powder or super-glued fingerprints stained with fluorescent stains or powder, the
164 Crime Scene Forensics
Table I.7 Close-Up Photography Exercise
First Shutter Second Shutter Describe Quality of Photograph:
Photographs Speed Speed ISO Unexpected end of line»
Without Scales
1. 1st Shutter Speed
2. Final Shutter
Speed With Scales
1. 1st Shutter Speed
2. Final Shutter Speed
procedure of obtaining the close-up photograph is essentially the same. The difference is
that a barrier filter is placed over the lens so that the fluorescence reaches the digital sensor
without being overwhelmed by reflected light. The photographic principles remain the
same; the process for obtaining the perfect photograph does not change.
I.6.2 Questions
In 1000 words or less, explain why you made the changes you did to obtain the
perfect close-up photograph of the quarter.
If there are differences in the camera settings between the photographs taken with
and without scales, explain what they are and why they occurred.

Related Documents