Welcome message from author
This document is posted to help you gain knowledge. Please leave a comment to let me know what you think about it! Share it to your friends and learn new things together.
Transcript


2

3
Fifth Edition
This book is dedicated to all the pioneers
who overcame the toughest times and built
one of the greatest nations of all.

4

5
Special thanks to all the authors for making this book possible:
S. Patrick
Susan Morrow
Erik Bainbridge
M. Taylor
Theresa Anne DeMario
Lex Rooker
S. Walter
Shannon Azares
M. Searson
Fergus Mason
G. Arminius
M. Richard
Jimmy Neil
James Walton
P. Vlad
Edited and copyrighted by Claude Davis (www.askaprepper.com)
© 2019 Claude Davis
Fifth Edition
(a Global Brother production)

6
This book is in copyright. Subject to statutory exception and to the
provision of relevant collective licensing agreements, no reproduction of
any part may take place without the written permission of the editor.

7
This book is designed only to provide information. This information is provided and sold
with the knowledge that the publisher, editor, and authors do not offer any legal or other
professional advice. In the case of a need for any such expertise, consult with the
appropriate professional.
This book does not contain all information available on the subject.
This book has not been created to be specific to any individual’s or organization’s situation
or needs. Every effort has been made to make this book as accurate as possible. However,
there may be typographical and/or content errors. Therefore, this book should serve only
as a general guide and not as the ultimate source of subject information.
The authors, editor, and publisher shall have no liability or responsibility to any person or
entity regarding any loss or damage incurred, or alleged to have incurred, directly or
indirectly, by the information contained in this book. You hereby agree to be bound by
this disclaimer, or you may return this book within the guarantee time period for a full
refund.
Some products described in this book do not comply with FDA, USDA, or FSIS regulations
or local health codes. Dehydrating meat products does not reduce the health risks
associated with meat contaminated with Salmonella and/or E. coli O157H7.
The instructions provided have not been reviewed, tested, or approved by any official
testing body or government agency.
The authors and editor of this book make no warranty of any kind, expressed or implied,
regarding the safety of the final products or the methods used. The use, making, or
consumption of any products described in this book will be done at your own risk.
Some names and identifying details have been changed to protect the privacy of
individuals.

8
9
Disclaimer .................................................................................................................... 7
Table of Contents ......................................................................................................... 9
The Most Important Thing .......................................................................................... 19
How the Early Pioneers Built the Self-Feeding Fire ...................................................... 22
What You’ll Need .................................................................................................... 23
How to Build the Self-Feeding Fire Quickly .............................................................. 24
Tips ......................................................................................................................... 26
The Survival Food of the U.S. Civil War: How to Make Hardtack Biscuits..................... 27
Ingredients ....................................................................................................................................... 29
Hardware ......................................................................................................................................... 29
Lost Pioneer Recipes from the 18th Century ................................................................. 37
Bacon Fried Apples ........................................................................................................................... 37
Bean Sausage ................................................................................................................................... 37
Vinegar Lemonade ........................................................................................................................... 38
Poor Man’s Meal .............................................................................................................................. 38
Hot Water Cornbread ....................................................................................................................... 38
Buttery Sweet Potatoes.................................................................................................................... 39
Scrambled Dinner............................................................................................................................. 39
1875 Cottage Cheese ....................................................................................................................... 40
Blue-Flower Featherbed ................................................................................................................... 40
Side Pork and Mormon Gravy........................................................................................................... 40
Cooked Cabbage Salad ..................................................................................................................... 41
Lemon Pie Filling .............................................................................................................................. 41
Potato Pancakes ............................................................................................................................... 42
Bean Soup ........................................................................................................................................ 42
Pepper and Eggs ............................................................................................................................... 42
Dumplings ........................................................................................................................................ 43
Beans & Ham Hocks ......................................................................................................................... 43
Milk Toast ........................................................................................................................................ 43
Cinnamon Sugar Toast ..................................................................................................................... 44
Cornmeal Mush ................................................................................................................................ 44
Elk Backstrap with Spiced Plum Sauce .............................................................................................. 44

10
Corned Beef ..................................................................................................................................... 45
Soda Biscuits .................................................................................................................................... 46
Skillet Trout ...................................................................................................................................... 46
Winter Red Flannel Hash .................................................................................................................. 46
Mormon Johnnycake ........................................................................................................................ 47
Spotted Pup ..................................................................................................................................... 47
Oatmeal Pancakes ............................................................................................................................ 47
Spider Cornbread ............................................................................................................................. 48
Mud Apples ...................................................................................................................................... 48
Gorge Pasta ...................................................................................................................................... 48
Glazed Turnips ................................................................................................................................. 49
How North American Natives and Early Pioneers Made Pemmican ............................ 50
Nutritional Qualities ............................................................................................... 51
Directions ............................................................................................................... 52
Ingredients ....................................................................................................................................... 52
1. Rendering the Fat ......................................................................................................................... 52
2. Dried Meat Preparation................................................................................................................ 58
How Much Do I Need? ............................................................................................ 64
Delicious Recipes Using Cattails – “The Supermarket of the Swamp” .......................... 65
Alternative Practical Applications ........................................................................... 65
Medicine ................................................................................................................ 65
Fuel and illumination .............................................................................................. 66
Recipes: .................................................................................................................. 68
Scalloped Cattails ............................................................................................................................. 68
Cattail Pollen Biscuits ....................................................................................................................... 69
Cattail Pollen Pancakes .................................................................................................................... 69
Cattail Casserole............................................................................................................................... 69
Cattail Acorn Bread .......................................................................................................................... 70
Cattail Wild Rice Pilaf ....................................................................................................................... 70
Cattail Wild Rice Soup ...................................................................................................................... 70
Cat-on-the-Cob with Garlic Butter .................................................................................................... 71
Cattail Flower/Shoots Refrigerator Pickles ....................................................................................... 72
Indian Cattail Spoon Bread ............................................................................................................... 73
How The Pioneers Built Their Smokehouses ................................................................ 74
Step-by-step Guide on How to Build a Smokehouse The Pioneer Way .................... 75
Building The SmokeHouse ................................................................................................................ 77
How to Smoke Meat The Right Way ........................................................................ 80

11
How Sailors from the 17th Century Preserved Water in Their Ships for Months on End 81
Long Term Water Storage ....................................................................................... 82
Filtering Water Supplies .......................................................................................... 87
Instructions on How to Make a Charcoal Japanese Water Filter: ...................................................... 88
Silver Coins ............................................................................................................. 89
Rainwater Harvesting ....................................................................................................................... 90
Harvesting Rainwater ....................................................................................................................... 90
How Our Ancestors Made Candles And Glue out of Pine Resin .................................... 91
Necessary Ingredients ...................................................................................................................... 92
Step One: Melting the Resin ............................................................................................................. 92
Step Two (Optional): Filtering The Resin ........................................................................................... 93
Step Three: Making the Candles ....................................................................................................... 94
How To Make Glue Out of Pine Resin ...................................................................... 96
Crush the Charcoal, and Mix It with the Resin .................................................................................. 97
How the Sheriffs from the Frontiers Defended Their Villages and Towns .................. 100
Crime in the West ................................................................................................. 102
Equipment ............................................................................................................ 103
Guns .............................................................................................................................................. 103
Communications ................................................................................................... 105
Organization ......................................................................................................... 106
The Sheriff ............................................................................................................ 106
Deputy Sheriffs ..................................................................................................... 107
Posses ................................................................................................................... 107
Bringing It Up To Date ........................................................................................... 108
Showing the Flag .................................................................................................. 109
Raising a Posse ..................................................................................................... 111
What Our Ancestors Were Foraging For or ............................................................... 114
How to Wildcraft Your Table .................................................................................... 114
Prickly Lettuce ................................................................................................................................ 115
Wild Lettuce (One of The Best Natural Painkillers) ......................................................................... 116
Wild Lettuce Extract Recipe ............................................................................................................ 116
Arrowhead (Sagittaria Latifolia) ...................................................................................................... 118
Asparagus (Asparagus Officinalis) ................................................................................................... 118

12
Bulrush (Scirpus acutus, Scirpus validus) ........................................................................................ 120
Cattails (Typha Latifolia, Typha angustifolia) .................................................................................. 121
Chickweed, Common ..................................................................................................................... 122
Chicory (Cirhorium Intybus) ........................................................................................................... 123
Cleavers ......................................................................................................................................... 124
Dandelion (Taraxacum Officionale) ................................................................................................ 125
Henbit (Lamium Amplexicaule) ...................................................................................................... 126
Lady’s Thumb (Polygonum persicaria) ............................................................................................ 126
Lambs Quarters (Chenopodium album, Chenopodium berlanieri) .................................................. 127
Mint (Mentha piperita, Mentha spicata) ........................................................................................ 129
Mulberry (Morus alba, Morus rubra) .............................................................................................. 130
Mustard, Black (Brassica Nigra) ...................................................................................................... 131
Peppergrass (Lapidium Virginicum) ................................................................................................ 132
Pigweed (Amaranthus Retroflexus, Amaranthus Hybridus) ............................................................ 133
Plantain (Plantago major, Plantago minor) ..................................................................................... 134
Pennycress, Field (Thlaspi Arvense) ................................................................................................ 135
Purslane (Portulaca Oleracea) ........................................................................................................ 136
Quickweed (Galinsoga Parviflora) ................................................................................................... 137
Reed Grass (Phragmites communis) ............................................................................................... 138
Shepherd’s Purse (Capsella Bursa-pastoris) .................................................................................... 139
Sour Dock (Rumex crispus) ............................................................................................................. 140
Storksbill (Erodium Cicutarium) ...................................................................................................... 141
Watercress (Nasturtium Officinale) ................................................................................................ 142
Making Sourdough and Traditional and Survival Bark Bread .................................... 143
How to Make Sourdough Starter........................................................................... 144
How to Make Tasty Bread Like in 1869.................................................................. 146
Making Bark Bread (Famine Bread) ....................................................................... 147
Trapping in Winter for Beaver and Muskrat Just Like Our Forefathers Did ................ 150
Why Our Forefathers Trapped .............................................................................. 151
The Best Places to Trap for Beaver and Muskrat ................................................... 151
Their Local Habitats .............................................................................................. 152
The Types of Traps You’ll Use for Beaver and Muskrat .......................................... 153
Foot Hold Trap Types ..................................................................................................................... 154
Finding the Land Trails .......................................................................................... 157
How to Set the Foot Hold Trap .............................................................................. 158
Finding the Underwater Trails ............................................................................... 159
How to Set a Body Grip Trap ................................................................................. 160

13
Tanning................................................................................................................. 160
Selling at the Trading Post .............................................................................................................. 162
And There You Have It .................................................................................................................... 162
How Our Ancestors Made Herbal Poultice to Heal Their Wounds .............................. 163
What Is a Poultice? ............................................................................................... 164
A Few Poultice Recipes ......................................................................................... 166
Cataplasma Aromaticum ................................................................................................................ 166
Soothing Poultice ........................................................................................................................... 166
For Stomachaches .......................................................................................................................... 167
A Mustard Poultice......................................................................................................................... 167
A Native American Recipe to Treat an Abscess ............................................................................... 167
A Word of Warning from the Past .................................................................................................. 168
Our Ancestors’ Guide to Root Cellars ........................................................................ 169
History .................................................................................................................. 170
The Right Space for the Job ................................................................................... 170
Climate........................................................................................................................................... 170
What to Keep Where...................................................................................................................... 172
Creating the Ideal Conditions ................................................................................ 173
Lighting .......................................................................................................................................... 173
Humidity ........................................................................................................................................ 174
Dirt Floors ...................................................................................................................................... 174
Wet Cloth or Paper ........................................................................................................................ 174
Standing Water .............................................................................................................................. 175
Bury Your Treasure......................................................................................................................... 175
A Condensation Nightmare ............................................................................................................ 175
Ventilation ..................................................................................................................................... 175
Storage Ideas ........................................................................................................ 176
In-Garden Storage .......................................................................................................................... 177
Insulation ....................................................................................................................................... 177
Things That Do and Do Not Belong in Your Root Cellar .......................................... 177
Proper Storage ...................................................................................................... 178
Cull the Crops ................................................................................................................................. 179
Preparing Vegetables for Root Cellar Storage ................................................................................. 179
Curing Winter Vegetables for Storage ............................................................................................ 180
Pests .............................................................................................................................................. 180
Organization .................................................................................................................................. 181
Good Old-Fashioned Cooking on an Open Flame ...................................................... 184

14
Cast Iron Cooking .................................................................................................. 185
Care and Use .................................................................................................................................. 185
Seasoning Your Cookery ................................................................................................................. 186
Never Use Dish Soap ...................................................................................................................... 186
Iron Rusts ....................................................................................................................................... 187
No Fire ........................................................................................................................................... 187
Companion Tools ........................................................................................................................... 187
Roasting Meats ..................................................................................................... 187
On a Spit ........................................................................................................................................ 187
On a String ..................................................................................................................................... 188
Dutch Oven Cooking ............................................................................................. 189
The Right Temperature .................................................................................................................. 190
Companion Tools ........................................................................................................................... 191
Recipes Past and Future ........................................................................................ 191
Colcannon ...................................................................................................................................... 192
Meat Pies ....................................................................................................................................... 192
Mock-mock Turtle Soup ................................................................................................................. 193
Wassail ........................................................................................................................................... 193
Apple Pie ........................................................................................................................................ 194
Biscuits and Gravy .......................................................................................................................... 194
Easter Cake .................................................................................................................................... 195
Porridge ......................................................................................................................................... 195
Stew ............................................................................................................................................... 196
Bread ............................................................................................................................................. 196
How Our Ancestors Navigated Without Using a GPS System .................................... 197
Shadow Tip Method.............................................................................................. 197
Watch Method ..................................................................................................... 198
Using the Stars ...................................................................................................... 199
Letting the Sun Guide You ..................................................................................... 201
Letting the Moon Guide You at Night .................................................................... 201
Moss and Other Vegetation .................................................................................. 201
Making a Compass ................................................................................................ 202
Making Your Own Beverages: Beer to Stronger Stuff ................................................ 203
Making Beer – Basic Recipe................................................................................... 204
Equipment ..................................................................................................................................... 204
Ingredients ..................................................................................................................................... 204

15
Creating the Malt: Malted Barley ................................................................................................... 204
Making the Yeast ........................................................................................................................... 205
A Word on Hops ............................................................................................................................. 206
Making the Beer ............................................................................................................................. 206
A Bit of the Stronger Stuff: Distilling Your Own “Moonshine” ............................... 207
Making a Still .................................................................................................................................. 207
An Alembic Still .............................................................................................................................. 208
A Homemade Still........................................................................................................................... 209
A Schematic of a Homemade Still ................................................................................................... 211
Sailors ................................................................................................................... 211
Wild West Guns for SHTF .......................................................................................... 213
How They Made Gunpowder .................................................................................... 213
and a Guide to Rolling Your Own Ammo ................................................................... 213
Modern Firearms .................................................................................................. 213
Handguns ....................................................................................................................................... 214
Rifles .............................................................................................................................................. 215
Ammunition ................................................................................................................................... 215
Reloading Components ......................................................................................... 216
The Cartridge Case ......................................................................................................................... 217
Processing Brass Cartridge Cases .................................................................................................... 218
Primer Pocket ................................................................................................................................ 218
Bullets and Projectiles .................................................................................................................... 218
The Cast Lead Bullet ....................................................................................................................... 219
Casting Bullets ...................................................................................................... 220
The Bullet Mold .............................................................................................................................. 220
The Lead Melting Pot ..................................................................................................................... 221
The Ladle........................................................................................................................................ 221
The Melting Process ....................................................................................................................... 221
The Casting Process ........................................................................................................................ 222
Swaging Bullets .............................................................................................................................. 223
Machining Bullets ........................................................................................................................... 224
The Final Word on Lead Bullets ...................................................................................................... 224
Powder: How To Make Gun Powder The Old Fashioned Way ................................ 224
Recipe For Homemade Gunpowder ............................................................................................... 225
Smokeless Powder ......................................................................................................................... 229
Primers ................................................................................................................. 229
Primer Size ..................................................................................................................................... 229
Reloading Equipment ............................................................................................ 230

16
The Lee Loader ............................................................................................................................... 230
The Single-Stage Press .................................................................................................................... 231
The Progressive Press ..................................................................................................................... 231
Reloading Dies ............................................................................................................................... 232
Reloading Bench ............................................................................................................................ 232
The Tumbler ................................................................................................................................... 233
The Powder Scale ........................................................................................................................... 233
Manuals ......................................................................................................................................... 233
Storage of Ammunition and Components ............................................................. 234
How Much Ammunition Is Enough? ...................................................................... 234
Recycling ........................................................................................................................................ 235
Work Practices ............................................................................................................................... 235
Spycraft: Military Correspondence during the 1700s to 1900s................................... 237
Rectal Acorn, Silver Ball, and Quill Letters ...................................................................................... 237
Invisible Ink .................................................................................................................................... 239
Mask Letters .................................................................................................................................. 241
How Our Forefathers Made Knives ........................................................................... 244
Forging a Knife Blank ............................................................................................ 244
Forging the Blade .................................................................................................. 245
Forging the Tang ................................................................................................... 246
Grinding the Blade ................................................................................................ 246
Hardening the Blade ............................................................................................. 247
Making the Handle ............................................................................................... 249
How to Make Your Own Knife ............................................................................... 249
How Northern California Native Americans Build Their Semi-Subterranean Roundhouse
................................................................................................................................ 252
Building the Semi-Subterranean Roundhouse ....................................................... 255
Supporting Poles ............................................................................................................................ 255
Roof Construction .......................................................................................................................... 256
Roundhouse Entrance .................................................................................................................... 258
Fire Pit............................................................................................................................................ 258
Summary ........................................................................................................................................ 259
How and Why I Prefer to Make Soap with Modern Ingredients ................................ 261
History .................................................................................................................. 261
Why Modern Ingredients ...................................................................................... 262

17
Understanding the Process ................................................................................... 262
Irreplaceable Ingredients ...................................................................................... 263
Machinery and Equipment for Making Soap at Home ........................................... 264
Possible Soap Additives .................................................................................................................. 264
Essential Oils .................................................................................................................................. 264
So How Do You Make Soap? ................................................................................. 265
Ingredients ..................................................................................................................................... 265
Equipment ..................................................................................................................................... 266
Methodology ................................................................................................................................. 267
Temporarily Installing a Wood-Burning Stove During Emergencies........................... 271
Why a Wood-Burning Stove .................................................................................. 272
Temporarily Installing Your Wood-Burning Stove .................................................. 272
Temporarily Installing the Chimney ...................................................................... 273
Heating with Wood ............................................................................................... 274
Practical Survival Lessons from the Donner Party ..................................................... 276
The Story of the Donner Party .............................................................................. 278
The Fatal Decision .......................................................................................................................... 278
Escape and Rescue Attempts.......................................................................................................... 282
Survival Lessons from the Donner Party ................................................................ 283
Follow the Known Route ................................................................................................................ 283
Money Won’t Save You; It’s What You Know ................................................................................. 283
Supplies + Time = Life ..................................................................................................................... 284
Weather Is the Deciding Factor ...................................................................................................... 284
Know When to Turn Back ............................................................................................................... 284
Stress Leads to Anger and Volatility ............................................................................................... 285
Age and Gender Play a Huge Role in Survival.................................................................................. 285
Small Wounds = Death ................................................................................................................... 286
Learning from Our Ancestors How to Take Care of Our Hygiene When There Isn't
Anything to Buy ....................................................................................................... 287
Soap Making – The Old Fashion Way .................................................................... 287
Traditional Recipe for Soap ............................................................................................................ 288
Making Lye Water from Wood Ash ................................................................................................. 288
Collecting the Fat ........................................................................................................................... 289
Cooking the Soap: The Cold Process Method.................................................................................. 290
Preparation .................................................................................................................................... 290
Recipe ............................................................................................................................................ 290

18
Making Your Own Signature Soaps ................................................................................................. 291
Medicinal Soaps ............................................................................................................................. 291
Homemade Toothpaste ........................................................................................ 291
Basic Baking Soda Recipe ............................................................................................................... 292
Clay Toothpaste ............................................................................................................................. 292
To Taste ......................................................................................................................................... 292
How Our Forefathers Made Snow Shoes for Survival ................................................ 293
Anatomy of a Snowshoe ....................................................................................... 294
Making Survival Snowshoes .................................................................................. 295
Using Your Snowshoes .......................................................................................... 297
How Our Forefathers Built Their Sawmills, Grain Mills, and Stamping Mills .............. 298
How the Overshot Wheel Works ........................................................................... 299
Making That Force Usable ..................................................................................... 301
Gears .................................................................................................................... 302
Belts ............................................................................................................................................... 305
For Reciprocating Saws .................................................................................................................. 306
Don’t Forget Lubrication ................................................................................................................ 307
Building Your Own Water Wheel .......................................................................... 307

19
My parents were pretty old when I was born, and my nana and granddad were
born in the latter half of the 19th century. Consequently, I grew up “old fashioned.”
The tales my parents and grandparents told me were of times that were very different.
They told me of a time when you made the most of what you had, no matter how little
that was. My mother would tell me of how it was common for richer families to pass down
clothes to those poorer children in the community—and the children were thrilled with
their “new” clothes.
My younger brother and I would come home from school to my grandparents’ house,
where we’d be fed soup made using the previous day’s leftovers and bones the butcher
was throwing out; it was the best soup I have ever tasted. My parents and grandparents
were not only from a different age but also from a different philosophy.
Here we are, human beings in the 21st century, several lifetimes and a world away from
our grandparents and their ways. Have we become better at living? Has modern
technology given us a better world to live in than our grandparents had? I think not.
I watch as we become ever more expectant that the world owes us a living. Consumerism
has reached epic proportions; people feel aggrieved if they don’t own the latest gadget
and struggle to cope without the Internet, unable to entertain themselves.
I find it ironic that we talk about the Internet “connecting the world.” The Internet of
Things, or the IoT as it’s known, is the latest buzzword, where the excitement levels about
interconnectivity between human operators and devices are at dizzying levels. The truth
20
is we have never been so disconnected from life, from the world, from the soil, from the
trees and other animals, and from our souls.
We have lost the power to look after our loved ones and ourselves. We are so reliant on
others, often faceless corporations, to address our every waking need that many of us can
barely cook a decent meal—we resort to take-out and frozen meals. Our health, both
mental and physical, is suffering too because of our child-like dependence on others.
Humans need to connect again—connect to each other and connect to our world. We
need to learn the skills of our grandparents, skills that allowed them and their children to
survive wars and famines.
One of the most noticeable changes between our grandparents and us is that of our
attitudes and expectations. Our grandparents’ generation did not have the luxuries we all
indulge ourselves in—luxuries that have a finite life as we take more and more from the
planet.
My nana did not go out and buy wardrobes full of clothes. She would make her own
clothes. She would buy the fabric, often creating her own pattern from existing clothes,
cut the material, and sew the outfit. She was an amazing knitter and crocheted for the
extended family.
If an item of clothing became worn or ripped or a hole opened in a sock, it would be
mended, not thrown out. This was long before recycling and upcycling were seen as “on
trend.” This wasn’t recycling; this was an expected way of doing things.
My granddad grew fruit and vegetables and fished in the river; without those home-
produced foods, my mother and her siblings would not have eaten so well. He’d also
barter and swap various items for meat, which was a treat for the family rather than a
daily expectation as meat is now.
Home medicine was common. You simply couldn’t afford to see the doctor, and so various
“folk medicine” recipes were used for general illnesses and injuries. Medicines like
poultices and various teas were used to treat everything from minor cuts to stomach
pains. As our antibiotics stop working, we may find these home remedies useful again.
These skills were passed down. My mother, in turn, was taught from early childhood to
sew and knit, making it her living as she grew into adulthood. The recipes for folk
medicines and which berries were okay to eat were learned from childhood, and children
really could fend for themselves.
21
We need to find that part of ourselves again, that willingness to stand up for ourselves
and our family and say, “I’ll look after you. I don’t need things that don’t help me survive,
and I don’t need objects for the sake of having them. I do need strength and health and
happiness and companionship. I do need the knowledge that my grandparents had to
‘make do and mend.’”
To cook and grow, build and learn. To produce but know when to stop producing. To have
enough but not too much.
As a species, we are reaching a tipping point. There are seven billion of us on this small
blue planet, with around 1 million more people being added every 4.8 days.1 Our world is
changing, and we have entered an era termed the Anthropocene2, where the planetary
conditions and the wilderness are being profoundly changed by human beings.
We may well find that in the coming years, those old skills used by our grandparents
suddenly become needed again. The next major crisis, EMP, war, or any major disaster
that you can think of will teach us the hard way. Many of us will die because so many of
us are so detached from the real life.
We will find ourselves needing to replace social media with community spirit, and instead
of buying objects and clothes we don’t need, we will develop the “make do and mend”
attitude of our long-gone relatives.
We will embrace their lifestyle again and revel in the abilities we still have, as human
beings, to live our lives using our own hands and minds and bodies—to be explorers again
in our world and not passive users of it.
I may have been brought up “old fashioned,” but those of us with the skills to grow our
own food, treat our own wounds, and build our own houses—in fact, those of us living a
more conscious lifestyle—will reap those benefits in a world where the future is a very
uncertain one.
1 United Nations Environment Program UNEP 2 The epoch that begins when human activities started to have a significant global impact on Earth's ecosystems (Borenstein, Seth -14 October 2014)
22
- By James Walton –
“Some Native people suggest that one should test how cold
the hands are by touching the thumb to the little finger of the
same hand. As soon as you cannot carry out this exercise you
are reaching a dangerous state of incapacity, and you should
immediately take steps to warm up.”
– M. Kochanski
Spanning some 300 years from the first contact of settlers in Jamestown,
pioneers have explored their way across this massive continent. The pioneers pushed
westward and touched every part of this great land. Farmers, fur traders, miners, and
surveyors all played a crucial role in expanding the nation.
All that said, these men were not staying at the Holiday Inn during their explorations.
Pioneers were surviving out in the elements. Whether summer or winter, these brave
men and women forged on against the worst the North American climate could throw at
them. On this nasty road, self-reliance was everything.
It took a great deal of ingenuity to battle the elements, the wildlife, the germs, and the
native peoples as these pioneers traveled on their way. Things like sewing, weaving,
canning, and gunsmithing were skills that simply had to be learned when you were
surrounded by thousands of miles of hostile wilderness. Of course, they paid special
attention to the survival basics, and water, fire, and shelter were prioritized above all else.
23
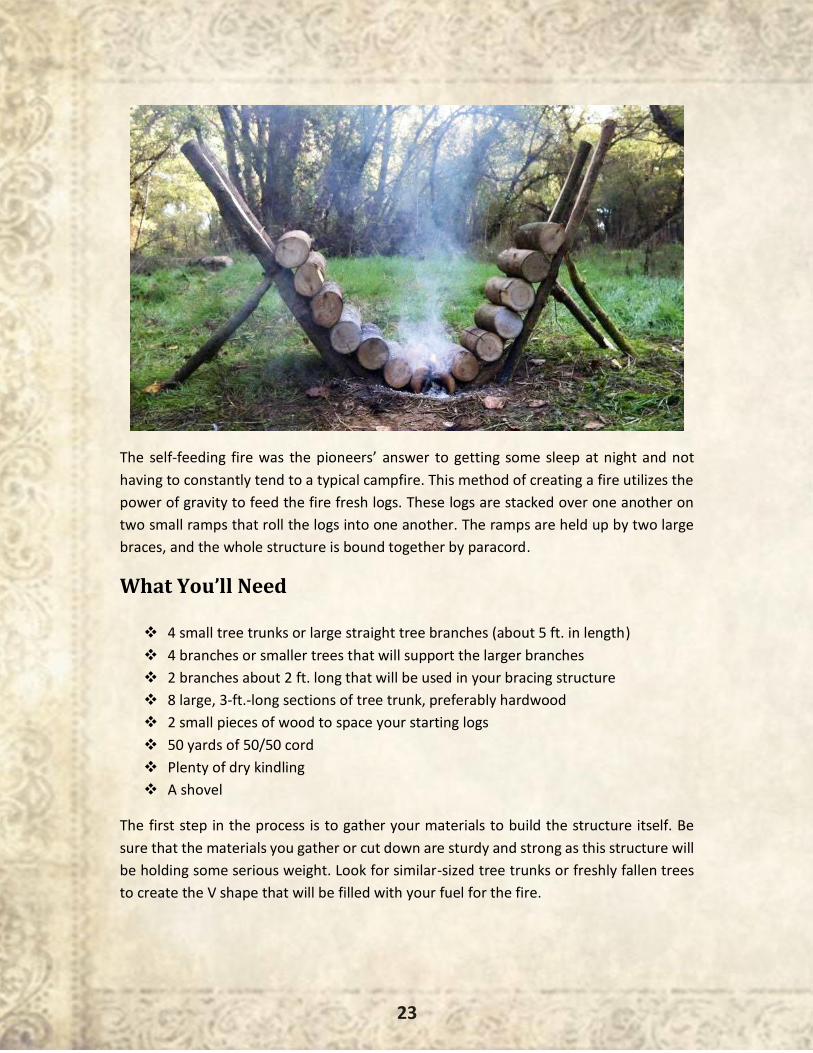
The self-feeding fire was the pioneers’ answer to getting some sleep at night and not
having to constantly tend to a typical campfire. This method of creating a fire utilizes the
power of gravity to feed the fire fresh logs. These logs are stacked over one another on
two small ramps that roll the logs into one another. The ramps are held up by two large
braces, and the whole structure is bound together by paracord.
What You’ll Need
❖ 4 small tree trunks or large straight tree branches (about 5 ft. in length)
❖ 4 branches or smaller trees that will support the larger branches
❖ 2 branches about 2 ft. long that will be used in your bracing structure
❖ 8 large, 3-ft.-long sections of tree trunk, preferably hardwood
❖ 2 small pieces of wood to space your starting logs
❖ 50 yards of 50/50 cord
❖ Plenty of dry kindling
❖ A shovel
The first step in the process is to gather your materials to build the structure itself. Be
sure that the materials you gather or cut down are sturdy and strong as this structure will
be holding some serious weight. Look for similar-sized tree trunks or freshly fallen trees
to create the V shape that will be filled with your fuel for the fire.
24
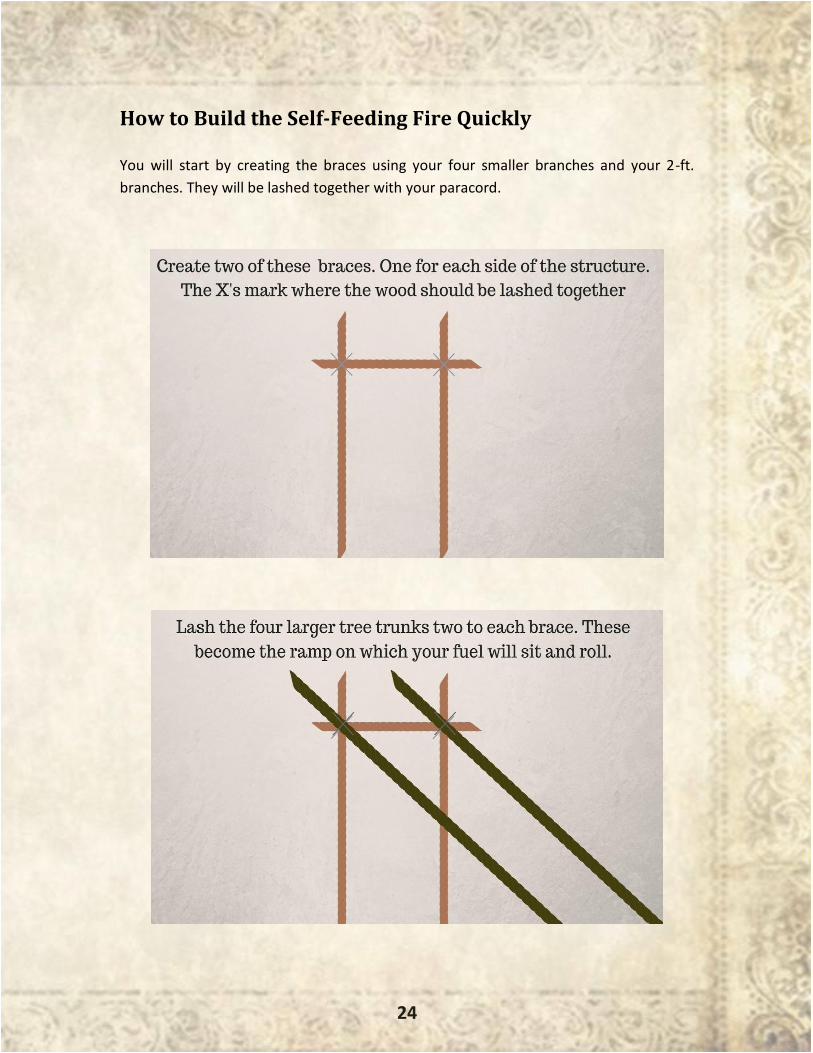
How to Build the Self-Feeding Fire Quickly
You will start by creating the braces using your four smaller branches and your 2-ft.
branches. They will be lashed together with your paracord.
25
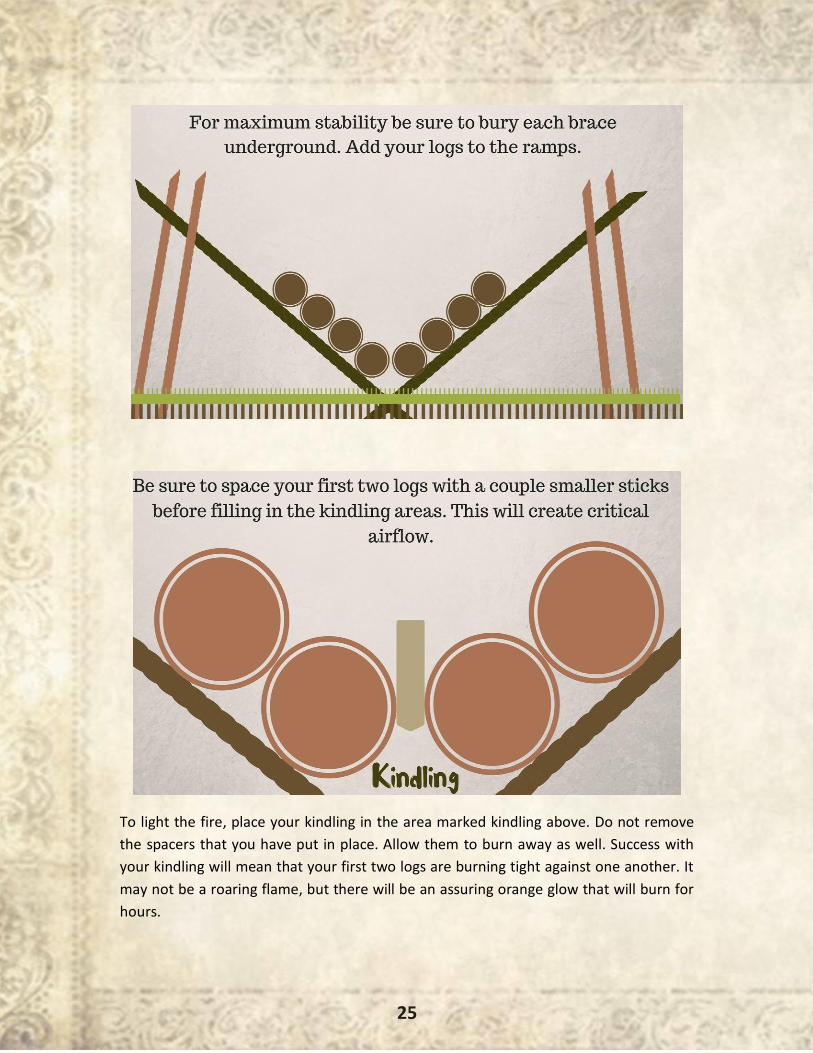
To light the fire, place your kindling in the area marked kindling above. Do not remove
the spacers that you have put in place. Allow them to burn away as well. Success with
your kindling will mean that your first two logs are burning tight against one another. It
may not be a roaring flame, but there will be an assuring orange glow that will burn for
hours.
26
If your fire smolders out before the main logs start burning, all is not lost. The quick fix is
to space your logs again with a couple new sticks and fill the areas with new kindling again.
We are not pioneers nor are we left to their challenges, so if you are really struggling, help
this thing along with some kind of accelerant.
The self-feeding fire will easily burn for 8+ hours, allowing you a great sleep without
stoking flames and adding logs. This forgotten skill is a testament to what the human race
is able to derive from adversity. It’s not as easy as throwing together a quick campfire,
but I can promise you when you wake up warm to the sun creeping over the horizon and
a fire still burning for breakfast, it will all be worth it.
Tips
❖ Build your base of sturdy materials, and don't skimp on your paracord.
❖ Be sure to bury all of the legs of your structure that touch the ground.
❖ The early stages of the fire will be all about oxygen, so provide airflow.
❖ Use several sizes of kindling, and distribute it through the length of the first two
logs.
❖ When in doubt, use an accelerant!
27
- By James Walton -
“An army marches on its stomach.”
– Napoleon Bonaparte
Though it may have been fire that brought humans out of the darkness and into
the light, just as powerful was the advent of agriculture that allowed us to build
communities and stop running and gunning for survival.
Buried in the heap of incredible technologies that catapulted our race to the very moon
itself lies an often neglected staple. It was an invention that would have made sea
exploration nearly impossible. It was a food that fed soldiers at war for thousands of
years. I’m talking about hardtacks.
Not familiar with the name? Well, it goes by many others as well. The fact of the matter
is, this staple of the seafaring peoples of old and pioneers alike has been called cabin
bread, pilot bread, sea biscuit, sea bread, ship’s biscuit, and, as we will discuss now,
hardtack.
The journey across the Atlantic was a harsh one that required a food source that could
last the long journey. Hardtack offered a carbohydrate energy source that was simply void
of moisture. This dried mixture of flour and water was often baked as many as four times
to ensure it could be stored for years, if needed, without spoiling.
That said, the hardtacks were not bullet proof. There are stories of sailors opening barrels
of hardtack only to find armies of beetles waiting inside and their food storage for the
voyage squandered. But these stories were very uncommon. At Wentworth Museum in
Pensacola, Florida, you can find a still-edible hardtack from the U.S. Civil War labeled
1862.
28
In Alaska, people still eat hardtacks and actually enjoy them! Though the hardtack eaten
in Alaska today does not come from the recipe we will discuss here, it’s still a very simple
leavened version with the addition of some fat as well.
Survival kits are required cargo on flights by light aircraft in Alaska, and it seems these
hardtacks are a favorite addition to these kits, so much so that they are available
everywhere these flights land or take off.
During the Civil War, the South was strangled by a naval blockade that kept fresh wheat
out of the hands of the Confederacy. In fact, in the early days of the war, the army was
eating hardtacks from the Mexican American War, which had ended in 1848. This
astounding fact should drive home the effectiveness of this food.
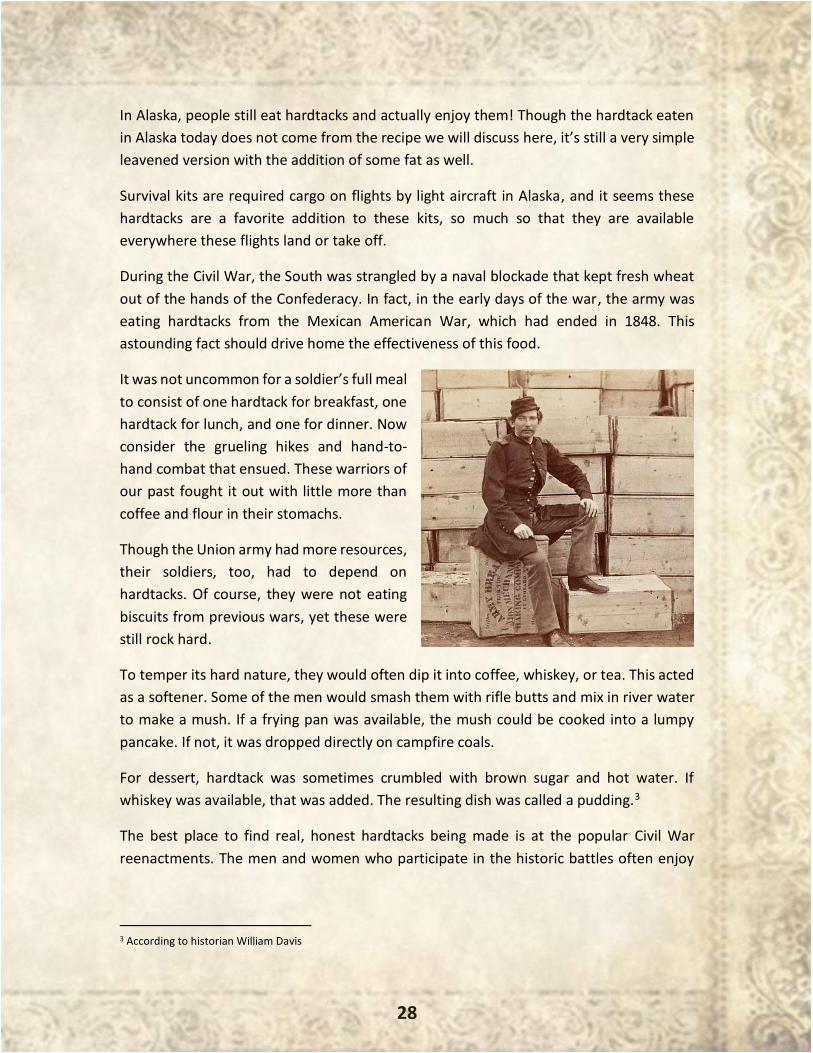
It was not uncommon for a soldier’s full meal
to consist of one hardtack for breakfast, one
hardtack for lunch, and one for dinner. Now
consider the grueling hikes and hand-to-
hand combat that ensued. These warriors of
our past fought it out with little more than
coffee and flour in their stomachs.
Though the Union army had more resources,
their soldiers, too, had to depend on
hardtacks. Of course, they were not eating
biscuits from previous wars, yet these were
still rock hard.
To temper its hard nature, they would often dip it into coffee, whiskey, or tea. This acted
as a softener. Some of the men would smash them with rifle butts and mix in river water
to make a mush. If a frying pan was available, the mush could be cooked into a lumpy
pancake. If not, it was dropped directly on campfire coals.
For dessert, hardtack was sometimes crumbled with brown sugar and hot water. If
whiskey was available, that was added. The resulting dish was called a pudding.3
The best place to find real, honest hardtacks being made is at the popular Civil War
reenactments. The men and women who participate in the historic battles often enjoy
3 According to historian William Davis
29
producing some of the foods of that time. These hardtacks produced by the enactors will
be the most authentic you can find outside of making them in your own kitchen.
Hardtacks are also gaining popularity among preppers and survivalists. The tough biscuit
is prized for exactly the same reasons it was in the past. There is an understanding that if
it all goes bad, these things will be around. Though they may not be the most delicious
option, they could feed you and your family in a bad situation. Thus, hardtacks are
becoming part of an extensive inventory of long-term food storage.
The brilliant thing about hard tacks is that they are little more than water, flour, and salt.
This is why they last an eternity. The desire to add things for flavor and texture is alluring,
but remember, the true purpose of this food is to last forever! The addition of things like
fats, which can go rancid, will shorten the lifespan of this food.
I will provide you with a basic recipe for creating these biscuits. What’s more important,
however, is that you understand the basic ratio. Many people think cooking is about
recipes, but really, knowing a ratio is much more powerful than a recipe because it can
be manipulated easily. The ratio for hardtacks is 3:1 flour to water. This can be 3 cups of
flour to 1 cup of water or 3lbs. to 1lb. or 3 tons to 1 ton. Take this ratio and apply it any
way you see fit.
Ingredients
❖ 3 cups of flour
❖ 1 cup of water
❖ 2 teaspoons of salt
Hardware
Cookie sheet or pizza stone ($9 ceramic planter bottom at the local home and garden
store)
❖ Large mixing bowl
❖ Rolling pin
❖ Pizza cutter (not necessary)
❖ Fork
❖ Big nail
Preheat the oven to 350°F.
30
Add your flour to the large mixing bowl, and stir it around a bit with your fork.
Add the salt to your bowl next, and make sure that it gets well integrated into the mix.
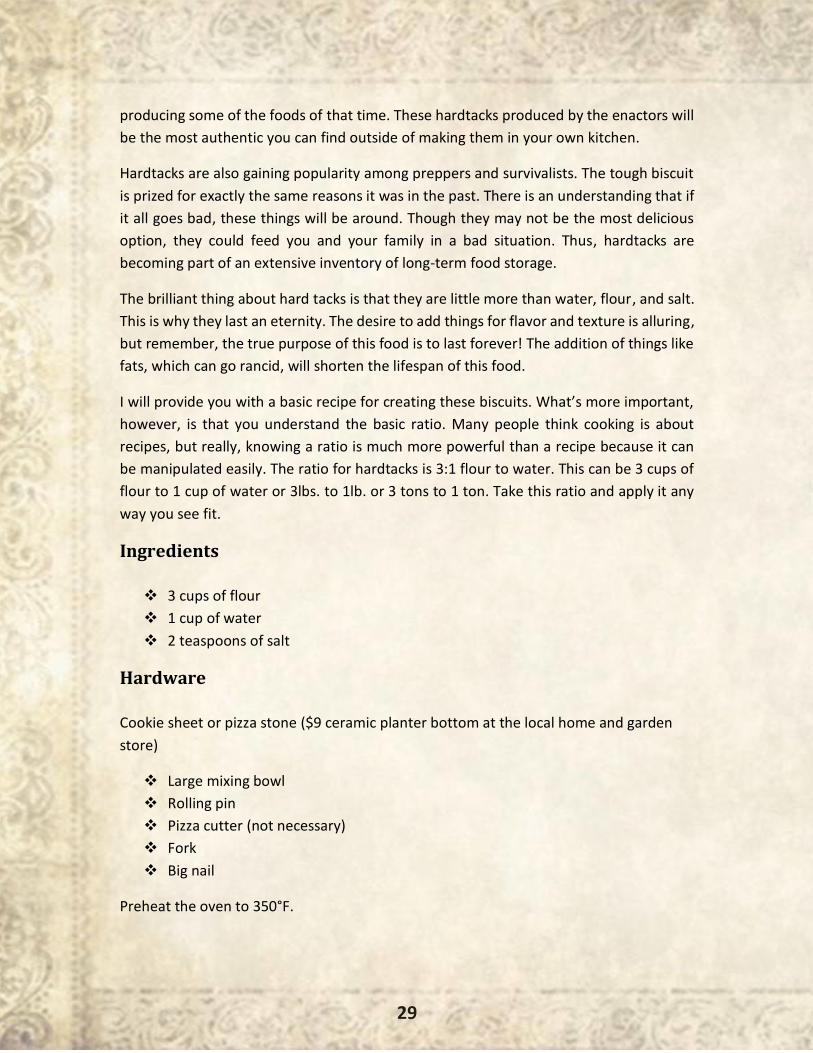
One of the best pieces of advice I can give you when making dough by hand (and if
you’re making hardtacks, leave the food processor in the cupboard) is to make a well.
Once all of your dry ingredients are incorporated, create a hole in the center of the
flour. Use your fork to push the flour up and around the edges of the bowl.
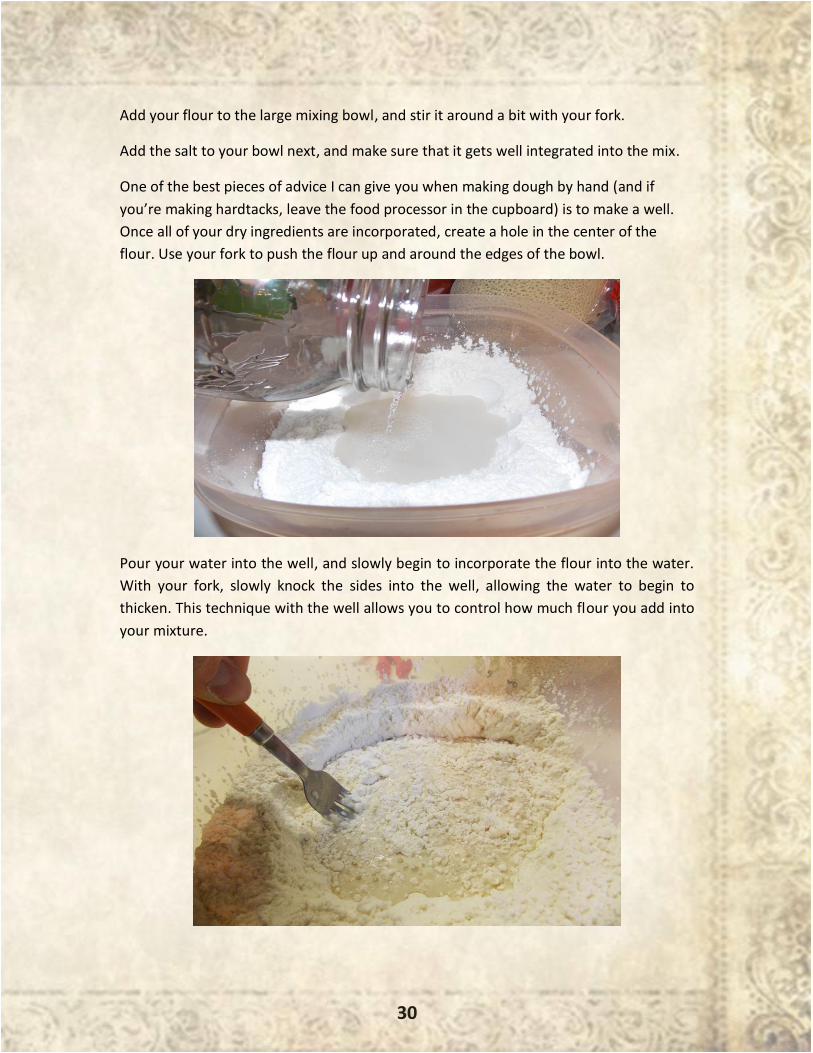
Pour your water into the well, and slowly begin to incorporate the flour into the water.
With your fork, slowly knock the sides into the well, allowing the water to begin to
thicken. This technique with the well allows you to control how much flour you add into
your mixture.
31
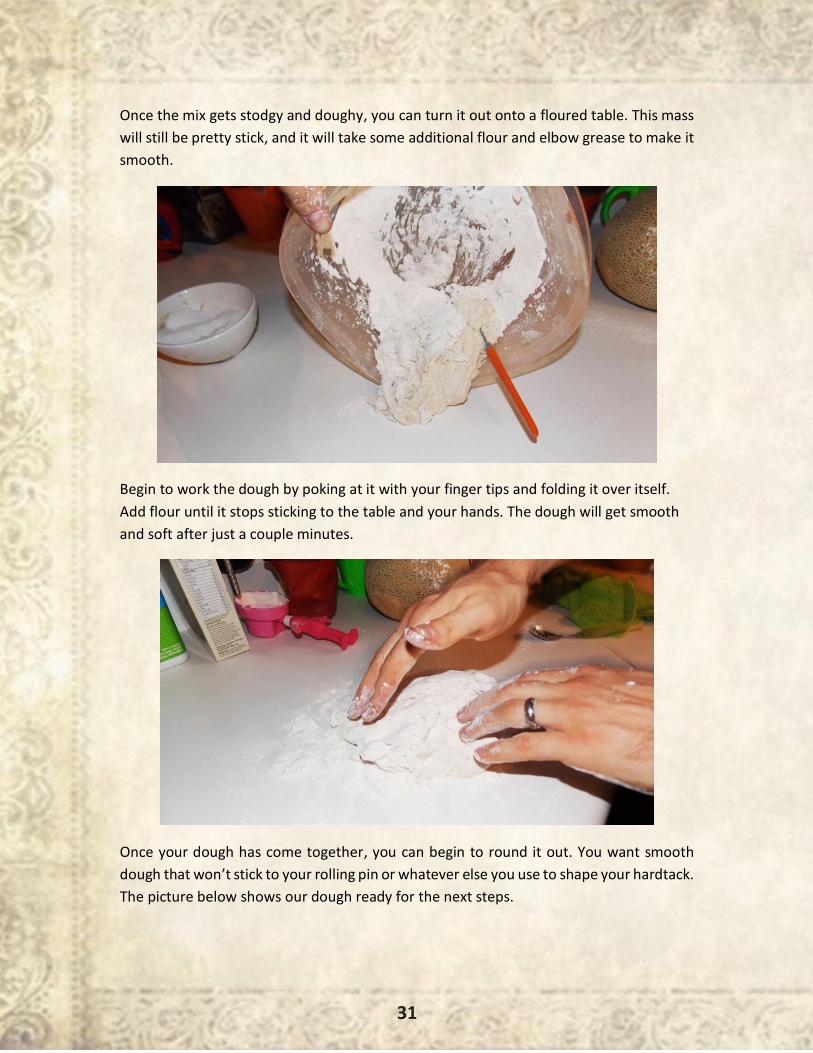
Once the mix gets stodgy and doughy, you can turn it out onto a floured table. This mass
will still be pretty stick, and it will take some additional flour and elbow grease to make it
smooth.
Begin to work the dough by poking at it with your finger tips and folding it over itself.
Add flour until it stops sticking to the table and your hands. The dough will get smooth
and soft after just a couple minutes.
Once your dough has come together, you can begin to round it out. You want smooth
dough that won’t stick to your rolling pin or whatever else you use to shape your hardtack.
The picture below shows our dough ready for the next steps.

32
There are several ways you can manipulate your hardtacks into various shapes. I utilize
the rolling pin and the pizza cutter. You could go as crazy as to use a cookie cutter. Just
know that although they may be shaped like dinosaurs, these tough biscuits will not soon
become a favorite around the house.
One method for forming hardtacks is to use the rolling pin to form a large square. If you
have trouble forming the square from your round ball of dough, simply use the pizza
cutter to trim the edges. Ensure your hardtacks are at least 1/2 inch thick. Remember
33
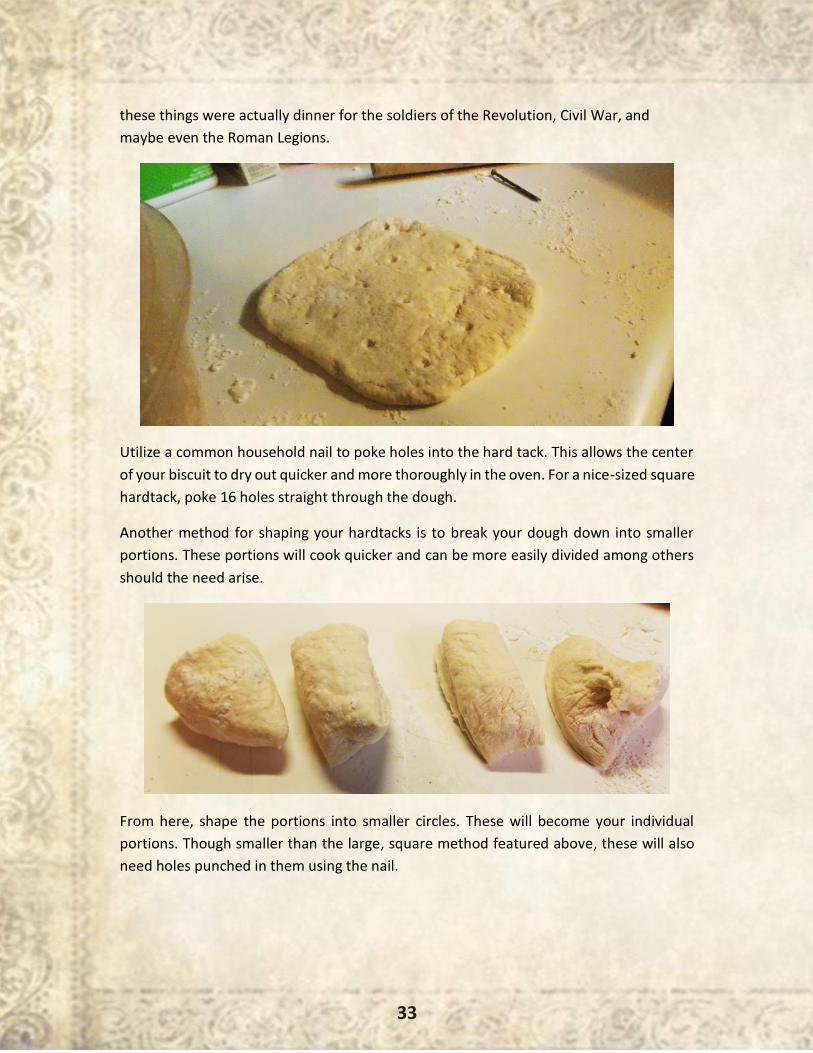
these things were actually dinner for the soldiers of the Revolution, Civil War, and
maybe even the Roman Legions.
Utilize a common household nail to poke holes into the hard tack. This allows the center
of your biscuit to dry out quicker and more thoroughly in the oven. For a nice-sized square
hardtack, poke 16 holes straight through the dough.
Another method for shaping your hardtacks is to break your dough down into smaller
portions. These portions will cook quicker and can be more easily divided among others
should the need arise.
From here, shape the portions into smaller circles. These will become your individual
portions. Though smaller than the large, square method featured above, these will also
need holes punched in them using the nail.
34
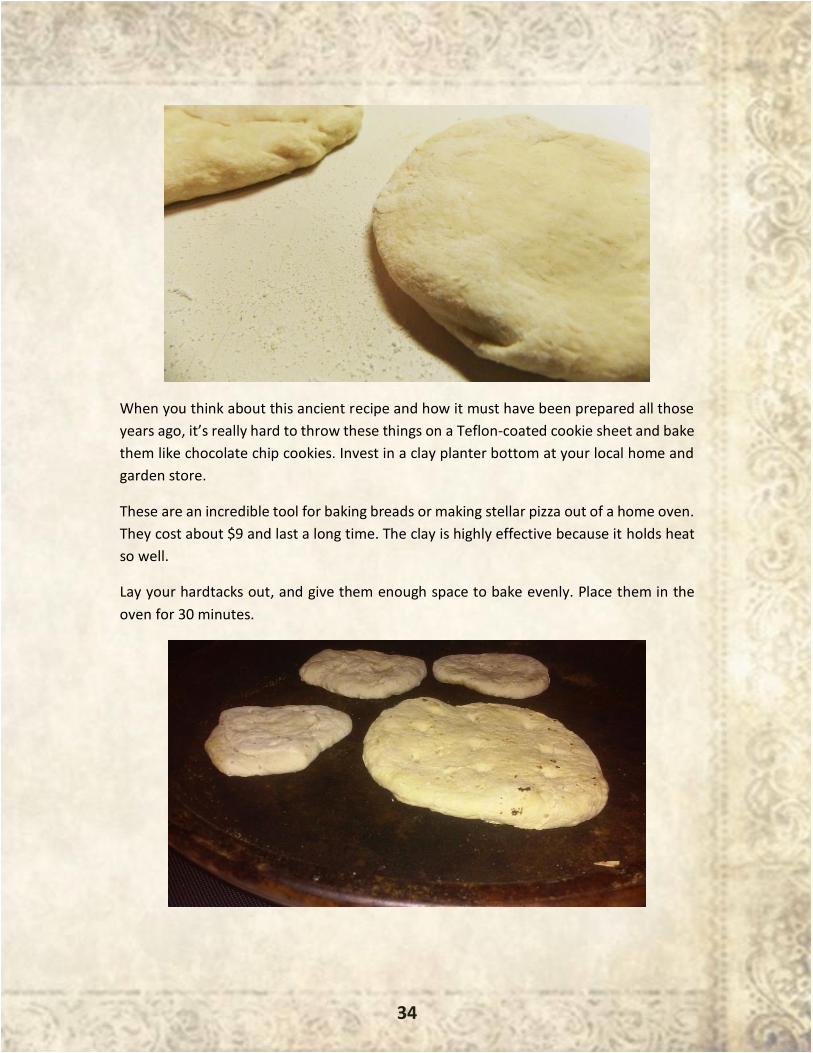
When you think about this ancient recipe and how it must have been prepared all those
years ago, it’s really hard to throw these things on a Teflon-coated cookie sheet and bake
them like chocolate chip cookies. Invest in a clay planter bottom at your local home and
garden store.
These are an incredible tool for baking breads or making stellar pizza out of a home oven.
They cost about $9 and last a long time. The clay is highly effective because it holds heat
so well.
Lay your hardtacks out, and give them enough space to bake evenly. Place them in the
oven for 30 minutes.
35
This 30-minute cook time is merely the first of at least two bakes these hard biscuits will
go through. This process, although time consuming, will ensure that there is no remaining
moisture in your hardtacks. Any moisture becomes the complete enemy of this process
of shelf stability. Some old recipes call for three and even four times in the oven. These
biscuits must have been closer kin to bricks than food.
Once your first 30 minutes is over, pull out the hardtacks and allow them to cool. The
steam will come out of them, and they will get pretty hard, although they will not be hard
or dry enough to store at this point. After having cooled them for about 20 minutes, place
them back in the oven. This time set your timer for one hour.
It will be this bake that thoroughly dries your biscuits and also begins to give them a
pleasing bit of color.
Following the last hour of baking, turn your oven off. DO NOT REMOVE THE HARDTACKS.
Instead, leave your pilot’s biscuits in the turned-off oven. Let the heat slowly drop in the
oven while your biscuits slowly dry even further. This is a great practice for really zapping
any remaining moisture left inside.
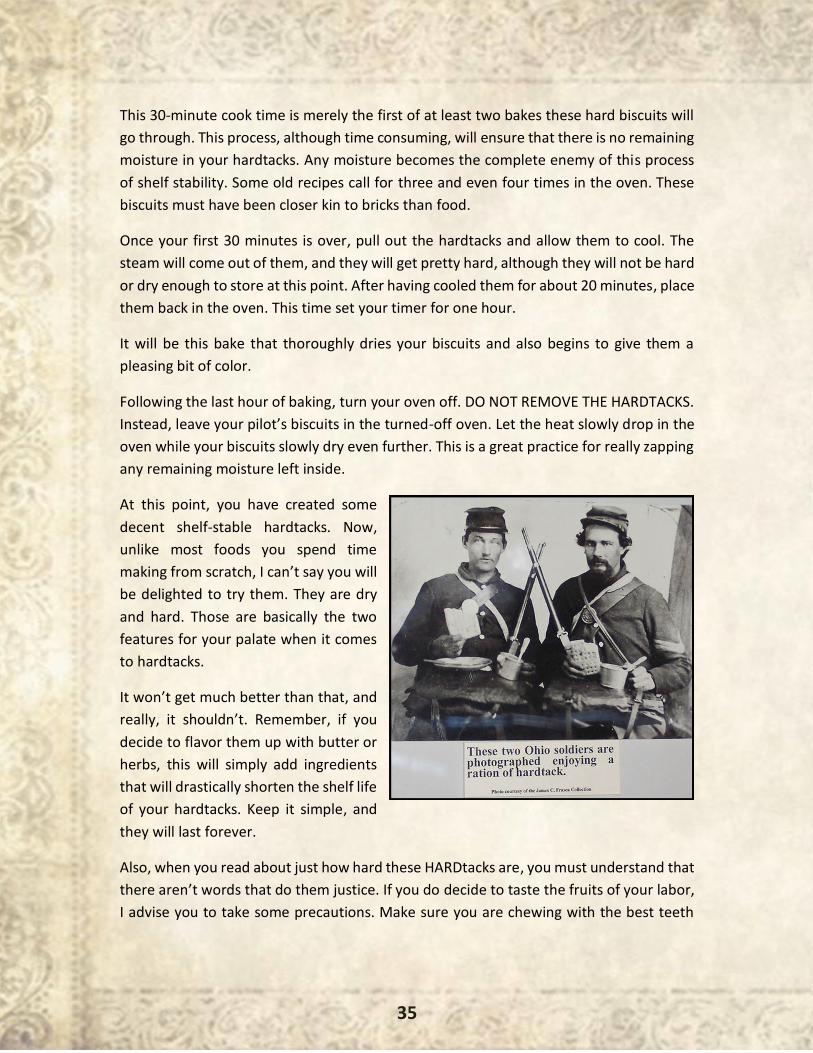
At this point, you have created some
decent shelf-stable hardtacks. Now,
unlike most foods you spend time
making from scratch, I can’t say you will
be delighted to try them. They are dry
and hard. Those are basically the two
features for your palate when it comes
to hardtacks.
It won’t get much better than that, and
really, it shouldn’t. Remember, if you
decide to flavor them up with butter or
herbs, this will simply add ingredients
that will drastically shorten the shelf life
of your hardtacks. Keep it simple, and
they will last forever.
Also, when you read about just how hard these HARDtacks are, you must understand that
there aren’t words that do them justice. If you do decide to taste the fruits of your labor,
I advise you to take some precautions. Make sure you are chewing with the best teeth

36
you have. If there is anything loose or filled in there, it may very well come out or even
shatter.
All jesting aside, this is an ancient food that has carried entire nations through tough
times. If you follow the recipe above and store your hardtacks properly, there is no doubt
these biscuits will do the same for you and your family if that day ever comes.
37
- By James Walton -
“You don’t need a silver fork to eat good food.”
– Paul Prudhomme
Whether pushing west into the dangerous and unknown territories or roughing
it through times of economic depression, Americans have often used very minimal
ingredients to make meals.
In these times of extreme need, Americans brought knowledge from their home country
or used whatever ingredients were cheap and plentiful to create meals to sustain them.
From these desperate times, some classic recipes emerged.
Bacon Fried Apples
❖ 5 slices of bacon
❖ 6 Granny Smith apples
❖ Fresh butter
Fry your bacon in a Dutch oven. Set it aside. Peel and slice your apples into similar sizes.
Put the apples in the Dutch oven, and fry in the bacon grease until softened. Remove
them and cover with crumbled bacon. Top with some fresh butter.
Bean Sausage
❖ 1 cup soaked lentils, dried peas, lima beans, or beans
❖ 1 egg
❖ 1/2 cup dried breadcrumbs
❖ 1/2 tsp salt
❖ 1 tsp sage
❖ 1/4 cup fat
38
Prep Time: 20 minutes; Cook Time: 10 minutes
Mash together the cooked beans in a large bowl. Add the rest of the ingredients, and mix
well. Form portions of this mix into sausage shapes. Coat with flour, and fry until crispy
on all sides.
Vinegar Lemonade
Mix 2 tablespoons of apple cider vinegar into a 12-ounce glass of water.
Stir in 2 tablespoons of sugar to taste.
The pioneers used vinegar for numerous reasons. One reason was to add vitamin C to
their diets.
Poor Man’s Meal
❖ 3 potatoes
❖ 1 onion
❖ 4 hot dogs
❖ 4 Tbsp tomato sauce
Prep Time: 5 minutes; Cook Time: 10 minutes
Peel and dice your potatoes to a similar size as your onions. Cook them over medium heat
until the onions begin to go translucent. Slice your hot dogs, and add them to the mix.
Finally, add your sauce, and simmer until the potatoes are soft.
Hot Water Cornbread
❖ 4 cups of boiling water
❖ 1 cup yellow cornmeal
❖ 1/4 cup flour
❖ 1/2 cup canola oil
❖ 1 tsp salt
❖ 1 Tbsp sugar (optional)
Prep Time: 5 minutes; Cook Time: 10 minutes
Combine the dry ingredients in a bowl. Add boiling water, and stir until you get the
consistency of pancake batter. Use a wooden spoon to do the stirring.
39
Heat about a 1/4 inch of oil in a cast iron skillet on medium-high heat. Use about a quarter
cup of batter per cake. Pour the batter into your hot oil, and fry the cake on both sides.
Delicious with fresh honey.
Buttery Sweet Potatoes
❖ 6 sweet potatoes
❖ 1 Tbsp butter
❖ 1/2 cup milk
❖ 1/2 cup cream
❖ Salt and pepper
❖ A dash of nutmeg
Prep Time: 10 minutes; Cook Time: 15 minutes
Start by peeling and dicing your sweet potatoes. Be sure to cut them all into similar sizes
so they cook evenly. Place them in a pot with your milk and cream. Simmer the potatoes
for about 10 minutes or until they are softened enough that a fork will pierce them
without resistance. Mash them with the back of a wooden spoon then add your butter
and seasonings.
Scrambled Dinner
❖ 3 large eggs
❖ 3 tablespoons butter
❖ 3 slices of white bread ripped into bite-sized pieces
❖ 1 can asparagus
Prep Time: 5 minutes; Cook Time: 5 minutes
Set your stovetop to medium heat. Melt the butter in a large cast iron skillet, and allow it
to begin to foam a bit. Add your ripped-up bread to the butter, and make sure the bread
gets coated thoroughly. Allow it a couple minutes of continuous movement to toast a bit.
Crack your eggs in a bowl, and add about a tablespoon of water. Whip the eggs until fluffy,
and add to your toasted bread in the skillet. I prefer to push the bread to one side and
begin to scramble the eggs on the empty side. Once the eggs are firmed up, add your can
of asparagus shoots. Season with salt and pepper.
40
1875 Cottage Cheese
Allow milk to form clabber. Skim off cream once clabbered. Set the clabbered milk on very
low heat, and cut in 1 inch squares.
Place a colander into the clabber. Skim off whey that rises into the colander.
When the clabber becomes firm, rinse with cold water. Squeeze liquid out, and press into
a ball. Crumble into a bowl.
Mix curds with thick cream.
Blue-Flower Featherbed
❖ 1 loaf of crusty bread
❖ 1 1/4 cups of Muenster cheese
❖ 1 3/4 cups of Ricotta cheese
❖ 1 cup of green onions
❖ 6 eggs
❖ 1 cup of milk
Prep Time: 5 minutes; Cook Time: 50 minutes
Butter a 9-inch cast iron skillet. Slice your loaf into 12 slices about 1/2 inch thick. Layer
your bread, cheeses, and green onions until you have used up all the bread. Whisk your
eggs and milk together with some salt and pepper. Pour the mixture over the layers.
Cover this, and allow it to sit in the refrigerator for at least an hour. Preheat the oven to
350 degrees. Bake for 50 minutes or until the egg mix begins to puff and brown.
Side Pork and Mormon Gravy
❖ 8 thick slices side pork (or thick-cut bacon strips)
❖ 4 tablespoons meat drippings
❖ 3 tablespoons flour
❖ 2 cups milk
❖ Salt, pepper, and paprika
Cook Time: 5 minutes
Begin by frying your bacon on both sides in a cast iron skillet till crisp. Add the meat
drippings to the pan, and remove the bacon. Take the pan off the heat, and add your
41
flour. Stir this in until the fat and flour mix gets nice and smooth. This mixture is called a
roux and will be used to thicken your gravy.
Put the pan back over the heat to allow the roux to cook for about a minute. Remove the
pan again, and slowly add the milk, about a half cup at a time. Allow the milk to thicken,
and stir it smooth before adding the next batch. The gravy will continue to thicken until
your mix comes to a simmer.
Cooked Cabbage Salad
❖ 1 pint or more of chopped cooked cabbage
❖ 1 egg well beaten
❖ 1/4 cup vinegar
❖ 1 tsp butter
❖ Dash of salt and pepper
Prep Time: 5 minutes; Cook Time: 5 minutes;
Using honey or sugar, sweeten the salad to your taste. Simmer a few minutes, and add
1/2 cup of thick, fresh cream. Serve immediately.
Lemon Pie Filling
❖ 1 cup of hot water
❖ 1 Tbsp cornstarch
❖ 1 cup white sugar
❖ 1 Tbsp butter
❖ Juice and grated rind of one lemon
❖ 1 egg
Prep Time: 10 minutes; Cook Time: 5 minutes
Add everything but the egg to a saucepan, and bring to a simmer for a few minutes. Take
a ladleful of the mix and mix it with your egg in a separate bowl. This will keep your egg
from scrambling. Add this mix back to the remainder of the filling. Simmer until it thickens.
This can be used in pies, turnovers, etc.
42
Potato Pancakes
❖ 1/2 cup milk
❖ 2 cups flour
❖ 1 egg
❖ 2 cups mashed potatoes
❖ 1 tsp salt
❖ 5 tsp baking powder
Prep Time: 10 minutes
Mix the potato, flour, salt, and baking soda in a bowl before adding in the remaining
ingredients. Form the cakes in your hands, and fry in a cast iron skillet over medium–high
heat. Eat these with butter, sour cream, or even hot sauce.
Bean Soup
❖ 1 quart water
❖ 1 cup beans
❖ 1 Tbsp onion juice
❖ 2 tsp salt
❖ 1–2 large onions, sliced or chunked
❖ 1/4 tsp mustard
❖ 2 Tbsp flour mixed with 2 Tbsp cold water
❖ 1 ham hock
Cook Time: 45 minutes
Soak your beans the night before as this will help soften them and will greatly reduce
cooking time. Add everything to a pot, and simmer for 45 minutes. If your water begins
to evaporate, simply add more.
Pepper and Eggs
❖ 3 large peppers
❖ 1 Tbsp vegetable oil or lard
❖ 4 eggs
Prep Time: 5 minutes; Cook Time: 5 minutes
43
Cut your peppers in half lengthwise before removing the seeds. Slice the peppers, and
fry them in a medium skillet in the oil or lard. Whip up the 4 eggs, and add them to the
peppers. Season with salt and pepper.
Dumplings
❖ 2 cups flour
❖ 4 tsp baking powder
❖ 2 Tbsp chilled fat drippings
❖ 1 tsp salt
❖ 1 cup milk, meat stock, or water
Prep Time: 15 minutes; Cook Time: 30 minutes
Sift salt together with all of your dry ingredients then cut with fat. This will make your
dough turn crumbly, and that’s what you want. Slowly add milk or water to create a soft
dough. Roll out and put on the pre-greased pan. These could be used in soups or stews
and should be cooked for thirty minutes.
Beans & Ham Hocks
❖ 4 or 5 smoked ham hocks
❖ 1 lb. dry pinto beans
❖ 1 chopped yellow onion
❖ Bay leaf
❖ 2 1/2 tsp black pepper
❖ Salt to taste
Cook Time: 1 hour
Boil your beans in a large pot with the onion, bay leaf, and ham hocks. Cook this pot over
a comfortable simmer until the beans are soft. Finally, add your seasonings and simmer
for another 15 minutes.
Milk Toast
❖ 1 pint scalded milk
❖ 1/2 tsp salt
❖ 2 Tbsp of butter
❖ 4 Tbsp cold water
44
❖ 2 1/2 Tbsp bread flour
❖ 6 slices dry toast
Prep Time: 5 minutes; Cook Time: 5 minutes
Add your water and flour to a skillet, and begin to heat on medium. Stir constantly until
you have a nice creamy paste. Add the milk slowly, and allow it to thicken as well. Cover
and cook on low for about 15 minutes. Sprinkle with salt, and add the butter in small
pieces. Dip your toast slices on one side into the sauce. Once softened, remove, and pour
the remaining sauce on the toast.
Cinnamon Sugar Toast
❖ 1 loaf crusty bread
❖ 1 stick butter
❖ 1 cup sugar
❖ 2 Tbsp. cinnamon
Prep Time: 1 minute; Cook Time: 3 minutes
Mix your sugar and cinnamon together. Cut your loaf into 1/2-inch slices, and grill, broil,
or toast them. Spread your butter on the toast while it’s still hot. Sprinkle your cinnamon
sugar mix on top, and serve.
Cornmeal Mush
❖ 1 cup cornmeal
❖ 2 cups bone broth
❖ Bacon grease
Prep Time: 8 hours; Cook Time: 5 minutes
Combine the cornmeal and the bone broth. Mix thoroughly, and place in a loaf pan. Allow
the mix to sit overnight in the cooler. Slice thick rounds, and fry in bacon grease. Fry each
side to a crisp golden brown.
Elk Backstrap with Spiced Plum Sauce
Sauce:
❖ 1/2 cup minced onion
45
❖ 1/2 cup cider vinegar
❖ 1 pound ripe plums, pitted and quartered
❖ 2 Tbsp sugar
❖ 1 cinnamon stick
❖ Salt and pepper
❖ 8 elk or venison backstraps cut into 4–5 oz. medallions
Prep Time: 20 minutes; Cook Time: 1 hour
Combine your onion and vinegar in a non-reactive saucepan, and cook over low heat until
the onion has softened. Add everything else for the sauce to the pot, and cook over
medium–low heat until thick and reduced to a jam consistency. This could take up to an
hour.
Meat:
Cook the elk medallions for about 3 minutes on each side, and allow to rest for 5 minutes
before serving.
Corned Beef
❖ 10 pounds of beef brisket
❖ 2 cups salt
❖ 2 cups molasses
❖ 2 Tbsp saltpeter
❖ 1 Tbsp ground pepper
❖ 1 Tbsp cloves
❖ Bourbon or whiskey
Prep Time: 10 days
Rinse the beef well before coating the remaining ingredients. Add the bourbon or whiskey
at the end to rub the meat down. This will keep mold growth down and help the meat’s
flavor as well. Turn every 24 hours, and add more salt when the amount used has
dissolved.
After 10 days, rinse well and use in soups or stews or slow cook on the grill. Drink the rest
of the bourbon while you wait during the 10 days.
46
Soda Biscuits
❖ 3 1/3 cups flour
❖ 1 tsp baking soda
❖ 1 tsp salt
❖ 1/4 cup milk
Prep Time: 15 minutes; Cook Time: 20 minutes
Preheat the oven to 400°F. Mix together your dry ingredients. Add the milk, and work
the mixture with your hands until you have a nice dough that can be rolled out. Punch
out circles using a cup or cutter. Bake in the oven for 15–20 minutes.
Skillet Trout
❖ 3 trout, dressed (head, fins, tail, and guts removed)
❖ 1/4 cup cornmeal
❖ 1/4 cup flour
❖ 1 tsp salt
Prep Time: 5 minutes; Cook Time: 5 minutes
Mix together your dry ingredients. Pat dry your trout fillets before dredging them in your
mixture of dry ingredients. Once they are well coated, immediately fry them in hot oil in
a cast iron skillet until crispy and golden brown.
Winter Red Flannel Hash
❖ 1 1/2 cups chopped corned beef
❖ 1 1/2 cups chopped cooked beets
❖ 1 medium onion, chopped
❖ 4 cups chopped cooked potatoes
Prep Time: 10 minutes; Cook Time: 5 minutes
In a large bowl, mix together your chopped ingredients. Heat some oil in a cast iron skillet
on high. Add your mix of chopped items to the hot oil, and drop the heat down to low.
Allow 10 full minutes on low without disturbing the mix. This will form a good crust. Turn
out onto a plate, and serve with eggs.

47
Mormon Johnnycake
❖ 2 cups yellow cornmeal
❖ 1/2 cup flour
❖ 1 tsp baking soda
❖ 1 tsp salt
❖ 2 cups buttermilk
Prep Time: 5 minutes; Cook Time: 20 minutes
Preheat the oven to 425°F. Combine your dry ingredients first before adding the wet, and
mix the whole batter thoroughly. Dump the mix into a buttered cast iron skillet, and bake
for 20 minutes.
Spotted Pup
❖ 1 lb. cooked rice
❖ 2 cups milk
❖ 2 eggs
❖ 1 Tbsp cinnamon
❖ 1/4 cup sugar
❖ A handful of raisins
Prep Time: 10 minutes; Cook Time: 15 minutes
Whip together the eggs and milk before combining all ingredients in a Dutch oven to cook
until the mixture becomes creamy and sweetened. This should take no longer than 15
minutes over a medium–low heat.
Oatmeal Pancakes
❖ 2 cups oatmeal
❖ 1 Tbsp melted fat
❖ 1/8 tsp salt
❖ 1 egg beaten in 1 cup of milk
❖ 1 cup sifted flour
❖ 1 tsp baking powder
Prep Time: 5 minutes; Cook Time: 2 minutes per cake
48
Add the oatmeal, flour, and baking powder to a bowl. Mix well. Combine with the
remaining ingredients. Fry this batter in a cast iron skillet over high heat. Serve with honey
or syrup.
Spider Cornbread
❖ 2 cups sour milk
❖ 1 1/2 cups cornmeal
❖ 1 tsp soda
❖ 2 eggs
❖ 2 Tbsp butter
❖ 1 tsp salt
Prep Time: 5 minutes; Cook Time: 20 minutes
Preheat the oven to 350°F. The use of sour milk is what makes this dish interesting. Mix
your dry ingredients together first before stirring in your wet ingredients. Add the batter
to a hot, buttered cast iron skillet. Cook in the oven for 20 minutes.
Mud Apples
❖ 4 large apples
❖ A bucket of mud
Prep Time: 15 minutes; Cook Time: 45 minutes
For this recipe, you should really have a campfire.
Using the mud, coat your apples completely in a nice layer. Spread the coals of your fire,
and lay the mud-coated apples on them. Build up the sides with the smoldering coals.
Allow the apples to bake and the “clay” to harden around them for 45 minutes.
Be careful once they are done as you will have to remove the hardened clay shell and they
will be smoking hot inside as well. Spoon the cooked apple out and enjoy!
Gorge Pasta
❖ 1 cup raw macaroni
❖ 1 can stewed tomatoes
❖ 1 lb. cheddar cheese
49
Cook Time: 15 minutes
Cook your pasta until it is nice and tender. Drain and allow it to steam for a minute or
two. Add the stewed tomatoes, cheddar cheese, and hot macaroni to a bowl, and stir
around until the cheese is completely melted.
Glazed Turnips
❖ 5 whole turnips
❖ 2 Tbsp butter
❖ 1 Tbsp salt
❖ 1 Tbsp sugar
Prep Time: 5 minutes; Cook Time: 10 minutes
Dice the turnips into nice, healthy-sized pieces. I would look for at least a half-inch in size
on the dice. After dicing all of your turnips, melt your butter in a skillet, and toss the
turnips in. Coat them well with the butter, and allow to cook for about five minutes. Next
sprinkle the turnips with salt and sugar, and allow to cook for another five minutes. By
this point, they should be softened and ready to eat.
50
- by Lex Rooker -
“A starving man will eat with the wolf.” –
Oklahoma Native Americans
Pemmican is a concentrated, nutritionally complete food invented by the North
American Plains Indians. It was originally made during the summer months from dried
lean buffalo meat and rendered fat as a way to preserve and store the meat for use when
traveling and as a primary food source during the lean winter months.
When pemmican was discovered by our early frontiersmen (explorers, hunters, trappers,
and the like), it became a highly sought-after commodity. The Hudson Bay Company
purchased tons of pemmican from the native tribes each year to satisfy the demand.
The basic unit of trade was an animal hide filled with pemmican, sealed with pure
rendered fat on the seams, and weighing about 90 pounds. As long as it was kept away
from moisture, heat, and direct sunlight, it would last for many years with no refrigeration
or other method of preservation.
There appeared to be two types of pemmican. One was a mixture of 50% shredded,
dehydrated lean meat and 50% rendered fat by weight. The other mixture was similar but
contained 50% rendered fat, 45% shredded dehydrated meat, and 5% dried and ground
berries by weight. The berries were typically Saskatoon berries, which grew in abundance
in the Great Plains area and are similar to blueberries.
There is much controversy as to whether the natives included the dried berries in the
pemmican they made for themselves or whether they added it only to the pemmican they
sold to the Hudson Bay Company “because the White Man preferred it that way.” I’m of
a mind that the natives consumed it both ways.

51
The journals from the Lewis and Clark expedition clearly state that the Indian tribes they
encountered consumed some berries, fruits, and tubers as part of their diet. It seems
reasonable that the inclusion of some dried berries would not be out of character for the
batches of pemmican made in late summer when ripe berries were available. Berries do
not appear to be a nutritional requirement, and they increase the chance of spoilage, so
the pemmican formula in this document is for meat and fat only and does not include
them.
Please bear in mind that pemmican is NOT a raw food, as the fat needs to be heated above
200°F in order to release it from its cellular structure and drive out the moisture. It is
therefore not recommended as part of a daily RAF (Raw Animal Food) diet. However, it is
a useful compromise when one is traveling, for use as emergency rations, or when
otherwise high-quality raw animal foods are unavailable.
It is important that the lean meat used in pemmican be dehydrated at a temperature
below 120°F, and a temperature between 100°F and 115°F is ideal. Temperatures above
120°F will “cook” the meat and will severely compromise the nutritional value of the
pemmican.
Federal and State laws require commercial dried meat products like jerky to be raised to
a temperature above 150°F, which cooks the meat to a well-done state and makes it
totally unsuitable for making pemmican.
Nutritional Qualities
The nutritional qualities of pemmican are unmatched when it is properly made. It can be
eaten for months or years as the only food, and no nutritional deficiencies will develop.
Yes, that is correct: no fruits, vegetables, grains, or dairy products are required to
maintain perfect health—just properly made pemmican and water.
Lack of vitamin C and scurvy are often brought up as a concern. Explorers, hunters, and
Native Americans have demonstrated over and over that consuming raw meat or meat
that was dried at a temperature below 120°F—as long as there is sufficient fat present to
supply enough calories—will maintain perfect health and prevent or cure scurvy. Those
that consume salted and preserved meats, biscuits, and other processed foods, even
when lemon juice is added to their diet, will often die from scurvy or other nutritional
deficiencies.
52
Calcium and weak bones is another concern. Due to the advertising of the dairy industry,
it is believed that milk, cheese, or other dairy products are essential to maintaining good
bone density. It has been shown that for people eating a diet of meat and fat, where the
animal consumed was allowed to eat its natural diet (usually grass), bones developed
normally and remained strong with no sign of deterioration.
For the best quality pemmican, use red meat (deer, beef, elk, bison, etc.) and the
rendered fat from these same animals. The animals should be grass fed or have eaten
their natural diet in the wild. DO NOT include nuts, seeds, vegetable products, vegetable
oils, grains, beans, or dairy products of any kind.
A small amount of well-dried berries (blueberries, Saskatoon, strawberries, etc.) is the
only acceptable addition and should not exceed 5% by weight should you choose to
include them.
Directions
Ingredients
Use equal amounts, by weight, of very dry red meat and rendered beef tallow. If you have
one pound of dried meat, then you will need one pound of rendered beef tallow, two
pounds of dried red meat, two pounds of rendered beef tallow, etc.
1. Rendering the Fat
Rendering fat is a simple process, and most of us are familiar with it as it is one of the end
results of frying bacon. The process of frying the bacon releases the fat from the cellular
structure of the meat and drives off the water. It is the boiling off of the water that
actually makes bacon pop and sizzle. The fat itself just turns to a liquid.
Our goal in our rendering process is a bit different from frying bacon in that it is the fat
we wish to keep rather than the crisp “cracklin’s,” which, by the way, taste good when
they are still warm with a bit of salt. If you don’t want them, they make wonderful dog
treats when cool.
We also want to keep the ultimate temperature of the fat as low as possible. I try to keep
it below 250°F and usually shoot for a final temperature of around 240°F. You gain nothing
by raising the temperature any higher than 240°–250°F other than more damage to the
fatty acids, which we want to avoid as much as possible. In short, you need the
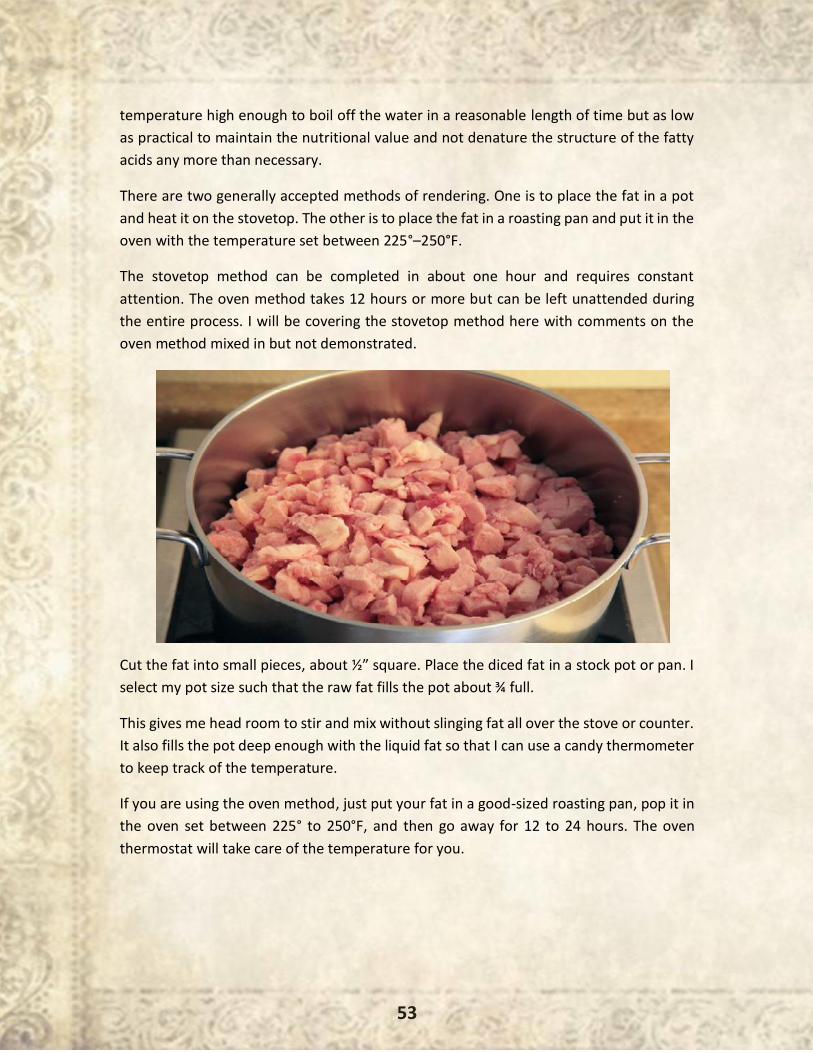
53
temperature high enough to boil off the water in a reasonable length of time but as low
as practical to maintain the nutritional value and not denature the structure of the fatty
acids any more than necessary.
There are two generally accepted methods of rendering. One is to place the fat in a pot
and heat it on the stovetop. The other is to place the fat in a roasting pan and put it in the
oven with the temperature set between 225°–250°F.
The stovetop method can be completed in about one hour and requires constant
attention. The oven method takes 12 hours or more but can be left unattended during
the entire process. I will be covering the stovetop method here with comments on the
oven method mixed in but not demonstrated.
Cut the fat into small pieces, about ½” square. Place the diced fat in a stock pot or pan. I
select my pot size such that the raw fat fills the pot about ¾ full.
This gives me head room to stir and mix without slinging fat all over the stove or counter.
It also fills the pot deep enough with the liquid fat so that I can use a candy thermometer
to keep track of the temperature.
If you are using the oven method, just put your fat in a good-sized roasting pan, pop it in
the oven set between 225° to 250°F, and then go away for 12 to 24 hours. The oven
thermostat will take care of the temperature for you.
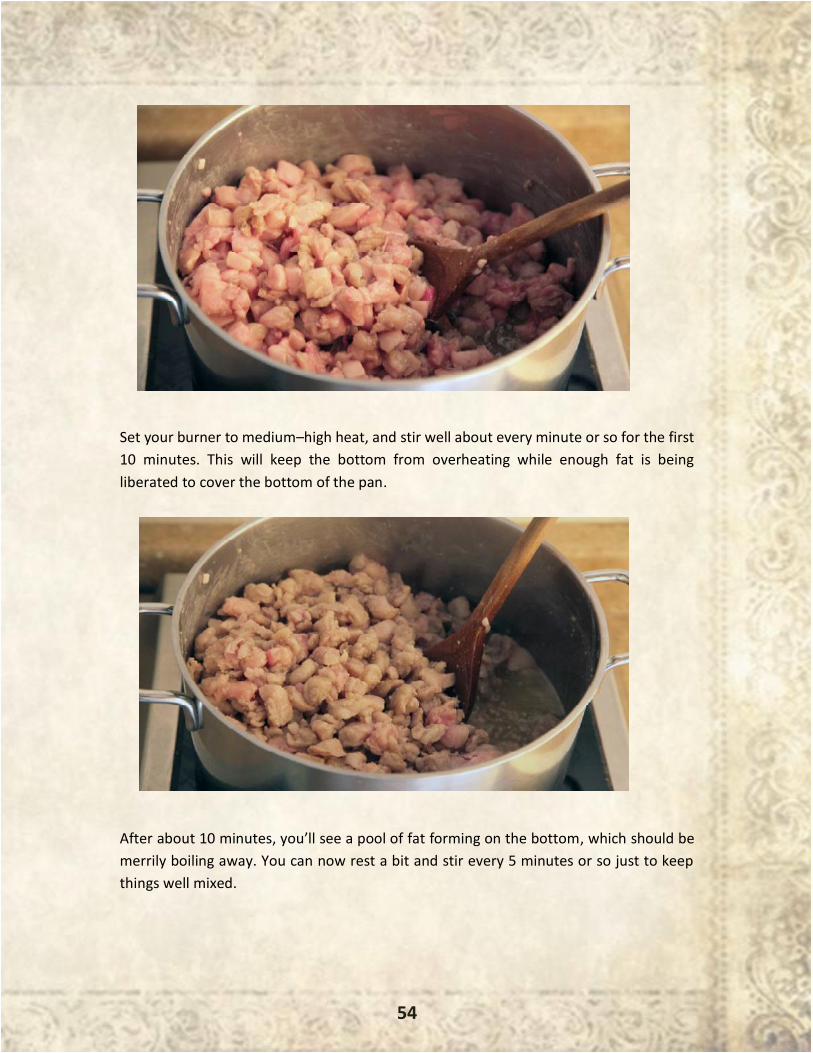
54
Set your burner to medium–high heat, and stir well about every minute or so for the first
10 minutes. This will keep the bottom from overheating while enough fat is being
liberated to cover the bottom of the pan.
After about 10 minutes, you’ll see a pool of fat forming on the bottom, which should be
merrily boiling away. You can now rest a bit and stir every 5 minutes or so just to keep
things well mixed.
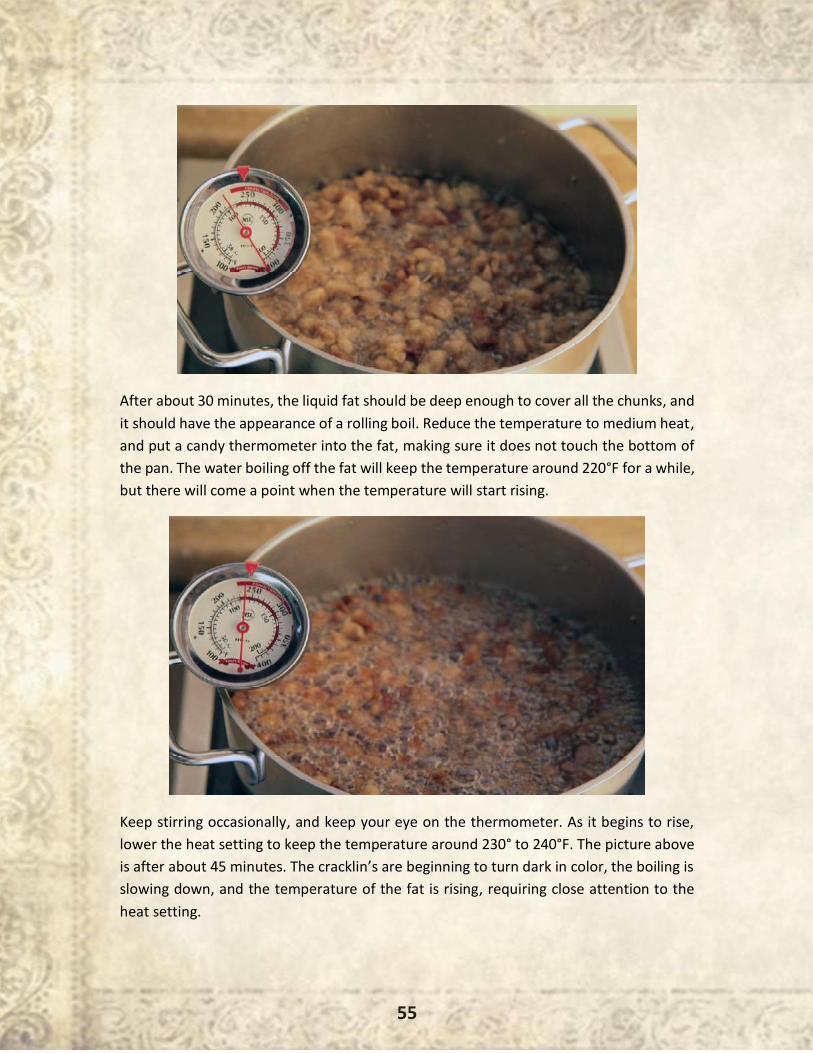
55
After about 30 minutes, the liquid fat should be deep enough to cover all the chunks, and
it should have the appearance of a rolling boil. Reduce the temperature to medium heat,
and put a candy thermometer into the fat, making sure it does not touch the bottom of
the pan. The water boiling off the fat will keep the temperature around 220°F for a while,
but there will come a point when the temperature will start rising.
Keep stirring occasionally, and keep your eye on the thermometer. As it begins to rise,
lower the heat setting to keep the temperature around 230° to 240°F. The picture above
is after about 45 minutes. The cracklin’s are beginning to turn dark in color, the boiling is
slowing down, and the temperature of the fat is rising, requiring close attention to the
heat setting.
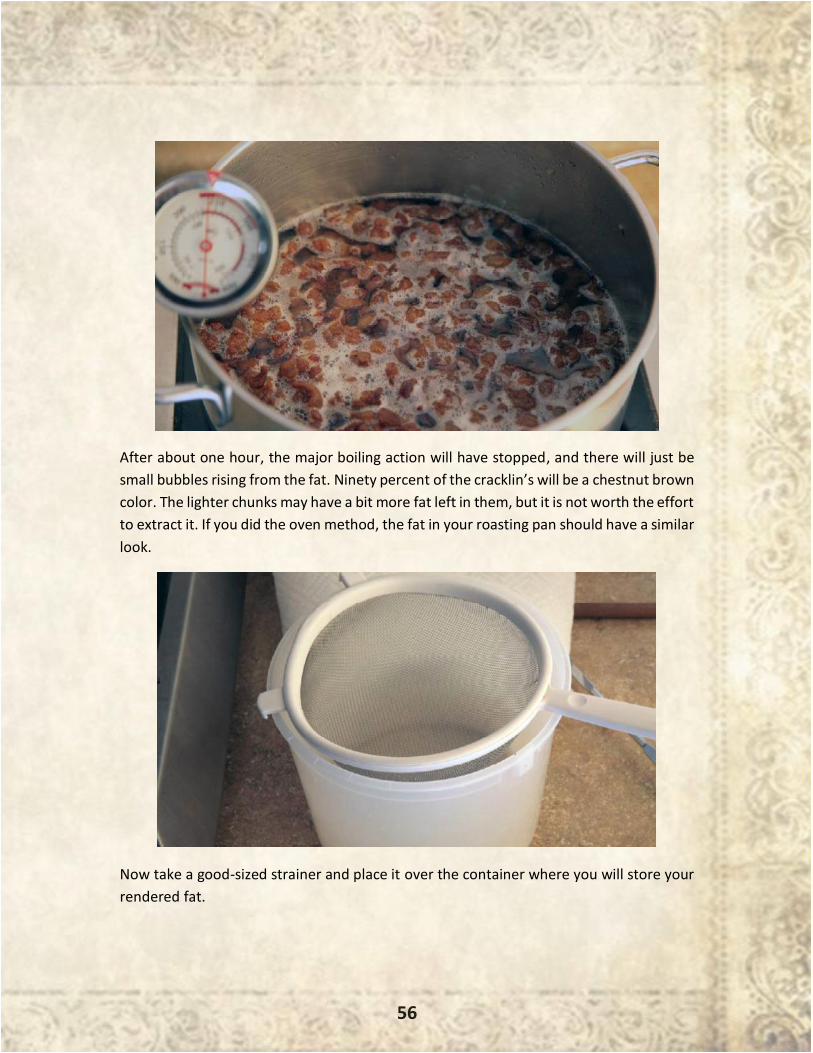
56
After about one hour, the major boiling action will have stopped, and there will just be
small bubbles rising from the fat. Ninety percent of the cracklin’s will be a chestnut brown
color. The lighter chunks may have a bit more fat left in them, but it is not worth the effort
to extract it. If you did the oven method, the fat in your roasting pan should have a similar
look.
Now take a good-sized strainer and place it over the container where you will store your
rendered fat.
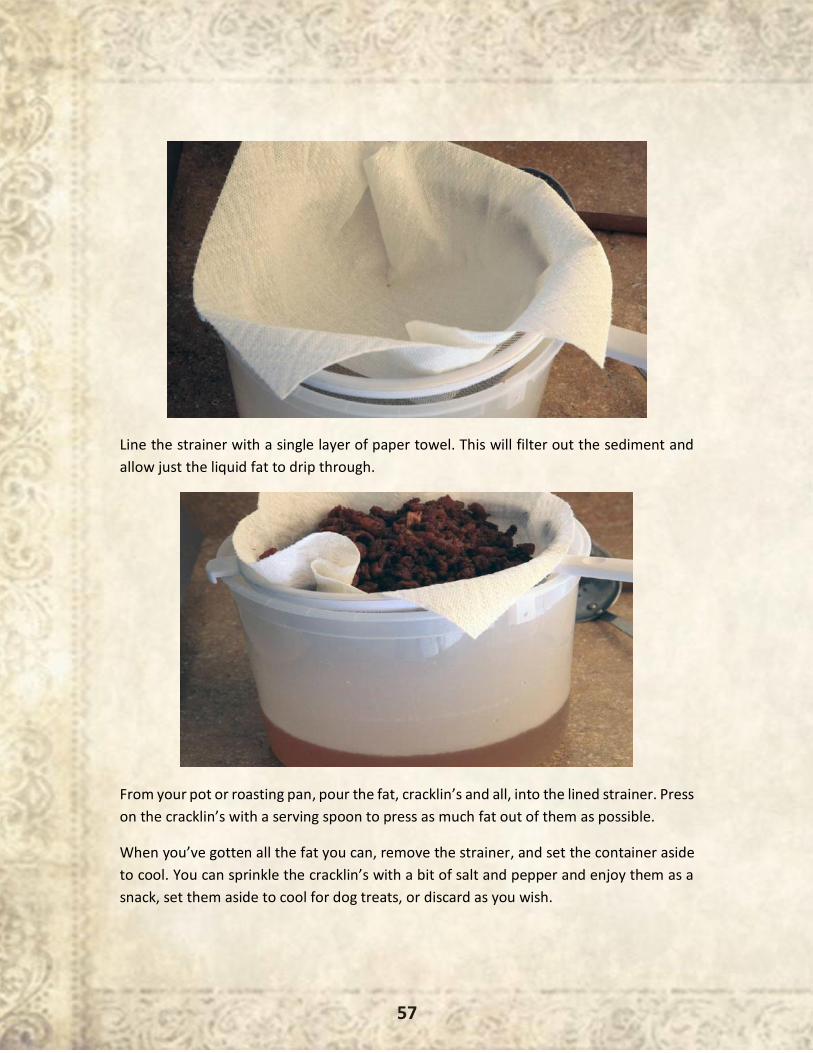
57
Line the strainer with a single layer of paper towel. This will filter out the sediment and
allow just the liquid fat to drip through.
From your pot or roasting pan, pour the fat, cracklin’s and all, into the lined strainer. Press
on the cracklin’s with a serving spoon to press as much fat out of them as possible.
When you’ve gotten all the fat you can, remove the strainer, and set the container aside
to cool. You can sprinkle the cracklin’s with a bit of salt and pepper and enjoy them as a
snack, set them aside to cool for dog treats, or discard as you wish.
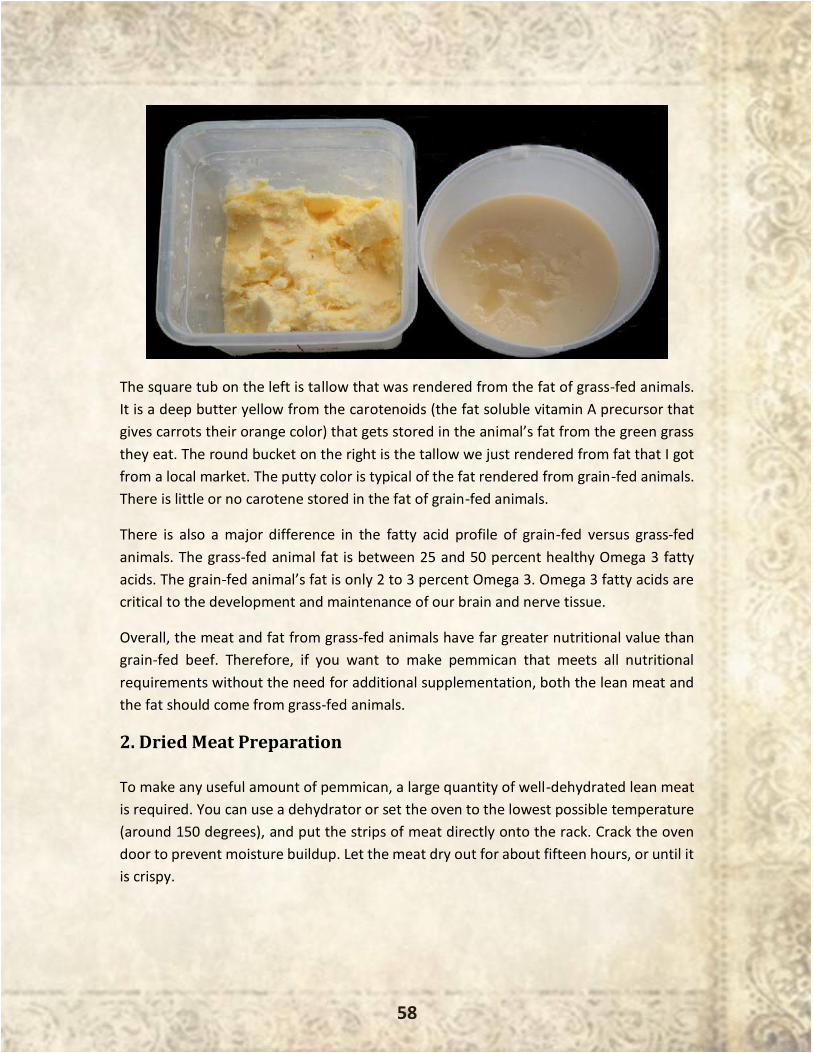
58
The square tub on the left is tallow that was rendered from the fat of grass-fed animals.
It is a deep butter yellow from the carotenoids (the fat soluble vitamin A precursor that
gives carrots their orange color) that gets stored in the animal’s fat from the green grass
they eat. The round bucket on the right is the tallow we just rendered from fat that I got
from a local market. The putty color is typical of the fat rendered from grain-fed animals.
There is little or no carotene stored in the fat of grain-fed animals.
There is also a major difference in the fatty acid profile of grain-fed versus grass-fed
animals. The grass-fed animal fat is between 25 and 50 percent healthy Omega 3 fatty
acids. The grain-fed animal’s fat is only 2 to 3 percent Omega 3. Omega 3 fatty acids are
critical to the development and maintenance of our brain and nerve tissue.
Overall, the meat and fat from grass-fed animals have far greater nutritional value than
grain-fed beef. Therefore, if you want to make pemmican that meets all nutritional
requirements without the need for additional supplementation, both the lean meat and
the fat should come from grass-fed animals.
2. Dried Meat Preparation
To make any useful amount of pemmican, a large quantity of well-dehydrated lean meat
is required. You can use a dehydrator or set the oven to the lowest possible temperature
(around 150 degrees), and put the strips of meat directly onto the rack. Crack the oven
door to prevent moisture buildup. Let the meat dry out for about fifteen hours, or until it
is crispy.
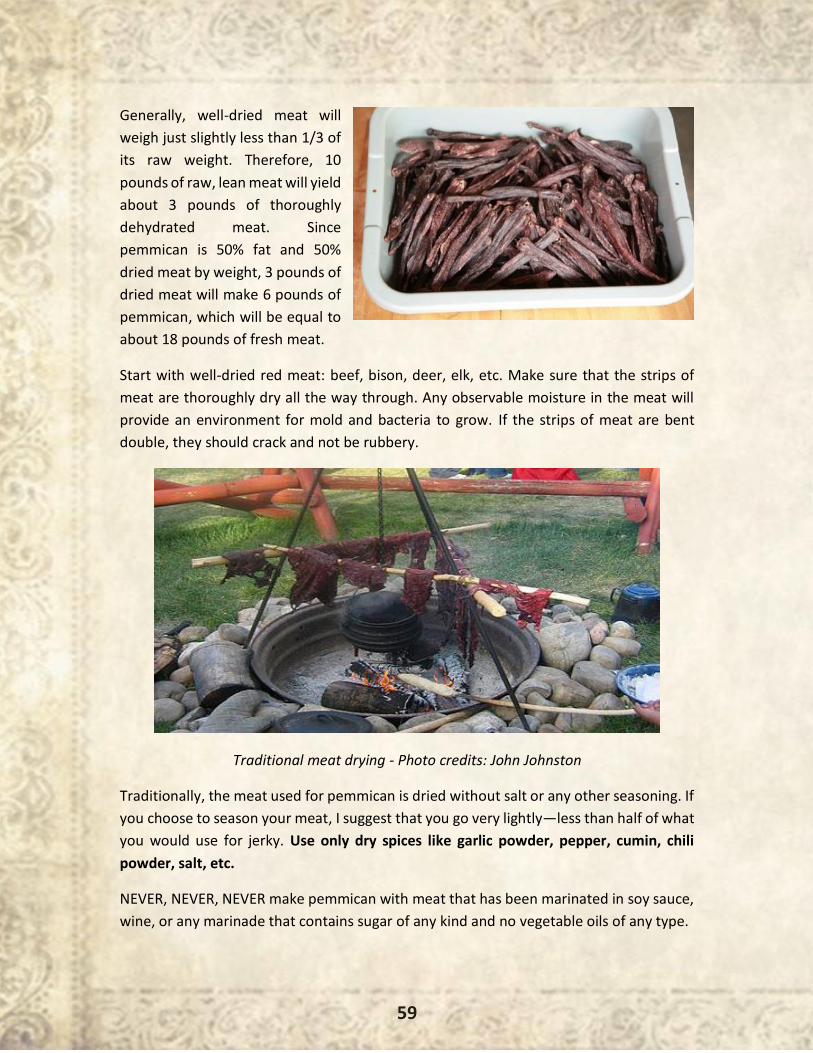
59
Generally, well-dried meat will
weigh just slightly less than 1/3 of
its raw weight. Therefore, 10
pounds of raw, lean meat will yield
about 3 pounds of thoroughly
dehydrated meat. Since
pemmican is 50% fat and 50%
dried meat by weight, 3 pounds of
dried meat will make 6 pounds of
pemmican, which will be equal to
about 18 pounds of fresh meat.
Start with well-dried red meat: beef, bison, deer, elk, etc. Make sure that the strips of
meat are thoroughly dry all the way through. Any observable moisture in the meat will
provide an environment for mold and bacteria to grow. If the strips of meat are bent
double, they should crack and not be rubbery.
Traditional meat drying - Photo credits: John Johnston
Traditionally, the meat used for pemmican is dried without salt or any other seasoning. If
you choose to season your meat, I suggest that you go very lightly—less than half of what
you would use for jerky. Use only dry spices like garlic powder, pepper, cumin, chili
powder, salt, etc.
NEVER, NEVER, NEVER make pemmican with meat that has been marinated in soy sauce,
wine, or any marinade that contains sugar of any kind and no vegetable oils of any type.
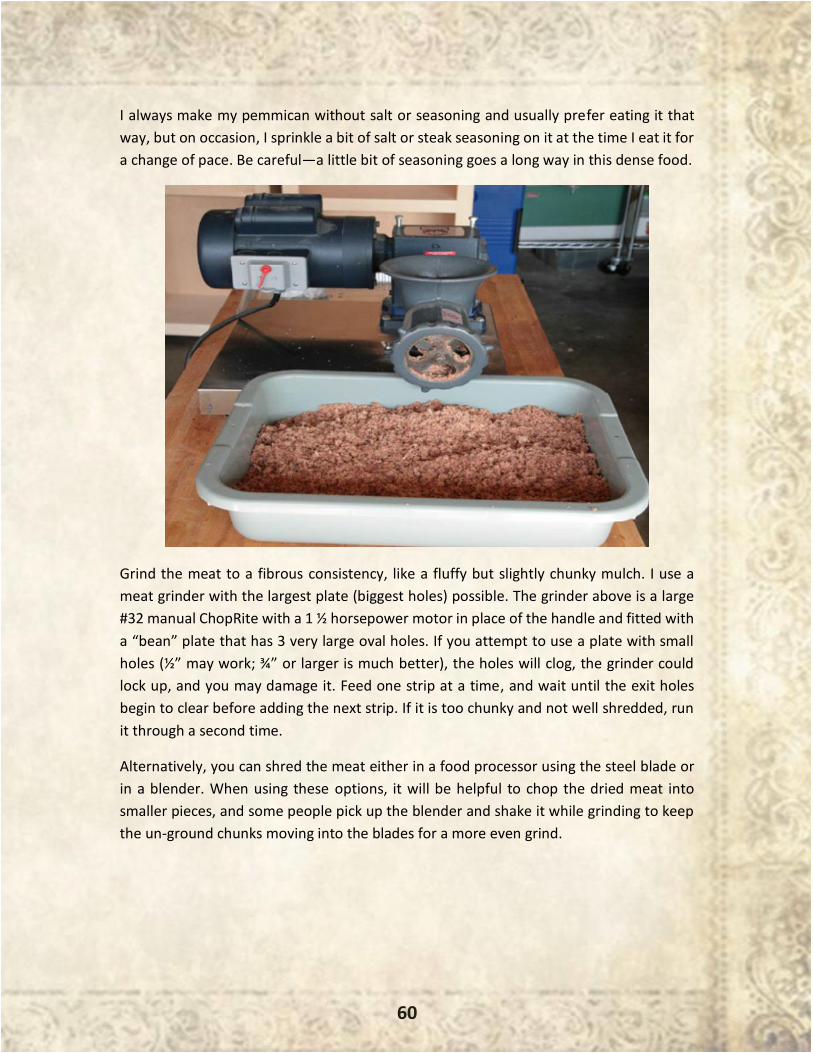
60
I always make my pemmican without salt or seasoning and usually prefer eating it that
way, but on occasion, I sprinkle a bit of salt or steak seasoning on it at the time I eat it for
a change of pace. Be careful—a little bit of seasoning goes a long way in this dense food.
Grind the meat to a fibrous consistency, like a fluffy but slightly chunky mulch. I use a
meat grinder with the largest plate (biggest holes) possible. The grinder above is a large
#32 manual ChopRite with a 1 ½ horsepower motor in place of the handle and fitted with
a “bean” plate that has 3 very large oval holes. If you attempt to use a plate with small
holes (½” may work; ¾” or larger is much better), the holes will clog, the grinder could
lock up, and you may damage it. Feed one strip at a time, and wait until the exit holes
begin to clear before adding the next strip. If it is too chunky and not well shredded, run
it through a second time.
Alternatively, you can shred the meat either in a food processor using the steel blade or
in a blender. When using these options, it will be helpful to chop the dried meat into
smaller pieces, and some people pick up the blender and shake it while grinding to keep
the un-ground chunks moving into the blades for a more even grind.
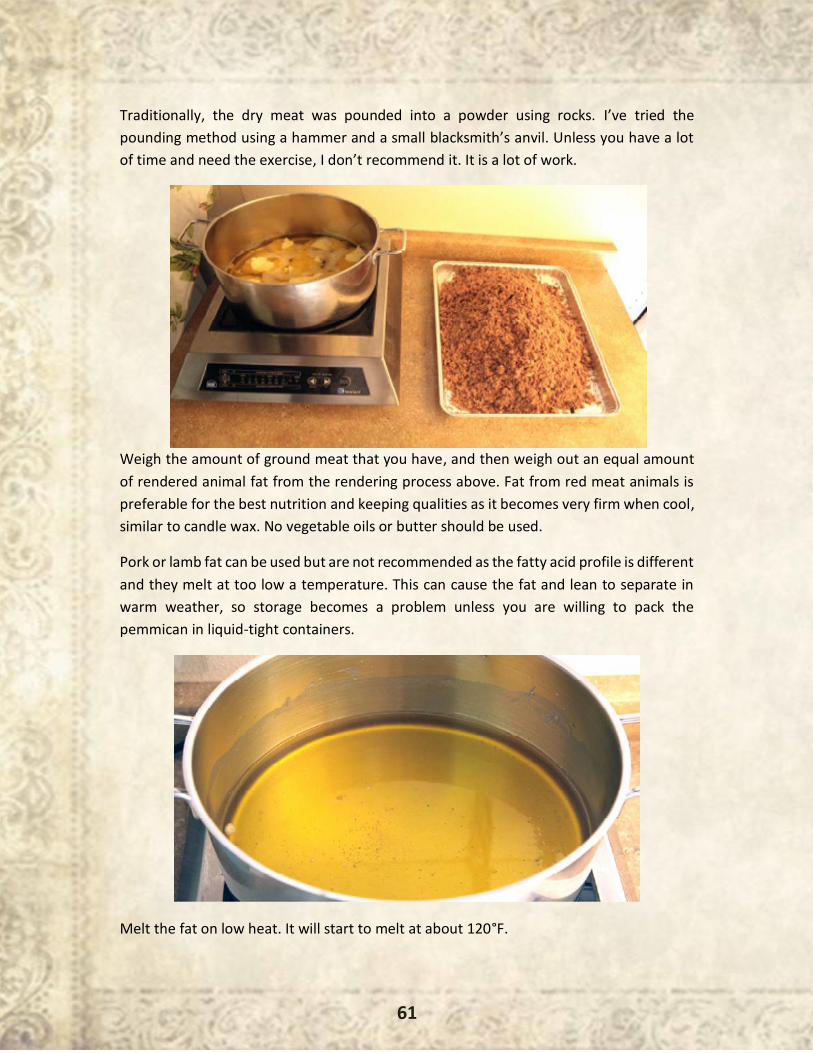
61
Traditionally, the dry meat was pounded into a powder using rocks. I’ve tried the
pounding method using a hammer and a small blacksmith’s anvil. Unless you have a lot
of time and need the exercise, I don’t recommend it. It is a lot of work.
Weigh the amount of ground meat that you have, and then weigh out an equal amount
of rendered animal fat from the rendering process above. Fat from red meat animals is
preferable for the best nutrition and keeping qualities as it becomes very firm when cool,
similar to candle wax. No vegetable oils or butter should be used.
Pork or lamb fat can be used but are not recommended as the fatty acid profile is different
and they melt at too low a temperature. This can cause the fat and lean to separate in
warm weather, so storage becomes a problem unless you are willing to pack the
pemmican in liquid-tight containers.
Melt the fat on low heat. It will start to melt at about 120°F.
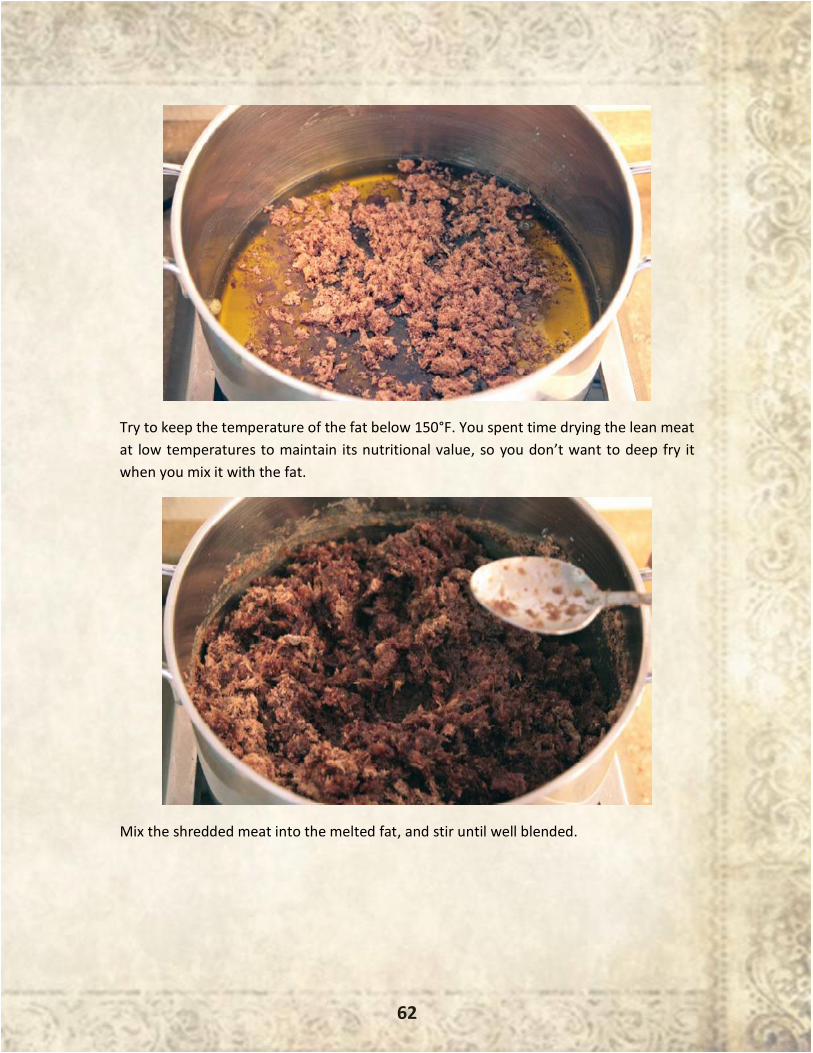
62
Try to keep the temperature of the fat below 150°F. You spent time drying the lean meat
at low temperatures to maintain its nutritional value, so you don’t want to deep fry it
when you mix it with the fat.
Mix the shredded meat into the melted fat, and stir until well blended.
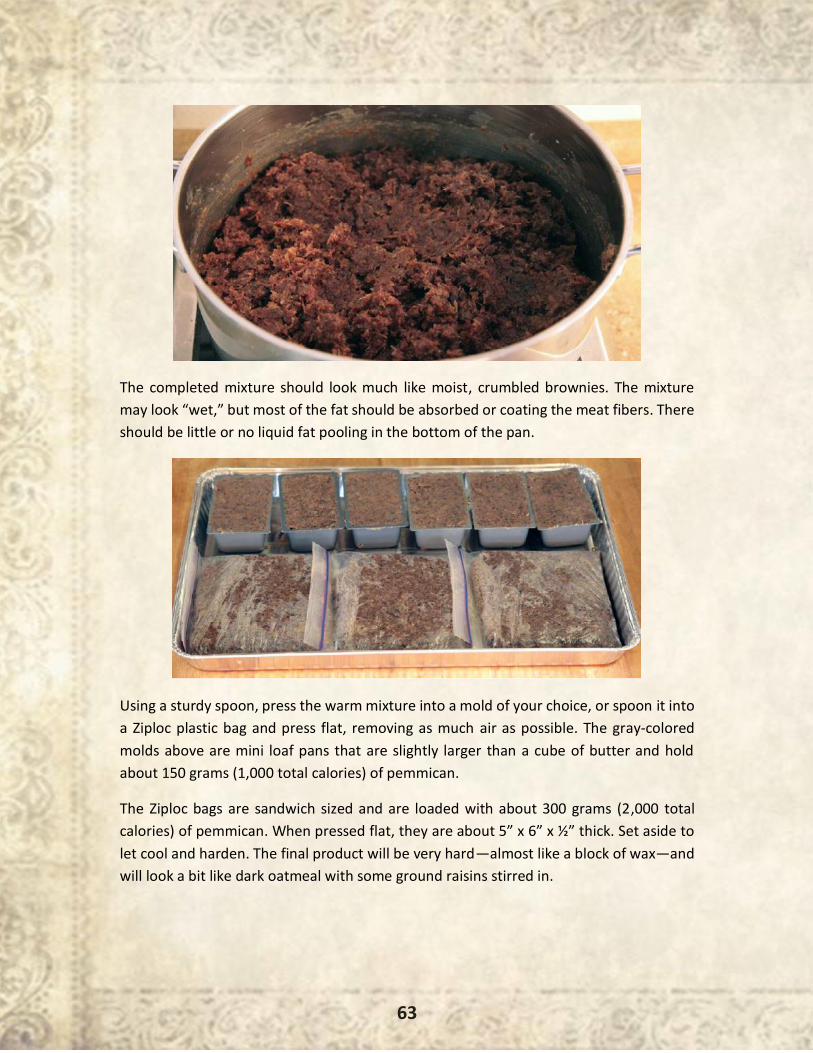
63
The completed mixture should look much like moist, crumbled brownies. The mixture
may look “wet,” but most of the fat should be absorbed or coating the meat fibers. There
should be little or no liquid fat pooling in the bottom of the pan.
Using a sturdy spoon, press the warm mixture into a mold of your choice, or spoon it into
a Ziploc plastic bag and press flat, removing as much air as possible. The gray-colored
molds above are mini loaf pans that are slightly larger than a cube of butter and hold
about 150 grams (1,000 total calories) of pemmican.
The Ziploc bags are sandwich sized and are loaded with about 300 grams (2,000 total
calories) of pemmican. When pressed flat, they are about 5” x 6” x ½” thick. Set aside to
let cool and harden. The final product will be very hard—almost like a block of wax—and
will look a bit like dark oatmeal with some ground raisins stirred in.
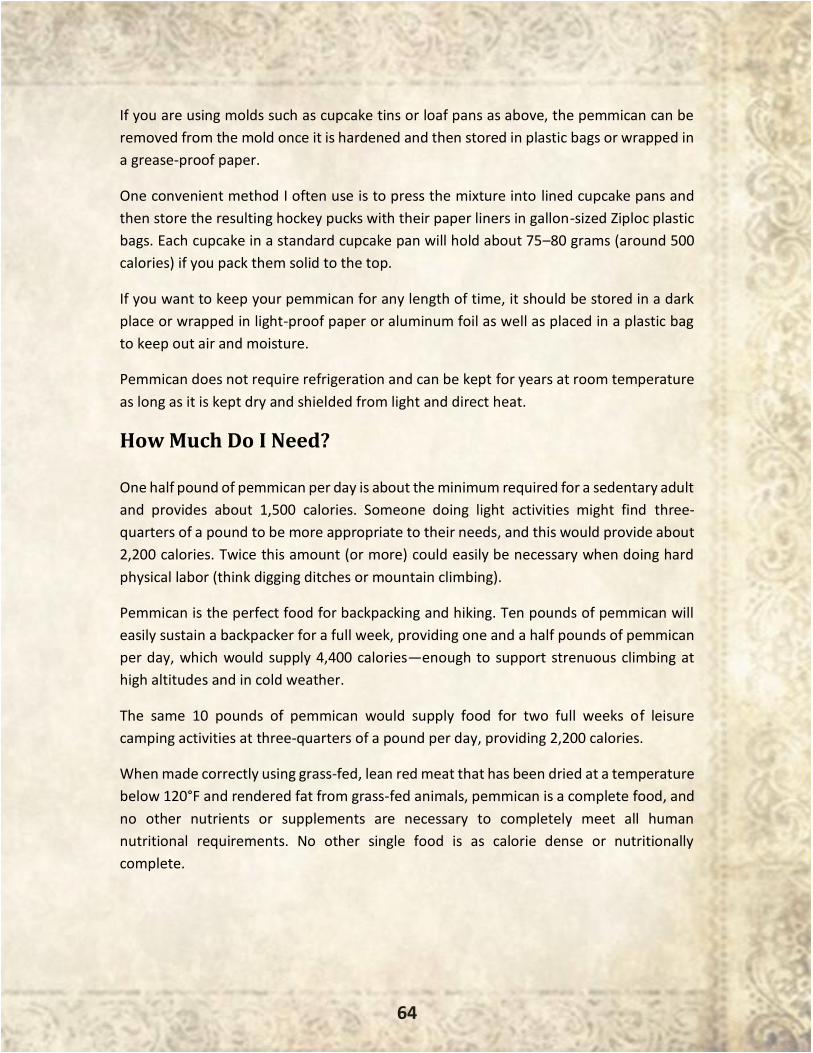
64
If you are using molds such as cupcake tins or loaf pans as above, the pemmican can be
removed from the mold once it is hardened and then stored in plastic bags or wrapped in
a grease-proof paper.
One convenient method I often use is to press the mixture into lined cupcake pans and
then store the resulting hockey pucks with their paper liners in gallon-sized Ziploc plastic
bags. Each cupcake in a standard cupcake pan will hold about 75–80 grams (around 500
calories) if you pack them solid to the top.
If you want to keep your pemmican for any length of time, it should be stored in a dark
place or wrapped in light-proof paper or aluminum foil as well as placed in a plastic bag
to keep out air and moisture.
Pemmican does not require refrigeration and can be kept for years at room temperature
as long as it is kept dry and shielded from light and direct heat.
How Much Do I Need?
One half pound of pemmican per day is about the minimum required for a sedentary adult
and provides about 1,500 calories. Someone doing light activities might find three-
quarters of a pound to be more appropriate to their needs, and this would provide about
2,200 calories. Twice this amount (or more) could easily be necessary when doing hard
physical labor (think digging ditches or mountain climbing).
Pemmican is the perfect food for backpacking and hiking. Ten pounds of pemmican will
easily sustain a backpacker for a full week, providing one and a half pounds of pemmican
per day, which would supply 4,400 calories—enough to support strenuous climbing at
high altitudes and in cold weather.
The same 10 pounds of pemmican would supply food for two full weeks of leisure
camping activities at three-quarters of a pound per day, providing 2,200 calories.
When made correctly using grass-fed, lean red meat that has been dried at a temperature
below 120°F and rendered fat from grass-fed animals, pemmican is a complete food, and
no other nutrients or supplements are necessary to completely meet all human
nutritional requirements. No other single food is as calorie dense or nutritionally
complete.
65
-By Sarah Hemingway –
“You name it, and we’ll make it from cattails!”
– Boy Scouts Motto
Cattails (Typha latifolia) are one of the most versatile plants on Earth. It is called
the “Supermarket of the Swamp” for good reason since it can be used throughout all four
seasons. The plants can be found virtually anywhere in the wildernesswhere there is a
water source across the entire North American continent and almost everywhere in the
Western hemisphere worldwide.
Alternative Practical Applications
It is said that if a person lost in the wilderness found cattails, they’d have four of the five
things needed to ensure their survival: water, food, shelter, and fuel. The Native
Americans used cattails for so many different reasons:
• Crafts (using green or dried leaves or fluff):
• Shelters’ covers
• Making mats, blankets, and baskets
• Making cordage used for hunting or fishing, as ropes, for belts and straps, for
defense equipment, as arrow shafts, and so on
• The fluff was used to insulate footwear and hats, for stuffing pillows, or for a
baby’s cradleboard.
Medicine
• The pollen is hemostatic and astringent. It was used for controlling external and
internal bleeding, chest pains, and other forms of blood stagnation. The pollen is
also mildly diuretic.
• Roots were used to treat burns, insect bites, scrapes, and bruises. Fresh, ponded
roots were used directly as a poultice for open blisters and infections but also as
a toothpaste if mashed up.
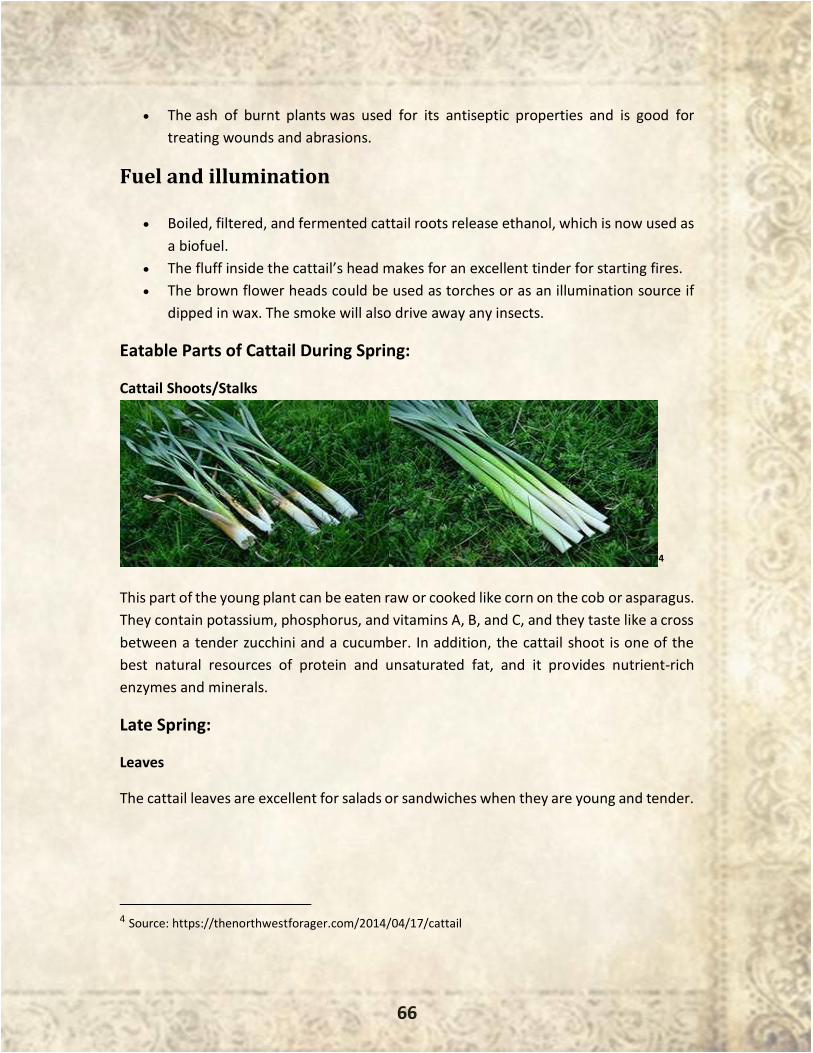
66
• The ash of burnt plants was used for its antiseptic properties and is good for
treating wounds and abrasions.
Fuel and illumination
• Boiled, filtered, and fermented cattail roots release ethanol, which is now used as
a biofuel.
• The fluff inside the cattail’s head makes for an excellent tinder for starting fires.
• The brown flower heads could be used as torches or as an illumination source if
dipped in wax. The smoke will also drive away any insects.
Eatable Parts of Cattail During Spring:
Cattail Shoots/Stalks
4
This part of the young plant can be eaten raw or cooked like corn on the cob or asparagus.
They contain potassium, phosphorus, and vitamins A, B, and C, and they taste like a cross
between a tender zucchini and a cucumber. In addition, the cattail shoot is one of the
best natural resources of protein and unsaturated fat, and it provides nutrient-rich
enzymes and minerals.
Late Spring:
Leaves
The cattail leaves are excellent for salads or sandwiches when they are young and tender.
4 Source: https://thenorthwestforager.com/2014/04/17/cattail
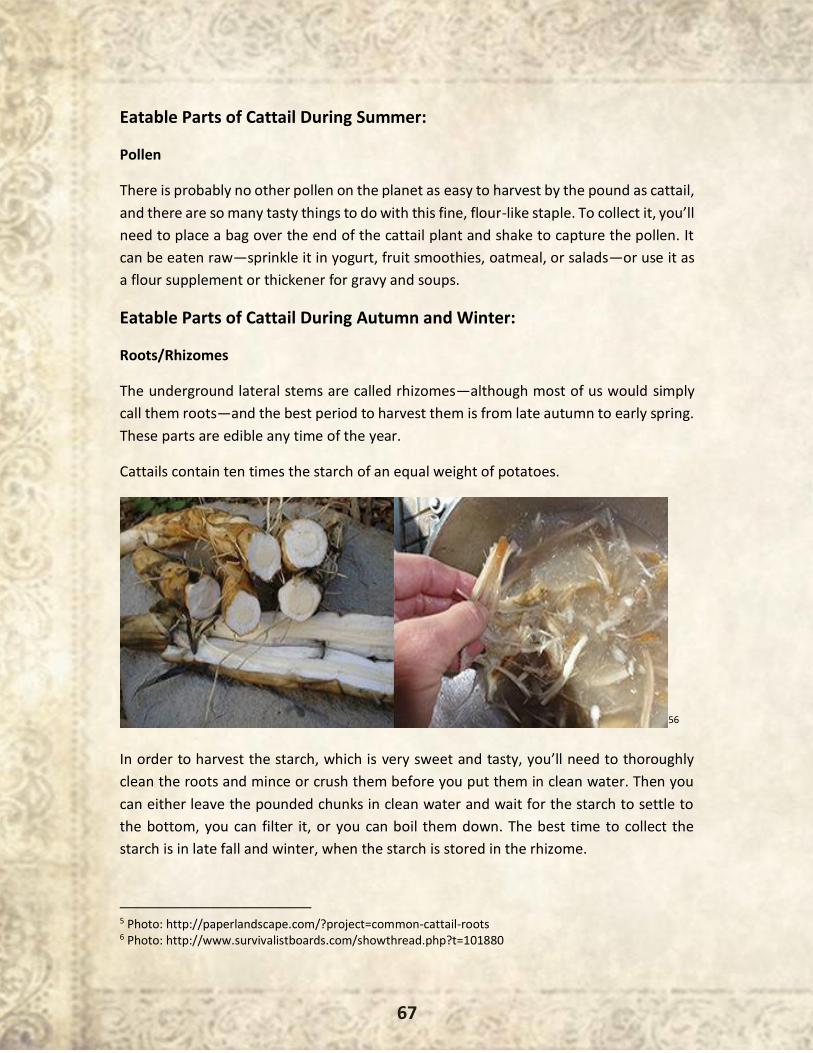
67
Eatable Parts of Cattail During Summer:
Pollen
There is probably no other pollen on the planet as easy to harvest by the pound as cattail,
and there are so many tasty things to do with this fine, flour-like staple. To collect it, you’ll
need to place a bag over the end of the cattail plant and shake to capture the pollen. It
can be eaten raw—sprinkle it in yogurt, fruit smoothies, oatmeal, or salads—or use it as
a flour supplement or thickener for gravy and soups.
Eatable Parts of Cattail During Autumn and Winter:
Roots/Rhizomes
The underground lateral stems are called rhizomes—although most of us would simply
call them roots—and the best period to harvest them is from late autumn to early spring.
These parts are edible any time of the year.
Cattails contain ten times the starch of an equal weight of potatoes.
56
In order to harvest the starch, which is very sweet and tasty, you’ll need to thoroughly
clean the roots and mince or crush them before you put them in clean water. Then you
can either leave the pounded chunks in clean water and wait for the starch to settle to
the bottom, you can filter it, or you can boil them down. The best time to collect the
starch is in late fall and winter, when the starch is stored in the rhizome.
5 Photo: http://paperlandscape.com/?project=common-cattail-roots 6 Photo: http://www.survivalistboards.com/showthread.php?t=101880
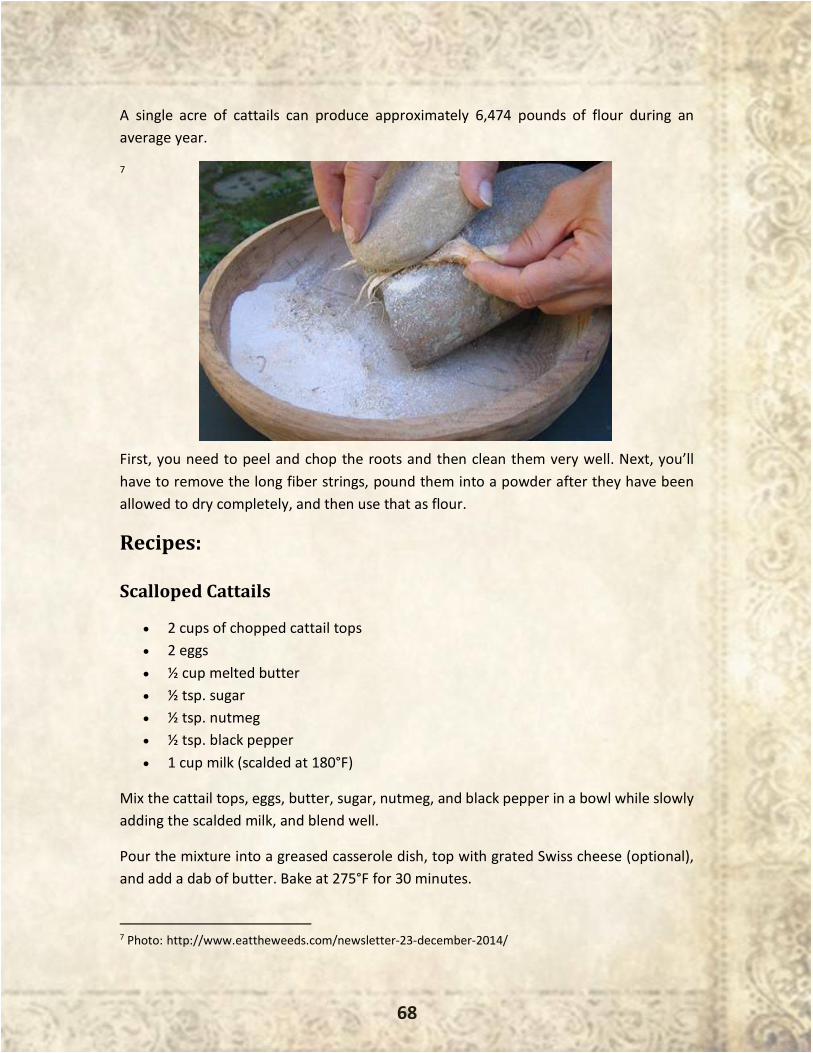
68
A single acre of cattails can produce approximately 6,474 pounds of flour during an
average year.
7
First, you need to peel and chop the roots and then clean them very well. Next, you’ll
have to remove the long fiber strings, pound them into a powder after they have been
allowed to dry completely, and then use that as flour.
Recipes:
Scalloped Cattails
• 2 cups of chopped cattail tops
• 2 eggs
• ½ cup melted butter
• ½ tsp. sugar
• ½ tsp. nutmeg
• ½ tsp. black pepper
• 1 cup milk (scalded at 180°F)
Mix the cattail tops, eggs, butter, sugar, nutmeg, and black pepper in a bowl while slowly
adding the scalded milk, and blend well.
Pour the mixture into a greased casserole dish, top with grated Swiss cheese (optional),
and add a dab of butter. Bake at 275°F for 30 minutes.
7 Photo: http://www.eattheweeds.com/newsletter-23-december-2014/
69
Cattail Pollen Biscuits
• 3 Tbsp. baking powder
• 1 1/3 cup flour
• ¼ cup cattail pollen
• 1 tsp salt
• 4 Tbsp. shortening
• 1/3 cup milk
Preheat oven to 450°F. Mix all ingredients. Cut the dough into biscuit shapes, and bake
them at 425 for 20 minutes.
Cattail Pollen Pancakes
• ½ cup cattail
• ½ cup flour
• 2 Tbsp. baking powder
• 1 Tbsp. salt
• 1 egg
• 1 cup milk
• 3 Tbsp. bacon drippings
Mix all ingredients.
Pour onto a hot skillet or griddle in four-inch pancake amounts.
Cattail Casserole
• 2 cups scraped cattail spikes
• 1 cup bread crumbs
• 1 egg (beaten)
• ½ cup milk
• 1 diced onion
• Salt and pepper (according to taste)
• ½ cup shredded cheddar cheese
Combine all ingredients in a casserole dish, and place in an oven set to 350°F for 25
minutes. Serve hot.
70
Cattail Acorn Bread
• 1 cup acorn flour
• 1 cup cattail flour (or another flour with gluten)
• 2 Tbsp. baking powder
• ½ tsp. sea salt
• 3 Tbsp. honey, agave nectar, or pure maple syrup
• 2 omega-three eggs (or regular), beaten
• ¾ cup whole milk
• 3 Tbsp. olive, grape seed, or coconut oil
Mix all of the ingredients together. Pour into a greased loaf pan. Bake at 400°F for 30
minutes.
Cattail Wild Rice Pilaf
This recipe can be made with brown rice, but the wild rice adds a special dimension to it.
• 1 cup dry wild rice (4 cups cooked)
• 2 Tbsp. sesame oil
• ½ cup chopped green onion
• 2 cups cattail shoots, sliced (about 30 cattails)
• 2 Tbsp. salt
• ½ cup slivered almonds
Cook the wild rice until tender. Sauté the onion and cattail shoots in sesame oil until
tender and translucent. Mix the rice and the sautéed cattail shoots and onion together.
Add the salt and slivered almonds. Serve hot.
Cattail Wild Rice Soup
• 1 cup dry wild rice (4 cups cooked)
• 2 tablespoons sesame oil
• ½ cup chopped green onion
• 2 cups cattail shoots, sliced (about 30 cattails)
• 2 Tbsp. salt
Cook the wild rice until tender. In a heavy-bottomed soup pot, sauté the onion and cattail
shoots in sesame oil until tender and translucent. Add the cooked wild rice, salt, and 4
cups of chicken broth or other soup stock of your choice. Simmer together for 15–20
minutes, and serve.
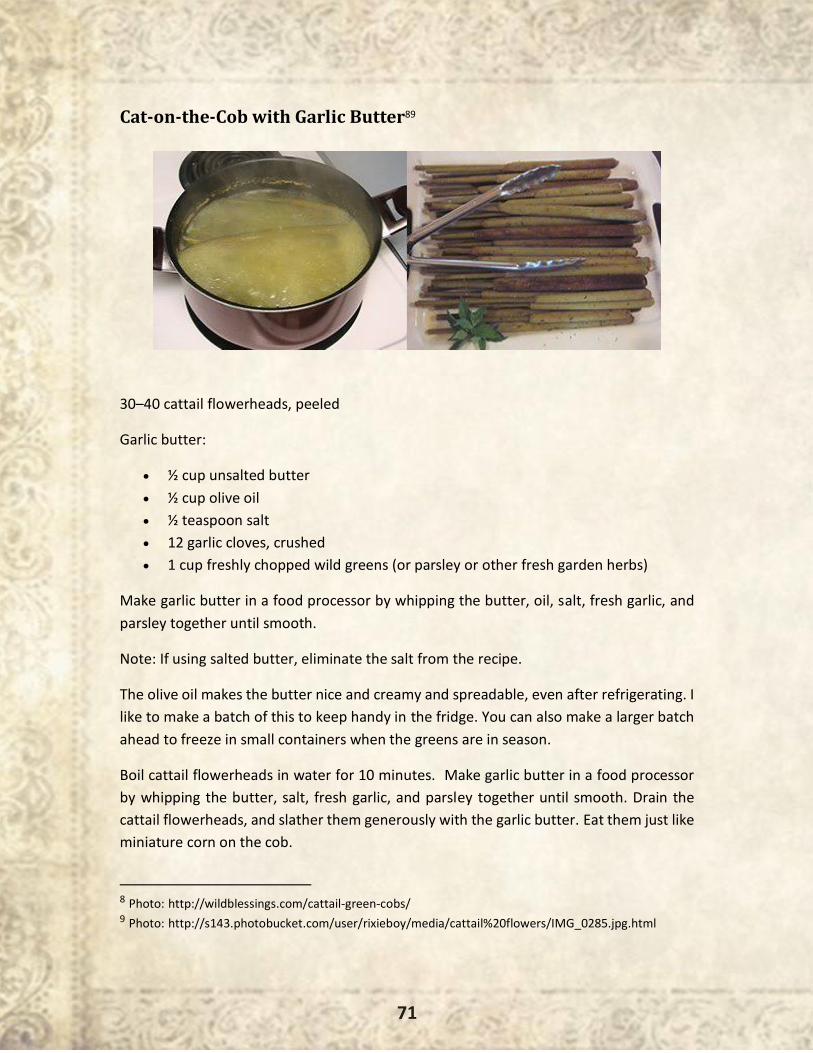
71
Cat-on-the-Cob with Garlic Butter89
30–40 cattail flowerheads, peeled
Garlic butter:
• ½ cup unsalted butter
• ½ cup olive oil
• ½ teaspoon salt
• 12 garlic cloves, crushed
• 1 cup freshly chopped wild greens (or parsley or other fresh garden herbs)
Make garlic butter in a food processor by whipping the butter, oil, salt, fresh garlic, and
parsley together until smooth.
Note: If using salted butter, eliminate the salt from the recipe.
The olive oil makes the butter nice and creamy and spreadable, even after refrigerating. I
like to make a batch of this to keep handy in the fridge. You can also make a larger batch
ahead to freeze in small containers when the greens are in season.
Boil cattail flowerheads in water for 10 minutes. Make garlic butter in a food processor
by whipping the butter, salt, fresh garlic, and parsley together until smooth. Drain the
cattail flowerheads, and slather them generously with the garlic butter. Eat them just like
miniature corn on the cob.
8 Photo: http://wildblessings.com/cattail-green-cobs/ 9 Photo: http://s143.photobucket.com/user/rixieboy/media/cattail%20flowers/IMG_0285.jpg.html
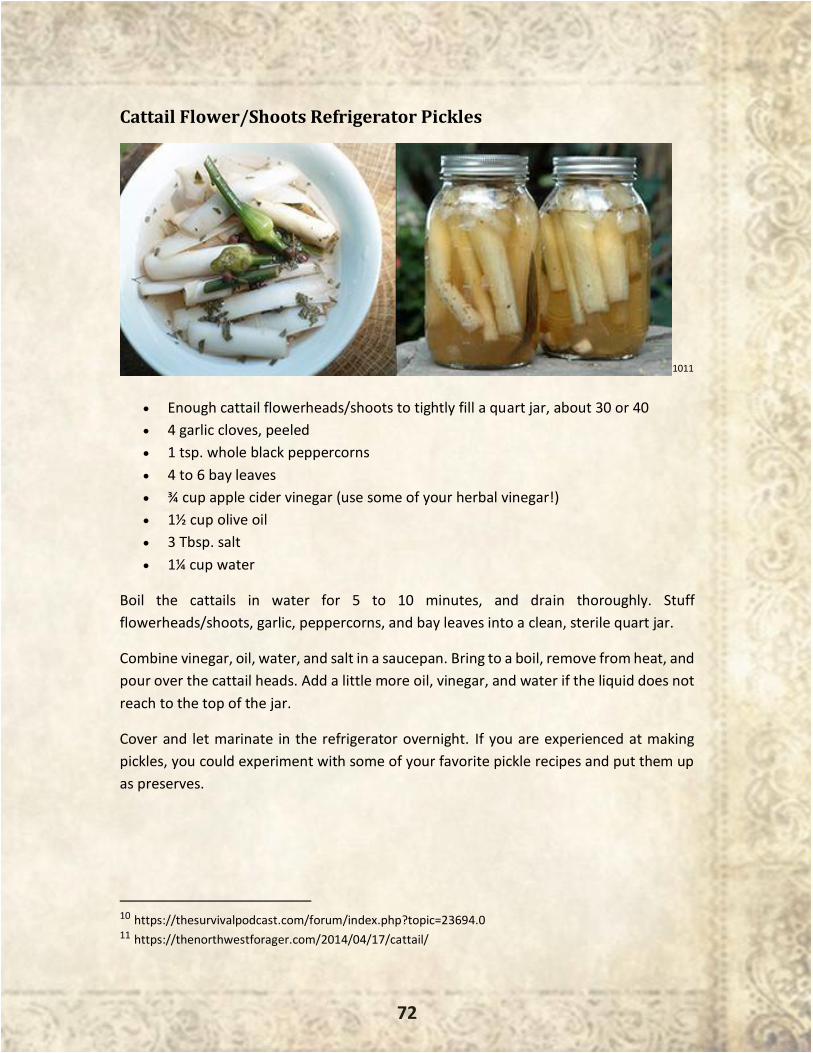
72
Cattail Flower/Shoots Refrigerator Pickles
1011
• Enough cattail flowerheads/shoots to tightly fill a quart jar, about 30 or 40
• 4 garlic cloves, peeled
• 1 tsp. whole black peppercorns
• 4 to 6 bay leaves
• ¾ cup apple cider vinegar (use some of your herbal vinegar!)
• 1½ cup olive oil
• 3 Tbsp. salt
• 1¼ cup water
Boil the cattails in water for 5 to 10 minutes, and drain thoroughly. Stuff
flowerheads/shoots, garlic, peppercorns, and bay leaves into a clean, sterile quart jar.
Combine vinegar, oil, water, and salt in a saucepan. Bring to a boil, remove from heat, and
pour over the cattail heads. Add a little more oil, vinegar, and water if the liquid does not
reach to the top of the jar.
Cover and let marinate in the refrigerator overnight. If you are experienced at making
pickles, you could experiment with some of your favorite pickle recipes and put them up
as preserves.
10 https://thesurvivalpodcast.com/forum/index.php?topic=23694.0 11 https://thenorthwestforager.com/2014/04/17/cattail/

73
Indian Cattail Spoon Bread
12
Preheat oven to 400°F.
• ½ cup butter
• 2 cups fresh flower buds or cattails on the cob
• ½ cup diced onions
• ½ cup diced green pepper
• salt
• 1 cup sharp cheese
• pinch of chili powder
Melt butter in a skillet, and add cattail buds, onions, green pepper, and salt. Sauté for 5
minutes or until tender. Pour into greased baking dish. Sprinkle with cheese and chili
powder. Bake until cheese melts. Spoon onto plate while hot.
12 http://the3foragers.blogspot.ro/2015/06/cattail-recipe-cattail-flower-bread.html
74
-By John Paicu-
“Smoke me a kipper, I’ll be back for breakfast”
– Ace Rimmer, Red Dwarf
Once upon a time, every house had a smokehouse. Households would make their
own smokehouses from hardwood and brick, and then they would use it to prepare all
kinds of meats. Preserved in cool, dry places, the smoked products would last up to one
year. Even though very few people nowadays still use traditional smokehouses, those that
care about eating healthy, delicious meat should know that building a smokehouse in your
own backyard is easier than it may look.
Smoking is one of the best, tastiest, and healthiest way to prepare meat, fish, and even
cheese, and the pioneers have been doing it for centuries. But back then they didn’t do it
to improve the taste of the meat. The main purpose of a smokehouse was to preserve the
meat. Preservation was done by sustained smoking (often for more than two weeks using
cold smoke) and salt curing. The pioneers would leave the products in the smoker for
extended periods of time (sometimes up to two years) because they didn’t have any
refrigeration systems.
Because we live in the world of the processed food industry—where nothing we buy from
supermarkets is healthy anymore—it’s only natural to want to reassess our options and
find a better way to cook our meat. Smoking is one of those methods that helps you
prepare meat the natural way, with no preservatives. It lasts longer, and it tastes
delicious. To get started, all you need to do is build the smokehouse, buy the meat, light
the fire, and allow the smoke to work its magic.
There are different types of smokehouses that you can build, although the easiest and
safest model is made of hardwood. Commonly referred to as a “slow cooking oven,” the
temperature in a smokehouse shouldn’t exceed 200 degrees Fahrenheit.
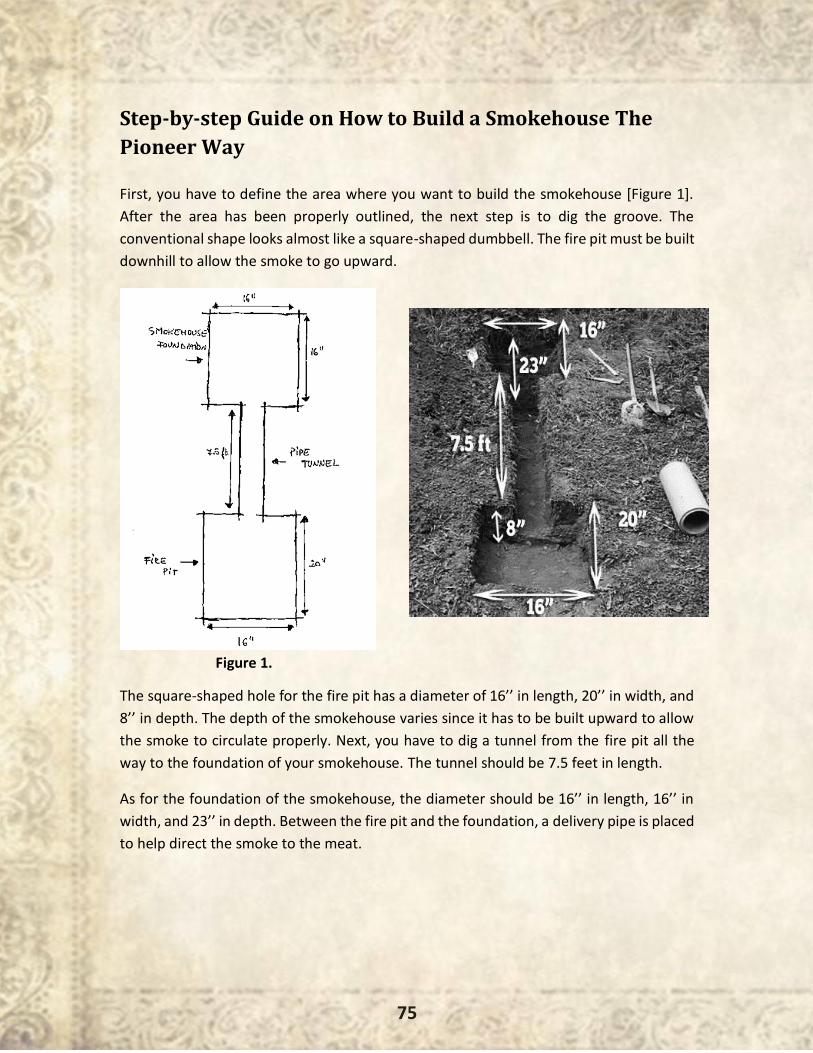
75
Step-by-step Guide on How to Build a Smokehouse The
Pioneer Way
First, you have to define the area where you want to build the smokehouse [Figure 1].
After the area has been properly outlined, the next step is to dig the groove. The
conventional shape looks almost like a square-shaped dumbbell. The fire pit must be built
downhill to allow the smoke to go upward.
Figure 1.
The square-shaped hole for the fire pit has a diameter of 16’’ in length, 20’’ in width, and
8’’ in depth. The depth of the smokehouse varies since it has to be built upward to allow
the smoke to circulate properly. Next, you have to dig a tunnel from the fire pit all the
way to the foundation of your smokehouse. The tunnel should be 7.5 feet in length.
As for the foundation of the smokehouse, the diameter should be 16’’ in length, 16’’ in
width, and 23’’ in depth. Between the fire pit and the foundation, a delivery pipe is placed
to help direct the smoke to the meat.
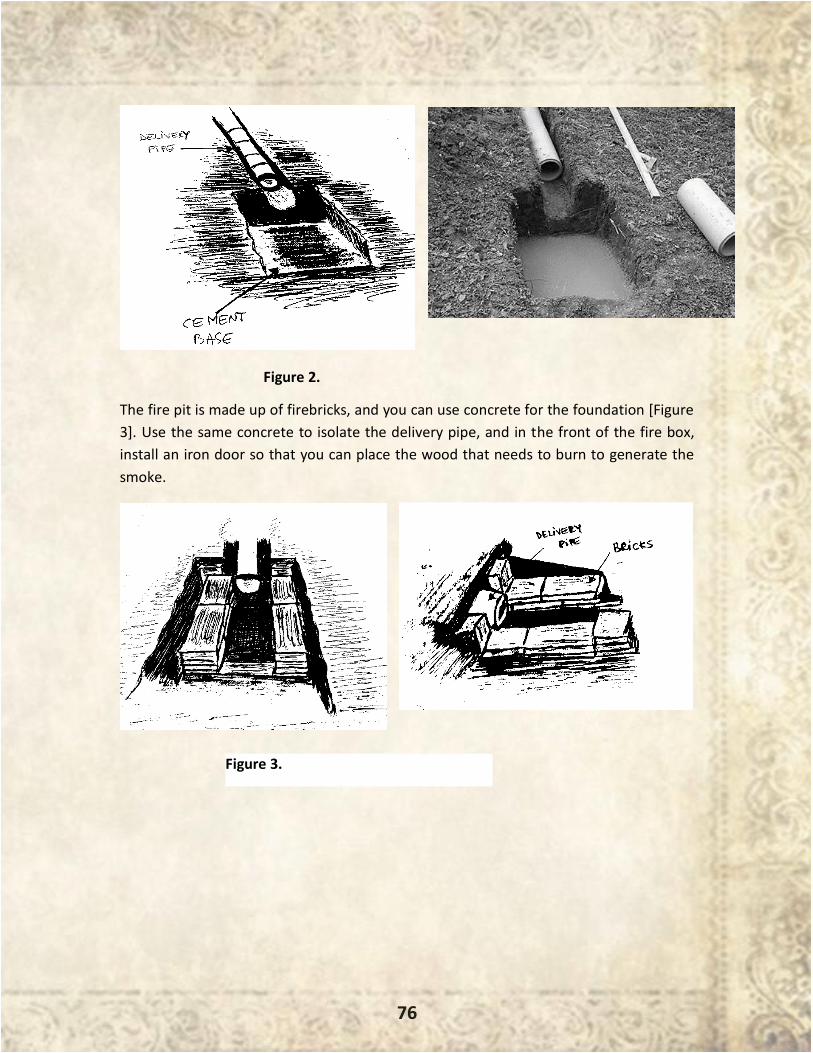
76
Figure 2.
The fire pit is made up of firebricks, and you can use concrete for the foundation [Figure
3]. Use the same concrete to isolate the delivery pipe, and in the front of the fire box,
install an iron door so that you can place the wood that needs to burn to generate the
smoke.
Figure 3.
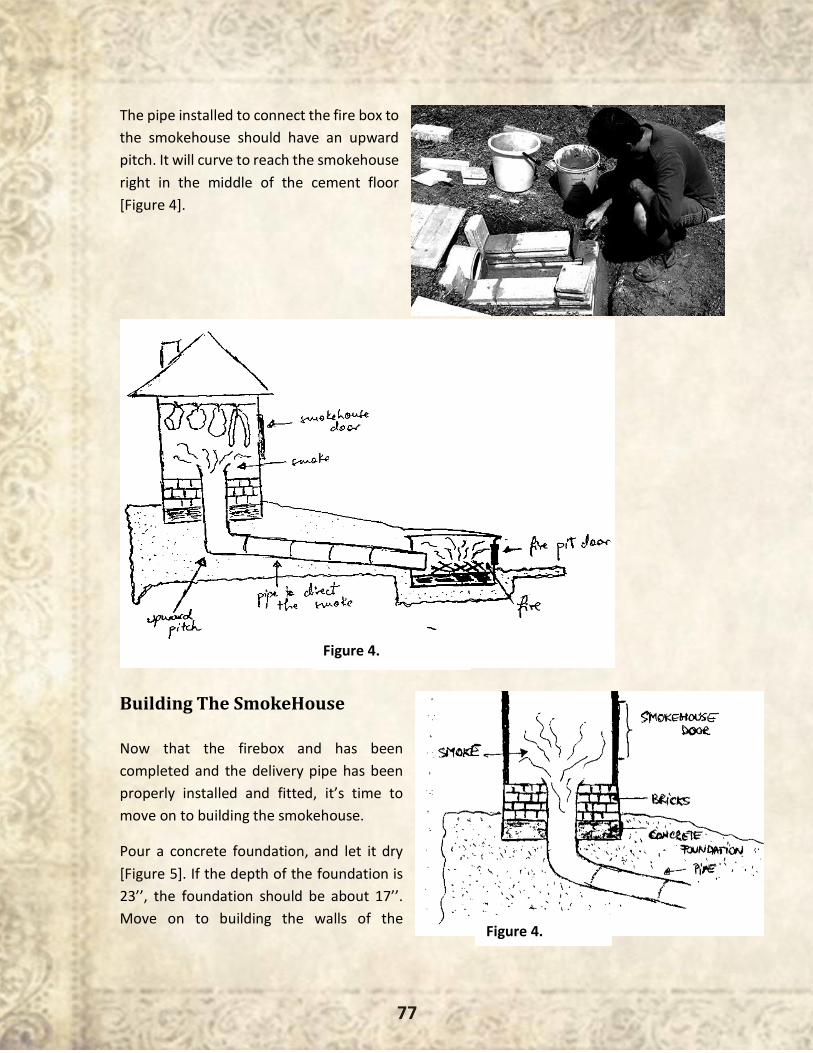
77
The pipe installed to connect the fire box to
the smokehouse should have an upward
pitch. It will curve to reach the smokehouse
right in the middle of the cement floor
[Figure 4].
Building The SmokeHouse
Now that the firebox and has been
completed and the delivery pipe has been
properly installed and fitted, it’s time to
move on to building the smokehouse.
Pour a concrete foundation, and let it dry
[Figure 5]. If the depth of the foundation is
23’’, the foundation should be about 17’’.
Move on to building the walls of the
Figure 4.
Figure 4.

78
smokehouse from bricks. About five layers of bricks should be enough (This means that
your foundation will be about 10’’ in height.).
For the wooden foundation of the
smokehouse, the best type of hardwood is
cherry, apple, pear, or apricot. You can use
pallets because they’re durable and
conveniently priced. The base of your
smokehouse should be square-shaped and
should mold perfectly after the brick
foundation. Since this is a small-sized
smokehouse, try not to exceed 3 feet in
height.
Considering the brick foundation is 16’’ x
16’’, the base of the wooden smokehouse
should also be 16’’ x 16’’. In height, 3 feet for
the walls and 1 foot for the roof should be
enough [Figure 6].
Figure 5.
Figure 7.
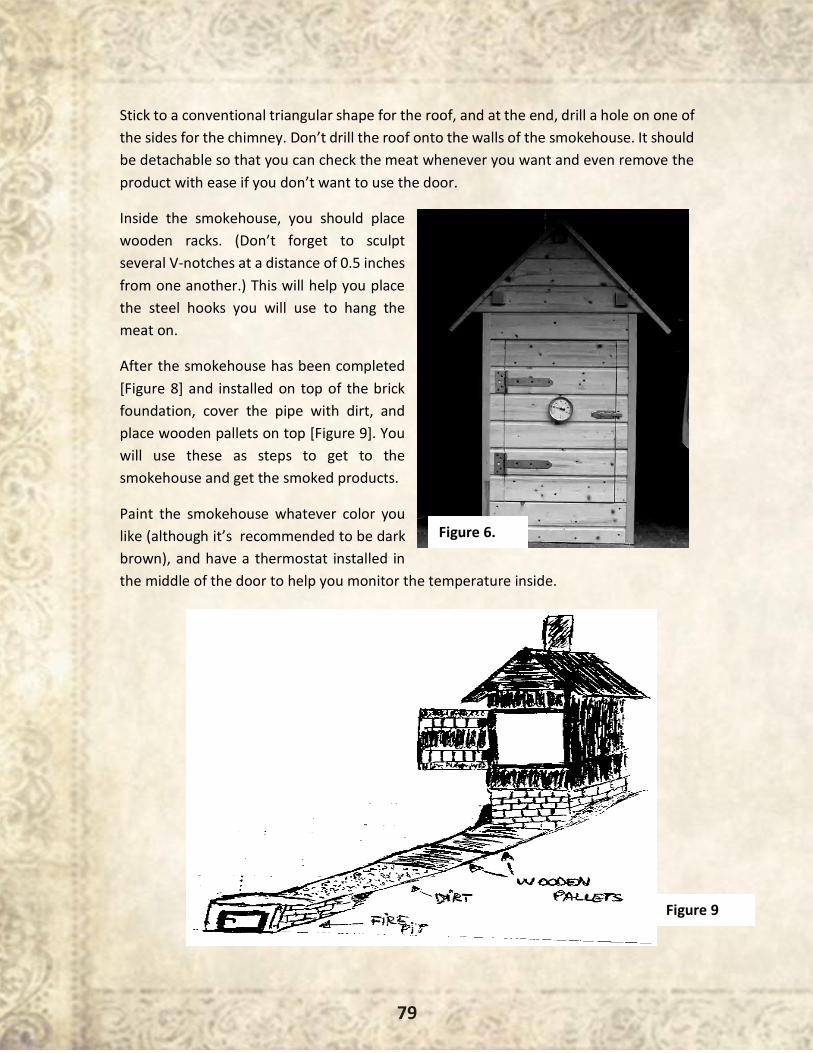
79
Stick to a conventional triangular shape for the roof, and at the end, drill a hole on one of
the sides for the chimney. Don’t drill the roof onto the walls of the smokehouse. It should
be detachable so that you can check the meat whenever you want and even remove the
product with ease if you don’t want to use the door.
Inside the smokehouse, you should place
wooden racks. (Don’t forget to sculpt
several V-notches at a distance of 0.5 inches
from one another.) This will help you place
the steel hooks you will use to hang the
meat on.
After the smokehouse has been completed
[Figure 8] and installed on top of the brick
foundation, cover the pipe with dirt, and
place wooden pallets on top [Figure 9]. You
will use these as steps to get to the
smokehouse and get the smoked products.
Paint the smokehouse whatever color you
like (although it’s recommended to be dark
brown), and have a thermostat installed in
the middle of the door to help you monitor the temperature inside.
Figure 6.
Figure 9
.
9
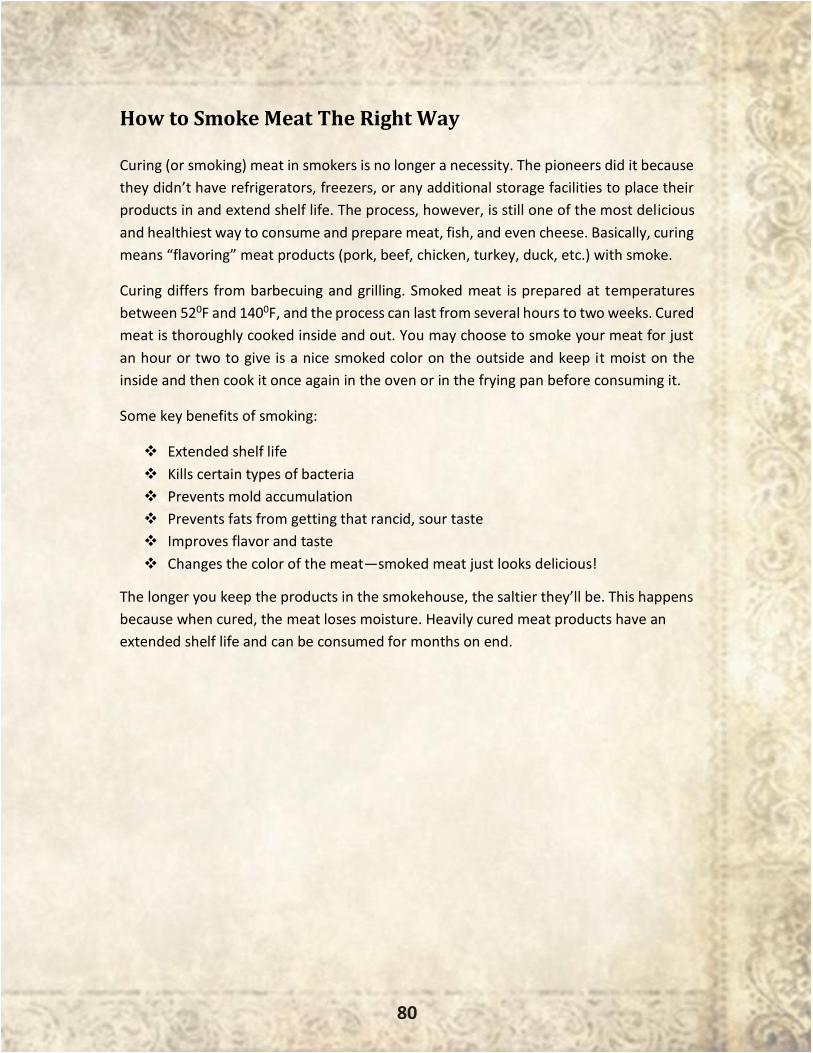
80
How to Smoke Meat The Right Way
Curing (or smoking) meat in smokers is no longer a necessity. The pioneers did it because
they didn’t have refrigerators, freezers, or any additional storage facilities to place their
products in and extend shelf life. The process, however, is still one of the most delicious
and healthiest way to consume and prepare meat, fish, and even cheese. Basically, curing
means “flavoring” meat products (pork, beef, chicken, turkey, duck, etc.) with smoke.
Curing differs from barbecuing and grilling. Smoked meat is prepared at temperatures
between 520F and 1400F, and the process can last from several hours to two weeks. Cured
meat is thoroughly cooked inside and out. You may choose to smoke your meat for just
an hour or two to give is a nice smoked color on the outside and keep it moist on the
inside and then cook it once again in the oven or in the frying pan before consuming it.
Some key benefits of smoking:
❖ Extended shelf life
❖ Kills certain types of bacteria
❖ Prevents mold accumulation
❖ Prevents fats from getting that rancid, sour taste
❖ Improves flavor and taste
❖ Changes the color of the meat—smoked meat just looks delicious!
The longer you keep the products in the smokehouse, the saltier they’ll be. This happens
because when cured, the meat loses moisture. Heavily cured meat products have an
extended shelf life and can be consumed for months on end.
81
- By S. Walter -
“We never know the worth of water till the well is dry.”
- Thomas Fuller, 1732
There is an old Slovakian proverb that goes something like this: “Water is the
world’s first and foremost medicine.” It couldn’t be more right.
Between the 16th and 19th centuries, sailing ships dominated naval warfare and
international trading routes at sea. Throughout this period, the square-rigged ships
carried early settlers, colonizers, and European explorers to different parts of the world,
marking one of the world’s most widespread human migrations in history. Nicknamed the
“Age of Sail,”[1] this period began in 1571 with the Battle of Lepanto and ended in 1862
with the Battle of Hampton Roads when the steam-powered CSS Virginia destroyed the
USS Congress and USS Cumberland sailing ships.[2]
European and the American colonies shared a very strong connection between the 16th
and 19th centuries—shipping. Back then, sailors would spent weeks, even months, at sea
and had to come up with a way to preserve fresh water.
In 1568 the daily ration of water in the Spanish navy was 0.25 gallons. Wine might have
been an excellent source of extra calories, but it dehydrated the body. Some didn’t even
drink their wine. They saved the wine to sell it afterwards upon arrival in America.[3] In
1636 the Admiralty of Amsterdam allowed ships with 100 sailors on board to carry 35
barrels of beer as well, apart from food.[4]
When Jamaica was conquered in 1655, rum became widely available. It was cheap, and
sailors soon realized that it lasted better in wooden barrels than beer did. Until 1740
82
sailors drank the rum in plain form with the permission of the captain. But then the
Admiralty demanded for it to be mixed with water, producing a famous beverage called
“grog.” On extended voyages at sea, sailors needed significant quantities of drinkable
water. However, the casks they always had on board were never enough to keep the crew
hydrated. To fix the shortage, they would sweeten the water with wine or beer, thus also
increasing the gallons available on board. But the wooden casks would often develop
algae. Wine and beer spoil pretty quickly, so they came up with a solution: adding rum to
the mix. Rum didn’t just increase the water amount. It was also used to purify the water.
Sixteen ounces of rum (one pint) is enough to purify one gallon of water.
Even though the practice didn’t stick in the Royal Navy, it has proven to be a viable
alternative for disinfecting contaminated water. If the taste doesn’t quite match your
preferences, try adding two tablespoons of sugar to the blend or some lemon juice (about
30 ounces). The alcohol in the rum kills harmful pathogens and bacteria, thus making the
water you have available safe to drink without getting drunk.
However, even though alcoholic beverages were preferred by the sailors, over-indulgence
would often lead to crew impairment in discipline and performance. On top of that, it was
a lot more expensive than water. A ship sailing for three months would require about one
gallon per day per person, for 135 men. The daily consumption would fluctuate depending
on combat circumstances, desertion, disease, and air temperature.
Before there were long-term settlements, our ancestors would often set up camp or stay
in a place where there was a nearby water source.
Long Term Water Storage
In 1630 sailors would store their water in wooden casks. They soon realized that casks
leak and rot, thus leading to the accumulation of algae and bacteria. As a countermeasure,
they started painting and charring casks on the inside before using them. Sulfurization
was another practice used to kill bacteria. This involved burning sulfur inside the barrels
and generating sulfur dioxide.[5] In spite of the heavy smell—often associated with rotten
eggs—the water was safe to drink.
Chlorinating the water is probably the simplest method to get rid of the unpleasant rotten
egg smell. However, make sure to use regular bleach only (16 drops - 1/4 tsp - of 6%
bleach per 2 gallons of water). For chlorine solution made at home with Granular calcium
hypochlorite (one heaping teaspoon -approximately ¼ ounce- to two gallons of water) at
83
0.05% concentration, add one part of chlorine solution to each 100 parts of water (1 pint
of the chlorine solution to every 12.5 gallons of water).
The history of using bleach dates back to the 1800s when a British scientist found out that
cholera had spread because of a contaminated water pipe. Upon his discovery, John Snow
applied chlorine to water, which was as effective as the people hoped it would be. This
discovery led to the first government public regulation to install municipal water filters
like chlorine. This is the process that you will have to apply if your municipality water does
not add chlorine to the water supply:
❖ Add two drops of non-scented chlorine bleach to every two liters of water. Make
sure that it is a non-additive.
❖ Before drinking or using the water, let it stand for 30 minutes.
❖ If you still smell the chlorine in the water, let it stand for another 15 minutes.
! Do not use scented bleaches, color-safe bleaches, or bleaches with added cleaners as
prescribed by FEMA, as this will contaminate you water.
! Do not use pool chlorine as it is much stronger than laundry or household bleach.
Aside from household or laundry bleach, you can also use chlorine dioxide tablets and
water drops. Potable Aqua tablets have been proven effective against bacteria, Giardia,
Lamblia, Cryptosporidium, and viruses. AquaMira water treatment drops are EPA-
registered, and a single one-ounce bottle of drops can treat 30 gallons of water.
Treating your water with iodine can also ensure clean drinking water. Simply add 12 drops
of 2% tincture of iodine per gallon of water. The only important thing to remember is that
family and friends that are pregnant or nursing cannot drink water treated with this
process.
Distilling is another way to disinfect water. Basically, you heat up the water to the point
when it becomes vapor, cool that vapor, and catch the purified water. It will give you the
clean water you need with the only disadvantage being that it is a time-consuming
process.
If you don’t have that much time and money to spend on all the options above, there are
ways to filter your water without making use of electricity and technology. This is based
on the sand filters that our ancestors used to sanitize the water in the early 1600s and the
first water filters in the 1700s that were made of wool, coal, and charcoal.
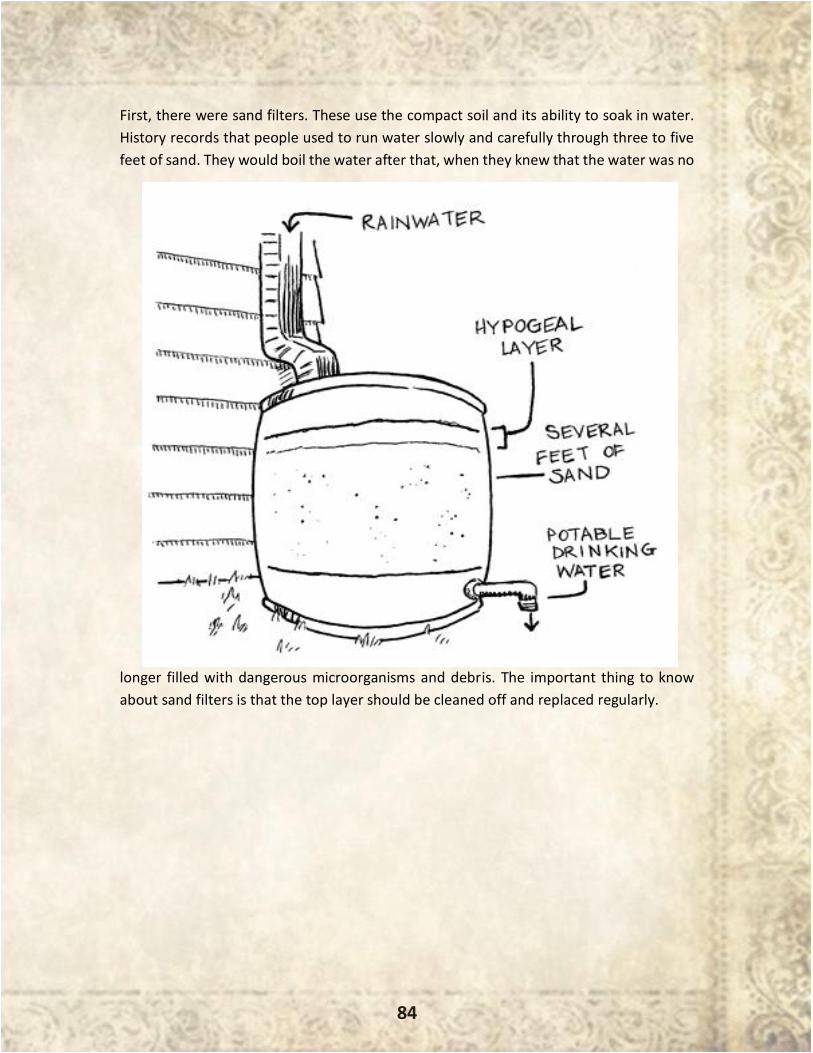
84
First, there were sand filters. These use the compact soil and its ability to soak in water.
History records that people used to run water slowly and carefully through three to five
feet of sand. They would boil the water after that, when they knew that the water was no
longer filled with dangerous microorganisms and debris. The important thing to know
about sand filters is that the top layer should be cleaned off and replaced regularly.

85
Today, storing water makes use of different containers. If you’re going to use plastic, keep
the following thoughts in mind:
❖ Not all plastic containers are safe for food and water. Make sure that the outside
of your chosen plastic has the recycling symbol with a number in the range of 1
to 7. Be wary of the number 7 however. Although it is food grade just like the
others, if the container was not used for any kind of food, do not trust it.
❖ The best food-grade containers are those that are marked with the number 2.
❖ If you’re going to existing plastic containers in your home, do not reuse old milk
jugs or cardboard-type juice boxes.
❖ Make sure to wash the plastic container thoroughly. If you can’t seem to get rid
of the smell, do not use it. Follow these steps when you’re sanitizing plastic
containers like Gatorade bottles:
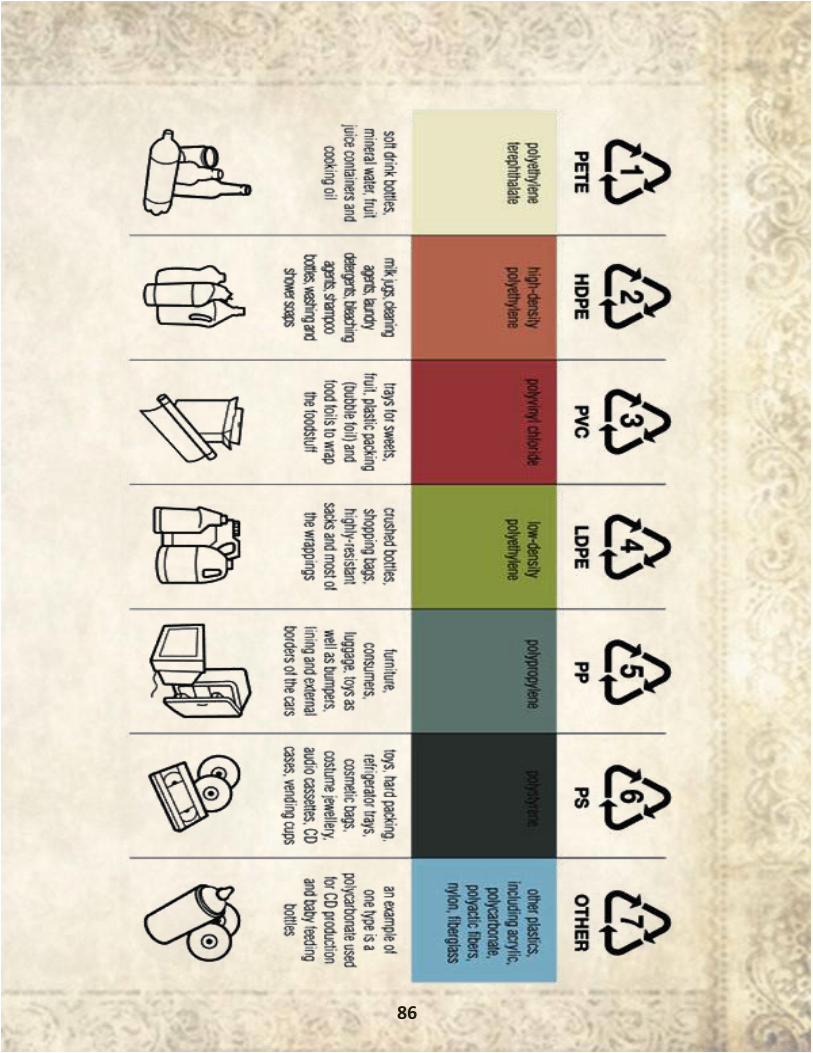
86
87
❖ Wash each bottle using water and dish soap.
❖ Sanitize each bottle and cap inside out with a bleach solution of 1 tsp. bleach
mixed in 1 quart of water.
o Rinse the sanitized bottle with clean water.
o Fill each bottle with tap water.
o Add two drops of standard unscented household bleach (4–6% sodium
hypochlorite).
o Empty and refresh your water storage once each year.
❖ If you’d like to be completely safe, the best containers to use are new ones.
If you’re going to choose glass containers, here are some guidelines:
❖ Make sure that your glass container is food safe. Some containers may have
been used to store chemicals, which could endanger you and your loved ones.
❖ Remember that glass can break easily. It can also crack under freezing
temperatures. Worse, it can have tiny, invisible flaws you are unable to see that
could trap contaminates in your water. Prepare proper storage.
❖ The best form of glassware that is safe for food and water is Borosilicate glass,
more popularly known as Pyrex.
❖ Watch out for soda-lime-based glass that calls itself Pyrex as it is not heat
resistant (i.e., Mason jars).
Another form of storage can be stainless steel, which was actually based on the
antibacterial properties of silver.
❖ Consider whether or not your water was treated with chlorine. Although
stainless steel is actually more durable than the first two options, chlorine alone
could corrode the container.
❖ It is better to look for steel drums that are lined a with protective coating to
lessen the risks.
❖ As with any container, make sure that your stainless steel containers are food
grade.
Filtering Water Supplies
In the early 1800s, sailors began filtering the water. The wooden casks would rot in time,
thus affecting the quality of the water. To preserve the freshness, they began adding
gunpowder to their putrid water resources. Also known as black powder, gunpowder was
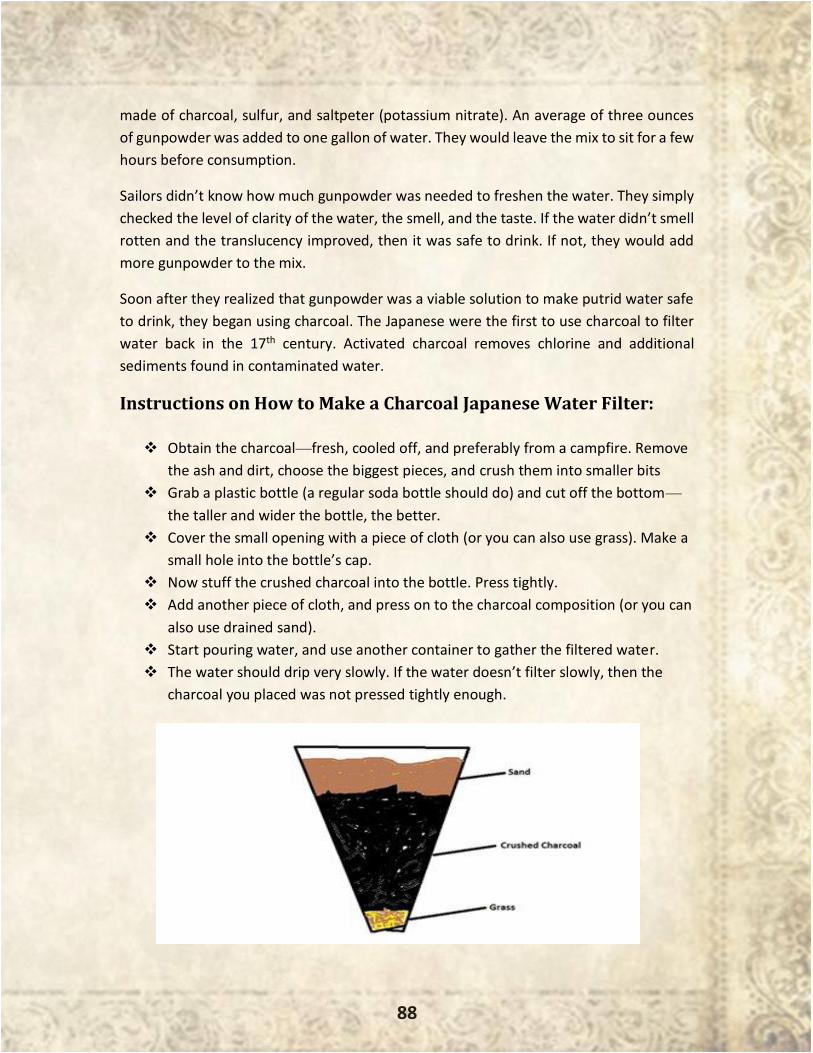
88
made of charcoal, sulfur, and saltpeter (potassium nitrate). An average of three ounces
of gunpowder was added to one gallon of water. They would leave the mix to sit for a few
hours before consumption.
Sailors didn’t know how much gunpowder was needed to freshen the water. They simply
checked the level of clarity of the water, the smell, and the taste. If the water didn’t smell
rotten and the translucency improved, then it was safe to drink. If not, they would add
more gunpowder to the mix.
Soon after they realized that gunpowder was a viable solution to make putrid water safe
to drink, they began using charcoal. The Japanese were the first to use charcoal to filter
water back in the 17th century. Activated charcoal removes chlorine and additional
sediments found in contaminated water.
Instructions on How to Make a Charcoal Japanese Water Filter:
❖ Obtain the charcoal—fresh, cooled off, and preferably from a campfire. Remove
the ash and dirt, choose the biggest pieces, and crush them into smaller bits
❖ Grab a plastic bottle (a regular soda bottle should do) and cut off the bottom—
the taller and wider the bottle, the better.
❖ Cover the small opening with a piece of cloth (or you can also use grass). Make a
small hole into the bottle’s cap.
❖ Now stuff the crushed charcoal into the bottle. Press tightly.
❖ Add another piece of cloth, and press on to the charcoal composition (or you can
also use drained sand).
❖ Start pouring water, and use another container to gather the filtered water.
❖ The water should drip very slowly. If the water doesn’t filter slowly, then the
charcoal you placed was not pressed tightly enough.
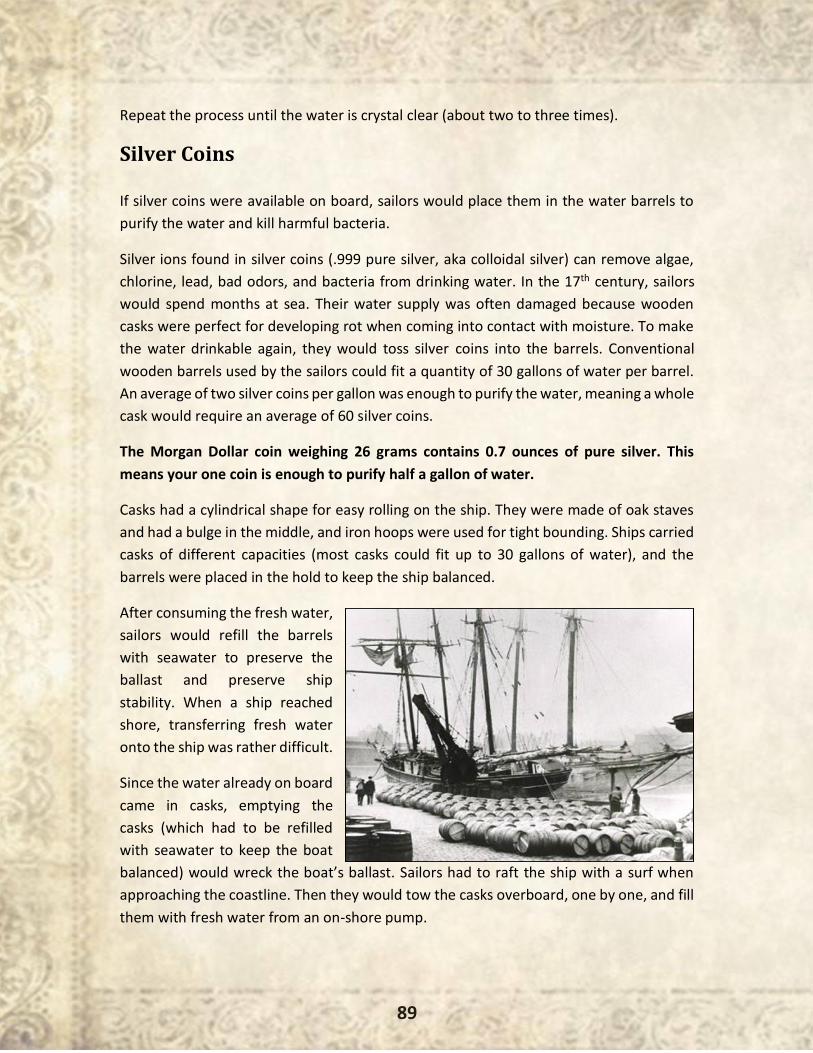
89
Repeat the process until the water is crystal clear (about two to three times).
Silver Coins
If silver coins were available on board, sailors would place them in the water barrels to
purify the water and kill harmful bacteria.
Silver ions found in silver coins (.999 pure silver, aka colloidal silver) can remove algae,
chlorine, lead, bad odors, and bacteria from drinking water. In the 17th century, sailors
would spend months at sea. Their water supply was often damaged because wooden
casks were perfect for developing rot when coming into contact with moisture. To make
the water drinkable again, they would toss silver coins into the barrels. Conventional
wooden barrels used by the sailors could fit a quantity of 30 gallons of water per barrel.
An average of two silver coins per gallon was enough to purify the water, meaning a whole
cask would require an average of 60 silver coins.
The Morgan Dollar coin weighing 26 grams contains 0.7 ounces of pure silver. This
means your one coin is enough to purify half a gallon of water.
Casks had a cylindrical shape for easy rolling on the ship. They were made of oak staves
and had a bulge in the middle, and iron hoops were used for tight bounding. Ships carried
casks of different capacities (most casks could fit up to 30 gallons of water), and the
barrels were placed in the hold to keep the ship balanced.
After consuming the fresh water,
sailors would refill the barrels
with seawater to preserve the
ballast and preserve ship
stability. When a ship reached
shore, transferring fresh water
onto the ship was rather difficult.
Since the water already on board
came in casks, emptying the
casks (which had to be refilled
with seawater to keep the boat
balanced) would wreck the boat’s ballast. Sailors had to raft the ship with a surf when
approaching the coastline. Then they would tow the casks overboard, one by one, and fill
them with fresh water from an on-shore pump.
90
Some sailors used the sailcloth catch system to refill their barrels. They would first wash
off the salt accumulated in the casks; then they would taste the water to make sure it was
sweet and would then refill their barrels before embarking on another adventure. In
extreme circumstances, they would even collect dew (condensed water) from the surface
of their ships and drink it to stay hydrated.
Rainwater Harvesting
A great method to stay hydrated at sea required harvesting rainwater. Sailors in the 17th
century would catch rainwater by plugging scuppers on the main deck. But in time, they
realized that the deck was not a clean environment, and they started using the
superstructure of the ship’s roof to harvest fresh rainwater. Then they would set up
buckets to catch the water or spread a horizontal canvas attached to the rigging and mast.
The accumulated water was directed into the casks.
Harvesting Rainwater
People have been harvesting rainwater for centuries, and the techniques and methods
used to store it have evolved tremendously. Starting from catching rainwater in large
buckets and bins to using more advanced systems, it all depends on the purpose you have
in mind for the water that you need. Landowners store rainwater for garden purposes
only; other people living in arid parts of the country might want it to survive, or at the
very least, they can cut back on expenses on their monthly water bill.
Contrary to popular belief, not all rainwater is safe to drink. It is important to check the
pH level of your water before consuming it. (Neutral pH levels are between 6.8 and 8.
Rainwater with a pH level above 8 is alkaline and shouldn’t be consumed until after it has
been properly filtered and purified. It may come from the sky, but before reaching the
ground, it may come in contact with harmful pollutants in the atmosphere.) If you live in
rainy areas of the country, you can easily have one or more barrels (up to 55 gallons)
attached to your house’s roof pipes.
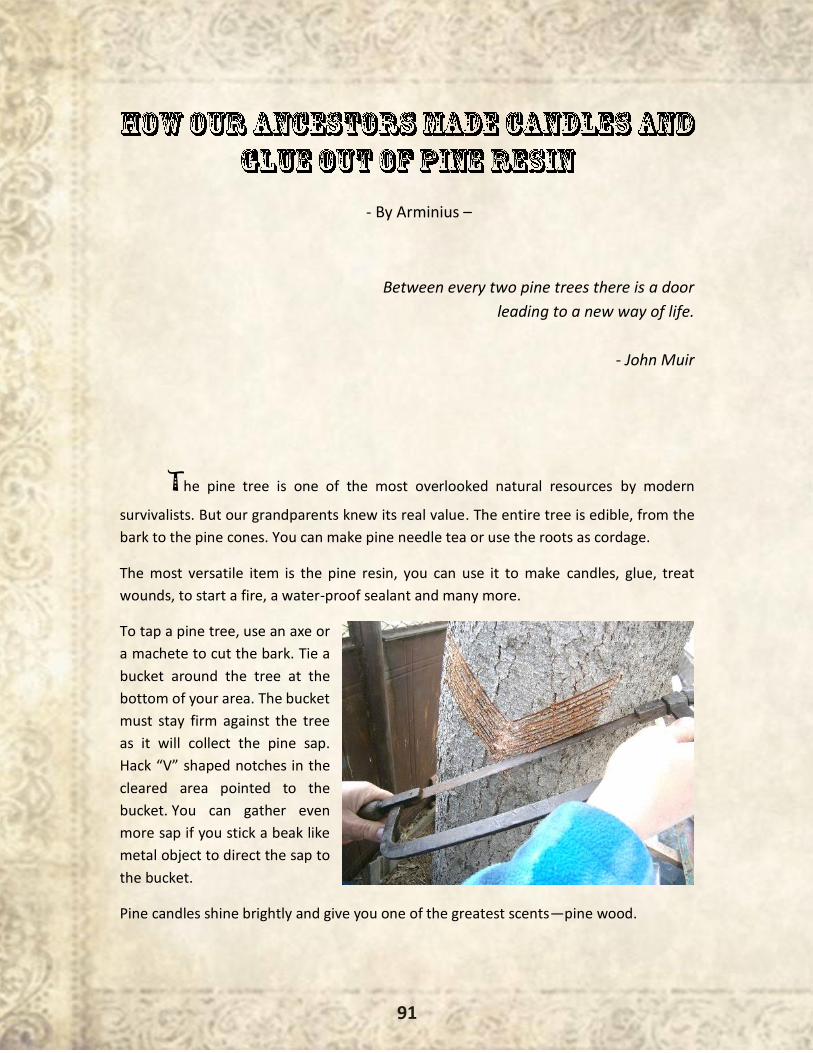
91
- By Arminius –
Between every two pine trees there is a door
leading to a new way of life.
- John Muir
The pine tree is one of the most overlooked natural resources by modern
survivalists. But our grandparents knew its real value. The entire tree is edible, from the
bark to the pine cones. You can make pine needle tea or use the roots as cordage.
The most versatile item is the pine resin, you can use it to make candles, glue, treat
wounds, to start a fire, a water-proof sealant and many more.
To tap a pine tree, use an axe or
a machete to cut the bark. Tie a
bucket around the tree at the
bottom of your area. The bucket
must stay firm against the tree
as it will collect the pine sap.
Hack “V” shaped notches in the
cleared area pointed to the
bucket. You can gather even
more sap if you stick a beak like
metal object to direct the sap to
the bucket.
Pine candles shine brightly and give you one of the greatest scents—pine wood.
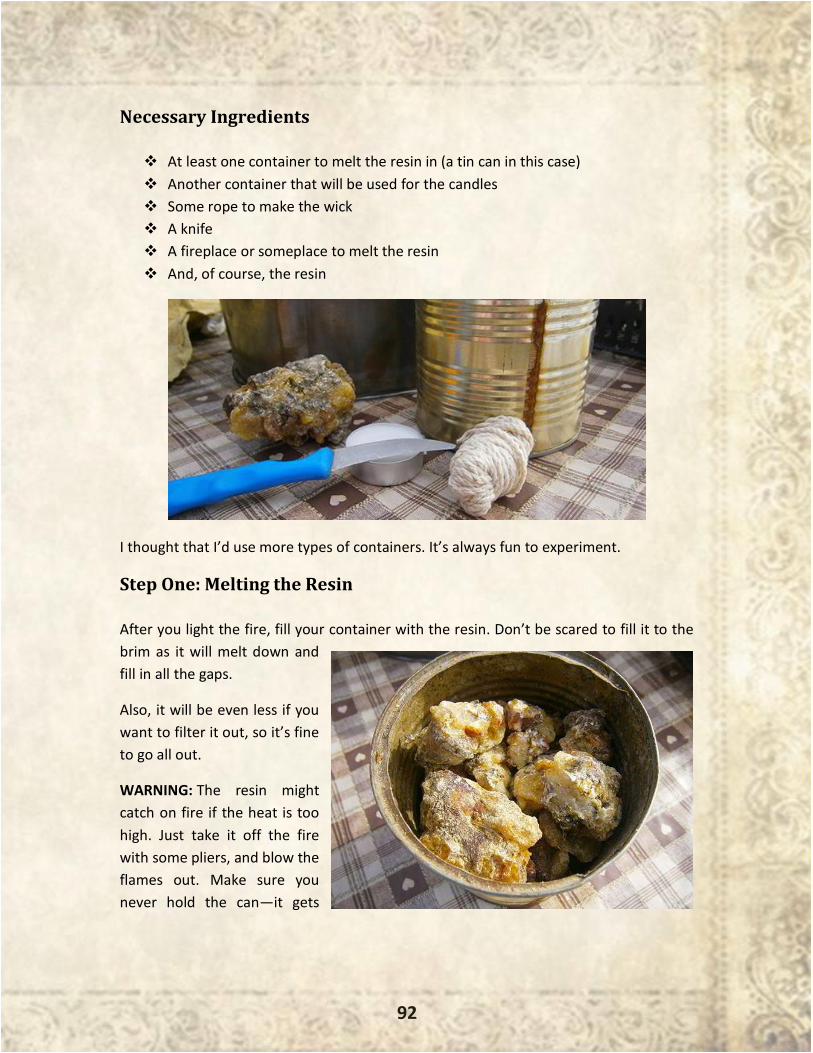
92
Necessary Ingredients
❖ At least one container to melt the resin in (a tin can in this case)
❖ Another container that will be used for the candles
❖ Some rope to make the wick
❖ A knife
❖ A fireplace or someplace to melt the resin
❖ And, of course, the resin
I thought that I’d use more types of containers. It’s always fun to experiment.
Step One: Melting the Resin
After you light the fire, fill your container with the resin. Don’t be scared to fill it to the
brim as it will melt down and
fill in all the gaps.
Also, it will be even less if you
want to filter it out, so it’s fine
to go all out.
WARNING: The resin might
catch on fire if the heat is too
high. Just take it off the fire
with some pliers, and blow the
flames out. Make sure you
never hold the can—it gets
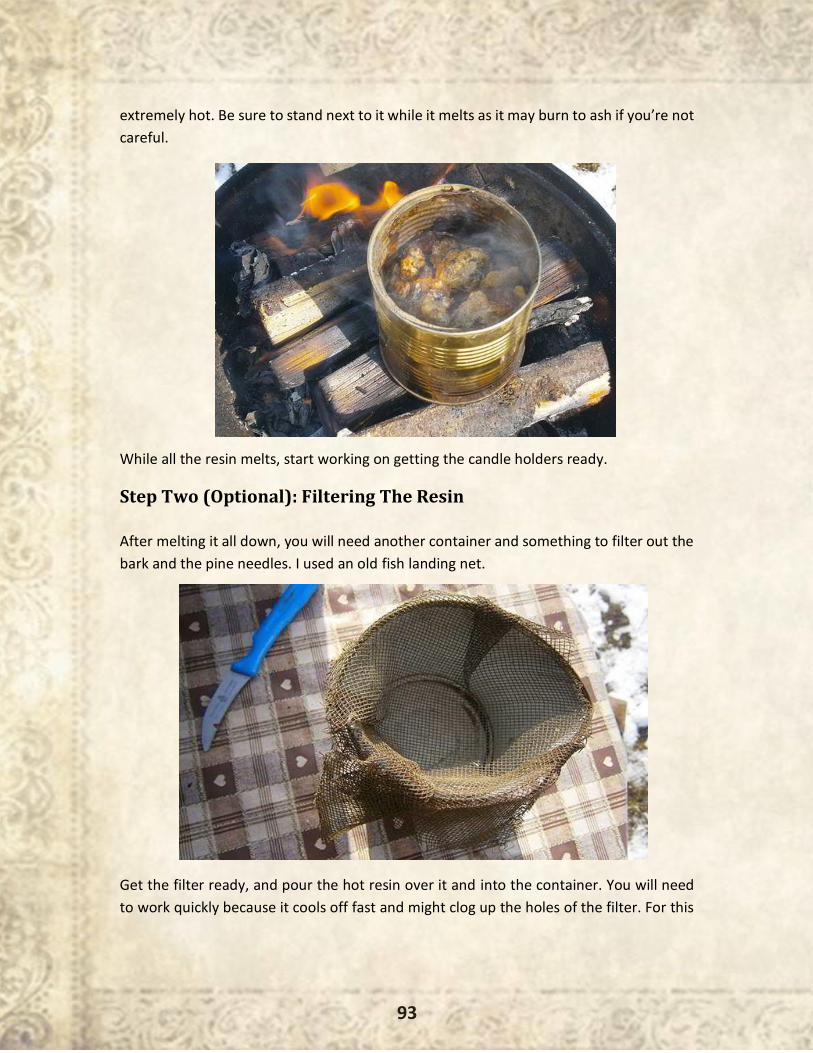
93
extremely hot. Be sure to stand next to it while it melts as it may burn to ash if you’re not
careful.
While all the resin melts, start working on getting the candle holders ready.
Step Two (Optional): Filtering The Resin
After melting it all down, you will need another container and something to filter out the
bark and the pine needles. I used an old fish landing net.
Get the filter ready, and pour the hot resin over it and into the container. You will need
to work quickly because it cools off fast and might clog up the holes of the filter. For this
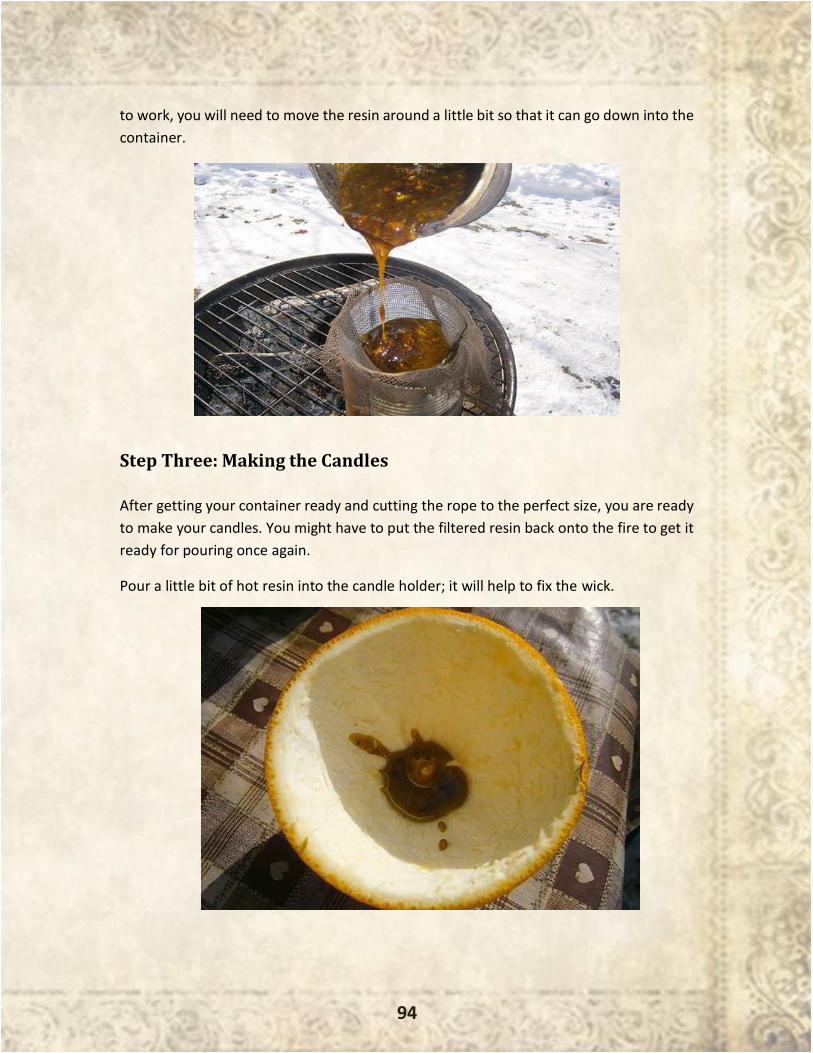
94
to work, you will need to move the resin around a little bit so that it can go down into the
container.
Step Three: Making the Candles
After getting your container ready and cutting the rope to the perfect size, you are ready
to make your candles. You might have to put the filtered resin back onto the fire to get it
ready for pouring once again.
Pour a little bit of hot resin into the candle holder; it will help to fix the wick.
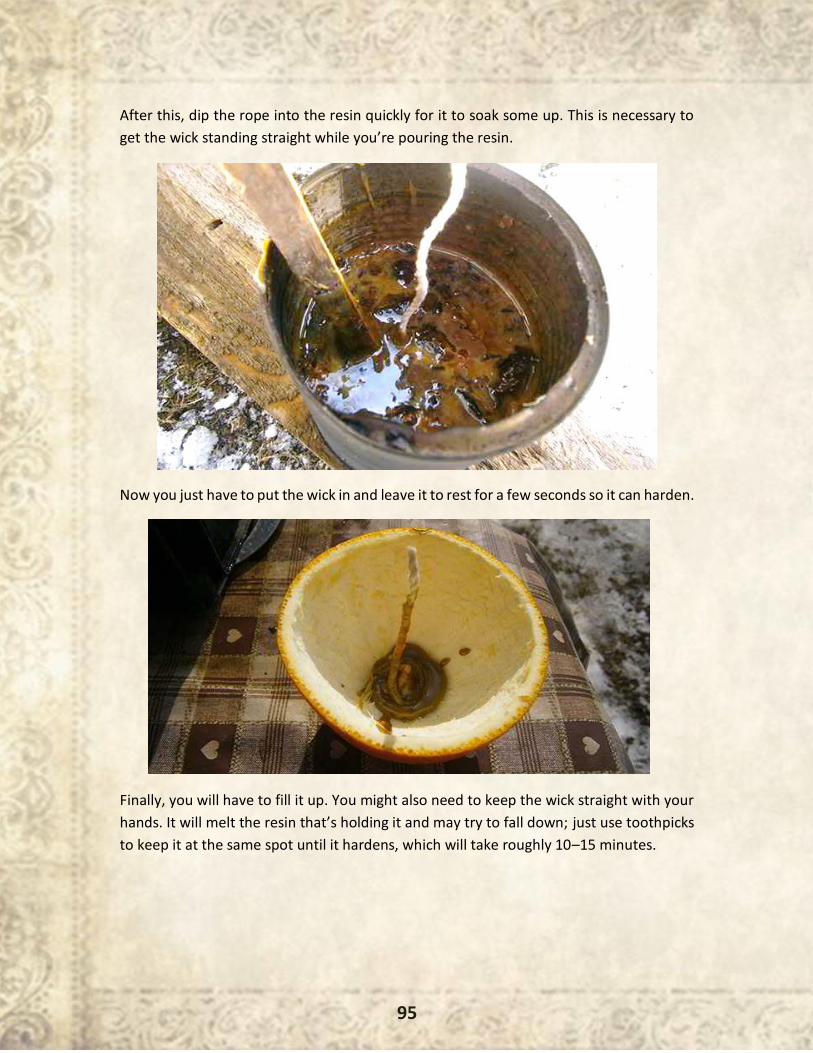
95
After this, dip the rope into the resin quickly for it to soak some up. This is necessary to
get the wick standing straight while you’re pouring the resin.
Now you just have to put the wick in and leave it to rest for a few seconds so it can harden.
Finally, you will have to fill it up. You might also need to keep the wick straight with your
hands. It will melt the resin that’s holding it and may try to fall down; just use toothpicks
to keep it at the same spot until it hardens, which will take roughly 10–15 minutes.
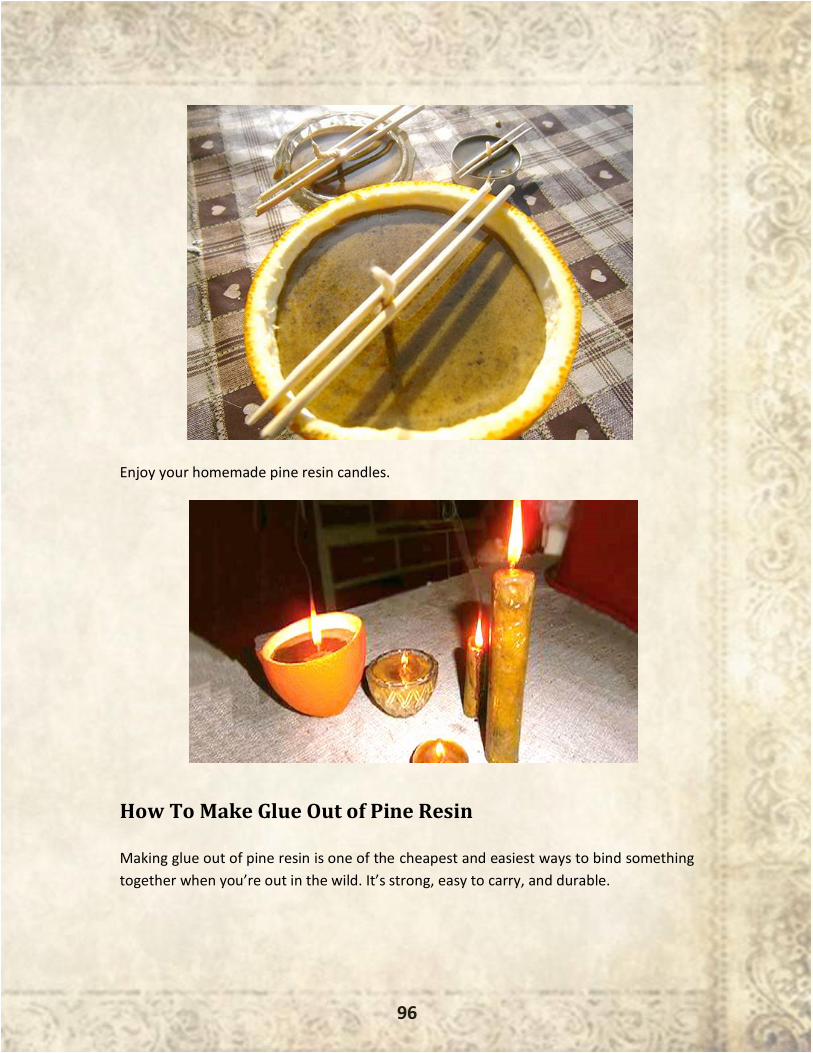
96
Enjoy your homemade pine resin candles.
How To Make Glue Out of Pine Resin
Making glue out of pine resin is one of the cheapest and easiest ways to bind something
together when you’re out in the wild. It’s strong, easy to carry, and durable.
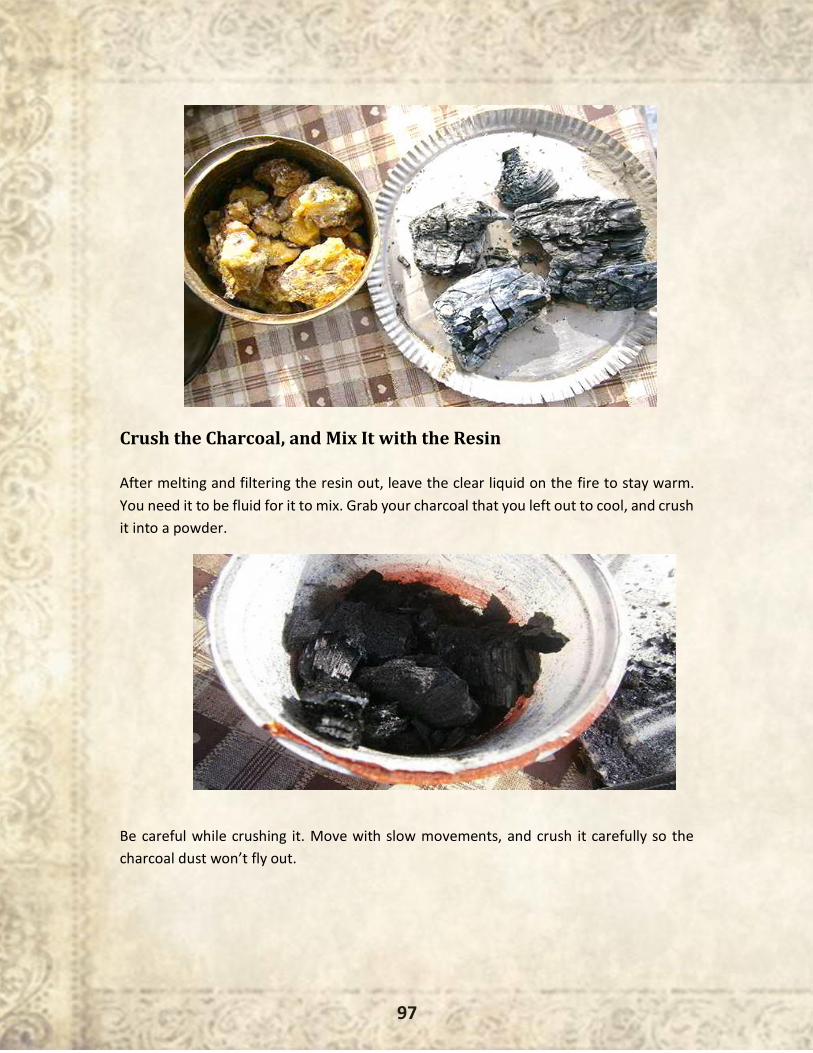
97
Crush the Charcoal, and Mix It with the Resin
After melting and filtering the resin out, leave the clear liquid on the fire to stay warm.
You need it to be fluid for it to mix. Grab your charcoal that you left out to cool, and crush
it into a powder.
Be careful while crushing it. Move with slow movements, and crush it carefully so the
charcoal dust won’t fly out.
98
After crushing it, dump it over the resin. What I did was put two parts resin and one part
charcoal, although it depends on how you like it. Experiment with it, and find the best for
you.
Making it is pretty simple and easy, but you have to work quickly as the resin hardens fast
and even faster with the crushed charcoal.

99
Now that you have your pine resin glue, you just need to test it out. I heated the glue up
once again and dumped some onto the bottom of this large bowl, placing a wine bottle
onto it for it to stick.
After that, I let it cool for around one minute. After lifting and turning the bowl over, the
wine bottle was stuck to it completely. I couldn’t remove it without breacking the glass.
The glue works, and it’s strong, durable, it dries quickly and isn’t sticky or messy. It’s
completely rock hard, which makes it easy to carry around. If you want, you can put it
inside a small can or stick it to a piece of wood for easy access.
100
- By Ruff Simons -
“If we desire to avoid insult, we must be able to repel
it; if we desire to secure peace, one of the most
powerful instruments of our rising prosperity, it must
be known that we are at all times ready for War.”
― George Washington
Westerns give us a vivid picture of law enforcement in the Old West. When a
gang of outlaws starts to terrorize a town, the frightened inhabitants beg their sheriff to
do something—but usually he’s either corrupt, a coward, or just not up to the job.
Everything seems lost until an enigmatic stranger appears, confronts the troublemakers,
and saves the day. It’s a striking image—but it’s wrong in almost every detail.
The people who settled the West were not shrinking violets. The fact that they were out
there in the first place should tell us that. These were people who’d left their homes and
traveled—sometimes from the cities of the East Coast and often all the way from
Europe—to make a new life in uncharted wilderness.
They were pioneers and adventurers—bold, determined people. They may have lived in
towns, but in most cases, they had built those towns themselves—few western
settlements at the time had seen two generations raised there, and many were only a few
years old. Even recent arrivals had struck out on a long, tough, and often dangerous
journey to reach their new home, and not many of them were easily scared.
Then there were the lawmen. Movies and novels often mix up the roles of marshal and
sheriff, but they were very different. The history of the Old West mostly played out in
territories that hadn’t yet achieved statehood.

101
That meant there were no state governments to take care of law enforcement.
The federal government’s
response was to send U.S.
marshals into the new territories.
The United States Marshals Service
is the country’s oldest law
enforcement agency and was set
up in 1789 as the enforcement arm
of the federal courts. Marshals
were ideal for the job because they
had extensive powers; they could
hire local deputies or recruit a posse. Virgil Earp was a U.S. Marshal, and he hired Wyatt
Earp (picture) and Doc Holliday as assistants.
But while marshals had a lot of power, there weren’t many of them—certainly not enough
to cover the huge and growing expanses of the West.
As towns became established, they started to take responsibility for their own law
enforcement in the shape of local sheriffs. The office of sheriff is an ancient one dating
back to Saxon England, but in the West, it took on a distinctive form. Instead of an official
appointed by the king, these new sheriffs were elected by the townspeople and given
responsibility for law and order.
Because they were elected, sheriffs tended to be trusted. There were exceptions
however—elections could be rigged, or enough voters could be bribed to elect an
unpopular candidate—but in general, the job was given to someone the people thought
could do it.
The position came with a lot of power and even more responsibility. The sheriff could
appoint deputies to help him with his duties, which were many. Sheriffs also often acted
as tax collectors and resolved disputes over grazing rights or access to water. They’re most
famous as lawmen though.
In the early days, before the western territories achieved statehood, sheriffs literally had
the power of life and death. A sheriff could arrest wrongdoers, hold a trial, and carry out
the sentence. Sometimes that meant locking a drunk up in the town jail for a few days;
sometimes it meant a hanging.
102
Crime in the West
What kinds of crimes did those sheriffs have to deal with though? Another stereotype we
get from movies is that the Old West was a lawless, violent place. The truth is, in general,
it wasn’t.
In fact, a typical Western town in the 1860s had a lot less crime and disorder than it does
today. That’s mostly down to the people who lived there and the lives they led. The new
lands of the West attracted a wide range of personalities, from visionaries that dreamed
of building a paradise to misfits on the run from the law to families, but the untamed land
was a ruthless judge.
To survive more than a few weeks out there, never mind to successfully establish a farm
or business, you had to learn to work together. Neighbors helped each other by trading
supplies or lending muscle to a building project. Merchants gave credit on an honor
system, and those who abused that trust soon found themselves unwelcome in town.
After the Civil War, the ranks of the pioneers swelled with veterans, who brought their
own camaraderie with them.
All this meant a level of trust soon developed in a Western town. People knew their
neighbors; they worked beside them and socialized with them. They knew they could rely
on each other for help. In this atmosphere, petty crime was frowned on, and violence was
surprisingly rare.
When violence threatened, it usually came from outside. There were gangs of outlaws
that were often made up of men who’d failed to fit in with the frontier society and banded
together with others like them. As big ranchers moved in and came into conflict with small
farmers, they sometimes hired gangs of gunslingers to enforce their will.
Later the early railway barons would resort to the same tactics. When the federal
government began its war against the Plains Indians, the previous good relations between
settlers and the tribes broke down, and warriors began attacking farms and even small
towns.
In fact, the threats that faced those old-time lawmen were a lot like the ones you’re likely
to be dealing with in a SHTF scenario, but they’re probably going to fall on you a lot
quicker.
103
After all, in the West, society was still being built, home by home and farm by farm. The
majority of the people were part of that effort. They were used to taking care of
themselves, growing their own food, digging wells for water, and resolving disputes like
adults.
Now imagine what it will be like when a developed society like ours, full of people that
think meat grows in shrink-wrapped packages, collapses. Suddenly all those people have
to fend for themselves—and unlike the old pioneers, they don’t have any idea how to do
it. It won’t be long before marauding gangs, desperate for basic necessities like food and
water, are trying to take them from anyone who looks like they’re managing to cope with
the situation.
Existing law enforcement probably won’t be able to help you much. either. What
elements of it haven’t collapsed will be completely overwhelmed because chaos will
spread far and fast. If you want to protect yourself, your family, and your property in this
scenario, you’re going to have to do it yourself.
Many people in the USA now realize this and aim to be prepared, but a lot of them are
going the wrong way about it. This is where the lessons of those old sheriffs come in.
To apply the same techniques as sheriffs in the West used, it helps to look at how your
own situation resembles theirs—and how it’s different.
Equipment
Guns
The USA’s high rate of gun ownership is what makes it possible to defend your community
if society breaks down—but it also increases the threat. You can bet that any group of
marauders will quickly pick up every gun they can get their hands on, while hungry
refugees could also be carrying to defend themselves. Having the right guns available is
going to make a huge difference to your efforts to preserve a little patch of law.
Colt still calls their Single Action Army revolver—the famous Peacemaker—“The gun that
won the West.” It wasn’t. In fact, the role of handguns in the Old West has been hugely
exaggerated, something else we can thank Hollywood for. Yes, many famous figures from
that time carried one, but they were nowhere near as common as the movies make out.
Almost every household on the frontier was armed, but guns were expensive—compared
to the average income, a lot more expensive than they are now—and few people could
104
afford a collection of them. They tended to buy one gun and would pick one that would
be as versatile as possible. Usually, it wasn’t a revolver.
For the typical settler in one of the new American territories, a handgun wasn’t actually
good for much. He needed a gun to put food on the table, maybe to hunt animals for their
pelts, and to keep critters away from his crops. Self-defense was just something else it
could be used for if necessary, but few people saw that as their gun’s main function, and
if they did use it for protection, it was more likely to be against an animal than a person.
The popular image of every cowboy and rancher walking around with a six-shooter
strapped to his hip simply isn’t correct, as period photos show. Some did carry revolvers,
but most didn’t. Rifles were far more common weapons in the West because they could
be used for hunting and had a longer range. After the Civil War, there was no shortage of
military-surplus rifle muskets, and many settlers carried those or similar weapons.
If there really is a gun that won the West, though, it has to be the humble 12-gauge
shotgun. It’s hard to imagine a more versatile workhorse firearm than this. It can be
loaded with anything from a single massive projectile—ball then, slug now—to a charge
of rock salt, so it’s capable of bringing down most game. Anything from small birds to the
largest deer can be taken with an appropriately loaded shotgun.
It’s also ideal for self-defense at short and medium range. No pistol cartridge comes close
to the power of a 12-gauge, and loaded with buckshot, it also has a much longer effective
range. Familiarity plays a part since in an emergency you’ll be a lot better off with the gun
you carry and use every day, but unless you’ve done hundreds of hours of specialist police
or military handgun training, a shotgun is just an easier weapon to protect yourself with.
The same things that made a shotgun the ideal weapon in the 19th century West still hold
true today; in fact, if anything, its advantages have increased. There’s a wider choice of
ammunition than ever, including rifled slugs that are accurate and hard-hitting out to 100
yards or more. Traditional side-by-sides have been replaced with pump actions, which are
extremely reliable but offer higher ammunition capacity.
Shotguns are designed for rapid, instinctive aiming and are useful for hunting and a critical
advantage in a self-defense situation. They also have a huge psychological effect. The
sound of a pump shotgun chambering a round is instantly recognizable and highly
intimidating. Cops will tell you that it often makes intruders turn tail and run without a
single shot being fired.
105
If it’s SHTF time, a lot of the intruders you’ll be facing are starving refugees from the city.
You don’t want them stealing your supplies, but you don’t want to shoot them either if
you can avoid it.
Communications
It’s amazing how quickly we’ve become used to today’s hyper-connected world. Most of
us are never out of touch, wherever we are, but only 25 years ago cell phones were a
rarity and mobile Internet completely unheard of. If you wanted to talk to someone while
you were out, you found a pay phone and hoped they were at home.
In the Old West, even that option didn’t exist. There were no telephones, and the only
quick way of communicating over long distances was the embryonic telegraph system.
The first telegraph line went up in 1844, linking Washington, D.C., with Baltimore. By 1856
there were around 40 U.S. telegraph companies, all based in the eastern states, but one
of them, which had recently renamed itself Western Union, had begun buying up many
of the others. Western Union opened the first transcontinental line in 1861 between New
York and California, and through the rest of the century, the telegraph network slowly
spread through the developing West.
Not every town had a telegraph station though, and few had more than one. Sending a
message wasn’t a fast process. Each one had to be tapped out by hand using Morse code
then written down at the receiving end. Then either the person it was addressed to had
to pick it up at the telegraph station or a Western Union runner would deliver it.
Even so, it was a huge improvement over what went before: – the Pony Express. Riders
on fast horses, changing mounts frequently, could carry a 20-pound sack of mail from St.
Joseph, Missouri, to Sacramento, California, in around ten days. The Pony Express became
a legend of the West—but it closed two days after the transcontinental telegraph started
operating. Still, riders were the quickest way to get a message between most towns out
west until well into the 1880s unless you lived beside the railroad.
If society collapses, you’ll suddenly find your communication options at least as narrow
as those of a 19th century pioneer. Cell phones, landline exchanges, and the Internet will
go down quickly. The only modern communications that will work are self-contained
radios with their own power sources, and if you don’t have them in your SHTF kit, you’ll
be back to using riders to carry messages outside your local area. If you don’t have any
horses and have to rely on automobiles or motorbikes, that’s going to use valuable fuel
106
reserves you’re probably reluctant to waste, but good communication played a big part
in keeping the Old West law abiding, and they’re just as important for you.
Organization
That brings us on to the next key point: how to organize. That’s something a lot of
preppers seem to overlook. A big part of being ready for when the SHTF is self-reliance,
and that doesn’t seem to sit well with committee meetings and organizing communities
to work together, but it needs to be talked about.
The people who set out to build the West were also self-reliant; they had to be. But they
also knew they could accomplish more by working together than they could as individuals.
One family can secure and defend their own property, but they have no control over the
surrounding area, and if a large enough group of marauders attacks them, they’re
eventually going to be overrun. A loose community of hundreds of well-prepared, self-
reliant people could be taken down by a dozen bandits if they only have to deal with them
one or two or five at a time. Now imagine the same dozen robbers approaching a typical
19th century town out on the frontier.
The town probably only had a couple of hundred people, and they lacked most of the
advantages we have today. They had no radios and no motor vehicles, and the most
common firearms were double-barrel shotguns and single-shot rifle muskets. But the
robbers had almost no chance, because the townspeople had an informal but effective
organization to keep the peace.
The Sheriff
Frontier towns couldn’t support a full-time police department; everyone was too busy
taming the surrounding land and building the town itself. Even the sheriff often wasn’t a
full-time law enforcer. Elected from among the people, he probably had a farm or
business of his own to run.
There were upsides to this though. Usually there wasn’t a divide between law
enforcement and civilians as there often is now. The townspeople knew that the sheriff
was one of their own. Most of them had voted for him; the ones who hadn’t still knew
who he was. There was an essential link between sheriff and people; they’d chosen him
to protect them from lawbreakers, and that meant he could count on their support when
he needed it.
107
Sheriffs could call for support in many ways, but one of their most valuable assets was
simply the community itself. People talked to their neighbors in a web of information
sharing that covered the district. If someone had a problem with pilfering around their
farm, pretty soon everyone else would know about it and be on the lookout.
Word would soon get to the sheriff, and he’d probably take a look around the area. Any
opportunist criminals would quickly see that the community was on the alert, and that
had a big deterrent effect.
Deputy Sheriffs
Where deterrence didn’t work, the sheriff had the power to deputize people to help him.
Larger towns might have full-time deputies that were paid from the sheriff’s share of the
taxes he collected. In smaller settlements, the sheriff might have a pool of men he knew
he could rely on but would only deputize when they were needed.
That’s the situation you’ll be in if society collapses; it’s not likely your local community
will be big enough to support full-time deputies.
A deputy sheriff, then and now, is a person appointed by the sheriff to carry out the
sheriff’s duties. They have all the powers of the sheriff himself, including investigating
crimes, making arrests, and detaining suspects and criminals. Traditionally, a deputy is an
employee of the sheriff, meaning they’re paid by the sheriff and are under their
command.
Posses
Because they had to be paid, the number of deputies a sheriff could employ was limited.
One option was to hire them only when needed, but sometimes so much manpower was
needed that it just wasn’t possible to hire that many people.
That’s where another of the sheriff’s powers came in: the right to raise a posse. This
comes from the tradition of Posse Comitatus, or “power of the community,” and like the
office of sheriff itself, it goes back to English common law.
A sheriff has the power to conscript any able-bodied man into a posse when manpower
is needed. Usually that happened when a fugitive had to be captured or a large group of
outlaws threatened the peace.
108
Members of a posse didn’t have all the powers of a sheriff or deputy, but they did have
whatever powers the sheriff delegated to them. For example, if the posse was called out
for a manhunt, its members would be given the power to arrest the fugitive. Other times
the right to self-defense would be enough for the task.
Bringing It Up To Date
So law and order in the Old West was mostly handled by sheriffs and the help they could
draw on from their communities, either by appointing deputies or raising a posse. The big
question is, when our own society collapses, how can you use those methods to keep
yourself and the people around you safe? Is it even an appropriate way to do things?
The answer to that question has to be yes. Sheriffs, unlike most modern police forces,
belong to the old tradition of policing by consent. If the people didn’t like the job their
sheriff was doing, when his term was up, they could elect someone else. That was an
important check that kept most sheriffs honest.
Now, with the police increasingly politicized and remote from the people, the element of
consent is gone. That doesn’t matter much to a powerful government that can enforce its
will through force, but what about when that government loses control? If you want to
preserve safety in the aftermath, the first thing you need to do is get consent because
people aren’t going to accept any other form of policing.
Getting yourself elected as sheriff probably isn’t realistic in an SHTF scenario. People are
likely to be too worried and too involved in looking after themselves to feel like organizing
a town hall meeting. Security is a priority though, and it’s likely to be needed sooner
rather than later.
That means someone has to take on the responsibility. If nobody else is doing it, you’re
going to have to step up, and your first task is going to be building the consent you need.
If you just start patrolling the area with a gun, the chances are you’ll be looked at with
suspicion—but with the right groundwork, you’ll get a much better response.
The first thing to do is speak to as many of your neighbors as you can. If you can get them
all together at once, great; if not, talk to them individually. Explain that you’re worried
about lawlessness affecting you and them and that you have some ideas to help prevent
any issues. Some will immediately see the advantages. Others might need some
convincing.
Focus on these points:

109
❖ Safety in numbers. A group of people working together can achieve a lot more
than the same number all doing their own thing—and that applies to security too.
❖ Better awareness. Being organized means sharing information, and that means
everyone gets advanced warning of any developing problems.
❖ Less time-consuming. If every home is 100% responsible for its own security,
everyone will spend a lot of time checking for intruders and standing guard. That
wastes time people could use producing food and adapting to the crisis.
❖ Safety for singles. Families can take turns checking perimeters at night or standing
guard when marauders are around. Anyone living alone can’t do that. If there are
older people in your area, they’re vulnerable too—and local safety is only as
strong as the weakest link.
When you show people that you’ve thought about keeping the area safe from
lawbreakers and you have a plan to do it, most of them are going to agree. You’re not
trying to take over; you just have some positive suggestions to save everyone some time
and gain them some security. What you’ll probably find is that your friends and neighbors
have been worrying about exactly those issues.
Most of us think we can protect our homes by ourselves—and most of the time we can—
but when a dozen armed and desperate people could raid our food supplies at any time,
we start to realize that we need to sleep sometime, and that leaves a lot of hours when
we’re not ready to respond. Ask anyone who’s done time in the military how exhausting
sentry duty gets.
Once the majority of your neighbors have accepted your plan, you’re ready to get started.
Without announcing it, you’ve basically got yourself elected as sheriff. Don’t get carried
away, but now you need to start putting the plan into effect—and that means you’re
going to need deputies.
This looks like the tricky bit; you have to persuade people to give up some of their time
to help you out. Actually, it’s not that hard, though, because they’ll see the benefits pretty
quickly. In exchange for taking turns at patrolling the area, they’ll be able to sleep soundly
every other night, knowing that someone’s out there keeping an eye on things and ready
to raise the alarm if necessary.
Showing the Flag
One of the most important things you can do is have a visible presence around the clock.
That’s one of the main reasons an old-time sheriff would take on deputies. Many crimes
110
are a lot easier to commit at night, but if the area’s being patrolled, that’s a big deterrent.
Obviously, you can’t do it all yourself; you need to sleep too, and you have other things
to attend to. So find a few volunteers who can see the benefits, and organize a shift
system. These people will do the job of your deputies.
How you patrol will depend a lot on the area. If it’s suburban or even urban, you might
need to control access. A small neighborhood can be held together even in a major
collapse but not if refugees and raiders have easy access.
Then again, you can’t mobilize enough manpower to cover every road. Consider
barricading most of them, at least well enough to keep vehicles out, and having
checkpoints to control the one or two you leave open. A roving deputy can check the
others on his rounds to make sure nobody’s trying to reopen them.
In a rural community, homes are likely to be a lot more scattered, and distances will be
longer. Vehicle patrols are an option here as long as fuel lasts, but outside of town, you’re
more likely to have access to horses and people that can ride. They’re a natural choice for
the job.
Anyone that’s patrolling should be armed with at least a handgun and ideally a shotgun
or rifle, and at night they’ll need a flashlight. If you have radios, they should take one of
those too. What you don’t want is to have them fully kitted out with military-style tactical
gear. They’re just guys out looking after their area and their neighbors after all. They just
have to be visible enough to be noticed.
Especially during the day, your deputies should be well-known and approachable people.
One of the most important things they can do, apart from just being seen, is to talk to
everyone they meet. That makes people feel involved in protecting themselves, which
means they’ll be more supportive of what you’re doing. It also helps information flow
around, and that’s vital. Remember, most of the modern ways of passing on information
will be gone, and just like in the Old West, it’s all going to be done by face-to-face
conversations.
That’s another reason for avoiding the military look. It’s just psychologically harder to talk
to someone that looks ready to fight a war, even if you know them. In the actual military,
a lot of soldiers whose job it is to talk to the locals will walk around with no helmet or
armor and just a sidearm, even in a high-threat environment. They take a risk—and break
the rules—because people are more likely to tell them stuff.
111
So your deputies need to talk to people, help them out where they can, and do everything
in their power to build an atmosphere where people talk about any worries they have,
anything they’ve seen, and anything else that can help preserve law and order.
Don’t just look outward either. If someone’s suffering from stress—and people will be in
an extreme SHTF scenario—you can pick up advance warning of any issues that are
developing. If someone’s started drinking heavily, getting aggressive with family or
neighbors, or possibly even thinking of suicide, you’ll get to hear about it, and you can
keep an eye on the situation before it gets out of control.
You and your deputies have other things to do too. You’ll know the places in the area
where bandits or refugees might hide out. Check them regularly for signs that anyone’s
been using them. Also take a look at anything that could endanger the community. If
there’s a levee nearby, make sure it’s visited daily—more often in heavy rain. Make sure
nobody’s playing around with local industries that use hazardous chemicals, and check
for evidence of tampering with the water supply.
One of the likeliest challenges you’ll face is groups of refugees looking for food, shelter,
and security. You can’t take them in; your own resources, no matter how well prepared
you are, will be stretched enough as the crisis goes on.
Be firm but compassionate. You need to turn them away, but don’t use force unless they
do it first. They’re Americans, after all, and they’re not to blame for what’s happened.
Some of them might even have been prepared for a social breakdown but had to move
out because their home was threatened or destroyed. Give them what help you can
without eating into your own reserves: directions to safe areas or even some medical
supplies for anyone who’s really sick or injured.
Eventually news is going to spread that your community has managed to hold itself
together, and no matter how small it is—even if it’s just you and one or two neighbors—
someone’s going to think of trying to take your resources away from you. There’s a good
chance that when they see you’re prepared and vigilant, they’ll back off and look for an
easier target—but they might not. That’s the worst-case scenario, and you need to be
prepared for it.
Raising a Posse
When you see a posse in the movies, it’s usually been raised to pursue a fugitive. That
was certainly one of their functions, but it’s not one you’re likely to be calling on. Your
112
priority is to keep wrongdoers out of your community. If they run, it’s usually best to just
let them get away; chasing them uses manpower and resources you can’t afford.
But posses had another use, and that was for self-defense against a large group of
attackers. That’s something you’re almost certainly going to need.
Sheriffs in the Old West had a legal right to draft manpower and were backed up by the
threat of penalties under Posse comitatus. That’s an advantage you won’t have. Law will
have broken down; you’re trying to hold a little piece of it together, but you can’t do it by
imposing fines on people who won’t join your posse. Ten to one they aren’t going to pay
the fines either. You’ll have to use persuasion, and again, most people will see the sense
behind it. Those who don’t will probably change their minds the first time your posse
proves its worth.
Raising a posse isn’t something you can leave until the barbarians are at the gates. You
have to know who you can call on that will be willing to help. Traditionally, that was all
able-bodied men; now it’s any able-bodied adult. You have to make sure they all have
access to a gun, ideally a long gun. If any don’t, see if you can get those with multiple guns
to loan one—and make sure the borrower knows how to use it.
Arrange a place for the posse to assemble if gunfire breaks out: somewhere central and
easily reached but not in the line of fire from the ways into your neighborhood. If you can
and if you have enough people, organize them into teams, and try to spread any veterans
among those teams to reinforce them.
When the community comes under attack, the last thing you want is for everyone to rush
toward the sound of the guns. What if the raiders have split into two groups? Keep a
reserve to deal with anything unexpected. An old sheriff wouldn’t take everyone with
him; he’d leave at least one trusted deputy and enough men to protect the town while
he was gone.
Sheriffs in the Old West had some other powers that you don’t. They could convict and
imprison or hang lawbreakers. Don’t even go there unless it’s clear the disaster is
permanent. Yes, you could lock someone up in your garage and call it the town jail, but
you’d just have to feed them. As for executions, that’s very dangerous territory. Even in
the worst-case scenario, like a major EMP attack, there’s a good chance the government
will regain control eventually. If that happens, you don’t need questions being asked
about what happened during the crisis.
113
The same goes for lynchings. If you’re the one who maintained the law—even
unofficially—and a criminal was lynched, you’re going to be held responsible for it. When
raiders arrive, aim to drive them off. If any get shot in the process, that’s legitimate self-
defense, but frontier justice is a different story.
Law enforcement in the Old West was all about the community looking after itself. It was
based on consent and on power exercised by a sheriff chosen from among the people.
That’s the way the law should be maintained, and many of today’s social problems trace
back to the fact that it isn’t done that way anymore. After the SHTF, it’s going to be
different. Surviving communities will have to return to the ways of the Western pioneers
because there will be no other way to maintain law and order.
If those communities don’t adopt the Western way of keeping the peace, then they won’t
last. However strong and self-reliant they are, they’ll inevitably be overwhelmed, one
house at a time, by those who emerge from the wreckage all around them.
The traditions of the sheriff, America’s iconic lawman, were essential to building this
country. They’ll be just as essential to rebuilding it after a collapse.
114
- By Theresa Anne DeMario -
“And God said, Behold, I have given you every herb
bearing seed, which is upon the face of all the earth,
and every tree, in the which is the fruit of a tree
yielding seed; to you it shall be for meat.”
- Genesis 1:29, King James Version
Wildcrafting is simply collecting wild edibles from your environment. This is
something everyone knew about at one point in human history.
Food grows everywhere humans have settled. If you ever find yourself in a survival
situation for an extended period of time, you’ll be downright grateful for a salad of fresh
greens or a tuber or two to supplement your rations.
In fact, when you learn to identify the wild edibles in your region, you’ll gain so many
options to add variety to your food stores that you won’t ever have to worry about
burning out on the same four flavors of MREs that you have had stored in your cellar since
1999.
The following list of herbs is far from comprehensive. All were chosen because they are
widespread across the United States and because they were most preferred by our great-
grandfathers.
There are many wonderful plants that only grow in specific regions. Be sure to do a little
research to discover what delicacy is growing near you, perhaps in your own back yard.
Still, the following plants should get you started, and once you see how easy it is to
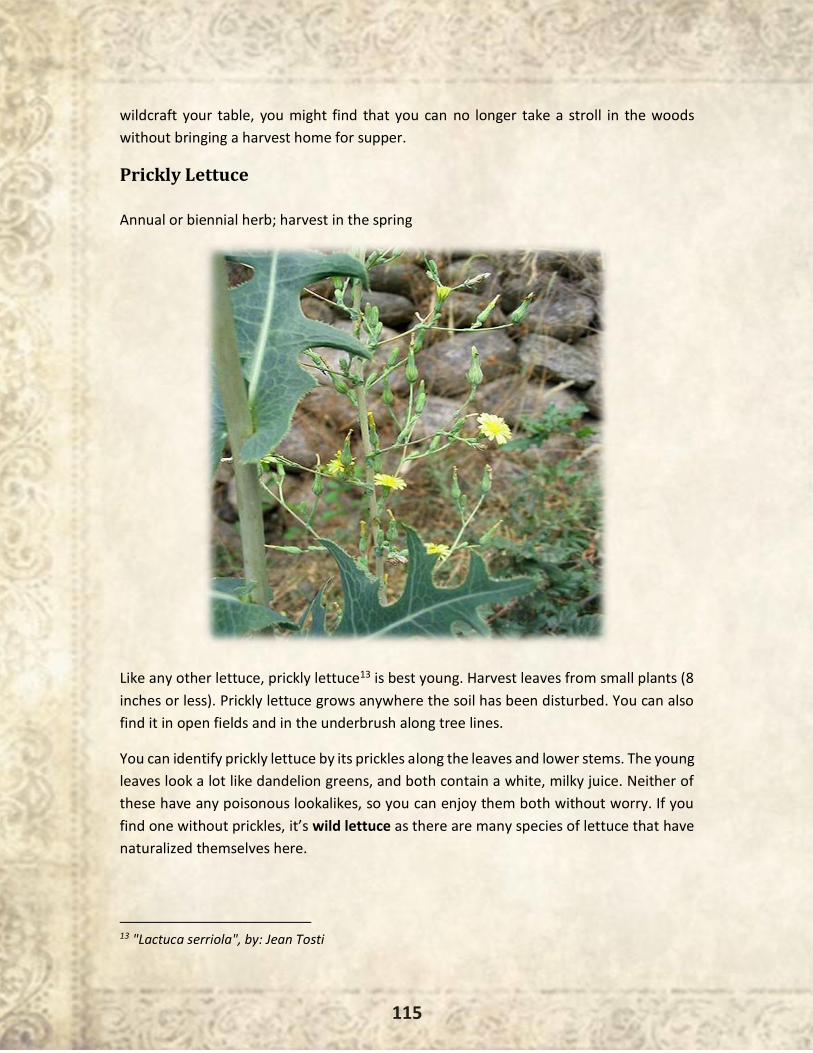
115
wildcraft your table, you might find that you can no longer take a stroll in the woods
without bringing a harvest home for supper.
Prickly Lettuce
Annual or biennial herb; harvest in the spring
Like any other lettuce, prickly lettuce13 is best young. Harvest leaves from small plants (8
inches or less). Prickly lettuce grows anywhere the soil has been disturbed. You can also
find it in open fields and in the underbrush along tree lines.
You can identify prickly lettuce by its prickles along the leaves and lower stems. The young
leaves look a lot like dandelion greens, and both contain a white, milky juice. Neither of
these have any poisonous lookalikes, so you can enjoy them both without worry. If you
find one without prickles, it’s wild lettuce as there are many species of lettuce that have
naturalized themselves here.
13 "Lactuca serriola", by: Jean Tosti
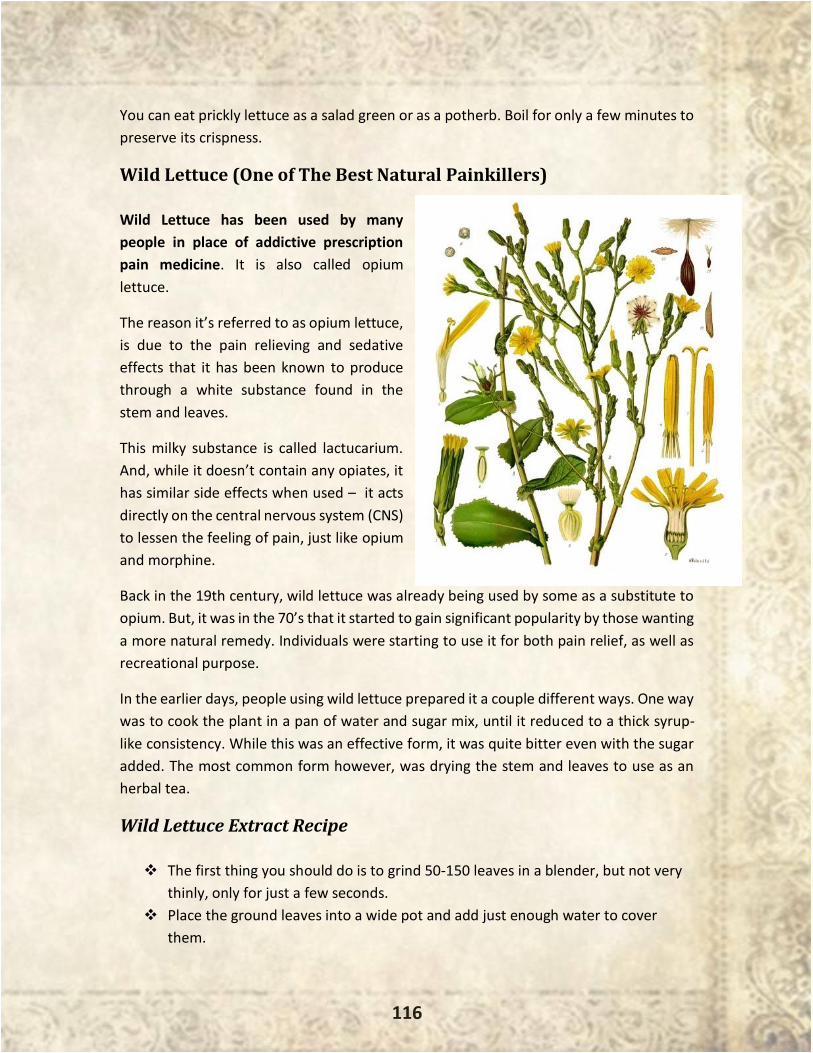
116
You can eat prickly lettuce as a salad green or as a potherb. Boil for only a few minutes to
preserve its crispness.
Wild Lettuce (One of The Best Natural Painkillers)
Wild Lettuce has been used by many
people in place of addictive prescription
pain medicine. It is also called opium
lettuce.
The reason it’s referred to as opium lettuce,
is due to the pain relieving and sedative
effects that it has been known to produce
through a white substance found in the
stem and leaves.
This milky substance is called lactucarium.
And, while it doesn’t contain any opiates, it
has similar side effects when used – it acts
directly on the central nervous system (CNS)
to lessen the feeling of pain, just like opium
and morphine.
Back in the 19th century, wild lettuce was already being used by some as a substitute to
opium. But, it was in the 70’s that it started to gain significant popularity by those wanting
a more natural remedy. Individuals were starting to use it for both pain relief, as well as
recreational purpose.
In the earlier days, people using wild lettuce prepared it a couple different ways. One way
was to cook the plant in a pan of water and sugar mix, until it reduced to a thick syrup-
like consistency. While this was an effective form, it was quite bitter even with the sugar
added. The most common form however, was drying the stem and leaves to use as an
herbal tea.
Wild Lettuce Extract Recipe
❖ The first thing you should do is to grind 50-150 leaves in a blender, but not very
thinly, only for just a few seconds.
❖ Place the ground leaves into a wide pot and add just enough water to cover
them.
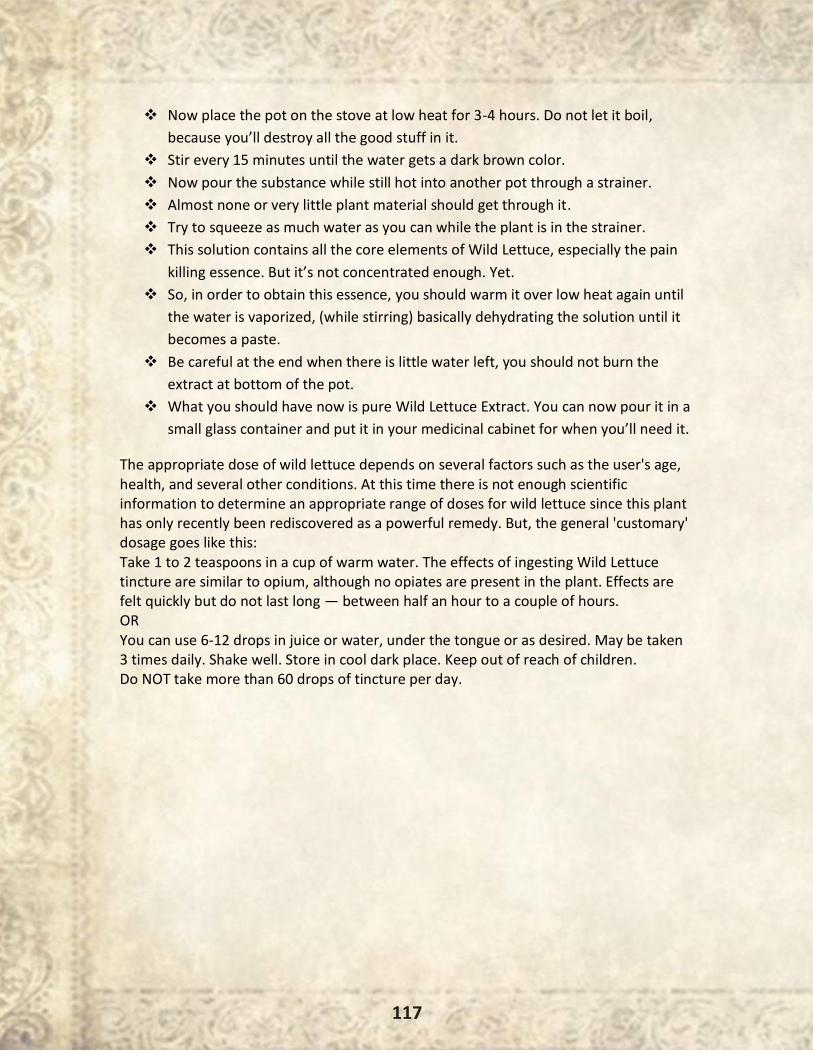
117
❖ Now place the pot on the stove at low heat for 3-4 hours. Do not let it boil,
because you’ll destroy all the good stuff in it.
❖ Stir every 15 minutes until the water gets a dark brown color.
❖ Now pour the substance while still hot into another pot through a strainer.
❖ Almost none or very little plant material should get through it.
❖ Try to squeeze as much water as you can while the plant is in the strainer.
❖ This solution contains all the core elements of Wild Lettuce, especially the pain
killing essence. But it’s not concentrated enough. Yet.
❖ So, in order to obtain this essence, you should warm it over low heat again until
the water is vaporized, (while stirring) basically dehydrating the solution until it
becomes a paste.
❖ Be careful at the end when there is little water left, you should not burn the
extract at bottom of the pot.
❖ What you should have now is pure Wild Lettuce Extract. You can now pour it in a
small glass container and put it in your medicinal cabinet for when you’ll need it.
The appropriate dose of wild lettuce depends on several factors such as the user's age, health, and several other conditions. At this time there is not enough scientific information to determine an appropriate range of doses for wild lettuce since this plant has only recently been rediscovered as a powerful remedy. But, the general 'customary' dosage goes like this: Take 1 to 2 teaspoons in a cup of warm water. The effects of ingesting Wild Lettuce tincture are similar to opium, although no opiates are present in the plant. Effects are felt quickly but do not last long — between half an hour to a couple of hours. OR You can use 6-12 drops in juice or water, under the tongue or as desired. May be taken 3 times daily. Shake well. Store in cool dark place. Keep out of reach of children. Do NOT take more than 60 drops of tincture per day.
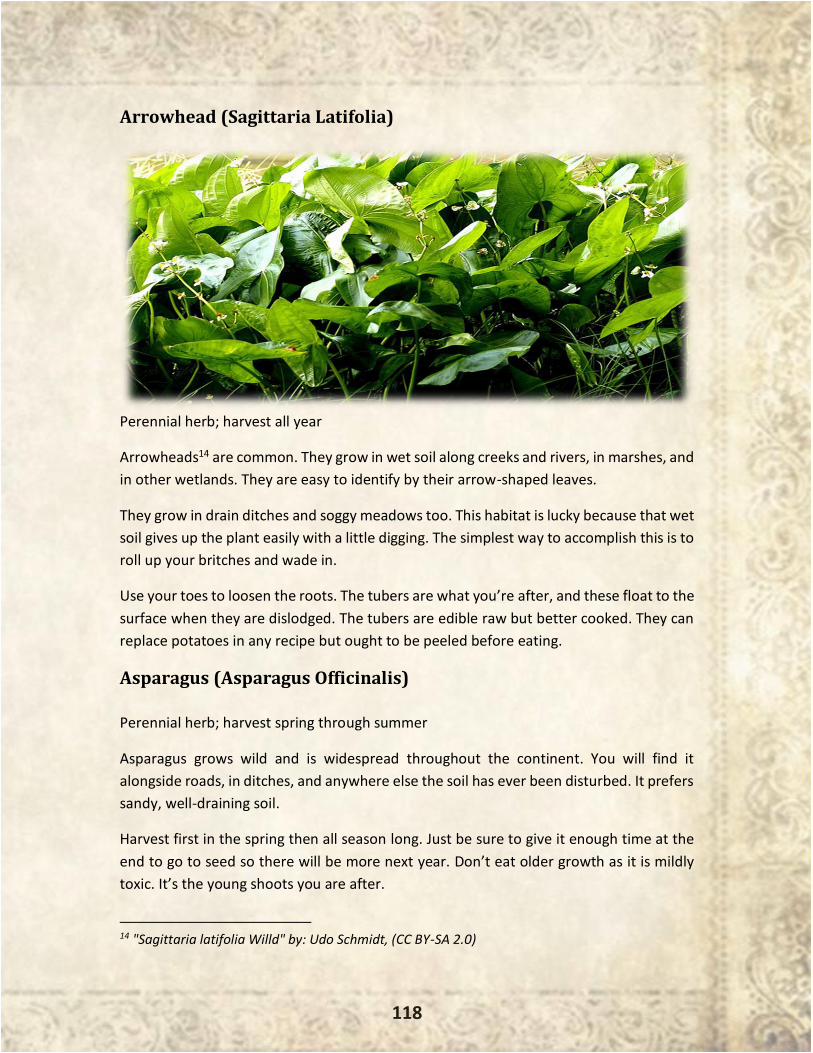
118
Arrowhead (Sagittaria Latifolia)
Perennial herb; harvest all year
Arrowheads14 are common. They grow in wet soil along creeks and rivers, in marshes, and
in other wetlands. They are easy to identify by their arrow-shaped leaves.
They grow in drain ditches and soggy meadows too. This habitat is lucky because that wet
soil gives up the plant easily with a little digging. The simplest way to accomplish this is to
roll up your britches and wade in.
Use your toes to loosen the roots. The tubers are what you’re after, and these float to the
surface when they are dislodged. The tubers are edible raw but better cooked. They can
replace potatoes in any recipe but ought to be peeled before eating.
Asparagus (Asparagus Officinalis)
Perennial herb; harvest spring through summer
Asparagus grows wild and is widespread throughout the continent. You will find it
alongside roads, in ditches, and anywhere else the soil has ever been disturbed. It prefers
sandy, well-draining soil.
Harvest first in the spring then all season long. Just be sure to give it enough time at the
end to go to seed so there will be more next year. Don’t eat older growth as it is mildly
toxic. It’s the young shoots you are after.
14 "Sagittaria latifolia Willd" by: Udo Schmidt, (CC BY-SA 2.0)
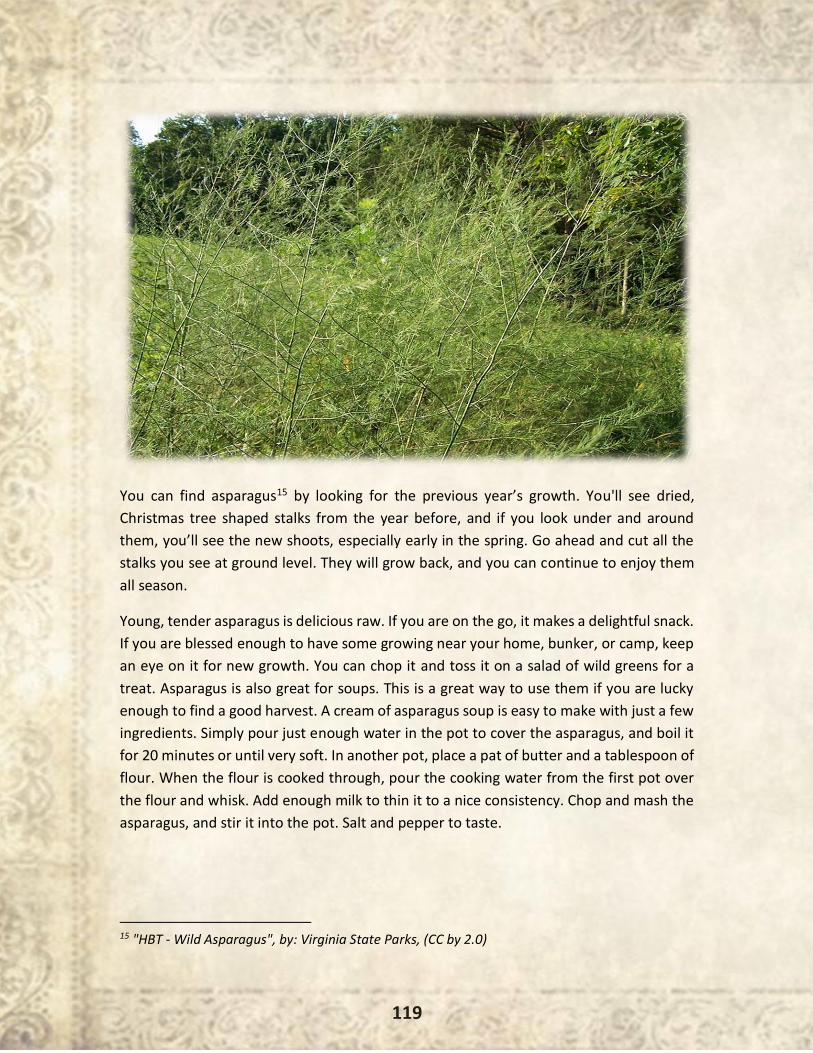
119
You can find asparagus15 by looking for the previous year’s growth. You'll see dried,
Christmas tree shaped stalks from the year before, and if you look under and around
them, you’ll see the new shoots, especially early in the spring. Go ahead and cut all the
stalks you see at ground level. They will grow back, and you can continue to enjoy them
all season.
Young, tender asparagus is delicious raw. If you are on the go, it makes a delightful snack.
If you are blessed enough to have some growing near your home, bunker, or camp, keep
an eye on it for new growth. You can chop it and toss it on a salad of wild greens for a
treat. Asparagus is also great for soups. This is a great way to use them if you are lucky
enough to find a good harvest. A cream of asparagus soup is easy to make with just a few
ingredients. Simply pour just enough water in the pot to cover the asparagus, and boil it
for 20 minutes or until very soft. In another pot, place a pat of butter and a tablespoon of
flour. When the flour is cooked through, pour the cooking water from the first pot over
the flour and whisk. Add enough milk to thin it to a nice consistency. Chop and mash the
asparagus, and stir it into the pot. Salt and pepper to taste.
15 "HBT - Wild Asparagus", by: Virginia State Parks, (CC by 2.0)
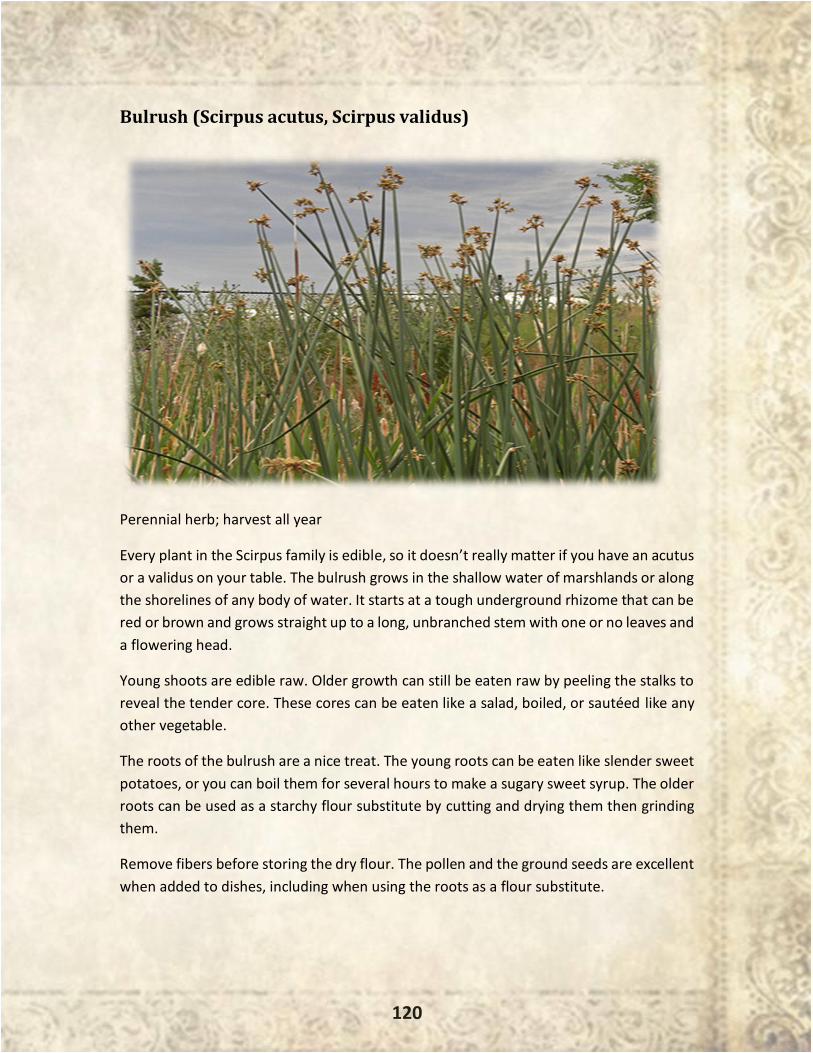
120
Bulrush (Scirpus acutus, Scirpus validus)
Perennial herb; harvest all year
Every plant in the Scirpus family is edible, so it doesn’t really matter if you have an acutus
or a validus on your table. The bulrush grows in the shallow water of marshlands or along
the shorelines of any body of water. It starts at a tough underground rhizome that can be
red or brown and grows straight up to a long, unbranched stem with one or no leaves and
a flowering head.
Young shoots are edible raw. Older growth can still be eaten raw by peeling the stalks to
reveal the tender core. These cores can be eaten like a salad, boiled, or sautéed like any
other vegetable.
The roots of the bulrush are a nice treat. The young roots can be eaten like slender sweet
potatoes, or you can boil them for several hours to make a sugary sweet syrup. The older
roots can be used as a starchy flour substitute by cutting and drying them then grinding
them.
Remove fibers before storing the dry flour. The pollen and the ground seeds are excellent
when added to dishes, including when using the roots as a flour substitute.

121
Cattails (Typha Latifolia, Typha angustifolia)
Perennial herb; harvest all year
Cattails grow all over the continent. They are plentiful and easy to find. You’ll most likely
find cattails near water. They like shallow water and marshlands the best. Identifying
cattails16 should be easy. You will usually find old growth nearby, and this will prevent you
from mistaking them for their only poisonous lookalike: the wild iris, which looks
remarkably similar along the roots and stems, so be wary.
During the cold months, you can dig up roots. Roasted, these taste like a fibrous sweet
potato or squash. It only takes a few minutes on an open fire to cook these through. Skin
these roots and add them to your soup to thicken and add a satisfying starchiness.
In the early spring, you can dig at the roots to find dormant sprouts, which are edible raw.
As the season progresses, you can find these sprouts near the roots and leafy bases of the
plant. Similarly, young stalks can also be eaten raw. Simply pull up the plant and peel back
the leaves to reveal the young, tender core. Both the sprouts and the core can be eaten
alone or added to a salad.
The stalks and unripe blooms also make a great potherb, which is cooked in a little water
until tender. Use less time for the stalks and a little more for the unripe blooms. Again,
you’ll want to peel the outer leaves first—similar to an ear of corn—before cooking. In
16 Cattails (water plant ) - Faungg (CC BY-ND 2.0)
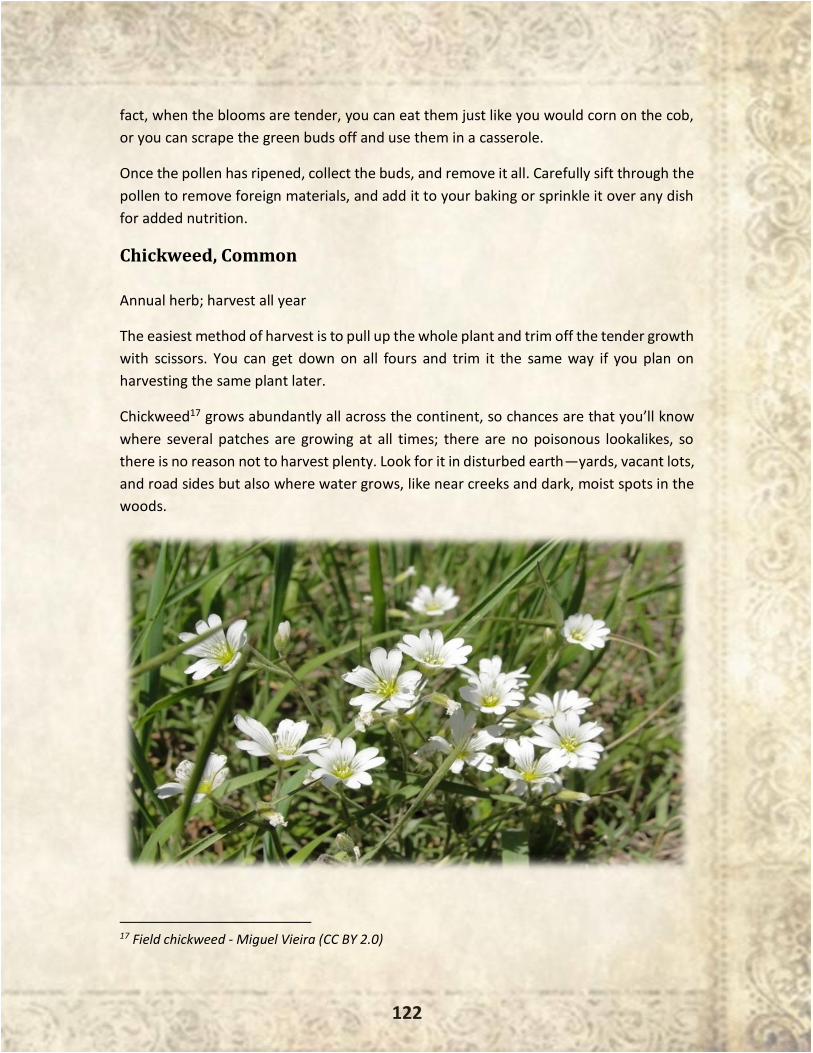
122
fact, when the blooms are tender, you can eat them just like you would corn on the cob,
or you can scrape the green buds off and use them in a casserole.
Once the pollen has ripened, collect the buds, and remove it all. Carefully sift through the
pollen to remove foreign materials, and add it to your baking or sprinkle it over any dish
for added nutrition.
Chickweed, Common
Annual herb; harvest all year
The easiest method of harvest is to pull up the whole plant and trim off the tender growth
with scissors. You can get down on all fours and trim it the same way if you plan on
harvesting the same plant later.
Chickweed17 grows abundantly all across the continent, so chances are that you’ll know
where several patches are growing at all times; there are no poisonous lookalikes, so
there is no reason not to harvest plenty. Look for it in disturbed earth—yards, vacant lots,
and road sides but also where water grows, like near creeks and dark, moist spots in the
woods.
17 Field chickweed - Miguel Vieira (CC BY 2.0)
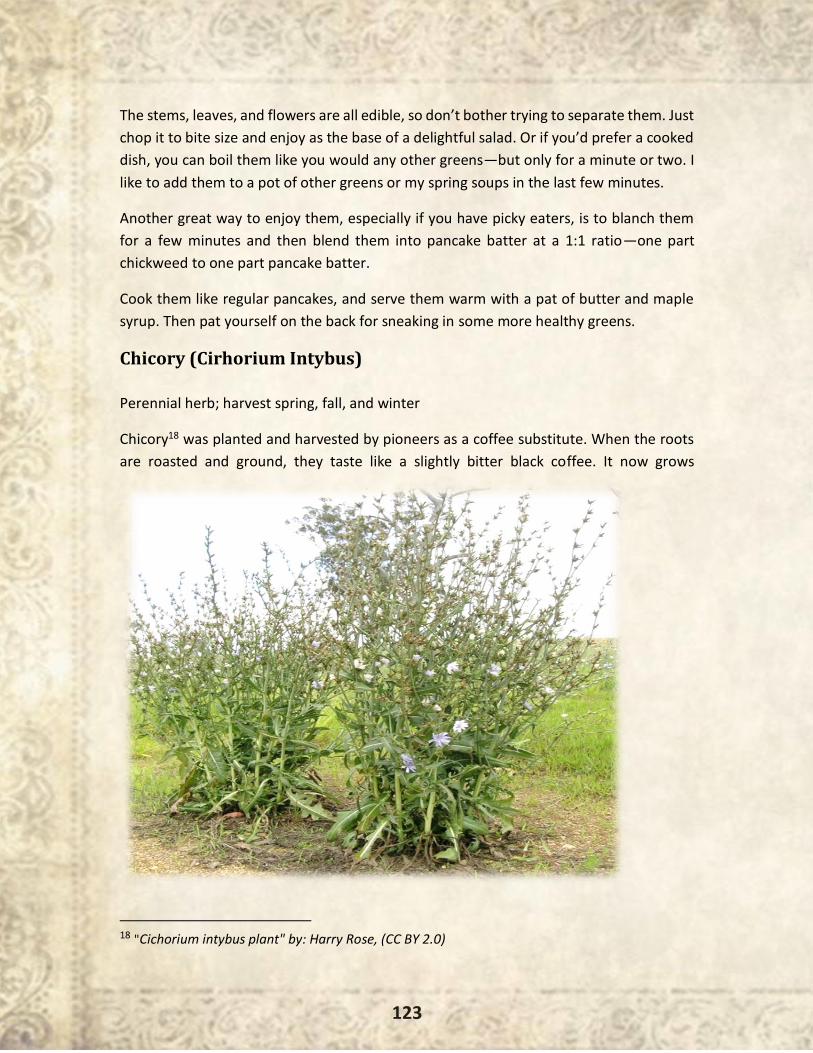
123
The stems, leaves, and flowers are all edible, so don’t bother trying to separate them. Just
chop it to bite size and enjoy as the base of a delightful salad. Or if you’d prefer a cooked
dish, you can boil them like you would any other greens—but only for a minute or two. I
like to add them to a pot of other greens or my spring soups in the last few minutes.
Another great way to enjoy them, especially if you have picky eaters, is to blanch them
for a few minutes and then blend them into pancake batter at a 1:1 ratio—one part
chickweed to one part pancake batter.
Cook them like regular pancakes, and serve them warm with a pat of butter and maple
syrup. Then pat yourself on the back for sneaking in some more healthy greens.
Chicory (Cirhorium Intybus)
Perennial herb; harvest spring, fall, and winter
Chicory18 was planted and harvested by pioneers as a coffee substitute. When the roots
are roasted and ground, they taste like a slightly bitter black coffee. It now grows
18 "Cichorium intybus plant" by: Harry Rose, (CC BY 2.0)
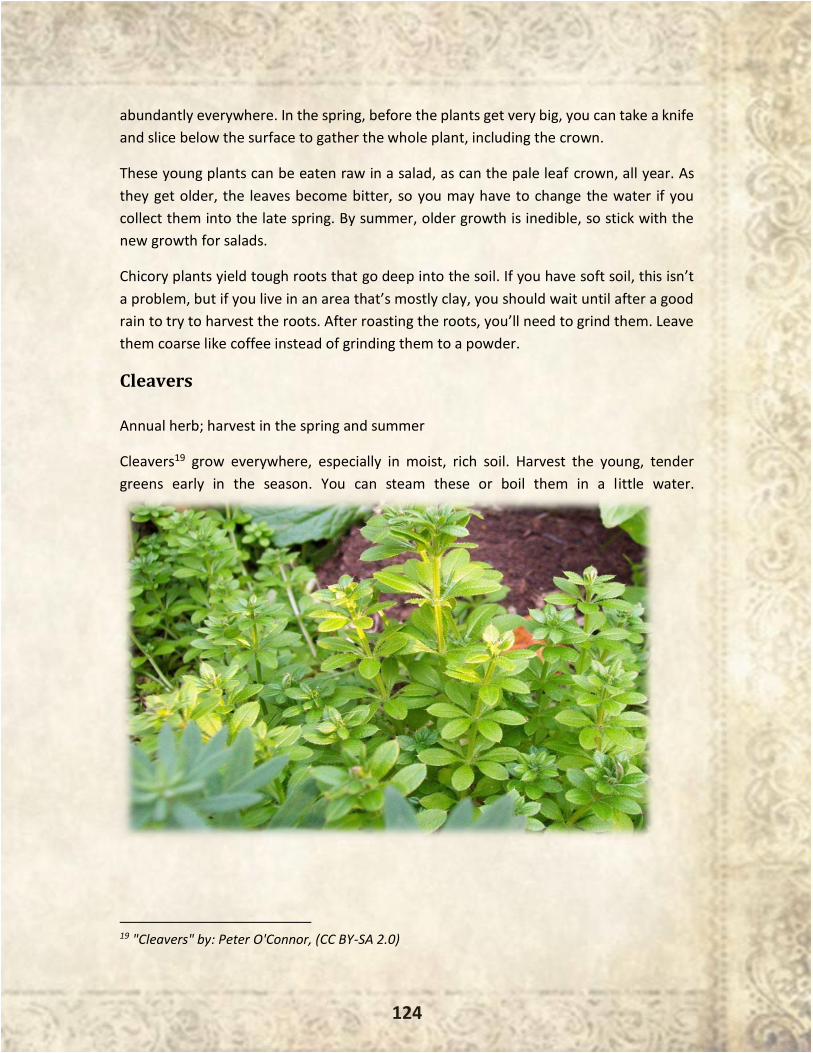
124
abundantly everywhere. In the spring, before the plants get very big, you can take a knife
and slice below the surface to gather the whole plant, including the crown.
These young plants can be eaten raw in a salad, as can the pale leaf crown, all year. As
they get older, the leaves become bitter, so you may have to change the water if you
collect them into the late spring. By summer, older growth is inedible, so stick with the
new growth for salads.
Chicory plants yield tough roots that go deep into the soil. If you have soft soil, this isn’t
a problem, but if you live in an area that’s mostly clay, you should wait until after a good
rain to try to harvest the roots. After roasting the roots, you’ll need to grind them. Leave
them coarse like coffee instead of grinding them to a powder.
Cleavers
Annual herb; harvest in the spring and summer
Cleavers19 grow everywhere, especially in moist, rich soil. Harvest the young, tender
greens early in the season. You can steam these or boil them in a little water.
19 "Cleavers" by: Peter O'Connor, (CC BY-SA 2.0)
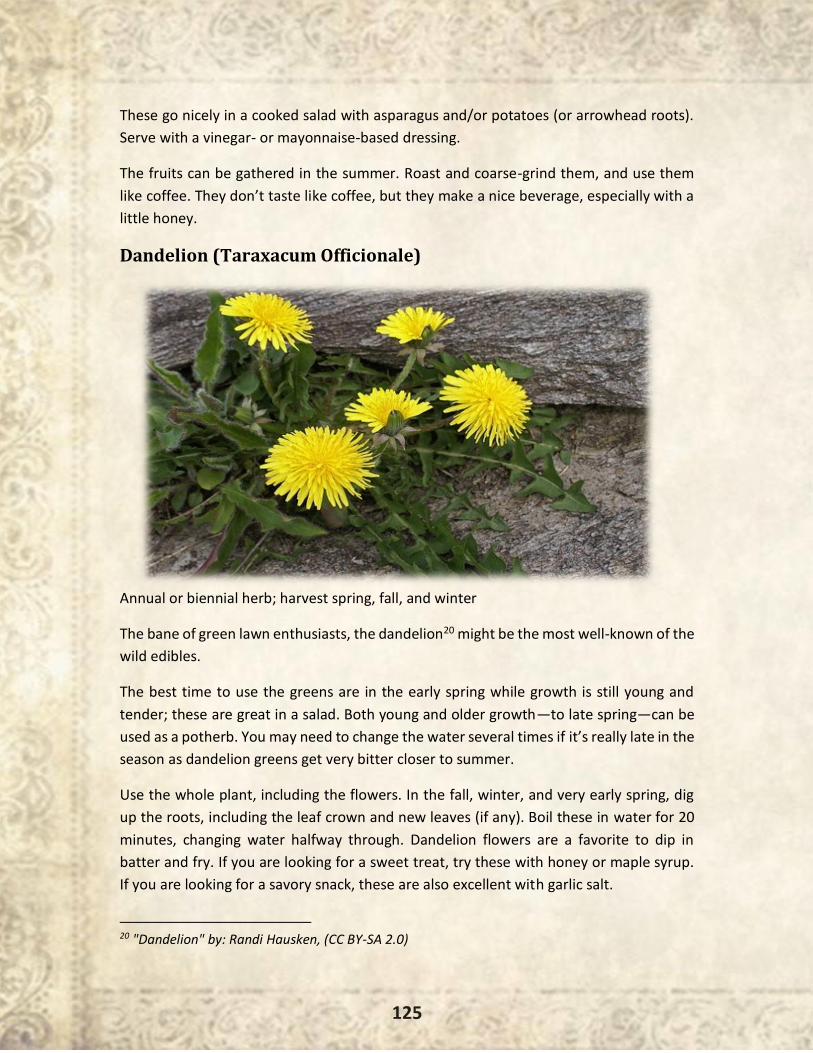
125
These go nicely in a cooked salad with asparagus and/or potatoes (or arrowhead roots).
Serve with a vinegar- or mayonnaise-based dressing.
The fruits can be gathered in the summer. Roast and coarse-grind them, and use them
like coffee. They don’t taste like coffee, but they make a nice beverage, especially with a
little honey.
Dandelion (Taraxacum Officionale)
Annual or biennial herb; harvest spring, fall, and winter
The bane of green lawn enthusiasts, the dandelion20 might be the most well-known of the
wild edibles.
The best time to use the greens are in the early spring while growth is still young and
tender; these are great in a salad. Both young and older growth—to late spring—can be
used as a potherb. You may need to change the water several times if it’s really late in the
season as dandelion greens get very bitter closer to summer.
Use the whole plant, including the flowers. In the fall, winter, and very early spring, dig
up the roots, including the leaf crown and new leaves (if any). Boil these in water for 20
minutes, changing water halfway through. Dandelion flowers are a favorite to dip in
batter and fry. If you are looking for a sweet treat, try these with honey or maple syrup.
If you are looking for a savory snack, these are also excellent with garlic salt.
20 "Dandelion" by: Randi Hausken, (CC BY-SA 2.0)

126
Henbit (Lamium Amplexicaule)
Annual herb; harvest in the spring
Henbit21 is one of those that are hard to miss and easy to love. When we were small
children, we used to pick the dainty little purple flowers to eat in the play yard as a sweet
treat. Now I pick the whole plant as a yummy green.
Henbit is one of the early spring bloomers, so it will also be one of the first herbs you
identify each growing season. The shoots and young leaves make for a crisp and tender
addition to a salad. The whole (above ground) plant can be used as a potherb.
Lady’s Thumb (Polygonum persicaria)
Annual herb; harvest in the spring through late fall
These widespread weeds are a wonderful addition to your wild-crafted table. You can find
Lady’s thumb22 growing in shady, rich soils and wetlands; there are no poisonous
lookalikes, and all Polygonum species are edible.
21 "Bee and henbits" by: Tammie Merrick Stogsdill (CC BY-SA 2.0) 22 "PinkStreamBankFlowerSK", by: Julia Adamson
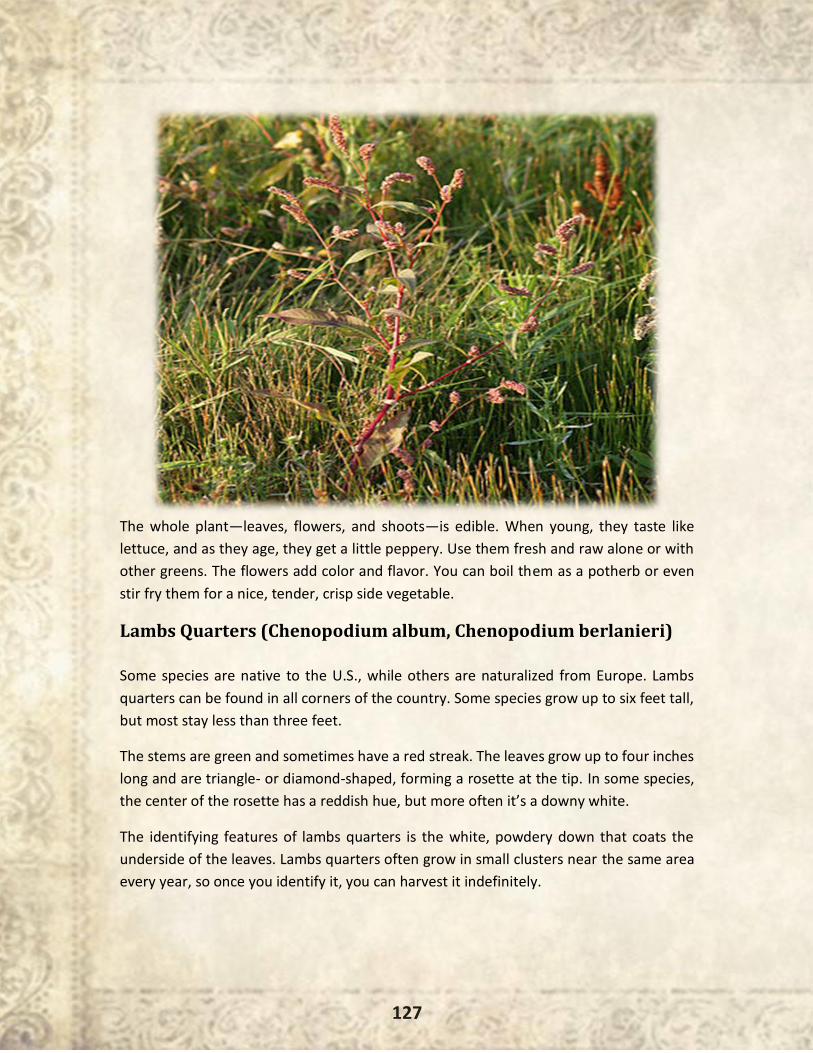
127
The whole plant—leaves, flowers, and shoots—is edible. When young, they taste like
lettuce, and as they age, they get a little peppery. Use them fresh and raw alone or with
other greens. The flowers add color and flavor. You can boil them as a potherb or even
stir fry them for a nice, tender, crisp side vegetable.
Lambs Quarters (Chenopodium album, Chenopodium berlanieri)
Some species are native to the U.S., while others are naturalized from Europe. Lambs
quarters can be found in all corners of the country. Some species grow up to six feet tall,
but most stay less than three feet.
The stems are green and sometimes have a red streak. The leaves grow up to four inches
long and are triangle- or diamond-shaped, forming a rosette at the tip. In some species,
the center of the rosette has a reddish hue, but more often it’s a downy white.
The identifying features of lambs quarters is the white, powdery down that coats the
underside of the leaves. Lambs quarters often grow in small clusters near the same area
every year, so once you identify it, you can harvest it indefinitely.
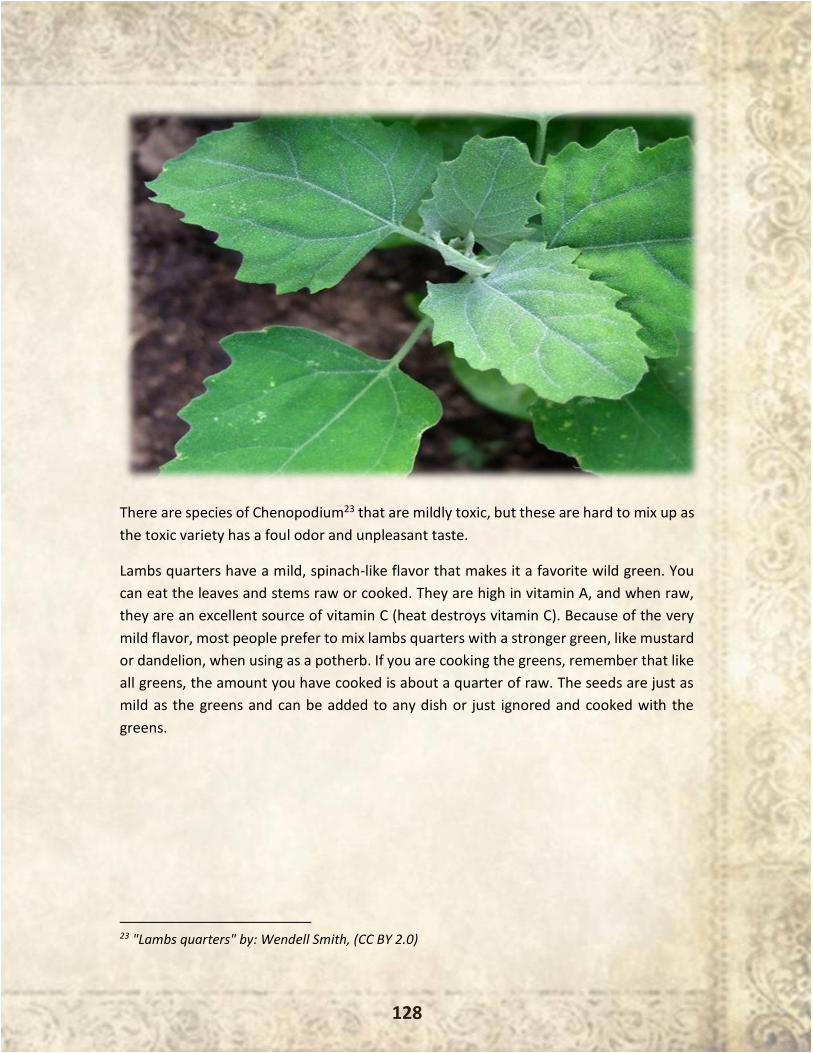
128
There are species of Chenopodium23 that are mildly toxic, but these are hard to mix up as
the toxic variety has a foul odor and unpleasant taste.
Lambs quarters have a mild, spinach-like flavor that makes it a favorite wild green. You
can eat the leaves and stems raw or cooked. They are high in vitamin A, and when raw,
they are an excellent source of vitamin C (heat destroys vitamin C). Because of the very
mild flavor, most people prefer to mix lambs quarters with a stronger green, like mustard
or dandelion, when using as a potherb. If you are cooking the greens, remember that like
all greens, the amount you have cooked is about a quarter of raw. The seeds are just as
mild as the greens and can be added to any dish or just ignored and cooked with the
greens.
23 "Lambs quarters" by: Wendell Smith, (CC BY 2.0)

129
Mint (Mentha piperita, Mentha spicata)
Perennial herb; harvest all year
Mints24 grow wild in wet places. They are incredibly easy to identify by sight and even
easier by smell. Mint smells and tastes like mint. You’ll find peppermint, spearmint,
hybrids, and native breeds growing from coast to coast.
Mint brings life to dishes you never even knew needed it, especially salads and pork and
fish. Mint tea, whether served hot or chilled, is a refrigerant and will cool you on a hot
day. Steep the leaves even longer, strain, and add sugar and pectin, and you have the
makings for a delightful jelly. You can also dry the leaves and store them for later use.
24 "Mentha piperita" by: Vsolymossy, (CC BY-SA 3.0)
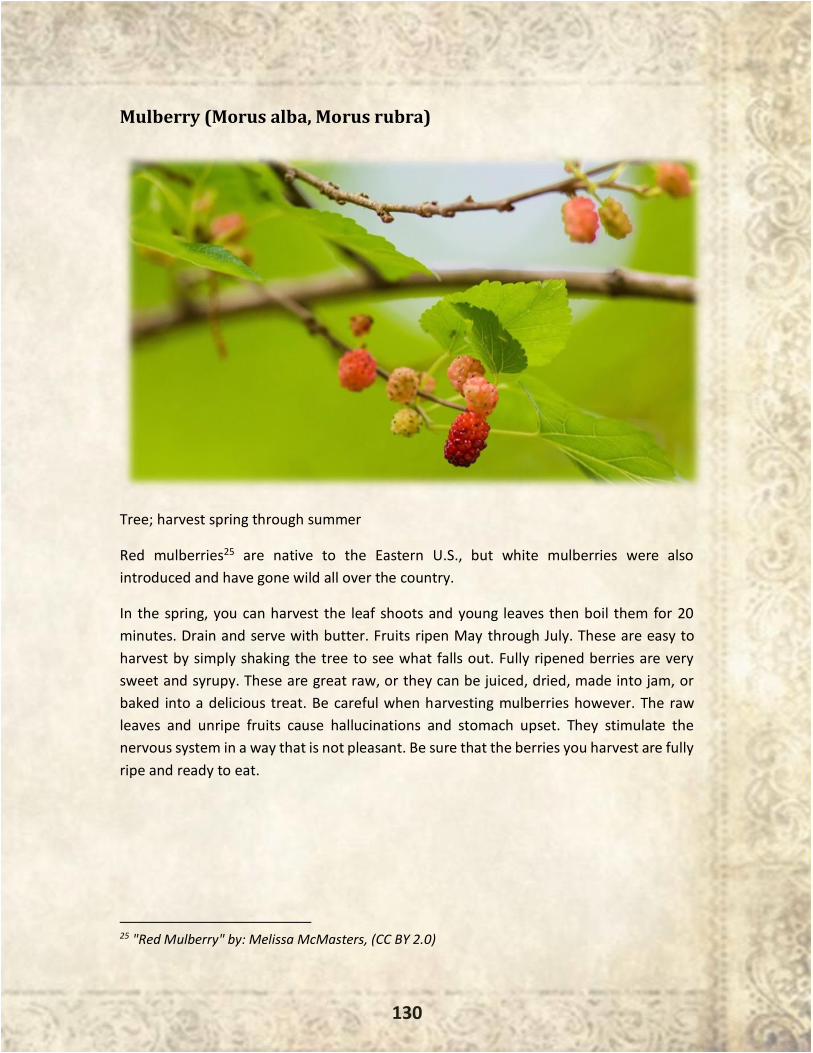
130
Mulberry (Morus alba, Morus rubra)
Tree; harvest spring through summer
Red mulberries25 are native to the Eastern U.S., but white mulberries were also
introduced and have gone wild all over the country.
In the spring, you can harvest the leaf shoots and young leaves then boil them for 20
minutes. Drain and serve with butter. Fruits ripen May through July. These are easy to
harvest by simply shaking the tree to see what falls out. Fully ripened berries are very
sweet and syrupy. These are great raw, or they can be juiced, dried, made into jam, or
baked into a delicious treat. Be careful when harvesting mulberries however. The raw
leaves and unripe fruits cause hallucinations and stomach upset. They stimulate the
nervous system in a way that is not pleasant. Be sure that the berries you harvest are fully
ripe and ready to eat.
25 "Red Mulberry" by: Melissa McMasters, (CC BY 2.0)
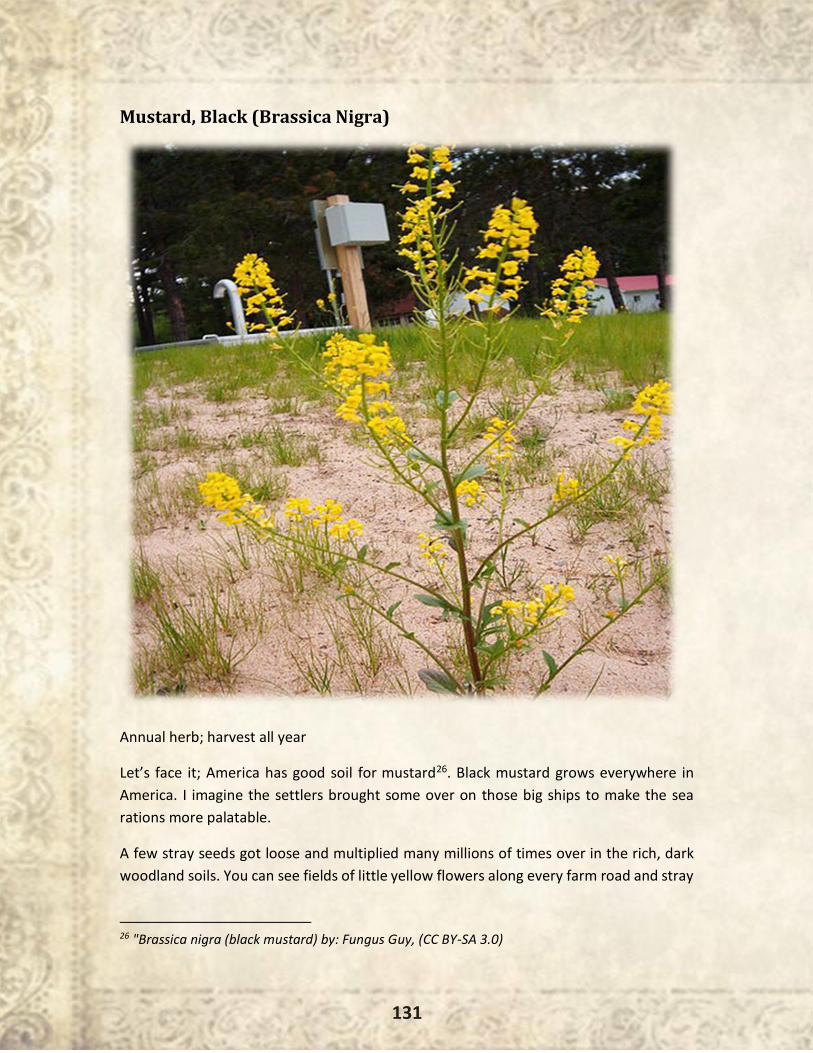
131
Mustard, Black (Brassica Nigra)
Annual herb; harvest all year
Let’s face it; America has good soil for mustard26. Black mustard grows everywhere in
America. I imagine the settlers brought some over on those big ships to make the sea
rations more palatable.
A few stray seeds got loose and multiplied many millions of times over in the rich, dark
woodland soils. You can see fields of little yellow flowers along every farm road and stray
26 "Brassica nigra (black mustard) by: Fungus Guy, (CC BY-SA 3.0)
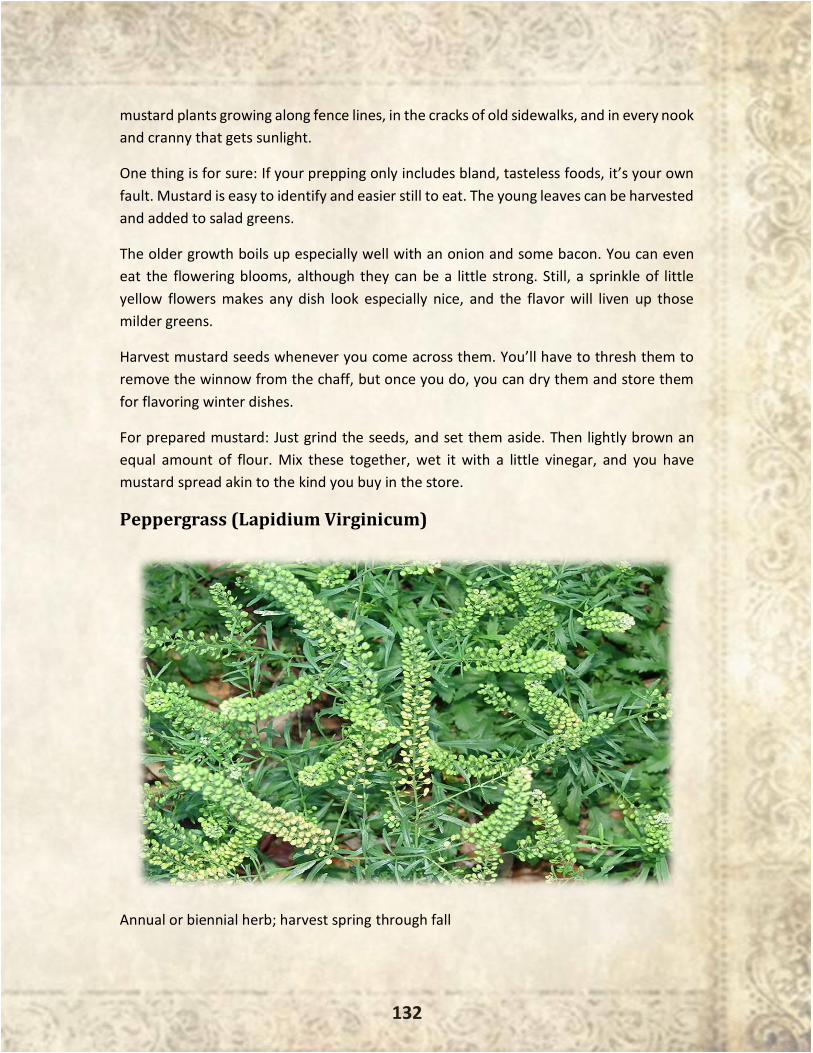
132
mustard plants growing along fence lines, in the cracks of old sidewalks, and in every nook
and cranny that gets sunlight.
One thing is for sure: If your prepping only includes bland, tasteless foods, it’s your own
fault. Mustard is easy to identify and easier still to eat. The young leaves can be harvested
and added to salad greens.
The older growth boils up especially well with an onion and some bacon. You can even
eat the flowering blooms, although they can be a little strong. Still, a sprinkle of little
yellow flowers makes any dish look especially nice, and the flavor will liven up those
milder greens.
Harvest mustard seeds whenever you come across them. You’ll have to thresh them to
remove the winnow from the chaff, but once you do, you can dry them and store them
for flavoring winter dishes.
For prepared mustard: Just grind the seeds, and set them aside. Then lightly brown an
equal amount of flour. Mix these together, wet it with a little vinegar, and you have
mustard spread akin to the kind you buy in the store.
Peppergrass (Lapidium Virginicum)
Annual or biennial herb; harvest spring through fall
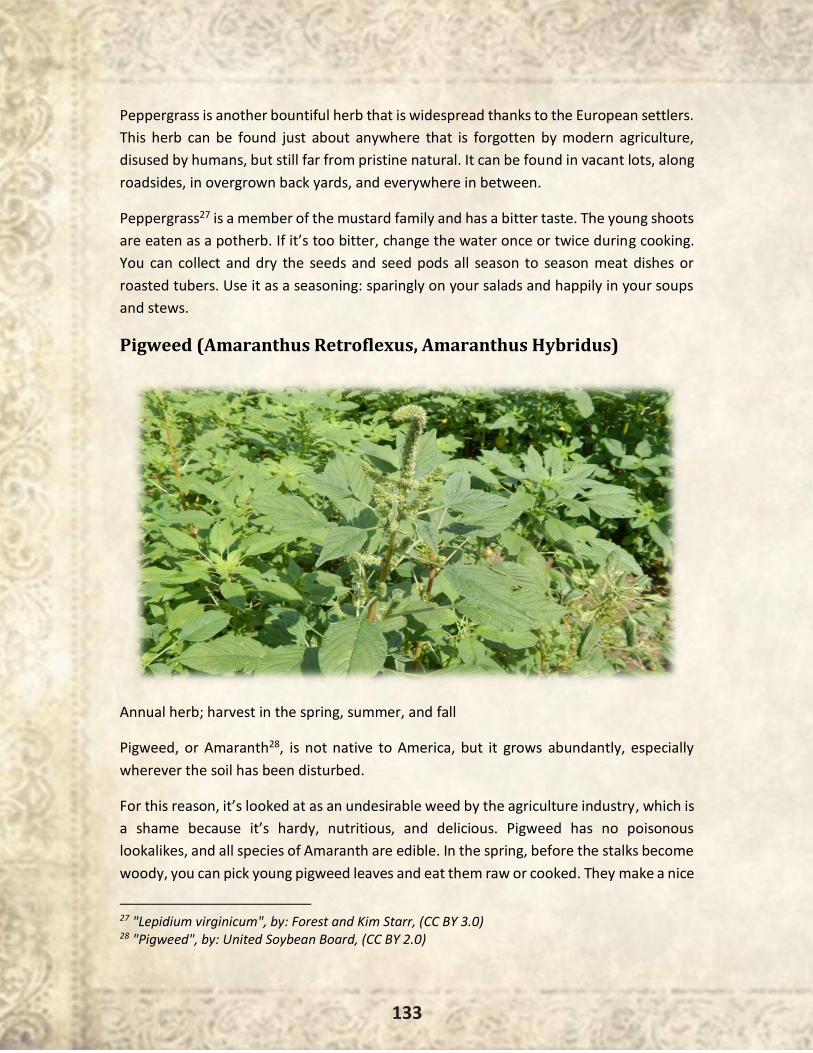
133
Peppergrass is another bountiful herb that is widespread thanks to the European settlers.
This herb can be found just about anywhere that is forgotten by modern agriculture,
disused by humans, but still far from pristine natural. It can be found in vacant lots, along
roadsides, in overgrown back yards, and everywhere in between.
Peppergrass27 is a member of the mustard family and has a bitter taste. The young shoots
are eaten as a potherb. If it’s too bitter, change the water once or twice during cooking.
You can collect and dry the seeds and seed pods all season to season meat dishes or
roasted tubers. Use it as a seasoning: sparingly on your salads and happily in your soups
and stews.
Pigweed (Amaranthus Retroflexus, Amaranthus Hybridus)
Annual herb; harvest in the spring, summer, and fall
Pigweed, or Amaranth28, is not native to America, but it grows abundantly, especially
wherever the soil has been disturbed.
For this reason, it’s looked at as an undesirable weed by the agriculture industry, which is
a shame because it’s hardy, nutritious, and delicious. Pigweed has no poisonous
lookalikes, and all species of Amaranth are edible. In the spring, before the stalks become
woody, you can pick young pigweed leaves and eat them raw or cooked. They make a nice
27 "Lepidium virginicum", by: Forest and Kim Starr, (CC BY 3.0) 28 "Pigweed", by: United Soybean Board, (CC BY 2.0)
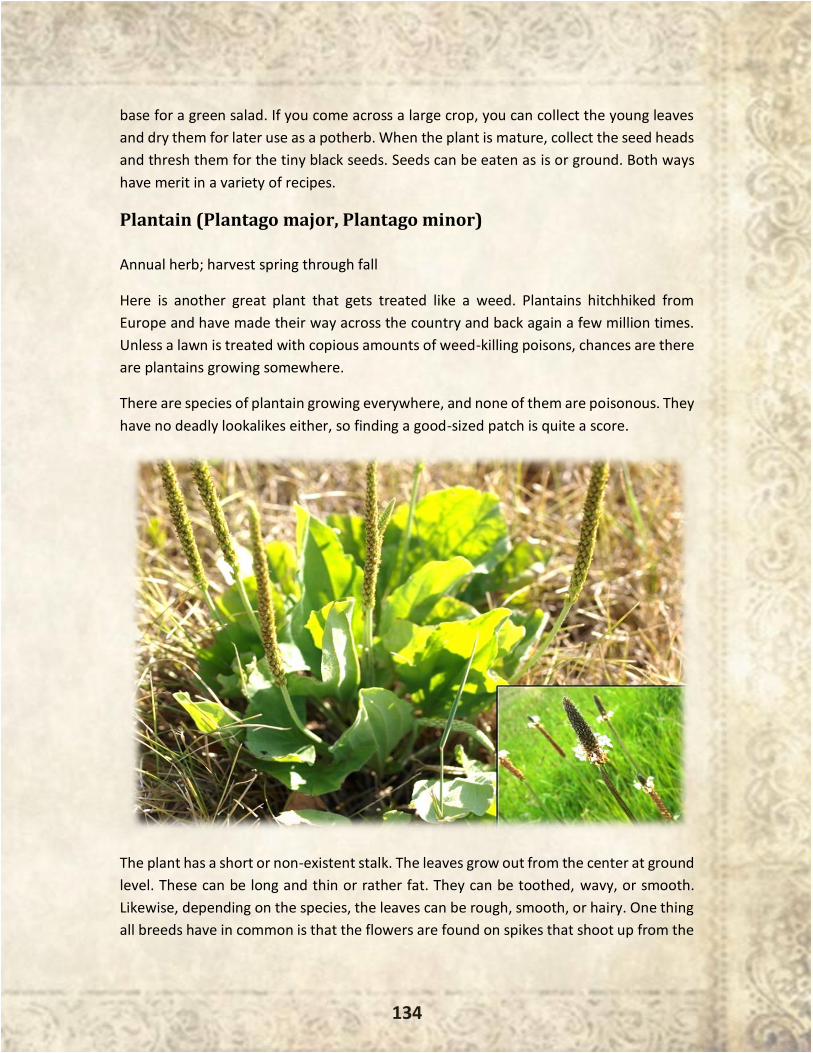
134
base for a green salad. If you come across a large crop, you can collect the young leaves
and dry them for later use as a potherb. When the plant is mature, collect the seed heads
and thresh them for the tiny black seeds. Seeds can be eaten as is or ground. Both ways
have merit in a variety of recipes.
Plantain (Plantago major, Plantago minor)
Annual herb; harvest spring through fall
Here is another great plant that gets treated like a weed. Plantains hitchhiked from
Europe and have made their way across the country and back again a few million times.
Unless a lawn is treated with copious amounts of weed-killing poisons, chances are there
are plantains growing somewhere.
There are species of plantain growing everywhere, and none of them are poisonous. They
have no deadly lookalikes either, so finding a good-sized patch is quite a score.
The plant has a short or non-existent stalk. The leaves grow out from the center at ground
level. These can be long and thin or rather fat. They can be toothed, wavy, or smooth.
Likewise, depending on the species, the leaves can be rough, smooth, or hairy. One thing
all breeds have in common is that the flowers are found on spikes that shoot up from the
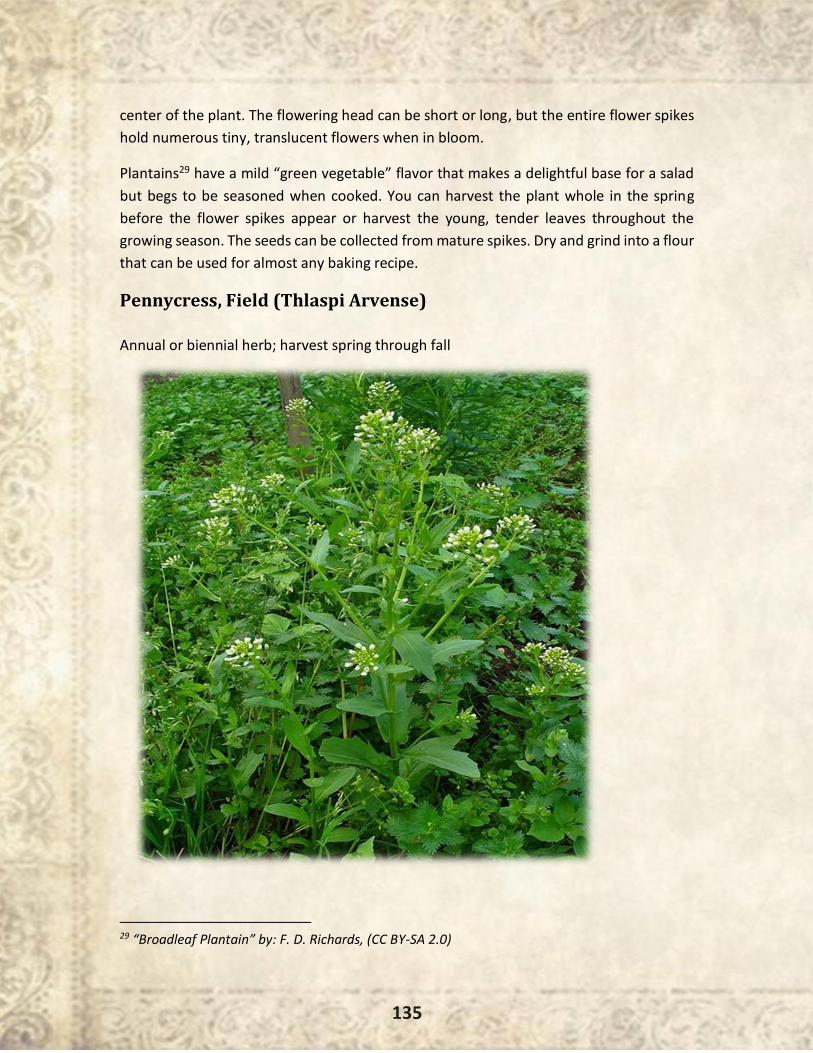
135
center of the plant. The flowering head can be short or long, but the entire flower spikes
hold numerous tiny, translucent flowers when in bloom.
Plantains29 have a mild “green vegetable” flavor that makes a delightful base for a salad
but begs to be seasoned when cooked. You can harvest the plant whole in the spring
before the flower spikes appear or harvest the young, tender leaves throughout the
growing season. The seeds can be collected from mature spikes. Dry and grind into a flour
that can be used for almost any baking recipe.
Pennycress, Field (Thlaspi Arvense)
Annual or biennial herb; harvest spring through fall
29 “Broadleaf Plantain” by: F. D. Richards, (CC BY-SA 2.0)
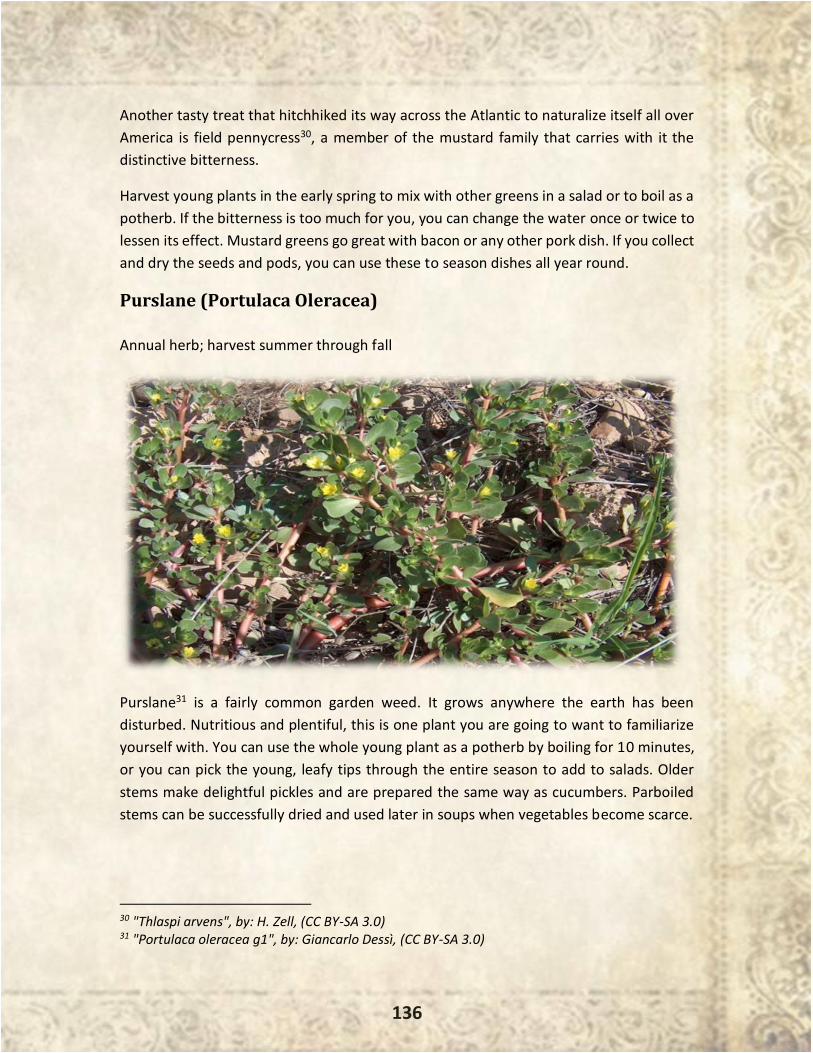
136
Another tasty treat that hitchhiked its way across the Atlantic to naturalize itself all over
America is field pennycress30, a member of the mustard family that carries with it the
distinctive bitterness.
Harvest young plants in the early spring to mix with other greens in a salad or to boil as a
potherb. If the bitterness is too much for you, you can change the water once or twice to
lessen its effect. Mustard greens go great with bacon or any other pork dish. If you collect
and dry the seeds and pods, you can use these to season dishes all year round.
Purslane (Portulaca Oleracea)
Annual herb; harvest summer through fall
Purslane31 is a fairly common garden weed. It grows anywhere the earth has been
disturbed. Nutritious and plentiful, this is one plant you are going to want to familiarize
yourself with. You can use the whole young plant as a potherb by boiling for 10 minutes,
or you can pick the young, leafy tips through the entire season to add to salads. Older
stems make delightful pickles and are prepared the same way as cucumbers. Parboiled
stems can be successfully dried and used later in soups when vegetables become scarce.
30 "Thlaspi arvens", by: H. Zell, (CC BY-SA 3.0) 31 "Portulaca oleracea g1", by: Giancarlo Dessì, (CC BY-SA 3.0)
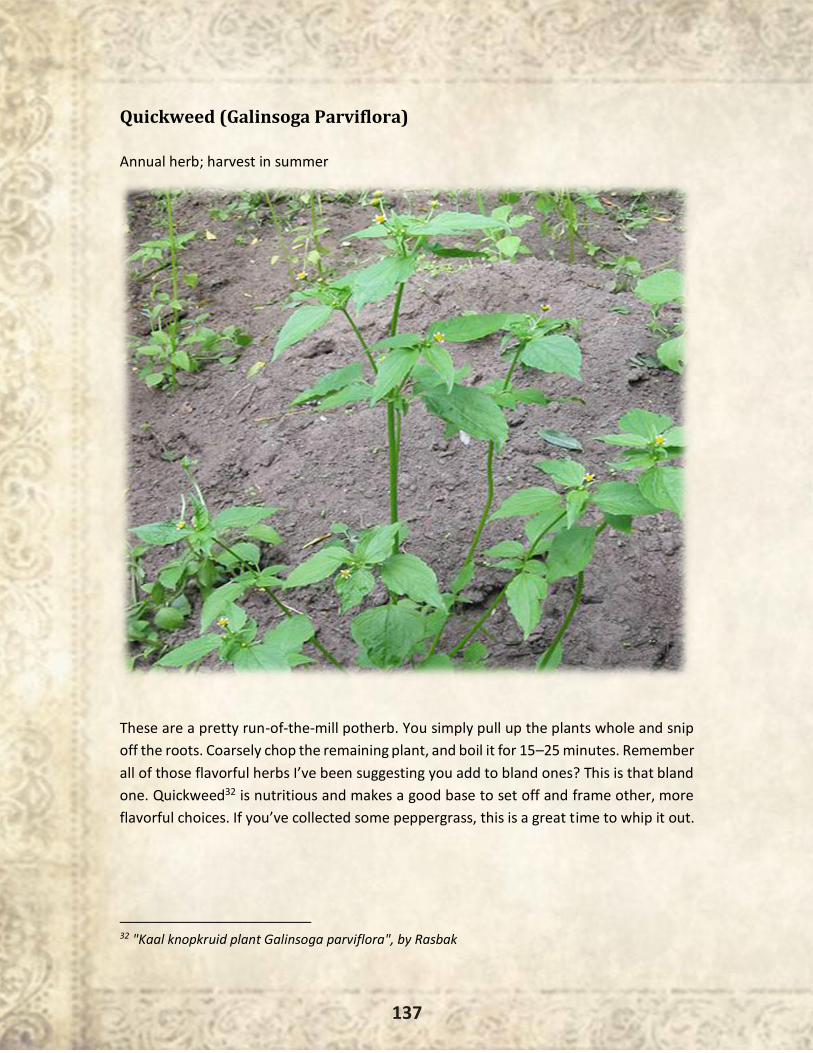
137
Quickweed (Galinsoga Parviflora)
Annual herb; harvest in summer
These are a pretty run-of-the-mill potherb. You simply pull up the plants whole and snip
off the roots. Coarsely chop the remaining plant, and boil it for 15–25 minutes. Remember
all of those flavorful herbs I’ve been suggesting you add to bland ones? This is that bland
one. Quickweed32 is nutritious and makes a good base to set off and frame other, more
flavorful choices. If you’ve collected some peppergrass, this is a great time to whip it out.
32 "Kaal knopkruid plant Galinsoga parviflora", by Rasbak
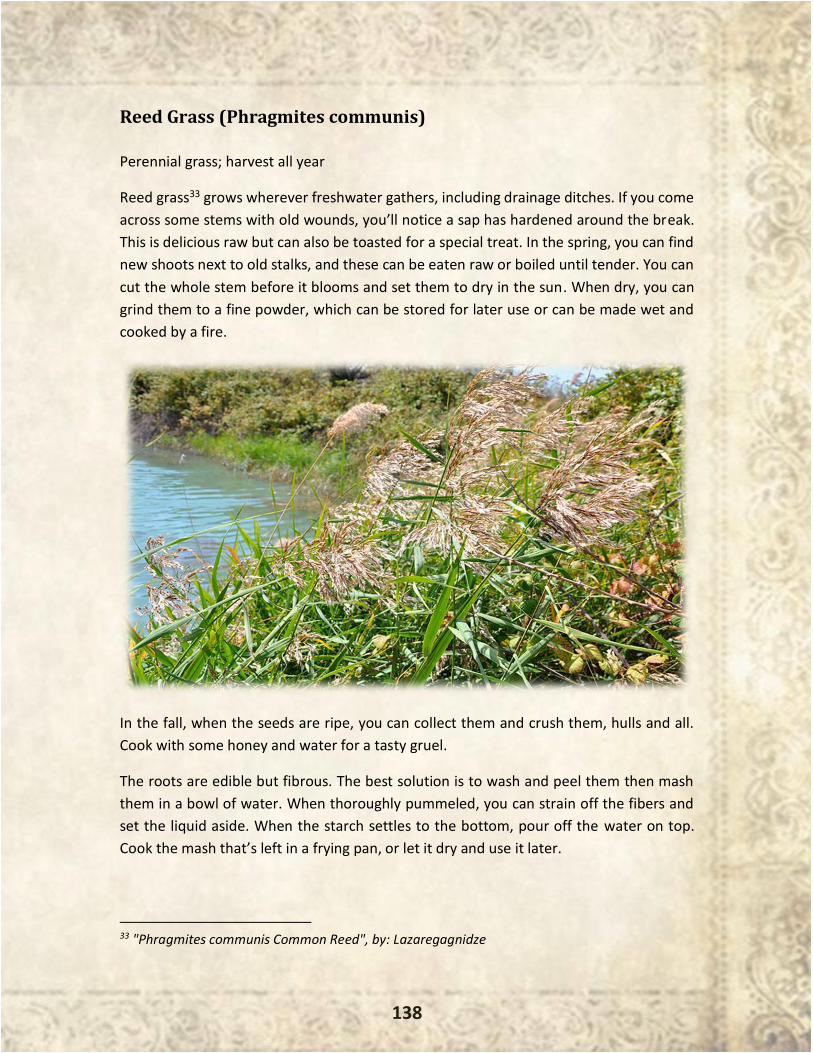
138
Reed Grass (Phragmites communis)
Perennial grass; harvest all year
Reed grass33 grows wherever freshwater gathers, including drainage ditches. If you come
across some stems with old wounds, you’ll notice a sap has hardened around the break.
This is delicious raw but can also be toasted for a special treat. In the spring, you can find
new shoots next to old stalks, and these can be eaten raw or boiled until tender. You can
cut the whole stem before it blooms and set them to dry in the sun. When dry, you can
grind them to a fine powder, which can be stored for later use or can be made wet and
cooked by a fire.
In the fall, when the seeds are ripe, you can collect them and crush them, hulls and all.
Cook with some honey and water for a tasty gruel.
The roots are edible but fibrous. The best solution is to wash and peel them then mash
them in a bowl of water. When thoroughly pummeled, you can strain off the fibers and
set the liquid aside. When the starch settles to the bottom, pour off the water on top.
Cook the mash that’s left in a frying pan, or let it dry and use it later.
33 "Phragmites communis Common Reed", by: Lazaregagnidze
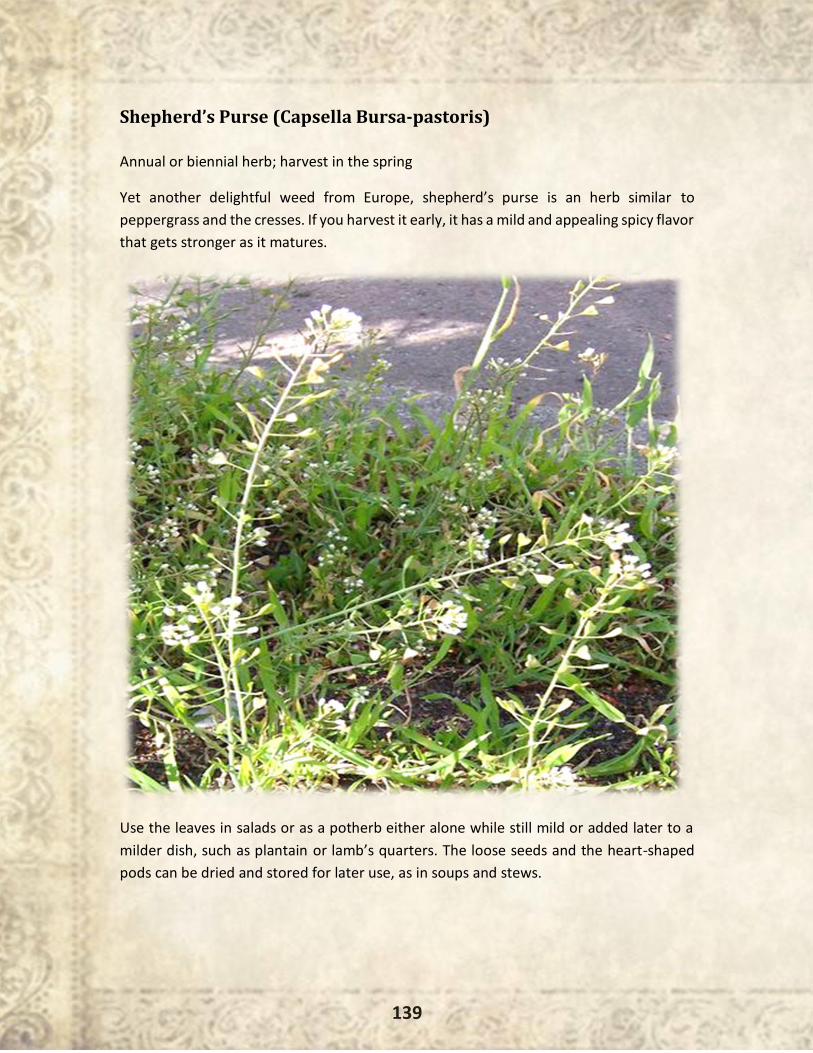
139
Shepherd’s Purse (Capsella Bursa-pastoris)
Annual or biennial herb; harvest in the spring
Yet another delightful weed from Europe, shepherd’s purse is an herb similar to
peppergrass and the cresses. If you harvest it early, it has a mild and appealing spicy flavor
that gets stronger as it matures.
Use the leaves in salads or as a potherb either alone while still mild or added later to a
milder dish, such as plantain or lamb’s quarters. The loose seeds and the heart-shaped
pods can be dried and stored for later use, as in soups and stews.
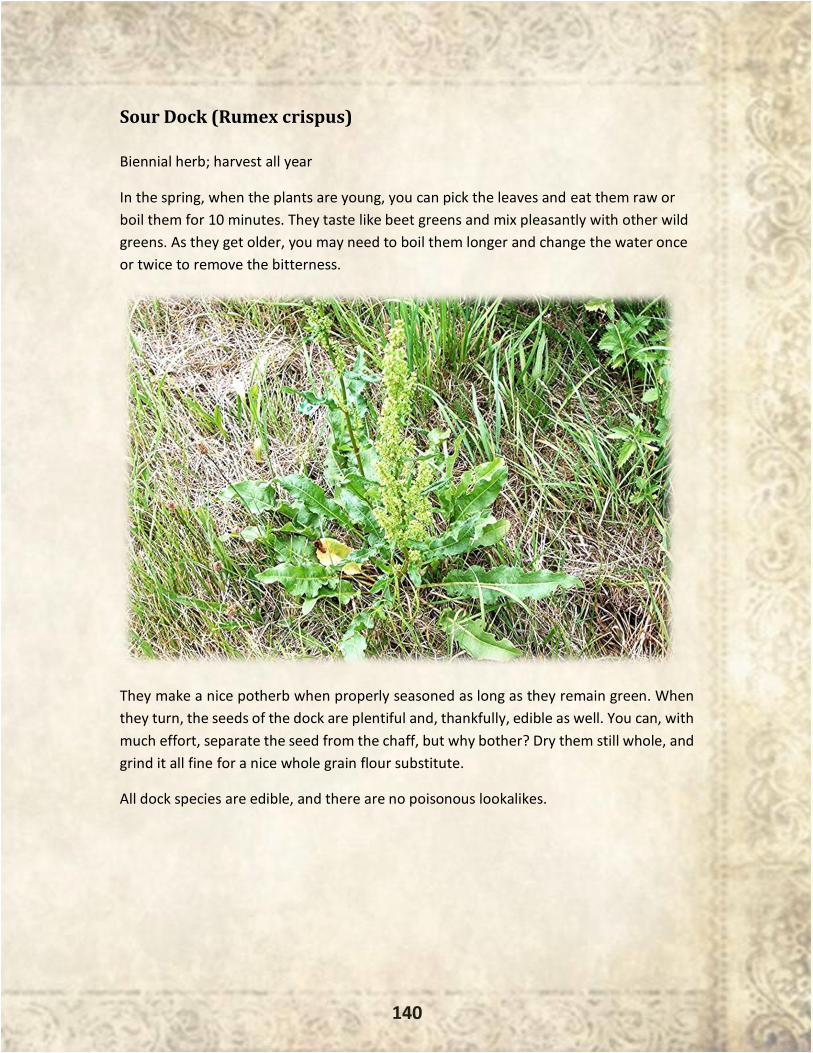
140
Sour Dock (Rumex crispus)
Biennial herb; harvest all year
In the spring, when the plants are young, you can pick the leaves and eat them raw or
boil them for 10 minutes. They taste like beet greens and mix pleasantly with other wild
greens. As they get older, you may need to boil them longer and change the water once
or twice to remove the bitterness.
They make a nice potherb when properly seasoned as long as they remain green. When
they turn, the seeds of the dock are plentiful and, thankfully, edible as well. You can, with
much effort, separate the seed from the chaff, but why bother? Dry them still whole, and
grind it all fine for a nice whole grain flour substitute.
All dock species are edible, and there are no poisonous lookalikes.
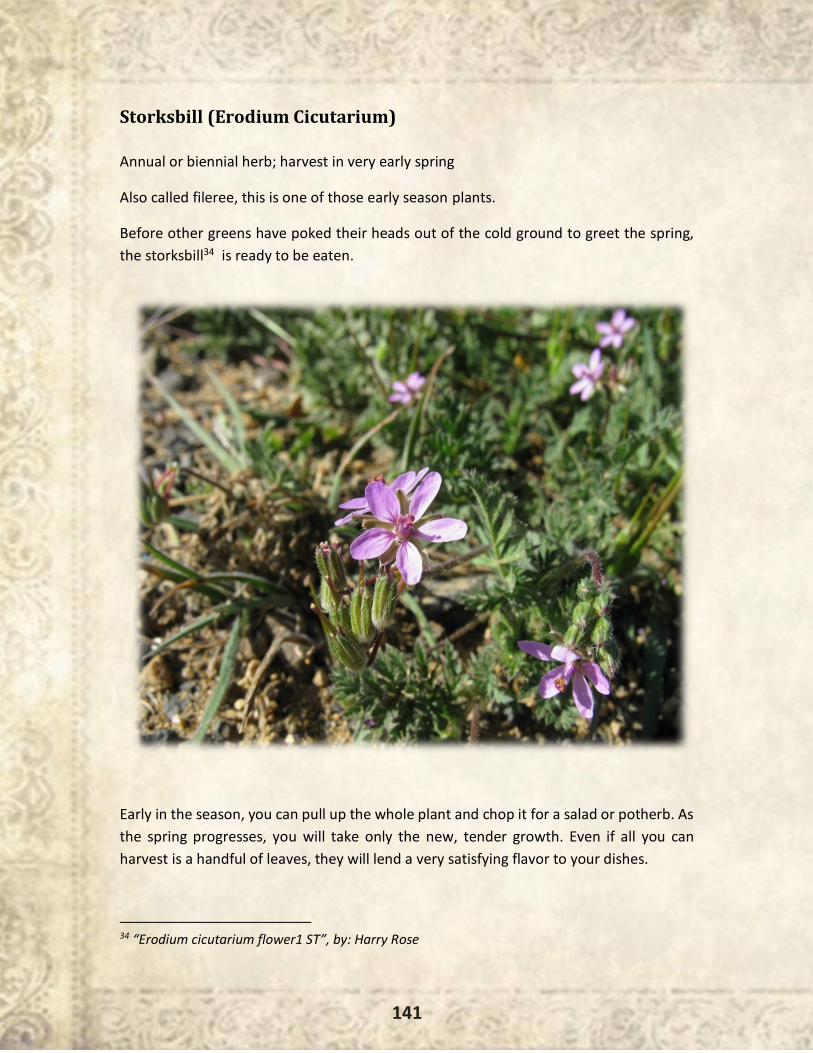
141
Storksbill (Erodium Cicutarium)
Annual or biennial herb; harvest in very early spring
Also called fileree, this is one of those early season plants.
Before other greens have poked their heads out of the cold ground to greet the spring,
the storksbill34 is ready to be eaten.
Early in the season, you can pull up the whole plant and chop it for a salad or potherb. As
the spring progresses, you will take only the new, tender growth. Even if all you can
harvest is a handful of leaves, they will lend a very satisfying flavor to your dishes.
34 “Erodium cicutarium flower1 ST”, by: Harry Rose
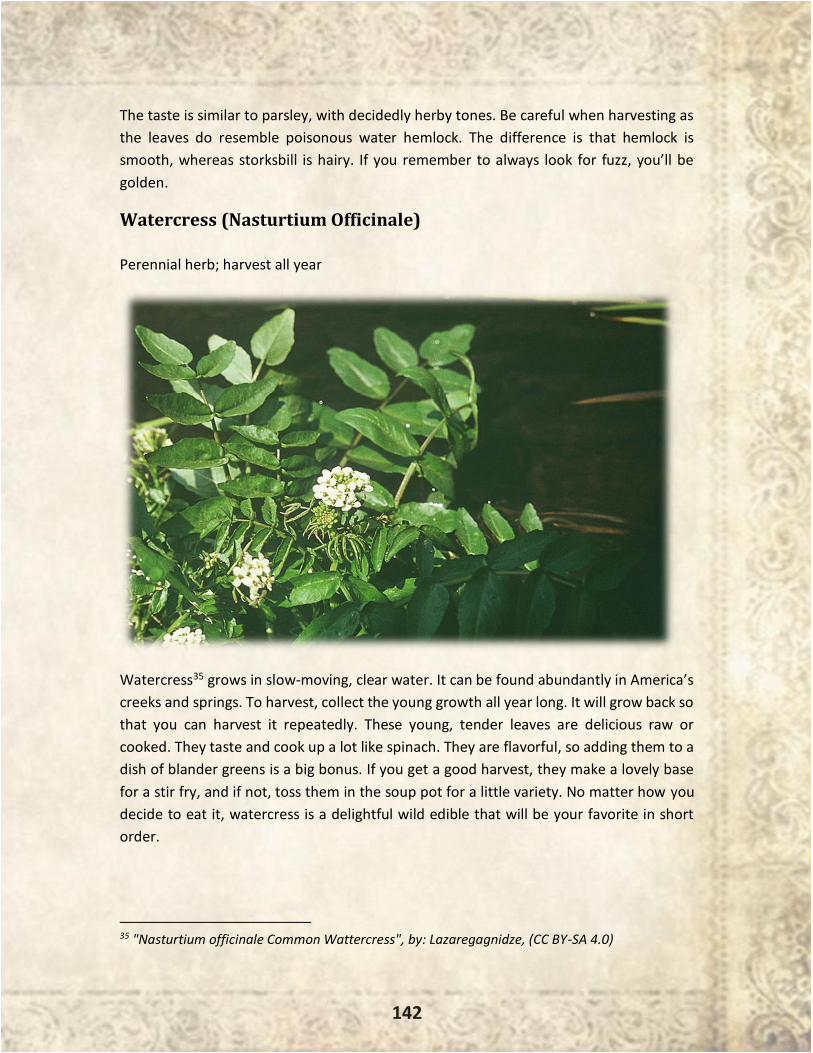
142
The taste is similar to parsley, with decidedly herby tones. Be careful when harvesting as
the leaves do resemble poisonous water hemlock. The difference is that hemlock is
smooth, whereas storksbill is hairy. If you remember to always look for fuzz, you’ll be
golden.
Watercress (Nasturtium Officinale)
Perennial herb; harvest all year
Watercress35 grows in slow-moving, clear water. It can be found abundantly in America’s
creeks and springs. To harvest, collect the young growth all year long. It will grow back so
that you can harvest it repeatedly. These young, tender leaves are delicious raw or
cooked. They taste and cook up a lot like spinach. They are flavorful, so adding them to a
dish of blander greens is a big bonus. If you get a good harvest, they make a lovely base
for a stir fry, and if not, toss them in the soup pot for a little variety. No matter how you
decide to eat it, watercress is a delightful wild edible that will be your favorite in short
order.
35 "Nasturtium officinale Common Wattercress", by: Lazaregagnidze, (CC BY-SA 4.0)
143
- By Shannon Azares -
“There are people in the world so hungry that God
cannot appear to them except in the form of bread.”
― Mahatma Gandhi
Modern baker’s yeast as we know it today did not exist until the late 1800s. Even
when it became available, it was usually too expensive for most of the population, and
that’s why they preferred to make their own. Housewives and bakers used different types
of wild yeast or massive amounts of eggs to leaven the bread.
Homemade yeast could be made through various ways, like using hops, potatoes, or a
flour/water/sugar mixture. It could also be made from distillery barm yeast or a
sourdough starter.
Unlike modern-day yeast, the homemade type made with sourdough starter takes a
longer time to rise. It usually takes 12–18 hours during the summer and 18–24 hours
during the winter.
Another difference between modern-day bread and traditional bread is that the former
uses more additives, while the latter is as organic as it can get. Our ancestors passed on
heirloom varieties of wheat to us, the most common being a blend of organic spelt,
einkorn, and barley. Aside from making their own bread, people from the early 1800s
used to plant and harvest their own wheat.
The best time to plant winter wheat is during the fall to allow for six to eight weeks of
growth before the soil freezes. This also ensures proper root development. Planting the
wheat too early makes it vulnerable to summertime insects and smothering during spring.
If it is planted too late, the wheat will not overwinter well.
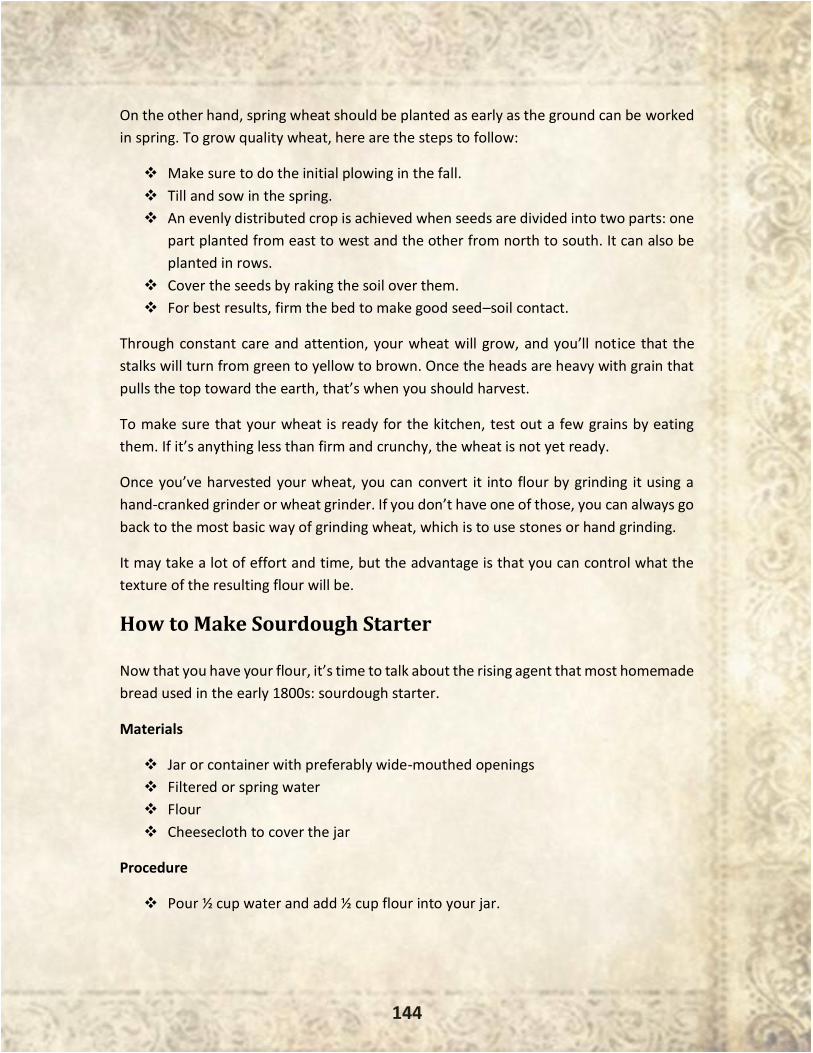
144
On the other hand, spring wheat should be planted as early as the ground can be worked
in spring. To grow quality wheat, here are the steps to follow:
❖ Make sure to do the initial plowing in the fall.
❖ Till and sow in the spring.
❖ An evenly distributed crop is achieved when seeds are divided into two parts: one
part planted from east to west and the other from north to south. It can also be
planted in rows.
❖ Cover the seeds by raking the soil over them.
❖ For best results, firm the bed to make good seed–soil contact.
Through constant care and attention, your wheat will grow, and you’ll notice that the
stalks will turn from green to yellow to brown. Once the heads are heavy with grain that
pulls the top toward the earth, that’s when you should harvest.
To make sure that your wheat is ready for the kitchen, test out a few grains by eating
them. If it’s anything less than firm and crunchy, the wheat is not yet ready.
Once you’ve harvested your wheat, you can convert it into flour by grinding it using a
hand-cranked grinder or wheat grinder. If you don’t have one of those, you can always go
back to the most basic way of grinding wheat, which is to use stones or hand grinding.
It may take a lot of effort and time, but the advantage is that you can control what the
texture of the resulting flour will be.
How to Make Sourdough Starter
Now that you have your flour, it’s time to talk about the rising agent that most homemade
bread used in the early 1800s: sourdough starter.
Materials
❖ Jar or container with preferably wide-mouthed openings
❖ Filtered or spring water
❖ Flour
❖ Cheesecloth to cover the jar
Procedure
❖ Pour ½ cup water and add ½ cup flour into your jar.
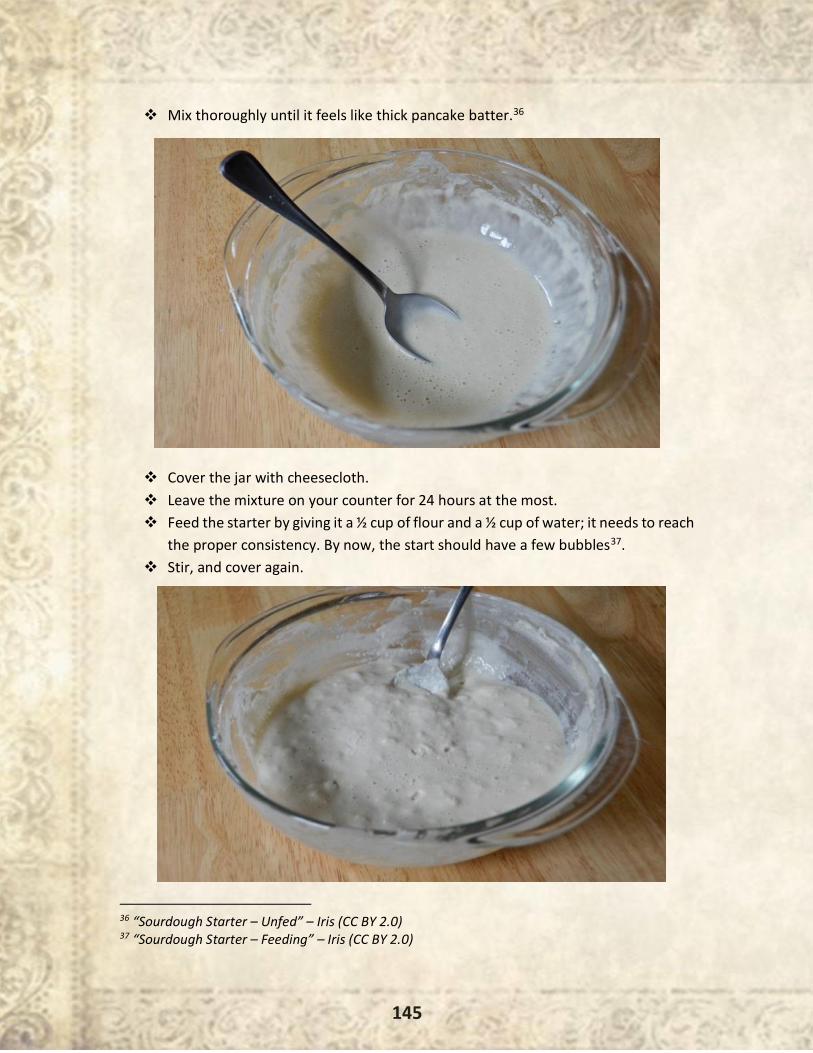
145
❖ Mix thoroughly until it feels like thick pancake batter.36
❖ Cover the jar with cheesecloth.
❖ Leave the mixture on your counter for 24 hours at the most.
❖ Feed the starter by giving it a ½ cup of flour and a ½ cup of water; it needs to reach
the proper consistency. By now, the start should have a few bubbles37.
❖ Stir, and cover again.
36 “Sourdough Starter – Unfed” – Iris (CC BY 2.0) 37 “Sourdough Starter – Feeding” – Iris (CC BY 2.0)
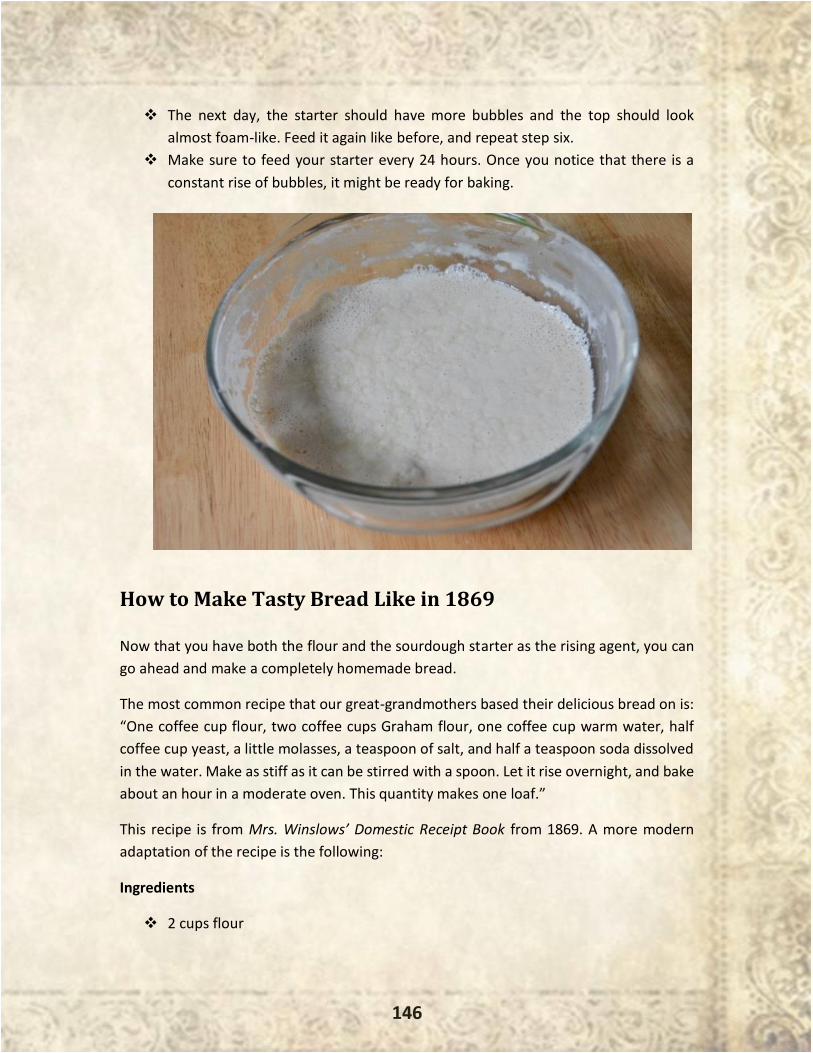
146
❖ The next day, the starter should have more bubbles and the top should look
almost foam-like. Feed it again like before, and repeat step six.
❖ Make sure to feed your starter every 24 hours. Once you notice that there is a
constant rise of bubbles, it might be ready for baking.
How to Make Tasty Bread Like in 1869
Now that you have both the flour and the sourdough starter as the rising agent, you can
go ahead and make a completely homemade bread.
The most common recipe that our great-grandmothers based their delicious bread on is:
“One coffee cup flour, two coffee cups Graham flour, one coffee cup warm water, half
coffee cup yeast, a little molasses, a teaspoon of salt, and half a teaspoon soda dissolved
in the water. Make as stiff as it can be stirred with a spoon. Let it rise overnight, and bake
about an hour in a moderate oven. This quantity makes one loaf.”
This recipe is from Mrs. Winslows’ Domestic Receipt Book from 1869. A more modern
adaptation of the recipe is the following:
Ingredients
❖ 2 cups flour
147
❖ 1 cup warm water
❖ ½ of the sourdough starter
❖ 2 Tbs. molasses (or whole cane sugar)
❖ 1 tsp. salt
❖ Optional: ½ tsp. baking soda
Procedure
❖ Mix flour and salt in a mixing bowl.
❖ Add sourdough starter, molasses, and warm water.
❖ Stir until the dough feels wet and sticky.
❖ Optional: To remove the sour flavor in your loaf, add a ½ tsp. of baking soda, and
mix it thoroughly.
❖ Place the dough into a greased 9x5-inch bread pan.
❖ Cover with a damp dish cloth or tea towel with a dry towel over it, and let it rise
for 12–24 hours.
❖ Once it has risen, the dough should be light and fluffy. To make sure, press lightly
on the dough. If it dents, it’s ready.
❖ Bake at 350°F for about 40–45 minutes. If you don’t have a timer, bake the bread
until it is golden brown.
❖ Tap on the bread, and if it sounds hollow, it’s ready for breakfast.
Making Bark Bread (Famine Bread)
Bark bread is a common form of survival food. Many would ask if tree inner bark is really
edible, and the answer to that is yes, it is. It is actually a safe and nutritious wild food as
long as you’re using the right part of the bark from the right species of tree. The edible
part of the tree bark is the cambium layer, which lies right next to the tough inner wood.
Edible and safe bark can be harvested from trees, the most common being pine trees.
Slippery elm, black birch, yellow birch, red spruce, black spruce, balsam fir, and tamarack
barks are also some of the trees with the specific bark you’re going to look for. The light
inner bark of a pine tree is harvested in the spring when the bark is more easily removed
from the tree trunk.
Another reason why it’s best to harvest in spring is because the vitamin content of the
bark is highest then. Here’s how you should harvest and prepare bark.
❖ Positively identify the tree species.
❖ Take only narrow vertical portions of the bark from the tree.
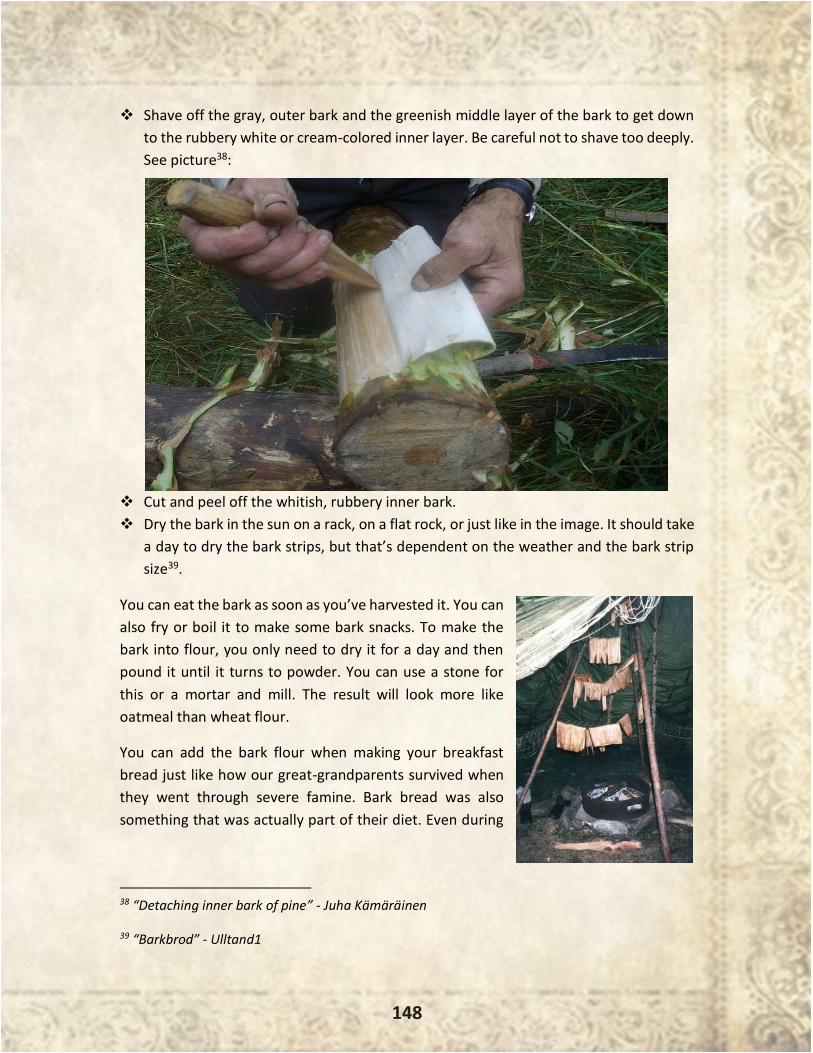
148
❖ Shave off the gray, outer bark and the greenish middle layer of the bark to get down
to the rubbery white or cream-colored inner layer. Be careful not to shave too deeply.
See picture38:
❖ Cut and peel off the whitish, rubbery inner bark.
❖ Dry the bark in the sun on a rack, on a flat rock, or just like in the image. It should take
a day to dry the bark strips, but that’s dependent on the weather and the bark strip
size39.
You can eat the bark as soon as you’ve harvested it. You can
also fry or boil it to make some bark snacks. To make the
bark into flour, you only need to dry it for a day and then
pound it until it turns to powder. You can use a stone for
this or a mortar and mill. The result will look more like
oatmeal than wheat flour.
You can add the bark flour when making your breakfast
bread just like how our great-grandparents survived when
they went through severe famine. Bark bread was also
something that was actually part of their diet. Even during
38 “Detaching inner bark of pine” - Juha Kämäräinen 39 “Barkbrod” - Ulltand1
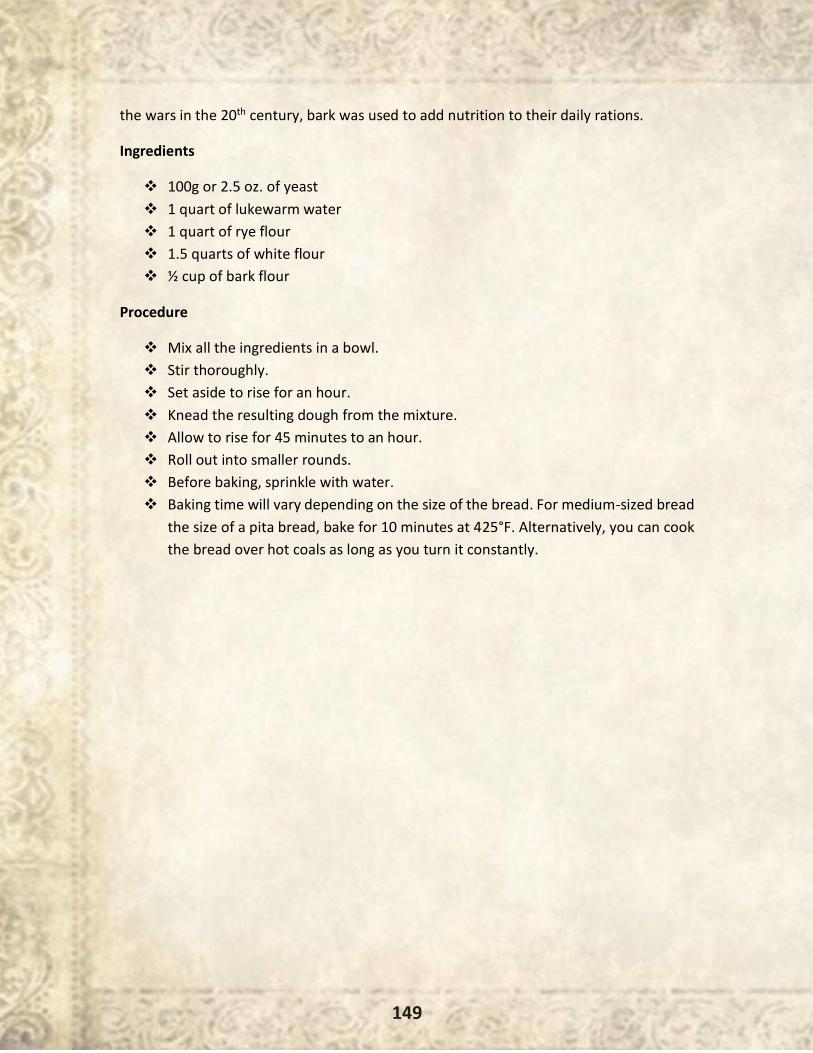
149
the wars in the 20th century, bark was used to add nutrition to their daily rations.
Ingredients
❖ 100g or 2.5 oz. of yeast
❖ 1 quart of lukewarm water
❖ 1 quart of rye flour
❖ 1.5 quarts of white flour
❖ ½ cup of bark flour
Procedure
❖ Mix all the ingredients in a bowl.
❖ Stir thoroughly.
❖ Set aside to rise for an hour.
❖ Knead the resulting dough from the mixture.
❖ Allow to rise for 45 minutes to an hour.
❖ Roll out into smaller rounds.
❖ Before baking, sprinkle with water.
❖ Baking time will vary depending on the size of the bread. For medium-sized bread
the size of a pita bread, bake for 10 minutes at 425°F. Alternatively, you can cook
the bread over hot coals as long as you turn it constantly.
150
- By S. Patrick –
“Feel what it’s like to truly starve, and I guarantee that you’ll
forever think twice before wasting food.”
– Criss Jami
I was born in Seattle, Washington, and since there’s not much in the way of
trapping going on up there, I was relocated at an early age to Lovell, Wyoming.
That’s not actually the reason my family moved, but once I developed my passion for
trapping, it was good enough for me.
In case you’ve never heard of Lovell, don’t feel bad. Until I was relocated there at the age
of eight, neither had I. In fact, I would guess that most folks couldn’t point to it on a map
without searching the whole state first.
Lovell is about 100 miles due east of what we call the park, which is Yellowstone National
Park. I don’t think Lovell has any bigger population now than when I was a kid 40 odd
years ago; it’s just stayed around 2,200 people.
The reason this area is so good for trapping is that it’s right at the foothills of the Big Horn
Mountains. It’s the prime area for many miles around for hunting, fishing, and trapping.
So like many young boys back then in a small town with those types of opportunities, I
trapped all winter and cut firewood and sold it or bucked hay and alfalfa all summer. I
have to tell you that I greatly preferred trapping to bucking for reasons you may well
imagine. Wyoming can get a little warm in the summer, and if you’ve ever bucked wet,
heavy alfalfa in the sun, I don’t have to tell you anymore.
151
Why Our Forefathers Trapped
Personally, I was trapping for the money. Growing up in a small town, it was a good way
to make money during the winter months when things really slowed down in the summer
job areas. Our forefathers, on the other hand, trapped for a variety of reasons, some of
which may surprise you.
Yes, of course, there was the fur trade, so they obviously trapped for the money. As a
matter of fact, many men who went bust in various gold or land rushes went on to make
their fortunes in the fur trade.
One such man was John Jacob Astor. A German-born immigrant, he got his big break in
the fur trade and went on to become a multimillionaire, a vast New York real estate
owner, and a legendary patron of the arts.
The majority of our forefathers trapped for the money. However, many who traded in
furs also used them as clothing for themselves and their families. They would quite
typically feed the carcasses to their dogs, and a normal homestead had several. They
would also use small, chopped pieces of the carcasses to drop in the seed hole along with
their corn plantings. The pieces would decompose and provide nutrients for the corn
stalks.
What we have to realize is that our forefathers trapped, hunted, farmed, and fished to
stay alive. In most cases, they used every part of the animal or plant in ways that we have
all but lost today. As an example, they would use the corn silk that we throw away today
for at least five different natural remedies, including kidney stones and edema.
In truth, I wish we would go back to a lot of that and get away from all these drugs that
are being pushed today.
The Best Places to Trap for Beaver and Muskrat
Beaver and muskrats’ habitats range from Florida to Canada with the real exceptions
being any of the arid states, such as Arizona, New Mexico, and others. There have been a
few dens found along the U.S. border with Mexico but definitely not in any appreciable
quantities.
Most beavers weigh between 26 and 90 pounds with only a few making it to the 100-
pound mark, according to fishwildlife.org. Muskrats usually weigh 1.3 to 4.4 pounds but
are typically much more abundant, says fishwildlife.org.
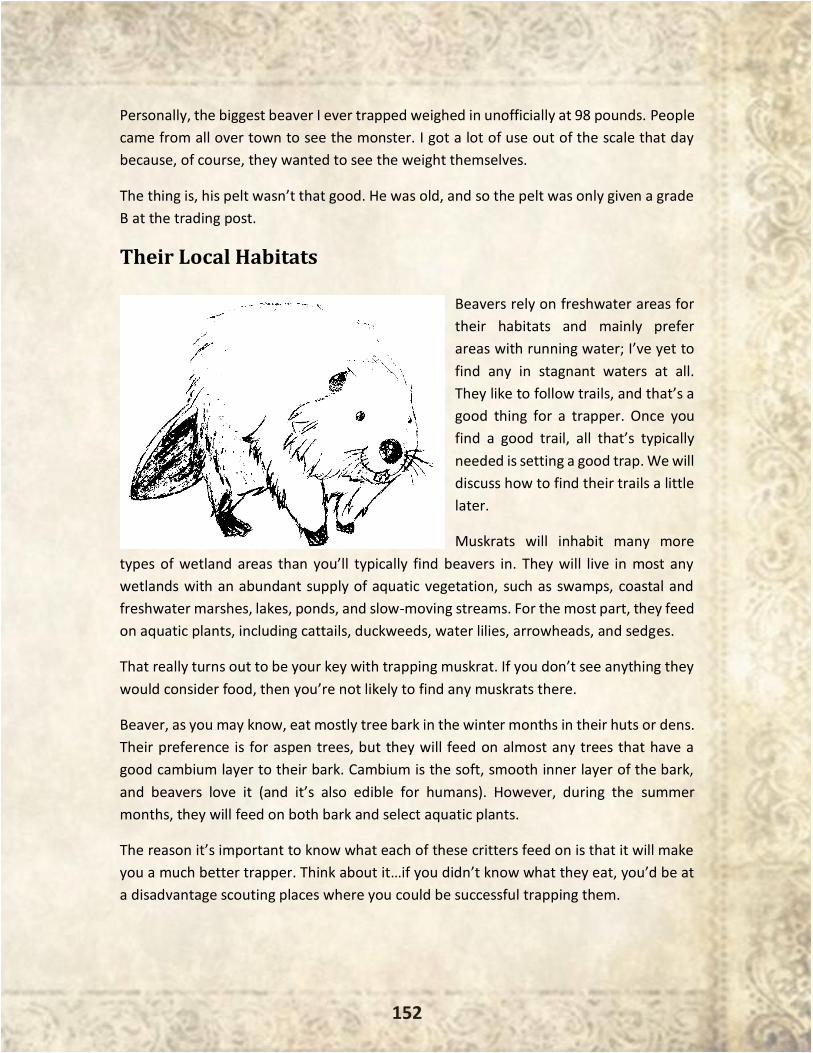
152
Personally, the biggest beaver I ever trapped weighed in unofficially at 98 pounds. People
came from all over town to see the monster. I got a lot of use out of the scale that day
because, of course, they wanted to see the weight themselves.
The thing is, his pelt wasn’t that good. He was old, and so the pelt was only given a grade
B at the trading post.
Their Local Habitats
Beavers rely on freshwater areas for
their habitats and mainly prefer
areas with running water; I’ve yet to
find any in stagnant waters at all.
They like to follow trails, and that’s a
good thing for a trapper. Once you
find a good trail, all that’s typically
needed is setting a good trap. We will
discuss how to find their trails a little
later.
Muskrats will inhabit many more
types of wetland areas than you’ll typically find beavers in. They will live in most any
wetlands with an abundant supply of aquatic vegetation, such as swamps, coastal and
freshwater marshes, lakes, ponds, and slow-moving streams. For the most part, they feed
on aquatic plants, including cattails, duckweeds, water lilies, arrowheads, and sedges.
That really turns out to be your key with trapping muskrat. If you don’t see anything they
would consider food, then you’re not likely to find any muskrats there.
Beaver, as you may know, eat mostly tree bark in the winter months in their huts or dens.
Their preference is for aspen trees, but they will feed on almost any trees that have a
good cambium layer to their bark. Cambium is the soft, smooth inner layer of the bark,
and beavers love it (and it’s also edible for humans). However, during the summer
months, they will feed on both bark and select aquatic plants.
The reason it’s important to know what each of these critters feed on is that it will make
you a much better trapper. Think about it…if you didn’t know what they eat, you’d be at
a disadvantage scouting places where you could be successful trapping them.
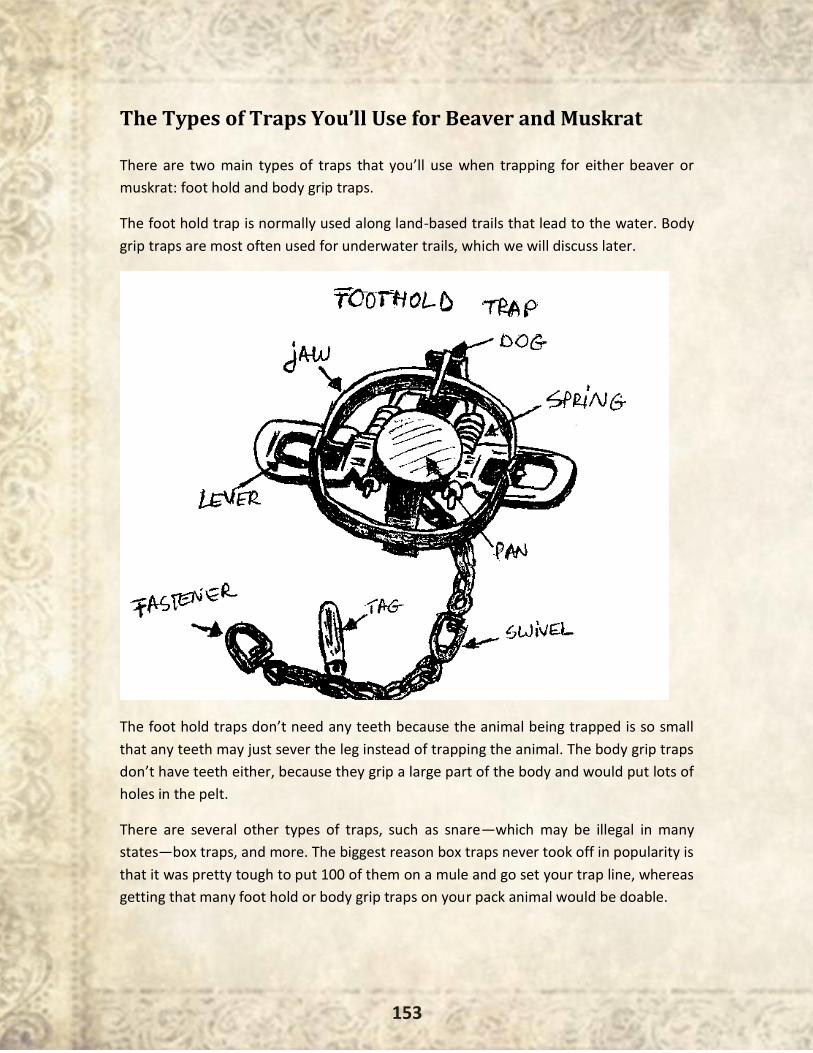
153
The Types of Traps You’ll Use for Beaver and Muskrat
There are two main types of traps that you’ll use when trapping for either beaver or
muskrat: foot hold and body grip traps.
The foot hold trap is normally used along land-based trails that lead to the water. Body
grip traps are most often used for underwater trails, which we will discuss later.
The foot hold traps don’t need any teeth because the animal being trapped is so small
that any teeth may just sever the leg instead of trapping the animal. The body grip traps
don’t have teeth either, because they grip a large part of the body and would put lots of
holes in the pelt.
There are several other types of traps, such as snare—which may be illegal in many
states—box traps, and more. The biggest reason box traps never took off in popularity is
that it was pretty tough to put 100 of them on a mule and go set your trap line, whereas
getting that many foot hold or body grip traps on your pack animal would be doable.
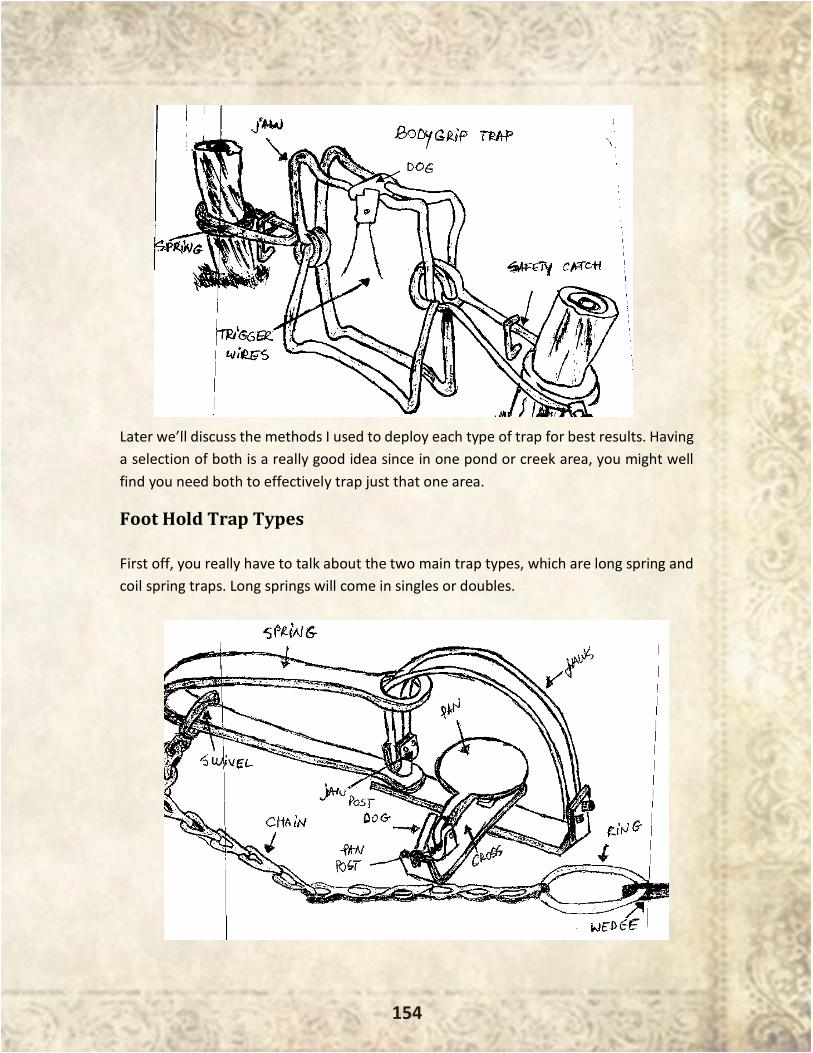
154
Later we’ll discuss the methods I used to deploy each type of trap for best results. Having
a selection of both is a really good idea since in one pond or creek area, you might well
find you need both to effectively trap just that one area.
Foot Hold Trap Types
First off, you really have to talk about the two main trap types, which are long spring and
coil spring traps. Long springs will come in singles or doubles.
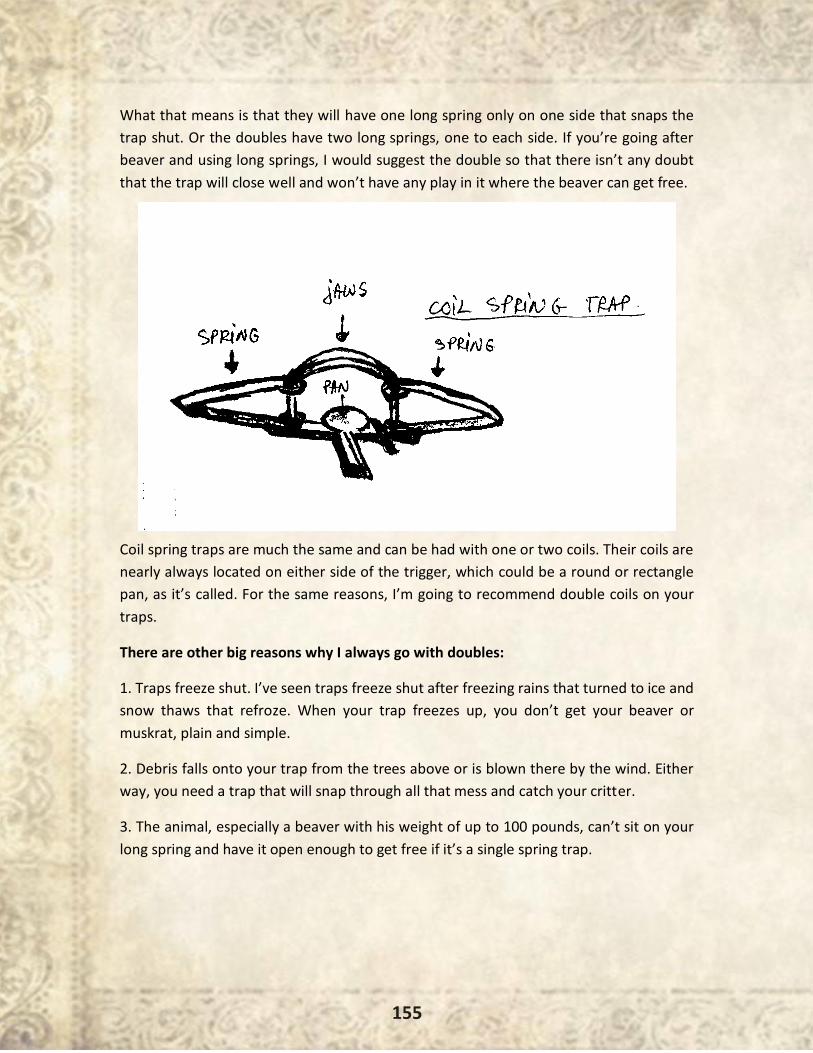
155
What that means is that they will have one long spring only on one side that snaps the
trap shut. Or the doubles have two long springs, one to each side. If you’re going after
beaver and using long springs, I would suggest the double so that there isn’t any doubt
that the trap will close well and won’t have any play in it where the beaver can get free.
Coil spring traps are much the same and can be had with one or two coils. Their coils are
nearly always located on either side of the trigger, which could be a round or rectangle
pan, as it’s called. For the same reasons, I’m going to recommend double coils on your
traps.
There are other big reasons why I always go with doubles:
1. Traps freeze shut. I’ve seen traps freeze shut after freezing rains that turned to ice and
snow thaws that refroze. When your trap freezes up, you don’t get your beaver or
muskrat, plain and simple.
2. Debris falls onto your trap from the trees above or is blown there by the wind. Either
way, you need a trap that will snap through all that mess and catch your critter.
3. The animal, especially a beaver with his weight of up to 100 pounds, can’t sit on your
long spring and have it open enough to get free if it’s a single spring trap.
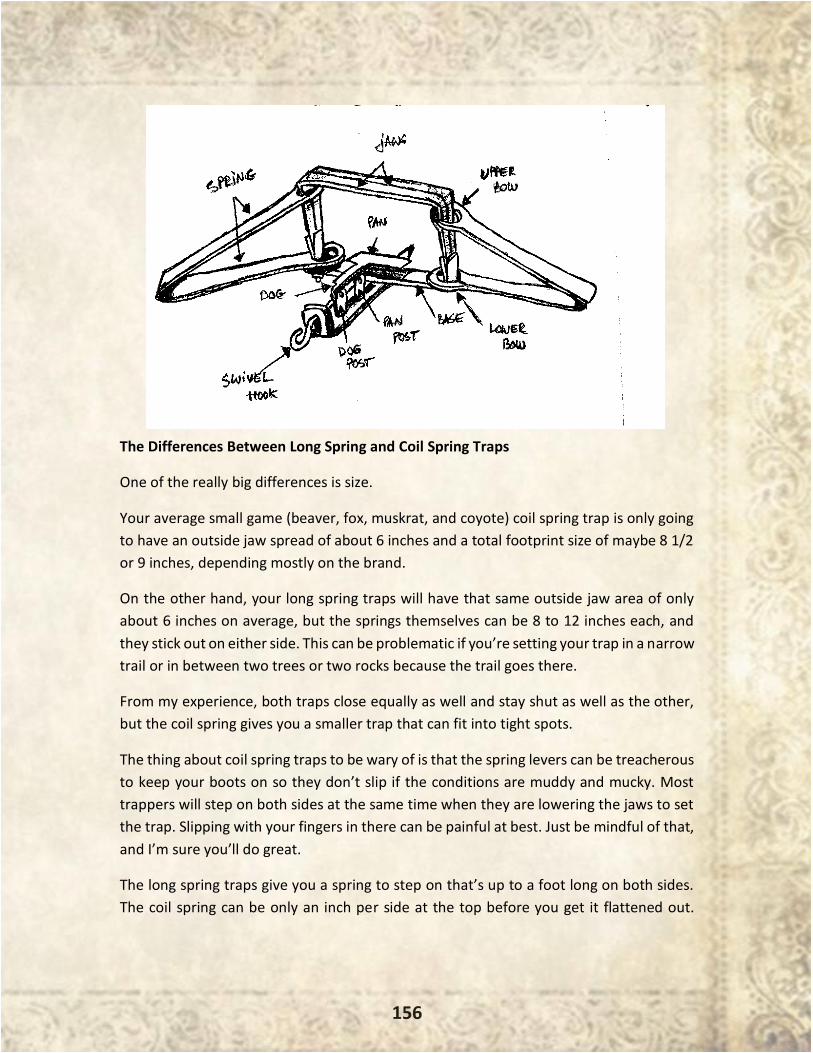
156
The Differences Between Long Spring and Coil Spring Traps
One of the really big differences is size.
Your average small game (beaver, fox, muskrat, and coyote) coil spring trap is only going
to have an outside jaw spread of about 6 inches and a total footprint size of maybe 8 1/2
or 9 inches, depending mostly on the brand.
On the other hand, your long spring traps will have that same outside jaw area of only
about 6 inches on average, but the springs themselves can be 8 to 12 inches each, and
they stick out on either side. This can be problematic if you’re setting your trap in a narrow
trail or in between two trees or two rocks because the trail goes there.
From my experience, both traps close equally as well and stay shut as well as the other,
but the coil spring gives you a smaller trap that can fit into tight spots.
The thing about coil spring traps to be wary of is that the spring levers can be treacherous
to keep your boots on so they don’t slip if the conditions are muddy and mucky. Most
trappers will step on both sides at the same time when they are lowering the jaws to set
the trap. Slipping with your fingers in there can be painful at best. Just be mindful of that,
and I’m sure you’ll do great.
The long spring traps give you a spring to step on that’s up to a foot long on both sides.
The coil spring can be only an inch per side at the top before you get it flattened out.
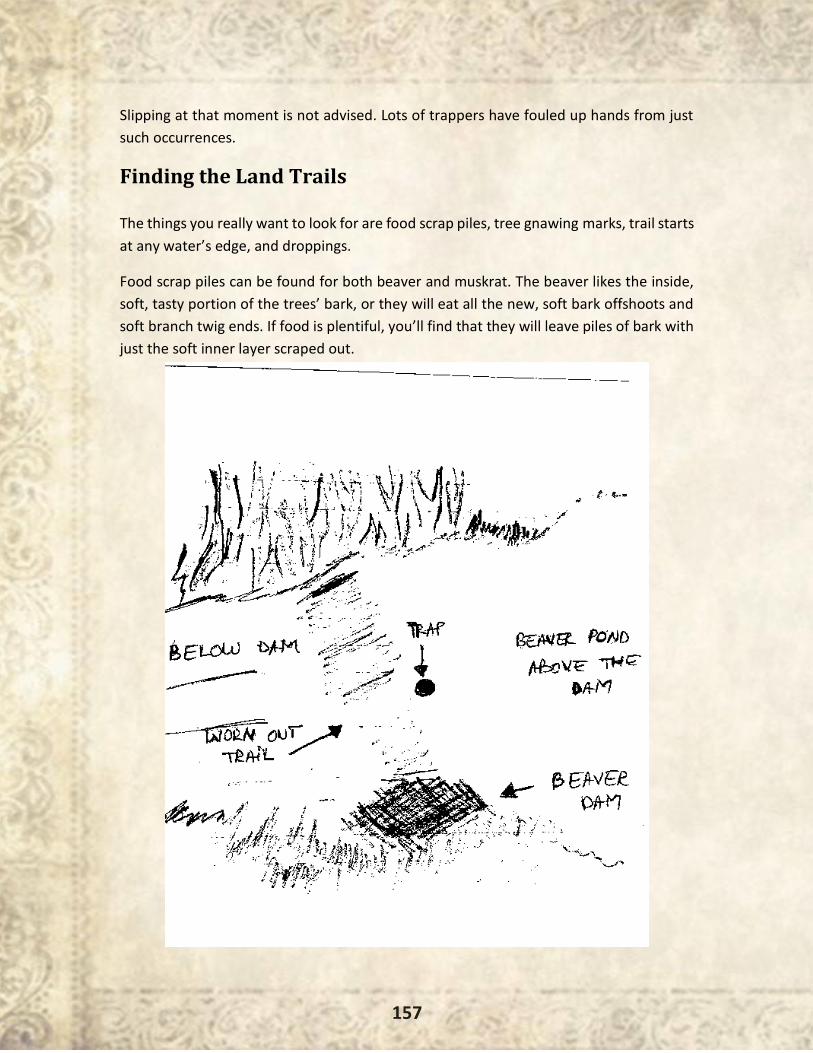
157
Slipping at that moment is not advised. Lots of trappers have fouled up hands from just
such occurrences.
Finding the Land Trails
The things you really want to look for are food scrap piles, tree gnawing marks, trail starts
at any water’s edge, and droppings.
Food scrap piles can be found for both beaver and muskrat. The beaver likes the inside,
soft, tasty portion of the trees’ bark, or they will eat all the new, soft bark offshoots and
soft branch twig ends. If food is plentiful, you’ll find that they will leave piles of bark with
just the soft inner layer scraped out.
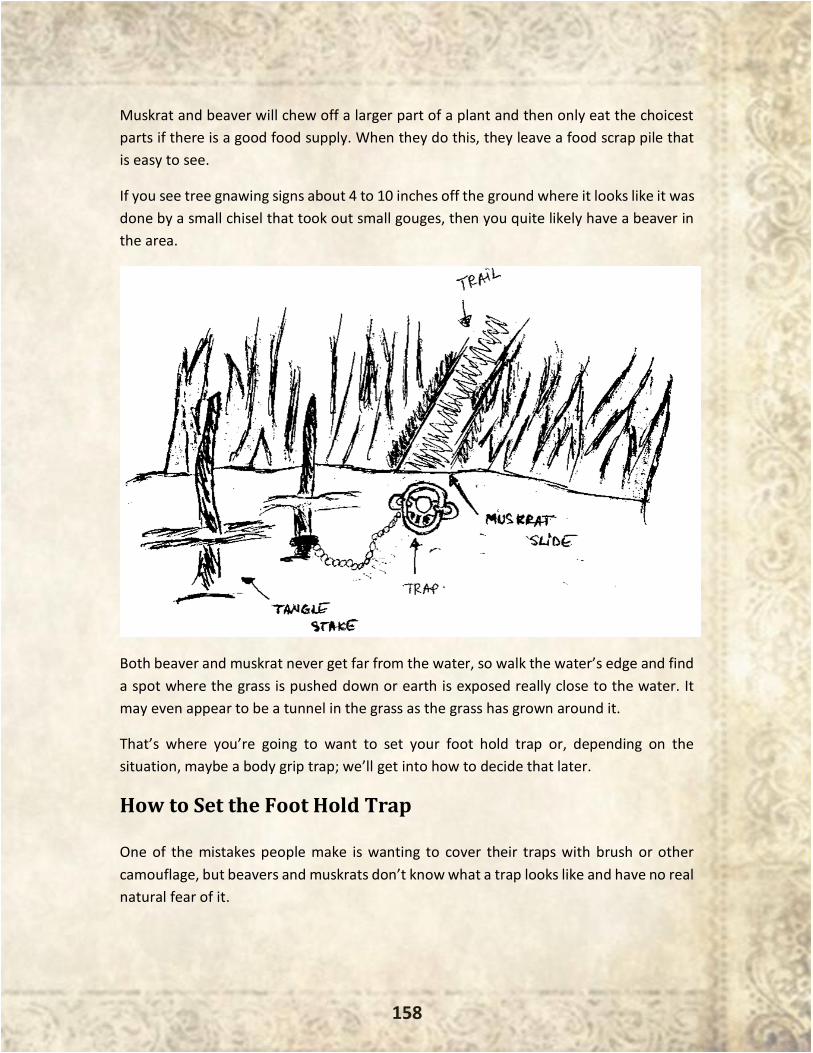
158
Muskrat and beaver will chew off a larger part of a plant and then only eat the choicest
parts if there is a good food supply. When they do this, they leave a food scrap pile that
is easy to see.
If you see tree gnawing signs about 4 to 10 inches off the ground where it looks like it was
done by a small chisel that took out small gouges, then you quite likely have a beaver in
the area.
Both beaver and muskrat never get far from the water, so walk the water’s edge and find
a spot where the grass is pushed down or earth is exposed really close to the water. It
may even appear to be a tunnel in the grass as the grass has grown around it.
That’s where you’re going to want to set your foot hold trap or, depending on the
situation, maybe a body grip trap; we’ll get into how to decide that later.
How to Set the Foot Hold Trap
One of the mistakes people make is wanting to cover their traps with brush or other
camouflage, but beavers and muskrats don’t know what a trap looks like and have no real
natural fear of it.

159
However, the brush you put on top of your trap can cause it to not close fully or properly,
and you will miss your critter. Then they might learn not to like that strange metal thingy.
Be sure to stake down your trap really well or wire it to a tree. If not, when you come back
and find it gone, you know you have a critter swimming somewhere with your trap on it.
Just set your trap in the middle so they can’t avoid it, and you should be good.
Finding the Underwater Trails
If you have a beaver hut or lodge and you have clear ice with no snow on top, then look
for a trail of bubbles leading to the hut. If you have snow on the ice, be sure to clear it
away so you can find the bubble trail.
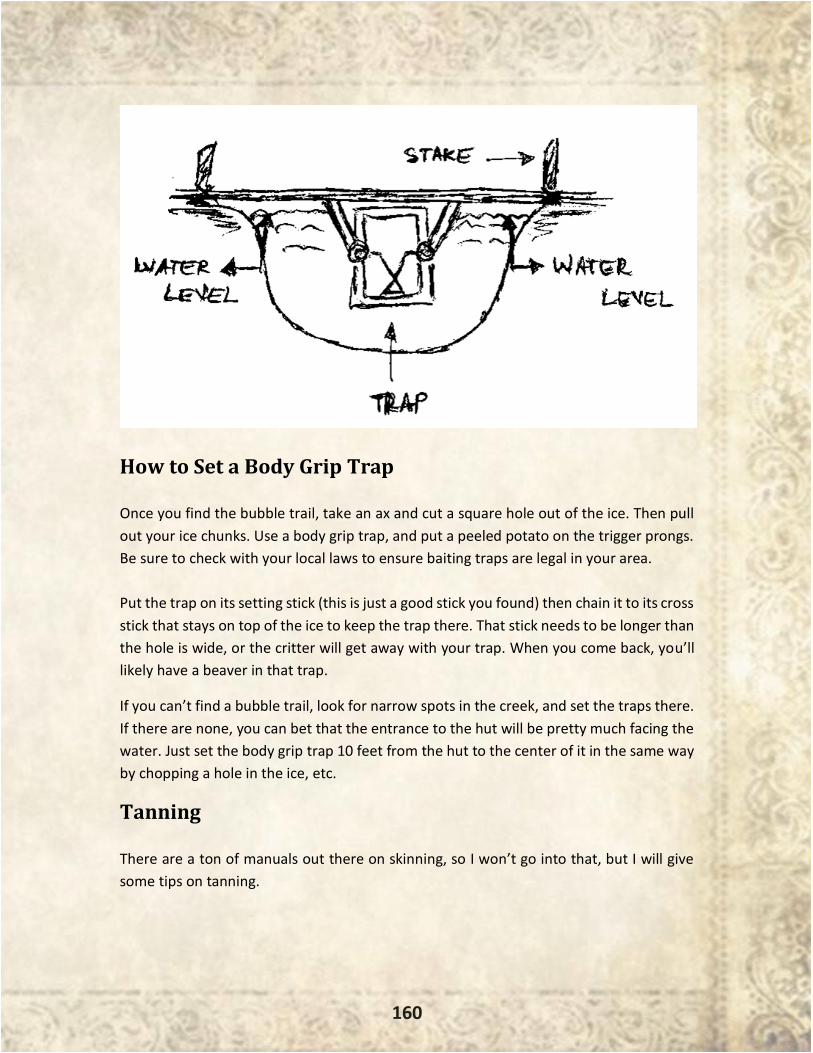
160
How to Set a Body Grip Trap
Once you find the bubble trail, take an ax and cut a square hole out of the ice. Then pull
out your ice chunks. Use a body grip trap, and put a peeled potato on the trigger prongs.
Be sure to check with your local laws to ensure baiting traps are legal in your area.
Put the trap on its setting stick (this is just a good stick you found) then chain it to its cross
stick that stays on top of the ice to keep the trap there. That stick needs to be longer than
the hole is wide, or the critter will get away with your trap. When you come back, you’ll
likely have a beaver in that trap.
If you can’t find a bubble trail, look for narrow spots in the creek, and set the traps there.
If there are none, you can bet that the entrance to the hut will be pretty much facing the
water. Just set the body grip trap 10 feet from the hut to the center of it in the same way
by chopping a hole in the ice, etc.
Tanning
There are a ton of manuals out there on skinning, so I won’t go into that, but I will give
some tips on tanning.
161
First off, never pull your hide tight and let your dogs de-fat the hide for you. I know a lot
of people do that, but it’s a mistake. Here’s why. Your dogs don’t know when you have
added your tanning mixture to the hide. Alum is aluminum sulfate, which is not good for
dogs, and the soda will give them gas so bad you’ll wish you hadn’t done that if it’s an
indoor dog.
Once you’re ready, mix up this little recipe.
❖ 2/3 cup Arm and Hammer Super Washing Soda
❖ 1 cup non-iodized salt
❖ 2 ½ cups alum
This mix is enough for one good-sized beaver, six to eight muskrats, or four to five good-
sized rabbits.
You can de-fat either before or after you soak your hides for the first soak; you may find
it easier to do afterwards.
Fill a five-gallon bucket with about three gallons of warm, but not hot, water. Add the salt,
and mix with a wooden stick until the salt is dissolved. Then add the aluminum sulfate
and the washing soda. Stir again until the chemicals are dissolved. It will be a little
effervescent, but that’s okay.
Drop the hide(s) in the bucket, and gently stir with a stick. You can use a non-metallic
weight to hold the hide under water if it tries to float. Make sure your weights are non-
metallic or you’ll have a worthless hide in no time with green spots on it. Only use a
wooden stick and a rope-type clothesline (you’ll understand the clothesline later) for the
same reason.
Stir, lift out, and re-immerse your hides once a day for three days. If you have not defatted
your hide yet, do so after the three-day mark. Then look at your solution. If it’s fatty, dirty,
and oily, as it will be most of the time, then make a fresh batch using the same recipe.
Then soak your hides for four to 11 more days, depending on the thickness and feel of the
hide. Rabbit will usually tan well after seven days, whereas beaver is usually 14 days.
Now wring out your hide by hand really well and hang over a clothesline indoors overnight
with the flesh side down and the fur side up. You want to dry the fur but not the hide. The
reason for doing this indoors is that dogs and critters will come take your prize right off
the line if it’s outdoors.

162
Now you need to start breaking your hide. Each day, knead it together like bread. Rotate
it in a circle, and knead it from every direction. This is how you end up with a nice, soft
hide instead of something that feels like a board. When the hide is fully dry and not cool
to the touch, then you are finished with that hide.
Selling at the Trading Post
The trader is going to do his best to buy your furs cheap. That’s his job, so don’t take
offense at it. Your beaver will have reached his fur peak between December and March,
so if you trapped during those times, you’ll have a good shot at a decent-priced pelt.
Blow on the fur in one direction, and you’ll see that there is what’s called under-fur. To
be a prime fur, this should be between 0.8"–1.2" long in the kidney area of the beaver.
The guard hairs (the longer outer hairs) should be between 2"–2.4" long.
Then, of course, you’ll have all the normal sundries of him saying, “Well, the hide’s nicked
here,” or “The split line on your skinning was off, so it’s not symmetrical,” or other such
things so he can barter you down. Like I said, this is normal, and your job is to refute his
claims of course.
And There You Have It
Now you can trap for beaver and muskrat just like our forefathers did.
These are much the same methods they used with the exception that a small number of
trappers used brain tanning methods. Most of those furs could not be sold to the
European markets because the smell was considered unsavory, so the practice of brain
tanning died out.
Follow all the above and you’ll be a successful trapper in no time.
163
- By Susan Morrow -
“All that man needs for health and healing has
been provided by God in nature; the challenge
of science is to find it.”
– Philippus Theophrastrus (1493–1541)
When I was a little girl and I had fallen down and hurt my knee (it’s always your
knee you hurt when you’re a child), my mother would put a poultice made of bread,
warmed in milk, onto the cut. It instantly soothed the knee. She’d then leave it on,
covered by a piece of material wrapped around it to hold it in place and keep the heat in.
When I took it off hours later, my knee definitely felt much better.
The art of the poultice is part of the long history of folk medicine that human beings have
used since we came to be. Folk medicine is a way of healing by using things like plants and
herbs as well as certain practices like blood-letting to fix an ailment.
The methods, recipes, and techniques are usually passed down through generations. You
may think that the ingredients in a poultice wouldn’t really have any effect, but if you
explore the ingredients and compare them to modern medicines, you may be surprised
at the similarities. For example, a poultice I mention in the section on recipes below
contains opium.
A medicine that is available over the counter in a number of countries, called “kaolin and
morphine,” is used for a similar ailment and uses morphine (a related drug to opium and

164
also derived from poppy seeds). Poultices may be seen to be “folk medicine,” but they
work in similar ways to modern medicine, and from my own experience, for certain
ailments, they do just as good a job.
What Is a Poultice?
A poultice is a topical application, often heated, that is used to treat wounds and sores.
The base of a poultice is often bread—like the ones my mother and grandmother would
use. But bran and other similar cereals can also be used as the base.
The Native Americans would use mashed pumpkin instead of bread. The poultice
ingredients would be heated, often in milk, and the warm mash would be wrapped
around the affected area using some sort of cloth—my grandmother would use rough
linen or gauze.
I have a book dated 1794 and called
Medicine Made of English Herbs. The
famous English herbalist, Culpepper,
wrote it.
The book has a small chapter on
poultices, and I will quote you a little
piece from that explaining what a
poultice is and what it is used for
(note that the book is written in old
English using F instead of S, so I will
translate into our more modern
spelling):
“Poultices are those kinds of things
which the Latins call Cataplasmata,
and our learned fellows, that if you
can read English, that’s all, call them
Cataplasms, because it is a crabbed
word few understand; it is indeed a
very fine kind of medicine to ripen
sores.”
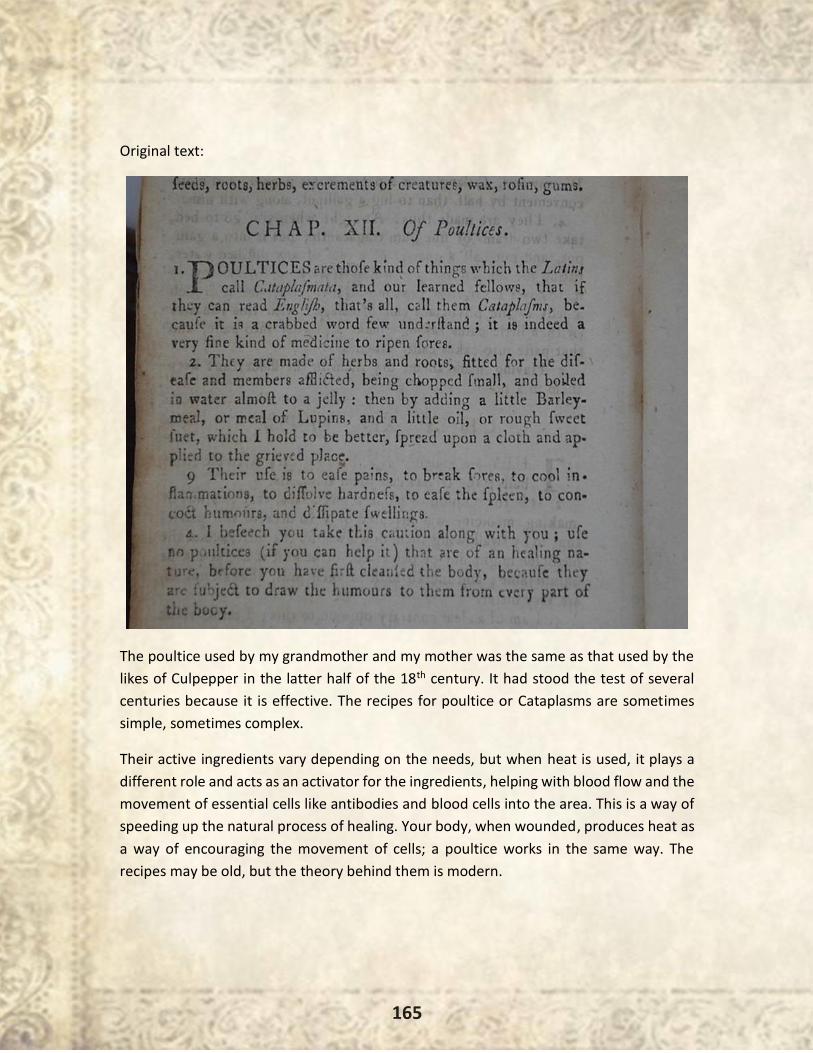
165
Original text:
The poultice used by my grandmother and my mother was the same as that used by the
likes of Culpepper in the latter half of the 18th century. It had stood the test of several
centuries because it is effective. The recipes for poultice or Cataplasms are sometimes
simple, sometimes complex.
Their active ingredients vary depending on the needs, but when heat is used, it plays a
different role and acts as an activator for the ingredients, helping with blood flow and the
movement of essential cells like antibodies and blood cells into the area. This is a way of
speeding up the natural process of healing. Your body, when wounded, produces heat as
a way of encouraging the movement of cells; a poultice works in the same way. The
recipes may be old, but the theory behind them is modern.
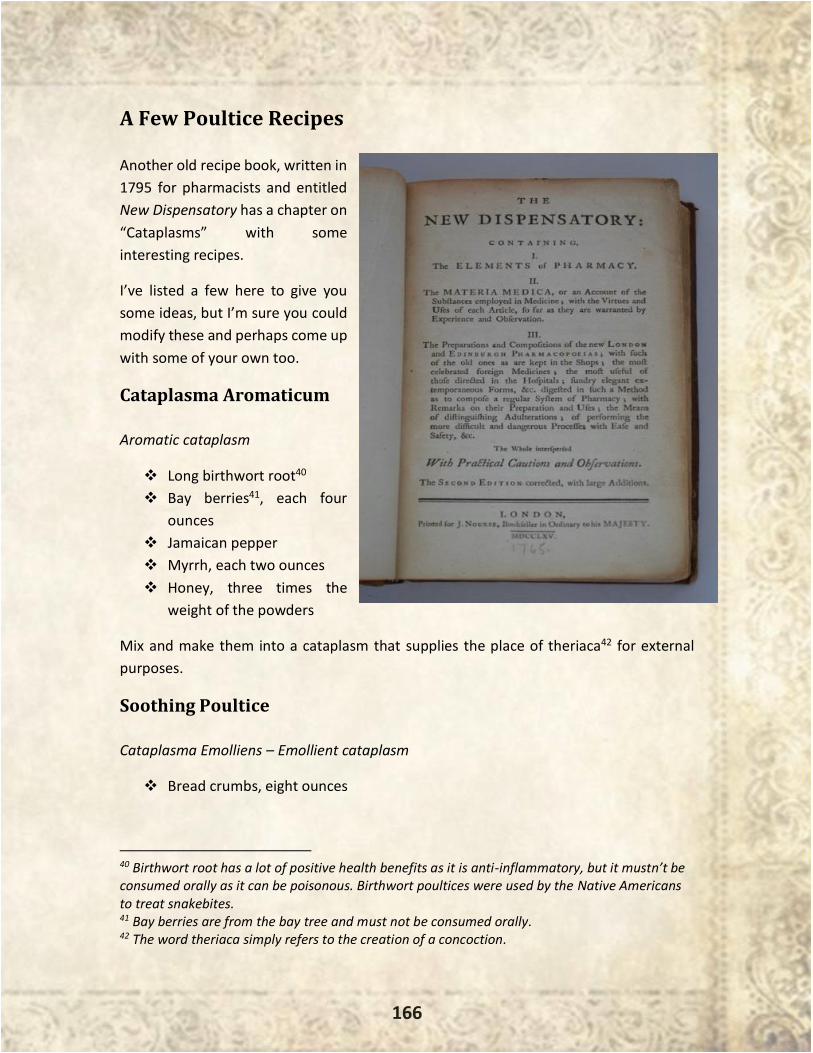
166
A Few Poultice Recipes
Another old recipe book, written in
1795 for pharmacists and entitled
New Dispensatory has a chapter on
“Cataplasms” with some
interesting recipes.
I’ve listed a few here to give you
some ideas, but I’m sure you could
modify these and perhaps come up
with some of your own too.
Cataplasma Aromaticum
Aromatic cataplasm
❖ Long birthwort root40
❖ Bay berries41, each four
ounces
❖ Jamaican pepper
❖ Myrrh, each two ounces
❖ Honey, three times the
weight of the powders
Mix and make them into a cataplasm that supplies the place of theriaca42 for external
purposes.
Soothing Poultice
Cataplasma Emolliens – Emollient cataplasm
❖ Bread crumbs, eight ounces
40 Birthwort root has a lot of positive health benefits as it is anti-inflammatory, but it mustn’t be consumed orally as it can be poisonous. Birthwort poultices were used by the Native Americans to treat snakebites. 41 Bay berries are from the bay tree and must not be consumed orally. 42 The word theriaca simply refers to the creation of a concoction.
167
❖ White soap43, one ounce
❖ Fresh cow’s milk, a sufficient quantity
For Stomachaches
Cataplasma Stomachicum – Stomachic cataplasm
❖ The aromatic cataplasm, one ounce
❖ Expressed oil of mace, two drams
❖ Anodyne balsam44, as much as is sufficient to reduce them into a proper
consistency
A Mustard Poultice
…which can be used for sore muscles, aches and pains, and even chest congestion:
Sinapismus – A sinapism
❖ Mustard seed powder
❖ Bread crumbs, equal parts
❖ Strong vinegar, as much as is sufficient
Mix and make them into a cataplasm to which is sometimes added a little bruised garlic.
(As an aside, I was prescribed a very similar concoction to this by a physiotherapist I was
seeing for back pain recently; it worked wonders.)
A Native American Recipe to Treat an Abscess
There is a tradition among Native Americans, which was then inherited by the settlers, of
using a poultice. As mentioned earlier, the poultice would often be made using a base of
mashed pumpkin.
But other base ingredients such as cornmeal would also be used. Here is a recipe for a
Native American poultice used for abscesses:
❖ Cornbread, flaxseed, or mashed pumpkin
43 White soap can be obtained as the soft froth you get when olive oil-based soap is steeped in water for a long time. 44 Anodyne balsam—now this may be tricky to get as it does contain opium!

168
❖ Ninebark decoction (steep the ninebark for several hours; then decant the liquid)
Warm the decoction with the mash, and place on the abscess.
A Word of Warning from the Past
A final word from the great herbalist Culpepper, who says on the matter of poultices in
his 1794 book that:
“I beseech you take this caution along with you; use no poultices (if you can help it) that
are of a healing nature before you have first cleansed the body, because they are subject
to draw the humours to them from every part of the body.”
A warning to heed. The power of the poultice is great, and should be used knowing that
to be true. Use them wisely.
169
- Theresa Anne DeMario -
“If you don’t have a plan and leave your food
choices to chance, chances are good that those
choices will stink.”
– Kristen Bentson
With the cost of food rising and the quality diminishing every year, root cellars
are not a thing of the past. Nor are they just a way to prep for an uncertain future.
A well-tended root cellar will dramatically reduce your cost of living now, freeing up those
much-needed funds for all those unperishable items that will make your life a little more
comfortable when the time comes.
A root cellar is the perfect place to store the bounty of your summer garden, but it is also
useful for those trips to the farmers’ market when you find a particularly great deal on
turnips but you know you won’t eat that many before they shrivel up on the shelf of your
pantry.
When I think of a root cellar, I picture a space set in the side of a hill, lined with stone45.
All year, it stays cool and damp—a glorious reprieve to escape to after a hot summer’s
day in the garden.
45 "Philander Knox Root Cellar" by: Thomas, (CC BY-ND 2.0)

170
More commonly, root cellars are less exciting, with dirt floors and wooden shelves. These
work too. In fact, when it comes to function, a cave, an unfinished basement, a bulkhead,
or even a covered trench will get the job done.
History
The oldest examples of root cellars date
back some 40,000 years ago in Australia.
Incidentally, this is also when fermentation
was discovered. People would grow
copious amounts of yams and bury them to
eat later.
Sometimes they would ferment, so
alcoholic beverages became a happy
byproduct of food storage. When you think
about it, this is probably also how and why
the wine cellar was invented. In fact, we’ve
unearthed underground storage from the
Iron Ages, when it was common practice to
bury immature wine.
However, root cellars as we understand them today—a convenient, walk-in food storage
space—is a relatively young idea that dates back only to 17th century England. In the rest
of the world, food preservation techniques, such as pickling, salting, and drying, excelled.
A happy combination reached the Americas during colonization.
The Right Space for the Job
Like history has shown us, root cellaring is not necessarily the best choice for every
environment, and even within the same climate, there are different kinds and ways to
adapt a root cellar to your individual needs.
Climate
Depending on where you are, your root cellar needs to perform specific functions for you.
If your climate is one of extremes, you need to take this into consideration.
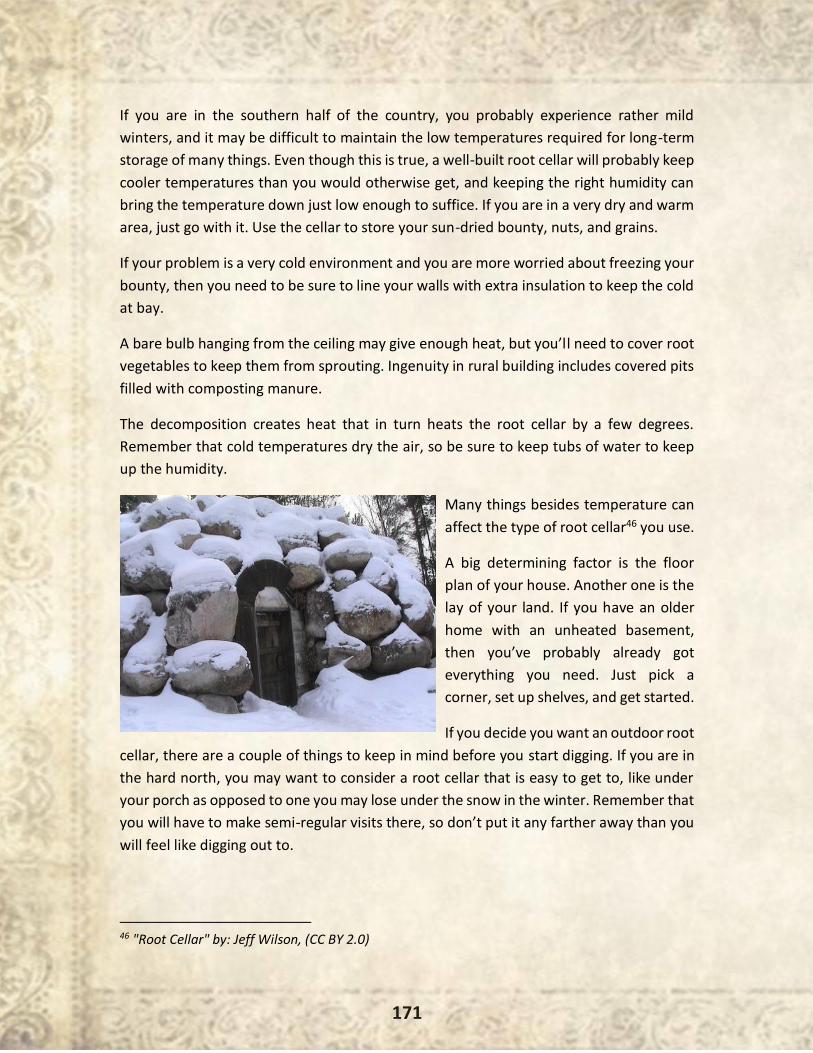
171
If you are in the southern half of the country, you probably experience rather mild
winters, and it may be difficult to maintain the low temperatures required for long-term
storage of many things. Even though this is true, a well-built root cellar will probably keep
cooler temperatures than you would otherwise get, and keeping the right humidity can
bring the temperature down just low enough to suffice. If you are in a very dry and warm
area, just go with it. Use the cellar to store your sun-dried bounty, nuts, and grains.
If your problem is a very cold environment and you are more worried about freezing your
bounty, then you need to be sure to line your walls with extra insulation to keep the cold
at bay.
A bare bulb hanging from the ceiling may give enough heat, but you’ll need to cover root
vegetables to keep them from sprouting. Ingenuity in rural building includes covered pits
filled with composting manure.
The decomposition creates heat that in turn heats the root cellar by a few degrees.
Remember that cold temperatures dry the air, so be sure to keep tubs of water to keep
up the humidity.
Many things besides temperature can
affect the type of root cellar46 you use.
A big determining factor is the floor
plan of your house. Another one is the
lay of your land. If you have an older
home with an unheated basement,
then you’ve probably already got
everything you need. Just pick a
corner, set up shelves, and get started.
If you decide you want an outdoor root
cellar, there are a couple of things to keep in mind before you start digging. If you are in
the hard north, you may want to consider a root cellar that is easy to get to, like under
your porch as opposed to one you may lose under the snow in the winter. Remember that
you will have to make semi-regular visits there, so don’t put it any farther away than you
will feel like digging out to.
46 "Root Cellar" by: Jeff Wilson, (CC BY 2.0)
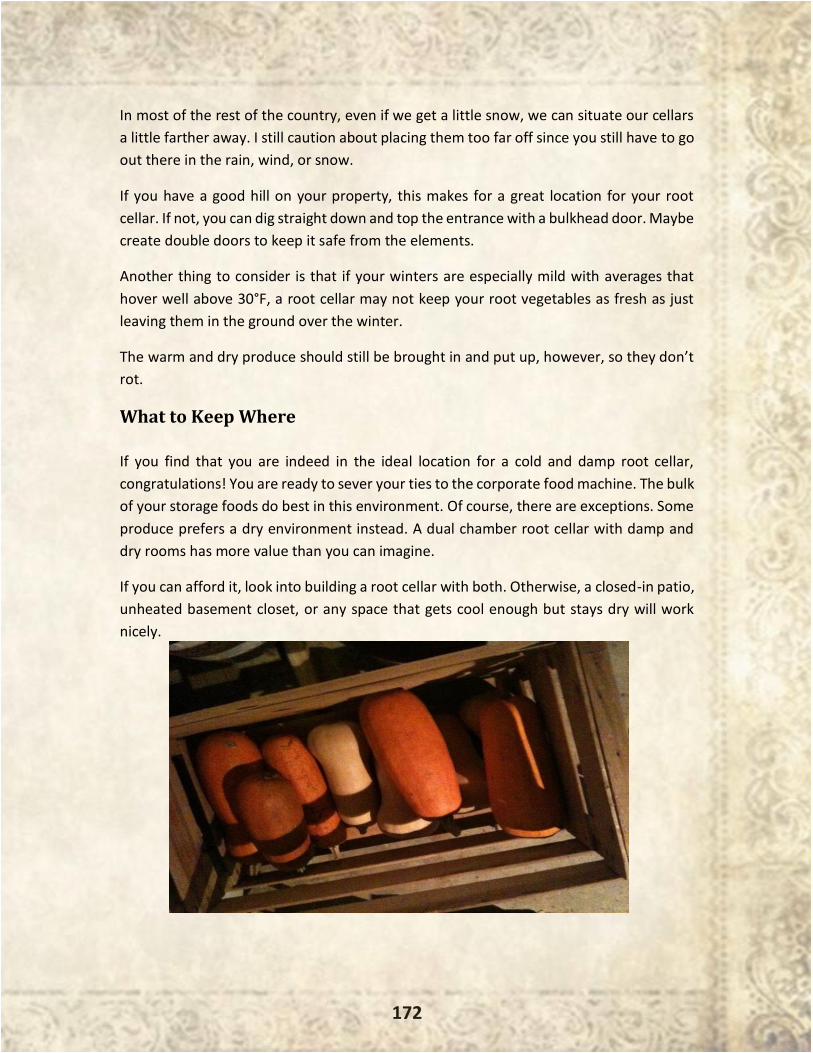
172
In most of the rest of the country, even if we get a little snow, we can situate our cellars
a little farther away. I still caution about placing them too far off since you still have to go
out there in the rain, wind, or snow.
If you have a good hill on your property, this makes for a great location for your root
cellar. If not, you can dig straight down and top the entrance with a bulkhead door. Maybe
create double doors to keep it safe from the elements.
Another thing to consider is that if your winters are especially mild with averages that
hover well above 30°F, a root cellar may not keep your root vegetables as fresh as just
leaving them in the ground over the winter.
The warm and dry produce should still be brought in and put up, however, so they don’t
rot.
What to Keep Where
If you find that you are indeed in the ideal location for a cold and damp root cellar,
congratulations! You are ready to sever your ties to the corporate food machine. The bulk
of your storage foods do best in this environment. Of course, there are exceptions. Some
produce prefers a dry environment instead. A dual chamber root cellar with damp and
dry rooms has more value than you can imagine.
If you can afford it, look into building a root cellar with both. Otherwise, a closed-in patio,
unheated basement closet, or any space that gets cool enough but stays dry will work
nicely.
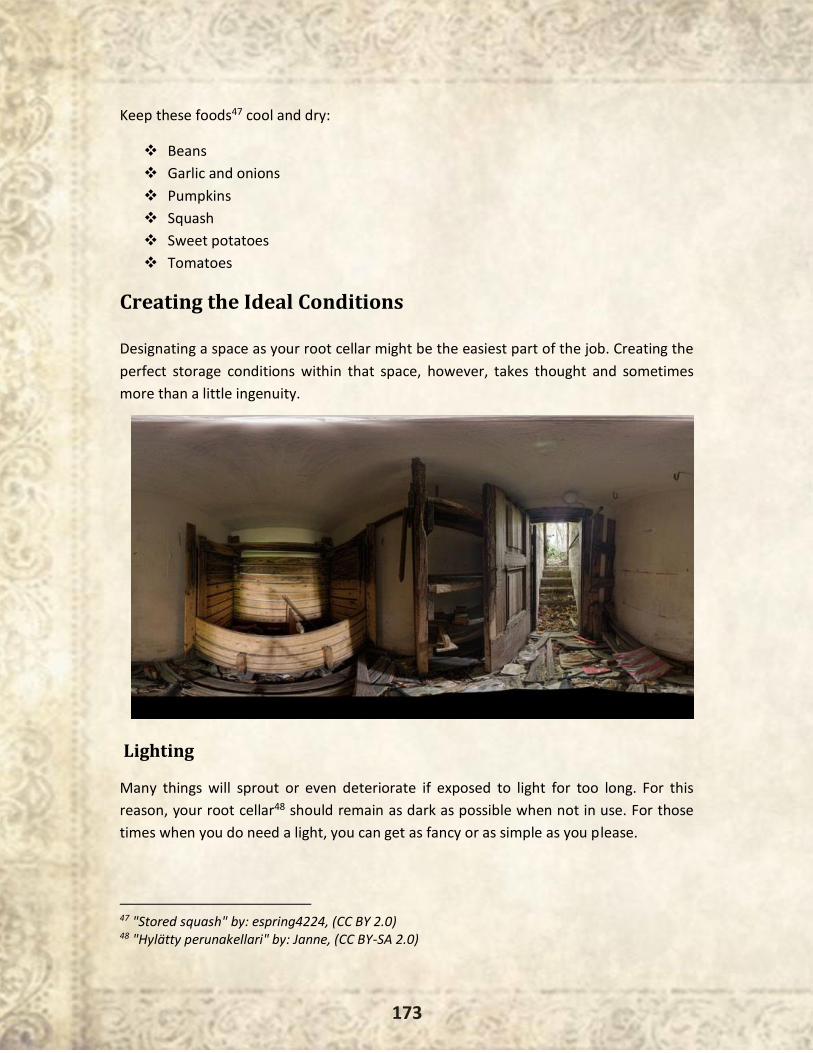
173
Keep these foods47 cool and dry:
❖ Beans
❖ Garlic and onions
❖ Pumpkins
❖ Squash
❖ Sweet potatoes
❖ Tomatoes
Creating the Ideal Conditions
Designating a space as your root cellar might be the easiest part of the job. Creating the
perfect storage conditions within that space, however, takes thought and sometimes
more than a little ingenuity.
Lighting
Many things will sprout or even deteriorate if exposed to light for too long. For this
reason, your root cellar48 should remain as dark as possible when not in use. For those
times when you do need a light, you can get as fancy or as simple as you please.
47 "Stored squash" by: espring4224, (CC BY 2.0) 48 "Hylätty perunakellari" by: Janne, (CC BY-SA 2.0)
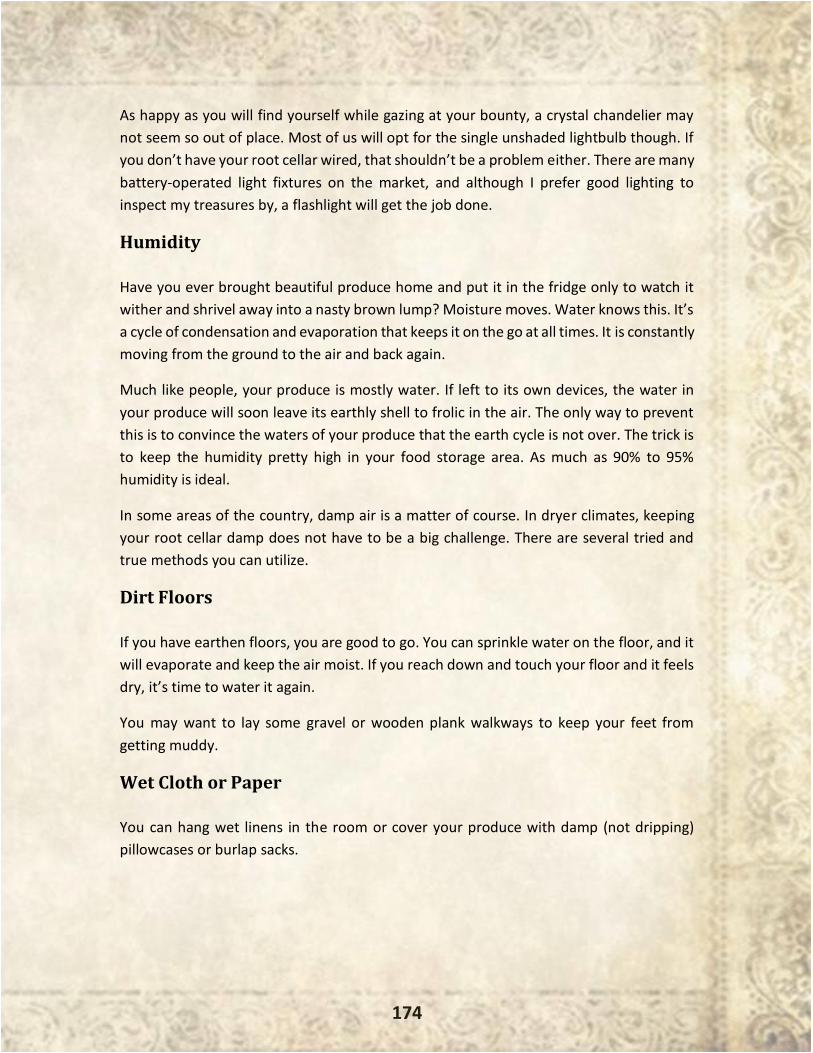
174
As happy as you will find yourself while gazing at your bounty, a crystal chandelier may
not seem so out of place. Most of us will opt for the single unshaded lightbulb though. If
you don’t have your root cellar wired, that shouldn’t be a problem either. There are many
battery-operated light fixtures on the market, and although I prefer good lighting to
inspect my treasures by, a flashlight will get the job done.
Humidity
Have you ever brought beautiful produce home and put it in the fridge only to watch it
wither and shrivel away into a nasty brown lump? Moisture moves. Water knows this. It’s
a cycle of condensation and evaporation that keeps it on the go at all times. It is constantly
moving from the ground to the air and back again.
Much like people, your produce is mostly water. If left to its own devices, the water in
your produce will soon leave its earthly shell to frolic in the air. The only way to prevent
this is to convince the waters of your produce that the earth cycle is not over. The trick is
to keep the humidity pretty high in your food storage area. As much as 90% to 95%
humidity is ideal.
In some areas of the country, damp air is a matter of course. In dryer climates, keeping
your root cellar damp does not have to be a big challenge. There are several tried and
true methods you can utilize.
Dirt Floors
If you have earthen floors, you are good to go. You can sprinkle water on the floor, and it
will evaporate and keep the air moist. If you reach down and touch your floor and it feels
dry, it’s time to water it again.
You may want to lay some gravel or wooden plank walkways to keep your feet from
getting muddy.
Wet Cloth or Paper
You can hang wet linens in the room or cover your produce with damp (not dripping)
pillowcases or burlap sacks.

175
Standing Water
Probably the most basic way to introduce moisture to a room is to simply put water there;
wide, shallow pans have more surface area for more rapid evaporation, or a bucket in the
corner might be enough if you don’t want to check it that often.
Bury Your Treasure
If you’ve tried the methods above and simply cannot keep your humidity level high
enough, try burying your roots in sand or sawdust. This prevents rapid dehydration and
preserves them longer.
A Condensation Nightmare
There is that point when the air temperature changes and the cycle of evaporation
becomes condensation. When this happens, you may be faced with a big, wet mess. That
much moisture will spoil your precious foods and encourage mold, mildew, and general
rot to take the room over.
Save yourself this trouble. Buy a thermometer and a hygrometer, and check the levels
regularly. Dew points vary according to atmospheric pressure, humidity, and
temperature. If you can find out what is normal for your area, you can prevent a disaster
by regulating these factors. Sometimes it’s as simple as cracking the door for a day or so.
Ventilation
Some vegetables stink when they sit, and some fruits give off ethylene gas, which speeds
the ripening and subsequent rot of your produce. This is why it’s important to keep the
air circulating.
Don’t underestimate the value of good ventilation when setting up your root cellar. The
key to good ventilation is to be sure it can be both monitored and controlled.
The easiest method is to simply put an intake vent close to the ground and an exhaust
vent close to the ceiling. Then you just let the air circulate naturally—cool air sinks and
heat rises. If you want to get fancy, you can install grates that open and close or a simple
fan in the exhaust vent.
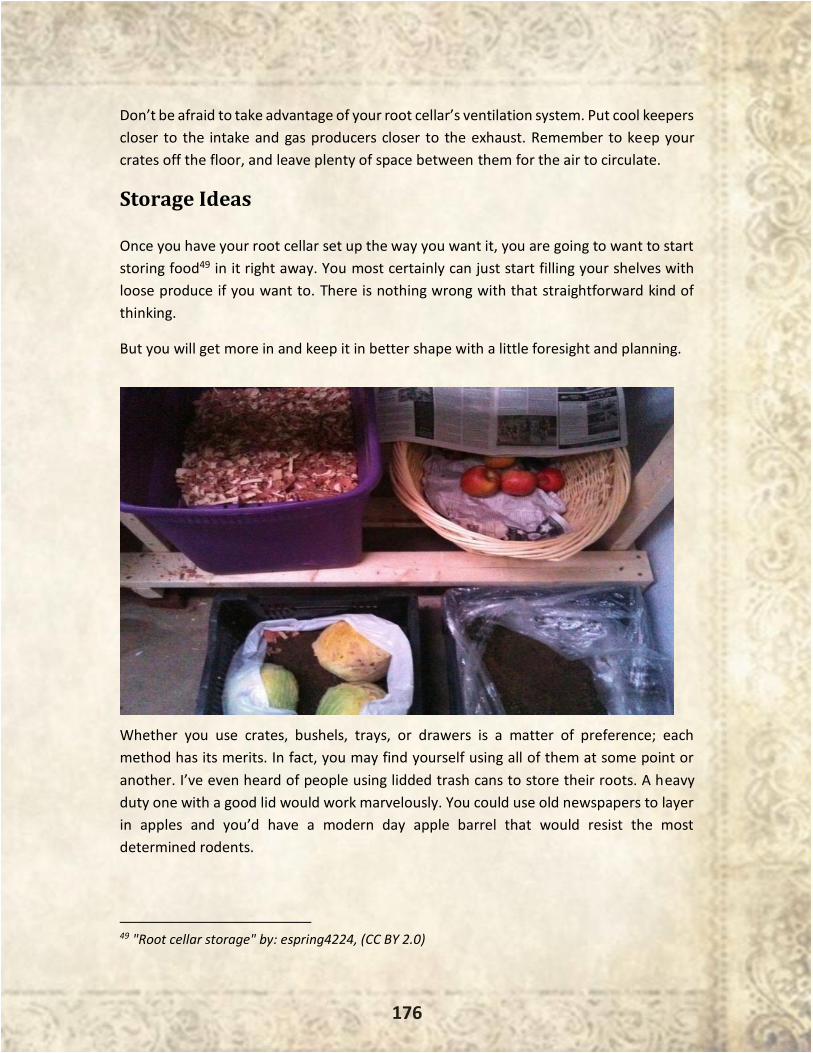
176
Don’t be afraid to take advantage of your root cellar’s ventilation system. Put cool keepers
closer to the intake and gas producers closer to the exhaust. Remember to keep your
crates off the floor, and leave plenty of space between them for the air to circulate.
Storage Ideas
Once you have your root cellar set up the way you want it, you are going to want to start
storing food49 in it right away. You most certainly can just start filling your shelves with
loose produce if you want to. There is nothing wrong with that straightforward kind of
thinking.
But you will get more in and keep it in better shape with a little foresight and planning.
Whether you use crates, bushels, trays, or drawers is a matter of preference; each
method has its merits. In fact, you may find yourself using all of them at some point or
another. I’ve even heard of people using lidded trash cans to store their roots. A heavy
duty one with a good lid would work marvelously. You could use old newspapers to layer
in apples and you’d have a modern day apple barrel that would resist the most
determined rodents.
49 "Root cellar storage" by: espring4224, (CC BY 2.0)
177
In-Garden Storage
First of all, not only is it okay to leave your root harvest until the last minute but it’s
actually desirable. You will want to wait until the ground has cooled completely before
you mulch over your garden. If you do it too soon, you will only trap the warmth and
promote the composting and decay of your treasured roots.
You will need to harvest carrots before the temperature gets too low. They are damaged
when frozen. However, kale is a champion fall green and will do fine out there through a
few frosts. So will leeks and onions. Cabbage, cauliflower, and celery are pretty cold hardy
as well.
Speaking of vegetables that tolerate the cold, turnips, parsnips, and horseradish actually
improve when left in the ground for a light freeze. Just be sure that you don’t let the
conditions get to where your bounty is under a few feet of snow and you can’t break
ground any longer! It might prove best to go ahead and dig them up while you can and
store them in containers outside for a while.
Insulation
While it’s difficult to make absolutely sure that your root cellar stays the right
temperature with the perfect amount of humidity, it is really easy to provide them with a
little extra support via insulation. What sort of insulation you use is up to you.
Simply line the bottom of your container with an inch of insulation and layer in your
produce, leaving a quarter inch between each layer.
Although root vegetables can touch each other slightly (as opposed to apples), you must
be sure to leave one to three inches on each side between your produce and the
container.
❖ Shredded paper
❖ Newspaper
❖ Sawdust
❖ Peat moss
Things That Do and Do Not Belong in Your Root Cellar
While the root cellar is the perfect place to store raw fresh produce, unless you have dual
compartments, it is a terrible idea to store your canned or boxed foods there!
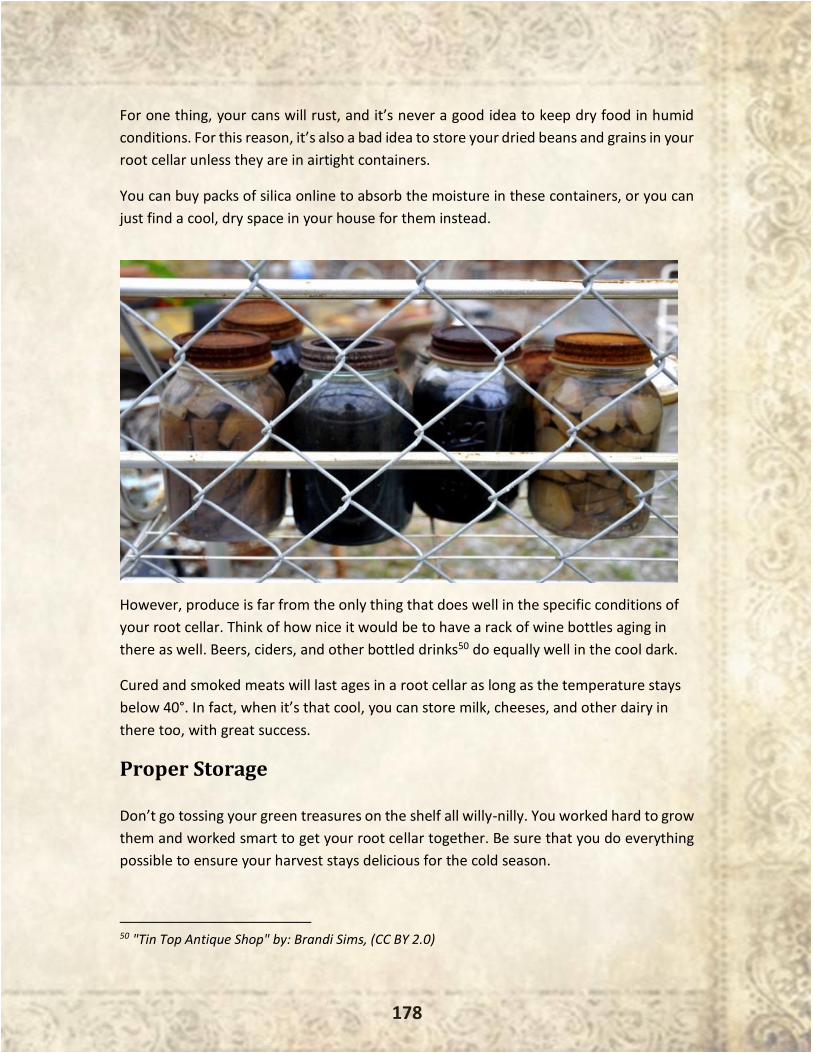
178
For one thing, your cans will rust, and it’s never a good idea to keep dry food in humid
conditions. For this reason, it’s also a bad idea to store your dried beans and grains in your
root cellar unless they are in airtight containers.
You can buy packs of silica online to absorb the moisture in these containers, or you can
just find a cool, dry space in your house for them instead.
However, produce is far from the only thing that does well in the specific conditions of
your root cellar. Think of how nice it would be to have a rack of wine bottles aging in
there as well. Beers, ciders, and other bottled drinks50 do equally well in the cool dark.
Cured and smoked meats will last ages in a root cellar as long as the temperature stays
below 40°. In fact, when it’s that cool, you can store milk, cheeses, and other dairy in
there too, with great success.
Proper Storage
Don’t go tossing your green treasures on the shelf all willy-nilly. You worked hard to grow
them and worked smart to get your root cellar together. Be sure that you do everything
possible to ensure your harvest stays delicious for the cold season.
50 "Tin Top Antique Shop" by: Brandi Sims, (CC BY 2.0)
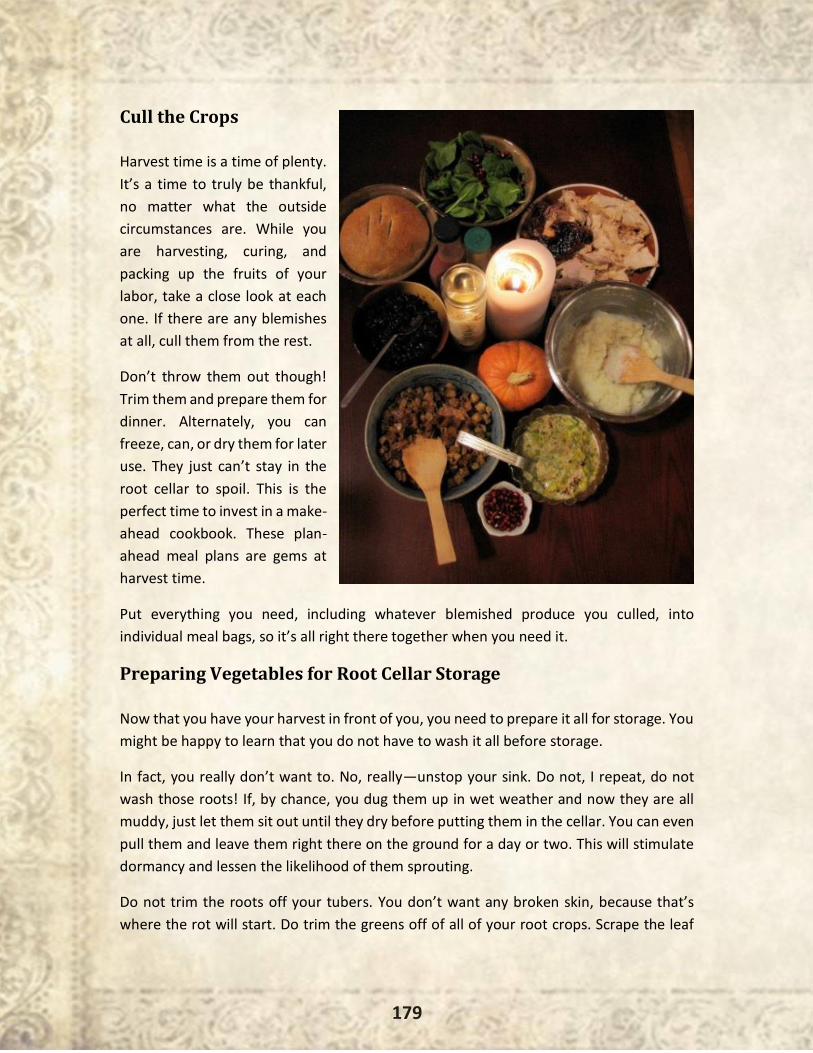
179
Cull the Crops
Harvest time is a time of plenty.
It’s a time to truly be thankful,
no matter what the outside
circumstances are. While you
are harvesting, curing, and
packing up the fruits of your
labor, take a close look at each
one. If there are any blemishes
at all, cull them from the rest.
Don’t throw them out though!
Trim them and prepare them for
dinner. Alternately, you can
freeze, can, or dry them for later
use. They just can’t stay in the
root cellar to spoil. This is the
perfect time to invest in a make-
ahead cookbook. These plan-
ahead meal plans are gems at
harvest time.
Put everything you need, including whatever blemished produce you culled, into
individual meal bags, so it’s all right there together when you need it.
Preparing Vegetables for Root Cellar Storage
Now that you have your harvest in front of you, you need to prepare it all for storage. You
might be happy to learn that you do not have to wash it all before storage.
In fact, you really don’t want to. No, really—unstop your sink. Do not, I repeat, do not
wash those roots! If, by chance, you dug them up in wet weather and now they are all
muddy, just let them sit out until they dry before putting them in the cellar. You can even
pull them and leave them right there on the ground for a day or two. This will stimulate
dormancy and lessen the likelihood of them sprouting.
Do not trim the roots off your tubers. You don’t want any broken skin, because that’s
where the rot will start. Do trim the greens off of all of your root crops. Scrape the leaf
180
area completely away because any tops left will only encourage decay in the roots around
it.
Curing Winter Vegetables for Storage
Many vegetables must be cured before storage. Curing promotes a dormant state that
prevents sprouting or rot. Onions and garlic should have their tops clipped with about an
inch left behind. Leave these in the sun for a week before storing. Here’s a tip: Pantyhose
are the best way to store them. Simply fill the hose with the bulbs and hang them from a
rack in a cool, dry room.
Pumpkins and winter squash need to sit out in the garden (or the porch, yard, wherever)
for two full weeks before storing them. This gives them a chance to develop a good hard
rind that will protect them throughout the winter. Then store them in a cool, dry place
until you need them. The only exception is acorn squash. They don’t store well, so don’t
bother. Just eat them and be happy.
Sweet potatoes also need to be cured. Keep them in a warm, damp space for a week to
10 days before moving them to storage.
Pests
Nothing will ruin your day faster than discovering pests in your root cellar. Whether it’s
mice, birds, or weevils, you don’t want any visitors—period. In the case of pests, the old
saying rings true today. The best offense is a good defense. Calk holes and cracks; play
close attention to the area around your vents. While you’re examining your vents, do you
need to cover them with a mesh wire? Close the door and look for any rays of light. Check
to see if you need to put a piece of weather stripping under the door.
Then, when the room is as secure as you can make it, look to your containers. If you
already know you are going to have a pest problem, get containers with lids. Make sure
the lids to grains are airtight, not just to avoid exposure to moisture but to prevent weevil
infestations, and also keep all containers off the ground. You should do this anyway. The
ground is often too moist for good storage, but it also makes it too convenient for pests
to get to your food.
The best containers to prevent pests are plastic totes with lids, or like mentioned earlier,
large, lidded trashcans would work like a charm.

181
Of course, tenacious rats will just chew through anything you put in their paths, so be sure
to hide some good-quality rat traps in the corners, along the walls, or under your shelves.
Organization
Whether using totes or banana boxes, organizing your bounty so that you know what’s
stored where is almost as important as convenient access to everything.
Don’t shove crates in front of or on top of other crates if you can avoid it. You need at
least a small space between each for circulation. It also makes it nearly impossible to see
what you have if they’re too close.
Label everything. Don’t be afraid. Go crazy with it. Label the shelves. Label the totes. Label
the cat if you think it would help you to remember where everything is.
Put the variety, the date stored, and the projected use-by date so you know how much
you need to cook before it goes bad. Keep a notebook and pen on a shelf so that you can
keep notes about the climate of your cellar; the keepability of the varieties you chose;
and any interesting incidents or observations that may be important to you, your children,
or whomever inherits your treasure room.
Tomatoes will not store for long, but if you still have tomatoes on the vine when the frost
threatens, you can yank the whole plant and hang it upside down in your root cellar until
the tomatoes ripen.

182
This method will lengthen the storage capacity of your long-keeping varieties for four to
six months, no matter how you set it up, what you store there, or what ingenious thing
you dream up to overcome the obstacles.

183
You are now well on your way to becoming as self-reliant as possible, and when you do,
you will know deep down in your soul that you really are ready for anything, and that’s a
great feeling!
184
- By Theresa Anne DeMario -
“One of the very nicest things about life is the way we
must regularly stop whatever it is we are doing and
devote our attention to eating.”
– Luciano Pavarotti
When planning for an uncertain future, the first thing you may want to do is
build up your supply of food, but that act has little meaning if you have no way to cook it.
Some serious preppers have already figured that problem out with alternative power
sources and generators to run their electric ovens. The rest of us will have to make do
with good old-fashioned cooking on an open fire.
Homemakers of the 18th and 19th century could turn out culinary masterpieces that were
not only hardy but so good that the recipes have been copied, tweaked, and handed
down, generation after generation, until they reached the modern era of convenience
foods and microwaves. Now when you want a pie, all you have to do is pop down to the
grocery and pick one up. Something was lost when we gave up the old ways of cooking.
Let’s face it—food tastes better when it’s lovingly created and carefully tended.
If you want to not only survive disaster but to live and flourish, you’ll want to learn to
cook over an open flame like the pioneers did. With the right tools, heaps of patience,
and just a little bit of practice, you’ll be creating fire-roasted feasts like you’ve been doing
it your whole life.
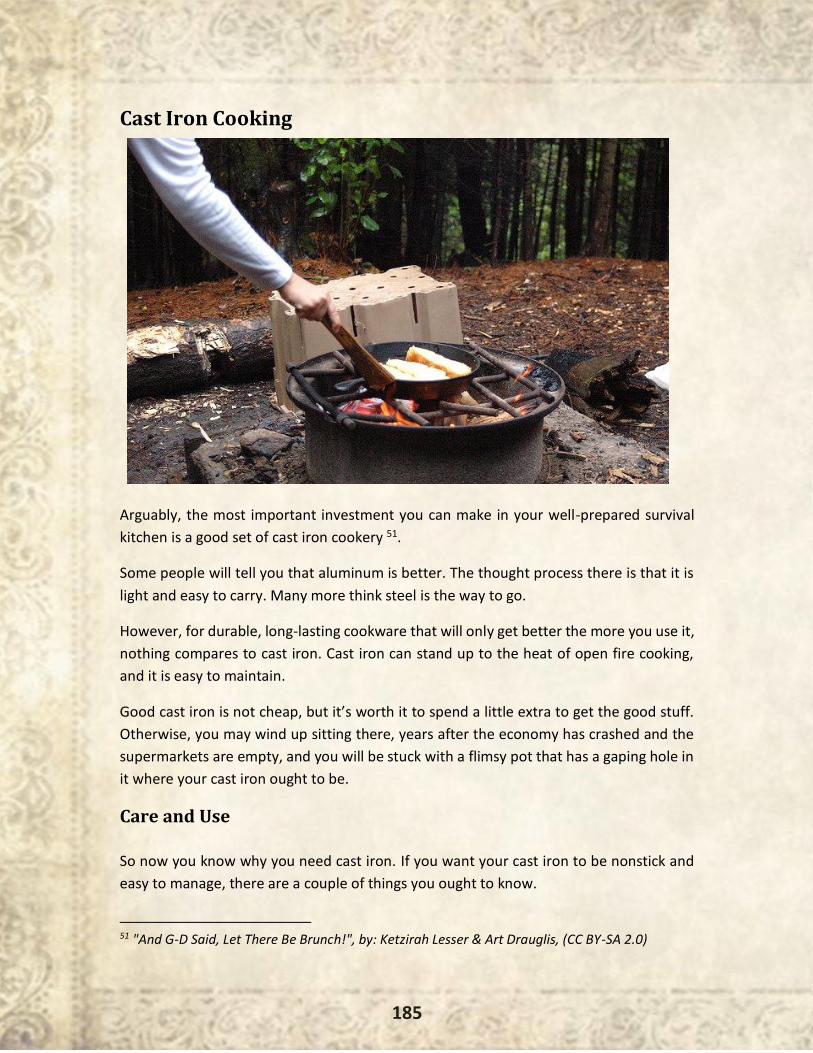
185
Cast Iron Cooking
Arguably, the most important investment you can make in your well-prepared survival
kitchen is a good set of cast iron cookery 51.
Some people will tell you that aluminum is better. The thought process there is that it is
light and easy to carry. Many more think steel is the way to go.
However, for durable, long-lasting cookware that will only get better the more you use it,
nothing compares to cast iron. Cast iron can stand up to the heat of open fire cooking,
and it is easy to maintain.
Good cast iron is not cheap, but it’s worth it to spend a little extra to get the good stuff.
Otherwise, you may wind up sitting there, years after the economy has crashed and the
supermarkets are empty, and you will be stuck with a flimsy pot that has a gaping hole in
it where your cast iron ought to be.
Care and Use
So now you know why you need cast iron. If you want your cast iron to be nonstick and
easy to manage, there are a couple of things you ought to know.
51 "And G-D Said, Let There Be Brunch!", by: Ketzirah Lesser & Art Drauglis, (CC BY-SA 2.0)
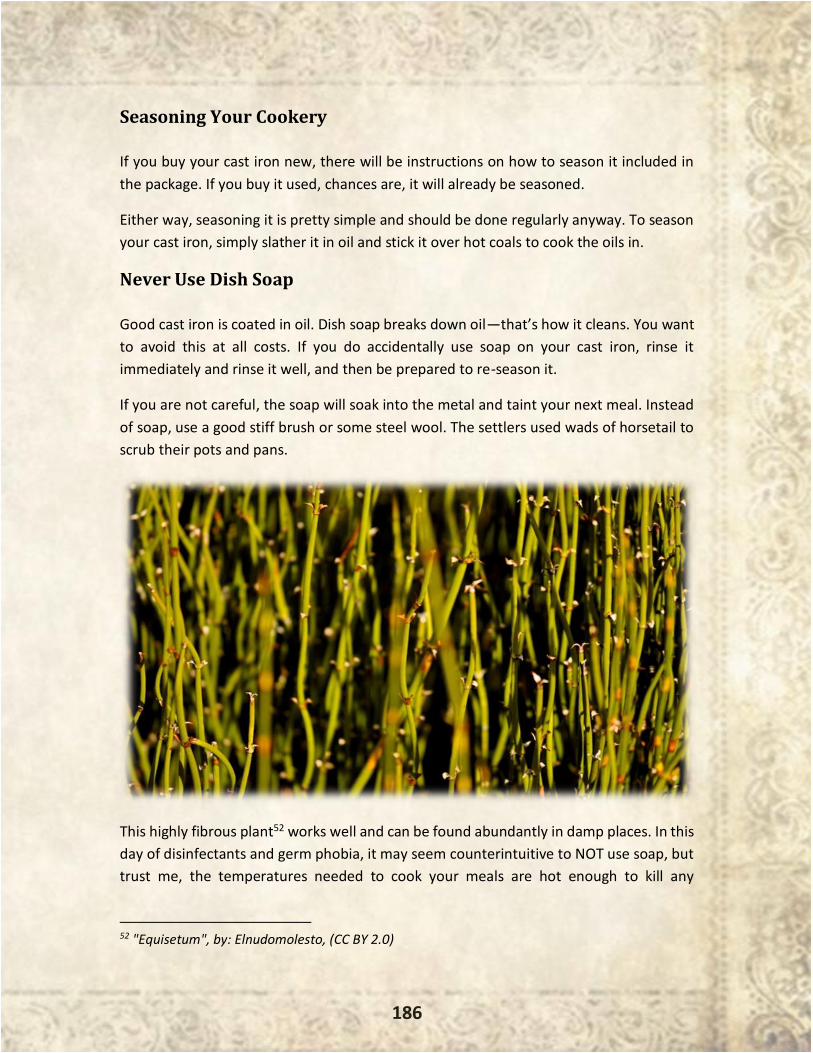
186
Seasoning Your Cookery
If you buy your cast iron new, there will be instructions on how to season it included in
the package. If you buy it used, chances are, it will already be seasoned.
Either way, seasoning it is pretty simple and should be done regularly anyway. To season
your cast iron, simply slather it in oil and stick it over hot coals to cook the oils in.
Never Use Dish Soap
Good cast iron is coated in oil. Dish soap breaks down oil—that’s how it cleans. You want
to avoid this at all costs. If you do accidentally use soap on your cast iron, rinse it
immediately and rinse it well, and then be prepared to re-season it.
If you are not careful, the soap will soak into the metal and taint your next meal. Instead
of soap, use a good stiff brush or some steel wool. The settlers used wads of horsetail to
scrub their pots and pans.
This highly fibrous plant52 works well and can be found abundantly in damp places. In this
day of disinfectants and germ phobia, it may seem counterintuitive to NOT use soap, but
trust me, the temperatures needed to cook your meals are hot enough to kill any
52 "Equisetum", by: Elnudomolesto, (CC BY 2.0)
187
potential germs, and a well-seasoned cast iron surface should be easy enough to clean
without soap.
Iron Rusts
Because iron does rust, never leave it soaking in water or leave water in it. Even if you
think it is well coated with oil, it will still rust. If you are not cooking with it, clean it, dry
it, oil it down, and put it away. Stay in the habit of taking care of your cast iron. If cared
for properly, it will last for generations.
No Fire
At the very least, don’t leave an empty pot in the fire. It’s tempting to just burn all the
left-over food off, but cast iron can warp and even crack if left in a hot fire too long. For
the same reason, don’t put cold water in a hot pan. Again, take care of your cookery, and
it will take care of you.
Companion Tools
If you are prepping a survival kitchen and you’ve got your cast iron, there are a few things
you should think about packing with it. You’ll need heavy pot holders because good cast
iron is all metal, and those handles get HOT!
If you get a cast iron cooking pot, you’ll want a metal hook to remove it from the fire.
They also make heavy hooks to remove the lid of your pot that are sensibly called lid
lifters. Tongs, spoons, spatulas, and other cooking utensils will also be necessary
Roasting Meats
This is always what I think of when I think of outdoor cooking. Roasting trophy catches
over an open fire is the epitome of frontier cuisine.
That said, if you’ve ever actually tried it, you’ll know that it can be trickier than it looks.
That’s okay. Even roasting meat takes skill and know-how. The know-how you can get
here. The skill will come with practice.
On a Spit
There is a wide variety of barbecue roasting spits available commercially, or if you’re
handy, you can make a good one without too much trouble. In the wild, you can use sticks
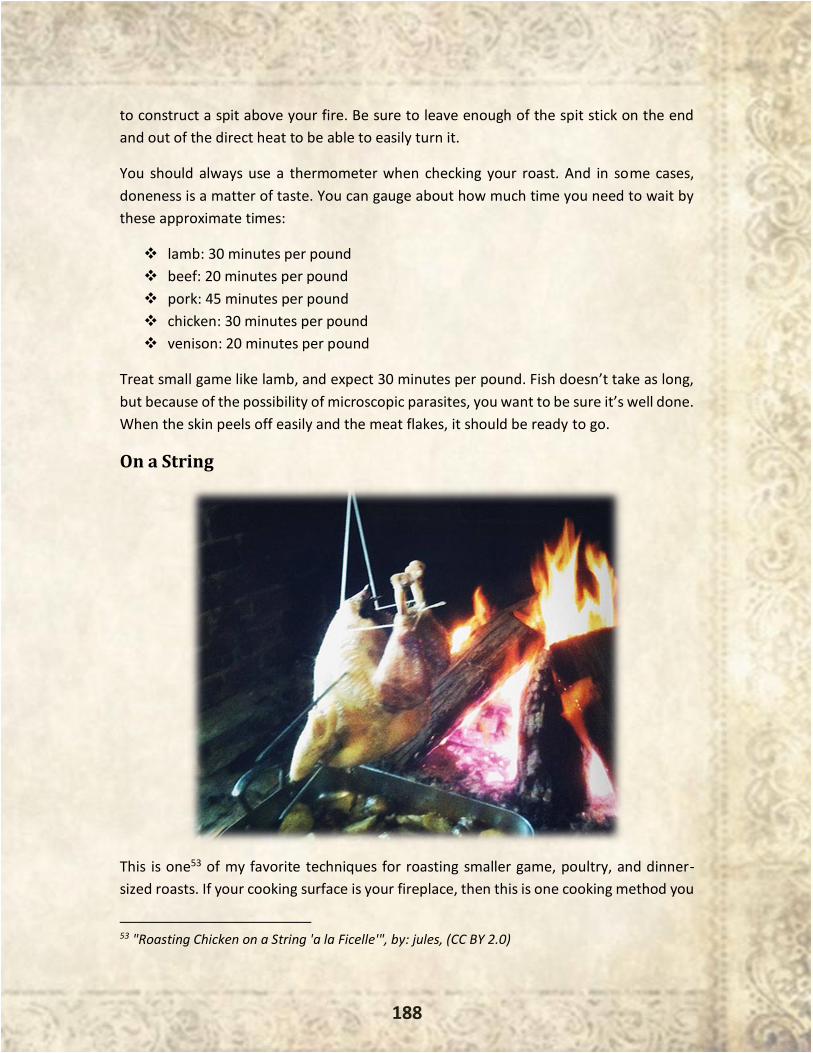
188
to construct a spit above your fire. Be sure to leave enough of the spit stick on the end
and out of the direct heat to be able to easily turn it.
You should always use a thermometer when checking your roast. And in some cases,
doneness is a matter of taste. You can gauge about how much time you need to wait by
these approximate times:
❖ lamb: 30 minutes per pound
❖ beef: 20 minutes per pound
❖ pork: 45 minutes per pound
❖ chicken: 30 minutes per pound
❖ venison: 20 minutes per pound
Treat small game like lamb, and expect 30 minutes per pound. Fish doesn’t take as long,
but because of the possibility of microscopic parasites, you want to be sure it’s well done.
When the skin peels off easily and the meat flakes, it should be ready to go.
On a String
This is one53 of my favorite techniques for roasting smaller game, poultry, and dinner-
sized roasts. If your cooking surface is your fireplace, then this is one cooking method you
53 "Roasting Chicken on a String 'a la Ficelle'", by: jules, (CC BY 2.0)
189
should familiarize yourself with immediately. It’s easy, and the meat comes out perfect
with very little fuss.
Choose the right-sized meats for this method. Don’t choose heavy meats, or you’ll break
your string. You don’t want big roasts either, because the center will still be raw as the
outside burns. Chicken is perfect. Small game and reasonably-sized hunks of meat work
too.
Once you’ve got your meat seasoned the way you like it, you will have to truss it up with
some kitchen string. Either knot it well or go ahead and buy a set of trussing needles to
attach the chicken to the string. You’ll secure the legs and wings to the sides and hook it
over the fire. If you have a wooden mantel, this is the perfect place to stick the hook. If
you are outside, look for a good-sized branch or one of those iron hangers for hanging
plants.
You’ll want to place a drip pan under the meat to avoid any messes. As the string slowly
unwinds, the chicken turns itself, making this a hassle-free dinner. Every now and then,
twist the string back up, and while you’re at it, baste the meat and string occasionally to
keep them moist.
It takes around an hour and a half to roast a chicken, but you should use a thermometer
to make sure it’s done.
Tips
Let that fire burn for more than an hour before you start cooking, feeding it when needed
so that there are plenty of hot coals and less open flame. You want the meat close enough
to get the heat without the fire touching it.
No matter what you are roasting, you want to try to shape the meat so that it is as even
and cylindrical as possible. That way, it will be evenly cooked.
Dutch Oven Cooking
Even if you forgo the cast iron skillet or soup pot, you should have a Dutch oven. Not only
can you bake in a Dutch oven but the body of the oven can be used for anything cooked
in a pot, and the lid can be turned upside down to be used like a frying pan. A Dutch oven
can do it all and then some.
Cooking in a Dutch oven may take some getting used to. Figuring out how to get and keep
the right temperature takes time and patience, but if you take that time and have the
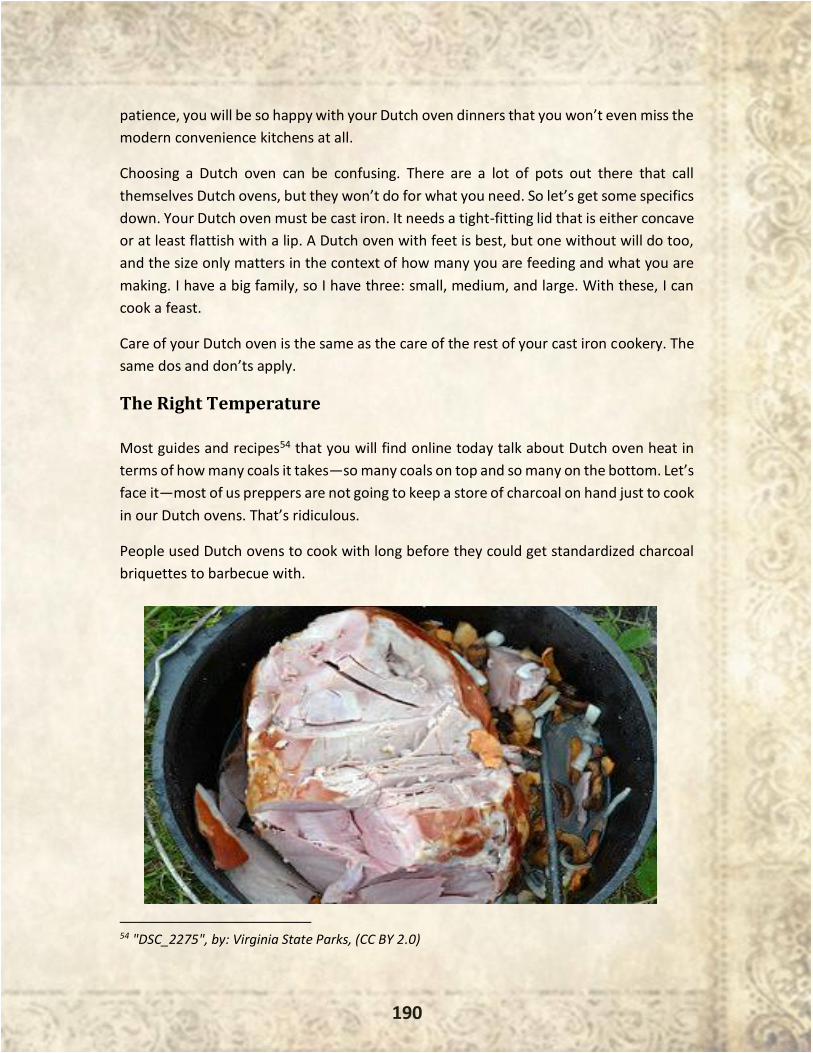
190
patience, you will be so happy with your Dutch oven dinners that you won’t even miss the
modern convenience kitchens at all.
Choosing a Dutch oven can be confusing. There are a lot of pots out there that call
themselves Dutch ovens, but they won’t do for what you need. So let’s get some specifics
down. Your Dutch oven must be cast iron. It needs a tight-fitting lid that is either concave
or at least flattish with a lip. A Dutch oven with feet is best, but one without will do too,
and the size only matters in the context of how many you are feeding and what you are
making. I have a big family, so I have three: small, medium, and large. With these, I can
cook a feast.
Care of your Dutch oven is the same as the care of the rest of your cast iron cookery. The
same dos and don’ts apply.
The Right Temperature
Most guides and recipes54 that you will find online today talk about Dutch oven heat in
terms of how many coals it takes—so many coals on top and so many on the bottom. Let’s
face it—most of us preppers are not going to keep a store of charcoal on hand just to cook
in our Dutch ovens. That’s ridiculous.
People used Dutch ovens to cook with long before they could get standardized charcoal
briquettes to barbecue with.
54 "DSC_2275", by: Virginia State Parks, (CC BY 2.0)
191
The problem is that it’s really hard to explain heat distribution in other terms, especially
since different wood coals will hold heat differently.
Think in terms of equal space. You’ll usually want to use as many coals as it would take to
completely fill in the space below your oven. Distribute the coals according to the
guidelines below. Adjust the amount as you see fit after you gain a little experience.
❖ Roasting: Using the starting amount of coals, put half on top and half on the
bottom.
❖ Baking: Put a quarter of your coals on the bottom and three-fourths on the lid.
❖ Simmering: Place three-fourths of the coals on the bottom and a quarter on top.
❖ Frying: Put all your coals on the bottom.
***Always space your wood coals evenly apart for the best results.***
Companion Tools
There are plenty of good accessories to go with your Dutch oven. Depending on your
cooking preferences, some of these will be more useful than others.
❖ Leather gloves and heavy potholders to handle a hot oven
❖ A lid lifter—a long metal hook used to remove the lid of your Dutch oven safely
❖ A small shovel to move coals around
❖ A trivet for baking or steaming in your Dutch oven to keep your food off the hot
sides
❖ A cake pan to be placed on the trivet that is slightly smaller in diameter than your
Dutch oven.
❖ –Long-handled tongs
❖ Other utensils that you would always use, such as spoons, spatula, etc.
Recipes Past and Future
These recipes were chosen to be easy and without too many exotic ingredients (sans
spices—stock up on those!). With that in mind, enjoy the fruits of your labor. Your larder
is well stocked, and your garden is growing well. You deserve a feast55.
55 "DSC_2292" , by: Virginia State Parks, (CC BY 2.0)
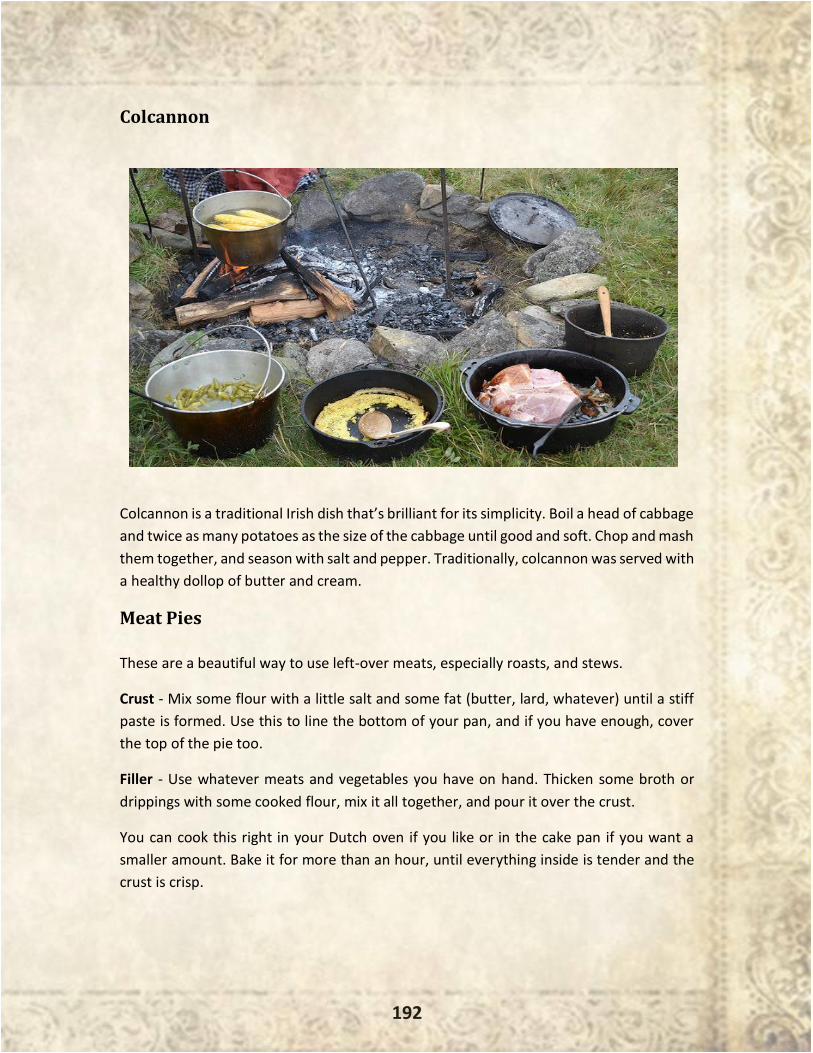
192
Colcannon
Colcannon is a traditional Irish dish that’s brilliant for its simplicity. Boil a head of cabbage
and twice as many potatoes as the size of the cabbage until good and soft. Chop and mash
them together, and season with salt and pepper. Traditionally, colcannon was served with
a healthy dollop of butter and cream.
Meat Pies
These are a beautiful way to use left-over meats, especially roasts, and stews.
Crust - Mix some flour with a little salt and some fat (butter, lard, whatever) until a stiff
paste is formed. Use this to line the bottom of your pan, and if you have enough, cover
the top of the pie too.
Filler - Use whatever meats and vegetables you have on hand. Thicken some broth or
drippings with some cooked flour, mix it all together, and pour it over the crust.
You can cook this right in your Dutch oven if you like or in the cake pan if you want a
smaller amount. Bake it for more than an hour, until everything inside is tender and the
crust is crisp.
193
Turnovers are made with the same ingredients, but you make a big, flat crust and spoon
some filling in the middle of one half. Fold the crust over and pinch it together, and then
cook it on a frying pan. Turnovers were a popular meal to send off with working men and
will hold up well for a day or so if prepared in advance.
Mock-mock Turtle Soup
Original mock turtle soup called for a calf’s head to be boiled down for 8 hours. In this
recipe, we’ll use whatever meat we have on hand. Boil a pound or more of meat—with
the bones, if you have them—for at least two hours. The water should be seasoned with
bay leaves, parsley, marjoram, and basil (or just use what you’ve got). After two hours,
toss in enough root vegetables, such as potatoes, turnips, and carrots, to feed your family.
While this is cooking, take six hard-boiled egg yolks and mash them together with a little
raw yolk and some flour to make a dough. Roll a dozen marble-sized balls, and toss them
into the pot with a cup or two of red wine when the vegetables are almost tender.
Wassail
The Wassail bowl is a forgotten Christmas tradition. Even the old cookbooks refer to it as
an old one. The spicy drink was ushered in with much ceremony and was often decorated
with wreathes and ribbons. It would be a beautiful tradition to bring back when we find
ourselves in need of a little reminding about the good things in life.
Many old recipes can be found for wassail. Depending on the cook, it might have beer,
cider, or wine as the base. The spices vary too. Feel free to adapt and change the following
recipe to include whatever you have on hand and to satisfy your own taste buds. This is
as much a part of the tradition as drinking the wassail itself. In a small pot, boil the
following:
❖ 1 tsp. cardamom
❖ 1 tsp. cloves
❖ 1 tsp. nutmeg
❖ 1 tsp. mace
❖ 1 tsp. ginger
❖ 1 tsp. cinnamon
❖ 1 tsp. coriander
❖ 1 cup of water
194
After about 20 minutes, pour this into a gallon of wine/beer or cider. Add 3 to 4 cups of
sugar, and put in on the fire.
While it is cooking, prepare the wassail bowl by cracking a dozen eggs into it and beating
them well. Add a cup of the warming wine to the eggs, and beat it in. Repeat this step
three more times.
Then, when the wine begins to boil, take it off the heat and pour it gradually into the bowl,
taking care to go slowly and stirring continuously. You need to stir briskly to form the froth
that makes wassail so pretty.
Once you have it poured and frothed, serve it immediately. Roasted apple or a couple
cups of raisins were commonly tossed in the wassail. A pint of brandy was also often used.
Apple Pie
Prepare a stiff paste for the crusts by mashing flour into fat (butter, lard, shortening). Line
your well-oiled Dutch oven with the paste, reserving enough for the top. Make sure the
crust is as even as possible. Roll the rest out to make your top crust. You only want your
pie to be an inch or two thick, three max.
Peel, slice, and core your apples. You can parboil or stew them in a little water, but if they
are very ripe, this is not necessary. Add cinnamon, sugar, and butter to taste.
Dampen the top of the crust in your Dutch oven, lay your top crust on top, and pinch them
together. Cut a slit on top to vent, put the lid on your oven, and place it in the coals with
a quarter of the coals on the bottom and the rest on top. It takes 45 minutes to an hour
to bake a pie this way.
***If you are using dried apples, reconstitute them and stew them for an hour or so
before adding them to the pie. You should stew unripe apples as well.***
Biscuits and Gravy
Start this recipe with a well-oiled Dutch oven. Preheat it, keeping all of the coals on the
bottom to get it nice and hot. While it’s heating up, mix the following together in a bowl:
❖ 2 c. flour
❖ 1 tsp. salt
❖ 1 Tbs. sugar
❖ 4 tsp. baking powder
195
Cut in 1/3 c. shortening. Then add ¼ c. milk. Mix only until everything is wet.
Spoon drop the biscuits into the Dutch oven, making sure they are evenly spaced, and put
on the lid.
Now remove three-quarters of the coals from under the oven, taking care to even out the
remaining coals. Put the coals you took out from under on top. Bake for 8–10 minutes or
until golden on top. Remove and cover with a towel to keep warm.
Put the coals back under the oven, and add your meat. I like pork sausage, but my
grandma sometimes used pork chops or just plain lard when there was no meat. Cook
thoroughly. If you are using just a fat to make this gravy, and maybe even if you aren’t,
you’ll want to season it with sage, thyme, and onion as well as salt and pepper.
Add ¼ c. of flour to the pot, and stir until well-cooked but not burnt. Then add 2 ½ c. milk
and stir until thickened. Serve immediately by pouring over the biscuits on individual
plates.
Easter Cake
Using this method, you can bake any and all of your favorite cake recipes in the Dutch
oven. This Easter cake is an adaptation of a recipe found in the 1903 Boston Cooking
School magazine. During times of crisis, there is little that says, “Everything is going to be
okay,” like a bit of cake. It seems cake just brightens the dreariest of days.
Preheat your Dutch oven using half and half for the coals. Use a trivet in your oven. If you
don’t have a trivet, similar-sized pebbles, marbles, or beads work well too.
Sift together 1 c. flour with 1 tsp. baking powder. Set aside. In a separate bowl, beat 4 egg
whites until stiff. In yet another bowl, beat ½ c. soft butter with ½ c. sugar. Add 1 tsp.
vanilla extract. Combine all ingredients, and mix well.
You need a cake pan that is smaller than your Dutch oven. A 9-inch cake pan and a 10-
inch Dutch oven are ideal. Pour your batter into a greased cake pan. Pour an inch of water
into the bottom of your Dutch oven, and place the pan on the trivet. Leave the coals half
and half for this recipe. It takes 45 minutes to 1 hour for the cake to bake.
Porridge
There is not much that is more versatile than porridge. It can be made using oats, rice,
buckwheat, or any other grain. It can even be made using peas.
196
Porridge was a traditional mid-day meal for peasants in Europe and the settlers of early
America. This recipe makes the best breakfast porridge ever.
In the evening, dig a small ditch near your fire pit, and line it with hot coals. In your Dutch
oven, combine 1 c. of rolled oats with 4 c. water and 2 c. milk. Add 1 c. applesauce and 1
cinnamon stick. Put your Dutch oven in the pit, and cover it with more hot coals. Then
bury it with dirt. In the morning, uncover the Dutch oven, being especially careful not to
dislodge the lid. Dust off the dirt and ash before serving (no one wants ashy porridge).
Stew
Like the porridge, stew is a favorite of days gone by. A stew is rather easy to make. In the
morning, toss whatever meats and vegetables you have on hand in a pot along with your
favorite seasonings, and cook it on a medium fire for most of the day.
An hour before it is to be eaten, thicken it with cooked flour, cornstarch, arrow root,
mashed beans, or potatoes. Serve and enjoy. Stews go particularly well with bread.
Bread
Making bread in a Dutch oven is easy! The trick is not to be too much of a bread snob.
Use bread flour if you can get it. All-purpose works fine when you can’t. Whole wheat
works good too when you are using this method. Start the bread the day before you want
to eat the loaf. Combine the following:
❖ 3 c. flour
❖ 1 tsp. yeast
❖ 1 tsp. salt
❖ 1 ½ c. water
In a large bowl, mix the ingredients until everything is wet, but don’t worry too much
about the lumps. Set the bowl aside in a warm, safe spot, and forget about it.
The next day, an hour before you want to bake your bread, preheat your well-oiled Dutch
oven with half the coals on top and half on bottom. Meanwhile, turn your dough out onto
a floured surface, and gently (DO NOT KNEAD) shape it into a roughly Dutch oven shape.
You want it kind of evenly flat on top. If it rises too much, it will stick to your lid!
Move your coals back into baking position, and bake for 45 minutes.
197
- By Shannon Azares -
“I may not have gone where I intended to go, but I
think I have ended up where I needed to be.”
– Douglas Adams
Have you ever wondered how people used to find their way across the land or
the seas without modern equipment? Not having a GPS might be doable, but having no
maps might be veering toward unbelievable.
Still, we have no way of being sure that we will always have the comfort of either. After
all, few people even own maps anymore, and our GPS system will be totally unreliable in
case of an EMP. All that we’ll know is what cities are north, south, east, or west.
Shadow Tip Method
This is based on the fact that the sun moves across the sky from east to west.
Materials:
❖ Stick
❖ Pebble
Procedure:
❖ Dig a small hole on the ground, where you will stand the stick.
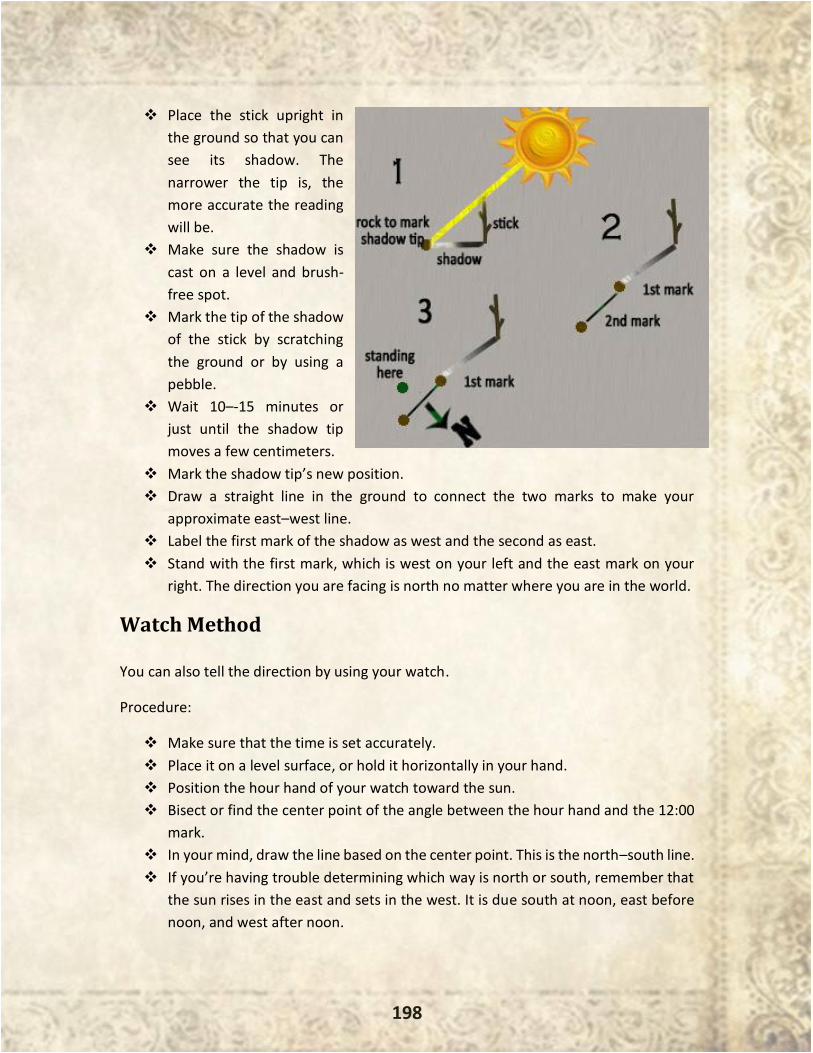
198
❖ Place the stick upright in
the ground so that you can
see its shadow. The
narrower the tip is, the
more accurate the reading
will be.
❖ Make sure the shadow is
cast on a level and brush-
free spot.
❖ Mark the tip of the shadow
of the stick by scratching
the ground or by using a
pebble.
❖ Wait 10–-15 minutes or
just until the shadow tip
moves a few centimeters.
❖ Mark the shadow tip’s new position.
❖ Draw a straight line in the ground to connect the two marks to make your
approximate east–west line.
❖ Label the first mark of the shadow as west and the second as east.
❖ Stand with the first mark, which is west on your left and the east mark on your
right. The direction you are facing is north no matter where you are in the world.
Watch Method
You can also tell the direction by using your watch.
Procedure:
❖ Make sure that the time is set accurately.
❖ Place it on a level surface, or hold it horizontally in your hand.
❖ Position the hour hand of your watch toward the sun.
❖ Bisect or find the center point of the angle between the hour hand and the 12:00
mark.
❖ In your mind, draw the line based on the center point. This is the north–south line.
❖ If you’re having trouble determining which way is north or south, remember that
the sun rises in the east and sets in the west. It is due south at noon, east before
noon, and west after noon.
199
❖ If your watch is set on daylight savings time, use the center point between the
hour hand and the 1:00 mark to determine the north and south line.
Using the Stars
Because the North Star is known to stay fixed, is always visible in a clear night sky (from
the northern hemisphere), and is always pointing north, our ancestors used it for
thousands of years as a guiding star both on land and sea.
Finding the North Star was one of the basic skills all navigators and travelers knew and
used on a regular basis—a skill that has been forgotten by the masses since the invention
of the compass. But unlike the compass, the North Star always points to the TRUE NORTH.
There is no magnetic declination to deal with.
The North Star, which is what we call it today, is actually named Polaris, and surprisingly,
it wasn’t always the North Star and won’t always be:
Thousands of years ago, when the pyramids were rising from the sands of ancient
Egypt, the North Star was an inconspicuous star called Thuban in the constellation
Draco the Dragon. Twelve thousand years from now, the blue-white star Vega in
the constellation Lyra will be a much brighter North Star than our current Polaris.
…So when you’re talking about stars “moving” or staying “fixed,” remember…they
are all moving through the vastness of space. It’s just the relatively short time of
a human lifespan that prevents us from seeing this grand motion. 56
One of the easiest ways to find Polaris is by using the group of stars known as the Big
Dipper or the Little Dipper.
Go outside tonight (or now if it’s already night), and try to find one of them first. The Big
Dipper and the Little Dipper are actually the only groups of stars I know how to find, but
I’ve known this since I was a little kid. It’s very easy.
If you find the Big Dipper first, locate the two stars Dubhe and Merak in the outer part of
the Big Dipper’s bowl (see picture). Simply draw an imaginary line from Merak through
Dubhe, and go about five times this distance to find Polaris.
56 Earth Sky (http://earthsky.org)
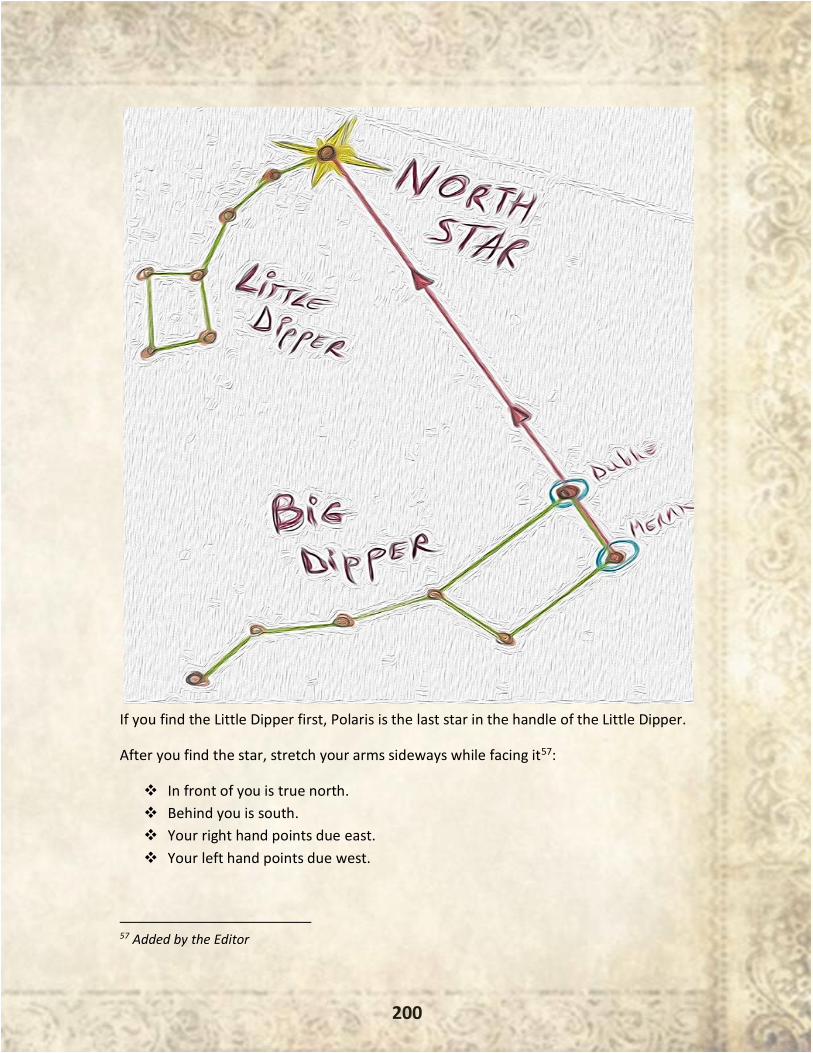
200
If you find the Little Dipper first, Polaris is the last star in the handle of the Little Dipper.
After you find the star, stretch your arms sideways while facing it57:
❖ In front of you is true north.
❖ Behind you is south.
❖ Your right hand points due east.
❖ Your left hand points due west.
57 Added by the Editor
201
Letting the Sun Guide You
The important thing to remember when using the sun for navigation is that it will always
rise in the general east and will set in the general west.
Throughout the day, the sun will make an arc to the south in the northern hemisphere
and to the north in the southern hemisphere, which will always be toward the equator.
Deriving direction from these general facts, we can then say that in the morning, the sun
will be in the general east; in the afternoon, it will always be in the general west.
If you determine that the sun is in the east, the north will be approximately a quarter turn
counterclockwise. If the sun is in the west, then north will be a quarter of a turn clockwise.
At around 12 noon, the sun will be due south in the northern hemisphere and due north
in the southern hemisphere.
There are a few notes to consider. Seasons can change the path of the sun. During the
summer, sunrise and sunset will be farther from the equator. In the winter, it will tend to
be closer to the equator. And finally, during spring and fall, the sun will rise and set in the
most accurate east and west.
Letting the Moon Guide You at Night
When you’re out during the night and the sun is nowhere to be seen, the moon can guide
you to a rough east–west direction. If the moon rises before the sun sets, the illuminated
side will be west. If the moon rises after midnight, the illuminated side will be east.
Moss and Other Vegetation
There’s something we can learn from our grandparents aside from using the heavenly
bodies. The old saying was that the moss grows on the north side of a tree, but this is only
partially accurate. Moss does grow on the north side of the tree, but it also grows on the
south and in every possible direction. To make our grandparents’ saying more accurate,
we should say that the equator is most likely on the same side of the tree where the moss
growth is more lush and vigorous.
Another way to determine direction using vegetation and moisture is by observing where
plants are damper. North-facing slopes receive less sun than south-facing slopes. The
plants will therefore be cooler and damper on the north side.
202
In the summer, north-facing slopes retain patches of snow. In the winter, plants on the
south-facing slopes are the first to lose snow. The ground will also have a shallower depth
of snow than its counterpart in the other direction.
Making a Compass
Materials:
❖ Metal sewing needle
❖ Cork or plastic bottle cap
❖ Bar magnet or ref magnet
❖ Sticky tack
❖ Shallow dish of water
❖ Sharp knife or scissors
❖ Towel (optional)
Procedure:
❖ Cut a circle approximately ¼ inch or 5–10mm thick from the end of a cork with
scissors or a knife. You can also use an upturned plastic bottle cap.
❖ Place the product on one side.
❖ Magnetize the needle by rubbing it on the magnet from the tip to the bottom 50
times. If the magnet has its north pole labeled, then stroke the needle with this
end. Remember to lift the magnet from the needle after each stroke to reduce the
chance of demagnetizing the needle as you return it back to the bottom.
❖ Stick the magnetized needle to the circle of cork with some tack. Alternatively, you
can let the needle go through the cork.
❖ Float the cork in a dish of water.
❖ Keep the dish away from computers and other devices that contain magnets.
❖ Once it stops moving, the tip of the needle should be pointing due north and the
tail pointing due south.
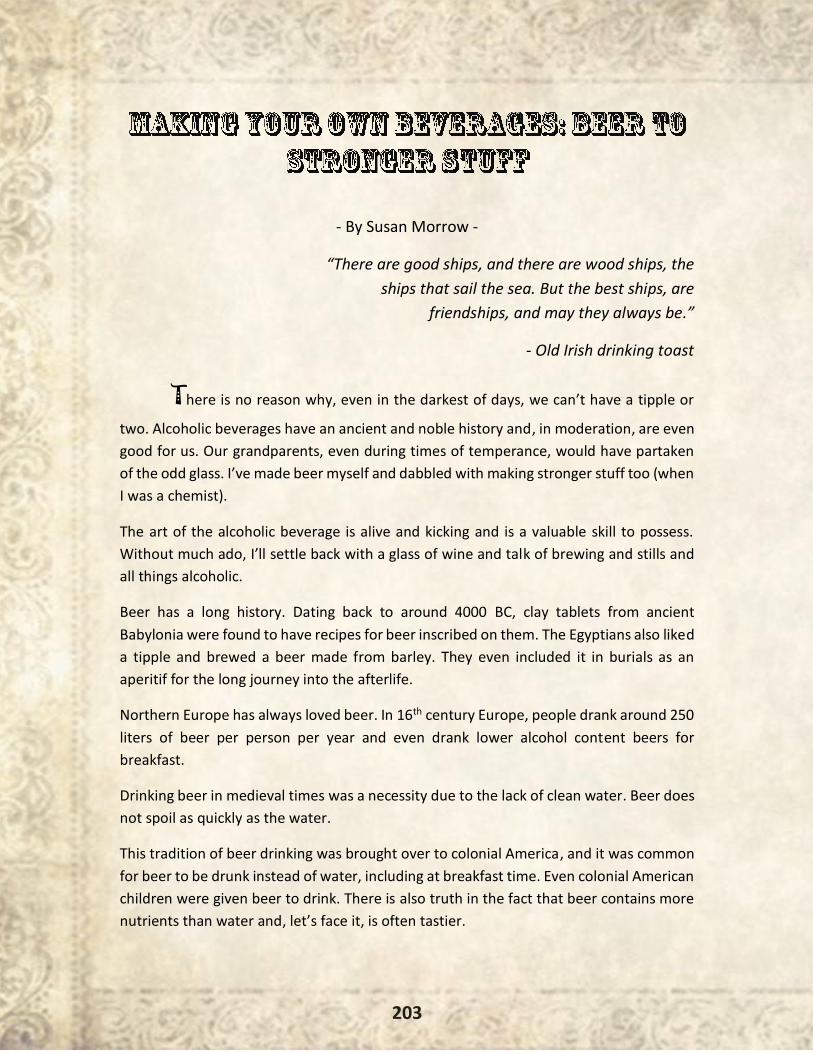
203
- By Susan Morrow -
“There are good ships, and there are wood ships, the
ships that sail the sea. But the best ships, are
friendships, and may they always be.”
- Old Irish drinking toast
There is no reason why, even in the darkest of days, we can’t have a tipple or
two. Alcoholic beverages have an ancient and noble history and, in moderation, are even
good for us. Our grandparents, even during times of temperance, would have partaken
of the odd glass. I’ve made beer myself and dabbled with making stronger stuff too (when
I was a chemist).
The art of the alcoholic beverage is alive and kicking and is a valuable skill to possess.
Without much ado, I’ll settle back with a glass of wine and talk of brewing and stills and
all things alcoholic.
Beer has a long history. Dating back to around 4000 BC, clay tablets from ancient
Babylonia were found to have recipes for beer inscribed on them. The Egyptians also liked
a tipple and brewed a beer made from barley. They even included it in burials as an
aperitif for the long journey into the afterlife.
Northern Europe has always loved beer. In 16th century Europe, people drank around 250
liters of beer per person per year and even drank lower alcohol content beers for
breakfast.
Drinking beer in medieval times was a necessity due to the lack of clean water. Beer does
not spoil as quickly as the water.
This tradition of beer drinking was brought over to colonial America, and it was common
for beer to be drunk instead of water, including at breakfast time. Even colonial American
children were given beer to drink. There is also truth in the fact that beer contains more
nutrients than water and, let’s face it, is often tastier.

204
Frontier America didn’t have as much access to beer, and their chosen tipple was whiskey,
which they made from corn, saying that “drink in itself is a good creature of God.” Even
presidents drank homebrew; Benjamin Franklin making his own spruce-based beer.
Of course, one of the positive aspects of brewing beer is that grain lifetime can be
extended. Grains have a limited shelf life and can be contaminated with the fungal
hallucinogen ergot. So there was good reason for our forefathers to brew a concoction
from their grains before they were lost.
Making Beer – Basic Recipe
This recipe is for a basic beer; no additional fermentation steps are needed. One thing
before you start. It’s really important to use clean equipment. Bacteria can spoil beers
and make them undrinkable.
Equipment
❖ A large cooking pot (around 5–10 gallons)
❖ A decent-sized barrel or container as a fermenter (It must be very clean; you can
use boiling water to clean it if you don’t have any sterilizing tablets.)
❖ A syphon (This can be a piece of tubing—again, clean.)
❖ A clean mixing spoon (Keep the spoon for this purpose only.)
❖ A hydrometer (This is for checking the strength of the beer. If you don’t have
one, you can’t check the strength, so beware—it may be the strong stuff!)
❖ Muslin or similar cloth for filtering the beer
❖ Something to bottle the beer in (sterilize before using)
Ingredients
You can use most grain types to make beer. This includes barley, millet, corn, rice, wheat,
and spelt. You can also use mixed grains.
Creating the Malt: Malted Barley
To make good malt, you need to take grains that still have their husks on. You need 2
pounds of whole barley for every gallon of homemade beer.
The first step of malt making is getting the barley (or other grain) to form shoots. To do
this, wash the barley, and allow the chaff to float to the top. Drain the barley, making sure
205
the chaff is removed, and then leave the barley to steep for 8 hours in water that covers
it by around 2 inches.
Drain again after this time, and leave without water for 8 hours. After this time, again add
more clean water, and leave for another 8 hours. After this second soak, you should start
to see tiny shoots emerging.
At this time, drain and spread the grain onto something absorbent. You need to cover this
over with some sort of dark sack or bag (a trash bag, for example). This keeps it moist and
dark. You need to keep watch on the sprouting process and stop the process when the
sprouts are just less than the length of the grain itself; depending on the grain used, this
will take around 3 days. The object of this is to stop further germination of the grain at
this point as you get better beer.
To get your malt ready for beer making, you need to dry it out. You do this over a heat
source that can get to temperatures of around 100°–125°F for 24 hours. This could be a
fire pit in the ground with a tray over it, for example. Turn the malt over periodically to
help the drying process.
You’ll know it’s ready when the grain is crunchy and sweet to the bite. If it’s hard and
glassy in appearance, you’ve gone wrong during germination and need to start again. The
beer will be undrinkable if you use this sort of malt.
Take this final-stage malted barley and shake it up to separate the malted grains from the
sprouts. You can use a colander to do this or something similar. Finally, take the malted
grains and crush them to get ready for brewing.
Making the Yeast
Yeast is a naturally occurring organism. When you see the “bloom” on a grape, that’s a
type of yeast. If you don’t have access to commercially isolated yeasts, you can make your
own by following this recipe:
Use 1.5 pounds of grain (white flour is great if you can get it) to a gallon of water (or use
the equivalent ratio). Place together in a jar with a lid or piece of muslin or cheesecloth.
Give it a shake, and leave to stand until you see a froth forming (this can take a few days).
This froth should be removed and can either be used directly in the beer or dried out.
An even better method is to use fruit, which gives a different flavor to the beer. You can
use all sorts of fruits, the obvious one being grapes. Mash the fruit up and leave in a jar,
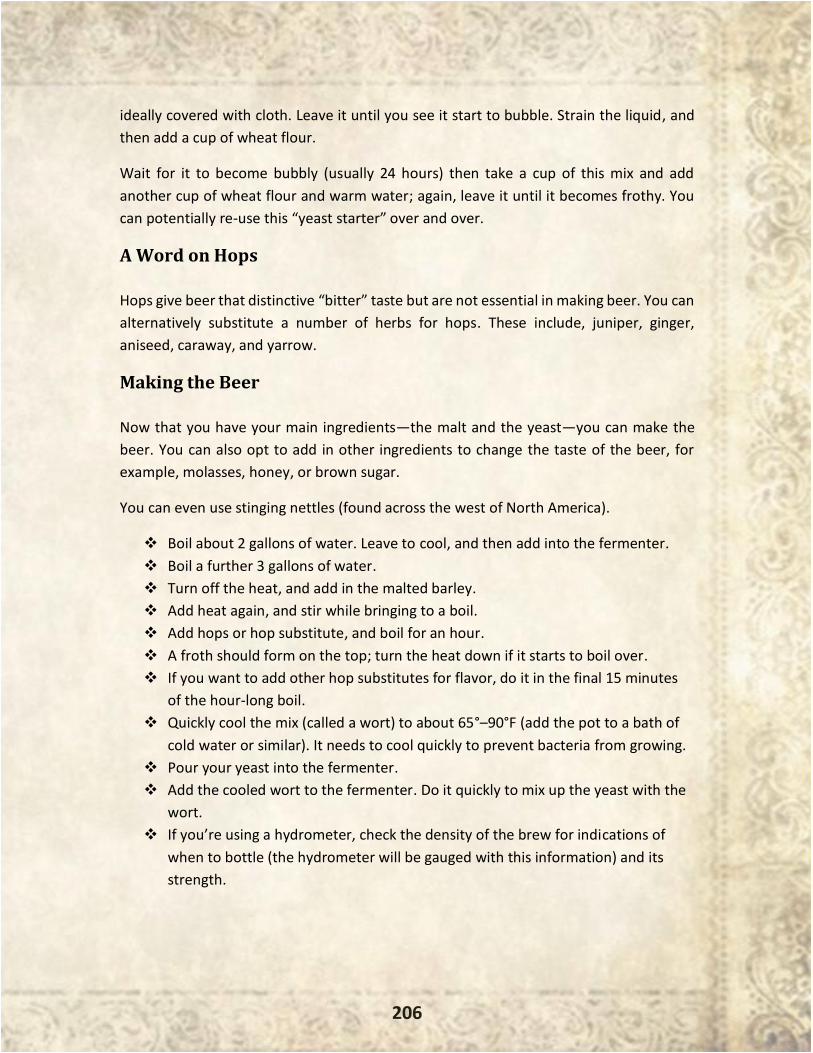
206
ideally covered with cloth. Leave it until you see it start to bubble. Strain the liquid, and
then add a cup of wheat flour.
Wait for it to become bubbly (usually 24 hours) then take a cup of this mix and add
another cup of wheat flour and warm water; again, leave it until it becomes frothy. You
can potentially re-use this “yeast starter” over and over.
A Word on Hops
Hops give beer that distinctive “bitter” taste but are not essential in making beer. You can
alternatively substitute a number of herbs for hops. These include, juniper, ginger,
aniseed, caraway, and yarrow.
Making the Beer
Now that you have your main ingredients—the malt and the yeast—you can make the
beer. You can also opt to add in other ingredients to change the taste of the beer, for
example, molasses, honey, or brown sugar.
You can even use stinging nettles (found across the west of North America).
❖ Boil about 2 gallons of water. Leave to cool, and then add into the fermenter.
❖ Boil a further 3 gallons of water.
❖ Turn off the heat, and add in the malted barley.
❖ Add heat again, and stir while bringing to a boil.
❖ Add hops or hop substitute, and boil for an hour.
❖ A froth should form on the top; turn the heat down if it starts to boil over.
❖ If you want to add other hop substitutes for flavor, do it in the final 15 minutes
of the hour-long boil.
❖ Quickly cool the mix (called a wort) to about 65°–90°F (add the pot to a bath of
cold water or similar). It needs to cool quickly to prevent bacteria from growing.
❖ Pour your yeast into the fermenter.
❖ Add the cooled wort to the fermenter. Do it quickly to mix up the yeast with the
wort.
❖ If you’re using a hydrometer, check the density of the brew for indications of
when to bottle (the hydrometer will be gauged with this information) and its
strength.
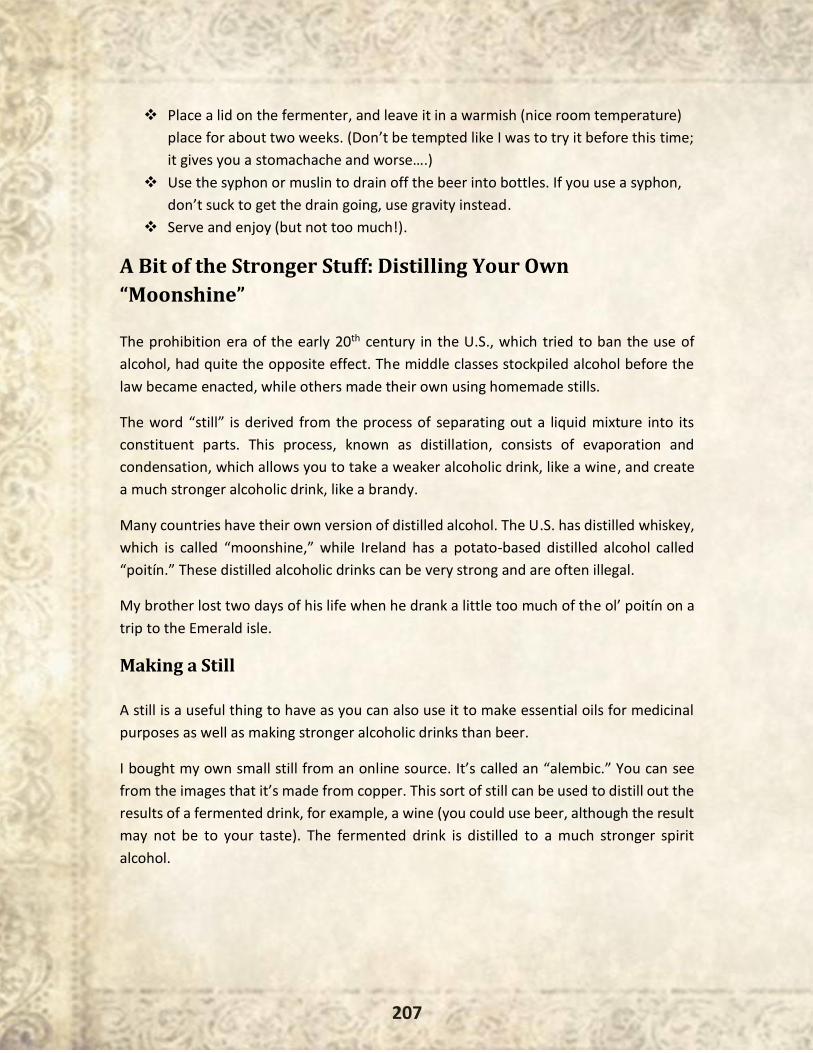
207
❖ Place a lid on the fermenter, and leave it in a warmish (nice room temperature)
place for about two weeks. (Don’t be tempted like I was to try it before this time;
it gives you a stomachache and worse….)
❖ Use the syphon or muslin to drain off the beer into bottles. If you use a syphon,
don’t suck to get the drain going, use gravity instead.
❖ Serve and enjoy (but not too much!).
A Bit of the Stronger Stuff: Distilling Your Own
“Moonshine”
The prohibition era of the early 20th century in the U.S., which tried to ban the use of
alcohol, had quite the opposite effect. The middle classes stockpiled alcohol before the
law became enacted, while others made their own using homemade stills.
The word “still” is derived from the process of separating out a liquid mixture into its
constituent parts. This process, known as distillation, consists of evaporation and
condensation, which allows you to take a weaker alcoholic drink, like a wine, and create
a much stronger alcoholic drink, like a brandy.
Many countries have their own version of distilled alcohol. The U.S. has distilled whiskey,
which is called “moonshine,” while Ireland has a potato-based distilled alcohol called
“poitín.” These distilled alcoholic drinks can be very strong and are often illegal.
My brother lost two days of his life when he drank a little too much of the ol’ poitín on a
trip to the Emerald isle.
Making a Still
A still is a useful thing to have as you can also use it to make essential oils for medicinal
purposes as well as making stronger alcoholic drinks than beer.
I bought my own small still from an online source. It’s called an “alembic.” You can see
from the images that it’s made from copper. This sort of still can be used to distill out the
results of a fermented drink, for example, a wine (you could use beer, although the result
may not be to your taste). The fermented drink is distilled to a much stronger spirit
alcohol.
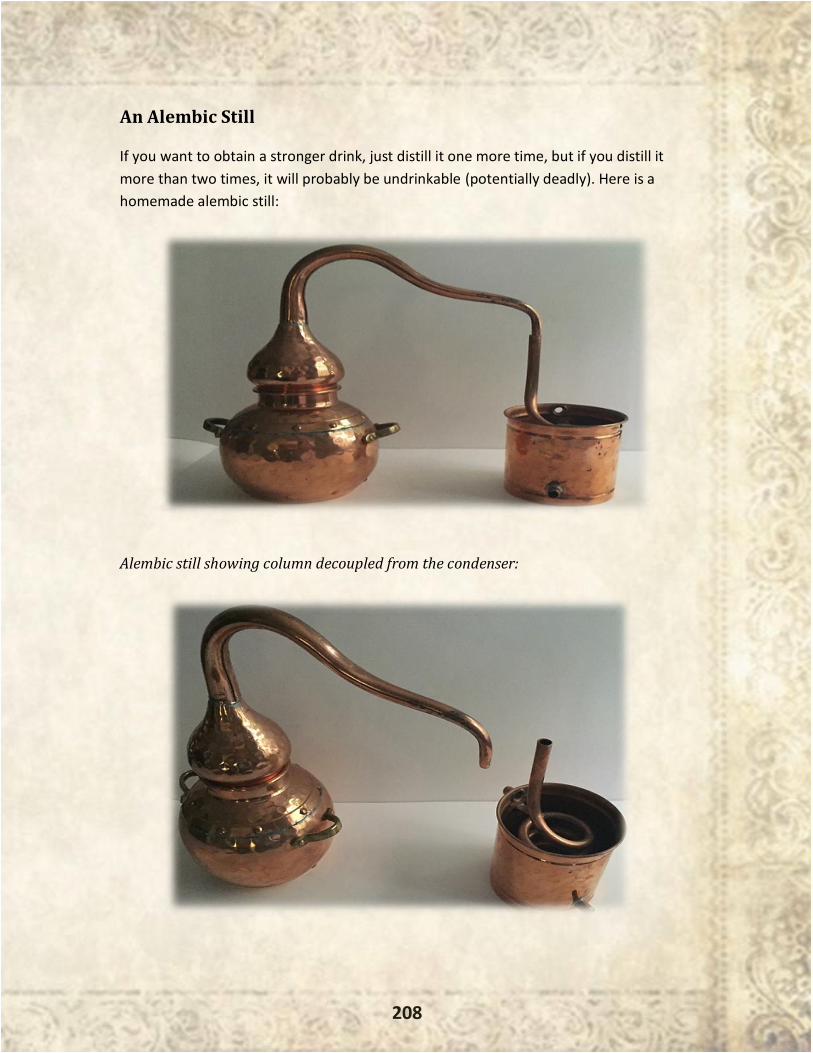
208
An Alembic Still
If you want to obtain a stronger drink, just distill it one more time, but if you distill it
more than two times, it will probably be undrinkable (potentially deadly). Here is a
homemade alembic still:
Alembic still showing column decoupled from the condenser:
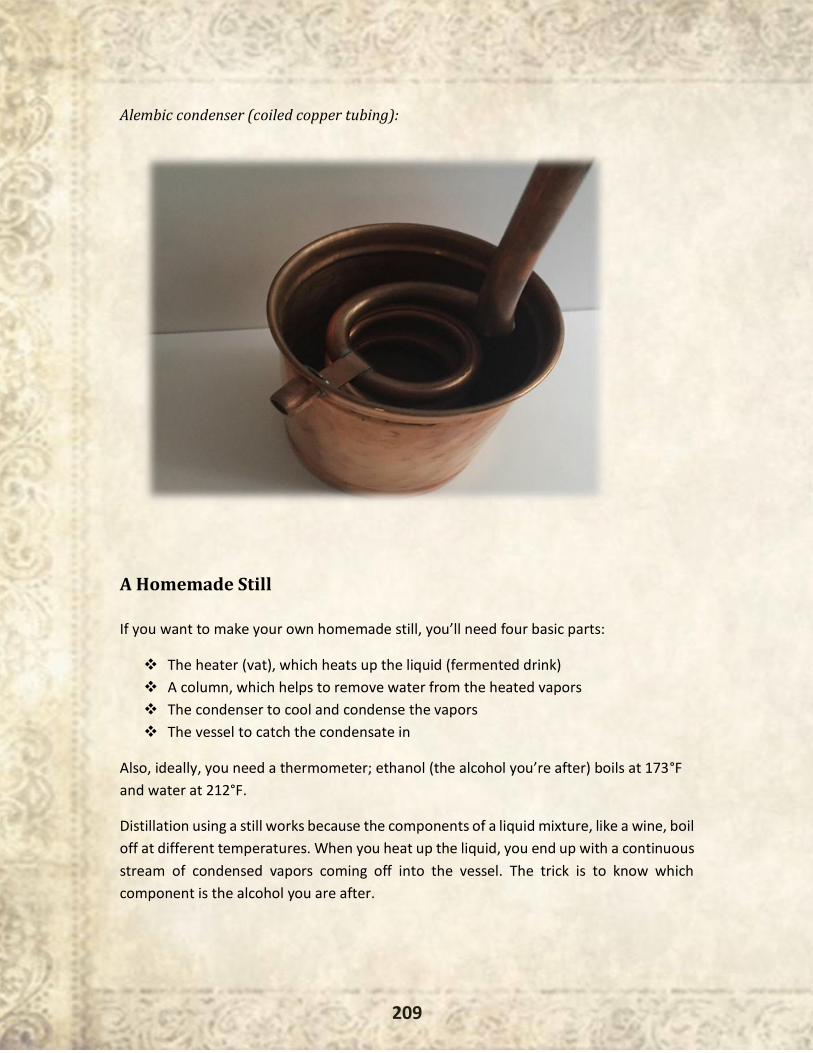
209
Alembic condenser (coiled copper tubing):
A Homemade Still
If you want to make your own homemade still, you’ll need four basic parts:
❖ The heater (vat), which heats up the liquid (fermented drink)
❖ A column, which helps to remove water from the heated vapors
❖ The condenser to cool and condense the vapors
❖ The vessel to catch the condensate in
Also, ideally, you need a thermometer; ethanol (the alcohol you’re after) boils at 173°F
and water at 212°F.
Distillation using a still works because the components of a liquid mixture, like a wine, boil
off at different temperatures. When you heat up the liquid, you end up with a continuous
stream of condensed vapors coming off into the vessel. The trick is to know which
component is the alcohol you are after.
210
As a word of advice, junk the first 5–10% of the condensate as this is likely to be a type of
alcohol known as methanol as well as mixes of other low boiling point chemicals. The
alcohol you’re after is ethanol, which is the type of alcohol found in whiskey58.
The Vat
This is used to place the fermented liquid in. It will be heated up, so it needs a lid. A
pressure cooker can be used, for example, but something that is metal and has a lid is the
basic requirement.
You’ll need a hole in the top of the lid to connect the next piece of equipment, the column.
You need to seal the connection between the column and the vat.
However, you also need to test the temperature since if it heats much above the boiling
point of ethanol (173°F), you will get too much water in the resultant captured
condensate, so leave a small entry point for a thermometer59.
The Column
When the liquid is heated, a mix of water and alcohol will be vaporized off. Alcohol (both
methanol and ethanol) has lower boiling points than water, but because they are soluble
in water, they often condense, containing some water.
The column helps by allowing the water to condense back down into the vat. The bigger
the surface area of the inside of the column, the better, so if you can hammer some tacks
or nails into the inside of the column, you should get better results.
The Condenser
This is a coil of wire. You usually use copper just because it’s easier to coil than other
metals and corrodes more slowly. The coil is immersed in cold water, and the heated
vapors pass through this coil and ultimately condense out to the vessel.
The Vessel
The vessel can be any container that is used to catch the condensate. Remember, you
may need to junk the first 5–10% of the captured condensate as this will contain the lower
boiling point, methanol.
58 It is often illegal to distil alcohol without a distiller’s license. 59 You don’t absolutely have to use a thermometer, but it does allow a greater accuracy. If you don’t have one, you can guess the temperature by ensuring the liquid doesn’t boil too vigorously.

211
A Schematic of a Homemade Still
The entry points into the lidded vessel need to be plugged. You can plug the
thermometer entry point using either a flour/water mix or, even better, use clay.
Sailors
Sailors were famous consumers of alcohol of all kinds, and beer was a daily part of their
diet. A voyage on a sailing ship could last a very long time; from England, it took five weeks
to cross the Atlantic, three months to India, and four months to Australia or China. A cask
of water might start the journey clear and fresh, but after a few weeks, it would be
streaked with green slime and infested with bacteria and parasites. Water was also
carried, but the sailors mostly used it for cooking.
There were ways they used to preserve water that you will find later on. When they
wanted a drink, most of the time they opted for beer. Kegs of beer stayed fresh much
longer than water. The full name of the popular IPA style is India Pale Ale, and it was
specially brewed to survive the long voyage from England to India without spoiling.
The Royal Navy only stopped issuing its sailors a daily rum ration in 1970, when the
admirals finally realized that alcohol and guided missiles were a bad idea, and that

212
tradition has its origins in the drinking habits of the Age of Sail. In the 18th century, each
man’s daily beer allowance was a British gallon—over nine and a half U.S. pints.
It was small beer, but that’s still a formidable amount of alcohol. Later, when the Navy
began operating in the Mediterranean and Caribbean, they found that the beer quickly
went bad in the heat. The daily gallon was replaced with a half pint of rum. When mixed
with water, it killed the bacteria and made it safe to drink.

213
- By Mike Searson -
“The rifle itself has no moral stature, since it has no
will of its own. Naturally, it may be used by evil men
for evil purposes, but there are more good men than
evil, and while the latter cannot be persuaded to the
path of righteousness by propaganda, they can
certainly be corrected by good men with rifles.”
– Jeff Cooper
A true end-of-the-world scenario, with no electricity, power, or other
conveniences, could very well transform us into users of 19th century technology.
How likely this scenario could be is a matter of opinion, but it is something that should
give us a reason to prepare.
Modern Firearms
Most preppers and survivalists are familiar with the modern standby firearms: Glock, SIG,
AR, AK, shotgun, etc. We love them too and always have a few of each on hand, but an
unimaginable disaster could render them obsolete rather quickly. A high-end semiauto is
a thing of beauty with a stockpile of ammo and the skill in knowing how to use it, but what
happens when a part breaks and the factory and all its suppliers are gone?
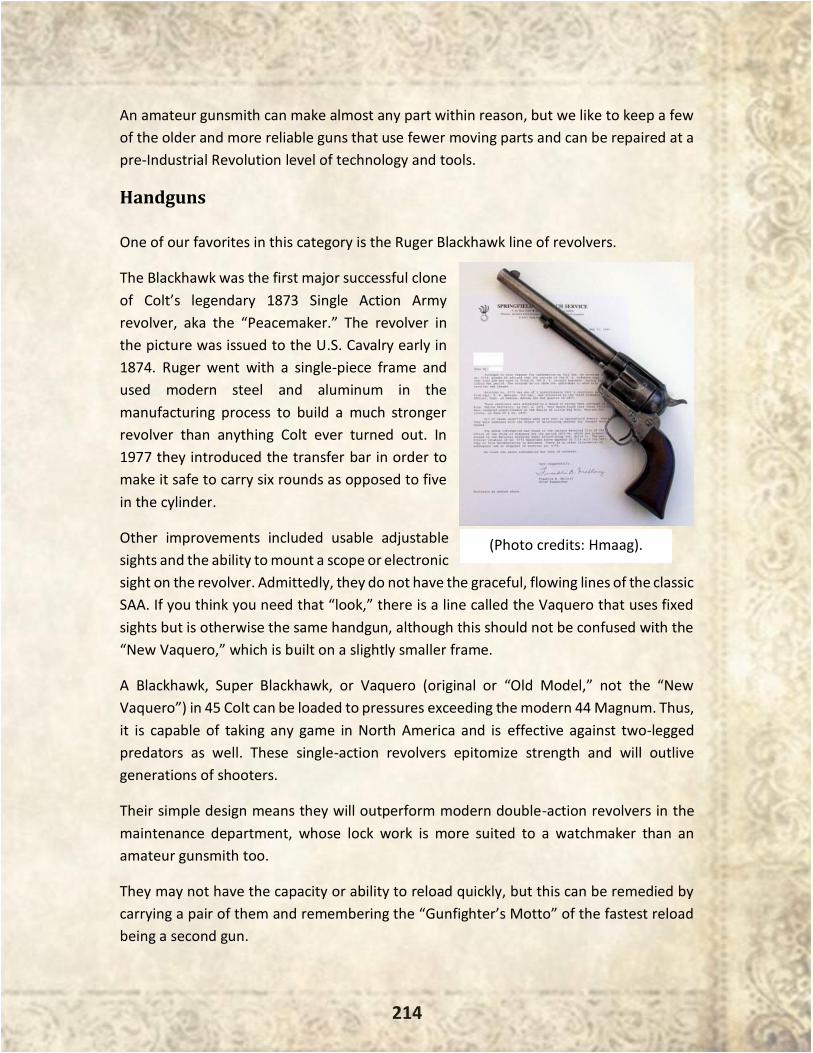
214
An amateur gunsmith can make almost any part within reason, but we like to keep a few
of the older and more reliable guns that use fewer moving parts and can be repaired at a
pre-Industrial Revolution level of technology and tools.
Handguns
One of our favorites in this category is the Ruger Blackhawk line of revolvers.
The Blackhawk was the first major successful clone
of Colt’s legendary 1873 Single Action Army
revolver, aka the “Peacemaker.” The revolver in
the picture was issued to the U.S. Cavalry early in
1874. Ruger went with a single-piece frame and
used modern steel and aluminum in the
manufacturing process to build a much stronger
revolver than anything Colt ever turned out. In
1977 they introduced the transfer bar in order to
make it safe to carry six rounds as opposed to five
in the cylinder.
Other improvements included usable adjustable
sights and the ability to mount a scope or electronic
sight on the revolver. Admittedly, they do not have the graceful, flowing lines of the classic
SAA. If you think you need that “look,” there is a line called the Vaquero that uses fixed
sights but is otherwise the same handgun, although this should not be confused with the
“New Vaquero,” which is built on a slightly smaller frame.
A Blackhawk, Super Blackhawk, or Vaquero (original or “Old Model,” not the “New
Vaquero”) in 45 Colt can be loaded to pressures exceeding the modern 44 Magnum. Thus,
it is capable of taking any game in North America and is effective against two-legged
predators as well. These single-action revolvers epitomize strength and will outlive
generations of shooters.
Their simple design means they will outperform modern double-action revolvers in the
maintenance department, whose lock work is more suited to a watchmaker than an
amateur gunsmith too.
They may not have the capacity or ability to reload quickly, but this can be remedied by
carrying a pair of them and remembering the “Gunfighter’s Motto” of the fastest reload
being a second gun.
(Photo credits: Hmaag).

215
Rifles
When it comes to a rifle that you want to be able to rely on, you may want to consider a
quality single shot chambered in 45-70. We chose this cartridge for its range and power
level, and like the straight wall revolvers we talked about, it is quite easy to reload.
The Ruger Number One, Thompson Center line of single shots and even the reproduction
Sharps rifles from Pedersoli, Cimarron, and others make great candidates.
(Ruger No. 1 single-shot with custom barrel with action open – photo credits Arthurrh)
As in the case with the semiauto handguns, we are not saying to discard your modern
equipment, but having a few “Old Tech” designs on hand is just a safe bet.
Ammunition
As was witnessed in the first half of 2013, firearms can become useless without a steady
supply of ammunition. It does not take an act of war, alien invasion, zombie apocalypse,
Congressional writ, or Executive Order to halt the ammunition supply; the market can
easily suffer as a result of speculation and panic buying.
When big box discount stores have to limit customers’ purchases to two boxes a day, it is
a pretty good indication that it has gone beyond the warning stage.
Most shooters and those with a preparedness mindset could see events like these coming
months if not years in advance and built their supply steadily. However, it was noticed
that as the supply situation did not resolve within a reasonable amount of time, these
prepared shooters had to resort to using ammunition that was saved for a rainy day with
no signs for replenishment in sight.
Even dedicated reloaders of ammunition faced the same pitfalls as the companies that
make ammunition also make reloading components. The major manufacturers saw their
components going right back to their own production lines to feed the consumer demand
for more ammunition.
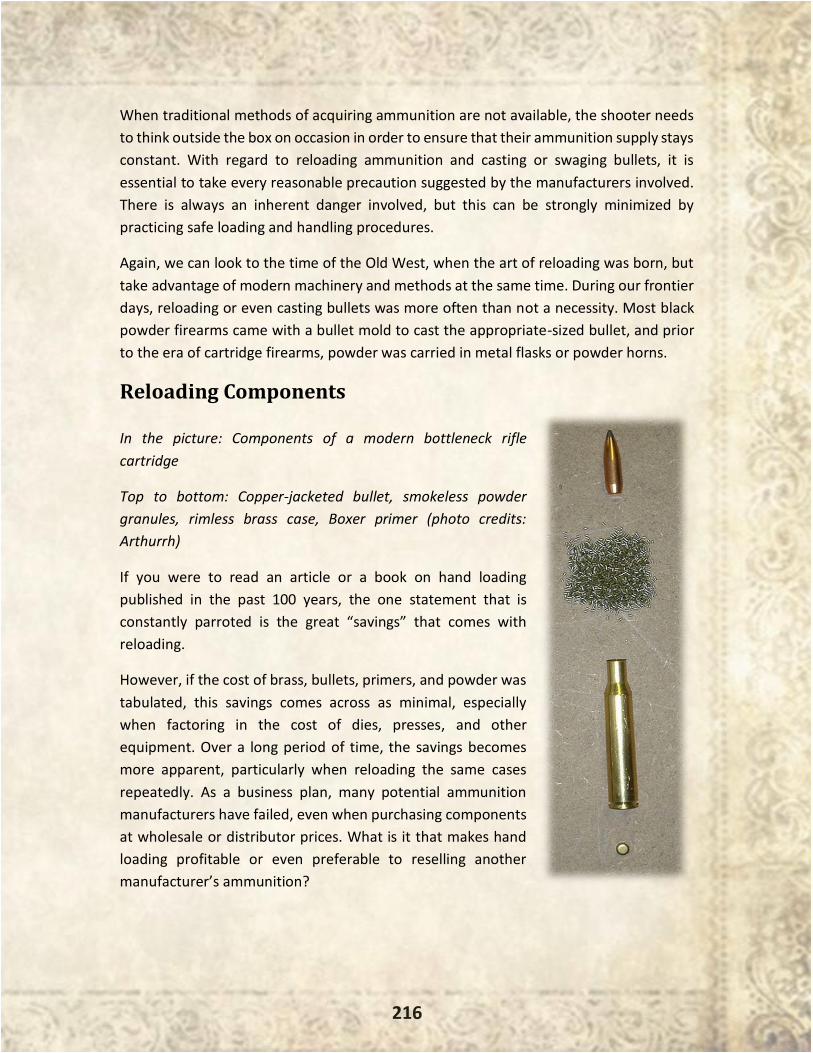
216
When traditional methods of acquiring ammunition are not available, the shooter needs
to think outside the box on occasion in order to ensure that their ammunition supply stays
constant. With regard to reloading ammunition and casting or swaging bullets, it is
essential to take every reasonable precaution suggested by the manufacturers involved.
There is always an inherent danger involved, but this can be strongly minimized by
practicing safe loading and handling procedures.
Again, we can look to the time of the Old West, when the art of reloading was born, but
take advantage of modern machinery and methods at the same time. During our frontier
days, reloading or even casting bullets was more often than not a necessity. Most black
powder firearms came with a bullet mold to cast the appropriate-sized bullet, and prior
to the era of cartridge firearms, powder was carried in metal flasks or powder horns.
Reloading Components
In the picture: Components of a modern bottleneck rifle
cartridge
Top to bottom: Copper-jacketed bullet, smokeless powder
granules, rimless brass case, Boxer primer (photo credits:
Arthurrh)
If you were to read an article or a book on hand loading
published in the past 100 years, the one statement that is
constantly parroted is the great “savings” that comes with
reloading.
However, if the cost of brass, bullets, primers, and powder was
tabulated, this savings comes across as minimal, especially
when factoring in the cost of dies, presses, and other
equipment. Over a long period of time, the savings becomes
more apparent, particularly when reloading the same cases
repeatedly. As a business plan, many potential ammunition
manufacturers have failed, even when purchasing components
at wholesale or distributor prices. What is it that makes hand
loading profitable or even preferable to reselling another
manufacturer’s ammunition?
217
The answer is in sourcing the components. We determined long ago that sourcing one or
two components independently was the key to making a reloading business profitable,
but this mentality can be applied to the shooter looking to produce their own ammunition
as well.
The manufacture of modern primers and smokeless powder should not be attempted by
the novice and should be handled by companies that adhere to strict quality control. For
our purposes, that leaves brass cases and bullets.
The Cartridge Case
Sourcing cartridge cases is the basic foundation of a reloading effort. It starts with the
shooter saving their cases and perhaps obtaining cases from other sources. Without brass
cases, there can be no ammunition.
Most cartridge cases are made of brass, although lacquered steel, zinc, aluminum, copper,
and even plastic can be used. Of all these materials, only brass cartridge cases are suitable
for reloading.
Brass cartridge cases can be bought in wholesale lots, bartered for, or collected from
shooting ranges. When using range pickups, the hand loader needs to inspect for Berdan
primers. This is an older type of primer mostly found in surplus ammunition from Europe
and is evidenced by two flash holes inside the case as opposed to the single flash hole of
the Boxer primer. Although technically they can be reloaded, they require specialized and
expensive tooling to do so as well as a supply of Berdan primers.
Additionally, steel and aluminum cases cannot be reloaded and can cause damage to the
shooter’s reloading equipment if this is attempted. Aluminum cases mostly have a flat
gray metallic color and are most commonly found with a “CCI Blazer” head stamp on the
rim of the case. They can further be identified by their use of Berdan primers and their
distinctive pair of flash holes inside the case. Steel cases typically have a dark green, black,
or even copper-colored case to reflect an anti-corrosive coating on their exterior. Like
aluminum cases, they are most often found with Berdan primers.
Lastly, certain calibers will only sustain a certain amount of reloading depending on the
firearm that has fired them. This is most notable in 40 S&W rounds fired in pistols with
unsupported chambers (first- and second-generation Glocks) or 223 or 308 ammunition
fired from H&K or CETME rifles, which use a fluted chamber to aid in extraction. These
particular pieces of brass should be avoided at all costs and make good candidates for the
218
scrap bucket as repeatedly resizing them will weaken the brass and will eventually result
in catastrophic failure.
Processing Brass Cartridge Cases
In order to be an effective hand loader, one must inspect, sort, and process the brass
cases in order to ensure that the ammunition will be safe to load. Processing helps
eliminate the Berdan primed cases, aluminum cases, steel cases, and, hopefully, any cases
of the incorrect caliber or those that are not in their correct specifications.
While inspecting cases, the shooter should look for cracks in the neck and excessive bulges
near the base. More than likely these cases will not resize properly and will need to be
discarded into the scrap bucket.
When using brass that has been fired and collected from a shooting range, it is advisable
to clean and lube the cases. This can be done in a media tumbler with crushed walnut
shells or dried corncobs. Polishing chemicals can be added to speed up the process as well
as special lubricants that will reduce wear and tear on the reloading equipment.
Depending on the equipment used, the brass can be de-primed at this time. This is usually
done via a single-stage reloading press and a de-capping pin. This step in the process
resizes the case mouth as well.
Primer Pocket
The primer pocket is the part of the cartridge case where the primer is seated. Some types
of military surplus brass will have an extra crimp to hold the primer in place. While
processing brass for reloading, the crimp will need to be removed. In extreme cases, the
pocket will need to be de-burred or reamed so a new primer can be seated.
Bullets and Projectiles
Bullets are the one component that can most easily be made and stockpiled by any
shooter of any skill level. Again, the prospective hand loader has choices instead of simply
buying bullets or even the base material with which to cast them.
When it comes to store-bought bullets, the possibilities are seemingly endless. Leafing
through a supplier’s catalog or scrolling through a manufacturer’s webpage can be
overwhelming when it comes to choosing the correct bullet for a reloading project. Most
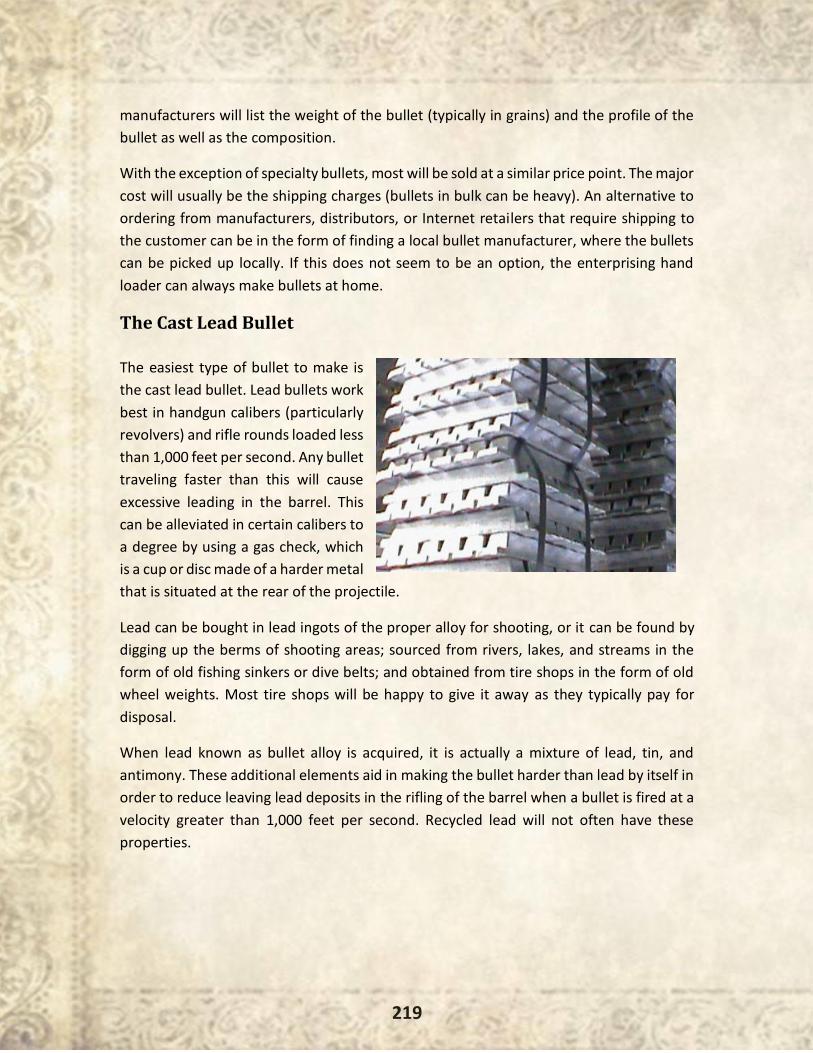
219
manufacturers will list the weight of the bullet (typically in grains) and the profile of the
bullet as well as the composition.
With the exception of specialty bullets, most will be sold at a similar price point. The major
cost will usually be the shipping charges (bullets in bulk can be heavy). An alternative to
ordering from manufacturers, distributors, or Internet retailers that require shipping to
the customer can be in the form of finding a local bullet manufacturer, where the bullets
can be picked up locally. If this does not seem to be an option, the enterprising hand
loader can always make bullets at home.
The Cast Lead Bullet
The easiest type of bullet to make is
the cast lead bullet. Lead bullets work
best in handgun calibers (particularly
revolvers) and rifle rounds loaded less
than 1,000 feet per second. Any bullet
traveling faster than this will cause
excessive leading in the barrel. This
can be alleviated in certain calibers to
a degree by using a gas check, which
is a cup or disc made of a harder metal
that is situated at the rear of the projectile.
Lead can be bought in lead ingots of the proper alloy for shooting, or it can be found by
digging up the berms of shooting areas; sourced from rivers, lakes, and streams in the
form of old fishing sinkers or dive belts; and obtained from tire shops in the form of old
wheel weights. Most tire shops will be happy to give it away as they typically pay for
disposal.
When lead known as bullet alloy is acquired, it is actually a mixture of lead, tin, and
antimony. These additional elements aid in making the bullet harder than lead by itself in
order to reduce leaving lead deposits in the rifling of the barrel when a bullet is fired at a
velocity greater than 1,000 feet per second. Recycled lead will not often have these
properties.
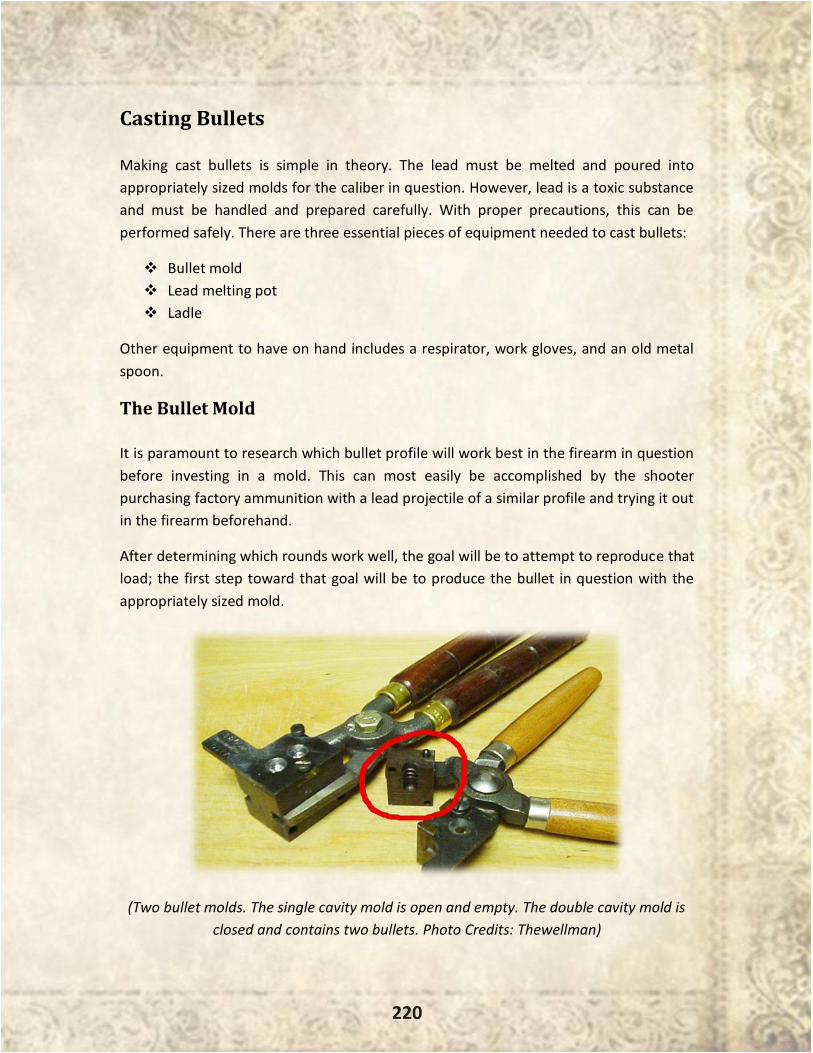
220
Casting Bullets
Making cast bullets is simple in theory. The lead must be melted and poured into
appropriately sized molds for the caliber in question. However, lead is a toxic substance
and must be handled and prepared carefully. With proper precautions, this can be
performed safely. There are three essential pieces of equipment needed to cast bullets:
❖ Bullet mold
❖ Lead melting pot
❖ Ladle
Other equipment to have on hand includes a respirator, work gloves, and an old metal
spoon.
The Bullet Mold
It is paramount to research which bullet profile will work best in the firearm in question
before investing in a mold. This can most easily be accomplished by the shooter
purchasing factory ammunition with a lead projectile of a similar profile and trying it out
in the firearm beforehand.
After determining which rounds work well, the goal will be to attempt to reproduce that
load; the first step toward that goal will be to produce the bullet in question with the
appropriately sized mold.
(Two bullet molds. The single cavity mold is open and empty. The double cavity mold is
closed and contains two bullets. Photo Credits: Thewellman)
221
Bullet molds can be purchased for almost any caliber, and different manufacturers will
offer different patterns or profiles of different weights for each.
The Lead Melting Pot
A melting pot can be made using an old stock pot or cast iron pot. If the bullet caster has
the means, a special-purpose electric pot specifically made for melting lead can be
purchased.
Lead melts at 600 to 621 degrees Fahrenheit. This means that the caster must be able to
supply a heat source of that temperature. Because of the potential toxic fumes, the lead
must be melted in a well-ventilated area, preferably outdoors. If the temperature gets
hotter than 650 degrees, the potential for toxic fumes becomes even greater, so a gauge
of some type should be used to monitor this. The special-purpose lead melting pots often
have these gauges built in.
It is strongly advised to use a respirator and gloves while melting the lead.
The Ladle
The dipper or ladle is used to pour the molten lead from the pot into the mold. Some of
the special-purpose melting pots have a bottom spout to alleviate this. Some old-time
bullet casters prefer the ladle, even when they have a bottom spout, because they believe
the pour is more consistent.
The Melting Process
It can take 10 to 20 minutes for the lead to melt at the proper temperature.
If the caster is utilizing recycled lead, impurities will separate and rise to the surface. This
will be in the form of dirt or even residual jacket material or lube with regard to recycled
bullets. Recycled wheel weights may have rubber or other metal as a residue. The rubber
and lube will burn off, but the metals and dirt will need to be sifted and removed from
the lead pot before pouring it to cast by use of a metal spoon. These impurities will appear
blackish in color and, after removal, may leave a trace color within the molten lead. These
impurities should be placed in a metal container for disposal.
Wax shavings can be introduced to aid in fluxing out any remaining impurities. After
stirring in the wax, the caster should scrape the bottom and sides of the melting pot to
222
remove every last bit of these impurities before pouring into a mold. The final product
should be a bright silver color.
The Casting Process
It is important to follow the manufacturer’s instructions completely when using a bullet
mold. Some will recommend heating the mold, while some will recommend using a
release agent beforehand.
Whether the caster is filling the mold from a bottom spout or using a ladle, the molten
lead needs to be poured directly into the hole on the top of the mold’s sprue plate until
there is a slight overflow (which is called sprue and is how the plate gets its name). This
will allow the mold cavity to fill properly as the lead cools.
The bullet will take its shape in about five to seven seconds. The caster can then rotate
the sprue plate by tapping on it with a wooden dowel or a rubber or wooden mallet. The
sprue plate should cut the excess lead from the top, and the open mold should release
the bullet. The bullet may need to be tapped free of the mold by using the mallet again.
Your first bullets may have a crackled or wrinkled appearance due to the mold being too
cool. Eventually the mold will achieve the proper temperature and the bullets will look
fine. If they take on a frosted appearance, it means the mold is getting too hot.
These newly formed bullets should be dropped into a towel, a wooden box, or, in some
instances, a pan of water to quench the bullets. The excess lead sprues can be added to
the melting pot along with any flawed bullets and melted again to make new ones.
The bullets should be allowed to cool down and set for at least 24 hours before hand
loading. In most cases, the bullets will be ready to go at this point. If the bullets prove to
be inaccurate, they may need to be resized to fit the firearm’s bore. There are specialized
motorized tools that can be bought for this purpose for under $1,000, or the bullet caster
can purchase a bullet sizing die of the appropriate diameter and mount it in a single-stage
reloading press in order to process several batches of properly sized bullets.
If you wish to size and lubricate the bullets, there is a specialized tool for this, or the
bullets may be lubricated individually. Spray lubricants can be applied, or the caster may
want to take another step and apply a coating.
223
Swaging Bullets
Bullet swaging is an alternative method of producing bullets at the individual level. It is
mostly used by major ammunition manufacturers with expensive machinery and
dedicated factories. Swaging utilizes pressure to form a bullet. As opposed to casting, no
heat is needed, and there is no requirement to melt the lead.
Of course, this negates the ability to use recycled materials such as dive weights, wheel
weights, fishing lures, or previously fired bullets, but it is the way to go if the hand loader
wants to produce jacketed ammunition or specialized bullets, such as a hollow-based wad
cutter. For making effective use of pre-existing materials, previously fired brass rim fire
cases can be recycled and used as jacket material.
The pressure needed to swage a bullet is applied by means of either a hydraulic or hand-
powered press. The press holds a die and a set of internal and external punches. The two
punches apply force against the material from both ends of the die until it flows and takes
on the actual shape of the die. When manufacturing a jacketed bullet, the lead core or
wire is forced into the jacket material in the same manner.
Swaging can be performed in a home workshop using machinery made by companies such
as Corbin. Most of the presses used for reloading can be used in the swaging process to
swage the bullets, form bullet jackets from copper strip or tubing, and make the lead wire
itself. Corbin offers dedicated swaging presses that can be easily converted into single-
stage reloading presses as well.
The initial setup of a swaging operation is costlier than a basic casting venture but can be
more versatile, particularly if the end user has a greater need for jacketed ammunition
for use in semiautomatic rifles and handguns.
There is a reduced risk of exposure to toxic substances, and the operation can be
conducted “under the radar,” with no one being the wiser to a manufacturing facility as
they would with the smell of melting lead ingots. The end user does not have to be
concerned with fluctuations in the molding and casting process due to temperature
either.
After the initial cost of setting up the machinery, the cost of bullet production is
essentially the same cost as the raw materials, and the end result is usually a more
accurate bullet as opposed to a cast bullet.
224
Machining Bullets
In some instances, bullets can be machined. Although it is not an ideal situation, it can be
a method of last resort. We know several shooters of 338 Lapua Magnum and 50 BMG
who have found it cheaper to turn out bullets for these rifles on a lathe or a screw
machine.
Some use bronze or copper, and one uses steel in his 50 BMG rifle. The problem with steel
is that it quickly erodes the bore of the rifle; however, the shooter in question maintains
that he spends so little on reloading components that he finds it cheaper to replace the
barrel after it is shot out.
The Final Word on Lead Bullets
Lead is a toxic substance that can cause health problems and birth defects. It is advisable
to wear gloves whenever possible while handling it and strongly advised for reloaders to
wash their hands with cold, soapy water after handling it and before eating or drinking or
before enjoying tobacco products.
Powder: How To Make Gun Powder The Old Fashioned
Way
Would you believe that this powerful propellant, that has changed the world as we
know it, was made as far back as 142 AD?
With that knowledge, how about the fact that it took nearly 1200 years for us to figure
out how to use this technology in a gun. The history of this astounding substance is one
that is inextricably tied to the human race. Imagine the great battles and wars tied to
this simple mixture of sulfur, carbon and potassium nitrate. Mixed in the right ratios this
mix becomes gunpowder.
We have just become such a dependent bunch that the process, to most of us, seems
like some type of magic that only a Merlin could conjure up. So, I will lift the veil on
gunpowder.
Gun Powder Formula:
❖ 75% Potassium Nitrate
❖ 15% Charcoal

225
❖ 10% Sulfur
Recipe For Homemade Gunpowder
Tools:
❖ Digital Ounces Scale
❖ 2 Glass or Plastic Mixings Containers
❖ Plastic spoon
❖ Blunt object for smashing potassium nitrite (I used the handle of a small tack
hammer)
❖ Fine mesh sieve
Ingredients:
❖ Potassium Nitrate (Salt Peter) / Stump Remover
❖ Activated Charcoal
❖ Powdered Sulfur
Technique
A little safety first before we get into steps and instructions. Sulfur can kill you and the
gas it gives off when burned can kill you. Potassium nitrite is no picnic either, it can
damage your vision and poison you if ingested. Gunpowder is highly
flammable/explosive and could cause you great physical harm.
❖ Wear eye protection
❖ Use gloves
❖ Use a dust mask
❖ Work in a well-ventilated area
❖ Most importantly use common sense
PROCEED WITH CAUTION!
Gather your ingredients and measure them based on the black powder formula above.
Whether you are making 1lb or 10lb the breakdown will be the same 75% Potassium
Nitrate, 15% Charcoal and 10% Sulfur.
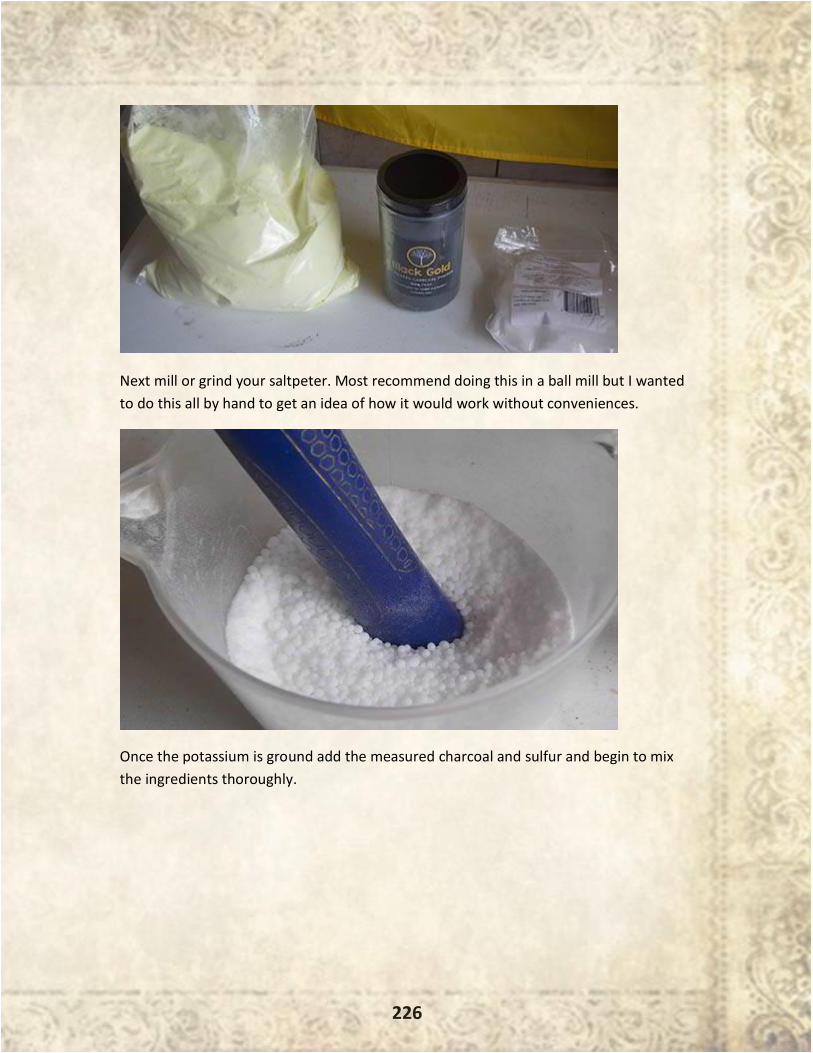
226
Next mill or grind your saltpeter. Most recommend doing this in a ball mill but I wanted
to do this all by hand to get an idea of how it would work without conveniences.
Once the potassium is ground add the measured charcoal and sulfur and begin to mix
the ingredients thoroughly.
227
As you can see in the photo above the mix was not completely smooth so I ran it
through a mesh sieve to remove and potassium nitrate that had not been ground fine
enough. This process created a much finer powder and helped incorporate the three
ingredients.
It worked so much better than hand mixing I just ran it through the sieve again. You can
really see it becoming something at this point. The sieve was crucial to this process if
you are going to be doing it by hand. The finer the sieve the better.
228
The final product looked something like this. I was very happy with the consistency
achieved in such a short amount of time. This whole process may have taken 30
minutes. Most people recommend you run the ingredients in a ball mill for 12 hours!
That said, their black powder is of a superior quality in comparison to what was created
here by hand. Still, this stuff would get the job done.
I folded a small piece of paper in half and laid that on a rock before lighting it. Light this
stuff from a distance with a torch or a long piece of paper. Especially the first time. You
will not know how good your black powder is and you don’t want to find out by having it
scorch your face.
229
If you want to make it more powerful here are two great tips for powering up your
gunpowder:
Add water to the mix and stir it into a paste then allow it to dry. This really gets the
three powders to mingle thoroughly.
Add (isopropyl) alcohol to the mix depending on batch size and this will make it really
angry when the fire hits it.
Making gunpowder at home is one of those cheap and easy endeavors that will surprise
you. It’s also puts you in contact with a process that changed the course of history! Just
be safe and smart as you are creating a highly combustible substance!
Smokeless Powder
After the discovery that burn rates of powder could be controlled by changing the granule
size of the powder, Viellie and Nobel introduced smokeless powder to the world. This new
powder did not have the corrosive or hydroscopic properties of black powder, and most
importantly, it did not leave clouds of white smoke in its wake when a round was fired.
Because of the higher pressure involved with smokeless powder, it should only be fired
in modern firearms made after 1898 and never fired in firearms marked “For Black
Powder Only.”
Primers
Of all the components that make up a round of ammunition, primers tend to be the most
dangerous to handle or attempt to make.
Primer Size
There are three sizes of primers: shotgun, small, and large.
Small and large primers each come in three different degrees: rifle, pistol, and Magnum.
The size of the primer depends on the case.
Most center fire pistol ammunition uses the small pistol primer with the exception of
10mm, 45 ACP, 44 Special, 41 Magnum, 44 Magnum, 45 Colt, 45 ACP, 50 Action Express,
500 Smith & Wesson, 454 Casul, and Wildcat cartridges based on these case designs.
230
Small Magnum primers are used by the 357 Magnum, and the large Magnum primers are
intended for the 41 Magnum, 44 Magnum, 454 Casul, 50 Action Express, and 500 Smith
& Wesson when used in conjunction with a slow-burning powder that takes up almost all
of the capacity of the case to guarantee proper ignition.
Shooters looking to save money should know that using a case loaded with a small
amount of a fast-burning powder does not require the more expensive Magnum primer.
Magnum primers should be used when the temperature is below 0 degrees and is safe to
use with any ball powder. It may not be particularly advantageous to use with a fast-
burning powder, and despite their expense, they may be the only primer that is available
to the reloader.
The bottom line is that they are completely safe to use in non-Magnum rounds despite
their ominous-sounding name.
Shotgun primers are used for reloading shotgun shells and are used in lieu of percussion
caps in certain inline modern muzzle-loading rifles. They cannot be used to reload pistol
or rifle ammunition.
Reloading Equipment
There is an entire industry dedicated to the reloading of center fire ammunition apart
from the individual ammunition components. A reloading press can cost anywhere from
$30 to $30,000 depending upon its intended use.
The Lee Loader
The Lee Loader is a pocket-sized
reloading tool available in a variety of
pistol and rifle calibers. The company
claims that a single round of
ammunition can be loaded using this
tool in as little as 30 seconds.
This tool is commonly used in the
field by Bench rest rifle shooters,
who reload their fired brass on the
firing line, and is perfect for a bug out

231
bag provided that the reloader brings along ammunition components, such as powder,
primers, and bullets.
The kit contains all the basic tools to remove the fired primer, seat the new primer, flare
the case mouth, measure and pour powder, seat the bullet, and crimp the bullet in place.
Because it only resizes the neck portion of rifle cases, it is advised to only use it to reload
brass that has been fired from a single rifle.
This low-cost entry ($30–$40) is often a gateway tool into more dedicated reloading, but
it still holds a place in most bug out or survival situations and can be handy to take to the
range for basic load development.
The Single-Stage Press
The heart of most reloading workshops is the single-stage press. Most reloaders that
move on to progressive or automated systems will still use classic single-stage presses for
case preparation or calibers that are not loaded as frequently.
Single-stage presses are manufactured by a variety of companies, such as RCBS, Dillon,
Lee, and Hornady. Essentially, these presses consist of a device to hold the cartridge case
in place and a handle to move the case into one of the dies.
The user must remove each case from the press after each step is completed. When each
stage of assembly is finished, the reloader removes the die from that stage and places the
die for the next one to complete the loading sequence.
Production is faster and much more stable than the Lee Loader but not as fast as the
progressive or automated press.
The Progressive Press
If ever there was a press that changed the way ammunition is loaded, it would have to be
the progressive or multi-stage press. Similar in operation to the single-stage press with
regard to moving the handle, the progressive press makes use of several dies at once by
means of a tool head.
Most progressive presses are hand indexed, meaning that the reloader must manually
move the cartridge case from one stage to the next, but a fair number of presses are
coming to market with an auto indexing feature. Auto indexing allows the cartridge case

232
to move automatically as the handle is raised or lowered, depending on the
manufacturer.
Progressive presses have numerous safety features that
can be installed to ensure safe operation. Some feature a
powder warning, alerting the user to the presence of too
much or too little powder in the case.
On presses that feature a feed system for primers, a low
primer sensor can be installed to let the user know that
the primer tube will soon be empty.
Advanced and more expensive presses can have case
feeding stations and bullet feeding stations attached so
all the reloader needs to do is keep these feeders full of
components. Some of these presses will allow the
reloader to load as many as 1,200 rounds in an hour.
Reloading Dies
The most critical piece of reloading equipment for the
progressive or single-stage press is a set of reloading dies.
Each of the dies performs one or more specific functions
during the reloading process, and each set of dies is made for a specific caliber. Some sets
of dies will work on similar calibers, but this is not universal.
For example, a typical set of dies for 38 Long Colt will work with 38 Special and 357
Magnum because all three cartridges have the same external dimensions apart from
length. It is the same with 44 Special and 44 Magnum or 45 Colt and 45 Schofield, although
the latter two have different rim diameters. In a similar vein 45 ACP dies will work with
45 Auto Rim, aside from the shell holder.
Magnum handgun dies marked “357 Magnum Only” or “44 Magnum Only” will not work
on the shorter calibers due to the internal dimensions with regard to setting the crimp.
These dies cannot be adjusted to sit lower in the press.
Reloading Bench
The loading bench is vital for all single-stage and progressive presses as well as keeping
all of the other equipment organized. You should look at mounting a press to a bench as
233
critical as you would mounting a scope to a rifle. The more stable and strong the mount
is, the more consistent your reloads will be. The Lee Hand Loader and the automated
presses (which come with their own workbenches) would be the exceptions to this.
A quality bench can take the form of a solid wood top work bench from a hardware store
or a purpose-built unit designed for reloading.
The Tumbler
A dry media tumbler may be seen as an unnecessary luxury by most reloaders. As stated
earlier, it can be invaluable for case preparation and preserving the life of the reloading
press and its parts, but it can serve an equally important function when the reloading
stage is complete.
All modern ammunition factories tumble and polish their brass when it is complete. This
gives the ammunition that fresh and shiny appearance when it is first taken out of the box
and is completely safe to do.
Specially-made rotary tumblers for this purpose are sold by various companies that cater
to the reloading industry, but the same effect can be had by using a cement mixer to
tumble large quantities of brass.
As in case preparation, dry corncob or walnut shell makes the best media, but some
reloaders use cat litter. Polishing and lubrication agents made for reloading can be used
to aid the process, as can products such as Brasso.
The Powder Scale
Powder scales are vital to the reloader. Too much powder can create a hazardous
situation that can cause a catastrophic failure in the firearm (i.e., the gun blows up). Too
little powder can cause a bullet to become lodged in the bore and is often referred to as
a squib load. There are two types of scales on the market: the older balance-beam type
and the digital. Both are effective, but the digital scale tends to be more reliable and easy
to read.
Manuals
If there is one thing there is not a shortage of, it is reloading manuals. Just about every
bullet and powder manufacturer publishes usable reloading data and releases a free

234
version of it. These can range from 3-page leaflets to 100-page brochures and are yours
for the asking.
More dedicated versions are available in hardback bound book or CD/DVD format for a
fee of $10 to $50. A company known as Load Books produces 68 caliber-specific manuals
available in spiral-bound paperback from their website or at retail locations that sell
reloading equipment.
Storage of Ammunition and Components
All ammunition and reloading components must be stored in a cool, dry place. Despite
the old wives’ tales that circulate in gun shops or over the Internet, there is no shelf life
on ammunition. Ammunition that was properly loaded and stored in 1886 can safely be
fired today. It is when the ammunition has been exposed to widely fluctuating
temperatures and humidity conditions that it can be problematic.
Some shooters go an extra step and secure their ammunition in a safe or locking cabinet
to protect it from home burglaries or children finding it.
Reloaded ammunition should not be stored in plastic bags. The ideal way is to use ready-
made ammunition boxes to store the rounds and label them with the load information
and date of manufacture. A cheaper alternative to this can be reusing the trays if not the
ammunition boxes of commercial store-bought ammunition with a label to mark the
loading data.
Powder is perhaps the most fragile component to store. It should always be stored in its
original container of metal or fiber and must follow all the safeguards of ammunition
storage with regards to temperature and humidity. Exposure to light and wide
temperature fluctuations can cause powder to deteriorate rapidly and turn an indefinite
shelf life into that of a few months. Powder should never be stored in a glass or clear
plastic container for these reasons.
How Much Ammunition Is Enough?
When it comes to storing ammunition or keeping a reserve, the question often becomes:
“How much do I really need?”
The answer is different for everybody. A basic rule of thumb is a minimum of 1,000 rounds
for each caliber of center fire ammunition and 2,000 to 5,000 rounds of each caliber of
rim fire. This is not set in stone; it is merely a guideline. A competitive pistol shooter will
235
burn through 1,000 rounds in a few weeks of intense practice leading up to a match. A
hunter who makes a trip to Africa once a decade for a safari may only need several boxes
of 458 Winchester Magnum or 375 Holland & Holland.
Recycling
One element common to hand loading, bullet casting, and bullet swaging is recycling. In
some respects, this may be the most productive “green” activity there is. Cartridge cases
are the most common element that can be used over again. Enterprising loaders often
dig up berms at shooting ranges to retrieve the fired lead to melt down and cast again.
Although rim fire cartridges are not reloadable, a swaging die can be purchased from
Corbin to process the fired cases into cheap and effective bullet jackets if the reloader
goes the swaging route.
Some reloaders will take advantage of certain components found on existing ammunition
to further this end. Certain blank cartridges can be reused as cases with intact primers.
Calibers that share a common bullet can be recycled for their bullets.
Lastly, the scrap bucket was mentioned in the text for disposal of weakened cartridge
cases. These damaged cases and the used primers from a reloading operation are made
of brass, which can be taken to a scrap metal or recycling plant and sold off for the value
in the metal. Some reloaders make connections at these operations and will trade their
scrap brass and aluminum for reusable lead. If it ever comes down to financing a home
reloading operation, this can be an alternative way to do it.
In a similar vein, 223 or 5.56mm NATO ammunition shares the same base as 9mm and
380 ACP. These cartridge cases can be cut down and trimmed to be used for that purpose
if cracks are discovered in the case neck, rendering them unsuitable for use in a rifle.
Work Practices
Reloading ammunition, casting bullets, and bullet swaging are rewarding activities that
can not only help you save money, make money, and tailor your loads to your guns but
are fun activities as well.
As stated earlier, they all carry some inherent risk. Whether it is lead exposure, a
catastrophic malfunction in a firearm, or blowing up a stack of primers in an automated
press, accidents can happen.
236
The best way to avoid this is to adhere to safe work practices and avoid distractions. Some
reloaders go as far as wearing hearing and eye protection as if they were on a shooting
range. A shop apron can keep lube, grease, powder, and other substances off your work
clothes.
Keeping work areas clean goes a long way too. Spent primers, loose bullets, or cartridge
cases can not only clutter a work bench but can create a hazard if dropped on the floor.
Having a broom or air blower handy can go a long way with regards to keeping your area
clean.
It is vital to mark everything you make with powder weight and type as well as the bullet
weight. Sometimes it might be the only identifier of which load shoots better at the range.
When it comes to reloading ammunition, we strongly urge the reader to consult the
various reloading manuals available for free or for a nominal cost. The information
contained in those works is invaluable, and not only will you be independent of the
shifting supply of ammunition at the retail level but you will gain a greater understanding
of shooting and how your various firearms work.
Over time you will discover which loads and bullets work best in your guns, and you will
become a more proficient shooter. If TEOTWAWKI does happen, you might be the only
one left with a decent stockpile of ammo and the knowledge about how to produce it,
which means infinite ammo and bartering ammo.
237
- By Jimmy Neil -
“The two words ‘information’ and ‘communication’
are often used interchangeably, but they signify quite
different things. Information is giving out;
communication is getting through.”
- Sydney J. Harris
During the American Revolutionary War in the 1700s and the Civil War in the
1800s, technology was not as advanced as it is today. Confidential messages and top
secret information had to go by word of mouth or ciphered documents.
Spycraft was a must, and certain skills were required in an effort to protect vital messages
that could end the war. Connections, networks, relationships, and knowledge were
required of potential spies. They played an important role in carrying and delivering
information as it decided what the next move would be and how they would carry it out.
Thus, different methods were developed to protect the messages in case they were
intercepted.
Rectal Acorn, Silver Ball, and Quill Letters
In 2009 a woman whose ancestor was a Confederate in the American Civil War visited the
Museum of Confederacy with an acorn-shaped object in her hand. It was a little over an
inch long and was made of brass. There were no inscriptions or markings on it. She told
the museum that it was a device that her ancestor had used to carry, protect, and deliver
secret messages to destinations both near and far.
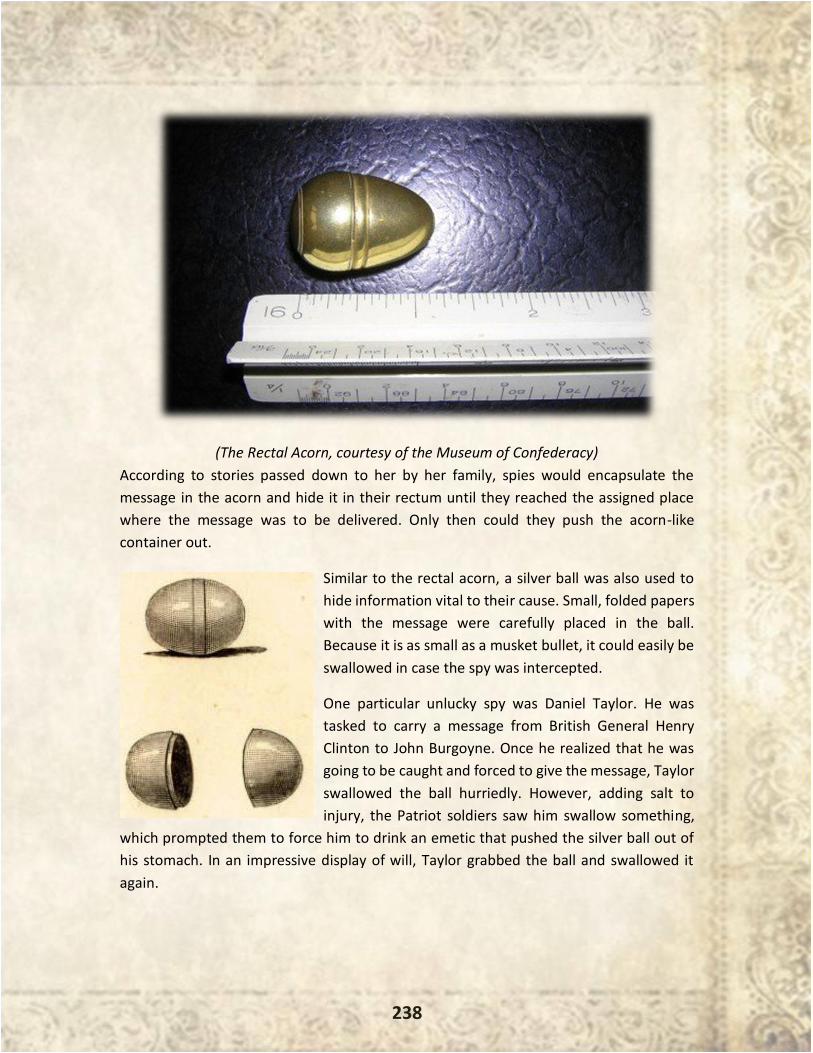
238
(The Rectal Acorn, courtesy of the Museum of Confederacy)
According to stories passed down to her by her family, spies would encapsulate the
message in the acorn and hide it in their rectum until they reached the assigned place
where the message was to be delivered. Only then could they push the acorn-like
container out.
Similar to the rectal acorn, a silver ball was also used to
hide information vital to their cause. Small, folded papers
with the message were carefully placed in the ball.
Because it is as small as a musket bullet, it could easily be
swallowed in case the spy was intercepted.
One particular unlucky spy was Daniel Taylor. He was
tasked to carry a message from British General Henry
Clinton to John Burgoyne. Once he realized that he was
going to be caught and forced to give the message, Taylor
swallowed the ball hurriedly. However, adding salt to
injury, the Patriot soldiers saw him swallow something,
which prompted them to force him to drink an emetic that pushed the silver ball out of
his stomach. In an impressive display of will, Taylor grabbed the ball and swallowed it
again.
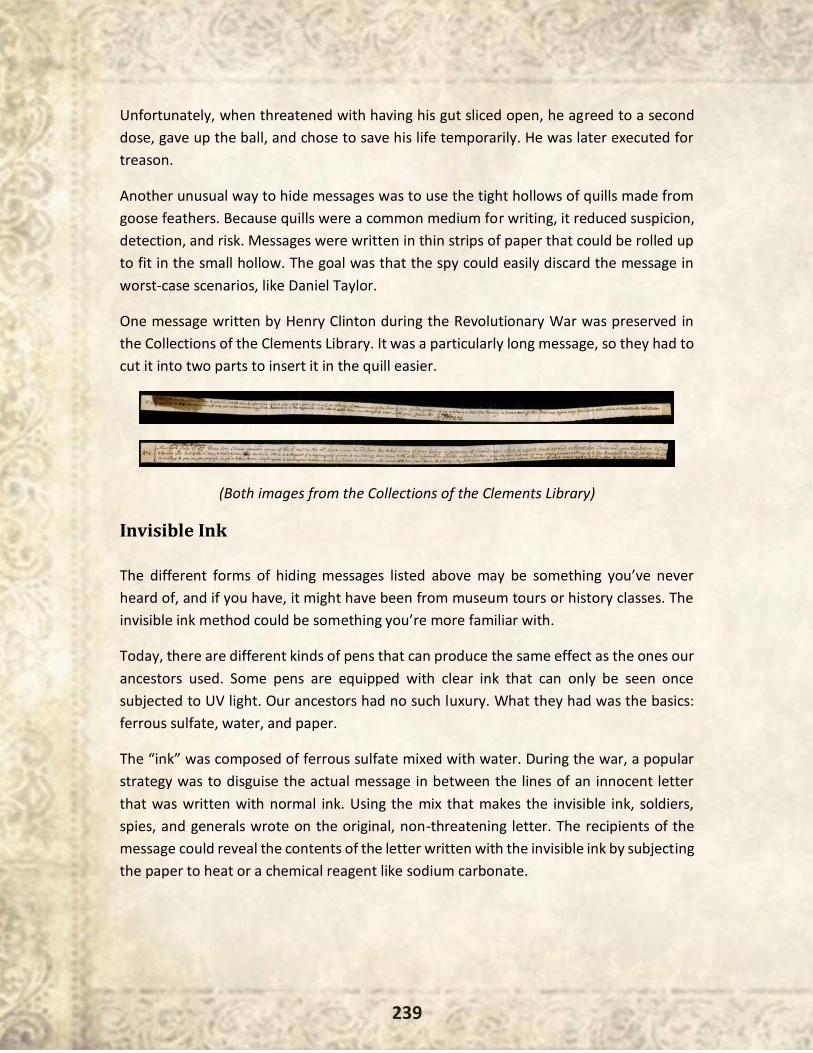
239
Unfortunately, when threatened with having his gut sliced open, he agreed to a second
dose, gave up the ball, and chose to save his life temporarily. He was later executed for
treason.
Another unusual way to hide messages was to use the tight hollows of quills made from
goose feathers. Because quills were a common medium for writing, it reduced suspicion,
detection, and risk. Messages were written in thin strips of paper that could be rolled up
to fit in the small hollow. The goal was that the spy could easily discard the message in
worst-case scenarios, like Daniel Taylor.
One message written by Henry Clinton during the Revolutionary War was preserved in
the Collections of the Clements Library. It was a particularly long message, so they had to
cut it into two parts to insert it in the quill easier.
(Both images from the Collections of the Clements Library)
Invisible Ink
The different forms of hiding messages listed above may be something you’ve never
heard of, and if you have, it might have been from museum tours or history classes. The
invisible ink method could be something you’re more familiar with.
Today, there are different kinds of pens that can produce the same effect as the ones our
ancestors used. Some pens are equipped with clear ink that can only be seen once
subjected to UV light. Our ancestors had no such luxury. What they had was the basics:
ferrous sulfate, water, and paper.
The “ink” was composed of ferrous sulfate mixed with water. During the war, a popular
strategy was to disguise the actual message in between the lines of an innocent letter
that was written with normal ink. Using the mix that makes the invisible ink, soldiers,
spies, and generals wrote on the original, non-threatening letter. The recipients of the
message could reveal the contents of the letter written with the invisible ink by subjecting
the paper to heat or a chemical reagent like sodium carbonate.
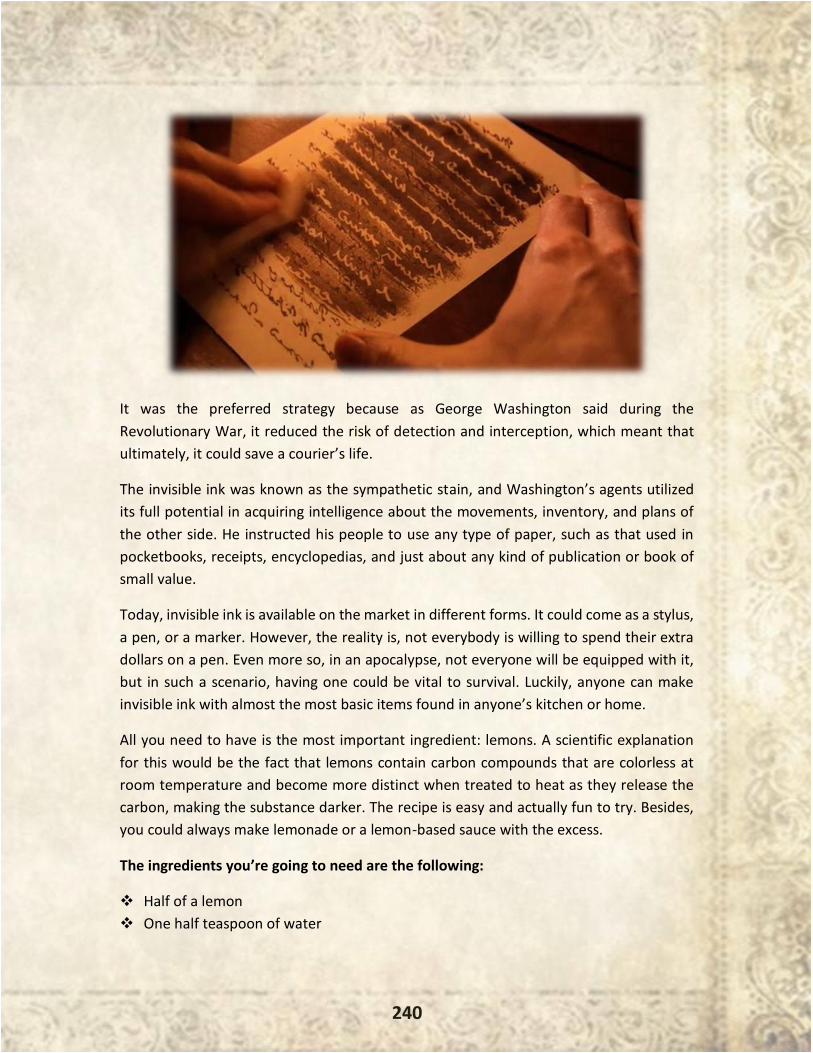
240
It was the preferred strategy because as George Washington said during the
Revolutionary War, it reduced the risk of detection and interception, which meant that
ultimately, it could save a courier’s life.
The invisible ink was known as the sympathetic stain, and Washington’s agents utilized
its full potential in acquiring intelligence about the movements, inventory, and plans of
the other side. He instructed his people to use any type of paper, such as that used in
pocketbooks, receipts, encyclopedias, and just about any kind of publication or book of
small value.
Today, invisible ink is available on the market in different forms. It could come as a stylus,
a pen, or a marker. However, the reality is, not everybody is willing to spend their extra
dollars on a pen. Even more so, in an apocalypse, not everyone will be equipped with it,
but in such a scenario, having one could be vital to survival. Luckily, anyone can make
invisible ink with almost the most basic items found in anyone’s kitchen or home.
All you need to have is the most important ingredient: lemons. A scientific explanation
for this would be the fact that lemons contain carbon compounds that are colorless at
room temperature and become more distinct when treated to heat as they release the
carbon, making the substance darker. The recipe is easy and actually fun to try. Besides,
you could always make lemonade or a lemon-based sauce with the excess.
The ingredients you’re going to need are the following:
❖ Half of a lemon
❖ One half teaspoon of water
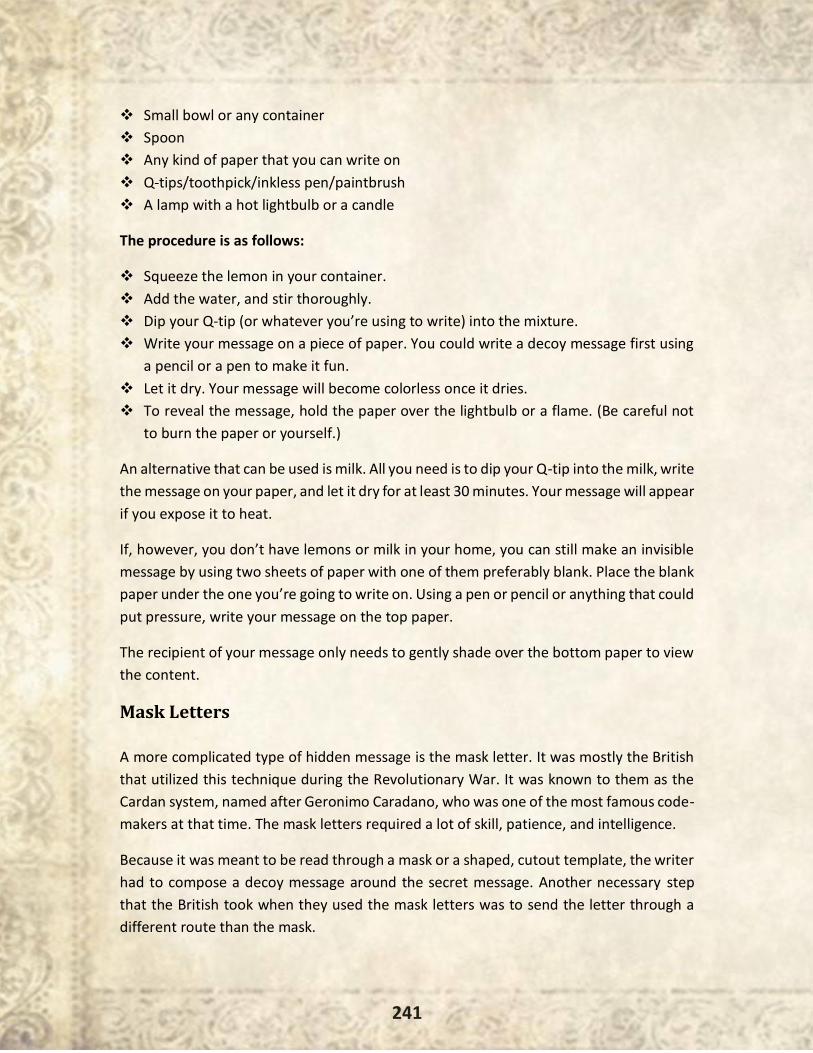
241
❖ Small bowl or any container
❖ Spoon
❖ Any kind of paper that you can write on
❖ Q-tips/toothpick/inkless pen/paintbrush
❖ A lamp with a hot lightbulb or a candle
The procedure is as follows:
❖ Squeeze the lemon in your container.
❖ Add the water, and stir thoroughly.
❖ Dip your Q-tip (or whatever you’re using to write) into the mixture.
❖ Write your message on a piece of paper. You could write a decoy message first using
a pencil or a pen to make it fun.
❖ Let it dry. Your message will become colorless once it dries.
❖ To reveal the message, hold the paper over the lightbulb or a flame. (Be careful not
to burn the paper or yourself.)
An alternative that can be used is milk. All you need is to dip your Q-tip into the milk, write
the message on your paper, and let it dry for at least 30 minutes. Your message will appear
if you expose it to heat.
If, however, you don’t have lemons or milk in your home, you can still make an invisible
message by using two sheets of paper with one of them preferably blank. Place the blank
paper under the one you’re going to write on. Using a pen or pencil or anything that could
put pressure, write your message on the top paper.
The recipient of your message only needs to gently shade over the bottom paper to view
the content.
Mask Letters
A more complicated type of hidden message is the mask letter. It was mostly the British
that utilized this technique during the Revolutionary War. It was known to them as the
Cardan system, named after Geronimo Caradano, who was one of the most famous code-
makers at that time. The mask letters required a lot of skill, patience, and intelligence.
Because it was meant to be read through a mask or a shaped, cutout template, the writer
had to compose a decoy message around the secret message. Another necessary step
that the British took when they used the mask letters was to send the letter through a
different route than the mask.

242
It could be that there were separate couriers for both the letter and the mask. It was
imperative that the mask and the letter went in different ways so that if the letter was
intercepted, it would just be an innocent letter stating general facts or exaggerating good
news.
The Clements Library was able to preserve one of the mask letters that Henry Clinton sent
to John Burgoyne. It is likely that to make everything easier, Clinton must have written
the secret message before adding words and sentences to create a letter that makes
sense if read without a mask. The content of the letter was mainly to inform Burgoyne of
their military success without making anything obvious.
Once placed under the mask, his real message appeared, which revealed a completely
different content. The actual letters were preserved in the Clements Library.
(From the collections of the Clements Library)
Despite the big names and history attached to the mask letter, it’s still a secret writing
technique that anyone can make today. Here’s how:
Materials
❖ Blank paper
❖ Cardboard/paper (it’s okay if it has print)
❖ Pen
❖ Envelope (optional)
Procedure
❖ Cut out your chosen shape of the mask on the cardboard.

243
❖ Place the mask over the blank paper.
❖ Write your secret message within the mask.
❖ Remove the mask, and make sure that it is readable.
❖ Fill the paper with words or sentences to hide your secret message. (Note: The
content must be innocent and must not give away your secret message.)
❖ Put the letter in the envelope, and address it to your recipient.
❖ Send your letter!
During the 1700s and the 1800s, spycraft required a huge amount of skill and scientific
knowledge for the different methods to succeed. Resources were limited, and they had
to utilize whatever was within reach to create effective ways of carrying and delivering
information. A strong will and determination were necessary to carry the message.
Today, we have access to advanced technology and even greater knowledge. In the past,
invisible ink was created with tannic acid. Now, all we need is a lemon or a carton of milk,
and even e-mails can be encoded.
Protecting yourself is easy when you have the money. But again, in worst-case scenarios
like an EMP, communication will be so rudimentary and information will be so powerful
that whoever possesses it will be king!
244
- By M. Richard -
“A sharp knife is safer than a dull one.” –
Unknown
The knife has been one of mankind’s most essential tools since the first cave man
found a stone that was broken to form a sharp edge and discovered how useful it was.
Since that time, countless designs of knives have been made in a constant effort to
develop a better knife. Of course, there is no one perfect design, as knives are used for
many different purposes.
Modern knives are made cookie-cutter fashion in factories around the world. But in olden
times, knives were each handcrafted works of art. While there were some factories that
made knives in the 1800s, these knives were thought to be inferior and useful only as
trade goods with the Indians.
Nobody who truly depended on their knife wanted a factory knife; they wanted one that
was handmade by a skilled blacksmith or knife maker.
Today’s factory-produced knives are mostly ground from stainless steel, a material that
didn’t exist in the 1800s. While grinding has always been a necessary part of knife making,
in times past, knives weren’t fully formed by grinding but rather by forging.
Forging a Knife Blank
The beginning of any knife was making the blank out of high carbon steel. High carbon
steels were used as they were harder and would hold a better edge. Steel making wasn’t
developed to today’s highly scientific state, and some knife makers would actually cast
their own steel; however, the majority used the commercially available steels of the day.
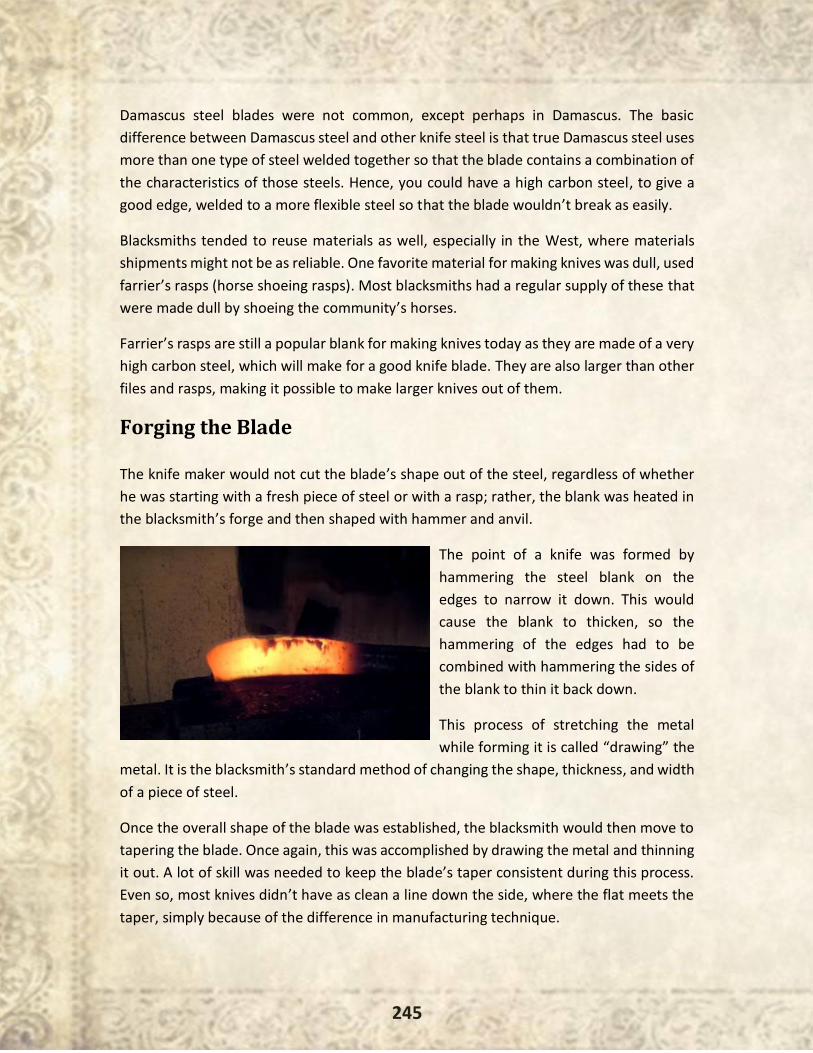
245
Damascus steel blades were not common, except perhaps in Damascus. The basic
difference between Damascus steel and other knife steel is that true Damascus steel uses
more than one type of steel welded together so that the blade contains a combination of
the characteristics of those steels. Hence, you could have a high carbon steel, to give a
good edge, welded to a more flexible steel so that the blade wouldn’t break as easily.
Blacksmiths tended to reuse materials as well, especially in the West, where materials
shipments might not be as reliable. One favorite material for making knives was dull, used
farrier’s rasps (horse shoeing rasps). Most blacksmiths had a regular supply of these that
were made dull by shoeing the community’s horses.
Farrier’s rasps are still a popular blank for making knives today as they are made of a very
high carbon steel, which will make for a good knife blade. They are also larger than other
files and rasps, making it possible to make larger knives out of them.
Forging the Blade
The knife maker would not cut the blade’s shape out of the steel, regardless of whether
he was starting with a fresh piece of steel or with a rasp; rather, the blank was heated in
the blacksmith’s forge and then shaped with hammer and anvil.
The point of a knife was formed by
hammering the steel blank on the
edges to narrow it down. This would
cause the blank to thicken, so the
hammering of the edges had to be
combined with hammering the sides of
the blank to thin it back down.
This process of stretching the metal
while forming it is called “drawing” the
metal. It is the blacksmith’s standard method of changing the shape, thickness, and width
of a piece of steel.
Once the overall shape of the blade was established, the blacksmith would then move to
tapering the blade. Once again, this was accomplished by drawing the metal and thinning
it out. A lot of skill was needed to keep the blade’s taper consistent during this process.
Even so, most knives didn’t have as clean a line down the side, where the flat meets the
taper, simply because of the difference in manufacturing technique.
246
Final tapering of the blade was left for grinding. At this point, all the blacksmith was trying
to do was to make the knife blank. The edge was usually left about 3/32" to 1/8" thick. A
lot of grinding would be necessary to make it into a finished knife.
Forging the Tang
With the blade formed, the blacksmith would turn to shaping the tang for the handle. All
knives made during this time period were full-tang knives. The idea of partial tang is an
invention of industrialization, as a means of reducing costs. It was important to shape the
blade first, as the handle would be made to balance the blade. Any extra material would
be cut off the handle end rather than the blade end.
Most knives had fairly simple handles compared to today’s knives. The idea of relieving
the handle to create finger grips is relatively new in knife-making history. Old knives had
handles that were most often straight with a rounded end. Some might have handles that
bowed out in the center or had a wider butt to help maintain the grip.
As the knife blade had been drawn in forging, it would probably be wider than the
unforged blank of the handle.
However, for a very wide knife, the blacksmith might reduce the depth of the blade in
essentially the same way that the point of the knife was formed, alternating hammering
the edges and sides to draw out the steel to the desired shape. For fighting knives or
sheath knives (which might also end up being used for fighting), the tang of the handle
was forged to leave a step between the blade and handle for a hilt to butt up against.
Finally, once the blade and handle are fully formed, the end of the handle is cut off to the
right length for the knife’s design and the end rounded.
Grinding the Blade
At this point, the knife maker just has a knife blank. The blade and tang are formed, but
the blade is not sharp. The next stage in the process is the grinding of the blade. In the
1800s, this was done on a foot-powered grinding wheel; in the Middle Ages, they had to
grind the blade on a rock to put an edge on it. Considering that the edge was roughly 1/8"
thick at the start of grinding, the process of grinding was a long one that required a lot of
patience.
The first step of grinding the blade is always to smooth out any inconsistencies in the
blank’s profile, both for the blade and the tang. The hammering of the blade can produce
247
some slight waviness in the edge, which is eliminated by grinding. The final point of the
blade is also formed at this point as there are limits to what can be done on the anvil.
With the profile cleaned up, the knife maker moves on to grinding the taper of the blade.
Knife makers did their grinding freehand, with the blade pointed up, just as experienced
knife makers do today. Considering that the average taper angle of a blade is somewhere
between 7 and 15 degrees, maintaining that angle freehand is challenging to say the least.
Some knife makers used a block cut at an angle to ensure consistency, but this was a
technique more for beginners, not experienced knife makers.
The grinding of the blade is accomplished by long strokes over the full length of the blade
rather than working on only one part of the blade at a time. The long strokes across the
grinding wheel help to keep the blade shape and edge consistent. Every few strokes the
blade is flipped to allow the other side to be ground. In this manner, the blade is kept
even so that the edge goes right down the center of the blade.
The knife is not fully sharpened in this stage, but the blade is ground to a fine edge. The
actual cutting edge of a knife is usually 20 to 30 degrees, even though the blade makes a
much sharper angle. The final sharpening is done by hand on a whetstone as the very last
step.
Hardening the Blade
The finished blade needs to be hardened and tempered to make it usable. The repeated
heating and cooling of the metal during forging causes the metal to be annealed. This
makes it easier to work and to bend but is not good for a blade that must be kept sharp.
Before tempering, rivet holes are drilled in the tang. Most knives had two rivets in the
handle, but it is possible to find examples with more. The rivets will hold the sides of the
handle to the tang. For knife makers that did not have the capability of drilling holes (not
all blacksmiths did), the holes could be made with a punch.
The process of hardening the blade consists of heating it and then quenching it in oil. This
works better when the oil is hot, which is easily accomplished by heating an additional
piece of steel in the forge and then running it through the oil bath to warm it.
A horizontal oil bath works better for hardening knife blades than a vertical one. What I
mean by that is a bath that allows the knife to be placed in it horizontally rather than
vertically. Putting the knife in vertically, as if you were stabbing the oil, can cause uneven
cooling, which can warp the blade.
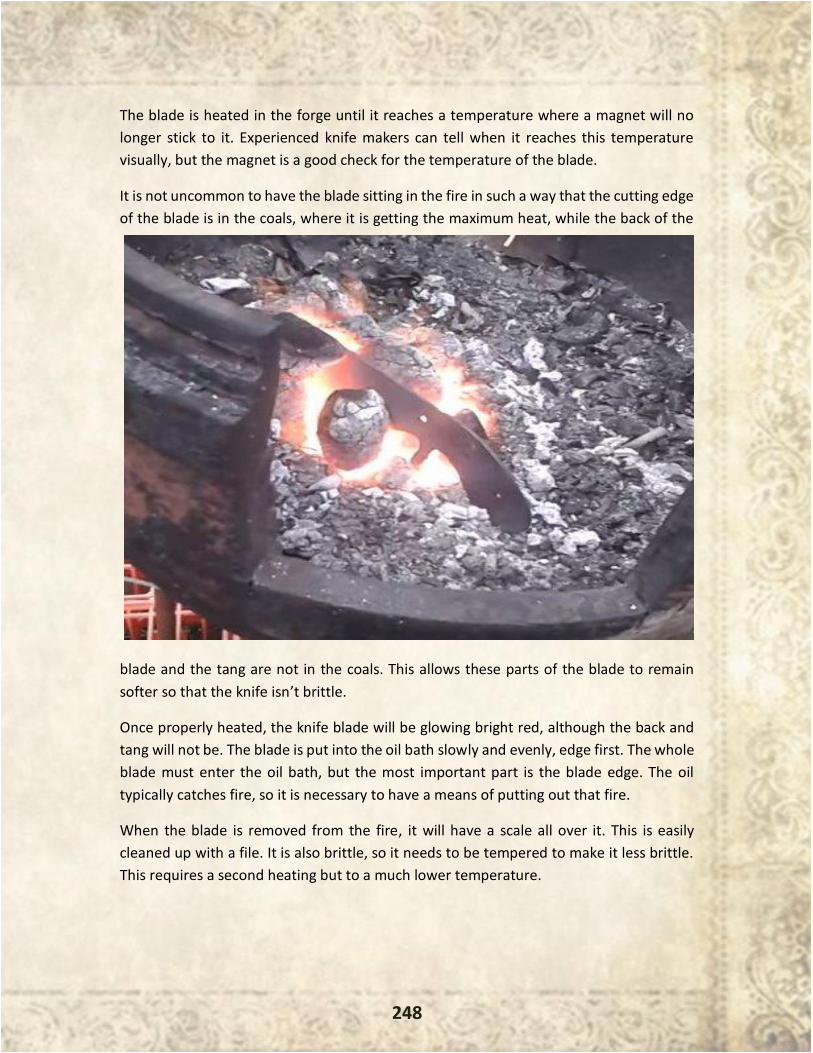
248
The blade is heated in the forge until it reaches a temperature where a magnet will no
longer stick to it. Experienced knife makers can tell when it reaches this temperature
visually, but the magnet is a good check for the temperature of the blade.
It is not uncommon to have the blade sitting in the fire in such a way that the cutting edge
of the blade is in the coals, where it is getting the maximum heat, while the back of the
blade and the tang are not in the coals. This allows these parts of the blade to remain
softer so that the knife isn’t brittle.
Once properly heated, the knife blade will be glowing bright red, although the back and
tang will not be. The blade is put into the oil bath slowly and evenly, edge first. The whole
blade must enter the oil bath, but the most important part is the blade edge. The oil
typically catches fire, so it is necessary to have a means of putting out that fire.
When the blade is removed from the fire, it will have a scale all over it. This is easily
cleaned up with a file. It is also brittle, so it needs to be tempered to make it less brittle.
This requires a second heating but to a much lower temperature.
249
The metal was heated to about 1500 degrees and oil quenched to harden it; now it is
heated to about 400 degrees for about two hours and allowed to air cool to temper it.
The actual temperature used will depend on the type of steel used for the knife.
Making the Handle
Many different materials have been used through the centuries for knife handles. The
simplest handle is created by wrapping the tang with leather, but wood is most common.
Handles can also be made of antler, bone, stone and even the preserved feet of animals.
If the knife is going to have a hilt, the knife maker would cut it out of thick sheet metal,
usually brass (1/8" to 1/4" thick). As a soft metal, brass works well for a knife hilt, as the
opponent's blade may stick in it, when blocking, giving the knife wielder an opportunity
to try and jerk the knife out of their opponent's hand.
Wood handles are made by rough-cutting the two sides, usually out of the same thin piece
of wood. The knife tang is used as a pattern for cutting out the handle pieces and drilling
the holes. Once rough shaped, they are attached to the handle with rivets (usually brass).
Final shaping of the handle is made back on the grinder, shaping the handle to fit
comfortably in the hand.
The final step to making any knife is to put an edge on it with a whetstone. Knife makers
look for an ideal of an edge that can cut paper by being pushed through the edge of the
paper, without any lateral movement. That's a really sharp blade.
How to Make Your Own Knife
Most of us don’t have a blacksmith’s shop in our backyards or even know how to work in
one if we did have it, so we are limited in our ability to make knives. However, if you have
a grinder or stationary belt sander, you can still make knives by grinding the blades. A belt
sander actually works better and is the tool of choice for most modern knife makers.
While people who make knives regularly use some rather sophisticated belt sanders, you
don’t need a high-dollar belt sander to make a knife. I have a 1" by 30" belt sander that I
bought at Harbor Freight. This is probably the cheapest belt sander on the market, yet I
have been able to make knives successfully on it. The narrow belt actually works better
than a wide belt would and more closely resembles the two-inch-wide belts used by the
pros.
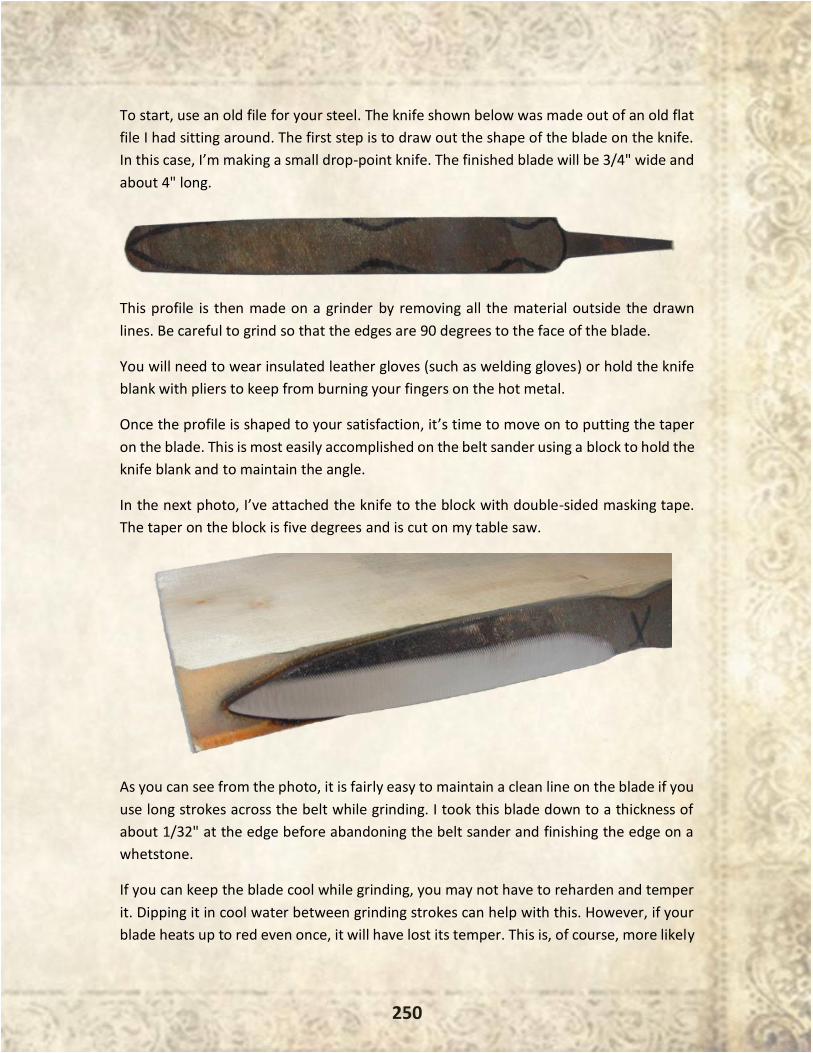
250
To start, use an old file for your steel. The knife shown below was made out of an old flat
file I had sitting around. The first step is to draw out the shape of the blade on the knife.
In this case, I’m making a small drop-point knife. The finished blade will be 3/4" wide and
about 4" long.
This profile is then made on a grinder by removing all the material outside the drawn
lines. Be careful to grind so that the edges are 90 degrees to the face of the blade.
You will need to wear insulated leather gloves (such as welding gloves) or hold the knife
blank with pliers to keep from burning your fingers on the hot metal.
Once the profile is shaped to your satisfaction, it’s time to move on to putting the taper
on the blade. This is most easily accomplished on the belt sander using a block to hold the
knife blank and to maintain the angle.
In the next photo, I’ve attached the knife to the block with double-sided masking tape.
The taper on the block is five degrees and is cut on my table saw.
As you can see from the photo, it is fairly easy to maintain a clean line on the blade if you
use long strokes across the belt while grinding. I took this blade down to a thickness of
about 1/32" at the edge before abandoning the belt sander and finishing the edge on a
whetstone.
If you can keep the blade cool while grinding, you may not have to reharden and temper
it. Dipping it in cool water between grinding strokes can help with this. However, if your
blade heats up to red even once, it will have lost its temper. This is, of course, more likely

251
to happen at the point than anywhere else. A clear indication that the blade has been
overheated will be that the metal has turned blue.
If you have to harden your blade, you can accomplish the same sort of hardening with a
small plumber’s torch and MAPP gas. Don’t try it with propane, as it won’t get hot enough
to turn the steel red.
For the rest of the project, you can do things essentially the same way that they did it in
olden times. Sharpening a knife on a whetstone hasn’t changed much nor have the
methods for making a handle. You may decide to make a more complex handle shape
than they did back then, but since you’re grinding it, that won’t be much of an issue.
Don’t forget to make yourself a nice sheath to show off your new knife. A sheath not only
allows you to carry your homemade knife with you but also protects the knife from
inadvertent damage.
252
- By Erik Bainbridge -
“It wasn't raining when Noah built the Ark.”
– Howard Ruff
When most people think of Native American life as it was in the old days, they
commonly think of a nomadic tribe living in tipis and having a warrior tradition. However,
this is a stereotype that wasn’t always true. There was a wide variety of Native American
cultures and languages in North America, with some very different ways of life.
Native Americans living in coastal California just north of today’s San Francisco couldn’t
have been more different than that stereotype. Living in stable villages in homes made of
materials such as tule reeds or redwood bark, each village lived within its own territory.
There was no warrior tradition or warrior class. They had no need to be migratory. Food
was generally abundant except during drought years. Salmon spawned in coastal
waterways, deer and other game were plentiful, and year-round streams provided water.
Before Europeans arrived in the late 18th century, life had been stable there for millennia.
If you could travel back in time to before Europeans first colonized California and visited
a typical village in this area, you’d likely notice two or more hills in the village. The hills
would usually be perfectly round in shape, although they could be oval in some villages.
You might see smoke coming out of the hills. If you walked closer, you’d see the smoke
was coming from a hole on the hill and that each hill had at least one entrance.
The hills were man made. The smaller hill(s) would be one or more sweathouses, and the
large hill would be the village roundhouse. All were semi-subterranean and made by
digging a hole in the ground, building a roof over it, and covering the roof with earth. The
roundhouse served as a communal hall, a dance house, and a ceremonial house. The exact
usages could vary regionally.
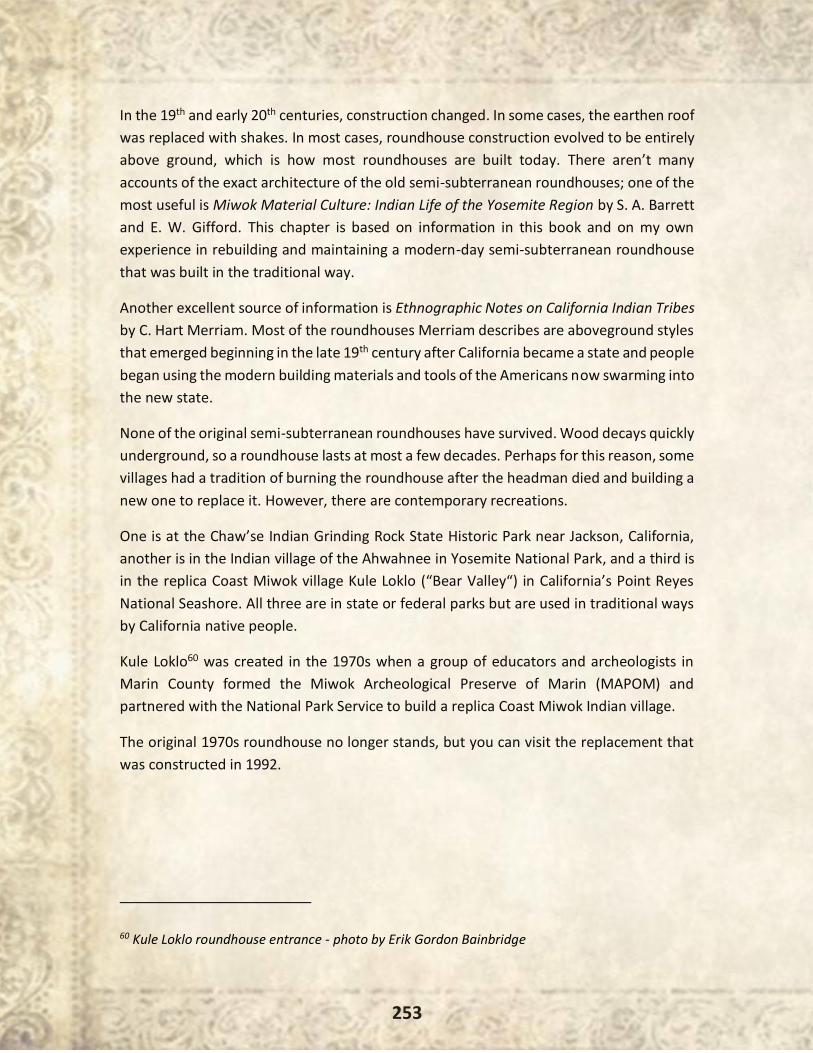
253
In the 19th and early 20th centuries, construction changed. In some cases, the earthen roof
was replaced with shakes. In most cases, roundhouse construction evolved to be entirely
above ground, which is how most roundhouses are built today. There aren’t many
accounts of the exact architecture of the old semi-subterranean roundhouses; one of the
most useful is Miwok Material Culture: Indian Life of the Yosemite Region by S. A. Barrett
and E. W. Gifford. This chapter is based on information in this book and on my own
experience in rebuilding and maintaining a modern-day semi-subterranean roundhouse
that was built in the traditional way.
Another excellent source of information is Ethnographic Notes on California Indian Tribes
by C. Hart Merriam. Most of the roundhouses Merriam describes are aboveground styles
that emerged beginning in the late 19th century after California became a state and people
began using the modern building materials and tools of the Americans now swarming into
the new state.
None of the original semi-subterranean roundhouses have survived. Wood decays quickly
underground, so a roundhouse lasts at most a few decades. Perhaps for this reason, some
villages had a tradition of burning the roundhouse after the headman died and building a
new one to replace it. However, there are contemporary recreations.
One is at the Chaw’se Indian Grinding Rock State Historic Park near Jackson, California,
another is in the Indian village of the Ahwahnee in Yosemite National Park, and a third is
in the replica Coast Miwok village Kule Loklo (“Bear Valley“) in California’s Point Reyes
National Seashore. All three are in state or federal parks but are used in traditional ways
by California native people.
Kule Loklo60 was created in the 1970s when a group of educators and archeologists in
Marin County formed the Miwok Archeological Preserve of Marin (MAPOM) and
partnered with the National Park Service to build a replica Coast Miwok Indian village.
The original 1970s roundhouse no longer stands, but you can visit the replacement that
was constructed in 1992.
60 Kule Loklo roundhouse entrance - photo by Erik Gordon Bainbridge
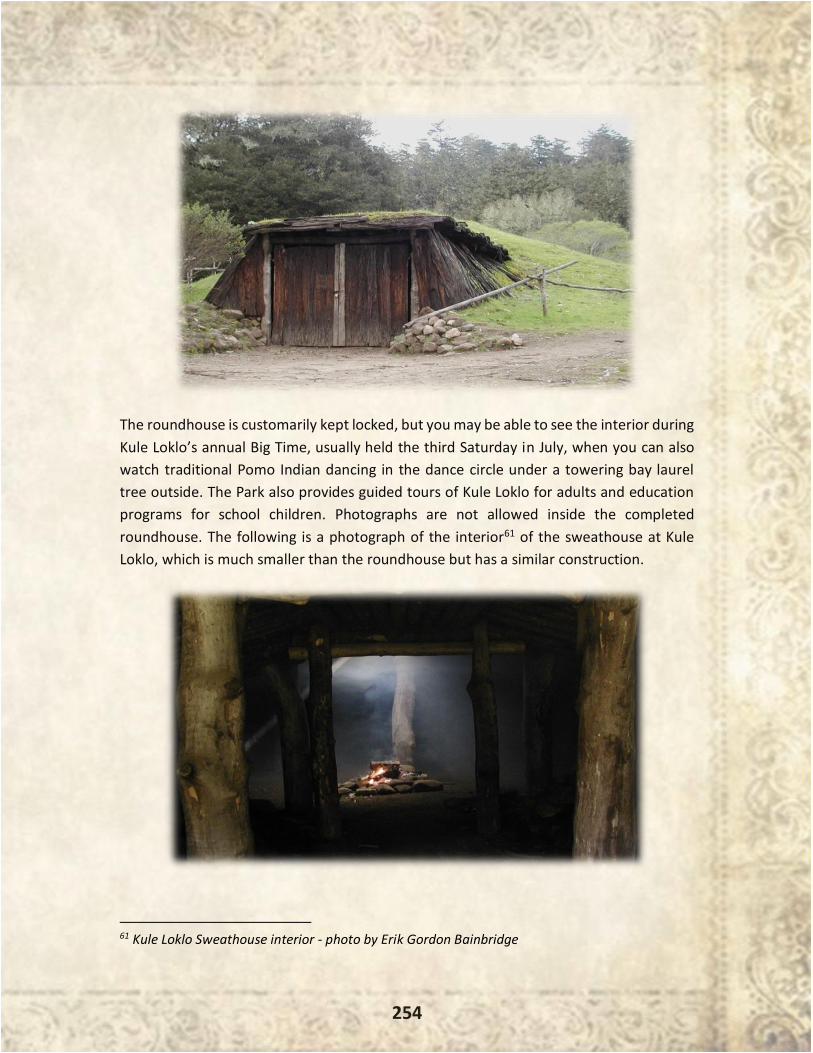
254
The roundhouse is customarily kept locked, but you may be able to see the interior during
Kule Loklo’s annual Big Time, usually held the third Saturday in July, when you can also
watch traditional Pomo Indian dancing in the dance circle under a towering bay laurel
tree outside. The Park also provides guided tours of Kule Loklo for adults and education
programs for school children. Photographs are not allowed inside the completed
roundhouse. The following is a photograph of the interior61 of the sweathouse at Kule
Loklo, which is much smaller than the roundhouse but has a similar construction.
61 Kule Loklo Sweathouse interior - photo by Erik Gordon Bainbridge
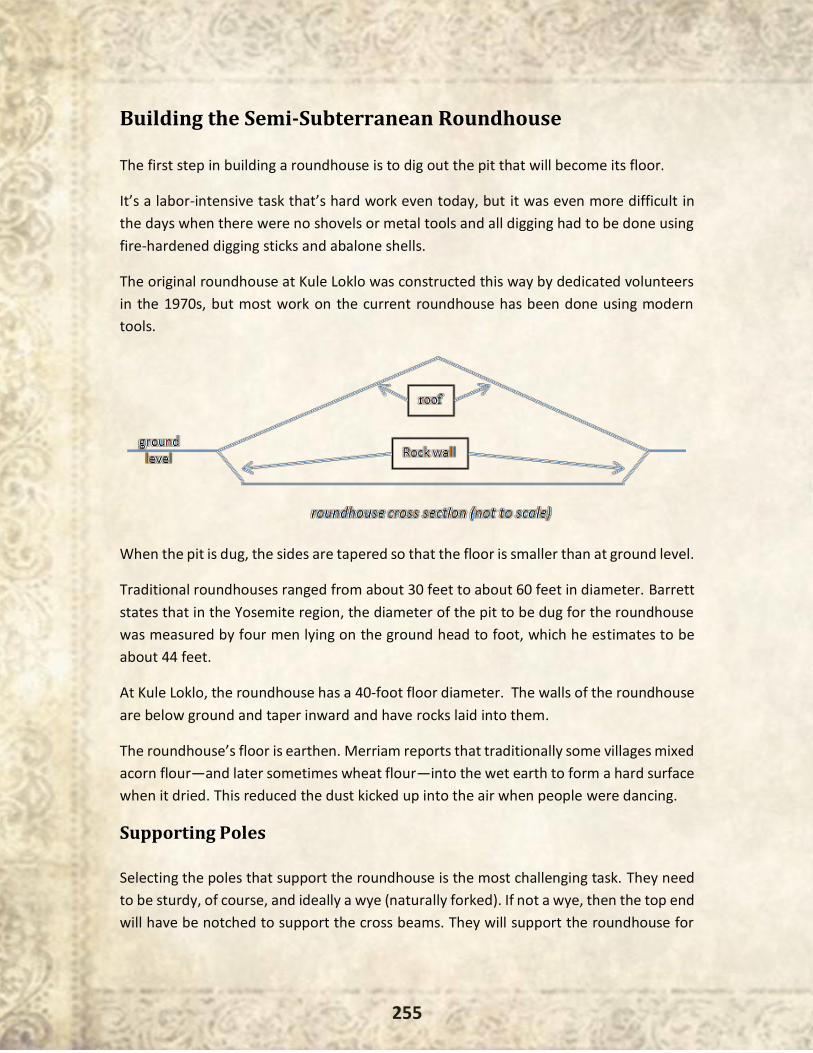
255
Building the Semi-Subterranean Roundhouse
The first step in building a roundhouse is to dig out the pit that will become its floor.
It’s a labor-intensive task that’s hard work even today, but it was even more difficult in
the days when there were no shovels or metal tools and all digging had to be done using
fire-hardened digging sticks and abalone shells.
The original roundhouse at Kule Loklo was constructed this way by dedicated volunteers
in the 1970s, but most work on the current roundhouse has been done using modern
tools.
When the pit is dug, the sides are tapered so that the floor is smaller than at ground level.
Traditional roundhouses ranged from about 30 feet to about 60 feet in diameter. Barrett
states that in the Yosemite region, the diameter of the pit to be dug for the roundhouse
was measured by four men lying on the ground head to foot, which he estimates to be
about 44 feet.
At Kule Loklo, the roundhouse has a 40-foot floor diameter. The walls of the roundhouse
are below ground and taper inward and have rocks laid into them.
The roundhouse’s floor is earthen. Merriam reports that traditionally some villages mixed
acorn flour—and later sometimes wheat flour—into the wet earth to form a hard surface
when it dried. This reduced the dust kicked up into the air when people were dancing.
Supporting Poles
Selecting the poles that support the roundhouse is the most challenging task. They need
to be sturdy, of course, and ideally a wye (naturally forked). If not a wye, then the top end
will have be notched to support the cross beams. They will support the roundhouse for
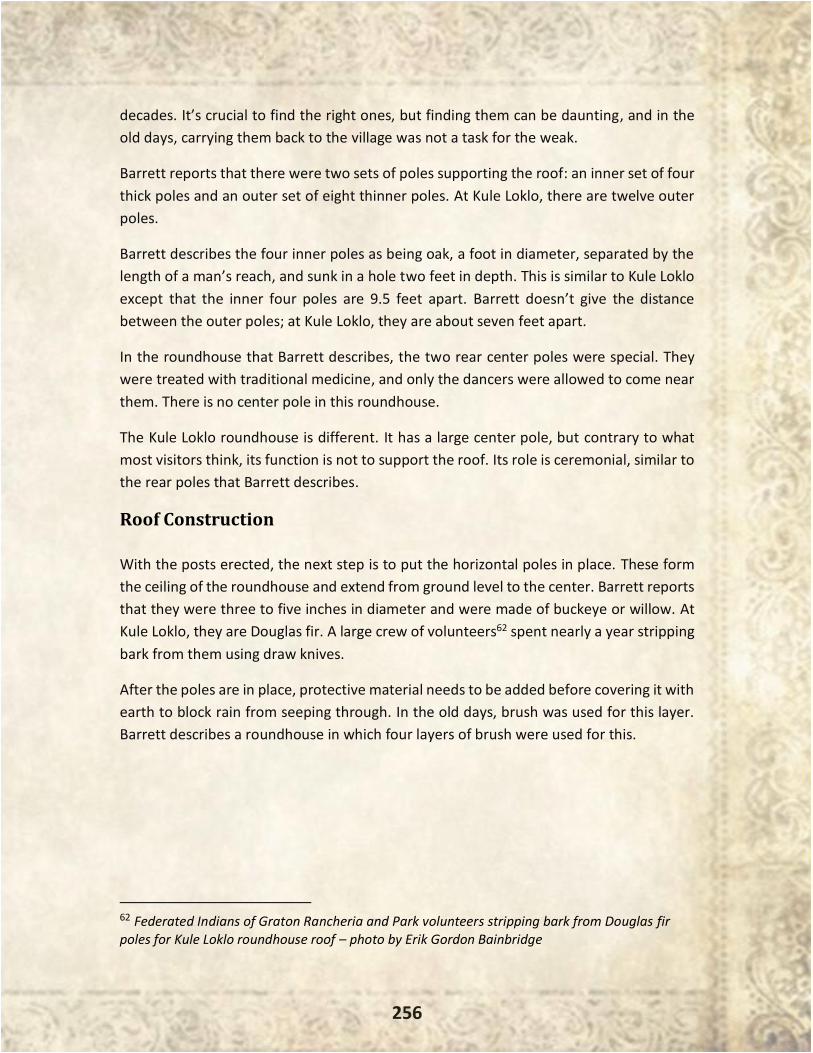
256
decades. It’s crucial to find the right ones, but finding them can be daunting, and in the
old days, carrying them back to the village was not a task for the weak.
Barrett reports that there were two sets of poles supporting the roof: an inner set of four
thick poles and an outer set of eight thinner poles. At Kule Loklo, there are twelve outer
poles.
Barrett describes the four inner poles as being oak, a foot in diameter, separated by the
length of a man’s reach, and sunk in a hole two feet in depth. This is similar to Kule Loklo
except that the inner four poles are 9.5 feet apart. Barrett doesn’t give the distance
between the outer poles; at Kule Loklo, they are about seven feet apart.
In the roundhouse that Barrett describes, the two rear center poles were special. They
were treated with traditional medicine, and only the dancers were allowed to come near
them. There is no center pole in this roundhouse.
The Kule Loklo roundhouse is different. It has a large center pole, but contrary to what
most visitors think, its function is not to support the roof. Its role is ceremonial, similar to
the rear poles that Barrett describes.
Roof Construction
With the posts erected, the next step is to put the horizontal poles in place. These form
the ceiling of the roundhouse and extend from ground level to the center. Barrett reports
that they were three to five inches in diameter and were made of buckeye or willow. At
Kule Loklo, they are Douglas fir. A large crew of volunteers62 spent nearly a year stripping
bark from them using draw knives.
After the poles are in place, protective material needs to be added before covering it with
earth to block rain from seeping through. In the old days, brush was used for this layer.
Barrett describes a roundhouse in which four layers of brush were used for this.
62 Federated Indians of Graton Rancheria and Park volunteers stripping bark from Douglas fir poles for Kule Loklo roundhouse roof – photo by Erik Gordon Bainbridge
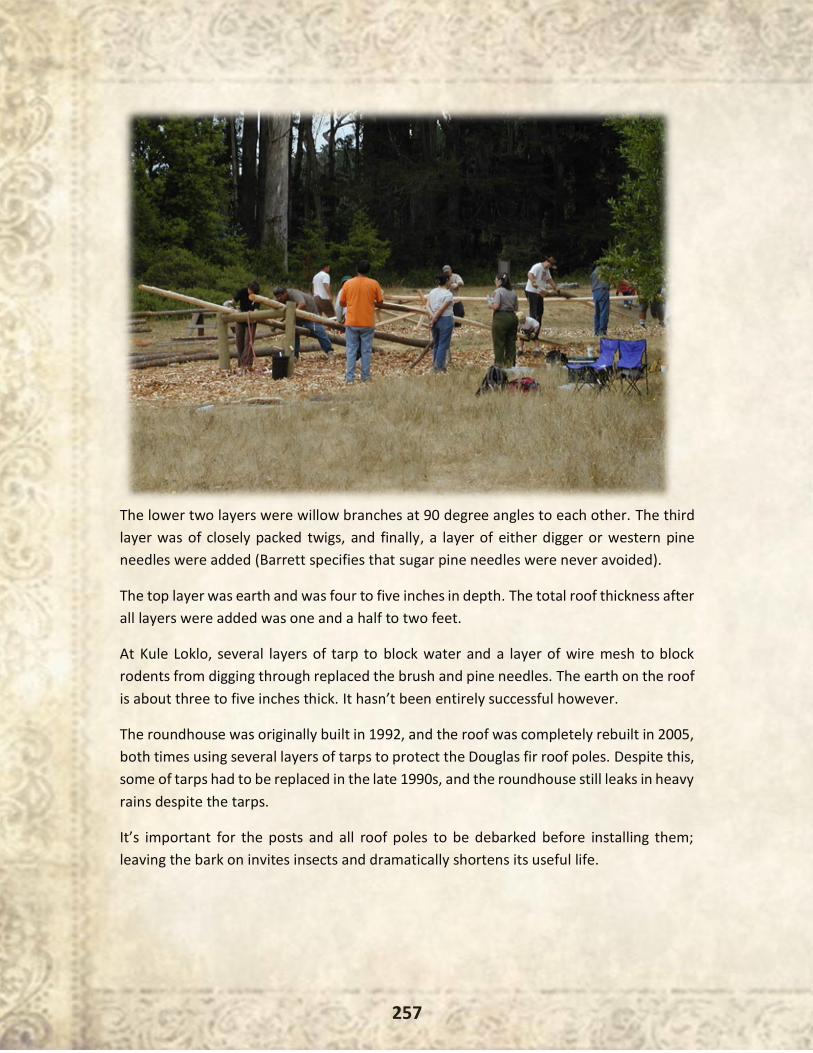
257
The lower two layers were willow branches at 90 degree angles to each other. The third
layer was of closely packed twigs, and finally, a layer of either digger or western pine
needles were added (Barrett specifies that sugar pine needles were never avoided).
The top layer was earth and was four to five inches in depth. The total roof thickness after
all layers were added was one and a half to two feet.
At Kule Loklo, several layers of tarp to block water and a layer of wire mesh to block
rodents from digging through replaced the brush and pine needles. The earth on the roof
is about three to five inches thick. It hasn’t been entirely successful however.
The roundhouse was originally built in 1992, and the roof was completely rebuilt in 2005,
both times using several layers of tarps to protect the Douglas fir roof poles. Despite this,
some of tarps had to be replaced in the late 1990s, and the roundhouse still leaks in heavy
rains despite the tarps.
It’s important for the posts and all roof poles to be debarked before installing them;
leaving the bark on invites insects and dramatically shortens its useful life.

258
Roundhouse Entrance
There are different styles for the roundhouse entrance. I’ve been told that in the very old
days, many roundhouses didn’t even have doors or entrances as we think of them today.
Entrance and exit was through the smoke hole. After the fire started, no one left until the
fire died down. I haven’t seen any written descriptions of these however.
All the roundhouses that I’ve read formal accounts about had at least one entrance other
than the smoke hole. In some cases, the entrance was simply an opening in the
roundhouse roof and an excavation or depression in the surrounding ground. In many
cases, such as at Kule Loklo, there is an entrance vestibule. Kule Loklo’s is about 24 feet
long and about eight feet wide. The sides are redwood bark. The roof is earth-covered.
Fire Pit
The ideal location for the fire pit is in the center of the roundhouse. This allows the smoke
hole to be at the high point of the roof, which reduces how much smoke builds up inside
the roundhouse. Most traditional roundhouses I’ve read about have had a center fire pit.
However, some roundhouses, such as the one at Kule Loklo, have a center pole, which
necessitates placing the fire pit elsewhere. In the Kule Loklo roundhouse, the fire pit is
between the center pole and the entrance.
The smoke hole needs to be directly over the fire pit for fire safety reasons; however, the
absence of a central smoke hole allows smoke to build up at the roof’s peak and causes
the roundhouse to fill with smoke quickly if the fire turns smoky. One solution to this
might be to enlarge and lengthen the smoke hole toward the center.
The Kule Loklo roundhouse was built with just one entrance, facing east, but several years
after its construction, a 28" x 56"opening was added on the west side to aid with airflow
and to reduce smoke. Smoke reduction is a problem with any indoor fire, especially in a
structure without a chimney, like the roundhouse. There are several steps you can take
to minimize smoke.
The most fundamental is to use only high-quality wood. Oak and madrone are best for
this, but make sure it’s dry and seasoned. Wet or green wood will smoke more. If it’s
properly seasoned, you should see small cracks forming in the firewood cross section.
One risk in using low-quality wood is getting a pitch log. This is usually pine log with a
large amount of resin in it.
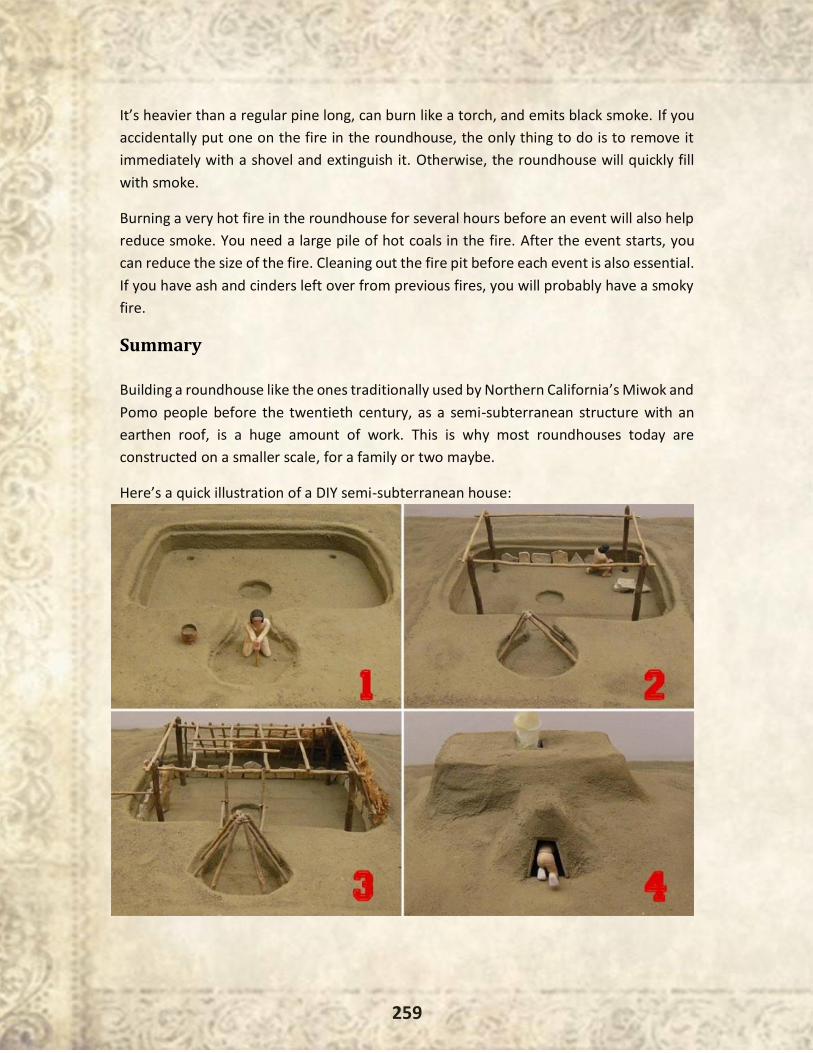
259
It’s heavier than a regular pine long, can burn like a torch, and emits black smoke. If you
accidentally put one on the fire in the roundhouse, the only thing to do is to remove it
immediately with a shovel and extinguish it. Otherwise, the roundhouse will quickly fill
with smoke.
Burning a very hot fire in the roundhouse for several hours before an event will also help
reduce smoke. You need a large pile of hot coals in the fire. After the event starts, you
can reduce the size of the fire. Cleaning out the fire pit before each event is also essential.
If you have ash and cinders left over from previous fires, you will probably have a smoky
fire.
Summary
Building a roundhouse like the ones traditionally used by Northern California’s Miwok and
Pomo people before the twentieth century, as a semi-subterranean structure with an
earthen roof, is a huge amount of work. This is why most roundhouses today are
constructed on a smaller scale, for a family or two maybe.
Here’s a quick illustration of a DIY semi-subterranean house:

260
The temperature is always moderate inside—mild on cold winter days and cool on hot
summer days—and the earthen walls and roof isolate the interior from the noises outside.
Anyone attempting to build one needs to pay particular attention to debarking the poles,
to waterproofing the roof, and to reducing smoke.
261
- By S. Walter -
“I wonder how much it would take to buy a soap
bubble if there were only one in the world.”
– Mark Twain
For a long time, most people used to make items for everyday use on their own.
Soap was no exception.
Before large industries came, people would use a variety of techniques to come up with
the best-smelling, longest-lasting soap for their needs.
This skill will come in handy when surviving an incident that makes access to commercial
soap impossible. It is a neat trick every survivalist and prepper should know from the word
go.
History
Our ancestors didn’t have the luxury of the mainstream industries we’ve had since the
Industrial Revolution. This means that getting your hand on lye, let alone commercially
prepared soap, was impossible. Processed oil, be it coconut oil or olive oil, was also hard
to come by. The solution that lay in the most important soap-making ingredients could
only be found in a natural and rather impure form of wood ash and lard.
Lye is, in essence, a strong alkali. Hardwood ash is a rich alkali, hence a sound substitute
to modern-day commercial lye. Passing clean water through this ash and letting it decant
onto a container was all they needed to create a strong lye solution. Since distilling water
was still a complicated process back then, our ancestors found their pure water in
rainwater.
262
This process was simple, and you can replicate it today very easily.
❖ Take a big container, for instance, a bucket, and puncture a couple of small holes
in the bottom.
❖ Put a thin layer of pebbles at the very bottom of the bucket before shoveling it full
of hardwood ash.
❖ Place it over another smaller bucket that should be underneath the holes in the
ash-containing bucket.
❖ Pour water into the ash a little bit at a time, and let it seep into the collecting
bucket through the tiny holes at the bottom. A quarter of the ash bucket’s volume
should let you collect some good concentrated lye.
Using hot water will increase the strength of the created lye.
They would then use a feather to test the strength of the lye. If the bird’s feather dissolved
in the lye, then it was strong enough to make soap. If it didn’t, the collected lye solution
had to be boiled to evaporate part of the water in it and make it more concentrated.
The oil, on the other hand, was made from animal fat. This could be lard or cow fat. It was
heated till it melted to form a clear oil before it was poured into bubbling hot ash solution
while still hot. After this, the process was more or less the same as what we do with
modern-day ingredients.
Why Modern Ingredients
Commercial lye and processed oil increase your accuracy. These give you pure soaps and
reduce your chances of making caustic soap. This makes the process more efficient and
simpler to implement. Knowing about the ash and lard approach will, however, keep you
moving in case you don’t have the commercial ingredients at your disposal.
Understanding the Process
Usually the process of making soap can be as complicated as you make it to be. I like to
look at it as a simple and exciting process, especially because of the fact that I get to
choose all the ingredients I want to include in my soap. This is, in fact, the ultimate beauty
of making your own soap. The ability to pick different fragrances and ingredients and
watch your soap develop into something from nothing is exciting and thrilling. Coming up
with the perfect soap requires you to master the art of adjustments because precision is
what makes the difference between a great soap and an epic failure.
263
However, this is not as difficult as it seems, and all you need to understand is what makes
the best soap through practice. You may have to repeat a procedure several times before
you finally get it right.
An easy way to convert the process into a manageable routine is to break down the
ingredients into cups and smaller portions that you can work with. This allows you to
handle the process of soap making with ease and guarantees similar results no matter
how many times you have to do it. It spares you the errors of bulk soap making that can
occur when you miss something, thus wasting the entire process.
Irreplaceable Ingredients
Great soaps require the use of crystal lye or pure sodium hydroxide. You cannot replace
either of these ingredients with the other because of the challenge of measurements.
While there are numerous substitutes, you can never be too sure about measurements,
hence the possibility of making a serious mistake. Apart from the challenge of
measurements, substituting your lye could also mean having soap with metallic pieces in
it, which is something that you do not want. Every soap maker wants pure, natural soap
that is free of impurities and easy to make.
Be cautious when using lye. It eats into fabric and can easily cause holes in even the
strongest materials. The same effects are also felt on the skin as it burns and irritates the
skin.
You need to exercise caution when using lye and wear protective covering, such as gloves
and eye masks, to prevent the burning substance from reaching into unwanted parts of
the body. Mixing the lye with water causes it to heat up and fume after thirty seconds to
about one minute. The choking sensation you get is because of this process and should
not be worrying as it clears in a few seconds.
Be careful not to reverse the procedure, as it is always advisable to add lye to water and
not the other way around. In addition, you need to stir the mixture immediately after you
have added the lye into the water. The last thing you want is an explosion caused by
overheated lye that was clumped at the bottom of the mixing container.
Since safety is a concern for everyone, proper mixing of lye allows it to react with oils in
your soap, breaking it down completely. As such, you get the assurance that your finished
product is 100% safe and free from caustic lye because it has undergone the process of
saponification.
264
Machinery and Equipment for Making Soap at Home
With every possibility of making soap exposed to you, the biggest question remains
whether or not it is possible to do so without special equipment. You need to set aside
items that you will use for any other purpose, especially cooking. While it is possible to
argue that you will clean and rinse the items properly, it’s not worth taking any chances.
Setting aside soap-making items is safer and more efficient. There are special materials
that you could use for your needs. Enamel and steel mixing bowls are advisable to use
when making soap. Stay away from plastic because some of them melt, and since there
is no sure way to tell which ones will, it is advisable to avoid them altogether. Stirring
spoons could be made from silicone or styrene plastic.
For the molding process, you can either buy molding items at your local store or use
sandwich containers or silicone baking pans as a substitute. The advantage of these pans
is the fact that you can always peel the mold off as soon as you make it. Gather together
newspapers, a quart canning jar, a stainless steel thermometer with the ability to read up
to 200 degrees, old towels, and any additional additive that you may have in mind.
Possible Soap Additives
Soaps vary in color, shapes, and fragrances, just to mention a few differences. The beauty
of making your own soap is the fact that you can do practically anything you want with it.
You are free to add any ingredients that please you as well as smells that you appreciate
and love. However, there are certain basic and popular additives that you should always
have in mind when making soap.
Survivalists are staunch believers in Mother Nature. Making natural soap should be a
priority. The important thing with herbs is to ensure that they are properly dried before
being included in the soap mixture. Some of the most common soap herbs include
lavender and chamomile, although there are different herbs that people use as well,
depending on personal preference. The goal is to ensure that you find high-quality herbs
if you are going to make the best soaps on the market.
Essential Oils
Essential oils are gathered from different plant parts, including the roots, leaves, flowers,
seeds, and stems. Usually, fragrance oils are blended from natural essential oils, or they
are sometimes artificially generated. It is important to know what you have. Most of the
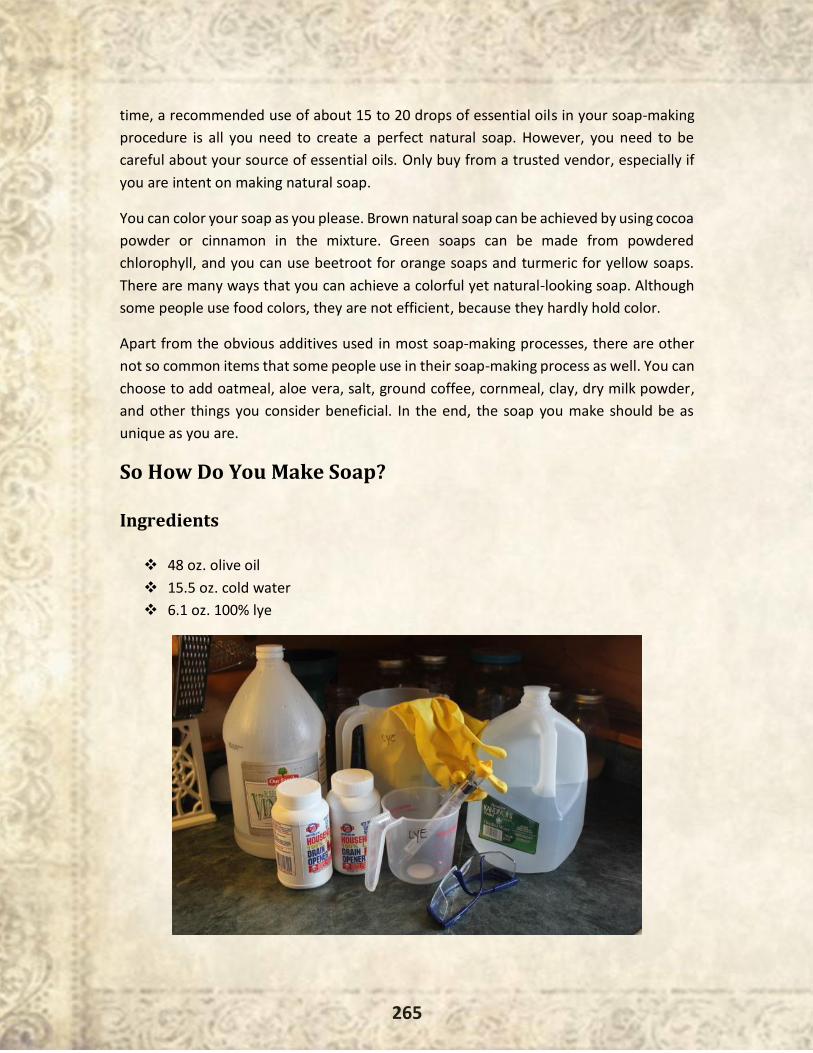
265
time, a recommended use of about 15 to 20 drops of essential oils in your soap-making
procedure is all you need to create a perfect natural soap. However, you need to be
careful about your source of essential oils. Only buy from a trusted vendor, especially if
you are intent on making natural soap.
You can color your soap as you please. Brown natural soap can be achieved by using cocoa
powder or cinnamon in the mixture. Green soaps can be made from powdered
chlorophyll, and you can use beetroot for orange soaps and turmeric for yellow soaps.
There are many ways that you can achieve a colorful yet natural-looking soap. Although
some people use food colors, they are not efficient, because they hardly hold color.
Apart from the obvious additives used in most soap-making processes, there are other
not so common items that some people use in their soap-making process as well. You can
choose to add oatmeal, aloe vera, salt, ground coffee, cornmeal, clay, dry milk powder,
and other things you consider beneficial. In the end, the soap you make should be as
unique as you are.
So How Do You Make Soap?
Ingredients
❖ 48 oz. olive oil
❖ 15.5 oz. cold water
❖ 6.1 oz. 100% lye

266
Note that the ingredients are measured in weight, not in volume. Use an electrical scale
as it is more accurate. Failing to use the right weights will result in caustic or unset soap.
Equipment
❖ Protective gear (goggles, gas mask, and gloves)
❖ Glass or plastic containers
❖ A metallic pot
❖ A thermometer
❖ Two stirring spoons/spatulas
❖ Small sandwich boxes to use as molds
❖ Plastic wrap
❖ A cleaver
❖ An accurate weighing scale

267
Methodology
1. Prepare the lye.
Lye is very caustic, so you need to take some precautions when using it. Cover the work
area with a newspaper—unless you don’t mind corroding or dirtying it.
Wear protective gear such as eye
cover and gloves. Measure water
into the quartz can, and stand by
with your spoon ready to stir.
Measure the exact amounts of lye
needed, and pour it into the water,
stirring with every small addition.
You should take a step back when it
starts to fume and allow the gases to
evaporate. Allow the water to sit as
you move to the next step as the water clears. Never pour water into the lye as this could
cause an explosion. Always ensure that you are adding the lye into the water.
2. Weigh the olive oil.
Take a clean, clear jar, and place it on the weighing scale. Take note of its weight as you
will need this figure to get the exact olive oil weight.
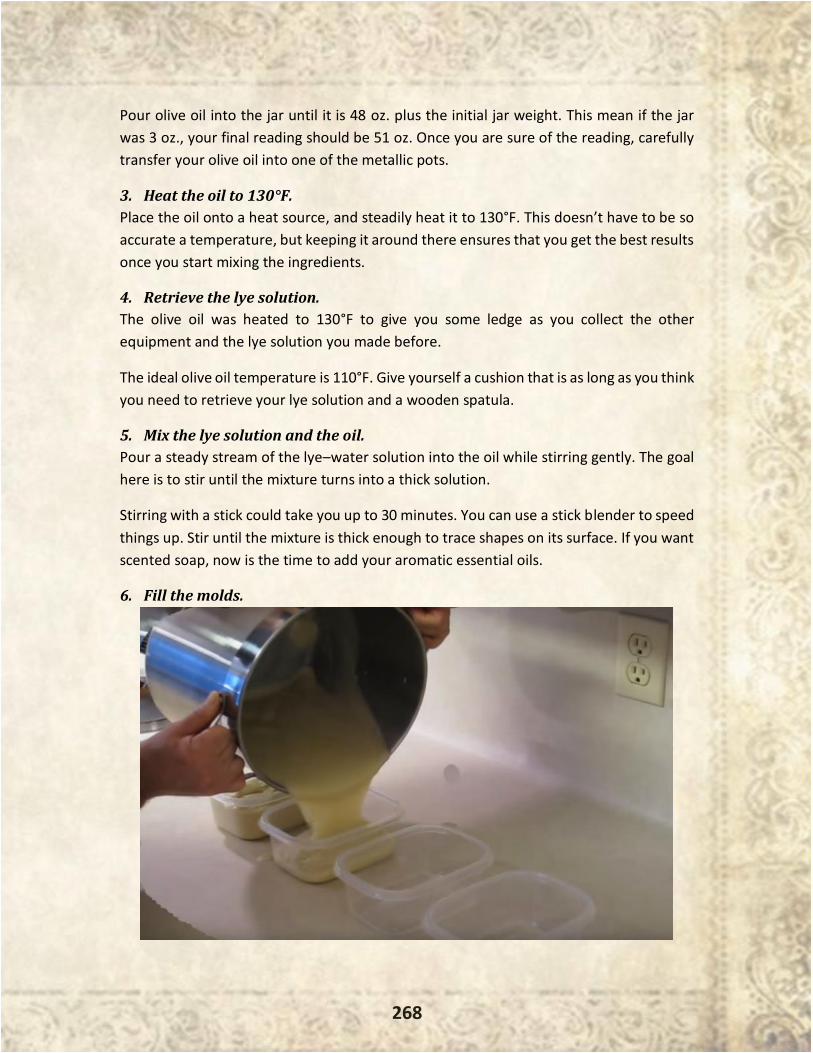
268
Pour olive oil into the jar until it is 48 oz. plus the initial jar weight. This mean if the jar
was 3 oz., your final reading should be 51 oz. Once you are sure of the reading, carefully
transfer your olive oil into one of the metallic pots.
3. Heat the oil to 130°F.
Place the oil onto a heat source, and steadily heat it to 130°F. This doesn’t have to be so
accurate a temperature, but keeping it around there ensures that you get the best results
once you start mixing the ingredients.
4. Retrieve the lye solution.
The olive oil was heated to 130°F to give you some ledge as you collect the other
equipment and the lye solution you made before.
The ideal olive oil temperature is 110°F. Give yourself a cushion that is as long as you think
you need to retrieve your lye solution and a wooden spatula.
5. Mix the lye solution and the oil.
Pour a steady stream of the lye–water solution into the oil while stirring gently. The goal
here is to stir until the mixture turns into a thick solution.
Stirring with a stick could take you up to 30 minutes. You can use a stick blender to speed
things up. Stir until the mixture is thick enough to trace shapes on its surface. If you want
scented soap, now is the time to add your aromatic essential oils.
6. Fill the molds.

269
Once you have achieved a thick, uniform mixture, move swiftly and pour the mixture into
your mold cups. Don’t fill the mold cups to the brim (you can use the plastic wrap to line
the mold cups before pouring in the mix).
Seal the mold cups, and wrap them with towels. This will let the mixture cool slowly as it
sets. Give the soap a day to dry and cool off.
7. Retrieve the soap from the molds.
Unwrap the plastic molds, and overturn them to knock out the now hardened soap. If you
used a plastic wrap, this would be as easy as pulling on the wrap. If you didn’t, you might
need to use a butter knife to coax the soap off the mold.
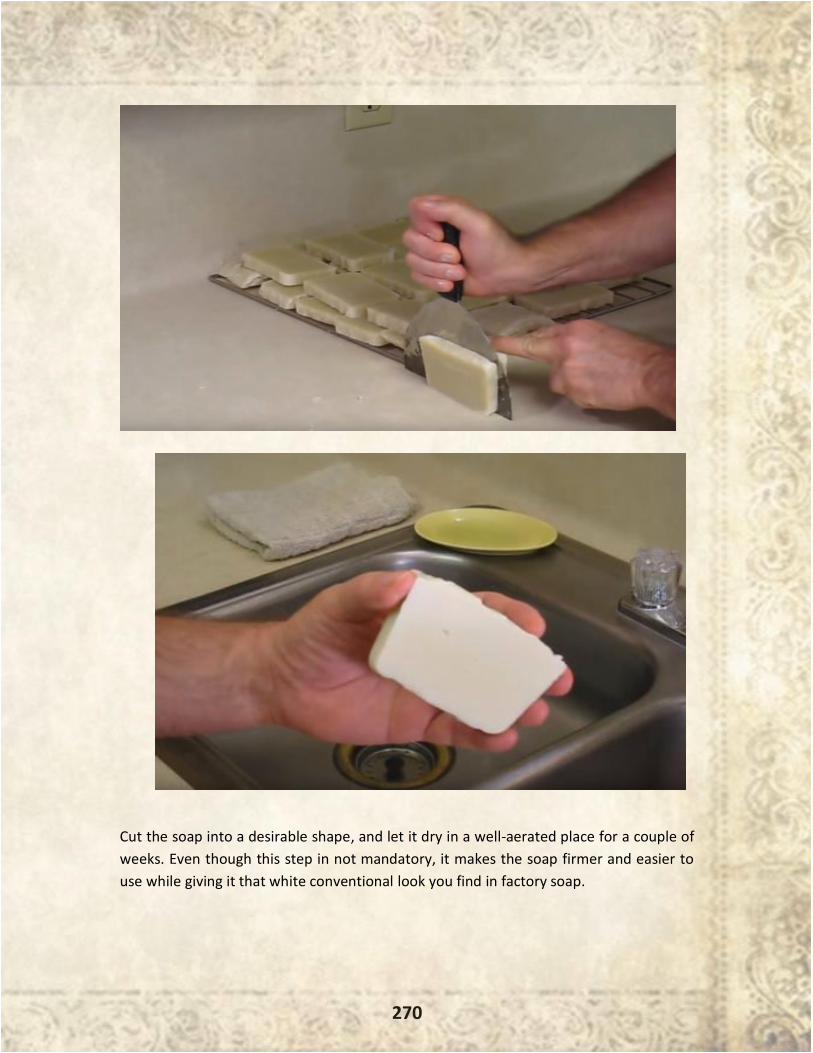
270
Cut the soap into a desirable shape, and let it dry in a well-aerated place for a couple of
weeks. Even though this step in not mandatory, it makes the soap firmer and easier to
use while giving it that white conventional look you find in factory soap.
271
- By M. Richard -
“Chop your own firewood, and it will warm you twice.”
- Old Proverb
In the event of a grid-down situation, most survivalists are planning on heating
their homes with wood. That makes sense considering the long history that man has with
using wood for heating and cooking.
Wood is readily available in much of the country, can be harvested with commonly
available tools, and produces a fair amount of heat. Although some special equipment is
required to heat with wood, it is nowhere near as much as heating by other means.
For those that have a fireplace or wood-burning stove already in operation in their home,
this isn’t going to be all that hard to do. But adding in either one is a rather large job,
especially in a two-story home. That is, adding them in the way you’re supposed to is a
large job. Fortunately for us, our ancestors showed us how to do this without it being a
big job.
In pioneering times, putting heat into a public building was a luxury. Many times, churches
and other community buildings were built without any heat source, and then the heat
source was added later. This allowed them to finish the building and make it usable
without having to wait to save the money needed for a large wood-burning stove.
The interesting thing is that these added-in heaters were often more efficient than the
ones that were installed when the building was first built. That’s mostly because of the
way they dealt with the chimney pipe, which was in a manner that was much different
than a building that was built with the stove already built in.
272
Why a Wood-Burning Stove
Even the earliest models of wood-burning stoves were much more efficient than a
fireplace, which is what made them such a great success.
The typical fireplace is set into an exterior wall of the home and only emits heat from the
open front side. Some heat actually escapes through the back and sides of the fireplace,
and a lot of it escapes up the chimney.
This is basic physics—more specifically, thermodynamics. The basic idea is that heat rises.
The smoke from the fire heats the air, which goes up the chimney, taking the smoke with
it. If this didn’t happen, our homes would be filled with smoke.
The difference that the wood burning stove made is that it radiated heat from all sides,
not just from the front. That greatly increased the amount of heat that it put into a room
or the amount of heat that you could receive from a log of wood.
Today’s wood-burning stoves are much more efficient than those older models, mostly
because of design improvements that have been done to meet more and more stringent
EPA regulations. However, those regulations don’t affect older, pre-existing stoves. So if
you manage to find an old wood-burning stove, keep it around for an emergency. You’ll
still be able to use it.
Temporarily Installing Your Wood-Burning Stove
Originally, wood-burning stoves were made of cast iron or sometimes from cast steel.
Since the stove is made of metal, it gets hot. Most modern wood-burning stoves are heavy
gauge steel and lined with fire brick. This doesn’t stop them from getting hot though,
although not as hot as an iron box without firebrick in it.
You’ll need to pick a location for your stove63 where it can provide heat to your room
while still being out of the way.
63 “Wood burning stove“ Valerie Everett (CC BY 2.0)
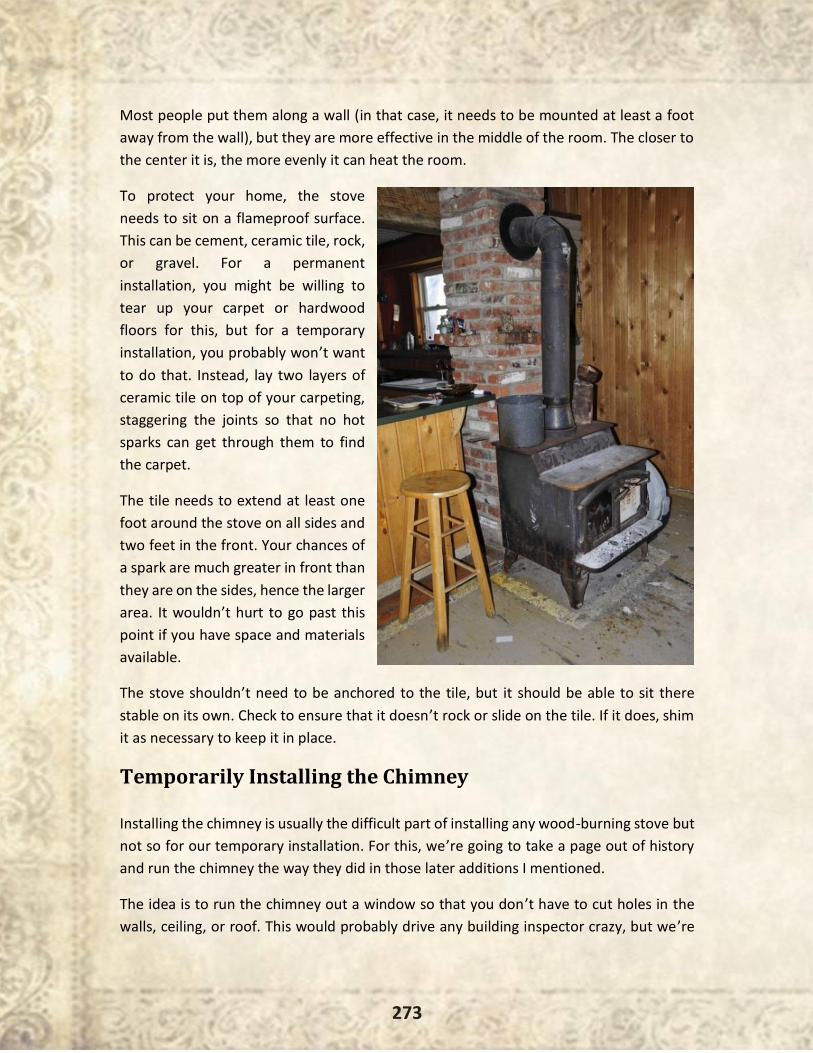
273
Most people put them along a wall (in that case, it needs to be mounted at least a foot
away from the wall), but they are more effective in the middle of the room. The closer to
the center it is, the more evenly it can heat the room.
To protect your home, the stove
needs to sit on a flameproof surface.
This can be cement, ceramic tile, rock,
or gravel. For a permanent
installation, you might be willing to
tear up your carpet or hardwood
floors for this, but for a temporary
installation, you probably won’t want
to do that. Instead, lay two layers of
ceramic tile on top of your carpeting,
staggering the joints so that no hot
sparks can get through them to find
the carpet.
The tile needs to extend at least one
foot around the stove on all sides and
two feet in the front. Your chances of
a spark are much greater in front than
they are on the sides, hence the larger
area. It wouldn’t hurt to go past this
point if you have space and materials
available.
The stove shouldn’t need to be anchored to the tile, but it should be able to sit there
stable on its own. Check to ensure that it doesn’t rock or slide on the tile. If it does, shim
it as necessary to keep it in place.
Temporarily Installing the Chimney
Installing the chimney is usually the difficult part of installing any wood-burning stove but
not so for our temporary installation. For this, we’re going to take a page out of history
and run the chimney the way they did in those later additions I mentioned.
The idea is to run the chimney out a window so that you don’t have to cut holes in the
walls, ceiling, or roof. This would probably drive any building inspector crazy, but we’re
274
doing it for an emergency situation, not a permanent modification to your home.
Hopefully, there won’t be any building inspectors running around then checking people’s
chimneys.
There are two types of chimney pipe. In olden times, they used a single-wall chimney.
Today’s fireplaces and wood-burning stoves, however, use a triple-wall chimney. This is
done for safety, with the spaces between the walls creating a draft to ensure that the
heat from the rising smoke doesn’t heat up the outer layer of the chimney pipe and start
a fire. But for our temporary installation, this is not what we want.
By using a single-wall chimney pipe and running it across the room to the window, the
chimney becomes a big radiator, radiating the heat from the smoke out into the room.
That increases the overall heat you are getting from the wood-burning stove without
having to burn any more wood.
In order to do this, not only will you need single-wall chimney pipe but you’ll need a piece
of aluminum flashing or sheet aluminum to replace the glass in the window. The pipe
should pass through this sheet aluminum as close to the top of the window as possible,
and then the chimney should bend upward, with the top being above the roof of the
home. Secure it in place so that the wind cannot knock it down.
It is important that the chimney pipe angle upward from the stove to the window,
although it doesn’t have to angle upward by much. A rise of 1/4" per foot should be
enough to ensure that the draw continues. Be careful to attach the sections of chimney
pipe together so that they seal against each other well, especially the part that is running
horizontally.
Heating with Wood
Good hardwoods will provide more heat per cord than softwoods will. Basically, the
denser the wood, the more heat energy it contains. Buying hardwood firewood may be
more of an investment than buying softwood firewood is, but it is actually cheaper to heat
your home with the hardwood.
Most firewood providers cut the firewood to about 16 inches in length. If you cut your
own, check the amount of space you have in the firebox of your wood-burning stove.
Typically, there is a lot of space that is unused because of using wood that is too short. If
your firebox is 22 inches long, then you want your wood to be cut to about 20 inches.
275
That allows you to put the maximum amount of wood in the stove, allowing it to burn
longer and reducing your labor.
The wood-burning stove will basically only heat the room that it is in. While you will get
some residual heat in adjoining rooms, they won’t be as warm as the room with the stove.
This is a large part of the reason why in pioneering days, few people had multi-room
homes. One large room, with the kids sleeping in the loft, was more energy efficient.
You can heat beds in the rest of your home by using a bed warmer. This copper pan is
attached to a long handle and has a lid on it. Coals from the fire are scooped into the bed
warmer, which is then placed between the sheets, moving it around every few minutes.
It will make any bed toasty warm in a short while.
Soapstone was also used to heat homes as well as to provide some heat when riding in a
carriage or wagon. The soapstone was heated in the fire and then placed in a wool carrier,
which was placed on the floor of the carriage. Placing a lap blanket over your legs, with
the soapstone underneath them, provided a considerable amount of heat.
People riding in the back of the buckboard could take advantage of this heat as well by
sitting in the bed of the wagon with their backs to the wagon seat. A blanket over their
legs would help hold in their body heat, while the soapstone warmed them from behind.
276
- By Karen Hendry -
“The person who follows the crowd will
usually go no further than the crowd.”
– Albert Einstein
The Donner Party was the most famous tragedy in the history of the westward
migration.
Almost ninety wagon train emigrants were unable to cross the Sierra Nevada before
winter, and almost one-half of them died. Their story should be a warning for all those
that plan to bug out when SHTF, especially in the winter, without having a few things
already available there.
The 1800s were a century of true survival. The pioneers that crossed the Great Plains and
followed the trails out West had a tough journey across lands that we now know to be
covered in civilized farmland and crisscrossed by seemingly endless highways. Pioneer
families traveled in wagon trains across the rough, unforgiving terrain. Many travelers
were farmers that already had their own supplies, but many had to buy supply kits. The
kit included the following:
❖ A wagon
❖ Teams of oxen
❖ 150 pounds of food for each person
❖ Cooking equipment
❖ Two sets of clothing
❖ One extra pair of shoes each
❖ 25 pounds of soap

277
❖ A washtub and washboard
❖ Tobacco
❖ Tent
❖ Ground cloth
❖ Blankets
❖ Various tools
❖ Guns and ammunition
Once people got going on the trails, they often found themselves abandoning anything
that wasn’t essential so they could lighten the load and make the trip easier.
The two most popular trails on the trip west were the Oregon Trail and the California Trail,
but Lansford W. Hastings created a new route that left the Oregon Trail at Fort Bridger
and crossed the Great Salt Lake Desert before joining the California Trail at Humboldt.
One famous family that made the journey was the Donner family along with a handful of
others. They chose use to the new route, called the Hastings Cutoff, even though many
278
whom they were traveling with chose the well-established route through Fort Hall to the
north.
This new route had never truly been tested, and it ended up slowing down the Donner
Party, causing them much hardship and resulting in a devastating journey that stranded
them in the Sierra Nevada during the winter of 1846–47.
The Donner family story is one that has long been considered one of the strangest and
most tragic crossings in the pioneering history of the United States.
The Story of the Donner Party
The Donner Party set out from Springfield, Illinois, in April of 1846. Sometimes known as
the Donner–Reed Party, the emigration west was initiated by James Frasier Reed, a
businessman looking forward to the promise of the West. He prepared to move his family
west in great style. Also in the same wagon train from Illinois was the Donner family,
which consisted of brothers George and Jacob Donner and their families.
The Donner Party left Illinois the very same day Lansford Hastings left California to travel
east along his new route and test it out. The Donner Party arrived in Fort Laramie on June
27, 1846, which was only a week behind schedule.
Here, James Reed met an old friend, James Clyman, who had ridden the Hastings Cutoff
east with Lansford Hastings. Clyman warned Reed not to take the Hastings Cutoff because
the wagons would not get through easily and they would have to deal with the desert and
the Sierra Nevada. Reed would later disregard this warning.
The Fatal Decision
On July 19, the party had reached Little Sandy River. They had previously received a letter
from Lansford Hastings letting them know that he would personally meet them in Fort
Bridger and guide them along the Hastings Cutoff.
At Little Sandy River, the larger portion of the original party continued on the established
route west, and a smaller group, which would become known as the Donner Party,
continued on along the Hastings Cutoff.
On the advice of Hastings, the Donner Party crossed the Great Salt Lake Desert, a journey
that would be in large part responsible for the future suffering of the group. They had
already been slowed down while forging a new path through the Wasatch Mountains.
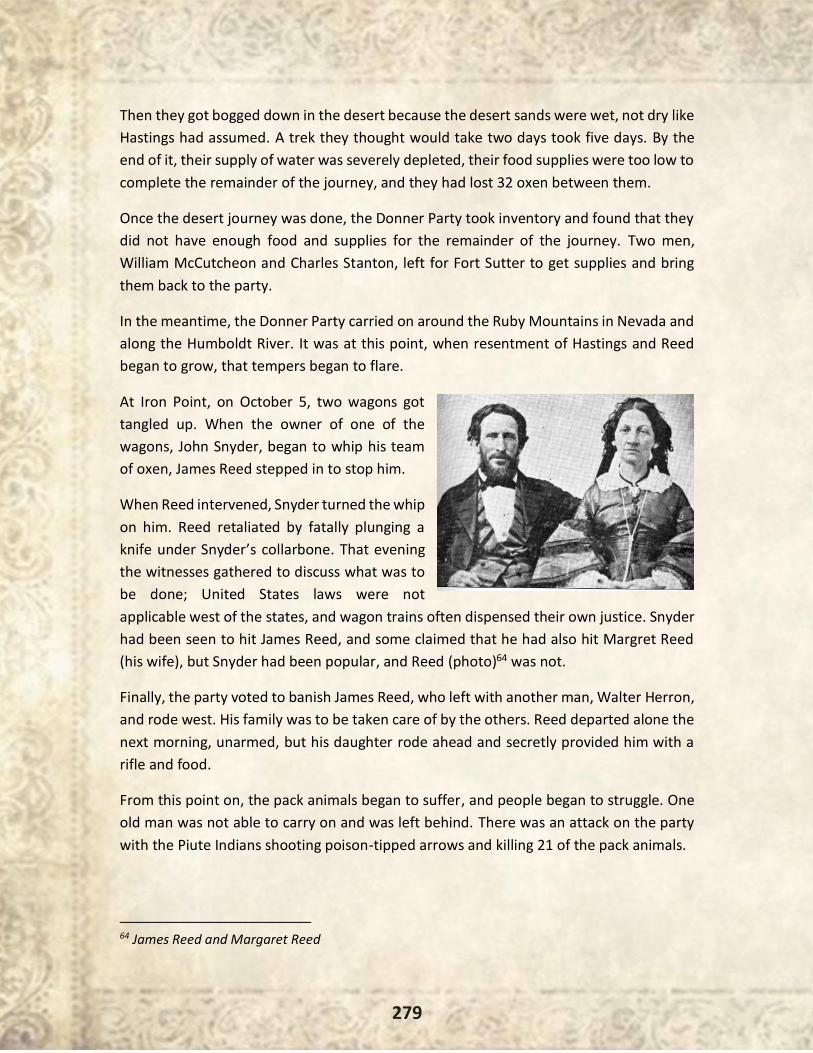
279
Then they got bogged down in the desert because the desert sands were wet, not dry like
Hastings had assumed. A trek they thought would take two days took five days. By the
end of it, their supply of water was severely depleted, their food supplies were too low to
complete the remainder of the journey, and they had lost 32 oxen between them.
Once the desert journey was done, the Donner Party took inventory and found that they
did not have enough food and supplies for the remainder of the journey. Two men,
William McCutcheon and Charles Stanton, left for Fort Sutter to get supplies and bring
them back to the party.
In the meantime, the Donner Party carried on around the Ruby Mountains in Nevada and
along the Humboldt River. It was at this point, when resentment of Hastings and Reed
began to grow, that tempers began to flare.
At Iron Point, on October 5, two wagons got
tangled up. When the owner of one of the
wagons, John Snyder, began to whip his team
of oxen, James Reed stepped in to stop him.
When Reed intervened, Snyder turned the whip
on him. Reed retaliated by fatally plunging a
knife under Snyder’s collarbone. That evening
the witnesses gathered to discuss what was to
be done; United States laws were not
applicable west of the states, and wagon trains often dispensed their own justice. Snyder
had been seen to hit James Reed, and some claimed that he had also hit Margret Reed
(his wife), but Snyder had been popular, and Reed (photo)64 was not.
Finally, the party voted to banish James Reed, who left with another man, Walter Herron,
and rode west. His family was to be taken care of by the others. Reed departed alone the
next morning, unarmed, but his daughter rode ahead and secretly provided him with a
rifle and food.
From this point on, the pack animals began to suffer, and people began to struggle. One
old man was not able to carry on and was left behind. There was an attack on the party
with the Piute Indians shooting poison-tipped arrows and killing 21 of the pack animals.
64 James Reed and Margaret Reed
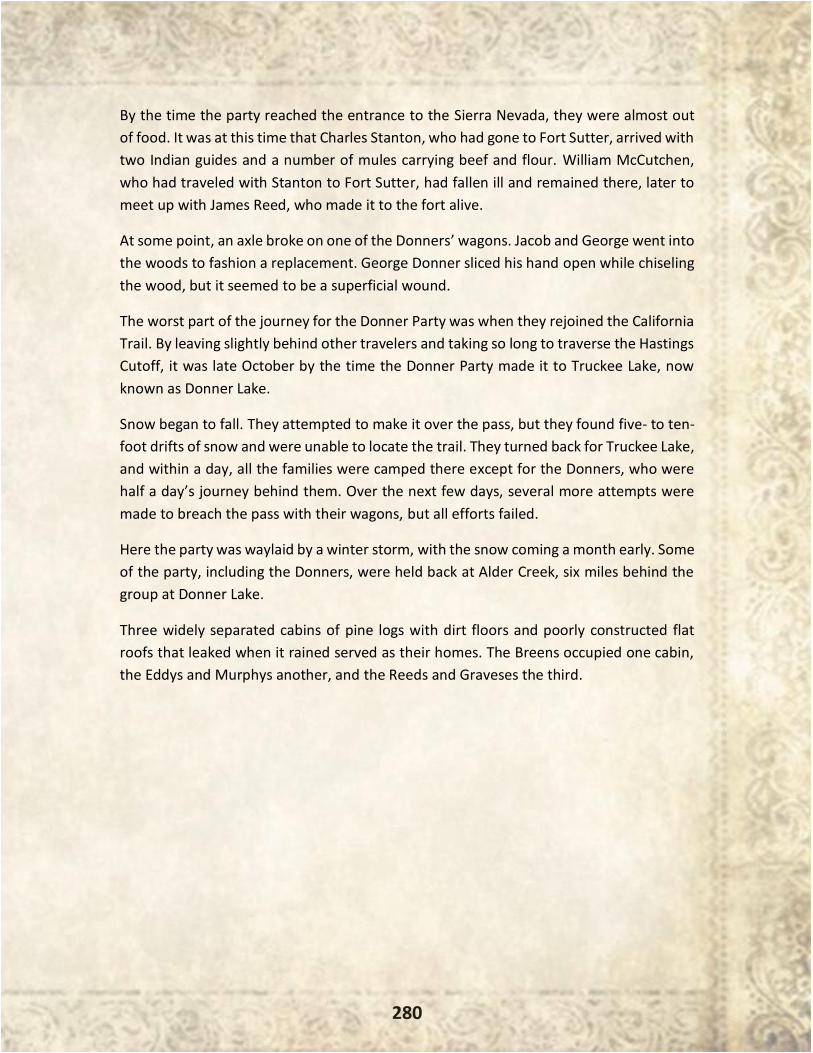
280
By the time the party reached the entrance to the Sierra Nevada, they were almost out
of food. It was at this time that Charles Stanton, who had gone to Fort Sutter, arrived with
two Indian guides and a number of mules carrying beef and flour. William McCutchen,
who had traveled with Stanton to Fort Sutter, had fallen ill and remained there, later to
meet up with James Reed, who made it to the fort alive.
At some point, an axle broke on one of the Donners’ wagons. Jacob and George went into
the woods to fashion a replacement. George Donner sliced his hand open while chiseling
the wood, but it seemed to be a superficial wound.
The worst part of the journey for the Donner Party was when they rejoined the California
Trail. By leaving slightly behind other travelers and taking so long to traverse the Hastings
Cutoff, it was late October by the time the Donner Party made it to Truckee Lake, now
known as Donner Lake.
Snow began to fall. They attempted to make it over the pass, but they found five- to ten-
foot drifts of snow and were unable to locate the trail. They turned back for Truckee Lake,
and within a day, all the families were camped there except for the Donners, who were
half a day’s journey behind them. Over the next few days, several more attempts were
made to breach the pass with their wagons, but all efforts failed.
Here the party was waylaid by a winter storm, with the snow coming a month early. Some
of the party, including the Donners, were held back at Alder Creek, six miles behind the
group at Donner Lake.
Three widely separated cabins of pine logs with dirt floors and poorly constructed flat
roofs that leaked when it rained served as their homes. The Breens occupied one cabin,
the Eddys and Murphys another, and the Reeds and Graveses the third.
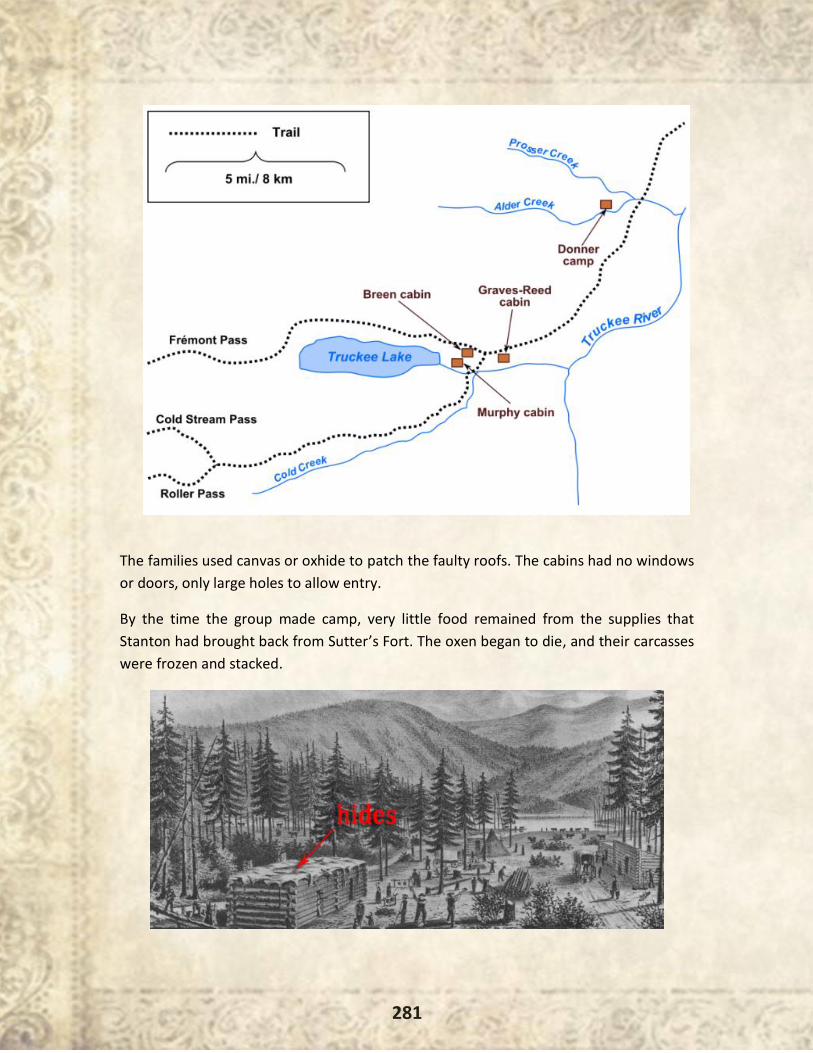
281
The families used canvas or oxhide to patch the faulty roofs. The cabins had no windows
or doors, only large holes to allow entry.
By the time the group made camp, very little food remained from the supplies that
Stanton had brought back from Sutter’s Fort. The oxen began to die, and their carcasses
were frozen and stacked.
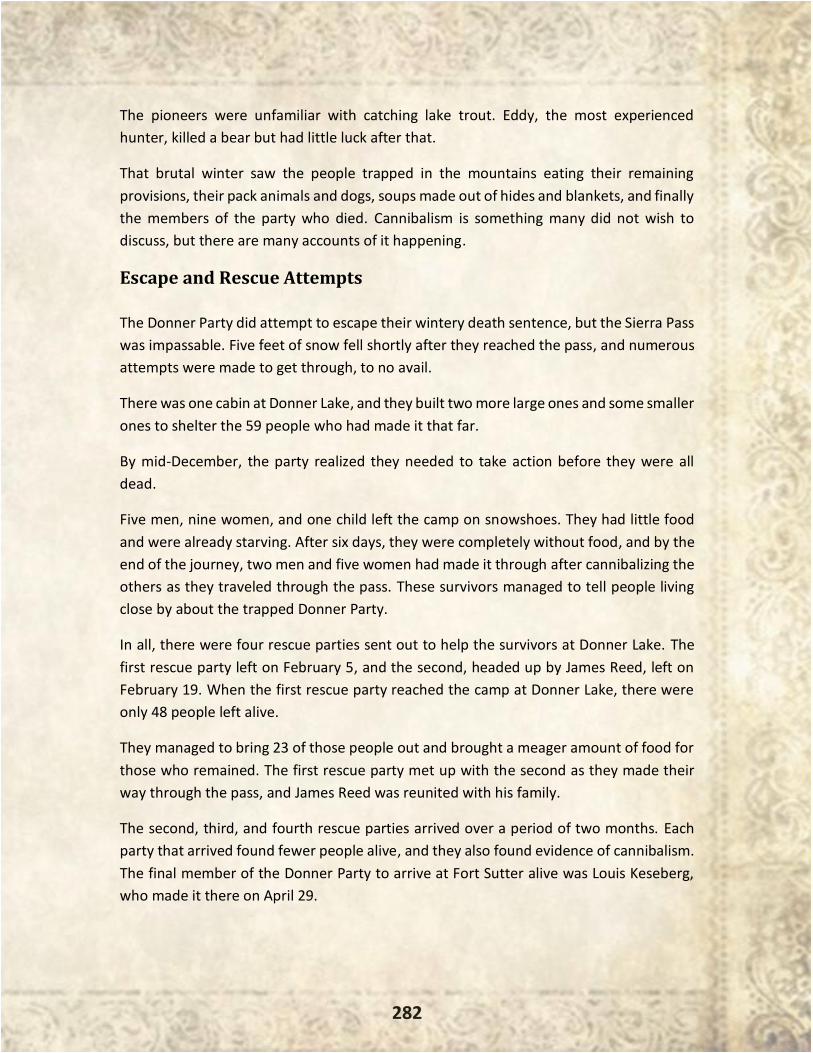
282
The pioneers were unfamiliar with catching lake trout. Eddy, the most experienced
hunter, killed a bear but had little luck after that.
That brutal winter saw the people trapped in the mountains eating their remaining
provisions, their pack animals and dogs, soups made out of hides and blankets, and finally
the members of the party who died. Cannibalism is something many did not wish to
discuss, but there are many accounts of it happening.
Escape and Rescue Attempts
The Donner Party did attempt to escape their wintery death sentence, but the Sierra Pass
was impassable. Five feet of snow fell shortly after they reached the pass, and numerous
attempts were made to get through, to no avail.
There was one cabin at Donner Lake, and they built two more large ones and some smaller
ones to shelter the 59 people who had made it that far.
By mid-December, the party realized they needed to take action before they were all
dead.
Five men, nine women, and one child left the camp on snowshoes. They had little food
and were already starving. After six days, they were completely without food, and by the
end of the journey, two men and five women had made it through after cannibalizing the
others as they traveled through the pass. These survivors managed to tell people living
close by about the trapped Donner Party.
In all, there were four rescue parties sent out to help the survivors at Donner Lake. The
first rescue party left on February 5, and the second, headed up by James Reed, left on
February 19. When the first rescue party reached the camp at Donner Lake, there were
only 48 people left alive.
They managed to bring 23 of those people out and brought a meager amount of food for
those who remained. The first rescue party met up with the second as they made their
way through the pass, and James Reed was reunited with his family.
The second, third, and fourth rescue parties arrived over a period of two months. Each
party that arrived found fewer people alive, and they also found evidence of cannibalism.
The final member of the Donner Party to arrive at Fort Sutter alive was Louis Keseberg,
who made it there on April 29.
283
Survival Lessons from the Donner Party
Even though in the U.S. today life is very different from the days of the pioneers, there
are many survivalists that prepare for bad times and try to ensure they have the
equipment, tools, and skills to survive in any setting.
The situation that befell the Donner Party and the struggle they went through to survive
can be a lesson for anyone that is preparing to survive any post-collapse conditions,
including living in the bush for an extended period of time and/or migrating from one
geographical area to another.
The reality is, if a disaster of a significant size were to occur, many people would not
survive. The Donner Party learned that lesson the hard way, and while knowing what they
went through will not change the conditions of a post-collapse society, perhaps the
experiences of the Donner Party can serve as lessons to help those that are planning to
survive any hard times to come.
The following is a discussion of the various survival lessons we can take from the
experience of the Donner Party:
Follow the Known Route
This is critical. Stay on the road, and don’t take shortcuts. In any survival situation, if at all
possible, you want to follow the path that has been the most traveled, not the least. When
it comes to survival, there is far more danger in trying something new.
The Donner Party knew the Hastings Cutoff was new, and they had fair warning that it
was not safe and should be avoided. However, they let their desire to find a shorter route
sway their judgment.
Everyone who chose to take the traditional route to California that year made it to their
destination alive and well. If the Donner Party had done the same, their tragedy would
have been avoided.
Money Won’t Save You; It’s What You Know
James Reed had plenty of money, but the hard trail doesn’t care about money. Once they
turned onto the Hastings Cutoff, there was no help for them during the journey, no matter
how much money Reed had. When you are out on the trail, it is what you know that will
help you survive.
284
Of course, that doesn’t mean money is completely useless. It was later James Reed’s
money that made it possible for him to mount a rescue attempt to save his family and the
other survivors. Money is definitely on the list, but it won’t buy a thing when everybody
is suffering and starving.
Supplies + Time = Life
You need enough supplies to get you through to the end of your journey along with what
you need to help you establish yourself when you get to your destination, but you
shouldn’t take more than that.
The more you are carrying, the slower you will go, and when you need to make it to your
destination before winter sets in, you do not want to be slowed down.
If you run short of time, you will use up your supplies before you reach your destination,
and then you will have to live off the land. This is difficult at the best of times, but once
the snow flies, it is even more difficult.
The Donner Party fell prey to a shortage of time. Essentially, it was the Hastings Cutoff
that killed them. They lost three days’ worth of travel in the desert and had to abandon
many of their wagons and supplies. They managed to hunt and kill a bear early on, but as
time went by and the weather got worse, wild food became scarce.
Because their trip took too long, they ran out of supplies, and starvation set in. Many
resorted to cannibalizing the dead in order to survive.
Weather Is the Deciding Factor
Weather is everything. If you are fortunate enough to have to survive in a geographic area
that doesn’t see winter or other long-term severe weather, time might be more on your
side, but if you have bad weather, it is almost impossible to live off the land.
Unless you have enough supplies and food and water set aside, you will starve to death
when bad weather hits. If, like the members of the Donner Party, you have to resort to
eating people, then your life is most definitely on the line.
Know When to Turn Back
There were numerous times when the Donner Party ran into trouble. The first instance of
this was the desert crossing. When they began sinking in the moist sand and getting
285
bogged down, when they had lost many of their animals, and when they had to start
making decisions as to what to leave behind, right then they should have cut their losses
and turned back. There were other instances when the party barely made it through as
well.
When you are in a survival situation and you are struggling to get where you’re going and
falling behind with every step, it is best to turn back. True, you will have to start all over
again, but it’s better to go back to a place you are familiar with that might have supplies
and other people than to continue into the unknown unprepared and behind schedule.
In a survival situation, if you are barely making it, you will likely die.
Stress Leads to Anger and Volatility
The more stress people are under, the more volatility a group will be dealing with. In a
survival situation, people are often pushed to their absolute limits. They are hungry, they
are tired, and they are watching their children starve. This leads to stress, which leads to
anger, which leads to volatility and violence.
This is what happened to James Reed when he lost his temper and stabbed a man to
death, which led to Reed being cast out of the group. Avoiding stress as much as possible
in a survival situation will serve you well.
Age and Gender Play a Huge Role in Survival
Archaeologists have studied the Donner Party’s plight and have gone to the sites where
the party was stranded, both on Donner Lake and Alder Creek. Through careful study of
the sites and the ages and genders of those who died, they have determined that many
of those who survived were women.
A total of 87 men, women, and children were trapped in the mountains that terrible
winter, and only 47 survived. There were 53 males and 34 females, and of those, 30 males
died and 10 females died. That means 64% of the males died and only 33% of the females
died. Age also played a role in survival, with everyone aged 49 and over having died and
10 of 16 children under the age of 5 having died.
Why did so many more women survive? It comes down to a few gender-specific traits.
Women have more body fat and consume energy more slowly than men, both of which
would protect them more from cold and starvation, and they have milder temperaments
that cause them to be more reliant on cooperation than on aggression.

286
In a survival situation, this information might help determine who is more vulnerable.
Obviously, everyone needs to pull their weight, but if women can take care of situations
that might bring out the aggressiveness in men and food can be distributed in such a way
that takes into account women’s slower energy consumption, then it might help more
members of a group survive.
Small Wounds = Death
George Donner sliced his hand open while chiseling the wood, and it seemed a superficial
wound. But when food became scarce and his body was deprived of much-needed
vitamins and nutrients, his arm became gangrenous, finally leading to his death.
287
- Susan Morrow -
“Take care of your body. It’s the only
place you have to live.”
– Jim Rohn
Around 10 billion pounds of soap are produced each year, and in the U.S.,
about one billion toothpaste tubes are sent to landfills each year. We use a lot of hygiene
products and for good reason. Keeping our bodies and teeth clean is a vital part of keeping
our overall health good.
According to the Global Soap Project, 44% of deaths caused by diarrhea could have been
prevented through simply washing hands with soap. So imagine a world where suddenly
our supplies of hygiene products like soap and toothpaste have dried up.
Our grandparents didn’t live in a world where mass consumerism reigned. They were able
to create their own hygiene products from simple, readily available ingredients.
It’s easy to make your own products, and I’ll give you some recipes here that will give you
the knowledge to make sure that you can keep your and your family’s health in good
condition.
Soap Making – The Old Fashion Way
Unlike a previous chapter here you’ll find the old fashioned way of making soap.
The use of soap has a long history going back many thousands of years. The first
archeological evidence for soap comes from an excavation of ancient Babylon. This soap-
288
like material was found in cylinders dating back to around 2800 BC (that’s 4,800 years
ago).
Soap has gone from strength to strength since then, not only being used for cleaning of
humans and our garments but also for medicinal uses too. For example, soap imbued with
aloe vera has been used to treat fungal skin infections.
By the 19th century, rural Americans were making their own soap using ashes from the
fire and hog fat.
Traditional Recipe for Soap
Making soap is known as “saponification.” The chemical reaction underlying the creation
of soap is very basic and involves heating an oil or fat with a base (alkali) such as sodium
hydroxide to produce the soap.
The more difficult of the two ingredients to obtain is the base. We mentioned earlier that
19th century Americans used ashes to create soap.
These ashes were the starting material for the base, also known as lye. Lye is commonly
called sodium hydroxide and most often used in modern soaps, but if made from wood
ash, it is potassium hydroxide and makes a slightly softer soap.
Making Lye Water from Wood Ash
Follow this recipe to create a supply of wood ash lye in preparation for soap making:
❖ Collect rain water. Use rain water as it’s a soft water; you should never use hard
water for soap making.
❖ Collect wood ash from fires. The wood from broad-leaved hardwoods make the
best lye, but make sure it is well burned, to a white ash if possible.
❖ Create a container with small holes in the bottom that are small enough so the
wood ash can’t fall through.
❖ Take another container that the first container can fit over. This will collect the lye
water.
❖ Take the container with holes, and cover the bottom with stones.
❖ Fill this bucket with the wood ash up to about four inches from the top.
289
❖ Fit this bucket over the second (no holes) bucket.
❖ Now heat up the rainwater, without boiling, and pour the water over the ashes.
❖ Lye will collect in the bottom bucket. It’s usually a brownish color.
❖ Leave to stand for several hours or overnight.
❖ Collect the lye water, and repeat the process using the lye water instead of
rainwater.
❖ Repeat until no more brown water leaches from the ashes.
! The trick to making good strong lye is multiple filters through the wood ash.
! One of the tricks to knowing if the lye is ready is if a chicken feather dissolves in it.
! Some suggest using straw on top of the stones in the bucket.
! To strengthen the lye water, you can also boil it down to evaporate the water and
concentrate the lye.
Collecting the Fat
The second main ingredient for a basic soap is some sort of fat or oil. You can use many
types of fats or oils to create soap, and the type used will dictate the softness of the soap
produced. Below is a list of common oils or fats you could use and the resultant type of
soap each will produce; however, you can use virtually any type of fat or oil:
❖ Olive Oil: You’ll end up with a brittle but good lather soap that is long lasting.
❖ Vegetable Oil: This produces a softer soap than olive oil and lathers well.
❖ Lard: This is often used for laundry soap as it doesn’t lather well.
❖ Beef Fat: This produces a soft soap that is not really suitable for washing but is
best for laundry use.
You can also mix up any fats you have to create soap.
If using an animal fat to create laundry soap, for example, you should render the fat first
to remove any impurities that might prevent complete saponification.
290
Rendering fats involves slowly heating the fat for about 30 minutes, adding about 50%
water, then boiling for around four hours. After this time, you strain the fat through a
muslin (or similar material) sieve into a bowl. You then leave the fat to harden in a cool
place. Once hardened, you invert the bowl and remove the top layer of gelatinous and
grainy material to leave the yellow “tallow” ready for soap making.
Cooking the Soap: The Cold Process Method
There are a number of methods to make soap, but I’ve chosen the cold process method
here as it is a fairly simple one. You can experiment with your own methods once you
understand the principles.
The only down side to the cold process method is that although it is quick to make the
soap, the “cure” process can be lengthy; the longer you leave the soap, the better the
soap becomes.
Preparation
Before we start, just a safety notice. Remember, lye water is caustic, so it will burn if you
get it on your skin and especially if you get it in your eyes. Always take care when using,
and wash away any splashes immediately with lots of water.
Firstly, prepare some sort of vessel that the soap will be poured into as a setting mold. A
bread tin or something similar will do. Traditionally, soap molds were made of wood, but
you can use anything. Ideally, line the mold with greaseproof paper.
Recipe
The ratio of lye water to fat should be around one-third lye water to fat, e.g., 1 cup of lye
water to 3 cups of fat.
❖ Take your fat/oil. Warm the fat or oil on a stove until either melted or gently
warmed. Remember, you can mix oils and fats too.
❖ Take your lye water.
❖ You must make sure the melted fats and lye water are both around the same
temperature. If you have a thermometer, they should ideally be between 80–
130°F).
291
❖ Slowly add the lye water to the melted fats, and stir to mix. The stirring allows the
chemical reaction (saponification) to happen. Mix briskly until the solution starts
to thicken. There is a point known as the “trace,” where if you take a drizzle of the
solution and let it fall onto the mix, it will remain on the surface for a while before
being drawn back in.
❖ At this point of the trace, pour the solution into the mold.
❖ Cover with blankets or towels, and leave at room temperature for about 24 hours.
The soap should solidify in this time.
Cold process soaps can be used within two days of production but do improve over time.
Making Your Own Signature Soaps
Now that you have a basic recipe for a soap base, you can experiment adding all kinds of
other ingredients. Just add the additional ingredients at step 4, just before the trace point.
Medicinal Soaps
Adding different ingredients to your basic soap recipe can create many types of soaps,
including ones that can help with various medical problems. For example, adding
lavender, geranium, or bergamot to your soap recipe creates a soap that is good for
eczema.
Broadleaf plantain (Plantago major), when used as an ingredient in soap making, makes
a great antiseptic soap. Take plantain leaves and grind them up, adding them into the
soap base. You can use the plantain soap to clean a wound before adding a poultice onto
the area (see the chapter on How Our Ancestors Made Herbal Poultice).
Ideally, you should use essential oils in the recipe, but you can make homemade flower
waters too and use those.
Homemade Toothpaste
If you’ve ever had a toothache, you know how important it is to keep your teeth clean.
The last thing you want is to have to perform “home dentistry” on yourself or a loved one.
Making toothpaste that is effective at keeping your teeth clean and healthy isn’t as hard
as it sounds.
292
If you don’t have a toothbrush, use a finger with toothpaste on it, or create a brush from
a soft twig; chew on the twig ends to create a frayed edge, and use that as your brush.
The main ingredient of any toothpaste is an abrasive substance. This is usually baking soda
but could potentially be any inert material, even clay.
Here are two basic recipes that you can use as a starting point depending on what you
have available:
Basic Baking Soda Recipe
Baking soda is a great basic ingredient for toothpaste because, being abrasive, it can be
used to rub off any plaque buildup. To make this toothpaste, you’ll need the following:
❖ A cup of baking powder (abrasive)
❖ Pinch of salt (anti-bacterial)
❖ Water
Optionally, you can also add some tastier ingredient such as mint, which you can make up
yourself from mint leaves by finely chopping or grinding.
You then simply mix the baking soda and salt, adding the mint leaves if you wish. Add
water to the mix until you get the right consistency for your toothpaste.
Clay Toothpaste
If you can’t get a hold of baking soda, you can use clay. However, be careful as it can be
highly abrasive, so use carefully.
Ideally, grind the clay down as fine as possible before using.
As with the basic baking soda recipe, add a pinch of salt and some mint leaves or
peppermint oil, if you can get it, then mix in some water to the right consistency.
To Taste
You can also add any other ingredient to create a tastier toothpaste, this includes coconut
oil, herbs, orange or lemon peel, and fennel.
293
- By M. Richard -
“My old grandmother always used to say, summer
friends will melt away like summer snows, but
winter friends are friends forever.”
– George R.R. Martin
Winter is the worst time to try to survive. If you think about it, back when we
were primarily an agricultural society, life was built around preparing to make it through
the winter. Crops were grown, harvested, and preserved with the idea of making it
through the winter and to the next planting season.
We’ve even memorialized this in a way in the creation of the holiday Thanksgiving. The
Pilgrims celebrated that they were prepared for winter and that they were going to
survive.
There are many things about wintertime that make it a hard time to survive. Everything
from the temperature to the lack of food is working against you. But one that we don’t
often think about is the difficulty of moving through the snow. Just getting around in the
winter without snow plows to clear our roads is a bit of a challenge.
Getting around in the winter can be dangerous as well. Fighting through the snow can
make you sweat, which makes you much more liable to fall victim to hypothermia. You
need a way of moving through the snow that will help keep you from having to work too
hard.
Fortunately, our ancestors solved this problem for us with the creation of snowshoes.
Actually, skis were created with the same idea, but it’s much easier to make and use a
pair of snowshoes than it is to make and use a pair of skis. About the only thing special
you have to do to walk in snowshoes is walk with your feet far apart.
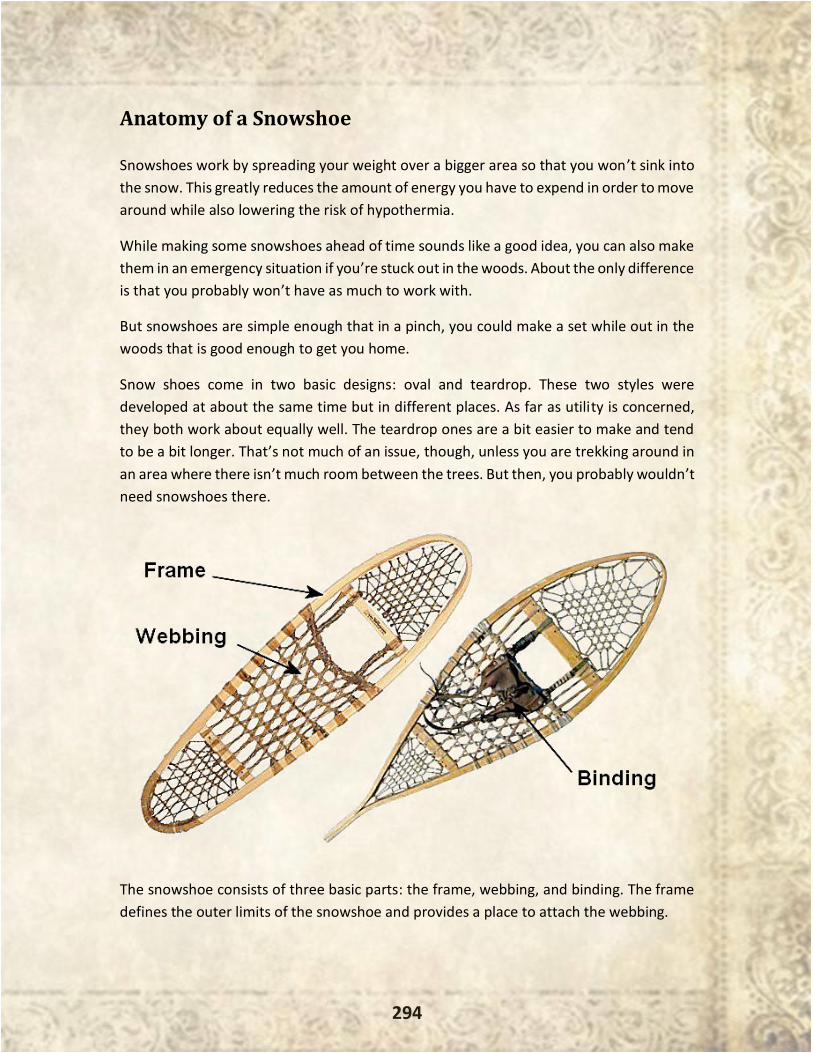
294
Anatomy of a Snowshoe
Snowshoes work by spreading your weight over a bigger area so that you won’t sink into
the snow. This greatly reduces the amount of energy you have to expend in order to move
around while also lowering the risk of hypothermia.
While making some snowshoes ahead of time sounds like a good idea, you can also make
them in an emergency situation if you’re stuck out in the woods. About the only difference
is that you probably won’t have as much to work with.
But snowshoes are simple enough that in a pinch, you could make a set while out in the
woods that is good enough to get you home.
Snow shoes come in two basic designs: oval and teardrop. These two styles were
developed at about the same time but in different places. As far as utility is concerned,
they both work about equally well. The teardrop ones are a bit easier to make and tend
to be a bit longer. That’s not much of an issue, though, unless you are trekking around in
an area where there isn’t much room between the trees. But then, you probably wouldn’t
need snowshoes there.
The snowshoe consists of three basic parts: the frame, webbing, and binding. The frame
defines the outer limits of the snowshoe and provides a place to attach the webbing.
295
Crossbars on the frame help to maintain the shape of the shoe, preventing it from
collapsing inward from the pressure of the webbing as well as providing a means of
transferring your weight to the shoe. When properly worn, the ball of the foot is over the
front crossbar.
The webbing is actually the part of the snowshoe that does the work by spreading your
weight over a large area to keep you from sinking in the snow.
Traditionally, snowshoe webbing was made of rawhide, but you can use just about any
sort of cord, such as paracord. In a true emergency, you could tie branches from a pine
tree to the frame as the pine needles would naturally accomplish the same thing.
Making Survival Snowshoes
To make survival snowshoes, you’ve got to start with the frame. This is usually made by
cutting some saplings off to about eight feet rather than using branches. You’ll need to
work over the saplings that you cut, making them a consistent thickness along the whole
length. This step could be omitted in a true emergency, but you’ll end up with lopsided
snowshoes.
To bend the frames, first soak them in water for at least 12 hours, and then heat them
over a fire, being careful to not let them burn. If you are doing this at home, you can do a
better job of bending them by clamping a coffee can in place and putting a torch inside it.
The wood strips could then be bent directly over the hot coffee can. In the woods, you’ll
have to heat the wood and then bend it over a deadfall to shape it.
As you can see from the photo, there is actually less bending required to make the
teardrop shaped snowshoes than there is for the oval ones. Because of this, it’s easier to
make them consistent, which is a real design advantage.
With the frame bent, tie it in place. This is usually done by drilling a series of holes through
the frame and then running the cordage through those holes, “sewing” the two ends
together. If you don’t have a drill, which is a common problem out in the wild, you can
heat a piece of wire, a small screwdriver, or an awl and burn a hole through the wood.
Although the picture does not show it, many people will bend the toe of their snowshoe
upwards about ten degrees, starting from the front crossbar. This helps you to avoid
scooping up snow with your snowshoes as you walk. In order to do this, soak the
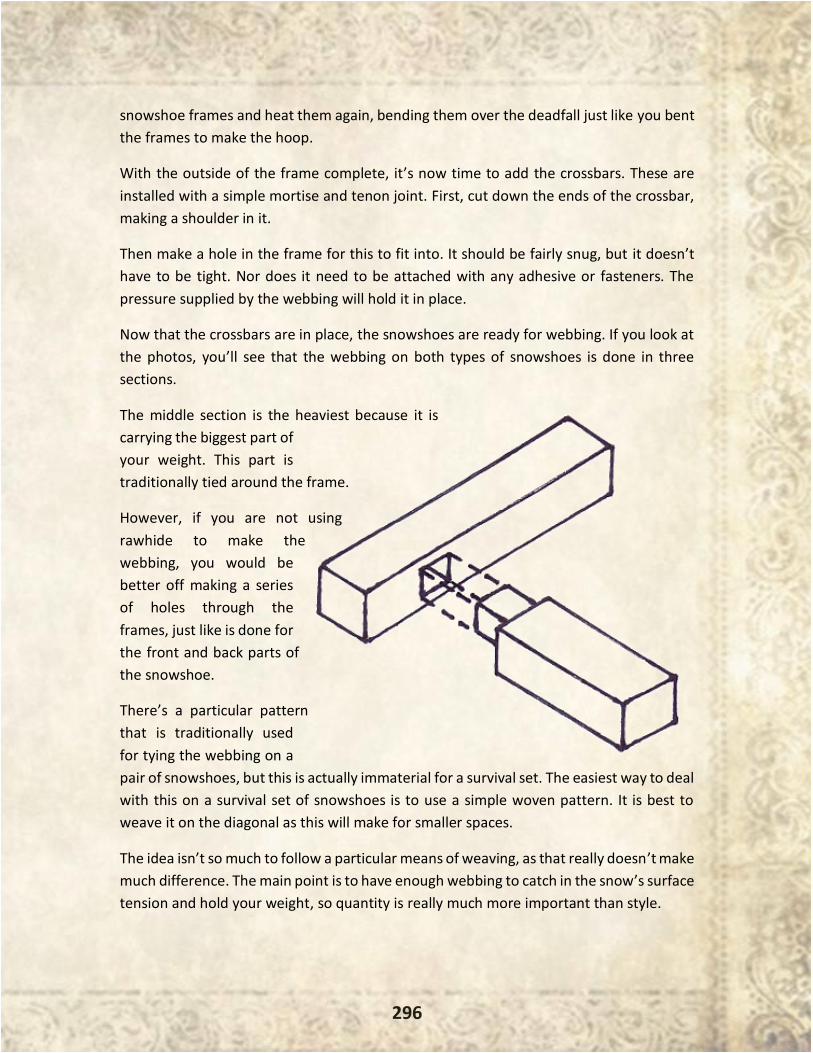
296
snowshoe frames and heat them again, bending them over the deadfall just like you bent
the frames to make the hoop.
With the outside of the frame complete, it’s now time to add the crossbars. These are
installed with a simple mortise and tenon joint. First, cut down the ends of the crossbar,
making a shoulder in it.
Then make a hole in the frame for this to fit into. It should be fairly snug, but it doesn’t
have to be tight. Nor does it need to be attached with any adhesive or fasteners. The
pressure supplied by the webbing will hold it in place.
Now that the crossbars are in place, the snowshoes are ready for webbing. If you look at
the photos, you’ll see that the webbing on both types of snowshoes is done in three
sections.
The middle section is the heaviest because it is
carrying the biggest part of
your weight. This part is
traditionally tied around the frame.
However, if you are not using
rawhide to make the
webbing, you would be
better off making a series
of holes through the
frames, just like is done for
the front and back parts of
the snowshoe.
There’s a particular pattern
that is traditionally used
for tying the webbing on a
pair of snowshoes, but this is actually immaterial for a survival set. The easiest way to deal
with this on a survival set of snowshoes is to use a simple woven pattern. It is best to
weave it on the diagonal as this will make for smaller spaces.
The idea isn’t so much to follow a particular means of weaving, as that really doesn’t make
much difference. The main point is to have enough webbing to catch in the snow’s surface
tension and hold your weight, so quantity is really much more important than style.

297
You can easily use a couple hundred feet of paracord or rawhide to lace a set of
snowshoes, so make sure you have plenty. You will also need a small amount for tying
your snowshoes to your boots.
All any snowshoe binding consists of is a couple of straps, much like sandal straps. If you
don’t have leather to make the straps out of, you can use paracord.
Using Your Snowshoes
As I just mentioned, the snowshoes are tied onto the boots, usually with one strap over
the toes, a second over the arch of the foot, and a third around the back of the foot.
However, only the toe of the boot is firmly tied down to the shoe. The rest of the binding
is there to keep the shoe from falling off, but the heel lifts off the shoe when you are
walking.
The hardest part of getting used to walking in snowshoes is that you have to walk like you
are bow-legged. If you forget that little detail, you will find that you end up putting one
snowshoe overlapping the other. The first time that happened to me, I fell over in three
feet of powder snow. Argh.
While you are getting used to walking in snowshoes, it can be useful to use ski poles for
balance. However, once you are accustomed to them, you should be able to walk and
even run without any balance problems. The natural stride of using snowshoes is very
similar to your normal walking stride, with the exception of having your feet farther apart.
298
- By M. Richard -
“It seems better to me for a child to have these
skills and never use them than not have them
and one day need them.”
– Kristin Cashore
We tend to think of the use of machinery as something associated with the
industrial age. Many of our modern tools and equipment are powered by either electric
motors or gasoline engines—both inventions of the industrial age.
But mankind’s history of building and using machinery goes much further back than that.
Before our modern means of producing mechanical energy, manpower, animal power,
and even water power were in common use.
The water wheel was invented to harness the naturally occurring kinetic energy contained
in flowing water. This was mankind’s first “free” energy that was provided by nature. Like
solar power, other than the initial investment in equipment, there is virtually no cost
associated with using water power.
There are three basic styles of water wheels: the horizontal, the undershot vertical, and
the overshot vertical. We can see an evolution of design between these three as the most
recent of the three has been the overshot vertical water wheel.
However, the horizontal water wheel has been improved upon and encased and is now
called an impeller. These are used extensively in hydroelectric plants around the world.
So even though it is the oldest style, it has become the only water wheel design in
common use today.
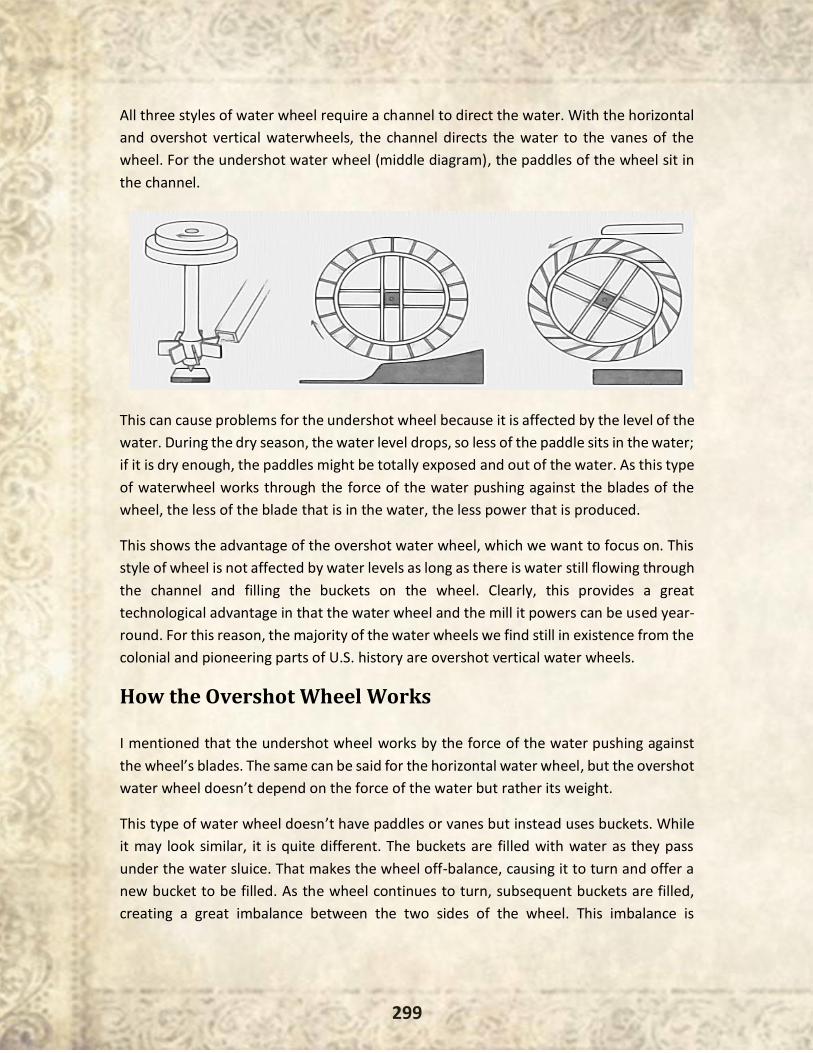
299
All three styles of water wheel require a channel to direct the water. With the horizontal
and overshot vertical waterwheels, the channel directs the water to the vanes of the
wheel. For the undershot water wheel (middle diagram), the paddles of the wheel sit in
the channel.
This can cause problems for the undershot wheel because it is affected by the level of the
water. During the dry season, the water level drops, so less of the paddle sits in the water;
if it is dry enough, the paddles might be totally exposed and out of the water. As this type
of waterwheel works through the force of the water pushing against the blades of the
wheel, the less of the blade that is in the water, the less power that is produced.
This shows the advantage of the overshot water wheel, which we want to focus on. This
style of wheel is not affected by water levels as long as there is water still flowing through
the channel and filling the buckets on the wheel. Clearly, this provides a great
technological advantage in that the water wheel and the mill it powers can be used year-
round. For this reason, the majority of the water wheels we find still in existence from the
colonial and pioneering parts of U.S. history are overshot vertical water wheels.
How the Overshot Wheel Works
I mentioned that the undershot wheel works by the force of the water pushing against
the wheel’s blades. The same can be said for the horizontal water wheel, but the overshot
water wheel doesn’t depend on the force of the water but rather its weight.
This type of water wheel doesn’t have paddles or vanes but instead uses buckets. While
it may look similar, it is quite different. The buckets are filled with water as they pass
under the water sluice. That makes the wheel off-balance, causing it to turn and offer a
new bucket to be filled. As the wheel continues to turn, subsequent buckets are filled,
creating a great imbalance between the two sides of the wheel. This imbalance is
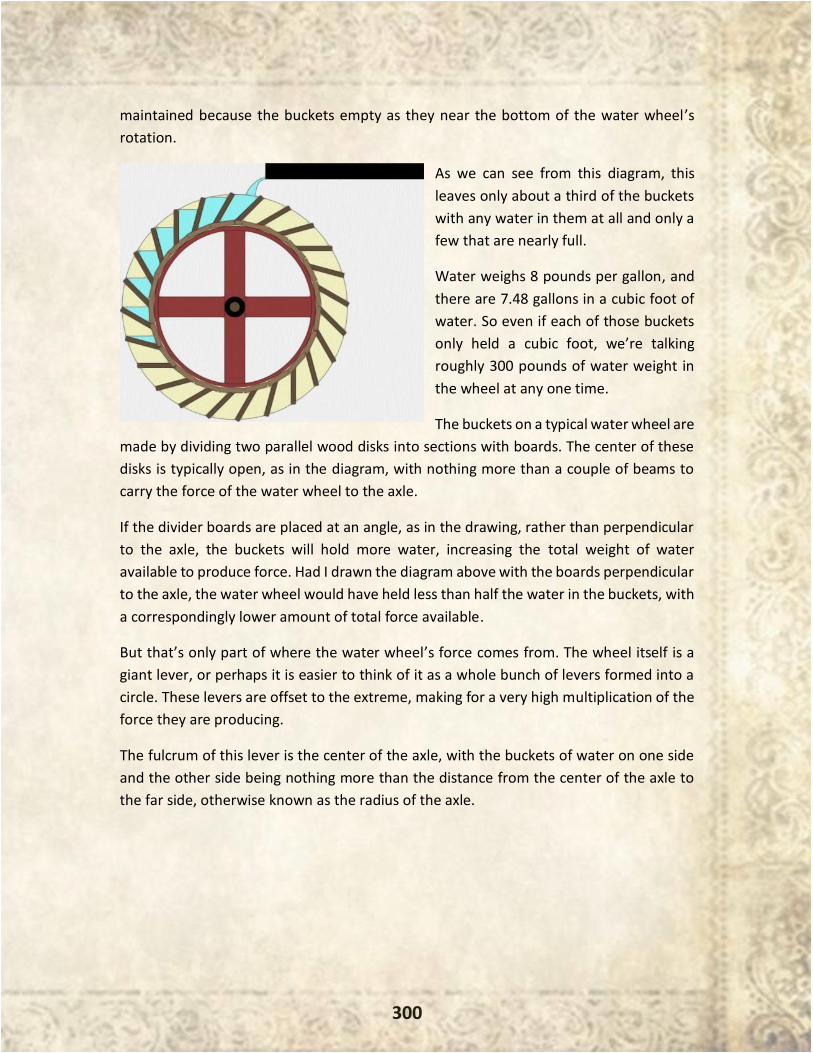
300
maintained because the buckets empty as they near the bottom of the water wheel’s
rotation.
As we can see from this diagram, this
leaves only about a third of the buckets
with any water in them at all and only a
few that are nearly full.
Water weighs 8 pounds per gallon, and
there are 7.48 gallons in a cubic foot of
water. So even if each of those buckets
only held a cubic foot, we’re talking
roughly 300 pounds of water weight in
the wheel at any one time.
The buckets on a typical water wheel are
made by dividing two parallel wood disks into sections with boards. The center of these
disks is typically open, as in the diagram, with nothing more than a couple of beams to
carry the force of the water wheel to the axle.
If the divider boards are placed at an angle, as in the drawing, rather than perpendicular
to the axle, the buckets will hold more water, increasing the total weight of water
available to produce force. Had I drawn the diagram above with the boards perpendicular
to the axle, the water wheel would have held less than half the water in the buckets, with
a correspondingly lower amount of total force available.
But that’s only part of where the water wheel’s force comes from. The wheel itself is a
giant lever, or perhaps it is easier to think of it as a whole bunch of levers formed into a
circle. These levers are offset to the extreme, making for a very high multiplication of the
force they are producing.
The fulcrum of this lever is the center of the axle, with the buckets of water on one side
and the other side being nothing more than the distance from the center of the axle to
the far side, otherwise known as the radius of the axle.
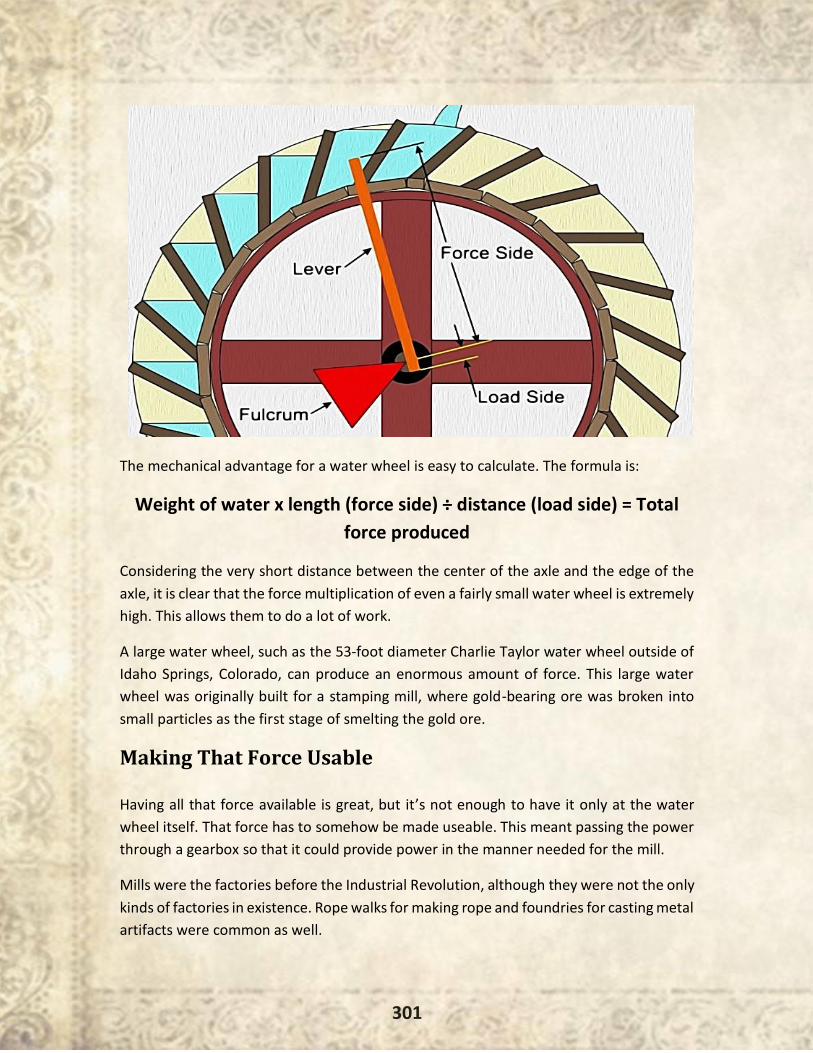
301
The mechanical advantage for a water wheel is easy to calculate. The formula is:
Weight of water x length (force side) ÷ distance (load side) = Total
force produced
Considering the very short distance between the center of the axle and the edge of the
axle, it is clear that the force multiplication of even a fairly small water wheel is extremely
high. This allows them to do a lot of work.
A large water wheel, such as the 53-foot diameter Charlie Taylor water wheel outside of
Idaho Springs, Colorado, can produce an enormous amount of force. This large water
wheel was originally built for a stamping mill, where gold-bearing ore was broken into
small particles as the first stage of smelting the gold ore.
Making That Force Usable
Having all that force available is great, but it’s not enough to have it only at the water
wheel itself. That force has to somehow be made useable. This meant passing the power
through a gearbox so that it could provide power in the manner needed for the mill.
Mills were the factories before the Industrial Revolution, although they were not the only
kinds of factories in existence. Rope walks for making rope and foundries for casting metal
artifacts were common as well.
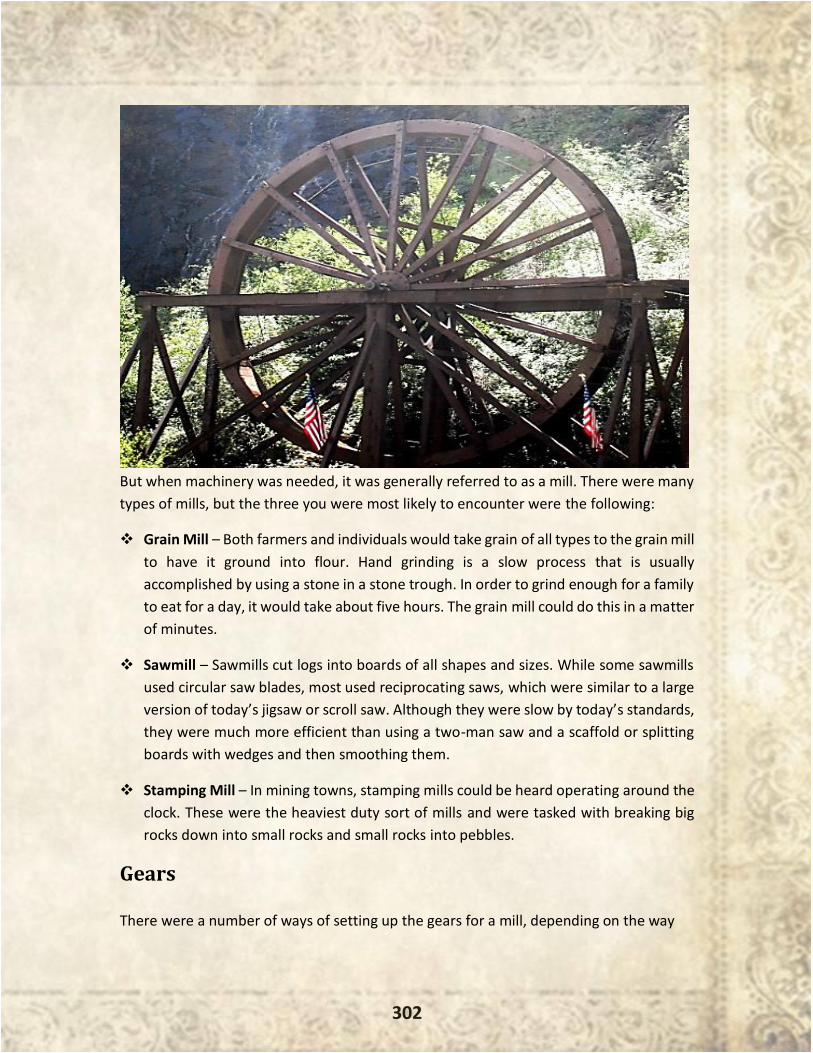
302
But when machinery was needed, it was generally referred to as a mill. There were many
types of mills, but the three you were most likely to encounter were the following:
❖ Grain Mill – Both farmers and individuals would take grain of all types to the grain mill
to have it ground into flour. Hand grinding is a slow process that is usually
accomplished by using a stone in a stone trough. In order to grind enough for a family
to eat for a day, it would take about five hours. The grain mill could do this in a matter
of minutes.
❖ Sawmill – Sawmills cut logs into boards of all shapes and sizes. While some sawmills
used circular saw blades, most used reciprocating saws, which were similar to a large
version of today’s jigsaw or scroll saw. Although they were slow by today’s standards,
they were much more efficient than using a two-man saw and a scaffold or splitting
boards with wedges and then smoothing them.
❖ Stamping Mill – In mining towns, stamping mills could be heard operating around the
clock. These were the heaviest duty sort of mills and were tasked with breaking big
rocks down into small rocks and small rocks into pebbles.
Gears
There were a number of ways of setting up the gears for a mill, depending on the way

303
the mill was going to be used and the time period the mill was built in. Earlier mills used
wood gears, while later ones used metal gears. Metal was much more expensive but could
handle a heavier load and would last longer. Wood gears fell into three basic categories:
spur gear, crown gear, and lantern gear. To protect them from the weather, the gears
were pretty much always inside the mill, usually in the lower story.
In the case of a grain mill, it would be necessary to change the direction of the water
wheel’s force by 90 degrees. This was done by either attaching a spur gear to the water
wheel’s axle and a crown gear to the grinding stone’s axle or connecting a crown gear to
the water wheel’s axle and a lantern gear to the grinding stone’s axle.
In this diagram, the axles have been removed and the gears separated for clarity.
In actual use, the teeth of the gears would mesh with each other.
There would be a horizontal axle going through the vertical gear (spur gear on the left or
crown gear on the right) and a vertical axle going through the horizontal gear (crown gear
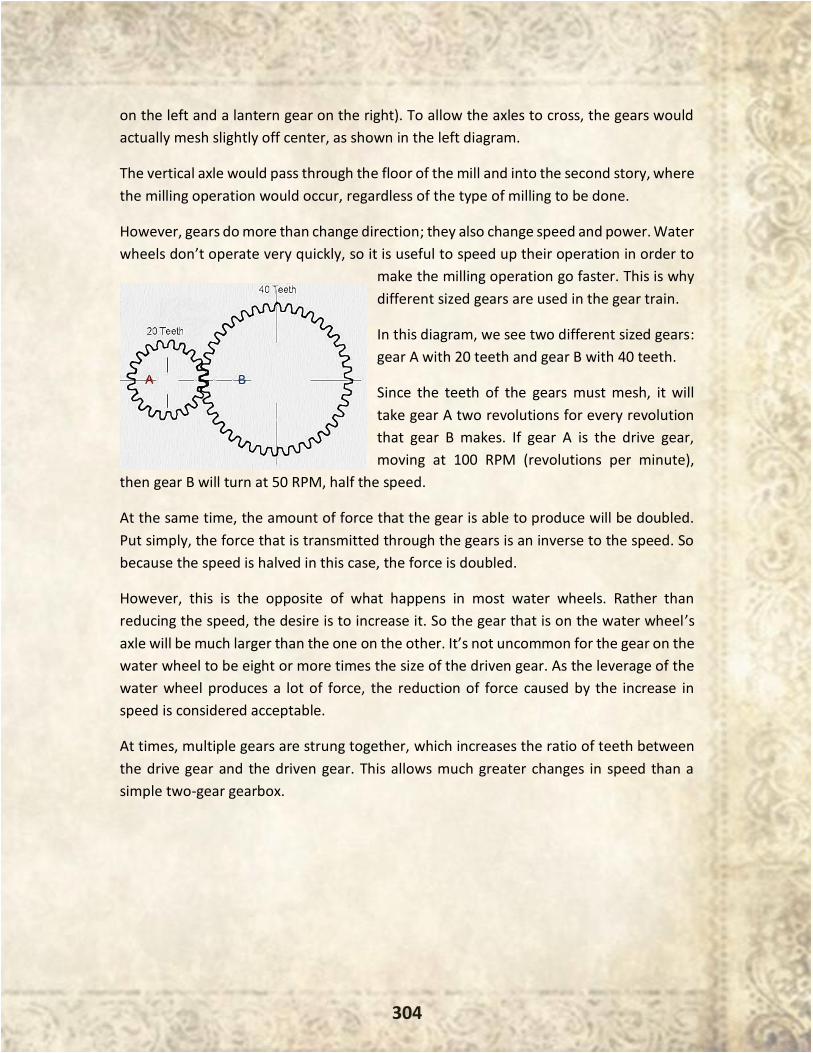
304
on the left and a lantern gear on the right). To allow the axles to cross, the gears would
actually mesh slightly off center, as shown in the left diagram.
The vertical axle would pass through the floor of the mill and into the second story, where
the milling operation would occur, regardless of the type of milling to be done.
However, gears do more than change direction; they also change speed and power. Water
wheels don’t operate very quickly, so it is useful to speed up their operation in order to
make the milling operation go faster. This is why
different sized gears are used in the gear train.
In this diagram, we see two different sized gears:
gear A with 20 teeth and gear B with 40 teeth.
Since the teeth of the gears must mesh, it will
take gear A two revolutions for every revolution
that gear B makes. If gear A is the drive gear,
moving at 100 RPM (revolutions per minute),
then gear B will turn at 50 RPM, half the speed.
At the same time, the amount of force that the gear is able to produce will be doubled.
Put simply, the force that is transmitted through the gears is an inverse to the speed. So
because the speed is halved in this case, the force is doubled.
However, this is the opposite of what happens in most water wheels. Rather than
reducing the speed, the desire is to increase it. So the gear that is on the water wheel’s
axle will be much larger than the one on the other. It’s not uncommon for the gear on the
water wheel to be eight or more times the size of the driven gear. As the leverage of the
water wheel produces a lot of force, the reduction of force caused by the increase in
speed is considered acceptable.
At times, multiple gears are strung together, which increases the ratio of teeth between
the drive gear and the driven gear. This allows much greater changes in speed than a
simple two-gear gearbox.
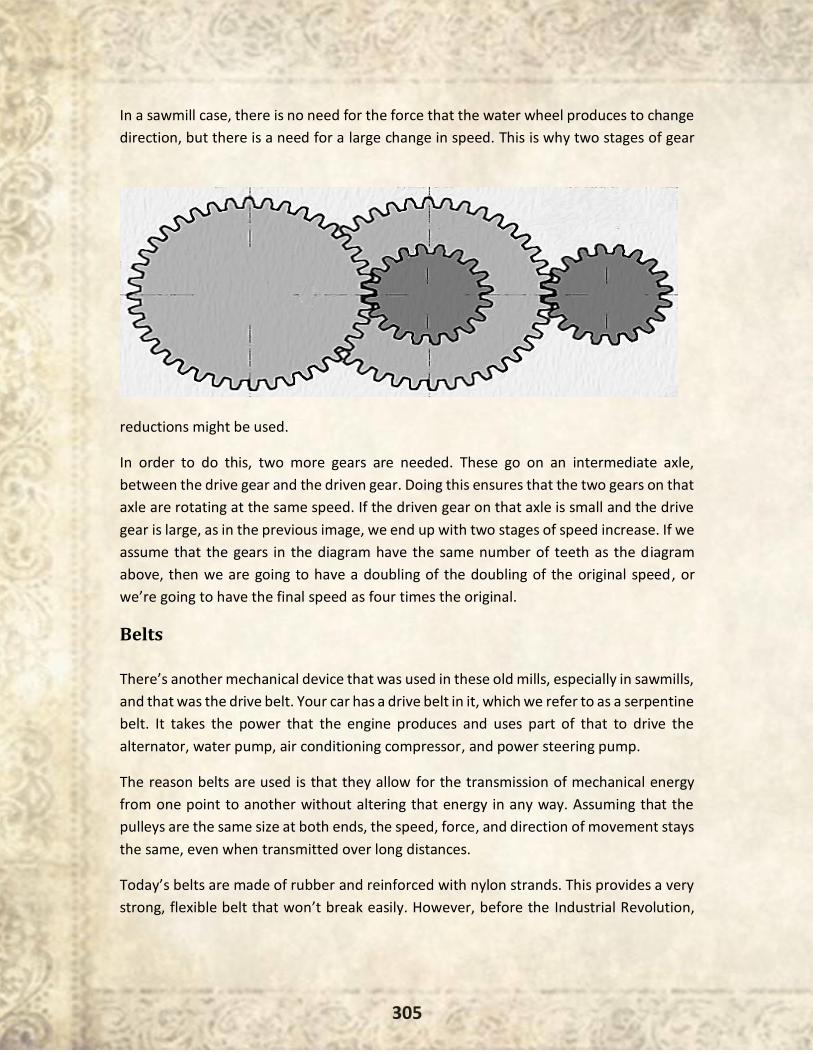
305
In a sawmill case, there is no need for the force that the water wheel produces to change
direction, but there is a need for a large change in speed. This is why two stages of gear
reductions might be used.
In order to do this, two more gears are needed. These go on an intermediate axle,
between the drive gear and the driven gear. Doing this ensures that the two gears on that
axle are rotating at the same speed. If the driven gear on that axle is small and the drive
gear is large, as in the previous image, we end up with two stages of speed increase. If we
assume that the gears in the diagram have the same number of teeth as the diagram
above, then we are going to have a doubling of the doubling of the original speed, or
we’re going to have the final speed as four times the original.
Belts
There’s another mechanical device that was used in these old mills, especially in sawmills,
and that was the drive belt. Your car has a drive belt in it, which we refer to as a serpentine
belt. It takes the power that the engine produces and uses part of that to drive the
alternator, water pump, air conditioning compressor, and power steering pump.
The reason belts are used is that they allow for the transmission of mechanical energy
from one point to another without altering that energy in any way. Assuming that the
pulleys are the same size at both ends, the speed, force, and direction of movement stays
the same, even when transmitted over long distances.
Today’s belts are made of rubber and reinforced with nylon strands. This provides a very
strong, flexible belt that won’t break easily. However, before the Industrial Revolution,

306
they didn’t have the capability of making belts like that. The technology actually came out
of designing pneumatic tires, which were invented in the 1890s.
Until then, belts were made out of leather straps that were stitched together. One
advantage of a mill that uses belts is the ability to disconnect the saw blade from the
water wheel. In this manner, the saw can be stopped without having to stop the mill
entirely.
That is a nice safety feature and a fairly easy one to build in. All that is needed is an extra
pulley that the belt goes around. Then, when the mill needs to be stopped, this extra
pulley is moved, creating slack in the belt. The friction in the saw will naturally cause it to
slow.
For Reciprocating Saws
I mentioned earlier that most sawmills used reciprocating blades rather than circular
blades. That was a simple necessity as the amount of steel required to make a circular
saw blade is much larger.
Most town blacksmiths wouldn’t have the capability of working that big a piece of steel.
But they could work a piece of steel big enough to make, repair, sharpen, or set the teeth
of a reciprocating saw blade.
To covert the rotational power of a water wheel into the linear mechanical power needed
for a reciprocating saw blade, a simple crankshaft is used. This becomes the axle for either
the water wheel or for the reduction gear, depending on how the sawmill is designed.
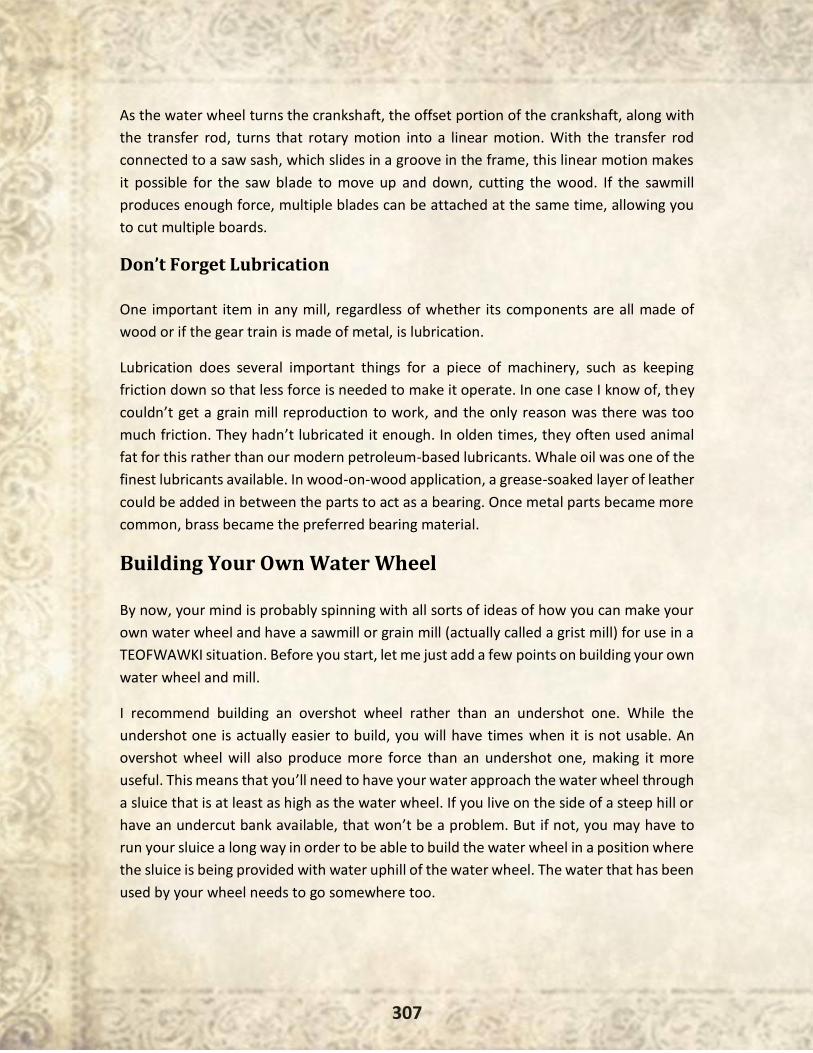
307
As the water wheel turns the crankshaft, the offset portion of the crankshaft, along with
the transfer rod, turns that rotary motion into a linear motion. With the transfer rod
connected to a saw sash, which slides in a groove in the frame, this linear motion makes
it possible for the saw blade to move up and down, cutting the wood. If the sawmill
produces enough force, multiple blades can be attached at the same time, allowing you
to cut multiple boards.
Don’t Forget Lubrication
One important item in any mill, regardless of whether its components are all made of
wood or if the gear train is made of metal, is lubrication.
Lubrication does several important things for a piece of machinery, such as keeping
friction down so that less force is needed to make it operate. In one case I know of, they
couldn’t get a grain mill reproduction to work, and the only reason was there was too
much friction. They hadn’t lubricated it enough. In olden times, they often used animal
fat for this rather than our modern petroleum-based lubricants. Whale oil was one of the
finest lubricants available. In wood-on-wood application, a grease-soaked layer of leather
could be added in between the parts to act as a bearing. Once metal parts became more
common, brass became the preferred bearing material.
Building Your Own Water Wheel
By now, your mind is probably spinning with all sorts of ideas of how you can make your
own water wheel and have a sawmill or grain mill (actually called a grist mill) for use in a
TEOFWAWKI situation. Before you start, let me just add a few points on building your own
water wheel and mill.
I recommend building an overshot wheel rather than an undershot one. While the
undershot one is actually easier to build, you will have times when it is not usable. An
overshot wheel will also produce more force than an undershot one, making it more
useful. This means that you’ll need to have your water approach the water wheel through
a sluice that is at least as high as the water wheel. If you live on the side of a steep hill or
have an undercut bank available, that won’t be a problem. But if not, you may have to
run your sluice a long way in order to be able to build the water wheel in a position where
the sluice is being provided with water uphill of the water wheel. The water that has been
used by your wheel needs to go somewhere too.
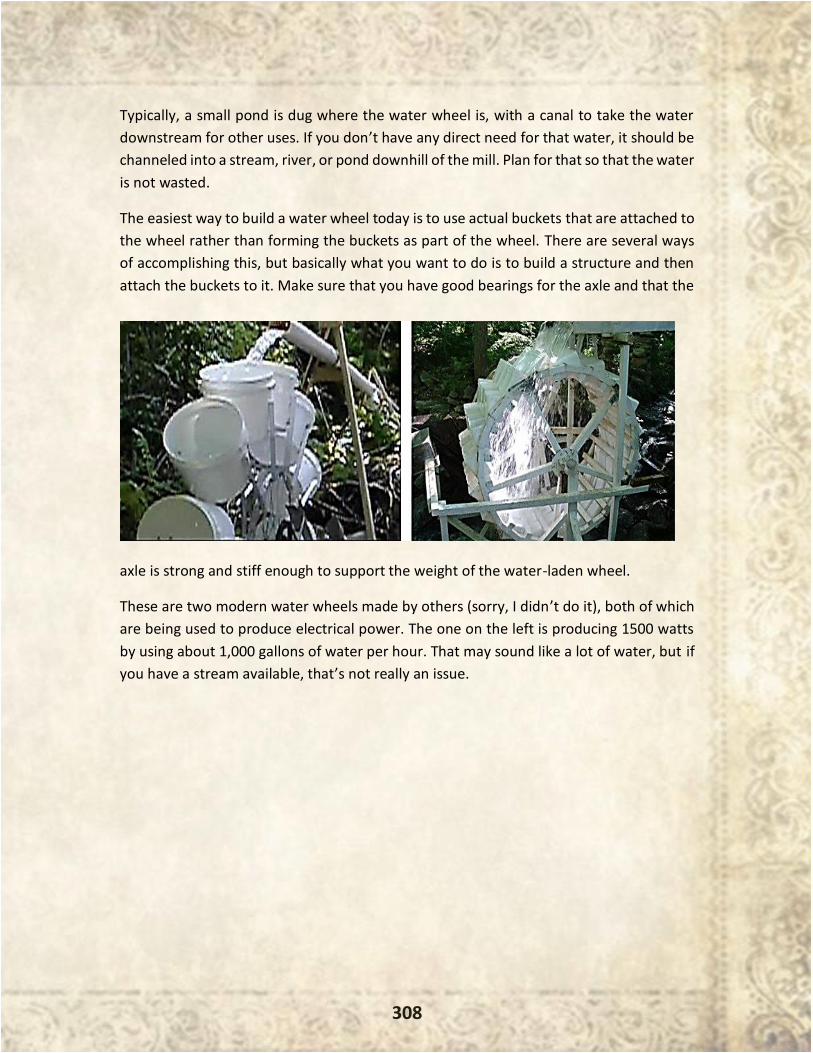
308
Typically, a small pond is dug where the water wheel is, with a canal to take the water
downstream for other uses. If you don’t have any direct need for that water, it should be
channeled into a stream, river, or pond downhill of the mill. Plan for that so that the water
is not wasted.
The easiest way to build a water wheel today is to use actual buckets that are attached to
the wheel rather than forming the buckets as part of the wheel. There are several ways
of accomplishing this, but basically what you want to do is to build a structure and then
attach the buckets to it. Make sure that you have good bearings for the axle and that the
axle is strong and stiff enough to support the weight of the water-laden wheel.
These are two modern water wheels made by others (sorry, I didn’t do it), both of which
are being used to produce electrical power. The one on the left is producing 1500 watts
by using about 1,000 gallons of water per hour. That may sound like a lot of water, but if
you have a stream available, that’s not really an issue.
Related Documents