ENDNOTE ® X7 THE LITTLE ENDNOTE HOW-TO BOOK

Welcome message from author
This document is posted to help you gain knowledge. Please leave a comment to let me know what you think about it! Share it to your friends and learn new things together.
Transcript
ENDNOTE® X7
THE LITTLE ENDNOTE HOW-TO BOOK
EndNote How-To Book Copyright © Thomson Reuters 2014 Page 2 of 103 September 23, 2014
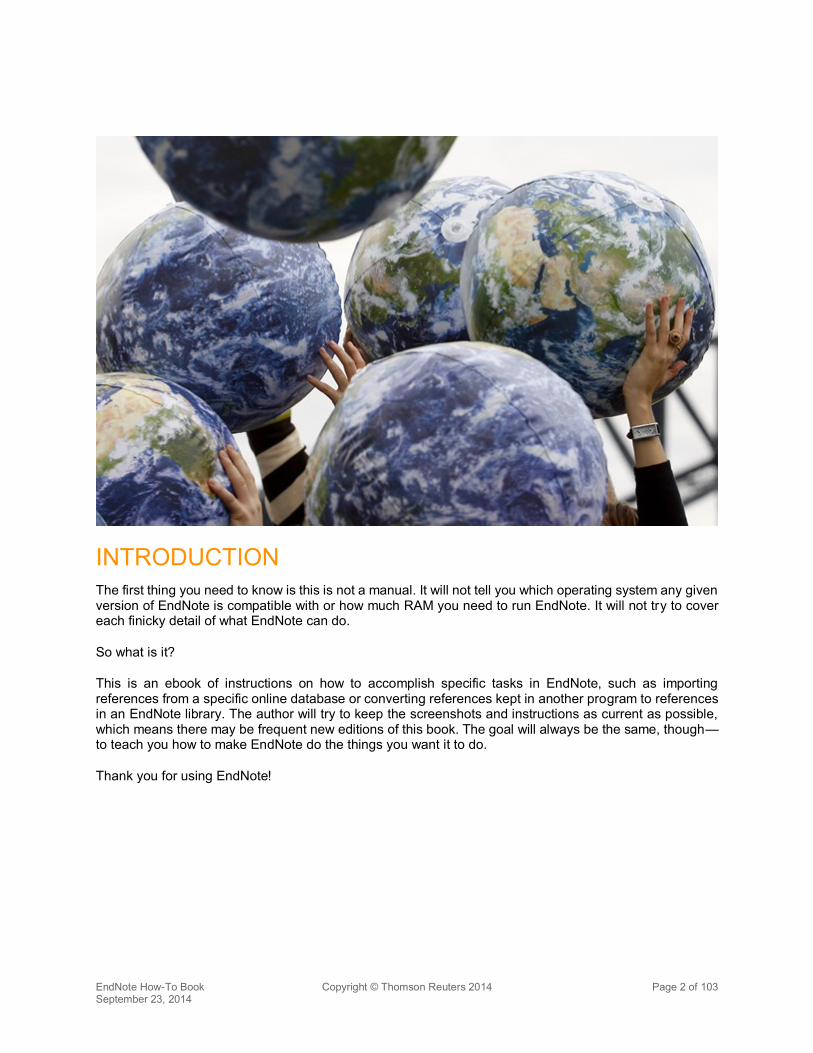
INTRODUCTION The first thing you need to know is this is not a manual. It will not tell you which operating system any given version of EndNote is compatible with or how much RAM you need to run EndNote. It will not try to cover each finicky detail of what EndNote can do.
So what is it?
This is an ebook of instructions on how to accomplish specific tasks in EndNote, such as importing references from a specific online database or converting references kept in another program to references in an EndNote library. The author will try to keep the screenshots and instructions as current as possible, which means there may be frequent new editions of this book. The goal will always be the same, though—to teach you how to make EndNote do the things you want it to do.
Thank you for using EndNote!

EndNote How-To Book Copyright © Thomson Reuters 2014 Page 3 of 103 September 23, 2014
TABLE OF CONTENTS TABLE OF CONTENTS ............................................................................................................................. 3 1 INSTALLING ENDNOTE ............................................................................................................... 6 1.1 FOR ADMINISTRATORS ..................................................................................................................... 6
1.1.1 Creating a Site License Installer for Windows ................................................................................ 6 1.1.2 Creating a Site License Installer for Macintosh ............................................................................ 10 1.2 FOR USERS ................................................................................................................................... 13 1.2.1 A Custom Installation for a Site License Copy of EndNote on Windows ...................................... 13 1.2.2 A Custom Installation for a Single-User Copy of EndNote on Windows ....................................... 19 1.2.3 A Custom Installation for a Site License Copy of EndNote on Macintosh .................................... 19 1.2.4 A Custom Installation for a Single-User Copy of EndNote on Macintosh ..................................... 24 1.2.5 Uninstalling EndNote on Macintosh ............................................................................................. 24 2 USING DIRECT EXPORT TO IMPORT REFERENCES FROM ONLINE DATABASES ............ 26 2.1 DIRECT EXPORT FROM THOMSON REUTERS WEB OF SCIENCE .......................................................... 26
2.1.1 Using the Marked List .................................................................................................................. 26 2.1.2 Not Using the Marked List ............................................................................................................ 28 2.2 DIRECT EXPORT FROM PUBMED ..................................................................................................... 30 2.2.1 Using the Clipboard ...................................................................................................................... 30 2.2.2 Not Using the Clipboard ............................................................................................................... 32 2.3 BROWSER ACTIONS WITH DIRECT EXPORT ...................................................................................... 34
2.3.1 Firefox on Windows ...................................................................................................................... 34 2.3.2 Firefox on Macintosh .................................................................................................................... 36 2.3.3 Internet Explorer on Windows ...................................................................................................... 38 2.3.4 Google Chrome on Windows ....................................................................................................... 38 2.4 ENDNOTE ONLINE PLUG-INS FOR DIRECT EXPORT ........................................................................... 39 2.4.1 Internet Explorer........................................................................................................................... 39 2.4.2 Firefox .......................................................................................................................................... 40 2.4.3 Google Chrome ............................................................................................................................ 41 3 IMPORTING PDF FILES AND PDF HANDLING ......................................................................... 42 3.1 IMPORTING PDF FILES ................................................................................................................... 42
3.1.1 Importing a Folder of PDF Files on Windows ............................................................................... 42 3.1.2 Importing a Folder of PDF Files on Macintosh ............................................................................. 43 3.2 SETTING PDF HANDLING ................................................................................................................ 44 3.2.1 Windows ...................................................................................................................................... 44 3.2.2 Macintosh ..................................................................................................................................... 45 4 ENDNOTE ONLINE ..................................................................................................................... 47
EndNote How-To Book Copyright © Thomson Reuters 2014 Page 4 of 103 September 23, 2014
4.1 SET UP ENDNOTE SYNC ................................................................................................................. 47 4.1.1 Back Up the EndNote Desktop Library ......................................................................................... 47 4.1.2 EndNote Sync .............................................................................................................................. 48 4.2 INSTALLING THE INTERNET EXPLORER PLUG-IN ............................................................................... 49
4.2.1 From within Internet Explorer ....................................................................................................... 49 4.2.2 Installing from the Downloaded .msi File ...................................................................................... 54 4.3 INSTALLING THE FIREFOX EXTENSION .............................................................................................. 54 4.3.1 Windows and Macintosh .............................................................................................................. 54 4.4 USING DIRECT EXPORT ONLINE ...................................................................................................... 56 4.5 CAPTURING MULTIPLE REFERENCES ............................................................................................... 56
4.5.1 Installing the Capture Bookmarklet .............................................................................................. 56 4.5.2 Capture a Page of References from Google Scholar ................................................................... 57 4.5.3 Capture a Set of References from PubMed ................................................................................. 58 4.6 CAPTURING A SINGLE REFERENCE .................................................................................................. 60 5 CITE WHILE YOU WRITE ........................................................................................................... 62 5.1 CITE WHILE YOU WRITE IN MICROSOFT WORD ON WINDOWS ........................................................... 62
5.1.1 Installing the Cite While You Write Tools ..................................................................................... 62 5.1.2 Adding Citations to a Document Using Insert Citation.................................................................. 62 5.1.3 Adding Citations to a Document Using Insert Selected Citations ................................................. 64 5.1.4 Selecting the EndNote Style for Your Citations and Bibliography ................................................ 64 5.1.5 Editing Citations in the Document ................................................................................................ 65 5.2 CITE WHILE YOU WRITE IN MICROSOFT WORD ON MACINTOSH ......................................................... 68
5.2.1 Installing the Cite While You Write Tools ..................................................................................... 68 5.2.2 Adding Citations to a Document Using Insert Citation.................................................................. 68 5.2.3 Adding Citations to a Document Using Insert Selected Citations ................................................. 70 5.2.4 Selecting the EndNote Style for Your Citations and Bibliography ................................................ 71 5.2.5 Editing Citations in the Document ................................................................................................ 72 6 COLLABORATION: SHARING ENDNOTE REFERENCES ....................................................... 76 6.1 HOW NOT TO SHARE AN ENDNOTE LIBRARY ................................................................................... 76 6.1.1 Don’t Put EndNote Libraries on “Cloud” Services ........................................................................ 76 6.1.2 Don’t Put EndNote Libraries on Distant Network Servers ............................................................ 76 6.1.3 Don’t Send the .enl File for a Library When Sharing a Library ..................................................... 76 6.2 SHARING FULL ENDNOTE LIBRARIES .............................................................................................. 77 6.2.1 Unlimited Attachment Space in EndNote Online .......................................................................... 77 6.2.2 Full Library Sharing ...................................................................................................................... 78 6.3 SHARE GROUPS IN ENDNOTE ONLINE ............................................................................................. 82
6.3.1 Creating an EndNote Online Library ............................................................................................ 83
EndNote How-To Book Copyright © Thomson Reuters 2014 Page 5 of 103 September 23, 2014
6.3.2 Share Your Group in EndNote Online .......................................................................................... 83 6.3.3 What the User You Shared Your Group with Will See ................................................................. 85 6.4 PUT A READ-ONLY ENDNOTE LIBRARY ON A NETWORK DRIVE ......................................................... 86 6.5 SEND A COMPRESSED LIBRARY ...................................................................................................... 87 6.6 THE TRAVELING LIBRARY ............................................................................................................... 88 6.6.1 Using the Traveling Library to Create Bibliographies in Shared Documents ................................ 88 6.6.2 Exporting the Traveling Library .................................................................................................... 90 7 CONVERTING FROM OTHER REFERENCING SOFTWARE .................................................... 92 7.1 CONVERTING FROM REFERENCE MANAGER TO ENDNOTE ................................................................. 92 7.1.1 Converting the Reference Manager Database ............................................................................. 92 7.1.2 Converting Reference Manager Attachments to EndNote Attachments ....................................... 96 7.1.3 Converting Word Documents with Reference Manager Citations ................................................ 98 8 INDEX ........................................................................................................................................ 101
EndNote How-To Book Copyright © Thomson Reuters 2014 Page 6 of 103 September 23, 2014
1 INSTALLING ENDNOTE
This chapter will have two main sections, one for administrators who need to create site license installers for their EndNote users, and one for users. Both of these sections will be detailed, with step-by-step instructions and screenshots.
Please note that you will need an administrative level of access sufficient to install software on your computer. Also note that security software or operating system security settings may stop the installation process at various times and ask your permission to continue. You must choose the option to continue for the software to be installed.
Please also note the network administrator instructions will only work for site license/volume installations. They will not work for single-user, concurrent, or workstation installations.
1.1 FOR ADMINISTRATORS
1.1.1 Creating a Site License Installer for Windows
A site license installer for Windows consists of two files: 1) ENX7Inst.msi and 2) license.dat. These two files can be distributed to users and the user can install EndNote on their computer without knowing the site’s product key for the installation. Anybody with knowledge of the product key for the site can create a site installer, with no programming knowledge needed.
x Download the EndNote Windows installer from http://endnote.com/x7/ENX7Inst.msi (the address is case-sensitive and must be typed exactly as shown).
x Download the ADMIN.zip file from http://endnote.com/sites/en/files/m/zip/admin.zip (the address is case-sensitive and must be typed exactly as shown).
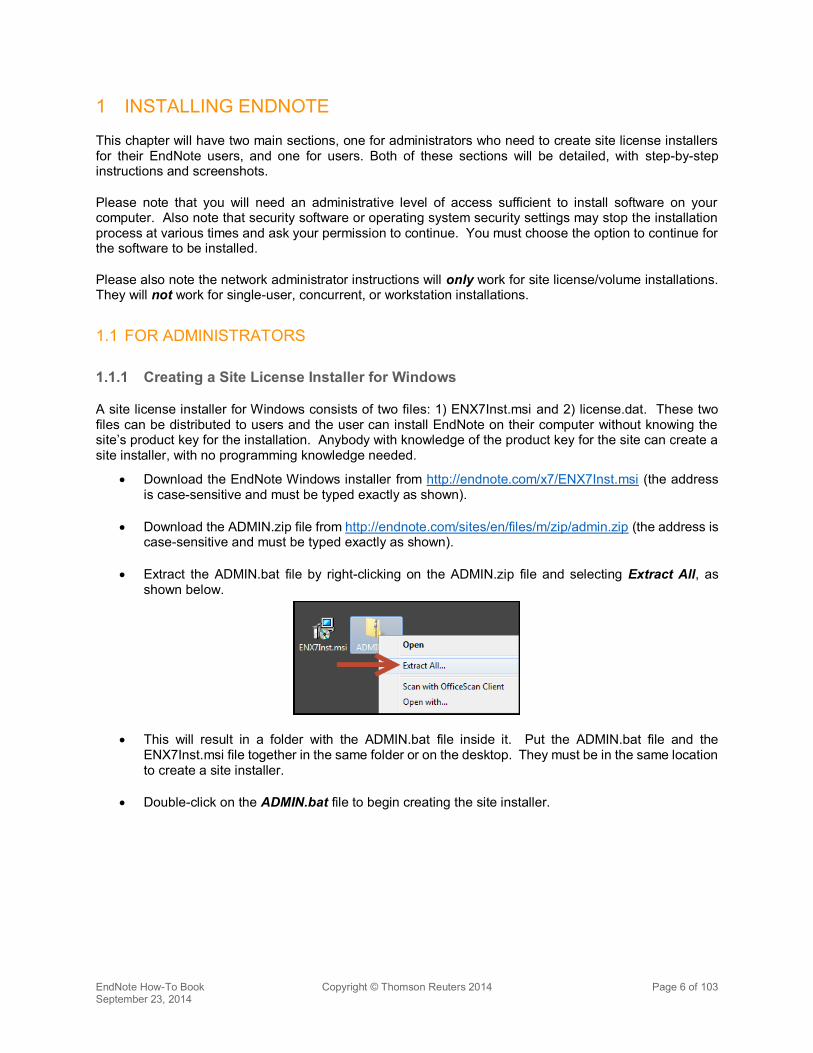
x Extract the ADMIN.bat file by right-clicking on the ADMIN.zip file and selecting Extract All, as shown below.
x This will result in a folder with the ADMIN.bat file inside it. Put the ADMIN.bat file and the ENX7Inst.msi file together in the same folder or on the desktop. They must be in the same location to create a site installer.
x Double-click on the ADMIN.bat file to begin creating the site installer.

EndNote How-To Book Copyright © Thomson Reuters 2014 Page 7 of 103 September 23, 2014
x If you see the window below, click the Run button.
x When the windows below appears, click the Next button.
EndNote How-To Book Copyright © Thomson Reuters 2014 Page 8 of 103 September 23, 2014
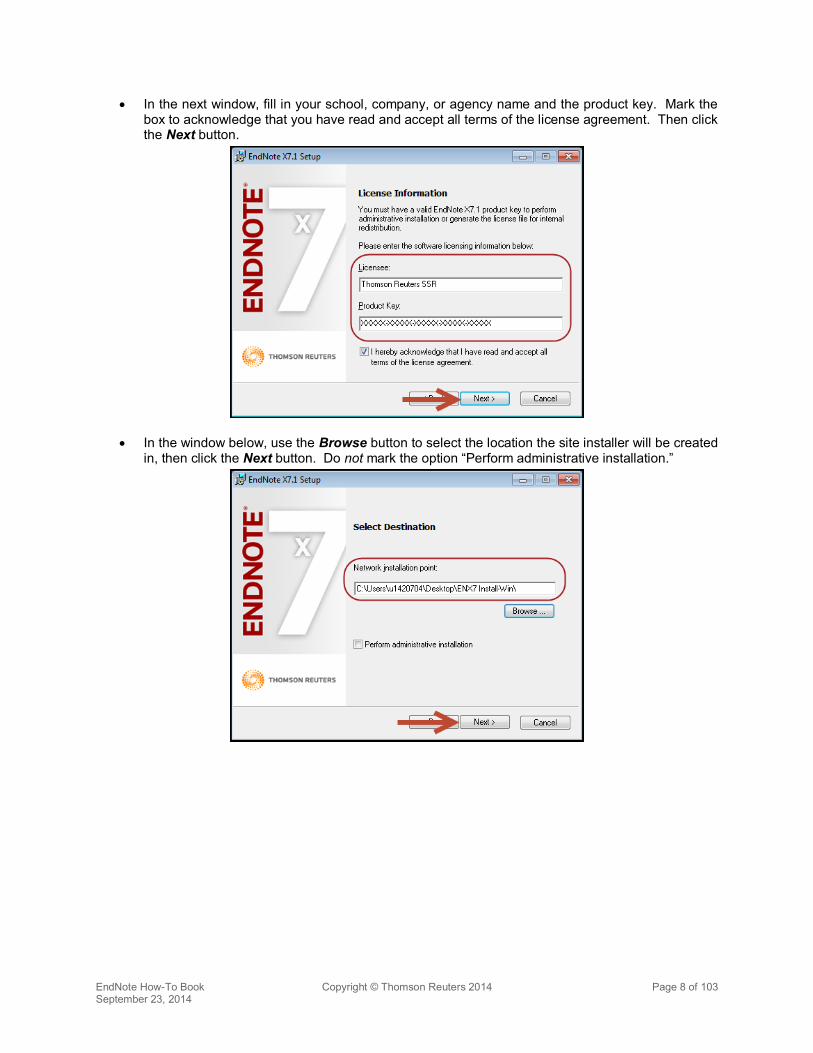
x In the next window, fill in your school, company, or agency name and the product key. Mark the box to acknowledge that you have read and accept all terms of the license agreement. Then click the Next button.
x In the window below, use the Browse button to select the location the site installer will be created in, then click the Next button. Do not mark the option “Perform administrative installation.”
EndNote How-To Book Copyright © Thomson Reuters 2014 Page 9 of 103 September 23, 2014
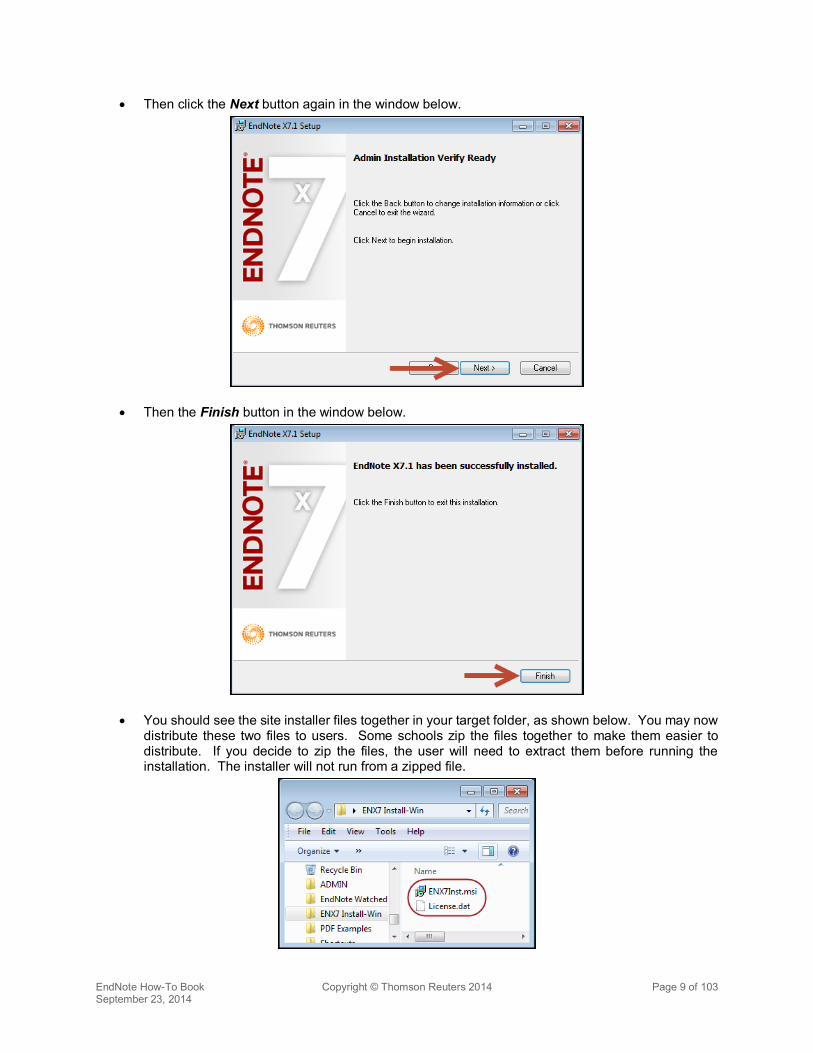
x Then click the Next button again in the window below.
x Then the Finish button in the window below.
x You should see the site installer files together in your target folder, as shown below. You may now distribute these two files to users. Some schools zip the files together to make them easier to distribute. If you decide to zip the files, the user will need to extract them before running the installation. The installer will not run from a zipped file.

EndNote How-To Book Copyright © Thomson Reuters 2014 Page 10 of 103 September 23, 2014
1.1.2 Creating a Site License Installer for Macintosh
A site license installer for Macintosh consists of a single file called EndNote X7 Site Installer.dmg. This file can be distributed to users and the user can install EndNote on their computer without needing the site’s product key for the installation. Anybody with knowledge of the product key for the site can create a site installer, with no programming knowledge needed.
Note you may receive a message that EndNote is requesting access to your Contacts during the installation. This access is used to determine the current user of the software and you are not required to allow access to continue the installation.
x Download the EndNote Macintosh installer from http://endnote.com/x7/EndNoteX7Installer.dmg (the address is case-sensitive and must be typed exactly as shown).
x Place the EndNoteX7Installer.dmg file on your desktop. Then double-click on the file.
x Do not drag the EndNote X7 folder to Applications as shown in the image below. Instead, double-click on the EndNote X7 folder to begin creating the site installer.
x Double-click on the EndNote X7.app file.

EndNote How-To Book Copyright © Thomson Reuters 2014 Page 11 of 103 September 23, 2014
x If you see the window below, click Open.
x You will receive a warning that running EndNote from the disk image is meant only for volume license administrators, displayed in front of another EndNote window. Click Continue to continue creating a site license installer.
x Next you will receive a warning that you will need a valid volume license product key to create a redistributable image. A single-user license key cannot be used to create a site license installer. Click Next to continue.
EndNote How-To Book Copyright © Thomson Reuters 2014 Page 12 of 103 September 23, 2014
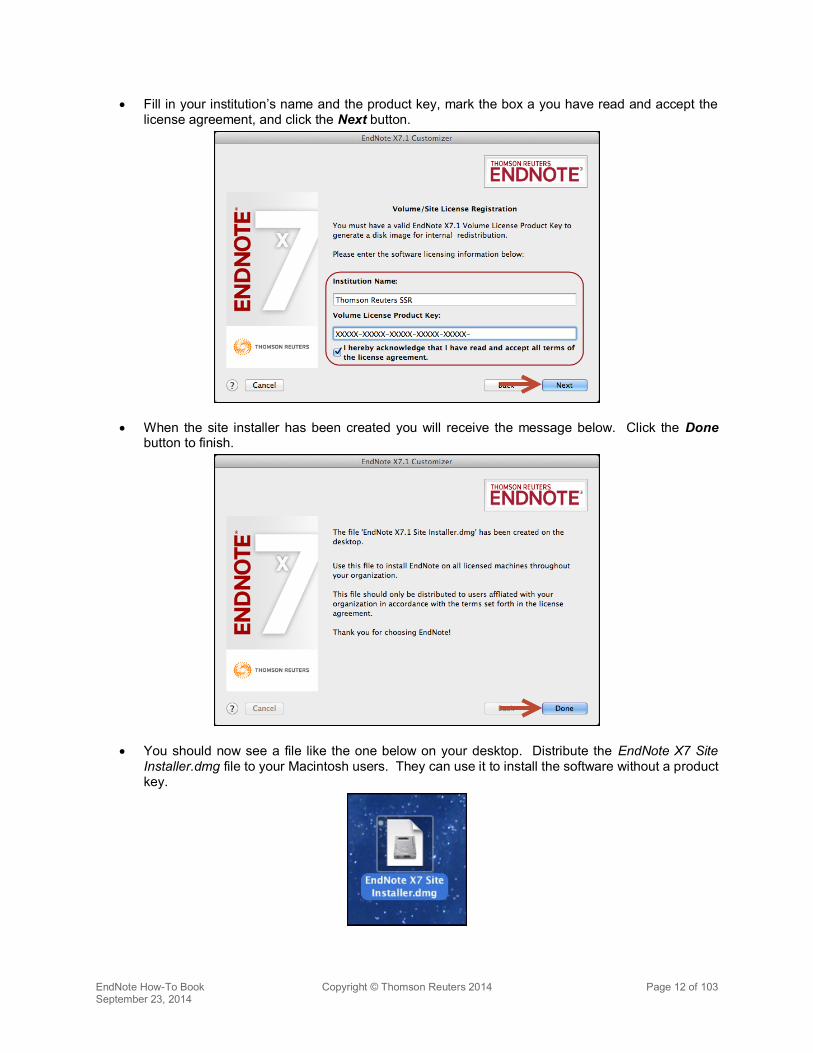
x Fill in your institution’s name and the product key, mark the box a you have read and accept the license agreement, and click the Next button.
x When the site installer has been created you will receive the message below. Click the Done button to finish.
x You should now see a file like the one below on your desktop. Distribute the EndNote X7 Site Installer.dmg file to your Macintosh users. They can use it to install the software without a product key.

EndNote How-To Book Copyright © Thomson Reuters 2014 Page 13 of 103 September 23, 2014
1.2 FOR USERS
1.2.1 A Custom Installation for a Site License Copy of EndNote on Windows
A typical installation of EndNote installs less than 500 styles, 500 filters, and 500 connection files to EndNote, even though there are thousands of styles, as well as many more filters and connection files. A custom installation will allow the user to add extra sets of styles, filters, and connection files to EndNote. For example, a user could add all the humanities styles available to the typical set.
If you have a previous version of EndNote installed, you should uninstall it using Control Panel before installing the new version.
x Your school, company, or agency will need to provide you with two files to install the program, an ENX7Inst.msi installer and a license.dat file. These two files must be together in the same folder for the installation to run without asking for a product key. If you are given a zipped file containing these two files, as in the example file shown at the left below, you will need to extract them from the zipped file before running the installer. Right-click on the file, then select the Extract All option as shown at the right below.
EndNote How-To Book Copyright © Thomson Reuters 2014 Page 14 of 103 September 23, 2014
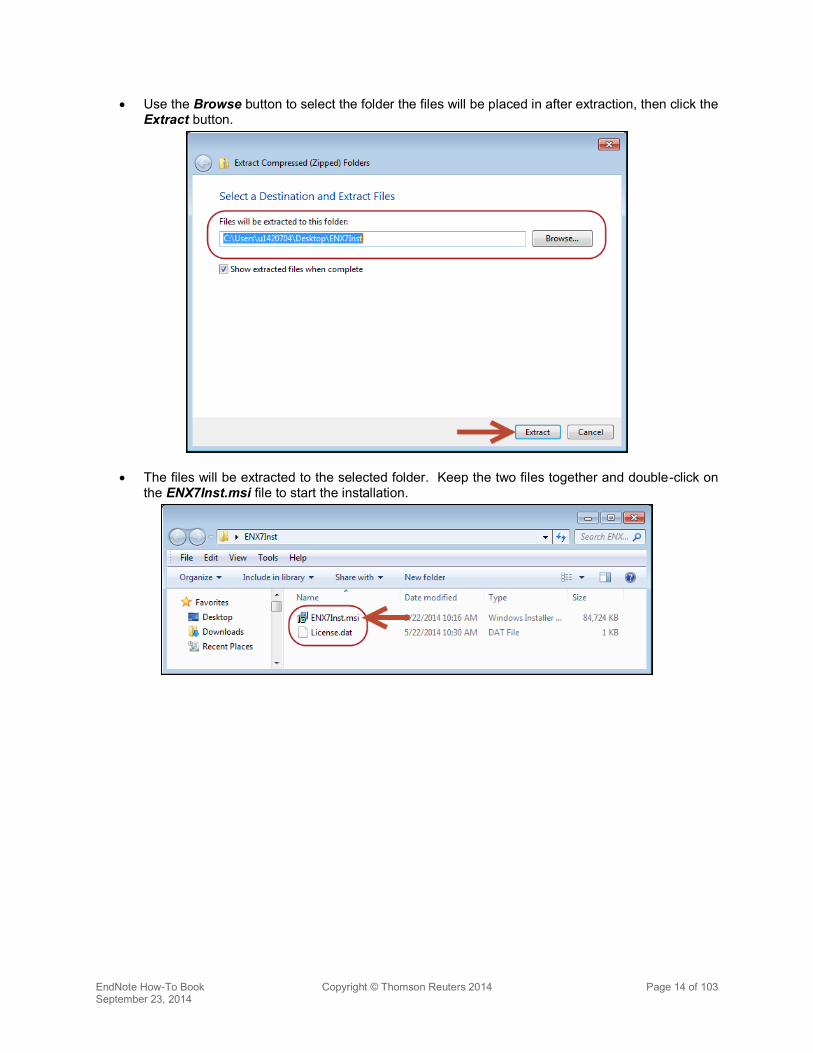
x Use the Browse button to select the folder the files will be placed in after extraction, then click the Extract button.
x The files will be extracted to the selected folder. Keep the two files together and double-click on the ENX7Inst.msi file to start the installation.
EndNote How-To Book Copyright © Thomson Reuters 2014 Page 15 of 103 September 23, 2014
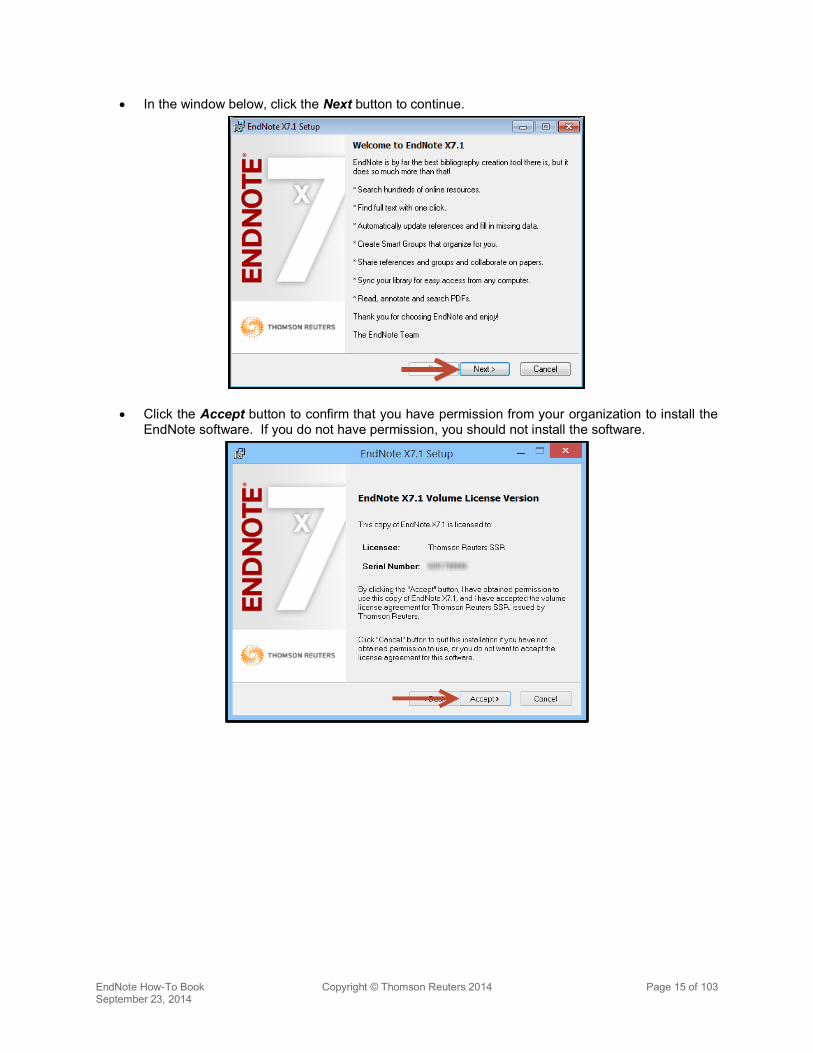
x In the window below, click the Next button to continue.
x Click the Accept button to confirm that you have permission from your organization to install the EndNote software. If you do not have permission, you should not install the software.
EndNote How-To Book Copyright © Thomson Reuters 2014 Page 16 of 103 September 23, 2014
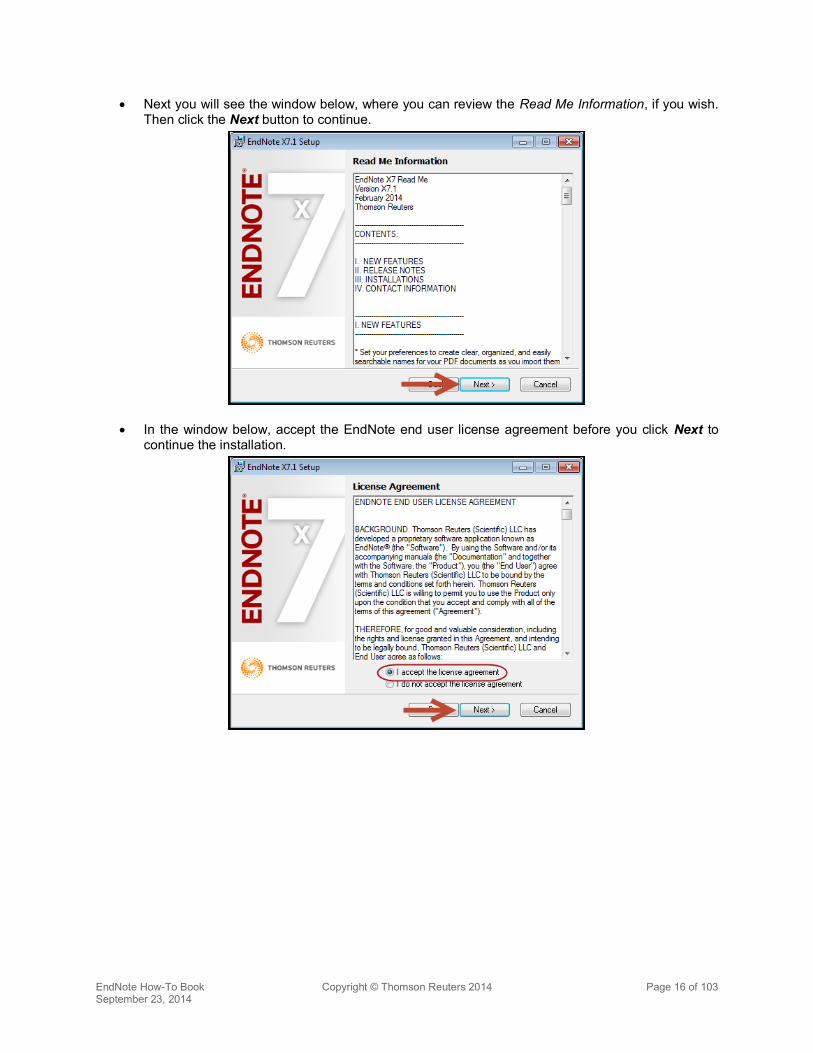
x Next you will see the window below, where you can review the Read Me Information, if you wish. Then click the Next button to continue.
x In the window below, accept the EndNote end user license agreement before you click Next to continue the installation.

EndNote How-To Book Copyright © Thomson Reuters 2014 Page 17 of 103 September 23, 2014
x In the window below, decide if you will perform a typical installation or a custom installation. If you select a Typical installation, a limited set of popular styles, filters, and connection files will be installed. If you select a Custom installation, you can choose which additional sets of styles, filters, and connection files will be added to the typical set. The remaining windows will show the options for a Custom installation.
x By default, the program will be installed in the C:\Program Files (x86)\EndNote X7\ folder, but you can change this if you need to. It is best to leave it with the default location unless it is necessary to put it in another folder for some reason, such as a lack of space on the C drive.
EndNote How-To Book Copyright © Thomson Reuters 2014 Page 18 of 103 September 23, 2014
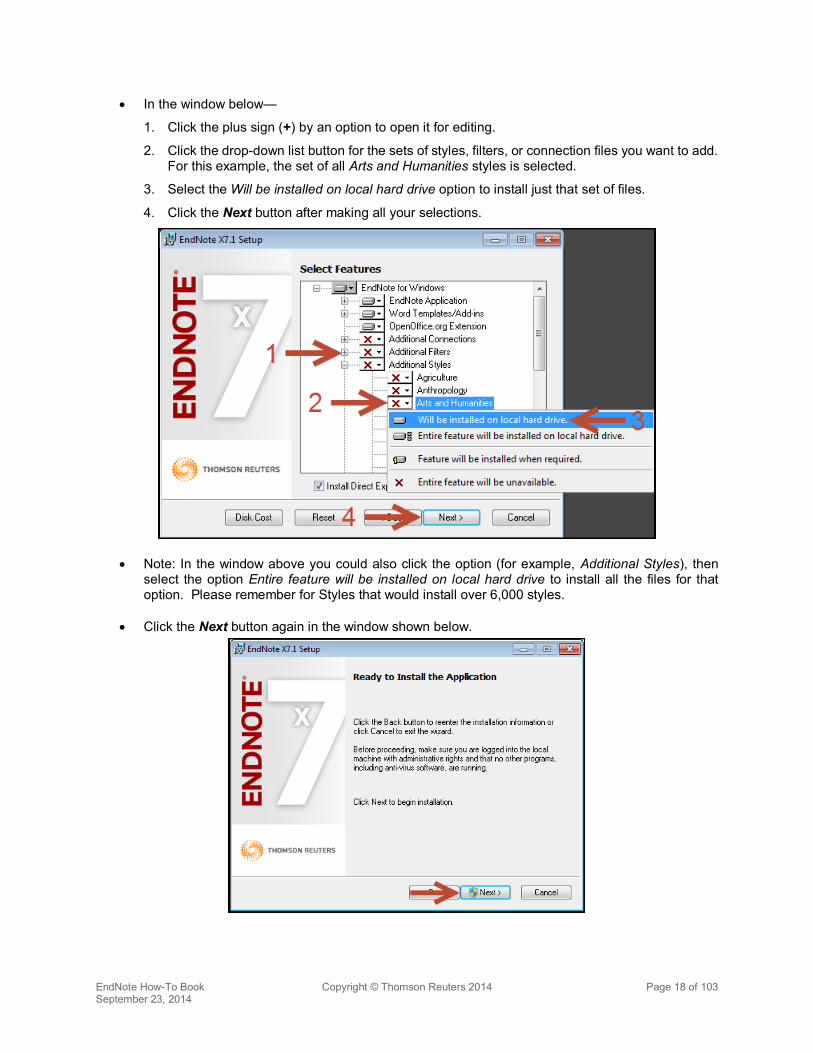
x In the window below—
1. Click the plus sign (+) by an option to open it for editing.
2. Click the drop-down list button for the sets of styles, filters, or connection files you want to add. For this example, the set of all Arts and Humanities styles is selected.
3. Select the Will be installed on local hard drive option to install just that set of files.
4. Click the Next button after making all your selections.
x Note: In the window above you could also click the option (for example, Additional Styles), then select the option Entire feature will be installed on local hard drive to install all the files for that option. Please remember for Styles that would install over 6,000 styles.
x Click the Next button again in the window shown below.
EndNote How-To Book Copyright © Thomson Reuters 2014 Page 19 of 103 September 23, 2014
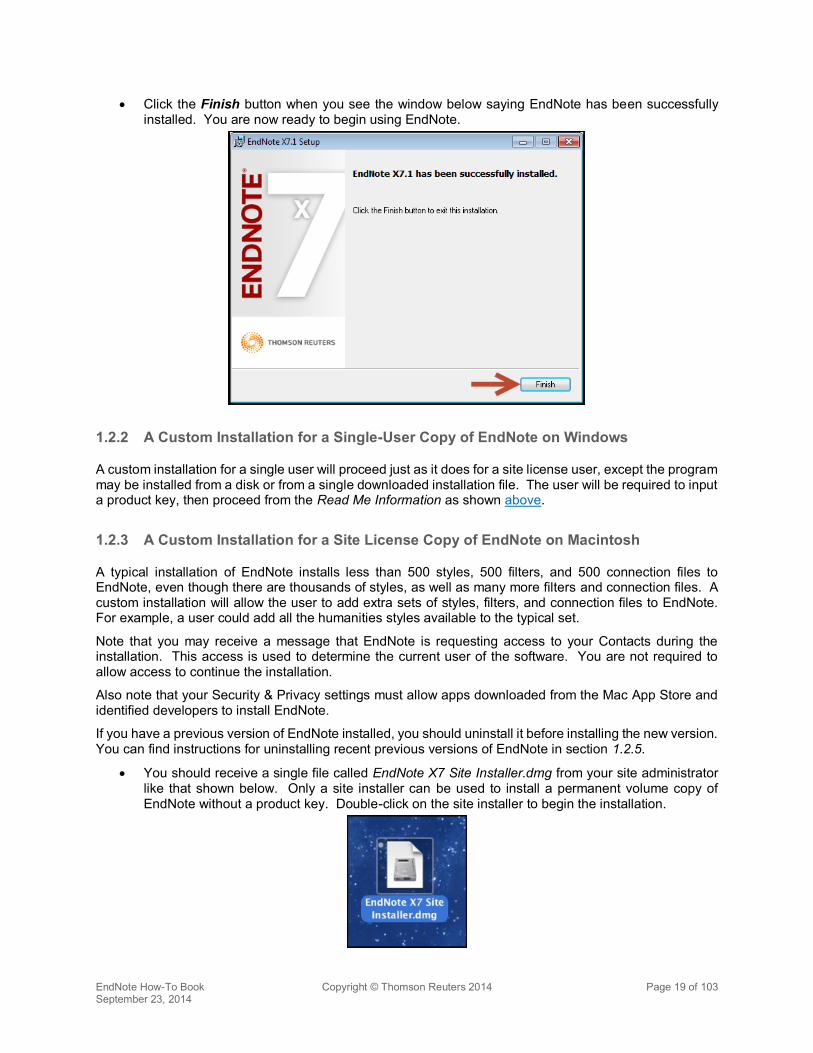
x Click the Finish button when you see the window below saying EndNote has been successfully installed. You are now ready to begin using EndNote.
1.2.2 A Custom Installation for a Single-User Copy of EndNote on Windows
A custom installation for a single user will proceed just as it does for a site license user, except the program may be installed from a disk or from a single downloaded installation file. The user will be required to input a product key, then proceed from the Read Me Information as shown above.
1.2.3 A Custom Installation for a Site License Copy of EndNote on Macintosh
A typical installation of EndNote installs less than 500 styles, 500 filters, and 500 connection files to EndNote, even though there are thousands of styles, as well as many more filters and connection files. A custom installation will allow the user to add extra sets of styles, filters, and connection files to EndNote. For example, a user could add all the humanities styles available to the typical set.
Note that you may receive a message that EndNote is requesting access to your Contacts during the installation. This access is used to determine the current user of the software. You are not required to allow access to continue the installation.
Also note that your Security & Privacy settings must allow apps downloaded from the Mac App Store and identified developers to install EndNote.
If you have a previous version of EndNote installed, you should uninstall it before installing the new version. You can find instructions for uninstalling recent previous versions of EndNote in section 1.2.5.
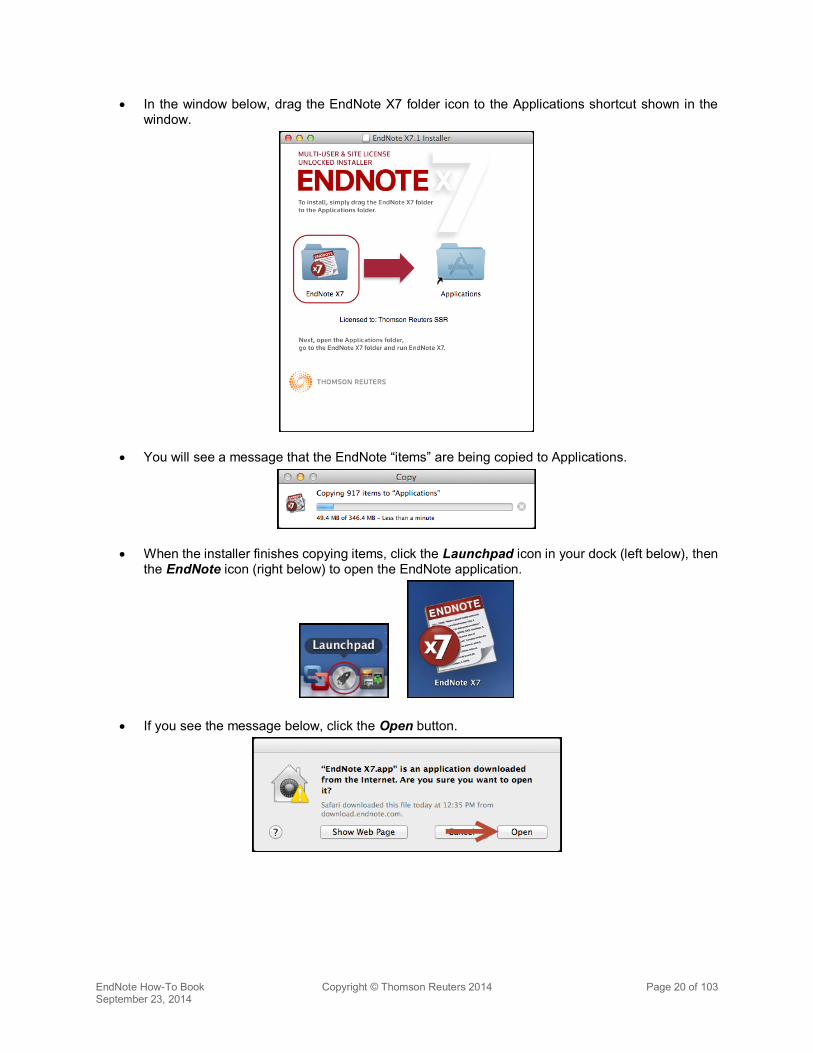
x You should receive a single file called EndNote X7 Site Installer.dmg from your site administrator like that shown below. Only a site installer can be used to install a permanent volume copy of EndNote without a product key. Double-click on the site installer to begin the installation.
EndNote How-To Book Copyright © Thomson Reuters 2014 Page 20 of 103 September 23, 2014
x In the window below, drag the EndNote X7 folder icon to the Applications shortcut shown in the window.
x You will see a message that the EndNote “items” are being copied to Applications.
x When the installer finishes copying items, click the Launchpad icon in your dock (left below), then the EndNote icon (right below) to open the EndNote application.
x If you see the message below, click the Open button.

EndNote How-To Book Copyright © Thomson Reuters 2014 Page 21 of 103 September 23, 2014
x The first time you open EndNote it will complete the installation process, starting with the message below. Click the Next button.
x You are then shown the Read Me information. Click the Next button to continue.
EndNote How-To Book Copyright © Thomson Reuters 2014 Page 22 of 103 September 23, 2014
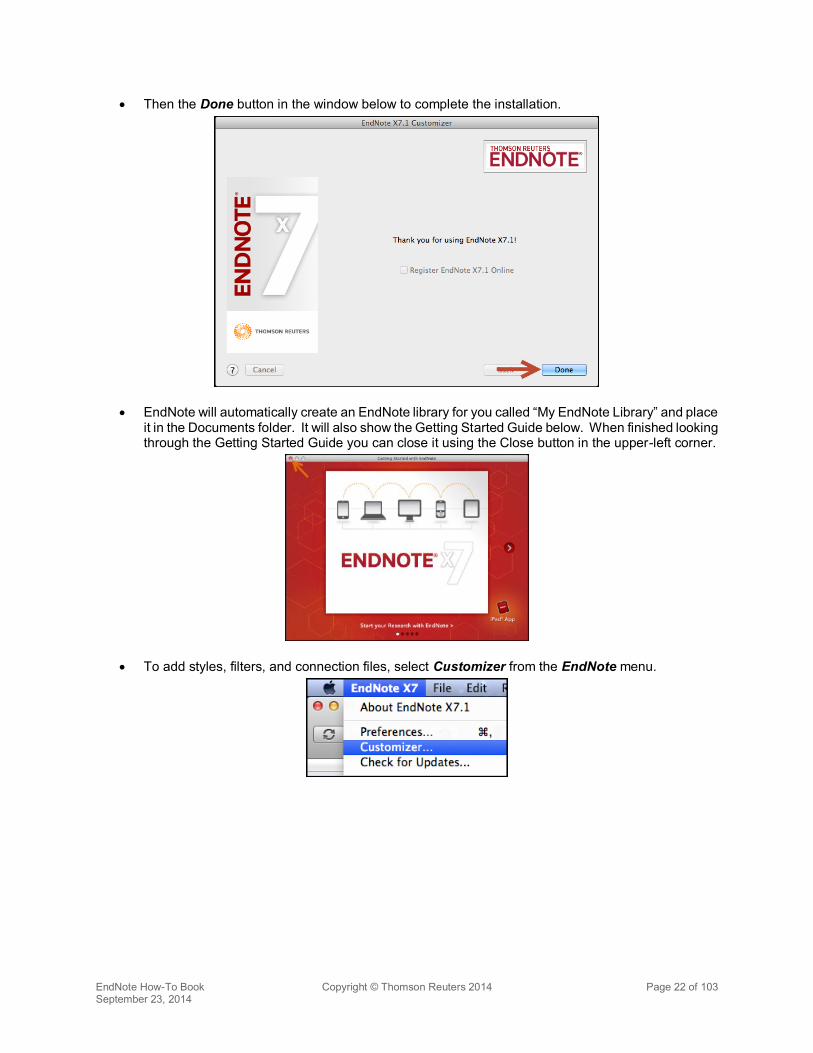
x Then the Done button in the window below to complete the installation.
x EndNote will automatically create an EndNote library for you called “My EndNote Library” and place it in the Documents folder. It will also show the Getting Started Guide below. When finished looking through the Getting Started Guide you can close it using the Close button in the upper-left corner.
x To add styles, filters, and connection files, select Customizer from the EndNote menu.
EndNote How-To Book Copyright © Thomson Reuters 2014 Page 23 of 103 September 23, 2014
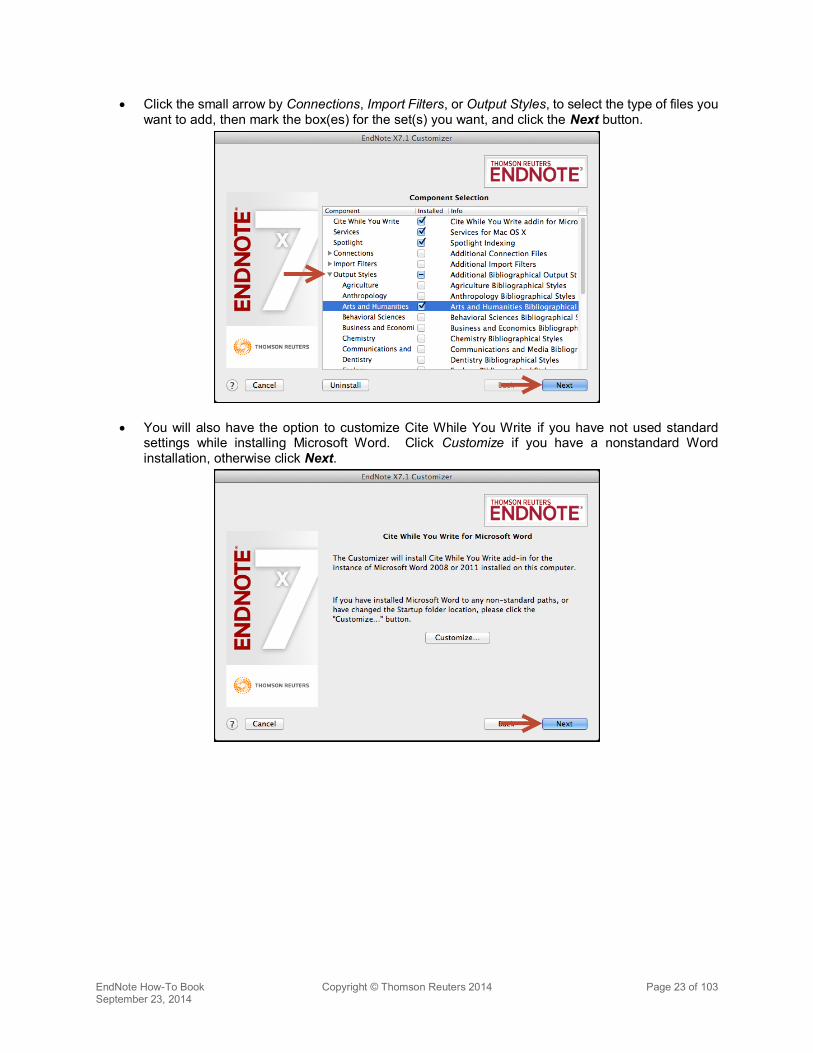
x Click the small arrow by Connections, Import Filters, or Output Styles, to select the type of files you want to add, then mark the box(es) for the set(s) you want, and click the Next button.
x You will also have the option to customize Cite While You Write if you have not used standard settings while installing Microsoft Word. Click Customize if you have a nonstandard Word installation, otherwise click Next.
EndNote How-To Book Copyright © Thomson Reuters 2014 Page 24 of 103 September 23, 2014
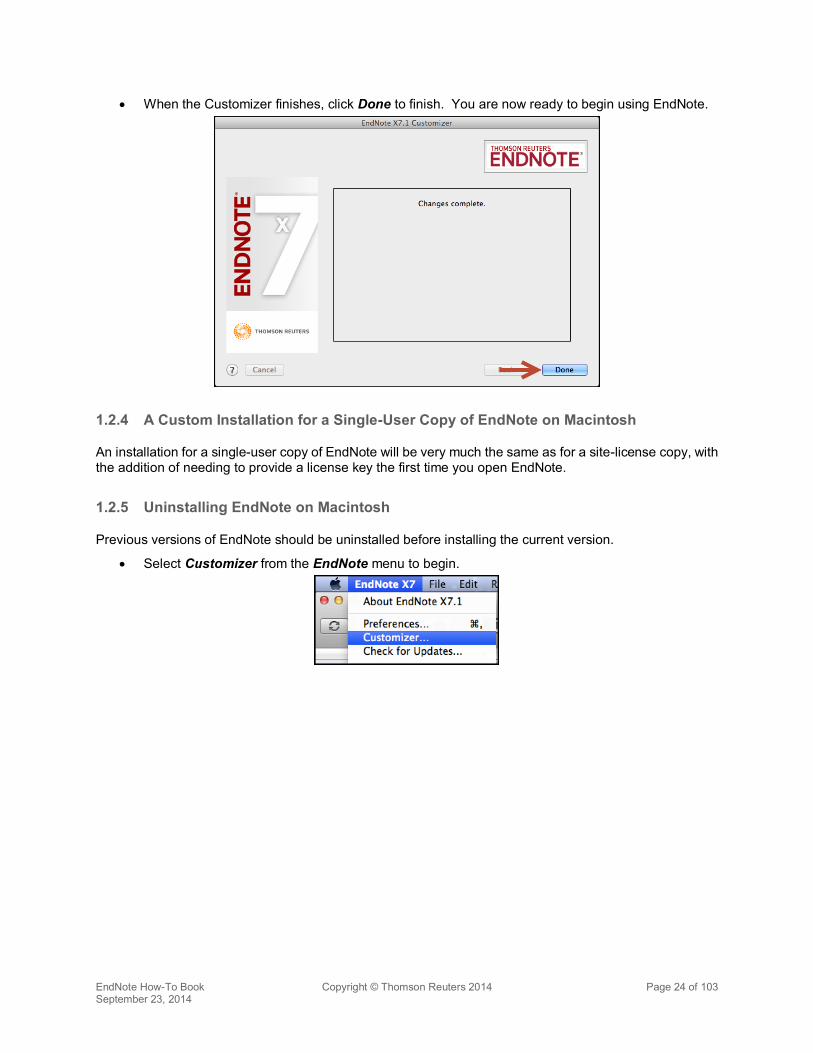
x When the Customizer finishes, click Done to finish. You are now ready to begin using EndNote.
1.2.4 A Custom Installation for a Single-User Copy of EndNote on Macintosh
An installation for a single-user copy of EndNote will be very much the same as for a site-license copy, with the addition of needing to provide a license key the first time you open EndNote.
1.2.5 Uninstalling EndNote on Macintosh
Previous versions of EndNote should be uninstalled before installing the current version.
x Select Customizer from the EndNote menu to begin.

EndNote How-To Book Copyright © Thomson Reuters 2014 Page 25 of 103 September 23, 2014
x In the Customizer windows shown below, unmark all boxes, then click the Uninstall button.
x When the uninstall finishes you will see the window below. Click the Exit button, then drag the EndNote folder in Applications to the trash. If you have stored any personal libraries, styles, filters, or connection files in the EndNote folder, these should first be moved to the Documents folder. In general, it is best to keep these files in Documents.
x You are now ready to begin the installation, described in section 1.2.3 above.
EndNote How-To Book Copyright © Thomson Reuters 2014 Page 26 of 103 September 23, 2014
2 USING DIRECT EXPORT TO IMPORT REFERENCES FROM ONLINE DATABASES
2.1 DIRECT EXPORT FROM THOMSON REUTERS WEB OF SCIENCE
2.1.1 Using the Marked List
Web of Science’s marked list provides a useful way to keep track of the references you want to keep when browsing a large set of search results. References can be added to the marked list as you browse through them, then exported from the marked list later.
x Perform your search of the Web of Science.
x Mark the references you want to add to the marked list, and click on the Add to Marked List button.
x When ready to export, go to the marked list by clicking the Marked List button.
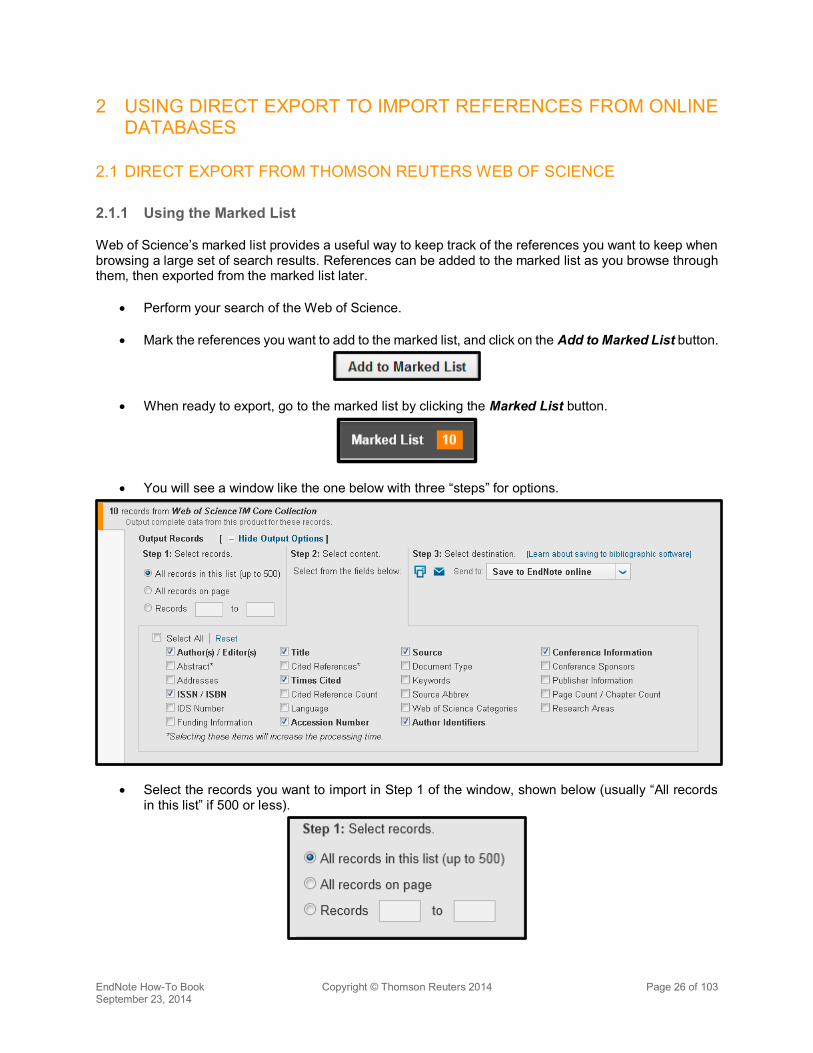
x You will see a window like the one below with three “steps” for options.
x Select the records you want to import in Step 1 of the window, shown below (usually “All records in this list” if 500 or less).
EndNote How-To Book Copyright © Thomson Reuters 2014 Page 27 of 103 September 23, 2014
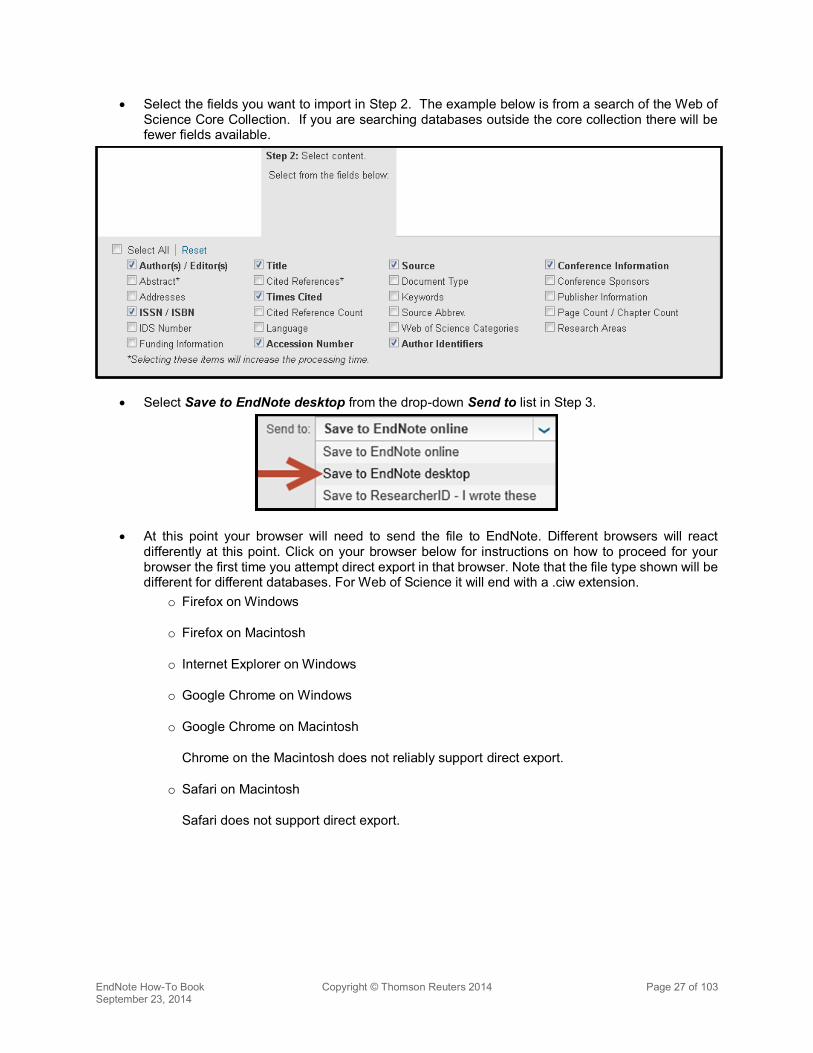
x Select the fields you want to import in Step 2. The example below is from a search of the Web of Science Core Collection. If you are searching databases outside the core collection there will be fewer fields available.
x Select Save to EndNote desktop from the drop-down Send to list in Step 3.
x At this point your browser will need to send the file to EndNote. Different browsers will react differently at this point. Click on your browser below for instructions on how to proceed for your browser the first time you attempt direct export in that browser. Note that the file type shown will be different for different databases. For Web of Science it will end with a .ciw extension.
o Firefox on Windows
o Firefox on Macintosh
o Internet Explorer on Windows
o Google Chrome on Windows
o Google Chrome on Macintosh
Chrome on the Macintosh does not reliably support direct export.
o Safari on Macintosh
Safari does not support direct export.
EndNote How-To Book Copyright © Thomson Reuters 2014 Page 28 of 103 September 23, 2014
2.1.2 Not Using the Marked List
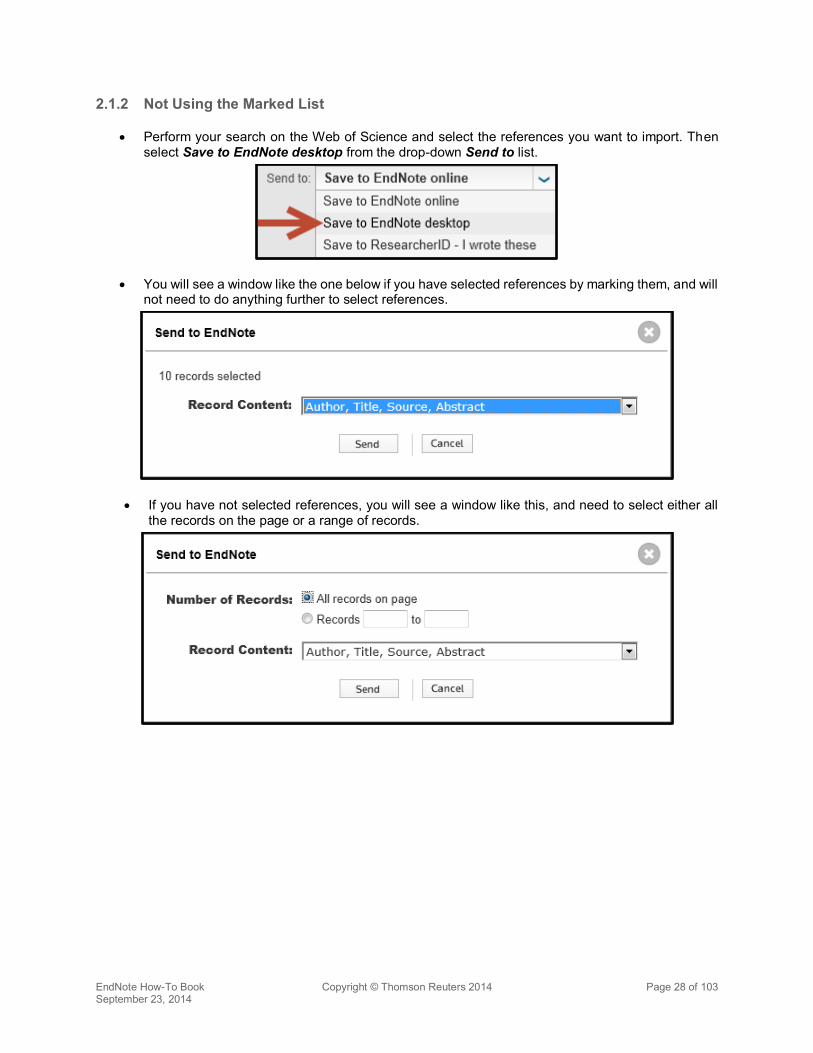
x Perform your search on the Web of Science and select the references you want to import. Then select Save to EndNote desktop from the drop-down Send to list.
x You will see a window like the one below if you have selected references by marking them, and will not need to do anything further to select references.
x If you have not selected references, you will see a window like this, and need to select either all the records on the page or a range of records.
EndNote How-To Book Copyright © Thomson Reuters 2014 Page 29 of 103 September 23, 2014
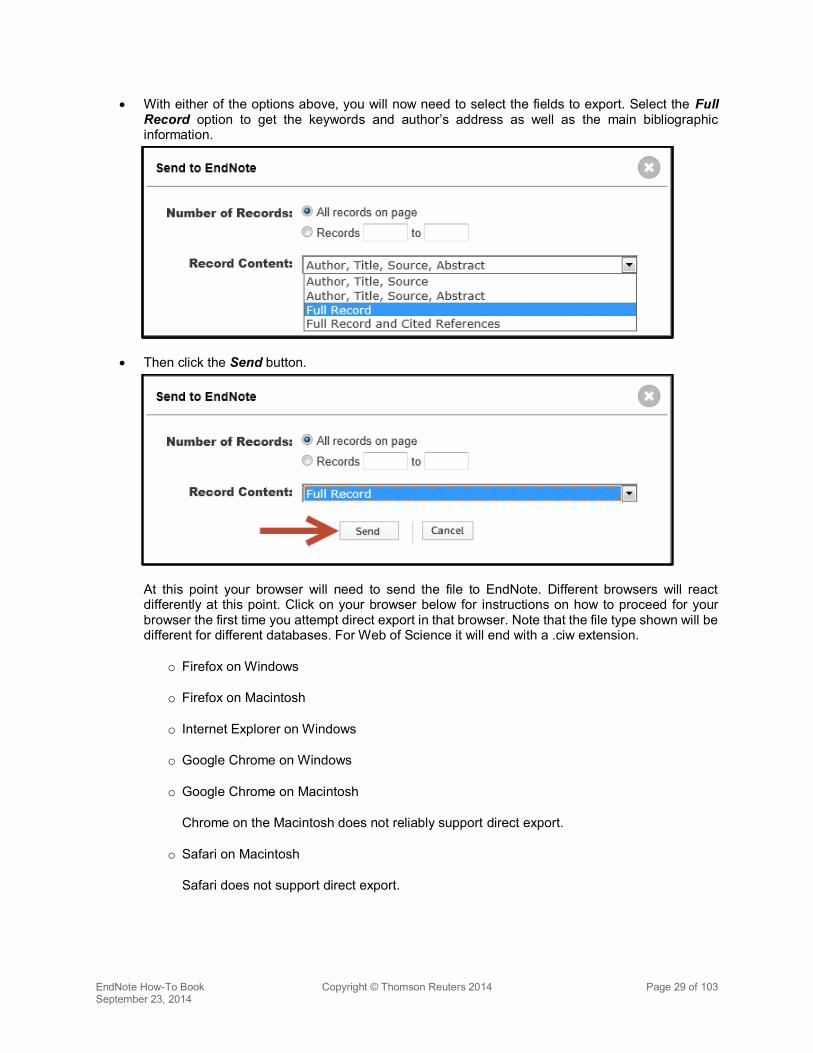
x With either of the options above, you will now need to select the fields to export. Select the Full Record option to get the keywords and author’s address as well as the main bibliographic information.
x Then click the Send button.
At this point your browser will need to send the file to EndNote. Different browsers will react differently at this point. Click on your browser below for instructions on how to proceed for your browser the first time you attempt direct export in that browser. Note that the file type shown will be different for different databases. For Web of Science it will end with a .ciw extension.
o Firefox on Windows
o Firefox on Macintosh
o Internet Explorer on Windows
o Google Chrome on Windows
o Google Chrome on Macintosh
Chrome on the Macintosh does not reliably support direct export.
o Safari on Macintosh
Safari does not support direct export.

EndNote How-To Book Copyright © Thomson Reuters 2014 Page 30 of 103 September 23, 2014
2.2 DIRECT EXPORT FROM PUBMED
2.2.1 Using the Clipboard
PubMed’s clipboard provides a useful way to keep track of the references you want to keep when browsing a large set of search results. References can be added to the clipboard as you browse through them, then exported from the clipboard later.
x Perform your search of PubMed and mark the references you would like to add to the Clipboard on each page, then click on the Send to link to send the selected references to the Clipboard.
x In the window shown below, select the Clipboard option, then click the Add to Clipboard button to add the selected references to the Clipboard. You can continue adding references to the Clipboard. Up to 500 references can be kept on the Clipboard for up to eight hours without activity.
EndNote How-To Book Copyright © Thomson Reuters 2014 Page 31 of 103 September 23, 2014
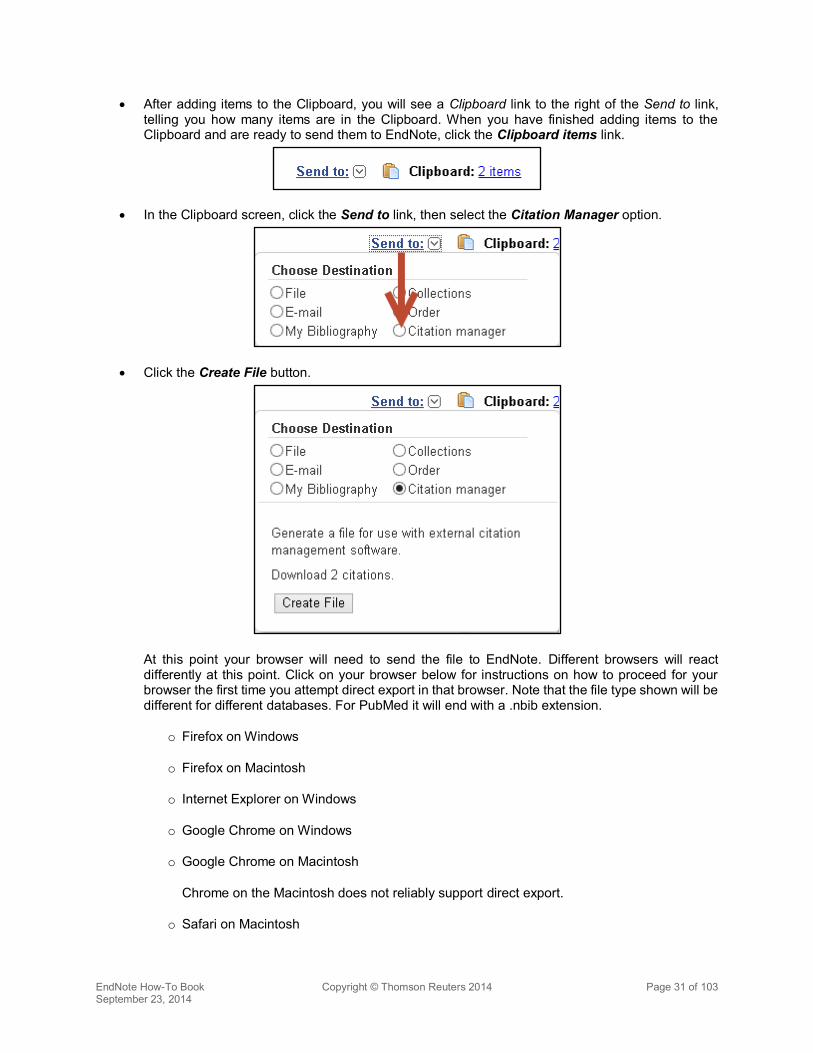
x After adding items to the Clipboard, you will see a Clipboard link to the right of the Send to link, telling you how many items are in the Clipboard. When you have finished adding items to the Clipboard and are ready to send them to EndNote, click the Clipboard items link.
x In the Clipboard screen, click the Send to link, then select the Citation Manager option.
x Click the Create File button.
At this point your browser will need to send the file to EndNote. Different browsers will react differently at this point. Click on your browser below for instructions on how to proceed for your browser the first time you attempt direct export in that browser. Note that the file type shown will be different for different databases. For PubMed it will end with a .nbib extension.
o Firefox on Windows
o Firefox on Macintosh
o Internet Explorer on Windows
o Google Chrome on Windows
o Google Chrome on Macintosh
Chrome on the Macintosh does not reliably support direct export.
o Safari on Macintosh
EndNote How-To Book Copyright © Thomson Reuters 2014 Page 32 of 103 September 23, 2014
Safari does not support direct export.
2.2.2 Not Using the Clipboard
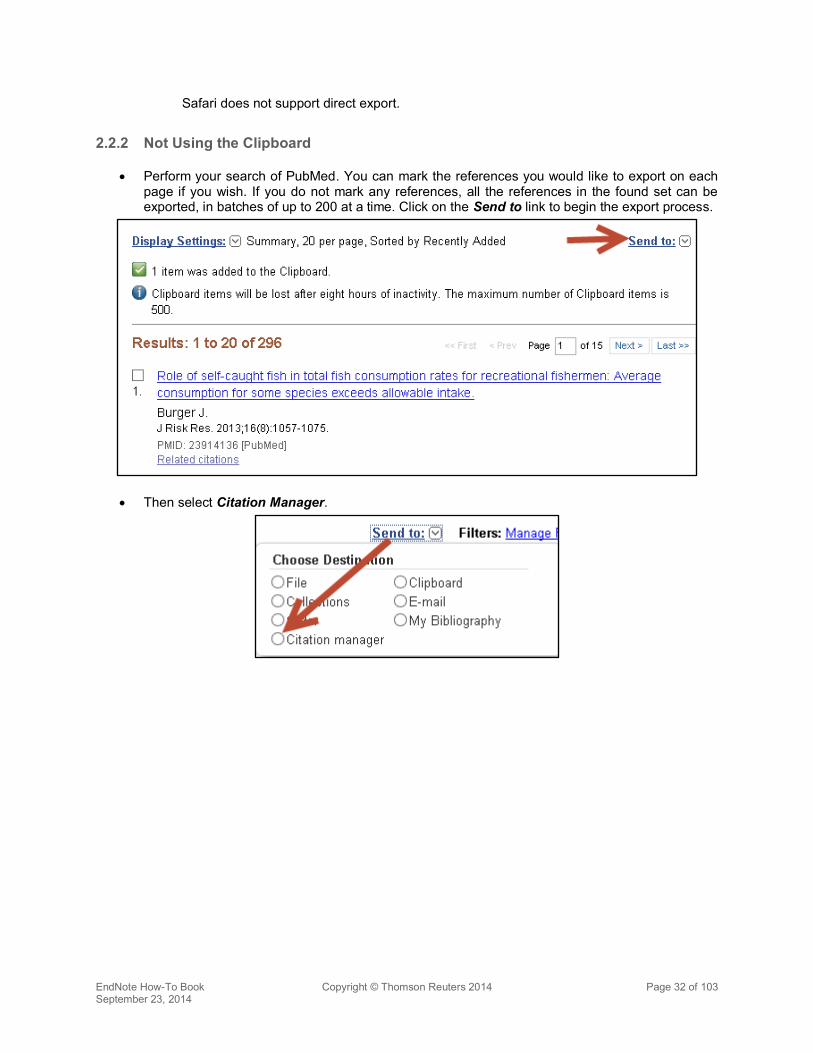
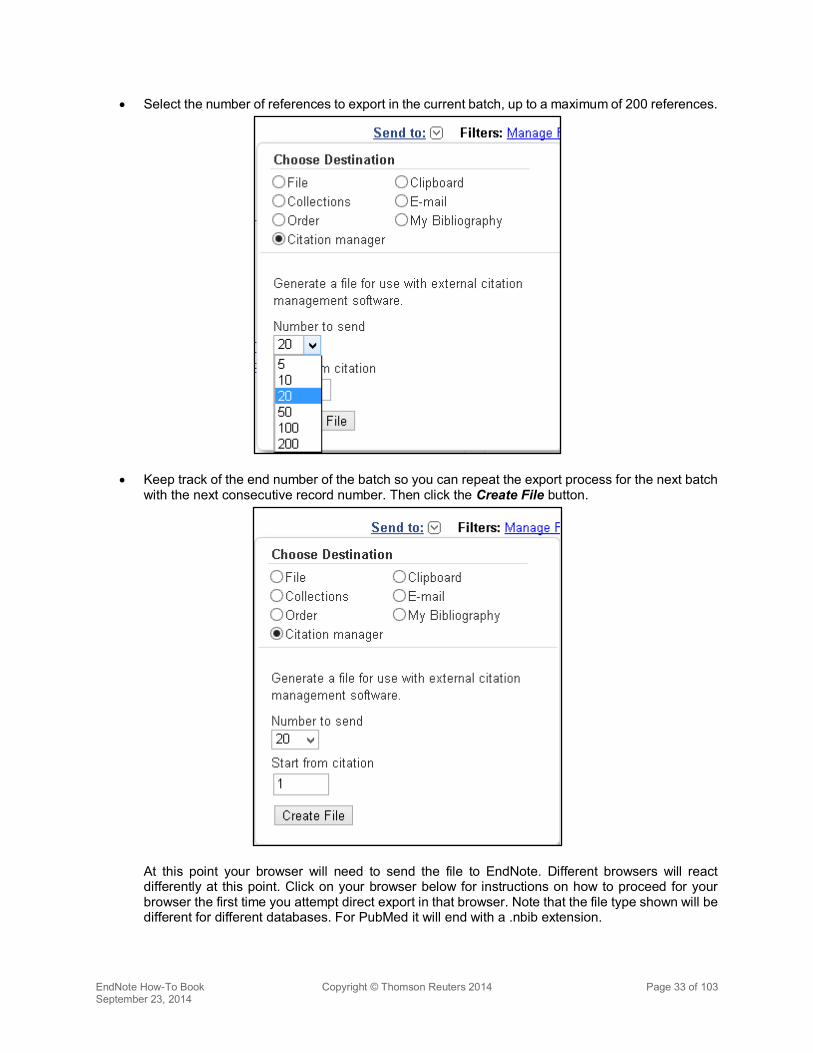
x Perform your search of PubMed. You can mark the references you would like to export on each page if you wish. If you do not mark any references, all the references in the found set can be exported, in batches of up to 200 at a time. Click on the Send to link to begin the export process.
x Then select Citation Manager.
EndNote How-To Book Copyright © Thomson Reuters 2014 Page 33 of 103 September 23, 2014
x Select the number of references to export in the current batch, up to a maximum of 200 references.
x Keep track of the end number of the batch so you can repeat the export process for the next batch with the next consecutive record number. Then click the Create File button.
At this point your browser will need to send the file to EndNote. Different browsers will react differently at this point. Click on your browser below for instructions on how to proceed for your browser the first time you attempt direct export in that browser. Note that the file type shown will be different for different databases. For PubMed it will end with a .nbib extension.

EndNote How-To Book Copyright © Thomson Reuters 2014 Page 34 of 103 September 23, 2014
o Firefox on Windows
o Firefox on Macintosh
o Internet Explorer on Windows
o Google Chrome on Windows
o Google Chrome on Macintosh
Chrome on the Macintosh does not reliably support direct export.
o Safari on Macintosh
Safari does not support direct export.
2.3 BROWSER ACTIONS WITH DIRECT EXPORT
2.3.1 Firefox on Windows
x Your EndNote library should be open before attempting to import references.
x Firefox will bring up a window like the one below the first time a new export file type attempts to download. To have the file open in EndNote so the references will be imported, you can select the ResearchSoft Direct Export Helper if you see it shown as the default, or you can click on the drop-down list and select the Other option as shown.

EndNote How-To Book Copyright © Thomson Reuters 2014 Page 35 of 103 September 23, 2014
x This should bring up a window like the one below. Select EndNote from this list (your version may vary from the version shown here). Then click on the OK button.
x When returned to the window below, you may select the option to Do this automatically for files like this from now on. Please note there are several different files types that work with direct export, and you will need to go through this process for each of these file types (.ciw, .ris, .ovd, .enw, .nbib).
x Click the OK button to finish the import into EndNote.
EndNote How-To Book Copyright © Thomson Reuters 2014 Page 36 of 103 September 23, 2014
2.3.2 Firefox on Macintosh
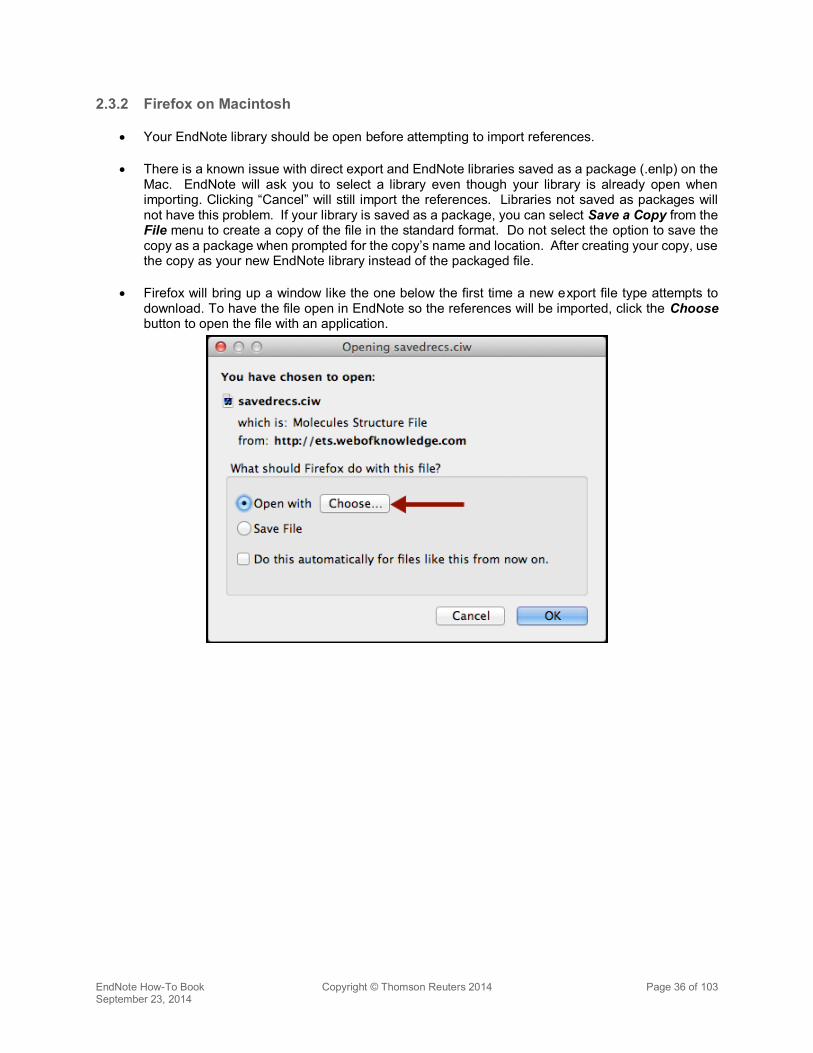
x Your EndNote library should be open before attempting to import references.
x There is a known issue with direct export and EndNote libraries saved as a package (.enlp) on the Mac. EndNote will ask you to select a library even though your library is already open when importing. Clicking “Cancel” will still import the references. Libraries not saved as packages will not have this problem. If your library is saved as a package, you can select Save a Copy from the File menu to create a copy of the file in the standard format. Do not select the option to save the copy as a package when prompted for the copy’s name and location. After creating your copy, use the copy as your new EndNote library instead of the packaged file.
x Firefox will bring up a window like the one below the first time a new export file type attempts to download. To have the file open in EndNote so the references will be imported, click the Choose button to open the file with an application.
EndNote How-To Book Copyright © Thomson Reuters 2014 Page 37 of 103 September 23, 2014
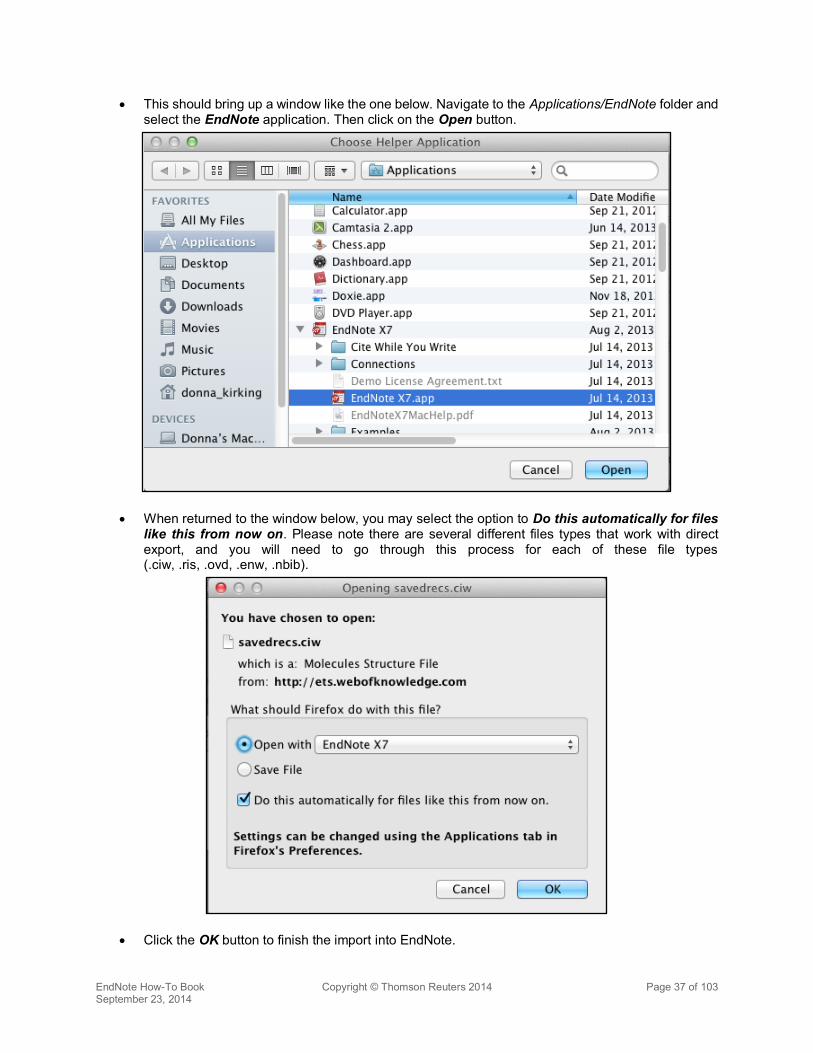
x This should bring up a window like the one below. Navigate to the Applications/EndNote folder and select the EndNote application. Then click on the Open button.
x When returned to the window below, you may select the option to Do this automatically for files like this from now on. Please note there are several different files types that work with direct export, and you will need to go through this process for each of these file types (.ciw, .ris, .ovd, .enw, .nbib).
x Click the OK button to finish the import into EndNote.
EndNote How-To Book Copyright © Thomson Reuters 2014 Page 38 of 103 September 23, 2014
2.3.3 Internet Explorer on Windows
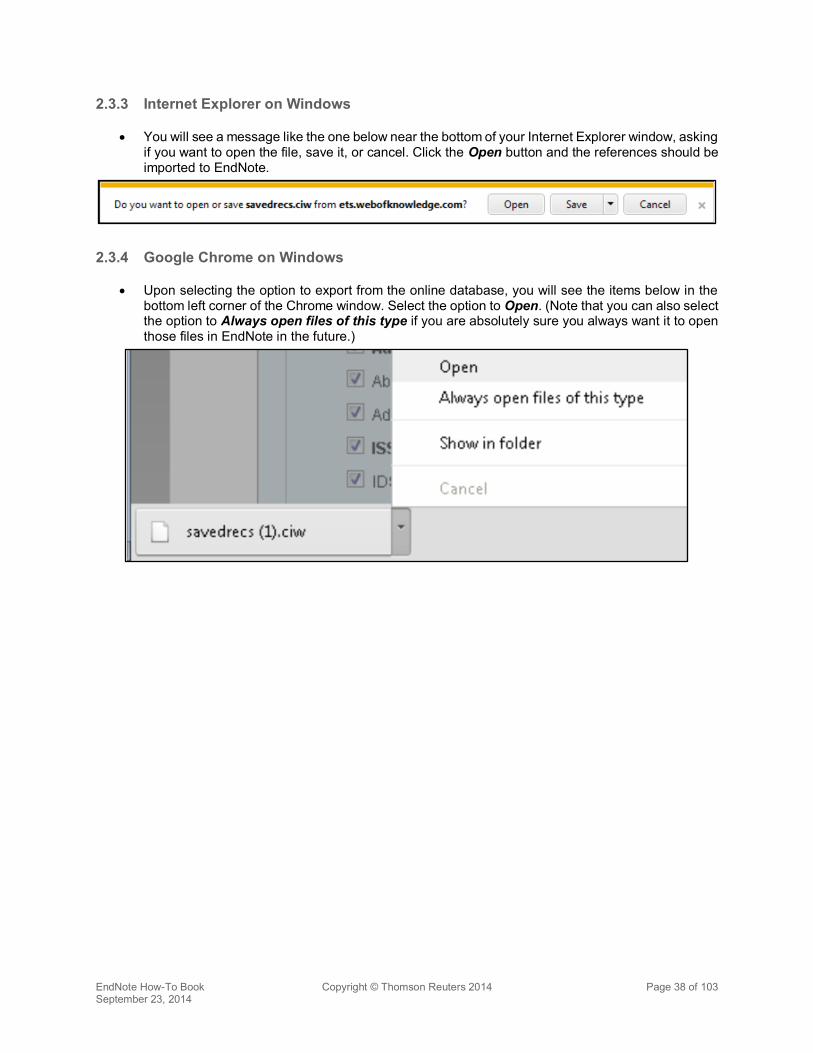
x You will see a message like the one below near the bottom of your Internet Explorer window, asking if you want to open the file, save it, or cancel. Click the Open button and the references should be imported to EndNote.
2.3.4 Google Chrome on Windows
x Upon selecting the option to export from the online database, you will see the items below in the bottom left corner of the Chrome window. Select the option to Open. (Note that you can also select the option to Always open files of this type if you are absolutely sure you always want it to open those files in EndNote in the future.)

EndNote How-To Book Copyright © Thomson Reuters 2014 Page 39 of 103 September 23, 2014
x You will then see a window similar to this, showing you a list of possible programs for opening the file. Select EndNote from the list, then click the OK button. (Note: If you have installed the EndNote online plug-in for Internet Explorer and have previously set this file type to open, you may not see this window in Chrome. See section 2.4.3.)
2.4 ENDNOTE ONLINE PLUG-INS FOR DIRECT EXPORT
2.4.1 Internet Explorer
x If you have installed the EndNote online plug-in for Internet Explorer, you will see a window like the one below when you use direct export. Select EndNote if you want the search results sent to your EndNote desktop library. Select EndNote Web if you want the search results sent to your EndNote online library.
EndNote How-To Book Copyright © Thomson Reuters 2014 Page 40 of 103 September 23, 2014
2.4.2 Firefox
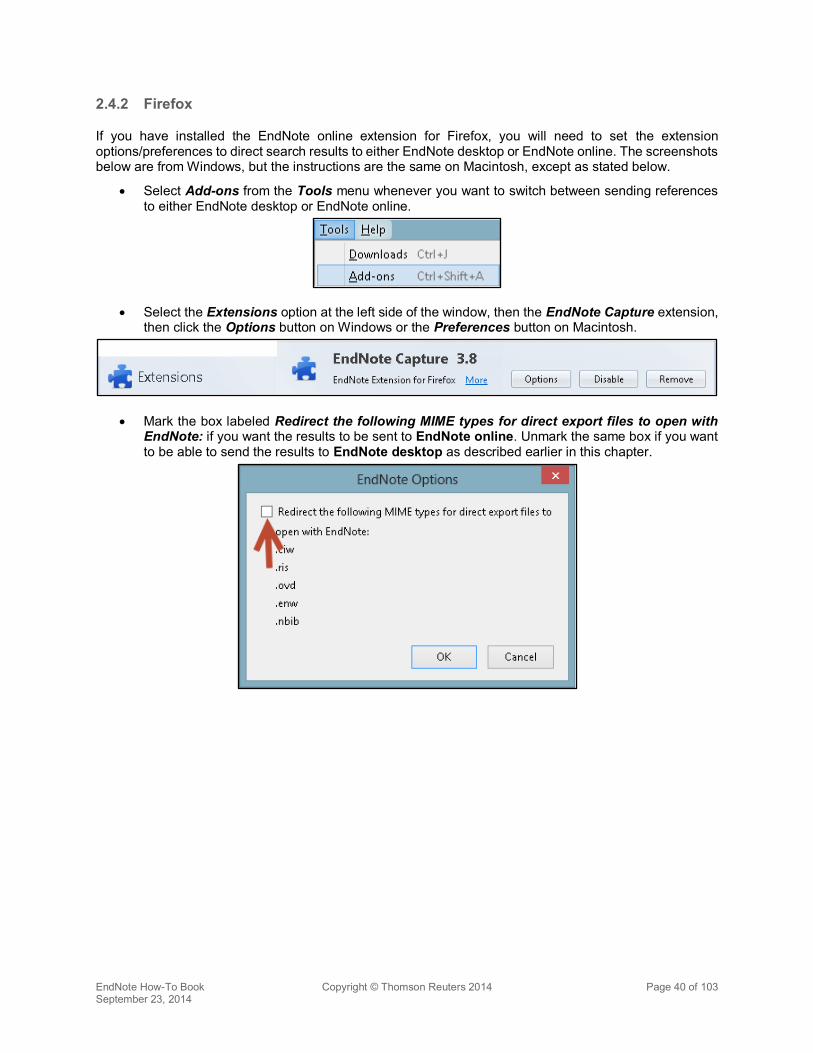
If you have installed the EndNote online extension for Firefox, you will need to set the extension options/preferences to direct search results to either EndNote desktop or EndNote online. The screenshots below are from Windows, but the instructions are the same on Macintosh, except as stated below.
x Select Add-ons from the Tools menu whenever you want to switch between sending references to either EndNote desktop or EndNote online.
x Select the Extensions option at the left side of the window, then the EndNote Capture extension, then click the Options button on Windows or the Preferences button on Macintosh.
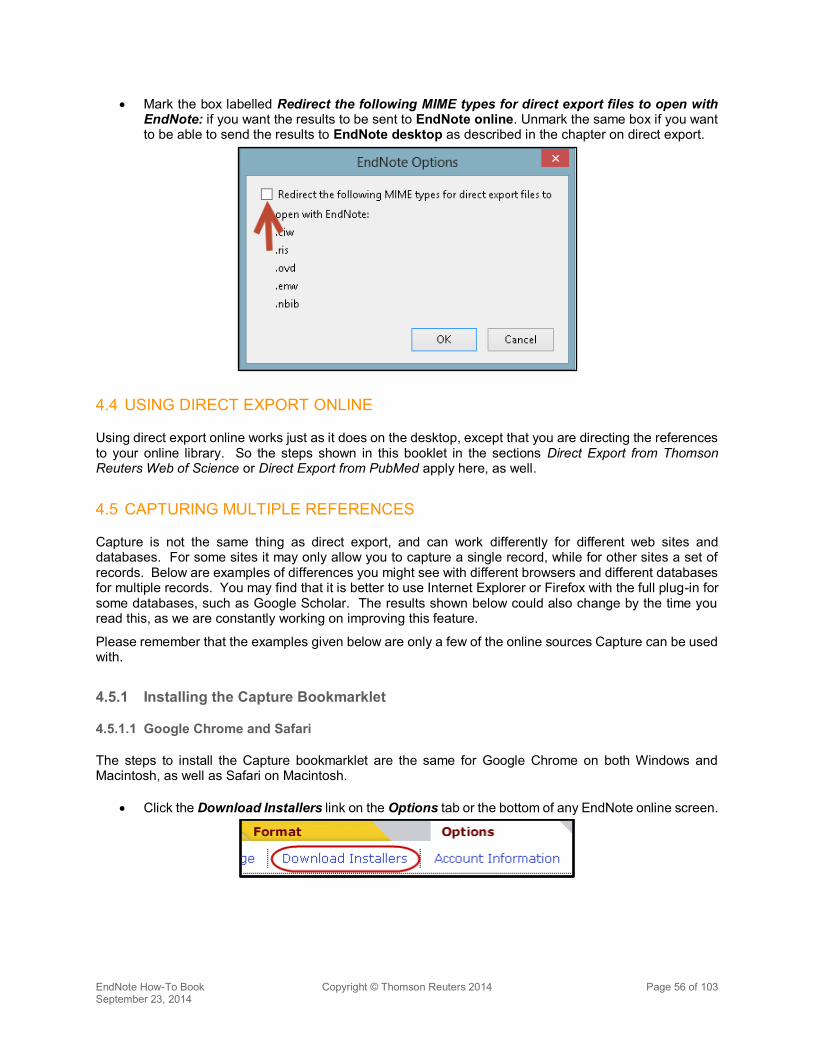
x Mark the box labeled Redirect the following MIME types for direct export files to open with EndNote: if you want the results to be sent to EndNote online. Unmark the same box if you want to be able to send the results to EndNote desktop as described earlier in this chapter.
EndNote How-To Book Copyright © Thomson Reuters 2014 Page 41 of 103 September 23, 2014
2.4.3 Google Chrome
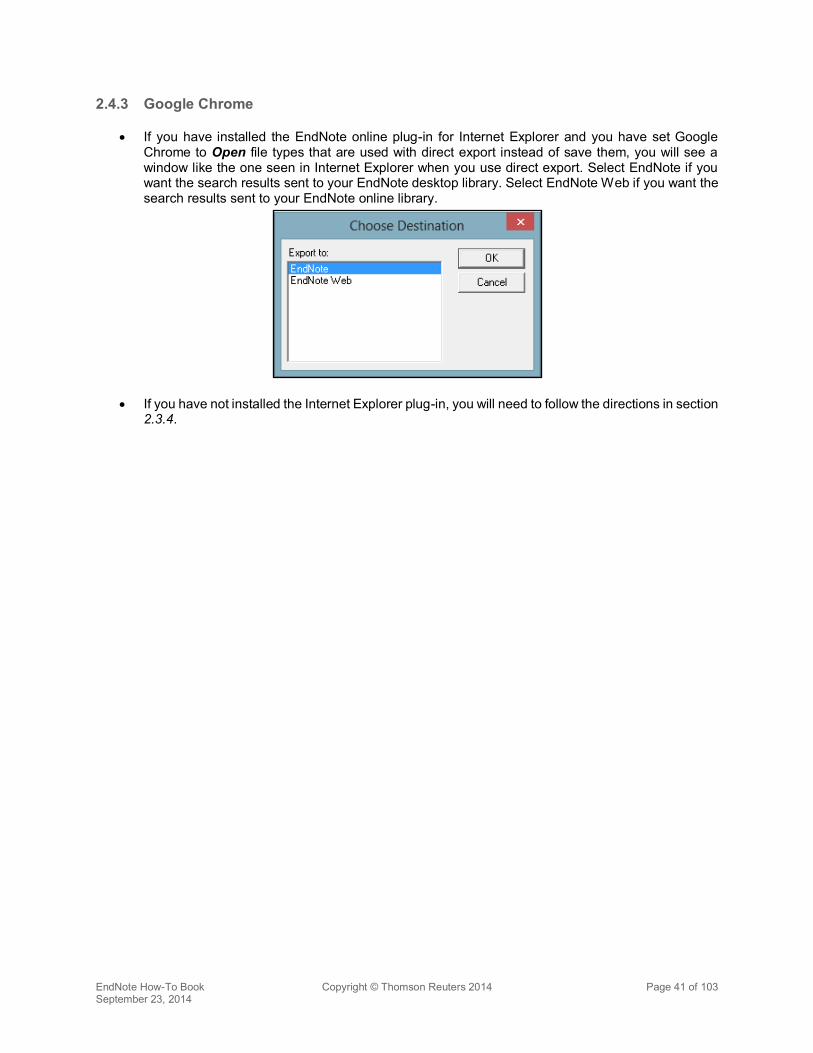
x If you have installed the EndNote online plug-in for Internet Explorer and you have set Google Chrome to Open file types that are used with direct export instead of save them, you will see a window like the one seen in Internet Explorer when you use direct export. Select EndNote if you want the search results sent to your EndNote desktop library. Select EndNote Web if you want the search results sent to your EndNote online library.
x If you have not installed the Internet Explorer plug-in, you will need to follow the directions in section 2.3.4.

EndNote How-To Book Copyright © Thomson Reuters 2014 Page 42 of 103 September 23, 2014
3 IMPORTING PDF FILES AND PDF HANDLING
3.1 IMPORTING PDF FILES
EndNote can import PDF files containing a Digital Object Identifier (DOI) in the metadata or the first two pages of the PDF. EndNote sends the DOI to PubMed and CrossRef, online databases capable of looking up reference data by DOI. The online databases send back the bibliographic information, EndNote imports it, then attaches the PDF to the record created. This means the PDF must have a DOI and EndNote must have access to the Internet during the import.
3.1.1 Importing a Folder of PDF Files on Windows
x Select Import from the File menu, then select Folder.
x Click the Choose button, navigate to the folder you want to import, and double-click on it. It will appear in the Import Folder: field. If you wish to include subfolders within that folder, mark the box labeled Include files in subfolders. If you want EndNote to create a separate group set for the main folder and groups within it for the subfolders, mark the box labeled Create a Group Set for this import. Leave the other settings at their defaults. (Note that in EndNote X7, EndNote will attempt to attach PDFs to matching records that already exist in the library instead of creating duplicate records.) When all your options are set, click the Import button.
EndNote How-To Book Copyright © Thomson Reuters 2014 Page 43 of 103 September 23, 2014
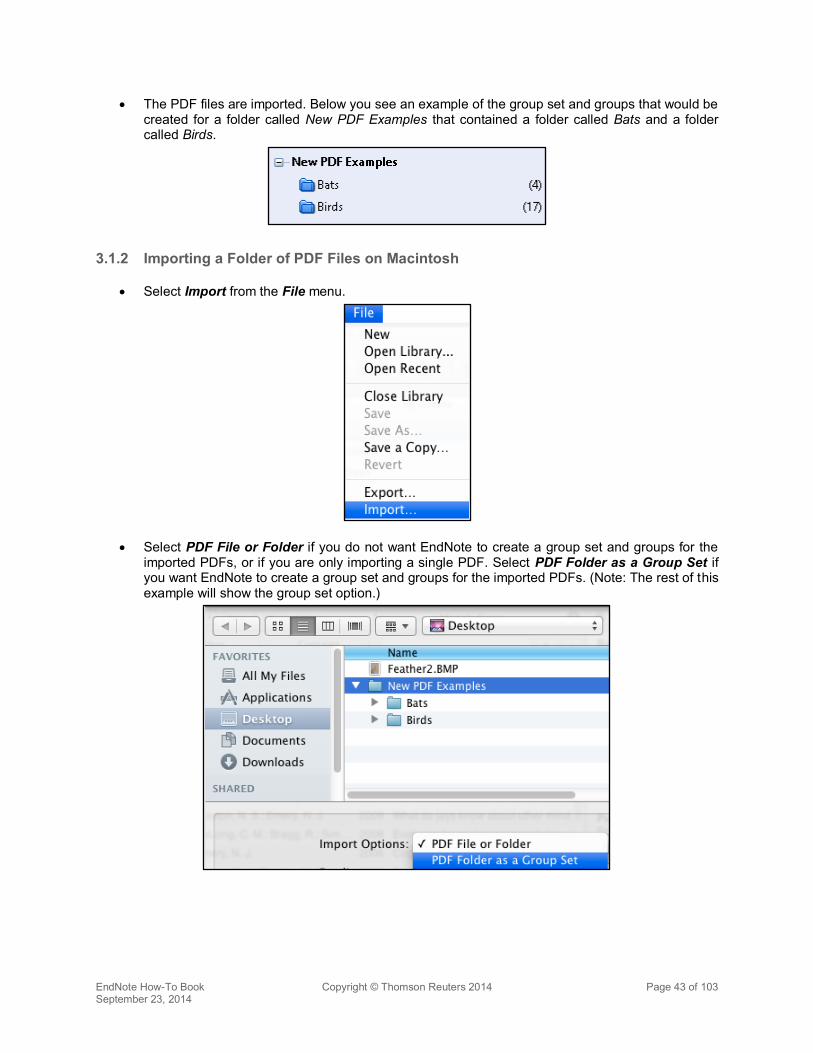
x The PDF files are imported. Below you see an example of the group set and groups that would be created for a folder called New PDF Examples that contained a folder called Bats and a folder called Birds.
3.1.2 Importing a Folder of PDF Files on Macintosh
x Select Import from the File menu.
x Select PDF File or Folder if you do not want EndNote to create a group set and groups for the imported PDFs, or if you are only importing a single PDF. Select PDF Folder as a Group Set if you want EndNote to create a group set and groups for the imported PDFs. (Note: The rest of this example will show the group set option.)
EndNote How-To Book Copyright © Thomson Reuters 2014 Page 44 of 103 September 23, 2014
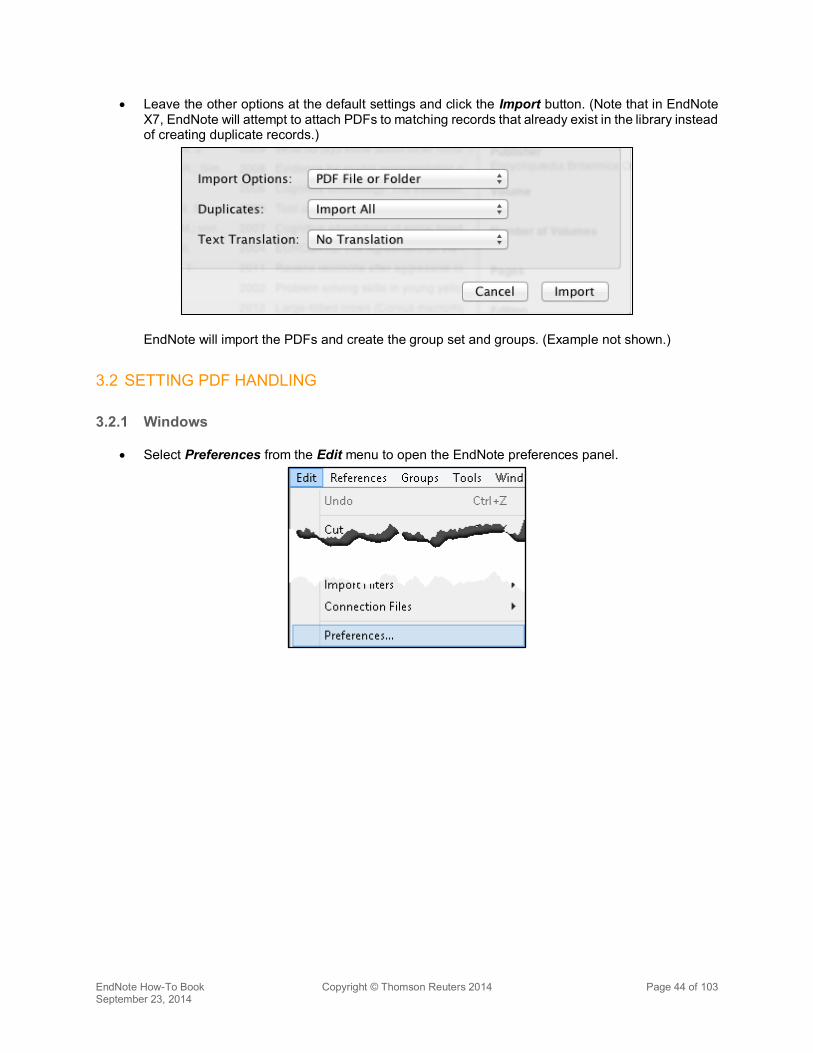
x Leave the other options at the default settings and click the Import button. (Note that in EndNote X7, EndNote will attempt to attach PDFs to matching records that already exist in the library instead of creating duplicate records.)
EndNote will import the PDFs and create the group set and groups. (Example not shown.)
3.2 SETTING PDF HANDLING
3.2.1 Windows
x Select Preferences from the Edit menu to open the EndNote preferences panel.
EndNote How-To Book Copyright © Thomson Reuters 2014 Page 45 of 103 September 23, 2014
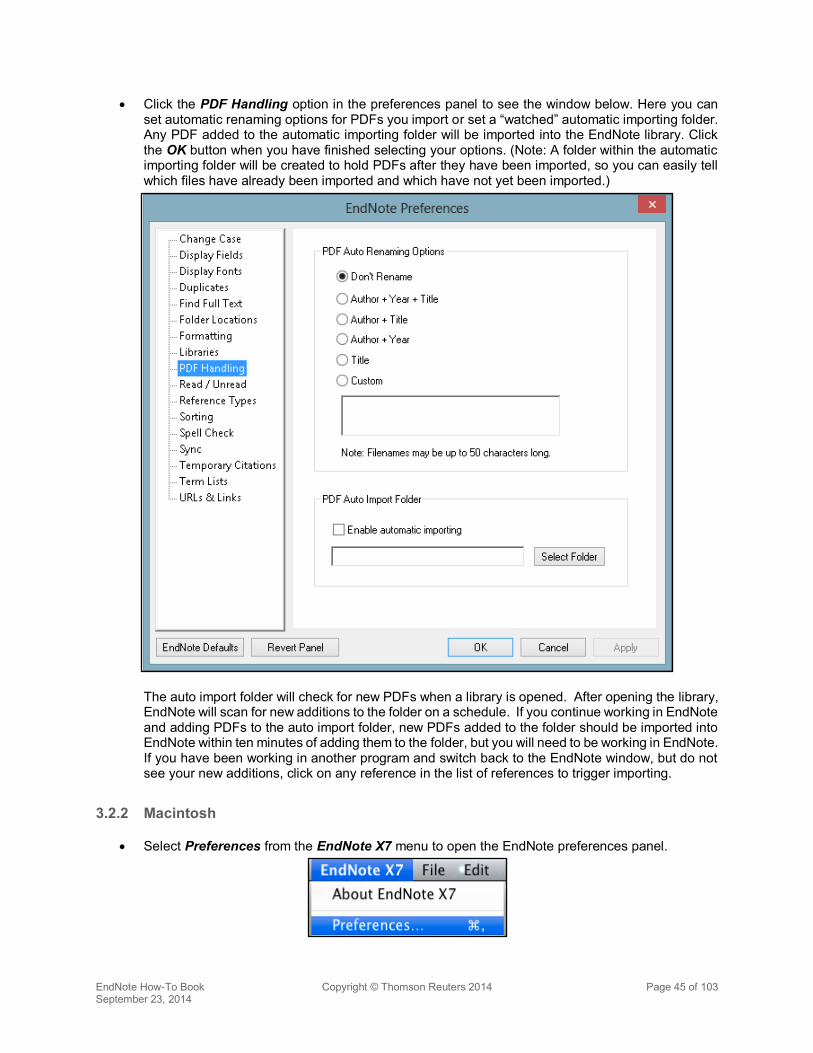
x Click the PDF Handling option in the preferences panel to see the window below. Here you can set automatic renaming options for PDFs you import or set a “watched” automatic importing folder. Any PDF added to the automatic importing folder will be imported into the EndNote library. Click the OK button when you have finished selecting your options. (Note: A folder within the automatic importing folder will be created to hold PDFs after they have been imported, so you can easily tell which files have already been imported and which have not yet been imported.)
The auto import folder will check for new PDFs when a library is opened. After opening the library, EndNote will scan for new additions to the folder on a schedule. If you continue working in EndNote and adding PDFs to the auto import folder, new PDFs added to the folder should be imported into EndNote within ten minutes of adding them to the folder, but you will need to be working in EndNote. If you have been working in another program and switch back to the EndNote window, but do not see your new additions, click on any reference in the list of references to trigger importing.
3.2.2 Macintosh
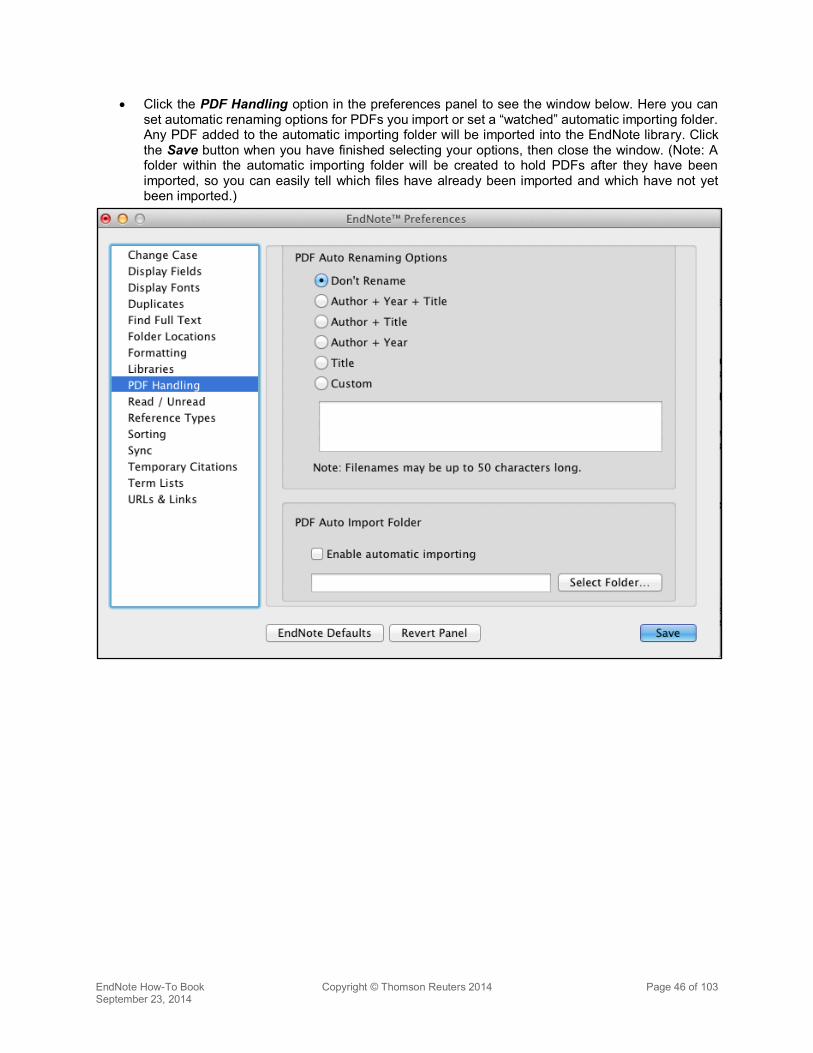
x Select Preferences from the EndNote X7 menu to open the EndNote preferences panel.
EndNote How-To Book Copyright © Thomson Reuters 2014 Page 46 of 103 September 23, 2014
x Click the PDF Handling option in the preferences panel to see the window below. Here you can set automatic renaming options for PDFs you import or set a “watched” automatic importing folder. Any PDF added to the automatic importing folder will be imported into the EndNote library. Click the Save button when you have finished selecting your options, then close the window. (Note: A folder within the automatic importing folder will be created to hold PDFs after they have been imported, so you can easily tell which files have already been imported and which have not yet been imported.)
EndNote How-To Book Copyright © Thomson Reuters 2014 Page 47 of 103 September 23, 2014
4 ENDNOTE ONLINE
EndNote lets you work on your desktop, online, or on an iPad. This chapter cannot cover everything EndNote can do online, but it will show you how using plug-ins and capture features of EndNote online can help you even if you prefer to work on the desktop.
Whether you are upgrading from EndNote basic (online only, with a limited feature set) and merging that library with your desktop library, or creating an online library for the first time, you need to start by setting up EndNote Sync to keep all your references and custom groups up to date on both the desktop and online.
4.1 SET UP ENDNOTE SYNC
4.1.1 Back Up the EndNote Desktop Library
First, you should make a complete backup copy of your desktop library by saving a compressed library. Note that EndNote may ask if you want to make a backup when you begin syncing, but you can do it manually in advance using the method below.
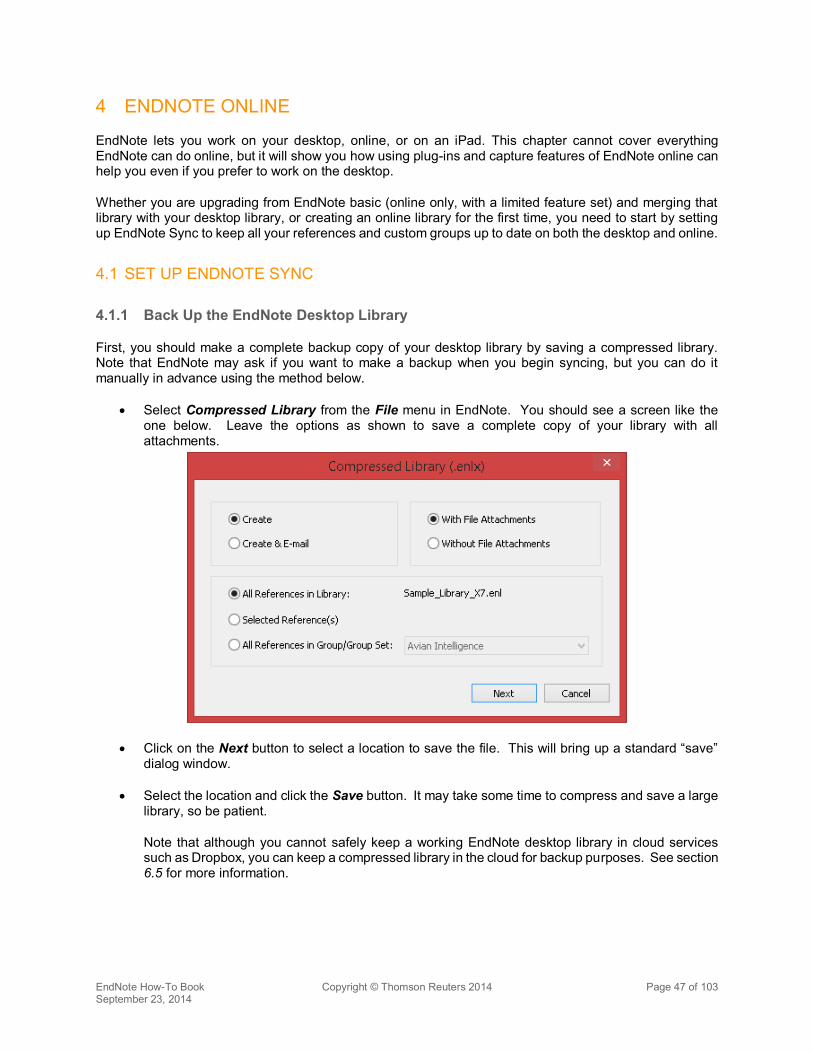
x Select Compressed Library from the File menu in EndNote. You should see a screen like the one below. Leave the options as shown to save a complete copy of your library with all attachments.
x Click on the Next button to select a location to save the file. This will bring up a standard “save” dialog window.
x Select the location and click the Save button. It may take some time to compress and save a large library, so be patient.
Note that although you cannot safely keep a working EndNote desktop library in cloud services such as Dropbox, you can keep a compressed library in the cloud for backup purposes. See section 6.5 for more information.
EndNote How-To Book Copyright © Thomson Reuters 2014 Page 48 of 103 September 23, 2014
4.1.2 EndNote Sync
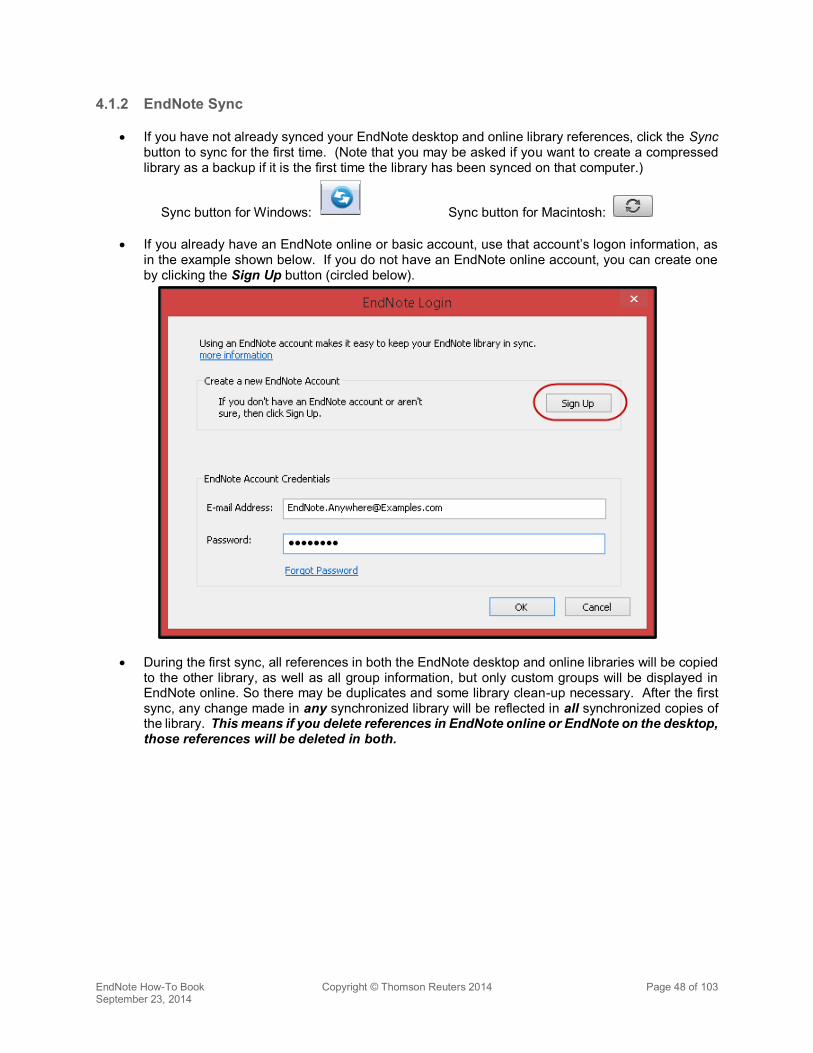
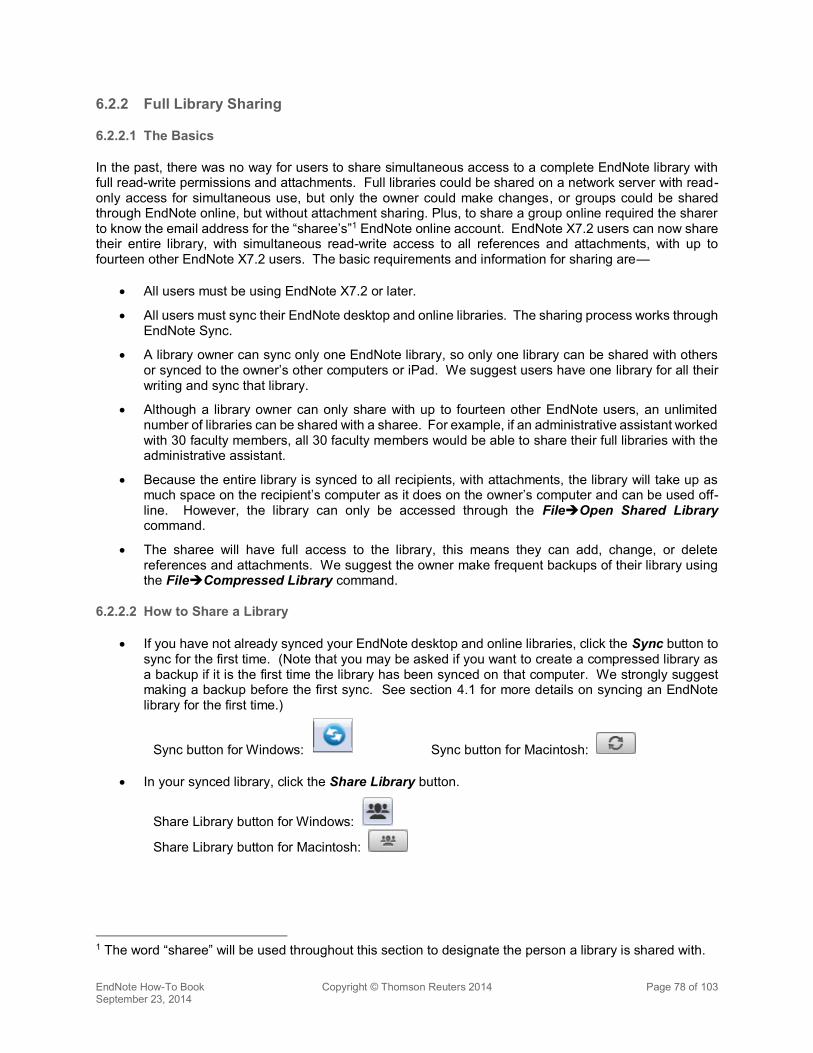
x If you have not already synced your EndNote desktop and online library references, click the Sync button to sync for the first time. (Note that you may be asked if you want to create a compressed library as a backup if it is the first time the library has been synced on that computer.)
Sync button for Windows: Sync button for Macintosh:
x If you already have an EndNote online or basic account, use that account’s logon information, as in the example shown below. If you do not have an EndNote online account, you can create one by clicking the Sign Up button (circled below).
x During the first sync, all references in both the EndNote desktop and online libraries will be copied to the other library, as well as all group information, but only custom groups will be displayed in EndNote online. So there may be duplicates and some library clean-up necessary. After the first sync, any change made in any synchronized library will be reflected in all synchronized copies of the library. This means if you delete references in EndNote online or EndNote on the desktop, those references will be deleted in both.
EndNote How-To Book Copyright © Thomson Reuters 2014 Page 49 of 103 September 23, 2014
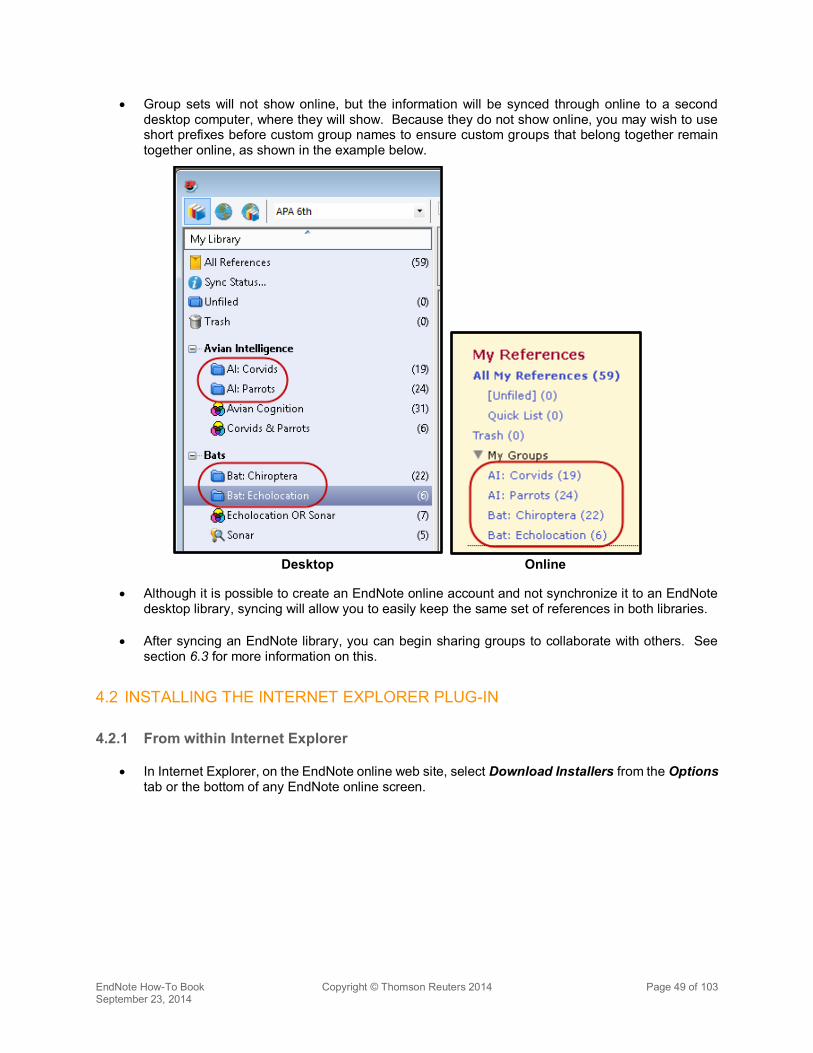
x Group sets will not show online, but the information will be synced through online to a second desktop computer, where they will show. Because they do not show online, you may wish to use short prefixes before custom group names to ensure custom groups that belong together remain together online, as shown in the example below.
Desktop
Online
x Although it is possible to create an EndNote online account and not synchronize it to an EndNote desktop library, syncing will allow you to easily keep the same set of references in both libraries.
x After syncing an EndNote library, you can begin sharing groups to collaborate with others. See section 6.3 for more information on this.
4.2 INSTALLING THE INTERNET EXPLORER PLUG-IN
4.2.1 From within Internet Explorer
x In Internet Explorer, on the EndNote online web site, select Download Installers from the Options tab or the bottom of any EndNote online screen.

EndNote How-To Book Copyright © Thomson Reuters 2014 Page 50 of 103 September 23, 2014
x Select Download Windows with Internet Explorer plug-in under the Cite While You Write section (circled below).
x Click the Run button to begin the installation. Internet Explorer is still open.
x You will see a message that the installer is searching for installed applications. This message may remain for several minutes, so be patient.
EndNote How-To Book Copyright © Thomson Reuters 2014 Page 51 of 103 September 23, 2014
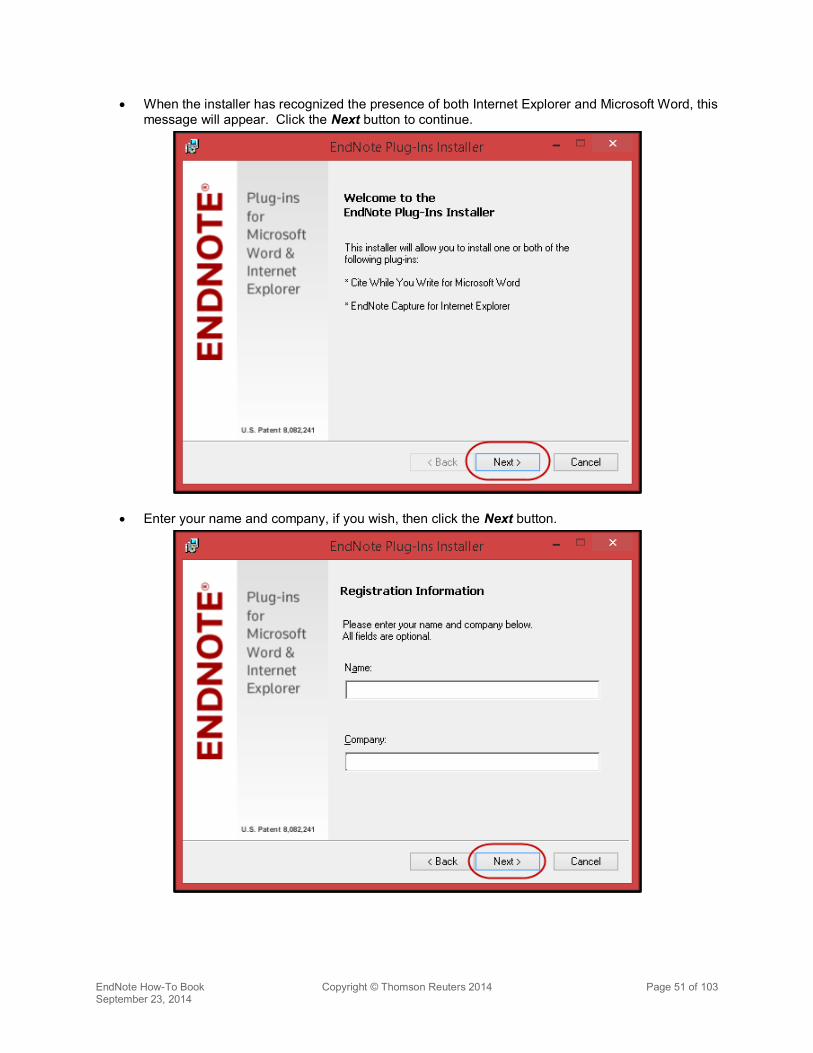
x When the installer has recognized the presence of both Internet Explorer and Microsoft Word, this message will appear. Click the Next button to continue.
x Enter your name and company, if you wish, then click the Next button.
EndNote How-To Book Copyright © Thomson Reuters 2014 Page 52 of 103 September 23, 2014
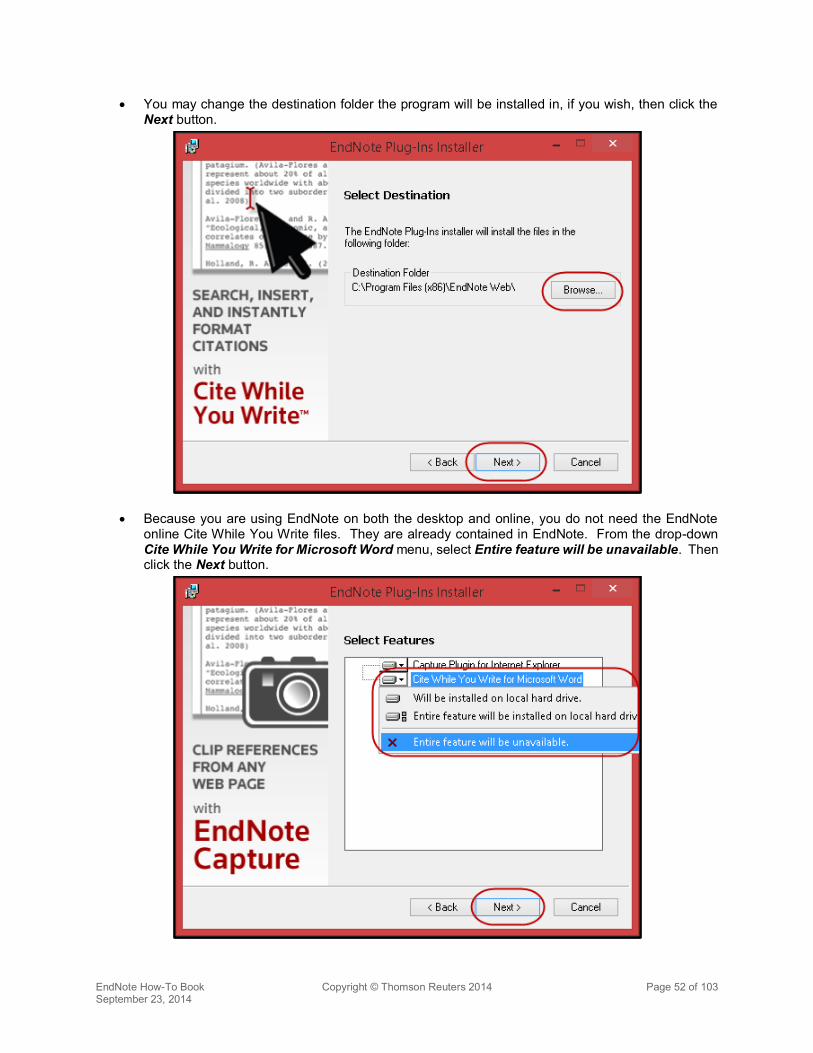
x You may change the destination folder the program will be installed in, if you wish, then click the Next button.
x Because you are using EndNote on both the desktop and online, you do not need the EndNote online Cite While You Write files. They are already contained in EndNote. From the drop-down Cite While You Write for Microsoft Word menu, select Entire feature will be unavailable. Then click the Next button.
EndNote How-To Book Copyright © Thomson Reuters 2014 Page 53 of 103 September 23, 2014
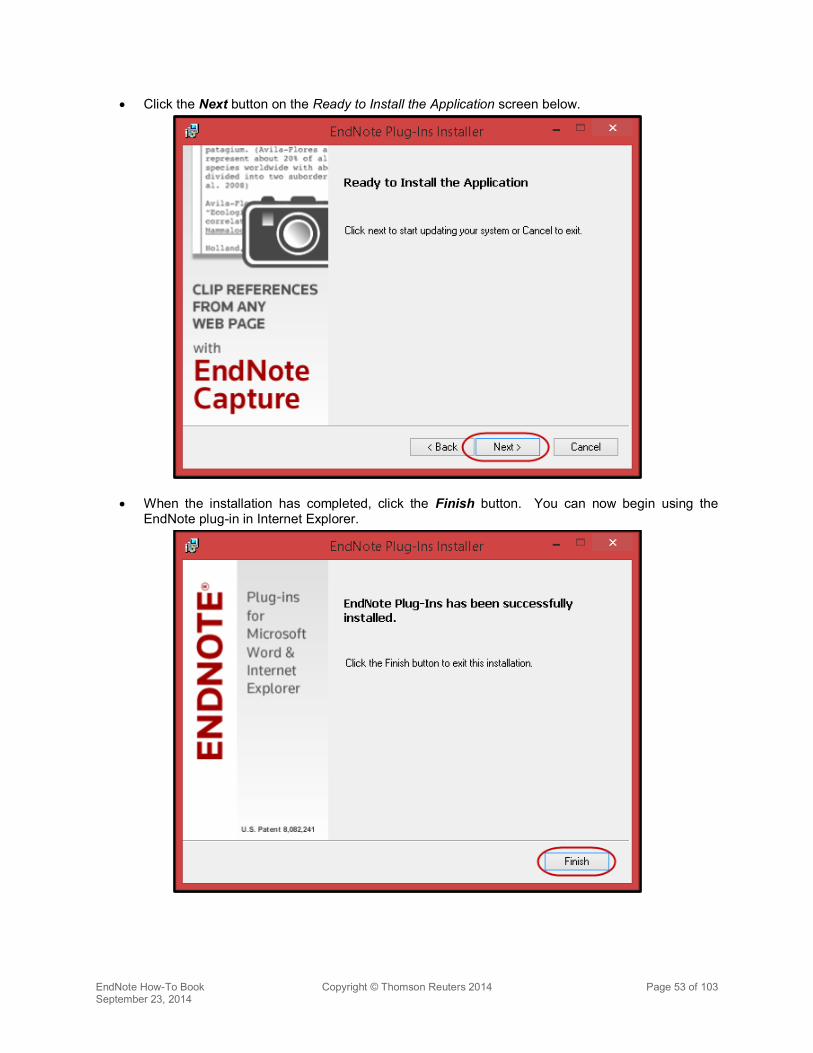
x Click the Next button on the Ready to Install the Application screen below.
x When the installation has completed, click the Finish button. You can now begin using the EndNote plug-in in Internet Explorer.
EndNote How-To Book Copyright © Thomson Reuters 2014 Page 54 of 103 September 23, 2014
4.2.2 Installing from the Downloaded .msi File
If you need to install the plug-in on several computers, use the .msi installer.
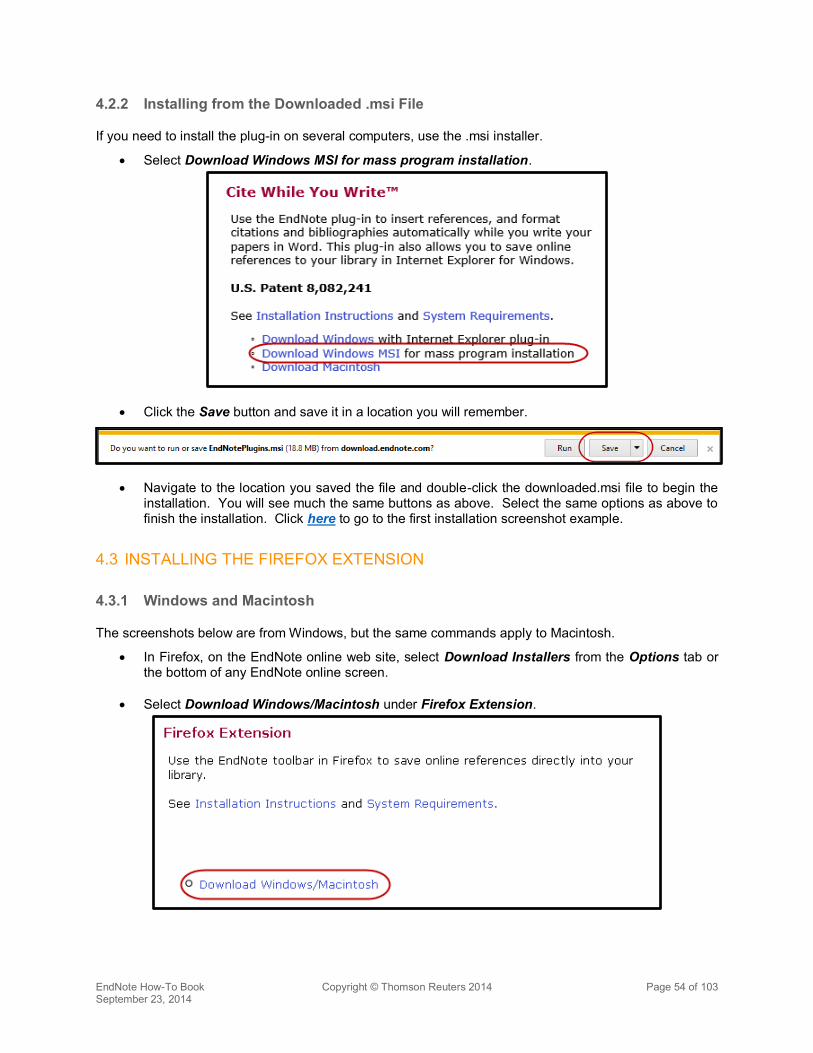
x Select Download Windows MSI for mass program installation.
x Click the Save button and save it in a location you will remember.
x Navigate to the location you saved the file and double-click the downloaded.msi file to begin the installation. You will see much the same buttons as above. Select the same options as above to finish the installation. Click here to go to the first installation screenshot example.
4.3 INSTALLING THE FIREFOX EXTENSION
4.3.1 Windows and Macintosh
The screenshots below are from Windows, but the same commands apply to Macintosh.
x In Firefox, on the EndNote online web site, select Download Installers from the Options tab or the bottom of any EndNote online screen.
x Select Download Windows/Macintosh under Firefox Extension.

EndNote How-To Book Copyright © Thomson Reuters 2014 Page 55 of 103 September 23, 2014
x When you see the message asking if you want to allow the installation, click Allow.
x When the warning below is received, click Install Now.
x You will be prompted to restart Firefox to complete the installation. x After you have installed the EndNote online extension for Firefox, you will need to set the extension
options/preferences to direct search results to EndNote desktop or online. x Select Add-ons from the Tools menu whenever you want to switch between sending references
to either EndNote desktop or EndNote online.
x Select the Extensions option at the left side of the window, then the EndNote Capture extension, then click the Options button on Windows or the Preferences button on Macintosh.
EndNote How-To Book Copyright © Thomson Reuters 2014 Page 56 of 103 September 23, 2014
x Mark the box labelled Redirect the following MIME types for direct export files to open with EndNote: if you want the results to be sent to EndNote online. Unmark the same box if you want to be able to send the results to EndNote desktop as described in the chapter on direct export.
4.4 USING DIRECT EXPORT ONLINE
Using direct export online works just as it does on the desktop, except that you are directing the references to your online library. So the steps shown in this booklet in the sections Direct Export from Thomson Reuters Web of Science or Direct Export from PubMed apply here, as well.
4.5 CAPTURING MULTIPLE REFERENCES
Capture is not the same thing as direct export, and can work differently for different web sites and databases. For some sites it may only allow you to capture a single record, while for other sites a set of records. Below are examples of differences you might see with different browsers and different databases for multiple records. You may find that it is better to use Internet Explorer or Firefox with the full plug-in for some databases, such as Google Scholar. The results shown below could also change by the time you read this, as we are constantly working on improving this feature.
Please remember that the examples given below are only a few of the online sources Capture can be used with.
4.5.1 Installing the Capture Bookmarklet
4.5.1.1 Google Chrome and Safari
The steps to install the Capture bookmarklet are the same for Google Chrome on both Windows and Macintosh, as well as Safari on Macintosh.
x Click the Download Installers link on the Options tab or the bottom of any EndNote online screen.
EndNote How-To Book Copyright © Thomson Reuters 2014 Page 57 of 103 September 23, 2014
x Locate the Capture Reference bookmarklet on the screen and drag it to the bookmarks bar (Chrome) or favorites bar (Safari).
x A Capture Reference button will appear on the bookmarks bar (Chrome) or favorites bar (Safari).
4.5.1.2 Safari on iPad
If you are synchronizing bookmarks between your Mac desktop and iPad and you have installed the Capture bookmarklet on your desktop computer, you should see a Capture Reference button appear on the favorites bar in Safari on the iPad. In general, it will work as it does on the desktop, but we have seen problems using it with sites that require scrolling.
4.5.2 Capture a Page of References from Google Scholar
x Begin by logging into your EndNote online account, then go to the Google Scholar site.
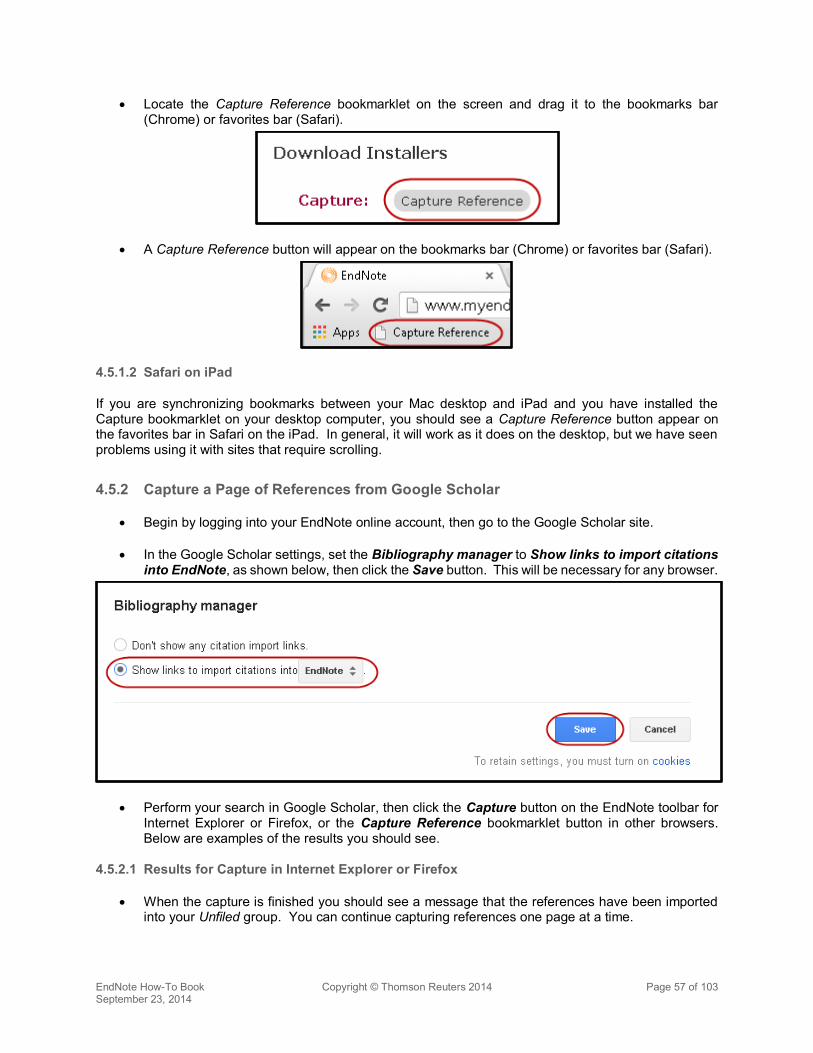
x In the Google Scholar settings, set the Bibliography manager to Show links to import citations into EndNote, as shown below, then click the Save button. This will be necessary for any browser.
x Perform your search in Google Scholar, then click the Capture button on the EndNote toolbar for Internet Explorer or Firefox, or the Capture Reference bookmarklet button in other browsers. Below are examples of the results you should see.
4.5.2.1 Results for Capture in Internet Explorer or Firefox
x When the capture is finished you should see a message that the references have been imported into your Unfiled group. You can continue capturing references one page at a time.

EndNote How-To Book Copyright © Thomson Reuters 2014 Page 58 of 103 September 23, 2014
4.5.2.2 Results for Capture References Bookmarklet in Google Chrome
x The bookmarklet in Chrome will not be able to import the page of references. We suggest using Internet Explorer or Firefox for Google Scholar.
4.5.3 Capture a Set of References from PubMed
x Perform your search in PubMed, then click the Capture button on the EndNote toolbar for Internet Explorer or Firefox, or the Capture Reference bookmarklet button in other browsers. Below are the results you should see.
4.5.3.1 Results for Capture Button in Internet Explorer or Firefox
x When the capture is finished you should see a message that multiple references have been imported into your Unfiled group. You can continue capturing references one page at a time. (Please note that in these browsers you could also use direct export to export up to 200 references at a time to either your online or desktop library.)
4.5.3.2 Results for Capture Bookmarklet in Google Chrome on Windows
x When you see the screen below, select my.endnote.com to import the page of references to your EndNote online library or EndNote to import the references to your EndNote desktop library.
x If you selected my.endnote.com, you can also select the group to add the reference to or you can create a new group for the references.
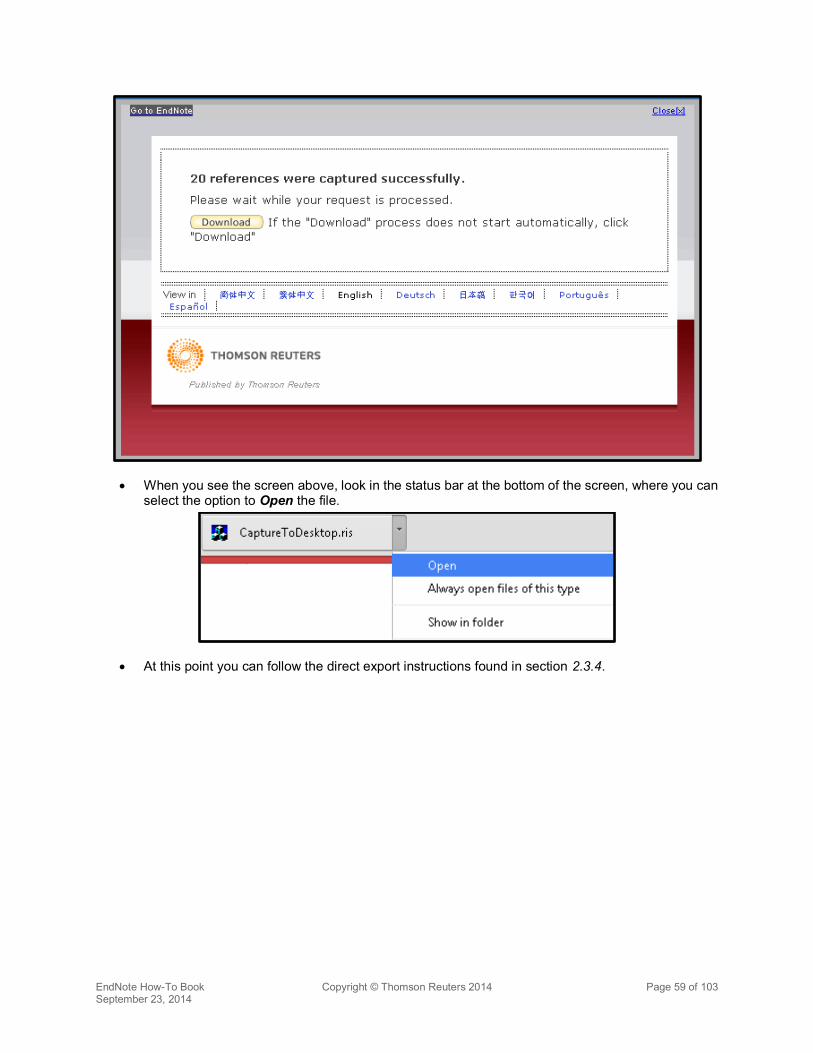
x If you selected EndNote, Chrome will download the references as shown below.
EndNote How-To Book Copyright © Thomson Reuters 2014 Page 59 of 103 September 23, 2014
x When you see the screen above, look in the status bar at the bottom of the screen, where you can select the option to Open the file.
x At this point you can follow the direct export instructions found in section 2.3.4.
EndNote How-To Book Copyright © Thomson Reuters 2014 Page 60 of 103 September 23, 2014
4.6 CAPTURING A SINGLE REFERENCE
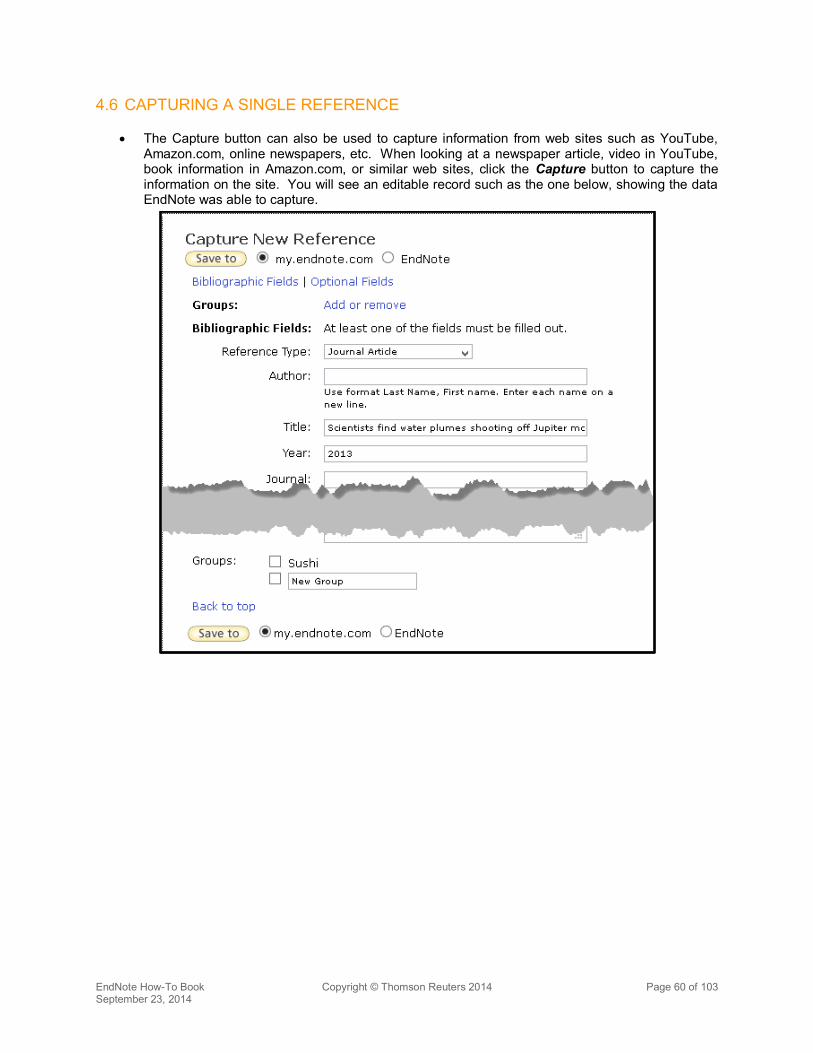
x The Capture button can also be used to capture information from web sites such as YouTube, Amazon.com, online newspapers, etc. When looking at a newspaper article, video in YouTube, book information in Amazon.com, or similar web sites, click the Capture button to capture the information on the site. You will see an editable record such as the one below, showing the data EndNote was able to capture.
EndNote How-To Book Copyright © Thomson Reuters 2014 Page 61 of 103 September 23, 2014
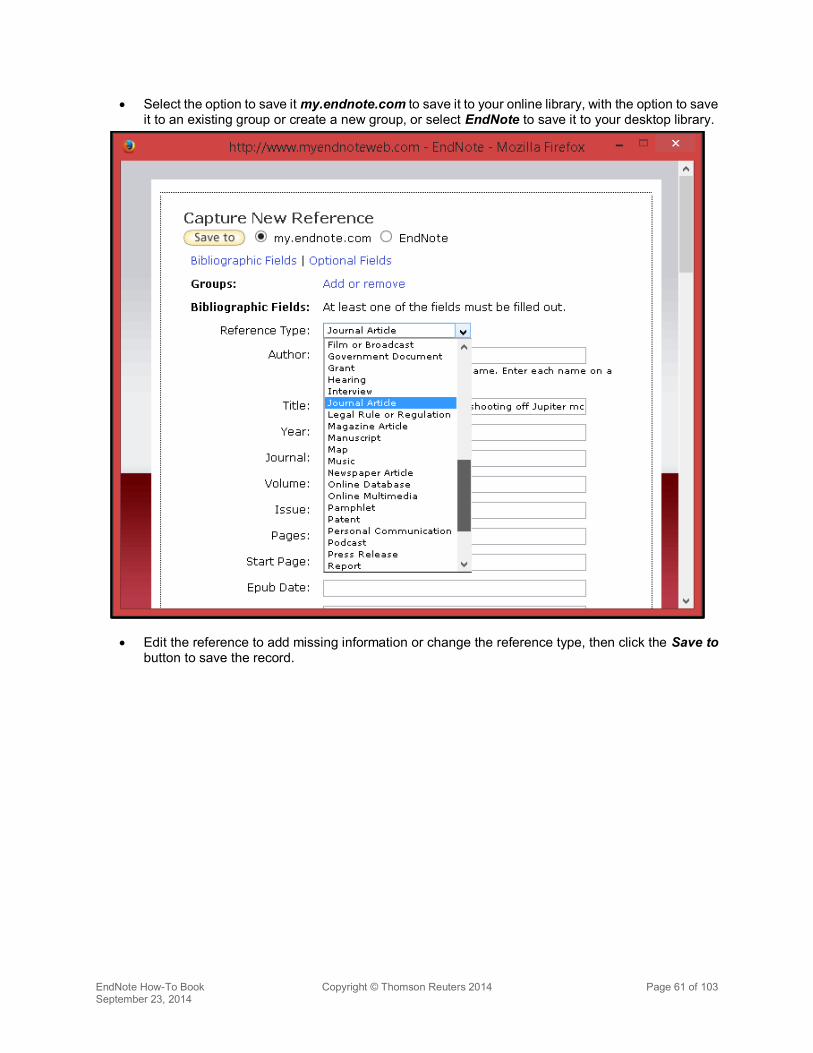
x Select the option to save it my.endnote.com to save it to your online library, with the option to save it to an existing group or create a new group, or select EndNote to save it to your desktop library.
x Edit the reference to add missing information or change the reference type, then click the Save to button to save the record.
EndNote How-To Book Copyright © Thomson Reuters 2014 Page 62 of 103 September 23, 2014
5 CITE WHILE YOU WRITE
EndNote’s Cite While You Write (CWYW) lets you look up references, insert them in your document, format your bibliography, and edit your citations to include page numbers or other text, all from within your word-processing document. Below are instructions for using Cite While You Write with Microsoft Word.
5.1 CITE WHILE YOU WRITE IN MICROSOFT WORD ON WINDOWS
5.1.1 Installing the Cite While You Write Tools
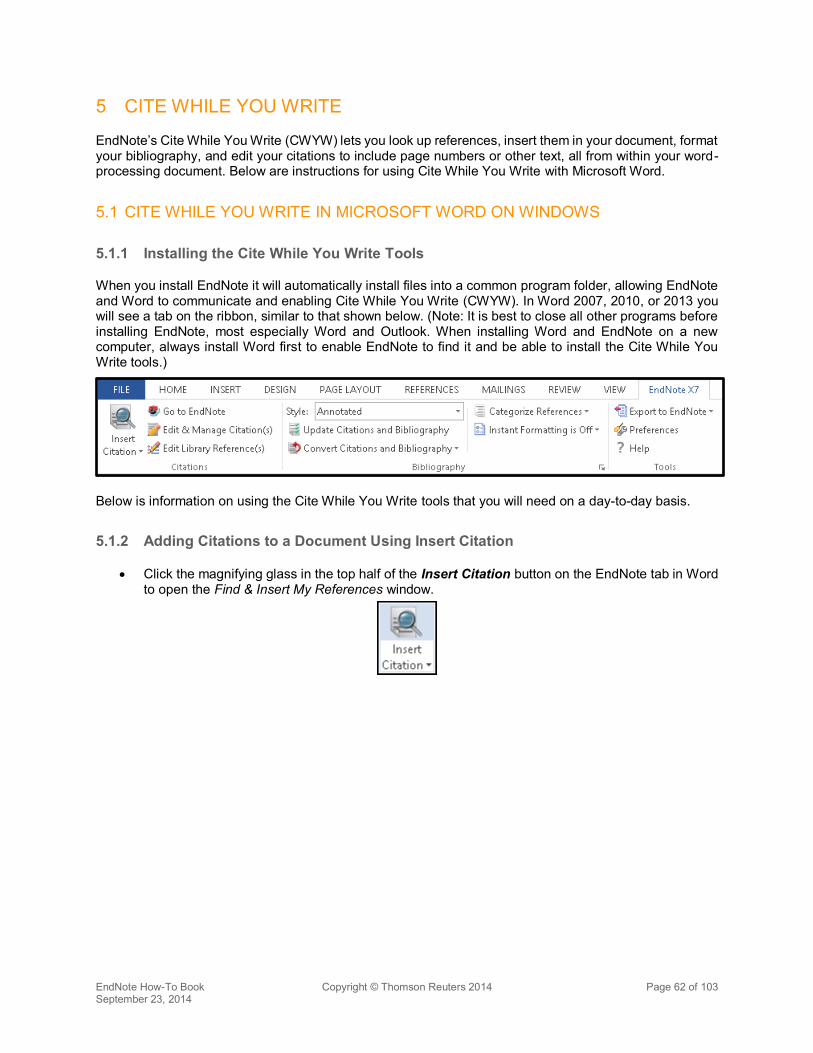
When you install EndNote it will automatically install files into a common program folder, allowing EndNote and Word to communicate and enabling Cite While You Write (CWYW). In Word 2007, 2010, or 2013 you will see a tab on the ribbon, similar to that shown below. (Note: It is best to close all other programs before installing EndNote, most especially Word and Outlook. When installing Word and EndNote on a new computer, always install Word first to enable EndNote to find it and be able to install the Cite While You Write tools.)
Below is information on using the Cite While You Write tools that you will need on a day-to-day basis.
5.1.2 Adding Citations to a Document Using Insert Citation
x Click the magnifying glass in the top half of the Insert Citation button on the EndNote tab in Word to open the Find & Insert My References window.

EndNote How-To Book Copyright © Thomson Reuters 2014 Page 63 of 103 September 23, 2014
x In the Find & Insert My References window that appears, enter your search terms and click the Find button, or press the Enter/Return key, to bring up a set of references that contain those search terms. The terms can be anywhere in the EndNote record, but all the terms must be present in the same record.
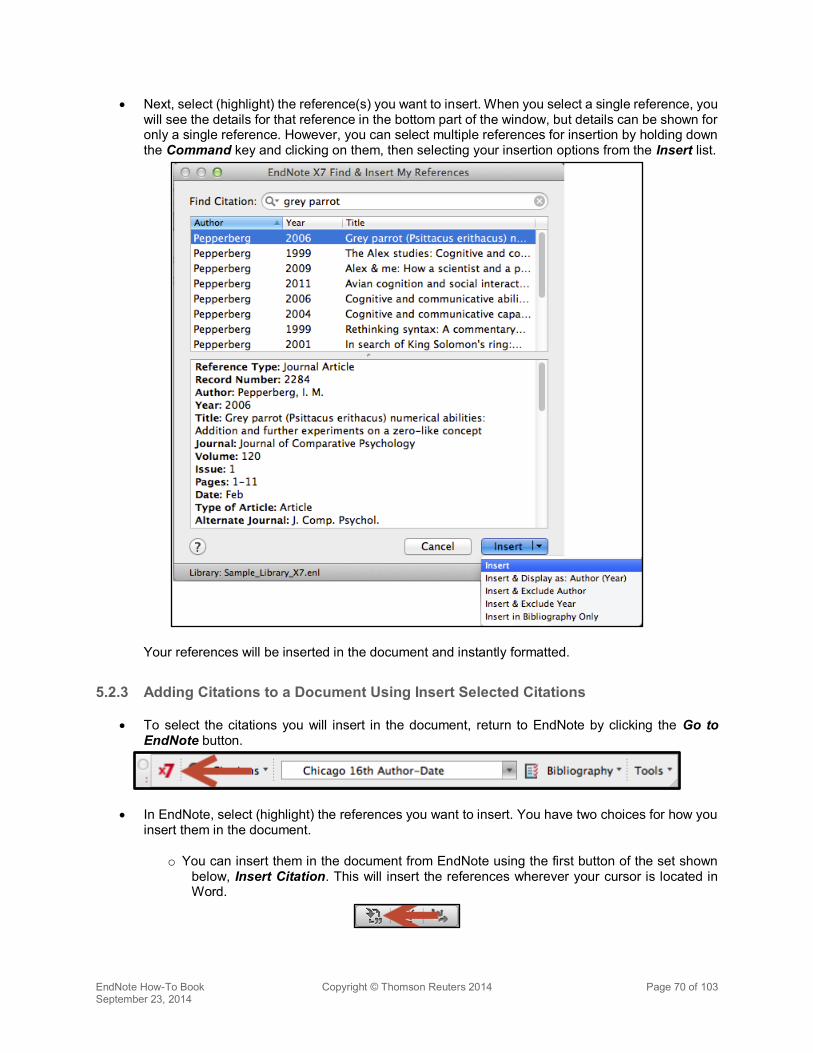
x Next, select (highlight) the reference(s) you want to insert. When you select a single reference, you will see the details for that reference in the bottom part of the window, but details can be shown for only a single reference. However, you can select multiple references for insertion by holding down the Control key and clicking on them, then selecting your insertion options from the Insert list.
Your references will be inserted in the document and instantly formatted.
EndNote How-To Book Copyright © Thomson Reuters 2014 Page 64 of 103 September 23, 2014
5.1.3 Adding Citations to a Document Using Insert Selected Citations
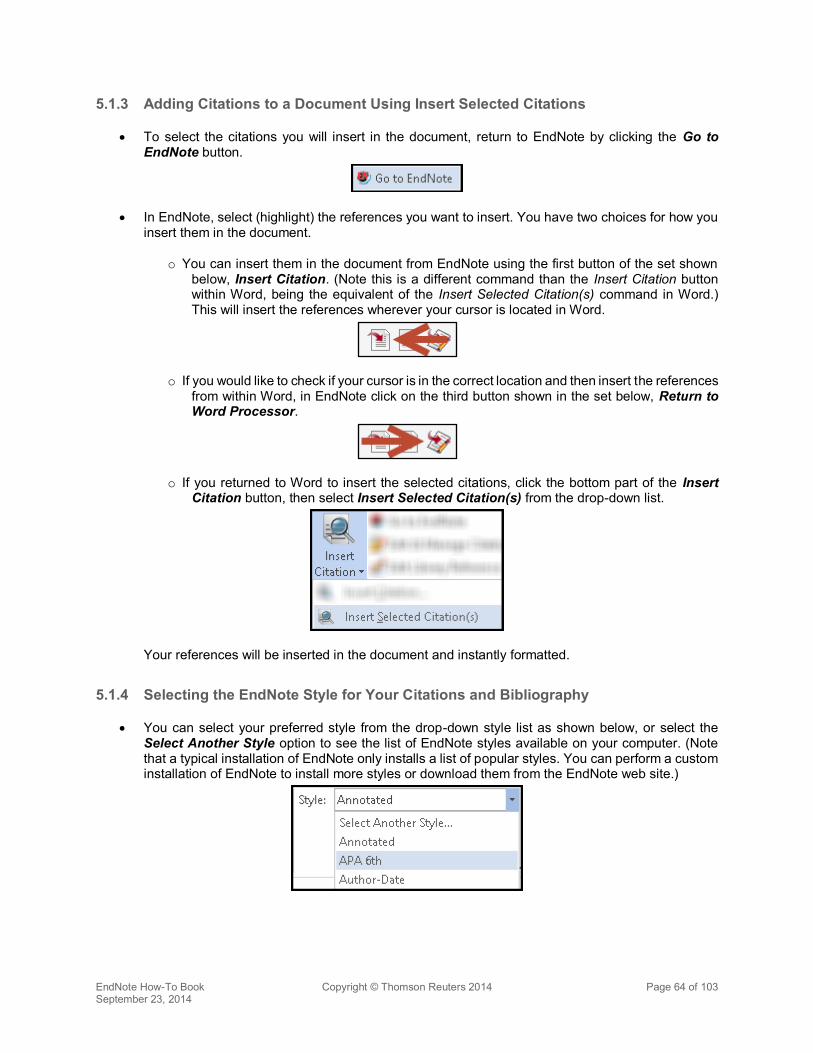
x To select the citations you will insert in the document, return to EndNote by clicking the Go to EndNote button.
x In EndNote, select (highlight) the references you want to insert. You have two choices for how you insert them in the document.
o You can insert them in the document from EndNote using the first button of the set shown below, Insert Citation. (Note this is a different command than the Insert Citation button within Word, being the equivalent of the Insert Selected Citation(s) command in Word.) This will insert the references wherever your cursor is located in Word.
o If you would like to check if your cursor is in the correct location and then insert the references from within Word, in EndNote click on the third button shown in the set below, Return to Word Processor.
o If you returned to Word to insert the selected citations, click the bottom part of the Insert Citation button, then select Insert Selected Citation(s) from the drop-down list.
Your references will be inserted in the document and instantly formatted.
5.1.4 Selecting the EndNote Style for Your Citations and Bibliography
x You can select your preferred style from the drop-down style list as shown below, or select the Select Another Style option to see the list of EndNote styles available on your computer. (Note that a typical installation of EndNote only installs a list of popular styles. You can perform a custom installation of EndNote to install more styles or download them from the EndNote web site.)
EndNote How-To Book Copyright © Thomson Reuters 2014 Page 65 of 103 September 23, 2014
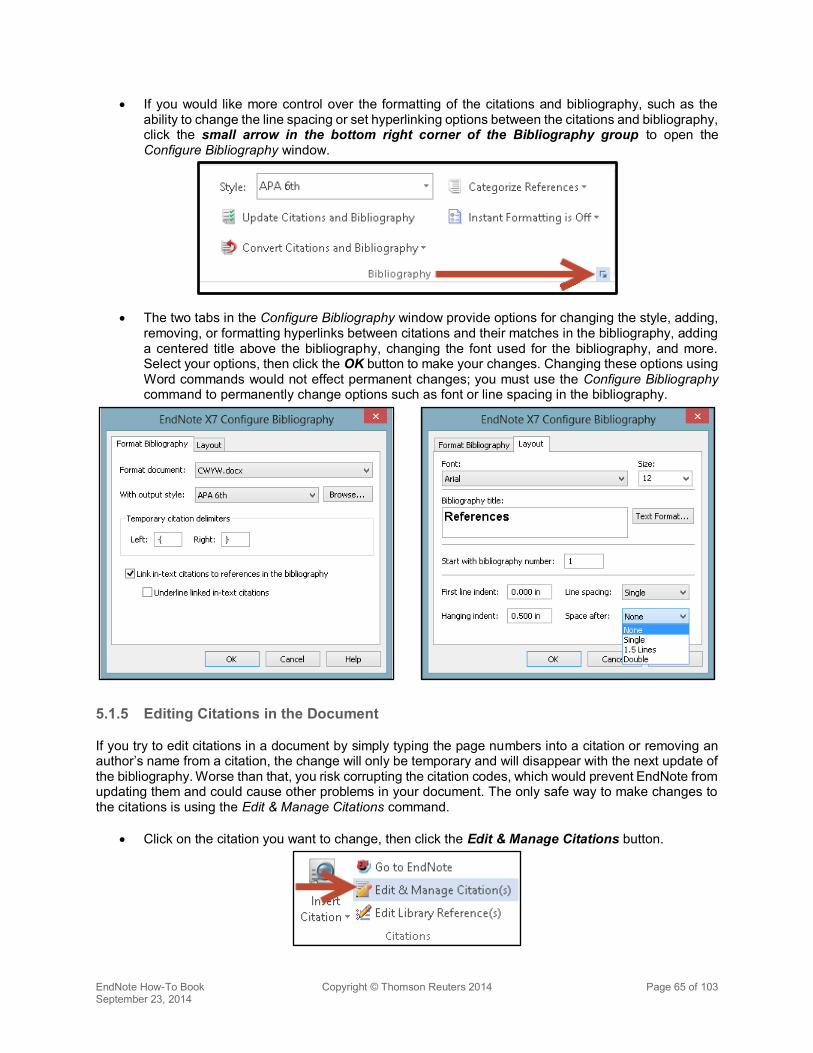
x If you would like more control over the formatting of the citations and bibliography, such as the ability to change the line spacing or set hyperlinking options between the citations and bibliography, click the small arrow in the bottom right corner of the Bibliography group to open the Configure Bibliography window.
x The two tabs in the Configure Bibliography window provide options for changing the style, adding, removing, or formatting hyperlinks between citations and their matches in the bibliography, adding a centered title above the bibliography, changing the font used for the bibliography, and more. Select your options, then click the OK button to make your changes. Changing these options using Word commands would not effect permanent changes; you must use the Configure Bibliography command to permanently change options such as font or line spacing in the bibliography.
5.1.5 Editing Citations in the Document
If you try to edit citations in a document by simply typing the page numbers into a citation or removing an author’s name from a citation, the change will only be temporary and will disappear with the next update of the bibliography. Worse than that, you risk corrupting the citation codes, which would prevent EndNote from updating them and could cause other problems in your document. The only safe way to make changes to the citations is using the Edit & Manage Citations command.
x Click on the citation you want to change, then click the Edit & Manage Citations button.

EndNote How-To Book Copyright © Thomson Reuters 2014 Page 66 of 103 September 23, 2014
x In the Edit & Manage Citations window there are two tabs in the lower part of the window. The first tab, Edit Citation (shown below), contains fields where you can add prefix or suffix text to a citation, as well as page numbers for those styles that require them. There is also a drop-down Formatting list that provides options to put the author’s name outside of the parentheses, exclude an author’s name, exclude the year, or show the reference only in the bibliography. (Note: If you are using a style where page numbers entered in the Pages field do not show, enter page numbers in the Suffix field, which will always show.)
EndNote How-To Book Copyright © Thomson Reuters 2014 Page 67 of 103 September 23, 2014
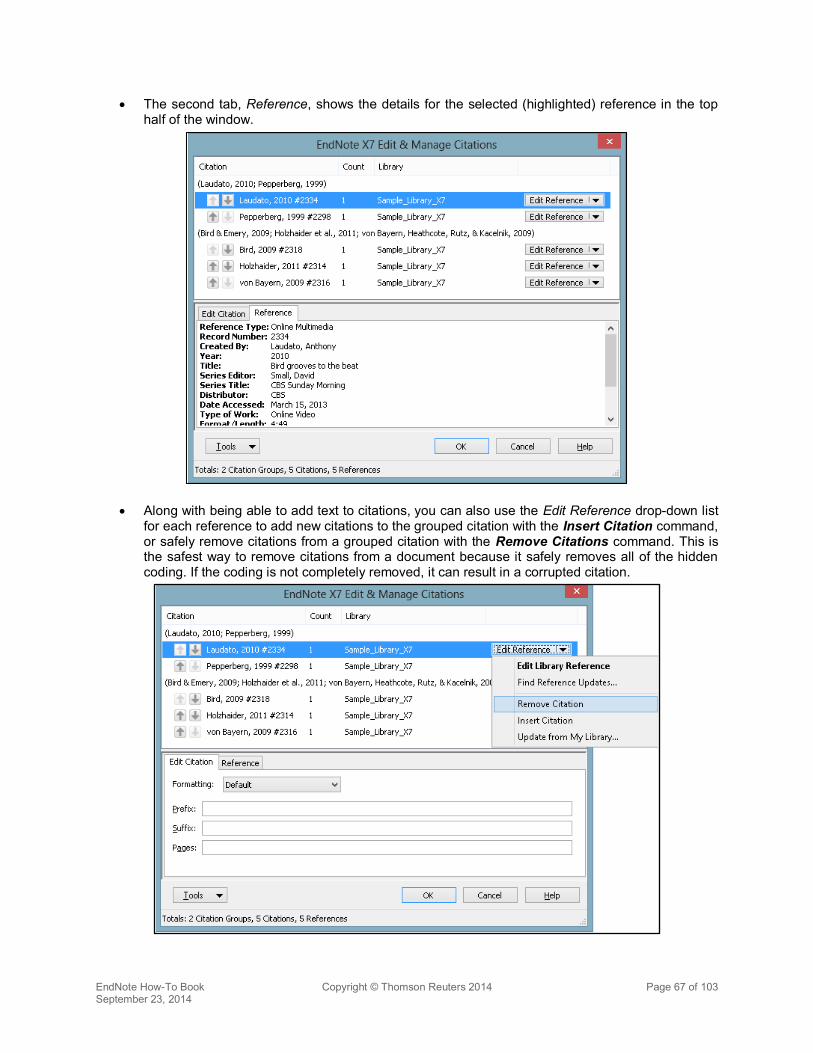
x The second tab, Reference, shows the details for the selected (highlighted) reference in the top half of the window.
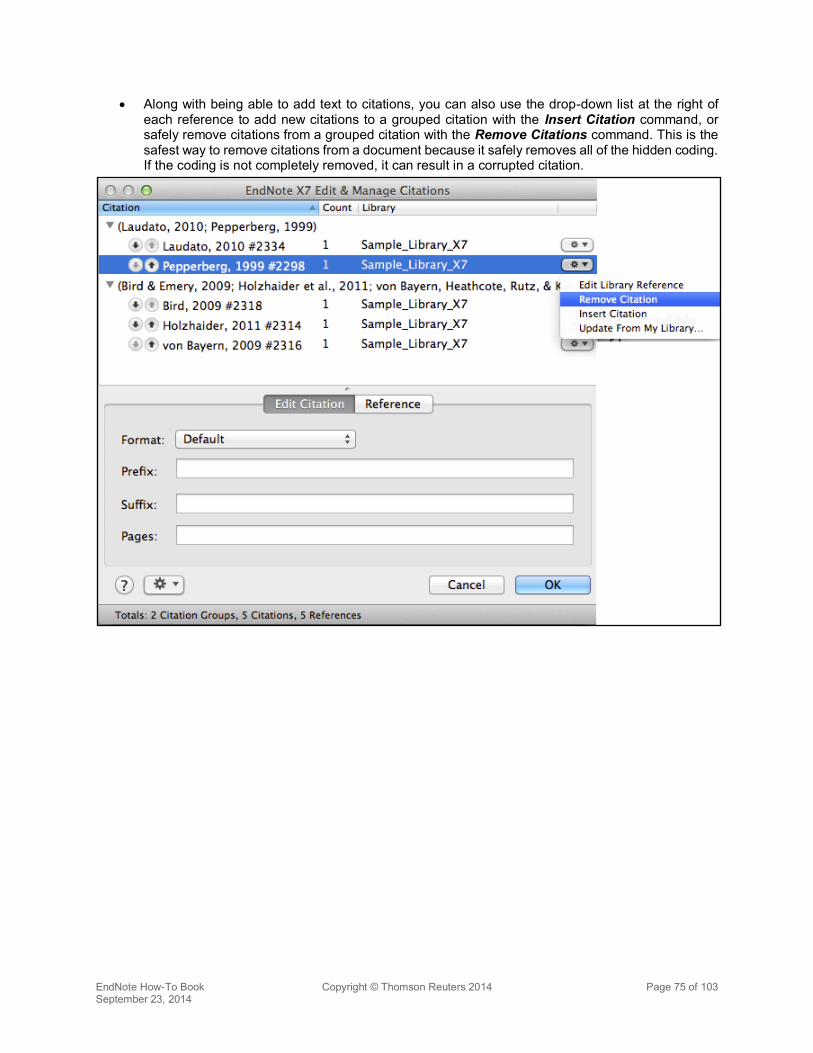
x Along with being able to add text to citations, you can also use the Edit Reference drop-down list for each reference to add new citations to the grouped citation with the Insert Citation command, or safely remove citations from a grouped citation with the Remove Citations command. This is the safest way to remove citations from a document because it safely removes all of the hidden coding. If the coding is not completely removed, it can result in a corrupted citation.
EndNote How-To Book Copyright © Thomson Reuters 2014 Page 68 of 103 September 23, 2014
5.2 CITE WHILE YOU WRITE IN MICROSOFT WORD ON MACINTOSH
5.2.1 Installing the Cite While You Write Tools
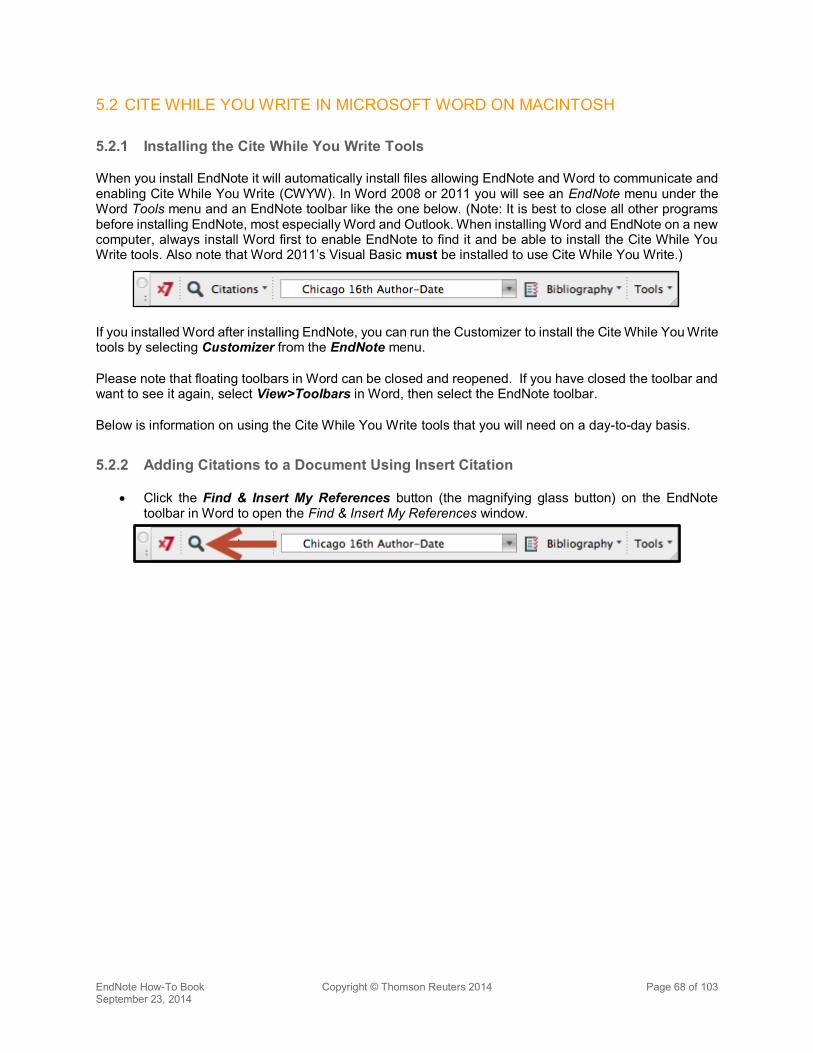
When you install EndNote it will automatically install files allowing EndNote and Word to communicate and enabling Cite While You Write (CWYW). In Word 2008 or 2011 you will see an EndNote menu under the Word Tools menu and an EndNote toolbar like the one below. (Note: It is best to close all other programs before installing EndNote, most especially Word and Outlook. When installing Word and EndNote on a new computer, always install Word first to enable EndNote to find it and be able to install the Cite While You Write tools. Also note that Word 2011’s Visual Basic must be installed to use Cite While You Write.)
If you installed Word after installing EndNote, you can run the Customizer to install the Cite While You Write tools by selecting Customizer from the EndNote menu.
Please note that floating toolbars in Word can be closed and reopened. If you have closed the toolbar and want to see it again, select View>Toolbars in Word, then select the EndNote toolbar.
Below is information on using the Cite While You Write tools that you will need on a day-to-day basis.
5.2.2 Adding Citations to a Document Using Insert Citation
x Click the Find & Insert My References button (the magnifying glass button) on the EndNote toolbar in Word to open the Find & Insert My References window.
EndNote How-To Book Copyright © Thomson Reuters 2014 Page 69 of 103 September 23, 2014
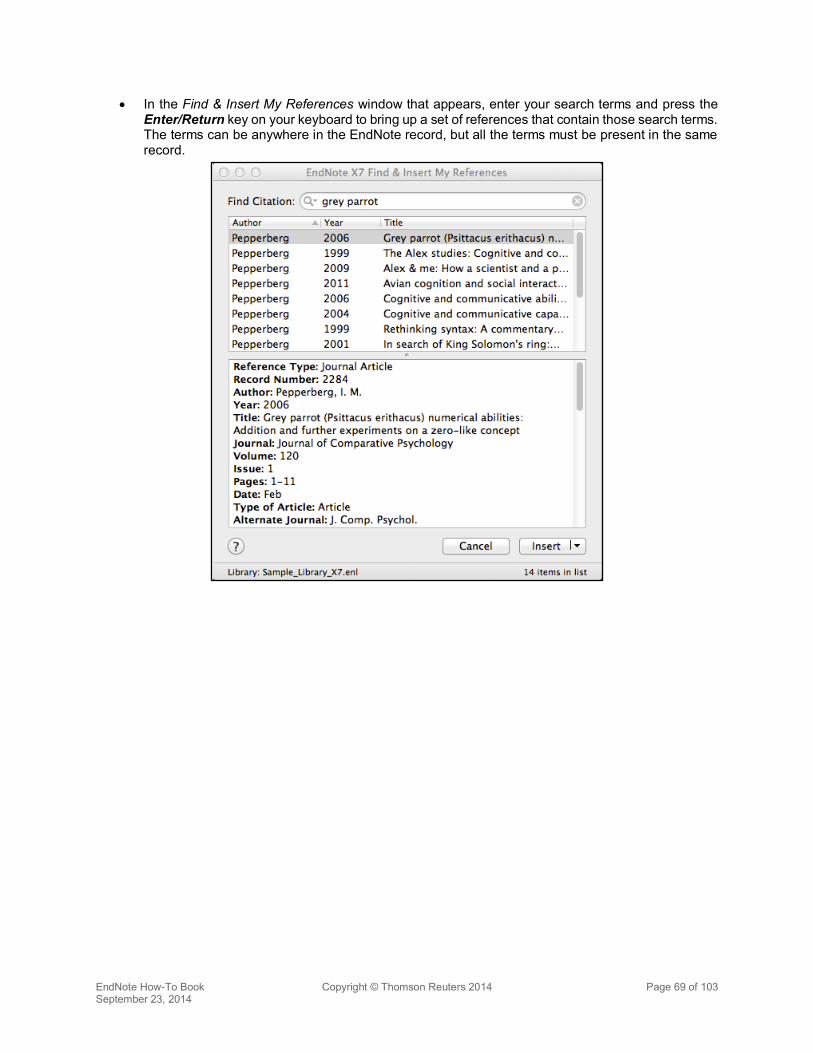
x In the Find & Insert My References window that appears, enter your search terms and press the Enter/Return key on your keyboard to bring up a set of references that contain those search terms. The terms can be anywhere in the EndNote record, but all the terms must be present in the same record.
EndNote How-To Book Copyright © Thomson Reuters 2014 Page 70 of 103 September 23, 2014
x Next, select (highlight) the reference(s) you want to insert. When you select a single reference, you will see the details for that reference in the bottom part of the window, but details can be shown for only a single reference. However, you can select multiple references for insertion by holding down the Command key and clicking on them, then selecting your insertion options from the Insert list.
Your references will be inserted in the document and instantly formatted.
5.2.3 Adding Citations to a Document Using Insert Selected Citations
x To select the citations you will insert in the document, return to EndNote by clicking the Go to EndNote button.
x In EndNote, select (highlight) the references you want to insert. You have two choices for how you insert them in the document.
o You can insert them in the document from EndNote using the first button of the set shown below, Insert Citation. This will insert the references wherever your cursor is located in Word.
EndNote How-To Book Copyright © Thomson Reuters 2014 Page 71 of 103 September 23, 2014
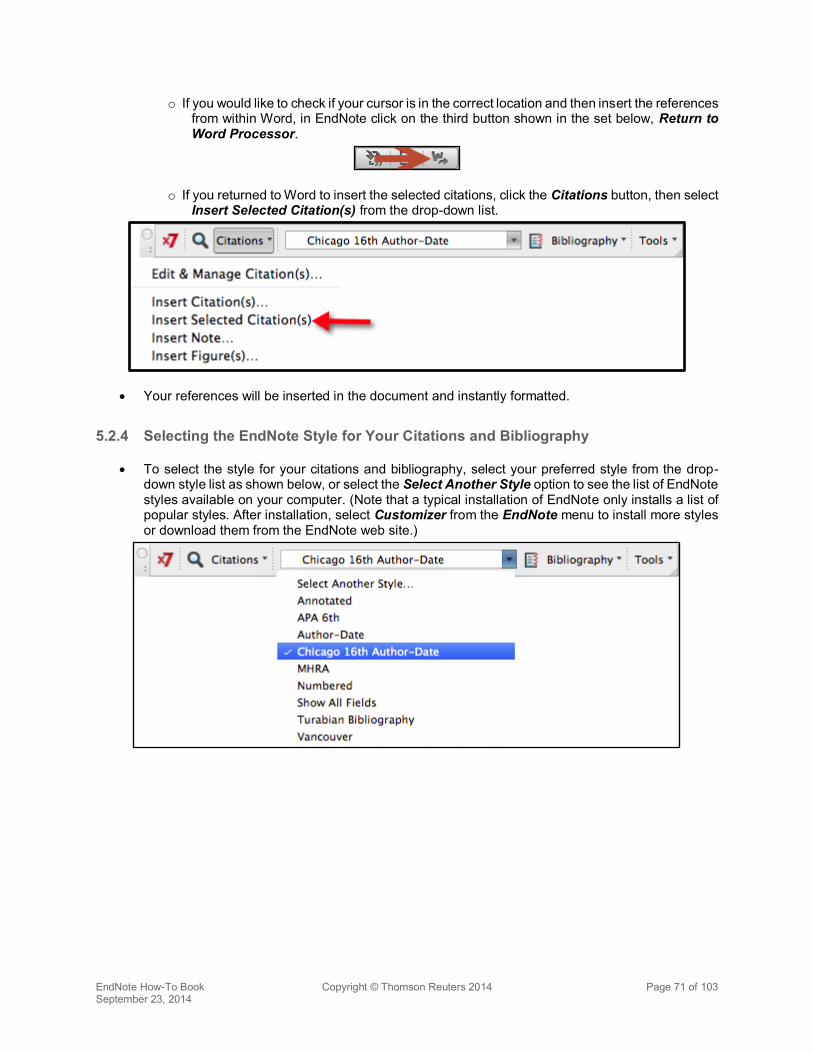
o If you would like to check if your cursor is in the correct location and then insert the references from within Word, in EndNote click on the third button shown in the set below, Return to Word Processor.
o If you returned to Word to insert the selected citations, click the Citations button, then select Insert Selected Citation(s) from the drop-down list.
x Your references will be inserted in the document and instantly formatted.
5.2.4 Selecting the EndNote Style for Your Citations and Bibliography
x To select the style for your citations and bibliography, select your preferred style from the drop-down style list as shown below, or select the Select Another Style option to see the list of EndNote styles available on your computer. (Note that a typical installation of EndNote only installs a list of popular styles. After installation, select Customizer from the EndNote menu to install more styles or download them from the EndNote web site.)

EndNote How-To Book Copyright © Thomson Reuters 2014 Page 72 of 103 September 23, 2014
x If you would like more control over the formatting of the citations and bibliography, such as the ability to change the line spacing or set hyperlinking options between the citations and bibliography, select Configure Bibliography from the drop-down Bibliography list.
x The two tabs in the Configure Bibliography window provide options for changing the style, adding, removing, or formatting hyperlinks between citations and their matches in the bibliography, adding a centered title above the bibliography, changing the font used for the bibliography, and more. Select your options, then click the OK button to make your changes. Changing these options using Word commands would not effect permanent changes; you must use the Configure Bibliography command to permanently change options such as font or line spacing in the bibliography. (Note: Because simply clicking on a hyperlink in a Word for Macintosh document will activate the link, it is best not to turn on hyperlinking between citations and bibliography until you are finished working with the document.)
5.2.5 Editing Citations in the Document
If you try to edit citations in a document by simply typing the page numbers into a citation or removing an author’s name from a citation, the change will only be temporary and will disappear with the next update of the bibliography. Worse than that, you risk corrupting the citation codes, which would prevent EndNote from updating them and could cause other problems in your document. The only safe way to make changes to the citations is using the Edit & Manage Citations command.
EndNote How-To Book Copyright © Thomson Reuters 2014 Page 73 of 103 September 23, 2014
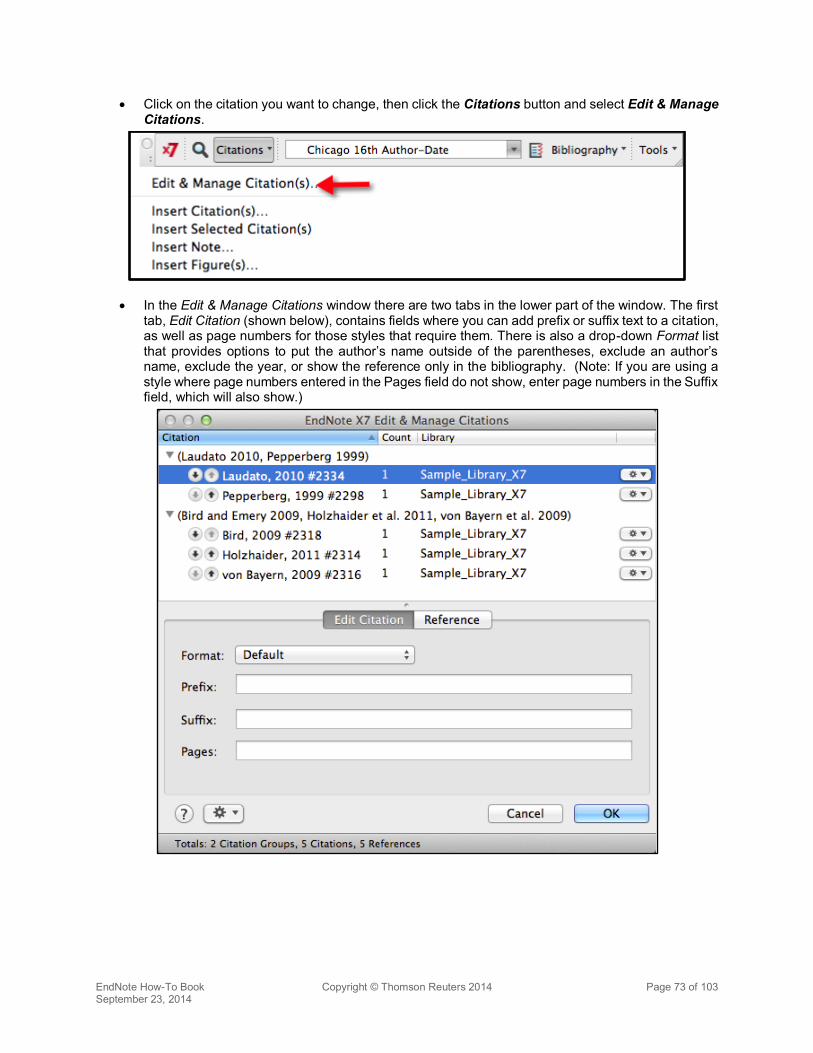
x Click on the citation you want to change, then click the Citations button and select Edit & Manage Citations.
x In the Edit & Manage Citations window there are two tabs in the lower part of the window. The first tab, Edit Citation (shown below), contains fields where you can add prefix or suffix text to a citation, as well as page numbers for those styles that require them. There is also a drop-down Format list that provides options to put the author’s name outside of the parentheses, exclude an author’s name, exclude the year, or show the reference only in the bibliography. (Note: If you are using a style where page numbers entered in the Pages field do not show, enter page numbers in the Suffix field, which will also show.)
EndNote How-To Book Copyright © Thomson Reuters 2014 Page 74 of 103 September 23, 2014
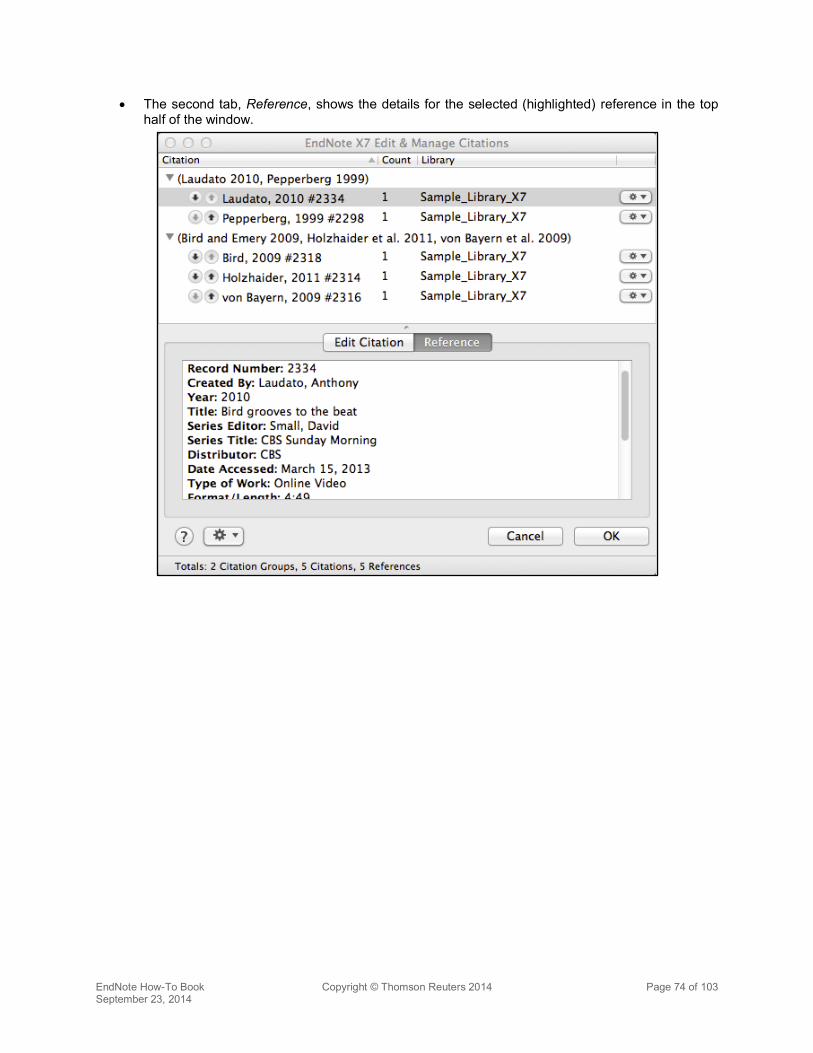
x The second tab, Reference, shows the details for the selected (highlighted) reference in the top half of the window.
EndNote How-To Book Copyright © Thomson Reuters 2014 Page 75 of 103 September 23, 2014
x Along with being able to add text to citations, you can also use the drop-down list at the right of each reference to add new citations to a grouped citation with the Insert Citation command, or safely remove citations from a grouped citation with the Remove Citations command. This is the safest way to remove citations from a document because it safely removes all of the hidden coding. If the coding is not completely removed, it can result in a corrupted citation.

EndNote How-To Book Copyright © Thomson Reuters 2014 Page 76 of 103 September 23, 2014
6 COLLABORATION: SHARING ENDNOTE REFERENCES
An EndNote library is not a single file. It is a set of files, many of them frequently updated as you work, and these files must be updated in a strict sequence by EndNote to avoid corruption of the library. This can cause difficulties when sharing libraries because only EndNote can properly control the sequence for updating and saving of data in the library, and outside synchronization or file management services can actually damage EndNote libraries. This section covers some of the methods to avoid, and then talks about safer methods of sharing references or complete libraries.
6.1 HOW NOT TO SHARE AN ENDNOTE LIBRARY
6.1.1 Don’t Put EndNote Libraries on “Cloud” Services
Never store an EndNote working library on any cloud service for sharing, or even just for your own use on multiple computers. This will eventually lead to library corruption because of the way the cloud services synchronize files over the Internet. Such unusable cloud services would include, but are not limited to—
x Amazon Cloud
x Box
x Dropbox
x Google Drive
x SharePoint
x OneDrive
x SugarSync
Also, never store a working library on a flash drive.
The reason these methods are inadvisable is that when you are working in EndNote, it is saving data to multiple files, and the data must be saved in a set sequence, as described above. When cloud services transfer that data, they may change the sequence of file saves. This eventually leads to library corruption. The library may appear to be fine for days, weeks, or even months, but will eventually be corrupted.
6.1.2 Don’t Put EndNote Libraries on Distant Network Servers
EndNote libraries with read-write access should not be stored on network drives outside of the building the library owner is located in. If the data must travel through the Internet, even within a company intranet or VPN network, latency issues can result in the packets of information arriving out of sequence on the distant server, causing corruption problems like those seen in cloud services. Ideally, the library should be kept on the owner’s computer.
6.1.3 Don’t Send the .enl File for a Library When Sharing a Library
Every EndNote library is made up of two parts: the .enl file and the .data folder, as seen below.

EndNote How-To Book Copyright © Thomson Reuters 2014 Page 77 of 103 September 23, 2014
It may be helpful to think of the .enl file as just the interface file for working with the contents of the .data folder, where all the real data is kept. When you open a .enl file, EndNote searches for the matching .data folder and refreshes the screen with the latest information in a sort of “snapshot.” If the .data folder is removed, EndNote will create a new one with data to match the last “snapshot” because it must have a .data folder to work. However, that new .data folder would not contain any of the attachments, group structure, or term lists from the original library; it would contain only the reference data. If you send somebody the .enl file only, they will receive only a portion of the library.
So how can you share EndNote references safely?
6.2 SHARING FULL ENDNOTE LIBRARIES
The EndNote X7.2 update introduced two much-requested features to EndNote:
1. Unlimited attachment space in EndNote online.
2. Full library sharing for up to fifteen people, including the library owner.
6.2.1 Unlimited Attachment Space in EndNote Online
In the past, EndNote X6/X7 users were limited to 5 gigabytes of attachment space in EndNote online. For EndNote X7 users, that limit has now been removed. As in EndNote on the desktop, an unlimited number of files of any type can be synchronized to and stored in EndNote online — PDFs, Word documents, PowerPoint presentations, even audio or video files — and through EndNote online those attachments can sync with up to three computers per user (for a single-user license of EndNote, site licenses may have restrictions on outside installations of the software).
Please note that EndNote basic users will still be limited to 2 gigabytes of attachment space.
EndNote How-To Book Copyright © Thomson Reuters 2014 Page 78 of 103 September 23, 2014
6.2.2 Full Library Sharing
6.2.2.1 The Basics
In the past, there was no way for users to share simultaneous access to a complete EndNote library with full read-write permissions and attachments. Full libraries could be shared on a network server with read-only access for simultaneous use, but only the owner could make changes, or groups could be shared through EndNote online, but without attachment sharing. Plus, to share a group online required the sharer to know the email address for the “sharee’s”1 EndNote online account. EndNote X7.2 users can now share their entire library, with simultaneous read-write access to all references and attachments, with up to fourteen other EndNote X7.2 users. The basic requirements and information for sharing are—
x All users must be using EndNote X7.2 or later.
x All users must sync their EndNote desktop and online libraries. The sharing process works through EndNote Sync.
x A library owner can sync only one EndNote library, so only one library can be shared with others or synced to the owner’s other computers or iPad. We suggest users have one library for all their writing and sync that library.
x Although a library owner can only share with up to fourteen other EndNote users, an unlimited number of libraries can be shared with a sharee. For example, if an administrative assistant worked with 30 faculty members, all 30 faculty members would be able to share their full libraries with the administrative assistant.
x Because the entire library is synced to all recipients, with attachments, the library will take up as much space on the recipient’s computer as it does on the owner’s computer and can be used off-line. However, the library can only be accessed through the FileÎOpen Shared Library command.
x The sharee will have full access to the library, this means they can add, change, or delete references and attachments. We suggest the owner make frequent backups of their library using the FileÎCompressed Library command.
6.2.2.2 How to Share a Library
x If you have not already synced your EndNote desktop and online libraries, click the Sync button to sync for the first time. (Note that you may be asked if you want to create a compressed library as a backup if it is the first time the library has been synced on that computer. We strongly suggest making a backup before the first sync. See section 4.1 for more details on syncing an EndNote library for the first time.)
Sync button for Windows: Sync button for Macintosh:
x In your synced library, click the Share Library button.
Share Library button for Windows:
Share Library button for Macintosh:
1 The word “sharee” will be used throughout this section to designate the person a library is shared with.

EndNote How-To Book Copyright © Thomson Reuters 2014 Page 79 of 103 September 23, 2014
x Enter the email address of the person you want to invite to the shared library, then click the Invite button. The email address does not need to be the one the invitee/sharee uses for their EndNote online account. (Note: excess space has been removed from the image to better fit on page.)
x The invitee’s name will be added to the list at the top of the dialog with a Pending status to show they have not yet accepted the invitation. If you want to send a reminder of the invitation or remove them from the list, you can do that at any time.
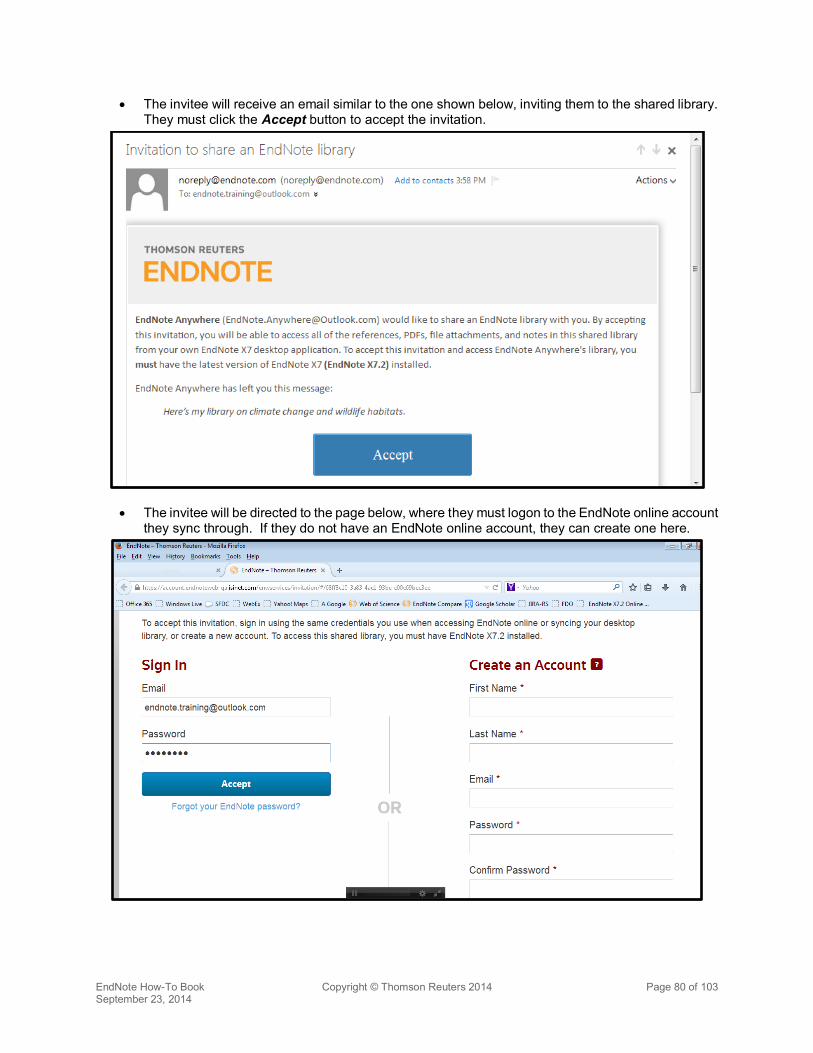
EndNote How-To Book Copyright © Thomson Reuters 2014 Page 80 of 103 September 23, 2014
x The invitee will receive an email similar to the one shown below, inviting them to the shared library. They must click the Accept button to accept the invitation.
x The invitee will be directed to the page below, where they must logon to the EndNote online account they sync through. If they do not have an EndNote online account, they can create one here.
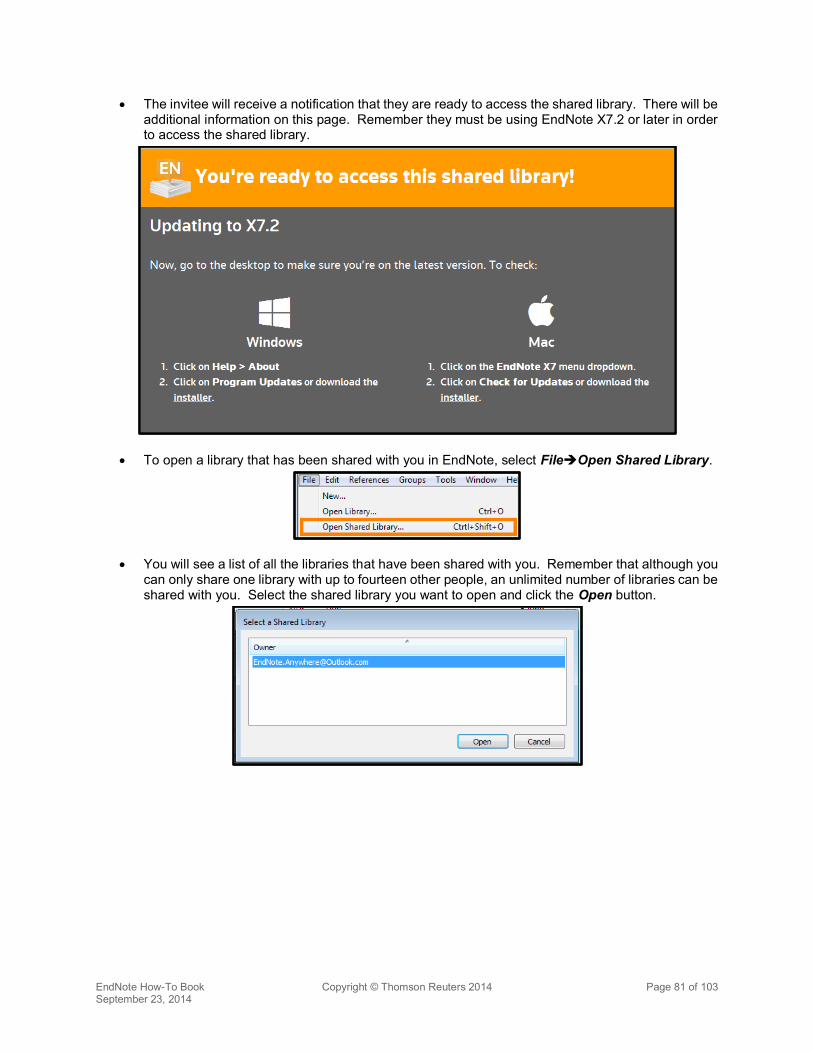
EndNote How-To Book Copyright © Thomson Reuters 2014 Page 81 of 103 September 23, 2014
x The invitee will receive a notification that they are ready to access the shared library. There will be additional information on this page. Remember they must be using EndNote X7.2 or later in order to access the shared library.
x To open a library that has been shared with you in EndNote, select FileÎOpen Shared Library.
x You will see a list of all the libraries that have been shared with you. Remember that although you can only share one library with up to fourteen other people, an unlimited number of libraries can be shared with you. Select the shared library you want to open and click the Open button.
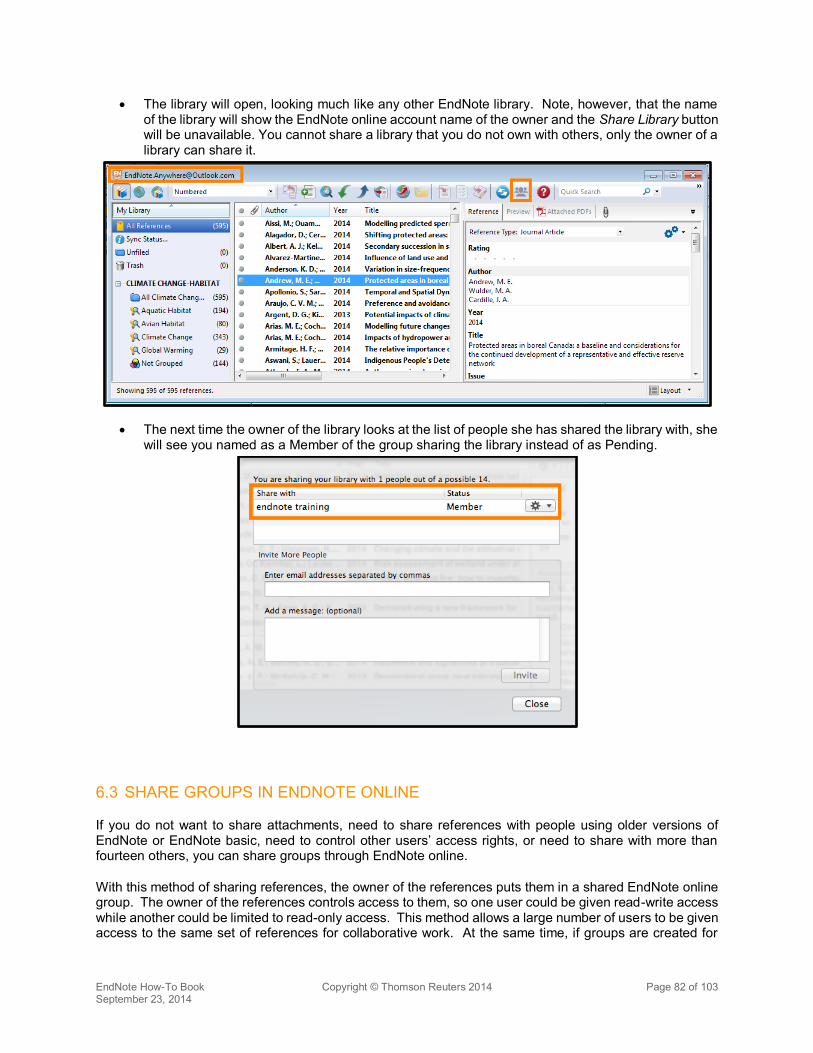
EndNote How-To Book Copyright © Thomson Reuters 2014 Page 82 of 103 September 23, 2014
x The library will open, looking much like any other EndNote library. Note, however, that the name of the library will show the EndNote online account name of the owner and the Share Library button will be unavailable. You cannot share a library that you do not own with others, only the owner of a library can share it.
x The next time the owner of the library looks at the list of people she has shared the library with, she will see you named as a Member of the group sharing the library instead of as Pending.
6.3 SHARE GROUPS IN ENDNOTE ONLINE
If you do not want to share attachments, need to share references with people using older versions of EndNote or EndNote basic, need to control other users’ access rights, or need to share with more than fourteen others, you can share groups through EndNote online.
With this method of sharing references, the owner of the references puts them in a shared EndNote online group. The owner of the references controls access to them, so one user could be given read-write access while another could be limited to read-only access. This method allows a large number of users to be given access to the same set of references for collaborative work. At the same time, if groups are created for

EndNote How-To Book Copyright © Thomson Reuters 2014 Page 83 of 103 September 23, 2014
specific projects, it can also allow the owner to limit shared access to only the references for a project instead of the entire library.
EndNote online data is kept on secure Thomson Reuters servers. These servers are kept in locked rooms, with strictly limited employee access, and use SSL encryption for data security, much like a bank.
Please note the following restrictions.
x This method allows sharing of the EndNote desktop/online record data, but does not allow sharing of attachments, even within your own organization. However, you can share links to documents stored online. So, if you have a copy of a document in a SharePoint or DropBox folder, you can share a link to the external copy of the document using the URL field.
x Groups can only be shared with other EndNote online or basic users, and you will need to know the email addresses used as account names of such users to share references with them.
Note: Screenshots below show Windows examples, but the features will work the same way on Macintosh.
6.3.1 Creating an EndNote Online Library
Please see section 4 for information on setting up your EndNote online library if you have not done so already.
6.3.2 Share Your Group in EndNote Online
x Select Manage My Groups on the Organize tab in EndNote online to see a screen like that below.
x Mark the Share box for the group you want to share, as shown above. You will see an icon with two people and an arrow appear to the left of any shared group.
x Click the Manage Sharing button for your shared group to begin sharing it with others.
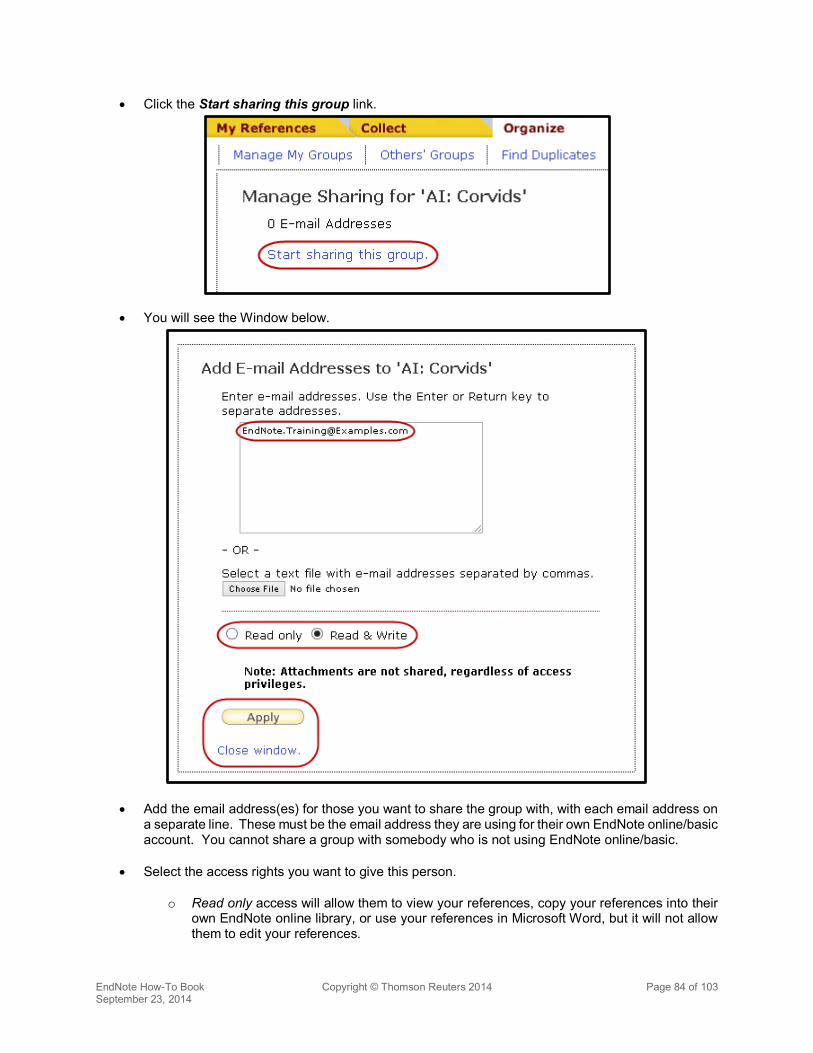
EndNote How-To Book Copyright © Thomson Reuters 2014 Page 84 of 103 September 23, 2014
x Click the Start sharing this group link.
x You will see the Window below.
x Add the email address(es) for those you want to share the group with, with each email address on a separate line. These must be the email address they are using for their own EndNote online/basic account. You cannot share a group with somebody who is not using EndNote online/basic.
x Select the access rights you want to give this person.
o Read only access will allow them to view your references, copy your references into their own EndNote online library, or use your references in Microsoft Word, but it will not allow them to edit your references.

EndNote How-To Book Copyright © Thomson Reuters 2014 Page 85 of 103 September 23, 2014
o Read & Write access will allow them to view your references, copy your references into their own EndNote online library, or use your references in Microsoft Word, and it will also allow them to edit your references, add new references, and delete your references. Changes made to your references by others with Read & Write access will also be synchronized back to your EndNote desktop library if you are synchronizing your libraries.
x Click on the Apply button to save the options, then the Close window link.
x You should now see something like the screen below, showing who you have shared the group with and what level of access you have given them. You can change the level of access or stop sharing the group with them at any time.
6.3.3 What the User You Shared Your Group with Will See
x The user you shared your group with will see your group show up under a Groups Shared by Others heading in their EndNote online library. The notebook and pencil icon you see below will only show when they have been given Read & Write access to the group.
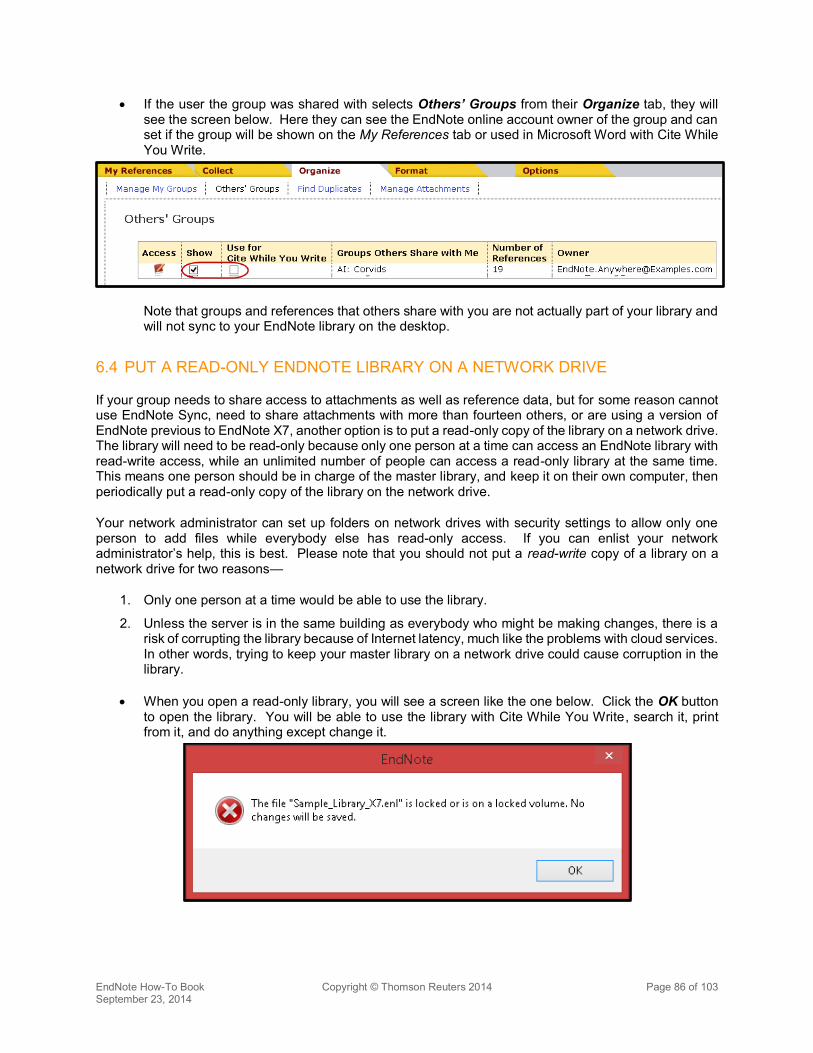
EndNote How-To Book Copyright © Thomson Reuters 2014 Page 86 of 103 September 23, 2014
x If the user the group was shared with selects Others’ Groups from their Organize tab, they will see the screen below. Here they can see the EndNote online account owner of the group and can set if the group will be shown on the My References tab or used in Microsoft Word with Cite While You Write.
Note that groups and references that others share with you are not actually part of your library and will not sync to your EndNote library on the desktop.
6.4 PUT A READ-ONLY ENDNOTE LIBRARY ON A NETWORK DRIVE
If your group needs to share access to attachments as well as reference data, but for some reason cannot use EndNote Sync, need to share attachments with more than fourteen others, or are using a version of EndNote previous to EndNote X7, another option is to put a read-only copy of the library on a network drive. The library will need to be read-only because only one person at a time can access an EndNote library with read-write access, while an unlimited number of people can access a read-only library at the same time. This means one person should be in charge of the master library, and keep it on their own computer, then periodically put a read-only copy of the library on the network drive.
Your network administrator can set up folders on network drives with security settings to allow only one person to add files while everybody else has read-only access. If you can enlist your network administrator’s help, this is best. Please note that you should not put a read-write copy of a library on a network drive for two reasons—
1. Only one person at a time would be able to use the library.
2. Unless the server is in the same building as everybody who might be making changes, there is a risk of corrupting the library because of Internet latency, much like the problems with cloud services. In other words, trying to keep your master library on a network drive could cause corruption in the library.
x When you open a read-only library, you will see a screen like the one below. Click the OK button to open the library. You will be able to use the library with Cite While You Write, search it, print from it, and do anything except change it.

EndNote How-To Book Copyright © Thomson Reuters 2014 Page 87 of 103 September 23, 2014
x The suggested “best method” for putting your read-only copy on the network drive is to first make a compressed library with all records and all attachments on your hard drive, then copy that file to the network location and open it there. It will uncompress to create the .enl file and .data folder necessary to work in the library.
6.5 SEND A COMPRESSED LIBRARY
If you are unable to use the methods described above, you could instead send a compressed library through email, burn it to disk, or put it on a flash drive or on a shared cloud service. This method allows you to control exactly which groups of references are included, and whether or not attachments are included.
The disadvantage of this method is that users are not working with the same copy of the library. Each person would have their own copy of the library and changes to references could be made in each copy differently.
x With the EndNote library you want to compress open in EndNote, select Compressed Library from the File menu. You should then see the screen below, which you saw earlier in this chapter, but because you are not making a complete backup copy this time you can limit the references to only those you want to send.
x Select the Create option to create a compressed library you can save on your computer and then attach to an email. The Create & E-mail option will work with most MAPI-compliant email programs, but may not work with all email programs. It will not work with web email programs such as Gmail.
x Select the With File Attachments option to include all attachments for the references you are sending, not just the PDFs. Select Without File Attachments to make the file smaller and to remove PDFs and other attachments.
x The bottom part of the window gives you options on which references will be included in the compressed file.
o All References in Library would include all of the references in your library. This option is also an excellent way to create backup copies of your libraries. Please note that you may be unable to attach very large libraries with attachments to emails or even put them on disks because of operating system limitations on the size of zipped/compressed files.
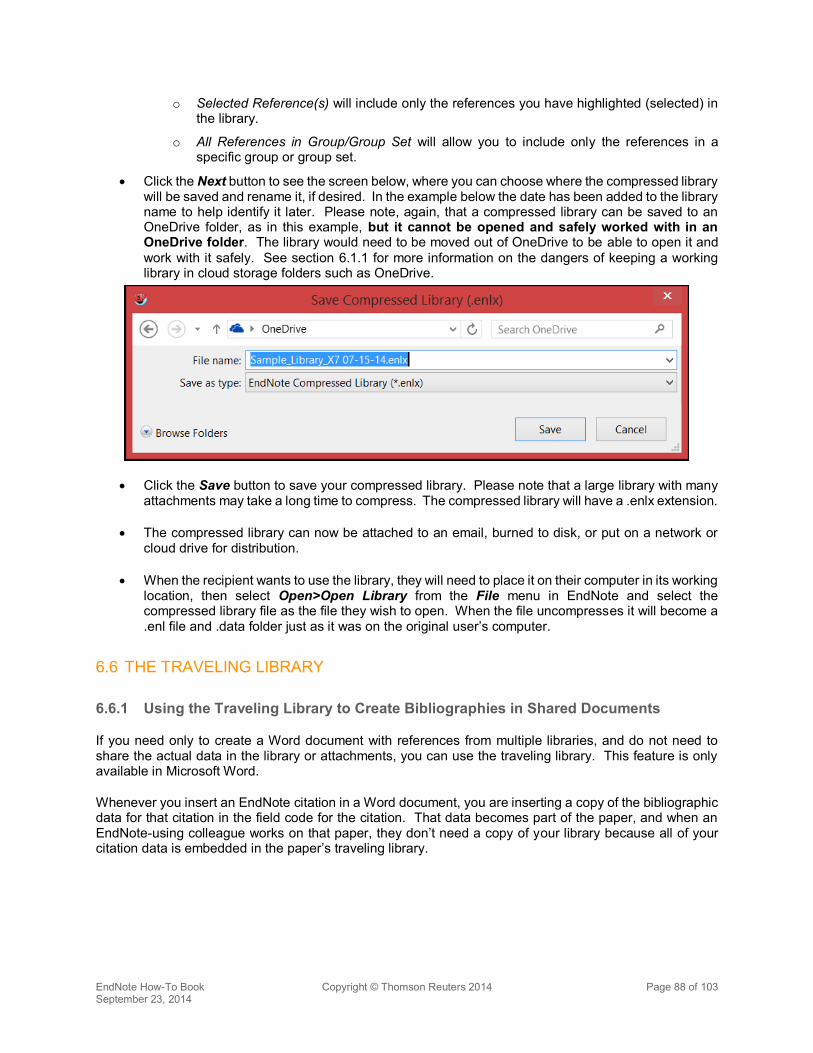
EndNote How-To Book Copyright © Thomson Reuters 2014 Page 88 of 103 September 23, 2014
o Selected Reference(s) will include only the references you have highlighted (selected) in the library.
o All References in Group/Group Set will allow you to include only the references in a specific group or group set.
x Click the Next button to see the screen below, where you can choose where the compressed library will be saved and rename it, if desired. In the example below the date has been added to the library name to help identify it later. Please note, again, that a compressed library can be saved to an OneDrive folder, as in this example, but it cannot be opened and safely worked with in an OneDrive folder. The library would need to be moved out of OneDrive to be able to open it and work with it safely. See section 6.1.1 for more information on the dangers of keeping a working library in cloud storage folders such as OneDrive.
x Click the Save button to save your compressed library. Please note that a large library with many attachments may take a long time to compress. The compressed library will have a .enlx extension.
x The compressed library can now be attached to an email, burned to disk, or put on a network or cloud drive for distribution.
x When the recipient wants to use the library, they will need to place it on their computer in its working location, then select Open>Open Library from the File menu in EndNote and select the compressed library file as the file they wish to open. When the file uncompresses it will become a .enl file and .data folder just as it was on the original user’s computer.
6.6 THE TRAVELING LIBRARY
6.6.1 Using the Traveling Library to Create Bibliographies in Shared Documents
If you need only to create a Word document with references from multiple libraries, and do not need to share the actual data in the library or attachments, you can use the traveling library. This feature is only available in Microsoft Word.
Whenever you insert an EndNote citation in a Word document, you are inserting a copy of the bibliographic data for that citation in the field code for the citation. That data becomes part of the paper, and when an EndNote-using colleague works on that paper, they don’t need a copy of your library because all of your citation data is embedded in the paper’s traveling library.
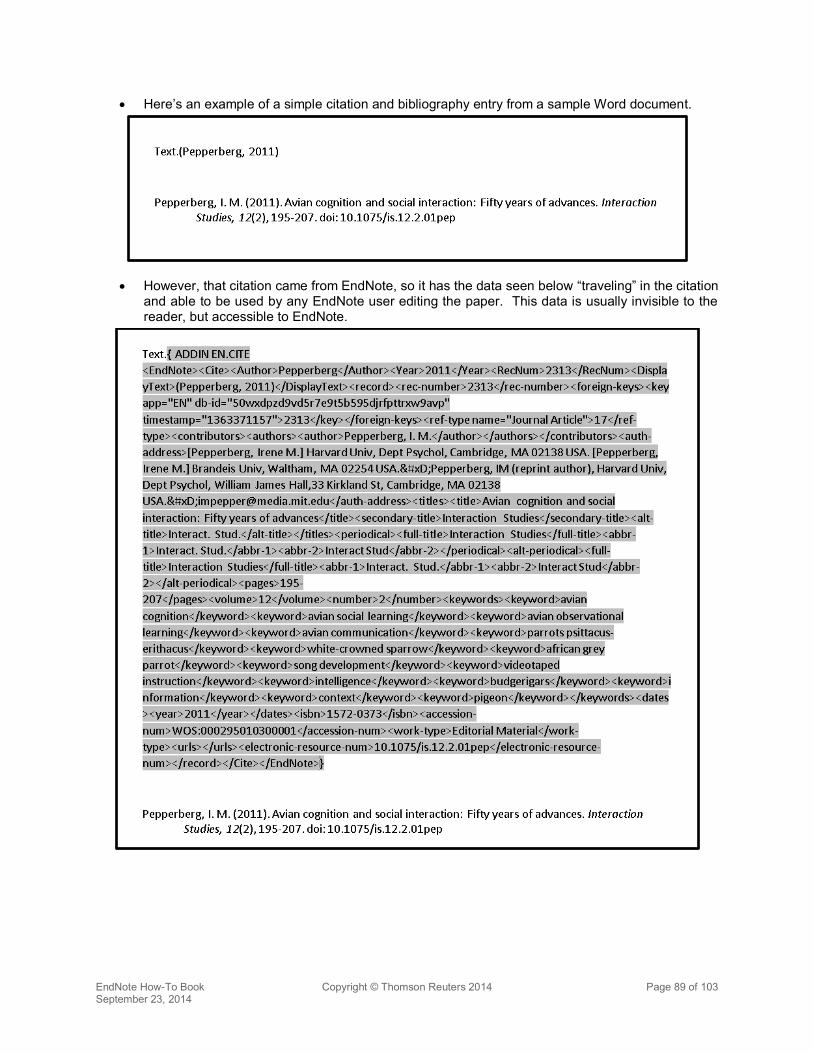
EndNote How-To Book Copyright © Thomson Reuters 2014 Page 89 of 103 September 23, 2014
x Here’s an example of a simple citation and bibliography entry from a sample Word document.
x However, that citation came from EndNote, so it has the data seen below “traveling” in the citation and able to be used by any EndNote user editing the paper. This data is usually invisible to the reader, but accessible to EndNote.

EndNote How-To Book Copyright © Thomson Reuters 2014 Page 90 of 103 September 23, 2014
x Below is the same reference, but reformatted with the Vancouver style instead of the APA. That’s not anything special for EndNote. However, this citation and bibliography were formatted with no libraries open in EndNote! That means the only information EndNote had to work with was the data available in the traveling library.
This means you can send a copy of your paper to a colleague using EndNote, and they do not need a copy of your library. They can add citations from their own EndNote library, and EndNote will merge your citations and theirs together to create a single bibliography.
6.6.2 Exporting the Traveling Library
Data in a traveling library can be extracted and put in your own EndNote library.
x On the Cite While You Write tab in Word for Windows, click Export to EndNote in the Tools group, then select Export Traveling Library from the drop-down list. On Macintosh, select Export Traveling Library from the Tools drop-down list on the floating EndNote toolbar.
Windows
Macintosh
x Select the EndNote library to import the references to, or create a new library. EndNote will filter out duplicate references that came from the library you select.
Windows
Macintosh
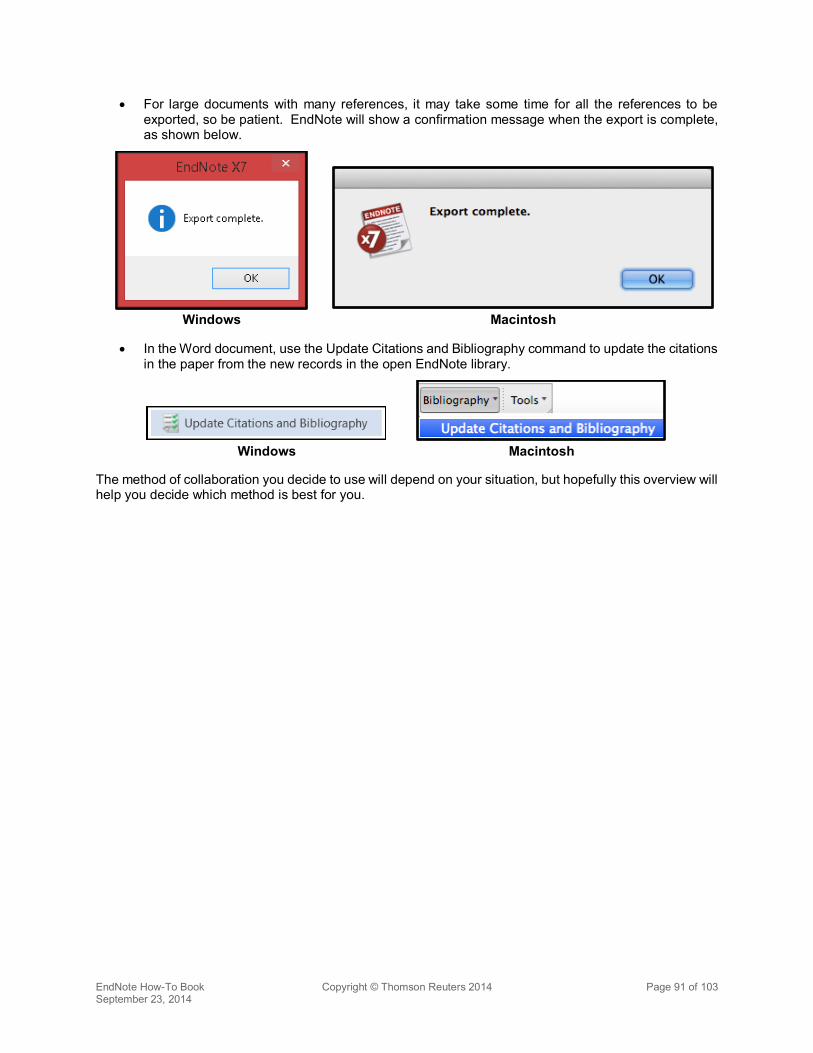
EndNote How-To Book Copyright © Thomson Reuters 2014 Page 91 of 103 September 23, 2014
x For large documents with many references, it may take some time for all the references to be exported, so be patient. EndNote will show a confirmation message when the export is complete, as shown below.
Windows
Macintosh
x In the Word document, use the Update Citations and Bibliography command to update the citations in the paper from the new records in the open EndNote library.
Windows
Macintosh
The method of collaboration you decide to use will depend on your situation, but hopefully this overview will help you decide which method is best for you.
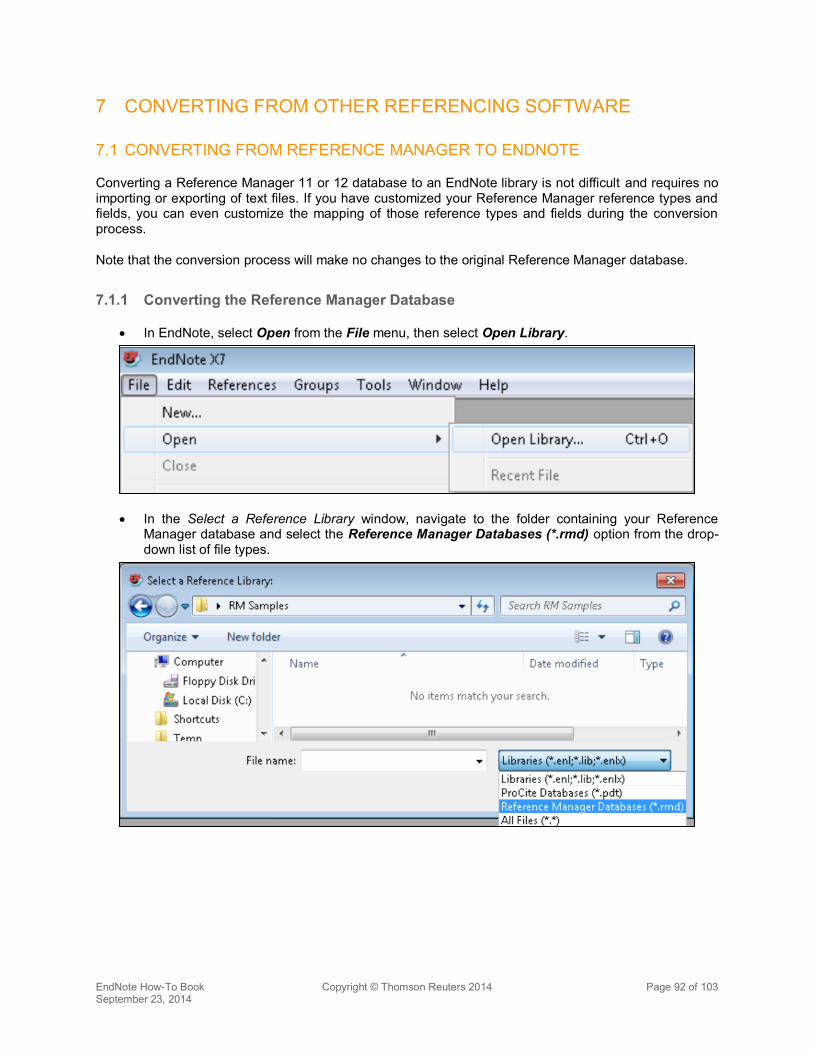
EndNote How-To Book Copyright © Thomson Reuters 2014 Page 92 of 103 September 23, 2014
7 CONVERTING FROM OTHER REFERENCING SOFTWARE
7.1 CONVERTING FROM REFERENCE MANAGER TO ENDNOTE
Converting a Reference Manager 11 or 12 database to an EndNote library is not difficult and requires no importing or exporting of text files. If you have customized your Reference Manager reference types and fields, you can even customize the mapping of those reference types and fields during the conversion process.
Note that the conversion process will make no changes to the original Reference Manager database.
7.1.1 Converting the Reference Manager Database
x In EndNote, select Open from the File menu, then select Open Library.
x In the Select a Reference Library window, navigate to the folder containing your Reference Manager database and select the Reference Manager Databases (*.rmd) option from the drop-down list of file types.

EndNote How-To Book Copyright © Thomson Reuters 2014 Page 93 of 103 September 23, 2014
x You will now see the Reference Manager database in the folder. Select it, then click on the Open button.
x If you have not customized any of your reference types or fields in Reference Manager, you can simply click the Convert button to convert the database. If you have customized your database, click the Customize button to customize the field mappings. (Click here to continue with the uncustomized conversion instructions.)

EndNote How-To Book Copyright © Thomson Reuters 2014 Page 94 of 103 September 23, 2014
x If you have selected to customize your conversion, in the top half of the field mapping window you can select the EndNote reference type that each Reference Manager reference type will import as. For example, in the screen shot below it shows that any reference that was entered as an abstract in Reference Manager will be imported as a journal article in EndNote. You can change these options if you wish using the drop-down list for each match in the EndNote column.
x In the bottom part of this window you can select the specific fields in EndNote that each Reference Manager field will map to for the shown Reference type. In the screenshot below, the Notes field for the Magazine Article reference type in Reference Manager is being mapped to the Notes field in EndNote.
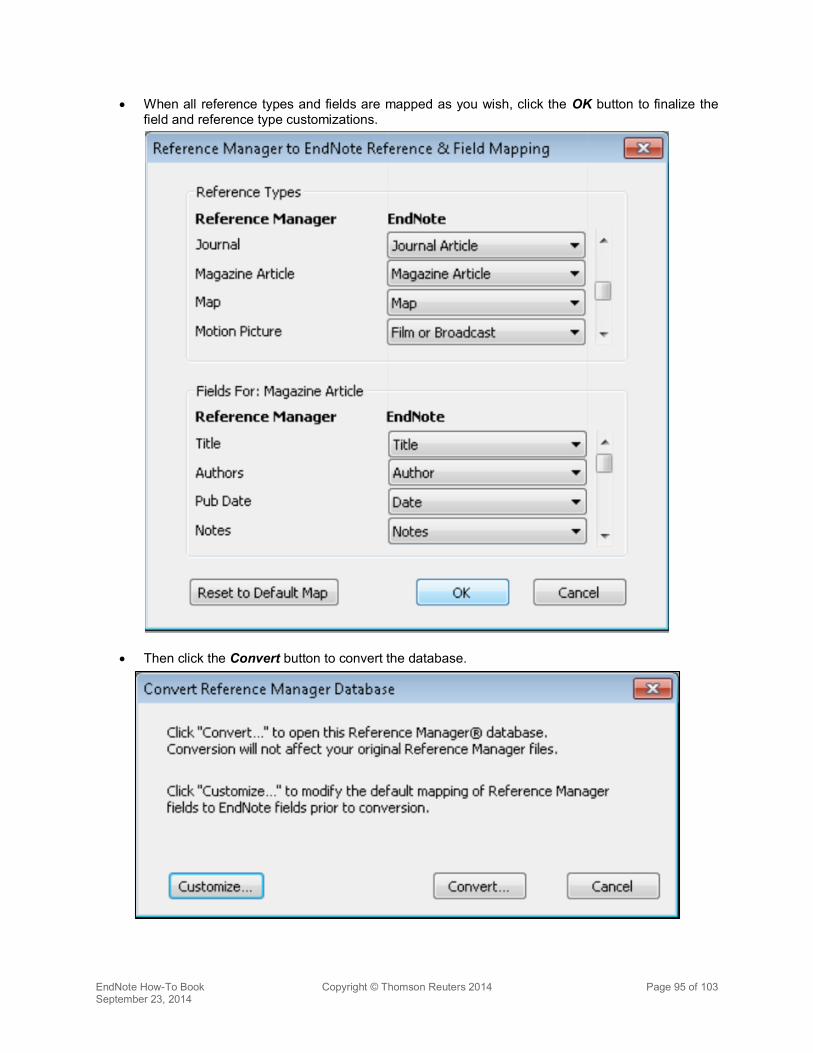
EndNote How-To Book Copyright © Thomson Reuters 2014 Page 95 of 103 September 23, 2014
x When all reference types and fields are mapped as you wish, click the OK button to finalize the field and reference type customizations.
x Then click the Convert button to convert the database.
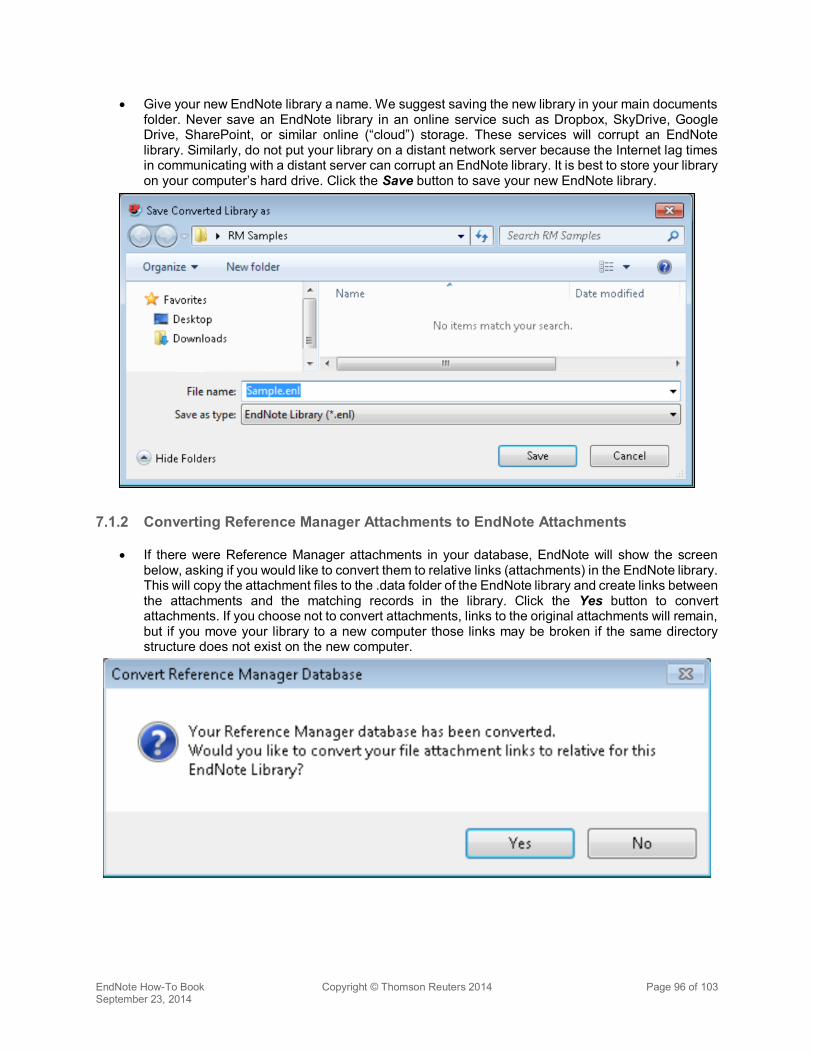
EndNote How-To Book Copyright © Thomson Reuters 2014 Page 96 of 103 September 23, 2014
x Give your new EndNote library a name. We suggest saving the new library in your main documents folder. Never save an EndNote library in an online service such as Dropbox, SkyDrive, Google Drive, SharePoint, or similar online (“cloud”) storage. These services will corrupt an EndNote library. Similarly, do not put your library on a distant network server because the Internet lag times in communicating with a distant server can corrupt an EndNote library. It is best to store your library on your computer’s hard drive. Click the Save button to save your new EndNote library.
7.1.2 Converting Reference Manager Attachments to EndNote Attachments
x If there were Reference Manager attachments in your database, EndNote will show the screen below, asking if you would like to convert them to relative links (attachments) in the EndNote library. This will copy the attachment files to the .data folder of the EndNote library and create links between the attachments and the matching records in the library. Click the Yes button to convert attachments. If you choose not to convert attachments, links to the original attachments will remain, but if you move your library to a new computer those links may be broken if the same directory structure does not exist on the new computer.
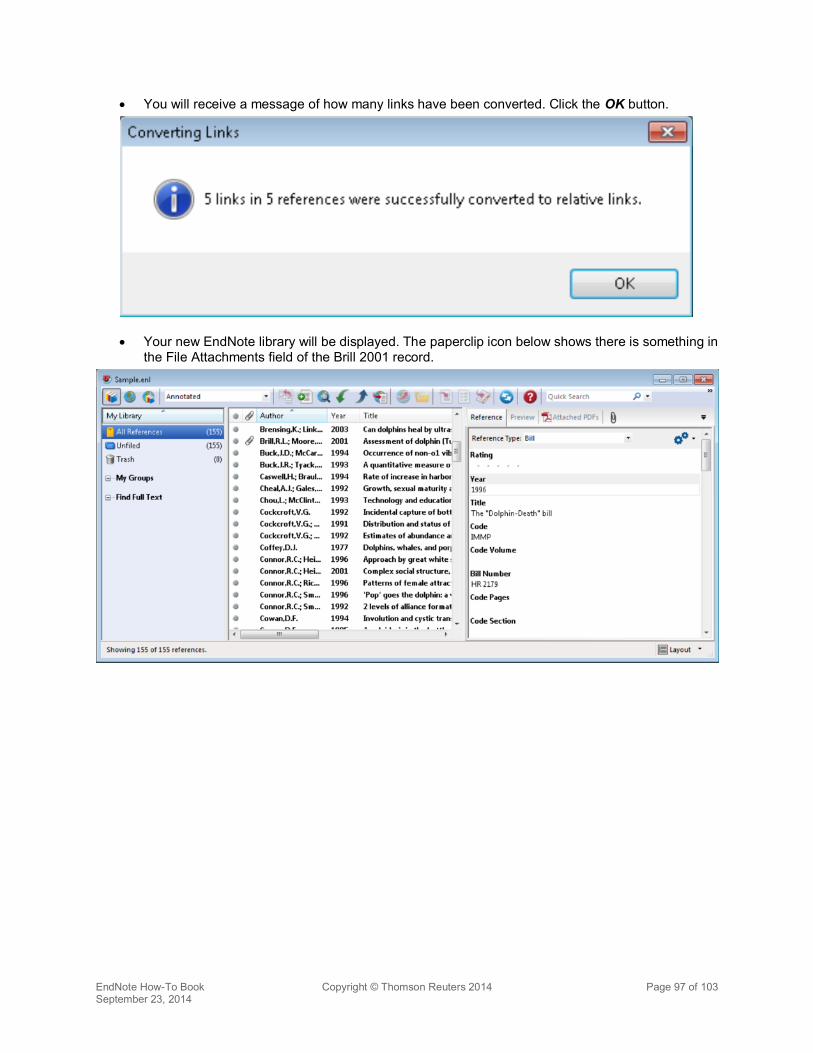
EndNote How-To Book Copyright © Thomson Reuters 2014 Page 97 of 103 September 23, 2014
x You will receive a message of how many links have been converted. Click the OK button.
x Your new EndNote library will be displayed. The paperclip icon below shows there is something in the File Attachments field of the Brill 2001 record.
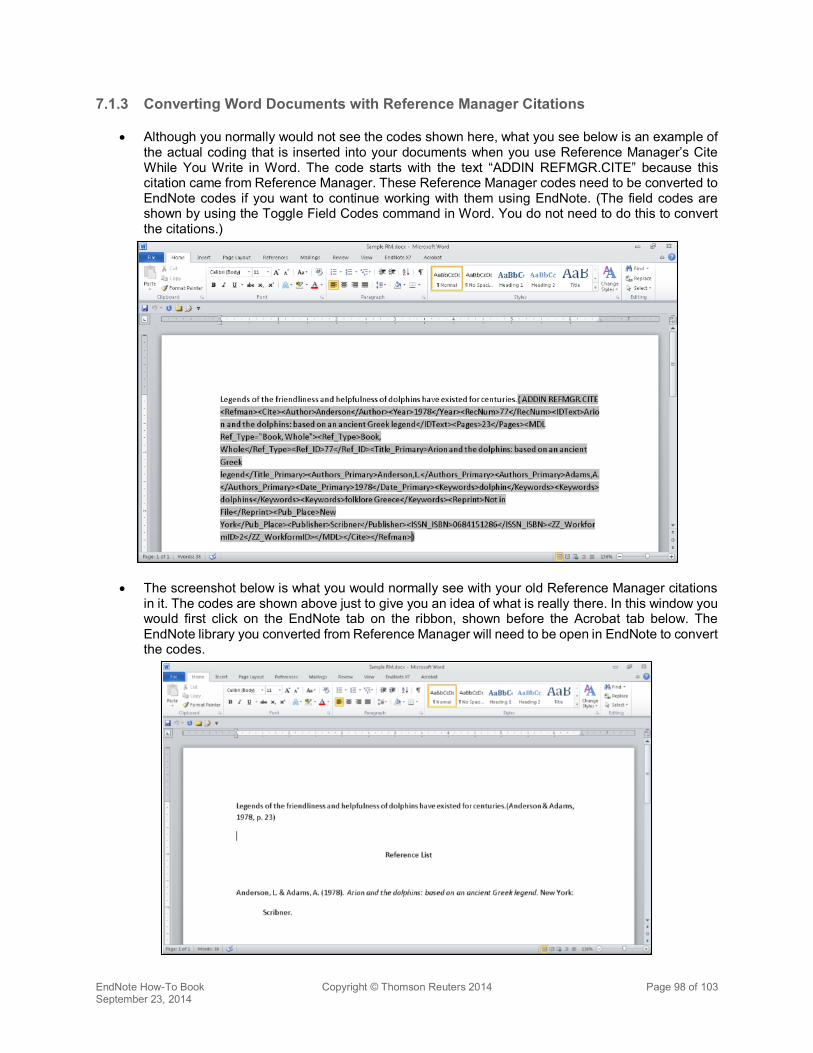
EndNote How-To Book Copyright © Thomson Reuters 2014 Page 98 of 103 September 23, 2014
7.1.3 Converting Word Documents with Reference Manager Citations
x Although you normally would not see the codes shown here, what you see below is an example of the actual coding that is inserted into your documents when you use Reference Manager’s Cite While You Write in Word. The code starts with the text “ADDIN REFMGR.CITE” because this citation came from Reference Manager. These Reference Manager codes need to be converted to EndNote codes if you want to continue working with them using EndNote. (The field codes are shown by using the Toggle Field Codes command in Word. You do not need to do this to convert the citations.)
x The screenshot below is what you would normally see with your old Reference Manager citations in it. The codes are shown above just to give you an idea of what is really there. In this window you would first click on the EndNote tab on the ribbon, shown before the Acrobat tab below. The EndNote library you converted from Reference Manager will need to be open in EndNote to convert the codes.
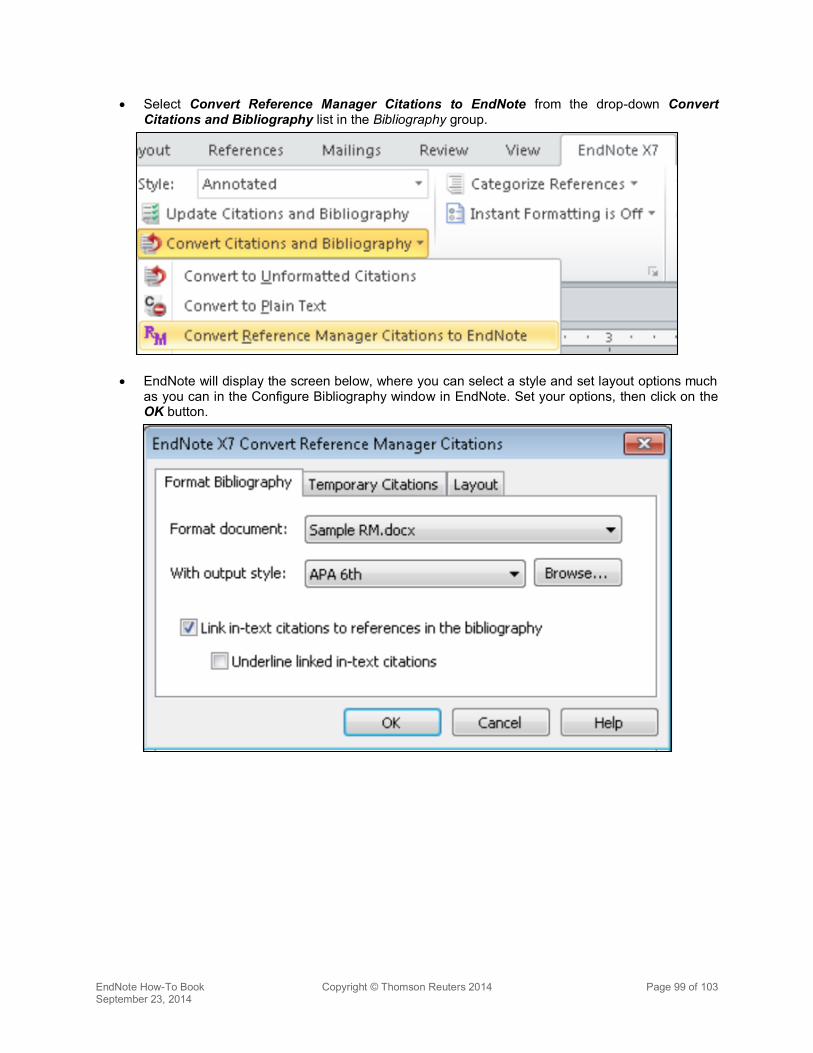
EndNote How-To Book Copyright © Thomson Reuters 2014 Page 99 of 103 September 23, 2014
x Select Convert Reference Manager Citations to EndNote from the drop-down Convert Citations and Bibliography list in the Bibliography group.
x EndNote will display the screen below, where you can select a style and set layout options much as you can in the Configure Bibliography window in EndNote. Set your options, then click on the OK button.
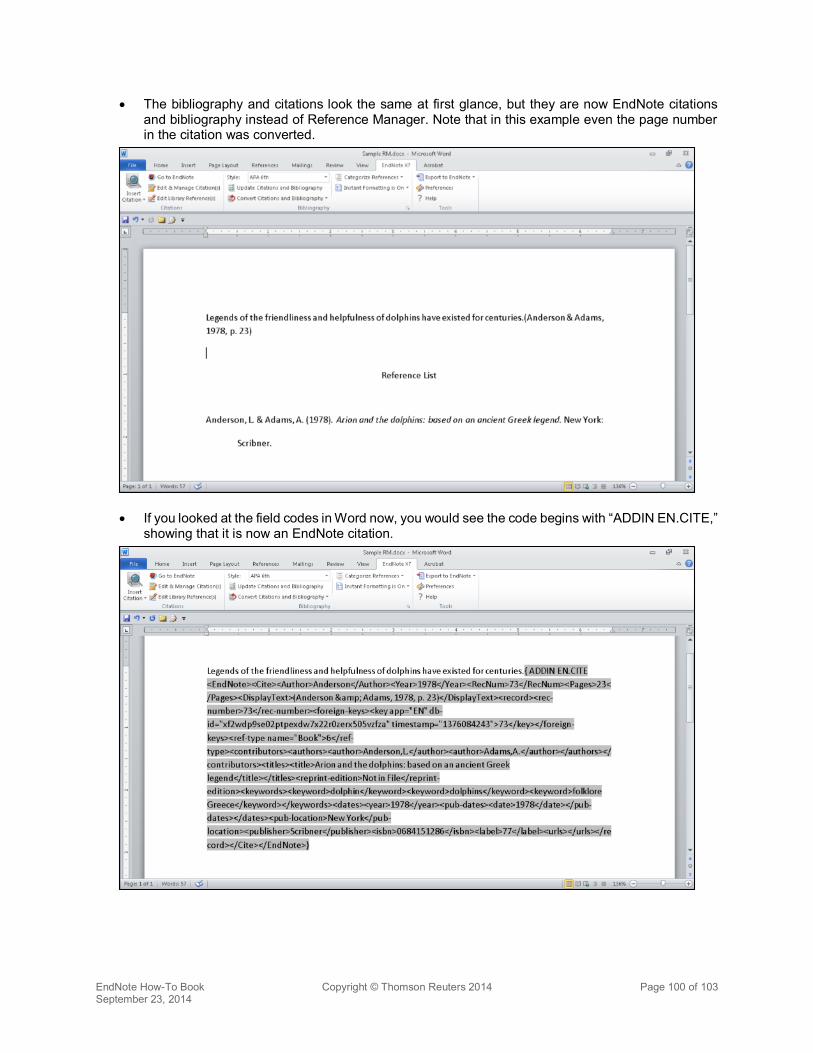
EndNote How-To Book Copyright © Thomson Reuters 2014 Page 100 of 103 September 23, 2014
x The bibliography and citations look the same at first glance, but they are now EndNote citations and bibliography instead of Reference Manager. Note that in this example even the page number in the citation was converted.
x If you looked at the field codes in Word now, you would see the code begins with “ADDIN EN.CITE,” showing that it is now an EndNote citation.
EndNote How-To Book Copyright © Thomson Reuters 2014 Page 101 of 103 September 23, 2014
8 INDEX
ADMIN.bat, 6 ADMIN.zip, 6 Attachment Space in EndNote Online, 77 Backing Up a Library. See Compressed Libraries:For Backups Browser Actions with Direct Export, 34
Firefox on Macintosh, 36 Firefox on Windows, 34 Google Chrome on Windows, 38 Internet Explorer on Windows, 38
Capture. See EndNote Online:Capture Capture Bookmarklet. See EndNote Online:Capture Bookmarklet Cite While You Write, 23, 50, 52, 62, 68, 86, 90, 98
Word for Windows, 62 Adding Citations, 62 Configuring the Bibliography, 65 Editing Citations, 65 Installing, 62 Selecting Styles, 64
Word on Macintosh, 68 Adding Citations, 68 Configuring the Bibliography, 72 Editing Citations, 72 Installing, 68 Selecting Styles, 71
Collaboration, 76 EndNote Online, 82
Groups Shared by Others, 85 Sharing Groups, 83
How Not to Share a Library Cloud Services, 76 EndNote Read-Write Libraries on Network Drives, 76 Sending .enl Files, 76
How Not To Share a Library, 76 Amazon Cloud, 76 Box, 76 Dropbox, 76 Google Drive, 76 OneDrive, 76 SharePoint, 76 SugarSync, 76
Network Drives, 76, 86 EndNote Read-Only Library, 86 EndNote Read-Write Libraries, 76
Send a Compressed Library, 87 Sharing a Full EndNote Library in EndNote X7.2 or Later, 77
How to Share a Library, 78 The Basics, 78
Traveling Library, The, 88 Compressed Libraries, 87
For Backups, 47 For Sharing Refences, 87
Creating a Site License Installer for Macintosh, 10 Creating a Site License Installer for Windows, 6 Custom installation, 13, 17, 19
EndNote How-To Book Copyright © Thomson Reuters 2014 Page 102 of 103 September 23, 2014
Customizer, 22, 24, 25, 68, 71 CWYW. See Cite While You Write Direct Export, 26
EndNote Online Plug-In, 39 Firefox, 40 Internet Explorer, 39
Google Chrome on Windows, 41 PubMed, 30
Not Using the Clipboard, 32 Using the Clipboard, 30
Using EndNote Online Plug-In, 56 Web of Science, 26
Not Using the Marked List, 28 Using the Marked List, 26
EndNote Library Components, 76 Sharing. See Collaboration, See Collaboration
EndNote Online, 39, 47 Capture
Capturing a Single Reference, 60 Capturing Multiple References, 56 Google Chrome, 58 Google Scholar, 57 Google Scholar with Internet Explorer or Firefox, 57 PubMed, 58 PubMed in Google Chrome, 58 PubMed in Internet Explorer or Firefox, 58
Capture Bookmarklet, 56 Google Chrome and Safari, 56 Safari on iPad, 57
EndNote Online Plug-In, 39 Firefox, 40 Internet Explorer, 39
Sharing Groups and References, 82 EndNote Online Plug-In, 49
Capture, 56 Installing
Firefox Extension, 54 From Downloaded .msi File, 54 From within Internet Explorer, 49 Internet Explorer, 49
EndNote Sync, 47, 48 Setup, 47
EndNote Windows installer, 6 EndNote X7 Site Installer.dmg, 10, 12, 19 EndNote X7.2, 77 EndNoteX7Installer.dmg, 10 ENX7Inst.msi, 6, 13, 14 http://endnote.com/x7/EndNoteX7Installer.dmg, 10 Installing EndNote, 6
For Administrators, 6 For Users, 13
Custom Installation for a Site License Copy on Windows, 13 For Users
Custom Installation for a Single-User License on Macintosh, 24 Custom Installation for a Single-User License on Windows, 19 Custom Installation for a Site License Copy on Macintosh, 19
license.dat, 6, 13

EndNote How-To Book Copyright © Thomson Reuters 2014 Page 103 of 103 September 23, 2014
PDF Files Importing, 42
Macintosh, 43 Windows, 42
PDF Handling Preferences, 44 Macintosh, 45 Windows, 44
Preferences, Setting PDF Handling, 44
PubMed, 30, 31, 32, 33, 42, 58 Direct Export. See Direct Export:PubMed
Reference Manager, 92 Converting Attachments to EndNote, 96 Converting the Reference Manager Database, 92 Converting to EndNote, 92 Converting Word Documents with Reference Manager Citations, 98
Sharing EndNote References. See Collaboration Sync. See EndNote Sync Synchronizing Libraries. See EndNote Sync Synchronizing References. See EndNote Sync Typical installation, 13, 17, 19 Uninstalling EndNote
Macintosh, 24 Windows, 13
Web of Science Direct Export. See Direct Export:Web of Science
Related Documents