The Kdenlive Quick Start Guide This documentation was converted from the KDE UserBase Kdenlive/Manual/QuickStart page.

Welcome message from author
This document is posted to help you gain knowledge. Please leave a comment to let me know what you think about it! Share it to your friends and learn new things together.
Transcript
The Kdenlive Quick Start Guide
This documentation was converted from the KDE UserBaseKdenlive/Manual/QuickStart page.

The Kdenlive Quick Start Guide
2
Contents
1 Quick Start 5
1.1 Creating a new project . . . . . . . . . . . . . . . . . . . . . . . . . . . . . . . . . . . 5
1.2 Adding clips . . . . . . . . . . . . . . . . . . . . . . . . . . . . . . . . . . . . . . . . . 7
1.3 Timeline . . . . . . . . . . . . . . . . . . . . . . . . . . . . . . . . . . . . . . . . . . . 81.3.1 Effects . . . . . . . . . . . . . . . . . . . . . . . . . . . . . . . . . . . . . . . . 111.3.2 Music . . . . . . . . . . . . . . . . . . . . . . . . . . . . . . . . . . . . . . . . . 14
1.4 Rendering . . . . . . . . . . . . . . . . . . . . . . . . . . . . . . . . . . . . . . . . . . 15
1.5 Complete manual . . . . . . . . . . . . . . . . . . . . . . . . . . . . . . . . . . . . . . 17
2 Credits and License 18

Abstract
The Kdenlive Quick Start Guide
Chapter 1
Quick Start
1.1 Creating a new project
Kdenlive directory structure
The first step is creating a new (empty) folder for our new project. I will call it quickstart-tutorial/ in this tutorial. Then get some sample video clips, or download them from here:kdenlive-tutorial-videos-2011-avi.tar.bz2 (7 MB)1, and extract them to e.g. a quickstart-tutorial/Videos/ subfolder inside the project folder.
The image on the left shows the suggested directory structure: Each project has its own directory,with video files in the Videos subdirectory, audio files in the Audio directory, etc. (read more)
(The tutorial from now on assumes that you use the sample videos provided, but it works withany.)
1 If you prefer Theora (which you probably don’t since Ogg Video usually causes problems), you can alternativelydownload kdenlive-tutorial-videos-2011-ogv.tar.bz2.
5
The Kdenlive Quick Start Guide
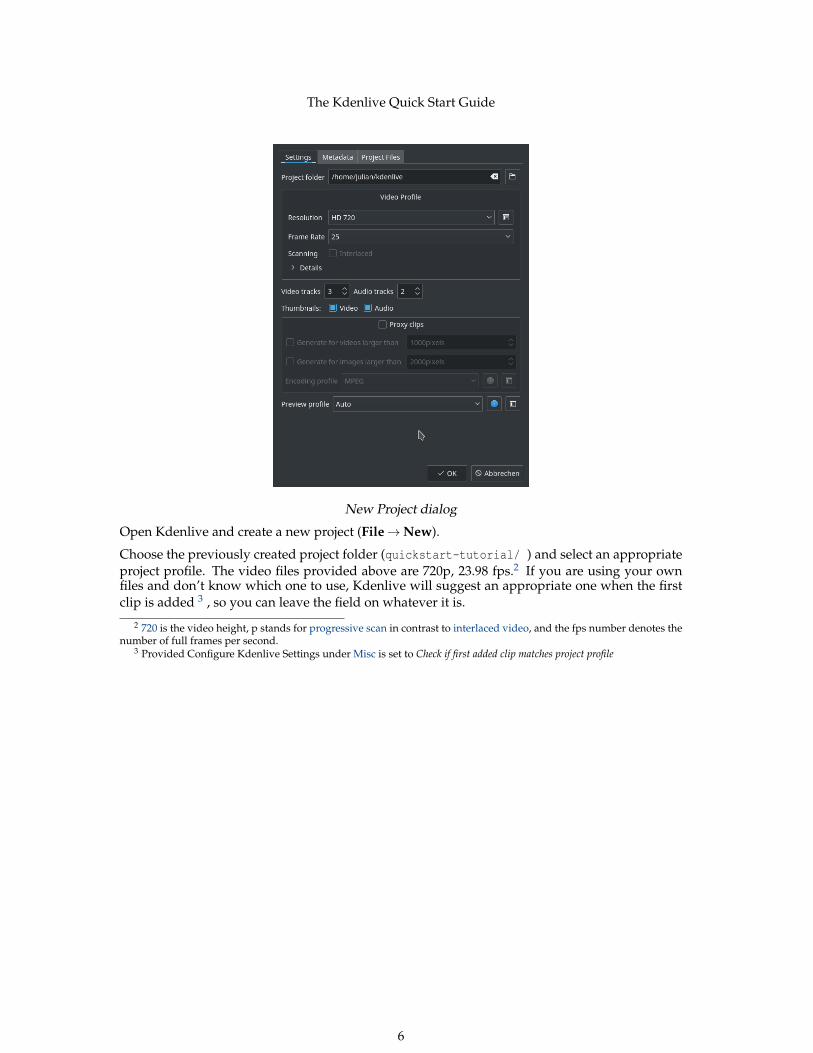
New Project dialog
Open Kdenlive and create a new project (File → New).
Choose the previously created project folder (quickstart-tutorial/ ) and select an appropriateproject profile. The video files provided above are 720p, 23.98 fps.2 If you are using your ownfiles and don’t know which one to use, Kdenlive will suggest an appropriate one when the firstclip is added 3 , so you can leave the field on whatever it is.
2 720 is the video height, p stands for progressive scan in contrast to interlaced video, and the fps number denotes thenumber of full frames per second.
3 Provided Configure Kdenlive Settings under Misc is set to Check if first added clip matches project profile
6
The Kdenlive Quick Start Guide
1.2 Adding clips
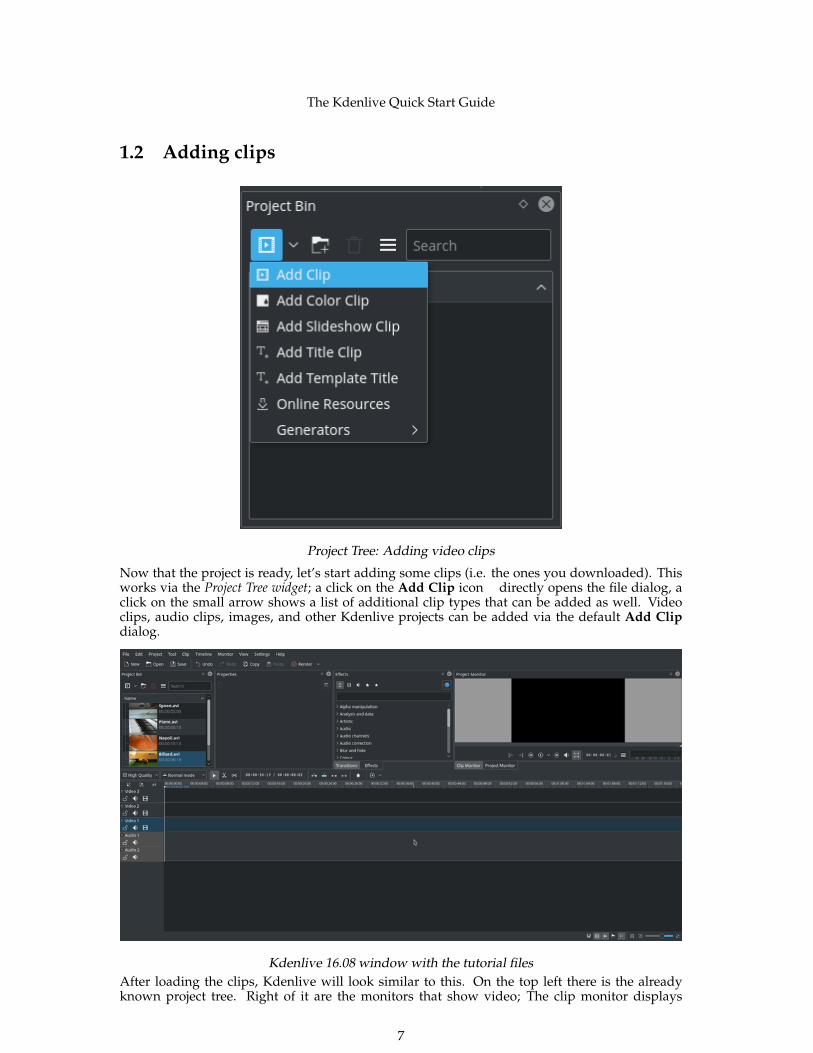
Project Tree: Adding video clips
Now that the project is ready, let’s start adding some clips (i.e. the ones you downloaded). Thisworks via the Project Tree widget; a click on the Add Clip icon directly opens the file dialog, aclick on the small arrow shows a list of additional clip types that can be added as well. Videoclips, audio clips, images, and other Kdenlive projects can be added via the default Add Clipdialog.
Kdenlive 16.08 window with the tutorial filesAfter loading the clips, Kdenlive will look similar to this. On the top left there is the alreadyknown project tree. Right of it are the monitors that show video; The clip monitor displays
7

The Kdenlive Quick Start Guide
video from the original clips, the project monitor shows how the output video will look, with alleffects, transitions, etc. applied. The third, also very important, item is the timeline (below themonitors): This is the place where the video clips will be edited. There are two different typesof tracks, Video and Audio. Video tracks can contain any kind of clip, audio tracks as well – butwhen dropping a video file to the audio track, only the audio will be used.
Saving a Kdenlive project
Let’s save the work via File → Save. This saves our project, i.e. where we placed the clips on thetimeline, which effects we applied, and so on. It can not be played.4 The process of creating thefinal video is called Rendering.
1.3 Timeline
See also Timeline section of the manualNow comes the actual editing. Project clips are combined to the final result on the timeline. Theyget there by drag and drop: Drag some Napoli (assuming you are using the files provided above,as in the rest of this quick start tutorial; If not, please make sure your screen is waterproof, andperhaps tomatoproof) from the project tree, and drop it onto the first track in the timeline.
First clips in the timeline4 To be correct, it can be played using melt yourproject.kdenlive, but this is not the way you would want to present
your final video since it is (most likely) too slow. Additionally, it only works if melt is installed.
8
The Kdenlive Quick Start Guide
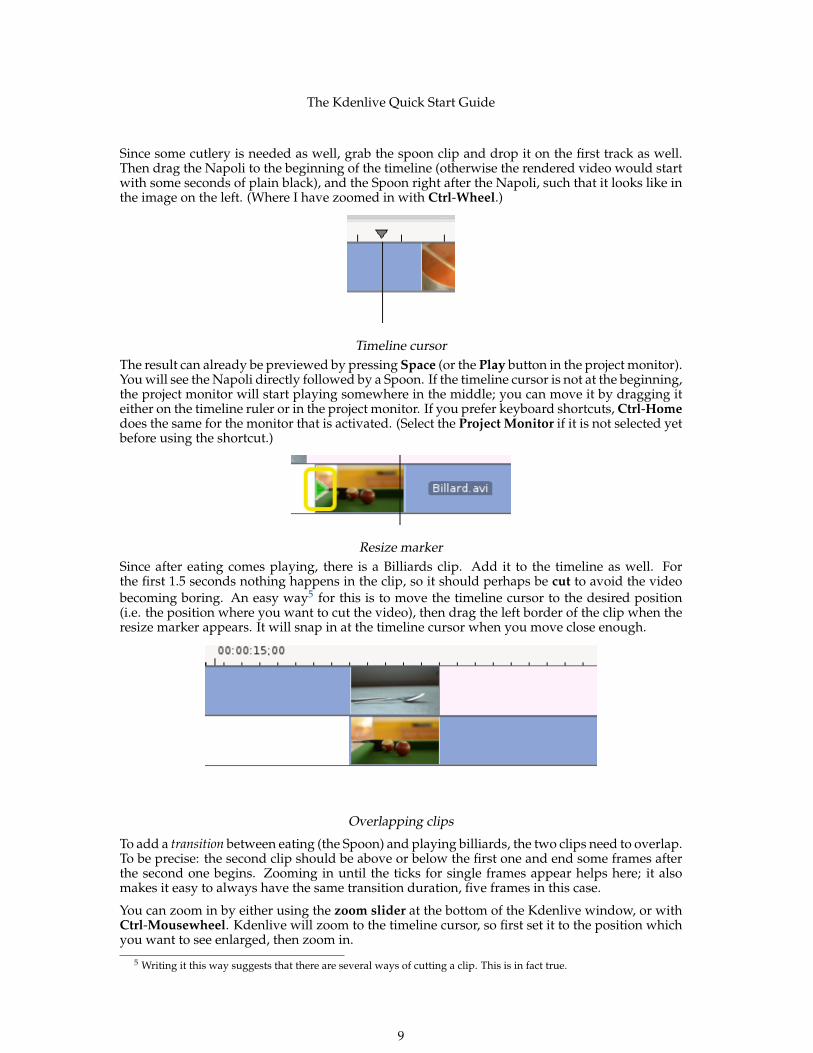
Since some cutlery is needed as well, grab the spoon clip and drop it on the first track as well.Then drag the Napoli to the beginning of the timeline (otherwise the rendered video would startwith some seconds of plain black), and the Spoon right after the Napoli, such that it looks like inthe image on the left. (Where I have zoomed in with Ctrl-Wheel.)
Timeline cursorThe result can already be previewed by pressing Space (or the Play button in the project monitor).You will see the Napoli directly followed by a Spoon. If the timeline cursor is not at the beginning,the project monitor will start playing somewhere in the middle; you can move it by dragging iteither on the timeline ruler or in the project monitor. If you prefer keyboard shortcuts, Ctrl-Homedoes the same for the monitor that is activated. (Select the Project Monitor if it is not selected yetbefore using the shortcut.)
Resize markerSince after eating comes playing, there is a Billiards clip. Add it to the timeline as well. Forthe first 1.5 seconds nothing happens in the clip, so it should perhaps be cut to avoid the videobecoming boring. An easy way5 for this is to move the timeline cursor to the desired position(i.e. the position where you want to cut the video), then drag the left border of the clip when theresize marker appears. It will snap in at the timeline cursor when you move close enough.
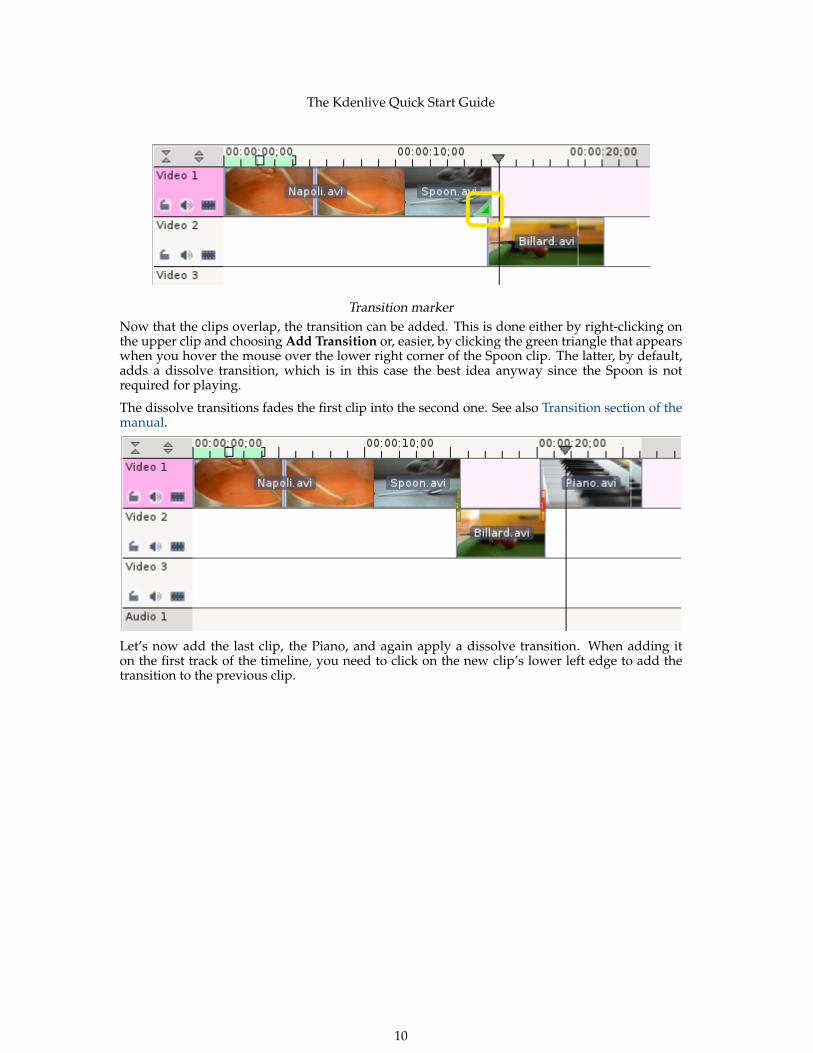
Overlapping clips
To add a transition between eating (the Spoon) and playing billiards, the two clips need to overlap.To be precise: the second clip should be above or below the first one and end some frames afterthe second one begins. Zooming in until the ticks for single frames appear helps here; it alsomakes it easy to always have the same transition duration, five frames in this case.
You can zoom in by either using the zoom slider at the bottom of the Kdenlive window, or withCtrl-Mousewheel. Kdenlive will zoom to the timeline cursor, so first set it to the position whichyou want to see enlarged, then zoom in.
5 Writing it this way suggests that there are several ways of cutting a clip. This is in fact true.
9
The Kdenlive Quick Start Guide
Transition markerNow that the clips overlap, the transition can be added. This is done either by right-clicking onthe upper clip and choosing Add Transition or, easier, by clicking the green triangle that appearswhen you hover the mouse over the lower right corner of the Spoon clip. The latter, by default,adds a dissolve transition, which is in this case the best idea anyway since the Spoon is notrequired for playing.
The dissolve transitions fades the first clip into the second one. See also Transition section of themanual.
Let’s now add the last clip, the Piano, and again apply a dissolve transition. When adding iton the first track of the timeline, you need to click on the new clip’s lower left edge to add thetransition to the previous clip.
10

The Kdenlive Quick Start Guide
1.3.1 Effects
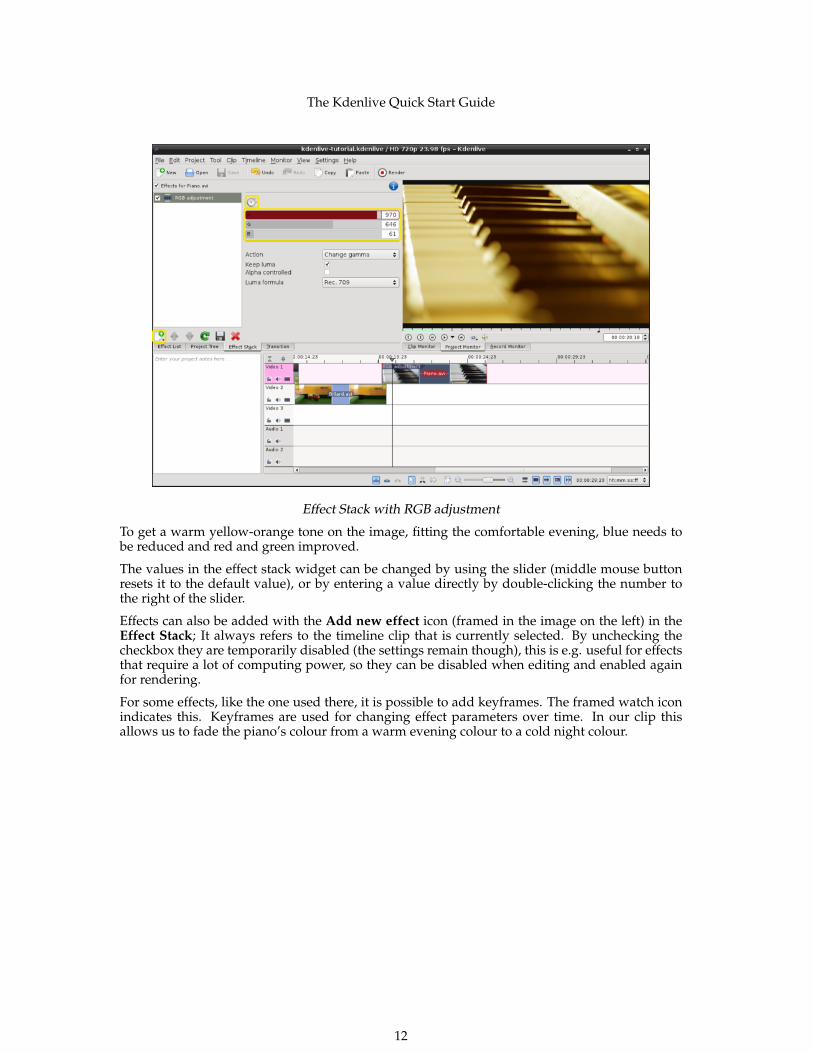
Effect ListThe Piano can be colourized by adding an effect to it. Select the piano clip, then double-click theRGB Adjustment effect in the Effect List. If it is not visible, you can get it via View → EffectList.
Once the effect has been added, its name will be added to the timeline clip. It will also be shownin the Effect Stack widget.
11
The Kdenlive Quick Start Guide
Effect Stack with RGB adjustment
To get a warm yellow-orange tone on the image, fitting the comfortable evening, blue needs tobe reduced and red and green improved.
The values in the effect stack widget can be changed by using the slider (middle mouse buttonresets it to the default value), or by entering a value directly by double-clicking the number tothe right of the slider.
Effects can also be added with the Add new effect icon (framed in the image on the left) in theEffect Stack; It always refers to the timeline clip that is currently selected. By unchecking thecheckbox they are temporarily disabled (the settings remain though), this is e.g. useful for effectsthat require a lot of computing power, so they can be disabled when editing and enabled againfor rendering.
For some effects, like the one used there, it is possible to add keyframes. The framed watch iconindicates this. Keyframes are used for changing effect parameters over time. In our clip thisallows us to fade the piano’s colour from a warm evening colour to a cold night colour.
12
The Kdenlive Quick Start Guide
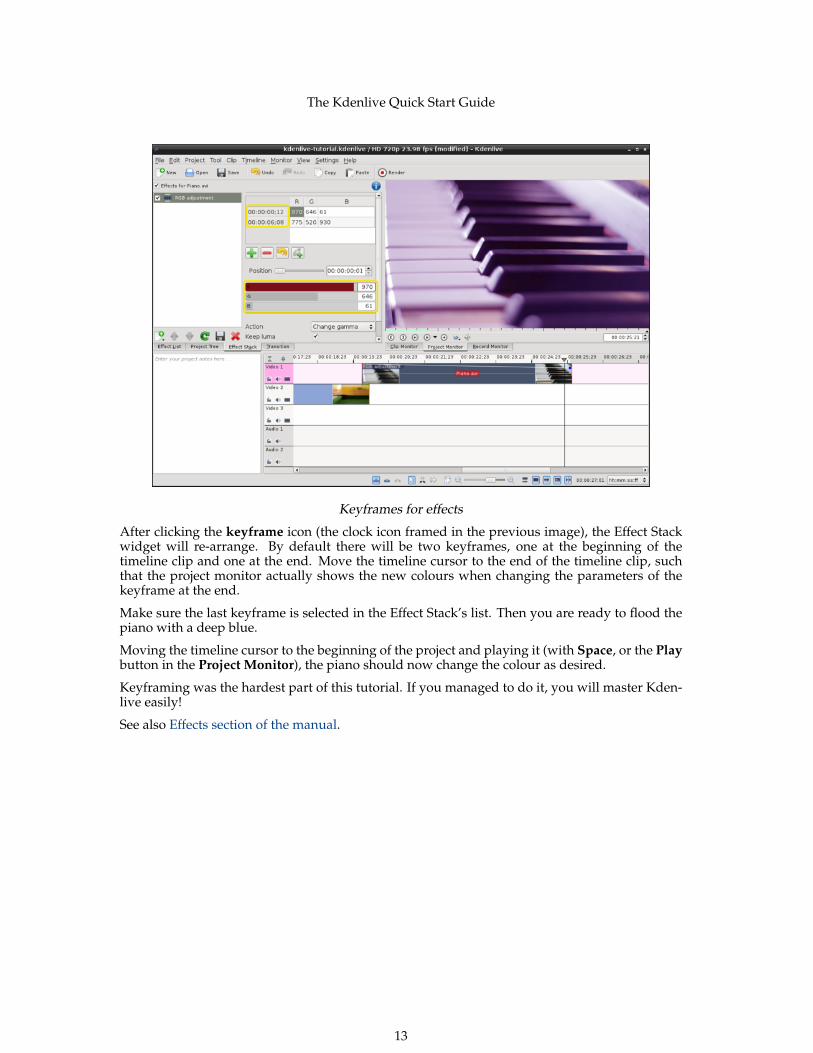
Keyframes for effects
After clicking the keyframe icon (the clock icon framed in the previous image), the Effect Stackwidget will re-arrange. By default there will be two keyframes, one at the beginning of thetimeline clip and one at the end. Move the timeline cursor to the end of the timeline clip, suchthat the project monitor actually shows the new colours when changing the parameters of thekeyframe at the end.
Make sure the last keyframe is selected in the Effect Stack’s list. Then you are ready to flood thepiano with a deep blue.
Moving the timeline cursor to the beginning of the project and playing it (with Space, or the Playbutton in the Project Monitor), the piano should now change the colour as desired.
Keyframing was the hardest part of this tutorial. If you managed to do it, you will master Kden-live easily!
See also Effects section of the manual.
13
The Kdenlive Quick Start Guide
1.3.2 Music
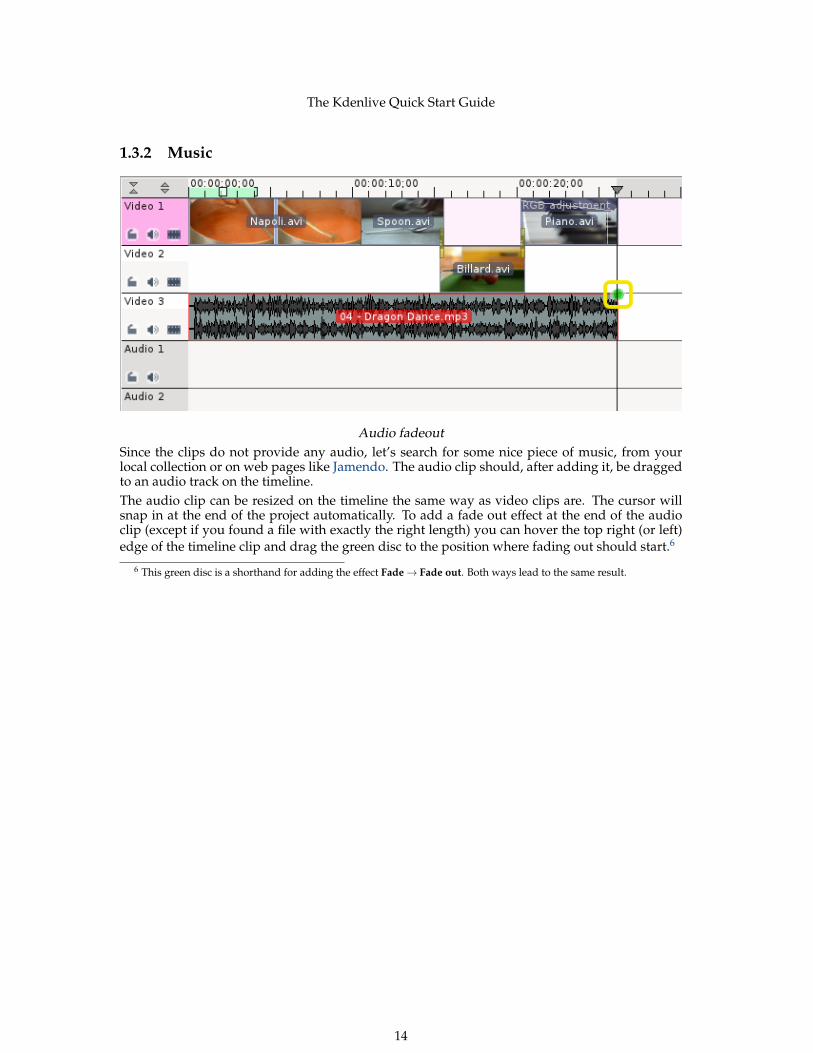
Audio fadeoutSince the clips do not provide any audio, let’s search for some nice piece of music, from yourlocal collection or on web pages like Jamendo. The audio clip should, after adding it, be draggedto an audio track on the timeline.The audio clip can be resized on the timeline the same way as video clips are. The cursor willsnap in at the end of the project automatically. To add a fade out effect at the end of the audioclip (except if you found a file with exactly the right length) you can hover the top right (or left)edge of the timeline clip and drag the green disc to the position where fading out should start.6
6 This green disc is a shorthand for adding the effect Fade → Fade out. Both ways lead to the same result.
14

The Kdenlive Quick Start Guide
1.4 Rendering
Rendering dialog
A few minutes left, and the project is finished! Click the Render button (or go to Project →Render, or press Ctrl-Enter) to get the dialog shown on the left. Select the desired output file forour new video with all effects and transitions, choose MPEG4 (works nearly everywhere) and abitrate of 2000k (the higher the bitrate, the larger the output file and the better the quality – butsince the bitrate for the input clips was 2000k already, using a higher one would not improvequality and is therefore unnecessary), and press the Render to File button.
15
The Kdenlive Quick Start Guide
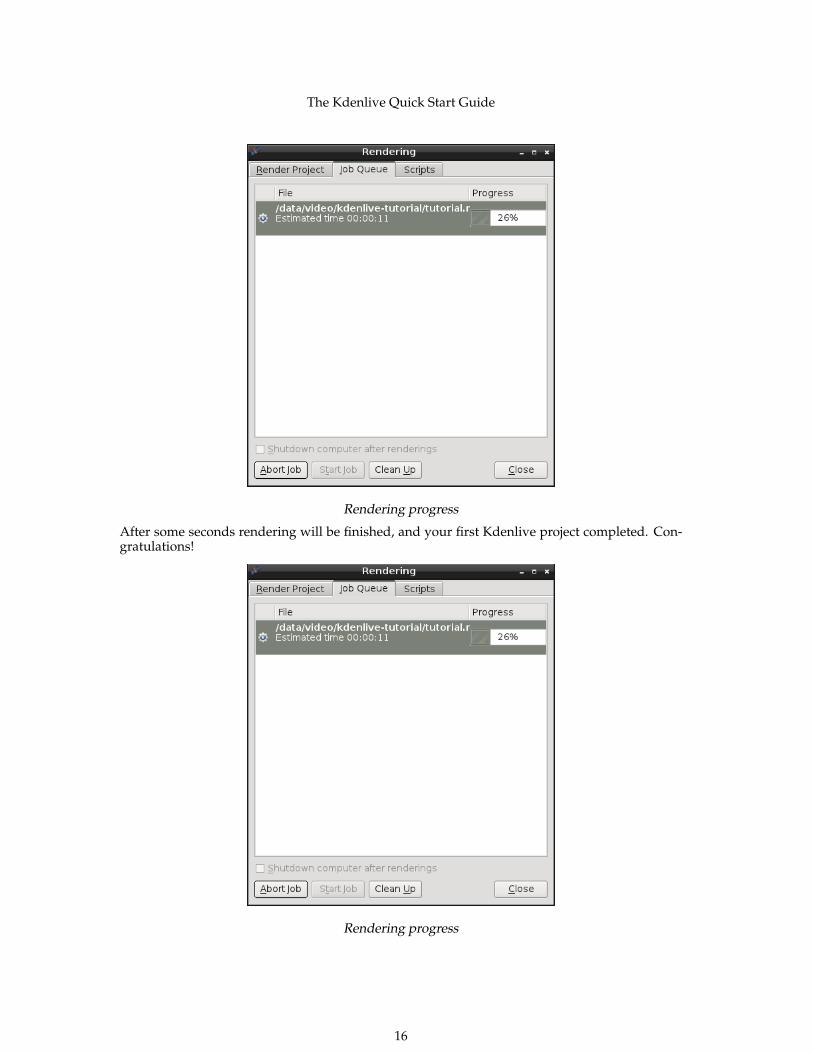
Rendering progress
After some seconds rendering will be finished, and your first Kdenlive project completed. Con-gratulations!
Rendering progress
16
The Kdenlive Quick Start Guide
1.5 Complete manual
Further documentation for the current version of Kdenlive can be found in the full manual.
17
The Kdenlive Quick Start Guide
Chapter 2
Credits and License
Documentation Copyright see the UserBase Kdenlive/Manual/QuickStart page history
This documentation is licensed under the terms of the GNU Free Documentation License.
18
Related Documents

![Workflow de edição de vídeo em Linuxcarolinepimenta.eu/myfiles/outros/EdVideoLinux_PT.pdf · 2012. 4. 24. · 9 Edição de vídeo com o Kdenlive Abra o Kdenlive [1-3] e escolha](https://static.cupdf.com/doc/110x72/5fe5a46874934c289e23ca46/workflow-de-edio-de-vdeo-em-2012-4-24-9-edio-de-vdeo-com-o-kdenlive.jpg)