The Future of Training Creating Videos in Creating Videos in Camtasia: A Deeper Look Camtasia: A Deeper Look (Intermediate) (Intermediate) Joe Schipper Technology Integration Specialist (ITRT) Western Branch High School, Chesapeake, VA http://

The Future of Training Creating Videos in Camtasia: A Deeper Look (Intermediate) Joe Schipper Technology Integration Specialist (ITRT) Western Branch High.
Dec 26, 2015
Welcome message from author
This document is posted to help you gain knowledge. Please leave a comment to let me know what you think about it! Share it to your friends and learn new things together.
Transcript

The Future of Training
Creating Videos in Camtasia: A Creating Videos in Camtasia: A Deeper Look (Intermediate)Deeper Look (Intermediate)
Joe SchipperTechnology Integration Specialist (ITRT)
Western Branch High School, Chesapeake, VA
http://cpsvstecollaboration.wikispaces.com

Importing an Existing Project

Importing an Existing Project
Existing Camtasia projects must be imported from a .zip file.
Click Import Zipped Project…

Importing an Existing Project
Browse out to .zip file on top and select location to place Camtasia project on bottom.
Click OK
Using Titles

After opening your project, click on Title Clips.
Using Titles

Click in the black area and type the text that will show on the clip. You may choose the font before typing or highlight and change the font. Click OK when finished.
Type the title name here. This is the title of clip that will show in the Clip Bin, not the text of the clip.
Using Titles

Even though it is designated as a Title clip, it can go anywhere in the timeline. Just drag and drop.
Using Titles

Once the clip is placed on the timeline, you can adjust the time the clip shows or edit the text of the clip. You can only edit the clip if it is placed on the timeline. You cannot edit it in the clip bin.
Using Titles

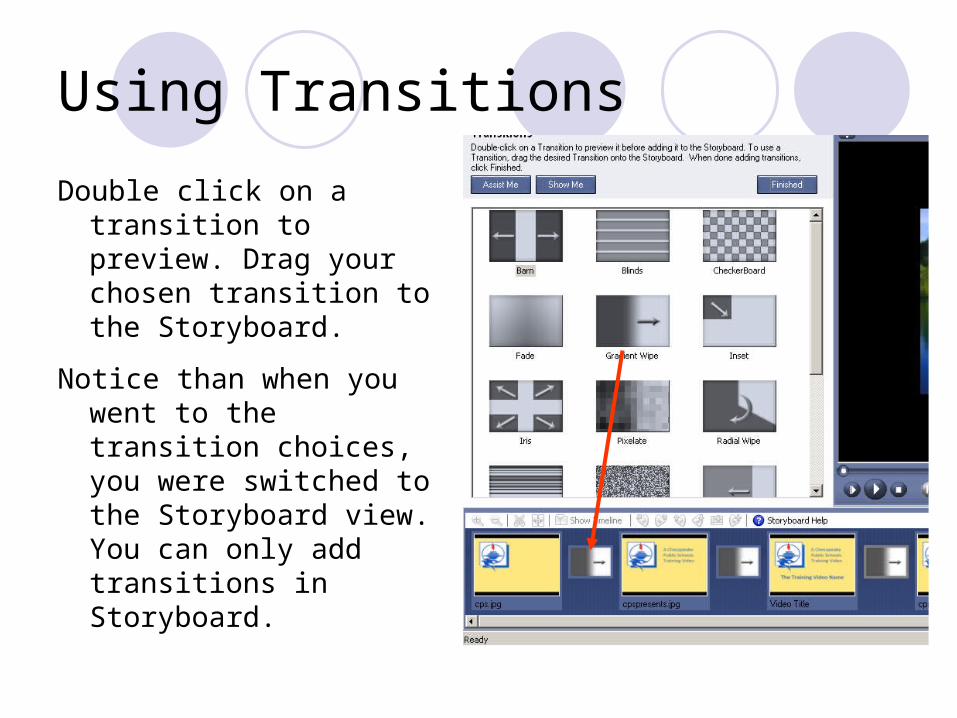
Using Transitions

Using Transitions
After opening your project, click on Transitions.
Using Transitions
Double click on a transition to preview. Drag your chosen transition to the Storyboard.
Notice than when you went to the transition choices, you were switched to the Storyboard view. You can only add transitions in Storyboard.

Using Transitions
By default, the length of the transition is 3 seconds. When in Storyboard view, you cannot tell what the length of your transitions are unless you right click on the transition. After you have chosen all your transitions, click finished.

Using Transitions
Back in the Timeline view, you can now see that the last transition is longer than the others.
To adjust, right click and choose the length you want.

Tips: The default duration time for Transitions is three
seconds. The duration is customized using Tools > Options > Transitions.
Transitions can only be placed between clips. You cannot begin or end a video with a Transitions.
Double-click on a Transition effect to see it play in the Preview Area. You can also highlight a Transition and click the Play button to see the Transition effect.
Using Transitions

Edit Videos Using the Timeline
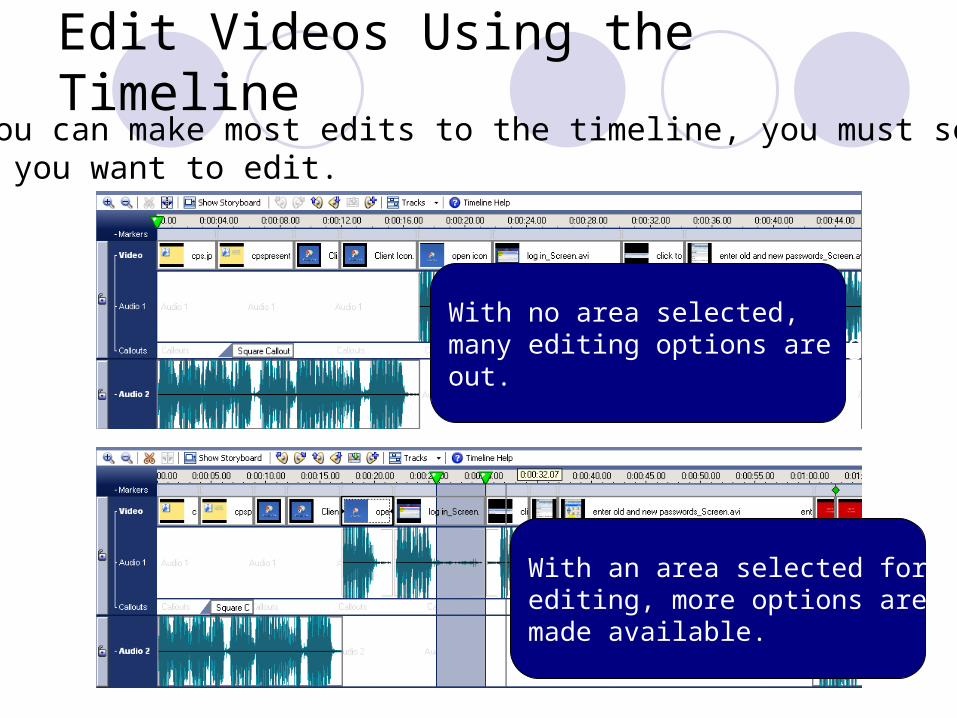
Edit Videos Using the TimelineBefore you can make most edits to the timeline, you must select the area you want to edit.
With no area selected, many editing options are grayed out.
With an area selected for editing, more options are made available.

Timeline Tools: A Closer Look
Cut: Delete unwanted portions from the timeline. This action will cut all clips and elements in the selected area unless you lock a track you donot want cut.
zoom in
zoom out

Timeline Tools: A Closer Look
Split: Place the seek bar at the point where you wantto make the split so that you can add transitions or graphics between scenes.

Graphic Added after SplittingTrack

Timeline Tools: A Closer Look
Fade In Fade Out
Select an area of your audio and have it fade in or out.

Timeline Tools: A Closer Look
Volume up Volume down
You can lock one track while you increase or decrease the volume of the other.

Timeline Tools: A Closer Look
Select an area of your audio and replace that audio with silence. You canlock one track if you want to keep that audio in place while silencing another track.
Replace with Silence

Timeline Tools: A Closer LookSave the Current Frame as an Image

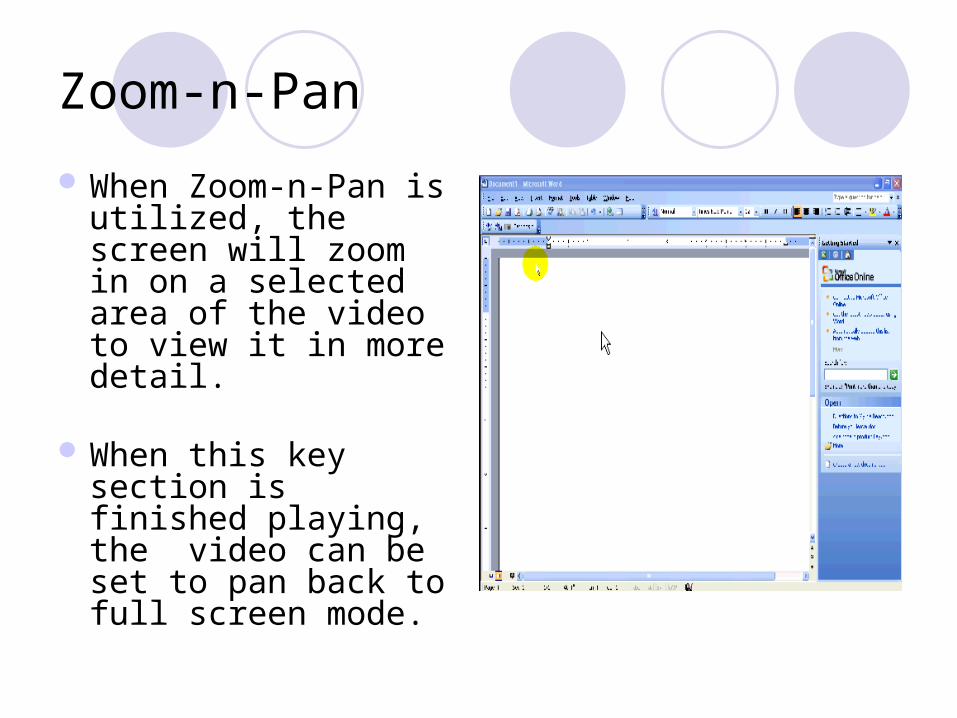
Zoom-n-Pan
The Zoom and Pan feature in Camtasia is used to highlight key
frames.
Zoom-n-Pan
When Zoom-n-Pan is utilized, the screen will zoom in on a selected area of the video to view it in more detail.
When this key section is finished playing, the video can be set to pan back to full screen mode.
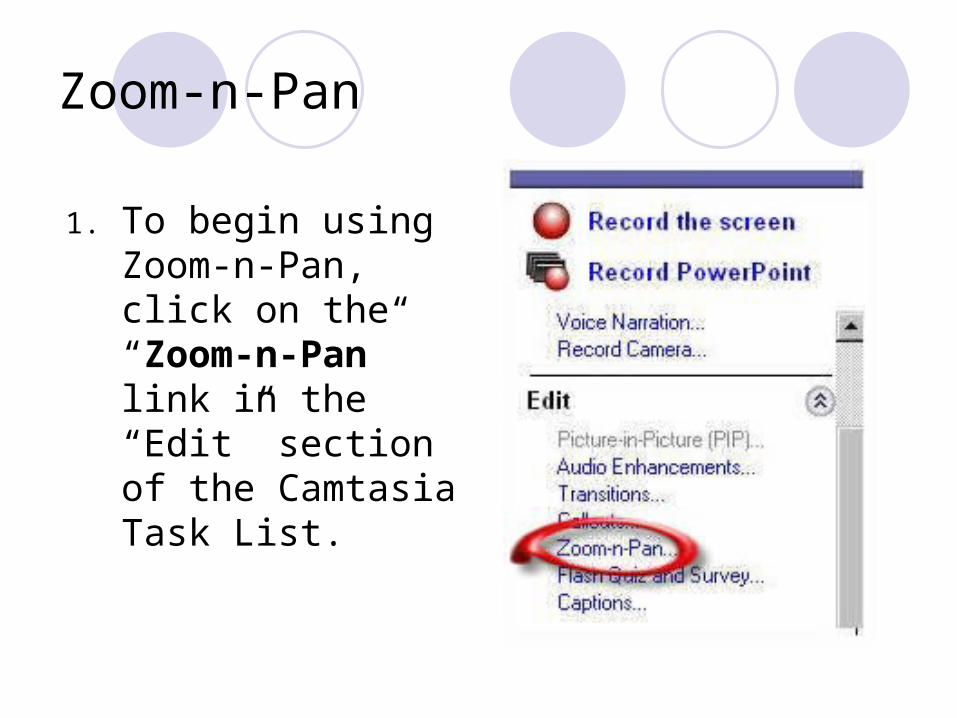
1. To begin using Zoom-n-Pan, click on the “Zoom-n-Pan” link in the “Edit” section of the Camtasia Task List.
Zoom-n-Pan

Zoom-n-Pan
2. Click on the “Add Zoom-n-Pan Key Frame”.
3. Drag the green arrow to the exact location on the timeline where you want to begin zooming in.
Zoom-n-Pan
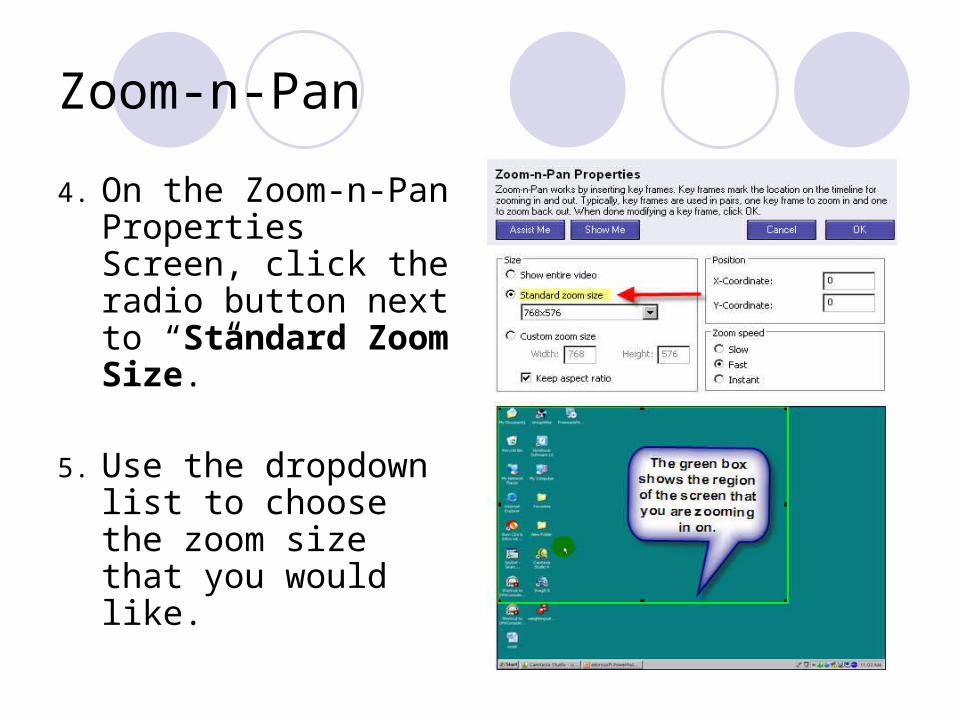
4. On the Zoom-n-Pan Properties Screen, click the radio button next to “Standard Zoom Size.”
5. Use the dropdown list to choose the zoom size that you would like.

Zoom-n-Pan You may wish to
customize the size of the zoom area manually by using the sizing squares on the green box.
It is recommended that you check the box next to “Keep aspect ratio” to avoid distortion in your video.

Zoom-n-Pan
6. Choose a zoom speed, then click “OK” to add the starting frame.

Zoom-n-Pan
7. Now you will need to set an ending frame to pan the video back to full screen. Start by clicking on the “Add Zoom-n-Pan key frame” link again.

Zoom-n-Pan
8. Drag the green arrow to the exact location on the timeline where you want to begin zooming out.
9. Click on the radio button next to “Show Entire Video.”
10. Select a Zoom Speed, and then click “OK.”
Zoom-n-Pan
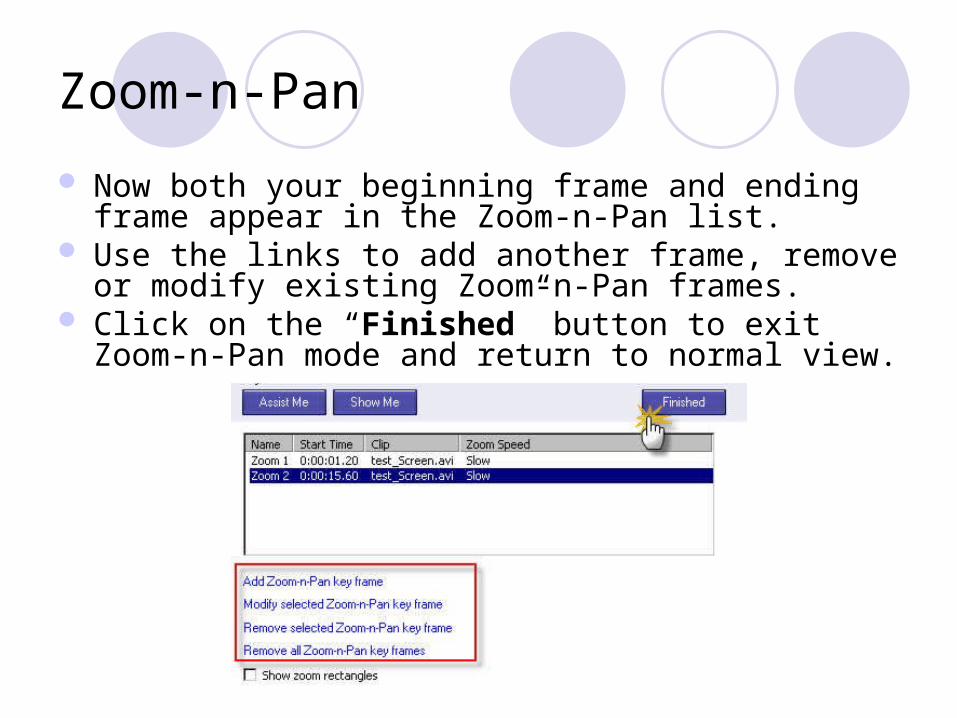
Now both your beginning frame and ending frame appear in the Zoom-n-Pan list.
Use the links to add another frame, remove or modify existing Zoom-n-Pan frames.
Click on the “Finished” button to exit Zoom-n-Pan mode and return to normal view.

CalloutsCallouts are graphics that appear on top
of a video that draws the viewer’s attention to specific objects or processes.
Add callouts by clicking the “Callouts” button in the left pane under “Edit”.

Types of Callouts
Blur Callout -used for blurring private information such as passwords
Flash Hot Spot -a button that can launch a URL or go to a specific place in the movie
Custom Callout -You can create your own callout using a bmp., gif., .png, or .jpg image file. (Example: Company logo)

Adding a Callout
While in the “Callout” window, position the seekbar where you want to insert the callout.
(You can also adjust the position and length of callout after you create it)

From the “Callout Type” dropdown menu, choose the type of callout you would like to insert.
Adding a Callout

From this “Callout Properties” menu you will be able to customize the callout by selecting the color fill and border.
Adding a Callout
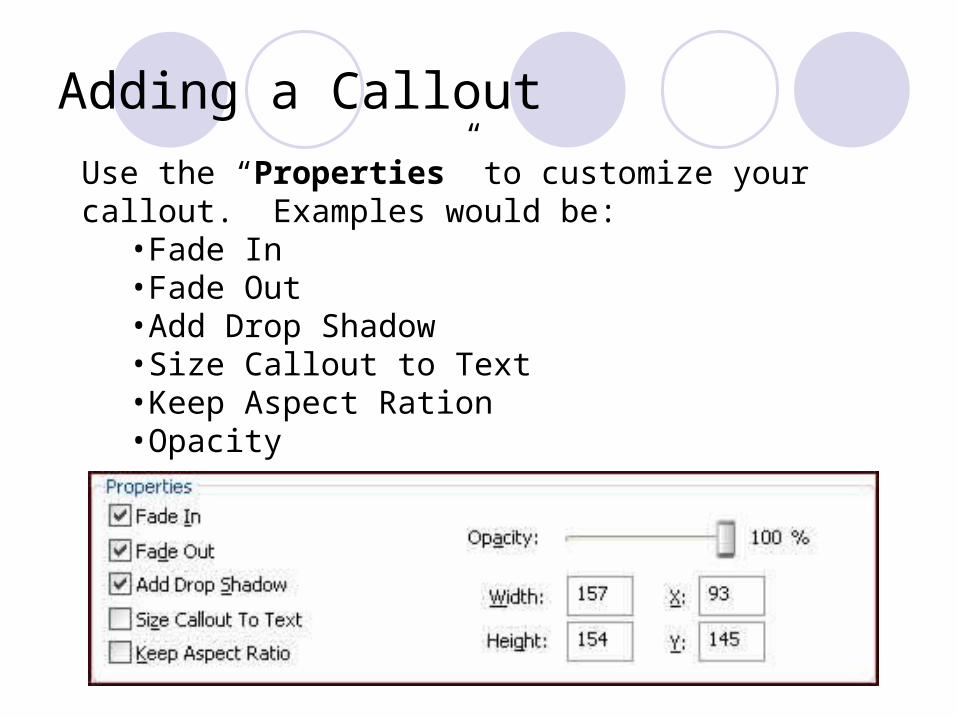
Use the “Properties” to customize your callout. Examples would be:
•Fade In•Fade Out•Add Drop Shadow•Size Callout to Text•Keep Aspect Ration•Opacity
Adding a Callout

Drag your “callout” to the location you want to emphasize
Adding a Callout
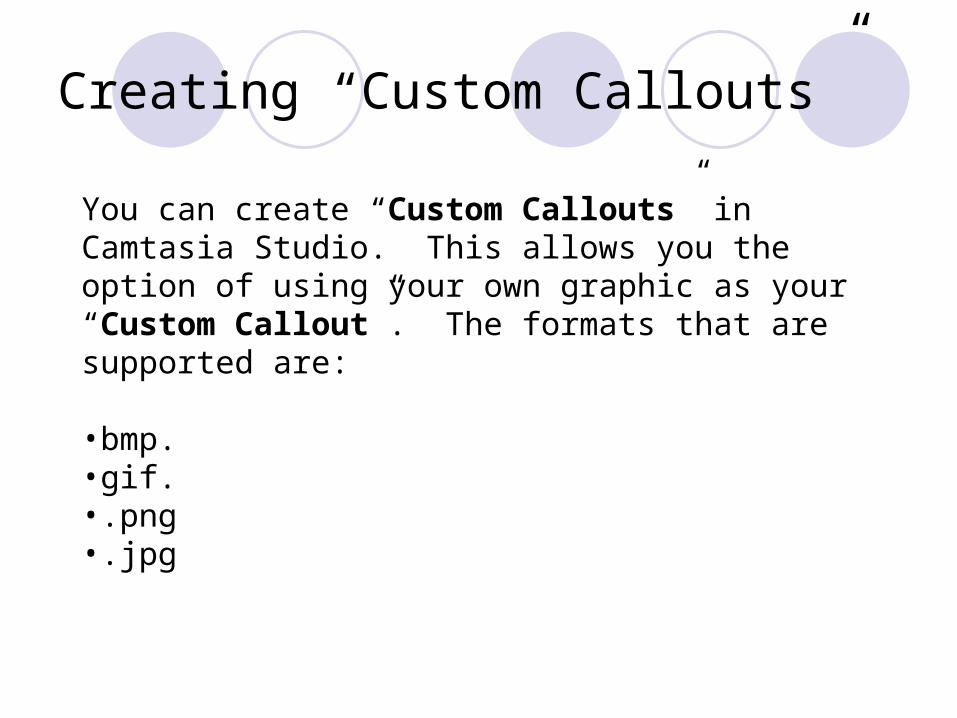
Creating “Custom Callouts”
You can create “Custom Callouts” in Camtasia Studio. This allows you the option of using your own graphic as your “Custom Callout”. The formats that are supported are:
•bmp.•gif.•.png•.jpg

Click “Custom Callouts” on the Callout Properties task pane. This will open the “Custom Callout Manager”.
Creating “Custom Callouts”
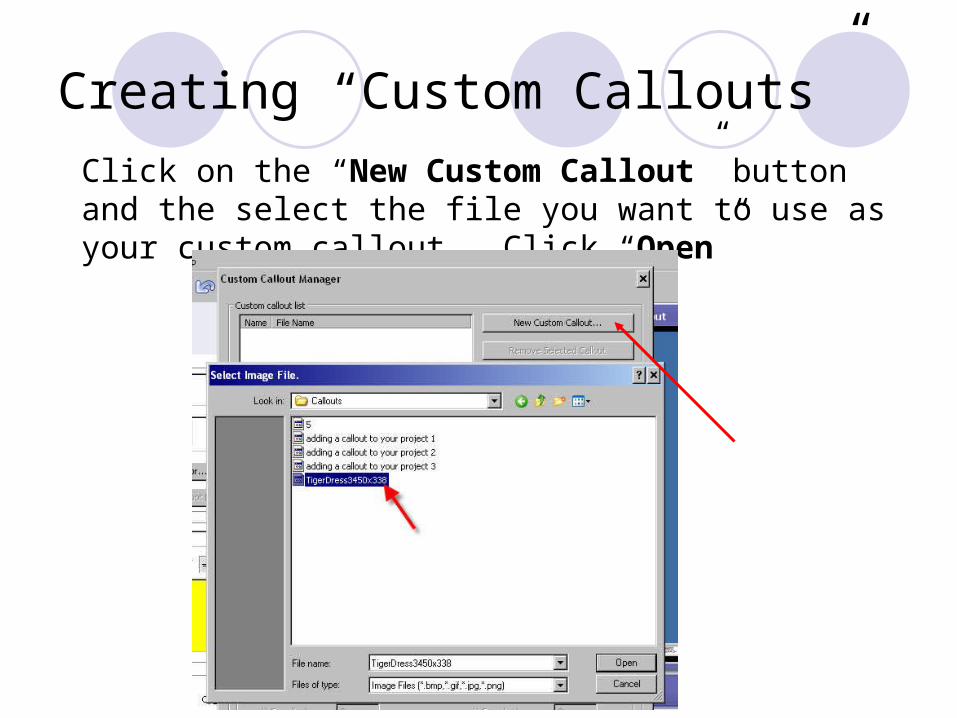
Click on the “New Custom Callout” button and the select the file you want to use as your custom callout. Click “Open”
Creating “Custom Callouts”
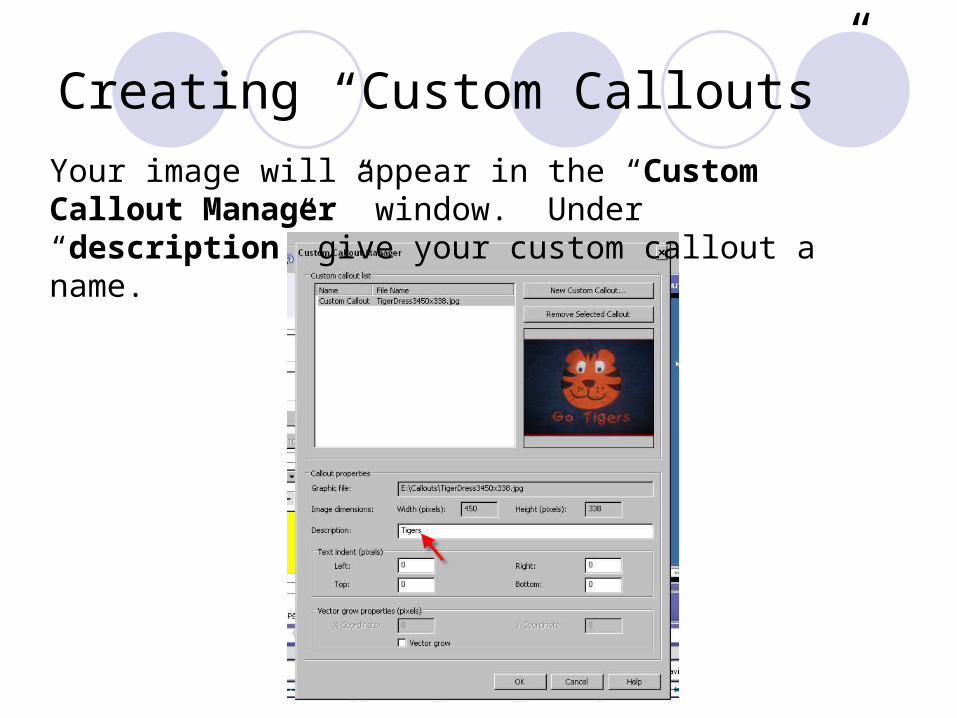
Your image will appear in the “Custom Callout Manager” window. Under “description” give your custom callout a name.
Creating “Custom Callouts”
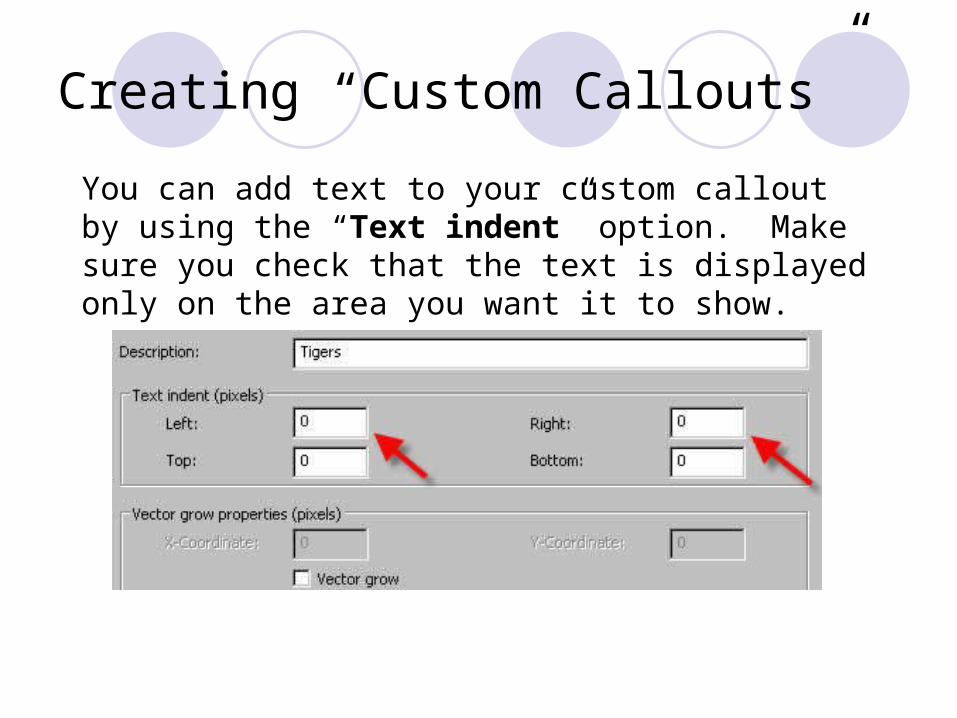
You can add text to your custom callout by using the “Text indent” option. Make sure you check that the text is displayed only on the area you want it to show.
Creating “Custom Callouts”

Blur Callout
You can create “Blur Callout” in Camtasia Studio. This allows you to hide confidential information that might be shown on your screen recording.
Example: your username when logging into Novell

Blur Callout
Capture screen recording of logging in

Click on “Callouts” in the “Edit” task bar
Blur Callout
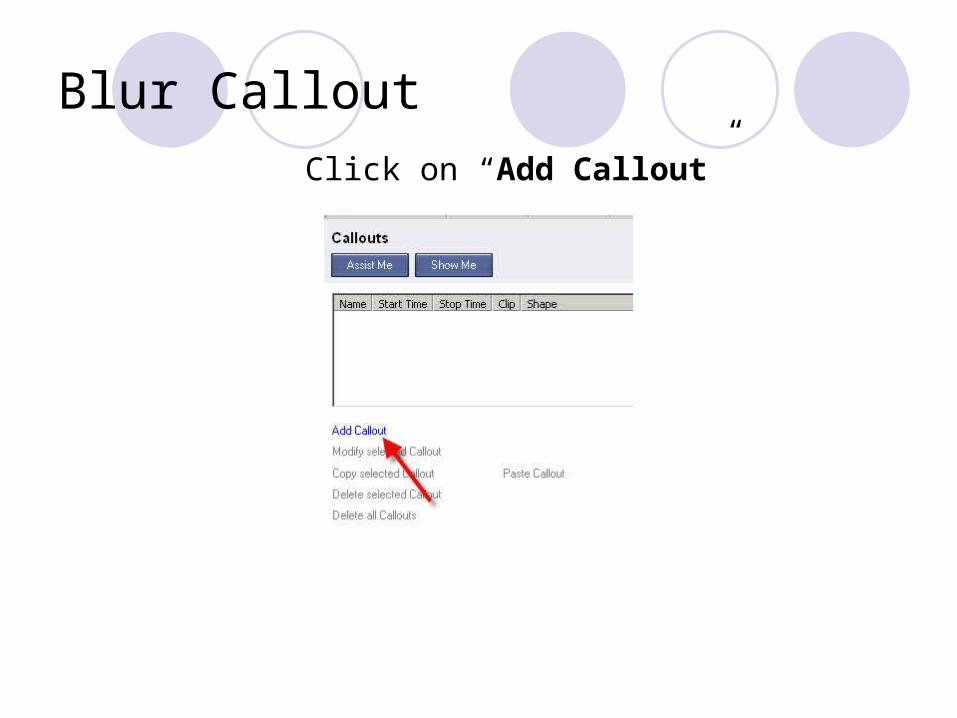
Click on “Add Callout”
Blur Callout

•Click on the drop down menu for “Callout type:”
•Choose “Blur Callout”
Blur Callout

Drag “Blur Callout” and place on top of sensitive information
Blur Callout
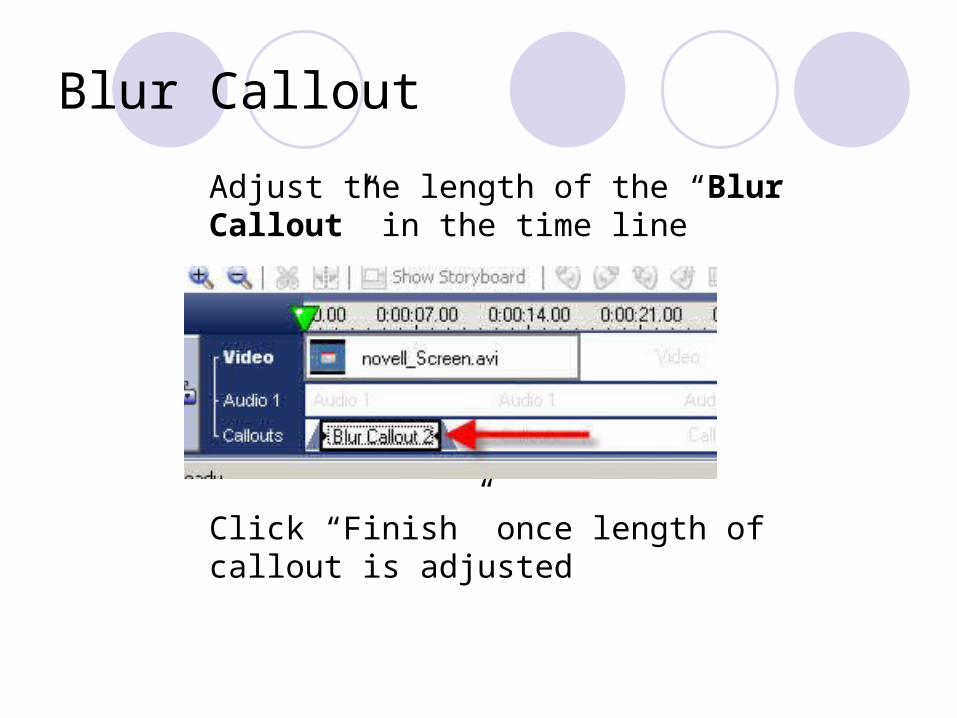
Adjust the length of the “Blur Callout” in the time line
Click “Finish” once length of callout is adjusted
Blur Callout
Picture in Picture (PIP)

Picture in Picture (PiP)
First, decide if your PIP will have audio or not and mute audio if necessary when recording this video segment.

Picture in Picture (PiP)
Once you have added a video to the timeline, right click on your PIP media and select “Add to PIP.” (Note: a camrec will not import to PIP.)

Picture in Picture (PiP)
Next, select the default choice to preview the PIP on top of video and click “OK.”

Picture in Picture (PiP)
Next, right click on the PIP media timeline and select “Modify PIP.”
Picture in Picture (PiP)
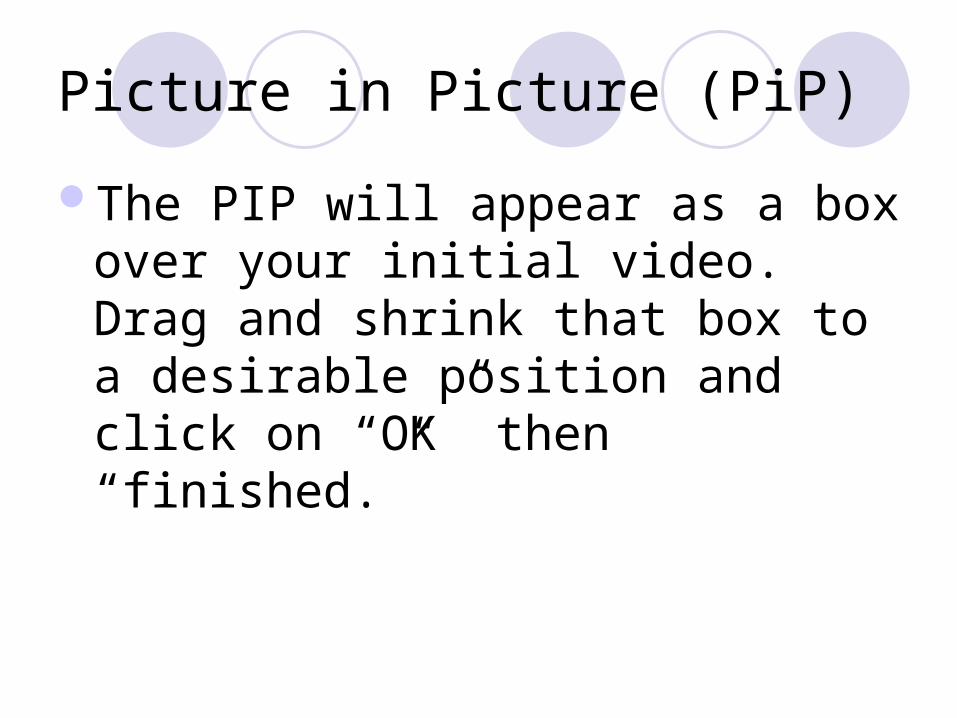
The PIP will appear as a box over your initial video. Drag and shrink that box to a desirable position and click on “OK” then “finished.”

Picture in Picture (PiP)
You are now ready to continue your video.

Audio Enhancements

Applying Audio Enhancements
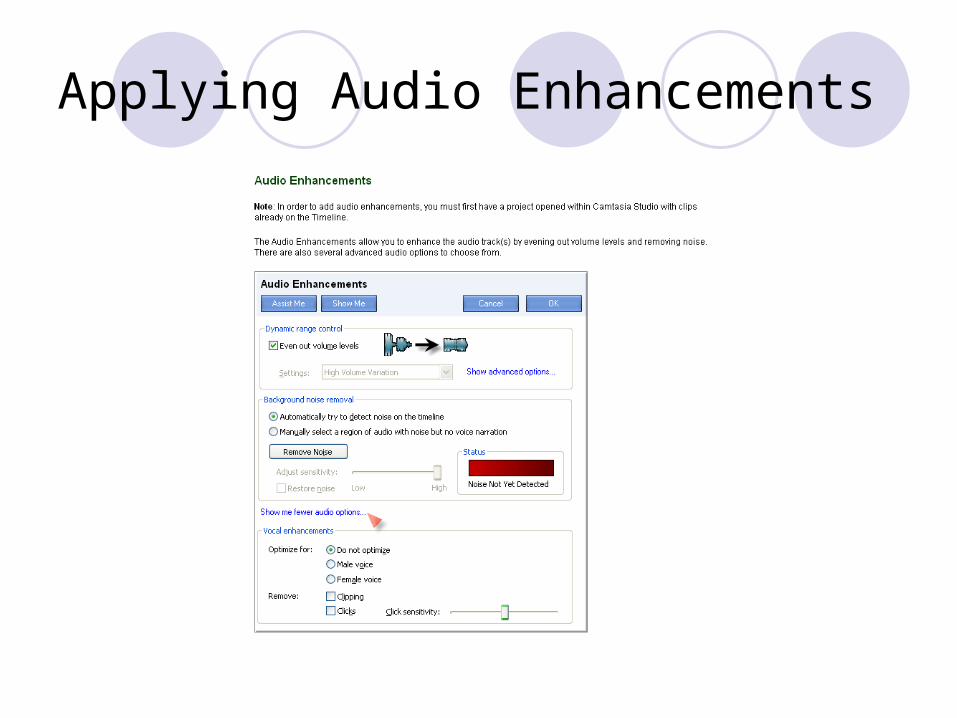
Applying Audio Enhancements
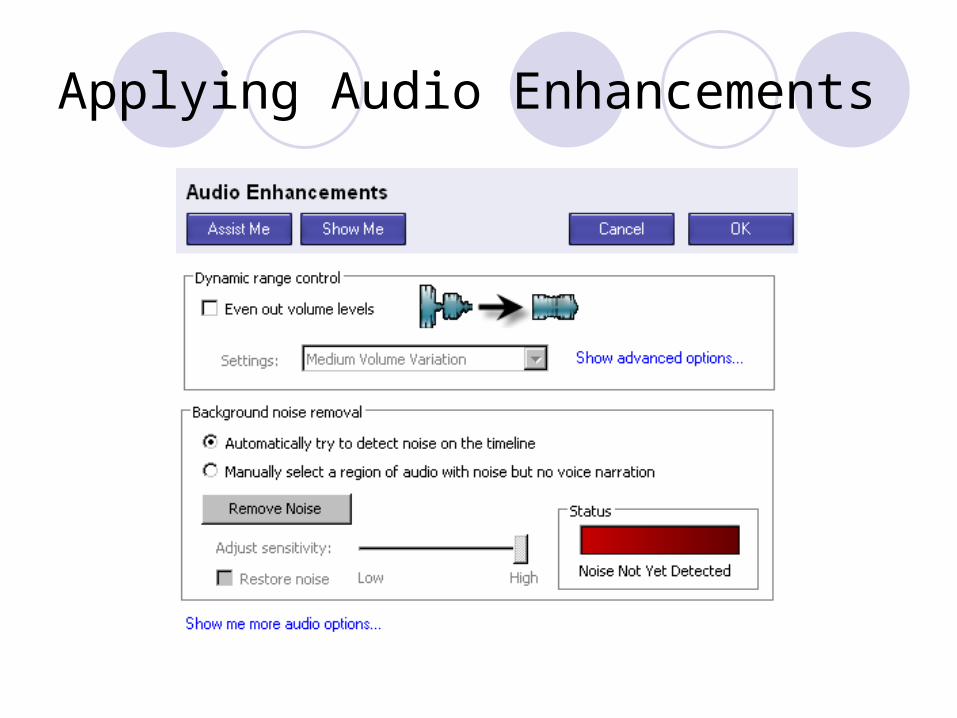
Applying Audio Enhancements

Applying Audio Enhancements
Applying Audio Enhancements

Even out volume levels:
• Click Play in the Preview Area to test how the enhancements sound.
•While the video is playing, check and uncheck to hear a comparison of the before and after audio quality.
•Change the Settings option if desired.
Adjusts the volume of the audio clips to a standard level. This is useful since recording levels between audio clips can vary greatly. When the Even out volume levels option is turned on, the audio waveform will immediately show signs of being improved.
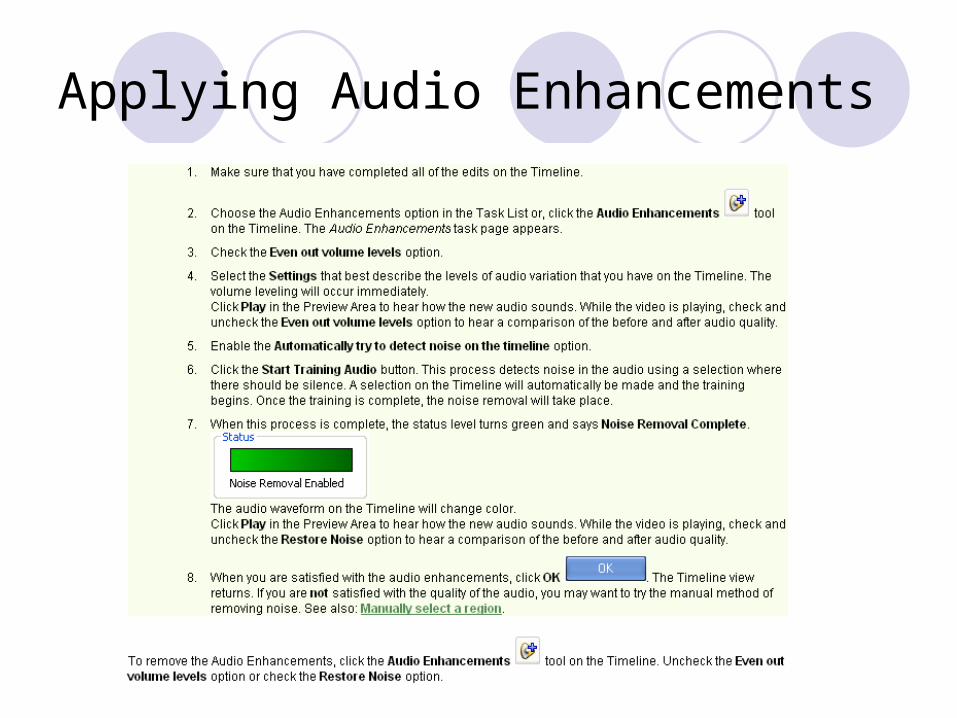
Applying Audio Enhancements

Automatically try to detect noise on the timeline
The Training process detects noise within the audio at a location where silence exists. Camtasia Studio will automatically look for the best area on the Timeline in which to train for noise reduction.
This works best when you have a single audio clip on the Timeline or, all of the audio clips contain similar kinds of noise.
Once you have made the selection, click the Noise Removal button. The training and noise reduction process begins immediately. The status area will let you know when the process is complete.
• Click the Play button in the Preview Area to hear how the new audio sounds.
• While the video is playing, check and uncheck the Restore Noise option to hear a comparison of the before and after audio quality.
Applying Audio Enhancements

Manually select a region of audio with noise but no voice narration
Manually select a region on the Timeline's audio waveform to train for noise reduction. This should be a location where silence should exist. You need only make a small selection - less than one second.
If no true silence exists, you might have to train over an area that has some speaking in it. In this case, if necessary, use the Adjust Sensitivity option to fine tune the noise reduction.
Once you have made the selection, click the Noise Removal button. The training and noise reduction process begins immediately. The status area will let you know when the process is complete.
• Click the Play button in the Preview Area to hear how the new audio sounds. • While the video is playing, check and uncheck the Restore Noise option to hear a comparison of the before and after audio quality.• When you are satisfied with the audio enhancements, click OK.
Applying Audio Enhancements

Adjust Sensitivity
The Adjust Sensitivity slider option is used after the Training and Noise Reduction processes have been completed. Use if the noise reduction process caused the audio to degrade in quality. This might happen if the training occurred over a selection that did not contain true silence.
In this case, use the slider to reduce the sensitivity and thereby restore some of the audio quality.
• Click the Play button in the Preview Area to hear how the audio sounds.
• As the video plays, use the Adjust Sensitivity lever to fine tune the noise
reduction enhancements.
Applying Audio Enhancements

Producing Video with Custom Settings
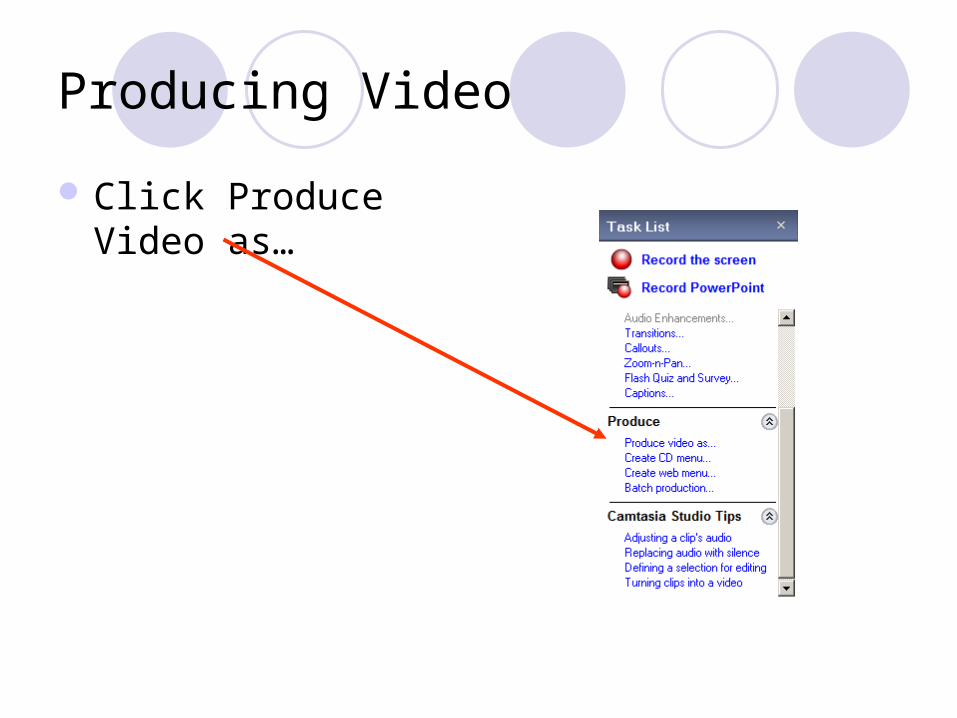
Producing Video
Click Produce Video as…

Producing Video
You can produce videos using recommended settings, preset setting or custom settings.

Producing Video (Recommend)
Web will be smaller size, moderate quality. E-mail very small, very low quality
CD larger size, better quality (CPS Default)
DVD very large, high quality Hard Drive very large, high
quality iPod small size, moderate
quality, specific format

Producing Video (Recommend)
Selections help determine where the higher quality will be focused.
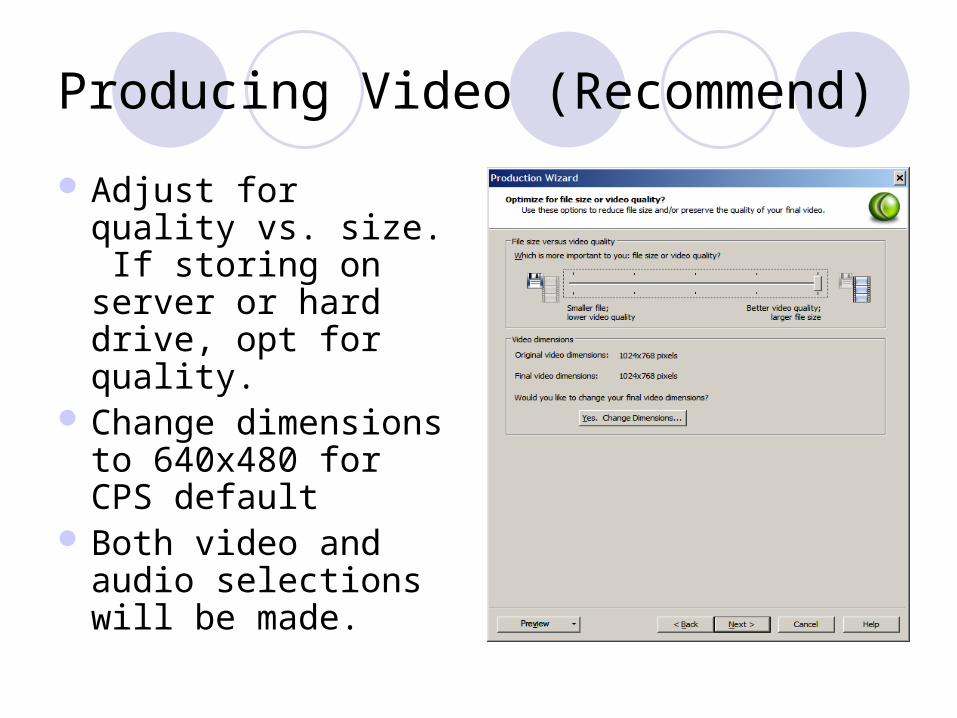
Producing Video (Recommend)
Adjust for quality vs. size. If storing on server or hard drive, opt for quality.
Change dimensions to 640x480 for CPS default
Both video and audio selections will be made.

Producing Video (Recommend)
Choose location to place final video.

Producing Video (Recommend)
Summary of choices Click Finish. Will take
some time depending on size of video.
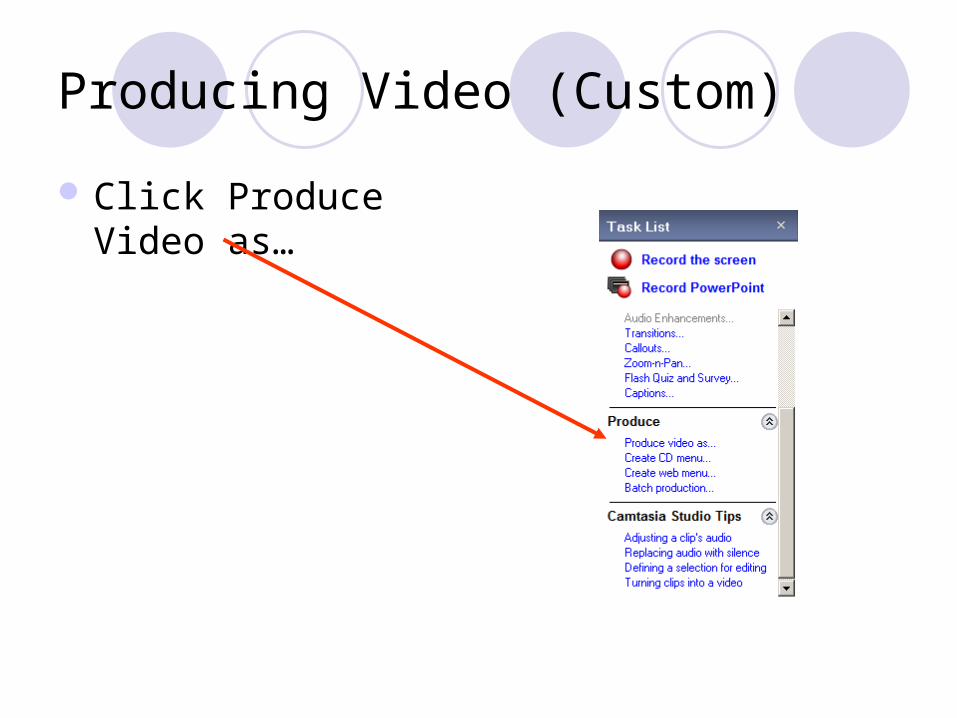
Producing Video (Custom)
Click Produce Video as…

Producing Video (Custom)
Flash – Good for web pages. Small size
WMV – Good for web or server. Runs in WMP. (CPS Default)
MOV – Runs only in Quicktime. Larger size, higher quality
AVI – Runs in almost any player, often large size, high quality
iPod – format specific. Small

Producing Video (Custom)
Choose a quality. Highest all around for
standard viewing is Camtasia Studio Full Motion Video and Audio High.

Producing Video (Custom)
Choose a video size. CPS default is 640x480.

Producing Video (Custom)
To add a watermark, check block. Browse out to image.
Camtasia will give you options for how watermark can look.

Producing Video (Custom)
Choose location to place final video.
Click Finish. Will take some time depending on size of video.
Now get out there and make some videos!
Related Documents