The Exposure Sheet The traditional hand-numbered paper Exposure Sheet ("X-sheet" for short) is fast becoming a relative of the dodo. With the advent of more CG animation, Flash, and paperless systems, the traditional X-sheet is frequently an afterthought, if it is indeed used at all. This is a crime to the art, in my opinion, because the X-sheet is not only the document that can act as the "bible" for almost all stages of an animated scene (from editor, to director, to layout artist, to animator, to clean-up artist, to scanner, to painter, to cameraman or scene planner, to final compositor), but it is also the perfect visual guide for an animator to plan his or her scene creatively and effi- ciently. In the current scenario, the best I can do is map out for you how a traditional X-sheet works, and hope for the future that it continues to be incorporated into the animation process.

The Exposure Sheet
Dec 11, 2015
crash course
Welcome message from author
This document is posted to help you gain knowledge. Please leave a comment to let me know what you think about it! Share it to your friends and learn new things together.
Transcript
The Exposure Sheet
The traditional hand-numbered paper Exposure Sheet ("X-sheet" for short) is fast becoming a relative of the dodo. With the advent of more CG animation, Flash, and paperless systems, the traditional X-sheet is frequently an afterthought, if it is indeed used at all. This is a crime to the art, in my opinion, because the X-sheet is not only the document that can act as the "bible" for almost all stages of an animated scene (from editor, to director, to layout artist, to animator, to clean-up artist, to scanner, to painter, to cameraman or scene planner, to final compositor), but it is also the perfect visual guide for an animator to plan his or her scene creatively and efficiently. In the current scenario, the best I can do is map out for you how a traditional X-sheet works, and hope for the future that it continues to be incorporated into the animation process.

68 C H A R A C T E R A N I M A T I O N C R A S H C O U R S E
Here is a standard X-sheet:
T H E E X P O S U R E S H E E T
It is normally 6 feet long (96 frames) - not an actual foot, but the representation of an actual 12 inches of 35mm film that would measure out to 16 frames. It is subdivided horizontally, with each horizontal row representing one frame of picture, with darker horizontal lines every 8 frames for easy reference. "1st sheets" often have only 5 feet of information (80 frames), utilizing the top space for more detailed scene identification and camera instruction. The X-sheet is subdivided vertically into several thin columns, and they are read right to left, with the right side devoted to camera instructions, the middle for the BG, underlay, overlay, and animation levels, and the far left for the dialogue breakdown, music indications, and directorial and timing information.

C H A R A C T E R A N I M A T I O N C R A S H C O U R S E
Camera InstructionsOn the right side of the sheet, all of the information needed for fielding, camera movement, and exposures (fades, dissolves) is exposed. Let's say that you would like Scene 1 to start at 15 field center, hold that position for the first foot, then truck in to 10 Field, 1 North, 2 East over 28 frames, and hold that position for 30 frames to the end of the scene. You want the truck-in to cushion out smoothly from your start position and cushion in smoothly to the final position. Also, you would like a 12-frame fade-in at the head of the scene, and a 12-frame dissolve to Scene 2 at the end of the scene. The right column of your X-sheet would look like this:->
The cut points (start and end of the scene) are marked in red horizontally. The opening field is shown on the sheets and held, with a straight vertical line, to the point where the truck-in starts. The wiggly line indicates the cushion out, then a constant trucking rate, finished off with the opposite wiggly line to indicate the cushion to a stop for the final fielding, over the desired 28-frame range. The final field is marked and held to the end of the scene. The 12-frame fade-in is indicated by the upside-down widening "V." (A fade-out is a right-side up closing "V".) The 24-frame dissolve at the end is shown as a fade-out V superimposed over a fade-in V to show the overlap between Scenes 1 and 2. You should understand when animating that the following scene also requires the same degree of overlap at the head, and that you must provide animation for the entire length of the dissolve in both scenes. However, the usual readability of images through a dissolve is up to the center of the dissolve for the outgoing scene, and from the center of the dissolve for the incoming scene.

T H E E X P O S U R E S H E E T
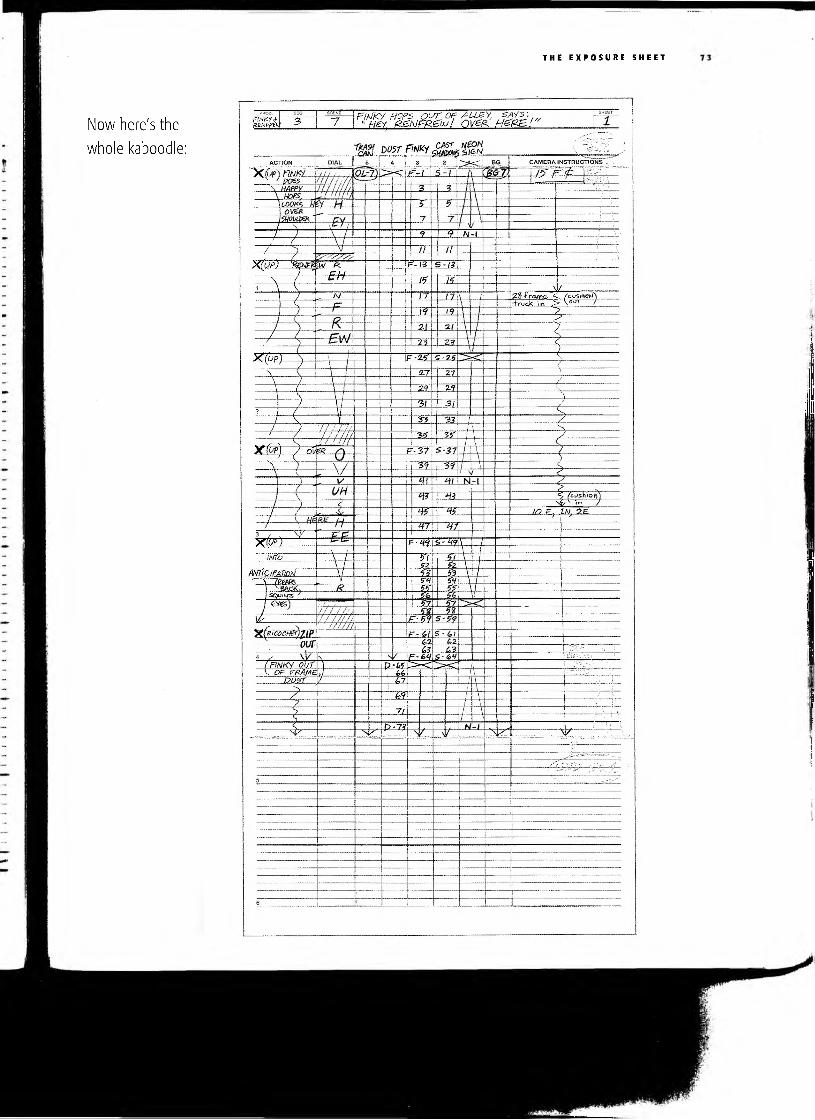
The Dialogue and Action ColumnsOn the far left side of the X-sheet are the Dialogue and Action indications. In the dialogue column, the soundtrack has been broken down by the editor for every frame, showing exactly how many frames it takes to make the sounds for the individual words. In this example, where the character Finky is saying, "Hey, Renfrew.... Over here!" we can see that it takes 1 frame for the "R" in Renfrew, 3 frames for the "eh," 1 frame for the "n," 2 frames for the "f," 2 frames for the "r," and 12 frames that trail out for the "ew." (More about lip-sync and dialogue animation later!) This column is often used for music and hard sound effects as well, indicating the frequency of beats and appearance of accents. We can see here that the beats are coming 12 frames apart, with a "ricochet" noise occurring on one of the beats. In the action column, the director has placed his timing notes for the major movement and acting of the character: he hops in on 12's to match the beats (but to make it look funnier, the "ups" are what hits the beats), and he's "happy" while he's doing it. He then anticipates (rears back) with squinted eyes, and zips out of frame to match the "ricochet" noise. Moreover, if the director hasn't already made these indications, it's up to the animator to plan the X-sheets in similar fashion, to establish and break rhythms, and do a lot of the thinking work about the scene before the animation even begins. I can't place enough importance on this stage of animation planning, because it allows the animator to see, visually on paper, how the rhythms and changes in timing and acting can work. It's literally the "road map" for the execution of the scene.

72 C H A R A C T E R A N I M A T I O N C R A S H C O U R S E
The Animation LevelsBetween the left and right sides are the animation columns, read from right to left, with the bottommost level on the right, and the topmost level on the left. Although this was originally conceived as a guide for the cameraman (indicating from bottom to top what order the various cels, BGs and overlay/ underlay artwork had to be stacked for the frame to appear correctly on screen), it is still used to this day on digital exposure sheets for proper alignment of all levels.
From right to left, we see that BG 7 is on the bottom, followed by the neon sign that fades on for 8 frames, holds for 8 frames, and fades out for 8 frames, followed by a blank (indicated by the "X"), before the 32-frame cycle starts up again. On top of that are cast shadows, then the character Finky on top. This is followed by an effects level (dust) that pops on for the "zip." Finally, at the topmost level is an overlay (a foreground piece of art) labeled "OL-7."
Each level is prefixed by a logical letter set before the numbers: "N" for neon, "S" for shadows, "F" for Finky, etc. The sheets are numbered on twos with odd numbers (1, 3, 5, etc.), except at the end, where ones are used for more elaborate movement on the anticipation and zip-out. An excellent working method is to number the sheets on twos all the way down, usually in the major character level. (This is regardless of whether you will eventually need ones or not.) This way, you can see exactly which frame number corresponds to dialogue, beats, and timing indications.
T H E E X P O S U R E S H E E T
Now here's the whole kaboodle:
C H A R A C T E R A N I M A T I O N C R A S H C O U R S E74
There are even more variations and notations to be made on the X-sheet, especially once it is converted to a digital format. Here, panning and trucking increments can be notated, as can exposures for certain levels (say, a translucency on the cast shadows and tone mattes), and further stuff too technical for me to understand or mention here. In any event, you will continue to see references to the humble traditional X-sheet throughout the rest of the chapters.
Related Documents