The CW Machine Manager © 2017 Ulrich H. Steinberg

Welcome message from author
This document is posted to help you gain knowledge. Please leave a comment to let me know what you think about it! Share it to your friends and learn new things together.
Transcript

The CW Machine
Manager
© 2017 Ulrich H. Steinberg
Contents Introduction ...........................................................................................................2 Installation.............................................................................................................3 Starting the CW Machine Manager .......................................................................4 The Software Screen ............................................................................................5 The Help Functions...............................................................................................9 The Configuration Screen ...................................................................................10 The Users Screen ...............................................................................................14 The Logbook Screen...........................................................................................17 The Terminal Screen ..........................................................................................23
Simulating a Numeric Keypad .........................................................................36 Synchronizing the CW Machine and a Radio......................................................37 Appendix A: Editing The Country List .................................................................39 Appendix B: The Special Notes File....................................................................40
CW Machine Manager V. 4.2 1

Introduction
The CW Machine Manager is a Windows program that lets you perform most configuration and data exchange operations for the CW Machine using a convenient graphical interface. It requires a CW Machine device with the CW Machine firmware, attached to a serial port on your computer, and it will not start unless it finds the CW Machine firmware.
Most of the functions that are accessible through the joystick menu of the CW Machine can be performed in the CW Machine Manager, but the CW Machine Manager goes further:
The CW Machine Manager can convert the internal log of the CW Machine into a readable list and into ADIF files which are compatible with most logging programs.
The CW Machine Manager can submit logging information directly to the ARRL’s Logbook of the World and to eQSL.
You can see the log information for your most recent QSOs in real time.
When you enter a call, the country is displayed or a note that you can attach to a call
The CW Machine Manager turns the CW Machine into a full-featured keyboard keyer with a fully editable type-ahead buffer.
The Terminal screen lets you watch the keyer output as it is being sent, and you can type received text to record both sides of a QSO.
You can store multiple user profiles and transmit a profile to the keyer with a mouse click. A “profile” is the equivalent of a Users file described in the CW Machine manual: it contains the calls and names for two users, and the messages corresponding to the number keys on the numeric keypad.
You can use your key to send perfect CW from a remotely controlled transmitter using several sophisticated remote control techniques.
You can download the latest version of the CW Machine firmware and the CW Machine Manager program from the Internet at the click of a button.
The CW Machine Manager will run only on Windows 2000 or later versions of Windows, including 64-bit versions. The CW Machine Manager communicates with the CW Machine device through a RS232 serial port. The speed of that communication link is set in the CW Machine firmware, and the CW Machine Manager will automatically detect the speed and the port that the CW Machine device is connected to. If your PC does not have a serial port, you can use a high-quality USB-serial adapter. It should be mapped to COM1 … COM4. Many inexpensive adapters have proven problematic, and the only types that have worked consistently without problems are the adapter that we are offering and adapters made by Keyspan, e.g. the Keyspan USA-19HS.
CW Machine Manager V. 4.2 2

Installation Installing the CW Machine Manager is straight forward, using an installation program that will put all the necessary files on your hard disk. This also provides an uninstall function that lets you cleanly remove the CW Machine Manager if desired. The installation process is self explanatory once you start the CWMSETUP.EXE program, and actually there’s only one choice that you could potentially override: you may want to choose a different target directory for the CW Machine Manager program. (but in most cases the proposed default should be just fine)
The installation will put icons for the CW Machine Manager program and for the CW Machine manuals on your Windows desktop.
CW Machine Manager V. 4.2 3

Starting the CW Machine Manager The installation program will place an icon for the CW Machine on your Windows desktop, and you start the program by double-clicking on that icon. Another folder icon that will be placed on your desktop contains the links to the CW Machine documentation. If you want to keep the CW Machine Manager always on top, never to be covered by other Windows that you may have opened on your desktop, just click on the “The CW Machine” label at the top of the screen after the program has started. This will toggle the “always on top” feature and remember your choice the next time you start the CW Machine Manager. Before you try starting the CW Machine Manager, make sure that the CW Machine device is connected to your PC with a serial cable or a USB-serial adapter, and that the firmware in the device is running. If the LCD screen of the device is blank, touch the left side of your paddle (or move the joystick up) to get the scrolling version display on the LCD – you have to see something on the LCD display before you start the CW Machine Manager. The CW Machine Manager will try to locate the device by sending out a handshake signal on all COM ports of your computer, at the four different speeds that can be selected on the CW Machine (38400 baud, 19200 baud, 9600 baud, 4800 baud), starting with the fastest speed. COM ports 1 through 16 are tried. If a device is found, and it has a firmware version that is compatible with the CW Machine Manager, the COM port and speed are memorized, and these settings are tried first when you start the program the next time to provide virtually instantaneous program start up. If you have other devices connected to COM ports, the CW Machine Manager will in some rare situations not be able to detect the COM port that the CW Machine device is connected to. In that case you can select the COM port manually on the Software screen. Normally you should not touch the CWM Port pull-down on the Software screen, and it cannot be used to actually change the COM port. If the CW Machine Manager does not find a device, or the device contains outdated firmware, you will see ……:
CW Machine Manager V. 4.2 4
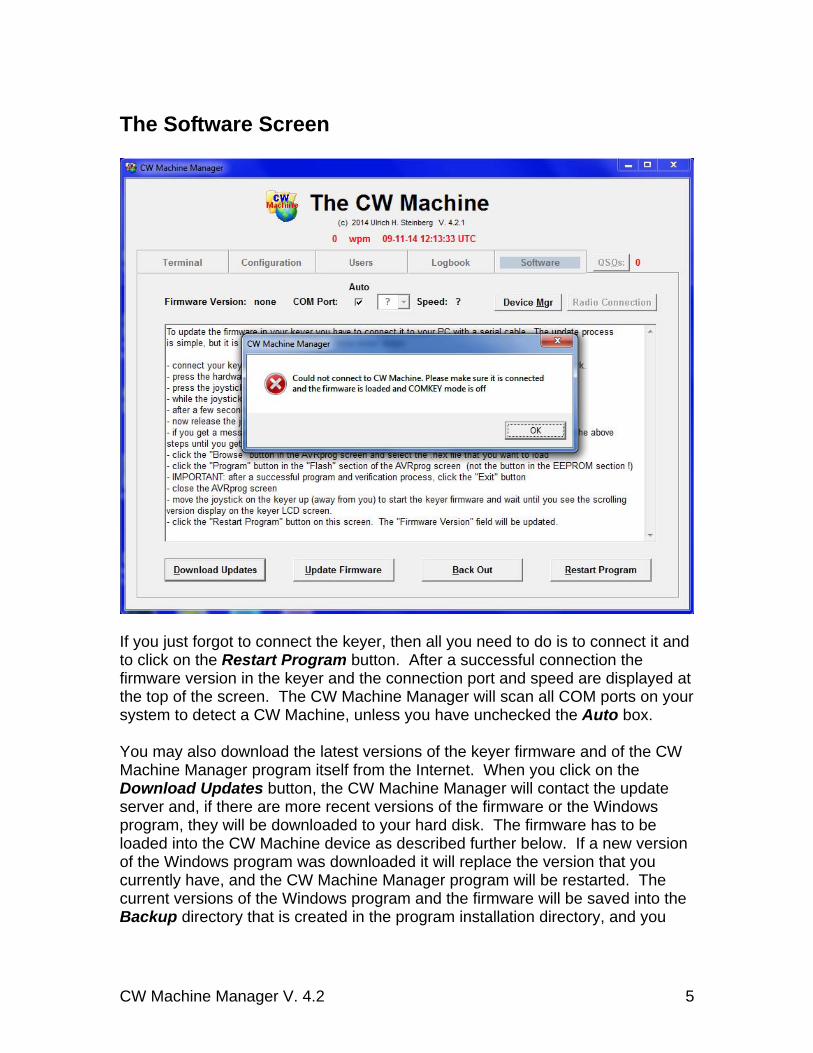
The Software Screen
If you just forgot to connect the keyer, then all you need to do is to connect it and to click on the Restart Program button. After a successful connection the firmware version in the keyer and the connection port and speed are displayed at the top of the screen. The CW Machine Manager will scan all COM ports on your system to detect a CW Machine, unless you have unchecked the Auto box. You may also download the latest versions of the keyer firmware and of the CW Machine Manager program itself from the Internet. When you click on the Download Updates button, the CW Machine Manager will contact the update server and, if there are more recent versions of the firmware or the Windows program, they will be downloaded to your hard disk. The firmware has to be loaded into the CW Machine device as described further below. If a new version of the Windows program was downloaded it will replace the version that you currently have, and the CW Machine Manager program will be restarted. The current versions of the Windows program and the firmware will be saved into the Backup directory that is created in the program installation directory, and you
CW Machine Manager V. 4.2 5

can restore them at a later time with the Back Out button as described further down. The Device Mgr button lets you start the Windows Device Manager program, to let you check or change settings related to the COM port. This is mainly important if you are using a USB-serial adapter and want to change the COM port that has been assigned by Windows. (You cannot change the COM port mapping with the COM pull-down on the Software screen! You have to use the Device Manager.) The following screen shot shows the typical screens that you would use to change the COM port mapping for a USB-serial adapter.
CW Machine Manager V. 4.2 6

If a keyer is connected but it has outdated firmware, then you need to install the latest firmware version as explained on this screen. The firmware for the CW Machine is distributed as a HEX file named KeyLargo.hex. You can also load firmware for our other programs through this screen. The firmware for the CW Trainer, e.g., is called KeyTrain.hex. The procedure to load it into the keyer is simple, but you should follow it exactly to avoid complications. Make sure that your serial port is COM1 … COM4. The AVRprog program that is used to update the firmware will not work with ports above COM4. This very same procedure can be used at any time to update the firmware in your keyer:
press the hardware reset button on the keyer, so that the LCD screen goes blank
press the joystick on the keyer (like pressing a button down) and KEEP PRESSING IT
while the joystick is still being pressed click the Update Firmware button after a few seconds you should see the AVRprog pop-up screen:
release the joystick if you get a message that "no supported board was found", check your
serial connection and try again. This will also happen if your serial port is above COM4.
CW Machine Manager V. 4.2 7

click the "Browse" button in the AVRprog screen and select the firmware
file that you want to load. This file is usually located in the Updates directory that is created in the program installation directory – in other words, if you use the default installation values and you have an English language version of Windows with a harddisk C:, then you should select the file C:\Program Files\CW Machine \Updates\KeyLargo.hex for the Keyer function, or …\KeyTrain.hex for the CW Trainer function, to load the firmware. AVRprog will remember this selection and pre-fill the field above the Browse button; so the next time you won’t have to go through the selection process again.
click the "Program" button in the "Flash" section of the AVRprog screen. Do not click the “Program” button in the “EEPROM” section!
after a successful program and verification process, click the "Exit" button (!!! Don’t just close the AVRprog screen, because that will not result in a successful installation)
close the AVRprog screen (!!! Otherwise AVRprog still owns the port and the CW Machine Manager cannot connect.)
move the joystick on the keyer up (away from you) to start the keyer software and wait until you see the scrolling version display on the keyer LCD.
click the Restart Program button on the CW Machine Manager screen. The Current Firmware field will be updated to show the version that is in the keyer now. If you have loaded firmware for some of our other programs for the CW Machine hardware, the Windows component of that program will automatically be started when you click the Restart Program button, and that program will have a very similar Software screen with identical functionality.
If all is well, you will see the version of the firmware that has been loaded into the keyer, and the navigation tabs are unlocked so that you can navigate to the other screens of the CW Machine Manager. You display the other screens of the CW Machine Manager by just clicking on one of the five tabs Terminal, Configuration, Users, Logbook, or Software. The Back Out button lets you restore a previous version of the software and firmware. When you click it, the previous version of the Windows software will be restored and replace the current version. The previous version of the keyer firmware will be restored as if you had downloaded it, and you have to follow the procedure described above to load it into the keyer.
CW Machine Manager V. 4.2 8
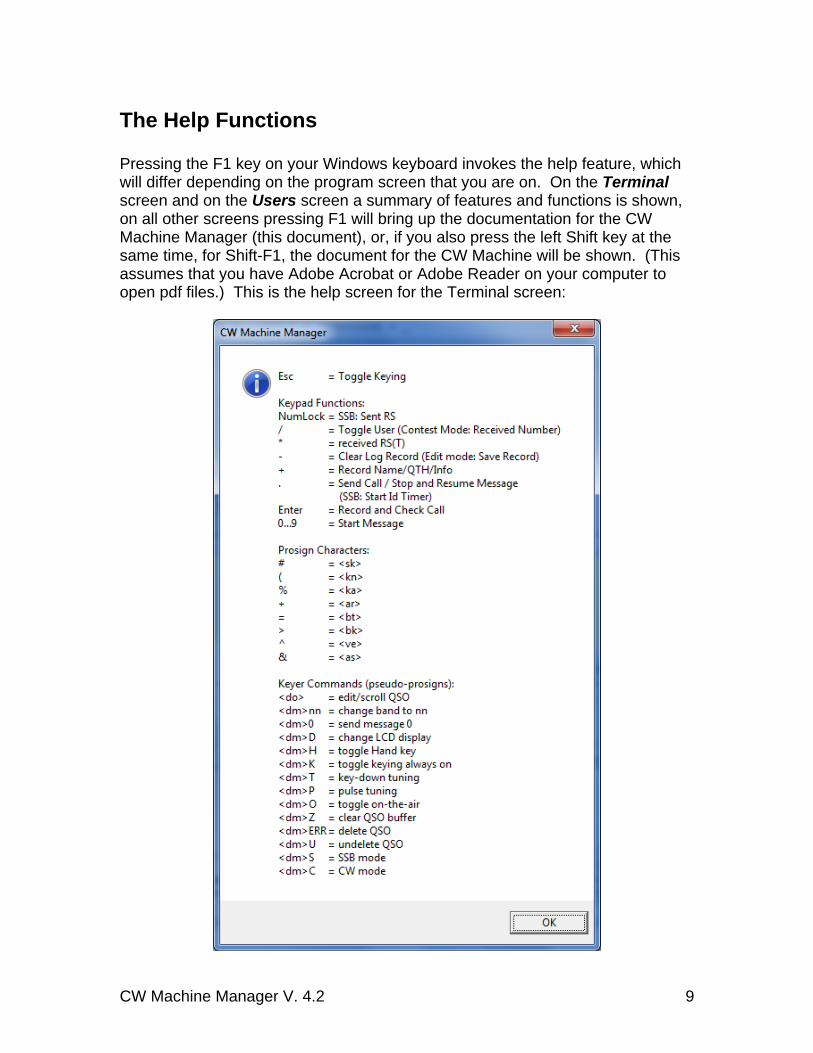
The Help Functions Pressing the F1 key on your Windows keyboard invokes the help feature, which will differ depending on the program screen that you are on. On the Terminal screen and on the Users screen a summary of features and functions is shown, on all other screens pressing F1 will bring up the documentation for the CW Machine Manager (this document), or, if you also press the left Shift key at the same time, for Shift-F1, the document for the CW Machine will be shown. (This assumes that you have Adobe Acrobat or Adobe Reader on your computer to open pdf files.) This is the help screen for the Terminal screen:
CW Machine Manager V. 4.2 9

The Configuration Screen
When you connect successfully to your keyer for the first time, the CW Machine Manager will show the Configuration screen after the startup. It will then, however, remember the last screen that you were on when you close the program, and that screen will be the first one shown when you start it the next time. The Configuration screen lets you adjust most settings of the keyer. It is a pretty crowded screen, so let’s take a look starting at the top.
The Keyer Speed and the UTC Time are shown in the top section of the application window where they are visible on all screens. If you adjust the potentiometer on the CW Machine device, the speed change is automatically reflected on the screen. The UTC time is derived from your PC clock and the time zone that you have specified in Windows. When you start the CW Machine Manager, this time is sent to the keyer to synchronize its built-in clock which is
CW Machine Manager V. 4.2 10

used for the time stamps in log records and shown on the LCD display. You can synchronize the clock in the device with your PC at any time by clicking at the date/time display at the top of any screen. The Operation section lets you choose the Band that will be stored in the keyer’s log. The Contest Mode box controls the way QSO’s are logged by the keyer; if you check it, the Serial Number field on this screen will be enabled to let you chose the starting serial number that the keyer will use for contest exchanges. The keyer will, of course, automatically increment the serial number all the way up to 999999 with each QSO, and the current serial number is shown in the upper right of the application window where it is visible on all screens. The Log Search box controls whether the keyer log is searched for a previous QSO with a station when a new log record is created. In quiet mode, when you are off the air, the log is always searched, even when the box is unchecked. The Keying section lets you set the Keyer Mode (Iambic B1, Iambic B2, Iambic B3, Iambic A, Bug, Hand, Ultimatic) and the paddle orientation (Reverse). The Always checkbox lets you toggle the “Keying Always On” feature, which enables keying, even in SSB mode or in edit mode when the CW Machine usually goes into quiet mode – there is no quiet mode and you are always “on the air”. The Memory checkbox lets you toggle the dash/dot memory in the keying logic. The check boxes for the automatic spacing functions, Auto CS and Auto WS, if selected, make sure that the minimum space between characters, 3 ticks, and the minimum space between words, 7 ticks, is maintained if your fingers are a little too fast; this alters the “feeling” of the keyer, and you should experiment with these settings to find your optimum setting. The Lowest Speed and Highest Speed sliders let you set the speed range that is covered by the speed potentiometer. If you have difficulty adjusting any slider on this screen to a precise value with your mouse, just drag it to the approximate value and then use the left/right arrow keys on your keyboard for the fine adjustment. In the Special Features section you have a check box that controls the Automatic Logging which scans your transmission for keywords and patterns to collect the information for a log record (for details refer to the CW Machine document). If the Automatic Audit box is checked, the contents of the Monitor box on the Terminal screen will be saved when the program ends. The SSB checkbox controls SSB mode, allowing logging of SSB QSOs using your key or keyboard and enabling the ID Timer function for the <.> (decimal point) key on the keypad. The national Morse characters ÄÀÖ, used in French and German, have the same Morse pattern as the characters ÆÅØ, used in Scandinavian languages. If you check the Nordic Characters box, the Scandinavian characters will be displayed, otherwise the French/German characters.
CW Machine Manager V. 4.2 11

The Remote Control button is only visible if you have installed the Remote Control Option for the CW Machine. It opens up another window that lets you configure a number of options for remote operation. This is discussed in detail in a separate document that comes with the Remote Control Option. The LCD and Sidetone section lets you set the LCD Contrast, and the Frequency and the relative Volume of the keyer side tone. The volume setting also controls the volume of the beep that is used to signal some events. If you move the volume slider past the 100% mark, it will change to Buzzer, and the CW Machine
will generate a buzzer sound instead of the normal sine tone. Sine tones, unlike the buzzer tone, cannot be reproduced by the small piezo transducer in the device. If you went to the Buzzer position by mistake, you can click on the word Buzzer, and the slider will change back to the 100% position. If Tone On is unchecked, the keyer will not create a tone when transmitter keying is active (because your transmitter will generate a sidetone); if the keyer is in “silent mode” with the keying disabled, and therefore your transmitter will not generate a sidetone, then the keyer will always create a tone, regardless of the setting of this option. The Compensation section lets you adjust the parameters of the T/R compensation feature if the Compensation On box is checked. The purpose of this keyer feature is to compensate for latencies in your transmitter’s keying. There are two typical issues which can both be compensated by the CW Machine. The first, sometimes found in transceivers or transmitter/receiver combinations that do not offer true QSK, is the shortening of the first element of the first character after your transceiver switches from receive to transmit mode. The CW Machine compensates for this by extending the length of the first element by the amount of time that you set with the Extension slider. The keyer needs to know what the “first character” is, i.e., you have to tell it how long your transceiver stays in transmit mode after the last character before it goes to receive; you set this value with the T/R Delay slider. Characters that are started while the transceiver is still (assumed to be) in transmit mode will not be altered. The second issue is that some transmitters create “light” characters by not transmitting for the full key-down duration, reducing the time of every dit and dah and extending the space between the elements of a character. The CW Machine
CW Machine Manager V. 4.2 12

compensates for this by adding the amount of time that you set with the Extension slider to every dit and dah and reducing the space between them by that same amount. You enable this type of weighting by setting the T/R Delay slider to 0. (As an example: the Elecraft K3 sounds most “natural” with an Extension of 6-7msec, for the Elecraft KX3 12msec is a good starting point for experiments.) When compensation is enabled, the sidetone of the keyer will sound the “normal” character timing and not reflect the altered timing – just like the signal should sound that comes out of your transmitter. After you have made all the necessary adjustments you have to send them to the keyer by clicking the Use Configuration button. You can click the Read Configuration button at any time to see the actual configuration of the keyer. The Save Configuration button lets you save the current configuration settings to a file on your PC, and you can restore the last saved configuration by clicking on the Restore Configuration button. The configuration is saved in a file called configuration.cwm in your CW Machine folder, and you can copy it to another PC if required.
CW Machine Manager V. 4.2 13
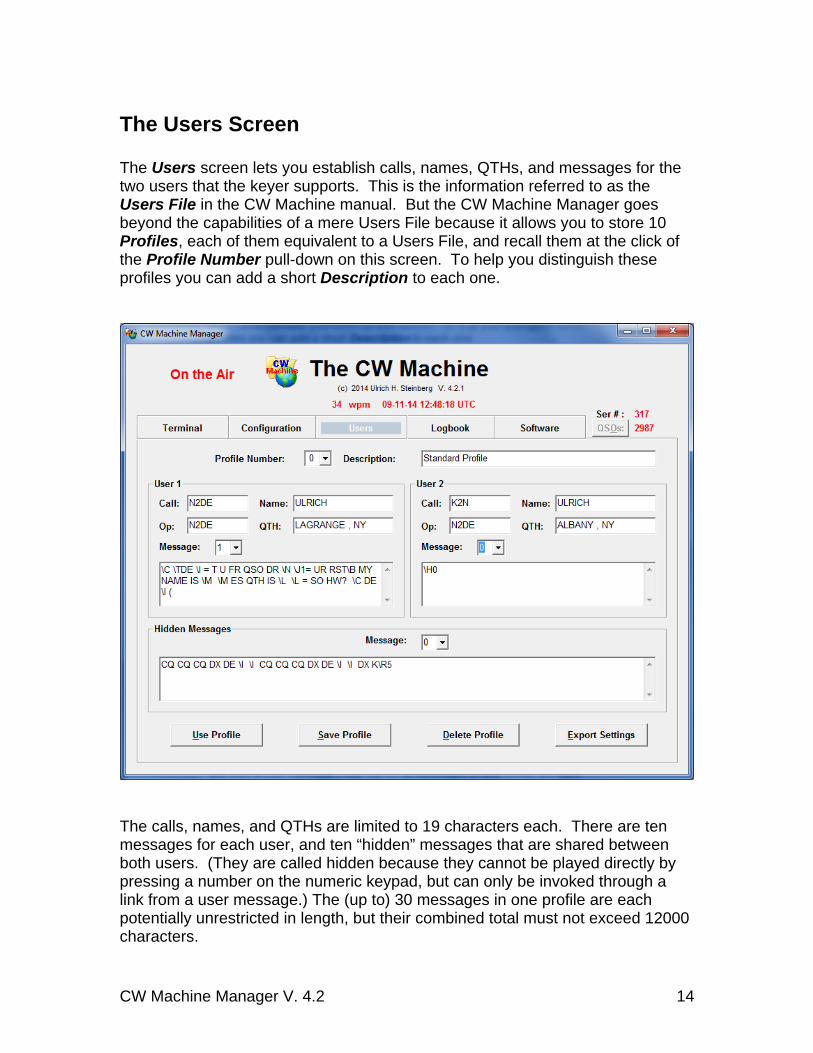
The Users Screen The Users screen lets you establish calls, names, QTHs, and messages for the two users that the keyer supports. This is the information referred to as the Users File in the CW Machine manual. But the CW Machine Manager goes beyond the capabilities of a mere Users File because it allows you to store 10 Profiles, each of them equivalent to a Users File, and recall them at the click of the Profile Number pull-down on this screen. To help you distinguish these profiles you can add a short Description to each one.
The calls, names, and QTHs are limited to 19 characters each. There are ten messages for each user, and ten “hidden” messages that are shared between both users. (They are called hidden because they cannot be played directly by pressing a number on the numeric keypad, but can only be invoked through a link from a user message.) The (up to) 30 messages in one profile are each potentially unrestricted in length, but their combined total must not exceed 12000 characters.
CW Machine Manager V. 4.2 14

Messages may not only contain plain text but also, as explained in the CW Machine manual, special commands that are interpreted by the keyer when a message is sent. To help you when creating or editing these messages, pressing the F1 key displays a brief summary of the available commands and the substitute characters for the prosigns. For details refer to the CW Machine manual.
CW Machine Manager V. 4.2 15

After you have created a profile you can send it to the keyer by clicking the Use Profile button; this also automatically saves the profile. By clicking the other buttons, Save Profile and Delete Profile, you can save and delete the profiles that are stored on your PC. The CW Machine Manager stores the profiles and other configuration information in the Windows registry. You can export this information to a file for backup purposes or to transfer it to another computer. Clicking on the Export Settings button will create a file named cwm.reg in your CW Machine directory. You restore the data to the Windows registry by opening the cwm.reg file with the registry editor utility regedit (or, on most systems, by just double-clicking on cwm.reg). When you import the settings, the CW Machine Manager must not be running, otherwise the import operation will fail.
CW Machine Manager V. 4.2 16
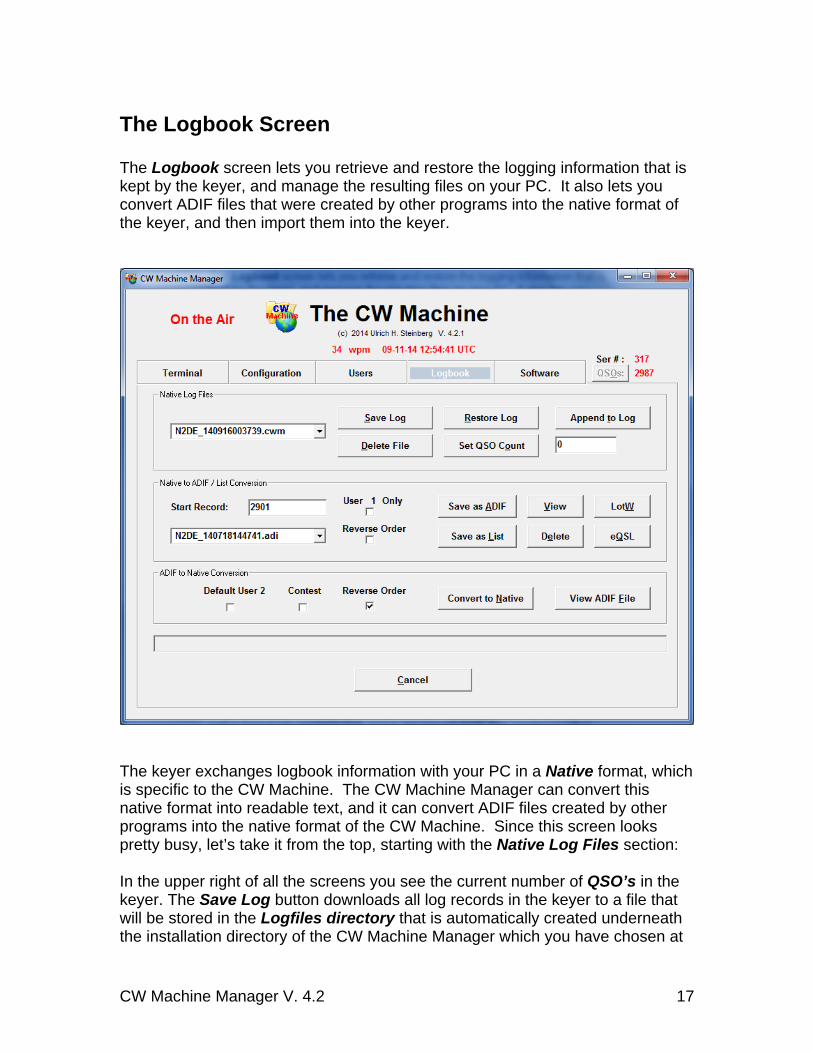
The Logbook Screen The Logbook screen lets you retrieve and restore the logging information that is kept by the keyer, and manage the resulting files on your PC. It also lets you convert ADIF files that were created by other programs into the native format of the keyer, and then import them into the keyer.
The keyer exchanges logbook information with your PC in a Native format, which is specific to the CW Machine. The CW Machine Manager can convert this native format into readable text, and it can convert ADIF files created by other programs into the native format of the CW Machine. Since this screen looks pretty busy, let’s take it from the top, starting with the Native Log Files section: In the upper right of all the screens you see the current number of QSO’s in the keyer. The Save Log button downloads all log records in the keyer to a file that will be stored in the Logfiles directory that is automatically created underneath the installation directory of the CW Machine Manager which you have chosen at
CW Machine Manager V. 4.2 17
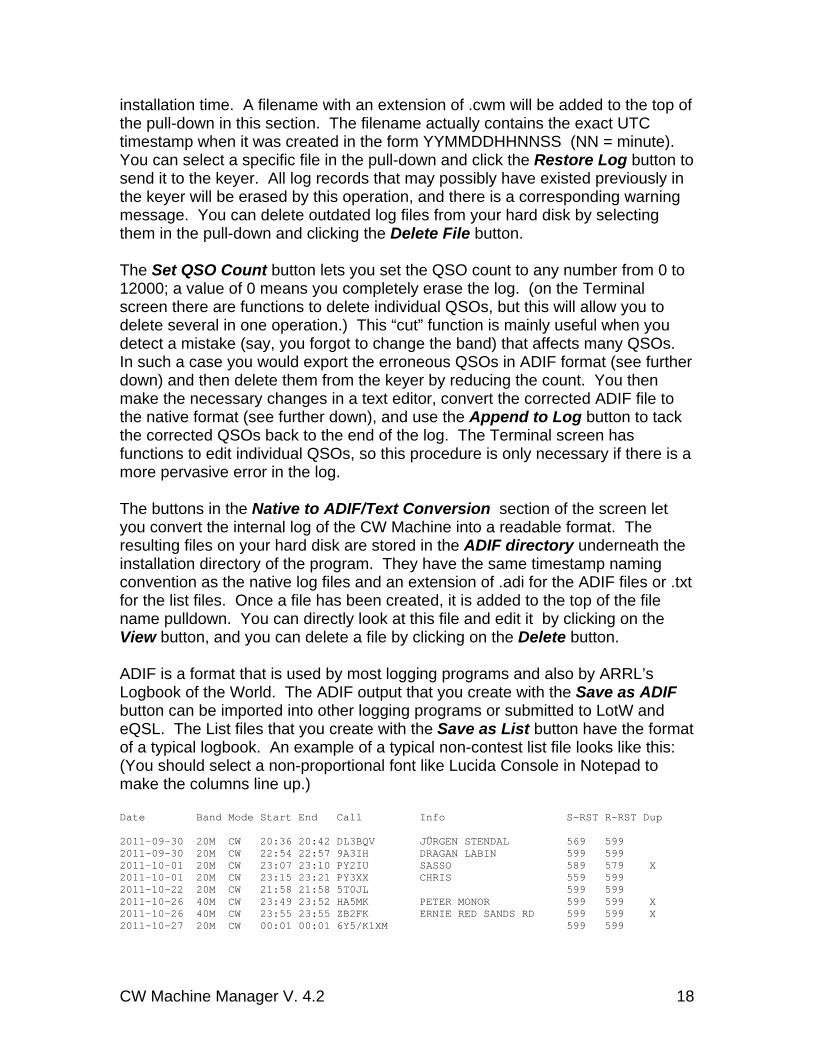
installation time. A filename with an extension of .cwm will be added to the top of the pull-down in this section. The filename actually contains the exact UTC timestamp when it was created in the form YYMMDDHHNNSS (NN = minute). You can select a specific file in the pull-down and click the Restore Log button to send it to the keyer. All log records that may possibly have existed previously in the keyer will be erased by this operation, and there is a corresponding warning message. You can delete outdated log files from your hard disk by selecting them in the pull-down and clicking the Delete File button. The Set QSO Count button lets you set the QSO count to any number from 0 to 12000; a value of 0 means you completely erase the log. (on the Terminal screen there are functions to delete individual QSOs, but this will allow you to delete several in one operation.) This “cut” function is mainly useful when you detect a mistake (say, you forgot to change the band) that affects many QSOs. In such a case you would export the erroneous QSOs in ADIF format (see further down) and then delete them from the keyer by reducing the count. You then make the necessary changes in a text editor, convert the corrected ADIF file to the native format (see further down), and use the Append to Log button to tack the corrected QSOs back to the end of the log. The Terminal screen has functions to edit individual QSOs, so this procedure is only necessary if there is a more pervasive error in the log. The buttons in the Native to ADIF/Text Conversion section of the screen let you convert the internal log of the CW Machine into a readable format. The resulting files on your hard disk are stored in the ADIF directory underneath the installation directory of the program. They have the same timestamp naming convention as the native log files and an extension of .adi for the ADIF files or .txt for the list files. Once a file has been created, it is added to the top of the file name pulldown. You can directly look at this file and edit it by clicking on the View button, and you can delete a file by clicking on the Delete button. ADIF is a format that is used by most logging programs and also by ARRL’s Logbook of the World. The ADIF output that you create with the Save as ADIF button can be imported into other logging programs or submitted to LotW and eQSL. The List files that you create with the Save as List button have the format of a typical logbook. An example of a typical non-contest list file looks like this: (You should select a non-proportional font like Lucida Console in Notepad to make the columns line up.) Date Band Mode Start End Call Info S-RST R-RST Dup 2011-09-30 20M CW 20:36 20:42 DL3BQV JÜRGEN STENDAL 569 599 2011-09-30 20M CW 22:54 22:57 9A3IH DRAGAN LABIN 599 599 2011-10-01 20M CW 23:07 23:10 PY2IU SASSO 589 579 X 2011-10-01 20M CW 23:15 23:21 PY3XX CHRIS 559 599 2011-10-22 20M CW 21:58 21:58 5T0JL 599 599 2011-10-26 40M CW 23:49 23:52 HA5MK PETER MONOR 599 599 X 2011-10-26 40M CW 23:55 23:55 ZB2FK ERNIE RED SANDS RD 599 599 X 2011-10-27 20M CW 00:01 00:01 6Y5/K1XM 599 599
CW Machine Manager V. 4.2 18

While the same QSOs look like this in ADIF format: LOGGER:<PROGRAMID:14>THE CW MACHINE<PROGRAMVERSION:5>4.2.1<EOH> <QSO_DATE:8>20110930<TIME_ON:6>203610<TIME_OFF:6>204206<MODE:2>CW<BAND:3>20M <CALL:6>DL3BQV<NAME:6>JÜRGEN<QTH:7>STENDAL<RST_RCVD:3>599<RST_SENT:3>569 <STATION_CALLSIGN:4>N2DE<EOR> <QSO_DATE:8>20110930<TIME_ON:6>225425<TIME_OFF:6>225736<MODE:2>CW<BAND:3>20M <CALL:5>9A3IH<NAME:6>DRAGAN<QTH:5>LABIN<RST_RCVD:3>599<RST_SENT:3>599 <STATION_CALLSIGN:4>N2DE<EOR> <QSO_DATE:8>20111001<TIME_ON:6>230739<TIME_OFF:6>231009<MODE:2>CW<BAND:3>20M <CALL:5>PY2IU<NAME:5>SASSO<RST_RCVD:3>579<RST_SENT:3>589 <STATION_CALLSIGN:4>N2DE<NOTES:9>DUPLICATE<EOR> <QSO_DATE:8>20111001<TIME_ON:6>231508<TIME_OFF:6>232113<MODE:2>CW<BAND:3>20M <CALL:5>PY3XX<NAME:5>CHRIS<RST_RCVD:3>599<RST_SENT:3>559 <STATION_CALLSIGN:4>N2DE<EOR> <QSO_DATE:8>20111022<TIME_ON:6>215826<TIME_OFF:6>215829<MODE:2>CW<BAND:3>20M <CALL:5>5T0JL<RST_RCVD:3>599<RST_SENT:3>599 <STATION_CALLSIGN:4>N2DE<EOR> <QSO_DATE:8>20111026<TIME_ON:6>234957<TIME_OFF:6>235219<MODE:2>CW<BAND:3>40M <CALL:5>HA5MK<NAME:5>PETER<QTH:5>MONOR<RST_RCVD:3>599<RST_SENT:3>599 <STATION_CALLSIGN:4>N2DE<NOTES:9>DUPLICATE<EOR> <QSO_DATE:8>20111026<TIME_ON:6>235529<TIME_OFF:6>235533<MODE:2>CW<BAND:3>40M <CALL:5>ZB2FK<NAME:5>ERNIE<QTH:12>RED SANDS RD<RST_RCVD:3>599<RST_SENT:3>599 <STATION_CALLSIGN:4>N2DE<NOTES:9>DUPLICATE<EOR> <QSO_DATE:8>20111027<TIME_ON:6>000135<TIME_OFF:6>000136<MODE:2>CW<BAND:3>20M <CALL:8>6Y5/K1XM<RST_RCVD:3>599<RST_SENT:3>599 <STATION_CALLSIGN:4>N2DE<EOR>
For contest QSOs the formats of both, the ADIF file and the list file show serial numbers, and in the list file the precision of the start time goes down to seconds (but there is no end time). Obviously the list format is easier to read for humans, but it cannot be used for data exchange with other programs. You have the option to set the starting point of the conversion and to filter the information by user. The CW Machine will remember how far you have already converted the log into text and suggest that as the starting point for the next conversion – so you don’t have to always convert the whole keyer log into text. (but you can, if you specify a Start Record of 1.) Normally the ADIF / List output contains the information for both users that the keyer supports. Checking the User x Only box will only show records created by the user that is currently selected in the keyer. Another filter that is always active separates contest QSOs and “normal” QSOs: if the keyer is currently configured for contest operation, then only contest QSOs will be shown in the conversion output – if the keyer is not in contest mode then only “normal” QSOs will be shown and contest QSOs are skipped.
CW Machine Manager V. 4.2 19
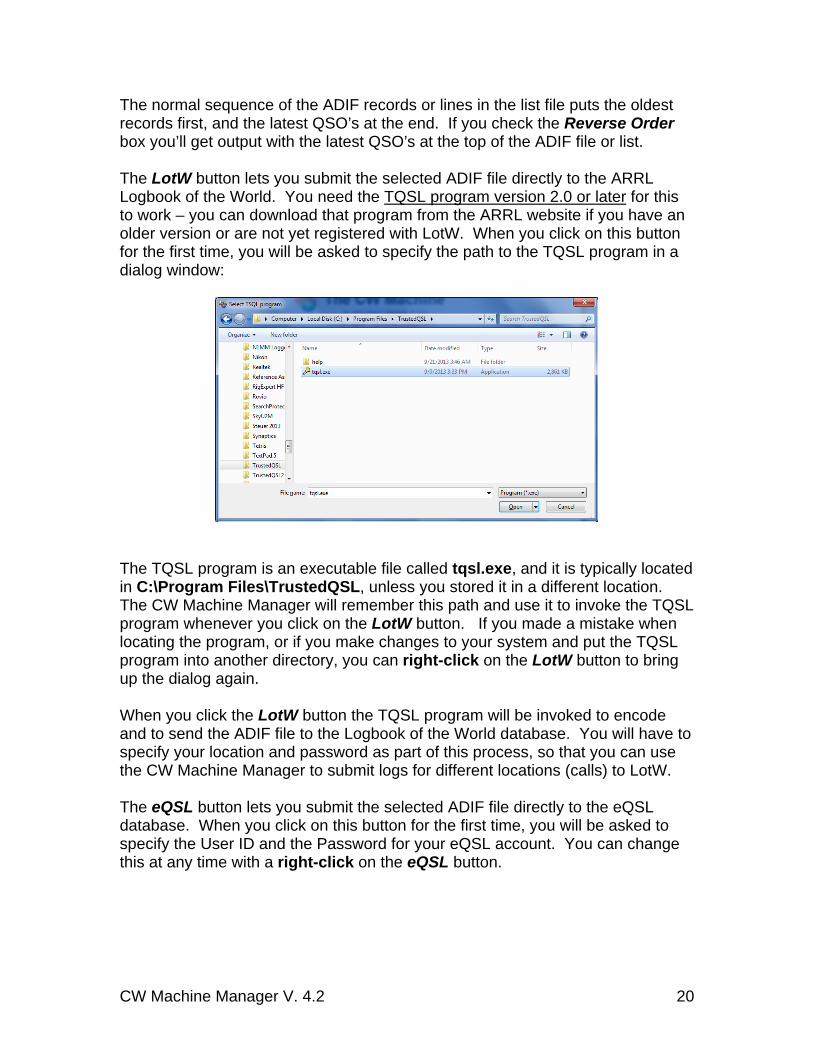
The normal sequence of the ADIF records or lines in the list file puts the oldest records first, and the latest QSO’s at the end. If you check the Reverse Order box you’ll get output with the latest QSO’s at the top of the ADIF file or list. The LotW button lets you submit the selected ADIF file directly to the ARRL Logbook of the World. You need the TQSL program version 2.0 or later for this to work – you can download that program from the ARRL website if you have an older version or are not yet registered with LotW. When you click on this button for the first time, you will be asked to specify the path to the TQSL program in a dialog window:
The TQSL program is an executable file called tqsl.exe, and it is typically located in C:\Program Files\TrustedQSL, unless you stored it in a different location. The CW Machine Manager will remember this path and use it to invoke the TQSL program whenever you click on the LotW button. If you made a mistake when locating the program, or if you make changes to your system and put the TQSL program into another directory, you can right-click on the LotW button to bring up the dialog again. When you click the LotW button the TQSL program will be invoked to encode and to send the ADIF file to the Logbook of the World database. You will have to specify your location and password as part of this process, so that you can use the CW Machine Manager to submit logs for different locations (calls) to LotW. The eQSL button lets you submit the selected ADIF file directly to the eQSL database. When you click on this button for the first time, you will be asked to specify the User ID and the Password for your eQSL account. You can change this at any time with a right-click on the eQSL button.
CW Machine Manager V. 4.2 20

The ADIF to Native Conversion section of the screen lets you select and edit ADIF files that were created by other programs or by the keyer itself and convert them to the native keyer format, so that they can be imported into the keyer with the Restore Log or the Append to Log buttons as explained above. If you click on the View ADIF File button or the Convert to Native button, a dialogue window will open that lets you select a file. Only files with an extension of .adi or .txt are shown in this selection since these are the typical file extensions for ADIF files.
If you clicked on the View ADIF File button and Open a file in this dialogue, it will be opened in Notepad, so you can edit it or just inspect it. If you clicked on the Convert to Native button and Open a file in this dialogue, a file with the name ~adifimport.cwm will be created in your log file directory. You will also receive a message that tells you how many log records were successfully converted and how many were rejected because they had formatting errors that couldn’t be resolved. If records were rejected, the relative record numbers of the first 100 faulty records will be displayed, too, so that you can take a closer look at the ADIF source and resolve possible problems. Records with a date before 1901 or after 2099 will be rejected. Only QSOs with an ADIF MODE tag of CW or SSB will be accepted. The conversion function lets you select many ADIF files, one after the other, and the conversion result for each ADIF file is appended to the ~adifimport.cwm file. This way you can select ADIF files from different sources and combine them into a single native-format file for importation.
CW Machine Manager V. 4.2 21
The Default User 2 option lets you specify that User 2, not User 1, should be assumed if the conversion process cannot make that determination. In the Users screen you should have defined a user profile with a call for user 1, probably user 2. If one of these two calls matches the call in the ADIF <STATION_CALLSIGN> tag (or the <OPERATOR> tag if there is no <STATION_CALLSIGN> tag in the input file), then the conversion mechanism will automatically assign the corresponding user designation. However, if your ADIF file doesn’t contain a < STATION_CALLSIGN > tag or <OPERATOR> tag, or the given operator call matches none of the calls in the current profile, then User 1 is assumed, unless you have checked Default User 2. The Contest option serves a similar purpose. If an ADIF record contains the serial number tags <SRX> and/or <STX>, the corresponding QSO is always flagged as a contest QSO. If neither of these tags is found, then you can still specify that all QSOs are contest QSOs by checking the Contest box. The CW Machine expects log records to be in ascending date/time sequence for the import process, i.e., the first records in the ADIF file represent the oldest QSO’s, and the latest QSO’s are at the end. If your favorite logging program exports the ADIF log records the other way around, with the latest QSO’s at the top, you should check the Reverse Order box; the conversion process will then reverse the order of records, so that they are in proper sequence for the CW Machine logger. After you have converted and combined all your ADIF files into that single ~adifimport.cwm file, which should be at the top of your file selection pull-down in the Native Log Files section, you import that file into the keyer by clicking on the Restore Log or the Append to Log button. At the completion of the import operation the ~adifimport.cwm file will be automatically deleted. You should never interrupt a data transfer to or from the keyer by moving the keyer joystick or touching a paddle that may be connected. This will lead to unpredictable results and can also lock up the CW Machine Manager. If you want to interrupt a data transfer you should click the Cancel button.
CW Machine Manager V. 4.2 22

The Terminal Screen The Terminal screen lets you monitor the transmission of the keyer and see information related to an ongoing QSO and to QSOs already in the log. It also implements a comfortable keyboard keyer function, and it can be used as a “mill” to record received text by typing it on your keyboard.
At the top of the screen is the Band selection that you already know from the Configuration Screen. The only difference here is that the information will be sent to the keyer as soon as you make a change, and there is no need to click an additional button. The same is true for the Mode pull-down, which corresponds to the SSB checkbox on the Configuration Screen and lets you instantly change between CW and SSB. The Hand Key checkbox let’s you instantly switch to a hand key (straight key, cootie key, mechanical bug), overriding the standard keying mode that you have selected on the Configuration Screen. That way you can connect a hand key and a paddle with a Y-connector to the CW Machine and quickly switch between the two. (this is identical to the <dm>H command sequence when you use a key to switch keying modes).
CW Machine Manager V. 4.2 23

A left mouse click on the Tune button causes a “key-down” for tuning purposes, a right mouse click sends a pulse train – both tuning modes are ended when you click on this button again. Also shown at the top is the Current User that you can toggle with the ‘/’ (forward slash) key on the numeric keypad. Toggling the user determines the call, name, and messages that are used by the keyer. If you click on the QSOs buttton at the top, an additional window will open and show you the most recent QSOs in the log in the same format that was shown as the List output on the Logbook screen. If the QSO list window is already open, clicking the button will bring it to the foreground. The QSO list window will automatically receive the focus, i.e. come to the foreground, if there is a change in the list, either by adding new QSOs or by editing a QSO. If you start sending with your paddle, the Terminal screen will automatically come to the foreground.
Unlike a list output file this list window is dynamic – new QSOs will automatically be added to the top of the list, and if you delete or edit a QSO the result will also be shown in the list. Initially the list window will show the 20 most recent QSOs, and new QSOs will be added at the top, making the list grow. If you edit or delete QSOs, or you navigate away from the Terminal screen and then come back, the list will be refreshed and the last 20 QSOs will be shown again. If you double-click anywhere on a line in the list, this is equivalent to entering the call on the Terminal screen and clicking on the Check Call button, as described further down. In the above screen shot, if you double-click on third line, the QSO with OK1FJS will be found. You can then edit this QSO by clicking on the Scroll/Edit button as described further down. If you click on the grey frame surrounding the QSO list, the Terminal screen will be brought back into the foreground. This is for situations where you maximize both, the Terminal window and the QSO list, and want a simple way to switch between the two. The CW Machine Manager switches automatically between the Terminal screen and the QSO List screen, so in most cases you do not have to switch explicitly. The Speed slider on the Terminal screen is an alternative to using the speed potentiometer on the device, and it covers the full range from 5wpm on the left to
CW Machine Manager V. 4.2 24

75wpm on the right. When you move the potentiometer, the speed slider will move, too. However, once you use the slider to adjust the speed, the potentiometer will be disabled and only the slider will work from then on. To restore the potentiometer back to operation you have click on the word Speed: to the left of the slider or the speed number displayed at the top of the screen, or move the joystick on the CW Machine left or right. Most of the Terminal screen is taken up by two text boxes, the Monitor box at the top, and the Transmit Buffer box further down. One of the boxes has a light-yellow background, and you can control where that colored background is by either left-clicking with your mouse on the desired box, or by using the caps lock key on your keyboard to switch that background color from one box to the other. When you type characters on your keyboard they will be shown in the box with the yellow background. This lets you use the CW Machine as a comfortable CW keyboard (Transmit Buffer box is yellow) or a “mill” to record received text (Monitor box is yellow). The + and – buttons to the right of the Monitor box let you adjust the font size. Alternatively, a left mouse click while holding the Shift key on either the Monitor box or the Transmit Buffer box will increase the font size in both boxes one step with every Shift-click. If you hold the Ctrl key when clicking, the font size will be decreased. If you hold the Alt key when clicking, the font will be reset to the original size. The Monitor box always shows the character stream that is being sent by the keyer. When you use the CW Machine Manager as a “mill”, you can also enter the received text, so that the Monitor box shows both sides of the QSO. The program automatically inserts blank lines between that you sent and text that you copy with the mill. The Monitor box is virtually endless and it will scroll down as new characters are being sent or entered. The Clear button lets you clear the text box. The Save button will save the contents of the text box, with a time stamp, to a file in the Audit directory underneath the CW Machine directory on your hard disk. That file has a name like cwm[YYYYY].txt where [YYYY] is the current year in UTC time. This save operation is also automatically performed when you close the program. That way the annual audit file contains a record of all your transmissions throughout the year, and, if you use the mill function, it contains both sides of all QSOs. The Review button opens a list of previously saved audit files which you can open for review. A right-click on the Save button will open a scratch pad text file called CWMNotes.txt, which you can use to record anything you want to remember. The Scroll / Edit button scrolls back in the log one QSO at a time in Edit Mode, showing the QSO information in the Call / Info lines in the QSO Info frame on the screen. You can change the QSO information if required. If you click on
CW Machine Manager V. 4.2 25

Scroll / Edit while a match condition exists, i.e., you have searched for a previous QSO by call sign with the Check Call button or the <Ctrl-Enter> key combination as explained below, and a previous QSO was found, then this previous QSO will be edited when you click on Scroll / Edit. This way you can edit a QSO far back in the log by looking for the call sign, without repeated use of the Scroll / Edit button to find it. To leave edit mode, storing possible modifications in the QSO record, you have to click on the Save QSO button. While you are in edit mode, there is a red frame around this button as a reminder. In edit mode you can change the call, name, QTH, reports, and the band of a previously stored QSO, and the received serial number for contest QSOs. If you change the band in edit mode, e.g. using the pull down selection at the top of the screen or the <dm> pseudo prosign of the keyer, only the record that is currently being edited is affected – the band selection for new QSOs will remain unchanged. If you are not in Edit mode, the Previous QSO button is visible if you have information in the QSO Info frame, i.e., a QSO is in progress or you have searched for QSO information. Clicking on this button lets you scroll back in the log showing previous QSOs with this station. (this is the situation shown in the screen snapshot) If there is no information in the QSO Info frame the caption on the Previous QSO button will change to Delete Last QSO. Clicking on Delete Last QSO will delete the most recent QSO in the log. If you delete a QSO by mistake, a right-click on this button (or, if you like keyboard shortcuts: Alt-U) will undelete that QSO or several QSOs if you right-click (or Alt-U) multiple times. If you are in Edit mode the caption of the button will change to Delete QSO. Clicking on Delete QSO will flag the QSO that you currently see in the QSO Info frame as deleted by changing the first character in the call to a special flag character which is shown as a “-“ minus sign when you scroll back to that QSO. A right-click on this button will remove the “deleted” flag. QSOs which are flagged as deleted are still in memory, and they are included in your QSO count, but they will not be shown in lists or in ADIF output – the only way to see them is by scrolling back through the log in Edit mode. If a call is being shown the QSO Info frame, either as the result of a current QSO or because you checked this call or scrolled back in the log, a click on the Call button will display information about this call from a search engine. The default search engine is QRZ.COM – in other words, if N2DE is shown as the call and you click on the Call button, your standard web browser will start and show you the search result for N2DE on QRZ.COM. In order to see address information and other details, you have to be registered on QRZ.COM and be logged in – registration is free and well worth the effort. The command line for the search engine can be changed by a right-click on the Call button, but, unless you have sufficient technical know how, just leave the default setting for QRZ.COM.
CW Machine Manager V. 4.2 26

The CW Machine Manager uses a country list, described in Appendix A, to determine the country whenever a call is shown in the QSO Info frame. The ± button (keyboard shortcut Alt-+) at the upper right corner of the QSO Info frame lets you attach notes to a particular call which will be shown instead of the country. If you click on the button, an input line opens:
You can enter up to 40 characters which will be associated with the current call and shown instead of the country. If the text contains an ampersand (&) it must be doubled (&&). You store this information by just hitting the Enter key on your keyboard, or by clicking on the +-button again, or by clicking somewhere else on the screen. If you want to delete a note, just click on the +-button and completely erase the note – as a result the country will be shown again for this call. The notes are kept in a file which is further explained in Appendix B. The Terminal screen not only shows what the keyer is sending if you are using a paddle or hand key, but it also lets you use your Windows keyboard to send text and control the keyer’s logging functions. If you want to use the CW Machine Manager as a keyboard keyer, click on the Transmit Buffer box if it does not already have the yellow background, so that it shows the characters that you type. The HotKey checkbox near the Send Message button controls whether text is sent immediately to the CW Machine device as you are typing it in, or whether you can prepare it at leisure and send it by clicking on the Send Message button or hitting <Enter>. Sending text immediately is similar to the mode that a directly attached keyboard uses; if the CW Machine is not in silent mode (“On the Air”), characters are transmitted as they are typed for a fast “question and answer” style of operation; if the CW Machine is in silent mode, characters are just put into the device’s internal buffer. If you don’t use HotKey mode, you can prepare your response while the other station is transmitting. In actual operation you will probably switch between both modes by checking and un-checking the HotKey checkbox. You can also toggle HotKey mode using the <Alt- Ctrl> key combination on your keyboard to check and un-check the box. If your keyboard creates special national characters, the CW Machine keyer will support them if a corresponding Morse character exists. All letters will be translated to upper case before they are sent to the CW Machine keyer; so there is no need to use the Shift keys.
CW Machine Manager V. 4.2 27
Several keys are used to create the operational prosigns: The ‘*’ character will be sent as ---- , the international character for CH. The “=” is sent as the prosign <bt> The “+” is sent as the prosign <ar> The “#” is sent as the prosign <sk> (does not store the log record !) The “>” is sent as the prosign <bk> The “(“ is sent as the prosign <kn> The “%” is sent as the prosign <ka> The “&” is sent as the prosign <as> The “^” is sent as the prosign <ve>
The numeric keypad on your Windows keyboard works similar to a
numeric keypad that is directly attached to the CW Machine keyer, but there are some important differences which simplify operation on a laptop without a separate numeric keypad. On such a machine you would normally use the number keys on the keyboard side to enter reports or a contest serial number. The keys of an “embedded” keypad (usually activated with an “Fn” key), however, must be used to start messages and perform other keypad functions. Also, unlike with a directly attached keyboard, the <NumLock> key does not toggle silent mode; this function is done by the ESC key on the keyboard side. If your Windows keyboard does not have a separate or an embedded numeric keypad, the CW Machine Manager can simulate the numeric keypad keys, as described further down.
The numbers on the numeric keypad, <0> through <9>, start predefined messages which are loaded into the keyer through a settings file or as part of a profile through the Users screen.
The <Ctrl-Enter> key combination is used to enter a call into the keyer (this can also be done by <Enter> if the HotKey function is enabled). If the Log Search function is enabled on the Configuration screen, or keying is off, the log is searched for a previous QSO with this station. If a duplicate is found, the QSO information of the previous QSO will be shown on the keyer’s LCD screen and in the QSO Info frame on the Terminal screen. The Check Call button on the Terminal screen performs the same function. The “call” to be checked is the last word that you typed, either into the Transmit Buffer or the Monitor box.
CW Machine Manager V. 4.2 28

The <+> key on the numeric keypad, possibly prefixed with the <*> key, is used to store the name, the QTH, or other information in the keyer log. In contest mode this is normally not the name but some information like a state or grid square. Therefore, in contest mode, the information entered with the <+> key will always be shown as an ADIF COMMENT when you export the log in ADIF format. In non-contest mode the <+> key can enter two items in “round robin” fashion, normally the name and the QTH. Anything starting with a letter is treated as a name (first item), or the QTH (second item). A leading ‘/’ (forward slash) signifies QSL_VIA, and a leading “:” (colon) indicates a COMMENT. An ‘_’ (underscore) in the name or QTH will be displayed as a space. If you enter a “=” (the prosign <bt>) for the name or QTH, the entry will remain unchanged and the “round robin” advances to the next item. If you enter a “?” (question mark) for the name or QTH the corresponding item will be removed from the log record. The call and these two items are stored in a single field in the log record that can hold a maximum of 27 characters, including the two separator characters between call, name, and QTH. The call can have a maximum of 13 characters and must be present for a valid QSO. The name and QTH are optional and can be any length up to a combined length of 27 characters.
The <NumLock> key on the numeric keypad is used for SSB QSOs to
enter the sent RS report into the logbook entry. On the Terminal screen the cursor will jump into the normally invisible field Sent RS. You can enter the report and complete the entry by hitting the <Enter> key. Reports that don’t have a valid format will not be accepted. You can clear the field with the <-> (minus) key on the numeric keypad.
The </> key on the numeric keypad, in non-contest mode, switches between users 1 and 2 of the keyer. In contest mode, however, it is used to enter the received serial number. On the Terminal screen the cursor will jump into the normally invisible field Serial #. You can enter a serial number up to 6 digits and complete the entry by hitting the <Enter> key. You can clear the field with the <-> (minus) key on the numeric keypad.
The <*> key on the numeric keypad is used to enter the received RS(T) report into the logbook entry. On the Terminal screen the cursor will jump into the normally invisible field Recvd RST (or Recvd RS in SSB mode). You can enter the report and complete the entry by hitting the <Enter> key. Reports that don’t have a valid format will not be accepted. You can clear the field with the <-> (minus) key on the numeric keypad.
CW Machine Manager V. 4.2 29

In addition to the function of entering the received RS(T), the ‘*’ key has additional functions to control the logging functions if it is succeeded by other keys:
if you press the <*> key twice in succession, this will reset the round robin pointer which determines whether information entered with the <+> key is treated as the name or the QTH. (see description of the <+> key) After the <*><*> key combination the round robin will be repositioned on the name. This is for situations where you used the<+> key several times during a QSO and lost track of the round robin position.
if you follow the <*> key with the </> key, i.e., you enter <*></> in succession, the round robin for information entry will be positioned on the QTH.
if you follow the <*> key with the <+> key, i.e., you enter <*><+> in succession, the last two words in the Morse buffer will be entered as one piece of information. So you can enter names like Jean Pierre or QTHs like Santa Fe (see description of the <+> key)
if you follow the <*>key with the <.>Key, i.e., you enter <*><.> In succession, the current time will be inserted into the log record as the QSO start time. This is identical to the \T command in messages. This is for situations where you may have entered the call of the other station, e.g. that rare DX, long before you actually had a chance to start the QSO.
The <-> key on the numeric keypad is used to interrupt a message that is being transmitted and clear the call and QSO information from the keyer memory. When you are entering reports or a serial number, this key will clear the data entry field so that you can correct mistakes.
The <.> (decimal point) key on the numeric keypad in CW mode sends your own call or stops and resumes a messages. In SSB mode it starts a 10 minute id timer.
The Esc key on the keyboard, in CW mode, toggles silent mode of the keyer. As long as keying is active, i.e., silent mode is off, you will see the large “On the Air” in the upper left corner of this screen.
CW Machine Manager V. 4.2 30
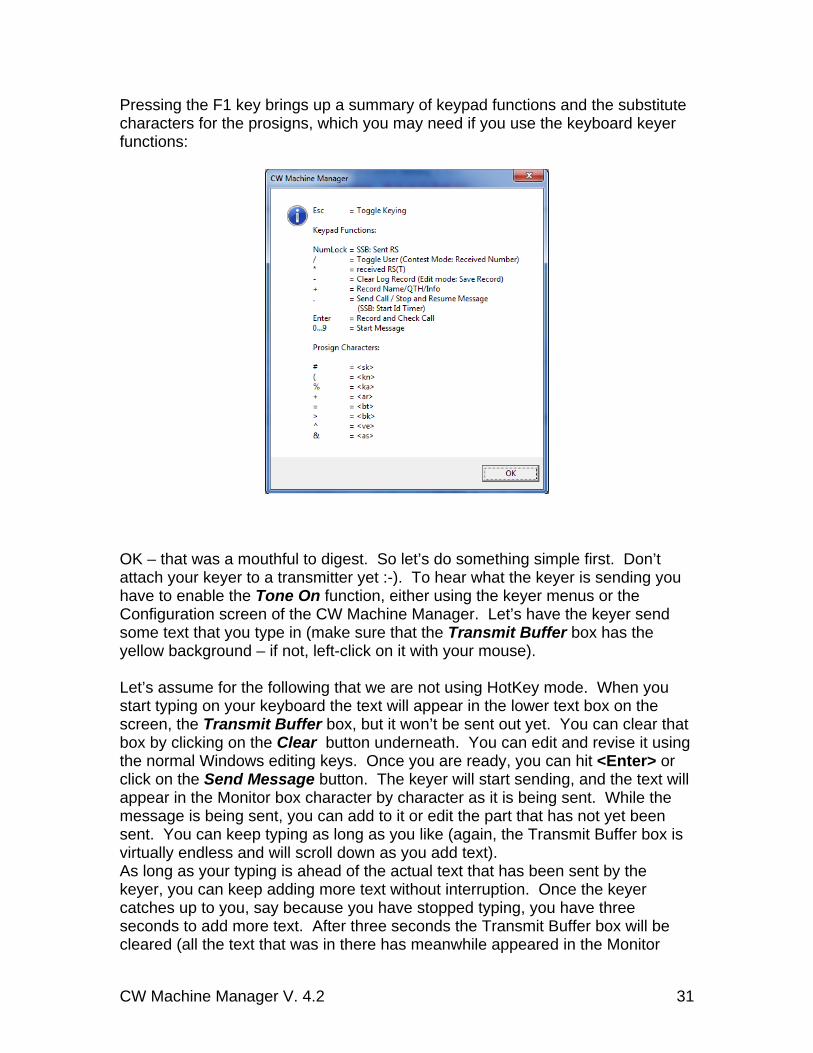
Pressing the F1 key brings up a summary of keypad functions and the substitute characters for the prosigns, which you may need if you use the keyboard keyer functions:
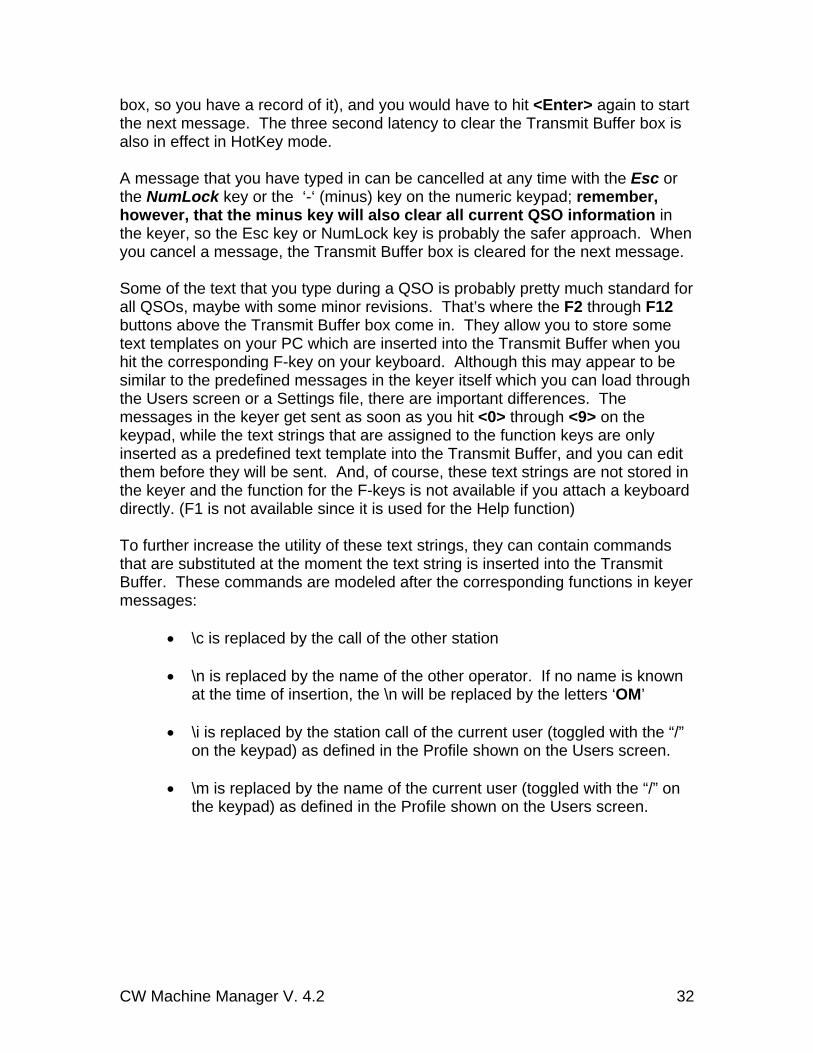
OK – that was a mouthful to digest. So let’s do something simple first. Don’t attach your keyer to a transmitter yet :-). To hear what the keyer is sending you have to enable the Tone On function, either using the keyer menus or the Configuration screen of the CW Machine Manager. Let’s have the keyer send some text that you type in (make sure that the Transmit Buffer box has the yellow background – if not, left-click on it with your mouse). Let’s assume for the following that we are not using HotKey mode. When you start typing on your keyboard the text will appear in the lower text box on the screen, the Transmit Buffer box, but it won’t be sent out yet. You can clear that box by clicking on the Clear button underneath. You can edit and revise it using the normal Windows editing keys. Once you are ready, you can hit <Enter> or click on the Send Message button. The keyer will start sending, and the text will appear in the Monitor box character by character as it is being sent. While the message is being sent, you can add to it or edit the part that has not yet been sent. You can keep typing as long as you like (again, the Transmit Buffer box is virtually endless and will scroll down as you add text). As long as your typing is ahead of the actual text that has been sent by the keyer, you can keep adding more text without interruption. Once the keyer catches up to you, say because you have stopped typing, you have three seconds to add more text. After three seconds the Transmit Buffer box will be cleared (all the text that was in there has meanwhile appeared in the Monitor
CW Machine Manager V. 4.2 31
box, so you have a record of it), and you would have to hit <Enter> again to start the next message. The three second latency to clear the Transmit Buffer box is also in effect in HotKey mode. A message that you have typed in can be cancelled at any time with the Esc or the NumLock key or the ‘-‘ (minus) key on the numeric keypad; remember, however, that the minus key will also clear all current QSO information in the keyer, so the Esc key or NumLock key is probably the safer approach. When you cancel a message, the Transmit Buffer box is cleared for the next message. Some of the text that you type during a QSO is probably pretty much standard for all QSOs, maybe with some minor revisions. That’s where the F2 through F12 buttons above the Transmit Buffer box come in. They allow you to store some text templates on your PC which are inserted into the Transmit Buffer when you hit the corresponding F-key on your keyboard. Although this may appear to be similar to the predefined messages in the keyer itself which you can load through the Users screen or a Settings file, there are important differences. The messages in the keyer get sent as soon as you hit <0> through <9> on the keypad, while the text strings that are assigned to the function keys are only inserted as a predefined text template into the Transmit Buffer, and you can edit them before they will be sent. And, of course, these text strings are not stored in the keyer and the function for the F-keys is not available if you attach a keyboard directly. (F1 is not available since it is used for the Help function) To further increase the utility of these text strings, they can contain commands that are substituted at the moment the text string is inserted into the Transmit Buffer. These commands are modeled after the corresponding functions in keyer messages:
\c is replaced by the call of the other station
\n is replaced by the name of the other operator. If no name is known
at the time of insertion, the \n will be replaced by the letters ‘OM’
\i is replaced by the station call of the current user (toggled with the “/” on the keypad) as defined in the Profile shown on the Users screen.
\m is replaced by the name of the current user (toggled with the “/” on the keypad) as defined in the Profile shown on the Users screen.
CW Machine Manager V. 4.2 32

An assignment for the F2 key that you can define by clicking on the F2 button might look like this:
When you press the F2 key this text will be inserted. Since it contains the command \N, the name of the other operator will automatically be inserted at that point. The F keys don’t have the “intelligence” of the messages that are stored in the keyer itself. Therefore, the preferred method for recorded messages often is to store them in the keyer and to activate them with keys on the numeric keypad – however, messages in the keyer cannot be altered as easily “in flight”, and you should experiment which method best suits your needs.
CW Machine Manager V. 4.2 33
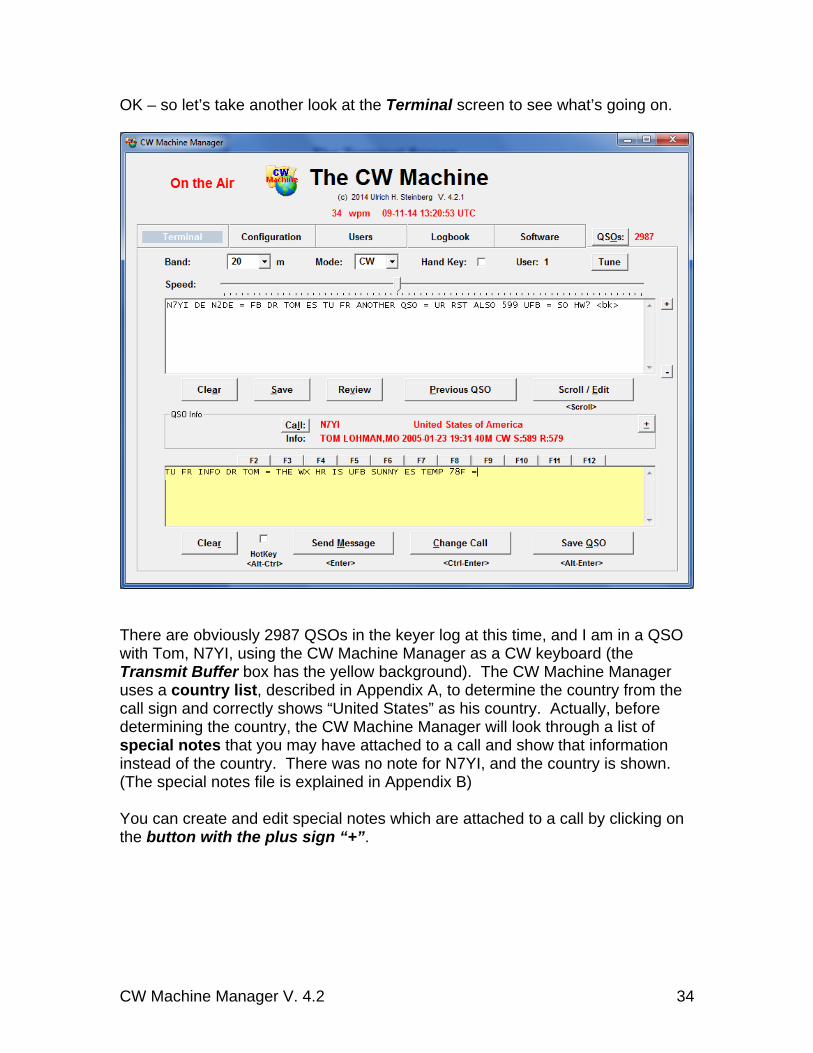
OK – so let’s take another look at the Terminal screen to see what’s going on.
There are obviously 2987 QSOs in the keyer log at this time, and I am in a QSO with Tom, N7YI, using the CW Machine Manager as a CW keyboard (the Transmit Buffer box has the yellow background). The CW Machine Manager uses a country list, described in Appendix A, to determine the country from the call sign and correctly shows “United States” as his country. Actually, before determining the country, the CW Machine Manager will look through a list of special notes that you may have attached to a call and show that information instead of the country. There was no note for N7YI, and the country is shown. (The special notes file is explained in Appendix B) You can create and edit special notes which are attached to a call by clicking on the button with the plus sign “+”.
CW Machine Manager V. 4.2 34

The last QSO with Tom that is in the log was on January 23, 2005 at 19:31 UTC on 40m CW. I could cycle through all previous QSOs with Tom by clicking on the Previous QSO button. This is what happened:
I called CQ (not visible on the screen because I erased that part) and Tom responded, giving me a 599 report.
I entered his call N7YI into the Transmit Buffer box using my keyboard and hit <Ctrl-Enter>. This sent the call to the CW Machine, it found the previous QSO in the log, and it returned his name and the date of the previous QSO to this screen.
I responded to Tom with the text that is shown in the Monitor box.
While I listen to his transmission I am preparing my response. I used the F2 key with the text assignment shown above, and you can see that the command \N was replaced with the name “TOM”. As soon as I hit <Enter> this response will be sent.
For text that doesn’t need to be edited before it goes out you will probably use the keyer functions for the <0> … <9> keys on the keypad. A typical example is “N7YI DE N2DE kn”, which would be stored as “\C DE \I (” in the keyer as a message through the Users screen or a users file. The weather report obviously is something that changes, and therefore it was assigned to the F2 key so that it can be edited before it goes out. Actually, once you are an advanced user, you can mix the functionality of text that you type in and the canned messages that are invoked by the number keys on the keypad: Assume that you type in some text and you use HotKey mode or start the transmission as described above with <Enter>, and, while the keyer is busy transmitting, you append some text that contains number keys on the numeric keypad. When the keyer encounters a number key in your typed message, the corresponding pre-recorded message will be inserted at that point. Conversely, if a recorded message that is assigned to one of the number keys on the keypad is being sent, you can already prepare and submit (HotKey mode or <Enter>) some additional text that will automatically start as soon as the recorded message ends or reaches a \B command. A recorded message will automatically resume after the \B when all the text that you sent has been transmitted, effectively embedding your typed text into the recorded message.
CW Machine Manager V. 4.2 35

Simulating a Numeric Keypad Many functions of the CW Machine are controlled by keys on the numeric keypad, either a keypad that is attached directly to the CW Machine device or a keypad that is part of your Windows keyboard. Many operators prefer the directly attached keypad and position it close to their key, where it can be operated with “the other” hand. In some situations, however, carrying the numeric keypad along may be inconvenient. Larger laptop computers often have a separate numeric keypad. Smaller laptops often have a keypad that is embedded into the keyboard and activated by a function key. But some Win8 Bluetooth keyboards, or the keyboards of the Apple Mac laptops, don’t have numeric keypads. For these situations the CW Machine Manager has a function to simulate the keypad keys using “normal” keys on the keyboard. If you hold down the Ctrl key on your keyboard, then pressing the following keys will perform the functions of keys on a numeric keypad (the location references refer to the layout of a US keyboard):
- Number keys 1,2,…, 0 in the top row simulate the corresponding number keys on the keypad
- The minus key in the top row, next to the 0, simulates the minus key on the keypad,
- The = key in the top row, next to the minus key, simulates the plus key on the keypad.
- The semicolon key, to the right of the L key, simulates the * on the keypad - The point key, two keys to the right of the M key in the bottom row,
simulates the decimal point on the keypad. - The forward slash key, next to the point key in the bottom row, simulates
the forward slash (division) key on the keypad. - The backward slash key, three keys to the right of the P key, simulates the
Esc key on a keyboard (to toggle quiet mode)
You can also toggle a “lock” for the keypad simulation by pressing Ctrl-Space. While this function is active, you’ll see a red Keypad label on the screen, and you won’t have to hold the Ctrl key to simulate the keypad. However, if you are using the “mill” function or the keyboard keyer function, make sure that you toggle the keypad lock off before you start typing! Otherwise you may inadvertently activate the simulated keypad functions with unintended consequences. The keypad “lock” state will be saved and restored when you start the CW Machine Manager the next time.
CW Machine Manager V. 4.2 36

Synchronizing the CW Machine and a Radio You can connect the CW Machine as an external keyer to all radios which support straight keys.. (bypassing any internal keyer that the radio may have) But some functions can be greatly simplified by an automatic information exchange between the CW Machine and a radio that can be controlled by software. At this time the CW Machine Manager only supports connectivity to the Elecraft K3 and KX3 radios, but other radios may be added later. The radio will signal the band and the mode (CW/SSB) to the CW Machine, and the CW Machine will enable and disable transmitter output as required. The logger in the CW Machine needs to know the band and the mode, and in some situations, e.g. when you add or modify information in a log record, you want to use your paddle without transmitting (“quiet mode”). These functions are accomplished seamlessly through the CW Machine Manager. Your radio has to be connected through a serial connection to your computer – so there will be two serial connections, one for the CW Machine device and one for the radio. In order to connect to a radio, you go to the Software screen and click on the Radio Connection button. This opens a small Window:
At he top you select the radio type – the only choices at this time are the Elecraft KX3 and K3. You have to know the port and the baud rate that your radio uses to “talk” to the computer! You select the port and the baud rate with the other two pull-downs and then click on the Connect button. If you get a
CW Machine Manager V. 4.2 37

Connection Failed message your choice for the port and/or baud rate was probably incorrect and you can just try again with some other combination. If all goes well, you should get:
If you check the Auto Connect box, the CW Machine Manager will automatically try to connect to the radio, using the same selections, when it is started the next time, and you won’t have to go to this screen at all. You should click on the Close button to close this window. You can redisplay it at any time by clicking on the Radio Connection button of the Software screen. You can connect to a different radio by first Disconnecting from the current radio and then Connecting to the new one. The CW Machine Manager program is now connected to the CW Machine device and to the radio, and it acts as a conduit for information between the two. If you change the band or the mode on your radio, these changes will be reflected in the CW Machine Manager and they will be signaled to the CW Machine device. (remember that the CW Machine logger only supports CW and SSB, so any mode other than CW would be recorded as SSB) If you toggle quiet mode (“off the air”) for the CW Machine, e.g., with the NumLock key on the keypad, the transmitter output of the radio will be disabled. As long as you are connected to a radio, all functions to change the band or mode with the CW Machine Manager or with the joystick or the <dm> pseudo-prosign are disabled. The controls on your radio determine these settings.
CW Machine Manager V. 4.2 38

Appendix A: Editing The Country List The CW Machine Manager uses a country list to determine the country from a call sign. This list is just a text file, called countries.txt, in your CW Machine folder (usually C:\Program Files\CW Machine). A section of this text file looks like this:
OEZZ Austria OJZZ Finland OLZZ Czech Republic OMZZ Slovak Republic OTZZ Belgium OZZZ Denmark P1ZZ unknown country P2ZZ Papua New Guinea P3ZZ Cyprus P4ZZ Aruba P9ZZ North Korea
The first four characters of each line are matched, left to right, against the first four characters of a call. The list is sorted in ascending alphabetical order and searched down from the beginning. When a line is found where the first four letters are equal or higher in alphabetical order compared to the call sign, the search stops and the country is taken from that line. If, e.g., the call sign is OM3TP the CW Machine Manager scans the list using OM3T as the matching criteria. The line starting with OLZZ is still alphabetically before OM3T, but the line starting with OMZZ is alphabetically higher, and the result is that the country is determined as “Slovak Republic”. You also see in the section above that Denmark has all call signs starting with OZ; there is no country that has a call sign starting with P1, but P2 calls are from Papua New Guinea. You can edit (carefully!) the list as required. Please remember that numerals (0…9) are before letters (A…Z) in the sort sequence, and the prefixes have to be in ascending order. If the country name contains an ampersand (&), it has to be doubled (&&). The country name can contain a maximum of 40 characters, and any characters beyond that limit are ignored. If you modify the list, you have to restart the CW Machine Manager program because the list is read into memory only once when the program starts. The CW Machine Manager will issue an error message if it detects an error in the sort sequence while it reads the file, and you should correct these errors for proper operation of the lookup algorithm.
CW Machine Manager V. 4.2 39
CW Machine Manager V. 4.2 40
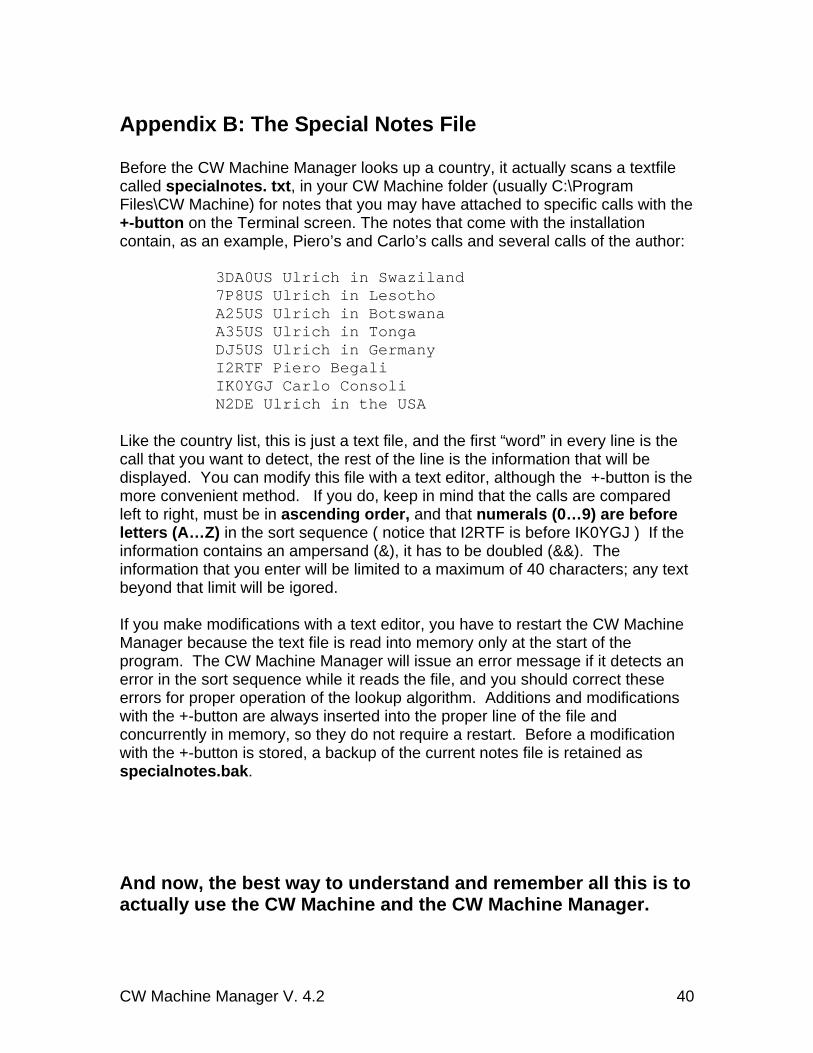
Appendix B: The Special Notes File Before the CW Machine Manager looks up a country, it actually scans a textfile called specialnotes. txt, in your CW Machine folder (usually C:\Program Files\CW Machine) for notes that you may have attached to specific calls with the +-button on the Terminal screen. The notes that come with the installation contain, as an example, Piero’s and Carlo’s calls and several calls of the author:
3DA0US Ulrich in Swaziland 7P8US Ulrich in Lesotho A25US Ulrich in Botswana A35US Ulrich in Tonga DJ5US Ulrich in Germany I2RTF Piero Begali IK0YGJ Carlo Consoli N2DE Ulrich in the USA
Like the country list, this is just a text file, and the first “word” in every line is the call that you want to detect, the rest of the line is the information that will be displayed. You can modify this file with a text editor, although the +-button is the more convenient method. If you do, keep in mind that the calls are compared left to right, must be in ascending order, and that numerals (0…9) are before letters (A…Z) in the sort sequence ( notice that I2RTF is before IK0YGJ ) If the information contains an ampersand (&), it has to be doubled (&&). The information that you enter will be limited to a maximum of 40 characters; any text beyond that limit will be igored. If you make modifications with a text editor, you have to restart the CW Machine Manager because the text file is read into memory only at the start of the program. The CW Machine Manager will issue an error message if it detects an error in the sort sequence while it reads the file, and you should correct these errors for proper operation of the lookup algorithm. Additions and modifications with the +-button are always inserted into the proper line of the file and concurrently in memory, so they do not require a restart. Before a modification with the +-button is stored, a backup of the current notes file is retained as specialnotes.bak. And now, the best way to understand and remember all this is to actually use the CW Machine and the CW Machine Manager.
Related Documents