^ v-H /5o THE 4-H HORSE PROJECT PNW 587 A PACIFIC NORTHWEST EXTENSION PUBLICATION OREGON STATE UNIVERSITY * WASHINGTON STATE UNIVERSITY * UNIVERSITY OF IDAHO THIS PUBLICATION IS OUT OF DATE. For most current information: http://extension.oregonstate.edu/catalog

Welcome message from author
This document is posted to help you gain knowledge. Please leave a comment to let me know what you think about it! Share it to your friends and learn new things together.
Transcript
^ v-H /5o
THE 4-H HORSE PROJECT
PNW 587
A PACIFIC NORTHWEST EXTENSION PUBLICATION
OREGON STATE UNIVERSITY * WASHINGTON STATE UNIVERSITY * UNIVERSITY OF IDAHO
THIS P
UBLICATIO
N IS O
UT OF D
ATE.
For mos
t curr
ent in
formati
on:
http:/
/exten
sion.o
regon
state.
edu/c
atalog

0
Introducing the 4-H Horse Project 1
THE HORSE 3 Breeds 4 Colors and Markings 15 Parts of the Horse 17 Horse Psychology and Behavior 19 Choosing a Horse 22
THE HORSE'S HEALTH 25 The Normal Horse 26 First Aid and When to Call
the Veterinarian 27 Diseases 31 Parasites 35 The Equine Hoof 41 Equine Teeth 44
CARE ANP MANAGEMENT OF THE HORSE 47 Basic Handling and Safety 48 Facilities 52 Feed and Nutrition 60 Grooming 69 Weather and Your Horse 77 Trailers, Loading, and Hauling 80 Raising a Foal 82
TACK AND EQUIPMENT SS Care of Tack 86 General Tack and Equipment 87 Western Tack 95 Hunt Seat Tack 100 Saddle Seat Tack 104
RIDING ANP SHOWING 105 Ethics and Etiquette 106 Choosing a Qualified Riding
Instructor/Trainer 108 Showmanship 110 Performance 117 Western Games 139 Pleasure Trail Riding
and Camping 141
GLOSSARY 145
AMITIONAI RESOURCES 147 THIS
PUBLIC
ATION IS
OUT O
F DATE.
For mos
t curr
ent in
formati
on:
http:/
/exten
sion.o
regon
state.
edu/c
atalog

taMMco© « &>$ Ktas \Pmsm Many people, young and old, are
discovering the satisfaction and pleasure that horses can bring them. The 4-H Horse Project can be an exciting and worthwhile experience for both you and your horse. To be a 4-H Horse Club member, you must first enroll in 4-H in your county.
In addition to the 4-H goals for youth, the 4-H Horse Project has six main objectives:
1. Learn to know and select a good saddle horse
2. Learn to care for horses properly 3. Learn to ride 4. Learn to train and handle horses 5. Acquire a broad equine knowledge base 6. Enjoy a healthy outdoor recreational
activity
A 4-H Horse Project animal may be a horse, pony, mule, or donkey, which you may ride, drive, or train. Stallions over 12 months of age are not allowed as a 4-H project. 4-H uses the industry standard of January 1 as a horse's birthdate to determine age.
If you don't have a horse, you may belong to a 4-H Horse Science club or join as a horseless member. With these options, you can learn about horses, compete in all activities that do not require horses, and work with other youth on horse-related subjects.
You may own, share, borrow, or lease your project animal. (Refer to PNW 574, the 4-H Horse Contest Guide, for project animal guidelines.) In any case, you should be the one who is responsible for your horse's primary care and management. This is your project animal,
and you need to be doing the work! If you board your horse, know what and how much it gets fed. Know what vaccinations it receives and what its deworming schedule is. Observe its foot care. Take on as much of the responsibility of caring for the horse as you can.
If you're a younger or inexperienced member, you may need help training your horse. Even older, experienced members need assistance from time to time. Remember, though, that this is your project, so do as much of the training and prelparation for shows as you can.
There are many activities in the 4-H Horse Project. You may show your horse in a variety of classes: showmanship, English equitation, Western equitation, trail, dressage, driving, and jumping. Western Gaming events include Barrels, Figure Eight Stake Race, Key Race, Pole Bending, and Flag Races. You can show a young horse in Ground Training, and some counties offer First Year Under Saddle, In-Hand Trail, or Ranch Horse classes.
In addition to showing your horse, you may take part in judging, hippology, horse bowl, presentations, and public speaking contests. Some members may wish to participate in clubs that mostly do pleasure riding, trail riding, or horse camping.
Keeping accurate records is also an important aspect of the 4-H Horse Project.
No matter which activities you choose, you'll find the 4-H Horse Project a challenge and a chance to learn-by-doing in all aspects of horsemanship.
THE 4hln} ISORSE PROJECT
THIS P
UBLICATIO
N IS O
UT OF D
ATE.
For mos
t curr
ent in
formati
on:
http:/
/exten
sion.o
regon
state.
edu/c
atalog

THE M HORSE PROJECT
THIS P
UBLICATIO
N IS O
UT OF D
ATE.
For mos
t curr
ent in
formati
on:
http:/
/exten
sion.o
regon
state.
edu/c
atalog
Ute Cta
THE 4=110 CiloRSE IPROJIECT
THIS P
UBLICATIO
N IS O
UT OF D
ATE.
For mos
t curr
ent in
formati
on:
http:/
/exten
sion.o
regon
state.
edu/c
atalog
BRIIN There are many breeds of horses. Following are brief
descriptions of some of the more common or notable breeds. For more information, visit one of the many websites on horse breeds.
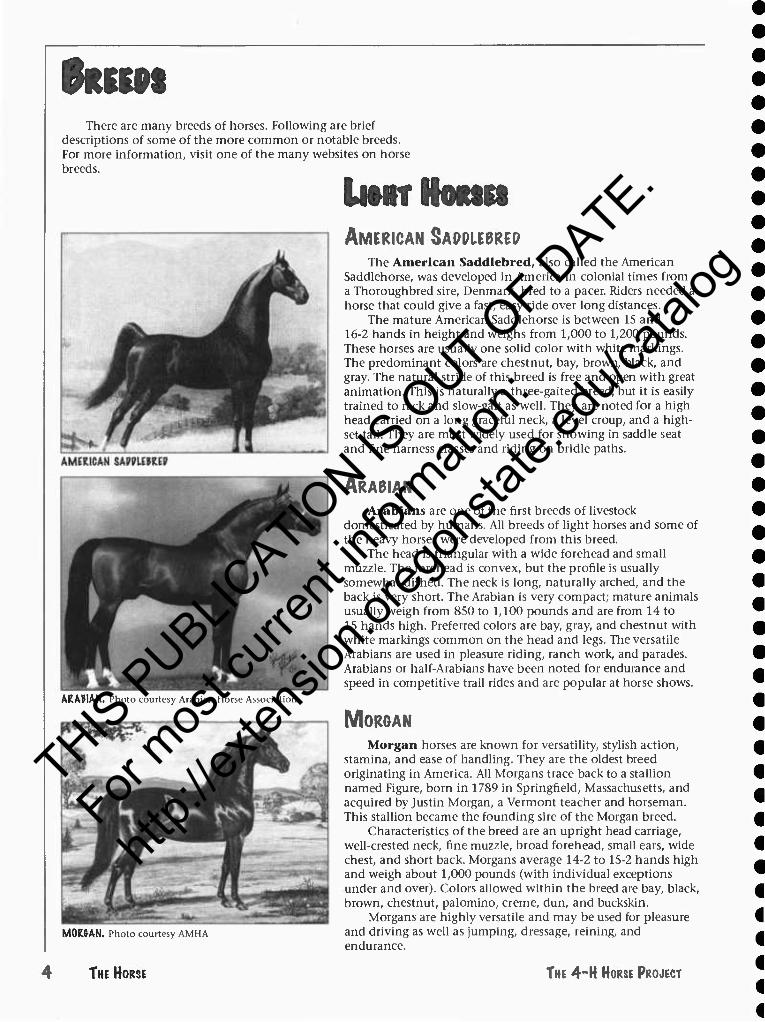
ARABIAN. Photo courtesy Arabian Horse Association
MORGAN. Photo courtesy AMHA
IwttrHoMn AMERICAN SAPPUBRED
The American Saddlebred, also called the American Saddlehorse, was developed in America in colonial times from a Thoroughbred sire, Denmark, bred to a pacer. Riders needed a horse that could give a fast, easy ride over long distances.
The mature American Saddlehorse is between 15 and 16-2 hands in height and weighs from 1,000 to 1,200 pounds. These horses are usually one solid color with white markings. The predominant colors are chestnut, bay, brown, black, and gray. The natural stride of this breed is free and open with great animation. This is naturally a three-gaited breed, but it is easily trained to rack and slow-gait as well. They are noted for a high head carried on a long graceful neck, a level croup, and a high- set tail. They are most widely used for showing in saddle seat and fine harness classes and riding on bridle paths.
ARABIAN Arabians are one of the first breeds of livestock
domesticated by humans. All breeds of light horses and some of the heavy horses were developed from this breed.
The head is triangular with a wide forehead and small muzzle. The forehead is convex, but the profile is usually somewhat dished. The neck is long, naturally arched, and the back is very short. The Arabian is very compact; mature animals usually weigh from 850 to 1,100 pounds and are from 14 to 15 hands high. Preferred colors are bay, gray, and chestnut with white markings common on the head and legs. The versatile Arabians are used in pleasure riding, ranch work, and parades. Arabians or half-Arabians have been noted for endurance and speed in competitive trail rides and are popular at horse shows.
MOR&AN Morgan horses are known for versatility, stylish action,
stamina, and ease of handling. They are the oldest breed originating in America. All Morgans trace back to a stallion named Figure, born in 1789 in Springfield, Massachusetts, and acquired by Justin Morgan, a Vermont teacher and horseman. This stallion became the founding sire of the Morgan breed.
Characteristics of the breed are an upright head carriage, well-crested neck, fine muzzle, broad forehead, small ears, wide chest, and short back. Morgans average 14-2 to 15-2 hands high and weigh about 1,000 pounds (with individual exceptions under and over). Colors allowed within the breed are bay, black, brown, chestnut, palomino, creme, dun, and buckskin.
Morgans are highly versatile and may be used for pleasure and driving as well as jumping, dressage, reining, and endurance.
THE HORSE THE 4-H HORSE PROJECT
THIS P
UBLICATIO
N IS O
UT OF D
ATE.
For mos
t curr
ent in
formati
on:
http:/
/exten
sion.o
regon
state.
edu/c
atalog
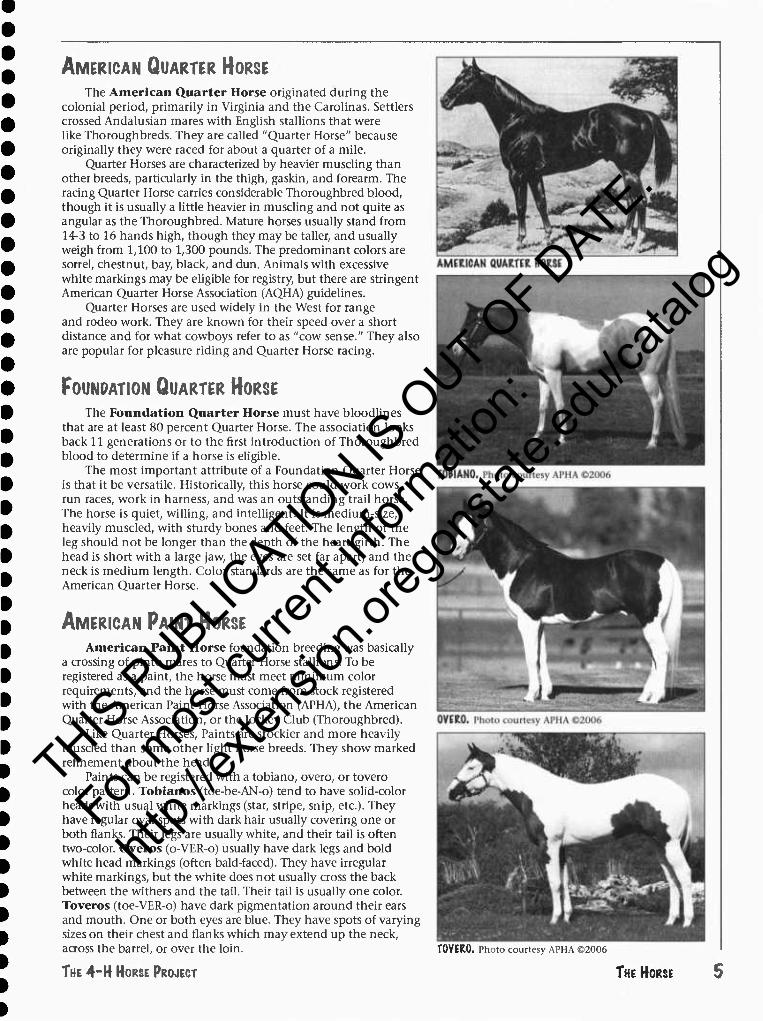
AMERICAN QUARTER HORSE The American Quarter Horse originated during the
colonial period, primarily in Virginia and the Carolinas. Settlers crossed Andalusian mares with English stallions that were like Thoroughbreds. They are called "Quarter Horse" because originally they were raced for about a quarter of a mile.
Quarter Horses are characterized by heavier muscling than other breeds, particularly in the thigh, gaskin, and forearm. The racing Quarter Horse carries considerable Thoroughbred blood, though it is usually a little heavier in muscling and not quite as angular as the Thoroughbred. Mature horses usually stand from 14-3 to 16 hands high, though they may be taller, and usually weigh from 1,100 to 1,300 pounds. The predominant colors are sorrel, chestnut, bay, black, and dun. Animals with excessive white markings may be eligible for registry, but there are stringent American Quarter Horse Association (AQHA) guidelines.
Quarter Horses are used widely in the West for range and rodeo work. They are known for their speed over a short distance and for what cowboys refer to as "cow sense." They also are popular for pleasure riding and Quarter Horse racing.
FOUNDATION QUARTER HORSE The Foundation Quarter Horse must have bloodlines
that are at least 80 percent Quarter Horse. The association looks back 11 generations or to the first introduction of Thoroughbred blood to determine if a horse is eligible.
The most important attribute of a Foundation Quarter Horse is that it be versatile. Historically, this horse could work cows, run races, work in harness, and was an outstanding trail horse. The horse is quiet, willing, and intelligent. It is medium-size, heavily muscled, with sturdy bones and feet. The length of the leg should not be longer than the depth of the heart girth. The head is short with a large jaw, the eyes are set far apart, and the neck is medium length. Color standards are the same as for the American Quarter Horse.
AMERICAN PAINT HORSE American Paint Horse foundation breeding was basically
a crossing of pinto mares to Quarter Horse stallions. To be registered as a paint, the horse must meet minimum color requirements, and the horse must come from stock registered with the American Paint Horse Association (APHA), the American Quarter Horse Association, or the Jockey Club (Thoroughbred).
Like Quarter Horses, Paints are stockier and more heavily muscled than some other light horse breeds. They show marked refinement about the head.
Paints can be registered with a tobiano, overo, or tovero color pattern. Tobianos (toe-be-AN-o) tend to have solid-color heads with usual white markings (star, stripe, snip, etc.). They have regular oval spots with dark hair usually covering one or both flanks. Their legs are usually white, and their tail is often two-color. Overos (o-VER-o) usually have dark legs and bold white head markings (often bald-faced). They have irregular white markings, but the white does not usually cross the back between the withers and the tail. Their tail is usually one color. Toveros (toe-VER-o) have dark pigmentation around their ears and mouth. One or both eyes are blue. They have spots of varying sizes on their chest and flanks which may extend up the neck, across the barrel, or over the loin.
THE 4-H HORSE PROJECT
TOVERO. Photo courtesy APHA ©2006
THE HORSE
THIS P
UBLICATIO
N IS O
UT OF D
ATE.
For mos
t curr
ent in
formati
on:
http:/
/exten
sion.o
regon
state.
edu/c
atalog
TENNESSEE WALKING HORSE
TENNESSEE WALKING HORSE
THOMmmEP
MMiVMLVWiV. Photo courtesy Ed Keye
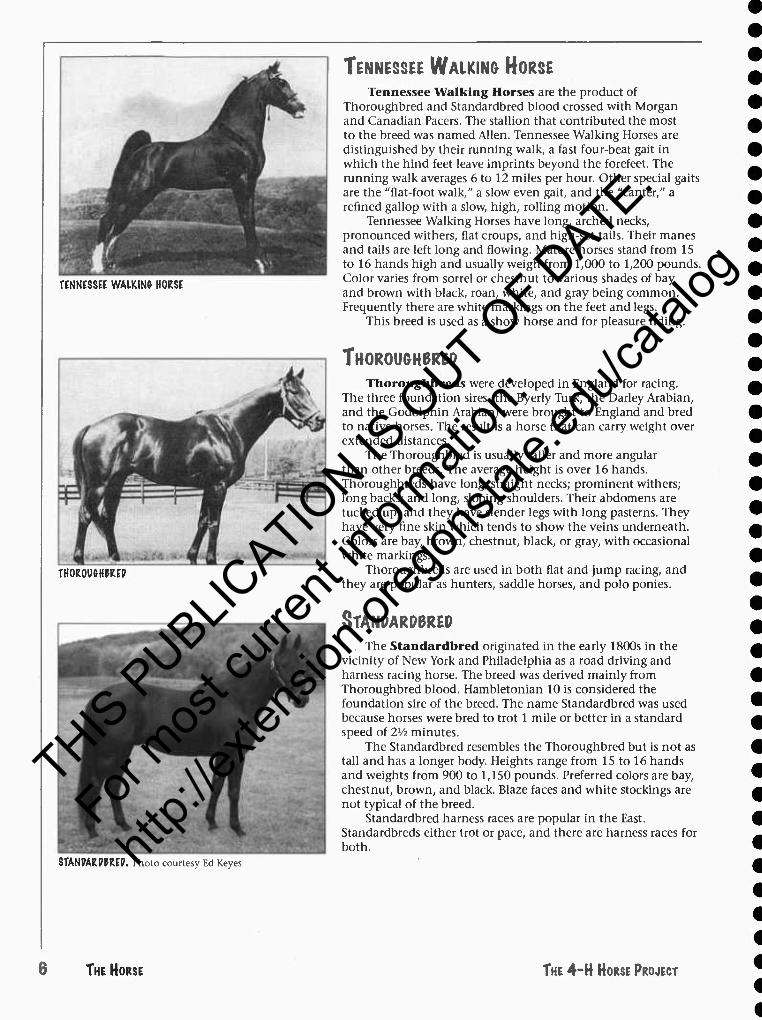
Tennessee Walking Horses are the product of Thoroughbred and Standardbred blood crossed with Morgan and Canadian Pacers. The stallion that contributed the most to the breed was named Allen. Tennessee Walking Horses are distinguished by their running walk, a fast four-beat gait in which the hind feet leave imprints beyond the forefeet. The running walk averages 6 to 12 miles per hour. Other special gaits are the "flat-foot walk," a slow even gait, and the "canter," a refined gallop with a slow, high, rolling motion.
Tennessee Walking Horses have long, arched necks, pronounced withers, flat croups, and high-set tails. Their manes and tails are left long and flowing. Mature horses stand from 15 to 16 hands high and usually weigh from 1,000 to 1,200 pounds. Color varies from sorrel or chestnut to various shades of bay and brown with black, roan, white, and gray being common. Frequently there are white markings on the feet and legs.
This breed is used as a show horse and for pleasure riding.
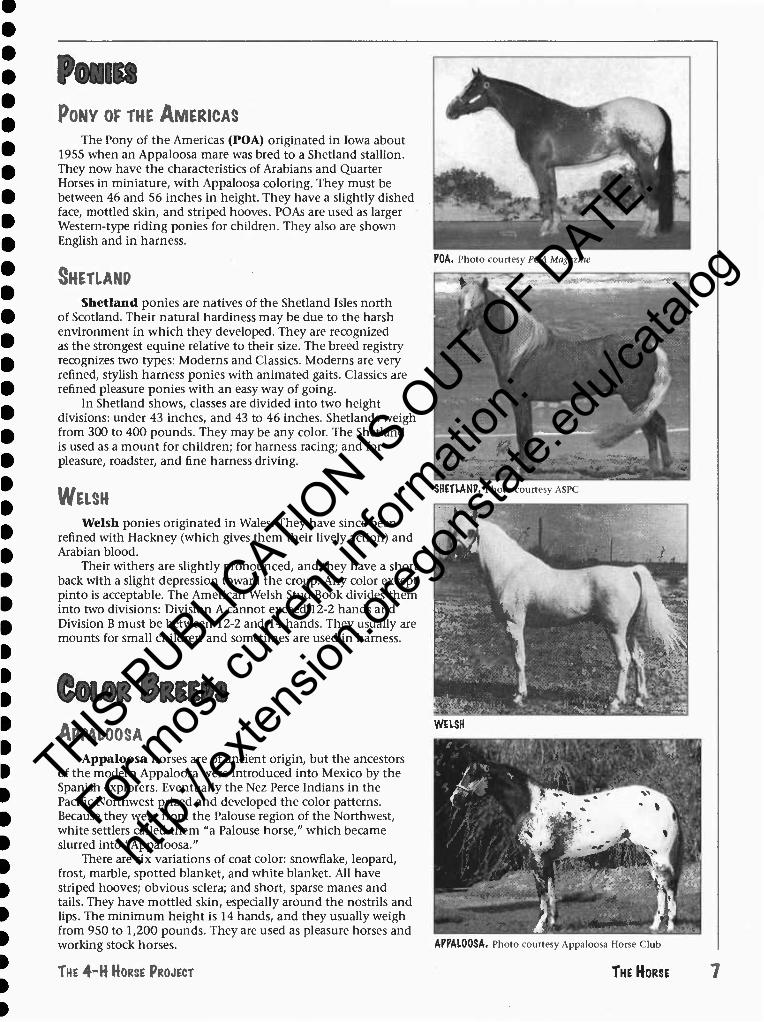
THOROU&HBREP Thoroughbreds were developed in England for racing.
The three foundation sires (the Byerly Turk, the Darley Arabian, and the Godolphin Arabian) were brought to England and bred to native horses. The result is a horse that can carry weight over extended distances.
The Thoroughbred is usually taller and more angular than other breeds. The average height is over 16 hands. Thoroughbreds have long, straight necks; prominent withers; long backs; and long, sloping shoulders. Their abdomens are tucked up, and they have slender legs with long pasterns. They have very fine skin which tends to show the veins underneath. Colors are bay, brown, chestnut, black, or gray, with occasional white markings.
Thoroughbreds are used in both flat and jump racing, and they are popular as hunters, saddle horses, and polo ponies.
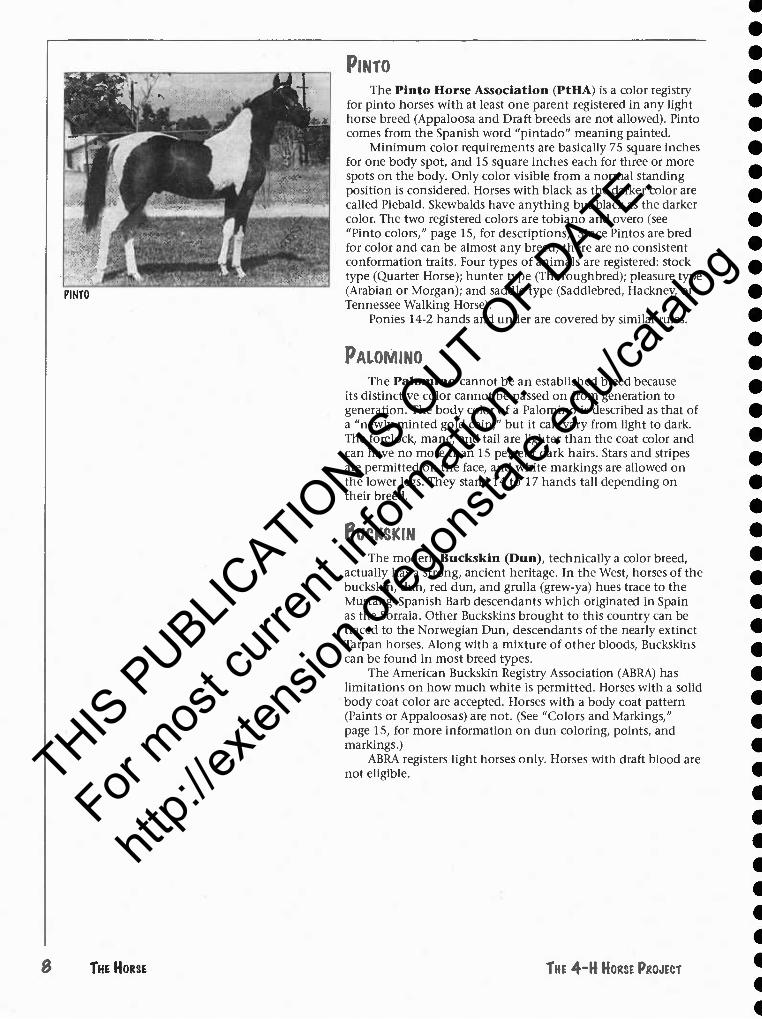
STANPARMRED The Standardbred originated in the early 1800s in the
vicinity of New York and Philadelphia as a road driving and harness racing horse. The breed was derived mainly from Thoroughbred blood. Hambletonian 10 is considered the foundation sire of the breed. The name Standardbred was used because horses were bred to trot 1 mile or better in a standard speed of IVz minutes.
The Standardbred resembles the Thoroughbred but is not as tall and has a longer body. Heights range from 15 to 16 hands and weights from 900 to 1,150 pounds. Preferred colors are bay, chestnut, brown, and black. Blaze faces and white stockings are not typical of the breed.
Standardbred harness races are popular in the East. Standardbreds either trot or pace, and there are harness races for both.
6 THE HORSE THE 4-H HORSE PROJECT
THIS P
UBLICATIO
N IS O
UT OF D
ATE.
For mos
t curr
ent in
formati
on:
http:/
/exten
sion.o
regon
state.
edu/c
atalog
Pomn PONY OF THE AMERICAS
The Pony of the Americas (POA) originated in Iowa about 1955 when an Appaloosa mare was bred to a Shetland stallion. They now have the characteristics of Arabians and Quarter Horses in miniature, with Appaloosa coloring. They must be between 46 and 56 inches in height. They have a slightly dished face, mottled skin, and striped hooves. POAs are used as larger Western-type riding ponies for children. They also are shown English and in harness.
SHETLAND Shetland ponies are natives of the Shetland Isles north
of Scotland. Their natural hardiness may be due to the harsh environment in which they developed. They are recognized as the strongest equine relative to their size. The breed registry recognizes two types: Moderns and Classics. Moderns are very refined, stylish harness ponies with animated gaits. Classics are refined pleasure ponies with an easy way of going.
In Shetland shows, classes are divided into two height divisions: under 43 inches, and 43 to 46 inches. Shetlands weigh from 300 to 400 pounds. They may be any color. The Shetland is used as a mount for children; for harness racing; and for pleasure, roadster, and fine harness driving.
WELSH Welsh ponies originated in Wales. They have since been
refined with Hackney (which gives them their lively action) and Arabian blood.
Their withers are slightly pronounced, and they have a short back with a slight depression toward the croup. Any color except pinto is acceptable. The American Welsh Stud Book divides them into two divisions: Division A cannot exceed 12-2 hands and Division B must be between 12-2 and 14 hands. They usually are mounts for small children and sometimes are used in harness.
Count feifN APPALOOSA
Appaloosa horses are of ancient origin, but the ancestors of the modern Appaloosa were introduced into Mexico by the Spanish explorers. Eventually the Nez Perce Indians in the Pacific Northwest prized and developed the color patterns. Because they were from the Palouse region of the Northwest, white settlers called them "a Palouse horse," which became slurred into "Appaloosa."
There are six variations of coat color: snowflake, leopard, frost, marble, spotted blanket, and white blanket. All have striped hooves; obvious sclera; and short, sparse manes and tails. They have mottled skin, especially around the nostrils and lips. The minimum height is 14 hands, and they usually weigh from 950 to 1,200 pounds. They are used as pleasure horses and working stock horses.
THE 4-H HORSE PROJECT
POA. Photo courtesy POA Magazine
fc A - -»Sffl
u ■
m Sr ' ■*■
'^w J??*' • ^'^'Ll1 iiiiii&iil1..,11.'1 \i jSpjjwj SHETIAM. Photo courtesy ASPC
M^ ._
m^ ^.-s^vii
WELSH
n B
■anflffl Hi% •l^fe-' T!
PBraHn Kv iml " . jt * m
V p.^9:;!^ "DinWlHM
i .;'*'•' -' Janl^H Him* ' t'ltifa-if'T— t^iti U mtL-j WKKKmKm . ' ■ ■'
APPALOOSA. Photo courtesy Appaloosa Horse Club
THE HORSE
THIS P
UBLICATIO
N IS O
UT OF D
ATE.
For mos
t curr
ent in
formati
on:
http:/
/exten
sion.o
regon
state.
edu/c
atalog
c2s' ^ ''' -■1 i 1*^ \l ^
/ 1 L
r 1 r j^[ 1 ;
• r lJf,JUWJl!!l. m r „ *. :
,.l
: f/ ■ H -1 ■ 1 l^My
j* mm ."■■ .■,; K ■■
■ -■. H9HBi
PINTO
PINTO
The Pinto Horse Association (PtHA) is a color registry for pinto horses with at least one parent registered in any light horse breed (Appaloosa and Draft breeds are not allowed). Pinto comes from the Spanish word "pintado" meaning painted.
Minimum color requirements are basically 75 square inches for one body spot, and 15 square inches each for three or more spots on the body. Only color visible from a normal standing position is considered. Horses with black as the darker color are called Piebald. Skewbalds have anything but black as the darker color. The two registered colors are tobiano and overo (see "Pinto colors," page 15, for descriptions). Since Pintos are bred for color and can be almost any breed, there are no consistent conformation traits. Four types of animals are registered: stock type (Quarter Horse); hunter type (Thoroughbred); pleasure type (Arabian or Morgan); and saddle type (Saddlebred, Hackney, or Tennessee Walking Horse).
Ponies 14-2 hands and under are covered by similar rules.
PALOMINO The Palomino cannot be an established breed because
its distinctive color cannot be passed on from generation to generation. The body color of a Palomino is described as that of a "newly minted gold coin," but it can vary from light to dark. The forelock, mane, and tail are lighter than the coat color and can have no more than 15 percent dark hairs. Stars and stripes are permitted on the face, and white markings are allowed on the lower legs. They stand 14 to 17 hands tall depending on their breed.
BUCKSKIN The modern Buckskin (Dun), technically a color breed,
actually has a strong, ancient heritage. In the West, horses of the buckskin, dun, red dun, and grulla (grew-ya) hues trace to the Mustang-Spanish Barb descendants which originated in Spain as the Sorraia. Other Buckskins brought to this country can be traced to the Norwegian Dun, descendants of the nearly extinct Tarpan horses. Along with a mixture of other bloods. Buckskins can be found in most breed types.
The American Buckskin Registry Association (ABRA) has limitations on how much white is permitted. Horses with a solid body coat color are accepted. Horses with a body coat pattern (Paints or Appaloosas) are not. (See "Colors and Markings," page 15, for more information on dun coloring, points, and markings.)
ABRA registers light horses only. Horses with draft blood are not eligible.
s THE HORSE THE 4-H HORSE PROJECT
THIS P
UBLICATIO
N IS O
UT OF D
ATE.
For mos
t curr
ent in
formati
on:
http:/
/exten
sion.o
regon
state.
edu/c
atalog
PRATT HOMH PELSIANS
The Belgian is known as the widest, deepest, most compact, most massive, and lowest set draft breed. It is extremely quiet, docile, and patient. Its action is powerful, but less springy than the Clydesdale or Percheron. Mature stallions stand 15-2 to 17 hands and weigh from 1,900 to over 2,200 pounds. Originally mainly a bay breed, today the majority of Belgians are chestnuts. Many have flaxen manes and tails and white-blazed faces.
In the United States, Belgians far outnumber all other draft breeds.
CLYDESDALE The Clydesdale was named after the valley of the River
Clyde in Scotland, where it originated. It was imported from Scotland and Canada in the early 1870s.
More rangy and lighter than other draft breeds, the stallions average from 1,700 to 1,900 pounds and stand 16 to 17 hands high. Clydesdales have a broad face with a straight or convex profile. Their necks are long and broad at the base with prominent withers, and they have wide, deep chests. Their hind legs are frequently cow-hocked. Bay, black, and brown with white markings are common colors. They have much feathering with flowing hair about the fetlocks. The Scots placed particular emphasis on style and action, and the animals make a very pretty picture in parades and exhibitions.
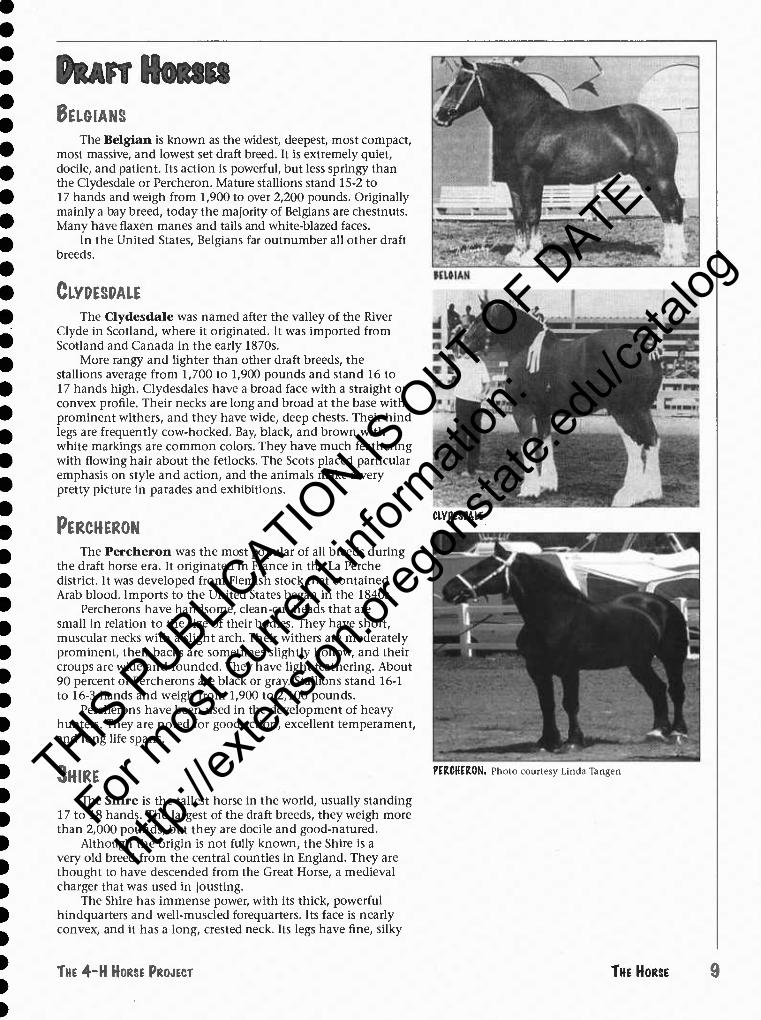
PERCHERON The Percheron was the most popular of all breeds during
the draft horse era. It originated in France in the La Perche district. It was developed from Flemish stock that contained Arab blood. Imports to the United States began in the 1840s.
Percherons have handsome, clean-cut heads that are small in relation to the size of their bodies. They have short, muscular necks with a slight arch. Their withers are moderately prominent, their backs are sometimes slightly hollow, and their croups are wide and rounded. They have light feathering. About 90 percent of Percherons are black or gray. Stallions stand 16-1 to 16-3 hands and weigh from 1,900 to 2,100 pounds.
Percherons have been used in the development of heavy hunters. They are noted for good action, excellent temperament, and long life spans.
SHIRE The Shire is the tallest horse in the world, usually standing
17 to 18 hands. The largest of the draft breeds, they weigh more than 2,000 pounds, but they are docile and good-natured.
Although the origin is not fully known, the Shire is a very old breed from the central counties in England. They are thought to have descended from the Great Horse, a medieval charger that was used in jousting.
The Shire has immense power, with its thick, powerful hindquarters and well-muscled forequarters. Its face is nearly convex, and it has a long, crested neck. Its legs have fine, silky
CLYPESPAIE
PERCHERON. Photo courtesy Linda Tangen
THE 4-H HORSE PROJECT THE HORSE 9
THIS P
UBLICATIO
N IS O
UT OF D
ATE.
For mos
t curr
ent in
formati
on:
http:/
/exten
sion.o
regon
state.
edu/c
atalog
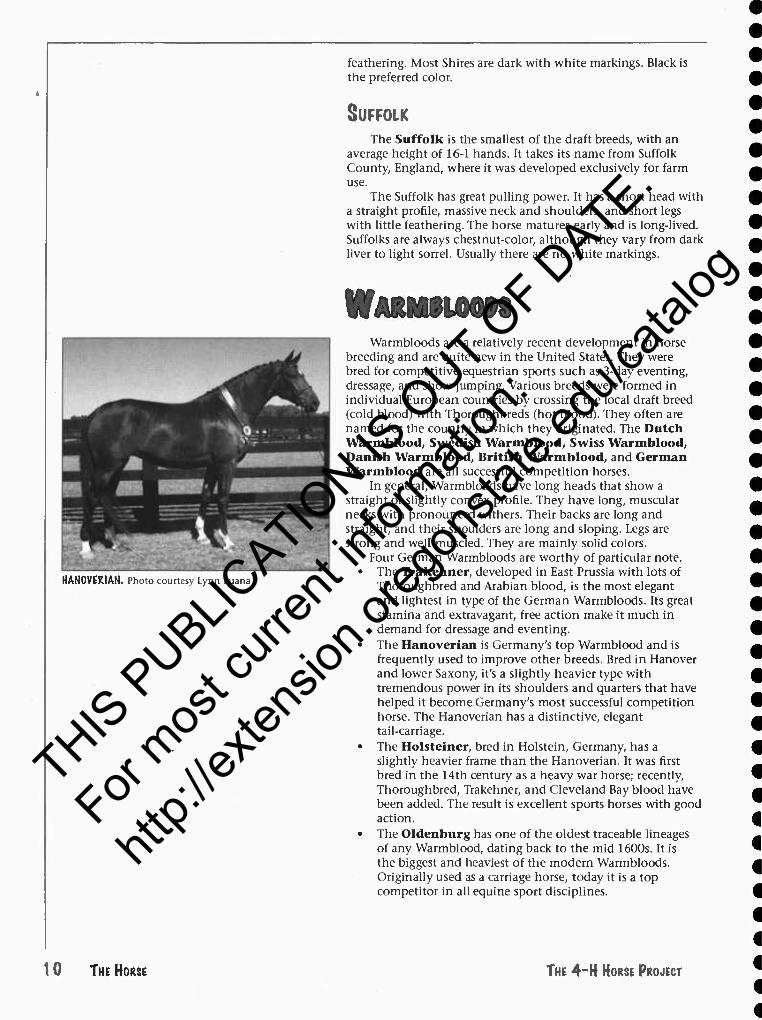
HANOVERIAN. Photo courtesy Lynn Puana
feathering. Most Shires are dark with white markings. Black is the preferred color.
SUFFOLK The Suffolk is the smallest of the draft breeds, with an
average height of 16-1 hands. It takes its name from Suffolk County, England, where it was developed exclusively for farm use.
The Suffolk has great pulling power. It has a short head with a straight profile, massive neck and shoulders, and short legs with little feathering. The horse matures early and is long-lived. Suffolks are always chestnut-color, although they vary from dark liver to light sorrel. Usually there are no white markings.
MTARMIIOON Warmbloods are a relatively recent development in horse
breeding and are quite new in the United States. They were bred for competitive equestrian sports such as 3-day eventing, dressage, and show jumping. Various breeds were formed in individual European countries by crossing the local draft breed (cold blood) with Thoroughbreds (hot blood). They often are named for the country in which they originated. The Dutch Warmblood, Swedish Warmblood, Swiss Warmblood, Danish Warmblood, British Warmblood, and German Warmblood are all successful competition horses.
In general, Warmbloods have long heads that show a straight or slightly convex profile. They have long, muscular necks with pronounced withers. Their backs are long and straight, and their shoulders are long and sloping. Legs are strong and well-muscled. They are mainly solid colors.
Four German Warmbloods are worthy of particular note. • The Trakehner, developed in East Prussia with lots of
Thoroughbred and Arabian blood, is the most elegant and lightest in type of the German Warmbloods. Its great stamina and extravagant, free action make it much in demand for dressage and eventing.
• The Hanoverian is Germany's top Warmblood and is frequently used to improve other breeds. Bred in Hanover and lower Saxony, it's a slightly heavier type with tremendous power in its shoulders and quarters that have helped it become Germany's most successful competition horse. The Hanoverian has a distinctive, elegant tail-carriage.
• The Holsteiner, bred in Holstein, Germany, has a slightly heavier frame than the Hanoverian. It was first bred in the 14th century as a heavy war horse; recently. Thoroughbred, Trakehner, and Cleveland Bay blood have been added. The result is excellent sports horses with good action.
• The Oldenburg has one of the oldest traceable lineages of any Warmblood, dating back to the mid 1600s. It is the biggest and heaviest of the modern Warmbloods. Originally used as a carriage horse, today it is a top competitor in all equine sport disciplines.
10 THE HORSE THE 4-H HORSE PROJECT
THIS P
UBLICATIO
N IS O
UT OF D
ATE.
For mos
t curr
ent in
formati
on:
http:/
/exten
sion.o
regon
state.
edu/c
atalog
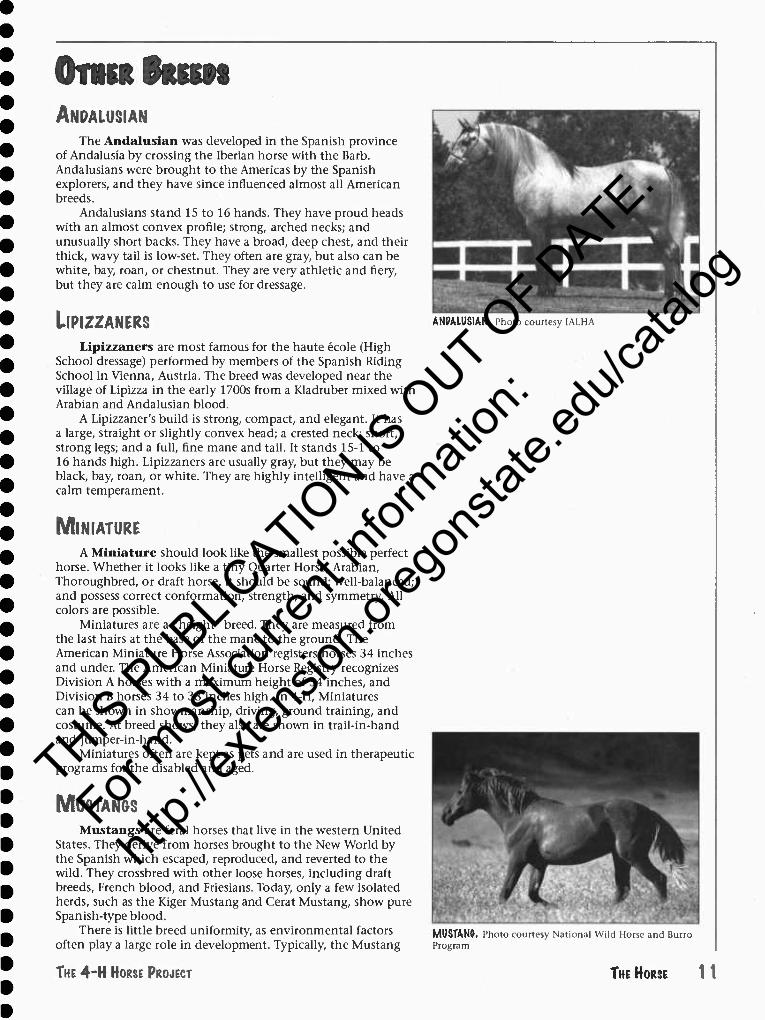
OmitfttiiN ANPALUSIAN
The Andalusian was developed in the Spanish province of Andalusia by crossing the Iberian horse with the Barb. Andalusians were brought to the Americas by the Spanish explorers, and they have since influenced almost all American breeds.
Andalusians stand 15 to 16 hands. They have proud heads with an almost convex profile; strong, arched necks; and unusually short backs. They have a broad, deep chest, and their thick, wavy tail is low-set. They often are gray, but also can be white, bay, roan, or chestnut. They are very athletic and fiery, but they are calm enough to use for dressage.
llPIZZANERS
Lipizzaners are most famous for the haute ecole (High School dressage) performed by members of the Spanish Riding School in Vienna, Austria. The breed was developed near the village of Lipizza in the early 1700s from a Kladruber mixed with Arabian and Andalusian blood.
A Lipizzaner's build is strong, compact, and elegant. It has a large, straight or slightly convex head; a crested neck; short, strong legs; and a full, fine mane and tail. It stands 15-1 to 16 hands high. Lipizzaners are usually gray, but they may be black, bay, roan, or white. They are highly intelligent and have a calm temperament.
MINIATURE A Miniature should look like the smallest possible perfect
horse. Whether it looks like a tiny Quarter Horse, Arabian, Thoroughbred, or draft horse, it should be sound; well-balanced; and possess correct conformation, strength, and symmetry. All colors are possible.
Miniatures are a "height" breed. They are measured from the last hairs at the base of the mane to the ground. The American Miniature Horse Association registers horses 34 inches and under. The American Miniature Horse Registry recognizes Division A horses with a maximum height of 34 inches, and Division B horses 34 to 38 inches high. In 4-H, Miniatures can be shown in showmanship, driving, ground training, and costume. At breed shows, they also are shown in trail-in-hand and jumper-in-hand.
Miniatures often are kept as pets and are used in therapeutic programs for the disabled and aged.
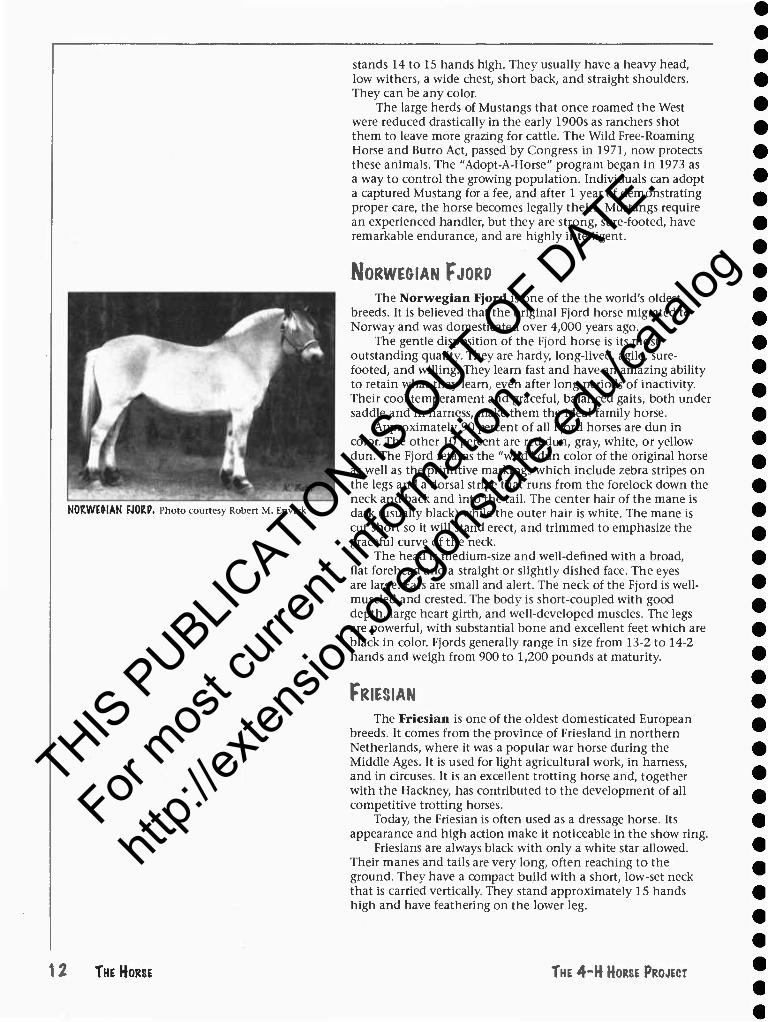
MUSTANDS
Mustangs are feral horses that live in the western United States. They derive from horses brought to the New World by the Spanish which escaped, reproduced, and reverted to the wild. They crossbred with other loose horses, including draft breeds, French blood, and Friesians. Today, only a few isolated herds, such as the Kiger Mustang and Cerat Mustang, show pure Spanish-type blood.
There is little breed uniformity, as environmental factors often play a large role in development. Typically, the Mustang
ANPAWSIAN. Photo courtesy 1ALHA
MUSTANft. Photo courtesy National Wild Horse and Burro Program
THE 4-H HORSE PROJECT THE HORSE
THIS P
UBLICATIO
N IS O
UT OF D
ATE.
For mos
t curr
ent in
formati
on:
http:/
/exten
sion.o
regon
state.
edu/c
atalog
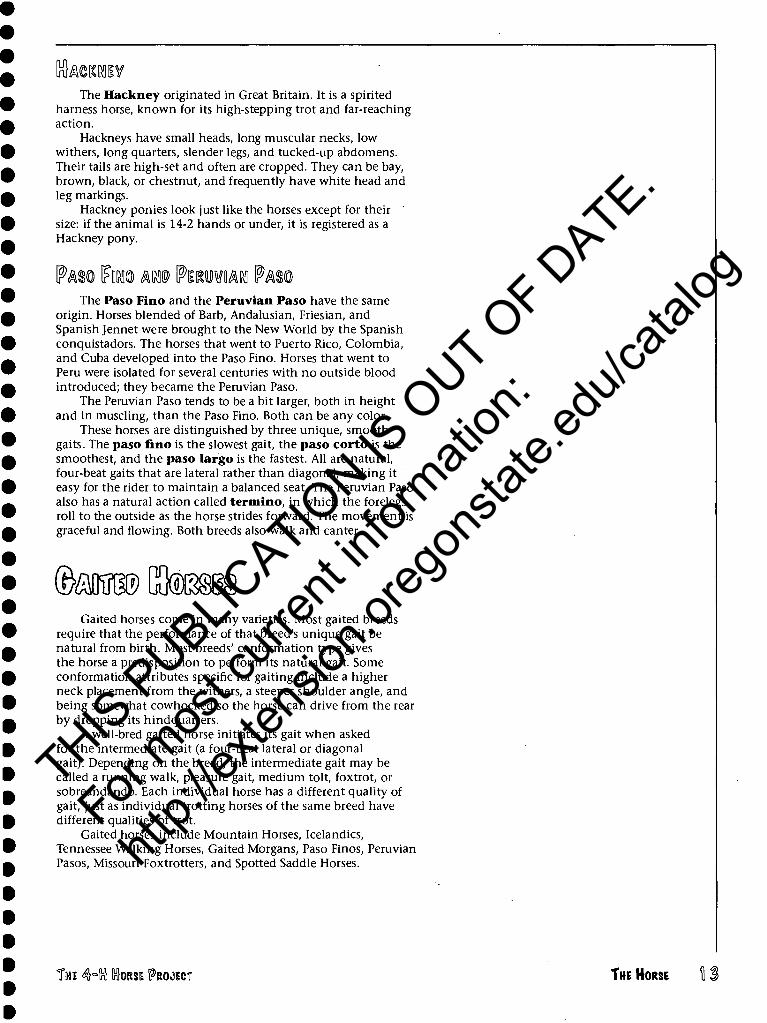
NORWEGIAN FJORP. Photo courtesy Robert M. Envick
stands 14 to 15 hands high. They usually have a heavy head, low withers, a wide chest, short back, and straight shoulders. They can be any color.
The large herds of Mustangs that once roamed the West were reduced drastically in the early 1900s as ranchers shot them to leave more grazing for cattle. The Wild Free-Roaming Horse and Burro Act, passed by Congress in 1971, now protects these animals. The "Adopt-A-Horse" program began in 1973 as a way to control the growing population. Individuals can adopt a captured Mustang for a fee, and after 1 year of demonstrating proper care, the horse becomes legally theirs. Mustangs require an experienced handler, but they are strong, sure-footed, have remarkable endurance, and are highly intelligent.
NORWEGIAN FJORP The Norwegian Fjord is one of the the world's oldest
breeds. It is believed that the original Fjord horse migrated to Norway and was domesticated over 4,000 years ago.
The gentle disposition of the Fjord horse is its most outstanding quality. They are hardy, long-lived, agile, sure- footed, and willing. They learn fast and have an amazing ability to retain what they learn, even after long periods of inactivity. Their cool temperament and graceful, balanced gaits, both under saddle and in harness, make them the ideal family horse.
Approximately 90 percent of all Fjord horses are dun in color. The other 10 percent are red dun, gray, white, or yellow dun. The Fjord retains the "wild" dun color of the original horse as well as the primitive markings which include zebra stripes on the legs and a dorsal stripe that runs from the forelock down the neck and back and into the tail. The center hair of the mane is dark (usually black) while the outer hair is white. The mane is cut short so it will stand erect, and trimmed to emphasize the graceful curve of the neck.
The head is medium-size and well-defined with a broad, flat forehead and a straight or slightly dished face. The eyes are large. Ears are small and alert. The neck of the Fjord is well- muscled and crested. The body is short-coupled with good depth, large heart girth, and well-developed muscles. The legs are powerful, with substantial bone and excellent feet which are black in color. Fjords generally range in size from 13-2 to 14-2 hands and weigh from 900 to 1,200 pounds at maturity.
FRISIAN The Friesian is one of the oldest domesticated European
breeds. It comes from the province of Friesland in northern Netherlands, where it was a popular war horse during the Middle Ages. It is used for light agricultural work, in harness, and in circuses. It is an excellent trotting horse and, together with the Hackney, has contributed to the development of all competitive trotting horses.
Today, the Friesian is often used as a dressage horse. Its appearance and high action make it noticeable in the show ring.
Friesians are always black with only a white star allowed. Their manes and tails are very long, often reaching to the ground. They have a compact build with a short, low-set neck that is carried vertically. They stand approximately 15 hands high and have feathering on the lower leg.
12 THE HORSE THE 4-H HORSE PROJECT
THIS P
UBLICATIO
N IS O
UT OF D
ATE.
For mos
t curr
ent in
formati
on:
http:/
/exten
sion.o
regon
state.
edu/c
atalog
[ntoW The Hackney originated in Great Britain. It is a spirited
harness horse, known for its high-stepping trot and far-reaching action.
Hackneys have small heads, long muscular necks, low withers, long quarters, slender legs, and tucked-up abdomens. Their tails are high-set and often are cropped. They can be bay, brown, black, or chestnut, and frequently have white head and leg markings.
Hackney ponies look just like the horses except for their size: if the animal is 14-2 hands or under, it is registered as a Hackney pony.
The Paso Fino and the Peruvian Paso have the same origin. Horses blended of Barb, Andalusian, Friesian, and Spanish Jennet were brought to the New World by the Spanish conquistadors. The horses that went to Puerto Rico, Colombia, and Cuba developed into the Paso Fino. Horses that went to Peru were isolated for several centuries with no outside blood introduced; they became the Peruvian Paso.
The Peruvian Paso tends to be a bit larger, both in height and in muscling, than the Paso Fino. Both can be any color.
These horses are distinguished by three unique, smooth gaits. The paso fino is the slowest gait, the paso corto is the smoothest, and the paso largo is the fastest. All are natural, four-beat gaits that are lateral rather than diagonal, making it easy for the rider to maintain a balanced seat. The Peruvian Paso also has a natural action called termino, in which the forelegs roll to the outside as the horse strides forward. The movement is graceful and flowing. Both breeds also walk and canter.
(bmm ^mm Gaited horses come in many varieties. Most gaited breeds
require that the performance of that breed's unique gait be natural from birth. Most breeds' conformation type gives the horse a predisposition to perform its natural gait. Some conformation attributes specific for gaiting include a higher neck placement from the withers, a steeper shoulder angle, and being somewhat cowhocked so the horse can drive from the rear by dropping its hindquarters.
A well-bred gaited horse initiates its gait when asked for the intermediate gait (a four-beat lateral or diagonal gait). Depending on the breed, the intermediate gait may be called a running walk, pleasure gait, medium tolt, foxtrot, or sobreandando. Each individual horse has a different quality of gait, just as individual trotting horses of the same breed have different qualities of trot.
Gaited horses include Mountain Horses, Icelandics, Tennessee Walking Horses, Gaited Morgans, Paso Finos, Peruvian Pasos, Missouri Foxtrotters, and Spotted Saddle Horses.
THE 4=110 KtoRsi IFROJECT THI HORSI
THIS P
UBLICATIO
N IS O
UT OF D
ATE.
For mos
t curr
ent in
formati
on:
http:/
/exten
sion.o
regon
state.
edu/c
atalog
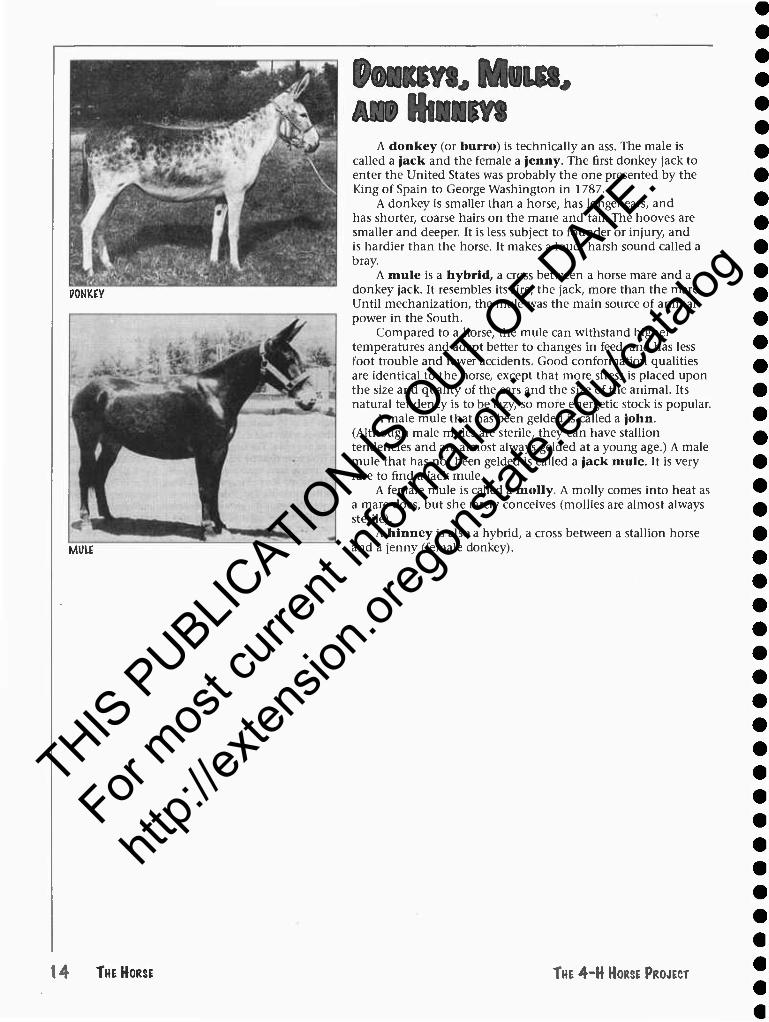
POMKEY
MULE
"mm ^cooHnnBYi
A donkey (or burro) is technically an ass. The male is called a jack and the female a jenny. The first donkey jack to enter the United States was probably the one presented by the King of Spain to George Washington in 1787.
A donkey is smaller than a horse, has longer ears, and has shorter, coarse hairs on the mane and tail. The hooves are smaller and deeper. It is less subject to founder or injury, and is hardier than the horse. It makes a loud, harsh sound called a bray.
A mule is a hybrid, a cross between a horse mare and a donkey jack. It resembles its sire, the jack, more than the mare. Until mechanization, the mule was the main source of animal power in the South.
Compared to a horse, the mule can withstand higher temperatures and adapt better to changes in feed, and has less foot trouble and fewer accidents. Good conformation qualities are identical to the horse, except that more stress is placed upon the size and quality of the ears and the size of the animal. Its natural tendency is to be lazy, so more energetic stock is popular.
A male mule that has been gelded is called a John. (Although male mules are sterile, they can have stallion tendencies and are almost always gelded at a young age.) A male mule that has not been gelded is called a jack mule. It is very rare to find a jack mule.
A female mule is called a molly. A molly comes into heat as a mare does, but she rarely conceives (mollies are almost always sterile).
A hinney is also a hybrid, a cross between a stallion horse and a jenny (female donkey).
14 THE HORSE THE 4-H HORSE PROJECT
THIS P
UBLICATIO
N IS O
UT OF D
ATE.
For mos
t curr
ent in
formati
on:
http:/
/exten
sion.o
regon
state.
edu/c
atalog

Qmm im $Mmm
mi The five basic coat colors of horses are:
Bay—Mixture of red and tan. It includes many shades, from a light tan (light bay) to a dark, rich shade that is almost brown (dark bay). A bay horse has black points (mane, tail, and lower portion of the legs).
Black—Completely black, including the muzzle and flanks. Fine tan or brown hairs indicate the horse is not a true black but a seal brown.
Brown—Almost black but has fine tan or brown hairs on the muzzle or flanks.
Chestnut (sorrel)—Basically red, from a light yellow (light chestnut) to a dark liver color (dark chestnut). Between these come the brilliant red-gold and copper shades. The mane and tail are usually the same color as the body. If they are light, they are called flaxen.
White—Horse is born white and remains white throughout life. Has pink skin and brown eyes (rarely blue).
Five major variations to these coat colors are:
Gray—Mixture of white and black hairs on black skin. They may appear black at birth, but lighten with age. Grays are often dappled. Dapples are small spots of a lighter or darker color.
Palomino—Golden color with white, silver, or ivory manes and tails.
Pinto—May be any of the coat colors, but it has irregular colored and white areas. Two color patterns are recognized: tobiano and overo.
The tbbiano's head is usually marked like a solid color horse with a blaze, star, etc. All four legs are white, spots are regular and distinct, and there is usually dark color in the flank area. It may be predominantly white or colored.
The overo usually has at least one dark leg, a bald face, a one-color tail, and a calico (splashy) coat pattern with no white crossing the back. It, too, may be mainly white or colored.
Roan—Mixture of white hairs with one or more base colors. White with bay is red roan, white with chestnut is strawberry roan, and white with black is blue roan.
Dun—To be in the family of dun horses, the color must be buckskin, dun, red dun, or grulla (grew-ya). Following are descriptions of these colors. Points on a dun horse refers to mane, tail, legs, and ear frames.
Buckskin. The body coat is some shade of tan, from very light (creme) to very dark (bronze). Points are black or dark brown. A dorsal stripe is not required.
Dun. The body coat is some shade of tan, from very light (creme) to a dull or smutty brown (earth tone). Points, dorsal stripe, and other dun factor markings (see below) are dirty black or smutty brown. A dorsal stripe is required.
Red Dun. The body coat is a reddish tan without the range of shade seen in the other colors. Mane and tail are red or reddish brown, cream, or mixed. Points and dun factor markings are a reddish brown and must show a contrast with the body coat. A dorsal stripe is required.
Grulla. The body coat is slate color (bluish gray like the blue heron) from light blue gray to a brownish shade. Points and dun factor markings are black. A dorsal stripe is required.
Dun factor markings Dun horses exhibit some or all of
primitive markings known as dun factors. These include dark ear frames, frosted forelock, cobwebbing under forelock, face masking, mottled or striped neck, frosted mane, shoulder stripe and rib barring, shoulder mottling, dorsal stripe, leg barring and mottling, and frosted tail. Consult the ABHRA for details.
White markings on the horse's head and/ or legs are a good way to identify individual animals. Descriptions of markings are used on registration papers and veterinary documents. Therefore, it is important to use proper terminology when describing markings.
THE 4h[n} KIORSIE PROJECT THE HORSE
THIS P
UBLICATIO
N IS O
UT OF D
ATE.
For mos
t curr
ent in
formati
on:
http:/
/exten
sion.o
regon
state.
edu/c
atalog
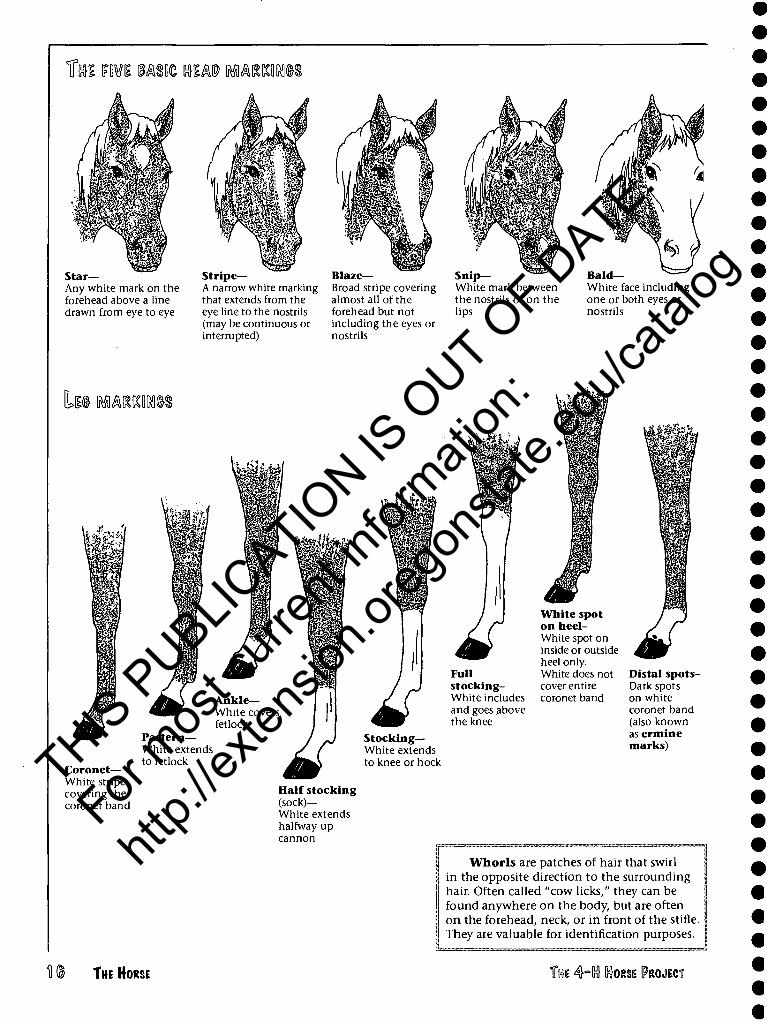
f m nm mm mm mmmm
Star- Any white mark on the forehead above a line drawn from eye to eye
Stripe— A narrow white marking that extends from the eye line to the nostrils (may be continuous or interrupted)
Blaze— Broad stripe covering almost all of the forehead but not including the eyes or nostrils
Snip— White mark between the nostrils or on the lips
Bald- White face including one or both eyes or nostrils
lm MAmm
Ankle— White covers fetlock
Coronet— White stripe covering the coronet band
Pastern— White extends to fetlock
^ Full stocking- White includes and goes above the knee
White spot on heel- White spot on inside or outside heel only. White does not cover entire coronet band
Stocking— White extends to knee or hock
Distal spots- Dark spots on white coronet band (also known as ermine marks)
Half stocking (sock)— White extends halfway up cannon
Whorls are patches of hair that swirl in the opposite direction to the surrounding hair. Often called "cow licks," they can be found anywhere on the body, but are often on the forehead, neck, or in front of the stifle. They are valuable for identification purposes.
THE HORSE THE 4°$ HORSE PROJECT
THIS P
UBLICATIO
N IS O
UT OF D
ATE.
For mos
t curr
ent in
formati
on:
http:/
/exten
sion.o
regon
state.
edu/c
atalog
Wmm m mas HMM
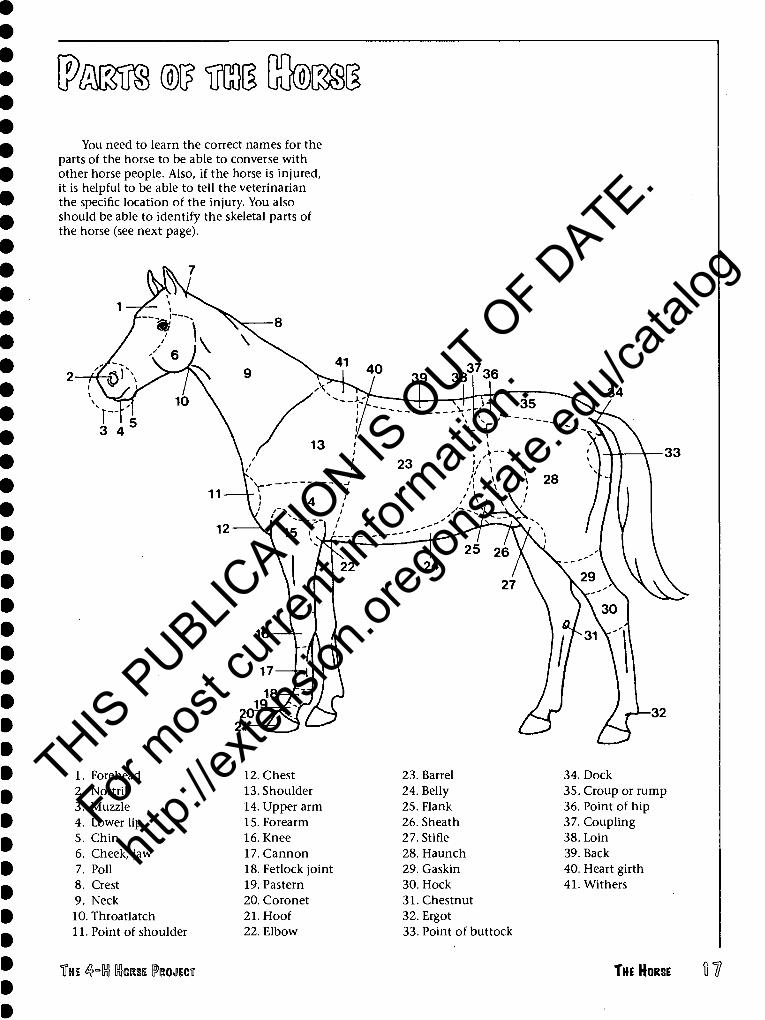
You need to learn the correct names for the parts of the horse to be able to converse with other horse people. Also, if the horse is injured, it is helpful to be able to tell the veterinarian the specific location of the injury. You also should be able to identify the skeletal parts of the horse (see next page).
2-ft0
1. Forehead 2. Nostril 3. Muzzle 4. Lower lip 5. Chin 6. Cheek, jaw 7. Poll 8. Crest 9. Neck 10. Throatlatch 11. Point of shoulder
12. Chest 13. Shoulder 14. Upper arm 15. Forearm 16. Knee 17. Cannon 18. Fetlock joint 19. Pastern 20. Coronet 21. Hoof 22. Elbow
23. Barrel 24. Belly 25. Flank 26. Sheath 27. Stifle 28. Haunch 29. Gaskin 30. Hock 31. Chestnut 32. Ergot 33. Point of buttock
34. Dock 35. Croup or rump 36. Point of hip 37. Coupling 38. Loin 39. Back 40. Heart girth 41. Withers
THE 4Hlnl DORSE PROJECT THE HORSE n
THIS P
UBLICATIO
N IS O
UT OF D
ATE.
For mos
t curr
ent in
formati
on:
http:/
/exten
sion.o
regon
state.
edu/c
atalog
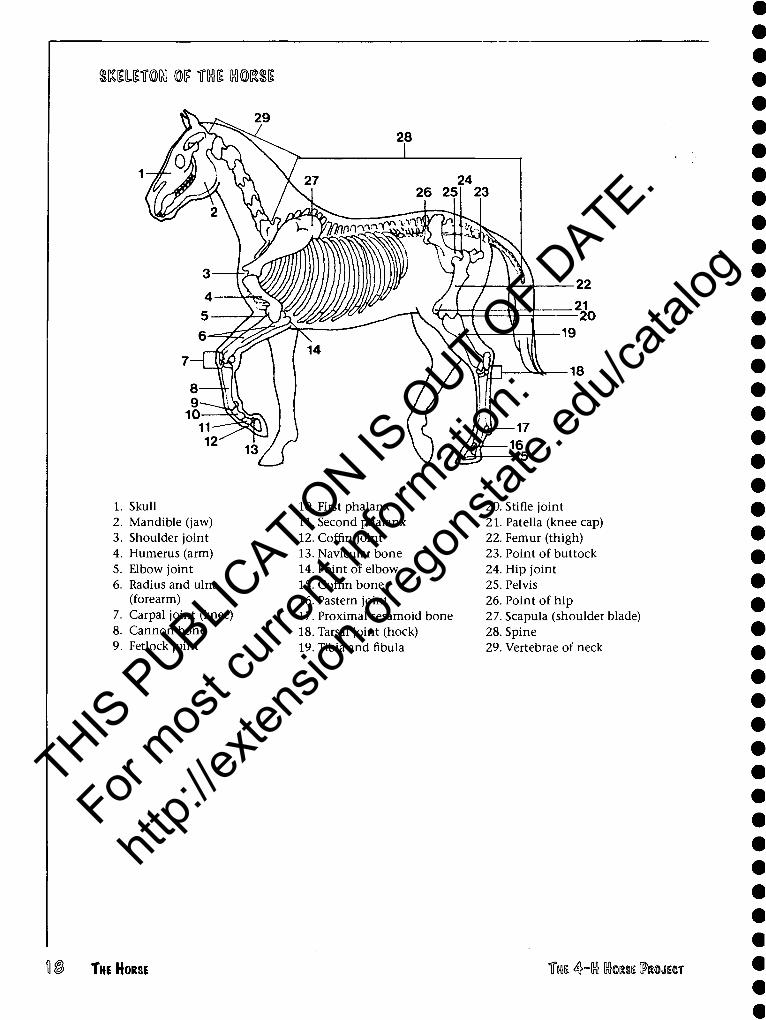
mmm m m mm
1. Skull 2. Mandible (jaw) 3. Shoulder joint 4. Humerus (arm) 5. Elbow joint 6. Radius and ulna
(forearm) 7. Carpal joint (knee) 8. Cannon bone 9. Fetlock joint
10. First phalanx 11. Second phalanx 12. Coffin joint 13. Navicular bone 14. Point of elbow 15. Coffin bone 16. Pastern joint 17. Proximal sesamoid bone 18. Tarsal joint (hock) 19. Tibia and fibula
20. Stifle joint 21. Patella (knee cap) 22. Femur (thigh) 23. Point of buttock 24. Hip joint 25. Pelvis 26. Point of hip 27. Scapula (shoulder blade) 28. Spine 29. Vertebrae of neck
§ THE HORSE THE 4hln} Ctasi [PROJIICT
THIS P
UBLICATIO
N IS O
UT OF D
ATE.
For mos
t curr
ent in
formati
on:
http:/
/exten
sion.o
regon
state.
edu/c
atalog
Ktog l?mM» im
•mmM Horses are very sociable herd animals.
Originally, they lived on open plains and walked many miles each day as they grazed. Because horses evolved as prey animals, their body, mind, and spirit are attuned to one basic focus: survival. A horse's slogan is "Act first and think later."
The horse has survived extinction by developing instincts based on hiding, flight (running away), or fighting (kicking and biting), and adapting to constantly changing conditions. The development of sight, hearing, touch, smell, memory, and the flight instinct have all equipped horses to escape from their predators.
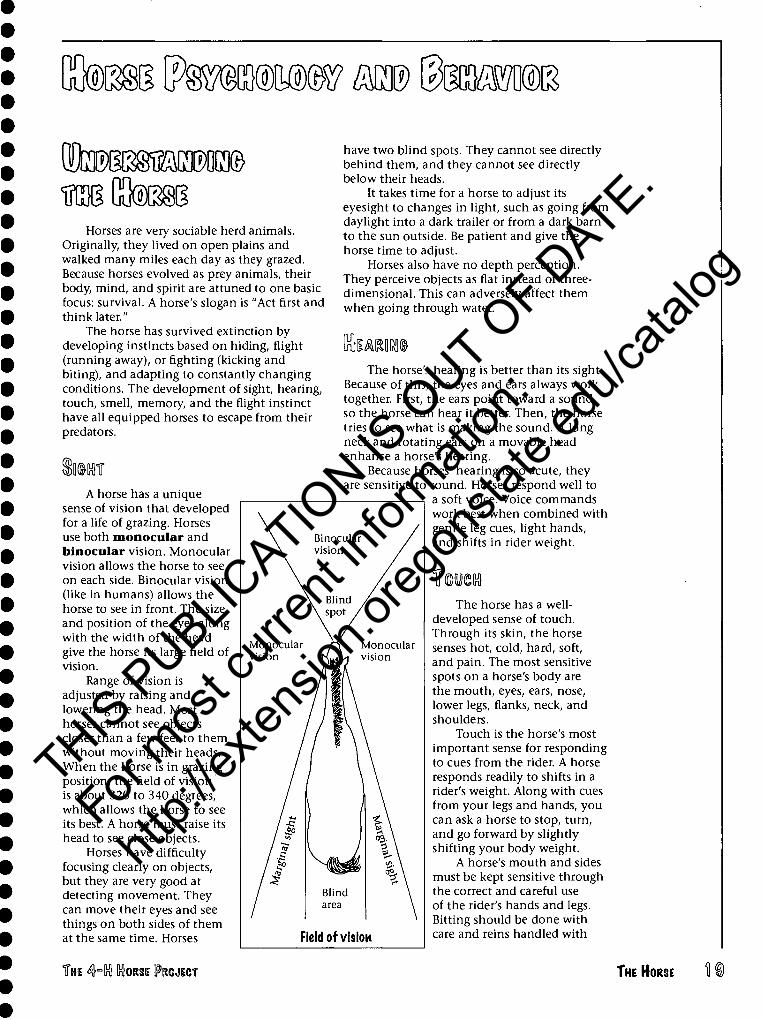
have two blind spots. They cannot see directly behind them, and they cannot see directly below their heads.
It takes time for a horse to adjust its eyesight to changes in light, such as going from daylight into a dark trailer or from a dark barn to the sun outside. Be patient and give the horse time to adjust.
Horses also have no depth perception. They perceive objects as flat instead of three- dimensional. This can adversely affect them when going through water.
Ctamd
A horse has a unique sense of vision that developed for a life of grazing. Horses use both monocular and binocular vision. Monocular vision allows the horse to see on each side. Binocular vision (like in humans) allows the horse to see in front. The size and position of the eyes along with the width of the head give the horse its large field of vision.
Range of vision is adjusted by raising and lowering the head. Most horses cannot see objects closer than a few feet to them without moving their heads. When the horse is in grazing position, the field of vision is about 320 to 340 degrees, which allows the horse to see its best. A horse must raise its head to see close objects.
Horses have difficulty focusing clearly on objects, but they are very good at detecting movement. They can move their eyes and see things on both sides of them at the same time. Horses
The horse's hearing is better than its sight. Because of this, the eyes and ears always work together. First, the ears point toward a sound so the horse can hear it better. Then, the horse tries to see what is making the sound. A long neck and rotating ears on a movable head enhance a horse's hearing.
Because horses' hearing is so acute, they are sensitive to sound. Horses respond well to
a soft voice. Voice commands work best when combined with gentle leg cues, light hands, and shifts in rider weight.
Field of vision
The horse has a well- developed sense of touch. Through its skin, the horse senses hot, cold, hard, soft, and pain. The most sensitive spots on a horse's body are the mouth, eyes, ears, nose, lower legs, flanks, neck, and shoulders.
Touch is the horse's most important sense for responding to cues from the rider. A horse responds readily to shifts in a rider's weight. Along with cues from your legs and hands, you can ask a horse to stop, turn, and go forward by slightly shifting your body weight.
A horse's mouth and sides must be kept sensitive through the correct and careful use of the rider's hands and legs. Bitting should be done with care and reins handled with
THE 4°[n} tase PROJECT THE HORSE
THIS P
UBLICATIO
N IS O
UT OF D
ATE.
For mos
t curr
ent in
formati
on:
http:/
/exten
sion.o
regon
state.
edu/c
atalog
light hands. A rider who jerks on the horse's mouth or constantly kicks the horse in the ribs will have an unresponsive horse.
Improperly fitting saddles can place undue pressure on the sensitive withers and back. This can cause injury and/or behavior problems.
Horses vary in their skin sensitivity, but most enjoy grooming and having their backs scratched. Comfortable, safe touch is critical to the horse's peace of mind. Smart handlers use this knowledge as a primary factor in their training methods.
Horses do a lot of sniffing and tasting to determine whether they are in danger. A horse may flare its nostrils; or it may lift its head, raise its upper lip, and compress its nostrils in what is called a flehman response. Dilated nostrils can reflect interest, curiosity, or apprehension.
A horse's sense of smell is superior to that of humans and is inherent to its well-being. Mares and foals identify each other using smell as the primary sense. Stallions can identify mares in heat for great distances. Because their sense of smell is so acute, be sure to keep horses' quarters clean, especially of urine and feces.
(MfaOKV Horses have wonderful memories that can
enhance or harm their training. It is important to reinforce good behavior and stop bad behavior before it becomes a dangerous habit.
Horses learn through repetition, and while a horse's intelligence in solving problems may not be very high, its learning ability is. If they do something repeatedly, it will become a habit. For example, if you let a horse walk off as you mount it a few times in a row, the horse is likely to develop this as a habit.
Horses also learn by association, which means the horse remembers if a similar experience was pleasurable or unpleasant and responds to that memory. Horse handlers should make training sessions positive and be concerned with long-term well-being more than winning a battle. It is important to work through a horse's fears rather than punish it for its basic nature.
Horses are generally curious and like to explore their environment. Since their vision isn't acute and they have virtually no depth perception, their natural instinct is to run
when they feel threatened. Horses see every experience in life as something either to fear and flee, or not to fear and therefore ignore. The running from fear is called their flight instinct.
Some horses may be fine at home but require more patience in unfamiliar surroundings. Young or inexperienced horses might run from certain sights, sounds, and smells that later in life they would ignore.
te§8 ©sifflrag A person's strength is no match for that of
a horse, so we must learn to understand their behavior and natural instincts for a successful relationship with them. We try to interpret (or read) the horse's behavior under different conditions and learn to understand the horse's actions.
To read a horse, it is important to learn its body language and understand its mood. A horse's body language includes a flick of an ear, pawing of a foot, shaking of the head, or swishing of the tail. Observing these gestures daily teaches us to read our horses and communicate with them.
It is important to remember that each horse has its own set of characteristics and its own individual temperament. Training history and environment can influence the horse's behavior and help create the horse's personality.
Three factors can affect the horse's character: genetic makeup, effects of past experiences, and present circumstances. A horse's character or behavior can be changed, but it takes time and good horsemanship skills.
Horses are herd animals that look for a leader, so they are easily dominated. As the handler, it is important that your horse see you as its leader. When a horse lowers its head and licks its lips, it is a sign that it is being submissive and allowing you to be the leader. Always remember that dominance does not mean cruelty.
When working with horses, remember their basic fears: loss of balance, fear of falling, fear of water, injury to the poll area, and fear of an object that they haven't had experience with. It is always better to work through the horse's fears in a calm, quiet manner than to use force. Never rush the horse into something it is not ready and willing to try. Before a horse can learn, it has to know that everything is safe. When it feels safe, a horse is adaptable, versatile, and willing to submit.
THE HORSE THE 4°lnl MORSE (PROJECT
THIS P
UBLICATIO
N IS O
UT OF D
ATE.
For mos
t curr
ent in
formati
on:
http:/
/exten
sion.o
regon
state.
edu/c
atalog
hmi ^nm A stable vice is any abnormal behavior
a horse acquires. Vices can affect the horse's health and performance, in addition to being frustrating for its caretaker. Most vices are a result of improper management because the owner doesn't understand horse behavior and psychology. Because horses evolved as free-roaming herd animals, overconfinement, isolation, and poor feeding techniques often cause behavior problems. The more natural a horse's lifestyle, the less its chance of developing a stable vice. Wild horses almost never exhibit vices.
CRIBBING One of the best-known stable vices is
cribbing. When a horse cribs, it grabs a solid object with its incisor teeth, arches its neck, and sucks in air. This behavior can lead to chipped and worn-down teeth, poor appetite, weight loss, and serious digestive problems. Also, cribbers cause substantial damage to property.
A horse often starts cribbing because it is bored. Once a horse learns to crib, it is extremely difficult to stop it. Each time a horse cribs, its body releases endorphins (natural pleasure-producing chemicals) to which it becomes addicted. Soon the horse would rather crib than eat.
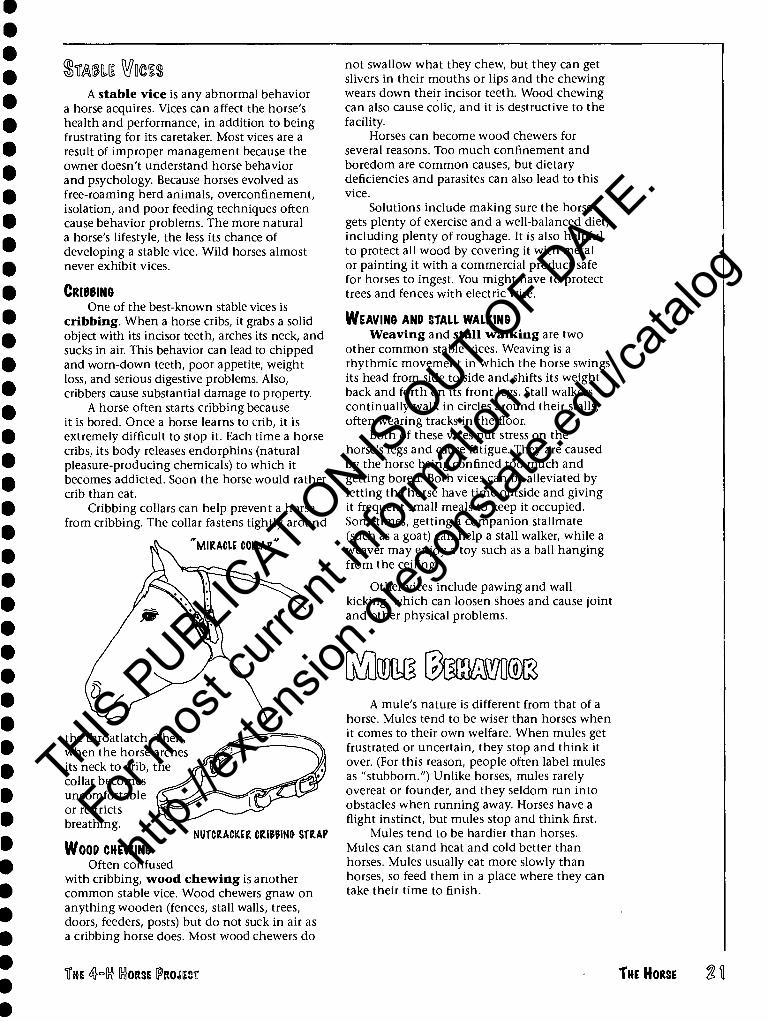
Cribbing collars can help prevent a horse from cribbing. The collar fastens tightly around
the throatlatch. Then, when the horse arches its neck to crib, the collar becomes uncomfortable or restricts breathing.
NUTCRACKER CRIWM& STRAP WOOD CHEWING
Often confused with cribbing, wood chewing is another common stable vice. Wood chewers gnaw on anything wooden (fences, stall walls, trees, doors, feeders, posts) but do not suck in air as a cribbing horse does. Most wood chewers do
not swallow what they chew, but they can get slivers in their mouths or lips and the chewing wears down their incisor teeth. Wood chewing can also cause colic, and it is destructive to the facility.
Horses can become wood chewers for several reasons. Too much confinement and boredom are common causes, but dietary deficiencies and parasites can also lead to this vice.
Solutions include making sure the horse gets plenty of exercise and a well-balanced diet, including plenty of roughage. It is also helpful to protect all wood by covering it with metal or painting it with a commercial product safe for horses to ingest. You might have to protect trees and fences with electric wire.
WEAVING ANP STALL WALKING Weaving and stall walking are two
other common stable vices. Weaving is a rhythmic movement in which the horse swings its head from side to side and shifts its weight back and forth on its front legs. Stall walkers continually walk in circles around their stalls, often wearing tracks in the floor.
Both of these vices put stress on the horse's legs and cause fatigue. They are caused by the horse being confined too much and getting bored. Both vices can be alleviated by letting the horse have time outside and giving it frequent small meals to keep it occupied. Sometimes, getting a companion stallmate (such as a goat) can help a stall walker, while a weaver may enjoy a toy such as a ball hanging from the ceiling.
Other vices include pawing and wall kicking, which can loosen shoes and cause joint and other physical problems.
GffliEsSkeMS A mule's nature is different from that of a
horse. Mules tend to be wiser than horses when it comes to their own welfare. When mules get frustrated or uncertain, they stop and think it over. (For this reason, people often label mules as "stubborn.") Unlike horses, mules rarely overeat or founder, and they seldom run into obstacles when running away. Horses have a flight instinct, but mules stop and think first.
Mules tend to be hardier than horses. Mules can stand heat and cold better than horses. Mules usually eat more slowly than horses, so feed them in a place where they can take their time to finish.
THE 4HH Ctasi PROJECT THE HORSE
THIS P
UBLICATIO
N IS O
UT OF D
ATE.
For mos
t curr
ent in
formati
on:
http:/
/exten
sion.o
regon
state.
edu/c
atalog
to®gOC!](& £\ C[]®B§8
It is important to choose a horse that is the right match for you. There are many types and breeds to choose from, and you need to know what to look for and what each is capable of doing. Also, like humans, horses have individual dispositions or temperaments which are as important as any other factor in making your choice.
The first step in choosing a horse is to make a list of your requirements, taking into account all the factors listed below. If you know what you are looking for, you won't waste time going to see horses that don't meet your needs.
Perhaps the most important thing to do when choosing a horse is to seek expert advice. The wrong choice can be a frustrating, dangerous, unhappy affair. Even an experienced person can benefit from another point of view.
Before you begin looking at horses, consider the following factors.
TIMER'S sxraraes tm MRSIS'S imi m mmmm
A "green" horse and a "green" rider are those who do not have much experience. A young horse and an inexperienced rider do not "learn together," and the combination often results in disappointment or accidents. The rider may become discouraged or frightened and lose interest in horses completely.
The less experienced a rider you are, the more dependable and well-trained the horse should be. A trained horse may cost more money than a young, unbroke, or spoiled horse, but it is the best choice. If you are a more experienced rider, you may want more of a challenge—but be careful not to overestimate your ability.
$>mm\ sozg m® mi The rider's size affects his or her ability
to make the horse perform. Even experienced riders may have trouble on a horse that is too big for them, as their legs may not be long enough to provide proper cues.
Ideally, if the horse is the right size for the rider, the stirrups will be nearly level with the bottom of the heart girth. This gives a secure seat and allows for effective use of leg aids. Generally, a horse should not be asked to carry more than 20 percent of its body weight. Therefore, if the horse weighs 1,000 pounds, the rider should not weigh more than
200 pounds. Since it can be hard to find a horse exactly the right size, it is better to buy a horse that is too big than one that is too small.
Many children begin with a pony, which can give several years of pleasure under saddle or in harness. Ponies also cost less to feed and require less space than a horse. Before buying a pony, be sure to think about how long the child can ride it before it is outgrown.
EM'S MI The horse's age should be consistent with
what the rider desires the horse to do. Horses from 6 to 18 years of age are best for most purposes. Horses under the age of 5 usually are not fully trained (finished), and they may be unpredictable at times.
For more experienced members, choosing a yearling or 2-year-old and doing the training can be very satisfying.
re s umm A stallion is a male horse able to sire (or
father) a foal. Stallions over 12 months old may not be shown in 4-H. It takes an experienced handler to control one.
A mare is a mature female, 3 years or older. Mares are easier than stallions to manage, though they can become moody when in heat. If one of your goals is to raise a foal, a mare is your only choice.
A gelding is a male horse that has been castrated. A gelding is generally considered to be the most even-tempered and dependable horse. Geldings are often preferred for novice and youth riders.
A female horse under the age of 3 is called a filly, and a young male is called a colt. An unweaned horse is a foal.
ffim® hm immm urn Study the characteristics of various breeds
and note those suited to the type of riding you wish to do (or if you want to use the horse for pleasure, showing, sport, or breeding). Some breeds'are better adapted to Western riding, some to dressage, some to jumping, etc. It is not practical to expect a horse to do well at an event that it is not bred to do.
A registered purebred horse is usually more expensive than a grade horse (a horse of mixed origins, not purebred). A crossbred horse
THE HORSE THE 4h[n} tasi PROJECT
THIS P
UBLICATIO
N IS O
UT OF D
ATE.
For mos
t curr
ent in
formati
on:
http:/
/exten
sion.o
regon
state.
edu/c
atalog

sometimes combines desired characteristics of both parent breeds and makes a good riding horse that is less expensive.
(&@)im Unless you are looking for a specific
color breed to show outside of 4-H, such as a Buckskin or Paint, the horse's color should be one of your last considerations. Limiting yourself to a certain color decreases the pool of horses you can choose from.
Good conformation is especially important if the horse will be used for showing, breeding, jumping, or other athletic work. Look for an overall balanced appearance and a smooth blending of all the parts. Learn to recognize common unsoundnesses. Don't worry about blemishes that do not affect serviceability.
Refer to PNW 575, the Horse Judging Manual, for detailed information on conformation.
Mm IMmmsm If you decide to lease a horse or other
animal instead of to buy one, you must have a lease agreement with the owner. All leases should include the following:
• Names of lessor and lessee • Description of the horse (or other animal) • Length of time you are to lease the horse • What you will pay to lease the horse • What you can use the horse for, and
limitations on use of the horse • Facility requirements • What the horse needs in the way of
shoeing, feeding, and health care (including who pays for what)
• What happens in case of the horse's death or injury
• Other considerations as needed
®wm ZJ Gtas
When you try out horses, be sure you have someone knowledgeable with you. Have the owner ride the horse or watch someone else ride it. You should ride the horse two or three different times, making sure you try everything you want the horse to do. Arrive early, so you can watch the horse being caught and tacked up. If possible, take the horse to a different setting to see how it behaves. Ask specific questions. Don't be rushed into buying something. There are a lot of good horses out there!
The horse's price depends on its age, training, and condition. The owner's eagerness to sell, the time of the year, and the availability of that type of animal are also factors. Often horses are less expensive in the fall, because owners don't want to bear the cost of keeping the horse over the winter.
The price may include tack and/or transportation home. Be sure this is agreed upon in advance and in writing.
When you have decided you are interested in a horse, arrange for a prepurchase exam by an independent veterinarian. Tell the veterinarian what you want to use the horse for. That way, she or he will know whether any problems found will make the horse unsuitable for your needs.
Once you've agreed to buy the horse, ask for a sales contract. This contract should include all of the following:
• Names of the seller and buyer • Name of the horse with a detailed
description • Price, what is included in the price (tack,
feed, transportation, etc.) and payment schedule
• Warranties on health and training, or "as is"
• List of known vices • Statement that seller has the right to sell
the horse • Signatures of seller and buyer • Date • Return or void option
Do not pay in cash unless you get a written, signed receipt. Papers on a registered horse should be transferred at the time the final payment is made. You will need to check with the appropriate breed association for specific criteria on how to make this transfer.
Before you buy a horse, make sure you can make the commitment necessary to take proper care of the horse. A horse is a significant investment of time and money. If you are unsure whether you have the time and/or resources to own a horse, you might want to try leasing a horse first.
THE 4hln} DORSI IPROJICT THE HORSE
THIS P
UBLICATIO
N IS O
UT OF D
ATE.
For mos
t curr
ent in
formati
on:
http:/
/exten
sion.o
regon
state.
edu/c
atalog

14 THE « MORSE PROJECT
THIS P
UBLICATIO
N IS O
UT OF D
ATE.
For mos
t curr
ent in
formati
on:
http:/
/exten
sion.o
regon
state.
edu/c
atalog

fe \§mm\ taKTG}
THE 4=[rl} HORSE (PROJECT
THIS P
UBLICATIO
N IS O
UT OF D
ATE.
For mos
t curr
ent in
formati
on:
http:/
/exten
sion.o
regon
state.
edu/c
atalog

te Gtam Eteg It is important to know what the normal
appearance and habits of a horse are so that you can tell if something is not right. Each horse is different, so you need to be aware of what is normal for your horse. Many illnesses begin with very subtle symptoms. The better you know your horse, the faster you will notice any changes and be able to tell when something is wrong. Get in the habit of checking your horse every day. Watch it when it comes into the barn. Watch it eat for a few minutes. Groom daily. All these will help you to spot trouble early.
Also, practice taking your horse's vital signs—temperature, pulse, and respiration (TPR)—so that you can do this quickly and accurately when needed. Be sure you know your horse's normal TPR. To establish a baseline, take readings twice a day for a week (preferably at the same times each day) and calculate the average. Then, if your horse shows signs of a problem, you will quickly be able to determine if a vital sign is abnormal.
The following are signs of a normal, healthy horse.
• Contentment—Looks unworried when resting
• Alertness—Has a bright-eyed attitude and perks up its ears for the slightest reason
• Good appetite—Is eager and demand- ing while feed is being rationed, and eats readily
• Sleek coat—Hair is shiny and smooth, with a healthy "bloom." Skin is pliable and elastic, not dry and tight (hidebound). Pinch a fold of skin on the neck; it should take only 1 or 2 seconds to flatten.
• Bright eyes—Eyes are clear with pink membranes under the lower lid. Fluid is clear.
• Normal feces and urine—Consistency of feces (manure) varies with the diet but usually is firm, not dry. Both feces and urine should be passed without effort and contain no blood, mucus, or pus.
• Intestinal sounds—Gurgles, squeaks, and rumbles are signs that the stomach is moving food normally.
• Normal temperature—Ranges from 99 to 101oE To take a horse's temperature, use an animal thermometer with a string tied to the end. Shake the mercury down (or use a digital thermometer, which is faster). Lubricate the thermometer with lubricating jelly. Stand alongside the hip and insert the thermometer into the rectum; hold for at least 3 minutes. Remove it gently and quickly wipe it clean without touching the bulb end. Read the temperature. If the temperature is 102oF or above when the horse is at rest, the horse is probably ill and may need a veterinarian.
• Normal pulse—Ranges from 32 to 48 beats per minute. Find the artery at the jawbone where it winds around from the inner side, and feel the pulse with the tips of your index and middle fingers. Using a watch's second hand, count the beats for 15 seconds and then multiply by four. If the pulse rate is above 50, the horse may be in distress or suffering from overexertion or abdominal pain (colic). Keep in mind that pulse rates are somewhat higher on young, small, or nervous animals. Rates are also higher when the horse is excited or is being exercised.
• Normal respiration—Rate can range from 8 to 20 breaths per minute at rest. Place your hand on the horse's flank and count the rise and fall rate for 15 seconds, then multiply by four. A horse in good health will pause as though it is holding its breath, but a sick animal may breathe at 30 or more respirations per minute. Exercise, excitement, or hot weather may increase the rate. Breath should smell sweet. Mucous membranes in the nostrils and gums should be a normal pink color and moist.
To avoid horse health problems, start with a management program to prevent illness, parasites, injury, and accidents. Work with one veterinarian so he or she can become familiar with your horse and its health history. Ask your veterinarian to recommend an immunization and deworming schedule.
HEALTH THE ^hlnl KIORSE Woxa
THIS P
UBLICATIO
N IS O
UT OF D
ATE.
For mos
t curr
ent in
formati
on:
http:/
/exten
sion.o
regon
state.
edu/c
atalog
tar £to m ^Jmn m @m
IFotM^i® An equine first-aid kit is a necessity for all
barns. Keep it in a dry, clean place and check it frequently to make sure it contains complete, fresh supplies. Post the veterinarian's phone number by the phone.
All first-aid kits should contain the following:
• Veterinary thermometer and lubricating jelly Antiseptic ointment Antiseptic spray Scissors Sterile, nonstick dressings Roll of cotton Bandages or vet wrap Sponges Latex gloves
Other useful items to have on hand include:
• Iodine • Alcohol • Butazolidin tablets or paste • Epsom salts • Eye wash or ointment • Twitch • Medicine boot • Stethoscope • Hydrogen peroxide • Syringes and needles (disposable) • Tweezers • Watch with second hand
The decision whether to call a veterinarian when a horse is ill or injured depends on each individual's level of experience and knowledge of first aid treatment. Learn which situations require a veterinarian's care, and know what you can do before a veterinarian arrives. You can treat minor injuries and some illnesses, but contact a veterinarian immediately if you have
any doubts or questions. Prompt and proper treatment can mean the difference between a minor incident and a disaster.
Following are examples of times to call a veterinarian:
The horse's temperature is 102oF or higher. The horse appears to be in shock (symptoms of shock are on page 28). A pressure bandage on a wound does not stop the bleeding. The horse is very lame. A wound is a deep puncture. A wound is deeper than the skin and is near the eyes, mouth, joints, or tendon sheaths. Infection appears in any wound. The horse shows signs of colic. The horse's appetite decreases or it is off its feed for 12 to 24 hours. The horse has a cough that steadily worsens, is wheezy, or seems painful. You suspect a broken bone. The horse is choking with excessive salivation. The horse has persistent diarrhea. A mare is having difficulty foaling.
While waiting for the veterinarian to arrive, do not put any medication on wounds, do not feed or water the horse unless you have been instructed to do so, restrain the horse from injuring itself, and keep calm.
When the veterinarian arrives, have the following information ready, if you can:
• Detailed medical history, including normal TPR and vaccination schedule
• Horse's temperature • Horse's heart rate (especially if you
suspect colic) • Duration of the illness/problem • Changes in routine or environment • Changes in feed or feeding habits
While the veterinarian is working on the horse, help by holding the horse firmly by the halter. Stand on the same side as the doctor. Remain quiet while the doctor uses the stethoscope to check the stomach and respiration.
Control the horse with as little restraint as possible. It is better not to tie it up. Begin by
THE 4rU UtasE PROJECT HEALTH n
THIS P
UBLICATIO
N IS O
UT OF D
ATE.
For mos
t curr
ent in
formati
on:
http:/
/exten
sion.o
regon
state.
edu/c
atalog
scratching the withers or forehead and giving the command "Whoa." Try a light, steady tap on the forehead with a finger. When a leg is being treated, hold up another foot to help keep the horse from stamping. If the horse won't keep still, try using a chain lead shank over the nose.
Holding a fold of skin on the neck firmly just above the shoulder can also be effective. A firm hold and slight twist of the ear also can control the horse, but be careful not to damage cartilage.
A twitch is a common device used to control a horse. It can be a loop of rope or a chain attached to a stick, or a clamp-type "humane" twitch. To apply the twitch, reach through the loop or clamp with your hand and grasp the horse's upper lip. Fold the lip edges together, slip the loop over the lip, and quickly twist or tighten it. Do not tighten it more than is necessary to keep it from slipping, and release it as soon as possible.
If all other methods fail, a veterinarian may use a tranquilizer to quiet the horse.
Write down all instructions for the horse's care, and follow them exactly. Never stop prescribed treatment just because the horse seems better.
Gently clean abrasions to remove all debris from the wound. Use a cold water hose. Pat dry and apply antiseptic. Large wounds may require stitching.
For severe bleeding, apply a pressure bandage, not a tourniquet. Be sure the pressure is applied evenly on and around the wound. Do not panic if the blood loss seems great. The average horse can lose up to 4 gallons of blood without severe stress. After 15 to 30 minutes, remove the bandage. Call the veterinarian if the bleeding does not stop.
A common aftermath of wounds is proud flesh, a red lumpy mound filling the wound. Healthy new tissue should be pink and velvety. Proud flesh may develop if the wound was not cleaned thoroughly; irritating, harsh soap or medications were used; or the bandage was too tight. Proud flesh prevents normal tissue from forming and must be stopped early. If you suspect proud flesh is developing, or the wound in any other way looks unhealthy, contact a veterinarian.
thoroughly and treated. The key is to keep the puncture open so that it can drain.
Punctures to the sole of the foot are common and often lead to abscesses. Skin punctures may be caused by fence wire or wood splinters.
Tetanus bacteria in a puncture wound is a serious concern. Be sure your horse is current with its vaccination. If its last booster was more than 5 to 6 months ago, give it another one.
Tying a horse on a long line to graze or tying it with too long a lead rope often results in rope burns, especially on the rear pasterns. The wound may have cut to the bone or merely scraped off the hair, but all rope burns should be treated depending on severity (see wounds) to avoid lameness and a slow-healing injury.
Wmm dm Weeping and squinting may be caused
by a cut or scrape of the eyeball, an allergy, a bruise, a bit of dirt or seed under the eyelid, or irritation by flies. Other irritants may be dusty feed, ash, pollen, or other material in the environment. A simple eye wash may clear this up. If the problem continues, contact a veterinarian.
§mm% km Qmrnm Bleeding under the skin causes a bruise.
Immediately apply an ice pack or cold water directly from a hose to help stop the swelling. Continue treatment for at least 20 minutes and repeat in an hour. If the swelling persists or increases, call a veterinarian.
When normally active horses are kept stalled without exercise, they may develop swelling in the legs. This is known as stocking-up and is most common in the hind legs. Exercise and proper wrapping of the legs help reduce the swelling.
Punctures are deep wounds with small openings that tend to close quickly. These easily become infected if they are not cleaned
Shock is the result of extreme stress from disease or injury. Call the veterinarian immediately. Signs of shock include depression, rapid breathing, pale gums, low temperature, cold lower legs, and shallow and/or rapid pulse.
While waiting for the veterinarian, keep the horse warm and quiet. Noise can cause more stress. Handle the horse gently and calmly.
HEALTH THE 4hM MORSE PROJECT
THIS P
UBLICATIO
N IS O
UT OF D
ATE.
For mos
t curr
ent in
formati
on:
http:/
/exten
sion.o
regon
state.
edu/c
atalog

©ouc Colic is a general term for any abdominal
pain in a horse. Due to its extremely sensitive, unique digestive system, the horse is quite susceptible to colic; and colic can be fatal. There are several types of colic, ranging from mild to severe. Because the signs are similar, it is hard to tell whether a horse has a mild case or whether the situation is life-threatening. Call a veterinarian immediately when you suspect colic.
Signs of colic may include any of the following:
Looking at the abdomen Nipping or kicking at belly Rolling violently Getting up and down frequently Sweating Abdomen abnormally quiet Pawing and/or grunting Increased pulse rate (over 60 beats per minute) Abdominal distention Depression Off feed
While waiting for the veterinarian to arrive, do not give the horse any food or water. Also, do not give the horse any medication, as this may mask pain and other signs that could aid the veterinarian in determining the type of colic and treatment needed. It is rare for rolling to cause an intestine to twist, but if the horse tries to roll excessively, walk it slowly. Otherwise, it is best to let the horse stand or lie quietly; overwalking will tire it and may cause it to go into shock.
Many things can cause colic, and some horses are more susceptible than others. Any of the following may be factors that lead to colic:
Parasites Sudden changes in diet Not chewing food properly (bolting food) Eating too much at one time Poor quality feed (too coarse or moldy) Irregular feeding Lack of water, or too much icy water when the horse is hot Working on a full stomach Poor dental health ' Ingesting sand Stress Gas
The type of colic determines the method of treatment. Types of colic include spasmodic colic, impaction colic, displacement colic, and excessive fermentation.
Spasmodic colic is the most common type. It usually is not life-threatening. Muscular
spasms of the intestinal tract cause mild to moderate pain. Sudden changes in diet and overexcitement are common causes. An anti-inflammatory drug or other pain relief medication is usually enough to relieve the horse.
Impaction colic occurs when there is a blockage in the intestine, and the contents of the intestines stop moving. This happens most often in the large colon. The blockage can be caused by poorly digested food, sand, an enterolith (a hard lump produced by the concretion of mineral salts), or swallowed foreign matter. It is sometimes possible to use mineral oil, liquid paraffin, or stool softeners to lubricate the blockage and move it along. Other times, surgery is necessary.
In displacement colic, a part of the intestine is twisted or becomes trapped in other abdominal structures. This is extremely serious, and surgery usually is required to save the horse's life. It must be done promptly, or the affected section of intestine may die.
Excessive fermentation (or tympanitic colic) occurs when the contents of the stomach ferment more rapidly than they can be eliminated, forming a large quantity of gas. This often happens when a horse eats too much grain. Chemical changes decrease the flow of blood to the hooves, which can cause founder and even death. This type of colic is difficult to treat. Medicine may not relieve the gas pressure, and surgery is not always successful.
PREVENTION There are several things you can do to help
prevent colic. Deworm your horse regularly, as parasites are the leading cause of colic. Make sure clean, fresh water is always available. Provide regular dental care to make sure your horse can chew its food properly. Make any changes in routine or environment gradually to save the horse from stress.
Proper feeding is crucial in preventing colic. Feed high-quality foods, and feed often in small amounts. Make feed changes gradually over the course of about 2 weeks. Feed in a manger rather than on the ground, as the horse can ingest sand and/or parasites. Horses that are kept on pasture all the time seldom have colic.
laMIMS§§ Most lameness occurs in the front legs,
because they carry two-thirds of the horse's weight. Also, most lameness problems occur from the knee or hock down—almost 90 percent of all lameness is caused by a problem in the feet.
T« 4-$ tesi IPRMICT HEALTH
THIS P
UBLICATIO
N IS O
UT OF D
ATE.
For mos
t curr
ent in
formati
on:
http:/
/exten
sion.o
regon
state.
edu/c
atalog
If a horse becomes lame, check its legs for wounds and carefully inspect the hooves for imbedded rocks or nails, puncture wounds, or loose shoes. If the lameness is worse on rough ground, suspect a problem in the hoof.
Learn to tell which leg is lame. Have someone trot the horse, and watch its head movement from the side. At a normal trot, the head has very little up-and-down motion. But if the horse limps or favors a front leg, the head will drop as it puts extra weight on the sound leg. Trotting in a circle on the longe line puts more strain on the inside legs. If the lameness doesn't show in one direction, reverse.
If the horse seems to be lame in a rear leg, have someone trot it directly away from you and watch the hips. The hip on the sound leg will dip, but the hip on the lame side will stay higher and seem to bounce upward. In severe cases, you may see some head movement as well.
After you have identified the lame leg, test each part to find the sore spot. Encircle the leg with your hands, and squeeze each area very firmly until the horse reacts. Feel for swelling and heat. Test the opposite leg for comparison. Be very careful with the hind legs to avoid being kicked. Try bending each joint and holding it for 30 seconds, then release it and have the horse trotted away. Again, do each side for comparison.
Treatment depends on what has caused the lameness. Some lameness can be treated easily with cold water or time off; some requires a veterinarian's care.
Many people are using alternative methods of treatment for their horses, especially when the horse is not responding to traditional care. These therapies should not replace standard veterinary medicine, but can be used with traditional treatments in an integrated approach to healing the horse. Your veterinarian should still be your first contact for an equine health issue. Always consult your veterinarian before you begin an alternative treatment, and get a recommendation for a licensed and reputable practitioner.
One of the most common alternative therapies is chiropractic treatment. A chiropractor manipulates the horse's spine to correct misalignments and restore the spine to its normal position. This reduces back pain, improves flexibility, and increases the range of motion. Be sure you use a licensed practitioner, because the spine can be damaged if the treatment is not done properly.
Massage is also a popular alternative therapy. Massage manipulates the soft tissues by rubbing and kneading with fingers and elbows. Massage can loosen tight muscles, ease spasms, stimulate blood flow, and restore or increase range of motion. Massage is also a good way to relax the horse and relieve stress. One caution: if the horse is very sore, massage may make the condition worse.
Another alternative is acupuncture, an ancient Chinese medicine which may relieve a horse's pain, especially arthritis pain. Acupuncture stimulates certain points with needles. The stimulation increases the flow of blood to the area which helps in the healing process. The needles also trigger the release of endorphins, pain-relieving proteins naturally produced by the body. There are usually no side effects to acupuncture, though extremely sensitive horses may develop some inflammation at the needle insertion site.
The use of magnet therapy in treating horses is gaining support. Blood contains electrically charged particles, and placing magnets over the sore area is believed to attract more blood to the spot. The increased . circulation hastens healing. For best results, the magnets are supposed to stay in place for some time, so they are often found sewn into blankets, boots, or pads.
Homeopathy uses tiny amounts of natural substances to treat horses. While there is not much scientific evidence to support this type of therapy, it does not harm the horse. Nor will it mask signs as drugs often do. You must use care, though, because larger amounts of these substances can actually cause disease.
Other types of alternative therapies include herbology, which uses plant material instead of drugs; electric stimulation, in which a machine delivers an electrical current to muscles or nerves; and radiant energy, which uses light or sound waves to increase the horse's circulation.
s© HEALTH THE 4°[n} MORSE PROJECT
THIS P
UBLICATIO
N IS O
UT OF D
ATE.
For mos
t curr
ent in
formati
on:
http:/
/exten
sion.o
regon
state.
edu/c
atalog
(tow feWTTO
It is usually cheaper to prevent disease than to treat a sick animal. You can help prevent disease by doing the following:
• Follow a vaccination program recommended by your veterinarian.
• Keep the animal clean and groomed. • Keep the animal's quarters clean. When
moving into a facility, it is a good idea to disinfect or bleach the entire stall before you move the horse in.
• Never share feed or water buckets. Sanitize buckets periodically, and always after a horse has been ill.
• Do not share grooming supplies, tack, or other equipment.
• Isolate sick animals. • Avoid letting your horse come into
contact with strange animals. • Wash your hands between working with
different horses.
A vaccination program is extremely important in preventing disease. Vaccination protocols vary depending on your location and individual veterinarian preference. You should talk with your veterinarian about a vaccination schedule for each horse you own. This schedule should include which vaccinations to give, when to give them, and what type they are (for example, subcutaneous, intramuscular, or nasal). Your veterinarian also can teach you how to give shots correctly and safely.
For up-to-date vaccination recommen- dations, you may also consult the AAEP (American Association of Equine Practitioners) schedule of "Guidelines for Vaccination of Horses." You can find this on their website, or ask your veterinarian.
lows Srocspimoftflrams Commonly called sleeping sickness,
equine encephalomyelitis is a viral infection that causes inflammation of the brain. It is contagious to humans. Three strains are commonly recognized: Eastern equine encephalomyelitis (EEE), Western equine encephalomyelitis (WEE), and Venezuelan equine encephalomyelitis (VEE).
All types are spread by insects. Mosquitoes are the main carrier, but mites, ticks, and lice also may transmit the disease. The insect bites an infected animal, usually a wild bird or
rodent, and then bites and feeds on a horse, spreading the disease.
Signs are the same for all three strains and usually appear 7 to 21 days after a bite from an infected mosquito. The first signs are fever, depression, and loss of appetite. The horse may grind its teeth and have trouble swallowing. Later, problems with the central nervous system appear. There may be ataxia (poor coordination), and the horse may circle, walk aimlessly, or appear blind. Convulsions or tremors may occur. Eventually, the horse may show paralysis or go into a coma.
WEE has the lowest mortality rate, at 20 to 50 percent. VEE has a mortality rate of 40 to 80 percent, while EEE has a mortality rate of 75 to 90 percent. Horses that survive often have lasting neurological effects such as clumsiness or depression.
Vaccination is the best prevention for this disease. Horses need annual boosters in the spring before the mosquito season. Insect control also can help prevent the spread of the disease. Use repellents on your horse, and eliminate any standing, stagnant water where mosquitoes can breed.
fct fcs WBW This mosquito-borne virus causes
encephalitis (inflammation of the brain). It was first detected in the United States in 1999, in New York. It has since spread to almost every state. Horses are affected more than any other domestic animal. Most horses usually recover fully from the disease, but one-third of infected horses die.
Horses are incidental or "dead-end" hosts to the virus. This means that infected animals do not pass the disease on to other animals. There is no horse-to-horse or horse-to-human transmission. Mosquitoes get the virus from infected birds (crows and jays are common carriers), then transmit the virus when they feed on a horse.
In horses, signs of the virus appear 5 to 15 days after infection. These signs include ataxia, depression, weakness of limbs, partial paralysis, muscle twitching or tremors, wandering or circling, altered gait, convulsions, and loss of appetite. There is usually no fever.
There is no specific treatment for West Nile virus, only the standard veterinary care used for any viral infection. Horses are euthanized when the infection is so severe that the horse is not able to recover.
THE 4Hln} Uom PROJECT HEALTH
THIS P
UBLICATIO
N IS O
UT OF D
ATE.
For mos
t curr
ent in
formati
on:
http:/
/exten
sion.o
regon
state.
edu/c
atalog
All horses should be vaccinated against this disease. The initial vaccine is given in a series of two injections that must be 3 weeks apart. Yearly boosters then are required, which should be given before peak mosquito season.
Practice mosquito control. Eliminate standing water where mosquitoes can breed, and clean water troughs weekly. Keep horses inside during dawn and dusk, as this is when mosquitoes tend to be the most active. You can also treat your horse with a mosquito repellent.
Equine infectious anemia (EIA) is a viral disease of horses, donkeys, and mules. It is sometimes called swamp fever. The disease is spread when blood from an infected horse is transferred to another horse, most commonly by horseflies and deerflies. However, the virus also may be spread by unsterile hypodermic needles or from a pregnant mare to her fetus.
Cases may be acute or chronic. In an acute case, the horse may have a high fever, depression, swelling in the belly and legs, and yellow, inflamed mucous membranes. About one-third of infected horses die within a month.
Horses that recover remain infected all their lives. They show chronic symptoms, such as anemia, weight loss, and exhaustion, and they become carriers of the disease. Stress can trigger an acute attack at any time.
Currently, there is no cure for EIA, nor is there any vaccine to prevent it. The only control is screening for the virus by performing a Coggins test. This blood test must be done by a state-approved laboratory. A horse will test positive if there are EIA antibodies in its blood, which means the horse is an infected carrier of the disease. Most states, countries, horse shows, and race tracks require recent negative Coggins tests before allowing horses to enter. Any horse that tests positive must be reported to state and federal authorities. Such animals usually are euthanized.
IMA Equine influenza (flu) is a viral respiratory
disease. It is one of the most common horse diseases and is extremely contagious, often becoming an epidemic.
The virus is found in a horse's nasal discharge and spreads easily from horse to horse. It can be transmitted by direct contact, by a horse coughing up to 100 feet away, or by the wind carrying droplets up to 4 miles away. Handlers' clothing and skin, grooming supplies, and blankets all can be contaminated and spread the virus.
Most infected horses show symptoms within 1 to 5 days. Typically, the horse has a fever, a dry, hacking cough, and clear nasal discharge. After a few days, the cough becomes moist and the nasal discharge thick and colored. The horse may be lethargic and easily tired. Loss of appetite is also a common symptom.
The main treatment for equine influenza is rest. Do not work the horse for 3 weeks, so the lining of the respiratory tract can heal. With rest and good nursing care, most horses recover completely within a few weeks.
Vaccinations are effective in preventing this disease, but the vaccine's protection only lasts 3 to 4 months. High-risk horses, such as those that travel to many shows or that are in contact with many other horses, may need to be vaccinated two to four times per year. Horses that have very little chance of exposure to the virus may only require a yearly booster.
Equine rhinopneumonitis is caused by the equine herpes virus (EHV). There are two distinct types.
EHV-4 (snots) is common in young horses, particularly foals and yearlings. Signs include fever, depression, loss of appetite, gold-color nasal discharge, and swollen lymph glands. The horse may be sick for several weeks, but the death rate is quite low. Mature horses usually develop an immunity to this type.
EHV-1 is the more serious type, causing abortion in pregnant mares. It can also cause respiratory disease and paralysis. Horses do not develop immunity to this form of the disease.
Rhino vaccines provide only short- term immunity. Pregnant mares should be vaccinated in their 5th, 7th, and 9th months of pregnancy. Foals and young horses often are vaccinated at 2- to 3-month intervals. Older horses should be vaccinated every 2 to 12 months depending on the risk.
IPoTORfflAC KIMS (PSM Potomac horse fever (PHF) is a disease
caused by the parasite Ehrlichia risticii. This disease is most common in the eastern United States, but it does occur elsewhere. (Recently, a disease known as the "Shasta River Crud" in California was found to be caused by the same organism.) PHF is a seasonal disease, and the majority of cases occur in the summer.
It had been thought that PHF was spread by ticks, but current research indicates that freshwater snails might be the carriers. If this is true, keeping horses away from water where the snails live would prevent the disease.
HEALTH THE 4hlnl MORSE PROJECT
THIS P
UBLICATIO
N IS O
UT OF D
ATE.
For mos
t curr
ent in
formati
on:
http:/
/exten
sion.o
regon
state.
edu/c
atalog
The signs of PHF are fever, severe diarrhea, mild colic, loss of appetite, and depression. Laminitis can be a serious complication. Antibiotics are used in treatment, but the success rate varies.
Vaccinate horses that live in or are traveling to areas where this disease has been confirmed.
Strangles is an upper respiratory disease caused by the bacterium Streptococcus equi. It is very contagious, and the bacteria may survive in a barn or paddock for up to 2 months.
Discharges from the nose and burst abscesses spread the disease. This can happen through direct contact or through contamination of equipment such as water buckets, brushes, or tack.
The most common sign of strangles is swollen lymph glands under the jaw or at the throatlatch. Severe swelling restricts the air passages, causing the horse to have difficulty breathing and creating a "strangled" sound. Abscesses may form, which usually break and drain pus in 10 to 14 days. Fever, loss of appetite, listlessness, and nasal discharge are other signs of strangles.
Isolate affected horses immediately. Disinfect all feed and water containers, stall walls, grooming supplies, and tack. Abscesses may need to be lanced and drained. Rest is the most important treatment. Most horses recover from strangles, but they should stay isolated and rest for up to 3 months.
Whether or not to vaccinate for strangles remains controversial. Current vaccines do not completely protect a horse from getting strangles, and many problems are reported with reactions to the vaccine. Therefore, many adult horses are not vaccinated for this disease unless they are in a high-risk environment. Consider vaccinating young horses or any horse that is going to a site where strangles has recently occurred.
fSMIM
$Mm Rabies affects all warm-blooded animals.
Horses rarely get rabies, but when they do, it is 100 percent fatal.
Signs of rabies vary greatly. Horses may get extremely agitated and become unmanageable. Behavior may be bizarre, changing from depression to aggression. Colic, lameness, and muscle spasms are also common. Death usually occurs in 4 to 5 days.
Vaccinate horses kept in areas where rabies is found, especially those exposed to wildlife.
Tetanus is a serious disease caused by the bacterium Clostridium tetanus, which is found in soil. The bacteria usually enter the horse's body through a puncture wound. They multiply and produce a powerful toxin that affects the horse's nervous system.
Signs include lameness, a stiff-legged gait, muscle spasms, and a stiff, held-out tail. The third eyelid may cover the front of the eye. Swallowing becomes difficult and the horse is unable to eat (which gives this disease its common name, lockjaw).
The horse is the most susceptible animal to tetanus. Treatment is difficult, expensive, and not often successful; tetanus is fatal in more than 80 percent of cases. For this reason, vaccinations are important to prevent this disease. Annual boosters are recommended. Horses also must receive a booster following lacerations or puncture wounds if their last booster was more than 5 to 6 months previous.
Unmmmmm » EPM is a degenerative disease of the central
nervous system. It is the primary cause of serious, permanent neurological problems in a horse. EPM has been reported in almost all parts of the country, and it is estimated that over 50 percent of horses in the United States have been exposed.
EPM is caused by the protozoal organism Sarcocystis neurona found in opossums. The horse is infected when it eats feed or drinks water that has been contaminated by opossum feces. As with West Nile virus, horses are "dead- end" hosts and cannot transmit the disease to others.
Signs of EPM vary widely in severity and depend on where the damage to the nervous system has occurred. They are almost always asymmetrical (not the same on both sides of the body). Signs include ataxia, weakness, muscle loss or atrophy, difficulty swallowing, and paralysis of the eye, face, or mouth muscles.
The way a horse responds to infection also varies. Some horses seem to have an effective immune response and fend off the disease. Some carry the infection for years before developing symptoms, while others succumb rapidly, especially if under stress. Three factors appear to affect the progression of the disease: the number of organisms the horse ingested, the amount of time the horse was infected before treatment began, and the location in the brain or spinal cord where the damage occurs.
THE 4hln} CtasE ^MMECT HEALTH
THIS P
UBLICATIO
N IS O
UT OF D
ATE.
For mos
t curr
ent in
formati
on:
http:/
/exten
sion.o
regon
state.
edu/c
atalog
EPM is difficult to diagnose because the anti-inflammatory drugs), and antiprotozoal signs are similar to many other diseases. A medications. These medications may rid the Western Blot analysis on cerebrospinal fluid is horse of the protozoa, but they cannot repair used to diagnose EPM, but this only tells you damage to the nervous system that was done if the horse has been exposed to 5. neurona and before treatment began, has developed antibodies. It does not tell you if You can help prevent EPM by limiting the horse has or will develop the disease. the horse's exposure to opossum feces. Keep
Early diagnosis and treatment give a opossums out of hay storage areas, and keep horse the best chance for recovery from EPM, grain bins tightly sealed. Use feeders that and 60 to 70 percent of horses do recover minimize spills, and keep water tanks clean, fully. Treatment may include broad-spectrum Maintaining your horse's health and fitness will antimicrobials, NSAIDS (nonsteroidal help it fend off infection.
S4 HEALTH THE Q-U DORSE (PROJECT
THIS P
UBLICATIO
N IS O
UT OF D
ATE.
For mos
t curr
ent in
formati
on:
http:/
/exten
sion.o
regon
state.
edu/c
atalog
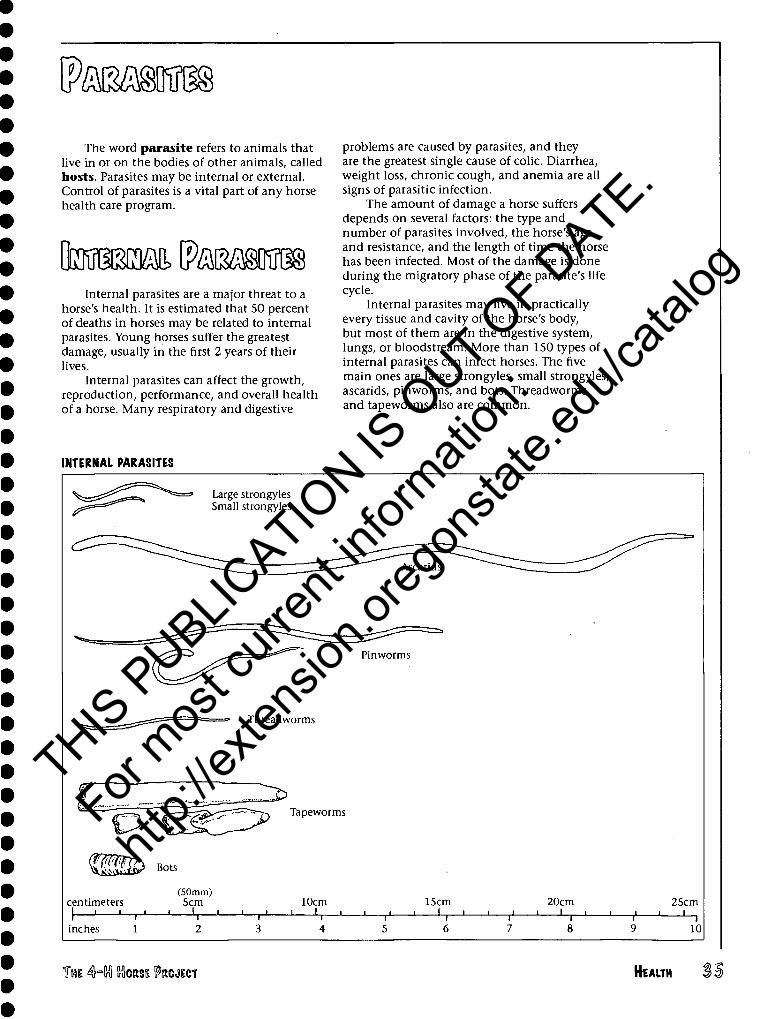
ta£\§[M
The word parasite refers to animals that live in or on the bodies of other animals, called hosts. Parasites may be internal or external. Control of parasites is a vital part of any horse health care program.
tascm P/^MKHS Internal parasites are a major threat to a
horse's health. It is estimated that 50 percent of deaths in horses may be related to internal parasites. Young horses suffer the greatest damage, usually in the first 2 years of their lives.
Internal parasites can affect the growth, reproduction, performance, and overall health of a horse. Many respiratory and digestive
problems are caused by parasites, and they are the greatest single cause of colic. Diarrhea, weight loss, chronic cough, and anemia are all signs of parasitic infection.
The amount of damage a horse suffers depends on several factors: the type and number of parasites involved, the horse's age and resistance, and the length of time the horse has been infected. Most of the damage is done during the migratory phase of the parasite's life cycle.
Internal parasites may live in practically every tissue and cavity of the horse's body, but most of them are in the digestive system, lungs, or bloodstream. More than 150 types of internal parasites can infect horses. The five main ones are large strongyles, small strongyles, ascarids, pinworms, and bots. Threadworms and tapeworms also are common.
INTERNAL PARASITES
Large strongyles Small strongyles
Pinworms
Threadworms
:z> Tapeworms
Bots
centimeters I i i i i
(50mm) 5 cm
—IT-
10cm 15cm 20cm 25cm L
inches 10
THE 4~!n} tasE IPROJIICT HEALTH
THIS P
UBLICATIO
N IS O
UT OF D
ATE.
For mos
t curr
ent in
formati
on:
http:/
/exten
sion.o
regon
state.
edu/c
atalog

tm^ StROMmss tewo^OTHMS Large strongyles are the most common
internal parasite and are also the most harmful. While the adults remain in the large intestine, the larvae migrate extensively through many of the horse's organs, and severe tissue damage can result.
The adults are long, fat worms, reddish in color (because they feed on their host's blood). They bite off pieces of the large intestine and actively suck blood. This causes anemia in the horse, as well as weakness, diarrhea, and weight loss.
The life cycle of large strongyles begins when the horse swallows eggs in its feed. The larvae migrate through various organs, ending up as adults in the large intestine. The adults lay thousands of eggs daily which are expelled in feces and contaminate the feed.
There are three significant species of large strongyles: Strongylus vulgaris, Strongylus endentatus, and Strongylus equinus. S. vulgaris is by far the most dangerous. Causing up to 90 percent of all colic cases, this parasite is sometimes known as "the Killer." The larvae penetrate the walls of arteries that provide blood to the intestines. This disruption of blood flow in the digestive tract causes colic. S. endentatus and S. equinus are not as dangerous as S. vulgaris. Their larvae migrate only within the liver before returning to the large intestine to mature.
%Mm %mmwm The damage done by small strongyles
is much less severe than that done by large strongyles. They do not migrate beyond the lining of the intestine, they are only loosely attached to the intestinal wall, and usually they do not suck blood.
An infestation of small strongyles may cause colic, and diarrhea is common. Weight loss and ulcers in the colon also may occur. Signs include anemia, dark or black feces, and soft feces with a foul odor.
The life cycle of small strongyles begins when horses feed on grass contaminated with larvae. After they are ingested, the larvae migrate to the large intestine, where they mature into adults and begin laying eggs. The eggs of adult small strongyles are expelled in feces. Larvae develop and contaminate grass, and the cycle begins again.
Ascarids (Parascaris equorum) are the largest of the five main internal parasites. They look
like large, white earthworms, up to 22 inches long and V2 inch wide.
Ascarids mainly affect foals and young horses. Mature horses that have been exposed to roundworms over time usually develop an immunity and are not affected.
During larval migration, the liver and lungs can become inflamed and scarred. Adult worms can cause intestinal blockage, which leads to colic. The main danger of an ascarid infestation is rupture of the small intestine. A rupture may cause peritonitis, which can be fatal.
Signs of a horse with ascarids are a pot belly, rough coat, slow growth, diarrhea, nasal discharge, and cough.
The life cycle of ascarids takes about 3 months to complete. The horse swallows eggs found on feed or in water. The eggs hatch in the small intestine, and the larvae burrow into the intestinal wall. There they enter the bloodstream, migrate through the liver and heart, and finally reach the lungs. In the lungs, they move to the respiratory passages, where they are coughed up and reswallowed. They return to the small intestine where they mature and lay eggs.
An adult roundworm can produce 200,000 eggs per day. The thick-shelled eggs are extremely resistant to freezing or drying. In a pasture or stall, they can remain infective for years. Because the eggs are almost always present, roundworms are very common. It is important to deworm foals every 2 months through their first year.
Pinworms (Oxyuris equi) are the least harmful of the common internal parasites. Mainly, they irritate the area around the tail. The horse rubs this area to get relief, and can suffer hair loss and wounds as a result.
Adult pinworms are thin and usually 3 to 6 inches long. They are common in foals but are seldom found in mature horses.
A pinworm's life cycle has no migratory phase. The eggs are ingested and develop in the colon. The adults live in the colon and rectum. Eggs are laid around the anus, where they cause irritation. The eggs drop off and contaminate the feeding area. The entire life cycle takes about 5 months.
Bots refers to the larvae of the bot fly, which looks like a honey bee. In summer and early fall, the fly lays yellow eggs on the horse's hair, especially on the legs. As the horse licks the eggs, they hatch, and the small larvae attach to the tongue and burrow in the
HEALTH THE 4HI}{} HORSE IPROJIECT
THIS P
UBLICATIO
N IS O
UT OF D
ATE.
For mos
t curr
ent in
formati
on:
http:/
/exten
sion.o
regon
state.
edu/c
atalog
mouth. In about 3 weeks, a second larval stage is swallowed and attaches to the lining of the stomach. After another 9 months, the larvae are expelled in the manure, where they pupate into flies.
The entire cycle takes 1 year. The larvae winter in the horse's stomach, are expelled in the spring, and develop into adult flies in the summer. Therefore, the time to deworm for bots is mid- to late summer and after a killing frost.
Bots affect horses of all ages. They usually cause little damage, but a large infestation can damage the stomach wall, even causing a rupture.
The best prevention is to remove all bot eggs from the horse's hair. Do this where the horse does not graze, so eggs do not contaminate the feed.
fTOOTTOM Threadworms (Strongyloides westeri) mainly
affect young foals. The foal usually gets the larvae in the dam's milk, although larvae in the bedding may also penetrate its skin. The larvae migrate through the lungs and the small intestine. The entire life cycle of the threadworm takes less than 2 weeks.
The main complication of a threadworm infection is diarrhea, which can be severe enough to cause dehydration. Foals quickly develop an immunity, and threadworms generally disappear by the time the foal is 6 months old.
mmm§ Tapeworms affect horses of all ages.
Tapeworms are not found in all areas, because they require an intermediate host: the orbatid mite. A horse swallows the mite, and the tapeworm matures 2 to 4 months later.
There are two common species of tapeworm. Anoplocephala perfoliata is the most common. It is the smaller of the two and is found in the cecum see "The Digestive System," page 60). Anoplocephala magna is larger and is found in the small intestine.
Tapeworms can cause digestive problems, including intestinal blockage and colic. They can also cause ulcers.
faromuMfc QmiiiiMi IPARASITISS All horses have parasites. You can never
completely get rid of them, but you can keep them under control through proper management techniques. The key is to interrupt the life cycle of the worms. There are several methods to do this; manure cleanup,
pasture rotation, and deworming are the main ones.
MANURE CLEANUP Parasites are spread mainly through
manure. Therefore, if you dispose of manure properly, you can greatly decrease the number of worms.
Clean stalls regularly, removing all manure and wet bedding.
It is best to feed in a manger and disinfect it periodically. This prevents manure from coming into contact with the horse's feed. Also, be sure to keep manure out of any water source.
Do not spread fresh manure on pastures. Instead, compost the manure, making sure it gets hot enough to destroy parasite eggs.
Pick manure out of small paddocks or corrals every few days. Drag pastures during hot, dry weather. This breaks up the droppings and exposes eggs to the sun's ultraviolet rays.
PASTURE ROTATION Rotate pastures every 2 months. Avoid
overgrazing, because there are more parasites on the lower parts of the grass. Also, do not overcrowd pastures. The more horses on a pasture, the more eggs deposited.
Most internal parasites live in only one species of animal. Therefore, rotating species on pastures can help break the worms' life cycles. For example, alternate sheep or cows with horses on a pasture. It is important to note that grazing different animals together at the same time does not help to reduce parasites; they must alternate time on the pasture.
DEWORMING The purpose of deworming is to kill
mature parasites before they lay eggs. No single schedule of deworming fits all horses. The horse's age, the season, climate, and the number of horses in the area all make a difference in how often deworming is needed. Most veterinarians agree, though, that horses should be dewormed at least four times per year. Current research shows that deworming treatments need not be evenly spaced. It is more effective to deworm more frequently in autumn through spring and not necessary to deworm in the summer.
The most common type of dewormer is paste, but sometimes powders and stomach tubes are used. Daily dewormers are also available and are becoming more popular.
Whatever type of dewormer you choose, it is important to know what its active ingredient is. Different drugs are effective on different parasites, so you need to choose the proper drug for the type of worm your horse may have. Also, parasites can become resistant to drugs, so it is important to rotate the type
THE 4hln} Ctass ^ROJICT HEALTH in
THIS P
UBLICATIO
N IS O
UT OF D
ATE.
For mos
t curr
ent in
formati
on:
http:/
/exten
sion.o
regon
state.
edu/c
atalog
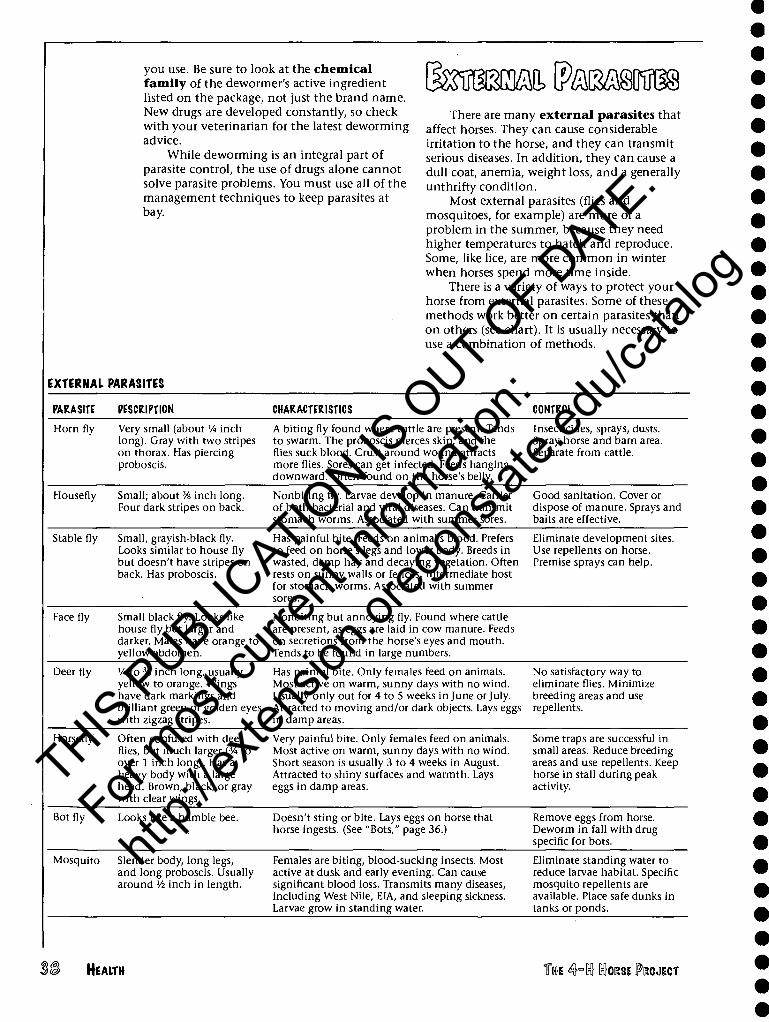
you use. Be sure to look at the chemical family of the dewormer's active ingredient listed on the package, not just the brand name. New drugs are developed constantly, so check with your veterinarian for the latest deworming advice.
While deworming is an integral part of parasite control, the use of drugs alone cannot solve parasite problems. You must use all of the management techniques to keep parasites at bay.
HsfflSBcm StaaM There are many external parasites that
affect horses. They can cause considerable irritation to the horse, and they can transmit serious diseases. In addition, they can cause a dull coat, anemia, weight loss, and a generally unthrifty condition.
Most external parasites (flies and mosquitoes, for example) are more of a problem in the summer, because they need higher temperatures to hatch and reproduce. Some, like lice, are more common in winter when horses spend more time inside.
There is a variety of ways to protect your horse from external parasites. Some of these methods work better on certain parasites than on others (see chart). It is usually necessary to use a combination of methods.
EXTERNAL PARASITES
PARASITE PESCRIPTION CHARACTERISTICS CONTROL
Horn fly Very small (about V4 inch long). Gray with two stripes on thorax. Has piercing proboscis.
A biting fly found where cattle are present. Tends to swarm. The proboscis pierces skin, and the flies suck blood. Crust around wound attracts more flies. Sores can get infected. Feeds hanging downward. Often found on the horse's belly.
Insecticides, sprays, dusts. Spray horse and barn area. Separate from cattle.
Housefly Small; about % inch long. Four dark stripes on back.
Nonbiting fly. Larvae develop in manure. Carrier of both bacterial and viral diseases. Can transmit stomach worms. Associated with summer sores.
Good sanitation. Cover or dispose of manure. Sprays and baits are effective.
Stable fly Small, grayish-black fly. Looks similar to house fly but doesn't have stripes on back. Has proboscis.
Has painful bite. Feeds on animal's blood. Prefers to feed on horse's legs and lower body. Breeds in wasted, damp hay and decaying vegetation. Often rests on sunny walls or fences. Intermediate host for stomach worms. Associated with summer sores.
Eliminate development sites. Use repellents on horse. Premise sprays can help.
Face fly Small black fly. Looks like house fly but larger and darker. Males have orange to yellow abdomen.
Nonbiting but annoying fly. Found where cattle are present, as eggs are laid in cow manure. Feeds on secretions from the horse's eyes and mouth. Tends to be found in large numbers.
Deer fly 'A to % inch long, usually yellow to orange. Wings have dark markings and brilliant green or golden eyes with zigzag stripes.
Has painful bite. Only females feed on animals. Most active on warm, sunny days with no wind. Usually only out for 4 to 5 weeks in June or July. Attracted to moving and/or dark objects. Lays eggs in damp areas.
No satisfactory way to eliminate flies. Minimize breeding areas and use repellents.
Horsefly Often confused with deer flies, but much larger (% to over 1 inch long). Has a heavy body with a large head. Brown, black, or gray with clear wings.
Very painful bite. Only females feed on animals. Most active on warm, sunny days with no wind. Short season is usually 3 to 4 weeks in August. Attracted to shiny surfaces and warmth. Lays eggs in damp areas.
Some traps are successful in small areas. Reduce breeding areas and use repellents. Keep horse in stall during peak activity.
Botfly Looks like a bumble bee. Doesn't sting or bite. Lays eggs on horse that horse ingests. (See "Bots," page 36.)
Remove eggs from horse. Deworm in fall with drug specific for bots.
Mosquito Slender body, long legs, and long proboscis. Usually around Vz inch in length.
Females are biting, blood-sucking insects. Most active at dusk and early evening. Can cause significant blood loss. Transmits many diseases, including West Nile, EIA, and sleeping sickness. Larvae grow in standing water.
Eliminate standing water to reduce larvae habitat. Specific mosquito repellents are available. Place safe dunks in tanks or ponds.
HEALTH THE 4~ln} IntoRsi (PROJECT
THIS P
UBLICATIO
N IS O
UT OF D
ATE.
For mos
t curr
ent in
formati
on:
http:/
/exten
sion.o
regon
state.
edu/c
atalog
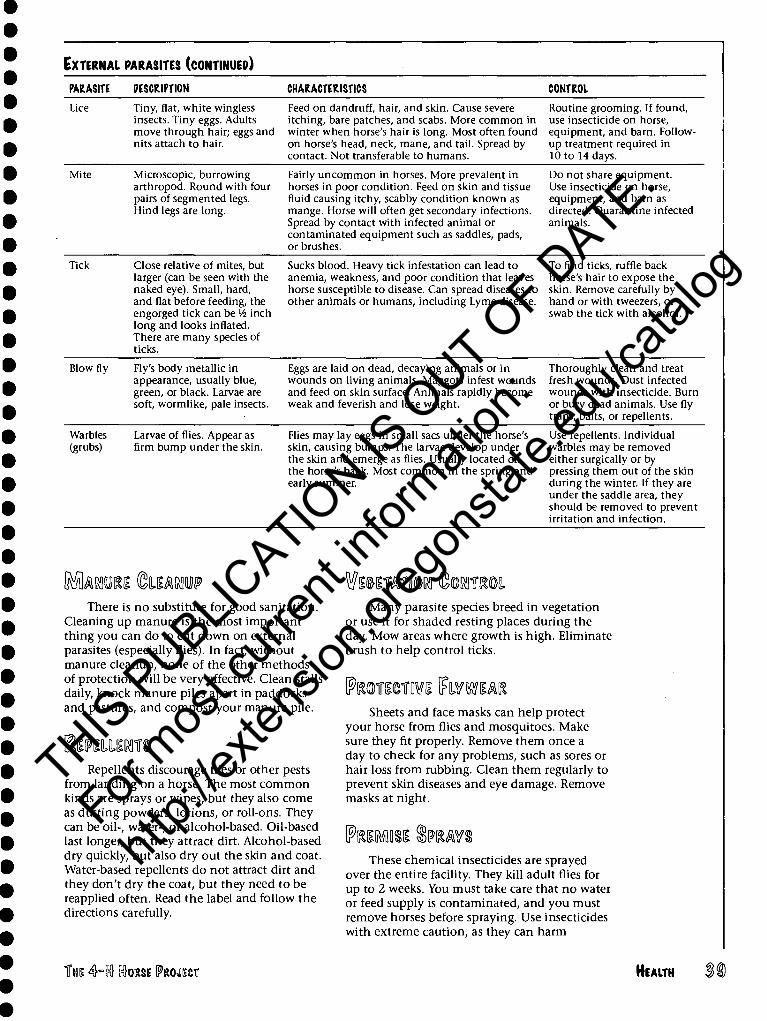
EXTERNAL PARASITES (CONTINUED)
PARASITE DESCRIPTION CHARACTERISTICS CONTROL
Lice Tiny, flat, white wingless insects. Tiny eggs. Adults move through hair; eggs and nits attach to hair.
Feed on dandruff, hair, and skin. Cause severe itching, bare patches, and scabs. More common in winter when horse's hair is long. Most often found on horse's head, neck, mane, and tail. Spread by contact. Not transferable to humans.
Routine grooming. If found, use insecticide on horse, equipment, and barn. Follow- up treatment required in 10 to 14 days.
Mite Microscopic, burrowing arthropod. Round with four pairs of segmented legs. Hind legs are long.
Fairly uncommon in horses. More prevalent in horses in poor condition. Feed on skin and tissue fluid causing itchy, scabby condition known as mange. Horse will often get secondary infections. Spread by contact with infected animal or contaminated equipment such as saddles, pads, or brushes.
Do not share equipment. Use insecticide on horse, equipment, and barn as directed. Quarantine infected animals.
Tick Close relative of mites, but larger (can be seen with the naked eye). Small, hard, and flat before feeding, the engorged tick can be Vz inch long and looks inflated. There are many species of ticks.
Sucks blood. Heavy tick infestation can lead to anemia, weakness, and poor condition that leaves horse susceptible to disease. Can spread diseases to other animals or humans, including Lyme disease.
To find ticks, ruffle back horse's hair to expose the skin. Remove carefully by hand or with tweezers, or swab the tick with alcohol.
Blow fly Fly's body metallic in appearance, usually blue, green, or black. Larvae are soft, wormlike, pale insects.
Eggs are laid on dead, decaying animals or in wounds on living animals. Maggots infest wounds and feed on skin surface. Animals rapidly become weak and feverish and lose weight.
Thoroughly clean and treat fresh wounds. Dust infected wounds with insecticide. Burn or bury dead animals. Use fly traps, baits, or repellents.
Warbles Larvae of flies. Appear as (grubs) firm bump under the skin.
Flies may lay eggs in small sacs under the horse's skin, causing bumps. The larvae develop under the skin and emerge as flies. Usually located on the horse's back. Most common in the spring and early summer.
Use repellents. Individual warbles may be removed either surgically or by pressing them out of the skin during the winter. If they are under the saddle area, they should be removed to prevent irritation and infection.
US toOTP There is no substitute for good sanitation.
Cleaning up manure is the most important thing you can do to cut down on external parasites (especially flies). In fact, without manure cleanup, none of the other methods of protection will be very effective. Clean stalls daily, knock manure piles apart in paddocks and pastures, and compost your manure pile.
dsipmsOTs Repellents discourage flies or other pests
from landing on a horse. The most common kinds are sprays or wipes, but they also come as dusting powders, lotions, or roll-ons. They can be oil-, water-, or alcohol-based. Oil-based last longer, but they attract dirt. Alcohol-based dry quickly, but also dry out the skin and coat. Water-based repellents do not attract dirt and they don't dry the coat, but they need to be reapplied often. Read the label and follow the directions carefully.
Many parasite species breed in vegetation or use it for shaded resting places during the day. Mow areas where growth is high. Eliminate brush to help control ticks.
tanrraws hvmm Sheets and face masks can help protect
your horse from flies and mosquitoes. Make sure they fit properly. Remove them once a day to check for any problems, such as sores or hair loss from rubbing. Clean them regularly to prevent skin diseases and eye damage. Remove masks at night.
These chemical insecticides are sprayed over the entire facility. They kill adult flies for up to 2 weeks. You must take care that no water or feed supply is contaminated, and you must remove horses before spraying. Use insecticides with extreme caution, as they can harm
THE 4~[n} KORSI IPROJICT HEALTH
THIS P
UBLICATIO
N IS O
UT OF D
ATE.
For mos
t curr
ent in
formati
on:
http:/
/exten
sion.o
regon
state.
edu/c
atalog
horses, humans, and the environment. Insect resistance is also becoming more of a problem. mmm mwm WWER hm
tmn m§ §Mn These come in a wide variety of types.
All use some method to attract and kill adult flies. Some are disposable, and some need to be emptied and restocked. They can be smelly and unsightly.
To reduce breeding areas, keep feed areas clean of wasted hay or grass that retains moisture. Make sure there is no water standing in tires, barrels, puddles, or ditches. Empty water tanks once a week. Repair leaky faucets, clean rain gutters, and make sure all areas have good drainage.
[pMAsmc WASPS (m PRSQWMMS) f^mmr fOMSS These small, nonstinging wasps are
harmless to horses and humans, but they can help control fly populations. They lay their eggs in fly pupae, killing them before they can hatch. Release these predators early in the fly season and then approximately every 2 weeks throughout the summer. It may take a long time before you see results.
Feed-throughs prevent flies from developing in the horse's manure. While these can be effective, the chemicals in them may also kill beneficial microorganisms, such as those that decompose manure.
Certain parasites are more active at certain times of the day. For example, mosquitoes are most active at dusk and in the early evening. Adjust your horse's turnout time according to which parasite is the most troublesome.
HEALTH THE 4-lnl (nlORSI [PROJIECT
THIS P
UBLICATIO
N IS O
UT OF D
ATE.
For mos
t curr
ent in
formati
on:
http:/
/exten
sion.o
regon
state.
edu/c
atalog
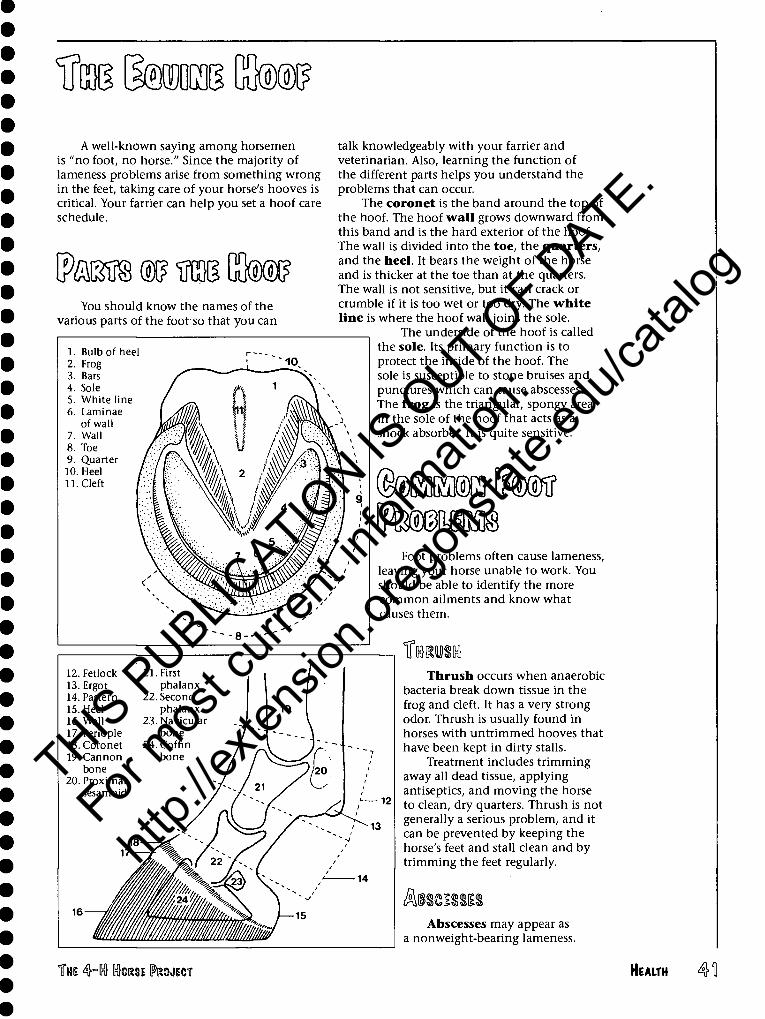
Utas Hmm \§m A well-known saying among horsemen
is "no foot, no horse." Since the majority of lameness problems arise from something wrong in the feet, taking care of your horse's hooves is critical. Your farrier can help you set a hoof care schedule.
You should know the names of the various parts of the foot so that you can
1. Bulb of heel 1 ^
2. Frog /^~^^^-^\ 3. Bars
4. Sole > ' fii, i \v- 5. White line / # H A\ 6. Laminae |
of wall jb 7. Wall /*? SMA u /^'EF^ \ 8. Toe /:::■/' mu /JM\ 9. Quarter /. /f 10. Heel /■,./ ;; 11. Cleft l.A | ^■/a ■..■.| ,
V"' ■^• w; ■ \vV.' w •''•y/'*^'-'■'V ' V ' ■ v' ' v!i:•' %i*vV :y/^7'- ■■'/ '
\ '■'■ X ̂ vii' 5 yA^ '• J ' \• ^Pk^. 7 \^&-:::./ /
<" N '';^^ferti^^^'y -''' \
"---8---"''
talk knowledgeably with your farrier and veterinarian. Also, learning the function of the different parts helps you understand the problems that can occur.
The coronet is the band around the top of the hoof. The hoof wall grows downward from this band and is the hard exterior of the hoof. The wall is divided into the toe, the quarters, and the heel. It bears the weight of the horse and is thicker at the toe than at the quarters. The wall is not sensitive, but it can crack or crumble if it is too wet or too dry. The white line is where the hoof wall joins the sole.
The underside of the hoof is called the sole. Its primary function is to protect the inside of the hoof. The sole is susceptible to stone bruises and punctures which can cause abscesses. The frog is the triangular, spongy area in the sole of the hoof that acts as a shock absorber. It is quite sensitive.
teESKCfl (FdXKf
12. Fetlock 13. Ergot 14. Pastern 15. Heel 16. Wall 17. Periople 18. Coronet 19. Cannon
bone 20. Proximal
sesamoid
. First phalanx
. Second phalanx
. Navicular bone
. Coffin bone
teftlM® Foot problems often cause lameness,
leaving your horse unable to work. You should be able to identify the more common ailments and know what causes them.
1[mm Thrush occurs when anaerobic
bacteria break down tissue in the frog and cleft. It has a very strong odor. Thrush is usually found in horses with untrimmed hooves that have been kept in dirty stalls.
Treatment includes trimming away all dead tissue, applying antiseptics, and moving the horse to clean, dry quarters. Thrush is not generally a serious problem, and it can be prevented by keeping the horse's feet and stall clean and by trimming the feet regularly.
Abscesses may appear as a nonweight-bearing lameness.
THE 4~!n} IHIORSE IPROJICT HEALTH 4H
THIS P
UBLICATIO
N IS O
UT OF D
ATE.
For mos
t curr
ent in
formati
on:
http:/
/exten
sion.o
regon
state.
edu/c
atalog
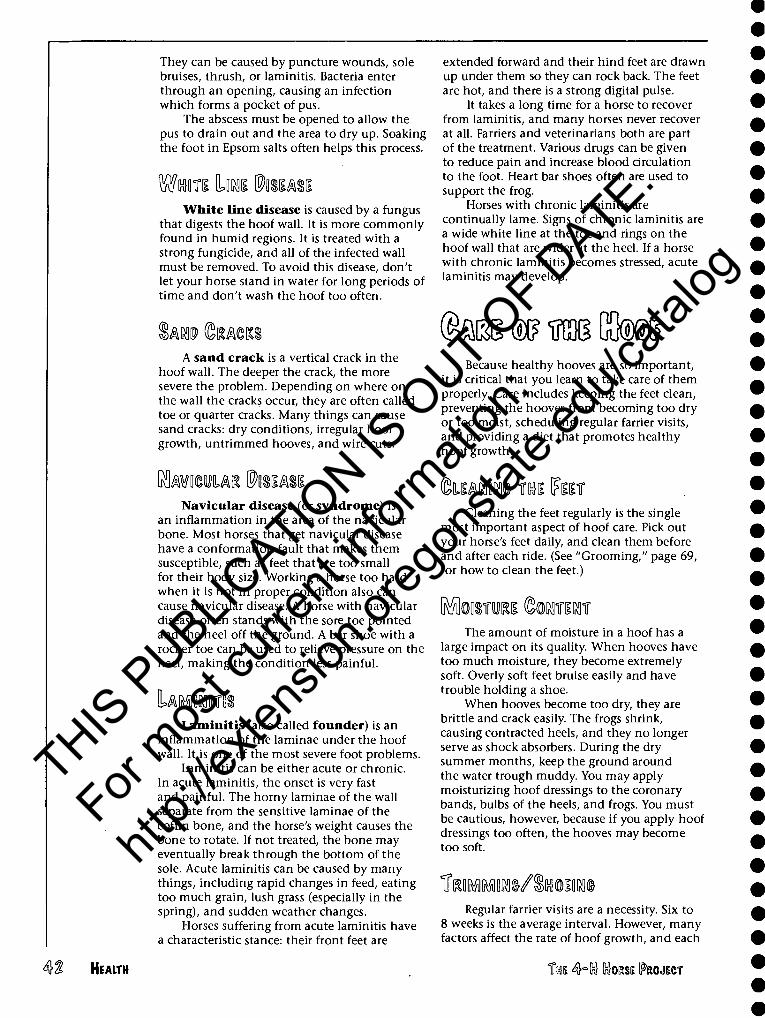
They can be caused by puncture wounds, sole bruises, thrush, or laminitis. Bacteria enter through an opening, causing an infection which forms a pocket of pus.
The abscess must be opened to allow the pus to drain out and the area to dry up. Soaking the foot in Epsom salts often helps this process.
Wmn km §mm White line disease is caused by a fungus
that digests the hoof wall. It is more commonly found in humid regions. It is treated with a strong fungicide, and all of the infected wall must be removed. To avoid this disease, don't let your horse stand in water for long periods of time and don't wash the hoof too often.
lm® ©RACKS
A sand crack is a vertical crack in the hoof wall. The deeper the crack, the more severe the problem. Depending on where on the wall the cracks occur, they are often called toe or quarter cracks. Many things can cause sand cracks: dry conditions, irregular hoof growth, untrimmed hooves, and wire cuts.
GtomM Mtm Navicular disease (or syndrome) is
an inflammation in the area of the navicular bone. Most horses that get navicular disease have a conformation fault that makes them susceptible, such as feet that are too small for their body size. Working a horse too hard when it is not in proper condition also can cause navicular disease. A horse with navicular disease often stands with the sore toe pointed and the heel off the ground. A bar shoe with a rocker toe can be used to relieve pressure on the heel, making the condition less painful.
Laminitis (also called founder) is an inflammation of the laminae under the hoof wall. It is one of the most severe foot problems.
Laminitis can be either acute or chronic. In acute laminitis, the onset is very fast and painful. The horny laminae of the wall separate from the sensitive laminae of the coffin bone, and the horse's weight causes the bone to rotate. If not treated, the bone may eventually break through the bottom of the sole. Acute laminitis can be caused by many things, including rapid changes in feed, eating too much grain, lush grass (especially in the spring), and sudden weather changes.
Horses suffering from acute laminitis have a characteristic stance: their front feet are
extended forward and their hind feet are drawn up under them so they can rock back. The feet are hot, and there is a strong digital pulse.
It takes a long time for a horse to recover from laminitis, and many horses never recover at all. Farriers and veterinarians both are part of the treatment. Various drugs can be given to reduce pain and increase blood circulation to the foot. Heart bar shoes often are used to support the frog.
Horses with chronic laminitis are continually lame. Signs of chronic laminitis are a wide white line at the toe and rings on the hoof wall that are wider at the heel. If a horse with chronic laminitis becomes stressed, acute laminitis may develop.
ai m « mi Because healthy hooves are so important,
it is critical that you learn to take care of them properly. Care includes keeping the feet clean, preventing the hooves from becoming too dry or too moist, scheduling regular farrier visits, and providing a diet that promotes healthy hoof growth.
(toiMd ™ (FIST Cleaning the feet regularly is the single
most important aspect of hoof care. Pick out your horse's feet daily, and clean them before and after each ride. (See "Grooming," page 69, for how to clean the feet.)
The amount of moisture in a hoof has a large impact on its quality. When hooves have too much moisture, they become extremely soft. Overly soft feet bruise easily and have trouble holding a shoe.
When hooves become too dry, they are brittle and crack easily. The frogs shrink, causing contracted heels, and they no longer serve as shock absorbers. During the dry summer months, keep the ground around the water trough muddy. You may apply moisturizing hoof dressings to the coronary bands, bulbs of the heels, and frogs. You must be cautious, however, because if you apply hoof dressings too often, the hooves may become too soft.
TRIMMIIM/STOSIIM Regular farrier visits are a necessity. Six to
8 weeks is the average interval. However, many factors affect the rate of hoof growth, and each
& HEALTH THE 4=ln} MORSE (FRCMECT
THIS P
UBLICATIO
N IS O
UT OF D
ATE.
For mos
t curr
ent in
formati
on:
http:/
/exten
sion.o
regon
state.
edu/c
atalog

horse is different. Therefore, you will need to schedule farrier visits according to the needs of each individual horse.
Whether you put shoes on your horse or leave it barefoot depends on what you are using the horse for and the quality of the hooves. A horse that has foot problems or is ridden daily or on hard surfaces should probably wear shoes. A horse with good feet that is taken on trails on the weekend may be fine going barefoot. When possible, it is a good idea to let the horse go barefoot for at least a few months each year. This allows the heels to spread naturally and strengthens the frog.
Vitamin A, found in green feeds, is necessary for hoof growth. A horse that is deficient in vitamin A often has weak hoof walls that crack and crumble. Good quality hay or pasture usually supplies a horse with an adequate amount of vitamin A.
A biotin supplement is sometimes used to aid hoof growth. The effects of biotin have not been proven scientifically, but some horses do appear to benefit. Hooves grow slowly, so you must use a supplement for 6 months to a year before expecting to see any difference.
Consistent exercise may do more to promote hoof growth than supplements, as exercise increases the blood circulation to your horse's hooves.
THE 4hln} [fHoem PROJECT HEALTH Ql
THIS P
UBLICATIO
N IS O
UT OF D
ATE.
For mos
t curr
ent in
formati
on:
http:/
/exten
sion.o
regon
state.
edu/c
atalog
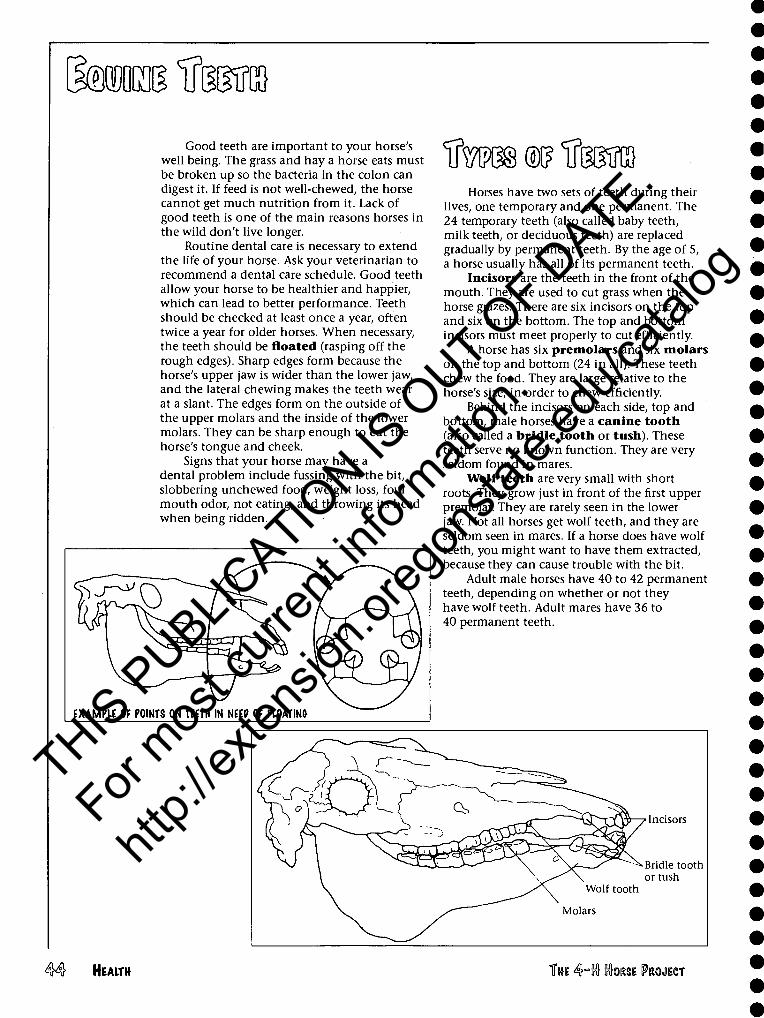
g1f@ Good teeth are important to your horse's
well being. The grass and hay a horse eats must be broken up so the bacteria in the colon can digest it. If feed is not well-chewed, the horse cannot get much nutrition from it. Lack of good teeth is one of the main reasons horses in the wild don't live longer.
Routine dental care is necessary to extend the life of your horse. Ask your veterinarian to recommend a dental care schedule. Good teeth allow your horse to be healthier and happier, which can lead to better performance. Teeth should be checked at least once a year, often twice a year for older horses. When necessary, the teeth should be floated (rasping off the rough edges). Sharp edges form because the horse's upper jaw is wider than the lower jaw, and the lateral chewing makes the teeth wear at a slant. The edges form on the outside of the upper molars and the inside of the lower molars. They can be sharp enough to cut the horse's tongue and cheek.
Signs that your horse may have a dental problem include fussing with the bit, slobbering unchewed food, weight loss, foul mouth odor, not eating, and throwing its head when being ridden.
tfwds m tarn Horses have two sets of teeth during their
lives, one temporary and one permanent. The 24 temporary teeth (also called baby teeth, milk teeth, or deciduous teeth) are replaced gradually by permanent teeth. By the age of 5, a horse usually has all of its permanent teeth.
Incisors are the teeth in the front of the mouth. They are used to cut grass when the horse grazes. There are six incisors on the top and six on the bottom. The top and bottom incisors must meet properly to cut efficiently.
A horse has six premolars and six molars on the top and bottom (24 in all). These teeth chew the food. They are large relative to the horse's size, in order to chew efficiently.
Behind the incisors on each side, top and bottom, male horses have a canine tooth (also called a bridle tooth or tush). These teeth serve no known function. They are very seldom found in mares.
Wolf teeth are very small with short roots. They grow just in front of the first upper premolar. They are rarely seen in the lower jaw. Not all horses get wolf teeth, and they are seldom seen in mares. If a horse does have wolf teeth, you might want to have them extracted, because they can cause trouble with the bit.
Adult male horses have 40 to 42 permanent teeth, depending on whether or not they have wolf teeth. Adult mares have 36 to 40 permanent teeth.
^ -^^
A r~-^I (tr- k ^ f? ^^\
i \
^
^ ^^~ ^r """ ^-0^0^=? Incisors
\ J^— y^^^ Bridle tooth \^^-^\ or tush /^ Wolf tooth
Molars
HEALTH THE 4Hln} Ctasi (PROJECT
THIS P
UBLICATIO
N IS O
UT OF D
ATE.
For mos
t curr
ent in
formati
on:
http:/
/exten
sion.o
regon
state.
edu/c
atalog
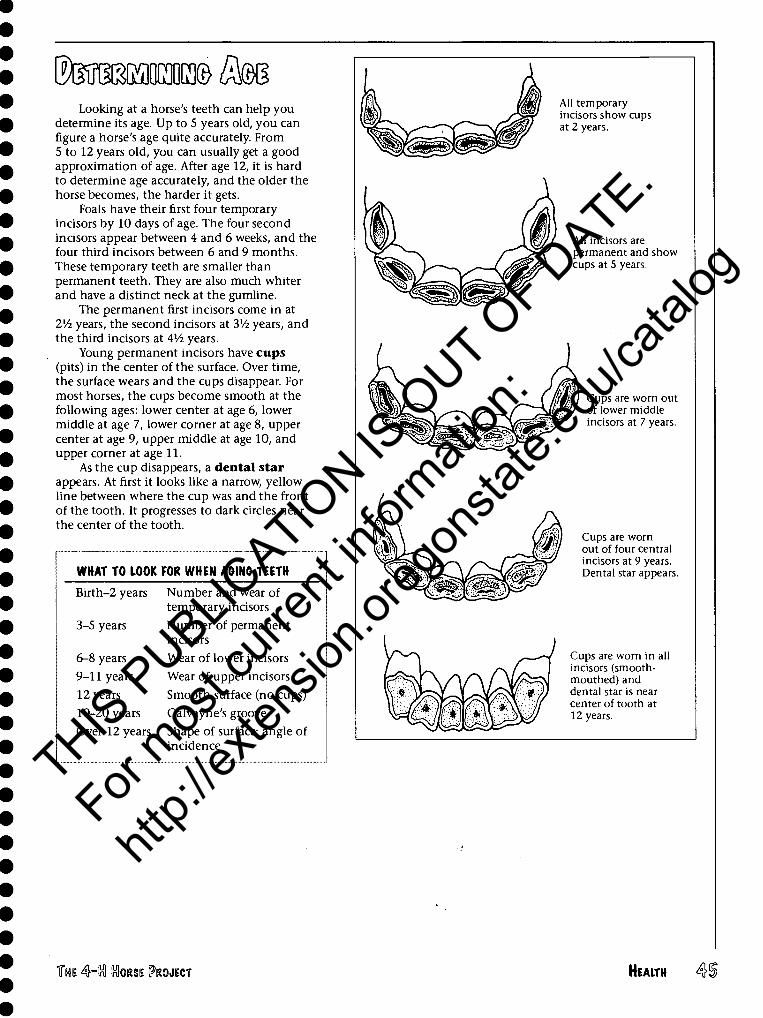
(MMMm© /M Looking at a horse's teeth can help you
determine its age. Up to 5 years old, you can figure a horse's age quite accurately. From 5 to 12 years old, you can usually get a good approximation of age. After age 12, it is hard to determine age accurately, and the older the horse becomes, the harder it gets.
Foals have their first four temporary incisors by 10 days of age. The four second incisors appear between 4 and 6 weeks, and the four third incisors between 6 and 9 months. These temporary teeth are smaller than permanent teeth. They are also much whiter and have a distinct neck at the gumline.
The permanent first incisors come in at IVz years, the second incisors at SVz years, and the third incisors at 41/z years.
Young permanent incisors have cups (pits) in the center of the surface. Over time, the surface wears and the cups disappear. For most horses, the cups become smooth at the following ages: lower center at age 6, lower middle at age 7, lower corner at age 8, upper center at age 9, upper middle at age 10, and upper corner at age 11.
As the cup disappears, a dental star appears. At first it looks like a narrow, yellow line between where the cup was and the front of the tooth. It progresses to dark circles near the center of the tooth.
WHAT TO LOOK FOR WHEN AGING TEETH
Birth-2 years Number and wear of temporary incisors
3-5 years Number of permanent incisors
6-8 years Wear of lower incisors 9-11 years Wear of upper incisors 12 years Smooth surface (no cups) 10-20 years Galvayne's groove Over 12 years Shape of surface; angle of
incidence
All temporary incisors show cups at 2 years.
All incisors are permanent and show cups at 5 years.
Cups are worn out of lower middle incisors at 7 years.
Cups are worn out of four central incisors at 9 years. Dental star appears.
Cups are worn in all incisors (smooth- mouthed) and dental star is near center of tooth at 12 years.
TKE 4hln} HORSE (PROJECT HEALTH 4*
THIS P
UBLICATIO
N IS O
UT OF D
ATE.
For mos
t curr
ent in
formati
on:
http:/
/exten
sion.o
regon
state.
edu/c
atalog
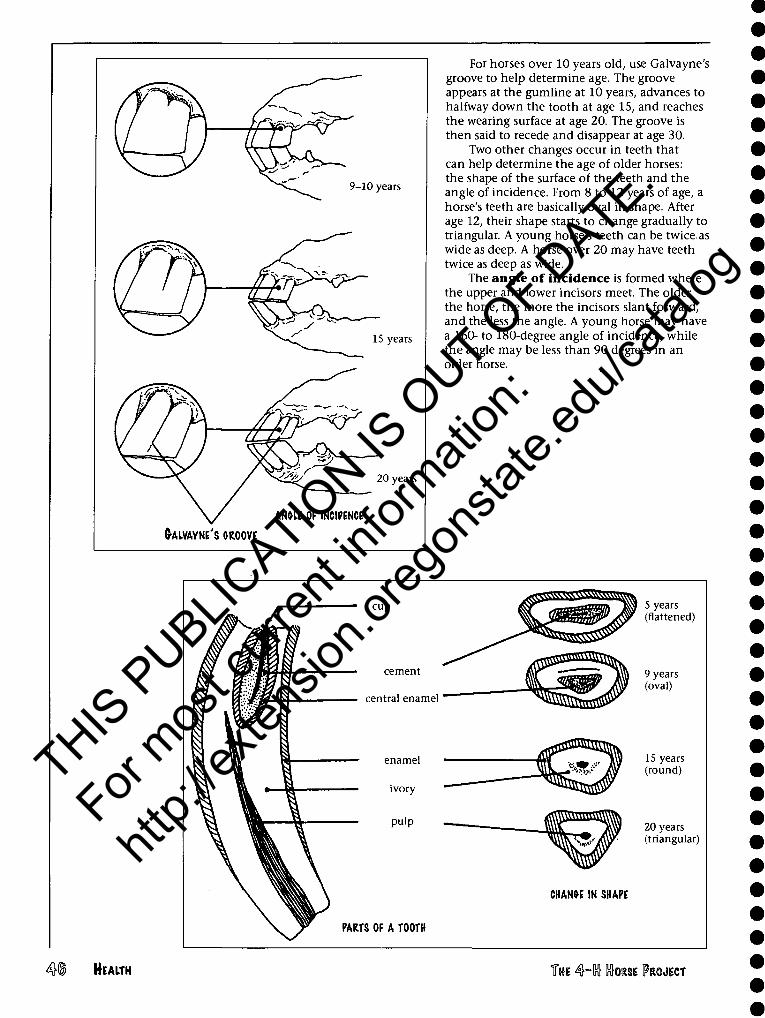
10 years
15 years
20 years
ANOLE OF INCIPENCE
(xALVAYNE'S GROOVE
For horses over 10 years old, use Galvayne's groove to help determine age. The groove appears at the gumline at 10 years, advances to halfway down the tooth at age 15, and reaches the wearing surface at age 20. The groove is then said to recede and disappear at age 30.
Two other changes occur in teeth that can help determine the age of older horses: the shape of the surface of the teeth and the angle of incidence. From 8 to 12 years of age, a horse's teeth are basically oval in shape. After age 12, their shape starts to change gradually to triangular. A young horse's teeth can be twice, as wide as deep. A horse over 20 may have teeth twice as deep as wide.
The angle of incidence is formed where the upper and lower incisors meet. The older the horse, the more the incisors slant forward, and the less the angle. A young horse may have a 160- to 180-degree angle of incidence, while the angle may be less than 90 degrees in an older horse.
cup
cement
central enamel
5 years (flattened)
9 years (oval)
15 years (round)
20 years (triangular)
CHANGE IN SHAPE
FARTS OF A TOOTH
4(1 HEALTH THI ^-Inl Hotm IPRQ«T
THIS P
UBLICATIO
N IS O
UT OF D
ATE.
For mos
t curr
ent in
formati
on:
http:/
/exten
sion.o
regon
state.
edu/c
atalog

am m® \Emmm\m m inag Gte
THE 4°U IHIOKSE [PROJIECT
THIS P
UBLICATIO
N IS O
UT OF D
ATE.
For mos
t curr
ent in
formati
on:
http:/
/exten
sion.o
regon
state.
edu/c
atalog
too® fcm» am Horsemanship is the art of riding and
handling a horse. Equitation is a refinement of riding techniques. The mark of a skilled rider is the ability to get desired results with the least effort and minimum resistance from the horse.
Horsemanship and good horse training are closely linked. The way a horse performs is a combined result of the skill of the rider and the quality of training the horse has received. A beginning rider cannot do much even with a well-trained horse; a skilled rider does not expect much from a green horse.
To overcome their fears, horses need slow, thoughtful training methods that take their natural instincts into account. We want to teach the horse to trust and not to refer back to its natural defense mechanisms.
To communicate and work effectively with horses, a person must stay calm and centered. This creates an atmosphere in which the horse can relax, trust, and learn.
Though horses are normally quiet and gentle, they can become excited and react violently if they are frightened or mistreated. If you follow simple safety rules, you can avoid undoing hours of careful training or a serious mishap. Carelessness is the leading cause of accidents and can cause serious injury to the handler, rider, horse, or others.
Knowledge of safe riding and handling is important to basic horsemanship. A gentle voice, slow easy movements, and a calm attitude reduce the horse's fear and excitement.
Cto©(!£E m ®MM The most common riding-related injuries
are to the head. Many of these could be prevented or made less severe by wearing protective headgear when riding or working around horses. 4-H rules require that members wear helmets any time they are riding or driving an equine, but it is recommended that you wear a helmet whenever you are working around horses.
Protective headgear must meet American Society for Testing Materials (ASTM) standards and be certified by the Safety Equipment Institute (SEI). Be sure your headgear fits properly and is fastened correctly.
When riding, wear boots with proper heels that prevent your feet from slipping through the stirrups. There should be a Vi-inch clearance between the side of the stirrup and your boot.
Always wear hard-soled shoes when working around horses.
Gtooaa© Always get to know the horse you are
working with. Know its temperament and the way it reacts. Recognize the horse's peculiarities. If someone else is handling your horse, tell them what to expect.
Work on the horse from a position as near the shoulder as possible. See "Grooming" (page 69) for more safety guidelines.
Punish the horse only at the instant it misbehaves. Even a minute later the horse will not understand why it's being punished. Never strike the horse on the head or between the ears.
Avoid letting your horse kick or be kicked by keeping enough space between horses when tying, standing, or riding.
Whenever possible, approach the horse at an angle and come in near its shoulder. Speak to it as you are walking up. Most horses are likely to jump or kick when startled and should never be approached from the rear. If it is necessary to approach from the rear, always speak to the horse before approaching or touching it. Speak to the horse first, then stroke it on the rump, and move calmly to the head. Stay close to the horse's body to reduce the impact if it kicks.
Pet a horse by placing your hand on the horse's shoulder and neck. Don't reach directly for the horse's nose. Their nose is in their blind spot, so this is annoying to the horse. When walking around horses, stay out of kicking range and do not walk under the tie rope. If you need to go behind the horse, stay close, putting your hand on its rump while speaking softly, moving closely around the horse's tail.
When catching a horse in a large corral or pasture, move slowly, keeping the halter and rope out of sight. Watch out for other horses in the pasture that might be aggressive. Do not chase the horse, but patiently walk it down by
4§ CARE AND MANAGEMENT THE 4hln} KIORSE PROJECT
THIS P
UBLICATIO
N IS O
UT OF D
ATE.
For mos
t curr
ent in
formati
on:
http:/
/exten
sion.o
regon
state.
edu/c
atalog
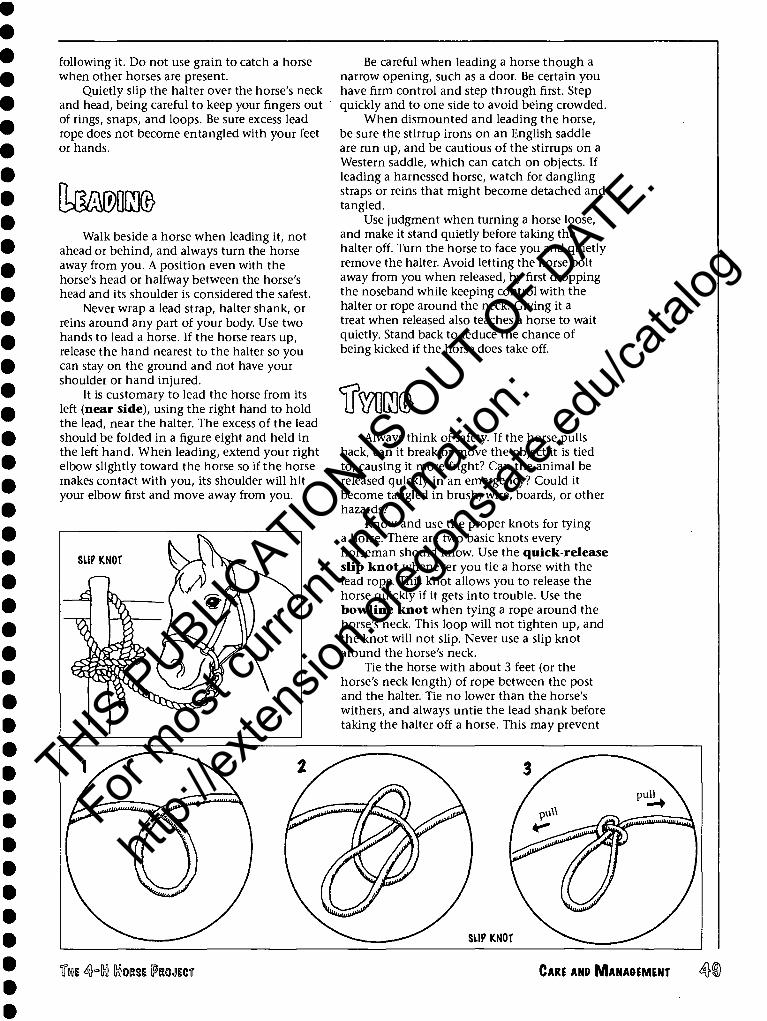
following it. Do not use grain to catch a horse when other horses are present.
Quietly slip the halter over the horse's neck and head, being careful to keep your fingers out of rings, snaps, and loops. Be sure excess lead rope does not become entangled with your feet or hands.
Umm Walk beside a horse when leading it, not
ahead or behind, and always turn the horse away from you. A position even with the horse's head or halfway between the horse's head and its shoulder is considered the safest.
Never wrap a lead strap, halter shank, or reins around any part of your body. Use two hands to lead a horse. If the horse rears up, release the hand nearest to the halter so you can stay on the ground and not have your shoulder or hand injured.
It is customary to lead the horse from its left (near side), using the right hand to hold the lead, near the halter. The excess of the lead should be folded in a figure eight and held in the left hand. When leading, extend your right elbow slightly toward the horse so if the horse makes contact with you, its shoulder will hit your elbow first and move away from you.
Be careful when leading a horse though a narrow opening, such as a door. Be certain you have firm control and step through first. Step quickly and to one side to avoid being crowded.
When dismounted and leading the horse, be sure the stirrup irons on an English saddle are run up, and be cautious of the stirrups on a Western saddle, which can catch on objects. If leading a harnessed horse, watch for dangling straps or reins that might become detached and tangled.
Use judgment when turning a horse loose, and make it stand quietly before taking the halter off. Turn the horse to face you and quietly remove the halter. Avoid letting the horse bolt away from you when released, by first dropping the noseband while keeping control with the halter or rope around the neck. Giving it a treat when released also teaches a horse to wait quietly. Stand back to reduce the chance of being kicked if the horse does take off.
Hmm Always think of safety. If the horse pulls
back, can it break or move the object it is tied to, causing it more fright? Can the animal be released quickly in an emergency? Could it become tangled in brush, wire, boards, or other hazards?
Know and use the proper knots for tying a horse. There are two basic knots every horseman should know. Use the quick-release slip knot whenever you tie a horse with the lead rope. This knot allows you to release the horse quickly if it gets into trouble. Use the bowline knot when tying a rope around the horse's neck. This loop will not tighten up, and the knot will not slip. Never use a slip knot around the horse's neck.
Tie the horse with about 3 feet (or the horse's neck length) of rope between the post and the halter. Tie no lower than the horse's withers, and always untie the lead shank before taking the halter off a horse. This may prevent
TtSE 4hln} KOKSI IPRCMICT CARE AND MANAGEMENT m
THIS P
UBLICATIO
N IS O
UT OF D
ATE.
For mos
t curr
ent in
formati
on:
http:/
/exten
sion.o
regon
state.
edu/c
atalog
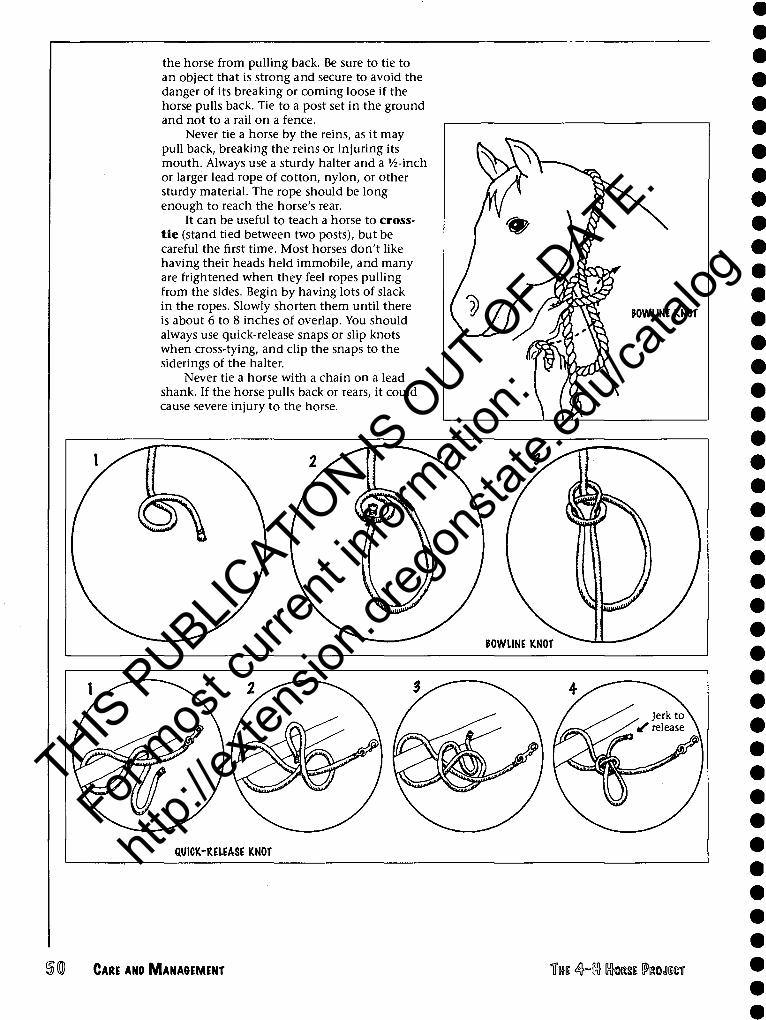
the horse from pulling back. Be sure to tie to an object that is strong and secure to avoid the danger of its breaking or coming loose if the horse pulls back. Tie to a post set in the ground and not to a rail on a fence.
Never tie a horse by the reins, as it may pull back, breaking the reins or injuring its mouth. Always use a sturdy halter and a Vi-inch or larger lead rope of cotton, nylon, or other sturdy material. The rope should be long enough to reach the horse's rear.
It can be useful to teach a horse to cross- tie (stand tied between two posts), but be careful the first time. Most horses don't like having their heads held immobile, and many are frightened when they feel ropes pulling from the sides. Begin by having lots of slack in the ropes. Slowly shorten them until there is about 6 to 8 inches of overlap. You should always use quick-release snaps or slip knots when cross-tying, and clip the snaps to the siderings of the halter.
Never tie a horse with a chain on a lead shank. If the horse pulls back or rears, it could cause severe injury to the horse.
BOWLINE KNOT
QUICK-RELEASE KNOT
CARE AND MANAGEMENT TTWE 4hln} Ctasi PROJECT
THIS P
UBLICATIO
N IS O
UT OF D
ATE.
For mos
t curr
ent in
formati
on:
http:/
/exten
sion.o
regon
state.
edu/c
atalog

Wear your helmet at all times when riding. A horse should stand quietly and remain
still until you are mounted and cue it to move off. Keep light control of the reins at all times. Never mount or dismount a horse in a barn or near fences, trees, or overhanging projections.
Until you know your horse, confine your riding to an enclosed area. Only after you are familiar with your horse and have good communication should you ride in open spaces or on a trail. Never ride your horse with just a halter and lead rope.
Ride at safe gaits. Never rush past riders who are proceeding at a slower pace. Approach them slowly, passing on the left if possible, and continue cautiously. Be careful about leaving other horses behind. Ask riders if it's okay to go on without them.
When walking abreast or single file, you should leave at least one horse's length between horses. You should be able to see the hind heels of the horse in front of or beside you. Leave extra space if you are behind a horse with a red ribbon tied in its tail, as that means the horse may kick.
To prevent a horse from becoming barn sour (wanting to rush home, often out of control), always walk your horse back to the stable or barn.
Walk when going downhill or over rough ground, sand, mud, ice, or snow. Be aware of terrain and ride appropriately.
Dogs and horses are not always good companions. Your dog may be a problem for other riders or horses, so be sure to ask others if it is okay to bring your dog along. If you do bring your dog, be sure you keep it under control at all times and obey any leash laws.
Riding at night can be a pleasure, but you must accept that it is more hazardous than daytime riding. Walk the horse; fast gaits can be dangerous. Be sure to wear light-colored clothing and carry a flashlight and reflectors. Ride in places that are safe and familiar.
If a rider is injured and appears in pain, lightheaded, or unconscious, do not move him or her. Unless the rider's safety is in question, let a qualified person assess the injuries and determine if and how the person should be moved.
Try to avoid paved or other hard-surfaced roads, and always walk your horse when crossing roads. If you need to ride on a road, follow the rules to help make it a safe and enjoyable experience.
1. Remember to wear your helmet. 2. Be sure you know your horse well.
Safety starts with a dependable horse. A nervous horse is far more difficult to handle away from familiar surroundings. Train your horse at home to confront new and strange objects quietly. If your horse becomes frightened, remain calm, speak to it quietly, steady it, and give it time to overcome its fear.
3. Never ride alone. Ride in single file, staying at least a full horse's length behind the horse in front. Place quiet horses in the front and at the rear of the ride.
4. Ride defensively. A person riding a horse on the road has to follow the same rules as the driver of a motor vehicle. Know the rules and regulations from your state's driver's manuals. Ride with the traffic, on the right-hand side of the road. Use the correct hand signals for turning or stopping. If your horse becomes frightened while a car is approaching, raise your hand palm up as if you were signaling a stop (the driver should slow down). Do not make unusual or unexpected moves. Be alert, courteous, and aware of others. Acknowledge drivers who slow down while passing you. Wear bright, colorful clothing that any motorist can see.
THE 4h[n} KORSI PROJECT CARE AND MANAGEMENT
THIS P
UBLICATIO
N IS O
UT OF D
ATE.
For mos
t curr
ent in
formati
on:
http:/
/exten
sion.o
regon
state.
edu/c
atalog

Whether you plan to keep your horse at your home or board it, you must make sure it has a safe and healthy environment. The facility should also be safe and convenient for you.
• A productive pasture with plenty of grass and few weeds
• Safe turnout areas • Very little mud, even during the rainy
season • All manure and stall waste composted to
feed the pasture, or removed from the facility and composted
• Convenient setup for the feeding and care of horses
• Safe fencing • Safe, well-designed stalls
Be sure you know what the laws of your state require. Also, each county has different building codes and land use laws, and there are various water quality standards you must meet. It is important that what you do at your equine facility is both legal and environmentally sound. Ask the following questions about your facility (or the place where you board) to assess whether there are health or pollution concerns.
1. Are the horses in good health? 2. Is the drinking water clean? 3. Are there plants growing on streambanks? 4. Is all running water carrying manure or
dirt diverted to avoid creeks or canals? 5. Is manure stored so that no pollutants
infiltrate groundwater?
towss Shelter is one of the basic requirements
for horses, mainly to protect them from wind and give them a place out of the rain to dry off. Shelter also allows them to get out of the sun and avoid insects.
A simple shed is adequate shelter. A typical shed has three sides with the open fourth side facing away from the prevailing wind. It should have a high ceiling with no objects overhead, so a tall horse throwing its head up does not hurt itself. There should be slight drainage
away from the shed to prevent mud problems. A shed can be roomy enough to shelter several horses, but be sure it has several exits so no horse is cornered by another.
If you need a more controlled environ- ment, a barn is a good option. There are many things to think about when designing a barn. Some of these include:
• Cost • Safety • Maintenance • Convenience • Ventilation • Mud management • Manure management • Lighting • Fire risk • Rodent control » Feed storage
There is excellent information on building barns in books and on the Web. Spend time doing research and visiting facilities before you begin your own building project. Following are some general guidelines:
• Barn aisles should be at least 8 feet wide with nonslip surfaces.
• Stalls should be at least 10 x 10 feet; 12 x 12 feet is better. Larger stalls may be needed for foaling.
• Ceiling and doors should be at least 8 to 9 feet high.
• Stall doors should be 4 feet wide. • Walls between stalls should be at least
7 feet high. The bottom 5 feet may be solid with slats or screens above.
» Good ventilation is critical to avoid respiratory problems.
• Floors should be dry and level. o Good lighting is a necessity. • There should be easy access to electricity
and water.
Check all buildings regularly for damage and projecting or sharp objects. Fix problems immediately. Clutter in and around the barn is always a safety hazard. Make sure aisles and common pathways are clear.
A good facility is set up so that you can feed and water your horse easily. Water is available wherever you need it, and feed is stored for convenient access.
CARE ANP MANAOIMENT THE 4hln} HORSE IPROJIICT
THIS P
UBLICATIO
N IS O
UT OF D
ATE.
For mos
t curr
ent in
formati
on:
http:/
/exten
sion.o
regon
state.
edu/c
atalog

If possible, design so that you can feed without having to enter stalls, paddocks, or pastures. Horses can be aggressive around food, so this a safety feature. It also usually makes feeding faster.
You can choose from a variety of feeder styles for both hay and grain. Whenever possible, feed horses at ground level. This is a horse's natural eating position, and it helps stretch the neck and back. Feeding at ground level also means there will be less chance of hayseeds or other debris falling into the horse's eyes, ears, and face. If you can feed at ground level, it is better to place the feed in a manger or tub rather than on the bare ground. This helps reduce waste, external parasites, and internal parasite ingestion. It can also help prevent sand colic.
Whether your horse is in a stall, turnout area, or pasture, it should have water available at all times. There are many types of water containers, but all should hold enough water to last from the time you fill them until you check them again.
Large tanks work well in pastures, and they are better insurance against your horse's running out of water. You can make tanks from bathtubs, wash tubs, or garbage cans, or you can buy regular watering tanks.
In a stall, you can use buckets or automatic waterers. Place buckets in a corner or hang them from a hook so they don't get knocked over. For mature horses, secure them about 38 to 42 inches off the ground. Automatic waterers make watering your horse easy, but some people don't like them because you can't tell how much water your horse has drunk. Research indicates that horses tend to drink less water when you use automatic waterers than when you use buckets. Drinking less water can lead to dehydration, colic, and other health problems.
Whatever containers you use to water your horse, be sure you keep them clean and change the water often. In the summer, empty them once a week and scrub them out. This eliminates algae growth and kills mosquito larvae. If it gets below freezing in the winter, remove any ice chunks twice a day. (See "Weather and Your Horse," page 77, for more cold-weather watering advice.)
Immm $m Feed must be stored properly to maintain
its quality. Store hay in a well-ventilated place to keep it from molding or getting powdery fungus. Use boards or pallets to keep it off damp floors. Keep hay under cover to protect it from rain, snow, or direct sun. Never stack wet hay in a barn, as spontaneous combustion can cause a fire. Remember that hay loses nutritional value over time, so don't store more than a year's supply.
Store grain in tightly covered containers to keep out rodents and other animals. To prevent mold, be sure the storage area is dry. Clean the insides of storage bins often, especially in summer, as they can mildew quickly. We suggest that you store no more than a 2-week supply of grain at a time, as grain molds can be deadly.
Be sure that horses cannot get into any feed storage areas.
fn teas It is important to have a safe area to tie
horses, whether inside the barn or outside in a paddock or field. Always tie to a solid, immovable object. A strong, tall, solid wall is the safest. Solid, heavy fence posts are safe as long as they are not on an electric or barbed wire fence. It is never safe to tie to a rail.
Place sturdy tie rings in walls, trees, or posts. The tie ring should be level with the horse's withers or higher. Cross-ties in barn aisles are recommended. (See "Tying," page 49.)
Imii §mim The more absorbent the bedding, the less
you have to use. Using less bedding reduces the amount of waste, takes you less time to clean a stall, and costs you less.
One way to reduce the amount of bedding required is to use rubber mats in your horse's stall. Mats provide enough cushion for the horse that you need only enough bedding to soak up urine. Mats make cleaning easier because they are flat, which is also better for the horse's feet and legs. Mats also prevent a pawing horse from digging holes in the stall floor.
Even if you have rubber mats, you still need to put some bedding on them. Use whatever is available in your area as long as it is dry and not dusty.
T« 4=lnl InlORSE P'ROJICT CARE ANP MANAGEMENT
THIS P
UBLICATIO
N IS O
UT OF D
ATE.
For mos
t curr
ent in
formati
on:
http:/
/exten
sion.o
regon
state.
edu/c
atalog
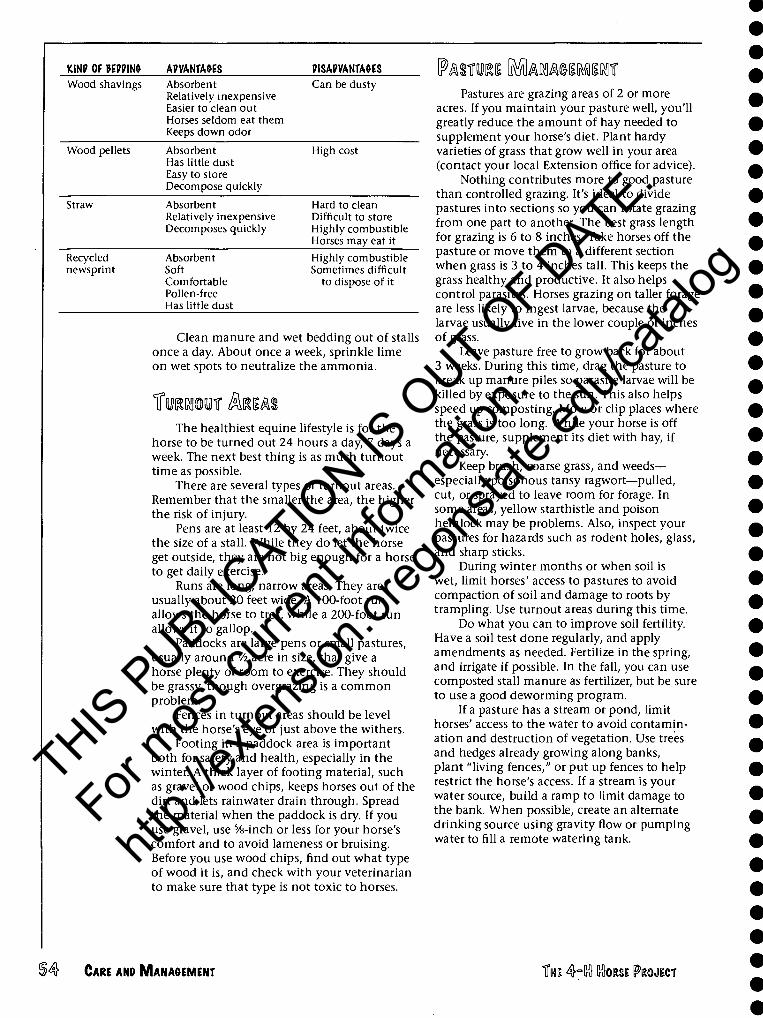
KIN? OF MWm AmNTA&ES PISAPVANTA&ES Wood shavings Absorbent
Relatively inexpensive Easier to clean out Horses seldom eat them Keeps down odor
Can be dusty
Wood pellets Absorbent Has little dust Easy to store Decompose quickly
High cost
Straw Absorbent Hard to clean Relatively inexpensive Difficult to store Decomposes quickly Highly combustible
Horses may eat it
Recycled Absorbent Highly combustible newsprint Soft Sometimes difficult
Comfortable to dispose of it Pollen-free Has little dust
Clean manure and wet bedding out of stalls once a day. About once a week, sprinkle lime on wet spots to neutralize the ammonia.
TWRRIOIOT Mm The healthiest equine lifestyle is for the
horse to be turned out 24 hours a day, 7 days a week. The next best thing is as much turnout time as possible.
There are several types of turnout areas. Remember that the smaller the area, the higher the risk of injury.
Pens are at least 12 by 24 feet, about twice the size of a stall. While they do let the horse get outside, they are not big enough for a horse to get daily exercise.
Runs are long, narrow areas. They are usually about 20 feet wide. A 100-foot run allows the horse to trot, while a 200-foot run allows it to gallop.
Paddocks are large pens or small pastures, usually around Vz acre in size, that give a horse plenty of room to exercise. They should be grassy, though overgrazing is a common problem.
Fences in turnout areas should be level with the horse's eye or just above the withers.
Footing in a paddock area is important both for safety and health, especially in the winter. A thick layer of footing material, such as gravel or wood chips, keeps horses out of the dirt and lets rainwater drain through. Spread the material when the paddock is dry. If you use gravel, use %-inch or less for your horse's comfort and to avoid lameness or bruising. Before you use wood chips, find out what type of wood it is, and check with your veterinarian to make sure that type is not toxic to horses.
Pastures are grazing areas of 2 or more acres. If you maintain your pasture well, you'll greatly reduce the amount of hay needed to supplement your horse's diet. Plant hardy varieties of grass that grow well in your area (contact your local Extension office for advice).
Nothing contributes more to good pasture than controlled grazing. It's ideal to divide pastures into sections so you can rotate grazing from one part to another. The best grass length for grazing is 6 to 8 inches. Take horses off the pasture or move them to a different section when grass is 3 to 4 inches tall. This keeps the grass healthy and productive. It also helps control parasites. Horses grazing on taller forage are less likely to ingest larvae, because the larvae usually live in the lower couple of inches of grass.
Leave pasture free to grow back for about 3 weeks. During this time, drag the pasture to break up manure piles so parasite larvae will be killed by exposure to the sun. This also helps speed up composting. Mow or clip places where the grass is too long. While your horse is off the pasture, supplement its diet with hay, if necessary.
Keep brush, coarse grass, and weeds— especially poisonous tansy ragwort—pulled, cut, or sprayed to leave room for forage. In some areas, yellow starthistle and poison hemlock may be problems. Also, inspect your pastures for hazards such as rodent holes, glass, and sharp sticks.
During winter months or when soil is wet, limit horses' access to pastures to avoid compaction of soil and damage to roots by trampling. Use turnout areas during this time.
Do what you can to improve soil fertility. Have a soil test done regularly, and apply amendments as needed. Fertilize in the spring, and irrigate if possible. In the fall, you can use composted stall manure as fertilizer, but be sure to use a good deworming program.
If a pasture has a stream or pond, limit horses' access to the water to avoid contamin- ation and destruction of vegetation. Use trees and hedges already growing along banks, plant "living fences," or put up fences to help restrict the horse's access. If a stream is your water source, build a ramp to limit damage to the bank. When possible, create an alternate drinking source using gravity flow or pumping water to fill a remote watering tank.
i4 CARE AND MANAGEMENT TTtti 4°[n} tass IPROJICT
THIS P
UBLICATIO
N IS O
UT OF D
ATE.
For mos
t curr
ent in
formati
on:
http:/
/exten
sion.o
regon
state.
edu/c
atalog
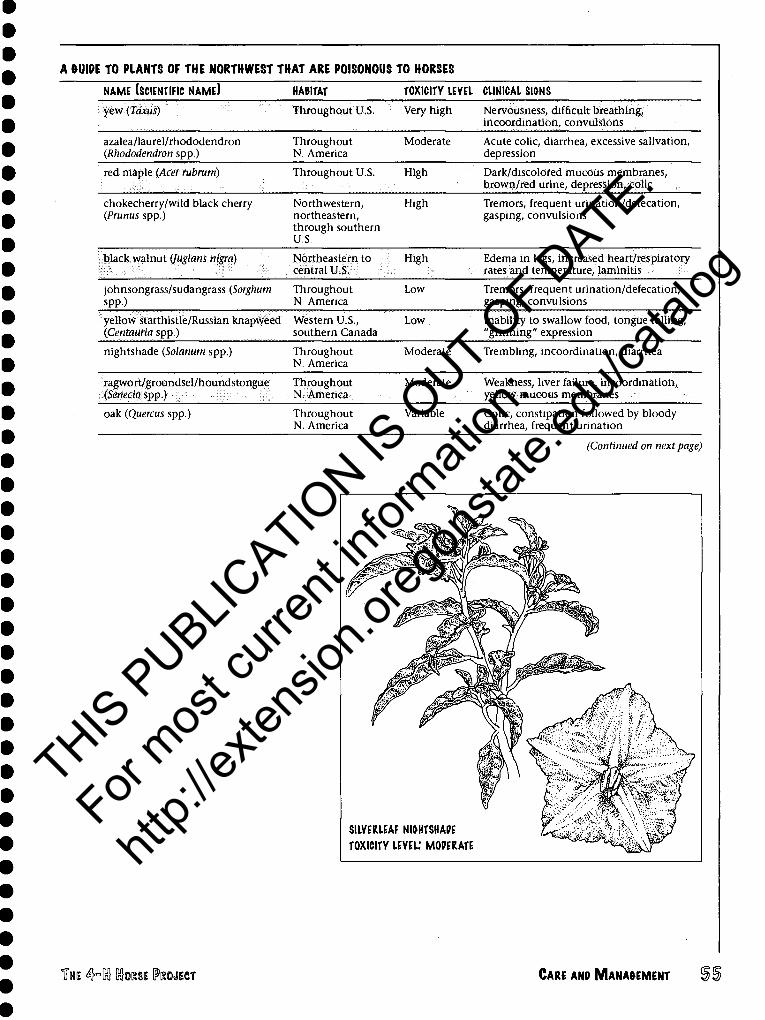
A WIDE TO PLANTS OF THE NORTHWEST THAT ARE POISONOUS TO HORSES
NAME (SCIENTIFIC NAME) HAWTAT TOXICITY IEVEI CLINICAL SIONS
yew(Taxus) Throughout U.S. Very high Nervousness, difficult breathing, incoordination, convulsions
azalea/laurel/rhododendron (Rhododendron spp.)
Throughout N. America
Moderate Acute colic, diarrhea, excessive salivation, depression
red maple (Acer ntbrum) Throughout U.S. High Dark/discolored mucous membranes, brown/red urine, depression, colic
chokecherry/wild black cherry (Prunus spp.)
Northwestern, northeastern, through southern U.S.
High Tremors, frequent urination/defecation, gasping, convulsions
black walnut (fuglam nigra) Northeastern to central U.S.
High Edema in legs, increased heart/respiratory rates and temperature, laminitis
johnsongrass/sudangrass (Sorghum spp.)
Throughout N. America
Low Tremors, frequent urination/defecation, gasping, convulsions
yellow starthistle/Russian knapweed (Centauria spp.)
Western U.S., southern Canada
Low Inability to swallow food, tongue lolling, "grinning" expression
nightshade (Solanum spp.) Throughout N. America
Moderate Trembling, incoordination, diarrhea
ragwort/groundsel/houndstongue (Senecio spp.)
Throughout N. America
Moderate Weakness, liver failure, incoordination, yellow mucous membranes
oak (Quercus spp.) Throughout N. America
Variable Colic, constipation followed by bloody diarrhea, frequent urination
(Continued on next page)
SILVEKLEAF NIOHTSHAPE TOXICITY LEVEL: MODERATE
THE 4~[nl KIOKSI (PROJECT CARE AND MANA&EMENT
THIS P
UBLICATIO
N IS O
UT OF D
ATE.
For mos
t curr
ent in
formati
on:
http:/
/exten
sion.o
regon
state.
edu/c
atalog
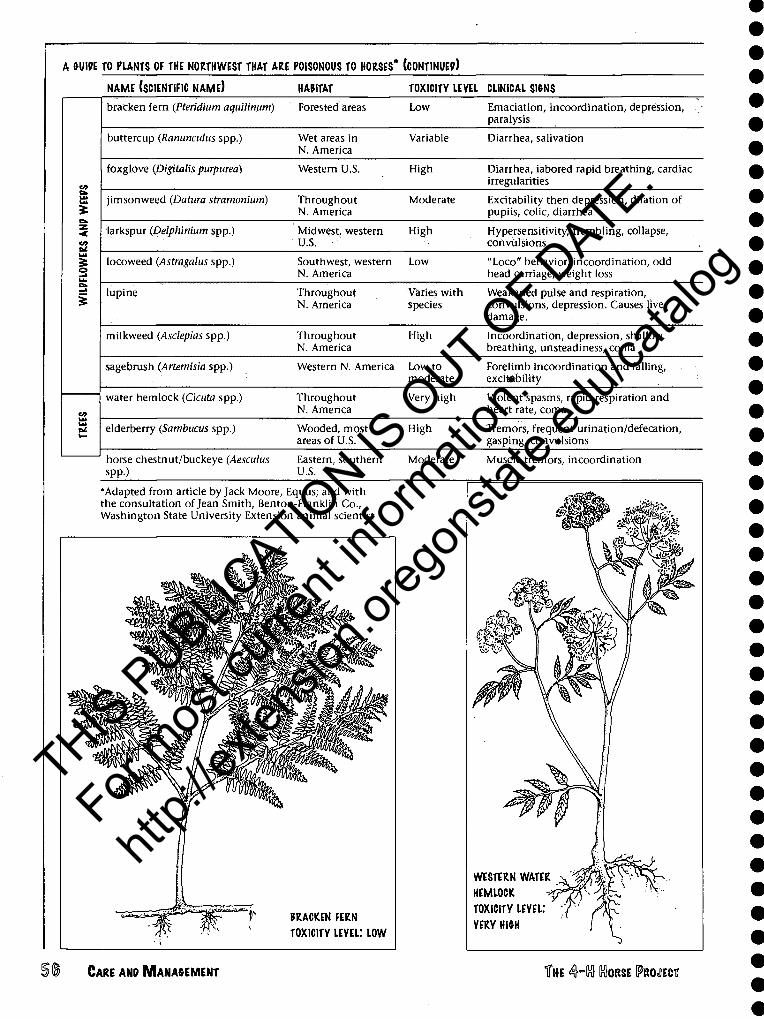
A mn TO PLANTS OF THE NORTHWEST THAT ARE POISONOUS TO HORSES* (CONTINUE?)
NAME (SCIENTIFIC NAME) HAWTAT TOXICITY LEVEL CLINICAL SIGNS
CO
z ■«
—»
bracken fern (Pteridium aquilinum) Forested areas Low Emaciation, incoordination, depression, paralysis
buttercup (Ranunculus spp.) Wet areas in N. America
Variable Diarrhea, salivation
foxglove (Digitalis purpurea) Western U.S. High Diarrhea, labored rapid breathing, cardiac irregularities
jimsonweed (Datura stramonium) Throughout N. America
Moderate Excitability then depression, dilation of pupils, colic, diarrhea
larkspur (Delphinium spp.) Midwest, western U.S.
High Hypersensitivity, trembling, collapse, convulsions
locoweed (Astragalus spp.) Southwest, western N. America
Low "Loco" behavior, incoordination, odd head carriage, weight loss
lupine Throughout N. America
Varies with species
Weakened pulse and respiration, convulsions, depression. Causes liver damage.
milkweed (Asclepias spp.) Throughout N. America
High Incoordination, depression, shallow breathing, unsteadiness, coma
sagebrush (Artemisia spp.) Western N. America Low to moderate
Forelimb incoordination and falling, excitability
water hemlock (Cicuta spp.) Throughout N. America
Very high CO
Violent spasms, rapid respiration and heart rate, coma
elderberry (Sambucus spp.) Wooded, most areas of U.S.
High Tremors, frequent urination/defecation, gasping, convulsions
horse chestnut/buckeye (Aesculus Eastern, southern Moderate Muscle tremors, incoordination
*Adapted from article by Jack Moore, Equus; and with the consultation of Jean Smith, Benton-Franklin Co., Washington State University Extension animal scientist
PRACKEN FERN
TOXICITY LEVEL: LOW
WESTERN WATER
HEMLOCK
TOXICITY LEVEL;
VERY HIM
CARE ANP MANAGEMENT THI 4H[n} KIQRSE PROJECT
THIS P
UBLICATIO
N IS O
UT OF D
ATE.
For mos
t curr
ent in
formati
on:
http:/
/exten
sion.o
regon
state.
edu/c
atalog
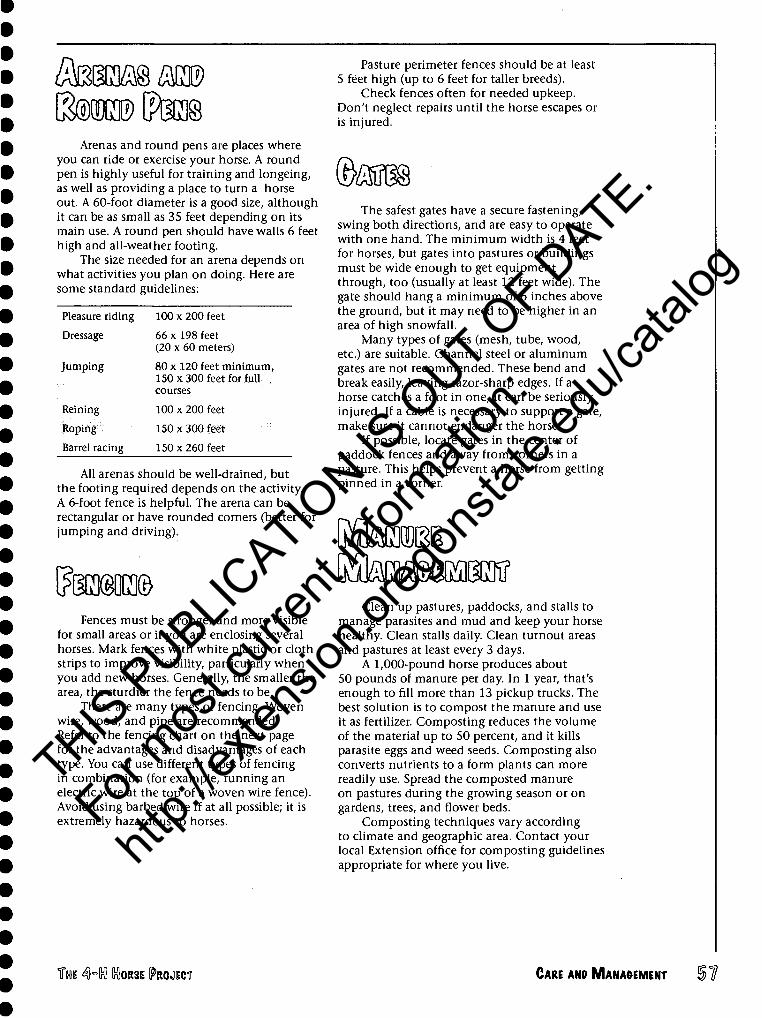
s Arenas and round pens are places where
you can ride or exercise your horse. A round pen is highly useful for training and longeing, as well as providing a place to turn a horse out. A 60-foot diameter is a good size, although it can be as small as 35 feet depending on its main use. A round pen should have walls 6 feet high and all-weather footing.
The size needed for an arena depends on what activities you plan on doing. Here are some standard guidelines:
Pleasure riding 100 x 200 feet
Dressage 66 x 198 feet (20 x 60 meters)
Jumping 80 x 120 feet minimum, 150 x 300 feet for full . courses
Reining 100 x 200 feet
Roping 150x300 feet
Barrel racing 150 x 260 feet
All arenas should be well-drained, but the footing required depends on the activity. A 6-foot fence is helpful. The arena can be rectangular or have rounded corners (better for jumping and driving).
\$mMM Fences must be stronger and more visible
for small areas or if you are enclosing several horses. Mark fences with white plastic or cloth strips to improve visibility, particularly when you add new horses. Generally, the smaller the area, the sturdier the fence needs to be.
There are many types of fencing. Woven wire, wood, and pipe are recommended. Refer to the fencing chart on the next page for the advantages and disadvantages of each type. You can use different types of fencing in combination (for example, running an electric wire at the top of a woven wire fence). Avoid using barbed wire if at all possible; it is extremely hazardous to horses.
Pasture perimeter fences should be at least 5 feet high (up to 6 feet for taller breeds).
Check fences often for needed upkeep. Don't neglect repairs until the horse escapes or is injured.
The safest gates have a secure fastening, swing both directions, and are easy to operate with one hand. The minimum width is 4 feet for horses, but gates into pastures or buildings must be wide enough to get equipment through, too (usually at least 12 feet wide). The gate should hang a minimum of 6 inches above the ground, but it may need to be higher in an area of high snowfall.
Many types of gates (mesh, tube, wood, etc.) are suitable. Channel steel or aluminum gates are not recommended. These bend and break easily, leaving razor-sharp edges. If a horse catches a foot in one, it can be seriously injured. If a cable is necessary to support a gate, make sure it cannot endanger the horse.
If possible, locate gates in the center of paddock fences and away from corners in a pasture. This helps prevent a horse from getting pinned in a corner.
Clean up pastures, paddocks, and stalls to manage parasites and mud and keep your horse healthy. Clean stalls daily. Clean turnout areas and pastures at least every 3 days.
A 1,000-pound horse produces about 50 pounds of manure per day. In 1 year, that's enough to fill more than 13 pickup trucks. The best solution is to compost the manure and use it as fertilizer. Composting reduces the volume of the material up to 50 percent, and it kills parasite eggs and weed seeds. Composting also converts nutrients to a form plants can more readily use. Spread the composted manure on pastures during the growing season or on gardens, trees, and flower beds.
Composting techniques vary according to climate and geographic area. Contact your local Extension office for composting guidelines appropriate for where you live.
THE 4hH WORSE [?RO«T CARE AND MANAGEMENT 17
THIS P
UBLICATIO
N IS O
UT OF D
ATE.
For mos
t curr
ent in
formati
on:
http:/
/exten
sion.o
regon
state.
edu/c
atalog
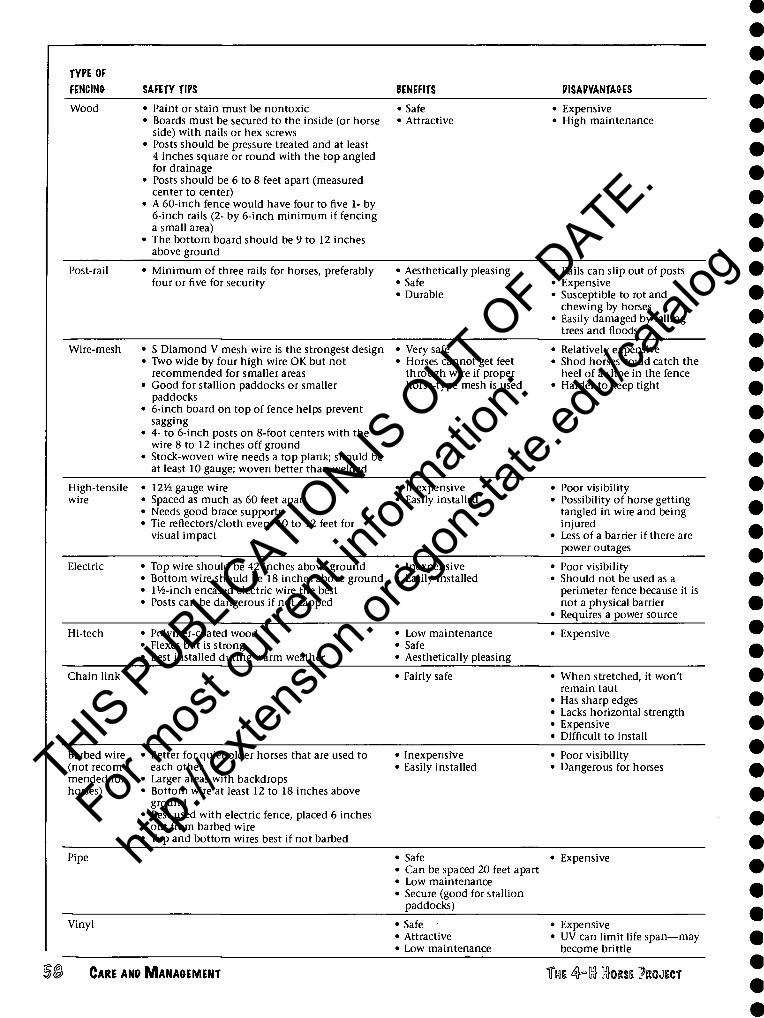
TYPE OF
FENCINfr SAFETY TIPS BENEFITS PISAPVANTA&ES
Wood • Paint or stain must be nontoxic • Safe • Expensive • Boards must be secured to the inside (or horse • Attractive • High maintenance
side) with nails or hex screws • Posts should be pressure treated and at least
4 inches square or round with the top angled for drainage
• Posts should be 6 to 8 feet apart (measured center to center)
• A 60-inch fence would have four to five 1- by 6-inch rails (2- by 6-inch minimum if fencing a small area)
• The bottom board should be 9 to 12 inches above ground
Post-rail • Minimum of three rails for horses, preferably • Aesthetically pleasing • Rails can slip out of posts four or five for security • Safe • Expensive
• Durable • Susceptible to rot and chewing by horses
• Easily damaged by falling trees and floods
Wire-mesh • 5 Diamond V mesh wire is the strongest design • Very safe • Relatively expensive • Two wide by four high wire OK but not • Horses cannot get feet • Shod horses could catch the
recommended for smaller areas through wire if proper heel of a shoe in the fence • Good for stallion paddocks or smaller horse-type mesh is used • Harder to keep tight
paddocks • 6-inch board on top of fence helps prevent
sagging • 4- to 6-inch posts on 8-foot centers with the
wire 8 to 12 inches off ground • Stock-woven wire needs a top plank; should be
at least 10 gauge; woven better than welded
High-tensile • 121/2 gauge wire • Inexpensive • Poor visibility wire • Spaced as much as 60 feet apart • Easily installed • Possibility of horse getting
• Needs good brace supports tangled in wire and being • Tie reflectors/cloth every 10 to 12 feet for injured
visual impact • Less of a barrier if there are power outages
Electric • Top wire should be 42 inches above ground • Inexpensive • Poor visibility • Bottom wire should be 18 inches above ground • Easily installed • Should not be used as a • lV4-inch encased electric wire the best perimeter fence because it is • Posts can be dangerous if not capped not a physical barrier
• Requires a power source
Hi-tech • Polymer-coated wood • Low maintenance • Expensive • Flexes but is strong • Safe • Best installed during warm weather • Aesthetically pleasing
Chain link • Fairly safe • When stretched, it won't remain taut
• Has sharp edges • Lacks horizontal strength • Expensive • Difficult to install
Barbed wire • Better for quiet older horses that are used to • Inexpensive • Poor visibility (not recom- each other • Easily installed • Dangerous for horses mended for • Larger areas with backdrops horses) • Bottom wire at least 12 to 18 inches above
ground • Best used with electric fence, placed 6 inches
out from barbed wire • Top and bottom wires best if not barbed
Pipe • Safe • Can be spaced 20 feet apart • Low maintenance • Secure (good for stallion
paddocks)
• Expensive
Vinyl • Safe • Expensive • Attractive • UV can limit life span—may • Low maintenance become brittle
CARE ANP MANAGEMENT THE ^hln} CtasE [FRCMECT
THIS P
UBLICATIO
N IS O
UT OF D
ATE.
For mos
t curr
ent in
formati
on:
http:/
/exten
sion.o
regon
state.
edu/c
atalog
IMitow A barn fire can be devastating. Take every
possible step to protect the barn (or other horse facilities) from fire. Make sure you have a plan and know where you will secure your horses in case of a fire. Practice a fire drill several times a year so everyone knows what to do. Keep important phone numbers where you can find them quickly, and post directions to your barn next to the phone.
To help prevent a fire, follow these fire safety guidelines:
1. Do not allow smoking in or around the barn, hay, or bedding. Post "No Smoking" signs, and enforce the ban.
2. Keep your barn clean. Dust and cobwebs are fire hazards. Remove combustible items such as old rags, sacks, loose hay, or equipment that may leak gas or oil.
3. Mow or spray brush and tall grass and remove trees and debris within a 50-foot radius of the barn or horse facilities.
4. Protect against lightning. Install a grounded lightning rod system to protect your barn during electrical storms.
5. Be sure to have adequate and appropriate fire extinguishers. Place them every 40 feet, or keep one at each entrance, in the tack room, and near feed storage areas. Make sure they are charged, and protect them from freezing.
6. Try to have a large water supply inside and outside the barn. Keep hoses drained, and protect them from freezing in the winter. Keep a hose attached to your external water supply.
7. Install smoke detectors. Detectors and alarms that sense heat and smoke can save critical time if a fire does start. Check them regularly (at least twice a year) and replace batteries when necessary. You may want to connect the detector to a loud, external siren that can be heard far from the barn.
8. Cage all electric light fixtures and protect them from horse, rodent, or weather damage. Enclose all electrical wiring in conduit. Periodically check wiring for damage and replace if necessary.
9. Never lock stall doors. Keep halters and lead ropes close to each stabled horse. Consider marking each with glow-in-the-dark paint or reflectors. Keep a container with a supply of empty feed sacks or towels available for blindfolds.
10. Store hay and bedding in a separate building from the stalls. (Some insurance companies require hay to be stored separately, so check with your agent.)
Keep hay away from electrical outlets, the main fuse box, and electric fence units.
11. Make sure that the hay you store is properly cured and that it's kept dry. Check new hay frequently for hot spots. Wet hay can start fires through spontaneous combustion.
12. Don't use extension cords. If you must, use an industrial-grade cord, and don't overload it.
13. Know the location of all master electrical switches, and make them easily accessible.
14. All appliances in the barn should be UL listed. Never use portable heaters. Use caution with heated elements, such as water heaters, trough heaters, or heat tape.
15. Build barns out of noncombustible materials. Look for pressure-treated wood, because it burns more slowly.
Ask your local fire department to do a walkthrough of your barn to point out other fire-prevention steps you can take.
tes m ^ te If a fire does break out, stay calm. Call
the fire department. In a calm, clear voice, give your name, farm name, and location. If the address is different than the house, give directions. Do not hang up until you are sure the information was heard.
Open only one door of the stable. As long as possible, keep the flow of air to a minimum so the fire will not explode. If the fire is spreading rapidly and there is heavy smoke, stay out of the barn. Do not risk your own life to rescue your horse.
• Lead each horse out of the barn, and take it to a paddock a safe distance from the bam and out of the way of fire trucks and equipment. If the horse won't be led, blindfold it using a towel, handkerchief, or sack. Wet the blindfold in water before putting it on the horse's head and eyes.
• Do not turn a horse loose, because it might run back into the barn.
• Save equipment stored in the barn only after horses are out.
• Open all access gates to the barn area and keep roads clear for fire trucks.
• Use whatever firefighting equipment you have to contain the fire until help arrives.
• Once help arrives, step aside and let the professional firefighting crew handle things.
• As soon as possible, check your horses for injuries. Call a veterinarian if horses are burned or have inhaled smoke. Check for burns around the horse's nostrils and eyes. Keep any burned areas on the body or legs moist with a cold, wet cloth.
THE 4-110 HOoRsi PROJECT CARE AND MANAGEMENT
THIS P
UBLICATIO
N IS O
UT OF D
ATE.
For mos
t curr
ent in
formati
on:
http:/
/exten
sion.o
regon
state.
edu/c
atalog
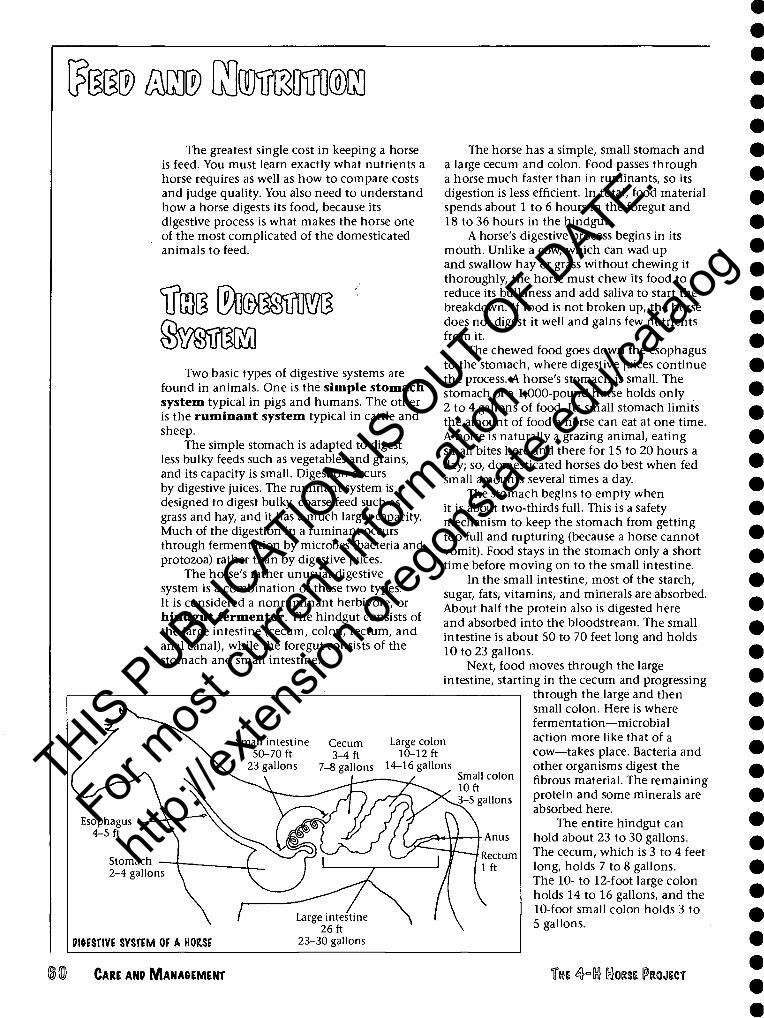
te> M?) \Hmmm The greatest single cost in keeping a horse
is feed. You must learn exactly what nutrients a horse requires as well as how to compare costs and judge quality. You also need to understand how a horse digests its food, because its digestive process is what makes the horse one of the most complicated of the domesticated animals to feed.
If rail ®OWK
Two basic types of digestive systems are found in animals. One is the simple stomach system typical in pigs and humans. The other is the ruminant system typical in cattle and sheep.
The simple stomach is adapted to digest less bulky feeds such as vegetables and grains, and its capacity is small. Digestion occurs by digestive juices. The ruminant system is designed to digest bulky, coarse feed such as grass and hay, and it has a much larger capacity. Much of the digestion in a ruminant occurs through fermentation by microbes (bacteria and protozoa) rather than by digestive juices.
The horse's rather unusual digestive system is a combination of these two types. It is considered a nonruminant herbivore, or hindgut fermentor. The hindgut consists of the large intestine (cecum, colon, rectum, and anal canal), while the foregut consists of the stomach and small intestine.
Cecum 3-4 ft
7-8 gallons
Large colon 10-12 ft
14-16 gallons
Stomach 2-4 gallons
PlfrESTIVE SYSTEM OF A HORSE
Large intestine 26 ft
23-30 gallons
The horse has a simple, small stomach and a large cecum and colon. Food passes through a horse much faster than in ruminants, so its digestion is less efficient. In total, food material spends about 1 to 6 hours in the foregut and 18 to 36 hours in the hindgut.
A horse's digestive process begins in its mouth. Unlike a cow, which can wad up and swallow hay or grass without chewing it thoroughly, the horse must chew its food to reduce its bulkiness and add saliva to start the breakdown. If food is not broken up, the horse does not digest it well and gains few nutrients from it.
The chewed food goes down the esophagus to the stomach, where digestive juices continue the process. A horse's stomach is small. The stomach of a 1,000-pound horse holds only 2 to 4 gallons of food. Its small stomach limits the amount of food a horse can eat at one time. A horse is naturally a grazing animal, eating small bites here and there for 15 to 20 hours a day; so, domesticated horses do best when fed small amounts several times a day.
The stomach begins to empty when it is about two-thirds full. This is a safety mechanism to keep the stomach from getting too full and rupturing (because a horse cannot vomit). Food stays in the stomach only a short time before moving on to the small intestine.
In the small intestine, most of the starch, sugar, fats, vitamins, and minerals are absorbed. About half the protein also is digested here and absorbed into the bloodstream. The small intestine is about 50 to 70 feet long and holds 10 to 23 gallons.
Next, food moves through the large intestine, starting in the cecum and progressing
through the large and then small colon. Here is where fermentation—microbial action more like that of a cow—takes place. Bacteria and other organisms digest the fibrous material. The remaining protein and some minerals are absorbed here.
The entire hindgut can hold about 23 to 30 gallons. The cecum, which is 3 to 4 feet long, holds 7 to 8 gallons. The 10- to 12-foot large colon holds 14 to 16 gallons, and the 10-foot small colon holds 3 to 5 gallons.
Small colon 10 ft ;-5 gallons
Anus Rectum 1ft
CARE ANP MANAGEMENT THE 4°K WORSE PROJECT
THIS P
UBLICATIO
N IS O
UT OF D
ATE.
For mos
t curr
ent in
formati
on:
http:/
/exten
sion.o
regon
state.
edu/c
atalog
Because of the horse's combination type digestive system, it can eat both grains and forage. However, this digestive system makes the horse prone to health problems such as colic and founder. So, there are several things you must keep in mind when determining what to feed your horse.
1. A horse's digestive system works well when its feed consists mainly of grass and hay. The system does not work well when too much grain is added to the diet. (Grains are very high in starch. Excess starch cannot be digested in the foregut, so it is passed to the hindgut. Extra starch in the hindgut increases the number of starch-digesting bacteria. These produce lactic acid, which makes the large intestine more acidic. The fiber-digesting bacteria can't survive in acidic conditions, and when they die, they release toxins. Colic and/or founder are often the result.)
2. The horse has no gall bladder. This makes it hard to digest and get nutrients from a diet that is high in fat.
3. Remember that the digestibility of the food is just as important as the food's nutrient content. The horse gets no benefit from foods it cannot digest.
GJMlgGMS There are six essential nutrients: proteins,
carbohydrates, fats, vitamins, minerals, and water. A horse must receive all nutrients in the proper amounts, as both too little and too much can cause health problems.
A balanced ration supplies all required nutrients in the proper amounts for each individual horse. A maintenance diet provides the minimum amount needed to keep the horse in the same physical condition.
to-rsra Proteins are necessary for all of life's
processes. They are especially important for growth, reproduction, and lactation. They are required for muscle repair and building. The requirement for most adult horses is 8 to 10 percent of the ration.
Good-quality hays and grains have enough protein for most horses. Cultivated grass hay contains about 9 percent protein, and alfalfa averages about 15 percent. Native grass hay averages only 7 percent and may be as low as 5 percent. Therefore, it must be supplemented.
Horses need more protein at certain times of their lives. Mares should receive 11 percent protein in their last 90 days of pregnancy
and 14 percent while lactating. Growing foals should receive 18 percent protein, as most tissue growth occurs at an early age. Grain alone, with only 10 percent protein, cannot supply these extra needs. Common sources of extra protein are legume hays, pasture, soybean meal, and linseed meal.
Signs that a horse is deficient in protein include weight loss; a rough, coarse coat; slow growth; a decline in the horse's performance; and a decrease in a mare's milk production.
Horses also can suffer from too much protein in their diet. Too much protein can lead to dehydration and an electrolyte imbalance. Signs of too much protein include drinking more water, urinating larger amounts, and sweating more profusely.
Carbohydrates are the horse's main source of energy. After a horse's basic requirement for maintenance is met, extra energy is used for work, growth, and milk production, or stored as body fat. The amount of energy a horse requires is determined by the horse's size and by the amount and kind of work it performs.
Carbohydrates include sugars, starches, and cellulose. Glucose, a simple sugar, is the main building block of carbohydrates and the chief form in which the horse absorbs carbohydrates.
Grains such as oats, barley, and corn may be as much as 60 percent carbohydrates. They are excellent sources of energy. Due to the relatively small size of the horse's digestive system, an increased need for energy is met by adding grain and decreasing the amount of hay.
Fats are the densest source of energy. They contain about twice as many calories per pound as carbohydrates and protein, and they provide more body heat. Premixed feeds usually contain 2 to 6 percent fat, which is easily enough to maintain a horse. If a horse's diet lacks fat, the horse may develop rough skin and a thin, rough hair coat.
Vitamins are required in small amounts to help regulate chemical reactions within the body. Each vitamin has a unique function and cannot be replaced with another. Also, a deficiency of one vitamin can interfere with another's function. Deficiencies affect growth, reproduction, and general health, but symptoms can be difficult to diagnose.
Most horses get enough vitamins in their normal diet. Green leafy forage contains most
THE 4hlr!l IBORSE ^ROJIICT CARE AND MANAGEMENT
THIS P
UBLICATIO
N IS O
UT OF D
ATE.
For mos
t curr
ent in
formati
on:
http:/
/exten
sion.o
regon
state.
edu/c
atalog
vitamins and, along with sunshine, usually supplies a horse with all it needs. You may need to give your horse a vitamin supplement if your feed is low quality, if the horse is under stress, if it is not eating well, or if it is doing strenuous work.
Do not feed a vitamin supplement unless it is needed. Feeding more than the recommended allowance is a waste of money and can cause health problems.
VITAMIN A Green grass and legume hay contain
carotene, which is converted to vitamin A in the animal's body. Vitamin A maintains the health of mucous membranes (such as those found in the respiratory tract), and increases resistance to respiratory infections. Severe deficiency may cause night blindness, reproductive difficulties, poor hoof development, difficult breathing, incoordination, and/or poor appetite. Alfalfa leaf meal is used in pelleted commercial supplements to supply this vitamin.
Oxidation (exposure to air) destroys vitamin A. Therefore, hay that has sat for more than a year has very little vitamin A left in it.
VITAMIN P Sunlight is the natural source of vitamin
D. Horses kept inside may be deficient and need a supplement. This vitamin helps develop sound bones and teeth, so requirements are high during growth. A serious deficiency may cause rickets, slow growth, or weak bones and teeth. Cod liver oil or dried yeast with vitamin D added are effective supplements.
VITAMIN I Green pasture or hay supplies vitamin E.
The amount of vitamin E in hay decreases with plant maturity and with the length of storage time. Poor feed or stress may cause a deficiency. Broodmares, stallions, or racehorses may need additional vitamin E to aid in the development and maintenance of muscle. Soybean meal or wheat germ oil provide additional amounts.
VITAMIN K Vitamin K is needed for the production
of blood clots. Internal bleeding may occur if there is a deficiency.
VITAMIN C A horse's liver produces vitamin C. A horse
almost always has a sufficient quantity, so there is no need to supplement this vitamin.
Minerals are essential for sound bones, teeth, and tissues. They are needed for maintenance of body structure, fluid balance,
CARE AND MANAGEMENT
nerve conduction, and muscle contraction. Minerals are important at all stages of life, but pregnant mares have increased requirements and lactating mares even more.
Proper mineral balance is very important, because one mineral can counteract the effect of another. For example, too much phosphorous reduces the amount of calcium and other minerals that a horse can absorb. Consult a veterinarian or do further research to determine the proper supplements for your horse. Most horses get enough minerals in their regular diet, with the exception of salt.
SALT Horses may lose 1 to 2 ounces of salt per
day in sweat. Lack of salt may contribute to heat stress, poor appetite, or a rough coat. Most horse feeds are deficient in salt, so horses need free access to salt in block or granular form. Iodized or trace mineralized salt is recommended.
Salt should always be available in summer or if the horse is being worked hard. Loose salt may be better in the winter, because the horse may not lick a block as much.
The salt requirement varies according to temperature and the amount of work. On the average, a horse consumes 2 ounces of salt daily or about 1 pound per week. Horses on green pasture usually require more salt.
Protect salt and mineral supplies from rain or other moisture to prevent waste.
CALCIUM AND PHOSPHORUS The ratio of calcium to phosphorus in the
diet is critical. In general, the ration should be two parts calcium to one part phosphorus for weanlings and yearlings. As the horse matures, it needs much less phosphorous in relation to calcium. The amount of phosphorus should never exceed the amount of calcium.
Rickets, fragile bones, or other abnormal bone development can occur from a calcium- phosphorus imbalance. Hormone imbalance may also result.
High-quality hay meets the calcium needs of the mature horse, but grass hays and grains usually do not supply enough calcium for the growing horse and pregnant or nursing mare. Legume hay is a rich source of calcium.
Grains are a good source of phosphorus. However, a diet with too much grain is likely to produce a calcium-phosphorous imbalance.
A good source of supplemental calcium and phosphorous for growing horses is dicalcium phosphate mixed half-and-half with salt to make it palatable. One-fourth cup per day supplies the needs of a pregnant or nursing mare. Foals require less. Commercial mixes also are available.
THE 4HI}5 CtasE PROJECT
THIS P
UBLICATIO
N IS O
UT OF D
ATE.
For mos
t curr
ent in
formati
on:
http:/
/exten
sion.o
regon
state.
edu/c
atalog
IODINE Feeds grown on Pacific Northwest soils are
deficient in iodine. Lack of iodine may cause goiter or stillborn or weak foals. Iodized salt is recommended.
IRON Most grass and hay are iron-rich, but a
mare's milk is deficient. Make sure foals have access to trace-mineralized salt, which contains iron. The body uses iron to form hemoglobin, which enables the blood to carry oxygen, so a deficiency may cause anemia.
SELENIUM Some Northwest soils are deficient in
this mineral, which is important for proper utilization of vitamin E. Pregnant mares, foals, and young horses particularly need selenium to help prevent skeletal and muscle disorders. Some commercial feed supplements contain selenium, or it may be injected.
There is a very narrow range of normal levels of selenium. Too much can be dangerous (it is toxic), so be careful not to give more than is needed.
Water is as essential to good nutrition as any solid feed. In fact, water is considered the most important nutrient, as a horse cannot live long without it. It is the major component of blood, which carries nutrients to all parts of the body. It picks up waste products and helps eliminate them. Be sure that fresh, clean water is available to your horse at all times.
Normally, a mature horse drinks 10 to 12 gallons of water a day. When the temperature is high or during work, it can drink considerably more than that. A lactating mare also drinks more water than usual.
See "Weather and Your Horse," page 77, regarding dehydration in hot weather and watering strategies for winter.
tmm m ta> Feed includes roughages (pasture and
hay), grains or concentrates, and supplements. Whichever feeds you choose, be sure they are good quality. The quality of the feed is far more important than the quantity fed.
(FtaM
grazes freely during the summer requires little else to meet its nutritional needs.
Pastures may include both native ranges and improved fields. Grass grown in fertilized fields is more nutritious than native grass.
Remove horses from pasture during the winter to avoid damage from trampling. Winter growth is high in water content and not very nutritious, so you would need a hay supplement and possibly grain and other supplements also. Allow the grass to become well established before turning horses out in the spring.
When returning the horse to pasture in the spring, follow a careful schedule to avoid founder. Feed the horse first, then allow it only 1 to 2 hours grazing the first week, 2 to 4 hours the second week, and 6 to 8 hours the third week. Shorten the time if the horse's Crestline thickens or its droppings are loose.
Using pasture reduces feed costs, particularly if the pasture is well managed. (See "Pasture Management," page 54.) A horse that
Hay is forage that has been cut, dried, and baled. There are two categories of hay: legumes and grasses. Legumes, such as alfalfa and clover, are higher in protein, calcium, and vitamin A. Grass hay is higher in fiber content and lower in digestible energy. Common grass hays are timothy, orchardgrass, fescue, bentgrass, and ryegrass.
Good-quality grass hay has enough nutrients to sustain a horse. The horse can eat more without getting fat, which is better for the horse's digestion and helps relieve boredom. Take care when feeding alfalfa to make sure the protein level isn't too high and the horse doesn't get overfed. Mixing alfalfa and grass hay together is often a good choice.
Hay is most nutritious when it is cut before maturity. The older a hay is when it is cut, the more fiber it has and the less digestible it is. Older hay also has less protein and phosphorus.
Hay should have a high leaf-to-stem ratio. Most of the nutrients are in the leaves, and they are also more palatable. Stems are hard to digest and low in nutritional value. So, leafy hay gives more value per ton.
Quality hay should be green: the greener the hay, the higher it is in vitamins, especially vitamin A. Hay that has been left in the rain will not be green and will have few vitamins left in it.
All hay should be sweet smelling and free of dust, dirt, and foreign objects. It should contain no weeds, especially poisonous types. Never feed moldy hay, as it can cause heaves, colic, and abortion.
Chopped hay has been cut into pieces about an inch long and then bagged. It can be quite dusty, so molasses or oil usually is added. This product can be fed to horses with
THS 4h[n} DORSS (PROJECT CARE AND MANA&EMENT
THIS P
UBLICATIO
N IS O
UT OF D
ATE.
For mos
t curr
ent in
formati
on:
http:/
/exten
sion.o
regon
state.
edu/c
atalog
respiratory problems or that have trouble chewing. You can mix grain in with chopped hay when feeding.
Grain generally is not necessary for mature horses, and they certainly need far less than most owners think they do. Lactating mares, young growing horses, and hardworking horses need grain added to their diet. Do not feed grain within 1 hour before or after hard work.
Grains and concentrates (pelleted or sweet feed) are low in fiber, highly digestible, and less bulky than roughage. The energy value of different grains varies widely. Know the nutritional value of each and feed only what is needed. No more than half the ration should be concentrates.
OATS This popular grain contains the correct
balance of nutrients and is a relatively safe feed. Horses can digest the starch from oats in the foregut, leading to fewer digestion problems. Oats are higher in fiber, protein, and minerals than many other grains, and they are highly digestible and palatable.
Oats can be fed whole, rolled, or crimped. Rolled oats are recommended for very young or old horses that cannot chew well. Whole oats are generally less dusty and do not mold as easily.
Varieties of oats include gray, white, and red. White are most commonly used because they are the softest and easiest to roll.
BARLEY Barley is higher in energy than oats, so you
don't need to feed as much. It is moderate in fiber, nutritious, and palatable. It can help a horse gain weight.
Feed only steamrolled or crimped barley. The hard hulls of whole barley must be processed or they are very hard to digest.
CORN Corn is a high-energy carbohydrate that is
relatively expensive in the Northwest. It is low in fiber, protein, calcium, and other minerals. It has a high calorie content, so it is fattening and can cause obesity. Use corn with caution, as it is easy to overfeed.
Corn should be cracked or rolled. This makes it somewhat dusty, but it is a satisfactory feed when used in combination with other feeds and molasses. Never feed moldy corn: it can be lethal.
WHEAT Wheat is higher in energy than corn. It
generally is not used as a grain for horses due
to its high cost. It is best used in a feed mixture, as it is not very palatable by itself. The hard kernels must be processed, or the horse cannot digest them.
WHEAT BRAN This is the coarse outer covering of the
wheat kernel. It contains about 16 percent protein, but only about 50 percent is digestible. It also contains a good amount of phosphorus. Because it is high in bulk, it is a good laxative. Bran mash is prepared by mixing bran with hot water to the consistency of oatmeal and allowing it to steam under cover until cool.
RYE Although it is high in protein, rye is not
very palatable and is seldom used as a horse grain. It is susceptible to the "ergot" fungus which can cause severe health problems.
ALFALFA PELLETS Alfalfa hay is mowed and chopped in the
field, then dried at a dehydrating plant, ground, and formed into pellets. The pellets can become quite dusty, which adversely affects horses with respiratory problems. A horse's diet cannot consist solely of alfalfa pellets, because the particles in the pellets are not large enough to maintain normal digestion.
ALFALFA CUBES An alternative to pellets, these are made
by coarsely chopping alfalfa hay and then compressing it into small cubes (usually about 2x2 inches). This process does not reduce the nutritional value of the feed; it remains the same as hay. The material in the cubes is large enough to maintain normal digestion. While alfalfa is the most common, cubes can be made from other types of hay as well, and grass and alfalfa may be mixed in a cubed feed.
There are several advantages to feeding cubes over baled hay. Generally, there is less waste, and the quality tends to be more consistent. Cubes are easier to handle, it is easy to monitor the exact amount being fed, and they require less storage space. Cubes also have little dust, making them a much better choice than pellets for horses with respiratory problems.
Disadvantages to feeding cubes are that horses can choke from eating them too fast, they are more expensive than hay, and horses can become bored because they spend less time eating. Also, you must carefully regulate how much is fed, as it is easy for a horse to overeat and become fat or have digestive problems.
BEET PULP PELLETS Beet pulp is the fibrous material left after
processing sugar beets. It is an easily digestible fiber supplement that can replace other forage
14 CARE AND MANAGEMENT THE ^hM MORSE (PROJECT
THIS P
UBLICATIO
N IS O
UT OF D
ATE.
For mos
t curr
ent in
formati
on:
http:/
/exten
sion.o
regon
state.
edu/c
atalog
in the horse's diet. Up to 25 percent of a horse's feed can be beet pulp. It is low in crude protein (usually 7 to 10 percent) and high in fiber (around 22 percent).
A common misconception about beet pulp pellets is that they cause choke, a condition in which food gets stuck in the horse's esophagus. Actually, choke often is a behavior problem, as it usually occurs in horses that bolt their food (swallow without chewing). Slow eaters seldom choke.
Another common myth about beet pulp pellets is that they expand in the stomach if they are not soaked properly before feeding, causing a horse's stomach to rupture. Studies show that the pellets are safe to feed without soaking as long as the horse has free access to water. Most people still prefer to soak them, because it makes them more palatable.
To soak pellets, place them in a tub and add twice as much water as pellets. You may use warm or cold water, but do not use hot water: it destroys the nutrients. Soak the pellets for at least 2 hours or until they no longer look like pellets. Soak only enough pellets for one feeding. If they soak for over 12 hours, they ferment and are unpalatable to the horse.
Beet pulp pellets often help add and keep weight on hard keepers. They are also a good supplement for poor-quality hay. Horses with dental problems often do well on beet pulp pellets, because they are easy to chew. They are not a good choice for horses doing strenuous work.
SUWUMMTS Add supplements to your horse's feed only
when something is missing from its diet. Use them only on the advice of a veterinarian. Feeding unnecessary supplements can disrupt the balance of vitamins and minerals and damage the horse's health. If the horse cannot rid itself of the excess nutrients, they can build up to toxic levels in the body. They are also fairly expensive.
Common protein supplements are soybean meal, linseed meal, cottonseed meal, and brewer's grain. Common fat supplements are rice bran, flaxseed, and vegetable oil.
SOYBEAN MEAL Soybean meal is the most common protein
supplement. At 44 percent protein, it helps meet the protein requirements of foals and lactating mares without adding too much bulk. One to 2 cups twice a day should supply what they need. Soybean meal contains lysine (lie- SEEN), an amino acid which affects growth. Be sure adequate calcium and phosphorous are available also.
LINSEED MEAL This protein supplement has laxative
qualities. Linseed meal averages 35 percent protein, but it is less digestible than soybean meal, so more must be fed. It is deficient in lysine and should not be the only protein supplement given to mares and foals.
Modern solvent processing techniques have greatly reduced the fat content. Only the old "expeller" process leaves 10 percent fat, which adds gloss to the coat.
COTTONSEED MEAL This supplement averages 41 to 48 percent
protein. It is rich in phosphorous and low in lysine. It is not popular as a horse feed, because certain seeds may contain a toxic substance.
BREWER'S ©RAIN Brewer's grain is the mash removed from
malt when making beer. It is palatable and nutritious, containing around 25 percent protein, 13 percent fat, and many B vitamins.
RICE BRAN Rice bran has up to 20 percent crude fat.
It is a popular fat supplement and an excellent source of vitamin E. Rice bran can help a horse maintain weight and give it a sleek, glossy coat. It is not as messy to feed as vegetable oil, and it keeps longer. It is also highly palatable.
A drawback to rice bran is that it can create a calcium-phosphorous imbalance. Many manufacturers add calcium to the rice bran to help maintain the proper balance. To reduce the chance of mineral overload, do not feed more than 2 pounds per day.
FLAXSEED These small, hard seeds must be ground,
cooked, or soaked in water so the horse can digest them. Flaxseed has a high concentration of omega-3 fatty acids which the horse cannot produce on its own. It is high in soluble fiber which gels in water and is thought to reduce the risk of sand colic. It is also a good source of vitamin E.
VEGETABLE OIL This is probably the most common fat
supplement. It is added as a top dressing to grain rations to give more sheen to a horse's coat. Do not feed more than 2 cups per day. Corn, soybean, and safflower oils are commonly used. Oils can turn rancid if they are stored too long.
Mm®« ©©cmsTS few MIXED FEEDS
Mixed feeds are produced commercially for convenience, and they are more expensive.
THE 4°ln} KOBSI PROJECT CARE ANP MANAGEMENT
THIS P
UBLICATIO
N IS O
UT OF D
ATE.
For mos
t curr
ent in
formati
on:
http:/
/exten
sion.o
regon
state.
edu/c
atalog
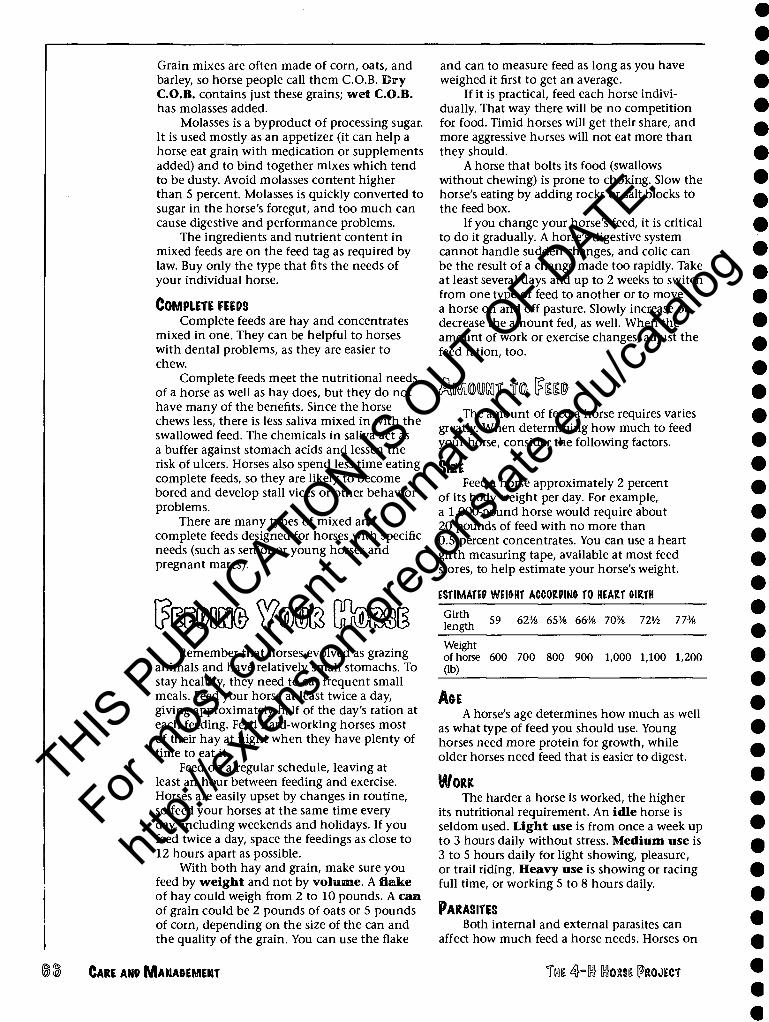
Grain mixes are often made of corn, oats, and barley, so horse people call them C.O.B. Dry C.O.B. contains just these grains; wet C.O.B. has molasses added.
Molasses is a byproduct of processing sugar. It is used mostly as an appetizer (it can help a horse eat grain with medication or supplements added) and to bind together mixes which tend to be dusty. Avoid molasses content higher than 5 percent. Molasses is quickly converted to sugar in the horse's foregut, and too much can cause digestive and performance problems.
The ingredients and nutrient content in mixed feeds are on the feed tag as required by law. Buy only the type that fits the needs of your individual horse.
COMPUTE FEEPS Complete feeds are hay and concentrates
mixed in one. They can be helpful to horses with dental problems, as they are easier to chew.
Complete feeds meet the nutritional needs of a horse as well as hay does, but they do not have many of the benefits. Since the horse chews less, there is less saliva mixed in with the swallowed feed. The chemicals in saliva act as a buffer against stomach acids and lessen the risk of ulcers. Horses also spend less time eating complete feeds, so they are likely to become bored and develop stall vices or other behavior problems.
There are many types of mixed and complete feeds designed for horses with specific needs (such as senior or young horses and pregnant mares).
0 MM Remember that horses evolved as grazing
animals and have relatively small stomachs. To stay healthy, they need to eat frequent small meals. Feed your horse at least twice a day, giving approximately half of the day's ration at each feeding. Feed hard-working horses most of their hay at night when they have plenty of time to eat it.
Feed on a regular schedule, leaving at least an hour between feeding and exercise. Horses are easily upset by changes in routine, so feed your horses at the same time every day, including weekends and holidays. If you feed twice a day, space the feedings as close to 12 hours apart as possible.
With both hay and grain, make sure you feed by weight and not by volume. A flake of hay could weigh from 2 to 10 pounds. A cam of grain could be 2 pounds of oats or 5 pounds of corn, depending on the size of the can and the quality of the grain. You can use the flake
and can to measure feed as long as you have weighed it first to get an average.
If it is practical, feed each horse indivi- dually. That way there will be no competition for food. Timid horses will get their share, and more aggressive horses will not eat more than they should.
A horse that bolts its food (swallows without chewing) is prone to choking. Slow the horse's eating by adding rocks or salt blocks to the feed box.
If you change your horse's feed, it is critical to do it gradually. A horse's digestive system cannot handle sudden changes, and colic can be the result of a change made too rapidly. Take at least several days and up to 2 weeks to switch from one type of feed to another or to move a horse on and off pasture. Slowly increase or decrease the amount fed, as well. When the amount of work or exercise changes, adjust the feed ration, too.
toOTOT IT® [PtESI The amount of feed a horse requires varies
greatly. When determining how much to feed your horse, consider the following factors.
SIZE Feed a horse approximately 2 percent
of its body weight per day. For example, a 1,000-pound horse would require about 20 pounds of feed with no more than 0.5 percent concentrates. You can use a heart girth measuring tape, available at most feed stores, to help estimate your horse's weight.
ESTIMATE? WEI&HT ACCOMIM TO HEART frlftTH
Girth length 59 62% 65% 66% 70% 7ZV2 77%
Weight of horse Gb)
600 700 800 900 1,000 1,100 1,200
AGE A horse's age determines how much as well
as what type of feed you should use. Young horses need more protein for growth, while older horses need feed that is easier to digest.
WORK The harder a horse is worked, the higher
its nutritional requirement. An idle horse is seldom used. Light use is from once a week up to 3 hours daily without stress. Medium use is 3 to 5 hours daily for light showing, pleasure, or trail riding. Heavy use is showing or racing full time, or working 5 to 8 hours daily.
PARASITES Both internal and external parasites can
affect how much feed a horse needs. Horses on
CARE AND MANAGEMENT THE 4-IrO Gtasi IPROJICT
THIS P
UBLICATIO
N IS O
UT OF D
ATE.
For mos
t curr
ent in
formati
on:
http:/
/exten
sion.o
regon
state.
edu/c
atalog
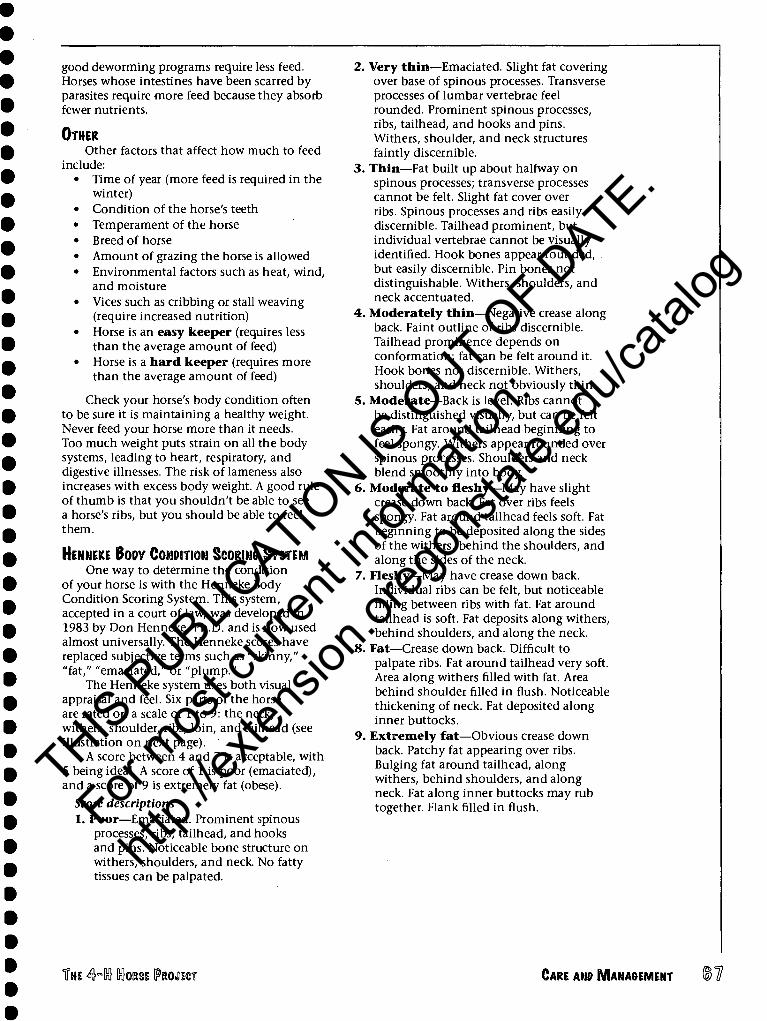
good deworming programs require less feed. Horses whose intestines have been scarred by parasites require more feed because they absorb fewer nutrients.
OTHER Other factors that affect how much to feed
include: • Time of year (more feed is required in the
winter) • Condition of the horse's teeth • Temperament of the horse • Breed of horse • Amount of grazing the horse is allowed • Environmental factors such as heat, wind,
and moisture • Vices such as cribbing or stall weaving
(require increased nutrition) • Horse is an easy keeper (requires less
than the average amount of feed) • Horse is a hard keeper (requires more
than the average amount of feed)
Check your horse's body condition often to be sure it is maintaining a healthy weight. Never feed your horse more than it needs. Too much weight puts strain on all the body systems, leading to heart, respiratory, and digestive illnesses. The risk of lameness also increases with excess body weight. A good rule of thumb is that you shouldn't be able to see a horse's ribs, but you should be able to feel them.
HENNEKE BOW CONDITION SCORING SYSTEM One way to determine the condition
of your horse is with the Henneke Body Condition Scoring System. This system, accepted in a court of law, was developed in 1983 by Don Henneke, Ph.D. and is now used almost universally. The Henneke scores have replaced subjective terms such as "skinny," "fat," "emaciated," or "plump."
The Henneke system uses both visual appraisal and feel. Six parts of the horse are rated on a scale of 1 to 9: the neck, withers, shoulder, ribs, loin, and tailhead (see illustration on next page).
A score between 4 and 7 is acceptable, with 5 being ideal. A score of 1 is poor (emaciated), and a score of 9 is extremely fat (obese).
Score descriptions 1. Poor—Emaciated. Prominent spinous
processes, ribs, tailhead, and hooks and pins. Noticeable bone structure on withers, shoulders, and neck. No fatty tissues can be palpated.
2. Very thin—Emaciated. Slight fat covering over base of spinous processes. Transverse processes of lumbar vertebrae feel rounded. Prominent spinous processes, ribs, tailhead, and hooks and pins. Withers, shoulder, and neck structures faintly discernible.
3. Thin—Fat built up about halfway on spinous processes; transverse processes cannot be felt. Slight fat cover over ribs. Spinous processes and ribs easily discernible. Tailhead prominent, but individual vertebrae cannot be visually identified. Hook bones appear rounded, . but easily discernible. Pin bones not distinguishable. Withers, shoulders, and neck accentuated.
4. Moderately thin—Negative crease along back. Faint outline of ribs discernible. Tailhead prominence depends on conformation; fat can be felt around it. Hook bones not discernible. Withers, shoulders, and neck not obviously thin.
5. Moderate—Back is level. Ribs cannot be distinguished visually, but can be felt easily. Fat around tailhead beginning to feel spongy. Withers appear rounded over spinous processes. Shoulders and neck blend smoothly into body.
6. Moderate to fleshy—May have slight crease down back. Fat over ribs feels spongy. Fat around tailhead feels soft. Fat beginning to be deposited along the sides of the withers, behind the shoulders, and along the sides of the neck.
7. Fleshy—May have crease down back. Individual ribs can be felt, but noticeable filling between ribs with fat. Fat around tailhead is soft. Fat deposits along withers, behind shoulders, and along the neck.
8. Fat—Crease down back. Difficult to palpate ribs. Fat around tailhead very soft. Area along withers filled with fat. Area behind shoulder filled in flush. Noticeable thickening of neck. Fat deposited along inner buttocks.
9. Extremely fat—Obvious crease down back. Patchy fat appearing over ribs. Bulging fat around tailhead, along withers, behind shoulders, and along neck. Fat along inner buttocks may rub together. Flank filled in flush.
TK &U Itas! (pRQ.recT CARE AMP MANA&EMENT J7
THIS P
UBLICATIO
N IS O
UT OF D
ATE.
For mos
t curr
ent in
formati
on:
http:/
/exten
sion.o
regon
state.
edu/c
atalog
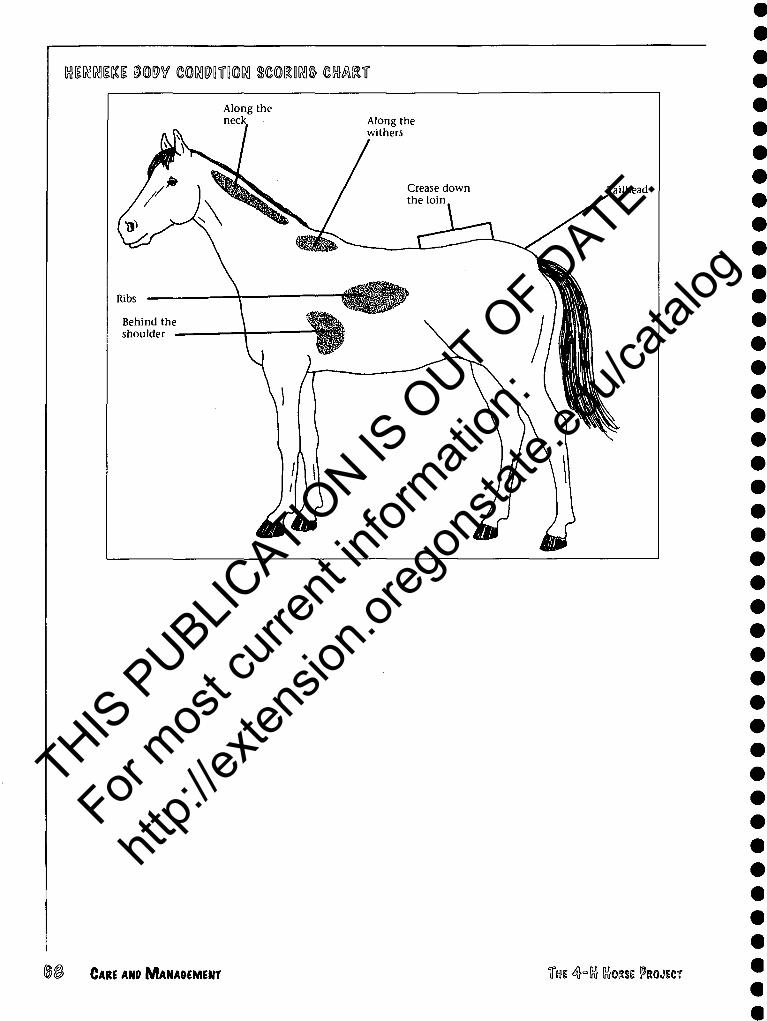
Msmscti mm mmmm §mmm mmi
Along the necl
Behind the shoulder •
Along the withers
Tailhead
CARE AND MANAGEMENT THE 4h[n} MORSE PROJECT
THIS P
UBLICATIO
N IS O
UT OF D
ATE.
For mos
t curr
ent in
formati
on:
http:/
/exten
sion.o
regon
state.
edu/c
atalog
Grooming is an important part of a horse's health care. Daily grooming cleans the hair, stimulates natural oils which make the coat shine, and lessens the possibility of skin diseases and parasites. Vigorous massaging improves the condition of muscles. Injuries can be found and treated promptly.
Follow these safety guidelines at all times when working around horses:
• Speak to the horse before touching it to avoid startling it or getting kicked.
• Never stand directly behind a horse to groom. To brush the tail, stand near the point of the buttock, to the side and facing the rear. Hold the tail and bring it around to you.
• Pick up all grooming equipment and do not leave anything in the stall.
• When tying a horse, always use a halter and quick-release knot (or panic snaps on cross ties). Tie to something that is safe, secure, and solid (never to fence board, wire fences, gates, wobbly or rotten posts, cars, machinery, etc.).
• Stay behind the forelegs (because a horse may strike) and in front of the hind legs (so you have less chance of getting kicked).
• Walk close around the hindquarters, keeping your hand on the horse and talking so it knows you are there.
• Have at least a 90-degree angle between the horse and the tie point so that you won't get pinned if the horse suddenly moves over.
• Never walk under a horse's head or neck when it is tied. The horse may pull back and lunge forward, pinning you against the tie rail, fence, or wall.
• Never crawl under a horse.
Use grooming tools in the following order: 1. Currycomb 2. Dandy brush 3. Body brush 4. Mane and tail comb 5. Hoof pick 6. Cloth
Begin grooming at the horse's left (near) shoulder. Depending on how dirty the horse is, you may start with the curry or the dandy brush. First clean the neck, then the back, girth, barrel, and finally the hindquarters and legs. It is very important to clean the back and girth area so the horse won't get sores from the saddle and the girth.
Repeat the process on the right (off) side. When the horse is mostly clean, brush its
entire body with the body brush. Then brush or comb the mane and tail.
Next, use a hoof pick to clean out dirt and debris from each hoof. Always work from heel to toe. Begin by running the pick down the grooves on each side of the frog. Then run the pick around the inside rim of the shoe to clean off the sole. Gently clean the cleft in the center of the frog. It's a good idea to use a brush to clean off the sole thoroughly. Not only does this remove any remaining bits of dirt, but it allows you to inspect the foot for signs of bruising, thrush, cracks, punctures, or abscesses. When you are done cleaning a hoof, be sure you set the foot back down. Do not just drop it.
Here is a safe and easy way to pick up a horse's foot. Approach the horse's shoulder diagonally, and talk to make sure your horse knows you are there. To pick up a front foot, stand beside the shoulder, face the rear, and place your nearer hand on the horse's shoulder. Run the other hand gently but firmly down the front of the leg and grasp the fetlock. Squeeze in with your thumb and forefinger while lightly pushing on the horse's shoulder to force its weight onto the opposite leg. Pick up the foot and support it on your knee.
To pick up a rear foot, face toward the rear with the inside hand on the point of the hip. Run the other hand down the back of the leg and grasp the cannon just above the fetlock. Push the horse's weight onto its opposite leg and squeeze with your hand. Pick up the foot, lifting it forward. Then step to the rear, bringing the hoof straight back. Avoid pulling the leg out to the side.
Finish grooming by running over the horse's entire body with a soft cloth.
Wash grooming equipment with soap and warm water often enough to keep it clean. To avoid spreading skin diseases, don't lend or borrow tools. If you have to share tools, disinfect them before using them on another horse.
THE 4=ln} Uom (PROJECT CARE AND MANAGEMENT
THIS P
UBLICATIO
N IS O
UT OF D
ATE.
For mos
t curr
ent in
formati
on:
http:/
/exten
sion.o
regon
state.
edu/c
atalog
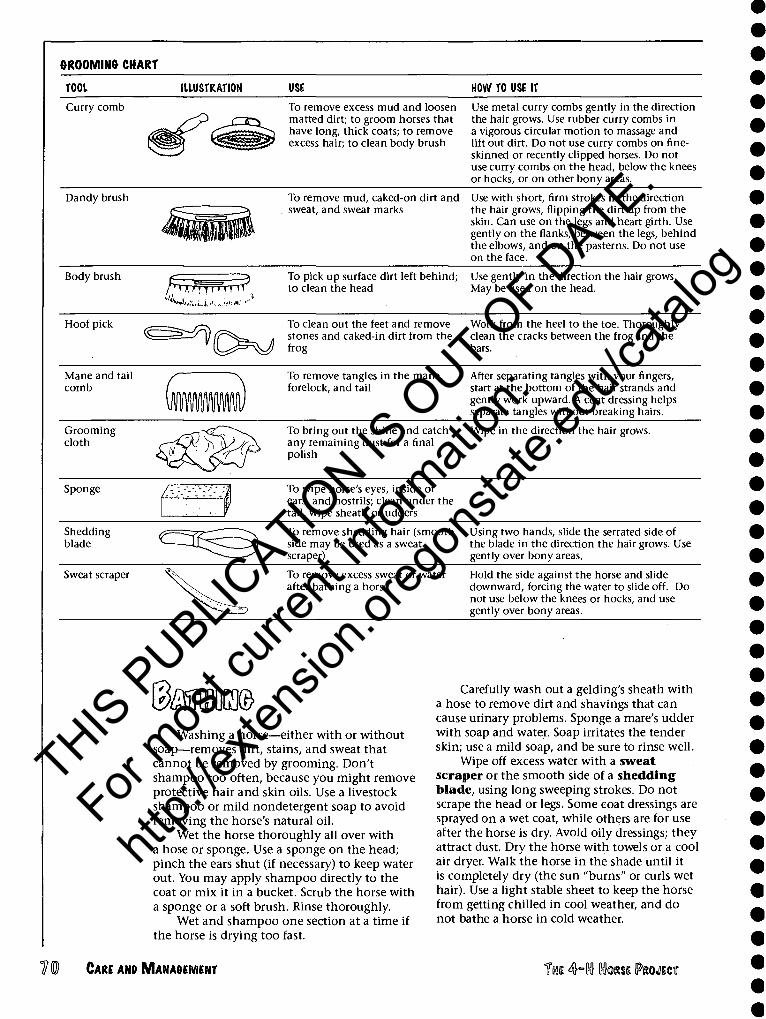
©ROOMING CHART
TOOL ILLUSTRATION USE HOW TO USE IT
Curry comb To remove excess mud and loosen matted dirt; to groom horses that have long, thick coats; to remove excess hair; to clean body brush
Use metal curry combs gently in the direction the hair grows. Use rubber curry combs in a vigorous circular motion to massage and lift out dirt. Do not use curry combs on fine- skinned or recently clipped horses. Do not use curry combs on the head, below the knees or hocks, or on other bony areas.
Dandy brush To remove mud, caked-on dirt and sweat, and sweat marks
Use with short, firm strokes in the direction the hair grows, flipping the dirt up from the skin. Can use on the legs and heart girth. Use gently on the flanks, between the legs, behind the elbows, and on the pasterns. Do not use on the face.
Body brush /TTTTTTT-ryTTT ■4,
To pick up surface dirt left behind; to clean the head
Use gently in the direction the hair grows. May be used on the head.
WjAifci.'..,..!!):
Hoof pick <S^
To clean out the feet and remove stones and caked-in dirt from the frog
Work from the heel to the toe. Thoroughly clean the cracks between the frog and the bars.
Mane and tail comb
To remove tangles in the mane, forelock, and tail
After separating tangles with your fingers, start at the bottom of the hair strands and gently work upward. A coat dressing helps separate tangles without breaking hairs.
Grooming cloth
To bring out the shine and catch any remaining dust for a final polish
Wipe in the direction the hair grows.
Sponge To wipe horse's eyes, inside of ears, and nostrils; clean under the tail, wipe sheath or udders
Shedding blade
To remove shedding hair (smooth side may be used as a sweat scraper)
Using two hands, slide the serrated side of the blade in the direction the hair grows. Use gently over bony areas.
Sweat scraper To remove excess sweat or water after bathing a horse
Hold the side against the horse and slide downward, forcing the water to slide off. Do not use below the knees or hocks, and use gently over bony areas.
Washing a horse—either with or without soap—removes dirt, stains, and sweat that cannot be removed by grooming. Don't shampoo too often, because you might remove protective hair and skin oils. Use a livestock shampoo or mild nondetergent soap to avoid removing the horse's natural oil.
Wet the horse thoroughly all over with a hose or sponge. Use a sponge on the head; pinch the ears shut (if necessary) to keep water out. You may apply shampoo directly to the coat or mix it in a bucket. Scrub the horse with a sponge or a soft brush. Rinse thoroughly.
Wet and shampoo one section at a time if the horse is drying too fast.
Carefully wash out a gelding's sheath with a hose to remove dirt and shavings that can cause urinary problems. Sponge a mare's udder with soap and water. Soap irritates the tender skin; use a mild soap, and be sure to rinse well.
Wipe off excess water with a sweat scraper or the smooth side of a shedding blade, using long sweeping strokes. Do not scrape the head or legs. Some coat dressings are sprayed on a wet coat, while others are for use after the horse is dry. Avoid oily dressings; they attract dust. Dry the horse with towels or a cool air dryer. Walk the horse in the shade until it is completely dry (the sun "burns" or curls wet hair). Use a light stable sheet to keep the horse from getting chilled in cool weather, and do not bathe a horse in cold weather.
1 (0) CARE AND MANAGEMENT THE 4hln} MORSE PROJECT
THIS P
UBLICATIO
N IS O
UT OF D
ATE.
For mos
t curr
ent in
formati
on:
http:/
/exten
sion.o
regon
state.
edu/c
atalog
"Hmsmm For neat appearance and showing, long
hairs usually are clipped from the muzzle, ears, jaw, fetlocks, and bridle path. Different breeds have different clipping requirements, and you may trim your horse according to its breed type.
Bathe and dry your horse thoroughly before clipping. Start practicing a month or more before a show to accustom your horse to the clippers. Grasping an ear may quiet an uneasy animal. Place a firm hand near the area to be clipped to reduce sensitivity.
You need electric clippers, hand clippers, or a comb and a pair of sharp fetlock scissors with curved blades. Electric clippers are easiest to use and give the best results; but you can do a fairly good job with scissors, a comb, and a lot of patience.
The following clipper blades are recommended:
#10 for general clipping #15 for finer clipping #40 (surgical blade) for "sharper" ears and
bridle path
Have clipper blades sharpened periodically. Use a lightweight oil or kerosene on the blades before, during, and after clipping for a painless, smooth job.
If you use scissors, lift the hair with a comb and then snip it off to give a smoother surface and protect the horse from an accidental jab. Hand clippers are hard to operate, tiring to use, and do not blend hair well.
If you decide to remove the whiskers, first use the #10 blade. You then can clip the muzzle more closely with a #40 blade or finish carefully with a safety razor. It is not required that you remove the whiskers completely.
If your horse is pastured most of the time, it is best to leave whiskers about 1 inch long. Never clip the eyelashes or the hairs inside the nostrils. These are essential for the horse's safety and comfort.
Hold an ear in one hand and clip the outer edges. Clip downward on the upper part and upward along the lower curve of the ear. To leave a natural point, do not clip the tips.
Trim the inner ear even with the edges to give a neater appearance without removing the inner ear hair. If you clip the inside of the ear, first put a large piece of cotton in the ear to keep hair from falling down inside. Brush the inside of the ear clean before removing the cotton.
Horses kept on pasture either need the hair left in the inner ear or a good insecticide to protect them from flies and gnats.
<faf Trim the long hair between the jaws and
under the throat closely. Use a #10 blade and clip against the direction of the hair growth. Do not clip the cheek or jowl, because this changes the color of the hair.
There are two ways of clipping legs: trimming and booting-up. Trimming is done in the direction of the hair growth, and booting-up goes against the hair growth. If the horse does not stand still, a helper could pick up the opposite foot to help prevent the horse from moving.
TRIMMING (#15 blade recommended)
Trim excess hair from the lower legs by pointing the clippers down and running them lightly and evenly down the leg. Repeat several times, being careful to lift the blades gradually at the end of each stroke. This procedure thins and removes excess hair, but does not change the color of the clipped areas.
To trim the fetlocks, pick up the hoof and run the clippers around and under the bulge of the fetlock joint.
Reverse the clippers and trim the hair at the coronet band by clipping upward, making an even edge around the hoof.
B00TIG!®"UP (#10 blade recommended)
Clip against the direction of the hair, blending carefully below the knee and hock. This is often done on white legs.
Carefully peel or cut off chestnuts (the horny, insensitive growths found on the inside of the legs above the knees and below the hocks). They are softer and easier to trim after bathing. Trim off ergots (small, horny growths on the back of the fetlocks) close to the skin (use scissors) to allow close clipping of the fetlock hair.
THE 4Hlnl MORSE IPRMICT CARE AND MANAGEMENT 711
THIS P
UBLICATIO
N IS O
UT OF D
ATE.
For mos
t curr
ent in
formati
on:
http:/
/exten
sion.o
regon
state.
edu/c
atalog

TRIMMING AND ©ROOMING BREED PREFERENCE OPTIONS
91119 SET-UP TRIMMINO AM MOOMINO PREFERENCES
American Saddlebred Stretched
Andalusian Squared
Appaloosa/P.O.A. Squared
Arabian/part Arabian Hind: one forward, one behind
Connemara Squared, not stretched
Hunter
Miniature Horse
Missouri Fox Trotter
Morgan
Mustang
Paso Fino
Peruvian Paso
Quarter Horse/Paint
Saddle Type
Shetland Pony
Tennessee Walking Horse
Warmbloods
Welsh Pony
Western/Stock Type
Squared
Squared, not stretched
Squared
Slightly stretched
Squared
Squared
Squared
Squared
Squared or stretched
Stretched
Stretched
Open, so all four legs can be viewed from the side
Balanced on all four feet
Squared, not stretched
Squared
Pleasure horses: manes and tails long and natural. Braiding optional (forelock and first lock of mane with ribbons).
Minimum clipping. Bridle path no more than 1 inch.
Clear hoof polish only. See Western or Hunter type for more information.
Bridle path 6 to 8 inches. No braiding except hunt seat.
Usually shown as typical Hunters, braiding optional. Bridle path 1 inch. Ears need not be trimmed inside.
Mane pulled S'/z to 4^ inches, generally braided with conservative or matching color yarn. Scalloped or button braids optional.
Forelock braided. Bridle path no longer than 1 inch. Tail long and full. Braiding tail is optional, but never braided
unless mane and forelock also are braided.
No braiding. Body clipping common.
Bridle path according to conformation. Forelock and first lock of mane braided with ribbon.
Bridle path 6 to 8 inches. No braiding except hunt seat.
Natural appearance is desired. Muzzle, ears, and feathers are not clipped.
Minimum bridle path (up to 2 inches). No hoof black.
Bridle path not required, but may be up to 4 inches. Face, ears, and legs trimmed, but natural look is desired. No braiding.
Bridle path not required, but may be up to 2 inches. Natural appearance is desired. Roach mane is acceptable. No hoof black (clear only).
Bridle path length depends on personal preference. Mane usually shortened, may be banded for Western or English,
or braided for English.
Natural long mane. Tail long, full, and natural.
Bridle path 4 to 6-inches. Forelock and first lock of mane braided with ribbon. Body clipping common.
Bridle path 6 to 8 inches. Forelock and first lock of mane braided with ribbon.
Bridle path 1 to 2 inches. Braided mane and forelock optional.
Manes and tails natural. Minimum bridle path. Full feathers allowed in Division A. Braiding optional for Division B. Ears not trimmed inside.
Mane may be natural, reached, or pulled to 3l/i to 4V4 inches, and may be banded.
Tails natural.
It CARE ANP MANAGEMENT THE 4=ln} MORSE PROJECT
THIS P
UBLICATIO
N IS O
UT OF D
ATE.
For mos
t curr
ent in
formati
on:
http:/
/exten
sion.o
regon
state.
edu/c
atalog
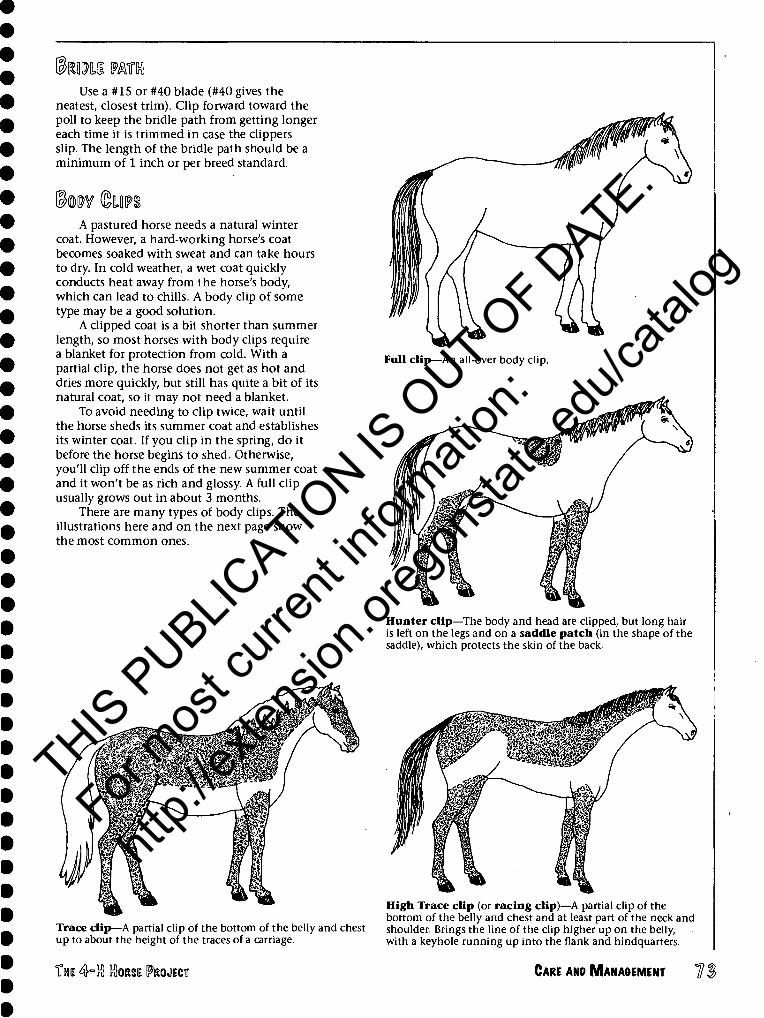
®mm mm Use a #15 or #40 blade (#40 gives the
neatest, closest trim). Clip forward toward the poll to keep the bridle path from getting longer each time it is trimmed in case the clippers slip. The length of the bridle path should be a minimum of 1 inch or per breed standard.
A pastured horse needs a natural winter coat. However, a hard-working horse's coat becomes soaked with sweat and can take hours to dry. In cold weather, a wet coat quickly conducts heat away from the horse's body, which can lead to chills. A body clip of some type may be a good solution.
A clipped coat is a bit shorter than summer length, so most horses with body clips require a blanket for protection from cold. With a partial clip, the horse does not get as hot and dries more quickly, but still has quite a bit of its natural coat, so it may not need a blanket.
To avoid needing to clip twice, wait until the horse sheds its summer coat and establishes its winter coat. If you clip in the spring, do it before the horse begins to shed. Otherwise, you'll clip off the ends of the new summer coat and it won't be as rich and glossy. A full clip usually grows out in about 3 months.
There are many types of body clips. The illustrations here and on the next page show the most common ones.
Full clip—An all-over body clip.
Hunter clip—The body and head are clipped, but long hair is left on the legs and on a saddle patch (in the shape of the saddle), which protects the skin of the back.
Trace clip—A partial clip of the bottom of the belly and chest up to about the height of the traces of a carriage.
High Trace clip (or racing clip)—A partial clip of the bottom of the belly and chest and at least part of the neck and shoulder. Brings the line of the clip higher up on the belly, with a keyhole running up into the flank and hindquarters.
THE 4H(r{} MORSE PROJECT CARE ANP MANAGEMENT 1\
THIS P
UBLICATIO
N IS O
UT OF D
ATE.
For mos
t curr
ent in
formati
on:
http:/
/exten
sion.o
regon
state.
edu/c
atalog
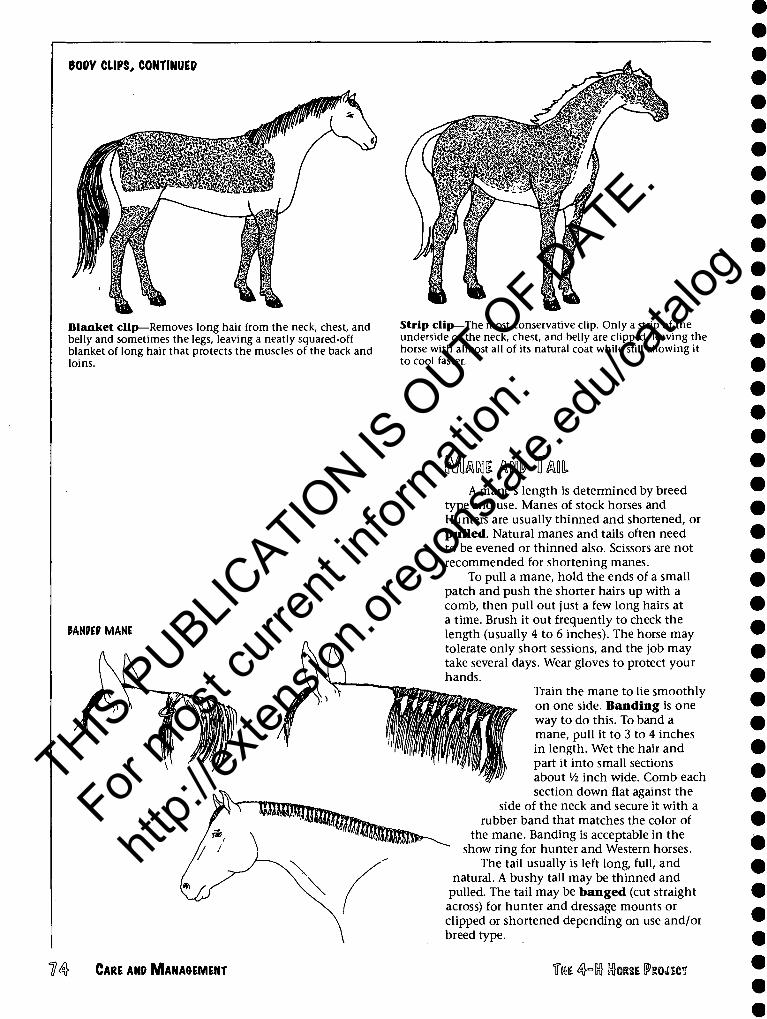
BOPY CLIPS, CONTINUED
Blanket clip—Removes long hair from the neck, chest, and belly and sometimes the legs, leaving a neatly squared-off blanket of long hair that protects the muscles of the back and loins.
Strip clip—The most conservative clip. Only a strip of the underside of the neck, chest, and belly are clipped, leaving the horse with almost all of its natural coat while still allowing it to cool faster.
Am m® tmi
MmV MANE
A mane's length is determined by breed type and use. Manes of stock horses and Hunters are usually thinned and shortened, or pulled. Natural manes and tails often need to be evened or thinned also. Scissors are not recommended for shortening manes.
To pull a mane, hold the ends of a small patch and push the shorter hairs up with a comb, then pull out just a few long hairs at a time. Brush it out frequently to check the length (usually 4 to 6 inches). The horse may tolerate only short sessions, and the job may take several days. Wear gloves to protect your hands.
Train the mane to lie smoothly on one side. Banding is one way to do this. To band a mane, pull it to 3 to 4 inches in length. Wet the hair and part it into small sections about Vz inch wide. Comb each section down flat against the
side of the neck and secure it with a rubber band that matches the color of
the mane. Banding is acceptable in the show ring for hunter and Western horses.
The tail usually is left long, full, and natural. A bushy tail may be thinned and
pulled. The tail may be banged (cut straight across) for hunter and dressage mounts or clipped or shortened depending on use and/or breed type.
CARE AND MANAGEMENT THE 4°ln} BtasE ^ROJICT
THIS P
UBLICATIO
N IS O
UT OF D
ATE.
For mos
t curr
ent in
formati
on:
http:/
/exten
sion.o
regon
state.
edu/c
atalog
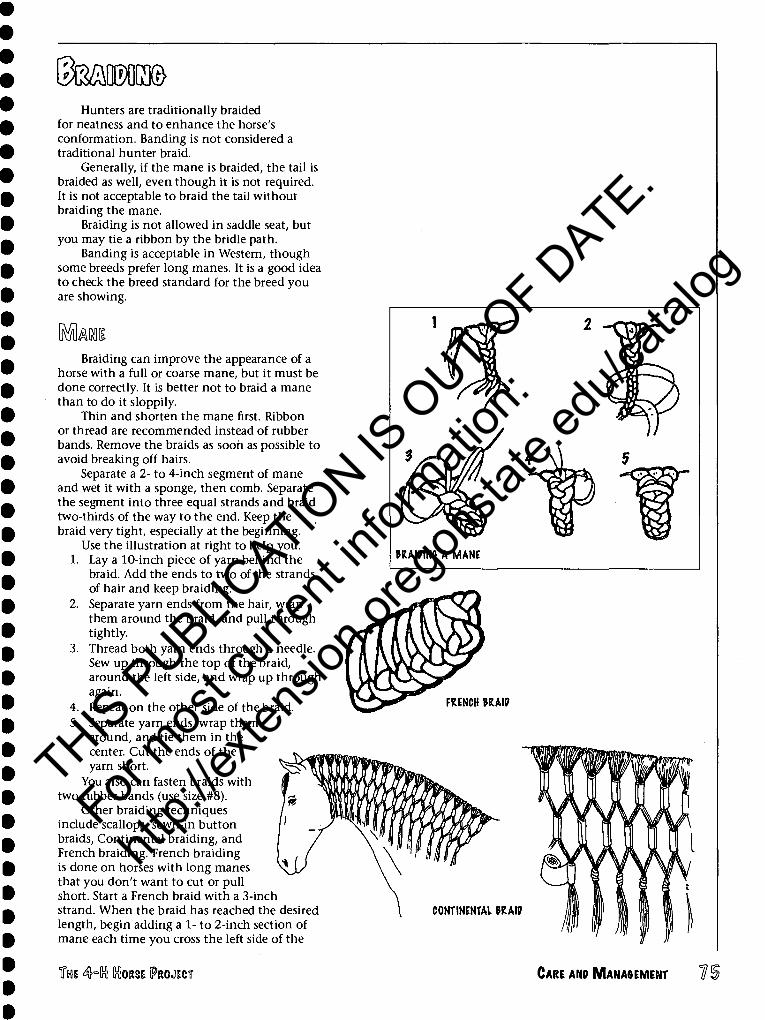
Hunters are traditionally braided for neatness and to enhance the horse's conformation. Banding is not considered a traditional hunter braid.
Generally, if the mane is braided, the tail is braided as well, even though it is not required. It is not acceptable to braid the tail without braiding the mane.
Braiding is not allowed in saddle seat, but you may tie a ribbon by the bridle path.
Banding is acceptable in Western, though some breeds prefer long manes. It is a good idea to check the breed standard for the breed you are showing.
Braiding can improve the appearance of a horse with a full or coarse mane, but it must be done correctly. It is better not to braid a mane than to do it sloppily.
Thin and shorten the mane first. Ribbon or thread are recommended instead of rubber bands. Remove the braids as soon as possible to avoid breaking off hairs.
Separate a 2- to 4-inch segment of mane and wet it with a sponge, then comb. Separate the segment into three equal strands and braid two-thirds of the way to the end. Keep the braid very tight, especially at the beginning.
Use the illustration at right to help you. 1. Lay a 10-inch piece of yarn behind the
braid. Add the ends to two of the strands of hair and keep braiding.
2. Separate yarn ends from the hair, wrap them around the braid, and pull through tightly.
3. Thread both yarn ends through a needle. Sew up through the top of the braid, around the left side, and wrap up through again.
4. Repeat on the other side of the braid. 5. Separate yarn ends, wrap them
around, and tie them in the center. Cut the ends of the yarn short.
You also can fasten braids with two rubber bands (use size #8).
Other braiding techniques include scallops, sewn-in button braids, Continental braiding, and French braiding. French braiding is done on horses with long manes that you don't want to cut or pull short. Start a French braid with a 3-inch strand. When the braid has reached the desired length, begin adding a 1- to 2-inch section of mane each time you cross the left side of the
FRENCH KAIP
THE 4Hln} KORSE IPROJIICT CARE AND MANAGEMENT 11
THIS P
UBLICATIO
N IS O
UT OF D
ATE.
For mos
t curr
ent in
formati
on:
http:/
/exten
sion.o
regon
state.
edu/c
atalog
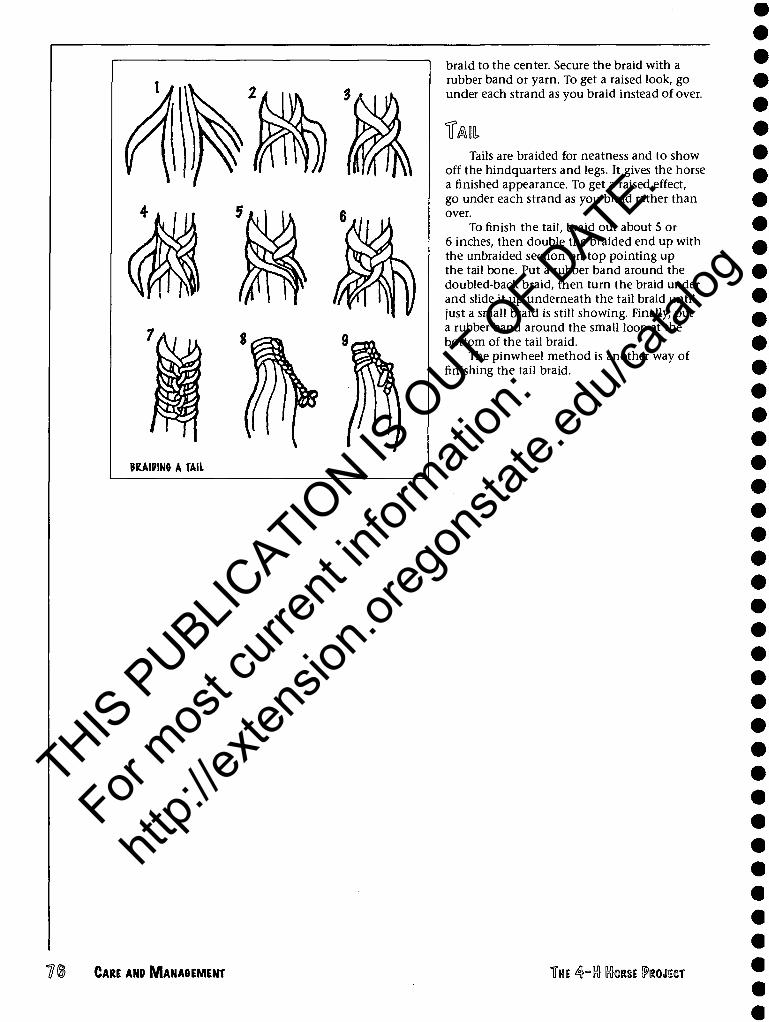
braid to the center. Secure the braid with a rubber band or yarn. To get a raised look, go under each strand as you braid instead of over.
Tails are braided for neatness and to show off the hindquarters and legs. It gives the horse a finished appearance. To get a raised effect, go under each strand as you braid rather than over.
To finish the tail, braid out about 5 or 6 inches, then double the braided end up with the unbraided section on top pointing up the tail bone. Put a rubber band around the doubled-back braid, then turn the braid under and slide it up underneath the tail braid until just a small braid is still showing. Finally, put a rubber band around the small loop at the bottom of the tail braid.
The pinwheel method is another way of finishing the tail braid.
^ CARE AND MANAGEMENT THE 4=[n} tasE PROJECT
THIS P
UBLICATIO
N IS O
UT OF D
ATE.
For mos
t curr
ent in
formati
on:
http:/
/exten
sion.o
regon
state.
edu/c
atalog
Extreme weather conditions put stress on a horse and can affect its health. You need to know what problems to look for in summer and winter and how to prevent those problems.
When the weather turns cold, you'll need to make adjustments to your horse's routine care. Though you may not enjoy spending time in the cold and wet, remember that your horse is depending on you to keep it healthy.
Your horse must have shelter where it can dry off each day and be out of the wind. If your horse has proper shelter, its winter hair coat will generally keep it warm enough. The hairs grow downward to make an insulating layer of air. When the horse gets cold, special muscles make the hair stand up, which increases the air layer and the insulation. A horse produces more body oils in the winter, which help the coat shed water. So, if the horse is dry and out of the wind, it can stand subfreezing temperatures easily.
But when the horse gets wet, its hair flattens, and the insulating air layer is lost. Wet hair also conducts heat away from the horse's body faster than dry hair, which may cause the horse to get cold. If your horse is shivering, has a tense body or clamped tail, or its ears feel cold, it is probably too cold.
Wind also affects the insulating air layer in a horse's coat by blowing the hairs apart. This greatly increases the loss of body heat. Wind is often more of a problem than rain. A horse can stand being in the rain for awhile as long as the wind is not blowing.
While shelter is important, be sure your horse is not shut up in an airtight, heated barn. Such a place is a haven for dust, molds, and ammonia fumes, all of which are extremely harmful to the horse's health. The horse must have fresh air, or it runs a high risk of developing respiratory problems.
hmm In cold weather, a horse needs more
energy to keep warm, so its nutritional needs increase. Feeding your horse properly during
THI 4rU DORSI PROJECT
winter not only prevents weight loss and loss of conditioning, but helps prevent colic and laminitis. A general rule of thumb is to increase the feed ration 10 percent for each 10°F below freezing.
A common mistake is to increase the amount of grain, but a horse needs more forage in cold weather, not more grain. The fermentation of forage during digestion produces more and longer-lasting heat than that produced from the digestion of grain. Therefore, giving your horse more hay will help it keep warm, but feeding it extra grain will not.
Horses often are not worked as hard in the winter, so they do not use as much energy. Since grains are generally high in carbohydrates (the source of most energy), you must decrease the amount fed or your horse may become too energetic and less manageable. The common term for this is hot.
If your horse has a thick winter coat, it is important to monitor its weight closely. It is often hard to tell through all the hair if the horse is losing weight. Once a week, feel for its ribs.
Remember that adequate salt intake is just as important in cold weather as in the summer.
torsOT§ Wintertime watering can be a challenge. A
cold horse does not like to drink cold water and may drink very little if the water is icy. Though they are not losing water from sweating, horses still need plenty of water. Two common results of a horse's not drinking enough are dehydration and impaction colic.
Make sure your horse gets enough to drink by providing clean, fresh water free of ice. Inexpensive stock tank heaters can keep your water ice-free (be sure to protect the cord from chewing). It also helps to remove any chunks of ice from water sources and add hot water to buckets to warm the water already there.
Do not expect your horse to get water by eating snow. A horse would have to eat about six buckets of snow to equal drinking one bucket of water. Even if there is lots of snow around, you must still provide drinking water.
Most horses do not need to be blanketed. A normal horse's winter coat keeps it as warm as a top-quality blanket. In fact, blankets may be counterproductive. The weight of the blanket
CARE AND MANAGEMENT in
THIS P
UBLICATIO
N IS O
UT OF D
ATE.
For mos
t curr
ent in
formati
on:
http:/
/exten
sion.o
regon
state.
edu/c
atalog

flattens the hair, eliminating the air layer and the horse's natural insulation.
One of the main concerns with blankets is overheating. If the horse gets too warm, it sweats under the blanket and becomes wet. This can lead to chills and illness.
If you choose to blanket, change blanket weight with changes in temperature, both from day to night and from day to day. It is always better that a blanket be too light than too heavy. Check for overheating by feeling for sweat under the blanket near the girth and the flank.
Often people blanket their horse more as a convenience to them than as a help to the horse. Make sure you have a good reason for keeping your horse blanketed all winter.
When deciding whether or not to blanket your horse in the winter, take the following into account:
Horse's condition. A healthy, conditioned horse is less likely to need blanketing. An older horse, an underweight horse, or a horse with a health problem may require blanketing.
Horse's activity level. If your horse is not being ridden much during the winter, don't blanket it. If you are riding daily or showing, you may want to clip the horse, in which case you must blanket it.
Facilities. If your horse has adequate shelter, it probably doesn't need a blanket. The more exposure your horse has to wind and rain, the more likely it will need a blanket.
Expense. Blankets are expensive. To blanket your horse properly, you will need several blankets of different weights.
Your time commitment. Keeping your horse blanketed takes a lot of work. Because blankets flatten the horse's hair, you should groom the horse daily to stir the hair back up. You should remove and readjust blankets at least once each day to check for areas of rubbing, hair loss, or sores. Replace wet turnout blankets with dry ones. Never stall a horse in a wet blanket. Check blankets for damage daily, and clean them several times a year.
All of these things take time. If you cannot commit to changing your horse's blanket at least once a day, you should not blanket at all.
Even in winter, daily exercise is important. Horses often are turned out and ridden less in winter. This makes them very energetic when they are turned out, especially if their grain ration has not been reduced. Horses can
hurt themselves if they are too rambunctious, pulling muscles and tendons.
Make sure your horse gets some exercise each day. Warm it up slowly to loosen muscles. The colder the weather, the longer it takes to warm up adequately.
Even more important than the warm-up time is properly cooling the horse down after the workout. In winter, a horse needs to be cooled down gradually and completely to avoid the risk of chills. If the horse is sweaty, rub its coat with a towel to fluff the hair. Keep the horse moving until its hair is dry and its body temperature has returned to normal. If the blood vessels narrow too rapidly, cramps can develop. On the average, during the winter, half of your workout time should be spent cooling the horse down.
If you are riding outside during the winter, remember that footing is often slippery. Frozen ground is hard and can cause bruises to the horse's sole. Abscesses are more common in the winter mud. Snow can pack in shoes, causing lameness. Check your horse's feet often.
CuW fcow teg Four common heat-related health problems
are dehydration, heat stroke, thumps, and sunburn.
taVDRATTOR]
Dehydration occurs when the horse does not drink enough water to supply its needs. Signs of dehydration include dry, hard feces; dark yellow, opaque urine; and lethargy. In severe cases, colic can occur. The horse may stop sweating, collapse, or die. A slightly dehydrated horse may show few symptoms and be fine if it drinks water. A moderately dehydrated horse may need electrolytes along with water, while a severely dehydrated horse needs veterinary care and may require intravenous (IV) fluids.
To test for dehydration, pinch 1 to 2 inches of skin on the horse's neck, forward of the shoulder. When you let go, the skin should immediately snap back. If it doesn't, the horse is dehydrated. You also can check for dehydration by testing the capillary refill time (CRT). Apply pressure to a spot on the horse's gums for a few seconds. The gum will turn white. When you release the pressure, the gum should return to a pink color within 2 seconds.
11$ CARE ANP MANAGEMENT THE 4hlnl tasE taw&CT
THIS P
UBLICATIO
N IS O
UT OF D
ATE.
For mos
t curr
ent in
formati
on:
http:/
/exten
sion.o
regon
state.
edu/c
atalog

Cta %m@m Heat stroke is a serious, often fatal,
condition. Signs include hot, dry skin; refusal to move; an increase in the pulse and respiratory rates; weakness; and a temperature of 106 to 110oF. Act immediately; it is essential to lower the horse's body temperature quickly. Call the veterinarian, hose the horse with cold water, and get the horse in the shade. If there is no breeze, cool the horse with a fan.
Thumps is the common name for synchronous diaphragmatic flutter (SDF), a rhythmic spasm in the flank that twitches in time with the heartbeat. SDF is a sign that the horse is severely dehydrated and low on electrolytes. Immediate treatment is needed. In mild cases, rehydrating the horse and cooling it off will stop the spasms. In more severe cases, a veterinarian may need to administer IV fluids.
Strawra Appaloosas, Paints, and blaze faces
commonly suffer from sunburn, but any pink- skinned areas are vulnerable. Prevent sunburn by keeping horses in during the middle of the day, covering them with a light sheet, or using a sunblock lotion.
tewmoKi To avoid heat-related health problems, you
may need to shorten the length of your ride, lower the intensity of the workout, or ride early in the morning or late in the evening when it is cooler. The more in shape your horse is, the less likely it is to suffer from the heat. In particular, make sure your horse is not overweight.
The primary way a horse controls its body temperature is by sweating and sweat evaporation. Humid weather reduces the evaporation of sweat. When planning your
riding activity, it is as important to consider humidity as temperature. Use the Heat Stress Index (H.S.I.) to help plan your workouts. To find the H.S.I., add the temperature to the percent of humidity. (For example, if the temperature is 80oF and the humidity is 30%, the H.S.I, would be 110.) Once you have determined the H.S.I., use the following guidelines:
H.S.I. Guideline
under 120 Ride normally 120-150 Lessen intensity or length of
workout 150-180 Use caution; only work lightly over 180 Do not ride
It is commonly thought that you should not let a hot horse drink water, but dehydration is a much more serious problem than what might happen if a horse drinks while hot. Just be sure that the water is not icy cold, as this may cause colic. Room-temperature water is safe for the horse to drink.
If your horse is extremely hot after a ride, don't be afraid to hose it off with cold water. This does not cause cramping, but cools the muscles and prevents overheating. When you are done hosing, be sure to scrape the water off. If left on the horse, the water quickly heats and causes the horse to become hotter. Walk the horse until it is dry and cool. The slight breeze generated by walking can help sweat evaporate.
When a horse sweats, it loses essential salts and minerals in addition to water. These electrolytes are essential for the proper functioning of muscles and heart. Electrolyte supplements can be added to a horse's water, but the horse must drink enough water for the supplements to work. Also, too many electrolytes can cause as many problems as too few, so make sure your horse needs a supplement before you use one. Most veterinarians recommend that only horses in a rigorous work schedule be given electrolyte supplements routinely.
tm 4=ln} InlORSI [PGWMICT CARE AND MANAGEMENT r<
THIS P
UBLICATIO
N IS O
UT OF D
ATE.
For mos
t curr
ent in
formati
on:
http:/
/exten
sion.o
regon
state.
edu/c
atalog
Buy a safe horse trailer and keep it in good condition. That way, you and your horse have a better chance of arriving at your destination healthy and happy.
When choosing your horse trailer, consider your horse's point of view. Your horse wants lots of room, light, air, and safety. Be sure the trailer has enough useable space to keep your horse comfortable. Windows or slats and a light-color interior make the trailer more inviting and provide airflow (ventilation). Keep the trailer clean, so your horse does not inhale dirt and particles while traveling. Roof vents also help with airflow, and a light-colored roof keeps the trailer cooler.
Consider the design of your trailer. There should be nothing sticking out or sharp-edged that could harm the horse. Posts and dividers should be strong enough for the biggest horse and should have quick releases. Step-ups and ramps should be low to the ground, not slippery, and easy for the horse to negotiate.
Brakes and lights must work. Balls, hitches, and safety chains or cables should be in good repair. Tires should be inflated per manufacturer's instructions. Be sure the trailer tows level, with equal weight on each tire.
Here is a quick checklist of minimum requirements for any trailer:
• Be sure floor boards are in good shape and are supported by the frame of the trailer. Check for any rot.
• Be sure the body of the trailer is firmly attached to the frame.
• Check for wobbly wheels, and be sure all lug nuts and bolts are securely in place. Pack wheel bearings yearly and service grease fittings.
• Tires should be in good repair and inflated properly. Have a spare.
• Door latches must fasten securely. • All lights and brakes must work properly. • Be sure the hitch is solid and the ball size
correct. • Safety chains must be secured. • Be sure the trailer is big enough for the
horse you intend to haul.
Be sure all state requirements for trailer brakes, lights, and registration have been met. Be sure your towing vehicle is suitable to pull your trailer when it's at capacity.
Ideally, your horse has been taught to load and unload, every time, any place, under all conditions. Before loading, it is important that your horse respect you from the ground and that you understand safety from the ground.
There are many philosophies on how to load a horse properly and how to train a horse to load. Most include a few simple recommendations. Be patient. Do not get the horse anxious about the horse trailer, and teach the horse to go forward and backward on command. Most agree that inflicting pain is not the best way to train a horse to load. Rather, use some irritation and then relief from the irritation when the horse responds in a positive manner (such as moving forward into or toward the trailer). Before introducing a trailer, you can practice going forward and backward by putting your horse between two logs or two panels.
Practice loading and unloading your horse well in advance of any scheduled event. Trying to load and unload a horse that has not been trained properly can be dangerous for both you and the horse. If your horse has not been taught to load or you are having trouble loading or unloading, don't hesitate to contact a knowledgeable person to help you. There are also many books and videos on the subject. Never load your horse in a trailer that is not attached securely to a tow vehicle. An unattached trailer is not heavy enough to balance a horse's weight. As the horse goes in, the rear of the trailer will fall back and become extremely unsafe.
Before you load your horse, you may want to consider a few extra safety precautions. Use a leather halter in the trailer rather than nylon. Leather breaks more easily in case of emergency. Always remove all saddles and tack before loading. Apply shipping boots or wrap
CARE AND MANA&EMENT THE 4-lnJ KORSE PtawicT
THIS P
UBLICATIO
N IS O
UT OF D
ATE.
For mos
t curr
ent in
formati
on:
http:/
/exten
sion.o
regon
state.
edu/c
atalog

your horse's legs properly to add protection and/or support. Be sure bandages or wraps extend over the coronet bands onto the hoof. They should also cover the heel area. If you are hauling long distances, remove the horse's leg wraps every day to allow for circulation.
Think carefully before using shavings or other bedding on the floor of your trailer. The dust and particles flying about can be a major irritant to your horse. If you use them, you may want to wet them down.
QOCMl^OG!]©
GtaflGo© Be sure the trailer is properly hitched,
safety chains are attached, and all lights are working properly. If you are pulling a straight load, put a single or the heaviest horse on the left side of the trailer. This gives the horse a smoother and easier ride (because of the crown of the road). Be sure all chains and bars are secured. Tie your horse with enough length that it can move its head, but not so much that it can turn its head around or socialize with the horse next to it. Use a quick release knot or a quick release trailer tie.
The most common reason a horse is difficult to load or haul is poor driving. Keep turns, starts, and stops slow and steady. Drive within the speed limit, and allow extra stopping distance. Look far ahead to avoid emergencies, and drive defensively. Avoid driving so slowly that traffic backs up and drivers behind become impatient. The law requires slow vehicles to pull off the road and allow other traffic to pass.
At every stop, check the horse, gate latches, and trailer hitch before continuing on your trip.
Practice leaving the horse in the trailer for a few minutes when you arrive at your destination. This keeps the horse from thinking it should exit the trailer immediately upon stopping.
Check the unloading area for safe footing. Always untie the horse before undoing butt chains, bars, or dividers. Never stand directly behind the horse when unhooking butt chains or bars. Try to keep the horse straight and calm as it exits the trailer. Make the horse back or walk quietly out of the trailer without rushing.
IFtSMW Hauling is as much a workout for the horse
as an equal amount of ride time. If you are hauling for long stretches of time, it's good to stop every couple of hours to take a short break and offer your horse water. It is not necessary to unload the horse—just a few minutes of rest is enough. Always carry an equine first-aid kit (see "First Aid," page 27) and a water bucket.
No matter where you travel, you are exposing your horse to diseases or viruses. Be sure your horse's vaccinations are up to date, including a recent booster for influenza. If in doubt, check with your veterinarian. If you are traveling out of state, contact your state Department of Agriculture, your state veterinarian, and the state veterinarian of your destination at least 2 weeks in advance to determine what documents, tests, or vaccinations are required and recommended before transport. Common forms required include a health certificate, brand inspection, and bill of sale or registration papers. The destination veterinarian also can inform you of recent outbreaks of disease or other concerns in the area(s) to which you are traveling. Better to be safe than to arrive without the necessary documents and/or vaccinations.
TME 4-K KIORSS PROJECT CARE ANP MANAGEMENT
THIS P
UBLICATIO
N IS O
UT OF D
ATE.
For mos
t curr
ent in
formati
on:
http:/
/exten
sion.o
regon
state.
edu/c
atalog
\3mm a (?to A foal project can be challenging and
rewarding. Consult libraries, magazines, trainers, veterinarians, and experienced breeders to gain skills and knowledge.
Breeding a mare and raising a foal require a large investment in time and money. Consider the following:
• You may have to change stalls, fences, and equipment to accommodate a foal.
• You'll need special knowledge of nutrition, health care, genetics, and reproduction.
• To choose a stallion, you'll need to know the characteristics desired and the strong and weak features of the mare.
• The mare must be bred and foal at a time that fits into a riding program or activities such as a county fair.
• There will be extra expenses, including the stud fee, board, veterinary care, and feed supplements.
• You will need the skill and knowledge to train a young horse.
chestnut foal, but recessive factors make their appearance only when two animals carrying the recessive genes mate.
Color and sex are inherited in a simple manner involving just a few genes, but most characteristics are passed by a combination of many genes. Examples are speed, special gaits, "cow sense," jumping ability, disposition, and size.
The mare and stallion's ancestors and offspring can show whether a desirable characteristic has become dominant. The more often the trait appears in the line, the more dominant it probably is.
The horse's upbringing (environment) can also affect the quality of its inherited traits. Maximum development of inherited characteristics such as growth, conformation, or speed depends on proper training and nutrition. In fact, only 15 to 30 percent of the variations among animals may be due to heredity if both parents are of average or better quality. However, when one parent is significantly better than the other, the variation may be as much as 90 percent. While environmental effects are apparent, choosing a superior stallion is still very important.
You can improve the odds for getting a satisfactory foal by making a careful study of heredity and reproduction. Proper preparation of the mare helps ensure conception. (The national average of mares bred that produce a live foal is about 60 percent; but, with proper management, it can be as high as 90 percent.)
talPQW In the body cells of horses, 32 pairs of
chromosomes carry thousands of pairs of minute particles called genes, which are the basic hereditary material. When a sperm or an egg is formed, only one chromosome and one gene of each pair goes into it. After mating and fertilization occur, the 32 single chromosomes from the parents unite to form new pairs. Many combinations are possible.
Dominant genes can mask (hide) the characteristics of recessive gemes. For example, if genetically pure black is crossed with pure chestnut, the foal will be black, because black is a dominant color. But, the foal carries a recessive chestnut gene masked by the dominant black gene. There is a 25 percent chance that this black foal will produce a
Inspect breeding facilities and observe the condition of all horses. Then, use the following guidelines to choose a stallion (stud):
• He should be a purebred animal with a pedigree showing successful performance and halter records.
• He should be a proven producer of uniformly high-quality offspring.
8 He should be a superior individual in type and soundness and be typical of current breed standards.
• He must be able to produce qualities the mare lacks and help overcome her weaknesses.
• His conception rate should be high.
The stud fee is a major expense, but a superior stallion can be a good investment in the future desirability of the get (offspring). One rule of thumb suggests that a foal's worth is three times the stud fee. Other expenses for the foal (feed, health care, etc.), will be far greater than the stud fee.
After you've chosen the stallion, you'll often have to pay a booking fee as a deposit. Both owners sign a breeding contract that
CARE AND MANA&EMENT THE 4-lnl UtasE [PROJECT
THIS P
UBLICATIO
N IS O
UT OF D
ATE.
For mos
t curr
ent in
formati
on:
http:/
/exten
sion.o
regon
state.
edu/c
atalog
covers board fees, veterinarian checks, shoe removal, live foal guarantee, and registration information.
After the mare is bred, you will be given a breeding certificate in order to register the foal. This is an important document, so keep it in a safe place.
Characteristics of the broodmare (dam), both good and bad, may be passed on to the foal. Analyze the broodmare carefully to avoid breeding to a stallion with the same problems. It is better not to breed a mare of poor quality or with inheritable unsoundness. There is no market for inferior foals.
The mare should be of good ancestry, whether purebred or grade.
Most fillies are not bred until they are at least 3 years old. The mare should be fed and exercised to a slightly lean condition. She should be on a deworming program and have up-to-date rhinopneumonitis, flu, tetanus, and sleeping sickness vaccinations. (See "Controlling Internal Parasites," page 37; and "Diseases," page 31.)
Spring (from March to June) is the ideal season for both breeding and foaling. However, race and show foals are usually planned for birth as soon as possible after January 1 for maximum development.
Begin to watch the mare for signs of heat (the fertile period) several months before breeding, and chart her cycles. The interval between periods averages 21 days but may range from 10 to 37 days. Heat periods average 4 to 6 days but may range from 1 to 12 days. When the mare is "in season," the external genitals relax and there is a slight mucus discharge from the vagina. She may tease other mares or geldings and seem to desire company. The most noticeable sign is more frequent urination.
Deliver the mare to the breeding farm about a week before the heat period is expected.
tedMCV After the mare is bred, heat periods stop
(though occasionally a mare shows false heat). Usually, the breeder keeps the mare or allows her to return during the next possible cycle to check for pregnancy.
The first check for pregnancy can be done using ultrasound 12 to 14 days after ovulation. A veterinarian can determine pregnancy by making a rectal examination about 40 days after the last service. A laboratory can do blood tests as early as 45 days after breeding.
During the 11-month gestation period (pregnancy), mares should be turned out to pasture, where they usually get ample exercise. Exercise stabled mares moderately at least an hour per day until a few days before foaling.
To learn nutrition requirements for pregnant and nursing mares, read the "Feed and Nutrition" section (page 60).
The first sign of foaling is an enlarged udder about 2 to 6 weeks before birth. About 7 to 10 days before foaling, the mare's buttock muscles near the tailhead sink in and the abdomen drops. The nipples fill 4 to 6 days before foaling, and wax appears on the ends of the nipples 2 to 4 days before birth. As actual foaling time approaches, the vulva becomes full and loose, milk drops from the nipples, and the mare becomes restless. She may break into a sweat, urinate frequently, and repeatedly lie down and get up. Sometimes, though, there are no signs, so be prepared 30 days in advance.
Shortly before foaling, decrease feed and add about V* pound wheat bran per feeding.
When the weather is warm, allow the mare to foal in a clean pasture away from other livestock. During bad weather, use a box stall that has been cleaned and disinfected with 4 ounces of lye in 10 gallons of boiling hot water. Use half-strength solution to scrub mangers and grain boxes. Sprinkle the floor lightly with lime. Put down plenty of straw bedding. When foaling begins, someone should be near, but not in sight.
In a normal presentation (position of foal at birth), the front feet come first with the heels down, and foaling usually takes no more than 15 to 30 minutes. If there is any other presentation, call a veterinarian immediately.
Make certain that the newborn foal is breathing and that the membrane has been removed from its mouth and nostrils. Thoroughly soak the navel cord with iodine as soon as possible to help prevent infection. Then let the mare and foal rest for a time. A strong, healthy foal will be on its feet and ready to nurse within Vz to 2 hours after birth.
Colostrum (pronounced ko-LOSS-trum) is the concentrated milk secreted by the dam for the first few days after giving birth. It contains antibodies which protect the foal from certain infections and is a natural laxative. Do not reduce the benefits of colostrum by "milking out" a mare before foaling time.
Remove the afterbirth (membrane surrounding the foal) from the stall and place it in a bucket so the veterinarian can check it for completeness. The afterbirth is usually expelled within 1 to 6 hours after foaling. If it has not been expelled within 3 hours, call the
TME 4h[n} CtasE PROJECT CARE AMP MANAGEMENT
THIS P
UBLICATIO
N IS O
UT OF D
ATE.
For mos
t curr
ent in
formati
on:
http:/
/exten
sion.o
regon
state.
edu/c
atalog

veterinarian. Clean and re-bed the stall after the mare and foal are up to reduce the chance of infection.
Give the mare small quantities of warm water. Feed lightly the first few days. A bran mash with a few oats is good. Be observant; if the mare has a raised temperature, call a veterinarian.
If the foal has not had a bowel movement within 4 to 12 hours after birth, and it seems sluggish or fails to nurse, call a veterinarian.
Some foals develop diarrhea 7 to 9 days after foaling when the mare comes in heat. Other causes might be a contaminated udder; nonremoval of fecal matter from the foal; above-normal temperature in the mare; too much feed; or cold, damp conditions. The diarrhea will likely cease on its own; but if it continues, call a veterinarian.
(Pm tos Weather permitting, the best place for a
mare and foal is on pasture. When the foal is 10 to 20 days old, it will begin to nibble on a little grain and hay. Place a grain box low for the foal, and place a board across a corner of the stall or pasture which the foal can pass under, but not the mare. Put the foal's hay and grain on the opposite side from the mare.
Many problems are caused by lack of care in the foal's first 2 years. To learn nutrition requirements for foals, read the "Feed and Nutrition" section (page 60).
Some leg problems can be solved by regular, corrective hoof trimming.
Worms are a particular threat to foals, so deworm the mare and foal regularly. The mare can be dewormed when the foal is about 1 week old. She and the foal should be dewormed again 2 months later.
Foals usually are weaned at 4 to 6 months of age. Recent research indicates that late and/or gradual weaning may reduce the development of vices such as pacing and weaving.
If the foal has been eating adequate hay and grain daily, weaning will cause only a slight setback. Cut the dam's ration in half a few days before the separation to start to dry up her udder.
When possible, wean foals in pairs or groups. This helps reduce the trauma of being separated from their mothers.
Move the mare to new quarters, leaving the foal in a familiar place. Some breeders prefer to locate the mare and foal so they can still see each other, to reduce stress in both. Others believe that keeping them out of each other's sight shortens the process.
It usually takes a month to dry up the mare, after which she may be returned to an adjoining pasture or stall. The mare and foal may share a pasture after about 8 to 12 weeks.
The foal (now a weanling) should calm down in a few days and may be turned out to pasture alone or with a gentle horse. During the weaning period, a foal often becomes more interested in human companionship and begins to develop a personality.
Decrease the mare's feed or pasture and replace alfalfa hay with grass hay during weaning. You may rub camphorated oil on the udder, but do not milk it out.
Careful stallion selection and heredity have given the foal many good qualities, and now environment is critical. Change feed rations as the foal grows, and provide plenty of exercise. Vaccinate and deworm regularly, and keep its hooves trimmed. Handle and train the foal with firm, consistent discipline, being sure to reward it for good behavior. The result will be a healthy horse with good manners, capable of performing to the best of its ability.
CARE ANP MANAGEMENT THE 4Hln} MORSE PROJECT
THIS P
UBLICATIO
N IS O
UT OF D
ATE.
For mos
t curr
ent in
formati
on:
http:/
/exten
sion.o
regon
state.
edu/c
atalog

UM m ^mmmm
THE 4°ln} WORSE PROJECT
THIS P
UBLICATIO
N IS O
UT OF D
ATE.
For mos
t curr
ent in
formati
on:
http:/
/exten
sion.o
regon
state.
edu/c
atalog
(&m m tes
The saddle, bridle, and other gear to equip a horse are called tack. It is your responsibility to make sure all tack is clean, well adjusted, in good repair, and safe for use. You also should know which tack to use for the activities you want to do.
Inspect tack often and carefully. Check particularly around buckles, Chicago screws, folds, holes, and other places that take a lot of stress (such as where the latigo attaches to the D-ring). Make sure stitching is not rotten or pulling apart. Do not ride with questionable tack or you might have a serious accident.
OMMM "tfm You can help maintain the quality of your
tack by storing it properly. Keep all leather in a dry area with good air circulation, out of direct sunlight, preferably at room temperature. A fabric cover over saddles and bridles protects them from dust and dirt.
Store saddles on racks, sawhorses, or barrels. Do not hang them on a rope from the ceiling or place them on their front edges; the skirts will turn under and the stitching on the horn may break.
Hang bridles on wide, rounded hooks. You can make bridle holders from cans or blocks of wood. Hanging bridles on a thin hook, such as a nail, can strain the leather causing it to crack or break.
Hang blankets or pads so air can circulate and dry them. You may need to protect them from mice.
(tem© UagB It is important to keep tack clean. Stiff,
dry leather breaks easily and often cannot be restored. Sponge it after every use to remove dirt and sweat. You can use just water or a mild leather soap with water. Never, no matter how wet it is, put leather near heat to dry.
Periodically, you will need to clean your tack more thoroughly. Make sure you use a soap made for cleaning leather. Using a cloth or a soft-bristled brush, clean the item completely.
Apply a light coat of leather oil or conditioner from time to time. Use a commercial product or pure neatsfoot oil (not a compound) to soften leather and darken it. Follow with a good glycerin saddle soap to remove oil from the surface. When the leather is dry, buff it for a rich shine.
While conditioning is necessary to keep leather pliable and restore lost natural oil, be careful not to over-oil your leather. Excess oil collects dust, rots stitching, and comes off on clothing. It is much better to give your leather tack a routine light conditioning than to soak it only once in a while.
If you have trouble with your leather tack getting mildew or mold, you can wipe it periodically with a mild acid solution such as vinegar and water.
Brush or wash blankets and pads when they are dirty. Let them dry in a well-ventilated area. Use soapy water and a sponge to clean nylon equipment.
TACK ANP EQUIPMENT THE 4=lnl Worn PROJECT
THIS P
UBLICATIO
N IS O
UT OF D
ATE.
For mos
t curr
ent in
formati
on:
http:/
/exten
sion.o
regon
state.
edu/c
atalog
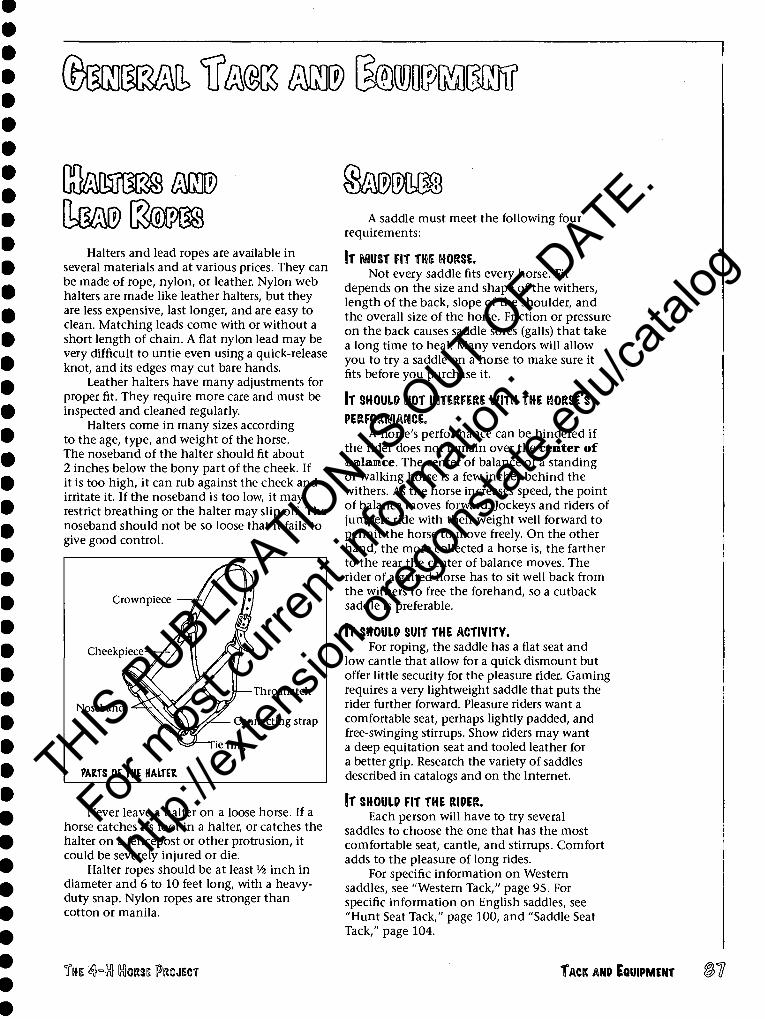
(Smm ^mz m Hmmmm
Urn ftmrn Halters and lead ropes are available in
several materials and at various prices. They can be made of rope, nylon, or leather. Nylon web halters are made like leather halters, but they are less expensive, last longer, and are easy to clean. Matching leads come with or without a short length of chain. A flat nylon lead may be very difficult to untie even using a quick-release knot, and its edges may cut bare hands.
Leather halters have many adjustments for proper fit. They require more care and must be inspected and cleaned regularly.
Halters come in many sizes according to the age, type, and weight of the horse. The noseband of the halter should fit about 2 inches below the bony part of the cheek. If it is too high, it can rub against the cheek and irritate it. If the noseband is too low, it may restrict breathing or the halter may slip off. The noseband should not be so loose that it fails to give good control.
Crownpiece
Cheekpiece
Noseband Throatlatch
Connecting strap
ie ting
FARTS OF THE HALTER
Never leave a halter on a loose horse. If a horse catches its foot in a halter, or catches the halter on a fencepost or other protrusion, it could be severely injured or die.
Halter ropes should be at least Vz inch in diameter and 6 to 10 feet long, with a heavy- duty snap. Nylon ropes are stronger than cotton or manila.
A saddle must meet the following four requirements:
IT MUST FIT TGSS HORSE. Not every saddle fits every horse. Fit
depends on the size and shape of the withers, length of the back, slope of the shoulder, and the overall size of the horse. Friction or pressure on the back causes saddle sores (galls) that take a long time to heal. Many vendors will allow you to try a saddle on a horse to make sure it fits before you purchase it.
IT SHOULP NOT ICmRFERE WITH THE HORSE'S
PERFORMANCE. A horse's performance can be hindered if
the rider does not remain over the center of balamce. The center of balance of a standing or walking horse is a few inches behind the withers. As the horse increases speed, the point of balance moves forward. Jockeys and riders of jumpers ride with their weight well forward to permit the horse to move freely. On the other hand, the more collected a horse is, the farther to the rear the center of balance moves. The rider of a gaited horse has to sit well back from the withers to free the forehand, so a cutback saddle is preferable.
IT SHOULP SUIT THE ACTIVITY. For roping, the saddle has a flat seat and
low cantle that allow for a quick dismount but offer little security for the pleasure rider. Gaming requires a very lightweight saddle that puts the rider further forward. Pleasure riders want a comfortable seat, perhaps lightly padded, and free-swinging stirrups. Show riders may want a deep equitation seat and tooled leather for a better grip. Research the variety of saddles described in catalogs and on the Internet.
IT SHOULP FIT THE RIPER. Each person will have to try several
saddles to choose the one that has the most comfortable seat, cantle, and stirrups. Comfort adds to the pleasure of long rides.
For specific information on Western saddles, see "Western Tack," page 95. For specific information on English saddles, see "Hunt Seat Tack," page 100, and "Saddle Seat Tack," page 104.
THE 4hln} tasi frnxn TACK ANP EQUIPMENT
THIS P
UBLICATIO
N IS O
UT OF D
ATE.
For mos
t curr
ent in
formati
on:
http:/
/exten
sion.o
regon
state.
edu/c
atalog
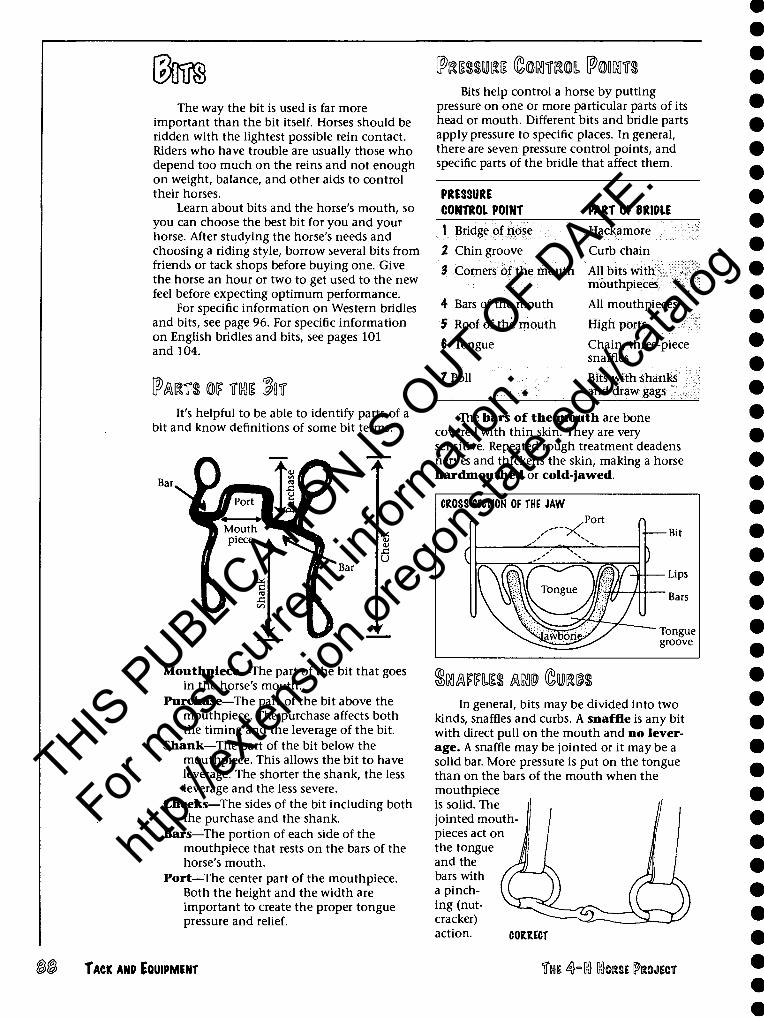
The way the bit is used is far more important than the bit itself. Horses should be ridden with the lightest possible rein contact. Riders who have trouble are usually those who depend too much on the reins and not enough on weight, balance, and other aids to control their horses.
Learn about bits and the horse's mouth, so you can choose the best bit for you and your horse. After studying the horse's needs and choosing a riding style, borrow several bits from friends or tack shops before buying one. Give the horse an hour or two to get used to the new feel before expecting optimum performance.
For specific information on Western bridles and bits, see page 96. For specific information on English bridles and bits, see pages 101 and 104.
$mn m iras §n It's helpful to be able to identify parts of a
bit and know definitions of some bit terms.
Mouthpiece—The part of the bit that goes in the horse's mouth.
Purchase—The part of the bit above the mouthpiece. The purchase affects both the timing and the leverage of the bit.
Shank—The part of the bit below the mouthpiece. This allows the bit to have leverage. The shorter the shank, the less leverage and the less severe.
Cheeks—The sides of the bit including both the purchase and the shank.
Bars—The portion of each side of the mouthpiece that rests on the bars of the horse's mouth.
Port—The center part of the mouthpiece. Both the height and the width are important to create the proper tongue pressure and relief.
Bits help control a horse by putting pressure on one or more particular parts of its head or mouth. Different bits and bridle parts apply pressure to specific places. In general, there are seven pressure control points, and specific parts of the bridle that affect them.
PRESSURE CONTROL POINT PART OF 0RIPLE
1 Bridge of nose
2 Chin groove
$ Corners of the mouth
4 Bars of the mouth
5 Roof of the mouth
6 Tongue
/Poll
Hackamore
Curb chain
All bits with mouthpieces
All mouthpieces
High ports
Chain, three-piece snaffles
Bits with shanks and draw gags
The bars of the mouth are bone covered with thin skin. They are very sensitive. Repeated rough treatment deadens nerves and thickens the skin, making a horse hardmouthed or cold-jawed.
DMMPISS «(&mm In general, bits may be divided into two
kinds, snaffles and curbs. A snaffle is any bit with direct pull on the mouth and no lever- age. A snaffle may be jointed or it may be a solid bar. More pressure is put on the tongue than on the bars of the mouth when the mouthpiece is solid. The || , // jointed mouth- pieces act on the tongue and the bars with a pinch- ing (nut- cracker) action. CORRECT
TACK ANP EQUIPMENT THE 4H(n} KIORSI (PROJICT
THIS P
UBLICATIO
N IS O
UT OF D
ATE.
For mos
t curr
ent in
formati
on:
http:/
/exten
sion.o
regon
state.
edu/c
atalog
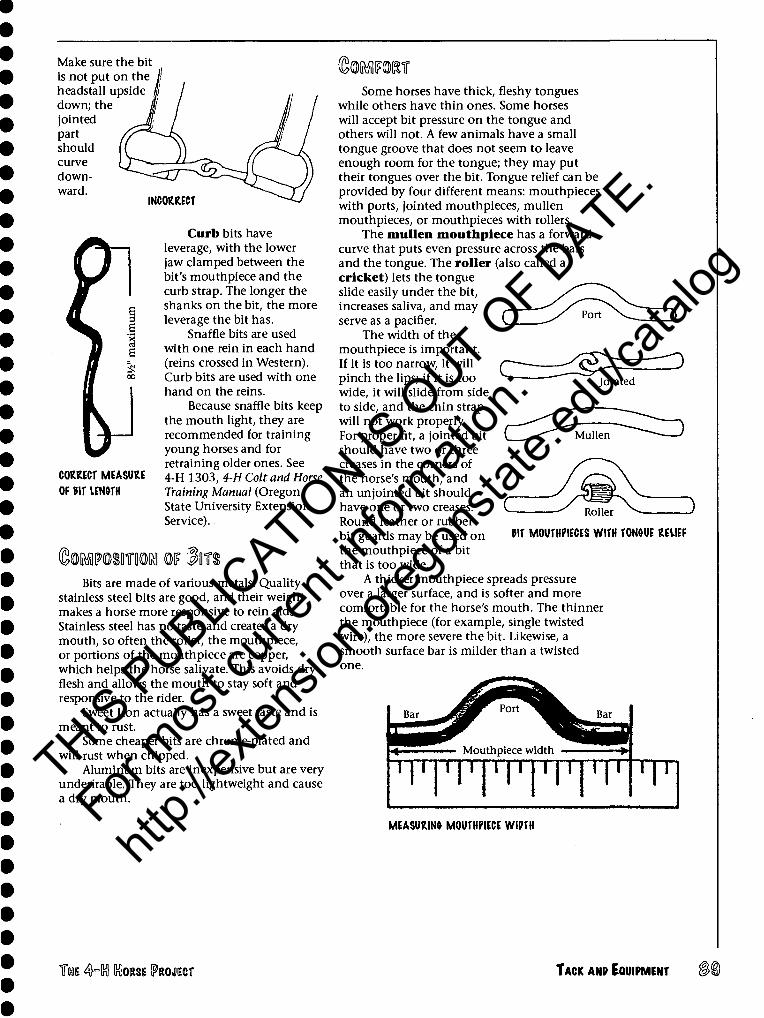
Make sure the bit is not put on the headstall upside down; the jointed part should curve down- ward.
CORRECT MEASURE
OF NT IENOTH
INCORRECT
Curb bits have leverage, with the lower jaw clamped between the bit's mouthpiece and the curb strap. The longer the shanks on the bit, the more leverage the bit has.
Snaffle bits are used with one rein in each hand (reins crossed in Western). Curb bits are used with one hand on the reins.
Because snaffle bits keep the mouth light, they are recommended for training young horses and for retraining older ones. See 4-H 1303, 4-H Colt and Horse Training Manual (Oregon State University Extension Service).
(tarosmw m §m Bits are made of various metals. Quality
stainless steel bits are good, and their weight makes a horse more responsive to rein aids. Stainless steel has no taste and creates a dry mouth, so often the roller, the mouthpiece, or portions of the mouthpiece are copper, which helps the horse salivate. This avoids dry flesh and allows the mouth to stay soft and responsive to the rider.
Sweet Iron actually has a sweet taste and is meant to rust.
Some cheaper bits are chrome-plated and will rust when chipped.
Aluminum bits are inexpensive but are very undesirable. They are too lightweight and cause a dry mouth.
Some horses have thick, fleshy tongues while others have thin ones. Some horses will accept bit pressure on the tongue and others will not. A few animals have a small tongue groove that does not seem to leave enough room for the tongue; they may put their tongues over the bit. Tongue relief can be provided by four different means: mouthpieces with ports, jointed mouthpieces, mullen mouthpieces, or mouthpieces with rollers.
The mullen mouthpiece has a forward curve that puts even pressure across the bars and the tongue. The roller (also called a cricket) lets the tongue slide easily under the bit, increases saliva, and may serve as a pacifier.
The width of the mouthpiece is important. If it is too narrow, it will pinch the lips; if it is too wide, it will slide from side to side, and the chin strap will not work properly. For proper fit, a jointed bit should have two or three creases in the corners of the horse's mouth, and an unjointed bit should have one or two creases. Round leather or rubber bit guards may be used on the mouthpiece of a bit that is too wide.
A thicker mouthpiece spreads pressure over a larger surface, and is softer and more comfortable for the horse's mouth. The thinner the mouthpiece (for example, single twisted wire), the more severe the bit. Likewise, a smooth surface bar is milder than a twisted one.
Jointed
Roller
NT MOUTHPIECES WITH T0N»UE RELIEF
MEASURING MOUTHPIECE WIPTH
T« 4hK} Ctasi PROJECT TACK ANP EQUIPMENT
THIS P
UBLICATIO
N IS O
UT OF D
ATE.
For mos
t curr
ent in
formati
on:
http:/
/exten
sion.o
regon
state.
edu/c
atalog
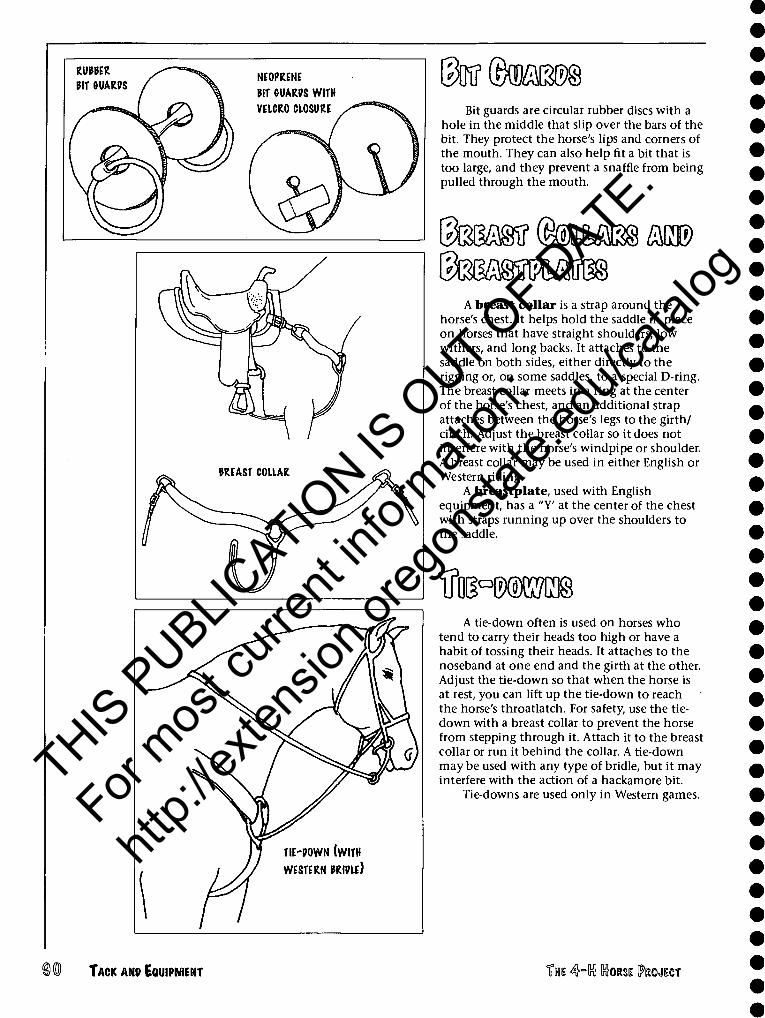
mm. m &UARPS
BREAST COLLAR
(star (&mm
TIE-POWN (WITH
WESTERN PRIPLE)
Bit guards are circular rubber discs with a hole in the middle that slip over the bars of the bit. They protect the horse's lips and corners of the mouth. They can also help fit a bit that is too large, and they prevent a snaffle from being pulled through the mouth.
A breast collar is a strap around the horse's chest. It helps hold the saddle in place on horses that have straight shoulders, low withers, and long backs. It attaches to the saddle on both sides, either directly to the rigging or, on some saddles, to a special D-ring. The breast collar meets in a ring at the center of the horse's chest, and an additional strap attaches between the horse's legs to the girth/ cinch. Adjust the breast collar so it does not interfere with the horse's windpipe or shoulder. A breast collar may be used in either English or Western riding.
A breastplate, used with English equipment, has a "V at the center of the chest with straps running up over the shoulders to the saddle.
%o0®OT A tie-down often is used on horses who
tend to carry their heads too high or have a habit of tossing their heads. It attaches to the noseband at one end and the girth at the other. Adjust the tie-down so that when the horse is at rest, you can lift up the tie-down to reach the horse's throatlatch. For safety, use the tie- down with a breast collar to prevent the horse from stepping through it. Attach it to the breast collar or run it behind the collar. A tie-down may be used with any type of bridle, but it may interfere with the action of a hackamore bit.
Tie-downs are used only in Western games.
TACK ANP EQUIPMENT THE 4hlnl MORSE IPtawicT
THIS P
UBLICATIO
N IS O
UT OF D
ATE.
For mos
t curr
ent in
formati
on:
http:/
/exten
sion.o
regon
state.
edu/c
atalog
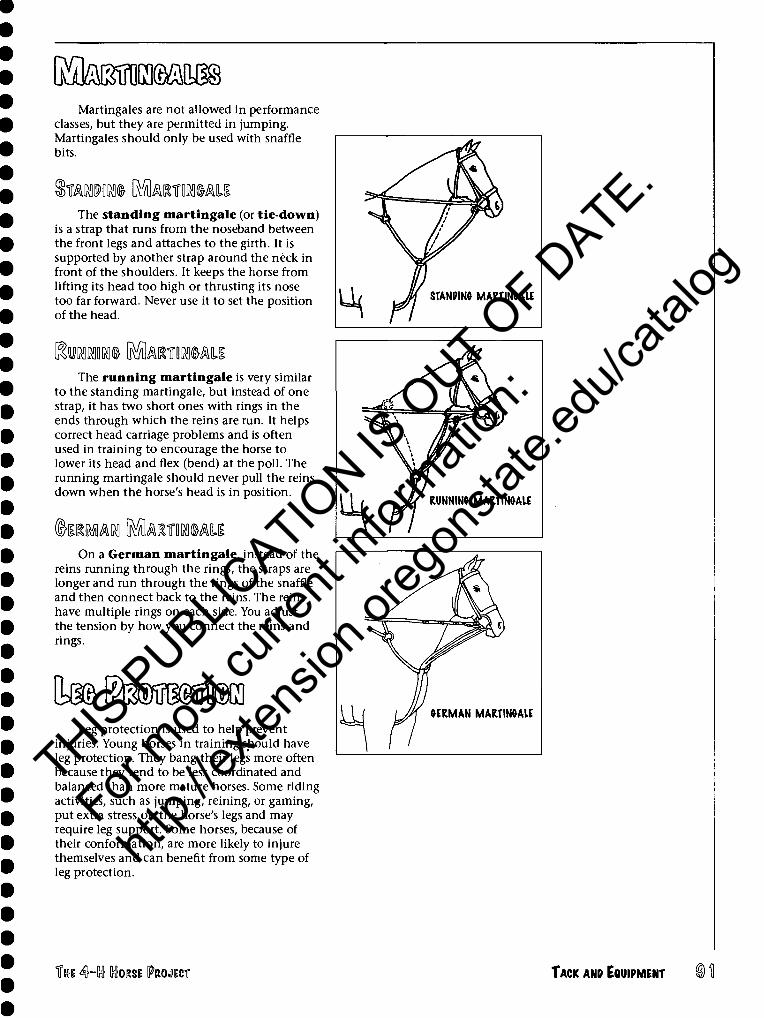
Rtemmii® Martingales are not allowed in performance
classes, but they are permitted in jumping. Martingales should only be used with snaffle bits.
The standing martingale (or tie-down) is a strap that runs from the noseband between the front legs and attaches to the girth. It is supported by another strap around the neck in front of the shoulders. It keeps the horse from lifting its head too high or thrusting its nose too far forward. Never use it to set the position of the head.
The running martingale is very similar to the standing martingale, but instead of one strap, it has two short ones with rings in the ends through which the reins are run. It helps correct head carriage problems and is often used in training to encourage the horse to lower its head and flex (bend) at the poll. The running martingale should never pull the reins down when the horse's head is in position.
On a German martingale, instead of the reins running through the rings, the straps are longer and run through the rings of the snaffle and then connect back to the reins. The reins have multiple rings on each side. You adjust the tension by how you connect the reins and rings.
Be© (^(MSgfiFOfiJCO Leg protection is used to help prevent
injuries. Young horses in training should have leg protection. They bang their legs more often because they tend to be less coordinated and balanced than more mature horses. Some riding activities, such as jumping, reining, or gaming, put extra stress on the horse's legs and may require leg support. Some horses, because of their conformation, are more likely to injure themselves and can benefit from some type of leg protection.
STANPINt MARTINOALE
RUNNING MARTIN5ALE
GERMAN MARTINGALE
THE 4-lnl KIORSE PROJECT TACK AND EQUIPMENT
THIS P
UBLICATIO
N IS O
UT OF D
ATE.
For mos
t curr
ent in
formati
on:
http:/
/exten
sion.o
regon
state.
edu/c
atalog
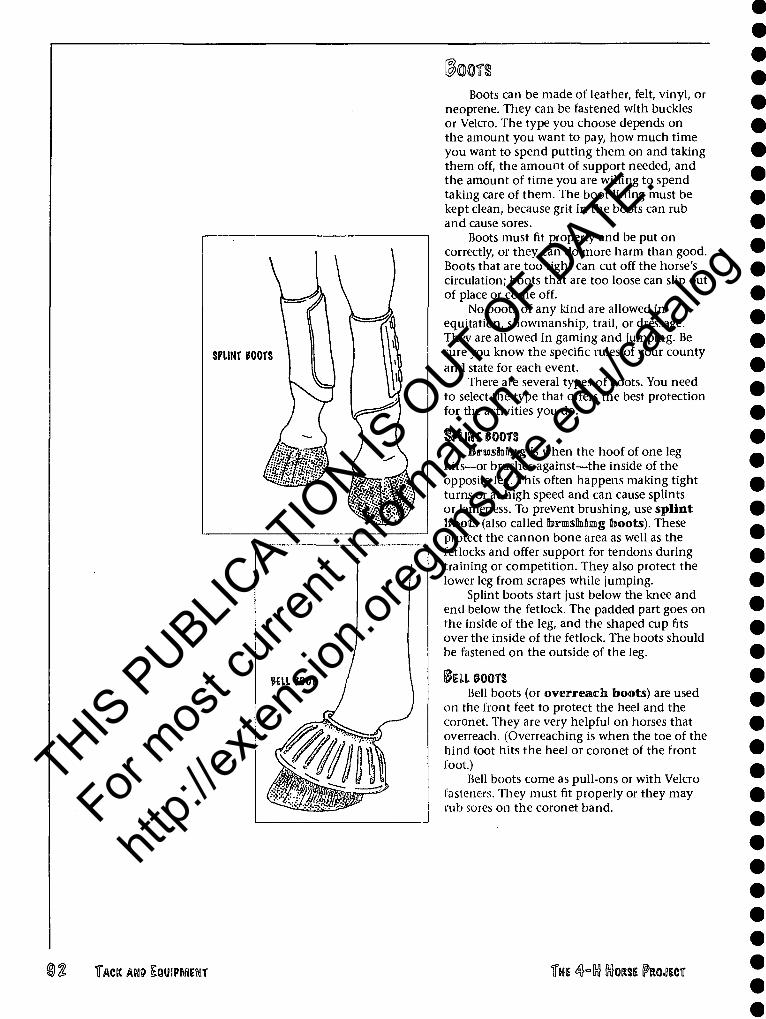
Boots can be made of leather, felt, vinyl, or neoprene. They can be fastened with buckles or Velcro. The type you choose depends on the amount you want to pay, how much time you want to spend putting them on and taking them off, the amount of support needed, and the amount of time you are willing to spend taking care of them. The boot lining must be kept clean, because grit in the boots can rub and cause sores.
Boots must fit properly and be put on correctly, or they can do more harm than good. Boots that are too tight can cut off the horse's circulation; boots that are too loose can slip out of place or come off.
No boots of any kind are allowed in equitation, showmanship, trail, or dressage. They are allowed in gaming and jumping. Be sure you know the specific rules of your county and state for each event.
There are several types of boots. You need to select the type that offers the best protection for the activities you do.
SPllftST BOOTS BmsMmg is when the hoof of one leg
hits—or brushes against—the inside of the opposite leg. This often happens making tight turns or at high speed and can cause splints or lameness. To prevent brushing, use splint IsMOtts (also called KprasMmg tooots). These protect the cannon bone area as well as the fetlocks and offer support for tendons during training or competition. They also protect the lower leg from scrapes while jumping.
Splint boots start just below the knee and end below the fetlock. The padded part goes on the inside of the leg, and the shaped cup fits over the inside of the fetlock. The boots should be fastened on the outside of the leg.
SELL BOOTS Bell boots (or ©verreaclh boots) are used
on the front feet to protect the heel and the coronet. They are very helpful on horses that overreach. (Overreaching is when the toe of the hind foot hits the heel or coronet of the front foot.)
Bell boots come as pull-ons or with Velcro fasteners. They must fit properly or they may rub sores on the coronet band.
TACK nm lammim THS 4hln} InlORSI PROJECT
THIS P
UBLICATIO
N IS O
UT OF D
ATE.
For mos
t curr
ent in
formati
on:
http:/
/exten
sion.o
regon
state.
edu/c
atalog
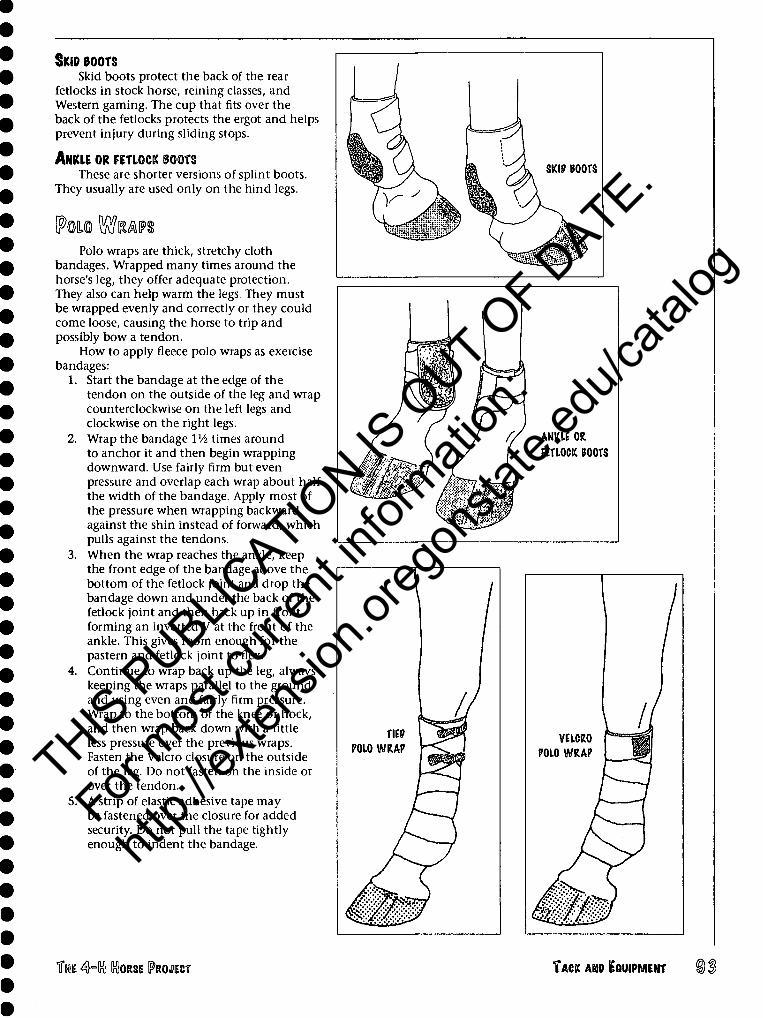
SKID SOOTS Skid boots protect the back of the rear
fetlocks in stock horse, reining classes, and Western gaming. The cup that fits over the back of the fetlocks protects the ergot and helps prevent injury during sliding stops.
ANKLE OR FETLOCK SOOTS These are shorter versions of splint boots.
They usually are used only on the hind legs.
Polo wraps are thick, stretchy cloth bandages. Wrapped many times around the horse's leg, they offer adequate protection. They also can help warm the legs. They must be wrapped evenly and correctly or they could come loose, causing the horse to trip and possibly bow a tendon.
How to apply fleece polo wraps as exercise bandages:
1. Start the bandage at the edge of the tendon on the outside of the leg and wrap counterclockwise on the left legs and clockwise on the right legs.
2. Wrap the bandage VA times around to anchor it and then begin wrapping downward. Use fairly firm but even pressure and overlap each wrap about half the width of the bandage. Apply most of the pressure when wrapping backward against the shin instead of forward, which pulls against the tendons.
3. When the wrap reaches the ankle, keep the front edge of the bandage above the bottom of the fetlock joint and drop the bandage down and under the back of the fetlock joint and then back up in front forming an inverted V at the front of the ankle. This gives room enough for the pastern and fetlock joint to flex.
4. Continue to wrap back up the leg, always keeping the wraps parallel to the ground and using even and fairly firm pressure. Wrap to the bottom of the knee or hock, and then wrap back down with a little less pressure over the previous wraps. Fasten the Velcro closure on the outside of the leg. Do not fasten on the inside or over the tendon.
5. A strip of elastic adhesive tape may be fastened over the closure for added security. Do not pull the tape tightly enough to indent the bandage.
ANKIE OR
FETLOCK SOOTS
THS 4hK HORSE PROJECT TACK AND IOUIPMENT D^
THIS P
UBLICATIO
N IS O
UT OF D
ATE.
For mos
t curr
ent in
formati
on:
http:/
/exten
sion.o
regon
state.
edu/c
atalog
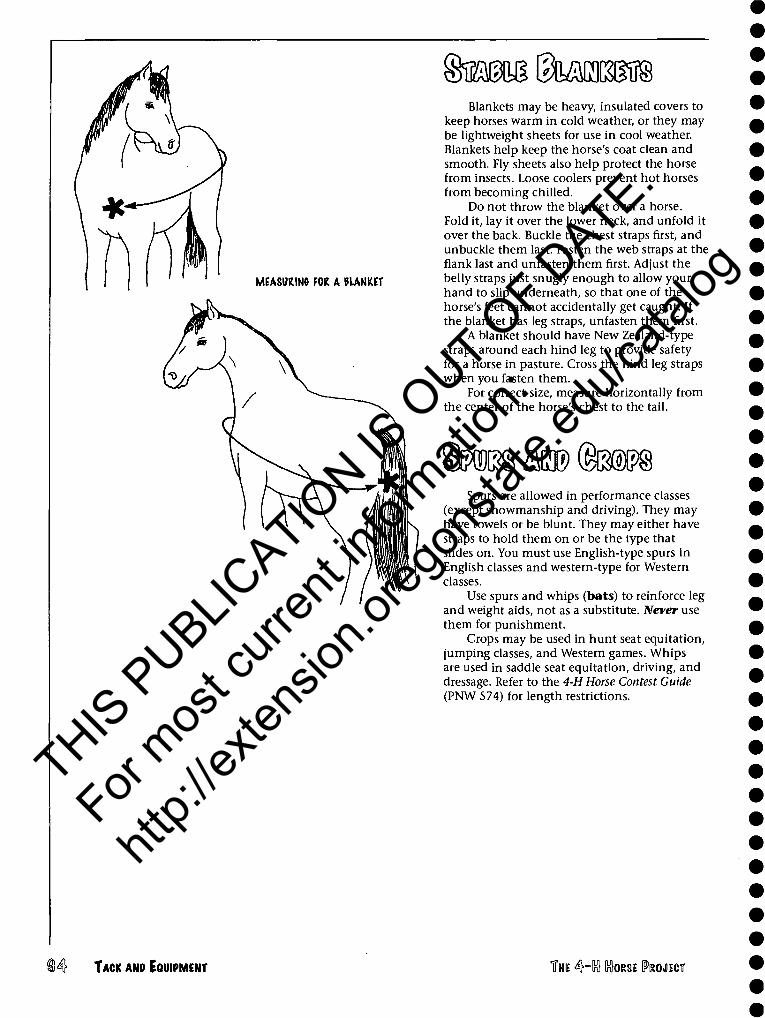
MEASURING FOR A BLANKET
teftg H£ra?u§ Blankets may be heavy, insulated covers to
keep horses warm in cold weather, or they may be lightweight sheets for use in cool weather. Blankets help keep the horse's coat clean and smooth. Fly sheets also help protect the horse from insects. Loose coolers prevent hot horses from becoming chilled.
Do not throw the blanket over a horse. Fold it, lay it over the lower neck, and unfold it over the back. Buckle the chest straps first, and unbuckle them last. Fasten the web straps at the flank last and unfasten them first. Adjust the belly straps just snugly enough to allow your hand to slip underneath, so that one of the horse's feet cannot accidentally get caught. If the blanket has leg straps, unfasten them first.
A blanket should have New Zealand-type straps around each hind leg to provide safety for a horse in pasture. Cross the hind leg straps when you fasten them.
For correct size, measure horizontally from the center of the horse's chest to the tail.
9w sm @MM Spurs are allowed in performance classes
(except showmanship and driving). They may have rowels or be blunt. They may either have straps to hold them on or be the type that slides on. You must use English-type spurs in English classes and western-type for Western classes.
Use spurs and whips (bats) to reinforce leg and weight aids, not as a substitute. Never use them for punishment.
Crops may be used in hunt seat equitation, jumping classes, and Western games. Whips are used in saddle seat equitation, driving, and dressage. Refer to the 4-H Horse Contest Guide (PNW 574) for length restrictions.
D4 TACK AND EQUIPMENT THE 4=ln} CtasE PtewicT
THIS P
UBLICATIO
N IS O
UT OF D
ATE.
For mos
t curr
ent in
formati
on:
http:/
/exten
sion.o
regon
state.
edu/c
atalog
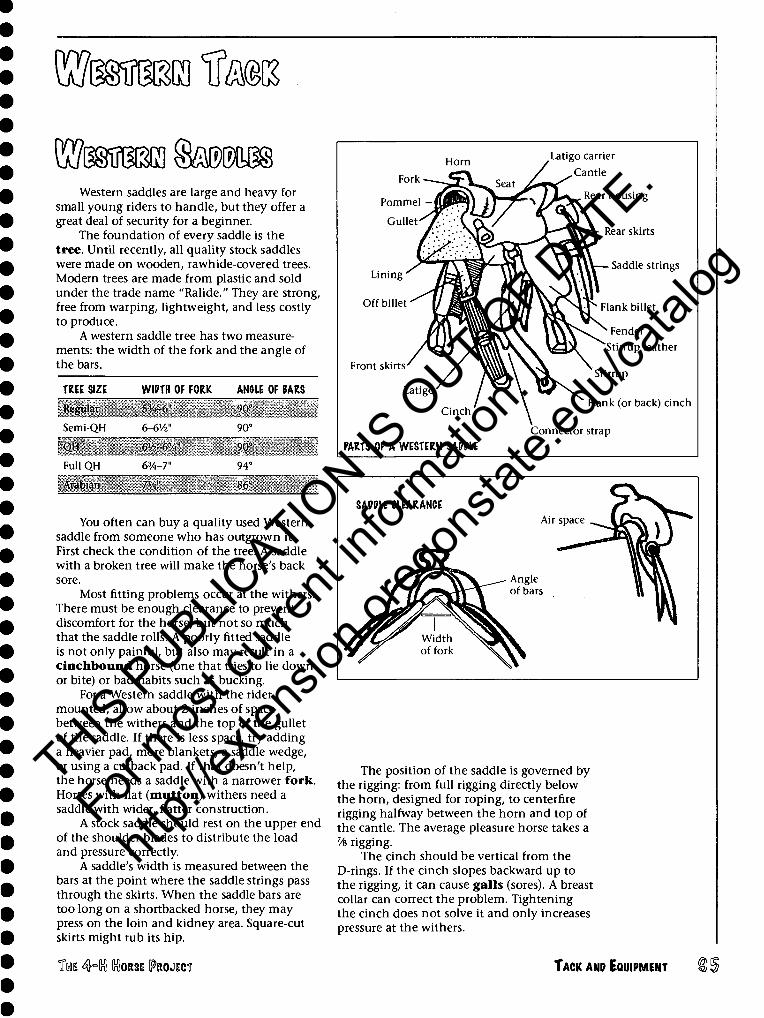
l^gMgco Ito
KyBMiBGo Qmm Western saddles are large and heavy for
small young riders to handle, but they offer a great deal of security for a beginner.
The foundation of every saddle is the tree. Until recently, all quality stock saddles were made on wooden, rawhide-covered trees. Modern trees are made from plastic and sold under the trade name "Ralide." They are strong, free from warping, lightweight, and less costly to produce.
A western saddle tree has two measure- ments: the width of the fork and the angle of the bars.
TREE SIZE WIPTH OF FORK AN&IE OF MRS
Rcguldr 5</.-G" ,0"
Vnn-QH h-fi1 J" '()"
QM 61/'. h'.' JO*
lullQII h'i-7" vr
Vdbian 7W 86'
You often can buy a quality used Western saddle from someone who has outgrown it. First check the condition of the tree. A saddle with a broken tree will make the horse's back sore.
Most fitting problems occur at the withers. There must be enough clearance to prevent discomfort for the horse, but not so much that the saddle rolls. A poorly fitted saddle is not only painful, but also may result in a cinchbound horse (one that tries to lie down or bite) or bad habits such as bucking.
For a Western saddle with the rider mounted, allow about 2 inches of space between the withers and the top of the gullet of the saddle. If there is less space, try adding a heavier pad, more blankets, a saddle wedge, or using a cutback pad. If that doesn't help, the horse needs a saddle with a narrower fork. Horses with flat (mutton) withers need a saddle with wider, flatter construction.
A stock saddle should rest on the upper end of the shoulder blades to distribute the load and pressure correctly.
A saddle's width is measured between the bars at the point where the saddle strings pass through the skirts. When the saddle bars are too long on a shortbacked horse, they may press on the loin and kidney area. Square-cut skirts might rub its hip.
Horn Fork-—_ij^.
■fc. Seat /.
Latigo carrier / Cantle
Pommel _flfl?'!~ij 1 h< *\ ' 1*^ Rear housing
GullefY/:' \C tJ /
« V-^Y^V Rear skirts
Lining ' /s*'. e y i V\ \\V— Saddle strings
Off billet (/ JfjSfll
1 f tVO^Y-p Flank billet
\ Wv^C^ Fender yqy Stirrup leather
Front skirts' /
/S i\ ^ ̂ . Stirrup Latigo/ ;
Cinch
6J\ 0 Flank (or back) cinch
\ Connector strap
PARTS OF A WESTERN SAPPLE
SAWLE CLEARANCE Air space
Angle of bars
The position of the saddle is governed by the rigging: from full rigging directly below the horn, designed for roping, to centerfire rigging halfway between the horn and top of the cantle. The average pleasure horse takes a % rigging.
The cinch should be vertical from the D-rings. If the cinch slopes backward up to the rigging, it can cause galls (sores). A breast collar can correct the problem. Tightening the cinch does not solve it and only increases pressure at the withers.
THE 4hlnl Utasi [PROJIICT TACK ANP EQUIPMENT
THIS P
UBLICATIO
N IS O
UT OF D
ATE.
For mos
t curr
ent in
formati
on:
http:/
/exten
sion.o
regon
state.
edu/c
atalog
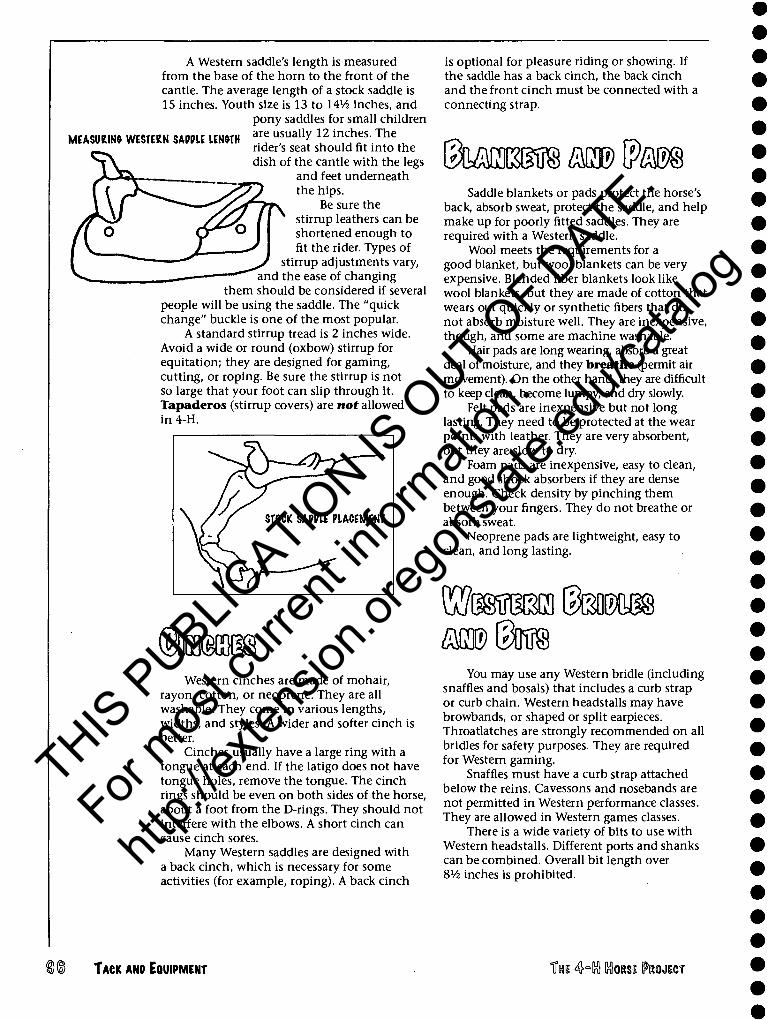
MEASURING WESTERN SAWIE LENGTH
A Western saddle's length is measured from the base of the horn to the front of the cantle. The average length of a stock saddle is 15 inches. Youth size is 13 to HVi inches, and
pony saddles for small children are usually 12 inches. The rider's seat should fit into the dish of the cantle with the legs
and feet underneath the hips.
Be sure the stirrup leathers can be shortened enough to fit the rider. Types of
stirrup adjustments vary, and the ease of changing
them should be considered if several people will be using the saddle. The "quick change" buckle is one of the most popular.
A standard stirrup tread is 2 inches wide. Avoid a wide or round (oxbow) stirrup for equitation; they are designed for gaming, cutting, or roping. Be sure the stirrup is not so large that your foot can slip through it. Tapaderos (stirrup covers) are not allowed in 4-H.
©IMS Western cinches are made of mohair,
rayon, cotton, or neoprene. They are all washable. They come in various lengths, widths, and styles. A wider and softer cinch is better.
Cinches usually have a large ring with a tongue at each end. If the latigo does not have tongue holes, remove the tongue. The cinch rings should be even on both sides of the horse, about a foot from the D-rings. They should not interfere with the elbows. A short cinch can cause cinch sores.
Many Western saddles are designed with a back cinch, which is necessary for some activities (for example, roping). A back cinch
is optional for pleasure riding or showing. If the saddle has a back cinch, the back cinch and the front cinch must be connected with a connecting strap.
[&»[»§ m> \Pm Saddle blankets or pads protect the horse's
back, absorb sweat, protect the saddle, and help make up for poorly fitted saddles. They are required with a Western saddle.
Wool meets the requirements for a good blanket, but wool blankets can be very expensive. Blended fiber blankets look like wool blankets, but they are made of cotton that wears out quickly or synthetic fibers that do not absorb moisture well. They are inexpensive, though, and some are machine washable.
Hair pads are long wearing, absorb a great deal of moisture, and they breathe (permit air movement). On the other hand, they are difficult to keep clean, become lumpy, and dry slowly.
Felt pads are inexpensive but not long lasting. They need to be protected at the wear points with leather. They are very absorbent, but they are slow to dry.
Foam pads are inexpensive, easy to clean, and good shock absorbers if they are dense enough. Check density by pinching them between your fingers. They do not breathe or absorb sweat.
Neoprene pads are lightweight, easy to clean, and long lasting.
IfcnM] ®Mm
You may use any Western bridle (including snaffles and bosals) that includes a curb strap or curb chain. Western headstalls may have browbands, or shaped or split earpieces. Throatlatches are strongly recommended on all bridles for safety purposes. They are required for Western gaming.
Snaffles must have a curb strap attached below the reins. Cavessons and nosebands are not permitted in Western performance classes. They are allowed in Western games classes.
There is a wide variety of bits to use with Western headstalls. Different ports and shanks can be combined. Overall bit length over 8V2 inches is prohibited.
TACK AND EQUIPMENT THE 4-ln} Ktosm PROJECT
THIS P
UBLICATIO
N IS O
UT OF D
ATE.
For mos
t curr
ent in
formati
on:
http:/
/exten
sion.o
regon
state.
edu/c
atalog
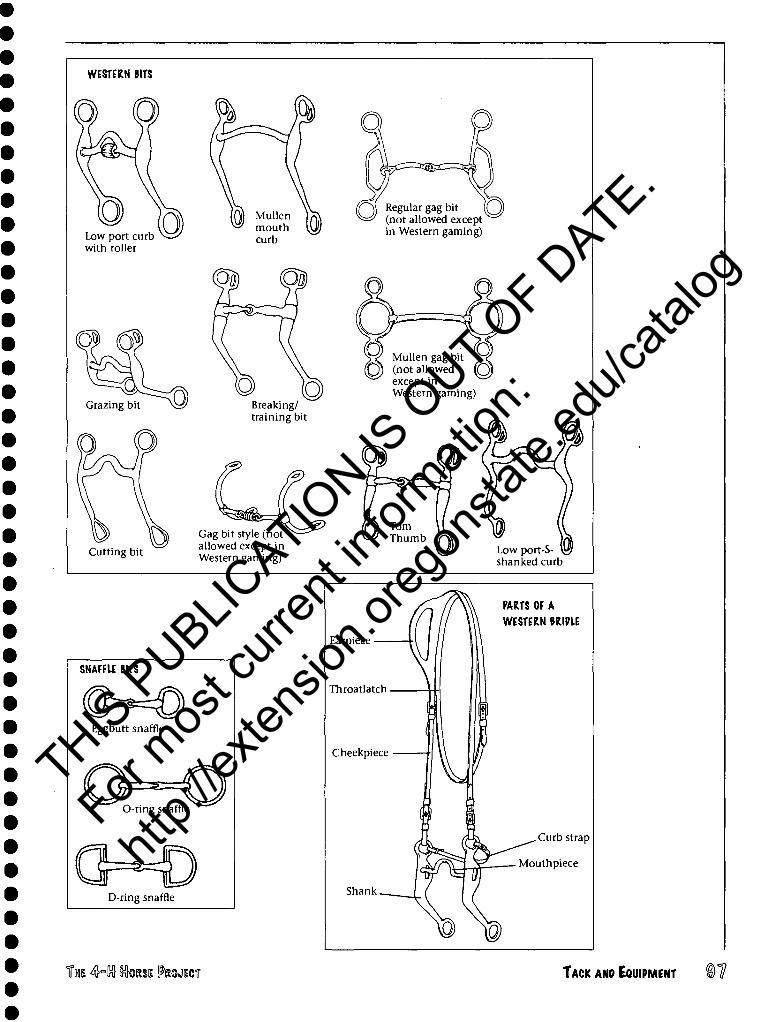
WESTERN PITS
Low port curb with roller
Q) Mullen ^J mouth
curb
(not allowed except' in Western gaming)
Breaking/ training bit
y? Mullen gag bit %? (P) (not allowed O
except in Western gaming)
Cutting bit
Gag bit style (not allowed except in Western gaming)
Low port-S- shanked curb
SNAFFLE NTS
Eggbutt snaffle
O-ring snaffle
D-ring snaffle
Earpiece ■
Throatlatch -
Cheekpiece •
Shank
PARTS OF A
WESTERN mm
Curb strap
Mouthpiece
TTHI 4hK} tasE PtecwiCT TACK AND EQUIPMENT
THIS P
UBLICATIO
N IS O
UT OF D
ATE.
For mos
t curr
ent in
formati
on:
http:/
/exten
sion.o
regon
state.
edu/c
atalog
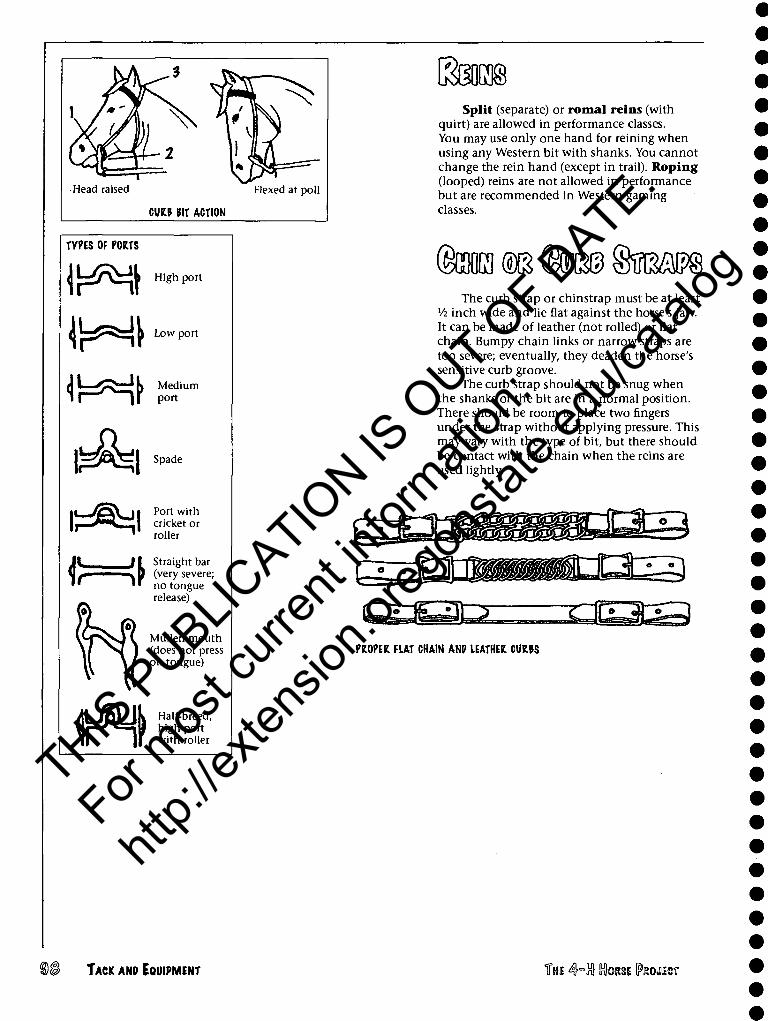
Head raised Flexed at poll
cm m ACTION
TYPES OF PORTS
1^ High port
I ■—^^^ h Low port
Medium port
j~^^tjj Spade
i>=<\
Port with cricket or roller
Straight bar (very severe; no tongue release)
Mullen mouth (does not press on tongue)
/L/SLJk Half-breed, Ur-"^Ay high port \\ |f with roller
\Mm Split (separate) or romal reins (with
quirt) are allowed in performance classes. You may use only one hand for reining when using any Western bit with shanks. You cannot change the rein hand (except in trail). Roping (looped) reins are not allowed in performance but are recommended in Western gaming classes.
The curb strap or chinstrap must be at least Vz inch wide and lie flat against the horse's jaw. It can be made of leather (not rolled) or flat chain. Bumpy chain links or narrow straps are too severe; eventually, they deaden the horse's sensitive curb groove.
The curb strap should not be snug when the shanks of the bit are in a normal position. There should be room to place two fingers under the strap without applying pressure. This may vary with the type of bit, but there should be contact with the chain when the reins are used lightly.
~T-^3^^^ffl Sllli&slgstrr^ -^—, — . —<=s-—fife—<sn —
I^JJU^W MLJua^Ai £-ip^LJ> ^^QESd
PROPER FIAT CHAIN ANP LEATHER CURPS
D§ TACK ANP EQUIPMENT THE 4hlnl MORSE IFROJICT
THIS P
UBLICATIO
N IS O
UT OF D
ATE.
For mos
t curr
ent in
formati
on:
http:/
/exten
sion.o
regon
state.
edu/c
atalog
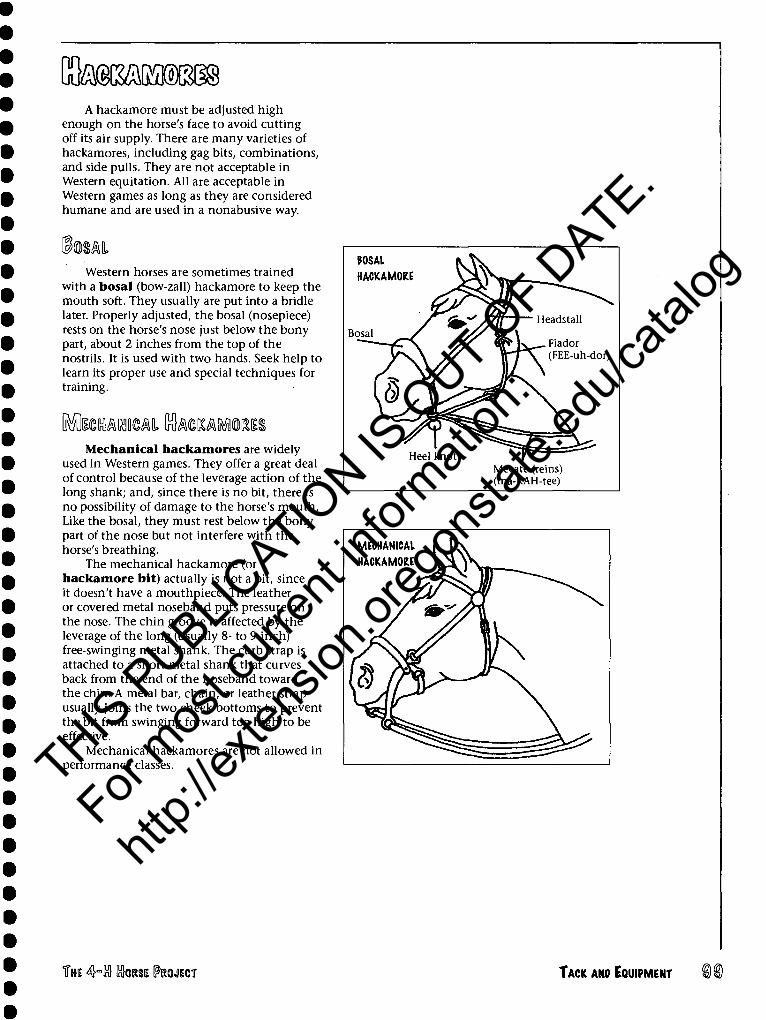
A hackamore must be adjusted high enough on the horse's face to avoid cutting off its air supply. There are many varieties of hackamores, including gag bits, combinations, and side pulls. They are not acceptable in Western equitation. All are acceptable in Western games as long as they are considered humane and are used in a nonabusive way.
Western horses are sometimes trained with a bosal (bow-zall) hackamore to keep the mouth soft. They usually are put into a bridle later. Properly adjusted, the bosal (nosepiece) rests on the horse's nose just below the bony part, about 2 inches from the top of the nostrils. It is used with two hands. Seek help to learn its proper use and special techniques for training.
IMtaAKUCAIl (nto&MWS Mechanical hackamores are widely
used in Western games. They offer a great deal of control because of the leverage action of the long shank; and, since there is no bit, there is no possibility of damage to the horse's mouth. Like the bosal, they must rest below the bony part of the nose but not interfere with the horse's breathing.
The mechanical hackamore (or hackamore bit) actually is not a bit, since it doesn't have a mouthpiece. The leather or covered metal noseband puts pressure on the nose. The chin groove is affected by the leverage of the long (usually 8- to 9-inch) free-swinging metal shank. The curb strap is attached to a short metal shank that curves back from the end of the noseband toward the chin. A metal bar, chain, or leather strap usually joins the two cheek bottoms to prevent the bit from swinging forward too high to be effective.
Mechanical hackamores are not allowed in performance classes.
POSAL
HACKAMORE
Bosal
Heel knot Mecate (reins) (ma-KAH-tee)
MECHANICAL
HACKAMORE
THI Q-$ InloRSE (PROJECT TACK AND EQUIPMENT
THIS P
UBLICATIO
N IS O
UT OF D
ATE.
For mos
t curr
ent in
formati
on:
http:/
/exten
sion.o
regon
state.
edu/c
atalog
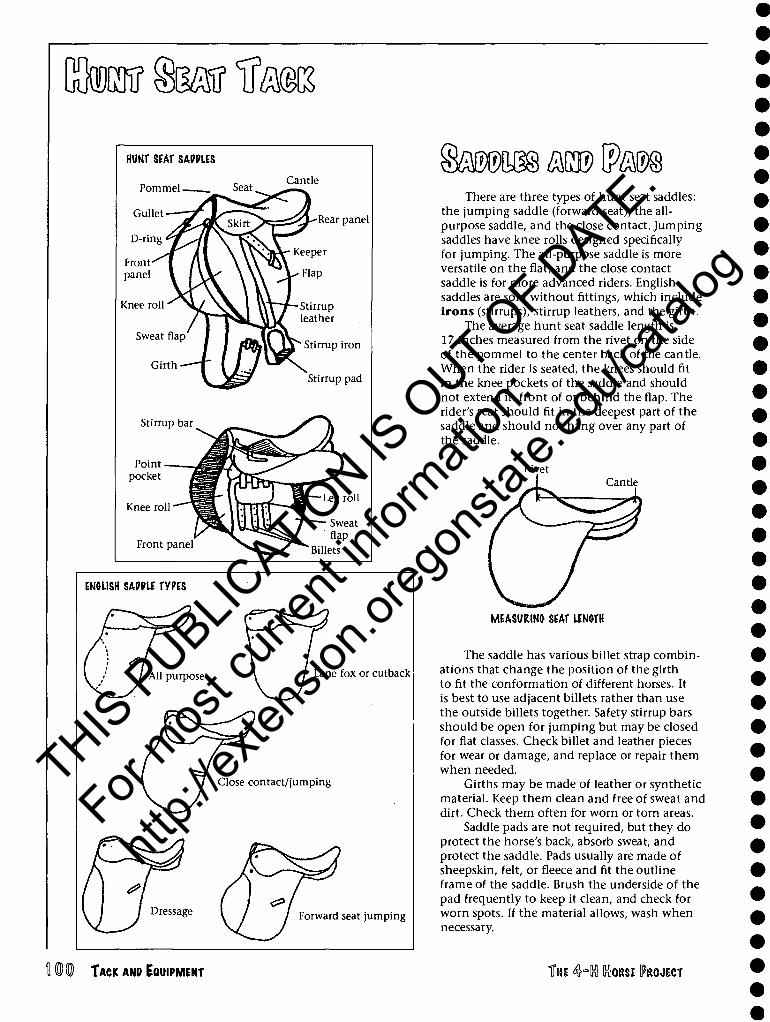
efirtarlTM
Cantle
Rear panel
Stirrup leather
Stirrup iron
Stirrup pad
Stirrup bar
Point pocket
Knee roll
Front panel
ENHISH SAWLE TYPES
Lane fox or cutback
Forward seat jumping
§mm im \Pm There are three types of hunt seat saddles:
the jumping saddle (forward seat), the all- purpose saddle, and the close contact. Jumping saddles have knee rolls designed specifically for jumping. The all-purpose saddle is more versatile on the flat, and the close contact saddle is for more advanced riders. English saddles are sold without fittings, which include irons (stirrups), stirrup leathers, and the girth.
The average hunt seat saddle length is 17 inches measured from the rivet on the side of the pommel to the center back of the cantle. When the rider is seated, the knees should fit in the knee pockets of the saddle and should not extend in front of or behind the flap. The rider's seat should fit in the deepest part of the saddle and should not hang over any part of the saddle.
Rivet Cantle
MEASURING SEAT UNOTH
The saddle has various billet strap combin- ations that change the position of the girth to fit the conformation of different horses. It is best to use adjacent billets rather than use the outside billets together. Safety stirrup bars should be open for jumping but may be closed for flat classes. Check billet and leather pieces for wear or damage, and replace or repair them when needed.
Girths may be made of leather or synthetic material. Keep them clean and free of sweat and dirt. Check them often for worn or torn areas.
Saddle pads are not required, but they do protect the horse's back, absorb sweat, and protect the saddle. Pads usually are made of sheepskin, felt, or fleece and fit the outline frame of the saddle. Brush the underside of the pad frequently to keep it clean, and check for worn spots. If the material allows, wash when necessary.
TACK AND EQUIPMENT THE 4=ln} KORSE PROJECT
THIS P
UBLICATIO
N IS O
UT OF D
ATE.
For mos
t curr
ent in
formati
on:
http:/
/exten
sion.o
regon
state.
edu/c
atalog
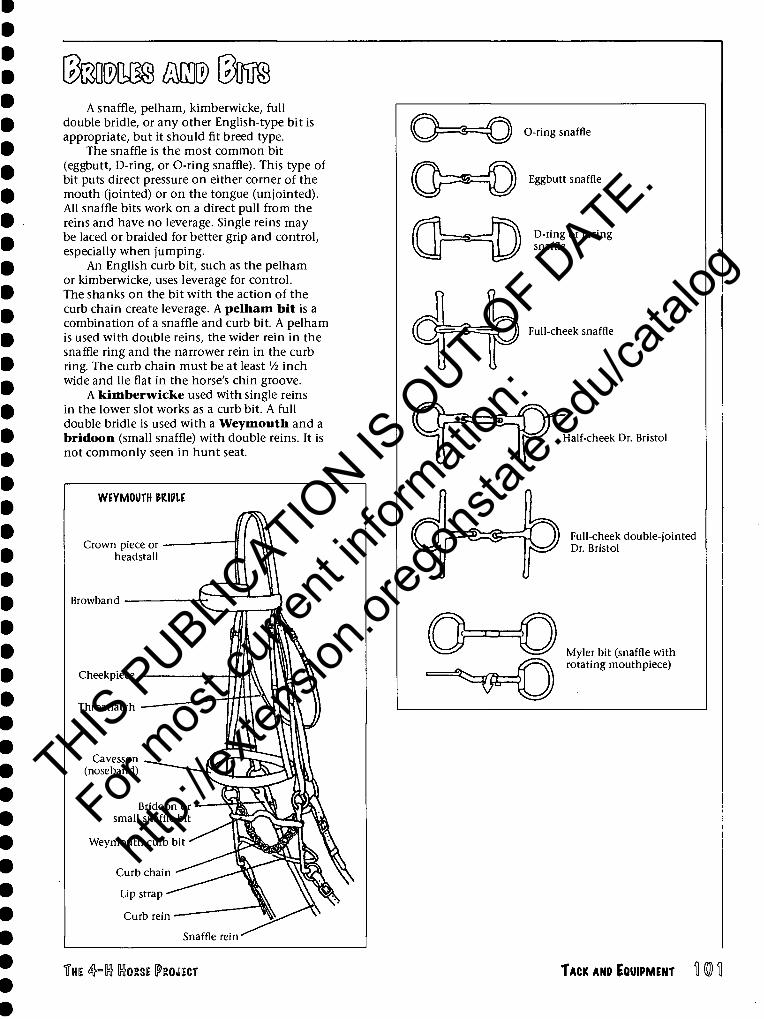
A snaffle, pelham, kimberwicke, full double bridle, or any other English-type bit is appropriate, but it should fit breed type.
The snaffle is the most common bit (eggbutt, D-ring, or O-ring snaffle). This type of bit puts direct pressure on either corner of the mouth (jointed) or on the tongue (unjointed). All snaffle bits work on a direct pull from the reins and have no leverage. Single reins may be laced or braided for better grip and control, especially when jumping.
An English curb bit, such as the pelham or kimberwicke, uses leverage for control. The shanks on the bit with the action of the curb chain create leverage. A pelham bit is a combination of a snaffle and curb bit. A pelham is used with double reins, the wider rein in the snaffle ring and the narrower rein in the curb ring. The curb chain must be at least Vz inch wide and lie flat in the horse's chin groove.
A kimberwicke used with single reins in the lower slot works as a curb bit. A full double bridle is used with a Weymouth and a bridoon (small snaffle) with double reins. It is not commonly seen in hunt seat.
WEYMOUTH TRIPLE
Crown piece or headstall
Browband
Cheekpiece
Throatlatch
Cavesson (noseband)
Bridoon or small snaffle bit
Weymouth curb bit
Curb chain
Lip strap
Curb rein
Snaffle rein
0=*=O ° ring snaffle
Eggbutt snaffle
D-ring or racing snaffle
Full-cheek snaffle
Half-cheek Dr. Bristol
Full-cheek double-jointed Dr. Bristol
Myler bit (snaffle with rotating mouthpiece)
THE 4h[nt tasE PROJECT TACK ANP EQUIPMENT
THIS P
UBLICATIO
N IS O
UT OF D
ATE.
For mos
t curr
ent in
formati
on:
http:/
/exten
sion.o
regon
state.
edu/c
atalog
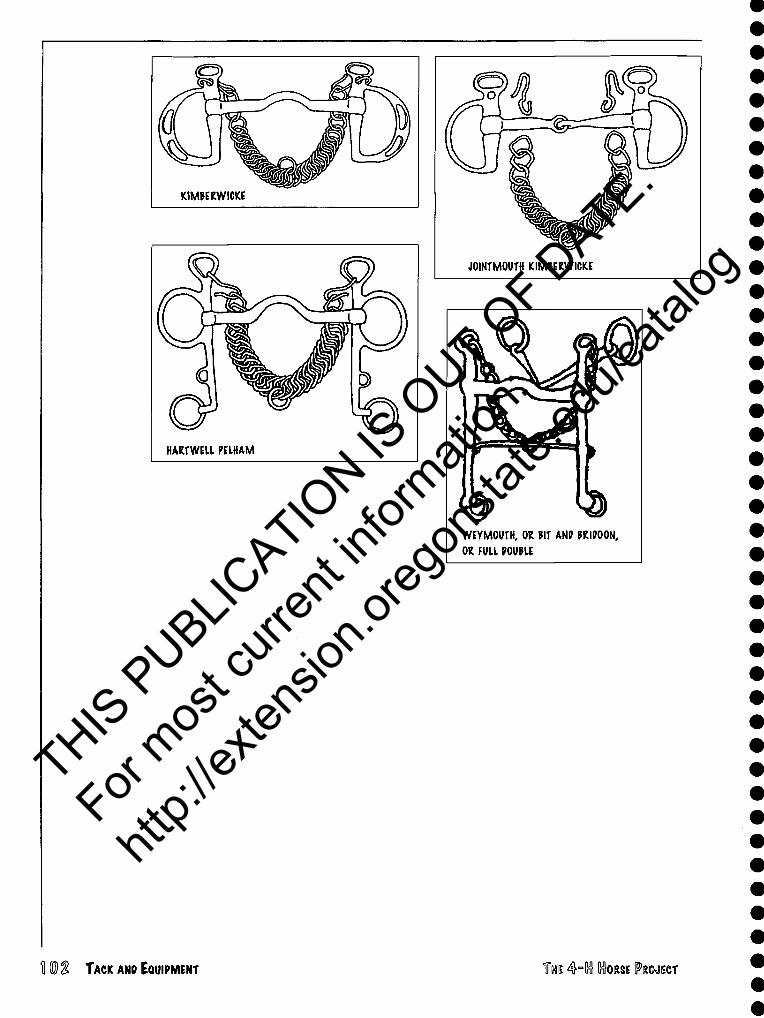
WEYMOUTH, OR BIT AM PRIPOON, OR FULL mill
TACK AND EQUIPMENT THE 4H[n} MORSE [FROJIECT
THIS P
UBLICATIO
N IS O
UT OF D
ATE.
For mos
t curr
ent in
formati
on:
http:/
/exten
sion.o
regon
state.
edu/c
atalog
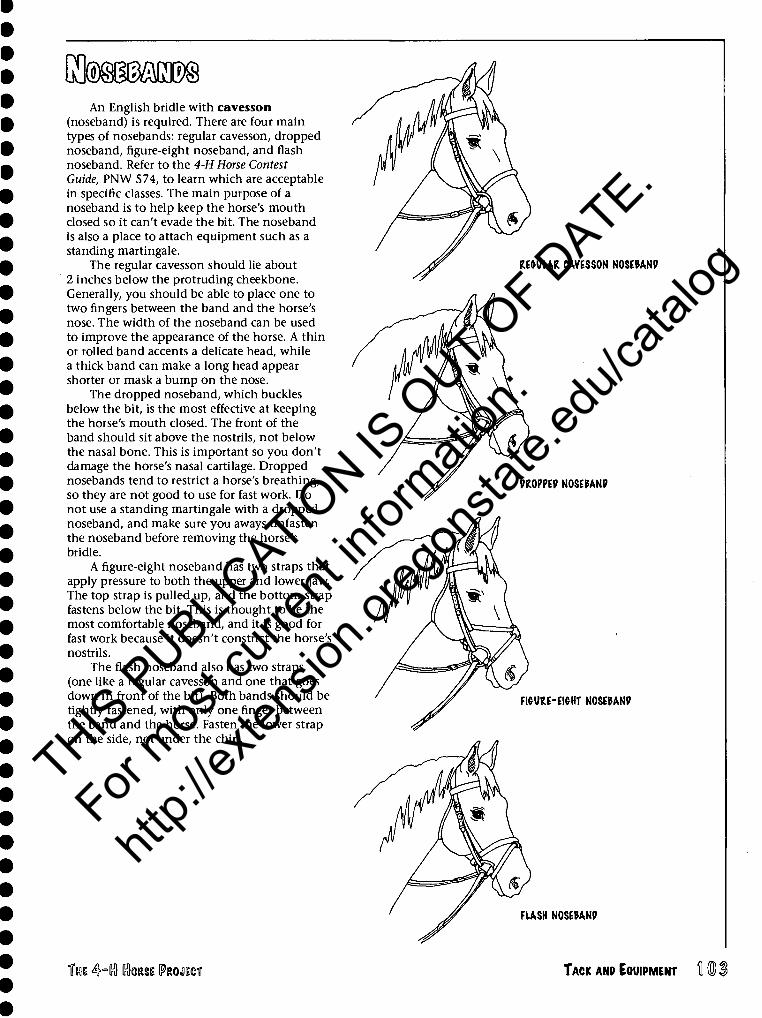
An English bridle with cavesson (noseband) is required. There are four main types of nosebands: regular cavesson, dropped noseband, figure-eight noseband, and flash noseband. Refer to the 4-H Horse Contest Guide, PNW 574, to learn which are acceptable in specific classes. The main purpose of a noseband is to help keep the horse's mouth closed so it can't evade the bit. The noseband is also a place to attach equipment such as a standing martingale.
The regular cavesson should lie about 2 inches below the protruding cheekbone. Generally, you should be able to place one to two fingers between the band and the horse's nose. The width of the noseband can be used to improve the appearance of the horse. A thin or rolled band accents a delicate head, while a thick band can make a long head appear shorter or mask a bump on the nose.
The dropped noseband, which buckles below the bit, is the most effective at keeping the horse's mouth closed. The front of the band should sit above the nostrils, not below the nasal bone. This is important so you don't damage the horse's nasal cartilage. Dropped nosebands tend to restrict a horse's breathing, so they are not good to use for fast work. Do not use a standing martingale with a dropped noseband, and make sure you aways unfasten the noseband before removing the horse's bridle.
A figure-eight noseband has two straps that apply pressure to both the upper and lower jaw. The top strap is pulled up, and the bottom strap fastens below the bit. This is thought to be the most comfortable noseband, and it is good for fast work because it doesn't constrict the horse's nostrils.
The flash noseband also has two straps (one like a regular cavesson and one that goes down in front of the bit). Both bands should be tightly fastened, with only one finger between the band and the horse. Fasten the lower strap on the side, not under the chin.
mUUR CAVESSON NOSEPANP
mr?v) NOSEPANP
FIWRE-EIMT NOSEPANP
FLASH NOSEtANP
THE 4hln} (TSORSI (PRCMECT TACK ANP EQUIPMENT
THIS P
UBLICATIO
N IS O
UT OF D
ATE.
For mos
t curr
ent in
formati
on:
http:/
/exten
sion.o
regon
state.
edu/c
atalog
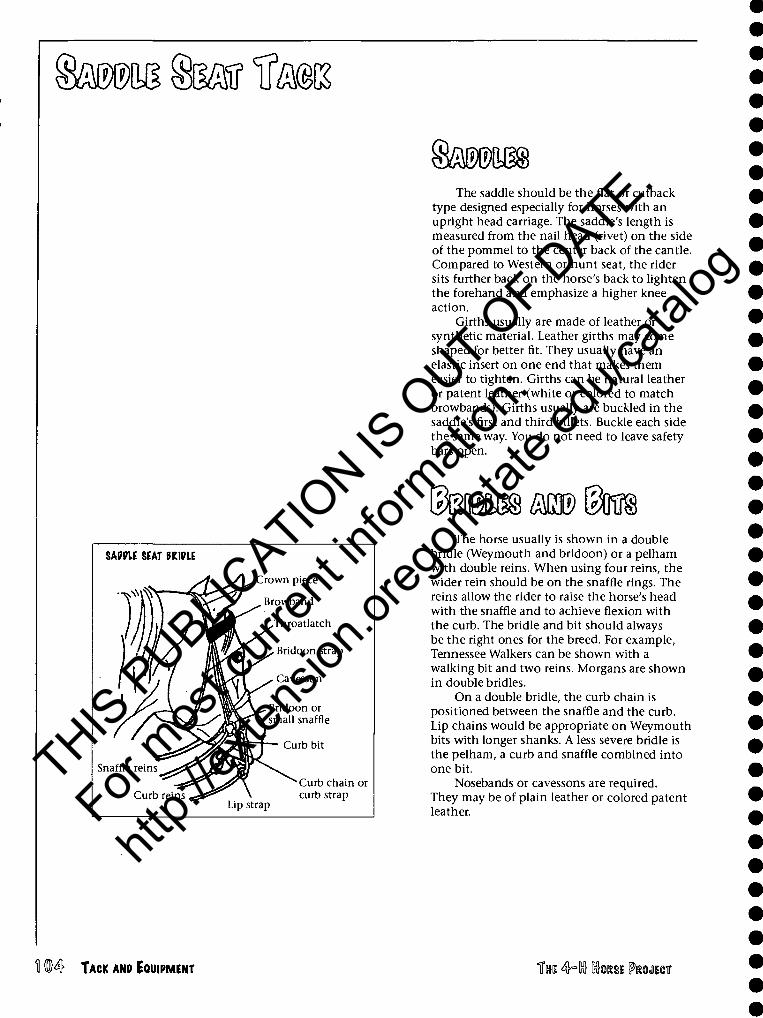
garffM
The saddle should be the flat or cutback type designed especially for horses with an upright head carriage. The saddle's length is measured from the nail head (rivet) on the side of the pommel to the center back of the cantle. Compared to Western or hunt seat, the rider sits further back on the horse's back to lighten the forehand and emphasize a higher knee action.
Girths usually are made of leather or synthetic material. Leather girths may come shaped for better fit. They usually have an elastic insert on one end that makes them easier to tighten. Girths can be natural leather or patent leather (white or colored to match browbands). Girths usually are buckled in the saddle's first and third billets. Buckle each side the same way. You do not need to leave safety bars open.
SAWIE SEAT mm
Snaffle reins
Curb reins
Crown piece
Browband
Throatlatch
Bridoon strap
Cavesson
Bridoon or small snaffle
Curb bit
Lip strap
Curb chain or curb strap
The horse usually is shown in a double bridle (Weymouth and bridoon) or a pelham with double reins. When using four reins, the wider rein should be on the snaffle rings. The reins allow the rider to raise the horse's head with the snaffle and to achieve flexion with the curb. The bridle and bit should always be the right ones for the breed. For example, Tennessee Walkers can be shown with a walking bit and two reins. Morgans are shown in double bridles.
On a double bridle, the curb chain is positioned between the snaffle and the curb. Lip chains would be appropriate on Weymouth bits with longer shanks. A less severe bridle is the pelham, a curb and snaffle combined into one bit.
Nosebands or cavessons are required. They may be of plain leather or colored patent leather.
TACK AND EQUIPMENT THE 4h[n} MORSE PROJECT
THIS P
UBLICATIO
N IS O
UT OF D
ATE.
For mos
t curr
ent in
formati
on:
http:/
/exten
sion.o
regon
state.
edu/c
atalog

THE 4]"=K1 HORSE PROJECT
THIS P
UBLICATIO
N IS O
UT OF D
ATE.
For mos
t curr
ent in
formati
on:
http:/
/exten
sion.o
regon
state.
edu/c
atalog
m mmmm The dictionary defines ethics as "the study
of human conduct, with emphasis on the determination of right and wrong." Ethics are concerned with voluntary actions; that is, the things you choose to do. The decisions you make regarding your horse and showing events affect how others view you, and reflect on your club, your county, and the 4-H Program as a whole. Be sure the decisions you make are ethical ones.
To help determine whether what you are doing is ethical, ask yourself the following questions:
• Will I need to lie about this? • Does this harm the horse? • Is this against any rule? • If someone were watching me, would I
not do this? • Does this misrepresent me or the horse? • Would I be unhappy if someone did this
to me?
If the anwer to any of these questions is "yes," don't do it. It is not ethical.
To maintain your integrity and that of the 4-H Horse Program, follow these guidelines:
i (0)« TOI ROMS. Rules are made for a reason, and they are
meant for everyone to follow. Don't look for loopholes or ways to bend or stretch the rules. Play fair. Be sure you know the rules of the show, your county, and your state.
WHEN I COMPETE, I have a performance goal...never a goal "only to beat someone else." I respect and learn from other competitors more skilled than myself. I don't criticize other competitors, officials, or judges. I do my best today. I have fun. I stay home if I can't follow the above rules.
Adapted from a presentation by Doug Householder, Ph.D., Extension horse specialist, Texas A&M University, at the 1997 National Youth Horse Council Meeting
Any time you have to lie, you are being unethical. Don't lie, and don't do anything that you would later want to lie about or hide.
3. TAKE PROPER CMS m mm MORSE. .
Make sure your horse has adequate food, water, and shelter and keep it in good health with correct grooming, parasite control, vaccinations, foot and dental care, and basic safety. Proper care also means that you use humane training methods. Any mistreatment or abuse is unacceptable and will not be tolerated by the 4-H Program.
JMOMSTTRATE mm
wmnmmmWo Good sportsmanship is a part of being
ethical. Be gracious and courteous whether you win or lose. Help others who are in the competition with you. Don't run down other members, and don't blame the judge for your performance. Never blame your horse if you don't do well. Jerking on the reins or spurring the horse in anger are poor images to project of yourself and 4-H. Your attitude is important not only in the show ring, but in all aspects of life.
PSRSPEOWE. Winning is not the main goal. Rather,
strive to do your best, to learn, and to grow. Compete against yourself and the course instead of other members. Have fun. If you don't enjoy what you are doing, maybe this isn't the right activity for you.
iNimwEiMir. Remember that the main goal of 4-H is
youth development. Parents and other adults are there to help and teach you, not to do your work. Help them to focus on what is best for all the kids and the program, not just on you. Do as much as you can yourself.
RIPING AND SHOWING THE ^HK} (SORSI PROJECT
THIS P
UBLICATIO
N IS O
UT OF D
ATE.
For mos
t curr
ent in
formati
on:
http:/
/exten
sion.o
regon
state.
edu/c
atalog
©tani? ®ms£\ to unig ^msa ®m
At a horse show, you'll have opportunities to use warm-up space. The warm-up ring is usually overcrowded, so following these simple rules can help make it a safer and more beneficial place.
• All horses work in the same direction. • Trainers, leaders, and helpers remain
outside the arena. • Don't mix longeing and riding in the
same arena. • Don't mix carts and mounted horses in
the same arena. • If you ride a mule, donkey, or pony,
remember that some horses are not familiar with these kinds of animals and may be frightened. Be respectful and careful when warming up together. Don't cut others off into the rail or crowd the rail, moving others off. Communicate with those around you, especially if you are having trouble. Do not halt and/or back up without warning those around you. Keep two horses' lengths between you and the horses to the side, front, and back. Be in control; if you're not, you're not ready to be there. Keep your language and comments appropriate. The 4-H Code of Conduct applies at all times. If your horse has a tendency to kick, put a red ribbon in its tail.
Remember that all contestants are doing their best to be seen by the judge. Be respectful of the riders around you. Adhere to the same guidelines in the show ring as in the warm-up arena, and add the following:
• Don't try to "squeeze" into a space in line where there isn't space.
• Don't be afraid to enter the arena first. • When working a pattern, stay away
from those who are lined up whenever possible.
• Be ready and waiting for the judge's signal for you to begin.
• Wait for the judge to acknowledge you before you begin your pattern and before returning to line when you finish your pattern, unless the judge requests otherwise.
• Be sure your exhibitor number is clearly visible.
• If you are too close to another exhibitor, don't hesitate to circle safely and find your own space on the rail.
• Do not dismount in riding classes. • Ask a steward or judge for permission if
you want to be excused. • Be sure your horse is prepared for the
horse show environment (clapping, chairs moving, people climbing bleachers, and so on).
THE 4Hlnl MORSE PROJECT Ripiwe ANP SHOWING
THIS P
UBLICATIO
N IS O
UT OF D
ATE.
For mos
t curr
ent in
formati
on:
http:/
/exten
sion.o
regon
state.
edu/c
atalog
ta®» a ©MOW $WM m
Finding the perfect riding instructor is not an easy task! The right instructor helps you become a safe, confident handler and rider, no matter which discipline you choose. Two of the most important elements of riding are safety and fun. If either of these is missing, then you have the wrong instructor. It is worth the time and energy to find the right trainer/instructor so you can be safe and successful.
Before you begin your search for an instructor, decide what your goals are, both for yourself and your horse. You also must decide which discipline or type of riding you want to pursue: English or Western. English includes jumping, hunt seat, saddle seat, dressage, and eventing. Western offers pleasure, stock seat, Western games, reining, cutting, and others.
Determine what your best learning environment is. Some instructors have a busy, active barn; others a quieter, laid-back atmosphere. Also, you can choose group or private lessons. Some people like having other riders around them who have the same goals. Others like to have the instructor's undivided attention.
Find an instructor who really understands horses and is experienced in your chosen discipline. An instructor must have people skills as well as horsemanship abilities and must be able to help students achieve their goals. Not all good trainers are good instructors. A good instructor must not only understand the horse and the chosen discipline, he or she must also know how to teach.
To begin your search for a riding instructor, ask friends, local horse clubs, 4-H leaders, veterinarians, and farriers for referrals. Talk to other horse owners and find out which instructors have worked well for them. Check with riders currently learning from an instructor to find out about his or her ability to teach and train. Also, try the Yellow Pages or a Horseman's Directory.
Follow the guidelines below when searching for an instructor.
fasOMAMTy Is it easy for you to talk to this instructor
about yourself and your horse's needs? Does he or she answer your questions in words that you can understand? Is the instructor's personality a
good match for yours? Discuss lesson programs, student goals, and riding styles with the instructor.
taums Don't just telephone barns—visit them.
Make sure you check an instructor's stable and other facilities to see whether the environment is safe and clean. Walk around and look at the conditions that you and your horse will be working in. A good facility's upkeep reflects the owner/instructor's sense of pride.
Safety is paramount. A good teaching facility has a firm helmet rule: everyone is required to wear a helmet when mounted, including the instructor. Don't accept the excuse that a "professional" doesn't need a helmet. This is not a correct message to give to students.
i^SSWS W flMSTRMCTOR Watch the instructor give a lesson. This will
give you valuable insight into the instructor's methods and style, and save you considerable time and money in the long run. Are you comfortable with the instructor's teaching style? An instructor who screams at students, berates them, or is condescending is not the one you want!
If an instructor will not allow you to watch a few lessons before making a decision, you may want to look elsewhere.
totumnro Does this instructor have a good reputation
among peers and other horse people? What do the instructor's current students think? Talk to these people and find out.
Decide how far you are willing to travel to get lessons. Is the instructor's facility within that range? Some instructors will consider coming to your place. Find out if this is a possibility.
RIPIM ANP SHOWING THE 4~(n} DORSE PROJECT
THIS P
UBLICATIO
N IS O
UT OF D
ATE.
For mos
t curr
ent in
formati
on:
http:/
/exten
sion.o
regon
state.
edu/c
atalog

tat (tomcEs Ask instructors how much they charge for Ask for written references, and then check
a standard lesson, and decide whether you can them. A good instructor/trainer is happy to afford their rates. Ask how long their standard supply you with several references. If he or she lesson is. Most instructors give an hour lesson, will not or cannot give you references, move but some may go only 45 minutes; make sure on. you are getting what you pay for. Also, check to Be sure you feel comfortable with all see if they give group lessons, as they may be arrangements you make with the instructor, less expensive. It is your responsibility to make sure you
get your time and money's worth, and that the instructor upholds his or her end of the agreement.
THE 4-Iri} KIORSE (PROJECT RIPINO AND SHOWING
THIS P
UBLICATIO
N IS O
UT OF D
ATE.
For mos
t curr
ent in
formati
on:
http:/
/exten
sion.o
regon
state.
edu/c
atalog
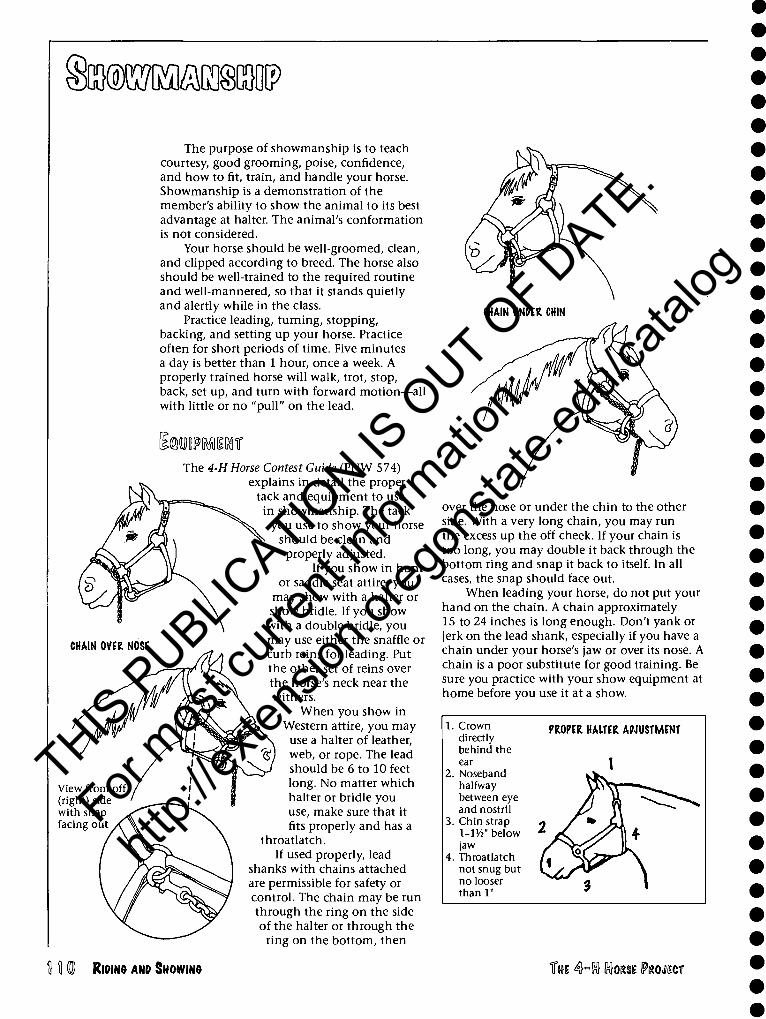
flMTtMlOSTO
View from off (right) side with snap facing out
The purpose of showmanship is to teach courtesy, good grooming, poise, confidence, and how to fit, train, and handle your horse. Showmanship is a demonstration of the member's ability to show the animal to its best advantage at halter. The animal's conformation is not considered.
Your horse should be well-groomed, clean, and clipped according to breed. The horse also should be well-trained to the required routine and well-mannered, so that it stands quietly and alertly while in the class.
Practice leading, turning, stopping, backing, and setting up your horse. Practice often for short periods of time. Five minutes a day is better than 1 hour, once a week. A properly trained horse will walk, trot, stop, back, set up, and turn with forward motion—all with little or no "pull" on the lead.
The 4-H Horse Contest Guide (PNW 574) explains in detail the proper
tack and equipment to use in showmanship. The tack
you use to show your horse should be clean and properly adjusted.
If you show in hunt or saddle seat attire, you
may show with a halter or show bridle. If you show with a double bridle, you may use either the snaffle or curb reins for leading. Put the other set of reins over the horse's neck near the withers.
When you show in Western attire, you may
use a halter of leather, web, or rope. The lead should be 6 to 10 feet long. No matter which halter or bridle you use, make sure that it fits properly and has a
throatlatch. If used properly, lead
shanks with chains attached are permissible for safety or control. The chain may be run through the ring on the side of the halter or through the
ring on the bottom, then
over the nose or under the chin to the other side. With a very long chain, you may run the excess up the off cheek. If your chain is too long, you may double it back through the bottom ring and snap it back to itself. In all cases, the snap should face out.
When leading your horse, do not put your hand on the chain. A chain approximately 15 to 24 inches is long enough. Don't yank or jerk on the lead shank, especially if you have a chain under your horse's jaw or over its nose. A chain is a poor substitute for good training. Be sure you practice with your show equipment at home before you use it at a show.
1. Crown directly behind the ear
2. Noseband halfway between eye and nostril
3. Chin strap l-lVz" below jaw
4. Throatlatch not snug but no looser than 1"
PROPER HALTER ADJUSTMENT
RIDING AND SHOWING TK 4°In} KORSI PROJECT
THIS P
UBLICATIO
N IS O
UT OF D
ATE.
For mos
t curr
ent in
formati
on:
http:/
/exten
sion.o
regon
state.
edu/c
atalog
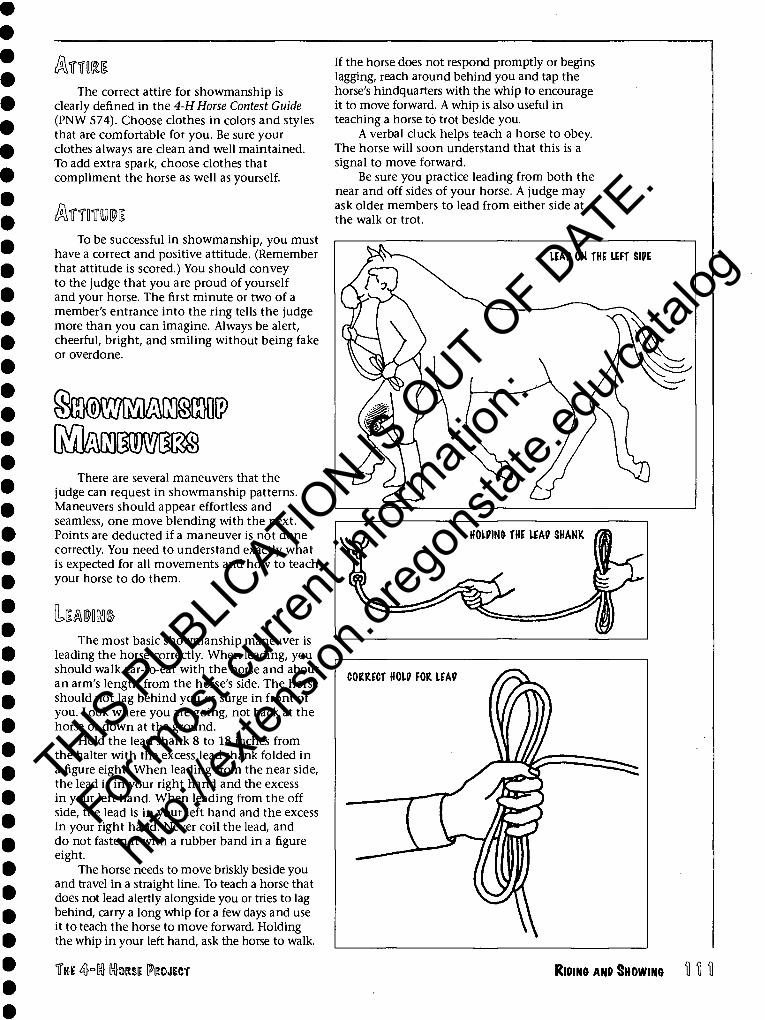
ATTIRE The correct attire for showmanship is
clearly defined in the 4-H Horse Contest Guide (PNW 574). Choose clothes in colors and styles that are comfortable for you. Be sure your clothes always are clean and well maintained. To add extra spark, choose clothes that compliment the horse as well as yourself.
To be successful in showmanship, you must have a correct and positive attitude. (Remember that attitude is scored.) You should convey to the judge that you are proud of yourself and your horse. The first minute or two of a member's entrance into the ring tells the judge more than you can imagine. Always be alert, cheerful, bright, and smiling without being fake or overdone.
There are several maneuvers that the judge can request in showmanship patterns. Maneuvers should appear effortless and seamless, one move blending with the next. Points are deducted if a maneuver is not done correctly. You need to understand exactly what is expected for all movements and how to teach your horse to do them.
Umm The most basic showmanship maneuver is
leading the horse correctly. When leading, you should walk ear-to-ear with the horse and about an arm's length from the horse's side. The horse should not lag behind you or surge in front of you. Look where you are going, not back at the horse or down at the ground.
Hold the lead shank 8 to 18 inches from the halter with the excess lead shank folded in a figure eight. When leading from the near side, the lead is in your right hand and the excess in your left hand. When leading from the off side, the lead is in your left hand and the excess in your right hand. Never coil the lead, and do not fasten it with a rubber band in a figure eight.
The horse needs to move briskly beside you and travel in a straight line. To teach a horse that does not lead alertly alongside you or tries to lag behind, carry a long whip for a few days and use it to teach the horse to move forward. Holding the whip in your left hand, ask the horse to walk.
If the horse does not respond promptly or begins lagging, reach around behind you and tap the horse's hindquarters with the whip to encourage it to move forward. A whip is also useful in teaching a horse to trot beside you.
A verbal cluck helps teach a horse to obey. The horse will soon understand that this is a signal to move forward.
Be sure you practice leading from both the near and off sides of your horse. A judge may ask older members to lead from either side at the walk or trot.
THE 4H[n} Gtasi IF'KOJIICT RIDING AND SHOWING
THIS P
UBLICATIO
N IS O
UT OF D
ATE.
For mos
t curr
ent in
formati
on:
http:/
/exten
sion.o
regon
state.
edu/c
atalog
When a pattern calls for a back, the horse should promptly back the requested distance in a straight line. Four steps is considered one length, counting the steps of the front feet. A half-step at the end of the back to even the feet is not counted as a step. At the end of the back, the front feet should be within half a hoof's length of being even. Be sure you back the proper number of steps.
To teach a horse to back, give the horse the command "Back." Then apply pressure on the nose with the halter using light tugs. Avoid a steady pull. At the same time, push on the point of the shoulder with a whip handle or short stick. The instant the horse responds, reward it by releasing the pressure. At first, ask for just one back step at a time. As the horse responds correctly, ask for more steps. To teach the horse to back straight, back it along a fence, wall, or barn aisle.
TlIIRKIS
Most patterns use degrees to tell you how far you need to turn.
One-quarter turn = 90 degrees Half turn =180 degrees Three-quarter turn = 270 degrees Full turn = 360 degrees
The direction of the turn is the direction the horse's head moves.
HAUNCH TURNS In a haunch turn, the horse pivots on
its hindquarters with energy and impulsion. Properly done, a haunch turn must have forward motion, meaning the nonpivot hind foot moves around in front of the pivot foot. The pivot foot is the inside hind foot. When doing a right haunch turn, the right hind foot is the pivot foot. When doing a left haunch turn, the left hind foot is the pivot foot.
Unless the turn is less than 90 degrees, always turn the horse away from you. Therefore, a right haunch turn is done from the near side of the horse. A left haunch turn is done from the off side of the horse.
The horse has to learn to pivot on the correct hind leg and hold its pivot foot in position. To teach a right haunch turn, follow these steps:
1. Walk toward the horse's throatlatch and get the horse to move away from you with the horse's left front foot crossing over its right. Cluck or tap the horse's shoulder to get the horse moving.
2. Your hand needs to be a few inches from the halter to have control of the horse's head. Ask the horse to move slightly
forward and around. Don't let the horse bend its neck; keep its body straight.
3. Lift the lead shank to transfer the horse's weight to its hocks, then go into the turn. Use the lead shank to guide the horse's head slightly forward and to the right, using your hand to tap the shoulder to move the horse away from pressure.
4. Just before the horse drops weight onto its left hind leg, move the horse forward one half-step to place weight on the right hind foot. Keep moving the horse and bring the the left foot forward. With practice, the horse will learn to pivot on its right hind foot and bring its left hind foot forward on its own.
For a left haunch turn, repeat the above steps, reversing sides and directions.
Remember that when you are in a showmanship class, you may not touch the horse during a haunch turn.
FOREHAND TURNS In a forehand turn, the horse pivots on its
forequarters. A forehand turn should be done with forward motion, not by backing around the pivot foot. The pivot foot is the inside front foot. When doing a left forehand turn, the left front foot is the pivot foot. The nose turns to the left and the hip swings to the right. In a right forehand turn, the right front foot is the pivot foot, and the horse's nose goes right with the hip swinging left. To perform a right forehand turn correctly, the handler must move to the off side of the horse.
To teach a horse how to do a left forehand turn, follow these steps:
1. Facing the side of the horse, take the halter in the left hand to hold the head up.
2. With your right hand, touch the horse lightly about 4 inches behind the girth where the heel will act when you are mounted. At the same time, pull the horse's head slightly to the left. The horse will move its haunches to the right.
3. The left forefoot, acting as the pivot foot, may step up and down, but it should remain as nearly as possible in the same spot. The right leg must step around in front of the left.
4. Do not ask for too much of a turn to start with. Take only one or two steps, and then reward the horse by rubbing its neck. By adding a few steps at a time, the horse will eventually be able to make a complete 360-degree turn on the forehand.
To teach a right forehand turn, repeat the above steps, reversing sides and directions.
RioiNft AND SHOWING THE 4hln} KIORSE PROJECT
THIS P
UBLICATIO
N IS O
UT OF D
ATE.
For mos
t curr
ent in
formati
on:
http:/
/exten
sion.o
regon
state.
edu/c
atalog
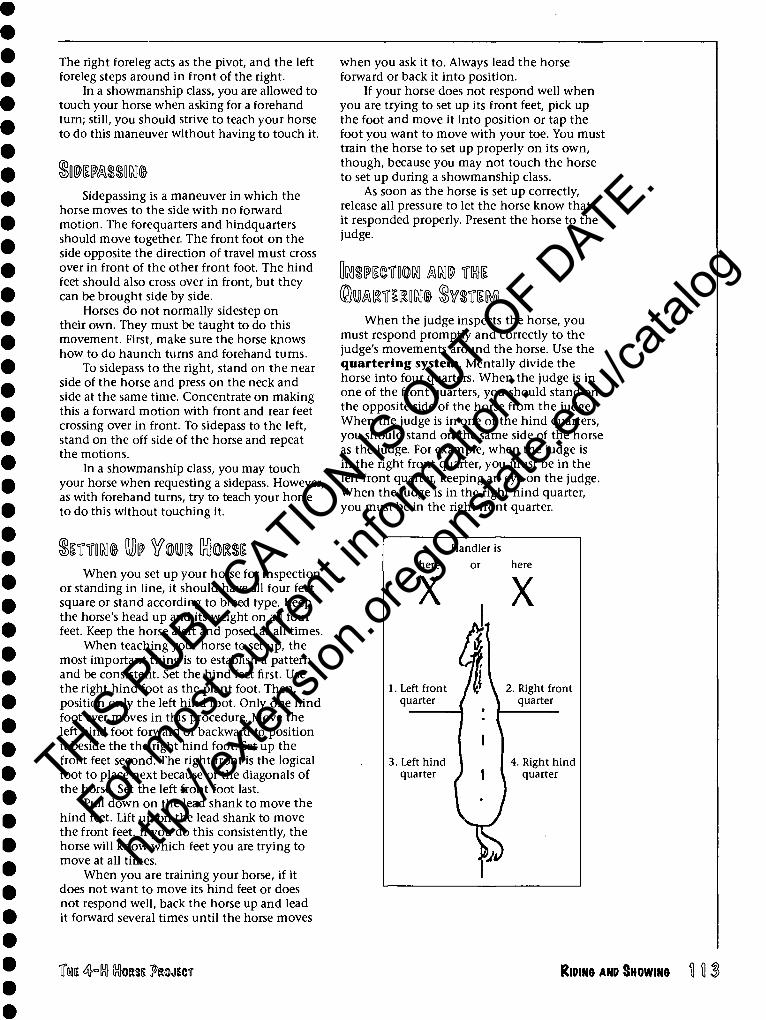
The right foreleg acts as the pivot, and the left foreleg steps around in front of the right.
In a showmanship class, you are allowed to touch your horse when asking for a forehand turn; still, you should strive to teach your horse to do this maneuver without having to touch it.
Sidepassing is a maneuver in which the horse moves to the side with no forward motion. The forequarters and hindquarters should move together. The front foot on the side opposite the direction of travel must cross over in front of the other front foot. The hind feet should also cross over in front, but they can be brought side by side.
Horses do not normally sidestep on their own. They must be taught to do this movement. First, make sure the horse knows how to do haunch turns and forehand turns.
To sidepass to the right, stand on the near side of the horse and press on the neck and side at the same time. Concentrate on making this a forward motion with front and rear feet crossing over in front. To sidepass to the left, stand on the off side of the horse and repeat the motions.
In a showmanship class, you may touch your horse when requesting a sidepass. However, as with forehand turns, try to teach your horse to do this without touching it.
kmm dDi? fm®, $®m When you set up your horse for inspection
or standing in line, it should have all four feet square or stand according to breed type. Keep the horse's head up and its weight on all four feet. Keep the horse alert and posed at all times.
When teaching your horse to set up, the most important thing is to establish a pattern and be consistent. Set the hind feet first. Use the right hind foot as the plant foot. Then, position only the left hind foot. Only one hind foot ever moves in this procedure. Move the left hind foot forward or backward to position it beside the the right hind foot. Set up the front feet second. The right front is the logical foot to place next because of the diagonals of the horse. Set the left front foot last.
Pull down on the lead shank to move the hind feet. Lift up on the lead shank to move the front feet. If you do this consistently, the horse will know which feet you are trying to move at all times.
When you are training your horse, if it does not want to move its hind feet or does not respond well, back the horse up and lead it forward several times until the horse moves
when you ask it to. Always lead the horse forward or back it into position.
If your horse does not respond well when you are trying to set up its front feet, pick up the foot and move it into position or tap the foot you want to move with your toe. You must train the horse to set up properly on its own, though, because you may not touch the horse to set up during a showmanship class.
As soon as the horse is set up correctly, release all pressure to let the horse know that it responded properly. Present the horse to the judge.
When the judge inspects the horse, you must respond promptly and correctly to the judge's movements around the horse. Use the quartering system. Mentally divide the horse into four quarters. When the judge is in one of the front quarters, you should stand on the opposite side of the horse from the judge. When the judge is in one of the hind quarters, you should stand on the same side of the horse as the judge. For example, when the judge is in the right front quarter, you must be in the left front quarter, keeping an eye on the judge. When the judge is in the right hind quarter, you must be in the right front quarter.
Handler is
here or here
X X
1 /(•' \ 2. Right front
( \ quarter 1. Left front
quarter
.)
3. Left hind quarter
4. Right hind J | quarter
I ' / 4 i)
THE 4~H Ctess FROJICT RIDINO AND SHOWING
THIS P
UBLICATIO
N IS O
UT OF D
ATE.
For mos
t curr
ent in
formati
on:
http:/
/exten
sion.o
regon
state.
edu/c
atalog
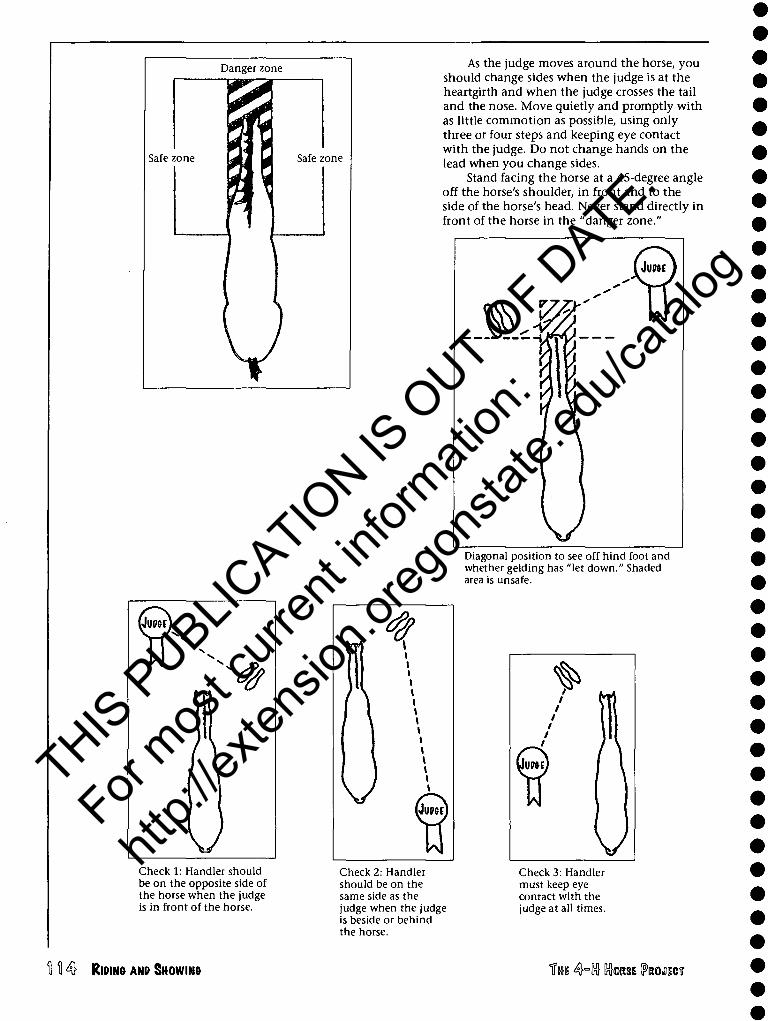
Danger zone
Safe zone Safe zone
As the judge moves around the horse, you should change sides when the judge is at the heartgirth and when the judge crosses the tail and the nose. Move quietly and promptly with as little commotion as possible, using only three or four steps and keeping eye contact with the judge. Do not change hands on the lead when you change sides.
Stand facing the horse at a 45-degree angle off the horse's shoulder, in front and to the side of the horse's head. Never stand directly in front of the horse in the "danger zone."
Diagonal position to see off hind foot and whether gelding has "let down." Shaded area is unsafe.
Check 1: Handler should be on the opposite side of the horse when the judge is in front of the horse.
Check 2: Handler should be on the same side as the judge when the judge is beside or behind the horse.
Check 3: Handler must keep eye contact with the judge at all times.
tl 4 RIDING ANP SHOWING THE 4!"=ln} Ctasi PROJECT
THIS P
UBLICATIO
N IS O
UT OF D
ATE.
For mos
t curr
ent in
formati
on:
http:/
/exten
sion.o
regon
state.
edu/c
atalog

taM£Mfl(?
Learn to read and follow patterns correctly. You must understand exactly what the judge is asking for and try to analyze what the judge is expecting. If the pattern states "Back 6 steps," that indicates the judge is probably a stickler for perfection and precision, and you need to make sure you back exactly six steps. If the pattern calls for a 180-degree haunch turn, then that is exactly what the judge is looking for. If you turn more than 180 degrees or less than 180 degrees, you will have points deducted from your score.
You must execute a pattern exactly as diagrammed. Some judges like to use cones or markers in their patterns. Make sure you are on the correct side of the cone per the drawn or spoken pattern. Getting too close to or too far from a cone disrupts a maneuver. Walking around or knocking down cones are major faults in showmanship. If the pattern calls for you to walk or trot at a cone, this means to pick up the walk or trot when the horse's front feet are even with the cone.
Think ahead, and plan out your pattern. Follow these helpful tips to prepare:
• Read the pattern aloud several times. • Draw the pattern on a sheet of paper to
help memorize it. • Walk the pattern without the horse and
physically do the required maneuvers. • Look to see where cones (or other
markers) are set up in the arena, and visualize where the horse must be in relation to them during the pattern.
• Watch other people do the pattern (but be sure you know whether they are doing it correctly).
See the sample Showmanship pattern on the next page.
(km, IPmmmM m \lwmmm
The class procedure and scoring are well defined in the 4-H Horse Contest Guide (PNW 574).
All judges have similar expectations. They look for contestants who have "done their homework" and are able to do all maneuvers and other requested elements properly. Straight lines are extremely important. Horses should travel and set up straight. Crooked lines detract from the performance.
Remember these showmanship pointers: • Show 100 percent of the time you are in
the arena. • Pay attention at all times. • Do not allow your horse to rest a foot. • Demonstrate a positive attitude. • If you have a nervous or fractious horse,
move to the end of the line so you do not interfere with other horses in the class.
• Maintain proper etiquette at all times in the show ring.
• Practice ahead of time. By learning all the basic showmanship maneuvers, you will be able to perform to your best potential.
THE 4=lnl KIORSI IPRCMECT RIPIN6 AND SHOWING
THIS P
UBLICATIO
N IS O
UT OF D
ATE.
For mos
t curr
ent in
formati
on:
http:/
/exten
sion.o
regon
state.
edu/c
atalog
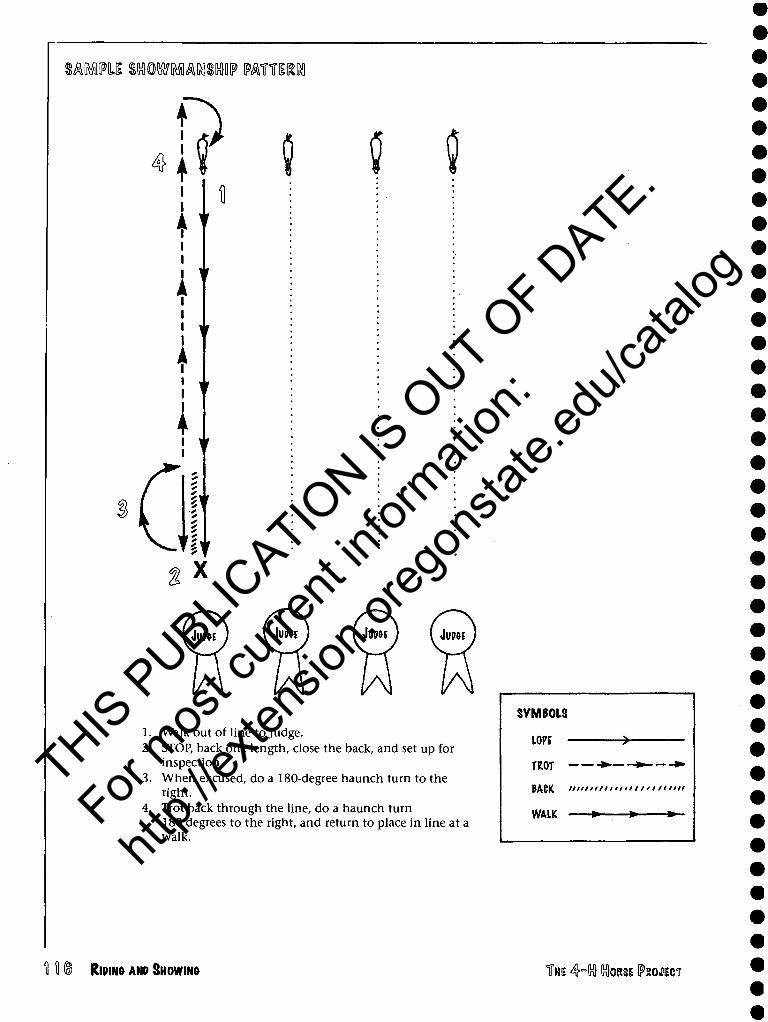
MBmiE WWRMIMDIP PATTERM
1. Walk out of line to Judge. 2. STOP, back one length, close the back, and set up for
inspection. 3. When excused, do a 180-degree haunch turn to the
right. 4. Trot back through the line, do a haunch turn
180 degrees to the right, and return to place in line at a walk.
SYMBOLS
LOPE -
TROT -
JACK litimntii ii 11 'I fiitu
WALK
RIPIM AND SHOWING THE 4-ln} Ctei PROJECT
THIS P
UBLICATIO
N IS O
UT OF D
ATE.
For mos
t curr
ent in
formati
on:
http:/
/exten
sion.o
regon
state.
edu/c
atalog
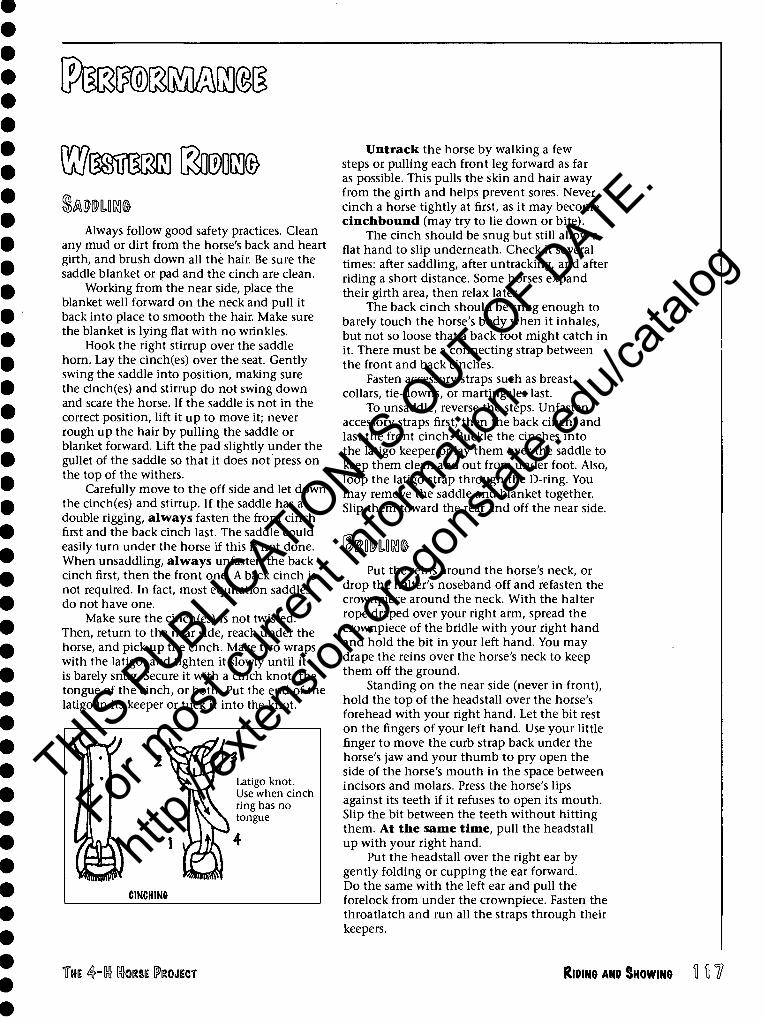
CyiMfiMa \Mm
Always follow good safety practices. Clean any mud or dirt from the horse's back and heart girth, and brush down all the hair. Be sure the saddle blanket or pad and the cinch are clean.
Working from the near side, place the blanket well forward on the neck and pull it back into place to smooth the hair. Make sure the blanket is lying flat with no wrinkles.
Hook the right stirrup over the saddle horn. Lay the cinch(es) over the seat. Gently swing the saddle into position, making sure the cinch(es) and stirrup do not swing down and scare the horse. If the saddle is not in the correct position, lift it up to move it; never rough up the hair by pulling the saddle or blanket forward. Lift the pad slightly under the gullet of the saddle so that it does not press on the top of the withers.
Carefully move to the off side and let down the cinch(es) and stirrup. If the saddle has a double rigging, always fasten the front cinch first and the back cinch last. The saddle could easily turn under the horse if this is not done. When unsaddling, always unfasten the back cinch first, then the front one. A back cinch is not required. In fact, most equitation saddles do not have one.
Make sure the cinch(es) is not twisted. Then, return to the near side, reach under the horse, and pick up the cinch. Make two wraps with the latigo, and tighten it slowly until it is barely snug. Secure it with a cinch knot, the tongue of the cinch, or both. Put the end of the latigo in its keeper or tuck it into the knot.
Latigo knot. Use when cinch ring has no tongue
mmm
Untrack the horse by walking a few steps or pulling each front leg forward as far as possible. This pulls the skin and hair away from the girth and helps prevent sores. Never cinch a horse tightly at first, as it may become cinchbound (may try to lie down or bite).
The cinch should be snug but still allow a flat hand to slip underneath. Check it several times: after saddling, after untracking, and after riding a short distance. Some horses expand their girth area, then relax later.
The back cinch should be snug enough to barely touch the horse's body when it inhales, but not so loose that a back foot might catch in it. There must be a connecting strap between the front and back cinches.
Fasten accessory straps such as breast collars, tie-downs, or martingales last.
To unsaddle, reverse the steps. Unfasten accessory straps first, then the back cinch, and last the front cinch. Buckle the cinches into the latigo keeper or lay them over the saddle to keep them clean and out from under foot. Also, loop the latigo strap through the D-ring. You may remove the saddle and blanket together. Slip them toward the rear and off the near side.
HmmM Put the reins around the horse's neck, or
drop the halter's noseband off and refasten the crownpiece around the neck. With the halter rope draped over your right arm, spread the crownpiece of the bridle with your right hand and hold the bit in your left hand. You may drape the reins over the horse's neck to keep them off the ground.
Standing on the near side (never in front), hold the top of the headstall over the horse's forehead with your right hand. Let the bit rest on the fingers of your left hand. Use your little finger to move the curb strap back under the horse's jaw and your thumb to pry open the side of the horse's mouth in the space between incisors and molars. Press the horse's lips against its teeth if it refuses to open its mouth. Slip the bit between the teeth without hitting them. At the same time, pull the headstall up with your right hand.
Put the headstall over the right ear by gently folding or cupping the ear forward. Do the same with the left ear and pull the forelock from under the crownpiece. Fasten the throatlatch and run all the straps through their keepers.
THE 4=115 MORSE I^ROJIICT RIDING ANP SHOWING 7
THIS P
UBLICATIO
N IS O
UT OF D
ATE.
For mos
t curr
ent in
formati
on:
http:/
/exten
sion.o
regon
state.
edu/c
atalog
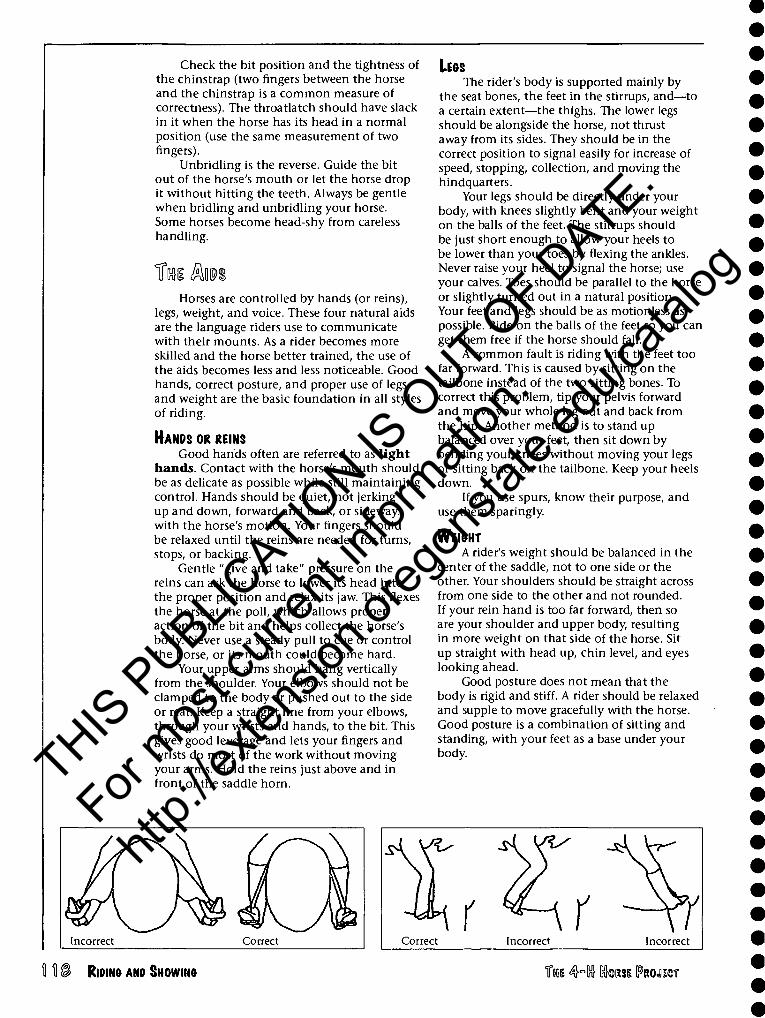
Check the bit position and the tightness of the chinstrap (two fingers between the horse and the chinstrap is a common measure of correctness). The throatlatch should have slack in it when the horse has its head in a normal position (use the same measurement of two fingers).
Unbridling is the reverse. Guide the bit out of the horse's mouth or let the horse drop it without hitting the teeth. Always be gentle when bridling and unbridling your horse. Some horses become head-shy from careless handling.
TTKHS /km Horses are controlled by hands (or reins),
legs, weight, and voice. These four natural aids are the language riders use to communicate with their mounts. As a rider becomes more skilled and the horse better trained, the use of the aids becomes less and less noticeable. Good hands, correct posture, and proper use of legs and weight are the basic foundation in all styles of riding.
HANDS OR REINS Good hands often are referred to as light
hands. Contact with the horse's mouth should be as delicate as possible while still maintaining control. Hands should be quiet, not jerking up and down, forward and back, or sideways with the horse's motion. Your fingers should be relaxed until the reins are needed for turns, stops, or backing.
Gentle "give and take" pressure on the reins can ask the horse to lower its head into the proper position and relax its jaw. This flexes the horse at the poll, which allows proper action of the bit and helps collect the horse's body. Never use a steady pull to cue or control the horse, or its mouth could become hard.
Your upper arms should hang vertically from the shoulder. Your elbows should not be clamped to the body or pushed out to the side or rear. Keep a straight line from your elbows, through your wrists and hands, to the bit. This gives good leverage and lets your fingers and wrists do most of the work without moving your arms. Hold the reins just above and in front of the saddle horn.
LESS The rider's body is supported mainly by
the seat bones, the feet in the stirrups, and—to a certain extent—the thighs. The lower legs should be alongside the horse, not thrust away from its sides. They should be in the correct position to signal easily for increase of speed, stopping, collection, and moving the hindquarters.
Your legs should be directly under your body, with knees slightly bent and your weight on the balls of the feet. The stirrups should be just short enough to allow your heels to be lower than your toes by flexing the ankles. Never raise your heel to signal the horse; use your calves. Toes should be parallel to the horse or slightly turned out in a natural position. Your feet and legs should be as motionless as possible. Ride on the balls of the feet so you can get them free if the horse should fall.
A common fault is riding with the feet too far forward. This is caused by sitting on the tailbone instead of the two sitting bones. To correct this problem, tip your pelvis forward and move your whole leg out and back from the hip. Another method is to stand up balanced over your feet, then sit down by bending your knees without moving your legs or sitting back on the tailbone. Keep your heels down.
If you use spurs, know their purpose, and use them sparingly.
WEI&HT A rider's weight should be balanced in the
center of the saddle, not to one side or the other. Your shoulders should be straight across from one side to the other and not rounded. If your rein hand is too far forward, then so are your shoulder and upper body, resulting in more weight on that side of the horse. Sit up straight with head up, chin level, and eyes looking ahead.
Good posture does not mean that the body is rigid and stiff. A rider should be relaxed and supple to move gracefully with the horse. Good posture is a combination of sitting and standing, with your feet as a base under your body.
Incorrect Correct Correct Incorrect Incorrect
RIDIN& AND SHOWING THE 4°ln} Ctasi [PROJECT
THIS P
UBLICATIO
N IS O
UT OF D
ATE.
For mos
t curr
ent in
formati
on:
http:/
/exten
sion.o
regon
state.
edu/c
atalog
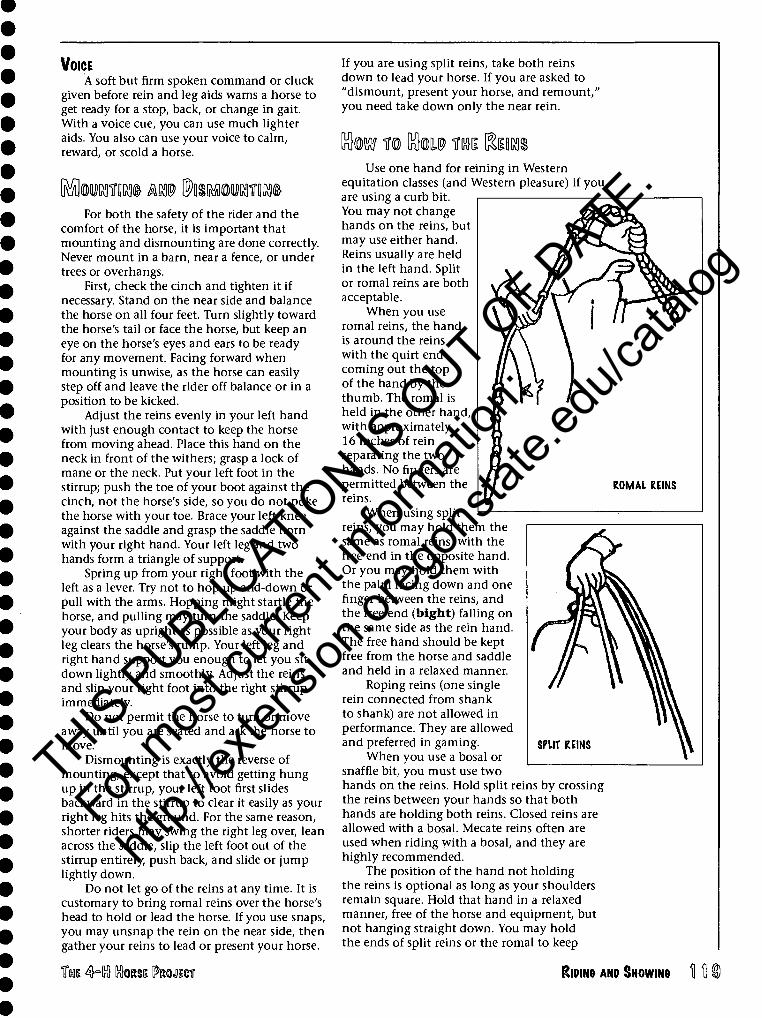
VOICE A soft but firm spoken command or cluck
given before rein and leg aids warns a horse to get ready for a stop, back, or change in gait. With a voice cue, you can use much lighter aids. You also can use your voice to calm, reward, or scold a horse.
For both the safety of the rider and the comfort of the horse, it is important that mounting and dismounting are done correctly. Never mount in a barn, near a fence, or under trees or overhangs.
First, check the cinch and tighten it if necessary. Stand on the near side and balance the horse on all four feet. Turn slightly toward the horse's tail or face the horse, but keep an eye on the horse's eyes and ears to be ready for any movement. Facing forward when mounting is unwise, as the horse can easily step off and leave the rider off balance or in a position to be kicked.
Adjust the reins evenly in your left hand with just enough contact to keep the horse from moving ahead. Place this hand on the neck in front of the withers; grasp a lock of mane or the neck. Put your left foot in the stirrup; push the toe of your boot against the cinch, not the horse's side, so you do not poke the horse with your toe. Brace your left knee against the saddle and grasp the saddle horn with your right hand. Your left leg and two hands form a triangle of support.
Spring up from your right foot with the left as a lever. Try not to hop up-and-down or pull with the arms. Hopping might startle the horse, and pulling may turn the saddle. Keep your body as upright as possible as your right leg clears the horse's rump. Your left leg and right hand support you enough to let you sit down lightly and smoothly. Adjust the reins and slip your right foot into the right stirrup immediately.
Do not permit the horse to turn or move away until you are seated and ask the horse to move.
Dismounting is exactly the reverse of mounting, except that to avoid getting hung up in the stirrup, your left foot first slides backward in the stirrup to clear it easily as your right leg hits the ground. For the same reason, shorter riders may swing the right leg over, lean across the saddle, slip the left foot out of the stirrup entirely, push back, and slide or jump lightly down.
Do not let go of the reins at any time. It is customary to bring romal reins over the horse's head to hold or lead the horse. If you use snaps, you may unsnap the rein on the near side, then gather your reins to lead or present your horse.
If you are using split reins, take both reins down to lead your horse. If you are asked to "dismount, present your horse, and remount," you need take down only the near rein.
Use one hand for reining in Western equitation classes (and Western pleasure) if you are using a curb bit. You may not change hands on the reins, but may use either hand. Reins usually are held in the left hand. Split or romal reins are both acceptable.
When you use romal reins, the hand is around the reins with the quirt end coming out the top of the hand by the thumb. The romal is held in the other hand, with approximately 16 inches of rein separating the two hands. No fingers are permitted between the reins.
When using split reins, you may hold them the same as romal reins, with the free end in the opposite hand. Or you may hold them with the palm facing down and one finger between the reins, and the free end (bight) falling on the same side as the rein hand. The free hand should be kept free from the horse and saddle and held in a relaxed manner.
Roping reins (one single rein connected from shank to shank) are not allowed in performance. They are allowed and preferred in gaming.
When you use a bosal or snaffle bit, you must use two hands on the reins. Hold split reins by crossing the reins between your hands so that both hands are holding both reins. Closed reins are allowed with a bosal. Mecate reins often are used when riding with a bosal, and they are highly recommended.
The position of the hand not holding the reins is optional as long as your shoulders remain square. Hold that hand in a relaxed manner, free of the horse and equipment, but not hanging straight down. You may hold the ends of split reins or the romal to keep
TME &$ GtasE Wmm RIDING ANP SHOWING
THIS P
UBLICATIO
N IS O
UT OF D
ATE.
For mos
t curr
ent in
formati
on:
http:/
/exten
sion.o
regon
state.
edu/c
atalog
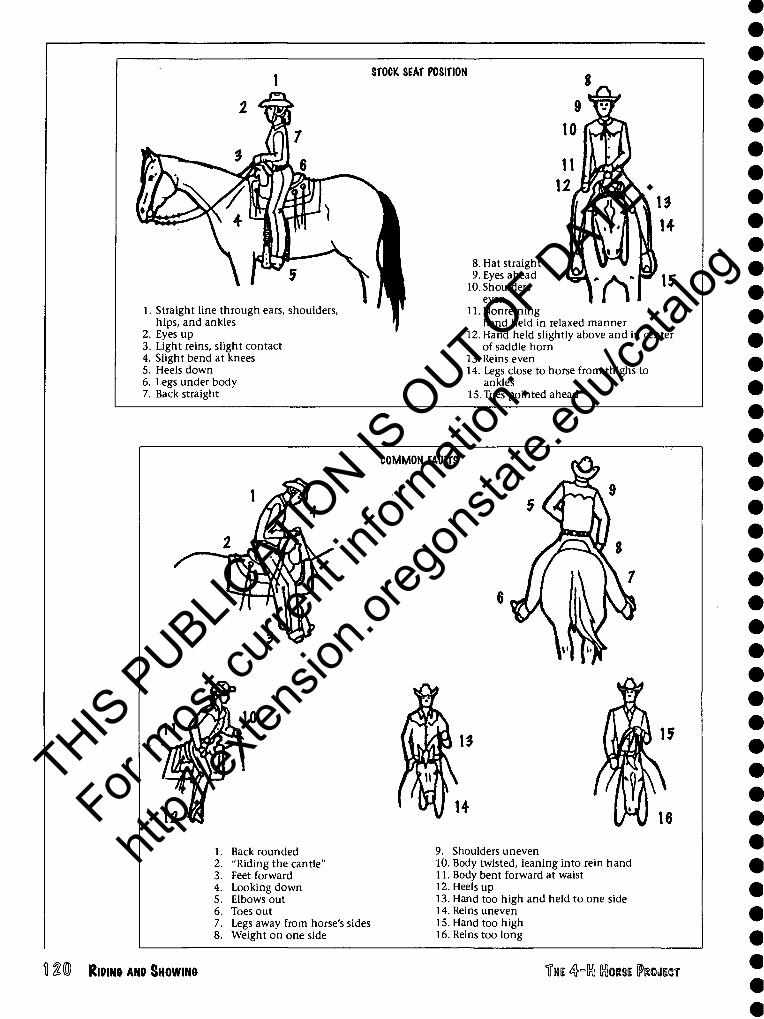
1 STOCK SEAT POSITION s 1 A ̂ 3
if 17 10 (C
ivty
ml' W ^^^^^ ^t£ W V ii 'J lr/\l
SHI 7 ) N ur) fflvA 15
4^ ar | Ml m 14
\F •W"3 -s ,. VH 8. Hat straight 1 y 3 \ / b Ys ]^A y. Eyes ahead
1 I^B 10. Shoulders 1 I^W even
(b^ -rvr ^15 1. Straight line through ears, shoulders, ' ■' ll.Nonreining
hips, and ankles T hand held in relaxed manner 2. Eyes up 12. Hand held slightly above and in center 3. Light reins, s ight contact of saddle horn 4. Slight bend at knees 13. Reins even 5. Heels down 14. Legs close to horse from thighs to 6. Legs under body ankles 7. Back straight 15. Toes pointed ahead
COMMON FAULTS
1. Back rounded 2. "Riding the cantle" 3. Feet forward 4. Looking down 5. Elbows out 6. Toes out 7. Legs away from horse's sides 8. Weight on one side
9. Shoulders uneven 10. Body twisted, leaning into rein hand 11. Body bent forward at waist 12. Heels up 13. Hand too high and held to one side 14. Reins uneven 15. Hand too high 16. Reins too long
RlDINft ANP SHOWIM fHI 4°ln} InlOBSE [PRWICT
THIS P
UBLICATIO
N IS O
UT OF D
ATE.
For mos
t curr
ent in
formati
on:
http:/
/exten
sion.o
regon
state.
edu/c
atalog
them from swinging and to adjust the length of the reins. Placing the hand on your thigh is acceptable. Your hands should not be right next to each other, as you don't ever want it to appear that you have two hands on the reins.
fcTsra Qzhm
WALK The walk is a four-beat gait, with the
horse's feet hitting the ground one at a time. Collect the horse by lightly picking up the
reins and making contact with the bit. At the same time, squeeze lightly with the thighs, but do not let the horse move forward. With the horse brought to attention this way, use relatively light pressure with the calves of your legs to move it into a walk. Release the bit contact if the horse has been trained to go on a looser rein, but never let the reins hang slack. Follow the movements of the horse's head with your hand.
Encourage the horse to walk freely. Do not peck at the horse with your heels; your feet should be as motionless as possible. Flex at the waist to absorb the horse's motion in your lower body.
Jo& Jog is the term used in Western riding
for a slow trot. A trot is a two-beat gait with diagonals (opposite corner legs) moving as a pair, striking the ground at the same time.
Collect the horse at the halt or walk and use more leg pressure to go. forward at the jog. You may use a voice command or cluck first, depending on the horse. Adjust the rein tension to allow the horse to move forward at the desired pace.
Lean your body weight slightly forward from the hips as an additional aid, but come back to an erect position for a jog. Keep enough weight on your feet to absorb the motion in your ankles. Also relax the seat muscles, so the sitting bones follow the slight side-to-side motion.
In a fast jog, the horse is asked to increase the speed and frequency of its steps. In an extended jog, the horse noticeably extends the length of its stride without increasing the frequency of its steps.
In Western riding, as the speed of the jog increases, lean slightly forward, keeping contact with your thighs. Put more weight in the stirrups and keep your heels down to absorb the impact in the ankles, knees, and thighs. Bring the seat slightly out of the saddle, rising slightly forward on your thighs, moving with the horse's motion.
lOPE The lope is a three-beat gait. One rear foot
hits the ground followed by the other rear foot and the diagonal front foot. Then the other front foot hits the ground. Lope is the term used in Western riding for a canter. During the lope (or at a faster gait, the gallop), the horse goes forward in a series of leaps. As it lopes, the horse's body is turned at a slight angle to the direction it is traveling.
In a circle, horses naturally lope on the inside lead. If the rider simply collects the horse and uses stronger leg pressure than is required for the trot, the horse will lope on either the right or left lead. The rider must guide the horse's body into the correct angle for the lead, using the reins and legs.
For the left lead, collect the horse at the walk and lift its head slightly to lighten the forehand. Do not lean forward. To angle the horse's body, move your right leg back a few inches and push the hindquarters slightly to the left. Follow instantly with enough pressure to push the horse forward into the bit, but do not allow it to speed up. At the same time, your left leg should put pressure at the cinch to increase forward motion. Your body weight should be nearly centered, with a slight shift to the right (outside) sitting bone. This lightens the left forequarter.
The horse should begin to lope from the walk without trotting. It may be necessary to rein the horse slightly to the right to help pick up the lead. Straighten the horse's head as soon as it picks up the lead.
Reverse the aids for the right lead. Your hands and arms should be relaxed
enough to move with the horse's head. Locked arms tend to make a rider rock forward and back in the saddle. Rigid posture is another cause of rocking. Your back must be supple at the waist.
With practice and experience, a rider can feel whether or not the horse is on the correct lead. When the horse's body is angled away from the leading side, the saddle moves forward in a slight spiral, and the rider's leg on the leading side is pushed ahead. For example, when the horse is on the left lead, the rider's left leg tends to move ahead.
Another way to check is to glance down, without tipping your head, at the horse's leading shoulder, which naturally moves forward. (Do not lean over to look.)
Left to itself, a horse often develops the habit of using one lead most of the time. It may refuse to take the unaccustomed lead entirely. Ask for a specific lead even on a pleasure ride to avoid this problem. Using both leads also relieves strain on the horse's legs.
The counter canter (the horse leading with the outside leg in a circle, or the outside
THI 4hln} frtasE IPRWICT RIPIM AND SHOWING
THIS P
UBLICATIO
N IS O
UT OF D
ATE.
For mos
t curr
ent in
formati
on:
http:/
/exten
sion.o
regon
state.
edu/c
atalog
lead) is a good exercise to test the horse's obedience and improve its balance.
Lead changes More advanced horses and riders may wish
to try making smooth changes from one lead to the other. The easiest method is to drop to a walk or trot and immediately pick up the opposite lead. This is a simple change. Try to take as few steps as possible between leads.
Another technique is the interrupted change. Bring the horse to a complete halt, and immediately apply the correct aid to take the lope on the opposite lead. There should be no walking or trotting steps.
The third type of change is the flying lead change. The horse must change front and rear leads without dropping to a trot or walk. If the horse misses the rear lead, it is called cross-centering, cross-firing, cross- leading, or disunited.
When compared to an equal pattern using an alternate change, credit is given for a good flying change. However, a simple or interrupted change with no mistakes is better than a flying lead change done poorly.
A good stop at every speed requires a definite set of aids to prepare the horse. Give the voice command "Whoa" first. Fix your hands in one position to set up a barrier with the bit. Then, push the horse into the bit by squeezing the legs.
Sit deep, nearly on the tailbone, without leaning forward or back, to absorb the shock and avoid being jerked forward. Grip with your thighs and put more weight on your heels to keep them low and underneath the body. Do not shove your legs forward, as this pushes your weight back on the horse's hindquarters and makes a good stop more difficult.
The horse should be trained to stop immediately when the reins apply pressure. Relax the pressure on the bit once the horse has stopped, but maintain contact.
To back, give the horse a signal to move by squeezing with your thighs. At the same time, create a barrier with the bit by setting your hand(s). The horse cannot move forward, so it backs. Relax the pressure on the bit as soon as the horse starts to back.
Troc Turning requires a combination of reins,
leg, and weight. If the horse neckreins (turns with one hand on the reins), lay the outside rein against the horse's neck in front of the withers without pulling on the bit. Move your hand as little as possible, and try not to reach
across the neck. Your outside leg should press against the horse's side to help push it into the turn. Your weight should stay upright in the center of the saddle.
If you are riding with two hands on the reins, pull the direct (inside) rein in the direction of the turn as lightly as possible. Two hands are not used with a Western curb bit. Move your hand back toward your body, not to the outside. Loosen the outside rein slightly and lay it against the horse's neck. Your legs and weight work the same way as in neck reining.
The indirect rein aid is used to move the horse's weight from one front shoulder to the other, bending only the head and neck. The rein makes a line from the inner side of the bit, across the front of the withers, to the rider's opposite hip. One use for the indirect rein is to keep the horse from cutting corners, while still bending properly in the corners.
fcTm ^lEASIURE Western Pleasure is an event judged on
a horse's ability to be a pleasure to ride. To be a pleasure to ride, a horse must be broke and quiet, soft and smooth, and go with little restraint. In addition, the horse must meet the requirements of the class.
Western Pleasure—Pleasure Type and Pony Western Pleasure are class divisions and not separate events.
CLASS ROUTINE Contestants show their horses at a walk,
jog, and lope. They are worked both ways of the ring at all gaits. Horses may be asked for an extended jog. The order to reverse is executed by turning away from the rail. Riders should not be asked to reverse at the lope. After rail work is complete, entries line up as directed. Riders usually are asked to back.
SCORING PROCEPURE Horses are judged on manners, performance,
and suitability to give a pleasurable ride. A good pleasure horse has a stride of reasonable length in keeping with its conformation. The horse has enough cushion to its pastern to give the rider a pleasant, smooth ride. The horse carries its head in a natural position, not high and over flexed at the poll, or low with the nose out or over-flexed. The horse should be relaxed but alert and ready to respond to the rider's commands without excessive cueing. When asked to extend the jog/jog-trot, the horse moves out with the same smooth way of going.
Faults • Nervous at walk • Jogging during walk
RIPING AND SHOWING THE 4-U tass IPROJICT
THIS P
UBLICATIO
N IS O
UT OF D
ATE.
For mos
t curr
ent in
formati
on:
http:/
/exten
sion.o
regon
state.
edu/c
atalog
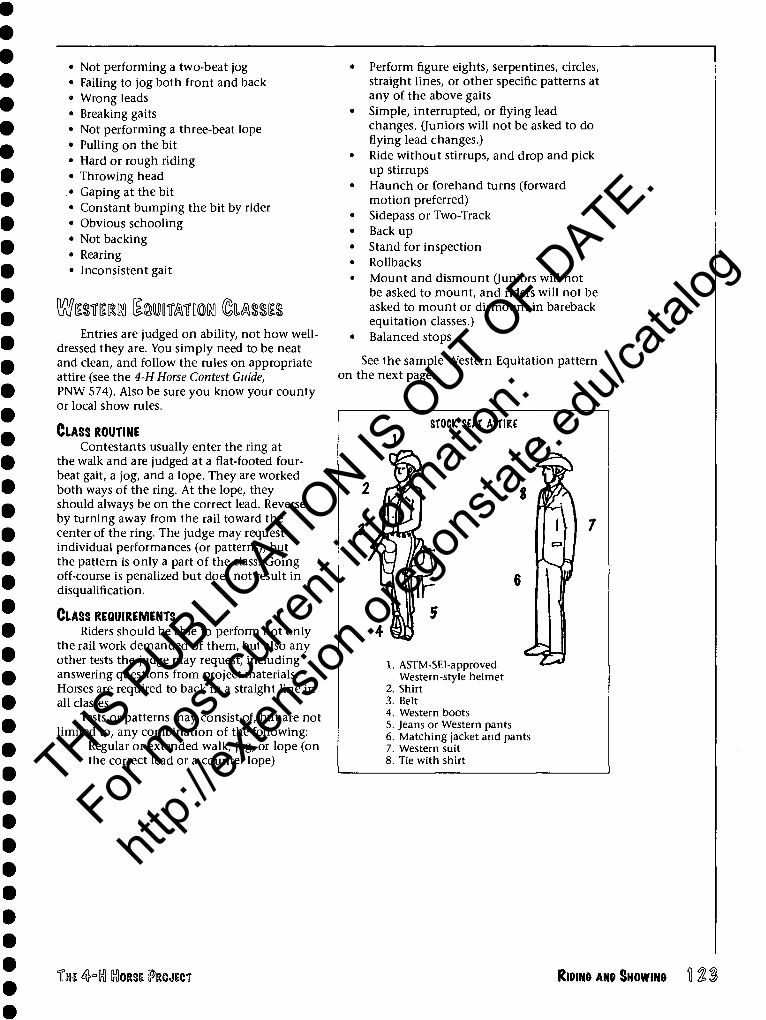
Not performing a two-beat jog Failing to jog both front and back Wrong leads Breaking gaits Not performing a three-beat lope Pulling on the bit Hard or rough riding Throwing head Gaping at the bit Constant bumping the bit by rider Obvious schooling Not backing Rearing Inconsistent gait
Entries are judged on ability, not how well- dressed they are. You simply need to be neat and clean, and follow the rules on appropriate attire (see the 4-H Horse Contest Guide, PNW 574). Also be sure you know your county or local show rules.
CLASS ROUTINE Contestants usually enter the ring at
the walk and are judged at a flat-footed four- beat gait, a jog, and a lope. They are worked both ways of the ring. At the lope, they should always be on the correct lead. Reverse by turning away from the rail toward the center of the ring. The judge may request individual performances (or patterns), but the pattern is only a part of the class. Going off-course is penalized but does not result in disqualification.
CLASS REQUIREMENTS Riders should be able to perform not only
the rail work demanded of them, but also any other tests the judge may request, including answering questions from project materials. Horses are required to back in a straight line in all classes.
Tests or patterns may consist of, but are not limited to, any combination of the following:
• Regular or extended walk, jog, or lope (on the correct lead or a counter lope)
• Perform figure eights, serpentines, circles, straight lines, or other specific patterns at any of the above gaits
• Simple, interrupted, or flying lead changes. (Juniors will not be asked to do flying lead changes.)
• Ride without stirrups, and drop and pick up stirrups
• Haunch or forehand turns (forward motion preferred)
• Sidepass or Two-Track • Back up • Stand for inspection • Rollbacks • Mount and dismount (Juniors will not
be asked to mount, and riders will not be asked to mount or dismount in bareback equitation classes.)
• Balanced stops
See the sample Western Equitation pattern on the next page.
STOCK SEAT ATTIRE
Q^\ ^ \
;1 ■ % d
7
E [W 6 1 1
M 5 ■
4J m ■>
1. ASTM-SEI-approved £3 Western-style helmet
2. Shirt 3. Belt 4. Western boots 5. Jeans or Western pants 6. Matching jacket and pants 7. Western suit 8. Tie with shirt
TBS 4hlnl HORSI IFROJICT R101N& ANP SHOWING
THIS P
UBLICATIO
N IS O
UT OF D
ATE.
For mos
t curr
ent in
formati
on:
http:/
/exten
sion.o
regon
state.
edu/c
atalog

$mm wsmm EQiuumiriioM mmm
r>i__ ,— ^ ^_
START
8 ■ 5 8 M ft UNE
1. 90-degree right forehand turn 2. Jogtrot 3. Lope—left lead 4. Optional change to right lead 5. STOP 6. 90-degree right haunch turn 7. Extended trot 8. STOP 9. Back two lengths and close
SYMBOLS
10PE >-
m —*.--♦- *■
SACK t'>/nn/iiiiiiiiiiiiiii
WAIK * * ^
IQ KioiNe AND SHOWING THE ^K KIORSI IPROJIECT
THIS P
UBLICATIO
N IS O
UT OF D
ATE.
For mos
t curr
ent in
formati
on:
http:/
/exten
sion.o
regon
state.
edu/c
atalog
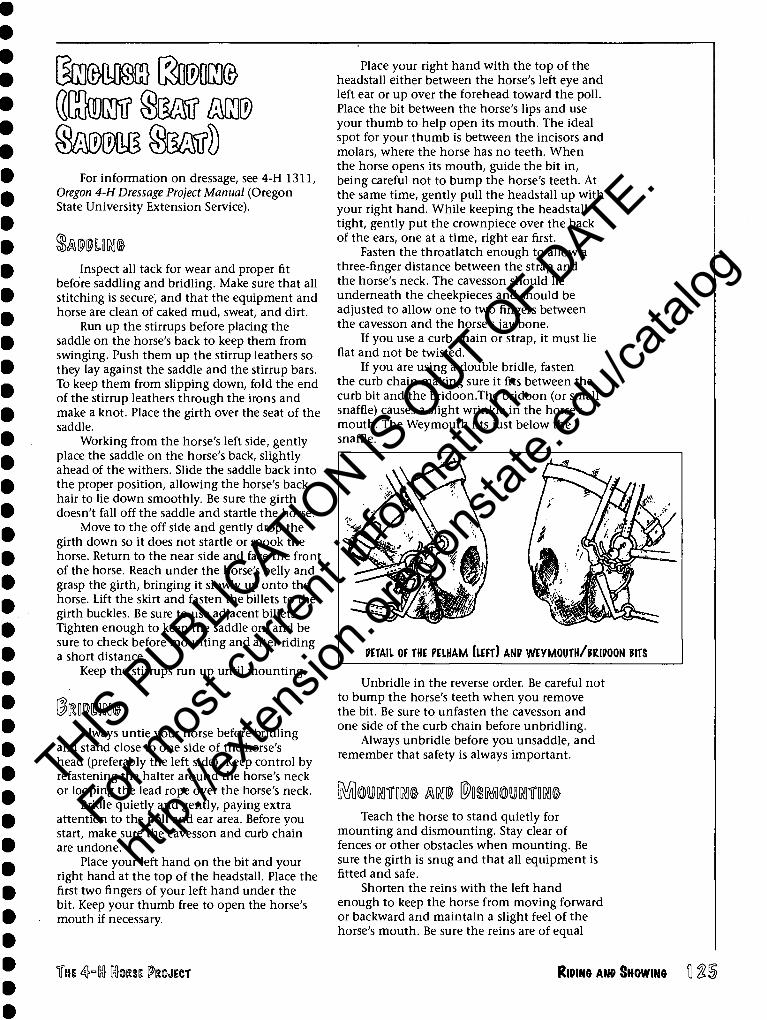
(iCtor tar m For information on dressage, see 4-H 1311,
Oregon 4-H Dressage Project Manual (Oregon State University Extension Service).
Inspect all tack for wear and proper fit before saddling and bridling. Make sure that all stitching is secure, and that the equipment and horse are clean of caked mud, sweat, and dirt.
Run up the stirrups before placing the saddle on the horse's back to keep them from swinging. Push them up the stirrup leathers so they lay against the saddle and the stirrup bars. To keep them from slipping down, fold the end of the stirrup leathers through the irons and make a knot. Place the girth over the seat of the saddle.
Working from the horse's left side, gently place the saddle on the horse's back, slightly ahead of the withers. Slide the saddle back into the proper position, allowing the horse's back hair to lie down smoothly. Be sure the girth doesn't fall off the saddle and startle the horse.
Move to the off side and gently drop the girth down so it does not startle or spook the horse. Return to the near side and face the front of the horse. Reach under the horse's belly and grasp the girth, bringing it slowly up onto the horse. Lift the skirt and fasten the billets to the girth buckles. Be sure to use adjacent billets. Tighten enough to keep the saddle on, and be sure to check before mounting and after riding a short distance.
Keep the stirrups run up until mounting.
Icmiw Always untie your horse before bridling
and stand close to one side of the horse's head (preferably the left side). Keep control by refastening the halter around the horse's neck or looping the lead rope over the horse's neck.
Bridle quietly and gently, paying extra attention to the poll and ear area. Before you start, make sure the cavesson and curb chain are undone.
Place your left hand on the bit and your right hand at the top of the headstall. Place the first two fingers of your left hand under the bit. Keep your thumb free to open the horse's mouth if necessary.
Place your right hand with the top of the headstall either between the horse's left eye and left ear or up over the forehead toward the poll. Place the bit between the horse's lips and use your thumb to help open its mouth. The ideal spot for your thumb is between the incisors and molars, where the horse has no teeth. When the horse opens its mouth, guide the bit in, being careful not to bump the horse's teeth. At the same time, gently pull the headstall up with your right hand. While keeping the headstall tight, gently put the crownpiece over the back of the ears, one at a time, right ear first.
Fasten the throatlatch enough to allow a three-finger distance between the strap and the horse's neck. The cavesson should lie underneath the cheekpieces and should be adjusted to allow one to two fingers between the cavesson and the horse's jawbone.
If you use a curb chain or strap, it must lie flat and not be twisted.
If you are using a double bridle, fasten the curb chain making sure it fits between the curb bit and the bridoon.The bridoon (or small snaffle) causes a slight wrinkle in the horse's mouth. The Weymouth fits just below the snaffle.
Unbridle in the reverse order. Be careful not to bump the horse's teeth when you remove the bit. Be sure to unfasten the cavesson and one side of the curb chain before unbridling.
Always unbridle before you unsaddle, and remember that safety is always important.
Teach the horse to stand quietly for mounting and dismounting. Stay clear of fences or other obstacles when mounting. Be sure the girth is snug and that all equipment is fitted and safe.
Shorten the reins with the left hand enough to keep the horse from moving forward or backward and maintain a slight feel of the horse's mouth. Be sure the reins are of equal
THE 4HK1 MORSE [PROJECT RIDING ANP SHOWIM
THIS P
UBLICATIO
N IS O
UT OF D
ATE.
For mos
t curr
ent in
formati
on:
http:/
/exten
sion.o
regon
state.
edu/c
atalog
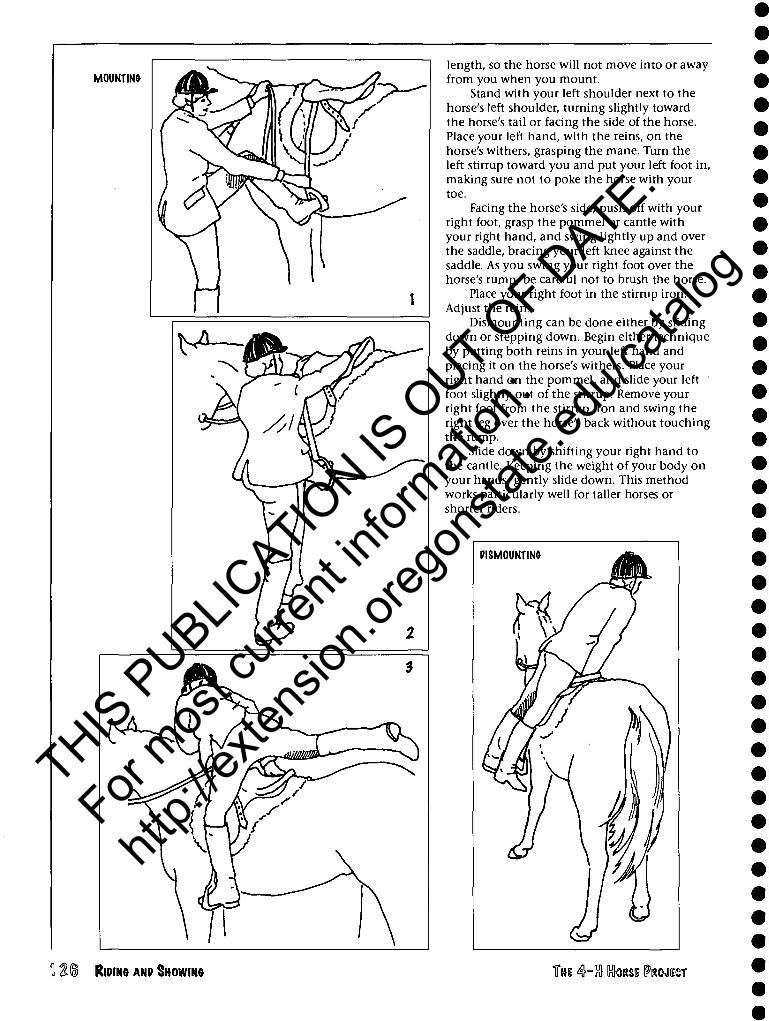
MOUNTING length, so the horse will not move into or away from you when you mount.
Stand with your left shoulder next to the horse's left shoulder, turning slightly toward the horse's tail or facing the side of the horse. Place your left hand, with the reins, on the horse's withers, grasping the mane. Turn the left stirrup toward you and put your left foot in, making sure not to poke the horse with your toe.
Facing the horse's side, push off with your right foot, grasp the pommel or cantle with your right hand, and swing lightly up and over the saddle, bracing your left knee against the saddle. As you swing your right foot over the horse's rump, be careful not to brush the horse.
Place your right foot in the stirrup iron. Adjust the reins.
Dismounting can be done either by sliding down or stepping down. Begin either technique by putting both reins in your left hand and placing it on the horse's withers. Place your right hand on the pommel, and slide your left foot slightly out of the stirrup. Remove your right foot from the stirrup iron and swing the right leg over the horse's back without touching the rump.
Slide down by shifting your right hand to the cantle. Keeping the weight of your body on your hands, gently slide down. This method works particularly well for taller horses or shorter riders.
RIDING ANP SHOWING THE Q-U KORSE 9mm
THIS P
UBLICATIO
N IS O
UT OF D
ATE.
For mos
t curr
ent in
formati
on:
http:/
/exten
sion.o
regon
state.
edu/c
atalog

To step down, continue the motion of the right leg swinging over the horse's rump. Step down, reversing the order of mounting. For safety, be sure you slide your left foot slightly out of its iron before you begin dismounting.
After dismounting, always run the stirrups up the leathers and lead the horse after the reins are brought over the horse's head. With a double bridle, it is safest to lead with the snaffle rein and keep the curb rein over the horse's neck.
^preiSMd «[lire {mmm w m mmm m mm
When using single reins, as with a snaffle or kimberwicke, the rein goes between the ring finger and the little finger.
When using double reins, as with the pelham or double bridle, you need to know the correct procedure for addressing the reins. Let the reins hang evenly over the horse's withers with the snaffle rein buckle on top of the curb rein buckle.
1. Take up all four reins at the buckle in your right hand and hold them about 6 inches above the withers.
2. From the front, while keeping the reins in your right hand, insert all four reins between the fingers of your left hand and slide it down to the horse's neck. The little finger is between the left snaffle and left curb rein, ring finger between the left curb and right curb reins, middle finger between the right curb and right snaffle reins, and first finger on the outside of the right snaffle. The thumb is on the outside of the left snaffle rein.
3. Release the reins from your right hand and reach down to take up the right reins, drawing the bight of the reins up until you make contact with the horse's mouth. Separate the curb and snaffle with your little finger, snaffle on the outside.
4. Release the right reins from your left hand. Keep your thumbs on the reins to prevent slipping. Drop the bight to the off side.
When mounting, address the reins as in step 2 with the reins in your left hand, and then gather and address the reins after mounting.
I oft- /-nrH Iff /l^-
/Oil 77 /J ^^-_ [/ //t—Right snaffle ^
Sj /// KignlcuiU
I i PICKING UP REINS
Snaffle rein
— Curb rein
CORRECT "A" POSITION
Bight of reins
INCORRECT, FIAT, PIANO HAWS
THE 4h[n} tarn [PROJECT RIPIW AND SHOWING 17
THIS P
UBLICATIO
N IS O
UT OF D
ATE.
For mos
t curr
ent in
formati
on:
http:/
/exten
sion.o
regon
state.
edu/c
atalog
WALK The walk is a definite four-beat gait and
not a resting gait. The walk should be true and flat-footed, with the horse on the bit. You should be in the deepest part of the saddle and sitting straight up, with a vertical line running through the shoulders and hips to the back of the heel.
SITTING TROT The sitting trot is a two-beat gait but
slower than the posting trot. You should maintain a close seat and quiet hands.
POSTING TROT The posting trot is mannerly, cadenced,
balanced, and free moving. There should be light contact on the reins with the horse slightly on the bit and not showing resistance. You should be posting (rising with the rhythm of the trot) on the proper diagonals.
When riding the horse in a posting trot, relax, feel the horse's motion, and think "up and down" as it trots. The key is to keep your feet under your body, heels down, head up, and upper body only slightly forward. A close grip with your thighs and knees prevents your dropping into the saddle too quickly and heavily and getting bumped. Try to roll your thighs slightly inward to maintain proper position.
Even though the horse's head moves up and down during the trot, it's important that your hands stay quiet. You must not pull yourself up with the reins when rising. Your elbows should open and close the angle to the bit.
On the right diagonal, you are sitting in the saddle when the left front leg is on the ground or the horse's right shoulder is moving forward. On the left diagonal, you are sitting when the right front leg is on the ground or horse's left shoulder is moving forward.
When circling clockwise, you are posting on the left diagonal. When circling counter- clockwise, you are posting on the right diagonal. In an arena, it's sometimes easier to remember "rise and fall to the front leg on the wall."
To change diagonals smoothly at the trot, either sit one beat or stand one bump or stride. When performing serpentines or figure eights, change diagonals in the center of the half circle or circle.
EXTENPEP TROT The extended trot (strong trot) should
remain collected but show a lengthened stride. Your position at the extended trot is the same as the posting trot position.
CANTER The canter is a three-beat gait. It should
be smooth, with moderate collection, and correct and straight on both leads. Both the horse and you should show the ability to move on at the canter or to slow down without resistance. You might be asked to extend the canter, which is a lengthening of stride but not an increase in speed.
At the canter, your upper body position is halfway between that of the posting trot and the walk. At the extended canter, put more weight on the stirrups and lean slightly forward.
HAND BAUOP The hand gallop is a faster gait with a
lengthened stride, but you are still in control, staying in motion with the horse. You should assume the two-point position, leaning slightly forward with the seat out of the saddle. This allows your center of gravity to be over the horse's center of gravity.
INTERMEDIATE GAIT The intermediate gait is performed by
those breeds that do not have a normal two- beat trot (see "Gaited horses," page 13, for a more detailed description). Gaits performed by the various breeds range from a four-beat lateral gait to a four-beat diagonal pattern.
At the intermediate gait, you should assume a balanced seat, with your upper body slightly behind the true vertical (Vz inch is often enough) and your heels an equal distance in front of the vertical.
Riders do not post the intermediate gait, but if a 4-H pattern calls for a posting trot and all aspects of the pattern are equal, then the rider posting correctly at the two-beat trot will be given preference.
tat SIM For detailed information on jumping, see
the Hunt Seat and Jumper Manual (PNW 488). This style of riding suits a horse with
free, forward movement and the aptitude for cross-country riding or jumping. Hunt seat allows you close contact with the horse, using balance and a slight grip. Learning the basics and proper techniques on the flat are important before attempting jumps.
BASIC BOW POSITION The hunter saddle places you in a forward
position where the horse is best able to balance the weight for an athletic performance. At the walk or slow sitting trot, your back is vertical. At the posting trot, or when galloping and jumping, you may lean slightly forward from
RIDING AND SHOWING THE 4hlrft tasE PROJECT
THIS P
UBLICATIO
N IS O
UT OF D
ATE.
For mos
t curr
ent in
formati
on:
http:/
/exten
sion.o
regon
state.
edu/c
atalog
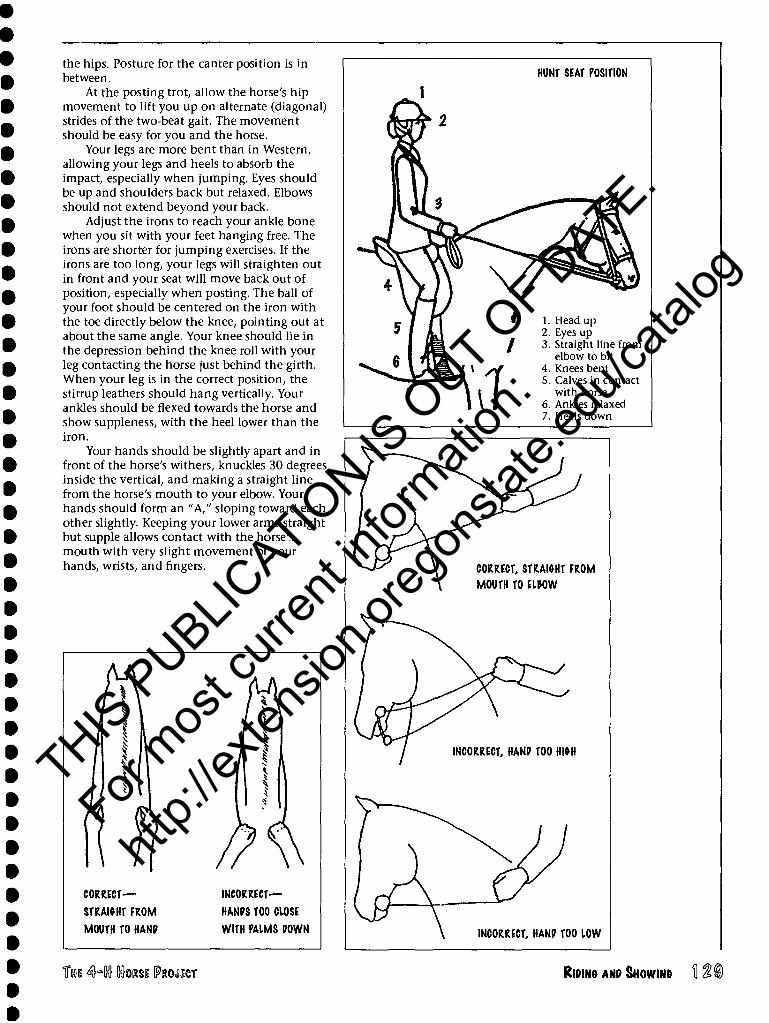
the hips. Posture for the canter position is in between.
At the posting trot, allow the horse's hip movement to lift you up on alternate (diagonal) strides of the two-beat gait. The movement should be easy for you and the horse.
Your legs are more bent than in Western, allowing your legs and heels to absorb the impact, especially when jumping. Eyes should be up and shoulders back but relaxed. Elbows should not extend beyond your back.
Adjust the irons to reach your ankle bone when you sit with your feet hanging free. The irons are shorter for jumping exercises. If the irons are too long, your legs will straighten out in front and your seat will move back out of position, especially when posting. The ball of your foot should be centered on the iron with the toe directly below the knee, pointing out at about the same angle. Your knee should lie in the depression behind the knee roll with your leg contacting the horse just behind the girth. When your leg is in the correct position, the stirrup leathers should hang vertically. Your ankles should be flexed towards the horse and show suppleness, with the heel lower than the iron.
Your hands should be slightly apart and in front of the horse's withers, knuckles 30 degrees inside the vertical, and making a straight line from the horse's mouth to your elbow. Your hands should form an "A," sloping toward each, other slightly. Keeping your lower arms straight but supple allows contact with the horse's mouth with very slight movement of your hands, wrists, and fingers.
HUNT SEAT POSITION
CORRECT—
STRAI&HT FROM
MOUTH TO HAM
INCORRECT—
HAMS TOO CLOSE
WITH PALMS POWN
1. Head up 2. Eyes up 3. Straight line from
elbow to bit Knees bent Calves in contact with horse Ankles relaxed Heels down
CORRECT, STRAIGHT FROM MOUTH TO ELBOW
INCORRECT, HAW TOO HIGH
INCORRECT, HAM TOO LOW
4= RIDING ANP SHOWING
THIS P
UBLICATIO
N IS O
UT OF D
ATE.
For mos
t curr
ent in
formati
on:
http:/
/exten
sion.o
regon
state.
edu/c
atalog
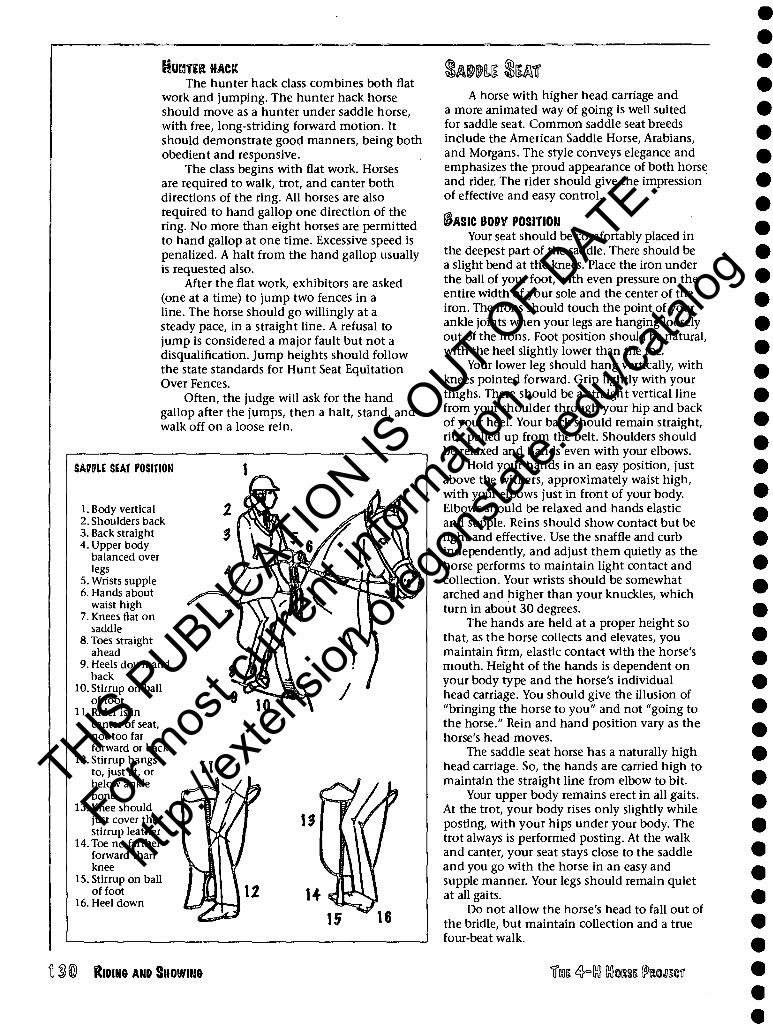
Uumw HACK The hunter hack class combines both flat
work and jumping. The hunter hack horse should move as a hunter under saddle horse, with free, long-striding forward motion. It should demonstrate good manners, being both obedient and responsive.
The class begins with flat work. Horses are required to walk, trot, and canter both directions of the ring. All horses are also required to hand gallop one direction of the ring. No more than eight horses are permitted to hand gallop at one time. Excessive speed is penalized. A halt from the hand gallop usually is requested also.
After the flat work, exhibitors are asked (one at a time) to jump two fences in a line. The horse should go willingly at a steady pace, in a straight line. A refusal to jump is considered a major fault but not a disqualification. Jump heights should follow the state standards for Hunt Seat Equitation Over Fences.
Often, the judge will ask for the hand gallop after the jumps, then a halt, stand, and walk off on a loose rein.
SAPPIE SEAT POSITION
l.Body vertical 2. Shoulders back 3. Back straight 4. Upper body
balanced over legs
5. Wrists supple 6. Hands about
waist high 7. Knees flat on
saddle 8. Toes straight
ahead 9. Heels down and
back 10. Stirrup on ball
of foot 11. Rider is in
center of seat, not too far forward or back
12. Stirrup hangs to, just at, or below ankle bone
13. Knee should just cover the stirrup leather
14. Toe no farther forward than knee
15. Stirrup on ball of foot
16. Heel down
A horse with higher head carriage and a more animated way of going is well suited for saddle seat. Common saddle seat breeds include the American Saddle Horse, Arabians, and Morgans. The style conveys elegance and emphasizes the proud appearance of both horse and rider. The rider should give the impression of effective and easy control.
IASIC BOOV POSITION Your seat should be comfortably placed in
the deepest part of the saddle. There should be a slight bend at the knees. Place the iron under the ball of your foot, with even pressure on the entire width of your sole and the center of the iron. The irons should touch the point of your ankle joints when your legs are hanging loosely out of the irons. Foot position should be natural, with the heel slightly lower than the toe.
Your lower leg should hang vertically, with knees pointed forward. Grip lightly with your thighs. There should be a straight vertical line from your shoulder through your hip and back of your heel. Your back should remain straight, ribs pulled up from the belt. Shoulders should be relaxed and hands even with your elbows.
Hold your hands in an easy position, just above the withers, approximately waist high, with your elbows just in front of your body. Elbows should be relaxed and hands elastic and supple. Reins should show contact but be light and effective. Use the snaffle and curb independently, and adjust them quietly as the horse performs to maintain light contact and collection. Your wrists should be somewhat arched and higher than your knuckles, which turn in about 30 degrees.
The hands are held at a proper height so that, as the horse collects and elevates, you maintain firm, elastic contact with the horse's mouth. Height of the hands is dependent on your body type and the horse's individual head carriage. You should give the illusion of "bringing the horse to you" and not "going to the horse." Rein and hand position vary as the horse's head moves.
The saddle seat horse has a naturally high head carriage. So, the hands are carried high to maintain the straight line from elbow to bit.
Your upper body remains erect in all gaits. At the trot, your body rises only slightly while posting, with your hips under your body. The trot always is performed posting. At the walk and canter, your seat stays close to the saddle and you go with the horse in an easy and supple manner. Your legs should remain quiet at all gaits.
Do not allow the horse's head to fall out of the bridle, but maintain collection and a true four-beat walk.
KiDiNft AND SHOWING Teas 4HK1 tass Wmm
THIS P
UBLICATIO
N IS O
UT OF D
ATE.
For mos
t curr
ent in
formati
on:
http:/
/exten
sion.o
regon
state.
edu/c
atalog
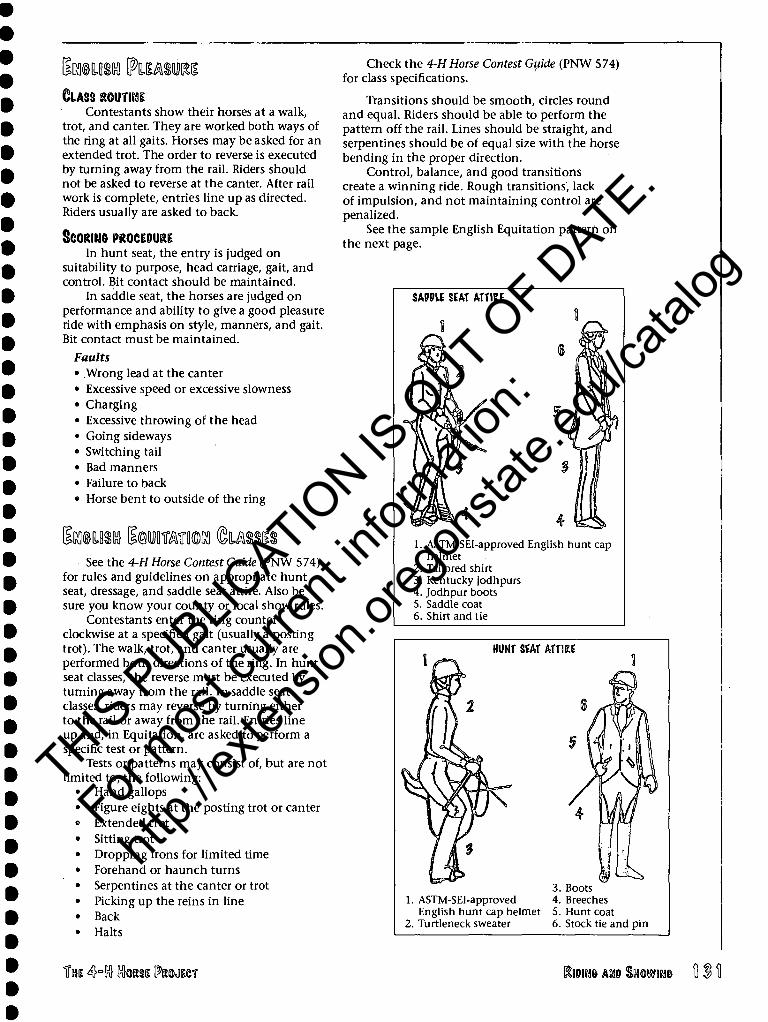
mum $wmn 0USS gOUTifJE
Contestants show their horses at a walk, trot, and canter. They are worked both ways of the ring at all gaits. Horses may be asked for an extended trot. The order to reverse is executed by turning away from the rail. Riders should not be asked to reverse at the canter. After rail work is complete, entries line up as directed. Riders usually are asked to back.
SCORING PRocioimg In hunt seat, the entry is judged on
suitability to purpose, head carriage, gait, and control. Bit contact should be maintained.
In saddle seat, the horses are judged on performance and ability to give a good pleasure ride with emphasis on style, manners, and gait. Bit contact must be maintained.
Faults • Wrong lead at the canter • Excessive speed or excessive slowness • Charging • Excessive throwing of the head • Going sideways • Switching tail • Bad manners • Failure to back • Horse bent to outside of the ring
See the 4-H Horse Contest Guide (PNW 574) for rules and guidelines on appropriate hunt seat, dressage, and saddle seat attire. Also be sure you know your county or local show rules.
Contestants enter the ring counter- clockwise at a specified gait (usually a posting trot). The walk, trot, and canter usually are performed both directions of the ring. In hunt seat classes, the reverse must be executed by turning away from the rail. In saddle seat classes, riders may reverse by turning either to the rail or away from the rail. Entries line up and, in Equitation, are asked to perform a specific test or pattern.
Tests or patterns may consist of, but are not limited to, the following:
Hand gallops Figure eights at the posting trot or canter Extended trot Sitting trot Dropping irons for limited time Forehand or haunch turns Serpentines at the canter or trot Picking up the reins in line Back Halts
Check the 4-H Horse Contest Guide (PNW 574) for class specifications.
Transitions should be smooth, circles round and equal. Riders should be able to perform the pattern off the rail. Lines should be straight, and serpentines should be of equal size with the horse bending in the proper direction.
Control, balance, and good transitions create a winning ride. Rough transitions, lack of impulsion, and not maintaining control are penalized.
See the sample English Equitation pattern on the next page.
SAMIE SEAT ATTIRE
1. ASTM-SEI-approved English hunt cap helmet
2. Tailored shirt 3. Kentucky jodhpurs 4. Jodhpur boots 5. Saddle coat 6. Shirt and tie
HUNT SEAT ATTIRE
1. ASTM-SEI-approved English hunt cap helmet
2. Turtleneck sweater
3. Boots 4. Breeches 5. Hunt coat 6. Stock tie and pin
THE 4h!n} Ktoem tymmi %>mm km %mmm \.
THIS P
UBLICATIO
N IS O
UT OF D
ATE.
For mos
t curr
ent in
formati
on:
http:/
/exten
sion.o
regon
state.
edu/c
atalog

imm mmm mmmnm mmm
STOP
4
i
\\ . , CHANGE % ^w PIA&ONAl
V
f RI6HT PIA&ONAL
START LINE MOVES
4}
y LEFT LEAP
X CHANOE LEAP
^ V
^
J} j j \\ { J} 5 5 -* *
1. Walk out of line about two horse lengths. 2. Do a 90-degree right haunch turn. 3. Pick up a posting trot on the right diagonal, changing to
left diagonal in the center of the serpentine. 4. STOP; do a 90-degree right forehand turn. 5. Canter on the left lead, do a lead change of choice to right
lead. 6. STOP. Back 4 steps. Wait to be excused. When excused,
return to end of line.
SYMBOLS
CANTER
TROT * *»- *►
PACK H///IIIIIIIIIIHIIII>IIIII
WALK * * ^
RIDING ANP SHOWINO THS 4hlnl ITIORSI PROJECT
THIS P
UBLICATIO
N IS O
UT OF D
ATE.
For mos
t curr
ent in
formati
on:
http:/
/exten
sion.o
regon
state.
edu/c
atalog
Utem KtesB (km, A trail horse needs the ability to travel
through, over, and between obstacles with an inquisitive desire to go forward that doesn't compromise its calm and relaxed way of going. It should approach each obstacle squarely, with authority and correct form, while maintaining a willingness to be responsive to its rider with no resistance.
Credit is given to the horse that negotiates an entire course efficiently and in a timely manner. The good trail horse is skillful, attentive, and confident. It gives one the impression of being sure, safe, and a pleasure to ride.
Trail horses are required to work over and through obstacles at a walk, jog/trot, or canter/ lope. They should be on a reasonably loose rein without undue restraint.
In a trail class, the horse is judged on performance, way of going, responsiveness, willingness, and general attitude with emphasis on manners. Horses are penalized for delaying or taking too much time approaching or negotiating the obstacles, and the judge may advance the horse to the next obstacle. A horse is not marked down for sniffing or looking over an obstacle, as long as the horse is under control and proceeds without undue delay. Head, ear, and nostril movement show that a horse is curious.
Tn h 1£mi (ntoi Trail classes are no longer simple tests of
how a horse would behave on the trail. Today's trail classes are more like obstacle courses that test the horse's agility and responsiveness. The courses require a high degree of body control and athleticism.
Members are not required to participate in trail. You should have practiced and mastered basic obstacles before exhibiting at any competition. Before you attempt to execute a trail course, be sure you have taught your horse these movements:
• Move away from leg pressure • Turn on the forehand • Turn on the haunches • Sidepass • Move one foot at a time in any direction • Stop promptly, as soon as the command
is given • Back easily and slowly in all directions
When your horse can do all of these movements willingly, you should be ready to attempt most trail obstacles. When you start practicing with obstacles, go slowly. Your horse needs to build confidence and trust.
Show the horse what you want it to do, and work from the ground first.
Vary the obstacles. When practicing, work one obstacle, go do something else (like railwork), and then come back and do the obstacle again. Once your horse can do something well, don't keep repeating it. Expose your horse to as many things as you can. The more you expose your horse to while practicing, the less apprehensive it will be when faced with new obstacles in a class. Go out for trail rides often and try natural obstacles.
To be good at trail, you must persevere and practice often. Eventually, your horse will learn to obey your cues, to place its feet where you want them, and to go forward without resistance.
Before you show, read the 4-H Horse Contest Guide (PNW 574). Make sure your tack and attire are correct, neat, and clean. Use the guidelines for the seat (English or Western) that you will be riding. Groom your horse to look its best.
Read the instructions for the course carefully and know the pattern. Ride through the course in your mind, and plan how you will negotiate each obstacle.
During the class, concentrate but relax and breathe normally. Your horse can sense your uneasiness. Many horses do fine at home but not in competition purely because their riders are nervous. Ride quietly. Shifting your weight or moving your arms or legs can send the wrong message to your horse or put your horse off balance.
Don't rush. Let the horse settle between maneuvers. If you make a mistake, don't get frustrated. You may do the rest perfectly. If you approach an obstacle that your horse has refused before, remain calm and ride positively.
If you have to dismount, be sure to check the cinch and bridle before you get back on. Your horse must stand while you mount.
Take note of which obstacles your horse does well and which need improvement. After the show, return home and practice the things that challenged you the most.
[te@MMIE»S[^ ©usmcLgs
Obstacles you might encounter in a trail class include, but are not limited to, the following:
• Gate • Walk, jog, lope, or lead over poles, logs,
brush • Bridge, plank, or platform
THE 4=1}} KoRgi PROJECT RIDING AND SHOWING
THIS P
UBLICATIO
N IS O
UT OF D
ATE.
For mos
t curr
ent in
formati
on:
http:/
/exten
sion.o
regon
state.
edu/c
atalog
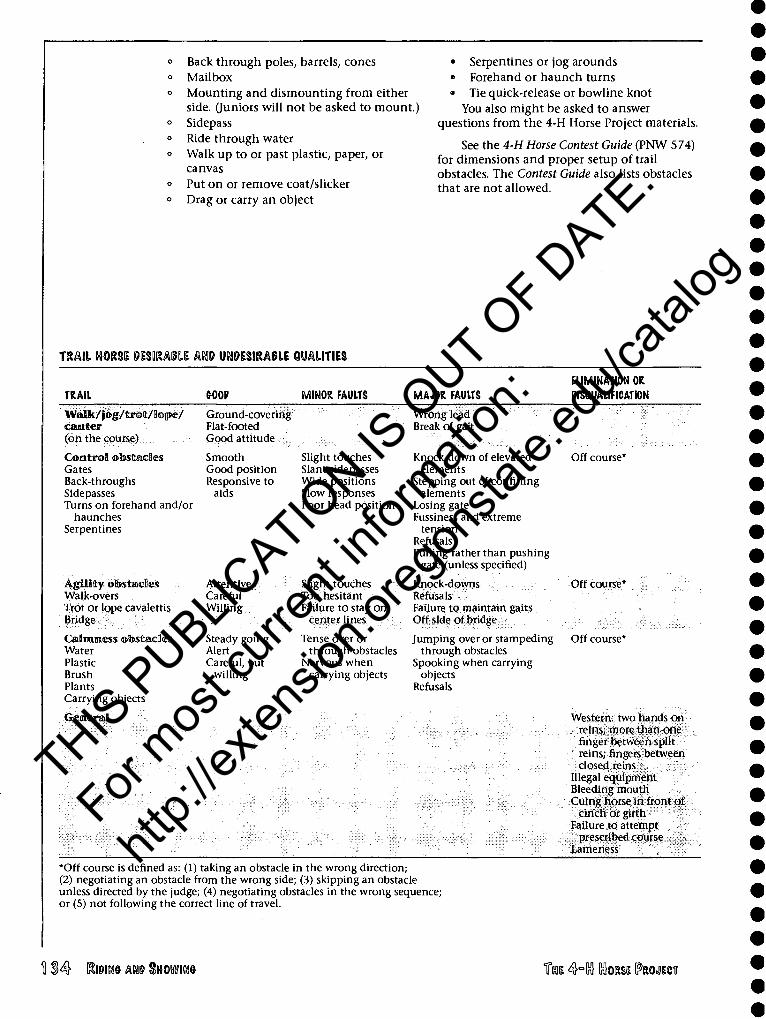
Back through poles, barrels, cones Mailbox Mounting and dismounting from either side. (Juniors will not be asked to mount.) Sidepass Ride through water Walk up to or past plastic, paper, or canvas Put on or remove coat/slicker Drag or carry an object
• Serpentines or jog arounds • Forehand or haunch turns 8 Tie quick-release or bowline knot
You also might be asked to answer questions from the 4-H Horse Project materials.
See the 4-H Horse Contest Guide (PNW 574) for dimensions and proper setup of trail obstacles. The Contest Guide also lists obstacles that are not allowed.
TRAIL HORSS mw.mil km UWESIRABIE QUALITIES
ELIMINATION OR TRAIL &00P MINOR FAULTS MAJOR FAULTS DISQUALIFICATION
WaMs/jog/troft/lope/ Ground-covering Wrong lead camter Flat-footed Break of gait (on the course) Good attitude
Control obstacles Smooth Slight touches Knock-down of elevated Off course* Gates Good position Slant sidepasses elements Back-throughs Responsive to Wide positions Stepping out of confining Sidepasses aids Slow responses elements Turns on forehand and/or Poor head position Losing gate
haunches Fussiness and extreme Serpentines tension
Refusals Pulling rather than pushing
gate (unless specified)
Agilitty oSsstacles Attentive Slight touches Knock-downs Off course* Walk-overs Careful Too hesitant Refusals Trot or lope cavalettis Willing Failure to stay on Failure to maintain gaits Bridge center lines Off side of bridge
Calmness obsftacles Steady going Tense over or Jumping over or stampeding Off course* Water Alert through obstacles through obstacles Plastic Careful, but Nervous when Spooking when carrying Brush willing carrying objects objects Plants Refusals Carrying objects
-Giemeral
'.'«;■;■; ■ vj;;:;,
Western: two hands on reins; more than one finger between split reins; fingers between closed reins
Illegal equipment Bleeding mouth Cuing horse in front of
cinch or girth Failure to attempt
prescribed course Lameness
*Off course is defined as: (1) taking an obstacle in the wrong direction; (2) negotiating an obstacle from the wrong side; (3) skipping an obstacle unless directed by the judge; (4) negotiating obstacles in the wrong sequence; or (5) not following the correct line of travel.
\Q tow km %mmm TTHI 4hln} KIOKSI PROJICT
THIS P
UBLICATIO
N IS O
UT OF D
ATE.
For mos
t curr
ent in
formati
on:
http:/
/exten
sion.o
regon
state.
edu/c
atalog

mmm mmi mmm mmi HOIKSS &mm
mi
4 OZEEinD ....
X Q )TT) )
7 <a =«_ 0(n)
*^-—P^'
1. Stand for inspection. 2. Trot/jog figure eight around
cones, starting to the left. 3. Lope left lead. 4. STOP at pole. 5. Sidepass right over pole. 6. Back between barrels. 7. Sidepass left over pole. 8. Walk over bridge as shown. 9. Walk over raised posts. 10. Open gate, pass through
gate, and close.
(its A ga) v ^ fv y.
ENTER MOUNTEP
SVMBOLS
10FE
TROT/JO»—*•- PACK mni i n i
WAIK—B—i
mi in li ii
——0=—o-
RI&HT-HANP
<\ POSH
WAIT TO 9E EXCUSE?
EXIT MOUNTEP
THE 4hln} Ctasi [pRiaiJiiseT KIOINO ANP SHOWING
THIS P
UBLICATIO
N IS O
UT OF D
ATE.
For mos
t curr
ent in
formati
on:
http:/
/exten
sion.o
regon
state.
edu/c
atalog
GATES It is your job to position the horse so the
gate may be worked properly and easily. The sidepass, haunch turn, forehand turn, backing, and neck reining are all used in working a gate.
Ride up parallel to the gate and as close to it as possible, or ride up a few steps away from it and sidepass over. Always push the gate away from you unless it is unsafe or the pattern directions specifically state otherwise.
You can walk forward through a gate or back through it. If you walk forward through it, stand facing the latch. If you back through it, stand facing the hinges.
You should try to keep a hand on the gate at all times, but it is better to let go than pull the gate over or frighten the horse.
Sit up as straight as possible while working the gate. If you lean too far, you can dig the horse in the side and push it away from the gate. Remember, the simple shift of weight is sending an opposing message to your horse.
When you have finished working the gate, sidepass a step or two away from the gate if the pattern allows.
Patient practice is a must! Push and walk through gates
Begin by standing parallel to the gate facing the latch. Open the latch with your hand nearer the gate. Back a few steps slowly, keeping your hand on the gate, until the horse's head is past the gate standard. Push the gate away from you, and, using neck reining, move the horse forward through the opening. Once your knee has passed the end of the gate, begin pushing the horse's hindquarters around until the horse is facing the opposite direction (the hinges). Sidepass over (and back if necessary) to close and latch the gate.
Push and back through gates Begin by standing parallel to the gate
facing the hinges, but with your hand beside the latch. Open the latch with your hand nearest the gate. Sliding your hand along the gate, walk the horse forward until its tail is beyond the latch gate standard. Push the gate away from you. Push the horse's hindquarters through the gate, then back a few steps. When your knee has passed the end of the gate, push the horse's hindquarters around the end of the gate until it is facing the opposite direction (the latch). Sidepass over to close and latch the gate.
Pull and walk through gates Begin by standing parallel to the gate
facing the latch. Open the latch with the hand nearest the gate. Pull the gate toward you as your horse sidepasses away from it. When the gate is well open, move your horse forward until your knee is just past the end of the gate. Using your legs and reins, turn the horse around the end of the gate and then walk
forward through it. Sidepass away from the gate to pull it shut beside you. Then take a few steps back until you can latch the gate closed.
Pull and back through gates Begin by standing parallel to the gate
facing the hinges. Open the latch with the hand nearer the gate. Pull the gate toward you as your horse sidepasses away from it. Make sure the gate is well open. Back your horse until your knee is past the end of the gate, then turn the horse around the end of the gate and back through the opening until the horse's head is past the gate standard. Sidepass away from the gate, pulling it closed. Step forward to latch the gate.
Rope gates Maneuver through a rope gate much as
you would a "solid" gate. Make sure the horse's body is far enough through the gate before you make a turn to close the gate. Be very careful when working a rope gate that the rope does not loop down and catch a stirrup or foot. If your horse becomes frightened, be sure you let go of the rope immediately.
SIDEPASSING Most trail courses include one or more
obstacles that require the horse to sidepass (see page 113 for a description of a correct sidepassing maneuver). The sidepass should be smooth and continuous. Look in the direction of travel, and remain in the center of the horse as much as possible (although a slight weight shift to the side opposite the direction of travel is acceptable). Staying straight and balanced in the saddle will make your cues more subtle, the movement smoother, and the performance better.
Practice sidepassing without a fence line or other barrier. Working in a box-shape pattern is an excellent exercise. Walk forward a few steps, halt, and then sidepass to the right. Back up a few steps, halt, and sidepass to the left, completing the box. This exercise helps make the horse responsive to leg cues and weight shifts.
To train a horse to sidepass over a pole, begin by stepping over a pole on the ground. Center the pole under the horse's body, just behind the rider's leg. Look in the direction you will go and sidepass off the pole. Be sure you work both directions. As the horse improves, approach the pole by sidepassing to it. To provide more difficulty, sidepass around turns or elevate the poles.
If you are working a box made of poles, work first with the horse's front feet inside the box, then with the hind feet inside the box. Sidepass to the corner of the box, then use a turn on the forehand or a turn on the haunches to negotiate the corner.
RIDINO AND SHOWING THE 4°ln} Ctasi [PRCMICT
THIS P
UBLICATIO
N IS O
UT OF D
ATE.
For mos
t curr
ent in
formati
on:
http:/
/exten
sion.o
regon
state.
edu/c
atalog
BACK-THROU&HS To perform a back-through successfully,
your horse must be able to back in a straight line as well as in circles or around objects. Since turns or changes of direction may be required in a back-through, your horse must also be able to do forehand and haunch turns. The back should be slow but smooth and consistent, with fluid steps. Make sure your horse is always in a good position and never against an obstacle.
Look slightly back and down without leaning to verify your position. Choose one side to watch; looking from side to side shifts your weight and throws your horse off balance. Keep your legs close to your horse to give support and control its body movement. If a correction is needed, make it while the horse is taking a step backward. This makes the correction more subtle and prevents an over-correction.
Begin your back-through training with two parallel poles set on the ground 4 feet apart. Walk forward between the poles, halt, and back straight out. Go slowly. Take a step or two, then hesitate if necessary before taking more steps. To help keep the horse from rushing, do not always completely back out. Stop before reaching the end, then walk forward and out.
When your horse can back quietly, smoothly, and straight without hitting the poles, you can move on to more difficult exercises. Instead of walking forward between the poles, walk to one end, turn your horse into position, and then back through the poles. Elevate the poles or back between barrels or cones.
Teach your horse to back through an "L." Back the horse until its hind feet are centered in the turn. Turn on the forehand to move the horse's hindquarters 90 degrees. Hesitate, then turn on the haunches to move the horse's forehand 90 degrees. This should position you for the final straight back movement.
To back around barrels or cones, use the same technique. Back straight, then hesitate, and use a forehand or haunch turn to position the horse properly for the next backing action.
BRID&ES Bridges come in a variety of styles.
Whatever you practice on at home, make sure
it is strong enough to support the weight of the horse.
You may be asked simply to walk over a bridge, or you could be asked to stop on the bridge. Advanced patterns may call for turning on a bridge or even backing off a bridge.
Your horse should approach the bridge calmly but alertly. Try to get your horse to lower its head and inspect the bridge before stepping onto it. (Most horses do not do this naturally, so one idea is to put a little grain on the bridge.) Apply light pressure with both legs to encourage your horse to move forward, and use all your aids to ask the horse to walk confidently straight over the bridge.
WALK-OVERS, TROT-OVERS, OR LOPE-OVERS These obstacles are staples of the modern
trail course, and they come in an endless variety of designs. Your horse should be able to negotiate any pattern, at any gait, smoothly and calmly. Knocking poles is a fault, so your horse should pick its feet up and go through cleanly.
Approach at the center and lean slightly foward. For walk-overs, give your horse its head and let it put its head down and look at the obstacle.
Begin training your horse over these obstacles by placing several poles on the ground and walking over them. Vary the distance between the poles so your horse learns to look and pay attention.
As your horse becomes more comfortable with the exercise, trot over the poles, and finally do lope-overs. Start with straight lines, and then add bends or turns. You can also elevate the poles or use logs or rails.
JUMPS Make sure your horse knows the difference
between a jump and a walk-over. For a jump, gather the reins up a little, and squeeze with your legs to keep the horse centered and moving forward with impulsion. Give with the reins as the horse jumps, and flow with the horse over the jump. Be careful not to jerk the reins when landing.
The horse should jump willingly and cleanly.
lm 4°$ IntoRSs PROJECT RIDING AND SHOWING in
THIS P
UBLICATIO
N IS O
UT OF D
ATE.
For mos
t curr
ent in
formati
on:
http:/
/exten
sion.o
regon
state.
edu/c
atalog

Being able to harness drive your horse increases its value and gives you more ways to have fun together. You can drive your horse regardless of breed, type, or gender, as long as it is at least 2 years of age and mentally and physically capable.You can drive light horses, draft horses, ponies, donkeys, mules, or minis.
You can drive a horse for pleasure on trails or country roads. If showing is your choice, there are Pleasure Driving classes or Combined Driving events. Timed driving events or gaming classes also are options, depending on your county and/or state.
Basic driving equipment consists of a harness and a vehicle or cart. The driving style and the breed and size of horse determine what type of equipment you need.
Driving your horse increases its usefulness and gives you a head start working with a
young horse before it is physically able to carry a saddle and rider. Driving teaches obedience and develops the young horse's mouth so it learns to be "on the bit" and to flex and bend. Driving also develops the horse's muscles, especially the hindquarters, chest, and legs. Most of all, the young horse and handler have the chance to work in cooperation, which is the basis of all future training.
Each breed of horse performs differently and has a distinct style of moving while driven. Check current breed publications for driving specifications for your breed or type of horse.
For information on training and driving the horse for 4-H classes, refer to the 4-H Horse and Pony Driving Manual (PNW 229) or the 4-H Colt and Horse Training Manual (4-H 1303, Oregon State University Extension Service).
You can find rules regarding classes, tack, and attire in the 4-H Horse Contest Guide (PNW 574).
l§> RIPING AND SHOWING THE 4}°ln} KIORSI Wmm
THIS P
UBLICATIO
N IS O
UT OF D
ATE.
For mos
t curr
ent in
formati
on:
http:/
/exten
sion.o
regon
state.
edu/c
atalog
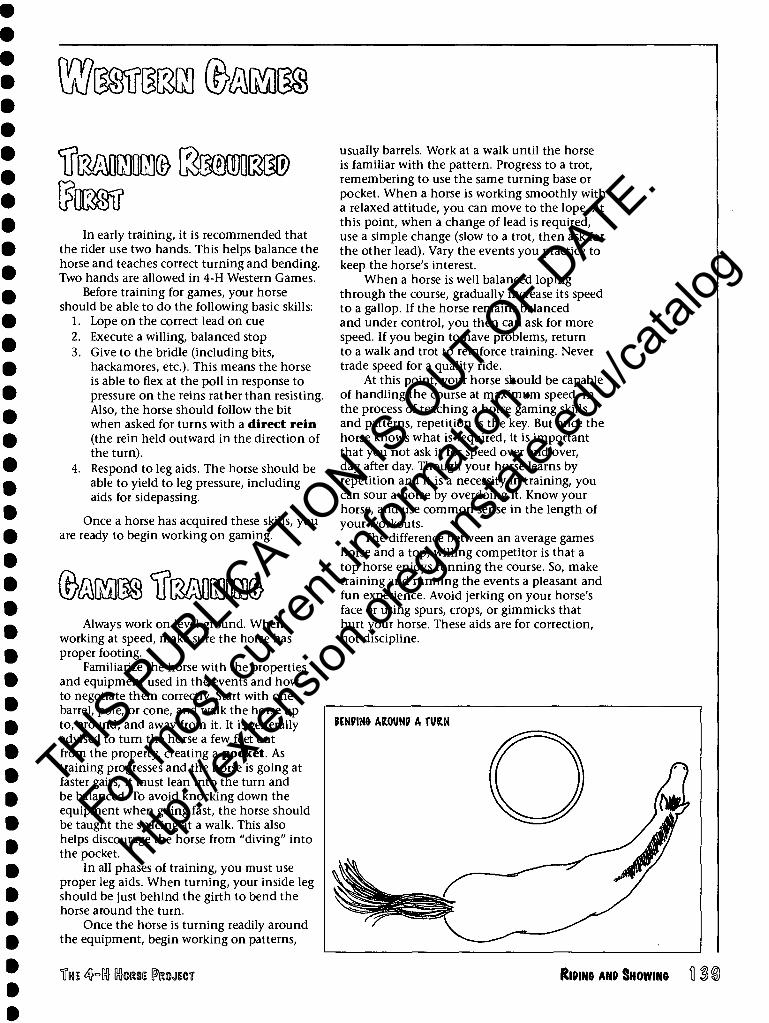
tor In early training, it is recommended that
the rider use two hands. This helps balance the horse and teaches correct turning and bending. Two hands are allowed in 4-H Western Games.
Before training for games, your horse should be able to do the following basic skills:
1. Lope on the correct lead on cue 2. Execute a willing, balanced stop 3. Give to the bridle (including bits,
hackamores, etc.). This means the horse is able to flex at the poll in response to pressure on the reins rather than resisting. Also, the horse should follow the bit when asked for turns with a direct rein (the rein held outward in the direction of the turn).
4. Respond to leg aids. The horse should be able to yield to leg pressure, including aids for sidepassing.
Once a horse has acquired these skills, you are ready to begin working on gaming.
taoss IMm© Always work on level ground. When
working at speed, make sure the horse has proper footing.
Familiarize the horse with the properties and equipment used in the events and how to negotiate them correctly. Start with one barrel, pole, or cone, and walk the horse up to, around, and away from it. It is generally advised to turn the horse a few feet out from the property, creating a pocket. As training progresses and the horse is going at faster gaits, it must lean into the turn and be balanced. To avoid knocking down the equipment when going fast, the horse should be taught the spacing at a walk. This also helps discourage the horse from "diving" into the pocket.
In all phases of training, you must use proper leg aids. When turning, your inside leg should be just behind the girth to bend the horse around the turn.
Once the horse is turning readily around the equipment, begin working on patterns,
usually barrels. Work at a walk until the horse is familiar with the pattern. Progress to a trot, remembering to use the same turning base or pocket. When a horse is working smoothly with a relaxed attitude, you can move to the lope. At this point, when a change of lead is required, use a simple change (slow to a trot, then ask for the other lead). Vary the events you practice to keep the horse's interest.
When a horse is well balanced loping through the course, gradually increase its speed to a gallop. If the horse remains balanced and under control, you then can ask for more speed. If you begin to have problems, return to a walk and trot to reinforce training. Never trade speed for a quality ride.
At this point, your horse should be capable of handling the course at maximum speed. In the process of teaching a horse gaming skills and patterns, repetition is the key. But once the horse knows what is required, it is important that you not ask it for speed over and over, day after day. Though your horse learns by repetition and it is a necessity in training, you can sour a horse by overdoing it. Know your horse, and use common sense in the length of your workouts.
The difference between an average games horse and a top, willing competitor is that a top horse enjoys running the course. So, make training and running the events a pleasant and fun experience. Avoid jerking on your horse's face or using spurs, crops, or gimmicks that hurt your horse. These aids are for correction, not discipline.
THE 4hQ CtasE IPRCMECT RIPING ANP SHOWING
THIS P
UBLICATIO
N IS O
UT OF D
ATE.
For mos
t curr
ent in
formati
on:
http:/
/exten
sion.o
regon
state.
edu/c
atalog
Mm mas KyiMBBC!] (brnm teas
Your method of riding can directly affect your time score. You should be balanced with the horse, with your head and eyes looking forward. Looking back to see whether a barrel, pole, or cone falls can easily throw your horse off stride. Keep your feet in the stirrups throughout the ride.
When coming to a turn, sit down deep in the saddle to help the horse gather itself. Avoid
holding on to the cantle of the saddle when turning or stopping, as this puts too much pressure on your horse's kidneys and puts you off balance. While turning, use your inside leg behind the girth. As your horse is coming out of the turn, raise slightly out of the saddle to free the hindquarters.
Always keep in mind that your horse should enjoy games. Keep your hands as light as possible and guide your horse through the events. Reward your horse with praise or pats after a satisfactory performance.
RIPINO ANP SHOWING THE 4Hlnl CtasE FROJECIT
THIS P
UBLICATIO
N IS O
UT OF D
ATE.
For mos
t curr
ent in
formati
on:
http:/
/exten
sion.o
regon
state.
edu/c
atalog

tewg toot \Mm m %mmm
Hksoe. Boeotfl© Trail riding can be a fun way to enjoy your
horse and the outdoors, but you need to follow a few safety and etiquette guidelines.
Safety and pleasure begin with a dependable, well-mannered horse. Be sure you know your horse well and can predict how it will react in various situations. A nervous horse is far more difficult to handle away from familiar surroundings. Train your horse at home to confront new and strange objects quietly and calmly. If your horse becomes frightened, remain calm, speak to it quietly, steady it, and give it time to overcome its fear.
Make sure your horse is in good physical condition and is shod. You may need to work up to taking long rides or tackling strenuous terrain. Think of your horse first and make sure you do not overtire it.
Vary your gaits, and don't canter for long periods of time. Speed is tiring and unsafe, not only for the horse but for the rider as well.
Be sure all equipment fits well and is in good repair. Use a clean, thick saddle blanket or pad. The cinch should be snug, but not extremely tight. Check the cinch before starting up or down steep grades. Use a breast collar or crupper if necessary to keep the saddle in place. A back cinch can help as well.
Do not tie reins together. In an emergency, you may not have time to get the reins off over the horse's head (or it may not be safe to do so). Reins not tied together just fall, and you can get hold of one or both of them.
Never ride alone. Ride with someone you know to be experienced and thoughtful. In larger groups, elect someone who knows the trails as "trail boss." The trail boss determines the pace and the route.
Wait until all riders are mounted before you move off, making sure you always mount and dismount on the uphill side. Keep at least one horse's length between you and the horse in front of you. Watch for tree limbs that could hit your horse in the face.
Ride balanced and erect to avoid tiring the horse or making its back sore. When riding downhill, keep your body perpendicular to the horse. When riding uphill, move your weight off the seat and forward, as in jumping, to help the horse. On long rides, dismount and lead your horse for a few minutes each hour. Periodically loosen the girth, let the horse rest, and then retighten before mounting.
THE 4~[n} KIORSE PtaMECT
If you meet other horses or hikers on the trail, find a wide part of the trail and pull off to allow them to pass safely. If the trail does not widen and you meet another horse on the trail, then as you pass, turn your horse's head slightly toward the other horse's head (this angles the hind end farther away).
Water your horse along the trail, if possible. Ride across rivers diagonally, facing upstream. Never cross rivers during high water. Avoid wet or boggy places, and back out immediately if the ground seems soft.
Do not leave the trail. You might suddenly come upon holes, unsafe surfaces, sharp objects, or bees' nests off the trail.
When riding during hunting season, make lots of noise and wear bright-color clothing, such as a fluorescent vest and orange hat.
Carry the following items: • Sturdy halter and lead rope • Pocket knife • Hoof pick • Wire cutters • Canteen • Basic first-aid kit • Bad-weather clothing (slicker) • Litter bag
Other handy items to carry: • Hobbles, if your horse is trained for their
use • Emergency shoeing tools or easy boot • Cell phone (carry on you, not in a pack) • Lariat • Pieces of leather or baling twine for repairs • Dry matches • Energy bar • Flashlight
(^GM]© Camping with your horse can be a lot of
fun, but it requires careful planning. Think about where you will camp and where you will ride. Make sure that you have permission to ride on private lands, and that you follow all regulations for riding on public lands and taking your horse into any water. Check the weather forecast: take appropriate clothing, and consider cancelling your trip if the weather prediction is bad. If you are going to use a pack animal, make sure you get expert training on how to pack properly.
RiDiN» ANP SHOWING MH
THIS P
UBLICATIO
N IS O
UT OF D
ATE.
For mos
t curr
ent in
formati
on:
http:/
/exten
sion.o
regon
state.
edu/c
atalog

Make lists of what you need to take both for you and your horse. Take everything suggested above for trail rides. In addition, you will need the following:
For you: • Sleeping gear (tent, sleeping bag, air
mattress) • Clothing to last the entire trip • Cooking utensils • Food • Shovel and axe
For your horse: • Feed (hay and grain) • Water bucket • Grooming tools • Rope • Tack
You can pack all your gear on your horse or a pack animal, or have a vehicle take it all and meet you at your camp.
It is nice to be able to set up a camp and take rides out from it each day. A good campsite should have access to water, grass for grazing, and a place to secure the horses. It should also have a flat place for you to sleep and a good place to do the cooking.
When you reach camp after a ride, take care of your horse first. Cool it out and give it small amounts of water at a time until it is satisfied. Groom it well and give it a small amount of hay. Give it a normal feeding of hay and grain later. Place your saddle blanket or pad where it will dry out. Cover all your gear at night to protect it from weather and wildlife.
You will need a way to secure the horses at camp. There are five common ways to do this: corrals, picket lines, tethering, hobbles, and tying to trees.
Corrals are best if they are available. Some horse camps have permanent ones you can use.
Some people carry portable ones that set up quickly. It is possible to make a corral by tying ropes from tree to tree at about chest height.
A picket line is a rope tied between two trees above wither height. Tie horses on the line about 10 feet apart using a quick-release knot.
Tethering is tying a horse with a long rope to a stake or tree. This is not the best method for most horses. Horses easily become tangled in the rope and get severe rope burns. Before you use this method, make sure your horse is savvy about ropes and that there is always someone keeping on eye out for problems.
Some people tie their horse to a tree to secure it in camp. This method is not preferred, as the horse can damage the tree. The horse also can wind itself around the tree, leaving it no room to move. If you have to tie to a tree, it is best to tie to a strong overhead branch. Leave enough slack in the rope for the horse to reach its nose to the ground.
Hobbles are straps used to tie a horse's front legs together. You should allow 8 to 10 inches of slack. Hobbles prevent most horses from running off, although some horses learn to move quite well in them. Be sure your horse is completely broken to accepting hobbles before attempting to use them. It is a good idea to train your horse to accept hobbles, because it will be less likely to panic if it gets its feet caught in wire, rope, or brush.
However you secure the horses, make sure they are away from your campsite. They attract flies and are rather smelly.
When you leave camp, make sure you clean up well. Be sure any fires are out and drowned. Pack out all litter with you. Do not bury anything, because animals will dig it up. Remove all unused hay, and scatter manure. Leave your campsite looking natural and better than it did when you arrived.
\Qt RIDIM AND SHOWING THE 4hln} CtasE IPKOJECT
THIS P
UBLICATIO
N IS O
UT OF D
ATE.
For mos
t curr
ent in
formati
on:
http:/
/exten
sion.o
regon
state.
edu/c
atalog
THE ^Hln} MORSE IPROJIICT RiPiNft ANP SHOWING H 4}^
THIS P
UBLICATIO
N IS O
UT OF D
ATE.
For mos
t curr
ent in
formati
on:
http:/
/exten
sion.o
regon
state.
edu/c
atalog
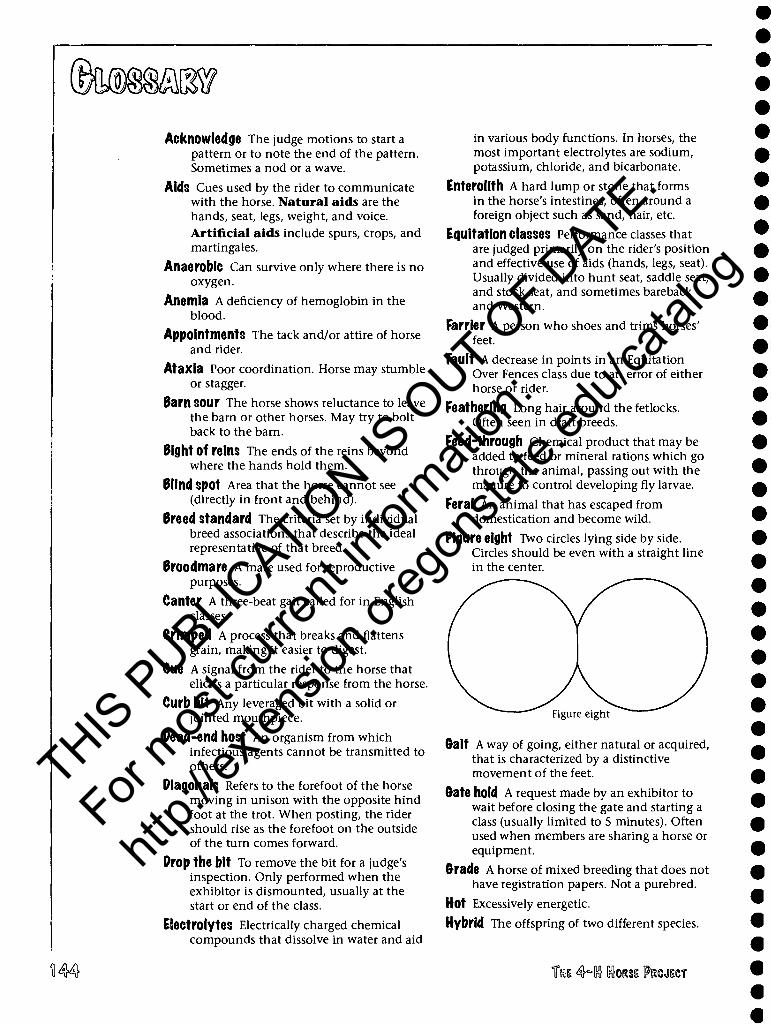
Acknowledge The judge motions to start a pattern or to note the end of the pattern. Sometimes a nod or a wave.
Aids Cues used by the rider to communicate with the horse. Natural aids are the hands, seat, legs, weight, and voice. Artificial aids include spurs, crops, and martingales.
Anaerobic Can survive only where there is no oxygen.
Anemia A deficiency of hemoglobin in the blood.
Appointments The tack and/or attire of horse and rider.
Ataxia Poor coordination. Horse may stumble or stagger.
Bam SOUr The horse shows reluctance to leave the barn or other horses. May try to bolt back to the barn.
Bight of reins The ends of the reins beyond where the hands hold them.
Blind Spot Area that the horse cannot see (directly in front and behind).
Breed Standard The criteria set by individual breed associations that describe the ideal representative of that breed.
Broodmare A mare used for reproductive purposes.
Canter A three-beat gait called for in English classes.
Crimped A process that breaks and flattens grain, making it easier to digest.
Cue A signal from the rider to the horse that elicits a particular response from the horse.
Curb bit Any leveraged bit with a solid or jointed mouthpiece.
Dead-end host An organism from which infectious agents cannot be transmitted to others.
Diagonals Refers to the forefoot of the horse moving in unison with the opposite hind foot at the trot. When posting, the rider should rise as the forefoot on the outside of the turn comes forward.
Drop the bit To remove the bit for a judge's inspection. Only performed when the exhibitor is dismounted, usually at the start or end of the class.
Electrolytes Electrically charged chemical compounds that dissolve in water and aid
in various body functions. In horses, the most important electrolytes are sodium, potassium, chloride, and bicarbonate.
Enterolith A hard lump or stone that forms in the horse's intestines, often around a foreign object such as sand, hair, etc.
Equitation Classes Performance classes that are judged primarily on the rider's position and effective use of aids (hands, legs, seat). Usually divided into hunt seat, saddle seat, and stock seat, and sometimes bareback and Western.
Farrier A person who shoes and trims horses' feet.
Fault A decrease in points in an Equitation Over Fences class due to an error of either horse or rider.
Feathering Long hair around the fetlocks. Often seen in draft breeds.
Feed-through Chemical product that may be added to feed or mineral rations which go through the animal, passing out with the manure to control developing fly larvae.
Feral An animal that has escaped from domestication and become wild.
Figure eight Two circles lying side by side. Circles should be even with a straight line in the center.
Figure eight
&alt A way of going, either natural or acquired, that is characterized by a distinctive movement of the feet.
&ate hold A request made by an exhibitor to wait before closing the gate and starting a class (usually limited to 5 minutes). Often used when members are sharing a horse or equipment.
Grade A horse of mixed breeding that does not have registration papers. Not a purebred.
Hot Excessively energetic.
Hybrid The offspring of two different species.
THE 4=[n} Ctasi PtecmcT
THIS P
UBLICATIO
N IS O
UT OF D
ATE.
For mos
t curr
ent in
formati
on:
http:/
/exten
sion.o
regon
state.
edu/c
atalog
In-hand The member exhibits the horse on the ground with only a halter or bridle.
Inspection When the judge moves around the horse during a Showmanship class or checks equipment for a performance class.
Jog A two-beat gait called for in Western classes.
Lactation The secretion of milk from the mare's mammary glands.
Lead When loping or cantering, the foreleg that is reaching out the furthest.
Lethargic Exhibiting drowsiness or indifference.
Leverage bit Any bit for which the reins attach to a shank rather than directly to the mouthpiece.
Lope A three-beat gait called for in Western classes.
Markings Any difference from the predominant coat color of the horse.
Mottled Refers to small dots of white on the muzzle, on the genitalia, and around the eyes of some horses, especially on Appaloosas.
Near Side The left side of the horse.
Off COUrse Failure to complete any or all of the elements of a pattern in proper sequence.
Off Side The right side of the horse.
Pace A two-beat gait in which the legs on one side of the horse move forward at the same time.
Palatable Pleasing to the taste.
Pattern The layout of maneuvers involved in a class.
Peritonitis Inflammation of the lining of the abdominal cavity.
PiVOt A turn in which the horse moves with one foot "planted" to the ground. The pivot foot may move up and down, but should not move from its original spot. The pivot foot should be the foot on the inside of the turn.
Pleasure Class A performance class judged primarily on the horse (its manners, way of going, responsiveness, etc.)
Points Coloring of the legs, mane, and tail.
Proboscis A long appendage coming from the head of an animal. Most commonly, the tubular feeding organ of certain insects.
Purebred A horse whose sire and dam are both in the same registry.
Quartering system The discipline that designates your movements during Showmanship when the judge is doing an inspection.
Rack A fast, four-beat gait of the American Saddle Horse.
Ratcatcher A tie worn at the neck in hunt seat apparel. Usually wraps around the collar and is held in place with a pin.
Ration All of the feed given to a horse.
Sclera The outer white membrane covering the eye.
Scratch When an exhibitor withdraws from an entered class before the class begins.
Serpentine A series of half-circles performed on a line.
SlOW-gait A slow, animated, four-beat gait of the American Saddlehorse in which each foot is held momentarily in midair.
Squaring up To position the horse with all four legs equally balanced.
Steamroll A grain processing method that uses steam to soften grain and then runs the grain through rollers that break the outer shells.
Superintendent Person(s) in charge of the event.
Supplements Additions to feed in order to increase certain nutrients.
Tack Equipment used on the horse.
Tolt A four-beat gait without a moment of suspension.
Toxin An organic poison.
Transition A change in gait.
Trot A two-beat gait in which diagonal legs move forward together.
Untrack Leading the horse forward or backward a few steps.
Vice An acquired abnormal behavior.
Walk A flat-footed, four-beat gait, natural to all horses.
THE 4=ln} Ktocm IPROJIICT \m
THIS P
UBLICATIO
N IS O
UT OF D
ATE.
For mos
t curr
ent in
formati
on:
http:/
/exten
sion.o
regon
state.
edu/c
atalog

^)[M]@mB> (3(MflMi@
Horse Industry Handbook. American Youth Horse Council, Lexington, Kentucky. 1994
Dictionary of Equine Terms. Compiled by New Horizons Equine Education Center, Inc. Alpine Publications, Loveland, Colorado. 1998
taw R3©KirKwsw limrafM
4-H Horse Contest Guide, PNW 574 4-H Horse Judging Manual, PNW 575 4-H Horse and Pony Driving Manual, PNW 229 Hunt Seat and Jumper Manual, PNW 488
^mm tats
4-H Colt and Horse Training Manual, 4-H 1303 Oregon 4-H Dressage Project Manual, 4-H 1311 To order publications:
http://extension.oregonstate. edu/catalog/4h
WASM&TOM STATS (UIRIIVERSDTY
Harness Driving Manual and Rules for Washington State, EM4881
To order publications: http://pubs.wsu.edu/cgi-bin/pubs/ index.html
Gtaioim 4hK} tmmi
4-H Horse Program: Horses and Horsemanship (CO 200)
4-H Horse Program: Horse Science (CO 201) To order publications: 4-hmall.org
teMTSS
UNIVERSITY OF IDAHO EXTENSION 4-H PROGRAM
http://www.4h.uidaho.edu
OREGON STATE UNIVERSITY EXTENSION 4-H PROGRAM
http://oregon.4h.oregonstate.edu
WASHINGTON STATE UNIVERSITY EXTENSION
4-H PROGRAM http://4h.wsu.edu
UNITED STATES EQUESTRIAN FEDERATION www.usef.org
UNITED STATES DRESSAGE FEDERATION www.usdf.org
MS THE $t~U CtasE IPRQJICT
THIS P
UBLICATIO
N IS O
UT OF D
ATE.
For mos
t curr
ent in
formati
on:
http:/
/exten
sion.o
regon
state.
edu/c
atalog

This publication was developed and written by the PNW 4-H Horse Curriculum Team. The team was led by Roberta Lundeberg, 4-H Program Assistant, Oregon State University; and Jerry Newman, Extension 4-H Youth Development Specialist, Washington State University. Oregon members are Peggy Ashford, Candi Bothum, and Shirley Watson. Washington members are Marilyn Anderson, Doug Evenson, Anne Garret, and Pat Pehling. Idaho members are Erika Theil and Jim Wilson.
For corrections or changes to this publication, contact:
4-H Youth Development State Office 105 Ballard Extension Hall Oregon State University Corvallis, OR 97331-3608 Phone (541) 737-2421 Fax (541) 737-1332
h Wmmmm State 4-H Office, WSU Pullman 601 Johnson Tower P.O. Box 644852 Pullman, WA 99164-4852 (509) 335-4128 Fax (509) 335-2808
Idaho State 4-H Office P.O. Box 443015 Moscow, ID 83844-3015
Any corrections or changes must be approved by the appropriate horse development or equine advisory committee. Approved changes will be forwarded to the PNW horse curriculum team for review and final decision.
THIS P
UBLICATIO
N IS O
UT OF D
ATE.
For mos
t curr
ent in
formati
on:
http:/
/exten
sion.o
regon
state.
edu/c
atalog

© 2006 Oregon State University
Pacific Northwest Extension publications are produced cooperatively by the three Pacific Northwest Land-Grant universities: Oregon State University, Washington State University, and the University of Idaho. Similar crops, climate, and topography create a natural geographic unit that crosses state lines. Since 1949, the PNW program has published more than 575 titles, preventing duplication of effort, broadening the availability of faculty specialists, and substantially reducing costs for the participating states.
Published and distributed in furtherance of the Acts of Congress of May 8 and June 30, 1914, by the Oregon State University Extension Service, Washington State University Extension, University of Idaho Cooperative Extension System, and the U.S. Department of Agriculture cooperating.
The three participating Extension Services offer educational programs, activities, and materials—without regard to race, color, religion, sex, sexual orientation, national origin, age, marital status, disability, and disabled veteran or Vietnam-era veteran status—as required by Title VI of the Civil Rights Act of 1964, Title IX of the Education Amendments of 1972, and Section 504 of the Rehabilitation Act of 1973. The Oregon State University Extension Service, Washington State University Extension, and University of Idaho Extension are Equal Opportunity Employers.
Published November 2006. $9.50
THIS P
UBLICATIO
N IS O
UT OF D
ATE.
For mos
t curr
ent in
formati
on:
http:/
/exten
sion.o
regon
state.
edu/c
atalog
Related Documents


