Textbook
Mar 17, 2016
Textbookdadad addawa dawd wae people love text book let me see it
Welcome message from author
This document is posted to help you gain knowledge. Please leave a comment to let me know what you think about it! Share it to your friends and learn new things together.
Transcript

Textbook’s Xbox 360 Firmware Tutorial
www.360mods.net
Table of Contents
Introduction Warnings Cost SATA Compatibility VIA SATA Drive Brand BenQ Opening The Xbox 360 Downloading The Firmware iPrep (USB) Xbox 360 and PC Connections Booting From USB Flashing Your Drive (USB) iPrep (NTFS4DOS CD) Xbox 360 and PC Connections Flashing Your Drive (NTFS4DOS CD) iPrep (Floppy) Xbox 360 and PC Connections Flashing Your Drive (Floppy) Samsung Opening The Xbox 360 MS25 or MS28 MS25 Downloading The Firmware iPrep (USB) Xbox 360 and PC Connections Booting From USB Flashing Your Drive (USB) iPrep (NTFS4DOS CD) Xbox 360 and PC Connections Flashing Your Drive (NTFS4DOS CD) iPrep (Floppy) Xbox 360 and PC Connections Flashing Your Drive (Floppy) MS28 Bad Flash Method (solderless)

Xbox 360 and PC Connection Flashing VCC Switch Method (requires soldering) Xbox 360 and PC Connection Flashing Updating Firmware Method 1 – Firmware Overwrite Method 2 – The “make” Command Method 3 – Repeat Process Disabling FirmGuard Restoring to Original Firmware Hitachi Opening The Xbox 360 Xbox 360 and PC Connection ModeB Slax CD 2-Wire Trick Connectivity Kits Hotswap Boot Flashed Drive With an Open Tray ModeB Indicators Detecting The Drive in Windows Version 46/47/59 Drives Downloading The Firmware Restoring The Drive (if previously flashed) Flashing The Drive Version 0078FK Drives Version 0079 Drives Method 1 – Modchip Method 2 – Using an External Programmer
Making Backups of Your Xbox 360 Games Using a Kreon Drive Using the Xbox 360 Samsung Drive WxRipper Method Verifying Game Images Bitsetting to DVD-ROM Burning With IMGBurn Burning With CloneCD
Downloads Thanks

Introduction The Xbox 360 DVD-ROM drive firmware hack is currently the only modification or hack available for the Xbox 360 that allows you to play properly created backup copies of Xbox 360 games. The firmware hack does NOT allow homebrew programs to run and does NOT bypass region protection. If a video game is locked to a particular region, then it will only play on an Xbox 360 of that same region. Before jumping into this modification, it is a good idea to learn how this hack works. In the most basic form, an Xbox 360’s game protection comes from two security measures. First of which is encryption. Nearly all files on an Xbox 360 game disc as well as the Xbox 360 hard drive are signed with Microsoft’s private key. If anything in these files, even just a single bit, is changed, the signature is broken and the Xbox 360 refuses to run the file. The second security measure is media locking. The default.xex (game executable) is restricted to run only from a certain type of media. For example, all Xbox 360 games are restricted to run only from “Xbox 360” media. Before the firmware hacks, if you were to copy an Xbox 360 game and try running it from “DVD+R DL” the Xbox 360 would obviously see that it wasn’t “Xbox 360” media and refuse to run it because of the media restriction. This media restriction is what the firmware hacks bypass. The firmware fakes out the Xbox 360 into thinking that any media is “Xbox 360” media. You copy your game to DVD+R DL, insert it into a firmware-hacked drive, and instead of returning “DVD+R DL” to the Xbox 360, the drive says it is an “Xbox 360” disc and it then plays the game. As you can see, the firmware hack does not bypass any signature protection whatsoever. That is why the Xbox 360 backups have to be 1:1 unedited backups of the Xbox 360 games.
Warnings The Xbox 360 firmware hack may be illegal under the Digital Millennium Copyright Act (United States), the European Union Copyright Directive (Europe), or other copyright laws in your country. Downloading, installing, and using this firmware could potentially be illegal. You are doing so at your own risk. Copying or downloading games that you have not legally purchased or own is illegal in all countries. This violates not only laws in your own country, but international copyright laws as well. The purpose of the firmware hack is for making backup copies of games that you legally own. Software piracy is illegal, carries a huge penalty if convicted, is ethically wrong, and hurts the game companies. Support the game developers by purchasing the games you play. You wouldn’t work for free, would you? Using this firmware hack and running your backups on Xbox Live violates the Xbox Live Terms of Service agreement that you agreed to when you signed up for the online gaming service. Microsoft withholds the right to terminate the Xbox Live service from you for any reason, at any point, with no warning, and no refunds. If you do get banned from Xbox Live, it is the system that is banned permanently. Simply put, if you are worried about Xbox Live, do not install this firmware modification. Finally, upgrading your Xbox 360 firmware requires you to open your Xbox 360, open your PC, and connect the Xbox 360 DVD-ROM drive to your computer via a SATA cable. This will void your Xbox 360 warranty. Also, this firmware upgrade is not recommended for novices. A technical level of computer knowledge is required, with an understanding of how to configure your PC BIOS, use MS-DOS, or the MS-DOS command prompt, and the use of CD/DVD software. If, after reading through this tutorial, you still do not understand it completely, either ask questions in forums until you do or get an experienced installer to do the job for you. Read through the entire tutorial before attempting to modify the system. This is not a guide to be read for the first time while you’re doing it, it should have already been read in full before attempting the modification.
Costs You will most likely have to spend a good amount of money in order to do this. Flashing the Xbox 360 firmware usually requires a specific SATA chipset, so if you don’t have a SATA chipset that is compatible for flashing your drive, you have to purchase a compatible PCI Sata card. Many people purchase the VIA VT6421 PCI SATA cards that usually cost around $20 USD. That is just for flashing the drive. In order to make game backups you need something to rip them with and something to burn them. First, let’s skip to burning. You’re going to need a DVD burner that can burn Double Layer DVD+R DL discs. You may also want to look into seeing if your burner supports something called “bitsetting” to DVD-ROM. A cheap, quality drive that automatically bitsets for you is the Pioneer 112D. You can find these online for around $40 USD. A burner isn’t going to do you any good without discs to burn them to. So get some DVD+R DL. My recommendation: use Verbatim brand discs, as they are the highest quality and you will not suffer from read errors if they are burned correctly. These discs, at the cheapest, will set you back around $2 USD a disc. Ripping games is somewhat complex. There are three different methods for ripping an Xbox 360 game. One is using an opened, external PC DVD-ROM drive and hotswapping a large DVD movie with the game, then dumping the game with WxRipper and merging a few patch files in later. So that won’t cost you any, but it’s a pain to have to keep a drive opened and outside of your PC all the time. There is another method, that is easier, but it requires purchasing a “Kreon” PC DVD-ROM drive. If you install this drive into your PC, ripping a game is as simple as inserting the game into the drive, loading Xbox Backup Creator, and one click on the “Backup” button. But the drive will cost you somewhere around $50 USD. You may already have some of these, but if you have none of them, you’re looking at quite a bit of money. $20 USD for a SATA card, $40 USD for a burner, $40 USD for some DVD+R DL (assuming you want to backup 20 games), and $50 USD for a Kreon drive comes out to be $150 USD. You have to ask yourself if it is worth it or not.

SATA Compatibility Before you go taking apart your Xbox 360, you might as well make sure you have the right equipment to flash your drive. The Xbox 360 DVD-ROM drive uses a Serial ATA (SATA) interface, so you will need SATA ports on your desktop PC’s motherboard. The picture below shows what a SATA port looks like. Having SATA is not enough though; you must have the right kind - the chipset that controls the SATA functions must be compatible with your version Xbox 360 drive.
Samsung MS25 Samsung MS25 drives can be flashed with many SATA chipsets. Silicon Image, Promise, and NForce2 chipsets are known to NOT be compatible for flashing Samsung drives. There are possibly more that cannot flash a Samsung MS25. Intel ICH5/6/7/8 chipsets, NForce 3/4, SiS, Uli, Jmicron, and VIA chipsets are all known to be compatible – others may also be. You cannot flash a Samsung drive using a SATA-to-USB adapter. If you are unsure whether your SATA is compatible or not, the best advice is to just try it out. If the SATA isn’t compatible, the drive won’t be recognized. You won’t brick your drive if the SATA is incompatible, it just “won’t work” – so you’re not losing much by just trying out what you already have. If you do not have SATA or yours is incompatible, you should look into purchasing a VIA VT6421 PCI card. You can find links to retailers here. Samsung MS28 Samsung MS28 drives can be flashed using two methods, the VIA bad-flash recovery method and the VCC method. You are best off purchasing a VIA brand card to do the bad-flash recovery method. You can find links to retailers here. Even with the VCC method, you would need a chipset
compatible with MS25 drives, since the VCC method is the equivalent of temporarily “dropping down” to MS25. It is just easier and safer using a VIA brand SATA chipset. You cannot flash a Samsung drive using a SATA-to-USB adapter. Hitachi 46 / 47 / 59 These “older version” Hitachi drives can be flashed with basically all SATA chipsets. It should work as long as the SATA supports ATAPI devices (optical drives). Another good thing about these drives is they are the only Xbox 360 drives that can be flashed with a SATA-to-USB adapter. The cheap generic one I bought on eBay worked fine. Hitachi 0078FK These drives can be flashed by most SATA chipsets. Silicon Image SATA chipsets will NOT work; they corrupt the data and will give you an error. Attempting to flash this drive with a SIL chipset could brick your drive. Also, in rare cases, there are reports that VIA chipsets have problems with some version 78 drives. Personally, my VIA 8237 is iffy. I have to play with it for a while until I get it to read the drive. Shorter SATA cables seem to help with my setup. Many other chipsets should work fine. VIA SATA Just some notes about users of VIA SATA chipsets. This is for both onboard chipsets (like the 8237) as well as the PCI cards (6421). A common problem is detecting the drive with MTKFlash with VIA chipsets. For some reason, many people have this problem when using the external ports on the VIA SATA cards, or the “1” port if using internal. What seems to work best for most people is always using the primary “0” SATA port. On the PCI SATA cards, this is almost always an internal port. If there are multiple internal ports, use the port closest to the front of your PC. If you still can’t get the drive detected, you can try –pk-‘s suggestions. Also, the latest VIA SATA drivers are available here. When you run through the installation wizard, uncheck (don’t install) the VIA RAID Tool. Just install the drivers.
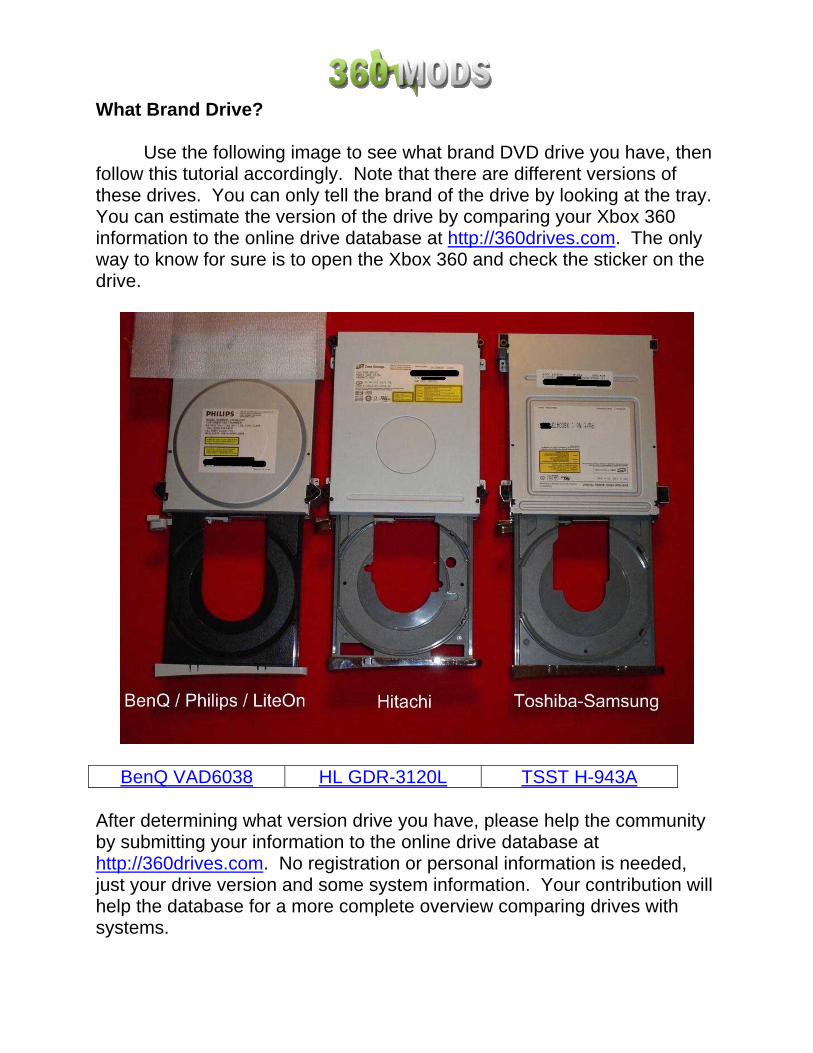
What Brand Drive? Use the following image to see what brand DVD drive you have, then follow this tutorial accordingly. Note that there are different versions of these drives. You can only tell the brand of the drive by looking at the tray. You can estimate the version of the drive by comparing your Xbox 360 information to the online drive database at http://360drives.com. The only way to know for sure is to open the Xbox 360 and check the sticker on the drive.
BenQ VAD6038 HL GDR-3120L TSST H-943A
After determining what version drive you have, please help the community by submitting your information to the online drive database at http://360drives.com. No registration or personal information is needed, just your drive version and some system information. Your contribution will help the database for a more complete overview comparing drives with systems.

Philips/BenQ/LiteOn VAD6038 Tutorial
You will need:
• VIA or NForce SATA chipset • iPrep 101 v006
This method only works with VIA or NForce SATA chipsets. Any other chipset requires soldering a switch to the drive and is covered in a tutorial here.

Opening The Xbox 360 The outer Xbox 360 “shell” is entirely screwless. Plastic friction tabs hold the case together. There are many different tutorials for opening the Xbox 360, with different methods. Here are some links to “opening the Xbox 360” tutorials. I decided not to cover opening the Xbox 360 in this tutorial since it is already long enough and there are many other tutorials for opening the Xbox 360. Notes:
- The Anandtech guide says you need to use a Torx 12 screwdriver. There is no such thing. You need a Torx 10 screwdriver.
- Removing the grey side grill on the hard drive side is a little tricky. The first friction tab is actually inaccessible from the top holes in the case, so you need to stick your screwdriver in the hole by where the hard drive button is and unclip it. (See Pic)
- In order to push in the back clips, you can do one of two things. You can use a thin metal object such as a precision flathead screwdriver / bobby pin / paperclip OR you can make an opening “key” out of a CD spindle case. The key would not work for me, it was too flimsy, but it works for some people. You can also purchase an “unlock kit.”
- If all you want to do is just flash the firmware, you only need to remove the six long screws on the bottom. (See Pic)
Read all these guides and watch all the videos, figure out how you want to go about opening the Xbox 360. It is not rocket science. Anandtech Guide InformIT Guide Xbox-Accessories Disassembly Hydra's Guide to Making a CD Unlock Key Textbook’s Video acDC's Video

Downloading The Firmware
The hacked firmware may be illegal under the DMCA, EUCD, or other local, national, and international copyright laws. It contains portions of Microsoft’s copyrighted firmware and therefore cannot be linked to or downloaded publicly. Do not request the firmware on any forums because you will most likely be banned. Use Xbins. Xbins is an IRC channel and FTP server that hosts Xbox and Xbox 360 mod files.
If you have never used Xbins before, the easiest method is to use Ground Zero’s automated Xbins downloader.
Download and run the xbins.exe file. It will ask you where you want to save the files, choose your desktop. Now, go into the “Xbins” folder on your desktop and run the .bat file. The program will connect to the IRC channel, message the bot, and connect to the FTP server. When FileZilla opens you should see the local Downloads folder on your left and the Xbins FTP server on your right.
The hacked firmware can be found in:
/XBOX 360/firmware/hacked firmware/Benq VAD6038/
Simply drag the “Benq.iXtreme.v1.4.rar” file over to the left side of FileZilla and wait for it to finish downloading.

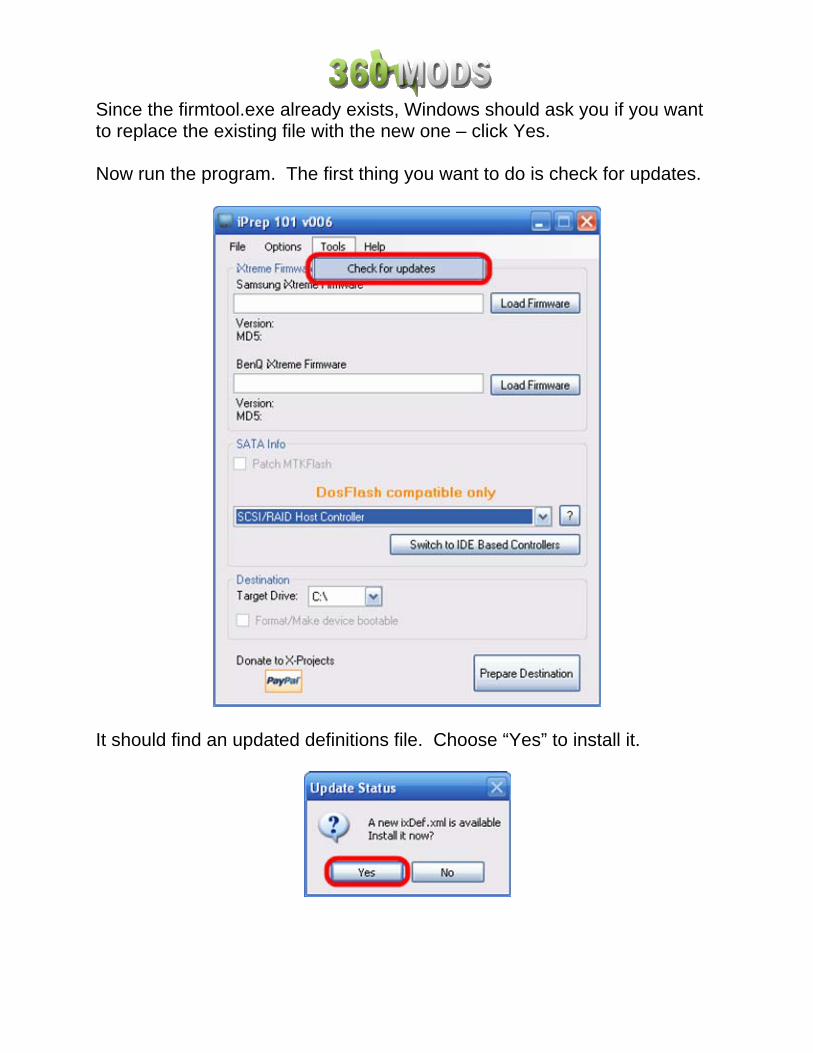
iPrep (USB Flash Drive) The following process will set up a bootable USB flash drive with everything necessary to read your original firmware and write the hacked firmware onto the drive. We will use iPrep to automatically detect your SATA port, format the USB drive, and copy the required DosFlash and hacked firmware files onto it. First, you need to make sure Microsoft .NET Framework v2 is installed. It is needed for iPrep to run. If you do not have this installed, you will be prompted to download and install it. Second, you need to make sure the drivers for your SATA chipset are installed. Use either the CD that came with your computer/SATA card, or use the manufacturer’s web site to install the latest drivers. The latest drivers for VIA chipsets and Windows XP are here. Once you have that taken care of, you can download and install iPrep. Klutsh updates iPrep frequently, the latest version is always available on his website at http://www.x-projects.org or on xbins in: /XBOX 360/firmware/firmware tools/iPrep 101/ The download is in the form of a RAR archive. Use WinRAR to extract all the files to a new folder and run the installer to install iPrep. Next we will update Firmtool to the newest version which is 1.2. There are many improvements from 1.1 to 1.2 so it is recommended to update before formatting your drive with iPrep and flashing. To do this, download Firmtool 1.2 from here and extract the “firmtoolv1.2.rar” file. Then replace the “firmtool.exe” file in the folder below with the new one from the rar file. C:\Program Files\X-Projects\iPrep 101\Resources\Tools Since the firmtool.exe already exists, Windows should ask you if you want to replace the existing file with the new one – click Yes. Now run the program. The first thing you want to do is check for updates.

It should find an updated definitions file. Choose “Yes” to install it.
Hit the “Load Firmware” button on iPrep.

When you hit this button, a “Load iXtreme” window should open for you to browse for the iXtreme firmware. Browse and open the: “Benq.iXtreme.v1.4.rar” file

You should then get a series of messages confirming that iPrep has found the iXtreme firmware files inside the rar, the first one will be for the NON-STEALTH version, click No.
iPrep will continue loading the firmware, click Yes to choose the speed that you would like to use. (2x, 5x, 8x, or 12x)

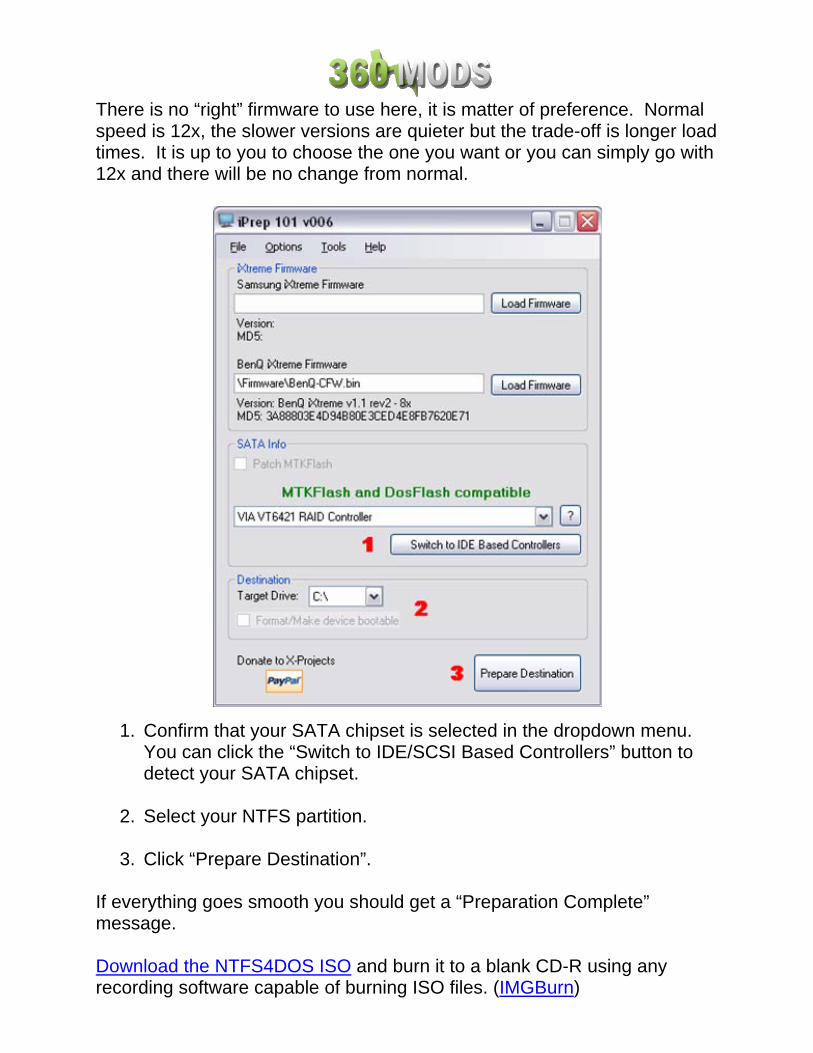
There is no “right” firmware to use here, it is matter of preference. Normal speed is 12x, the slower versions are quieter but the trade-off is longer load times. It is up to you to choose the one you want or you can simply go with 12x and there will be no change from normal.
1. Confirm that your SATA chipset is selected in the dropdown menu. You can click the “Switch to IDE/SCSI Based Controllers” button to detect your SATA chipset.
2. Select your USB flash drive from the drop-down list. Check the box
to Format the flash drive and make it bootable. Remember to get any important data off the flash drive first, it will be erased!
3. Click “Prepare Destination”.
If everything goes smooth you should get a “Preparation Complete” message.

Xbox 360 and PC Connections
Power off your PC and Xbox 360. Make sure the Xbox 360 power cable and video cable are both plugged in. You do not need to hook up the video to a TV, but it does have to be plugged into the back of the Xbox 360.
The Xbox 360 uses a floating point ground. Your PC uses a “true earth” ground. This difference can cause excess voltage to travel through your SATA cable and potentially damage your Xbox 360 DVD drive or PC Motherboard / SATA card. Remedy this problem by connecting the Xbox 360’s ground to the PC’s ground. The easiest way to do this is by using a “croc clip wire” and connecting the Xbox 360 metal casing to your PC’s metal case. You can use anything conductive to connect the Xbox 360 case to the PC case - you could just tape some bare/stripped wire to each, or even just set the Xbox 360 next to the PC so that they are touching.
Many people have flashed their drives completely ignoring this recommendation. The possibility of damaging something by ignoring this step is rare, but still possible. So, you could say grounding the PC and 360 together isn’t absolutely necessary, but it is recommended. If you have the ability to do so, it is safest to take the time to do it.
Disconnect all other drives in your PC. You should disconnect all hard drives and DVD drives so they do not get accidentally flashed with the hacked firmware. Disabling these devices in your BIOS may not work, so physically unplugging them is the best solution.
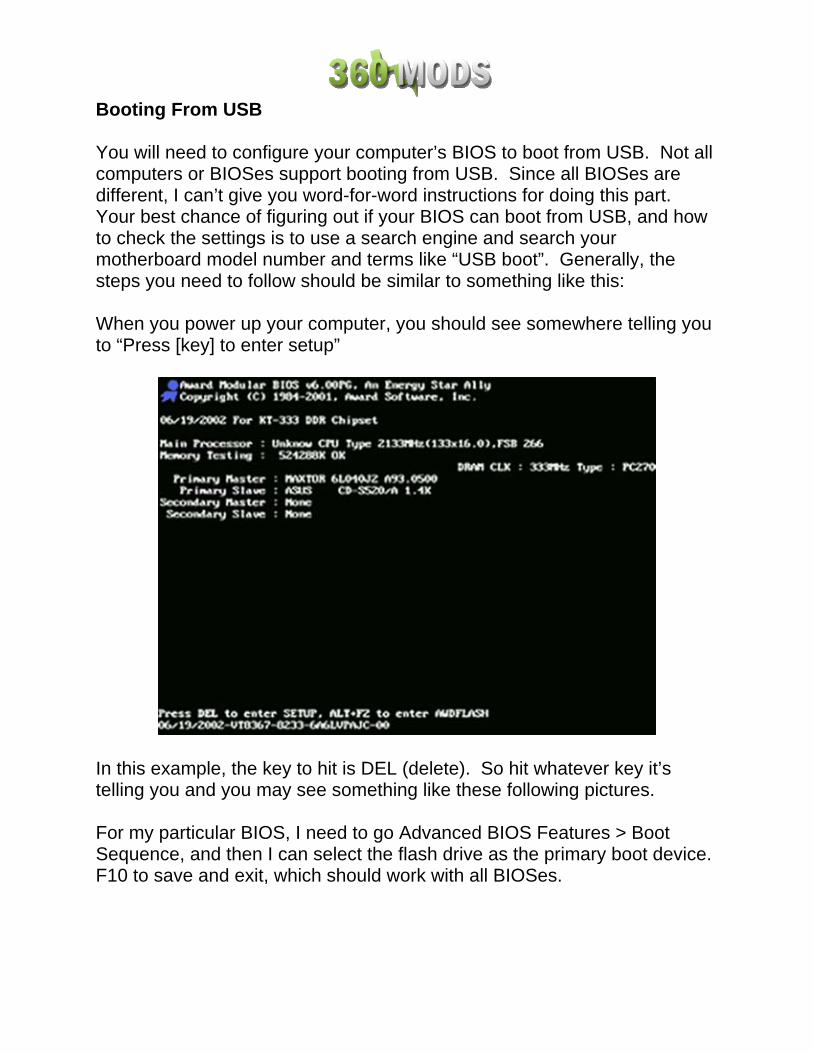
Booting From USB You will need to configure your computer’s BIOS to boot from USB. Not all computers or BIOSes support booting from USB. Since all BIOSes are different, I can’t give you word-for-word instructions for doing this part. Your best chance of figuring out if your BIOS can boot from USB, and how to check the settings is to use a search engine and search your motherboard model number and terms like “USB boot”. Generally, the steps you need to follow should be similar to something like this: When you power up your computer, you should see somewhere telling you to “Press [key] to enter setup”
In this example, the key to hit is DEL (delete). So hit whatever key it’s telling you and you may see something like these following pictures. For my particular BIOS, I need to go Advanced BIOS Features > Boot Sequence, and then I can select the flash drive as the primary boot device. F10 to save and exit, which should work with all BIOSes.


Flashing The Drive (USB) Reading The Original Firmware Connect the SATA cable from the 360 to your PC / SATA card, then turn on your PC and boot from the USB flash drive into DOS. The Xbox 360 should still be off at this point.
Enter y to accept the iPrep Terms of Use.

Type in the following command, using your Xbox 360 serial number found on the back of the Xbox 360 case. (we’ll use the serial number 1234567 12345 as an example) dBen 1234567 12345 [press enter]
Follow the prompts on the screen, make sure your 360 is OFF and press any key to continue. Press Y to resend the MTK Vendor Intro.
• Turn on the Xbox 360 and wait 2 or more seconds, status toggles between 0x51 and 0xD1.
• Turn off the Xbox 360 and wait 2 or more seconds, status will stay at
0xD1.
• Turn on the Xbox 360, you should get a good drive status 0x73 and reading should begin automatically.

All 4 banks should read OK and you should get a “Reading finished!” message with a Datasum.
Firmtool will then run automatically to create the hacked firmware…
If you get a green success message from Firmtool power off the 360 and proceed to the flashing page. If you get any red error messages DO NOT proceed with flashing.

Firmtool Errors Sometimes there are problems. If your firmware dump is not the correct size, does not contain a valid key, or does not contain a valid drive version, FirmTool will abort. If you get something like any of these pictures, DO NOT PROCEED WITH FLASHING! Doing so may brick your Xbox 360 and leave you without a valid drive key. Something is wrong. Make sure you have unplugged all other drives in your PC and try starting this tutorial over again. INVALID DRIVE SERIAL
ORIG.BIN IS WRONG SIZE
NO VALID KEY IN ORIG.BIN

Again, your screen should match the screenshot below before proceeding: FIRMTOOL SUCCESS

Flashing The Hacked Firmware After reading the original firmware and firmtool has completed successfully, you can proceed to flashing the hacked firmware. You should not need to restart your PC in order to flash, but you will need to power off the Xbox 360. Type in the following command, using your Xbox 360 serial number found on the back of the Xbox 360 case. (we’ll use the serial number 1234567 12345 as an example) fBen 1234567 12345 [press enter]
Following the prompts on the screen, make sure your 360 is OFF and press any key to continue. Press Y to resend the MTK Vendor Intro.
• Turn on the Xbox 360 and wait 2 or more seconds, status toggles between 0x51 and 0xD1.
• Turn off the Xbox 360 and wait 2 or more seconds, status will stay at
0xD1.
• Turn on the Xbox 360, you should get a good drive status 0x73 and erasing should begin automatically.

You will then see this screen which tells you to power OFF the 360:
IMPORTANT! You must power the 360 back ON before pressing any key to continue. If you press any key to continue with the 360 powered OFF (as instructed to do on screen) it will immediately freeze attempting to write Bank 0. This is a bug in iPrep 006 and will hopefully be resolved in a future release. So power the 360 OFF, wait a few seconds, power it ON, wait a few seconds, then press any key to continue.
Writing should begin as soon as you press any key to continue with the 360 already powered ON. All 4 banks should write OK and you should get a “Writing finished!” message with a Datasum.

iPrep (NTFS4DOS CD) The following process will set up an NTFS partition (your Windows hard drive) with everything necessary to read your original firmware and write the hacked firmware onto the drive. One thing you should realize before starting is that NTFS4DOS has been known to have some problems with partitions larger than 32gb. You can try going ahead and using your large partition, but if you experience problems or just want to make sure it will work, you should make a small, logical, primary partition using something like Partition Magic or a Gparted live cd. We will use iPrep to automatically detect your SATA port and copy the required DosFlash and hacked firmware files onto it. First, you need to make sure Microsoft .NET Framework v2 is installed. It is needed for iPrep to run. If you do not have this installed, you will be prompted to download and install it. Second, you need to make sure the drivers for your SATA chipset are installed. Use either the CD that came with your computer/SATA card, or use the manufacturer’s web site to install the latest drivers. The latest drivers for VIA chipsets and Windows XP are here. Once you have that taken care of, you can download and install iPrep. Klutsh updates iPrep frequently, the latest version is always available on his website at http://www.x-projects.org or on xbins in: /XBOX 360/firmware/firmware tools/iPrep 101/ The download is in the form of a RAR archive. Use WinRAR to extract all the files to a new folder and run the installer to install iPrep. Next we will update Firmtool to the newest version which is 1.2. There are many improvements from 1.1 to 1.2 so it is recommended to update before formatting your drive with iPrep and flashing. To do this, download Firmtool 1.2 from here and extract the “firmtoolv1.2.rar” file. Then replace the “firmtool.exe” file in the folder below with the new one from the rar file. C:\Program Files\X-Projects\iPrep 101\Resources\Tools
Since the firmtool.exe already exists, Windows should ask you if you want to replace the existing file with the new one – click Yes. Now run the program. The first thing you want to do is check for updates.
It should find an updated definitions file. Choose “Yes” to install it.

Hit the “Load Firmware” button on iPrep.
When you hit this button, a “Load iXtreme” window should open for you to browse for the iXtreme firmware. Browse and open the: “Benq.iXtreme.v1.4.rar” file

You should then get a series of messages confirming that iPrep has found the iXtreme firmware files inside the rar, the first one will be for the NON-STEALTH version, click No.
iPrep will continue loading the firmware, click Yes to choose the speed that you would like to use. (2x, 5x, 8x, or 12x)
There is no “right” firmware to use here, it is matter of preference. Normal speed is 12x, the slower versions are quieter but the trade-off is longer load times. It is up to you to choose the one you want or you can simply go with 12x and there will be no change from normal.
1. Confirm that your SATA chipset is selected in the dropdown menu. You can click the “Switch to IDE/SCSI Based Controllers” button to detect your SATA chipset.
2. Select your NTFS partition. 3. Click “Prepare Destination”.
If everything goes smooth you should get a “Preparation Complete” message. Download the NTFS4DOS ISO and burn it to a blank CD-R using any recording software capable of burning ISO files. (IMGBurn)

Xbox 360 and PC Connections
Power off your PC and Xbox 360. Make sure the Xbox 360 power cable and video cable are both plugged in. You do not need to hook up the video to a TV, but it does have to be plugged into the back of the Xbox 360.
The Xbox 360 uses a floating point ground. Your PC uses a “true earth” ground. This difference can cause excess voltage to travel through your SATA cable and potentially damage your Xbox 360 DVD drive or PC Motherboard / SATA card. Remedy this problem by connecting the Xbox 360’s ground to the PC’s ground. The easiest way to do this is by using a “croc clip wire” and connecting the Xbox 360 metal casing to your PC’s metal case. You can use anything conductive to connect the Xbox 360 case to the PC case - you could just tape some bare/stripped wire to each, or even just set the Xbox 360 next to the PC so that they are touching.
Many people have flashed their drives completely ignoring this recommendation. The possibility of damaging something by ignoring this step is rare, but still possible. So, you could say grounding the PC and 360 together isn’t absolutely necessary, but it is recommended. If you have the ability to do so, it is safest to take the time to do it.
Flashing The Drive (NTFS4DOS CD) Reading The Original Firmware
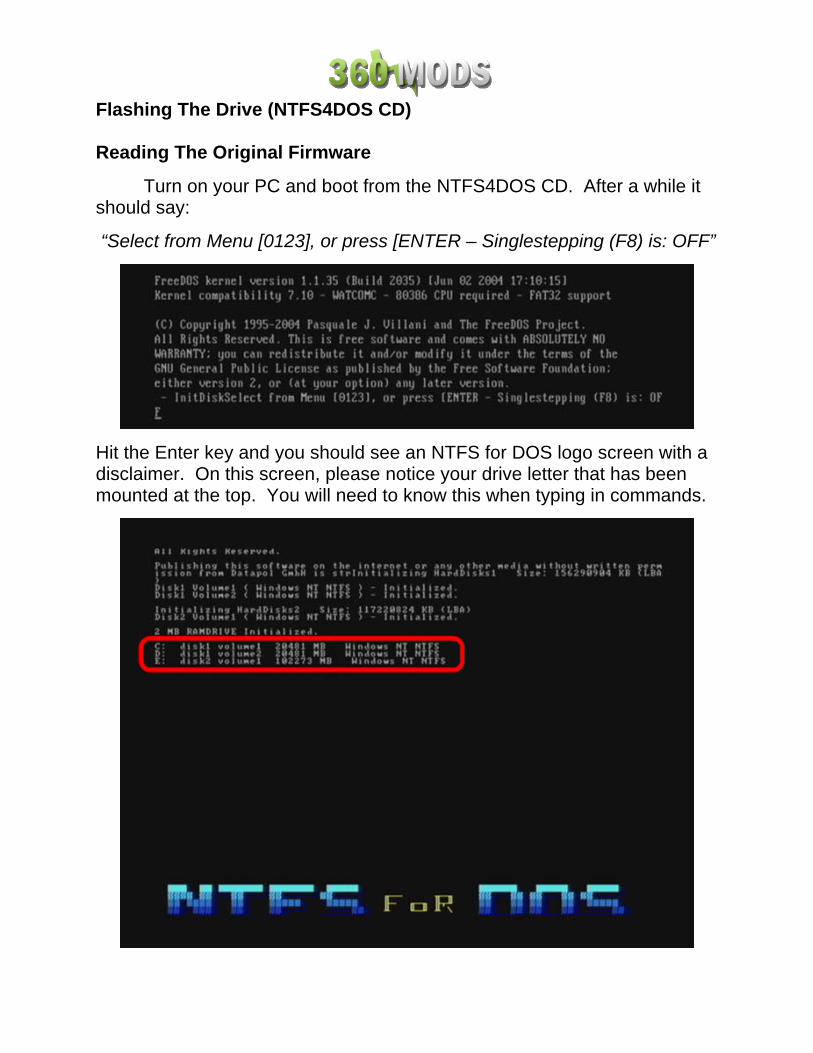
Turn on your PC and boot from the NTFS4DOS CD. After a while it should say:
“Select from Menu [0123], or press [ENTER – Singlestepping (F8) is: OFF”
Hit the Enter key and you should see an NTFS for DOS logo screen with a disclaimer. On this screen, please notice your drive letter that has been mounted at the top. You will need to know this when typing in commands.

The disclaimer asks you if you are going to use this for private usage only, please type in “Yes” without the quotes, and hit the Enter key.
Dos will start in your ram drive. You will need to mount your hard drive.
C: [press enter] use the drive letter your hard drive was given
cd iPrep_101 [press enter] If you get a message saying “chdir failed” it is because of the long directory name. Type “dir” without the quotes and hit enter for a directory listing of the C: drive. The iPrep_101 folder may show up as something like IPREP_~2 or similar. So use that with the cd command.
Now that you are in the right directory, you can now connect the Xbox 360 to the PC using the SATA cable.

Enter y to accept the iPrep Terms of Use.
Type in the following command, using your Xbox 360 serial number found on the back of the Xbox 360 case. (we’ll use the serial number 1234567 12345 as an example) dBen 1234567 12345 [press enter]

Follow the prompts on the screen, make sure your 360 is OFF and press any key to continue. Press Y to resend the MTK Vendor Intro.
• Turn on the Xbox 360 and wait 2 or more seconds, status toggles between 0x51 and 0xD1.
• Turn off the Xbox 360 and wait 2 or more seconds, status will stay at
0xD1.
• Turn on the Xbox 360, you should get a good drive status 0x73 and reading should begin automatically.
All 4 banks should read OK and you should get a “Reading finished!” message with a Datasum.

Firmtool will then run automatically to create the hacked firmware…
If you get a green success message from Firmtool power off the 360 and proceed to the flashing page. If you get any red error messages DO NOT proceed with flashing.

Firmtool Errors Sometimes there are problems. If your firmware dump is not the correct size, does not contain a valid key, or does not contain a valid drive version, FirmTool will abort. If you get something like any of these pictures, DO NOT PROCEED WITH FLASHING! Doing so may brick your Xbox 360 and leave you without a valid drive key. Something is wrong. Make sure you have unplugged all other drives in your PC and try starting this tutorial over again. INVALID DRIVE SERIAL
ORIG.BIN IS WRONG SIZE
NO VALID KEY IN ORIG.BIN

Again, your screen should match the screenshot below before proceeding: FIRMTOOL SUCCESS

Flashing The Hacked Firmware After reading the original firmware and firmtool has completed successfully, you can proceed to flashing the hacked firmware. You should not need to restart your PC in order to flash, but you will need to power off the Xbox 360. Type in the following command, using your Xbox 360 serial number found on the back of the Xbox 360 case. (we’ll use the serial number 1234567 12345 as an example) fBen 1234567 12345 [press enter]
Following the prompts on the screen, make sure your 360 is OFF and press any key to continue. Press Y to resend the MTK Vendor Intro.
• Turn on the Xbox 360 and wait 2 or more seconds, status toggles between 0x51 and 0xD1.
• Turn off the Xbox 360 and wait 2 or more seconds, status will stay at
0xD1.
• Turn on the Xbox 360, you should get a good drive status 0x73 and erasing should begin automatically.

You will then see this screen which tells you to power OFF the 360:
IMPORTANT! You must power the 360 back ON before pressing any key to continue. If you press any key to continue with the 360 powered OFF (as instructed to do on screen) it will immediately freeze attempting to write Bank 0. This is a bug in iPrep 006 and will hopefully be resolved in a future release. So power the 360 OFF, wait a few seconds, power it ON, wait a few seconds, then press any key to continue.
Writing should begin as soon as you press any key to continue with the 360 already powered ON. All 4 banks should write OK and you should get a “Writing finished!” message with a Datasum.
iPrep (Floppy) Quick warning about floppies. Lately, people have been bricking their drives by using floppies. They are unreliable and can die mid-flash. Sometimes the person is lucky and the bad flash recovery method can be used to reflash the drive. Others needed to hotswap and use the bad flash recovery. Floppies are old technology for a reason. They are very unreliable. Please try to refrain from using a floppy. If you can use a bootable USB stick or burn an NTFS4DOS CD, do that instead. If you absolutely must use a floppy, use a new one! The following process will set up a bootable floppy disk with everything necessary to read your original firmware and write the hacked firmware onto the drive. We will use iPrep to automatically detect your SATA port, format the floppy, and copy the required DosFlash and hacked firmware files onto it. First, you need to make sure Microsoft .NET Framework v2 is installed. It is needed for iPrep to run. If you do not have this installed, you will be prompted to download and install it. Second, you need to make sure the drivers for your SATA chipset are installed. Use either the CD that came with your computer/SATA card, or use the manufacturer’s web site to install the latest drivers. The latest drivers for VIA chipsets and Windows XP are here. Once you have that taken care of, you can download and install iPrep. Klutsh updates iPrep frequently, the latest version is always available on his website at http://www.x-projects.org or on xbins in: /XBOX 360/firmware/firmware tools/iPrep 101/ The download is in the form of a RAR archive. Use WinRAR to extract all the files to a new folder and run the installer to install iPrep. Next we will update Firmtool to the newest version which is 1.2. There are many improvements from 1.1 to 1.2 so it is recommended to update before formatting your drive with iPrep and flashing. To do this, download Firmtool 1.2 from here and extract the “firmtoolv1.2.rar” file. Then replace the “firmtool.exe” file in the folder below with the new one from the rar file.
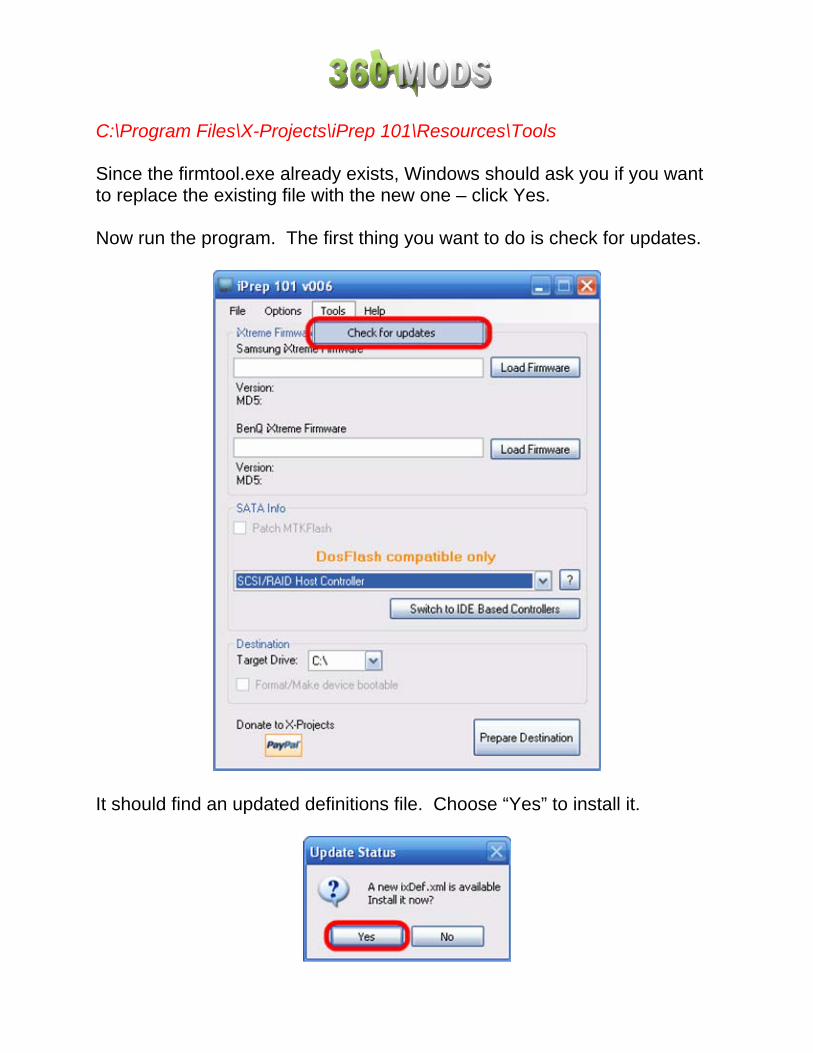
C:\Program Files\X-Projects\iPrep 101\Resources\Tools Since the firmtool.exe already exists, Windows should ask you if you want to replace the existing file with the new one – click Yes. Now run the program. The first thing you want to do is check for updates.
It should find an updated definitions file. Choose “Yes” to install it.
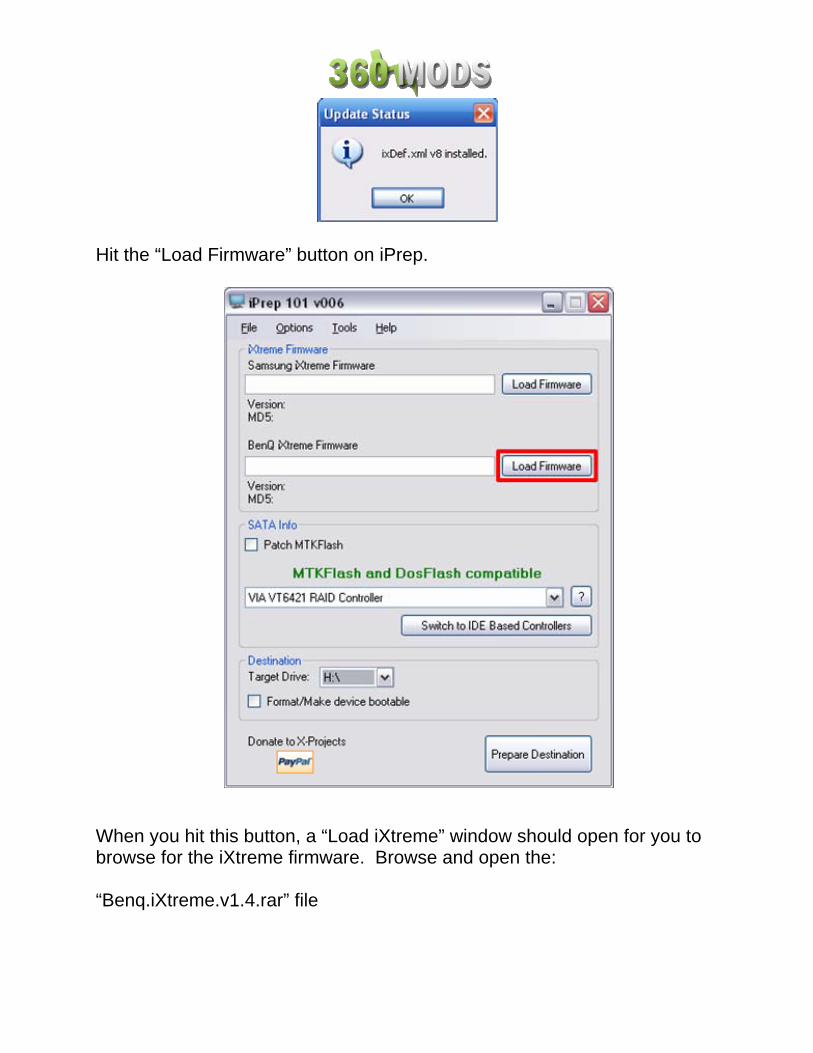
Hit the “Load Firmware” button on iPrep.
When you hit this button, a “Load iXtreme” window should open for you to browse for the iXtreme firmware. Browse and open the: “Benq.iXtreme.v1.4.rar” file

You should then get a series of messages confirming that iPrep has found the iXtreme firmware files inside the rar, the first one will be for the NON-STEALTH version, click No.
iPrep will continue loading the firmware, click Yes to choose the speed that you would like to use. (2x, 5x, 8x, or 12x)
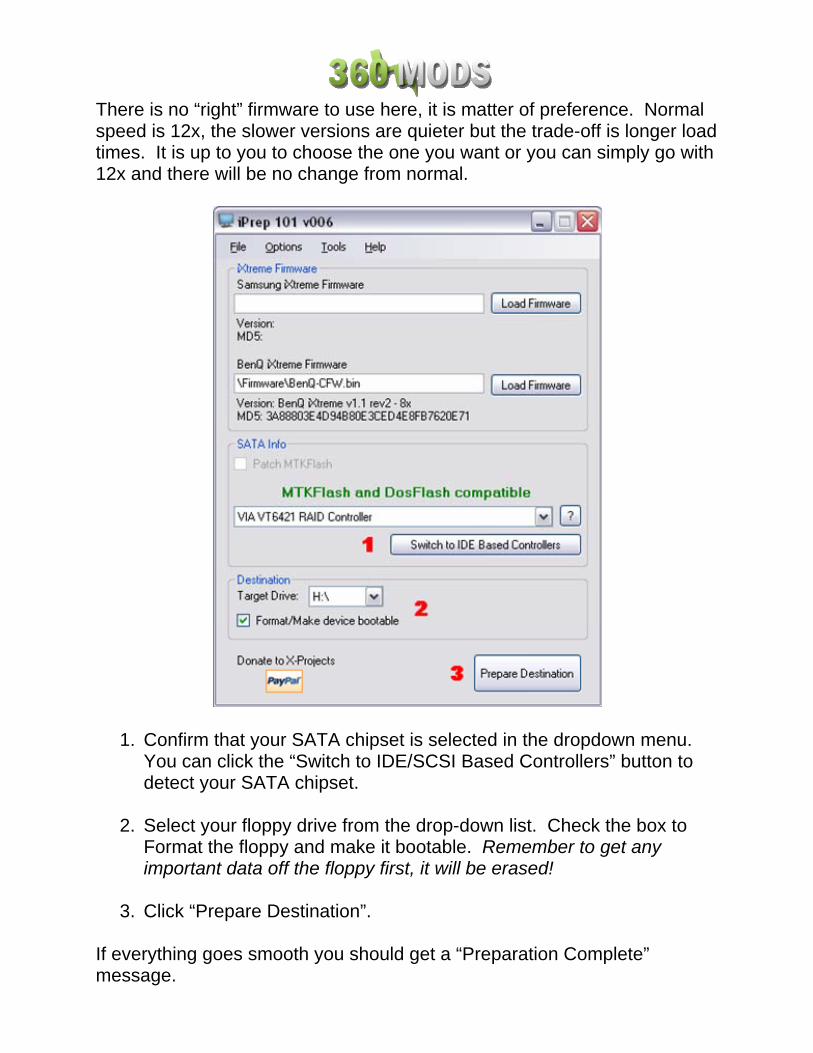
There is no “right” firmware to use here, it is matter of preference. Normal speed is 12x, the slower versions are quieter but the trade-off is longer load times. It is up to you to choose the one you want or you can simply go with 12x and there will be no change from normal.
1. Confirm that your SATA chipset is selected in the dropdown menu. You can click the “Switch to IDE/SCSI Based Controllers” button to detect your SATA chipset.
2. Select your floppy drive from the drop-down list. Check the box to
Format the floppy and make it bootable. Remember to get any important data off the floppy first, it will be erased!
3. Click “Prepare Destination”.
If everything goes smooth you should get a “Preparation Complete” message.

Xbox 360 and PC Connections
Power off your PC and Xbox 360. Make sure the Xbox 360 power cable and video cable are both plugged in. You do not need to hook up the video to a TV, but it does have to be plugged into the back of the Xbox 360.
The Xbox 360 uses a floating point ground. Your PC uses a “true earth” ground. This difference can cause excess voltage to travel through your SATA cable and potentially damage your Xbox 360 DVD drive or PC Motherboard / SATA card. Remedy this problem by connecting the Xbox 360’s ground to the PC’s ground. The easiest way to do this is by using a “croc clip wire” and connecting the Xbox 360 metal casing to your PC’s metal case. You can use anything conductive to connect the Xbox 360 case to the PC case - you could just tape some bare/stripped wire to each, or even just set the Xbox 360 next to the PC so that they are touching.
Many people have flashed their drives completely ignoring this recommendation. The possibility of damaging something by ignoring this step is rare, but still possible. So, you could say grounding the PC and 360 together isn’t absolutely necessary, but it is recommended. If you have the ability to do so, it is safest to take the time to do it.
Disconnect all other drives in your PC. You should disconnect all hard drives and DVD drives so they do not get accidentally flashed with the hacked firmware. Disabling these devices in your BIOS may not work, so physically unplugging them is the best solution.
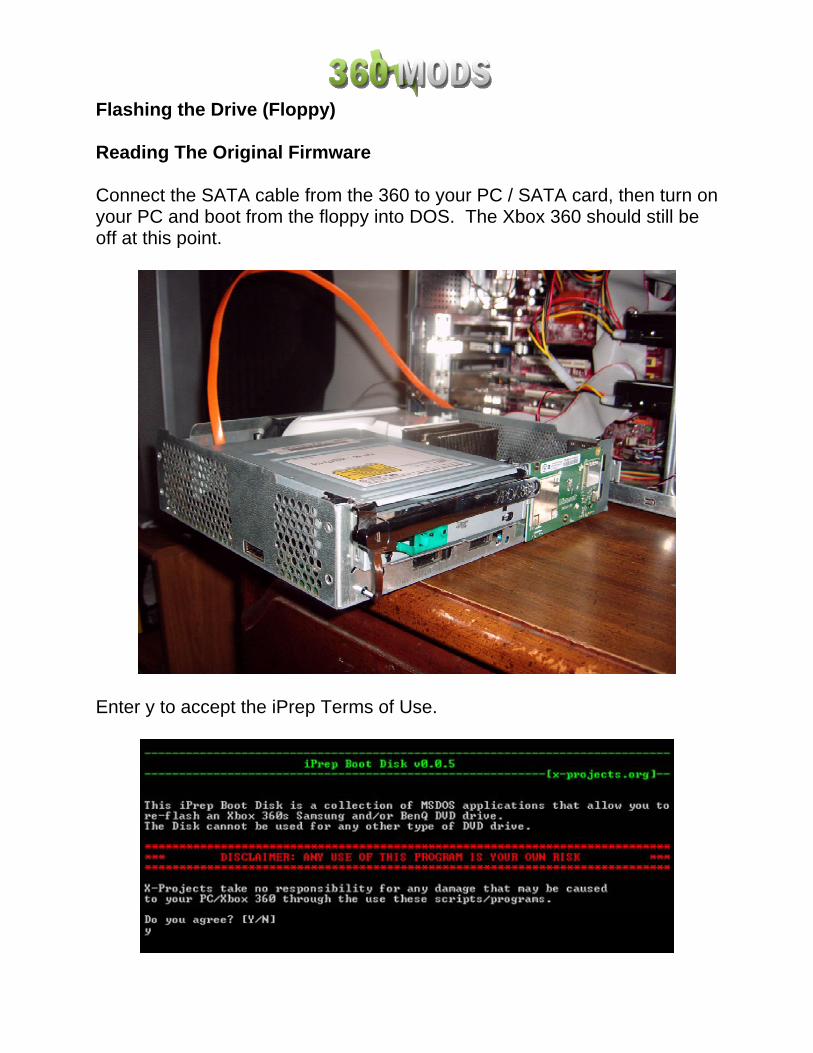
Flashing the Drive (Floppy) Reading The Original Firmware Connect the SATA cable from the 360 to your PC / SATA card, then turn on your PC and boot from the floppy into DOS. The Xbox 360 should still be off at this point.
Enter y to accept the iPrep Terms of Use.

Type in the following command, using your Xbox 360 serial number found on the back of the Xbox 360 case. (we’ll use the serial number 1234567 12345 as an example) dBen 1234567 12345 [press enter]
Follow the prompts on the screen, make sure your 360 is OFF and press any key to continue. Press Y to resend the MTK Vendor Intro.
• Turn on the Xbox 360 and wait 2 or more seconds, status toggles between 0x51 and 0xD1.
• Turn off the Xbox 360 and wait 2 or more seconds, status will stay at
0xD1.
• Turn on the Xbox 360, you should get a good drive status 0x73 and reading should begin automatically.

All 4 banks should read OK and you should get a “Reading finished!” message with a Datasum.
Firmtool will then run automatically to create the hacked firmware…
If you get a green success message from Firmtool power off the 360 and proceed to the flashing page. If you get any red error messages DO NOT proceed with flashing.

Firmtool Errors Sometimes there are problems. If your firmware dump is not the correct size, does not contain a valid key, or does not contain a valid drive version, FirmTool will abort. If you get something like any of these pictures, DO NOT PROCEED WITH FLASHING! Doing so may brick your Xbox 360 and leave you without a valid drive key. Something is wrong. Make sure you have unplugged all other drives in your PC and try starting this tutorial over again. INVALID DRIVE SERIAL
ORIG.BIN IS WRONG SIZE
NO VALID KEY IN ORIG.BIN
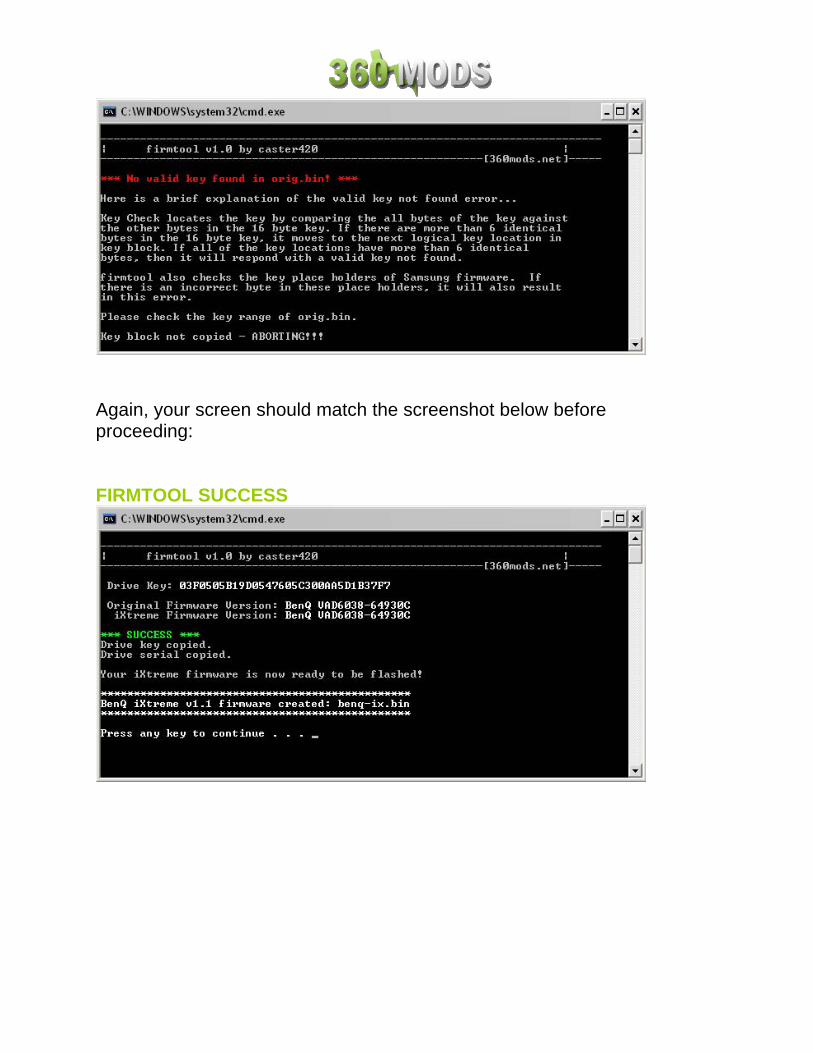
Again, your screen should match the screenshot below before proceeding: FIRMTOOL SUCCESS
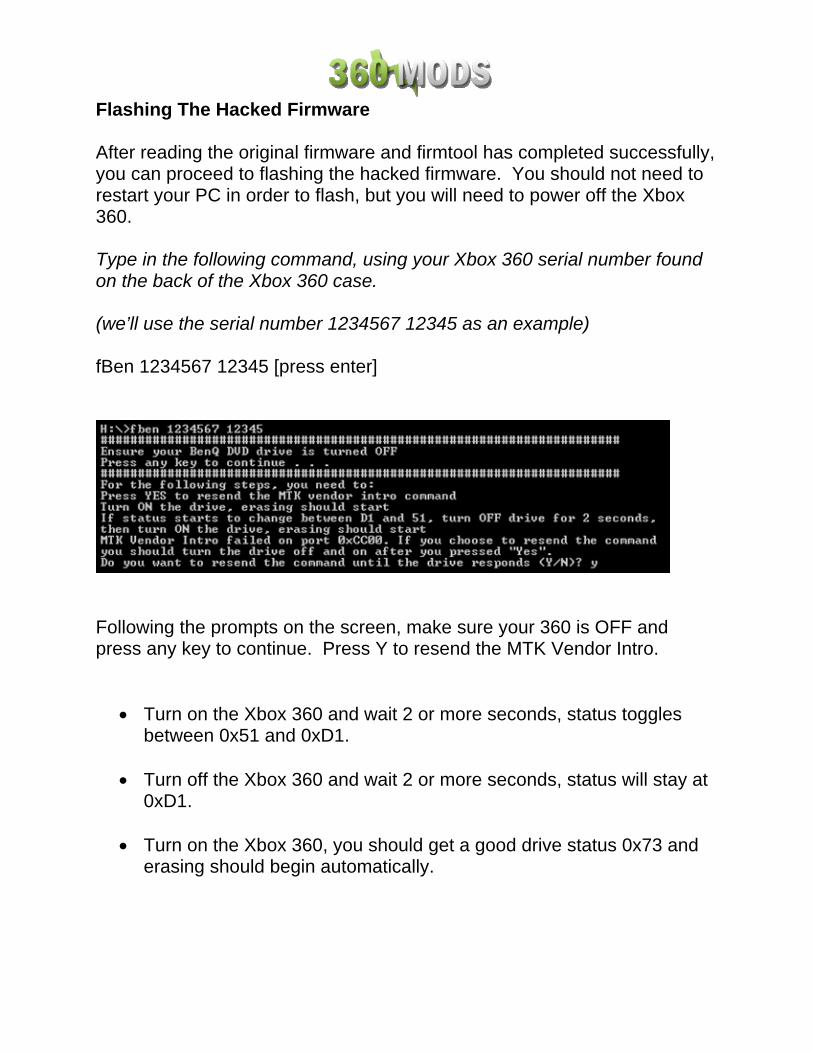
Flashing The Hacked Firmware After reading the original firmware and firmtool has completed successfully, you can proceed to flashing the hacked firmware. You should not need to restart your PC in order to flash, but you will need to power off the Xbox 360. Type in the following command, using your Xbox 360 serial number found on the back of the Xbox 360 case. (we’ll use the serial number 1234567 12345 as an example) fBen 1234567 12345 [press enter]
Following the prompts on the screen, make sure your 360 is OFF and press any key to continue. Press Y to resend the MTK Vendor Intro.
• Turn on the Xbox 360 and wait 2 or more seconds, status toggles between 0x51 and 0xD1.
• Turn off the Xbox 360 and wait 2 or more seconds, status will stay at
0xD1.
• Turn on the Xbox 360, you should get a good drive status 0x73 and erasing should begin automatically.

You will then see this screen which tells you to power OFF the 360:
IMPORTANT! You must power the 360 back ON before pressing any key to continue. If you press any key to continue with the 360 powered OFF (as instructed to do on screen) it will immediately freeze attempting to write Bank 0. This is a bug in iPrep 006 and will hopefully be resolved in a future release. So power the 360 OFF, wait a few seconds, power it ON, wait a few seconds, then press any key to continue.
Writing should begin as soon as you press any key to continue with the 360 already powered ON. All 4 banks should write OK and you should get a “Writing finished!” message with a Datasum.
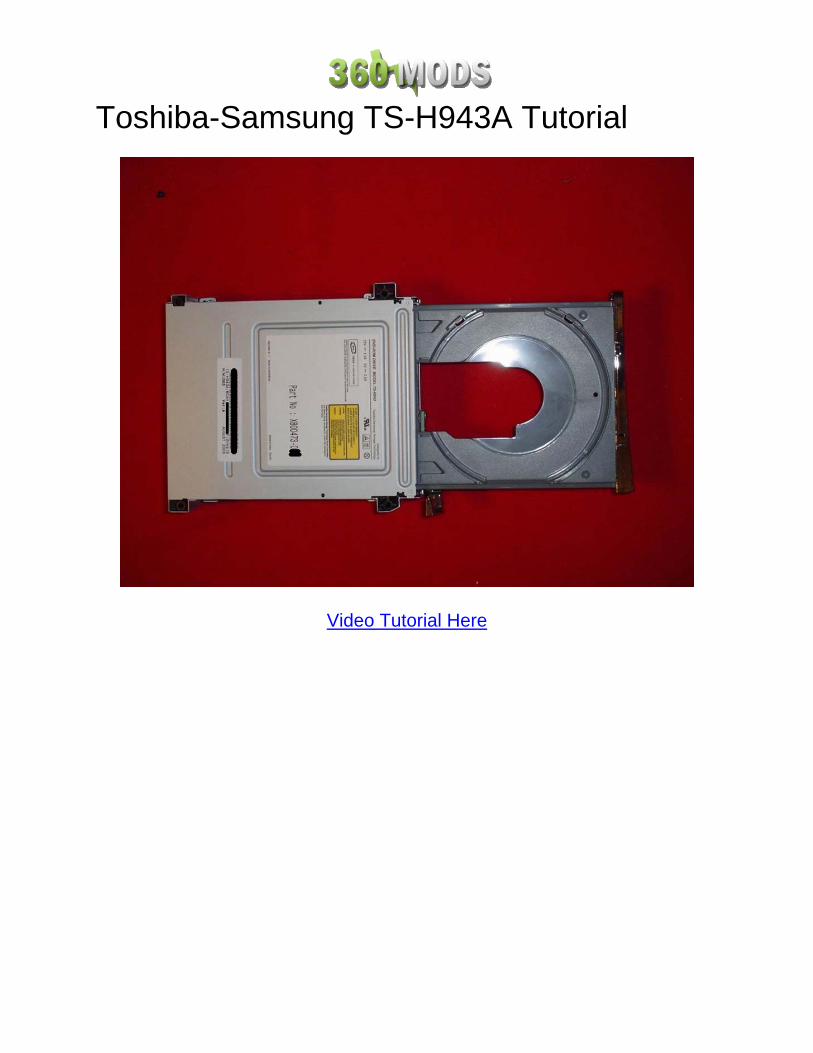
Toshiba-Samsung TS-H943A Tutorial
Video Tutorial Here
Opening The Xbox 360 The outer Xbox 360 “shell” is entirely screwless. Plastic friction tabs hold the case together. There are many different tutorials for opening the Xbox 360, with different methods. Here are some links to “opening the Xbox 360” tutorials. I decided not to cover opening the Xbox 360 in this tutorial since it is already long enough and there are many other tutorials for opening the Xbox 360. Notes:
- The Anandtech guide says you need to use a Torx 12 screwdriver. There is no such thing. You need a Torx 10 screwdriver.
- Removing the grey side grill on the hard drive side is a little tricky. The first friction tab is actually inaccessible from the top holes in the case, so you need to stick your screwdriver in the hole by where the hard drive button is and unclip it. (See Pic)
- In order to push in the back clips, you can do one of two things. You can use a thin metal object such as a precision flathead screwdriver / bobby pin / paperclip OR you can make an opening “key” out of a CD spindle case. The key would not work for me, it was too flimsy, but it works for some people. You can also purchase an “unlock kit.”
- If all you want to do is just flash the firmware, you only need to remove the six long screws on the bottom. (See Pic)
Read all these guides and watch all the videos, figure out how you want to go about opening the Xbox 360. Anandtech Guide InformIT Guide Xbox-Accessories Disassembly Hydra's Guide to Making a CD Unlock Key Textbook’s Video acDC's Video
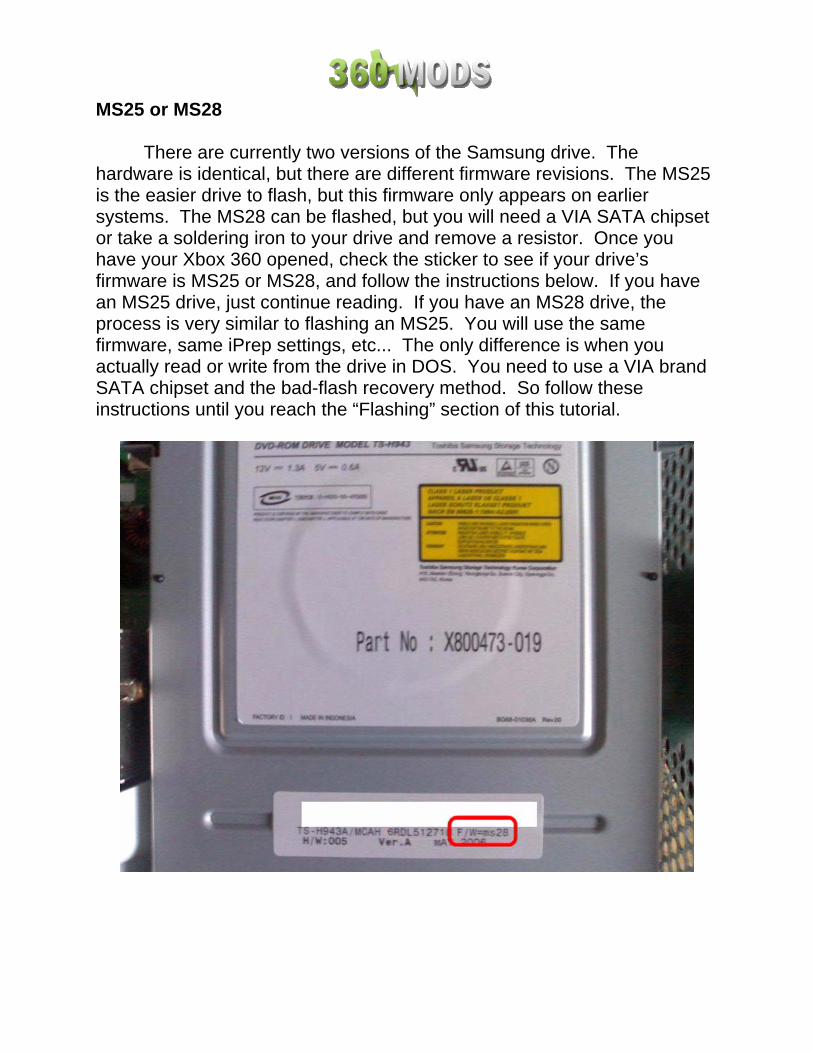
MS25 or MS28 There are currently two versions of the Samsung drive. The hardware is identical, but there are different firmware revisions. The MS25 is the easier drive to flash, but this firmware only appears on earlier systems. The MS28 can be flashed, but you will need a VIA SATA chipset or take a soldering iron to your drive and remove a resistor. Once you have your Xbox 360 opened, check the sticker to see if your drive’s firmware is MS25 or MS28, and follow the instructions below. If you have an MS25 drive, just continue reading. If you have an MS28 drive, the process is very similar to flashing an MS25. You will use the same firmware, same iPrep settings, etc... The only difference is when you actually read or write from the drive in DOS. You need to use a VIA brand SATA chipset and the bad-flash recovery method. So follow these instructions until you reach the “Flashing” section of this tutorial.

Downloading The Firmware
The hacked firmware may be illegal under the DMCA, EUCD, or other local, national, and international copyright laws. It contains portions of Microsoft’s copyrighted firmware and therefore cannot be linked to or downloaded publicly. Do not request the firmware on any forums because you will most likely be banned. Use Xbins. Xbins is an IRC channel and FTP server that hosts Xbox and Xbox 360 mod files.
If you have never used Xbins before, the easiest method is to use Ground Zero’s automated Xbins downloader.
Download and run the xbins.exe file. It will ask you where you want to save the files, choose your desktop. Now, go into the “Xbins” folder on your desktop and run the .bat file. The program will connect to the IRC channel, message the bot, and connect to the FTP server. When FileZilla opens you should see the local Downloads folder on your left and the Xbins FTP server on your right.
The hacked firmware can be found in:
/XBOX 360/firmware/hacked firmware/Toshiba-Samsung TS-H943/
Simply drag the “Samsung.iXtreme.1.4.rar” file over to the left side of FileZilla and wait for it to finish downloading.

iPrep (USB Flash Drive)
The following process will set up a bootable USB flash drive with everything necessary to read your original firmware and write the hacked firmware onto the drive. We will use iPrep to hex-edit MTKFlash, format the USB drive, and copy the files onto it.
First, you need to make sure Microsoft .NET Framework v2 is installed. It is needed for iPrep to run. If you do not have this installed, you will be prompted to download and install it.
Second, you need to make sure the drivers for your SATA chipset are installed. Use either the CD that came with your computer/SATA card, or use the manufacturer’s web site to install the latest drivers. The latest drivers for VIA chipsets are here.
Once you have that taken care of, you can download and install iPrep. Klutsh updates iPrep frequently, the latest version is always available on his website at http://www.x-projects.org or on xbins in: /XBOX 360/firmware/firmware tools/iPrep 101/ The download is in the form of a RAR archive. Use WinRAR to extract all the files to a new folder and run the installer to install iPrep. Next we will update Firmtool to the newest version which is 1.2. There are many improvements from 1.1 to 1.2 so it is recommended to update before formatting your drive with iPrep and flashing. To do this, download Firmtool 1.2 from here and extract the “firmtoolv1.2.rar” file. Then replace the “firmtool.exe” file in the folder below with the new one from the rar file. C:\Program Files\X-Projects\iPrep 101\Resources\Tools Since the firmtool.exe already exists, Windows should ask you if you want to replace the existing file with the new one – click Yes. Now run the program. The first thing you want to do is check for updates.

It should find an updated definitions file. Choose “Yes” to install it.
Hit the “Load Firmware” button on iPrep.

A “Load iXtreme” window should open for you to browse for the iXtreme firmware. Browse and open the “Samsung.iXtreme.1.4.rar” you downloaded from Xbins.
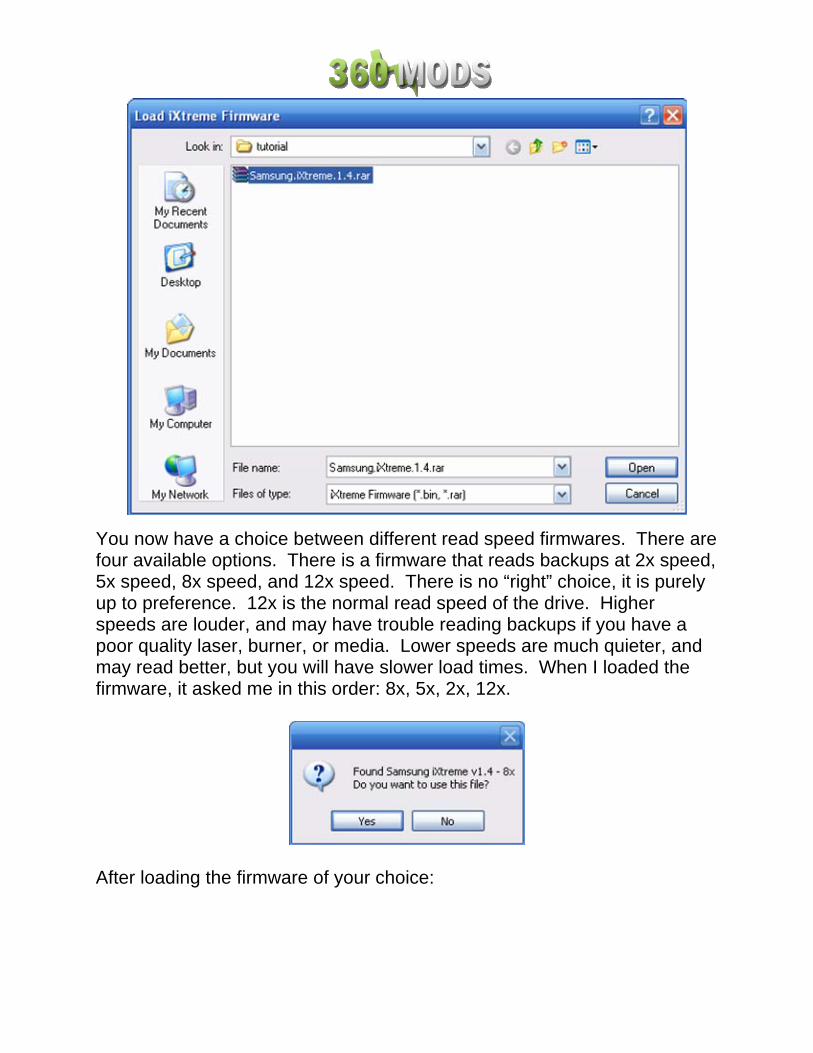
You now have a choice between different read speed firmwares. There are four available options. There is a firmware that reads backups at 2x speed, 5x speed, 8x speed, and 12x speed. There is no “right” choice, it is purely up to preference. 12x is the normal read speed of the drive. Higher speeds are louder, and may have trouble reading backups if you have a poor quality laser, burner, or media. Lower speeds are much quieter, and may read better, but you will have slower load times. When I loaded the firmware, it asked me in this order: 8x, 5x, 2x, 12x.
After loading the firmware of your choice:

1. Select Patch MTKFlash 2. Select your SATA controller from the list. If you can not locate the
correct one in the drop-down list, hit the button below it to switch between IDE/SCSI based controllers.
3. Choose the flash drive as the target drive and check the box to format it and make it bootable. Remember to get any important data off the flash drive first, it will be erased!
4. Hit Prepare Destination If everything goes smooth you should get a message saying “Preperation Complete.”
Xbox 360 and PC Connections
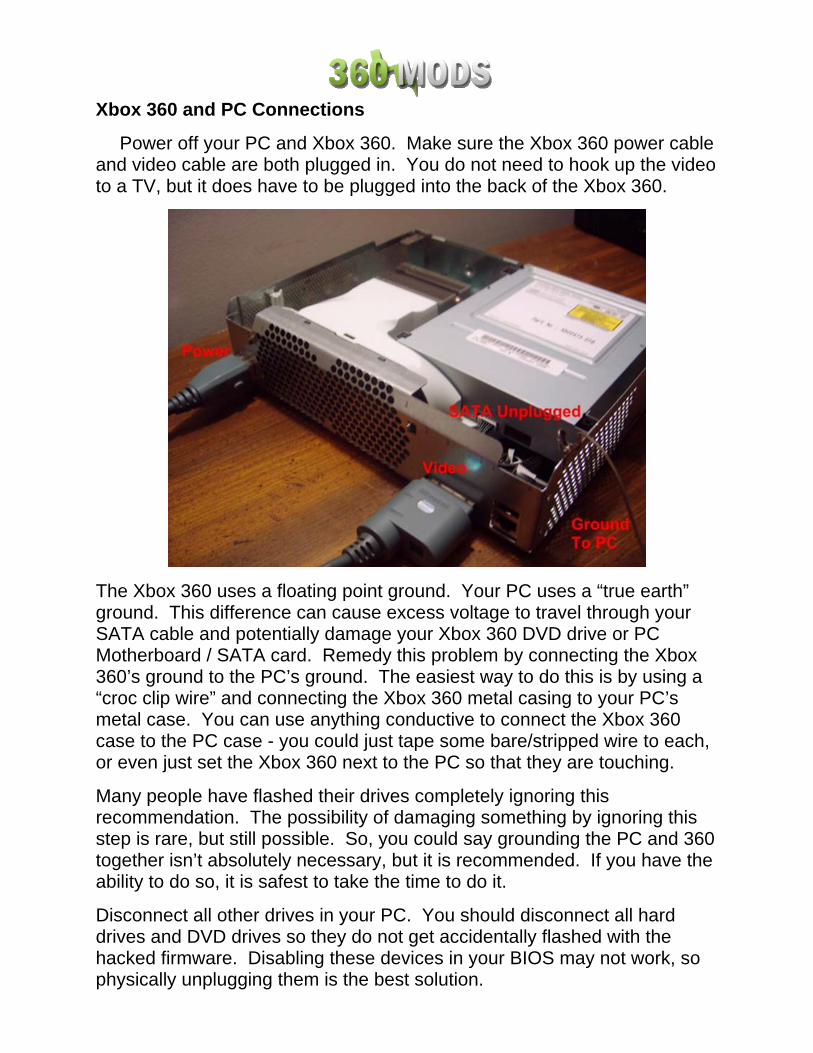
Power off your PC and Xbox 360. Make sure the Xbox 360 power cable and video cable are both plugged in. You do not need to hook up the video to a TV, but it does have to be plugged into the back of the Xbox 360.
The Xbox 360 uses a floating point ground. Your PC uses a “true earth” ground. This difference can cause excess voltage to travel through your SATA cable and potentially damage your Xbox 360 DVD drive or PC Motherboard / SATA card. Remedy this problem by connecting the Xbox 360’s ground to the PC’s ground. The easiest way to do this is by using a “croc clip wire” and connecting the Xbox 360 metal casing to your PC’s metal case. You can use anything conductive to connect the Xbox 360 case to the PC case - you could just tape some bare/stripped wire to each, or even just set the Xbox 360 next to the PC so that they are touching.
Many people have flashed their drives completely ignoring this recommendation. The possibility of damaging something by ignoring this step is rare, but still possible. So, you could say grounding the PC and 360 together isn’t absolutely necessary, but it is recommended. If you have the ability to do so, it is safest to take the time to do it.
Disconnect all other drives in your PC. You should disconnect all hard drives and DVD drives so they do not get accidentally flashed with the hacked firmware. Disabling these devices in your BIOS may not work, so physically unplugging them is the best solution.

Booting From USB You will need to configure your computer’s BIOS to boot from USB. Not all computers or BIOSes support booting from USB. Since all BIOSes are different, I can’t give you word-for-word instructions for doing this part. Your best chance of figuring out if your BIOS can boot from USB, and how to check the settings is to use a search engine and search your motherboard model number and terms like “USB boot”. Generally, the steps you need to follow should be similar to something like this: When you power up your computer, you should see somewhere telling you to “Press [key] to enter setup”
In this example, the key to hit is DEL (delete). So hit whatever key it’s telling you and you may see something like these following pictures. For my particular BIOS, I need to go Advanced BIOS Features > Boot Sequence, and then I can select the flash drive as the primary boot device. F10 to save and exit, which should work with all BIOSes.


Flashing The Drive (USB)
This tutorial is for MS25 drives only, if you have an MS28, please click here to follow the MS28 flashing procedure.
Reading The Original Firmware
Turn on your PC and Xbox 360 at the same time, and boot your PC from the USB flash drive into DOS. When you reach the DOS command prompt, plug the SATA cable into the Xbox 360 DVD drive, so that the drive is connected to your PC / SATA card.
Enter y to accept the iPrep Terms of Use.

Type in the following command, using your Xbox 360 serial number found on the back of the Xbox 360 case.
(We’ll use the serial number 1234567 12345 as an example)
dSam 1234567 12345 [press enter]
If you get errors like “Directory already exists” or “MKDIR failed…” don’t worry. The batch file is trying to create a new folder but it’s already there.
MTKFlash should run and your drive should be listed. If you see an item in the list named “XTREME”, select that and it should make a backup of your original firmware.

Firmtool will now check if a valid key exists in both your original and hacked firmware, and that they match. If you get a green success message from Firmtool power off the 360 and proceed to the flashing page. If you get any red error messages DO NOT proceed with flashing.

Firmtool Errors Sometimes there are problems. If your firmware dump is not the correct size, does not contain a valid key, or does not contain a valid drive version, FirmTool will abort. If you get something like any of these pictures, DO NOT PROCEED WITH FLASHING! Doing so may brick your Xbox 360 and leave you without a valid drive key. Something is wrong. Make sure you have unplugged all other drives in your PC and try starting this tutorial over again. ORIG.BIN IS WRONG SIZE
NO VALID KEY IN ORIG.BIN

Firmtool will also check your firmware version strings to make sure they match. These must match or you could get error code 66 after flashing your drive. If Firmtool asks if you want to copy the version string, type Y to use the ms25 version strings from your original firmware.
Again, your screen should match the screenshot below before proceeding: FIRMTOOL SUCCESS
Unplug the SATA cable from the 360 DVD drive, power-cycle the Xbox 360, and reboot your PC.
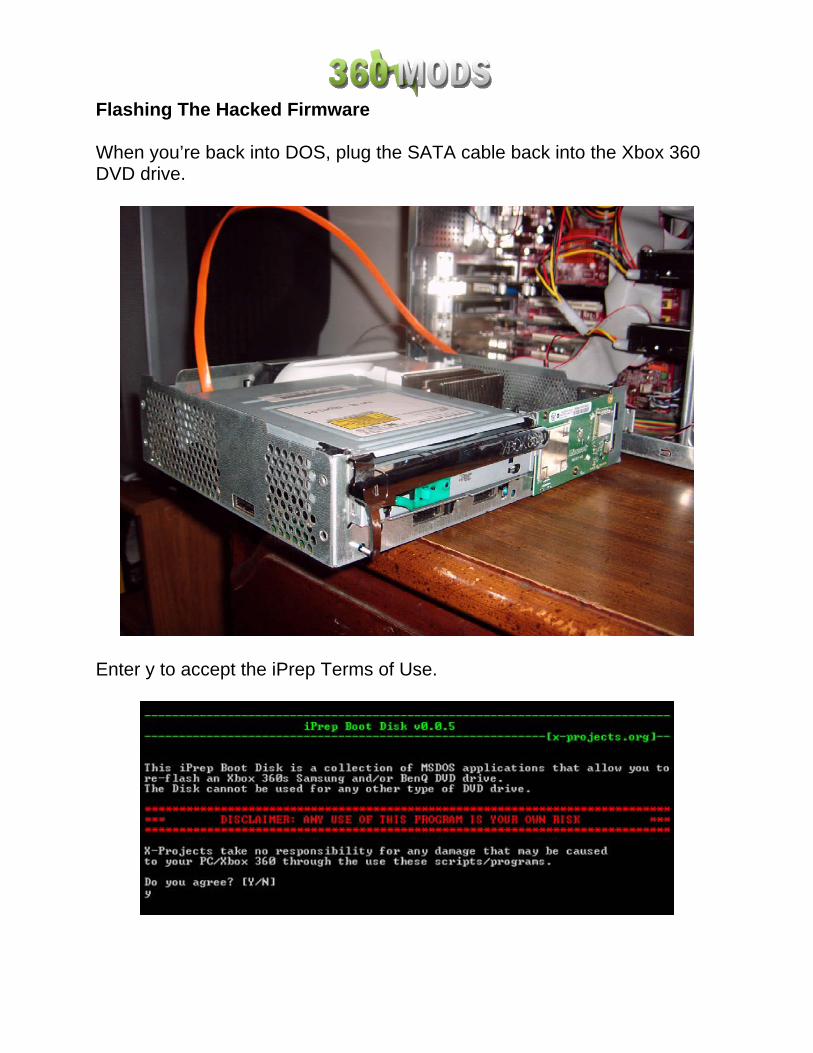
Flashing The Hacked Firmware When you’re back into DOS, plug the SATA cable back into the Xbox 360 DVD drive.
Enter y to accept the iPrep Terms of Use.

Type in the following command, using your Xbox 360 serial number that you used with the dSam command.
fSam 1234567 12345 [press enter]
MTKFlash should run and your drive should be listed. If you see an item in the list named “XTREME”, choose that. iPrep renames your SATA controller to this when it creates the hexedited MTKFlash. Select the drive from the list and it should flash your drive with the hacked firmware. It should flash 4 banks. The 4th bank may say something like Datasum, it is normal. When it is done flashing, unplug the SATA cable from the 360 DVD drive, power off the Xbox 360, and power off your PC. Reconnect the 360 DVD drive to the 360 motherboard and test it.

Backup Your Original Firmware!
Boot into Windows. Plug in your USB drive and find your Sam-OFW.bin and Sam-CFW.bin in the BACKUPS folder. This is your Xbox 360 drive firmware and needs to be kept safe! Make a copy of these files. Then make another one on another drive. Then make another somewhere else. Email it to yourself.
You should keep all the files on your flash drive to make future firmware updates easier.
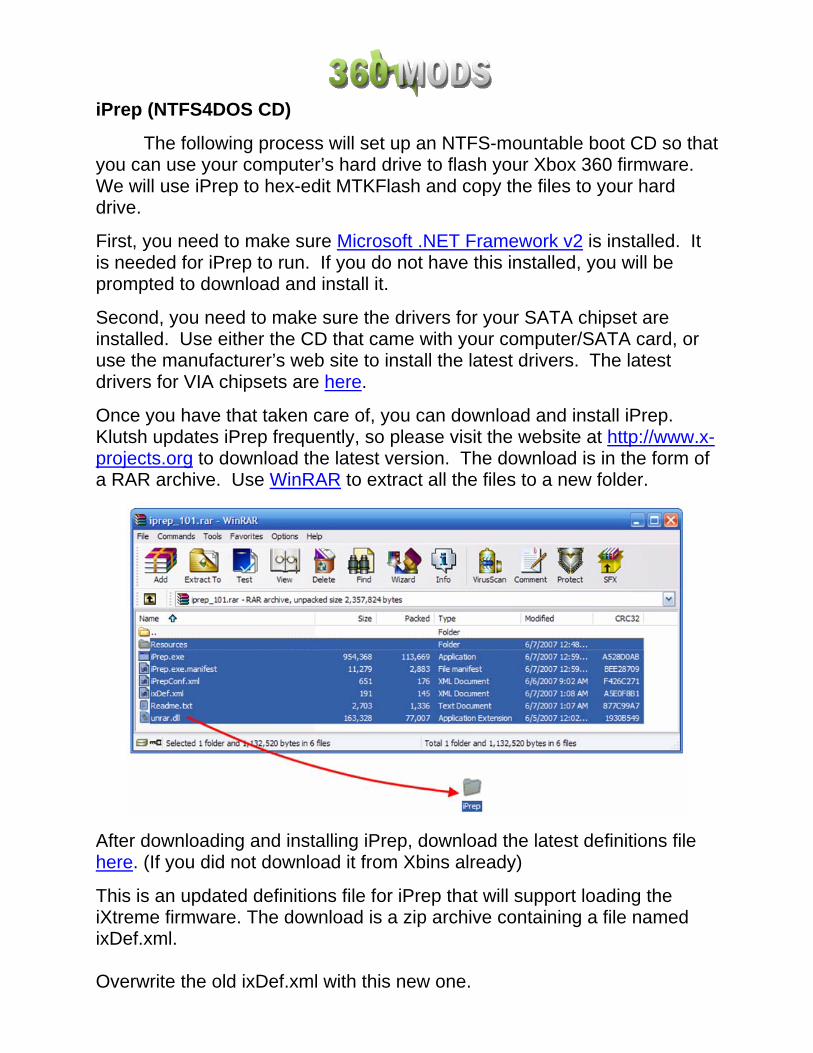
iPrep (NTFS4DOS CD)
The following process will set up an NTFS-mountable boot CD so that you can use your computer’s hard drive to flash your Xbox 360 firmware. We will use iPrep to hex-edit MTKFlash and copy the files to your hard drive.
First, you need to make sure Microsoft .NET Framework v2 is installed. It is needed for iPrep to run. If you do not have this installed, you will be prompted to download and install it.
Second, you need to make sure the drivers for your SATA chipset are installed. Use either the CD that came with your computer/SATA card, or use the manufacturer’s web site to install the latest drivers. The latest drivers for VIA chipsets are here.
Once you have that taken care of, you can download and install iPrep. Klutsh updates iPrep frequently, so please visit the website at http://www.x-projects.org to download the latest version. The download is in the form of a RAR archive. Use WinRAR to extract all the files to a new folder.
After downloading and installing iPrep, download the latest definitions file here. (If you did not download it from Xbins already)
This is an updated definitions file for iPrep that will support loading the iXtreme firmware. The download is a zip archive containing a file named ixDef.xml.
Overwrite the old ixDef.xml with this new one.

Since the default file already exists, Windows should ask you if you want to overwrite the file – answer Yes.
Now run iPrep.exe and load your iXtreme firmware file.
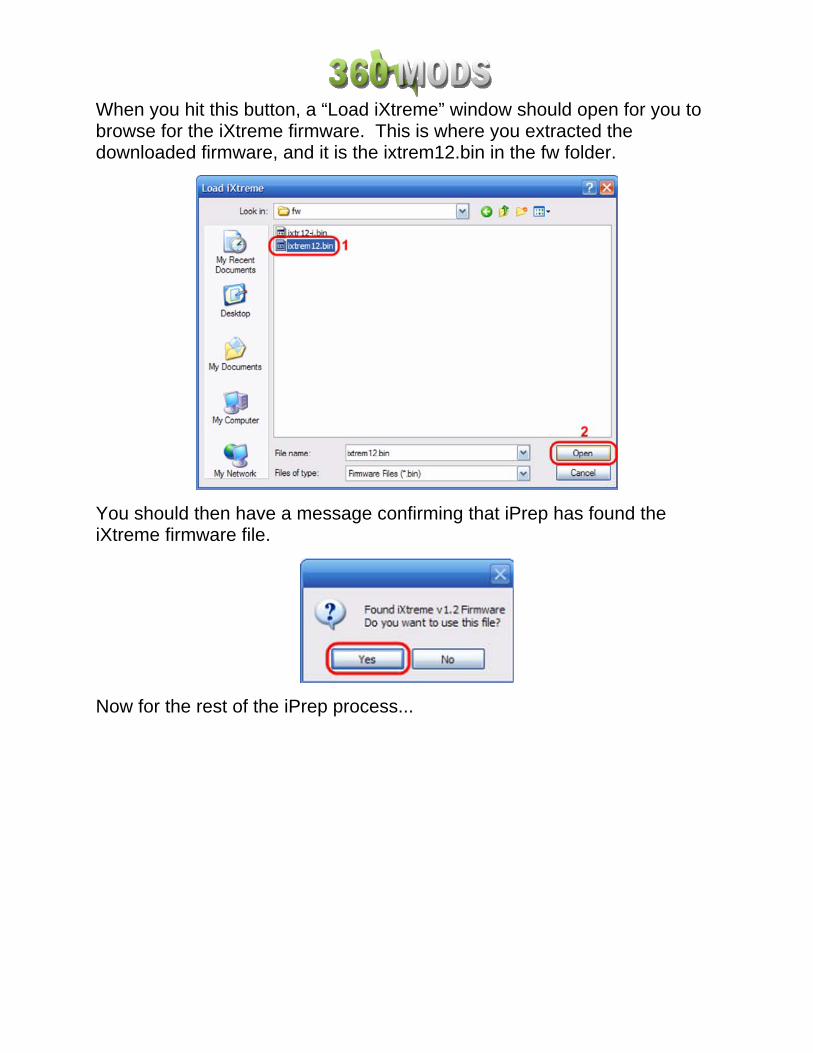
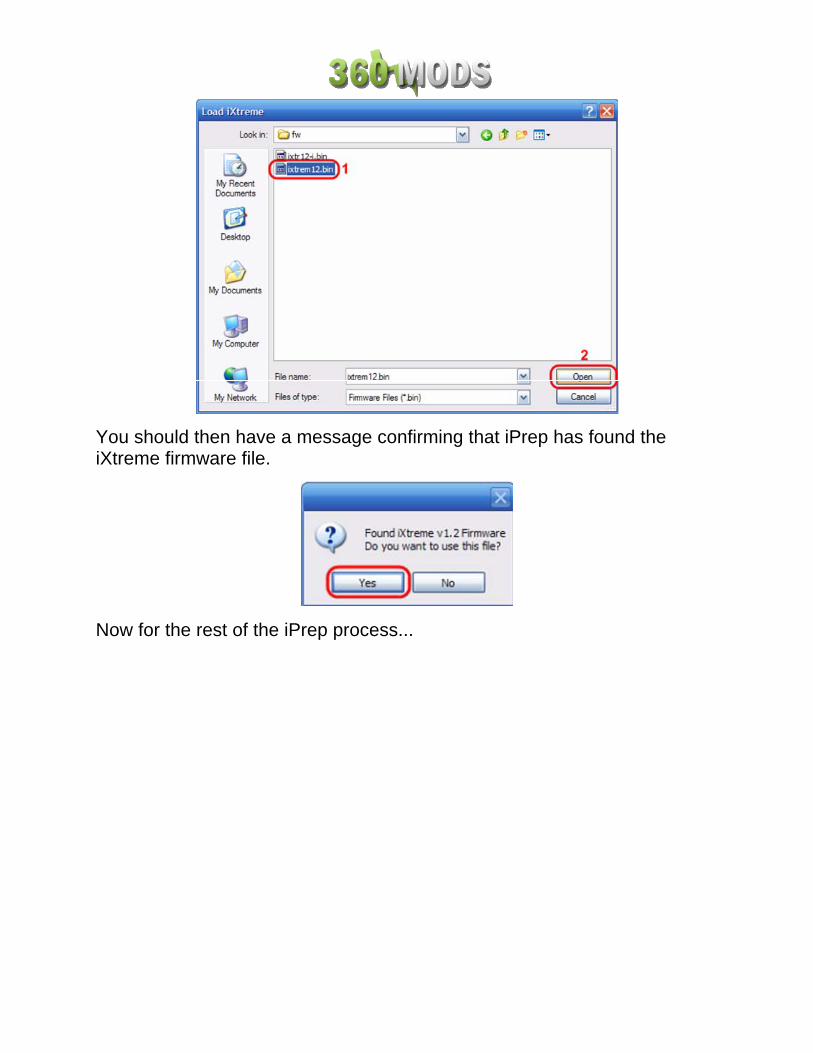
When you hit this button, a “Load iXtreme” window should open for you to browse for the iXtreme firmware. This is where you extracted the downloaded firmware, and it is the ixtrem12.bin in the fw folder.
You should then have a message confirming that iPrep has found the iXtreme firmware file.
Now for the rest of the iPrep process...

1. Confirm that the firmware loaded is iXtreme v 1.2 and the MD5 matches the image above.
2. Force Device List should already be checked, just make sure it is. 3. Check the box for Custom Serial ATA. 4. Hit either of the list buttons and select your SATA controller from the
drop-down list. It should input the ID and IO values in the textboxes above.
5. Select your hard drive from the drop-down list. 6. Do it!
If everything goes smooth you should get this message.
Download the NTFS4DOS ISO and burn it to a blank CD-R using any recording software capable of burning ISO files. (IMGBurn)

Xbox 360 and PC Connections
Power off your PC and Xbox 360. Make sure the Xbox 360 power cable and video cable are both plugged in. You do not need to hook up the video to a TV, but it does have to be plugged into the back of the Xbox 360.
The Xbox 360 uses a floating point ground. Your PC uses a “true earth” ground. This difference can cause excess voltage to travel through your SATA cable and potentially damage your Xbox 360 DVD drive or PC Motherboard / SATA card. Remedy this problem by connecting the Xbox 360’s ground to the PC’s ground. The easiest way to do this is by using a “croc clip wire” and connecting the Xbox 360 metal casing to your PC’s metal case. You can use anything conductive to connect the Xbox 360 case to the PC case - you could just tape some bare/stripped wire to each, or even just set the Xbox 360 next to the PC so that they are touching.
Many people have flashed their drives completely ignoring this recommendation. The possibility of damaging something by ignoring this step is rare, but still possible. So, you could say grounding the PC and 360 together isn’t absolutely necessary, but it is recommended. If you have the ability to do so, it is safest to take the time to do it.

Flash The Drive (NTFS4DOS CD)
This tutorial is for MS25 drives only, if you have an MS28, please click here to follow the MS28 flashing procedure.
Reading The Original Firmware
Turn on your PC and boot from the NTFS4DOS CD. After a while it should say:
“Select from Menu [0123], or press [ENTER – Singlestepping (F8) is: OFF”
Hit the Enter key and you should see an NTFS for DOS logo screen with a disclaimer. On this screen, please notice your drive letter that has been mounted at the top. You will need to know this when typing in commands.

The disclaimer asks you if you are going to use this for private usage only, please type in “Yes” without the quotes, and hit the Enter key.
Dos will start in your ram drive. You will need to mount your hard drive.
C: [press enter] use the drive letter your hard drive was given
cd IPREP [press enter]
Now that you are in the right directory, you can now connect the Xbox 360 to the PC using the SATA cable.

Type in the following command, using your Xbox 360 serial number found on the back of the Xbox 360 case.
(We’ll use the serial number 1234567 12345 as an example)
iDump 1234567 12345 [press enter]

If you get errors like “Directory already exists” or “MKDIR failed…” don’t worry. The batch file is trying to create a new folder but it’s already there.
MTKFlash should run and your drive should be listed. If you see an item in the list named “XTREME”, select that and it should make a backup of your original firmware.
Samtool will now check if a valid key exists in both your original and hacked firmware, and that they match. This is what it should look like.

If your firmware dump is not the correct size, does not contain a valid key, or does not contain a valid drive version, Samtool will abort.
If you get something like these pictures, DO NOT PROCEED PAST THIS POINT IN THE TUTORIAL! Doing so will brick your Xbox 360, and leave you without a valid drive key. Something is wrong, make sure you have unplugged all other drives in your PC and restart the tutorial or get help.
If your screen is like the one above that says “Correct”, you can continue.
Samtool will also check your firmware version strings to make sure they match. These must match or you could get error code 66 after flashing your drive. If Samtool asks if you want to copy the version string, type Y to use the ms25 version strings from your original firmware.
Unplug the SATA cable from the 360 DVD drive, power-cycle the Xbox 360, and reboot your PC.
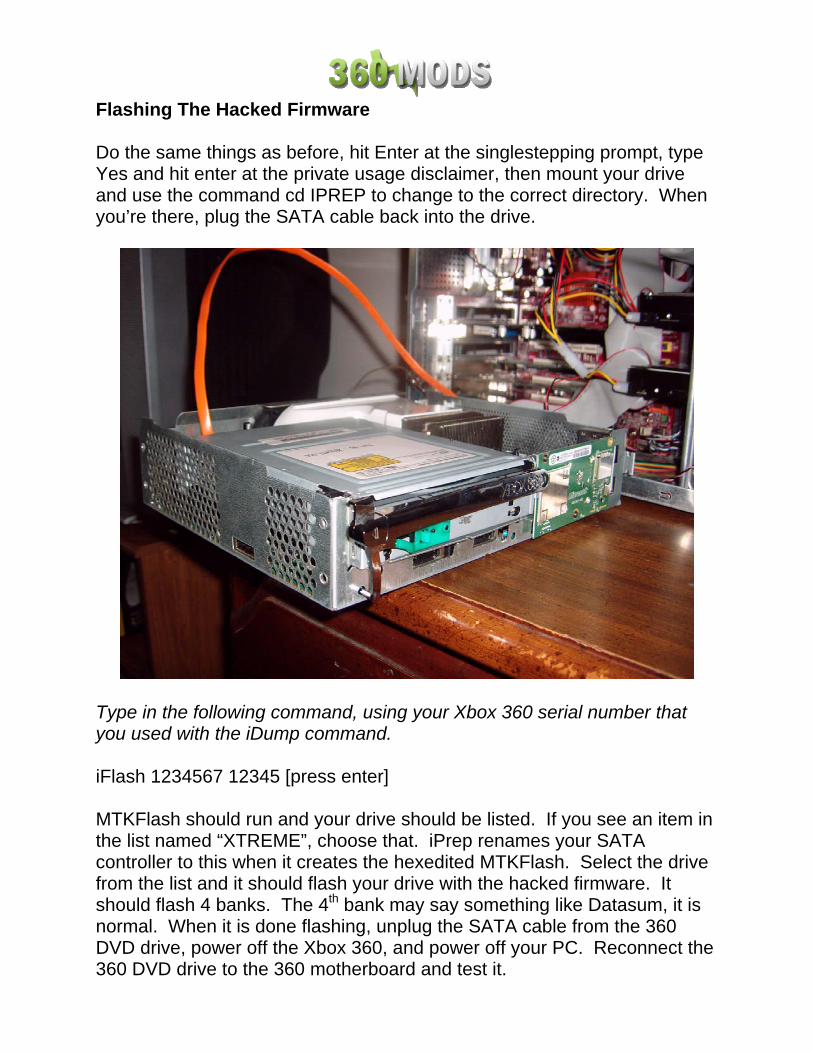
Flashing The Hacked Firmware Do the same things as before, hit Enter at the singlestepping prompt, type Yes and hit enter at the private usage disclaimer, then mount your drive and use the command cd IPREP to change to the correct directory. When you’re there, plug the SATA cable back into the drive.
Type in the following command, using your Xbox 360 serial number that you used with the iDump command. iFlash 1234567 12345 [press enter] MTKFlash should run and your drive should be listed. If you see an item in the list named “XTREME”, choose that. iPrep renames your SATA controller to this when it creates the hexedited MTKFlash. Select the drive from the list and it should flash your drive with the hacked firmware. It should flash 4 banks. The 4th bank may say something like Datasum, it is normal. When it is done flashing, unplug the SATA cable from the 360 DVD drive, power off the Xbox 360, and power off your PC. Reconnect the 360 DVD drive to the 360 motherboard and test it.
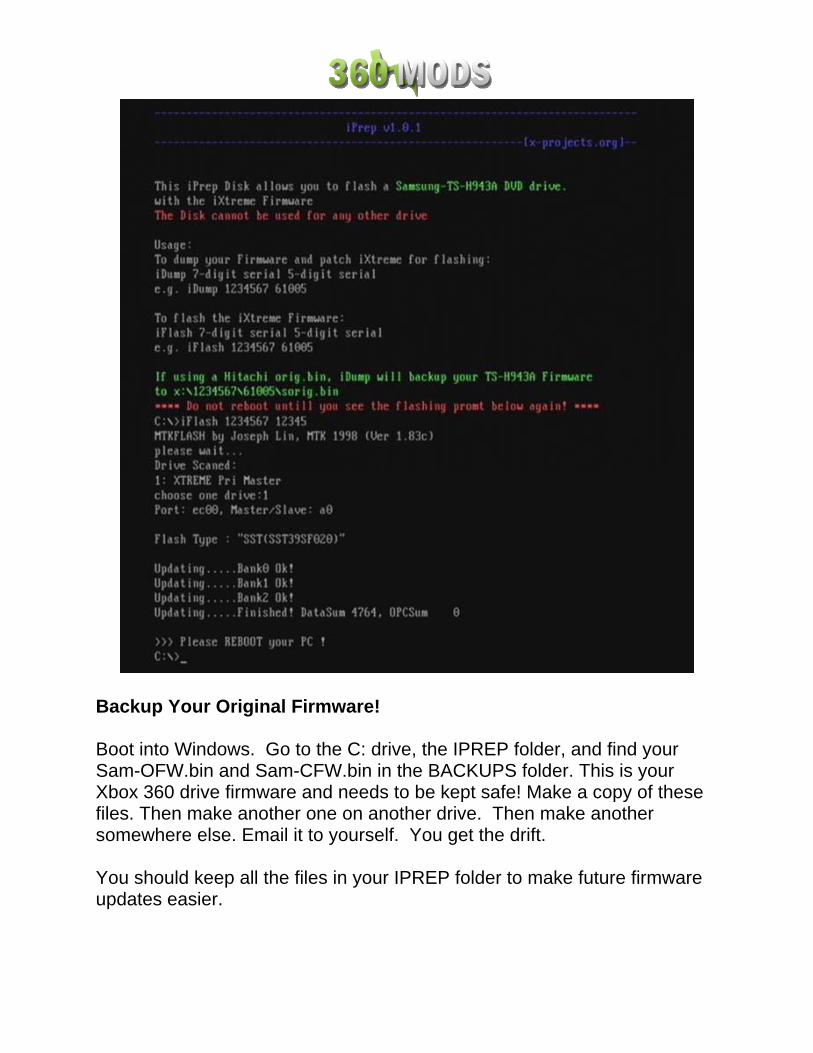
Backup Your Original Firmware! Boot into Windows. Go to the C: drive, the IPREP folder, and find your Sam-OFW.bin and Sam-CFW.bin in the BACKUPS folder. This is your Xbox 360 drive firmware and needs to be kept safe! Make a copy of these files. Then make another one on another drive. Then make another somewhere else. Email it to yourself. You get the drift. You should keep all the files in your IPREP folder to make future firmware updates easier.

iPrep (Floppy) Quick warning about floppies. Lately, people have been bricking their drives by using floppies. They are unreliable and can die mid-flash. Sometimes the person is lucky and the bad flash recovery method can be used to reflash the drive. Others needed to hotswap and use the bad flash recovery. Floppies are old technology for a reason. They are very unreliable. Please try to refrain from using a floppy. If you can use a bootable USB stick or burn an NTFS4DOS CD, do that instead. If you absolutely must use a floppy, use a new one!
The following process will set up a floppy disk with everything necessary to read your original firmware and write the hacked firmware onto the drive. We will use iPrep to hex-edit MTKFlash, format the floppy disk, and copy the files onto it.
First, you need to make sure Microsoft .NET Framework v2 is installed. It is needed for iPrep to run. If you do not have this installed, you will be prompted to download and install it.
Second, you need to make sure the drivers for your SATA chipset are installed. Use either the CD that came with your computer/SATA card, or use the manufacturer’s web site to install the latest drivers. The latest drivers for VIA chipsets are here.
Once you have that taken care of, you can download and install iPrep. Klutsh updates iPrep frequently, so please visit the website at http://www.x-projects.org to download the latest version. The download is in the form of a RAR archive. Use WinRAR to extract all the files to a new folder.

After downloading and installing iPrep, download the latest definitions file here. (If you did not download it from Xbins already)
This is an updated definitions file for iPrep that will support loading the iXtreme firmware. The download is a zip archive containing a file named ixDef.xml.
Overwrite the old ixDef.xml with this new one.
Since the default file already exists, Windows should ask you if you want to overwrite the file – answer Yes.

Now run iPrep.exe and load your iXtreme firmware file.
When you hit this button, a “Load iXtreme” window should open for you to browse for the iXtreme firmware. This is where you extracted the downloaded firmware, and it is the ixtrem12.bin in the fw folder.
You should then have a message confirming that iPrep has found the iXtreme firmware file.
Now for the rest of the iPrep process...

1. Confirm that the firmware loaded is iXtreme v 1.2 and the MD5 matches the image above.
2. Force Device List should already be checked, just make sure it is. 3. Check the box for Custom Serial ATA. 4. Hit either of the list buttons and select your SATA controller from the
drop-down list. It should input the ID and IO values in the textboxes above.
5. Select your floppy drive from the drop-down list. 6. Check the box to Format the floppy and make it bootable.
Remember to get any important data off the floppy first, it will be erased!
7. Do it!
If everything goes smooth you should get this message.

Xbox 360 and PC Connections
Power off your PC and Xbox 360. Make sure the Xbox 360 power cable and video cable are both plugged in. You do not need to hook up the video to a TV, but it does have to be plugged into the back of the Xbox 360.
The Xbox 360 uses a floating point ground. Your PC uses a “true earth” ground. This difference can cause excess voltage to travel through your SATA cable and potentially damage your Xbox 360 DVD drive or PC Motherboard / SATA card. Remedy this problem by connecting the Xbox 360’s ground to the PC’s ground. The easiest way to do this is by using a “croc clip wire” and connecting the Xbox 360 metal casing to your PC’s metal case. You can use anything conductive to connect the Xbox 360 case to the PC case - you could just tape some bare/stripped wire to each, or even just set the Xbox 360 next to the PC so that they are touching.
Many people have flashed their drives completely ignoring this recommendation. The possibility of damaging something by ignoring this step is rare, but still possible. So, you could say grounding the PC and 360 together isn’t absolutely necessary, but it is recommended. If you have the ability to do so, it is safest to take the time to do it.
Disconnect all other drives in your PC. You should disconnect all hard drives and DVD drives so they do not get accidentally flashed with the hacked firmware. Disabling these devices in your BIOS may not work, so physically unplugging them is the best solution.

Flash The Drive (Floppy) This tutorial is for MS25 drives only, if you have an MS28, please click here to follow the MS28 flashing procedure. Reading The Original Firmware Turn on your PC and Xbox 360 at the same time, and boot your PC from the USB flash drive into DOS. When you reach the DOS command prompt, plug the SATA cable into the Xbox 360 DVD drive, so that the drive is connected to your PC / SATA card.
Type in the following command, using your Xbox 360 serial number found on the back of the Xbox 360 case.
(We’ll use the serial number 1234567 12345 as an example)
iDump 1234567 12345 [press enter]

If you get errors like “Directory already exists” or “MKDIR failed…” don’t worry. The batch file is trying to create a new folder but it’s already there.
MTKFlash should run and your drive should be listed. If you see an item in the list named “XTREME”, select that and it should make a backup of your original firmware.
Samtool will now check if a valid key exists in both your original and hacked firmware, and that they match. This is what it should look like.

If your firmware dump is not the correct size, does not contain a valid key, or does not contain a valid drive version, Samtool will abort.
If you get something like these pictures, DO NOT PROCEED PAST THIS POINT IN THE TUTORIAL! Doing so will brick your Xbox 360, and leave you without a valid drive key. Something is wrong, make sure you have unplugged all other drives in your PC and restart the tutorial or get help.
If your screen is like the one above that says “Correct”, you can continue.
Samtool will also check your firmware version strings to make sure they match. These must match or you could get error code 66 after flashing your drive. If Samtool asks if you want to copy the version string, type Y to use the ms25 version strings from your original firmware.
Unplug the SATA cable from the 360 DVD drive, power-cycle the Xbox 360, and reboot your PC.

Flashing The Hacked Firmware When you’re back into DOS, plug the SATA cable back into the Xbox 360 DVD drive.
Type in the following command, using your Xbox 360 serial number that you used with the iDump command. iFlash 1234567 12345 [press enter] MTKFlash should run and your drive should be listed. If you see an item in the list named “XTREME”, choose that. iPrep renames your SATA controller to this when it creates the hexedited MTKFlash. Select the drive from the list and it should flash your drive with the hacked firmware. It should flash 4 banks. The 4th bank may say something like Datasum, it is normal. When it is done flashing, unplug the SATA cable from the 360 DVD drive, power off the Xbox 360, and power off your PC. Reconnect the 360 DVD drive to the 360 motherboard and test it.
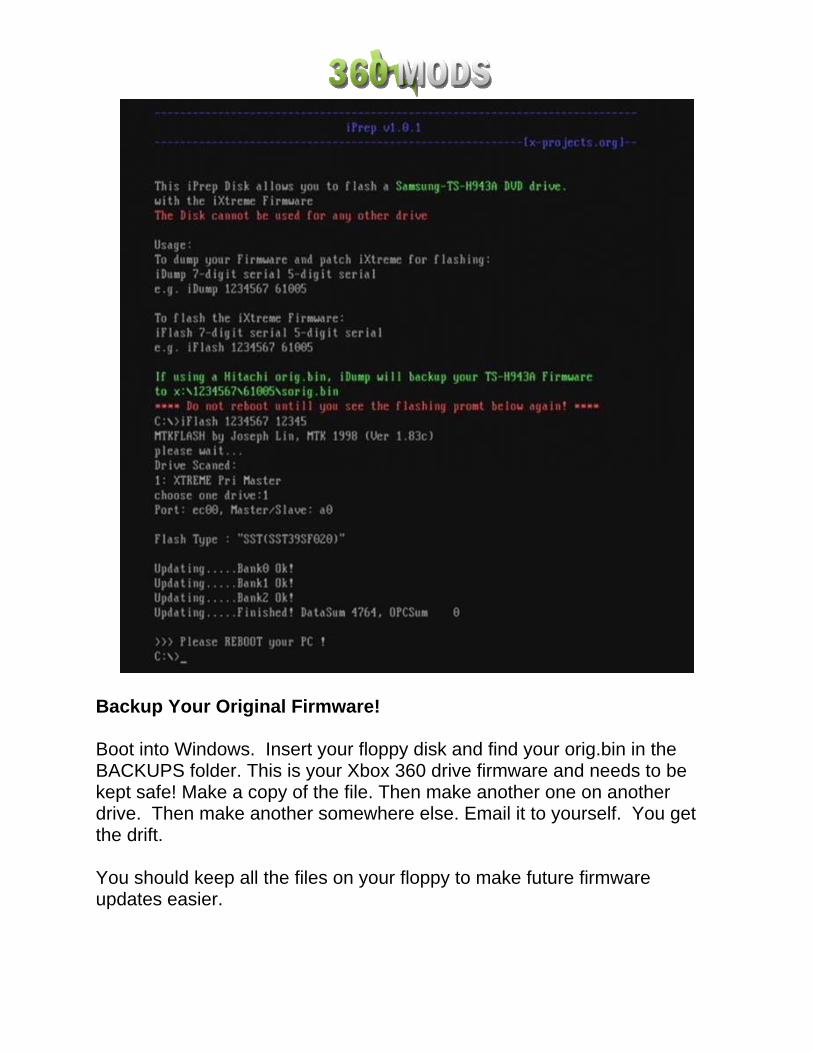
Backup Your Original Firmware! Boot into Windows. Insert your floppy disk and find your orig.bin in the BACKUPS folder. This is your Xbox 360 drive firmware and needs to be kept safe! Make a copy of the file. Then make another one on another drive. Then make another somewhere else. Email it to yourself. You get the drift. You should keep all the files on your floppy to make future firmware updates easier.
MS28 Instructions
The MS28 firmware has certain lockout routines and can not be normally flashed via MTKFlash like an MS25 can. There are a couple workarounds to get the drive flashed. The VCC switch method requires you to open up the drive, desolder a resistor, and use a switch or wires to read/write to the drive. The VIA / Bad Flash Recovery method does not require desoldering/soldering, but will only work with VIA brand SATA chipsets. The preparation for flashing an MS28 drive is the same as if you were flashing an MS25. The only difference is the actual flashing. Preliminary Setup (same as MS25)
1. Check the SATA/MTKFlash Compatibility List 2. Download The Hacked Firmware 3. Use iPrep to prepare a floppy/USB/NTFSCD (Instructions for these are in the MS25 section of the tutorial)

Flashing an MS28 Using the Bad Flash Recovery Method
(This method is easier and safer than the VCC method) Video Tutorial Here
Requirements:
- VIA chipset, simply will not work for other chipsets - Need to be able to power off the drive and power it back on.
Recommend using the console to power the drive or the Xecuter Connectivity Kit v2 (which has a power switch).
- Need to use the /sata switch in the MTKFlash command or the drive will not show up (iPrep does this for you)
Setup (iPrep) is the same as MS25. Xbox 360 and PC Connections
Power off both your PC and Xbox 360. Make sure the Xbox 360 power cable and video cable are both plugged in. You do not need to hook up the video to a TV, but the cable does have to be plugged into the back of the Xbox 360.
The Xbox 360 uses a floating point ground. Your PC uses a “true earth” ground. This difference can cause excess voltage to travel through your SATA cable and potentially damage your Xbox 360 DVD drive or PC Motherboard / SATA card. You can solve this problem by connecting the Xbox 360’s ground to the PC’s ground. The easiest way to do this is by using a “croc clip wire” and connecting the Xbox 360 metal casing to your PC’s metal case. You can use anything conductive to connect the Xbox 360 case is connected to the PC case. You don’t have to use croc clips, you could just tape some bare/stripped wire to each, or even set the Xbox 360 next to the PC so that they are touching. Many people have flashed their drives completely ignoring this recommendation. The possibility of damaging something by ignoring this step is rare, but still possible. So, you could say grounding the PC and 360 together isn’t absolutely necessary, but it is recommended. If you have the ability to do so, it is safest to take the time to do it. Disconnect all other drives in your PC. You should disconnect all hard drives and DVD drives so they do not get accidentally flashed with the hacked firmware. Disabling these devices in your BIOS may not work, so physically unplugging them is the best solution. (Unless of course if you are using the NTFS4DOS CD. The drives would need to remain connected in this case)

Reading The Original Firmware Turn on your PC and Xbox 360 at the same time, and boot your PC from the bootable media into DOS. When you reach the DOS command prompt, plug the SATA cable into the Xbox 360 DVD drive, so that the drive is connected to your PC / SATA card.
Enter y to accept the iPrep Terms of Use.
Type in the following command, using your Xbox 360 serial number found on the back of the Xbox 360 case.

(We’ll use the serial number 1234567 12345 as an example)
dSam 1234567 12345 [press enter]
If you get errors like “Directory already exists” or “MKDIR failed…” don’t worry. The batch file is trying to create a new folder but it’s already there.
MTKFlash should run and your drive should be listed. If you see an item in the list named “XTREME”, that’s good – but don’t select it yet.
While at the menu, power off your Xbox 360. To make sure your Xbox 360 is completely powered off, check the light on the power brick to make sure it is orange.
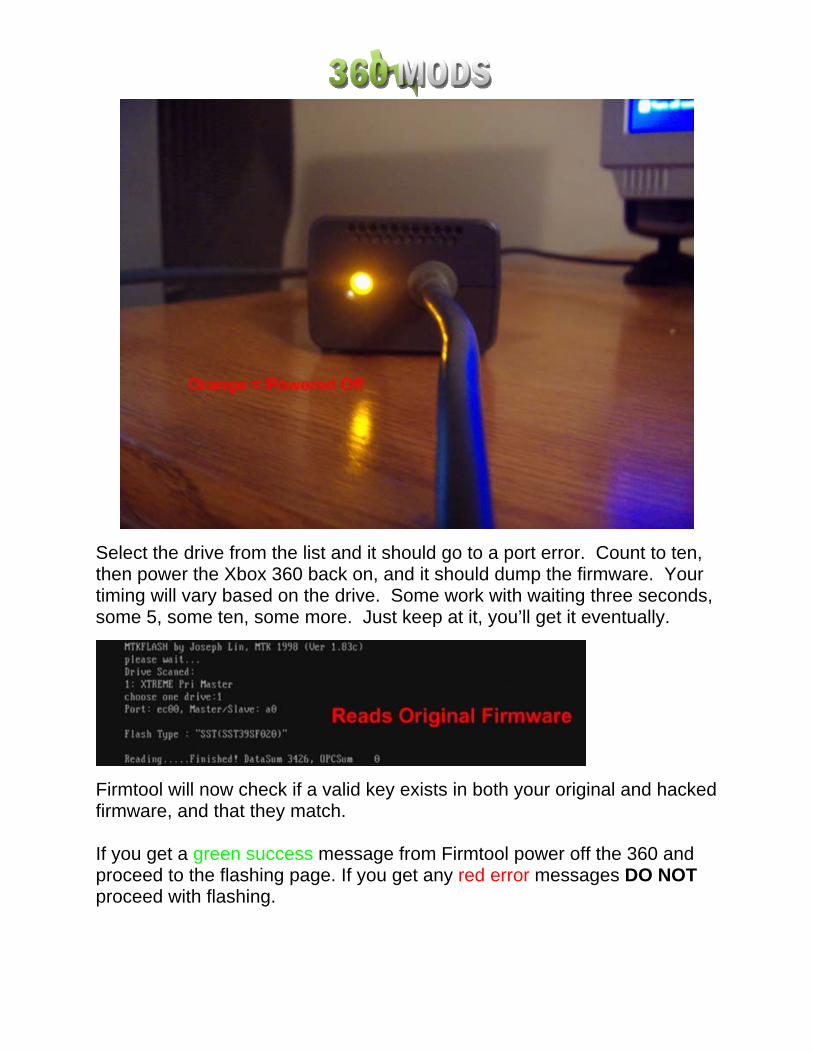
Select the drive from the list and it should go to a port error. Count to ten, then power the Xbox 360 back on, and it should dump the firmware. Your timing will vary based on the drive. Some work with waiting three seconds, some 5, some ten, some more. Just keep at it, you’ll get it eventually.
Firmtool will now check if a valid key exists in both your original and hacked firmware, and that they match. If you get a green success message from Firmtool power off the 360 and proceed to the flashing page. If you get any red error messages DO NOT proceed with flashing.

Firmtool Errors Sometimes there are problems. If your firmware dump is not the correct size, does not contain a valid key, or does not contain a valid drive version, FirmTool will abort. If you get something like any of these pictures, DO NOT PROCEED WITH FLASHING! Doing so may brick your Xbox 360 and leave you without a valid drive key. Something is wrong. Make sure you have unplugged all other drives in your PC and try starting this tutorial over again. ORIG.BIN IS WRONG SIZE
NO VALID KEY IN ORIG.BIN

Firmtool will also check your firmware version strings to make sure they match. These must match or you could get error code 66 after flashing your drive. If Firmtool asks if you want to copy the version string, type Y to use the ms25 version strings from your original firmware.
Again, your screen should match the screenshot below before proceeding: FIRMTOOL SUCCESS
Unplug the SATA cable from the 360 DVD drive, power-cycle the Xbox 360, and reboot your PC.

Flashing The Hacked Firmware
When you’re back into DOS, plug the SATA cable back into the Xbox 360 DVD drive.
Type in the following command, using your Xbox 360 serial number that you used with the dSam command.
fSam 1234567 12345 [press enter]
MTKFlash should run and your drive should be listed. If you see an item in the list named “XTREME”, that is what you want, but don’t choose it yet.
While at the menu, power off your Xbox 360. To make sure your Xbox 360 is powered off, check the light on the power brick to make sure it is orange.

Select the drive from the list and it should go to a port error. Count to ten, then power the Xbox 360 back on, and it should dump the firmware. Your timing will vary based on the drive. Some work with waiting three seconds, some 5, some ten, some more. Just keep at it, you’ll get it eventually.
It should flash 4 banks. The 4th bank may say something like Datasum, it is normal. When it is done flashing, unplug the SATA cable from the 360 DVD drive, power off the Xbox 360, and power off your PC. Reconnect the 360 DVD drive to the 360 motherboard and test it.
Backup Your Original Firmware!
Boot into Windows. Plug in your USB drive and find your Sam-OFW.bin and Sam-CFW.bin in the BACKUPS folder. This is your Xbox 360 drive firmware and needs to be kept safe! Make a copy of these files. Then make another one on another drive. Then make another somewhere else. Email it to yourself.
You should keep all the files on your bootable media to make future firmware updates easier.

Flashing an MS28 Using The VCC Switch Method
(Not for noobs, requires desoldering of a very small smt resistor)
The VCC method is like temporarily making your drive an MS25. So for that reason, you still need a SATA chipset that is capable of flashing MS25 drives.
Open up your drive and desolder the middle VCC resistor (resistor R408) like in the following picture:
Wire up a simple SPST toggle/slide switch (or use wires) to the blue and red locations. The second blue circle is just an alternate point if needed. Set the switch to “On.”

Xbox 360 and PC Connections Since you already have the drive apart and now have a switch installed on it, leave the PCB out of the DVD drive like xboxto did in the following image. Just make sure you supply power to the board through the Xbox 360 and you still have the video cables connected to the Xbox 360.
Power off your PC and Xbox 360. Make sure the Xbox 360 power cable
and video cable are both plugged in. You do not need to hook up the video to a TV, but it does have to be plugged into the back of the Xbox 360.

The Xbox 360 uses a floating point ground. Your PC uses a “true earth” ground. This difference can cause excess voltage to travel through your SATA cable and potentially damage your Xbox 360 DVD drive or PC Motherboard / SATA card. Remedy this problem by connecting the Xbox 360’s ground to the PC’s ground. The easiest way to do this is by using a “croc clip wire” and connecting the Xbox 360 metal casing to your PC’s metal case. You can use anything conductive to connect the Xbox 360 case to the PC case - you could just tape some bare/stripped wire to each, or even just set the Xbox 360 next to the PC so that they are touching.
Many people have flashed their drives completely ignoring this recommendation. The possibility of damaging something by ignoring this step is rare, but still possible. So, you could say grounding the PC and 360 together isn’t absolutely necessary, but it is recommended. If you have the ability to do so, it is safest to take the time to do it.
Disconnect all other drives in your PC. You should disconnect all hard drives and DVD drives so they do not get accidentally flashed with the hacked firmware. Disabling these devices in your BIOS may not work, so physically unplugging them is the best solution.

Reading The Original Firmware Power on your Xbox 360 and PC. Insert your bootable media, to a DOS prompt. Connect the Samsung drive to the PC using a SATA cable. Enter y to accept the iPrep Terms of Use.
Type in the following command, using your Xbox 360 serial number found on the back of the Xbox 360 case.
(We’ll use the serial number 1234567 12345 as an example)
dSam 1234567 12345 [press enter]
If you get errors like “Directory already exists” or “MKDIR failed…” don’t worry. The batch file is trying to create a new folder but it’s already there.

MTKFlash should run and your drive should be listed. If you see an item in the list named “XTREME”, that is it, but don’t select it just yet. Just leave it at the menu of drive choices.
At this point, power off the Xbox 360.
To make sure your Xbox 360 is completely powered off, check the light on the power brick to make sure it is orange.
When you are sure the Xbox 360 is off, flip your VCC switch to the “Off” position, and power up your Xbox 360 again.
You will want to have one hand on your VCC switch, and the other hand on the key to select your drive. Quickly flip the VCC switch to “On”, and then a split-second later, hit the key for your drive. It should dump your original firmware.

Firmtool will now check if a valid key exists in both your original and hacked firmware, and that they match. If you get a green success message from Firmtool power off the 360 and proceed to the flashing page. If you get any red error messages DO NOT proceed with flashing.

Firmtool Errors Sometimes there are problems. If your firmware dump is not the correct size, does not contain a valid key, or does not contain a valid drive version, FirmTool will abort. If you get something like any of these pictures, DO NOT PROCEED WITH FLASHING! Doing so may brick your Xbox 360 and leave you without a valid drive key. Something is wrong. Make sure you have unplugged all other drives in your PC and try starting this tutorial over again. ORIG.BIN IS WRONG SIZE
NO VALID KEY IN ORIG.BIN

Firmtool will also check your firmware version strings to make sure they match. These must match or you could get error code 66 after flashing your drive. If Firmtool asks if you want to copy the version string, type Y to use the ms25 version strings from your original firmware.
Again, your screen should match the screenshot below before proceeding: FIRMTOOL SUCCESS
Unplug the SATA cable from the 360 DVD drive, power-cycle the Xbox 360, and reboot your PC.

Flashing The Hacked Firmware When you’re back into DOS, plug the SATA cable back into the Xbox 360 DVD drive.
Enter y to accept the iPrep Terms of Use.

Type in the following command, using your Xbox 360 serial number that you used with the dSam command.
fSam 1234567 12345 [press enter]
It should display your SATA chipset. Do not select it yet, just leave it at the menu.
At this point, power off the Xbox 360. When you are sure the Xbox 360 is off, flip your VCC switch to the “Off” position, and power up your Xbox 360 again. You will want to have one hand on your VCC switch, and the other hand on the key to select your drive. Quickly flip the VCC switch to “On”, and then a split-second later, hit the key for your drive.
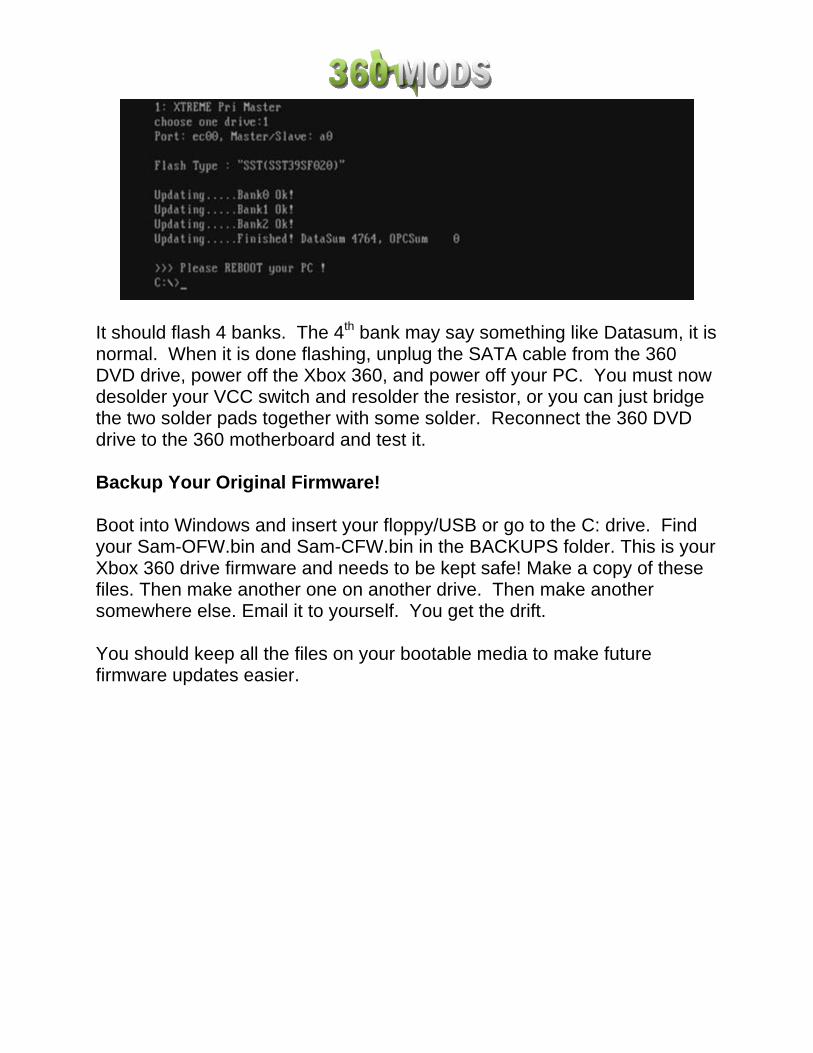
It should flash 4 banks. The 4th bank may say something like Datasum, it is normal. When it is done flashing, unplug the SATA cable from the 360 DVD drive, power off the Xbox 360, and power off your PC. You must now desolder your VCC switch and resolder the resistor, or you can just bridge the two solder pads together with some solder. Reconnect the 360 DVD drive to the 360 motherboard and test it. Backup Your Original Firmware! Boot into Windows and insert your floppy/USB or go to the C: drive. Find your Sam-OFW.bin and Sam-CFW.bin in the BACKUPS folder. This is your Xbox 360 drive firmware and needs to be kept safe! Make a copy of these files. Then make another one on another drive. Then make another somewhere else. Email it to yourself. You get the drift. You should keep all the files on your bootable media to make future firmware updates easier.
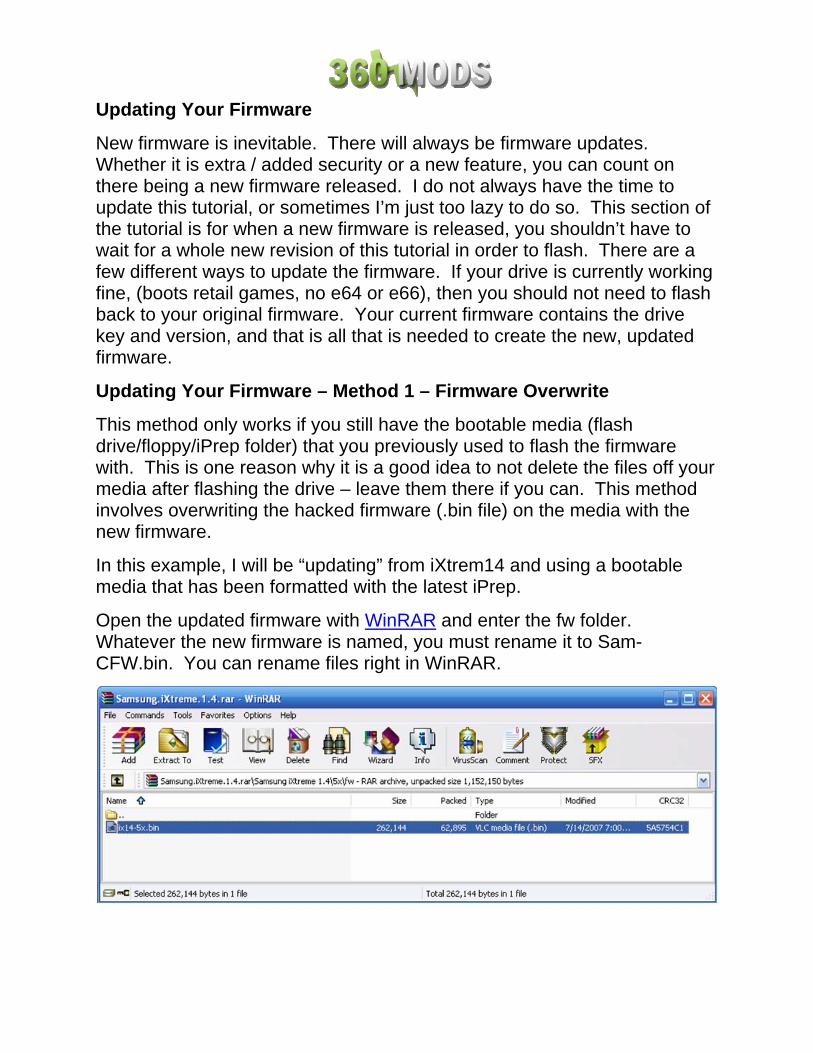
Updating Your Firmware
New firmware is inevitable. There will always be firmware updates. Whether it is extra / added security or a new feature, you can count on there being a new firmware released. I do not always have the time to update this tutorial, or sometimes I’m just too lazy to do so. This section of the tutorial is for when a new firmware is released, you shouldn’t have to wait for a whole new revision of this tutorial in order to flash. There are a few different ways to update the firmware. If your drive is currently working fine, (boots retail games, no e64 or e66), then you should not need to flash back to your original firmware. Your current firmware contains the drive key and version, and that is all that is needed to create the new, updated firmware.
Updating Your Firmware – Method 1 – Firmware Overwrite
This method only works if you still have the bootable media (flash drive/floppy/iPrep folder) that you previously used to flash the firmware with. This is one reason why it is a good idea to not delete the files off your media after flashing the drive – leave them there if you can. This method involves overwriting the hacked firmware (.bin file) on the media with the new firmware.
In this example, I will be “updating” from iXtrem14 and using a bootable media that has been formatted with the latest iPrep.
Open the updated firmware with WinRAR and enter the fw folder. Whatever the new firmware is named, you must rename it to Sam-CFW.bin. You can rename files right in WinRAR.
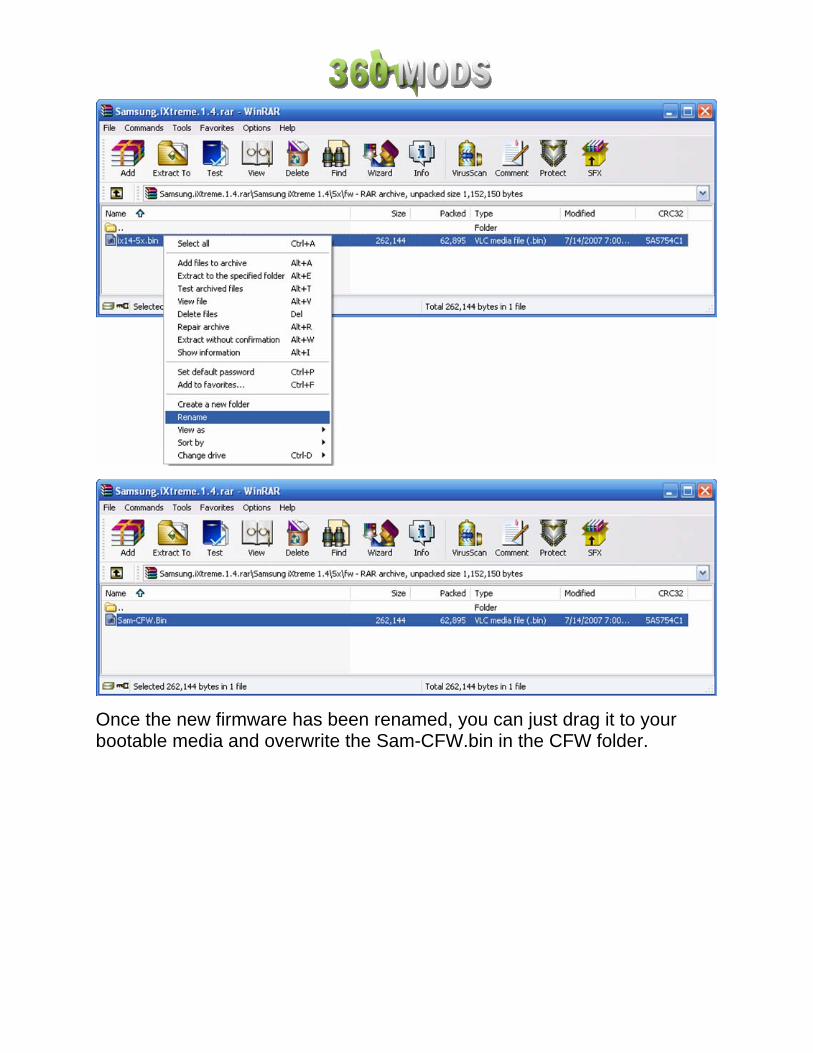
Once the new firmware has been renamed, you can just drag it to your bootable media and overwrite the Sam-CFW.bin in the CFW folder.

Then you need to do follow the same flashing procedure you used to flash your drive the first time. Boot to DOS, run dSam, reboot, and run fSam. Remember to read the second necessary section on updating firmware – Disabling FirmGuard.
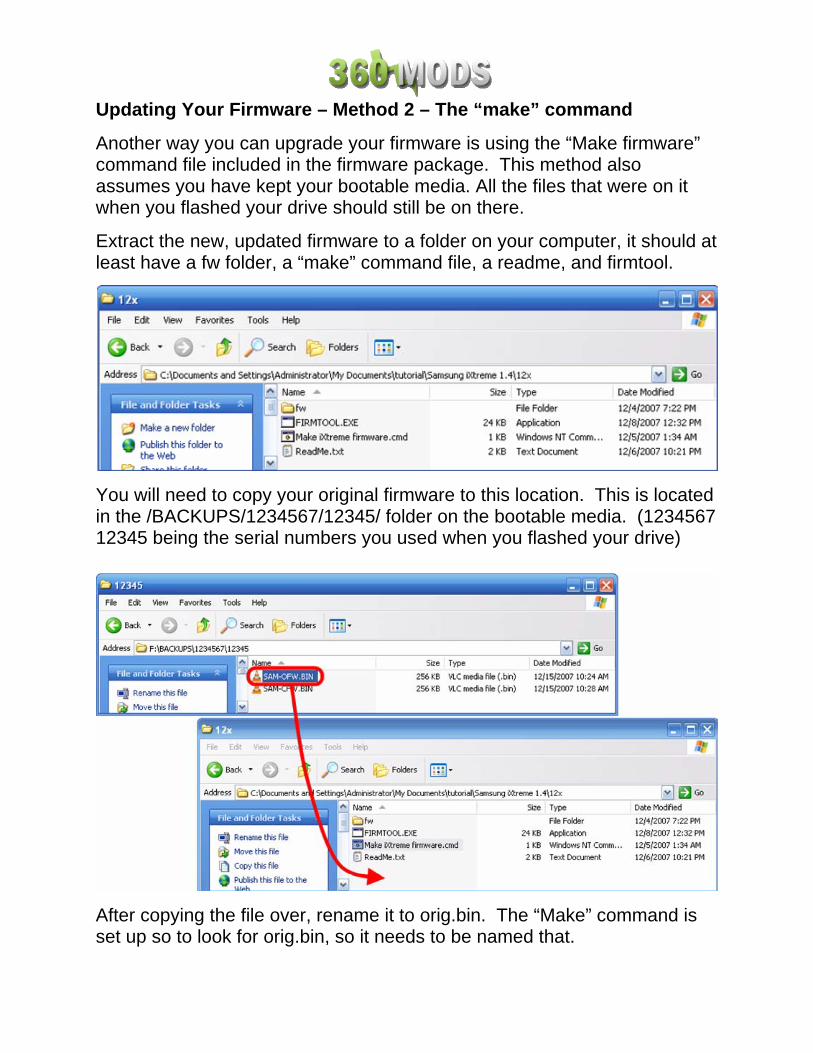
Updating Your Firmware – Method 2 – The “make” command
Another way you can upgrade your firmware is using the “Make firmware” command file included in the firmware package. This method also assumes you have kept your bootable media. All the files that were on it when you flashed your drive should still be on there.
Extract the new, updated firmware to a folder on your computer, it should at least have a fw folder, a “make” command file, a readme, and firmtool.
You will need to copy your original firmware to this location. This is located in the /BACKUPS/1234567/12345/ folder on the bootable media. (1234567 12345 being the serial numbers you used when you flashed your drive)
After copying the file over, rename it to orig.bin. The “Make” command is set up so to look for orig.bin, so it needs to be named that.
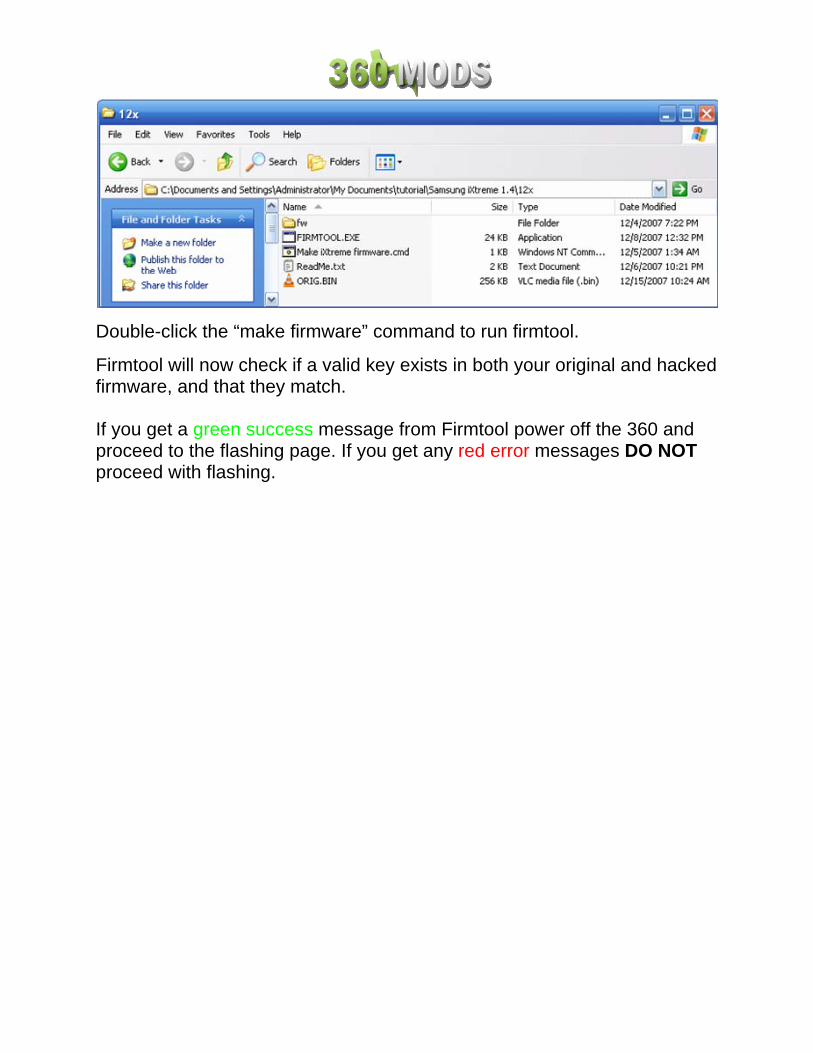
Double-click the “make firmware” command to run firmtool.
Firmtool will now check if a valid key exists in both your original and hacked firmware, and that they match. If you get a green success message from Firmtool power off the 360 and proceed to the flashing page. If you get any red error messages DO NOT proceed with flashing.
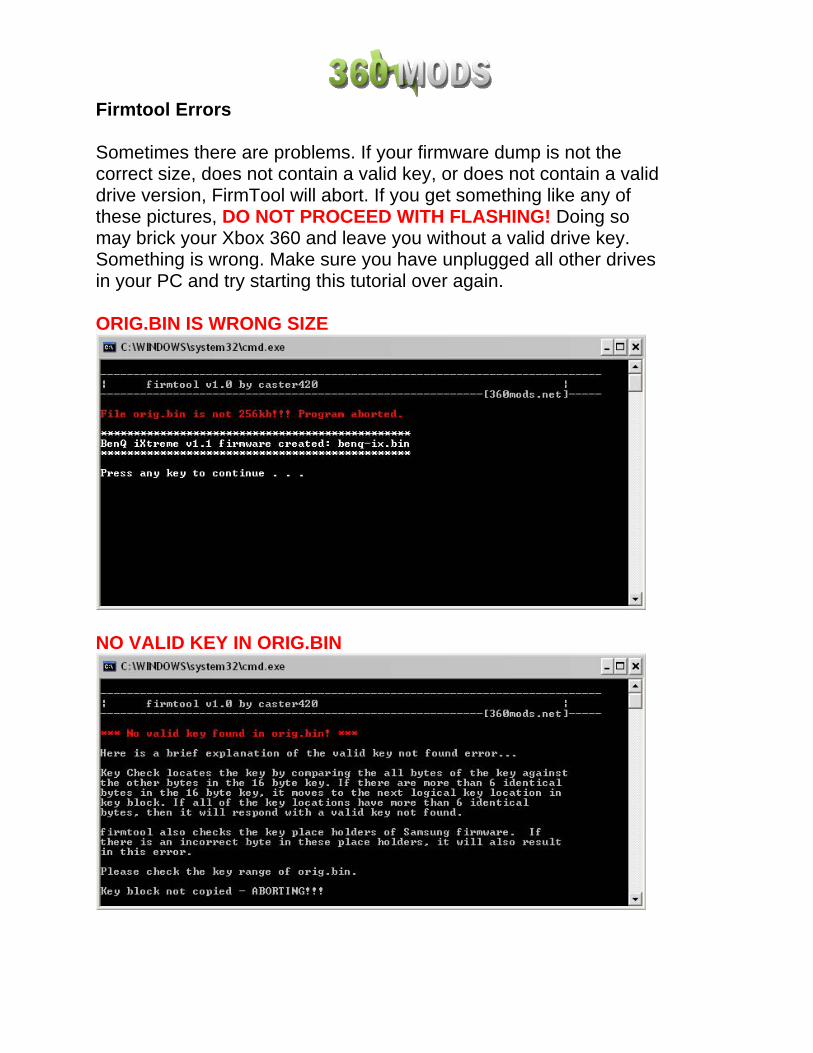
Firmtool Errors Sometimes there are problems. If your firmware dump is not the correct size, does not contain a valid key, or does not contain a valid drive version, FirmTool will abort. If you get something like any of these pictures, DO NOT PROCEED WITH FLASHING! Doing so may brick your Xbox 360 and leave you without a valid drive key. Something is wrong. Make sure you have unplugged all other drives in your PC and try starting this tutorial over again. ORIG.BIN IS WRONG SIZE
NO VALID KEY IN ORIG.BIN
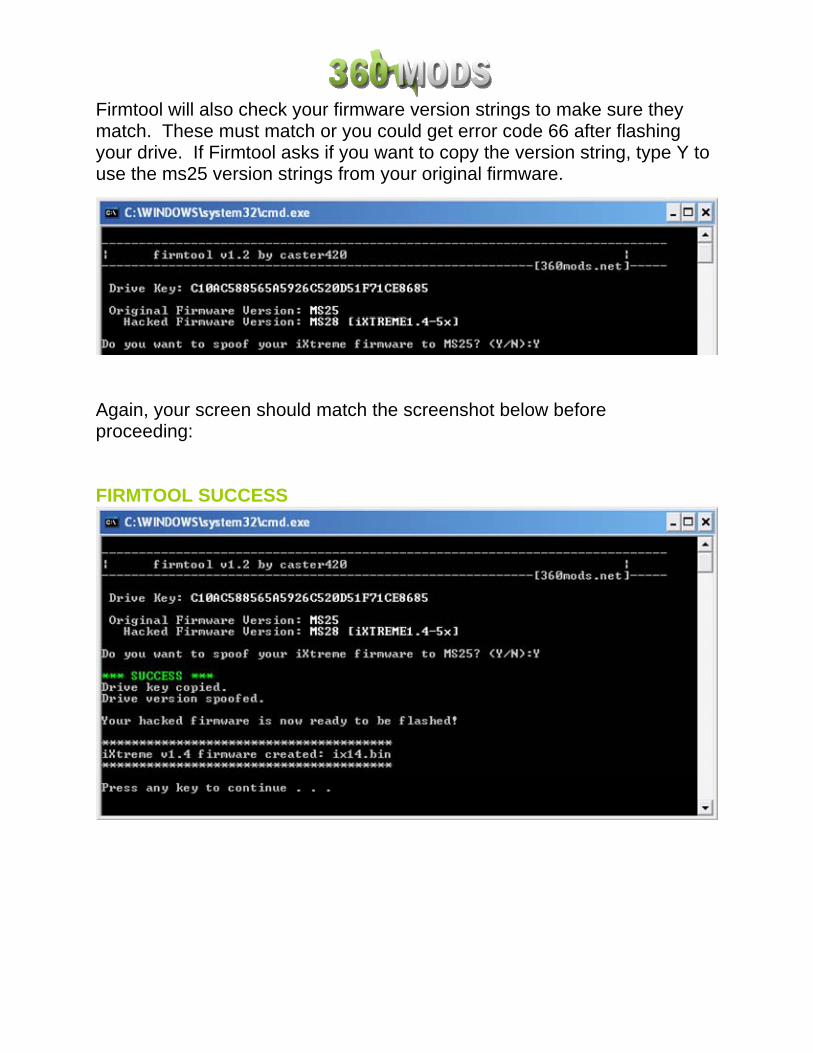
Firmtool will also check your firmware version strings to make sure they match. These must match or you could get error code 66 after flashing your drive. If Firmtool asks if you want to copy the version string, type Y to use the ms25 version strings from your original firmware.
Again, your screen should match the screenshot below before proceeding: FIRMTOOL SUCCESS

Once firmtool has completed successfully, you should have a new file. It is the hacked firmware injected with your drive key and version. In this example, the “make” generates a file named ix14.bin. If the firmware version was iXtreme 1.5, it would probably be named ix15.bin.
Copy the generated file over to your bootable media.
Now your bootable media is all set. To flash the drive, boot to DOS and type this command: mtkflash w /m /sata ix14.bin

You will still need to disable or bypass FirmGuard. Edit the command for whatever file you are flashing. For example, if the “make firmware” generated an ix15.bin, you would use the command mtkflash w /m /sata ix15.bin

Updating Your Firmware – Method 3 – “Repeat Entire Process”
This method would be your choice if you do not still have the bootable media you used when you last flashed your drive.
With the release of a new firmware, iPrep will require a “definitions update” to load that new firmware. You should be able to use Tools > Check for Updates right within iPrep to download the latest definitions file.
Then you would run iPrep, load the new firmware, go through the process of setting up bootable media again, and flash the drive like you did the first time. You would have to boot to DOS, run dSam, reboot, and run fSam. Essentially, just repeating the entire process, with the new firmware and updated definitions file for iPrep. You would still have to disable or bypass FirmGuard.

Disabling FirmGuard (Reflashing when your drive if already flashed with a hacked firmware) Firmware versions Xtreme v4.x-5.x and all iXtreme versions include FirmGuard, which makes reading and writing to the drive much more difficult. This FirmGuard uses the MS28 core firmware lockout routines. Essentially, once you flash the drive with a hacked firmware you then have an MS28 drive, no matter what your drive was originally. In order to be able to read or write from a drive that has FirmGuard, follow either of these methods. Now, when following the above instructions, remember to do this instead: FirmGuard disable method 1 – 0800 Disc
1. You need to disable FirmGuard. Burn the activate.iso to a DVD+R DL using IMGBurn or CloneCD.
2. Boot your PC to DOS; leave the 360 powered off, but with both power and video cables connected. The drive should be hooked up to your SATA port.
3. When you reach the DOS command prompt, power on your Xbox 360, hit the eject button, and insert your 0800 disc. Let it spin up and read the disc. It usually takes a good 10 to 20 seconds. If you listen carefully, you can hear the drive laser shift and when you hear no more sounds except for the constant spinning disc, the disc has done the job.
4. Eject the drive back open and take out the 0800 disc. 5. FirmGuard should now be disabled and you should be able to read
and write to the drive just like it was a normal MS25 drive. FirmGuard bypass method 2 – VIA & bad-flash
1. Users with a VIA chipset can avoid using the 0800 disc if they can correctly follow the instructions for “Bad-Flashing an MS28 Drive” in this tutorial. The FirmGuard is basically just the MS28 firmware, and this method for flashing the MS28 drives also works with bypassing FirmGuard.

Restoring Original Firmware
Restoring the drive to the original firmware should not be necessary if your drive is currently working and you are only interested in updating to a newer hacked firmware. Nevertheless, you may have some reason to flash back to the original firmware, so I have included the instructions.
Restoring the Samsung drive’s original firmware is very easy if you still have the bootable media you created with the latest iPrep. All you need to do is boot to dos like you would for flashing the drive, and instead of typing dSam or fSam, type rSam. You would use the serial number you used when you flashed the drive, so something like rSam 1234567 12345.
You will still need to disable or bypass FirmGuard.

Hitachi-LG GDR3120L Tutorial
Video Tutorial Here (v46/47/59 drives)

Opening The Xbox 360 The outer Xbox 360 “shell” is entirely screwless. Plastic friction tabs hold the case together. There are many different tutorials for opening the Xbox 360, with different methods. Here are some links to “opening the Xbox 360” tutorials. I decided not to cover opening the Xbox 360 in this tutorial since it is already long enough and there are many other tutorials for opening the Xbox 360. Notes:
- The Anandtech guide says you need to use a Torx 12 screwdriver. There is no such thing. You need a Torx 10 screwdriver.
- Removing the grey side grill on the hard drive side is a little tricky. The first friction tab is actually inaccessible from the top holes in the case, so you need to stick your screwdriver in the hole by where the hard drive button is and unclip it. (See Pic)
- In order to push in the back clips, you can do one of two things. You can use a thin metal object such as a precision flathead screwdriver / bobby pin / paperclip OR you can make an opening “key” out of a CD spindle case. The key would not work for me, it was too flimsy, but it works for some people. You can purchase an “unlock kit.”
- If all you want to do is just flash the firmware, you only need to remove the six long screws on the bottom. (See Pic)
Read all these guides and watch all the videos, figure out how you want to go about opening the Xbox 360. It is not rocket science. Anandtech Guide InformIT Guide Xbox-Accessories Disassembly Hydra's Guide to Making a CD Unlock Key Textbook’s Video acDC's Video
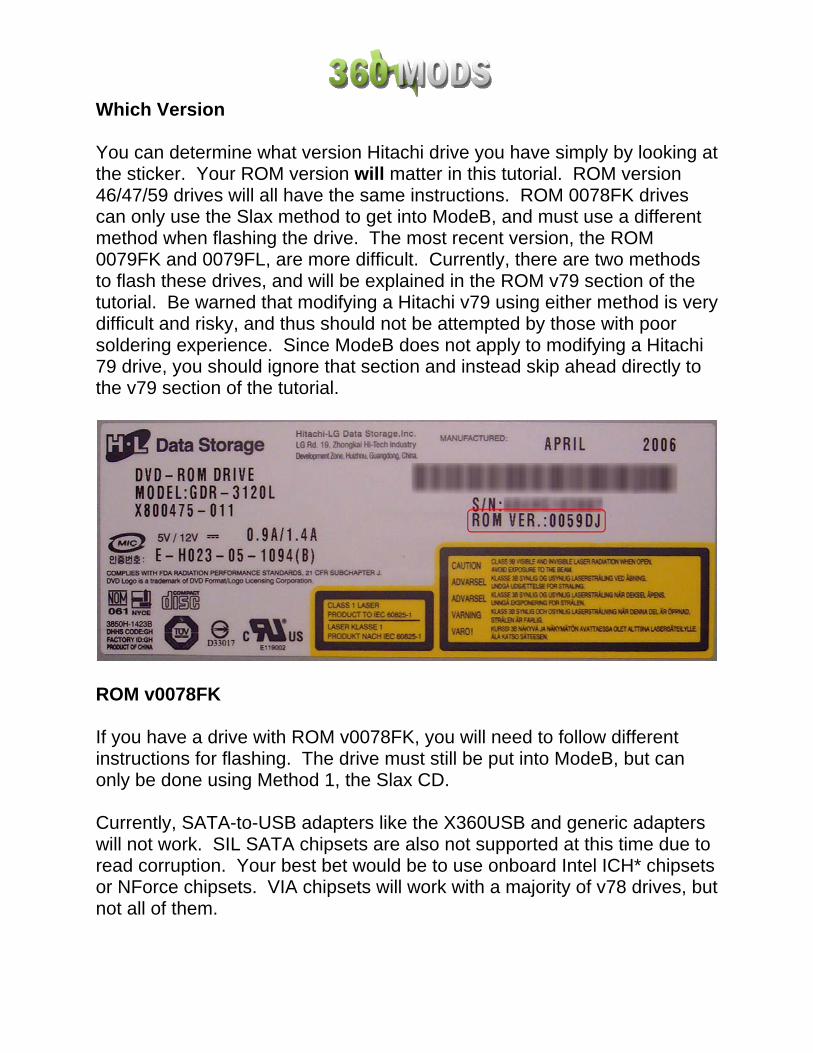
Which Version You can determine what version Hitachi drive you have simply by looking at the sticker. Your ROM version will matter in this tutorial. ROM version 46/47/59 drives will all have the same instructions. ROM 0078FK drives can only use the Slax method to get into ModeB, and must use a different method when flashing the drive. The most recent version, the ROM 0079FK and 0079FL, are more difficult. Currently, there are two methods to flash these drives, and will be explained in the ROM v79 section of the tutorial. Be warned that modifying a Hitachi v79 using either method is very difficult and risky, and thus should not be attempted by those with poor soldering experience. Since ModeB does not apply to modifying a Hitachi 79 drive, you should ignore that section and instead skip ahead directly to the v79 section of the tutorial.
ROM v0078FK If you have a drive with ROM v0078FK, you will need to follow different instructions for flashing. The drive must still be put into ModeB, but can only be done using Method 1, the Slax CD. Currently, SATA-to-USB adapters like the X360USB and generic adapters will not work. SIL SATA chipsets are also not supported at this time due to read corruption. Your best bet would be to use onboard Intel ICH* chipsets or NForce chipsets. VIA chipsets will work with a majority of v78 drives, but not all of them.

Xbox 360 and PC Connections
Power off your PC and Xbox 360. Make sure the Xbox 360 power cable and video cable are both plugged in. You do not need to hook up the video to a TV, but it does have to be plugged into the back of the Xbox 360.
The Xbox 360 uses a floating point ground. Your PC uses a “true earth” ground. This difference can cause excess voltage to travel through your SATA cable and potentially damage your Xbox 360 DVD drive or PC Motherboard / SATA card. Remedy this problem by connecting the Xbox 360’s ground to the PC’s ground. The easiest way to do this is by using a “croc clip wire” and connecting the Xbox 360 metal casing to your PC’s metal case. You can use anything conductive to connect the Xbox 360 case to the PC case - you could just tape some bare/stripped wire to each, or even just set the Xbox 360 next to the PC so that they are touching.
Many people have flashed their drives completely ignoring this recommendation. The possibility of damaging something by ignoring this step is rare, but still possible. So, you could say grounding the PC and 360 together isn’t absolutely necessary, but it is recommended. If you have the ability to do so, it is safest to take the time to do it.
Disconnect all other drives in your PC. You should disconnect all hard drives and DVD drives so they do not get accidentally flashed with the hacked firmware. Disabling these devices in your BIOS may not work, so physically unplugging them is the best solution.

ModeB ModeB is the Hitachi drive’s built-in debug mode that we need to get into before anything else can be done. When in ModeB, the drive can be recognized in Windows and flashed with the hacked firmware. There are a few different ways to get into ModeB. You only need to use whatever method works and you feel comfortable with. ModeB Method 1 – SLAX The first method you can use to get your Hitachi drive into ModeB is by using a bootable SLAX Live CD. It is a specially edited Linux LiveCD that will send custom commands to the Hitachi drive on bootup.
1. Download the latest SLAX image from Xbox-Scene 2. Burn the .iso image to a blank CD-R using IMGBurn, CloneCD, Nero,
or any other recording software capable of burning .iso image files. 3. Make sure your computer’s BIOS is set to boot from CD first. Most
are set to this by default. 4. Power off both the Xbox 360 and PC. 5. Make sure both power and video cables are plugged into the Xbox
360. Also provide a true path to ground between the Xbox 360 case and PC case by using croc clips, small wire, or setting them against each other so they are touching.
6. Unplug the small, black SATA cable from the back of the Hitachi DVD drive and connect your Hitachi drive to your PC via a SATA cable.
7. Power on the Xbox 360 and PC at the same time. Boot the PC from the Slax CD and wait until you reach the login prompt. If you get a message that says “Spinning up disc….” , hit eject on your Hitachi drive, and the Slax disc should continue to load. If you get that message, that’s a good thing, it means your drive is probably already in ModeB.
8. Check for ModeB! (see below) Troubleshooting: Some people are having problems with the Slax disc, and the only suggestion I can give you is to try turning on the Xbox 360 at a different time. I know with my VIA chipset, it usually works best if I don’t turn on the 360 until just after the Slax disc started to load. You can also check out this video of how to use Slax to get a Hitachi drive into ModeB. (The video is for a Hitachi 78FK drive, but the information on using Slax would be useful for all drive versions.)
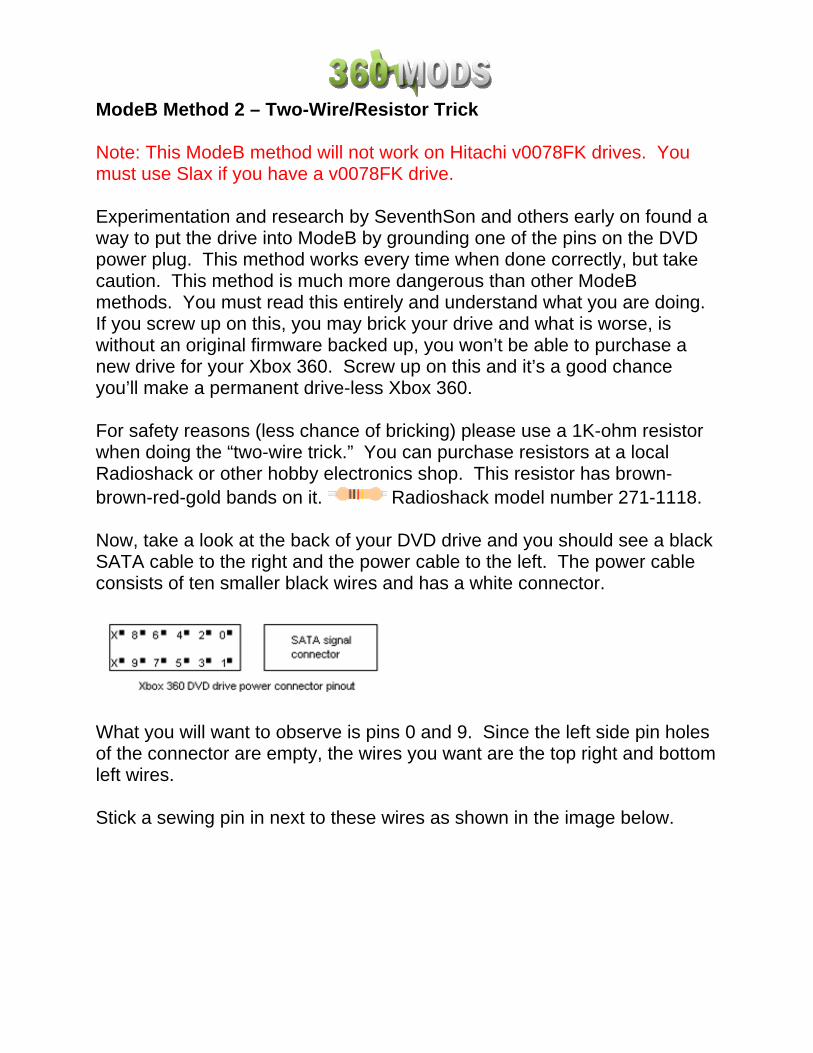
ModeB Method 2 – Two-Wire/Resistor Trick Note: This ModeB method will not work on Hitachi v0078FK drives. You must use Slax if you have a v0078FK drive. Experimentation and research by SeventhSon and others early on found a way to put the drive into ModeB by grounding one of the pins on the DVD power plug. This method works every time when done correctly, but take caution. This method is much more dangerous than other ModeB methods. You must read this entirely and understand what you are doing. If you screw up on this, you may brick your drive and what is worse, is without an original firmware backed up, you won’t be able to purchase a new drive for your Xbox 360. Screw up on this and it’s a good chance you’ll make a permanent drive-less Xbox 360. For safety reasons (less chance of bricking) please use a 1K-ohm resistor when doing the “two-wire trick.” You can purchase resistors at a local Radioshack or other hobby electronics shop. This resistor has brown-brown-red-gold bands on it. Radioshack model number 271-1118. Now, take a look at the back of your DVD drive and you should see a black SATA cable to the right and the power cable to the left. The power cable consists of ten smaller black wires and has a white connector.
What you will want to observe is pins 0 and 9. Since the left side pin holes of the connector are empty, the wires you want are the top right and bottom left wires. Stick a sewing pin in next to these wires as shown in the image below.
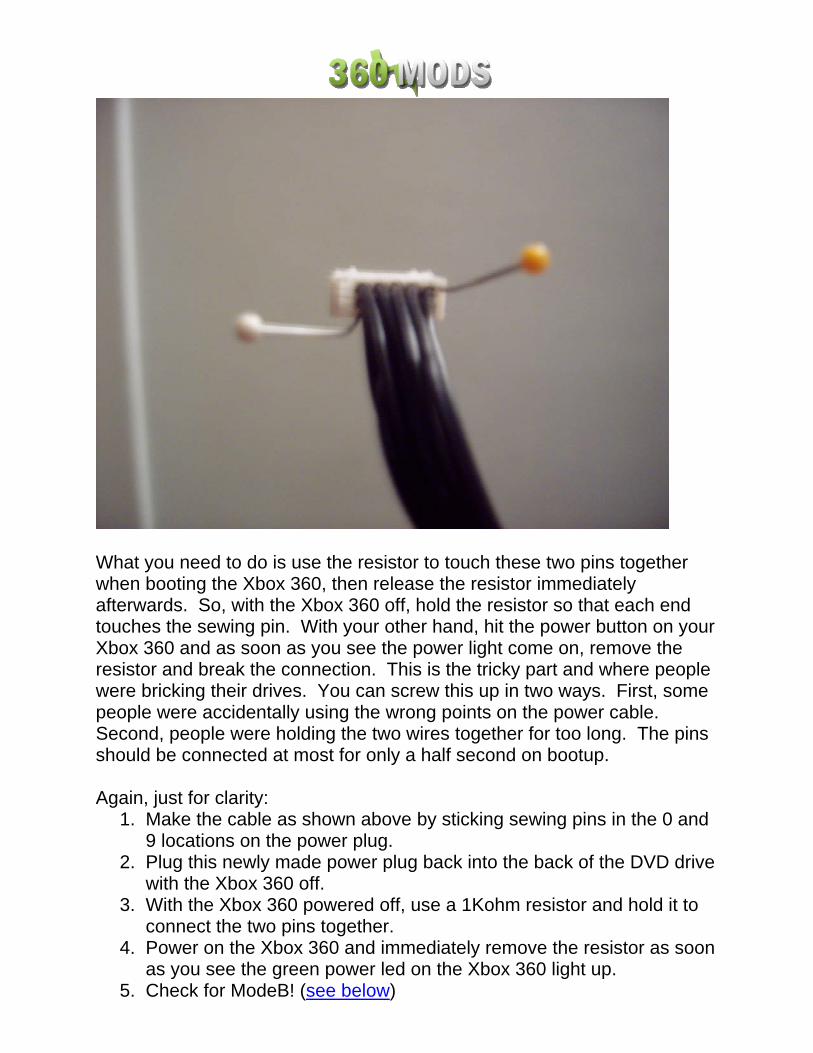
What you need to do is use the resistor to touch these two pins together when booting the Xbox 360, then release the resistor immediately afterwards. So, with the Xbox 360 off, hold the resistor so that each end touches the sewing pin. With your other hand, hit the power button on your Xbox 360 and as soon as you see the power light come on, remove the resistor and break the connection. This is the tricky part and where people were bricking their drives. You can screw this up in two ways. First, some people were accidentally using the wrong points on the power cable. Second, people were holding the two wires together for too long. The pins should be connected at most for only a half second on bootup. Again, just for clarity:
1. Make the cable as shown above by sticking sewing pins in the 0 and 9 locations on the power plug.
2. Plug this newly made power plug back into the back of the DVD drive with the Xbox 360 off.
3. With the Xbox 360 powered off, use a 1Kohm resistor and hold it to connect the two pins together.
4. Power on the Xbox 360 and immediately remove the resistor as soon as you see the green power led on the Xbox 360 light up.
5. Check for ModeB! (see below)

ModeB Method 3 – Connectivity Kit Note: This ModeB method will not work on Hitachi v0078FK drives. You must use Slax if you have a v0078FK drive. If the Slax disc did not work for you and you are too afraid to use the two-wire/resistor trick method, you can purchase a Xeno or Xecuter Connectivity Kit to put the drive into ModeB. Some important warnings about the kits – You can blow up the kit and/or drive if you plug in the DVD power cables upside down. Look on the connector. There are small tabs to make sure you are connecting the cables correctly. You can also blow up the kit and/or drive if you short it out on something. The back of the kit is not protected, and you can see bare solder points on the circuit. If you aren’t careful, you can short the kit onto your PC case, Xbox drive, or another metal object. For a clear explanation of these dangers, take a look at this PDF. Disconnect all cables from the DVD drive and take it out of the Xbox 360. Power off your PC and hook up the connectivity kit. Hook up the SATA cable to the DVD drive as well. Push the ModeB button down and power on your PC and boot into Windows.
For the Xecuter kit, make sure the Eject button is up and the ModeB button is down before powering up the system.

The same status LED configuration is used for the Xeno kit. If you power up the drive and the LED is green, hit the ModeB button so that the LED turns red for ModeB.
ModeB Method 4 – Hotswap Note: This ModeB method will not work on Hitachi v0078FK drives. You must use Slax if you have a v0078FK drive. The fourth method of ModeB in fact is not a method to get into ModeB at all. The drive never goes into ModeB, but using this method, you will be able to flash your drive and since that’s what we are trying to do here, it is still included as a “ModeB method.” This method is not very applicable to many people so I won’t spend too much time going over it. You need a SATA DVD-ROM drive hooked up to your PC and detected in Windows. This can be a normal PC SATA DVD-ROM drive like the SH-D163A or it can also be an Xbox 360 Samsung drive in 0800 mode. Whatever it is, it has to be a SATA DVD-ROM drive detected and working in Windows. Note your drive letter, then unplug the SATA cable from your “normal” drive and plug it into the Hitachi drive. You can then flash your Hitachi with that drive letter. I personally couldn’t get this working, but others have, so it’s in here.

ModeB Method 5 – Boot Previously Flashed Drive With an Open Tray All previous hacked Hitachi firmwares have a seldom-known feature that allows them to be easily put back into ModeB. Remember, this only works with hacked firwmares (drives that have already been flashed). This ModeB method is not one to be used on drives that still have the original firmware. Power on the Xbox 360, eject the Hitachi tray, and make sure there is no disc in the tray. Leave the tray open, and then unplug the Xbox 360 power supply from the wall electrical outlet. Just hitting the 360’s power button would make the tray retract, we want it to stay open – and unplugging from the wall does this. Then, plug the power supply back in, and power the 360 back up. The drive should go into ModeB.
ModeB Indicators It is obvious that we must first get the Hitachi drive into ModeB before doing anything else. Before worrying about your PC, before worrying about flashing, or anything else, focus on ModeB. ModeB is a property of the DVD drive alone. It does not rely on SATA and has nothing to do with your computer. In fact, you can do the following checks with no SATA cable hooked up to the Hitachi drive at all. The following are signs of ModeB. Your Hitachi drive must be doing one of the following. Your drive does not have to display all these signs to be in ModeB. If your drive is showing just one of these, it is in ModeB. Signs of ModeB:
1. If using the Xbox 360 to power the drive and using the wire/resistor trick, your Xbox 360’s power LED should flash rapidly
2. With all methods, it should take two presses of the eject button to either open or close the DVD tray.
3. With all methods, when you eject the drive back in using the eject button, it should auto-eject back open a second later. This only occurs if you are using the Xbox 360 to power the drive.
4. Obviously, if the drive shows up in Windows, then it is in ModeB. When you do get into ModeB, do not power off the drive. Powering off the drive will make you lose ModeB and you would have to repeat your steps all over again.

Drive Detection in Windows When you have made sure your drive is in ModeB, connect it to your PC and power up your PC. If you used Slax, remember to take out the Slax disc because you need to boot from the hard drive into Windows. At the Windows loading bar, you should eject the Hitachi drive in and out a few times. Some people believe that they only need to eject the drive if the loading gets stuck, but this is NOT true! Testing has shown that device I/O errors while flashing were a result from the failure to eject the Hitachi drive at the Windows loading bar. When Windows boots up, check to see if the drive is detected. First, open device manager. Right-click “My Computer” and select “Manage.” A Computer Management window should open up with a list to the left. In that list to the left, under System Tools, is Device Manager. Check your CD/DVD drives to see if the Hitachi GDR-3120L is listed.
Open up “My Computer” and see if you have a new CD-ROM drive. Right-click on your drive and eject it. You just want to make sure you know which drive is the Hitachi drive. Remember the drive letter.
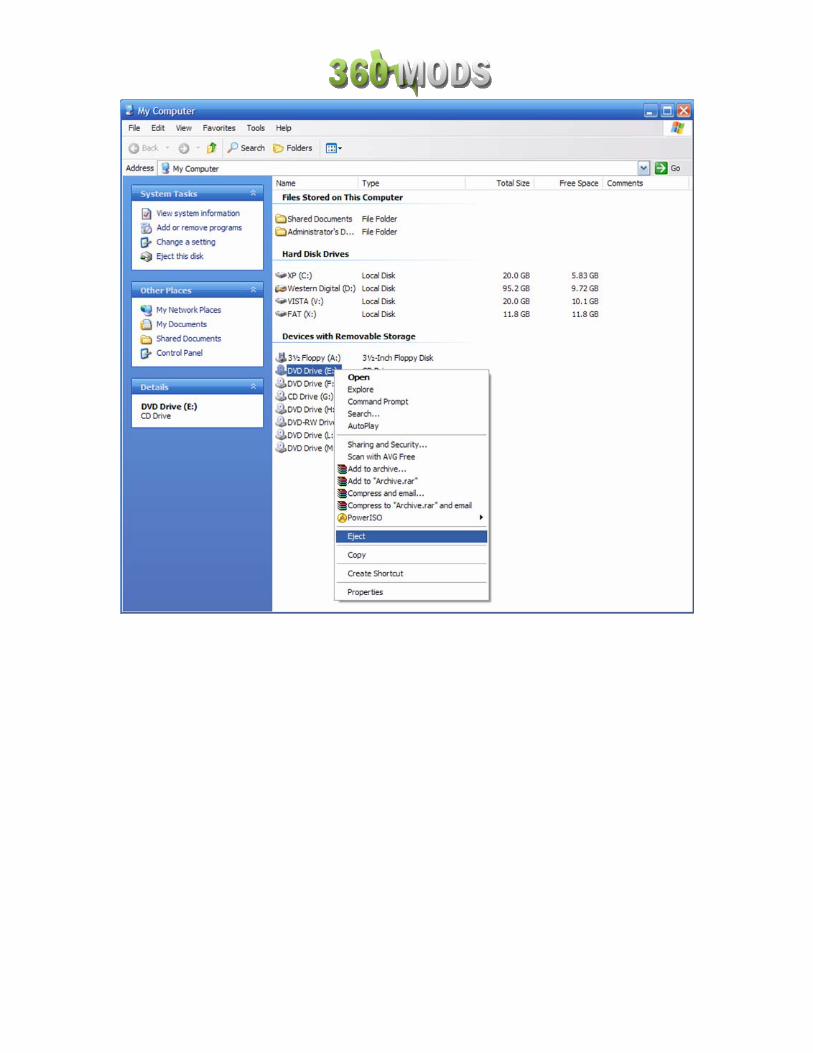
Flashing v46/47/59 Drives The rest of this tutorial is for the “old” version Hitachi drives. If you have a v0078FK drive, please click here for those instructions. If you have a v0079 drive, you shouldn’t even be reading this in the first place since you were instructed to skip the ModeB section, but here is the link to the v0079 instructions.
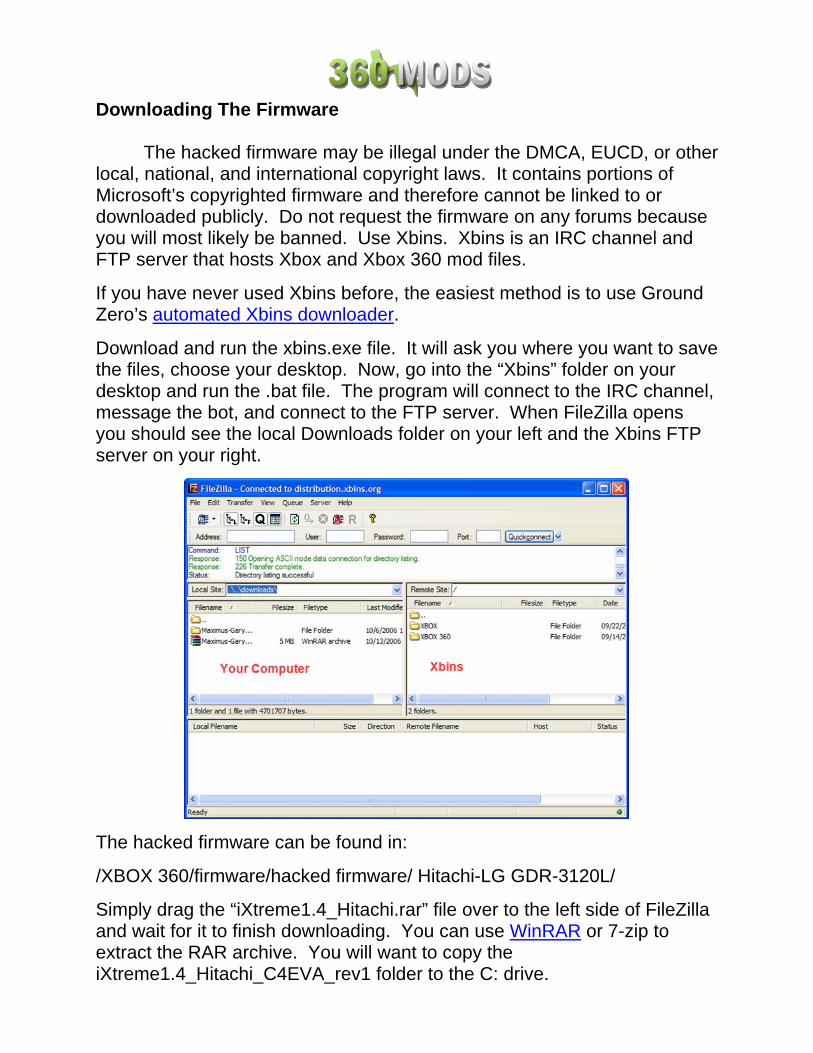
Downloading The Firmware
The hacked firmware may be illegal under the DMCA, EUCD, or other local, national, and international copyright laws. It contains portions of Microsoft’s copyrighted firmware and therefore cannot be linked to or downloaded publicly. Do not request the firmware on any forums because you will most likely be banned. Use Xbins. Xbins is an IRC channel and FTP server that hosts Xbox and Xbox 360 mod files.
If you have never used Xbins before, the easiest method is to use Ground Zero’s automated Xbins downloader.
Download and run the xbins.exe file. It will ask you where you want to save the files, choose your desktop. Now, go into the “Xbins” folder on your desktop and run the .bat file. The program will connect to the IRC channel, message the bot, and connect to the FTP server. When FileZilla opens you should see the local Downloads folder on your left and the Xbins FTP server on your right.
The hacked firmware can be found in:
/XBOX 360/firmware/hacked firmware/ Hitachi-LG GDR-3120L/
Simply drag the “iXtreme1.4_Hitachi.rar” file over to the left side of FileZilla and wait for it to finish downloading. You can use WinRAR or 7-zip to extract the RAR archive. You will want to copy the iXtreme1.4_Hitachi_C4EVA_rev1 folder to the C: drive.
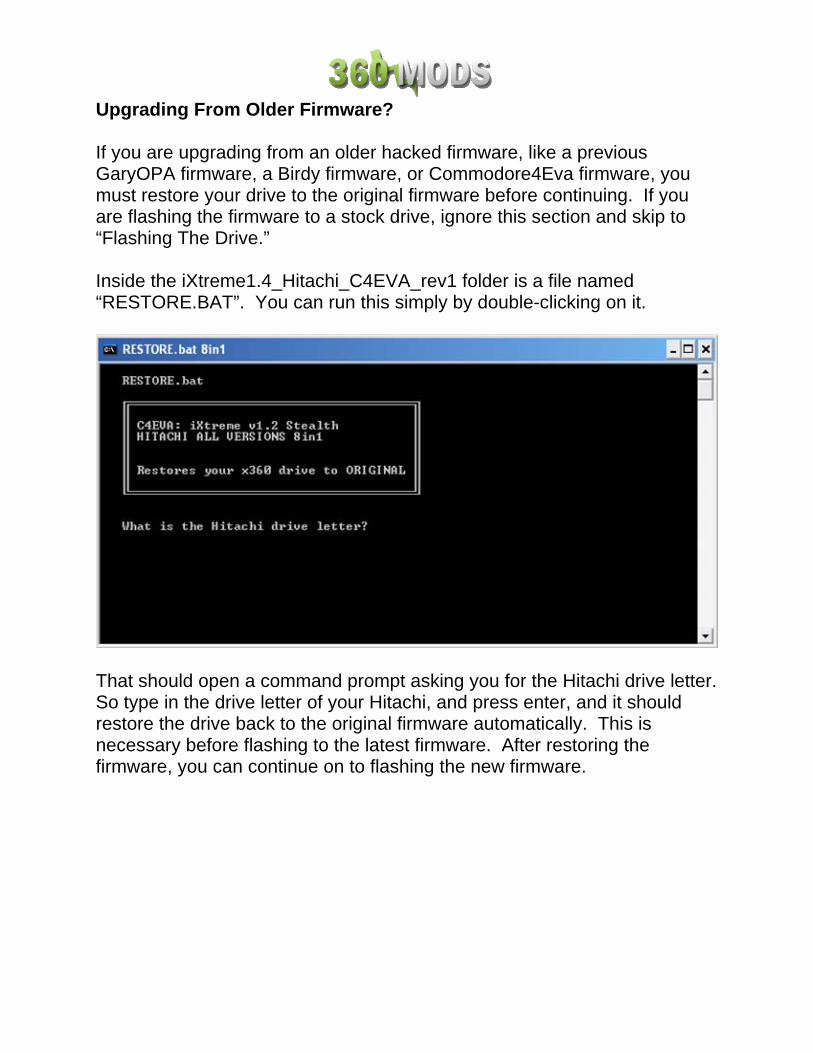
Upgrading From Older Firmware? If you are upgrading from an older hacked firmware, like a previous GaryOPA firmware, a Birdy firmware, or Commodore4Eva firmware, you must restore your drive to the original firmware before continuing. If you are flashing the firmware to a stock drive, ignore this section and skip to “Flashing The Drive.” Inside the iXtreme1.4_Hitachi_C4EVA_rev1 folder is a file named “RESTORE.BAT”. You can run this simply by double-clicking on it.
That should open a command prompt asking you for the Hitachi drive letter. So type in the drive letter of your Hitachi, and press enter, and it should restore the drive back to the original firmware automatically. This is necessary before flashing to the latest firmware. After restoring the firmware, you can continue on to flashing the new firmware.


Flashing The Drive Inside the iXtreme1.4_Hitachi_C4EVA_rev1 folder is a file named “FLASHIX.BAT”. You can run this simply by double-clicking on it.
That should open a command prompt asking you for the Hitachi drive letter. So type in the drive letter of your Hitachi, and press enter.
Now it asks for the name you want for the folder to store the files in. This will be used to store your original firmware and hacked firmware. You should keep it short, just choose something easy to match to your drive, like your first name. Wait until the process to finish. You will find a backup of your original firmware in the iXtreme1.4_Hitachi_C4EVA_rev1 folder. There will be a folder in there starting with X16S- and whatever you chose to name the folder. Zip or Rar this folder up and email it to yourself for backup purposes.
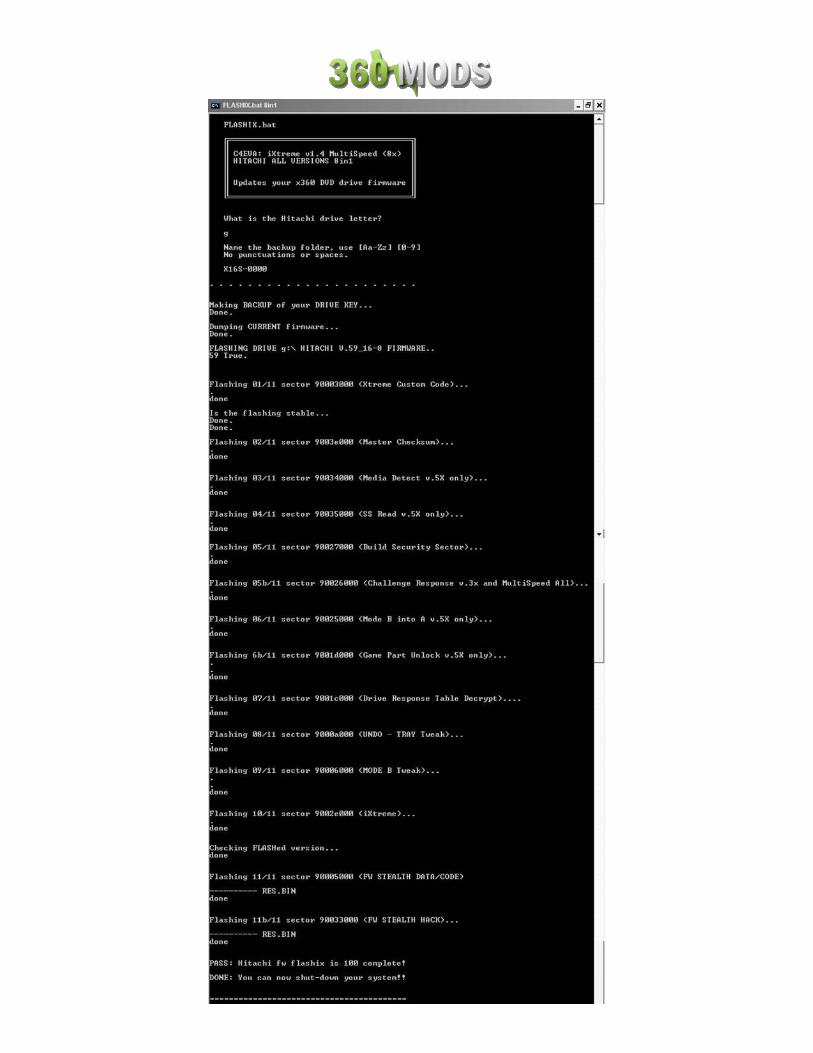
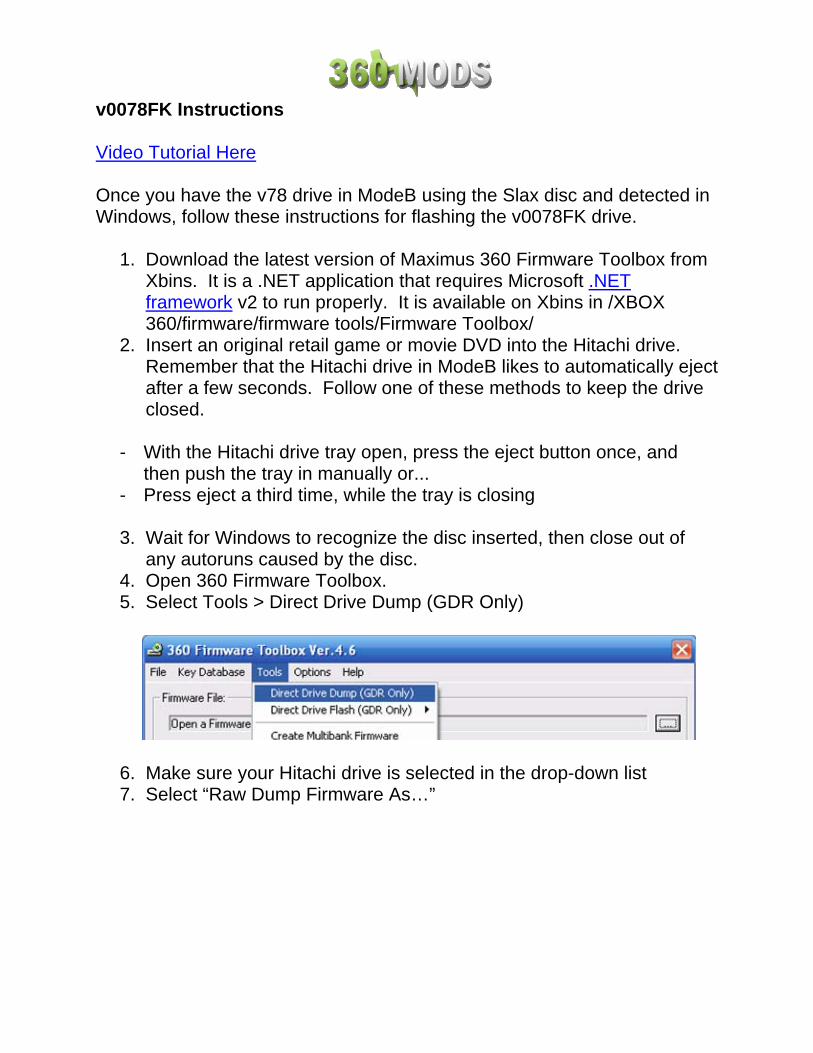
v0078FK Instructions Video Tutorial Here Once you have the v78 drive in ModeB using the Slax disc and detected in Windows, follow these instructions for flashing the v0078FK drive.
1. Download the latest version of Maximus 360 Firmware Toolbox from Xbins. It is a .NET application that requires Microsoft .NET framework v2 to run properly. It is available on Xbins in /XBOX 360/firmware/firmware tools/Firmware Toolbox/
2. Insert an original retail game or movie DVD into the Hitachi drive. Remember that the Hitachi drive in ModeB likes to automatically eject after a few seconds. Follow one of these methods to keep the drive closed.
- With the Hitachi drive tray open, press the eject button once, and
then push the tray in manually or... - Press eject a third time, while the tray is closing 3. Wait for Windows to recognize the disc inserted, then close out of
any autoruns caused by the disc. 4. Open 360 Firmware Toolbox. 5. Select Tools > Direct Drive Dump (GDR Only)
6. Make sure your Hitachi drive is selected in the drop-down list 7. Select “Raw Dump Firmware As…”

8. Save the original firmware as original.bin somewhere safe
9. The program will tell you that your firmware has been dumped and
asks if you want to open it, select “Yes” 10. Make sure the key displayed looks fairly unique, with no multiple FF
or 00 bytes. You may also want to dump the firmware a couple times and make sure the key is the same for each dump.
11. Select Tools > Smart Hack Patcher

12. Read the warning and accept it 13. On the line labeled output file, click the box to the right with the
ellipsis (three dots) and save the file as hacked.bin where you saved the original firmware
14. Select one of the v78 firmwares, 2x, 5x, 8x, and 12x are the different read speeds for the firmware.

You now have a choice between different read speed firmwares. There are four available options. There is a firmware that reads backups at 2x speed, 5x speed, 8x speed, and 12x speed. There is no “right” choice, it is purely up to preference. 12x is the normal read speed of the drive. Higher speeds are louder, and may have trouble reading backups if you have a poor quality laser, burner, or media. Lower speeds are much quieter, and may read better, but you will have slower load times.
15. Select “Generate File” 16. It should say the hacked firmware was created, and asks if you want
to open it, again select “Yes” 17. Verify that the key is still the same as before 18. Select Tools > Direct Drive Flash (GDR Only) 19. Select Differential Flash (Patch)
20. Check that your Hitachi drive is selected in the drop-down list 21. Hit “Read and Detect Differences” 22. Select “Start Flashing” and let it finish

23. Close out of the program, hook the drive back up to the 360, and test it out.
Email yourself the original.bin and hacked.bin for backup purposes.

v0079 Instructions The Hitachi v0079FK and v0079FL drives have extra security in place that makes flashing the drives using software alone currently not possible. There are two ways to flash a v79 drive, but both require soldering and both are difficult. Method 1 – Modchip There are modchips for the v79 drives that, when fitted, allow you to use Maximus 360 Firmware Toolbox to flash the drive. There are two different modchips for v79 drives. The first is a Maximus 79 Pass Key. The second is the Infectus FLASH079. The features of both chips are very similar, the main point being that it allows you to flash the v79 drive. Both chips will also boot the drive into ModeB if the chip detects the drive is still flashed with the original firmware. So after fitting the chip, you shouldn’t need to worry about ModeB, just powering the drive should put it in ModeB. With both chips, the modchip needs to remain installed if you plan on upgrading the drive firmware in the future. The official 79 Pass Key site is: http://www.maximusgames.net/79passkeyinfo.php Here you will find links to resellers, installation diagrams, and tutorials. The official FLASH079 site is: http://www.infectus.biz/news.php?news=2007-09-28%2012.09.13 You can purchase the FLASH079 chip from: http://www.hardstore.com/default.asp?cmd=getProd&cmdID=9204&idC=623&pType=-1

Purchase whichever chip you prefer. I know that with the 79 Pass Key, there is an option of adding a fcc ribbon connector socket and flat cable for usually around $6 extra. That choice is up to you. You will need to open up the DVD drive using a Philips head screwdriver and remove the printed circuit board.
The drive PCB should look like this.
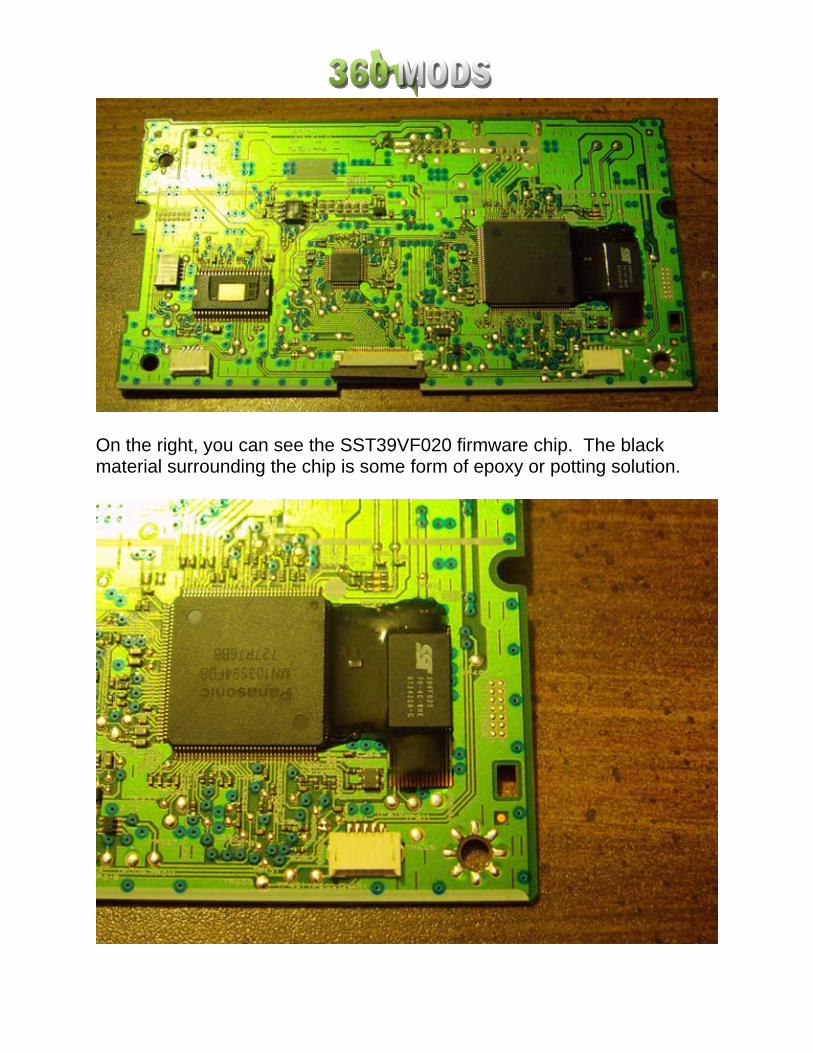
On the right, you can see the SST39VF020 firmware chip. The black material surrounding the chip is some form of epoxy or potting solution.
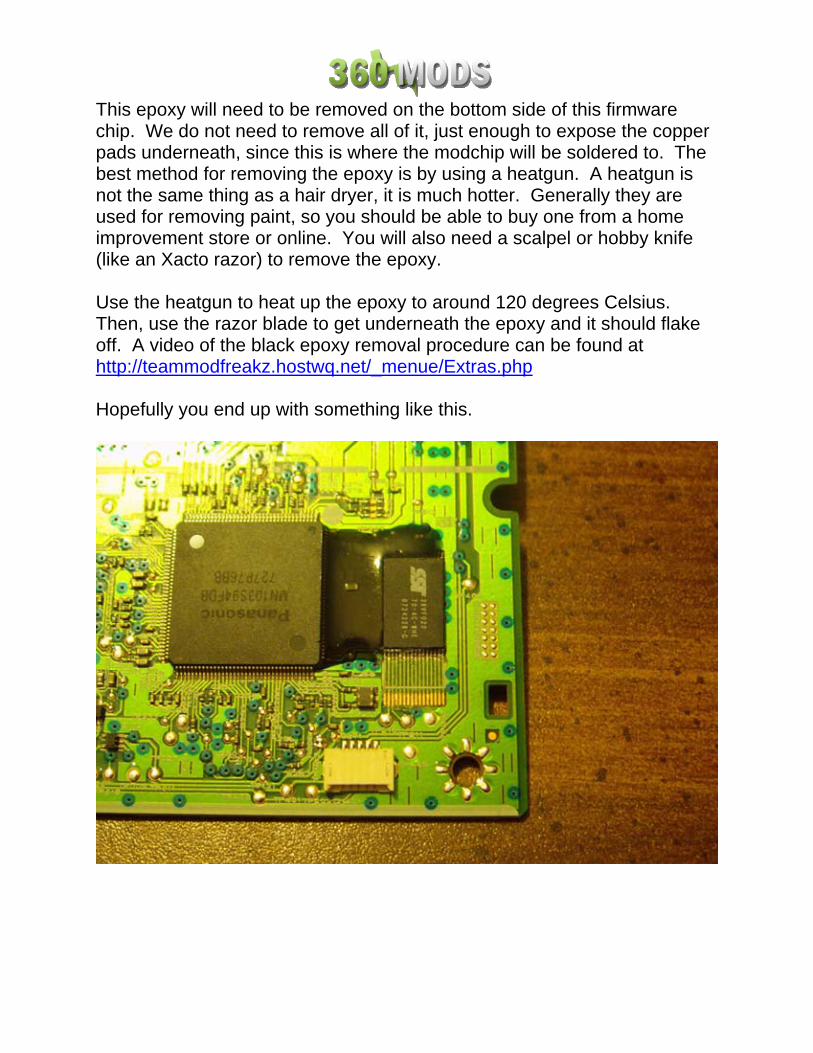
This epoxy will need to be removed on the bottom side of this firmware chip. We do not need to remove all of it, just enough to expose the copper pads underneath, since this is where the modchip will be soldered to. The best method for removing the epoxy is by using a heatgun. A heatgun is not the same thing as a hair dryer, it is much hotter. Generally they are used for removing paint, so you should be able to buy one from a home improvement store or online. You will also need a scalpel or hobby knife (like an Xacto razor) to remove the epoxy. Use the heatgun to heat up the epoxy to around 120 degrees Celsius. Then, use the razor blade to get underneath the epoxy and it should flake off. A video of the black epoxy removal procedure can be found at http://teammodfreakz.hostwq.net/_menue/Extras.php Hopefully you end up with something like this.

Once the epoxy has been removed, you can install the modchip. If you are installing a 79 Pass Key, using wires, please use this diagram.
If you are installing the 79 Pass Key with the flat cable, please download the official tutorial here or here. If you are installing the FLASH079, please use this diagram.


v0079 Instructions Video Tutorial Here (video is for flashing v78 – it is the same procedure) A v0079 drive fitted with a 79 Pass Key or FLASH079 is flashed with Maximus 360 Firmware Toolbox. The instructions are the same as flashing a v0078FK drive.
1. Download the latest version of Maximus 360 Firmware Toolbox from Xbins. It is a .NET application that requires Microsoft .NET framework v2 to run properly. It is available on Xbins in /XBOX 360/firmware/firmware tools/Firmware Toolbox/
2. Insert an original retail game or movie DVD into the Hitachi drive. Remember that the Hitachi drive in ModeB likes to automatically eject after a few seconds. Follow one of these methods to keep the drive closed.
- With the Hitachi drive tray open, press the eject button once, and
then push the tray in manually or... - Press eject a third time, while the tray is closing 3. Wait for Windows to recognize the disc inserted, then close out of
any autoruns caused by the disc. 4. Open 360 Firmware Toolbox. 5. Select Tools > Direct Drive Dump (GDR Only)
6. Make sure your Hitachi drive is selected in the drop-down list 7. Select “Raw Dump Firmware As…”
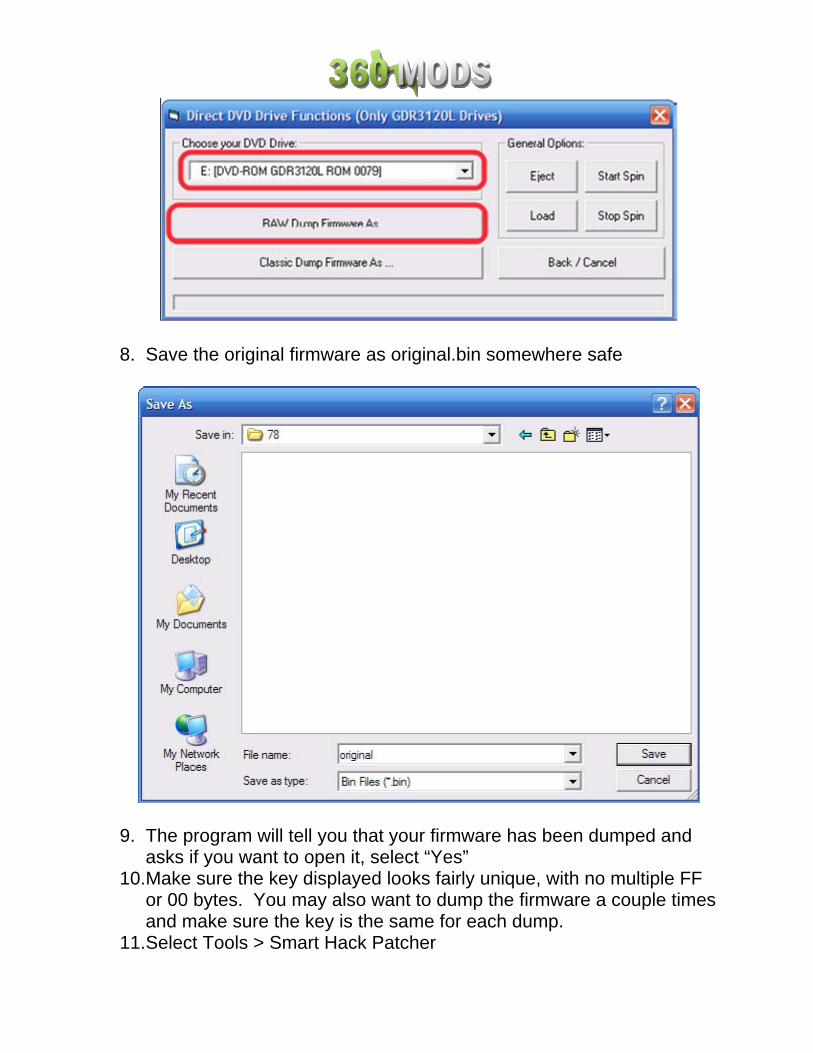
8. Save the original firmware as original.bin somewhere safe
9. The program will tell you that your firmware has been dumped and
asks if you want to open it, select “Yes” 10. Make sure the key displayed looks fairly unique, with no multiple FF
or 00 bytes. You may also want to dump the firmware a couple times and make sure the key is the same for each dump.
11. Select Tools > Smart Hack Patcher

12. Read the warning and accept it 13. On the line labeled output file, click the box to the right with the
ellipsis (three dots) and save the file as hacked.bin where you saved the original firmware
14. Select one of the v78+ firmwares, 2x, 5x, 8x, and 12x are the different read speeds for the firmware.
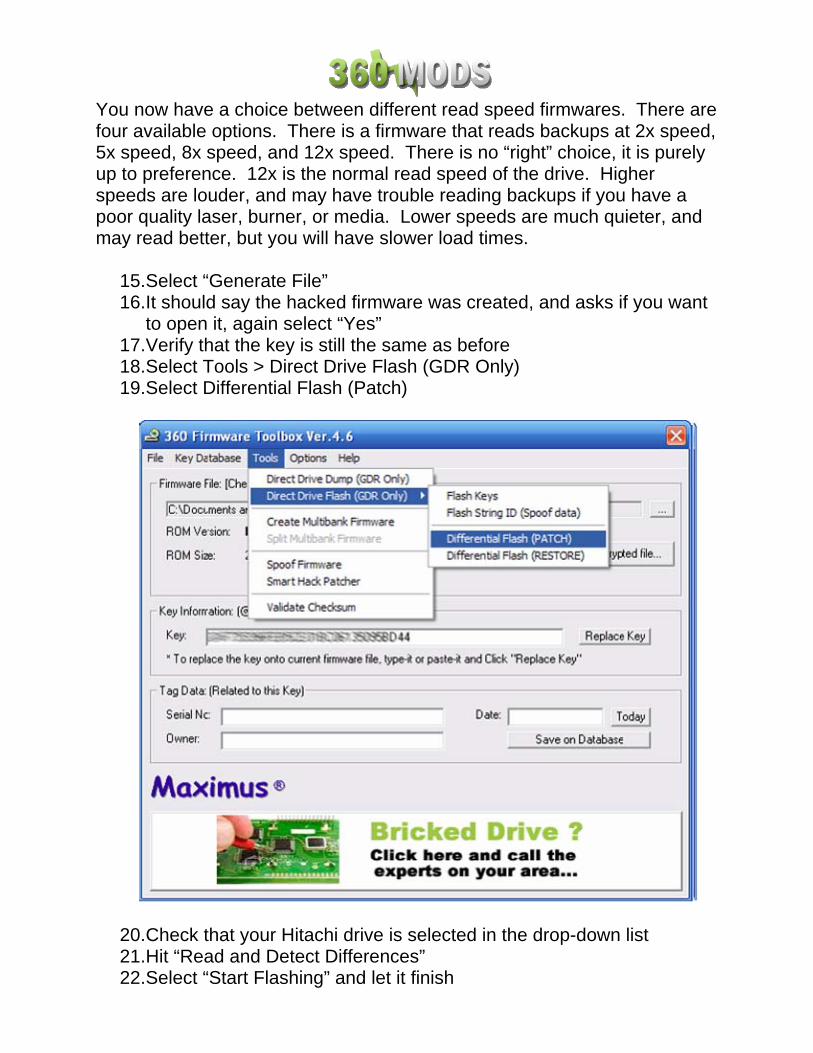
You now have a choice between different read speed firmwares. There are four available options. There is a firmware that reads backups at 2x speed, 5x speed, 8x speed, and 12x speed. There is no “right” choice, it is purely up to preference. 12x is the normal read speed of the drive. Higher speeds are louder, and may have trouble reading backups if you have a poor quality laser, burner, or media. Lower speeds are much quieter, and may read better, but you will have slower load times.
15. Select “Generate File” 16. It should say the hacked firmware was created, and asks if you want
to open it, again select “Yes” 17. Verify that the key is still the same as before 18. Select Tools > Direct Drive Flash (GDR Only) 19. Select Differential Flash (Patch)
20. Check that your Hitachi drive is selected in the drop-down list 21. Hit “Read and Detect Differences” 22. Select “Start Flashing” and let it finish

23. Close out of the program, hook the drive back up to the 360, and test it out.
Email yourself the original.bin and hacked.bin for backup purposes.

Method 2 – Using an External Programmer Another way to flash the drive firmware is by desoldering the TSOP firmware chip and using an external Willem programmer. The chip is then resoldered back to the drive. This process should not be taken lightly. Many would say that this is more difficult, and at a higher risk because the PCB or chip can easily be damaged. You will need a Willem programmer and 14mm TSOP32 socket adapter for this method. Those alone are more expensive than either of the v79 modchips. The advantage this has to the modchips would be for people who will be flashing many v79 drives. With a programmer, you can use the v78 firmware, and then firmware upgrades in the future can be flashed like the v0078FK, using software alone. Many people sell Willem programmers and TSOP sockets on ebay. Do a search for “14mm TSOP32” and you will probably find the socket and a programmer together in a combo. If you do some research you can find sites that sell the programmer and socket, Sivava is the only one I know of. You will need to open up the DVD drive using a Philips head screwdriver and remove the printed circuit board.
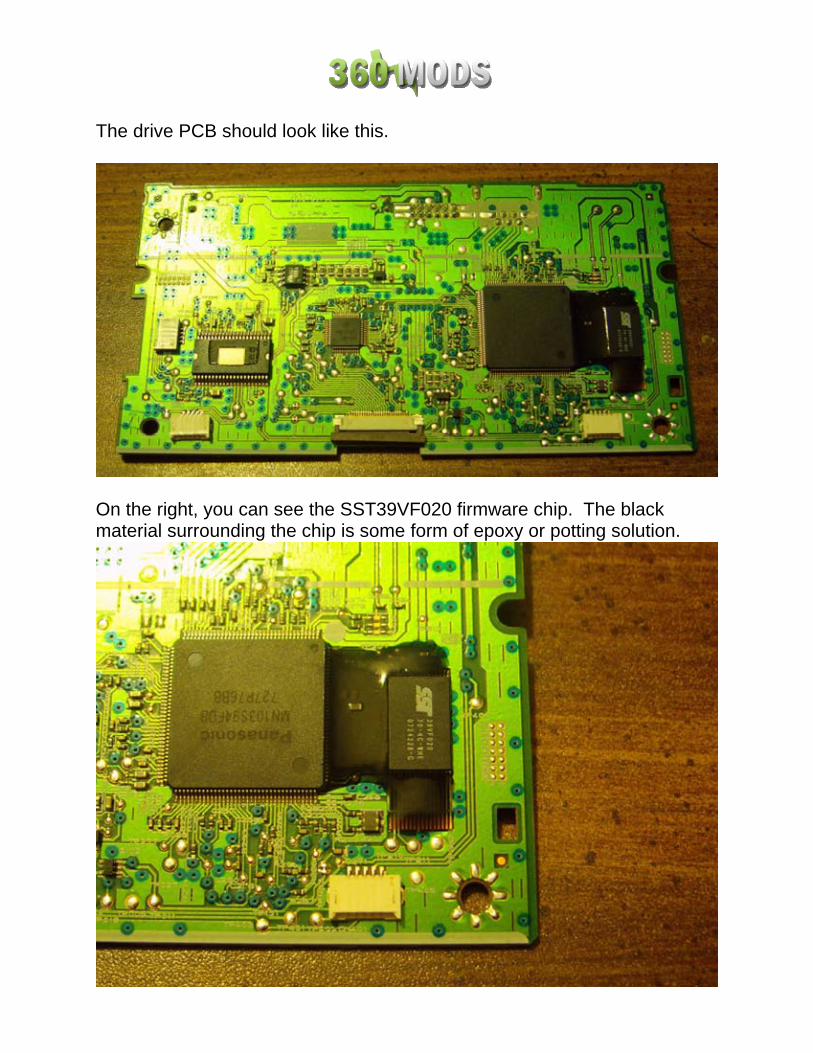
The drive PCB should look like this.
On the right, you can see the SST39VF020 firmware chip. The black material surrounding the chip is some form of epoxy or potting solution.

This epoxy will need to be removed everywhere around the chip. The best method for removing the epoxy is by using a heatgun. A heatgun is not the same thing as a hair dryer, it is much hotter. Generally they are used for removing paint, so you should be able to buy one from a home improvement store or online. You will also need a scalpel or hobby knife (like an Xacto razor) to remove the epoxy. Use the heatgun to heat up the epoxy to around 120 degrees Celsius. Then, use the razor blade to get underneath the epoxy and it should flake off. A video of the black epoxy removal procedure can be found at http://teammodfreakz.hostwq.net/_menue/Extras.php Hopefully you end up with something like this.
The chip must then be desoldered carefully. This is probably the riskiest and most difficult part of the entire procedure. The Modfreakz video shows you two methods for removing the chip, with a pyropen or some other heat source, or by flooding with a soldering iron. One important note I would like

to make is that for every v79 drive I have done, there has been epoxy underneath the firmware chip. Just look at the following image:
This means that the solder flood removal technique isn’t going to work. You have to use a pyropen or heat gun to desolder the firmware chip. I personally use a heat gun. Below is an image of a board I removed the chip on. I also cleaned up the epoxy on the PCB after removing the chip. If you notice on both FuzzyLogic’s photo above and my photo below, you can see in some places where the thin foil of the PCB has started to “bubble” because of the heat. Personally, I would rather have some relatively safe bubbles and make sure everything was hot enough than I would risk pulled traces or broken chip legs.
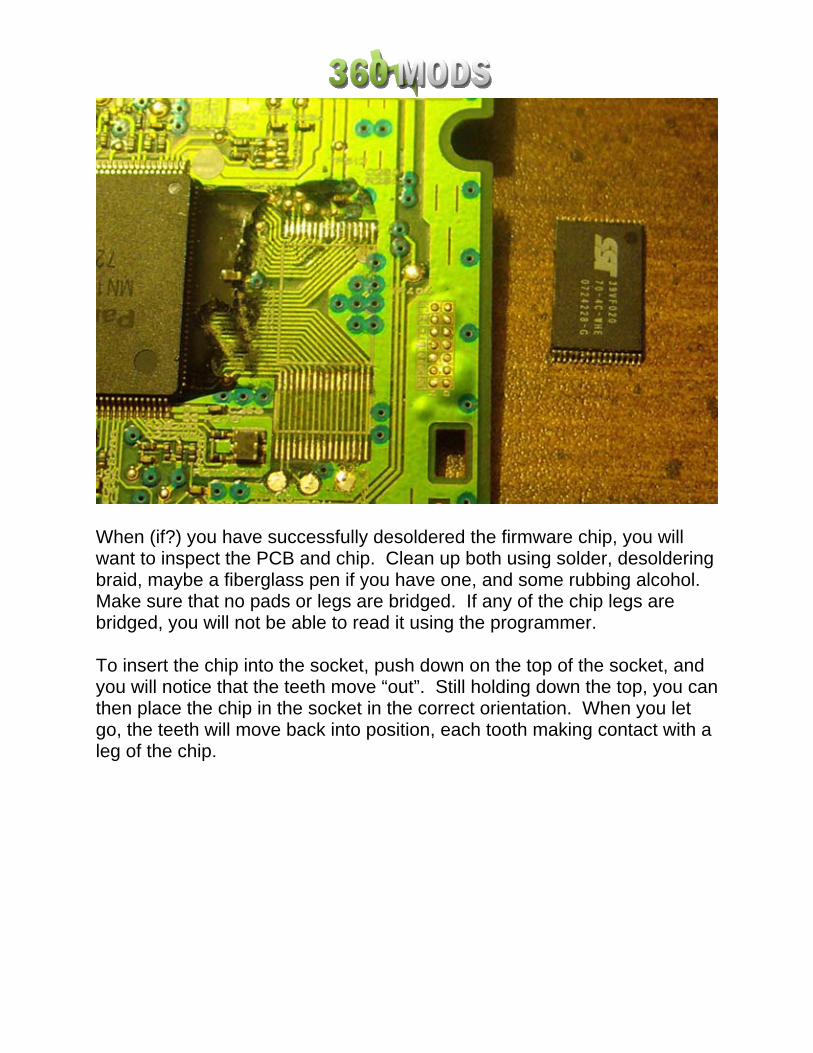
When (if?) you have successfully desoldered the firmware chip, you will want to inspect the PCB and chip. Clean up both using solder, desoldering braid, maybe a fiberglass pen if you have one, and some rubbing alcohol. Make sure that no pads or legs are bridged. If any of the chip legs are bridged, you will not be able to read it using the programmer. To insert the chip into the socket, push down on the top of the socket, and you will notice that the teeth move “out”. Still holding down the top, you can then place the chip in the socket in the correct orientation. When you let go, the teeth will move back into position, each tooth making contact with a leg of the chip.

Then just insert the socket into your Willem programmer, and hook it up to your PC. If you will notice, the DIP switches on the programmer are set to 3, 5, 6, 10, and 11. I already know what these switches are because I have programmed SST39VF020 chips before, but if you didn’t know, the programming software would tell you anyways.
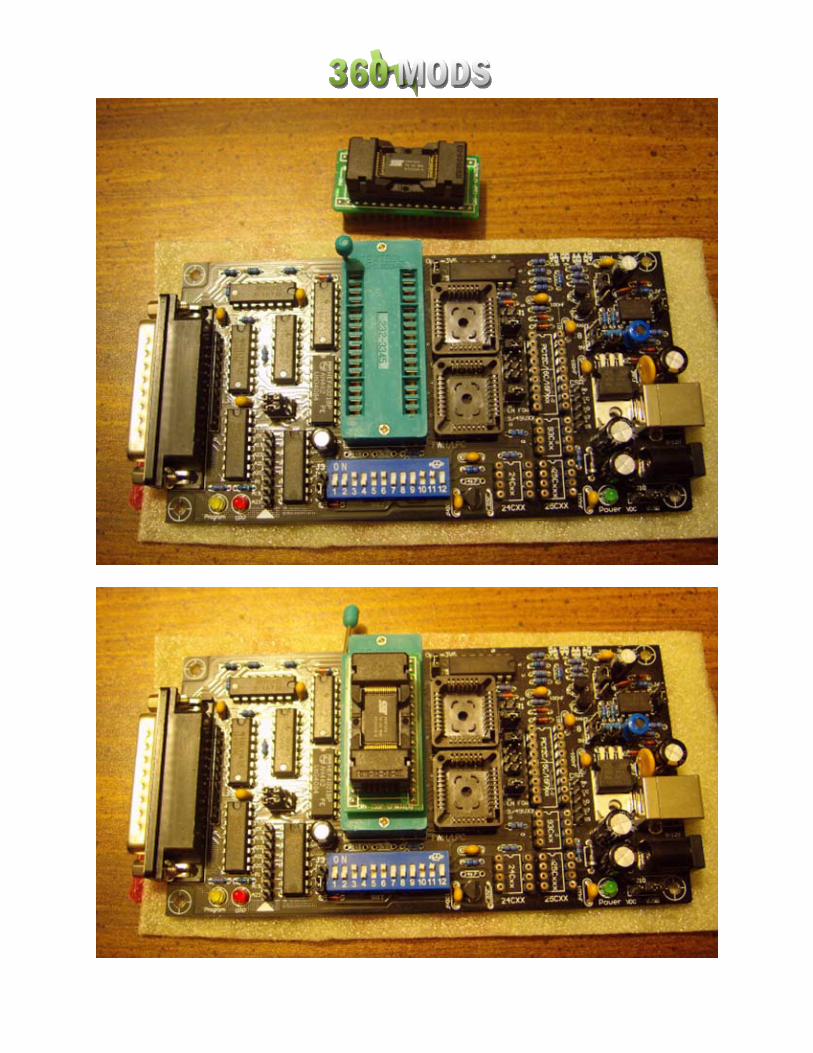

Using the Willem Software If you run the software that comes with your programmer, it should look something like this.
To make sure the programmer is working correctly, the first thing you want to do is go to Help > Test Hardware. If it all checks out good, it should show “Hardware present” at the bottom of the program.
Set the device by clicking on the box marked Device Select. The firmware chip is an SST39VF020. So you will want to select that. The way the chips are listed in your software may be different than mine, but it should have it somewhere. Note that the chip I have selected is actually listed as SST29LF/VF020 (29 instead of 39). If you look above and below that, the chips in the list are 39, so I believe this is just a typographical error by the software developers, and that it really should say 39.
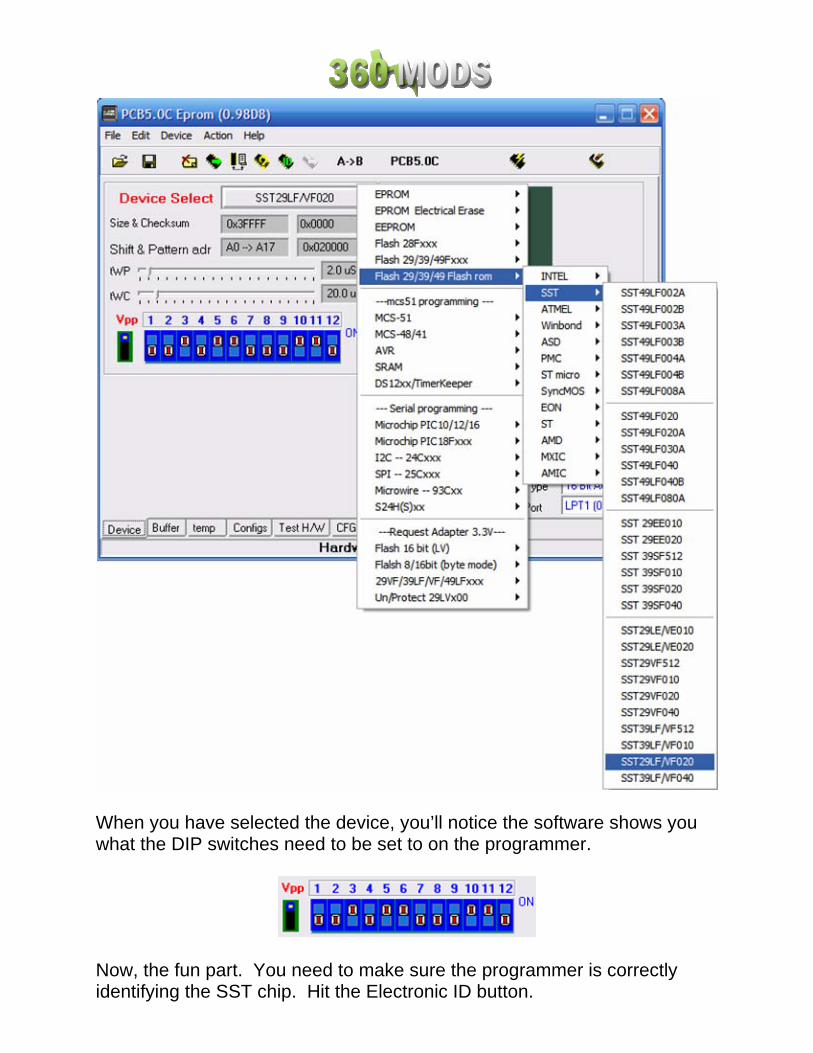
When you have selected the device, you’ll notice the software shows you what the DIP switches need to be set to on the programmer.
Now, the fun part. You need to make sure the programmer is correctly identifying the SST chip. Hit the Electronic ID button.

You should see a small popup like this. If you do not, that means the programmer is not reading the chip correctly. Make sure no legs on the chip are bridged.
Then hit Read Chip to read the contents of the SST chip.
During reading:
And hopefully, you see this at the bottom of the program:
You can even check the program’s buffer to see the hex contents of the chip you just read. Hitachi firmware is encrypted, so you won’t see anything useful.

After a read, you will want to save the data from the buffer into a .bin file.
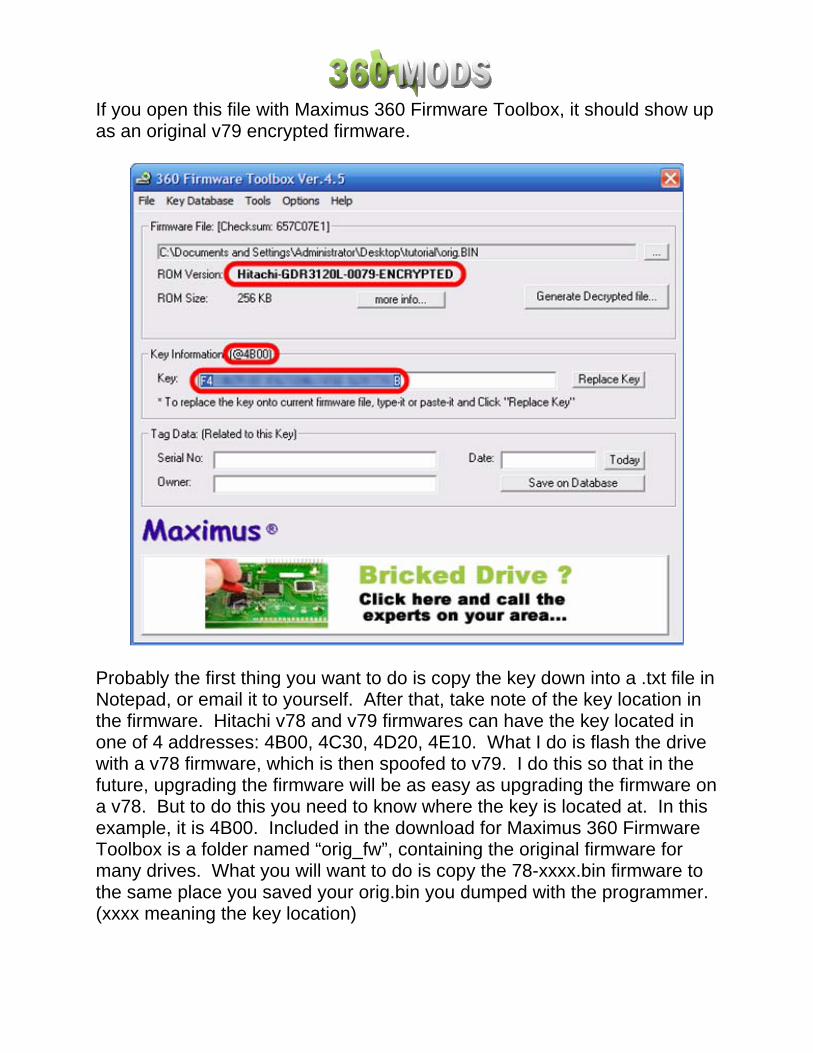
If you open this file with Maximus 360 Firmware Toolbox, it should show up as an original v79 encrypted firmware.
Probably the first thing you want to do is copy the key down into a .txt file in Notepad, or email it to yourself. After that, take note of the key location in the firmware. Hitachi v78 and v79 firmwares can have the key located in one of 4 addresses: 4B00, 4C30, 4D20, 4E10. What I do is flash the drive with a v78 firmware, which is then spoofed to v79. I do this so that in the future, upgrading the firmware will be as easy as upgrading the firmware on a v78. But to do this you need to know where the key is located at. In this example, it is 4B00. Included in the download for Maximus 360 Firmware Toolbox is a folder named “orig_fw”, containing the original firmware for many drives. What you will want to do is copy the 78-xxxx.bin firmware to the same place you saved your orig.bin you dumped with the programmer. (xxxx meaning the key location)

You should still have firmware toolbox open with your orig.bin loaded. Copy the key to the clipboard.
Open the 78-xxxx.bin file with firmware toolbox.

It should look like this:

Paste your key into the textbox and hit replace key.
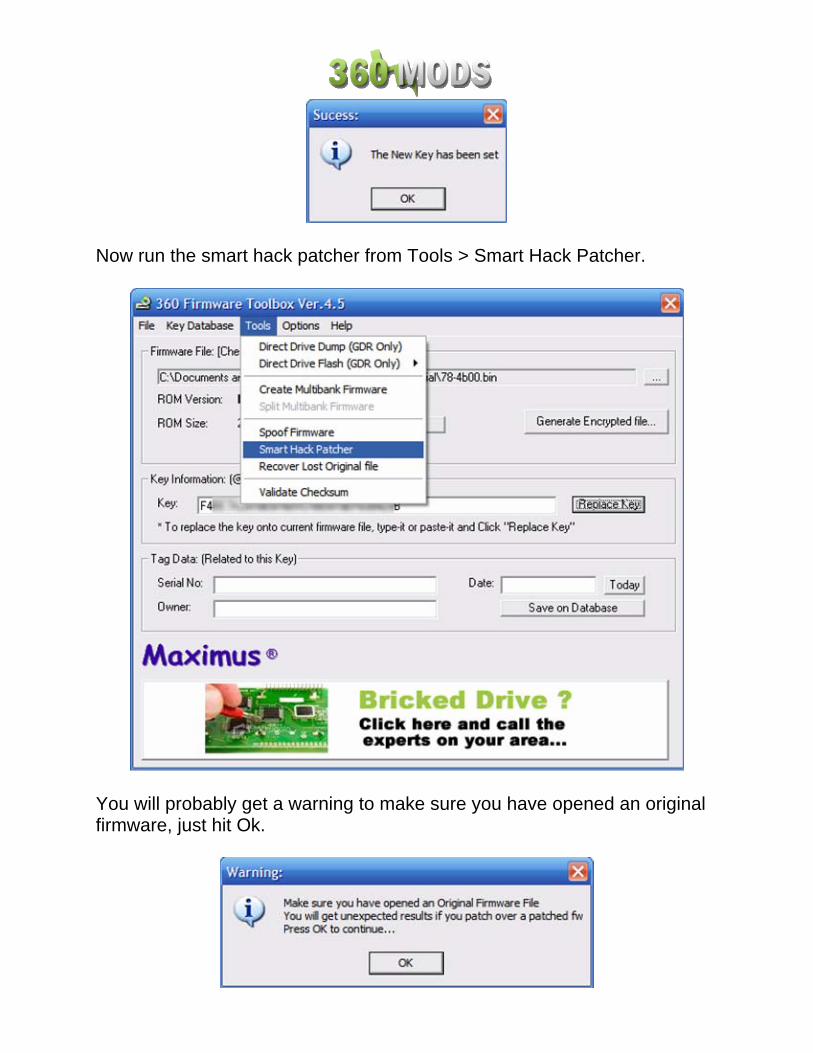
Now run the smart hack patcher from Tools > Smart Hack Patcher.
You will probably get a warning to make sure you have opened an original firmware, just hit Ok.

You now have a choice between different read speed firmwares. There are four available options. There is a firmware that reads backups at 2x speed, 5x speed, 8x speed, and 12x speed. There is no “right” choice, it is purely up to preference. 12x is the normal read speed of the drive. Higher speeds are louder, and may have trouble reading backups if you have a poor quality laser, burner, or media. Lower speeds are much quieter, and may read better, but you will have slower load times. Make sure the Rule Set is the iXtreme firmware and it is for v78+. Select one of the v78+ firmwares, 2x, 5x, 8x, and 12x are the different read speeds for the firmware. Then hit the ellipsis button to choose the save file. Save as hacked.bin

Hit the generate file button, and open the firmware.
Notice how the firmware is now v78, hacked with iXtreme v1.2, but it has your drive key from the v79.

Now we spoof the firmware to v79. Go to Tools > Spoof Firmware.
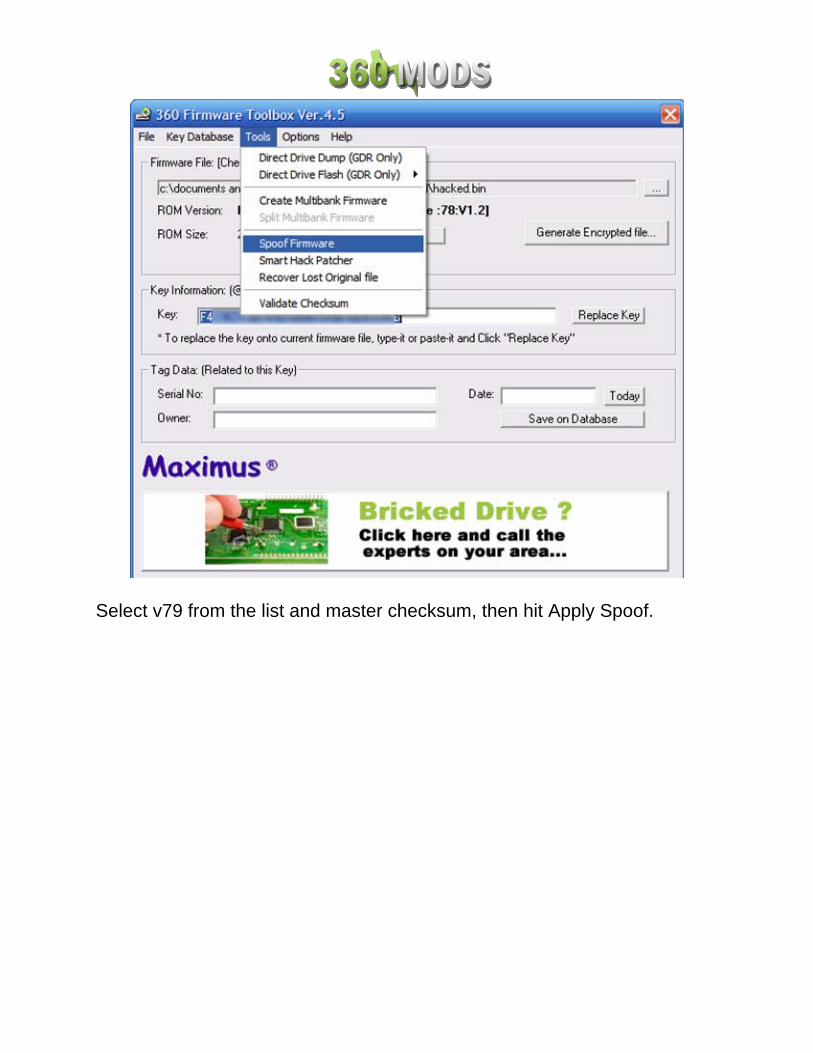
Select v79 from the list and master checksum, then hit Apply Spoof.


Now the last part is to generate an encrypted firmware.

You’re done with firmware toolbox. You can close out of it. Now we need to flash this firmware back to the SST chip. Before you do that, take a look at the folder you saved your files in.

Only an encrypted firmware can be flashed back to a drive. Flashing a decrypted firmware would result in a non-working drive (brick). Go back to the Willem sotware. Before programming the chip, we need to erase it first. A chip erase should take less than a second.
Then you should check to make sure the chip is empty.
Open the hacked-e.bin

Then program the chip.

Once the chip has been programmed, you need to resolder it back to the drive. First clean up the PCB as best you can, making sure there are no bridges between pads and you have removed all of the epoxy. There are a couple different ways you could go about resoldering the chip. As you saw in the Modfreakz video, he used a pyropen/heatgun to resolder the chip. This would definitely work, and there’s not much to it, just make sure the chip is lined up, heat the area, and put pressure on the chip while it cools so that it is flush with the board. Personally, I like to use another method that I found using Google one day. http://warmcat.com/milksop/soldering.html uses a “flood and braid” procedure. You can view the tutorial there, and it works great for me. First I tack the corners down so the chip is aligned and won’t move.
Then I cover both sides of the chip in solder.
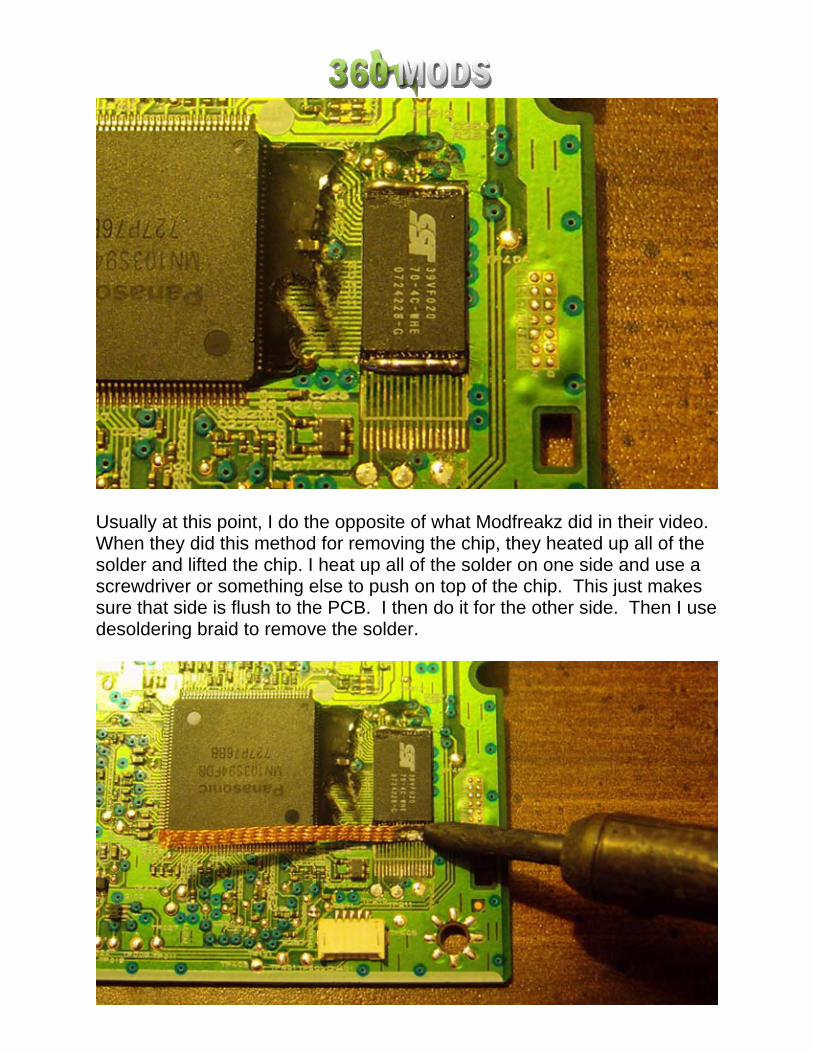
Usually at this point, I do the opposite of what Modfreakz did in their video. When they did this method for removing the chip, they heated up all of the solder and lifted the chip. I heat up all of the solder on one side and use a screwdriver or something else to push on top of the chip. This just makes sure that side is flush to the PCB. I then do it for the other side. Then I use desoldering braid to remove the solder.

Hopefully you get a clean resolder job and everything works, so go test it out.
If anybody cares, the drive used in these photos worked perfectly :P
Backing Up Xbox 360 Games
There are a few different ways to back up your Xbox 360 games. There are two free/cheap methods, but are pretty complex. There is a much easier method as well, but it requires that you purchase a specific DVD-ROM drive and install it in your PC.
Method 1 – Purchasing a “Kreon” Drive (best option)
The following drives can be purchased, installed in your PC, and then flashed with one of Kreon’s alternate firmwares for reading Xbox 360 games.
SH-D162C (IDE) *TS-H352C (IDE) SH-D163A (SATA) *TS-H353A (SATA) SH-D162D (IDE) *TS-H352D (IDE) SH-D163B (SATA) *TS-H353B (SATA) *If you notice in this list, after each SH drive there is a matching TS drive right underneath it. This TS drive has the same hardware and firmware, and it can be flashed with the above drive’s firmware. For example, a TS-H352C can be flashed with the SH-D162C firmware and the TS-H353A can be flashed with the SH-D163A firmware. The only difference when flashing these TS drives is you need to run the –nocheck option.
After purchasing the drive, install it in your PC and then get on Xbins and download the firmware. Alternatively, many people sell these drives pre-flashed with the Kreon firmware on eBay.
Downloading the Kreon Firmware
The best method to obtain the firmware is by using Xbins. Xbins is an IRC channel and FTP server that hosts Xbox and Xbox 360 mod files, homebrew programs, and development software.
If you have never used Xbins before, the easiest method is to use Ground Zero’s automated Xbins downloader.
Download

Download the self-extracting archive and run the xbins.exe file. It will ask you where you want to save the files, choose your desktop. Now, go into the “Xbins” folder on your desktop and run the .bat file. The program will automatically connect to the IRC channel, message the bot, and connect to the FTP server. When filezilla opens up you should see the local Xbins folder on your left side, and a few folders on your right side (this is the FTP server).
The hacked firmware can be found in:
/XBOX 360/firmware/hacked firmware/Samsung SH-D162C/
Or whatever drive yours is.
Simply drag the .RAR file over to the left side of FileZilla, into the Xbins folder and wait for it to finish downloading. You can use WinRAR or 7-zip to extract the RAR archive.
Read the “How to upgrade firmware.txt” included in the RAR archive for instructions on flashing your drive with the Kreon firmware.
When the drive is flashed with the Kreon firmware, you can start making backups of your Xbox 360 games.
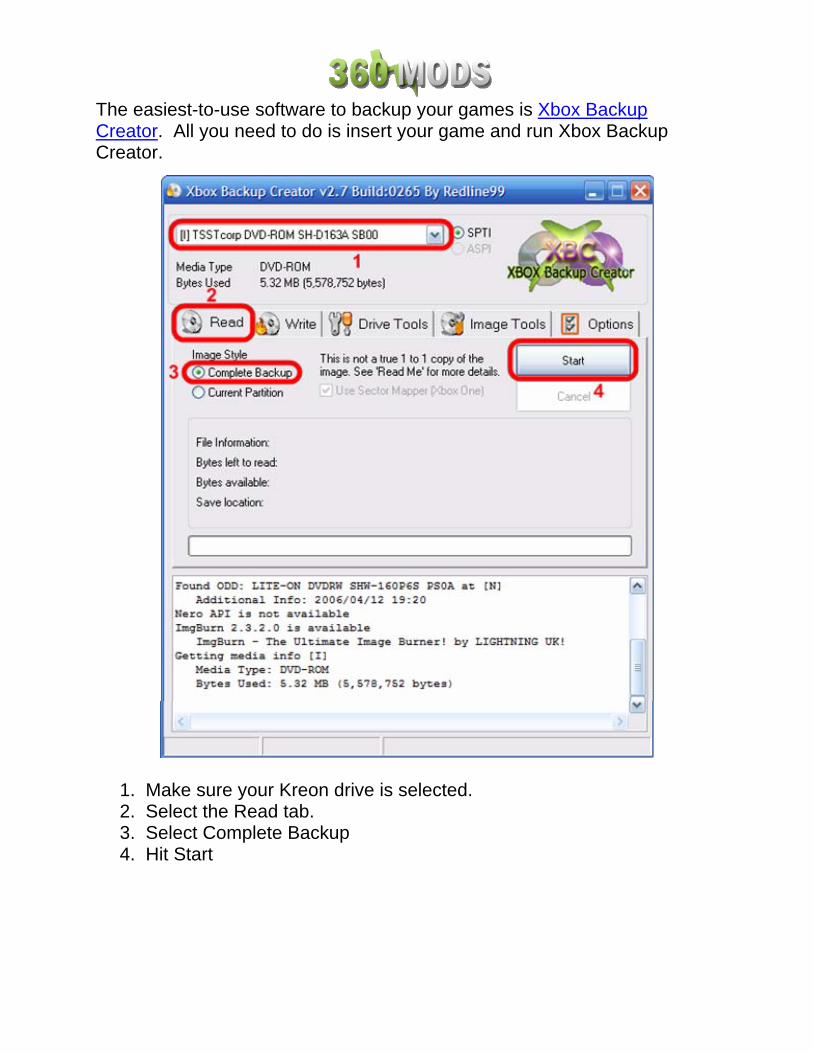
The easiest-to-use software to backup your games is Xbox Backup Creator. All you need to do is insert your game and run Xbox Backup Creator.
1. Make sure your Kreon drive is selected. 2. Select the Read tab. 3. Select Complete Backup 4. Hit Start

Name the file anything you want and hit Save.
Wait for the game to backup to your computer. To burn the game, you can also use Xbox Backup Creator.

1. Make sure your DVD recorder is selected. 2. Select the Write tab 3. Select your writing speed , 2.4x recommended 4. Hit Start and select your .dvd file
Method 2 – Using Your Xbox 360 Drive (Samsung only) NOTE! – The iXtreme firmware does not have the ability to be recognized in Windows with the 0800 disc and therefore cannot be used to backup games. The only way to backup games with a Samsung drive is if it is flashed with the xtrm0800 firmware (from the very first firmware release) or with an Xtreme firmware and using the 0800 disc. This method involves connecting the Samsung drive to your PC. This method currently does not work with the Hitachi drive because the game partition fails to unlock correctly. In order to get the Samsung drive recognized in Windows, the drive needs to already have the flashed firmware on it. You will then need to enable the built-in 0800 mode of the firmware. First, you need to burn the enable0800.iso to a DVD+R DL using IMGBurn or CloneCD. Unplug the SATA cable from the DVD drive. Make sure both power and video cables are hooked up to the Xbox 360. Power on the 360 and insert the 0800 disc you burned. Listen to the drive, let it spin up and read the disc. After 10-20 seconds, you can take eject the drive and take out the 0800 disc. Your drive is now in 0800 mode. Now, you can either connect the drive to the PC (plug in SATA cable) with the PC off, then boot into Windows. You may also try “hot plugging” the SATA cable with Windows already running. The easiest-to-use software to backup your games is Xbox Backup Creator. All you need to do is insert your game and run Xbox Backup Creator.

1. Make sure your Xbox 360 drive is selected. 2. Select the Read tab. 3. Select Complete Backup 4. Hit Start

Name the file anything you want and hit Save.
Wait for the game to backup to your computer.

To burn the game, you can also use Xbox Backup Creator.
1. Make sure your DVD recorder is selected. 2. Select the Write tab 3. Select your writing speed , 2.4x recommended 4. Hit Start and select your .dvd file

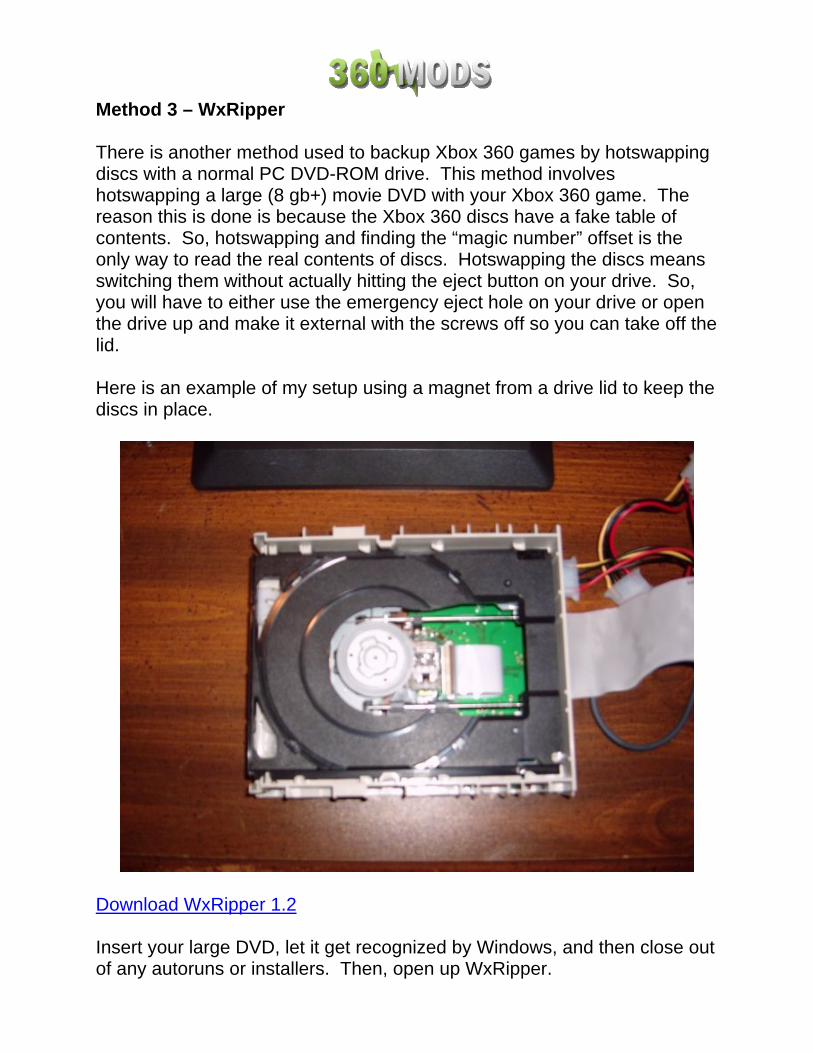
Method 3 – WxRipper There is another method used to backup Xbox 360 games by hotswapping discs with a normal PC DVD-ROM drive. This method involves hotswapping a large (8 gb+) movie DVD with your Xbox 360 game. The reason this is done is because the Xbox 360 discs have a fake table of contents. So, hotswapping and finding the “magic number” offset is the only way to read the real contents of discs. Hotswapping the discs means switching them without actually hitting the eject button on your drive. So, you will have to either use the emergency eject hole on your drive or open the drive up and make it external with the screws off so you can take off the lid. Here is an example of my setup using a magnet from a drive lid to keep the discs in place.
Download WxRipper 1.2 Insert your large DVD, let it get recognized by Windows, and then close out of any autoruns or installers. Then, open up WxRipper.
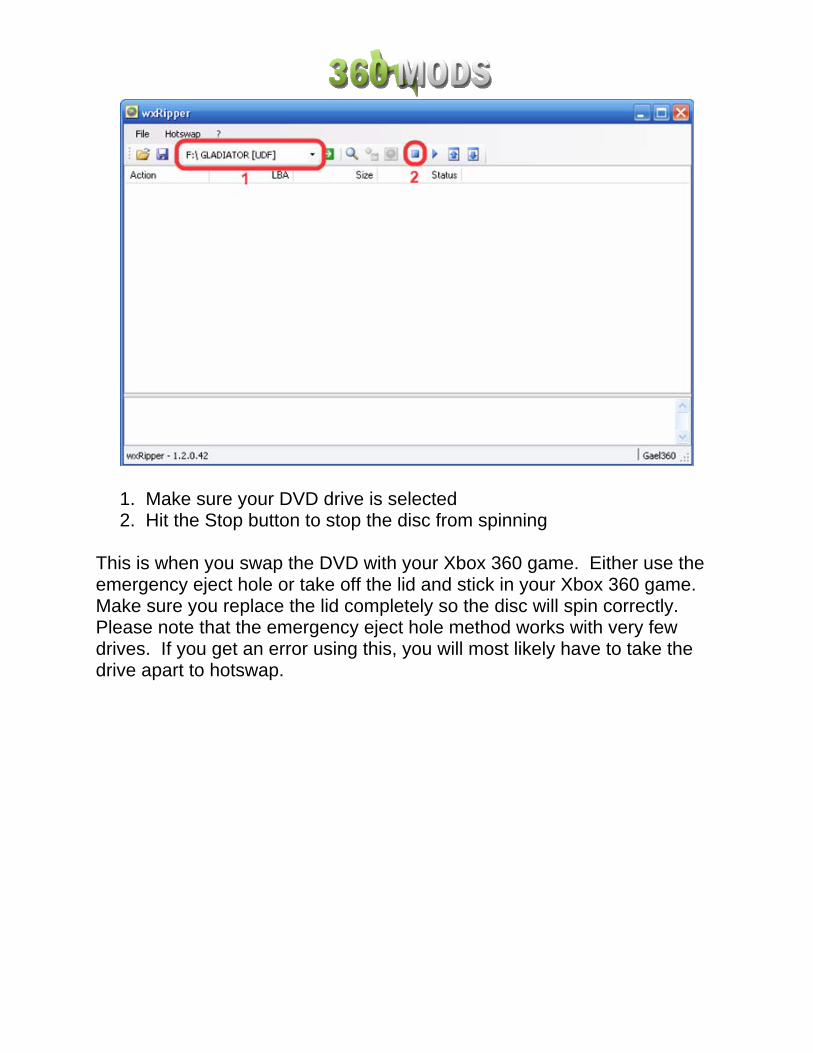
1. Make sure your DVD drive is selected 2. Hit the Stop button to stop the disc from spinning
This is when you swap the DVD with your Xbox 360 game. Either use the emergency eject hole or take off the lid and stick in your Xbox 360 game. Make sure you replace the lid completely so the disc will spin correctly. Please note that the emergency eject hole method works with very few drives. If you get an error using this, you will most likely have to take the drive apart to hotswap.

1. Select the Play button to spin the Xbox 360 disc. 2. Select the magnifying glass to find the magic number. 3. Select the green arrow to start dumping the game.
If you get errors in WxRipper, your DVD drive doesn't like the bad sectors between LBA19408 & LBA20479. LBA20480 isn't a bad sector, but your drive has a problem aligning the lens on LBA20480... To fix: 1 - Click on 'Find magic number', the action list is generated 2 - Save the action list to a layout file (File->Save layout file...) 3 - Edit the layout file with notepad, you should have these 3 first lines: C19408 D1072 C109344 if you want to make an ISO with the XDVDFS session starting at LBA129824, like a raw dump, replace these 3 lines with these ones: D19408 D1072 D109344
Then File-> Load Layout File and dump as normal. OR METHOD 2: Regarding the layout file: - Usually the first 3 lines are like this:
• C19408 • D1072 • C109344
- People say to change them to this (bold represents the changes):
• D19408 <- D = Dummy instead of C (Copy) • D1072 <- Same as original • D109344 <- D= Dummy instead of C (Copy)
In this case, all you're doing is 'faking' the first three lines. I figured out that 9 out of 10 problems occur at the 3rd line, so that's really the only one you need to Dummy. Therefore: - Most of the time this will work (bold represents the only change):
• C19408 <- Same as original • D1072 <- Same as original • D109344 <- D = Dummy instead of C (Copy)
This way you get more of the original information. I'm not sure if this matters, but I say more is better when it comes to duplicating a game. If you want to go even further: - Since I noticed most people (myself included) occasionally get a CRC error at 91136, especially on games like Tomb Raider and Hitman, I use this layout (replace first 3 lines with these 4):
• C19408 <- Same as original • D1072 <- Same as original • C91135 <- Original used to be C109344, which I split into 2 parts,
stopping at 1 byte before my CRC error @ 91136

• D18209 <- Dummy the remainder of the part that gives the error.
18209 (this line) + 91135 (previous line) = 109344 (original number)
Patching Your Image
After making the dump with WxRipper, you must inject the security sector, pfi, and dmi files into the image before burning it. To do this, we will be using XDVDMulleter. You can get this off Xbins in /XBOX 360/xdvdfs/XDVDMulleter/
Run the program and select “View ISO Details.”
Then load the .iso you dumped with WxRipper.

Now under the compatibility list, you should see that the image does not have a security sector, pfi, or dmi sector. This image would not work with the iXtreme firmware, so that’s why we need to inject these files.
At the bottom, hit the insert ss button, then browse and select this game’s ss.bin. Do the same for inserting the stealth files, select the pfi.bin and dmi.bin.
To burn the game, you can use Xbox Backup Creator, IMGBurn, or CloneCD.

1. Make sure your DVD recorder is selected. 2. Select the Write tab 3. Select your writing speed , 2.4x recommended 4. Hit Start and select your .dvd file

Verifying Game Images The iXtreme firmwares were created with security in mind. Features from previous “Xtreme” firmwares were scrapped, because they could potentially be detected by Xbox Live. The most important difference was that the iXtreme firmware will only play completely stealth backups. It will refuse to play backups that do not have a valid pfi or dmi sector. For this reason, it is a good idea to check all of your backup images after you have ripped them to the hard drive. Doing this takes only a few seconds, and it may stop you from burning off a game that won’t work with the iXtreme firmware.
To do this, we will be using XDVDMulleter. You can get this off Xbins in /XBOX 360/xdvdfs/XDVDMulleter/
Run the program and select “View ISO Details.”
Then load the .iso

The next screen will analyze the .iso and show whether the ss, pfi, dmi files and other critical parts are present. Everything should be checked, and if they are, then “iXtreme Compatibility” should also be checked. Then you know you can burn the image and it should work.


Bitsetting
The latest firmware for both the Xbox 360 Hitachi and Samsung drives does not require bitsetting. For the most part, this is true. But in some cases, bitsetting is still required and it is still recommend, even when using the latest firmware. It only takes a second and if it doesn’t cause any problems and may actually help, why not do it?
Bitsetting is a standard of the +R DVD format. It allows you to set the booktype of your +R and +R DL discs to DVD-ROM for greater compatibility. Since bitsetting/booktyping is dependent on what burner you are using, I can’t give you universal instructions that everybody will be able to follow, but I can help.
I would recommend using your favorite search engine such as Google and search for your DVD burner model number with the terms bitsetting and/or booktype. Just do a little research on your drive. Some drives auto-bitset, some may need a firmware update, some may need to use a specific program, and some may work with IMGBurn alone.
1. Pioneer burners, including the 111D and 112D drives, are already set to auto-bitset all +R and +R DL media to DVD-ROM. No firmware update is needed, no program, no settings at all. Just burn the discs without messing with anything. They will already be set for you.
2. LiteOn burners enable bitsetting differently from other drives. You can use the LiteOn Bitsetting Utility or IMGBurn to bitset to DVD-ROM. In order to bitset, you must have a blank +R disc already inserted into the drive. Also, if the booktype does not look like it changed, don’t worry. Mine doesn’t appear to change, but every burn does end up being DVD-ROM booktype.

3. For other drives, you can try using IMGBurn. With a +R disc in the drive, open IMGBurn and go to Tools > Drive > Change Booktype.

There will be tabs for different types of drives. If you select your drive and it says “Unknown” then you do not have that drive type or your drive does not support bitsetting. As I said earlier, some drives have an updated firmware for bitsetting support. You may notice some settings for “EEPROM.” This will permanently change the bitsetting of the drive, so that it will always set to DVD-ROM, similar to how the Pioneer drives bitset automatically. You will only have to bitset one time if you choose the eeprom option.
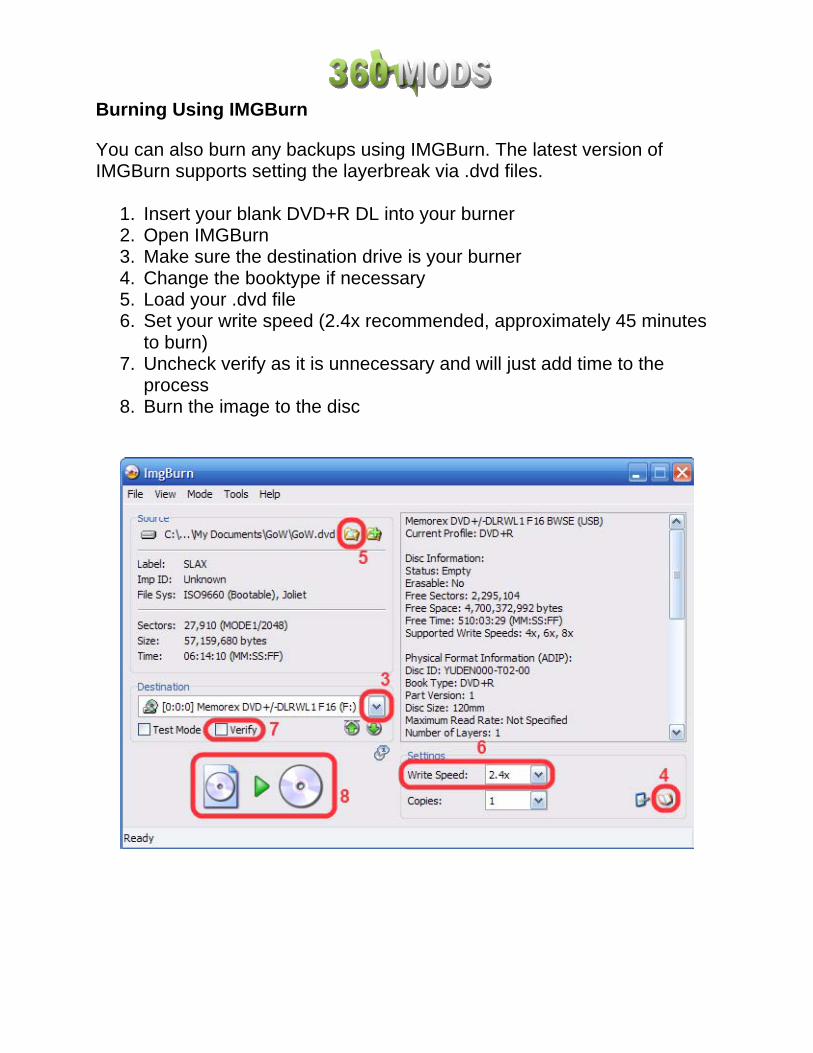
Burning Using IMGBurn
You can also burn any backups using IMGBurn. The latest version of IMGBurn supports setting the layerbreak via .dvd files.
1. Insert your blank DVD+R DL into your burner 2. Open IMGBurn 3. Make sure the destination drive is your burner 4. Change the booktype if necessary 5. Load your .dvd file 6. Set your write speed (2.4x recommended, approximately 45 minutes
to burn) 7. Uncheck verify as it is unnecessary and will just add time to the
process 8. Burn the image to the disc

Burning Using CloneCD
CloneCD also supports the custom layerbreak via the .dvd file. To burn using CloneCD:
1. Insert your blank DVD+R DL into your burner 2. Open CloneCD 3. Select “Write from image file
4. Hit the browse button and open your .dvd file. Check to make sure the layerbreak is set to 1913760.
5. Hit next, and select your burner from the list of drives to the left.
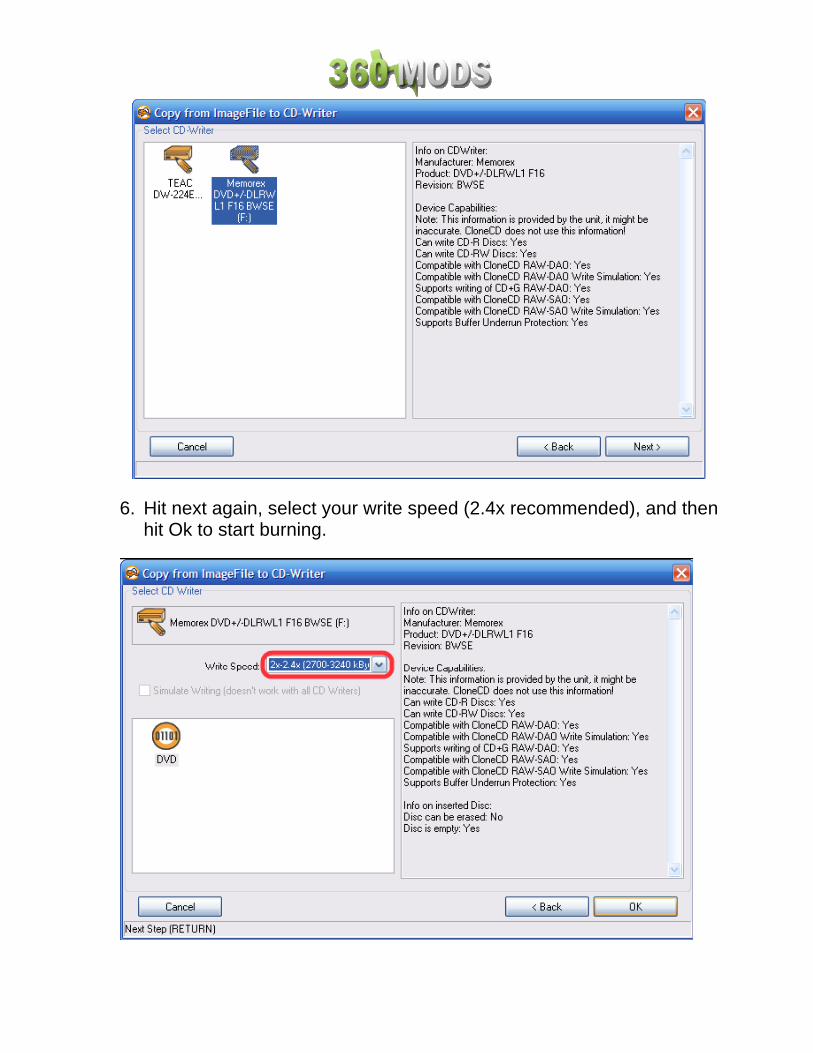
6. Hit next again, select your write speed (2.4x recommended), and then hit Ok to start burning.

Downloads
This Tutorial WinRAR Microsoft .NET Framework v2 Easy Xbins Latest VIA SATA Drivers iPrep Xbox Backup Creator WxRipper activate.iso / enable0800.iso IMGBurn CloneCD ”Open CMD Here” Powertoy Slax v2.1 Connectivity Kit Precautions

Thanks www.360mods.net – site I started www.xboxhacker.net – the hardcore Xbox hackers www.xbox-scene.com – huge resource for Xbox mods www.free60.org – getting Linux on the Xbox 360 commodore4eva – for hacking the drives and being so consistent Iriez – for Xbins and his amazing dedication to the scene Maximus / carranzafp – for the time put into the Hitachi drives and firmware toolbox GaryOPA – for his Hitachi work early on TheSpecialist – group that first hacked the system Seventhson / Kev.nu – so much information on the drives MacDennis – group that first hacked the system Robinsod – group that first hacked the system, as well as hv info probutus – for making “Slax” Dr. Matrix – wow, hv knowledge is crazy Team Modfreakz – always around, doing something cool arnezami – for the timing attack and hopefully a hacked kernel in the future crawler360 – for recreating the tmbinc’s exploit Felix Domke(tmbinc) – for the hypervisor exploit and Linux development stonersmurf – for Linux testing and development cpasjuste – for Linux tutorials and testing Birdy – for help with the Hitachi development Joseph Lin – for making MTKFlash Caster420 – for firmtool and helping me run the site Lahey – for rewriting the Hitachi batch files Klutsh – for Xtreme Boot Maker and now iPrep Exobex – for X360SAM Redline99 – for Xbox Backup Creator Schtrom – for Dosflash Badsheepy – for XDVD Mulleter Gael360 – for WxRipper Ground Zero – for “Easy Xbins” l33 – for AutoSAM Grim187 – for finding the MTKFlash hexedits Boke – for his MTKFlash force list patch Redline – for helping me with MS28 testing XTNS06 – MS28 testing rodpad – MS28 testing IIsTixII – MS28 testing PrimitiveX5 – helping moderate forums vinomarky – helping moderate forums bigd23 – helping moderate forums sosotit – for his game backup tutorial AccidentProne – for his many tutorials Geebee – the original tutorial creator mksoftware – helped GB on the tutorial #fw on EFNET #360mods.net on EFNET And anybody else I forgot
Related Documents