SEPTEMBER 2015 AUTHOR: IONUT DAVID TestLink Test Management Tool Version 1.9.10

Welcome message from author
This document is posted to help you gain knowledge. Please leave a comment to let me know what you think about it! Share it to your friends and learn new things together.
Transcript

SEPTEMBER 2015AUTHOR: IONUT DAVID
TestLink Test Management ToolVersion 1.9.10

•How to work with TestLink•Step by step operations•Additional features•Benefits•Q&A
Agenda

HOW TO WORK WITH TESTLINK
1. Create a Project2. Create Test Cases (Test Suites) for this
Project3. Create Test Plan4. Specify Build of the Project you are going
to test5. Add Test Cases to the Test Plan6. Assign Test Cases to Test Engineers7. Execute Test Cases (Test Engineers)8. See Reports and Charts

HOW TO WORK WITH TESTLINK
Additional facilities:•Assigning Keywords (we may form a group of Test Cases for Regression tests)•Specifying Requirements (we may bind them with Test Cases in the many-to-many relation and see if our Test Cases cover our requirements) •Events log (you can see here the history of all the changes)

TESTLINK MAIN SCREEN
Here is how the main page of Test Link looks like:

STEP 1: CREATE A PROJECT
To create a project go to the Test Project Management section

STEP 1. CREATE A PROJECT

STEP 1. CREATE A PROJECT.Important fields:• Name: Project name• ID: used for forming a unique Test Cases ID. E.g. DT-03 means that the Test Case is created for Dummy Test project and it has ID=3
• Description: what is the aim of the Project, what is the target group, what is the business logic, what is the Test Environment.

STEP 1. CREATE A PROJECT.Enhanced features: Requirements feature – we may specify
requirements and see if they are well-covered by Test Cases
Testing priority – we may assign priority to Test Cases (high, medium, low)
Test Automation – we may specify whether the test should be performed manually or automatically
Inventory – to tell the truth, I didn’t understand what it means

STEP 1. CREATE A PROJECT.You can now set the Project that you will work on:

STEP 2. CREATE TEST CASESTest Cases will be create in Test Specification section:
Accessible also from the desktop:

STEP 2. CREATE TEST CASESTest Suites are created using the following button:
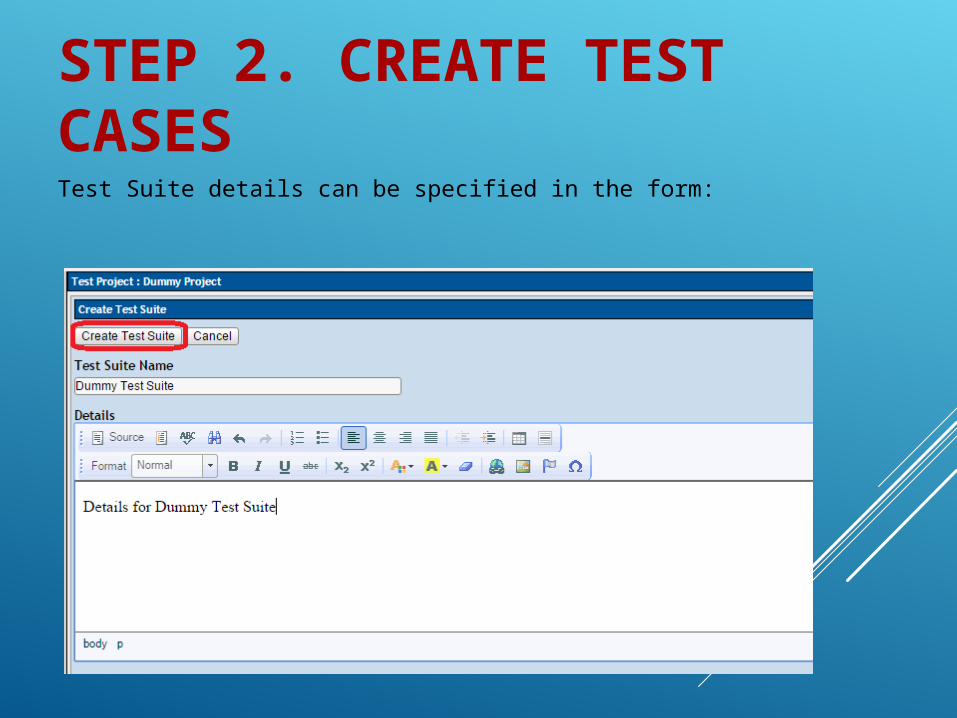
STEP 2. CREATE TEST CASESTest Suite details can be specified in the form:
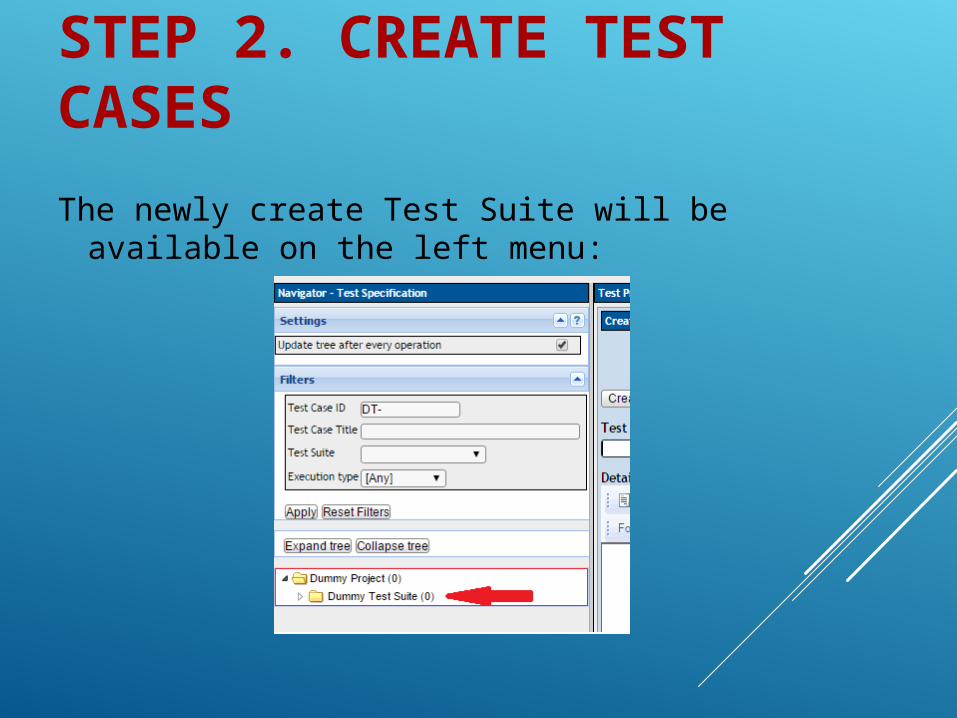
STEP 2. CREATE TEST CASESThe newly create Test Suite will be available on the
left menu:

STEP 2. CREATE TEST CASESFor a better management we could create multiple sub-sections

STEP 2. CREATE TEST CASESThe tree structure can be seen on navigation panel:

STEP 2. CREATE TEST CASESHow to create a Test Case:

STEP 2. CREATE TEST CASESImportant fields:•Test Case Title•Summary•Preconditions•Status•Keywords

STEP 2. CREATE TEST CASESHere we add steps to our Test Case:

STEP 2. CREATE TEST CASESWe could have multiple steps in a Test Case:

STEP 2. CREATE TEST CASESWe may also import and export Test Suites or Test Cases (in the XML format)We could import them from other projects
Unfortunately, for now it’s the only way to transfer them from one project to another.

STEP 3. CREATE TEST PLANTestLink won’t allow you to execute Test Suites if you don’t create a Test Plan and specify the Test Build.
Let’s begin with the Test Plan, so let’s get back to Desktop

STEP 3. CREATE TEST PLAN

STEP 3. CREATE TEST PLANCurrent Test Plan will appear in the top right browser cornerAfter you’ve added a Test Plan, menu appear.

STEP 4. SPECIFY BUILDCreate a new build from the menu.
A build is identified by its title.
Each build is related to the active Test Plan.
Description should include: list of delivered packages, fixes or features, approvals, status, etc.

STEP 4. SPECIFY BUILDA build has several attributes:

STEP 5. ADD TEST CASES TO A PLANSelect a Test Case to add:

STEP 5. ADD TEST CASES TO A PLANOnly Test Cases, not Test Suites or the whole Test Specification can be added to a Test Plan.
So, until you don’t select one separate TC the button “Add to Test Plans” will not appear

STEP 5. ADD TEST CASES TO A PLANThen you can choose what Test Plan you want to add the selected TC to:

STEP 5. ADD TEST CASES TO A PLANTest Case can be assigned to Test Plans from Desktop:

STEP 5. ADD TEST CASES TO A PLANMultiple selection is possible:

STEP 6. ASSIGN TC EXECUTION TO USERSBefore assigning TC to testers you should create users with appropriate roles here:
Add/Create users:

STEP 6. ASSIGN TC EXECUTION TO USERSThen you can assign TC execution here:

STEP 6. ASSIGN TC EXECUTION TO USERSThis page allows test leaders to assign users to particular tests within the Test Plan.

STEP 7. EXECUTE TESTSTo start executing tests Test Engineers should go to Test Execution section:
In this section the user can register the results of the tests and track execution progress:

STEP 7. EXECUTE TESTSThe page has four main areas:
- General information

STEP 7. EXECUTE TESTS- Execution history, where the user can see past results of the test execution:

STEP 7. EXECUTE TESTS- Test case details, where the user can see the execution steps:

STEP 7. EXECUTE TESTS- Test result, where the user can set the result of the execution:

STEP 8. SEE REPORTS AND CHARTSAfter the test case execution is finished you may see the results by accessing the Test Reports section from here:
Or from here:

STEP 8. SEE REPORTS AND CHARTSYou’ll have available a range of preset reports:

STEP 8. SEE REPORTS AND CHARTSTest Plan Report – the document has options that define the content and the document structure.

STEP 8. SEE REPORTS AND CHARTSExample:

STEP 8. SEE REPORTS AND CHARTSTest Report – this document includes also the test results.
Example:

STEP 8. SEE REPORTS AND CHARTSTest Result matrix – This report shows the last test case execution result for each build.

STEP 8. SEE REPORTS AND CHARTSCharts

STEP 8. SEE REPORTS AND CHARTSCharts

STEP 8. SEE REPORTS AND CHARTSGeneral Test Plan Metrics – this page shows you the most current status of a Test Plan

STEP 8. SEE REPORTS AND CHARTSBlocked, Failed and Not Run – this report shows all of the currently blocked, failing or not executed test cases.

ADDITIONAL FEATURES: KEYWORDS1. Go to the “Keyword Management” section
2. Select or create new Keywords

ADDITIONAL FEATURES: KEYWORDSNow you can add Keywords both to Test Suites and Test Cases, either all (>>) or only one Keyword (>)

ADDITIONAL FEATURES: KEYWORDSThen you’ll be able to see such a usefully chart demonstrating the Result by Keywords

ADDITIONAL FEATURES: REQUIREMENTSYou open the section in this way:
Or like this:

ADDITIONAL FEATURES: REQUIREMENTSYou can create requirement documents:

ADDITIONAL FEATURES: REQUIREMENTSYou can create requirement specification (where multiple requirements can be managed):

ADDITIONAL FEATURES: REQUIREMENTSYou can create individual requirement documents:

ADDITIONAL FEATURES: REQUIREMENTSYou can create (or import) individual requirement documents:

ADDITIONAL FEATURES: REQUIREMENTSRequirements can be detailed here:

ADDITIONAL FEATURES: REQUIREMENTSThere are different stages of requirement document:
There are also different types of requirements:

ADDITIONAL FEATURES: REQUIREMENTSThen requirements can be assigned to Test Cases:
Select Test Suite or Test Case and assign it to one or more Requirements:

ADDITIONAL FEATURES: REQUIREMENTSThen requirements can be assigned to Test Cases:
Select Test Suite or Test Case and assign it to one or more Requirements:

ADDITIONAL FEATURES: EVENTS LOGCan be accessed from the main top menu:
A selection of filter is available to customize the events:

ADDITIONAL FEATURES: EVENTS LOGAfter the filters are set, the user can see below the list of events:

TESTLINK BENEFITS:• We have all the documents structured and
organized• We solve the problem of version management• We can control the testing process (events log +
different type of reports)• We can see if all the requirements are covered
with Test Cases• We can select Test Cases for different type of
testing (Regression, Acceptance, Smoke)• We can see the results of testing in a very clear
and easy-to-use form• We can track in real time the status of the testing
process

Q&A

THANK YOU FOR YOUR
ATTENTION!
Related Documents