Technology for fermentation and maturation process of beer production Fermentation and maturation process of beer production The brewing process, which is the first phase of the production cycle of beer, is followed by a second phase, called fermentation process, or fermentation. Fermenting wort is a manifestation of metabolism of brewer yeast, which is added after the oxidation to the wort immediately after it is cooled to the fermentation temperature and pumped from the brewhouse to fermentation vessels. The task of brewer yeast in the fermentation stage is to convert part of the sugars in the wort into alcohol. At the set degree of fermentation the fermentation process is interrupted (not to be the full conversion of 100 % sugar). The so-called young or green beer is pumped into another container, wherein continuing fermentation process has a lower intensity, but at a lower temperature and higher pressure, while the beer carbonated by carbon dioxide. This part of the fermentation process is called maturation of beer, also known as lagering. Two main fermentation technologies Design and construction of containers for the main fermentation varies depending on the technology. In our mini-breweries we use both most common fermentation technologies which can be used within one brewery also in combinations and produce beer of different kinds and sensory properties. I. The bottom fermentation of beer The style of bottom-fermenting includes all bottom -fermented beers using the yeasts Saccharomyces uvarum. The majority of world production are bottom- fermented beers, including Czech lager Pilsner. These include for example also Dortmunder, Bock, Marzen and more beers called lagers.

Technology for Fermentation and Maturation Process of Beer Production
Jan 27, 2016
cong nghe san xuat bia
Welcome message from author
This document is posted to help you gain knowledge. Please leave a comment to let me know what you think about it! Share it to your friends and learn new things together.
Transcript

Technology for fermentation and maturation process of beer production
Fermentation and maturation process of beer production
The brewing process, which is the first phase of the production cycle of beer, is followed by a
second phase, called fermentation process, or fermentation. Fermenting wort is a manifestation
of metabolism of brewer yeast, which is added after the oxidation to the wort immediately after it
is cooled to the fermentation temperature and pumped from the brewhouse to fermentation vessels.
The task of brewer yeast in the fermentation stage is to convert part of the sugars in the wort into
alcohol. At the set degree of fermentation the fermentation process is interrupted (not to be the
full conversion of 100 % sugar). The so-called young or green beer is pumped into another
container, wherein continuing fermentation process has a lower intensity, but at a lower
temperature and higher pressure, while the beer carbonated by carbon dioxide. This part of the
fermentation process is called maturation of beer, also known as lagering.
Two main fermentation technologies
Design and construction of containers for the main fermentation varies depending on the
technology. In our mini-breweries we use both most common fermentation technologies which can
be used within one brewery also in combinations and produce beer of different kinds and sensory
properties.
I. The bottom fermentation of beer
The style of bottom-fermenting includes all bottom -fermented beers using the yeasts
Saccharomyces uvarum. The majority of world production are bottom- fermented beers, including
Czech lager Pilsner. These include for example also Dortmunder, Bock, Marzen and more beers
called lagers.
Bottom beer fermentation is carried out at temperatures of 6-12 ° C and lasts for 6-12 days. For a
month or longer they lie (from here the name “lager”) at subzero temperatures which ensure,
among other things, the dispersion of sulfur compounds created during primary fermentation.
The technology of open fermentation in open fermentation vats in the fermentation room is
typical mainly for production of bottom- fermented beers. It allows especially convenient
collection of krausen from the dead yeast in the last stage of the fermentation which is a
prerequisite for making a quality bottom fermented beer of traditional taste. Open technology is
absolutely unsuitable for the production of top-fermented beer since the access of air to the active
yeast surfaced beer tends to result in the contamination by undesirable organisms.

For small breweries, there is a strong argument for the main beer fermentation in open vats –
the great marketing asset. View of the fermenting beer is one of the main attractions for visitors
microbrewery.
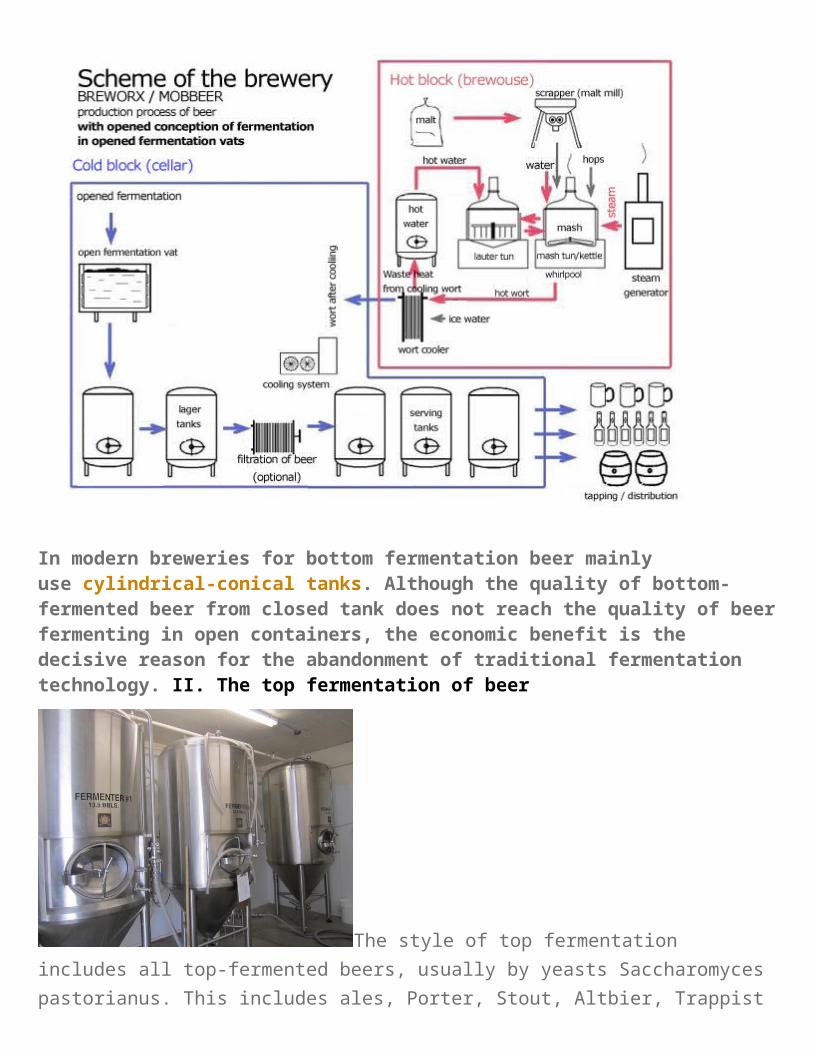
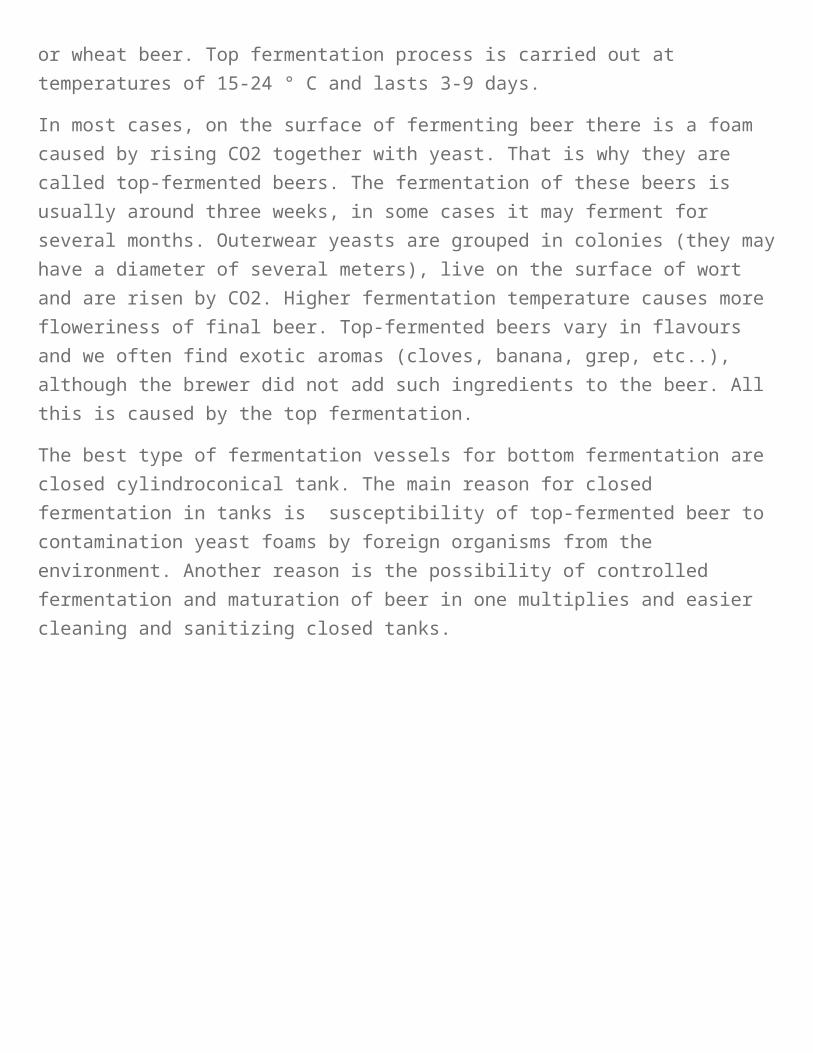
In modern breweries for bottom fermentation beer mainly use cylindrical-conical tanks. Although the quality of bottom-fermented beer from closed tank does not reach the quality of beer fermenting in open containers, the economic benefit is the decisive reason for the abandonment of traditional fermentation technology. II. The top fermentation of beer
The style of top fermentation includes all top-fermented
beers, usually by yeasts Saccharomyces pastorianus. This includes ales, Porter, Stout, Altbier,
Trappist or wheat beer. Top fermentation process is carried out at temperatures of 15-24 ° C and
lasts 3-9 days.
In most cases, on the surface of fermenting beer there is a foam caused by rising CO2 together
with yeast. That is why they are called top-fermented beers. The fermentation of these beers is
usually around three weeks, in some cases it may ferment for several months. Outerwear yeasts are
grouped in colonies (they may have a diameter of several meters), live on the surface of wort and
are risen by CO2. Higher fermentation temperature causes more floweriness of final beer. Top-
fermented beers vary in flavours and we often find exotic aromas (cloves, banana, grep, etc..),
although the brewer did not add such ingredients to the beer. All this is caused by the top
fermentation.
The best type of fermentation vessels for bottom fermentation are closed cylindroconical tank. The
main reason for closed fermentation in tanks is susceptibility of top-fermented beer to
contamination yeast foams by foreign organisms from the environment. Another reason is the
possibility of controlled fermentation and maturation of beer in one multiplies and easier cleaning
and sanitizing closed tanks.
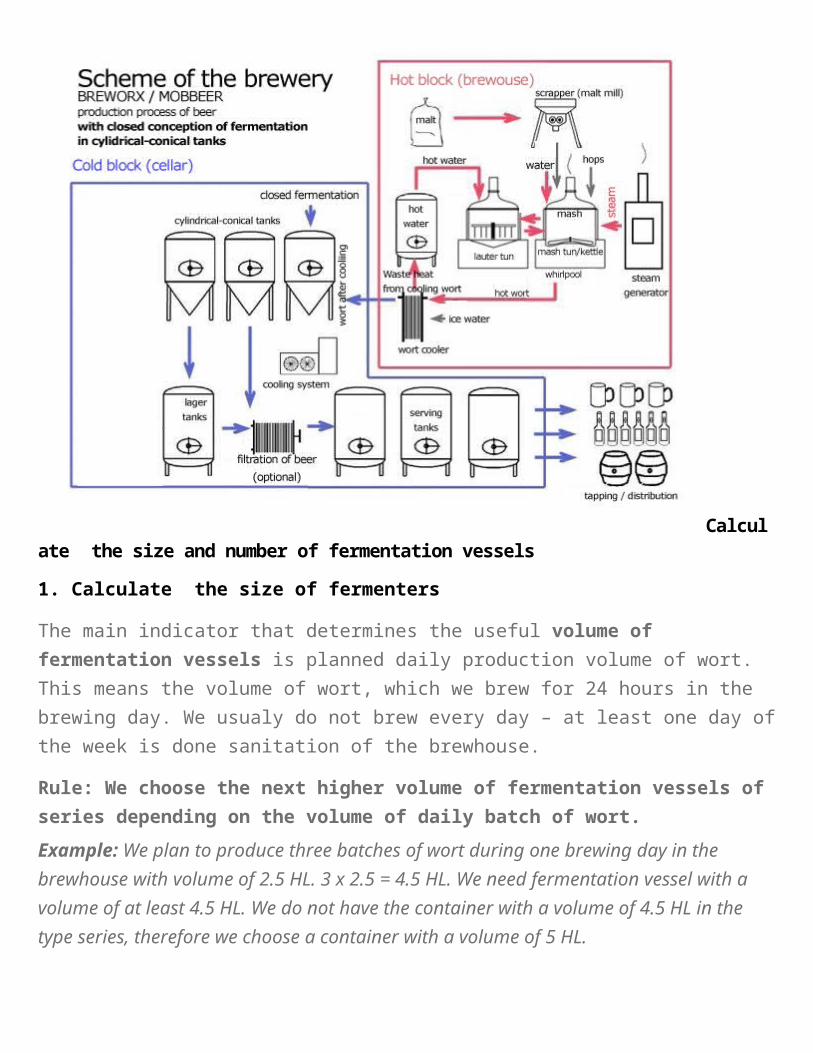
Calculate the size and number of fermentation vessels
1. Calculate the size of fermenters
The main indicator that determines the useful volume of fermentation vessels is planned daily
production volume of wort. This means the volume of wort, which we brew for 24 hours in the
brewing day. We usualy do not brew every day – at least one day of the week is done sanitation of
the brewhouse.
Rule: We choose the next higher volume of fermentation vessels of series depending on the
volume of daily batch of wort.
Example: We plan to produce three batches of wort during one brewing day in the brewhouse
with volume of 2.5 HL. 3 x 2.5 = 4.5 HL. We need fermentation vessel with a volume of at least 4.5
HL. We do not have the container with a volume of 4.5 HL in the type series, therefore we choose
a container with a volume of 5 HL.
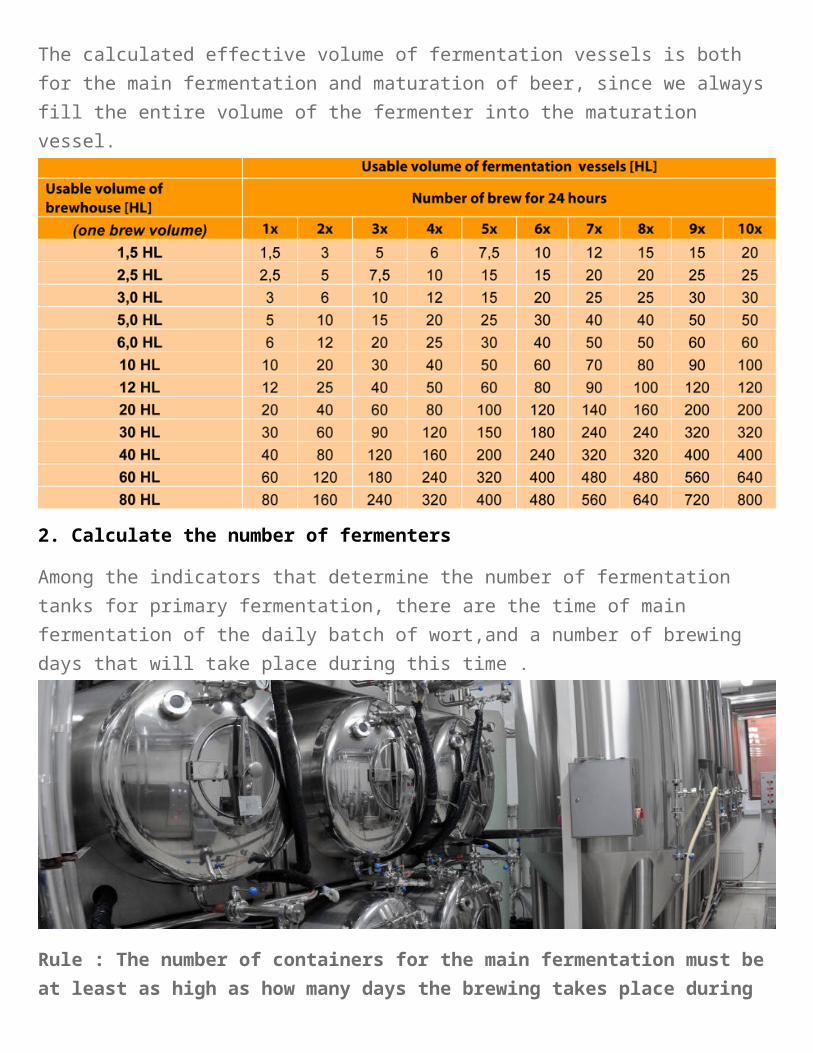
The calculated effective volume of fermentation vessels is both for the main fermentation and
maturation of beer, since we always fill the entire volume of the fermenter into the maturation
vessel.
2. Calculate the number of fermenters
Among the indicators that determine the number of fermentation tanks for primary fermentation,
there are the time of main fermentation of the daily batch of wort,and a number of brewing days
that will take place during this time .
Rule : The number of containers for the main fermentation must be at least as high as how
many days the brewing takes place during one period of the main fermentation . The types of
fermentation vessels are chosen according to the type of fermentation of selected beers (CC
tanks or open fermentation vats for bottom -fermented beers or CC tanks then only for top-
fermented beers).
Example : We plan to produce 1x weekly top-fermented beer with main fermentation time 6 days
and twice a week bottom-fermented beer with main fermentation time of 12 days. It follows that in
the first beer during 6 days it is held up only one brewing day and we need for it one fermenter of
the type cylindroconical tank (CCT) . In contrast, while making the second beer there are four
brewing days during 12 days, so we need 4 fermentation vessels, either cylidroconical tanks
(CCT), or open fermentation vats (OFV). Altogether our brewery needs 5 fermentation vessels for
main fermentation with the volume coounted according the previous text. The structure of the
vessels will be 1 OFV + 4 CCTs or 5 CCTs.
Note: The recommended duration of fermentation is the main part of each recipe for a selected
type of beer. Yet the real time of the main fermentation vary up to + / – 2 days, which is due to a
number of factors, such as vitality of the yeast, the quality of malt, wort extract variable,
temperature and others. In fact, for each batch the brewer decides on the termination of the main
fermentation according to measurement results of fermented extract by hydrometer. For the above
reasons, we recommend calculating the time of the main fermentation by two days longer than the
recipe states. In practice, this usually means having one more fermentation container in the
brewery. Ignoring this recommendation will result in a lack of fermentation containers and non-
standard extension of the main fermentation of the problematic batch and reducing the planned
production volume.
Calculate number and type of vessels for beer maturation
Among the indicators that determine the number, size and type of containers for beer maturation,
there are the recommended maturation periods (lying) of produced beer, the brewing daily volume
of wort and the number of days that takes place during this period.
Rule: The number of containers for beer maturation must be at least as high as how many
batches mature at the same time.
The type and shape of maturation vessels is not very important, but they must be able to keep the
maturation beer under the set pressure using a barrier facility. They arecylindroconical tanks,
vertical maturation cylindrical tanks and horizontal maturation tanks. Beer can further mature in
service tanks.

Example : We plan to produce once a week top-fermented beer with a suggested maturation
period of 3 weeks and twice a week bottom- fermented beer with a recommended period of
maturation nine weeks. It means that the first beer needs for simultaneous maturation of batches 3
maturation vessels, the other beer 18 maturation containers (2 x 9). Total need in the brewery is 3
+18 = 21 maturation vessels.
Note : For specialy beers with EPM > 12 % it is recommended to have beer maturation time of
several months. To equip the brewery with maturation vessels for example for one batch of 14 -
degree beer a week implies the need for extremely high amounts of maturation tanks in the
brewery. This is not normally needed because the demand for strong beers in restaurants is usually
not that big. In practice this extreme is solved in winter, when beer consumption with a lower
alcohol content declines, the maturation tanks reserved for the basic assortment can be used
(brewing schedule is temporarily reduced to the half of production volume) to produce special
beers with higher alcohol content, while the maturation process takes place in tanks only as long as
necessary for a few weeks, when it is not needed to use them for the usual summer assortment.
Special beer is filled into kegs stored in cold, where maturation process continues. Due to the long
lifetime of beers with more alcohol it is possible to offer these winter specials from kegs during all
remainder of the year, when the tank is used for production of usual assortment of weaker beers.
Technical parameters of the fermentation vessels for primary fermentation of beer
OPEN FERMENTATION VATS
The traditional brewery cellar technology is based on historically proven method of slow
fermentation of young beer in open fermentation vats and the maturation of beer in closed lager
tanks at moderate pressures. In this manner, in Central Europe, beer has been manufactured for at
least 150 years.
Although in the past 50 years the traditional method of slow fermentation, bottom- fermented beer
was replaced by the modern concept of a brewery cellar, the production of beer in closed
cylindrical-conical tanks, lately there is again a shift to a proven classic open fermentation
technology.
The concept of a brewery cellar with cylindrical-conical tanks instead of open fermentation vats
has distinct advantages that make it particularly preferred for large breweries, in contrast the
classical concept has several essential characteristics, that make it particularly popular for
microbreweries and restaurant microbreweries. Among the main ones it´s lower cost, simple
operation, and the possibility of convenient collection of so-called “quilt” , it is layer of dead yeast
, which presence in the beer leaves an unpleasant sour – bitter tinge.
But for small breweries there is one advantage of the
technology of open fermentation, for the big breweries completely irrelevant. And that is the
opportunity to show intermediate of the beer production in different phases . Who ever visited as a
tourist a microbrewery, in his mind remains the memory of a bathtub full of young beer, which is
covered by a layer of foam of interesting structure and colors. Looking at beer at the stage of
primary fermentation is simply fascinating, and that is the most important. The operator of a small
brewery can boast before the guests. The view of the hall full of stainless steel closed tanks
definitely cannot replace that experience.
The disadvantage of primary fermentation in open fermentation vats is the inappropriateness of
this technology for production of top-fermented beers, as active
fermenting yeasts are through foam easily contaminated by undesirable organisms
from the surroundings. This technology can be bypassed only by very sterile environment in which
top-fermented beer is fermented separately from other beers.
We produce and deliver with our breweries open fermentation vats cooled by glycol or ice water

that circulates in the duplicators of fermentation vessels. Optionally, you can supply the
fermentation vats fitted with a hinged lid, which increases the resistance of fermenting beer from
contamination.
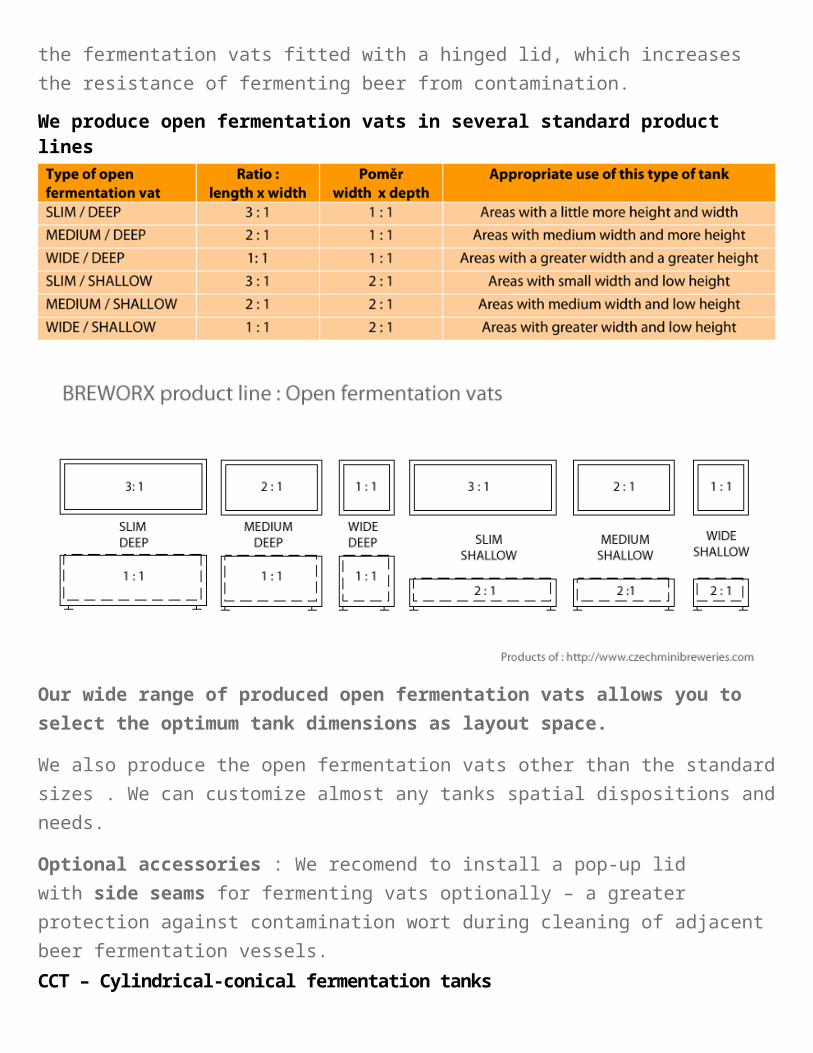
We produce open fermentation vats in several standard product lines
Our wide range of produced open fermentation vats allows you to select the optimum tank
dimensions as layout space.
We also produce the open fermentation vats other than the standard sizes . We can customize
almost any tanks spatial dispositions and needs.
Optional accessories : We recomend to install a pop-up lid with side seams for fermenting vats
optionally – a greater protection against contamination wort during cleaning of adjacent beer
fermentation vessels.
CCT – Cylindrical-conical fermentation tanks

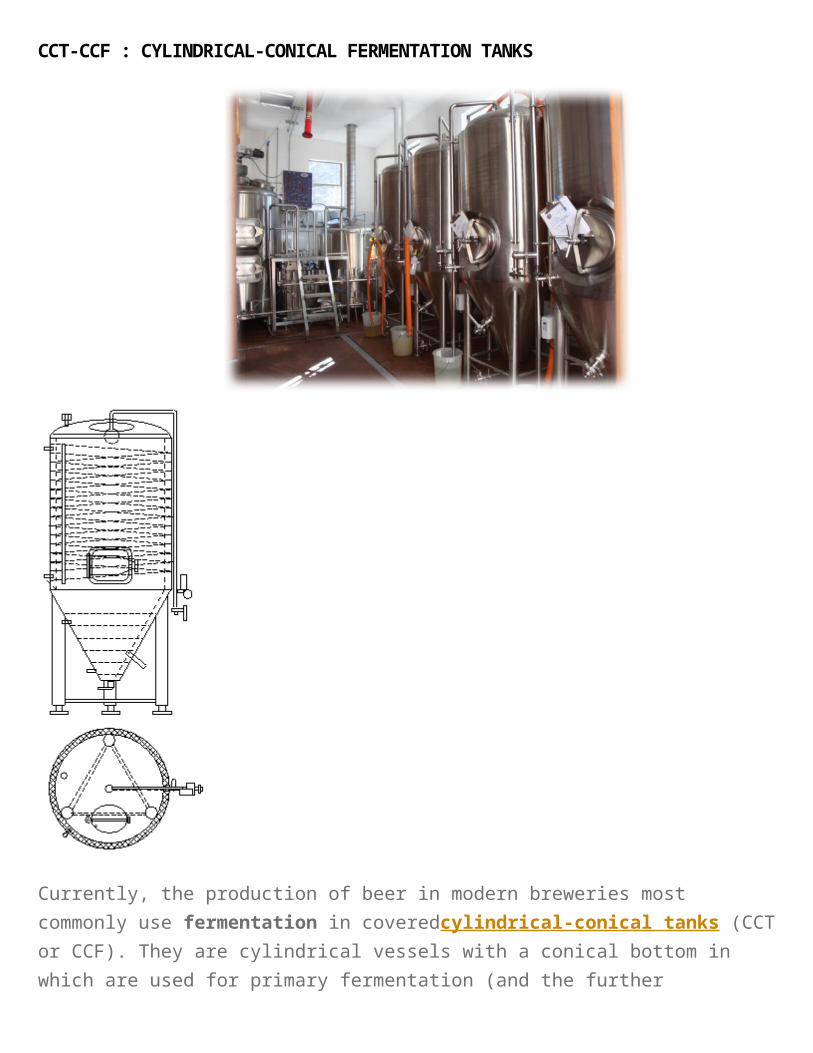
CCT-CCF : CYLINDRICAL-CONICAL FERMENTATION TANKS
Currently, the production of beer in modern breweries most commonly use fermentation in
coveredcylindrical-conical tanks (CCT or CCF). They are cylindrical vessels with a conical
bottom in which are used for primary fermentation (and the further fermentation continues in lager
tanks), or the entire fermentation process, including maturation ( lagering tanks are not used ).
Compared to traditional open fermentation vatsCCT´s have several advantages . Among the most
important is high-quality automatic sanitation, the possibility of full automation of the
fermentation process (lower labor costs) and less floor space, which fermentation technology
occupies ( CCT can also be installed outside the building of the brewery space). Fermentation at a
slight overpressure speeds up the fermentation process. The covered fermentation
technology prevents contamination by foreign organisms and does not place such a high demands
on sterility of the environment as open fermentation in the fermentation vats.
The temperature of the liquid in the CC tanks is maintained by using different coolant as needed in
several cooling zones.
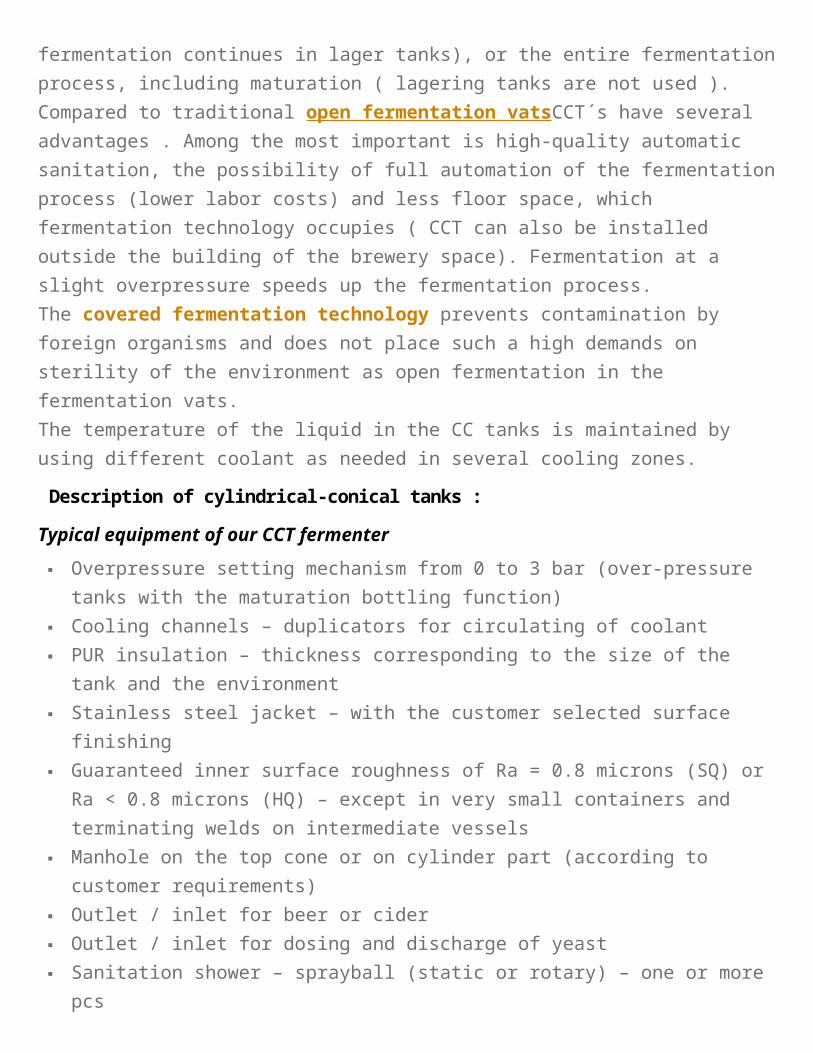
Description of cylindrical-conical tanks :
Typical equipment of our CCT fermenter
Overpressure setting mechanism from 0 to 3 bar (over-pressure tanks with the maturation
bottling function)
Cooling channels – duplicators for circulating of coolant
PUR insulation – thickness corresponding to the size of the tank and the environment
Stainless steel jacket – with the customer selected surface finishing
Guaranteed inner surface roughness of Ra = 0.8 microns (SQ) or Ra < 0.8 microns (HQ) –
except in very small containers and terminating welds on intermediate vessels
Manhole on the top cone or on cylinder part (according to customer requirements)
Outlet / inlet for beer or cider
Outlet / inlet for dosing and discharge of yeast
Sanitation shower – sprayball (static or rotary) – one or more pcs
Cleanable and sanitizable sampling cock
Double-acting air vent valve
Independent safety overpressure valve
Thermometer pocket
Cleanable and sanitizable glass level indicator
Optional equipment of of our CCT fermenter
Thermometer or thermo-sensor
Manometer
Automatic valves for regulation the coolant flow in the cooling channels
Local thermostat unit (control valves duplicators, depending on the temperature)
Control system for manual or automatic control of fermentation and maturation process
Carbo
nation
stone
– the
special jet for carbonation of beverages from CO2 bottles
Stainless steel ladder for easy access to the door of the tank
I. Size ratio variations of CCT fermenters :
We produce CCT fermentation tanks in 6 production lines by the ratio of the height and diameter
of the container. It is advantage for customers, because dimensions of tanks is often necessary to
adapt for limited space dispositions.
Our wide range of produced cylindrical-conical tanks allows you to select the optimum tank
dimensions as layout space.
Properties wider tanks with small height of cylindrical part:
They are better for the beer yeast (lower hydrostatic pressure)
A gradual temperature curve during the transition from primary fermentation the beer
maturation (smaller heat transfer area, lower cooling effect)
They are less demanding in terms of height space.
They are more demanding in terms of floor space.
Properties slender tanks with large height of cylindrical part:
Tanks with larger volumes require a different yeast strain (higher hydrostatic pressure)
steep temperature curve during the transition from primary fermentation the beer maturation
(larger heat transfer area, the greater the cooling effect)
They are more demanding in terms of height space
They require less floor space.
We also produce cylinder- conical tanks with other than the standard sizes . We can
customize almost any tanks by your special needs.
II. Variations of CCT fermenters according to their ovepressure limit:
In addition, the customer can choose between the pressure and non-pressure containers. According
to the maximum allowable pressure in the vessel we produce CC fermentation tanks in several
designs:
Non-pressure fermentation tanks – the maximum available overpressure is 0.5 bar – it is
designed as 2.0 bar tank, but it is not declared as pressure tank and doesn´t have a pressure
vessel passport. Suitable for non-pressure fermentation of beer or cider.
Over-pressure fermentation tanks – the maximum available overpressure is 3.0 bar
(according to specific customer requirements up to 5.0 bar), includes PED certificate for
pressure vessels – container can be used not only for the fermentation and maturation of beer,
but also as pressure bright beer tank for tapping into kegs or bottles, filtration and drafting of
beer or cider.
III. Variations of CCT fermenters according to their quality and equipment:
According to requirements and financial possibilities of customers we can produce fermentation
tanks at three classes of quality:

HQ – HIGH Quality – High quality workmanship of all parts, welded joints and surfaces.
The inner surface has a guaranteed roughness Ra μm – glossy design. The outer surface is
unified. All functional armatures and fittings that have an impact on the reliability and safety
of the products are made in Europe or in the USA. A perfect separation of the used yeast from
the beer or cider, especially at single-phase fermentation of beer or cider when the both
fermentation and maturation process are provided in the same tank. Luxury equipment of the
tanks. The main advantages are the savings of sanitizing solutions, water and energy,
minimized losses of beverages, shorter work time, reduction of production costs. Three years
warranty for stainless steel main parts and also for the fittings. The quality class for the most
demanding customers.
SQ – STANDARD Quality – Standard quality workmanship of all parts, welded joints and
surfaces. All functional armatures and fittings that have an impact on the reliability and safety
of the products are purchased from approved suppliers from Europe or USA. Inspection of all
critical welds and joints. The inner surface has a guaranteed roughness Ra=0.8 μm – semi
glossy design. Usual equipment af the vessels, usual set of fittings. Tanks in this quality class
comply with all European regulations for pressure vessels and food processing plants. Two
years warranty for stainless steel main parts, two year for the fittings. It is the most often
ordered quality variaton of tanks for our customers.
LQ – LOWER Quality – Lower quality workmanship of all parts, welded joints and
surfaces. The most of functional armatures and fittings are purchased from approved suppliers
from Asia. The inner and outer surface are not unified. Not guaranteed surface roughness on
the inside of the containers. One year warranty for stainless steel main parts, one year for the
fittings. This solution is interesting only for starting small breweries because it saves an
investition costs. Unfortunatelly, this brings higer beverage production costs. Longer period of
sanitation, greater consumption of the sanitizing solution, energy, labor and hot water. High
losses of produced beverages. We don´t offer this quality class for our products, because the
equipment with the LQ quality class does not comply with the European regulations for
pressure vessels and food processing plants. It is the quality of tanks of very cheap world
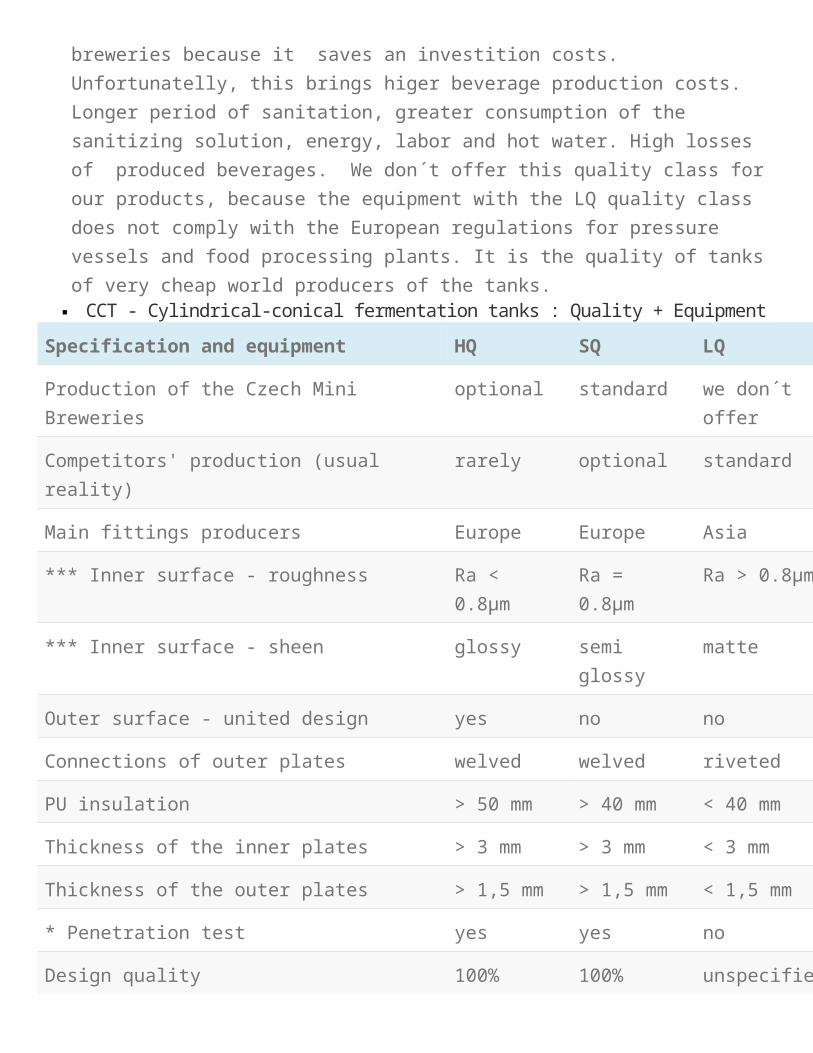
producers of the tanks. CCT - Cylindrical-conical fermentation tanks : Quality + Equipment
Specification and equipment HQ SQ LQ
Production of the Czech Mini Breweries optional standard we don´t offer

Specification and equipment HQ SQ LQ
Competitors' production (usual reality) rarely optional standard
Main fittings producers Europe Europe Asia
*** Inner surface - roughness Ra < 0.8μm Ra = 0.8μm Ra > 0.8μm
*** Inner surface - sheen glossy semi glossy matte
Outer surface - united design yes no no
Connections of outer plates welved welved riveted
PU insulation > 50 mm > 40 mm < 40 mm
Thickness of the inner plates > 3 mm > 3 mm < 3 mm
Thickness of the outer plates > 1,5 mm > 1,5 mm < 1,5 mm
* Penetration test yes yes no
Design quality 100% 100% unspecified
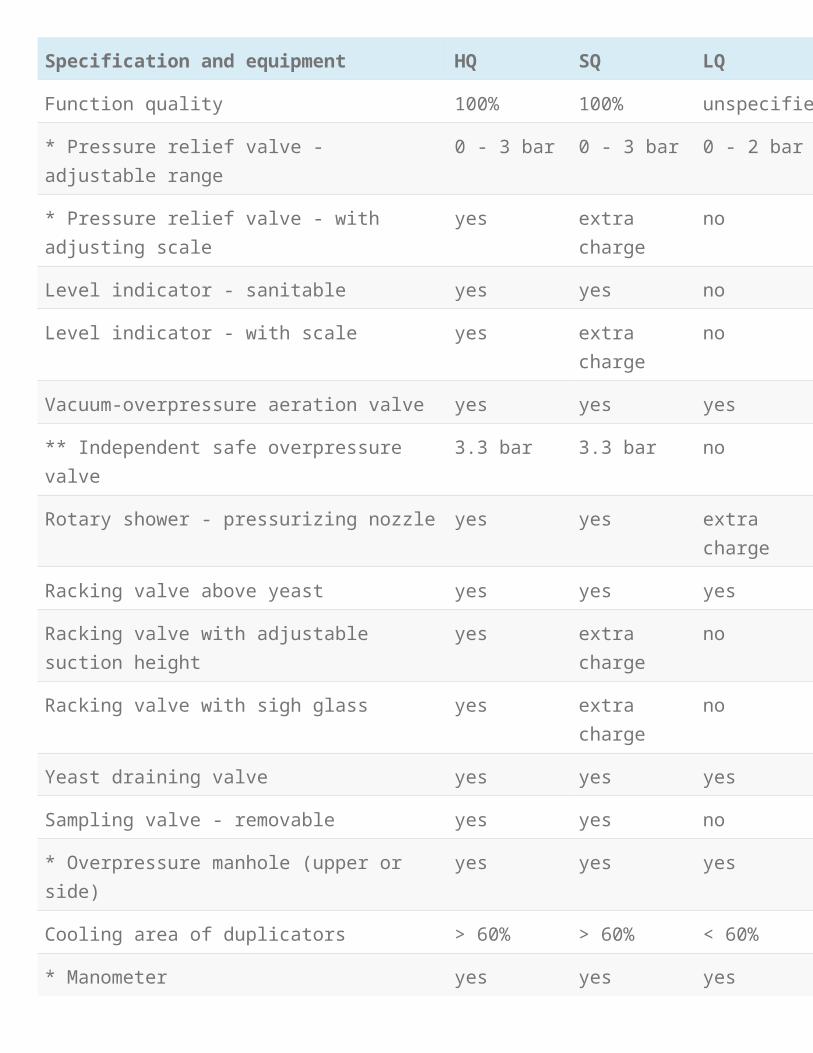
Function quality 100% 100% unspecified
* Pressure relief valve - adjustable range 0 - 3 bar 0 - 3 bar 0 - 2 bar
* Pressure relief valve - with adjusting scale yes extra charge no
Level indicator - sanitable yes yes no
Level indicator - with scale yes extra charge no
Vacuum-overpressure aeration valve yes yes yes
** Independent safe overpressure valve 3.3 bar 3.3 bar no
Rotary shower - pressurizing nozzle yes yes extra charge
Racking valve above yeast yes yes yes
Racking valve with adjustable suction height yes extra charge no

Specification and equipment HQ SQ LQ
Racking valve with sigh glass yes extra charge no
Yeast draining valve yes yes yes
Sampling valve - removable yes yes no
* Overpressure manhole (upper or side) yes yes yes
Cooling area of duplicators > 60% > 60% < 60%
* Manometer yes yes yes
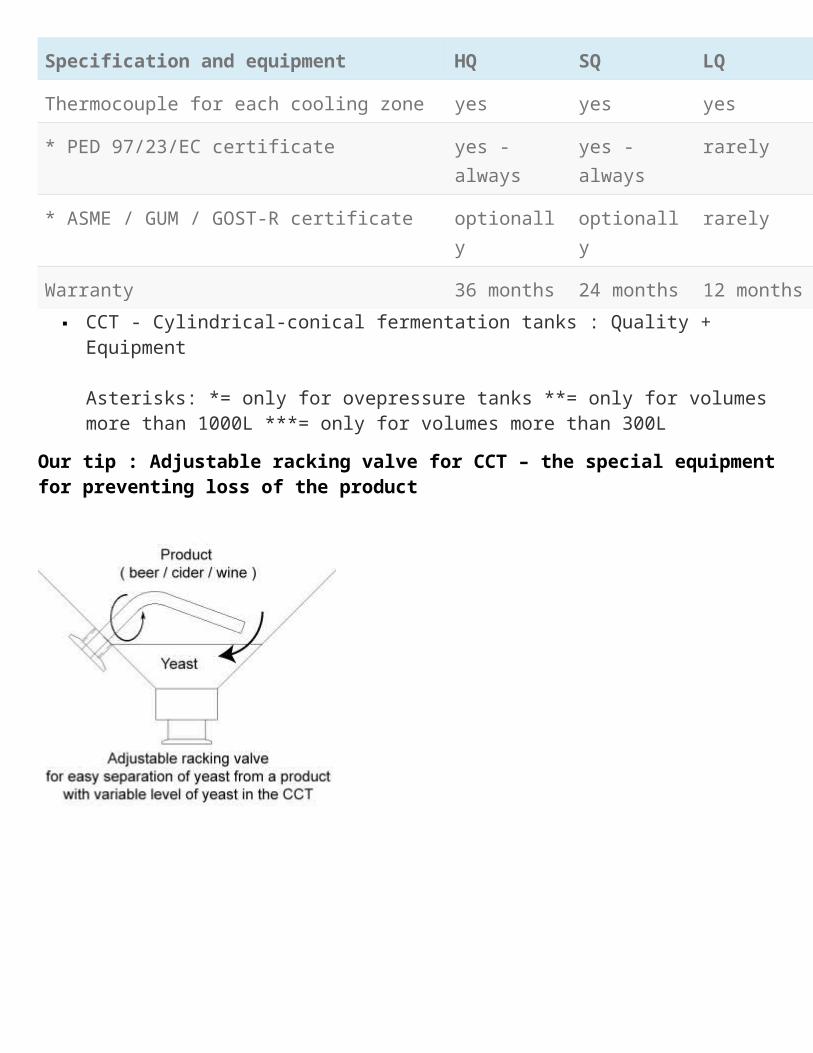
Thermocouple for each cooling zone yes yes yes
* PED 97/23/EC certificate yes - always yes - always rarely
* ASME / GUM / GOST-R certificate optionally optionally rarely
Warranty 36 months 24 months 12 months
CCT - Cylindrical-conical fermentation tanks : Quality + Equipment
Asterisks: *= only for ovepressure tanks **= only for volumes more than 1000L ***= only for volumes more than 300L
Our tip : Adjustable racking valve for CCT – the special equipment for preventing loss of the product

We recommend to use our new adjustable racking valve system for easy separation of yeast from
the product (beer, cider, wine …) without loss of product residues.
This system allows the precise height setting of the outlet pipe suction hole just above the actual
level of yeast in the tank.
No more product loss – no unusable residues in the tanks.
Your price :
SQ version of CCT – 650 Eur surcharge
HQ version of CCT – included in price
Our quality Ten: Why to buy cylindrical-conical tanks just from us?
(why we can not to be the cheapest …)
1. We design, manufacture, mounted and testing of all vessels (excluding non-pressure) in
accordance with the strict standards and guidelines for pressure vessels (EU Directive PED
97/23 / EC Pressure Equipment). I.e :
Each pressure vessel contains a double-acting air vent valve (prevents against an
over pressurization or implosion of the tank during its charging / discharging)
Each pressure vessel also contains an independent overpressure safety
valve (prevents against a very dangerous overpressurization of the vessel and the
subsequent explosion during a malfunction or insufficient capacity of the double
acting air vent valve)
Each pressure vessel is designed by certified designer who is qualified for the
designing and calculation of pressure vessels.
Production documentation for each pressure vessel containing static strength
calculation, the exact description of a right manufacturing process, including the
required types of welds, thickness of material, critical points solutions.
All the manufactured pressure vessels are subjected to rigorous testing of tightness
and porosity of welds, using a special liquid that detects even the slightest unwanted
leaks, pores or micro-cracks = The Penetration Test
Pressure vessels are tested at overpressure which is at least 1 bar higher than the
overpressure, for which containers are certified.
The Protocol on the tightness and pressure tests and the EU declaration of
conformity are issued to all pressure vessels. We also attach thePressure vessel
passport, at the request of the customer.
Manufacturing processes, design drawings, manufacturing, tightness and pressure
tests are supervised by an inspector of TÜV SÜD Czech or another certified
company, supplying quality control and compliance with European standards.
Each pressure vessel contains an indelible nameplate with the obligatory name of
the manufacturer, the ultimate pressure or other data that uniquely identifies the
concrete pressure vessel in accordance with EU PED 97/23 / EC
Optionally we can produce the pressure equipment according to the conditions and
standards of ASME, GOST-R or GUM certification rules. In this case, we charge an
extra surcharge for the special certification :
PED certification … is included in the price
ASME certification … surcharge 10%
GUM certification … surcharge 5%
GOST-R certification … surcharge 10%
2. We produce food containers fundamentally from food stainless steel that fully comply with
the Regulation of the European Parliament and Council Regulation EC no. 1935/2004.
These materials do not release their constituents to food in quantities which could endanger
human health or bring about an unacceptable changes in the composition of food or a
deterioration in their organoleptic and sensory characteristics in contact with food under
normal or foreseeable conditions. We do not use cheap stainless steel with lower quality,
which will soon lose their corrosion resistance and indifference to food, especially after
repeated contact with the sanitation solutions.
3. We are looking into suppliers of construction and installation materials and components
from which we produce equipment for food production and handling. We do not buy any
material from importers who are unable to prove its European origins and characteristics.
4. All the tanks, which we design for fermentation, maturation and storage of beverages,
have optimized dimensions for the fermentation processes, maturation process, carbonation,
carried out in accordance with technological standards for beverages production. We do not
set the dimensions of the containers by an unqualified “eyeball” estimate .
5. All containers that are made in HQ quality class, are produced with the guaranteed inner
surface roughness of Ra < 0.8 microns, containers that are made inSQ quality class, are
produced with the guaranteed inner surface roughness of Ra = 0.8 microns (except in very
small containers and terminating welds on intermediate vessels), which is the European
standard prescribed roughness of the inner surfaces of the containers that come into contact
with food and carried with their sanitation alkalis and acids. Guaranteed roughness of the
inner surface of the vessel is extremely important to ensure thorough cleaning and sanitation
tanks. This is an essential prerequisite for achieving purity and sterility of food production
equipment. We guarantee this limited roughness for 100% of the interior surface also for the
tanks. We repeatedly do measurements of all internal surfaces of tanks with the special
oughness-meter TR-130 during all their manufacturing process. We polish the inner surface of
the tank until the desired roughness is reached.
6. Each container is designed and manufactured in such a way as to ensure easy cleaning and
sanitizing of all surfaces that come into contact with food. Therefore, the vessels are
equipped with at least one sanitation shower, removable and sanitizable level-indicators and
sample cooks. We do not use any cheap fittings, for which the manufacturer has failed to
sanitary design and cleanability.
7. Tanks in HQ quality class have an united outer surface. All joints of the outer sheets
(thickness at least 2 mm) are either welded or completely sealed. This is important to prevent
ingress of moisture into the double casing, moistening the insulating material and the loss of
insulating ability. This ensures a consistent quality and insulating capacity of the tanks. For
containers in LQ quality the external sheets are usually riveted and they have a thickness of at
least 1 mm.
8. We isolate all the pressure vessels by quality PU foam. The insulating polyuretan foam is
professionally applied to the insulating space of the container so as to avoid formation of
thermal bridges, unisolated empty space or deformation of containers.We do not use cheap
little functional replacements for the isolation of containers such as insulating wool,
polystyrene beads, inexpertly applied foam.
9. Diameters of nozzles, valves and piping are sized correctly according to the volume and
vessel function – we do not mount underpowered functional elements on the tanks.
10.The warranty for the tanks produced in HQ is 36 months, warranty for the tanks produced
in SQ is 24 months. The warranty on vessel in LQ quality is 12 months. The practical life of
the vessels is usually several decades, while elements with lower lifetime (dampers, valves,
seals, etc.) can usually to be easily replaced with a new standardized elements of the same or
another manufacturer.
We recommend also the alternative solution for your fermenters :
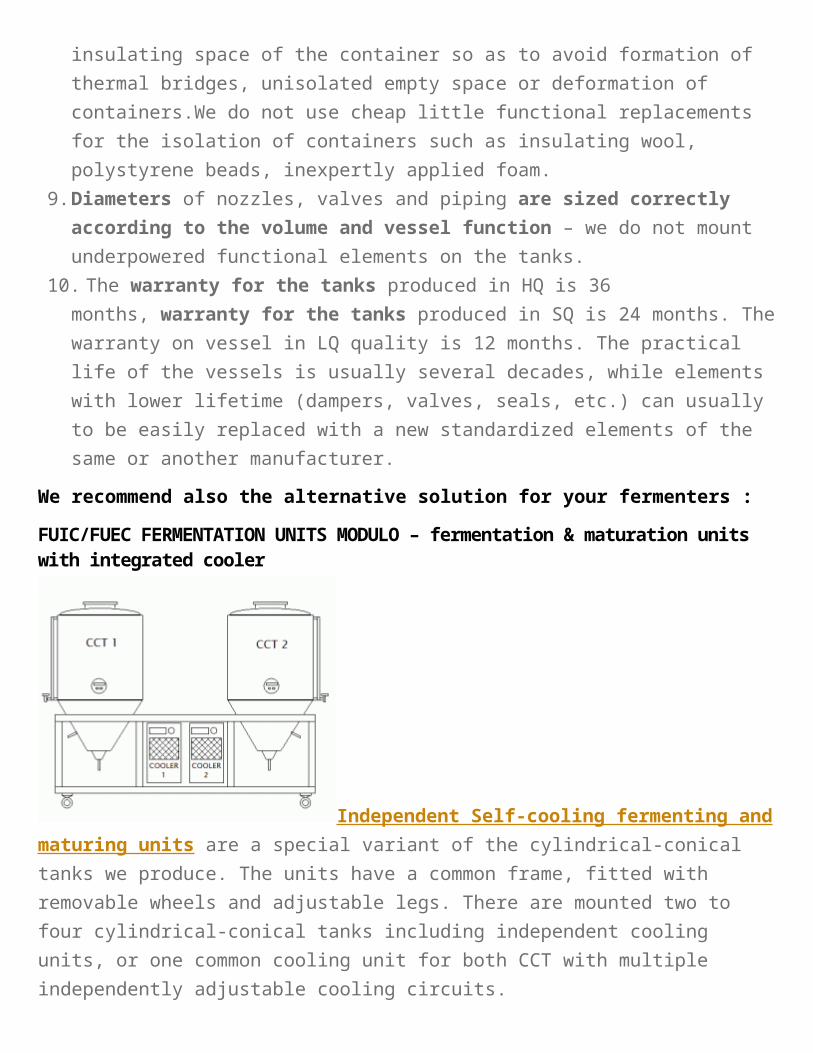
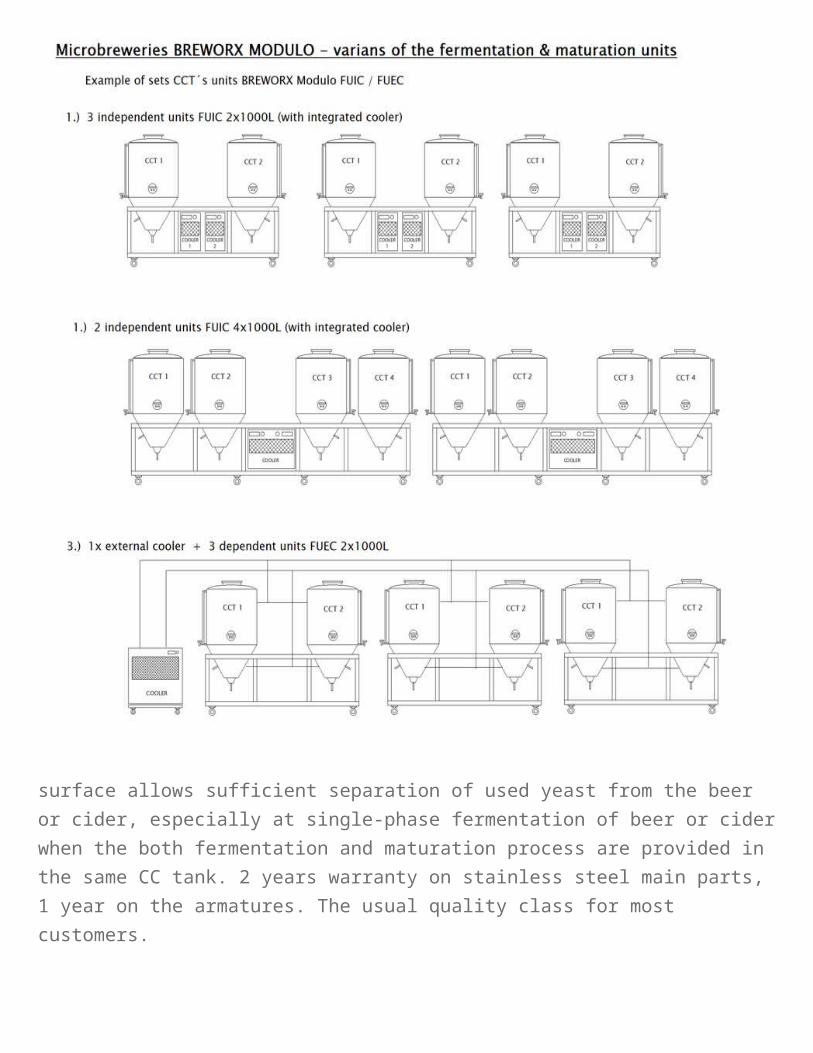
FUIC/FUEC FERMENTATION UNITS MODULO – fermentation & maturation units with integrated cooler
Independent Self-cooling fermenting and maturing
units are a special variant of the cylindrical-conical tanks we produce. The units have a common
frame, fitted with removable wheels and adjustable legs. There are mounted two to four
cylindrical-conical tanks including independent cooling units, or one common cooling unit for
both CCT with multiple independently adjustable cooling circuits.
The advantage is the independence of the fermentation unit to an external cooling, simple
installation without the need for specialized refrigeration workers, flexible integration with other
elements of the brewery using special sanitable food hoses.
The self-fermentation unit modules are mounted in our modular Microbreweries BREWORX
MODULO, but they are compatible with all other microbreweries – end fittings will be filled by
the request of customer.
http://www.czechminibreweries.com/production/modular-breweries-modulo/fermentation-maturation-units/
http://www.czechminibreweries.com/production/modular-breweries-modulo/fermentation-maturation-units/

Modular microbrewery kit BREWORX MODULO :
Independent self-cooling fermentation and maturation units FUIC & FUEC
with Cylindrical-conical tanks (CCT)
Fermentation and maturation units BREWORX
MODULO are the equipment for fermentation and maturation of wort. During the fermentation
and maturation of wort made in brewhouse the wort becomes the final drink – beer. Time
parameters of the fermentation and maturation process depend on the type of beer, the set pressure
in the cylindrical-conical tanks and the requirements of the brewer.
Fermentation and maturation units BREWORX MODULO are independent mobile blocks
withcylindrical-conical tanks, including everything needed for the main fermentation of beer, beer
maturation, bottling and dispensing beer. They consist of these components :
2 pcs or 4 pcs of CCT – isolated by liquid cooled cylindrical-conical tanks
2 pcs of the liquid cooling unit with integrated condenser (only FUIC version)
Elements for measurement and control of temperature and circulation of coolant
Piping for cooling liquid – elements for connecting between coolers and tanks
Shared frame with adjustable legs and the possibility of moving with wheels
Why choose MODULO FUIC/FUEC unit for the fermentation and maturation of beer ?
Independence of fermentation & maturation unit to the external cooling system – Each
fermentation unit has its own independent liquid cooling system
Easy and quick installation – Customer receives the fermentation block on the pallet, takes it
on wheels to the destination, connects the device to the power supply and it can be used
immediately
Financial savings and quick startup – Customer dispenses with the construction work and
refrigeration specialists – nothing to demolish, weld, or pressurize the coolant.
Minimizing of operating losses during an equipment failure – In case of a failure of one
cooling unit only one tank is temporarily not working, not the entire brewery
Mobility – Displacement of the vessels in the brewery cellar is simple and quick –
fermentation block is transported to another place and can work again soon
Simple connection – The fermentation block is connected to the brewhouse and other devices
using special hoses and fast clampped end pieces – no need to install the welded piping
system
Compatibility – We deliver fermentation blocks with adapters that enable integration of a
module into an existing system of any microbrewery – connected via hoses or stainless pipes
The tables above show that for the production of bottom-fermented beers species (eg.
Pilsner style), we must consider the time of production of beer by about 50-60% longer than
the production of top-fermented beers. As well as the period of production is extending too
if we want to produce some stronger beers.
For this reason it is necessary carefully count the number of fermentation and ripening
tanks for assess the production capacity of the brewery.
The calculation of the required number of vessels is quite complex and is always a part of
the calculation that we perform for free in the invitation to tender, in consultation business
plan of specific customer.
Assembly variants of the fermentation units Modulo FUIC/FUEC
1) Fermentation & maturation units FUIC 2x CCT
– Each unit contains two cylindrical-conical tanks and an integrated liquid cooler, which ensures
cooling of the wort on required temperature. With an integrated cooler it is unnecessary to connect
the fermentation units with the external cooling system, but it is necessary to ensure the operating
temperature max. 35 ° C in the room (by a ventilation or air conditioning system on hot days).
2) Fermentation & maturation units FUEC 2x CCT
– Each unit contains 2 CCT and is not equipped with an integrated cooler. One or several FUEC
units share a common cooling unit that can be equipped with an integrated condenser (located
completely in the interior) or with an external condenser (the condenser of cooler is located in the
exterior – requires installation by a qualified refrigeration technician).
Pressure variants of the Fermentation & maturation units MODULO FUIC/FUEC :
1) Fermentation (not maturation) units non-pressure type (0.0 bar) MODULO FUIC/FUEC
NxCCT-NP
– CCTs are produced as non-pressure vessels, designed exclusively for the main fermentation of
the wort at pressure 0 bar. It is not possible to use these tanks for beer maturation, which must be
carried out under mild pressure. In this embodiment, internal welds in CCTs are not grinded as it
does not allow the extraction of yeast from the cone without a pumping of beer into another
maturation tank. Therefore, the fermentation tanks are dimensioned to sufficient temperature for
the main fermentation, but not for the maturation of beer.
2) Fermentation & maturation units – pressure type (3.0 bar) MODULO FUIC/FUEC NxCCT-HP
– CCTs are produced as pressure vessels designed both for the main fermentation of the wort, and
also for the subsequent maturation of beer under pressure up to 3.0 bar. In these CCTs it is
possible to switch from the primary fermentation to maturation of beer in the same container. But
it is always better to pump beer into another clean tank because of better separation of the beer
from the settled yeast. In this embodiment, internal welds are ground to the roughness of Ra 0.8,
which significantly improves the slip of settled yeast into a receiving tank cone.. This design
allows also hand-filling and machinery-filling of beer into kegs and bottles. Overpressure of 3.0
bar is sufficient for quick machinery beer bottling or hand-filling of beer into kegs and bottles.
Quality class variants of FUIC by the level of workmanship and equipment :
According to requirements and financial possibilities of customers we produce fermentation tanks
at two classes of quality:
1) HQ – HIGH Quality
– High quality workmanship of all parts, welded joints and surfaces. The outer surface is unified.
All functional armatures and fittings that have an impact on the reliability and safety of the
products are made in Europe or in the USA. 100% inspection of all welds and joints. 100%
guaranteed surface roughness on the inside of the containers. Perfectly smooth inner surface is
needed for perfect separation of the used yeast from the beer or cider, especially at single-phase
fermentation of beer or cider when the both fermentation and maturation process are provided in
the same CC tank. 3 years warranty on stainless steel main parts, 2 years on the armatures.
Necessary quality class for the most demanding customers.
2) SQ – STANDARD Quality
– Standard quality workmanship of all parts, welded joints and surfaces. All functional armatures
and fittings that have an impact on the reliability and safety of the products are purchased from
approved suppliers from Europe, USA and Asia. Inspection of all critical welds and joints. 80%
guaranteed surface roughness on the inside of the containers. The inner
surface allows sufficient separation of used yeast from the beer or cider, especially at single-phase
fermentation of beer or cider when the both fermentation and maturation process are provided in
the same CC tank. 2 years warranty on stainless steel main parts, 1 year on the armatures. The
usual quality class for most customers.
Applicability of fermentation units by brewhouse and number of brews in a brewing day

Applicability of fermentation units for production operations
Controlling Fermentation Temperature: Techniques
Controlling the temperature of your fermentations is one of the best ways to improve the quality of your beers; we’ll show you how — from low-tech tricks to high-tech equipment.
Get Your Fermentation Temperature Under Control!
Controlling the temperature of actively fermenting wort can have a major impact on the flavor of the finished beer. Fermenting above the normal temperature range may produce excessive fruity-flavored esters or harsh-flavored fusel alcohols. I once brewed a batch of ale during the summer and allowed the fermentation temperature to exceed 80 °F (27 °C). The finished beer tasted like a batch of Juicy Fruit gum! Most homebrewers do not possess a sophisticated means to maintain fermentation temperatures in a suitable range. This is the reason that historically many beers that needed to be fermented in a cool environment (particularly lagers) were brewed during the winter months and stored in caves or cellars. This is also why I ferment ale in the winter and mead in the summer, when my basement is in the proper temperature range for each type of fermentation.

Normal ale fermentation temperatures range from 68 to 72 °F (20 to 22 °C) and lager fermentation temperatures from 45 to 55 °F (7 to 13 °C). Also keep in mind that the heat generated by an active fermentation can warm a typical 5-gallon (19-L) batch of beer by 10 to 15 degrees Fahrenheit (5.5 to 8.3 degrees Celsius). Even though a basement in a northern climate may be cool enough to keep ale fermentation from overheating, it is often not cool enough to properly conduct lager fermentation. On the other hand, fermenting below the normal temperature range for a given yeast strain may result in a sluggish or incomplete fermentation. So what if your brewing area does not hold a desirable fermentation temperature during the time you wish to brew? Following are a number of techniques to help manage fermentation temperatures that vary from the simple to the sophisticated.
Keeping it cool A simple way to help cool your fermenting wort is by employing evaporation, the same way our bodies cool themselves on a warm day. Rather than allowing the wort itself to evaporate, place the fermenter in a large tub or pan of water and cover it with a t-shirt or other material that can wick the water out of the pan and let it evaporate from the outer surface of the fermenter, cooling it in the process. This method works best when the air surrounding the wet t-shirt is dry and/or circulated by a fan, allowing for increased evaporation of the water. Evaporative cooling using this technique can keep a fermenter approximately 5 to 15 degrees Fahrenheit (5.5 to 8.3 degrees Celsius) cooler than the surrounding air. A somewhat more aggressive approach to keeping your fermentation cool is to add ice to the water surrounding the fermentation vessel. This technique requires a little more monitoring to be sure ice is replenished as it melts throughout active fermentation. This method also makes it difficult to control the temperature of the fermenting wort in an ice water bath, resulting in a situation where the wort might be kept cooler than desired. A little experimentation may be necessary to determine if evaporative cooling and/or ice water cooling provides the proper temperature range for your brewing environment. A self adhesive temperature strip placed on the outside of a fermenting vessel above the level of an ice water bath can provide a simple and convenient means of monitoring wort temperature during fermentation. If the wet t-shirt and/or ice bath approaches prove insufficient to keep your fermentation in the proper temperature range, or won’t give you enough control, there are more advanced methods you can employ to get the job done. By setting up a recirculating pump in a separate container holding ice water (an insulated cooler works well) and pumping the chilled water to a bath surrounding your fermenter, you can achieve more control than with a simple ice water bath surrounding the fermenter. By adjusting the rate of flow or size of the water bath surrounding the fermenter you may be able to keep things cool without overdoing it. To provide even more control to a recirculating cold water system, you can add a temperature controller with a temperature sensing probe. The temperature controller can be used to control the recirculating pump so it will pump cold water around the fermenter whenever the temperature of the fermenting wort rises above the desired temperature. Stopper thermowells are available to house a temperature sensing probe so it can be immersed in a carboy or fermenting bucket. A

thermowell is simply a tube, often stainless steel, which is open on one end. The closed end of the thermowell is immersed in the liquid and the temperature-sensing probe is slid down inside the thermowell. This sort of control system can make your setup truly automatic except for keeping the ice water bath stocked with ice. The same temperature controller can also be used to simply control the temperature inside a refrigerator or freezer. The temperature controller is plugged into a power outlet and then the refrigerator or freezer is plugged into the controller. The controller’s probe is then taped to the side of the fermenter or placed inside a stopper thermowell that is immersed in the wort. The thermostat can then be set to keep the refrigerator or freezer in a temperature range for the style of beer being fermented or the stage of conditioning (lagering) desired. Temperature controllers come in both analog and digital models and have between a 1 and 4 degree Fahrenheit (0.5 to 2.2 degree Celsius) differential respectively, thus keeping the system they control in a 2 to 8 degree Fahrenheit (1.1 to 4.4 degree Celsius) temperature range. A temperature controller is necessary to keep the cooling system from running colder than the desired fermentation temperature. Temperature controllers are readily available to buy from homebrewing suppliers in the $50 to $100 price range. If employing a refrigerator or freezer for fermentation temperature control, it must be large enough to hold your fermenting vessel and be available for the job for the time required. Used refrigerators and freezers can often be acquired relatively inexpensively and only run when needed for fermenting or conditioning a batch of beer. You can also make your own homemade icebox chiller, such as one based on a design by Ken Schwartz, that utilizes jugs of ice to cool air that is circulated in an insulated box where a fermenter is kept. This arrangement utilizes a computer fan to provide air circulation and a thermostat for temperature control inside an insulated box made of rigid foam insulation. Plans for the “Son of Fermentation Chiller” can be found on the Web athttp://www.ihomebrewsolutions.com/son-of-fermentation-chiller/.
Keeping it warm
During certain times of the year a garage or basement brewery may not be warm enough for ale or mead fermentation. It then becomes necessary to invent ways to keep a fermentation warm without spending the energy (and money) keeping the whole house or brewing area at the proper temperature. Perhaps the easiest method to warm a fermenter is to cover and wrap it with a blanket or other insulating material to retain the heat produced by the fermentation. A self-adhesive thermometer strip makes monitoring the temperature of the fermenting vessel simple. If conserving the heat produced by the fermentation is not enough, there are also ways to add heat to the system. In the past, I have used an inexpensive submersible aquarium heater to warm water held in a large tub in which my carboy was placed. A self adhesive thermometer strip on my carboy allowed me to monitor the temperature as I adjusted the thermostat on the aquarium heater to achieve the desired temperature.

The flip side of using an insulated box (such as the Son of Fermentation Chiller mentioned earlier) to keep fermentation cool is to rig a light bulb inside the box to keep it warm and control the light by means of a temperature controller. Care must be taken to be sure the hot bulb will not contact any surface that could melt or catch fire. For a few dollars more, there are products such as the Fermwrap, a flexible electric heating jacket that supplies heat over its entire surface area and is therefore safe to use on glass carboys or plastic buckets. The Fermwrap will typically raise the temperature of a five-gallon (19-L) batch an additional 10 degrees Fahrenheit (5 degrees Celsius). Additionally, the Fermwrap can also be coupled with a temperature controller and stopper thermowell to control the temperature with more precision.
Shoot the moon
If money is no object, you can go for the ultimate in temperature controlled fermentation with a glycol-jacketed conical fermenter with self-contained cooling and heating capability such as the model pictured on page 65 for $1,500 to $2,500 (I can dream, can’t I?). These units are thermostatically controlled to cool or heat the wort as needed to control the temperature in a narrow range. Some models are programmable to ferment, perform a diacetyl rest, then lager. If you would like to try building your own glycol-jacketed conical, look for the plans in a future issue of Brew Your Own. Whatever method you choose to control temperature during fermentation, it will be time and money well spent. The yeast that you use, and the environment it has to work in, has arguably the greatest impact on beer flavor of any part of the brewing process. There are many special and style-specific strains of yeast now available to the homebrewer. Each strain has a temperature range where it performs best. Managing fermentation temperature to get the most from a particular strain of yeast can move your brewing up to another level, or allow you to explore new styles of beer that you may not have been able to brew before.
Jon Stika is an avid homebrewer from Dickinson, North Dakota — the land of notoriously chilly winters. He writes “Techniques” for every issue of Brew Your Own.
New flavours for lager beer – successful generation of hybrid yeasts
VTT Technical Research Centre of Finland Ltd has been the first to publish a scientific study on the successful generation of hybrid lager yeasts. For centuries the same few yeast strains have been used in the production of lager beer, in contrast to ale, whisky, wine and cider, for which there is a wide range of yeast strains available to produce different nuances of flavour. VTT has been developing hybrid lager yeasts so as to impart new flavour to the beer and accelerate the production process.
Traditionally, even very different tasting lagers have been produced using the reliable and cold-hardySaccharomyces pastorianus yeast species. Studies have shown that this trustworthy brewmaster's helper is actually a hybrid composed of two different yeast species. One of them is
the Saccharomyces cerevisiae yeast commonly used in the production of ale, while the other, only recently discovered in the wild, has been named Saccharomyces eubayanus.
These findings have opened up possibilities for researchers to create new, customised lager yeasts through selective mating of strains of different yeast species. This enables the production of new flavours for beer or the acceleration of the fermentation phase in beer production, for example.
VTT has screened its own microbial strain collection and the ale yeast strains of commercial collections in order to identify the properties that affect the beer fermentation process. We succeeded in finding suitable yeast strains and mating them with Saccharomyces eubayanus yeast.
The hybrid yeasts generated by VTT's researchers have inherited useful properties from their "parents". The new yeasts accelerate the wort fermentation process and improve the production of ethanol. They are also more tolerant to cold than their Saccharomyces cerevisiae parent strain, and settle better after fermentation than their predecessors.
The study was published in the online version of the Journal of Industrial Microbiology and Biotechnology publication series on 15 February 2015.
The study shows that VTT's method is suitable for the generation of new lager yeast strains and the creation of new properties affecting the flavour of beer, as well as improving the beer production process. New lager yeast strains can now be generated entirely without genetic modification technology.
The following organizations have funded the research: Alfred Kordelin Foundation, PBL Brewing Laboratory, Academy of Finland and EU's Marie Curie ITN Yeastcell-project.
10 Keys to Great Lager
Getting started in the world of homebrewing doesn't have to be limited to brewing ales.
Lagers can be fun and easy as long as you remember to be patient, control the temperature,
and master a few other tricks.
In terms of sales volume, the most popular beers in the world today are lager styles. Conversely, while most modern beer drinkers likely were introduced to beer first through lager styles, the majority of homebrewers enter the hobby by making beers that fall into the ale category.
There are many good reasons for this. Lager beer styles are usually differentiated from their ale counterparts by the use of bottom-fermenting yeast strains. These strains work best at lower temperatures than are necessary for most ale fermentations. Lager beers also typically incorporate long-term secondary conditioning. This often lasts weeks or even months longer than a typical ale fermentation.
The result is that lager beers usually have a much cleaner, crisper aroma and flavor profile than can be produced by top-fermenting ale yeast at warmer temperatures. But the relative ease of using a top-fermenting yeast strain, the shorter fermentation and maturation times, and the higher level of esters (fruity flavors) typically encountered in ales make them appealing to brewers. Ales typically have a greater margin for error that can help to cover up minor deviations or
inconsistencies in the flavor profile. All of these factors work in favor of the ale fermentation when brewing at home.
Does this mean that you should not or cannot produce high-quality authentic lager styles at home? Not at all! By keeping in mind some of the traits that separate lagers from ales, homebrewers can produce lagers that are every bit as good if not better than their commercially produced cousins. The tips that follow are aimed at helping you to maximize your chances for reproducing that crisp, clean lager flavor and aroma found in good commercial lagers produced around the world today.
1. Remember, patience is a virtue.
Lager is a derivation of a German word, lagern, originally meaning "to store." The original lager styles were the result of long-term storage in caves far beneath the ground. While a typical ale can be brewed, bottled, and begin being consumed as quickly as two to three weeks, lager takes weeks or even months longer to develop. It is a law of nature that as temperatures drop, the metabolism of most organisms begins to slow down. Yeast cells are no exception.
While a lager fermentation goes through pretty much the same phases as an ale fermentation, it does so considerably slower because of the temperatures involved. True success in lager brewing can only be achieved by waiting while each phase in the fermentation and conditioning process is allowed to run its course at its own pace. By abbreviating any part of lager production, you increase the possibility of creating uncharacteristic off-flavors that will stand out as flaws in the finished beer.
When in doubt it is usually a good idea to wait a few days longer before racking or bottling a lager beer. Also, it is not uncommon for lager fermentations to exhibit some rather unusual aromas such as burnt matches or other sulfur characters during the fermentation. With patience and time these characteristics usually fade and disappear, leaving a clean finished beer.
2. Control temperature well.
All yeast strains have a temperature range under which they give optimal fermentation results. With most lager strains this temperature range can be anywhere from as low as 38° F to as high as 60° F, depending on the actual yeast strain. It is very important, once the optimal performance range for a particular type of yeast is determined, to keep the fermentation within these boundaries. Store the fermenter with a thermometer inside or use a stick-on type thermometer. This makes monitoring fermentation temperatures a simple task.
Usually, the most accurate solution to temperature control involves converting a refrigerator or freezer into a controlled storage cabinet for fermenters. The optimal fermentation range of most yeast strains, even lagers designed for cold fermentations, is outside of the normal temperature range of these appliances. So some sort of modified temperature control needs to be attached to allow the unit to run properly and accurately at temperatures higher than it was originally designed to. But these types of controls are readily available with complete instructions for their use. For brewers who are unwilling or unable to invest in a spare refrigerator dedicated only to brewing, proper temperature control is still easily obtainable. Remember that lager brewing predates

modern refrigeration technology, and by employing methods practiced by lager brewers in the early days, it is a simple matter to achieve a relatively consistent, low-temperature fermentation with just a little effort.
Keep fermenters in colder areas of the house, such as the basement or garage. If you live in a particularly hot area, you might need to limit lager brewing to the colder winter months. But remember that air changes temperature much more rapidly than liquid. Protect your fermenter from direct sunlight (you should always do this, whether you’re worried about temperature or not), and insulate it with some form of cover. While the daytime and nighttime air temperatures might fluctuate by as much as 20 or 30 degrees, over the same period the temperature in your fermenter will only fluctuate a few degrees. This kind of fluctuation is well within the acceptable range for most commercially available lager yeast strains.
For brewers wanting to make lagers in warmer climates without the benefit of a spare refrigerator, low fermentation temperatures can be maintained by placing the fermenter in some type of water bath such as a large bucket or small plastic trash can. Some brewers even go as far as to maintain a supply of several one- or two-liter plastic soda bottles filled with water and placed in the household freezer. The thawed bottles are removed from the water bath and swapped with frozen ones from the freezer at regular intervals, such as once or twice a day. A relatively stable temperature can be maintained by varying the number of frozen bottles added to the water bath and how often they are replaced. While this is a labor-intensive procedure, it has been used successfully to maintain fermentation temperatures consistently in the 45° to 50° F range even in balmy Southern California.
3. Use a true lager-type yeast.
Today there are more quality yeast strains available to homebrewers than at any other time. For brewing an authentic lager at true lager temperatures, the very best option is to choose a liquid yeast strain or culture. While these yeast strains cost a little more than dry yeast strains, they usually give far better and more consistent results. This is especially true at the lower temperatures associated with brewing lager.
These liquid cultures usually are superior in terms of purity and performance, and they are available in different strains to produce a wide variety of specific lager styles. In addition most yeast suppliers can provide information regarding optimal fermentation conditions for a particular yeast strain. Even brewers located in more remote areas usually can obtain high-quality liquid yeast cultures through mail order.
4. Use a yeast starter.
While this is good advice for any homebrewer using liquid yeast, it is particularly important to make a yeast starter when brewing a true lager. Remember that the metabolism of yeast, even lager yeast, slows greatly as the temperature begins to drop.
During the critical growth phase following pitching, the yeast cells are reproducing to give enough cells for fermentation. The reduced temperatures involved in lager brewing delay the onset of
growth. This can result in a lag phase that is unacceptably long, allowing bacteria to reproduce and leaving the potential for contamination.
A good way to avoid this problem is to pitch a greater amount of yeast, usually two to three times greater cell volume than necessary for an ale fermentation. The best way to achieve this is by pitching a healthy slurry of yeast harvested from a previous lager batch or by creating a yeast starter a few days prior to the actual brew.
5. Use Irish moss and a vigorous full-wort boil.
Proteins are the prime component in chill haze. In addition extended contact time in the fermenter between the beer and the protein trub (the sediment that collects at the bottom of the fermenter) can result in the creation of off-flavors.
This is particularly important for lagers because they ferment considerably longer than ales, and the cold fermentation temperatures lagers use cause proteins to settle out. Maintaining a hard, rolling boil, boiling all of the wort (rather than topping off in the fermenter), and adding a fining agent such as Irish moss causes proteins to precipitate (fall out of solution). Thus, a lot of these proteins can be prevented from making it into the fermenter where they can cause harm. This also creates a brighter, cleaner final product.
6. Use a wort chiller.
Failure to quickly and rapidly drop the temperature of the wort as close to fermentation temperature as possible can result in a strong, healthy, and premature initial fermentation. In this case the bulk of the fermentation takes place long before the wort cools to the optimal fermentation range, creating a lager that exhibits ale-like esters and characters. Furthermore, rapid wort chilling accelerates the coagulation of proteins and helps prevent some of the difficulties involving proteins in the fermenter.
Most homebrewers do not have the ability to quickly and easily chill boiling wort to true lager fermentation temperatures. But getting the temperature to 60° F or lower puts the breaks on premature fermentation. This should allow you to drop the temperature the rest of the way during the lag phase before full primary fermentation kicks in.
7. Use a two-stage method of fermentation.
Even with a hard boil and the use of fining agents, protein trub will still make it into the fermenter. Racking a beer from a primary fermenter into a secondary fermenter or lagering vessel eliminates this additional protein. It also removes the yeast sediment, which can result in yeasty characters and off-flavors if it is left in contact with the beer.
With a healthy fermentation, an adequate volume of yeast for conditioning remains in suspension within the beer even after the sediment is removed. Most lagers really develop their clean, finished character through an extended conditioning period of several weeks at temperatures on the low end of the yeast strain’s performance range. Racking into a secondary fermenter allows this process to take place without creating any off-flavors or aromas.
8. Incorporate a diacetyl rest into the fermentation.
A natural byproduct of yeast fermentation is a compound called diacetyl. It can result in a buttery or butterscotch-candy flavor in the finished beer. While these characteristics are normal and even desirable in some ale styles, in most lagers any trace of diacetyl is a substantial flaw that detracts from the clean character of the beer.
Toward the end of fermentation and before the yeast begins to settle out, the yeast metabolizes and reduces the diacetyl. The colder temperatures of lager fermentation not only slow this metabolic reaction, but they increase the tendency of the yeast to settle out, or sediment, more quickly. This decreases the time available to reduce these compounds.
To offset this, many brewers incorporate a diacetyl rest after the bulk of the primary fermentation is complete, a time that is easily determined with hydrometer readings. The fermenter is slowly warmed to 50° to 55° F for two to five days. Then the temperature is dropped down to conditioning temperatures. Not only does this brief rise in temperature speed up the reduction of diacetyl-causing compounds, it also ensures that the primary fermentation is indeed complete.
9. Select appropriate ingredients for the style of lager you are brewing.
One of the great joys in homebrewing is the versatility of being unrestricted by style and commercial considerations. But keep in mind that the predominant characteristic in most true lager styles is a crisp, clean aroma and flavor. Hops and malt work together without being overshadowed by yeast characters and aromas.
Proper selection of ingredients is critical to this balance. A malt or hop variety that is perfectly acceptable in a fruity, estery ale might be entirely out of place in a lager, resulting in sulfury, grassy, or smoky overtones that could overshadow the cleanliness and balance of a well-made lager. By all means do feel free to experiment with ingredients, but if your goal is a clean, traditional lager, keep in mind the ingredients that were originally used to produce the style in question.
10. Sanitize!
While proper and effective sanitation is critical in all brewing styles, its importance in lager brewing can be more dramatic for two reasons.
Most lager beers undergo a long aging period. While this usually takes place at lower temperatures, bacteria can still grow and thrive —just more slowly. The long aging period gives the bacteria an extended period to develop to levels above the flavor threshold, the point at which the off-flavor can be perceived in the beer. So one level of sanitation might be perfectly acceptable for producing an ale that is to be fermented and consumed within six weeks. But this same level of sanitation might be inadequate for a lager, which most likely will be much older when it is consumed.
In addition the estery character that is an important part of many ale fermentations can mask minor contamination. But in a clean lager the same minor contamination is much more apparent.
Brewing a quality lager beer style does require slightly more effort and additional techniques that are not necessary when producing an ale. Many of the tips described here are good ideas regardless of whether you’re brewing an ale or lager. But incorporating them into your brewing regimen will allow the lagers you produce at home to have all of the distinctive characteristics of their commercial counterparts.
Fermenting Lagers
Lagers are fermented with a bottom fermenting lager yeast (Saccaromyces pastorianus). These yeasts are able to ferment at lower temperatures than the top fermenting ale yeasts (Saccromyces Cervesiae). The result of this low temperature fermentation and maturation is a beer with a cleaner flavor profile (less esters, less higher alcohols) than its top fermented counterpart. The extended cold storage (lagering) also makes these beers more shelf stable than ales which explains why most of the world's beers are of the lager variety.
Because lagers ferment at lower temperatures than ales and yeast metabolism works slower at these temperatures, they take longer to ferment and also require more attention than ale fermentations, which makes them less attractive for most home brewers. This article is aimed at the novice as well as the advanced lager brewer and tries to be explain the various lager brewing techniques that home brewers use. The first section is a how-to for your first lager fermentation. The following sections delve deeper into the subject of lager fermentation and discuss the pros and cons of different fermentation techniques and also give some background information on lager fermentation in commercial breweries.
Your First Lager Fermentation
Though many experienced brewers may read this and note that this is not the absolutely best way to ferment lagers, it is regarded as the most foolproof and that's what you are looking for for your first lager fermentation. You need the first batch to be a success to get hooked on lagers and their smooth taste. Then you may start digging deeper into this subject and find a fermentation schedule that works best for you and your set-up.
One day before brew day pitch a 2 qt (2 L) well aerated starter with an Activator Pack (Wyeast) or vial (White Labs) of the lager yeast of your choice. Both companies offer really great yeast strains. If you are looking for a versatile lager yeast go with the German Lager (WLP830 or Wyeast 2124; According to White Labs and Wyeast this is the W-34/70 strain which is the most widely used lager strain in German beers) or whatever your recipe calls for. Keep this starter at room temperature 68 - 70 *F ( 20 - 21 *C) and let it start fermenting. It may throw off some sulfur notes (rotten egg smell) which is common for lager yeasts.
Brew an average gravity lager OG: 1.044 - 1.056 (11 - 12 °P). These beers will not result in toxic alcohol levels for the yeast which makes for a more forgiving fermentation. Once brewed, chill the wort to a temperature below 60 *F (15 °C). The mid 50's should work best for this fermentation schedule. If you are not able to get the wort that cold with your chiller and your tap water, you can use a pump to recirculate ice water though the chiller. Because this pump doesn't have to be food grade, a simple submersible utility pump will do. Another option is to let the wort cool in your lagering fridge before pitching.
When transferring the wort into the fermenter, make sure to leave most of the hot break and hops in the kettle. This can be achieved with Whirlpooling or straining. The latter can be problematic since the fine break material tends to clog the strainer. The removal of hot break, some cold break and hops is recommended because the beer would be sitting on this trub for a long time (4 weeks) although recent studies have shown that the importance of trub removal is somewhat overstated [Kuehbeck 2007]. After transfer into the fermenter the wort needs to be aerated well. A healthy lager fermentation requires more oxygen than an ale of the same strength in order to reduce the stress on the yeast. The required oxygen level of 8-10 ppm (mg/L) is best achieved though 1 to 1.5 minutes of pure O2 or 20-30 minutes sterile air though a 2 micron stainless steel stone.
Pitch the whole starter into the primary fermenter. Wait until you see fermentation activity (low kraeusen or bubbles in the airlock) until you move the fermenter to an area (basement or fridge) where you have a constant 48 - 52 *F (9 - 11 *C). Let the primary fermentation take its course for a few (3-4 weeks) until there is no airlock activity left. If you want to pitch the yeast cold (at 46 - 48 F ( 8-9 C), which is actually the preferred method, you will need to grow more yeast. This means using a starter as large as 1 gal. When pitching cold you can also expect a longer lag time. Because all these things complicate the process I'm advocating warm pitching for your first lager.
After the primary fermentation is complete, rack the beer to a lagering vessel. It can be another carboy or a soda keg with shortened dip tube. The beer is then moved to an area where the ambient temperature is between 32 and 38 °F (0 - 3 °C) where it will remain for at least another 4 weeks.
Now you can either rack to a serving keg and force carbonate, in case you didn't do the force carbonation during lagering, or bottle. If you plan to bottle condition the beer you may want to add fresh yeast with the priming sugar, because the yeast present in the beer may not perform as well anymore. After all, it is about 7-6 weeks old. A quarter to half a pack of dry yeast is the easiest way at this point. It also doesn't matter if ale or lager yeast is used since the flavor profile of the beer has already been determined by the yeast used for the primary fermentation. If you don't add fresh yeast you need to be more patient with the conditioning of the beer. Let the beer carbonate at room temperature or anywhere between. The higher the temperature is, the faster the beer will carbonate.
The following sections will explain lager fermentation in more detail and show procedures that can improve the quality of the finished beer even further.
The 3 phases of a lager fermentation
A lager fermentation consists of these 3 phases:
primary fermentation : main fermentation of the fermentable extract. The bulk of the CO2 and alkohol are created here
maturation : the yeast is allowed to clean up some of its byproducts like diacetyl (butterscotch flavor) and acetaldehyde (green apple flavor)
cold stabilization (lagering) : the low temperature causes haze forming proteins and polyphenols come out of solution and drop out of suspension. There is also a mellowing of flavors and some formation of esters happening. The latter becomes only significant after more than 12 weeks [Narziss 2005]
Depending on the fermentation schedule that is used, which are explained in the following sections, distinct boundaries may exist between these phases or they may simply flow into each other. In particular the maturation of the beer (also known as diacetyl rest) can be held at a temperature higher than primary fermentation, an extension of primary fermentation or at a temperature lower than primary fermentation.
The conventional fermentation in a German lager brewery
The majority of the information given in this section is taken from a German brewing text book "Abriss der Bierbrauerei" (Overview of beer brewing) by Ludwig Narziss, one of Germany's leading teachers and experts on brewing.
After the whirlpool the wort is cooled to close to 32 °F (0 °C) to maximize the cold break. It is then warmed up to pitching temperature which can be between 41 °F (5 °C) and 46 °F (8 °C). The majority of the cold break (~ 60%) is removed through either sedimentation tanks, flotation tanks, centrifuges or filtration. Filtration is the only means of complete cold break removal the other methods remove only about 2/3 of it. Once the cold break is removed the wort is aerated with sterile air to achieve a wort oxygen content of 8-10 ppm (mg/l). In case of cold break removal through flotation, the aeration of the wort is achieved during the flotation process.
Yeast is pitched at about 500 ml thick yeast slurry per 100 l 12 °P (1.048 SG) wort (this equals about 100ml or 3oz yeast slurry per 5 gal). Once the yeast is well distributed this equals about 15 x 106 cells per ml wort. When it comes to pitching and primary fermentation temperatures cold and warm lager fermentation exists. The cold fermentation uses a pitching temperature of 41 *F (5 *C) and a maximum fermentation temperature of 48 *F (9 *C) and the warm fermentation uses a pitching temperature of 46 *F (8 *C) and a maximum fermentation temperature of 50 - 54 *F (10 - 12 *C). This should however not be confused with warm vs. cold pitching. There is no warm pitching in commercial German lager fermentation.
Once the yeast is pitched it takes about 24 hours for the low Kraeusen to develop. High Kraeusen starts on the 3rd day, when the maximum temperature is reached and lasts until the 5th day. At this time yeast growth slows down and the yeast starts to flocculate. This is when the beer is slowly cooled at a rate of 0.5 - 0.7 °C in order to avoid shocking the yeast. At this time the primary fermentation is considered done, but the beer has only attenuated to about 40% - 60%.
A few days later, when the beer is racked to the secondary/lagering tanks it has a temperature of about 39 - 41 *F (3.5 - 5 *C). The remaining fermentable extract is 1.2 - 1.4 % by weight (about 5 - 6 gravity points). Many breweries mix beer from different batches in the lagering tanks to compensate for fluctuations in color, bitterness, attenuation and other parameters. The addition to that 20-50% beer fermented with low flocculating yeast is beneficial for achieving a higher attenuation since this yeast will work longer than better flocculating strains of yeast.
During the secondary fermentation (a.k.a lagering) the tanks are closed and the pressure build-up is controlled by a pressure sensitive bleeder valve. This system, called Spundungsapparat, ensures the proper carbonation of the beer during lagering. The German Purity Law prohibits the use of non-fermentation CO2 for beer carbonization. It is also more economical for a brewery to use the CO2 produced during fermentation.
Key for a good lagering is control of the yeast contents and temperature profile such that the fermentation slowly continues during the whole time the beer is lagered. Only this allows for the
processes to happen that are commonly referred to as maturation: reduction of diacetyl, acedealdehyde, higher alcohols etc. The lagering takes between 4 weeks and 6 months. At the end of lagering the beer has the desired attenuation, which is generally a little higher than the limit of attenuation. For light colored beers this attenuation is about 2-4% and for dark beers as much as 6% above the limit of attenuation. Export style beers can have an attenuation as close as 0.5% below the limit of attenuation. A difference between actual and limit of attenuation means that there are fermentable sugars left in the beer which are a vital part of the flavor profile, but larger percentages of these sugars result in in a less shelf stable beer.
Brewing lagers in a home brew setting
The process described above is how the best lagers are brewed. But it is very difficult to handle for the home brewer. The reason: the yeast needs to be kept working throughout the lagering phase otherwise the result is an underattenuated (=sweet) beer that is rather undrinkable and requires further attention (mostly the addition of fresh yeast and raising its temperature). Because of that all home brewing instructions that are given in the state of the art home brewing literature are based on a lager fermentation process that is referred to as accelerated fermentation and maturation in commercial brewing. Even many commercial lager breweries use this accelerated process due to time and tank space constraints for the production of their lager beers. Anheuser Bush for instance produces Budweiser with only one week of primary fermentation and 3 weeks of secondary/lagering. The key to this is their Beechwood ageing process where the porosity of the beechwood allows for a greater contact area between the yeast, which flocculated onto the beechwood strips, and the beer resulting in a shorter maturation time.
Home brewing a lager (the advanced process)
The following sections go into more detail about the home brewing process for lagers and try to explain the different approaches to the process that are done by different brewers.
Pitching rate and yeast propagation
Lager yeast pitching amount based on the recommendation of 100 ml thick yeast sediment per 100l 12 Plato wort [Narziss 2005]
Proper pitching rate is important for brewing lagers, especially if cold pitching (see next section) is chosen. As noted previously the proper amount of yeast for a 12 °P (1.048 SG) wort is about 100 ml yeast sediment for 20l (5 Gal) of wort. Jamil Zainasheff from the Brewing Network has a nicepitching rate calculator on his web page. This tool allows you to calculate the amount needed
for proper ale and lager fermentation based on the original gravity of the wort and the viability of the yeast.
The problem with pitching based on a pitching rate is always knowing how much yeast one actually has available. Without a Hemocytometer it is hard to count yeast cells. That's why determining yeast amount based on the volume of yeast sediment is more practical for the home brewer.
The pitchable liquid yeast products that are out there (White Labs vials and Wyeast Activator packs) are not a sufficient amount of yeast for lagers when pitched cold. This means you need to propagate yeast by growing them in wort. Essentially you are making a starter but you are expecting more than waking up the yeast; you are expecting yeast growth. That's why the starter needs to be fairly big and needs to be prepared a few days in advance. How big depends on your equipment and how early depends on the temperature at which you keep the starter.
Equipment: If you have a stir plate you should be fine with about 2 qts of 10 °P (1.040 SG) wort because the constant yeast suspension and aeration leads to a more efficient yeast growth. If you don't have a stir plate and need to shake the starter once in a while to keep as much of the yeast suspended as possible, you should make a 3-4 qt starter. These amounts assume that you want to grow yeast from a White Labs vial or a Wyeast activator pack. Experience will tell you what works best for you.
Temperature: As much as there is debate about warm pitching vs. cold pitching there is debate about the propagation temperature for lager yeast. Microbiologists will tell you that yeast (lager and ale) should be propagated at 75 *F (25 *C) because that is the temperature at which they will grow best. Brewers however generally agree that yeast should be propagated at or slightly above primary fermentation temperature because the yeast should not get used to living and performing at higher temperatures than the primary fermentation temperature. Some home brewers report that yeast grown at temperatures above room temperature (80+ *F) tends to loose their flocculation characteristic which makes it harder for the yeast to drop out at the end of fermentation. Growing yeast at primary fermentation temperatures also avoids shocking the yeast when pitched because its temperature is already close to pitching temperature. The yeast propagation guidelines from the yeast bank Weihenstephan also suggest that the last stages of propagation are done close to fermentation temperatures.
Reusing an existing yeast cake is the easiest way to get a proper pitch of yeast. But is it recommended that the wort is not simply racked onto the old cake but that the yeast is taken from the primary fermenter and pitched according to the necessary pitching rate for the beer to avoid over pitching. Keep in mind that yeast quickly looses its vitality after primary fermentation and that such yeast should be stored cold (close to 32 °F is best) and pitched within a week. After that the yeast performance starts to suffer significantly and it might be necessary to make another propagation step with that yeast to recharge its glycogen reserves.
Cold vs. Warm pitching
Among home brewers there is is often debate regarding the proper pitching temperature for lagers. Some say that you need to pitch warm to allow for better initial growth of the yeast and others say that you need to pitch below the primary fermentation temperature.
To understand that both sides have valid arguments one has to understand where they are coming from. Warm pitching has been introduced by home brewers and yeast manufacturers because it allows for pitching a lager with a smaller pitching rate and leads to a shorter lag time which is less concerning for the first time lager brewer. That's why warm pitching was suggested in the "Your first lager fermentation" section above. To pitch warm, chill your wort until it has a temperature of 65 - 68 °F (15 - 18 °C) aerate it well and pitch the yeast. Now wait until you see signs of fermentation (low kraeusen or bubbles in the airlock) and move it to an area where you maintain about 50 °F so that the wort can cool down while the yeast starts to take off.
Industrial lager brewing only does cold pitching because the proper pitching rates and yeast health can be ensured. Because of the initially higher fermentation temperatures, warm pitching is associated with an increased level of ester, diacetyl and fusel alcohol production which are components that, at higher levels, are not desired in a lager. Diacetyl will be reduced by the yeast during the maturation of the beer but most of the esters and higher alcohols can carry over into the finished product.
That's why cold pitching is also recommended for the home brewing of lager beer as long as a proper pitch of healthy yeast is available. If this is not the case, cold pitching can lead to a very long lag time and sluggish fermentation. In order to pitch cold, chill the wort to 43 - 48 °F (6 - 9 °C) and resuspend the yeast with some wort. Make sure to break up all clumps. If you have a stir plate, stirring the wort and yeast for a few minutes will take care of that very nicely. Now pitch it into the wort and place the fermenter in a space with a constant temperature of 46 - 50 *F (8 - 10 *C). Most brewers use a fridge or freezer chest with an external temperature control for this. Expect the fermentation to start within 16 - 36 hrs. For lager fermentation the lag time should not be too short. Because of the low beer (it is actually beer since yeast has already been pitched) temperature there is less risk of contamination since the metabolism of the bacteria and wild yeast is also reduced. The lag time also appears longer for lagers because the colder beer can absorb more CO2 before it is forced out of solution and forms the Kraeusen. If you are concerned that your yeast isn't active after pitching, measure the pH of the beer. If it dropped from the lower to mid 5's at pitching time into the upper 4's 12 hrs after pitching, the yeast is doing alright. The lowered pH already provides additional insurance against infections. Oftentimes you can also see a stratification of yeast. In this case the very top layer of the beer seems darker and less cloudy. The yeast is in suspension in the cloudy beer just below that layer. I have had low Kraeusen formation as late as 48 hrs after pitching. Though I don't like it to take that long, the beer turned out just fine.
Fast Ferment Test
When brewing lagers I strongly recommend that a Fast Ferment Test is done. Palmer [Palmer, 2006] was referring to brewing lagers as flying blind because you don't know when they are done fermenting. With a FFT you will be able to determine the FG of your lager well before the actual batch has finished fermenting. This is especially helpful for all grain brewers because the final gravity of the beer can greatly be influenced by mashing.
Primary Fermentation
Because of the slower yeast metabolism at lower fermentation temperatures, lager fermentations take longer than ale fermentations of the same wort. While ale primary fermentations are generally done after 3 - 6 days and final gravity is reached at that time, for lagers it can take 1 - 3 weeks and the final gravity may not be reached after the completed primary fermentation.
In the classical lager brewing method, as described above, the primary fermentation is over after about 7 - 10 days, but the attenuation of the beer is not yet at the attenuation level that is desired at bottling time. Good fermentation management allows the yeast to be actively fermenting even during the lagering (cold storage) phase. This need to be kept in mind when brewers talk about the length of primary fermentation for their lagers: What was the attenuation when the beer was racked to a secondary and what was the attenuation of the beer when it was done?
Proper temperature control is crucial for a clean lager fermentation. This can be done by controlling the temperature of the beer or the ambient temperature. If you control the temperature of the beer, you are able to avoid a temperature drop once the fermentation slows down. This will keep the yeast more active and the maturation will progress faster. But it is not really necessary to do so. Keeping the ambient temperature at a constant level is sufficient if this temperature is chosen such that the beer will not exceed a maximum fermentation temperature of 46 - 54 °F (8 - 12 °C) which is usually reached shortly after the high kraeusen stage. Lower temperatures will cause longer fermentation times, but are known to yield better beers due to the further suppression of fusel alcohol formation. Because if the slower yeast metabolism at these low temperatures, the fermentation temperature is not expected to rise more than 2-4 °F (1-2 °C) above the ambient temperature which means that there won't be a sigificant temperature drop once the fermentation slows down. The difference between the ambient temp and the fermentation temperature is also a nice indication for the intensity of the fermentation.
Though many lager yeast strains indicate that they ferment with lager characteristics even in the upper 50's (14 °C) I recommend that the primary fermentation temperature shouldn't exceed 54 °F (12 °C). Keeping it closer to 48 °F (9 °C) is even better.
Once you see the activity of the fermentation slowing down significantly you should take a gravity reading of the beer to check its current attenuation as well as taste. Once you have brewed a few batches of lager beer, this attenuation will also give you an idea of the yeast's performance during the primary fermentation. Keep a record of this to compare different yeast strains and other fermentation facors on the fermentation performance.
Maturation of the beer
Once the primary fermentation is considered done the final gravity has not been reached yet and fermentation byproducts like diacetyl and acedealdehyde need to be reduced by the yeast. This process is called maturation of the beer and in the conventional fermentation approach for lagers, as outlined above, it happens during the long cold storage.
But most of the books and instructions on home brewing lagers don't suggest this fermentation practice because it is very easy to fail. The problem lies in not being able to chill the fermenting beer without shocking the yeast into dormancy. The latter will result in a cloyingly sweet and under attenuated beer that may still have elevated levels of diacetyl because the yeast was not able to sufficiently reduce these "young-beer" compounds. The key to such a fermentation schedule are excellent yeast health, precise temperature control and a yeast strain that works well at very low temperatures. Many of these factors are much easier to achieve in a commercial brewery than in a home brewery.
To avoid this problem, home brewers usually use what is referred to as accelerated maturation in commercial brewing, a process which allows for the nearly complete fermentation of the beer before it is placed into cold storage. To further understand the various maturation techniques that
are out there lets have a look at the following diagrams which I found in a presentation about beer production on the web server of the Technical University of Vienna [TU Vienna]:
different lager fermentation schedules[TU Vienna]
(A) - shows the temperature (continuous line), extract (=gravity) (dash-dot-dash line) and diacetyl (dashed line) of a conventional lager fermentation. As you can see the maximum fermentation temperature is held for only 4 days before the beer is slowly cooled to lagering temperatures over the course of the next 7 to 8 days. Though the extract is close to the FG of 2 °P, the diacetyl level is still considerable at the time of racking (large arrow on top). This diacetyl is reduced over the course of lagering.
(B) - shows a lager fermentation schedule that uses higher fermenation temperatures and pressure to accelerate the primary fermentation and maturation of the beer. The controlled use of pressure (indicated as dash-dot-dot-dash line in the diagram) allows the production of esters and higher alcohols, which is more intensive at higher fermentation temperatures, to be limited [Narziss, 2005]. Though more diacetyl is produced because of the higher fermentation temperature it is also reduced quicker, allowing the beer to maturate within only 8 days. primary fermentation under pressure is for the home brewer only of academical interest (though some have done it
successfully) since it requires primary fermenters that can withstand pressure and a means of controlling that pressure without the benefit of an increase in beer quality.
(C) - This fermentation schedule comes closer to what a home brewer can do. The wort is pitched cold at 44 °F (6 °C) and rises to 48 °F (9 °C) over the next few days where it is kept until an attenuation of 40 - 50% is reached. The fermentation temperature is then raised to give the fermentation another boost which results in reaching the beers final gravity and the reduction of diacetyl below the taste threshold. This step is commonly referred to as the "diacetyl rest" though the temperature increase is not as pronounced as the one shown in diagram F. After that rest, the beer is racked from the yeast and quickly chilled to lagering temperatures. Since no further yeast activity is necessary (target attenuation has been reached and diacetyl has been reduced) there is no need in a gradual cooling of the beer to avoid shocking the yeast. This works well if you have a dedicated lagering space in which you keep multiple batches and thus need to keep its temperature constant.
D - Here is another fermentation schedule better suited for the home brewer than (A). The wort is pitched cold and primary fermentation is done at 48 °F (9 °C). Once the beer is within about 2 °P (8 gravity points) of the targeted FG (see Fast Ferment Test) the beer is racked to a secondary. Because of the colder fermentation temperature the addition of kraeusen beer can be beneficial for a better diacetyl reduction as well as better attenuation of the beer. For an explanation of that process see below. If you use a soda keg as the secondary fermentation vessel (make sure you shorten its dip tube by about one inch) the secondary fermentation can be used to carbonate the beer. Besides having a few practical reasons (keeping the keg sealed and having carbonated beer once the lagering is complete) it takes the home brewing process closer to the way lagers are brewed in Germany. Since the German Purity Law for beer doesn't allow the use of non-fermentation CO2 for carbonation, brewers need to carbonate their beer during the secondary fermentation and lagering phase. Once the beer has been racked to a carboy or keg, it is kept at primary fermentation temperature until the targeted attenuation has been reached and the diacetyl has been sufficiently reduced. After that the beer can quickly be chilled to lagering temperatures because there is no need to keep the yeast working.
Another widely used approach is to keep the beer in the primary fermenter until it has completely fermented and the diacetyl has been reduced. Wile it is not as easy to build up carbonation with this process, the larger amount of yeas available in the primary allows for a quicker maturation of the beer.
E - This is similar to D, but the pitching and primary fermentation temperatures are higher which results in faster fermentation and maturation.
F - Is a fermentation schedule that uses an explicit maturation rest at a higher temperature: also known as diacetyl rest. This schedule resembles best what authors like Noonan and Palmer suggest for a proper lager fermentation: Pitch cold, let it ferment around 50 °F (10 °C) and once the fermentation slowed down significantly and the gravity of the beer is close to its final gravity, raise the beers temperature to 65 - 68 °F (17-19 °C) for a diacetyl rest. This diacetyl rest has the effect of giving the slowing yeast a boost to finish the last sugars and reduce the diacetyl. As the previous examples for fermentation schedules showed, such a rest is not really necessary. But it can be helpful when the used yeast shows a very sluggish fermentation performance and has a hard

time reaching the targeted final gravity when kept at fermentation temperatures. After this rest is complete the beer can be crashed to lagering temperatures.
These 6 examples, which were taken from a technical brewing and not a home brewing text, illustrate the various options for lager fermentation control that the home brewer has. a very practical option is D since it requires only 2 fermentation spaces at constant temperatures: one at 46 - 50 °F (8 - 10 °C) for the primary fermentation and maturation and one at 32 - 36 °F (0 - 2 °C) for the cold conditioning/lagering. Since no ramping of temperature is necessary such a fermentation cellar set-up easily allows for the fermentation/lagering of multiple batches of lager at different stages. Since the actual temperature of an explicit maturation rest (diacetyl rest) is not so important it can easily be accomplished by moving the beer into a warmer part of the house before starting to cold condition (lager) the beer if such a rest is needed.
When to rack the beer
When using accelerated maturation, as described above, the beer can be racked before or after its maturation is completed. Though it will be taken from the majority of the yeast, plenty of yeast will remain in suspension to finish the job although it may do its job a little slower. My own experience tells me to keep the beer in the primary until it is at least within 1 Plato (4 gravity points) of the expected final extract/gravity. Racking shortly after finished primary fermentation also enables the home brewer to harvest fresher yeast that can immediately be used in another batch.
Adding Kraeusen
Kraeusen beer is fermenting wort which is still in its high kraeusen stage. When added to a beer after primary fermentation, it provides fresh healthy yeast, which may be able to do a better job in attenuating and maturating the beer. Sometimes it can also be beneficial to add different yeast with the addition of Kraeusen. A less flocculent strain, for example, can enable a better attenuation while the main flavor profile was determined by the more flocculent strain that was used during primary fermentation. For a commercial brewer the addition of Kraeusen is simple since they always have various batches of the same beer at different fermentation stages. Some of them may even use different yeast strains for the benefit mentioned above.
In order to use the kraeusen technique, the home brewer will have to make a large (1 - 2 l or quart) starter from either fresh wort or wort saved from the initial batch pitched with some of the yeast from the primary, or a new culture of yeast. Left over wort from brewday can easily be kept in soda bottles in the freezer if it is boiled and cooled before the yeast is pitched (I have to add a wort of caution here as I'm currently suspecting that oxygenation of the wort is occurring during that time and it eventually leads to an off-flavor of the beer. Until I determined the exact source of that off-flavor I'm not using wort stored in the freezer anymore. But the wort stored in the freezer is still great for propagating yeast). One way of getting some yeast out of the primary is to use a sanitized racking cane. Use your thumb to keep one end closed and push it into the carboy. Then release the thumb and beer will rush into the cane and pull a lot of yeast with it. Close the cane off again, pull it out and dump its contents in the starter vessel. This should be repeated 5-10 times to get enough yeast into the starter. Now the yeast in the starter is allowed to start fermentation at primary fermentation temperatures. When the beer is then racked to the secondary, the Kaeusen is added without adding the layer of yeast sediment that may have already settled on the bottom.
Maturation/Cold Conditioning Vessel
There are 2 kinds of vessels that are commonly used by home brewers for the maturation and cold conditioning (a.k.a. lagering) of lagers: carboys and soda kegs. Because of their oxygen permeability, buckets should not be used for long term storage of any beer (except some wild beers) and are thus not suitable for lagering. When the beer is racked after the fermentation and maturation has been completed, the carboy or keg should be purged with CO2 to minimize the amount of oxygen that is left in there once the beer has been transferred because the inactive yeast will not be able to bind this oxygen. Though more expensive, soda kegs make for the best lagering vessel for the home brewer:
Their narrower shape allows more of them to fit in a freezer chest or fridge thus allowing for a more efficient use of the cold space
The beer can be carbonated (force or natural) during the lagering phase. This may actually be necessary to keep the lid sealed
With a shortened dip tube the sediment can be left behind and the beer can easily be transferred to a serving keg by using pressure or siphon without any contact to the ambient air.
They don't break
Natural carbonation
Unlike commercial German brewers, home brewers are not required to carbonate their beers naturally. But using natural carbonation provides a few benefits that should not be overlooked:
Since the yeast is still fairly active when the beer is racked, most of the oxygen that is picked up during this process (splashing or O2 in the head space) will be taken up by the yeast before it can react with other compounds in the beer. This is beneficial because due to the shortened dip tube the lagering keg cannot be purged with CO2 as efficiently as serving kegs can. To efficiently purge a serving keg (full length dip tube) fill that keg completely with sanitizer solution and push it out with CO2 and don't open the keg after that. Because there was no air in the keg when it was closed off, all the sanitzer has been replaced with CO2. Obviously this doesn't work so well with a shortened dip tube since a considerable amount of sanitizer would remain in the keg. Recent studies have shown that even active yeast may not be active enough to consume all the oxygen from the headspace before it can contribute to oxygenation of the beer [Hermann 2005], because of that the head space should be purged as well. It is sufficient to vent and re-pressurize it for 4-5 times.
When the keg is pressurized by the CO2 from the fermenting beer, there is no connection to a CO2 tank necessary to keep the lid sealed and to take samples with a picnic tap
The beer is already carbonated when the lagering is completed.
To use natural carbonation a soda keg or other pressure resistant vessel needs to be used. Carboys are not designed to withstand pressure. Since CO2 needs to be produced for the natural carbonation a sufficient level of fermentable sugars needs to be present after the beer has been racked. This can be achieved by:
racking the beer when about 1-1.5 % fermentable extract (4 - 6 gravity points) are left. At this time there is also enough yeast in suspension to ensure a good secondary fermentation. This process is called Gruenschlauchen (green racking) in German brewing
adding fermentable sugars in the form of Speise (a.k.a gyle, which is unfermented wort), malt extract or sugar. But if the beer has already fermented too far the amount of yeast that is transferred during racking may not be sufficient for a good secondary fermentation
adding Kraeusen allows the addition of fermentable extract and fresh yeast. This is the preferred method to use when the beer is racked late and the amount of yeast in the racked beer is lower. It also allows topping off the keg with another 2 qts of beer when the primary fermentation was done in a 5 gal carboy and only 4.5 gal beer could be racked to the keg.
soda keg with pressure gauge and bleeder valve
Contrary to priming bottles, the amount of sugar needed for natural carbonation doesn't have to be calculated as precisely since the actual carbonation in the beer can easily be adjusted with Spundung. Spundung is the technical German term for controlled pressure release from a fermenter. For this a pressure gauge needs to be connected to the gas-in connect of the keg. Based on a carbonation table the current CO2 content of the beer can be determined from the current head pressure (measured by the pressure gauge) and the current temperature of the beer. If the carbonation is too high, the excess pressure can be relieved with the bleeder valve. If the bleeder valve is build as an adjustable pressure sensitive blow-off valve the process is even easier since you can set the maximum pressure based on the desired carbonation level for the given beer temperature and let the system vent fermentaion CO2 as needed.
lagering/cold conditioning
Whereas maturation and cold conditioning happen simultaneously with the classic lager fermentation schedule, it is a separate step when accelerated maturation is used. With that the beer has been almost completely fermented before the temperature is lowered to near freezing and no particular care needs to be taken to avoid shocking the yeast since no significant further yeast
activity is required. When the beer is conditioned at low temperatures various processes take place that lead to the smooth character which is expected from a lager:
Proteins and polyphenols (tannins) form agglomerations (basically bind with each other to form larger molecules) which become insoluble and precipitate out of solution. [Nguyen 2007]
Hop polyphenols will drop out leading to milder hop bitterness Yeast sediment which cleans up the beer and removes the yeasty smell and taste associated
with young beer Some of the alcohols and acids form esters in the beer which leads to new flavor compounds.
This process is very slow and becomes only significant after more than 12 weeks [Narziss 2005].
Some yeast activity may be present which leads to further clean-up and extract reduction of the beer. I oftentimes see another extract drop of 0.1 - 0.2 Plato over the course of a few weeks.
Depending on the gravity and style of beer, a cold conditioning time of 4 weeks up to 6 months is required. Towards the end of that time, fining agents like gelatin or isinglass might be used to speed up the clarification process, but are generally not necessary. Once the beer has finished cold conditioning, it should be racked to a serving keg to get it off the old yeast and avoid autolysis of this yeast. At this point it is also safe to let the beer warm up again
racking to a serving keg
If a soda keg was used for cold conditioning the transfer can be done in a closed system which dramatically reduces the beers exposure to oxygen, which at this stage is the beer's biggest enemy due to the unavailability of active yeast that could absorb it. When attempting to rack in a closed system, the shortened dip tube is important. It lets you move the beer and leave the majority of the sediment behind. The trick is to move the cold conditioning keg as little as possible before the beer is racked because any movement can stir up sediment. If you are using a freezer chest to cold condition the beer you can leave the keg in the freezer chest while using CO2 to push it into the serving keg. If the beer is already carbonated you need to mount a pressure gauge and valve on the gas-in port of the destination keg to maintain pressure in that keg. Otherwise the beer will foam up. You can then open the valve a little to let some of the CO2 escape wile the beer is flowing into that keg. Keep an eye on the kegs when the destination keg is almost full. Once CO2 is blown though the jumper hose, the beer in the destination keg can foam up and enter the pressure gauge/valve.
Another efficient and more elegant way of racking beer from one keg to another is to siphon the beer from one keg to another. For that place the source keg above the destination keg. Connect the gas-in of the destination keg and the gas-in of the source keg to the same CO2 regulator. This results in the same pressure in the destination and source keg. Now take a long jumper hose and first connect it to the bev-out of the destination keg and then to the bev-out of the source keg. Always make sure to connect to the bev-out of the source keg last. If there is pressure in the jumper hose, you could bubble CO2 through the dip tube on the source keg which will stir up sediment.
Nothing is flowing yet. To get the siphon started disconnect the CO2 on the destination keg and briefly pull the pressure relieve valve on that keg. Now that the pressure is slightly lower in the
destination keg the beer will start flowing and the siphon is started. Reconnect the gas-in of the destination keg to the CO2 system so the CO2 from that keg can flow into the source keg. This process will take a while, but you don't need to monitor it.
If you plan to filter your beer, the transfer from the cold conditioning keg to the serving keg is the time to do this.
Instead of racking the beer to a serving keg it can also be filled into bottles at this stage. The cold temperature of the beer allows it to retain its carbonation much easier. So well in fact that it can be filled into bottled chilled to beer temperature without the use of a counter pressure bottle filler. A piece of racking cane stuck into the tip of a picnic tap helps with filling the bottles from the bottom up. Cap on foam to minimize trapping air in the bottle. I do that for all lagers that I plan to age in bottles for an extended time after they have been cold conditioned.
lagers and bottle conditioning
When bottle conditioning lager beer, there are 2 options for the brewer:
bottle the beer after the primary fermentation and maturation is complete and cold condition the beer in the bottle
bottle the beer after cold conditioning is complete
Both have their pros and cons
bottle conditioning before cold conditioning
When you bottle condition before cold conditioning, you wait until the beer has completed fermentation and prime the beer with corn sugar or DME. Since the yeast is still fairly healthy and active there shouldn't be any problems in getting the beer carbonated. Let the beer carbonate at room temperature for a week. Give it a taste to ensure complete carbonation before moving it to cold storage 32 - 42 *F (0 - 5 *C) to cold condition it.
Because the beer is bottled before cold conditioning, all the yeast and other sediment that settles out during that phase will remain in the bottle.
bottle conditioning after cold conditioning
If you plan to bottle after cold conditioning, as suggested in Noonan's Book "New Brewing Lager Beer", you lager the beer in a carboy first (since you are bottling I’m assuming that you don’t have kegs for cold conditioning). This may take 4 weeks to a few months depending on the beer. Because the yeast has been inactive for such a long time and only little yeast is in suspension anyway, it is recommended to add fresh yeast at bottling time to ensure consistent carbonation in a reasonable time frame. The fresh yeast can come from either dry yeast (1/4 pack should be enough), yeast sediment from the primary fermenter of another batch or Kraeusen. The type of yeast doesn't matter much since the flavor has already been defined during the fermentation and cold conditioning process. Any clean well flocculating ale or lager yeast will do.
When racking from the cold conditioning vessel to the bottling bucket make sure that as little sediment as possible is transferred since the advantage of this method is to leave all this behind and have the beer benefit from bulk-aging.
LAGER METHOD
NOTE: I don’t take credit for developing this method, rather I was inspired by smaller craft breweries making tasty lager beers who I assumed are forced to go grain to glass quickly just to maintain their business. I simply wondered, “if they can do it, why can’t we?” The method I discuss here includes ideas similar to those proposed by Ludwig Narziss andGreg Noonan long before I came along, a couple dudes often credited for inspiring the public to brew and drink more delicious lager beer!
I’m a lover of all things lager- Márzen, Schwarzbier, Helles, and Pilsner are some of favorite styles. As a homebrewer, I initially avoided
making lager due to my inability to precisely control fermentation temperature. Once I finally got my chamber setup and made a couple
lagers using more traditional fermentation schedules, I found myself avoiding them due to how long they took to finish. I also began
wondering how I might be able to hasten the process. I had learned that with precise control of my temperature, I could turn most ales
around in 2 weeks and wondered why I couldn’t use this control to do the same with lager beers. I made a couple batches that came out
surprisingly well, played with the method for a few months, and was gradually convincing myself the days of 2 month lagers were behind
me. After numerous successful batches, I happen to catch an episode of The Session on The Brewing Network where Mike “Tasty” McDole
mentioned how he takes lager grain-to-glass in 2 weeks using precise control of fermentation temperature. This was validating,
particularly since I was aiming for a much less anxiety provoking 3-4 week turnaround.
German brewers began making lager beers long before the advent of controllable refrigeration, fermenting and conditioning their beer in
caves that maintained a fairly consistent 45°-55°F. They also brewed with the seasons, hence beers like Märzen, which was only brewed
between September 29 and April 23 with consumption usually commencing in late Summer through October. The point I’m trying to
make here is that the long-term fermentation and aging appears to be mostly a function of the inability to control environmental
temperature.
A few things we’ve learned over the last couple centuries of brewing is that yeast generally works slower at cooler temperatures and
faster at warmer temperatures, most esters and phenolics are produced during the growth phase of fermentation, which in my
experience lasts about 4-5 days for cool fermented lagers, and beer lagers faster at colder temperatures. I know, there’s supposedly
something else that magically happens to a beer over time besides just clarity, but let’s be real here, clarity is what most of us are
waiting for as the indication that a beer is ready to drink. And if I’m being totally honest, I sort of enjoy the very minimal perceptible
changes that occur in a beer over the 2-3 weeks I have it on tap.
| THE METHOD |
Step 1: Primary Fermentation
Chill wort to pitching temp of 48°-53°F (9°-12°C), pitch adequately sized starter (decanted), set regulator to initial fermentation temp
between 50°-55°F (10°-13°C), and leave the beer to fermentuntil it is at least 50% attenuated. I’ve found the time this takes is
dependent on 2 primary factors:
1. Original Gravity: a 1.080 Doppelbock is going to take longer to reach 50% attenuation than a 1.048 Helles.
2. Yeast Type: in my experience, rehydrated dry lager yeasts take 12-36 hours longer to show signs of active fermentation compared
to liquid yeasts built up in starters or even slurry harvested from a prior batch.
I originally advised leaving the fermenting beer at primary temp for 5 days assuming folks were checking SG prior to making temp
changes. This was a mistake on my part. While it is possible even high OG beers will reach 50% attenuation in this amount of time, I’ve
heard from a couple folks who experience differently. As such, here are my new better-safe-than-sorry recommendations:
OG OF WORT YEAST TYPE APPROXIMATE PRIMARY TIME
≤ 1.060 OG Liquid 4-7 days
OG OF WORT YEAST TYPE APPROXIMATE PRIMARY TIME
≤ 1.060 OG Dry 5-8 days
≥ 1.061 Liquid 6-10 days
≥ 1.061 Dry 7-14 days
Another factor worth considering is your preferred primary fermentation temperature, as yeast is going to work a bit faster at 54°F (12°C)
compared to 48°F/ (9°C). The original 5 day recommendation will likely hold true for most folks, as it has for me, I just want to emphasize
the importance of taking SG measurements prior to making temp changes.
Step 2: The Ramp Up
Once 50% attenuation is reached, remove the probe from the side of the fermentor so it measures ambient temp in the chamber and
start bumping the regulator up 5°F every 12 hours until it reaches 65°-68°F (18°-20°C). Allow the beer to remain at this temp
until fermentation is complete and the yeast have cleaned-up after themselves, which can take anywhere from 4 to 10 days.
Alternate Option
Keep the temp probe attached to the fermentor and forgo the incremental temperature increases but immediately setting your regulator
to 65°-68°F (18°-20°C). While I still prefer the more gentle approach to temp increases, I’ve heard from many people have had great
success using this slightly less time-consuming approach.
Step 3: The Ramp Down
When FG is stable and no diacetyl or acetaldehyde is detected in the beer, begin ramping the temp down in 5°-8°F increments every 12
hours or so until it reaches 30°-32°F (-1°-0°C). Allow the beer to remain at this temp for 3-5 days, during which it will begin to drop clear.
Alternate Option 1
Setting the regulator to 30°-32°F (-1°-0°C) without gradually stepping the temp down will shave 2-3 days off of the entire process. Many
brewers have done this with positive results, myself included, though I still tend to prefer the original method if only to reduce the
amount of airlock fluid that gets sucked into the beer as it crashes.
Alternate Option 2
If super bright beer is something you pine for, as I do, and you’re okay with putting animal products in your beer, as I am,
consider adding gelatin once the temp of the beer has reached 50°F (10°C). In my experience, this has significantly decreased the
amount of time required for the beer to clear to commercial levels, I usually end up kegging 24-48 hours after adding the gelatin.
Step 4: Packaging & Storage
Once the beer is clear, it’s ready to be packaged, the process of which is obviously different depending on whether one uses kegs or
bottles. Yes, bottle conditioning is absolutely possible with this method.
For Those Who Keg…
Simply transfer the cold and clear beer to your keg, place it in your keezer on gas, and leave it for 3+ days before enjoying! Using
my typical kegging/carbonation method in conjunction with gelatin, I’ve found the beer is usually ready for consumption after about 5
days of “lagering” in my keezer, while others swear their beers peak after 2 weeks or so of cold storage. This is likely an issue of
subjective preference mixed with a sprinkle of confirmation bias, but regardless, do what you works best for you!
For Those Who Bottle…
Use a trusted priming sugar calculator to determine the amount of your preferred fermentable to use; adding extra yeast is unnecessary,
even if you fined with gelatin. Place the primed bottles in an environment that maintains a fairly consistent 68°-72°F (20°-23°C) and
allow them to carbonate for 2-3 weeks. Once carbonated, I recommend placing multiple bottles in the fridge to “bottle lager” for 5+ days
before enjoying, as this will encourage the precipitation of most particulate matter, providing you a clear and delicious lager beer.
| EVIDENCE |
Dortmunder Export (1.058 OG) at 20 days old
German Pils (1.049 OG) at 24 days old

To the skeptics out there or those who feel anxious questioning convention, I understand completely, believe me. I know it’s not easy
trusting some dude you’ve never met, but I mean it when I say the many lager beers I’ve made using this method have tasted exactly
how they were brewed to taste, no different than those I made in the past using the traditional drawn-out method. If you’ve been holding
off from making lager beer because of the time commitment, consider giving this method a shot, I have a feeling you’ll be brewing many
more lagers in the future if you do.
Brewing the Perfect Lager at HomeLagers present a special challenge to the homebrewer. Despite the dominance of lagers in the commercial markets both
in America and Continental Europe, brewing a lager at home is more difficult than ales. This week we take a close look
at what’s needed to brew a lager at home and discuss some lager recipes.
Lagers: “Some” Refrigeration Required
First time brewers often rush to buy their first lager kit, planning to brew the beers they have always tasted at home.
Alas, most of these projects end in disaster since true lagers can’t be fermented properly without refrigeration in the
mid to low 50 degree F (around 11-12 C) range. Fermenting at room temperature results in an excess of esters (fruity or
spicy), fusel alcohols, diacytl (butterscotch), and sulfur flavors. Also since lagers are very light in body and flavor, any
flaws are easily noticed.
So you need to ferment cold – at the recommended temperature range for your yeast either using a dedicated beer
refrigerator, or cold ice bath (swapping ice out periodically to maintain temperature). Note that most household
refrigerators do not adjust to a high enough temperature for lagering, so a separate plugin temperature controller
(which plugs into the wall) from a home brew supply store may be required.
Other Considerations when Brewing a Lager
Brewing a lager is not dramatically different than ales, other than the obvious difference in fermentation temperature,
but some challenges do come into play:
Mashing Profiles – Many, though not all, lagers are brewed with a relatively light flavor profile and have a clean
crisp finish. To achieve this finish, you want to mash at a lower temperature – around 148 F (64.4 C). Some people
even use a special two step mash profile for lagers – one step at the low 140’s (60-62C) and a second step in the mid
to high 150’s (69 C). This two step lager mash activates both alpha and beta enzymes maximizing the conversion of
sugars into maltose – resulting in a light body, more complete fermentation.
A Full Length Boil – Dimethyl Sulfide and other volatiles are a problem with many lagers (the creamed corn
flavor), in part because lagers are light and it is easier to taste minor flaws. Use a full length boil of at least 70-90
minutes with an open top (no covered pots!) to reduce these volatiles.
Oxygen – Aeration of the wort is also important, as lager yeast likes plenty of oxygen. You only aerate BEFORE
pitching the yeast, and there areseveral methods you can use as described here (shaking, aerating and oxygen).
Yeast Pitching Rates – Lagers require more yeast to get a strong, solid fermentation. In fact, the
recommended yeast pitch rate for a lager is about twice as much as an ale. Ideally ales should have a 0.75 million
cells per milliliter-degree plato pitch rate, and lagers a 1.5 million/ml-P. So a starter is almost always required if
working with liquid yeast. For dry lager yeast, pitching twice as much yeast is recommended.
Fermenation Profiles – Lager fermentation requires more time to get started – it has a longer lag time. Some
people try starting fermentation at a slightly higher temperature to kickstart the yeast, but I don’t recommend this.
Ferment at the recommended temperature range for the yeast strain you are working on (usually around the mid
50’s F but yeasts do vary)
Diacytl Rests – Lager yeast produce more diacytl, which is a buttery compound that can be an off flavor. Yeast can
reabsorb the diacytl but it requires a diacytl rest – which is done by raising the temperature of your lager a few
degrees at the end of fermentation for about a day. It is covered in quite a bit of detail in this podcast with Dr
Charlie Bamforth.
Patience when Lagering – Lagers require an extended period after fermentation is complete at cold temperature –
called “lagering”. DMS (cooked corn smell) , hydrogen sulfide (rotten egg smell) and other off aromas will be
present in your beer after it has fermented. Cold lagering for a period of 4-12 weeks is recommended (and often
required) for cleaning up your lagers.
Pitch New Yeast for Bottling – Since these beers are often lagered at cold temperatures for an extended period, if
you are going to bottle your beer you should probably add a small amount of additional yeast with your priming
sugar. This will ensure that you get a clean carbonation you expect instead of a flat lager. Obviously if you carbonate
a keg with CO2 this is not needed.
Dimethyl Sulfides (DMS) in Home Brewed BeerDimethyl Sulfide (DMS) is a sulfur compound produced during fermentation of beer that has the aroma of cooked or
creamed corn. As part of my ongoing series on flavors in beer (including the earlier articles Esters in Home Brewed
Beer and Judging Beer), we’re going to go into detail this week on DMS.
DMS in Home Brewed BeerDMS (Dimethyl Sulfide) is a byproduct of mashing and fermentation, so it is present to some degree in all beers. It has
the aroma of cooked or creamed corn. Because people can perceive DMS even at very low flavor thresholds (of 10-150
parts per billion) it can have a significant impact on the flavor of finished beer.
DMS is primarily found in lagers for a variety of reasons we will discuss shortly. DMS is actually desirable at low levels
in many lagers, but excessive levels of DMS will create a strong cooked corn aroma and flavor. German lagers contain
the highest DMS concentrations (50-175 parts per billion). American lagers generally contain less than 100 ppb, and
British ales contain the lowest concentrations at 10-20 ppb. (Ref: Wikipedia).
Where DMS comes from:
All malt has in it a chemical called S-Methyl Methionine (SMM) which is responsible for DMS. SMM is an amino acid
formed during germination and kilning of barley as part of the malting process. The maltster can reduce SMM by
slightly under-modifying the malt, and adjusting the kilning temperatures, but this is largely outside the control of
homebrewers. However, two row pale malts have significantly lower SMM levels than six row pale malts, so you can
reduce your DMS levels by choosing a two row pale malt base. Also very pale lager malts (such as pilsner malt) tend to
have slightly higher SMM levels due to the very low temperatures used in kilning.
Heating the SMM present in pale malt will always produce some DMS. During the mashing process (and even the boil),
some SMM is broken down into both DMS and a variant of DMS called Dimethyl Sulfoxide (DMSO) which is basically
DMS with an oxygen atom attached. So after the mashing process we have wort that contains both DMS and DMSO (as
well as some residual SMM).
The good news is that DMS itself is very volatile and a lot of it will boil off rapidly when we boil or wort during the
brewing process. However DMSO is more stable, and some of it can be converted to DMS during fermenation. Vigorous
ale fermentations generally produce less DMS.
Finally, infection can produce a DMS like flavor and aroma, though it will generally be an aroma closer to cabbage than
corn. If you have a strong cabbage aroma or flavor you may have an infection in your finished beer.
DMS in the Beer Brewing Process
DMS is created whenever wort is heated, so some DMS is present in any beer. DMS is created in the mash, however
most DMS is evaporated during the boil, so the boil is the primary place to focus if you have a DMS problem.
The half-life for DMS is 40 minutes, so half of the DMS will be boiled off in a 40 minute vigorous boil. So if we do the
math, a 60 minute boil gets rid of 64.7% of the DMS and a 90 minute boil rids us of 79% of the DMS. That is why most
experienced brewers recommend a 90 minute or longer vigorous boil.
Since DMS needs to evaporate off during the boil, it is important not to cover your pot. Covering a brew kettle during
the boil will prevent the DMS from evaporating and create a beer with much higher levels of DMS.
Rapidly cooling your wort after boiling is also important. The SMM to DMS conversion continues at temperatures well
below boiling, so DMS is produced even while the wort is cooling after the boil. However, unlike the mash, DMS
produced while cooling cannot be boiled off. This conversion continues even if the hot wort is vented. For every hour you
have hot wort sitting around, you will produce approximately a 30% increase in DMS.
During fermentation, CO2 bubbles actually help remove from DMS from the beer. More vigorous ale yeasts tend to
produce lower DMS levels. Also different strains of yeast do tend to produce DMS during fermentation primarily by
converting DMSO (which does not boil off) to DMS. Lager yeasts and yeasts fermented at lower temperatures tend to
have higher DMS production. Certain wild yeasts and bacteria can create high levels of DMS as well.
DMS aromas (including some sulfur or rotten-egg aroma) during fermentation (particularly lagers) are not unusual, so
you don’t need to toss your beer out just because you have a DMS aroma during fermentation. Some of this will fade
naturally during the lagering process.
Finally, beers with robust flavor profiles (dark beers, strong ales, etc) tend to mask the DMS cooked corn flavor with
other flavors such as roast, chocolate or caramel malts. Because of this, high DMS levels are most perceivable in lightly
flavored beers such as low-adjunct pilsners, many German lagers, continental lagers and extremely light ales. DMS is
rarely a problem in beers that are Amber colored or darker, and also rarely an issue with most robust beer styles.
Controlling DMS – Summary
High DMS levels are most often perceived as a problem in light lagers such as Pilsner and many German lagers
Choose a 2 row pale malt (over 6 row) as a base malt to minimize SMM (a DMS precursor)
Very pale base malts (such as pilsner malt) tend to have higher SMM levels which drives higher DMS production
Avoid using corn as an adjunct with these beers, as it can enhance the creamed corn perception
Boil your wort for 90 minutes or longer with a vigorous rolling boil
Don’t cover your boil pot – leave it open so the DMS can evaporate during the boil
Minimize hot wort standing time by rapidly cooling your wort after the boil
Select a yeast and correct fermentation temperature to minimize DMS production
For many lagers, DMS aroma is normal during fermentation, but it should fade with time as you lager and age the
beer
Beer Yeast, Fermentation, and Home BrewingI started brewing in the 1980’s, which was the modern equivalent of the wild west days of home brewing. We simply did
not have either the technical knowledge or access to the high quality ingredients that brewers have today.
Yeast, in particular, was one ingredient that improved dramatically in the last 20 years. When I started, the only yeast
available was dry packet “bread-style” yeast. It came in two flavors – ale and lager. The quality of these two yeast strains
was questionable, resulting in significant variation in flavor and character.
In the early 1990’s Wyeast and White Labs introduced high quality liquid yeasts to the US homebrewing market.
Companies like SafeAle also brought high quality dry yeasts into the picture. This revolutionized homebrewing in a way
that is difficult to explain today.
Brewing Yeast
Brewing yeast is a single cell microorganism (technically a fungi), and both ale and lager yeasts are members of the
family Saccharymyces Cerevisiae. Lager yeast was earlier classified as S. Uvarum, but a recent reclassification put it in
the S. Cerevisiae family. Ales are traditionally called “top fermenting” for the yeast layer that forms at the top of the
fermenter, while lagers are called “bottom fermenting”
Ale yeasts ferment in the range 10-25C and produce beers high in esters and often lower in attenuation, both distinctive
characteristic of ales. Ale yeast strains are often mixed together to aid in attenuation and flocculation. Lagers ferment in
the range from 7-15C and produce a cleaner beer with lower esters.
The Fermentation Life Cycle
Yeast goes through four overlapping phases when fermenting beer into wort. After pitching, yeast starts in the “Lag
Phase”. During the lag phase, the yeast strives to reproduce as fast as possible. The key ingredient during this phase is
Glycogen, an sugar stored internally in the yeast, which is broken into glucose to fuel yeast reproduction. If an
insufficient amount of yeast is pitched (or the yeast itself is low in glycogen), you will get an excess of dicytl (buttery or
butterscotch flavor) in your finished beer. A properly sized Yeast Starter is critical.
The lag phase is followed quickly by the respiration (also called the growth) phase. In this phase the cells grow
logarithmically (usually one to three doublings) by cellular division. In this phase the critical ingredients are oxygen and
a variety of yeast nutrients. The cells will continue to grow until the oxygen or nutrients have been depleted.
Once all of the oxygen has been scrubbed from the wort, the fermentation phase begins. Yeast cells convert simple
sugars into carbon dioxide, alcohol and beer flavors. As the sugars are consumed, the gravity of the beer will rapidly
drop. Fermentation normally takes 3-7 days.
Sedimentation is the final phase of fermentation. Yeast will begin to form into clumps and settle to the bottom of the
fermenter in a process called flocculation. In this phase, yeast will also store the glycogen needed for future
reproduction as it prepares to enter a dormant state. Some yeasts will settle (flocculate) much more rapidly than others,
so settling can take from days to weeks depending on the yeast variety.
Understanding Yeast Characteristics
Selecting a yeast appropriate for a given beer involves some knowledge of key yeast characteristics:
Attenuation: Refers to the percentage of sugars converted to alcohol and CO2. A high attenuation yeast will result
in a clean, dry finish. Low attenuation yeasts typically leave ester, malt and other flavors behind leaving a more full
bodied complex beer flavor.
Flocculation: Flocculation refers to the ability of yeast to form clumps (flocs) at the end of fermentation and rapidly
sediment (or be skimmed) from the finished beer. Low flocculation yeast is often called “powdery” yeast. High
flocculation yeasts tend to fall out of the beer before completing fermentation, leaving a more complex, higher
gravity beer. Low flocculation yeasts such as lagers will completely ferment, leaving a cleaner finish but it can then
be difficult to separate the yeast from the beer.
Temperature Range: Different yeast strains have differing temperature tolerances. Ales ferment at a higher
temperature. Higher temperature fermentation is associated with higher ester production, and lower temperature
with clean dry flavors.
Alcohol Tolerance : Many yeasts are sensitive to alcohol content, and will have trouble fermenting very high
original gravity wort. Champagne, Wine, or other alcohol tolerant yeasts are frequently used either for primary
fermentation or as a second yeast addition to assure full fermentation of very high gravity beers such as barley wine.
Beer Flavor: Individual yeast strains can add widely varying flavor profiles to your beer. A good example is Hefe-
Weizen, where a significant majority of the clove and banana beer flavor comes directly from the yeast. Matching
the yeast strain to the style of beer is a the best way to provide proper flavoring.
An Examples of Yeast in Beer Design
In most cases, brewers tend to select the Wyeast or White Labs yeast that matches their beer style. Lets look at a few
examples where varying from the script might pay off: One example is brewing an Irish Stout. Irish stout has a very dry
roasted character derived from roasted barley.
A traditional yeast choice might be an Irish Ale yeast such as White labs WLP004. However, looking at WLP004, it has a
modest attenuation of 71.5%, which will produce a more fruity finish. One could experiment by picking WLP007, “Dry
English Ale” yeast. This yeast has a much higher attenuation (75%) and will leave a drier finish on the beer, while still
retaining some of the English esters needed for the stout.
At the other extreme, I know several brewers that use a single strain, White Labs California Ale WLP001 for just about
every beer they brew. Their justification is that this yeast is relatively flavor neutral for an ale yeast, has a very high
attenuation and leaves a clean finish on any beer. It ferments rapidly and flocculates quickly from the beer minimizing
storage time needed. Personally I don’t subscribe to this “one size fits all” approach, but a number of brewers have
demonstrated great success with it.
The above are just examples, but the key to great beer design is to understand the ingredients you are working with.
Knowledge of the characteristics of yeast, and its significant effect on your beer will help you to become a better brewer.
Esters in Beer BrewingEsters in home brew beer can be both a blessing and a curse. Ester (a fruity flavor) can be highly desirable in many
English ales or Bavarian Weizen, but can also be a curse in other styles like lager. This week we take a look at esters in
beer and what you can do about it.

What are Esters?
Esters are a fruity flavor produced during fermentation that can vary in taste and aroma between pears, roses, bananas
or other light fruits. In very high concentration it can create a solvent-like flavor.
Esters are formed in beer by the “esterification” of ethanol which is the primary alcohol in beer. Ethanol combines with
fatty acids and a molecule called acetyl coenzyme (ACOA) forming ethyl acetate. Ethyl acetate’s flavor varies from a
light pear-like character to solvent-like in high concentrations.
Other alcohols present in the beer may also combine to produce additional esters. For example isoamyl alcohol will
combine and produce isoamyl acetate which tastes like bananas in low concentration. This ester is the distinct banana
flavor that is the defining characteristic of Bavarian Hefeweizen.
Are Esters Bad?
Different styles require different levels of esters. For example, esters are highly undesirable for most lagers, so you
would want to minimized ester production when brewing a lager. Esters are a feature of many English ales and as noted
above in Weizen/Hefeweizen.
Choosing a Yeast Strain
The production of esters is primarily driven by the yeast used. Yeasts have an enzyme called acetate transferase (AAT)
which drives the production of esters. A low AAT yeast will produce far fewer esters, so choosing a yeast that is
appropriate to the style you are brewing is the #1 way to control ester production and make sure it is appropriate for
your beer.
Fermentation Temperature
A second way to control ester production is by controlling the fermentation temperature. Higher temperatures in
fermentation result in rapid yeast growth, more AAT and more ester production. This is why, in general, ale yeast
produces more ester than lager yeast. So if you are brewing an estery English ale you might want to target the high end
of the yeast’s fermentation temperature.
If you are brewing a style such as lager where you want few esters, be sure to ferment at appropriate lager
temperatures. One common beginner mistake is to attempt fermentation of a lager at room temperature which will
result in a fruity lager – not what you were shooting for at all.
Yeast Pitch Rate and Esters
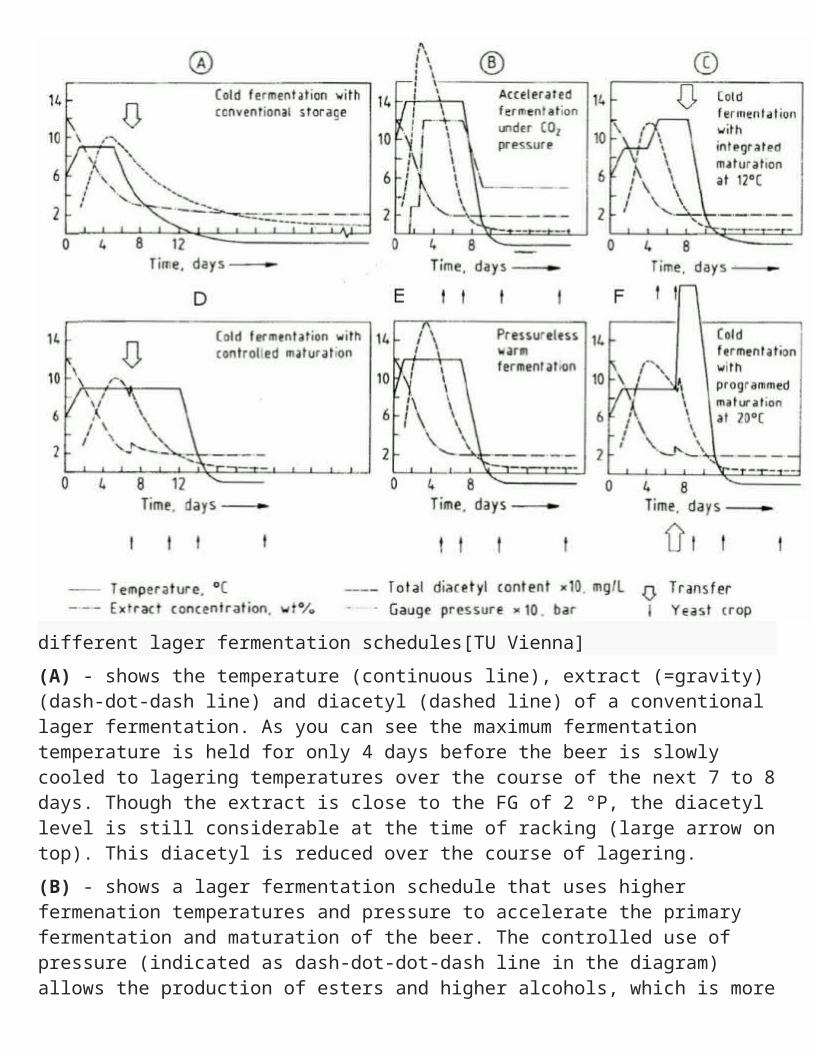
A third way to control ester production is by varying your pitch rate. If you under-pitch yeast (i.e. don’t pitch enough
yeast for your volume of wort) the yeast will reproduce rapidly during the short lag phase. Rapidly reproducing yeast
enhances AAT production and subsequently produces more esters in the finished beer. This is another common problem
for beginners who often brew with no starter and get fruity esters in their lagers. Pitching enough yeast (or even
overpitching) will result in less ester production.
Oxygenation of Wort and Esters
Finally you can reduce esters by properly oxiginating your wort. During the growth phase, the yeast will actually
consume ACOA (above) which is a precursor of ester production to reproduce. However this only continues until the
yeast run out of oxygen. So if you properly oxygenate your wort it will reduce overall ester production. Conversely if you
under-oxygenate your wort it will actually enhance ester production in the finished beer.
Diacetyl in Home Brewed Beer – The Butterscotch FlavorDiacetyl is the butterscotch or buttery flavor that can ruin your home brewed beer. This week, as part of my ongoing
series on beer flavors and off flavors, we’ll discuss diacetyl in your beer and how you can control it. Earlier articles in the
series include DMS in home brewed beer, Esters in Home Brewed Beer and Judging Beer.
Diacetyl tastes like butter, Pentainedione tastes like honey
If you want to learn more about diacetyl I also recommend listening to my podcast/video interview with Charlie
Bamforth – he does a great job of explaining it.
What is Diacetyl?
Diacetyl is a natural by-product of fermentation. It is one of two major Vicinal Diketones (VDKs) produced during
fermentation, the other being Pentainedione. Diacetyl tastes like butter or butterscotch and in fact is used in the
production of artificial butter flavors. Pentainedione provides a honey like flavor. Both can be detremental to the finished
beer, and are considered off flavors if too much is present.
Diacetyl is most noticible in very light flavored beers, such as light lager, due to its relatively low flavor threshold. It is
far less of an issue in full bodied english ales or dark beers because ales are fermented at higher temperature which
helps break down VDKs after fermentation. Also other flavors in ales often mask the flavor of remaining diacetyl.
Diacetyl can also be produced by bacterial infection, and in fact bacteria produces more diacetyl than pentainedione. It
is most often produced by contaminated keg lines (particularly in bars), but can occur even in home brewed beers that
are infected.
Controlling Diacetyl
Diacetyl is a natural byproduct of fermentation, so it cannot be completely eliminated. However healthy yeast can also
“mop up” or break down both diacetyl and pentainedione into other substances that have a much higher flavor
threshold. To do this, the yeast needs to remain in contact with the beer, and also it needs to remain healthy.
This brings us to the first important method for controlling diacetyl, which is simply to pitch a proper quantity of healthy
yeast with a good yeast starter at the start of the fermentation. Properly pitching the right amount of yeast will result in
a strong healthy yeast concentration after fermentation and allow the yeast to reabsorb the VDKs (diacetyl and
pentainedione). Underpitching can lead to diacetyl.
A second method, called “krausening”, involves pitching fresh active yeast after the beer has completed fermentation.
This active yeast will break down the diacetyl and pentainedione and significantly reduce the levels of both in the
finished beer.
A third method, often used with lagers, is to add a diacetyl rest. A diacetyl rest is allowing the fermentation temperature
to rise slightly to 57F or 14 C for lagers (roughly a few degrees higher than your fermentation temperature) near the
end of the fermentation to help activate the yeast so it can absorb some of the VDKs. Diacetyl rests are rarely needed
with ales, as ales are already fermented at a high temperature that promotes VDK reduction.
Diacetyl can also come from bacterial contamination, so it is important to sanitize everything that might touch your
beer. Dirty keg lines also contain bacteria that produces diacetyl, so keeping your keg lines clean is very important.
Finally, some commercial brewers use a product called Maturex that is a chemical that helps reduce VDKs. In some
cases, microbrewers and home brewers can obtain this as well, but it must be used with care in the appropriate
quantity.
Summary
Diacetyl (butterscotch flavor) and pentainedione (honey flavor) are a natural biproduct of fermentation, but both can
be broken down by healthy yeast when fermentation completes.
The primary method for controlling diacetyl (and pentainedione) is to pitch the appropriate quantity of healthy yeast
from a yeast starter and ensure that the yeast remains healthy.
A diacetyl rest for lagers (raising it a few degrees during fermentation) can also help reduce diacetyl in the finished
beer by helping the yeast break down VDKs.
For some really light lagers where eliminating all of the diacetyl is important, a method called krausening can also
be used. In krausening, fresh active yeast is added after fermentation has completed to break down remaining
VDKs. This method is relatively quick – taking less than a day in most cases.
If you are kegging, be sure to keep your keg lines and taps clean as bacteria often creates diacetyl within the dirty
lines and taps.
Poor sanitation can lead to bacterial infection which will also produce large quantities of diacetyl. Keep your
equipment clean.
Finally, some commercial brewers use chemical additives (Maturex) to chemically break down diacetyl and
pentainedione. This may be available for microbreweries and home brewers if you can find a good source of it.
Lager Brewing
Brewing a true lager takes a little bit more work and specialized equipment than brewing an ale. The most important factors in brewing a
good lager outside of recipe formulation are: yeast strain selection, pitch rate, and fermentation temperature.
Yeast Strain Selection:
Once the recipe has been chosen, the next task that will have the biggest impact on the final beer is yeast strain choice. Home brewers
have a wide selection of lager strains to choose from. The strain should be chosen based on the style of beer, the fermentation
temperature, original gravity, and time available for conditioning or lagering.
Pitch Rate:
Lagers typically have a reduced ester profile and are characterized as clean with discernable malt character. It is very important to
recognize that pitch rate is directly related to ester production. Increasing the quantity of yeast pitched is the most effective method of
reducing the ester profile in the finished beer. A minimum of 12 million cells per milliliter is recommended to keep esters at a minimum.
One Wyeast Activator pack will deliver about 6 million cells per milliliter to 5 gallons of wort. In order to increase this rate to 12 million
cells per milliliter it is necessary to either pitch two Activators or to make a 0.5 gallon (2 liter) starter with an Activator. If a starter is
made using a Propagator (50ml package) then the starter needs to be 1 gallon (3.78 liters) to achieve 12 million cells per ml.
Fermentation Temperature:
One of the most common questions we field is, “should I start my lager warm or cold?” The answer depends on how much time you have
for your primary fermentation and how clean you want your final beer. The best results will be achieved by pitching at least 12 million
cells per milliliter into cold and well aerated wort (48 to 58°F, 9 to 15°C).
If a faster primary fermentation is desired or you are pitching less yeast, then it is best to start a little bit warmer and then cool to the
desired fermentation temperature once signs of fermentation are evident.
Secondary Fermentation:
A secondary fermentation at a temperature below the primary fermentation allows for a slow reduction of any remaining fermentable
sugars. This secondary fermentation can take from one to three weeks at temperatures starting between 39-41°F (4-5°C) and slowly
falling to as low as 33°F (1°C). The length of the secondary depends on the amount of fermentable sugars remaining.
Conditioning or Lagering:
Lagering is a time when harsh flavors from fermentation are mellowed. Yeast re-absorb some of the ester compounds from fermentation
as well as some of the sulfur compounds. Malt tannins coagulate with haze-forming proteins and precipitate out along with some
sulfurous compounds.
Temperatures should remain very stable during lagering, generally in the range of 33-34°F (1-2°C). Contact with oxygen at this point is
very detrimental to beer flavor and should be avoided at all costs. Lagering time depends on many factors. If a cold secondary

fermentation was employed, then the length of the lagering period can generally be decreased. A lagering period of one to four weeks is
typical.
Related Documents