Technology and Livelihood Education Quarter 1 – Module 1: Read Plans and Details in Accordance with Job Requirement PLUMBING (Grade 11 Specialization Course) 11

Welcome message from author
This document is posted to help you gain knowledge. Please leave a comment to let me know what you think about it! Share it to your friends and learn new things together.
Transcript

Technology
and Livelihood
Education
Quarter 1 – Module 1:
Read Plans and Details in
Accordance with Job
Requirement
PLUMBING (Grade 11 Specialization Course)
11

Subject Area – TVL Grade 11- Plumbing Specialization Course Self-Learning Module (SLM) Quarter 1 – Module 1: Read Plans and Details in Accordance with Job Requirement First Edition, 2020 Republic Act 8293, section 176 states that: No copyright shall subsist in any work of the Government of the Philippines. However, prior approval of the government agency or office wherein the work is created shall be necessary for exploitation of such work for profit. Such agency or office may, among other things, impose as a condition the payment of royalties. Borrowed materials (i.e., songs, stories, poems, pictures, photos, brand names, trademarks, etc.) included in this module are owned by their respective copyright holders. Every effort has been exerted to locate and seek permission to use these materials from their respective copyright owners. The publisher and authors do not represent nor claim ownership over them.
Printed in the Philippines by Department of Education – SOCCSKSARGEN Region
Office Address: Regional Center, Brgy. Carpenter Hill, City of Koronadal
Telefax: (083) 2288825/ (083) 2281893
E-mail Address: [email protected]
Development Team of the Module
Writer: Roxane Love S. Descuatan
Editors: Hilda D. Ngilay and Jose F. Dacillo, Jr.
Reviewers: Amalia C. Caballes and Sally A. Palomo
Illustrators: Jay M. Alora, Romy A. Juanico and Roxane Love S. Descuatan
Layout Artist: Hilda D. Ngilay
Cover Art Designer: Reggie D. Galindez
Management Team: Allan G. Farnazo, CESO IV – Regional Director
Fiel Y. Almendra, CESO V – Assistant Regional Director
Romelito G. Flores, CESO V - Schools Division Superintendent
Mario M. Bermudez, CESO VI – Assistant Schools Division Superintendent
Gilbert B. Barrera – Chief, CLMD
Arturo D. Tingson Jr. – REPS, LRMS
Peter Van C. Ang-ug – REPS, ADM
Gilda O. Orendain - REPS, TLE/EPP/TVE
Juliet F. Lastimosa - CID Chief
Sally A. Palomo - Division EPS In- Charge of LRMS
Gregorio O. Ruales - Division ADM Coordinator
Amalia C. Caballes – EPS, TLE/EPP/TVE
11
Technology
and Livelihood
Education Quarter 1 – Module 1:
Read Plans and Details
in Accordance with
Job Requirement
PLUMBING (Grade 11 Specialization Course)
4
Introductory Message
For the facilitator:
Welcome to the TVL – Plumbing Grade 11 Specialization Course Alternative
Delivery Mode (ADM) Module on Read Plans and Details in Accordance with Job
Requirement!
This module was collaboratively designed, developed and reviewed by educators
both from public and private institutions to assist you, the teacher or facilitator in
helping the learners meet the standards set by the K to 12 Curriculum while
overcoming their personal, social, and economic constraints in schooling.
This learning resource hopes to engage the learners into guided and independent
learning activities at their own pace and time. Furthermore, this also aims to help
learners acquire the needed 21st century skills while taking into consideration
their needs and circumstances.
In addition to the material in the main text, you will also see this box in the body of
the module:
As a facilitator you are expected to orient the learners on how to use this module.
You also need to keep track of the learners' progress while allowing them to
manage their own learning. Furthermore, you are expected to encourage and assist
the learners as they do the tasks included in the module.
Notes to the Teacher
This contains helpful tips or strategies
that will help you in guiding the learners.
5
For the learner:
Welcome to the TVL – Plumbing Grade 11 Specialization Course Alternative
Delivery Mode (ADM) Module on Read Plans and Details in Accordance with Job
Requirement!
The hand is one of the most symbolized part of the human body. It is often used to
depict skill, action and purpose. Through our hands we may learn, create and
accomplish. Hence, the hand in this learning resource signifies that you as a
learner is capable and empowered to successfully achieve the relevant
competencies and skills at your own pace and time. Your academic success lies in
your own hands!
This module was designed to provide you with fun and meaningful opportunities
for guided and independent learning at your own pace and time. You will be
enabled to process the contents of the learning resource while being an active
learner.
This module has the following parts and corresponding icons:
What I Need to Know
This will give you an idea of the skills or
competencies you are expected to learn in
the module.
What I Know
This part includes an activity that aims to
check what you already know about the
lesson to take. If you get all the answers
correct (100%), you may decide to skip this
module.
What’s In
This is a brief drill or review to help you link
the current lesson with the previous one.
What’s New
In this portion, the new lesson will be
introduced to you in various ways such as a
story, a song, a poem, a problem opener, an
activity or a situation.
What is It
This section provides a brief discussion of
the lesson. This aims to help you discover
and understand new concepts and skills.
What’s More
This comprises activities for independent
practice to solidify your understanding and
skills of the topic. You may check the
answers to the exercises using the Answer

6
Key at the end of the module.
What I Have Learned
This includes questions or blank
sentence/paragraph to be filled in to process
what you learned from the lesson.
What I Can Do
This section provides an activity which will
help you transfer your new knowledge or
skill into real life situations or concerns.
Assessment
This is a task which aims to evaluate your
level of mastery in achieving the learning
competency.
Additional Activities
In this portion, another activity will be given
to you to enrich your knowledge or skill of
the lesson learned. This also tends retention
of learned concepts.
Answer Key
This contains answers to all activities in the
module.
At the end of this module you will also find:
The following are some reminders in using this module:
1. Use the module with care. Do not put unnecessary mark/s on any part of
the module. Use a separate sheet of paper in answering the exercises.
2. Don’t forget to answer What I Know before moving on to the other activities
included in the module.
3. Read the instruction carefully before doing each task.
4. Observe honesty and integrity in doing the tasks and checking your
answers.
5. Finish the task at hand before proceeding to the next.
6. Return this module to your teacher/facilitator once you are through with it.
If you encounter any difficulty in answering the tasks in this module, do not
hesitate to consult your teacher or facilitator. Always bear in mind that you are
not alone.
We hope that through this material, you will experience meaningful learning
and gain deep understanding of the relevant competencies. You can do it!
References This is a list of all sources used in
developing this module.
7
What I Need to Know
Have you heard the saying, “A picture is worth a thousand words”? This
phrase is true specifically about technical drawings.
An engineer, a designer or an architect uses drawings to be able to describe
the size, shape, and relationship of a compound object. Hence, drawings have
become the universal language to communicate the necessary information for the
construction, assembly and service of industrial products.
In this module, you will learn independently on how to read the plumbing
layout plan. This includes the different types of lines; plumbing or piping drawings;
plumbing signs, symbols, and plumbing fixtures.
The lesson comes with learning activities designed to measure your progress.
You have to answer each to the best of your ability and be honest as you can.
Hopefully, after learning this module, you will be equipped with knowledge and
skills in Preparing Pipes, Tools and Equipment for Installation in Plumbing.
At the end of this module, you should be able to:
Lay out work area for pipes installation. (TLE_IAPB9-12PI-Ia-b-1)
Read plans and details in accordance with job requirement.
8
What I Know
Let us determine how much you already know about plumbing signs and
symbols.
Activity 1.1 Match It!
Directions: Match the descriptions in Column A to the terms in Column B. Write
the letter that corresponds to your answer on the space provided
before each number.
COLUMN A COLUMN B
____1. A thick line used to trace the edges or contours
of an object.
____2. A medium weight line used to show edges,
surfaces and corners of an object which
cannot be seen.
____3. Thin lines used to display a section view of the
cut surfaces of an object.
____4. A very thin (size) line made of long-short-long
lines. It is used to indicate the centers of
holes, arcs, and symmetrical objects
____5. A thin line used to show the size of an object.
____6. A thin line which shows the boundary of
dimension line.
____7. A line used to point to a drawing area that
requires an explanatory note.
____8. It is a thick line use to illustrate the internal
shape at a part or assembly by cutting
through the object.
____9. This kind of line is used to shorten the view of
a long part of an object.
a. line
b. alphabets of lines
c. isometric
d. orthographic
drawings
e. piping drawings
f. phantom line
g. break line
h. cutting plane line
i. leader line
9
____10. It is a long-short-short-long lines used to
display the movement of an object or part in
opposite positions.
____11. It illustrates the location and size of pipes,
fittings, and valves.
____12. It is a single-angled projection. Objects can
be illustrated in the front view, the side view,
and the top or plan view.
____13. This drawing displays a three-dimensional
object in a single image, from three
viewpoints.
____14. These are lines used for a specific purpose in
sketching plumbing drawings.
____15. It can be described as a straight one-
dimensional figure, without thickness and
endlessly extending in both directions.
j. extension line
k. dimension line
l. center line
m. section line
n. hidden line
o. object line
Lesson
1
READ PLANS AND DETAILS
IN ACCORDANCE WITH JOB
REQUIREMENT
What’s In
Have you tried giving a direction of a place just by writing it in a sentence? It
is difficult, right? It can be easier if you draw the direction of the place. Just like in
plumbing, a plumber can easily locate the different plumbing needed to be installed
if it is in a drawing or layout plan.
In this module, you will be learning on how to read the plumbing layout
plan. This includes the different types of lines used in drafting plumbing or piping
drawings.
Are you excited for this lesson? You may now proceed with the next activity.
10
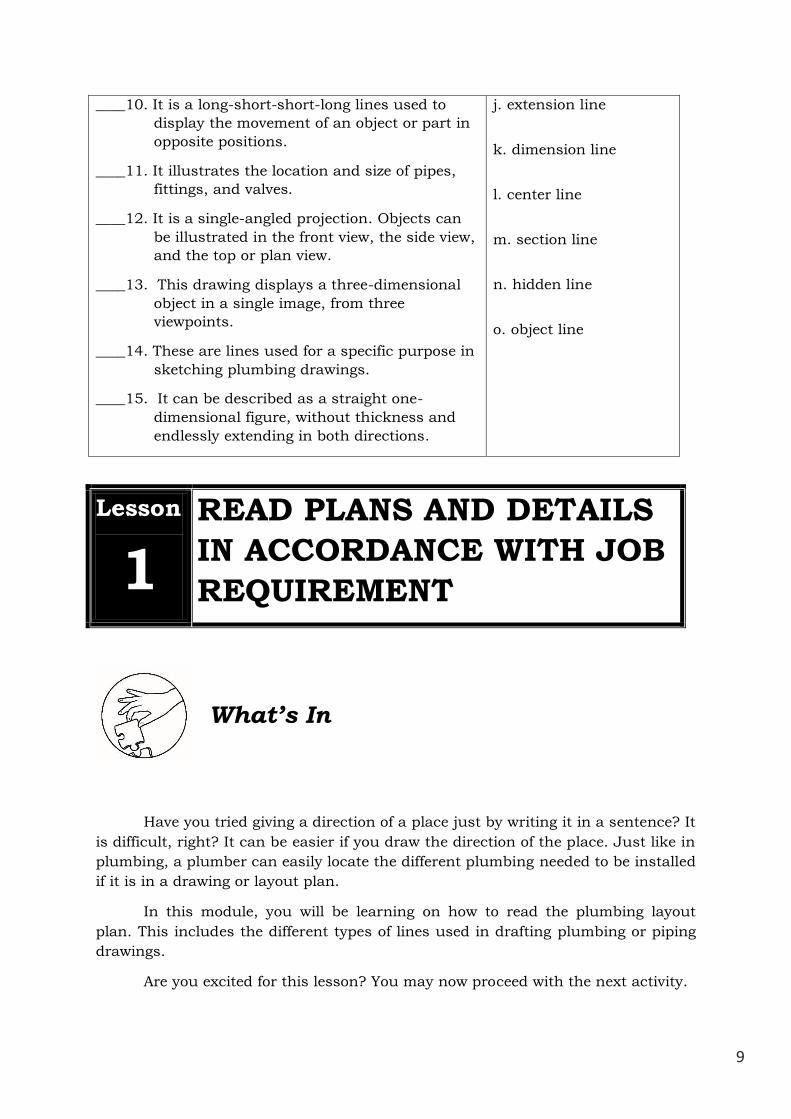
What’s New
At this point, you are heading into meaningful activities and learning
encounters. Complete the exercises and answer the learning activities to experience
lifelong and practical learning that awaits at the end of this module.
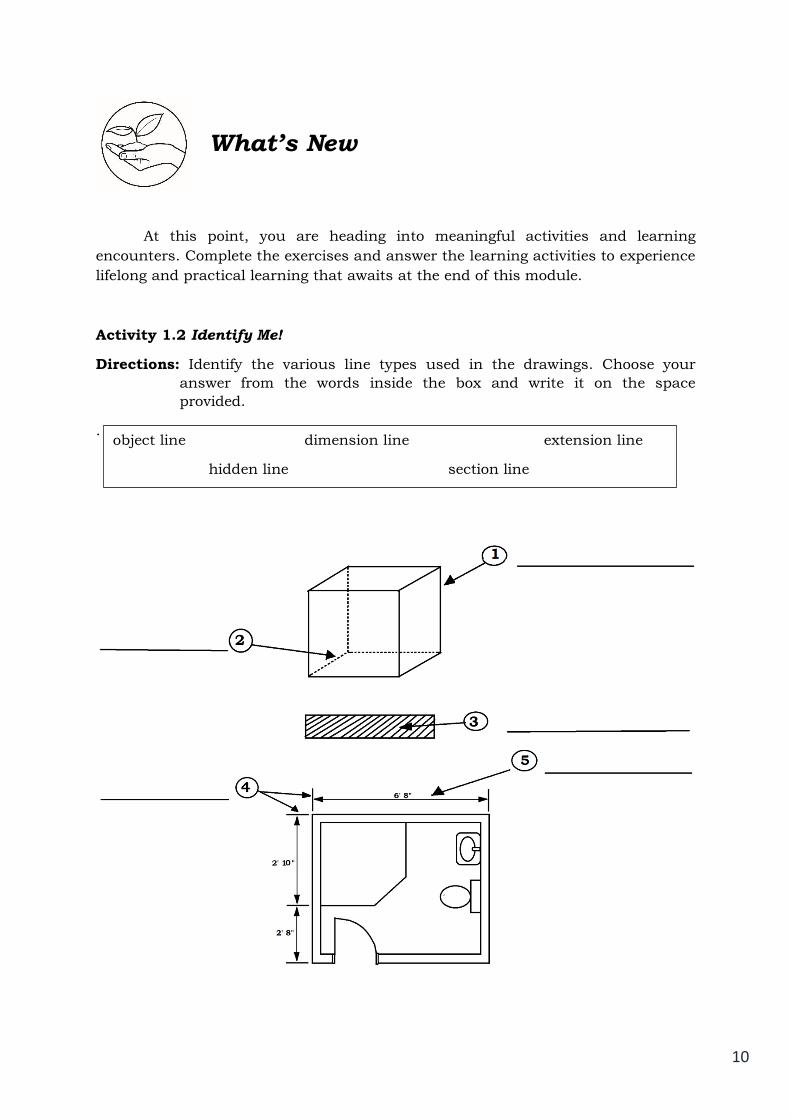
Activity 1.2 Identify Me!
Directions: Identify the various line types used in the drawings. Choose your
answer from the words inside the box and write it on the space
provided.
.
object line dimension line extension line
hidden line section line
11
What is It
Reading plans and details in accordance with job requirement is a
challenging task. That’s why in this part of the module you need to read each item
carefully and try to master the uses of each term for this will be your guide in doing
your next activities.
DEFINITION OF TERMS
Analyze is to examine something in great detail in order to understand it better.
Blueprint is a photographic print of technical drawing with white lines and blue
backgrounds.
Dimension is the measurement of one or more direction such as length, width, and
height.
Interpret is to ascribe particular meaning of significance to something.
Pictorial Diagram shows the basic form or lay-out of pictures of actual component.
Plan is a method of doing something that is work out in advance.
Schematic Diagram shows the basic form or lay-out of plumbing symbols.
Sign is something that indicates the rule to follow.
Symbol is something that represents abstraction with the names of plumbing
components.
Line can be described as a straight one-dimensional figure, without thickness and
endlessly extending in both directions.
READING PLUMBING LAYOUT PLAN OR PLUMBING DRAWING
The first step in reading a plumbing drawing is to learn the meaning of each line.
Lines are part of the information needed to fully understand the drawing. These
lines are commonly referred to as Alphabets of Lines.
USES OF ALPHABETS OF LINES
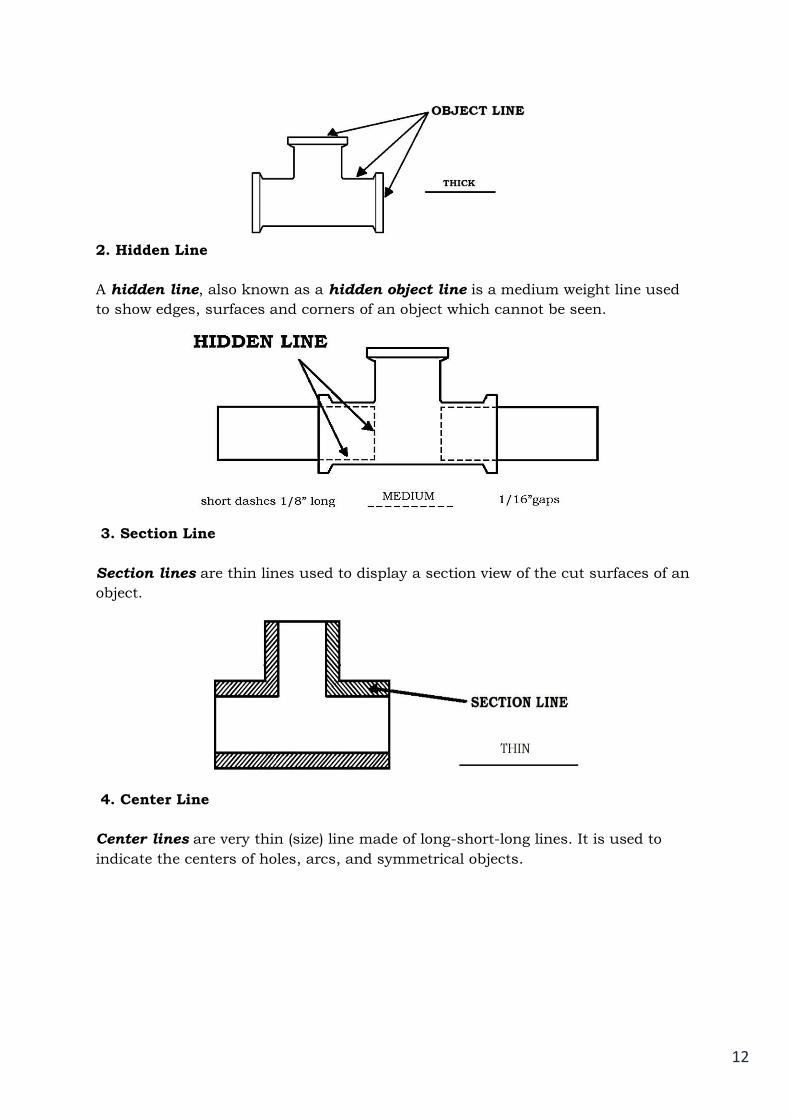
1. Object Line
A visible line, or object line is a thick line used to trace the edges or contours of
an object.
12
2. Hidden Line
A hidden line, also known as a hidden object line is a medium weight line used
to show edges, surfaces and corners of an object which cannot be seen.
3. Section Line
Section lines are thin lines used to display a section view of the cut surfaces of an
object.
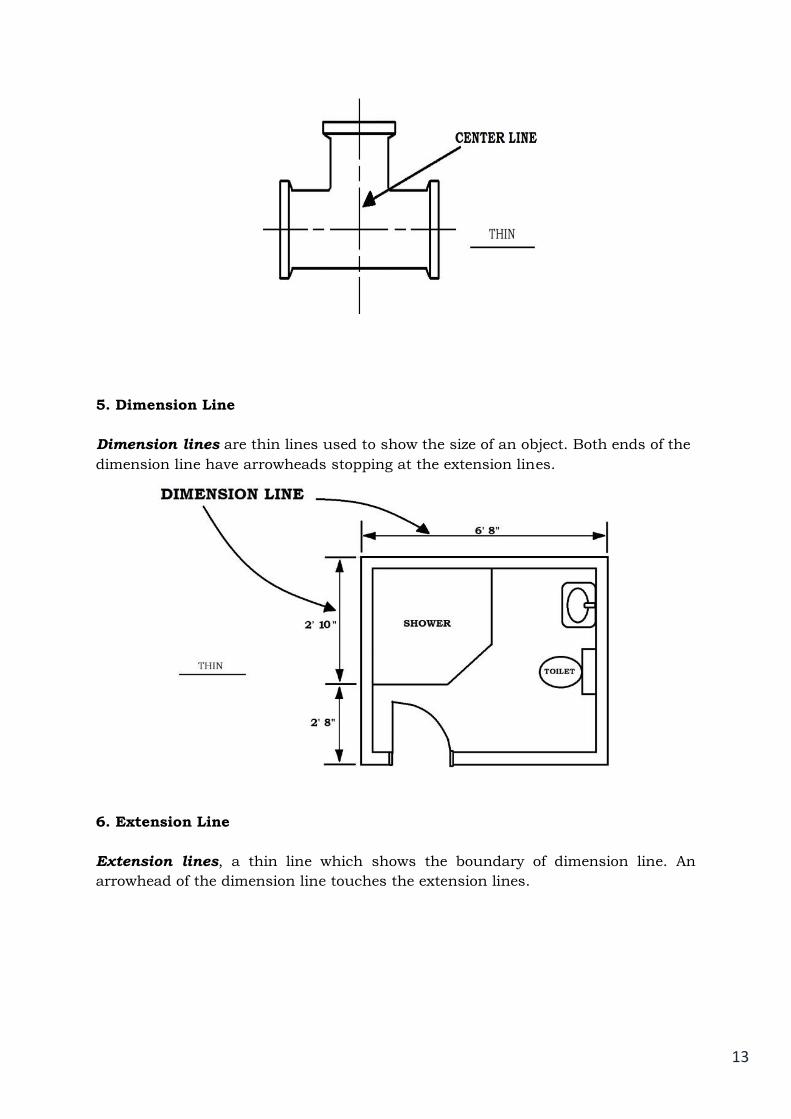
4. Center Line
Center lines are very thin (size) line made of long-short-long lines. It is used to
indicate the centers of holes, arcs, and symmetrical objects.
13
5. Dimension Line
Dimension lines are thin lines used to show the size of an object. Both ends of the
dimension line have arrowheads stopping at the extension lines.
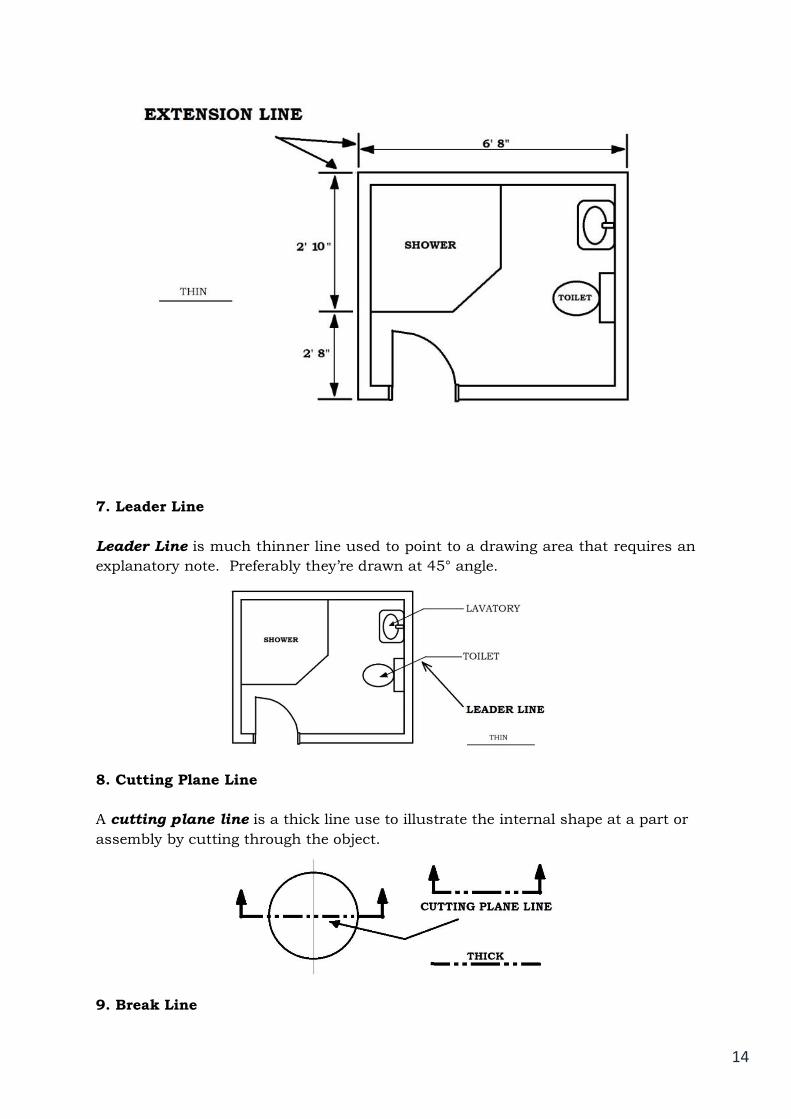
6. Extension Line
Extension lines, a thin line which shows the boundary of dimension line. An
arrowhead of the dimension line touches the extension lines.
14
7. Leader Line
Leader Line is much thinner line used to point to a drawing area that requires an
explanatory note. Preferably they’re drawn at 45° angle.
8. Cutting Plane Line
A cutting plane line is a thick line use to illustrate the internal shape at a part or
assembly by cutting through the object.
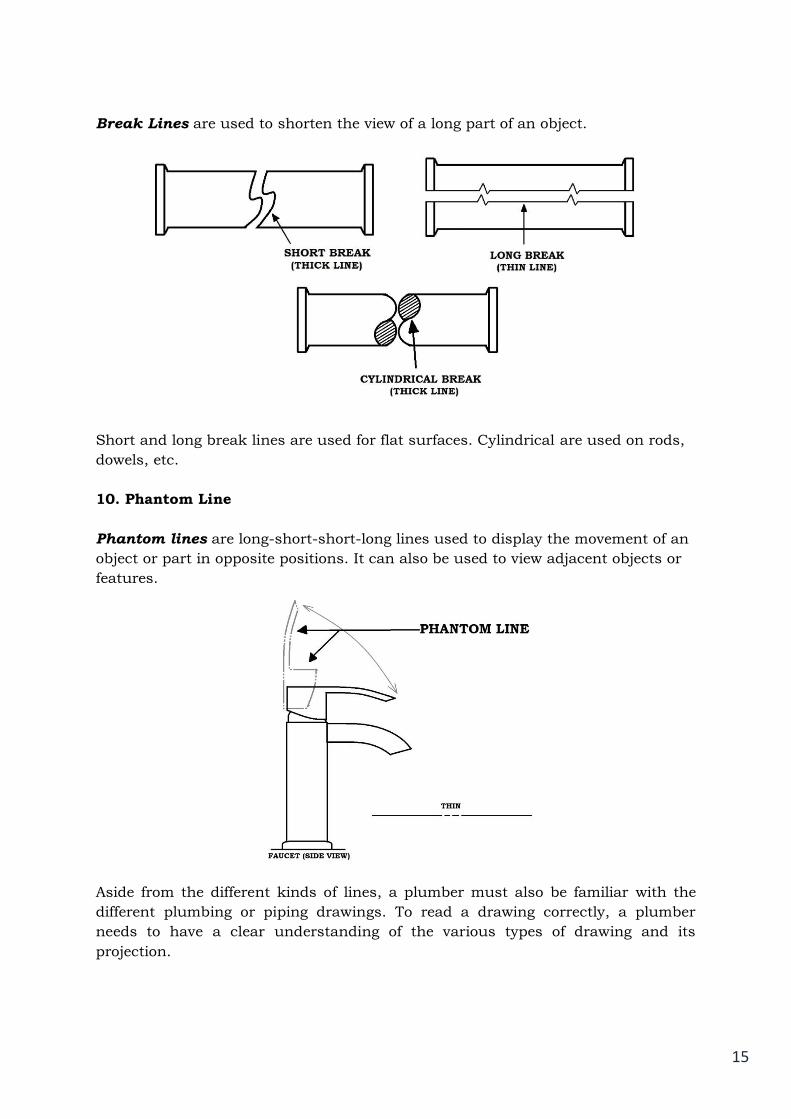
9. Break Line
15
Break Lines are used to shorten the view of a long part of an object.
Short and long break lines are used for flat surfaces. Cylindrical are used on rods,
dowels, etc.
10. Phantom Line
Phantom lines are long-short-short-long lines used to display the movement of an
object or part in opposite positions. It can also be used to view adjacent objects or
features.
Aside from the different kinds of lines, a plumber must also be familiar with the
different plumbing or piping drawings. To read a drawing correctly, a plumber
needs to have a clear understanding of the various types of drawing and its
projection.
16
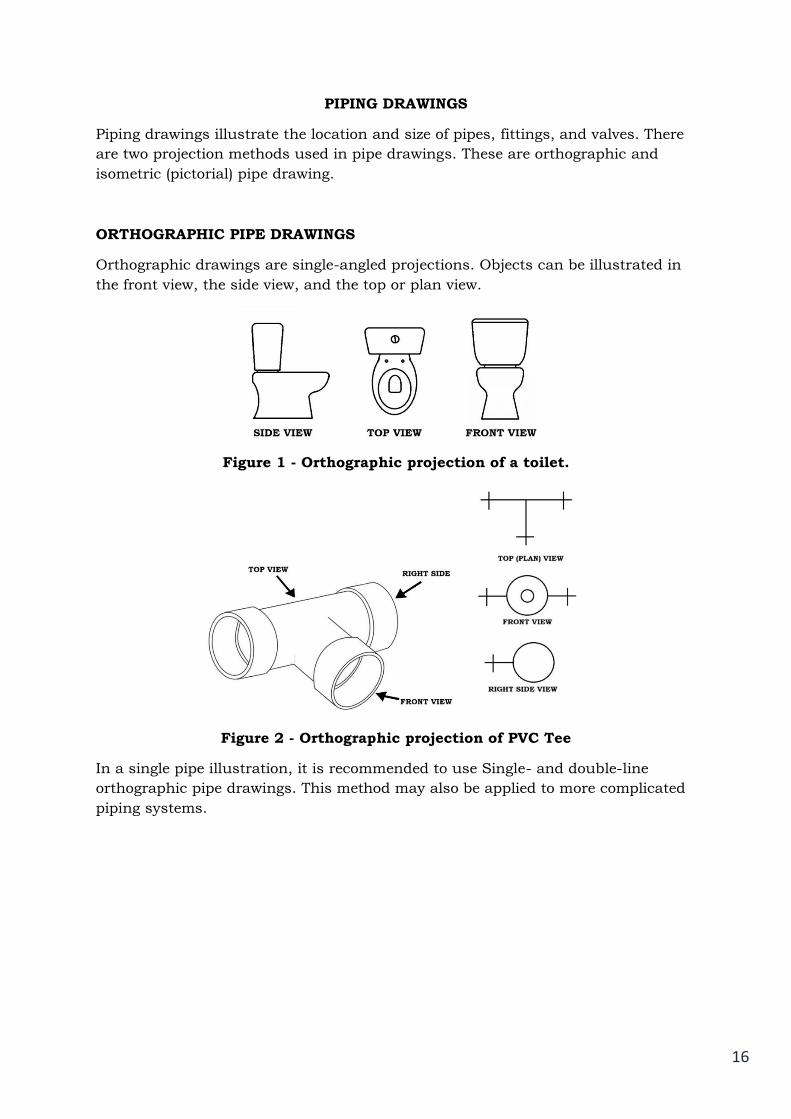
PIPING DRAWINGS
Piping drawings illustrate the location and size of pipes, fittings, and valves. There
are two projection methods used in pipe drawings. These are orthographic and
isometric (pictorial) pipe drawing.
ORTHOGRAPHIC PIPE DRAWINGS
Orthographic drawings are single-angled projections. Objects can be illustrated in
the front view, the side view, and the top or plan view.
Figure 1 - Orthographic projection of a toilet.
Figure 2 - Orthographic projection of PVC Tee
In a single pipe illustration, it is recommended to use Single- and double-line
orthographic pipe drawings. This method may also be applied to more complicated
piping systems.
17
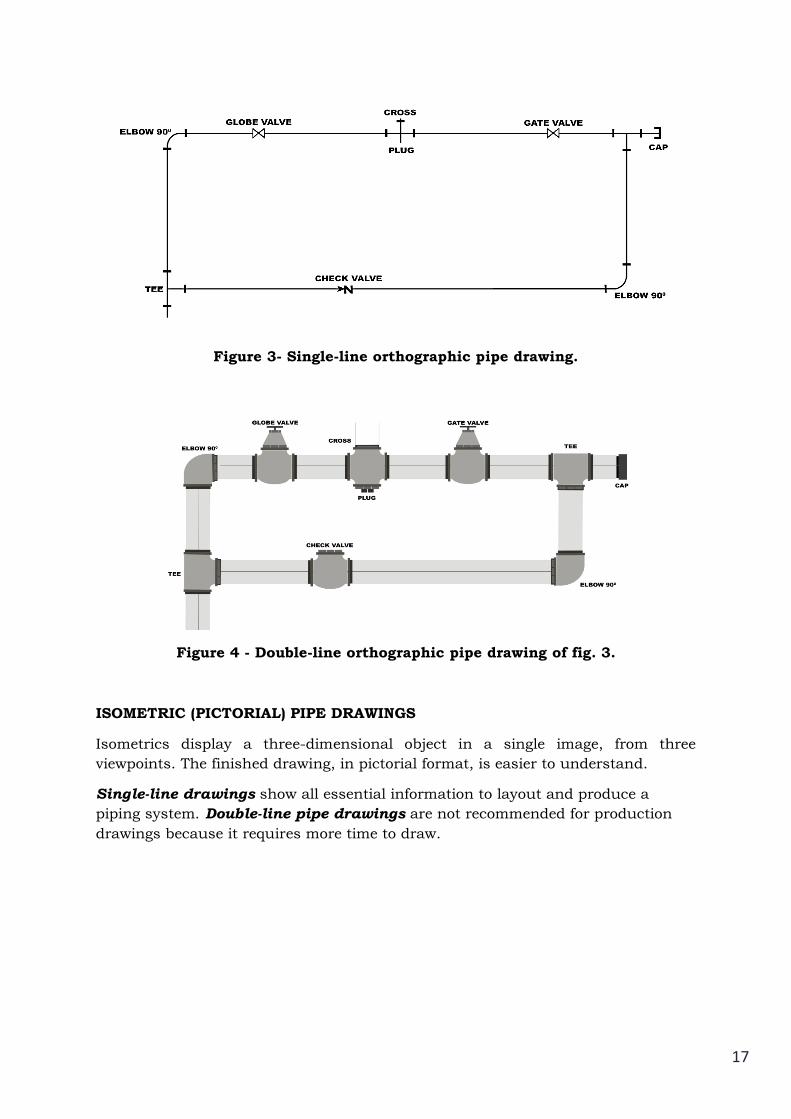
Figure 3- Single-line orthographic pipe drawing.
Figure 4 - Double-line orthographic pipe drawing of fig. 3.
ISOMETRIC (PICTORIAL) PIPE DRAWINGS
Isometrics display a three-dimensional object in a single image, from three
viewpoints. The finished drawing, in pictorial format, is easier to understand.
Single-line drawings show all essential information to layout and produce a
piping system. Double-line pipe drawings are not recommended for production
drawings because it requires more time to draw.
18
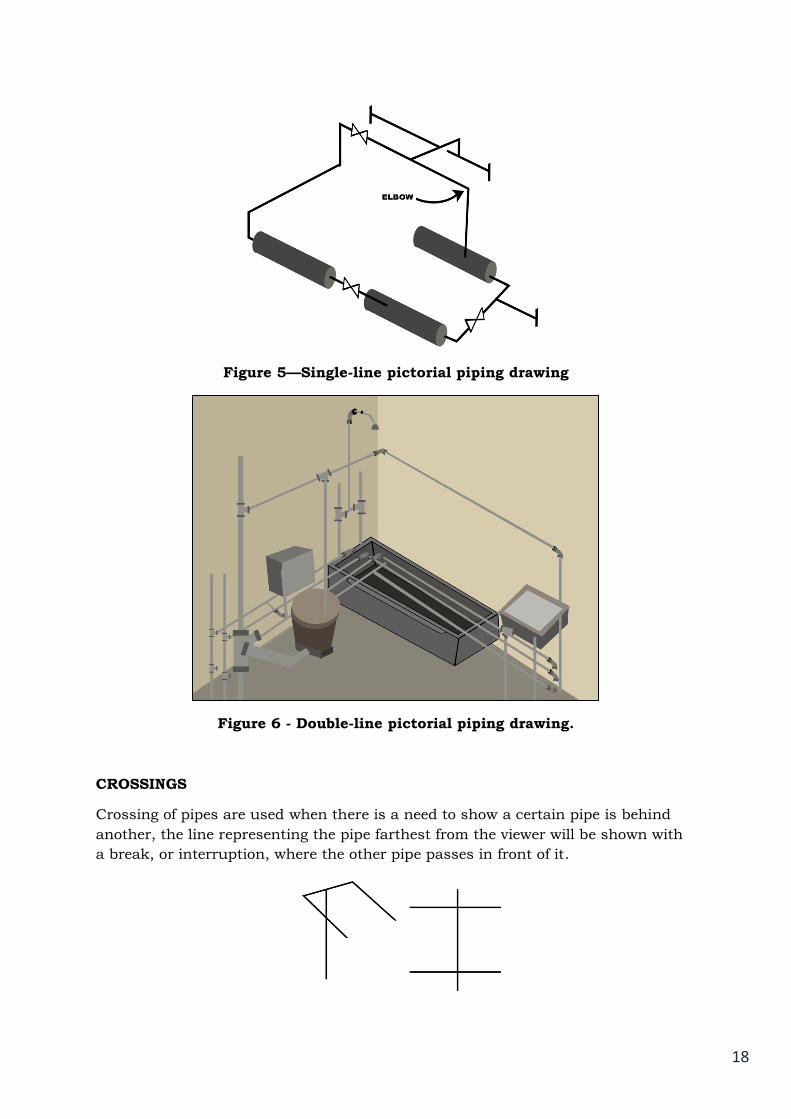
Figure 5—Single-line pictorial piping drawing
Figure 6 - Double-line pictorial piping drawing.
CROSSINGS
Crossing of pipes are used when there is a need to show a certain pipe is behind
another, the line representing the pipe farthest from the viewer will be shown with
a break, or interruption, where the other pipe passes in front of it.
19
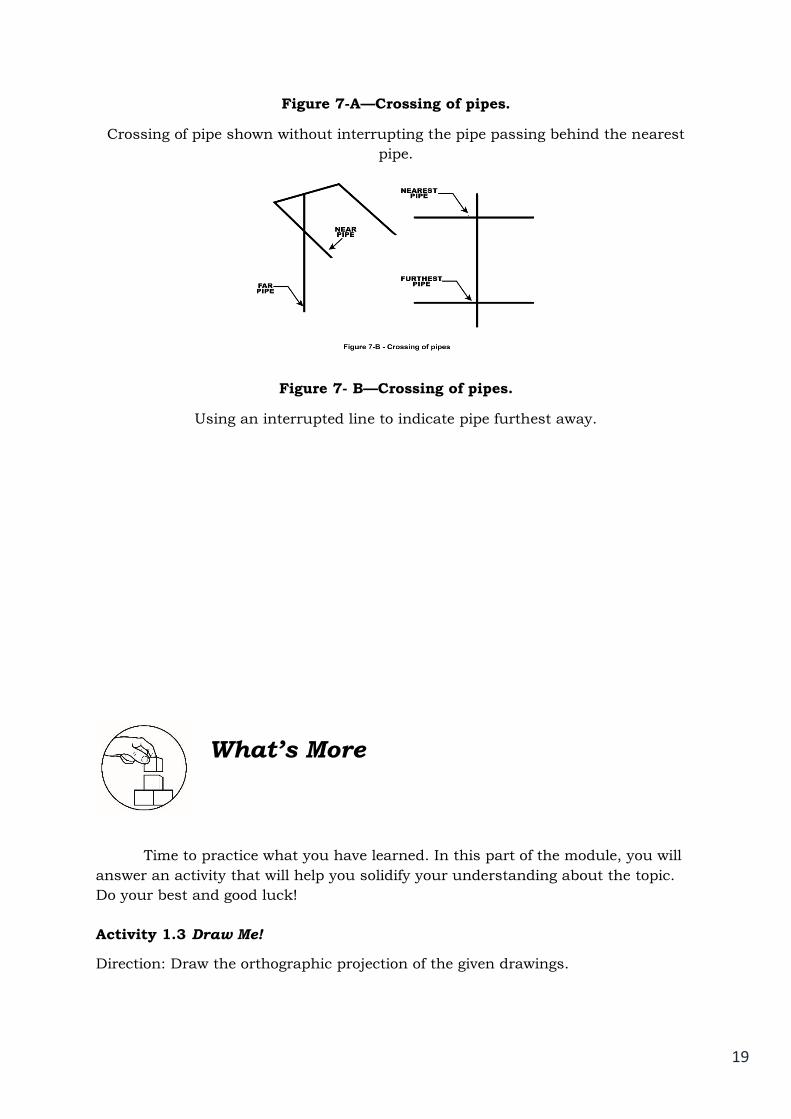
Figure 7-A—Crossing of pipes.
Crossing of pipe shown without interrupting the pipe passing behind the nearest
pipe.
Figure 7- B—Crossing of pipes.
Using an interrupted line to indicate pipe furthest away.
What’s More
Time to practice what you have learned. In this part of the module, you will
answer an activity that will help you solidify your understanding about the topic.
Do your best and good luck!
Activity 1.3 Draw Me!
Direction: Draw the orthographic projection of the given drawings.
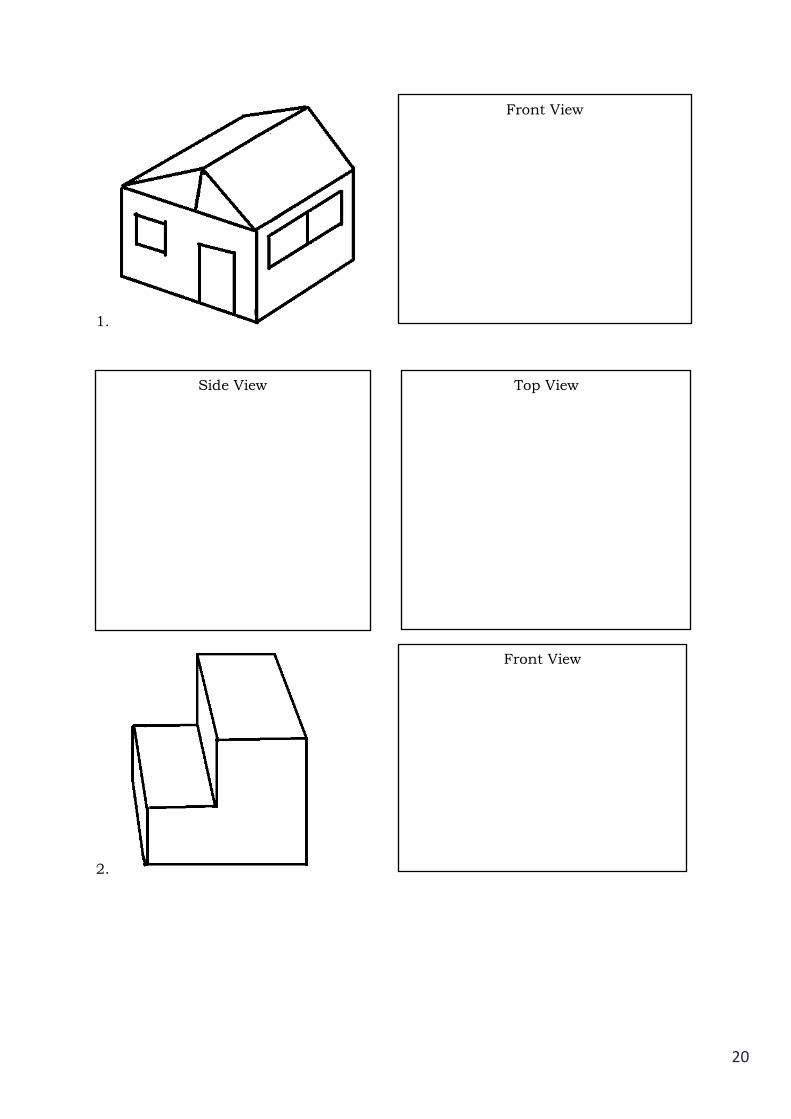
20
1.
2.
Front View
Side View Top View
Front View
21
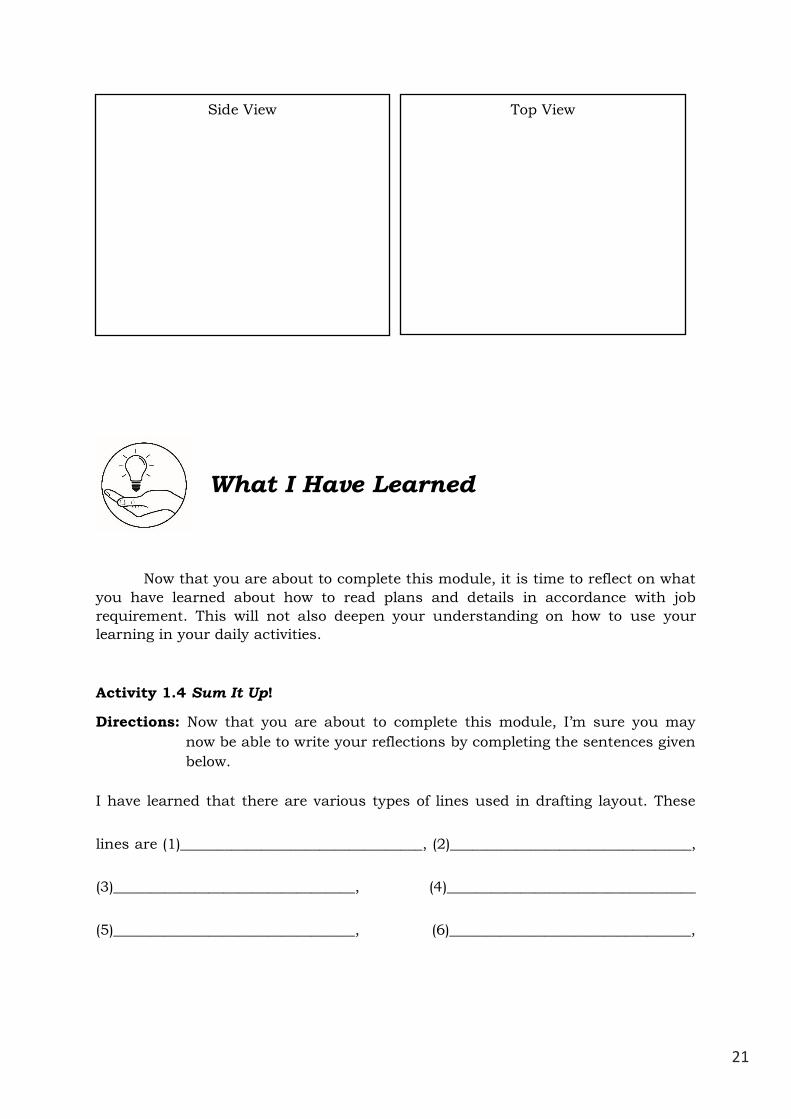
What I Have Learned
Now that you are about to complete this module, it is time to reflect on what
you have learned about how to read plans and details in accordance with job
requirement. This will not also deepen your understanding on how to use your
learning in your daily activities.
Activity 1.4 Sum It Up!
Directions: Now that you are about to complete this module, I’m sure you may
now be able to write your reflections by completing the sentences given
below.
I have learned that there are various types of lines used in drafting layout. These
lines are (1)_________________________________, (2)_________________________________,
(3)_________________________________, (4)__________________________________
(5)_________________________________, (6)_________________________________,
Side View Top View
22
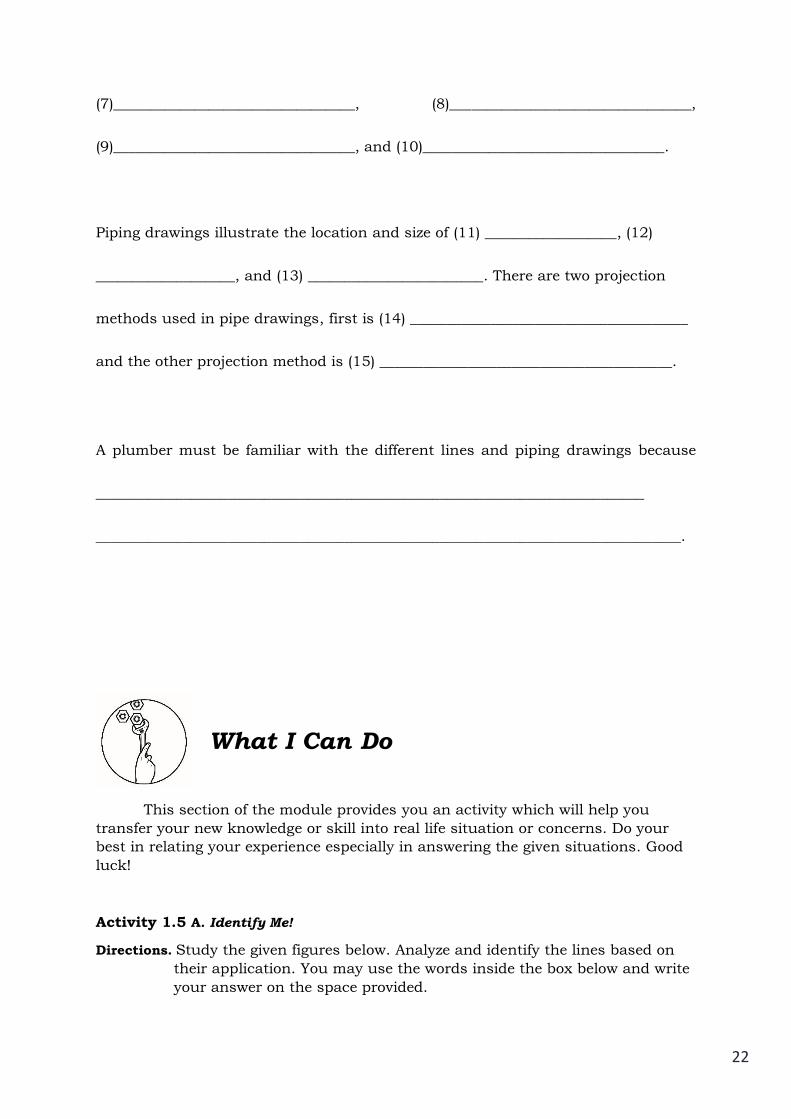
(7)_________________________________, (8)_________________________________,
(9)_________________________________, and (10)_________________________________.
Piping drawings illustrate the location and size of (11) __________________, (12)
___________________, and (13) ________________________. There are two projection
methods used in pipe drawings, first is (14) ______________________________________
and the other projection method is (15) ________________________________________.
A plumber must be familiar with the different lines and piping drawings because
___________________________________________________________________________
________________________________________________________________________________.
What I Can Do
This section of the module provides you an activity which will help you
transfer your new knowledge or skill into real life situation or concerns. Do your
best in relating your experience especially in answering the given situations. Good
luck!
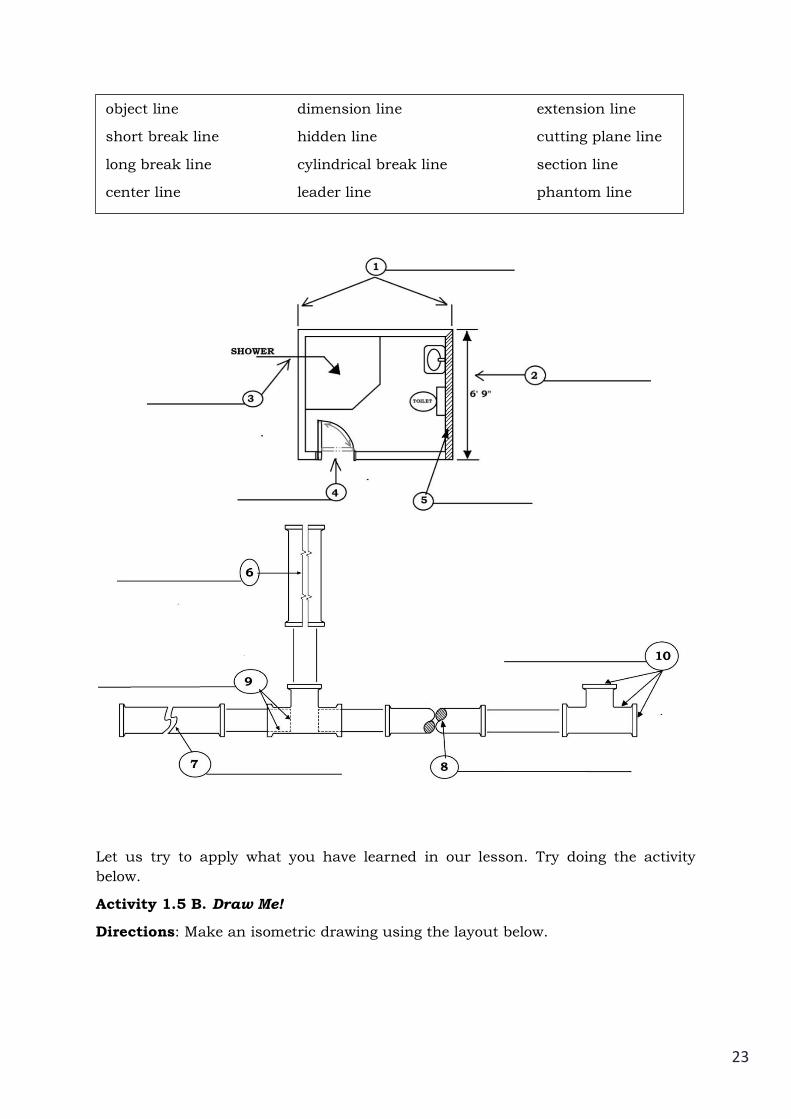
Activity 1.5 A. Identify Me!
Directions. Study the given figures below. Analyze and identify the lines based on
their application. You may use the words inside the box below and write
your answer on the space provided.
23
Let us try to apply what you have learned in our lesson. Try doing the activity
below.
Activity 1.5 B. Draw Me!
Directions: Make an isometric drawing using the layout below.
object line dimension line extension line
short break line hidden line cutting plane line
long break line cylindrical break line section line
center line leader line phantom line
24

25
DRAW HERE

26
Assessment
Now that you are about to finish this module, you are to determine your
learning by doing your best in answering the following activity properly.
Activity 1.6 Match Me!
Directions: Now that you are about to finish this module, you are to determine
your learnings by answering the following activities.
COLUMN A COLUMN B
____1. A thin line used to show the size of an object.
____2. A line used to point to a drawing area that
requires an explanatory note.
____3. Thin lines used to display a section view of the
cut surfaces of an object.
____4. It is a thick line use to illustrate the internal
shape at a part or assembly by cutting through
the object.
____5. A thick line used to trace the edges or contours
of an object.
____6. A thin line which shows the boundary of
dimension line.
____7. A medium weight line used to show edges,
surfaces and corners of an object which cannot
be seen.
____8. A very thin (size) line made of long-short-long
lines. It is used to indicate the centers of holes,
arcs, and symmetrical objects.
____9. This kind of line is used to shorten the view of
a long part of an object.
____10. It is a long-short-short-long lines used to
display the movement of an object or part in
opposite positions.
____11. It can be described as a straight one-
dimensional figure, without thickness and
endlessly extending in both directions.
____12. They are single-angled projections. Objects
can be illustrated in the front view, the side
a. line
b. alphabets of lines
c. isometric
d. orthographic drawings
e. piping drawings
f. phantom line
g. break line
h. cutting plane line
i. leader line
j. extension line
k. dimension line
l. center line

27
view, and the top or plan view.
____13. This drawing displays a three-dimensional
object in a single image, from three viewpoints.
____14. These are lines used for a specific purpose in
sketching plumbing drawings.
____15. It illustrates the location and size of pipes,
fittings, and valves.
m. section line
n. hidden line
o. object line
Additional Activities
Congratulations! You are about to finish this module. I hope you’ve learned a
lot about our lesson.
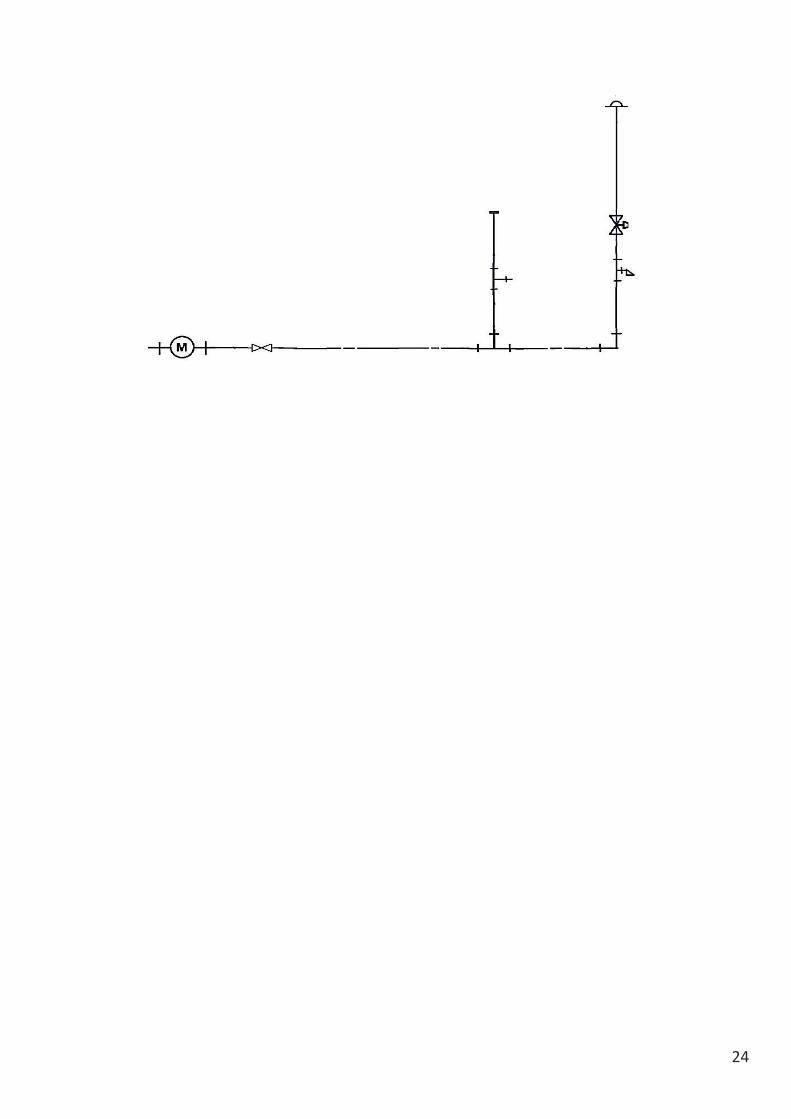
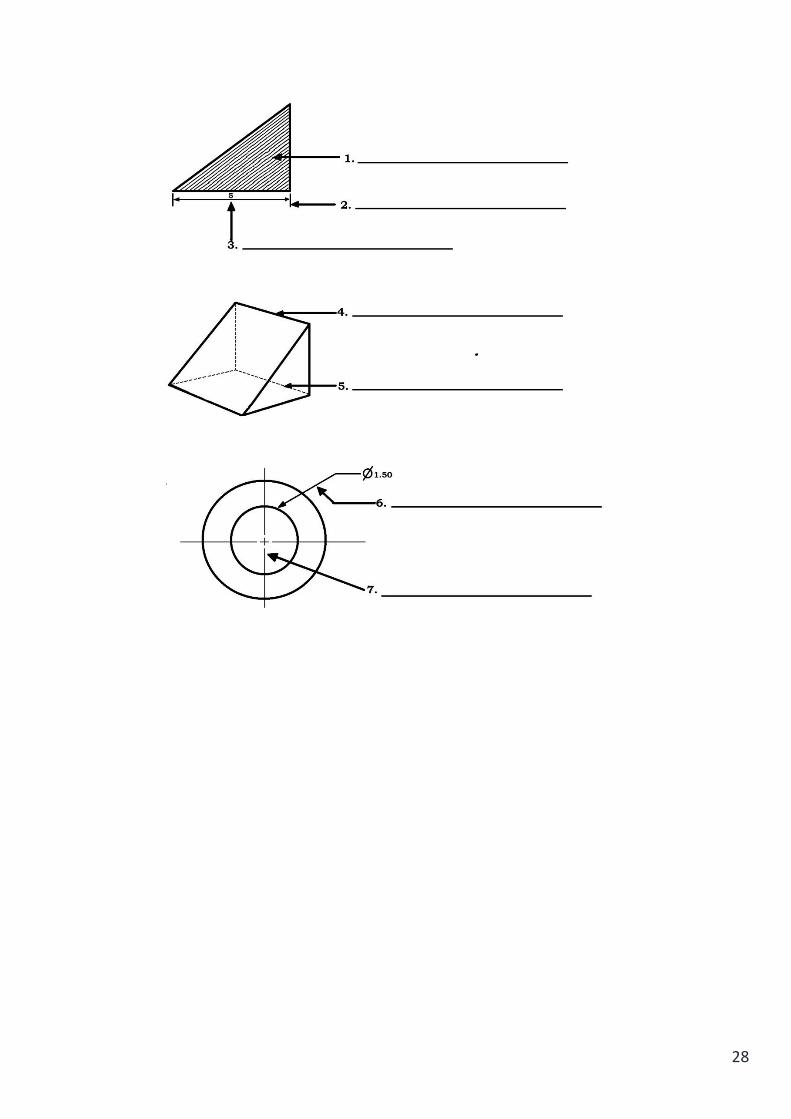
Activity 1.7 A. What Line Am I?
Directions: Identify the lines in the drawing. Write your answer on the space
provided.
28
29
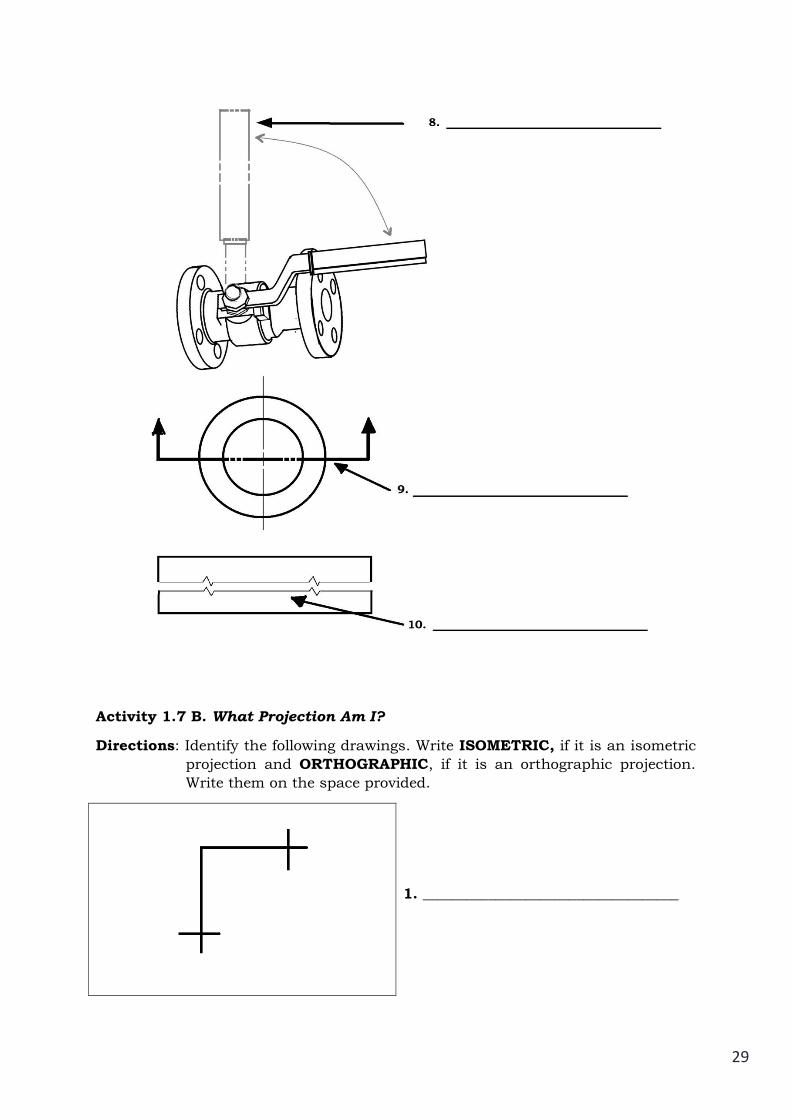
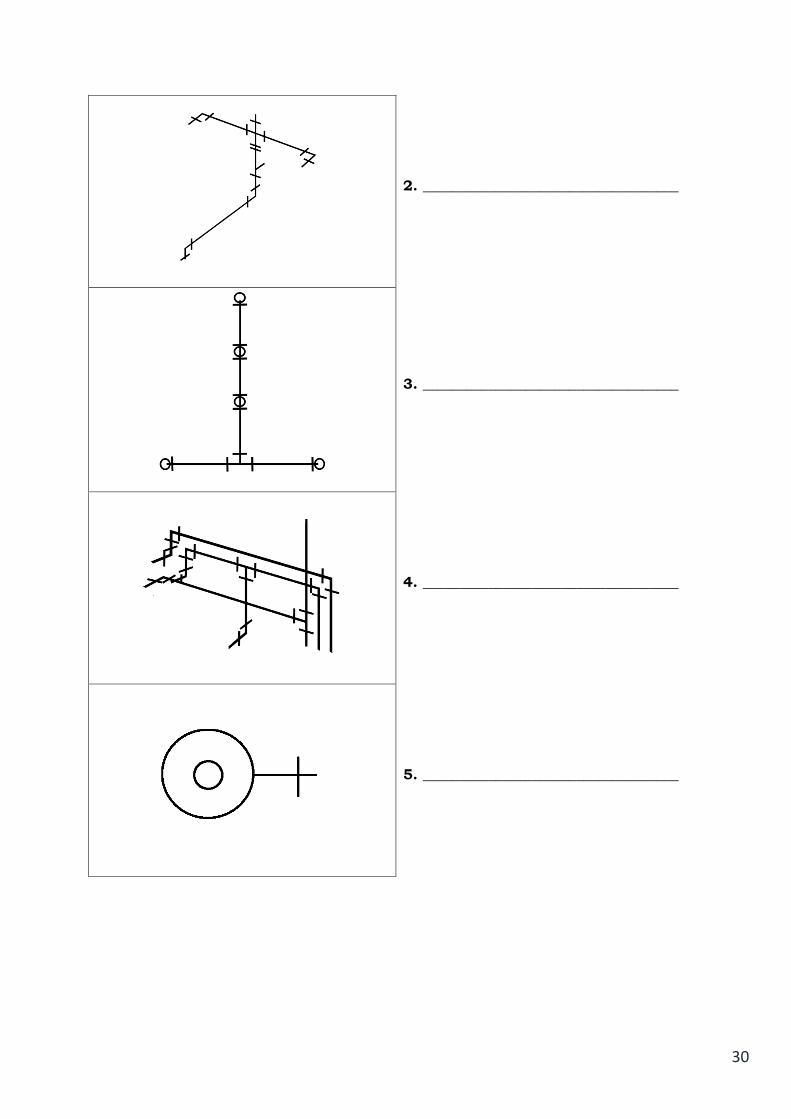
Activity 1.7 B. What Projection Am I?
Directions: Identify the following drawings. Write ISOMETRIC, if it is an isometric
projection and ORTHOGRAPHIC, if it is an orthographic projection.
Write them on the space provided.
1. ___________________________________
30
2. ___________________________________
3. ___________________________________
4. ___________________________________
5. ___________________________________
31
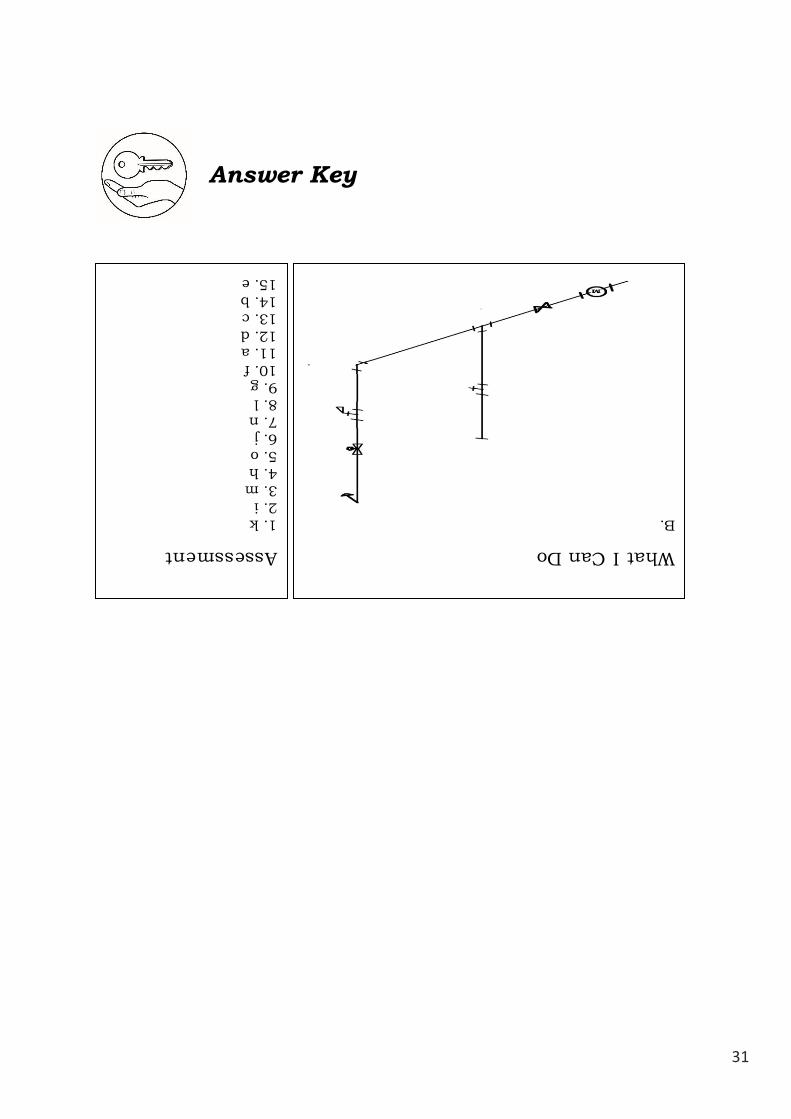
Answer Key
Assessment
1. k
2. i 3. m
4. h 5. o
6. j 7. n
8. l 9. g
10. f
11. a 12. d
13. c 14. b
15. e
What I Can Do
B.
32
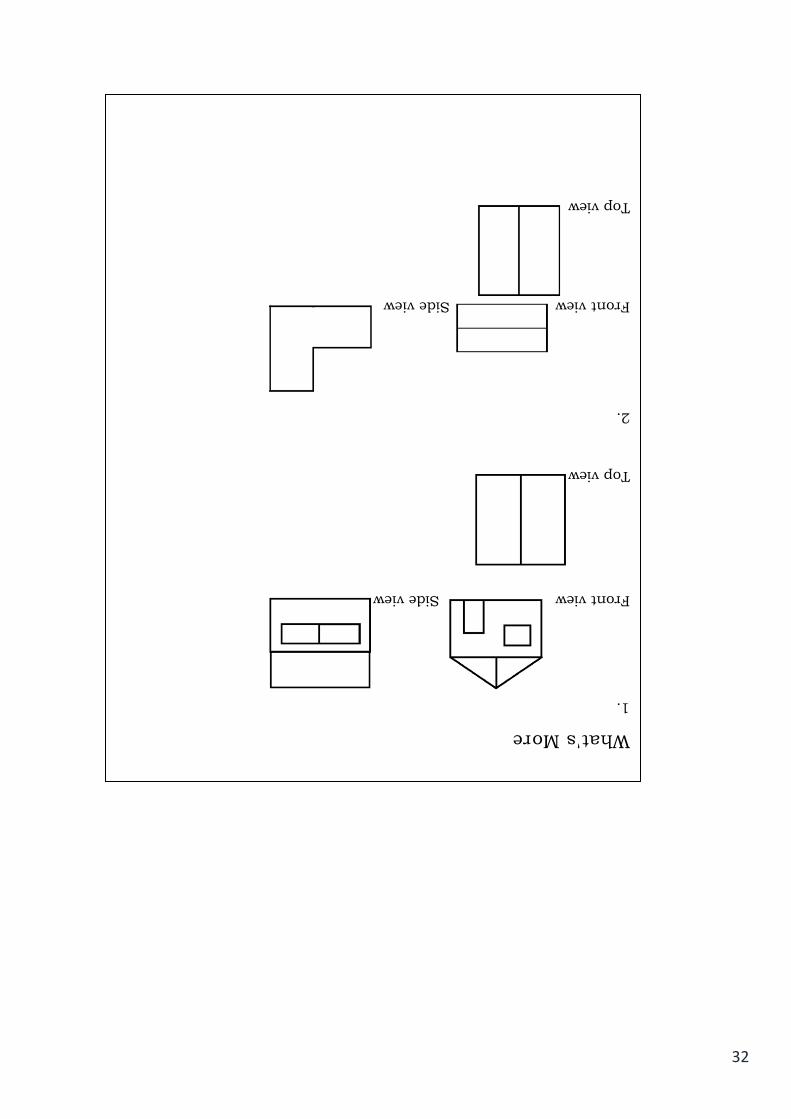
What's More
1.
Front view Side view
Top view
2.
Front view Side view
Top view

33
What I Can Do
A.
1. extension line 2. dimension line
3. leader line
4. phantom line 5. section line
6. long break line 7. short break line
8. cylindrical break line 9. hidden line
10. object line
What's New
1. object line
2. hidden line
3. section line
4. extension line
5. dimension line
What I Know
1. o 2. n
3. m
4. l 5. k
6. j 7. i
8. h 9. g
10. f
11. e 12. d
13. c 14. b
15. a

34
References
K to 12 TLE PLUMBING Learning Modules for Grades 7 and 8 by Department of
Education, Philippines p. 59, 64
K to 12 Industrial Arts – Plumbing (NC I) Curriculum Guide May 2016 p. 12
DISCLAIMER
This Self-learning Module (SLM) was developed by DepEd SOCCSKSARGEN
with the primary objective of preparing for and addressing the new normal.
Contents of this module were based on DepEd’s Most Essential Learning
Competencies (MELC). This is a supplementary material to be used by all
learners of Region XII in all public schools beginning SY 2020-2021. The
process of LR development was observed in the production of this module.
This is version 1.0. We highly encourage feedback, comments, and
recommendations.
For inquiries or feedback, please write or call: Department of Education – SOCCSKSARGEN Learning Resource Management System (LRMS)
Regional Center, Brgy. Carpenter Hill, City of Koronadal
Telefax No.: (083) 2288825/ (083) 2281893
Email Address: [email protected]
Related Documents