Technical Note TN-123 10/05/WH RAE Systems by Honeywell 877-723-2878 raesystems.com 1 SPECIAL DIAGNOSTIC MODES FOR RAE SYSTEMS INSTRUMENTS All RAE Systems gas monitors have a special diagnostic mode that can be used to evaluate the condition of lamps, sensors, pumps, etc. The Diagnostic Mode is entered via a special start-up sequence. This consists of holding down the keys in Table 1 while turning on. This Diagnostic Mode isnot to be confused with the initial diagnostics that are automatically performed during routine start-up. The instrument goes through the standard start-up sequence and then displays raw sensor readings in certain modes, rather than readings converted to ppm or percent. On most instruments, a rapid start-up can be achieved by pressing Y/+ again when “Diagnostic Mode” is displayed after a few start-up screens. In addition to the special diagnostics, many of the usual functions can still be performed in this mode, such as zeroing and calibration (except for a few instruments). This technical note focuses on the sensor diagnostics; see the product manuals for information on other diagnostics such as pump threshold, display contrast, backlight threshold, battery level, and sensor expiration dates. Table 2 lists the location and specifications for the raw sensor readings, and the paragraphs below give further information specific to each type of monitor. MINIRAE PLUS & MINIRAE PLUS CLASSIC Turn on while depressing the up arrow. Toggle 3 times with the menu key to reach the CO display. The signal decreases when span gas is applied. The amount of the decrease depends on whether an “attenuator ring” is installed between the lamp and the sensor block. A new 10.6 eV lamp should exhibit a drop of more than 200 counts without the ring, and 60 to 120 counts with the ring in place. Caution: When the reading drops to zero it resets to 300 and then drops further from there. Thus, when a lamp is very strong and 100 ppm isobutylene is applied, the reading may appear to drop only a small amount and appear as a weak lamp. In such cases it is important to look for the cycling as the span gas is turned on or off. As the lamp ages, the attenuator ring can be removed to allow more light to pass and increase the count difference. Occasionally, a 10.6 eV lamp that doesn’t seem to respond at all with the ring in place can be brought back to full working condition by removing the ring. A new 11.7 eV lamp should give a drop of ~100 counts with 100 ppm isobutylene. Never use an attenuator ring with this lamp, because of its lower output. When the span difference drops to less than 10 or 20 counts the lamp begins to have difficulty calibrating or lighting, and needs to be replaced. MINIRAE 2000, PPBRAE PLUS & ULTRARAE Depress the Y/+ button while turning the unit on, and hold it until the beep stops. The unit starts up in the 1A raw count scale. Press MODE once to move to the 10A scale, and then Y/+ to reach the 100A scale. The B scales are not used at present. The raw count rise (delta) listed in Table 2 are with the high-intensity 10.6 eV lamps for the ppbRAE Plus and standard 10.6 eV lamps for the MiniRAE 2000. TOXIRAE PID Depress the Y/+ button while turning on. The reading starts at <60 with no attenuation (x1) and increases when applying span gas. If the value increases above 3,686, the attenuation automatically increases to x10, and the reading switches to 369 x10. A new 10.6 eV lamp typically shows >1,000 x1 counts with 100 ppm isobutylene. This value drops rapidly in the first week or so, and then stabilize above a few hundred counts. Newer instruments (s/n above ~800) have higher internal gain, so that the initial lamp counts should be approaching 4000 (400 x10) and a stabilized lamp above 1000 x1. Low output in this mode could result from a weak lamp, corroded or dirty sensor, or a faulty circuit board. • Toggling the Mode key once yields the lamp power draw display, which should read between 140 and 175 counts. At lower values, the lamp has most likely failed to light. When the lamp is removed, the reading should drop to 125 to 137; otherwise there is a circuit board problem. • Toggling two more times reaches a “no lamp” prompt. This mode is useful when the instrument gives a “lmp” error despite the lamp being lit. Press Y/+ with the lamp removed to reset the lamp detection baseline and erase the error display. TOXIRAE SINGLE-GAS MONITORS These use the N/- button held down while turning the unit on, to enter the Diagnostic Mode. The raw counts are seen after beginning calibration by holding the N/- and Mode keys at the same time. For Oxygen Monitors, the raw readings decrease when pure nitrogen is applied.

Welcome message from author
This document is posted to help you gain knowledge. Please leave a comment to let me know what you think about it! Share it to your friends and learn new things together.
Transcript

Technical Note TN-123 10/05/WH
RAE Systems by Honeywell 877-723-2878 raesystems.com 1
SPECIAL DIAGNOSTIC MODES FOR RAE SYSTEMS INSTRUMENTSAll RAE Systems gas monitors have a special diagnostic mode that can be used to evaluate the condition of lamps, sensors, pumps, etc. The Diagnostic Mode is entered via a special start-up sequence. This consists of holding down the keys in Table 1 while turning on. This Diagnostic Mode isnot to be confused with the initial diagnostics that are automatically performed during routine start-up. The instrument goes through the standard start-up sequence and then displays raw sensor readings in certain modes, rather than readings converted to ppm or percent. On most instruments, a rapid start-up can be achieved by pressing Y/+ again when “Diagnostic Mode” is displayed after a few start-up screens.
In addition to the special diagnostics, many of the usual functions can still be performed in this mode, such as zeroing and calibration (except for a few instruments). This technical note focuses on the sensor diagnostics; see the product manuals for information on other diagnostics such as pump threshold, display contrast, backlight threshold, battery level, and sensor expiration dates. Table 2 lists the location and specifications for the raw sensor readings, and the paragraphs below give further information specific to each type of monitor.
MINIRAE PLUS & MINIRAE PLUS CLASSIC
Turn on while depressing the up arrow. Toggle 3 times with the menu key to reach the CO display. The signal decreases when span gas is applied. The amount of the decrease depends on whether an “attenuator ring” is installed between the lamp and the sensor block. A new 10.6 eV lamp should exhibit a drop of more than 200 counts without the ring, and 60 to 120 counts with the ring in place.
Caution: When the reading drops to zero it resets to 300 and then drops further from there. Thus, when a lamp is very strong and 100 ppm isobutylene is applied, the reading may appear to drop only a small amount and appear as a weak lamp. In such cases it is important to look for the cycling as the span gas is turned on or off. As the lamp ages, the attenuator ring can be removed to allow more light to pass and increase the count difference. Occasionally, a 10.6 eV lamp that doesn’t seem to respond at all with the ring in place can be brought back to full working condition by removing the ring.
A new 11.7 eV lamp should give a drop of ~100 counts with 100 ppm isobutylene. Never use an attenuator ring with this lamp,
because of its lower output. When the span difference drops to less than 10 or 20 counts the lamp begins to have difficulty calibrating or lighting, and needs to be replaced.
MINIRAE 2000, PPBRAE PLUS & ULTRARAE
Depress the Y/+ button while turning the unit on, and hold it until the beep stops. The unit starts up in the 1A raw count scale. Press MODE once to move to the 10A scale, and then Y/+ to reach the 100A scale. The B scales are not used at present. The raw count rise (delta) listed in Table 2 are with the high-intensity 10.6 eV lamps for the ppbRAE Plus and standard 10.6 eV lamps for the MiniRAE 2000.
TOXIRAE PID
Depress the Y/+ button while turning on. The reading starts at <60 with no attenuation (x1) and increases when applying span gas. If the value increases above 3,686, the attenuation automatically increases to x10, and the reading switches to 369 x10. A new 10.6 eV lamp typically shows >1,000 x1 counts with 100 ppm isobutylene. This value drops rapidly in the first week or so, and then stabilize above a few hundred counts. Newer instruments (s/n above ~800) have higher internal gain, so that the initial lamp counts should be approaching 4000 (400 x10) and a stabilized lamp above 1000 x1. Low output in this mode could result from a weak lamp, corroded or dirty sensor, or a faulty circuit board.
• Toggling the Mode key once yields the lamp power draw display, which should read between 140 and 175 counts. At lower values, the lamp has most likely failed to light. When the lamp is removed, the reading should drop to 125 to 137; otherwise there is a circuit board problem.
• Toggling two more times reaches a “no lamp” prompt. This mode is useful when the instrument gives a “lmp” error despite the lamp being lit. Press Y/+ with the lamp removed to reset the lamp detection baseline and erase the error display.
TOXIRAE SINGLE-GAS MONITORS
These use the N/- button held down while turning the unit on, to enter the Diagnostic Mode. The raw counts are seen after beginning calibration by holding the N/- and Mode keys at the same time. For Oxygen Monitors, the raw readings decrease when pure nitrogen is applied.
Technical Note TN-123 10/05/WH
RAE Systems by Honeywell 877-723-2878 raesystems.com 2
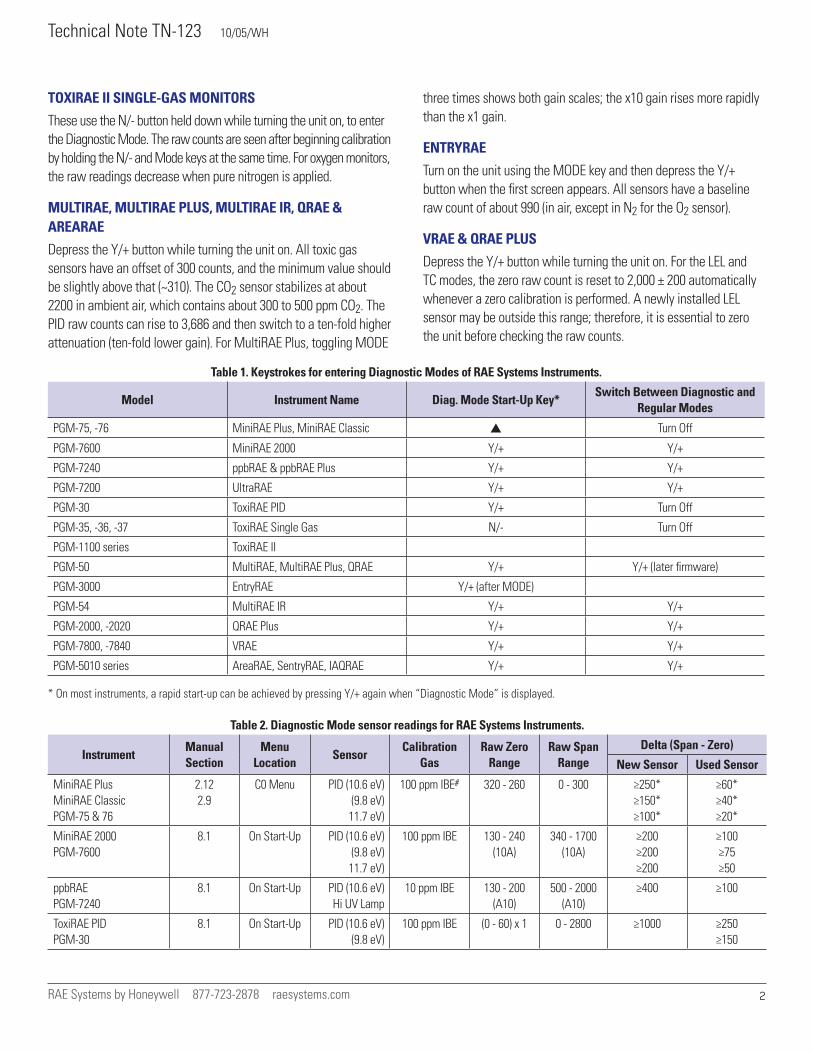
TOXIRAE II SINGLE-GAS MONITORS
These use the N/- button held down while turning the unit on, to enter the Diagnostic Mode. The raw counts are seen after beginning calibration by holding the N/- and Mode keys at the same time. For oxygen monitors, the raw readings decrease when pure nitrogen is applied.
MULTIRAE, MULTIRAE PLUS, MULTIRAE IR, QRAE & AREARAE
Depress the Y/+ button while turning the unit on. All toxic gas sensors have an offset of 300 counts, and the minimum value should be slightly above that (~310). The CO2 sensor stabilizes at about 2200 in ambient air, which contains about 300 to 500 ppm CO2. The PID raw counts can rise to 3,686 and then switch to a ten-fold higher attenuation (ten-fold lower gain). For MultiRAE Plus, toggling MODE
three times shows both gain scales; the x10 gain rises more rapidly than the x1 gain.
ENTRYRAE
Turn on the unit using the MODE key and then depress the Y/+ button when the first screen appears. All sensors have a baseline raw count of about 990 (in air, except in N2 for the O2 sensor).
VRAE & QRAE PLUS
Depress the Y/+ button while turning the unit on. For the LEL and TC modes, the zero raw count is reset to 2,000 ± 200 automatically whenever a zero calibration is performed. A newly installed LEL sensor may be outside this range; therefore, it is essential to zero the unit before checking the raw counts.
Table 1. Keystrokes for entering Diagnostic Modes of RAE Systems Instruments.
Model Instrument Name Diag. Mode Start-Up Key*Switch Between Diagnostic and
Regular Modes
PGM-75, -76 MiniRAE Plus, MiniRAE Classic Turn Off
PGM-7600 MiniRAE 2000 Y/+ Y/+
PGM-7240 ppbRAE & ppbRAE Plus Y/+ Y/+
PGM-7200 UltraRAE Y/+ Y/+
PGM-30 ToxiRAE PID Y/+ Turn Off
PGM-35, -36, -37 ToxiRAE Single Gas N/- Turn Off
PGM-1100 series ToxiRAE II
PGM-50 MultiRAE, MultiRAE Plus, QRAE Y/+ Y/+ (later firmware)
PGM-3000 EntryRAE Y/+ (after MODE)
PGM-54 MultiRAE IR Y/+ Y/+
PGM-2000, -2020 QRAE Plus Y/+ Y/+
PGM-7800, -7840 VRAE Y/+ Y/+
PGM-5010 series AreaRAE, SentryRAE, IAQRAE Y/+ Y/+
* On most instruments, a rapid start-up can be achieved by pressing Y/+ again when “Diagnostic Mode” is displayed.
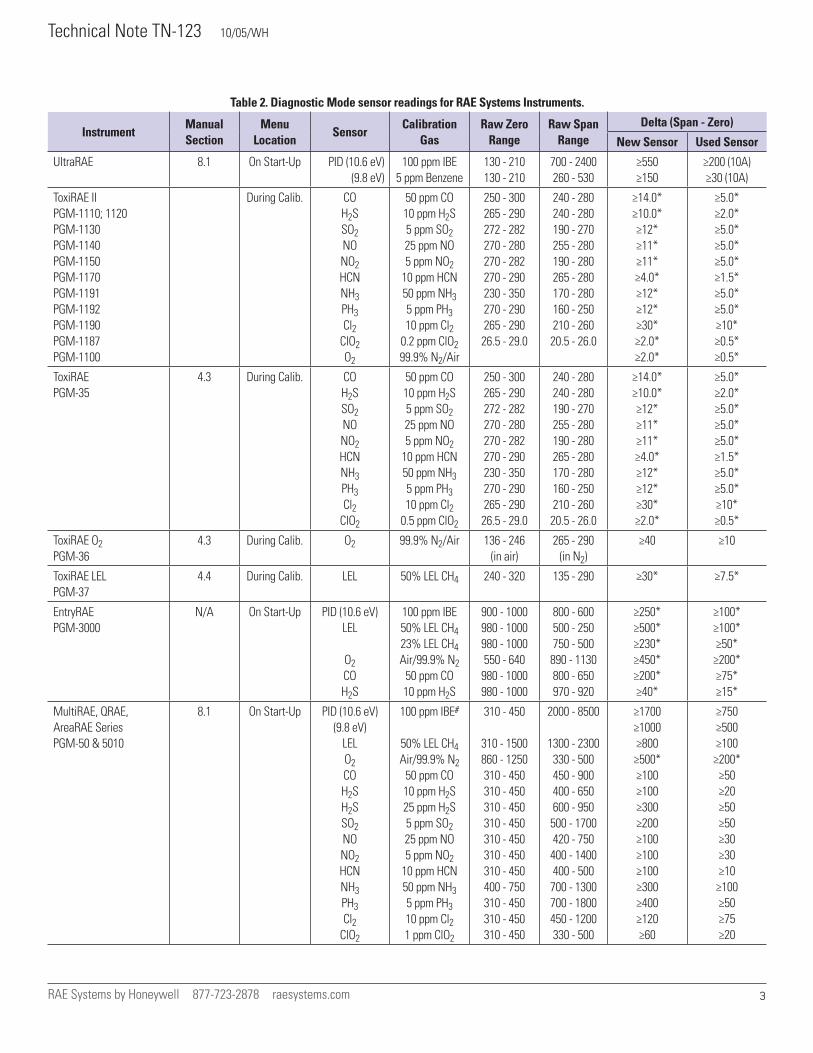
Table 2. Diagnostic Mode sensor readings for RAE Systems Instruments.
InstrumentManual Section
Menu Location
SensorCalibration
GasRaw Zero
RangeRaw Span
RangeDelta (Span - Zero)
New Sensor Used Sensor
MiniRAE Plus MiniRAE Classic PGM-75 & 76
2.12 2.9
C0 Menu PID (10.6 eV) (9.8 eV)
11.7 eV)
100 ppm IBE# 320 - 260 0 - 300 ≥250* ≥150* ≥100*
≥60* ≥40* ≥20*
MiniRAE 2000 PGM-7600
8.1 On Start-Up PID (10.6 eV) (9.8 eV)
11.7 eV)
100 ppm IBE 130 - 240 (10A)
340 - 1700 (10A)
≥200 ≥200 ≥200
≥100 ≥75 ≥50
ppbRAE PGM-7240
8.1 On Start-Up PID (10.6 eV) Hi UV Lamp
10 ppm IBE 130 - 200 (A10)
500 - 2000 (A10)
≥400 ≥100
ToxiRAE PID PGM-30
8.1 On Start-Up PID (10.6 eV) (9.8 eV)
100 ppm IBE (0 - 60) x 1 0 - 2800 ≥1000 ≥250 ≥150
Technical Note TN-123 10/05/WH
RAE Systems by Honeywell 877-723-2878 raesystems.com 3
Table 2. Diagnostic Mode sensor readings for RAE Systems Instruments.
InstrumentManual Section
Menu Location
SensorCalibration
GasRaw Zero
RangeRaw Span
RangeDelta (Span - Zero)
New Sensor Used Sensor
UltraRAE 8.1 On Start-Up PID (10.6 eV) (9.8 eV)
100 ppm IBE 5 ppm Benzene
130 - 210 130 - 210
700 - 2400 260 - 530
≥550 ≥150
≥200 (10A) ≥30 (10A)
ToxiRAE II PGM-1110; 1120 PGM-1130 PGM-1140 PGM-1150 PGM-1170 PGM-1191 PGM-1192 PGM-1190 PGM-1187 PGM-1100
During Calib. CO H2S SO2 NO NO2 HCN NH3 PH3 Cl2
ClO2 O2
50 ppm CO 10 ppm H2S 5 ppm SO2 25 ppm NO 5 ppm NO2
10 ppm HCN 50 ppm NH3 5 ppm PH3 10 ppm Cl2
0.2 ppm ClO2 99.9% N2/Air
250 - 300 265 - 290 272 - 282 270 - 280 270 - 282 270 - 290 230 - 350 270 - 290 265 - 290 26.5 - 29.0
240 - 280 240 - 280 190 - 270 255 - 280 190 - 280 265 - 280 170 - 280 160 - 250 210 - 260 20.5 - 26.0
≥14.0* ≥10.0* ≥12* ≥11* ≥11* ≥4.0* ≥12* ≥12* ≥30* ≥2.0* ≥2.0*
≥5.0* ≥2.0* ≥5.0* ≥5.0* ≥5.0* ≥1.5* ≥5.0* ≥5.0* ≥10* ≥0.5* ≥0.5*
ToxiRAE PGM-35
4.3 During Calib. CO H2S SO2 NO NO2 HCN NH3 PH3 Cl2
ClO2
50 ppm CO 10 ppm H2S 5 ppm SO2 25 ppm NO 5 ppm NO2
10 ppm HCN 50 ppm NH3 5 ppm PH3 10 ppm Cl2
0.5 ppm ClO2
250 - 300 265 - 290 272 - 282 270 - 280 270 - 282 270 - 290 230 - 350 270 - 290 265 - 290 26.5 - 29.0
240 - 280 240 - 280 190 - 270 255 - 280 190 - 280 265 - 280 170 - 280 160 - 250 210 - 260 20.5 - 26.0
≥14.0* ≥10.0* ≥12* ≥11* ≥11* ≥4.0* ≥12* ≥12* ≥30* ≥2.0*
≥5.0* ≥2.0* ≥5.0* ≥5.0* ≥5.0* ≥1.5* ≥5.0* ≥5.0* ≥10* ≥0.5*
ToxiRAE O2 PGM-36
4.3 During Calib. O2 99.9% N2/Air 136 - 246 (in air)
265 - 290 (in N2)
≥40 ≥10
ToxiRAE LEL PGM-37
4.4 During Calib. LEL 50% LEL CH4 240 - 320 135 - 290 ≥30* ≥7.5*
EntryRAE PGM-3000
N/A On Start-Up PID (10.6 eV) LEL
O2 CO H2S
100 ppm IBE 50% LEL CH4 23% LEL CH4 Air/99.9% N2
50 ppm CO 10 ppm H2S
900 - 1000 980 - 1000 980 - 1000 550 - 640 980 - 1000 980 - 1000
800 - 600 500 - 250 750 - 500 890 - 1130 800 - 650 970 - 920
≥250* ≥500* ≥230* ≥450* ≥200* ≥40*
≥100* ≥100* ≥50* ≥200* ≥75* ≥15*
MultiRAE, QRAE, AreaRAE Series PGM-50 & 5010
8.1 On Start-Up PID (10.6 eV) (9.8 eV)
LEL O2 CO H2S H2S SO2 NO NO2 HCN NH3 PH3 Cl2
ClO2
100 ppm IBE#
50% LEL CH4 Air/99.9% N2
50 ppm CO 10 ppm H2S 25 ppm H2S 5 ppm SO2 25 ppm NO 5 ppm NO2
10 ppm HCN 50 ppm NH3 5 ppm PH3 10 ppm Cl2 1 ppm ClO2
310 - 450
310 - 1500 860 - 1250 310 - 450 310 - 450 310 - 450 310 - 450 310 - 450 310 - 450 310 - 450 400 - 750 310 - 450 310 - 450 310 - 450
2000 - 8500
1300 - 2300 330 - 500 450 - 900 400 - 650 600 - 950 500 - 1700 420 - 750 400 - 1400 400 - 500 700 - 1300 700 - 1800 450 - 1200 330 - 500
≥1700 ≥1000 ≥800 ≥500* ≥100 ≥100 ≥300 ≥200 ≥100 ≥100 ≥100 ≥300 ≥400 ≥120 ≥60
≥750 ≥500 ≥100 ≥200* ≥50 ≥20 ≥50 ≥50 ≥30 ≥30 ≥10 ≥100 ≥50 ≥75 ≥20

Technical Note TN-123 10/05/WH
RAE Systems by Honeywell 877-723-2878 raesystems.com 4
Table 2. Diagnostic Mode sensor readings for RAE Systems Instruments.
InstrumentManual Section
Menu Location
SensorCalibration
GasRaw Zero
RangeRaw Span
RangeDelta (Span - Zero)
New Sensor Used Sensor
MultiRAE IR PGM-54
8.1 On Start-up CO2 Others
5000 ppm CO2 See PGM-50
500 - 3000 See PGM-50
700 - 3100 See PGM-50
≥150 See PGM-50
≥50 See PGM-50
VRAE PGM-7800 & 7840
8.1 On Start-up LEL/TC
O2 CO H2S H2S SO2 NO NO2 HCN NH3 PH3 Cl2
ClO2
50% LEL CH4
20 Vol% CH4 Air/99.9% N2
50 ppm CO 10 ppm H2S 25 ppm H2S 5 ppm SO2 25 ppm NO 5 ppm NO2
10 ppm HCN 50 ppm NH3 5 ppm PH3 10 ppm Cl2
0.5 ppm ClO2
2150 - 2190 1900 - 2200 1000 - 1350 150 - 200 150 - 200 150 - 200 120 - 210 120 - 210 120 - 210 150 - 240 600 - 1200 120 - 210 120 - 210 130 - 240
2550 - 3200 2400 - 2900 100 - 200 350 - 800 300 - 500 500 - 2500 500 - 1100 420 - 800 300 - 1100 300 - 500
1000 - 3500 1200 - 2500 340 - 1400 190 - 300
≥400 ≥300 ≥800 ≥200 ≥150 ≥400 ≥450 ≥300 ≥150 ≥200 ≥900 ≥1100 ≥240 ≥40
≥100 ≥150 ≥300* ≥100 ≥50 ≥150 ≥100 ≥50 ≥75 ≥75 ≥200 ≥200 ≥100 ≥15
QRAE Plus PGM-2000
8.1 On Start-up LEL/TC
O2 CO H2S H2S SO2 NO NO2 HCN NH3 PH3 Cl2
50% LEL CH4
20 Vol% CH4 Air/99.9% N2
50 ppm CO 10 ppm H2S 25 ppm H2S 5 ppm SO2 25 ppm NO 5 ppm NO2
10 ppm HCN 50 ppm NH3 5 ppm PH3 10 ppm Cl2
2150 - 2190 1800 - 2200 1000 - 1350 150 - 200 150 - 200 150 - 200 120 - 210 120 - 210 120 - 210 120 - 240 200 - 900 120 - 400 120 - 210
2400 - 3400 2400 - 2900 100 - 200 350 - 800 300 - 500 650 - 1000 400 - 1000 350 - 550 350 - 550 300 - 600
1500 - 3700 1200 - 3500 340 - 900
≥300 ≥300 ≥800 ≥200 ≥150 ≥400 ≥300 ≥200 ≥120 ≥150 ≥800 ≥1000 ≥240
≥100 ≥150 ≥300* ≥100 ≥50 ≥150 ≥100 ≥50 ≥50 ≥50 ≥200 ≥200 ≥100
* Raw counts drop when span gas is applied. O2: C # IBE = Isobutylene, C3H8 = Propane.
Related Documents