TECHNICAL SERVICE BULLETIN Bulletin Nbr: 831-2639 ed. 4 Date:...........Februari 2009 Market: all Pinch protection activates Cars affected Saab 9-3 equipped with pinch protection: 4D/5D: M03- CV: M04- Background The software for pinch protection functionality has been improved from M07 in order to prevent the pinch protection from activating, which means that the window cannot be closed even if there is nothing obstructing it. The software is also available for older cars as per above (does not apply to 4D M03). The software also includes diagnostic and fault diagnosis options (does not apply to CV and 4D M03-M04). The control module must not be replaced when the pinch protection incorrectly activates, as the fault is not in the control module. In order to facilitate fault diagnosis, two new tests and new read values have been added into Tech2 (not CV and 4D M03-M04). The tests and read values are oriented toward adaptation performance and mechanical problems. As the pinch protection system is adaptive the adaptation performance is one of the most important parameters. A system with poor adaptation performance is more likely to activate the pinch protection incorrectly. One of the reasons the pinch protection may activate before the window is closed is that the window's actual position does not correspond to the programmed position. This means that the window lift motor will not stop at the end position but instead will back up a bit. In the case of customer complaint, the following procedure must be carried out. Symptom description The pinch protection activates before the window is closed. Parts required As required, see EPC for part numbers. Note First ensure the car is fitted with the pinch protection. Lift up the window lift button. Cars with pinch protection: the button has two positions.

Welcome message from author
This document is posted to help you gain knowledge. Please leave a comment to let me know what you think about it! Share it to your friends and learn new things together.
Transcript

TECHNICAL SERVICE BULLETIN Bulletin Nbr: 831-2639 ed. 4 Date:...........Februari 2009 Market: all
Pinch protection activates
Cars affected Saab 9-3 equipped with pinch protection: 4D/5D: M03- CV: M04- Background The software for pinch protection functionality has been improved from M07 in order to prevent the pinch protection from activating, which means that the window cannot be closed even if there is nothing obstructing it. The software is also available for older cars as per above (does not apply to 4D M03). The software also includes diagnostic and fault diagnosis options (does not apply to CV and 4D M03-M04). The control module must not be replaced when the pinch protection incorrectly activates, as the fault is not in the control module. In order to facilitate fault diagnosis, two new tests and new read values have been added into Tech2 (not CV and 4D M03-M04). The tests and read values are oriented toward adaptation performance and mechanical problems. As the pinch protection system is adaptive the adaptation performance is one of the most important parameters. A system with poor adaptation performance is more likely to activate the pinch protection incorrectly. One of the reasons the pinch protection may activate before the window is closed is that the window's actual position does not correspond to the programmed position. This means that the window lift motor will not stop at the end position but instead will back up a bit. In the case of customer complaint, the following procedure must be carried out. Symptom description
The pinch protection activates before the window is closed. Parts required As required, see EPC for part numbers. Note
First ensure the car is fitted with the pinch protection. Lift up the window lift button.
Cars with pinch protection: the button has two positions.

Cars without pinch protection: the button has one position.
Procedure M03
1. Check if the window's actual position corresponds with the programmed position.
1.a. Do not program.
1.b. Raise the window using "Express Up." If this is not possible, temporarily disconnect the pinch protection so that the window can be closed. The ignition should be in the ON position. Hold down the disconnect button for the rear window lifts in the driver door (the button must be depressed the entire time the window is closing). Close the applicable window. The next time the window lift is used, the pinch protection will be active again.
1.c. Use Tech2 and check that the read values show that the window is closed. Body - Power Windows - option Driver/Pass door - Read Values. Select using operation button - advanced operation - select group. Read in menu Window position xxx counts - Window, programmed upper stop xxx counts.
1.d. Calculate the difference between the actual upper stop position and the programmed actual stop position by taking the values from pos 1 c "Programmed upper stop" minus "Window position," e.g. 1168 - 1151 = 17. If the value is higher than 15, change the window lift's electric motor and then program.
2. If the fault remains, carry out checking and fault diagnosis M03-M04, see page 7. If the fault has been rectified, then no additional steps are necessary.
Note
If the door control module has been replaced and is M04- then the window lift must be from M04-.
If the window lift has been replaced and is M04- then the door control module must be from M04-.
To distinguish the window lift from M03 and M04-, check the colour of the pulley behind the window lift motor.
M03= White
M04= Light brown/beige
Check the above in order to avoid the pinch protection incorrectly deploying.
3. If the problem remains following the above fault diagnosis, then the pinch protection can be deactivated using Tech 2 (version 127.000 or later) under the menu entitled Fault diagnosis - Model year 2003 - Saab 9-3 Sport (9440) - All - Service - Activate/Deactivate pinch protection.

Procedure M04-
Note
This deactivation means that the "Express up" function is deactivated.
1. Check if the window's actual position corresponds with the programmed position.
1.a. Do not program.
1.b. Raise the window using "Express Up." If this is not possible, temporarily disconnect the pinch protection so that the window can be closed. The ignition should be in the ON position. Hold down the disconnect button for the rear window lifts in the driver door (the button must be depressed the entire time the window is closing). Close the applicable window. The next time the window lift is used, the pinch protection will be active again.
1.c. Use Tech2 and check that the read values show that the window is closed. Body - Power Windows - option Driver/Pass door - Read Values. Select using operation button - advanced operation - select group. Read in menu Window position xxx counts - Window, programmed upper stop xxx counts.
1.d. Calculate the difference between the actual upper stop position and the programmed actual stop position by taking the values from pos 1 c "Programmed upper stop" minus "Window position," e.g. 1168 - 1151 = 17. If the value is higher than 15, change the window lift's electric motor and then program.
4D, M04: If the fault remains, proceed to step 2.
4D/5D M05-M06: If the fault remains, proceed to step 2.
4D/5D M07-: If the fault remains proceed to step 3.
CV M04-06: If the fault remains, proceed to step 2.
CV M07-: If the fault remains, proceed to step 3.
If the fault is rectified then no additional steps are necessary.
Car variant - Model year Software number
4D M04
DDM 12772267-AA PDM 12772265-AA RLDM 12772262-AA RRDM 12772261-AA

CV M04
DDM 12772268-AA PDM 12772066-AA
Car variant - Model year Software number
4D/5D M05- up to and including Vehicle Identification Number 51035621
DDM 12774945-AA PDM 12774946-AA RLDM 12774947-AA RRDM 12774948-AA
CV M05 up to and including Vehicle Identification Number 56001455
DDM 12774949-AA PDM 12774950-AA
Car variant - Model year Software number
4D/5D from and including Vehicle Identification Number 51035622 - M06
DDM 12772005BA PDM 12772004BA
CV from and including Vehicle Identification Number 56001456 - M06
DDM 12772001BA PDM 12772000BA
2.Check the door control module software number. If the software number is in accordance with those specified above or newer:
4D, M04: Carry out checking and fault diagnosis M03-M04, see page 7.
4D/5D M05-M06: Proceed to step 3.
CV: Carry out the procedure for CV, see page 10.
If the software number is older than those specified above:
Connect Tech2 (version 126.000 or later) and perform update. Add the door

control module with Tech2 under menu All - Add / Remove. Check the operation.
4D, M04: If the fault remains, carry out checking and fault diagnosis M03-M04, see page 8.
4D/5D M05- If the fault remains, proceed to step 3.
CV: If the fault remains, carry out the CV procedure, see page 10.
If the fault is rectified then no additional steps are necessary.
3. Raise and lower the window several times. If the pinch protection deploys each time the window is raised, proceed to step 9. If the pinch protection deploys sporadically, proceed to step 4.
4. If the pinch protection deploys while raising from the bottom position, proceed to step 5. If the pinch protection deploys during raising following lowering, but not to the bottom position, proceed to step 7.
5. Perform the adaptation test. Start the test in Tech2 under Body - Power Windows - Driver Door/Passenger Door - Miscellaneous - Adaptation test window system. The windows will now be lowered and raised 10 times in order to test the adaptation performance and to read the clamping forces.
The test is now complete.
6. If the test is OK, proceed to step 18. In the event of error messages, proceed to step 6a.
6.a. Error message: "Slow mechanical system". Max. clamping force is higher than 70, the window runs slowly. Check the mechanical system in accordance with steps 11-17. Use the read value "Position of max. force (mm)" in order to locate the problem area.
Check the adjustments using the read values. Then proceed to step 18.
6.b. Error message: "Mechanical problem, adjust window lift/window seal". Check the mechanical system in accordance with steps 11-17.
Check the adjustments using the read values. Then proceed to step 18.
6.c. Error message: "Poor adaptation performance". Adaptation approved less than 8 out of 10 times. The system cannot adapt itself. Carry out the programming of the window in accordance with step 18 and repeat the adaptation test. Note that several messages may arise at the same time. In which case carry out the mechanical fault diagnosis first.
7.
Carry out the Window opening/Closing test. Start the test in Tech2 under "Body - Power Windows - Driver Door/Passenger Door - Miscellaneous - Window opening/Closing test. The test is used to check whether the window is unsteady during the change of direction which creates the so-called "drawer effect". Tech2 opens the window to the selected opening point and closes it again. Start the test, open 1/3, 1/2 and 2/3.

If the test is OK, proceed to step 18.
In the event of error messages, proceed to step 8.
8. Error message: "Check/adjust window anchorage point/window lift". The difference in clamping force for the first 20 mm is higher than 20, check the window anchorage point/window lift. Carry out step 7 again and check the improvements.
9. Read out the following read values in Tech2 under Read Values - Advanced, miscellaneous:
9.a. False pinch protection activation during whole cycle: Lower the window to the bottom. Activate "Express up" and check the read values following pinch protection activation. Check the mechanics in accordance with steps 11-18. Use "Position of max. force" to locate the problem area.
9.b. False pinch protection activation at turning centre of window: Lower the window, stop and raise it before it has reached the bottom position. Read off the values following pinch protection activation. Check the window anchorage point if "Force difference first 20 mm" is higher than 20.
In the event of a value above 20, carry out step 15.
10. Check the improvements.
11. Check the glass guide seal on both sides of the window. Check the following:
11.a. that the guide in the seal (A) is clean. Check that no rubbish has become caught. Clean the seal if necessary.

11.b. that the seal is not damaged or creased. If the seal is damaged or creased then it must be replaced.
12. Check the outer and inner window seal (B). Check with the window down that the seal is not damaged or creased. If the seal is damaged or creased then it must be replaced.
13. Raise and lower the window. Use the blocking button if the pinch protection has deployed. Check that the window runs in an even line without a tipping or vibrating movement.
If the window is OK, proceed to step 16.
If the window is not OK, proceed to step 14.
14. Remove the door trim in accordance with WIS - Interior equipment - Adjustment/Replacement - Door trim.
15. Check the following:
15.a. that the window lift and motor are fastened securely without play. Adjust if necessary.
15.b. that the window is fastened securely and is not unsteady in the slider when it is raised and lowered. The window must be in contact with the rubber coated mountings (B). (Illustration seen from the outside). Adjust by undoing the screws, then press the window down, back.
Tightening torque 9 Nm (7 lbf ft)

16. Remove the door trim in accordance with WIS - Interior equipment - Adjustment/Replacement - Door trim. Check contacts, connectors with regard to oxidation, dislodged pins and pin clamping force.
17. Fit the door trim in accordance with WIS - Interior equipment - Adjustment/Replacement - Door trim.
18. Carry out pinch protection programming as follows:
Note
Only one control module to be calibrated at a time due to voltage variations.
18.a. Close the window.
18.b. Reset the pinch protection by removing and fitting fuse F5 from the instrument panel electrical centre (IPEC). The pinch protection for both door modules is now reset and both front windows can be programmed.
18.c. Start the car.
18.d. Lower the window fully. Hold the button depressed during the entire operation.
18.e. Raise the window fully. Hold the button up during the entire operation. Wait for at least 1 second when the window is in the top position.
18.f. Lower the window fully. Hold the button depressed during the entire operation.
18.g. Raise the window fully. Hold the button up during the entire operation. Wait for at least 1 second when the window is in the top position.
18.h. When calibration has been completed an audible confirmation is heard. In the event that there is no audible confirmation, repeat the procedure.
Description of read values All values are reset and their measurement starts following activation of "Express up". Max. force - Max. clamping force
Shows max. measured force during the latest closing cycle. Purpose: To identify deviating slowness in the system. Position of max. force (mm) - Max. clamping force position (mm)
Shows the position, in mm from bottom position, of max. measured force during the latest closing cycle. Purpose: To show where fault diagnosis of the mechanical system should be focused. Average force - Average clamping force value
Average value of the force in the latest closing cycle. Purpose: To indicate how slow the system is, comparable with Max. force. Force difference - Clamping force difference
Difference between Max. force and Average force. Purpose: To identify mechanical variations. Force difference first 20 mm - Clamping force difference first 20 mm
Description: Measures the difference of min./max. torque during the first 20 mm following activation. Purpose: To detect whether the window is unsteady during the change of direction, so-called "drawer effect". Checking and fault diagnosis M03-M04, 4D
1. Check the glass guide seal on both sides of the window. Check the following:
1.A. that the guide in the seal is clean. Check that no rubbish has become caught. Clean the seal if necessary.

1.B. that the seal is not damaged or creased. If the seal is damaged or creased then it must be replaced.
2. Check the outer and inner window seals. Check with the window wound down that the seal is not damaged or creased. If the seal is damaged or creased it must be replaced.
3. Raise and lower the window. Use the blocking button if the pinch protection has deployed. Check that the window runs in an even line without a tipping or vibrating movement. If the window is OK, proceed to step 6. If the window is not OK, proceed to step 4.
4. Remove the door trim in accordance with WIS - Interior equipment - Adjustment/Replacement - Door trim.
5. Check the following:
5.A. that the window lift and motor are fastened securely without play. Adjust if necessary.

Procedure, CV
5.B. that the window is fastened securely and is not unsteady in the slider when it is raised and lowered. The window must be in contact with the rubber coated mountings. (Illustration seen from the outside). Adjust by undoing the screws, press the window down, back. Tightening torque 9 Nm (7 lbf ft)
6. Remove the door trim. Check contacts, connectors with regard to oxidation, dislodged pins and pin clamping force.
7. Fit the door trim in accordance with WIS - Interior equipment - Adjustment/Replacement - Door trim.
8. Reset the pinch protection by removing and fitting fuse F5 from the instrument panel electrical centre (IPEC) (applies to front door module) or fuse 21 in the rear electrical centre (REC) (applies to rear door module). Carry out pinch protection programming in accordance with WIS - Body - Doors and locks - Adjustment/Replacement - Calibration of pinch protection.
1. Remove fuse F5 from the instrument panel electrical centre (IPEC).
2. Fit the fuse.
Note
The pinch protection for door windows has now lost the previously programmed values. Pinch protection will be reprogrammed when the anti-pinch test is carried out.
3.Carry out the anti-pinch test in Tech2 under the menu, Body - Power Windows - Driver Door/Passenger Door - Miscellaneous - Anti-pinch test Convertible. Use Tech2 version 116.000 or later.

4. If the results of the Tech2 anti-pinch test are positive, no further action is necessary.
5. If the Tech2 anti-pinch test fails, proceed to step 6 and adjust the window(s) specified.
6. Lower the door window fully.
7. Remove the retaining bolt from the inner cover of the door mirror base and prise the cover from the door. Use 82 93 474 Removal tool.
8. Remove the inner cover of the door mirror base by lifting the cover straight up.
9. Driver's side: Unplug the connector from the door mirror switch.
10. Raise the window to its closed position.
11. Undo the four retaining bolts.

12. Undo and remove the adjuster screw.
13. Adjust the door mirror base by holding it so that it is in line with the door window.
14. Adjust the door mirror base so that the door window is angled inward slightly more than the door mirror base. The seal should have a gentle S-shape where it meets the glass.
Note
With the door closed, press the top edge of the glass outward, causing the door mirror base and the glass to form a straight line. This can be checked by pressing the top edge of the glass outward when the door is open.

15. Tighten the four bolts.
16. Insert the adjuster screw and tighten loosely so that it does not rattle.
17. Check that the door mirror and door window align with the A-pillar seal.
18. Check that the door windows and rear side windows operate smoothly by first raising the door windows and then the side windows. Lower all of the windows. Then raise the side windows followed by the door windows.
19. Remove fuse F5 in the instrument panel electrical centre (IPEC).
20.Fit the fuse. Note
The pinch protection for door windows has now lost the previously programmed values. Pinch protection will be reprogrammed when the anti-pinch test is carried out.
Warranty/Time Information
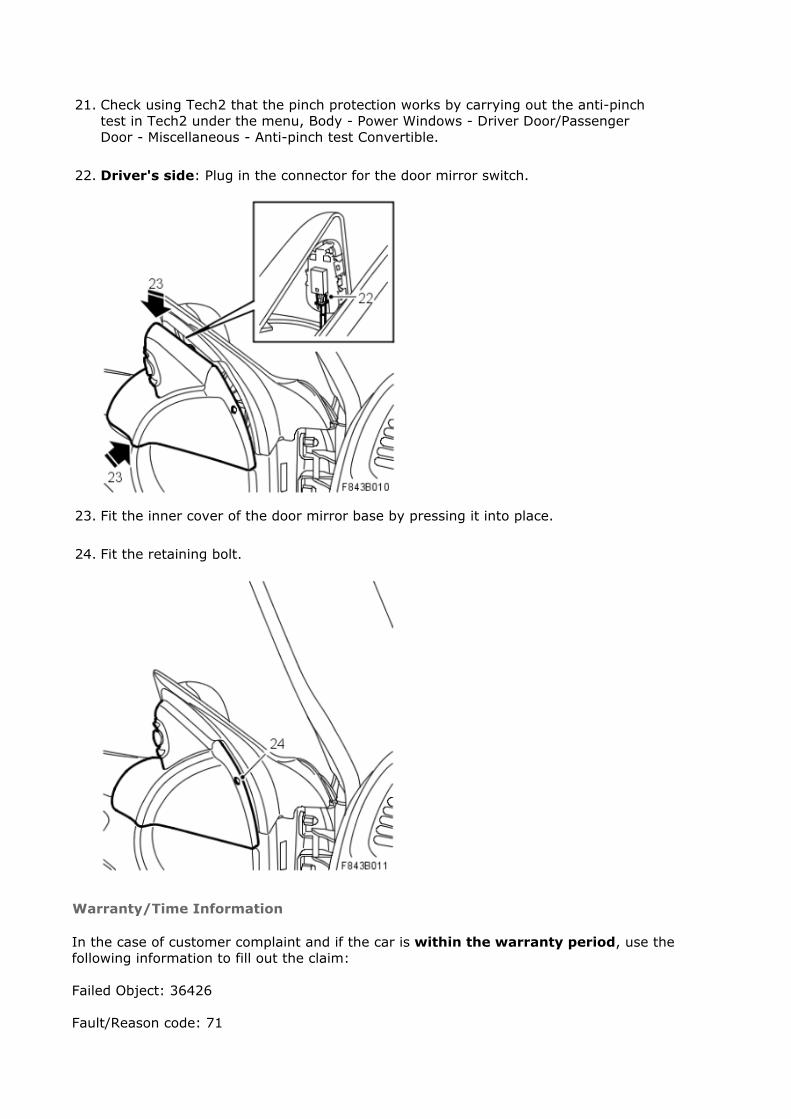
21. Check using Tech2 that the pinch protection works by carrying out the anti-pinch test in Tech2 under the menu, Body - Power Windows - Driver Door/Passenger Door - Miscellaneous - Anti-pinch test Convertible.
22. Driver's side: Plug in the connector for the door mirror switch.
23. Fit the inner cover of the door mirror base by pressing it into place.
24. Fit the retaining bolt.
In the case of customer complaint and if the car is within the warranty period, use the following information to fill out the claim: Failed Object: 36426 Fault/Reason code: 71

Fault diagnosis procedure is not available.
Location code: 09 (US=9) Warranty Type (US): 01 Repair/Action code: 05 Labour Operation (US): 3642611 (4D M03-M04) 3642612 (4D/5D M05-) 3642613 (CV M04-) 3642614 (4D M03) 8352101 (left) 8352102 (right) Labour operation/Time (CA): 36426-03 (SPS programming): N8520 / 0.3 hr 3642611M03-M04, 4D (procedure, excluding SPS/deactivation): N2142 / 0.4 h add M03 (deactivation pinch protection) 0.1 h 3642612 (4D/5D M05-) (procedure, excluding SPS): N2142 / 0.6 h 3642613 (CV M04-) CV (procedure, excluding SPS): N2142 / 0.4 h 83521 (change motor window lift, left): N6255 / 0.3 h 83521 (change motor window lift, right): N6254 / 0.3 h Time: 36426-03 (SPS programming): 0.3 hr 36426-14 (deactivation, pinch protection M03): 0.1 h 36426-11 (procedure M03-M04, excluding SPS/deactivation): 0.4 h 36426-12 (procedure M05-, excluding SPS): 0.6 h 36426-13 (procedure CV, excluding SPS): 0.4 h 83521 (change motor window lift): 0.3 h
Related Documents