Circulate To: General Manager, Service Manager, Parts Manager, Warranty Manager, Service Advisors, Technicians, Body Shop Manager, Fleet Repair Technical Service Bulletin GROUP NUMBER RECALL 15-01-013 DATE MODEL(S) MARCH 2015 2009 – 2011 3.8L GENESIS SEDAN (BH) SUBJECT: STOP LAMP SWITCH REPLACEMENT / ECU REPROGRAMMING (RECALL CAMPAIGN 125) Description: The stop lamp circuit includes a diode in series between the stop lamp switch and the stop lamps. A failure of the diode can result in inoperative stop lamps, increasing the risk of a crash. This bulletin provides the service procedure to replace the stop lamp switch, the joint diode, and reprogram the ECU. Applicable Vehicles: Certain 2009 - 2011 3.8L Genesis Sedan (BH) *** Retail Vehicles *** As required by federal law, dealers must perform all open recalls on used vehicles, demo and rental vehicles prior to placing them into customer use and whenever an affected vehicle is in the shop for any maintenance or repair. When a vehicle arrives at the service department, access Hyundai Motor America’s “Warranty Vehicle Information” screen via WEBDCS to identify open Campaigns. IMPORTANT

Welcome message from author
This document is posted to help you gain knowledge. Please leave a comment to let me know what you think about it! Share it to your friends and learn new things together.
Transcript
Circulate To: General Manager, Service Manager, Parts Manager, Warranty Manager, Service Advisors, Technicians, Body Shop Manager, Fleet Repair
Technical Service Bulletin
GROUP NUMBER
RECALL 15-01-013
DATE MODEL(S)
MARCH 2015 2009 – 2011 3.8L GENESIS SEDAN (BH)
SUBJECT: STOP LAMP SWITCH REPLACEMENT / ECU REPROGRAMMING
(RECALL CAMPAIGN 125)
Description: The stop lamp circuit includes a diode in series between the stop lamp switch and the stop lamps. A failure of the diode can result in inoperative stop lamps, increasing the risk of a crash. This bulletin provides the service procedure to replace the stop lamp switch, the joint diode, and reprogram the ECU.
Applicable Vehicles: Certain 2009 - 2011 3.8L Genesis Sedan (BH)
*** Retail Vehicles *** As required by federal law, dealers must perform all open recalls on used vehicles, demo and rental vehicles prior to placing them into customer use and whenever an affected vehicle is in the shop for any maintenance or repair. When a vehicle arrives at the service department, access Hyundai Motor America’s “Warranty Vehicle Information” screen via WEBDCS to identify open Campaigns.
IMPORTANT

STOP LAMP SWITCH REPLACEMENT / ECU REPROGRAMMING (RECALL CAMPAIGN 125)
TSB #: 15-01-013 Page 2 of 11
SUBJECT:
Parts Information:
PART NAME Model FIGURE / PART NUMBER REMARK
STOP LAMP REWORK KIT
BH
OMRON
91789-WIR01QQH
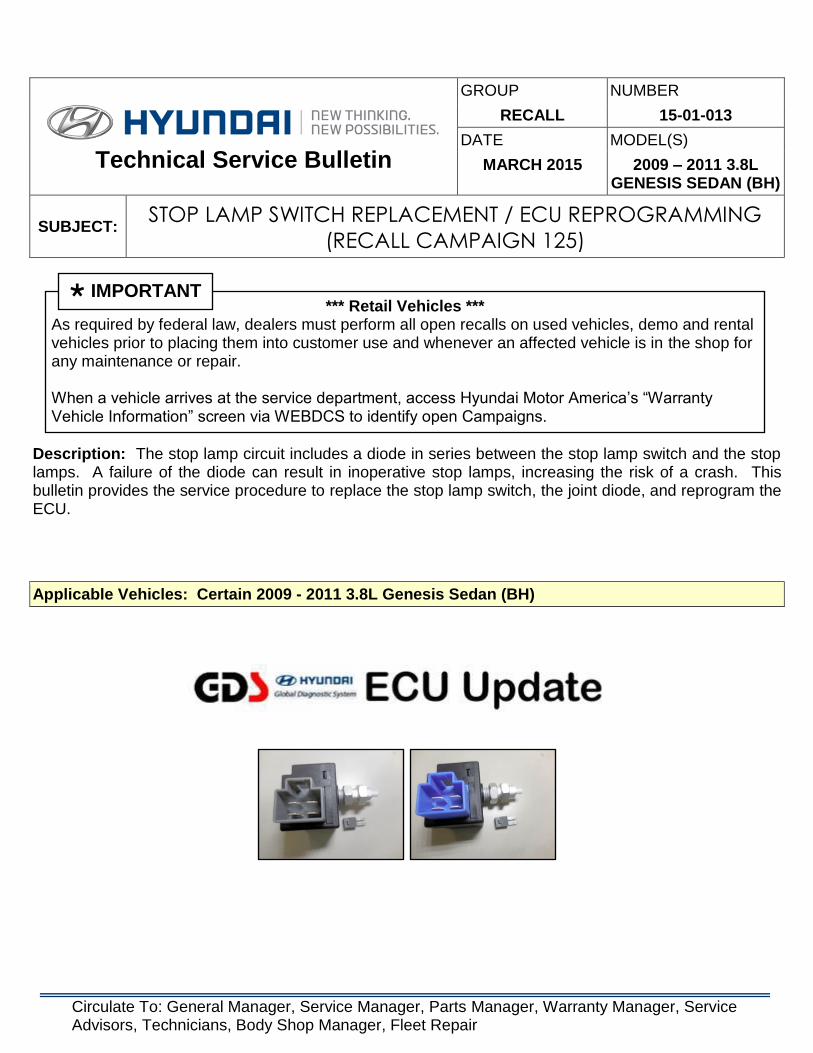
Stop lamp switch (Gray Connector)
+ Joint Diode
BH
OMRON
91789-WIR02QQH
Stop lamp switch (Blue Connector)
+ Joint Diode
Warranty Information:
OP CODE OPERATION OP TIME
41C085R0 REPLACEMENT OF STOP LAMP SWITCH, JOINT, AND ECU
REPROGRAMMING 0.7 M/H
NOTE: Submit Claim on Campaign Claim Entry Screen
STOP LAMP SWITCH REPLACEMENT / ECU REPROGRAMMING (RECALL CAMPAIGN 125)
TSB #: 15-01-013 Page 3 of 11
SUBJECT:
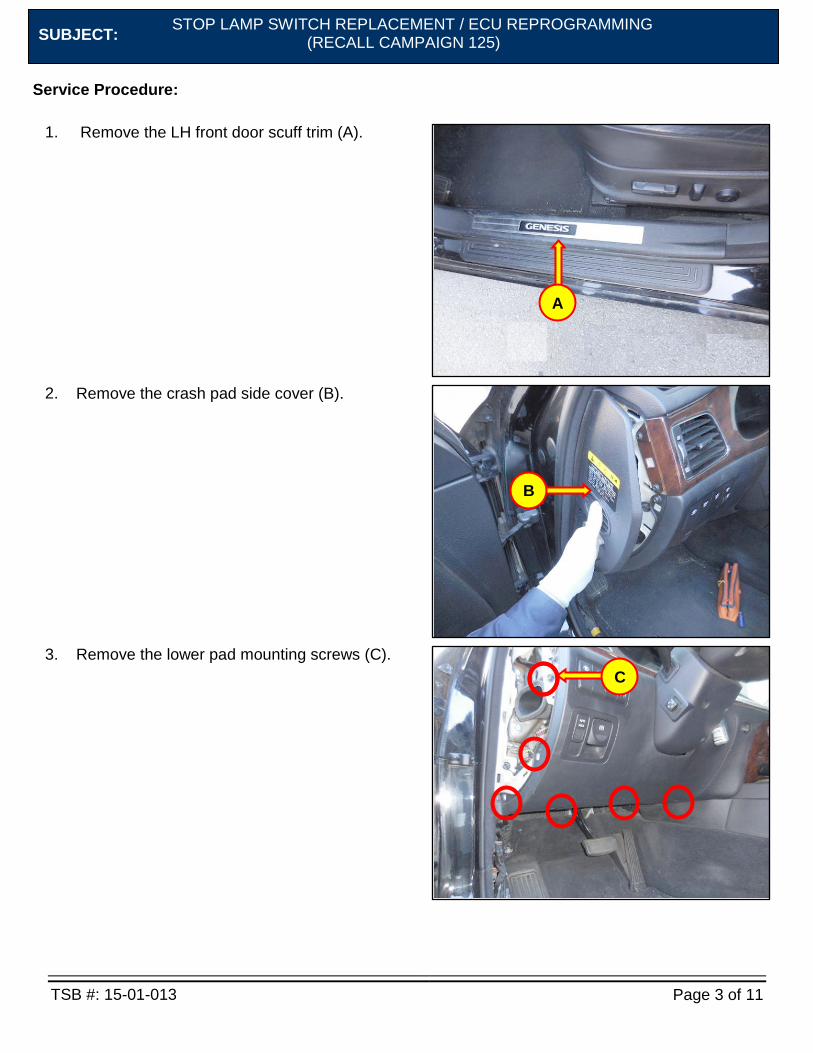
Service Procedure:
1. Remove the LH front door scuff trim (A).
2. Remove the crash pad side cover (B).
3. Remove the lower pad mounting screws (C).
A
B
C

STOP LAMP SWITCH REPLACEMENT / ECU REPROGRAMMING (RECALL CAMPAIGN 125)
TSB #: 15-01-013 Page 4 of 11
SUBJECT:
4. Disconnect the connector (D) and then remove the lower pad.
5. Remove the bracket mounting bolts (E) and nuts (F).
Tightening torque:
7.8 ~ 11.7 Nm (0.8 ~ 1.2 kgf.m, 5.7 ~ 8.6 lb-ft)
6. Disconnect the connector (G) and then remove the bracket.
D
E
F
G Visually inspect to see what brand the stop lamp switch is. Refer to the “PART REPLACEMENT TABLE” on the next page to find the correct stop lamp switch for replacement if applicable.
NOTICE

STOP LAMP SWITCH REPLACEMENT / ECU REPROGRAMMING (RECALL CAMPAIGN 125)
TSB #: 15-01-013 Page 5 of 11
SUBJECT:
PART REPLACEMENT TABLE:
BRAND IF VEHICLE IS EQUIPPED WITH REPLACE WITH
INFAC
OMRON
91789-WIR01QQH
TRUWIN
OMRON
91789-WIR01QQH
OMRON
91789-WIR02QQH
OMRON TRUWIN INFAC
The OMRON stop lamp switch is physically larger than TRUWIN or
INFAC.
NOTICE

STOP LAMP SWITCH REPLACEMENT / ECU REPROGRAMMING (RECALL CAMPAIGN 125)
TSB #: 15-01-013 Page 6 of 11
SUBJECT:
STOP LAMP SWITCH REPLACEMENT PROCEDURE
1. Disconnect the stop lamp switch connector (H).
2. Loosen the upper mounting nut (I) of the current stop lamp switch.
3. Remove the lower mounting nut (J) of the current stop lamp switch. Lower mounting nut: 7.8 ~ 9.8 Nm (0.8 ~ 1.0 kgf.m, 5.8 ~ 7.2 lb-ft)
H
I
J Replace the Stop Lamp Switch with like color connector. For example, Blue “TRUWIN” switch will be replaced with Blue “OMRON” switch.
NOTICE

STOP LAMP SWITCH REPLACEMENT / ECU REPROGRAMMING (RECALL CAMPAIGN 125)
TSB #: 15-01-013 Page 7 of 11
SUBJECT:
4. Remove the current stop lamp switch assembly (K), and then install the new stop lamp switch in reverse order of removal.
5. Connect the stop lamp switch connector (L) to the new stop lamp switch (M).
5.1 Ground the screw thread part (N) of the new stop lamp switch to a near chassis ground, and then confirm that the stop lamp operates normally when pressing or releasing the rod (O) of the new stop lamp switch. If it does not operate normally, replace it with the “BLUE CONNECTOR OMRON STOP LAMP SWITCH”.
K
L
O
N
M
Step ’5.1’ is only for the ‘INFAC’ switch replacement. If the brand of the previous stop lamp switch is ‘TRUWIN’, skip step ’5.1’.
NOTICE

STOP LAMP SWITCH REPLACEMENT / ECU REPROGRAMMING (RECALL CAMPAIGN 125)
TSB #: 15-01-013 Page 8 of 11
SUBJECT:
6. Adjust the gap between the stop lamp switch lower end and the stopper (P) with the brake pedal released. Specification : 1.0 ~ 2.0 mm (0.04 ~ 0.08 in)
7. Verify the stop lamp on the rear combination lamp operates normally when depressing the brake pedal.
JOINT DIODE REPLACEMENT PROCEDURE
1. Strip off the yellow wire tape (Q) on the driver side wire harness.
P
Q

STOP LAMP SWITCH REPLACEMENT / ECU REPROGRAMMING (RECALL CAMPAIGN 125)
TSB #: 15-01-013 Page 9 of 11
SUBJECT:
2. Locate the diode (R).
3. Unlock the diode (S) using a small flathead screwdriver or a pick.
4. Remove the diode (S).
R
S
S

STOP LAMP SWITCH REPLACEMENT / ECU REPROGRAMMING (RECALL CAMPAIGN 125)
TSB #: 15-01-013 Page 10 of 11
SUBJECT:
5. Install the Joint Diode (T).
6. Wrap the installed Joint Diode with a new tape (U).
7. Reinstall all the removed parts in reverse order of removal.
8. Verify the stop lamp on the rear combination lamp operates normally when depressing the brake pedal.
9. Proceed with ECU reprograming.
ECU REPROGRAMMING
Event # Description
353 BH 3.8MPI BRAKE LAMP CONTROL LOGIC IMPROVEMENT
NOTE:
Refer to the TSB 15-GI-001 for the tablet-based Mobile GDS ECU update procedures.
Refer to the TSB 15-GI-002 for the PC-based GDS ECU update procedures.
Select “Engine” as the system to reprogram.
T
U

STOP LAMP SWITCH REPLACEMENT / ECU REPROGRAMMING (RECALL CAMPAIGN 125)
TSB #: 15-01-013 Page 11 of 11
SUBJECT:
ROM ID Information Table: Verify the ECU ROM ID before updating the software. Refer to the table below.
Model OPT MY ECU P/N ROM ID
OLD NEW
BH 3.8 MPI 6AT IMMO
EHPS
09MY(ULEV) 39106-3C011
BH8N38*M2**8H4AE
BH9N38*M2**8P7AE
BH8N38*M2**8J4AE
BH8N38*M2**8L2AE
BH8N38*M2**8M6AE
BH8N38*M2**8N2BE
BH8N38*M2**8N2CE
BH8N38*M2**8N2DE
BH9N38*M2**8P4AE
10MY(ULEV) 39106-3C013
BH8N38*M2**8P1AE
BH8N38*M2**8P1BE
BH9N38*M2**8P1AE
BH9N38*M2**8P4AE
11MY(ULEV) 39106-3C015 BHAN38*M2**8P4AE BHAN38*M2**8P7AE
NON EHPS
09MY(ULEV) 39106-3C010
BH8N38*M2**8H4A*
BH9N38*M2**8P7A*
BH8N38*M2**8J4A*
BH8N38*M2**8L2A*
BH8N38*M2**8M6A*
BH8N38*M2**8N2B*
BH8N38*M2**8N2C*
BH8N38*M2**8N2D*
BH9N38*M2**8P4A*
10MY(ULEV) 39106-3C012
BH8N38*M2**8P1A*
BH8N38*M2**8P1B*
BH9N38*M2**8P1A*
BH9N38*M2**8P4A*
11MY(ULEV) 39106-3C014 BHAN38*M2**8P4A* BHAN38*M2**8P7A*
MANUAL MODE PASSWORD INFORMATION TABLE:
MENU PASSWORD
BH 3.8 MPI NON EHPS 39106-3C010/2 3012
BH 3.8 MPI NON EHPS 39106-3C014 3014
BH 3.8 MPI EHPS 39106-3C011/3 3013
BH 3.8 MPI EHPS 39106-3C015 3015
Related Documents