MITEL – SIP CoE Technical Configuration Note Configure Mitel MiVoice Business 7.2 SP1 PRI for use with IntelePeer SIP Trunking SIP CoE 12-4940-00XXX

Welcome message from author
This document is posted to help you gain knowledge. Please leave a comment to let me know what you think about it! Share it to your friends and learn new things together.
Transcript
MITEL – SIP CoE
Technical Configuration Note
Configure Mitel MiVoice Business 7.2 SP1 PRI for use with IntelePeer SIP Trunking
SIP CoE 12-4940-00XXX
ii
NOTICE
The information contained in this document is believed to be accurate in all respects but is not warranted by Mitel Networks ™ Corporation (MITEL®). The information is subject to change without notice and should not be construed in any way as a commitment by Mitel or any of its affiliates or subsidiaries. Mitel and its affiliates and subsidiaries assume no responsibility for any errors or omissions in this document. Revisions of this document or new editions of it may be issued to incorporate such changes.
No part of this document can be reproduced or transmitted in any form or by any means - electronic or mechanical - for any purpose without written permission from Mitel Networks Corporation.
TRADEMARKS
Mitel is a trademark of Mitel Networks Corporation.
Windows and Microsoft are trademarks of Microsoft Corporation.
Other product names mentioned in this document may be trademarks of their respective companies and are hereby acknowledged.
Mitel Technical Configuration Notes – Configure MiVoice Business for use with IntelePeer SIP Trunking
May 2016 12-4940-00XXX
™ Trademark of Mitel Networks Corporation © Copyright 2016, Mitel Networks Corporation
All rights reserved
Table of Contents
iii
OVERVIEW .................................................................................................................... 1 Interop History ........................................................................................................................1 Interop Status .........................................................................................................................1 Software & Hardware Setup ...................................................................................................1 Tested Features......................................................................................................................2 Device Limitations and Known Issues ...................................................................................2 Network Topology ...................................................................................................................3
CONFIGURATION NOTES ........................................................................................... 4 MiVoice Business Configuration Notes ..................................................................................4
Configuration Template .................................................................................................................... 4 Network Requirements .................................................................................................................... 4 Assumptions for MiVoice Business Programming ........................................................................... 4 Licensing and Option Selection – SIP Licensing ............................................................................. 5 Class of Service Assignment ........................................................................................................... 6
Class of Service for Trunk ............................................................................................................ 7 General ..................................................................................................................................... 7 Advanced ................................................................................................................................ 11
Class of Service for Phone ......................................................................................................... 13 General ................................................................................................................................... 13 Advanced ................................................................................................................................ 17
Network Element Assignment ........................................................................................................ 19 Network Element Assignment (Proxy) ........................................................................................... 20 Trunk Attributes .............................................................................................................................. 21 SIP Peer Profile.............................................................................................................................. 22 ARS Digit Modification Plans ......................................................................................................... 27 ARS Routes ................................................................................................................................... 28 ARS Digits Dialed........................................................................................................................... 29 Personal Ring Groups Configuration ............................................................................................. 30 MiVB Setup for Connecting NuPoint .............................................................................................. 34
Licensing and Option Selection – SIP Licensing .................................................................... 34 System Options ....................................................................................................................... 34 Class of Service Options ........................................................................................................ 35 IP Endpoints used for NuPoint Ports ...................................................................................... 36 Voicemail Hunt Group ............................................................................................................. 38 HCIReroute Hunt Group ......................................................................................................... 39
MiCollab NuPoint Configuration ..................................................................................................... 41 Network Elements ................................................................................................................... 41 Adding Mailboxes.................................................................................................................... 46
MiVoice Border Gateway Configuration Notes ................................................................... 50

1
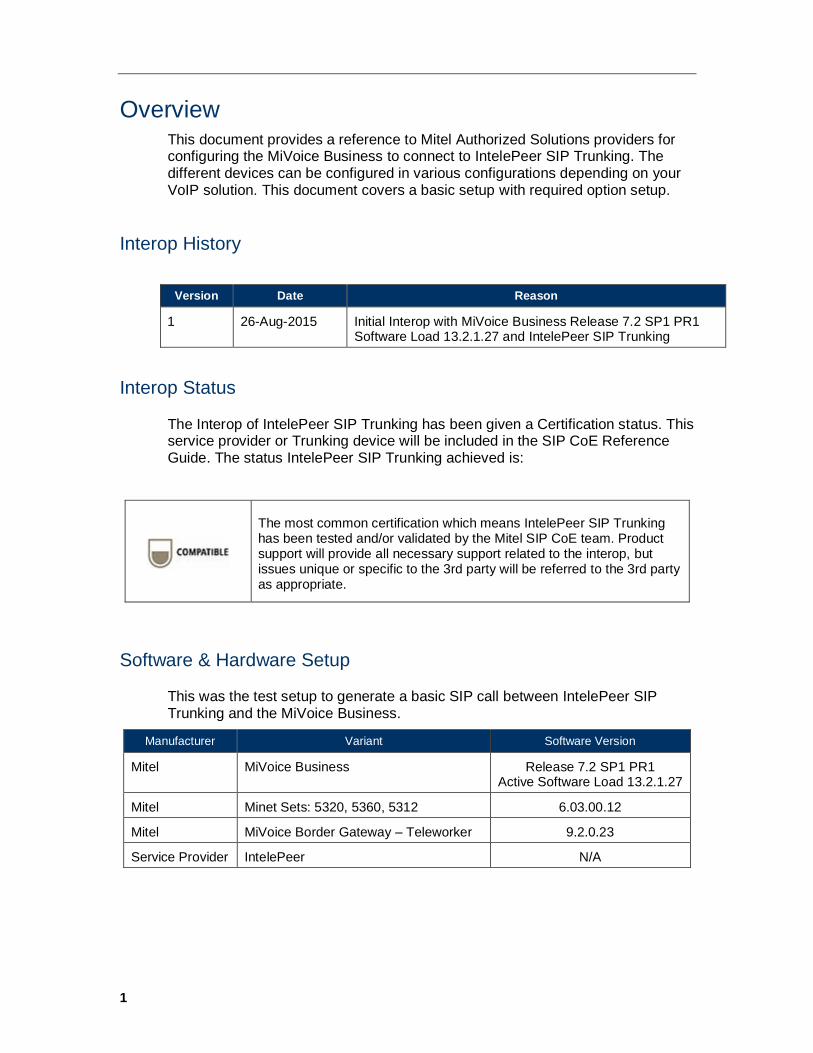
Overview This document provides a reference to Mitel Authorized Solutions providers for configuring the MiVoice Business to connect to IntelePeer SIP Trunking. The different devices can be configured in various configurations depending on your VoIP solution. This document covers a basic setup with required option setup.
Interop History
Version Date Reason
1 26-Aug-2015 Initial Interop with MiVoice Business Release 7.2 SP1 PR1 Software Load 13.2.1.27 and IntelePeer SIP Trunking
Interop Status
The Interop of IntelePeer SIP Trunking has been given a Certification status. This service provider or Trunking device will be included in the SIP CoE Reference Guide. The status IntelePeer SIP Trunking achieved is:
The most common certification which means IntelePeer SIP Trunking has been tested and/or validated by the Mitel SIP CoE team. Product support will provide all necessary support related to the interop, but issues unique or specific to the 3rd party will be referred to the 3rd party as appropriate.
Software & Hardware Setup
This was the test setup to generate a basic SIP call between IntelePeer SIP Trunking and the MiVoice Business.
Manufacturer Variant Software Version
Mitel MiVoice Business Release 7.2 SP1 PR1 Active Software Load 13.2.1.27
Mitel Minet Sets: 5320, 5360, 5312 6.03.00.12
Mitel MiVoice Border Gateway – Teleworker 9.2.0.23
Service Provider IntelePeer N/A
2
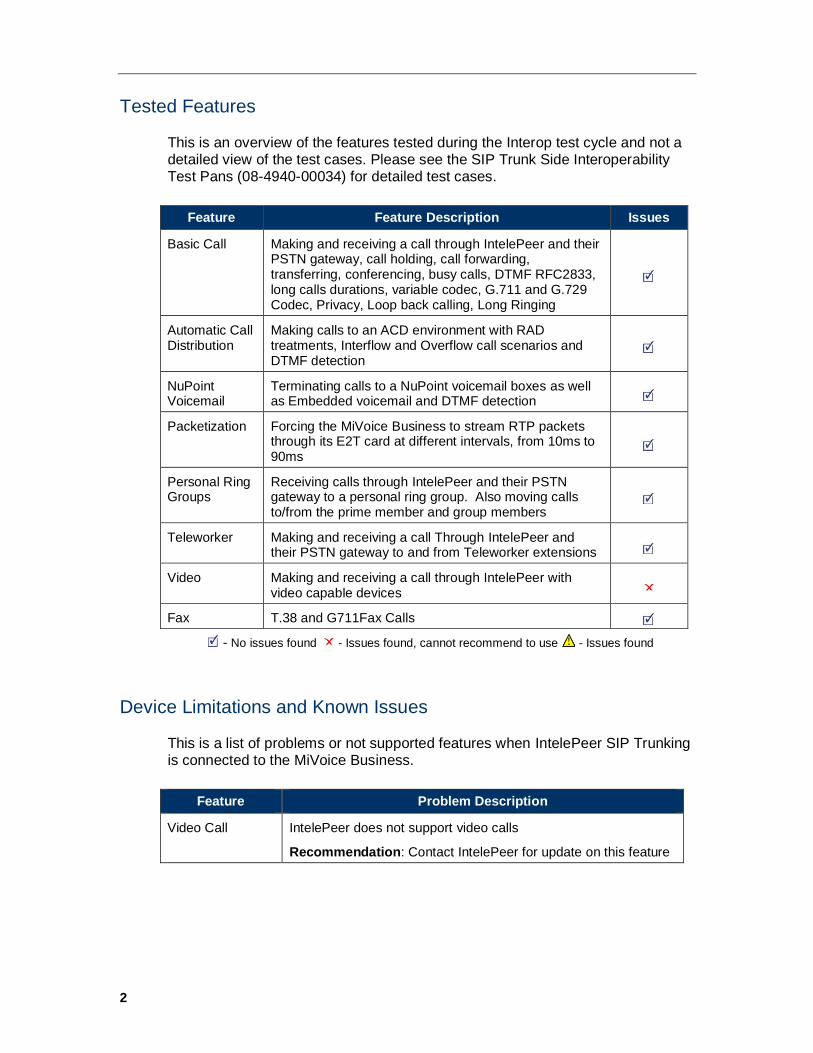
Tested Features
This is an overview of the features tested during the Interop test cycle and not a detailed view of the test cases. Please see the SIP Trunk Side Interoperability Test Pans (08-4940-00034) for detailed test cases.
Feature Feature Description Issues
Basic Call Making and receiving a call through IntelePeer and their PSTN gateway, call holding, call forwarding, transferring, conferencing, busy calls, DTMF RFC2833, long calls durations, variable codec, G.711 and G.729 Codec, Privacy, Loop back calling, Long Ringing
Automatic Call Distribution
Making calls to an ACD environment with RAD treatments, Interflow and Overflow call scenarios and DTMF detection
NuPoint Voicemail
Terminating calls to a NuPoint voicemail boxes as well as Embedded voicemail and DTMF detection
Packetization Forcing the MiVoice Business to stream RTP packets through its E2T card at different intervals, from 10ms to 90ms
Personal Ring Groups
Receiving calls through IntelePeer and their PSTN gateway to a personal ring group. Also moving calls to/from the prime member and group members
Teleworker Making and receiving a call Through IntelePeer and their PSTN gateway to and from Teleworker extensions
Video Making and receiving a call through IntelePeer with video capable devices
Fax T.38 and G711Fax Calls
- No issues found - Issues found, cannot recommend to use - Issues found
Device Limitations and Known Issues
This is a list of problems or not supported features when IntelePeer SIP Trunking is connected to the MiVoice Business.
Feature Problem Description
Video Call IntelePeer does not support video calls
Recommendation: Contact IntelePeer for update on this feature

3
Network Topology
This diagram shows how the testing network is configured for reference
Figure 1: Network Topology
4
Configuration Notes This section is a description of how the SIP Interop was configured. These notes should give a guideline how a device can be configured in a customer environment and how MiVoice Business programming with IntelePeer SIP Trunking was configured in our test environment.
Disclaimer: Although Mitel has attempted to setup the interop testing facility as closely as possible to a customer premise environment, implementation setup could be different onsite. YOU MUST EXERCISE YOUR OWN DUE DILIGENCE IN reviewing, planning, implementing, and testing a customer configuration.
MiVoice Business Configuration Notes
The following steps show how to program a MiVoice Business to interconnect with IntelePeer SIP Trunking.
Configuration Template
A configuration template can be found in the same MOL Knowledge Base article as this document. The template is a Microsoft Excel spreadsheet (.csv format) solely consisting of the SIP Peer profile option settings used during Interop
testing. All other forms should be programmed as indicated below. Importing the template can save you considerable configuration time and reduce the likelihood of data-entry errors. Refer to the MiVoice Business documentation on how the Import functionality is used.
Network Requirements
There must be adequate bandwidth to support the VoIP. As a guide, the Ethernet bandwidth is approximately 85 Kb/s per G.711 voice session and 29 Kb/s per G.729 voice session (assumes 20ms packetization). As an example, for 20 simultaneous SIP sessions, the Ethernet bandwidth consumption will be approximately 1.7 Mb/s for G.711 and 0.6Mb/s. Almost all Enterprise LAN networks can support this level of traffic without any special engineering. Please refer to the MiVoice Business Engineering guidelines for further information.
For high quality voice, the network connectivity must support a voice-quality grade of service (packet loss <1%, jitter < 30ms, one-way delay < 80ms)
Assumptions for MiVoice Business Programming
The SIP signaling connection uses UDP on Port 5060
5
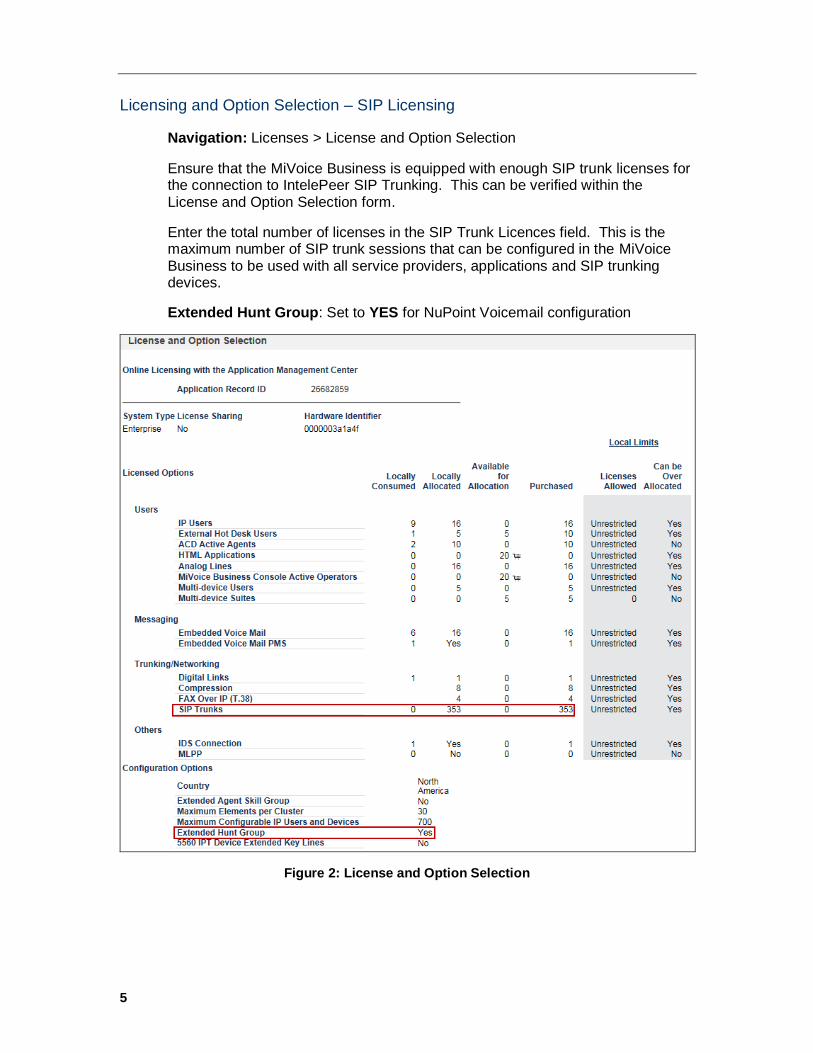
Licensing and Option Selection – SIP Licensing
Navigation: Licenses > License and Option Selection
Ensure that the MiVoice Business is equipped with enough SIP trunk licenses for the connection to IntelePeer SIP Trunking. This can be verified within the License and Option Selection form.
Enter the total number of licenses in the SIP Trunk Licences field. This is the maximum number of SIP trunk sessions that can be configured in the MiVoice Business to be used with all service providers, applications and SIP trunking devices.
Extended Hunt Group: Set to YES for NuPoint Voicemail configuration
Figure 2: License and Option Selection
6
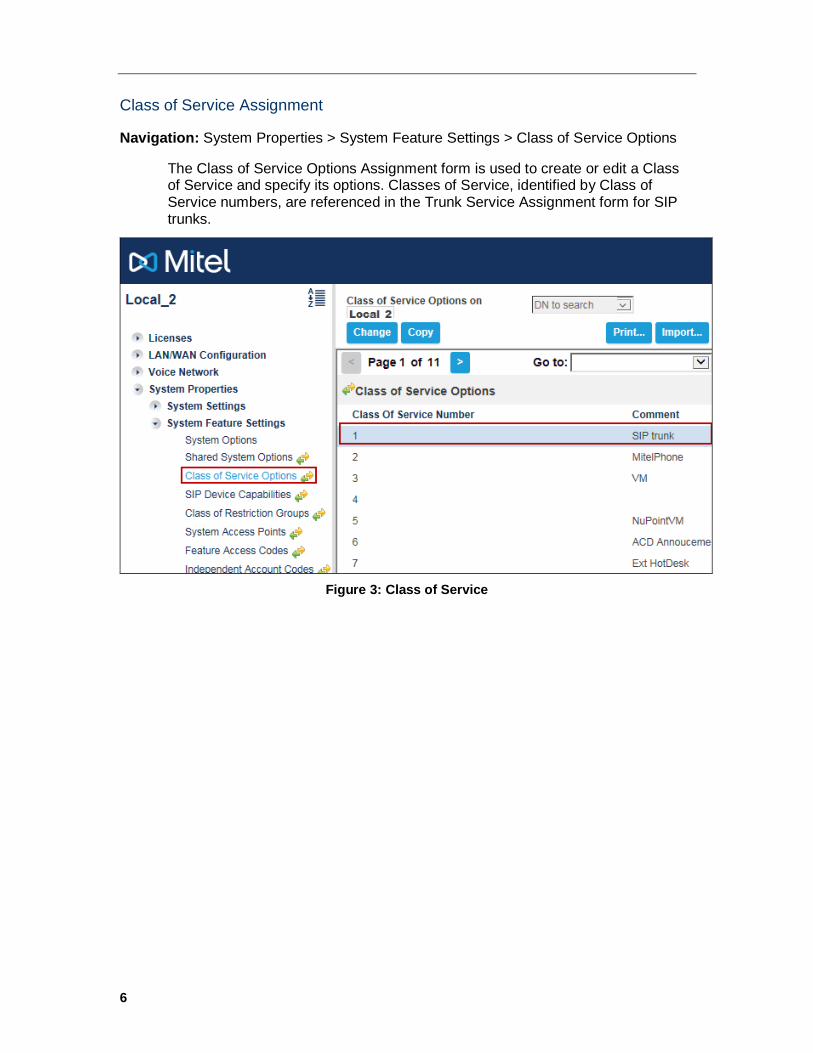
Class of Service Assignment
Navigation: System Properties > System Feature Settings > Class of Service Options
The Class of Service Options Assignment form is used to create or edit a Class of Service and specify its options. Classes of Service, identified by Class of Service numbers, are referenced in the Trunk Service Assignment form for SIP trunks.
Figure 3: Class of Service
7
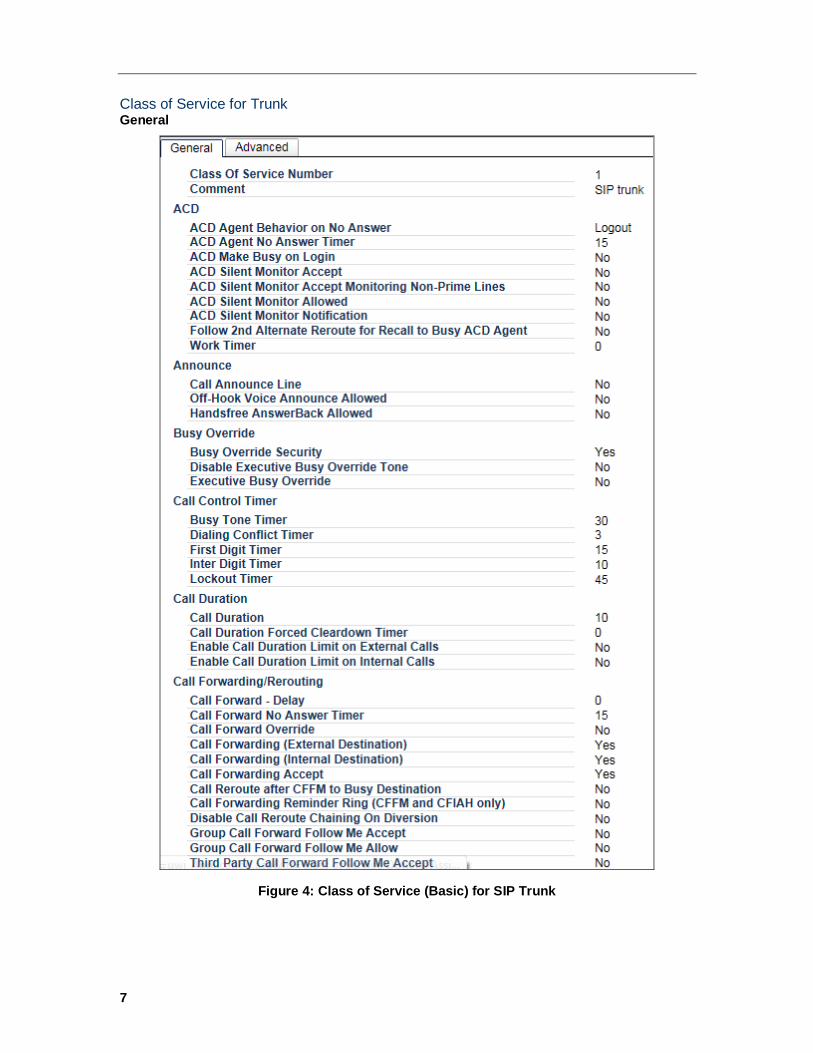
Class of Service for Trunk General
Figure 4: Class of Service (Basic) for SIP Trunk

8
Figure 5: Class of Service (Basic) for SIP Trunk – Cont.

9
Figure 6: Class of Service (Basic) for SIP Trunk – Cont.

10
Figure 7: Class of Service (Basic) for SIP Trunk – Cont.
‘
11
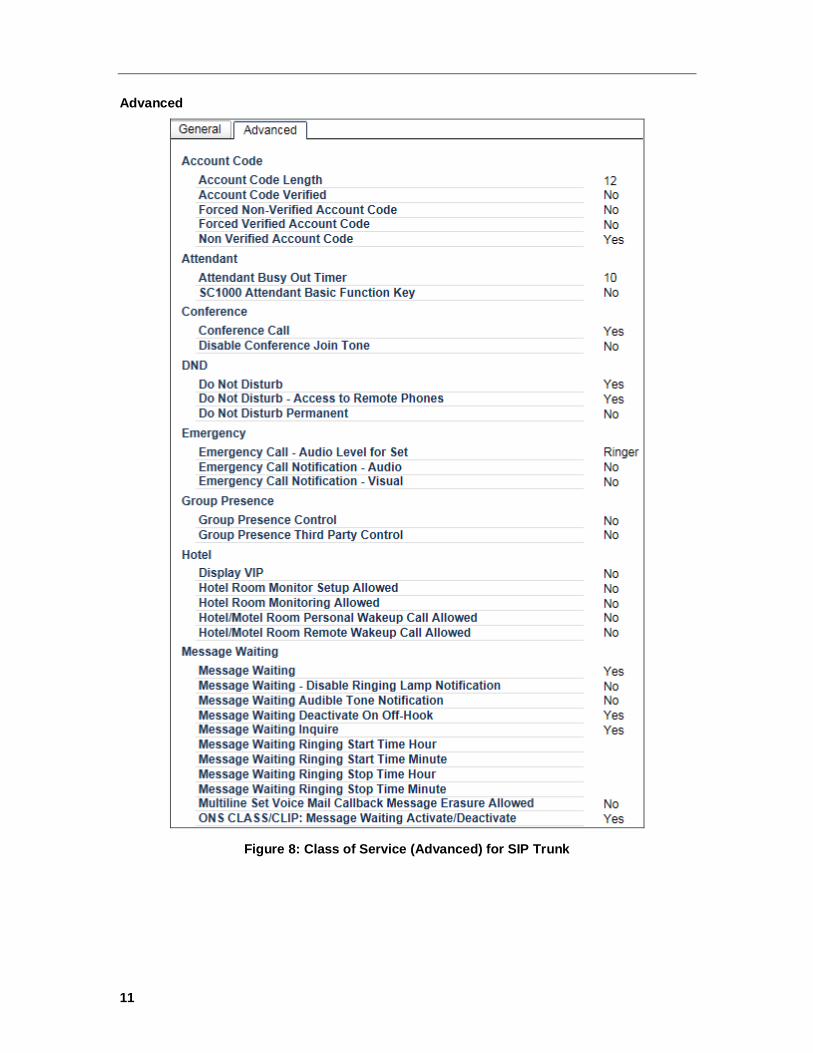
Advanced
Figure 8: Class of Service (Advanced) for SIP Trunk

12
Figure 9: Class of Service (Advanced) for SIP Trunk – Cont.
13
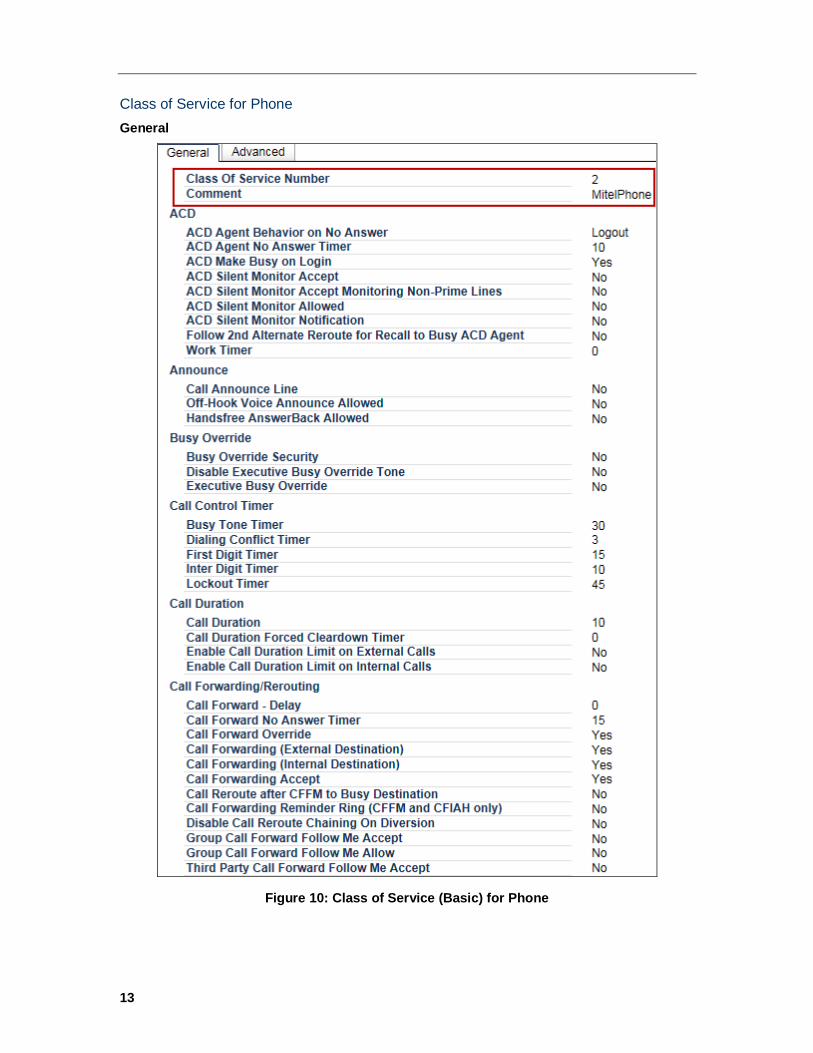
Class of Service for Phone
General
Figure 10: Class of Service (Basic) for Phone

14
Figure 11: Class of Service (Basic) for Phone – Cont.

15
Figure 12: Class of Service (Basic) for Phone – Cont.
16
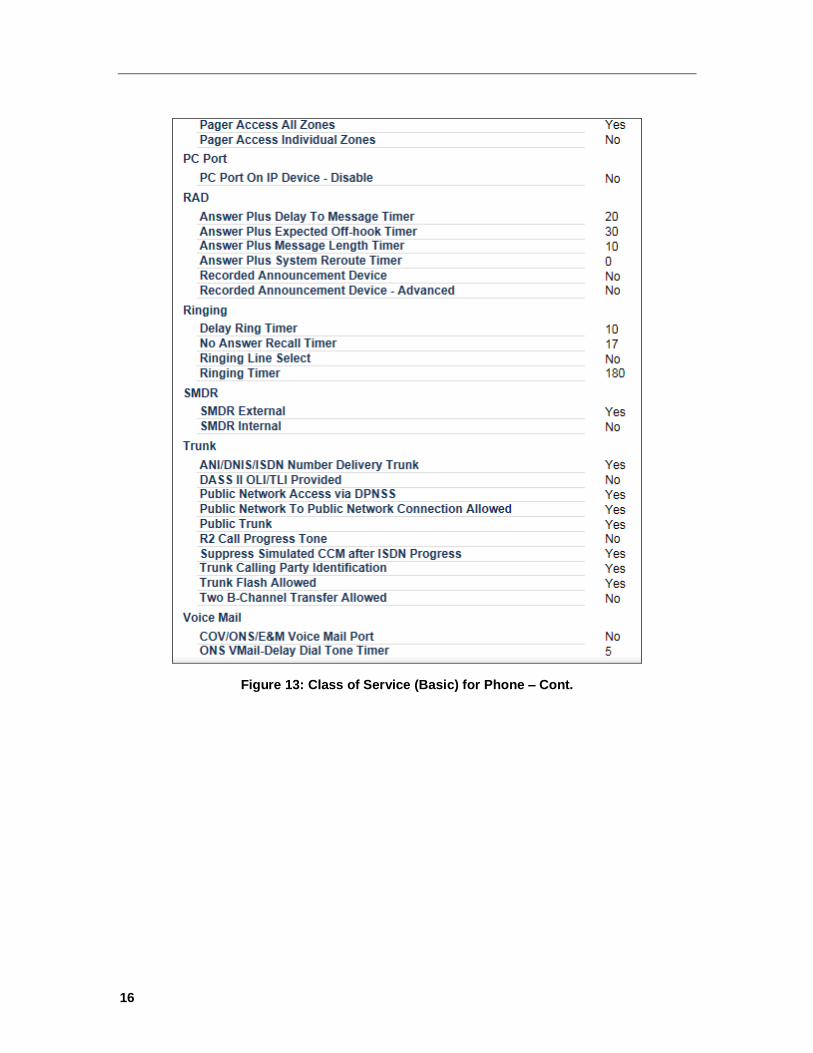
Figure 13: Class of Service (Basic) for Phone – Cont.
17
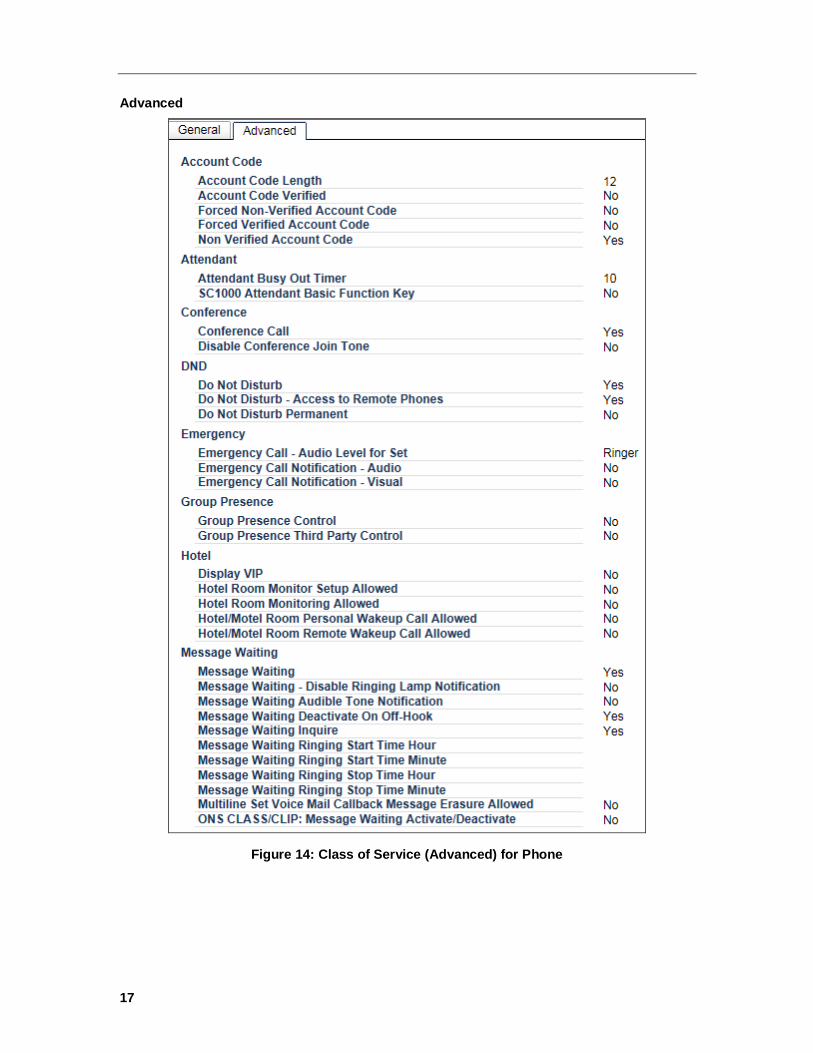
Advanced
Figure 14: Class of Service (Advanced) for Phone

18
Figure 15: Class of Service (Advanced) for Phone – Cont.
19
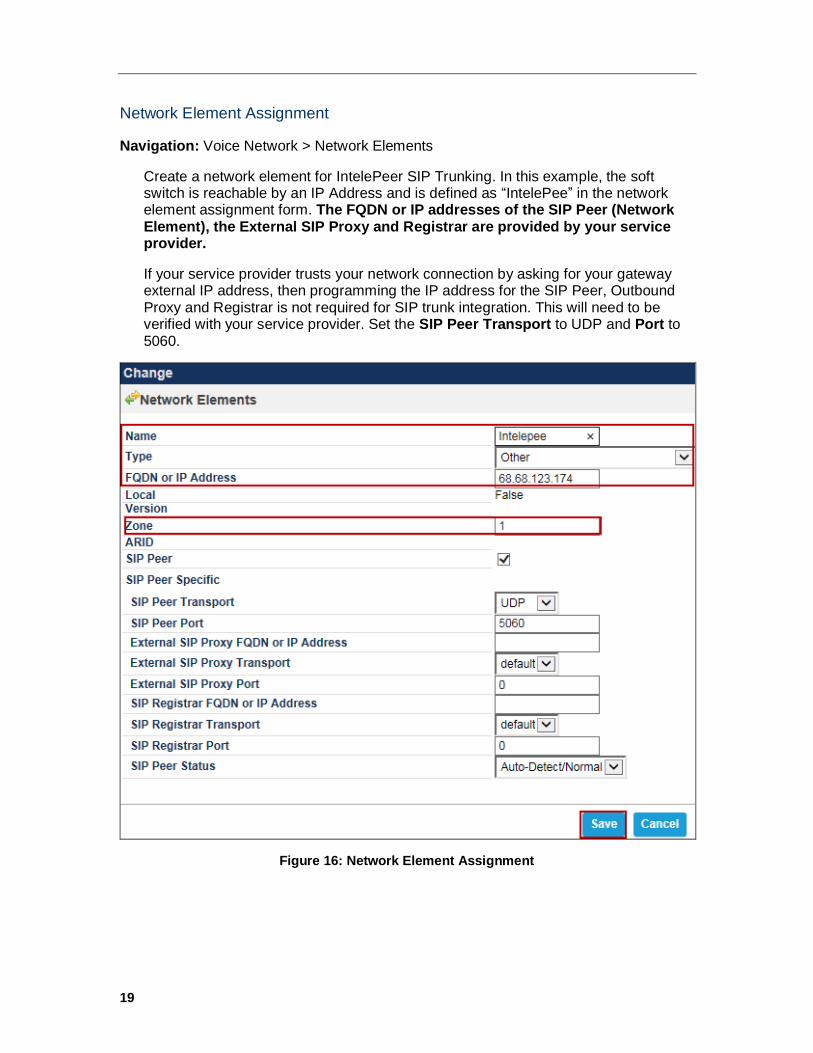
Network Element Assignment
Navigation: Voice Network > Network Elements
Create a network element for IntelePeer SIP Trunking. In this example, the soft switch is reachable by an IP Address and is defined as “IntelePee” in the network element assignment form. The FQDN or IP addresses of the SIP Peer (Network Element), the External SIP Proxy and Registrar are provided by your service provider.
If your service provider trusts your network connection by asking for your gateway external IP address, then programming the IP address for the SIP Peer, Outbound Proxy and Registrar is not required for SIP trunk integration. This will need to be verified with your service provider. Set the SIP Peer Transport to UDP and Port to 5060.
Figure 16: Network Element Assignment
20
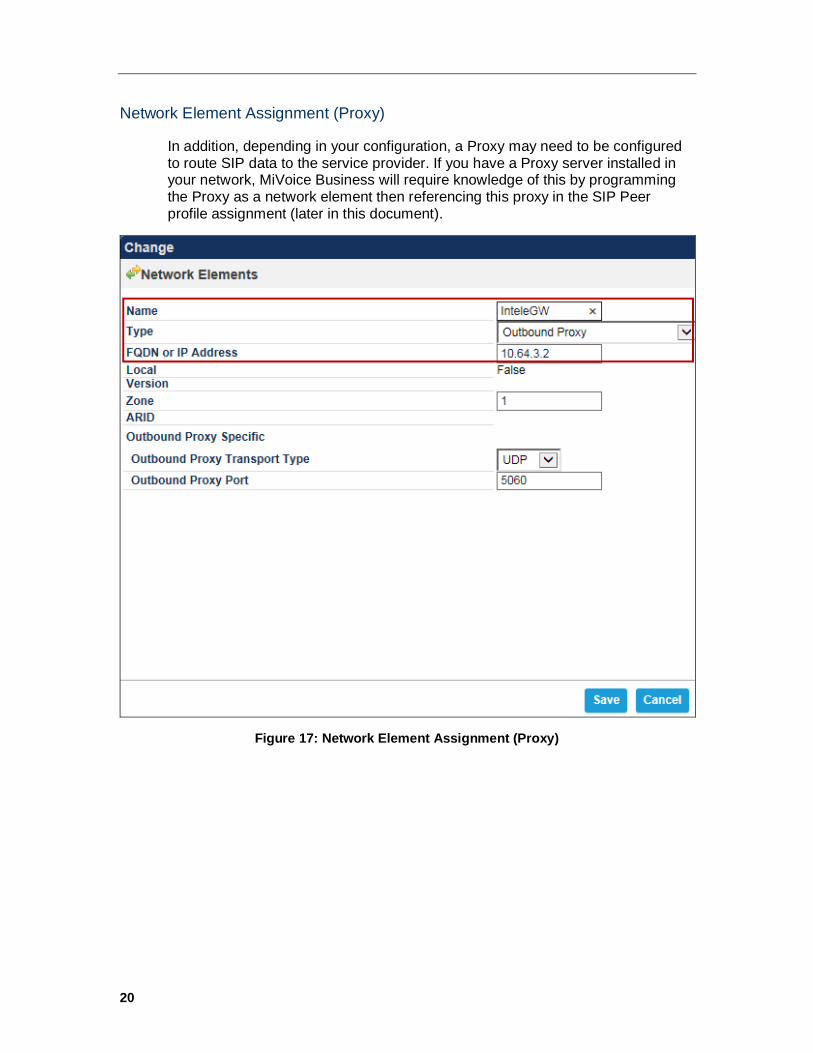
Network Element Assignment (Proxy)
In addition, depending in your configuration, a Proxy may need to be configured to route SIP data to the service provider. If you have a Proxy server installed in your network, MiVoice Business will require knowledge of this by programming the Proxy as a network element then referencing this proxy in the SIP Peer profile assignment (later in this document).
Figure 17: Network Element Assignment (Proxy)
21
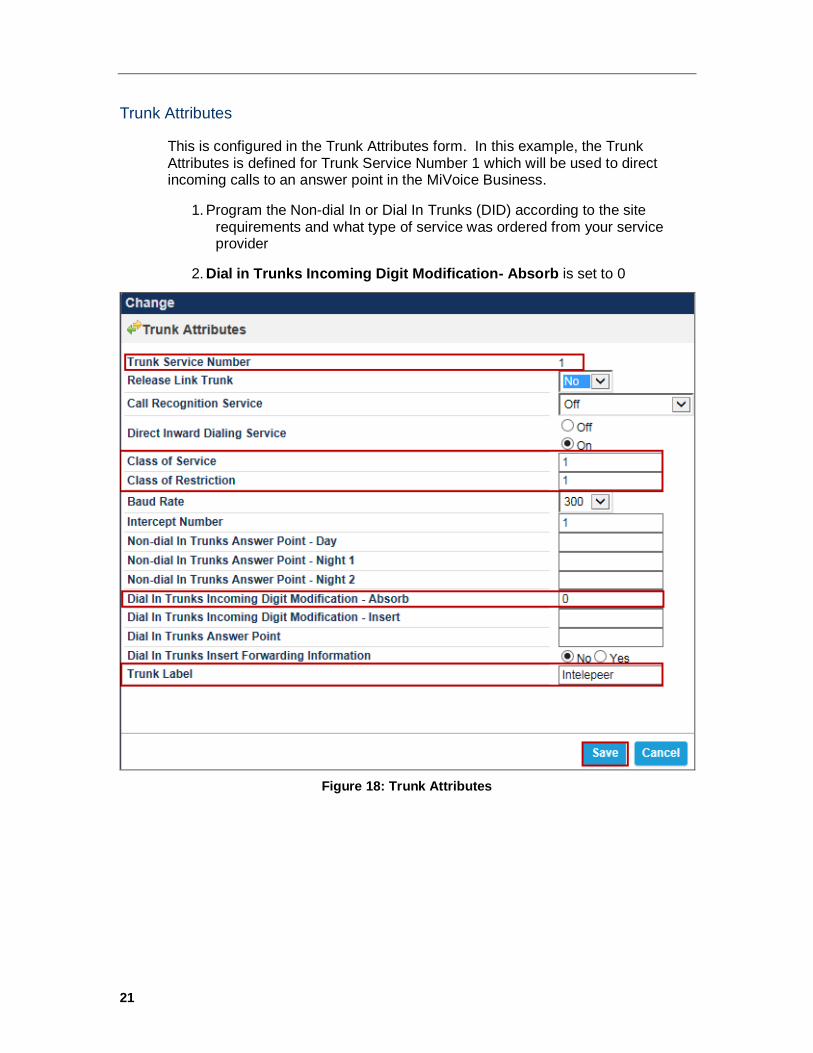
Trunk Attributes
This is configured in the Trunk Attributes form. In this example, the Trunk Attributes is defined for Trunk Service Number 1 which will be used to direct incoming calls to an answer point in the MiVoice Business.
1. Program the Non-dial In or Dial In Trunks (DID) according to the site requirements and what type of service was ordered from your service provider
2. Dial in Trunks Incoming Digit Modification- Absorb is set to 0
Figure 18: Trunk Attributes
22
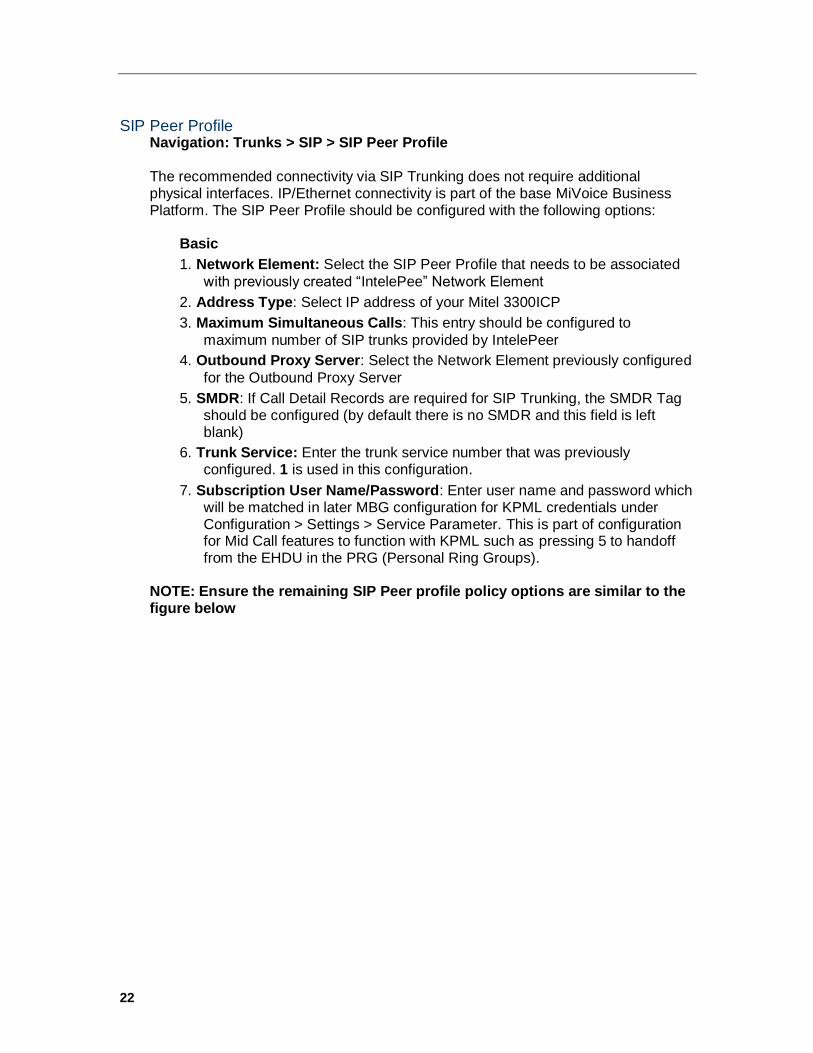
SIP Peer Profile Navigation: Trunks > SIP > SIP Peer Profile
The recommended connectivity via SIP Trunking does not require additional physical interfaces. IP/Ethernet connectivity is part of the base MiVoice Business Platform. The SIP Peer Profile should be configured with the following options:
Basic
1. Network Element: Select the SIP Peer Profile that needs to be associated
with previously created “IntelePee” Network Element
2. Address Type: Select IP address of your Mitel 3300ICP
3. Maximum Simultaneous Calls: This entry should be configured to
maximum number of SIP trunks provided by IntelePeer
4. Outbound Proxy Server: Select the Network Element previously configured
for the Outbound Proxy Server
5. SMDR: If Call Detail Records are required for SIP Trunking, the SMDR Tag should be configured (by default there is no SMDR and this field is left blank)
6. Trunk Service: Enter the trunk service number that was previously configured. 1 is used in this configuration.
7. Subscription User Name/Password: Enter user name and password which will be matched in later MBG configuration for KPML credentials under Configuration > Settings > Service Parameter. This is part of configuration for Mid Call features to function with KPML such as pressing 5 to handoff from the EHDU in the PRG (Personal Ring Groups).
NOTE: Ensure the remaining SIP Peer profile policy options are similar to the figure below
23
Figure 19: SIP Peer Profile – Basic
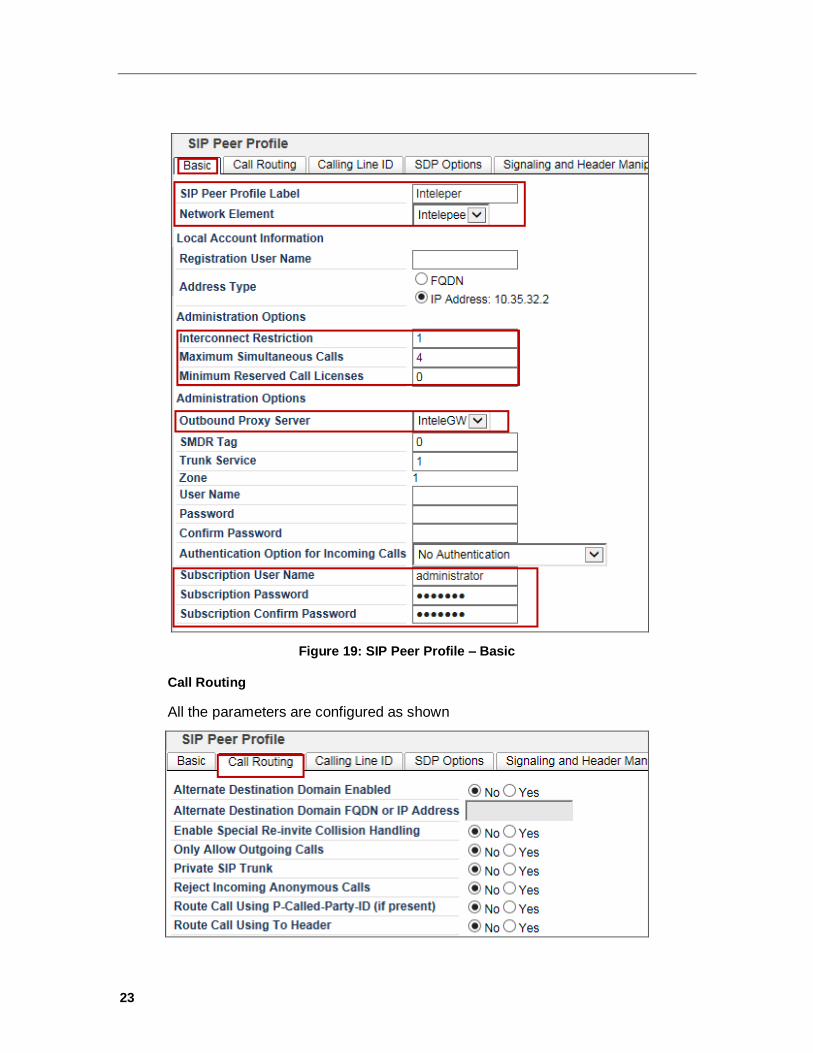
Call Routing
All the parameters are configured as shown
24
Figure 20: SIP Peer Profile Assignment – Call Routing
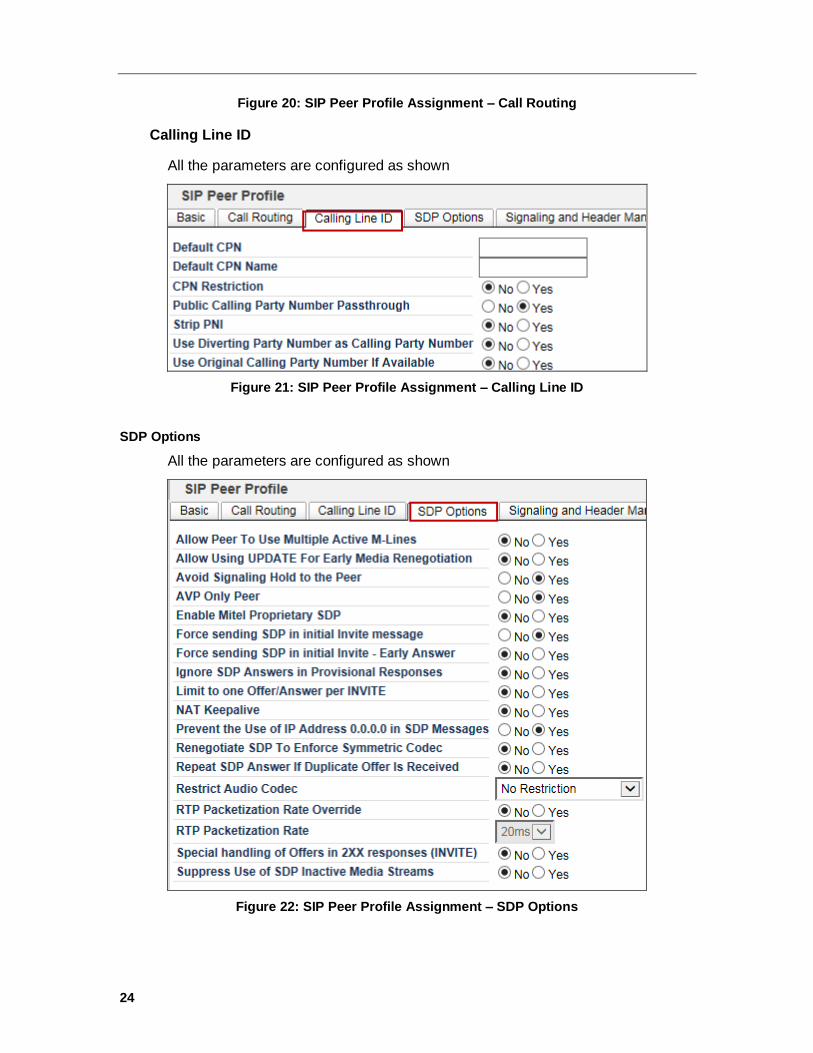
Calling Line ID
All the parameters are configured as shown
Figure 21: SIP Peer Profile Assignment – Calling Line ID
SDP Options
All the parameters are configured as shown
Figure 22: SIP Peer Profile Assignment – SDP Options
25
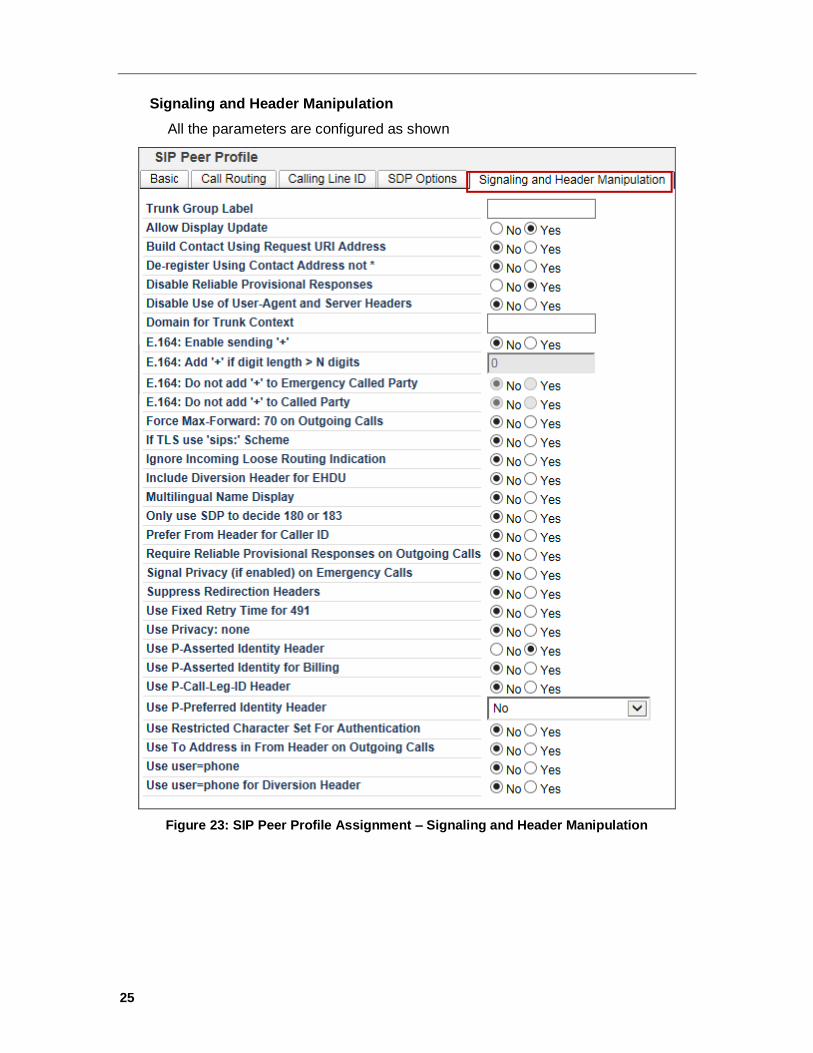
Signaling and Header Manipulation
All the parameters are configured as shown
Figure 23: SIP Peer Profile Assignment – Signaling and Header Manipulation
26
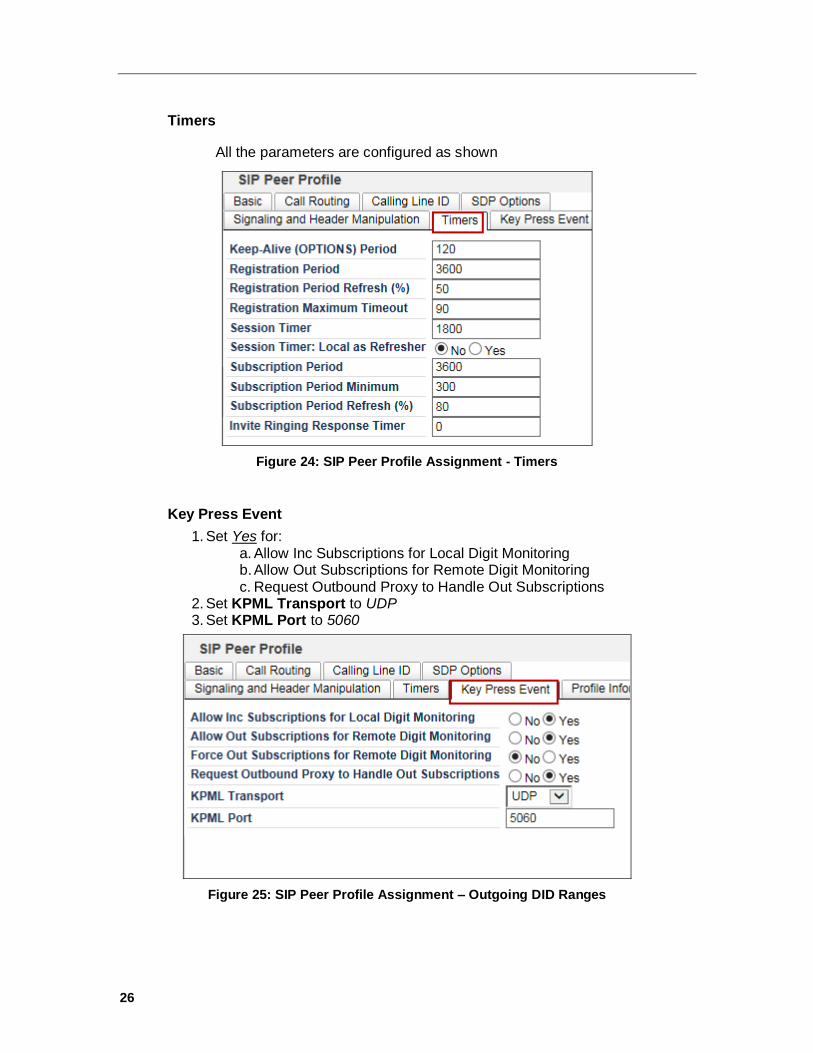
Timers
All the parameters are configured as shown
Figure 24: SIP Peer Profile Assignment - Timers
Key Press Event
1. Set Yes for: a. Allow Inc Subscriptions for Local Digit Monitoring b. Allow Out Subscriptions for Remote Digit Monitoring c. Request Outbound Proxy to Handle Out Subscriptions
2. Set KPML Transport to UDP 3. Set KPML Port to 5060
Figure 25: SIP Peer Profile Assignment – Outgoing DID Ranges
27
Figure 26: SIP Peer Profile Assignment – Profile Information
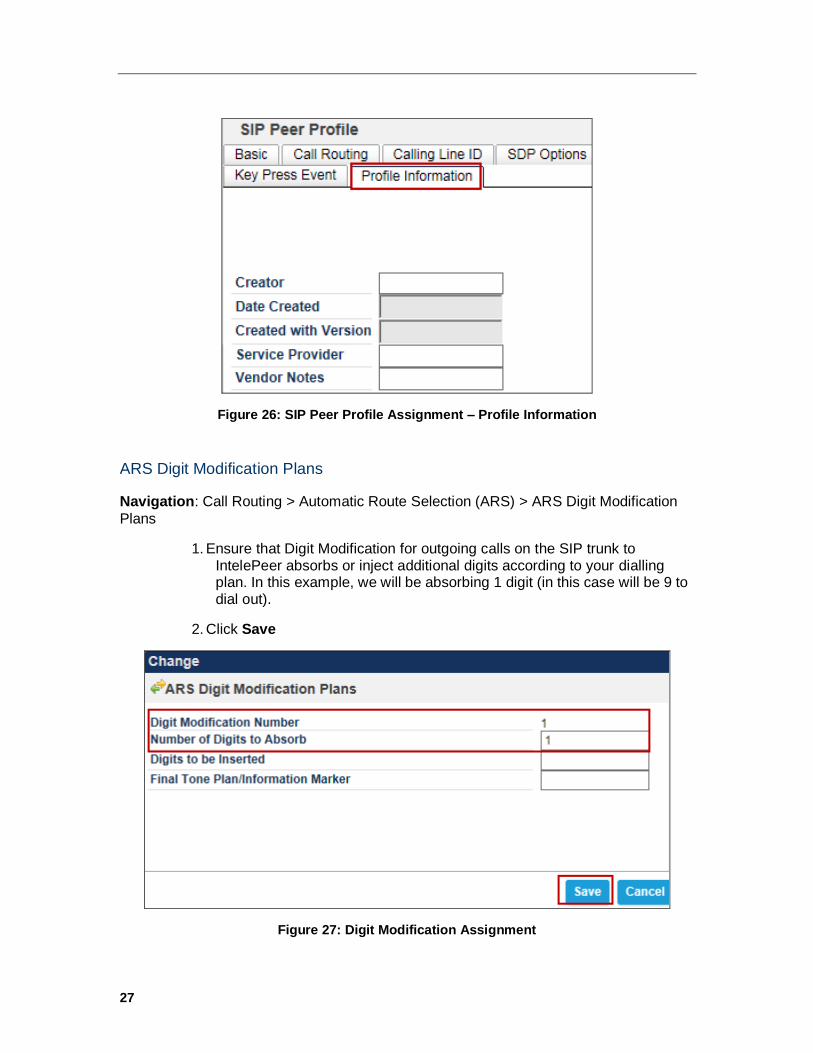
ARS Digit Modification Plans
Navigation: Call Routing > Automatic Route Selection (ARS) > ARS Digit Modification
Plans
1. Ensure that Digit Modification for outgoing calls on the SIP trunk to IntelePeer absorbs or inject additional digits according to your dialling plan. In this example, we will be absorbing 1 digit (in this case will be 9 to dial out).
2. Click Save
Figure 27: Digit Modification Assignment
28
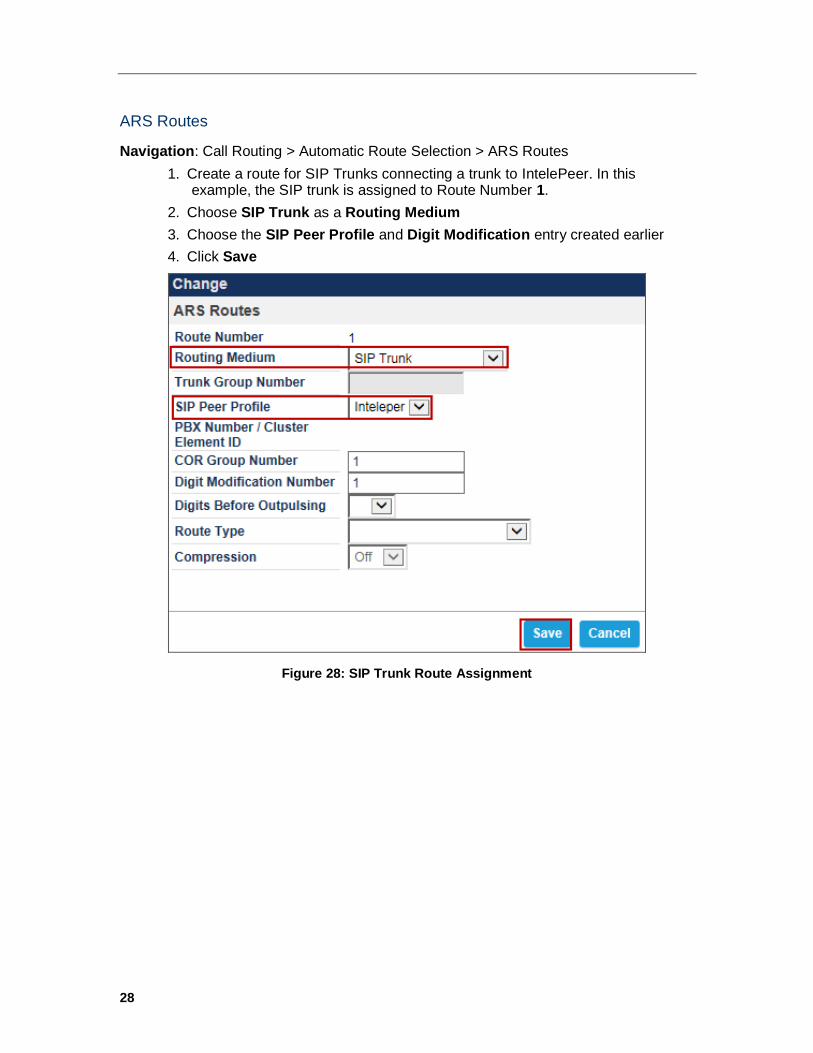
ARS Routes
Navigation: Call Routing > Automatic Route Selection > ARS Routes
1. Create a route for SIP Trunks connecting a trunk to IntelePeer. In this example, the SIP trunk is assigned to Route Number 1.
2. Choose SIP Trunk as a Routing Medium
3. Choose the SIP Peer Profile and Digit Modification entry created earlier
4. Click Save
Figure 28: SIP Trunk Route Assignment
29
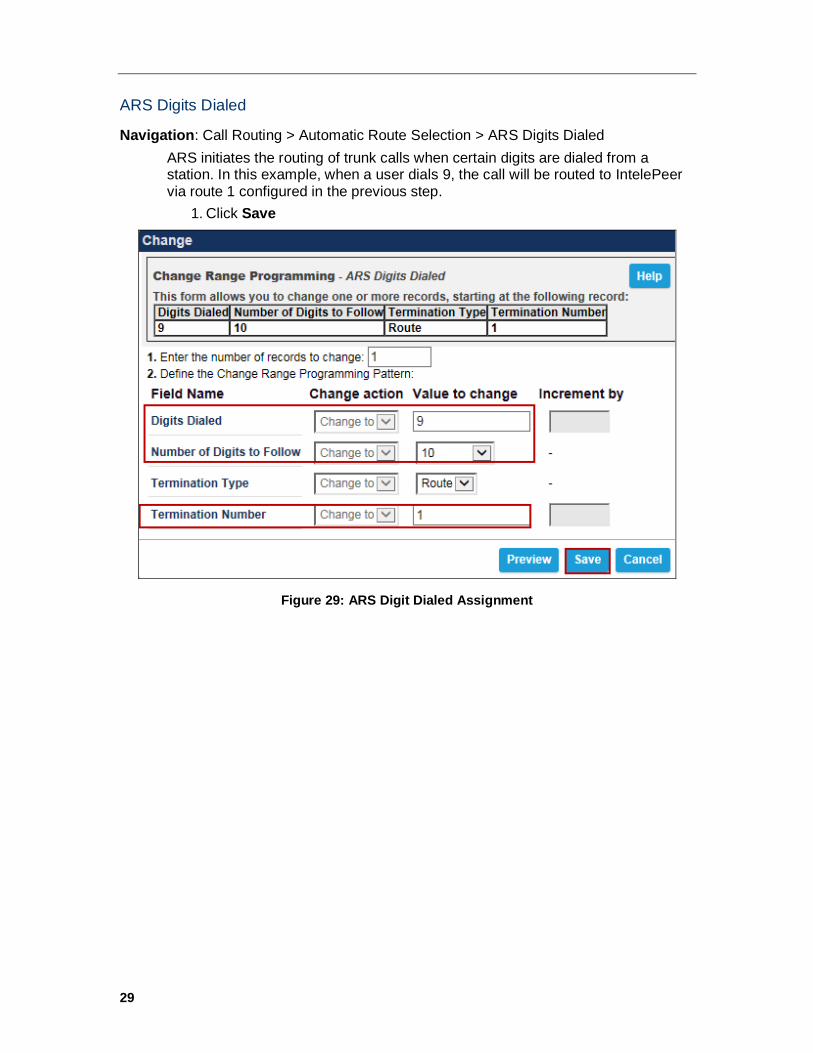
ARS Digits Dialed
Navigation: Call Routing > Automatic Route Selection > ARS Digits Dialed
ARS initiates the routing of trunk calls when certain digits are dialed from a station. In this example, when a user dials 9, the call will be routed to IntelePeer via route 1 configured in the previous step.
1. Click Save
Figure 29: ARS Digit Dialed Assignment
30
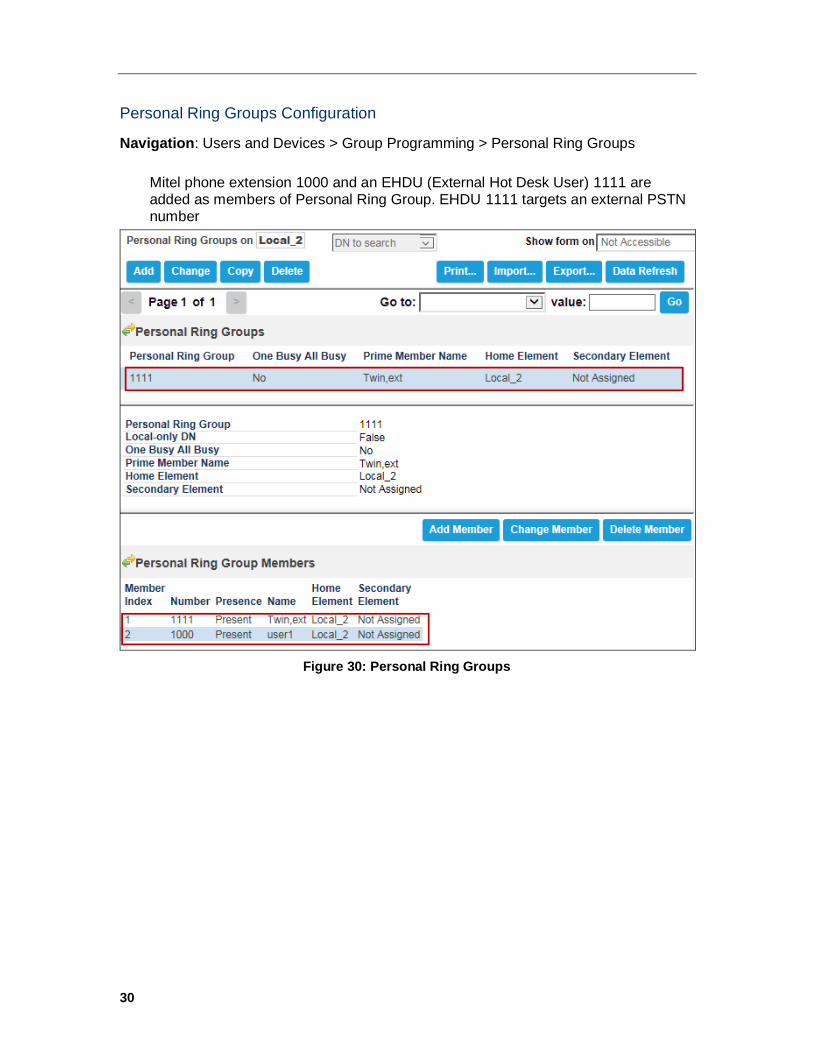
Personal Ring Groups Configuration
Navigation: Users and Devices > Group Programming > Personal Ring Groups
Mitel phone extension 1000 and an EHDU (External Hot Desk User) 1111 are added as members of Personal Ring Group. EHDU 1111 targets an external PSTN number
Figure 30: Personal Ring Groups
31
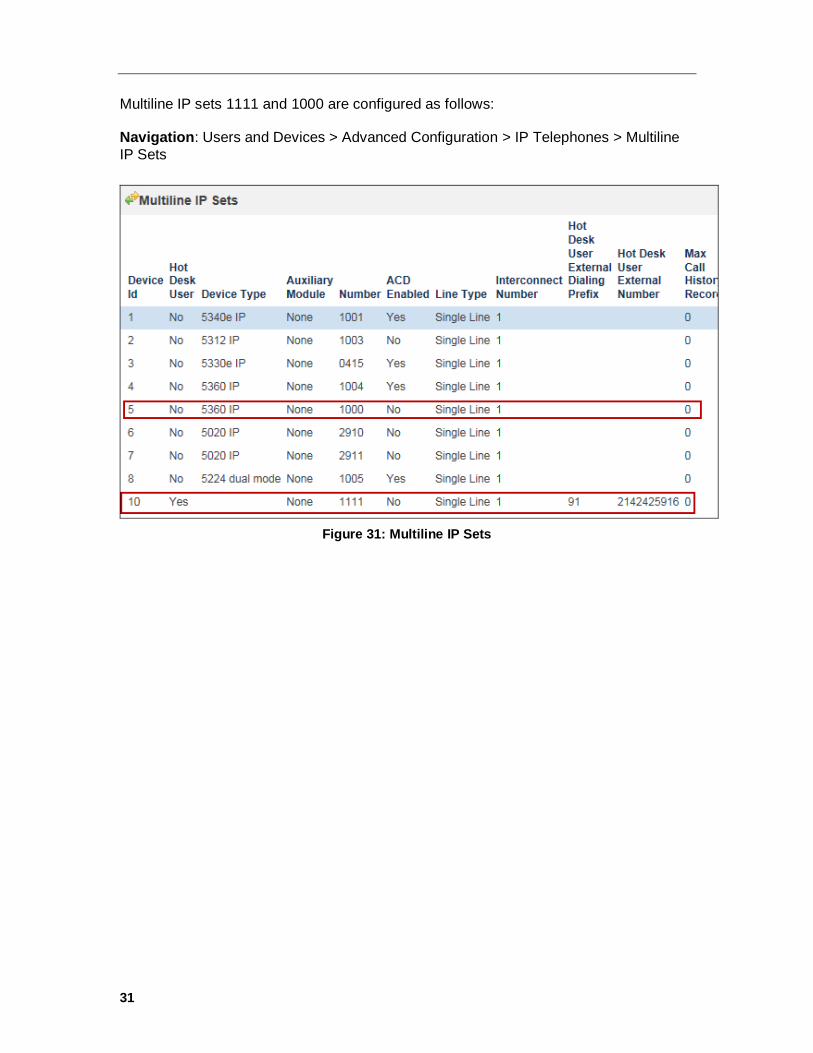
Multiline IP sets 1111 and 1000 are configured as follows: Navigation: Users and Devices > Advanced Configuration > IP Telephones > Multiline
IP Sets
Figure 31: Multiline IP Sets
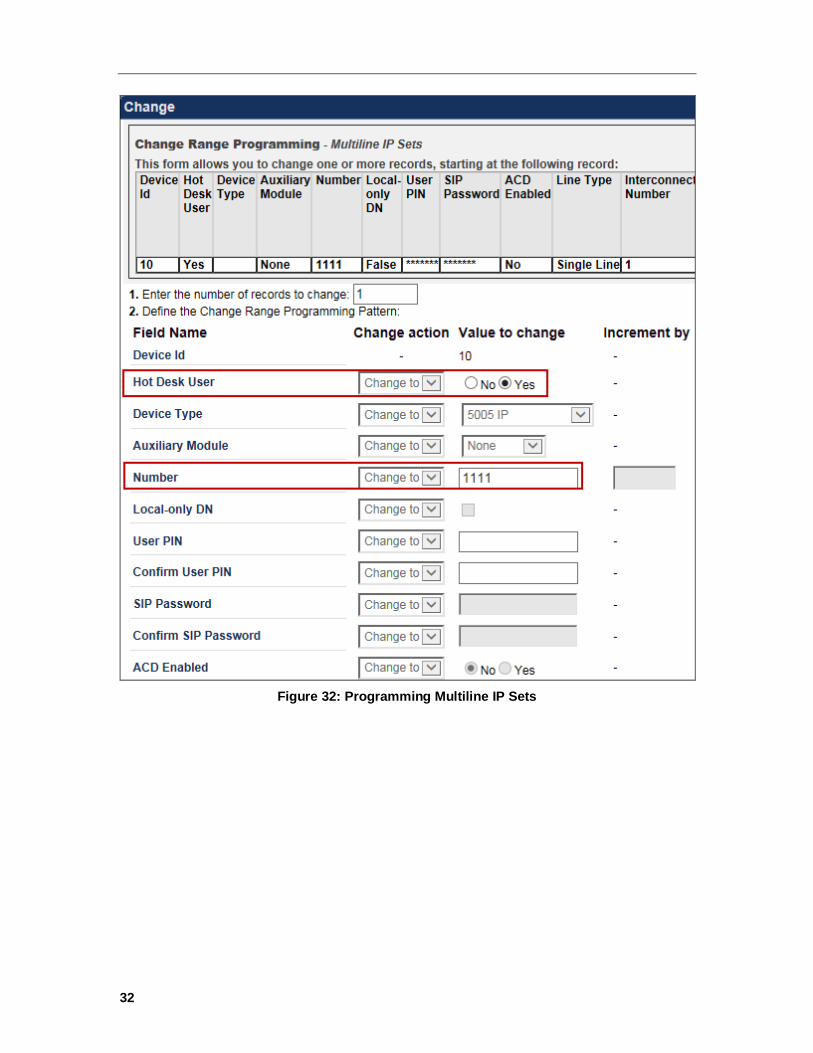
32
Figure 32: Programming Multiline IP Sets
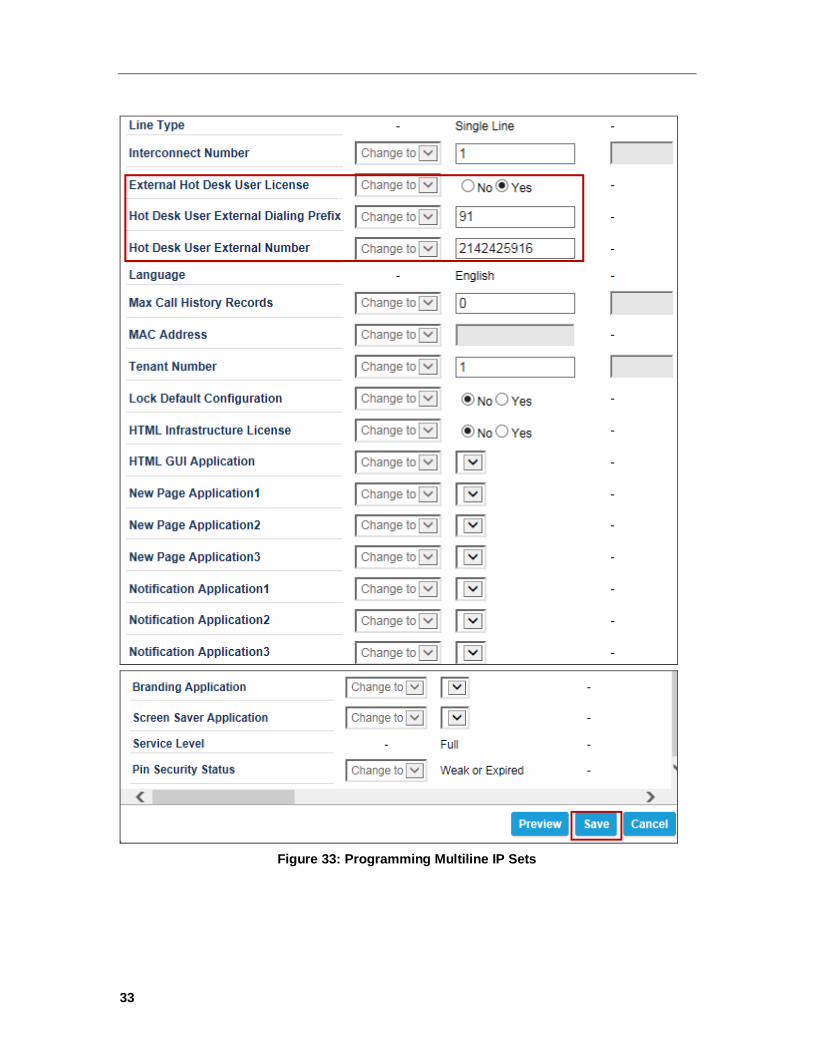
33
Figure 33: Programming Multiline IP Sets
34
NuPoint Configuration
MiVB Setup for Connecting NuPoint
Licensing and Option Selection – SIP Licensing
The first step in setting up the MiVB for connecting to NuPoint is checking the Extended Hunt Group option to see if it is enabled. Refer to Figure 2.
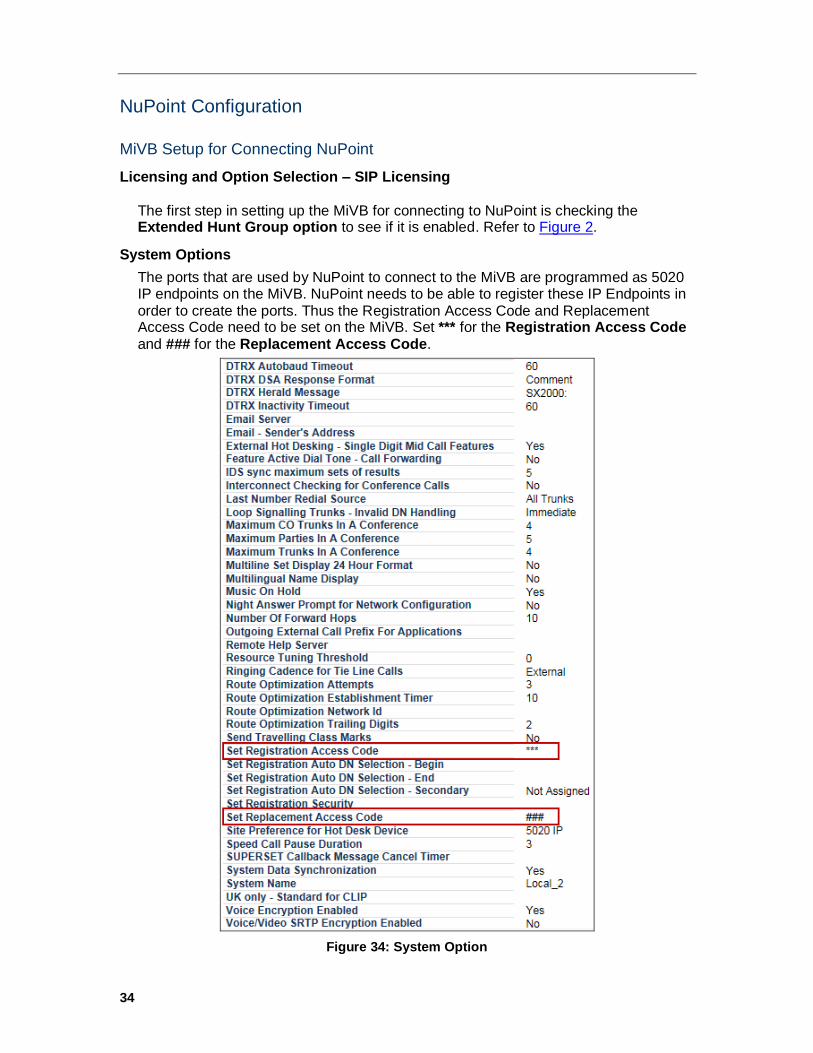
System Options
The ports that are used by NuPoint to connect to the MiVB are programmed as 5020 IP endpoints on the MiVB. NuPoint needs to be able to register these IP Endpoints in order to create the ports. Thus the Registration Access Code and Replacement Access Code need to be set on the MiVB. Set *** for the Registration Access Code and ### for the Replacement Access Code.
Figure 34: System Option
35
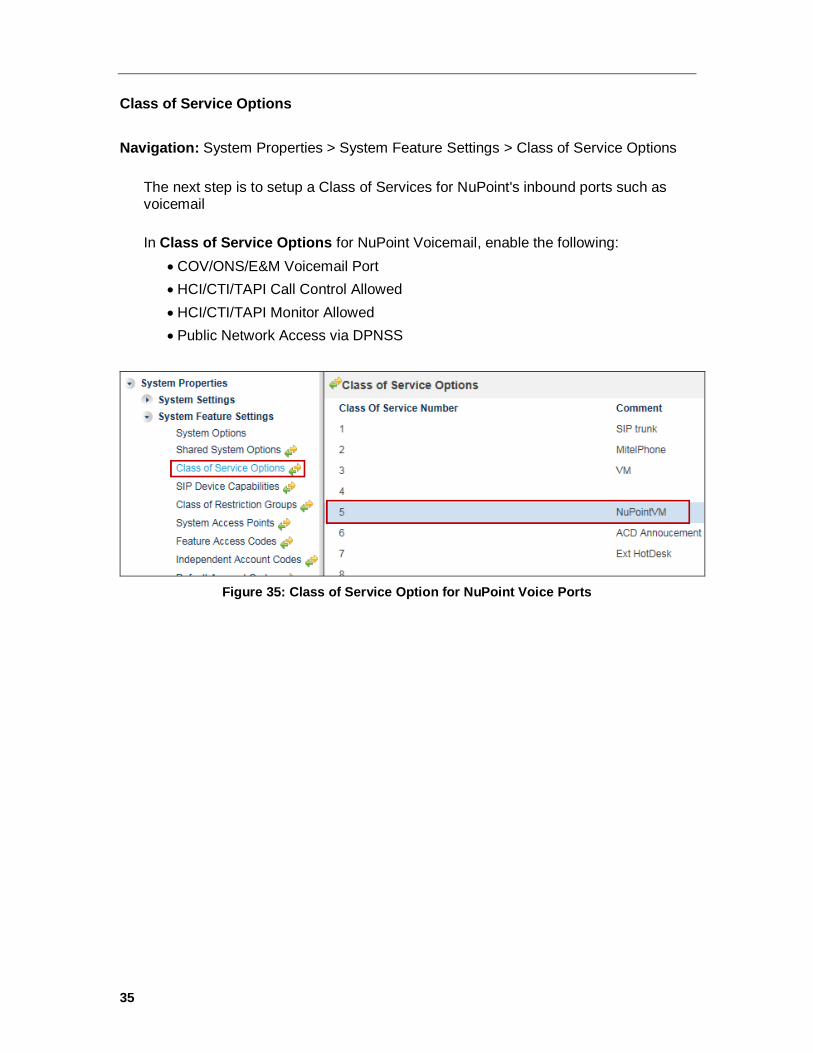
Class of Service Options
Navigation: System Properties > System Feature Settings > Class of Service Options
The next step is to setup a Class of Services for NuPoint's inbound ports such as voicemail
In Class of Service Options for NuPoint Voicemail, enable the following:
COV/ONS/E&M Voicemail Port
HCI/CTI/TAPI Call Control Allowed
HCI/CTI/TAPI Monitor Allowed
Public Network Access via DPNSS
Figure 35: Class of Service Option for NuPoint Voice Ports
36
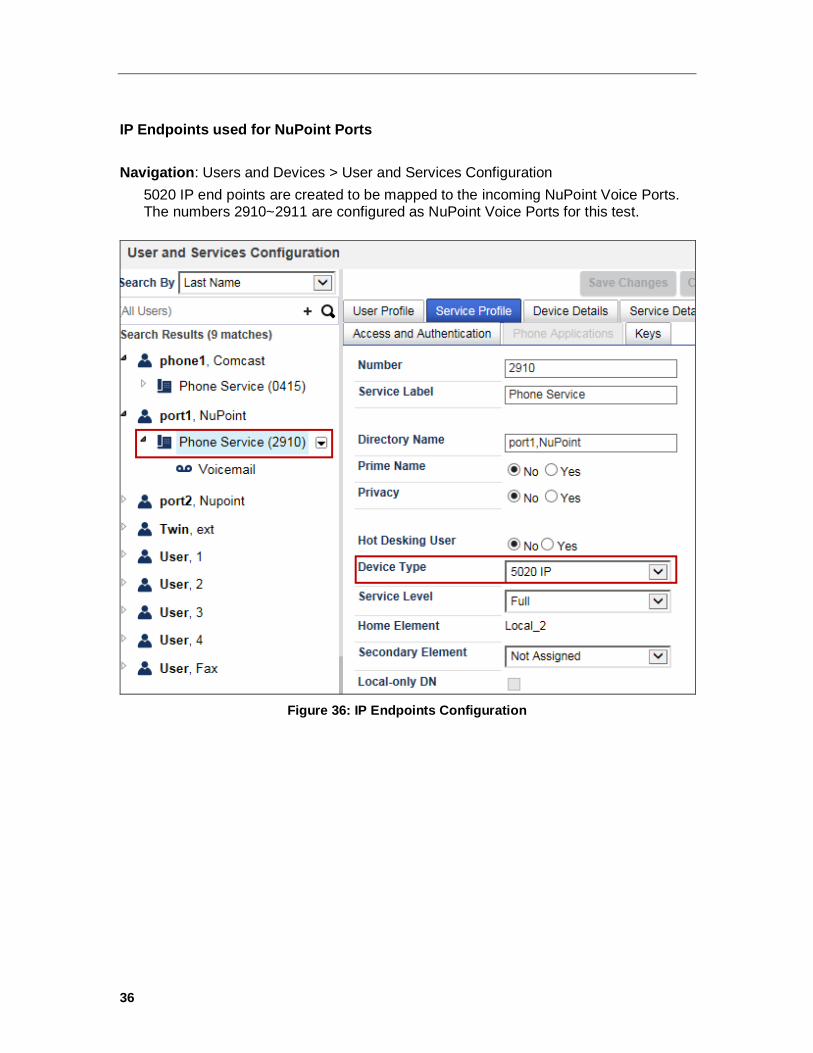
IP Endpoints used for NuPoint Ports
Navigation: Users and Devices > User and Services Configuration
5020 IP end points are created to be mapped to the incoming NuPoint Voice Ports. The numbers 2910~2911 are configured as NuPoint Voice Ports for this test.
Figure 36: IP Endpoints Configuration
37
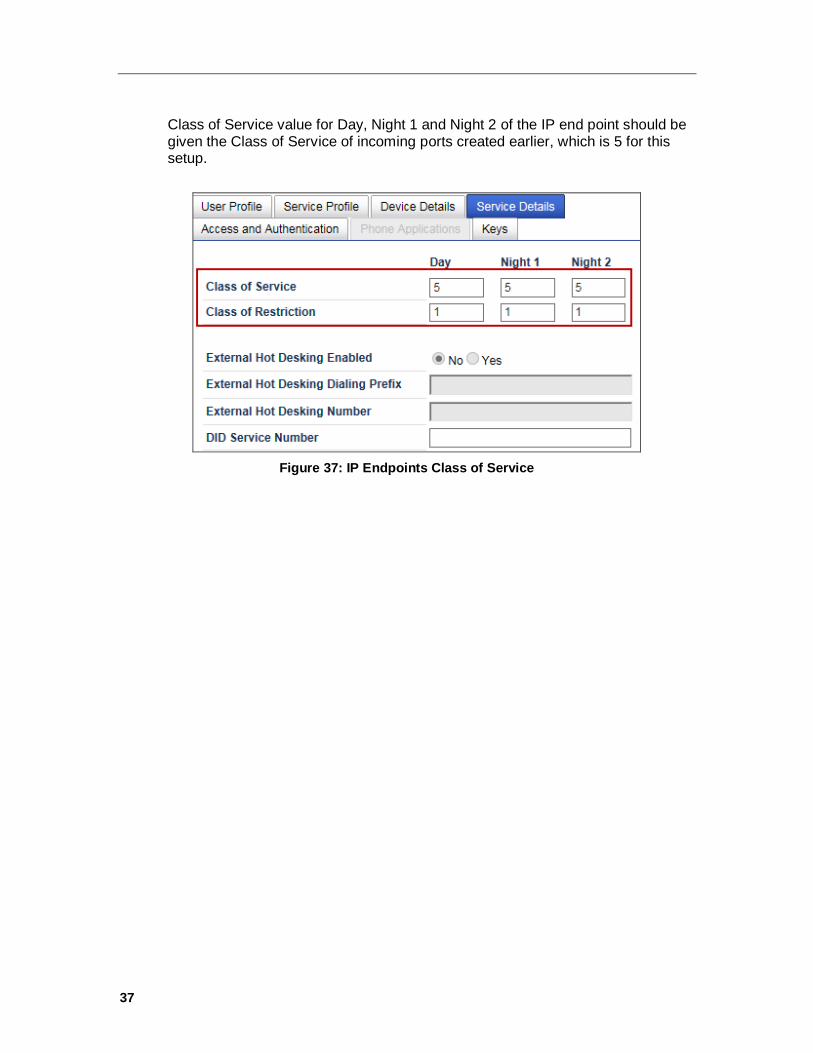
Class of Service value for Day, Night 1 and Night 2 of the IP end point should be given the Class of Service of incoming ports created earlier, which is 5 for this setup.
Figure 37: IP Endpoints Class of Service
38
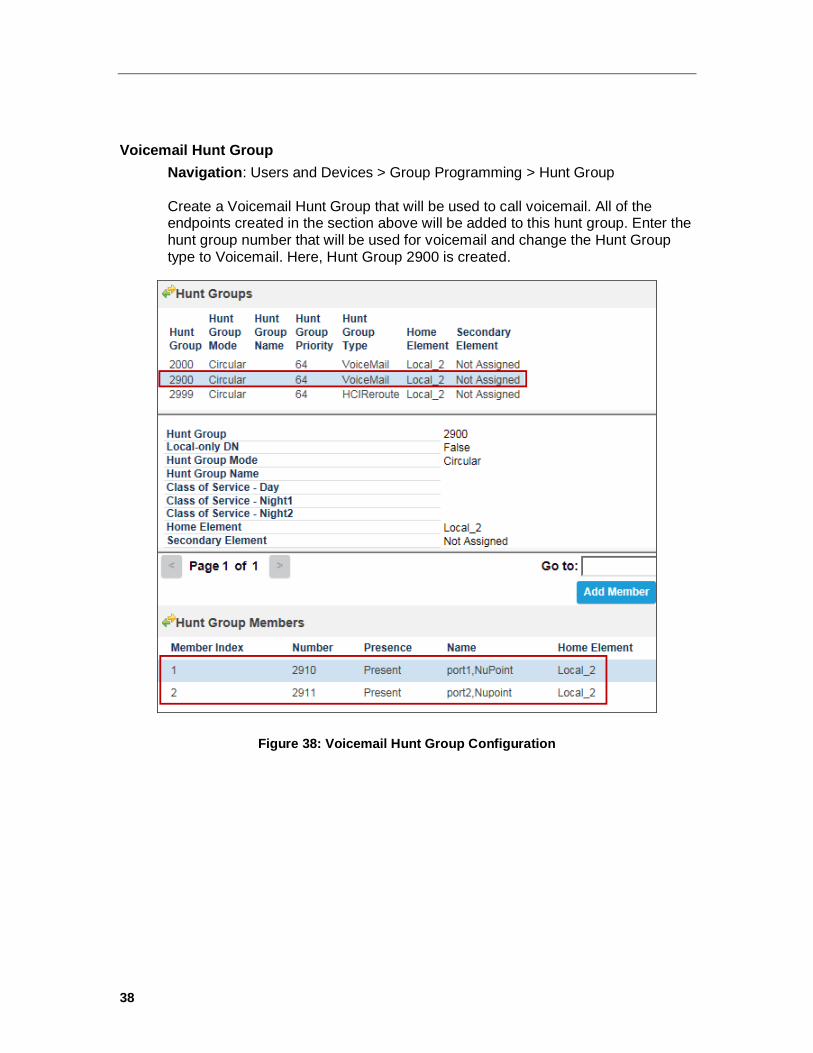
Voicemail Hunt Group
Navigation: Users and Devices > Group Programming > Hunt Group Create a Voicemail Hunt Group that will be used to call voicemail. All of the endpoints created in the section above will be added to this hunt group. Enter the hunt group number that will be used for voicemail and change the Hunt Group type to Voicemail. Here, Hunt Group 2900 is created.
Figure 38: Voicemail Hunt Group Configuration
39
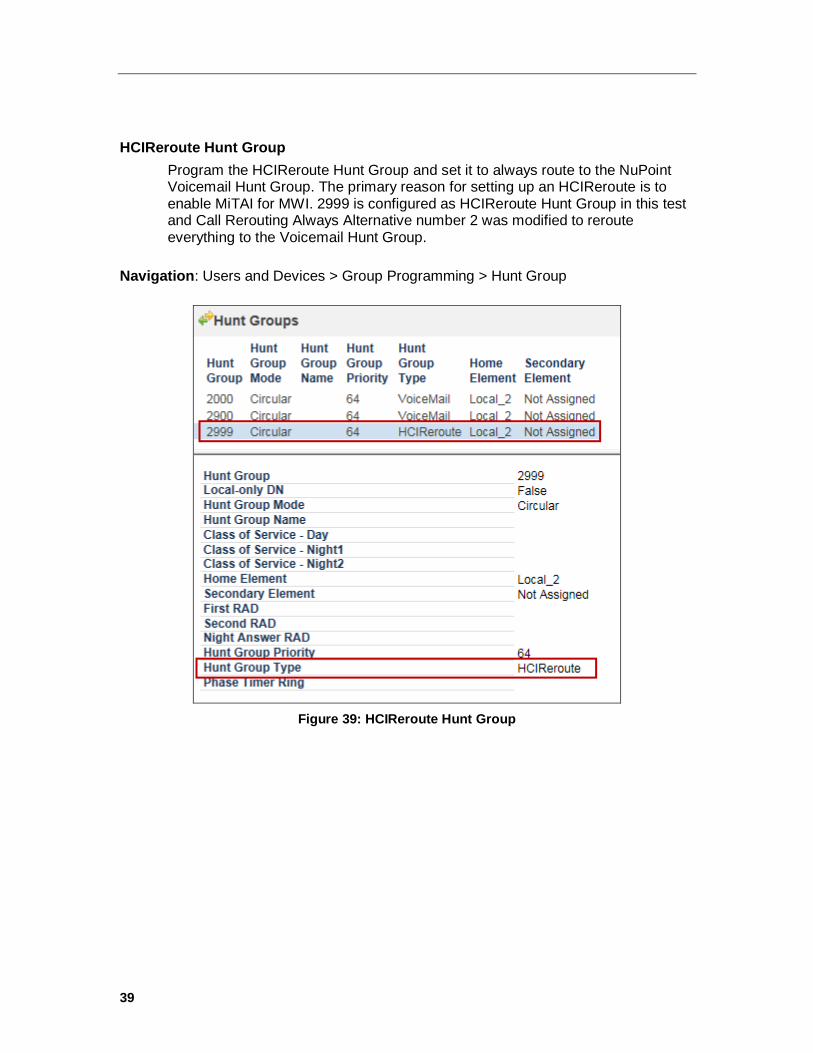
HCIReroute Hunt Group
Program the HCIReroute Hunt Group and set it to always route to the NuPoint Voicemail Hunt Group. The primary reason for setting up an HCIReroute is to enable MiTAI for MWI. 2999 is configured as HCIReroute Hunt Group in this test and Call Rerouting Always Alternative number 2 was modified to reroute everything to the Voicemail Hunt Group.
Navigation: Users and Devices > Group Programming > Hunt Group
Figure 39: HCIReroute Hunt Group
40
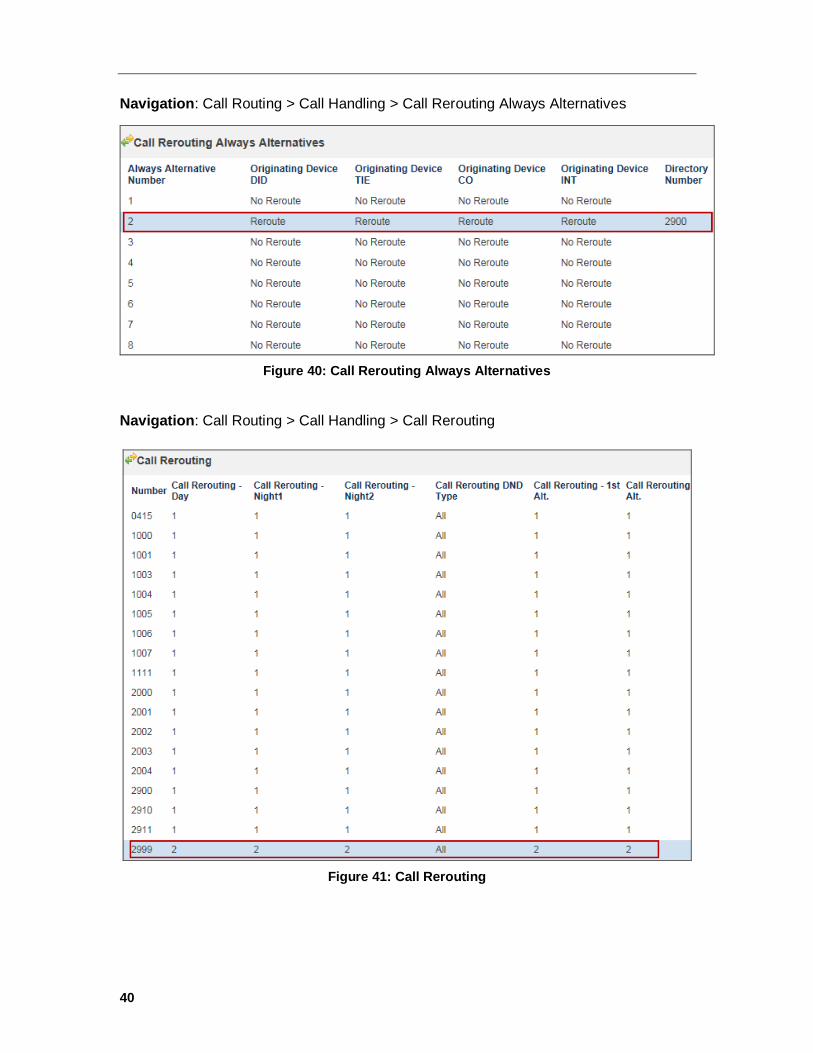
Navigation: Call Routing > Call Handling > Call Rerouting Always Alternatives
Figure 40: Call Rerouting Always Alternatives
Navigation: Call Routing > Call Handling > Call Rerouting
Figure 41: Call Rerouting
41
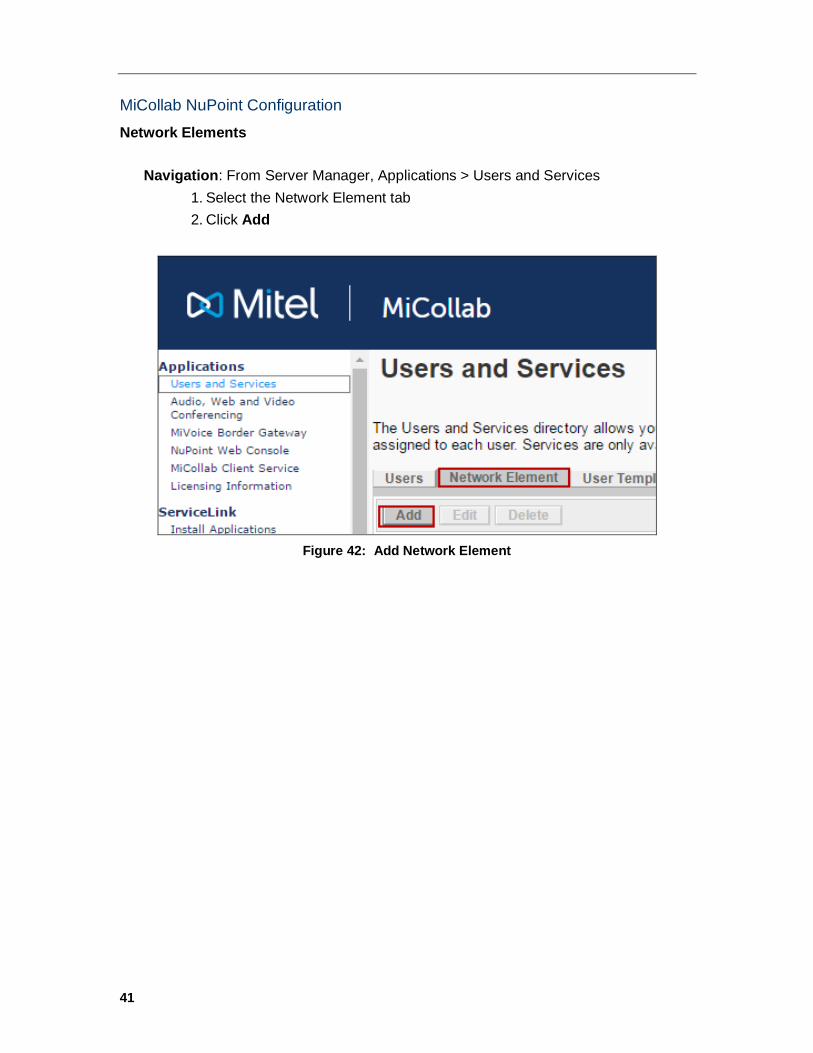
MiCollab NuPoint Configuration
Network Elements
Navigation: From Server Manager, Applications > Users and Services
1. Select the Network Element tab
2. Click Add
Figure 42: Add Network Element
42
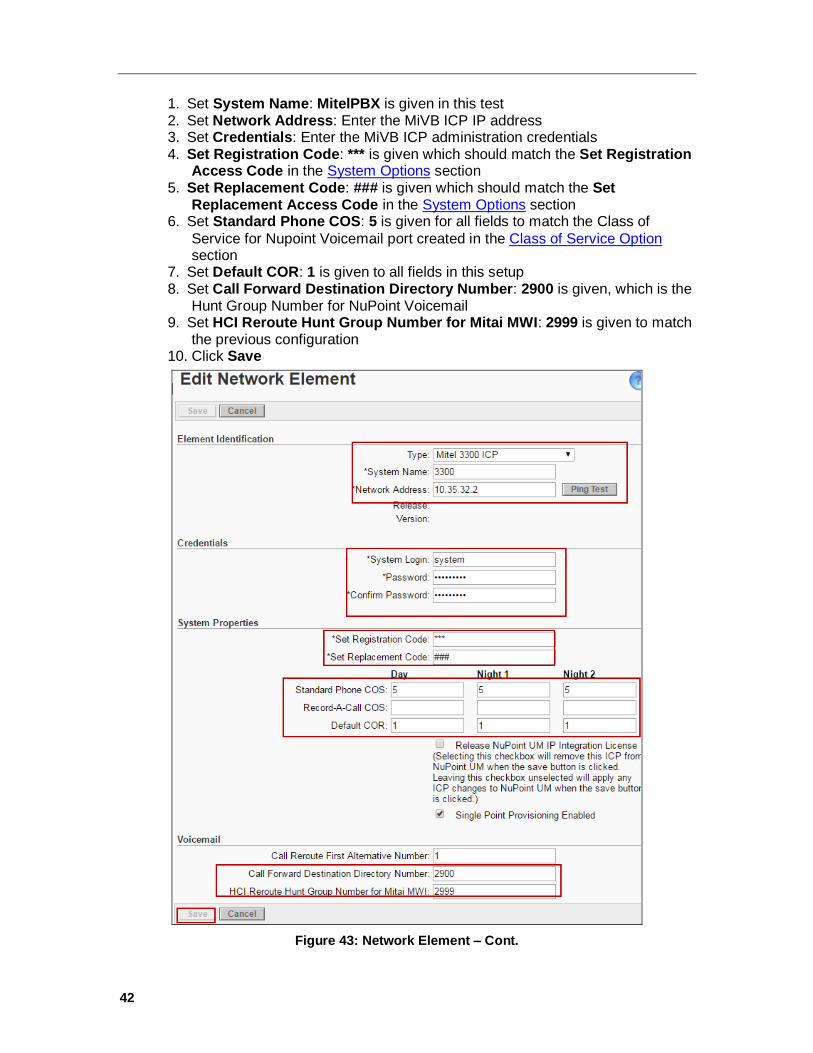
1. Set System Name: MitelPBX is given in this test 2. Set Network Address: Enter the MiVB ICP IP address 3. Set Credentials: Enter the MiVB ICP administration credentials 4. Set Registration Code: *** is given which should match the Set Registration
Access Code in the System Options section 5. Set Replacement Code: ### is given which should match the Set
Replacement Access Code in the System Options section 6. Set Standard Phone COS: 5 is given for all fields to match the Class of
Service for Nupoint Voicemail port created in the Class of Service Option section
7. Set Default COR: 1 is given to all fields in this setup 8. Set Call Forward Destination Directory Number: 2900 is given, which is the
Hunt Group Number for NuPoint Voicemail 9. Set HCI Reroute Hunt Group Number for Mitai MWI: 2999 is given to match
the previous configuration 10. Click Save
Figure 43: Network Element – Cont.

43
Voicemail Line Group
1. Click NuPoint Web Console
Figure 44: Voicemail Line Group Configuration
Navigation: Offline Configuration > Line Groups
2. Click Add
Figure 45: Voicemail Line Group Configuration – Cont.
44
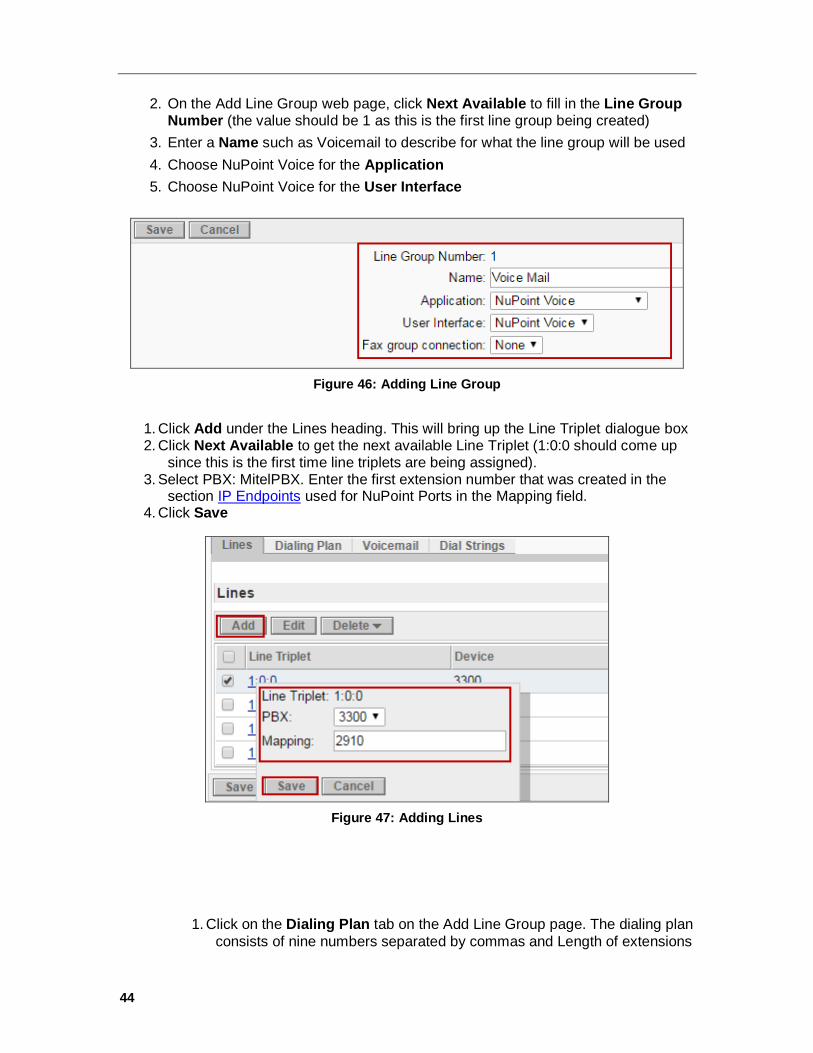
2. On the Add Line Group web page, click Next Available to fill in the Line Group Number (the value should be 1 as this is the first line group being created)
3. Enter a Name such as Voicemail to describe for what the line group will be used
4. Choose NuPoint Voice for the Application
5. Choose NuPoint Voice for the User Interface
Figure 46: Adding Line Group
1. Click Add under the Lines heading. This will bring up the Line Triplet dialogue box 2. Click Next Available to get the next available Line Triplet (1:0:0 should come up
since this is the first time line triplets are being assigned). 3. Select PBX: MitelPBX. Enter the first extension number that was created in the
section IP Endpoints used for NuPoint Ports in the Mapping field. 4. Click Save
Figure 47: Adding Lines
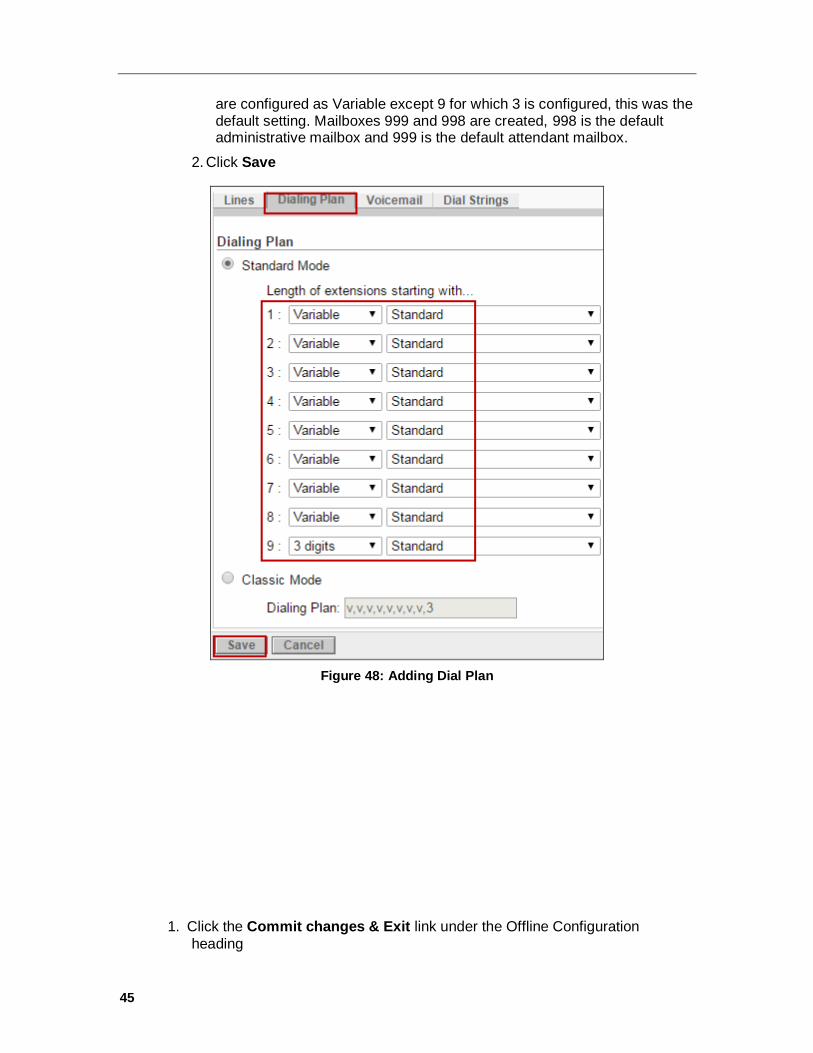
1. Click on the Dialing Plan tab on the Add Line Group page. The dialing plan
consists of nine numbers separated by commas and Length of extensions
45
are configured as Variable except 9 for which 3 is configured, this was the default setting. Mailboxes 999 and 998 are created, 998 is the default administrative mailbox and 999 is the default attendant mailbox.
2. Click Save
Figure 48: Adding Dial Plan
1. Click the Commit changes & Exit link under the Offline Configuration
heading
46
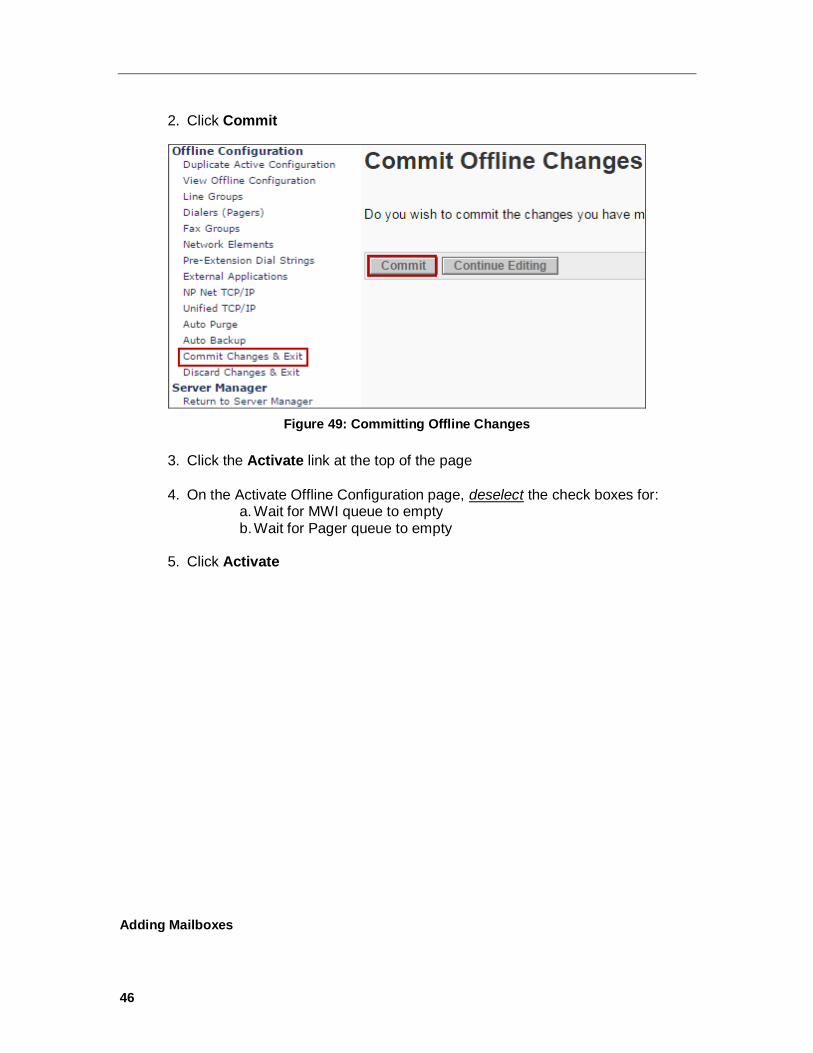
2. Click Commit
Figure 49: Committing Offline Changes
3. Click the Activate link at the top of the page
4. On the Activate Offline Configuration page, deselect the check boxes for:
a. Wait for MWI queue to empty b. Wait for Pager queue to empty
5. Click Activate
Adding Mailboxes
47
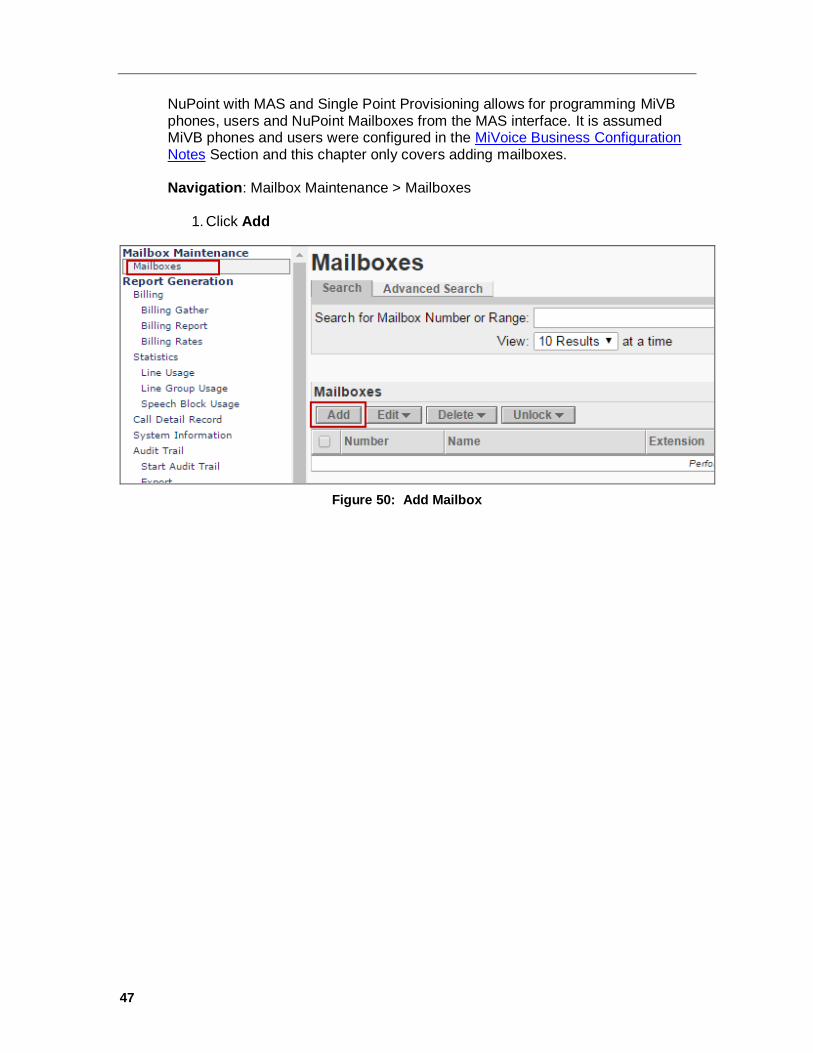
NuPoint with MAS and Single Point Provisioning allows for programming MiVB phones, users and NuPoint Mailboxes from the MAS interface. It is assumed MiVB phones and users were configured in the MiVoice Business Configuration Notes Section and this chapter only covers adding mailboxes. Navigation: Mailbox Maintenance > Mailboxes
1. Click Add
Figure 50: Add Mailbox
48
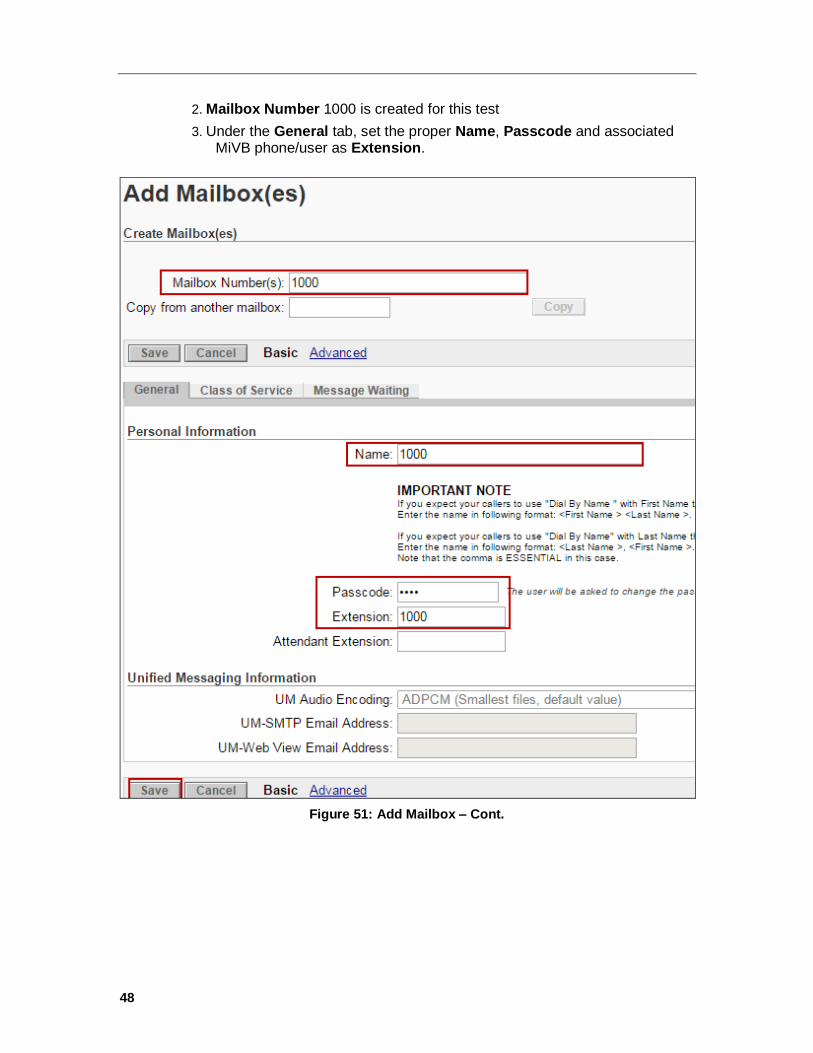
2. Mailbox Number 1000 is created for this test
3. Under the General tab, set the proper Name, Passcode and associated MiVB phone/user as Extension.
Figure 51: Add Mailbox – Cont.
49
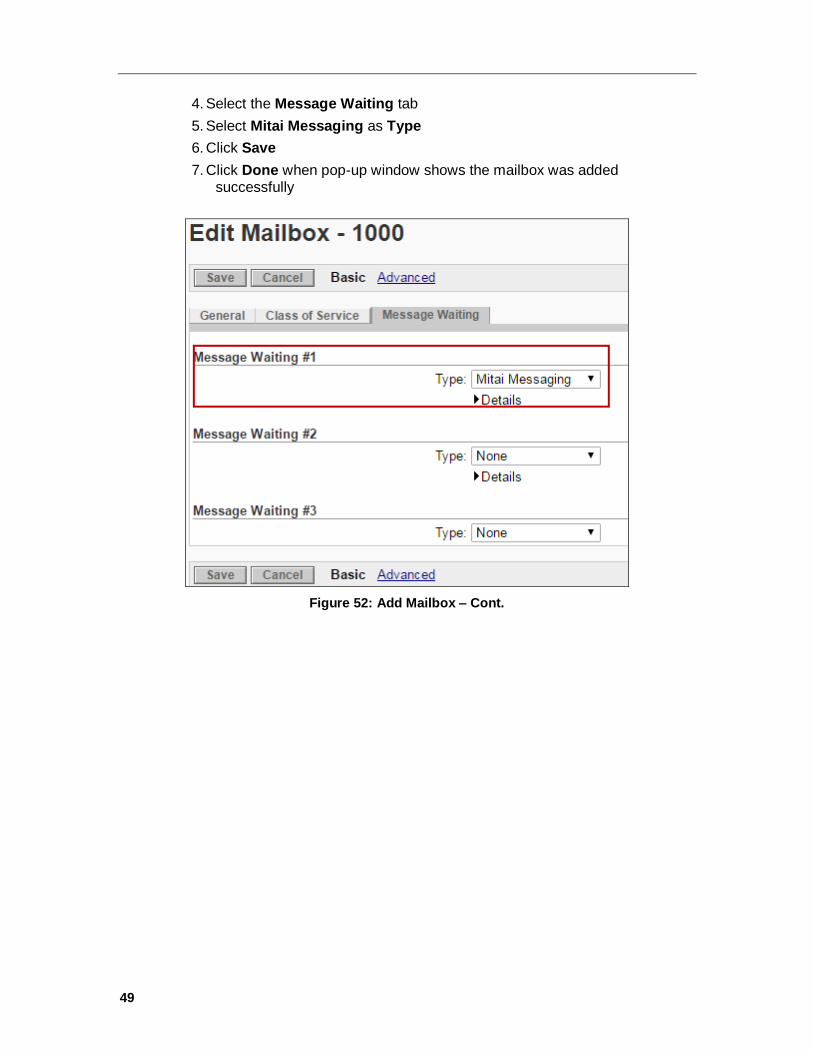
4. Select the Message Waiting tab
5. Select Mitai Messaging as Type
6. Click Save
7. Click Done when pop-up window shows the mailbox was added successfully
Figure 52: Add Mailbox – Cont.
50
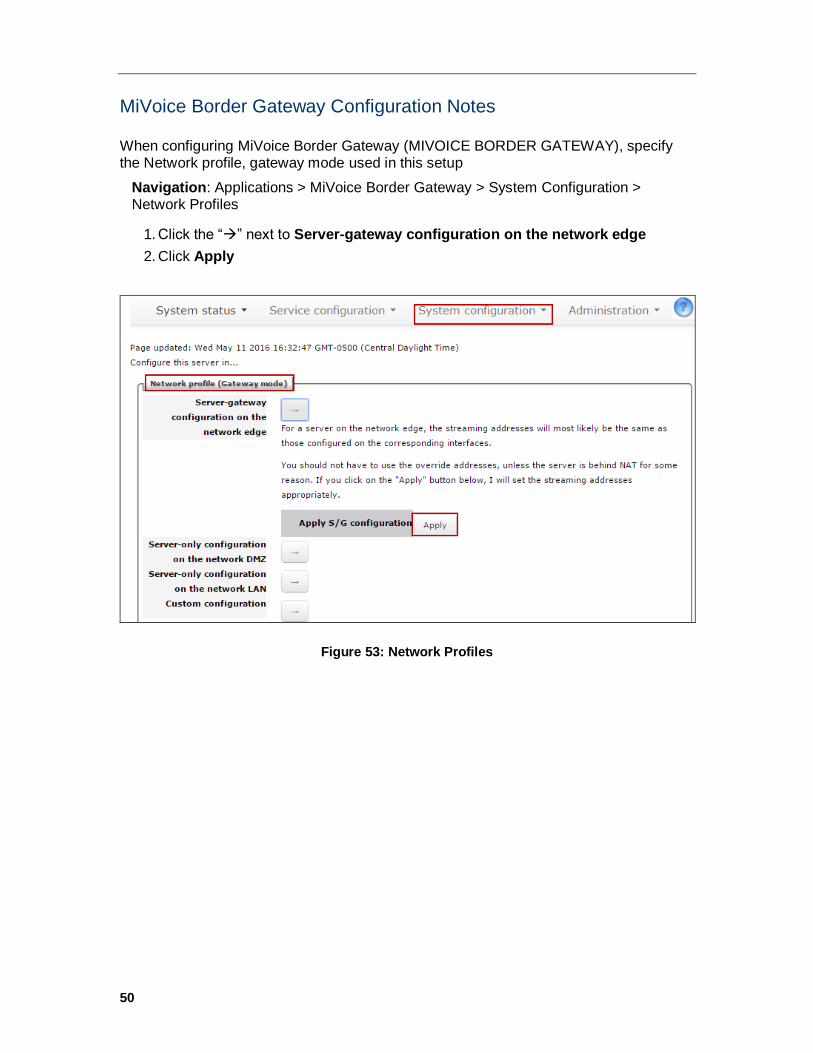
MiVoice Border Gateway Configuration Notes
When configuring MiVoice Border Gateway (MIVOICE BORDER GATEWAY), specify the Network profile, gateway mode used in this setup
Navigation: Applications > MiVoice Border Gateway > System Configuration > Network Profiles
1. Click the “” next to Server-gateway configuration on the network edge
2. Click Apply
Figure 53: Network Profiles
51
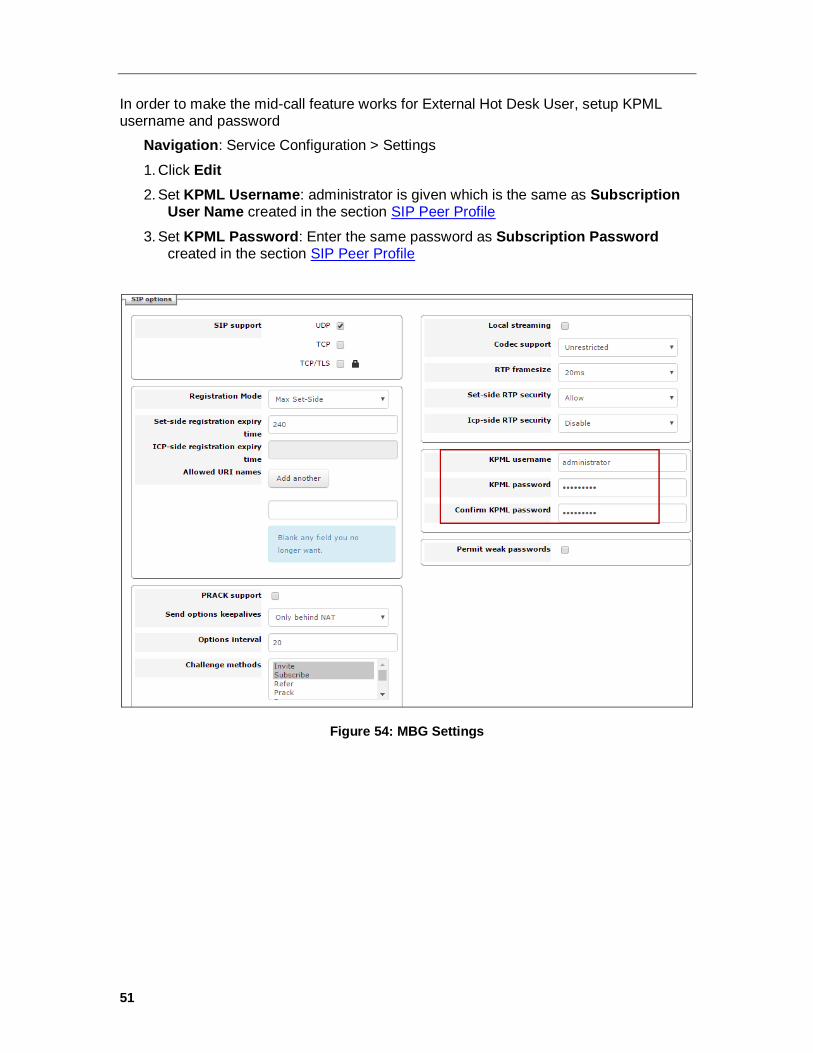
In order to make the mid-call feature works for External Hot Desk User, setup KPML username and password
Navigation: Service Configuration > Settings
1. Click Edit
2. Set KPML Username: administrator is given which is the same as Subscription User Name created in the section SIP Peer Profile
3. Set KPML Password: Enter the same password as Subscription Password created in the section SIP Peer Profile
Figure 54: MBG Settings
52
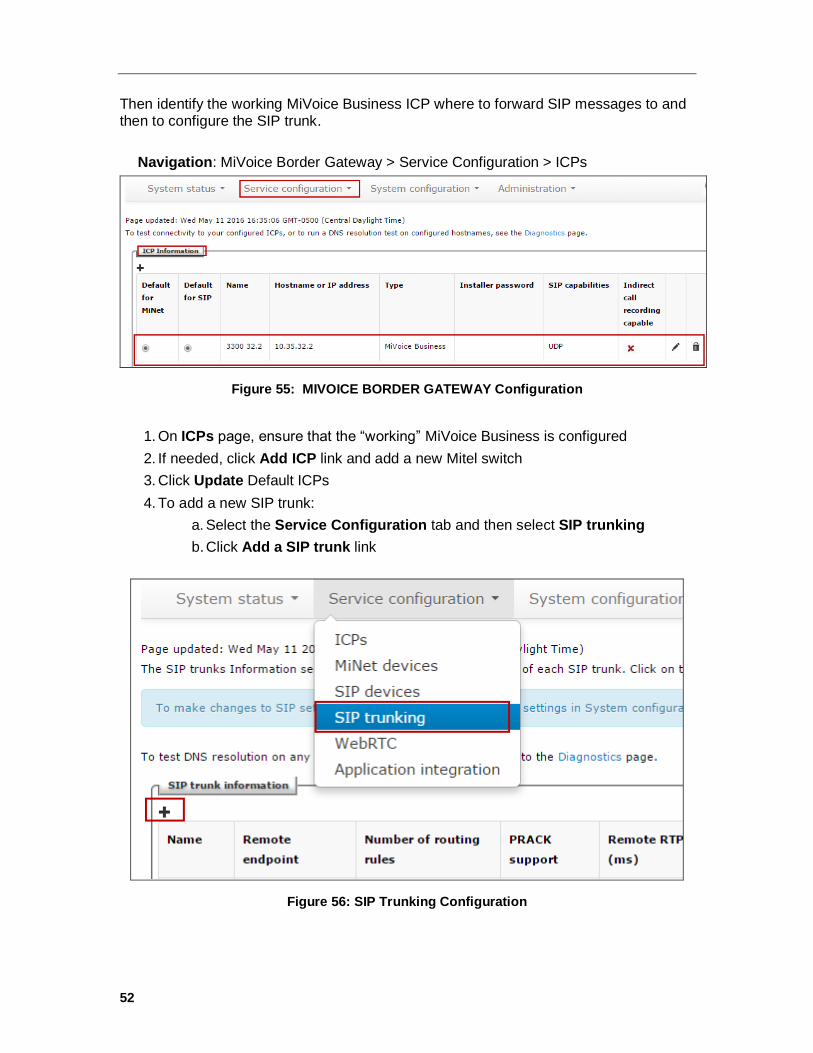
Then identify the working MiVoice Business ICP where to forward SIP messages to and then to configure the SIP trunk.
Navigation: MiVoice Border Gateway > Service Configuration > ICPs
Figure 55: MIVOICE BORDER GATEWAY Configuration
1. On ICPs page, ensure that the “working” MiVoice Business is configured
2. If needed, click Add ICP link and add a new Mitel switch
3. Click Update Default ICPs
4. To add a new SIP trunk:
a. Select the Service Configuration tab and then select SIP trunking
b. Click Add a SIP trunk link
Figure 56: SIP Trunking Configuration
53
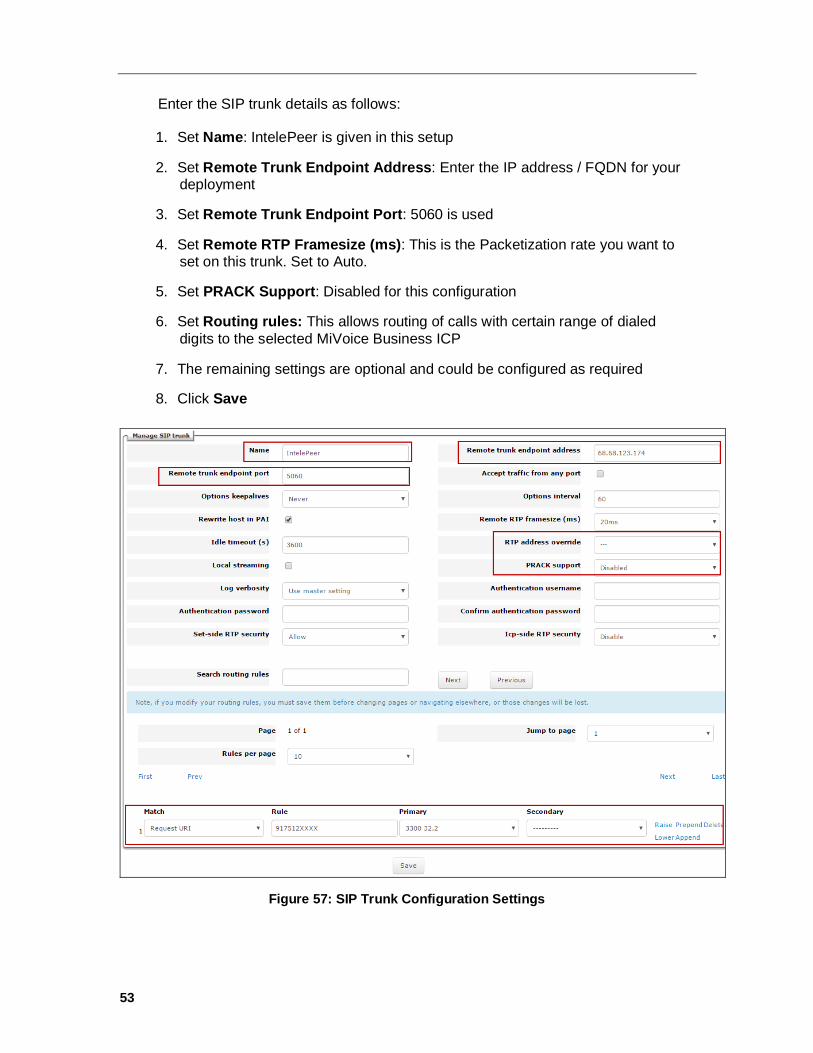
Enter the SIP trunk details as follows: 1. Set Name: IntelePeer is given in this setup
2. Set Remote Trunk Endpoint Address: Enter the IP address / FQDN for your deployment
3. Set Remote Trunk Endpoint Port: 5060 is used
4. Set Remote RTP Framesize (ms): This is the Packetization rate you want to set on this trunk. Set to Auto.
5. Set PRACK Support: Disabled for this configuration
6. Set Routing rules: This allows routing of calls with certain range of dialed
digits to the selected MiVoice Business ICP
7. The remaining settings are optional and could be configured as required
8. Click Save
Figure 57: SIP Trunk Configuration Settings

54
Related Documents