TeamMate+ Protocol Document Created November 2020 COAST COMMUNITY COLLEGE DISTRICT INTERNAL AUDIT

Welcome message from author
This document is posted to help you gain knowledge. Please leave a comment to let me know what you think about it! Share it to your friends and learn new things together.
Transcript
TeamMate+ Protocol Document Created November 2020
COAST COMMUNITY COLLEGE DISTRICT
INTERNAL AUDIT
i
TeamMate+ Protocol Document Table of Contents
Introduction ...................................................................................................................... 1
Development ............................................................................................................ 1
Team Cloud and Executable Files ............................................................................... 1
LogOn and Passwords ..................................................................................................... 2
Users ................................................................................................................................... 3
Adding a New User .................................................................................................... 4
Dimensions ........................................................................................................................ 5
Settings .............................................................................................................................. 6
Taxonomy .......................................................................................................................... 7
Response Tracking..................................................................................................... 7
Notifications ..................................................................................................................... 7
Document Requests .................................................................................................. 7
Assessments/Audit Plan ................................................................................................ 8
Perspectives ...................................................................................................................... 9
Time Tracking ............................................................................................................... 10
Timesheet Set-Up .................................................................................................... 10
Timesheet Rules and Notifications .......................................................................... 11
Project Management .................................................................................................... 12
Project Workflow: Milestones/Project Phases and Schedule/Costs .......................... 12
Project Naming Conventions ................................................................................... 13
Procedures/Testing Documentation ........................................................................ 15
Procedure Workflow Rules and Notifications ........................................................... 17
Work Papers .................................................................................................................. 17
Workpaper Workflow Rules and Notifications ......................................................... 18
Folder/Folder Cabinet for Project Templates (TM+) ........................................... 18
ii
Issues/Findings and Recommendations .................................................................. 19
Coaching Notes .............................................................................................................. 21
Risks and Controls ........................................................................................................ 21
Risks ....................................................................................................................... 22
Control.................................................................................................................... 22
Data Movement.............................................................................................................. 22
Optional Features ......................................................................................................... 23
Home Page .............................................................................................................. 23
Dashboards ............................................................................................................. 23
1
Introduction
The TeamMate+ Configuration Protocol document outlines the Coast Community College District (CCCD) Internal Audit Department’s (IA) configuration and implementation strategies and policies.
Development
IA has two databases, development and production. IA tested configuration settings in development and finalized settings in production. Once complete, the vendor transferred the settings from development to production. Due to the non-static nature of testing, settings and policies in the test database may NOT be the same as those in the production database. The development database will always be available for use, in order to test changes to configuration settings and/or train new users. The production database is considered the final product. It is critical that when logging in to perform work that you log into the correct database. If changes occur in configuration, it is recommended to contact TeamMate support and request another transfer to production so that the new settings may be applied to the active work environment.
Team Cloud and Executable Files
TeamMate+ is hosted by the vendor for a fee. This is more EFFICIENT for CCCD because IT staff do not need to be trained on a system that is only used by IA. CCCD provides IA staff with a computer and Internet access, but the software and system requirements reside in a Cloud environment at the Wolters Kluwer “data farm” in Dallas, Texas.
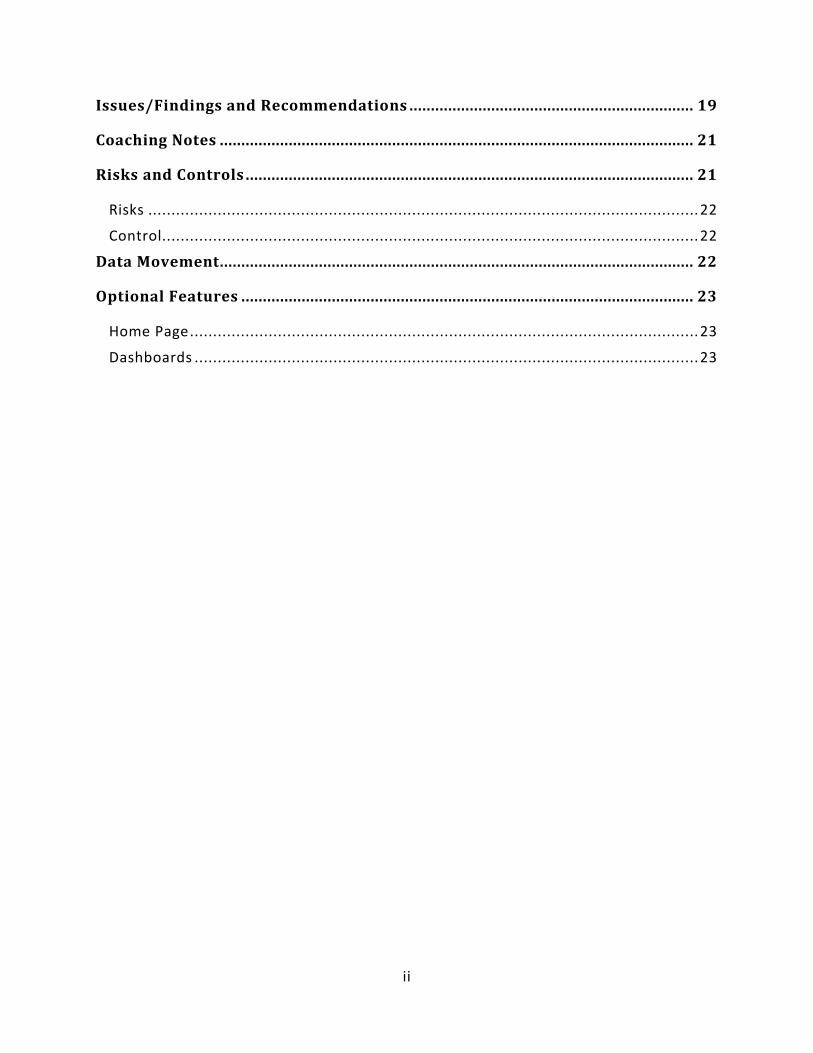
ALL NEW USERS must obtain the .exe files and install them on their own CCCD machine. Upon implementation, the IA Director will obtain the .exe files for TeamMate+ and TeamMate Analytics and store them in the TeamMate+ file on the group share. I:\TeamMate\Teammate Plus. The IA Director ensures the most current versions of the .exe files are saved in the group share. Any staff member with Administrator access may access these files by logging into their TeamMate+ account, clicking the drop-down menu under the Name, selecting Support, and accessing the files. The TeamMate Analytics .exe files may be found by conducting a search in TeamMate Connect.
As new versions are released, it is VERY IMPORTANT to read the release notes, as users may need to install an updated version of the .exe file(s). It is imperative that these .exe files are stored in a location where staff and CCCD IT User Support can access these files, in the event that a computer is replaced, we still have access to the files. CCCD IT User Support may need to provide additional administrator privileges in order to download and install these .exe files. If this is the case, contact the Network Analyst assigned to the District Office and request assistance.
2
LogOn and Passwords
To log into TeamMate+, use the following link and enter your login credentials for the DEVELOPMENT DATABASE:
https://cccdplus-dev.TeamMate+hosting.com/TeamMate+/Home/Login?returnUrl=%2FTeamMate+.
And use this link for the PRODUCTION DATABASE: https://cccdplus.teammatehosting.com/TeamMate/Home/Login?returnUrl=%2FTeamMate.
Save these links in Microsoft Edge and Google Chrome. The tool does not work as well in Internet Explorer. Users must login under their own unique credentials. Users will be “timed-out” if the system does not receive a response within approximately 15 minutes.
There may be a need to login as the Champion. If so, use these credentials:
Login: CM_Champion; Password: T3@mMate#2020. This login is typically used by a member of the TeamMate+ Team at Wolters Kluwer.
Administrators should change the CM Champion password after End User Training. This is NOT recommended at this time, in case additional support and/or training is needed from TeamMate Support.
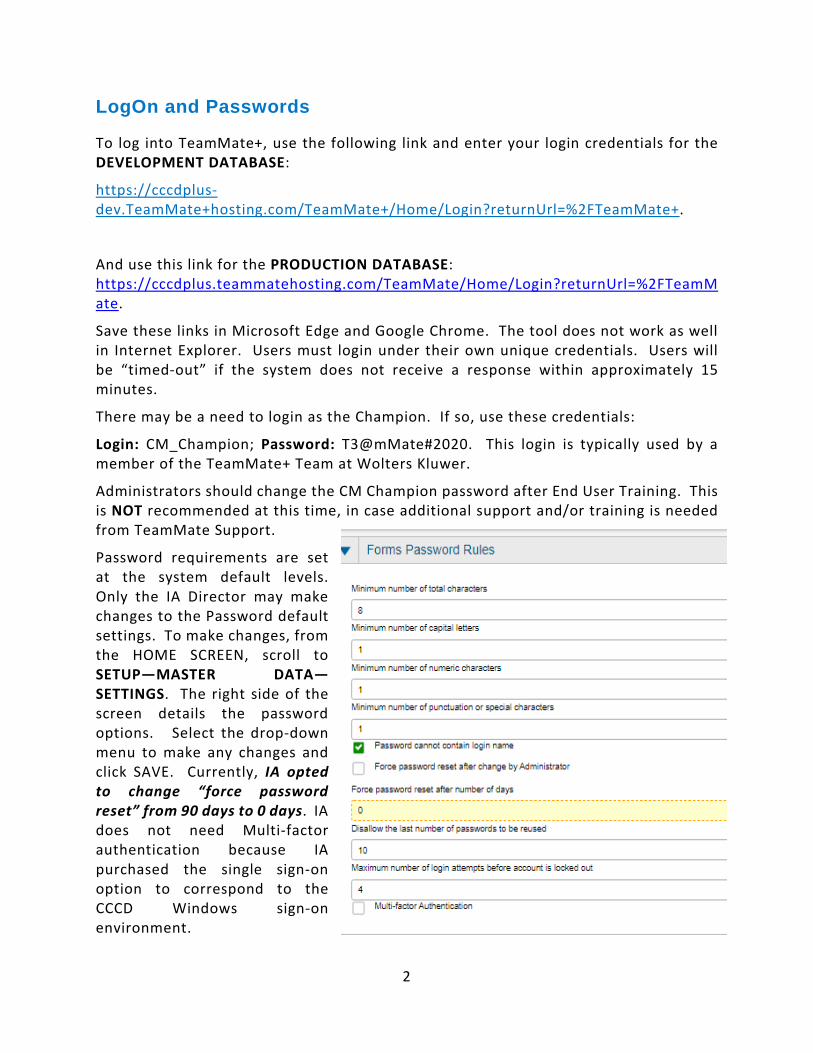
Password requirements are set at the system default levels. Only the IA Director may make changes to the Password default settings. To make changes, from the HOME SCREEN, scroll to SETUP—MASTER DATA—SETTINGS. The right side of the screen details the password options. Select the drop-down menu to make any changes and click SAVE. Currently, IA opted to change “force password reset” from 90 days to 0 days. IA does not need Multi-factor authentication because IA purchased the single sign-on option to correspond to the CCCD Windows sign-on environment.
3
Users
While some User fields are Default, like name, login credentials, etcetera, other fields may be customized. Only Administrators access may apply updates. The IA Director ultimately decides what customizable fields will be added to the system.
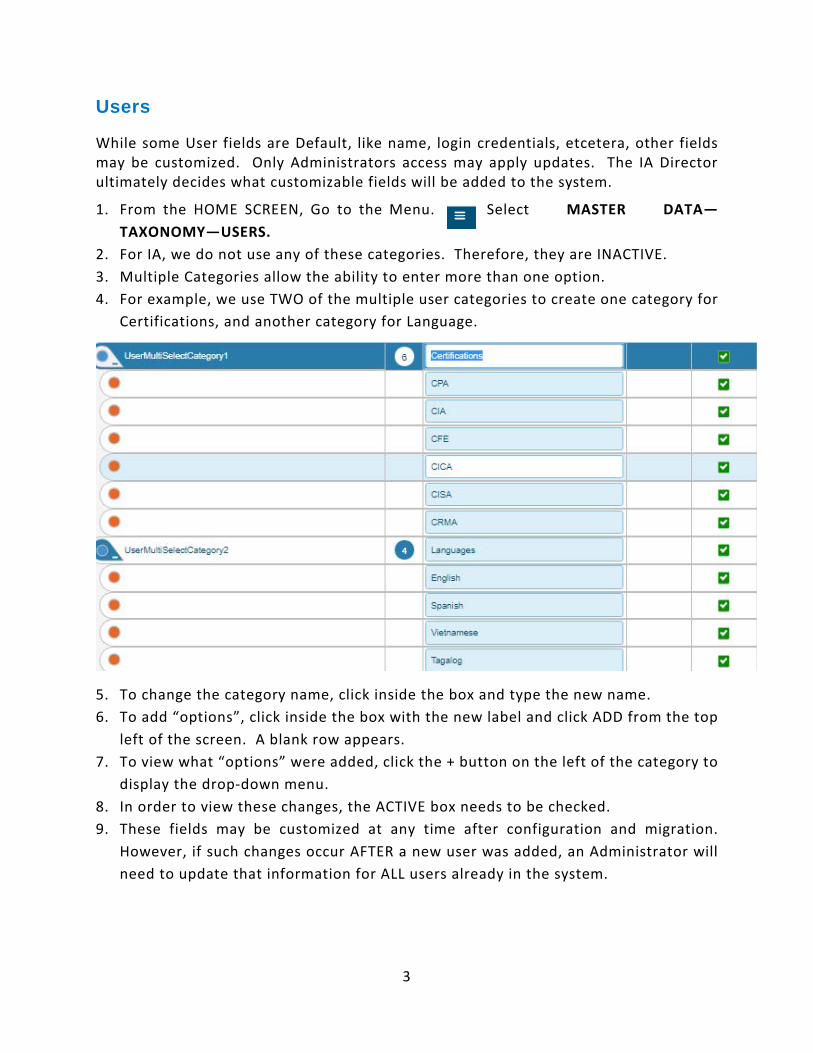
1. From the HOME SCREEN, Go to the Menu. Select MASTER DATA—TAXONOMY—USERS.
2. For IA, we do not use any of these categories. Therefore, they are INACTIVE. 3. Multiple Categories allow the ability to enter more than one option. 4. For example, we use TWO of the multiple user categories to create one category for
Certifications, and another category for Language.
5. To change the category name, click inside the box and type the new name. 6. To add “options”, click inside the box with the new label and click ADD from the top
left of the screen. A blank row appears. 7. To view what “options” were added, click the + button on the left of the category to
display the drop-down menu. 8. In order to view these changes, the ACTIVE box needs to be checked. 9. These fields may be customized at any time after configuration and migration.
However, if such changes occur AFTER a new user was added, an Administrator will need to update that information for ALL users already in the system.
4
Adding a New User
Users are added by Administrators, AFTER the .exe files are installed.
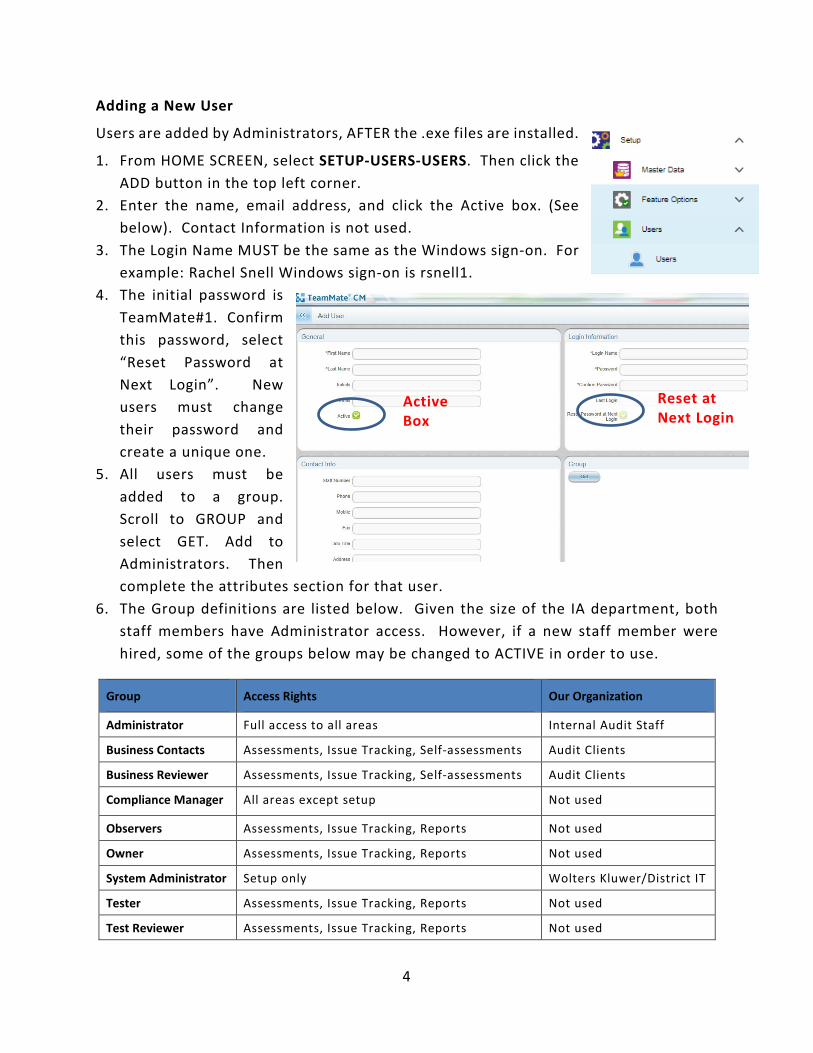
1. From HOME SCREEN, select SETUP-USERS-USERS. Then click the ADD button in the top left corner.
2. Enter the name, email address, and click the Active box. (See below). Contact Information is not used.
3. The Login Name MUST be the same as the Windows sign-on. For example: Rachel Snell Windows sign-on is rsnell1.
4. The initial password is TeamMate#1. Confirm this password, select “Reset Password at Next Login”. New users must change their password and create a unique one.
5. All users must be added to a group. Scroll to GROUP and select GET. Add to Administrators. Then complete the attributes section for that user.
6. The Group definitions are listed below. Given the size of the IA department, both staff members have Administrator access. However, if a new staff member were hired, some of the groups below may be changed to ACTIVE in order to use.
Group Access Rights Our Organization
Administrator Full access to all areas Internal Audit Staff
Business Contacts Assessments, Issue Tracking, Self-assessments Audit Clients
Business Reviewer Assessments, Issue Tracking, Self-assessments Audit Clients
Compliance Manager All areas except setup Not used
Observers Assessments, Issue Tracking, Reports Not used
Owner Assessments, Issue Tracking, Reports Not used
System Administrator Setup only Wolters Kluwer/District IT
Tester Assessments, Issue Tracking, Reports Not used
Test Reviewer Assessments, Issue Tracking, Reports Not used
Active Box
Reset at Next Login
5
7. Within TeamMate+, custom groups may also be created; however, IA does not have any custom groups.
8. On the Teams tab, the IA Director may assign staff to Teams in order to set up a Timesheet approval process. Currently, the only Team added is to approve timesheets. (See Time Tracking).
9. To edit Roles, go to HOME—SETUP—USERS—ROLES. Select the Role to change, click the Edit button in the top left corner. IA has opted not to change any roles.
Dimensions
The Primary Dimension is CCCD and the various colleges and departments within that subset. Secondary dimensions are those entities within the organization that may contain special relationships outside of the Primary Dimension. (IT systems, COSO, etc).
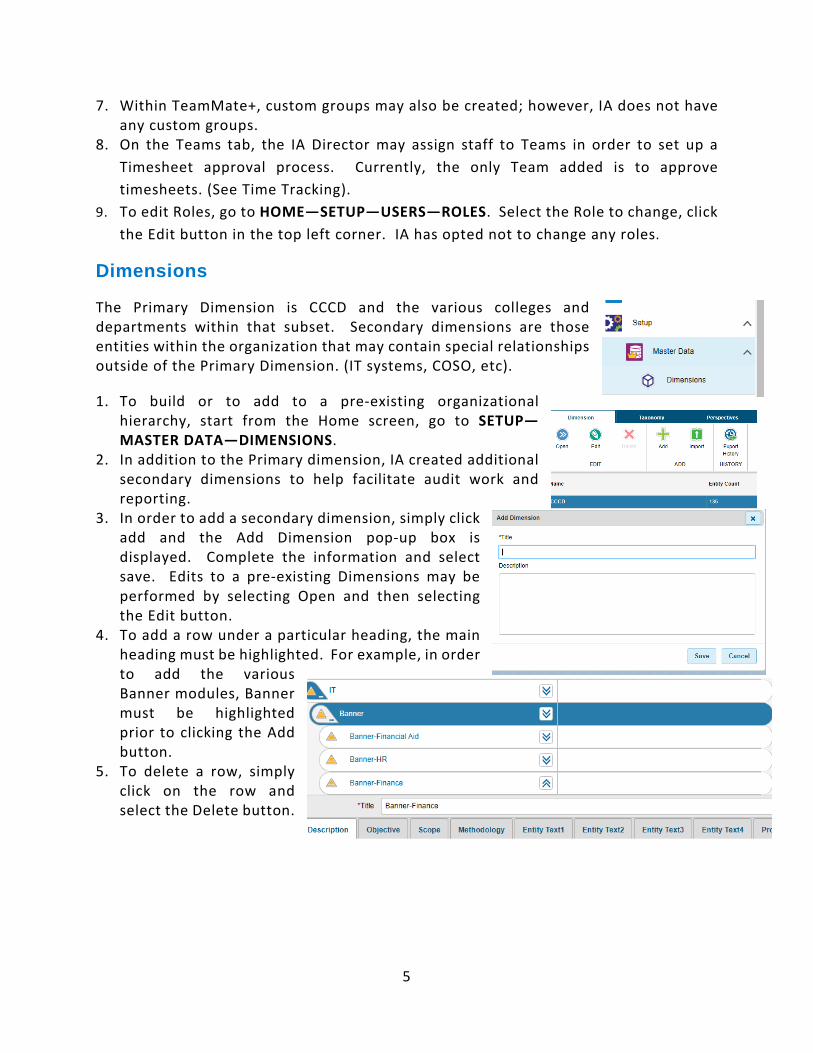
1. To build or to add to a pre-existing organizational hierarchy, start from the Home screen, go to SETUP—MASTER DATA—DIMENSIONS.
2. In addition to the Primary dimension, IA created additional secondary dimensions to help facilitate audit work and reporting.
3. In order to add a secondary dimension, simply click add and the Add Dimension pop-up box is displayed. Complete the information and select save. Edits to a pre-existing Dimensions may be performed by selecting Open and then selecting the Edit button.
4. To add a row under a particular heading, the main heading must be highlighted. For example, in order to add the various Banner modules, Banner must be highlighted prior to clicking the Add button.
5. To delete a row, simply click on the row and select the Delete button.
6
Settings
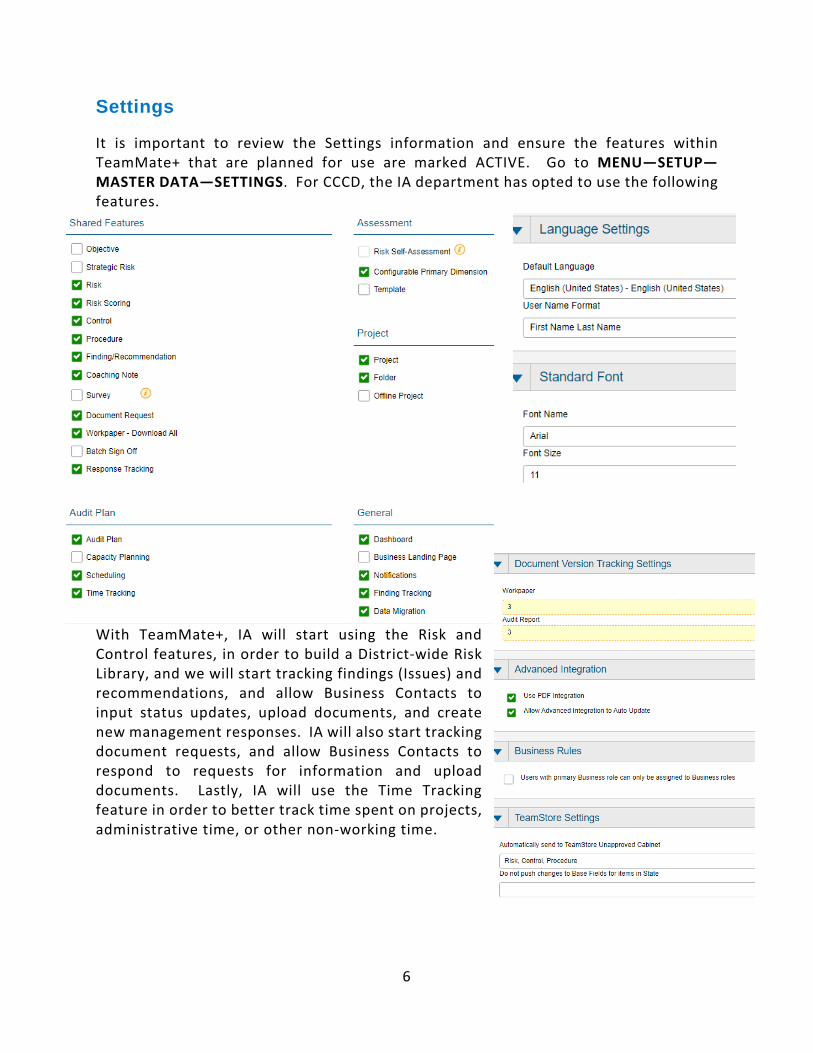
It is important to review the Settings information and ensure the features within TeamMate+ that are planned for use are marked ACTIVE. Go to MENU—SETUP—MASTER DATA—SETTINGS. For CCCD, the IA department has opted to use the following features.
With TeamMate+, IA will start using the Risk and Control features, in order to build a District-wide Risk Library, and we will start tracking findings (Issues) and recommendations, and allow Business Contacts to input status updates, upload documents, and create new management responses. IA will also start tracking document requests, and allow Business Contacts to respond to requests for information and upload documents. Lastly, IA will use the Time Tracking feature in order to better track time spent on projects, administrative time, or other non-working time.
7
Taxonomy
The bulk of the configuration occurs in Taxonomy. Taxonomy configuration is documented within specific sections of this document, unless otherwise noted. For now, IA is not using the Audit Report or Entity Taxonomy functions at this time.
Response Tracking
Response Tracking was recently added, and there are currently no items to configure.
Notifications
Notifications may be sent to team members as reminders to perform certain tasks. These tasks include submit a timesheet, sign off on a procedure or workpaper, review a procedure or workpaper, etc. Notifications may be made IN APP, which means messages appear within TeamMate+, or EMAIL, which is sent directly to the user’s email, or both. IA opted to use EMAIL.
For emails, notifications may be sent either INDIVIDUAL or CONSOLIDATED. Individual means that one email is sent per instance, instantaneously, whereas consolidated means that one email is sent per day (the next day) that sends all the instances in one email.
Notifications settings are documented in the relevant sections of this protocol document. Notifications for Audit Report and Miscellaneous are not in use, as IA is not using these features. It is possible for staff to change the notifications that they receive, even turn off notifications, by logging into TeamMate+ and navigating to HOME—NOTIFICATIONS. If a team member opts to turn off notifications AND fails to complete work timely (with which the notifications were designed to assist), then it may result in disciplinary action and documentation of work performance issues.
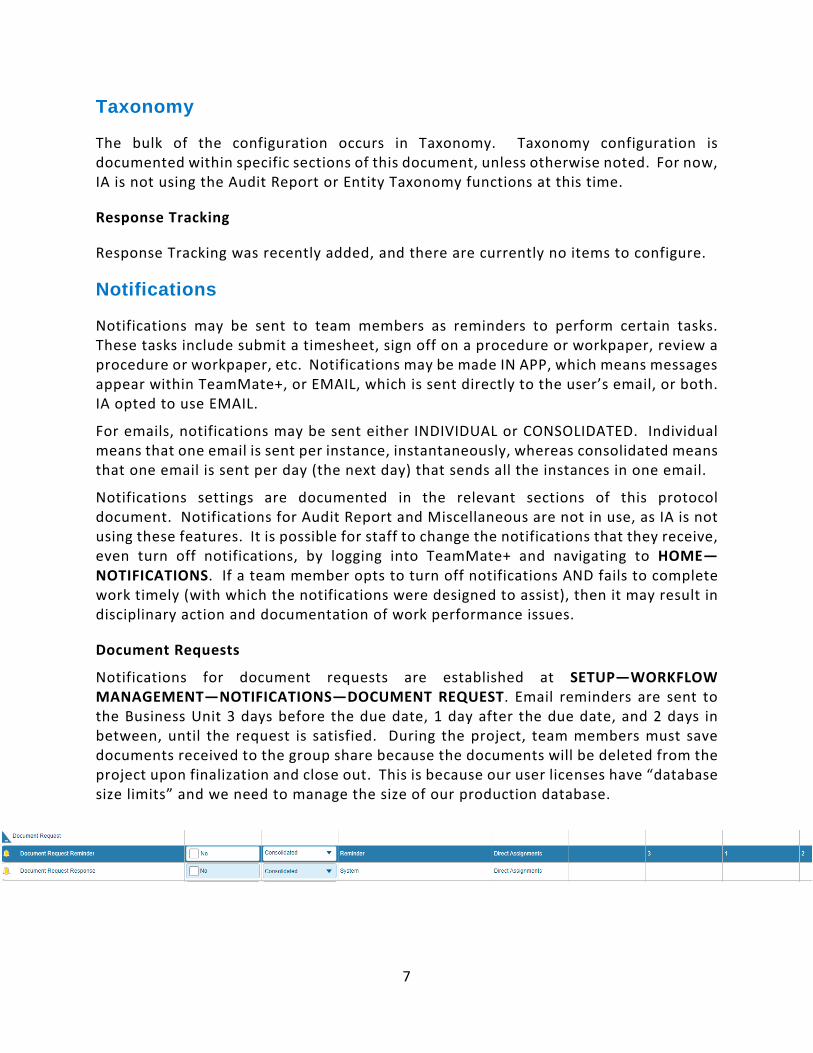
Document Requests
Notifications for document requests are established at SETUP—WORKFLOW MANAGEMENT—NOTIFICATIONS—DOCUMENT REQUEST. Email reminders are sent to the Business Unit 3 days before the due date, 1 day after the due date, and 2 days in between, until the request is satisfied. During the project, team members must save documents received to the group share because the documents will be deleted from the project upon finalization and close out. This is because our user licenses have “database size limits” and we need to manage the size of our production database.
8
Assessments/Audit Plan
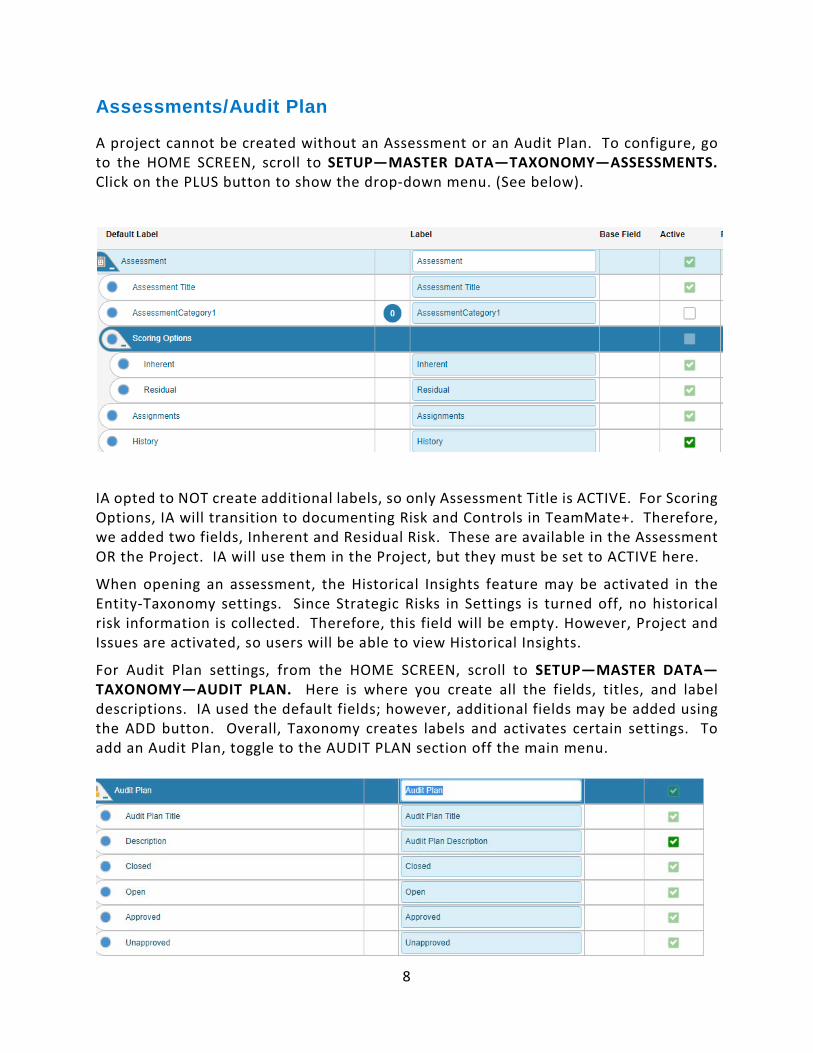
A project cannot be created without an Assessment or an Audit Plan. To configure, go to the HOME SCREEN, scroll to SETUP—MASTER DATA—TAXONOMY—ASSESSMENTS. Click on the PLUS button to show the drop-down menu. (See below).
IA opted to NOT create additional labels, so only Assessment Title is ACTIVE. For Scoring Options, IA will transition to documenting Risk and Controls in TeamMate+. Therefore, we added two fields, Inherent and Residual Risk. These are available in the Assessment OR the Project. IA will use them in the Project, but they must be set to ACTIVE here.
When opening an assessment, the Historical Insights feature may be activated in the Entity-Taxonomy settings. Since Strategic Risks in Settings is turned off, no historical risk information is collected. Therefore, this field will be empty. However, Project and Issues are activated, so users will be able to view Historical Insights.
For Audit Plan settings, from the HOME SCREEN, scroll to SETUP—MASTER DATA—TAXONOMY—AUDIT PLAN. Here is where you create all the fields, titles, and label descriptions. IA used the default fields; however, additional fields may be added using the ADD button. Overall, Taxonomy creates labels and activates certain settings. To add an Audit Plan, toggle to the AUDIT PLAN section off the main menu.
9
Perspectives
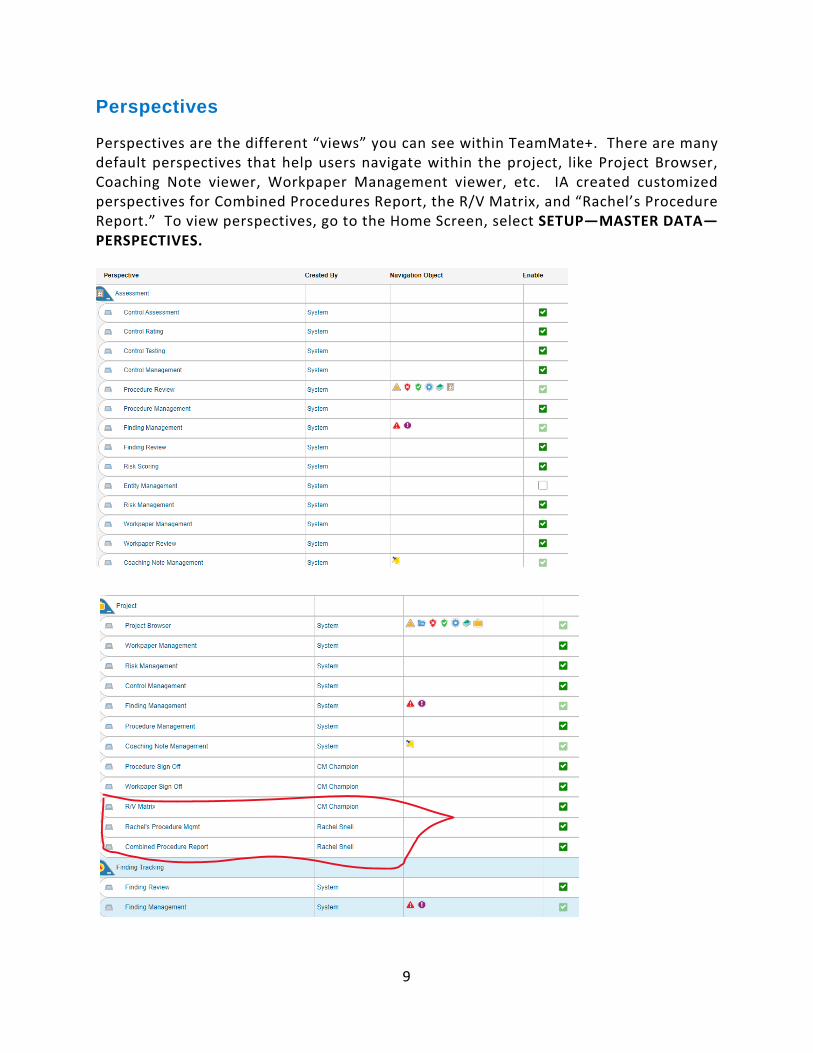
Perspectives are the different “views” you can see within TeamMate+. There are many default perspectives that help users navigate within the project, like Project Browser, Coaching Note viewer, Workpaper Management viewer, etc. IA created customized perspectives for Combined Procedures Report, the R/V Matrix, and “Rachel’s Procedure Report.” To view perspectives, go to the Home Screen, select SETUP—MASTER DATA—PERSPECTIVES.
10
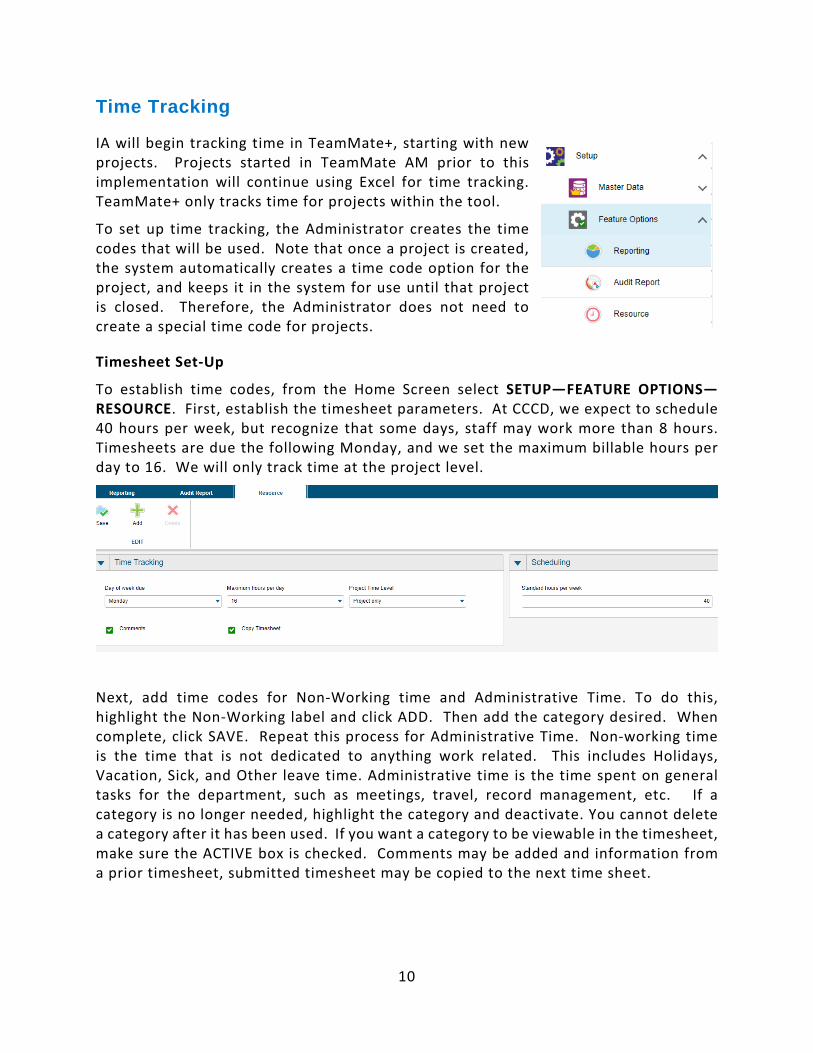
Time Tracking
IA will begin tracking time in TeamMate+, starting with new projects. Projects started in TeamMate AM prior to this implementation will continue using Excel for time tracking. TeamMate+ only tracks time for projects within the tool.
To set up time tracking, the Administrator creates the time codes that will be used. Note that once a project is created, the system automatically creates a time code option for the project, and keeps it in the system for use until that project is closed. Therefore, the Administrator does not need to create a special time code for projects.
Timesheet Set-Up
To establish time codes, from the Home Screen select SETUP—FEATURE OPTIONS—RESOURCE. First, establish the timesheet parameters. At CCCD, we expect to schedule 40 hours per week, but recognize that some days, staff may work more than 8 hours. Timesheets are due the following Monday, and we set the maximum billable hours per day to 16. We will only track time at the project level.
Next, add time codes for Non-Working time and Administrative Time. To do this, highlight the Non-Working label and click ADD. Then add the category desired. When complete, click SAVE. Repeat this process for Administrative Time. Non-working time is the time that is not dedicated to anything work related. This includes Holidays, Vacation, Sick, and Other leave time. Administrative time is the time spent on general tasks for the department, such as meetings, travel, record management, etc. If a category is no longer needed, highlight the category and deactivate. You cannot delete a category after it has been used. If you want a category to be viewable in the timesheet, make sure the ACTIVE box is checked. Comments may be added and information from a prior timesheet, submitted timesheet may be copied to the next time sheet.
11
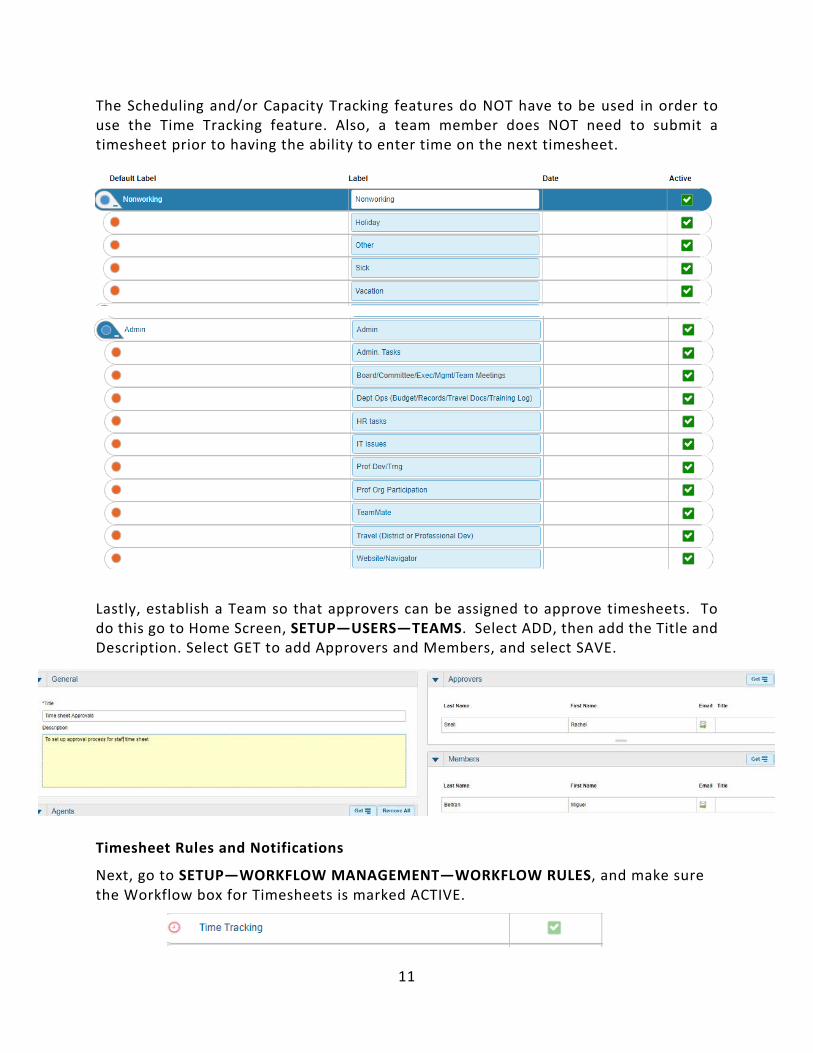
The Scheduling and/or Capacity Tracking features do NOT have to be used in order to use the Time Tracking feature. Also, a team member does NOT need to submit a timesheet prior to having the ability to enter time on the next timesheet.
Lastly, establish a Team so that approvers can be assigned to approve timesheets. To do this go to Home Screen, SETUP—USERS—TEAMS. Select ADD, then add the Title and Description. Select GET to add Approvers and Members, and select SAVE.
Timesheet Rules and Notifications
Next, go to SETUP—WORKFLOW MANAGEMENT—WORKFLOW RULES, and make sure the Workflow box for Timesheets is marked ACTIVE.

12
To set up notifications related to Timesheets, that is, notifying a team member that a timesheet is due and/or a manager that a timesheet is ready for review/approval, go to the HOME screen, go to SETUP—WORKFLOW MANAGEMENT—NOTIFICATIONS. The following three notifications were created to send a reminder via email to the User.
Currently, Timesheet is configured to send a reminder to complete the timesheet 3 days before it is due, 1 day after the due date if it is not submitted, and 1 day between notifications until the timesheet is submitted. To edit, highlight the Timesheet Reminder, click EDIT, and make any changes prior to clicking SAVE.
Project Management
There are several settings related to Project Management, including Milestones, creating projects, creating procedure workflows and reminders to complete certain project tasks, and establishing specific fields for documenting and linking work.
Project Workflow: Milestones/Project Phases and Schedule/Costs
Every project must have a timeline and cost budget associated with it. In the past, this information was created manually in an Excel document. In TeamMate+, this information is documented within the tool. To establish specific milestones, scroll to HOME—SETUP—WORKFLOW MANAGEMENT—PROJECT WORKFLOW. At CCCD, there are specific progress points that help maintain project workflow, and we establish target dates for when each of these steps should be completed.
To add a milestone, highlight a section, select ADD MILESTONE, enter the name of the milestone, and select ACTIVE. The arrows on the ribbon bar may be used to move a milestone up and down until the list is in the preferred order. Under SETUP—MASTER DATA—TAXONOMY—PROJECT—SCHEDULE, milestones and other Scheduling features are made available.
13
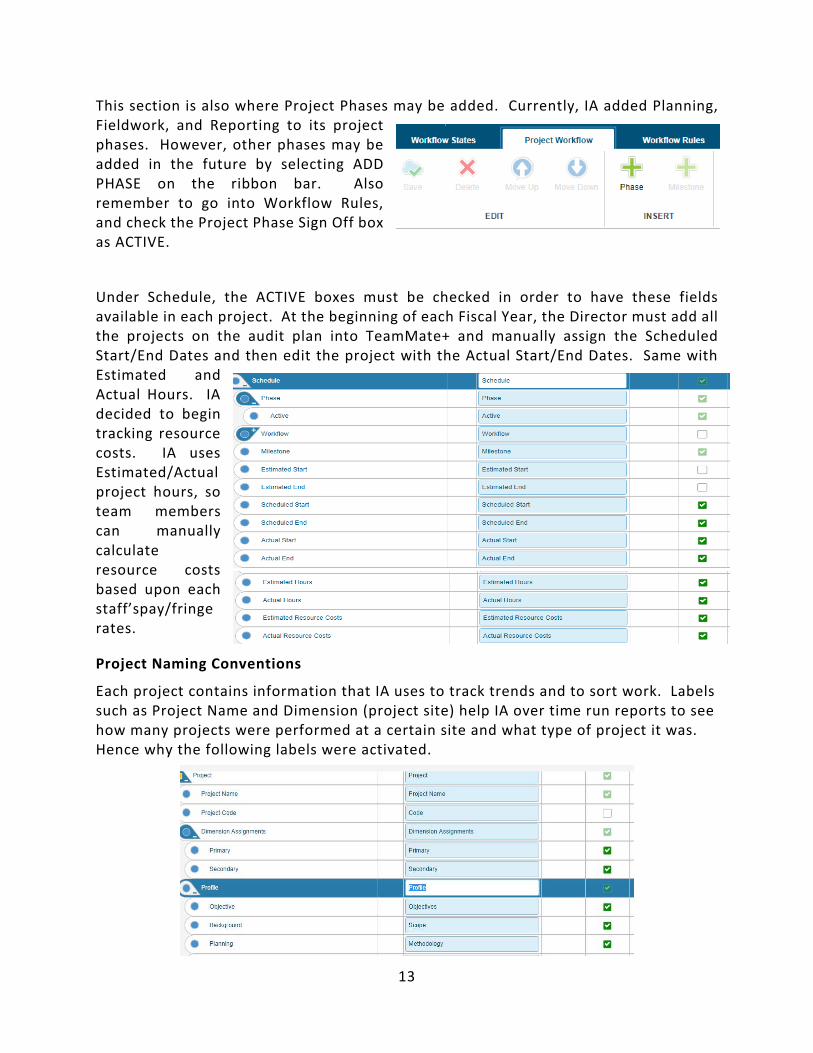
This section is also where Project Phases may be added. Currently, IA added Planning, Fieldwork, and Reporting to its project phases. However, other phases may be added in the future by selecting ADD PHASE on the ribbon bar. Also remember to go into Workflow Rules, and check the Project Phase Sign Off box as ACTIVE.
Under Schedule, the ACTIVE boxes must be checked in order to have these fields available in each project. At the beginning of each Fiscal Year, the Director must add all the projects on the audit plan into TeamMate+ and manually assign the Scheduled Start/End Dates and then edit the project with the Actual Start/End Dates. Same with Estimated and Actual Hours. IA decided to begin tracking resource costs. IA uses Estimated/Actual project hours, so team members can manually calculate resource costs based upon each staff’spay/fringe rates.
Project Naming Conventions
Each project contains information that IA uses to track trends and to sort work. Labels such as Project Name and Dimension (project site) help IA over time run reports to see how many projects were performed at a certain site and what type of project it was. Hence why the following labels were activated.
14
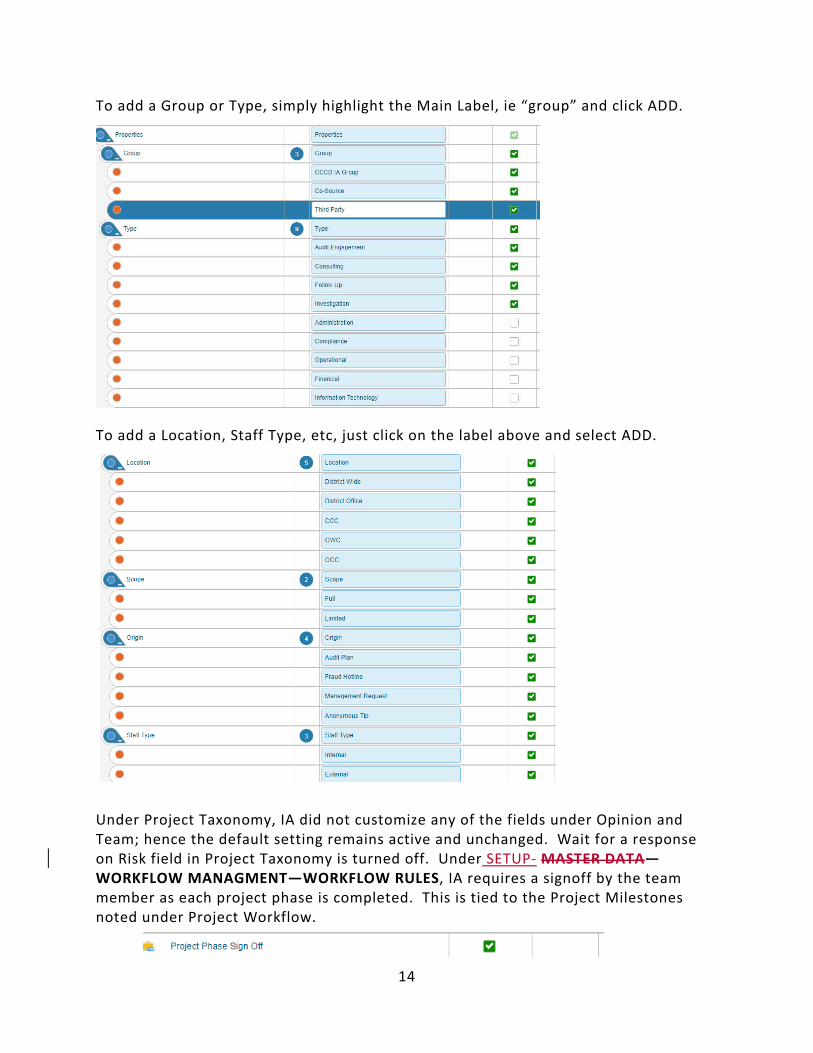
To add a Group or Type, simply highlight the Main Label, ie “group” and click ADD.
To add a Location, Staff Type, etc, just click on the label above and select ADD.
Under Project Taxonomy, IA did not customize any of the fields under Opinion and Team; hence the default setting remains active and unchanged. Wait for a response on Risk field in Project Taxonomy is turned off. Under SETUP- MASTER DATA—WORKFLOW MANAGMENT—WORKFLOW RULES, IA requires a signoff by the team member as each project phase is completed. This is tied to the Project Milestones noted under Project Workflow.
15
Procedures/Testing Documentation
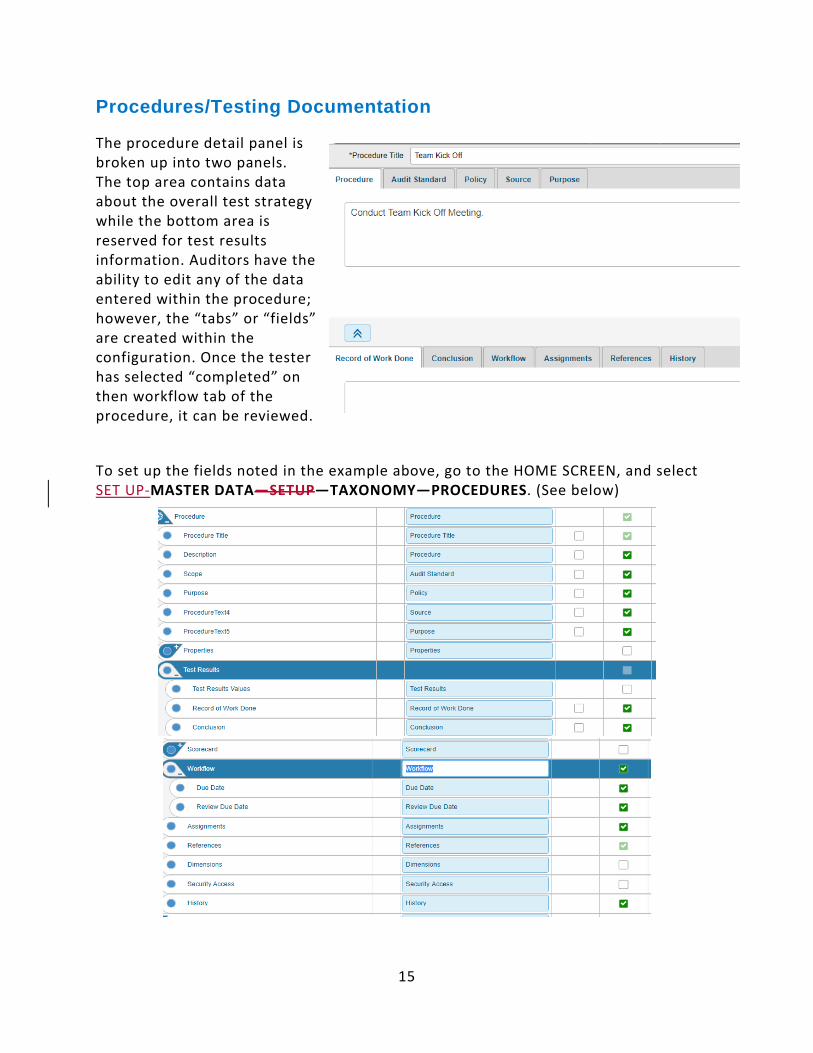
The procedure detail panel is broken up into two panels. The top area contains data about the overall test strategy while the bottom area is reserved for test results information. Auditors have the ability to edit any of the data entered within the procedure; however, the “tabs” or “fields” are created within the configuration. Once the tester has selected “completed” on then workflow tab of the procedure, it can be reviewed.
To set up the fields noted in the example above, go to the HOME SCREEN, and select SET UP-MASTER DATA—SETUP—TAXONOMY—PROCEDURES. (See below)
16
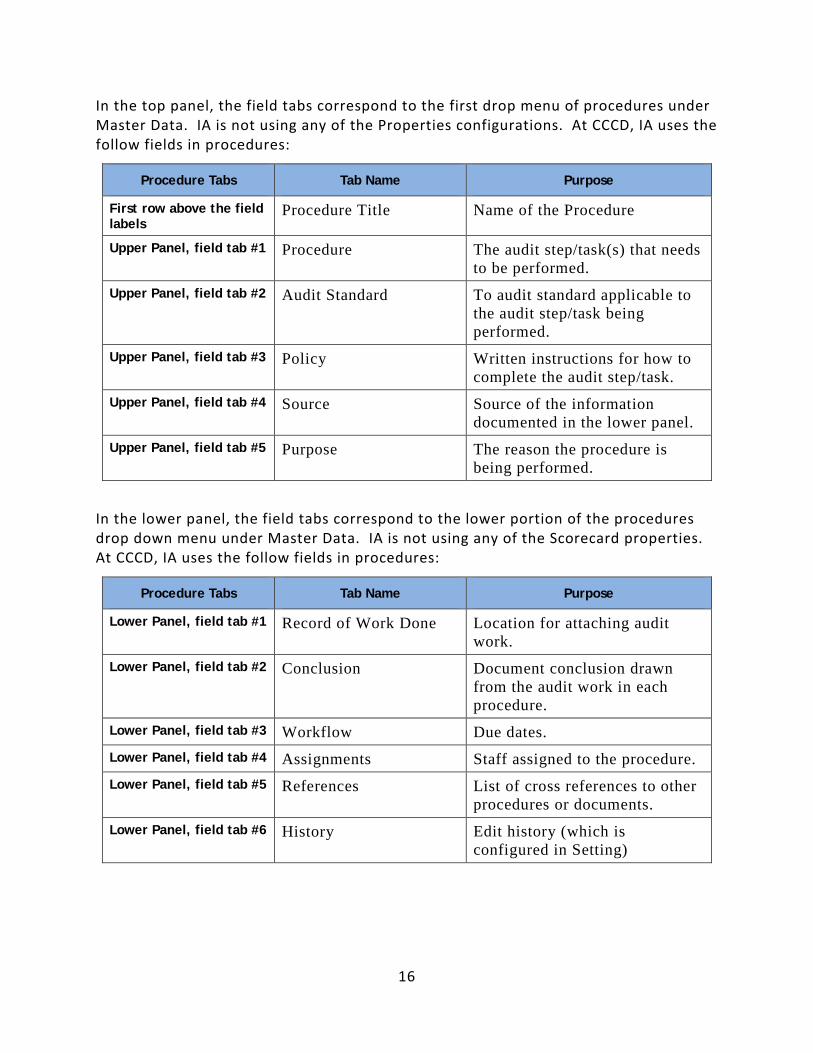
In the top panel, the field tabs correspond to the first drop menu of procedures under Master Data. IA is not using any of the Properties configurations. At CCCD, IA uses the follow fields in procedures:
In the lower panel, the field tabs correspond to the lower portion of the procedures drop down menu under Master Data. IA is not using any of the Scorecard properties. At CCCD, IA uses the follow fields in procedures:
Procedure Tabs Tab Name Purpose
First row above the field labels
Procedure Title Name of the Procedure
Upper Panel, field tab #1 Procedure The audit step/task(s) that needs to be performed.
Upper Panel, field tab #2 Audit Standard To audit standard applicable to the audit step/task being performed.
Upper Panel, field tab #3 Policy Written instructions for how to complete the audit step/task.
Upper Panel, field tab #4 Source Source of the information documented in the lower panel.
Upper Panel, field tab #5 Purpose The reason the procedure is being performed.
Procedure Tabs Tab Name Purpose
Lower Panel, field tab #1 Record of Work Done Location for attaching audit work.
Lower Panel, field tab #2 Conclusion Document conclusion drawn from the audit work in each procedure.
Lower Panel, field tab #3 Workflow Due dates. Lower Panel, field tab #4 Assignments Staff assigned to the procedure. Lower Panel, field tab #5 References List of cross references to other
procedures or documents. Lower Panel, field tab #6 History Edit history (which is
configured in Setting)
17
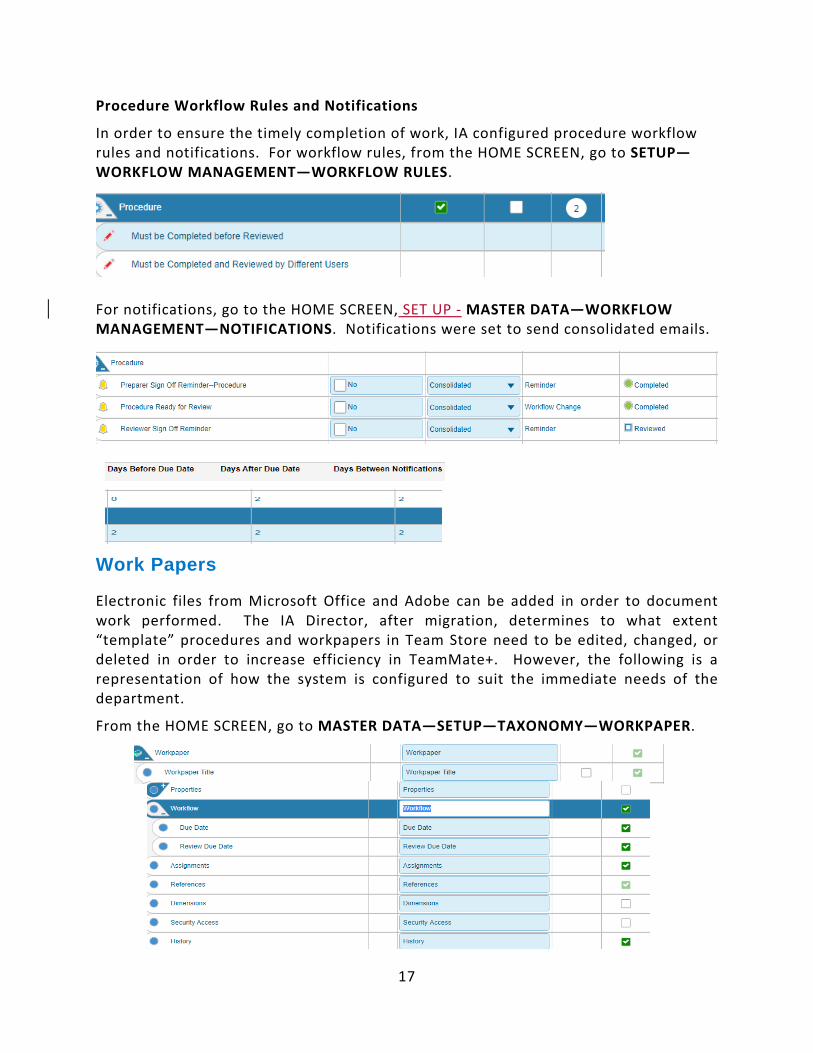
Procedure Workflow Rules and Notifications
In order to ensure the timely completion of work, IA configured procedure workflow rules and notifications. For workflow rules, from the HOME SCREEN, go to SETUP—WORKFLOW MANAGEMENT—WORKFLOW RULES.
For notifications, go to the HOME SCREEN, SET UP - MASTER DATA—WORKFLOW MANAGEMENT—NOTIFICATIONS. Notifications were set to send consolidated emails.
Work Papers
Electronic files from Microsoft Office and Adobe can be added in order to document work performed. The IA Director, after migration, determines to what extent “template” procedures and workpapers in Team Store need to be edited, changed, or deleted in order to increase efficiency in TeamMate+. However, the following is a representation of how the system is configured to suit the immediate needs of the department.
From the HOME SCREEN, go to MASTER DATA—SETUP—TAXONOMY—WORKPAPER.

18
Workpaper Workflow Rules and Notifications
Like procedures, IA established protocols for sending reminders when workpapers are due and need to be signed off and reviewed. From the HOME SCREEN, go to MASTER DATA—WORKFLOW MANAGEMENT—RULES. Just like Procedures, workpapers must be signed off and reviewed by different team members.
Also similar to procedures, notifications will be sent via email when items need to be signed off or reviewed. This is done by going to MASTER DATA—WORKFLOW MANAGEMENT—NOTIFICATIONS. Edits to any of these criteria can be made by highlighting the notification, selecting EDIT, and clicking SAVE.
Folder/Folder Cabinet for Project Templates (TM+)
Folder is really not used in TeamMate+, but the taxonomy is check active by scroll to HOME SCREEN—MASTER SETUP—TAXONOMY—FOLDER. This is default setting.
To have access to certain templates, scroll to HOME SCREEN—MASTER SETUP—TAXONOMY—FOLDER CABINET. In this folder, there are a few titles for templates that were set up by the vendor in order to allow IA perform tasks in a manner that they are currently performed, but within TeamMate+. These folder cabinets are labelled in such a way to mimic the project templates that were added to TeamStore.
19
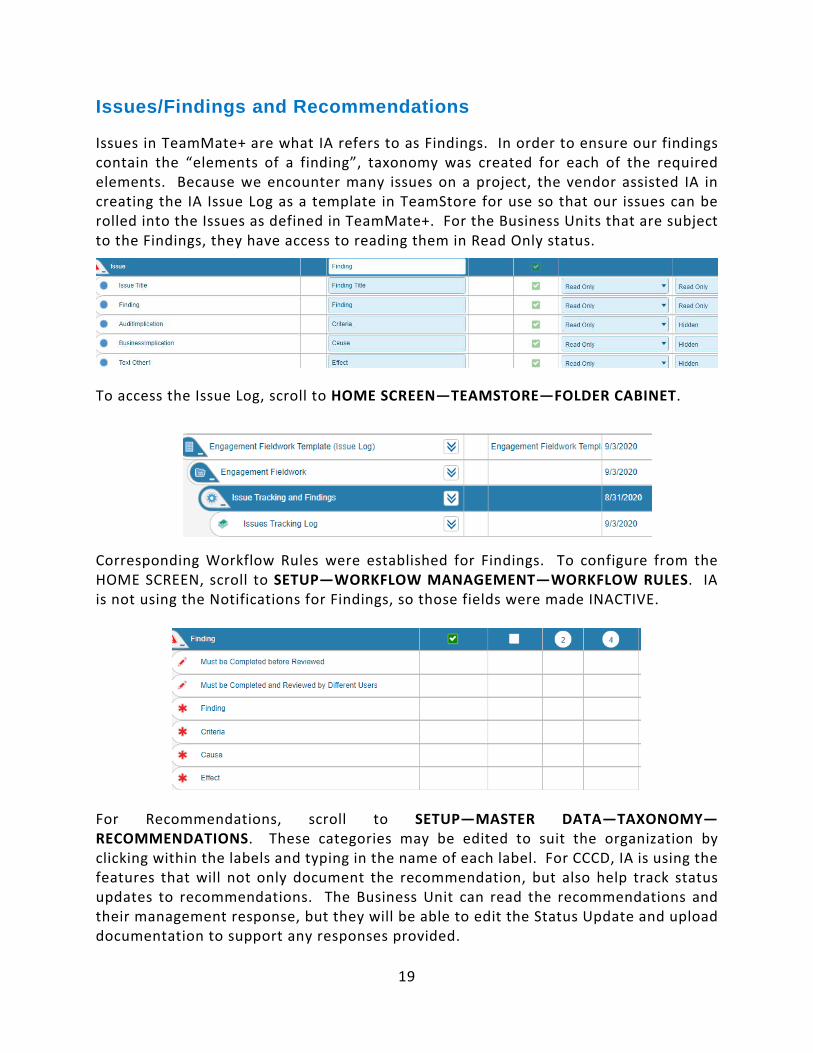
Issues/Findings and Recommendations
Issues in TeamMate+ are what IA refers to as Findings. In order to ensure our findings contain the “elements of a finding”, taxonomy was created for each of the required elements. Because we encounter many issues on a project, the vendor assisted IA in creating the IA Issue Log as a template in TeamStore for use so that our issues can be rolled into the Issues as defined in TeamMate+. For the Business Units that are subject to the Findings, they have access to reading them in Read Only status.
To access the Issue Log, scroll to HOME SCREEN—TEAMSTORE—FOLDER CABINET.
Corresponding Workflow Rules were established for Findings. To configure from the HOME SCREEN, scroll to SETUP—WORKFLOW MANAGEMENT—WORKFLOW RULES. IA is not using the Notifications for Findings, so those fields were made INACTIVE.
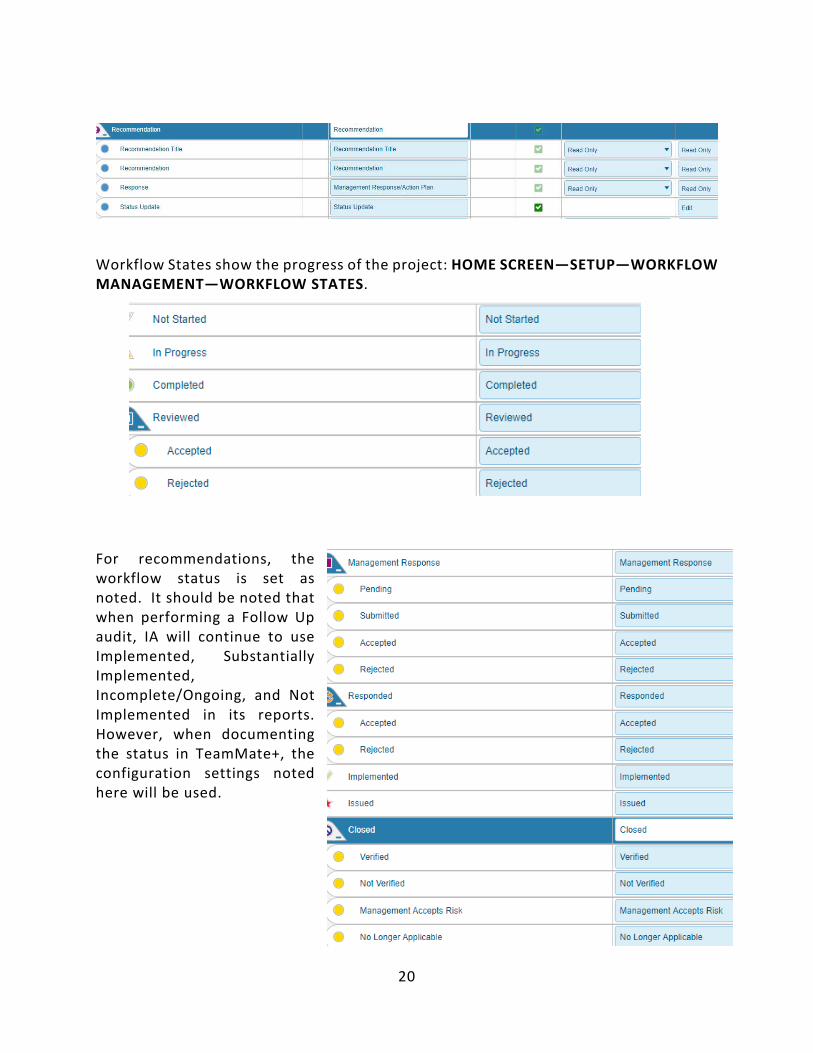
For Recommendations, scroll to SETUP—MASTER DATA—TAXONOMY—RECOMMENDATIONS. These categories may be edited to suit the organization by clicking within the labels and typing in the name of each label. For CCCD, IA is using the features that will not only document the recommendation, but also help track status updates to recommendations. The Business Unit can read the recommendations and their management response, but they will be able to edit the Status Update and upload documentation to support any responses provided.
20
Workflow States show the progress of the project: HOME SCREEN—SETUP—WORKFLOW MANAGEMENT—WORKFLOW STATES.
For recommendations, the workflow status is set as noted. It should be noted that when performing a Follow Up audit, IA will continue to use Implemented, Substantially Implemented, Incomplete/Ongoing, and Not Implemented in its reports. However, when documenting the status in TeamMate+, the configuration settings noted here will be used.
21
Coaching Notes
Coaching Notes are used to provide feedback on audit projects, demonstrate evidence of review, ensure compliance with audit standards, and provide training to staff. In TeamMate+, the coaching note feature is improved by eliminating the “chat” feature from TeamMate AM.
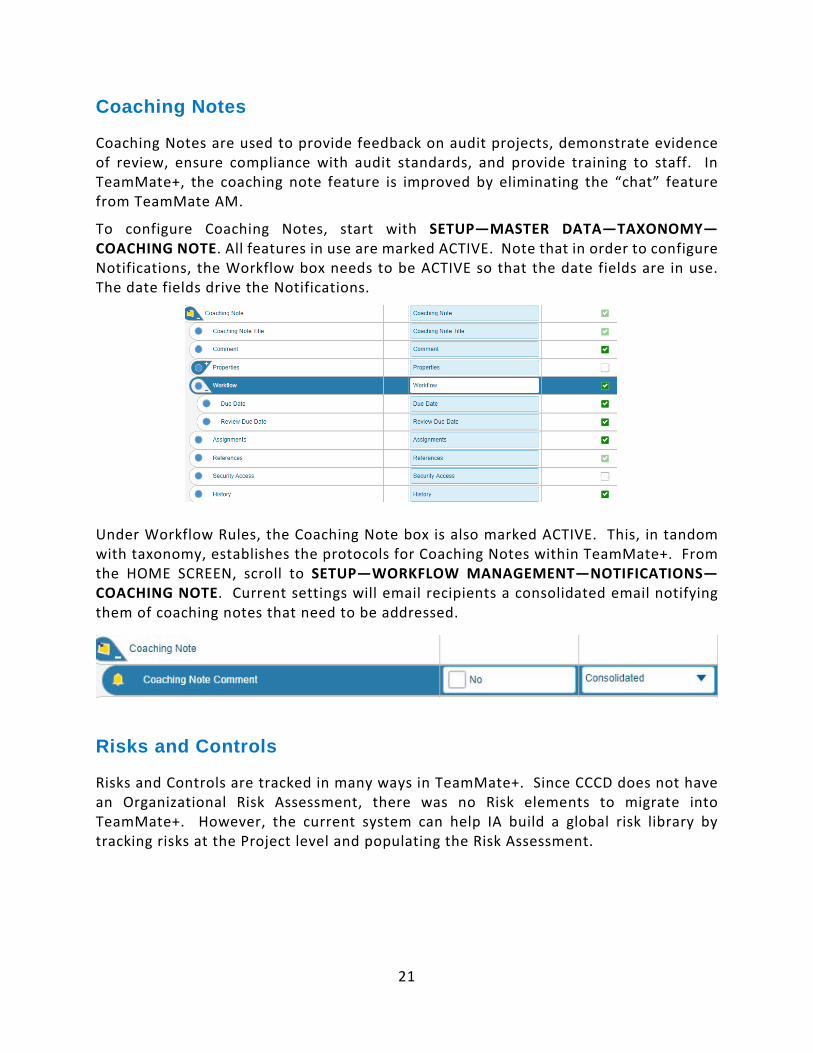
To configure Coaching Notes, start with SETUP—MASTER DATA—TAXONOMY—COACHING NOTE. All features in use are marked ACTIVE. Note that in order to configure Notifications, the Workflow box needs to be ACTIVE so that the date fields are in use. The date fields drive the Notifications.
Under Workflow Rules, the Coaching Note box is also marked ACTIVE. This, in tandom with taxonomy, establishes the protocols for Coaching Notes within TeamMate+. From the HOME SCREEN, scroll to SETUP—WORKFLOW MANAGEMENT—NOTIFICATIONS—COACHING NOTE. Current settings will email recipients a consolidated email notifying them of coaching notes that need to be addressed.
Risks and Controls
Risks and Controls are tracked in many ways in TeamMate+. Since CCCD does not have an Organizational Risk Assessment, there was no Risk elements to migrate into TeamMate+. However, the current system can help IA build a global risk library by tracking risks at the Project level and populating the Risk Assessment.
22
Risks
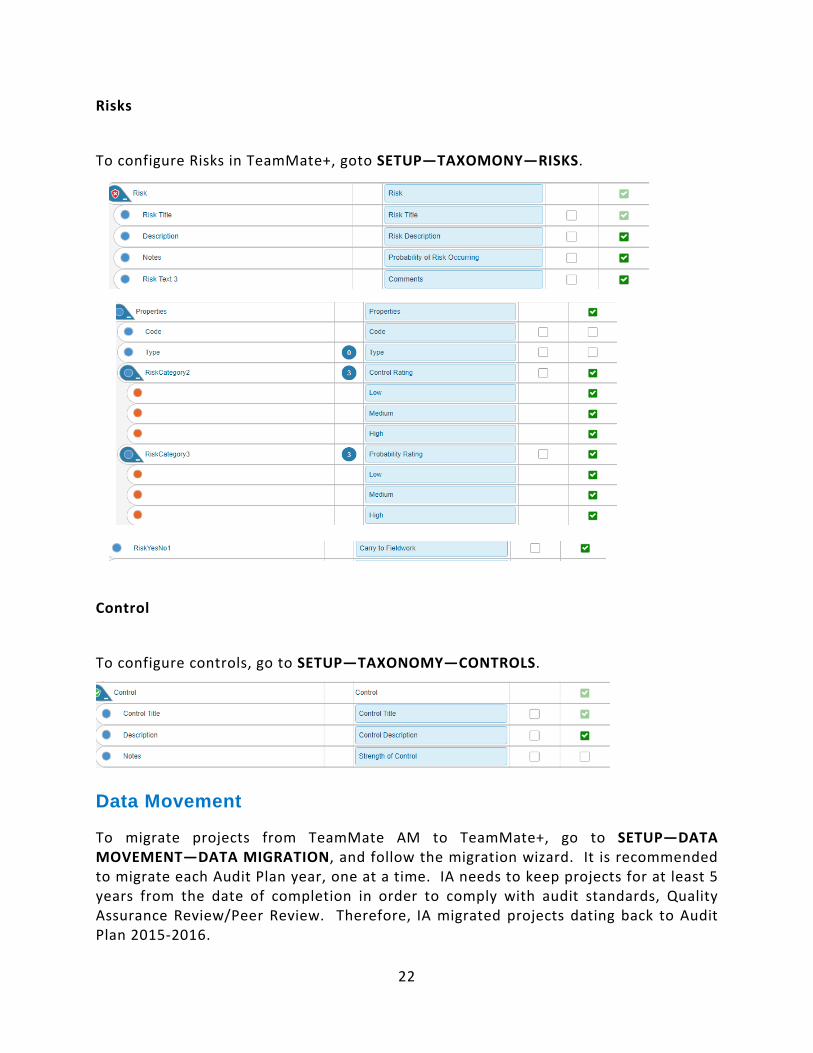
To configure Risks in TeamMate+, goto SETUP—TAXOMONY—RISKS.
Control
To configure controls, go to SETUP—TAXONOMY—CONTROLS.
Data Movement
To migrate projects from TeamMate AM to TeamMate+, go to SETUP—DATA MOVEMENT—DATA MIGRATION, and follow the migration wizard. It is recommended to migrate each Audit Plan year, one at a time. IA needs to keep projects for at least 5 years from the date of completion in order to comply with audit standards, Quality Assurance Review/Peer Review. Therefore, IA migrated projects dating back to Audit Plan 2015-2016.
23
Optional Features
There are many features in TeamMate+ that are designed to enhance that user’s experience, while optimizing the manner in which the business unit operates and reports on its work; however, some of these features are specific to the user and are not configured in the system. This means that each user has the ability to configure personal settings within TeamMate+ under the unique system login and password.
Home Page
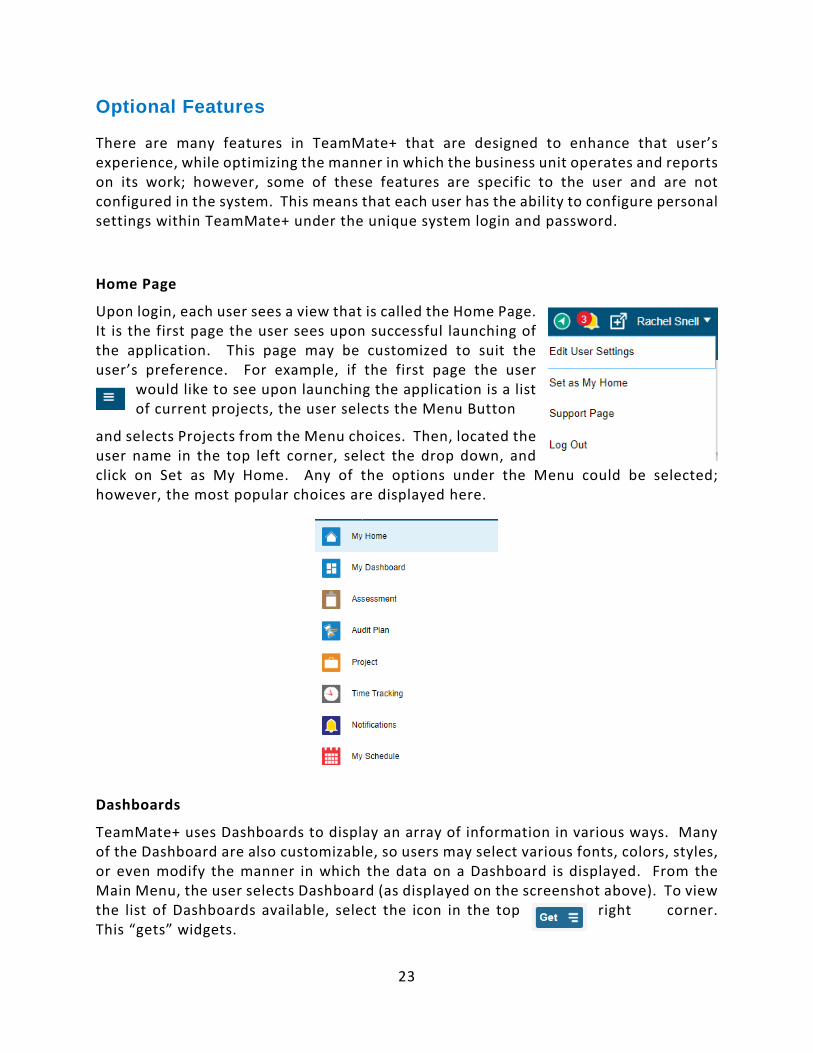
Upon login, each user sees a view that is called the Home Page. It is the first page the user sees upon successful launching of the application. This page may be customized to suit the user’s preference. For example, if the first page the user
would like to see upon launching the application is a list of current projects, the user selects the Menu Button
and selects Projects from the Menu choices. Then, located the user name in the top left corner, select the drop down, and click on Set as My Home. Any of the options under the Menu could be selected; however, the most popular choices are displayed here.
Dashboards
TeamMate+ uses Dashboards to display an array of information in various ways. Many of the Dashboard are also customizable, so users may select various fonts, colors, styles, or even modify the manner in which the data on a Dashboard is displayed. From the Main Menu, the user selects Dashboard (as displayed on the screenshot above). To view the list of Dashboards available, select the icon in the top right corner. This “gets” widgets.
24
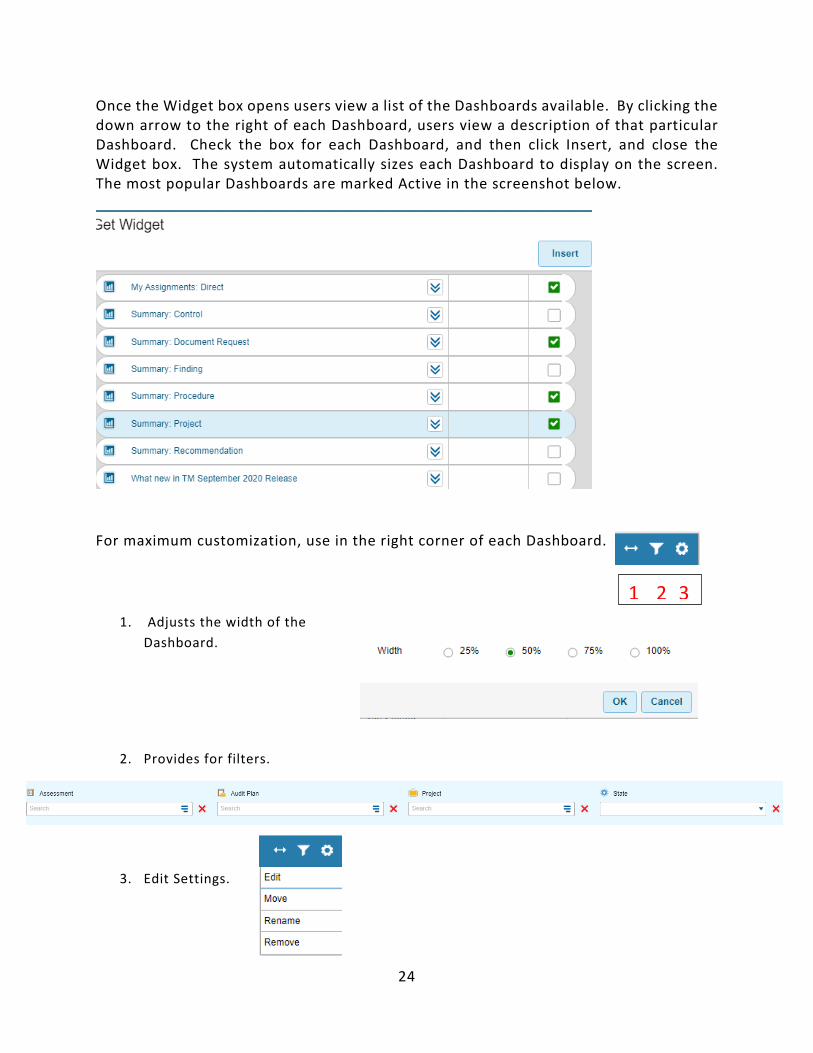
Once the Widget box opens users view a list of the Dashboards available. By clicking the down arrow to the right of each Dashboard, users view a description of that particular Dashboard. Check the box for each Dashboard, and then click Insert, and close the Widget box. The system automatically sizes each Dashboard to display on the screen. The most popular Dashboards are marked Active in the screenshot below.
For maximum customization, use in the right corner of each Dashboard.
1. Adjusts the width of the Dashboard.
2. Provides for filters.
3. Edit Settings.
1 2 3
25
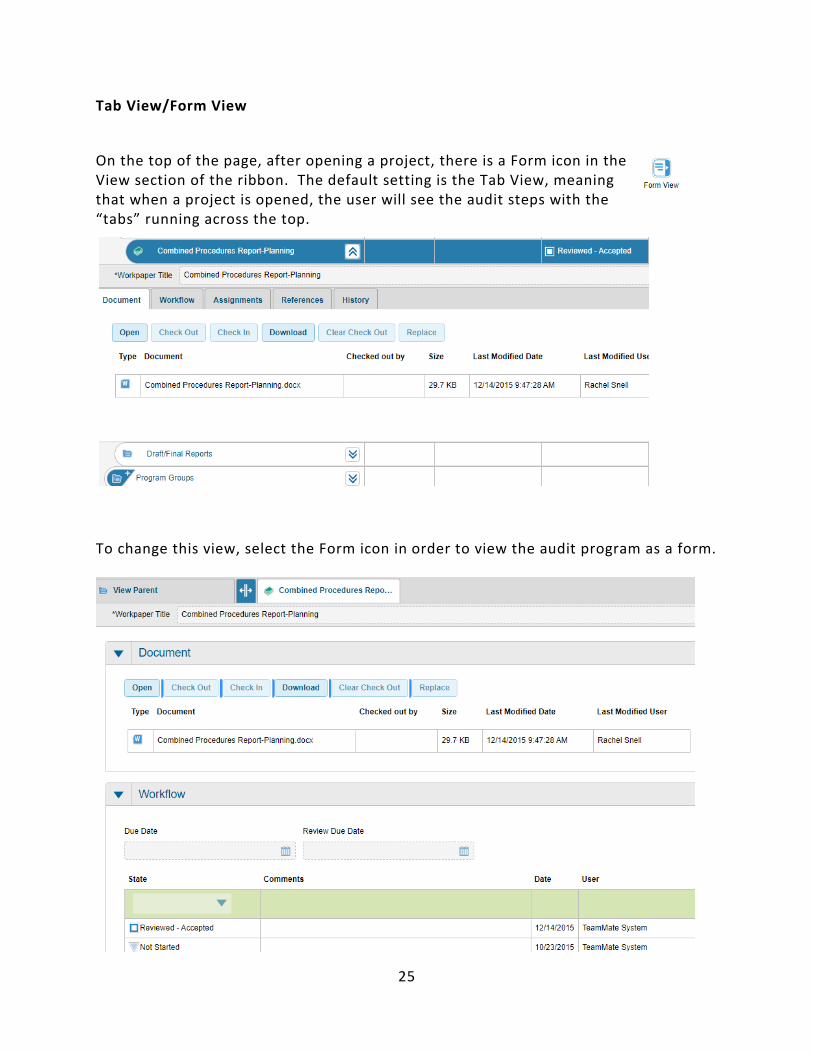
Tab View/Form View
On the top of the page, after opening a project, there is a Form icon in the View section of the ribbon. The default setting is the Tab View, meaning that when a project is opened, the user will see the audit steps with the “tabs” running across the top.
To change this view, select the Form icon in order to view the audit program as a form.

26
Related Documents


![[MS-DOCSWS]: SharePoint Document Sharing Web Service ProtocolMS... · SharePoint Document Sharing Web Service Protocol ... [MS-DOCSWS]: SharePoint Document Sharing Web Service Protocol](https://static.cupdf.com/doc/110x72/5ee0a000ad6a402d666bc906/ms-docsws-sharepoint-document-sharing-web-service-protocol-ms-sharepoint.jpg)


