Teacher Work Sample Physical Science Composite Teaching Table of Contents Learning Context 2 Focus Students 5 Lesson Plans: Acceleration 8 Vector Addition 23 Independence of Motion 34 Reflection

Welcome message from author
This document is posted to help you gain knowledge. Please leave a comment to let me know what you think about it! Share it to your friends and learn new things together.
Transcript
1
Teacher Work Sample
Physical Science Composite Teaching
Table of Contents
Learning Context 2
Focus Students 5
Lesson Plans:
Acceleration 8
Vector Addition 23
Independence of Motion 34
Reflection
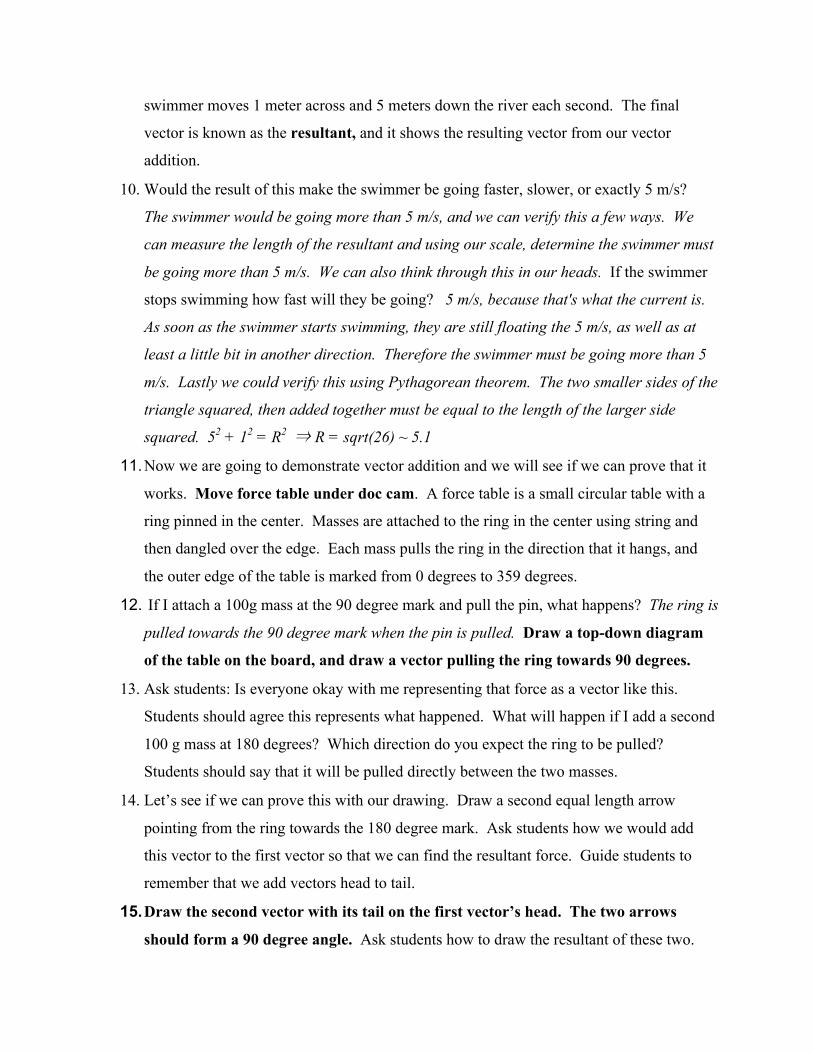
2
Learning Context
School district: Logan City School District
Name of school: Logan High School
Title 1 school: No
Demographics of school: Approximately 60% white, 30% Hispanic, 7% Asian. 45% percent of
students qualify for reduced or free lunch. Approximately 10% of students are special ed
students. 6% of students are English language learners. In the 2016 - 2017 school year LHS was
37.6% proficient in Language arts, 35.5% proficient in math, and 46.9% proficient in science.
Language arts and science proficiency increased 1.5% and 1.9%, respectively from the previous
school year, math proficiency decreased by 2.2%.
Description of school climate [who attends, leadership style, parent/community
involvement, school-wide discipline plan (if any), physical environment, academic
environment] : Logan High draws students from a large spectrum of circumstances. The
boundaries include a mix of wealthy neighborhoods to low class neighborhoods. Logan High is
located in a central location in the heart of Logan, right next to the community recreation center.
The school finished remodeling right before the school year began. Logan high school has a
very hands on leadership style. In my experience and from the stories I have heard from staff,
the administration are very active in management even down to small details. The principal is
very energetic and encouraging with the staff and students and holds high expectations for both
groups. Logan high school has a very involved community. The extra curricular events are
widely supported by students and families. Logan high has students from grades 9 - 12, and each
grade has about 425 students. The academic environment at Logan High promotes healthy study
3
habits from students. Logan High places an emphasis on science and has above average scores
on SAGE science testing. Teachers at LHS value student collaboration and the school has
numerous common areas for students to work in groups outside of classes.
Grade level: 10 - 12
Learning environment: [attendance, classroom management plan, seating arrangement,
level of student engagement in learning, level of safety for learning]: Approximately 90% of
the 36 students attend daily. Desks were arranged into rows facing the front of the class.
Students picked their seats on the first day of class and were then assigned to those seats. There
are 40 seats in the room so the class is mostly full. However, in the first few days of class it
became apparent that the rows made it difficult to walk around the room and get in close
proximity to some of the students. To solve this I rearranged the classroom into groups of three
tables. This opened up more room to walk around between tables. This also encourages
collaboration between students, which I frequently employ in class to help students learn.
Students are generally engaged, but easily distracted in this class due to the large class size.
Most of the students behave well, aside from 3-4 students that are very talkative. Students
should feel safe in the classroom. There have been no instances of bullying or aggression in the
classroom and students are encouraged to attempt each problem.
Subject matter of lessons: Physics, acceleration
Total number of students: 124
Students with special needs and short explanation of the needs: There are no students with
special needs in the classes I teach. Students may choose between physics and other science
courses at LHS, and physics is thought of as a more difficult science. After talking to the
counselors they told me that they discourage struggling students from taking physics.
4
With IEPs: 0. This number seemed low to me so I checked in person with Mary Morgan, the
special education team leader, and she confirmed there are no students with IEP’s in my classes.
Students who receive speech/language services: 0
English language learners: 0. After conferring with Molly Crouch the speech therapist at LHS,
she confirmed this, and said it is likely due to the rigorous nature of physics.
Gifted and talented: 0. My cooperating teacher said that Logan High does not track gifted or
talented students. Even if they did he suspects that all the gifted and talented students would be
enrolled in AP physics instead of standard physics.
Other (e.g., 504 plans--please specify): There are no students with 504 accommodations in the
classes I teach. Logan High School just switched tracking systems for this and the system does
not have a list of 504’s. I printed my class rosters and asked each counselor if any of the 504
students they work with were in the class. According to the counselors none of the students have
504’s, but it is possible that they missed a student.
5
Focus Students
Students’ background and interest for these lessons:
Student 1 is an 11th grader who scored poorly on the unit pre assessment. From looking at
his/her previous Sage scores I determined he/she performs well in math and below average in
science and language arts. He has attended LHS all 3 years of high school. He is not disruptive
during class, although he is easily distracted by his peers in class. Student 1 is technologically
skilled as demonstrated by his/her first electronic worksheet submission which contained colored
text and an embedded image in the .pdf file, while most students were struggling to do basic
edits on the file. During lunch he will occasionally eat lunch in my classroom while playing his
favorite video game, League of Legends. When asked about this student 1 said that he plays a
lot of video games with friends, and is in the Esports Club at Logan High School.
Student 2 is an 11th grader who performed above average on the pre assessment. This is the
student’s third year at Logan High School. The student has scored 4’s on the math and science
sections of the Sage test the past 3 years, except for a 3 in biology last year. The student scored
3’s in LA for the past 3 years. The student enjoys carpentry and works on building projects with
his/her father, because of this student 2’s favorite class is cabinetmaking at BATC. The student
performed perfectly on the velocity review quiz. The student spoke to me individually after class
once and said he likes physics so far and is most excited to learn about magnetism.
6
Students’ prior knowledge for these lessons: Both students have passed the quiz about
position, velocity, and speed. We have spent the past 2 weeks discussing speed and velocity, and
both students have completed a 6 page worksheet to practice and assess their understanding of
these concepts. Last class period students completed a lab using a motion detector where
students must predict the shape of a position vs. time or velocity vs time graph that would result
from walking a prescribed movement. Students analyzed their graphs and then tried to do this
process backwards; students analyze a graph and must decide how to walk in front of the motion
detector in order to recreate the graph. The lab was designed to give students the prior
knowledge and physical experiences necessary for these lessons. Both students have proven to
have at least a shallow understanding of these concepts through their performances on the
velocity review quiz and in the graphing lab. Student 1 still struggles with interpreting velocity
vs time graphs, and shows some confusion between displacement and distance. Student 2 has a
clear understanding of all of these and can articulate these concepts easily. I think that both
students have the prior knowledge necessary for the lessons I have planned.
How did your knowledge of these students and assessment of their prior knowledge inform
your lesson planning? Knowing that student 1 was struggling with velocity vs. time graphs
caused me to place more emphasis on the graphing section of the lesson. I inserted extra review
questions to help students connect acceleration to these graphs. Most of the students (including
both focus students) have experience driving cars. Acceleration in a car is the most common
experience students have with acceleration. Therefore I related most of my examples to
accelerating in a car because students can understand to this. Some of the higher performing
students, including student 2, have taken or are taking a calculus math class. To help these
students with the concepts of position, velocity, and acceleration I inserted extra resources to let
7
them explore how calculus helps with the mathematics of physics. For these students I added
extra extension questions to challenge the students to apply calculus to physics and interpret the
result.
Acceleration Introduction Lesson Description Introductory Physics: Grades 9 - 12 Time: 70 - 80 minutes Rationale: I chose to use both direct instruction and constructivist methods to teach the content to the students. In my teaching I try to avoid giving direct answers, but rather attempt to lead students to discover the answers because students remember more when they find the answers for themselves . Throughout my lesson I relate the concept of acceleration to experiences students have likely had (such as driving a car, or riding a roller coaster) because this helps students connect physics content to real world experiences. The hot wheels lab is designed to help students observe acceleration and then discover the effects of acceleration on the distance an object travels. The use of cameras and Logger Pro allows students to break down the motion frame by frame and closely examine what happens as the car accelerates. Standards Covered: Physics Standard 1- Objective 1 - Students will describe the motion of an object in terms of position, time, and velocity. Physics Standard 1- Objective 2 - Students will analyze the motion of an object in terms of velocity, time, and acceleration Academic Language/Vocabulary Objectives: analyze, observe, measure, evaluate, graphing, trend, velocity, speed, magnitude, slope, distance, displacement. Required Materials: Hot wheels cars, hot wheels track, video camera, Logger Pro software. The use of cameras and Logger Pro allows students to break down the motion frame by frame and closely examine what happens as the car accelerates. The use of these two technologies allows the students to graph the position of the car during each frame and then analyze the graph for trends in the data. Students are able to analyze their own data that they set up and acquired which makes the lab much more meaningful than analyzing a prescribed data set from the teacher.
8
Lesson Objectives: Students will understand that acceleration is a change in velocity Students will understand that acceleration must have a magnitude and a direction Students will relate their experiences with acceleration to the physics concept of acceleration Instructional Procedures: See attached lesson plan Adaptations/Accommodations: There are no English language learners or students with IEP’s in my class. I included extension questions at the end of the lesson to challenge gifted students if they finish the lab early. Students are put into partnerships so that struggling students can receive help from their peers. After students finish with the lab and extensions they are given the acceleration video assignment, this way the gifted students may begin working in class and have less homework to do. This also allows me to have extra time to help the struggling students while keeping the gifted students engaged and progressing. Assessment: Velocity and Acceleration Video assignment. This assignment requires students to film themselves or another object doing a series of motions. The motions include moving in the positive and negative directions with positive and negative accelerations. This assignment will help the students experience velocity and acceleration firsthand. The assignment will also make it very clear if students understand the concepts, because if they understand then their videos will clearly show it. 1 Dimensional motion worksheet. Students were assigned to do 7 pages from this worksheet. The worksheet reviews acceleration conceptually, and then contains problems requiring students to calculate the acceleration of an object given its velocity at different points in time. Students must also create position vs time graphs for an object given an initial velocity and an acceleration.

9
Acceleration Lesson Plan Subject/Course: Physics Topic: Acceleration Grade Level: 10 - 12 Desired Results Established Goal(s)/Target(s)—What will students know and be able to do
● Students will understand that acceleration is a change in velocity ● Students will understand that acceleration must have a magnitude and a direction ● Students will relate their experiences with acceleration to the physics concept of
acceleration Standards covered: 1- Objective 2 - Students will analyze the motion of an object in terms of velocity, time, and acceleration
Assessment Evidence
What is your evidence of Learning: - Students understand that acceleration changes an object’s velocity - Students can relate a description of motion to a graph of motion using position vs time
and velocity vs time - Students can analyze a graph of motion (position or velocity vs time) and determine the
acceleration of an object
10
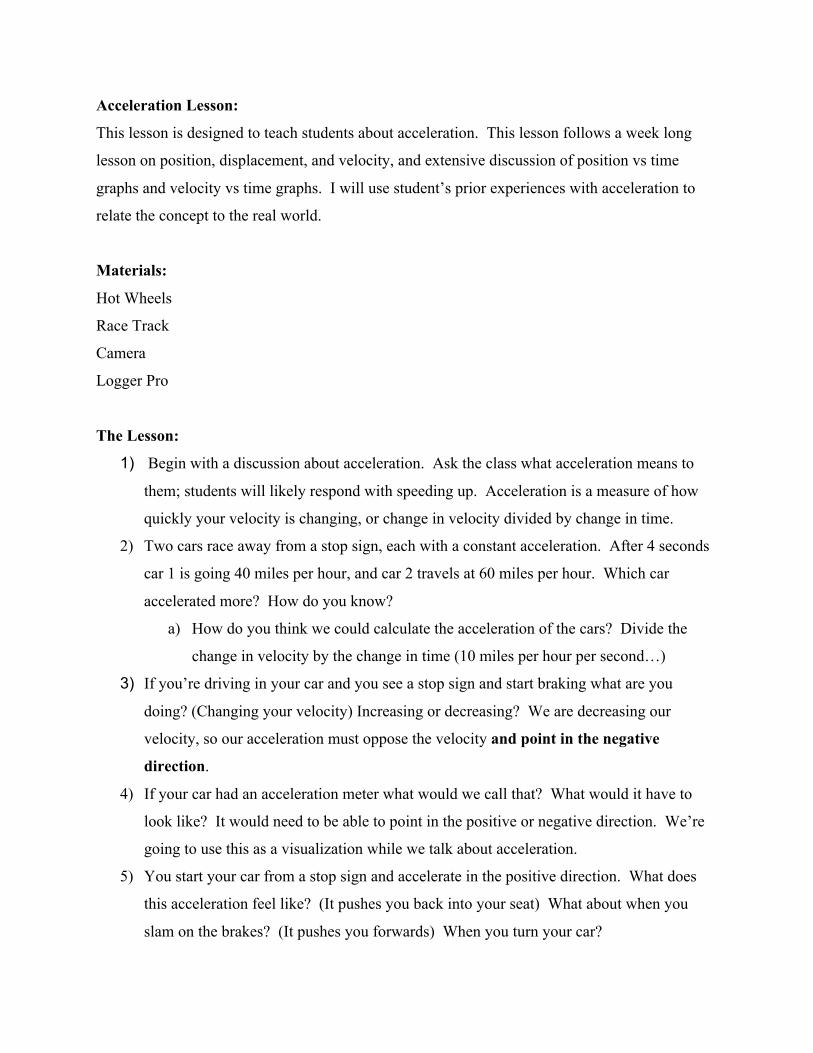
Acceleration Lesson:
This lesson is designed to teach students about acceleration. This lesson follows a week long
lesson on position, displacement, and velocity, and extensive discussion of position vs time
graphs and velocity vs time graphs. I will use student’s prior experiences with acceleration to
relate the concept to the real world.
Materials:
Hot Wheels
Race Track
Camera
Logger Pro
The Lesson:
1) Begin with a discussion about acceleration. Ask the class what acceleration means to
them; students will likely respond with speeding up. Acceleration is a measure of how
quickly your velocity is changing, or change in velocity divided by change in time.
2) Two cars race away from a stop sign, each with a constant acceleration. After 4 seconds
car 1 is going 40 miles per hour, and car 2 travels at 60 miles per hour. Which car
accelerated more? How do you know?
a) How do you think we could calculate the acceleration of the cars? Divide the
change in velocity by the change in time (10 miles per hour per second…)
3) If you’re driving in your car and you see a stop sign and start braking what are you
doing? (Changing your velocity) Increasing or decreasing? We are decreasing our
velocity, so our acceleration must oppose the velocity and point in the negative
direction.
4) If your car had an acceleration meter what would we call that? What would it have to
look like? It would need to be able to point in the positive or negative direction. We’re
going to use this as a visualization while we talk about acceleration.
5) You start your car from a stop sign and accelerate in the positive direction. What does
this acceleration feel like? (It pushes you back into your seat) What about when you
slam on the brakes? (It pushes you forwards) When you turn your car?
11
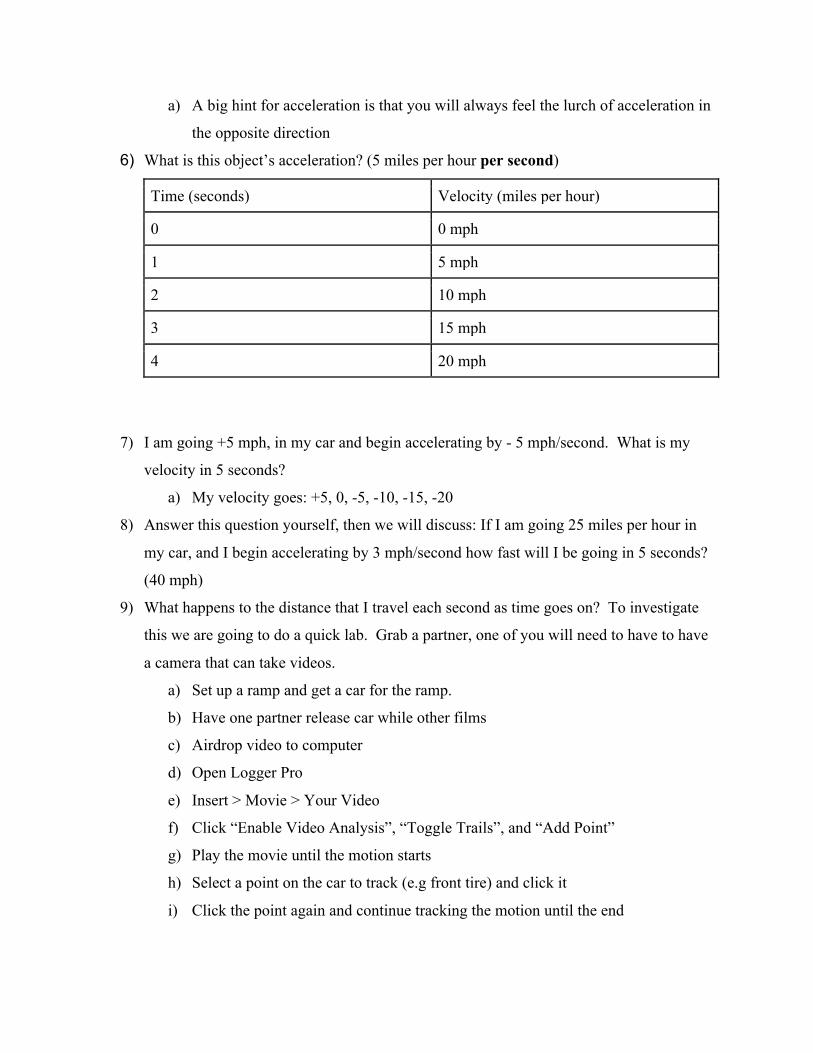
a) A big hint for acceleration is that you will always feel the lurch of acceleration in
the opposite direction
6) What is this object’s acceleration? (5 miles per hour per second)
Time (seconds) Velocity (miles per hour)
0 0 mph
1 5 mph
2 10 mph
3 15 mph
4 20 mph
7) I am going +5 mph, in my car and begin accelerating by - 5 mph/second. What is my
velocity in 5 seconds?
a) My velocity goes: +5, 0, -5, -10, -15, -20
8) Answer this question yourself, then we will discuss: If I am going 25 miles per hour in
my car, and I begin accelerating by 3 mph/second how fast will I be going in 5 seconds?
(40 mph)
9) What happens to the distance that I travel each second as time goes on? To investigate
this we are going to do a quick lab. Grab a partner, one of you will need to have to have
a camera that can take videos.
a) Set up a ramp and get a car for the ramp.
b) Have one partner release car while other films
c) Airdrop video to computer
d) Open Logger Pro
e) Insert > Movie > Your Video
f) Click “Enable Video Analysis”, “Toggle Trails”, and “Add Point”
g) Play the movie until the motion starts
h) Select a point on the car to track (e.g front tire) and click it
i) Click the point again and continue tracking the motion until the end
12
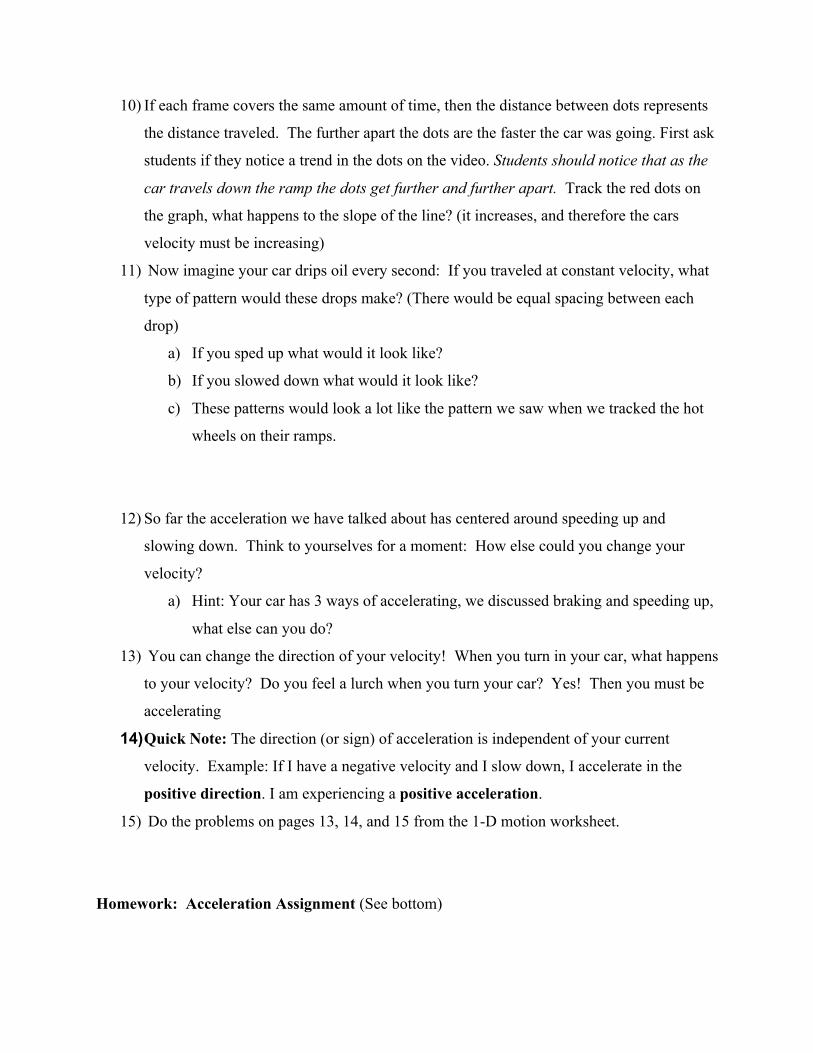
10) If each frame covers the same amount of time, then the distance between dots represents
the distance traveled. The further apart the dots are the faster the car was going. First ask
students if they notice a trend in the dots on the video. Students should notice that as the
car travels down the ramp the dots get further and further apart. Track the red dots on
the graph, what happens to the slope of the line? (it increases, and therefore the cars
velocity must be increasing)
11) Now imagine your car drips oil every second: If you traveled at constant velocity, what
type of pattern would these drops make? (There would be equal spacing between each
drop)
a) If you sped up what would it look like?
b) If you slowed down what would it look like?
c) These patterns would look a lot like the pattern we saw when we tracked the hot
wheels on their ramps.
12) So far the acceleration we have talked about has centered around speeding up and
slowing down. Think to yourselves for a moment: How else could you change your
velocity?
a) Hint: Your car has 3 ways of accelerating, we discussed braking and speeding up,
what else can you do?
13) You can change the direction of your velocity! When you turn in your car, what happens
to your velocity? Do you feel a lurch when you turn your car? Yes! Then you must be
accelerating
14) Quick Note: The direction (or sign) of acceleration is independent of your current
velocity. Example: If I have a negative velocity and I slow down, I accelerate in the
positive direction. I am experiencing a positive acceleration. 15) Do the problems on pages 13, 14, and 15 from the 1-D motion worksheet.
Homework: Acceleration Assignment (See bottom)

13

14
Extension Questions to consider:
Sir Isaac Newton wants to calculate the acceleration of objects due to Earth’s gravity. He drops
an apple and records the following data:
Time (seconds) Position (meters) Velocity (m/s)
0 0 0
1 4.9 ??
2 19.6 19.6
3 44.1 29.4
What is the object’s acceleration?
b) If the object stopped accelerating after 4 seconds what would its velocity be at 4 seconds? 6
seconds?
c) If the object stopped accelerating after 3 seconds what would its position be at 4 seconds?
Can an object travel at constant speed but not constant velocity?
Can an object travel at constant velocity but not constant speed?
What two controls on a car cause a change in speed? What control causes only a change in
velocity?
Why does the unit of time enter twice in the unit of acceleration?
Calculus students: The derivative of position is velocity, which describes how an object’s
position changes with time. The derivative of velocity is acceleration, which describes how an
object’s velocity changes with time. Could we find the derivative of acceleration? If so what
would that tell us about an object?
b) Could we find the derivative of this value? What would that tell us about the object?
For more info on calculus and kinematics visit: https://physics.info/kinematics-calculus/
Velocity and Acceleration Video
15
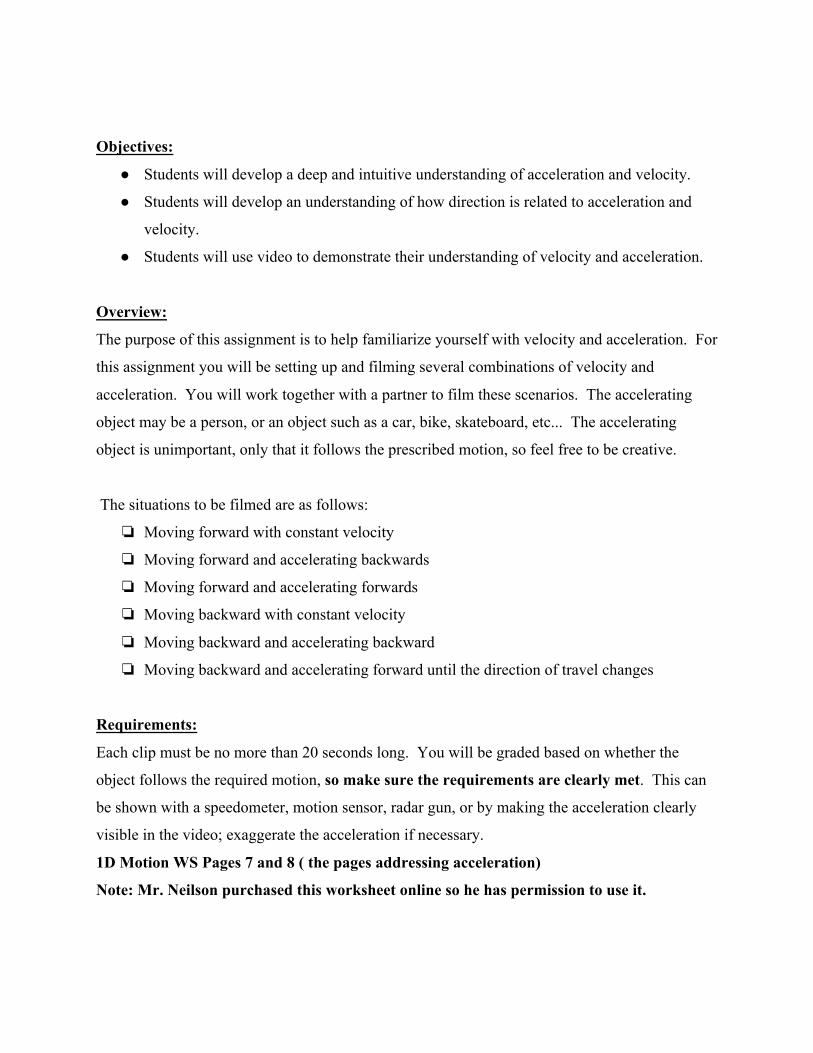
Objectives:
● Students will develop a deep and intuitive understanding of acceleration and velocity.
● Students will develop an understanding of how direction is related to acceleration and
velocity.
● Students will use video to demonstrate their understanding of velocity and acceleration.
Overview:
The purpose of this assignment is to help familiarize yourself with velocity and acceleration. For
this assignment you will be setting up and filming several combinations of velocity and
acceleration. You will work together with a partner to film these scenarios. The accelerating
object may be a person, or an object such as a car, bike, skateboard, etc... The accelerating
object is unimportant, only that it follows the prescribed motion, so feel free to be creative.
The situations to be filmed are as follows:
❏ Moving forward with constant velocity
❏ Moving forward and accelerating backwards
❏ Moving forward and accelerating forwards
❏ Moving backward with constant velocity
❏ Moving backward and accelerating backward
❏ Moving backward and accelerating forward until the direction of travel changes
Requirements:
Each clip must be no more than 20 seconds long. You will be graded based on whether the
object follows the required motion, so make sure the requirements are clearly met. This can
be shown with a speedometer, motion sensor, radar gun, or by making the acceleration clearly
visible in the video; exaggerate the acceleration if necessary.
1D Motion WS Pages 7 and 8 ( the pages addressing acceleration)
Note: Mr. Neilson purchased this worksheet online so he has permission to use it.
16

17
18
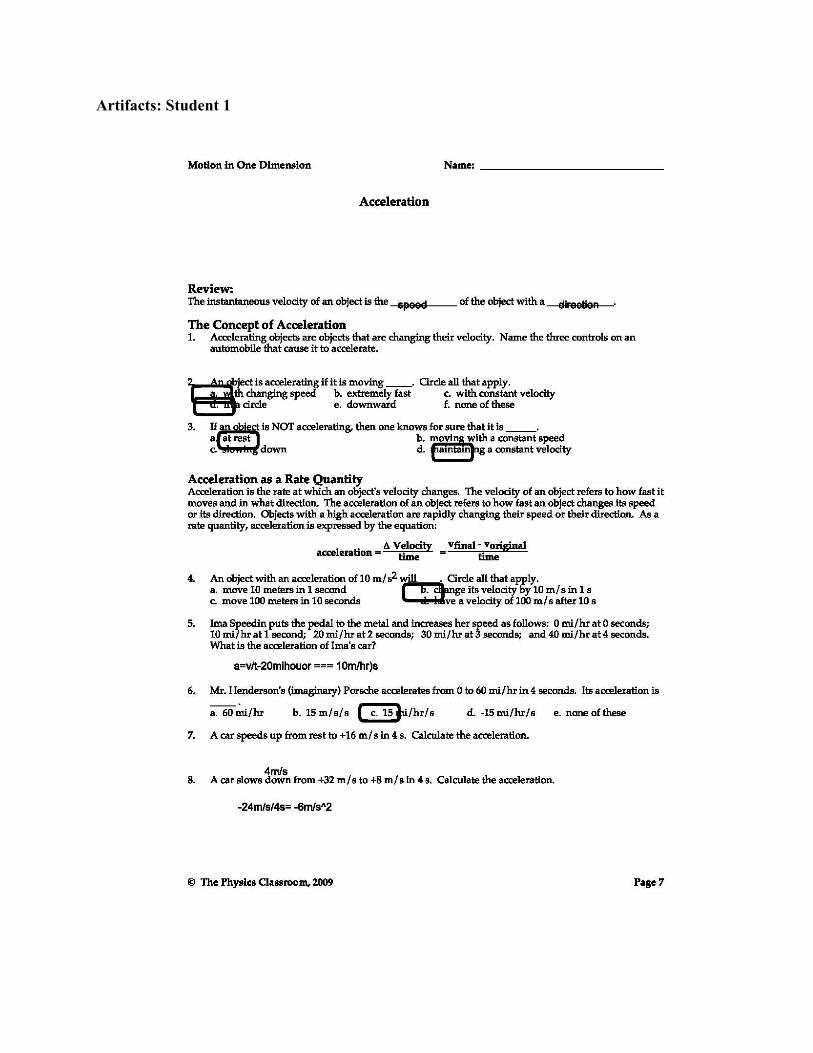
Artifacts: Student 1

19
Artifact Student 2:
20

21
22
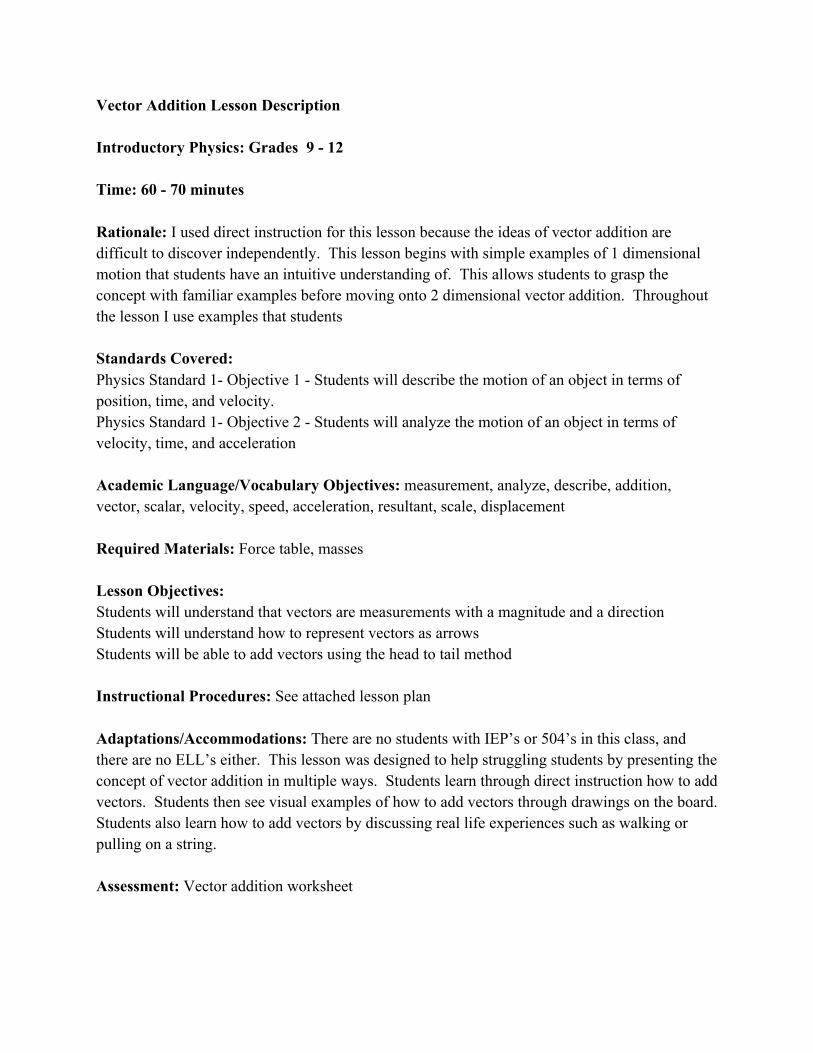
Vector Addition Lesson Description Introductory Physics: Grades 9 - 12 Time: 60 - 70 minutes Rationale: I used direct instruction for this lesson because the ideas of vector addition are difficult to discover independently. This lesson begins with simple examples of 1 dimensional motion that students have an intuitive understanding of. This allows students to grasp the concept with familiar examples before moving onto 2 dimensional vector addition. Throughout the lesson I use examples that students Standards Covered: Physics Standard 1- Objective 1 - Students will describe the motion of an object in terms of position, time, and velocity. Physics Standard 1- Objective 2 - Students will analyze the motion of an object in terms of velocity, time, and acceleration Academic Language/Vocabulary Objectives: measurement, analyze, describe, addition, vector, scalar, velocity, speed, acceleration, resultant, scale, displacement Required Materials: Force table, masses Lesson Objectives: Students will understand that vectors are measurements with a magnitude and a direction Students will understand how to represent vectors as arrows Students will be able to add vectors using the head to tail method Instructional Procedures: See attached lesson plan Adaptations/Accommodations: There are no students with IEP’s or 504’s in this class, and there are no ELL’s either. This lesson was designed to help struggling students by presenting the concept of vector addition in multiple ways. Students learn through direct instruction how to add vectors. Students then see visual examples of how to add vectors through drawings on the board. Students also learn how to add vectors by discussing real life experiences such as walking or pulling on a string. Assessment: Vector addition worksheet
23
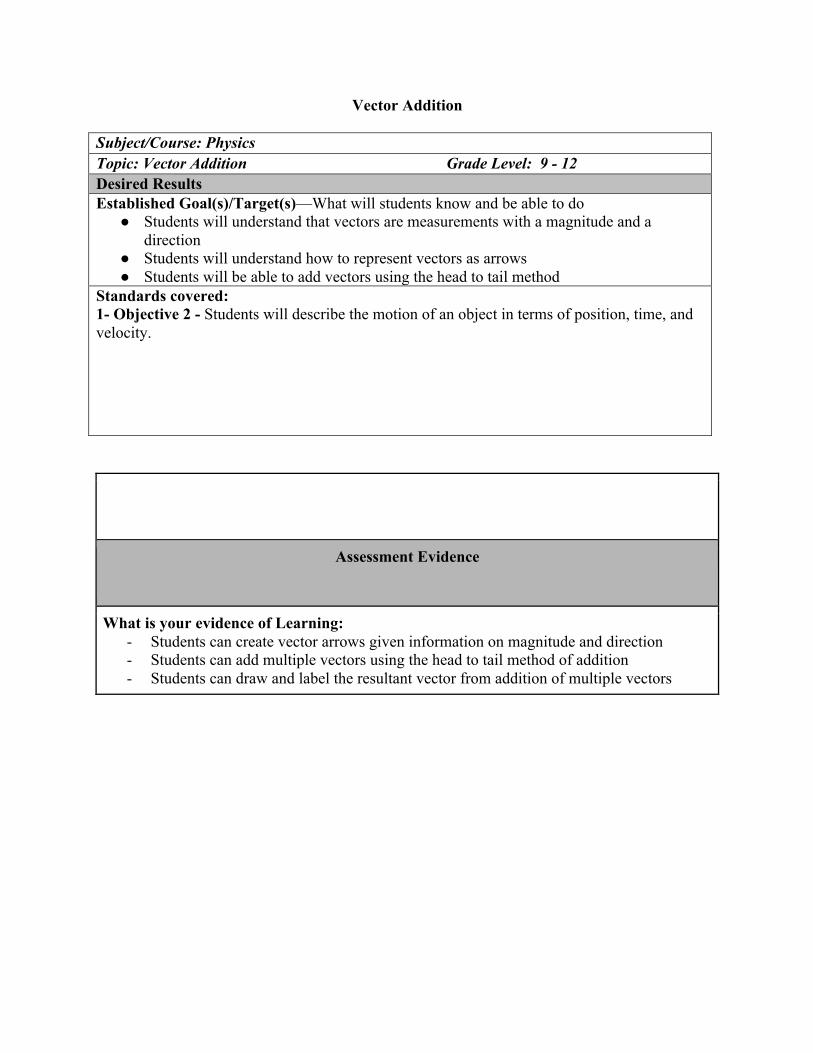
Vector Addition Subject/Course: Physics Topic: Vector Addition Grade Level: 9 - 12 Desired Results Established Goal(s)/Target(s)—What will students know and be able to do
● Students will understand that vectors are measurements with a magnitude and a direction
● Students will understand how to represent vectors as arrows ● Students will be able to add vectors using the head to tail method
Standards covered: 1- Objective 2 - Students will describe the motion of an object in terms of position, time, and velocity.
Assessment Evidence
What is your evidence of Learning: - Students can create vector arrows given information on magnitude and direction - Students can add multiple vectors using the head to tail method of addition - Students can draw and label the resultant vector from addition of multiple vectors
24
Vector Addition
This lesson is designed to teach students about vector notation. Students have previously learned
that vectors are measurements with magnitude and direction and that scalars are measurements
with only magnitude. Students will learn how to draw vectors as arrows where length represents
magnitude and arrow direction represents the vector direction. Students will learn that two
dimensional vectors have two one dimensional components. Lastly students will learn that
vectors may be added using head to tail addition.
Length of Lesson: 60 - 70 minutes
Lesson:
1. Review with students: what makes a measurement a vector, what two things must it
have? How is that different from a scalar measurement? Vectors contain a magnitude
and direction and scalars only have a magnitude. Remember magnitude means size.
2. Sometimes in physics we will represent vectors using arrows. The length of the arrow
represents the magnitude of the vector, and the direction that it points represents the
direction of the vector. When we do this we are generally going to use a scale to help us
relate the arrow to the measurement. Does anyone know what we mean by a scale? A
scale will relate the arrow length to the measurement. An example would be 1 inch = 1
mile per hour, or 1 cm = 1 mile.
3. The use of the scale means that the relative lengths of the arrows also represent the
relative magnitudes of the vectors. An arrow that is twice as long as another arrow would
have twice the magnitude.
4. Imagine you are walking along at 1 m/s and you walk onto a moving sidewalk also
moving at 1 m/s, how fast will you be walking on the sidewalk? This depends on the
directions of movements, so remember that velocity direction is vital in physics. Draw a
1 inch arrow pointed East. If this arrow is 1 inch and represents my velocity of 1 m/s,
what scale am I using? 1 inch = 1 m/s. If the moving sidewalk is also moving East at 1
m/s, what would its velocity arrow look like. Draw a second 1 inch arrow pointed
East.
25
5. If I walk onto the moving sidewalk while continuing to walk, how fast would someone
not on the sidewalk see me moving? Students should agree on 2 m/s. So I am moving at
2 m/s Eastward. How would that look as an arrow? Lead students to the answer of a 2
inch long arrow pointed East. If I was to add my two individual arrows to try and create
this arrow, how would I have to combine those arrows? The arrows must be placed with
the tail of the second arrow touching the head of the second arrow. If they were added
head to head or tail to tail the two would overlap and create a 1 inch arrow. Therefore
to add vectors you always place the tail of the added vector onto the head of the first
vector.
6. Imagine that the sidewalk was moving 1 m/s West instead, what would that look like? An
arrow 1 inch long pointed West. Draw a 1 inch arrow pointing West. If I walk on to
that sidewalk and continue walking, what would that look like to a person not on the
sidewalk? It would look like I am not moving. How would that look as an arrow? Lead
students to agree that with no speed, there would be no length to the arrow. If I want to
add my two vectors that I have drawn, how do I do that? The tail of the second overlaps
the head of the first and the two arrows exactly cancel out. What is the result of adding
these two velocities? Nothing, the two velocities cancel and I am left with no arrow.
Does this agree with what we decided before? Yes.
26
1
2
3
Result/ Displacement
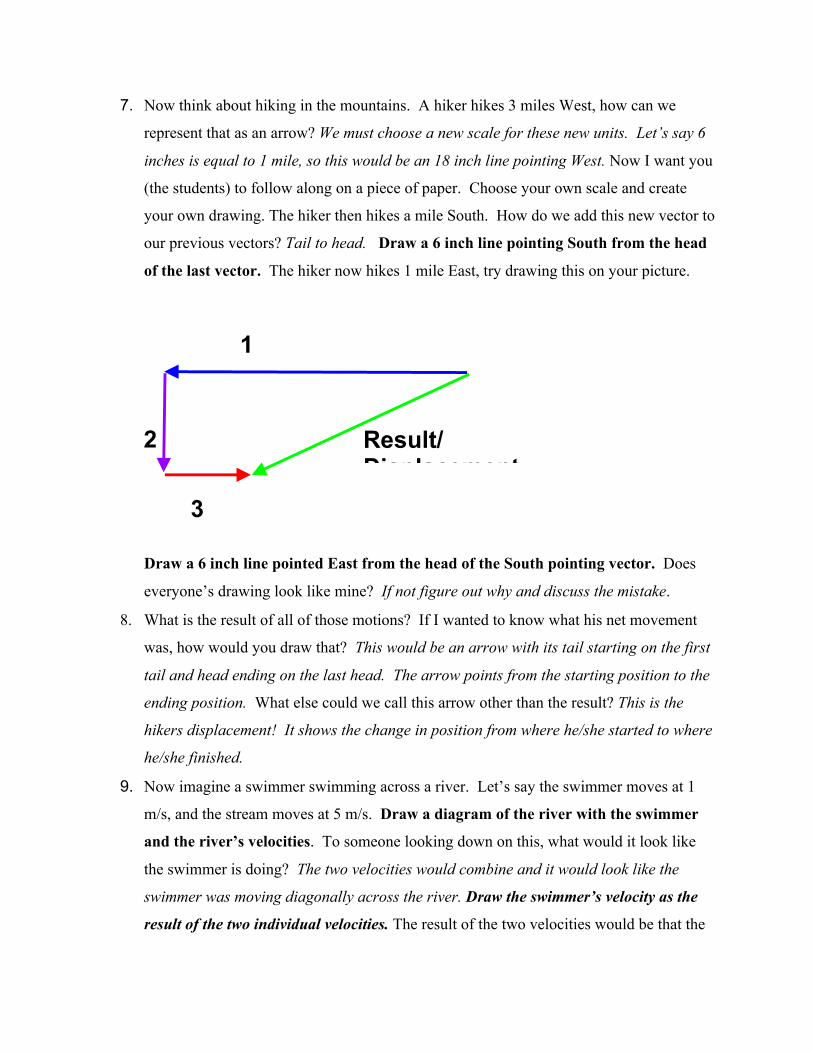
7. Now think about hiking in the mountains. A hiker hikes 3 miles West, how can we
represent that as an arrow? We must choose a new scale for these new units. Let’s say 6
inches is equal to 1 mile, so this would be an 18 inch line pointing West. Now I want you
(the students) to follow along on a piece of paper. Choose your own scale and create
your own drawing. The hiker then hikes a mile South. How do we add this new vector to
our previous vectors? Tail to head. Draw a 6 inch line pointing South from the head
of the last vector. The hiker now hikes 1 mile East, try drawing this on your picture.
Draw a 6 inch line pointed East from the head of the South pointing vector. Does
everyone’s drawing look like mine? If not figure out why and discuss the mistake.
8. What is the result of all of those motions? If I wanted to know what his net movement
was, how would you draw that? This would be an arrow with its tail starting on the first
tail and head ending on the last head. The arrow points from the starting position to the
ending position. What else could we call this arrow other than the result? This is the
hikers displacement! It shows the change in position from where he/she started to where
he/she finished.
9. Now imagine a swimmer swimming across a river. Let’s say the swimmer moves at 1
m/s, and the stream moves at 5 m/s. Draw a diagram of the river with the swimmer
and the river’s velocities. To someone looking down on this, what would it look like
the swimmer is doing? The two velocities would combine and it would look like the
swimmer was moving diagonally across the river. Draw the swimmer’s velocity as the
result of the two individual velocities. The result of the two velocities would be that the
27
swimmer moves 1 meter across and 5 meters down the river each second. The final
vector is known as the resultant, and it shows the resulting vector from our vector
addition.
10. Would the result of this make the swimmer be going faster, slower, or exactly 5 m/s?
The swimmer would be going more than 5 m/s, and we can verify this a few ways. We
can measure the length of the resultant and using our scale, determine the swimmer must
be going more than 5 m/s. We can also think through this in our heads. If the swimmer
stops swimming how fast will they be going? 5 m/s, because that's what the current is.
As soon as the swimmer starts swimming, they are still floating the 5 m/s, as well as at
least a little bit in another direction. Therefore the swimmer must be going more than 5
m/s. Lastly we could verify this using Pythagorean theorem. The two smaller sides of the
triangle squared, then added together must be equal to the length of the larger side
squared. 52 + 12 = R2 ⇒ R = sqrt(26) ~ 5.1
11. Now we are going to demonstrate vector addition and we will see if we can prove that it
works. Move force table under doc cam. A force table is a small circular table with a
ring pinned in the center. Masses are attached to the ring in the center using string and
then dangled over the edge. Each mass pulls the ring in the direction that it hangs, and
the outer edge of the table is marked from 0 degrees to 359 degrees.
12. If I attach a 100g mass at the 90 degree mark and pull the pin, what happens? The ring is
pulled towards the 90 degree mark when the pin is pulled. Draw a top-down diagram
of the table on the board, and draw a vector pulling the ring towards 90 degrees.
13. Ask students: Is everyone okay with me representing that force as a vector like this.
Students should agree this represents what happened. What will happen if I add a second
100 g mass at 180 degrees? Which direction do you expect the ring to be pulled?
Students should say that it will be pulled directly between the two masses.
14. Let’s see if we can prove this with our drawing. Draw a second equal length arrow
pointing from the ring towards the 180 degree mark. Ask students how we would add
this vector to the first vector so that we can find the resultant force. Guide students to
remember that we add vectors head to tail.
15. Draw the second vector with its tail on the first vector’s head. The two arrows
should form a 90 degree angle. Ask students how to draw the resultant of these two.
28
90 degrees
180 degrees
90 degrees
180 degrees
Individually: Added:
Resultant
The resultant will point from the tail of the first vector (the ring) to the head of the last
vector. This would point to an angle of 135 degrees, directly between the two masses,
which verifies our prediction. Verify this physically by pulling the pin on the table.
The ring should pull directly towards the 135 degree mark.
16. What if we change the mass at 180 degrees to a 300 g mass? Students’ intuition should
tell them it would pull the ring more towards 180 instead of 90 degrees. Redraw the 180
degree arrow 3 times as long as before, and add it to the 90 degree arrow. The
resultant should be longer and pointed more towards 180 than the 90 degree mark.
17. Now we are going to give you some practice with adding vectors. Distribute vector
addition worksheet. This worksheet has 8 vectors on it, and will have you practice
adding these vectors in different combinations. After adding these vectors you need to
find the magnitude (size) and direction of the resultant. The direction is easy, you may
use North, South, East, West, or up, down, left, right to describe it. How should we find
the magnitude of the resultant? Pythagorean theorem. Make a triangle out of your
resultant, and use that triangle to find the magnitude of the resultant. It is okay to leave
your magnitude as a square root, or as a decimal.
18. Students should be left with about 5 or 10 minutes to start the worksheet and ask
questions if they are confused.
29
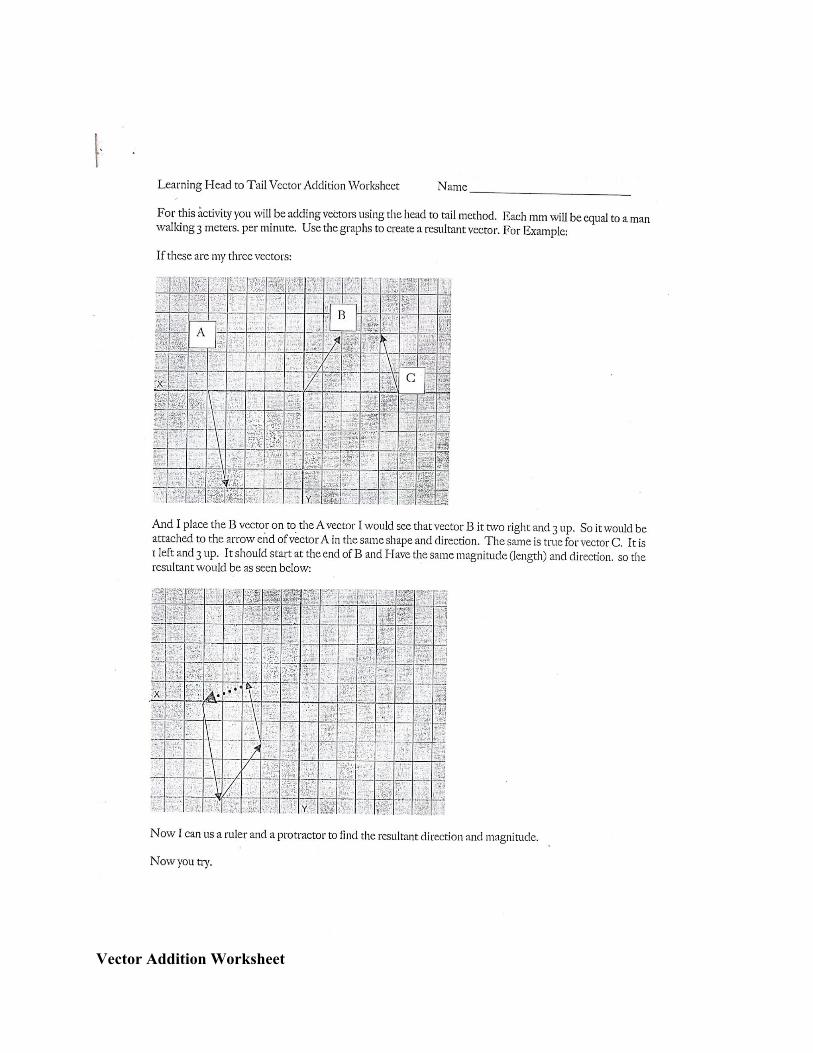
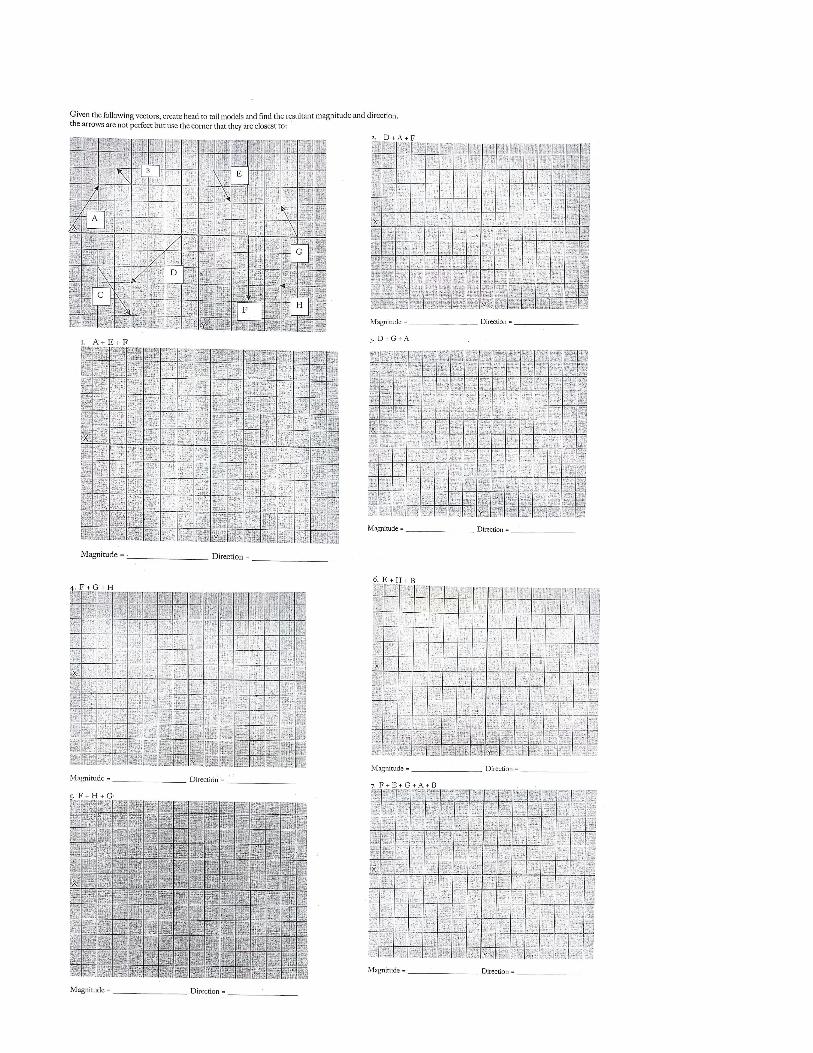
Vector Addition Worksheet
30
31
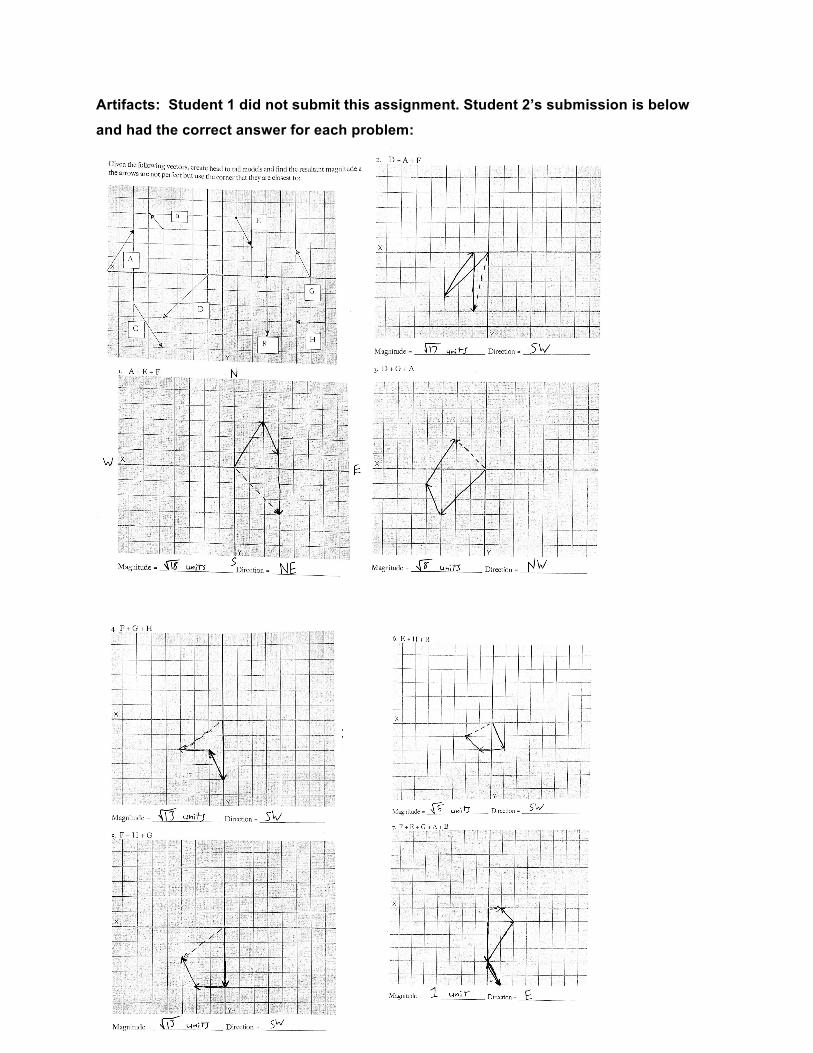
Artifacts: Student 1 did not submit this assignment. Student 2’s submission is below and had the correct answer for each problem:
32
Independence of Motion Lesson Description Introductory Physics: Grades 9 - 12 Time: 70 - 80 minutes Rationale: This lesson is taught mostly through direct instruction and whole class discussion. Student’s misconceptions are challenged from the beginning of the lesson by having them consider dropping and shooting a bullet simultaneously. Students are required to make predictions and hypotheses to give them practice in scientific method and thinking like a scientist. The ball launch demonstration is designed to be run like an experiment to model how to think like a scientist. The “monkey gun” demonstration is used because it challenges students to apply their knowledge to a new application that is challenging and exciting. The monkey gun also challenges students misconceptions because most students believe the gun must be aimed below the monkey in order to hit it. Standards Covered: Physics Standard 1- Objective 1 - Students will describe the motion of an object in terms of position, time, and velocity. Physics Standard 1- Objective 2 - Students will analyze the motion of an object in terms of velocity, time, and acceleration Academic Language/Vocabulary Objectives: measure, analyze, describe, predict, experiment, test, independence, dimension, vector, accelerate, velocity, angle Required Materials: Simultaneous ball drop/launch rig, monkey gun Lesson Objectives: Students will understand that 2 dimensional vectors are made of 2 1 dimensional vectors Students will understand that motion in 1 dimension is unaffected by motion in the other dimensions Students will understand that normal objects fall with at identical rates regardless of horizontal velocities Instructional Procedures: See attached lesson plan Adaptations/Accommodations: This lesson was designed to follow a slow smooth progression of topics to help struggling students keep up. Students learn the principle of the independence of motion at the beginning of the lesson. This means that all students know the principle, rather than hinting at the principle which would lead only the top students to understand the principle

33
and apply it to the monkey gun problem. The lesson is largely presented through real life scenarios relating to real experiences which gives all students an equal opportunity at predicting the monkey gun correctly. Assessment: The day after this lesson there was a quiz which had 2 questions addressing independence of motion.

34
Subject/Course: Physics Topic: Independence of Motion Grade Level: 9 - 12 Desired Results Established Goal(s)/Target(s)—What will students know and be able to do
● Students will understand that 2 dimensional vectors are made of 2 1 dimensional vectors
● Students will understand that motion in 1 dimension is unaffected by motion in the other dimensions
● Students will understand that normal objects fall with at identical rates regardless of horizontal velocities
Standards covered: 1- Objectives 1 & 2 - Students will analyze the motion of an object in terms of velocity, time, and acceleration
Assessment Evidence
What is your evidence of Learning: - Students are able to identify the 1 dimensional vectors that make up a two dimensional
vector - Students understand that vertical motion is generally unaffected by horizontal motion
35
Independence of Motion Lesson: This lesson is designed to teach students that the motion of
objects moving in 2 dimensions can be divided into 2 independent 1 dimensional motions.
Students will learn that horizontal motion does not affect vertical motion
Materials: Ball launch/drop rig, monkey gun
The Lesson:
1. Begin class with a review problem to get students thinking:
a. An airplane is flying north at 200 mph, a 60 mph wind blows from West to East.
i. Using vector (arrow) notation create a diagram of the plane’s velocity.
ii. What is the magnitude and direction of the airplane’s velocity? ~ 208.8
mph, Northeast
2. When we look at vectors such as this one we can determine that the object is moving in 2
dimensions, what are these dimensions in this case? North/South, East/West. Every 2
dimensional vector actually has 2 separate 1 dimensional components. For this problem,
what were the components? 200 mph N, 60 mph E.
3. My question I want you to think about is this: is motion in 1 dimension affected by the
object’s motion in the other dimensions? For example, if a bullet is dropped, and a
second bullet is shot horizontally, do they both hit the ground at the same time? Now take
a minute and discuss with a neighbor what you think, try and come to an agreement.
4. Survey the class: Which pairs think motion in 1 dimension is affected by the other
dimensions? Who thinks the motion in 1 dimension is unaffected by the other
dimensions? Call on a couple partnerships with each viewpoint and have them
explain why.
5. We are going to put this to the test with a couple of demonstrations. Show students the
ball dropper and launcher and explain it. The rig holds two steel bearings, the rig is
“loaded” so that by pulling a lever the rig launches one bearing directly horizontal, and
drops the other bearing with no horizontal velocity.
36
6. Now take a minute to write down a prediction for what will happen when the rig is
triggered. Specifically talk about the time it will take for each ball to hit the floor. Give
students a minute to think and write.
7. We are looking at the motion of these balls in 2 dimensions: left/right and up/down.
Let’s call the ball that falls ball A, and the ball that launches ball B. What is the initial
vertical velocity of ball A? Zero. Ball B? Zero. What is the initial horizontal velocity of
ball A? Zero. What is the initial horizontal velocity of ball B? Not zero, probably about
10 mph.
8. For this experiment what is the variable that we are manipulating? Horizontal velocity.
What is the variable we are observing and measuring? Vertical velocity. So we are
changing the horizontal velocity to see if it affects the vertical velocity. If horizontal and
vertical motion are independent, what would we expect for the time it takes each ball to
hit the ground? They would be the same because the horizontal component does not
affect the falling of the ball. If horizontal and vertical motions are dependent, what would
we expect for the time it takes each ball to hit the ground? The times would be different,
the different horizontal velocities would affect the falling of the balls.
9. Tell students to really listen for the sounds of the balls hitting. Try to see if they sound
simultaneous. Trigger the rig. The two balls should hit the ground at the same time.
Repeat the demo to verify the results. What does the identical fall times of the balls
tell us about the motion in each direction? That motion in the vertical direction is
independent of motion in the horizontal direction.
10. Now lets think about an application of this. Imagine a zookeeper is in a tree, at an equal
height in another tree 30 yards away a monkey hangs from a tree. The zookeeper wants
to shoot the monkey. However, the zookeeper knows that the noise of the gun will scare
the monkey and cause it to instantly fall from the tree. Where should the zookeeper aim
his gun? The monkey and the bullet will accelerate downwards at equal rates because
the bullet’s horizontal velocity will not affect its vertical acceleration. If it takes 1 second
for the bullet to hit the monkey, both objects will fall 4.9 meters and the bullet will
maintain the same height as the monkey.
11. I know this sounds a little counter-intuitive so let’s see if we can prove it with our own
monkey gun. When the “gun” launches the dart at the target, the target will be released
37
by a pulse of electricity. If the laws of physics hold true then our dart should hit our
target. Fire the monkey gun.
12. Now consider a scenario where the zookeeper is on the ground instead of in the tree.
Where will the zookeeper have to aim the gun this time? To try and answer this consider
the path of the bullet if there was no gravity. In the absence of gravity the bullet follows
a straight line at the angle it was shot in. If we add gravity back into the equation and
now consider the bullet’s path, we can find that the bullet curves down towards earth and
falls further and further under our straight line. Draw a diagram showing both bullet
paths. Looking at a diagram you can see that the bullet is falling from its straight path.
How quickly is it falling from its path? The only acceleration on the bullet is gravity, so
the bullet accelerates downwards at 10 m/s. Now consider the monkey. The monkey
crosses the path of the bullet, and when the bullet is fired the monkey begins falling. If
we add the monkey to our diagram you can see that the monkey could also be seen as
falling from the path of the straight bullet. How quickly does the monkey fall? The
monkey is also only under the pull of gravity, so it accelerates at 10 m/s. Both the
monkey and the bullet fall from the path of the straight bullet with the same acceleration.
Let’s say it takes the bullet 2 seconds to hit the monkey. The bullet will drop D = 10 * 2
= 20 meters from its straight path in that time. The monkey will drop 10 * 2 = 20 meters
as well.
13. So, where should we aim our monkey gun if it is sitting on the ground? Directly at the
target. Aim the “gun” at the target and fire the mechanism.
14. So what did we learn from this? Horizontal and vertical motions are independent of each
other. More generally, motion in one dimension is independent of motion in other
dimensions. We also verified that gravity accelerates all objects equally, regardless of
size, mass, and velocity. To summarize, write on the board: Independence of Motion -
Motion in one dimension (up/down) is not affected by motion in other dimensions
(left/right)
15. Students now take the Motion Review Quiz on Canvas.
38
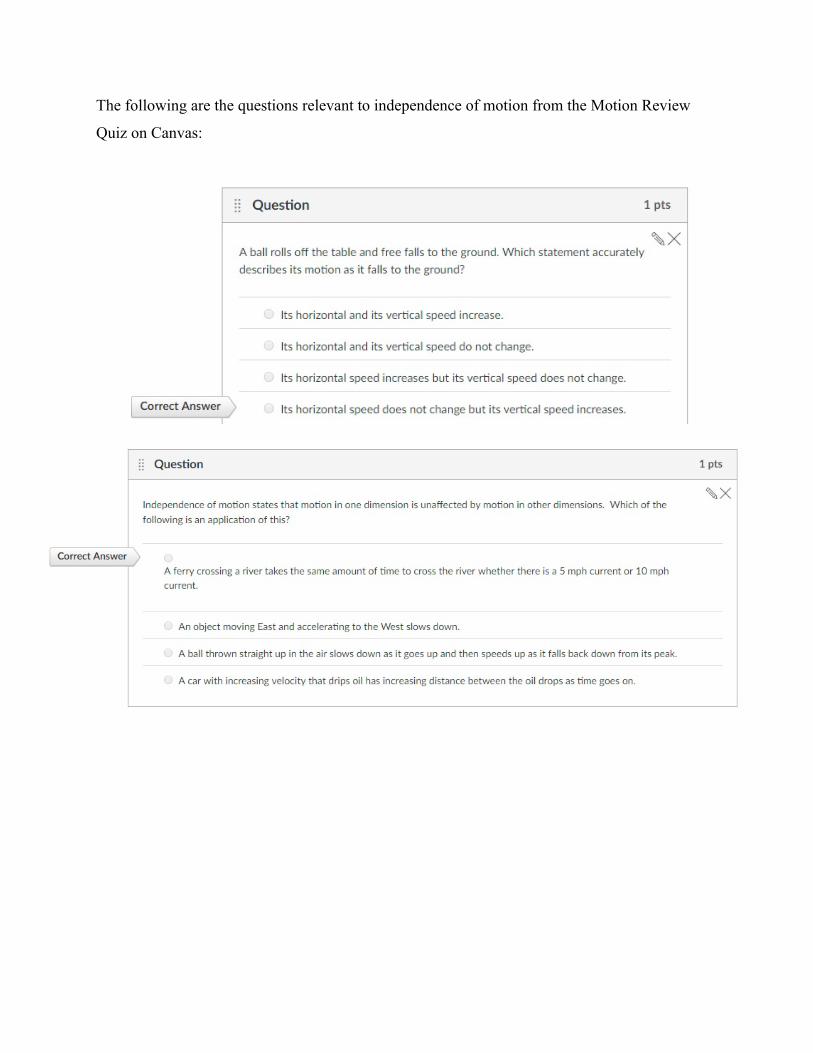
The following are the questions relevant to independence of motion from the Motion Review
Quiz on Canvas:
39
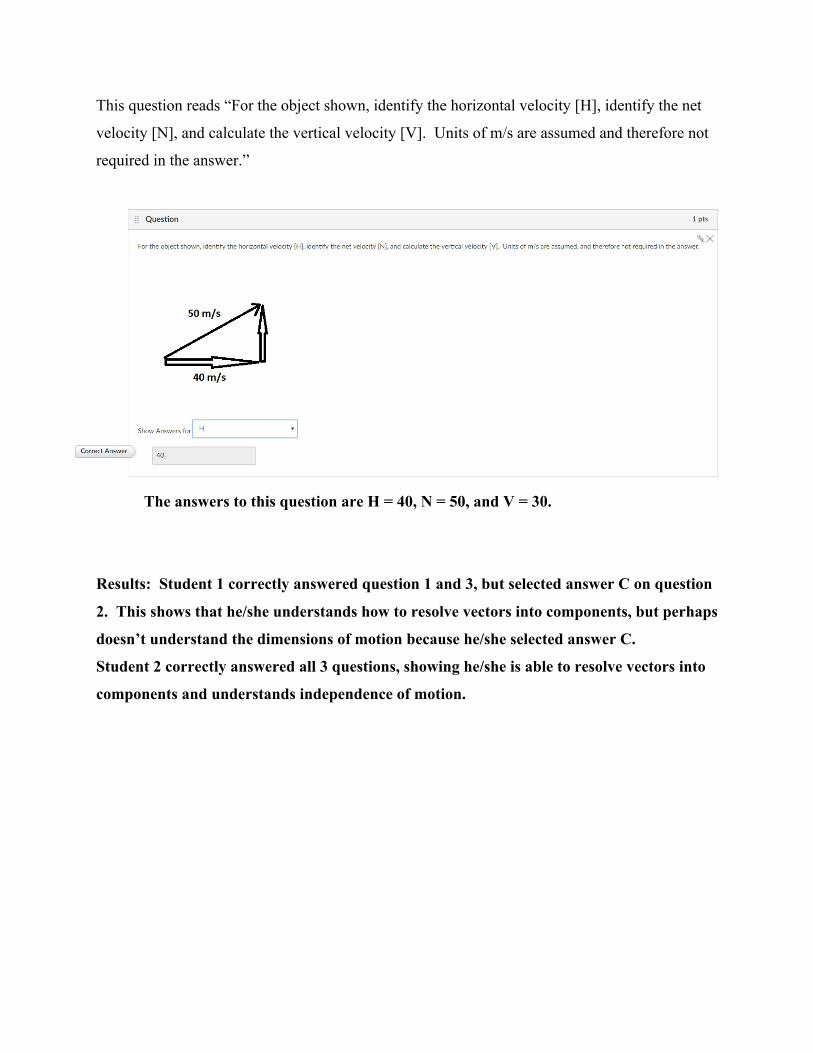
This question reads “For the object shown, identify the horizontal velocity [H], identify the net
velocity [N], and calculate the vertical velocity [V]. Units of m/s are assumed and therefore not
required in the answer.”
The answers to this question are H = 40, N = 50, and V = 30.
Results: Student 1 correctly answered question 1 and 3, but selected answer C on question
2. This shows that he/she understands how to resolve vectors into components, but perhaps
doesn’t understand the dimensions of motion because he/she selected answer C.
Student 2 correctly answered all 3 questions, showing he/she is able to resolve vectors into
components and understands independence of motion.
40
Reflection
Overall I feel that these lessons were effective in teaching the students the desired content. The
first lesson went very well. Students enjoyed the hot wheels lab, and in my discussions with the
students while they analyzed their videos, most of the students were able to correctly identify
that the car covered more distance each frame and were therefore speeding up. Focus student 1
was unable to describe why the changing slope of the position vs. time graph was useful.
However after I reminded him that the slope shows how much distance the car went in each
amount of time he realized the increasing slope meant an increasing velocity. The two
assignments I gave after the lesson were effective practice for students. I believe the worksheet
gave good practice thinking about and calculating acceleration. The video assignment was
effective in giving the students real life experience with acceleration and forced the students to
think about how frequently they accelerate. I would not change the worksheet. I would change
the video assignment to require students to label each video so that it is clear which motion they
are attempting. I would also require students to combine all of the videos into one video to make
them faster and easier to grade. For the lesson itself there is little I would change about it. The
only change I know I would make would be to use Hoverboards (not actually flying boards but
the ones that teenagers have) to explain acceleration. On a hoverboard to forward you must lean
forward, and to accelerate backward you must lean backward. These directions of acceleration
are independent of the direction of velocity. Therefore the hoverboards make a great way to
visualize acceleration, simply by observing which direction the rider is leaning.
The second lesson went quite well in my opinion. The lesson was an attempt to use
direct instruction to avoid giving students misconceptions. Students were fairly engaged, but
some seemed disinterested. If I was going to teach the lesson again I would add a lab to increase
41
student engagement. Several students seemed to be zoned out and were likely not following
along closely. The addition of a lab using the force table and requiring the students to predict the
direction the ring will move would get students involved and likely increase understanding.
Student 2 clearly understood how to add vectors because he/she easily completed the vector
addition worksheet in the 10 minutes left at the end of class without errors. Student 1’s
understanding is difficult to gauge because he/she did not turn in the worksheet. When I asked
several class periods later he/she was able to explain that vectors are added tail to head.
However when I asked how to calculate the magnitude of resultant he/she struggled until I led
him/her to use pythagorean theorem.
The third lesson was the best of the three lessons and I also enjoyed teaching it the most
of the lessons. Students were engaged and on task throughout the lesson, and results from the
quiz after the lesson were very good. If I was going to reteach this lesson I would not change
much. Instead of explaining to students where to aim the monkey gun and then demonstrating
that it works, I would ask the students where they think I should aim the gun and then discuss
what the possibilities are if I aim there. After that I would poll students to see who thinks I will
hit the “monkey” and who thinks I will miss. I think that by making students more involved in
the lesson this way they would be more engaged and learn more. I would also be more thorough
in my explanation of how the classroom monkey gun mirrors the scenario that I explained to the
students. Overall I think this unit was very successful in teaching the students the content. From
the surveys I gave students at the end of student teaching they also enjoyed this unit, as I could
tell from several comments mentioning how interesting the demonstrations involved were.
Related Documents


