Teach Yourself Windows 95 Module 3: Personalizing, Entertaining and O.L.E.

Teach Yourself
Dec 31, 2015
Teach Yourself. Windows 95. Module 3: Personalizing, Entertaining and O.L.E. Objectives of this Module. Personalizing Windows 95 Changing the date, time and time zone Adding wallpaper to the desktop Changing screen colors Using screen savers Changing mouse settings - PowerPoint PPT Presentation
Welcome message from author
This document is posted to help you gain knowledge. Please leave a comment to let me know what you think about it! Share it to your friends and learn new things together.
Transcript
Teach Yourself
Windows 95
Module 3: Personalizing, Entertaining and O.L.E.

Objectives of this Module
• Personalizing Windows 95– Changing the date, time and time zone– Adding wallpaper to the desktop– Changing screen colors– Using screen savers– Changing mouse settings– Moving and sizing the Taskbar– Hiding the Taskbar
Objectives of this Module, (cont’d)
– Changing screen resolution– Changing color depth
• Using Windows 95 for entertainment– Using the CD player– Assigning sounds to program events– Recording sounds– Using the media player

Objectives of this Module, (cont’d)
• Object Linking and Embedding– Linking information between documents– Embedding information into documents
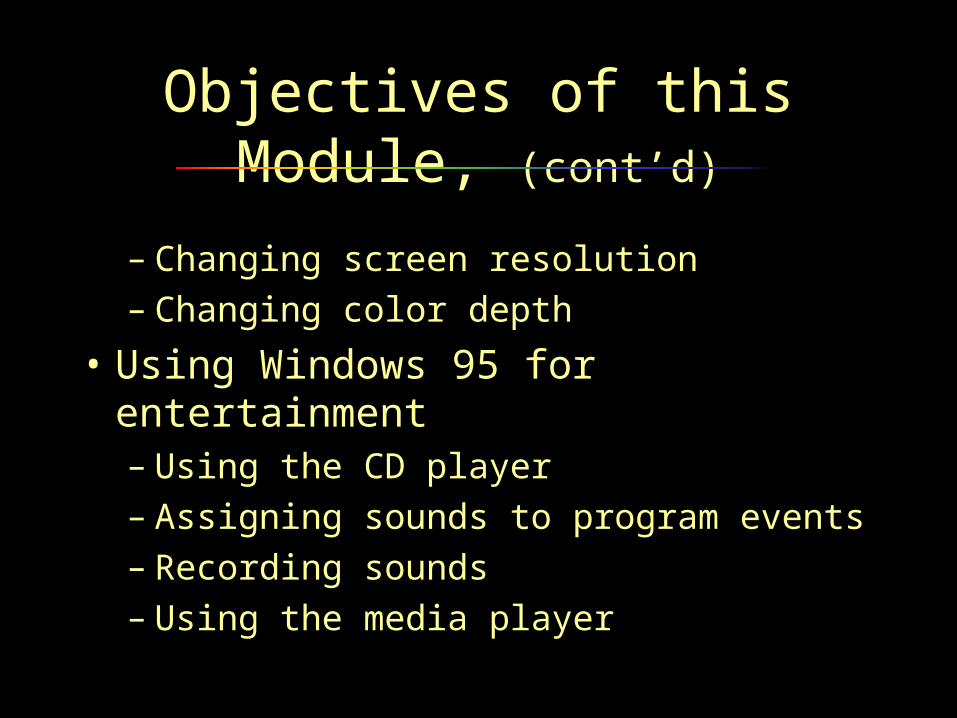
Windows 95 maintains time, date and time zone information for your computer and your location.
You can adjust these settings by double clicking the digital clock area in the System Tray.
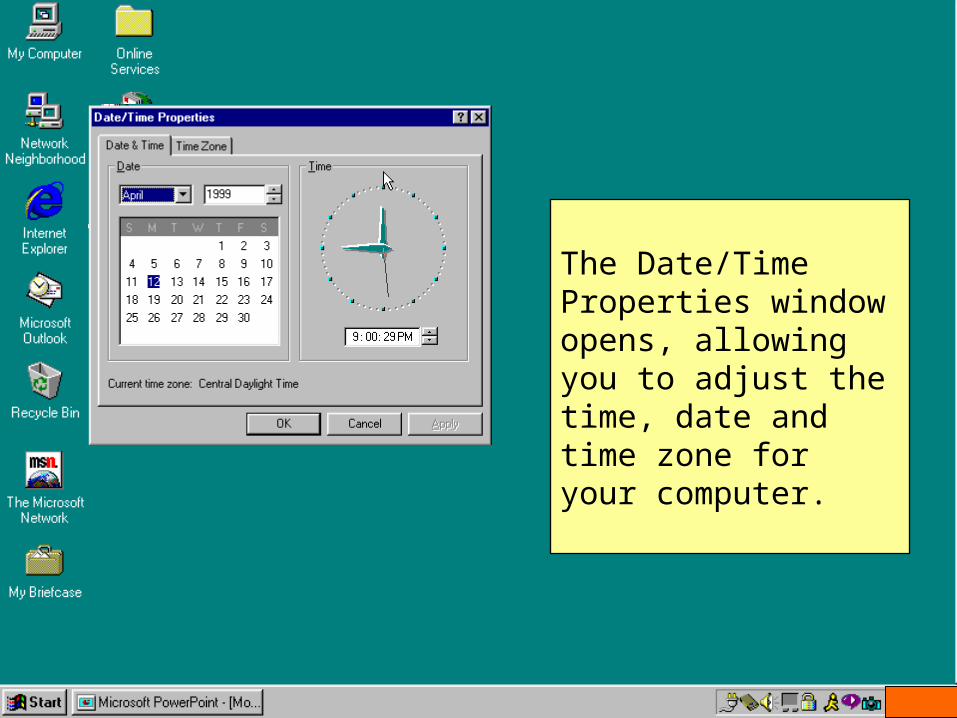
The Date/Time Properties window opens, allowing you to adjust the time, date and time zone for your computer.

To add wallpaper, right click a blank area on the desktop, and then click Properties on the context menu.
The Display Properties window is then displayed.
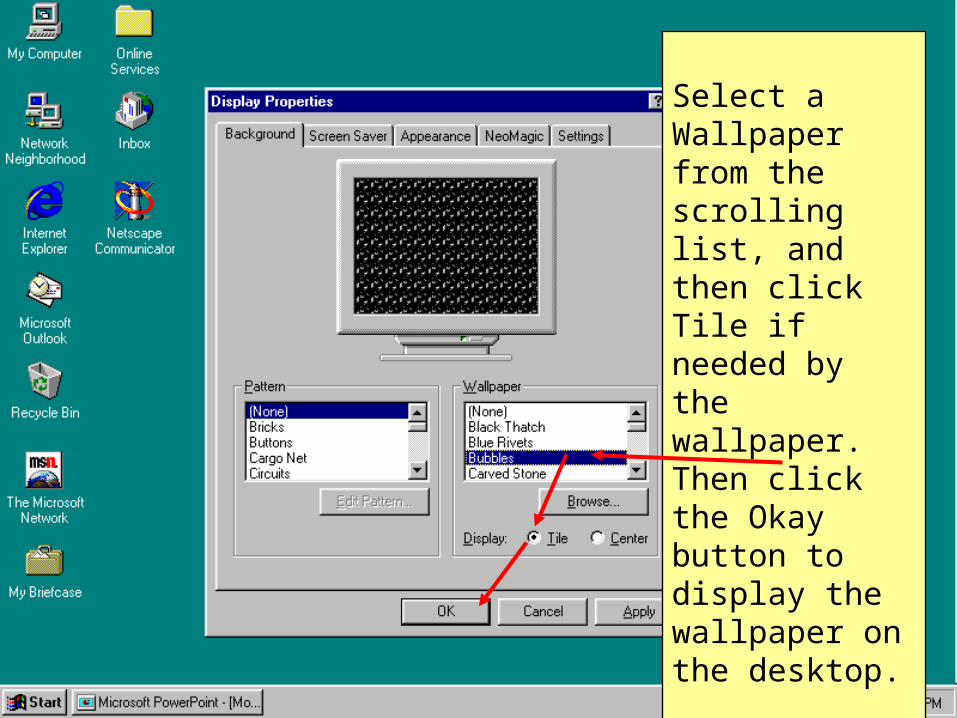
Select a Wallpaper from the scrolling list, and then click Tile if needed by the wallpaper. Then click the Okay button to display the wallpaper on the desktop.
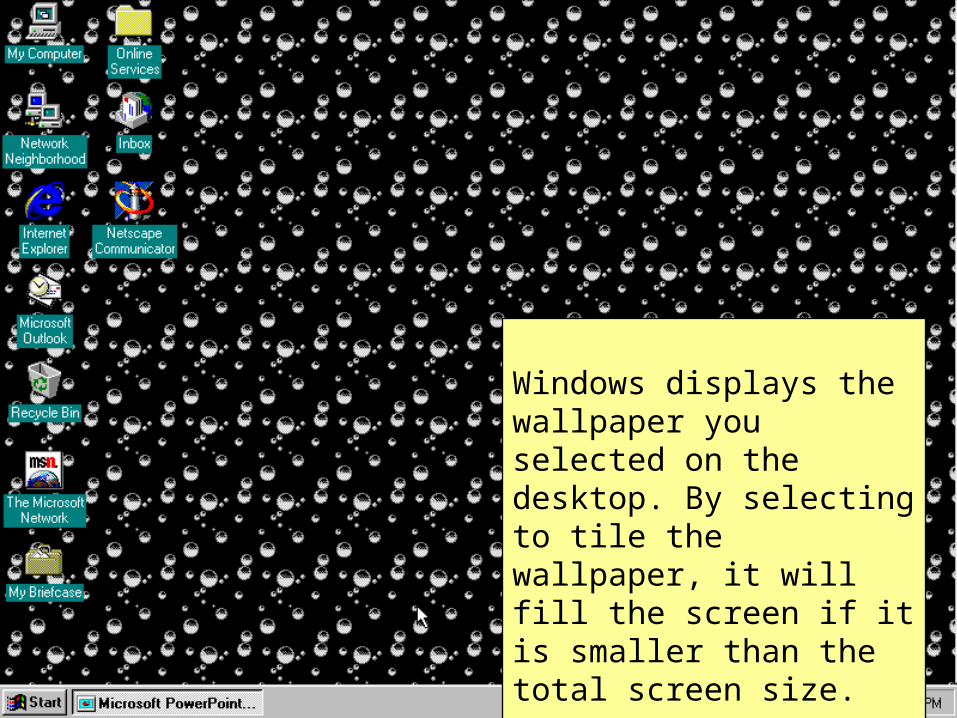
Windows displays the wallpaper you selected on the desktop. By selecting to tile the wallpaper, it will fill the screen if it is smaller than the total screen size.

You can also use the Display Properties window to changed the desktop color.
You can either select a component of the desktop, or select a custom color scheme. Here we will select a color for the desktop.
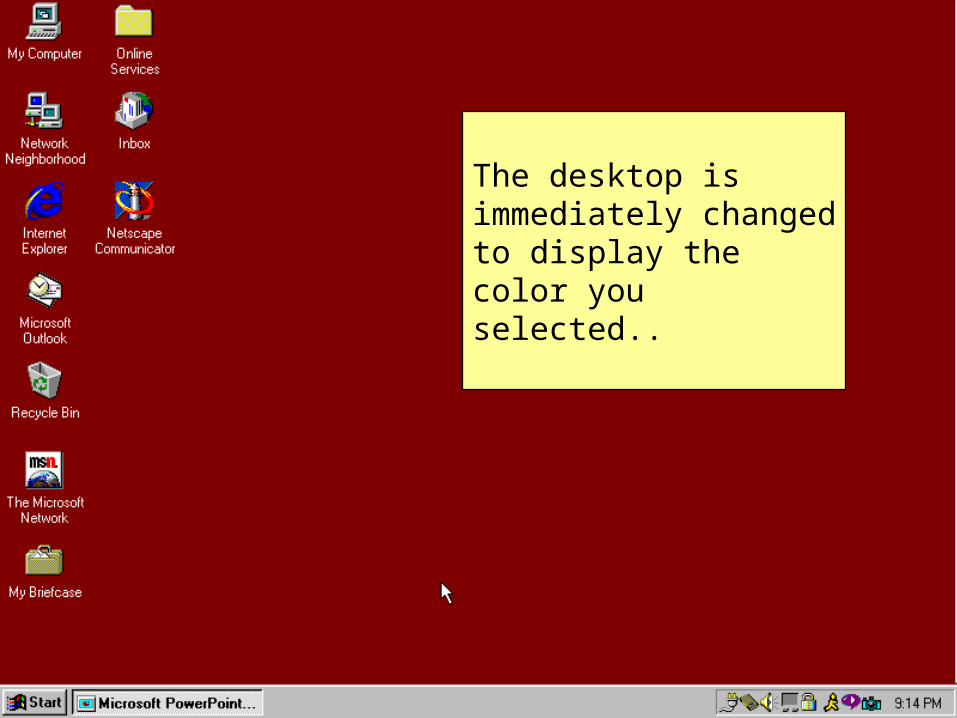
The desktop is immediately changed to display the color you selected..

By clicking the Screen Saver tab in the Display Properties window, you can select a screen saver, that windows will display when you are not using your computer.

Here, the Flying Windows screen saver is displayed when you are not using your computer.

In the Control Panel, you can change settings that affect how your mouse operates. Double-click the mouse icon to open the Mouse Properties window.
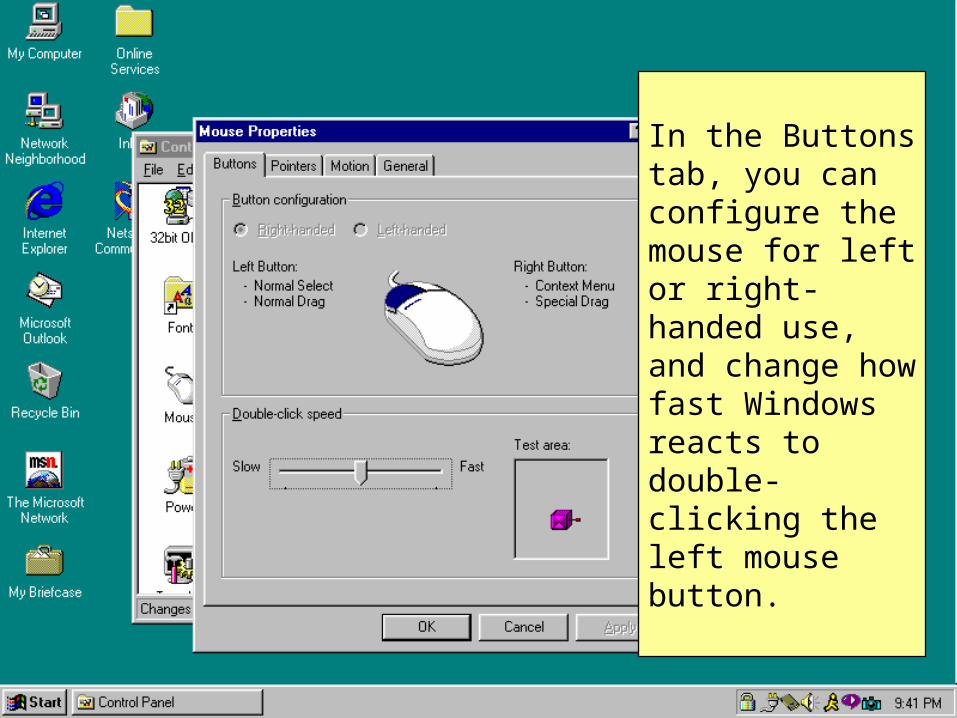
In the Buttons tab, you can configure the mouse for left or right-handed use, and change how fast Windows reacts to double-clicking the left mouse button.
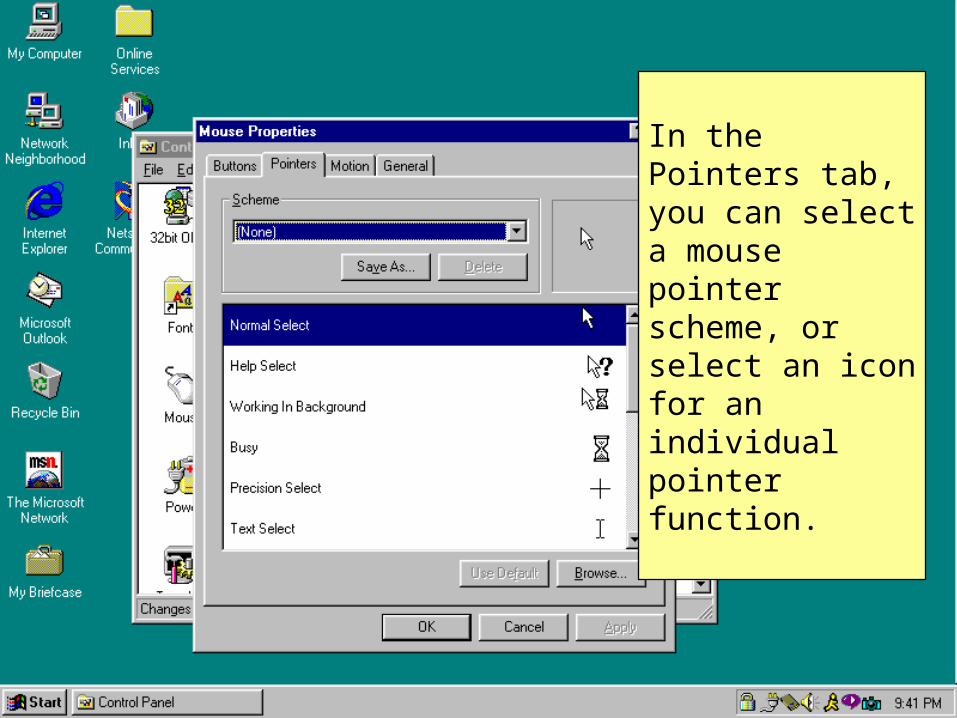
In the Pointers tab, you can select a mouse pointer scheme, or select an icon for an individual pointer function.

In the Motion tab, you can change how fast the pointer moves on the screen as you move the mouse.
You can also activate pointer trails, making it easier to find the mouse pointer on some computers.
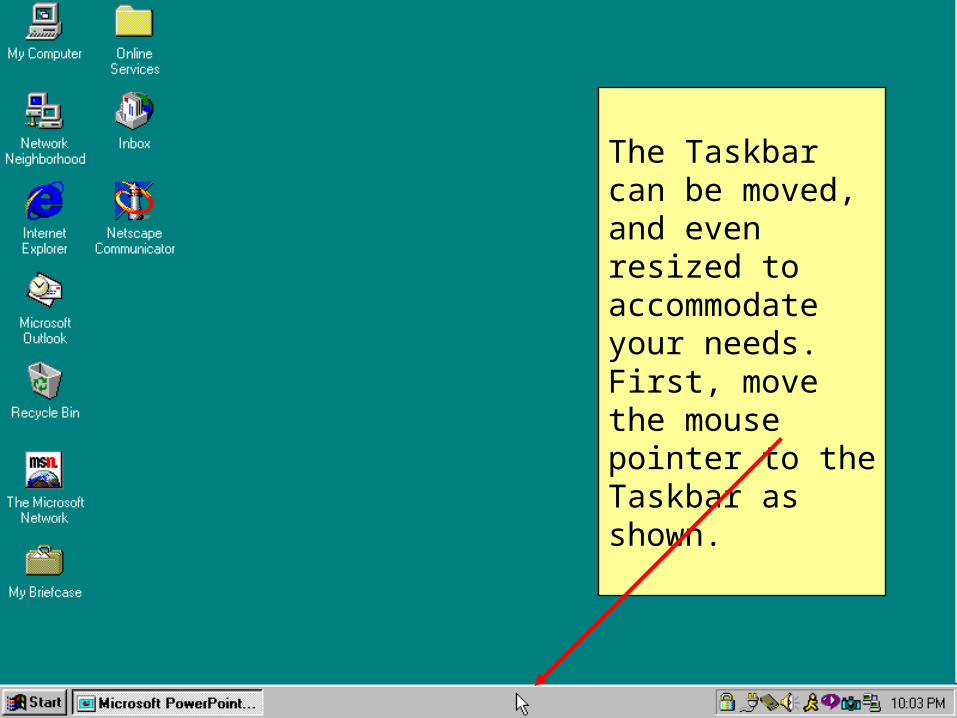
The Taskbar can be moved, and even resized to accommodate your needs. First, move the mouse pointer to the Taskbar as shown.
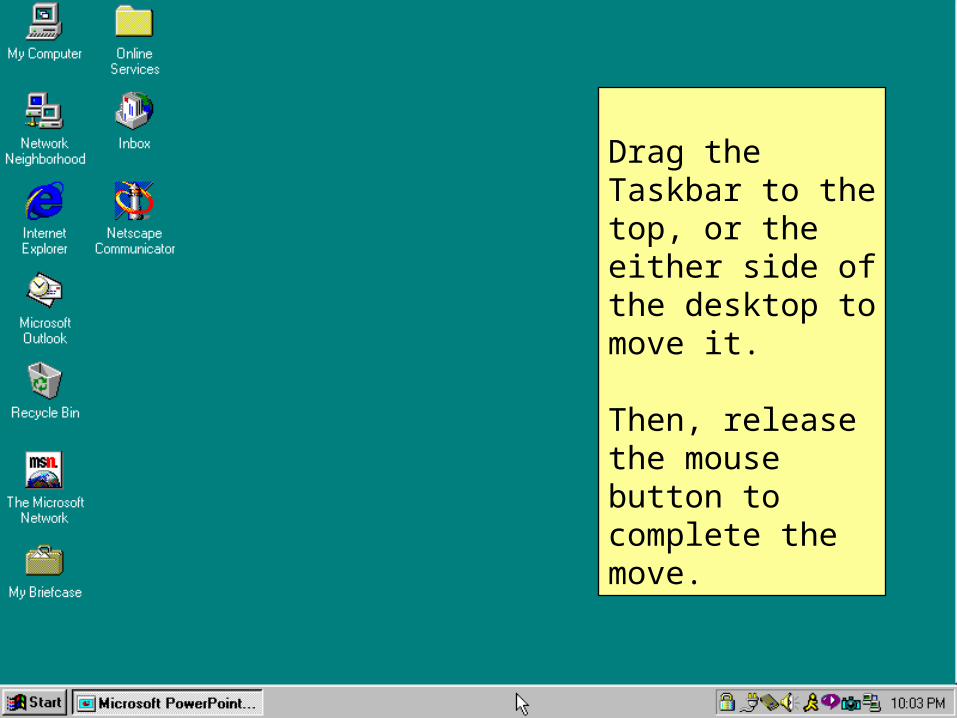
Drag the Taskbar to the top, or the either side of the desktop to move it.
Then, release the mouse button to complete the move.
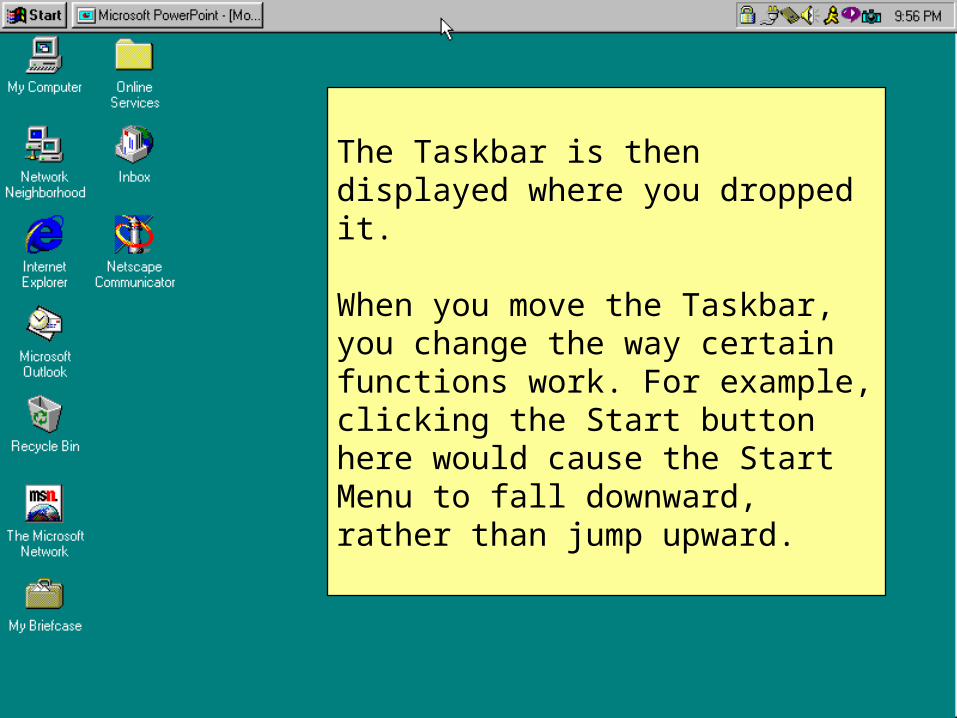
The Taskbar is then displayed where you dropped it.
When you move the Taskbar, you change the way certain functions work. For example, clicking the Start button here would cause the Start Menu to fall downward, rather than jump upward.

To resize the Taskbar, move the mouse pointer until it changes to a double-ended arrow, as shown.

Then, drag the mouse away from the Taskbar.

You can make the Taskbar so large that it takes up about half the desktop! To reduce the size of the taskbar, just drag the mouse back toward the taskbar.
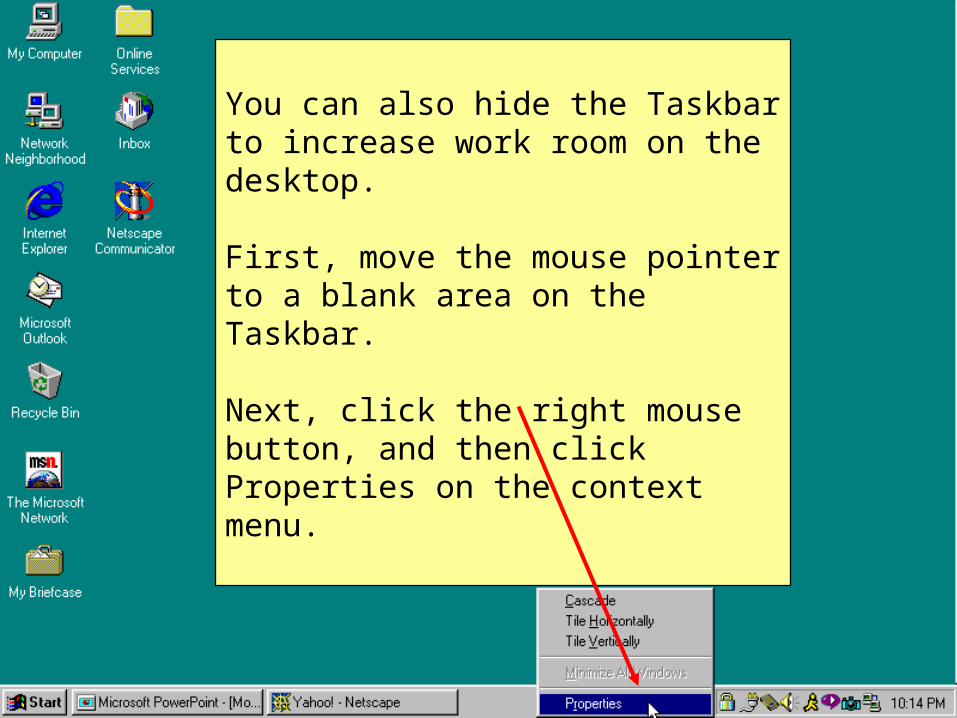
You can also hide the Taskbar to increase work room on the desktop.
First, move the mouse pointer to a blank area on the Taskbar.
Next, click the right mouse button, and then click Properties on the context menu.
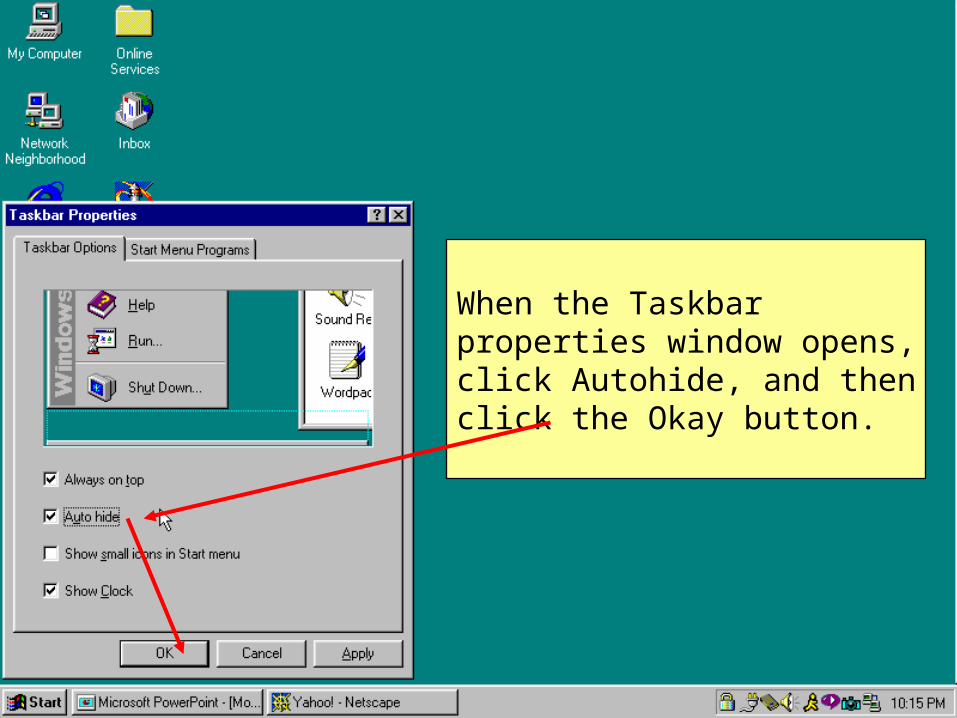
When the Taskbar properties window opens, click Autohide, and then click the Okay button.

Changing the screen resolution allows you to increase or decrease the size of icons, windows, and other items in Windows.
Increasing the screen resolution makes everything look smaller, and allows you to view more items on the screen at one time.
Decreasing the screen resolution makes everything look larger, and provides room for fewer items to be displayed on the screen.

To change the screen resolution, first open the Display Properties window, and then click the Settings tab.
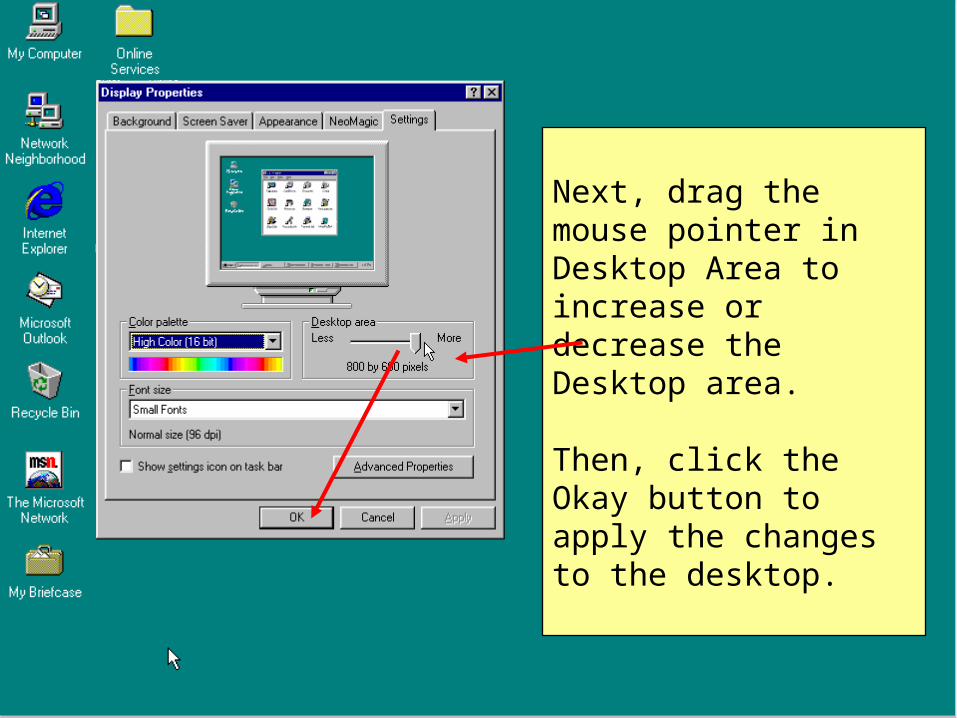
Next, drag the mouse pointer in Desktop Area to increase or decrease the Desktop area.
Then, click the Okay button to apply the changes to the desktop.

Increasing the color depth increases the number of colors that can be displayed in Windows 95.
To increase the color depth, click the Color palette drop-down, select a color depth, and then click the Okay button to apply the changes.
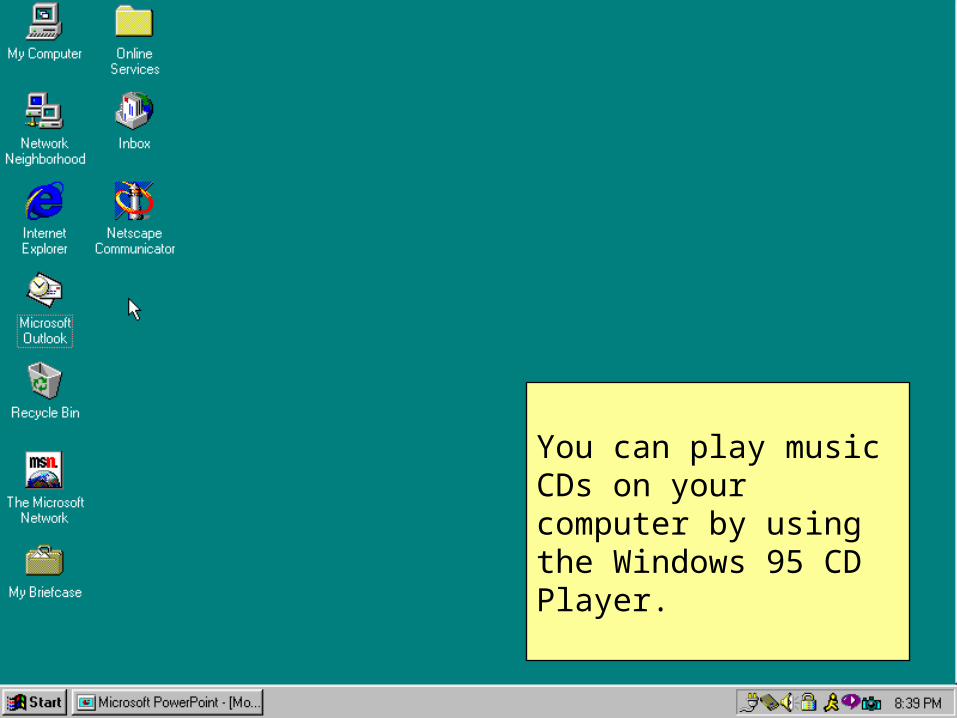
You can play music CDs on your computer by using the Windows 95 CD Player.

The CD player can be found in the Multimedia program group, which is located in Accessories.
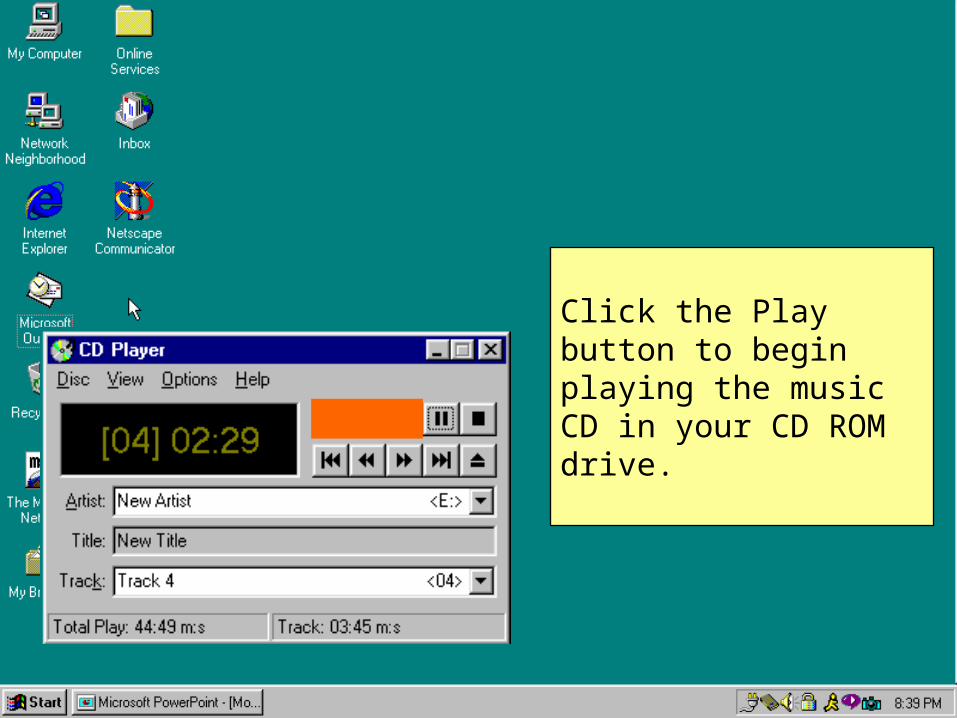
Click the Play button to begin playing the music CD in your CD ROM drive.

Clicking the Pause button will temporarily stop playing the CD.
Clicking the button a second time will resume playing the CD from the point where it was paused.

To stop playing the CD, click the stop button.
If you click the Play button after clicking the Stop button, the CD will begin playing from the beginning.

Optionally, you can:
•Play the songs in random order•Play the CD over and over•Play the first 10 seconds of each song
Click Options, and then click the desired option on the Menu bar.
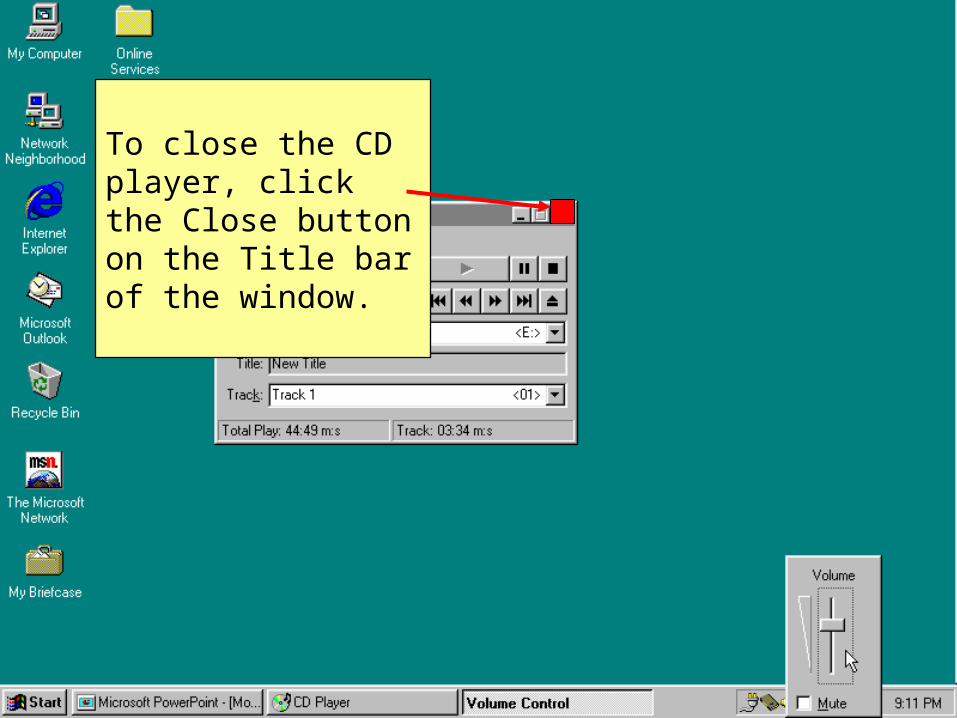
To close the CD player, click the Close button on the Title bar of the window.

To assign sound effects to events in Windows, double-click the Sound icon the the Control Panel.

The Sounds Properties window opens.
Here, you can select from several built-in sound schemes.
After selecting a scheme, click the Okay button to close the Sounds Properties window.
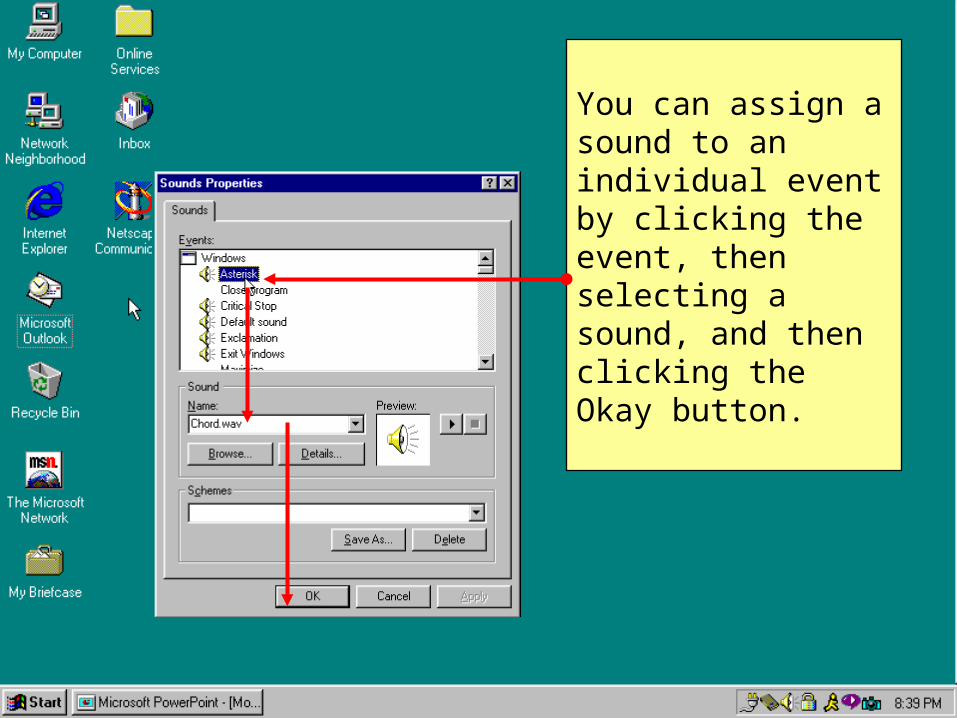
You can assign a sound to an individual event by clicking the event, then selecting a sound, and then clicking the Okay button.
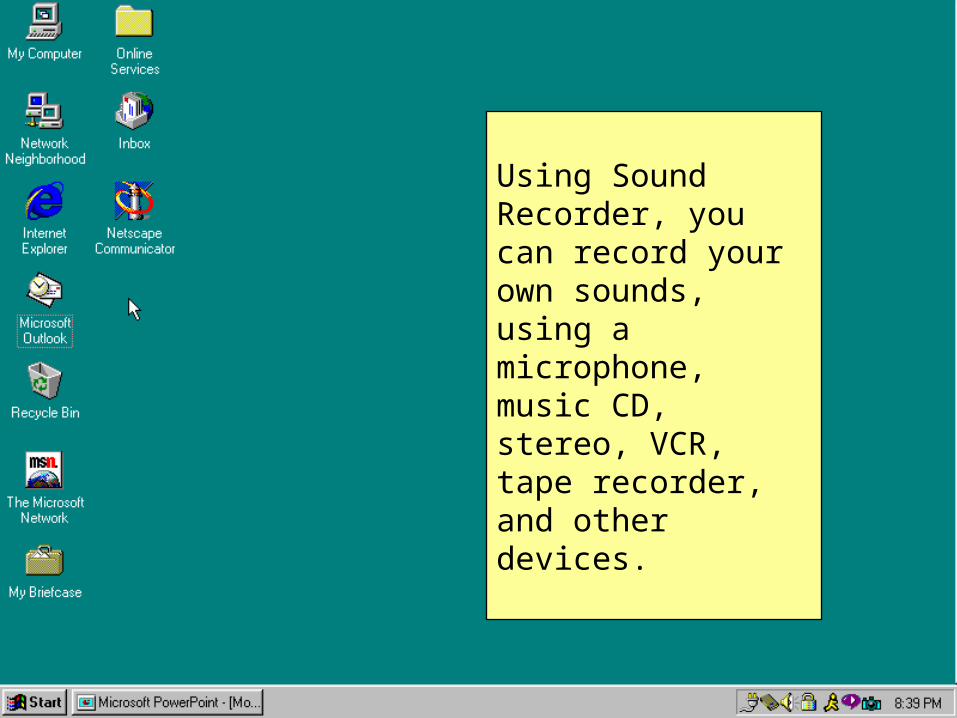
Using Sound Recorder, you can record your own sounds, using a microphone, music CD, stereo, VCR, tape recorder, and other devices.
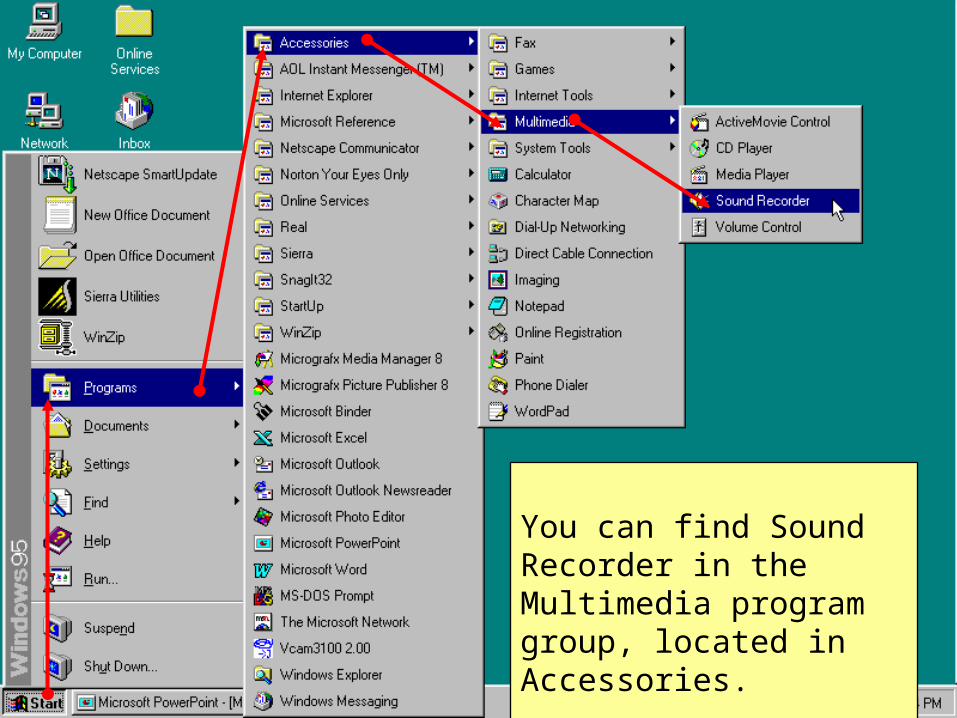
You can find Sound Recorder in the Multimedia program group, located in Accessories.
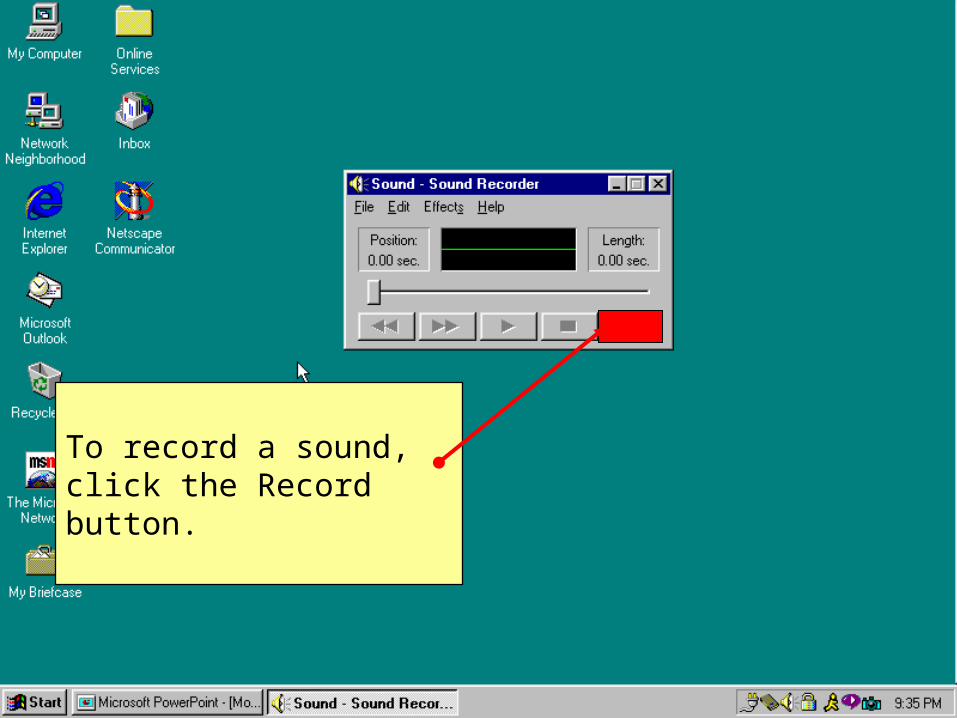
To record a sound, click the Record button.

To stop recording, press the Stop button.
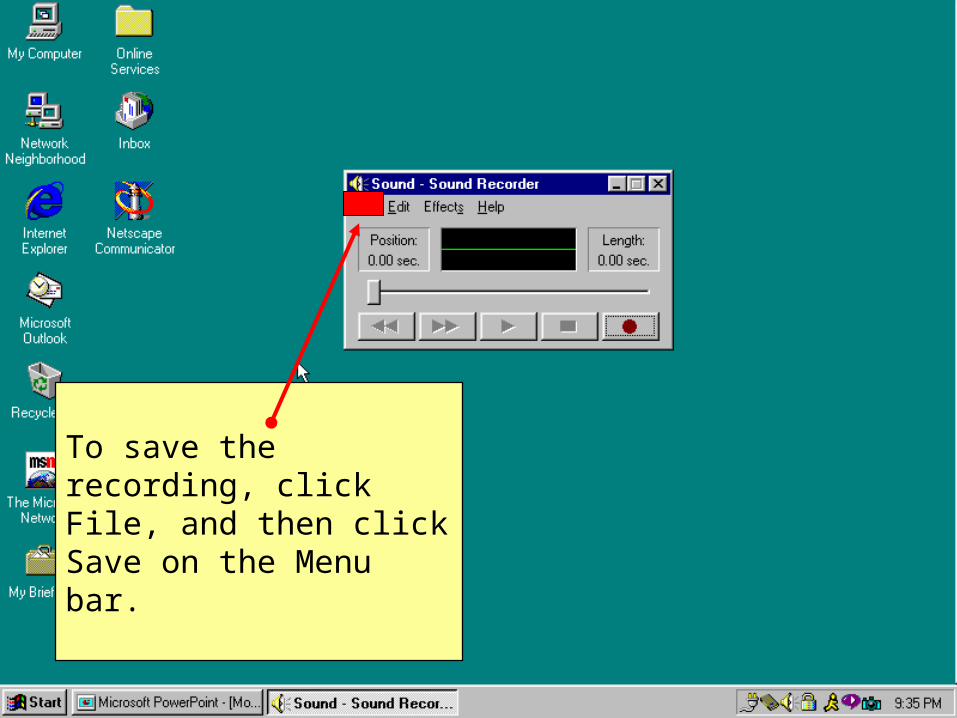
To save the recording, click File, and then click Save on the Menu bar.
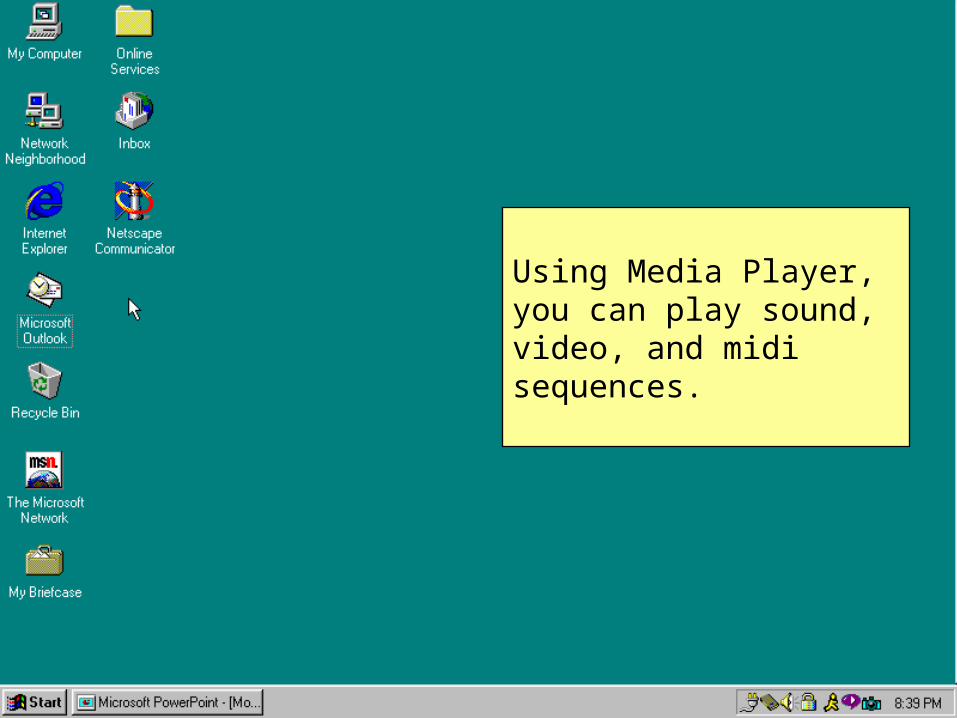
Using Media Player, you can play sound, video, and midi sequences.
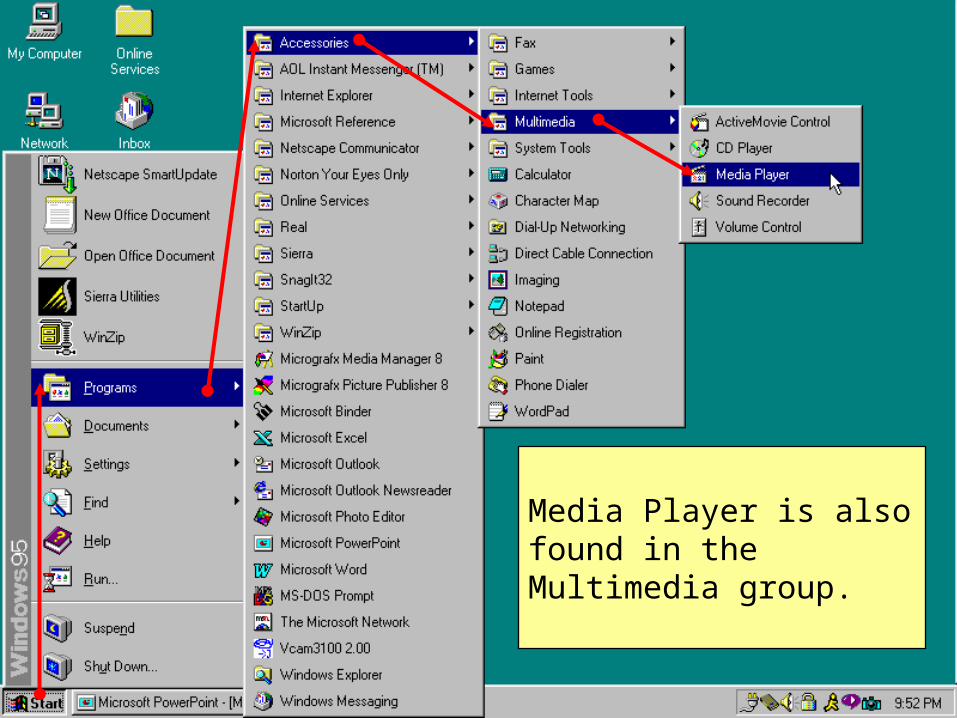
Media Player is also found in the Multimedia group.
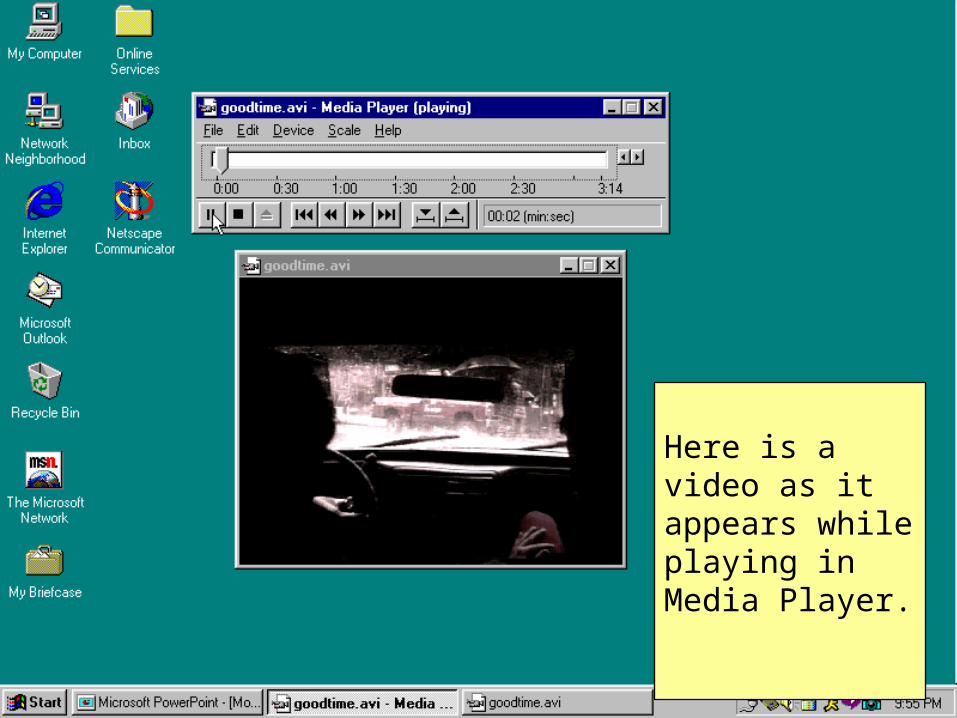
Here is a video as it appears while playing in Media Player.
Object Linking and Embedding (O.L.E.) allows you to exchange information between programs and documents, such as placing an Excel spreadsheet in a Word document..
Linked information remains in the original document. Changes that are made to the original document are reflected in the document containing the link.

Embedded information becomes part of the new document.
Changes made to the original document are not reflected in the document containing the embedded information.
Object Linking and Embedding is covered in chapter nine in the textbook.

Teach Yourself
Windows 95
This concludes Module 3

Related Documents