Task Analysis and Script for Using Gliffy by Angela Clark Task Analysis: 1. Open Gliffy.com. 2. Click START DRAWING (orange button) 3. Show signup and login page. 4. Explain the helpful hints that will show when first drawing. It is under the help button. 5. Look left to see objects under basic shapes. You can open to see other shapes available. 6. Keep Basic shapes and flowchart open. Click and drag the input/output object to the drawing board. This is the shape of a parallelogram. Expand to make bigger. 7. Type in Parallelogram if you want to label. 8. Under Basic Shapes, click and drag rectangle onto board. Type in name. 9. Under Flowchart, click and drag decision object (diamond). Elongate it. Type in name. 10. Under Basic Shapes, click and drag square onto board. Type in name. Make smaller. 11. Click at top for connector tool. Connect parallelogram to rectangle and rectangle to square

Task Analysis and Script - Clark
Dec 09, 2015
gliffy
Welcome message from author
This document is posted to help you gain knowledge. Please leave a comment to let me know what you think about it! Share it to your friends and learn new things together.
Transcript

Task Analysis and Script for Using Gliffy by Angela Clark
Task Analysis:
1. Open Gliffy.com.
2. Click START DRAWING (orange button)
3. Show signup and login page.
4. Explain the helpful hints that will show when first drawing. It is under the help button.
5. Look left to see objects under basic shapes. You can open to see other shapes available.
6. Keep Basic shapes and flowchart open. Click and drag the input/output object to the drawing board.
This is the shape of a parallelogram. Expand to make bigger.
7. Type in Parallelogram if you want to label.
8. Under Basic Shapes, click and drag rectangle onto board. Type in name.
9. Under Flowchart, click and drag decision object (diamond). Elongate it. Type in name.
10. Under Basic Shapes, click and drag square onto board. Type in name. Make smaller.
11. Click at top for connector tool. Connect parallelogram to rectangle and rectangle to square
12. Open UML Sequence file click and drag arrow. Connect rectangle to rhombus and rhombus to square
by rotating the arrow.
13. Type a Title using Test Tool. Change Font Size. Pick up and center it.
14. Use Straight Line Tool to add lines.
15. Scroll down to show how to make a graphic organizer.
16. Click and drag rectangle and center of drawing.
17. Click and drag round rectangle. Copy and paste to have 4. Show the grid lines can be off or on to help
keep in line.
18. Click and drag circles. Copy and paste to have 8.
19. Connect using straight line tool.
20. Go to diagram themes at top and choose a theme.
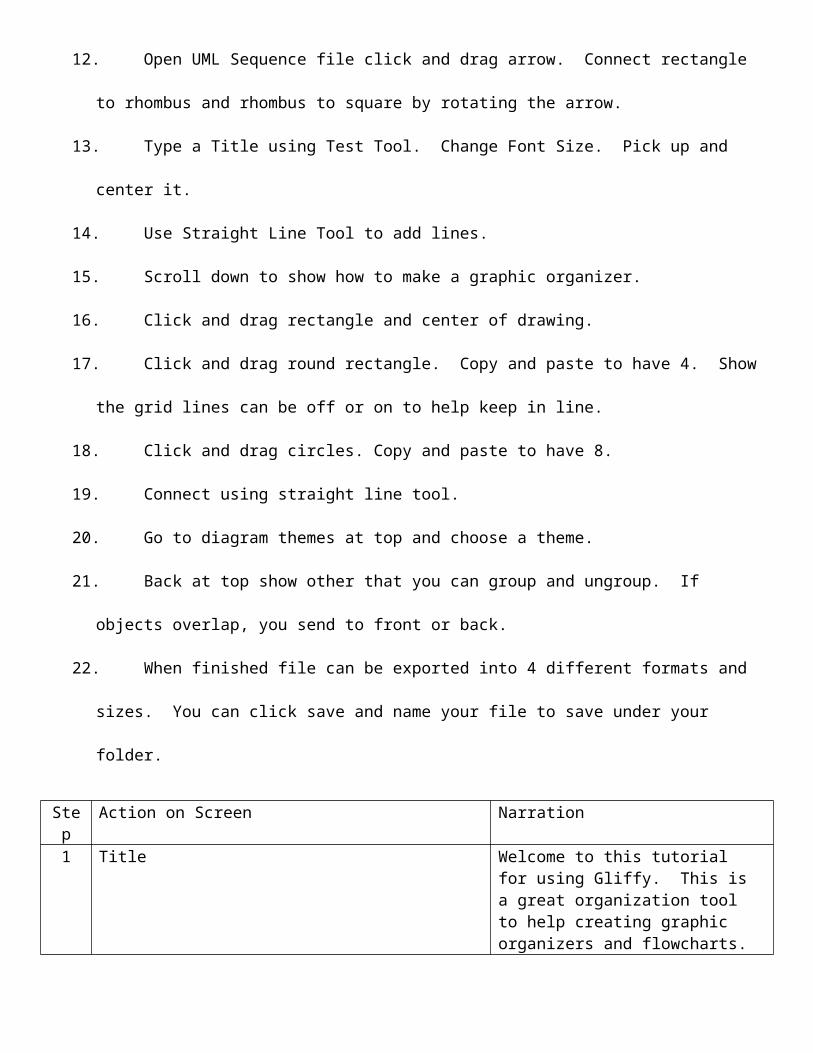
21. Back at top show other that you can group and ungroup. If objects overlap, you send to front or back.
22. When finished file can be exported into 4 different formats and sizes. You can click save and name your
file to save under your folder.
Step Action on Screen Narration1 Title Welcome to this tutorial for using Gliffy.
This is a great organization tool to help creating graphic organizers and flowcharts.
2 This is the first page you will see when you get on the website. Gliffy.com . You will click the orange button, START DRAWING.
3 As you can see there are helpful tips to get you started. I am going to start drawing. If you need to look at the tips again, you can go to the Help button.
4 Flowcharts and graphic organizers are used across the curriculum. I am going to start with a flow chart.
5 You can see the basic shapes and flowchart shapes that we will be using to the left.
6 I am going to make one for quadrilaterals.
7 I am going to go to flowchart section to click and draw a parallelogram. I will make it bigger by clicking on the corner and dragging to make in larger. I will go ahead and type in the name. If you forget you can go back to type in later.

8 I will now click drag a rectangle and type in the name. Now a rhombus. I am going to make this rhombus not look so much like a rotated square by clicking and dragging it down a little. Now will be the square. I don’t want my square this big. I will click and drag to make it smaller.
9 The rectangle and rhombus have the same properties of a parallelogram and square has the same characteristics of the rectangle and rhombus. I will connect them. I can use the connector tool or I can go to UML sequence, click and drag an arrow and rotate to where I want it. Here is the connector tool. I will connect parallelogram to the rectangle. I will use an arrow to connect parallelogram to rhombus. I will finish connecting because I can’t stand to leave it undone.
10 You go up here to type in your title. I will type in quadrilaterals. See, I can change the font. I am going to add lines so the students can write the characteristics. I will use the straight line tool. There are more types of quadrilaterals to add, but I think get the idea.
11 You can see how easy it is to build your flowchart. I can take objects that are meant for something else and make it what I need to be. I can already think of charts for science, history and literature.
12 I will show you how to make a graphic organizer. You can make templates for the students to fill in.

13 I will bring this in for the Main Idea of a book. I will use these for the main topic. You can easily copy and paste and move the objects around. The gridding helps to line up everything. It will go in place nicely. You have these tools here to help with the gridding. If you don’t want to see the grid, you can take it off. I like to see it. I will keep it on. Then, these circles are for the sub topic. I will use the straight line tool to connect.
14 This button has diagram themes. Is this neat? You can choose the color theme you want.
15 This website great for time lines in history, in chemistry and biology. Administration can use it to make career paths. This can show what classes students need to take and keep students on the right track.
16 If you look here and if something overlaps you send to the front or to the back. You can group and ungroup.
17 This is a great website for organizing. Thank you for watching. I hope you enjoyed it.
Related Documents


![[Gln.edu.Vn]New Oriental - IELTS Writing by Mat Clark - Task 1](https://static.cupdf.com/doc/110x72/553649074a79593c148b49a1/glneduvnnew-oriental-ielts-writing-by-mat-clark-task-1.jpg)