http://www.instructables.com/id/How-to-build-the-Worlds-Smallest-Electronic-Shock/ Home Sign Up! Explore Community Submit Build a World's Smallest Electronic Shocker! by Plasmana on July 22, 2008 Table of Contents intro: Build a World's Smallest Electronic Shocker! . . . . . . . . . . . . . . . . . . . . . . . . . . . . . . . . . . . . . . . . . . . . . . . . . . . . . . . . . . . . . . . . . . . . . . . . . . . . . . . . . . . . 2 step 1: Get the things!! . . . . . . . . . . . . . . . . . . . . . . . . . . . . . . . . . . . . . . . . . . . . . . . . . . . . . . . . . . . . . . . . . . . . . . . . . . . . . . . . . . . . . . . . . . . . . . . . . . . . . . . . . 2 step 2: Slaughter the camera! . . . . . . . . . . . . . . . . . . . . . . . . . . . . . . . . . . . . . . . . . . . . . . . . . . . . . . . . . . . . . . . . . . . . . . . . . . . . . . . . . . . . . . . . . . . . . . . . . . . 3 step 3: Continue slaughtering the camera... . . . . . . . . . . . . . . . . . . . . . . . . . . . . . . . . . . . . . . . . . . . . . . . . . . . . . . . . . . . . . . . . . . . . . . . . . . . . . . . . . . . . . . . . . 4 step 4: The beginning of the hardest part ever... . . . . . . . . . . . . . . . . . . . . . . . . . . . . . . . . . . . . . . . . . . . . . . . . . . . . . . . . . . . . . . . . . . . . . . . . . . . . . . . . . . . . . . 5 step 5: Hardest part ever... Step 1 . . . . . . . . . . . . . . . . . . . . . . . . . . . . . . . . . . . . . . . . . . . . . . . . . . . . . . . . . . . . . . . . . . . . . . . . . . . . . . . . . . . . . . . . . . . . . . . . 6 step 6: Hardest part ever... Step 2 . . . . . . . . . . . . . . . . . . . . . . . . . . . . . . . . . . . . . . . . . . . . . . . . . . . . . . . . . . . . . . . . . . . . . . . . . . . . . . . . . . . . . . . . . . . . . . . . 7 step 7: Hardest part ever... Step 3 . . . . . . . . . . . . . . . . . . . . . . . . . . . . . . . . . . . . . . . . . . . . . . . . . . . . . . . . . . . . . . . . . . . . . . . . . . . . . . . . . . . . . . . . . . . . . . . . 8 step 8: Hardest part ever... Step 4 . . . . . . . . . . . . . . . . . . . . . . . . . . . . . . . . . . . . . . . . . . . . . . . . . . . . . . . . . . . . . . . . . . . . . . . . . . . . . . . . . . . . . . . . . . . . . . . . 9 step 9: Hardest part ever... Step 5 . . . . . . . . . . . . . . . . . . . . . . . . . . . . . . . . . . . . . . . . . . . . . . . . . . . . . . . . . . . . . . . . . . . . . . . . . . . . . . . . . . . . . . . . . . . . . . . . 10 step 10: Hardest part ever...DONE!!! . . . . . . . . . . . . . . . . . . . . . . . . . . . . . . . . . . . . . . . . . . . . . . . . . . . . . . . . . . . . . . . . . . . . . . . . . . . . . . . . . . . . . . . . . . . . . . 11 step 11: Testing... Testing... . . . . . . . . . . . . . . . . . . . . . . . . . . . . . . . . . . . . . . . . . . . . . . . . . . . . . . . . . . . . . . . . . . . . . . . . . . . . . . . . . . . . . . . . . . . . . . . . . . . . . 11 step 12: Have fun electrocuting people and don't get caught by the police! . . . . . . . . . . . . . . . . . . . . . . . . . . . . . . . . . . . . . . . . . . . . . . . . . . . . . . . . . . . . . . . . . . 12 Related Instructables . . . . . . . . . . . . . . . . . . . . . . . . . . . . . . . . . . . . . . . . . . . . . . . . . . . . . . . . . . . . . . . . . . . . . . . . . . . . . . . . . . . . . . . . . . . . . . . . . . . . . . . . . . . 14 Advertisements . . . . . . . . . . . . . . . . . . . . . . . . . . . . . . . . . . . . . . . . . . . . . . . . . . . . . . . . . . . . . . . . . . . . . . . . . . . . . . . . . . . . . . . . . . . . . . . . . . . . . . . . . . . . . . . 14 Customized Instructable T-shirts . . . . . . . . . . . . . . . . . . . . . . . . . . . . . . . . . . . . . . . . . . . . . . . . . . . . . . . . . . . . . . . . . . . . . . . . . . . . . . . . . . . . . . . . . . . . . . . . 14 Comments . . . . . . . . . . . . . . . . . . . . . . . . . . . . . . . . . . . . . . . . . . . . . . . . . . . . . . . . . . . . . . . . . . . . . . . . . . . . . . . . . . . . . . . . . . . . . . . . . . . . . . . . . . . . . . . . . . . 14

Welcome message from author
This document is posted to help you gain knowledge. Please leave a comment to let me know what you think about it! Share it to your friends and learn new things together.
Transcript

http://www.instructables.com/id/How-to-build-the-Worlds-Smallest-Electronic-Shock/
Home Sign Up! Explore Community Submit
Build a World's Smallest Electronic Shocker!by Plasmana on July 22, 2008
Table of Contents
intro: Build a World's Smallest Electronic Shocker! . . . . . . . . . . . . . . . . . . . . . . . . . . . . . . . . . . . . . . . . . . . . . . . . . . . . . . . . . . . . . . . . . . . . . . . . . . . . . . . . . . . . 2
step 1: Get the things!! . . . . . . . . . . . . . . . . . . . . . . . . . . . . . . . . . . . . . . . . . . . . . . . . . . . . . . . . . . . . . . . . . . . . . . . . . . . . . . . . . . . . . . . . . . . . . . . . . . . . . . . . . 2
step 2: Slaughter the camera! . . . . . . . . . . . . . . . . . . . . . . . . . . . . . . . . . . . . . . . . . . . . . . . . . . . . . . . . . . . . . . . . . . . . . . . . . . . . . . . . . . . . . . . . . . . . . . . . . . . 3
step 3: Continue slaughtering the camera... . . . . . . . . . . . . . . . . . . . . . . . . . . . . . . . . . . . . . . . . . . . . . . . . . . . . . . . . . . . . . . . . . . . . . . . . . . . . . . . . . . . . . . . . . 4
step 4: The beginning of the hardest part ever... . . . . . . . . . . . . . . . . . . . . . . . . . . . . . . . . . . . . . . . . . . . . . . . . . . . . . . . . . . . . . . . . . . . . . . . . . . . . . . . . . . . . . . 5
step 5: Hardest part ever... Step 1 . . . . . . . . . . . . . . . . . . . . . . . . . . . . . . . . . . . . . . . . . . . . . . . . . . . . . . . . . . . . . . . . . . . . . . . . . . . . . . . . . . . . . . . . . . . . . . . . 6
step 6: Hardest part ever... Step 2 . . . . . . . . . . . . . . . . . . . . . . . . . . . . . . . . . . . . . . . . . . . . . . . . . . . . . . . . . . . . . . . . . . . . . . . . . . . . . . . . . . . . . . . . . . . . . . . . 7
step 7: Hardest part ever... Step 3 . . . . . . . . . . . . . . . . . . . . . . . . . . . . . . . . . . . . . . . . . . . . . . . . . . . . . . . . . . . . . . . . . . . . . . . . . . . . . . . . . . . . . . . . . . . . . . . . 8
step 8: Hardest part ever... Step 4 . . . . . . . . . . . . . . . . . . . . . . . . . . . . . . . . . . . . . . . . . . . . . . . . . . . . . . . . . . . . . . . . . . . . . . . . . . . . . . . . . . . . . . . . . . . . . . . . 9
step 9: Hardest part ever... Step 5 . . . . . . . . . . . . . . . . . . . . . . . . . . . . . . . . . . . . . . . . . . . . . . . . . . . . . . . . . . . . . . . . . . . . . . . . . . . . . . . . . . . . . . . . . . . . . . . . 10
step 10: Hardest part ever...DONE!!! . . . . . . . . . . . . . . . . . . . . . . . . . . . . . . . . . . . . . . . . . . . . . . . . . . . . . . . . . . . . . . . . . . . . . . . . . . . . . . . . . . . . . . . . . . . . . . 11
step 11: Testing... Testing... . . . . . . . . . . . . . . . . . . . . . . . . . . . . . . . . . . . . . . . . . . . . . . . . . . . . . . . . . . . . . . . . . . . . . . . . . . . . . . . . . . . . . . . . . . . . . . . . . . . . . 11
step 12: Have fun electrocuting people and don't get caught by the police! . . . . . . . . . . . . . . . . . . . . . . . . . . . . . . . . . . . . . . . . . . . . . . . . . . . . . . . . . . . . . . . . . . 12
Related Instructables . . . . . . . . . . . . . . . . . . . . . . . . . . . . . . . . . . . . . . . . . . . . . . . . . . . . . . . . . . . . . . . . . . . . . . . . . . . . . . . . . . . . . . . . . . . . . . . . . . . . . . . . . . . 14
Advertisements . . . . . . . . . . . . . . . . . . . . . . . . . . . . . . . . . . . . . . . . . . . . . . . . . . . . . . . . . . . . . . . . . . . . . . . . . . . . . . . . . . . . . . . . . . . . . . . . . . . . . . . . . . . . . . . 14
Customized Instructable T-shirts . . . . . . . . . . . . . . . . . . . . . . . . . . . . . . . . . . . . . . . . . . . . . . . . . . . . . . . . . . . . . . . . . . . . . . . . . . . . . . . . . . . . . . . . . . . . . . . . 14
Comments . . . . . . . . . . . . . . . . . . . . . . . . . . . . . . . . . . . . . . . . . . . . . . . . . . . . . . . . . . . . . . . . . . . . . . . . . . . . . . . . . . . . . . . . . . . . . . . . . . . . . . . . . . . . . . . . . . . 14

http://www.instructables.com/id/How-to-build-the-Worlds-Smallest-Electronic-Shock/
intro: Build a World's Smallest Electronic Shocker!This amazing little shocker is very tiny and can be hidden almost anywhere and give someone a surprise shock! It can operated by almost any 1.5v batteries!
So, on this instructable, I will show you how to make shockers that is smaller than a penny!
However, the biggest disadvantage of this shocker is, it is very hard to build, but it may be easy for experienced soldering iron user (like me) to build the shocker...
Please note that I am only 15 years old and I am not very good at grammar so if you find some parts of the instructable confusing, please let me know and I will try fix it.And excuse me for some of those blurry and hazy picture. I cannot make them better...
Disclaimer: This shocker can be dangerous, it gives out 450 shocking volts, so I am NOT responsible if you or anybody are injured or killed by the shocker, theresponsibility is yours...
Image Notes1. Are those the world's smallest electronic shocker?
Image Notes1. Pretty small isn't?
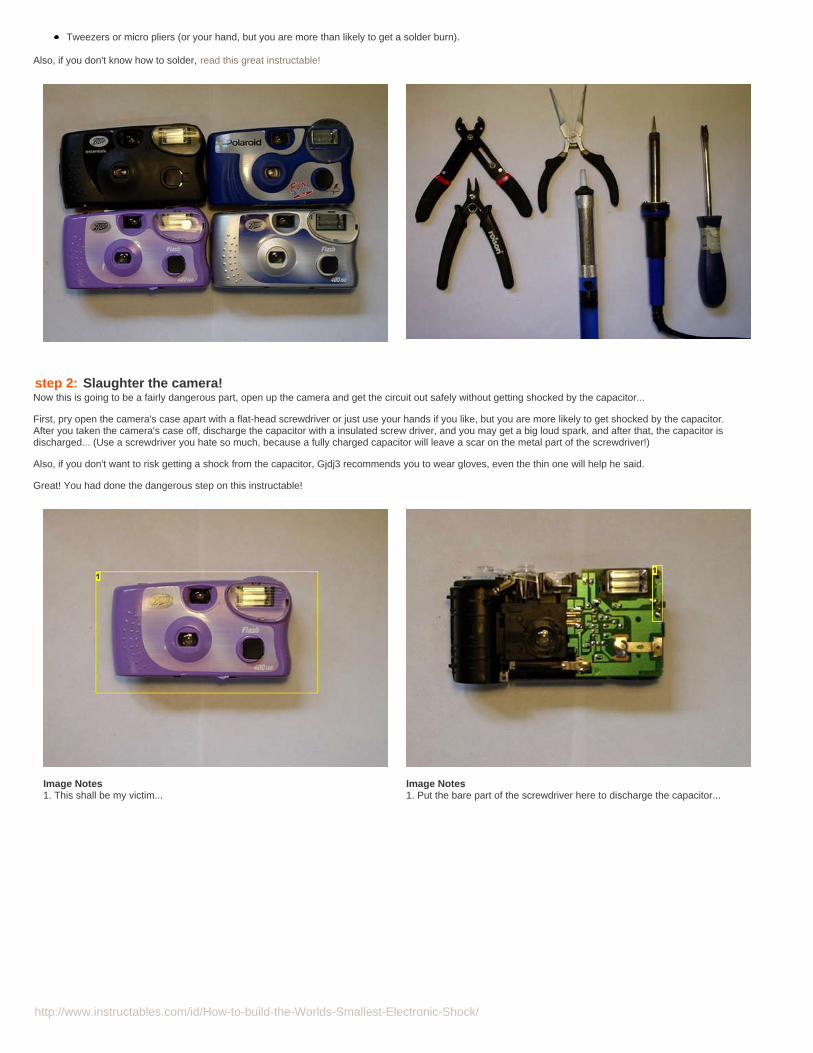
step 1: Get the things!!Hardly anything is needed for this project but the tools...
"Boots" or "Polaroid" type disposable flash camera (You can use a Kodak camera, but they are harder to work with).Some wires (I got mine from broken electronic devices).Solder.
And the tools...
Soldering iron with a micro-tip.Desolder pump (it makes everything so much easier, but you could probably get away with out one).Flat-head screwdriver.Wire strippers.Wire cutters.Pliers.
http://www.instructables.com/id/How-to-build-the-Worlds-Smallest-Electronic-Shock/
Tweezers or micro pliers (or your hand, but you are more than likely to get a solder burn).
Also, if you don't know how to solder, read this great instructable!
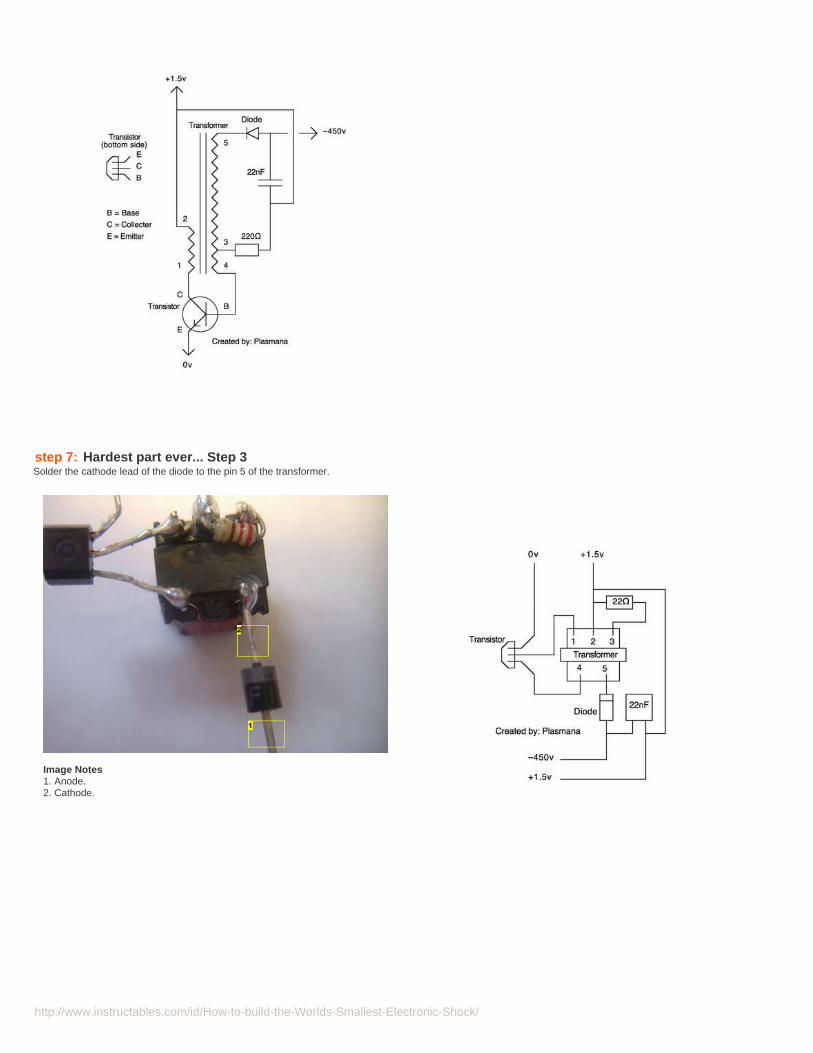
step 2: Slaughter the camera!Now this is going to be a fairly dangerous part, open up the camera and get the circuit out safely without getting shocked by the capacitor...
First, pry open the camera's case apart with a flat-head screwdriver or just use your hands if you like, but you are more likely to get shocked by the capacitor.After you taken the camera's case off, discharge the capacitor with a insulated screw driver, and you may get a big loud spark, and after that, the capacitor isdischarged... (Use a screwdriver you hate so much, because a fully charged capacitor will leave a scar on the metal part of the screwdriver!)
Also, if you don't want to risk getting a shock from the capacitor, Gjdj3 recommends you to wear gloves, even the thin one will help he said.
Great! You had done the dangerous step on this instructable!
Image Notes1. This shall be my victim...
Image Notes1. Put the bare part of the screwdriver here to discharge the capacitor...

http://www.instructables.com/id/How-to-build-the-Worlds-Smallest-Electronic-Shock/
Image Notes1. Camera's circuit removed from the camera's frame.
Image Notes1. Camera's circuit removed from the camera's frame.
step 3: Continue slaughtering the camera...Okay, after you had took apart the camera and discharge the capacitor...Desolder all of the wanted components off the camera's circuit (I desolder all of mine off).
The components we will need from this camera are...
Transformer with five pins.22nF film capacitor.220 ohm resistor.Transistor.Diode.
The rest of the components, you can keep them or throw them away, but the 80uF capacitor and the xenon tube is worth keeping...
The 80uF capacitor can come in great use if you build a coilgun project shown on this instructable.
And you can do some really interesting light effects with a xenon tube if you read this instructable.
If you fail to get the 220 ohm resistor, you can try buy one from radioshack or other electronic suppliers.Color code of the 220 ohm resistor is:Red - Red - Brown
Also, be very careful when desoldering (and soldering) the transistor, they are very heat sensitive, so desolder it quickly otherwise the transistor will burn out withoutshowing any signs of being dead. Using the dead transistor on the shocker will lead you to many problems, some people thinks this instructable is a lie, just because theyburnt out the transistor without knowing it...
Tip on soldering: Instead of risking a burnt-out transistor, use a heat sink like an alligator/crocodile clip to keep the transistor cool enough while desoldering andsoldering.
Image Notes1. Desoldering time!
Image Notes1. Everything is desoldered...

http://www.instructables.com/id/How-to-build-the-Worlds-Smallest-Electronic-Shock/
Image Notes1. This is what we want.
step 4: The beginning of the hardest part ever...Okay, here we go, build the shocker, the hardest part ever...
Read step by step through this instructable until you get to the end...
Okay, get all of the wanted components, fire up the soldering iron, turn on your work lamp, get a magnifying glass, and HERE WE GO!!!
Also I made a schematic and a design that should help you how to build a shocker...
Step 0: Start with a five pin transformer.
UPDATE - 9, October, 2008I have improved the schematics, I hope it is easier for you to read.
Image Notes1. Pin 1.2. Pin 2.3. Pin 3.4. Pin 4.5. Pin 5.

http://www.instructables.com/id/How-to-build-the-Worlds-Smallest-Electronic-Shock/
step 5: Hardest part ever... Step 1Solder the transistor's base to the pin 4 of the transformer and solder the transistor's collector to the pin 1 of the transformer.
Again don't forget what I said... (Kind of)Be very careful when soldering the transistor on the shocker, they are very heat sensitive, so solder it on quickly otherwise the transistor will burn out without showing any signs of being dead. Using the
dead transistor on the shocker will lead you to many problems, some people thinks this instructable is a lie, just because they burnt out the transistor without knowing it...
Image Notes1. Emitter.2. Collector.3. Base.

http://www.instructables.com/id/How-to-build-the-Worlds-Smallest-Electronic-Shock/
step 6: Hardest part ever... Step 2Solder one lead of the 220 ohm resistor to the pin 2 of the transformer and solder the resistor's other lead to the pin 3 of the transformer.
http://www.instructables.com/id/How-to-build-the-Worlds-Smallest-Electronic-Shock/
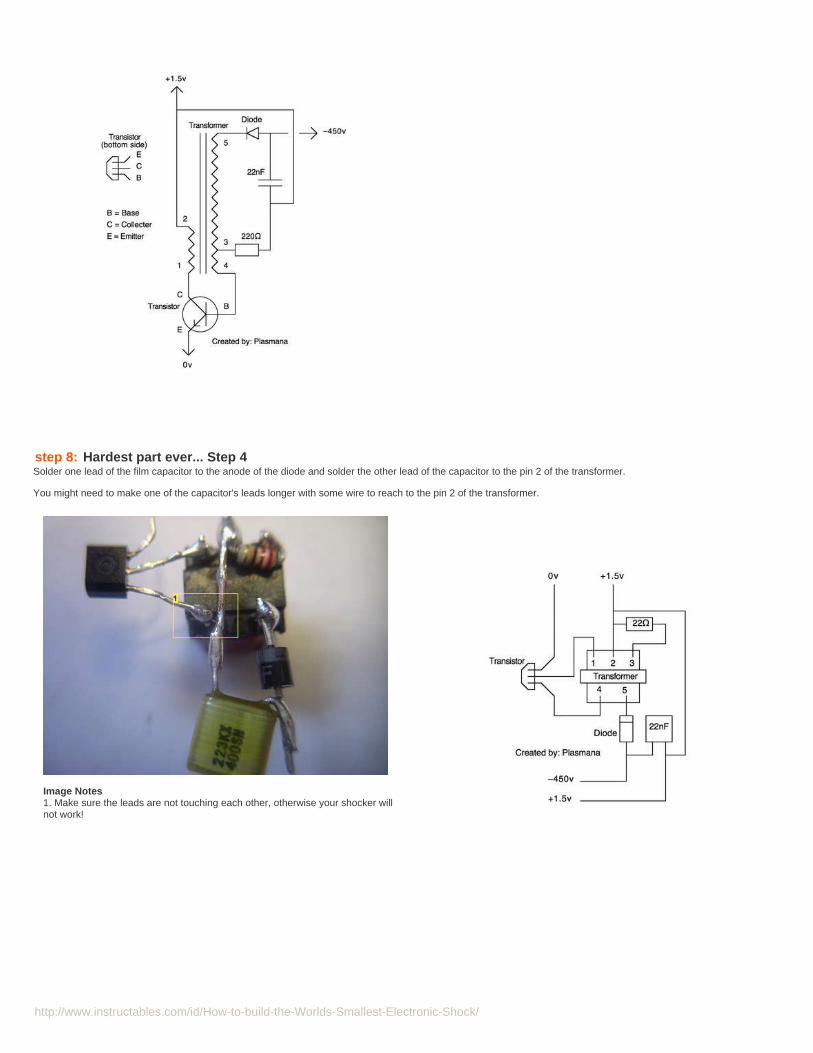
step 7: Hardest part ever... Step 3Solder the cathode lead of the diode to the pin 5 of the transformer.
Image Notes1. Anode.2. Cathode.
http://www.instructables.com/id/How-to-build-the-Worlds-Smallest-Electronic-Shock/
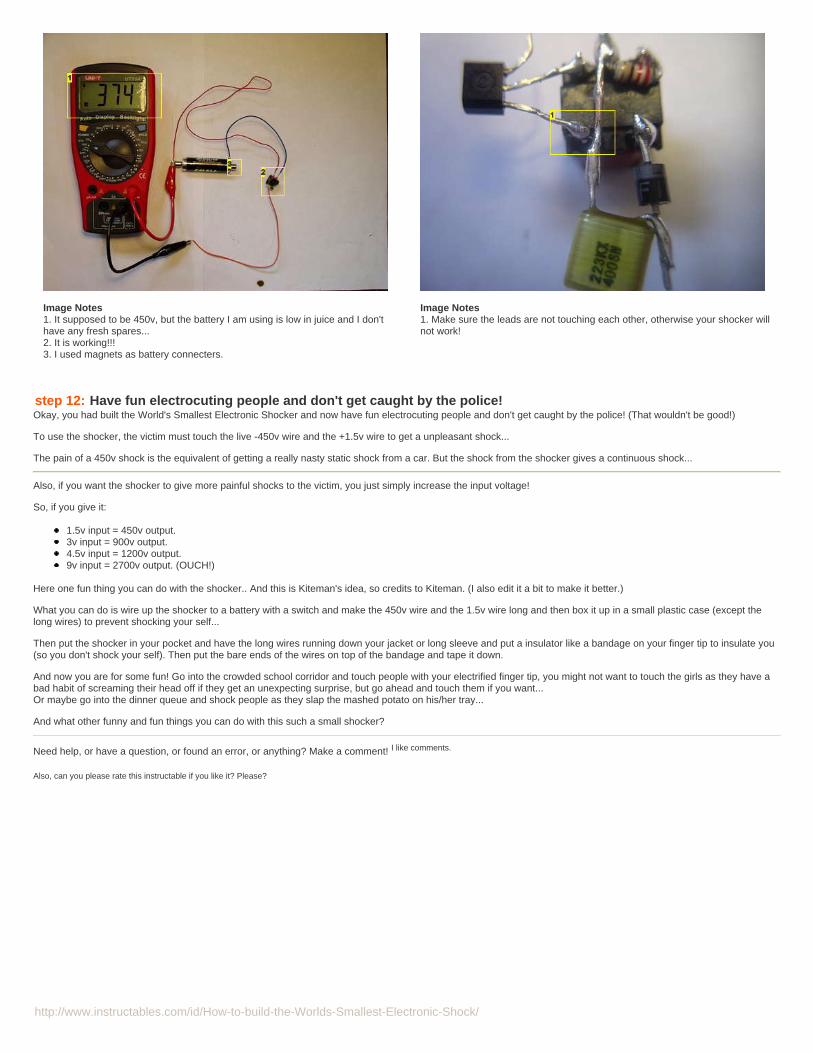
step 8: Hardest part ever... Step 4Solder one lead of the film capacitor to the anode of the diode and solder the other lead of the capacitor to the pin 2 of the transformer.
You might need to make one of the capacitor's leads longer with some wire to reach to the pin 2 of the transformer.
Image Notes1. Make sure the leads are not touching each other, otherwise your shocker willnot work!

http://www.instructables.com/id/How-to-build-the-Worlds-Smallest-Electronic-Shock/
step 9: Hardest part ever... Step 5Okay, you are almost there!
Solder the 0v of the battery wire to the emitter of the transistor, solder the positive voltage of the battery wire to the pin 2 of the transformer, and solder the high voltageoutput wire to the cathode of the diode and the capacitor.
Image Notes1. 0v.2. +1.5v.
Image Notes1. -450v.

http://www.instructables.com/id/How-to-build-the-Worlds-Smallest-Electronic-Shock/
step 10: Hardest part ever...DONE!!!DONE!!! You did it! You had completed the world's smallest electronic shocker!
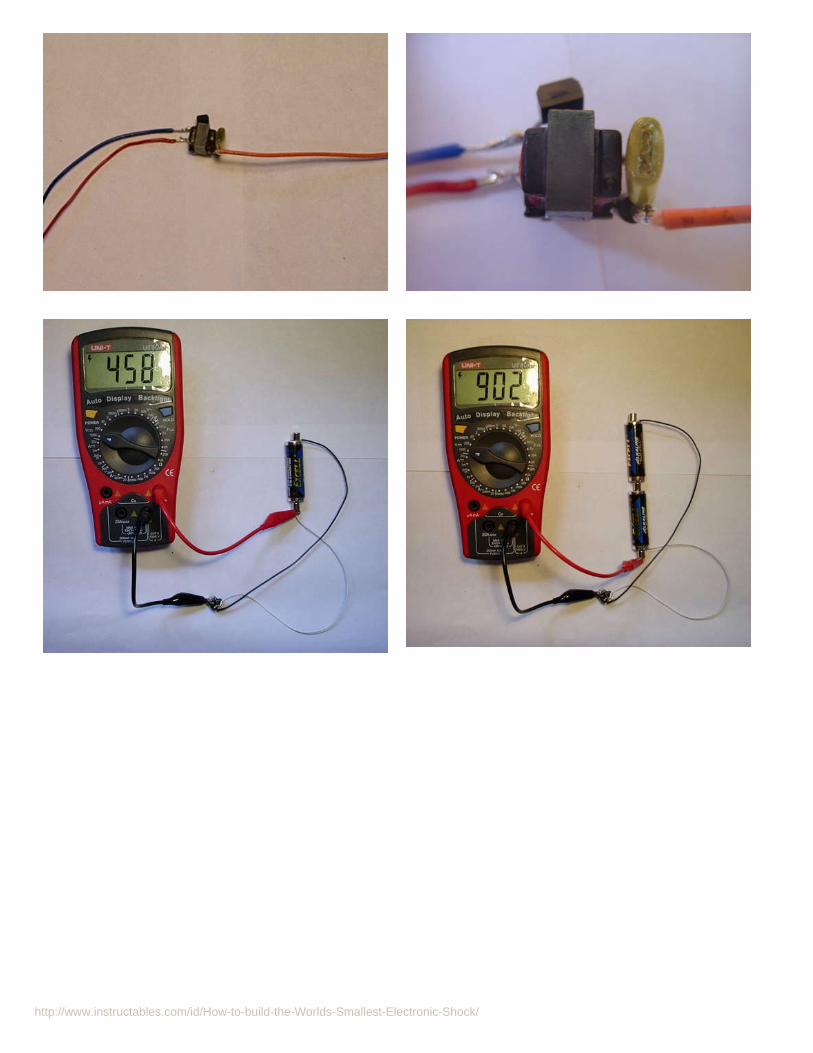
step 11: Testing... Testing...Okay, now it is time to test the shocker to see id it works...
Yay! Mine works!
If yours does not work, calm down, don't get so angry and blow off your head about hours of work for nothing.First, check your shocker closely, are there any wires touching each other? If so, move them apart a bit.If it still does not work, you probably killed the transistor from putting the soldering iron on its leads for to long, replace the transistor and don't keep the soldering iron onits leads for to long again. If it still does not work, build another shocker.
And if it STILL does not work, well I guess you can you can go very angry, and smash up the "I won't work for you!" shocker with a hammer and get over it.
http://www.instructables.com/id/How-to-build-the-Worlds-Smallest-Electronic-Shock/
Image Notes1. It supposed to be 450v, but the battery I am using is low in juice and I don'thave any fresh spares...2. It is working!!!3. I used magnets as battery connecters.
Image Notes1. Make sure the leads are not touching each other, otherwise your shocker willnot work!
step 12: Have fun electrocuting people and don't get caught by the police!Okay, you had built the World's Smallest Electronic Shocker and now have fun electrocuting people and don't get caught by the police! (That wouldn't be good!)
To use the shocker, the victim must touch the live -450v wire and the +1.5v wire to get a unpleasant shock...
The pain of a 450v shock is the equivalent of getting a really nasty static shock from a car. But the shock from the shocker gives a continuous shock...
Also, if you want the shocker to give more painful shocks to the victim, you just simply increase the input voltage!
So, if you give it:
1.5v input = 450v output.3v input = 900v output.4.5v input = 1200v output.9v input = 2700v output. (OUCH!)
Here one fun thing you can do with the shocker.. And this is Kiteman's idea, so credits to Kiteman. (I also edit it a bit to make it better.)
What you can do is wire up the shocker to a battery with a switch and make the 450v wire and the 1.5v wire long and then box it up in a small plastic case (except thelong wires) to prevent shocking your self...
Then put the shocker in your pocket and have the long wires running down your jacket or long sleeve and put a insulator like a bandage on your finger tip to insulate you(so you don't shock your self). Then put the bare ends of the wires on top of the bandage and tape it down.
And now you are for some fun! Go into the crowded school corridor and touch people with your electrified finger tip, you might not want to touch the girls as they have abad habit of screaming their head off if they get an unexpecting surprise, but go ahead and touch them if you want...Or maybe go into the dinner queue and shock people as they slap the mashed potato on his/her tray...
And what other funny and fun things you can do with this such a small shocker?
Need help, or have a question, or found an error, or anything? Make a comment! I like comments.
Also, can you please rate this instructable if you like it? Please?
http://www.instructables.com/id/How-to-build-the-Worlds-Smallest-Electronic-Shock/

http://www.instructables.com/id/How-to-build-the-Worlds-Smallest-Electronic-Shock/
Related Instructables
Make a ShockFlashlight! byPlasmana
How to build aTaser for free!by Plasmana
portablelightning take 2by robot797 High Voltage
Sparks bysynack
Portable BugZapper byshsh75
Hack a flashcamera into aemergencystrobe light byPlasmana
How to Make AHidden KodakTAZER byv3l0c1ty
Candy BoxTaser byshockhappy
AdvertisementsCustomized Instructable T-shirts
Comments50 comments Add Comment view all 589 comments
jimmy dean says: Oct 14, 2008. 8:14 PM REPLYIn the picture when you're soldering the transistor, does it matter which side you're looking at.
Plasmana says: Oct 15, 2008. 2:05 AM REPLYYes.

http://www.instructables.com/id/How-to-build-the-Worlds-Smallest-Electronic-Shock/
jimmy dean says: Oct 15, 2008. 12:16 PM REPLYthen which side is he showing us
nibbler125 says: Oct 14, 2008. 10:35 PM REPLYis it capable of throwing a gap?
bigredlevy says: Oct 15, 2008. 4:29 AM REPLY450V is not enough to jump a gap. car spark plugs usually run at 40,000 to 100,000 volts.
Plasmana says: Oct 15, 2008. 2:06 AM REPLYWhat do you mean?
Derinsleep says: Oct 15, 2008. 4:38 AM REPLYmaking a spark
Plasmana says: Oct 15, 2008. 5:32 AM REPLYAhh, I see...
If you give it 9 volt power, it may make tiny sparks...
rak says: Oct 14, 2008. 7:56 PM REPLYis this a continuous shock as long as u r touching both ends to someone or is it just a quick burst...?
Plasmana says: Oct 15, 2008. 1:53 AM REPLYA continuous shock.
The Expert Noob says: Oct 12, 2008. 2:23 PM REPLYhmmm..... world's smallest rail gun! (Comming Soon)
Plasmana says: Oct 14, 2008. 1:48 PM REPLYHaha! Good luck!
theXmaker says: Sep 27, 2008. 6:50 AM REPLYi used a kodak camera, and i don't know how to use it.So can u please tell me?
Plasmana says: Sep 28, 2008. 2:40 AM REPLYYou touch the high voltage wire and the positive side of the battery wire to shock people.
theXmaker says: Sep 28, 2008. 6:34 AM REPLYi know how to shock people(that was not my question), i said that i don't know how to make the shocker out of a kodak cam { I don't find any resistor,and the transformer have only 4 pins (i think) }
theXmaker says: Oct 6, 2008. 8:26 AM REPLYI'm so exited to make it, and a i have a kodak cam.so can you please tell me how to do it out of a disposable kodak cam?
Plasmana says: Oct 9, 2008. 1:11 PM REPLYYou can make the shocker using this instructable, the only problem that the kodak camera have is it has an ultra tiny resistor, too tiny to workwith. So you will need to buy a resistor.

http://www.instructables.com/id/How-to-build-the-Worlds-Smallest-Electronic-Shock/
theXmaker says: Oct 10, 2008. 11:41 AM REPLYwhat kind of resistors should i buy (#of ohms + it's color code)thanks
Plasmana says: Oct 12, 2008. 2:40 PM REPLYIt is a 220? resistor...
Color code:Red - Red - Brown
theXmaker says: Oct 14, 2008. 6:31 AM REPLYthanks
Plasmana says: Oct 14, 2008. 1:44 PM REPLYNo problem! :-)
oddish2211 says: Sep 29, 2008. 11:17 AM REPLYi've just finished building it, but when i measure the output with my multimeter on the -450 and the battery + line i only get 9 volts, the same as my inputwhat's wrong?
11010010110 says: Oct 2, 2008. 2:22 AM REPLYCheck that you made all the connections same as they were on the circuit board
Some boards may be different from what is in this insructable
If you blown the transistor try C945 instead it may work (you can find them in power supplies and CRT monitors)if you hold it with text to you and wires pointing to the left thenUp - to 0 vCenter - to the short thick wire on the transformerDown - to the thin wire on the transformer that goes inside
junits15 says: Oct 4, 2008. 1:05 PM REPLYwhat does your name mean?
11010010110 says: Oct 4, 2008. 1:33 PM REPLYRandom 1 and 0s
junits15 says: Oct 4, 2008. 5:36 PM REPLYhaha i thought it wuz binary XD
personperson says: Oct 14, 2008. 7:52 AM REPLYin binary it is 1686
junits15 says: Oct 14, 2008. 12:24 PM REPLYcool
Plasmana says: Sep 29, 2008. 12:08 PM REPLYYou mean you gave it a 9 volt input?
oddish2211 says: Sep 29, 2008. 1:51 PM REPLYyes
Plasmana says: Sep 29, 2008. 4:13 PM REPLYHmm... That is really odd....Are you sure you connected the shocker to the multimeter properly?Did the transistor burned out?Are there any shorts in your connections?

http://www.instructables.com/id/How-to-build-the-Worlds-Smallest-Electronic-Shock/
oddish2211 says: Sep 29, 2008. 10:09 PM REPLYeverything is fine, except instead of a 220 ohm resistor, i used 2 120 ohm resistors in serie, that couldn't be the problem, right?
Plasmana says: Oct 1, 2008. 11:49 AM REPLYDid you mean 2.1K? resistor? Well, high resistant can cause problems...
oddish2211 says: Oct 1, 2008. 10:14 PM REPLYno, 2x 120 Ohm resistors, so a total of 240 Ohm
Plasmana says: Oct 2, 2008. 5:32 PM REPLYOh, I see...
Well, that is really odd, or does the transformer have a different configuration...
Vortex18 says: Oct 7, 2008. 1:58 PM REPLYAlso having the same problem. The output voltage is exactly the same as the input voltage. I have every component exactly asmentioned except for the transformer, to which you have given very little description. I assume that every 5 pin transformerused in these camera circuits are the same seeing as every circuit does the same thing. Care you shed some light on myproblem?
annu2020 says: Oct 13, 2008. 10:03 PM REPLYI also wanted to make this shocker but not using camera accessories rather than getting it from the market. The problem that I am facing is that thespecification of transformer are not knpown to the individuals. It would be really a great help for me if you can tell me the trasformer's specifications orcharacteristics. Thanking you in anticipation. take care and good luck
norge says: Oct 12, 2008. 5:35 AM REPLY
yay it worked _ 473V with a 1.5v battery. tank you very much 5 stars
Plasmana says: Oct 12, 2008. 1:38 PM REPLYYou are welcome and thanks! :-)
Kryptonite says: Sep 27, 2008. 11:41 PM REPLYHEHEHEHe, im pullin apart cameras now and i got ALL the bits, i cant wait to post some pics. It's surprising the force of a capacitor, i discharged it with a setof pliers and it left this dirty great mark, but i feel happy now cuz there was a nice big spark and the lounge room smells funny now. good instructable cantwait to use it the step bro.
Plasmana says: Sep 28, 2008. 11:15 AM REPLYLOL! That is good, I can't wait to see your work! And yeah, I got lots of nasty marks on my metal things from the capacitor, and the funny smell you aresmelling is vaporized metal...
I hope for your grand success!
Kryptonite says: Oct 11, 2008. 6:51 PM REPLYi've been away on holiday so i havent been doing much with my electronics n stuff, so when i say i have All the bits, i meant i thought i had all thebits... no resistor.dick smith electronic stores are really bad, they don't sell 220 ohm resistors at any of the ones i've been to. looking thru the comments, it looks likeyou can use two 100 ohm resistors attached to each other (soldered) so that they would ad up to 200 ohms, not really 220, but close enough? and100 ohm resistor is brown black brown i believe, i dont wanna screw this up so plz, help.
Unit042 says: Oct 5, 2008. 6:30 PM REPLYAwesome ible, excellent way to get into high voltage, but I can't build it until I see a corrected schematic. Darn. Well, lemme guess at it(more fun that way).The 1.5v battery goes to an oscillator, which provides the alternating magnetic field necessary for the high voltage transformer to function, ie, low voltage lowcurrent to high voltage less current. I figure this could be done with a 555 (run by a 3V power source)?
Ooooh, maybe even run it off USB power, and then put it under computer control!

http://www.instructables.com/id/How-to-build-the-Worlds-Smallest-Electronic-Shock/
Plasmana says: Oct 9, 2008. 1:18 PM REPLYYes, you can use the 555 timer instead of a transistor, you can give it a 12v input if you want, it should not blow out the transformer.
And again, you can use the USB power if you want, but I am NOT responsible if your computer gets damaged!
Unit042 says: Oct 9, 2008. 2:36 PM REPLYNot likely that I'll use the USB, it's just an idea to get more ideas floating....
Plasmana says: Oct 9, 2008. 2:08 PM REPLYSchematics updated.
mortaldoom780 says: Oct 4, 2008. 7:58 PM REPLYHave you tested the amperage on the power outputted from this 'shocker'?
Plasmana says: Oct 9, 2008. 1:21 PM REPLYYes, the short-circuit output is 18mA with 1.5 volt input.
ubr.bzkr says: Oct 5, 2008. 1:36 PM REPLYOWWWWWWW!!!! omfg! I just finished mine, but accedently shocked myself with two AAs attached. well at least i know it works. Nice instructable dude.
ubr.bzkr says: Oct 5, 2008. 1:49 PM REPLYwow and it left a tiny little blister too. Ha Ha. this will be fun, but I should olny use 1 AA next time.
Picture%20004[1](640x480) 26 KB
view all 589 comments
Related Documents


