January 14, 2011 Taleo Enterprise Taleo 10 SP2 - Recruiting Configuration Guide

Welcome message from author
This document is posted to help you gain knowledge. Please leave a comment to let me know what you think about it! Share it to your friends and learn new things together.
Transcript
January 14, 2011
Taleo Enterprise
Taleo 10 SP2 - RecruitingConfiguration Guide
Configuration Guide Taleo 10 SP2 - Recruiting ii
Confidential Information and Notices
Confidential InformationThe recipient of this document (hereafter referred to as "the recipient") agrees that theConfidential Information disclosed herein by Taleo shall be retained in confidence by therecipient, and its respective employees, affiliates and/or subsidiaries.
For the purpose herein, the term "Confidential Information" shall mean the following:
1. Any information, know-how, data, process, technique, design, drawing, program, formulaor test data, work in process, business plan, sales, suppliers, customer, employee, investoror business information contained in a document, whether in written, graphic, or electronicform; or
2. Any document, diagram, or drawing which is either conspicuously marked as "Confidential",known or reasonably known by the other party to be confidential, or is of a proprietarynature, and is learned or disclosed in the course of discussions, demonstrations, or othercollaboration undertaken between the parties.
Limited Rights Notice (Dec 2007)
1. These data are submitted with limited rights under Subcontract No. 6896589. These datamay be reproduced and used by the Government with the express limitation that they willnot, without written permission of the Contractor, be used for purposes of manufacture nordisclosed outside the Government; except that the Government may disclose these dataoutside the Government for the following purposes, if any; provided that the Governmentmakes such disclosure subject to prohibition against further use and disclosure: None.
2. This notice shall be marked on any reproduction of these data, in whole or in part.
© 2011 Taleo Corporation. Do not reproduce without the written permission of TaleoCorporation.

Configuration Guide Taleo 10 SP2 - Recruiting iii
Table of Contents
Confidential Information and Notices............................................................. ii
PrefaceRevision History..........................................................................................2Technical Configuration and Software Performance..................................... 3
Basic ConceptsLogin......................................................................................................... 5
Login and Product Access.................................................................................. 5Accessing an Application................................................................................... 5Using the Forgot Password Link......................................................................... 5Changing My Password..................................................................................... 6Single Sign-On..................................................................................................6Tips to Ease Multi-Product Navigation................................................................ 7Creating Custom Instructions for the Forgot Password Message........................... 8Logging In Before Accessing the Response Center...............................................8
Getting Help..............................................................................................9Online Help...................................................................................................... 9Online Tour.......................................................................................................9Online Tour Creation Guidelines......................................................................10Uploading Personalized Online Tours............................................................... 11Tooltip............................................................................................................. 11

Configuration Guide Taleo 10 SP2 - Recruiting iv
Web Support Link............................................................................................11
Configuration and Recruiting Administration Menus...................................13Configuration Menu........................................................................................ 13Taleo Recruiting Administration Menu...............................................................14
Operation Mode Management................................................................. 16Operation Mode..............................................................................................16Modifying the Operation Mode........................................................................17
Release Notes Message............................................................................19Release Notes Message................................................................................... 19Deactivating the Release Notes Message.......................................................... 19Creating a Release Notes................................................................................ 20Editing a Release Notes...................................................................................20Displaying a Release Notes............................................................................. 21Hiding a Release Notes................................................................................... 21Setting a Release Notes Validity Period............................................................. 21Activating the Release Notes Feature in a Configuration Profile..........................22
Basic Concept..........................................................................................23Application Time-out........................................................................................23System Status...................................................................................................23History Section.................................................................................................24Languages.......................................................................................................24Multilingual Deployment.................................................................................. 25Multilingual Requisition and Requisition Template Behavior................................26Selecting the Base Language........................................................................... 27Activating a Language..................................................................................... 27Deactivating a Language................................................................................. 27Deep Linking...................................................................................................27Taleo 10 Supported Product URLs.................................................................... 28Taleo 10 Supported Action URLs...................................................................... 30
Settings, Security, Legal AgreementsGlobal Settings and Recruiting Settings..................................................... 34
Setting.............................................................................................................34Taleo 10 SP2 Settings with Modified Default Value............................................ 35Configuring a Setting...................................................................................... 37Resetting the Default Value of a Setting............................................................38
Regional Settings......................................................................................39Regional Setting...............................................................................................39Date Format....................................................................................................39Locale Identifier............................................................................................... 40Configuring the Currency................................................................................ 41Configuring the Number Format......................................................................41Configuring the Date Format........................................................................... 42Selecting a Preferred Locale.............................................................................42

Configuration Guide Taleo 10 SP2 - Recruiting v
Security Policy Settings..............................................................................44Security Policy..................................................................................................44Security Policy Settings..................................................................................... 44Configuring Security Policies............................................................................ 47
Legal Agreements.................................................................................... 48Legal Agreement............................................................................................. 48Creating a Legal Agreement............................................................................49Modifying a Legal Agreement.......................................................................... 49Deleting a Legal Agreement............................................................................ 49Activating a Legal Agreement.......................................................................... 50Deactivating a Legal Agreement...................................................................... 50Displaying the Legal Agreement to Users at Login............................................ 50Hiding the Legal Agreement to Users at Login..................................................51
Foundation DataOrganization - Location - Job Field.......................................................... 53
Contextualization: Organization-Location-Job Field...........................................53Mapping......................................................................................................... 55Structure Management.....................................................................................55Creating the Organization-Location-Job Field Structure.....................................55Adding a Level to the Organization-Location-Job Field Structure........................ 56Editing a Level in the Organization-Location-Job Field Structure.........................56Deleting a Level in the Organization-Location-Job Field Structure...................... 57Element Management......................................................................................57Creating an Element for the Organization-Location-Job Field Structure.............. 57Editing an Element in the Organization-Location-Job Field Structure...................58Moving an Element in the Organization-Location-Job Field Structure..................58Deleting an Element........................................................................................ 58Adding an Element to the Location or Job Field Structure.................................. 59Element Deactivation....................................................................................... 59Deactivating an Organization, Location or Job Field Element.............................65Deactivating an Organization, Location or Job Field Element While Displayed.... 65Organization-Location-Job Field Behavior of Deactivated Elements.................... 66
Department..............................................................................................72Department..................................................................................................... 72Creating a Department....................................................................................74Deleting a Department.................................................................................... 74Activating a Department.................................................................................. 74Deactivating a Department.............................................................................. 75Associating a Department to an Organization.................................................. 75Associating a Department to a Location........................................................... 75Dissociating a Department from an Organization............................................. 76Disassociating a Department from a Location...................................................76
Position.................................................................................................... 78

Configuration Guide Taleo 10 SP2 - Recruiting vi
Position............................................................................................................78Viewing Information on a Position....................................................................78
UsersUser Account Management...................................................................... 80
User Account...................................................................................................80User Account Status.........................................................................................81Employee Information......................................................................................81User Account General Preferences................................................................... 82Creating a User Account................................................................................. 83Editing a User Account.................................................................................... 84Activating a User Account................................................................................84Deactivating a User Account............................................................................84Deleting a User Account..................................................................................85Generating a Password....................................................................................85Work Item Delegation......................................................................................85Delegating Work Items.................................................................................... 86Transferring Work Items................................................................................... 86Locking a User Account...................................................................................87Unlocking a User Account............................................................................... 87Assigning a User Type to a User Account......................................................... 87Removing a User Type Assigned to a User Account........................................... 88Associating a Configuration Profile to a User Account....................................... 88Assigning a Coverage Area............................................................................. 88
User Type Management............................................................................90User Type........................................................................................................ 90Default Recruiting User Types...........................................................................90User Type Permission....................................................................................... 91Manager User Types and Related Permissions...................................................91Creating a User Type.......................................................................................94Activating a User Type..................................................................................... 94Deactivating a User Type................................................................................. 95Duplicating a User Type...................................................................................95Editing a User Type Properties..........................................................................96Dissociating All Users from a User Type........................................................... 96Deleting a User Type....................................................................................... 96Granting a User Type Permission..................................................................... 97Revoking a User Type Permission..................................................................... 97
Configuration Profile................................................................................ 98Configuration Profile........................................................................................98Creating a Configuration Profile...................................................................... 98Activating a Configuration Profile.....................................................................99Deactivating a Configuration Profile.................................................................99Deleting a Configuration Profile.......................................................................99

Configuration Guide Taleo 10 SP2 - Recruiting vii
User Group Management...................................................................... 100User Group...................................................................................................100User Group Management..............................................................................101Creating a User Group................................................................................. 102Adding a User to a User Group.................................................................... 102Removing a User from a User Group............................................................ 103Deleting a User Group..................................................................................103Coverage Area..............................................................................................103Adding a Coverage Area to a User Group.....................................................104Removing a Coverage Area from a User Group............................................. 104Adding Organizations, Locations and Job Fields to a Coverage Area............... 105Removing Organizations, Locations and Job Fields from a Coverage Area....... 105Reducing the Scope of a Coverage Area........................................................ 106
ListsList.........................................................................................................108
List Format.................................................................................................... 108List Format Context........................................................................................109List Format Variation......................................................................................110Building a Candidate or Requisition List......................................................... 110Creating a List Format...................................................................................111Deleting a List Format................................................................................... 111Ordering List Formats....................................................................................112Activating a List Format................................................................................. 112Deactivating a List Format............................................................................. 112Selecting a Default List Format.......................................................................113Setting Sort Criteria in a List Format...............................................................113Grouping Files in a List Format......................................................................114Assigning a List Format Variation to a Configuration Profile............................. 114Granting Permissions to Create List Formats................................................... 114Creating Custom Instructions for a List Format Context....................................115Locating the Name of a List Format............................................................... 115Candidate Progression Status.........................................................................116
Column................................................................................................. 118List Column...................................................................................................118Selecting a Column for a List Format............................................................. 118Ordering Columns in a List Format................................................................119Adding a Column to a Context......................................................................119Removing a Column from a Context..............................................................119Ordering Columns in a List Format................................................................120Item Requiring Attention Icon......................................................................... 120Activating the Item Requiring Attention Icon.................................................... 122Candidate File Identifier.................................................................................123Specifying the Default Candidate File Identifier Content...................................123

Configuration Guide Taleo 10 SP2 - Recruiting viii
Filter...................................................................................................... 124Advanced Filter..............................................................................................124Displaying Advanced Filters........................................................................... 124Hiding Advanced Filters................................................................................. 125Quick Filter................................................................................................... 125Requisition List Quick Filters...........................................................................126Candidate List Quick Filters........................................................................... 127Configuring a Quick Filter............................................................................. 129Show Filter.................................................................................................... 129Setting the Visibility of the Show Filter............................................................ 131Setting the Show Filter Default Value.............................................................. 131
Fields, Forms, FilesField...................................................................................................... 133
Field..............................................................................................................133Field Security Level........................................................................................ 134Field Contextualization...................................................................................136Field Staffing Type Exception.......................................................................... 136Creating a Field............................................................................................ 137Deleting a Field.............................................................................................137Editing the Properties of a Field..................................................................... 138Associating a Field to an Organization, Location, Job Field............................. 138Dissociating a Field from an Organization, Location, Job Field........................ 138Creating a Field Exception.............................................................................139Removing an Exception from a Field.............................................................. 139Making Content Required for a Field............................................................. 140Creating Custom Instructions for a Field.........................................................140
Selection................................................................................................ 141Global Selection List...................................................................................... 141Recruiting Selection List..................................................................................141Creating a Small Selection.............................................................................142Deleting a Small Selection............................................................................. 142Creating an Element for a Small Selection......................................................142Adding an Element to a Small Selection.........................................................143Removing an Element from a Small Selection................................................. 143Creating a Large Selection............................................................................ 144Deleting a Large Selection............................................................................. 144Creating an Element for a Large Selection..................................................... 144Removing an Element from a Large Selection................................................. 145
Field Layout........................................................................................... 146Field Layout...................................................................................................146Positioning Department Fields in the Requisition File........................................146Adding a Field to the Department Form......................................................... 147Removing a Field from the Department Form................................................. 147

Configuration Guide Taleo 10 SP2 - Recruiting ix
Positioning Fields in the Offer Form............................................................... 147Adding a Field to the Offer Form...................................................................148Removing a Field from the Offer Form...........................................................148
File........................................................................................................ 149User-defined File........................................................................................... 149Block.............................................................................................................151Building a User-defined File...........................................................................153Creating a User-defined File..........................................................................154Duplicating a User-defined File......................................................................154Activating a User-defined File........................................................................ 155Deactivating a User-defined File.................................................................... 155Deleting a User-defined File.......................................................................... 155Editing the Properties of a User-defined File................................................... 156Modifying the Title of a Section......................................................................156Modifying the Title of a Block........................................................................ 156Modifying the Name of a Tab........................................................................157Creating a Section in a User-defined File....................................................... 157Deleting a Section from a User-defined File....................................................157Adding a Block in a User-defined File............................................................158Removing a Block from a User-defined File.................................................... 158Choosing a User-defined Form for a Block.....................................................158
Form......................................................................................................160User-defined Forms....................................................................................... 160Creating a User-defined Form....................................................................... 160Duplicating a User-defined Form................................................................... 161Previewing a User-defined Form.....................................................................161Deleting a User-defined Form........................................................................162Activating a User-defined Form......................................................................162Deactivating a User-defined Form..................................................................162Adding Fields to a User-defined Form............................................................ 163Organizing Fields in a User-defined Form...................................................... 163Editing the Properties of a User-defined Form.................................................164Editing the Properties of a Field included in a User-defined Form..................... 164Creating Custom Instructions for a Block........................................................164Creating Custom Instructions for a Section..................................................... 165Creating Custom Instructions for a Tab.......................................................... 165Recruiting Form Types.................................................................................... 166User-defined Forms Selected Element Properties..............................................166
Candidate and Requisition File Setup......................................................169Candidate and Requisition File Setup............................................................. 169Associating a Requisition File to a Staffing Type.............................................. 170Dissociating a Requisition File from a Staffing Type......................................... 170Associating a Candidate File to a Staffing Type...............................................170Disassociating a Candidate File from a Staffing Type...................................... 171

Configuration Guide Taleo 10 SP2 - Recruiting x
Choosing the Requisition File Available to Users............................................. 171Choosing the Candidate File Available to Users..............................................171Files Associated to Configuration Profiles........................................................172Associating Candidate Creation Files to a Configuration Profile....................... 172Associating a Requisition File to a Configuration Profile...................................173
Candidate Selection WorkflowCandidate Selection Workflow Configuration...........................................175
Candidate Selection Workflow........................................................................175Candidate Selection Workflow Example..........................................................176Standard Candidate Selection Workflows........................................................177Candidate Selection Workflow Priority............................................................ 178Building a Candidate Selection Workflow....................................................... 180Creating a Candidate Selection Workflow.......................................................180Activating a Candidate Selection Workflow..................................................... 181Deactivating a Candidate Selection Workflow................................................. 181Deleting a Candidate Selection Workflow....................................................... 182Duplicating a Candidate Selection Workflow...................................................182Selecting a Default Candidate Selection Workflow...........................................182Associating a Candidate Selection Workflow to Organizations, Locations and/
or Job Fields............................................................................................ 183Disassociating a Candidate Selection Workflow from an Organization-
Location-Job Field.................................................................................... 183Associating a Candidate Selection Workflow to a Requisition Type....................184Disassociating a Candidate Selection Workflow from a Requisition Type............184Bulk Move to the Hire Step/Status.................................................................. 184Activating the Bulk Move to Hire Step/Status...................................................185Step/Status Change in One Click...................................................................185Competitive Workflow Restriction....................................................................186
Step.......................................................................................................188Candidate Selection Workflow Step................................................................ 188RSOffer Step..................................................................................................189Creating a Step.............................................................................................190Deleting a Step............................................................................................. 190Activating a Step........................................................................................... 191Deactivating a Step....................................................................................... 191Duplicating a Step.........................................................................................192Selecting the Default Status of a Step............................................................. 192Adding Steps to a Candidate Selection Workflow............................................ 192Configuring a Step Used in a Workflow......................................................... 193Removing a Step from a Candidate Selection Workflow...................................193Ordering Steps in a Candidate Selection Workflow......................................... 194Creating Custom Instructions for a Step......................................................... 194
Status.....................................................................................................196

Configuration Guide Taleo 10 SP2 - Recruiting xi
Candidate Selection Workflow Status..............................................................196Creating a Status.......................................................................................... 198Deleting a Status........................................................................................... 198Activating a Status......................................................................................... 198Deactivating a Status..................................................................................... 199Duplicating a Status...................................................................................... 199Configuring a Status Used in a Step.............................................................. 199Adding Statuses to a Step..............................................................................200Removing a Status from a Step......................................................................201Ordering Statuses in a Step...........................................................................201Activating a Status Shortcut............................................................................201Deactivating a Status Shortcut........................................................................202Allowing Date Entry and Modification for a Status...........................................202Activating the Automatic Progression of a Candidate.......................................203Deactivating the Automatic Progression of a Candidate...................................203
Action.................................................................................................... 204Candidate Selection Workflow Action............................................................. 204Activating an Action.......................................................................................205Deactivating an Action...................................................................................205Adding an Action to a Step........................................................................... 205Removing an Action from a Step................................................................... 206Reordering Actions in a Step..........................................................................206Making Comments Mandatory for an Action.................................................. 206
Qualifier................................................................................................ 208Qualifier and Qualifier Group....................................................................... 208Creating a Qualifier...................................................................................... 208Deleting a Qualifier.......................................................................................208Activating a Qualifier.....................................................................................209Deactivating a Qualifier.................................................................................209Creating a Qualifier Group........................................................................... 209Deleting a Qualifier Group............................................................................210Activating a Qualifier Group..........................................................................210Deactivating a Qualifier Group......................................................................211Adding a Qualifier to a Qualifier Group........................................................ 211Removing a Qualifier from a Qualifier Group................................................ 211Ordering Qualifiers in a Qualifier Group.......................................................212Adding a Qualifier Group to a Status............................................................ 212Removing a Qualifier Group from a Status.................................................... 212Ordering Qualifier Groups in a Status........................................................... 213
Phase.....................................................................................................214Phase............................................................................................................ 214Creating a Phase.......................................................................................... 214
Candidate and Requisition Search
Configuration Guide Taleo 10 SP2 - Recruiting xii
Candidate Search.................................................................................. 216Candidate Quick Search................................................................................216Specific Candidate Search............................................................................. 217Displaying the Candidate Quick Search and Specific Search............................219Giving Access to the Candidate Quick Search and Specific Search...................219Giving Access to Candidate Information During a Search................................219Advanced Search...........................................................................................220Displaying the Advanced Search Link............................................................. 222Giving Access to the Advanced Candidate Search...........................................222Conceptual Search........................................................................................ 222Displaying the Conceptual Search..................................................................224Giving Access to the Conceptual Search.........................................................224Advanced Candidate Search Page................................................................. 225Customizing the Advanced Candidate Search Page.........................................225Identifying a Field as a Search Criterion.........................................................226Why Advanced Search is not Displaying Expected Results................................ 226Randomized Search Result............................................................................. 227Search Result Archiving..................................................................................228General Profile Search...................................................................................229Exclusion of Agency Owned Candidates in Search Results............................... 230Excluding Agency Owned Candidates in Search Results...................................231Excluding Candidates with Specific Statuses from Search Results...................... 231
Requisition Search..................................................................................232Requisition Quick Search............................................................................... 232Displaying the Requisition Quick Search.........................................................233Giving Access to the Requisition Search..........................................................233
Search Queries...................................................................................... 234Search Query................................................................................................ 234
Search Operators...................................................................................236Boolean Operator, Wildcard and Other Special Characters............................. 236
Matching Candidate and Requisition.......................................................238Candidate Matching to a Requisition..............................................................238Matching Requisition Criteria......................................................................... 238Setting Matching Requisition Criteria.............................................................. 239Preview of Candidates Matching a Requisition................................................ 239Criteria for Matching Candidates................................................................... 240Filters for Matching Candidates......................................................................240Matched Candidates Preview......................................................................... 241Setting Matching Candidate Criteria...............................................................241Setting Matching Candidate Country Filters.................................................... 241Activating the Matching Candidate Email Notification......................................242Deactivating the Matching Candidate Email Notification..................................242
Correspondence

Configuration Guide Taleo 10 SP2 - Recruiting xiii
Message Templates................................................................................ 245Message Template......................................................................................... 245Creating a Message Template........................................................................247Creating a Message Template for a Specific Audience.....................................248Editing the Properties of a Message Template................................................. 248Editing the Context of a Message Template.................................................... 249Adding an Attachment to a Message Template............................................... 249Removing an Attachment from a Message Template........................................250Activating a Message Template...................................................................... 250Deactivating a Message Template.................................................................. 251Deleting a Message Template........................................................................ 251Duplicating a Message Template....................................................................251Editable Message Templates...........................................................................252
Paragraphs............................................................................................ 256Paragraph..................................................................................................... 256Adding a Paragraph to a Message Template.................................................. 257Creating a Paragraph for a Message Template...............................................257Ordering Paragraphs in a Message Template................................................. 258Editing a Paragraph in a Message Template................................................... 258Previewing a Paragraph in a Message Template..............................................258Activating a Paragraph in a Message Template...............................................259Deactivating a Paragraph in a Message Template...........................................259
Variables................................................................................................260Variable.........................................................................................................260Adding a Variable......................................................................................... 260List of Correspondence Variables................................................................... 261
Notifications...........................................................................................284Notification....................................................................................................284Activating a Notification.................................................................................285
Source TrackingSource................................................................................................... 287
Recruiting Source...........................................................................................287Source Types................................................................................................. 288Source Tracking............................................................................................. 289Creating a Source......................................................................................... 290Adding a Source........................................................................................... 291Removing a Source....................................................................................... 291Deleting a Source..........................................................................................291Reactivating a Source.................................................................................... 292Editing the Properties of a Source.................................................................. 292Editing the Organization-Location-Job Field of a Source..................................292
Event..................................................................................................... 294Recruiting Event............................................................................................. 294

Configuration Guide Taleo 10 SP2 - Recruiting xiv
Creating an Event......................................................................................... 294Editing an Event............................................................................................ 295Removing an Event........................................................................................295
LayoutPage Layout........................................................................................... 297
Home Page and List Elements Configuration.................................................. 297Auxiliary Navigation Bar................................................................................ 301Core Navigation Bar..................................................................................... 301About Window...............................................................................................302Search Widget...............................................................................................303Page Header................................................................................................. 303Creating a Page Header................................................................................304Page Footer...................................................................................................304Creating a Page Footer................................................................................. 305Welcome Title................................................................................................305Creating a Welcome Title.............................................................................. 305Separator Line...............................................................................................306Adding a Separator Line................................................................................306Expandable and Collapsible Sections in a File................................................ 306Logo............................................................................................................. 307Uploading an Organization Logo.................................................................. 308Color Theme................................................................................................. 308Modifying the Theme.....................................................................................309Selected Item Color....................................................................................... 309Communications Channel..............................................................................310Communications Channel Mode....................................................................312Customizing Text in the Customer Support Section.......................................... 313
Center Stage..........................................................................................315Center Stage................................................................................................. 315Creating a Center Stage................................................................................317Deleting a Center Stage................................................................................ 317Duplicating a Center Stage............................................................................318Activating a Center Stage.............................................................................. 318Deactivating a Center Stage.......................................................................... 319Modifying a Center Stage Properties.............................................................. 319Adding Channels and Links to a Center Stage................................................319Removing Channels and Links from a Center Stage........................................320Ordering Channels and Links in a Center Stage.............................................320Setting the Layout of a Center Stage.............................................................. 321Organizing a Multicolumn Center Stage.........................................................321Creating Custom Instructions for a Center Stage Channel............................... 322Associating a Center Stage to a Configuration Profile..................................... 322
Configuration Guide Taleo 10 SP2 - Recruiting xv
AgencyAgency and Agent................................................................................. 324
Staffing Agency and Agent............................................................................ 324Creating an Agency.......................................................................................325Deleting an Agency....................................................................................... 326Adding an Agent to an Agency......................................................................326Creating an Agent.........................................................................................326Deleting an Agent......................................................................................... 327Deactivating an Agent................................................................................... 327Transferring Referrals..................................................................................... 327Associating an Agency to an Organization-Location-Job Field......................... 328Dissociating an Agency from an Organization-Location-Job Field.................... 328Associating an Agent to an Organization-Location-Job Field........................... 329Dissociating an Agent from an Organization-Location-Job Field...................... 329Selecting a Preferred Agency..........................................................................330Defining a Referral Ownership Period............................................................ 330
Recruiting FundamentalsJob Board..............................................................................................332
Job Board Account........................................................................................ 332Creating a Job Board Account.......................................................................334Deleting a Job Board Account....................................................................... 334Editing a Job Board Account..........................................................................335Granting Access to a Job Board Account........................................................335Revoking Access to a Job Board Account........................................................335Candidate Profile Import from USAJobs......................................................... 336Setting-up Profile Imports from USAJobs.........................................................337Activating a Candidate Sourcing Certification................................................. 338Deactivating a Candidate Sourcing Certification............................................. 338Configuring the USAJobs Certification............................................................339Activating Secure Login..................................................................................339Deactivating Secure Login..............................................................................339Populated Fields from Profile Import...............................................................340
Merge Form...........................................................................................342Merge Form.................................................................................................. 342Creating a Merge Form.................................................................................343Deleting a Merge Form................................................................................. 343Activating a Merge Form............................................................................... 344Deactivating a Merge Form........................................................................... 344Configuring a Form.......................................................................................344Inserting Variables in a Merge Form.............................................................. 345
Candidate..............................................................................................346

Configuration Guide Taleo 10 SP2 - Recruiting xvi
Candidate..................................................................................................... 346Candidate Creation.......................................................................................347Candidate Duplicate Check........................................................................... 349ACE Candidate Alert..................................................................................... 350Candidate File Event......................................................................................351Candidate Comparison................................................................................. 352Candidate File Merge....................................................................................355Candidate Sharing........................................................................................ 357Candidate Interview.......................................................................................358File Attached to an Interview Invitation........................................................... 360Candidate Interview and Candidate Selection Workflow.................................. 361Automatic Candidate Pooling.........................................................................362Configuring the Automatic Candidate Pooling................................................ 364Candidate Onboarding................................................................................. 364
Requisition............................................................................................. 366Requisition File.............................................................................................. 366Requisition Creation.......................................................................................367Requisition Editing......................................................................................... 368Requisition Duplicate..................................................................................... 369Requisition Autofill Feature.............................................................................369Requisition/Staffing Type................................................................................ 370Activating a Requisition Type.......................................................................... 370Deactivating a Requisition Type...................................................................... 371Requisition Posting......................................................................................... 371Requisition Posting via a Staffing Agent.......................................................... 372Requisition Template...................................................................................... 373
Offer..................................................................................................... 375Offer Configuration.......................................................................................375Configuring an Offer - Overview................................................................... 376
Contingent Hiring.................................................................................. 377Contingent Hiring..........................................................................................377Configuring Contingent Hiring - Overview..................................................... 377
Hourly Hiring.........................................................................................379Hourly Manager Home Page and Center Stage.............................................. 379Hourly Manager User Type............................................................................ 380Fifth Level of Location....................................................................................381Evergreen Hiring........................................................................................... 382Setting Up the Evergreen Hiring Feature.........................................................385
Libraries.................................................................................................387Library...........................................................................................................387Question....................................................................................................... 388Interview Question.........................................................................................391Disqualification Question............................................................................... 392Explanations for Disqualification Questions.....................................................393

Configuration Guide Taleo 10 SP2 - Recruiting xvii
Enabling Explanation in Disqualification Questions......................................... 394Competency.................................................................................................. 394
Report....................................................................................................397Report........................................................................................................... 397Custom Report Universe................................................................................ 397Organizing Custom Fields in Reports............................................................. 398Configuring a Custom Field for Reports......................................................... 398
Task.......................................................................................................400Task.............................................................................................................. 400Self-assigned Task......................................................................................... 401Activating the Self-Assigned Task Feature........................................................402
General Features................................................................................... 403Attachment.................................................................................................... 403Folder............................................................................................................404Time Zone.....................................................................................................405Using the Time Zone for the Offer Start Date................................................. 406Print Function................................................................................................ 406Print PDF Views............................................................................................. 407
Partner ServicesScreening Services..................................................................................409
Screening Service...........................................................................................409Input Field.....................................................................................................410Result Field....................................................................................................410Result Set Field.............................................................................................. 411Creating a Screening Service......................................................................... 411Editing a Screening Service............................................................................412Activating a Screening Service........................................................................412Deactivating a Screening Service....................................................................412Creating a Screening Service Field................................................................. 413Editing a Screening Service Field....................................................................413Deleting a Screening Service Field..................................................................413Editing a Screening Service User-defined Form............................................... 413Previewing a Screening Service User-defined Form..........................................414Adding a Screening Service to a Candidate Selection Workflow....................... 414Removing a Screening Service from a Candidate Selection Workflow................414Editing a Service Label.................................................................................. 415Previewing a Service Label.............................................................................415Selecting a Message Template for a Screening Service.................................... 415Deleting a Message Template from a Screening Service.................................. 416Creating a Phase.......................................................................................... 416
Approvals
Configuration Guide Taleo 10 SP2 - Recruiting xviii
Approval................................................................................................419Approval....................................................................................................... 419Approver....................................................................................................... 421Approval via a BlackBerry..............................................................................422eShare Approval Acknowledgment................................................................. 423Requisition Approval Rerouting After Changes................................................ 423Setting a Default Approval Path for Requisitions.............................................. 424Setting a Default Approval Path for Offers......................................................424
Dynamic Approval Routing..................................................................... 426Dynamic Approval Routing............................................................................ 426Dynamic Approval Routing Approval Path.......................................................428Dynamic Approval Routing Reports to Structure...............................................428Setting Up the Dynamic Approval Routing...................................................... 428Defining the Dynamic Approval Routing Reports to Structure............................429Activating an Approval Path Category............................................................ 429Deactivating an Approval Path Category........................................................ 430Creating an Approval Path............................................................................ 430Deleting an Approval Path.............................................................................431Activating an Approval Path...........................................................................431Editing an Approval Path............................................................................... 431Deactivating an Approval Path....................................................................... 432Testing the Dynamic Approval Routing Workflow.............................................432
Dynamic Approval Routing Rule..............................................................434Dynamic Approval Routing Rules....................................................................434Exclusion Rule................................................................................................434Inclusion Rule................................................................................................ 435Creating an Exclusion Rule............................................................................ 437Activating an Exclusion Rule...........................................................................437Deactivating an Exclusion Rule.......................................................................438Deleting an Exclusion Rule.............................................................................438Adding a Role to an Exclusion Rule................................................................439Removing a Role from an Exclusion Rule........................................................439Creating a Conditional Inclusion Rule............................................................ 439Creating an Unconditional Inclusion Rule....................................................... 440Activating an Inclusion Rule........................................................................... 441Deactivating an Inclusion Rule....................................................................... 441Deleting an Inclusion Rule............................................................................. 441Adding a Role to an Inclusion Rule................................................................ 442Removing a Role from an Inclusion Rule........................................................ 442
Dynamic Approval Routing Sequence......................................................444Sequence.......................................................................................................444Creating a Sequence..................................................................................... 444Deleting a Sequence......................................................................................445Adding a Role to a Sequence........................................................................ 445

Configuration Guide Taleo 10 SP2 - Recruiting xix
Removing a Role from a Sequence................................................................ 446Ordering Roles in a Sequence....................................................................... 446
Functional Role...................................................................................... 448Functional Role..............................................................................................448Creating a Functional Role............................................................................ 449Editing a Functional Role............................................................................... 449Activating a Functional Role...........................................................................449Deactivating a Functional Role....................................................................... 450Deleting a Functional Role.............................................................................450Selecting a Default Assignee for a Functional Role.......................................... 450Adding an Assignee to a Functional Role....................................................... 451
Hierarchical Role....................................................................................452Hierarchical Role........................................................................................... 452Creating a Hierarchical Role..........................................................................452Activating a Hierarchical Role........................................................................ 453Editing a Hierarchical Role.............................................................................453Deactivating a Hierarchical Role.................................................................... 453Deleting a Hierarchical Role.......................................................................... 454Selecting a Superior Role...............................................................................454Adding a User to a Hierarchy........................................................................454Removing a User from a Hierarchy................................................................455
Assignee................................................................................................ 456Creating an Assignee.................................................................................... 456Deleting an Assignee.....................................................................................456Associating an Assignee to an Organization, Location or Job Field...................456Dissociating an Assignee from an Organization, Location or Job Field............. 457
Data Archiving and DeletionAutomated Task Configuration................................................................459
Automated Task.............................................................................................459Creating an Automated Task..........................................................................461Deleting an Automated Task.......................................................................... 461Modifying an Automated Task........................................................................462Activating an Automated Task........................................................................ 462Deactivating an Automated Task.................................................................... 462Executing Manually an Automated Task..........................................................463Stopping Manually an Automated Task...........................................................463Associating an Automated Task to a Location................................................. 463Dissociating an Automated Task from a Location............................................ 464Recovering Candidates Deleted by an Automated Task....................................464Verifying the Status of an Automated Task...................................................... 465
Product Resources

Configuration Guide Taleo 10 SP2 - Recruiting xx
Product Resource Administration............................................................. 467Resource Administration.................................................................................467Displaying Resource Identifiers....................................................................... 468Hiding Resource Identifiers.............................................................................469Refreshing Resource Values............................................................................469Blocking Resource Value Refresh.................................................................... 469Unblocking Resource Value Refresh................................................................470
TroubleshootingTroubleshooting......................................................................................472
AppendixTable Referencing Tips Included in the Document.................................... 477

Preface
• Revision History......................................................................................................2
• Technical Configuration and Software Performance................................................. 3

Preface Revision History
Configuration Guide Taleo 10 SP2 - Recruiting 2
Revision History
Date Modification Revised Topic
January 14, 2011 A table was added to provide an overview of the tips thatwere added throughout the document. Each tip has an IDassociated to it and this ID is also indicated beside eachtip.
Table Referencing TipsIncluded in the Document
December 6, 2010 Tips were added to provide useful information on some
features. These tips are represented with this icon .
July 23, 2010 Initial publication.

Preface Technical Configuration and SoftwarePerformance
Configuration Guide Taleo 10 SP2 - Recruiting 3
Technical Configuration and SoftwarePerformance
For information on technical configuration, refer to the latest version of the Taleo 10 TechnicalConfiguration and Software Performance Guide document for the applicable service pack.
This document contains configuration information that includes, but is not limited to, optimalperformance, supported operating systems and browsers, browser settings, HTTP requirements,SSL settings, recommendations for routing, firewall, proxy servers, encryption packs, and pop-up blockers.

Basic Concepts
• Login..................................................................................................................... 5
• Getting Help.......................................................................................................... 9
• Configuration and Recruiting Administration Menus...............................................13
• Operation Mode Management............................................................................. 16
• Release Notes Message........................................................................................19
• Basic Concept...................................................................................................... 23

Basic Concepts Login
Configuration Guide Taleo 10 SP2 - Recruiting 5
Login
Login and Product AccessAllows users to sign in the application to see the list of products to which they have access.
When opening the Taleo Enterprise solution, the User Sign In page appears. Users must selectthe language in which they want to use the application. If a user changes the default languageon the Sign In page, the page refreshes to the new language and subsequent Taleo pages arepresented in the selected language. After selecting a language, users also have the possibilityto tell the system to remember their selection so that the next time they sign in, the User Sign Inpage will be presented in the language selected.
In the User Sign In page, users must also provide a user name and password before beingable to see the list of Taleo products to which they have access. The user name and passwordare provided by the system administrator. But the user has the ability to modify their password.
Once a user’s credentials have been entered and accepted, the Table of Contents pageappears and presents Taleo products purchased by the organization and to which a user hasaccess according to the user’s user type and permissions. Note that if the user has access toonly one Taleo product, the product home page is displayed.
When accessing a Taleo application, the information displayed in the home page is specificto the user who signs in. The features to which the user has access also depends on productsettings enabled by the system administrator and on user type permissions granted to the user.
Accessing an ApplicationPrerequisite
You must know the Web address.
You must have received a user name and password from the system administrator.
Steps
1. Select the language in which you want to use the application.2. Enter your user name and password.3. Click Sign In.4. Click on the desired product.
Using the Forgot Password LinkPrerequisite
You must have a valid username and email address in your user profile.
Steps
1. Click Forgot Your Password?.2. Enter your username and email address.

Basic Concepts Login
Configuration Guide Taleo 10 SP2 - Recruiting 6
3. Click OK.
Result
If the request comes from an authorized user, an email is sent to the supplied address with acode to access the application.
Next Step
You must click the link provided in the email, enter your username and access code, andprovide a new password.
Changing My PasswordSteps
1. In the auxiliary navigation bar, click My Setup.2. Click Edit next to Account Information.3. Modify the information contained in the Account section.4. Click Save.
Single Sign-OnSingle Sign-on (SSO) enables a system to allow users to access multiple computer platforms orapplications after being authenticated one time only.
The Taleo Table of Contents page is always protected so users can access it only if they havebeen authenticated i.e., valid SSO credentials have been supplied or a valid user name andpassword have been entered in the User Sign In page to access the Table of Contents page.
The access to the Taleo Table of Contents page can be protected either with or without aCustom Challenge URL.
• Without a Challenge URL and no SSO credentials sent, when a user accesses the mainTaleo client zone URL, the Taleo Sign In page is displayed requiring user authentication. TheTaleo Table of Contents page will be displayed if authentication is validated.
• With a Custom Challenge URL, when a user accesses any Taleo client zone URL, the TaleoSign In page is not displayed.
If the Challenge URL authenticates the user, the Taleo application page will be displayed.
If the Challenge URL does not allow the authentication of the user, the Challenge URL willrequest authentication from the user. The Taleo application page will be displayed to theuser only if the authentication is validated.
Users can directly access Taleo 10 products without going through the main Taleo client zoneURL.
• Recruiting: https://clientzone.taleo.net/enterprise/enterprise/flex.jsf?lang=en• Configuration: https://clientzone.taleo.net/smartorg/index.jsf?lang=en
The client zone must be replaced by the actual zone ID of the client.
Benefits
• Improved security and system integrity.• Seamless login process and elimination of multiple authentication processes.

Basic Concepts Login
Configuration Guide Taleo 10 SP2 - Recruiting 7
Tips to Ease Multi-Product NavigationThe tips provided below will ease navigation between Taleo Enterprise products.
There is a setting called SSO Enabled Between Products.
Setting
Name Possible Values Default Value Location
SSO Enabled Between Products• No
• Yes
No Configuration > Settings
This setting only affects users with access to more than one Taleo Enterprise product. For theseusers, this setting determines the behavior a user experiences upon clicking Sign Out from anyTaleo Enterprise product.
If this setting is set to No, users will be completely exited from the system upon clicking SignOut. If this setting is set to Yes, users will be returned to the Table of Contents page where allavailable Taleo Enterprise products are listed and available for direct entry without requiringanother sign in process. For example, this would let system administrators quickly exit theRecruiting Center and navigate into Configuration. It would also let Reporting users quicklyaccess Reporting without having to go through a new sign in exercise.
In cases where this setting is set to Yes, there may be times when a client wants even moredirect access to be available. For example, the client may want a link to Reporting or Analyticsdirectly from within the Recruiting Center. Provided that the SSO is set to Yes, this can beconfigured by completing the following steps.
Step 1: Acquire the proper URL to access Reporting and Analytics• Set up your Test User so that it has access to Reporting and Analytics as well as Recruiting.• Once you are on the Table of Contents page, click the Reporting and Analytics link.• When in the Reporting product, copy the URL in the address bar. It will look something like
this: https://clientzone.taleo.net/smartorg/SamlInterSiteTransferService.jss?TARGET=https%3A%2F%2Fanalyticsch1.taleo.net%2Fanalytics%2Fhomepage&lang=en
Step 2: Edit the Configuration Profile for the user population where this link isdesired• Access the Configuration Profiles feature in SmartOrg (Configuration > [SmartOrg]
Administration > Configuration Profiles)• Choose the configuration profile you wish to edit.• Customize the following settings as follows:
Setting Value
Communication Channel Mode Customized
Communication Channel - Custom Title REPORTS ACCESS (or any other preferred text)
Communication Channel - Custom Link Click here to access reporting (or any other preferredtext)
Communication Channel - Custom Link URL The link is step 1 above
Be sure to validate that the URL is working properly prior to using it broadly and ensure the linkis only presented to users that also have access to the product configured for access, otherwise

Basic Concepts Login
Configuration Guide Taleo 10 SP2 - Recruiting 8
users will be presented with links to products for which their authentication permissions will notwork.
Creating Custom Instructions for the Forgot PasswordMessage
Prerequisite
Configuration > [Settings] Settings
Steps
1. Click on the System Administrator Phone Number setting.2. Click Edit.3. Enter text in the Value field. This text will appear in the Forgot Password message that is
displayed when a user makes a mistake at login.4. Click Save.
Logging In Before Accessing the Response CenterBy default, eShare users need to log in before being able to access the Response Center.The Response Center Login Required private setting controls this feature (Configuration >[Recruiting] Settings). If you do not wish users to log in before accessing the Response Center,communicate with Taleo Support to have this setting modified.

Basic Concepts Getting Help
Configuration Guide Taleo 10 SP2 - Recruiting 9
Getting Help
Online HelpThe Taleo administration module offers comprehensive help about concepts or tasks toperform.
The online help provides information about a concept or a task to be performed. The online
help, represented by this icon or the Help link, is available in the auxiliary navigation barlocated in the top right-hand corner of all pages.
When clicking on the help icon or the Help link, a table of contents of available help topics isdisplayed and it is also possible to search the help database to locate specific subjects.
Online TourTaleo Recruiting offers short clips describing essential user interface elements.
These online tours are short clips that present basic information about the design, navigationand certain features of the application. Each clip is no more than one minute in length to giveusers a quick way to get up to speed with how to use the product.
These tours are available in Taleo Recriuting. When activated by the system administrator, theyare available in the Clips tab in the right panel of the supporting tools, just beside the Helptab.
By default, key online tours designed by Taleo come with the product. Taleo reserves the rightto add new online tours, modify existing tours or delete tours at any time without notice tocustomers.
The tab where these online tours are available is configurable. Customers can choose todisable the tab or replace the content with their own XML file linking to alternative learningmaterials for their end users.
All online tours have been built using Taleo Proficiency, Taleo’s custom online learning tool foran ever changing environment. For customers choosing to create custom content using TaleoProficiency, the standard online tour content can be purchased as starting material. ContactTaleo Education Services or your Client Executive to learn more about Taleo Proficiency and/orpurchasing the online tour content.
Benefits• Makes the product more approachable.• Facilitates first-encounter use of the product.• Exposes basic, critical features clearly to users.• Gives sense of accomplishment in user’s first hour of using the product.• Encourages users to continue learning the product.
Configuration
The Online Clips setting must be set to define the overall behavior of the online tours feature.By default, Taleo standard online tours are displayed to users.

Basic Concepts Getting Help
Configuration Guide Taleo 10 SP2 - Recruiting 10
Setting
Name Possible Values Default Value Location
Online Clips• Taleo Standard (default)
• Disabled
• HTML Customized
Taleo Standard (default) Configuration>[Recruiting] Settings
The Online Clips - HTML Customized URL setting is used to insert the URL for customized onlinetours. For this setting to work, the Online Clips setting must be set to “HTML Customized”. Notethat one URL must be provided per language. And a URL must be provided for every activelanguage.
Setting
Name Possible Values Default Value Location
Online Clips - HTMLCustomized URL
Configuration>[Recruiting] Settings
The Taleo Recruiting Online Clips URL setting is used to indicate the target URL to TaleoRecruiting online tours. For this setting to work, the Online Clips setting must be set to “TaleoStandard (default)”.
Setting
Name Possible Values Default Value Location
Taleo Recruiting OnlineClips URL
Configuration>[Recruiting] Settings
Online Tour Creation GuidelinesCustomers should evaluate the content of the Taleo online tours to determine if it is appropriategiven the context of their own deployment. For customers choosing to deploy their own customonline tours, here are some guidelines about what to consider when building this material:
• Focus on the minimum information a new user needs to know in the first few hours of usingthe product. The concepts have to be focused; otherwise, the online tours will fail.
• Keep each online tour under one minute in length so as to not lose the user's attention.• Retention of concepts is significantly improved if a user can try to do immediately afterwards
what the online tour was explaining. Use the Taleo Proficiency “See It and then Try It” modeto let the user try what they have just seen.
• Online tours are not eLearning tutorials. eLearning tutorials provide steps to achievesomething. If you want to include true eLearning in the Online Tours section, we recommendthat you clearly distinguish your online tours content from more in depth eLearning content,and present the online tours content first. Then, use the online tours to explain concepts andprompt users awareness of some issues. Use eLearning content to provide the additionaldetails that are not in the online tour.
• Neither online tours nor eLearning tutorials should be designed to "replace" user manualsor online help. These mediums are not useful for reference. They cannot be indexed orsearched. Users tend not to reflect on information presented in video format, but to act onit. So present information in this medium that aligns with this format.

Basic Concepts Getting Help
Configuration Guide Taleo 10 SP2 - Recruiting 11
Uploading Personalized Online ToursSteps
1. Set the Online Clips recruiting setting to “HTML Customized”.This setting is used to define the overall behavior of the online tours feature.
2. Configure the Online Clips - HTML Customized URL recruiting setting.
This setting is used for inserting the URLs for custom online tour content. If the “HTMLcustomized” value was selected for the Online Clips setting, then this setting must beconfigured accordingly. Note that one URL must be provided per language. And a URLmust be provided for every active language.
Result
Taleo online tour content is replaced by your company’s own XML file linking to alternativelearning materials for their end users.
TooltipA tooltip is a short, explanatory text which appears when you “hover” your mouse over abutton, a link, a table cell heading or icon without clicking it.
Tooltips are available throughout the system and they give you additional information about anaction before performing it.
Taleo provides tooltips for buttons, links, icons and table cell headings. These tooltips are notconfigurable. However, for screening services, the system administrator can create tooltips forsome types of user-defined fields.
Web Support LinkThe Web Support link gives users access to Taleo Web support and question submissionfeature.
The Web Support link is available in the auxiliary navigation bar (Resources / My Setup) of allpages of the application if it was enabled by the system administrator.
Configuration
To display the Web Support link, the following setting must be set to Yes.
Setting
Name Possible Values Default Value Location
Display Web Support Link inAuxiliary Menu
• No
• Yes
No Configuration > [SmartOrg]Administration > ConfigurationProfiles
Furthermore, the Web Support optional feature must be activated by Taleo Support. If only theabove setting is turned on, users will not have access to Web Support even though the link willstill be present.

Basic Concepts Getting Help
Configuration Guide Taleo 10 SP2 - Recruiting 12
The auxiliary navigation bar must also be enabled.
Setting
Name Possible Values Default Value Location
Auxiliary Navigation Bar• No
• Yes
Yes Configuration > [SmartOrg]Administration > ConfigurationProfiles

Basic Concepts Configuration and Recruiting AdministrationMenus
Configuration Guide Taleo 10 SP2 - Recruiting 13
Configuration and Recruiting AdministrationMenus
Configuration MenuThe configuration menu gives system administrators access to all administration components ofTaleo Enterprise products in one centralized menu.
The configuration menu is composed of sub-administration menus divided into two mainsections:• Global Configuration• Specific Configuration
Global Configuration
Elements in the Global Configuration menu are used to manage content, data, settings and configurations thatare used across multiple products. Depending on the products activated in a company, the global configurationmenu can include:
• Operations: Operation Modes and Release Notes.
• Settings
• Selection Lists: standard selections used in different products such as Education Levels, Employee Statuses, etc.
• Roles: role definitions of both hierarchical and functional roles. Both role types are used for the DynamicApproval Routing module. In addition, functional roles are leveraged in defining Onboarding tasks.
• Dynamic Approval Routing: approval workflow definitions for requisitions and offers according to specifiedbusiness rules.
• Security: security policies and legal agreements presented to users when signing in an application. Note thatagreements for career sections are managed under Career Section Administration.
• Competencies: competency tools used in Taleo Performance for Rating Models, Competencies, GuidancePlans, etc.
• Synchronization Tool: This section allows you to export configuration elements, such as career sections,application flows, etc., from a source database to a target database.
Specific Configuration
Elements in the Specific Configuration menu are used to manage content, data, settings and configurations thatare targeted to a specific product or product area. Depending on the products activated in a company, the specificconfiguration menu can include:
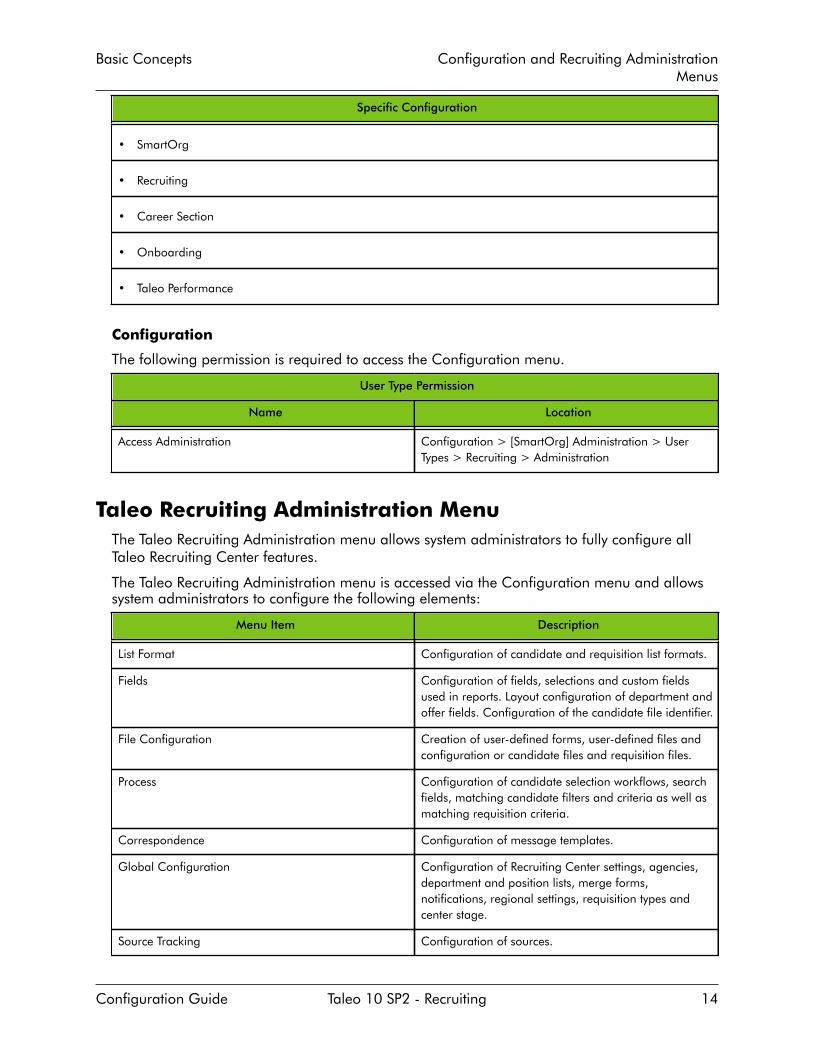
Basic Concepts Configuration and Recruiting AdministrationMenus
Configuration Guide Taleo 10 SP2 - Recruiting 14
Specific Configuration
• SmartOrg
• Recruiting
• Career Section
• Onboarding
• Taleo Performance
Configuration
The following permission is required to access the Configuration menu.
User Type Permission
Name Location
Access Administration Configuration > [SmartOrg] Administration > UserTypes > Recruiting > Administration
Taleo Recruiting Administration MenuThe Taleo Recruiting Administration menu allows system administrators to fully configure allTaleo Recruiting Center features.
The Taleo Recruiting Administration menu is accessed via the Configuration menu and allowssystem administrators to configure the following elements:
Menu Item Description
List Format Configuration of candidate and requisition list formats.
Fields Configuration of fields, selections and custom fieldsused in reports. Layout configuration of department andoffer fields. Configuration of the candidate file identifier.
File Configuration Creation of user-defined forms, user-defined files andconfiguration or candidate files and requisition files.
Process Configuration of candidate selection workflows, searchfields, matching candidate filters and criteria as well asmatching requisition criteria.
Correspondence Configuration of message templates.
Global Configuration Configuration of Recruiting Center settings, agencies,department and position lists, merge forms,notifications, regional settings, requisition types andcenter stage.
Source Tracking Configuration of sources.
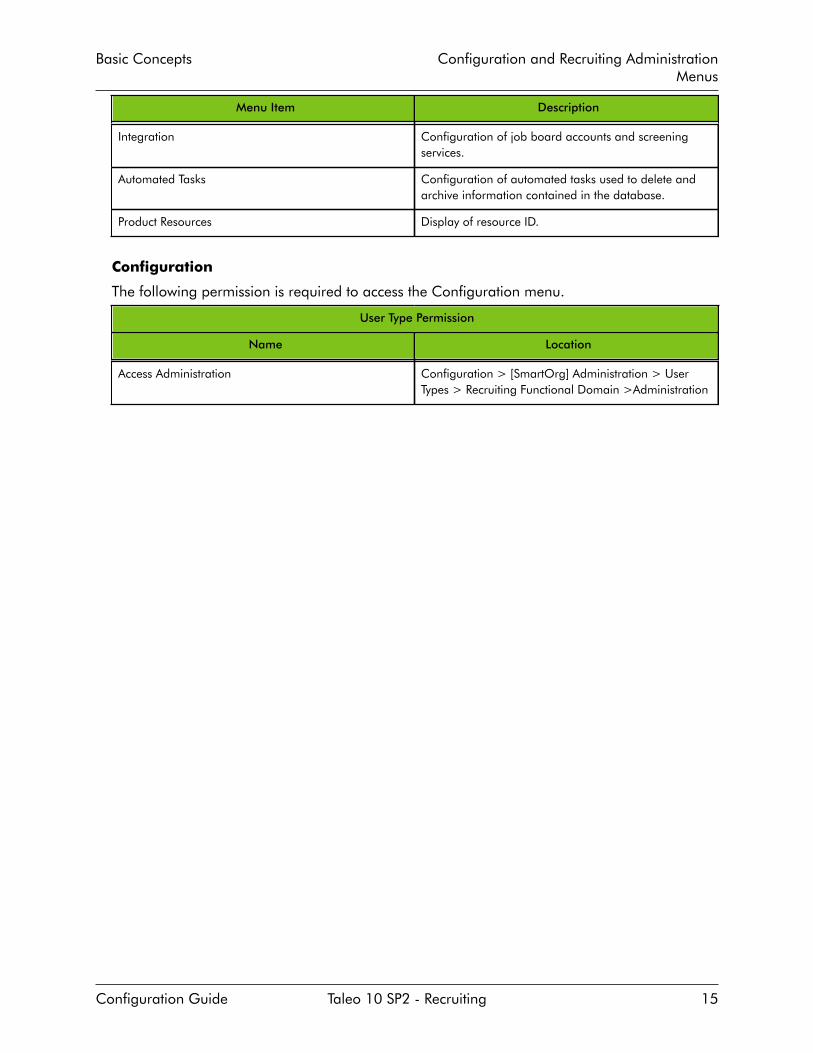
Basic Concepts Configuration and Recruiting AdministrationMenus
Configuration Guide Taleo 10 SP2 - Recruiting 15
Menu Item Description
Integration Configuration of job board accounts and screeningservices.
Automated Tasks Configuration of automated tasks used to delete andarchive information contained in the database.
Product Resources Display of resource ID.
Configuration
The following permission is required to access the Configuration menu.
User Type Permission
Name Location
Access Administration Configuration > [SmartOrg] Administration > UserTypes > Recruiting Functional Domain >Administration

Basic Concepts Operation Mode Management
Configuration Guide Taleo 10 SP2 - Recruiting 16
Operation Mode Management
Operation ModeThe operation mode of the system can be changed for service, configuration orimplementation purposes.
The Operation Mode feature is available in the Global Configuration menu and gives systemadministrators access to three operation modes:• implementation• maintenance• productionThe operation mode of the system can be changed for service, configuration orimplementation purposes. The system administrator has the option to switch to maintenancemode or production mode for each product individually or for all. The system administratorcan see the operation mode used by product as well as how many users are connected to eachproduct. Products supported by the operation mode feature are:• Recruiting (which also includes the Remote Manager Experience)• Performance• Career Section• Onboarding• New Hire PortalFor the above products, except the New Hire Portal, the system administrator will know thenumber of users using both the product AND the administrative area related to the product.
Production Mode: In production mode, all users as well as guests, agents and systemadministrators have access to the application.
In production mode, a system administrator can:• View structure elements for Organizations, Locations and Job Fields.• Save agencies, both via Integration and SmartOrg.• Create and edit job templates.• Select and view positions.• Create and edit departments.All tasks listed above can also be performed in maintenance mode and in implementationmode.
To import/export candidates (by Integration) and move candidates in the candidate selectionworkflow (by Integration), the system must be in production mode.
Maintenance Mode: The maintenance mode is a special administrative feature usedto protect the integrity of the database when editing Organization, Location or Job Fieldinformation.
In maintenance mode, the application is inactive. All users, except the system administrator, arelogged out automatically. The application displays a message to users as well as to candidatesin Career Sections, indicating that the application is in maintenance mode. If users are loggedin and have not saved data they were entering, this data will be lost.
For Taleo Recruiting, the system must be in maintenance mode for the following:
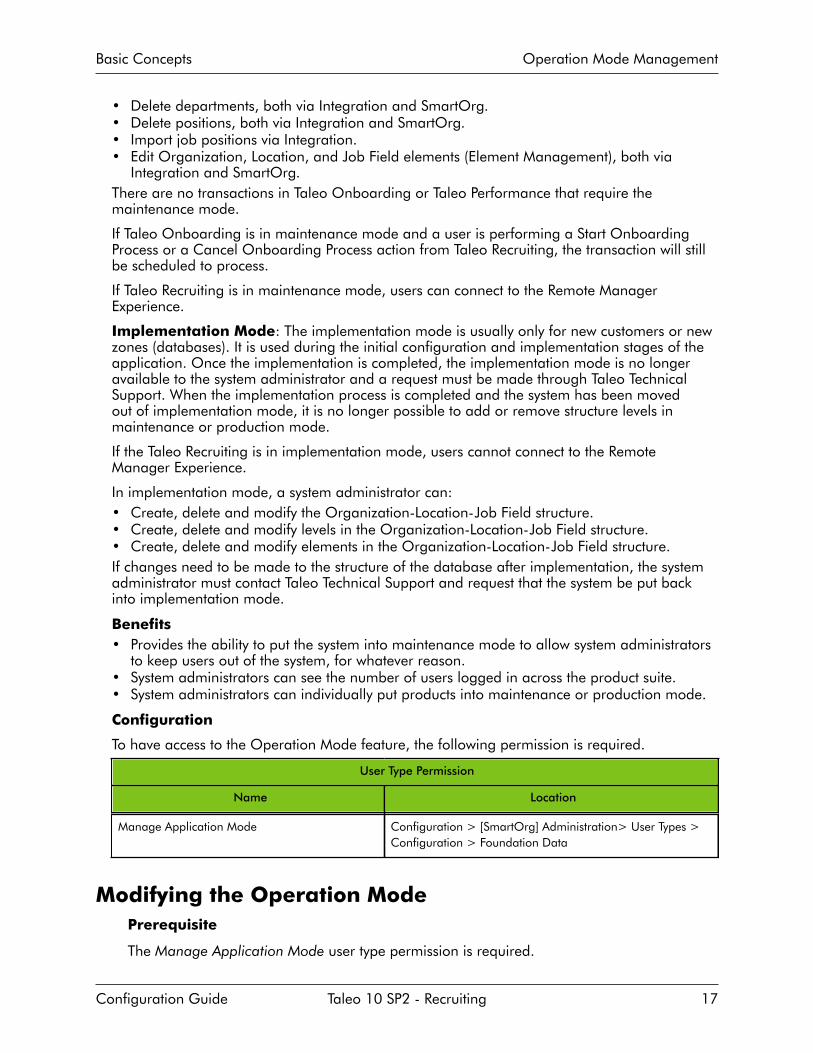
Basic Concepts Operation Mode Management
Configuration Guide Taleo 10 SP2 - Recruiting 17
• Delete departments, both via Integration and SmartOrg.• Delete positions, both via Integration and SmartOrg.• Import job positions via Integration.• Edit Organization, Location, and Job Field elements (Element Management), both via
Integration and SmartOrg.There are no transactions in Taleo Onboarding or Taleo Performance that require themaintenance mode.
If Taleo Onboarding is in maintenance mode and a user is performing a Start OnboardingProcess or a Cancel Onboarding Process action from Taleo Recruiting, the transaction will stillbe scheduled to process.
If Taleo Recruiting is in maintenance mode, users can connect to the Remote ManagerExperience.
Implementation Mode: The implementation mode is usually only for new customers or newzones (databases). It is used during the initial configuration and implementation stages of theapplication. Once the implementation is completed, the implementation mode is no longeravailable to the system administrator and a request must be made through Taleo TechnicalSupport. When the implementation process is completed and the system has been movedout of implementation mode, it is no longer possible to add or remove structure levels inmaintenance or production mode.
If the Taleo Recruiting is in implementation mode, users cannot connect to the RemoteManager Experience.
In implementation mode, a system administrator can:• Create, delete and modify the Organization-Location-Job Field structure.• Create, delete and modify levels in the Organization-Location-Job Field structure.• Create, delete and modify elements in the Organization-Location-Job Field structure.If changes need to be made to the structure of the database after implementation, the systemadministrator must contact Taleo Technical Support and request that the system be put backinto implementation mode.
Benefits• Provides the ability to put the system into maintenance mode to allow system administrators
to keep users out of the system, for whatever reason.• System administrators can see the number of users logged in across the product suite.• System administrators can individually put products into maintenance or production mode.
Configuration
To have access to the Operation Mode feature, the following permission is required.
User Type Permission
Name Location
Manage Application Mode Configuration > [SmartOrg] Administration> User Types >Configuration > Foundation Data
Modifying the Operation ModePrerequisite
The Manage Application Mode user type permission is required.

Basic Concepts Operation Mode Management
Configuration Guide Taleo 10 SP2 - Recruiting 18
Configuration > Operation Modes
Steps
1. In the Operation Modes page, click Edit.2. In the Operation Mode Editor page, select the desired mode for each product, that is
production or maintenance mode.3. Click Save.
Result
The selected operation mode appears beside each product. If the system is put inMaintenance mode, users currently logged will receive a message and will be logged out.

Basic Concepts Release Notes Message
Configuration Guide Taleo 10 SP2 - Recruiting 19
Release Notes Message
Release Notes MessageA pop-up message containing new release information, system improvements, key messagesor other important information may be displayed when users log into the system.
Users may be presented with a pop-up message once they log into the system.
Once they are logged in, users can turn off the Release Notes message by checking the Don’tdisplay the message again option. The message will reappear when new release informationor other important information is available and also when the user clears the browser cookies.
One release notes message is displayed to users, regardless of application.
Configuration
The Release Notes feature is available in the Configuration menu. No default release notesmessage is provided by Taleo. A blank page is displayed unless the system administratordecides to customize the page to present important information to users.
Once the system administrator has created the message, the Release Notes setting must beenabled in the user’s configuration profile.
Setting
Name Possible Values Default Value Location
Release Notes• Yes
• No
No Configuration >[SmartOrg] Administration> Configuration Profiles
To be able to edit the release notes content, the system administrator must have the followingpermission.
User Type Permission
Name Location
Edit release notes Configuration > [SmartOrg] Administration > UserTypes > Configuration > Foundation Data
Deactivating the Release Notes MessagePrerequisite
The release notes message must have been enabled by the system administrator.
Steps
1. Log on to an application.2. In the Release Notes page, check the ”Don’t display this message again” option.

Basic Concepts Release Notes Message
Configuration Guide Taleo 10 SP2 - Recruiting 20
Result
The release notes message will no longer be displayed until new release information orother important information is available. If you want to see the release note informationagain, before new released information is available, delete the browser cookies.
Creating a Release NotesPrerequisite
The Edit release notes user type permission is required.
Configuration > Release Notes
Steps
1. In the Release Notes page, click Edit.2. In the Release Notes Editor page, write the message.3. Clear the Do not display release note information check box.4. Specify the validity period of the message by indicating the period of time when the
message will be displayed.5. Click Save.
Result
The created release notes message is displayed to users when they log in the systemprovided the Release Notes setting has been activated in the user’s configuration profile.
Next Step
Enabling the Release Notes setting in the user’s configuration profile (Configuration >[SmartOrg] Administration > Configuration Profiles).
Editing a Release NotesPrerequisite
The Edit release notes user type permission is required.
Configuration > Release Notes
Steps
1. Click Edit.2. Complete the fields as required.3. Click Save.
Result
The release notes message is displayed to users when they log in the system provided theRelease Notes setting has been activated in the user’s configuration profile.
Next Step
Displaying the release notes.

Basic Concepts Release Notes Message
Configuration Guide Taleo 10 SP2 - Recruiting 21
Enabling the Release Notes setting in the user’s configuration profile (Configuration >[SmartOrg] Administration > Configuration Profiles).
Displaying a Release NotesPrerequisite
The Edit release notes user type permission is required.
Configuration > Release Notes
Steps
1. Click Edit.2. Clear the Do not display release note information check box.3. Click Save.
Result
The created release notes message is displayed to users when they log in the systemprovided the Release Notes setting has been activated in the user’s configuration profile.
Next Step
Enabling the Release Notes setting in the user’s configuration profile (Configuration >[SmartOrg] Administration > Configuration Profiles).
Hiding a Release NotesPrerequisite
The Edit release notes user type permission is required.
Configuration > Release Notes
Steps
1. Click Edit.2. Select the Do not display release note information check box.3. Click Save.
Result
The release notes message will not be displayed even if the Release Notes setting has beenactivated in the user’s configuration profile (Configuration > [SmartOrg] Administration >Configuration Profiles).
Setting a Release Notes Validity PeriodPrerequisite
The Edit release notes user type permission is required.
Configuration > Release Notes
Steps
1. Click Edit.
Basic Concepts Release Notes Message
Configuration Guide Taleo 10 SP2 - Recruiting 22
2. Set the validity period with the calendar icon.3. Click Save.
Next Step
The release notes message is displayed to users when they sign in the application only forthe determined period provided the Do not display release note information is not selectedand the Release Notes setting has been activated in the user’s configuration profile.
Activating the Release Notes Feature in a ConfigurationProfile
Prerequisite
The Release Notes message must be created.
Configuration > [SmartOrg] Administration > Configuration Profiles
Steps
1. Click a configuration profile.2. Click the Release Notes setting.3. Click Edit.4. Select Yes.5. Click Save.

Basic Concepts Basic Concept
Configuration Guide Taleo 10 SP2 - Recruiting 23
Basic Concept
Application Time-outTaleo applications include a security feature that warns the user when the application hasnot been used for more than thirty minutes even if a user is still signed in the application.When the time-out delay is reached, a message notifies the user that the time-out delay for theapplication is imminent.
Two scenarios are possible:• User takes action: When the application has been idled for thirty minutes, a message
notifies the user that the application requires attention. Clicking “Access the application”directs the user to the application. When the user accesses the application, he/she can resetthe application and a message indicates the remaining time before the session expires.
• User does not take action: If the user does not reset the application within the defined delay,a message is displayed, indicating that the user has been signed out of the application andhas to sign in again to use the application.
The time-out delay is set by default to thirty minutes. The reminder displayed before time-out isset by default to ten minutes before time-out.
Benefits• Users can save information before the application times out.• Unattended applications automatically sign out the user avoiding any unwanted intruders.
Configuration
A private setting allows the configuration of the application time-out for the Recruiting,Onboarding, Performance and Configuration products. The setting defines the time inmilliseconds before a session time-out reminder is displayed. Contact Taleo Support for details.
Setting
Name Possible Values Default Value Location
Reminder Delay BeforeTimeout
600000 Configuration > [Settings]Settings
System StatusA status indicates the current state of an element in the system.
Elements can have one of the following statuses:• Draft: A Draft element can be modified. A Draft element cannot be used. It must be Active
before it can be used.• Active: When an element is Active, only the name and description can be modified. It is not
possible to update the behavior of the element.• Inactive: When an element is Inactive, only the status can be modified. The only possibility is
to go back to the Active status.A Draft element can become Active. An Active element can become Inactive. An Inactiveelement can become Active. However, an Active element cannot “go back” to the Draft status.

Basic Concepts Basic Concept
Configuration Guide Taleo 10 SP2 - Recruiting 24
Draft Active Inactive
Benefits• Allows users to create elements without making them available right away.• Allows users to remove an existing element from use without removing it form the database.
History SectionThe History section of the administration module presents useful tracking details on anelement.
The three most recent events are displayed in the History section. To view a more completelisting of events, click More Info.
History
Element Description
Date and Time Date and time when an event occurred.
Event Event or action performed on an element.
Details Information regarding the event.
By The “actor” (person or system) who performed the event.
Information of the user that performed an action on an element can be viewed for bettertracking and troubleshooting purposes.
Important Note: (ID 304) History tracking of items such as settings and user types arenot item specific. Tracking is global for all changes made in the area. This means if lookingat a specific user type and going to view history, you will see all of the history for all user typechanges, not just the changes that have occurred with that specific user type.
LanguagesTaleo products are available in different optional languages.
Taleo products are available in different optional languages. Not all languages are availablefor all Taleo products and languages must be activated by the system administrator before theycan be used in an application.
The preferred language of a user is set in the user’s account by the system administrator. Thepreferred language is used by the system as the default content language which is the sameacross all Taleo products. If a product does not support the same set of content languages, itwill have its own preference configuration.
In Taleo applications, the languages in which an element is available are indicated in theActivated Languages field. When creating or editing an element, the user can chose thebase language as well as the languages in which an element will be available. The baselanguage of an element is the item’s reference language, usually used as a reference for otherlanguages or fallback display in list mode. The user’s preferred language is used as the defaultbase language when the user creates an element. The base language of an element can be

Basic Concepts Basic Concept
Configuration Guide Taleo 10 SP2 - Recruiting 25
changed at any time by the user. A language must be activated before it can be designated asa base language.
When multiple languages are used for an element, the icon is displayed. Hovering themouse over the icon displays the languages activated for the element. When only onelanguage is used for an element, the name of the language is displayed. When only onelanguage is used in your company, there is no special indicator.
Configuration
The list of languages, presented according to the organization's preferences, is configured bythe following private setting. An application language is the language in which a product canbe viewed.
Setting
Name Possible Values Default Value Location
Application Languages French, English,German,Spanish
Configuration > Settings
When creating new users, use the following settings to configure the correspondence languageand the content language.
Settings
Name Possible Values Default Value Location
CorrespondenceLanguage
Configuration > Settings
Content Language Configuration > Settings
When configuring a specific user, a preferred content language and a preferredcorrespondence language can be set in the user’s account.
User Account Preferences
Name Location
Content Language Configuration > [SmartOrg] Administration > UserAccounts > General Preferences
Correspondence Language Configuration > [SmartOrg] Administration > UserAccounts > General Preferences
Multilingual Deployment
Important Note: (ID 289)There are a few items worty of note for multlingual deploymentsand system behavior.
Requisition Search: When using the search within a requisition, the system will always try tosearch using the user's Recruiting Center session language. If a requisition is not translated intothe User's Recruiting Center session language, then the search criteria used will be empty andthe results will have no bearing on the requisition used to conduct the search. To work past this,

Basic Concepts Basic Concept
Configuration Guide Taleo 10 SP2 - Recruiting 26
users should ensure that requisitions are translated into their application language if they arelooking to use the "Search from this requisition" feature.
Language Fallback: Currently, there is no graceful fallback for the data presented to userswhen it is not available in their preferred language. This will impact customers with multilingualdeployments where managers and candidate language preferences are not the same or jobsare created for managers but not in that manager's language preference (extreme edge case).
Here are two examples to illustrate this point as well as guidance on how to resolve it:
Scenario 1: Candidate data presented in PDF to share recipient during share function.
If a candidate applies in Japanese and the share sender's content language preference isEnglish, the share file generated as well as all labels will be in English. Data for the submissionfile will be unilingual and will render for the user in English for selector fields and Japanese fortext fields (this means things like resume text, cover letter text, work experience and educationwill come through fine). However, any profile based multilingual text and text area fields willnot render for the user. This means for example that if the candidate has entered data into acandidate UDFs text field, it will not render to the share recipient if sent by an English contentlanguage share sender.
To work past this: If the share sender is sending a Japanese candidate submission and wantsthe data to be rendered in Japanese to the share recipient, he/she should change his/hercontent language preference under My Setup to Japanese prior to conducting the share action.
Scenario 2: Requisition approval request not translated into the user's specified contentlanguage.
If a requisition is created in English but a user's preferred content language is French, if therequisition has not been translated into French and is routed to that user for approval, fieldswhich are multilingual text will be missing data when it is routed for approval to that user. Forexample, compensation text fields and job description fields would be impacted by this.
To work past this: Customers should ensure that requisitions are translated into all contentlanguages used by approvers on a specific requisition. If a user does happen to receivea requisition approval request and some data does not come through because it was nottranslated into the user's content language, the user can log into the system and change hiscontent preference to the appropriate language and then go to generate the requisition fileagain. This time, it will render in the updated language preference specified that contains all ofthe data.
Multilingual Requisition and Requisition TemplateBehavior
Users can configure multiple languages on a requisition or requisition template.
Important Note: (ID 320) When editing one of these files in a language other than theRecruiting Center language in use, all labels and drop-down menus will still appear in thelanguage of the Recruiting Center, not the language of the file being edited. Prescreening andtext based content will display in the edit view of the file in the language selected. In addition,users can use the language indicator on the left panel to know which language of the file theyare working with. Edits can be made to drop-down menus in the file in any language; a valueselected in one language will apply to all languages.

Basic Concepts Basic Concept
Configuration Guide Taleo 10 SP2 - Recruiting 27
Selecting the Base LanguageSteps1. Open an element.2. Select Configure next to the Language drop-down list.3. Select the Base option for the desired language.4. Click Save.Result
The word Base appears next to the language in the Language drop-down list.
Activating a LanguagePrerequisite
Element must be in Edit mode.
Steps1. Edit an element.2. In the Activated Languages drop-down list, select Configure.3. For each required language, select Active from the Status drop-down list.4. Click Save.Result
Activated languages appear in the Activated Languages drop-down list.
Deactivating a LanguageSteps1. Edit an element.2. In the Activated Languages drop-down list, select Configure.3. For each language, select Not Used from the Status drop-down list.4. Click Save.Result
Selected languages no longer appear in the Activated Languages drop-down list.
Deep LinkingTaleo supports certain URLs that provide a direct access to Taleo products. Taleo also supportscertain URLs to get access to specific actions within a Taleo product.
Users can click on a hyperlink in an e-mail, portal or other environments outside Taleo'sapplication and navigate directly to a screen in the application.
Using the deep linking feature, the system administrator can provide URLs to users that directlyplace the user on the Recruiting home page, directly into the create requisition process, ordirectly into a specific job requisition or candidate file.
If single sign-on (SSO) is used, users are directed directly where the URL points to, withouthaving to go through the User Sign In page. If SSO is not used, users are first prompted to

Basic Concepts Basic Concept
Configuration Guide Taleo 10 SP2 - Recruiting 28
enter their credentials in the User Sign In page before being able to access the page defined bythe URL.
To create a URL that directs users to a specific action, specific parameters are required. Forexample, the following URL directs users to a specific requisition:
https://taleo.taleo.net/enterprise/publicurl/viewRequisition?requisitionNumber=8765&language=en
Paremeter Description Value
<Product URL> Taleo product identifier URL. taleo.taleo.net
<action> Action available for the product. viewRequisition
<parameter1> Parameter identifier. requisitionNumber
<value1> Key value. 8765
<parameter2> Language (fixed string). language
<value2> Language for the user to view thepage. If no language is specified,the browser language is used. If nolanguage is specified by the browser,the default language used is English.
en
System administrators should evaluate how users are using the product. If specific URLs areappropriate for some audiences, they should implement them to provide easier product oraction access.
Benefits
• Certain URLs can be used to directly access specific sections of Taleo products. They can beused for intranet portal integration and to provide a quicker access to specific informationwithin Taleo products.
Taleo 10 Supported Product URLsTaleo supports certain URLs that provide a direct access to Taleo products.
Change the "client.taleo.net" with the actual zone name.
Version 7.5 Taleo 10
Administrator WebTop Central Configuration
https://client.taleo.net/servlets/art.product.admin.AdminWTServlet?art_servlet_language=en
https://client.taleo.net/smartorg/index.jsf
Note: Users are redirected to the central configuration in Taleo 10.
Table of Contents page Table of Contents page
https://client.taleo.net/smartorg/smartorg/common/toc.jsf?lang=en
https://client.taleo.net/smartorg/smartorg/common/toc.jsf
Sign Out Sign Out

Basic Concepts Basic Concept
Configuration Guide Taleo 10 SP2 - Recruiting 29
Version 7.5 Taleo 10
https://client.taleo.net/smartorg/smartorg/session/applicationLogout.jsf?endReason=UL
https://client.taleo.net/smartorg/iam/accessmanagement/globalLogout.jsf
Staffing WebTop Recruiting Center home page
https://client.taleo.net/servlets/art.product.recruiterwebtop.MainOperatorServlet?art_servlet_language=en
https://client.taleo.net/enterprise/enterprise/flex.jsf
Manager WebTop Recruiting Center home page
https://client.taleo.net/servlets/art.product.hiringmanagerwebtop.HiringManagerWebTopServlet?art_servlet_language=en
https://client.taleo.net/enterprise/enterprise/flex.jsf
Note: Users are redirected to the center stage.
Internal Career Section Internal Career Section
https://client.taleo.net/careersection/x/jobsearch.ftl?lang=en
https://client.taleo.net/careersection/x/jobsearch.ftl?lang=en
X must be replaced by the ID of the internal careersection
X must be replaced by the ID of the internal careersection
Career Section - Job Application Career Section - Job Application
https://client.taleo.net/careersection/<cs_no>/jobapply.ftl?lang=<language>&job=<contest_no_OR_req_id>
https://client.taleo.net//careersection/<cs_no>/jobapply.ftl?lang=<language>&job=<contest_no_OR_req_id>
<cs_no> needs to be the number of the careersection.<language> needs to be replaced with thelanguage abbreviation code.<contest_no_OR_req_id>needs to be replaced with the requisition number or therequisition identification id.
<cs_no> needs to be the number of the careersection.<language> needs to be replaced with thelanguage abbreviation code.<contest_no_OR_req_id>needs to replaced with the requisition number or therequisition identification id.
Career Section - Job Details Career Section - Job Details
https://client.taleo.net/careersection/<cs_no>/jobdetails.ftl?lang=<language>&job=<contest_no_OR_req_id>
https://client.taleo.net//careersection/<cs_no>/jobdetails.ftl?lang=<language>&job=<contest_no_OR_req_id>
<cs_no> needs to be the number of the careersection.<language> needs to be replaced with thelanguage abbreviation code.<contest_no_OR_req_id>needs to be replaced with the requisition number or therequisition identification id.
<cs_no> needs to be the number of the careersection.<language> needs to be replaced with thelanguage abbreviation code.<contest_no_OR_req_id>needs to be replaced with the requisition number or therequisition identification id.
Career Section - Job Referral Career Section - Job Referral
https://client.taleo.net//careersection/<cs_no>/jobrefer.ftl?lang=<language>&job=<contest_no_OR_req_id>
https://client.taleo.net//careersection/<cs_no>/jobrefer.ftl?lang=<language>&job=<contest_no_OR_req_id>
<cs_no> needs to be the number of the careersection.<language> needs to be replaced with the
<cs_no> needs to be the number of the careersection.<language> needs to be replaced with the

Basic Concepts Basic Concept
Configuration Guide Taleo 10 SP2 - Recruiting 30
Version 7.5 Taleo 10
language abbreviation code.<contest_no_OR_req_id>needs to be replaced with the requisition number or therequisition identification id.
language abbreviation code.<contest_no_OR_req_id>needs to be replaced with the requisition number or therequisition identification id.
Onboarding New Hire Portal Onboarding New Hire Portal
https://client.taleo.net/newhireportal/index.jsp https://client.taleo.net/newhireportal/index.jsp
Onboarding Onboarding
https://client.taleo.net/onboarding/index.jsf https://client.taleo.net/onboarding/index.jsf
Taleo Scheduling Center Taleo Scheduling Center
https://TSC.taleo.net/zoneuser/mainMenu.action https://TSC.taleo.net/zoneuser/mainMenu.action
Performance Performance
https://client.taleo.net/orion/flex.jsf?lang=en https://client.taleo.net/orion/flex.jsf?lang=en
Taleo 10 Supported Action URLsTaleo supports certain URLs to get access to specific actions within a Taleo product.
Version 7.5 Taleo 10
Create a requisition Create a requisition
https://client.taleo.net/servlets/art.product.hiringmanagerwebtop.HiringManagerWebTopServlet?art_ip_action=CreateRequisition&art_servlet_language=en
http://client.taleo.net/enterprise/publicurl/createRequisition
Open a requisition Open a specific requisition
https://client.taleo.net/servlets/art.product.hiringmanagerwebtop.HiringManagerWebTopServlet?art_volatile_submited=false&art_ip_action=RequisitionPreview&reqAction=preview&reqToDelete=&reqNoToDelete=&caller_window_initial_language=&caller_window_form_name=&filterChange=0&sortAction=noSort&show_inactive_req=0&action=&requisitionNo=RequisitionNo&displayCurrentPageElement=&jrlSelectedReq=&nextFrame=GenericPage&requisition=&ComponentID=&ListNavigatorActionjrlLN=NO+BUTTON&LHCIdToSortjrlLH=&LHCIdToSwitchjrlLH=&ListHeaderActionjrlLH=&ToolbarActionToExecuteID=&toolbar_submitted=0&jrlLF=-1&art_servlet_language=en
http://client.taleo.net/enterprise/publicurl/viewRequisition?requisitionNumber=8765
Instead of requisitionNumber you can alsospecify the contest number: http://client.taleo.net/enterprise/publicurl/viewRequisition?contestNumber=TOR0000334
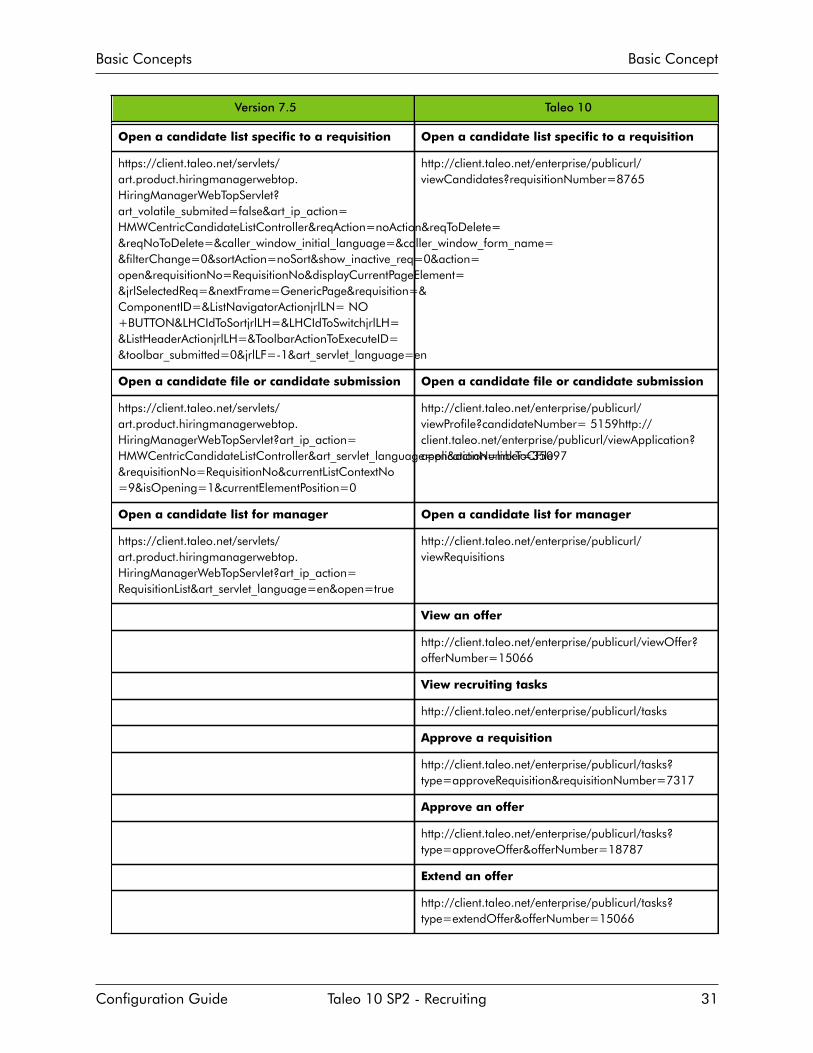
Basic Concepts Basic Concept
Configuration Guide Taleo 10 SP2 - Recruiting 31
Version 7.5 Taleo 10
Open a candidate list specific to a requisition Open a candidate list specific to a requisition
https://client.taleo.net/servlets/art.product.hiringmanagerwebtop.HiringManagerWebTopServlet?art_volatile_submited=false&art_ip_action=HMWCentricCandidateListController&reqAction=noAction&reqToDelete=&reqNoToDelete=&caller_window_initial_language=&caller_window_form_name=&filterChange=0&sortAction=noSort&show_inactive_req=0&action=open&requisitionNo=RequisitionNo&displayCurrentPageElement=&jrlSelectedReq=&nextFrame=GenericPage&requisition=&ComponentID=&ListNavigatorActionjrlLN= NO+BUTTON&LHCIdToSortjrlLH=&LHCIdToSwitchjrlLH=&ListHeaderActionjrlLH=&ToolbarActionToExecuteID=&toolbar_submitted=0&jrlLF=-1&art_servlet_language=en
http://client.taleo.net/enterprise/publicurl/viewCandidates?requisitionNumber=8765
Open a candidate file or candidate submission Open a candidate file or candidate submission
https://client.taleo.net/servlets/art.product.hiringmanagerwebtop.HiringManagerWebTopServlet?art_ip_action=HMWCentricCandidateListController&art_servlet_language=en&action=linkToCFile&requisitionNo=RequisitionNo¤tListContextNo=9&isOpening=1¤tElementPosition=0
http://client.taleo.net/enterprise/publicurl/viewProfile?candidateNumber= 5159http://client.taleo.net/enterprise/publicurl/viewApplication?applicationNumber=35097
Open a candidate list for manager Open a candidate list for manager
https://client.taleo.net/servlets/art.product.hiringmanagerwebtop.HiringManagerWebTopServlet?art_ip_action=RequisitionList&art_servlet_language=en&open=true
http://client.taleo.net/enterprise/publicurl/viewRequisitions
View an offer
http://client.taleo.net/enterprise/publicurl/viewOffer?offerNumber=15066
View recruiting tasks
http://client.taleo.net/enterprise/publicurl/tasks
Approve a requisition
http://client.taleo.net/enterprise/publicurl/tasks?type=approveRequisition&requisitionNumber=7317
Approve an offer
http://client.taleo.net/enterprise/publicurl/tasks?type=approveOffer&offerNumber=18787
Extend an offer
http://client.taleo.net/enterprise/publicurl/tasks?type=extendOffer&offerNumber=15066

Basic Concepts Basic Concept
Configuration Guide Taleo 10 SP2 - Recruiting 32
Version 7.5 Taleo 10
Extend posting
http://client.taleo.net/enterprise/publicurl/tasks?type=posting&requisitionNumber=8178
Amend an approval path
http://client.taleo.net/enterprise/publicurl/tasks?type=amendApprovalPath&requisitionNumber=7498
Finalize start date
http://client.taleo.net/enterprise/publicurl/tasks?type=finalizeStartDate&offerNumber=10437
Confirm employee presence
http://client.taleo.net/enterprise/publicurl/tasks?type=confirmEmployeePresence&applicationNumber=7322
Complete selection process
http://client.taleo.net/enterprise/publicurl/tasks?type=completeSelectionProcess&applicationNumber=7347
Ready for sourcing
http://client.taleo.net/enterprise/publicurl/tasks?type=readyForSourcing&requisitionNumber=5300
Contribute
http://client.taleo.net/enterprise/publicurl/tasks?type=contribute&requisitionNumber=7517
Sourcing strategy to be defined
http://client.taleo.net/enterprise/publicurl/tasks?type=sourcingStrategyToBeDefined&requisitionNumber=7537
To be completed
http://client.taleo.net/enterprise/publicurl/tasks?type=toBeCompleted&requisitionNumber=7483
To be filled
http://client.taleo.net/enterprise/publicurl/tasks?type=toBeFilled&requisitionNumber=6477
Verify
http://client.taleo.net/enterprise/publicurl/tasks?type=verify

Settings, Security, LegalAgreements
• Global Settings and Recruiting Settings................................................................. 34
• Regional Settings..................................................................................................39
• Security Policy Settings..........................................................................................44
• Legal Agreements................................................................................................ 48

Settings, Security, Legal Agreements Global Settings and Recruiting Settings
Configuration Guide Taleo 10 SP2 - Recruiting 34
Global Settings and Recruiting Settings
SettingA setting is used to configure features and elements in Taleo products.
There are two types of settings:
• Global settings: Settings related to multiple Taleo products.• Product settings: Settings specific to each Taleo product, for example, Recruiting,
Onboarding, or Performance.
This table provides paths to access global settings and product specific settings.
Settings
Product Location
Global settings Configuration > [Settings] Settings
SmartOrg settings Configuration > [SmartOrg] Settings
Recruiting settings Configuration > [Recruiting] Settings
Career Section settings Configuration > [Career Section] Settings
Onboarding settings Configuration > [Onboarding] Settings
Taleo Performance settings Configuration > [Taleo Performance] Settings
Settings are configured by system administrators. A default value is set by Taleo prior toapplication delivery. The system administrator can decide to change the value that will beapplied throughout the application. If for a given setting a user can change the value, theuser’s value overrides the value set by the system administrator.
A setting is assigned one of the following security levels:
Security Level Description
Public A system administrator can view and change the setting.
Protected A system administrator can view the setting, but changes canonly be done by Taleo.
Private A system administrator cannot view nor change the setting.Only Taleo can change the setting.
For a list of all available settings, refer to the Excel file entitled Taleo 10 SP3 Settings.xls.
Important Note: (ID 312) It may happen that a system administrator is able to view asetting but is unable to edit it. If this is the case and a setting needs to be modified, pleasecontact Taleo Support and they will make the desired change.

Settings, Security, Legal Agreements Global Settings and Recruiting Settings
Configuration Guide Taleo 10 SP2 - Recruiting 35
Taleo 10 SP2 Settings with Modified Default ValueIn Taleo 10 SP2, the default value of some settings was modified.
Important Note: (ID 276) This change applies only to new zones, not migrated zones.
Setting Name New Default Value Former Default Value Location
Ability to ReopenRequisitions
Yes No Configuration >[Recruiting] Settings
Ace Alert Option Default Ace Alert based onrequirements and assets
Ace Alert based onrequirements and scoring
Configuration >[Recruiting] Settings
Activate Self-assigned TaskManagement
Yes No Configuration >[Recruiting] Settings
Allow Admin UserPermission Updates
Yes No Configuration >[Recruiting] Settings
Approval Workflow Type Position Approval None Configuration >[Recruiting] Settings
Attached File MaximumSize
512000 100000 Configuration > Settings
Automatically RejectCandidates when Closinga Requisition
Yes No Configuration >[Recruiting] Settings
Career Section HitsTracking Activation
Yes No Configuration > [CareerSection] Settings
Career Section Latest PageTracking Activation
Yes No Configuration > [CareerSection] Settings
Communication ChannelURL
Empty en=https://sjasp1.taleo.net/mywebtop
Configuration >[Recruiting] Settings
Conceptual SearchActivation
Yes No Configuration >[Recruiting] Settings
Confirm EmployeePresence Reminder
3 No reminder Configuration >[Recruiting] Settings
Default History EventCategories
Attachments, CandidateProgression, Comments
Attachments Configuration >[Recruiting] Settings
Differentiate Internal andExternal Questions
Yes No Configuration >[Recruiting] Settings
Display IdentificationMissing Candidates
No Yes Configuration >[Recruiting] Settings
Disqualified CandidateReporting Activation
Enabled Disabled Configuration > Settings

Settings, Security, Legal Agreements Global Settings and Recruiting Settings
Configuration Guide Taleo 10 SP2 - Recruiting 36
Setting Name New Default Value Former Default Value Location
Enable DisqualificationQuestions
Yes No Configuration> [Recruiting]SettingsConfiguration >[Career Section] Settings
Enable eShare Email forResponse Center Access
Yes No Configuration > Settings
Enable New Hire Portal toDisplay New Layout
Yes No Configuration >[Onboarding] Settings
Enable Resume Parsing Yes No Configuration> [Recruiting]SettingsConfiguration >[Career Section] Settings
Explanation inDisqualification Questions
Yes No Configuration >[Recruiting] Settings
Highlight Keywords AfterSearch
Yes No Configuration >[Recruiting] Settings
Interview ManagementActivation
Yes No Configuration >[Recruiting] Settings
Invitation To Self-identify None 0 Configuration > [CareerSection] Settings
Job Posting Notification(Internal Candidates)
Yes No Configuration >[Recruiting] Settings
Maximum Size ofCandidate Attachment
512000 500000 Configuration > [CareerSection] Settings
Merge Form Activation Yes No Configuration >[Recruiting] Settings
My Webtop Offer ChannelActivation
Yes No Configuration >[Recruiting] Settings
OFCCP Search TraceCandidate IDs Activation
No Yes Configuration >[Recruiting] Settings
Offer Start Date Time ZoneActivation
Yes **empty** Configuration >[Recruiting] Settings
Posting AccountPrecedence Order
User Requisition User Configuration >[Recruiting] Settings
Request More Info Active None 0 Configuration > [CareerSection] Settings
Requisition NumberControl
By the System By the User or the System Configuration >[Recruiting] Settings
Requisition Number InitialValue
1 100 Configuration >[Recruiting] Settings

Settings, Security, Legal Agreements Global Settings and Recruiting Settings
Configuration Guide Taleo 10 SP2 - Recruiting 37
Setting Name New Default Value Former Default Value Location
Requisition Number PrefixBase
Year of creation Job Configuration >[Recruiting] Settings
Requisition NumberSequence Length
6 5 Configuration >[Recruiting] Settings
RMI Requirements DefaultValue
No RMI RMI based on requirementsand scoring
Configuration >[Recruiting] Settings
RMI Score Default Value 0 60 Configuration >[Recruiting] Settings
Send Rejection Letter toMatched Candidates
Never New Configuration >[Recruiting] Settings
Send Rejection Letter toRejected Candidates
No Yes Configuration >[Recruiting] Settings
Source Tracking QuestionsMandatory
Yes No Configuration >[Recruiting] Settings
SSO Enabled BetweenProducts
Yes No Configuration > Settings
Submission ScoringActivation
No Yes Configuration >[Recruiting] Settings
Tracking Mode Source Event Configuration >[Recruiting] Settings
Warning Before PostingExpires
3 0 Configuration >[Recruiting] Settings
Configuring a SettingPrerequisite
The security level of the setting must be Public.
The Manage Settings user type permission is required.
Configuration
Steps
1. In the Configuration page, click Settings for the desired product.2. Locate the setting using the Refine by list or the Feature column.3. Click on a setting.4. Click Edit next to the name of the setting.5. Make changes.6. Click Save.
Settings, Security, Legal Agreements Global Settings and Recruiting Settings
Configuration Guide Taleo 10 SP2 - Recruiting 38
Resetting the Default Value of a SettingPrerequisite
The security level of the setting must be Public.
The Manage Settings user type permission is required.
For global settings:
Configuration > [Settings] Settings
For product settings:
Configuration > [Product name] Settings
Steps
1. Click on the name of a setting.2. Click Reset next to the name of the setting.
Result
The default values of the setting is restored and reflects in the application.
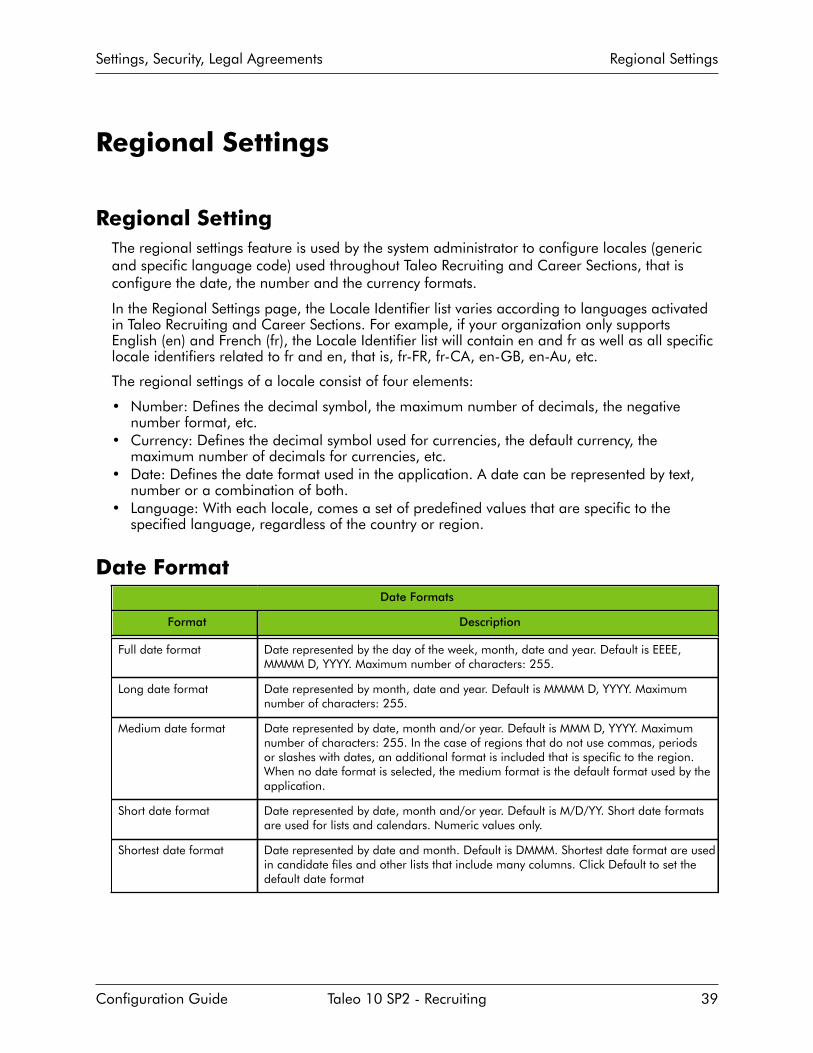
Settings, Security, Legal Agreements Regional Settings
Configuration Guide Taleo 10 SP2 - Recruiting 39
Regional Settings
Regional SettingThe regional settings feature is used by the system administrator to configure locales (genericand specific language code) used throughout Taleo Recruiting and Career Sections, that isconfigure the date, the number and the currency formats.
In the Regional Settings page, the Locale Identifier list varies according to languages activatedin Taleo Recruiting and Career Sections. For example, if your organization only supportsEnglish (en) and French (fr), the Locale Identifier list will contain en and fr as well as all specificlocale identifiers related to fr and en, that is, fr-FR, fr-CA, en-GB, en-Au, etc.
The regional settings of a locale consist of four elements:
• Number: Defines the decimal symbol, the maximum number of decimals, the negativenumber format, etc.
• Currency: Defines the decimal symbol used for currencies, the default currency, themaximum number of decimals for currencies, etc.
• Date: Defines the date format used in the application. A date can be represented by text,number or a combination of both.
• Language: With each locale, comes a set of predefined values that are specific to thespecified language, regardless of the country or region.
Date FormatDate Formats
Format Description
Full date format Date represented by the day of the week, month, date and year. Default is EEEE,MMMM D, YYYY. Maximum number of characters: 255.
Long date format Date represented by month, date and year. Default is MMMM D, YYYY. Maximumnumber of characters: 255.
Medium date format Date represented by date, month and/or year. Default is MMM D, YYYY. Maximumnumber of characters: 255. In the case of regions that do not use commas, periodsor slashes with dates, an additional format is included that is specific to the region.When no date format is selected, the medium format is the default format used by theapplication.
Short date format Date represented by date, month and/or year. Default is M/D/YY. Short date formatsare used for lists and calendars. Numeric values only.
Shortest date format Date represented by date and month. Default is DMMM. Shortest date format are usedin candidate files and other lists that include many columns. Click Default to set thedefault date format

Settings, Security, Legal Agreements Regional Settings
Configuration Guide Taleo 10 SP2 - Recruiting 40
Details About Date Format
Format Description
Text A date element that always appears in the form of text, such as days of the week, will bedisplayed in long form if four letters are used for its representation on the Date tab. Ifless than four letters are used, the date element will appear in an abbreviated form. Forexample, configuring a date format using “EEE” would produce “Fri” for Friday, whileusing “EEEE” would produce the long form “Friday”.
Numbers The system adds zeroes to single numbers in certain cases. For example, if the dateelement “DD” is part of the date format, the ninth day of the month will be displayedwith a leading zero, thus, “09”. If the date element is “D”, however, the system willdisplay “9” without a leading zero.
Text and Numbers When the date format element is composed of one or two characters, a numeric valueresults. For example, if the date format element is “M” or “MM”, the month of Februarywill be depicted as “2” and “02” respectively. On the other hand, a date format elementmade up of three or more characters will result in a textual representation of the date:in the case of “MMM”, February will appear as “FEB”, if “MMMM” is used, February willbe displayed as “February”.
Date Format Syntax
Symbol Meaning Presentation Example(US locale)
Y Year Numeric 2009
M Month of the year Alphanumeric July, Jul. or 07
D Day of the month Numeric 10
H Hour AM/PM (1-12) Numeric 12
h Hour of the day (0-23) Numeric 22
m Minute of the hour Numeric 38
s Seconds Numeric 59
E Day of the week Textual Tue, Tuesday
a AM/PM marker Textual PM
K Hour in AM/PM (0-11) Numeric 0
‘ Escape for text Delimiter ‘
‘‘ Single quotation mark (twice the escapecharacter)
Literal
Locale IdentifierLocale Language used in the Career Section
da Danish
de German
en English

Settings, Security, Legal Agreements Regional Settings
Configuration Guide Taleo 10 SP2 - Recruiting 41
Locale Language used in the Career Section
es Spanish
fr French
it Italian
ja Japanese
nl Dutch
pl Polish
pt Portuguese
ru Russian
sv Swedish
zh Simplified Chinese
Configuring the CurrencyPrerequisite
Configuration > [Recruiting] Administration > Regional Settings
Steps
1. Click on the name of a locale identifier.2. Click the Currency tab.3. Select the values for each setting.4. Click Done.
Result
The decimal symbol used for currencies, the default currency, and the maximum numberof decimals for currencies used in Taleo Recruiting are now configured and will be appliedeach time a currency is displayed in Taleo Recruiting.
Next Step
Configuring the date format.
Configuring the number format.
Selecting a locale.
Configuring the Number FormatPrerequisite
Configuration > [Recruiting] Administration > Regional Settings
Steps
1. Click on the name of a locale identifier.2. Click the Number tab.

Settings, Security, Legal Agreements Regional Settings
Configuration Guide Taleo 10 SP2 - Recruiting 42
3. Select a value for each setting.4. Click Done.
Result
The decimal symbol, the maximum number of decimals, the negative number format used inTaleo Recruiting are now selected and will be applied in Taleo Recruiting each time numbersare displayed.
Next Step
Configuring the date format.
Configuring the currency.
Selecting a preferred locale.
Configuring the Date FormatPrerequisite
Configuration > [Recruiting] Administration > Regional Settings
Steps
1. Click on the name of a locale identifier.2. Click the Date tab.3. Select a value for each setting.4. Click Done.
Result
The date format configuration is applied in Taleo Recruiting each time a date is displayed.
Next Step
Configuring the number format.
Configuring the currency.
Selecting a preferred locale.
Selecting a Preferred LocalePrerequisite
More than one locale must be available.
Configuration > [Recruiting] Administration > Regional Settings
Steps
1. Click on the name of a locale identifier.2. Click the General tab.3. Select a value.4. Click Done.

Settings, Security, Legal Agreements Regional Settings
Configuration Guide Taleo 10 SP2 - Recruiting 43
Result
The selected locale is displayed by default when more than one locale is available.
Next Step
Configuring the date format.
Configuring the currency format.
Configuring the number format.

Settings, Security, Legal Agreements Security Policy Settings
Configuration Guide Taleo 10 SP2 - Recruiting 44
Security Policy Settings
Security PolicySecurity policies are settings related to the sign in, user account, password and forgot passwordprocesses.
Settings for the following features can be modified:
• Sign in• User Account• Password• Forgot password
A History section provides information on actions performed on security settings such as thedate and time, a description and details on the action, as well as the “actor” (person or system)who performed the action.
For details on security policy settings, look at the list entitled Security Policy Settings.
Security Policy SettingsSecurity Policy - Sign In Settings
Setting Description
Display the link "Forgot your password?" Yes (default), No. When Yes is selected, the Forgot yourPassword link is displayed in the Sign In page.
Show the legal agreement to users at login. Yes, No (default).
Security Policy - User Account Settings
Setting Description
Number of incorrect sign-in attempts allowed per userbefore his/her account is locked
Unlimited, 3 (default), 5, 10, 15, 20, 100. Determinesthe maximum number of times a user can enterincorrect information during sign-in before the user’saccount is locked.
Period during which the system prevents access to anaccount that has been locked
Permanent (default); 2, 5, 10, 15 minutes; 1, 4 hours; 1day; 1 week; 30 days.
When creating a user account, send an email to user toconfirm registration and password.
Yes, No (default).
When creating a user account, generate automatically auser name.
Yes, No (default).
When creating a user account, generate automatically apassword.
Yes, No (default).

Settings, Security, Legal Agreements Security Policy Settings
Configuration Guide Taleo 10 SP2 - Recruiting 45
Security Policy - Password Settings
Setting Description
Allow a password to be valid for X days (leave the fieldempty if you want passwords to be always valid)
Number of days before a user must change his/herpassword. Putting no values means that the password isalways valid.
When a password change is required, prevent the reuseof the previous X passwords
Number of password changes required before a usercan use a password that he/she has used previously.Putting 0 means that the feature is disabled. 0 (defaultvalue).
Require passwords that contain at least X characters 6 to 20.
Require passwords that contain no more than Xcharacters
6 to 50. The system will start counting the number ofcharacters from the maximum number of charactersselected in the setting “Require passwords that containat least x characters”. For example, if you selected 10characters, the system will indicate a possible valuebetween 10 and 50.
Require passwords that contain at least X letters of theRoman alphabet
0 to 20. The number of characters cannot exceed thenumber indicated in the setting “Require passwords thatcontain at least x characters”.
Require passwords that contain at least X lowercaseletters of the Roman alphabet
0 to 20. The number of characters cannot exceed thenumber indicated in the setting “Require passwords thatcontain at least x characters”.
Require passwords that contain at least X uppercaseletters of the Roman alphabet
0 to 20. The number of characters cannot exceed thenumber indicated in the setting “Require passwords thatcontain at least x characters”.
Require passwords that contain at least X numericcharacters
0 to 20. The number of characters cannot exceed thenumber indicated in the setting “Require passwords thatcontain at least x characters”.
Require passwords that contain at least X charactersother than letters and numbers (! # $ % & ( ) * + ,- . / : ; < = > ? @ [ ] _ ` { | } ~)
0 to 20. The number of characters cannot exceed thenumber indicated in the setting “Require passwords thatcontain at least x characters”.
Require passwords that contain no more than X identicalconsecutive characters
2, 3, 4, 5. The number of characters cannot exceed thenumber indicated in the setting “Require passwords thatcontain at least x characters”.
Require passwords that do not contain the user's firstname
Yes, No (default).
Require passwords that do not contain the user's lastname
Yes, No (default).
Require passwords that do not contain thecorresponding user name
Yes (default), No.
Require passwords that do not contain the user's emailaddress
Yes, No (default).
Security Policy - Forgot Password Settings
Setting Description
Use this method to change passwords For details, see below.

Settings, Security, Legal Agreements Security Policy Settings
Configuration Guide Taleo 10 SP2 - Recruiting 46
Security Policy - Forgot Password Settings
Setting Description
Number of incorrect attempts allowed per user to enterthe email address
3, 5
Lock a user’s account when the number of incorrectattempts allowed to enter the email address is exceeded
Yes, No.
Details regarding the setting “Use this method to change passwords”
The change password procedure contains six options of authentication:
Options of the “Use this method to change passwords” Setting
Option Description
Access Code An email containing an access code is sent to the useronce the user has confirmed his/her email address.
Security Questions The user is asked to answer the security questionpreviously entered in his/her profile. If the answer iscorrect, the user is invited to enter a new password.
Security Questions and Access Code The user is asked to answer the security questionpreviously entered in his/her profile. If the answer iscorrect, an email containing an access code is sent tothe user once the user has confirmed his/her emailaddress.
Security Questions or Access Code The user is asked to answer the security questionpreviously entered in his/her profile. If the answer iscorrect and the user has an email address, an accesscode is sent to the user once the user has confirmedhis/her email address. If the user does not have anemail address and the answer to the security question iscorrect, the access is granted to the application and theuser is invited to change his/her password.
Security Questions and/or Access Code When this option is activated, one of the followingsituation will happen. Se the Security Questions and/OrAccess Code table.
Contact System Administrator The user is asked to contact the system administrator.Only the system administrator can then generate a newpassword and communicate it to the user.
Details regarding the “Security Question and/or Access Code” option
The user has an email address Security questions were activated
Yes Yes The user will have to answer thesecurity questions correctly and anaccess code will be emailed.
Yes No The user will receive an access codeby email.

Settings, Security, Legal Agreements Security Policy Settings
Configuration Guide Taleo 10 SP2 - Recruiting 47
Details regarding the “Security Question and/or Access Code” option
The user has an email address Security questions were activated
No Yes The user will have to answer thesecurity questions correctly to be ableto access the application.
No No The user will be asked to contact thetechnical support.
Configuring Security PoliciesPrerequisite
The Manage security policies user type permission is required.
Configuration > Security Policies
Steps
1. In the Security Policies page, click Edit next to a topic.2. In the Editor page, select a value for each required setting.3. Click Save.
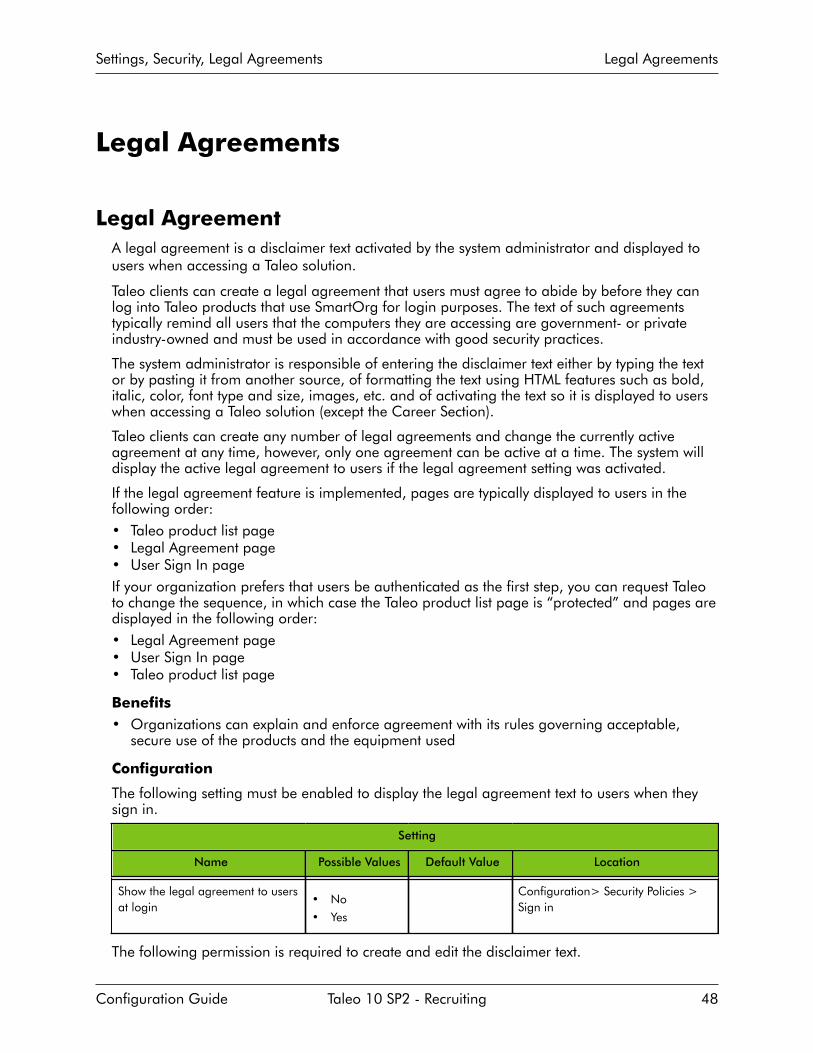
Settings, Security, Legal Agreements Legal Agreements
Configuration Guide Taleo 10 SP2 - Recruiting 48
Legal Agreements
Legal AgreementA legal agreement is a disclaimer text activated by the system administrator and displayed tousers when accessing a Taleo solution.
Taleo clients can create a legal agreement that users must agree to abide by before they canlog into Taleo products that use SmartOrg for login purposes. The text of such agreementstypically remind all users that the computers they are accessing are government- or privateindustry-owned and must be used in accordance with good security practices.
The system administrator is responsible of entering the disclaimer text either by typing the textor by pasting it from another source, of formatting the text using HTML features such as bold,italic, color, font type and size, images, etc. and of activating the text so it is displayed to userswhen accessing a Taleo solution (except the Career Section).
Taleo clients can create any number of legal agreements and change the currently activeagreement at any time, however, only one agreement can be active at a time. The system willdisplay the active legal agreement to users if the legal agreement setting was activated.
If the legal agreement feature is implemented, pages are typically displayed to users in thefollowing order:• Taleo product list page• Legal Agreement page• User Sign In pageIf your organization prefers that users be authenticated as the first step, you can request Taleoto change the sequence, in which case the Taleo product list page is “protected” and pages aredisplayed in the following order:• Legal Agreement page• User Sign In page• Taleo product list page
Benefits• Organizations can explain and enforce agreement with its rules governing acceptable,
secure use of the products and the equipment used
Configuration
The following setting must be enabled to display the legal agreement text to users when theysign in.
Setting
Name Possible Values Default Value Location
Show the legal agreement to usersat login
• No
• Yes
Configuration> Security Policies >Sign in
The following permission is required to create and edit the disclaimer text.

Settings, Security, Legal Agreements Legal Agreements
Configuration Guide Taleo 10 SP2 - Recruiting 49
User Type Permission
Name Location
Manage legal agreements Configuration > [SmartOrg] Administration > UserTypes > Configuration > Security Management
Creating a Legal AgreementPrerequisite
The Manage legal agreements user type permission is required.
Configuration > Legal Agreements
Steps
1. Click Create.2. Complete fields as required.3. Apply formatting to the text to organize information, facilitate readability and draw
attention to particular passages.4. Click Save.
Next Step
Activating the legal agreement.
Modifying a Legal AgreementPrerequisite
The Manage legal agreements user type permission is required.
Configuration > Legal Agreements
Steps
1. Click on a legal agreement.2. Click Edit next to properties.3. Modify fields as required.4. Click Save.
Deleting a Legal AgreementPrerequisite
The legal agreement must be active.
The Manage legal agreements user type permission is required.
Configuration > Legal Agreements
Steps
1. Click Delete next to the agreement.

Settings, Security, Legal Agreements Legal Agreements
Configuration Guide Taleo 10 SP2 - Recruiting 50
2. Answer Yes to the message that appears.
Result
The legal agreement is permanently deleted from the database. If the legal agreement wasactive, it will no longer be displayed to users when signing in a Taleo solution.
Activating a Legal AgreementPrerequisite
The Manage legal agreements user type permission is required.
Only one legal agreement can be activated at a time.
The legal agreement must be deactivated or draft.
Configuration > Legal Agreements
Steps
1. Click on the name of a legal agreement.2. Click Activate next to Properties.
Result
The activated legal agreement is displayed to users in Taleo solutions if the Show the legalagreement to users at login security policy is set to Yes.
Deactivating a Legal AgreementPrerequisite
The Manage legal agreements user type permission is required.
The legal agreement must be active.
Configuration > Legal Agreement
Steps
1. Cick on the name of a legal agreement.2. Click Deactivate next to Properties.
Result
The deactivated legal agreement is no longer displayed when users sign in a Taleo solution.
Displaying the Legal Agreement to Users at LoginPrerequisite
The Manager security policies user type permission is required.
Configuration > Security Policies
Steps
1. Click Edit next to Sign In.

Settings, Security, Legal Agreements Legal Agreements
Configuration Guide Taleo 10 SP2 - Recruiting 51
2. Select Yes for the Show the legal agreements to users at login option.3. Click Save.
Hiding the Legal Agreement to Users at LoginPrerequisite
The Manager security policies user type permission is required.
Configuration > Security Policies
Steps
1. Click Edit next to Sign In.2. Select No for the Show the legal agreements to users at login setting.3. Click Save.

Foundation Data
• Organization - Location - Job Field...................................................................... 53
• Department..........................................................................................................72
• Position................................................................................................................ 78
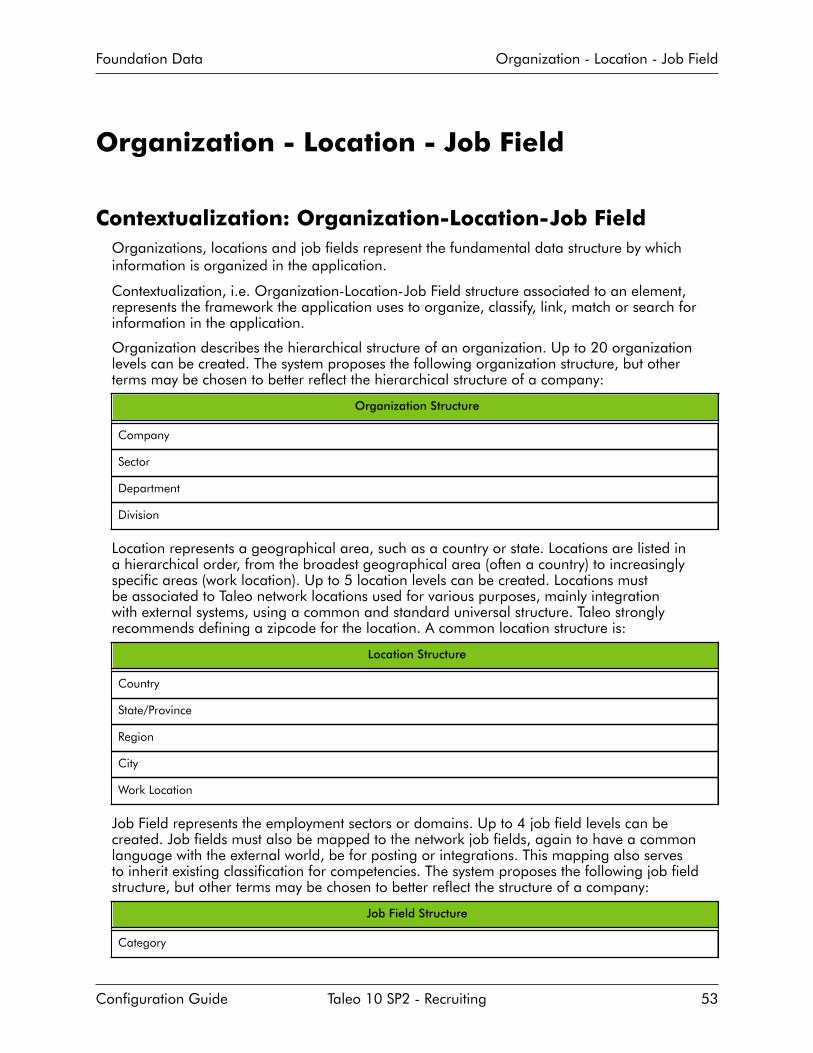
Foundation Data Organization - Location - Job Field
Configuration Guide Taleo 10 SP2 - Recruiting 53
Organization - Location - Job Field
Contextualization: Organization-Location-Job FieldOrganizations, locations and job fields represent the fundamental data structure by whichinformation is organized in the application.
Contextualization, i.e. Organization-Location-Job Field structure associated to an element,represents the framework the application uses to organize, classify, link, match or search forinformation in the application.
Organization describes the hierarchical structure of an organization. Up to 20 organizationlevels can be created. The system proposes the following organization structure, but otherterms may be chosen to better reflect the hierarchical structure of a company:
Organization Structure
Company
Sector
Department
Division
Location represents a geographical area, such as a country or state. Locations are listed ina hierarchical order, from the broadest geographical area (often a country) to increasinglyspecific areas (work location). Up to 5 location levels can be created. Locations mustbe associated to Taleo network locations used for various purposes, mainly integrationwith external systems, using a common and standard universal structure. Taleo stronglyrecommends defining a zipcode for the location. A common location structure is:
Location Structure
Country
State/Province
Region
City
Work Location
Job Field represents the employment sectors or domains. Up to 4 job field levels can becreated. Job fields must also be mapped to the network job fields, again to have a commonlanguage with the external world, be for posting or integrations. This mapping also servesto inherit existing classification for competencies. The system proposes the following job fieldstructure, but other terms may be chosen to better reflect the structure of a company:
Job Field Structure
Category

Foundation Data Organization - Location - Job Field
Configuration Guide Taleo 10 SP2 - Recruiting 54
Job Field Structure
Function
Specialty
Although Organization-Location-Job Field structures are configured with the help of aTaleo representative during the implementation phase (Implementation operation mode),modifications to structure elements can be done in maintenance mode at any time. It ispossible to customize the application to reflect a company’s unique structure and makemodifications to Organization-Location-Job field elements in real time so that the dataaccounts for any changes in the structure.
There are several key elements of Taleo solution that are tied to contextualization(Organization-Location-Job field structure), such as:• candidate selection workflow• requisitions and requisition templates• message templates• onboarding processes• reporting• integration• user management• source tracking• prescreening competencies, questions and assessments• approvals• etc.The purpose of contextualizing an element (that is, associating it to organizations, locationsand/or job fields) is to make the element relevant according to a specific context. Below is anexample of contextualization with candidate selection workflows.
Organization Location Job Field
Requisition Urban transportation United States/California/Los Angeles
Bus driver
CSW1 Urban transportation United States/California/San Jose
Bus driver
CSW2 Urban transportation United States Bus driver
The CSW1 would not be available to the user for this requisition, because the last level of itsLocation does not match that of the requisition.
The CSW2 could be available to the user for this requisition. The parent element of the lowestlevel of the requisition for each dimension (Organization, Location or Field) must be the sameas the lowest level of the workflow for each dimension:
When using contextualization, the system applies the AND operator between Organizations,Locations and Job Fields entities. However, the OR operator is applied between elements of thesame entity.
In the following example, a field would be displayed if Canada (or any of its children) ANDArchitecture were selected.
Location Canada

Foundation Data Organization - Location - Job Field
Configuration Guide Taleo 10 SP2 - Recruiting 55
Job Field Architecture
In the following example, a field would be displayed if Canada AND Architecture wereselected, or if United States AND Architecture were selected.Location Canada
Location United States
Job Field Architecture
Configuration
To manage organizations, locations and job fields in SmartOrg, the following permission isrequired.
User Type Permission
Name Location
Manage foundation data Configuration > [SmartOrg] Administration > User Types >Configuration > Foundation Data
MappingMapping is essential to the Organization, Location, and Job Field concept because it allows thecreation of an association between a custom element and a standard element from an externalsystem.
Through mapping, it is possible to organize and exchange data between two or more systemsin a compatible format. Mapping locations, for example, helps the application to communicatelocation information to job boards when posting a requisition. The two systems agree thatthe data structure location will represent a geographical place such as a country, a state or acity. The systems are then able to swap information based on a mutually comprehensible dataexchange agreement.
Structure ManagementThe Structure Editor lets you create and delete organization, location, and job field levelsaccording to your organization’s needs. The structure that you establish in the Structure Editorwill form the basis of the Organizations, Locations, and Job Fields throughout the application.
Creating the Organization-Location-Job Field StructurePrerequisite
The Manage Foundation Data user type permission is required.
The application must be in implementation mode.
Configuration > [SmartOrg] Administration
Steps
1. Click Structure Management under Organizations, Locations or Job Fields.2. Click Edit.

Foundation Data Organization - Location - Job Field
Configuration Guide Taleo 10 SP2 - Recruiting 56
3. Click Create to add levels.4. Enter a description for each level.5. Translate the description into every supported content language.6. In the Displayed column, select the levels that you want to display to the user.
For organizations and job fields, the levels must be displayed in sequence. For example,you can choose to display levels 1 to 3 and not 4, but you cannot display 1, 2, 4, but not3.
7. Click Save.
Adding a Level to the Organization-Location-Job FieldStructure
Prerequisite
The Manage Foundation Data user type permission is required.
The application must be in implementation mode.
Configuration > [SmartOrg] Administration
Steps
1. Click Structure Management under Organizations, Locations or Job Fields.2. Click Edit.3. Click Create to add levels.4. Enter a description for each level.5. Translate the description into every supported content language.6. In the Displayed column, select the levels that you want to display to the user.
The levels must be displayed in sequence. For example, you can choose to display levels1 to 3 and not 4, but you cannot display 1, 2, 4, but not 3.
7. Click Save.
Editing a Level in the Organization-Location-Job FieldStructure
Prerequisite
The Manage Foundation Data user type permission is required.
To edit the description of a level, the system must be in maintenance mode.
To edit which levels are displayed, the system must be in implementation mode.
Configuration > [SmartOrg] Administration
Steps
1. Click Structure Management under Organizations, Locations or Job Fields.2. Click Edit.3. Make required changes.4. Click Save.

Foundation Data Organization - Location - Job Field
Configuration Guide Taleo 10 SP2 - Recruiting 57
Deleting a Level in the Organization-Location-Job FieldStructure
Prerequisite
The Manage Foundation Data user type permission is required.
The application must be in implementation mode.
If you want to delete a level in the Organization structure, you must first move elements thatare attached to it to another level. You cannot delete levels if elements are linked to the level.
Configuration > [SmartOrg] Administration
Steps
1. Click Structure Management under Organizations, Locations or Job Fields.2. Click Edit.3. Click Delete next to the desired level.
Element ManagementThe Element Management feature allows a system administrator to view the properties of theOrganizations-Locations-Job Fields structure and to manage their children.
Creating an Element for the Organization-Location-JobField Structure
Prerequisite
The Manage Foundation Data user type permission is required.
The application must be in implementation mode or maintenance mode.
Entering a sequence number will overwrite the default alphabetical sequencing available inthe system.
For an element to be active, all of its parents must be active. If not, the Active (Pending)status will appear in the Status column.
Configuration > [SmartOrg] Administration
Steps
1. Click Element Management under Organizations, Locations or Job Fields.2. Click Create next to Children.3. Complete the fields.4. Click Save.

Foundation Data Organization - Location - Job Field
Configuration Guide Taleo 10 SP2 - Recruiting 58
Editing an Element in the Organization-Location-JobField Structure
Prerequisite
The Manage Foundation Data user type permission is required.
The application must be in implementation mode or maintenace mode.
Configuration > [SmartOrg] Administration
Steps
1. Click Element Management under Organizations, Locations or Job Fields.2. Click Edit in the Actions column.3. Make the required changes.4. Click Save.
Moving an Element in the Organization-Location-JobField Structure
Prerequisite
The Manage Foundation Data user type permission is required.
The application must be in implementation mode or maintenance mode.
You can only move organizations. Locations and job fields cannot be moved.
Configuration > [SmartOrg] Administration
Steps
1. Click Element Management under Organizations, Locations or Job Fields.2. In the list of Children, select the element that you want to move.3. Click Move.4. Specify under which organization you want to move the selected element.5. Click Save.
Deleting an ElementPrerequisite
The Manage Foundation Data user type permission is required.
The application must be in implementation mode or maintenace mode.
Configuration > [SmartOrg] Administration
Steps
1. Click Element Management under Organizations, Locations or Job Fields.2. In the list of Children, select the desired element.3. Click Delete.

Foundation Data Organization - Location - Job Field
Configuration Guide Taleo 10 SP2 - Recruiting 59
If the organization, location or job field that you want to delete has elements, you mustreassign the elements to another organization, location or job field. Click OK in themessage box. When the selector opens, you can reassign the elements by selecting anew organization, location or job field. All the elements (templates, requisitions andcandidates) associated to the organization, location or job field are now reassigned tothe organization, location or job field selected above.
Adding an Element to the Location or Job Field StructurePrerequisite
The Manage Foundation Data user type permission is required.
The application must be in implementation mode or maintenace mode.
Configuration > [SmartOrg] Administration
Steps
1. Click Element Management under Organizations, Locations or Job Fields.2. Click Add next to Children.3. Select the desired element.4. Click Select.
Element DeactivationOver time, Taleo clients might need to deactivate or reactivate certain Organization-Location-Job Field elements in SmartOrg to ensure that the foundation data structure reflects changes totheir business process structure.
Reports mention whether the status of an Organization-Location-Job Field element is Activeor Inactive. In addition, if you deactivate Organization-Location-Job Field elements, they areno longer displayed in the Recruiting Center but if elements or users are part of requisitions,templates, questions, tasks, candidates, etc. and the elements or users are deactivatedafterward, that information is retained for reporting purposes.
If a parent Organization, Location, or Job Field element is deactivated or reactivated, all childelements are updated to have the same state as the parent element.
If an Organization-Location-Job Field element is part of a record (e.g., requisition or candidatefile) and the element is deactivated, the system continues to display the element in the record.The Organization-Location-Job Field element is not displayed, however, in Organization-Location-Job Field selectors (e.g., Location Selector) if a user creates a new record or edits anexisting one. Recruiting Center users can delete a deactivated Organization-Location-Job Fieldelement from an existing record.
Deactivation is available via Taleo Connect Client (TCC). This can be done by changing thestatus of the Organization-Location-Job Field element.
Career Section Impact• If an Organization-Location-Job Field element is part of a candidate’s profile and
the element is deactivated, the system continues to display the element in the profile.Candidates cannot add a deactivated Organization-Location-Job Field element to theirprofile.

Foundation Data Organization - Location - Job Field
Configuration Guide Taleo 10 SP2 - Recruiting 60
• A candidate cannot add a deactivated Organization-Location-Job Field element to a newsearch.
• A candidate cannot add a deactivated Organization-Location-Job Field element to a savedsearch.
• If the candidate runs a saved search that includes a deactivated Organization-Location-Job Field element, the search uses the next higher active Organization-Location-Job Fieldelement; if there is no parent element, the criteria is excluded from the search.
• If a saved search contains a deactivated Organization-Location-Job Field element, thesearch uses the closest active parent element. The deactivated Organization-Location-JobField element is ignored if no parent element exists.
Recruiting Center Impacts
Recruiting Center
Functionality Impact
A deactivated Organization-Location-Job Field element can be included in searchcriteria. This enables the user to retrieve candidates whose candidate file includes anOrganization-Location-Job Field element that has since been deactivated.
Advanced searchIf a saved search includes an Organization-Location-Job Field element that has sincebeen deactivated, the element remains part of the search strategy and the searchresults. The element remains a search criterion if the search is repeated.
If an Organization-Location-Job Field element is deactivated, it continues to bedisplayed in a candidate file.
A deactivated Organization-Location-Job Field element is no longer displayed if theProfile tab is edited. This is recorded in the History tab.
If a user creates a candidate file or a candidate creates a profile, deactivatedOrganization-Location-Job Field elements are displayed in the Organization-Location-Job Field Selector windows.
A deactivated Organization-Location-Job Field element has no effect on sourcetracking contextualization.
Candidate File
A deactivated Organization-Location-Job Field element has no effect on LUDSselection contextualization.
Candidate Match A deactivated Organization-Location-Job Field element is not displayed.
Correspondence The system continues to use deactivated Organization-Location-Job Field elements forcontextualization of template.
If a Job is selected, it continues to be displayed if it is deactivated afterward.
If a Job is selected, and the Job element is later deactivated, and a user then attemptsto edit the Job, the deactivated Job continues to be displayed and can be edited.
Offers (Competitive/Expectation)
If a Job is deactivated, it is no longer displayed in the Selector window.
Prescreening andDisqualification Questions
Prescreening questions and disqualification questions retain their association withdeactivated Organization-Location-Job Field elements.

Foundation Data Organization - Location - Job Field
Configuration Guide Taleo 10 SP2 - Recruiting 61
Recruiting Center
Functionality Impact
A deactivated Organization-Location-Job Field element is not displayed.
Questions associated with a deactivated Organization-Location-Job Field element areonly displayed if the user selects an element and then selects Show all questions.
Questions keep their Active status even if the associated Organization-Location-JobField element has been deactivated.
Requisitions and templates retain their association with deactivated Organization-Location-Job Field elements.
A deactivated Organization-Location-Job Field element is not displayed.
Requisitions associated to a deactivated Organization-Location-Job Field elementare only displayed if they are associated with other Organization-Location-Job Fieldelements whose status is Active. For example, a Location element has been deactivatedbut the corresponding Job Field and/or Organization elements have an Active status.
When editing requisitions and templates that contain a deactivated Organization-Location-Job Field element, the requisitions retain their Active status.
If users edit the requisition, this action does not affect the requisition’s association withthe deactivated Organization-Location-Job Field element.
When editing requisitions and templates that contain a deactivated Organization-Location-Job Field element, the deactivated Organization-Location-Job Field elementis not displayed in the Organization-Location-Job Field Selector windows (e.g.:Location Selector).
When creating a requisition or a template, a deactivated Organization-Location-JobField element is not displayed.
When creating a requisition or a template, a deactivated Organization-Location-JobField element is not displayed in Organization-Location-Job Field Selector windows(e.g.: Location Selector).
Requisition Templates
When duplicating a requisition or a template, a deactivated Organization-Location-Job Field element is not displayed in Organization-Location-Job Field Selectorwindows (e.g.: Location Selector).
Competencies associated with a deactivated Organization-Location-Job Field elementare only displayed if the user selects an element and then selects Show all questions.
Competencies retain their association with deactivated Organization-Location-JobField elements.
Competencies keep their Active status even if the associated Organization-Location-Job Field element has been deactivated.
Competencies
A deactivated Organization-Location-Job Field element is not displayed.

Foundation Data Organization - Location - Job Field
Configuration Guide Taleo 10 SP2 - Recruiting 62
Recruiting Center
Functionality Impact
When selecting a requisition, a deactivated Organization-Location-Job Field is notdisplayed.
When selecting a requisition, the requisition can be selected based on deactivatedOrganization-Location-Job Field’s next highest active parent element.
When creating an Organization-Location-Job Field block, a deactivated Organization-Location-Job Field is not displayed in the Organization-Location-Job Field Selectorwindow.
When editing an Organization-Location-Job Field block, a deactivated Organization-Location-Job Field is not displayed in the Organization-Location-Job Field Selectorwindow
When editing an Organization-Location-Job Field, an update is logged on the Historytab.
In source tracking, a deactivated Organization-Location-Job Field has no impact onsource tracking contextualization.
Candidate Creation(Capture Resume)
In Personal Information LUDS, a deactivated Organization-Location-Job Field has noimpact on element contextualization.
Configuration Impact
Configuration Impact
Feature Impact
In view mode, an agency that has a deactivated Organization-Location-Job Fieldis displayed and the Organization-Location-Job Field value is displayed.
In edit mode, a deactivated Organization-Location-Job Field is displayed and canbe saved.
Agency
When adding an agency, a deactivated Organization-Location-Job Field is notdisplayed in the Organization-Location-Job Field Selector window.
In view mode, an agency that has a deactivated Organization-Location-Job Fieldis displayed and the Organization-Location-Job Field value is displayed.
In edit mode, a deactivated Organization-Location-Job Field is displayed and canbe saved.
Agent
When adding an agent, a deactivated Organization-Location-Job Field is notdisplayed in the Organization-Location-Job Field Selector window.
In view mode, tasks that include a deactivated Organization-Location-Job Fieldare displayed and the Organization-Location-Job Field value is displayed.
Automated TaskIn edit mode, a deactivated Organization-Location-Job Field is displayed and canbe saved.

Foundation Data Organization - Location - Job Field
Configuration Guide Taleo 10 SP2 - Recruiting 63
Configuration Impact
Feature Impact
When adding a task A deactivated Organization-Location-Job Field is notdisplayed in the Organization-Location-Job Field Selector window.
In view mode, a deactivated Organization-Location-Job Field is not displayed butis displayed on the Display Context tab.
In edit mode, a candidate selection workflow can be “resaved” with Organization-Location-Job Field if unchanged.Candidate Selection Workflow
When adding a candidate selection workflow, a deactivated Organization-Location-Job Field is not displayed in the Organization-Location-Job FieldSelector window.
In view mode, a deactivated Organization-Location-Job Field is displayed.
In edit mode, a deactivated Organization-Location-Job Field is displayed and canbe saved anew.Career Section Diversity Forms
When adding a form, a deactivated Organization-Location-Job Field is notdisplayed in the Organization-Location-Job Field Selector window.
In view mode, a deactivated Organization-Location-Job Field is displayed.Career Section - Job SearchFilter When adding a search filter, a deactivated Organization-Location-Job Field is not
displayed in the Organization-Location-Job Field Selector window.
In view mode, a deactivated Organization-Location-Job Field is displayed.Career Section Organization-Location-Job FieldAssociations
When adding an association, a deactivated Organization-Location-Job Field isnot displayed in the Organization-Location-Job Field Selector window.
In view mode, a deactivated Organization-Location-Job Field is displayed.
In edit mode, a deactivated Organization-Location-Job Field is displayed and thestatement can be “resaved” and activated if the Organization-Location-Job Fieldelement has not been edited.
Career Section Statements
When adding a statement, a deactivated Organization-Location-Job Field is notdisplayed in the Organization-Location-Job Field Selector window.
In view mode, a deactivated Organization-Location-Job Field is displayed.
In edit mode, a deactivated Organization-Location-Job Field is displayed and canbe saved anew.Career Section - URL builder
When creating an URL, a deactivated Organization-Location-Job Field is notdisplayed in the Organization-Location-Job Field Selector window.
In view mode, a deactivated Organization-Location-Job Field is not displayed.
In view mode, templates can be retrieved under the next highest parent elementof the deactivated Organization-Location-Job Field.Correspondence
In edit mode, a deactivated Organization-Location-Job Field is displayed and canbe saved.

Foundation Data Organization - Location - Job Field
Configuration Guide Taleo 10 SP2 - Recruiting 64
Configuration Impact
Feature Impact
When adding correspondence, deactivated Organization-Location-Job Field is notdisplayed in the Organization-Location-Job Field Selector window.
When editing large selection elements, a deactivated Organization-Location-Job Field is not displayed in drop-down lists and the value is lost if the userclicks Save. Only the next highest active parent is displayed in drop-down lists.contextualization.
Custom Large SelectionElements
When adding a custom large selection, a deactivated Organization-Location-JobField is not displayed in the Organization-Location-Job Field Selector window.
In view mode, a deactivated Organization-Location-Job Field is not displayed.
In edit mode, a deactivated Organization-Location-Job Field is displayed in theProperties section.
In edit mode, a source tracking configuration can be edited and “resaved” if theOrganization-Location-Job Field has not been edited.
Source Tracking
When adding a source, a deactivated Organization-Location-Job Field is notdisplayed in the Organization-Location-Job Field Selector window.
Taleo Connect Client Impact
Deactivation is available via Taleo Connect Client (TCC).
Web Services Impact
Deactivation is available via Taleo Connect Client (TCC).
Important Note: (ID 294) When deactivating Organization-Location-Job Field (OLF)elements, there are certain behaviors important to note. There are some areas where thedeactivated elements will still appear for the system administrator when using the TaleoConfiguration module. If this is a concern, customers should refrain from deactivating OLFelements until this changes.
It is important to note that the system does effectively hide where appropriate deactivated OLFelements from both candidates and Recruiting Center users.
Specifically, system administrators can still associate (either via an add or edit action) contentwith deactivated OLF elements and can still see deactivated OLF elements in the systemadministrator OLF tree views in the following areas within Taleo Configuration:
• Create/Modify Agency (Configuration > [Recruiting] Administration > Agencies)• Create/Modify Agent ( Configuration > [Recruiting] Administration > Agencies > Agents)• Create/Modify Task (Configuration > [Recruiting] Administration > Automated Tasks)• Create/Modify Selection - where elements are mapped to OLF (Configuration > [Recruiting]
Administration > Selection Lists > Large Selections)• Create/Modify Source (Configuration > [Recruiting] Administration > Sources)• Create/Modify OLF mapping to a given candidate selection workflow (Configuration >
[Recruiting] Administration > Candidate Selection Workflow > Workflow > Display ContextTab)

Foundation Data Organization - Location - Job Field
Configuration Guide Taleo 10 SP2 - Recruiting 65
• Create/Modify Job Board Account OLF Associations (on the permissions tab during create/modify) (Configuration > [Recruiting] Administration > Job Board Accounts > Job BoardAccount Permissions Tab)
• Create/Modify Department (Configuration > [Recruiting] Administration > Department List)In addition, the following tree views within Taleo Configuration will still show deactivated OLFelements:• Source list• Department list• Position list
Deactivating an Organization, Location or Job FieldElement
Prerequisite
The Manage Foundation Data user type permission is required.
Before you deactivate an Organization-Location-Job Field element, you should carefullyreview all associated objects (that is, requisitions, message templates, agencies, etc.) andassign a different Organization-Location-Job Field element to each object if necessary.
Configuration > [SmartOrg] Administration
Steps1. Click Element Management under Organizations, Locations or Job Fields.2. If the element you want to deactivate is displayed in the list of Children, click the
corresponding Deactivate in the Actions list.• If the element is at a lower level, you can drill down to the appropriate level by
clicking the element description in the Description list and then click the correspondingDeactivate.
3. Click OK.
Deactivating an Organization, Location or Job FieldElement While Displayed
Prerequisite
The Manage Foundation Data user type permission is required.
Before you deactivate an Organization-Location-Job Field element, you should carefullyreview all associated objects (that is, requisitions, message templates, agencies, etc.) andassign a different Organization-Location-Job Field element to each object if necessary.
Configuration > [SmartOrg] Administration
Steps1. Click Element Management under Organizations, Locations or Job Fields.2. If the element you want to deactivate is displayed in the list of Children, click the
corresponding the element description in the Description list.3. Click Deactivate next to the element description near the top of the following page.4. Click OK.

Foundation Data Organization - Location - Job Field
Configuration Guide Taleo 10 SP2 - Recruiting 66
Organization-Location-Job Field Behavior of DeactivatedElements
Context Action Organization-Location-Job Fieldbehavior if element is deactivated
Agency
Agency View Not displayed
Agency Edit Not displayed
Agency Add Not displayed
Agency - generate new posting Add Not displayed
PDF Form
Any Future Object configuration suchas PDF Forms or Passport Serviceswith Organization-Location-Job Fieldcontext
Add Not displayed
Any Future Object such as PDFForms or Passport Services withOrganization-Location-Job Fieldcontext
View Not displayed
Any Future Object such as PDFForms or Passport Services withOrganization-Location-Job Fieldcontext
Edit Not displayed
Automated Tasks for defined Organization-Location-Job Field contexts
Automated Tasks for definedOrganization-Location-Job Fieldcontexts
View Displayed to support historic dataintegrity
Automated Tasks for definedOrganization-Location-Job Fieldcontexts
Edit Displayed if current/historic dataselected (to allow re-saving andviewing without affecting dataintegrity)
Automated Tasks for definedOrganization-Location-Job Fieldcontexts
Add Not displayed
Candidate File
Candidate File View Displayed to support historic dataintegrity

Foundation Data Organization - Location - Job Field
Configuration Guide Taleo 10 SP2 - Recruiting 67
Context Action Organization-Location-Job Fieldbehavior if element is deactivated
Candidate File Edit Displayed if current/historic dataselected (to allow re-saving andviewing without affecting dataintegrity)
Candidate File Create Not displayed
Candidate Search - New Search Organization-Location-Job Field preferences
Candidate Search - New SearchOrganization-Location-Job Fieldpreferences
Other Not displayed
Candidate Search - Run SavedSearch with Organization-Location-Job Field preferences
View Not displayed
Candidate Search - Run SavedSearch with Organization-Location-Job Field preferences
Edit Not displayed
Candidate Search - Run SavedSearch with Organization-Location-Job Field preferences
Add Not displayed
Career Sections Organization-Location-Job Field
Career Sections Organization-Location-Job Field associationadmin/config
View Not displayed
Career Sections Organization-Location-Job Field associationadmin/config
Edit Not displayed
Career Sections Organization-Location-Job Field associationadmin/config
Add Not displayed
Career Sections URL
Career Sections URL View Displayed
Career Sections URL Edit Displayed
Career Sections URL Add Not displayed
Correspondence
Correspondence config/admin View Not displayed
Correspondence config/admin Edit Not displayed

Foundation Data Organization - Location - Job Field
Configuration Guide Taleo 10 SP2 - Recruiting 68
Context Action Organization-Location-Job Fieldbehavior if element is deactivated
Correspondence config/admin Add Not displayed
Disqualification Questions
Disqualification Library config View Not displayed
Disqualification Library config Edit Not displayed
Diversity Forms config/admin Add Not displayed
LUDS
LUDS View Not displayed
LUDS Edit Displayed if current/historic dataselected (to allow re-saving andviewing without affecting dataintegrity)
LUDS Add Not displayed
Offer Data
Offer Data View Displayed to support historic dataintegrity
Offer Data Edit Displayed if current/historic dataselected (to allow re-saving andviewing without affecting dataintegrity)
Offer Data Create Displayed if current/historic dataselected (to allow re-saving andviewing without affecting dataintegrity)
Onboarding Tasks
Onboarding tasks admin assigned toOrganization-Location-Job Field
View Not displayed
Onboarding tasks admin assigned toOrganization-Location-Job Field
Edit Not displayed
Onboarding tasks admin assigned toOrganization-Location-Job Field
Add Not displayed
Onboarding Transaction
Onboarding transaction associationto legacy Organization-Location-JobField
Other Displayed to support historic dataintegrity

Foundation Data Organization - Location - Job Field
Configuration Guide Taleo 10 SP2 - Recruiting 69
Context Action Organization-Location-Job Fieldbehavior if element is deactivated
Onboarding transaction filtering byOrganization-Location-Job Field
Filter Not displayed
Prescreening Questions
Prescreening Library config View Not displayed
Prescreening Library config Edit Not displayed
Prescreening Library config Add Not displayed
Privacy Agreements config/admin
Privacy Agreements config/admin View Not displayed
Privacy Agreements config/admin Edit Not displayed
Privacy Agreements config/admin Add Not displayed
Reports
Reporting - Running Reports Other Indicated as “inactivated” in thelisting
Requisitions
Req File Data View Displayed to support historic dataintegrity
Req File Data Edit Displayed if current/historic dataselected (to allow re-saving andviewing without affecting dataintegrity)
Req File Data Create Not displayed
Req Tree View in Recruiting Filter Not displayed
Requisition Filter by Manager orRecruiter
Filter Not displayed
Requisition Templates
Requisition Templates View Indicated as “inactivated” in thelisting
Requisition Templates Edit Not displayed
Requisition Templates Create Not displayed
Automated Tasks

Foundation Data Organization - Location - Job Field
Configuration Guide Taleo 10 SP2 - Recruiting 70
Context Action Organization-Location-Job Fieldbehavior if element is deactivated
Run Automated Tasks for DefinedOrganization-Location-Job Fieldcontexts
Other Displayed to support historic dataintegrity
SmartOrg-Organization-Location-Job Field
SmartOrg - Organization-Location-Job Field Admin
View Invalid; system doesn’t allow
SmartOrg - Organization-Location-Job Field Admin
Edit Not displayed
SmartOrg - Organization-Location-Job Field Admin
Create Not displayed
SmartOrg-User
SmartOrg - User Admin View Invalid; system doesn’t allow
SmartOrg - User Admin Edit Not displayed
SmartOrg - User Admin Create Not displayed
Sources
Source.Tracking config/admin View Not displayed
Source.Tracking config/admin Edit Not displayed
Source.Tracking config/admin Add Not displayed
User Groups
User Groups View Indicated as “inactivated” in thelisting
User Groups Edit Not displayed
User Groups Add Not displayed
User Groups - access to cand/reqdata per segmentation rules
Other Indicated as “inactivated” in thelisting
Departments
Departments View Displayed
Departments Edit Displayed
Departments Add Not displayed
Work Locations
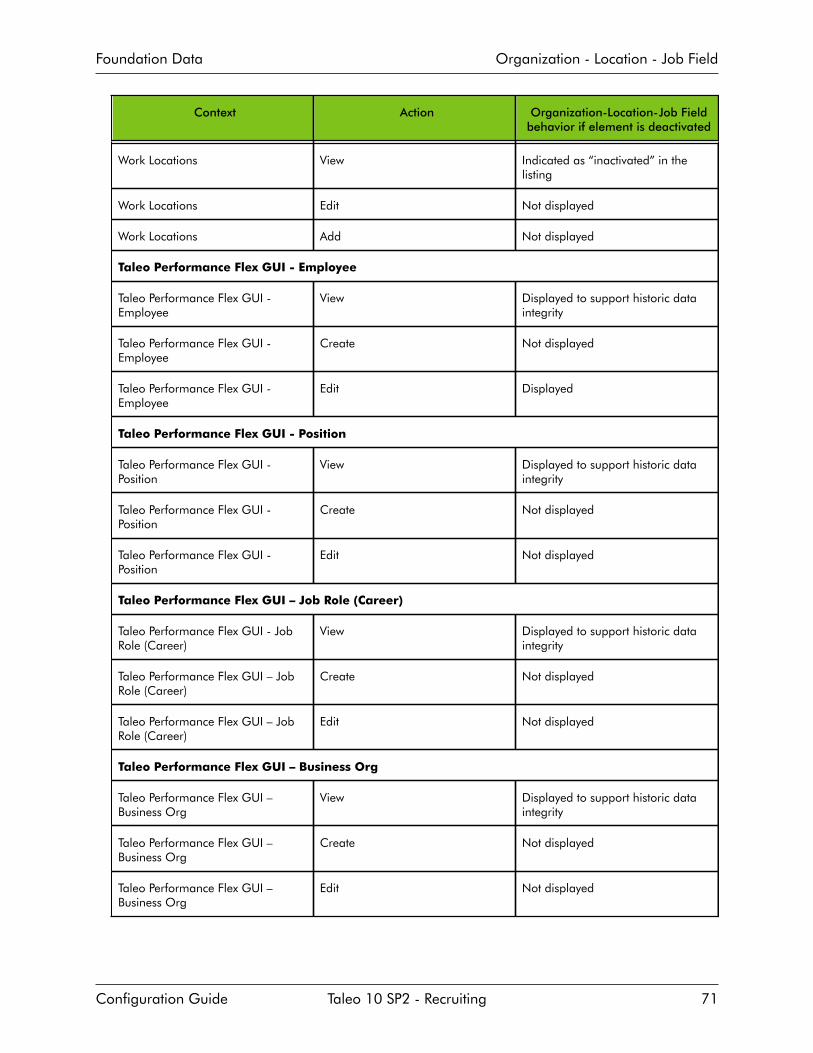
Foundation Data Organization - Location - Job Field
Configuration Guide Taleo 10 SP2 - Recruiting 71
Context Action Organization-Location-Job Fieldbehavior if element is deactivated
Work Locations View Indicated as “inactivated” in thelisting
Work Locations Edit Not displayed
Work Locations Add Not displayed
Taleo Performance Flex GUI - Employee
Taleo Performance Flex GUI -Employee
View Displayed to support historic dataintegrity
Taleo Performance Flex GUI -Employee
Create Not displayed
Taleo Performance Flex GUI -Employee
Edit Displayed
Taleo Performance Flex GUI - Position
Taleo Performance Flex GUI -Position
View Displayed to support historic dataintegrity
Taleo Performance Flex GUI -Position
Create Not displayed
Taleo Performance Flex GUI -Position
Edit Not displayed
Taleo Performance Flex GUI – Job Role (Career)
Taleo Performance Flex GUI - JobRole (Career)
View Displayed to support historic dataintegrity
Taleo Performance Flex GUI – JobRole (Career)
Create Not displayed
Taleo Performance Flex GUI – JobRole (Career)
Edit Not displayed
Taleo Performance Flex GUI – Business Org
Taleo Performance Flex GUI –Business Org
View Displayed to support historic dataintegrity
Taleo Performance Flex GUI –Business Org
Create Not displayed
Taleo Performance Flex GUI –Business Org
Edit Not displayed

Foundation Data Department
Configuration Guide Taleo 10 SP2 - Recruiting 72
Department
DepartmentA department represents a division or service in the company where a future employee willwork.
A department is the lowest level of an organizational unit. An example of a department couldbe a documentation department where technical writers, translators and editors are working.
Departments are available in:• Taleo Recruiting Administration menu, in the department list, to edit and create
departments.• SmartOrg in the department feature, when creating a user account.• Taleo Recruiting when creating a requisition.Departments can be imported from a Human Resource Management System (HRMS) in TaleoRecruiting using the Taleo integration service or they can be manually created by the systemadministrator. Departments can also be exported, deleted and recovered via Taleo’s integrationservice.
Departments can be linked to organizations and locations provided the system administratorhas activated the proper settings. If the settings are not activated, then departments will not bedisplayed to users.
When creating a department, the system administrator can define default approvers forrequisitions and offers. Specified approvers will be selected automatically when users arerequesting the approval of a requisition or an offer.
The autofill functionality is available for departments provided the system administrator hasactivated the proper setting. Therefore, when users select a department when creating arequisition, the department-related fields will automatically be filled.
Configuration
Important Note: (ID 290) System administrators with access to department administrationcan modify department data regardless of how the permission "Modify department informationimported from HRMS" is set (Configuration > [SmartOrg] Administration > User Types >Recruiting > Administration). Until this changes, system administrators should refrain fromediting this data if using Integration to populate it. If customers are allowing their systemadministrators to directly modify department data today, then this note can be ignored. Itonly applies in cases where customers are attempting to limit department editing by systemadministrators.
To manage departments, the following permission is required.
User Type Permission
Name Location
Manage foundation data Configuration > [SmartOrg] Administration > User Types >Configuration > Foundation Data
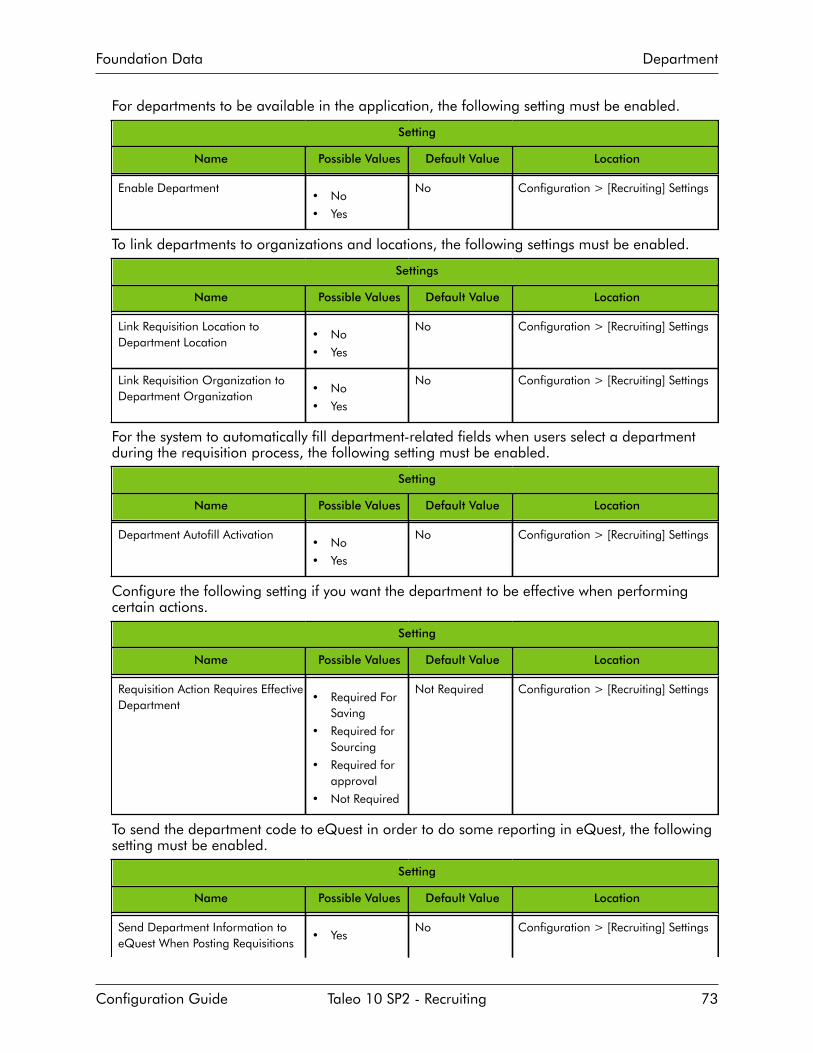
Foundation Data Department
Configuration Guide Taleo 10 SP2 - Recruiting 73
For departments to be available in the application, the following setting must be enabled.
Setting
Name Possible Values Default Value Location
Enable Department• No
• Yes
No Configuration > [Recruiting] Settings
To link departments to organizations and locations, the following settings must be enabled.
Settings
Name Possible Values Default Value Location
Link Requisition Location toDepartment Location
• No
• Yes
No Configuration > [Recruiting] Settings
Link Requisition Organization toDepartment Organization
• No
• Yes
No Configuration > [Recruiting] Settings
For the system to automatically fill department-related fields when users select a departmentduring the requisition process, the following setting must be enabled.
Setting
Name Possible Values Default Value Location
Department Autofill Activation• No
• Yes
No Configuration > [Recruiting] Settings
Configure the following setting if you want the department to be effective when performingcertain actions.
Setting
Name Possible Values Default Value Location
Requisition Action Requires EffectiveDepartment
• Required ForSaving
• Required forSourcing
• Required forapproval
• Not Required
Not Required Configuration > [Recruiting] Settings
To send the department code to eQuest in order to do some reporting in eQuest, the followingsetting must be enabled.
Setting
Name Possible Values Default Value Location
Send Department Information toeQuest When Posting Requisitions
• YesNo Configuration > [Recruiting] Settings

Foundation Data Department
Configuration Guide Taleo 10 SP2 - Recruiting 74
Setting
Name Possible Values Default Value Location
• No
Creating a DepartmentPrerequisite
The Enable Department setting must be activated.
Configuration > [Recruiting] Administration > Department List
Steps1. Click New...2. Complete the fields as required. ID number must be unique. The field Name must be
translated in every available languages.3. Click Done.Result
The department is created and displayed in the Department List page available to userswhen creating a requisition.
Deleting a DepartmentPrerequisite
The Enable Department setting must be activated.
The system must be in maintenance mode.
Configuration > [Recruiting] Administratio > Department List
Steps1. Click on a department.2. Click .
Result
The department is no longer available for use and is permanently removed from thedatabase.
Activating a DepartmentPrerequisite
The Enable Department setting must be activated.
The department must be created.
Configuration > [Recruiting] Administration > Department List
Steps1. Click on a department.

Foundation Data Department
Configuration Guide Taleo 10 SP2 - Recruiting 75
2. Specify if the department is always active or if it is active during a specific period of time.3. Click Done.
Result
The department is available to users in Taleo Recruiting.
Deactivating a DepartmentPrerequisite
The Enable Department setting must be activated.
The department must have the Active status.
Configuration > [Recruiting] Administration > Department List
Steps
1. Click on a department.2. Select Inactive.3. Click Done.
Result
The department is unavailable to users while maintaining the information in the databasefor reuse.
Associating a Department to an OrganizationPrerequisite
The Enable Department setting must be activated
You must create a department before you can associate it to an organization.
Configuration > [Recruiting] Administration > Department List
Steps
1. Click on a department.2. Specify to which organization the department is associated.3. Click Done.
Result
The department is associated to the selected organization.
Next Step
Associating a department to a location.
Associating a Department to a LocationPrerequisite
The Enable Department setting must be activated

Foundation Data Department
Configuration Guide Taleo 10 SP2 - Recruiting 76
You must create a department before you can associate it to a location.
Configuration > [Recruiting] Administration > Department List
Steps
1. Click on a department.2. Specify to which location the department is associated.3. Click Done.
Result
The department is associated to the selected location.
Next Step
Associating a department to an organization.
Dissociating a Department from an OrganizationPrerequisite
The Enable Department setting must be activated.
The department must be associated to an organization.
Configuration > [Recruiting] Administration > Department List
Steps
1. Click on a department.2. Under Organization, click .
3. Click Done.
Result
The department is no longer associated to the organization.
Next Step
Associate the department to an organization.
Disassociating a Department from a LocationPrerequisite
The Enable Department setting must be activated.
The department must be associated to an organization.
Configuration > [Recruiting] Administration > Department List
Steps
1. Click on a department.2. Under Location, click .
3. Click Done.
Foundation Data Department
Configuration Guide Taleo 10 SP2 - Recruiting 77
Result
The department is no longer associated to the location.
Next Step
Associating a department to a location.
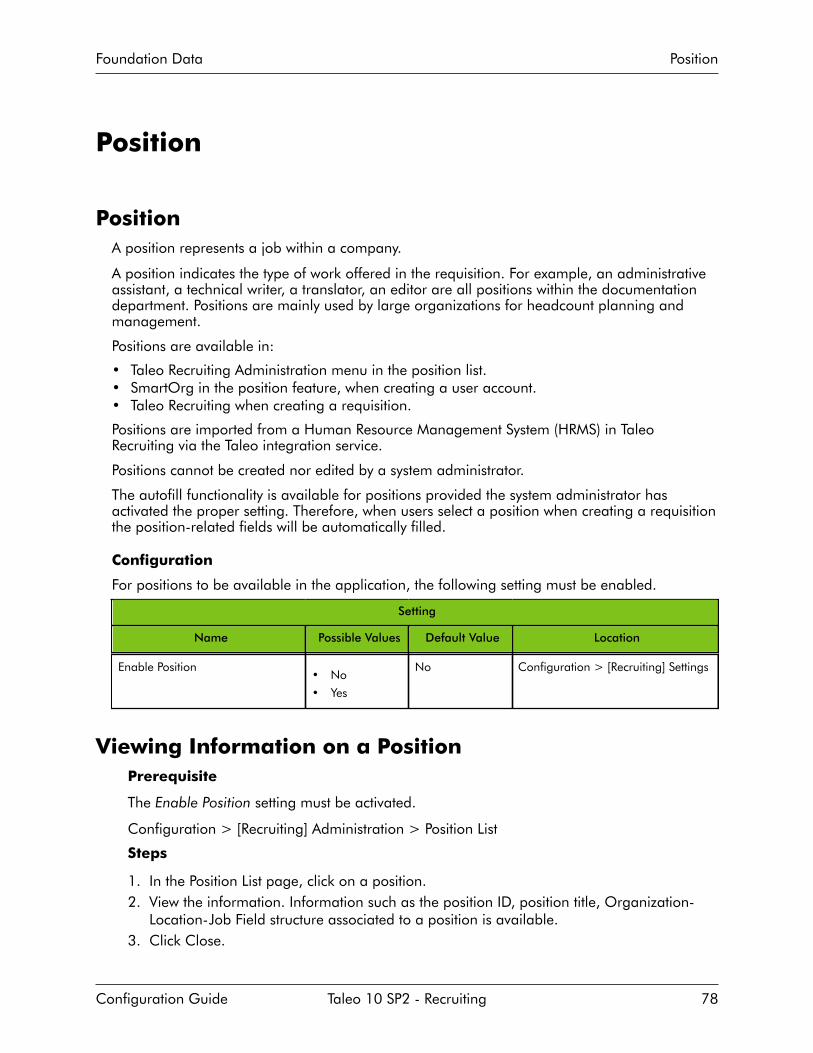
Foundation Data Position
Configuration Guide Taleo 10 SP2 - Recruiting 78
Position
PositionA position represents a job within a company.
A position indicates the type of work offered in the requisition. For example, an administrativeassistant, a technical writer, a translator, an editor are all positions within the documentationdepartment. Positions are mainly used by large organizations for headcount planning andmanagement.
Positions are available in:
• Taleo Recruiting Administration menu in the position list.• SmartOrg in the position feature, when creating a user account.• Taleo Recruiting when creating a requisition.
Positions are imported from a Human Resource Management System (HRMS) in TaleoRecruiting via the Taleo integration service.
Positions cannot be created nor edited by a system administrator.
The autofill functionality is available for positions provided the system administrator hasactivated the proper setting. Therefore, when users select a position when creating a requisitionthe position-related fields will be automatically filled.
Configuration
For positions to be available in the application, the following setting must be enabled.
Setting
Name Possible Values Default Value Location
Enable Position• No
• Yes
No Configuration > [Recruiting] Settings
Viewing Information on a PositionPrerequisite
The Enable Position setting must be activated.
Configuration > [Recruiting] Administration > Position List
Steps
1. In the Position List page, click on a position.2. View the information. Information such as the position ID, position title, Organization-
Location-Job Field structure associated to a position is available.3. Click Close.

Users
• User Account Management.................................................................................. 80
• User Type Management........................................................................................90
• Configuration Profile............................................................................................ 98
• User Group Management...................................................................................100

Users User Account Management
Configuration Guide Taleo 10 SP2 - Recruiting 80
User Account Management
User AccountA user account is created for each user who has access to Taleo applications on a regular oroccasional basis.
User accounts are defined by the system administrator in SmartOrg.
When creating a user account, the system administrator defines the following:
Element Description
Personal Information• Complete name
• Postal address
• E-mail address
• Phone and cellular numbers
• Employee ID (employee records are also maintainedin external systems like the company's HRIS. In thosesystems, the employee is given a unique ID. TheEmployee ID field is necessary in order to create theemployee record in Taleo when being fed over froman external system)
• etc.
Employee Information Used for Taleo Performance and Dynamic ApprovalRouting. Once information in this section is provided,the user's profile is updated and the person isconsidered an “employee.” Only employees can beusers of Taleo Performance.
• Employee picture
• Employee status
• Employee manager
• Organization, Location, Job Role
• etc.
Account Information• User name
• Password
• External user identifier
• Configuration profile
• etc.
User Types User types assigned to the user account.
User Groups User groups to which the user is part of.
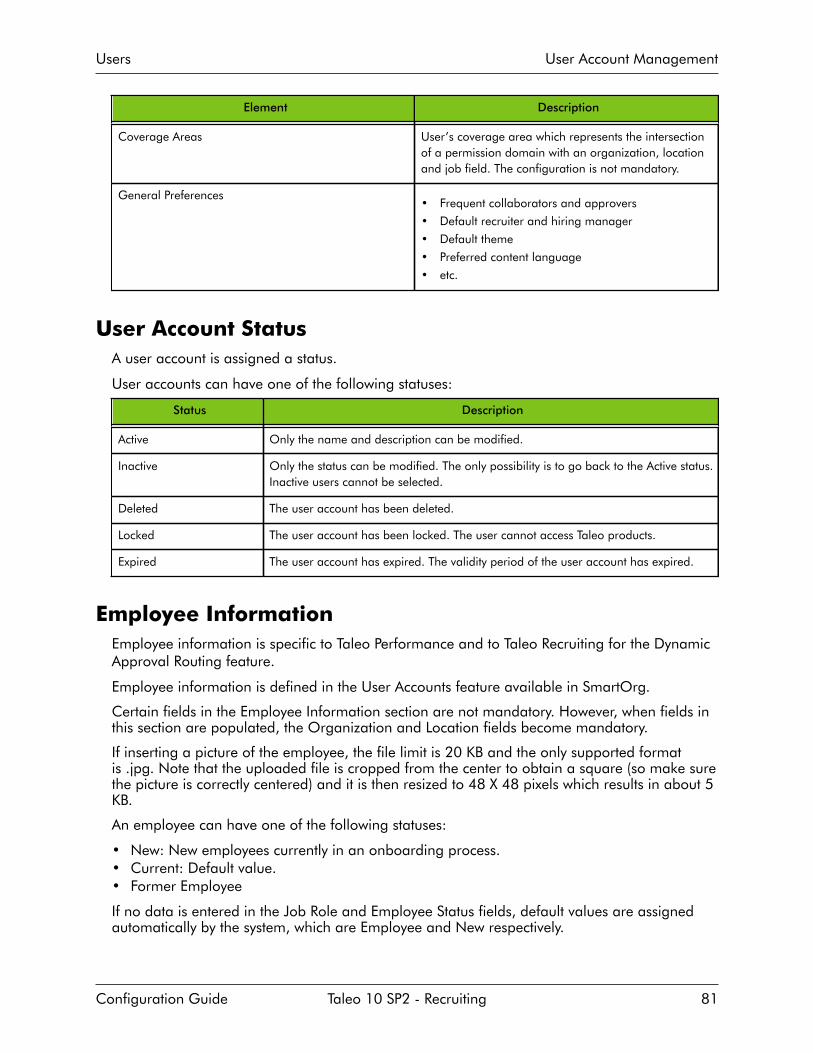
Users User Account Management
Configuration Guide Taleo 10 SP2 - Recruiting 81
Element Description
Coverage Areas User’s coverage area which represents the intersectionof a permission domain with an organization, locationand job field. The configuration is not mandatory.
General Preferences• Frequent collaborators and approvers
• Default recruiter and hiring manager
• Default theme
• Preferred content language
• etc.
User Account StatusA user account is assigned a status.
User accounts can have one of the following statuses:
Status Description
Active Only the name and description can be modified.
Inactive Only the status can be modified. The only possibility is to go back to the Active status.Inactive users cannot be selected.
Deleted The user account has been deleted.
Locked The user account has been locked. The user cannot access Taleo products.
Expired The user account has expired. The validity period of the user account has expired.
Employee InformationEmployee information is specific to Taleo Performance and to Taleo Recruiting for the DynamicApproval Routing feature.
Employee information is defined in the User Accounts feature available in SmartOrg.
Certain fields in the Employee Information section are not mandatory. However, when fields inthis section are populated, the Organization and Location fields become mandatory.
If inserting a picture of the employee, the file limit is 20 KB and the only supported formatis .jpg. Note that the uploaded file is cropped from the center to obtain a square (so make surethe picture is correctly centered) and it is then resized to 48 X 48 pixels which results in about 5KB.
An employee can have one of the following statuses:
• New: New employees currently in an onboarding process.• Current: Default value.• Former Employee
If no data is entered in the Job Role and Employee Status fields, default values are assignedautomatically by the system, which are Employee and New respectively.

Users User Account Management
Configuration Guide Taleo 10 SP2 - Recruiting 82
User Account General PreferencesGeneral preferences are assigned to each user account.
A user’s general preference settings are defined by the system administrator in the UserAccount feature available in SmartOrg. However, most settings can be modified by the user inTaleo Recruiting, in the My Setup feature, to fit his/her personal preferences.
Important Note:: (ID 292) It is important at deployment to review the defaults for theDefault Recruiter and Default Hiring Manager user preference fields within My Setup. By default,if there is no Default Recruiter or Default Hiring Manager specified for a user's preference,when the user creates a requisition he/she will be automatically listed as the "Recruiter" onthe requisition. If a user has his/her name in the Default Hiring Manager field, this will takeprecedence and the user will have his/her name appear in the Hiring Manager field ratherthan the Recruiter field. For proper behavior of managers, it is recommended to specify thisinformation automatically upon integration imports of manager User data.
Note for 7.5 migrations: Integration scripts from 7.5 where users were specified as ManagerWebTop users will work for the Taleo 10 migration to indicate that these users should havetheir name populated into the Default Hiring Manager field. Customers should validate this isworking properly prior to go live and that the integration script has run for all necessary users tohave this data populated correctly.
User Account General Preferences
Element Description
Accessibility Features Enable accessibility features in the system.
Candidate List Content By default, show only candidates that are in selectionprocess (if relevant).
Content Language Indicates the preferred content language.
Correspondence Language Indicates the preferred correspondence language.
Country Indicates the preferred country.
Default Distance Unit Default distance unit used when creating a user.
Default Hiring Manager Default hiring manager. See Important Note above.
Default Recruiter Default recruiter. See Important Note above.
Default Text Size Indicates the default text size.
Default Theme Indicates the default theme.
Display Question Details in Libraries Indicates the default view (details/no details) in thelibraries.
Enable eShare Email for Response Center Access Determines whether or not an eShare email will be sent.
Fax Notification Send faxable messages to the user by fax, not by email.
Frequent Collaborators Default frequent collaborators.

Users User Account Management
Configuration Guide Taleo 10 SP2 - Recruiting 83
User Account General Preferences
Element Description
Identifier Content Default identifier content.
Last Update Last update date.
Offer Frequent Approvers Default offer frequent approvers.
Place of Residence Default place of residence.
Preferred Non-Electronic Media Preferred non-electronic media.
Requisition File Automatic Filling Indicates if the user will use the "automatic filling" optionof the requisition file.
Requisition Frequent Approvers Default requisition frequent approvers.
Selected Item Default Color Indicates the default color of the selected items.
Sorting Key Default sorting key.
Tab displayed when accessing a candidate file from alist
Tab displayed when accessing a candidate file innavigation
Time Zone Indicates the preferred time zone.
When managing by candidate
When managing by offer
Workflow Events Notification Keep the user informed of workflow events by email.
Zip Code Used in search preferences, with the location (place ofresidence) and last update.
Creating a User AccountPrerequisite
The Manage user accounts user type permission is required.
In the Employee Information section, certain fields are not mandatory. However, when fieldsin this section are populated, the Organization and Location fields become mandatory.
In the Employee Information section, if no data is entered in the Employee Status and JobRole fields, these fields will be populated with their default values, Current and Employee.
Configuration > [SmartOrg] > Administration > User Accounts
Steps1. Click Create.2. Specify the language in which you want to create the user account.3. Complete the fields.4. Click Next.

Users User Account Management
Configuration Guide Taleo 10 SP2 - Recruiting 84
5. Click Finish.Result
The user account appears in the User Accounts list.
If the Employee Information section is completed, the user's profile is updated and theperson is considered an “employee.” Employees are used in Taleo Performance and theDynamic Approval Routing.
Editing a User AccountPrerequisite
The Manage user accounts user type permission is required.
Configuration > [SmartOrg] > Administration > User Accounts
Steps1. Click on a user account.2. Click Edit next to the section you want to modify.3. Make required changes.4. Click Save.
Activating a User AccountPrerequisite
The Manage user accounts user type permission is required.
Configuration > [SmartOrg] > Administration > User Accounts
Steps1. Click on a user account.2. Click Activate in Account Information.3. Click Yes.
Deactivating a User AccountPrerequisite
The Manage user accounts user type permission is required.
You need to transfer the user’s work items to another user.
Configuration > [SmartOrg] > Administration > User Accounts
Steps1. Click on a user account.2. Click Deactivate in Account Information.3. Click Yes.Result
The user account is deleted from the system.
Users User Account Management
Configuration Guide Taleo 10 SP2 - Recruiting 85
Deleting a User AccountPrerequisite
The Manage user accounts user type permission is required.
For the deletion to be possible, the user must not own any requisitions, templates, folders; noactions must be assigned to the user; the user must not report to a manager.
Any pending tasks and owned objects must first be transferred to another user.
Configuration > [SmartOrg] > Administration > User Accounts
Steps
1. Locate the user in the User Accounts list.2. Click Delete in the Actions column.3. Click Yes.
Result
Once deleted, the user account status is set to Deleted and the user account is deactivated.
Generating a PasswordAllows a system administrator to generate a password for a user if, for example, the user doesnot have his/her username handy or does not have an email address to receive a temporaryaccess code.
Prerequisite
The Manage user accounts user type permission is required.
Configuration > [SmartOrg] > Administration > User Accounts
Steps
1. Click on a user account.2. Click Generate Password in Account Information.3. Specify if you want to send the password in an e-mail.4. Click Yes.
Result
The user will be forced to change his/her password at next login.
Work Item DelegationWork item delegation allows a user to delegate work items to another user for a short presetperiod of time.
A user delegates work items to an alternate user for a preset period of time. This can be usefulduring the time a user is on vacation or on a sick leave. When selecting a user (new owner) towhom work items will be delegated, the following rules apply:• The new owner must have the same user type permissions (constraints not included) as the
current owner.

Users User Account Management
Configuration Guide Taleo 10 SP2 - Recruiting 86
• The new owner must be at least in all the same groups as the current owner.• If the current owner is an eShare user (not a Taleo application user), the new owner must
also be an eShare user.
Important Note: (ID 155) When a user delegates work items to an alternate user, if the useris a collaborator on a requisition, the alternate user must also be made collaborator on thatrequisition in order to perform the same actions as the user. The system does not automaticallyallow the delegated to interact as a collaborator on behalf of the original user.
Delegating Work ItemsPrerequisite
The Manage user accounts user type permission is required.
For a user to be valid for delegation, the following rules must be applied:
• The new owner must be different from the current owner.• It is always possible for a Recruiting Center user to be the new owner.
Configuration [SmartOrg] > Administration > User Accounts
Steps
1. Click on a user account.2. Click Delegate in Account Information.3. Select a user.4. Select From and To dates.5. Click Save.
Transferring Work ItemsPrerequisite
The Manage user accounts user type permission is required.
If the work items transferred belong to an employee, the designated user must also be anemployee.
The owner of the work items transferred must have the same user type as the designateduser.
Configuration > [SmartOrg] > Administration > User Accounts
Steps
1. Click on a user account.2. Click Transfer in Account Information.3. Select a user.4. Click Save.
Result
Work items (requisitions, templates, folders) have been transferred permanently to anotheruse. Note that correspondence messages are not included in the items being transferred.

Users User Account Management
Configuration Guide Taleo 10 SP2 - Recruiting 87
Next Step
Deleting the user account.
Locking a User AccountAllows a system administrator to lock a user account if, for example, the user was fired.
Prerequisite
The Manage user accounts user type permission is required.
Configuration > [SmartOrg] > Administration > User Accounts
Steps
1. Click on a user account.2. Click Lock in Account Information.3. Click Yes.
Next Step
Deactivating the user account.
Transfering the user’s work items.
Unlocking a User AccountAllows a system administrator to unlock a user account if, for example, a user enters anincorrect password too many times and the system locks the account.
Prerequisite
The Manage user accounts user type permission is required.
Configuration > [SmartOrg] > Administration > User Accounts
Steps
1. Click on a user account.2. Click Unlock in Account Information.3. Click Yes.
Assigning a User Type to a User AccountPrerequisite
The Manage user accounts user type permission is required.
Configuration > [SmartOrg] > Administration > User Accounts
Steps
1. Click on a user account.2. Click Edit next to User Types.3. Click Add next to User Types.4. Select one or several user types.

Users User Account Management
Configuration Guide Taleo 10 SP2 - Recruiting 88
5. Click Select.
Result
The user types appear in the User Types list.
Removing a User Type Assigned to a User AccountPrerequisite
The Manage user accounts user type permission is required.
Configuration > [SmartOrg] > Administration > User Accounts
Steps
1. Click on a user account.2. Click Edit next to User Types.3. Click Remove next to the user type.
Result
The user type is no longer displayed.
Next Step
Assigning a user type to the user account.
Associating a Configuration Profile to a User AccountPrerequisite
The Manage user accounts user type permission is required.
Each user account is assigned one configuration profile. If no configuration profile is used,the default value of each setting is used.
Changes made to a configuration profile are applied the next time a user linked to thisconfiguration profile logs in.
Configuration > [SmartOrg] > Administration > User Accounts
Steps
1. Click on a user account.2. Click Edit next to Account Information.3. Choose a configuration profile.4. Click Save.
Assigning a Coverage AreaAllows the system administrator to define a coverage area for a user account by selectingfunctional domains and specifying an Organization-Location-Job Field structure.
Prerequisite
The Manage user accounts permission is required.

Users User Account Management
Configuration Guide Taleo 10 SP2 - Recruiting 89
Configuration > [SmartOrg] Administration > User Accounts
Steps
1. Click on a user account.2. Click Create next to Personal Coverage Areas.3. Click Add next to Functional Domains.4. Select the desired functional domains then click Select.5. Click Save.6. If desired, specify organizations, locations and/or job fields for the coverage area.
If no Organization-Location-Job Field structure is specified, then the coverage area willapply to all organizations, locations and job fields .

Users User Type Management
Configuration Guide Taleo 10 SP2 - Recruiting 90
User Type Management
User TypeA user type is a set of permissions from various domains, used by various products to controlwhat users associated to a user type can do.
User types are centrally managed in SmartOrg for all products.
Default user types predefined by Taleo are provided with the system. The system administratorcan also create new user types.
A user type can cumulate permissions for multiple functional domains and thereforeprovides access to many products. Users are assigned a user type. Users navigate in multipleapplications according to permissions specified by their user type. A user can be associated toseveral user types. For example, the recruiter and administrator for recruiting, and manager forperformance.
Best Practices:
• It is recommended to leave untouched the Taleo default user types.• When creating a user type, it is recommended to duplicate an existing user type that has
been validated in the zone already to work properly.• If possible, use a single user type which combines all necessary permissions.
Default Recruiting User TypesDefault recruiting user types predefined by Taleo are provided with the system.
The default Recruiting user types are:
• System Administrator• Power Recruiter• Basic Recruiter• Power Manager• Basic Manager• Hourly Manager• Basic Onboarding• Power Onboarding
Important Note: (ID 275) These default user types are the ones recommended by Taleoas a starting point for system operability and represents traditional usage patterns. It isrecommended to leave untouched the Taleo default user types. Sourcing database zonescome with these default user types. For existing and migrating zones, these user types can bemanually created if desired. Once created, it is recommended to duplicate an existing user typethat has been validated in the zone already to work properly.
For a list of default Recruiting user types and their default permissions, refer to the Excel fileentitled Taleo 10 - SP3 - Default Recruiting User Types and Permissions.

Users User Type Management
Configuration Guide Taleo 10 SP2 - Recruiting 91
User Type PermissionA user type permission grants users access to a specific context in the application.
Permissions are organized by functional domains (core products):• Recruiting• Integration• Configuration• Performance• Grid• Compensation• Reporting and Analytics• myTaleo• CommonFunctional domains are then separated into sub-domains. Depending on the amount ofpermissions in a sub-domain, permissions can be grouped into sections. When permissionsare grouped into sections, the system administrator can select the desired section in a drop-down list and quickly see the permissions grouped in that section.
Example of how permissions are organized in a functional domain
Functional Domain Recruiting
Sub-Domain Requisitions
Section Requisition Types
Permission name Allow access to professional requisitions
Permission name Allow access to hourly requisitions
Permission name Allow access to campus requisitions
Permission name Allow access to contingent requisitions
Permission name Allow access to executive requisitions
Functional domains are highlighted when permissions have been granted. Also, the ExpandAll button allows the system administrator to see at a glance all domains, sub-domains andpermissions granted to a user type.
Each user account is assigned at least one user type for which a series of permissions aregranted.
A user type can cumulate permissions for multiple functional domains and therefore haveaccess to many products. A domain can be used in more than one product. The same domainsare used for groups or coverage area.
If the system administrator modifies the permissions associated with a user type, the changesaffect all users who have been assigned the user type.
For a list of all user type permissions, refer to Taleo 10 - User Type Permissions document.
Manager User Types and Related PermissionsIn Taleo 10, several features can now be accessed by managers.
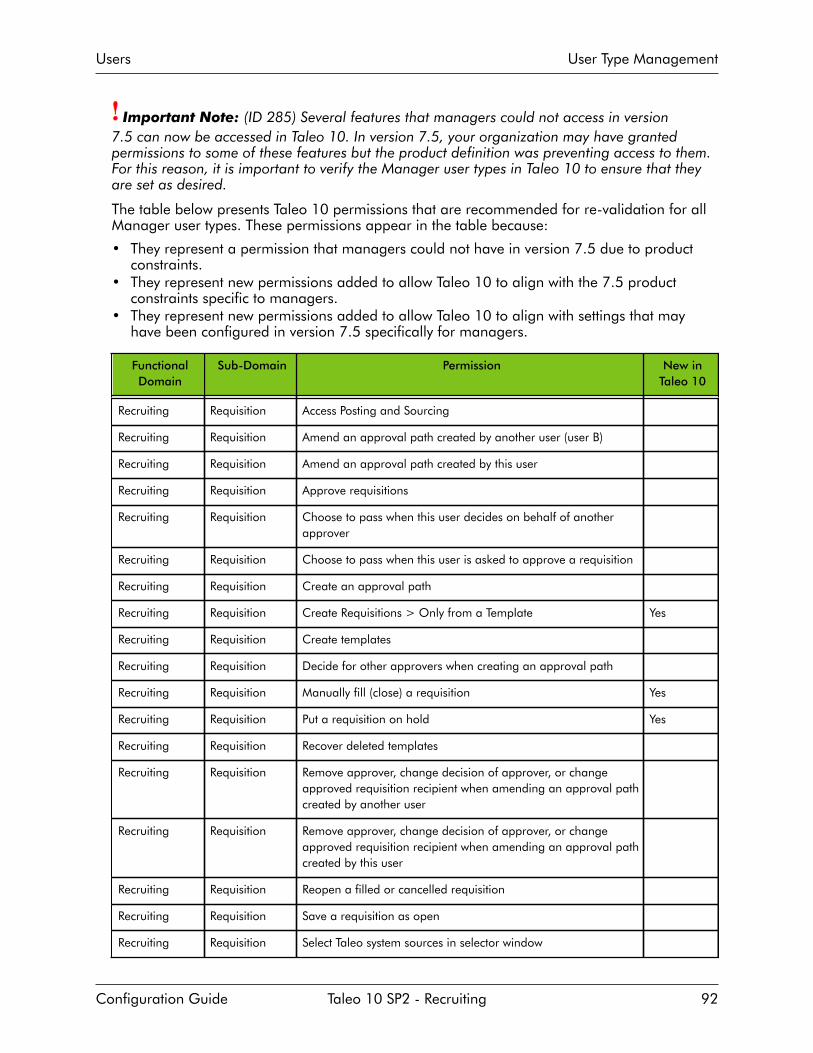
Users User Type Management
Configuration Guide Taleo 10 SP2 - Recruiting 92
Important Note: (ID 285) Several features that managers could not access in version7.5 can now be accessed in Taleo 10. In version 7.5, your organization may have grantedpermissions to some of these features but the product definition was preventing access to them.For this reason, it is important to verify the Manager user types in Taleo 10 to ensure that theyare set as desired.
The table below presents Taleo 10 permissions that are recommended for re-validation for allManager user types. These permissions appear in the table because:
• They represent a permission that managers could not have in version 7.5 due to productconstraints.
• They represent new permissions added to allow Taleo 10 to align with the 7.5 productconstraints specific to managers.
• They represent new permissions added to allow Taleo 10 to align with settings that mayhave been configured in version 7.5 specifically for managers.
FunctionalDomain
Sub-Domain Permission New inTaleo 10
Recruiting Requisition Access Posting and Sourcing
Recruiting Requisition Amend an approval path created by another user (user B)
Recruiting Requisition Amend an approval path created by this user
Recruiting Requisition Approve requisitions
Recruiting Requisition Choose to pass when this user decides on behalf of anotherapprover
Recruiting Requisition Choose to pass when this user is asked to approve a requisition
Recruiting Requisition Create an approval path
Recruiting Requisition Create Requisitions > Only from a Template Yes
Recruiting Requisition Create templates
Recruiting Requisition Decide for other approvers when creating an approval path
Recruiting Requisition Manually fill (close) a requisition Yes
Recruiting Requisition Put a requisition on hold Yes
Recruiting Requisition Recover deleted templates
Recruiting Requisition Remove approver, change decision of approver, or changeapproved requisition recipient when amending an approval pathcreated by another user
Recruiting Requisition Remove approver, change decision of approver, or changeapproved requisition recipient when amending an approval pathcreated by this user
Recruiting Requisition Reopen a filled or cancelled requisition
Recruiting Requisition Save a requisition as open
Recruiting Requisition Select Taleo system sources in selector window

Users User Type Management
Configuration Guide Taleo 10 SP2 - Recruiting 93
FunctionalDomain
Sub-Domain Permission New inTaleo 10
Recruiting Requisition Send an approval request reminder for requisitions
Recruiting Candidates Create Candidates
Recruiting Candidates Delete Applications
Recruiting Candidates Delete Candidate Files
Recruiting Candidates Edit Resume Information , Edit General Profile Information
Recruiting Candidates Edit the information about the referring agent in the "Agents" tab
Recruiting Candidates Set candidate selection workflow event dates, Edit comments inhistory summary
Recruiting Prescreening Access question and competency libraries
Recruiting Prescreening Create and edit requisition-specific questions
Recruiting Prescreening Create Questions, Edit Questions and Competencies
Recruiting Prescreening Display scoring information (weight and result columns) - thiswas defined via MWT setting in Taleo 7.5, ensure this permissionis set as desired for your user types in Taleo 10.
Yes
Recruiting Prescreening Edit Profiler, Edit Models
Recruiting Prescreening Manage disqualification questions
Recruiting Prescreening Remove or delete questions and competencies
Recruiting Prescreening View and manage ACE threshold and alert recipients Yes
Recruiting Prescreening View and manage the "Request More Information" alert Yes
Recruiting Prescreening View and manage the daily recruiting report Yes
Recruiting Sourcing Extend posting and unpost Yes
Recruiting Sourcing Invite matching candidates to apply
Recruiting Sourcing Post requisitions
Recruiting Sourcing Post to staffing agents/agencies Yes
Recruiting Sourcing Prevent and allow posting Yes
Recruiting Sourcing Request Internet mining by specialized agencies Yes
Recruiting Sourcing Request sourcing strategy by specialized agencies Yes
Recruiting Sourcing Submit ads to non-electronic media Yes
Recruiting Offer All offer and offer approval permissions - this entire module wasnot available to managers in 7.5. Ensure these permissions areset as desired for your manager user types in Taleo 10.
Recruiting Search Access advanced search

Users User Type Management
Configuration Guide Taleo 10 SP2 - Recruiting 94
FunctionalDomain
Sub-Domain Permission New inTaleo 10
Recruiting Search Access candidate Quick and Specific search
Recruiting Search Access competencies and questions criteria
Recruiting Search Access External/Internal candidate criteria
Recruiting Search Allow the same search criteria more than once within a query Yes
Recruiting Search Allow users to select the attribute Required, Desired or Excluded Yes
Recruiting Search Allow users to view candidates that are being considered in otheractive requisitions
Recruiting Search Customize advanced search queries
Recruiting Search Edit, move or delete search queries created by other users andsaved in shared folders
Recruiting Other Use Personal Folders
Recruiting Other Share Personal Folders
Recruiting Other Access Shared Folders
Creating a User TypePrerequisite
When creating a user type, it is recommended to duplicate an existing user type that hasbeen validated in the zone already to work properly.
The Manage user types user type permission is required.
Configuration > [SmartOrg] Administration > User Types
Steps1. Click Create.2. Provide a code and a name.3. Provide a description to clarify the intent of the user type.
The description is displayed in the user type selector and listed under the user accountdefinition page.
4. Click Save.5. Assign permissions in each functional domain.
Activating a User TypePrerequisite
The Manage user types user type permission is required.
The user type must have the Draft status.
Configuration > [SmartOrg] Administration > User Types

Users User Type Management
Configuration Guide Taleo 10 SP2 - Recruiting 95
Steps
1. Click on a user type.2. Click Edit next to Properties.3. Select Active in the Status field.4. Click Save.
Result
The user type is now available and the status Active appears in the User Types list.
Deactivating a User TypePrerequisite
The Manage user types user type permission is required.
The user type must have the Active status.
Configuration > [SmartOrg] Administration > User Types
Steps
1. Click on a user type.2. Click Edit next to Properties.3. Select Draft in the Status field.4. Click Save.
Result
The status Draft appears in the User Types list.
Duplicating a User TypeAllows a system administrator to quickly create a user type that is similar to an existing usertype.
Prerequisite
The Manage user types user type permission is required.
Configuration > [SmartOrg] Administration > User Types
Steps
1. Locate the user type you want to duplicate.2. Click Duplicate next to the user type.3. If your organization activated more than one language, enter values for each of the other
languages, being sure to click Refresh after you select a new language and before youenter the values for that language.
4. Click Save.
Result
On the user type definition page, your actions are displayed in the History section. On theUser Types page, the new user type is displayed and its status is Active.

Users User Type Management
Configuration Guide Taleo 10 SP2 - Recruiting 96
Editing a User Type PropertiesAllows the system administrator to modify the code, name, description and status of a usertype.
Prerequisite
The Manage user types user type permission is required.
Configuration > [SmartOrg] Administration > User Types
Steps
1. Click on a user type.2. Click Edit next to Properties.3. Enter your changes on the User Type Editor page.4. Click Save.
Dissociating All Users from a User TypePrerequisite
The Manage user types user type permission is required.
Configuration > [SmartOrg] Administration > User Accounts
Steps
1. In the Refine by field, select User Type.2. In the adjacent field, enter a word or part of a word found in the name of the user type
you want to delete.3. Click Refresh.4. Click a name displayed in the User Accounts list.5. Click Edit next to User Types.6. Locate the user type you want to remove and click Remove in the Actions list.7. Click Save.8. Repeat steps 4 to 7 for each user who has the user type you want to delete.
Result
The user type is no longer displayed in the User Types list.
Next Step
Deleting a user type.
Deleting a User TypePrerequisite
The Manage user types user type permission is required.
You can delete a user type provided no users are associated with the user type.

Users User Type Management
Configuration Guide Taleo 10 SP2 - Recruiting 97
Configuration > [SmartOrg] Administration > User Types
Steps
1. Locate the user type you want to delete.2. Click Delete in the Actions column.
Result
The user type is no longer displayed in the User Types list.
Granting a User Type PermissionAllows a system administrator to grant access to different parts of the application, products orservices.
Prerequisite
The Manage user types user type permission is required.
Configuration > [SmartOrg] Administration > User Types
Steps
1. Click on a user type.2. Click on a functional domain.3. Click Edit next to the sub-domain.4. Select the permissions you want to grant.5. Click Save.
Result
All users assigned with this user type now have the selected permissions.
Revoking a User Type PermissionPrerequisite
The Manage user types user type permission is required.
Configuration > [SmartOrg] Administration > User Types
Steps
1. Select a user type.2. Click the functional domain (and in some cases the sub-domain) containing the
permission.3. Click Edit next to the section containing the permission you want to revoke.4. Clear the check box next to the permission you want to revoke.5. Click Save.
Result
On the user type definition page, your actions are displayed in the History section. The userswho have the user type will no longer have the permissions you revoked.

Users Configuration Profile
Configuration Guide Taleo 10 SP2 - Recruiting 98
Configuration Profile
Configuration ProfileA configuration profile is defined by a set of settings which control how the application behavesfor a specific set of users to better fit the user experience.
It is through the configuration profile that different product behaviors can be achieved suchas a streamlined manager product experience vs. a more robust recruiter product experience.Users may have the same set of permissions which grant access to specific features, but howa user is presented access to the features is then further controlled by the configuration profiledesignation.
In addition to user types, which control permission access to specific features, users have aconfiguration profile associated with their user account. Configuration profiles are created inSmartOrg. Once created, a configuration profile is assigned to each user of the application viahis/her user account. Therefore, depending on the user signing into the application, elementsdisplayed to the user will vary depending on the configuration profile associated to the user.
Three default configuration profiles are provided:• Recruiter• Hiring Manager• Hourly ManagerThe system administrator can edit the settings for these default configuration profiles and canalso create new configuration profiles. Changes made to a configuration profile are appliedthe next time a user linked to this configuration profile logs in.
By default, when a new user is created, no configuration profile is selected. If no configurationprofile is used, the default value of each setting is used.Configuration
To have access to the Configuration Profiles feature in SmartOrg, the following permission isrequired.
User Type Permission
Name Location
Manage configuration profile Configuration > [SmartOrg] Administration > UserTypes > Configuration > User Management
Creating a Configuration ProfilePrerequisite
The Manage configuration profile user type permission is required.
Configuration > [SmartOrg] Administration > Configuration Profiles
Steps1. Click Create.

Users Configuration Profile
Configuration Guide Taleo 10 SP2 - Recruiting 99
2. Provide a code and a name.3. Click on the configuration profile settings and set them as desired.4. Click Save.
Activating a Configuration ProfilePrerequisite
A configuration profile must have the Draft or Deactivated status.
The Manage configuration profile user type permission is required.
Configuration > [SmartOrg] Administration > Configuration Profiles
Steps
1. Click on a configuration profile.2. Click Activate.
Next Step
Associating a configuration profile to a user account.
Deactivating a Configuration ProfilePrerequisite
A configuration profile must be activated.
The Manage configuration profile user type permission is required.
Configuration > [SmartOrg] Administration > Configuration Profiles
Steps
1. Click on a configuration profile.2. Click Deactivate.
Deleting a Configuration ProfilePrerequisite
The Manage configuration profile user type permission is required.
The configuration profile must have the Draft or Inactive status.
Configuration > [SmartOrg] Administration > Configuration Profiles
Steps
1. Click Delete next to the configuration profile.2. Click Yes.
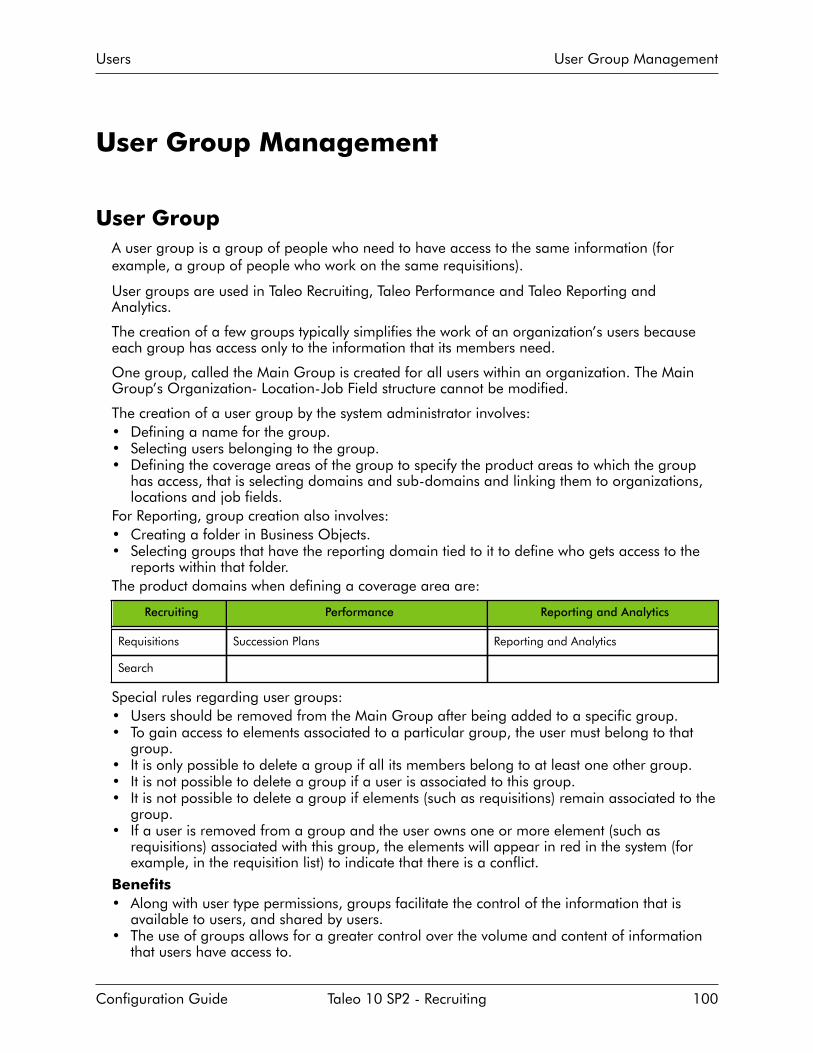
Users User Group Management
Configuration Guide Taleo 10 SP2 - Recruiting 100
User Group Management
User GroupA user group is a group of people who need to have access to the same information (forexample, a group of people who work on the same requisitions).
User groups are used in Taleo Recruiting, Taleo Performance and Taleo Reporting andAnalytics.
The creation of a few groups typically simplifies the work of an organization’s users becauseeach group has access only to the information that its members need.
One group, called the Main Group is created for all users within an organization. The MainGroup’s Organization- Location-Job Field structure cannot be modified.
The creation of a user group by the system administrator involves:• Defining a name for the group.• Selecting users belonging to the group.• Defining the coverage areas of the group to specify the product areas to which the group
has access, that is selecting domains and sub-domains and linking them to organizations,locations and job fields.
For Reporting, group creation also involves:• Creating a folder in Business Objects.• Selecting groups that have the reporting domain tied to it to define who gets access to the
reports within that folder.The product domains when defining a coverage area are:
Recruiting Performance Reporting and Analytics
Requisitions Succession Plans Reporting and Analytics
Search
Special rules regarding user groups:• Users should be removed from the Main Group after being added to a specific group.• To gain access to elements associated to a particular group, the user must belong to that
group.• It is only possible to delete a group if all its members belong to at least one other group.• It is not possible to delete a group if a user is associated to this group.• It is not possible to delete a group if elements (such as requisitions) remain associated to the
group.• If a user is removed from a group and the user owns one or more element (such as
requisitions) associated with this group, the elements will appear in red in the system (forexample, in the requisition list) to indicate that there is a conflict.
Benefits• Along with user type permissions, groups facilitate the control of the information that is
available to users, and shared by users.• The use of groups allows for a greater control over the volume and content of information
that users have access to.
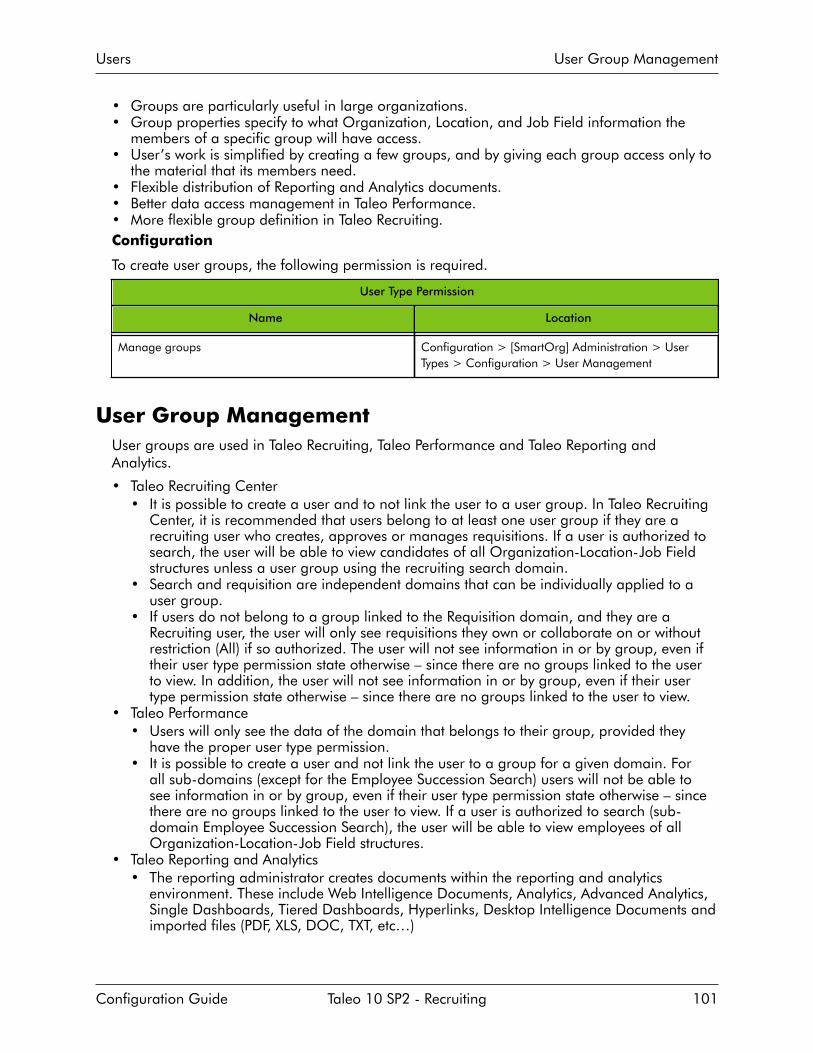
Users User Group Management
Configuration Guide Taleo 10 SP2 - Recruiting 101
• Groups are particularly useful in large organizations.• Group properties specify to what Organization, Location, and Job Field information the
members of a specific group will have access.• User’s work is simplified by creating a few groups, and by giving each group access only to
the material that its members need.• Flexible distribution of Reporting and Analytics documents.• Better data access management in Taleo Performance.• More flexible group definition in Taleo Recruiting.Configuration
To create user groups, the following permission is required.
User Type Permission
Name Location
Manage groups Configuration > [SmartOrg] Administration > UserTypes > Configuration > User Management
User Group ManagementUser groups are used in Taleo Recruiting, Taleo Performance and Taleo Reporting andAnalytics.
• Taleo Recruiting Center• It is possible to create a user and to not link the user to a user group. In Taleo Recruiting
Center, it is recommended that users belong to at least one user group if they are arecruiting user who creates, approves or manages requisitions. If a user is authorized tosearch, the user will be able to view candidates of all Organization-Location-Job Fieldstructures unless a user group using the recruiting search domain.
• Search and requisition are independent domains that can be individually applied to auser group.
• If users do not belong to a group linked to the Requisition domain, and they are aRecruiting user, the user will only see requisitions they own or collaborate on or withoutrestriction (All) if so authorized. The user will not see information in or by group, even iftheir user type permission state otherwise – since there are no groups linked to the userto view. In addition, the user will not see information in or by group, even if their usertype permission state otherwise – since there are no groups linked to the user to view.
• Taleo Performance• Users will only see the data of the domain that belongs to their group, provided they
have the proper user type permission.• It is possible to create a user and not link the user to a group for a given domain. For
all sub-domains (except for the Employee Succession Search) users will not be able tosee information in or by group, even if their user type permission state otherwise – sincethere are no groups linked to the user to view. If a user is authorized to search (sub-domain Employee Succession Search), the user will be able to view employees of allOrganization-Location-Job Field structures.
• Taleo Reporting and Analytics• The reporting administrator creates documents within the reporting and analytics
environment. These include Web Intelligence Documents, Analytics, Advanced Analytics,Single Dashboards, Tiered Dashboards, Hyperlinks, Desktop Intelligence Documents andimported files (PDF, XLS, DOC, TXT, etc…)

Users User Group Management
Configuration Guide Taleo 10 SP2 - Recruiting 102
• Each reporting document is filed into a “folder.”• Each reporting folder can be linked to one or more reporting groups containing the
reporting domain.• Users can belong to one or more groups that have the reporting domain associated,
Reporting Administrator ties these groups to reporting folders where reporting andanalytic documents are filed.
• Users only have access to the documents included in the folders to which their group(s)are linked. With the exception of reporting administrators, if a user has no groups linkedto a reporting domain, he/she will not be able to see any reports.
• When generating a report data presented is still derived by user’s access in thatapplication (Recruiting Center or Performance)
Creating a User GroupPrerequisite
The Manage groups user type permission is required.
Configuration > [SmartOrg] Administration > User Groups
Steps
1. Click Create.2. Complete the New Group page.3. If your organization activated more than one language, enter values for each of the other
languages, being sure to click Refresh after you select a new language and before youenter the values for that language.
4. Click Save.
Result
The system displays the user group. If you display the list of user groups, the new user groupappears there.
Next Step
Adding users to the user group.
Defining coverage areas for the user group.
Adding a User to a User GroupPrerequisite
The Manage groups user type permission is required.
You must create a user group before you can add users to it.
Configuration > [SmartOrg] Administration > User Groups
Steps
1. Click on a user group.2. Click Add next to Users.3. Click the check box next to each user you want to add to the user group.4. Click Select.
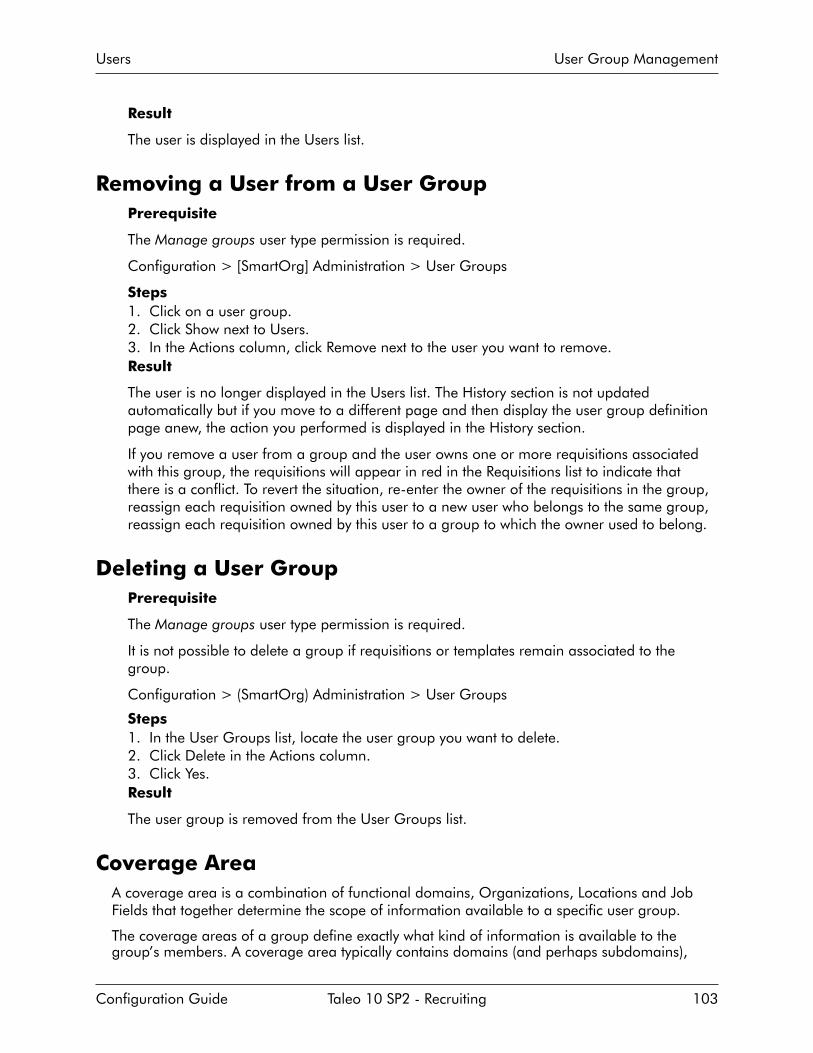
Users User Group Management
Configuration Guide Taleo 10 SP2 - Recruiting 103
Result
The user is displayed in the Users list.
Removing a User from a User GroupPrerequisite
The Manage groups user type permission is required.
Configuration > [SmartOrg] Administration > User Groups
Steps1. Click on a user group.2. Click Show next to Users.3. In the Actions column, click Remove next to the user you want to remove.Result
The user is no longer displayed in the Users list. The History section is not updatedautomatically but if you move to a different page and then display the user group definitionpage anew, the action you performed is displayed in the History section.
If you remove a user from a group and the user owns one or more requisitions associatedwith this group, the requisitions will appear in red in the Requisitions list to indicate thatthere is a conflict. To revert the situation, re-enter the owner of the requisitions in the group,reassign each requisition owned by this user to a new user who belongs to the same group,reassign each requisition owned by this user to a group to which the owner used to belong.
Deleting a User GroupPrerequisite
The Manage groups user type permission is required.
It is not possible to delete a group if requisitions or templates remain associated to thegroup.
Configuration > (SmartOrg) Administration > User Groups
Steps1. In the User Groups list, locate the user group you want to delete.2. Click Delete in the Actions column.3. Click Yes.Result
The user group is removed from the User Groups list.
Coverage AreaA coverage area is a combination of functional domains, Organizations, Locations and JobFields that together determine the scope of information available to a specific user group.
The coverage areas of a group define exactly what kind of information is available to thegroup’s members. A coverage area typically contains domains (and perhaps subdomains),

Users User Group Management
Configuration Guide Taleo 10 SP2 - Recruiting 104
which are core products, and Organizations, Locations and Job Fields. The combination ofdomains, Organizations, Locations and Job Fields associated with a coverage area determinethe scope of information available to the group for that area.
Benefits
• Enables the system administrator to define the scope of information available to a specificuser group not only by Organization, Location and Job Field but also by functional domain(core product).
• Provides the system administrator with more control over who has access to whichinformation.
• The system leverages domains in order to allow different Organizations, Locations and JobFields per domain, instead of having the same grouping across the entire suite. This canbe practical for users with a different Organization, Location and Job Field structure scopedepending on the domain.
Adding a Coverage Area to a User GroupAllows the system administrator to limit the information available to a user group by specifyingcore products and Organizations, Locations and Job Fields.
Prerequisite
The Manage groups user type permission is required.
You must create a user group before you can add coverage areas to it.
Configuration > [SmartOrg] Administration > User Groups
Steps
1. Click on a user group.2. Click Create next to Coverage Areas.3. Click Add next to Functional Domains.4. Select the domain/subdomain you want to make available to the user group.5. Click Select.6. Click Save.
Result
The domains you selected are displayed in the Functional Domains section of the CoverageArea page.
Next Step
Adding organizations, locations and job fields to the coverage area.
Removing a Coverage Area from a User GroupAllows a system administrator to reduce the kinds of information currently available to the usergroup.
Prerequisite
The Manage groups user type permission is required.

Users User Group Management
Configuration Guide Taleo 10 SP2 - Recruiting 105
Configuration > [SmartOrg] Administration > User Groups
Steps
1. Click on a user group.2. Click Show next to Coverage Areas.3. Click Remove next to the coverage area you want to remove.4. Click Yes.
Result
The coverage area is no longer displayed in the Coverage Areas list. The History sectionis not updated automatically but if you move to a different page and then display the usergroup definition page anew, the action you performed is displayed in the History section.
Adding Organizations, Locations and Job Fields to aCoverage Area
Allows the system administrator to further define which information will be available tomembers of the user group according to organizations, locations and job fields.
Prerequisite
The Manage groups user type permission is required.
You must add functional domains to a coverage area before you can add Organization,Location and Job Field values.
Configuration > [SmartOrg] Administration > User Groups
Steps
1. On a Coverage Area page, click Add next to the type of item you want to add:Organizations, Locations or Job Fields.
2. After the system displays the corresponding selector page, click the check box next toeach item you want to add to the coverage area.
3. Click Select.4. You can repeat the previous steps if you added Organization elements, for example, and
you also want to add Location and Job Field elements.
Result
The Organization, Location and Job Field elements you added are displayed in thecorresponding sections of the Coverage Area page.
Removing Organizations, Locations and Job Fields from aCoverage Area
Prerequisite
The Manage groups user type permission is required.
Configuration > [SmartOrg] Administration > User Groups

Users User Group Management
Configuration Guide Taleo 10 SP2 - Recruiting 106
Steps
1. Click on a user group.2. Click Show next to Coverage Areas.3. Click on a coverage area.4. On the Coverage Area page, click Remove next to the item you want to remove.
Result
The Organization, Location or Job Field element you removed is not longer displayed in thecorresponding section of the Coverage Area page.
Reducing the Scope of a Coverage AreaYou can remove functional domains, Organizations, Locations and Job Fields if you want toreduce the scope of a coverage area.
Prerequisite
Configuration > (SmartOrg) Administration > User Groups
Steps
1. Click on a user group.2. Click Show next to Coverage Areas.3. Click the coverage area you want to modify.4. You can perform any of the following steps.
• To remove a functional domain, Organization, Location or Job Field, click thecorresponding Remove in the Actions column.
• To remove all Organizations, all Locations or all Job Fields, click Remove All next tothe corresponding item.
Result
The items you removed are no longer displayed the Coverage Areas page. The actions youperformed are displayed in the History section of the user group definition page.

Lists
• List.....................................................................................................................108
• Column............................................................................................................. 118
• Filter.................................................................................................................. 124

Lists List
Configuration Guide Taleo 10 SP2 - Recruiting 108
List
List FormatA list format allows the display of candidate file or requisition file information in differentcolumns.
List formats are available for candidate lists as well as requisition lists. List formats areconfigured by the system administrator then used by users in Taleo Recruiting. Users can select(among the list formats created by the system administrator) the list format they wish to useto display files in a list. If they have been granted the permission, users can also create upto three list formats and select columns to display specific information. Columns available tochoose from have been previously defined by the system administrator.
Benefits
• Facilitates the search and organization of information.• Improves the organization of lists.• Speeds up candidate evaluation and improves recruiting process.• Displays only relevant information in columns.
Configuration
Settings
Name Possible Values Default Value Location
Requisition List Format• Variation 1
• Variation 2
• Variation 3
Variation 1 Configuration >[SmartOrg] Administration> Configuration Profiles
Candidate List Format• Variation 1
• Variation 2
• Variation 3
Variation 1 Configuration >[SmartOrg] Administration> Configuration Profiles
To create personalized list formats, users must be granted the following permissions.
User Type Permissions
Name Location
Create personal list formats for the requisition list Configuration > [SmartOrg] Administration > UserTypes > Recruiting > Requisitions
Create personal list formats for the candidate list Configuration > [SmartOrg] Administration > UserTypes > Recruiting > Candidates
To access requisition-specific candidate lists, users must be granted the following permission.
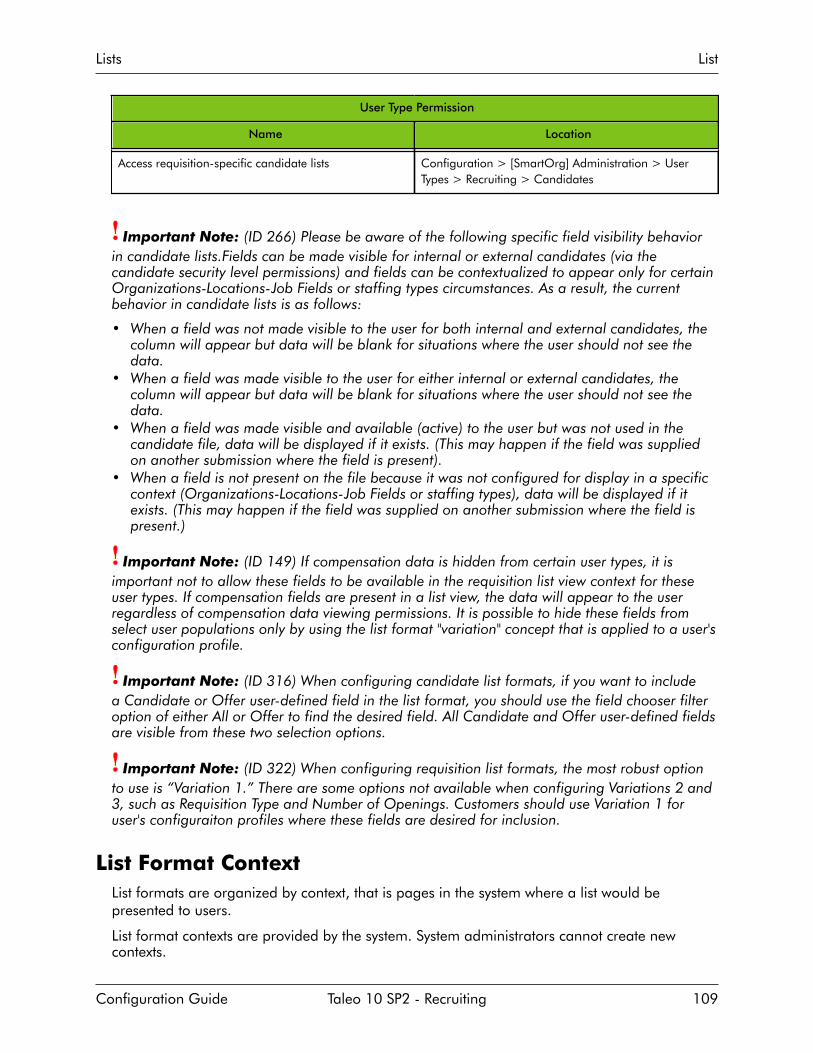
Lists List
Configuration Guide Taleo 10 SP2 - Recruiting 109
User Type Permission
Name Location
Access requisition-specific candidate lists Configuration > [SmartOrg] Administration > UserTypes > Recruiting > Candidates
Important Note: (ID 266) Please be aware of the following specific field visibility behaviorin candidate lists.Fields can be made visible for internal or external candidates (via thecandidate security level permissions) and fields can be contextualized to appear only for certainOrganizations-Locations-Job Fields or staffing types circumstances. As a result, the currentbehavior in candidate lists is as follows:
• When a field was not made visible to the user for both internal and external candidates, thecolumn will appear but data will be blank for situations where the user should not see thedata.
• When a field was made visible to the user for either internal or external candidates, thecolumn will appear but data will be blank for situations where the user should not see thedata.
• When a field was made visible and available (active) to the user but was not used in thecandidate file, data will be displayed if it exists. (This may happen if the field was suppliedon another submission where the field is present).
• When a field is not present on the file because it was not configured for display in a specificcontext (Organizations-Locations-Job Fields or staffing types), data will be displayed if itexists. (This may happen if the field was supplied on another submission where the field ispresent.)
Important Note: (ID 149) If compensation data is hidden from certain user types, it isimportant not to allow these fields to be available in the requisition list view context for theseuser types. If compensation fields are present in a list view, the data will appear to the userregardless of compensation data viewing permissions. It is possible to hide these fields fromselect user populations only by using the list format "variation" concept that is applied to a user'sconfiguration profile.
Important Note: (ID 316) When configuring candidate list formats, if you want to includea Candidate or Offer user-defined field in the list format, you should use the field chooser filteroption of either All or Offer to find the desired field. All Candidate and Offer user-defined fieldsare visible from these two selection options.
Important Note: (ID 322) When configuring requisition list formats, the most robust optionto use is “Variation 1.” There are some options not available when configuring Variations 2 and3, such as Requisition Type and Number of Openings. Customers should use Variation 1 foruser's configuraiton profiles where these fields are desired for inclusion.
List Format ContextList formats are organized by context, that is pages in the system where a list would bepresented to users.
List format contexts are provided by the system. System administrators cannot create newcontexts.

Lists List
Configuration Guide Taleo 10 SP2 - Recruiting 110
A context can contain several list formats. The number of list formats that can be created for acontext is defined by Taleo.
Type of List Default List Format Contexts
Candidate• All Candidates by Requisition List
• All Candidates by Folder List
• All Candidate by Offer List
• List of automatically pooled candidates
• Requisition Specific Candidate List
• Candidate Capture/Possible Duplicates List
• Search Results / Advanced Search
• Search Results / Quick Search
Requisition• Requisition List
• Mini Requisition List
List Format VariationVariations are used to organize list format contexts.
Three variations are available:
• Variation 1• Variation 2• Variation 3
The system administrator can configure list formats across all relevant requisition andcandidate list formats for each of these three variations. Then, for each configuration profileavailable in the SmartOrg Configuration Profiles feature, the system administrator defineswhich variation will be used for requisition and candidate list formats.
Building a Candidate or Requisition ListPrerequisite
Configuration > [Recruiting] Administration > List Formats
Steps
1. Select the context for which the list format is created.2. Create the list format.
a) Select columns.b) Put columns in the right sequence.c) Set column sorting criteria.d) Select the default list format for the context.e) Group files in the list format.
3. Activate advanced filters for the context.4. Select elements appearing in the quick filters.5. Create custom instructions appearing on the list format icon.6. Activate the list format.

Lists List
Configuration Guide Taleo 10 SP2 - Recruiting 111
7. Select a list format variation for each configuration profile.8. Grant the user type permission allowing users to create personalized list formats.
Result
The list format is available in Taleo Recruiting and users can select it.
Creating a List FormatPrerequisite
Configuration > [Recruiting] Administration > List Formats
Steps
1. Click on the Candidate or Requisition tab.2. Click on a context name.3. In the Formats for this Context tab, click New...4. Enter format details.5. Select the desired columns.6. To order columns in the list format, select a number in the Sequence Number column
then click Reorder.7. To sort files in the list according to a specific criterion, click the triangle icon in the Sort by
column next to the desired column name.8. Click Done.
Result
The list format appears in the Context Details page, under the Formats for this Context tab.
Next Step
Activating the list format.
If you created a candidate list format, specify the candidate file identifier content.
Deleting a List FormatPrerequisite
A default list format cannot be deleted.
Configuration > [Recruiting] Administration > List Formats
Steps
1. Click on the Candidate or Requisition tab.2. Click on a context name.3. In the Formats for this Context tab, select a list format.4. Click .
Result
The list format is deleted from the database. It no longer appears in the Context Detailspage, under the Formats for this Context tab and it is unavailable to users.

Lists List
Configuration Guide Taleo 10 SP2 - Recruiting 112
Ordering List FormatsPrerequisite
Configuration > [Recruiting] Administration > List Formats
Steps
1. Click on the Candidate or Requisition tab.2. Click on a context name.3. In the Formats for this Context tab, select a number in the Sequence Number column.4. Click Reorder.5. Click Done.
Result
List formats for the context are displayed in the specified order.
Activating a List FormatPrerequisite
Configuration > [Recruiting] Administration > List Formats
Steps
1. Click on the Candidate or Requisition tab.2. Click on a context name.3. In the Formats for this Context tab, click on a list format.4. Select Active.5. Click Done.
Result
In the Context Details page, under the Formats for this Context tab, a check icon appearsin the Active column next to the list format. Also, the list format is available to users in thecandidate or requisition lists.
Deactivating a List FormatPrerequisite
Configuration > [Recruiting] Administration > List Formats
Steps
1. Click on the Candidate or Requisition tab.2. Click on a context name.3. In the Formats for this Context tab, click on a list format.4. Deselect Active.5. Click Done.

Lists List
Configuration Guide Taleo 10 SP2 - Recruiting 113
Result
In the Context Details page, under the Formats for this Context tab, a check icon no longerappears in the Active column next to the list format. Also, the list format is unavailable whenusers select a list format for a candidate or requisition list.
Next Step
If you no longer want this list format, you can delete it.
Selecting a Default List FormatPrerequisite
The list format must be activated.
Configuration > [Recruiting] Administration > List Formats
Steps
1. Click on the Candidate or Requisition tab.2. Click on a context name.3. In the Formats for this Context tab, click on a list format.4. Select the option Default format for this context.5. Click Done.
Result
In the Formats for this Context tab, under the Formats for this Context tab, a check iconappears in the Default column, next to the list format. The list format will be applied bydefault to a requisition or candidate list.
Setting Sort Criteria in a List FormatPrerequisite
The list format must be created in order to set sorting criteria.
Configuration > [Recruiting] Administration > List Formats
Steps
1. Click on the Candidate or Requisition tab.2. Click on a context name.3. In the Formats for this Context tab, click on a list format.4.
To select a criterion, click in the Sort By column next to the desired column name.
5.To select a second sorting criterion, click in the Then by column next to the desiredcolumn name.
6.To select a third sorting criterion, click in the second Then by column next to thedesired column name.
7.To select ascending or descending sorting order, click repeatedly.
Lists List
Configuration Guide Taleo 10 SP2 - Recruiting 114
8. Click Done.
Result
Up to three different sorting criteria to display files in a candidate or requisition list arespecified.
Grouping Files in a List FormatPrerequisite
Configuration > [Recruiting] Administration > List Formats
Steps
1. Click on the Candidate or Requisition tab.2. Click on a context name.3. In the Formats for this Context tab, click on a list format.4. Select the option Group records by first sort criterion.5. Click Done.
Result
Files are grouped in the candidate or requisition list. For example, a system administratorcould decide to group candidate files by cities. As a result, the candidate list could displaycandidate files grouped by the city of Boston, then the city of Los Angeles, New York, SanFrancisco, etc.
Assigning a List Format Variation to a ConfigurationProfile
Prerequisite
Configuration > [SmartOrg] Administration > Configuration Profile
Steps
1. Click on a configuration profile.2. Click the setting Candidate List Format or Requisition List Format.3. Click Edit.4. Select a list format variation in the Value drop-down list.5. Click Save.
Next Step
Associating a configuration profile to a user account in the SmartOrg User Accounts feature,under Account Information.
Granting Permissions to Create List FormatsPrerequisite
Configuration > [SmartOrg] Administration > User Types > User Type

Lists List
Configuration Guide Taleo 10 SP2 - Recruiting 115
Steps
1. Click the Recruiting functional domain.2. Click Edit next to Requisitions.3. Select the Create personal list formats for the requisition list permission.4. Click Save.5. Click Edit next to Candidates.6. Select the Create personal list formats for the candidate list permission.7. Click Save.
Result
Users assigned the user type will be able to create up to three personal list formats.
Creating Custom Instructions for a List Format ContextPrerequisite
Only one text can be customized by context by language.
Text must be created for all available languages.
A maximum of 1000 text based characters is supported. HTML, rich text format (RTF) andhyperlinks are not supported.
Configuration > [Recruiting] Administration > List Formats
Steps
1. Click on the Candidate or Requisition tab.2. Click on a context name.3. Enter text in the Step Information field.4. Click Done.
Result
The text appears in a callout located to the left of the List Format Configuration iconavailable in the top right hand corner of a list. The callout only appears if instructions areprovided. The instructions appear for all lists in the context. Provide text will help clarify thelist format options to users or explain that other contexts are available for different recruitingcircumstance
Locating the Name of a List FormatAllows a system administrator to change elements available in a specific list format, withoutmistaking the name.
Steps
In any list of Taleo Recruiting Center, click .
Result
The name of the list format is the selected list format.The system administrator can changeelements available in a specific list format, without mistaking the name.
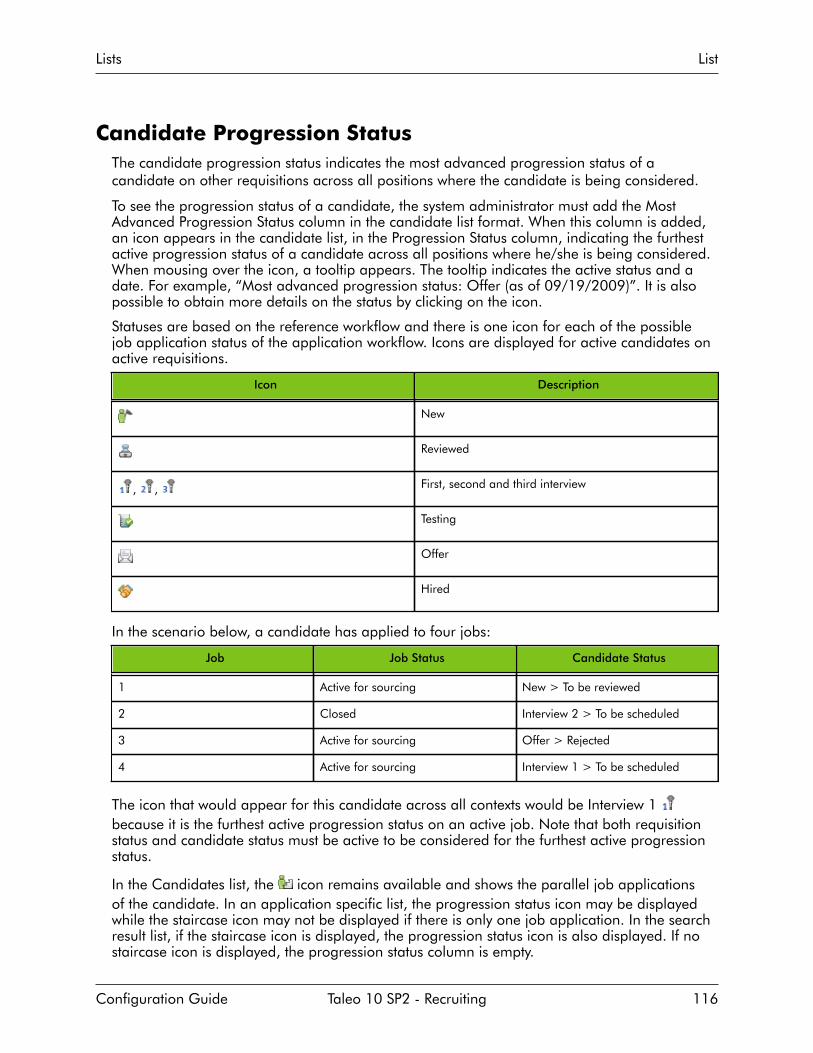
Lists List
Configuration Guide Taleo 10 SP2 - Recruiting 116
Candidate Progression StatusThe candidate progression status indicates the most advanced progression status of acandidate on other requisitions across all positions where the candidate is being considered.
To see the progression status of a candidate, the system administrator must add the MostAdvanced Progression Status column in the candidate list format. When this column is added,an icon appears in the candidate list, in the Progression Status column, indicating the furthestactive progression status of a candidate across all positions where he/she is being considered.When mousing over the icon, a tooltip appears. The tooltip indicates the active status and adate. For example, “Most advanced progression status: Offer (as of 09/19/2009)”. It is alsopossible to obtain more details on the status by clicking on the icon.
Statuses are based on the reference workflow and there is one icon for each of the possiblejob application status of the application workflow. Icons are displayed for active candidates onactive requisitions.
Icon Description
New
Reviewed
, , First, second and third interview
Testing
Offer
Hired
In the scenario below, a candidate has applied to four jobs:
Job Job Status Candidate Status
1 Active for sourcing New > To be reviewed
2 Closed Interview 2 > To be scheduled
3 Active for sourcing Offer > Rejected
4 Active for sourcing Interview 1 > To be scheduled
The icon that would appear for this candidate across all contexts would be Interview 1 because it is the furthest active progression status on an active job. Note that both requisitionstatus and candidate status must be active to be considered for the furthest active progressionstatus.
In the Candidates list, the icon remains available and shows the parallel job applicationsof the candidate. In an application specific list, the progression status icon may be displayedwhile the staircase icon may not be displayed if there is only one job application. In the searchresult list, if the staircase icon is displayed, the progression status icon is also displayed. If nostaircase icon is displayed, the progression status column is empty.

Lists List
Configuration Guide Taleo 10 SP2 - Recruiting 117
It is recommended to remove the tracking solution (staircase icon) and to replace it with theProgression Status feature in general lists (such as search result lists, folder lists) if you allowusers to view the content of requisitions to which a candidate has applied and to which the userhas access. In a job-specific candidate list, the staircase icon is visible only when there is atleast one concurrent active job application, and the progression status icon is visible as soon asthere is one active job application.
Benefits
• Reduces chances of having multiple users working on the same candidate simultaneously.• Users are informed of candidates being considered on other requisitions and they can have
additional details directly on the candidate list on the job where the candidate is active andhas progressed furthest.

Lists Column
Configuration Guide Taleo 10 SP2 - Recruiting 118
Column
List ColumnA list is composed of columns that display different types of information.
For a column to be available for a list format, it must have been made available for thispurpose. This is done via the field configuration feature. When defining the properties of afield, whether the field was provided by Taleo or is user-defined, the system administrator mustspecify if the field will be available in Taleo Recruiting. When this option is selected, the fieldbecomes available when selecting a column for a context.
Example of a list format and its columns.
Context List Format Columns
All Candidates/By Requisition Education Item Requiring Attention Icon
Disqualification Question Result
Candidate Record Identifier
Requisition Number and Title
Selection Step and Status
Education Level (most relevanteducation)
Program (most relevant education)
ConfigurationSettings
Name Possible Values Default Value Location
Maximum Candidate List Columns Any 17 Configuration > [Recruiting] Settings
Maximum Number of UDF forCandidate List Columns
Any 12 Configuration > [Recruiting] Settings
Selecting a Column for a List FormatPrerequisite
Configuration > [Recruiting] Administration > List Formats
Steps1. Click on the Candidate or Requisition tab.2. Click on a context name.3. In the Formats for this Context tab, click on a list format.4. Select the check box next to a column.

Lists Column
Configuration Guide Taleo 10 SP2 - Recruiting 119
5. Click Done.
Ordering Columns in a List FormatPrerequisite
Configuration > [Recruiting] Administration > List Formats
Steps1. Click on the Candidate or Requisition tab.2. Click on a context name.3. In the Formats for this Context tab, click on a list format.4. Select a number in the Sequence Number column.5. Click Reorder.6. Click Done.Result
Columns are placed in the list according to the order specified.
Adding a Column to a ContextPrerequisite
Configuration > [Recruiting] Administration > List Formats
Steps1. Click on the Candidate or Requisition tab.2. Click on a context name.3. In the Columns in this Context tab, click Add...4. Select a field group.5. Select a field in the Available Fields list.6. Click Add.7. Click Done.Result
The column appears in the Columns in this Context tab. The column is available to userswhen they customize their own list formats.
Next Step
Reordering columns in a context.
Removing a Column from a ContextPrerequisite
Configuration > [Recruiting] Administration > List Formats
Steps1. Click on the Candidate or Requisition tab.2. Click on a context name.3. In Columns in this Context tab, select a column.4. Click Remove.

Lists Column
Configuration Guide Taleo 10 SP2 - Recruiting 120
Result
The column no longer appears in the Columns in this Context tab. Also, the column is notdisplayed to users when they customize their own candidate or requisition list format.
Next Step
Reordering columns in the context.
Ordering Columns in a List FormatPrerequisite
Configuration > [Recruiting] Administration > List Formats
Steps1. Click on the Candidate or Requisition tab.2. Click on a context name.3. In the Formats for this Context tab, click on a list format.4. Select a number in the Sequence Number column.5. Click Reorder.6. Click Done.Result
Columns are placed in the list according to the order specified.
Item Requiring Attention IconThe Item Requiring Attention icon is used to draw users attention to items that they own thatrequire viewing.
The Item Requiring Attention icon appears in the Candidates list and Requisitions list to drawa user's attention to items that he/she owns and that require viewing.
This icon is only displayed to the owner of an element. A user who creates a requisition isconsidered the owner of the requisition. However, when creating a requisition, the user canspecify other owners for the requisition by completing the Recruiter, Recruiter Assistant, HiringManager and/or Hiring Manager Assistant fields.
The icon is removed when:• an item that has the Item Requiring Attention icon is opened• the user takes action on an item from the list view (without opening the item)Configuration
The following setting allows to remove the Item Requiring Attention icon when an action hasbeen performed against a candidate, even if the candidate’s file has not been physicallyviewed.
Setting
Name Possible Values Default Values Location
Item Requiring Attention icon inCandidate Submissions
• Yes
• No
No Configuration> [Recruiting] Settings

Lists Column
Configuration Guide Taleo 10 SP2 - Recruiting 121
The table below indicates the actions affected by the activation of the setting.
Action The icon is removed?
General Actions
Go in the candidate profile No
Offer Actions
Create Offer Yes
Make Offer Yes
Cancel Offer Yes
Capture Expectation Yes
Capture Candidate Response Yes
Capture Competitive Offer Yes
Extend Offer Yes
Renege Offer Yes
Rescind Offer Yes
Send Offer Yes
Update Expiration Date Yes
Update Start Date Yes
Request Approval Yes
Amend Approval Path Yes
Decide on Approval Yes
Terminate Approval Yes
Candidate Selection Workflow Actions
Move/Change Status & Step Yes
Bypass Yes
Reject Yes
Has Declined Yes
Hire Yes
Schedule Interview Yes
Update Interview Yes
Cancel Interview Yes
Mark as Yes Yes
Mark as No Yes

Lists Column
Configuration Guide Taleo 10 SP2 - Recruiting 122
Action The icon is removed?
Mark as Maybe Yes
Move all to next step Yes
Move to next step Yes
Revert Yes
Reset Selection Process Yes
Candidate File Actions
Match No
Merge No
Share No
Fill Out Form No
Print No
File in folder No
Compare Yes
Add Comment No
Add Grade No
Attach File No
Send Correspondence No
Find Similar Candidate No
Remove candidate No
Delete Submission Yes
Undelete Submission Yes
Create Screening Request No
Onboarding Actions
Start Onboarding Process Yes
Cancel Onboarding Process Yes
Activating the Item Requiring Attention IconPrerequisite
Configuration > [Recruiting] > Settings
Steps
1. Click on the Item Requiring Attention icon in Candidate Submissions setting.

Lists Column
Configuration Guide Taleo 10 SP2 - Recruiting 123
2. Click Edit.3. Set the value to Yes.4. Click Save.
Result
The system removes the Item Requiring Attention icon when an action has been performedagainst a candidate, even if the candidate’s file has not been physically viewed.
Candidate File IdentifierA candidate file identifier contains candidate-specific information presented in the CandidateRecord Identifier column of a candidate list.
A candidate file identifier can provide the following information in the form of text or icon:
• Candidate name (first name, last name, middle initial)• Identification number• Ace candidate• Internal candidate• In at least one selection process• Referred candidate• Registered person
The Candidate Record Identifier column is always present in a candidate list. The systemadministrator is responsible of defining which information will appear by default in the column.However, users can modify the information set by the system administrator via the My Setuppage.
Specifying the Default Candidate File Identifier ContentPrerequisite
Configuration > [Recruiting] Administration > File Identifiers
Steps
1. Click Candidate.2. Select the information you want to display.3. Select a sorting key to determine which value will be used to sort the candidate column.4. Click Done.
Result
Selected values appear in the Record Identifiers page. Also, The element selected will appearby default in the Candidate Record Identifier column of a candidate list.

Lists Filter
Configuration Guide Taleo 10 SP2 - Recruiting 124
Filter
Advanced FilterAdvanced filters are used to filter lists by a more expansive set of filtering criteria.
Both requisition and candidate lists have “advanced” filtering tools at the very bottom of theleft panel of the page. Users can select several advanced filter criteria to filter a list. Onceexecuted, the criteria are presented to the user across the top of the screen with a small xadjacent to the filter criteria. By clicking the x, the criteria can be removed and the list willdynamically update according to the updated criteria set. User-defined fields can also beavailable as filtering criteria.
Advanced filters are filtering on an already filtered list, that is whatever advanced filter criteriais selected, the list will be filtered based on what is already displayed in the list. For example,a user filters a requisitions list using the Pending, Open and On Hold status quick filters (hedoes not select the Draft status filter). The user then applies the advanced filter “Status Details/Draft”. The list will display “No matches found”. In this example, the system first displays allrequisitions except Draft ones. Then, from the results displayed by the quick filters, the systemfinds those requisitions that are draft.
When using advanced filters for which words must be entered, users have the ability to enterpartial words. For example, a user could filter a candidate list with candidates whose firstname starts with “cath”. The system would retrieve candidates whose first name is “cathy”,“catherine” or “cathia”.
Benefits
• Easy removal of filter criteria and dynamic list updating improves usability.• System administrators can control if users have access to advanced filters by context.
Configuration
Advanced filters are activated by the system administrator. The system administrator has theability to specify if the Advanced Filters button will be displayed or not. Criteria available inadvanced filters are pre-defined by the system based on the columns selected for the list formatcontext. The system administrator cannot modify them.
Displaying Advanced FiltersPrerequisite
Configuration > [Recruiting] Administration > List Formats
Steps
1. Click on the Candidate or Requisition tab.2. Click on a context name.3. Select Show Advanced Filters.4. Click Done.

Lists Filter
Configuration Guide Taleo 10 SP2 - Recruiting 125
Result
The Advanced Filters button is displayed for the selected candidate or requisition list formatcontext.
Hiding Advanced FiltersPrerequisite
Configuration > [Recruiting] Administration > List Formats
Steps
1. Click on the Candidate or Requisition tab.2. Click on a context name.3. Clear Show Advanced Filters.4. Click Done.
Result
The Advanced Filters button is no longer displayed for the selected candidate or requisitionlist format context.
Quick FilterQuick filters help users to quickly filter a list down to relevant information.
Quick filters are displayed on the left panel of a page and are available in the following lists:• Tasks• Requisitions• Candidates• Offers• Requisition Templates• Questions• Interview Questions• Disqualification Questions• CompetenciesBy default, quick filter categories are collapsed and only display selected filtering criteria. Whenno quick filter is selected, the list displays all available entries. As soon as one filter is selected,it is automatically applied to the list and the list refreshes according to the selection made.Users do not need to refresh the list. For example, in the Requisitions list, if the Open quickfilter is selected, only open requisitions will be displayed in the list.
Several quick filters can be applied at a time. Quick filters can be restored to their initial value.
Some quick filters have the icon to refresh the related list. Also, when entering data in more
than one field and clicking or pressing the Enter key, the refresh action takes into accountthe data entered in all the fields.
Important Note: (ID 318) When using quick filters, if the value selected is long it may causethe left panel to truncate the content visible in the quick filter once the value is applied to thefilter. To work past this, click the erase option to clear the filter options and return the screenback to its original state.

Lists Filter
Configuration Guide Taleo 10 SP2 - Recruiting 126
Important Note: (ID 317) When applying Organization, Location or Job Field quick filters,select the desired value and then click into another field in the quick filter area to get the list torefresh with the criteria applied.
Benefits• Dynamic filtering on screen improves usability.• Configuration by variation options gives flexibility in layout for different user audiences
where necessary.
Configuration
The system administrator can configure quick filters available in the Requisitions andCandidates lists. For a list format context, the system administrator has the ability to selectfilters amongst a predefined list of filters that will be displayed.
The system administrator can define a default value for certain quick filters. These defaultvalues are automatically applied to the list.• If a quick filter is displayed to users, users can choose to edit the default value for the filter.• If a quick filter is not displayed to users, this means that the users will only see candidates
according to this default value. As a result, the total number of candidates on a requisitioncan be different from what users see on their list.
For example: In the list format "All Candidates / By Requisition", the system administratordecides to not display the ACE filter but yet decides to set the ACE filter as a default value. Asa result, when users review the candidates list of a specific requisition, they will see a certainnumber of candidates. However, if they click the "candidate" number, which will display the listformat "All candidates / By Requisition" for that same requisition, the system will present themwith only the ACE candidates, but will not display the ACE filter and therefore the number ofcandidates they see are reduced to only show ACE candidates.
The system administrator also has the ability to define the order in which quick filters aredisplayed. It is important to note that for candidate list filters, the configuration option appearsrepeatedly for every single list format, however, similar requisition formats such as requisitionspecific candidate list formats will share the same configuration. Changing it in one location,will change it in all others as well. (Important Note - you must click apply changes - whichis about half way down the page prior to clicking Done for the changes to the filter formatconfiguration to take place.)
Requisition List Quick FiltersRequisition List Quick Filters
Filter Main Requisition List Mini Requisition List
Primary Location yes yes
Organization yes yes
Job Field yes yes
Status yes no
Requisition ID yes no
Note: The Status quick filter is considered a multi-select within the same field and acts as an OR filter. For example,when selecting the Draft and Open status filters, the user will see all requisitions that are either in Draft or Openstatus.

Lists Filter
Configuration Guide Taleo 10 SP2 - Recruiting 127
Candidate List Quick FiltersCandidate List Quick Filter
Filter AllCandidates
by Requisition
AllCandidatesBy Folder
AllCandidates
By Offer
RequisitionSpecific
Candidate List
Search Results- Quick orAdvanced
List ofautomatically
pooledcandidates
Candidates -Internal
yes yes yes yes yes yes
Candidates -Referred
yes yes yes yes yes yes
Candidates- RequiringAttention
yes yes yes yes yes no
Candidates- In selectionProcess
yes yes no no no no
Candidates- Active onCurrentRequisition
yes no no yes no no
Candidates- Active onconcurrentrequisition
yes no no yes yes yes
Candidates- Excludedisqualified
yes no no yes no no
Candidates- New inselectionprocess
yes no no yes no no
Submissions- Submissioncompleted
yes no no yes no no
Submissions -Meet requiredcriteria
yes no no yes no no
Submissions -ACE
yes no no yes no no
Submissions -Assets Met
yes no no yes no no
Submissions- Resultsbetween %
yes no no yes no no

Lists Filter
Configuration Guide Taleo 10 SP2 - Recruiting 128
Candidate List Quick Filter
Filter AllCandidates
by Requisition
AllCandidatesBy Folder
AllCandidates
By Offer
RequisitionSpecific
Candidate List
Search Results- Quick orAdvanced
List ofautomatically
pooledcandidates
Submissions -Creation Date
yes no no yes no no
Submissions-CompletionDate
yes no no yes no no
Submissions- Last ActivityDate
yes no no yes yes yes
Submissions -Step
yes no no yes no no
Submissions -Status
yes no no yes no no
Submissions -Employer
yes yes no yes yes no
Submissions -Program
yes yes no yes yes yes
Submissions -Radius
no no no no no yes
Requisitions -Status
yes no no no no no
Requisitions -Organization
yes no no no no no
Requisitions-Primarylocation
yes no no no no no
Requisitions -Job Field
yes no no no no no
Requisitions -Requisition ID
yes no no no no no
Folder Name no yes no no no no
Offer Status no no yes no no no
Shift no no no no yes yes
Offer Dates:Creation,Start,Approval,Expiration &Acceptance
no no yes no no no

Lists Filter
Configuration Guide Taleo 10 SP2 - Recruiting 129
Candidate List Quick Filter
Filter AllCandidates
by Requisition
AllCandidatesBy Folder
AllCandidates
By Offer
RequisitionSpecific
Candidate List
Search Results- Quick orAdvanced
List ofautomatically
pooledcandidates
Note: Candidates quick filters are considered a single select on different fields and act as an ANDbetween the filters. For example, when selecting the Internal and Referred candidate filters, theuser will only see the candidates that are Internal and Referred
Configuring a Quick FilterPrerequisite
Configuration > [Recruiting] Administration > List Formats
Steps
1. Click on the Candidate or Requisition tab.2. Click on context name.3. Click the Filters in this context tab.4. Select filtering criteria by selecting the Displayed check box next to each criterion.5. Select a default criterion by selecting the Default Value check box next to a criterion.6. Order filtering criteria by selecting a number in the Sequence Number column.7. Click Done.
Result
Quick filters are displayed for the selected requisition or candidate list format context.
Show FilterThe Show filter allows users to filter information displayed in a list using ownership,collaboration or status criteria.
The Show filter can appear in:
• requisitions list• candidates list• tasks list• home page
The Show filter:
• can be displayed everywhere except in the home page• can be displayed everywhere including the home page• can be not displayed at all.
Values appearing in the Show filter depend on the permissions granted to the user and on theconfiguration of the application. Available values are the same for all three pages where theShow filters can appear. Possible values are:
• I own• I collaborate on• I own or collaborate on

Lists Filter
Configuration Guide Taleo 10 SP2 - Recruiting 130
• I own in My coverage area• I own or collaborate on or in My coverage area• Groups the user is part of• All
For example:
• If a user’s permissions does not allow a user to see requisitions he/she does not own, theuser will only see the “I own” value.
• If a user’s permissions allow a user to see requisitions he/she does not own BUT thecollaborator feature is not available in the company, the user will not see the followingvalues related to the collaborator feature: “I own or collaborate on”, “I collaborate on” and“I own or collaborate on or in My coverage area”.
• If a user’s permissions allow the user to see requisitions he/she does not own AND thecollaborator feature is available in the company, the user will see the following valuesrelated to the collaborator feature: “I own or collaborate on”, “I collaborate on” and “I ownor collaborate on or in My coverage area”.
When displaying the Candidates list, a check box called Show requisitions inactived sinceappears just underneath the Show filter. Selecting this check box will add to the Requisitions listthe Deleted, Canceled and Filled requisitions.
Benefits
• The Show filter may be hidden to avoid users changing it and being distracted or confusedby it.
• A default value may be set for the Show filter for users’ convenience and to ensure that theysee the relevant requisitions without having to change this filter each time.
• Retail and hourly customers can use the configuration to default to My coverage area and tosimplify the experience for their decentralized hourly managers.
Configuration
For the Show filter to be displayed, the following setting must be configured.
Setting
Name Possible Values Default Value Location
Show information for FilterVisibility
• Never display
• Everywhere except inthe home page
• Everywhere including inthe home page
Everywhere including in thehome page
Configuration >[SmartOrg] Administration> Configuration Profiles
A default value for the Show filter can then be selected by configuring the following setting.
Setting
Name Possible Values Default Value Location
Show information for FilterDefault
• I own
• I collaborate on
• I own or I collaborateon
• My coverage area
I own Configuration >[SmartOrg] Administration> Configuration Profiles

Lists Filter
Configuration Guide Taleo 10 SP2 - Recruiting 131
Setting
Name Possible Values Default Value Location
• All users
Setting the Visibility of the Show FilterPrerequisite
Configuration > [SmartOrg] Administration > Configuration Profiles
Steps
1. Click on a configuration profile.2. Click on the Show information for Filter Visibility setting.3. Click Edit.4. Select the desired option in the Value field.
If you think users will not need to change the value of the Show filter, consider notdisplaying the Show filter to them.
5. Click Save.
Result
The system administrator can specify if and where the Show filter is displayed to users.
Next Step
Setting the Show filter default value.
Setting the Show Filter Default ValuePrerequisite
The Show information for Filter Visibility setting must be activated in the SmarOrgConfiguration Profiles feature.
Configuration > [SmartOrg] Administration > Configuration Profiles
Steps
1. Click on a configuration profile.2. Click on the Show information for Filter Default setting.3. Click Edit.4. Select the desired value in the Value field.
If you want to ensure users see relevant requisitions without having to change the filtereach time, do not display the Show filter.
5. Click Save.
Result
A default value is selected for the Show filter.

Fields, Forms, Files
• Field.................................................................................................................. 133
• Selection............................................................................................................ 141
• Field Layout....................................................................................................... 146
• File.................................................................................................................... 149
• Form..................................................................................................................160
• Candidate and Requisition File Setup..................................................................169
Fields, Forms, Files Field
Configuration Guide Taleo 10 SP2 - Recruiting 133
Field
FieldA field is used to collect and display information.
System administrators can configure fields in the system via the Fields feature of the TaleoRecruiting Administration module.
Fields are divided into four categories based on where they are used in the application. Thesecategories are:• Candidate• Department• Offer• RequisitionThe system provides standard fields predefined by Taleo and that can be made available inTaleo Recruiting, career sections, candidate search feature and History tab. The properties of afield such as where the field is used, if content is required for the field and confidentiality levelcan be modified by the system administrator. The field label may also be modified. ContactTaleo Consulting Services for further information.
Custom fields can be created to collect information according to specific organizationrequirements. Custom fields can also be made available in Taleo Recruiting Center, careersections, candidate search feature, History tab but also in reports using the Taleo reportingsolution. The maximum number of custom fields that can be created is by default 50 butadditional fields can be made available if purchased. The following types of custom fields canbe created:• Text• Multilingual text• Number• Date• SelectionWhen configuring a field, the system administrator specifies if the content for a field is requiredto save, approve or source. If this is the case, users must enter information in the field in orderto proceed. If content is not required, users do not have to enter information in the field. Ifa field in a file is mandatory and the user is not authorized to edit the field because of thesecurity level of the field, an error message will be displayed and the user will not be allowedto complete the transaction.
Also, the system administrator must specify:• the field security level• the field Organization-Location-Job Field contextualization• the field staffing type exception
Important Note: (ID 297) Department Date UDF ranges do not match what is configured inTaleo Administration for the range. This year option does not work – it recognizes “This year”as 2026 vs. 2010 – essentially this year is 16 years in the future. Please bear this in mind andavoid using the current year option in configurations of Department Date UDF fields for the timebeing.

Fields, Forms, Files Field
Configuration Guide Taleo 10 SP2 - Recruiting 134
Field Security LevelA security level is associated to each field to restrict access or viewing of a field.
Each field is associated to a security level:• General: Most basic security level; most fields have this level by default.• Restricted: Security level used to restrict specific users from either viewing or editing the
information.• Confidential: This is a confidentiality level beyond the Restricted security level that can
be used to restrict users from viewing and/or editing the information, especially sensitiveinformation.
When configuring fields, the system administrator specifies the security level of a field.
The security level of a field is associated to the security level of the following user typepermissions:• Security level for requisitions (in view mode)• Security level for requisitions (in edit mode)• Security level for internal candidates (in view mode)• Security level for internal candidates (in edit mode)• Security level for external candidates (in view mode)• Security level for external candidates (in edit mode)• Security level for offers (in view mode)• Security level for offers (in edit mode)When defining a user type, the system administrator needs to decide which security level willbe granted for these specific permissions. Each user type has one of the above security levelsassociated to it to define if the user type has a general, restricted or confidential access toinformation.
The security level of a field can be modified at any time, thus impacting the user typesassociated to that security level.
At a high level, the user type permissions work as follows:• Users having the “general” permission access will only see/edit fields set at the “general”
security levels.• Users having the “restricted” permission access will see/edit fields set at the “general” and
“restricted” security levels.• Users having the “confidential” permission access will see/edit fields set at all security levels,
that is “general”, “restricted” and “confidential”.For example, a hiring manager might have a view and edit access to general requisition fields,a view only access to restricted requisition fields and no access at all to confidential requisitionfields, while having a view only access to general offer fields.
More specifically the behaviors of these permissions are:• Restricted/Confidential Fields in View mode in the File:
If a field is at a higher security level than the user has access to view, the field will not bedisplayed to the user.
• Restricted/Confidential Fields in Edit mode in the File:
If a field is at a higher security level than the user has access to edit, but the field securitylevel gives them access to view it, then the field will be in read only mode in the edit. If afield is at a higher security level than the user has access to edit or view, then the field willnot be displayed to the user.

Fields, Forms, Files Field
Configuration Guide Taleo 10 SP2 - Recruiting 135
• Restricted/Confidential Fields on the List:
If a field is at a higher security level than the user has access to view for both external ANDinternal candidates, the user will see what he is allowed to see and Confidential will bedisplayed for the information the user cannot seet. If a field is at a higher security level thanthe user has access to view for either external OR internal, but not both, then the columnwill display and the field will show the word Confidential for those candidates that the useris restricted from seeing the content, whether the field has data or not. As well, grouping bythis field on the list will not be possible in this scenario.
• Restricted/Confidential Fields in the Advanced/Quick Filters of a list:
If a field is at a higher security level than the user has access to view for both external ANDinternal candidates, then the column will not be available in the Advanced or Quick Filters.If a field is at a higher security level than the user has access to view for either external ORinternal, but not both, then the column will be available in the Advanced or Quick Filters. Ifthe user filters using this field, then the system will filter as specified for the candidate typethat they can view, but will not filter the candidate type that they are restricted from seeingthe content and therefore will return all candidates for that type.
• Restricted/Confidential Fields in the Search (Quick/Advanced/Duplicate Check):
If a field is at a higher security level than the user has access to view for both external ANDinternal candidates, then the field will not be available in the Search.
If a field is at a higher security level than the user has access to view for either external ORinternal, but not both, then the field will be available in the Search. If the user searchesusing this field, then the system will search as specified for the candidate type that they cansee, but will not search the candidate type that they are restricted from seeing the content.
• Restricted/Confidential Fields in message templates (Correspondence):
If a field is at a higher security level than the user has access to view, then the user will notbe able to send a message template that contains the restricted or confidential token.
Important Note: (ID 313) Some candidate fields may automatically be set to Restricted orConfidential and should be reviewed and possibly edited to achieve the desired behavior. Forexample, by default many related personal information fields may be set to Restricted, and dateof birth and social security number are always set to Confidential. It is important to review thestate of these fields and ensure they are set properly according to the client desired outcome.
ConfigurationUser Type Permissions
Name Location
Security level for requisitions (in view mode) Configuration > [SmartOrg] Administration> User Types> Recruiting > Requisitions > General
Security level for requisitions (in edit mode) Configuration > [SmartOrg] Administration> User Types> Recruiting > Requisitions > General
Security level for internal candidates (in view mode) Configuration > [SmartOrg] Administration> User Types> Recruiting > Candidates > General
Security level for external candidates (in view mode) Configuration > [SmartOrg] Administration> User Types> Recruiting > Candidates > General
Security level for internal candidates (in edit mode) Configuration > [SmartOrg] Administration> User Types> Recruiting > Candidates > General

Fields, Forms, Files Field
Configuration Guide Taleo 10 SP2 - Recruiting 136
User Type Permissions
Name Location
Security level for external candidates (in edit mode) Configuration > [SmartOrg] Administration> User Types> Recruiting > Candidates > General
Security level for offers (in view mode) Configuration > [SmartOrg] Administration> User Types> Recruiting > Offers > General
Security level for offers (in edit mode) Configuration > [SmartOrg] Administration> User Types> Recruiting > Offers > General
Field ContextualizationField contextualization resides in specifying the Organization-Location-Job Field structure for afield.
Fields can be contextualized to define when fields are to be available for specificOrganizations, Locations or Job Fields.
For each field, with the exception of fields set as mandatory by the system, the systemadministrator can choose to define that a field is only available for a specific Organization,Location or Job Field. This means that outside of the defined structure, the field will not bevisible. Therefore, when creating a requisition, certain fields may or may not appear in therequisition if the fields have been tied to a specific Organization-Location-job Field structure.
For example, if a field is associated to the location United States, the field will only be availableif the location of the requisition resides in the United States.
Fields set as mandatory will only be mandatory in contexts where the field appears.
For offer and candidate fields on a candidate submission, this Organization-Location-Job Fieldstructure dependency is based on the structure of the requisition.
There are few fields which cannot be contextualized or marked with various security level,because they are mandatory to support the requisitions or candidates in the system:
• Creation date• Last modified date• Requisition number
Field Staffing Type ExceptionThe system administrator can decide to associate a field to a given Organization-Location-JobField structure for different staffing types.
Once an Organization-Location-Job Field structure is associated to a field, the systemadministrator can decide to use a different structure for different staffing types. In essence,this allows the system administrator to define the Organization-Location-Job Field structurespecifically for staffing types where specific contextualization is required.
An exception regarding the staffing type (Professional, Hourly, Campus, Contingent, Executives)can be created for a field. When doing this, the system administrator will be able to define newproperties for the field as well as a new Organization-Location Job Field structure for the fieldfor that staffing type. For example:

Fields, Forms, Files Field
Configuration Guide Taleo 10 SP2 - Recruiting 137
• A customer wants the Shift Availability Grid field to be visible for Hourly job submissionsonly. This would be done by modifying the property of the field to not available, and thenadding an exception for the Hourly staffing type where the property for the field is set toavailable.
• A customer wants to set the Social Security Number field so that it does not appear on anycandidate submissions except for Hourly submissions in the United States. This would bedone by modifying the property for the field to not available, and then adding an exceptionfor the Hourly staffing type where the property for the field is set to available and has theUnited States location linked to it.
• A customer wants to allow the designation of whether medical clearance is an employmentprecondition on all requisitions in the Medical Testing division except for executive jobswhere clearance is only required for Medical Testing requisitions in China, the United Statesand the United Kingdom. The customer does NOT want this field to display in any othercontexts. This would be done by making the field available for recruiting, linking the field tothe Medical Testing organization, and then creating an exception for the Executives staffingtype where the property of the field is set to available and is linked to the China, UnitedKingdom and United States locations and the Medical Testing organization.
Creating a FieldPrerequisite
Configuration > [Recruiting] Administration
Steps
1. In the Fields section, click on a field category.2. Click Create Custom Field.3. Provide the required information.4. Click Done.
Result
The field appears in the list of custom fields and can be used to create user-defined forms.
Deleting a FieldPrerequisite
Only custom fields can be deleted.
Configuration > [Recruiting] Administration
Steps
1. In the Fields section, click on a field category.2. Click Show Custom Fields.3. Click Delete next to the field to be deleted.4. Click Done.
Result
The field is no longer available when creating a user-defined form.

Fields, Forms, Files Field
Configuration Guide Taleo 10 SP2 - Recruiting 138
Editing the Properties of a FieldPrerequisite
Configuration > [Recruiting] Administration
Steps
1. In the Fields section, click on a field category.2. Click on the field.3. Click Edit next to Properties.4. Make changes as required.5. Click Save.
Result
The confidentiality level, the use and if the content is required for the field are specified.
Next Step
Associating a field to organizations, locations or job fields.
Associating a Field to an Organization, Location, JobField
Prerequisite
The Enable Field Classification setting must be enabled in the Recruiting settings.
Configuration > [Recruiting] Administration
Steps
1. Click on field category.2. Click on the desired field.3. Click Add next to Organizations, Locations or Job Fields.4. In the selector, select one or more elements.5. Click Select.
Result
The organizations, locations and job fields selected appear in the field page.
The field is available in Taleo Recruiting for an Organization-Location-Job Field structurecontext associated to the same organizations, locations or job fields.
Dissociating a Field from an Organization, Location, JobField
Prerequisite
The Enable Field Classification setting must be enabled in the Recruiting settings.

Fields, Forms, Files Field
Configuration Guide Taleo 10 SP2 - Recruiting 139
Configuration > [Recruiting] Administration
Steps
1. Click on field category.2. Click on a field.3. Click Remove next to an organization, location or job field.
Result
The field selected no longer appears in the field page.
The field will be available in Taleo Recruiting for all Organization-Location-Job Fieldstructures.
Creating a Field ExceptionPrerequisite
Configuration > [Recruiting] Administration
Steps
1. Click on a field category.2. Click on a field.3. Click Add next to Exceptions.4. Select a staffing type from the Staffing Types drop-down list.5. Click Create.6. If desired, click Add next to Organizations, Locations and/or Job Fields.7. Select organizations, locations and/or job fields.8. Click Select.
Result
The selected staffing type appears in the Exceptions section of the field page. The field willno longer be available when creating a user-defined form for a specific staffing type orOrganization-Location-Job Field structure of a staffing type.
Removing an Exception from a FieldPrerequisite
Configuration > [Recruiting] Administration
Steps
1. Click on a field category.2. Click on a field.3. Click Remove next to an exception.
Result
The field is available when creating a user-defined form for a specific staffing type orOrganization-Location-Job Field structure of a staffing type.

Fields, Forms, Files Field
Configuration Guide Taleo 10 SP2 - Recruiting 140
Making Content Required for a FieldPrerequisite
A user type permission grants users access to this feature.
The option is not available for all fields.
Configuration > [Recruiting] Administration > Fields
Steps
1. Click on field category.2. Click on the field.3. Click Edit.4. Select the type of requirement from the Content required list.5. Click Save.
Result
Content will be required in the field for sourcing, posting or requisitions.
Creating Custom Instructions for a FieldPrerequisite
The Instructions field supports 1000 characters, embedded HTML and hyperlinks.
Configuration > [Recruiting] Administration > User-Defined Forms
Steps
1. Click on a user-defined form.2. In the Page Content section, click in a field.3. In the Selected Element Properties section at the bottom of the page, enter custom
instructions in the Instructions field.
Note that the Help Callout field is not used in Recruiting.4. Format instructions if desired.5. Click Save.
Result
Instructions are only viewable by users when they are in edit mode within a file. Theinstructions appear underneath the field to assist users in understanding what they need todo with certain fields contained in a file.

Fields, Forms, Files Selection
Configuration Guide Taleo 10 SP2 - Recruiting 141
Selection
Global Selection ListA global selection list is a list of elements (values) used to define a field, that can be used byseveral products and that can only be viewed and edited.
Global selection lists are available in the Global Configuration menu. There are seven globalselection lists:• Education levels• Employee statuses• Job levels• Job types• Schedules• Shifts• TravelsGlobal selection lists can be edited, that is system-defined items can be added or removed.
Recruiting Selection ListA recruiting selection list is a list of elements (values) used to define a field, that can be used inTaleo Recruiting and that can be viewed, edited and created.
There are two types of selections:• Standard selection: A predefined selection provided by the system. Standard selections
cannot be created. They can only be made available in Taleo Recruiting or career sections.For certain standard selections (for example, Advance Notice), you can add and removepre-defined elements. For others (like Commission Package, Option Package, RelocationPackage and Stock Package), you can create new elements.
• Custom selection: A selection created by a system administrator to collect informationaccording to specific organization requirements. You can add elements to a customselection.
There are two categories of selections:• Small selection: The selection provides a few elements and is represented by a radio
button or a drop-down list. For example, the selection for the Justification field could containthe following elements: New Position, Replacement, Modification, Extension, Audit, Backfill,Jury Duty, Special Project, Vacation, Leave Absence, Succession Planning.
• Large selection: The selection provides a large number of elements and is represented bya selector. Large standard selections (such as employers, institutions, RSlocations, programs)are provided by the system. Large user-defined selections (LUDS) can be imported fromother systems or created from scratch in Taleo Recruiting Administration. A large user-defined selection can be associated to an organization, location or job field.
When creating a custom small selection, it is possible to select an option so that elementscontained in the small selection are sorted in alphabetical order.
Important Note: (ID 277) Please note the following behavior regarding the display of thecode and description of large user-defined selections (LUDS).

Fields, Forms, Files Selection
Configuration Guide Taleo 10 SP2 - Recruiting 142
Currently, you can configure a LUDS and indicate whether the code and/or the description willbe displayed.• In view mode, regardless of the configuration, only the description of LUDS is displayed.• In a selector, when using the auto-suggest feature to select a value for a LUDS, only the
description is displayed.• When viewing a LUDS from within a selector assistant window where a user selects a value,
if only the code was configured, then only the code is displayed; if only the description wasconfigured, then only the description is displayed. If both the code and description wereconfigured, then the code and description are displayed.
Creating a Small SelectionPrerequisite
Configuration > [Recruiting] Administration > Selections
Steps1. Select the Small Selections tab.2. Select the Custom tab.3. Click New...4. Complete the fields as required.5. Click Done.Result
The small selection is available in the Selection page, under Small Selections, Custom.
Next Step
Creating an element for a small selection.
Deleting a Small SelectionPrerequisite
Configuration > [Recruiting] Administration > Selection Lists
Steps1. Select the Small Selections tab.2. Select the Custom tab.3. Click on a selection4. In the Selection Editor, click .
5. Confirm the deletion.Result
The small selection is no longer available in the Selection page, under Custom SmallSelections list.
Creating an Element for a Small SelectionPrerequisite
The small selection must be created first.

Fields, Forms, Files Selection
Configuration Guide Taleo 10 SP2 - Recruiting 143
Configuration > [Recruiting] Administration > Selection Lists
Steps
1. In the Selection List page, select the Small Selections tab.2. Select the Custom tab.3. Click on a selection4. In the New/Modified Elements field, enter a value.5. Click Apply.
Result
The new value is added to the Available Elements list.
Next Step
Adding an element to a small selection.
Adding an Element to a Small SelectionPrerequisite
The small selection must be created first.
Configuration > [Recruiting] Administration > Selections
Steps
1. Select the Small Selections tab.2. Select the Custom tab.3. Click on a selection4. In the Available Elements list, select an element.5. Click Add.
Result
Additional elements (values) are added to the small selection.
Removing an Element from a Small SelectionPrerequisite
The small selection must be created first.
An element cannot be deleted if it is being used.
Configuration > [Recruiting] Administration> Selection Lists
Steps
1. Select the Small Selections tab.2. Select the Custom tab.3. Click on a selection4. In the Active Elements list, select an element.5. Click Remove.

Fields, Forms, Files Selection
Configuration Guide Taleo 10 SP2 - Recruiting 144
6. Click Done.
Result
The element (value) is deleted from a small selection.
Creating a Large SelectionPrerequisite
Configuration > [Recruiting] Administration > Selection Lists
Steps
1. In the Selection List page, select the Large Selections tab.2. Select the Custom tab.3. Click New...4. In the Selection Editor, complete the fields as required.5. Click Done.
Result
The large selection is available in the Selection page, under Large Selections.
Next Step
Creating an element for a large selection.
Deleting a Large SelectionPrerequisite
The large selection must not be in use.
Configuration > [Recruiting] Administration > Selection Lists
Steps
1. Select the Large Selections tab.2. Select the Custom tab.3. In the Selection list, select a selection4. Click .
5. Confirm the deletion.
Result
The large selection is no longer available in the Selection page, under Large Selections,Custom.
Creating an Element for a Large SelectionPrerequisite
The large selection must be created first.

Fields, Forms, Files Selection
Configuration Guide Taleo 10 SP2 - Recruiting 145
Configuration > [Recruiting] Administration > Selection Lists
Steps
1. In the Selection List page, select the Large Selections tab.2. Select the Custom tab.3. Click on a number of the Number of Elements column.4. In the Selection Element list, click New...5. In the Selection Editor page, complete the fields as required.6. Click Add.
Result
Additional elements (values) are added to the large selection.
Removing an Element from a Large SelectionPrerequisite
The large selection must be created first.
An element cannot be deleted if it is being used.
Configuration > [Recruiting] Administration > Selection Lists
Steps
1. Select the Large Selections tab.2. Select the Custom tab.3. Click on a number in the Number of Elements column.4. In the Selection Element list, select an element.5. Click .
Result
The element is removed from the large selection.

Fields, Forms, Files Field Layout
Configuration Guide Taleo 10 SP2 - Recruiting 146
Field Layout
Field LayoutField layout consists in determining the position of standard and custom fields in requisitionfiles, candidate files, offer grids.
Field layout works differently depending on the type of field.
Offer Field Layout: Both standard and custom offer fields can be positioned in the offerform (which is available to users via the candidate file). The layout consists in specifying inwhich category/section of the offer grid the field will be displayed (Top Section, GeneralTerms, Bonuses, Details), which sequential field position it should occupy and when it will bedisplayed (Always Displayed or Hidden by default if empty). Fields for a specific section mustbe sequentially grouped together. If a field is configured to display in any context, it will appearin the offer form and the system administrator will define the placement of the field. If a field isnot configured to display in a given context, it will be omitted from the offer form and the restof the fields will slide up in position to accommodate the field's absence.
Offer field layout configuration is available in Taleo Recruiting Administration, in the LayoutOffer feature.
Department Field Layout: Only custom department fields can be positioned in therequisition file, under the Administration section. The layout consists in specifying the line andposition where the field will appear in the requisition file.
Department field layout configuration is available in Taleo Recruiting Administration, in theLayout Department feature.
Candidate and Requisition Field Layout: To position candidate and requisition fields in afile, you need to create blocks of information (called user-defined forms) where you can placestandard and custom fields intermixed within the same form.
Candidate and requisition field layout configuration is available in Taleo RecruitingAdministration, in the User-defined Form feature.
Positioning Department Fields in the Requisition FilePrerequisite
Custom department fields must first be created.
Configuration > [Recruiting] Administration > Department Field Layout
Steps
1. Select the line and position to determine the position of the field.2. Click Apply.
Result
The field is positioned in the requisition file as specified.
Fields, Forms, Files Field Layout
Configuration Guide Taleo 10 SP2 - Recruiting 147
Adding a Field to the Department FormPrerequisite
Custom department fields must first be created.
Configuration > [Recruiting] Administration > Department Field Layout
Steps
1. Click Add...2. Select a field.3. Click Add.4. Click Done.
Result
The added field appears in the Field Label list of the Field Layout -Department page.
Next Step
Configuring the layout of department fields.
Removing a Field from the Department FormPrerequisite
Custom department fields must be included in the form.
Configuration > [Recruiting] Administration > Department Field Layout
Steps
1. Select a field.2. Click Remove.
Result
The removed field no longer appears in the Field Label list of the Field Layout -Departmentpage.
Next Step
Configuring the layout of department fields.
Positioning Fields in the Offer FormPrerequisite
Custom offer fields must first be created.
Configuration > [Recruiting] Administration > Offer Field Layout
Steps
1. Select the line and position to determine the position of the field.2. Click Apply.
Fields, Forms, Files Field Layout
Configuration Guide Taleo 10 SP2 - Recruiting 148
Result
The fields will be displayed in the offer form as specified.
Adding a Field to the Offer FormPrerequisite
Offer fields must first be created.
Configuration > [Recruiting] Administration > Offer Field Layout
Steps
1. Click Add...2. Select a field.3. Click Add.4. Click Done.
Result
The added field appears in the Field Label list of the Field Layout -Offer page.
Next Step
Configuring the layout of offer fields.
Removing a Field from the Offer FormPrerequisite
Custom offer fields must be included in the Offer form.
Configuration > [Recruiting] Administration > Offer Field Layout
Steps
1. Select a field.2. Click Remove.
Result
The removed field no longer appears in the Field Label list of the Field Layout -Offer page.
Next Step
Configuring the layout of offer fields.

Fields, Forms, Files File
Configuration Guide Taleo 10 SP2 - Recruiting 149
File
User-defined FileA user-defined file is used to build requisition or candidate files. It is a page consisting ofsections, and each section contains user-defined forms or system-defined information blocks.
The content and layout of requisition files and candidate files are configured by the systemadministrator. To have specific fields and blocks of information displayed in a page, severalelements must be configured and organized in an orderly manner.
The following image illustrates the relationship between fields, forms and files.
Field
Form/Block
File
User-defined files are used the same way throughout the application. Default files provided byTaleo can be modified or duplicated. User-defined files can also be created from scratch.
User-defined files are configured by the system administrator in the User-defined Files featureof the Taleo Recruiting Administration menu.
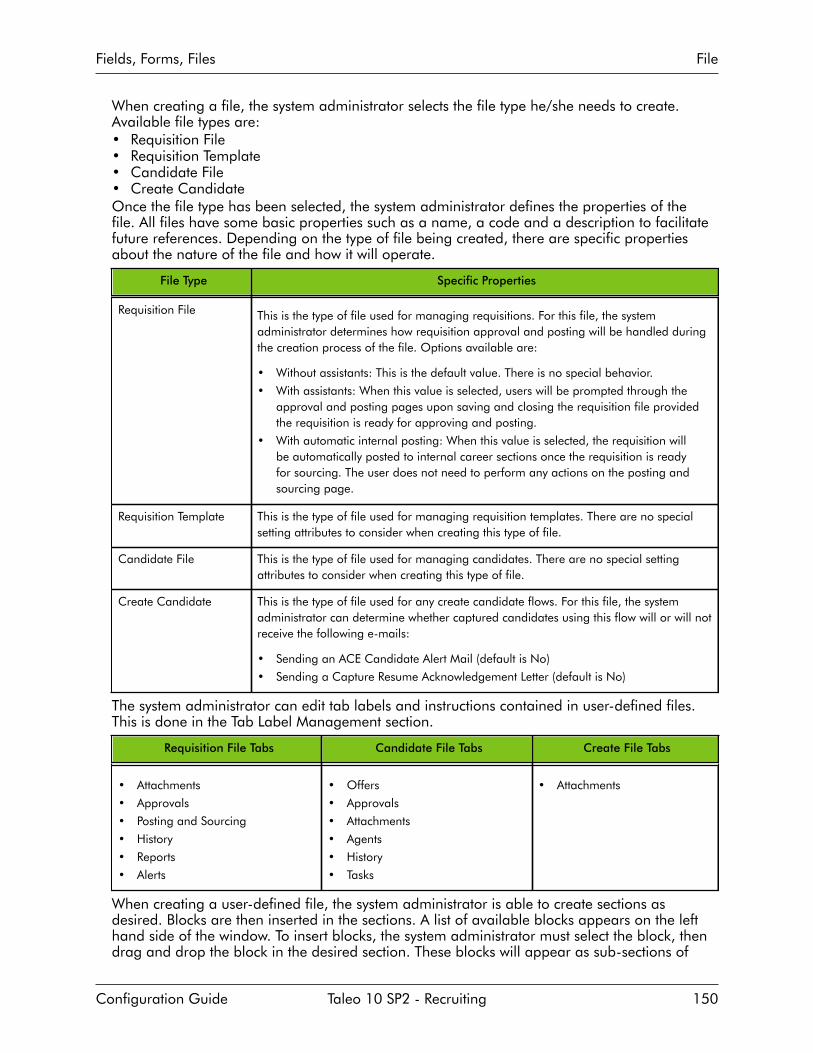
Fields, Forms, Files File
Configuration Guide Taleo 10 SP2 - Recruiting 150
When creating a file, the system administrator selects the file type he/she needs to create.Available file types are:• Requisition File• Requisition Template• Candidate File• Create CandidateOnce the file type has been selected, the system administrator defines the properties of thefile. All files have some basic properties such as a name, a code and a description to facilitatefuture references. Depending on the type of file being created, there are specific propertiesabout the nature of the file and how it will operate.
File Type Specific Properties
Requisition File This is the type of file used for managing requisitions. For this file, the systemadministrator determines how requisition approval and posting will be handled duringthe creation process of the file. Options available are:
• Without assistants: This is the default value. There is no special behavior.
• With assistants: When this value is selected, users will be prompted through theapproval and posting pages upon saving and closing the requisition file providedthe requisition is ready for approving and posting.
• With automatic internal posting: When this value is selected, the requisition willbe automatically posted to internal career sections once the requisition is readyfor sourcing. The user does not need to perform any actions on the posting andsourcing page.
Requisition Template This is the type of file used for managing requisition templates. There are no specialsetting attributes to consider when creating this type of file.
Candidate File This is the type of file used for managing candidates. There are no special settingattributes to consider when creating this type of file.
Create Candidate This is the type of file used for any create candidate flows. For this file, the systemadministrator can determine whether captured candidates using this flow will or will notreceive the following e-mails:
• Sending an ACE Candidate Alert Mail (default is No)
• Sending a Capture Resume Acknowledgement Letter (default is No)
The system administrator can edit tab labels and instructions contained in user-defined files.This is done in the Tab Label Management section.
Requisition File Tabs Candidate File Tabs Create File Tabs
• Attachments
• Approvals
• Posting and Sourcing
• History
• Reports
• Alerts
• Offers
• Approvals
• Attachments
• Agents
• History
• Tasks
• Attachments
When creating a user-defined file, the system administrator is able to create sections asdesired. Blocks are then inserted in the sections. A list of available blocks appears on the lefthand side of the window. To insert blocks, the system administrator must select the block, thendrag and drop the block in the desired section. These blocks will appear as sub-sections of

Fields, Forms, Files File
Configuration Guide Taleo 10 SP2 - Recruiting 151
the file. User-defined files must be activated before they can be used in building requisition orcandidate files.
Important Note: (ID 148) When creating a requisition file, the blocks in the Prescreeningsection must be placed in the following order: 1) Disqualification Questions 2) Competencies 3)Questions. Not all sections must be deployed, but when used they must be used in this relationto one another to ensure users do not encounter errors in the layout of the file.
Important Note: (ID 315) When creating a user-defined file and starting with a default, anyfields that are part of the default which are inactive will still appear in the file and will need tobe manually removed during the configuration of the file.
BlockBlocks are inserted in sections created in a user-defined file by the system administration.
When creating a user-defined file, the system administrator is able to create sections asdesired. Blocks are then inserted in the sections. A list of available blocks appears on the lefthand side of the window. To insert blocks, the system administrator must select the block, thendrag and drop the block in the desired section. These blocks will appear as sub-sections of thefile.
In addition to defining the ordering of sections and associated blocks, the system administratorcan define the properties of each of the blocks. Each user-defined form that has been createdis a type of block that can be inserted into in a file. The system administrator has the optionto select which form he/she wants to use for a specific block. For example, if the systemadministrator has created three Candidate Personal Information forms, when adding theCandidate Personal Information block to the file, the system administrator will get to choosewhich of the three Candidate Personal Information forms will be used for that file.
Some block types have special properties that the system administrator can configure.Candidate Block Special Properties
Candidate Personal Information Option to force users to provide a valid US social security number.
Certification Option to set the minimum number of entries required.
Education Option to set the minimum number of entries required.
References Option to set the minimum number of entries required.
Work Experience Option to set the minimum number of entries required.
Requisition Block Special Properties
Information This block must be one of the first four blocks in the file.
Beside the user-defined forms that are used as blocks of information in a file, pre-definedblocks of information provided with the system are available and can be incorporated in a file.Some of these blocks have special properties. Note that the field level content of these blocksis not configurable, but the system administrator does have control over the placement of thisinformation in the file.
System-defined Candidate Block Special Properties
Account information None

Fields, Forms, Files File
Configuration Guide Taleo 10 SP2 - Recruiting 152
System-defined Candidate Block Special Properties
Additional Information None
Contingent Staffing None
Cover Letter None
Disqualification Questions None
Employment Preferences Option allowing the display of the Organization menu.
Job Posting Notification Option to send by default an email notification whenever a new positionmatching this profile is posted.
Prescreening Questionnaire Option allowing the display of mandatory questions (none, single answer,single and multiple answer, all).
Prescreening Skills Option allowing the display of the mandatory statement checkbox. Settingallowing the selection of the skill assessment format (Simple, Detailedor Combined). Setting allowing to save only skill assessments when acandidate provides information about a given skill.
Profile Questionnaire Option allowing the display of mandatory questions (none, single answer,single and multiple answer, all).
Profile Skills Option allowing the display of the mandatory statement checkbox. Settingallowing the selection of the skill assessment format (Simple, Detailedor Combined). Setting allowing to save only skill assessments when acandidate provides information about a given skill.
Regulations Option allowing the display of the mandatory statement checkbox. Settingallowing the selection of the skill assessment format (Simple, Detailedor Combined). Setting allowing to save only skill assessments when acandidate provides information about a given skill.
Resume Option to define the minimum number of characters required in theresume field.
Screening None
Shift Availability Grid None
Source Tracking None
Submission Medium None
System-defined Requisition Block Special Properties
Abstract Not in template.
Candidate Selection Workflow This block is required in a requisition file and the field is always requiredto save a requisition. This block is optional for inclusion in the requisitiontemplate file, and if included, it will be required to save a template.
Disqualification Questions Not in template.
Group Not in template. This block must be one of the first four blocks in the file.

Fields, Forms, Files File
Configuration Guide Taleo 10 SP2 - Recruiting 153
System-defined Requisition Block Special Properties
Owners This block must be one of the first four blocks in the file. In addition,settings allow the display of the following fields: hiring manager, hiringmanager assistant, recruiter assistant, collaborators. Note: There isno setting to disable the recruiter field, but this can be accomplishedby contextualizing the field so that it only shows up in very limitedcircumstances. Technically, this field is required to save a requisition to thedatabase as the recruiter is considered the primary owner, but if the fieldis hidden from view, the user creating the requisition will be assigned therole of recruiter behind the scenes. If the customer has activated DynamicApproval Routing, the Owners block display the Manager field for users tobe able to route a requisition for approval.
Questions None
Regulatory Services None
Screening None
Skills Option to select the simple skill assessment format when the skillassessment format is set to Simple or Detailed.
Structure This block must be one of the first four blocks in the file. Also, settingsallow the display of organization, work location or job role fields.
For each section and block, the system administrator can customize the label and providecustom instructions to explain the purpose of the section or block to users. The name of asection and of a block is viewable by users when they are in view and edit mode within a file aswell as in the file’s Table of Contents.
The Description field supports 4000 full html based characters. The Description instructionswill only display in edit mode and must be displayed properly to the user when on the Fileincluding colour, font, hyperlink, etc.
User-defined files must be activated before they can be used in building requisition orcandidate files.
Building a User-defined FilePrerequisite
Configuration
Steps
1. Select fields to include in the file.a) Use existing fields or create new ones.
2. Select forms to include in the file.a) Use existing forms or create new ones.
3. Add fields to the forms (standard and custom fields can be intermixed).4. Activate the forms.5. Create the user-defined file.
a) Duplicate an existing file or create a new one.6. Select a file type (candidate file, requisition file, requisition template, create candidate).

Fields, Forms, Files File
Configuration Guide Taleo 10 SP2 - Recruiting 154
7. Add sections and blocks to the file.8. Activate the file.9. Specify the purpose for which the file will be used.10.Associate the file to a staffing type.11.Associate the file to a configuration profile.12.Associate the configuration profile to a user type.
Creating a User-defined FilePrerequisite
Configuration > [Recruiting] Administration > User-defined Files
Steps
1. Click Create.2. Select a file type and click Create.3. Provide a code and a name.4. Complete all other fields as required.5. Click Save.
Result
The user-defined file can be used to build requisition and candidate files.
Next Step
Creating sections in the user-defined file.
Adding blocks in the user-defined file.
Duplicating a User-defined FilePrerequisite
Configuration > [Recruiting] Administration > User-defined Files
Steps
1. Click Duplicate next to the file.2. Complete the fields.3. Click Save.
Result
The new user-defined file is available in the User-defined Files list.
Next Step
Creating sections in the user-defined file.
Adding blocks in the user-defined file.
Activating the user-defined file.

Fields, Forms, Files File
Configuration Guide Taleo 10 SP2 - Recruiting 155
Activating a User-defined FilePrerequisite
The user-defined file must have the inactive or draft status.
Configuration > [Recruiting] Administration > User-defined Files
Steps
1. Click on a user-defined file.2. Click Activate.
Result
The status of the user-defined file changes to Active in the Status column of the User-definedFiles list.
The user-defined file is available in the Candidate File Setup or Requisition File Setup pageand can be selected for a specific usage when building a requisition or a candidate file.
Next Step
Choosing the requisition file or candidate file available to users.
Deactivating a User-defined FilePrerequisite
The user-defined file must be active.
The user-defined file must not be in use.
Configuration > [Recruiting] Administration > User-defined Files
Steps
1. Click on a user-defined file.2. Click Deactivate.
Result
The status of the user-defined file is changed to Draft in the Status column of the User-defined Files list. The system administrator can modify the user-defined file or make itunavailable when building requisition or candidate files.
Next Step
Editing the properties of the user-defined file.
Creating sections in the user-defined file.
Adding blocks in the user-defined file.
Deleting a User-defined FilePrerequisite
The user-defined file must have the inactive or draft status.

Fields, Forms, Files File
Configuration Guide Taleo 10 SP2 - Recruiting 156
Configuration > [Recruiting] Administration > User-defined Files
Steps
1. Click Delete next to the file.2. Confirm the deletion.
Result
The user-defined file no longer appears in the User-defined Files list and can no longer beused.
Editing the Properties of a User-defined FilePrerequisite
The user-defined file must not be in use.
The user-defined file must have the inactive or draft status.
Configuration > Recruiting] Administration > User-defined Files
Steps
1. Cick on a user-defined file.2. Click Edit next to Properties.3. Modify fields as required.4. Click Save.
Modifying the Title of a SectionPrerequisite
The user-defined file must have the inactive or draft status.
The Title field supports 75 text based characters.
Configuration > [Recruiting] Administration > User-defined Files
Steps
1. Click on a user-defined file.2. Under Sections Ordering, click on a section.3. Click Edit next to Properties.4. Modify the value in the Title field.5. Click Save.
Result
The modified name of a section included in a user-defined file is viewable by users whenthey are in view and edit mode within a file as well as in the file’s Table of Contents.
Modifying the Title of a BlockPrerequisite
The user-defined file must have the inactive or draft status.

Fields, Forms, Files File
Configuration Guide Taleo 10 SP2 - Recruiting 157
The Title field supports 75 text based characters.
Configuration > [Recruiting] Administration > User-defined Files
Steps
1. Click on a user-defined file.2. Under Sections Ordering, click on a block.3. Click Edit next to Properties.4. Modify the value in the Title field.5. Click Save.
Result
The name of a block included in a user defined file is viewable by users when they are inview and edit mode within a file as well as in the file’s Table of Contents.
Modifying the Name of a TabThe name of a tab in a user-defined file can be modified. The system administrator can sendthe new name to Taleo Support who will then activate the text for your zone. Contact TaleoSupport for further information.
Creating a Section in a User-defined FilePrerequisite
The user-defined file must have the inactive or draft status.
Configuration > [Recruiting] Administration > User-defined Files
Steps
1. Click on a user-defined file.2. Click Edit next to Section Ordering.3. Enter the name of the section in the Add a Section field.4. Click Create Section.5. Click Save.
Result
A new section appears in the Section Ordering list of the user-defined file.
Next Step
Adding blocks to the user-defined file.
Deleting a Section from a User-defined FilePrerequisite
The user-defined file must have the inactive or draft status.
Configuration > [Recruiting] Administration > User-defined Files
Fields, Forms, Files File
Configuration Guide Taleo 10 SP2 - Recruiting 158
Steps
1. Click on a user-defined file.2. Click Edit next to Section Ordering.3. Click Delete next to a section.4. Click Save.
Result
The section and blocks included in the user-defined file are no longer displayed.
Adding a Block in a User-defined FilePrerequisite
The user-defined file must have the inactive or draft status.
At least one section must be created in the user-defined file.
Configuration > [Recruiting] Administration > User-defined Files
Steps
1. Click on a user-defined file.2. Click Edit next to Section Ordering.3. Drag and drop blocks from the Available Blocks list to a section.4. Click Save.
Removing a Block from a User-defined FilePrerequisite
The user-defined file must have the inactive or draft status.
The block must not be mandatory.
Configuration > [Recruiting] Administration > User-defined Files
Steps
1. Click on a user-defined file.2. Click Edit next to Section Ordering.3. Drag and drop blocks from a section back to the Available Blocks list.4. Click Save.
Choosing a User-defined Form for a BlockPrerequisite
Not available for all block types.
The user-defined file must have the inactive or draft status.
Configuration > [Recruiting] Administration > User-defined Files

Fields, Forms, Files File
Configuration Guide Taleo 10 SP2 - Recruiting 159
Steps
1. Click on a user-defined file.2. Under Section Ordering, click on a block.3. Click Edit next to Properties.4. Select a form in the User-defined Form drop-down list.5. Click Save.
Result
The system administrator can select which form he/she wants to use for a specific block.

Fields, Forms, Files Form
Configuration Guide Taleo 10 SP2 - Recruiting 160
Form
User-defined FormsA user-defined form is a block of information containing standard and/or custom fields thatcan be used in a specific context of a Taleo Product.
User-defined forms are used the same way throughout the application. User-defined forms canbe edited or created from scratch and while doing so the system administrator can specify touse the default form layout as the starting point. In both cases, it is possible to customize thelayout of the form, field labels, etc. Fields appearing in a user-defined form can be removedprovided that they are not mandatory (indicated by a red dot).
User-defined forms are configured by the system administrator in the User-defined Formsfeature of the Administration menu of the product for which the user-defined form will be used.
Several form types are available and differ from one product to another. These form types aresuggested ways of packaging information and each form type contains a default template thatthe system administrator can use to start building the form. The system administrator can alsochoose to build the form from scratch and ignore the default template. Note that it is possibleto create multiple user-defined forms for each type of form. For example, three different user-defined forms for references could be created and used for different purposes.
When defining the form, the system administrator provides a name, a code and a descriptionto facilitate future references. Then, rows, columns, sections can be added to the form via theToolbox. Fields are then inserted in the form. A list of available fields appears on the left handside of the window, in the Field Chooser. To insert fields, the system administrator must selectthe field, then drag and drop the field in the desired section. Each field included in the formcan have different properties which can be edited by selecting the field and scrolling to theSelected Element Properties section at the bottom of the form.
Once created, user-defined forms can be previewed to see how the information will bedisplayed to users. It is also possible to configure user-defined forms in all the languagesactivated for a company. Forms can be translated as required, but if no translation is provided,the form is displayed in the base language.
User-defined forms must be activated before they can be used.
All user-defined forms are created by the system administrator except for the user definedforms appearing in screening services which are supplied by the system, they cannot becreated by the system administrator. However, they can be edited. If no translation is provided,the form is displayed in the base language.
Creating a User-defined FormPrerequisite
Configuration > [Recruiting] Administration > User-defined Forms
Steps
1. Click Create.

Fields, Forms, Files Form
Configuration Guide Taleo 10 SP2 - Recruiting 161
2. Select a file type and click Next.3. Select a form type and click Create.
Or, select Use the default template to use the default form provided by Taleo.4. Provide a code, a name and a description.5. Add rows, columns and sections using the Toolbox features.6. In the Field Chooser list, select fields, then drag and drop them in the desired section.7. Edit the properties of a field by selecting the field and scrolling to the Selected Element
Properties section at the bottom of the form.8. Click Save.
Result
The custom form appears in the User-defined Forms list and is available when creating user-defined files.
Next Step
Previewing the form.
Configuring the form in all the languages activated for your company.
Activating the form.
Duplicating a User-defined FormPrerequisite
Configuration > [Recruiting] Administration > User-defined Forms
Steps
Click Duplicate next to the form.
Result
The new user-defined form appears in the User-defined Forms list with the extension (copy).
Next Step
Editing the user-defined form.
Previewing a User-defined FormPrerequisite
Configuration > [Recruiting] Administration > User-defined Forms
Steps
Click Preview next to the user-defined form.
Result
The page containing the form is displayed without having to login to the Taleo application.
Next Step
Adding fields to the user-defined form.

Fields, Forms, Files Form
Configuration Guide Taleo 10 SP2 - Recruiting 162
Activating the form.
Deleting a User-defined FormPrerequisite
The status of the user-defined form must be inactive.
Configuration > [Recruiting] Administration > User-defined Forms
Steps
1. Click Delete next to the user-defined form.2. Confirm the deletion.
Result
The user-defined form no longer appears in the User-defined Forms list. The user-definedform can no longer be used in user-defined files.
Activating a User-defined FormPrerequisite
Configuration > [Recruiting] Administration > User-defined Forms
Steps
Click Activate next to the user-defined form.
Result
The status of the user-defined form is changed to Active in the Status column of theUser-defined Forms list. The user-defined form can be used when building requisition orcandidate files.
Next Step
Creating a user-defined file.
Deactivating a User-defined FormPrerequisite
The user-defined form must be active.
The user-defined form must not be in use.
Configuration > [Recruiting] Administration > User-defined Forms
Steps
In the User-defined Forms page, click Deactivate next to the user-defined form.
Result
The status of the user-defined form is changed to Draft in the Status column of the User-defined Forms list. The user-defined form is unavailable when building requisition orcandidate files and can be modified.

Fields, Forms, Files Form
Configuration Guide Taleo 10 SP2 - Recruiting 163
Next Step
Editing the properties of the user-defined form.
Adding fields to the user-defined form.
Organizing fields in the user-defined form.
Adding Fields to a User-defined FormPrerequisite
Configuration > [Recruiting] Administration > User-defined Forms
Steps
1. Click on a form.2. Select a field from the Field Chooser list.3. Drag and drop the field in the desired section.4. Edit the properties of a field by selecting the field and scrolling to the Selected Element
Properties section at the bottom of the form.5. Click Save.
Result
The fields are added to the user-defined form in order to customize the form to specificneeds.
Next Step
Previewing the form.
Editing the properties of the fields.
Creating custom instructions for the fields.
Organizing Fields in a User-defined FormPrerequisite
Configuration > [Recruiting] Administration > User-defined Forms
Steps
1. Click on a form.2. Select a field in the Page Content section.3. Drag and drop the field elsewhere in the Page Content section.4. Click Save.
Result
Fields are included in the different sections of the form.
Next Step
Previewing the form.
Editing the properties of the fields.

Fields, Forms, Files Form
Configuration Guide Taleo 10 SP2 - Recruiting 164
Creating custom instructions for the fields.
Editing the Properties of a User-defined FormPrerequisite
Configuration > [Recruiting] Administration > User-defined Forms
Steps
1. Click on a user-defined form.2. Modify the Name, Code and Description fields.3. Click Save.
Result
The name, code and description of the user-defined form are modified.
Editing the Properties of a Field included in a User-defined Form
Prerequisite
Configuration > [Recruiting] Administration > User-defined Forms
Steps
1. Click on a user-defined form.2. In the Page Content section, click in a field.3. In the Selected Element Properties section, located at the bottom of the form, modify the
properties of the field.4. Click Save.
Result
The properties of the field included in a user-defined form are modified, i.e., the field type,adding instructions, indicating if the field is mandatory, etc is set..
Next Step
Previewing the form.
Creating custom instructions for the fields.
Creating Custom Instructions for a BlockPrerequisite
Configuration > [Recruiting] Administration > User-Defined Files
Steps
1. Click on a user-defined file.2. Click on a block.3. Click Edit next to Properties.4. In the Description field, enter custom instructions.
Fields, Forms, Files Form
Configuration Guide Taleo 10 SP2 - Recruiting 165
5. Format instructions if desired.6. Click Save.
Result
The specific instructions appear underneath the block title of a file to assist users inunderstanding what they need to do in a specific block of a file.
Creating Custom Instructions for a SectionPrerequisite
The Description field supports 4000 full HTML based characters.
Configuration > [Recruiting] Administration > User-Defined Files
Steps
1. Click on a user-defined file.2. In the Section Ordering section, click on a section title (displayed in bold).3. Click Edit next to Properties.4. In the Description field, enter custom instructions.5. Format instructions if desired.6. Click Save.
Result
Instructions are only viewable by users when they are in edit mode within a file. Theinstructions appear underneath the section title to assist users in understanding what theyneed to do in a specific section of a file.
Creating Custom Instructions for a TabPrerequisite
The Description field supports 4000 full HTML based characters.
Configuration > [Recruiting] Administration > User-Defined Files
Steps
1. Click on a user-defined file.2. In the Tab Label Management section, click Show.3. Click on a tab.4. Click Edit next to Properties.5. In the Description field, enter custom instructions.6. Format instructions if desired.7. Click Save.
Result
Instructions are only viewable by users when they are in edit mode within a file. Theinstructions appear underneath the tab header to assist users in understanding what theyneed to do in the History, Referral and Attachments tabs of a file.

Fields, Forms, Files Form
Configuration Guide Taleo 10 SP2 - Recruiting 166
Recruiting Form TypesAvailable Form Type For
Requisition File Requisition Template Candidate File
Abstract Additional Information Background Check
Additional Information Budget Basic Profile
Budget Compensation Candidate Personal Information
Compensation Contingent Terms Certifications
Contingent Terms External Description Education
External Description Identification References
Identification Internal Description Work Conditions
Internal Description Other Work Experience
Other Profile eSignature
Profile
User-defined Forms Selected Element PropertiesAvailable properties depend on the type of field. Not all properties are available for allelements or for all products.
Property Option Description
Access (Editable/ Read Only) Indicates if the field is read-only or editable. When read-only is selected,a user is unable to modify the field. Default value is Editable.
Binding field Data source to which the element is bound. The value displayed inthe Binding field represents the data value (available in the first list ofthe Field Chooser) to which the element is associated. For example,the Annual Bonus field is bound to the AssignmentOfferForForm/AnnualBonus. The value in the Binding field is not editable.
Columns Number of columns. Administrator can determine how many columns offields to display in each area of each page of the forms.
CSS Style The desired visual style for displaying the value within an input field. Usestyles as defined in the Cascading Style Sheets 2.0 standard: ww3.orgreference. This style will override the main style that is used when theform is displayed to assignees and viewers. If no style information isentered, the default visual presentation will be used for that page.
CSS Style Label This is used to control the formatting of the label above the input fieldthat is displayed to the assignee and form viewer.
CSS Style Instructions This style will override the style defined in the career section theme. If noinformation is entered, the style defined in the career section theme willbe used.
Default Value Default value of the input field

Fields, Forms, Files Form
Configuration Guide Taleo 10 SP2 - Recruiting 167
Property Option Description
Field Label Input Field Label
Field Size Indicates the number of elements displayed in a list. Field Size is used formultiple-selection fields. Default value is 1. For example, if the field sizeis 2, the list will display 2 values.
Field Type• Text Input• Password Input• Suggest• Text Area• Rich Text Format• Check Box• Radio Button• Drop-down List• Check Box• Multi level Selector - this enables the user to select a collection of
cascading values that are dependent on each other. Such as selectinga country, followed by a state/province and then a city.
• Date input• Date Drop- down list• Selector• Read-only Text• URL - this enables the value of the field to be displayed as a clickable
link when the user accesses the form.• Image URL - works the same as the URL, but makes the
corresponding image a clickable link.
Help Callout Similar to instructions, but this is displayed as a help bubble on the formand can provide information about a field to the user.
Input Mask Format of the input value. The following syntax must be used:9 = anynumber, a = any letter, n = any letter or number, | = logical, or\9 =the 9 character, \a = the a character, \n = the n character, \| = the, |character, Any other symbol = the symbol (including a space). Possibleformats for SSN and Zip/Postal codes: SSN: 999-99-9999ZIP CodeUnited States: 99999|99999-9999Postal Code Canada: a9a9a9|a9a9a9|a9a-9a9Note: Make sure to not add a space before and after the |operator. For example, do not enter 99999 | 99999-9999
Instructions This can be used to provide any special instructions necessary to explainwhat is being requested for the field. The instructions will appear justbelow the field.
Mandatory Indicates, by selecting the Yes or No option, if the field must becompleted. When a field is mandatory, a red square appears in front ofthe field. This can be useful for preventing an assignee from submittinga form with the value 'Not Specified' in a user-defined selection. Markingthe field as Mandatory will require the assignee to specify a value.
Rows Number of rows available in a text area.
Save Literals If Input Mask is used for a field, it may require that specific numbers orletters appear within the field when the assignee fills it out at runtime.Save Literals determines if specific characters in the input mask will besaved in this field, or if they are simply required for the user to type inbut removed from the saved value. This is useful for helping assignees to

Fields, Forms, Files Form
Configuration Guide Taleo 10 SP2 - Recruiting 168
Property Option Description
recognize the right information to type in, while removing the redundantcharacters for later use.
Status (Deactivated/Activated) Indicates if the field is activated or deactivated (i.e., grayed out or not).The use of this field depends on the value selected in the Access field.
Editable access + Activated status = field can be modified
Read-only access + Activated status = field not editable
Read-only access + Deactivated status = field not editable
Editable access + Deactivated status = field not editable
Tooltip Displays the text entered in the input field as a tooltip when the assignee/viewer hovers over the field in the form.
Value Area where user input should be entered or where the information savedin a field is displayed.

Fields, Forms, Files Candidate and Requisition File Setup
Configuration Guide Taleo 10 SP2 - Recruiting 169
Candidate and Requisition File Setup
Candidate and Requisition File SetupThe Candidate File Setup and Requisition File Setup features allow the system administrator toindicate which candidate files and requisition files are used in specific purposes.
Once the system administrator has created and activated user-defined files, he/she needs to dothe following:
• designate which files will be used for specific purposes;• associate files to staffing types, if desired;• specify which configuration profile will have access to specific files.
The system administrator designates which candidate file and/or requisition file will be used foreach of the following purposes:
Candidate File Purpose
Candidate File General profile.
Important Note: (ID 182) The same file is used for both editing and viewing
purposes.
Job submission. With this file, the system administrator first defines a primary file.Then, if desired, the system administrator can set a different file to be used foreach staffing type. If a specific staffing type file is not specified, the default file willbe used.
Important Note: (ID 182) The same file is used for both editing and viewing
purposes.
Create Candidate Quick profile creation.
1st general profile creation.
2nd general profile creation.
3rd general profile creation.
4th general profile creation.
1st job submission creation.
2nd job submission creation.
3rd job submission creation.
4th job submission creation.
General profile referrer/candidate file.
Job specific referrer/candidate file.

Fields, Forms, Files Candidate and Requisition File Setup
Configuration Guide Taleo 10 SP2 - Recruiting 170
Important Note: (ID 209) At least one Create Candidate flow must be activated for theCreate Candidate feature to work.
Requisition File Purpose
Requisition File Requisition File 1.
Requisition File 2.
Requisition File 3.
Requisition Template Job Template File.
For each job submission creation file and for each requisition file, the system administratorcan, if desired, set a different file type to be used for each staffing type. If a specific staffingtype file is not specified, the default file will be used.
Then, the system administrator specifies which configuration profile will have access to specificfiles. This is done via the SmartOrg Configuration Profiles feature. See Files Associated toConfiguration Profiles.
Associating a Requisition File to a Staffing TypePrerequisite
Configuration > [Recruiting] Administration > Requisition File Setup
Steps1. Click Edit.2. Click Add Staffing Type.3. Select a staffing type in the first drop-down list.4. Select the situation in which the file will be used in the second drop-down list.5. Click Save.
Dissociating a Requisition File from a Staffing TypePrerequisite
Configuration > [Recruiting] Administration > Requisition File Setup
Steps1. Click Edit.2. Click Remove next to a staffing type.3. Click Save.Result
If no other staffing types are associated to the requisition file, the requisition file will be usedwith all types of staffing.
Associating a Candidate File to a Staffing TypePrerequisite
Configuration > [Recruiting] Administration > Candidate File Setup

Fields, Forms, Files Candidate and Requisition File Setup
Configuration Guide Taleo 10 SP2 - Recruiting 171
Steps
1. Click Edit.2. Click Add Staffing Type.3. Select a staffing type in the first drop-down list.4. Select the situation in which the file will be used in the second drop-down list.5. Click Save.
Disassociating a Candidate File from a Staffing TypePrerequisite
Configuration > [Recruiting] Administration > Candidate File Setup
Steps
1. Click Edit.2. Click Remove next to a staffing type.3. Click Save.
Result
If no other staffing types are associated to the candidate file, the candidate file will be usedwith all types of staffing.
Choosing the Requisition File Available to UsersPrerequisite
The user-defined file must be created and activated.
Configuration > [Recruiting] Administration > Requisition File Setup
Steps
1. Click Edit.2. In the Requisition File Setup Editor page, for Requisition 1, Requisition 2 and Requisition
3, select the purpose for which the requisition file will be used.3. Click Save.
Result
The selected files will be available to users when creating a requisition.
Next Step
Associating a requisition file to a staffing type.
Choosing the Candidate File Available to UsersPrerequisite
User-defined files must first be created and activated.
Configuration > [Recruiting] Administration > Candidate File Setup

Fields, Forms, Files Candidate and Requisition File Setup
Configuration Guide Taleo 10 SP2 - Recruiting 172
Steps
1. Click Edit.2. For each candidate file, select the purpose for which the candidate file will be used.3. Click Save.
Result
The selected files will be available to users when creating a candidate.
Next Step
Associating a candidate file to a staffing type.
Files Associated to Configuration ProfilesSystem administrators define which configuration profiles have access to which activated user-defined files.
Once user-defined files have been created and activated, the system administrator can definewhich configuration profiles have access to which activated user-defined files. This is done viathe SmartOrg Configuration Profiles feature.
Setting Name Description
Requisition File Creation Indicates the files used to create a requisition.
View or Edit Requisition Files Allows the selection of one of the three requisition files for editing/viewing postcreation (the system administrator can choose that the file used for editing/viewingwill be the same file used for creating the file).
Candidate File Creation Indicates the files used to create a candidate.
For example, the system administrator may grant hiring managers access to the RequisitionFile 2, the quick profile creation, the 1st general profile creation and the 1st job submissioncreation. While hourly hiring managers may have access to the Requisition File 3, the quickprofile creation, the 2nd general profile creation and the 2nd job submission creation. Sinceeach user account is tied to a configuration profile, this then ultimately will drive what files theuser can see while using the system.
Note: There is only one specified Job Template file and Candidate File for all users, so thereare no configuration profile setting options related to these files.
Associating Candidate Creation Files to a ConfigurationProfile
Allows the system administrator to specify which create candidate files are associated to aconfiguration profile.
Prerequisite
Files must be created.
Configuration > [SmartOrg] Administration > Configuration Profiles
Steps
1. In the Configuration Profiles page, click on a configuration profile.

Fields, Forms, Files Candidate and Requisition File Setup
Configuration Guide Taleo 10 SP2 - Recruiting 173
2. Click on the Available Candidate Creation Files setting.3. Click Edit.4. Select the desired files.5. Click Save.
Associating a Requisition File to a Configuration ProfileAllows the system administrator to specify which requisition files are associated to aconfiguration profile.
Prerequisite
Files must be created.
Configuration > [SmartOrg] Administration > Configuration Profiles
Steps
1. In the Configuration Profiles page, click on a configuration profile.2. Click on the Create Requisition Files setting.3. Click Edit.4. Select the desired files.5. Click Save.

Candidate SelectionWorkflow
• Candidate Selection Workflow Configuration.......................................................175
• Step................................................................................................................... 188
• Status.................................................................................................................196
• Action................................................................................................................ 204
• Qualifier............................................................................................................ 208
• Phase.................................................................................................................214

Candidate Selection Workflow Candidate Selection Workflow Configuration
Configuration Guide Taleo 10 SP2 - Recruiting 175
Candidate Selection Workflow Configuration
Candidate Selection WorkflowA candidate selection workflow (CSW) provides the framework to move a candidate throughthe hiring process in order to evaluate and find the best candidate for a job.
A candidate selection workflow (CSW) includes steps, phases, statuses and actions a usermust go through before hiring a candidate. An analogy can be drawn between the candidateselection workflow and moving candidate resumes from one pile to another as the selectionprogresses and the number of resumes retained is reduced (for example, a candidatesubmission is analyzed, the candidate is contacted, interviewed, then selected).
The CSW is created by the system administrator then selected by the user when creating arequisition. When candidates apply on the requisition, the selected CSW is used to track andmanage candidates from the time they are new to the system to the time that they are hired.Candidate files in each step of the CSW can have a status. Specific actions can be performedon these candidate files depending on the steps and statuses. A set of user type permissionsgrant users access to the actions that can be performed in a candidate selection workflow.
CSW can be displayed to the user on a priority basis. The system will sort workflows accordingto the level of compatibility and ensure that the most appropriate workflow is displayed when auser is creating a requisition.
A CSW can be contextualized, that is organizations, locations and job fields can be associatedby the system administrator to the candidate selection workflow. As a result, when creating arequisition, the user will only see the CSW with an Organization-Location-Job Field structurematching the one of the requisition. If a CSW is not associated to any Organization-Location-Job Field element, this means that the CSW will be available for all requisitions.
When associating an Organization-Location-Job Field structure to a CSW, the more specificthe level of the structure is, the more compatible the workflow will be with a requisition.Moreover, the system will automatically select the workflow which provides the highest degreeof compatibility with the requisition.
Standard candidate selection workflows are supplied with the application which can be used astemplates to create customized workflows.
A candidate selection workflow can be associated to a requisition type (professional, hourly,etc.). As a result, when creating a requisition, the user will only see the CSW matching theselected requisition type. If a CSW is not associated to any requisition type, this means that theCSW will be available for all requisition types.
Configuration
User Type Permissions
Name Location
Choose a candidate selection workflow Configuration > [SmartOrg] Administration > User Types >Recruiting > Requisitions > General

Candidate Selection Workflow Candidate Selection Workflow Configuration
Configuration Guide Taleo 10 SP2 - Recruiting 176
User Type Permissions
Name Location
CSW user type permissions are grouped under theCandidate Selection Workflow.
Configuration > [SmartOrg] Administration > User Types >Recruiting > Candidates > Candidate Selection Workflow
Settings
Name Possible Values Default Value Location
Reset Candidate SelectionWorkflow after Candidate Re-applies
• If thesubmissionhas reachedthe statusHired, Inactiveor Withdrawn
• If thesubmissionhas reachedthe statusHired,Inactive.Withdrawn orRejected
• Alwaysunless thesubmissionhas reachedthe statusRejected
• Always
If the submissionhas reached thestatus Hired,Inactive orWithdrawn
Configuration > [Recruiting] Settings
Important Note: (ID 299) When configuring a candidate selection workflow, be awarethat after reviewing step information and exiting back to the step list, a message will appearindicating that information is not translated. You will see this message even if no edits weremade. To work past this, simply click OK and you will be returned to the list of steps.
Important Note: (ID 298) The Duplicate function for the candidate selection workflow is notworking properly. Do not use it. Instead, all steps should be created from scratch.
Candidate Selection Workflow ExampleA workflow is composed of one or many steps. And steps are composed of one or manystatuses.
Example of a Candidate Selection Workflow
Step Status Status completing thestep
Status stopping theCSW
New• To be reviewed
Short list Rejected

Candidate Selection Workflow Candidate Selection Workflow Configuration
Configuration Guide Taleo 10 SP2 - Recruiting 177
Example of a Candidate Selection Workflow
• Waiting for info• Under consideration• Phone screen• Candidate declined• Short list*• Rejected
Manager review• Manager to review• Under consideration by manager• Candidate declined• Short list*• Not interested
Short List Not interested
Interview• To be interviewed• 1st interview• 2nd interview• 3rd interview• 4th interview• Assessment/Test scheduled• Candidate declined• To offer*• Rejected
To offer Rejected
Pre-offer check• Pre-offer checks to do• Pre-offer check initiated• Candidate declined• Pending results - Proceed
conditionally*• All checks passed - Proceed*• All checks NOT passed - Proceed*• Rejected
• Pending results -proceed conditionally
• All checks passed -Proceed
• All checks NOT passed-Proceed
Rejected
Offer• Offer to create• Offer sent out• Negotiating• Offer rejected• Offer accepted*
Offer accepted
Hire Hired
Standard Candidate Selection WorkflowsStandard Candidate Selection Workflows
Workflow Description
Standard A streamlined version of the Master workflow similar tothe original sequential workflow.
Internal A workflow designed to accommodate an internalrecruitment selection process.

Candidate Selection Workflow Candidate Selection Workflow Configuration
Configuration Guide Taleo 10 SP2 - Recruiting 178
Standard Candidate Selection Workflows
Workflow Description
Executive A workflow designed to accommodate an executiverecruitment selection process.
Executive (Agency) A workflow designed to accommodate an agency drivenexecutive recruitment selection process.
Temporary/Contract A workflow designed to accommodate a temporary orcontract recruitment selection process.
Campus/Student A workflow designed to accommodate a campusrecruitment selection process.
Master A workflow that can be customized when no otherworkflow meets your requirements.
Reference Workflow 4.1
Sequential Workflow 4.1
Staffing Station A workflow for applications received via StaffingStations.
Union A workflow for unionized candidates.
Candidate Selection Workflow PriorityThe candidate selection workflow priority ensures that the most appropriate workflow isdisplayed to the user when creating a requisition.
The system can sort candidate selection workflows (CSW) according to the level of compatibilityand ensure that the most appropriate workflow is displayed when a user is creating arequisition.
The system administrator must identify one CSW as the company default workflow. However,the default workflow will be preselected only if no other workflow is found to be compatibleto the requisition or if other workflows are compatible because they are linked to allOrganization, Location and Job Field (all-all-all).
The system automatically preselects the most compatible workflow as follows:• The system makes the sum of the differences between the levels specified in the workflow
and in the requisition.• The workflow with the least differences is the one displayed in the Candidate Selection
Workflow field.• In case of a tie, the sort is performed on the code of the workflows.A workflow with no value (Null) for a dimension (Organization, Location or Job Field) willconsequently be associated to all structure elements from that dimension. However, associatinga workflow to no specific value (equivalent to all) will penalize its level of compatibility. Hence,a workflow tied to all-all-all will be much less pertinent than a workflow with the slightestspecificity in its categorization.
Example:Organization Location Job Field
Food Processing/Food Production United States/California/Los Angeles Cashier

Candidate Selection Workflow Candidate Selection Workflow Configuration
Configuration Guide Taleo 10 SP2 - Recruiting 179
Workflow 1: There is no difference between the Organization-Location-Job Field information ofthis workflow and that of the requisition.
Code Organization Location Job Field
CSW1 Food Processing/Food Production
United States/California/LosAngeles
Cashier
Difference (0) (0) (0)
Workflow 2: Because there is no job field, the sum of the difference is 20.Code Organization Location Job Field
CSW2 Food Processing/Food Production
United States/California/LosAngeles
All
Difference (0) (0) (20)
Workflow 3: There is a difference of one level in the Organization dimension, and a differenceof two levels in the Location dimension, so the sum of the differences is 3.
Code Organization Location Job Field
CSW3 Food Processing United States Cashier
Difference (1) (2) (0)
Workflow 4: There is no difference between the Organization-Location-Job Field information ofthis workflow and that of the requisition.
Code Organization Location Job Field
CSW4 Food Processing/Food Production
United States/California/LosAngeles
Cashier
Difference (0) (0) (0)
Workflow 5: Since no dimension is specified in this workflow, the sum of the differences is 60.Code Organization Location Job Field
CSW5 All All All
Difference (20) (20) (20)
Workflow 6: Once again, since no dimension is specified in this workflow, the sum of thedifferences is 60. However, this is the default workflow.
Code Organization Location Job Field
CSW6 All All All
Difference (20) (20) (20)
Workflow 7: The location of this workflow is not compatible with that of the requisition. Thismeans that this workflow is excluded. In this example, the workflow that would be displayed inthe Candidate Selection Workflow field is Workflow 4 (a_csw4), because even though Workflow1 (z_csw1) and 4 are tied and have he lowest sum of differences, Workflow 4 will be displayedfirst when a sort is performed on the code.

Candidate Selection Workflow Candidate Selection Workflow Configuration
Configuration Guide Taleo 10 SP2 - Recruiting 180
Code Organization Location Job Field
CSW7 Food Processing/Food Production
United States/California/San Jose
Cashier
Difference
Building a Candidate Selection WorkflowPrerequisite
Configuration > [Recruiting] Administration > Candidate Selection Workflow
Steps1. In the Workflows tab, click New, complete the fields then click Done.2. In the Workflow Details page, add steps to the candidate selection workflow and put
them in order.3. Click on the steps you added to the CSW and specify if the step is mandatory, restricted
or conditional.4. In the Steps tab, click on the step added to the CSW and customize each step, that is:
a) rename the step (optional);b) create custom instructions for the step;c) select appropriate statuses for the step and put them in the proper order;d) select the default status of a step;e) determine the status progression level of the step;f) link a status to a shortcut button. This shortcut allows users to change the status of a
candidate directly in a candidate file;g) make qualifiers or comments mandatory for the step;h) set notifications for the status;
5. In the Statuses tab, customize the statuses that make up the steps so they fit yourorganization needs. This includes:a) rename the status;b) add qualifiers (reason linked to a status for rejecting a candidate or for explaining why
a candidate declined a job offer.6. Associate the CSW to an Organization-Location-Job Field structure (optional).7. Associate the CSW to a requisition type.8. Grant the Choose a candidate selection workflow user type permission.9. Activate any user type permissions located in the Candidate Selection Workflow
functional domain.
Creating a Candidate Selection WorkflowPrerequisite
Determine your organization needs, determine if the process is feasible, select an existingworkflow that can be used as a starting point, standardize the workflow as much as possibleto produce efficient, easy to use reports.
Configuration > [Recruiting] Administration > Candidate Selection Workflow

Candidate Selection Workflow Candidate Selection Workflow Configuration
Configuration Guide Taleo 10 SP2 - Recruiting 181
Steps1. Click New...2. Enter a name, code, comments and description.3. Select Available to make the workflow available in Taleo Recruiting.4. Select Default Workflow to make this workflow the default workflow in Taleo Recruiting.5. In the Steps Usage tab, add steps to the workflow.6. In the Display Context tab, associate the workflow to organizations, locations or job
fields.7. In the Display Context tab, associate the workflow to a requisition type.8. Click Done.Result
The candidate selection workflow appears in the Workflows page. The candidate selectionworkflow can be used as a framework that will allow users to move candidates from onestep to another during the selection process.
Activating a Candidate Selection WorkflowPrerequisite
The candidate selection workflow must be created.
Configuration > [Recruiting] Administration > Candidate Selection Workflow > Workflowstab
Steps1. Click on a candidte selection workflow.2. Select Available.3. Click Done.Result
In the Workflows page, a check mark appears in the Available column next to the candidateselection workflow. The candidate selection workflow is now available to users when creatinga requisition.
Deactivating a Candidate Selection WorkflowPrerequisite
A candidate selection workflow must be active in order to deactivate it.
Configuration > [Recruiting] Administration > Candidate Selection Workflow
Steps1. Click on a candidate selection workflow.2. Clear the Available check box.3. Click Done.Result
In the Workflows page, a check mark no longer appears in the Available column next to thecandidate selection workflow. Users can no longer use the candidate selection workflow. Thecandidate selection workflow remains available in the database.

Candidate Selection Workflow Candidate Selection Workflow Configuration
Configuration Guide Taleo 10 SP2 - Recruiting 182
Deleting a Candidate Selection WorkflowPrerequisite
A workflow being used by another user cannot be deleted.
Configuration > [Recruiting] Administration > Candidate Selection Workflow
Steps
1. Select a candidate selection workflow.2. Click .
Result
The candidate selection workflow can no longer be used in Taleo Recruiting. The candidateselection workflow is permanently removed from the database.
Duplicating a Candidate Selection WorkflowPrerequisite
The candidate selection workflow should be similar to the one being created.
Configuration > [Recruiting] Administration > Candidate Selection Workflow
Steps
1. Click on a candidate selection workflow.2. Click Duplicate.3. Make required changes.4. Click Done.
Result
The candidate selection workflow is available in the Workflows page.
Next Step
Adding steps to the candidate selection workflow.
Associating the candidate selection workflow to organizations, locations, job fields.
Selecting a Default Candidate Selection WorkflowPrerequisite
The candidate selection workflow must be activated.
Configuration > [Recruiting] Administration > Candidate Selection Workflow
Steps
1. Click on a workflow.2. Select Default Workflow.3. Click Done.

Candidate Selection Workflow Candidate Selection Workflow Configuration
Configuration Guide Taleo 10 SP2 - Recruiting 183
Result
In the Workflows page, a check mark appears in the Default column next to the candidateselection workflow. The candidate selection workflow appears by default when users create arequisition.
Associating a Candidate Selection Workflow toOrganizations, Locations and/or Job Fields
Prerequisite
The candidate selection workflow must be created.
Configuration > [Recruiting] Administration > Candidate Selection Workflow
Steps
1. Click on a candidate selection workflow.2. Under the Display Context tab, click Add in the Jobs, Organizations or Locations
sections.3. Select Organization-Location-Job Field elements.4. Click Done.
Result
The candidate selection workflow is associated to an Organization-Location-Job Fieldstructure. When users create a requisition, only the workflows matching the structure ofthe requisition will be displayed according to the Organization-Location-Job Field selectedfor the requisition (instead of all workflows of the company). Moreover, the system willautomatically select the workflow which provides the highest degree of compatibility with therequisition.
Disassociating a Candidate Selection Workflow from anOrganization-Location-Job Field
Prerequisite
The candidate selection workflow must be associated to an Organization-Location-Job Fieldstructure.
Configuration > [Recruiting] Administration > Candidate Selection Workflow
Steps
1. Click on a candidate selection workflow.2. Under the Display Context tab, click Remove next to the organization, location or job
field you want to remove.3. Click Done.
Result
The candidate selection workflow is no longer associated to the Organization-Location-Job Field element and will be available for requisitions not associated to an Organization-Location-Job Field structure.

Candidate Selection Workflow Candidate Selection Workflow Configuration
Configuration Guide Taleo 10 SP2 - Recruiting 184
Associating a Candidate Selection Workflow to aRequisition Type
Prerequisite
The candidate selection workflow must be created.
Configuration > [Recruiting] Administration > Candidate Selection Workflow
Steps
1. Click on a candidate selection workflow.2. Under the Display Context tab, select a requisition type in the Available Requisition Types
list.3. Click Add4. Click Done.
Result
The selected requisition type now appears in the Selected Requisition Types list. When userscreate a requisition, workflows are displayed according to the requisition type (professional,hourly, contingent, etc.) selected for the requisition (instead of all workflows of the company).
Disassociating a Candidate Selection Workflow from aRequisition Type
Prerequisite
The candidate selection workflow must be created.
Configuration > [Recruiting] Administration > Candidate Selection Workflow
Steps
1. Click on a candidate selection workflow.2. Under the Display Context tab, select a requisition type in the Selected Requisition Types
list.3. Click Remove.4. Click Done.
Result
The requisition type returns in the Available Requisition Types list.
Bulk Move to the Hire Step/StatusUsers can move more than one candidate to the Hire step/status in a single transaction.
When this feature is activated, users are able to select more than one candidate to move to theHire step/status. The system performs a verification to see if the number of candidates selectedis equal to or less than the number of positions still open.
If additional information is required during the hire action, for example the start date, all theinformation entered will apply to all candidates hired in that action.

Candidate Selection Workflow Candidate Selection Workflow Configuration
Configuration Guide Taleo 10 SP2 - Recruiting 185
This feature supports candidate selection workflows with or without the RSOffer step.
Benefits
• Improved usability for users by allowing them to move more than one candidate to the Hirestep/status.
Configuration
The bulk move feature is enabled by the following setting. The setting is a global setting thataffects all requisition types (professional, executive, hourly, etc.). It cannot be activated for aspecific requisition type.
Setting
Name Possible Values Default Value Location
Simultaneous Hiring of MultipleCandidates
• No
• Yes
Yes Configuration > [Recruiting] Settings
As a recommended practice, customers should activate this feature to perform mass hiring.
Activating the Bulk Move to Hire Step/StatusPrerequisite
Configuration > [Recruiting] Settings
Steps
1. Click on the Simultaneous Hiring of Multiple Candidates setting.2. Click Edit.3. Select Yes.4. Click Save.
Result
User are able to move more than one candidate to the Hire step/status.
Step/Status Change in One ClickAllows users to access steps and statuses directly in the Candidates list without having to selectan action in the More Actions list.
To be able to change the step/status of a candidate with one click, the Next Action columnmust be added in a candidate list format.
The Next Action column contains actions that will give access to the next status or step relatedto a candidate. Actions available in the new column will allow users to:
• Change the status of a candidate to the next completion status (if the step is not alreadycompleted).
• Move the candidate to the initial status of the next step if the current step is completed.
Actions available in the Next Action column are Candidate Selection Workflow (CSW)movements only, either a
• Move to the next step in the CSW

Candidate Selection Workflow Candidate Selection Workflow Configuration
Configuration Guide Taleo 10 SP2 - Recruiting 186
• Change to the completion status within the current step
If the current status is not a completion status, the action displayed will be a move (changestatus) to the first completion status of the current step.
If the current status is a completion status, then the action will be a move to the next stepat the initial status. In a one-step CSW (reference workflow), only statuses configured as a“completion status” will show up as next steps.
Configuration
To be able to add a column to a list format, the following permission is required.
User Type Permission
Name Location
Create personal list formats for the candidate list Configuration > [SmartOrg] Administration > UserTypes > Recruiting > Candidates
Competitive Workflow RestrictionThis feature can be used to prevent users from advancing a candidate in the candidateselection workflow if the candidate is already in an advanced stage of selection (offer or hirestep) for another position.
System administrators have the option to implement the system such that if the workflow forone active submission is advanced to or beyond the selected threshold reference workflowstep, users are prevented from advancing the workflow of other submissions for this candidate.When a user attempts such an action, he/she will instead receive a message telling them whichsubmission is blocking them from advancing
Note that an active submission is a submission where the user is in the step on an activerequisition and not at a terminal that ends the workflow, such as Rejected nor Withdrawn.In other words, the candidate is still being actively considered on an active requisition or thecandidate has been hired.
To enable this feature, the system administrator must configure the following setting in TaleoRecruiting Administration:
• Threshold CSW Step - Prevent Advancing
The system administrator must select the reference workflow step that once reached willinvoke blocking the progression on other submissions. If no step is selected, the function is notactivated. Possible steps to choose from are:
• Reviewed• Testing• Hired• New• Offer• 1st Interview• 2nd Interview• 3rd Interview
When the Threshold CSW Step - Prevent Advancing setting is enabled, the system administratorcan grant the following user type permission to bypass this blocking and allow associated usersto advance candidates regardless of other submissions:

Candidate Selection Workflow Candidate Selection Workflow Configuration
Configuration Guide Taleo 10 SP2 - Recruiting 187
• Advanced candidates in workflow even if already reached the threshold step on a differentsubmission.
When all of the above has been configured, users will only notice a change if all the followingelements are true:
• The candidate has two or more submissions.• One of those submissions is active (not rejected or withdrawn), and its workflow has
advanced to or beyond the threshold step.• The requisition is active or the candidate is marked as being hired.• The user tries to advance the workflow of one of the other submissions from this candidate.• The user does not have user type permission to ignore this restriction.
If all of the above is true, users will see a message informing them that the workflow cannotbe advanced. The message will indicate the specific submission that is blocking them fromadvancing the candidate in the workflow.
Note that the Competitive Workflow Restriction feature is complimentary to the feature whichhides candidates from search results if they are beyond a threshold step in the reference model(which is activated by the Threshold CSW Step - Hide from Search setting).
Benefits
• Ability to avoid wasted time and resources by trying to hire the same candidate on twodifferent requisitions.
• Eliminates contention over candidates by restricting users from advancing a candidate onone submission if the candidate has already reached a defined threshold step on a differentsubmission.
• Encourages “early birds” to interview candidates promptly by enforcing a first-comefirst-served process of candidate management (for example, in decentralized hiringenvironments and candidate pools).

Candidate Selection Workflow Step
Configuration Guide Taleo 10 SP2 - Recruiting 188
Step
Candidate Selection Workflow StepA step represents a major stage or event in a candidate selection workflow.
A step in a candidate selection workflow can be mandatory or optional.
• Mandatory: If a step is mandatory, the user must take the candidate through the step beforemoving on to any subsequent steps. The user will not have access to the subsequent list ofsteps until the step is completed.
• Optional: If a step is optional, the user can skip the step entirely and move the candidateon to the next step. Or, the user can move a candidate conditionally through a step withoutcompleting the step in order to move to a subsequent step, and return to the conditionalcompletion step later to complete it.
Most steps are mandatory and sequential, meaning that they must be completed in theprescribed order. In some scenarios, a user may be able to move a candidate to a step withoutcompleting the current one, but the system will require that all mandatory steps be completedbefore a hire can be completed.
Each step must be finished with a completion status, indicated by an asterisk (*), before acandidate can move to another step in the hiring process. A completion status completes thestep.
A step can have a Restricted confidentiality level. In many organizations, hiring managers arenot involved in the earliest steps of the candidate selection process. Recruiters are responsiblefor evaluating new applications and only submit qualified candidates to the hiring managers.It is possible to configure steps to prevent hiring managers from viewing specific selection steps(such as New) in the Taleo Recruitng Candidates list.
Notifications can be added to steps. This allows sending a message to users to let them knowwhen a step is reached by candidates.
There is no limit on the number of steps that can be used in a CSW. However, a best practice isto only add necessary steps.
Example of a step versus possible statuses:
Step Status
New• To be reviewed
• Waiting for info
• Under consideration
• Phone screen
• Candidate declined
• Phone screen

Candidate Selection Workflow Step
Configuration Guide Taleo 10 SP2 - Recruiting 189
Configuration
User Type Permissions
Name Location
Move submissions to next step Configuration > [SmartOrg] Administration > User Types >Recruiting > Candidates > Candidate Selection Workflow
Bypass steps Configuration > [SmartOrg] Administration > User Types >Recruiting > Candidates > Candidate Selection Workflow
View candidates in steps whose confidentialitylevel is "Restricted"
Configuration > [SmartOrg] Administration > User Types >Recruiting > Candidates > Candidate Selection Workflow
CSW user type permissions are grouped under theCandidate Selection Workflow.
Configuration > [SmartOrg] Administration > User Types >Recruiting > Candidates > Candidate Selection Workflow
RSOffer StepThe RSOffer step is a step that can be included in a candidate selection workflow to allow usersto use the offer management module.
The system administrator is responsible of adding the RSOffer step in the candidate selectionworkflow. The RSOffer step must be placed before the Hire step.
The RSOffer step cannot be customized or edited (except for qualifier groups and qualifiers thatcan be added to specific statuses).
The RSOffer step has the following statuses:
RSOffer step
Status Description
Offer to be made Initial status of the Offer step.
Draft Offer terms have been started and saved, but not approved.
Cancelled A draft offer has been created and then cancelled prior to routing forapproval or extending to the candidate.
Approval in progress Offer has been routed for approval.
Approval rejected Offer has been rejected.
Approved Offer has been approved.
Extended Offer has been extended to the candidate.
Rescinded fter the offer has been extended or the candidate has accepted the offer, theuser (company) rescinds/revokes the offer.
In negotiation Offer was extended to the candidate. The user marked the candidate aswanting to negotiate the offer. If a new offer should be created, the user willneed to rescind the offer in order to create a new offer. If a new offer is notrequired, then either recapture the candidate response (accept or refused) orstatus them as Rejected or Has Declined.

Candidate Selection Workflow Step
Configuration Guide Taleo 10 SP2 - Recruiting 190
RSOffer step
Status Description
Refused Offer was extended to the candidate. The user marked the candidate asrefusing the offer. A new offer can be created at this point.
Accepted Offer was accepted by the candidate.
Reneged After the candidate has accepted the offer, the candidate refuses the offer(goes back on his or her word).
Rejected After the offer has been rescinded to a candidate, the user should status thecandidate as Rejected in the Offer step. This will allow another offer to becreated and extended.
Has declined After the offer has been refused or reneged by the candidate, the usershould status the candidate as Has Declined in the Offer step. This will allowanother offer to be created and extended
Creating a StepPrerequisite
Configuration > [Recruiting] Administration > Candidate Selection Workflow > Steps tab
Steps
1. Click New...2. Complete the name, short name (which appears on the Step tab in the Candidate List of
Taleo Recruiting), code, and comments.3. Complete the Step Information field if you want to create custom instructions for the step.4. Select a reference model. Reference models are used to map steps to reports, emails,
EEO status settings in Regulations as well as to other functions used throughout theapplication. They are also used to determine the status that will trigger the EmploymentEquity Information (USA) recruiting setting.
5. In the Statuses Usage tab, add statuses to the step.6. In the Actions Usage tab, select actions for the step.7. Click Done.
Result
The step appears in the Steps page. The Rejected and Declined statuses are present bydefault; they can be removed if desired.
Next Step
Reordering steps.
Deleting a StepPrerequisite
The step must not be used in a candidate selection workflow.

Candidate Selection Workflow Step
Configuration Guide Taleo 10 SP2 - Recruiting 191
Configuration > [Recruiting] Administration > Candidate Selection Workflow > Steps tab
Steps
1. Select a step.2. Click .
Result
The step no longer appears in the list of steps, and information is permanently deleted fromthe database.
Activating a StepPrerequisite
The step must be created.
Configuration > [Recruiting] Administration > Candidate Selection Workflow > Steps tab
Steps
1. Cick on a step.2. Select Available.3. Click Done.
Result
In the Steps page, a check mark appears in the Available column next to the step. The step isavailable for selection when creating a candidate selection workflow.
Next Step
Adding steps to a candidate selection workflow.
Deactivating a StepPrerequisite
The step must not be used by a candidate selection workflow.
Configuration > [Recruiting] Administration > Candidate Selection Workflow > Steps tab
Steps
1. Click on a step.2. Clear Available.3. Click Done.
Result
In the Steps page, a check mark no longer appears in the Available column next to the step.The step is removed from the list of steps available when creating a candidate selectionworkflow. The step remains in the database.
Next Step
Deleting the step, if the step is no longer required.

Candidate Selection Workflow Step
Configuration Guide Taleo 10 SP2 - Recruiting 192
Duplicating a StepPrerequisite
The step should be similar to the one being created.
Configuration > [Recruiting] Administration > Candidate Selection Workflow > Steps tab
Steps
1. Click on a step.2. Click Duplicate.3. Enter a new code.4. Make other necessary changes.5. Click Done.
Result
The step created from an existing one appears in the Steps page.
Next Step
Adding the status to a step.
Selecting the Default Status of a StepPrerequisite
The step must be created.
Only one status must be defined as the initial status for a specific step.
Configuration > [Recruiting] Administration > Candidate Selection Workflow > Steps tab
Steps
1. Click on a step.2. In the Statuses Usage tab, click on the desired status.3. Select the option This is the initial status for this step.4. Click Done.
Result
In the Step Details page, under the Statuses Usage tab, a check mark appears in the Initialcolumn next to the status. The default status is used when a candidate reaches the step.
Adding Steps to a Candidate Selection WorkflowPrerequisite
The step must be activated in order to add it to the candidate selection workflow.
If no steps are available, you can create one.
There is no limit on the number of steps tha can be used in a CSW. However, a best practiceis to only add necessary steps.

Candidate Selection Workflow Step
Configuration Guide Taleo 10 SP2 - Recruiting 193
Configuration > [Recruiting] Administration > Candidate Selection Workflow
Steps
1. Click on a candidate selection workflow.2. Under the Steps Usage tab, click Add...3. Select the steps.4. Click Add.5. Click Done.
Result
The step is added to the candidate selection workflow. Candidate will be required to gothrough the step for that candidate selection workflow.
Next Step
Configuring the steps.
Ordering the steps.
Configuring a Step Used in a WorkflowPrerequisite
The step must have been added to the candidate selection workflow before configuring it.
Configuration > [Recruiting] Administration > Candidate Selection Workflow
Steps
1. Click on a candidate selection workflow.2. Under the Steps Usage tab, click on a step.3. Decide if the step is mandatory, restricted or conditional.
If mandatory, the user will be forced to go through this step before going on to anyfollowing step.
Restricted prevents the step from being visible in the Candidates list.
If conditional, the step can be skipped entirely and the candidate can be moved to thenext step.
4. Set notifications for the step if desired. This allows you to send a message to users to letthem know when the step is reached by candidates.
5. Click Done.
Result
In the Workflow Details page, under the Steps Usage tab, a check icon appears in theMandatory, Restricted and Allow columns depending of your configuration choices.
Removing a Step from a Candidate Selection WorkflowPrerequisite
The step must be included in the candidate selection workflow.

Candidate Selection Workflow Step
Configuration Guide Taleo 10 SP2 - Recruiting 194
Configuration > [Recruiting] Administration > Candidate Selection Workflow
Steps
1. Click on a candidate selection workflow.2. Click on the check box next to a step, then click Remove.
Result
The step is no longer included in the candidate selection workflow. A step removed from acandidate selection workflow is not deleted permanently; it is still available in the Steps pageand can be reused.
Next Step
Ordering steps in the candidate selection workflow.
Ordering Steps in a Candidate Selection WorkflowPrerequisite
Steps must have been added to the candidate selection workflow.
Configuration > [Recruiting] Administration > Candidate Selection Workflow
Steps
1. Click on a candidate selection workflow.2. Under the Steps Usage tab, select a new position (number) in the list next to the step
name.3. Click Reorder.
Result
The steps in the candidate selection workflow are ordered as specified.
Creating Custom Instructions for a StepPrerequisite
Only one text can be entered for each step for each language.
Text must be provided for all available languages.
A maximum of 1000 text based characters is supported. HTML, rich text format (RTF) andhyperlinks are not supported.
Configuration > [Recruiting] Administration > Candidate Selection Workflow > Steps tab
Steps
1. Click on a step.2. Enter text in the Step Information field.3. Click Done.
Result
The instructions appear in a callout located within the Selection Workflow area in theleft hand side of a page. The callout displays all step-related instructions for the specific

Candidate Selection Workflow Step
Configuration Guide Taleo 10 SP2 - Recruiting 195
workflow, no matter what step the user has selected. The provided information regarding astep in a candidate selection workflow can explain users, for example, the purpose of thestep, what are the next steps in the workflow, etc.

Candidate Selection Workflow Status
Configuration Guide Taleo 10 SP2 - Recruiting 196
Status
Candidate Selection Workflow StatusA status indicates the position or state a candidate has reached in the step of a candidateselection workflow.
A candidate can change status during a step but the candidate can only have one status at atime in each step. Statuses are more flexible than steps as most are optional and do not needto be followed in a certain order. Statuses can be temporary therefore requiring an additionalaction from the user or they can complete a step (indicated by *) because they complete thestep by either moving the candidate to the next step or terminating the candidate selectionprocess.
Available statuses will depend on the candidate selection workflow being used. For example:• Approved• In Process• Negotiating• Waiting for resultsExample of a step versus possible statuses:
Step Status
New• To be reviewed
• Waiting for info
• Under consideration
• Phone screen
• Candidate declined
• Phone screen
Statuses have different progression levels.
Progression Level Description
Initial Indicates the first status that will apply to a candidate accessing a new step.Example: For the 1st Interview step, the initial status would be To Be Scheduled.
Not Started Indicates that the step has not started yet. Example: For the 1st Interview step,“To be Scheduled” is a Not Started status because the interview has not beenscheduled and the step has not officially started.
In Progress Indicates that a candidate needs to be moved to other statuses before movingto the next step. The option “move” is not available to the user at this point.Example: For the 1st Interview step, “Scheduled” is an In Progress status.
Completed Indicates that a candidate can move to the next step. The option “move” isavailable to the user at this point.
Conditionally Completed Indicates that a candidate can move from one step to another even if someactivities are not completed in the step (missing information, waiting for an

Candidate Selection Workflow Status
Configuration Guide Taleo 10 SP2 - Recruiting 197
Progression Level Description
approval, waiting to confirm an interview date, waiting for test results, etch.).When a status is conditionally completed, the user is able to return to the stepand eventually complete unfinished activities. The step is not completed untilall activities are finished. More than one status in a step can be conditionallycompleted.
When selecting the Completed level, the following option becomes available: “Allowcompletion even if some activities remain pending”. This option allows the move to the nextstep even if some activities are still pending from a previous step.
A status can be linked to a button that will be used as a shortcut to change the status of acandidate directly in a candidate file.
Shortcut Button Description
Changes the candidate’s status to the next appropriate status.
Changes the candidate’s status to Rejected.
Changes the candidate’s status to Under consideration.
When configuring a status used in a step, it is possible to ask the system to automaticallychange the status once an interview is scheduled during the step. This is done by selectingthe Interview Scheduling Behavior option. This option is used with the Interview Schedulingfeature only. You can activate the Interview Scheduling Behavior option for statuses related tothe 1st, 2nd and 3rd Interview steps. When a recruiter creates a meeting in Taleo Recruiting, ifthe Interview Scheduling Behavior option is selected in more than one status, the recruiter willhave to select the appropriate status in the Action Dialog window. The Interview Schedulingpermission must be enabled
When configuring a status used in a step, it is also possible to allow candidates to reach thestatus automatically when specific conditions are met. You can create and edit conditions thatwill be used to identify candidates who are allowed to reach this status automatically. Passportis responsible for handling requests to and from external service providers. It communicateswith other modules in order to maintain requests up to date and interacts with the assessmentplatform to request assessment evaluations. The automatic progression of applicationsautomates the CSW process based on the results obtained by Passport external services.
Configuration
Any changes made to a status affects all candidate selection workflows using the modifiedstatus.
User Type Permissions
Name Location
Change submission status Configuration > [SmartOrg] Administration > User Types >Recruiting > Candidates > Candidate Selection Workflow
CSW user type permissions are grouped under theCandidate Selection Workflow.
Configuration > [SmartOrg] Administration > User Types >Recruiting > Candidates > Candidate Selection Workflow

Candidate Selection Workflow Status
Configuration Guide Taleo 10 SP2 - Recruiting 198
Creating a StatusPrerequisite
Configuration > [Recruiting] Administration > Candidate Selection Workflow
Steps
1. Click New...2. Complete the fields.3. Click Done.
Result
The status appears in the Statuses page.
Next Step
Adding qualifiers.
Deleting a StatusPrerequisite
The status cannot be used in a step.
Configuration > [Recruiting] Administration > Candidate Selection Workflow > Statuses
Steps
1. Select a status.2. Click .
Result
The status no longer appears in the list of statuses and is permanently removed from thedatabase.
Activating a StatusPrerequisite
The status must be created.
Configuration > [Recruiting] Administration > Candidate Selection Workflow > Statusestab
Steps
1. Click on a status.2. Select Available.3. Click Done.
Result
In the Statuses page, a check mark appears in the Available column next to the status. Thestatus is available for selection when creating a step.

Candidate Selection Workflow Status
Configuration Guide Taleo 10 SP2 - Recruiting 199
Next Step
Adding the status to a step.
Deactivating a StatusPrerequisite
A status must be active in order to deactivate it.
Configuration > [Recruiting] Administration > Candidate Selection Workflow > Statuses
Steps
1. Click on a status.2. Clear the Available check box.3. Click Done.
Result
In the Statuses page, a check mark no longer appears in the Available column next to thestatus. The status no longer appears in the list of statuses available when creating a step.The status remains in the database.
Next Step
Deleting the status, if the status is no longer required.
Duplicating a StatusPrerequisite
The status should be similar to the one to be created.
Configuration > [Recruiting] Administration > Candidate Selection Workflow > Statuses
Steps
1. Cick on a status.2. Click Duplicate.3. Complete fields as required.4. Click Done.
Result
The status created from an existing one appears under the Statuses tab.
Next Step
Adding qualifier groups to the status.
Configuring a Status Used in a StepPrerequisite
The status must be added to the step before configuring it.

Candidate Selection Workflow Status
Configuration Guide Taleo 10 SP2 - Recruiting 200
Configuration > [Recruiting] Administration > Candidate Selection Workflow > Steps tab
Steps
1. Click on a step.2. Click on a status.3. Indicate if the status is the initial status of the step.4. Determine the step progression level, that is Not Started, In Progress, Completed.5. Select a status change button that is used a shortcut to change the status of a candidate
directly in a candidate file.6. Select the Ask for a qualifier option if you want the user to select a qualifier to motivate
the change to this status. This option is available only if the status has qualifiers defined.7. Select the Ask for comments option if you want the user to enter a comment when the
change is done to this status.8. Select the Interview Scheduling Behavior option if you want the system to automatically
change the status once an interview is scheduled for the step. This option is used withthe Interview Scheduling feature only. You can activate the Interview Scheduling Behavioroption for statuses related to the 1st, 2nd and 3rd Interview steps. When a recruitercreates a meeting in Taleo Recruiting, if the Interview Scheduling Behavior option isselected in more than one status, the recruiter will have to select the appropriate status inthe Action Dialog window. The Interview Scheduling permission must be enabled.
9. Set notifications for the status if desired. This allows you to send a message to users to letthem know when the status is reached by candidates.
10.Activate the automatic progression of candidates feature if desired and create conditions.11.Click Done.
Result
In the Step Details page, under the Statuses Usage tab, different information appears in theProgression Level, Reference Model, Initial, Qualifiers and Comments columns depending ofyour configuration choices.
Any changes made to a status affects all candidate selection workflows using the modifiedstatus
Adding Statuses to a StepPrerequisite
The status must be activated in order to add it to the step.
Configuration > [Recruiting] Administration > Candidate Selection Workflow > Steps tab
Steps
1. Click on a step.2. Under the Statuses Usage tab, click Add...3. Select a status.4. Click Add.5. Click Done.

Candidate Selection Workflow Status
Configuration Guide Taleo 10 SP2 - Recruiting 201
Next Step
Ordering statuses.
Removing a Status from a StepPrerequisite
You cannot remove a status that was selected as the initial status. You must first selectanother status that will become the initial status.
Configuration > [Recruiting] Administration > Candidate Selection Workflow > Steps tab
Steps
1. Click on a step.2. Under the Statuses Usage tab, select a status.3. Click Remove.4. Click Done.
Result
The status is no longer included in the step. A status removed from a step is not deletedpermanently; it is still available in the Statuses page and can be reused.
Ordering Statuses in a StepPrerequisite
Statuses must be included in the step before ordering them.
Configuration > [Recruiting] Administration > Candidate Selection Workflow > Steps tab
Steps
1. Click on a a step.2. In the Step Details page, under the Statuses Usage tab, select a new position (number) in
the list next to the status name.3. Click Reorder.4. Click Done.
Result
The statuses in the step are ordered as specified.
Activating a Status ShortcutPrerequisite
The status must be created.
Not all statuses have shortcut icons available.
Configuration > [Recruiting] Administration > Candidate Selection Workflow > Statusestab

Candidate Selection Workflow Status
Configuration Guide Taleo 10 SP2 - Recruiting 202
Steps
1. Click on a status.2. Select the option Activate the corresponding action.3. Click Done.
Result
A shortcut icon linked to the status is displayed in Taleo Recruiting. Users can quickly changethe status of a candidate using the button.
Deactivating a Status ShortcutPrerequisite
The status must be created.
Not all statuses have shortcut icons available.
Configuration > [Recruiting] Administration > Candidate Selection Workflow > Statusestab
Steps
1. Click on a status.2. Clear the option Activate the corresponding action.3. Click Done.
Result
A shortcut icon is no longer linked to the status in Taleo Recruiting.
Allowing Date Entry and Modification for a StatusPrerequisite
The status must be created to activate this setting.
For actions that result in a change of status (that is, Change Status, Move, Bypass, Offer,Hire a Candidate, Candidate has Declined, Reject Candidate). The results displayed inreports will reflect the actual dates when events were performed.
The Set candidate selection workflow event date user type permission is required.
Configuration > [Recruiting] Administration > Candidate Selection Workflow > Statusestab
Steps
1. Click on a status.2. Select the option Allow event date entry and modification.3. Click Done.
Result
Users will be able to enter the date when an event was performed, rather than when it wasrecorded.

Candidate Selection Workflow Status
Configuration Guide Taleo 10 SP2 - Recruiting 203
Activating the Automatic Progression of a CandidatePrerequisite
Requisition and candidate statuses must be active to consider a candidate for the furthestactive progression status.
Tracking solution must be removed.
Configuration > [Recruiting] Administration > Candidate Selection Workflow > Steps tab
Steps
1. Click on a step.2. Under the Statuses Usage tab, click on a status.3. Select the option Allow candidates to reach this status automatically when the (optional)
conditions specified below are met.4. Click Create a Condition...5. Complete the fields.
The list of available condition providers will vary according to the providers selectedat your organization. Information will vary according to service selected. For moreinformation on available services, please contact your Taleo representative.
6. Click Done.7. Click Done.
Result
The automatic progression feature is now activated for the status so that candidates canreach a status automatically when specified conditions are met.
Deactivating the Automatic Progression of a CandidatePrerequisite
The automatic progression of candidate application must be enabled in order to deactivateit.
Configuration > [Recruiting] Administration > Candidate Selection Workflow > Steps tab
Steps
1. Click on a step containing the status for which you want to deactivate the automaticprogression option.
2. Under the Statuses Usage tab, click on the desired status.3. Clear the option Allow candidates to reach this status automatically when the (optional)
conditions specified below are met.4. Click Done.
Result
The automatic progression feature is no longer activated for the status. Candidates can nolonger reach a status automatically.

Candidate Selection Workflow Action
Configuration Guide Taleo 10 SP2 - Recruiting 204
Action
Candidate Selection Workflow ActionA candidate selection workflow action is an event performed on a candidate file during thehiring process.
A candidate selection workflow action is linked to a specific step of the candidate selectionworkflow by the system administrator and it is performed by a user when a candidate reachesthe step of the workflow. For example, if the action Start Onboarding Process is added to astep, then the recruiter can start the Onboarding process when a candidate is in that step.
Candidate selection workflow actions are provided by the system. They cannot be created.Available actions for a candidate selection are:
Candidate Selection Workflow Actions
Action Description
Add Comments Add comments to a candidate file.
Attach Files Attach a document to a candidate file.
Bypass Bypass a step in a candidate selection workflow without any restriction.
Change Status/step Change the status of a step in a candidate selection workflow.
Export to SAP Export a candidate file to SAP human resources management system(HRMS).
Fill Out Form Add a PDF form to a candidate file. The candidate will be required tofill out the form.
Grade Enter or remove a grade in a candidate file.
Move Move a candidate from one step to another.
Reset Selection Process
Important Note: (ID 222) The rules for the "Reset Selection
Process" action are not well implemented and for now it is best to notimplement this action. This manual candidate feature is activated viathe permission "Reset the selection process of an existing submission".
Revert Undo the last action in a step.
Send Correspondence Send a correspondence to a candidate.
Start Onboarding Process Start an onboarding process.
Undelete Undelete a candidate file.
Update Start Date Update the start date of a candidate.

Candidate Selection Workflow Action
Configuration Guide Taleo 10 SP2 - Recruiting 205
ConfigurationUser Type Permissions
Name Location
CSW permissions are grouped under CandidateSelection Workflow.
Configuration > [SmartOrg] Administration > User Types >Recruiting > Candidates > Candidate Selection Workflow
Activating an ActionPrerequisite
Configuration > [Recruiting] Administration > Candidate Selection Workflow > Actions tab
Steps
1. Click on an action.2. Select Available.3. Click Done.
Result
In the Actions page, a check mark appears in the Available column next to the action. Theaction is available for selection when creating a step.
Deactivating an ActionPrerequisite
Configuration > [Recruiting] Administration > Candidate Selection Workflow > Actions tab
Steps
1. Click on an action.2. Clear the Available check box.3. Click Done.
Result
In the Actions page, a check mark no longer appears in the Available column next to theaction. Also, the action is no longer available in the list of actions for selection when creatinga step.
Adding an Action to a StepPrerequisite
The action must be activated.
Configuration > [Recruiting] Administration > Candidate Selection Workflow > Steps tab
Steps
1. Click on a step.2. Under the Actions Usage tab, click Add...

Candidate Selection Workflow Action
Configuration Guide Taleo 10 SP2 - Recruiting 206
3. Select an action then click Add.
Result
The action is added to the step indicating which action the user needs to perform when acoandidate reaches the step.
Next Step
Ordering actions in the step.
Removing an Action from a StepPrerequisite
The action must be activated.
Configuration > [Recruiting] Administration > Candidate Selection Workflow > Steps tab
Steps
1. Click on a step.2. Under the Actions Usage tab, select an action.3. Click Remove.
Result
The action is no longer available for the step. An action removed is not deleted permanently,it is still available in the Actions tab and can be reused.
Reordering Actions in a StepPrerequisite
Configuration > [Recruiting] Administration > Candidate Selection Workflow > Steps tab
Steps
1. Click on an step.2. Under the Actions Usage tab, select a new position (number) in the list next to the action
name.3. Click Reorder.
Result
The list is updated to reflect the new order of the actions. Actions will be carried out in thespecified order in the step.
Making Comments Mandatory for an ActionPrerequisite
Configuration > [Recruiting] Administration > Candidate Selection Workflow > Steps tab
Steps
1. Click on an action.

Candidate Selection Workflow Action
Configuration Guide Taleo 10 SP2 - Recruiting 207
2. Select Make comment mandatory.3. Click Done.
Result
In the Actions page, a check mark appears in the Comment Mandatory column next to theaction and users will need to provide a comment for this action.

Candidate Selection Workflow Qualifier
Configuration Guide Taleo 10 SP2 - Recruiting 208
Qualifier
Qualifier and Qualifier GroupA qualifier is a reason linked to a status for rejecting a candidate or for explaining why acandidate declined a job offer.
Qualifiers are reasons for rejecting a candidate or for explaining why a candidate declined ajob offer. Qualifiers are created by the system administrator and linked to the Has declined andRejected statuses. Qualifiers provide additional information needed to move a candidate in acandidate selection workflow or to change the status of a candidate.
When users change the status of a candidate to Has declined or Rejected, the qualifiersdisplayed will vary depending on the statuses linked to the steps chosen for the selectedcandidate selection workflow.
For example, a candidate may have declined a job for personal reasons, because he/shedoes not want to relocate, or because he/she has accepted another position. In this case thequalifiers could be:• Not willing to relocate• Not willing to travel• Feels that salary is insufficient• No reason given• etc.A qualifier group is a set of qualifiers created by the system administrator. Instead of linkingone qualifier to a status, the system administrator can link a group of qualifiers.
Creating a QualifierPrerequisite
Configuration > [Recruiting] Administration > Candidate Selection Workflow > Qualifierstab
Steps1. Click New...2. Complete fields as required.3. Click Done.Result
The qualifier appears in the Qualifiers page.
Deleting a QualifierPrerequisite
The qualifier must be deactivated.
The qualifier must not be used in a candidate selection workflow.
Candidate Selection Workflow Qualifier
Configuration Guide Taleo 10 SP2 - Recruiting 209
Configuration > [Recruiting] Administration > Candidate Selection Workflow > Qualifiers
Steps
1. Select a qualifier.2. Click .
Result
The qualifier no longer appears in the list of qualifiers.
Activating a QualifierPrerequisite
The qualifier must be created.
Configuration > [Recruiting] Administration > Candidate Selection Workflow > Qualifierstab
Steps
1. Click on a Code.2. Select Available.3. Click Done.
Result
In the Qualifiers page, a check mark appears in the Available column next to the qualifier.The qualifier is available in the qualifiers list when creating a qualifier group.
Deactivating a QualifierPrerequisite
The qualifier must be active.
Configuration > [Recruiting] Administration > Candidate Selection Workflow > Qualifiers
Steps
1. Click on a qualifier.2. Clear the Available check box.3. Click Done.
Result
In the Qualifiers page, a check mark no longer appears in the Available column next tothe qualifier. The qualifier is no longer available for selection when adding a qualifier to aqualifier group.
Creating a Qualifier GroupPrerequisite
Configuration > [Recruiting] Administration > Candidate Selection Workflow > QualifierGroups

Candidate Selection Workflow Qualifier
Configuration Guide Taleo 10 SP2 - Recruiting 210
Steps
1. Click New...2. Complete fields as required.3. Click Add to add an existing qualifier or New to create a new qualifier.4. Select at least one qualifier.5. Click Done.
Result
The qualifier group appears in the Qualifier Groups page. Users have a mean to explainwhy they moved a candidate in the candidate selection workflow or changed the status of acandidate.
Next Step
Activating a qualifier group.
Deleting a Qualifier GroupPrerequisite
Qualifier group must not be in use.
Configuration > [Recruiting] Administration > Candidate Selection Workflow > QualifierGroups
Steps
1. Select a qualifier group.2. Click .
Result
The qualifier group no longer appears in the list of qualifier groups when adding a qualifiergroup to a status.
Activating a Qualifier GroupPrerequisite
You must create a qualifier group before you can activate it.
Configuration > [Recruiting] Administration > Candidate Selection Workflow > QualifierGroups tab
Steps
1. Click on a qualifier group.2. Select Available.3. Click Done.
Result
In the Qualifier Groups page, a check mark appears in the Available column next to thequalifier group. The qualifier group is available in the Add Qualifiers Group list whencreating a status.
Candidate Selection Workflow Qualifier
Configuration Guide Taleo 10 SP2 - Recruiting 211
Deactivating a Qualifier GroupPrerequisite
A qualifier group must be active in order to deactivate it.
Configuration > [Recruiting] Administration > Candidate Selection Workflow > QualifierGroups
Steps1. Click on a qualifier group.2. Clear the Available check box.3. Click Done.Result
In the Qualifier Groups page, a check mark no longer appear in the Available column nextto the qualifier group. The qualifier group is no longer available for selection when creatinga status.
Adding a Qualifier to a Qualifier GroupPrerequisite
The qualifier must be activated.
Configuration > [Recruiting] Administration > Candidate Selection Workflow > QualifierGroups
Steps1. Click on a qualifier group.2. Click Add...3. Select a qualifier.4. Click Add.
Removing a Qualifier from a Qualifier GroupPrerequisite
The qualifier group must not be used.
Configuration > [Recruiting] Administration > Candidate Selection Workflow > QualifierGroups
Steps1. Click on a qualifier group.2. In the Qualifiers list, select a qualifier.3. Click Remove.Result
The qualifier is no longer included in the qualifier group. A qualifier removed from aqualifier group is not deleted permanently; it is still available in the Qualifiers page and canbe reused.

Candidate Selection Workflow Qualifier
Configuration Guide Taleo 10 SP2 - Recruiting 212
Ordering Qualifiers in a Qualifier GroupPrerequisite
A qualifier group must include more than one qualifier.
Configuration > [Recruiting] Administration > Candidate Selection Workflow > QualifierGroups
Steps
1. Click on a qualifier group.2. In the Qualifier list, select a new position (number) for a qualifier.3. Click Reorder.
Result
The qualifiers in the qualifier group are ordered as specified.
Adding a Qualifier Group to a StatusPrerequisite
The qualifier group must be activated in order to add it to the status.
Configuration > [Recruiting] Administration > Candidate Selection Workflow > Statuses
Steps
1. Click on a status.2. Click Add...3. Select a qualifier group.4. Click Add.
Result
The specific qualifier group is available to users when modifying the status of a candidate.
Removing a Qualifier Group from a StatusPrerequisite
The qualifier group must not be used.
Configuration > [Recruiting] Administration > Candidate Selection Workflow > Statuses
Steps
1. Click on a status.2. Select a qualifier group.3. Click Remove.
Result
The qualifier group is no longer linked to the status. A qualifier removed from a status is notdeleted permanently; it is still available in the Qualifier Groups page and can be reused.
Candidate Selection Workflow Qualifier
Configuration Guide Taleo 10 SP2 - Recruiting 213
Ordering Qualifier Groups in a StatusPrerequisite
Qualifier groups must be included in the status.
Configuration > [Recruiting] Administration > Candidate Selection Workflow > Statusestab
Steps
1. Click on a status.2. In the Qualifier Groups list, select a new position (number) for a qualifier group.3. Click Reorder.
Result
The qualifier groups in the status are reordered as specified.

Candidate Selection Workflow Phase
Configuration Guide Taleo 10 SP2 - Recruiting 214
Phase
PhaseA phase is a configured parameter for an action performed during the candidate selectionworkflow.
Phases are available in a candidate selection workflow only if phases are integrated to aservice. Therefore, not all services have phases that can be configured in a candidate selectionworkflow.
If phases are available for a service, the system administrator will be able to create phases andconfigure them.
Example:
The phase allows the system administrator to associate the workflow, step and status thatwill trigger a follow-up appointment and further configure which appointment invitation willbe distributed. A requisition can include up to ten phases. However, to avoid confusion, itis recommended to use only two or three phases per requisition. The appropriate invitationwill be automatically sent based on the calendar ID association selected by the user in therequisition file Screening section.
Creating a PhasePrerequisite
The Access Screening Services configuration and the Access Administration user typepermissions are required.
Configuration > [Recruiting] Administration > Selections > Large Selections tab > Customtab
Steps
1. In the Custom tab, click the elements link located on the same row as the service forwhich you are creating a phase.
2. Select New.3. Complete the fields.4. Click Done.
Result
A new phase is now available in the drop down list under phase in the CSW Action sectionof the service.
Next Step
Adding an invitation phase to a requisition.

Candidate and RequisitionSearch
• Candidate Search.............................................................................................. 216
• Requisition Search.............................................................................................. 232
• Search Queries.................................................................................................. 234
• Search Operators...............................................................................................236
• Matching Candidate and Requisition...................................................................238

Candidate and Requisition Search Candidate Search
Configuration Guide Taleo 10 SP2 - Recruiting 216
Candidate Search
Candidate Quick SearchThe candidate quick search allows users to quickly find specific candidates.
The candidate quick search is available at the top right hand corner of Taleo Recruiting pages.It is available to users if it has been configured in the user's configuration profile and if the usertype permission has been granted.
When performing a candidate quick search, the search engine searches for candidates whoapplied on a job, submitted a profile or are registered but did not apply on a job (that is aperson who referred a friend for a job and who had to register himself/herself as a new user).
The candidate quick search allows users to search information in the following fields:
• first name• last name• e-mail address• candidate identification number (you must use at least three numbers of the total
identification number or more, otherwise the search will not work)
If users have not been granted the permission to access candidate identification information,only a search with the candidate identification number is allowed.
When performing a candidate search, users can enter partial (either the first or last name) orcomplete names in the field. However, a best practice is to enter complete names to obtainmore exact results.
Users can also perform a search with a middle initial if they know the person's full name(example: Sam P Jones). If searching for someone who's first name contains initials, werecommend entering just the initials (example: Jr. will give you the following results: Jr., j.r., orJR).
If looking for someone who hyphenate's his/her name, it is not required to enter both names.Let’s say Smith-Jones is the name you are looking for. Entering Smith, Jones, Smith spaceJones or Smith-Jones, will bring back Smith-Jones.
The candidate quick search searches for all the search terms in all five fields. For this reason,the specific candidate search often produces search results that are more relevant than thosegenerated by the candidate quick search.
Configuration
The search tool is displayed to users if they have been granted the following user typepermission and if the Search Widget was enabled.

Candidate and Requisition Search Candidate Search
Configuration Guide Taleo 10 SP2 - Recruiting 217
User Type Permission
Name Location
Access candidate Quick and Specific search Configuration > [SmartOrg] Administration > User Types >Recruiting > Search
Setting
Name Possible Values Default Value Location
Search Widget• No
• Yes
Yes Configuration > [SmartOrg]Administration > ConfigurationProfile
If users were NOT granted the following permission, the system will only search against thecandidate identification number field.
User Type Permission
Name Location
Access candidate identification and contactinformation
Configuration > [SmartOrg] Administration > User Types >Requisitions > Candidates
The amount of candidates displayed in the search results list is set by the following privatesetting. Contact Taleo for more information.
Setting
Name Possible Values Default Value Location
Quick Search Candidate Pool Size Configuration > [Recruiting] Settings
The list format used to display search results is the Search Results / Quick search list format forthe variation defined in the user's configuration profile.
Important Note: (ID 174) The candidate quick search allows users to search informationin the following fields: first name, last name, email address and candidate ID. If you do notwant these fields to be visible to certain users, you must not give them access to the candidatequick search. Otherwise, they will be able to search and retrieve candidate files. Note that thefield security level continues to apply in the candidates list. If a user does not have a viewingpermission for some fields, “Confidential” will be displayed instead of the data used in thesearch.
Specific Candidate SearchThe specific candidate search can be considered to be an extension of the candidate quicksearch in that it offers greater searching precision.
The specific candidate search is available at the top right hand corner of Taleo Recruitingpages. It is available to users if it has been configured in the user's configuration profile and ifthe user type permission has been granted.
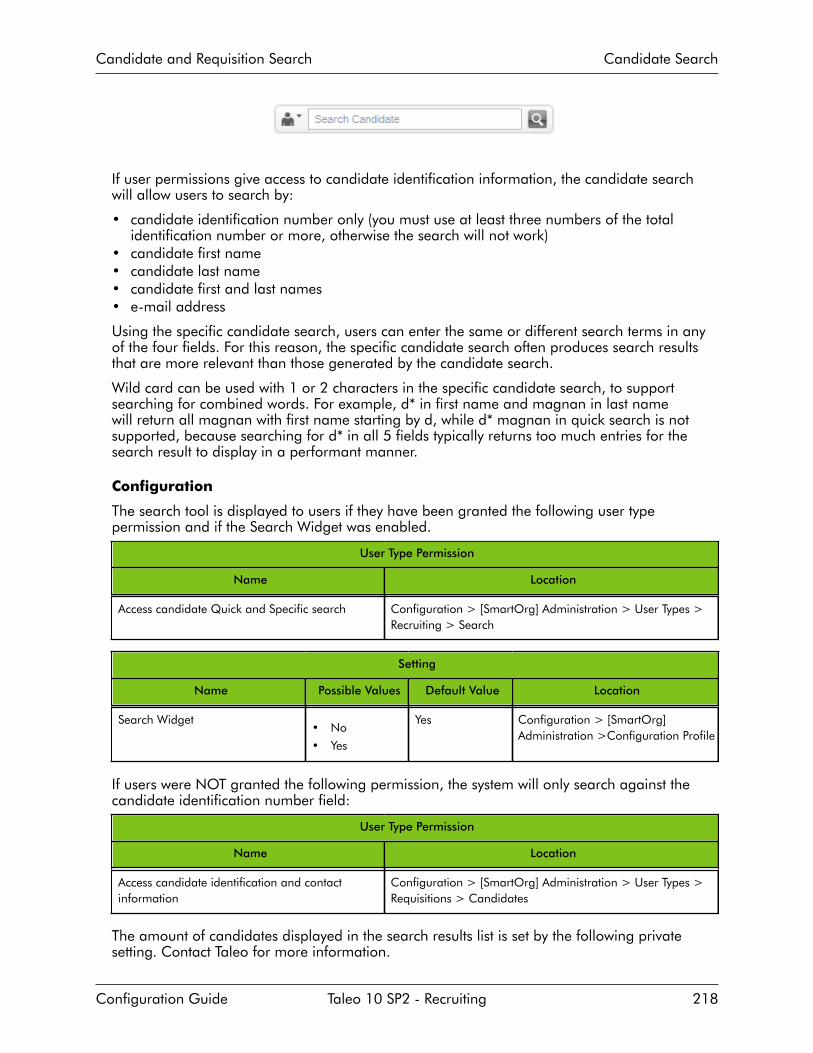
Candidate and Requisition Search Candidate Search
Configuration Guide Taleo 10 SP2 - Recruiting 218
If user permissions give access to candidate identification information, the candidate searchwill allow users to search by:
• candidate identification number only (you must use at least three numbers of the totalidentification number or more, otherwise the search will not work)
• candidate first name• candidate last name• candidate first and last names• e-mail address
Using the specific candidate search, users can enter the same or different search terms in anyof the four fields. For this reason, the specific candidate search often produces search resultsthat are more relevant than those generated by the candidate search.
Wild card can be used with 1 or 2 characters in the specific candidate search, to supportsearching for combined words. For example, d* in first name and magnan in last namewill return all magnan with first name starting by d, while d* magnan in quick search is notsupported, because searching for d* in all 5 fields typically returns too much entries for thesearch result to display in a performant manner.
Configuration
The search tool is displayed to users if they have been granted the following user typepermission and if the Search Widget was enabled.
User Type Permission
Name Location
Access candidate Quick and Specific search Configuration > [SmartOrg] Administration > User Types >Recruiting > Search
Setting
Name Possible Values Default Value Location
Search Widget• No
• Yes
Yes Configuration > [SmartOrg]Administration >Configuration Profile
If users were NOT granted the following permission, the system will only search against thecandidate identification number field:
User Type Permission
Name Location
Access candidate identification and contactinformation
Configuration > [SmartOrg] Administration > User Types >Requisitions > Candidates
The amount of candidates displayed in the search results list is set by the following privatesetting. Contact Taleo for more information.
Candidate and Requisition Search Candidate Search
Configuration Guide Taleo 10 SP2 - Recruiting 219
Setting
Name Possible Values Default Value Location
Quick Search Candidate Pool Size Configuration > [Recruiting] Settings
The list format used to display search results is the Search Results / Quick search list format forthe variation defined in the user's configuration profile.
Displaying the Candidate Quick Search and SpecificSearch
Prerequisite
Configuration > [SmartOrg] Administration > Configuration Profiles
Steps
1. Select a configuration profile.2. Click Search Widget.3. Click Edit.4. Select Yes.5. Click Save.
Giving Access to the Candidate Quick Search and SpecificSearch
Prerequisite
Configuration > [SmartOrg] Administration > User Types
Steps
1. Select a user type.2. Click Recruiting.3. Click Edit next to Search.4. Select the Access candidate Quick and Specific search permission.5. Click Save.
Giving Access to Candidate Information During a SearchPrerequisite
Configuration > [SmartOrg] Administration > User Types
Steps
1. Select a user type.2. Click Recruiting.3. Click Edit next to Candidates.4. Select the Access candidate identification and contact information permission.
Candidate and Requisition Search Candidate Search
Configuration Guide Taleo 10 SP2 - Recruiting 220
5. Click Save.
Result
If users were granted the permission, they can search candidates by:
• candidate user name• candidate first name• candidate last name• candidate first and last names• candidate e-mail address• candidate identification number only (you must use at least three numbers of the total
identification number or more, otherwise the search will not work)
If users were not granted the permission, only a search with the candidate identificationnumber is allowed.
Advanced SearchThe advanced search allows users to search for candidate files using an array of criteria thatare different than the ones used in the quick search function.
The advanced search is available at the top right hand corner of Taleo Recruiting pages. It isavailable to users if it has configured in the user's configuration profile and if the user typepermission has been granted.
When performing an advanced search, the more you add search criteria, the narrower thescope of your search will be, typically resulting in fewer but more pertinent results. By addingmultiple occurrences of the same criteria, you broaden the scope of your search, typicallyresulting in more search results.
A best practice is to start your advanced search with only a few criteria, and to then narrowyour search down by going back to your search query and entering one or more additionalsearch criteria. Your search results will then contain fewer candidates. It is simpler and moreefficient to start with a general search and narrow down the results to a manageable candidatepool than to start with a tightly defined narrow search and then need to broaden the search inorder to obtain a viable candidate pool.
By default, the following search criteria are included in the advanced search form:
• Keywords• External/Internal Candidate• Last Update• Place of Residence• Disqualified Candidate
A user type permission allows you to add other search criteria provided they were madeavailable by the system administrator. The system administrator can also define differentdefault pages.
For many search fields, you can specify an additional criterion:
• Required: Only candidates with that criterion are retrieved.• Excluded: Candidates with that criterion are excluded.• Desired: Candidates with that criterion are considered more relevant than those without the
criterion.
Example of an advanced search.

Candidate and Requisition Search Candidate Search
Configuration Guide Taleo 10 SP2 - Recruiting 221
Field Value
Disqualified Candidate Excluded.
Place of Residence Within 25 miles of location; US > FL > Jacksonville.Required.
Preferred Job Category: Technology; Function: Network Engineering.Required.
Preferred Job Category: Technology; Function: System Administration.Required.
Education Program: Computer Engineering; Education Level:Bachelor’s Degree
After running the above search, the search engine would return the following candidates:• Candidates who had not been disqualified, AND• Candidates who lived within 25 miles of Jacksonville, Florida, AND• Candidates who had indicated a preference for work in network engineering or system
administration, AND• Candidates without any job field, AND• Candidates who had a Bachelor's degree in computer engineering.The search engine can retrieve any number of candidate files although, for performance andmanagement reasons, only 300 are displayed. By default, we suggest to display the top 300 byrelevancy.
Configuration
The advanced search is displayed to users if they have been granted the following user typepermission and if the advanced search link was enabled.
User Type Permission
Name Location
Access advanced search Configuration > [SmartOrg] Administration > User Types >Recruiting > Search
Setting
Name Possible Values Default Value Location
Advanced Search Links• No
• Yes
Yes Configuration > [SmartOrg]Administration >Configuration Profile
Other permissions related to the advanced search are available in the Recruiting / Searchfunctional domain.
User Type Permissions
Name Location
Advanced search user type permissions aregrouped under Recruiting / Search.
Configuration > [SmartOrg] Administration > User Types >Recruiting > Search
Other settings related to the advanced search are available in the Recruiting settings.

Candidate and Requisition Search Candidate Search
Configuration Guide Taleo 10 SP2 - Recruiting 222
Settings
Name Possible Values Default Value Location
Advanced search settings areavailable under Recruting settings.A keyword seach with the word“Search” is the fastest way to viewthe settings.
Configuration > [Recruiting] Settings
The list format used to display search results is the Search Results / Advanced search list formatfor the variation defined in the user's configuration profile.
Displaying the Advanced Search LinkPrerequisite
Configuration > [SmartOrg] Administration > Configuration Profiles
Steps1. Select a configuration profile.2. Click Advanced Search Links.3. Click Edit.4. Select Yes.5. Click Save.
Giving Access to the Advanced Candidate SearchPrerequisite
Configuration > [SmartOrg] Administration > User Types
Steps1. Select a user type.2. Click Recruiting.3. Click Edit next to Search.4. Select the Access advanced search permission.5. Click Save.
Conceptual SearchConceptual search is an alternative way to search candidate files that broadens the searchresult by including documents that are similar based on concepts and proximities. The retrieveddocuments do not need to contain everything entered as search criteria, only related concepts.
Once the conceptual search is activated, the system administrator can control which users willhave access to conceptual search by granting them a user type permission. Please note: evenif customers have not activated the conceptual search, they will have the user type permissionavailable in their list of permissions but the permission has no function until the module isactivated by Taleo.
The conceptual search is available via the advanced search. When selecting the Conceptualoption, users must enter significant text in the Keywords text box like a job description or a

Candidate and Requisition Search Candidate Search
Configuration Guide Taleo 10 SP2 - Recruiting 223
paragraph describing the ideal candidate. On top of that, users can increase the conceptualsearch with any specific fielded search criteria made available to them. This provides thepossibility to mine the database on various concepts to find interesting candidates, but alsorestricts the result with more precise criteria, which was not available before.
The conceptual search is an extension of the related term search, where instead of findingvariations of entered words, the system automatically finds the right concepts to search forbased on the text provided and then broaden its search.
The conceptual search allows users to use large blocks of text (typically from a candidate'sresume or a job description) to search for candidates. Conceptual search is typically the besttool to use when searching for candidates with a minimum amount of structured fields. Thistool can be used when viewing a relatively large amount of text regarding particular sections ofa candidate's resume such as experience and education, or a job description and a user wantsto know if there are other candidates whose records contain similar information.
The conceptual search uses mathematical algorithms to assign a weight to each word in ablock of data with the exception of stop words—conjunctions, prepositions, articles and otherwords that are not key to searches—taking into account the other words in the text and theirrelationships with each other. It then searches for candidate files that contain similar text-basedinformation.
The conceptual search looks for patterns in text with a special algorithm and figures out thesubject of the text while the advanced search is looking for exact matches with exact fieldvalues. The conceptual search is designed to recognize themes and concepts based on yourinput. For example, searching with an interesting candidate's academic background generallygives better results than searching with the candidate's academic background and personalinformation such as address.
The conceptual search cannot retrieve disqualified candidates because they are not indexed inthe database.
Configuration
The conceptual search is displayed to users if they have been granted the following user typepermissions and if the advanced search link and conceptual search option were enabled.
User Type Permissions
Name Location
Access advanced search Configuration > [SmartOrg] Administration > User Types >Recruiting > Search
Access conceptual search option of the advancedsearch
Configuration > [SmartOrg] Administration > User Types >Recruiting > Search
Settings
Name Possible Values Default Value Location
Advanced Search Links• No
• Yes
Yes Configuration > [SmartOrg]Administration >Configuration Profile
Conceptual Search Activation• No
• Yes
Yes Configuration > [Recruiting] Settings
Candidate and Requisition Search Candidate Search
Configuration Guide Taleo 10 SP2 - Recruiting 224
Other permissions related to the advanced search are available in the Recruiting / Searchfunctional domain.
User Type Permissions
Name Location
Advanced search user type permissions aregrouped under Recruiting / Search.
Configuration > [SmartOrg] Administration > User Types >Recruiting > Search
Other settings related to the advanced search are availble in the Recruiting settings.
Settings
Name Possible Values Default Value Location
Advanced search settings areavailable under Recruting settings.A keyword seach with the word“Search” is the fastest way to viewthe settings.
Configuration > [Recruiting] Settings
The list format used to display search results is the Search Results / Advanced search list formatfor the variation defined in the user's configuration profile.
Displaying the Conceptual SearchPrerequisite
To enable the Conceptual Search Activation private setting, contact Taleo.
Configuration > [SmartOrg] Administration > Configuration Profiles
Steps
1. Select a configuration profile.2. Click Advanced Search Links.3. Click Edit.4. Select Yes.5. Click Save.
Giving Access to the Conceptual SearchPrerequisite
Configuration > [SmartOrg] Administration > User Types
Steps
1. Select a user type.2. Click Recruiting.3. Click Edit next to Search.4. Select the Access conceptual search option of the advanced search permission.5. Click Save.6. Select the Access advanced search permission.

Candidate and Requisition Search Candidate Search
Configuration Guide Taleo 10 SP2 - Recruiting 225
7. Click Save.
Advanced Candidate Search PageAllows a system administrator to select search criteria that will be available to users whenperforming an advanced candidate search in Taleo Recruiting.
The Candidate Search Page feature provides a list of fields that can be used as search criteria.The system administrator selects the fields that he/she wants to make available to userswhen performing an advanced candidate search. By default, the following search criteria areincluded in the advanced candidate search form:• Keywords• External/Internal Candidate• Last Update• Place of Residence• Disqualified CandidateFor a field to appear in the list of available fields (search criteria), the field must be configuredas such, that is the Candidate Search option must be selected when defining the properties of afield (Recruiting Administration Menu > Fields).
The system administrator has the ability to define for each available configuration profile, thefields that will be available in the Advanced Search page used to customize a search queryin Recruiting. Therefore, depending on the selections made by the system administrator foreach configuration profile, the fields displayed to users linked to different configuration profileswill differ. If the system administrator did not configure a specific selection of fields for a givenconfiguration profile, or if a user is not linked to a configuration profile, then only the defaultset of fields will be available in Taleo Recruiting when customizing a search query.
Important Note: (ID 280) When configuring the advanced candidate search page, be sureto only include fields in the form that you want users to use. If users have the permission toperform an advanced candidate search, they will have the ability to use any fields that you haveincluded in the form regardless of viewing permissions for the fields. When search results aredisplayed, if users are not allowed to view internal and/or external candidates, the field willappear in the list if the column is present and the word "Confidential" will appear instead of thedata in situations where users cannot view the data.
Customizing the Advanced Candidate Search PagePrerequisite
The Candidate Search option displayed in the Properties page of a field must be selected forthe field to appear in the Available Fields list.
When configuring the advanced candidate search page, be sure to only include fields inthe form that you want users to use. If a user has the permission to perform an advancedcandidate search, he/she will have the ability to use any fields that you have included in theform regardless of viewing permissions for the fields. When search results are displayed, ifthe user is not allowed to view internal and/or external candidates, the field will appear inthe list if the column is present and the word "Confidential" will appear instead of the data insituations where the user cannot view the data
Configuration > [Recruiting] Administration > Candidate Search Page
Candidate and Requisition Search Candidate Search
Configuration Guide Taleo 10 SP2 - Recruiting 226
Steps1. Select a field in the Available Fields list.2. Click Add.3. Click Save.Result
The field appears in the Selected Fields list. It is available to users when customizing theadvanced candidate search form provided they have access to the advanced search.
Identifying a Field as a Search CriterionPrerequisite
Configuration > [Recruiting] Administration
Steps1. Click on a field category.2. Click on a field.3. Click Edit next to Properties.4. Select the Candidate Search option.5. Click Save.Result
In the Fields list, Candidate Search appears in the Availability column. The field is alsoavailable in the Candidate Search Page feature.
Next Step
Customizing the advanced candidate search form.
Why Advanced Search is not Displaying Expected ResultsCertain elements could have an impact on advanced search results.
Segmentation: In a global environment, data segmentation, if activated, might exclude a lotof candidates from the search results. Make sure to verify if your company has introduced suchrestrictions and if this is the case, verify the impact and what, as a user, you are entitled to view.There are two dimensions to data segmentation: a permission per user type whereby whatusers can view is determined by their respective staffing type; and a recruiting setting allowsusers to indicate if candidate search results are restricted based on the search domains of eachuser's groups and personal coverage areas. A user This is probably the most complex case tovalidate. While it might be easy to manage only a few groups around specific organizations,segmentation can be difficult to clearly understand if users are associated with multiple groupsincorporating various organizations, locations and job fields
Incomplete applications: There are a significant number of candidates who never completetheir applications for various reasons. An incomplete general application might not beretrieved in a search result if the system configuration excludes their applications. Note that upto 30% of candidates might not have completed their application. An interesting alternativeto not displaying such candidates is to display them but to use the “incomplete application”column (to do so, activate the Complete Application Indicator column in the List FormatConfiguration window and look at the candidate files that have no checkmark in this column).Remember that the “incomplete application” flag refers to the online application process, notto the completeness of the candidate file. You might have detailed candidate files with a lot

Candidate and Requisition Search Candidate Search
Configuration Guide Taleo 10 SP2 - Recruiting 227
of information not displayed because the candidates didn’t complete the application processonline. On the other hand, you might have partial candidate files, that were captured orimported and whose basic information has the “complete” flag, even if only few fields werecaptured.
The incomplete application setting is an internal one, which can be activated only through aservice request. It is important that you know if your organization has them displayed or notbecause thousands of candidates might remain in an incomplete state and never be retrievedby the search engine.
Identification missing: ”Identification missing” candidates are candidate files without firstand last name and without the official “anonymous” flag. The name of the candidate does notappear; instead ”Identification missing” is displayed. Ask your system administrator if he/shehas activated the Display Identification Missing Candidates setting.
Excluding candidates in selection process: Candidates who are in a selection processassociated with an open requisition can be excluded from search results. Ask your systemadministrator if he/she has activated the Candidate Search Mask Processed setting.
Excluding candidates in selection process who have attained or proceededbeyond a specific status: The Search Most Advanced Submission Status setting works intandem with the Allow users to recruit candidates being considered in other active requisitionsuser type permission to prevent competitive recruiting. This setting sets the status from whichthe system is to stop showing candidates. If the candidate has attained or proceeded beyondthe selected status in one of its submissions, the candidate will no longer be displayed in thesearch results. This prevents users from matching these candidates to additional requisitionsand inviting them to apply for multiple positions. Ask your system administrator if he/she hasactivated that setting and user permission.
Matching the place of residence: By default, when a user searches for candidatesassociated with a specific place of residence, the system retrieves candidates associated witha “higher” location in addition to the specific location (place of residence). When the SearchPlace of Residence Match Activation setting is turned on, only exact matches are retrieved. It isrecommended that you include “higher” levels (country and state/province) because even if intheory candidates do have all levels (down to region), some might not. Exceptions are:
• If the place of residence field is not mandatory (usually only optional in capture candidate orthrough import).
• If it is a new country. Taleo place of residence locations, which are centrally managed,increase in number as customers request that specific new countries be included. Taleohad numerous countries without states or regions in the past and started to add into thedatabase such countries’ regions on a customer-by-customer basis. Some candidates neverhad the opportunity to select a 2nd or 3rd level so it is important that they are not excludedby default when a search is performed.
The number of exceptions should be less than the number of candidates with an exact matchand Taleo feels it is fair to retrieve those candidates who never had the opportunity to indicatetheir structured place of residence. Some Taleo clients might want to change this settinghowever.
Randomized Search ResultThe randomized search result feature allows users to specify that the information contained inthe advanced search result list be returned in random order.
Randomized search means that candidates displayed in the advanced search result list arepicked randomly in the overall list of candidates matching search criteria.

Candidate and Requisition Search Candidate Search
Configuration Guide Taleo 10 SP2 - Recruiting 228
An advanced candidate search done with randomization will return a list of 300 candidates orless, but instead of displaying the first 300 candidates, it will display any 300 of the matchingcandidates, with no predetermined priority, and will sort them based according to the sortingcriterion set for the list. Any candidate matching the search criteria can be returned. It couldbe candidate number 1, 2, 13, 57, 423, 789, etc. As soon as a candidate matches thesearch criteria, the candidate is displayed, even the least matching candidate, as long as thiscandidate meets the mandatory criteria. No pattern is used; therefore, if you run the sameexact search again, the list of candidates returned will be completely different.
An advanced candidate search done without randomization will return all candidates matchingsearch criteria and display the first 300 candidates or less, based on the number of returnedcandidates in the candidate list. The first 300 candidates will be displayed based on relevancybut sorted on the list definition. Thus it is always the same set of candidates, but sorteddifferently. If required criteria are used instead of relevancy then the 300 returned candidatesto work with are all valid candidates and are not displayed in a particular order.
Configuration
The following setting must be enabled to allow users to randomize search results.
Setting
Name Possible Values Default Value Location
Search Randomize Enabled• No
• Yes
Yes Configuration > [Recruiting] Settings
Search Result ArchivingThe search result archiving feature allows users to select the requisition for which they want toarchive search criteria and results.
The search result archiving feature was introduced for U.S. clients in order to comply witha regulation of the Office of Federal Contract Compliance Programs (OFCCP) regardingthe collection of gender, race and ethnicity data for each candidate. When performing anadvanced search, search criteria and/or results are archived in the database. The informationis kept in the database for two years for audit purposes and prevents candidates from harddeletion.
When the feature is activated, all search results, even those done for requisitions outside the USwill be archived.
Configuration
The following settings must be enabled to allow users to archive search results.
Settings
Name Possible Values DefaultValue
Location
OFCCP search trace activation• Enabled (without
requisition identification)
• Disabled
• Mandatory (withoutrequisition identification)
Disabled Configuration > [Recruiting]Settings

Candidate and Requisition Search Candidate Search
Configuration Guide Taleo 10 SP2 - Recruiting 229
Settings
Name Possible Values DefaultValue
Location
• Optional (withrequisition identification
OFCCP search trace candidateIDs activation
• Yes
• No
No Configuration > [Recruiting] Setting
General Profile SearchIt is possible to return search results of candidates who have only submitted a general profilebut have not yet applied on any specific requisition.
When this feature is enabled, users may add the “Exclude candidates who applied onrequisitions” search criteria in the advanced search form and decide to search only forcandidates who have submitted a general profile but have not yet applied for a specificposition. This feature helps to ensure candidates who do not apply for a specific job are alsoconsidered.
Configuration
This feature is available by default but must be implemented before it is visible to users. Thefollowing elements must be configured.
You must enable the Exclude candidates owned by agencies field in the advanced search form(Configuration > [Recruiting] Administration > Candidate Search Page).
The following permission must be granted to users.
User Type Permission
Name Location
Allow users to use the field to exclude candidateswho applied on requisitions
Configuration > [SmartOrg] Administration > User Types >Recruiting > Search
The advanced search feature is also required. The advanced search is displayed to users ifthey have been granted the following user type permission and if the advanced search link wasenabled.
User Type Permission
Name Location
Access advanced search Configuration > [SmartOrg] Administration > User Types >Recruiting > Search
Setting
Name Possible Values Default Value Location
Advanced Search Links• No
Yes Configuration > [SmartOrg]Administration >Configuration Profile

Candidate and Requisition Search Candidate Search
Configuration Guide Taleo 10 SP2 - Recruiting 230
Setting
Name Possible Values Default Value Location
• Yes
Exclusion of Agency Owned Candidates in Search ResultsAgency owned candidates can be excluded from candidate search results.
When this feature is enabled, users may add the “Exclude candidates owned by agencies”search criteria in the advanced search form and decide to include or not agency ownedcandidates in search results.
Benefits
• Recruiters and hiring managers have a much more efficient experience as they no longerneed to manually go through candidate files to make sure they are not off limits based onagency ownership agreements.
• Clients can more confidently manage agency agreements and expenses.• Provides extended configurability when using agencies for candidate referrals.• Provides reduced risk of unknowingly incurring agency costs.
Configuration
This feature is available by default but must be implemented before it is visible to users. Thefollowing elements must be configured.
You must add the Exclude candidates who applied on requisitions field in the advanced searchform (Configuration > [Recruiting] Administration > Candidate Search Page).
You must grant the following permission to users.
User Type Permissions
Name Location
Allow users to use the field to exclude candidatesowned by agencies
Configuration > [SmartOrg] Administration > User Types >Recruiting > Search
The advanced search feature is also required. The advanced search is displayed to users ifthey have been granted the following user type permission and if the advanced search link wasenabled.
User Type Permission
Name Location
Access advanced search Configuration > [SmartOrg] Administration > User Types >Recruiting > Search
Setting
Name Possible Values Default Value Location
Advanced Search Links• No
Yes Configuration > [SmartOrg]Administration >Configuration Profile

Candidate and Requisition Search Candidate Search
Configuration Guide Taleo 10 SP2 - Recruiting 231
Setting
Name Possible Values Default Value Location
• Yes
Excluding Agency Owned Candidates in Search ResultsPrerequisite
The Advanced Search Links setting must be activated in the SmartOrg Configuration Profilesfeature.
The Access advanced search user type permission must be granted.
Add the Exclude candidates owned by agencies field in the advanced search form.
Configuration > [SmartOrg] Administration > User Types > Recruiting
Steps
1. Click Edit next to Search.2. Select Allow users to exclude candidate owned by agencies.3. Click Save.
Result
The Exclude candidates owned by agencies search criteria is available in the advancedsearch form allowing users to exclude agency owned candidates in search results whenperforming a candidate advanced search.
Excluding Candidates with Specific Statuses from SearchResults
Prerequisite
Configuration > [Recruiting] Settings
Steps
1. Open the Threshold CSW Step - Hide from Search setting.2. Select a threshold step in the Value field.3. Click Save.
Result
The above setting works in conjunction with the Allow users to view candidates that are beingconsidered in other active requisitions user type permission. If the candidate has reached theselected status, the candidate will no longer be displayed in the search results, based on thepermission of the user type.
Next Step
Grant the Allow users to view candidates that are being considered in other activerequisitions user type permission.

Candidate and Requisition Search Requisition Search
Configuration Guide Taleo 10 SP2 - Recruiting 232
Requisition Search
Requisition Quick SearchThe requisition search allows users to quickly find specific requisitions.
The requisition quick search is available at the top right hand corner of Taleo Recruiting pages.It is available to users if it has been configured in the user's configuration profile and if the usertype permission has been granted.
The requisition quick search allow users to enter the title, the number or a keyword to find thedesired requisition. A wildcard search may also be used.
The search engine only returns results appropriate to the user's permissions and groupassociation. When performing a requisition search, the search engine looks through all thecontent of the requisition file.
For the requisition search, the system automatically applies the boolean operator AND. TheAND, OR, and NOT operators can be entered manually.
The search is not case sensitive.
For performance and management reasons, only up to 300 matching files are displayed.
Configuration
The search tool is displayed to users if they have been granted the following user typepermission and if the Search Widget was enabled:
User Type Permission
Name Location
Access requisition search Configuration > [SmartOrg] Administration > User Types >Recruiting > Search
Setting
Name Possible Values Default Value Location
Search Widget• No
• Yes
Yes Configuration > [SmartOrg]Administration >Configuration Profile
The list format used to display search results is the Search Results / Quick search list format forthe variation defined in the user's configuration profile.

Candidate and Requisition Search Requisition Search
Configuration Guide Taleo 10 SP2 - Recruiting 233
Displaying the Requisition Quick SearchPrerequisite
Configuration > [SmartOrg] Administration > Configuration Profiles
Steps
1. Select a configuration profile.2. Click Search Widget.3. Click Edit.4. Select Yes.5. Click Save.
Giving Access to the Requisition SearchPrerequisite
Configuration > [SmartOrg] Administration > User Types
Steps
1. Select a user type.2. Click Recruiting.3. Click Edit next to Search.4. Select the Access requisition search permission.5. Click Save.

Candidate and Requisition Search Search Queries
Configuration Guide Taleo 10 SP2 - Recruiting 234
Search Queries
Search QueryA search query is an advanced candidate search that has been saved in order to be usedrepetitively and potentially shared with other users.
A search query is a set of search criteria selected by the user to perform an advancedcandidate search. Each time an advanced search is performed, a search query can be created.A search query can be used as a basis for future searches and can be changed to narrow orbroaden search results when needed.
The search query feature is available at the top right hand corner of Taleo Recruiting pages.It is displayed to users if it has been activated in the user's configuration profile. Users cansave a Query if the feature is activated in the user’s configuration profile and if the user typepermission has been granted. The fields that can be selected in Taleo Recruiting to customizea search query are set by the system administrator for each configuration profile. If a user isnot linked to a configuration profile or is linked to a configuration profile for which the systemadministrator has not selected additional fields, then only the set of default fields are displayedwhen customizing a search query in Taleo Recruiting.#
Two types of queries can be created:• Personal search queries will remain available only to the user that created the query.• Shared search queries are queries that are made available to selected users.
Benefits• Saves time.• Allows users to repeat the same search.
Configuration
For the Save Query button to be displayed to users when creating an advanced search, thefollowing setting must be enabled.
Setting
Name Possible Values Default Value Location
Advanced Search “Save Query”button
• No
• Yes
Yes Configuration > [SmarOrg]Administration >Configuration Profile
The advanced search feature is also required. The advanced search is displayed to users ifthey have been granted the following user type permission and if the advanced search link wasenabled.
User Type Permission
Name Location
Access advanced search Configuration > [SmartOrg] Administration > User Types >Recruiting > Search

Candidate and Requisition Search Search Queries
Configuration Guide Taleo 10 SP2 - Recruiting 235
Setting
Name Possible Values Default Value Location
Advanced Search Links• No
• Yes
Yes Configuration > [SmartOrg]Administration >Configuration Profile
Other permissions related to the advanced search are available in the Recruiting / Searchfunctional domain.
User Type Permissions
Name Location
Advanced search user type permissions aregrouped under Recruiting / Search.
Configuration > [SmartOrg] Administration > User Types >Recruiting > Search
Other settings related to the advanced search are available in the Recruiting settings.
Settings
Name Possible Values Default Value Location
Advanced search settings areavailable under Recruting settings.A keyword seach with the word“Search” is the fastest way to viewthe settings.
Configuration > [Recruiting] Settings

Candidate and Requisition Search Search Operators
Configuration Guide Taleo 10 SP2 - Recruiting 236
Search Operators
Boolean Operator, Wildcard and Other SpecialCharacters
Boolean operators, wildcards and other special characters can be used when performing asearch.
Element Description
AND Place AND between search terms to search for candidate files that contain all of theterms. For example, a search for university AND librarian will retrieve candidate filesthat contained both the words university and librarian.***
OR Place OR between search terms to search for candidate files that contain at least oneof the terms. For example, a search for university OR college will retrieve candidatefiles that contained either word or both words.***
NOT Place NOT before search terms to exclude candidate files that contain the terms youspecify. For example, a search for computer NOT technician will retrieve files thatcontained the word computer but only if they did not contain the word technician.***
* (wildcard) Use the wildcard * to replace an undefined string to be searched. If using the wildcard*, at least 3 characters must be used with the *. You can place a wildcard characterwithin or at the end of a word but not at the beginning of a word. For example, asearch for comput* will retrieve all words that begin with comput such as computer,computing, computers, computation.
? (wildcard) Use the wildcard ? to replace an undefined character to be searched. You can place awildcard character within or at the end of a word but not at the beginning of a word.
" " (quotation marks) Use quotation marks to search for occurrences of an exact expression. For example, asearch for "database administrator" will retrieve candidate files that contain the exactterm database administrator with no terms or punctuation separating the two words.
( ) (parentheses) Operations enclosed in parentheses are performed before other operations. Forexample, a search query for candidates who worked as marketing or advertisingconsultants could look like the following: (market* or advertis*) and (consult*or agent or representative). The search engine would retrieve candidate files thatsatisfy the two conditions:
• Candidate files containing a word that begins with market or advertis such asmarket, markets, marketing, advertise, advertising, advertisement AND,
• Candidate files containing agent, representative, or a word beginning with consultsuch as agent, representative, consult, consults, consulting, consulted, consultant.
@ The @ character can be searched.

Candidate and Requisition Search Search Operators
Configuration Guide Taleo 10 SP2 - Recruiting 237
Element Description
Accentuated characters Accentuated characters (for example, é, à, ô, ù, etc.) are searched as not accentuatedcharacters. In other words, searching for Helene will find the word Hélène, andsearching for Hélène will find the word Helene.
*** If AND, OR, or NOT are present in the search field, the search engine assumes theyare boolean operators. The words OR, AND, or NOT cannot be searched as they are notrecognized as words but as boolean operators. Boolean operators are not recognized as astring in the search field or in the text being searched. If boolean operators are used in doublequotes, they are ignored.
Neither search terms, nor operators are case-sensitive.
If using boolean operators and simply entering a number of words, files that contain all of theterms are retrieved.

Candidate and Requisition Search Matching Candidate and Requisition
Configuration Guide Taleo 10 SP2 - Recruiting 238
Matching Candidate and Requisition
Candidate Matching to a RequisitionThis feature allows users to select one or several candidate files and to match them to one orseveral requisition files.
The matching action is available via this icon and can be performed from a candidate list orfrom within a candidate file.
Basically, a user selects a candidate file, clicks and the system presents a list of requisitions.Requisitions are displayed by the system if they match the default matching requisition criteriaset by the system administrator. However, these default criteria can be modified by the userto find more relevant requisitions for a particular candidate. This is done by selecting theMatching Requisitions option and clicking this icon both available in the Match Candidatesto Requisitions window. Once a candidate has been matched to a requisition, the user candecide to send an e-mail to the candidate to inform him/her that a match has been doneand to obtain more information on his/her application. E-mails are sent only for postedrequisitions, to avoid inviting candidates to requisitions they cannot see on the career section.Benefits• This feature is useful if, for example, a recruiter has found an interesting candidate who is
not the best fit for the position they applied to. However, the recruiter believes there may beother openings that would be a better fit for this candidate's experience and skills.
Configuration
To match candidates to a requisition, users must be granted the following permission.
User Type Permission
Name Location
Match candidates to requisitions Configuration > [SmartOrg] Administration > User Types >Recruiting > Search
Matching requisition criteria are configured in the Recruiting Administration menu.
Matching Requisition CriteriaMatching requisition criteria are used to find a match between a candidate file and requisitionfile.
Default matching requisition criteria are set by the system administrator. However, thesedefault criteria can be modified by the user to find more relevant requisitions for a particularcandidate. Matching criteria are:• Preferred Jobs and Job• Preferred Locations and Locations• Preferred Organizations and Organization• Place of residence and Location• Competencies

Candidate and Requisition Search Matching Candidate and Requisition
Configuration Guide Taleo 10 SP2 - Recruiting 239
• Questions• Job Level• Job Type• Schedule• Shift• Employee Status• Education Level• Travel• Minimum Annual SalaryMatching criteria (except for competencies and questions) can be set as desired or required:• Required: The criterion is mandatory. A match must exist between the content of the
candidate file and of the requisition file. If a requisition file meets the criterion, it will appearin the list of requisitions presented to the user.
• Desired: The criterion is an asset. A match is not required between the content of thecandidate file and of the requisition file. Desired criteria are considered as a plus. Arequisition file that does not match a desired criterion is not rejected.
Requisition files that meet all the required criteria and that also meet some desired criteria willappear at the top of the requisitions list presented to the user.
Competencies and questions criteria are considered as wildcards. If these criteria are notselected as required in the requisition, or if a candidate does not enter answers for thesecriteria, the answers will still be considered.
Setting Matching Requisition CriteriaPrerequisite
Configuration > [Recruiting] Administration > Matching Requisition Criteria
Steps1. In the Matching Criteria - Match Candidate page, select criteria and specify if they are
required or desired.2. Click Save.Result
Candidates will be matched to requisitions according to the criteria selected.
Preview of Candidates Matching a RequisitionThis feature allows users to select a requisition and to preview candidates who would be afit for the requisition based on the Job, Location and Organization structure fields as well asadditional matching criteria and filters.
When a user posts a requisition to a career section, the Preview Matching Candidates buttonin the Posting and Sourcing tab allows him/her to preview a list of candidates whose profilesmatch default matching criteria and filters.
For the Preview Matching Candidates button to appear in a requisition file, the countryspecified in the requisition must correspond to the country specified by the systemadministrator. For example, if a user posts a requisition for a job available in the United States,the Preview Matching Candidates button will be displayed if the system administrator selectedUnited States among the countries for which users can view matching candidates. This is usefulif a company may not feel comfortable in showing to users a list of matching candidates forjob posted in some countries because of regulation reasons (EEO regulations for example).

Candidate and Requisition Search Matching Candidate and Requisition
Configuration Guide Taleo 10 SP2 - Recruiting 240
Default matching criteria are set by the system administrator. However, these default criteriacan be modified by the user to find more relevant candidates for a particular requisition.
Default matching filters are also set by the system administrator. However, these default filterscan be modified by the user.
Once the user feels that he/she has found the right candidates, an e-mail is sent to thesecandidates to invite them to apply for the job.
Criteria for Matching CandidatesCriteria for matching candidates are used to find a match between a requisition file andcandidate file.
Default matching candidate criteria are set by the system administrator. However, thesedefault criteria can be modified by the user to find more relevant candidates for a particularrequisition. Matching criteria are:• Preferred Jobs and Job• Preferred Locations and Locations• Preferred Organizations and Organization• Place of residence and Location• Competencies• Questions• Job Level• Job Type• Schedule• Shift• Employee Status• Education Level• Willing to Travel• SalaryMatching criteria (except for competencies and questions) can be set as desired or required:• Required: The criterion is mandatory. The candidate has to meet this specific criterion to
appear in the list of candidates displayed to the users.• Desired: The criterion is not mandatory, it is considered an asset. A candidate who does
not have an asset will be matched as long as he or she meets all the required criteria.Candidates who do not match a Desired criterion are not rejected. Candidates who meet allthe Required criteria and who also meet some of the Desired criteria will appear at the topof the list of candidate displayed to the user.
Competencies and questions criteria are considered as wildcards. If these criteria are notset to Required in the requisition, or if a candidate does not enter answers for these criteria,the answers will still be considered. The candidate will be matched if he or she matches allthe other required criteria. Answering these criteria will help determine the position of thecandidate on the candidate list.
Filters for Matching CandidatesFilters for matching candidate are used to control the number of candidates displayed to userswhen viewing a list of candidates matching a requisition.
Default matching candidate filters are set by the system administrator. However, users have theability to modify default filters for a specific requisition. Matching candidate filters are:

Candidate and Requisition Search Matching Candidate and Requisition
Configuration Guide Taleo 10 SP2 - Recruiting 241
• A filter to invite or not candidates who have at least one job application with a specificstatus.
• A filter to invite or not candidates who have applied for a job through any type of source orthrough a specific source.
• A filter to invite candidates living in all countries, the requisition country, the requisitionstate/province or the requisition region.
• A filter to invite candidates whose information has been modified during the last x months.• A filter to invite or not internal candidates.
Matched Candidates PreviewAllows a system administrator to select the countries for which the Preview MatchingCandidates button will be activated.
This feature works with the feature entitled Viewing of Candidates Matched to a Requisition.If a requisition’s location corresponds to the country selected by the system administrator, thePreview Matching Candidates button will be available in the requisition Posting and Sourcingtab. For example, if Canada and United States are selected by the system administrator, onlythe requisitions whose locations are Canada and the United States will display the MatchingCandidates button.
This feature is useful if a company may not feel comfortable in showing to users a list ofmatching candidates for job posted in some countries because of regulation reasons (EEOregulations for example).
Setting Matching Candidate CriteriaPrerequisite
Configuration > [Recruiting] Administration > Matching Candidate Criteria
Steps1. In the Matching Criteria — Job Posting Notification page, select criteria and specify if
they are required or desired.2. Click Save.Result
Candidates will be matched to requisitions according to the criteria selected.
Next Step
Configuring matching candidate filters.
Configuring matching candidate country filters.
Activating the matching candidate email notification.
Setting Matching Candidate Country FiltersPrerequisite
Configuration > [Recruiting] Administration > Matching Candidate Preview
Steps1. In the Preview Matching Candidates page, select a country in the Available Countries list.

Candidate and Requisition Search Matching Candidate and Requisition
Configuration Guide Taleo 10 SP2 - Recruiting 242
Having no selection in the Selected Countries list disables the Preview MatchingCandidates button in the requisition file.
2. Click Add.3. Click Save.
Result
The country appears in the Selected Countries list. If the country specified in a requisitioncorresponds to a country you specified, users will be able to preview candidates who matchthe requisition.
Next Step
Configuring matching candidate criteria.
Configuring matching candidate filters.
Activating the matching candidate email notification.
Activating the Matching Candidate Email NotificationPrerequisite
Configuration > [Recruiting] Settings
Steps
1. In the Taleo Recruiting Settings page, click Email Job Matching Candidates Default.2. Click Edit.3. Select Yes.4. Click Save.
Result
In the requisition file, the option E-mail this job posting to matching candidates is selectedby default. An email will be automatically sent to candidates that match a requisitionrequirements.
Next Step
Configuring matching candidate criteria.
Configuring matching candidate filters.
Configuring matching candidate country filters.
Deactivating the Matching Candidate Email NotificationPrerequisite
Configuration > [Recruiting] Settings
Steps
1. In the Taleo Recruiting Settings page, click Email Job Matching Candidates Default.2. Click Edit.

Candidate and Requisition Search Matching Candidate and Requisition
Configuration Guide Taleo 10 SP2 - Recruiting 243
3. Select No.4. Click Save.
Result
In the requisition file, the Email this job posting to matching candidates option is selected bydefault. An email will be sent to candidates matching a requisition requirements.
Next Step
Configuring matching candidate criteria.
Configuring matching candidate filters.
Configuring matching candidate country filters.
Correspondence
• Message Templates............................................................................................ 245
• Paragraphs........................................................................................................ 256
• Variables............................................................................................................260
• Notifications.......................................................................................................284

Correspondence Message Templates
Configuration Guide Taleo 10 SP2 - Recruiting 245
Message Templates
Message TemplateA message template is an e-mail model used to send correspondence.
Message templates are used whenever a notification or e-mail is sent via the application.Message templates can be used, for example, during a process review, interview scheduling,approval process, candidate selection workflow, etc.
Message templates are available via the Configuration menu:
• Message templates under Global Configuration (Security) are messages relating to thesecurity of Taleo products. They are system-generated messages provided by Taleo.
• Message templates under Specific Configuration are messages specific to each Taleoproduct. Taleo provides system-generated message templates. But new message templatescan also be created. Paragraphs are added to messages. They can be accessed directly inthe message template, and they remain editable from within a template.
System-generated Message Templates: System-generated message templates can all beedited by the system administrator. Many system-generated message templates have protectiverestrictions. That is, it may not be possible to change to whom the message is intended for,the delivery method and, the message cannot be marked as confidential or read only, andit cannot be contextualized nor duplicated. The template name and message content of allmessages can be edited.
Message Formats: A message template can be created in different formats:
• HTML• Read only PDF file• Plain text
Message Variables: When creating a message template, variables can be drag and drop inthe To, Reply To, Cc, Bcc and Subject fields. These variables will automatically call informationfrom the system and display it in the template.
Important Note: (ID 303) If not desired for display, users should be advised to removeunresolved variables prior to sending a printed/faxed correspondence. If variables are notresolved, they will appear as unresolved vs. being hidden in the printed file. This precaution isnot necessary when sending a correspondences via e-mail.
Message Context: When creating a message template, a context can be defined in order tospecify in which specific conditions the template will be used. To specify these conditions, thetype of addressee (recipient) must be chosen, contextualisation (Organizations, Locations andJob Fields) can be configured, and the delivery method must be set to either:
• the type of addressee (recipient) must be chosen,• contextualisation (Organizations, Locations and Job Fields) can be configured. If
contextualisation is configured for a message template, the template is available onlyif the Organization-Location-Job Field structure of the message template matches theOrganization-Location-Job Field structure of the object for which the template is being used.For example, if a message template is created to be triggered for each new job posting in

Correspondence Message Templates
Configuration Guide Taleo 10 SP2 - Recruiting 246
Antarctica, then the message template will be sent only for a requisition with the locationAntarctica specified.
• the delivery method must be set to either:• Automatic: the message template is available only for a selected triggering event. In this
case, the message template is used in only one instance and is sent by the system withoutuser assistance.
• Manual: the message template may either be available for all candidate selectionworkflows or set to only display for specific workflows, steps or statuses. Manualtemplates must be sent by an authorized system user.
Paragraphs: Paragraphs are added to a message template. Existing paragraphs can beadded to the message template or new paragraphs can be created directly in the messagetemplate. If creating a paragraph from within a message template, note that the paragraphwill only be available for this template. Paragraphs are editable directly from within a template.An active message template must contain at least one paragraph. Important Note: To create aparagraph that can be reused by other message templates, the paragraph must be created viathe Paragraphs feature (available via the Paragraphs link in the product administration menuand in the Quick Access box within the Message Templates feature).
Important Note: (ID 278) To create a paragraph that can be reused by other messagetemplates, the paragraph must be created with the Paragraphs feature (available via theParagraphs link in the product administration menu and in the Quick Access box within theMessage Templates feature). Paragraphs created during message template creation will becreated for that message template only and can not be re-used.
Attachments: Files can be attached to message templates. By default, the attached filemaximum size is 0.1 Mb, and the attached files maximum total size is 500 Mb. The maximumnumber of attachments allowed is by default 5.
Important Note: (ID 286) Customers should be aware that with the separation of templatesfrom paragraphs in Taleo 10, file attachments are now directly attached to the correspondingmessage template. Files included in a message template are attached to the message bydefault at the time the message is sent. Users with the permission "Customize messages beforesending (using the Send Correspondence action)" and/or "Customize messages before sending(while changing the status of a candidate in a workflow)" will be able to remove attachmentsaccordingly, if desired.
User-defined Fields: Messages can contain user-defined fields (UDFs). Messages willresolve UDFs even if these UDFs are restricted from the user's view access. Customers shouldrefrain from inserting sensitive data in message templates they do not want a user to be able tosee while sending the correspondence. Standard field viewing permissions are honored when auser sends a manual correspondence. In such cases, fields are not exposed or included in themessage sent if the user sending the message is not authorized to view the field.
Configuration
To have access to the Message Templates feature in the Configuration menu, the followingpermission is required.
User Type Permission
Name Location
Access Correspondence Manager configuration Configuration > [SmartOrg] Administration > User Types >Recruiting > Administration

Correspondence Message Templates
Configuration Guide Taleo 10 SP2 - Recruiting 247
To create and edit message templates in the Configuration menu, the following permission isrequired.
User Type Permission
Name Location
Manage Message Templates Configuration > [SmartOrg] Administration > User Types >Configuration > Security Management
To be able to customize messages and remove attachments in message templates, one of thefollowing permission is required.
User Type Permission
Name Location
Customize messages before sending (using theSend Correspondence action)
Configuration > [SmartOrg] Administration> User Types >Recruiting > Candidates
Customize messages before sending (whilechanging the status of a candidate in a workflow)
Configuration > [SmartOrg] Administration> User Types >Recruiting > Candidates
Important Note: (ID 208) Automated Taleo system messages sent to candidates areintended for "all candidates" (both internal and external candidates). It is possible to createalternative messages for a specific audience so that a different message is sent to internal vs.external candidates.
Customers who have created user-defined message templates for automatic correspondence inTaleo 7.5 should make sure that the new message template behavior in Taleo 10 is consideredupon migration. This may mean editing existing user-defined message templates migrated from7.5, creating new user-defined message templates, or both.
To create a new audience specific message, see Creating a message template for a specificaudience.
Creating a Message TemplatePrerequisite
The Access Correspondence Manager and Message templates user type permissions arerequired.
Configuration
Steps
1. Click Message Templates for the desired product.2. Click Create.3. Enter the appropriate information.
If needed, variables can be used in the To, Cc, Bcc and Subject fields.4. Click Save.5. Back to the Template page, add at least one paragraph to the template by clicking Add
or Create.

Correspondence Message Templates
Configuration Guide Taleo 10 SP2 - Recruiting 248
6. Click Save.
Result
The message template is displayed in the Message Templates page and can be used byusers when they send messages.
Next Step
Activating the message template.
Creating a Message Template for a Specific AudiencePrerequisite
The Access Correspondence Manager and Message templates user type permissions arerequired.
Configuration
Steps
1. Click on the system message template that you wish to customize.2. Click Duplicate.
The new message template is associated to the same triggering event.3. Choose whether to link the new message template to the same paragraphs as the
original message, or to create a unique copy of these paragraphs for the new messagetemplate.
4. Specify for which audience the new message template is intended (for example, send thisnew alternative automatic message to internal candidates).
5. Make any desired changes to the paragraph content to suit the selected audience.
Note that if you chose to link the new message template to the original messageparagraphs, these changes will be updated on both templates.
6. Follow the same steps to create a message template for external candidates, as desired.
Result
The message template is displayed in the Message Templates page and can be used byusers when they send messages.
Note that in Taleo 10, it is not possible to have a message for "all candidates" and one forjust "internals" OR "externals." Therefore, once you have created new user-defined automaticmessage templates, it is important to deactivate the original system message template. Ifthis is not done, since both message properties can match the triggering context, the systemwill randomly select which active message to send (the original system message templatespecified to be sent to all as well as the user-defined one set for a specific candidateaudience.
Editing the Properties of a Message TemplatePrerequisite
The Access Correspondence Manager and Message templates user type permissions arerequired.

Correspondence Message Templates
Configuration Guide Taleo 10 SP2 - Recruiting 249
It is a best practice to deactivate the message template before modifying a messagetemplate. When edits are completed, the message template should be reactivated.
Configuration
Steps
1. Click Message Templates for the desired product.2. Click on a message template.3. Click Edit next to Properties.4. Modify the information.5. Click Save.
Result
Modifications made to the code, name, description, message format and variable(s) used inthe message are automatically reflected in messages sent using this template.
Editing the Context of a Message TemplatePrerequisite
The Access Correspondence Manager and Message templates user type permissions arerequired.
Message template must be deactivated.
Configuration
Steps
1. Click Message Templates for the desired product.2. Click on a deactivated message template.3. Click Edit next to Context.4. Modify the information.5. Click Save.
Result
Modifications made to the delivery method of the message template (automatic or manualaccording to a candidate selection workflow) as well as the Location-Organization-Job Fieldstructure are automatically reflected in the messages sent using this template.
Next Step
Editing the properties of a message template.
Reactivating the message template.
Adding an Attachment to a Message TemplatePrerequisite
The Access Correspondence Manager and Message templates user type permissions arerequired.

Correspondence Message Templates
Configuration Guide Taleo 10 SP2 - Recruiting 250
By default, the attached file maximum size is 0.1 Mb, and the attached files maximum totalsize is 500 Mb.
By default, the maximum number of attachments allowed is 5.
Steps
1. Click Message Templates for the desired product.2. Click on the message template.3. Click Add next to Attachments.4. Enter information in the fields.5. Click Browse... to select a document.6. Click Save.
Result
The attachment appears in the Attachments section of the message template if the size isbelow or equal to the maximum size allowed for attachments.
Removing an Attachment from a Message TemplatePrerequisite
The Access Correspondence Manager and Message templates user type permissions arerequired.
Steps
1. Click Message Templates for the desired product.2. Click on a message template.3. Click Remove next to the attachment.
Result
The attachment no longer appears in the Attachments section of the message template.
Activating a Message TemplatePrerequisite
The Access Correspondence Manager and Message templates user type permissions arerequired.
The message template must have an Inactive or Draft status.
Configuration
Steps
1. Click Message Templates for the desired product.2. Click on a message template.3. Click Activate.
Result
The status of the message template is Active and is now available to users when they sendmessages.

Correspondence Message Templates
Configuration Guide Taleo 10 SP2 - Recruiting 251
Deactivating a Message TemplatePrerequisite
The Access Correspondence Manager and Message templates user type permissions arerequired.
The message template must have the Active status.
Configuration
Steps
1. Click Message Templates for the desired product.2. Click on a message template.3. Click Deactivate.
Result
The status of the message template is Inactive. The template can no longer be used by usersto send messages but the template is not permanently deleted from the database.
Deleting a Message TemplatePrerequisite
The Access Correspondence Manager and Message templates user type permissions arerequired.
Configuration
Steps
1. Click Message Templates for the desired product.2. Click Delete next to the message template to delete.3. Click Yes.
Result
The message template is permanently deleted from the database.
Duplicating a Message TemplatePrerequisite
The Access Correspondence Manager and Message templates user type permissions arerequired.
Editing of system generated message templates is limited to optimize system performance.In several cases, such templates may not be duplicated, and often the context cannot bemodified.
Steps
1. Click Message Templates for the desired product.
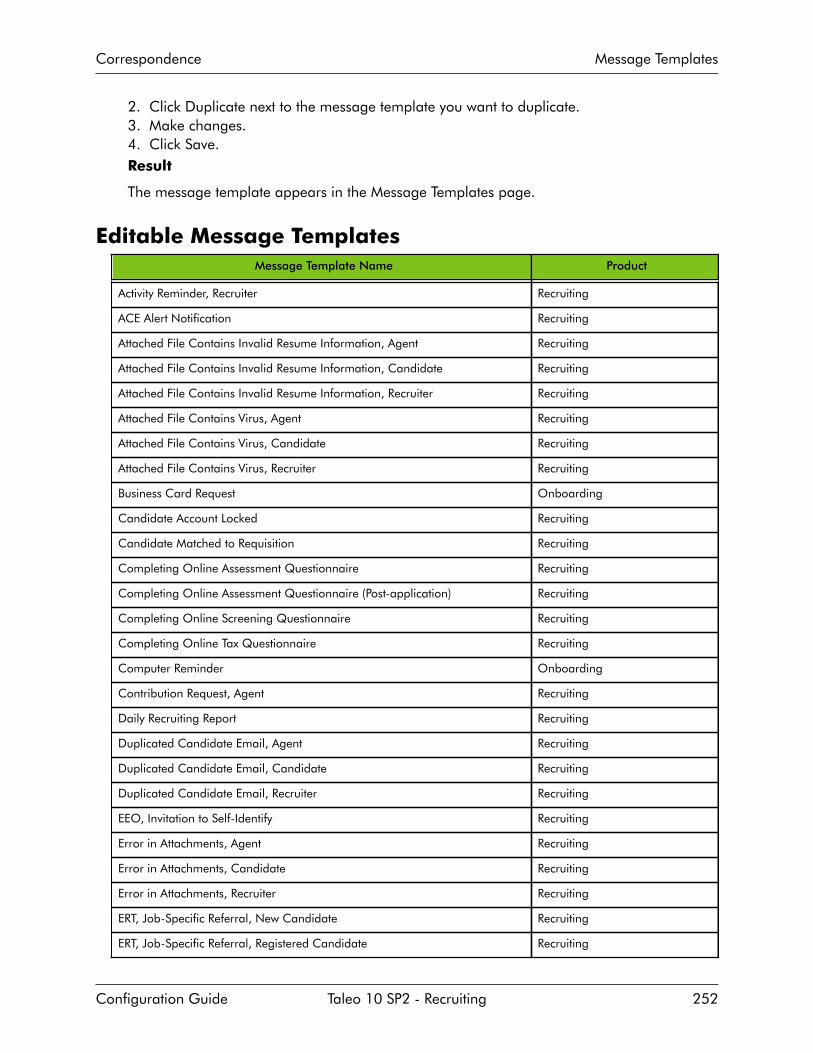
Correspondence Message Templates
Configuration Guide Taleo 10 SP2 - Recruiting 252
2. Click Duplicate next to the message template you want to duplicate.3. Make changes.4. Click Save.Result
The message template appears in the Message Templates page.
Editable Message TemplatesMessage Template Name Product
Activity Reminder, Recruiter Recruiting
ACE Alert Notification Recruiting
Attached File Contains Invalid Resume Information, Agent Recruiting
Attached File Contains Invalid Resume Information, Candidate Recruiting
Attached File Contains Invalid Resume Information, Recruiter Recruiting
Attached File Contains Virus, Agent Recruiting
Attached File Contains Virus, Candidate Recruiting
Attached File Contains Virus, Recruiter Recruiting
Business Card Request Onboarding
Candidate Account Locked Recruiting
Candidate Matched to Requisition Recruiting
Completing Online Assessment Questionnaire Recruiting
Completing Online Assessment Questionnaire (Post-application) Recruiting
Completing Online Screening Questionnaire Recruiting
Completing Online Tax Questionnaire Recruiting
Computer Reminder Onboarding
Contribution Request, Agent Recruiting
Daily Recruiting Report Recruiting
Duplicated Candidate Email, Agent Recruiting
Duplicated Candidate Email, Candidate Recruiting
Duplicated Candidate Email, Recruiter Recruiting
EEO, Invitation to Self-Identify Recruiting
Error in Attachments, Agent Recruiting
Error in Attachments, Candidate Recruiting
Error in Attachments, Recruiter Recruiting
ERT, Job-Specific Referral, New Candidate Recruiting
ERT, Job-Specific Referral, Registered Candidate Recruiting
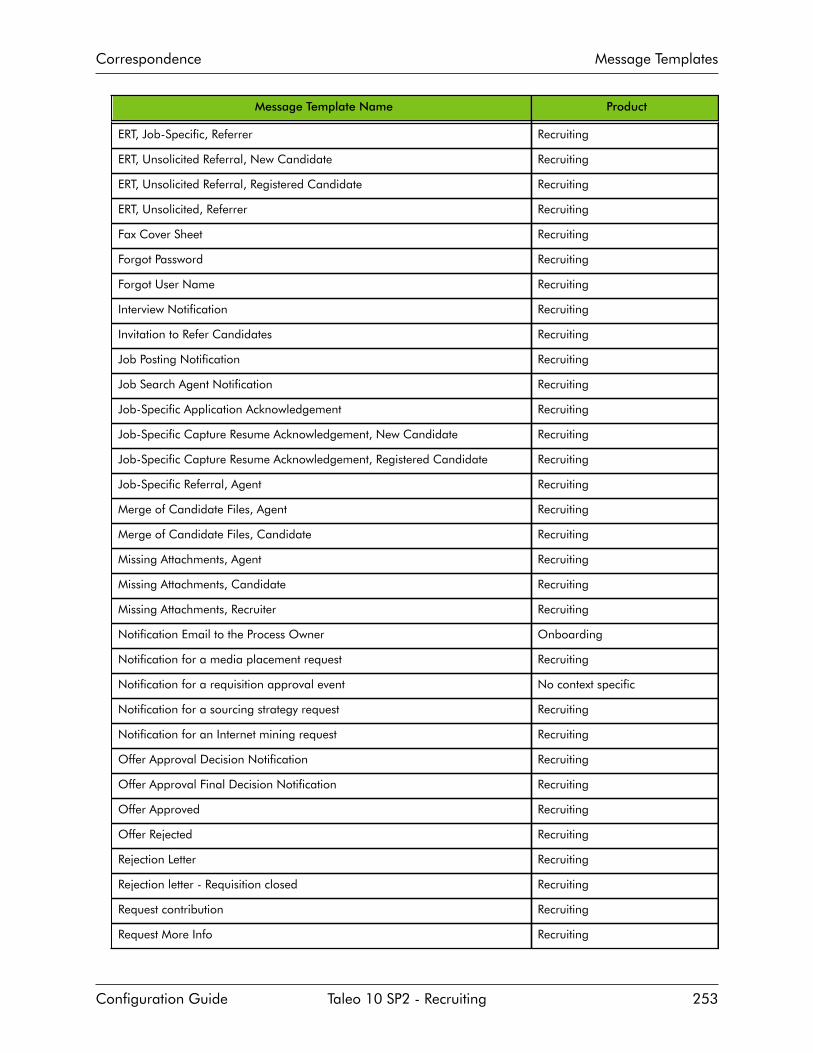
Correspondence Message Templates
Configuration Guide Taleo 10 SP2 - Recruiting 253
Message Template Name Product
ERT, Job-Specific, Referrer Recruiting
ERT, Unsolicited Referral, New Candidate Recruiting
ERT, Unsolicited Referral, Registered Candidate Recruiting
ERT, Unsolicited, Referrer Recruiting
Fax Cover Sheet Recruiting
Forgot Password Recruiting
Forgot User Name Recruiting
Interview Notification Recruiting
Invitation to Refer Candidates Recruiting
Job Posting Notification Recruiting
Job Search Agent Notification Recruiting
Job-Specific Application Acknowledgement Recruiting
Job-Specific Capture Resume Acknowledgement, New Candidate Recruiting
Job-Specific Capture Resume Acknowledgement, Registered Candidate Recruiting
Job-Specific Referral, Agent Recruiting
Merge of Candidate Files, Agent Recruiting
Merge of Candidate Files, Candidate Recruiting
Missing Attachments, Agent Recruiting
Missing Attachments, Candidate Recruiting
Missing Attachments, Recruiter Recruiting
Notification Email to the Process Owner Onboarding
Notification for a media placement request Recruiting
Notification for a requisition approval event No context specific
Notification for a sourcing strategy request Recruiting
Notification for an Internet mining request Recruiting
Offer Approval Decision Notification Recruiting
Offer Approval Final Decision Notification Recruiting
Offer Approved Recruiting
Offer Rejected Recruiting
Rejection Letter Recruiting
Rejection letter - Requisition closed Recruiting
Request contribution Recruiting
Request More Info Recruiting

Correspondence Message Templates
Configuration Guide Taleo 10 SP2 - Recruiting 254
Message Template Name Product
Requisition Approved Recruiting
Requisition Canceled Recruiting
Requisition Filled Recruiting
Requisition On Hold Recruiting
Requisition Reactivated Recruiting
Requisition Rejected Recruiting
Resume Parsing Service Unavailable to Agents Recruiting
Resume Parsing Service Unavailable, Agent Recruiting
Resume Parsing Service Unavailable, Candidate Recruiting
Resume Parsing Service Unavailable, Recruiter Recruiting
Selection Assessment Request (Candidate) Recruiting
Selection Assessment Request (Recruiter) Recruiting
Selection Assessment Request (Recruiter) ñ Candidate Email Missing Recruiting
Send Job to Friend Recruiting
Share Candidate Notification Recruiting
Sourcing Event Notification Recruiting
Standard notification for a candidate account confirmation SmartOrg
Standard notification for a First Login SmartOrg
Standard notification for a First Login Onboarding
Standard notification for a Forgot Password Onboarding
Standard notification for a Forgot Username SmartOrg
Standard notification for a Password Reset SmartOrg
Standard notification for a Password Reset Onboarding
Standard notification for a posting about to expire Recruiting
Standard notification for a registration SmartOrg
Standard notification for a reminder No context specific
Standard notification for a reminder Onboarding
Standard notification for a Request Approval Recruiting
Standard notification for a requisition approval Recruiting
Standard notification for a self-registration Recruiting
Standard notification for a self-registration SmartOrg
Standard notification for an expired posting Recruiting
Standard notification for the Offer approval Recruiting

Correspondence Message Templates
Configuration Guide Taleo 10 SP2 - Recruiting 255
Message Template Name Product
Standard notification to fill out a user-defined form Onboarding
Standard notification to fill out a user-defined form No context specific
Submission Progression Notification Recruiting
Unsolicited Application Acknowledgement Recruiting
Unsolicited Capture Resume Acknowledgement, New Candidate Recruiting
Unsolicited Capture Resume Acknowledgement, Registered Candidate Recruiting
Unsolicited Email Application Acknowledgement, Agent Recruiting
Unsolicited Email Application Acknowledgement, Candidate Recruiting
Unsolicited Referral, Agent Recruiting
Workflow Event Notification Recruiting

Correspondence Paragraphs
Configuration Guide Taleo 10 SP2 - Recruiting 256
Paragraphs
ParagraphA paragraph is a block of text added to a message template.
Paragraphs can be supplied with the system (message templates supplied with the systemhave default paragraphs attached to them). They can also be duplicated (when duplicating amessage template, paragraphs can be duplicated) or they can be created from scratch.
Paragraphs can be accessed from two places:• Paragraphs List: The Paragraphs list is available via the Paragraphs link in the product
administration menu and in the Quick Access box within the Message Templates feature.A paragraph created via the Paragraphs list is available for new and existing messagetemplates.
• Message Template: A paragraph created directly in a message template is only available forthat message template and is not available in the Paragraph List.
Important Note: (ID 278) To create a paragraph that can be reused by other messagetemplates, the paragraph must be created with the Paragraphs feature (available via theParagraphs link in the product administration menu and in the Quick Access box within theMessage Templates feature). Paragraphs created during message template creation will becreated for that message template only and can not be re-used.
Edits made to a paragraph in the Paragraph library will affect all templates using theparagraph, regardless of whether the edits are made directly from within a message templateor from within the Paragraphs list.
Paragraphs cannot be created if more than one language is activated for the messagetemplate.
Paragraph content is created by typing text and/or by adding variables. Variables automaticallycall information from the candidate file or job specific submission and display it in thetemplate. For example, if the {Candidate.LastName} variable is used, then the last name ofthe candidate will be automatically included by the system in the outgoing message.
By default, all variables are listed in the Available Variables list. However, a shorter list ofvariables can be displayed by entering a few letters contained in a variable. The systemthen automatically suggests variables containing these letters. For example, if enteringthe letters “add”, the system could suggest the following variables: “Candidate.Address”,“Candidate.Address2”, “ElectronicSignature.IpAddress”. Once the right variables aredisplayed, the system administrator can drag and drop the desired variables in the paragraph.To return to the default list of variables, the system administrator just needs to remove theletters they enteredConfiguration
User Type Permission
Name Location
Access Correspondence Manager configuration Configuration > [SmartOrg] Administration > User Types >Recruiting > Administration
Correspondence Paragraphs
Configuration Guide Taleo 10 SP2 - Recruiting 257
Adding a Paragraph to a Message TemplatePrerequisite
The Access Correspondence Manager and Message templates user type permissions arerequired.
The paragraph must be created and activated.
Configuration
Steps
1. Click Message Templates for the desired product.2. Click on a message template.3. Click Add next to Paragraphs.4. Select a paragraph (or chose to create a new one).5. Click Select.
Result
The paragraph appears in the Paragraphs section of the message template.
Next Step
Ordering paragraphs.
Creating a Paragraph for a Message TemplatePrerequisite
The Access Correspondence Manager and Message templates user type permissions arerequired.
Configuration
Steps
1. Click Message Templates for the desired product.2. Click on a message template.3. Click Create next to Paragraphs.4. Enter information in the fields.5. Type the content of the paragraph in the Text box.6. Insert variables in the text if desired.7. Click Save.
Result
The paragraph appears in the Paragraphs section of the message template.
Next Step
Ordering paragraphs.

Correspondence Paragraphs
Configuration Guide Taleo 10 SP2 - Recruiting 258
Ordering Paragraphs in a Message TemplatePrerequisite
The Access Correspondence Manager and Message templates user type permissions arerequired.
Configuration
Steps
1. Click Message Templates for the desired product.2. Click on a message template.3. Click Reorder next to Paragraphs.4. Select a paragraph you want to move to a different position.5. Use arrows to move the paragraph.6. Click Save.
Result
The paragraphs are displayed in the new order in the Paragraphs section of the messagetemplate.
Editing a Paragraph in a Message TemplatePrerequisite
The Access Correspondence Manager and Message templates user type permissions arerequired.
Deactivate the message template before modifying a paragraph.
Note that any edits will affect all templates that use the paragraph, so edit with care. Usermay chose to duplicate the paragraph and then edit the new version only.
Configuration
Steps
1. Click Message Templates for the desired product.2. Click on a message template.3. In the Paragraphs section, click Edit next to the paragraph.4. Modify the information in the fields.5. Click Save.
Previewing a Paragraph in a Message TemplatePrerequisite
The Access Correspondence Manager and Message templates user type permissions arerequired.
You must be in the active language of the message template.

Correspondence Paragraphs
Configuration Guide Taleo 10 SP2 - Recruiting 259
Configuration
Steps
1. Click Message Templates for the desired product.2. Click on a message template.3. Click Preview.
Result
A preview of the content of the paragraph is displayed.
Activating a Paragraph in a Message TemplatePrerequisite
The Access Correspondence Manager and Message templates user type permissions arerequired.
The paragraph must have the Inactive status.
Configuration
Steps
1. Click Message Templates for the desired product.2. Click on a message template.3. In the Paragraphs section, click on the paragraph.4. Click Activate.
Result
The status of the paragraph is Active and is now available for selection when adding aparagraph in a message template.
Deactivating a Paragraph in a Message TemplatePrerequisite
The Access Correspondence Manager and Message templates user type permissions arerequired.
The paragraph must have the Active status.
Configuration
Steps
1. Click Message Templates for the desired product.2. Click on a message template.3. In the Paragraphs section, click on a paragraph.4. Click Deactivate.
Result
The status of the paragraph is Inactive and the paragraph can no longer be selected in atemplate . The paragraph is not permanently deleted from the data base.

Correspondence Variables
Configuration Guide Taleo 10 SP2 - Recruiting 260
Variables
VariableVariables are strings of text replaced by contextual data that you can include in a message or aparagraph.
Variables (also sometimes referred to as tokens) are very useful in the creation of customizedmessages.
Variables are most often used in paragraphs within the body of a message but they can alsobe inserted in the To, Cc, Bcc, and Subject fields.
When creating message templates, you can select variables from a list of standard variables oryou can create custom variables.
Standard variables are provided with the system and represent a specific value in the database.For example, a message template contains the standard variable {CANDIDATE_LAST_NAME}.Just before sending the message to a candidate, the system will replace the variable by thecandidate’s last name.
If you do not find the variables you need in the list of standard variables, you can createcustom variables. Custom variables must have the same format as standard variables.• Custom variables must be inserted between the HTML tags <body> and </body>.• Custom variables must be enclosed in curly braces ('{' and '}').• Valid characters for custom variables are capital letters (A-Z), numbers (0-9) and the
underscore symbol (_).Custom variables should only be used in messages sent manually since user intervention isrequired to replace the variables by text strings just before the message is sent. Note that in thecase of eShare, there is no interface presented to the user to make such edits, and as such anycustom variables that are contained in a message template will not resolve and will display ablank space.
Adding a VariablePrerequisite
Configuration
Steps1. Select a message template.2. To add a variable in the To, Cc, Bcc, and Subject fields, click Edit next to Properties.3. To add a variable in a paragraph, click on a paragraph.4. Scroll the list of variables to find the desired variable.
To display a short list of variables matching a specific keyword, you can enter thekeyword in the Available Variables field. For example, entering candidate would displayall variables containing the word candidate.
To display the complete list of variables, simply remove the keyword you entered.
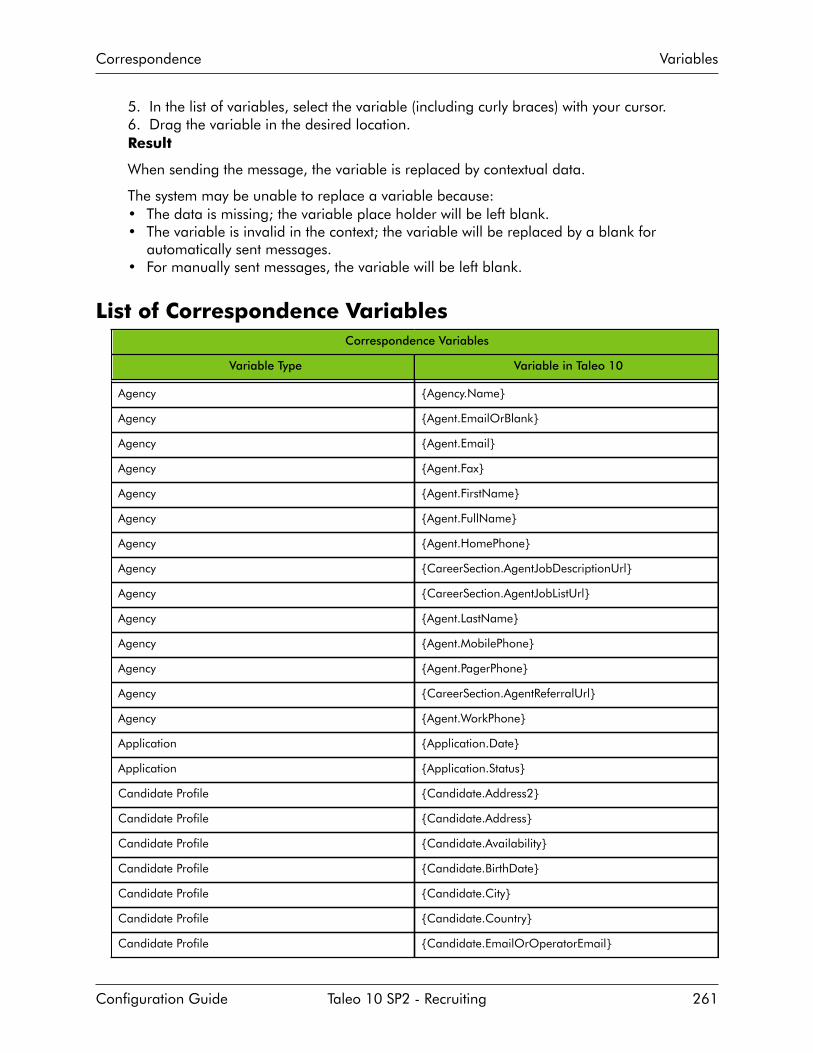
Correspondence Variables
Configuration Guide Taleo 10 SP2 - Recruiting 261
5. In the list of variables, select the variable (including curly braces) with your cursor.6. Drag the variable in the desired location.Result
When sending the message, the variable is replaced by contextual data.
The system may be unable to replace a variable because:• The data is missing; the variable place holder will be left blank.• The variable is invalid in the context; the variable will be replaced by a blank for
automatically sent messages.• For manually sent messages, the variable will be left blank.
List of Correspondence VariablesCorrespondence Variables
Variable Type Variable in Taleo 10
Agency {Agency.Name}
Agency {Agent.EmailOrBlank}
Agency {Agent.Email}
Agency {Agent.Fax}
Agency {Agent.FirstName}
Agency {Agent.FullName}
Agency {Agent.HomePhone}
Agency {CareerSection.AgentJobDescriptionUrl}
Agency {CareerSection.AgentJobListUrl}
Agency {Agent.LastName}
Agency {Agent.MobilePhone}
Agency {Agent.PagerPhone}
Agency {CareerSection.AgentReferralUrl}
Agency {Agent.WorkPhone}
Application {Application.Date}
Application {Application.Status}
Candidate Profile {Candidate.Address2}
Candidate Profile {Candidate.Address}
Candidate Profile {Candidate.Availability}
Candidate Profile {Candidate.BirthDate}
Candidate Profile {Candidate.City}
Candidate Profile {Candidate.Country}
Candidate Profile {Candidate.EmailOrOperatorEmail}

Correspondence Variables
Configuration Guide Taleo 10 SP2 - Recruiting 262
Correspondence Variables
Variable Type Variable in Taleo 10
Candidate Profile {Candidate.Email}
Candidate Profile {Candidate.EmployeeNumber}
Candidate Profile {Candidate.ExpectedHourlyPayRate}
Candidate Profile {Candidate.Fax}
Candidate Profile {Candidate.FirstNameOrCandidateEmail}
Candidate Profile {Candidate.FirstName}
Candidate Profile {Candidate.FullNameOrCandidateEmail}
Candidate Profile {Candidate.FullName}
Candidate Profile {Candidate.HireStartDate}
Candidate Profile {Candidate.HomePhone}
Candidate Profile {Candidate.IdentificationNumber}
Candidate Profile {Candidate.LastNameOrCandidateEmail}
Candidate Profile {Candidate.LastName}
Candidate Profile {Candidate.MiddleName}
Candidate Profile {Candidate.MobilePhone}
Candidate Profile {Candidate.PagerPhone}
Candidate Profile {Candidate.Prefix}
Candidate Profile {Candidate.Region}
Candidate Profile {Candidate.SecurityCode}
Candidate Profile {Candidate.SocialSecurityNumber}
Candidate Profile {Candidate.State}
Candidate Profile {Candidate.Suffix}
Candidate Profile {Candidate.Travel}
Candidate Profile {Candidate.Username}
Candidate Profile {Candidate.WeeklyHoursPreferred}
Candidate Profile {Candidate.WeeklyHoursWilling}
Candidate Profile {Candidate.WillWorkHolidays}
Candidate Profile {Candidate.WillWorkWeekends}
Candidate Profile {Candidate.WorkPhone}
Candidate Profile {Candidate.Zipcode}
Career Section {CareerSection.MySavedSearchesUrl}
Career Section {CareerSection.MySavedSearchesURL}

Correspondence Variables
Configuration Guide Taleo 10 SP2 - Recruiting 263
Correspondence Variables
Variable Type Variable in Taleo 10
Career Section {CareerSection.CareerSectionUrl}
Application {Application.Certifications[1].DateReceived}
Application {Application.Certifications[10].DateReceived}
Application {Application.Certifications[2].DateReceived}
Application {Application.Certifications[3].DateReceived}
Application {Application.Certifications[4].DateReceived}
Application {Application.Certifications[5].DateReceived}
Application {Application.Certifications[6].DateReceived}
Application {Application.Certifications[7].DateReceived}
Application {Application.Certifications[8].DateReceived}
Application {Application.Certifications[9].DateReceived}
Application {Application.Certifications[1].ExpirationDate}
Application {Application.Certifications[10].ExpirationDate}
Application {Application.Certifications[2].ExpirationDate}
Application {Application.Certifications[3].ExpirationDate}
Application {Application.Certifications[4].ExpirationDate}
Application {Application.Certifications[5].ExpirationDate}
Application {Application.Certifications[6].ExpirationDate}
Application {Application.Certifications[7].ExpirationDate}
Application {Application.Certifications[8].ExpirationDate}
Application {Application.Certifications[9].ExpirationDate}
Application {Application.Certifications[1].Location}
Application {Application.Certifications[10].Location}
Application {Application.Certifications[2].Location}
Application {Application.Certifications[3].Location}
Application {Application.Certifications[4].Location}
Application {Application.Certifications[5].Location}
Application {Application.Certifications[6].Location}
Application {Application.Certifications[7].Location}
Application {Application.Certifications[8].Location}
Application {Application.Certifications[9].Location}
Application {Application.certifications[1].Name}

Correspondence Variables
Configuration Guide Taleo 10 SP2 - Recruiting 264
Correspondence Variables
Variable Type Variable in Taleo 10
Application {Application.certifications[10].Name}
Application {Application.certifications[2].Name}
Application {Application.certifications[3].Name}
Application {Application.certifications[4].Name}
Application {Application.certifications[5].Name}
Application {Application.certifications[6].Name}
Application {Application.certifications[7].Name}
Application {Application.certifications[8].Name}
Application {Application.certifications[9].Name}
Application {Application.Certifications[1].NumberId}
Application {Application.Certifications[10].NumberId}
Application {Application.Certifications[2].NumberId}
Application {Application.Certifications[3].NumberId}
Application {Application.Certifications[4].NumberId}
Application {Application.Certifications[5].NumberId}
Application {Application.Certifications[6].NumberId}
Application {Application.Certifications[7].NumberId}
Application {Application.Certifications[8].NumberId}
Application {Application.Certifications[9].NumberId}
Application {Application.Certifications[1].Organization}
Application {Application.Certifications[10].Organization}
Application {Application.Certifications[2].Organization}
Application {Application.Certifications[3].Organization}
Application {Application.Certifications[4].Organization}
Application {Application.Certifications[5].Organization}
Application {Application.Certifications[6].Organization}
Application {Application.Certifications[7].Organization}
Application {Application.Certifications[8].Organization}
Application {Application.Certifications[9].Organization}
Career Section {CareerSection.ChangePasswordUrl}
Company {Other.CompanyLogos0}
Company {Other.CompanyLogos1}

Correspondence Variables
Configuration Guide Taleo 10 SP2 - Recruiting 265
Correspondence Variables
Variable Type Variable in Taleo 10
Company {Other.CompanyLogos2}
Company {Other.CompanyLogos3}
Company {Other.CompanyLogos4}
Company {Other.CompanyLogos5}
Company {Other.CompanyLogos6}
Company {Other.CompanyLogos7}
Company {Other.CompanyLogos8}
Company {Other.CompanyLogos9}
Company {Other.CompanyLogos10}
Company {Other.CompanyLogos11}
Company {Other.CompanyLogos12}
Company {Other.CompanyLogos13}
Company {Other.CompanyLogos14}
Company {Other.CompanyLogos15}
Company {Other.CompanyLogos16}
Company {Other.CompanyLogos17}
Company {Other.CompanyLogos18}
Company {Other.CompanyLogos19}
Company {Other.CompanyLogos20}
Company {Other.CompanyLogos21}
Company {Other.CompanyLogos22}
Company {Other.CompanyLogos23}
Company {Other.CompanyLogos24}
Company {Other.CompanyLogos25}
Company {Other.CompanyLogos26}
Company {Other.CompanyLogos27}
Company {Other.CompanyLogos28}
Company {Other.CompanyLogos29}
Company {Other.CompanyLogos30}
Company {Other.CompanyName}
Company {Other.CompanyStaticPage}
Requisition {Requisition.ContactEmailExternal}

Correspondence Variables
Configuration Guide Taleo 10 SP2 - Recruiting 266
Correspondence Variables
Variable Type Variable in Taleo 10
Requisition {Requisition.ContactEmailInternal}
Requisition {Requisition.ContactNameExternal}
Requisition {Requisition.ContactNameInternal}
Requisition {Requisition.ContestNumber}
Other {Other.CurrentDate}
Application {Application.Studies[1].Gpa}
Application {Application.Studies[10].Gpa}
Application {Application.Studies[2].Gpa}
Application {Application.Studies[3].Gpa}
Application {Application.Studies[4].Gpa}
Application {Application.Studies[5].Gpa}
Application {Application.Studies[6].Gpa}
Application {Application.Studies[7].Gpa}
Application {Application.Studies[8].Gpa}
Application {Application.Studies[9].Gpa}
Application {Application.Studies[1].GpaRange}
Application {Application.Studies[10].GpaRange}
Application {Application.Studies[2].GpaRange}
Application {Application.Studies[3].GpaRange}
Application {Application.Studies[4].GpaRange}
Application {Application.Studies[5].GpaRange}
Application {Application.Studies[6].GpaRange}
Application {Application.Studies[7].GpaRange}
Application {Application.Studies[8].GpaRange}
Application {Application.Studies[9].GpaRange}
Application {Application.Studies[1].Graduated}
Application {Application.Studies[10].Graduated}
Application {Application.Studies[2].Graduated}
Application {Application.Studies[3].Graduated}
Application {Application.Studies[4].Graduated}
Application {Application.Studies[5].Graduated}
Application {Application.Studies[6].Graduated}

Correspondence Variables
Configuration Guide Taleo 10 SP2 - Recruiting 267
Correspondence Variables
Variable Type Variable in Taleo 10
Application {Application.Studies[7].Graduated}
Application {Application.Studies[8].Graduated}
Application {Application.Studies[9].Graduated}
Application {Application.Studies[1].GraduationDate}
Application {Application.Studies[10].GraduationDate}
Application {Application.Studies[2].GraduationDate}
Application {Application.Studies[3].GraduationDate}
Application {Application.Studies[4].GraduationDate}
Application {Application.Studies[5].GraduationDate}
Application {Application.Studies[6].GraduationDate}
Application {Application.Studies[7].GraduationDate}
Application {Application.Studies[8].GraduationDate}
Application {Application.Studies[9].GraduationDate}
Application {Application.Studies[1].GraduationDateProjected}
Application {Application.Studies[10].GraduationDateProjected}
Application {Application.Studies[2].GraduationDateProjected}
Application {Application.Studies[3].GraduationDateProjected}
Application {Application.Studies[4].GraduationDateProjected}
Application {Application.Studies[5].GraduationDateProjected}
Application {Application.Studies[6].GraduationDateProjected}
Application {Application.Studies[7].GraduationDateProjected}
Application {Application.Studies[8].GraduationDateProjected}
Application {Application.Studies[9].GraduationDateProjected}
Application {Application.Studies[1].InstitutionCity}
Application {Application.Studies[10].InstitutionCity}
Application {Application.Studies[2].InstitutionCity}
Application {Application.Studies[3].InstitutionCity}
Application {Application.Studies[4].InstitutionCity}
Application {Application.Studies[5].InstitutionCity}
Application {Application.Studies[6].InstitutionCity}
Application {Application.Studies[7].InstitutionCity}
Application {Application.Studies[8].InstitutionCity}

Correspondence Variables
Configuration Guide Taleo 10 SP2 - Recruiting 268
Correspondence Variables
Variable Type Variable in Taleo 10
Application {Application.Studies[9].InstitutionCity}
Application {Application.Studies[1].InstitutionLocation}
Application {Application.Studies[10].InstitutionLocation}
Application {Application.Studies[2].InstitutionLocation}
Application {Application.Studies[3].InstitutionLocation}
Application {Application.Studies[4].InstitutionLocation}
Application {Application.Studies[5].InstitutionLocation}
Application {Application.Studies[6].InstitutionLocation}
Application {Application.Studies[7].InstitutionLocation}
Application {Application.Studies[8].InstitutionLocation}
Application {Application.Studies[9].InstitutionLocation}
Application {Application.Studies[1].InstitutionName}
Application {Application.Studies[10].InstitutionName}
Application {Application.Studies[2].InstitutionName}
Application {Application.Studies[3].InstitutionName}
Application {Application.Studies[4].InstitutionName}
Application {Application.Studies[5].InstitutionName}
Application {Application.Studies[6].InstitutionName}
Application {Application.Studies[7].InstitutionName}
Application {Application.Studies[8].InstitutionName}
Application {Application.Studies[9].InstitutionName}
Application {Application.Studies[1].NameAttending}
Application {Application.Studies[10].NameAttending}
Application {Application.Studies[2].NameAttending}
Application {Application.Studies[3].NameAttending}
Application {Application.Studies[4].NameAttending}
Application {Application.Studies[5].NameAttending}
Application {Application.Studies[6].NameAttending}
Application {Application.Studies[7].NameAttending}
Application {Application.Studies[8].NameAttending}
Application {Application.Studies[9].NameAttending}
Application {Application.Studies[1].ProgramName}

Correspondence Variables
Configuration Guide Taleo 10 SP2 - Recruiting 269
Correspondence Variables
Variable Type Variable in Taleo 10
Application {Application.Studies[10].ProgramName}
Application {Application.Studies[2].ProgramName}
Application {Application.Studies[3].ProgramName}
Application {Application.Studies[4].ProgramName}
Application {Application.Studies[5].ProgramName}
Application {Application.Studies[6].ProgramName}
Application {Application.Studies[7].ProgramName}
Application {Application.Studies[8].ProgramName}
Application {Application.Studies[9].ProgramName}
Application {Application.Studies[1].StartDate}
Application {Application.Studies[10].StartDate}
Application {Application.Studies[2].StartDate}
Application {Application.Studies[3].StartDate}
Application {Application.Studies[4].StartDate}
Application {Application.Studies[5].StartDate}
Application {Application.Studies[6].StartDate}
Application {Application.Studies[7].StartDate}
Application {Application.Studies[8].StartDate}
Application {Application.Studies[9].StartDate}
Application {Application.Studies[1].StudyLevel}
Application {Application.Studies[10].StudyLevel}
Application {Application.Studies[2].StudyLevel}
Application {Application.Studies[3].StudyLevel}
Application {Application.Studies[4].StudyLevel}
Application {Application.Studies[5].StudyLevel}
Application {Application.Studies[6].StudyLevel}
Application {Application.Studies[7].StudyLevel}
Application {Application.Studies[8].StudyLevel}
Application {Application.Studies[9].StudyLevel}
Other {ElectronicSignature.DateSigned}
Other {ElectronicSignature.DocumentIdentifier}
Other {ElectronicSignature.IpAddress}

Correspondence Variables
Configuration Guide Taleo 10 SP2 - Recruiting 270
Correspondence Variables
Variable Type Variable in Taleo 10
Application {Application.Experiences[1].BeginDate}
Application {Application.Experiences[10].BeginDate}
Application {Application.Experiences[2].BeginDate}
Application {Application.Experiences[3].BeginDate}
Application {Application.Experiences[4].BeginDate}
Application {Application.Experiences[5].BeginDate}
Application {Application.Experiences[6].BeginDate}
Application {Application.Experiences[7].BeginDate}
Application {Application.Experiences[8].BeginDate}
Application {Application.Experiences[9].BeginDate}
Application {Application.Experiences[1].CurrentEmployer}
Application {Application.Experiences[10].CurrentEmployer}
Application {Application.Experiences[2].CurrentEmployer}
Application {Application.Experiences[3].CurrentEmployer}
Application {Application.Experiences[4].CurrentEmployer}
Application {Application.Experiences[5].CurrentEmployer}
Application {Application.Experiences[6].CurrentEmployer}
Application {Application.Experiences[7].CurrentEmployer}
Application {Application.Experiences[8].CurrentEmployer}
Application {Application.Experiences[9].CurrentEmployer}
Application {Application.Experiences[1].Employer}
Application {Application.Experiences[10].Employer}
Application {Application.Experiences[2].Employer}
Application {Application.Experiences[3].Employer}
Application {Application.Experiences[4].Employer}
Application {Application.Experiences[5].Employer}
Application {Application.Experiences[6].Employer}
Application {Application.Experiences[7].Employer}
Application {Application.Experiences[8].Employer}
Application {Application.Experiences[9].Employer}
Application {Application.Experiences[1].EndDate}
Application {Application.Experiences[10].EndDate}

Correspondence Variables
Configuration Guide Taleo 10 SP2 - Recruiting 271
Correspondence Variables
Variable Type Variable in Taleo 10
Application {Application.Experiences[2].EndDate}
Application {Application.Experiences[3].EndDate}
Application {Application.Experiences[4].EndDate}
Application {Application.Experiences[5].EndDate}
Application {Application.Experiences[6].EndDate}
Application {Application.Experiences[7].EndDate}
Application {Application.Experiences[8].EndDate}
Application {Application.Experiences[9].EndDate}
Application {Application.Experiences[1].JobFunction}
Application {Application.Experiences[10].JobFunction}
Application {Application.Experiences[2].JobFunction}
Application {Application.Experiences[3].JobFunction}
Application {Application.Experiences[4].JobFunction}
Application {Application.Experiences[5].JobFunction}
Application {Application.Experiences[6].JobFunction}
Application {Application.Experiences[7].JobFunction}
Application {Application.Experiences[8].JobFunction}
Application {Application.Experiences[9].JobFunction}
Application {Application.Experiences[1].NameWhileEmployed}
Application {Application.Experiences[10].NameWhileEmployed}
Application {Application.Experiences[2].NameWhileEmployed}
Application {Application.Experiences[3].NameWhileEmployed}
Application {Application.Experiences[4].NameWhileEmployed}
Application {Application.Experiences[5].NameWhileEmployed}
Application {Application.Experiences[6].NameWhileEmployed}
Application {Application.Experiences[7].NameWhileEmployed}
Application {Application.Experiences[8].NameWhileEmployed}
Application {Application.Experiences[9].NameWhileEmployed}
Application {Application.Experiences[1].PermissionToContact}
Application {Application.Experiences[10].PermissionToContact}
Application {Application.Experiences[2].PermissionToContact}
Application {Application.Experiences[3].PermissionToContact}
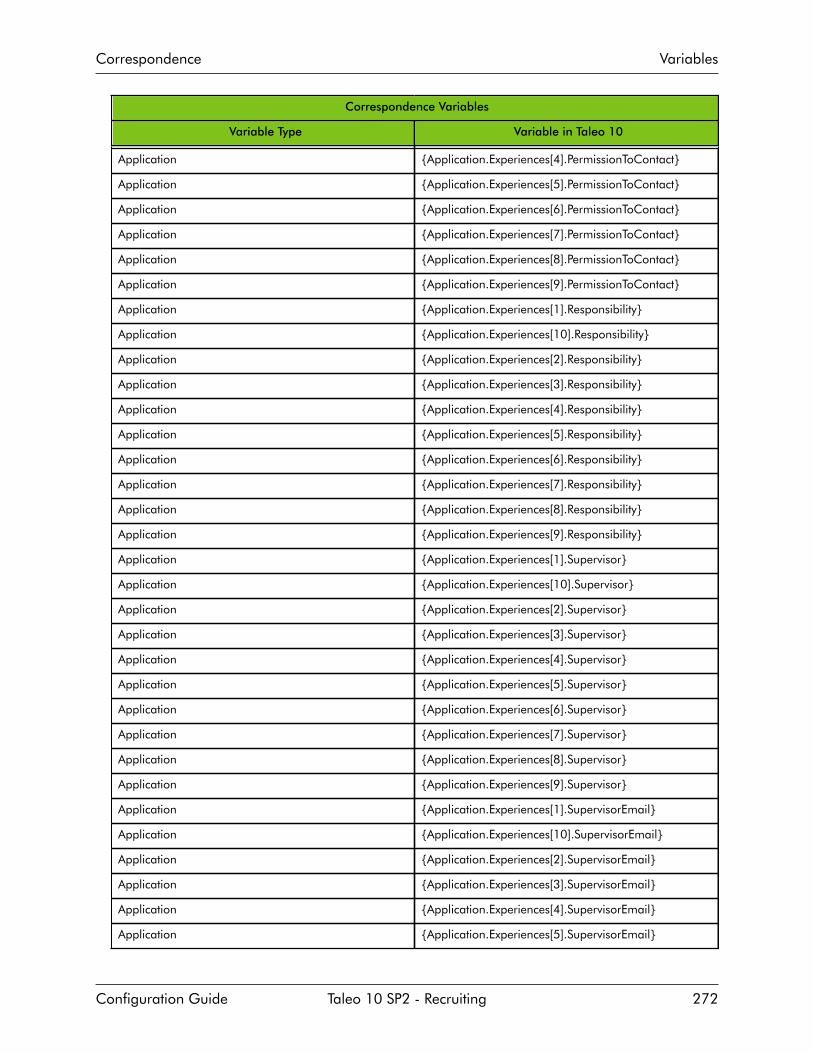
Correspondence Variables
Configuration Guide Taleo 10 SP2 - Recruiting 272
Correspondence Variables
Variable Type Variable in Taleo 10
Application {Application.Experiences[4].PermissionToContact}
Application {Application.Experiences[5].PermissionToContact}
Application {Application.Experiences[6].PermissionToContact}
Application {Application.Experiences[7].PermissionToContact}
Application {Application.Experiences[8].PermissionToContact}
Application {Application.Experiences[9].PermissionToContact}
Application {Application.Experiences[1].Responsibility}
Application {Application.Experiences[10].Responsibility}
Application {Application.Experiences[2].Responsibility}
Application {Application.Experiences[3].Responsibility}
Application {Application.Experiences[4].Responsibility}
Application {Application.Experiences[5].Responsibility}
Application {Application.Experiences[6].Responsibility}
Application {Application.Experiences[7].Responsibility}
Application {Application.Experiences[8].Responsibility}
Application {Application.Experiences[9].Responsibility}
Application {Application.Experiences[1].Supervisor}
Application {Application.Experiences[10].Supervisor}
Application {Application.Experiences[2].Supervisor}
Application {Application.Experiences[3].Supervisor}
Application {Application.Experiences[4].Supervisor}
Application {Application.Experiences[5].Supervisor}
Application {Application.Experiences[6].Supervisor}
Application {Application.Experiences[7].Supervisor}
Application {Application.Experiences[8].Supervisor}
Application {Application.Experiences[9].Supervisor}
Application {Application.Experiences[1].SupervisorEmail}
Application {Application.Experiences[10].SupervisorEmail}
Application {Application.Experiences[2].SupervisorEmail}
Application {Application.Experiences[3].SupervisorEmail}
Application {Application.Experiences[4].SupervisorEmail}
Application {Application.Experiences[5].SupervisorEmail}
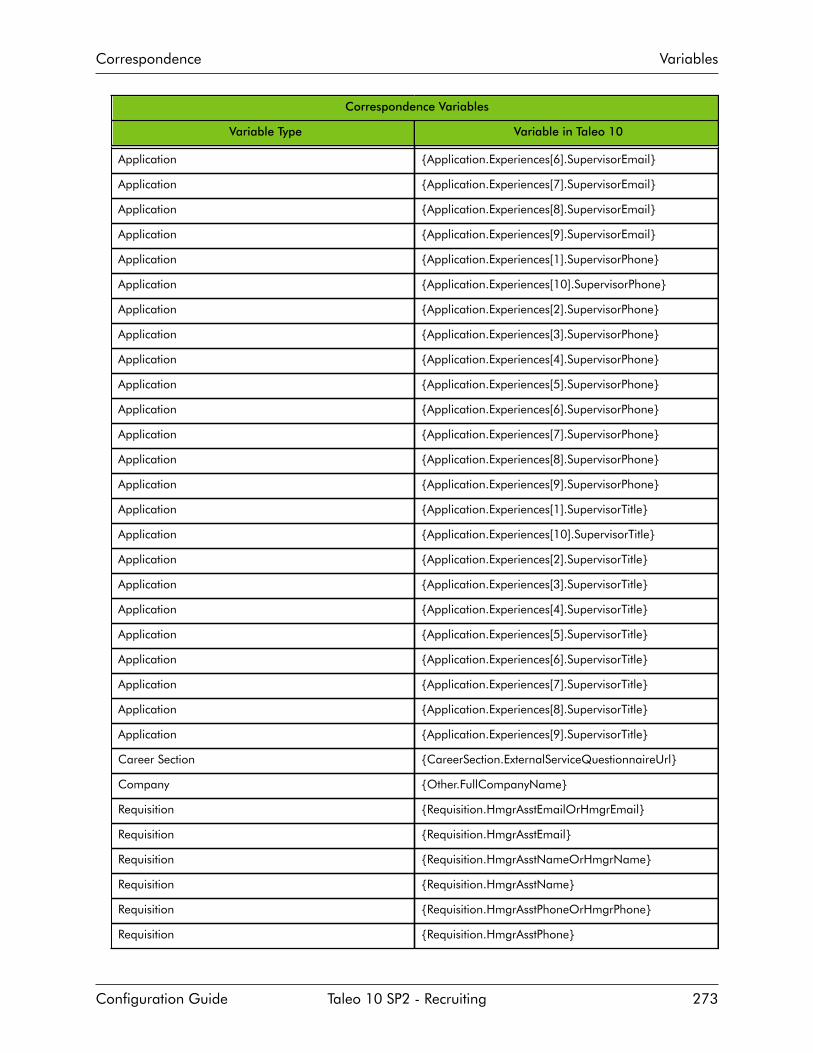
Correspondence Variables
Configuration Guide Taleo 10 SP2 - Recruiting 273
Correspondence Variables
Variable Type Variable in Taleo 10
Application {Application.Experiences[6].SupervisorEmail}
Application {Application.Experiences[7].SupervisorEmail}
Application {Application.Experiences[8].SupervisorEmail}
Application {Application.Experiences[9].SupervisorEmail}
Application {Application.Experiences[1].SupervisorPhone}
Application {Application.Experiences[10].SupervisorPhone}
Application {Application.Experiences[2].SupervisorPhone}
Application {Application.Experiences[3].SupervisorPhone}
Application {Application.Experiences[4].SupervisorPhone}
Application {Application.Experiences[5].SupervisorPhone}
Application {Application.Experiences[6].SupervisorPhone}
Application {Application.Experiences[7].SupervisorPhone}
Application {Application.Experiences[8].SupervisorPhone}
Application {Application.Experiences[9].SupervisorPhone}
Application {Application.Experiences[1].SupervisorTitle}
Application {Application.Experiences[10].SupervisorTitle}
Application {Application.Experiences[2].SupervisorTitle}
Application {Application.Experiences[3].SupervisorTitle}
Application {Application.Experiences[4].SupervisorTitle}
Application {Application.Experiences[5].SupervisorTitle}
Application {Application.Experiences[6].SupervisorTitle}
Application {Application.Experiences[7].SupervisorTitle}
Application {Application.Experiences[8].SupervisorTitle}
Application {Application.Experiences[9].SupervisorTitle}
Career Section {CareerSection.ExternalServiceQuestionnaireUrl}
Company {Other.FullCompanyName}
Requisition {Requisition.HmgrAsstEmailOrHmgrEmail}
Requisition {Requisition.HmgrAsstEmail}
Requisition {Requisition.HmgrAsstNameOrHmgrName}
Requisition {Requisition.HmgrAsstName}
Requisition {Requisition.HmgrAsstPhoneOrHmgrPhone}
Requisition {Requisition.HmgrAsstPhone}

Correspondence Variables
Configuration Guide Taleo 10 SP2 - Recruiting 274
Correspondence Variables
Variable Type Variable in Taleo 10
Requisition {Requisition.HmgrEmail}
Requisition {Requisition.HmgrName}
Requisition {Requisition.HmgrPhone}
Requisition {Requisition.JobDescriptionExternal}
Requisition {Requisition.JobDescriptionInternal}
Career Section {CareerSection.JobDescriptionUrl}
Career Section {CareerSection.JobIsiUrl}
Requisition {Requisition.JobQualificationsExternal}
Requisition {Requisition.JobQualificationsInternal}
Requisition {CareerSection.JobRmiUrl}
Requisition {Requisition.JobTitle}
Other {Other.JobToFriendComments}
Other {Other.JobToFriendDescription}
Other {Other.JobToFriendQualifications}
Career Section {CareerSection.JobUrl}
Requisition {Requisition.JobfieldStructure}
Application {Application.DisqualificationQuestions[1].Question}
Application {Application.DisqualificationQuestions[10].Question}
Application {Application.DisqualificationQuestions[2].Question}
Application {Application.DisqualificationQuestions[3].Question}
Application {Application.DisqualificationQuestions[4].Question}
Application {Application.DisqualificationQuestions[5].Question}
Application {Application.DisqualificationQuestions[6].Question}
Application {Application.DisqualificationQuestions[7].Question}
Application {Application.DisqualificationQuestions[8].Question}
Application {Application.DisqualificationQuestions[9].Question}
Application {Application.DisqualificationQuestions[1].Result}
Application {Application.DisqualificationQuestions[10].Result}
Application {Application.DisqualificationQuestions[2].Result}
Application {Application.DisqualificationQuestions[3].Result}
Application {Application.DisqualificationQuestions[4].Result}
Application {Application.DisqualificationQuestions[5].Result}

Correspondence Variables
Configuration Guide Taleo 10 SP2 - Recruiting 275
Correspondence Variables
Variable Type Variable in Taleo 10
Application {Application.DisqualificationQuestions[6].Result}
Application {Application.DisqualificationQuestions[7].Result}
Application {Application.DisqualificationQuestions[8].Result}
Application {Application.DisqualificationQuestions[9].Result}
Agency {Other.ListOfAgents}
Requisition {Requisition.LocationStructure}
Other {Other.MaximumAttachmentSize}
Other {Other.MaximumAttachments}
Scheduling {Meeting.Attendees}
Scheduling {Meeting.Comments}
Scheduling {Meeting.DateAndTime}
Scheduling {Meeting.Location}
Scheduling {Meeting.Organizer}
Scheduling {Meeting.SharedInformationAccess}
Scheduling {Meeting.Subject}
Career Section {CareerSection.MyAccountAccess}
Other {Other.MyActivityComments}
Other {Other.MyActivityDueDate}
Other {Other.MyActivityName}
Other {Other.MyActivityPriorityDesc}
Other {Other.MyActivityStatusDesc}
Offer {Offer.ActualStartDate}
Offer {Offer.ActualStartTime}
Offer {Offer.AnnualBonus}
Offer {Offer.CarAllowance}
Offer {Offer.CommissionAmount}
Offer {Offer.CommissionType}
Offer {Offer.CreationDate}
Offer {Offer.ExpenseAccount}
Offer {Offer.ExpiryDate}
Offer {Offer.ExtendDate}
Offer {Offer.OptionsType}

Correspondence Variables
Configuration Guide Taleo 10 SP2 - Recruiting 276
Correspondence Variables
Variable Type Variable in Taleo 10
Offer {Offer.Options}
Offer {Offer.OtherBonus}
Offer {Offer.OtherCompensation}
Offer {Offer.PayBasis}
Offer {Offer.Pay}
Offer {Offer.RelocationAmount}
Offer {Offer.RelocationType}
Offer {Offer.SalaryCurrency}
Offer {Offer.Salary}
Offer {Offer.SignOnBonus}
Offer {Offer.StockAmount}
Offer {Offer.StockType}
Offer {Offer.TargetStartDate}
Offer {Offer.VacationUnit}
Offer {Offer.Vacation}
User {Other.OperatorEmail}
User {Other.OperatorName}
User {Other.OperatorPhone}
Requisition {Requisition.OrganisationStructure}
Other {Other.OriginalMessageSentDate}
Other {Other.OriginalMessageSubject}
Other {Other.PageBreak}
Candidate Profile {Candidate.PrimaryNumber}
Other {Other.ProductName}
Candidate Profile {CareerSection.ProfilerUrl}
Application {Application.Questions[1].Question}
Application {Application.Questions[10].Question}
Application {Application.Questions[2].Question}
Application {Application.Questions[3].Question}
Application {Application.Questions[4].Question}
Application {Application.Questions[5].Question}
Application {Application.Questions[6].Question}

Correspondence Variables
Configuration Guide Taleo 10 SP2 - Recruiting 277
Correspondence Variables
Variable Type Variable in Taleo 10
Application {Application.Questions[7].Question}
Application {Application.Questions[8].Question}
Application {Application.Questions[9].Question}
Application {Application.Questions[1].QuestionResult}
Application {Application.Questions[10].QuestionResult}
Application {Application.Questions[2].QuestionResult}
Application {Application.Questions[3].QuestionResult}
Application {Application.Questions[4].QuestionResult}
Application {Application.Questions[5].QuestionResult}
Application {Application.Questions[6].QuestionResult}
Application {Application.Questions[7].QuestionResult}
Application {Application.Questions[8].QuestionResult}
Application {Application.Questions[9].QuestionResult}
Requisition {Requisition.RecruiterAsstEmailOrRecruiterEmail}
Requisition {Requisition.RecruiterAsstEmail}
Requisition {Requisition.RecruiterAsstNameOrRecruiterName}
Requisition {Requisition.RecruiterAsstName}
Requisition {Requisition.RecruiterAsstPhoneOrRecruiterPhone}
Requisition {Requisition.RecruiterAsstPhone}
Requisition {Requisition.RecruiterEmail}
Requisition {Requisition.RecruiterName}
Requisition {Requisition.RecruiterPhone}
Application {Application.References[1].Company}
Application {Application.References[10].Company}
Application {Application.References[2].Company}
Application {Application.References[3].Company}
Application {Application.References[4].Company}
Application {Application.References[5].Company}
Application {Application.References[6].Company}
Application {Application.References[7].Company}
Application {Application.References[8].Company}
Application {Application.References[9].Company}

Correspondence Variables
Configuration Guide Taleo 10 SP2 - Recruiting 278
Correspondence Variables
Variable Type Variable in Taleo 10
Application {Application.References[1].Country}
Application {Application.References[10].Country}
Application {Application.References[2].Country}
Application {Application.References[3].Country}
Application {Application.References[4].Country}
Application {Application.References[5].Country}
Application {Application.References[6].Country}
Application {Application.References[7].Country}
Application {Application.References[8].Country}
Application {Application.References[9].Country}
Application {Application.References[1].Email}
Application {Application.References[10].Email}
Application {Application.References[2].Email}
Application {Application.References[3].Email}
Application {Application.References[4].Email}
Application {Application.References[5].Email}
Application {Application.References[6].Email}
Application {Application.References[7].Email}
Application {Application.References[8].Email}
Application {Application.References[9].Email}
Application {Application.References[1].FirstName}
Application {Application.References[10].FirstName}
Application {Application.References[2].FirstName}
Application {Application.References[3].FirstName}
Application {Application.References[4].FirstName}
Application {Application.References[5].FirstName}
Application {Application.References[6].FirstName}
Application {Application.References[7].FirstName}
Application {Application.References[8].FirstName}
Application {Application.References[9].FirstName}
Application {Application.References[1].LastName}
Application {Application.References[10].LastName}

Correspondence Variables
Configuration Guide Taleo 10 SP2 - Recruiting 279
Correspondence Variables
Variable Type Variable in Taleo 10
Application {Application.References[2].LastName}
Application {Application.References[3].LastName}
Application {Application.References[4].LastName}
Application {Application.References[5].LastName}
Application {Application.References[6].LastName}
Application {Application.References[7].LastName}
Application {Application.References[8].LastName}
Application {Application.References[9].LastName}
Application {Application.References[1].MiddleInitial}
Application {Application.References[10].MiddleInitial}
Application {Application.References[2].MiddleInitial}
Application {Application.References[3].MiddleInitial}
Application {Application.References[4].MiddleInitial}
Application {Application.References[5].MiddleInitial}
Application {Application.References[6].MiddleInitial}
Application {Application.References[7].MiddleInitial}
Application {Application.References[8].MiddleInitial}
Application {Application.References[9].MiddleInitial}
Application {Application.References[1].Phone}
Application {Application.References[10].Phone}
Application {Application.References[2].Phone}
Application {Application.References[3].Phone}
Application {Application.References[4].Phone}
Application {Application.References[5].Phone}
Application {Application.References[6].Phone}
Application {Application.References[7].Phone}
Application {Application.References[8].Phone}
Application {Application.References[9].Phone}
Application {Application.References[1].ReferenceType}
Application {Application.References[10].ReferenceType}
Application {Application.References[2].ReferenceType}
Application {Application.References[3].ReferenceType}

Correspondence Variables
Configuration Guide Taleo 10 SP2 - Recruiting 280
Correspondence Variables
Variable Type Variable in Taleo 10
Application {Application.References[4].ReferenceType}
Application {Application.References[5].ReferenceType}
Application {Application.References[6].ReferenceType}
Application {Application.References[7].ReferenceType}
Application {Application.References[8].ReferenceType}
Application {Application.References[9].ReferenceType}
Application {Application.References[1].Relationship}
Application {Application.References[10].Relationship}
Application {Application.References[2].Relationship}
Application {Application.References[3].Relationship}
Application {Application.References[4].Relationship}
Application {Application.References[5].Relationship}
Application {Application.References[6].Relationship}
Application {Application.References[7].Relationship}
Application {Application.References[8].Relationship}
Application {Application.References[9].Relationship}
Application {Application.References[1].RelationshipLength}
Application {Application.References[10].RelationshipLength}
Application {Application.References[2].RelationshipLength}
Application {Application.References[3].RelationshipLength}
Application {Application.References[4].RelationshipLength}
Application {Application.References[5].RelationshipLength}
Application {Application.References[6].RelationshipLength}
Application {Application.References[7].RelationshipLength}
Application {Application.References[8].RelationshipLength}
Application {Application.References[9].RelationshipLength}
Application {Application.References[1].Title}
Application {Application.References[10].Title}
Application {Application.References[2].Title}
Application {Application.References[3].Title}
Application {Application.References[4].Title}
Application {Application.References[5].Title}

Correspondence Variables
Configuration Guide Taleo 10 SP2 - Recruiting 281
Correspondence Variables
Variable Type Variable in Taleo 10
Application {Application.References[6].Title}
Application {Application.References[7].Title}
Application {Application.References[8].Title}
Application {Application.References[9].Title}
Referral {Other.ReferralValidityPeriod}
Referral {Referrer.Email}
Referral {Referrer.FirstName}
Referral {Referrer.LastName}
Referral {Referrer.MiddleName}
Application {Other.RequestMoreInfoData}
Requisition {Requisition.AnnualBonus}
Requisition {Requisition.CarAllowance}
Requisition {Requisition.ClosingDate}
Requisition {Requisition.CommissionType}
Requisition {Requisition.Commission}
Requisition {Requisition.DepartmentName}
Requisition {Requisition.DepartmentNumber}
Requisition {Requisition.EducationLevel}
Requisition {Requisition.EmployeeReferralBonus}
Requisition {Requisition.EmployeeStatus}
Requisition {Requisition.ExpenseAccount}
Requisition {Requisition.HighQuartileSalary}
Requisition {Requisition.JobGrade}
Requisition {Requisition.JobLevel}
Requisition {Requisition.JobSchedule}
Requisition {Requisition.JobShift}
Requisition {Requisition.JobType}
Requisition {Requisition.LowQuartileSalary}
Requisition {Requisition.MaximumSalary}
Requisition {Requisition.MidpointSalary}
Requisition {Requisition.MinimumSalary}
Requisition {Requisition.No}

Correspondence Variables
Configuration Guide Taleo 10 SP2 - Recruiting 282
Correspondence Variables
Variable Type Variable in Taleo 10
Requisition {Requisition.Number}
Requisition {Requisition.OpeningDate}
Requisition {Requisition.OtherBonus}
Requisition {Requisition.OtherCompensation}
Requisition {Requisition.PublicReferralBonus}
Requisition {Requisition.RelocationType}
Requisition {Requisition.Relocation}
Requisition {Requisition.SharesType}
Requisition {Requisition.Shares}
Requisition {Requisition.SignOnBonus}
Requisition {Requisition.StockOptionsType}
Requisition {Requisition.StockOptions}
Requisition {Requisition.TargetStartDate}
Requisition {Requisition.VacationType}
Requisition {Requisition.Vacation}
Application {Candidate.ShiftGrid}
Application {Application.Skills[1].Name}
Application {Application.Skills[10].Name}
Application {Application.Skills[2].Name}
Application {Application.Skills[3].Name}
Application {Application.Skills[4].Name}
Application {Application.Skills[5].Name}
Application {Application.Skills[6].Name}
Application {Application.Skills[7].Name}
Application {Application.Skills[8].Name}
Application {Application.Skills[9].Name}
Application {Application.Skills[1].Result}
Application {Application.Skills[10].Result}
Application {Application.Skills[2].Result}
Application {Application.Skills[3].Result}
Application {Application.Skills[4].Result}
Application {Application.Skills[5].Result}

Correspondence Variables
Configuration Guide Taleo 10 SP2 - Recruiting 283
Correspondence Variables
Variable Type Variable in Taleo 10
Application {Application.Skills[6].Result}
Application {Application.Skills[7].Result}
Application {Application.Skills[8].Result}
Application {Application.Skills[9].Result}
Other {Other.SupportedAttachmentFormat}
Career Section {CareerSection.UnsubscribeNowUrl}
Other {Other.UserEmail}
Other {Other.UserFirstName}
Career Section {CareerSection.UserForgotPwdUrl}
Other {Other.UserFullName}
Other {Other.UserLastName}
Other {Other.UserMiddleName}
Other {Other.UserPassword}
Other {Other.UserUsername}
Other {CareerSection.UserWebtopSuiteUrl}
Candidate Profile {WorkConditions.Currency}
Candidate Profile {WorkConditions.HoursPreferred}
Candidate Profile {WorkConditions.HoursWillingWork}
Candidate Profile {WorkConditions.PayRate}
Candidate Profile {WorkConditions.WorkHoliday}
Candidate Profile {WorkConditions.WorkWeekend}

Correspondence Notifications
Configuration Guide Taleo 10 SP2 - Recruiting 284
Notifications
NotificationA notification is an e-mail message automatically sent by the system.
Notifications are optional e-mail messages sent to notify Recruiting and eShare users ofkey workflow events affecting the recruiting and hiring cycle. The system administrator canchoose whether to send or not to send an e-mail for a given triggering event. For example,notifications can be sent for:• Approval process• Job posting• End of sourcing• Candidate selection (when a candidate applies, starts or completes an interview step, when
an offer is made, etc.)• Requisition is being closed• Requisition is put on holdWhen the system administrator chooses to send a notification, the system automaticallychooses the message template with the corresponding triggering event.
eShare approval request (offers and requisitions) e-mails have an expiration date of 30 days.This date cannot be changed. eShare e-mails cannot be edited, they are supplied with theapplication. E-mails are sent to eShare users only for the contribute, extend posting, approverequisition and approve offer actions.
ConfigurationUser Type Permissions
Name Location
Access Correspondence Manager configuration Configuration > [SmartOrg] Administration> User Types >Recruiting > Administration
Send messages created from scratch (whilechanging the status of a candidate in a workflow)
Configuration > [SmartOrg] Administration> User Types >Recruiting > Candidates
Access the "Preferences" section in 'My Setup' menu Configuration > [SmartOrg] Administration> User Types >Recruiting > Other
Settings
Name Possible Values Default Value Location
Job Posting Notification (InternalCandidates)
• Yes
• No
Yes Configuration > [Recruiting]Settings
Workflow Events Notifications• Yes
• No
No Configuration > [Settings] Settings

Correspondence Notifications
Configuration Guide Taleo 10 SP2 - Recruiting 285
Activating a NotificationPrerequisite
The Workflow Events Notifications global setting allows the activation of this feature.
Configuration > [Recruiting] Administration > Notifications
Steps
1. Select the desired notifications and related options.2. Click Save.
For certain notifications, the user settings must indicate if the user wishes to receiveworkflow notifications. This can be determined by the system administrator in the user'ssettings, or by the user in My Setup (if permitted).
Result
The notifications are enabled. E-mails will be sent automatically by the system when selectednotifications and options are met.
Next Step
In SmartOrg, activate the user preference in user accounts entitled Workflow EventsNotification. E-mails will be sent automatically when selected notifications and options aremet.

Source Tracking
• Source............................................................................................................... 287
• Event..................................................................................................................294

Source Tracking Source
Configuration Guide Taleo 10 SP2 - Recruiting 287
Source
Recruiting SourceA recruiting source is a medium or event through which a candidate has heard about the jobposted or about a company.
Sources are used for source tracking purposes. Sources may be as diverse as Internet jobboards, job fairs, magazines, specialized trade publications, newspapers, professionalassociations, mailing lists, recruiting agencies, etc.
Two types of sources exist:• System-defined sources: These sources are provided by Taleo and cannot be deleted from
the database. However, they can be removed by the system administrator. A source thathas been removed from the sources list can be added again as it remains available in thedatabase. If a source is removed form the sources list, it no longer appears to users in TaleoRecruiting Center, unless users can access Taleo sources directly because they have beengranted the Select Taleo system sources in selector window user type permission. The use ofa system-defined source can be modified by the system administrator, that is if the source isused in the profiler, in a requisition, in both, or in none.
• User-defined sources: These sources are created by the system administrator. A user-definedsource can be permanently deleted from the sources list, provided it is not in use. If a user-defined source is in use, deleting it will only inactivate it. The properties of a user-definedsource as well as the Organization-Location-Job Field structure associated to it can bemodified by the system administrator even if the source is in use.
The system administrator can configure the use, the visibility and the Organization-Location-Job Field structure of a source.• Use: a source is required by users when creating a requisition (use = in requisition). A
source can also be used by candidates when entering their profile in a career section (use= in profiler). A source can be used in a requisition source list (in requisition) and/or in ageneral profile source list (in profiler). If the use of a source is not defined, then the sourcewill not automatically default into the source list for the requisitions or the general profiles.However, via Taleo Recruiting Center, a user can still add the source to a specific source list.The use of a source can be modified after it has been created
• Visibility: The visibility of a source can be set to internal or public. An internal source can beviewed only by users. A public source can be viewed by candidates in career sections and byusers in Taleo Recruiting Center.
• Organization-Location-Job Field structure: a source can be associated to organizations,locations and/or job fields. If a source is to be available to all requisitions, no Organization-Location-Job Field structure needs to be associated to the source. However:
When creating a requisition, only the sources that have the same Organization-Location-JobField structure as the requisition are displayed in the Sources list.
When a candidate applies on a job (requisition), only the sources that have the sameOrganization-Location-Job Field structure as the requisition on which the candidate isapplying on, are displayed in the Sources list.
When candidates complete their profile without actually applying on a job, all sources thatare active and set to “In Profiler” will display, no matter what the Organization-Location-Job

Source Tracking Source
Configuration Guide Taleo 10 SP2 - Recruiting 288
Field structure is set for on the source. The reason for this is that the source tracking blockcan be placed before or after the Organization-Location-Job Field block and therefore thesystem is just set to not look at the Organization-Location-Job Field when defining whatsources to display.
Benefits• Allows your organization to know how many candidates applied through each source.• Provides data on the performance of each source allowing your organization to better
decide where to post jobs.• When posting a job, only the sources relevant to the context are included and available for
candidates to choose from.• Provides the ability to efficiently manage large numbers of sources.• Does not require any settings activation.
ConfigurationUser Type Permissions
Name Location
Select Taleo system sources in selector window Configuration > [SmartOrg] Administration> User Types >Recruiting > Sourcing
Access Posting and Sourcing Configuration > [SmartOrg] Administration> User Types >Recruiting > Sourcing
Settings
Name Possible Values Default Value Location
Already Answered Source TrackingQuestion
• No
• Yes
Yes Configuration > [Recruiting] Settings
Source Tracking QuestionsMandatory
• No
• Yes
No Configuration > [Recruiting] Settings
Source Tracking List Presented• No
• Yes
Yes Configuration > [Recruiting] Settings
General Profile Source Tracking• No
• Yes
Yes Configuration > [Recruiting] Settings
Source TypesStandard Taleo Source Types
Agency
Agent
Billboards
Broadcast
Career Fair

Source Tracking Source
Configuration Guide Taleo 10 SP2 - Recruiting 289
Standard Taleo Source Types
Direct Mail
Direct Sourcing
Job Board
Magazines and Trade Publications
Mailing List
News Group
Newspapers
Other
Our Web Site
Professional Associations
Referral
Social Network
Talent Exchange
Taleo Performance
University Recruiting
Unsolicited
Source TrackingSource tracking allows users to know how the candidate has heard about a position.
Users have the option to embed the ID of an event or of a source into the URL that sends thecandidate to a Career Section. By using the ID of a source or an event in the URL of a CareerSection, it is possible to track the event or the source from which the candidate has heardabout a position.
If a source code is the same as the event code, the source code will win over the event code.Therefore, the same code should not be used for a source and an event.
There are technically three levels of source tracking:
Level Item Description Example
1 Source Type General source Newspaper
2 Source Specific source Boston globe
3 Event Timely event for a source An add in the Boston Globe on Sunday
The system administrator can determine at what level the tracking will take place:
• Source: Sourcing performance is measured in terms of the source only.• Event: Sourcing performance is measured in terms of a specific event related to a source.
To collect sourcing data, the application can be configured to ask candidates where they heardabout the job they are applying for. The choice of answers for each job posted can be specified

Source Tracking Source
Configuration Guide Taleo 10 SP2 - Recruiting 290
by the administrator in Recruiting Configuration. Recruiting Center users can then view data invarious layouts of the Source Tracking Report.
Note: Agencies and agents appearing under the Corporate Sources List are created under theAgencies section of Recruiting Configuration.
ConfigurationUser Type Permissions
Name Location
Select Taleo system sources in selector window Configuration > [SmartOrg] Administration> User Types >Recruiting > Sourcing
Access Posting and Sourcing Configuration > [SmartOrg] Administration> User Types >Recruiting > Sourcing
Access Source Tracking Management Configuration > [SmartOrg] Administration> User Types >Recruiting > Configuration
Settings
Name Possible Values Default Value Location
Already Answered Source TrackingQuestion
• No
• Yes
Yes Configuration > [Recruiting] Settings
Source Tracking QuestionsMandatory
• No
• Yes
No Configuration > [Recruiting] Settings
Source Tracking List Presented• No
• Yes
Yes Configuration > [Recruiting] Settings
General Profile Source Tracking• No
• Yes
No Configuration > [Recruiting] Settings
Creating a SourcePrerequisite
Only user-defined sources can be created.
The Access Source Tracking configuration user type permission is required.
Configuration > [Recruiting] Administration > Sources
Steps
1. In the Corporate Sources tab, click New...2. Follow the instructions of the Source Creation Wizard.
Result
The source is displayed in the Corporate Sources tab. It is available to candidates whenapplying on a job.

Source Tracking Source
Configuration Guide Taleo 10 SP2 - Recruiting 291
Adding a SourcePrerequisite
Only system sources can be added.
The Access Source Tracking configuration user type permission is required.
Configuration > [Recruiting] Administration > Sources
Steps
1. In the Corporate Sources tab, clear the Show Sub-folder Contents option located in theleft pane.
2. Click Refresh.3. In the Corporate Sources tab, click Add…4. Select a source.5. Click Add.6. Click Done.
Result
The selected source appears in the Corporate Sources tab and is available in RecruitingCenter.
Removing a SourcePrerequisite
Only system sources can be removed.
The source must not be used in a requisition or candidate profile.
The Access Source Tracking configuration user type permission is required.
Configuration > [Recruiting] Administration > Sources
Steps
1. In the Corporate Sources tab, select a source.2. Click Remove.
Result
The source is removed from the Corporate Sources tab. Users can no longer use the source.
Deleting a SourcePrerequisite
Only user-defined sources can be deleted.
The source must not be used in a requisition or candidate profile.
The Access Source Tracking configuration user type permission is required.

Source Tracking Source
Configuration Guide Taleo 10 SP2 - Recruiting 292
Configuration > [Recruiting] Administration > Sources
Steps
1. In the Corporate Sources tab, click on a source.2. Click Delete.
Result
If the deleted source is in use, it will only be deactivated. If the deleted source is not in use,then it is permanently deleted.
Reactivating a SourcePrerequisite
The Access Source Tracking configuration user type permission is required.
The source must be inactive.
Configuration > [Recruiting] Administration > Sources
Steps
1. In the Source list, select an inactive source.2. Select Reactivate.
Editing the Properties of a SourcePrerequisite
The source must not be used in a requisition or candidate profile.
The Access Source Tracking configuration user type permission is required.
Configuration > [Recruiting] Administration > Sources
Steps
1. In the Corporate Source tab, click on a source.2. Click Edit next to Source Properties.3. Edit properties as required.4. Click Done.
Result
The use of a source is modified, i.e. if a source is required by users when creating arequisition or by candidates when entering their profile in a career section.
Editing the Organization-Location-Job Field of a SourcePrerequisite
The source must be a user-defined source.
The source must not be used in a requisition or candidate profile.

Source Tracking Source
Configuration Guide Taleo 10 SP2 - Recruiting 293
The Access Source Tracking configuration user type permission is required.
Configuration > [Recruiting] Administration > Sources
Steps
1. In the Corporate Source tab, click on a source.2. Click Edit next to Organization-Location-Job Field Classification.3. Click Add to add Organization-Location-Job Field elements.4. Click Remove or Remove All to remove Organization-Location-Job Field elements.5. Click Done.
Result
The source will only be displayed in a context matching the Organization-Location-Job Fieldstructure.

Source Tracking Event
Configuration Guide Taleo 10 SP2 - Recruiting 294
Event
Recruiting EventAn event is a specific advertisement in a trade magazine, a recruiting event on a universitycampus (job fair), or a special recruiting event at an organization.
Events allow users to track down which event/banner/campaign are attracting the mostcandidates to their career sections. Events are created by the system administrator and arelinked to a specific source. When a source is used in a source list of a requisition (in requisition)or a general profile (in profiler), any event created for that source is also populated in the list.
For events to be made available in requisitions or in general profiles, the system administratormust set the Tracking Mode setting value to Event. This will display the Events column in theCorporate Sources List and from there, the system administrator will be able to configureevents.
For tracking purposes, the event ID which is unique, can be embedded into the URL that sendsthe candidate to a career section. Therefore, when a candidate logs to a career section, theURL will include the event from which the candidate has heard about the job posting or thecompany. For details, refer to the Career Section Administration Manual.
The properties of an event can be modified even if the event is used in a requisition or in ageneral profile.
Benefits• Provides data on the performance of each event allowing an organization to better decide
where to post jobs.
ConfigurationSetting
Name Possible Values Default Value Location
Tracking Mode• Source
• Event
Source Configuration > [Recruiting] Settings
Creating an EventPrerequisite
The source must be created.
The Tracking Mode setting must be set to Event.
The Access Source Tracking configuration user type permission is required.
Configuration > [Recruiting] Administration > Sources
Steps
1. On the Corporate Sources tab, click the number in the Events column next to a source.

Source Tracking Event
Configuration Guide Taleo 10 SP2 - Recruiting 295
2. Click New...3. Complete the fields.4. Click Done.
Result
The event appears in the Events list of the source. Candidates will be able to select this eventin the Career Sections.
Editing an EventPrerequisite
The source must be created.
The Tracking Mode setting must be set to Event.
The Access Source Tracking configuration user type permission is required.
Configuration > [Recruiting] Administration > Sources
Steps
1. On the Corporate Sources tab, click the number in the Events column next to a source.2. Click on an event.3. Modify the information as needed.4. Click Done.
Removing an EventPrerequisite
The source must be created.
The Tracking Mode setting must be set to Event.
The Access Source Tracking configuration user type permission is required.
Configuration > [Recruiting] Administration > Sources
Steps
1. On the Corporate Sources tab, click the number in the Events column next to a source.2. Select an event.3. Click .
4. Click Yes to confirm your choice.5. Click Done.
Result
The event no longer appears in the Events list of the source. Candidates will no longer beable to select this event in the Career Sections.

Layout
• Page Layout....................................................................................................... 297
• Center Stage......................................................................................................315

Layout Page Layout
Configuration Guide Taleo 10 SP2 - Recruiting 297
Page Layout
Home Page and List Elements ConfigurationElement Description Configuration
Auxiliary Navigation Bar The auxiliary navigation bar is the barlocated at the top right hand side ofpages and contains:
• Home• My Setup• Training and/or e-Learning• About• Sign Out• Web Support• Full screen mode icon
Configuration > [SmartOrg]Administration> Configuration Profiles> Auxiliary Navigation Bar
My Setup link The My Setup link is displayed in theauxiliary navigation bar.
Configuration > [SmartOrg]Administration> User Types >Recruiting > Other > Access the"Preferences" section in 'My Setup'menu
Training link The Training link is displayed in theauxiliary navigation bar and gives accessto online training materials.
Configuration > [SmartOrg]Administration > Configuration Profiles> Training Section URL
Configuration > [Settings] Settings >Training Link Activation
eLearning link The eLearning link is displayed in theauxiliary navigation bar and gives accessto eLearning materials.
Configuration > [SmartOrg]Administration > Configuration Profiles> eLearning Section URL
Web Support link The Web Support link is displayed in theauxiliary navigation bar and gives accessto Web Support. This link only works forusers who are authorized Web Supportusers.
Configuration > [SmartOrg]Administration > ConfigurationProfiles > Display Web Support Link inAuxiliary menu
About link The About link is displayed in theauxiliary navigation bar.
Configuration > [SmartOrg]Administration > Configuration Profiles> About Link in Auxiliary Menu
Core Navigation Bar The core navigation bar is located justabove the central panel and contains:
• Home icon
• Tasks tab• Requisitions tab• Candidates tab• Offers tab
Configuration > [SmartOrg]Administration > Configuration Profiles> Core Navigation Bar

Layout Page Layout
Configuration Guide Taleo 10 SP2 - Recruiting 298
Element Description Configuration
• New Hires tab• Libraries tab (Templates, Questions,
Competencies, DisqualificationQuestions)
Requisitions tab The Requisitions tab is displayed inthe core navigation bar and displaysrequisitions.
Configuration > [SmartOrg]Administration> User Types >Recruiting > Requisitions > Access the"Requisitions" section
Offers tab The Offers tab is displayed in the corenavigation bar and diplays offers.
Configuration > [SmartOrg]Administration> User Types >Recruiting > Offers > View offers
Libraries tab The Libraries tab is displayed in the corenavigation bar and provides accessto requisition templates, questions,competencies and disqualificationquestions.
Configuration > [SmartOrg]Administration> User Types >Recruiting > Prescreening > Access thequestion and competency libraries
Search Widget A tool allowing users to performcandidate search, specific candidatesearch and requisition search.
Configuration > [SmartOrg]Administration > Configuration Profiles> Search Widget
Configuration > [SmartOrg]Administration > User Types >Recruiting > Search > Access QuickSearch and Specific Search
Configuration > [SmartOrg]Administration > User Types >Recruiting > Search > AccessRequisition Search
Advanced Search link The Advanced Search link is availableat the top right hand corner of pages,just beside the search widget. It allowsusers to search for candidate files usingan array of criteria that are different thanthe ones used in the search function.
Configuration > [SmartOrg]Administration > Configuration Profiles> Advanced Search Links
Configuration > [SmartOrg]Administration > User Types >Recruiting > Search > Accessadvanced search
Search Queries link The Search Queries link is availableat the top right hand corner of pages,just beside the search widget. A searchquery is an advanced candidate searchthat has been saved in order to be usedrepetitively and potentially shared withother users.
Configuration > [SmartOrg]Administration > Configuration Profiles> Advanced Search Links
Configuration > [SmartOrg]Administration > User Types >Recruiting > Search > Accessadvanced search

Layout Page Layout
Configuration Guide Taleo 10 SP2 - Recruiting 299
Element Description Configuration
Configuration > [SmartOrg]Administration > User Types >Recruiting > Other > Folders
Center Stage A center stage is what users see in thecenter panel when they first log into theapplication. A center stage may containchannels providing overview informationon requisitions, candidates or offers, aswell as links to create requisitions or viewcandidates.
Configuration > [Recruiting]Administration > Center Stage
Configuration > [SmartOrg]Administration> User Types >Recruiting > Administration > AccessAdministration
Configuration > [SmartOrg]Administration > Configuration Profiles> Center Stage Configuration
Channels A channel is a section contained in thecenter stage. The following channels maybe displayed:
• Candidates• Offers• Onboarding• Candidates tab• Requisitions• Tasks
A channel can be expanded or
collapsed .
Configuration > [Recruiting]Administration > Center Stage
Communications Channel The Communications channel allows thedisplay of useful information to userswhen they first log into Taleo Recruiting.
Configuration > [SmartOrg]Administration > Configuration Profiles> Communication Channel Mode
Configuration > [SmartOrg]Administration > Configuration Profiles> Communication Channel -CustomSection Title
Configuration > [SmartOrg]Administration > Configuration Profiles> Communication Channel -CustomSection Text
Configuration > [SmartOrg]Administration > Configuration Profiles> Communication Channel -CustomSection Link
Configuration > [SmartOrg]Administration > Configuration Profiles> Communication Channel -CustomSection Link Tooltip
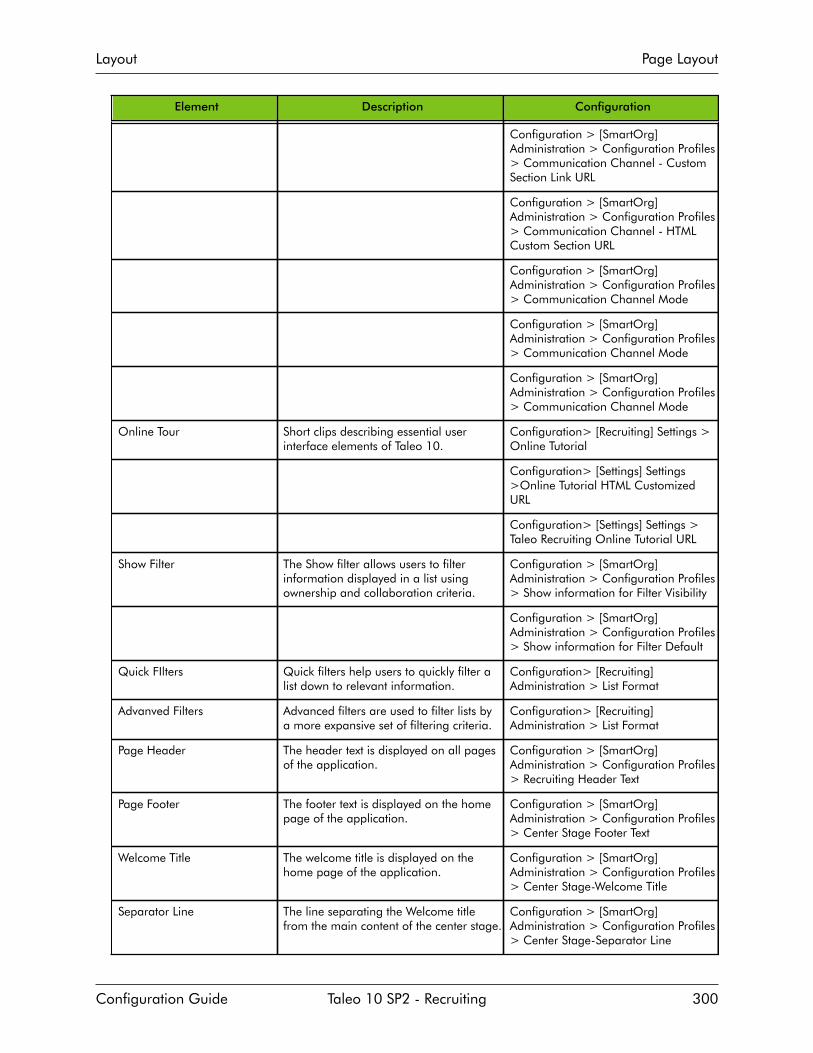
Layout Page Layout
Configuration Guide Taleo 10 SP2 - Recruiting 300
Element Description Configuration
Configuration > [SmartOrg]Administration > Configuration Profiles> Communication Channel - CustomSection Link URL
Configuration > [SmartOrg]Administration > Configuration Profiles> Communication Channel - HTMLCustom Section URL
Configuration > [SmartOrg]Administration > Configuration Profiles> Communication Channel Mode
Configuration > [SmartOrg]Administration > Configuration Profiles> Communication Channel Mode
Configuration > [SmartOrg]Administration > Configuration Profiles> Communication Channel Mode
Online Tour Short clips describing essential userinterface elements of Taleo 10.
Configuration> [Recruiting] Settings >Online Tutorial
Configuration> [Settings] Settings>Online Tutorial HTML CustomizedURL
Configuration> [Settings] Settings >Taleo Recruiting Online Tutorial URL
Show Filter The Show filter allows users to filterinformation displayed in a list usingownership and collaboration criteria.
Configuration > [SmartOrg]Administration > Configuration Profiles> Show information for Filter Visibility
Configuration > [SmartOrg]Administration > Configuration Profiles> Show information for Filter Default
Quick FIlters Quick filters help users to quickly filter alist down to relevant information.
Configuration> [Recruiting]Administration > List Format
Advanved Filters Advanced filters are used to filter lists bya more expansive set of filtering criteria.
Configuration> [Recruiting]Administration > List Format
Page Header The header text is displayed on all pagesof the application.
Configuration > [SmartOrg]Administration > Configuration Profiles> Recruiting Header Text
Page Footer The footer text is displayed on the homepage of the application.
Configuration > [SmartOrg]Administration > Configuration Profiles> Center Stage Footer Text
Welcome Title The welcome title is displayed on thehome page of the application.
Configuration > [SmartOrg]Administration > Configuration Profiles> Center Stage-Welcome Title
Separator Line The line separating the Welcome titlefrom the main content of the center stage.
Configuration > [SmartOrg]Administration > Configuration Profiles> Center Stage-Separator Line

Layout Page Layout
Configuration Guide Taleo 10 SP2 - Recruiting 301
Element Description Configuration
Logo A logo can be displayed in the upperleft corner of Taleo Recruiting and TaleoPerformance pages.
Configuration > [Settings] Settings>Organization Logo
Color Theme A theme is a set of colors used for bodytext, headings, links within an application.
Configuration > [Settings] Settings >Default Theme
Selected Item Color This is the color displayed when selectingelements in the user interface
Configuration > [Settings] Settings >Selected Item Default Color
Auxiliary Navigation BarThe auxiliary navigation bar is the bar located at the top right of pages.
If the auxiliary navigation bar has been enabled, it is available at all times for users to see andaccess.
The auxiliary navigation bar may contain the following elements (if enabled and if users weregranted access to them):• The Home link allows users to go back to the Recruiting home page.• The Resources drop-down list contains the following links:
• My Setup• Training• e-Learning• About• Web Support
• The Sign Out link allows users to sign out from Taleo Recruiting.Elements available in the Resources drop-down list may vary whether they were enabled andassigned to a user's configuration profile.Configuration
The display of the auxiliary navigation bar is enabled by the following setting.
Setting
Name Possible Values Default Value Location
Auxiliary Navigation Bar • No
• Yes
Yes Configuration > [SmartOrg]Administration > ConfigurationProfile
Elements displayed in the auxiliary navigation bar depends on settings that were enabledand on permissions granted to users. For details, refer to Home Page and List ElementsConfiguration.
Core Navigation BarThe core navigation bar provides access to specific features of the Recruiting Center.
The core navigation bar is located just above the central panel. If the bar has been enabled, itis available at all times.
The core navigation bar may contain the following elements (if enabled and if users weregranted access to them):

Layout Page Layout
Configuration Guide Taleo 10 SP2 - Recruiting 302
•Home icon . The home icon has two functionalities:• The home icon allows users to go back to the Table of Contents page.• The arrow located beside the home icon allows users to display a list providing quick
access to specific Taleo products or entry points (for example, Requisitions, Candidates).Products and entry points displayed are determined by active Taleo applications and usertype permissions
• Tasks• Requisitions• Candidates• Offers• New Hires• Libraries (Templates, Questions, Disqualification Questions, Interview Questions,
Competencies)Configuration
The display of the core navigation bar is enabled by the following setting.
Setting
Name Possible Values Default Value Location
Core Navigation Bar • No
• Yes
Yes Configuration > [SmartOrg]Administration > ConfigurationProfile
Elements displayed in the core navigation bar depends on permissions granted to users.
User Type Permissions
Name Location
Access the "Requisitions" section Configuration > [SmartOrg] Administration> User Types >Recruiting > Requisitions
View offers Configuration > [SmartOrg] Administration> User Types >Recruiting > Offers
Access the question and competency libraries Configuration > [SmartOrg] Administration> User Types >Recruiting > Prescreening
About WindowThe content of the About window was modified for the Recruiting Center, RecruitingAdministration, SmartOrg, Onboarding, Performance and Career Section Administrationproducts.
The About box displays the following information:• service pack information (always displayed)• version information (always displayed)• legal statement regarding IP protection (displayed if setting enabled)The legal statement is required mostly for Federal customers. The legal statement will appearas follows:
“Use, reproduction, or disclosure is subject to restrictions set forth in Subcontract No.[Subcontract Number(s)] with Taleo Corporation.”

Layout Page Layout
Configuration Guide Taleo 10 SP2 - Recruiting 303
Configuration
To display a legal statement in the About window, a subcontract number must be entered in thefollowing setting. Contact Taleo to enter or modify the value.
Setting
Name Possible Values Default Value Location
Subcontract Number None Configuration > [Settings]Settings
Search WidgetA tool allowing users to search for candidates and requisitions.
The search widget is available at the top right hand corner of Taleo Recruiting pages. It isavailable to users if it has been configured in the user's configuration profile and if the usertype permission has been granted.
The search widget gives access to three types of search:• quick candidate search• specific candidate search• quick requisition searchConfiguration
The display of the search widget is enabled by the following setting.
Setting
Name Possible Values Default Value Location
Search Widget• No
• Yes
Yes Configuration > [SmarOrg]Administration >Configuration Profile
Users must be granted a permission to access the different types of search available.
User Type Permissions
Name Location
Access candidate Quick and Specific search Configuration > [SmartOrg] Administration > User Types >Recruiting > Search
Access requisition search Configuration > [SmartOrg] Administration > User Types >Recruiting > Search
Page HeaderA header text can be displayed at the top of all pages of the application.

Layout Page Layout
Configuration Guide Taleo 10 SP2 - Recruiting 304
To display text in the header, the system administrator must first submit the desired text to TaleoSupport. Text requirements are:• The text area supports up to 50 characters.• Text must be supplied for all active languages.• Basic HTML formatting such as color, bold and italics are possible, but it is not possible to
embed hyperlinks.
Configuration
The following setting allows the activation of the page header.
Setting
Name Possible Values Default Value Location
Recruiting Header Text• No
• Yes
No Configuration > [SmartOrg]Administration> ConfigurationProfiles
Creating a Page HeaderPrerequisite
Text must be supplied for all active languages.
A maximum of 50 characters is allowed.
Basic HTML formatting such as color, bold and italics are possible, but it is not possible toembed hyperlinks.
Steps
1. Create a text for the page header.2. Send the text to Taleo Support.3. In the SmartOrg Configuration Profiles feature, activate the Recruiting Header Text
setting.
Result
The header text will be displayed to the user in the center of the top panel on all pages ofthe application.
Page FooterA footer text can be displayed on the home page of the application.
To display text in the footer, the system administrator must first submit the desired text to TaleoSupport. Text requirements are as follows:• The text area supports up to 50 characters.• Text must be supplied for all active languages.• Basic HTML formatting such as color, bold and italics are possible, but it is not possible to
embed hyperlinks.
Configuration
The following setting allows the activation of the page footer.
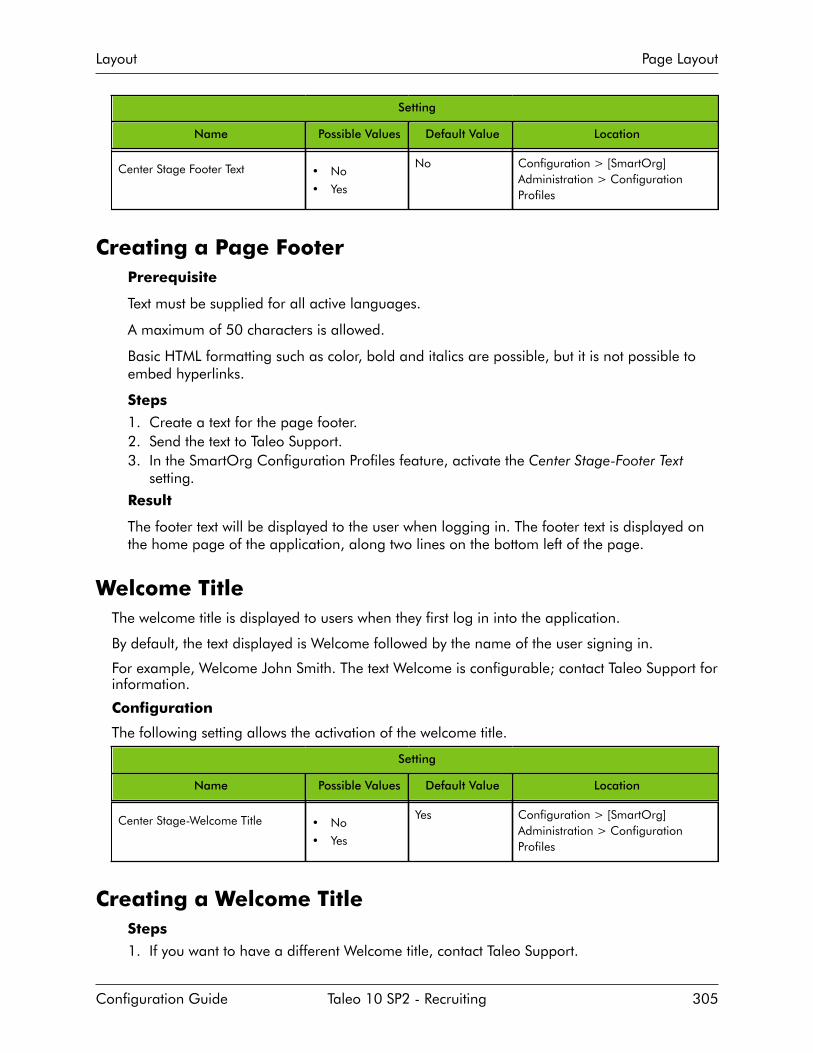
Layout Page Layout
Configuration Guide Taleo 10 SP2 - Recruiting 305
Setting
Name Possible Values Default Value Location
Center Stage Footer Text • No
• Yes
No Configuration > [SmartOrg]Administration > ConfigurationProfiles
Creating a Page FooterPrerequisite
Text must be supplied for all active languages.
A maximum of 50 characters is allowed.
Basic HTML formatting such as color, bold and italics are possible, but it is not possible toembed hyperlinks.
Steps
1. Create a text for the page footer.2. Send the text to Taleo Support.3. In the SmartOrg Configuration Profiles feature, activate the Center Stage-Footer Text
setting.
Result
The footer text will be displayed to the user when logging in. The footer text is displayed onthe home page of the application, along two lines on the bottom left of the page.
Welcome TitleThe welcome title is displayed to users when they first log in into the application.
By default, the text displayed is Welcome followed by the name of the user signing in.
For example, Welcome John Smith. The text Welcome is configurable; contact Taleo Support forinformation.
Configuration
The following setting allows the activation of the welcome title.
Setting
Name Possible Values Default Value Location
Center Stage-Welcome Title • No
• Yes
Yes Configuration > [SmartOrg]Administration > ConfigurationProfiles
Creating a Welcome TitleSteps
1. If you want to have a different Welcome title, contact Taleo Support.

Layout Page Layout
Configuration Guide Taleo 10 SP2 - Recruiting 306
2. In the SmartOrg Configuration Profiles feature, activate the Center Stage-Welcome Titlesetting.
Result
The Welcome text will be displayed to the user when logging in. The word Welcomedisplayed by default at the top left of the Center Stage is replaced.
Separator LineLine separating the Welcome title from the main content of the center stage.
By default, the separator line is not displayed.
Configuration
The following setting allows the activation of the separator line.
Setting
Name Possible Values Default Value Location
Center Stage-Separator Line • No
• Yes
No Configuration > [SmartOrg]Administration > ConfigurationProfiles
Adding a Separator LinePrerequisite
Center Stage must be created and activated.
Configuration > [SmartOrg] Administration > Configuration Profiles
Steps1. Click on a configuration profile.2. Click on the Center Stage - Separator Line setting.3. Click Edit.4. Select Yes.5. Click Save.Result
A line is added between the welcome title and the content of the center stage.
Expandable and Collapsible Sections in a FileSections in candidate files, requisition files and requisition templates can be expanded orcollapsed.
In view mode, sections in candidate files, requisition files and requisition templates can beexpanded or collapsed. Each section has an icon to expand and collapse the section.Only the section title is visible when the section is collapsed.
The expand/collapse feature is enabled by the system administrator. When the setting isenabled, the first section of a file is expanded while the other sections are collapsed. When the

Layout Page Layout
Configuration Guide Taleo 10 SP2 - Recruiting 307
setting is not enabled, all sections are expanded. In the My Setup page, under the Preferencestab (setting: Enable Expand/Collapse Feature), users can change the setting selected by thesystem administrator.
When the expand/collapse feature is enabled, only one expand/collapse context is preservedduring the same user session.
• When a file is accessed for the first time, the first section is expanded and all other sectionsare collapsed.
• The expand/collapse context is preserved when navigating between files of the same type.• The expand/collapse context is restored to the default expand/collapse configuration if,
during navigation, the user opens a file for a different requisition type or a different type offile.
Examples of when the context is preserved or restored
Type of file Type of file Context preserved or restored
Candidate File - Submission(Professional)
Candidate File - Submission(Professional)
Context preserved
Candidate File - General Profile Candidate File - General Profile Context preserved
Candidate File - Submission(Professional)
Candidate File - Submission (Hourly) Context restored
Candidate File - Submission(Professional)
Candidate File - General Profile Context restored
In edit mode, all sections are expanded. If users return to the view mode, all sections remainexpanded regardless of the current expand/collapse setting.
Benefits
• Increased performance by loading only the first section of candidate files, requisition filesand requisition templates.
Configuration
The following setting must be set to Yes to enable the expand/collapse feature. When thesetting is enabled, the first section of a file is expanded while the other sections are collapsed.
Setting
Name Possible Values Default Value Location
Enable Expand/CollapseFeature
• Yes
• No
Yes Configuration > [Settings]Settings
LogoA logo can be displayed in the upper left corner of Taleo applications pages.
The system administrator has the ability to upload a logo that will appear in the upper leftcorner of Taleo applications pages. By default, the Taleo logo is displayed.
A limit of one logo can be defined by zone. The logo must have a JPEG format and dimensionsof 185 x 60 pixels.

Layout Page Layout
Configuration Guide Taleo 10 SP2 - Recruiting 308
Benefits• Provides the ability to brand Taleo applications to more closely fit a customer branding.• Provides a consistent look and feel across Taleo applications.Configuration
Setting
Name Possible Values Default Value Location
Organization Logo Taleo Logo Configuration > [Settings] Settings
Uploading an Organization LogoPrerequisite
A limit of one logo can be uploaded per zone.
Logo must be in a JPEG format and have dimensions of 185 x 60 pixels.
Configuration > [Settings] Settings
Steps1. Click on the Organization Logo setting.2. Click Edit.3. Click Browse to select the file containing the company logo.4. Click Save.Result
The uploaded logo will be displayed in the upper left corner.
Color ThemeA theme is a set of colors used for body text, headings, and links within Taleo applications.
The following standard color themes are provided by Taleo.
Taleo Aqua Sand Ice Silver
A theme is selected by the system administrator for the different Taleo applications.
Users can modify the theme selected by the system administrator in their preferences (My Setup> Preferences tab).Benefits• Provides the ability to brand Taleo applications to more closely fit a customer branding.• Provides a consistent look and feel across Taleo applications.Configuration
By default, the theme selected is the Taleo green. The system administrator can select anothertheme by configuring the following setting.

Layout Page Layout
Configuration Guide Taleo 10 SP2 - Recruiting 309
Setting
Name Possible Values Default Value Location
Default theme• Aqua
• Silver
• Snow
• Taleo
• Ice
• Sand
Taleo Configuration > [Settings]Settings
Important Note: (ID 314) When defining a theme, core navigation will always stay in Taleogreen regardless of the theme color selected. If system administrators desire for the UI and thecore navigation to be completely aligned, for now, they should use the Taleo theme.
Users must be granted the following permission to overwrite the theme selected by the systemadministrator.
User Type Permission
Name Location
Access the "Preferences" section in 'My Setup' menu Configuration > [SmartOrg] Administration > UserTypes > Recruiting > Other
Modifying the ThemePrerequisite
Only one color theme can be displayed per zone.
Configuration > [Settings] Settings
Steps1. Click on the Default Theme setting.2. Click Edit.3. Select the desired color.4. Click Save.Result
Colors selected for body text, headings and links are displayed to user.
Selected Item ColorColor displayed when selecting elements in the user interface.
The following standard colors are provided by Taleo:• Green• Soft blue• Yellow• Blue (inverted)• Dark (inverted)

Layout Page Layout
Configuration Guide Taleo 10 SP2 - Recruiting 310
A default color is selected by the system administrator. Users can modify the color selected bythe system administrator in their preferences (Auxilairy Navigation Bar / Resources / My Setup /Preferences tab).
A high contrast color scheme, Dark (inverted), is available to users to address the Section 508compliance standard for visually impaired users.
Configuration
By default, the selected item color is soft blue. The system administrator can select anothercolor by configuring the following setting.
Setting
Name Possible Values Default Value Location
Selected Item Default Color• Green
• Blue (inverted)
• Soft Blue
• Yellow
• Dark (inverted)
Soft Blue Configuration > Settings
Users must be granted the following permission to overwrite the selected item color selected bythe system administrator.
User Type Permission
Name Location
Access the "Preferences" section in 'My Setup' menu Configuration > [SmartOrg] Administration > UserTypes > Recruiting > Other
Communications ChannelThe Communications channel allows the display of useful information to users when they firstsign in Taleo Recruiting.
The Communications channel is located under the tab located on the right panel of thehome page.
The Communications channel provided by default is made up of three sections, each beingexpandable and collapsible by users.
Section Name Default Text Link
Customer Support Text entered by the systemadministrator.
None
Documentation Center Release notes, tutorials, trainingmanuals, FAQ, glossaries, and othersupport documentation directlyrelated to the recruiting application.
The Documentation link gives accessto the Communication Center.
Resource Center Informational links within the hiringcycle, articles, research content, andmore.
The Resource Center link givesaccess to the Resource Center

Layout Page Layout
Configuration Guide Taleo 10 SP2 - Recruiting 311
Benefits• Flexible options for communication to different audiences.• Default option allows for distinct support instructions for different configuration profiles.• Custom option allows for distinct messaging of text and supporting documents to different
configuration profiles.• Ability to disable section for configuration profiles where the information is not applicable.
Configuration
The Communications channel is configured by the system administrator. By deploying theCommunications channel, customers can display different information at different levels ofcustomization to different user populations, depending on the level of information that needs tobe shared with the group of users.
Settings
Name PossibleValues
Default Value Location
Communication Channel Mode• Default
• Customized
• HTMLcustomized
• Disabled
Default Configuration > [SmartOrg]Administration > ConfigurationProfiles
Communication Channel -Custom Link
Custom Communication Channel -Custom Link
Configuration > [SmartOrg]Administration > ConfigurationProfiles
Customer Support Section• Yes
• No
No Configuration > [SmartOrg]Administration > ConfigurationProfiles
Communication Channel -Custom Link Tooltip
Custom Communication Channel -Custom Link Tooltip
Configuration > [SmartOrg]Administration > ConfigurationProfiles
Customer Support Text Custom Customer Support Text Configuration > [SmartOrg]Administration > ConfigurationProfiles
Communication Channel -Custom Text
Custom Communication Channel -Custom Text
Configuration > [SmartOrg]Administration > ConfigurationProfiles
Communication Channel -Custom Title
Custom Communication Channel -Custom Title
Configuration > [SmartOrg]Administration > ConfigurationProfiles
Communication Channel -HTML Custom URL
Custom Communication Channel -HTML Custom URL
Configuration > [SmartOrg]Administration > ConfigurationProfiles
Communication Channel -Custom Link URL
Custom Communication Channel -Custom Link URL
Configuration > [SmartOrg]Administration > ConfigurationProfiles

Layout Page Layout
Configuration Guide Taleo 10 SP2 - Recruiting 312
Communications Channel ModeCustomers have many options regarding if and how the Communications channel will bedisplayed to users. For each configuration profile, customers can define the appropriateapproach to take by configuring the Communication Channel Mode setting.
Communication Channel Mode
Value Description
Default The Communications channel is displayed in thestandard Taleo format.
However, the Customer Support section can bedisplayed and text in the Customer Support sectioncan be customized by configuring the followingconfiguration profile settings:
• Customer Support Section• Customer Support Text
If no text is customized, then the default text as definedby Taleo will be displayed.
Note that a private setting must be activated by TaleoSupport to define the Communications channel URL.
Customized The Communications channel can be customized todisplay different links.
By using this option, the system administrator cancustomize for each active Recruiting Center language, atitle, text, link, link tooltip, and URL.
The Customer Support section can be displayed and textin the Customer Support section can be customized byconfiguring the following configuration profile settings:
• Customer Support Section• Customer Support Text
If no text is customized, then the default text as definedby Taleo will be displayed.
The title of the Communications channel is customizedvia this configuration profile setting:
• Communication Channel - Custom Section Title
The text in the Communications channel is customizedvia this configuration profile setting:
• Communication Channel - Custom Section Text
The link text that brings users to the Communicationschannel is customized via this configuration profilesetting:
• Communication Channel - Custom Section Link

Layout Page Layout
Configuration Guide Taleo 10 SP2 - Recruiting 313
Communication Channel Mode
Value Description
The tooltip of the link that brings users to theCommunications channel is customized via thisconfiguration profile setting:
• Communication Channel - Custom Section LinkTooltip
The URL of the custom page in the Communicationschannel is customized via this configuration profilesetting:
• Communication Channel - Custom Section Link URL
Note that if the setting is set to Customized andthe above settings have no content, then theCommunications channel will be blank.
HTML Customized The Communications channel contains the URL of theclient’s HTML page.
Using this option, the system administrator can definean entirely distinct URL for each active Recruiting Centerlanguage. This URL will then be loaded in an iFrameand replace the Communications channel sectionon the home page. The HTML customized URLs canbe the same or can be different for each individualconfiguration profile.
The URL is customized via this configuration profilesetting:
• Communication Channel - HTML Custom sectionURL
If no content is provided or if content is invalid, then theCommunications channel will be displayed blank or withan error message.
Note that the HTML Customized mode requires thatFlash Player be set in transparent/opaque mode.
A private setting must be activated by Taleo Support todefine the standard Communications channel URL.
Disabled The Communications channel is not displayed.
Customizing Text in the Customer Support SectionPrerequisite
The Communication Channel Mode setting in the user’s configuration profile must be set toeither Default or Customized.
The Customer Support Section setting must be activated in the SmartOrg ConfigurationProfiles feature.
Configuration > [SmartOrg] Administration > Configuration Profiles

Layout Page Layout
Configuration Guide Taleo 10 SP2 - Recruiting 314
Steps
1. Click on a configuration profile.2. Click on the Customer Support Text setting.3. Click Edit.4. Enter the desired text for each activated language.5. Click Save.
Result
Added text will be displayed in the Customer Support section located in the Communicationschannel in the right panel of the page.

Layout Center Stage
Configuration Guide Taleo 10 SP2 - Recruiting 315
Center Stage
Center StageA center stage is what users see in the center panel when they first log into the RecruitingCenter.
From the center stage, users can be presented with key information and/or jump into theunderlying application to perform more complex actions. For example, a center stage maycontain elements such as task list, links to create requisitions or view candidates, channelsproviding overview information on requisitions, candidates or offers.
A center stage can be customized for specific needs or users. Once the center stage is createdand configured, it is associated to a configuration profile. And one configuration profile is thenassigned to a user account. Consequently, depending on the user logging into Taleo Recruiting,the information displayed in the central panel of the home page will differ.
Three default center stages are supplied with the application:
• Recruiter• Hiring Manager• Hourly Manager
The system administrator can edit these default center stages and can also create new centerstages either from scratch or by duplicating existing ones. Changes made to a center stage areapplied the next time a user linked to any configuration profiles using that center stage logs in.
Information in the center stage may be displayed as follows:
• Single column: channels, links and lists are displayed in one single column.• Two columns: channels, links and lists are displayed in two columns. The system
administrator can choose which column and the order in which each widget will appear inthat column.
• Two columns with header: channels, links and lists are displayed in either the header or oneof the two columns, as specified by the system administrator when placing the widgets.
A center stage may contain channels, links and lists.
Channels contain overview counts of information about the area and links that can redirectthe user to another part of the application. Channels are supplied by Taleo and cannot becreated nor edited. The following channels are available:
• Candidates• Offers• Onboarding• Requisitions• Tasks
A channel always includes a list of elements as well as the number of items associated to eachelement. The elements on the list are clickable and bring users to a more detailed area of theapplication, for example the candidate list, requisition list, etc. The elements on the list are alsodependent on the value selected in the Show filter.
The number in the following two columns work as follows:

Layout Center Stage
Configuration Guide Taleo 10 SP2 - Recruiting 316
• The number in the column is specific to you (not to your user groups). It represents thenumber of items that are new or have been updated by another user since you last viewedthem. For example, if you approve your own requisition, a “new” task is added to yourReady for sourcing tasks, and the number in this column for Ready for sourcing elementincreases by one.
• The number in the Total column represents the total number of items including new,previously viewed, and updated. For example, if you choose your user name in the Showlist and Ready for sourcing appears in the Tasks channel, the number in the Total columnrepresents the total number of your requisitions that are ready for sourcing.
Links redirect the user to another part of the application. Links are supplied by Taleo andcannot be created nor edited. The following links are available:• Create a Requisition• Onboarding Process• Reports• Search for candidates• View My Candidates• View My RequisitionsA mini requisition list may be available in the center stage. This mini requisition list canbe added in the center stage to allow users to access a candidate list directly from the homepage without having to go through the standard requisition list page. This mini requisition listcan contain up to four columns of summary information about each requisition, including thenumber of candidates. It can also display up to 30 requisitions (the ones with the most recentsubmission activity). This mini requisition list is used by default with the Hourly Manager centerstage.
Note that the Mini Requisition list and the Requisitions channel cannot be put in the samecenter stage.
Configuration
Center stages are created in Taleo Recruiting Administration, under Center Stage.
Once a center stage is created and configured, it is associated to a configuration profile usingthe following setting.
Setting
Name Possible Values Default Value Location
Center Stage Configuration Recruiter View Configuration > [SmartOrg]Administration > ConfigurationProfiles
A configuration profile is then assigned to a user account.
In addition to the center stage creation, the system administrator may decide to display awelcome title in the center stage, to add a separator line between the welcome title and thewidgets of the center stage, and also add a footer text on the center stage.
Settings
Name Possible Values Default Value Location
Center Stage-Separator Line • No
• Yes
No Configuration > [SmartOrg]Administration > ConfigurationProfiles

Layout Center Stage
Configuration Guide Taleo 10 SP2 - Recruiting 317
Settings
Name Possible Values Default Value Location
Center Stage Footer Text • No
• Yes
No Configuration > [SmartOrg]Administration > ConfigurationProfiles
Center Stage-Welcome Title • No
• Yes
Yes Configuration > [SmartOrg]Administration > ConfigurationProfiles
Creating a Center StagePrerequisite
The Center Stage Configuration user type permission is required.
The Mini Requisition list and the Requisitions channel cannot be put in the same centerstage.
Configuration > [Recruiting] Administration > Center Stage
Steps
1. Click Create.2. Complete the fields as required.3. Click Save.4. Click Edit next to Channels and Links.5. Click Add.6. Select channels and links.7. Click Select.8. Click Save.
Result
The newly created center stage appears in the Center Stages list. The information displayedin the central pane of the home page is configured as specified.
Next Step
Activating the center stage.
Deleting a Center StagePrerequisite
The Center Stage Configuration user type permission is required.
The center stage must be inactive.
Configuration > [Recruiting] Administration > Center Stage
Steps
Click Delete next to the center stage.

Layout Center Stage
Configuration Guide Taleo 10 SP2 - Recruiting 318
Result
The center stage is permanently deleted from the database.
Duplicating a Center StagePrerequisite
The Center Stage Configuration user type permission is required.
Configuration > [Recruiting] Administration > Center Stage
Steps
1. Click on the name of a center stage.2. Click Duplicate.3. Complete the fields as required.4. Click Save.5. Click Edit.6. Click Add.7. Select channels and links.8. Click select.9. Click Save.
Result
The newly created center stage appears in the Center Stages list.
Next Step
Activating a center stage.
Activating a Center StagePrerequisite
The center stage must have the inactive or draft status.
The Center Stage Configuration user type permission is required.
Configuration > [Recruiting] Administration > Center Stage
Steps
1. Click on the name of a center stage.2. Click Activate next to the name of the center stage.
Result
The center stage appears as active in the Center Stage list. The center stage can now beassociated to a configuration profile and a user account in SmartOrg.
Next Step
Associating the center stage to a configuration profile in SmartOrg.

Layout Center Stage
Configuration Guide Taleo 10 SP2 - Recruiting 319
Deactivating a Center StagePrerequisite
The Center Stage Configuration user type permission is required.
The center stage must have the active status.
Configuration > [Recruiting] Administration > Center Stage
Steps
1. Cick on the name of the center stage.2. Click Deactivate.
Result
The center stage appears as inactive in the Center Stages list. The center stage is no longeravailable in SmartOrg when associating a center stage to a configuration profile or useraccount.
Modifying a Center Stage PropertiesPrerequisite
The Center Stage Configuration user type permission is required.
Configuration > [Recruiting] Administration > Center Stage
Steps
1. Click on the name of a center stage.2. Click Edit next to Properties.3. Modify the fields as required.4. Click Save.
Next Step
Adding channels and links.
Adding Channels and Links to a Center StagePrerequisite
The center stage must be in the inactive or draft status.
The Center Stage Configuration user type permission is required.
Configuration > [Recruiting] Administration > Center Stage
Steps
1. Click on the name of a center stage.2. Click Edit next to Channels and Links.3. Click Add next to Channels and Links.

Layout Center Stage
Configuration Guide Taleo 10 SP2 - Recruiting 320
4. Select channels and links.5. Click Select.6. Click Save.
Result
When a user associated to that center stage will access Taleo Recruiting, the channels andlinks will appear.
Next Step
Ordering channels and links as well as columns in the center stage.
Removing Channels and Links from a Center StagePrerequisite
The center stage must be in the inactive or draft status.
The Center Stage Configuration user type permission is required.
Configuration > [Recruiting] Administration > Center Stage
Steps
1. Click on the name of a center stage.2. Click Edit next to Channels and Links.3. Cick Remove next to the channels and links to be removed.4. Click Save.
Result
The channels and links will no longer appear in the Center Stage page. When a userassociated to that center stage will access Taleo Recruiting, the removed channels and linkswill no longer be displayed.
Next Step
Activating a center stage.
Ordering Channels and Links in a Center StagePrerequisite
The center stage must be in the inactive or draft status.
The Center Stage Configuration user type permission is required.
Configuration > [Recruiting] Administration > Center Stage
Steps
1. Click on the name of a center stage.2. Click Edit next to Channels and Links.3. Specify the row order of each channel and link.4. Click Reorder.

Layout Center Stage
Configuration Guide Taleo 10 SP2 - Recruiting 321
5. Click Save.
Result
When a user associated to that center stage will access the Recruiting Center, the channelsand links will be displayed in the new order.
Next Step
Activating a center stage.
Setting the Layout of a Center StagePrerequisite
The center stage must be in the inactive or draft status.
The Center Stage Configuration user type permission is required.
Configuration > [Recruiting] Administration > Center Stage
Steps
1. Click on the name of a center stage.2. Click Edit next to Properties.3. Select the desired layout.4. Click Save.
Result
The center stage is laid out in one or, two columns or in two columns with a header.
Next Step
Organizing a multicolumn center stage.
Organizing a Multicolumn Center StagePrerequisite
The center stage must be in the inactive or draft status.
The Center Stage Configuration user type permission is required.
Configuration > > [Recruiting] Administration > Center Stage
Steps
1. In the Center Stage Configuration page, click on the name of a center stage.2. In the Center Stage page, click Edit next to Channels and Links.3. In the Channel and Link Editor page, select a value in the Section drop-down list.4. Click Save.
Result
Channels and links appear in the home page either on the right or left hand side of thepage.

Layout Center Stage
Configuration Guide Taleo 10 SP2 - Recruiting 322
Creating Custom Instructions for a Center Stage ChannelThe text appearing under the name of a channel in the center stage can be customized. Forexample, for the View Candidates channel, the following text could be modified: “View detailedinformation about your candidates”. Although no default text is supplied with the application,the system administrator can send the text to Taleo Support who will then activate the text foryour zone. Refer to the chapter entitled Label Change. You can also contact Taleo Support forfurther information.
Associating a Center Stage to a Configuration ProfilePrerequisite
The Center Stage must be created.
Configuration > [SmartOrg] Administration > Configuration Profiles
Steps
1. Click on a configuration profile.2. Click on the Center Stage Configuration setting.3. Click Edit.4. Select a center stage in the Value field.5. Click Save.
Result
The center stage is selected for each configuration profile and a configuration profile is tiedto each user. Consequently, depending on the user logging in to Taleo Recruiting Center, theinformation displayed in the central pane of the home page will differ.
Next Step
Associating a configuration profile to a user account in the SmartOrg User Accounts feature,under Account Information.

Agency
• Agency and Agent..............................................................................................324

Agency Agency and Agent
Configuration Guide Taleo 10 SP2 - Recruiting 324
Agency and Agent
Staffing Agency and AgentA staffing agency is a company offering staffing services such as a sourcing strategy, internetmining, media placement, or retained search. A staffing agent is a person working for astaffing agency and who can refer candidates for positions available in your organization.
A staffing agency can be used for the following services:
• Sourcing strategy: Agency providing services to prepare a job ad.• Internet mining: Agency searching the internet for candidates and resumes for a specific
requisition.• Media placement: Agency posting a requisition on electronic media such as newspapers,
magazines, billboards.• Staffing: Agency that provides full headhunter/recruiting services, in addition to the sourcing
services above. The agency may recruit, prescreen and actually submit a candidate for arequisition via the agency portal.
• Contingent staffing: Agency used for contingent staffing. MWBE means Minority WomenBusiness Owned. This is a flag available when exporting the agency information to anexternal system where billing occurs.
The following business rules apply to agencies and agents:
• An agency cannot be linked to an agency portal. Only agents (associated to an agency) arelinked to agency portals.
• An agent can only be associated to one agency. The agency must offer staffing services.• An agent has access to only one agency portal.• An agent can be associated to an Organization-Location-Job Field structure. When a
user whishes to invite agents to refer candidates for a job, the structure associated to theagents displayed by the system will correspond to the one of the requisition. If an agentis associated to more than one Organization-Location-Job Field, the requisition/agentmapping must satisfy all associated structures of the requisition to appear on the list.
Details regarding agent ownership
Regarding agent ownership (at the candidate level), an agent cannot refer a candidatealready owned by another agent. Ownership also prevents employee referrals even if theAccept Referrals for Known Candidates setting is activated. Note that regardless of ownership,professional agents can never refer a known candidate.
Regarding agent ownership (at the submission level), if the ownership delay is over, anotheragent can refer the same candidate on another requisition, but not on the current requisition.
For contingent staffing, a candidate may be referred over and over by various agents ONLYwhen the general ownership is expired, while this is not possible for professional staffing.The ownership at the submission level never expires. For professional agents, there is oneownership period, and once this period is over, the referral is "expired". For contingent agents,there is one ownership period, but it expires only at the general level. The ownership is keptat the submission level, since we need to continue to exchange with the same supplier forrate and time sheet until the job is completed, which might be weeks and months after theownership has expired.

Agency Agency and Agent
Configuration Guide Taleo 10 SP2 - Recruiting 325
Configuration
User Type Permissions
Name Location
Post to staffing agents/agencies Configuration > [SmartOrg] Administration> User Types >Recruiting > Sourcing
Request Internet mining by specialized agencies Configuration > [SmartOrg] Administration> User Types >Recruiting > Sourcing
Request sourcing strategy by specialized agencies Configuration > [SmartOrg] Administration> User Types >Recruiting > Sourcing
Settings
Name Possible Values Default Value Location
Agent Ownership Delay Any 0 Configuration > [Recruiting] Setting
Contingent Staffing AgentOwnership Delay
Any 0 Configuration > [Recruiting] Setting
Accept Referrals for KnownCandidates
Yes, No No Configuration > [Recruiting] Setting
Creating an AgencyPrerequisite
The agency portal and application flows must be created. For more information, see theCareer Section Administration Manual.
Configuration > [Recruiting] Administration > Agencies
Steps
1. Click the Agencies tab.2. Click New...3. In the Properties tab, complete the fields.
Use the same name for the agency and the agency portal.
The same e-mail address cannot be used for an agency and an agent.4. Click Done.
Result
The agency appears in the Agencies tab of the Agency Management page.
Next Step
Adding an agent to an agency. You may also want to associate the agency to anOrganization-Location-Job Field structure or select the agency as a preferred agency forsourcing, internet mining and media placement. You can also configure the languages inwhich the agency can be displayed.

Agency Agency and Agent
Configuration Guide Taleo 10 SP2 - Recruiting 326
Deleting an AgencyPrerequisite
Agents associated to the agency must first be deleted.
Referrals of the agents must be transferred to another agent.
Configuration > [Recruiting] Administration > Agencies
Steps
1. Click the Agencies tab.2. Select the name of the agency.3. Click .
Result
The agency is no longer available in the Agencies list of the Agency Management page.
Adding an Agent to an AgencyPrerequisite
The agency portal and application flows must be created. For more information, see theCareer Section Administration Manual.
The agency must be created.
Configuration > [Recruiting] Administration > Agencies
Steps
1. Click the Agencies tab.2. Click the name of the agency.3. In the Agents tab, click New...4. Complete the information under all tabs.
If you do not select a portal, the agent will be considered inactive and users will not beable to invite this agent to refer candidates.
5. Click Done.
Result
The agent appears in the Agents list of the agency and in the Agents tab of the AgencyManagement page. Users can refer candidates for a job to the agency.
Next Step
Associating an agent to an organization, location and job field
Creating an AgentPrerequisite
Configuration > [Recruiting] Administration > Agencies

Agency Agency and Agent
Configuration Guide Taleo 10 SP2 - Recruiting 327
Steps1. Click New...2. Complete the information as required.3. Click Done.Result
Recruiters can now ask this agent to refer candidates.
Deleting an AgentPrerequisite
Referrals must be transferred to another agent.
System must be in maintenance mode.
Configuration > [Recruiting] Administration > Agencies
Steps1. Click the Agencies tab.2. Click on the agency name.3. In the Agents tab, select the agent.4. Click .
5. Click Done.Result
Users can no longer ask this agent to refer candidates. The information of the agent ispermanently deleted from the system.
Deactivating an AgentPrerequisite
The agent must be created in order to deactivate it.
Configuration > [Recruiting] Administration > Agents
Steps1. Click the Agents tab.2. Click on the name of the agent.3. In the Login tab, select Not Specified in the Portal drop-down list.4. Click Done.Result
Recruiters can no longer ask this agent to refer candidates. The information on the agent isstill available in the system.
Transferring ReferralsPrerequisite
Referrals must be transferred to an agent from the same agency.

Agency Agency and Agent
Configuration Guide Taleo 10 SP2 - Recruiting 328
Configuration > [Recruiting] Administration > Agencies
Steps
1. Click the Agents tab.2. Click on the desired agent.3. In the Login tab, click Transfer Referrals...4. Browse to select an agent.5. Click OK.
Result
The agent’s referrals have been transferred to the selected agent.
Next Step
Deleting an agent.
Associating an Agency to an Organization-Location-JobField
Prerequisite
The agency must be created.
Configuration > [Recruiting] Administration > Agencies
Steps
1. Click the Agencies tab.2. Click the name of the agency.3. In the Job, Location or Organization tab, click Add...4. Select a Job, Location or Organization.5. Click Add6. Click Done.
Result
The Organization-Location-Job Field structure is added under the selected tab. When userswill ask agencies to find candidates, only the agencies corresponding to the Organization-Location-Job Field of the requisition will be displayed.
Next Step
Adding agents to the agency. Selecting a preferred agency.
Dissociating an Agency from an Organization-Location-Job Field
Prerequisite
The agency must be associated to an Organization-Location-Job Field.
Configuration > [Recruiting] Administration > Agencies

Agency Agency and Agent
Configuration Guide Taleo 10 SP2 - Recruiting 329
Steps
1. Click the Agencies tab.2. Click the name of the agency.3. In the Job, Location or Organization tab, select the element.4. Click Remove.5. Click Done.
Result
The agent will be available for all requisitions regardless of the requisition Organization-Location-Job Field structure.
Associating an Agent to an Organization-Location-JobField
Prerequisite
The agent must be created.
Configuration > [Recruiting] Administration > Agents
Steps
1. Click the Agents tab.2. Click the name of the agent.3. In the Job, Location or Organization tab, click Add...4. Select a Job, Location or Organization.5. Click Add.6. Click Done.
Result
The Organization-Location-Job Field structure is added under the selected tab. Agents willbe invited to refer candidates only if the Organization-Location-Job Field structure of theagent matches the one of the requisition.
Dissociating an Agent from an Organization-Location-Job Field
Prerequisite
The agent must be associated to an Organization-Location-Job Field structure.
Configuration > [Recruiting] Administration > Agents
Steps
1. Click the Agents tab.2. Click the name of the agent.3. In the Job, Location or Organization tab, select the element.

Agency Agency and Agent
Configuration Guide Taleo 10 SP2 - Recruiting 330
4. Click Remove.5. Click Done.
Result
The agent will be available for all requisitions regardless of the requisition Organization-Location-Job Field structure.
Next Step
Dissociating an agency from an Organization-Location-Job Field.
Selecting a Preferred AgencyPrerequisite
The agency must be created.
Configuration > [Recruiting] Administration > Agencies
Steps
1. Click Options...2. Click the Preferences tab.3. Select your preferred agency for each type of posting.4. Click Done.5. Click Save
Result
The selected agency for each type of posting will be displayed by default when users post arequisition.
Defining a Referral Ownership PeriodPrerequisite
The Agent Ownership Delay Recruiting setting must be enabled.
Configuration > [Recruiting] Administration > Agencies
Steps
1. Click Options...2. Click the Candidate Referral tab.3. Complete the information as required.4. Click Done.
Result
Once the duration period has expired, the agent no longer owns the candidate, thereforethe agent will not receive any compensation if the candidate is hired on a requisition;however, the candidate file will indicate referral ownership with an expired status.
Recruiting Fundamentals
• Job Board..........................................................................................................332
• Merge Form.......................................................................................................342
• Candidate..........................................................................................................346
• Requisition......................................................................................................... 366
• Offer................................................................................................................. 375
• Contingent Hiring.............................................................................................. 377
• Hourly Hiring..................................................................................................... 379
• Libraries.............................................................................................................387
• Report................................................................................................................397
• Task................................................................................................................... 400
• General Features............................................................................................... 403

Recruiting Fundamentals Job Board
Configuration Guide Taleo 10 SP2 - Recruiting 332
Job Board
Job Board AccounteQuest job board accounts enable users to post their requisitions to multiple job boardsthrough the eQuest job distribution portal.
eQuest job board accounts enable users to post their requisitions to multiple job listing sites,like Taleo Talent Exchange, using eQuest posting pages. Posting requisitions on job boards isperformed by using eQuest, a job posting distributor that gives access to the world's largestnetwork of job posting sites.
eQuest job board accounts are created by the system administrator. However, those accountsmust have been created in eQuest first, with the same username and password. Therefore, jobboards available for a specific account are set by eQuest. The system administrator can createas many accounts as needed. However, only one account can be designated as the defaultaccount.
Sending customer city and zip/postal code to eQuest
Customers have the possibility to send the customer city and its zip/postal code to eQuest. Asetting is available for this feature:
Setting
Name Possible Values Default Value Location
City Location Level for eQuestPosting
• Yes
• No
No Configuration > [Recruiting] Settings
This setting allows the system administrator to specify the location level that will be consideredwhen posting a requisition to eQuest. Once set, the location sent to eQuest to represent therequisition city will no longer be the RSLocation level 3 and its postal code, but the locationlevel specified in this setting. This will allow customers to post a requisition to the most precisecity location, usually located at level 3 or level 4.
In SmartOrg, under Locations, Element Management, the Zip/Postal Code field is availablefor each level of location. This zip/postal code was already available in the data model usingTaleo Connect Client, but was not visible in the user interface.
In Taleo Recruiting, when associating a Location structure to a requisition, the zip/postal codeset for the location in SmartOrg is used by eQuest to post a requisition on a job board at theappropriate location (instead of using the RSLocation set by the system), provided the CityLocation Level for eQuest Posting setting has been configured in the administration module.
Requisitions can be associated to any level of company defined locations. When Taleo sendsthe requisition to eQuest, we always try to send three location values:• Country: this is derived from the mapping between location and the reference RSLocation
level 1 done in SmartOrg by the administrator.• State/Province: this is also derived from the mapping done in SmartOrg between the
location and RSLocation level 2. This exists only if the requisition has an associated locationat least at the state/province level.

Recruiting Fundamentals Job Board
Configuration Guide Taleo 10 SP2 - Recruiting 333
• City: by default, this is also derived from the mapping between location and RSLocationat level 3, if the requisition is associated to a location with a level 3 mapping. If not, suchinformation is not sent to eQuest, although it is usually required, depending on the countryand job board. With the City Location Level for eQuest Posting setting, customers can senda more precise location, as defined in SmartOrg, instead of sending the broader RSLevel3,which represents a region rather than a city. For a large city such as San Francisco, this doesnot change the situation that much, although you can define a more precise zip/postal codeif required. But for a city like Dublin, CA, which does not exist in our list of reference regionsin RSLocation, you can now use your own location instead of using the closest region, whichwould be Hayward on this example, which is about 10 miles away.
Zip/postal codes will be considered by eQuest when posting a requisition only if the zip/postalcode is for the US and few other countries, but not all.
Sending department code for reporting purposes
Customers also have the possibility to send the department code in order to do some reportingin eQuest. A setting is available for this feature:
Setting
Name Possible Values Default Value Location
Send Department Information toeQuest When Posting Requisitions
• Yes
• No
No Configuration > [Recruiting] Settings
This setting allows the system administrator to specify if the department number will beprovided to eQuest when posting requisitions to eQuest. This is not used for posting purposes,but rather to allow reporting at the department level in eQuest.
Posting a requisition on a job board using eQuest
To post a requisition on a job board using eQuest, the requisition must first be posted on anexternal company career section. A requisition can be posted as many times as required butit cannot be posted twice on the same job board account. All job board accounts to which arequisition is already posted will be unavailable in the Sourcing Manager page. The requisitionmust be posted on an external company career section for at least the same time as on eQuestjob board account.
Accounts can be associated to an Organization-Location-Job Field structure or the group of thecurrent requisition. Therefore when a user chooses to post a requisition, only the accounts witha structure corresponding to the requisition’s Organization-Location-Job Field structure will beavailable.
Users can have access to several job board accounts. Every account that applies to a user isshown in Recruiting Center when posting a requisition.
Benefits• Recruiting Center users can have access to several eQuest accounts for requisition posting.• Requisitions can be posted on several eQuest accounts.• Each eQuest account allows posting on a specified number of job boards based on the
eQuest account configuration done at eQuest.• Requisitions can be posted to the Taleo Talent Exchange adding more exposure to your jobs
and increasing your search engine optimization.
Configuration
To post requisitions, users must be granted the following permission.

Recruiting Fundamentals Job Board
Configuration Guide Taleo 10 SP2 - Recruiting 334
User Type Permission
Name Location
Access Posting and Sourcing Configuration > [SmartOrg] Administration> User Types >Recruiting > Sourcing
To send the customer city and its zip/postal code to eQuest, the following setting must beenabled.
Setting
Name Possible Values Default Value Location
City Location Level for eQuestPosting
• Yes
• No
No Configuration > [Recruiting] Settings
To send the department code in order to do some reporting in eQuest, the following settingmust be enabled.
Setting
Name Possible Values Default Value Location
Send Department Information toeQuest When Posting Requisitions
• Yes
• No
No Configuration > [Recruiting] Settings
Creating a Job Board AccountPrerequisite
Configuration > [Recruiting] Administration > Job board Accounts
Steps
1. Click New...2. Under the Properties tab, select eQuest in the supplier drop-down list.3. Complete the fields as required in the Properties, Login and Permissions tab.4. Click Save.
Result
The newly created job board account appears in the Job Board Accounts list.
Deleting a Job Board AccountPrerequisite
Configuration > [Recruiting] Administration > Job board Accounts
Steps
1. Select a job board account.2. Click .
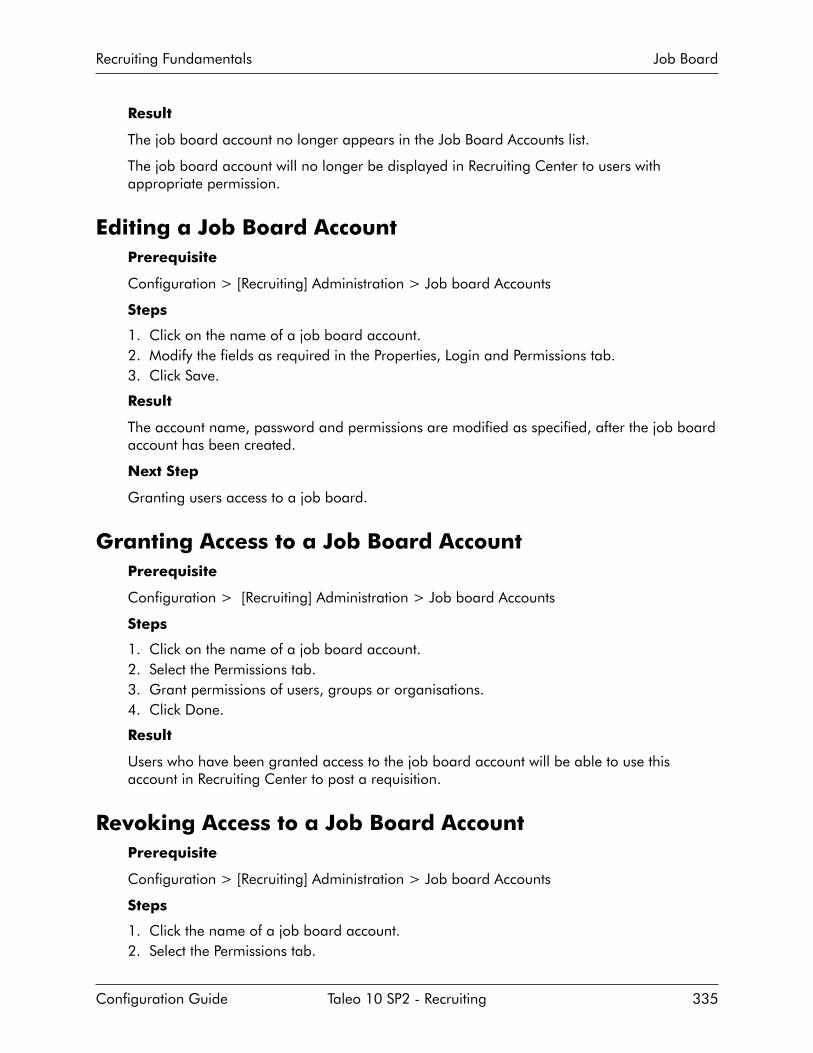
Recruiting Fundamentals Job Board
Configuration Guide Taleo 10 SP2 - Recruiting 335
Result
The job board account no longer appears in the Job Board Accounts list.
The job board account will no longer be displayed in Recruiting Center to users withappropriate permission.
Editing a Job Board AccountPrerequisite
Configuration > [Recruiting] Administration > Job board Accounts
Steps
1. Click on the name of a job board account.2. Modify the fields as required in the Properties, Login and Permissions tab.3. Click Save.
Result
The account name, password and permissions are modified as specified, after the job boardaccount has been created.
Next Step
Granting users access to a job board.
Granting Access to a Job Board AccountPrerequisite
Configuration > [Recruiting] Administration > Job board Accounts
Steps
1. Click on the name of a job board account.2. Select the Permissions tab.3. Grant permissions of users, groups or organisations.4. Click Done.
Result
Users who have been granted access to the job board account will be able to use thisaccount in Recruiting Center to post a requisition.
Revoking Access to a Job Board AccountPrerequisite
Configuration > [Recruiting] Administration > Job board Accounts
Steps
1. Click the name of a job board account.2. Select the Permissions tab.

Recruiting Fundamentals Job Board
Configuration Guide Taleo 10 SP2 - Recruiting 336
3. Modify the permissions of users, groups or organizations.4. Click Done.
Result
Users who had their access revoked to the job board account will no longer be able to usethis account to post a requisition in Recruiting Center.
Candidate Profile Import from USAJobsAvailable as an option for U.S. Federal customers, the candidate Profile Import enables thesystem to send during the candidate application, a candidate profile created on USAJobs toTaleo.
The system administrator can decide to allow the system to send to Taleo a candidate profilecreated on USAJobs, while the candidate is applying on a job. Therefore, data from thecandidate’s USAJobs resume be will automatically populated into the Taleo career section.The candidate will have the opportunity to validate the data, make changes or add additionalinformation that is required per client’s configuration of the application flow on their zone.Candidate Profile import is only available for candidates applying through the USAJobsjobboard.
When a candidate applies online after creating a profile and a resume on the USAJobsjobboard, the candidate is redirected to the client’s Taleo Career section.When the candidatewill be redirected from USAJobs to the client’s Taleo Career Section, the candidate will berequired to supply different type of information to access the career section, depending on ifthe candidate is new to the system, or if the candidate’s ID is linked to Taleo or not i.e.
• If the candidate has never applied on the specific career section before, the system willinform the candidate to create a new account and the USAJobs ID will then be linked to thenew candidate id. The system will automatically create their profile, pulling in specific datafrom their USAJobs profile/resume, allowing the candidate to verify and fill in additionalinformation.
• If the candidate has applied on the specific career section, but their USAJobs ID is not linkedto their Taleo zone specific ID, the candidate will be asked to login and their USAJobs ID willthen be linked to their existing Taleo zone specific candidate ID.
• If the candidate has applied on the specific career section and has a USAJobs ID linked totheir Taleo zone specific ID, the candidate will then be logged in with Single Sign On (SSO).
When the candidate is redirected to the client’s Taleo Career Section, the system checks andverifies if there is or is not a link between the USAJobs ID and the Taleo zone specific candidateID. If there is no link, the candidate will be presented with an option to either link an alreadyexisting candidate id or create an account. The text presented to the candidate to select theoption can be configured using Taleo’s label software. Contact support for more details.
To be imported from USAJobs to the career section, the resume created on USAJobs must havebeen filled in manually; attachments are not part of the import from USAJobs to Taleo.Thecandidate profile is imported only once, the first time; if the candidate makes changes to theirUSAJobs resume or selects a different resume on subsequent applications, the system willnot import or update the Taleo zone specific candidate profile.If the candidate ends the Taleoapplication process part way through, all valid data will be saved in the candidate’s record,whether they have reached that page in the flow or not, however the application will still beflagged as incomplete. If valid data that is imported is not part of the application flow, theimport will still save the data onto the Taleo candidate record.
In USAJobs the application can have two statuses:

Recruiting Fundamentals Job Board
Configuration Guide Taleo 10 SP2 - Recruiting 337
• Application Received – This will be sent back from Taleo upon completion of the applicationand the candidate selecting the ‘Return to External Application’ link.
• Application Status not Available – This will be the status if the application was not completedon the Taleo side for whatever reason and the candidate did not select the ‘Return toExternal Application’ link.
Candidate profile import is enabled via USAJobs Certification feature. It must be deployed,activated, and, Recruiting and Career section settings must be activated. The Access integrationservices configuration user type permission grants system administrators access to this feature.
ConfigurationUser Type Permissions
Name Location
Access integration services configuration Configuration > [SmartOrg] Administration > User Types >Recruiting > Administration
Settings
Name Possible Values Default Value Location
Activate Secure Login• No
• Yes
Yes Configuration > [Career Section]Settings
USAJobs Monster Company AccessTicket
Customer specific Blank Configuration > [Recruiting] Settings
USAJobs Monster Password Customer specific Blank Configuration > [Recruiting] Settings
Benefits• will make the process that much quicker for the candidate and not force double entry• allows the candidate, who has created a profile on USAJobs, to have the system send their
profile from USAJobs to Taleo real-time during the application process.
Impacts• User Type permission ‘Access Screening Services configuration’ has been renamed to ‘Access
integration services configuration’.• Attachments are not part of the import from USAJobs to Taleo.• The standard link back to USAJobs in the client’s Taleo Career Section is only available from
the Thank You page. Therefore a client may wish to add an additional link back to USAJobsfrom the My Submissions page.
• Reference Name from the USAJobs resume will be imported into Reference First Name fieldin Taleo, as that the field is not separated into 2 fields in USAJobs as it is in Taleo.
• Taleo’s Other Program field is being populated with content from USAJobs EducationSummary rather than from USAJobs Education Major.
• ‘GPA Out of’ field is not imported.
Setting-up Profile Imports from USAJobsPrerequisite
The Access integration services configuration user type permission must be granted to thesystem administrator.

Recruiting Fundamentals Job Board
Configuration Guide Taleo 10 SP2 - Recruiting 338
Steps
1. USAJobs Certification must be deployed using Passport console.2. The USAJobs Candidate Sourcing Service must be activated in the Candidate Sourcing
Feature.3. The system administrator must receive the company access ticket (CAT) from USAJobs.4. The USAJobs Monster Company Access Ticket Recruiting setting must be configured with
the CAT.5. The system administrator must receive the password from USAJobs.6. The USAJobs Monster Password Recruiting setting must be configured with the password.7. The Activate Secure Login Career Section setting must be activated.
Result
When a candidate will apply online for a job from USAJobs, if the candidate’s profile iscreated in USAJobs, the information included in the candidate’s profile will be imported tothe Company’s Taleo Career Section.
Activating a Candidate Sourcing CertificationPrerequisite
The Access integration services configuration user type permission grants users access to thisfeature.
Certification service must be deployed.
Configuration > [Recruiting] Administration > Candidate Sourcing
Steps
1. Click the name of a candidate sourcing service.2. Click Activate.
Result
The Certification service will be used next time a candidate applies on a job.
Deactivating a Candidate Sourcing CertificationPrerequisite
The Access integration services configuration user type permission grants users access to thisfeature.
Certification service must be deployed.
Configuration > [Recruiting] Administration > Candidate Sourcing
Steps
1. Click the name of a candidate sourcing service.2. Click Deactivate.
Result
The Certification service will no longer be available.

Recruiting Fundamentals Job Board
Configuration Guide Taleo 10 SP2 - Recruiting 339
Configuring the USAJobs CertificationPrerequisite
The Access integration services configuration user type permission grants users access to thisfeature.
Secure Login must be activated.
Certification service must be deployed.
System administrator must have requested a Company Access Ticked form USAJobs.
System administrator must have requested a password from USAJobs.
Configuration > [Recruiting] Settings
Steps
1. Click the USAJobs Monster Company Access Ticket Recruiting setting.2. Click Edit.3. Enter the Company Access Ticket provided by USAJobs.4. Click Save,5. Click the USAJobs Monster Password Recruiting setting.6. Click Edit.7. Enter the Password provided by USAJobs.8. Click Save.
Activating Secure LoginPrerequisite
The Access integration services configuration user type permission grants users access to thisfeature.
Configuration > [Career Section] Settings
Steps
1. Click the Activate Secure Login Career Section setting.2. Click Edit.3. Select Yes from the Value field.
Next Step
Administrator must request to restart the zone.
Deactivating Secure LoginPrerequisite
The Access integration services configuration user type permission grants users access to thisfeature.
Configuration > [Career Section] Settings

Recruiting Fundamentals Job Board
Configuration Guide Taleo 10 SP2 - Recruiting 340
Steps
1. Click the Activate Secure Login Career Section setting.2. Click Edit.3. Select No from the Value field.
Next Step
Administrator must request to restart the zone.
Populated Fields from Profile ImportFields being populated during a profile import
First Name Employment history
• Other employer• Other Function• Start• End
Last Name References
• First Name - The reference’s full name ill go into thefirst name, as USAJobs only has one name field.
• Phone number• email• Employer• Title• Relationship
Middle Name Education History
• Other institution• Other Program• Education Level• GPA - only the GPA field (not the Out of)• End of Date• Institution Location
Email Address
Street Address (Line 1)
Street Address (Line 2)
City
Country
State/Province
Zip/Postal code
Home Phone Number
Work Phone Number
Cell Phone Number

Recruiting Fundamentals Job Board
Configuration Guide Taleo 10 SP2 - Recruiting 341
Fields being populated during a profile import
Fax
User name - for SSO, once USAJobs id and TaleoCandidate ID are linked
Location Preference - Country)
Location Preference - State/Province
Location Preference - City
Job type
Schedule

Recruiting Fundamentals Merge Form
Configuration Guide Taleo 10 SP2 - Recruiting 342
Merge Form
Merge FormA merge form is a PDF document that can be tied to candidate selection workflows, steps andstatuses or that can be generated/filled out at any point on demand by a user.
Merge forms are used during the hiring process. For example, during interviews withcandidates, a recruiter may use a PDF form as a template to complete a candidate’s “Do notdisclose” information. PDF forms are most typically used for various new hire paperwork.
Merge forms are first built in Adobe Acrobat. System administrators then add them in TaleoRecruiting Administration and tie them to candidate selection workflows, steps and statuses tomake them available to users. Merge forms can be printed by a user, then further completed ifneeded and signed by the candidate. (None of this is tracked in the system).
If a field in the form is confidential to the user, a warning message is displayed and that field isleft blank.
Merge forms can be pre-populated with variables retained in the system within the MessageTemplate feature. These variables can be added using the Adobe Acrobat Professional Formsfeature. For example, you could take a merge form (such as the I-9 form) and insert Taleovariables that will automatically pull information from the candidate file. Instead of typing thename of a candidate, the name would automatically appear in the form.
By default, the maximum file size of a merge form is 2 MB.
Benefits
• Merge forms may be available in any language. Merged data is available in English only.Most asian languages are not supported, based on PDF conversion issues with tokens. Themerged data will pull what is in the candidates file, so it may not be in English.
• Merge forms provide consistency and the ability for corporate driven forms to beinterchanged with basically no interruption to the end user.
• Pre-populating information in a merge form reduces the time necessary for a candidate tocomplete the form.
Configuration
For the merge form feature to be available to users, the following setting must be enabled.
Setting
Name Possible Values Default Value Location
Merge Form Activation• Yes
• No
Yes Configuration >[Recruiting] Settings
The fields contained in a form obey to the following permissions granted to users:

Recruiting Fundamentals Merge Form
Configuration Guide Taleo 10 SP2 - Recruiting 343
User Type Permissions
Name Location
Security level for requisitions (in view mode) Configuration > [SmartOrg] Administration > UserTypes > Recruiting > Requisitions
Security level for external candidates (in view mode) Configuration > [SmartOrg] Administration > UserTypes > Recruiting > Candidates
Security level for internal candidates (in view mode) Configuration > [SmartOrg] Administration > UserTypes > Recruiting > Candidates
Access candidate identification and contact information Configuration > [SmartOrg] Administration > UserTypes > Recruiting > Candidates
Important Note: (ID 189) The merge form (fill out form) feature does not hide confidentialdata. If a user is not authorized to view specific requisition or candidate data because ofpermissions (for example, a field is confidential, or a block such as Compensation or ScreeningService is not visible), the user may still get access to this data using the fill out form feature.When a user generates a form, all data included in the form will appear in the file, regardless ofthe user's permissions. For this reason, administrators should not include fields in forms that allusers should not be able to access.
Creating a Merge FormPrerequisite
The PDF form must first be built in Adobe Acrobat.
Configuration > [Recruiting] Administration > Merge Forms
Steps
1. Click New...2. Complete fields as required.3. Select a PDF form using the Browse... button.4. Click Done.
Result
The form appears in the Merge Forms page as well as in the Candidate Selection Workflowmodule, under the Forms tab.
Next Step
Activating a merge form.
Deleting a Merge FormPrerequisite
The merge form must not be used.
Configuration > [Recruiting] Administration > Merge Forms

Recruiting Fundamentals Merge Form
Configuration Guide Taleo 10 SP2 - Recruiting 344
Steps
1. Select a merge form.2. Click .
Result
The merge form no longer appears in the list of merge forms.
Activating a Merge FormPrerequisite
You must create the form in the Merge Forms page before you can activate it.
Configuration > [Recruiting] Administration > Merge Forms
Steps
1. Click on a form.2. Select Available from the Status drop-down list.3. Click Done.
Result
In the Merge Forms page, Available appears in the Status column next to the merge form.The form is available when associating a form to a candidate selection workflow, step orstatus.
Deactivating a Merge FormPrerequisite
The form must be active.
Configuration > [Recruiting] Administration > Merge Forms
Steps
1. Click on a form.2. Select Not Available from the Status drop down list.3. Click Done.
Result
In the Merge Forms page, Not Available appears in the Status column next to the mergeform. The form is no longer available for selection when associating a form to a candidateselection workflow, step or status.
Configuring a FormPrerequisite
The form must first be made available via the Merge Forms feature.
Recruiting Fundamentals Merge Form
Configuration Guide Taleo 10 SP2 - Recruiting 345
Configuration > [Recruiting] Administration > Candidate Selection Workflow > Forms
Steps
1. In the Forms tab, click on a form.2. Indicate if the form is always available or if it is only available when associated to a
selected workflow, step or status.3. If a form is associated to a specific context, select the appropriate workflow, step and
status in the selector, then click Add.4. Click Done.
Result
The form is associated to a candidate selection workflow, a step or a status in order tosuggest users to complete the form when a candidate reaches the specified workflow, step orstatus.
Next Step
Inserting variables in a merge form.
Inserting Variables in a Merge FormPrerequisite
Adobe Acrobat Professional is required to insert variables.
Please note that this procedure may differ according to the version of Adobe AcrobatProfessional being used.
Variables are available under the Message Templates section in Taleo RecruitingAdministration.
Steps
1. Using Adobe Acrobat Professional, open a PDF form.2. In the Advanced menu, select Forms, then Edit Fillable Form.3. Select Acrobat’s Forms Tools.4. Click OK.5. Click the Text Field Tool icon.6. Draw a box using your cursor. The Text Field Properties window appears.7. Go to the Message Templates section of Taleo Recruiting Administration to copy the
required variable from the Available Variables drop-down selector.8. In the Text Field Properties window, under the General tab, paste the copied variable in
the Name field.9. Enter any other information, such as a tooltip or if the field is required.10.Click Close.
Result
The form contains Taleo variables that will automatically pull information from the candidatefile into the form.

Recruiting Fundamentals Candidate
Configuration Guide Taleo 10 SP2 - Recruiting 346
Candidate
CandidateA candidate is a person that applied on a job or that has submitted a profile.
A candidate is a person:
• who has submitted a profile• who has created a job submission• for which a profile has been created by a user• for which a job submission has been created by a user• who has been referred by an agent for a job opening• who has been referred by a friend for a job opening• who's profile has been submitted by an agent• who's profile has been submitted by a referrer• who has been created by a Recruiting system user
Details regarding internal and external candidates: In general, candidates applyingon a job or submitting their profile from an internal career section are automaticallyconsidered internal candidates. All other candidates are considered external candidates bydefault. Candidate’s internal/external state is tracked in the general profile and at the jobsubmission level.
In the General Profile: Internal candidates are identified by the icon. This icon isdisplayed in the candidate card located on the left pane and in the candidate list.
Application flows can be configured to allow candidates applying from external career sectionsto indicate that they are actually internal candidates.
Users may have the ability to change the internal/external state of a candidate directly in thecandidate file by using the Internal Candidate check box (which is available in the CandidatePersonal Information section of the candidate file, under the General Profile tab).
Users may also have the ability to automatically identify a candidate as Internal so thatcandidates who reach the Hire/Hired status in a candidate selection workflow will automaticallyhave their general profile updated to indicate Internal. The system will display the icon forthose candidates in a candidate list. Candidates who have received the Internal designationat the general profile level are considered to be internal candidates on the general profileeven if they applied via an external career section. Authorized system users or integrations arerequired to remove this designation from employees who leave the company. For integrationand reporting purposes, this field is named “Candidate.InternalApplication”.
In the Submission: Internal/external submissions are identified in the candidate submission,in the Submission Type field located under the candidate card. The internal/external state valueis used to improve metrics and analysis. Because all hired candidates can become “internal”without an application level designation of Internal or External all hires might appear in metricsas “internal hires”, which would be incorrect. Values for the Submission Type field are eitherExternal or Internal and this value is not currently editable. This field is derived strictly from theinternal/external value on the candidates' profile at the time the job submission was completed.For integration and reporting purposes, this field is named “Application.IsInternal”.

Recruiting Fundamentals Candidate
Configuration Guide Taleo 10 SP2 - Recruiting 347
Registered Candidate: A registered person file is a candidate that was created as a result oftwo different actions:
• Someone who did not have a candidate file in the system referred a candidate and becausethey were asked to provide some information about themselves, a registered person file wascreated.
• A candidate logged in to the career section and instead of following the application process,the candidate clicked on the My Account link and provided the information on that page.
Configuration
User Type Permissions
Name Location
Candidate-related permissions are grouped underthe Candidates functional domain.
Configuration > [SmartOrg] Administration> User Types >Recruiting > Candidates
Settings
Name Possible Values Default Value Location
Candidate-related settings aregrouped under the Candidatecategory and Candidate SelectionActions category.
Configuration > [Recruiting] Settings
Important Note: (ID 219) Currently, the candidate restore submission function is notworking. For this reason, until this changes, it is recommended to revoke the Delete applicationsuser type permission (Configuration > [SmartOrg] Administration> User Types > Recruiting >Candidates).
Candidate CreationUsers have the ability to create a candidate file to capture candidate information such aspersonal information, work experience, education, etc.
The creation of candidates is done via the Create Candidate action which is available in thehome page as well as in the Candidates list via the More Actions list. This action is availableto users if they have been granted the proper user type permission; it also depends to whichcreation file the user’s configuration profile was granted access to.
When selecting the Create Candidate action, the Create a Candidate wizard is launched.Users have the ability to create a general profile or a job-specific submission if these two typesof files have been activated by the system administrator. If selecting the job-specific submissionoption, users need to specify the requisition, which controls for which staffing types they want tocapture a candidate.
After deciding on the type of file to create, users have to select a template to create thecandidate. Templates are used to capture general profiles, job-specific submissions orreferrals, be general profile or job specific. The templates provided are based on theselected requisitions and their staffing type. Note that all users do not have the same list oftemplates since the system administrator can activate a different set of templates for differentconfiguration profiles.

Recruiting Fundamentals Candidate
Configuration Guide Taleo 10 SP2 - Recruiting 348
Users then select the folder where they want to save the candidate file and the language inwhich they want to create the candidate file.
Users can also select the Resume Parsing option to extract key data elements from acandidate's resume and to use these data elements to automatically populate fields in theapplication. The candidate's resume cannot exceed 100 kilobytes or the size defined bythe system administrator. It must also have the proper file format as defined by the systemadministrator. Resume Parsing has no impact on the formatting of a text (bold, italics, bullets).It can detect text in the header and footer. The following data elements are extracted from thecandidate's resume:• Personal information: first name, last name, initial, address, city, state/province, country,
zip/postal code, phone number, e-mail address.• Education: education level, evaluation date.• Experience: start date, end date, achievement.Then, a duplicate check has to be performed to find out if the candidate already exists inthe database. If duplicates are found, the system displays them in a list. Users can select thecandidate file and edit the file. If no duplicates are found or if duplicates are found and thecandidate is not on the list, users can create a new candidate file OR modify the duplicatesearch criteria and perform a new duplicate check.
When the candidate file template appears, users have to complete the required fields. Thelayout of the file is presented as a long form containing sections, blocks of information andfields selected by the system administrator. For details, see the Candidate File chapter.
ConfigurationSettings
Name Possible Values Default Value Location
Available Candidate Creation Files• Quick
GeneralProfile
• GeneralProfile 1, 2, 3,4
• Job-specificSubmission 1,2, 3, 4
• GeneralReferral
• Job-specificReferral
Configuration > [SmartOrg]Administration > ConfigurationProfiles
User Type Permissions
Name Location
Create candidates Configuration > [SmartOrg] Administration > UserTypes > Recruiting > Candidates
Important Note: (ID 210) Currently, users must have the “Attach a file (general)” and“Attach a file (on preselected candidates)” permissions for the resume parsing option to workproperly when creating a candidate.
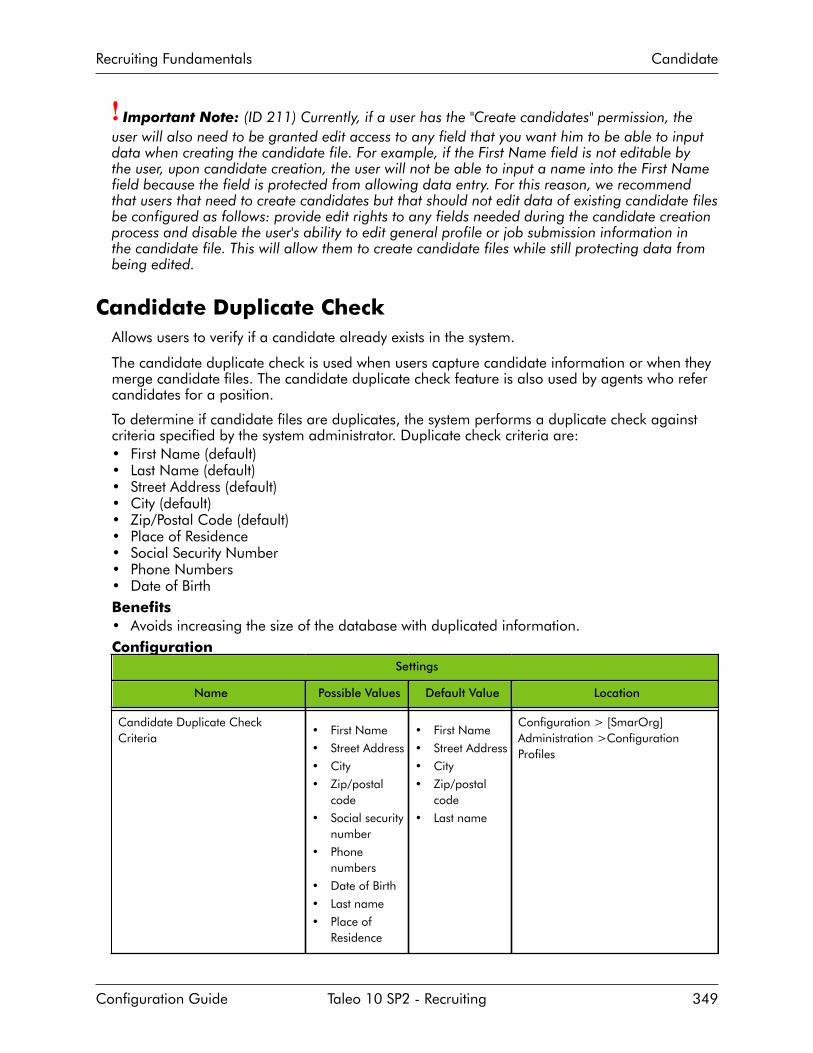
Recruiting Fundamentals Candidate
Configuration Guide Taleo 10 SP2 - Recruiting 349
Important Note: (ID 211) Currently, if a user has the "Create candidates" permission, theuser will also need to be granted edit access to any field that you want him to be able to inputdata when creating the candidate file. For example, if the First Name field is not editable bythe user, upon candidate creation, the user will not be able to input a name into the First Namefield because the field is protected from allowing data entry. For this reason, we recommendthat users that need to create candidates but that should not edit data of existing candidate filesbe configured as follows: provide edit rights to any fields needed during the candidate creationprocess and disable the user's ability to edit general profile or job submission information inthe candidate file. This will allow them to create candidate files while still protecting data frombeing edited.
Candidate Duplicate CheckAllows users to verify if a candidate already exists in the system.
The candidate duplicate check is used when users capture candidate information or when theymerge candidate files. The candidate duplicate check feature is also used by agents who refercandidates for a position.
To determine if candidate files are duplicates, the system performs a duplicate check againstcriteria specified by the system administrator. Duplicate check criteria are:• First Name (default)• Last Name (default)• Street Address (default)• City (default)• Zip/Postal Code (default)• Place of Residence• Social Security Number• Phone Numbers• Date of BirthBenefits• Avoids increasing the size of the database with duplicated information.Configuration
Settings
Name Possible Values Default Value Location
Candidate Duplicate CheckCriteria
• First Name
• Street Address
• City
• Zip/postalcode
• Social securitynumber
• Phonenumbers
• Date of Birth
• Last name
• Place ofResidence
• First Name
• Street Address
• City
• Zip/postalcode
• Last name
Configuration > [SmarOrg]Administration >ConfigurationProfiles

Recruiting Fundamentals Candidate
Configuration Guide Taleo 10 SP2 - Recruiting 350
ACE Candidate AlertThe ACE candidate alert allows users to set a threshold to identify the ideal candidates and tosend an e-mail to specific recipients to inform them that ACE candidates were found.
The ACE candidate alert allows the system to identify the candidate who achieves or exceedsthe ACE alert threshold for a job offer. The ACE candidate alert identifies top candidatesbased on their responses to the competencies and questions in the Prescreening section of therequisition file.
The ACE candidate icon identifies top candidates in the Candidate list of a requisition.
The ACE candidate alert is based on Required and Asset criteria. The ACE candidate alertdivides candidates into three groups that assist you in determining which candidate files toreview first:
• ACE candidates: Consider these candidates first because they meet all Required criteria andsome Asset criteria.
• Minimally qualified candidates: Consider these candidates after the ACE candidatesbecause they meet all Required criteria but no Asset criterion.
• Other candidates: Do not consider these candidates because they do not meet any Requiredcriteria.
A best practice is to always have the ACE candidate alert activated.
When setting the ACE candidate alert:
• Select the option “A candidate meeting all the required criteria achieves a result of atleast x%” to set the minimum result. Select a percentage from the list. At the right of thepercentage, the system displays the number of points the candidate must have to match theselected percentage. When changing the percentage, the value to the right is recalculated.Candidates who meet all the required criteria and the result value will be considered ACEcandidates. Do not use the percentage weighting option if you do not use the Weightcriterion in the Prescreening section of the requisition file. If you utilized weighting on someof the questions you could, if you wish, incorporate into the ACE candidate alert setting aswell. For a simple approach, you can start by using 75% weight result and then eventuallyalign that % with your own approach and utilization of weighting that works best for you.
• Select the option “A candidate meeting all the required criteria has at least x assets out of y”to set the minimum number of assets. Select a value from the list. Candidates who meet allthe required criteria and the minimum number of assets will be considered ACE candidates.
• Select the option “Identify a candidate as an ACE when either condition is met” to identifyACE candidates using the result or asset condition.
• Select the option “Identify a candidate as an ACE when both conditions are met” to identifyACE candidates using the result and asset conditions.
When setting the ACE candidate alert, you have the option to send an e-mail to notify specificrecipients that an ACE candidate was found.
ConfigurationUser Type Permissions
Name Location
View and manage ACE threshold and alertrecipients
Configuration > [SmartOrg] Administration > User Types >Recruiting > Requisitions

Recruiting Fundamentals Candidate
Configuration Guide Taleo 10 SP2 - Recruiting 351
Settings
Name Possible Values Default Value Location
Delay ACE alert Any 4 hours Configuration > [Recruiting] Settings
View and manage ACE thresholdand alert recipients
0 to 100 60 Configuration > [Recruiting] Settings
ACE Alert Option Default• In addition to
requirements,Ace Alertsboth based onscoring andassets.
• Ace Alertbased onrequirementsand assets
• no Ace Alert
• Ace Alertbased onrequirementsand scoring
• In addition torequirements,Ace alerteither basedon scoring orassets
Ace Alert basedon requirementsand assetsg
Configuration > [Recruiting] Settings
ACE Alert Score Default 60 Configuration > [Recruiting] Settings
Candidate File EventA candidate file event is any action performed on a candidate file.
When a candidate file is modified, either by the candidate or the user, an event to track thisaction is generated and is displayed in the candidate file History tab. There are 103 distinctcombinations (tracking event + event details) in the application and each combination belongsto one of the following eleven categories.
The system administrator selects the event categories used to track events but users can modifythe event categories selected.• Agent and referer• Attachments• Candidate file update• Candidate information• Candidate progression• Comments• Correspondence• Questions and competencies• Regulation• Resume

Recruiting Fundamentals Candidate
Configuration Guide Taleo 10 SP2 - Recruiting 352
• Screening services• OfferThe Correspondence event category allows users to review previously sent correspondence. Auser type permission allows users to resend the correspondence directly from the History tab.
Comments relating to an event can be added and edited in the History tab if the user has theproper user type permissions.
A user type permission allows users to modify the date of an event and specify when an actionon a candidate's file really took place, provided the feature has been activated. The use ofthe actual date enables reports to more accurately reflect user activity in the selection process.There might be a number of reasons why users would want to change certain dates in acandidate's file. For example, if a candidate had an interview on September 15, but that userwas only able to enter this information in the system on September 20, the event date wouldindicate September 20. The user could then change this date to September 15, which wouldbe more accurate. If the date and time related to an event can be edited, they appear as ahyperlink. The event date can only be between the application’s creation date and the currentdate.Configuration
User Type Permissions
Name Location
Edit comments in history summary Configuration > [SmartOrg] Administration > UserTypes > Recruiting > Candidates
Settings
Name Possible Values Default Value Location
Workflow Event Date Management• No
• Yes
No Configuration > [Recruiting] Setting
Default History Event Categories Attachments,CandidateProgression,Comments.
Candidate ComparisonAllows users to display candidate files side by side for comparison purposes.
From a requisition-specific candidate list, a user can select two or more candidate files andinvoke the Compare action in the More Actions list.
Up to four candidate files can be displayed simultaneously side by side. However, more thanfour candidate files can be compared. After expanding or collapsing sections of information tofocus on the most interesting criteria for a given comparison of four candidate files, the usercan click on the icon to lock a candidate file as being the reference against which the othercandidate files will be compared. The user can scroll through the other candidates selectedearlier, continue the comparison and remove unwanted candidates from the comparison viewas needed using the using the small x in the top right corner of the column for the candidate.
The sections of information displayed when comparing candidate files match the sections andsub-sections configured for the candidate file. The following fields are included in the compare

Recruiting Fundamentals Candidate
Configuration Guide Taleo 10 SP2 - Recruiting 353
process if they are present in the candidate file. Note that UDFs (other than screening results)are not included among the fields being compared.
Section Field
Basic Profile• Education Level
• Job Level
• Job Type
• Schedule
• Shift
• Employee Status
• Minimum Annual Salary
• Currency
• Travel
• Advance Notice
• Date of Availability
Work Experience• Achievements
• Current Job
• Employer
• Start Date
• End Date
• Job Function
• Other Employer
• Other Function
Work Conditions• Currency
• Expected Hourly Pay Rate
• Hours per week willing to work
• Hours per week, preferred
• Willing to work on holidays
• Willing to work on weekends
Certifications• Certification
• Expiration Date
• Issue Date
• Location
• Organization
• Other Certification
Education• Program
• Institution
• Other Institution
• Other Program
• Start Date
• Graduation Date
• GPA / GPA out of
• Graduated from High School or GED

Recruiting Fundamentals Candidate
Configuration Guide Taleo 10 SP2 - Recruiting 354
Section Field
• City
Prescreening• All questions
• All competencies
Shift Availability• Grid
Source Tracking• Display source or event
Screening Services• Most recent result for each service
Submission Medium• Display Medium
Contingent• Bill Rate
• Charge Sales Tax
• Pay Rate
• Worker Type
When comparing candidates, certain actions can be taken. The action will apply to allcandidates residing in the compare window at the time the action is taken. Available actionsare:
• Change Step/Status• Bypass• Revert• Send Correspondence• Add Comments• Create Self-assigned Task• Enter Grade• File in a Folder• Find Similar Candidates• Match• Share
Important Note: (ID 310) Users should know when making status updates during thecompare process that the screen will not refresh to reflect the updated statuses upon exitingthe compare screen. The statuses will have been applied and upon next screen refresh they willbe visible. Also, if updating several candidates’ status within the compare view and some arenot valid to be moved to the step, the warning message in this view will not list out the specificnames where the status update cannot be applied. The user instead will only be told that somecandidates will not have the status update applied and will need to determine which ones didnot receive it based on who actually does or does not have the status update reflected for thesubmission.
Important Note: (ID 309) Users should avoid trying to send a correspondence from withinthe candidate compare view. If a user attempts to send correspondence for one or morecandidates while in the compare view, the user will be blocked at the step of attempting toselect a message template and will be unable to complete the transaction.

Recruiting Fundamentals Candidate
Configuration Guide Taleo 10 SP2 - Recruiting 355
Important Note: (ID 307) Users should avoid creating self-assigned tasks from within thecompare function. If a user attempts to create a task for a candidate while in the compare view,he/she will receive an error message when trying to navigate out of the task and back to thecompare view. To get out, the user will need to restart.
Benefits• Provides an efficient way to analyze candidates side-by-side and to present finalists for
review and decision.• Displays comparable information for a subset of candidates in a clear, side-by-side format.• Can take certain actions on individual candidates or on all candidates.
Configuration
To enable the candidate comparison feature, the following setting must be enabled and thefollowing permission must be granted to users.
Setting
Name Possible Values Default Value Location
Activate Candidate Compare• No
• Yes
Yes Configuration > [Recruiting] Settings
User Type Permission
Name Location
Use candidate compare Configuration > [SmartOrg] Administration > User Types >Recruiting > Candidates
Candidate File MergeA candidate file merge allows users to combine two candidate files into one file.
A candidate file merge can be done in the following contexts:• Candidate quick search• Candidate advanced searchDuring a candidate file merge, a candidate file is enhanced with the content of anothercandidate file (i.e., the master file). The system suggests a master file as follows:• If both candidates were not referred, the system suggests the most recent candidate file.• If the most recent candidate was referred, the system suggests the oldest candidate file.• If both candidates were referred, the system suggests the first referral.To determine if the two candidate files are duplicate files, the system performs a duplicatecheck against fields specified by the system administrator. The following rules apply:• If there is no match between the fields, a message is displayed but the merge can still be
done.• If there is a match between the fields, the system merges the two candidate files. The master
candidate file is enhanced with the content of the duplicate file, and the duplicate file is thendeleted.
When a merge occurs, the content of the duplicate file is added to the content of the mastercandidate file. For the Education block, field content is copied over if Institution, Program orEducation Level are different. For the Work Experience block, field content is copied over ifEmployer or Job Function are different. Note that the content of custom fields is also merged.

Recruiting Fundamentals Candidate
Configuration Guide Taleo 10 SP2 - Recruiting 356
Note that the candidate file that is not selected is soft deleted (that is data can later berestored). All new candidate applications are considered for the merge action. However,existing candidate applications of the master candidate file are not overwritten.
If the e-mail option was selected when merging two candidate files, an e-mail message is sentto the candidate to inform him/her that two candidate files corresponding to his/her profilewere merged and to invite him/her to review the new candidate file. If the candidate file isowned by an agent, the e-mail message is sent to the agent rather than to the candidate.
A user type permission is required to be able to merge candidate files. Also, users who donot have the permission to view sensitive information for internal applications are able tomerge candidate files. However, the name of the candidate is not displayed; “ConfidentialInformation” appears instead.
It is not possible to merge candidate files for the following reasons:
• The duplicate candidate file is already in an onboarding process.• The duplicate candidate file contains an offer.• The duplicate candidate file contains an interview request.• The duplicate candidate file contains an incomplete external service request (i.e., an open
Passport transaction) such as a background check, a tax credit check, an assessment.
It is not possible to merge more than two candidate files at a time. However, here’s a possibleworkaround. If three duplicate files are found, first merge two candidate files. Then use themerged candidate file and merge it with the third candidate file. When doing the first merge,do not send a message to the candidate or the agent. Send it when doing the merge with thethird file.
It is not possible to automatically restore the master candidate file in its original state. You haveto restore it manually by removing information that was added. However, the deleted duplicatecandidate file can be restored by your system administrator.
It is possible to “unmerge” candidate files. You can undelete the duplicate candidate file, sincethis file was soft deleted. Regarding the master candidate file, users have to delete the newlycreated file manually to restore the state. The tracking history is not modifiable, but a commentcan be added to explain what was done.
Files attached to the duplicate file are also merged. If the maximum number of attachmentsallowed is exceeded or the attachments exceed the allocated disk space, the attachments willbe merged. However, you will not be able to add additional files, since the maximum numberis reached or exceeded.
Merging can create multilingual candidate files. When merging two candidate fileswith different languages, the master candidate file will have two languages instead ofone. However, the language of the master candidate file will be used for the generalcorrespondence. Application specific correspondence will continue to be in the language of theapplication, thus the candidate might start receiving correspondences in both languages.
Benefits
• Provides a cleaner database.• Recruiters do not work on the same candidate files without knowing it.• Agents are informed if two duplicate candidate files exist in the database, thus resolving
conflicting situations. When a duplicate candidate file is merged, agents who are owners ofthe master candidate file are informed immediately.
Configuration
The following settings are used to configure the merge feature.

Recruiting Fundamentals Candidate
Configuration Guide Taleo 10 SP2 - Recruiting 357
Settings
Name Possible Values Default Value Location
Merge form Activation• No
• Yes
No Configuration > [Recruiting] Setting
Maximum Number Merge Forms inList
Any 14 Configuration > [Recruiting] Setting
Maximum Merge Form Size Any 512000 Configuration > [Recruiting] Setting
To merge candidate files, users must be granted the following permission.
User Type Permission
Name Location
Merge Candidate files Configuration > [SmartOrg] Administration > User Types >Recruiting > Candidates
Important Note: (ID 217) Users can only perform a candidate file merge from searchresults, not from folders.
Candidate SharingThis feature allows users to share candidate files with people via e-mail.
The share action is represented by the icon and is available in the candidate list and thecandidate file.
The file generated when sharing a candidate file is a PDF file similar in look to what would begenerated using the Print function. In addition, the sections available for selection by a userare based on how the file is configured and on user type permissions. This means, if a systemadministrator wanted to allow users to more precisely control what is printed, he/she can dothis by increasing the sections in the file layout.
When using the share function, only fields containing data are visible in the view/print mode;this means fields with no data will not be rendered when sharing.
The PDF generated by the share function will be identical to the data presented to the user forthe selected sections while looking at the information in view mode.
Benefits• More granular sections of information based on the candidate file configurations.• Ability to share what the user wants in a list or file.
ConfigurationUser Type Permissions
Name Location
Share Candidates Configuration > [SmartOrg] Administration > User Types >Recruiting > Candidates
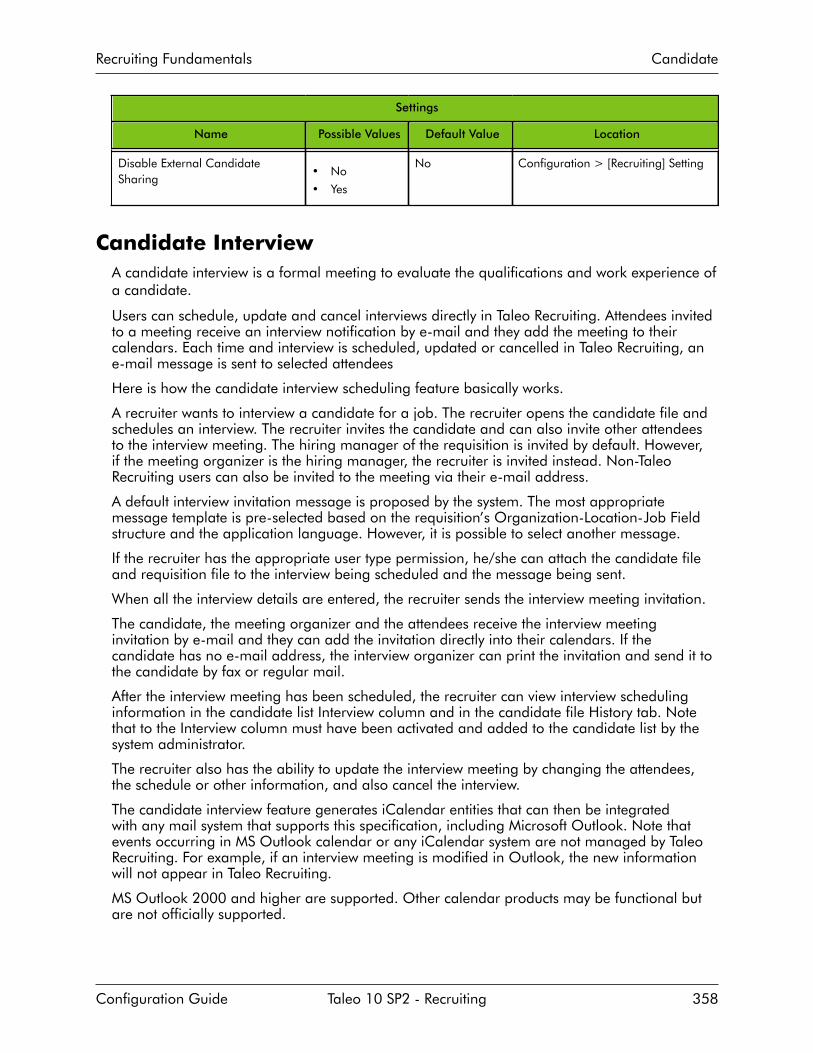
Recruiting Fundamentals Candidate
Configuration Guide Taleo 10 SP2 - Recruiting 358
Settings
Name Possible Values Default Value Location
Disable External CandidateSharing
• No
• Yes
No Configuration > [Recruiting] Setting
Candidate InterviewA candidate interview is a formal meeting to evaluate the qualifications and work experience ofa candidate.
Users can schedule, update and cancel interviews directly in Taleo Recruiting. Attendees invitedto a meeting receive an interview notification by e-mail and they add the meeting to theircalendars. Each time and interview is scheduled, updated or cancelled in Taleo Recruiting, ane-mail message is sent to selected attendees
Here is how the candidate interview scheduling feature basically works.
A recruiter wants to interview a candidate for a job. The recruiter opens the candidate file andschedules an interview. The recruiter invites the candidate and can also invite other attendeesto the interview meeting. The hiring manager of the requisition is invited by default. However,if the meeting organizer is the hiring manager, the recruiter is invited instead. Non-TaleoRecruiting users can also be invited to the meeting via their e-mail address.
A default interview invitation message is proposed by the system. The most appropriatemessage template is pre-selected based on the requisition’s Organization-Location-Job Fieldstructure and the application language. However, it is possible to select another message.
If the recruiter has the appropriate user type permission, he/she can attach the candidate fileand requisition file to the interview being scheduled and the message being sent.
When all the interview details are entered, the recruiter sends the interview meeting invitation.
The candidate, the meeting organizer and the attendees receive the interview meetinginvitation by e-mail and they can add the invitation directly into their calendars. If thecandidate has no e-mail address, the interview organizer can print the invitation and send it tothe candidate by fax or regular mail.
After the interview meeting has been scheduled, the recruiter can view interview schedulinginformation in the candidate list Interview column and in the candidate file History tab. Notethat to the Interview column must have been activated and added to the candidate list by thesystem administrator.
The recruiter also has the ability to update the interview meeting by changing the attendees,the schedule or other information, and also cancel the interview.
The candidate interview feature generates iCalendar entities that can then be integratedwith any mail system that supports this specification, including Microsoft Outlook. Note thatevents occurring in MS Outlook calendar or any iCalendar system are not managed by TaleoRecruiting. For example, if an interview meeting is modified in Outlook, the new informationwill not appear in Taleo Recruiting.
MS Outlook 2000 and higher are supported. Other calendar products may be functional butare not officially supported.

Recruiting Fundamentals Candidate
Configuration Guide Taleo 10 SP2 - Recruiting 359
When the candidate file and requisition file (or other candidate attachments) are included inthe interview meeting invitation, these do not follow in the Calendar meeting.
A candidate can only have one interview scheduled per application at a time.If a candidate hasno email address, users can still schedule an interview; they simply need to print the interviewinvitation and send it to the candidate by fax or regular mail.
Benefits
• Interviews are scheduled directly in Taleo Recruiting.• By importing the interview schedule information directly into Outlook, candidate interview
schedules can be tracked directly in Taleo Recruiting without the necessity for an externalproduct.
• The ability to add scheduling information into a calendar minimizes the risk for forgottenmeetings or conflicting agendas.
• Efficient communication and tracking of interview information at the users fingertips.
ConfigurationUser Type Permissions
Name Location
Manage interviews Configuration > [SmartOrg] Administration > User Types >Recruiting > Candidates
Send candidate files and requisitions to attendees Configuration > [SmartOrg] Administration > User Types >Recruiting > Candidates
To activate the interview management functionality, the following setting must be set to Yes.
Setting
Name Possible Values Default Value Location
Interview Management Activation• No
• Yes
Yes Configuration > [Recruiting] Setting
To allow meeting requests to be sent only to the members of the groups to which a userbelongs, the following setting must be set to Yes.
Setting
Name Possible Values Default Value Location
Confine Meeting Attendees to UserGroup
• No
• Yes
No Configuration > [Recruiting] Setting
To indicate how the candidate file and requisition file are shared with attendees whenscheduling interviews, the following setting must be configured.
Setting
Name Possible Values Default Value Location
Meeting Scheduling Sharing Mode• Via email
Via Taleo eShareCenter
Configuration > [Recruiting] Setting
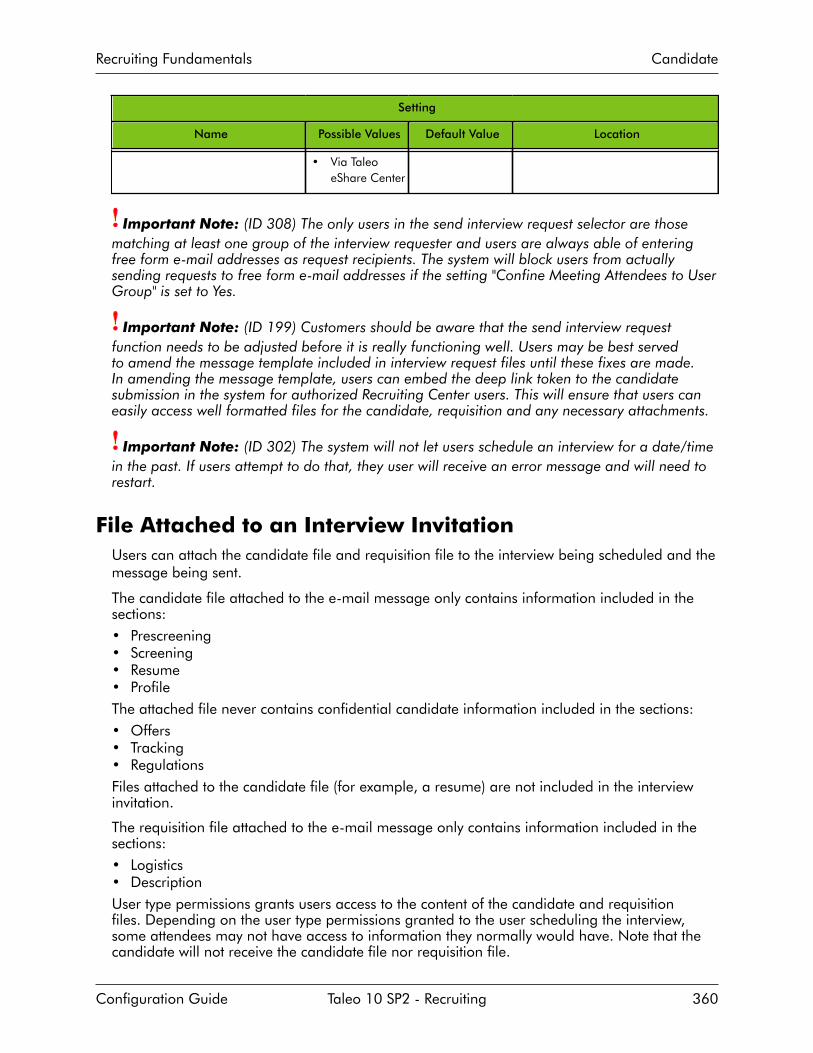
Recruiting Fundamentals Candidate
Configuration Guide Taleo 10 SP2 - Recruiting 360
Setting
Name Possible Values Default Value Location
• Via TaleoeShare Center
Important Note: (ID 308) The only users in the send interview request selector are thosematching at least one group of the interview requester and users are always able of enteringfree form e-mail addresses as request recipients. The system will block users from actuallysending requests to free form e-mail addresses if the setting "Confine Meeting Attendees to UserGroup" is set to Yes.
Important Note: (ID 199) Customers should be aware that the send interview requestfunction needs to be adjusted before it is really functioning well. Users may be best servedto amend the message template included in interview request files until these fixes are made.In amending the message template, users can embed the deep link token to the candidatesubmission in the system for authorized Recruiting Center users. This will ensure that users caneasily access well formatted files for the candidate, requisition and any necessary attachments.
Important Note: (ID 302) The system will not let users schedule an interview for a date/timein the past. If users attempt to do that, they user will receive an error message and will need torestart.
File Attached to an Interview InvitationUsers can attach the candidate file and requisition file to the interview being scheduled and themessage being sent.
The candidate file attached to the e-mail message only contains information included in thesections:• Prescreening• Screening• Resume• ProfileThe attached file never contains confidential candidate information included in the sections:• Offers• Tracking• RegulationsFiles attached to the candidate file (for example, a resume) are not included in the interviewinvitation.
The requisition file attached to the e-mail message only contains information included in thesections:• Logistics• DescriptionUser type permissions grants users access to the content of the candidate and requisitionfiles. Depending on the user type permissions granted to the user scheduling the interview,some attendees may not have access to information they normally would have. Note that thecandidate will not receive the candidate file nor requisition file.

Recruiting Fundamentals Candidate
Configuration Guide Taleo 10 SP2 - Recruiting 361
When the candidate file and requisition file (or other candidate attachments) are included inthe interview meeting invitation, these do not follow in the Calendar meeting.
ConfigurationUser Type Permissions
Name Location
Manage interviews Configuration > [SmartOrg] Administration> User Types >Recruiting > Candidates
Send candidate files and requisitions to attendees Configuration > [SmartOrg] Administration> User Types >Recruiting > Candidates
Access Attachments tab Configuration > [SmartOrg] Administration> User Types >Recruiting > Candidates
Settings
Name Possible Values Default Value Location
Interview Management Activation• No
• Yes
Yes Configuration > [Recruiting] Settings
Candidate Interview and Candidate Selection WorkflowThe candidate interview feature can be configured in the candidate selection workflow forproper candidate selection tracking.
Candidate selection workflows can be configured by the system administrator so that whenusers schedule an interview, the candidate’s status automatically changes to a preset value.To automatically change the candidate’s status, the system administrator must activate theInterview Scheduling Behavior option for the statuses in question, that is 1st, 2nd and 3rdinterview statuses (available in the Statuses Usage tab of a step).
Example:
A recruiter uses a candidate selection workflow containing the 1st, 2nd and 3rd Interview steps.All three steps have the following statuses:
• To be scheduled• Scheduled• Passed
The Interview Scheduling Behavior option is activated for the Scheduled status. The candidate iscurrently at the 1st Interview step and the To be Scheduled status.
The recruiter schedules an interview for the candidate. When the recruiter sends the interviewinvitation to the attendees, the status of the candidate automatically changes from To beScheduled to Scheduled.
The candidate attends the interview as scheduled. The recruiter wants to invite the candidate toa second interview. The recruiter has to perform the following steps:
• Change the status of the 1st Interview step to Passed.• Move the candidate to the 2nd Interview step and set the status to To be scheduled.• Schedule a new interview.

Recruiting Fundamentals Candidate
Configuration Guide Taleo 10 SP2 - Recruiting 362
Since the Scheduled status is also configured for the 2nd Interview step, the candidate’s 2ndInterview status automatically changes to Scheduled once the interview is sent to the attendees.
When using this functionality, a best practice is to configure the Interview steps with acompletion status that indicates the successful completion of the interview (for example, Passed,Successful). This helps to ensure that an interview that is past due is not simply forgotten.
Automatic Candidate PoolingThe Automatic Candidate Pooling feature allows customers to add autopooling criteria to arequisition or requisition template to find candidates in the database who are available andqualified for a job. Managers can then access the autopool results with a single click.
The Automatic Candidate Pooling feature is typically used in decentralized hiring environments,for example in high volume retail and hourly hiring where managers may have to quicklyidentify candidates on their own without the assistance of recruiters.
For the Automatic Candidate Pooling feature to be available, the feature must be enabled bythe system administrator. Users creating or defining autopooling criteria must be granted therequired user type permissions, but no permission is required to access the autopool results.
Autopooling criteria can be added to a requisition via the Autopooling Criteria tab (ifautopooling criteria were added to a requisition template, they will be inherited by therequisition). This is like a saved search that managers can use to find candidates who are bothavailable and qualified. The following autopooling criteria may include any criteria from theAdvanced Search, plus an additional set of basic criteria. For example:• Exclude candidates in selection process• Candidate’s general profile language must match the requisition language• Exclude expired job submissions (selected by default)• Exclude rejected candidates - Within the last x days• Exclude hired candidates - Within the last x days (selected by default)• Candidate’s place of residence - Within a radius of x kilometers/miles from the primary
location of the job opening• Submissions must match the following organization-location-job field structureAs a best practice, when defining autopooling criteria:• Define autopooling criteria in requisition templates so criteria are inherited as requisitions
are created.• Define the widest possible set of candidates from the database that would be both qualified
and available. This way, no time is wasted on unqualified or unavailable candidates. Forexample:• Set Organizations, Locations and Job Fields to only include candidates from other jobs
with overlapping skills and/or who applied to nearby locations. Filter by Organizationand Location if appropriate (specific country, specific division, etc.).
• Exclude candidates being considered in another requisition, who were recently hired,whose submissions have expired.
• Use the parameter to limit results to candidates who live within X kilometers/miles of theprimary location of the requisition.
Once autopooling criteria have been defined and enabled, the system will automaticallygenerate a list of candidates matching the criteria anytime on demand. This list of candidates
is accessible in the requisition-specific candidate list or in the requisition file via the icon. Amaximum of 300 candidates can be displayed. The user then has the ability to:• View candidate files.

Recruiting Fundamentals Candidate
Configuration Guide Taleo 10 SP2 - Recruiting 363
• Match candidates to the current job opening (candidates are moved from the autopoolresults list to the requisition-specific candidate list, and they can then be moved along theworkflow like any other candidate).
• Match candidates to the current job opening and reject them in a single action (which willremove undesired candidates from continuing to appear in the candidate pool for thisrequisition; note that by default this option is disabled).
• Filter the list of candidates using quick filters defined by the system administrator.• Sort the list of candidates by clicking a column heading.When viewing a candidate file, the user may be able to view the other job applications that thecandidate has submitted, depending on the permissions he/she was granted.
The user is able to match a candidate to the requisition via the autopooling feature even if he/she was not granted the permission to match candidates to a requisition in general.
The user may also be able to match and reject candidates in one action if he/she was grantedthe proper permission. When rejecting a candidate, the manager must specify the qualifiers(motives) and provide comments as required by the workflow.
If configured by the system administrator, the Automatic Candidate Pooling feature may alsoprovide the ability to create optional repooling rules which automatically set a candidate'ssubmission to an Inactive status after X days of inactivity. If the autopooling criteria for otherjobs include the criteria to exclude candidates who are in a selection process, candidates whoare automatically set to an inactive status will no longer be excluded and thus will be includedin pool results.Benefits• Allows employers to maximize the value of their candidate database and the sharing of
candidates across locations and jobs.• Allows employers to predefine a sophisticated search that meets regulations and company
policies.• Provides one-click access to candidates for any job according to pre-defined criteria.• Managers and recruiters no longer waste their time on candidates who are not available
nor qualified, who are already under consideration for other jobs or locations, or who havealready been hired.
ConfigurationUser Type Permissions
Name Location
View autopooling criteria Configuration > [SmartOrg] Administration > User Types >Recruiting > Requisition
Edit autopooling criteria Configuration > [SmartOrg] Administration > User Types >Recruiting > Requisition
Perform the "Reject" action from the candidateautopooling list
Configuration > [SmartOrg] Administration > User Types >Recruiting > Candidate
Settings
Name Possible Values Default Value Location
Automatic Candidate PoolingEnabled
• No
• Yes
No Configuration > [Recruiting] Settings
Inactivate Job Submissions Feature• No
No Configuration > [Recruiting] Settings

Recruiting Fundamentals Candidate
Configuration Guide Taleo 10 SP2 - Recruiting 364
Settings
Name Possible Values Default Value Location
• Yes
A candidate list format entitled"List of automatically pooledcandidates" controls the format ofthe automatic candidate poolingresults list.
Configuration > [Recruiting]Administration > List Formats >Candidate
Configuring the Automatic Candidate PoolingPrerequisite
Configuration > [Recruiting] Administration
Steps
1. Under Recruiting Settings, enable the Automatic Candidate Pooling Enabled setting.2. Under List Formats, configure the candidate list format context entitled List of
automatically pooled candidates.a) Select columns for the list format.b) Put columns in the right sequence.c) Set column sorting criteria.d) Configure quick filters. This list format allows the use of the same quick filters as the
Advanced Search list format, plus the Shift Availability filter.e) Activate the list format.
3. Under SmartOrg/User Types, grant the following user type permissions:• View autopooling criteria• Edit autopooling criteria• Perform the "Reject" action from the candidate autopooling list
4. You can define repooling rules within the Candidate Selection Workflow to automaticallyreturn candidates to the pool after X days of inactivity:a) Under Recruiting Settings, enable the Inactivate Job Submissions Feature setting.b) Under Candidate Selection Workflow/Statuses tab, create an inactive status and select
Inactive in the Reference Model list.c) Under Candidate Selection Workflow/Steps tab, add this inactive status to each
candidate selection workflow step in which you want to repool candidates.d) Within each desired candidate selection workflow, in the Steps Usage tab, click on the
step, select the Inactivate Job Submissions option and indicate the number of days.Note that different steps may have different durations or none at all.
Candidate OnboardingCandidate onboarding is the process of integrating a new employee into an organization.
Onboarding begins when a person accepts a position; it can include orientation,communication, filling out forms, getting equipment such as a laptop.

Recruiting Fundamentals Candidate
Configuration Guide Taleo 10 SP2 - Recruiting 365
A user type permission grants users access to this feature.
Benefits
• Improves time to productivity.• Reduces time and effort for Human Resources.
Configuration
User Type Permissions
Name Location
Initiate an onboarding process for a new resource Configuration > [SmartOrg] Administration > User Types >Other
Cancel an onboarding process in progress Configuration > [SmartOrg] Administration > User Types >Other
Settings
Name Possible Values Default Value Location
Onboarding Activation• No
• Yes
No Configuration > [Recruting] Settings
Recruiting Fundamentals Requisition
Configuration Guide Taleo 10 SP2 - Recruiting 366
Requisition
Requisition FileA requisition file details the specific requirements for a job position.
When opening a requisition file, users are always in view mode and they can from therechoose to go into edit mode. This provides a cleaner layout and eliminates the need to “close”the file (to exit out of it and reactivate other buttons on the screen) if only viewing the file. Inview mode, only fields for which data is provided are displayed. However, in edit mode, fieldsthat do not contain data are displayed according to user permissions.
When opening a requisition file, the screen is organized into three panes:• Left pane containing the requisition card in the top section and supporting information in
the bottom section. The pane can be expanded or collapsed.• Right pane containing supporting tools such as the online help and the diagnostic tool. The
pane can be expanded or collapsed.• Central pane containing a menu bar allowing users to perform actions on the requisition
file. It also contains tabs that provide complete information about the candidate. Dependingon which side the candidate card is, the information displayed will vary.
The requisition file contains several tabs:• Requisition• Alerts• Attachments• Approvals• Posting and Sourcing• History• ReportsThe content of the requisition file is presented as a long form. The main content of therequisition file is within the Requisition tab, which includes various sections. The other tabscontain peripheral information.
From the main requisition tab, whether in edit or view mode, users always have access to atable of contents section that allows quick jumping to different portions of the file. To displaythis table of contents, users simply have to click located in the Requisition tab.
The fields and layout of the requisition are configured by the system administrator. It is alsothe system administrator who grants users access to requisition files. Fields in a requisition arecompleted by a user to create a requisition. The requisition contains many details and fieldssuch as the title of the job, the number of openings, the requisition owners and collaborators,the organization, location and job field associated to it, compensation information, jobdescription, questions and competencies, etc. Once the requisition is created and approved,the user can post it on internal and/or external career sections, on job boards via eQuest, orvia agency offering staffing services. Once the requisition is posted, candidates can apply forthe job and fill the required fields.
Important Note: (ID 295) Any user authorized to view a requisition is also able to cancelthat requisition.

Recruiting Fundamentals Requisition
Configuration Guide Taleo 10 SP2 - Recruiting 367
Benefits
• Easy to navigate requisition files.• Diagnostic tool making it easy to understand what fields are required and when• The requisition file is highly flexible and only displays what the user is allowed to see.• The system administrator has the ability to define the layout of the requisition file based on
requisition types.
Requisition CreationRecruiters and managers have the ability to create requisitions to detail the specificrequirements for a job position.
The creation of requisitions is done via the Create Requisition button which is available in thehome page Requisitions channel as well as in the Requisitions page. This button is available tousers if they have been granted the proper user type permission.
When creating a requisition, the Create a Requisition wizard is launched. One of the firststep when creating a requisition is to select a requisition type. The system administrator isresponsible of activating requisition types and of granting the user type permissions that allowusers access to specific requisition types. If more than one requisition type has been activated,the user is asked to select the desired requisition type.
Depending on the company’s configuration, users may be able to specify specific elementssuch as the position, the department, the Organization- Location-Job Field structure. When thisinformation is provided, the system fills certain fields in the requisition form.
When all of the above have been specified, users complete the various fields of the requisition.
Important Note: (ID 305) When selecting collaborators, support users (that is, Taleopersonnel) will appear in the list of available users to include. These users should be ignored.
When creating a multilingual requisition form, the user’s preferred languages are activatedby default (the languages are displayed in the Activated Languages drop-down list), users arenot forced to translate non-mandatory fields (a non-mandatory field completed in the baselanguage can be left blank in other languages), and users can change the value selected for afield (they are not limited to the value selected for the base language).
When saving the requisition, a message appears if information is missing in certain fields.Users can also use the diagnostic tool to know which fields must be filled to be able to savethe requisition. If information is missing for certain fields, the diagnostic tool provides links tojump quickly to these fields to enter the missing information. The diagnostic tool is located inthe right-hand pane.
Once the requisition is completed, the requisition goes through an approval process beforebeing posted on career sections or job boards.
Configuration
To create requisitions, users must be granted the following permission.
User Type Permission
Name Location
Create requisitions Configuration > [SmartOrg] Administration> User Types >Recruiting > Requisitions
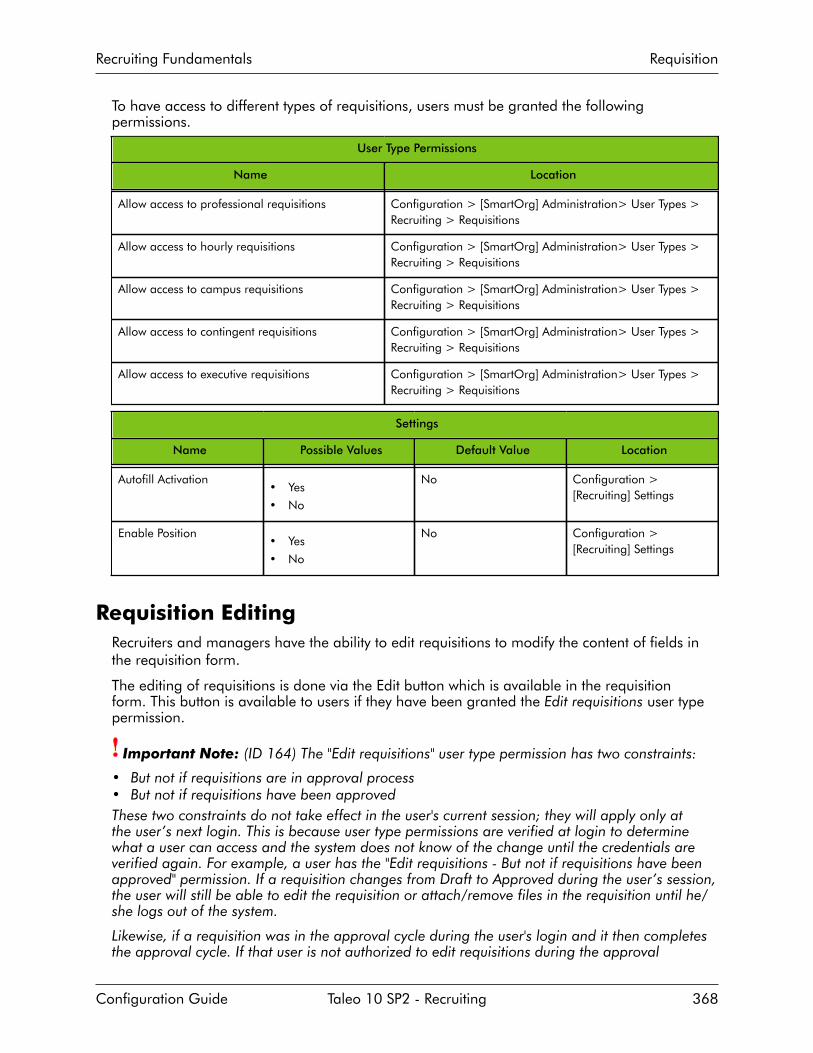
Recruiting Fundamentals Requisition
Configuration Guide Taleo 10 SP2 - Recruiting 368
To have access to different types of requisitions, users must be granted the followingpermissions.
User Type Permissions
Name Location
Allow access to professional requisitions Configuration > [SmartOrg] Administration> User Types >Recruiting > Requisitions
Allow access to hourly requisitions Configuration > [SmartOrg] Administration> User Types >Recruiting > Requisitions
Allow access to campus requisitions Configuration > [SmartOrg] Administration> User Types >Recruiting > Requisitions
Allow access to contingent requisitions Configuration > [SmartOrg] Administration> User Types >Recruiting > Requisitions
Allow access to executive requisitions Configuration > [SmartOrg] Administration> User Types >Recruiting > Requisitions
Settings
Name Possible Values Default Value Location
Autofill Activation• Yes
• No
No Configuration >[Recruiting] Settings
Enable Position• Yes
• No
No Configuration >[Recruiting] Settings
Requisition EditingRecruiters and managers have the ability to edit requisitions to modify the content of fields inthe requisition form.
The editing of requisitions is done via the Edit button which is available in the requisitionform. This button is available to users if they have been granted the Edit requisitions user typepermission.
Important Note: (ID 164) The "Edit requisitions" user type permission has two constraints:
• But not if requisitions are in approval process• But not if requisitions have been approvedThese two constraints do not take effect in the user's current session; they will apply only atthe user’s next login. This is because user type permissions are verified at login to determinewhat a user can access and the system does not know of the change until the credentials areverified again. For example, a user has the "Edit requisitions - But not if requisitions have beenapproved" permission. If a requisition changes from Draft to Approved during the user’s session,the user will still be able to edit the requisition or attach/remove files in the requisition until he/she logs out of the system.
Likewise, if a requisition was in the approval cycle during the user's login and it then completesthe approval cycle. If that user is not authorized to edit requisitions during the approval

Recruiting Fundamentals Requisition
Configuration Guide Taleo 10 SP2 - Recruiting 369
process, he/she may need to log out and back in again in order to regain the edit access to therequisition.
Requisition DuplicateRecruiters and managers have the ability to duplicate requisitions to create requisitions similarto an existing one.
A requisition can be duplicated via the icon which is available in the requisition form. Thisicon is available to users if they have been granted the proper user type permission.
When duplicating a requisition, all of the information is duplicated except the Alerts tabinformation and the Target Start Date field content. The information on the Alerts tab defaultsto your organization's ACE settings.
Important Note: (ID 306) When a requisition is duplicated, it will carry over the list ofapprovers from the original requisition as the starting point for approvers on the requisition. Ifin fact the requisition is never routed for approval but is saved as open, these approvers willremain on the Approvals tab with no dates associated with conducting an approval. Usersshould understand that if an approver appears on a page with no date next to their name, theynever approved the requisition. This scenario illustrates how this might come to occur.
Requisition Autofill FeatureRequisitions can be configured so that fields in the requisition are automatically filled.
The Requisition Wizard allows users to create requisitions. The Requisition Wizard may displaydifferent options allowing the automatic filling of certain fields in the requisition:• By default, the Template and Hiring Manager fields are displayed to users.• If the Enable Position setting is enabled, the Position and Hiring Manager fields are
displayed.• If the Department Autofill Activation setting is enabled, the Template and Department fields
are displayed.• If the Enable Position setting and Department Autofill Activation setting are enabled, the
Department and Position fields are displayed.Note that users have the ability to indicate in their user preferences if they want to use therequisition file automatic filling option (Resources > My Setup > Preferences). If they enablethis option, the Requisition Wizard is enabled and it displays fields configured by the systemadministrator. If users do not enable this option, it bypasses the Requisition Wizard and therequisition form is displayed.
ConfigurationSettings
Name Possible Values Default Value Location
Department AutofillActivation
• Yes
• No
No Configuration >[Recruiting] Settings
Enable Position• Yes
• No
No Configuration >[Recruiting] Settings
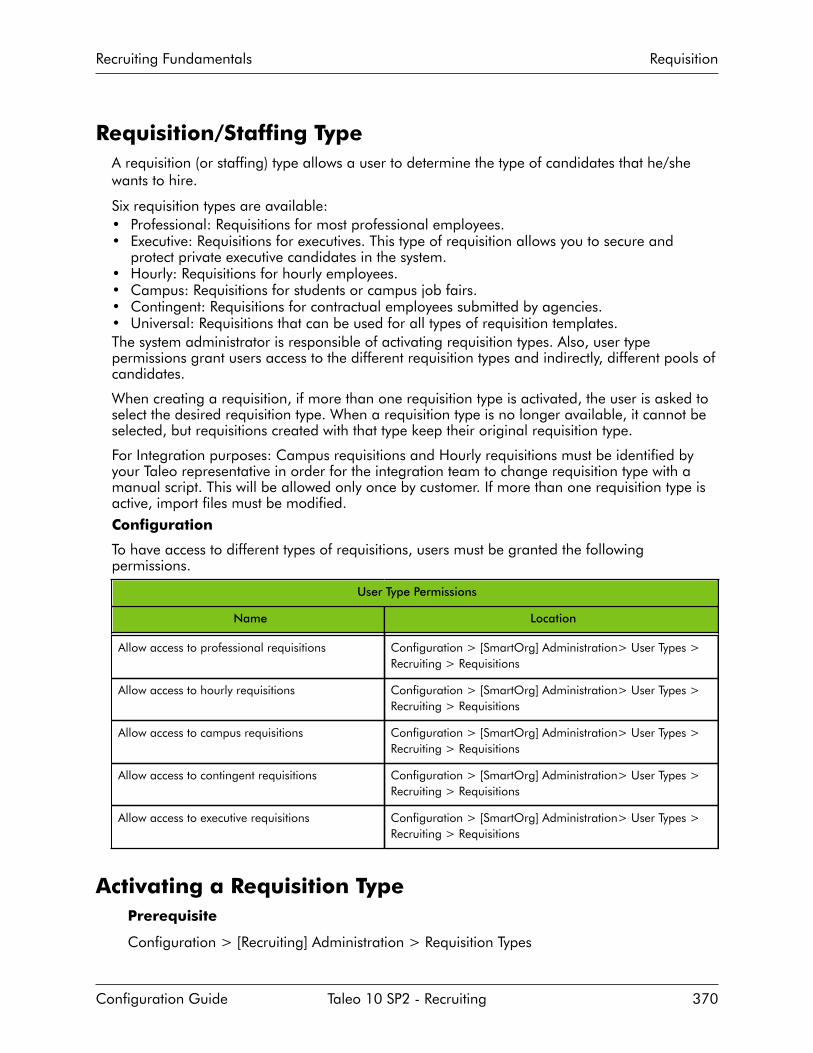
Recruiting Fundamentals Requisition
Configuration Guide Taleo 10 SP2 - Recruiting 370
Requisition/Staffing TypeA requisition (or staffing) type allows a user to determine the type of candidates that he/shewants to hire.
Six requisition types are available:• Professional: Requisitions for most professional employees.• Executive: Requisitions for executives. This type of requisition allows you to secure and
protect private executive candidates in the system.• Hourly: Requisitions for hourly employees.• Campus: Requisitions for students or campus job fairs.• Contingent: Requisitions for contractual employees submitted by agencies.• Universal: Requisitions that can be used for all types of requisition templates.The system administrator is responsible of activating requisition types. Also, user typepermissions grant users access to the different requisition types and indirectly, different pools ofcandidates.
When creating a requisition, if more than one requisition type is activated, the user is asked toselect the desired requisition type. When a requisition type is no longer available, it cannot beselected, but requisitions created with that type keep their original requisition type.
For Integration purposes: Campus requisitions and Hourly requisitions must be identified byyour Taleo representative in order for the integration team to change requisition type with amanual script. This will be allowed only once by customer. If more than one requisition type isactive, import files must be modified.Configuration
To have access to different types of requisitions, users must be granted the followingpermissions.
User Type Permissions
Name Location
Allow access to professional requisitions Configuration > [SmartOrg] Administration> User Types >Recruiting > Requisitions
Allow access to hourly requisitions Configuration > [SmartOrg] Administration> User Types >Recruiting > Requisitions
Allow access to campus requisitions Configuration > [SmartOrg] Administration> User Types >Recruiting > Requisitions
Allow access to contingent requisitions Configuration > [SmartOrg] Administration> User Types >Recruiting > Requisitions
Allow access to executive requisitions Configuration > [SmartOrg] Administration> User Types >Recruiting > Requisitions
Activating a Requisition TypePrerequisite
Configuration > [Recruiting] Administration > Requisition Types

Recruiting Fundamentals Requisition
Configuration Guide Taleo 10 SP2 - Recruiting 371
Steps
1. Select a requisition type in the Available Requisition Types list.2. Click Add.3. Click Done.
Result
The requisition type will be available to users when they created a requisition if they weregranted the Requisition Type user type in the SmarOrg user type feature.
Next Step
Granting the Requisition Type user type permission.
Deactivating a Requisition TypePrerequisite
Configuration > [Recruiting] Administration > Requisition Types
Steps
1. Select a requisition type in the Available Requisition Types list.2. Click Remove.3. Click Done.
Result
The requisition type will no longer be available to users when they created a requisition.
Next Step
Granting the Requisition Type user type permission.
Requisition PostingRequisition posting allows a user to publish a requisition in order to have candidates applyingon the job.
A requisition can be posted on:• Internal or external career sections.• eQuest: this is the doorway to post a requisition on any job board. A requisition must be
posted on a career section before being posted on eQuest.• Staffing agents: a user can ask an advertising agency to post an ad.• Non-electronic media such as newspapers, magazines and trade publications, billboards
and broadcasting. A list of preferred non-electronic media can be created in the Setuppage, under Preferences.
Depending on how settings are configured by the system administrator, a requisition may needapproval before being posted. When an approval is required, the approval requirements willbe displayed in the requisition file Approval Path tab.
When the last position of a requisition is filled, the requisition is automatically unposted fromthe company’s career sections and intranet, and the requisition is no longer displayed in therequisition list. Users might have to remove the requisition manually from other sites. Also, thestep for remaining candidates is changed to Rejected.

Recruiting Fundamentals Requisition
Configuration Guide Taleo 10 SP2 - Recruiting 372
Users must have the required user type permission to be able to post requisitions. Also,different permissions are also required to perform certain posting actions.
Benefits
• Allows a user to target where a requisition will be posted.
ConfigurationUser Type Permissions
Name Location
Post Requisitions Configuration > [SmartOrg] Administration > User Types >Recruiting > Sourcing
Prevent and allow posting Configuration > [SmartOrg] Administration > User Types >Recruiting > Sourcing
Extend posting and unpost Configuration > [SmartOrg] Administration > User Types >Recruiting > Sourcing
Requisition Posting via a Staffing AgentPosting a requisition via staffing agents involves many actions such as the creation of theagency portal, application flows, agencies and agents, as well as many actors such as thesystem administrator, the user, the agent and the candidate.
Agency portals (or agency career sections) provide a fully integrated solution that enablesorganizations to deal directly with staffing agencies. This feature helps ensure the privacy of theorganization's candidates and jobs by providing an agency-dedicated application flow withinone or multiple agency portals.
The posting of a requisition via posting agents involves the following.
After creating a requisition, a user can decide to use staffing agents to help him/her findcandidates for the job. The list of agents available is dependent on the organization, locationand job field selected for the requisition. The user can select one or several staffing agents whowill post the requisition on their job list, then determine the start and end time when candidatereferrals will be allowed. Note that this process can take place after the requisition is openedbut before it is posted to internal or external career sections as agents will be accessing therequisition through their own career section (agency portal).
An email is sent to staffing agents inviting them to refer candidates for the job. The staffingagent signs in to the Taleo agency portal, locates the requisition associated to him/her andrefers a candidate. When referring a candidate, the agent must first verify if the candidatealready exists in the database by entering the candidate’s email address and performing aduplicate check. If the candidate does not exist in the database, the agent is able to refer thecandidate.
Important Note: (ID 321) When changing the agent who referred a candidate, if we wantto reselect the original referring agent and the original ownership is expired, the change willnot take effect unless a different agent is first selected and then another modification is made toreselect the original agent.»
Candidates being referred receive an email informing them that they were referred by anagent for a job and inviting them to review the profile information submitted by the agent.

Recruiting Fundamentals Requisition
Configuration Guide Taleo 10 SP2 - Recruiting 373
Later, when searching through the candidate database, the user can easily identify candidatesreferred by an agent with this icon . The tracking tab of the candidate file also displays thename of the agency and that of the agent who referred the candidate. Candidates referred byan agent are considered agent-owned candidates. However, the user can remove the agent-ownership. The user has the possibility to perform a duplicate check to see if the candidatealready exist in the database.
As per the configuration aspect of the feature, the system administrator is responsible forcreating the agency portal as well as the application flows used by agents and agencies torefer candidates. For more information, see the Career Section Administration Manual. Oncethe agency portal and flows are created, the system administrator creates agencies and agents.It is necessary to create an agency because every agent is linked to an agency to be functional.An agency is not linked to a portal; only an agent at an agency is linked to a portal.
ConfigurationUser Type Permissions
Name Location
Post to staffing agents/agencies Configuration > [SmartOrg] Administration > User Types >Recruiting > Sourcing
Requisition TemplateA requisition template is a requisition file containing information that will likely be reused for asimilar job position.
Requisition templates are available to users in the Libraries menu.
A requisition template can be created for each position or job category. Depending on yourorganization's policies, the requisition template may be very detailed or may include only basicinformation.
When creating a new requisition, it is a best practice to select a requisition template first; thiswill auto-populate many of the requisition fields based on the selected template.
The creation of requisition templates is similar to the creation of requisitions. It is done viathe Create Template feature which is available in the Requisition Template Library, via theLibraries menu. This feature is available to users if they have been granted the proper user typepermission.
When creating a requisition template, the Create Requisition Template wizard is launched.One of the first step when creating a requisition template is to select a requisition type. Thesystem administrator is responsible of activating requisition types and of granting the user typepermissions that allow users access to specific requisition types. If more than one requisitiontype has been activated, the user is asked to select the desired requisition type.
Depending on the company’s configuration, users may be able to specify specific elementssuch as the Organization, Location and Job Field (Organization-Location-Job Field structure).
When all of the above have been specified, users complete the various fields of the requisitiontemplate. When saving the requisition template, a message appears if information is missingin certain fields. Users can also use the diagnostic tool to know which fields must be filledto be able to save the requisition template. If information is missing for certain fields, thediagnostic tool provides links to jump quickly to these fields to enter the missing information.The diagnostic tool is located in the right-hand pane.

Recruiting Fundamentals Requisition
Configuration Guide Taleo 10 SP2 - Recruiting 374
Once the requisition template is completed, it is available in the Requisition Templates page.
Important Note: (ID 243) Both the recruiter and user group fields can be specified inthe requisition template but unlike other fields in the template. These fields will not fill in asdefaulted fields in requisitions created from the template. The purpose of the recruiter field ina requisition template is to give a user ownership privilege of the template from a templateaccess viewing and filtering perspective in the Template library. The purpose of the user groupfield specified in a requisition template is to define which users will be authorized to createrequisitions using this template. Only those matching the group will see the template if a grouphas been specified.
Important Note: (ID 247) Even if the Job Code field is not used in the requisition template,the Code column will still display in the Requisition Template Library list and data will be blank.
Important Note: (ID 169) The action "Save this requisition as template" represented by thisicon in the requisition file is not functioning. Users should create requisition templates directly inthe Requisition Template Library.
Configuration
User Type Permissions
Name Location
Requisition Template permissions are groupedunder the Requisition functional domain.
Configuration > [SmartOrg] Administration > User Types >Recruiting > Requisition > Templates
Settings
Name Possible Values Default Value Location
Default Template Status• Active
• Inactive
• Draft
Active Configuration > [Recruiting] Settings
Important Note: (ID 279) Upon creation, requisition templates are put into the Draft statusby default until specified as Active.
Important Note: (ID 293) It is possible to configure the requisition template file to includethe CSW designation. If this field is included in the template, it will be required. If it is notnecessary to specify this field on the requisition template, it should not be included on theTemplate File configuration. When not included on the template, the legacy CSW configurationof workflow OLF contextualization will be honored. If the template contains a CSW field, theCSW defined on the template will override the definition of workflow contextualization in theCSW configuration area.
Recruiting Fundamentals Offer
Configuration Guide Taleo 10 SP2 - Recruiting 375
Offer
Offer ConfigurationOffer configuration consists of configuring offer fields, the offer form layout, the RSOffer stepas well as offer settings and permissions for each user type.
Field configuration: The definition of offer fields is done in the Recruiting Administrationmodule, by clicking the Offer link in the Fields section.
When defining a field, the system administrator specifies if:• the field is available in Taleo Recruiting Center.• the field is required or not for saving.• the security level of the field (general, restricted or confidential).• the Organization-Location-Job Field structure associated to the field, if any.• the exceptions based on staffing types being used.For details on the above settings, see the Field chapter.
Offer form configuration: Once fields have been defined, the system administrator definesthe layout of the offer form. This is done in the Recruiting Administration module, by clickingthe Offer Layout link in the Fields section. Both standard and custom offer fields can bepositioned in the offer form. The layout consists of specifying in which category/section of theoffer grid the field will be displayed (top section, general terms, bonuses, details) and the orderin which the field will be displayed. Fields for a specific section must be sequentially groupedtogether. If a field is configured to display in any context, it will appear in the grid and thesystem administrator will define the placement of the field. If a field is not configured to displayin a given context, it will be omitted from the offer grid and the rest of the fields will slide up inposition to accommodate the field's absence.
RSOffer step configuration: The system administrator must add the RSOffer step in thecandidate selection workflow. The RSOffer step must be placed before the Hire step.
Offer-related settings: The system administrator can activate different offer-relatedsettings. These settings are available in the Recruiting Settings section of the Taleo RecruitingAdministration module. To easily access these settings, it is possible to refine the list by usingthe Offer category filter.
Offer-related permissions: The system administrator then grants offer-related permissionsto user types. This is done in SmartOrg, via the User Types feature. Permissions are organizedinto functional domains. Offer-related permissions are available in the Recruiting domain,under Offers.
Permissions are available to allow field access control. These permissions are:• Security level (in edit mode)• Security level (in view mode)In both cases, the options are General, Restricted and Confidential. For more information onsecurity level, see the Field chapter.
Important Note: (ID 237) To create offers, users must be granted the “View and manageoffers” permission as well as the “Create offers” permission.

Recruiting Fundamentals Offer
Configuration Guide Taleo 10 SP2 - Recruiting 376
Important Note: (ID 239) The following permissions have special behaviour: "View andcapture competitive offer details" and "View candidate current job terms". That is, once auser can see any competitive offer, the user can see all competitive offers for the candidatecreated across all submissions where they exist. And, once a user can see any current job termsfor a candidate, the user can see all current job terms for the candidate created across alljob submissions where they exist. This is true even if the user is not authorized to access thesubmission on which this competitive or current job term was created.
Configuring an Offer - OverviewSteps
1. Configure fields to be included in the offer.a) Use existing offer fields or create new ones.b) Indicate that the field is available in Taleo Recruiting Center.c) Indicate if the field is required or not for saving.d) Specify the security level of the field (general, restricted or confidential).e) Specify the Organization-Location-Job Field structure associated to the field, if any.f) Add the exceptions based on staffing types being used.
2. Define the offer form layout by positioning offer fields in the offer form.3. Add the RSOffer step in the candidate selection workflow.
The RSOffer step must be placed before the Hire step.4. Activate offer-related settings.
Offer settings are grouped under the Offer category.5. Grant offer-related user type permissions.
Offer-related permissions are grouped under the Recruiting/Offers functional domain.

Recruiting Fundamentals Contingent Hiring
Configuration Guide Taleo 10 SP2 - Recruiting 377
Contingent Hiring
Contingent HiringContingent hiring is used to hire people when needed and for a limited period of time.Contingent hiring may include part-time, temporary and contractor work.
Once the contingent hiring feature has been purchased, the feature must be activated by Taleo.
When the feature is activated and configured, users can start acquiring contingent workers.When creating a requisition, users can choose a contingent requisition type which offers morefunctionalities than other requisition types as it has its own set of candidate selection workflow,a contingent information block, supplier invitation to submit candidates using the agencyportal, confirmation of availability and specific candidate ownership rules.
Configuration
Contingent hiring is not configured by default, it must be configured from scratch by the systemadministrator.
User Type Permissions
Name Location
Allow access to contingent requisitions Configuration > [SmartOrg] Administration> UserTypes > Recruiting >Requisitions
Edit bill rates Configuration > [SmartOrg] Administration> UserTypes > Configuration > Requisitions
See Contingent Staffing block information Configuration > [SmartOrg] Administration> UserTypes > Configuration > Requisitions
Configuring Contingent Hiring - OverviewPrerequisite
Contingent hiring feature must be available.
The Contingent Functionality Activation private setting must be activated by Taleo.
The Allow Hiring managers to create requisitions only from the selection of a template /contingent recruitment setting must be activated in the Recruiting settings.
The Allow access to contingent requisitions, See Contingent Staffing block information andEdit bill tares user type permissions must be granted in the SmartOrg User Types feature.
Steps1. Create a requisition file containing the contingent block.2. Create a candidate selection workflow specific to contingent hiring.3. Tie contingent notifications to the candidate selection workflow (for example, the agent
configuration request which is an important step of the contingent hiring).

Recruiting Fundamentals Contingent Hiring
Configuration Guide Taleo 10 SP2 - Recruiting 378
4. Create a career section of type Agency Portal in the Career Section Administrationmodule.
5. Create an agency providing contingent hiring services.6. Add agents to the agency and associate each agent to a portal in order to be able to
invite agents to submit candidates.7. Configure the agent confirmation request in the Career Section Administration module, if
desired.
This step allows the configuration of the confirmation step, usually at time of hiring.When deciding to go ahead with a specific contingent worker, the system can beconfigured to send a request to the agent to confirm the candidate’s availability. Theagent will receive an email and will be brought back to the candidate file where theconfirmation will occur and will most likely move the candidate to the hired status.
8. Create correspondence specific to contingent hiring.9. Create a requisition file containing the contingent block.10.If the Compensation- Contingent Staffing information block is added to the contingent
block, grant the Edit bill rates user type permission.
Users granted the Edit bill rates user type permission will be able to change the rates ofthe fields included in the Compensation -Contingent Staffing before inviting agents tosubmit candidates.
11.Select appropriate values for the Position Justification small standard selection.

Recruiting Fundamentals Hourly Hiring
Configuration Guide Taleo 10 SP2 - Recruiting 379
Hourly Hiring
Hourly Manager Home Page and Center StageThe Taleo solution supports managers doing self-service hiring and managers working ina decentralized environment. This includes options to use one or more simple home pageconfigurations for various populations of users.
Home pages are configured via the SmartOrg Configuration Profiles feature. A pre-definedHourly Manager configuration profile is provided with the application and this profilereferences a pre-defined Hourly Manager center stage. Both provides a reasonable set ofdefault settings which customers can use as a starting point and modify to meet their needs.
The configuration of the Hourly Manager home page consists of the following:
• configuring the Hourly Manager center stage.• associating the Hourly Manager center stage to the Hourly Manager configuration profile.• associating the Hourly Manager configuration profile to user accounts.• configuring the mini requisition list.
Center Stage: The default Hourly Manager center stage uses a channel called the MiniRequisition List. By default, the Hourly Manager center stage also contains the Onboardingchannel and a link to the Performance Management Suite (both of which only appear if thesemodules are deployed and available to the user). The Center Stage feature is available in theTaleo Recruiting Administration menu. For details, see the Center Stage chapter.
Configuration Profile: Once the center stage is created, the system administrator mustassociate it to a configuration profile. The system administrator can use the pre-defined HourlyManager configuration profile. By default, the Hourly Manager center stage is tied to theHourly Manager configuration profile. If desired, the system administrator can create a newconfiguration profile. The configuration and creation of configuration profiles are done in theSmartOrg Configuration Profiles feature. For details, see the Configuration Profile chapter.
User Account: To quickly and easily give users to hourly related capabilities, the systemadministrator only needs to update the user account by associated it to the Hourly Managerconfiguration profile. This is done in the SmartOrg User Accounts feature, under the AccountInformation section.
Mini Requisition (or Job Openings) List: This is a center stage widget option createdspecifically to help support distributed hourly hiring deployments. This list lets users click directlyfrom the center stage channel into a requisition's candidate list without having to first loadthe Requisition list page. This mini requisition list can contain up to four columns of summaryinformation about each requisition, including the number of candidates. It can also display upto 30 requisitions (the ones with the most recent submission activity).
The system administrator configures the mini requisition list (if used) via the List Formats featureavailable in the Taleo Recruiting Administration menu. See List Format Configuration for moredetails. The mini requisition list is called “Job Openings” to better support continuous hiringscenarios, however this name can be edited by Taleo.
Note that the mini requisition list honors the permissions set by the Show filter (e.g., ShowRequisitions I Own, I Collaborate On, etc.), if it is made visible on the home page. However, atypical hourly manager configuration is to define user permissions by Personal Coverage Area

Recruiting Fundamentals Hourly Hiring
Configuration Guide Taleo 10 SP2 - Recruiting 380
(for details, see the Personal Coverage Area chapter). This is done via the configuration profilefeature by selecting the My coverage area value in the Show Information For Filter Defaultsetting and by hiding this filter from the user via the Show information for Filter Visibility setting.This will make the user's permissions simple and automatic if you can define them in terms ofOrganizations, Locations and Job Fields.
For more information on this feature, see the recording http://bit.ly/vAWYU.
Benefits
• Options to easily configure a home page appropriate for decentralized or hourly managers:options to create a very simple view by hiding most controls; options to display links andchannels as appropriate for various classes of users; options to display the list of jobopenings directly on the home page.
• The pre-defined Hourly Manager Center Stage and Hourly Manager Configuration Profileprovide a reasonable set of defaults as a starting point for further configuration.
• Allows the setting of a configuration profile specific to hourly users by using the HourlyManager configuration profile and the Hourly Manager home page.
Impacts
This feature is available by default. The system administrator can leverage the pre-defineddefault Hourly Manager center stage or create new center stages specific to various populationof users and configure the mini requisition list via the List Format feature.
• Migration/Implementation
The Hourly Manager configuration profile and Hourly Manager center stage are providedas defaults which customers can modify as needed. Together, they provide a very simple,clean home page with many controls disabled.
No user accounts are pre-assigned to the Hourly Manager configuration profile in eithernew or migrated zones.
The Hourly Manager center stage includes the new Mini Requisition List channel by default.
Hourly Manager User TypeA default user type configuration has been created to support hourly manager's need for amore simplified user experience.
Although system administrators can create their own personalized user types, the hourlymanager user type is designed to help managers in hourly hiring deployments. The HourlyManager user type is intended to reflect the combination of permissions that will provide areasonable starting point for customers to use for their managers involved in self-service,continuous and/or high volume hiring scenarios.
Hourly Manager User Type
Permissions Granted Permissions Not granted
Access to hourly requisitions Edit candidate information
Access to requisitions that the user owns, is acollaborator on, or are in the user’s Personal CoverageArea
Access Professional, Campus, Contingent or Executiverequisition
Post requisitions to career sections Access job boards, staffing agents, internet mining

Recruiting Fundamentals Hourly Hiring
Configuration Guide Taleo 10 SP2 - Recruiting 381
Hourly Manager User Type
Permissions Granted Permissions Not granted
Access prescreening information Perform advanced search and save searches
Add comments to submissions
Unlock candidate accounts, reset password
Customize correspondence before sending
The default Hourly Manager user type may be used as is or an organization may decideto modify the permissions and rename the user type name to meet their organizationneeds. System administrators should review and modify all default permissions to meet theircompany's specific needs.
For more information on this feature, see the recording http://bit.ly/3aoii0.
Benefits
• Helps customers to efficiently deploy Taleo to hourly populations.• Saves time, captures Taleo recommended good practice permission settings.• Helps managers working in decentralized environments without a high level of recruiter
support. Ease of use for casual or infrequent system users.• Permissions are granted automatically by location or department via Personal Coverage
Area.• For high turnover and/or for managers receiving limited HR training.
Impacts
This feature is available by default. No configuration is required. The system administrator canreview default permissions granted to the Hourly Manager user type and begin associating thisuser type to users.
• Migration/Implementation
• At migration, no user account will be assigned the Hourly Manager user type, but thenew user type will be available for use.
• New zone deployments will include the new Hourly Manager User type.• Default permissions for the Hourly Manager are similar to the 7.5 Hiring Manager 1 user
type.
Fifth Level of LocationA fifth level of location can be added to the location structure to support more granularlocation specification requirements of some customers.
System administrators have the option to update their SmartOrg location structure and add upto 5 levels in this structure. Once the structure is updated, it will be possible to create locationelements across all activated levels in the location structure.
This accommodates customers who want to capture more specific location information withintheir Location tree, especially organizations with thousands of locations in different countries.The location structure could be defined as follows:
• Country• State/Province

Recruiting Fundamentals Hourly Hiring
Configuration Guide Taleo 10 SP2 - Recruiting 382
• Metro/Region• City/District• Store/LocationWith individual worksites part of the Location tree, even for large decentralized operations,locations can be assigned down to the work site level. Customers will also be able to use thelowest level in their structure as work locations. Also, data access can be controlled down to theLocation level using either the User Group and/or the Personal Coverage Area feature.
For more information on this feature, see the recording http://bit.ly/sM4qc.
Benefits• Allows a more granular specification of a location when necessary.• Allows customers to take advantage of the user group and personal coverage area features
that allow data access restriction according to the Organization-Location-Job Field structure.• The Location tree can begin with Country to provide for future expansion, even if all
locations are within a single country today. Individual locations can be captured in theLocation tree, even for large distributed organizations, allowing consistency in reporting,integration, assignment of permissions, and posting of requisitions to job boards.
Impacts
System administrators can update their SmartOrg location structure and add a fifth level to thestructure. This is done via the SmartOrg Administration menu.• Migration
• Before Taleo 10, the maximum number of levels in this structure was 4.• Existing zones will not be affected at migration. After migration, additional levels of
location can be added, for a maximum of five levels.• Existing Organization-Location-Job Field structures for location are unchanged.
Evergreen HiringEvergreen hiring is used in continuous hiring situations such as retail stores where employerswant to enable candidates to apply at all times, and also want a ready supply of candidatesavailable to move quickly when a need is identified.
Often such employers will want to implement a definite validity period and expiration forthe candidate's submission, with the easy ability for the candidate to re-apply after his/hersubmission expires. It is not uncommon for workers in the hourly retail world to have heldseveral different jobs within the span of a year. Employers need to ensure they are collectingall of the most recent information regarding a candidate's relevant history. This may also helpto limit legal exposures in addition to confirming candidate's continued interest in employmentwith the employer.
A submission validity period may be enabled for any requisition, before that requisition reachesthe Sourcing status. The number of days for the validity period is inherited from a defaultsetting (initially 90 days), but may be changed for specific requisitions by users with sufficientpermissions. The Validity Period and Validity Period Enabled fields may also be inherited from arequisition template. The submission validity period must be between 1 and 730 days (2 years).
The validity period starts when a candidate submits his/her completed submission. Thecandidate submission remains valid for the number of days defined in the requisition. Forsubmissions created when matching or referring a candidate, the period starts on the date thatthe candidate was matched or referred. If a submission is incomplete and the candidate latercompletes it, the validity period is restarted.

Recruiting Fundamentals Hourly Hiring
Configuration Guide Taleo 10 SP2 - Recruiting 383
The Evergreen Hiring feature basically works as follows:
For the Evergreen Hiring feature to be available, the system administrator must make thefollowing two requisition fields available in the Recruiting application:• Validity Period Enabled• Validity PeriodIf desired, the security level can be set for those fields to hide them from some users. Oncethese fields are activated, the system administrator can add them to the requisition and/or requisition template, in the Identification block. It is necessary to have the Validity PeriodEnabled field in either the requisition template and/or the requisition file in order to enablesubmission expiration.
Best Practice: If the expiration for all requisitions is the same (following the default setting),consider to either not display the Validity Period field in the requisition file, or to set the fieldto read-only. If different validity periods are needed for different jobs, consider adding theValidity Period field in the requisition template where authorized users can set it, but not in therequisition file itself.
In the Recruiting application, when creating a requisition or requisition template, users can usethe default validity period set by the system administrator or set a different validity period forthe requisition or requisition template being created. The validity period must be set before therequisition is posted. The submission validity period is displayed in the requisition card (locatedon the left hand side of the requisition), when hovering the mouse over the icon.
Once the requisition is posted, candidates applying on the requisition will be informed ofthe expiration date of their submission on the Thank You page. Within Taleo Recruiting, thesubmission validity period is displayed in the candidate submission card, when hovering themouse over the icon.
If the candidate's submission has expired and the requisition is still posted, the Modify link isreplaced with the Reapply link on the candidate's My Jobs page. When candidates re-apply fora job:• The submission’s validity period and expiration date are reset.• A summary of the candidate's current information will be displayed to allow him/her to
make any necessary changes.• Depending on how the zone was configured, the candidate selection workflow of the
submission may be reset back to the beginning.• A tracking history is automatically added in candidate file History tab. If during the reapply
process, the system forces the candidate selection workflow to be reset, a second trackinghistory is added in the History tab stating that.
Once candidates have applied on the requisition, the column in the Requisitions list indicatingthe candidate count considers if the submission validity period is enabled or not for therequisition. If the validity period is enabled, the count only includes candidate submissions thatare not expired.
The system administrator also has the ability to add the following columns in the candidate listsand requisition lists. When these columns are made available in list formats, users can selectthem to display the desired information:
Candidate List Columns Description
Submission Expired This column is represented by the icon. When a
submission is expired, the icon is displayed.

Recruiting Fundamentals Hourly Hiring
Configuration Guide Taleo 10 SP2 - Recruiting 384
Candidate List Columns Description
Latest Submission Date Date when the candidate has submitted his/hersubmission or has reapplied.
Submission Expiration Date Date when the candidate submission expires/expired.
Days before Submission Expiration Displays as a countdown the number of days left beforethe expiration of the submission.
Requisition List Columns Description
Submission Validity Period Enabled This column is represented by the icon.
Submission Validity Period Number of days of the validity period.
The Hide expired submissions quick filter can be added to Candidates list to let users show orhide expired candidate submissions. Expired submissions are hidden by default. This filter isonly available for requisition-specific candidate list formats.
The system administrator can also enable a setting to determine under which conditions theCandidate Selection Workflow (CSW) is reset to the initial step/status after a candidate re-applies for the same requisition (after submission expiration). Note that the CSW will neverchange if the submission has reached the Offer step or if an interview has been scheduled.
Benefits
• Companies can define and enforce submission validity periods with expirations forcandidate submissions.
• Companies can configure whether the Candidates list shall display expired submissions ornot.
• Candidates can easily re-apply for an open job even if their submission is expired.• Candidates can reconfirm that they are still in the job market, allowing recruiters to focus on
truly active candidates.• Candidate’s information is current with the most recent submission, including for example
work history, education, and contact information.• Candidates may be hired more than once on the same requisition, for example in cases of
seasonal rehiring.• In some cases, expired submissions may offer an enhanced degree of legal protection
against certain kinds of lawsuits (please reply on your attorney for legal questions).
ConfigurationSettings
Name Possible Values Default Value Location
Default Submission ValidityPeriod
Between 1 and 730 days 90 Configuration >[Recruiting] Settings
Reset Candidate SelectionWorkflow after CandidateRe-applies
• If the submission hasreached the statusHired, Inactive orWithdrawn
• If the submissionhas reached the
If the submission hasreached the status Hired,Inactive or Withdrawn
Configuration >[Recruiting] Settings

Recruiting Fundamentals Hourly Hiring
Configuration Guide Taleo 10 SP2 - Recruiting 385
Settings
Name Possible Values Default Value Location
status Hired, Inactive,Withdrawn or Rejected
• Always, unless thesubmission hasreached the statusRejected
• Always
Impacts• Limitation
Submission Validity Period and Expirations are not compatible with candidate selectionworkflows (CSW) using the Taleo Offer module (that is, CSW containing the RSOFFER step).If users attempt to create this combination, a message will prevent them from continuingunless they use a CSW without the RSOffer, or disable the validity period.
• Integration
New candidate fields available for export: Submission Expired, Latest Submission Date,Submission Expiration Date, Days Before Submission Expiration.
New requisition fields available for export/import: Submission Validity Period Enabled,Submission Validity Period.
New requisition template fields available for export/import: Submission Validity PeriodEnabled, Submission Validity Period, Number of Openings, Candidate Selection Workflow.
Setting Up the Evergreen Hiring FeaturePrerequisite
Configuration > [Recruiting] Administration
Steps
1. Under Recruiting Settings, set the validity period of the Default Submission Validity Periodsetting.
2. Under Fields/Requisition:a) Make the Validity Period Enabled field available to be used in Taleo Recruiting. Note
that the Validity Period field is automatically enabled when the Validity Period Enabledfield is activated.
b) You can set the security level of the Validity Period Enabled and Validity Period fields.3. Under User-defined Forms, add the Validity Period, Validity Period Enabled, and Number
of Openings fields in the Identification user-defined form.4. Under User-defined Files, add the Identification user-defined form to a requisition
template or requisition file.5. Under Requisition File Setup, associate the requisition file and/or requisition template to
a specific purpose.6. Under User-defined Files, you can select a Prescreening Hourly file and add the
Submission Validity Period block.

Recruiting Fundamentals Hourly Hiring
Configuration Guide Taleo 10 SP2 - Recruiting 386
7. Under Candidate File Setup, associate the candidate file to a specific purpose.8. Under List Formats, you can add the following columns to a candidate list format:
• Submission Expired• Latest Submission Date• Submission Expiration Date• Days before Submission Expiration
9. Under List Formats, you can add the following quick filter to a candidate list format:
• Show unexpired submissions10.Under List Formats, you can add the following columns to a requisition list format:
• Submission Validity Period Enabled• Submission Validity Period
11.Under Recruiting Settings, enable the Reset Candidate Selection Workflow afterCandidate Re-applies setting.
This setting allows users to determine whether the CSW is reset to the 1st step/status aftera candidate re-applies for the same requisition (after submission expiration). By defaultthe candidate's status remains the same. The CSW will not change if the submission hasreached the Offer step or if an interview has been scheduled.

Recruiting Fundamentals Libraries
Configuration Guide Taleo 10 SP2 - Recruiting 387
Libraries
LibraryThe Recruiting Center offers libraries containing questions, disqualification questions as well ascompetencies.
When accessing a library, the screen is organized into three panes:• The right pane contains supporting tools such as the online help. The pane can be
expanded or collapsed.• The central pane presents the list of elements. Elements displayed depend on the filters and
options selected in the left pane. A menu bar allows users to perform specific actions onelements.
• The left pane contains the following three tabs. The pane can be expanded or collapsed.
Tab Description
Library Contains quick filters to filter a list down to relevant information.
Job Field Contains filters to display elements associated to one or more job fields. A tree structureallows users to display elements associated to all job fields, or elements associated to aspecific job field.
Location Contains filters to display elements associated to one or more locations. A tree structureallows users to display elements associated to all locations, or elements associated to aspecific location.
Important Note: (ID 251) Users that have access to a library (Questions, DisqualificationQuestions and Competencies libraries) can access all items in the library. The system providesa flat list view option which help reduce duplication and mis-alignment of similar elementsacross the organization. Therefore, when users are in the tree structure view for Job or Location,they are not constrained by Job and Location elements that are linked to their group. They cannavigate and interact with the entire tree structure.
Configuration
To display the Disqualification Questions Library, this feature must be activated within yourcompany. If your organization has not yet implemented disqualification questions, contactTaleo Support to have the module turned on. To enable disqualification questions, the followingsetting must be set to Yes.
Setting
Name Possible Values Default Value Location
Enable Disqualification Questions• No
• Yes
No Configuration > [Recruiting] Settings
The following permission is required to access the Questions, Disqualification Questions and/or Competencies library.

Recruiting Fundamentals Libraries
Configuration Guide Taleo 10 SP2 - Recruiting 388
User Type Permission
Name Location
Access the question and competency libraries Configuration > [SmartOrg] Administration > User Types >Recruiting > Prescreening
QuestionA question is used to prescreen candidates and find the best candidates for a job.
Questions can be created in the Question Library as well as directly in a requisition.
Questions created in the Question library are available in the Question Library and can thenbe added in the Prescreening section of a requisition file. A user type permission grants usersaccess to the Question Library as well as to the actions that can be performed on questions inthe Question Library.
Questions created directly in a requisition are only available for the requisition and they arenot available in the Question Library for other requisitions. If at a later date you use that samerequisition to create a requisition template, the question that you created in the requisitionwill not be added to the Question library. However, if the question is created for a requisitiontemplate, then the question will be added to the library. Questions linked to a requisition arenot duplicated in the requisition; they are re-used. Therefore, any changes made to such aquestion from the requisition will be applied to the question in the Question Library as well.These changes will therefore also appear in all requisitions to which this question is linked. Auser type permission grants users access to the actions that can be performed on questions inthe requisition Prescreening section.
Three types of questions can be created:
Question Type Description
Single Answer Question The candidate can select one answer from a list of choices.
• Example: Please indicate the highest level of education that you haveattained.
Multiple Answer Question The candidate can select as many answers as applicable from a list ofchoices.
• Example: Please indicate in which areas you have a demonstratedknowledge and understanding of (check all that apply).
Text Question The candidate can type a brief answer in response to a specific question.Use text questions sparingly; use them where they can allow forexpansion of information asked in a previous question.
• Example: Provide a short overview of a program you have designedand implemented that had impact on employee development.
A question can have a maximum of 3000 characters.
Depending on the type of question created, different answer formats are available:• radio button• pop-up listEach question is assigned a code. With this unique code, users are able to standardizequestions and better control their import/export mechanism. When creating a question, users

Recruiting Fundamentals Libraries
Configuration Guide Taleo 10 SP2 - Recruiting 389
are required to assign a code to questions created in the Question Library. For questionscreated at the requisition level, a code is generated automatically.
Questions have one of the following statuses:• draft• active• inactiveEven if a question has been used in the past, it is possible to inactivate the question in theQuestion Library. Once inactive, a question is retained on existing requisitions but cannot beused in newly created requisitions. Inactive questions are also removed from active templatesand cannot be carried over when duplicating a requisition where a question was active. Also,now that a code is assigned to each question, it is easy to deactivate the right question whenusers realize they have a duplicate. In addition, users who manage questions can wait until aquestion is ready before making it available to end users.
When creating a question in the Question Library, users can make the question visible tointernal candidates, external candidates or all candidates.
When creating a question in the Question Library, the question can be associated to locationsand/or job fields. Associating questions to locations and/or job fields helps the user to selectthe appropriate questions while using the selector window. If questions associated to locationsand/or job fields are included in models, the Apply Model function available in the requisitionwill bring the appropriate questions into the requisition based on the locations and job fields ofthe requisition.
When associating a question to locations or job fields, the question can be made available in aprofile or in a model:• If a question is tagged “In profile”, the question will be available to users who create
a candidate file, and to candidates who are entering their profile in a career section.Questions made available will be sorted to match the location and job field preferencesdefined by the candidate.
• If a question is tagged "In model", the question will be applied to requisitions when usersclick the Apply Model function in the Prescreening section of a requisition. Questions will begrouped in a model based on the location and job field of the requisition.
Once a question is created in the Question Library, users can add it to the Prescreeningsection of a requisition file. When adding questions to a requisition file, users should considerbalancing the number of questions with the expected candidate volume and job complexity.
The following table outlines the recommended number of questions as per the number ofcandidates expected and the job complexity.
Difficult to Fill Position Average to Fill Position Easy to Fill Position
Number of CandidatesExpected
Low - Less than 30 Medium - 30 to 100 High - 100 +
Recommended Number ofQuestions
8 or less 12 or less As many as required
ACE Indicators Use Required
Use Asset optionally
Do not use Weight
Use Required,
Use Asset
Use Weight optionally
Use Required
Use Asset,
Use Weight
% of Candidates Identifiedas ACE Candidates
15% and higher 10% to 15% 5% to 10%

Recruiting Fundamentals Libraries
Configuration Guide Taleo 10 SP2 - Recruiting 390
The difficult to fill position expects few candidates. Fewer questions should be used. As a rule ofthumb, do not exceed 8 questions (job specific and skills together).
The average to fill position should keep candidates engaged, but not lose them due to toomany questions. As a rule of thumb, do not exceed 12 to 15 questions (job specific and skillstogether).
The easy to fill position expects a large number of candidates. You can use as many questionsas necessary (job specific and skills together).
Important Note: (ID 248) It is possible to edit a library question from within a requisition orrequisition template. Please be aware that by doing that the question is also modified in all therequisitions using that question. To avoid any confusion, refrain from editing library questions.Editing local questions can only be done within requisitions.
Important Note: (ID 256) When creating a new question, we recommend creating thequestion from scratch rather then duplicating an existing question. There are currently issueswith the duplicate feature that cause it to not work properly or according to permissionsgranted.
Important Note: (ID 258) It is not possible to delete questions in the Question Library.Instead, use the Deactivate Question option.
Configuration
User Type Permissions
Name Location
Question permissions are grouped under thePrescreening functional domain.
Configuration > [SmartOrg] Administration> User Types >Recruiting > Prescreening
Important Note: (ID 253) To be able to associate questions to Locations and/or Job Fields,users must be granted the following permission.
User Type Permissions
Name Location
Associate questions and competencies withstructure elements.
Configuration > [SmartOrg] Administration> User Types >Recruiting > Prescreening
Important Note: (ID 257) Any user that can access a question in the library can remove theassociation of a question to Locations and/or Job Fields. Customers should limit access to onlyusers that should have this capability.
Settings
Name Possible Values Default Value Location
Differentiate Internal and ExternalQuestions
• No
• Yes
Yes Configuration > [Recruiting] Settings

Recruiting Fundamentals Libraries
Configuration Guide Taleo 10 SP2 - Recruiting 391
Settings
Name Possible Values Default Value Location
Enable Requisition Question andSkill Validity Rule
• No
• Yes
Yes Configuration > [Recruiting] Settings
Source Tracking QuestionsMandatory
• No
• Yes
No Configuration > [Recruiting] Settings
Already Answered Source TrackingQuestion
• No
• Yes
No Configuration > [Recruiting] Settings
Interview QuestionAn interview question is used during an interview to prescreen candidates and find the bestcandidates for a job.
Users with the appropriate permission can create questions in the Interview Library. Questionsare associated to evaluations and evaluations are associated to requisitions where an evaluatoror an owner is assigned to complete the evaluation.
The Interview Library is available via the Libraries menu where users can create, duplicate, edit,activate, etc. interview questions.
A question can have a maximum of 1000 characters.
Questions can be associated to locations and job fields for filtering purposes only.
Questions need to be translated in all active languages before they can be activated.
Different answer formats are available:• radio button• pop-up list• checkbox• textBenefits• Users with the appropriate permissions can create and manage questions in a global
library.• Questions can be reused on evaluations.• During the evaluation process, the evaluator completes the evaluation providing feedback
on the candidate he/she is evaluating.• Questions and evaluations can be reused thereby helping to drive consistency in the
evaluation process across the organization.• Feedback is captured and viewed electronically within the Recruiting application.Configuration
The following setting must be set to Yes to enable the interview question feature:
Setting
Name Possible Values Default Value Location
Interview Questions andEvaluations Activation
• YesNo Configuration >
[Recruiting] Settings

Recruiting Fundamentals Libraries
Configuration Guide Taleo 10 SP2 - Recruiting 392
Setting
Name Possible Values Default Value Location
• No
The following permission must be granted to allow users to access the Interview Library wherethey can create, edit, duplicate, etc. interview questions in Taleo Recruiting:
User Type Permission
Name Location
Manage interview questions Configuration > [SmartOrg] Administration > UserTypes > Recruiting > Prescreening
Impacts
This feature is optional. At migration, the feature is disabled by default.• Migration
At migration, the Interview Questions and Evaluations Activation setting is set to No and theManage Interview Questions permission is not granted.
Disqualification QuestionA disqualification question is a single-answer question that contains the minimum requirementsfor a candidate to be eligible for a job. A candidate not meeting the required response can beinstantly exited from the application process.
To have access to disqualification questions, this feature must be activated within yourcompany.
Disqualification questions are created and configured in the Disqualification Question Library.Questions available in the Disqualification Question Library can appear in the Prescreeningsection of a requisition file if the locations and job fields of the disqualification questionmatches the locations and job fields of the requisition.
A disqualification question requires one answer from the candidate, that is the candidate islimited to one answer from a list of choices. When creating a disqualification question, at leasttwo answers must be provided, one of which must indicate that the candidate passes. Thereare three possible results for each answer:• The candidate passes: the candidate is not disqualified.• The candidate is disqualified: the candidate is automatically disqualified.• To be verified: the candidate file must be reviewed.If configured by your system administrator, you can have the ability to configure disqualificationquestions (active, draft or inactive) so that candidates are prompted for explanations forspecific responses. This feature provides candidates a greater opportunity to accurately explaintheir qualifications and it also reduces the need for users to make follow-up contact withcandidates to obtain details regarding their responses.
A disqualification question can be viewed by internal candidates, external candidates or allcandidates.
A disqualification question can be associated to locations and job fields.• If a question is not associated to any location or job field, the question will be displayed in
the requisition.

Recruiting Fundamentals Libraries
Configuration Guide Taleo 10 SP2 - Recruiting 393
• If a question is associated to all locations and/or to all job fields, the question will bedisplayed in the requisition.
• If a question is associated to specific locations and/or job fields, the question will bedisplayed in the requisition if it matches the location or job field of the requisition.
Unanswered disqualification questions are considered as being passed and will not affect thedisqualification status of the candidate.
Configuration
If your organization has not yet implemented disqualification questions, contact Taleo Supportto have the module turned on. To enable disqualification questions, the following setting mustbe set to Yes.
Setting
Name Possible Values Default Value Location
Enable Disqualification Questions• No
• Yes
Yes Configuration > [Recruiting] Settings
To use disqualification questions, users must be granted the following permission.
User Type Permission
Name Location
Manage disqualification questions Configuration > [SmartOrg] Administration > User Types >Recruiting > Prescreening
Explanations for Disqualification QuestionsThis feature provides users the ability to configure disqualification questions so that candidatesare prompted for explanations for specific answers.
When creating a disqualification question, when this feature is activated, the systemadministrator may specify that an explanation is required for certain answers.
If an explanation is required for an answer, the user must enter an introduction sentence for theexplanation. For example, if the question is “Have you ever been convicted of a crime?”, theintroduction sentence could “Please specify the crimes you were convicted for as well as anydetails”. A maximum of 256 characters can be entered.
When applying, if the candidate selects a response to a disqualification question requiring anexplanation, the candidate must provide it. A maximum of 1000 characters can be entered forthe explanation. Authorized recruiters and managers can also enter an explanation on behalfof the candidate either by capturing or editing the candidate submission.
When an explanation is provided for an answer, the explanation is displayed just below thequestion answer in the candidate file Prescreening section.
Benefits
• Provides users the ability to collect relevant additional details from candidates fordisqualification questions.
• Provides candidates the ability to explain their responses to disqualification questions as wellas greater opportunity to accurately explain their qualifications.

Recruiting Fundamentals Libraries
Configuration Guide Taleo 10 SP2 - Recruiting 394
• Requiring candidates to provide explanations during initial submission reduces the need forusers to make follow-up contact with candidates to obtain details regarding their responses.
Configuration
Your organization must be using disqualification questions for this feature to be available. Ifyou have not yet implemented disqualification questions, contact Taleo Support to have themodule turned on. Once activated, the following setting must be set to Yes.
Setting
Name Possible Values Default Value Location
Explanation in DisqualificationQuestions
• No
• Yes
Yes Configuration > [Recruiting] Settings
The following permission must be granted for users to be able to manage explanations fordisqualification questions.
User Type Permission
Name Location
Manage disqualification questions Configuration > [SmartOrg] Administration > User Types >Recruiting > Precreening > Disqualification Question
Enabling Explanation in Disqualification QuestionsSteps1. Ask Taleo to activate the disqualification question feature.2. In Taleo Recruiting Administration, activate the Explanation in Disqualification Questions
Recruiting setting.Result
Users have the ability to configure disqualification questions so that candidates areprompted for explanations for specific answers.
CompetencyA competency is used to gather proficiency level and years of experience of a candidate inorder to find the best candidate for a job.
Competencies are supplied with the system and are available in the Competency Library.Competencies available in the Competency Library can then be added in the Prescreeningsection of a requisition file. A user type permission grants users access to the CompetencyLibrary as well as to the actions that can be performed on Competencies in the requisition filePrescreening section and in the Competency Library.
Competencies are not written as a question. Examples of competencies could be “Humanresource planning”, “Develop, implement and evaluate human resources policies andprocedures”.
There are three types of competencies:• Simple competency: A simple competency allows you to identify if the competency is
required or an asset and to specify the weight of the competency. In career sections, when

Recruiting Fundamentals Libraries
Configuration Guide Taleo 10 SP2 - Recruiting 395
candidates assess their competencies in a prescribing questionnaire, they are presented witha question and a choice of competencies to select (check boxes).
• Detailed competency: A detailed competency allows you to identify if the competency isrequired or an asset, to specify the weight of the competency and to indicate the proficiencyand experience level. In career sections, when candidates assess their competencies in aprescreening questionnaire, they are presented with lists for each competency they have toassess.
• Simple and detailed competency: In career sections, candidates will have the choice ofusing the simple competency or to use the lists to provide more information on specificcompetencies.
A competency can be visible to internal candidates, external candidates or all candidates.
A competency can be associated to locations and job fields.• If a competency is not associated to any location or job field, the competency will be
available to users when adding competencies to a requisition.• If a competency is associated to all locations and/or to all job fields, the competency will be
available to users when adding competencies to a requisition only if the In Model option isselected.
• If a competency is associated to specific locations and/or job fields, the competency willbe available to users when adding competencies to a requisition if the In Model option isselected and if the competency matches the locations or job fields of the requisition.
When associating a competency to locations or job fields, the competency can be madeavailable in a profile or in a model:• If a competency is tagged “In profile”, the competency will be available to users who create
a candidate file, and to candidates who are entering their profile in a career section.Competencies made available will be sorted to match the location and job field preferencesdefined by the candidate.
• If a competency is tagged “In model”, the competency will be available to users whocomplete the Prescreening section of a requisition. Competencies will be grouped in amodel based on the location and job field of the requisition.
ConfigurationUser Type Permissions
Name Location
Associate questions and competencies withstructure elements
Configuration > [SmartOrg] Administration> User Types >Recruiting > Prescreening
Remove or delete questions and competencies Configuration > [SmartOrg] Administration> User Types >Recruiting > Prescreening
Edit questions and competencies Configuration > [SmartOrg] Administration> User Types >Recruiting > Prescreening
Add and remove competencies Configuration > [SmartOrg] Administration> User Types >Recruiting > Requisition
Settings
Name Possible Values Default Value Location
Enable Requisition Question andCompetency Validity Rule
• NoYes Configuration > [Recruiting]
Settings

Recruiting Fundamentals Libraries
Configuration Guide Taleo 10 SP2 - Recruiting 396
Settings
Name Possible Values Default Value Location
• Yes
Competency Selector DefaultView in Requisition
• Taleo competencies
• Organizationcompetencies
• Competency librairy
Organizationcompetencies
Configuration > [Recruiting]Settings
Competency Experience Level• Less than 1 year
• 1-3 years
• 3-5 years
• 5 years or +
1-3 years Configuration > [Recruiting]Setting
Competency Proficiency Level• Novice
• Intermediate
• Expert
• Guru
Intermediate Configuration > [Recruiting]Settings
Competency Assessment Format• Simple
• Detailed
• simple or Detailed
Detailed Configuration > [Recruiting]Settings

Recruiting Fundamentals Report
Configuration Guide Taleo 10 SP2 - Recruiting 397
Report
ReportA wide range of custom and standard reports are available via Taleo Recruiting.
Reports are available within the Taleo Reporting and Analytics solution. If your companyhas acquired this solution, users will be able to access a wide range of reports by selecting“Reporting and Analytics” in the Taleo Recruiting Table of Content page. For more details onthe Taleo reporting solution, refer to the Reporting and Analytics User Guide.
Custom fields can be added to reports. In Taleo Recruiting Administration, the systemadministrator can create custom fields and tag them to appear in reports.
Configuration
User Type Permission
Name Location
Access Reports Configuration > [SmartOrg] Administration > User Types >Recruiting > Other > General
Custom Report UniverseThe Custom Report Universe feature displays custom fields available for reports and allows thesystem administrator to specify an ID for each field in the reports.
The Custom Report Universe page only displays custom fields that have been tagged toappear in reports. Fields are organized into categories that is Requisition, Department, Offer,Candidate, Experience, Education.
The Custom Report Universe page also allows system administrators to specify an ID for eachfield (left hand side red rectangle). The ID will then appear in reports (right hand side redrectangle). Although the text appearing in the image is in English, IDs are displayed at thesame location in all languages.

Recruiting Fundamentals Report
Configuration Guide Taleo 10 SP2 - Recruiting 398
A maximum of 50 custom fields can be included in a report.
Organizing Custom Fields in ReportsPrerequisite
Configuration > [Recruiting] Administration > Custom Report Universe
Steps1. In the Custom Report Universe page, under each tab, select the position of the field by
selecting a number in the BO ID list.2. Click Reorder.Result
In the report, fields will be displayed in the specified order.
Configuring a Custom Field for ReportsPrerequisite
Configuration > [Recruiting] Administration > Fields
Steps1. In the Taleo Recruiting Administration page, click on field category.2. In the fields page, click Show Custom Fields.3. Click on a custom field.4. Click Edit Field Availability next to Properties.5. Click Save.Result
The custom field appears in the Custom Report Universe page and can be used in reports tocollect information specific to a company’s requirement.

Recruiting Fundamentals Report
Configuration Guide Taleo 10 SP2 - Recruiting 399
Next Step
Specify the order in which custom fields will appear in reports.

Recruiting Fundamentals Task
Configuration Guide Taleo 10 SP2 - Recruiting 400
Task
TaskA task is an action a user needs to perform regarding requisitions, candidate files or offers.
Tasks are generated by the system and displayed in the Tasks channel of the center stage.Hyperlinks in the Tasks channel give access to the Tasks list where users can see all tasks in onelist view and use quick filters to filter the list. Users who are assigned a task but do not haveaccess to the product (or who desire it) can receive e-mails (eShare) for approval related tasks.In the Tasks list, a task can only be executed by the owner of the task or his/her delegate. Allsystem-generated tasks show the due date as “blank” and the priority as “normal”. These fieldsare present to support any candidate self-assigned tasks which do have due dates and priorityset.
Tasks are assigned to a user or to the user’s assistant according to these rules:
• When a system-generated task is created, the assignee is always the “user’s assistant” (ifa user assistant is identified). Otherwise, the assignee is always the user. However, the useralso has access to these tasks even though they were assigned to the assistant.
• Both the user and the user’s assistant can access the linked task regardless to whom (user orassistant) the task was assigned to.
• If a user assistant is identified after a system-generated task was created, the task willremain assigned to the user, but the linked task will be available to both the user and user’sassistant.
• If a user assistant was assigned a task and the user assistant was later removed, the task willautomatically be re-assigned to the user.
In the Tasks list, when selecting the “I own” filter, tasks related to requisitions the user owns (asa user and user assistant) are displayed. If a system-generated task is assigned to the user,both the user and user’s assistant will be able to perform the task. If a system-generated task isassigned to the user assistant, both the user assistant and user will be able to perform the task.In both cases the task will be displayed as a link.
The Tasks list provides quick filters and presents information in different columns. Quick filtersand columns are not configurable.
Available quick filters are:
• task ownership (for example, I own, I collaborate on, etc.)• tasks requiring attention• completed tasks (by default, the Hide Completed Tasks option is selected)• tasks due date (with the ability to exclude tasks with no due date)• task type (for example, tasks to be completed, tasks ready for sourcing, self-assigned tasks,
etc.)• tasks related to a specific candidate or requisition• tasks related to a specific owner
Available columns are:
• Attention indicator flag• Tasks (links to the activity to complete the task; displays a callout containing the task type,
assignment date and owner)

Recruiting Fundamentals Task
Configuration Guide Taleo 10 SP2 - Recruiting 401
• Candidate (links to the associated candidate file; displays a callout containing phonenumbers and e-mail address)
• Requisition (links to the associated requisition file; displays a callout with requisition ID,activated languages and features)
• Assignee• Comments (callout displaying the comment)• Due date (only relevant for self-assigned tasks)• Priority (only relevant for self-assigned tasks)• Status
Tasks are related to requisition files, candidates files and offers. Available tasks are:
Tasks Related to a Requisition File Tasks Related to a Candidate File Tasks Related to an Offer
To be completed Finalize Start Date Extend Offer
Approve requisition Verify Approve Offer
Ready for sourcing Self-Assigned Task Confirming Employee presence atWork
Amend Approval Path
Sourcing strategy to be defined
Contribute
To be filled
Complete Selection Process
Extend posting
Configuration
For the task feature to be available to users in the center stage, you must configure the centerstage to include the Tasks channel.
Important Note: (ID 152) When a user receives a Ready for Sourcing task, the user musthave the "Post requisitions" permission to be able to complete the task.
Self-assigned TaskA self-assigned task is a task you create for yourself.
You can select a candidate file, create a self-assigned task to act on at a later time and activatea reminder to ensure the task is completed on time.
For example, let say that you want to call the candidate John Doyle by the end of the week toinvite him for an interview the following Monday. You need to open John Doyle candidate file,create a self-assigned task (for example “Confirm Monday’s Interview”) and set a reminderfor Friday. On Friday morning, you will receive an e-mail message reminding you to call Johnto see if he is available for an interview the following Monday. The e-mail message contains alink that you can click in order to access all the information regarding this task. Then, in yourlist of tasks, click on the task regarding John Doyle to obtain details regarding this task as wellas information regarding the candidate and the requisition he applied to. Look at John’s phonenumber in his candidate file and can call him to invite him for the interview. When the task is

Recruiting Fundamentals Task
Configuration Guide Taleo 10 SP2 - Recruiting 402
completed (i.e., you phoned John), you simply need to indicate that the task is completed byselecting the Completed status. The Confirm Monday’s Interview task is no longer displayed inthe Tasks list.
A self-assigned task can also be created for several candidate files. For example, you couldhave a pre-filtered lists of candidates that are to be phone screened and create a single self-assigned task to perform an initial phone screen. The system automatically creates a separateself-assigned task for each candidate that was selected.
Self-assigned tasks can only be viewed by their creator. They cannot be redirected to delegatesor transferred to a new user taking over.
Reminders are sent daily and users receive them in the morning (according to the appropriatetime zone).
Self-assigned tasks are not reportable; reports showing self-assigned tasks cannot be created.
Important Note: (ID 311) Users can view their self-assigned tasks upon initial login usingthe Tasks channel on the Center Stage; however, reminder e-mails are not currently sent to endusers.
Configuration
For the self-assigned task feature to be available, the following setting must be set to Yes.
Setting
Name Possible Values Default Value Location
Activate Self-Assigned TaskManagement
• No
• Yes
Yes Configuration > [Recruiting] Settings
Users must then be granted the following permission.
User Type Permission
Name Location
Manage my self-assigned tasks Configuration > [SmartOrg] Administration > User Types
Activating the Self-Assigned Task FeatureAllows the system administrator to let users create tasks for themselves.
Steps
1. Activate the Activate Self-Assigned Task Management setting.2. Grant the Manage my self-assigned tasks user type permission in the SmartOrg User
Types feature.
Result
The Create Self Assigned Task action in available to users in the More Actions list allowingusers to create tasks for themselves.

Recruiting Fundamentals General Features
Configuration Guide Taleo 10 SP2 - Recruiting 403
General Features
AttachmentAn attachment is a file that can be tied to a requisition, a candidate file, an offer, etc.
User type permissions allow users to attach and remove files in requisitions and candidate files.
Settings can be configured to specify the following:
• the maximum size of an attachment (by default, the allocated limit is 100 kb).• the maximum size of all attachments (by default, the allocated limit is 500 Mb).• the maximum number of attachments (by default, five files can be attached).
The following file formats are supported by the application. It is the responsibility of the systemadministrator to define which formats are available to users.
• Word Perfect (.wpd)• MS Word (.doc)• MS Word 2007 (.docx)• Adobe (.pdf)• Text (.txt)• Rich Text Format (.rtf)• Hypertext Markup Language (.htm)• Portable Document Format (.html)• Zip Format
ConfigurationUser Type Permissions
Name Location
Attach and remove files in requisitions. Configuration > [SmartOrg] Administration > UserTypes > Recruiting Functional Domain > Requisitions>General
Attach a file (on preselected candidates). Configuration > [SmartOrg] Administration > UserTypes > Recruiting Functional Domain > Candidates>General
Attach a file (general). Configuration > [SmartOrg] Administration > UserTypes > Recruiting Functional Domain > Candidates>General
Settings
Name Possible Values Default Value Location
Attached Files Maximum TotalSize
any 500000000 bytes Configuration > [Settings] Settings
Attached File Maximum Size any 512000 bytes Configuration > [Settings] Settings

Recruiting Fundamentals General Features
Configuration Guide Taleo 10 SP2 - Recruiting 404
Settings
Name Possible Values Default Value Location
Attachment Maximum Numberper Candidate
any 5 Configuration > [Career Sections]Settings
Candidate maximum attachmentupdates
any 5 Configuration > [Career Sections]Settings
Attachments Format Filter• Word Perfect
(.wpd)
• Text (.txt)
• Rich TextFormat (.rtf)
• HypertextMarkupLanguage(.htm)
• PortableDocumentFormat (.html)
• MS Word (.doc)
• MS Word 2007(.docx)
• Adobe (.pdf)
• Zip Format
Any File Format Configuration > [Career Sections]Settings
FolderA folder is a storage area for organizing candidate files and search queries.
Users, if they have been granted the proper permissions, have the ability to organize foldersin ways that best suit their needs. They can store candidate files as well as candidate searchqueries in folders. They can create, delete and rename folders and they can also share folderswith other users.
The folder feature is represented by this icon and is available in the left panel of theCandidates list and Search Queries page.
Benefits• Allows users to organize files more efficiently.
ConfigurationUser Type Permissions
Name Location
Use personal folders Configuration > [SmartOrg] Administration> User Types >Recruiting > Candidates
Share personal folders Configuration > [SmartOrg] Administration> User Types >Recruiting > Other
Recruiting Fundamentals General Features
Configuration Guide Taleo 10 SP2 - Recruiting 405
User Type Permissions
Name Location
Access shared folders Configuration > [SmartOrg] Administration> User Types >Recruiting > Other
Time ZoneTime zones are used throughout the system where a date or time is required.
In Taleo Recruiting, dates and time are presented in a manner that takes into account theuser’s time zone thereby making dates easier to understand and freeing users from the task ofconverting the dates themselves.
A setting allows the system administrator to set the default time zone for the entire company.Users who are in the same time zone as the company do not need to modify their time zone.However, users who are not located in the same time zone as their company will need tomodify their time zone to view information in their own time zone (for interview scheduling, forexample).
Time zone changes can be done by users via the My Setup feature available in the Resourcesdrop-down list of the auxiliary navigation bar (located in the top right-hand corner of pages) ifit was configured by the system administrator.
An example where time zone is used is for scheduling interviews with candidates. Whenscheduling an interview, the time zone of the person scheduling the meeting is used as areference value. This means that the time of the meeting in Taleo Recruiting is displayedaccording to the time zone selected by the person who scheduled the meeting, but the timeof the meeting in Outlook or Lotus Notes is displayed according to the time zone set in therecipients’ Windows settings. For example, a user living in San Francisco schedules an interviewfrom 2 p.m. to 3 p.m. Pacific Time. For an attendee living in New-York, the time of the meetingin Taleo Recruiting is from 2 p.m. to 3 p.m. Pacific Time, but the time of the meeting in Outlookis from 5 p.m. to 6 p.m. Eastern Time.
Important Note: (ID 291) Users should make sure they have their Recruiting Center userpreference set to the same time zone as the one set in their desktop operating system. Bothare used in varying places throughout the application when a date stamp is applied to atransaction. In most cases, the system is using the operating system (Windows) time zonefor conversion instead of the user preference, while the user preference is used in few cases.Time zones are relevant in defining the time that is stamped on any action that appears in theHistory tab of requisition and candidate files including requisition creation, job posting, sendingcorrespondence, CSW updates, and the defining of start date/time.
Note: In the History tab of the candidate file, there are times when date information appearsin two columns. These are the first column – Date, and the 3rd column – Details. CSW trackingevents may have an alternative date manually specified by the user; for this reason all CSWevents have a date also shown in the Details column. Currently, these two columns do now showthe same time zone. The Details column shows a date set by the system (not based on any userpreference) and the Date column is using the user’s operating system time zone preference.
Benefits• All dates and time are displayed according to the user’s time zone.• When users share information or send e-mails, the time zone is explicit, avoiding ambiguity
for the user receiving the information.

Recruiting Fundamentals General Features
Configuration Guide Taleo 10 SP2 - Recruiting 406
• The time zone feature makes Taleo Recruiting global system appear like a local system.
Configuration
To modify the time zone in the My Setup feature, users must be granted the followingpermission.
User Type Permission
Name Location
Access the "Preferences" section in 'My Set-up'menu
Configuration > [SmartOrg] Administration > User Types >Recruiting > Other
The time zone setting can be configured by the system administrator.
Setting
Name Possible Values Default Value Location
Time Zone Any UTC timezone
none Configuration> Settings
The My Setup feature is displayed to users if the auxiliary navigation bar was enabled.
Setting
Name Possible Values Default Value Location
Auxiliary Navigation Bar• Yes
• No
Yes Configuration > [SmartOrg]Administration > ConfigurationProfiles
Using the Time Zone for the Offer Start DateBy default, the time zone is used for the offer start date. The Offer Start Date Time ZoneActivation private setting controls this feature. If you do not wish to use the time zone for theoffer start date, communicate with Taleo Support to have this setting modified.
Print FunctionThe print function allows users to create a PDF version of a requisition file, a candidate file or alist of requisitions or candidate files that can then be printed.
The print function is available in a candidate list, a requisition list as well as within a candidatefile and requisition file. Users can print a list or the details of each file selected. Multiple filescan be selected from a list to be printed (maximum of 50 files) or multiple lines can be selectedto print the list (maximum of 1000). The print function creates a PDF for users to save and/orprint.
When using the print function, users can print:
• a requisition file or candidate file containing all sections of the file or only specific sections.For example, a user can choose to print from a candidate file only prescreening and basicprofile information. Sections selected by a user when using the print function are saved asdefaults for the next print action, but blocks selected within the main submission file section
Recruiting Fundamentals General Features
Configuration Guide Taleo 10 SP2 - Recruiting 407
are not. Also, sections available to a user are based on how the file is configured and onuser permissions. This means, if a system administrator wanted to allow users to moreprecisely control what is printed, he/she can do this by increasing the sections in the filelayout.
• a list of requisition files or candidate files. The content of the file is presented in differentcolumns and the content of each file is displayed in a row. The format of the list (that is,the columns used to display the information) is identical to the requisition or candidate listformat used.
When selecting one or several candidate files in a candidate list or requisition-specificcandidate list in order to print them, the Submission file is printed. When printing from aGeneral Profile list, the General Profile file will be printed.
When using the print function, only fields containing data are visible in the view/print mode;this means fields with no data will not be rendered when printing.
The PDF generated by the print function will be identical to the data presented to the user forthe selected sections while looking at the information in view mode.
Important Note: (ID 284) When printing a candidate file, it is not possible while printingto include the name of candidate facing attached files. In Taleo 10, attachments appear in theAttachments tab; they are not part of the candidate file and they are no longer printed with thefile (In 7.5, these were included on the Resume tab and were therefore visible.).
Print PDF ViewsTaleo leverages PDF files to render content to users in the following situations:
• Approval files
• Requisition file for requisition approval• Offer, submission and requisition files for offer approval
• Candidate share - Candidate submission file• ACE alert - Candidate submission file• Interview request - Candidate and requisition file• Send correspondence - Send via printed letter or fax

Partner Services
• Screening Services..............................................................................................409

Partner Services Screening Services
Configuration Guide Taleo 10 SP2 - Recruiting 409
Screening Services
Screening ServiceAn organization can choose to have external partners provide specialized screening services.
An organization can choose to have some services executed by a third party. A screeningservices partner can supply services such as:
• candidate assessment• background check• tax credit eligibility• interview guides• interview scheduling• validated tests to identify and measure a candidate’s qualifications, motivations, abilities
and eligibility
Screening services must be activated by the support service before they can be used in arequisition flow. Services are sourced to the application using an external tool, and enabled bydefault if the service does not require any additional configuration.
Once a service is made available by the support service, the service can be activated ordeactivated by the system administrator and made available or not to users when creating arequisition.
All screening services have the same properties, however, the settings of these properties willvary according to the service. The system administrator can configure the screening service i.e.modify input fields, phases, etc.
The languages in which an external service is available depend on the languages used by theservice providers and vendors.
Screening services are available to users provided they have been granted the user typepermission. User type permissions are granted by an administrators through the SmartOrgproduct.
Benefits
• Allows an organization to delegate specialized services to third party providers.• Allows an organization to concentrate resources on recruiting services.
Configuration
User Type Permissions
Name Location
Access Screening Services configuration Configuration > [SmartOrg] Administration > User Types >Recruiting > Administration
Services permissions are grouped under theRecruiting functional domain.
Configuration > [SmartOrg] Administration > User Types >Recruiting > Other

Partner Services Screening Services
Configuration Guide Taleo 10 SP2 - Recruiting 410
Input FieldAn input field is a specified area of the application where a user must enter or chooseinformation to request a service.
An input field is a specified area of the application where the user must enter or chooseinformation that will be sent to request a partner service. Input fields used in the applicationare specific to the service, therefore depending on the service used, the fields displayed in theapplication will differ from one service to another.
The properties of an input field are:• Code: The internal name of the input field. The code is a read-only property.• Name: The label of the field used in the requisition file. Depending on the service definition,
the name can be an editable property.• Domain: The type of field. The domain is a read only property. The possible values are:
• Text• Multilingual text• Numerical• Selection• Date• Date UTC sensitive• Boolean
• Mandatory: If the service definition specifies the field as mandatory, then the input field willalways be mandatory. If the service definition specifies the input field as optional, then theclient will be able to configure the field as being either mandatory or not.
• Default Value: this is the value of the field used by default by the system. Depending on theservice definition, this can be an editable property.
Input fields are displayed in the requisition file under the Screening section.Benefits• Allows a system administrator to specify if input fields are mandatory or not therefore
making sure that important information is supplied.• Allows a system administrator to customize the labels of an input field.
Result FieldA result field is a field for which a partner service will send one result value per service request.
A result field is a field for which a partner service will send one result value per service request.Result fields are specific to the service, therefore depending on the partner service used, theresult fields displayed will differ from one service to another. When requesting an externalpartner service, the result fields will be displayed to the service partner to enter or select theresults of the requested service.
The properties of a result field are:• Domain: The type of field. The domain is a read only property. The possible values are:
• Text• Multilingual text• Numerical• Selection• Date time sensitive

Partner Services Screening Services
Configuration Guide Taleo 10 SP2 - Recruiting 411
• Boolean• Code: The internal name of the result field. The code is a read-only property.• Name: The label of the field used to return results.Depending on the service definition, this
can be an editable property.• Default Value: depending on the service definition, this can be an editable property.
Result fields are never mandatory because the service partner can send the value of theresults not all at once. Once the service partner sends back the results to the application, theapplication from which the service was requested will use a predetermined user-defined formto display the results supplied by the partner.
Result Set FieldA result set field is a field for which the partner will send more than one result value per servicerequest.
A result set field is a field for which the partner will send more than one result value per servicerequest. Result set fields are specific to the service, therefore depending on the partner serviceused, the fields displayed will differ from one service to another. When requesting an externalpartner service, the result set fields will be displayed to the service partner to enter or select theresults of the selected service:
The properties of a result set field are:
• Domain: The type of field. The domain is a read only property. The possible values are:
• Text• Multilingual text• Numerical• Selection• Date• Date time sensitive• Boolean
• Code: The internal name of the result set field. The code is a read-only property t• Name: The label of the field used to return results.Depending on the service definition, this
can be an editable property.• Default Value: this is the value of the field used by default by the system. Depending on the
service definition, this can be an editable property.
Result fields are never mandatory because the service partner can send the value of the resultsnot all at once.
Creating a Screening ServiceA system administrator cannot create a screening service. Screening services are provided withthe system.
Next Step
Activating a screening service.

Partner Services Screening Services
Configuration Guide Taleo 10 SP2 - Recruiting 412
Editing a Screening ServicePrerequisite
The Access Screening Services configuration and the Access Administration user typepermissions are required.
Configuration > [Recruiting] Administration > Screening Services
Steps1. Click the name of a service.2. Click Edit next to Properties.3. Modify the settings and properties as required.4. Click Save.Result
The modifications applied to the properties and settings of the service are displayed in theservice page and in Recruiting Center under the Screening section of a requisition.
Activating a Screening ServicePrerequisite
The Access Screening Services configuration and the Access Administration user typepermissions are required.
The screening service must be inactive.
Configuration > [Recruiting] Administration > Screening Services
Steps1. Click the name of a service.2. Click Activate located next to the name of the service.Result
The service is available in the Recruiting Center when users request an external service.
Deactivating a Screening ServicePrerequisite
The Access Screening Services configuration and the Access Administration user typepermissions are required.
Configuration > [Recruiting] Administration > Screening Services
Steps1. Click the name of a service.2. Click Deactivate located next to the name of the service.Result
The service is no longer available in the Recruiting Center when requesting a service.
Partner Services Screening Services
Configuration Guide Taleo 10 SP2 - Recruiting 413
Creating a Screening Service FieldA system administrator cannot create an input, result or result set field for a screening service.
Next Step
Editing a screening service field.
Editing a Screening Service FieldPrerequisite
The Access Screening Services configuration and the Access Administration user typepermissions are required.
Configuration > [Recruiting] Administration > Screening Services
Steps1. Click the name of a service.2. Click the name of a field.3. Click Edit next to properties.4. Edit the information.5. Click Save.Result
The input, result or result set fields of the screening service re customized to a specific need.
Deleting a Screening Service FieldA system administrator cannot delete an input, result or result set field of a screening service.
Next Step
Editing a screening service field.
Editing a Screening Service User-defined FormPrerequisite
The Access Screening Services configuration and the Access Administration user typepermissions are required.
Configuration > [Recruiting] Administration > Screening Services
Steps1. Click on the name of a service.2. Click on a user-defined form.3. Make desired changes.4. Click Save.Result
The properties and fields of a screening service user-defined form are modified.

Partner Services Screening Services
Configuration Guide Taleo 10 SP2 - Recruiting 414
Previewing a Screening Service User-defined FormPrerequisite
The Access Screening Services configuration and the Access Administration user typepermissions are required.
Configuration > [Recruiting] Administration > Screening Services
Steps
1. Click on a screening service.2. Click Preview this form located beside the form you want to preview.
Result
The final layout of a user-defined form used in a screening service is displayed to the systemadministrator.
Adding a Screening Service to a Candidate SelectionWorkflow
Prerequisite
The Access Screening Services configuration and the Access Administration user typepermissions are required.
Configuration > [Recruiting] Administration > Screening Services
Steps
1. Click on the name of a service.2. Click Create next to CSW Action.3. Select values in the fields as required.4. Click Save.
Result
When the candidate selection workflow will be used in the Recruiting Center, the execution ofthe screening service will be carried out automatically.
Removing a Screening Service from a Candidate SelectionWorkflow
Prerequisite
The Access Screening Services configuration and the Access Administration user typepermissions are required.
Configuration > [Recruiting] Administration > Screening Services
Steps
1. Click on the name of a screening service.

Partner Services Screening Services
Configuration Guide Taleo 10 SP2 - Recruiting 415
2. In the CSW Actions section of the service page, click Remove located beside the CSW youwant to remove.
Result
This action will no longer be executed during the candidate selection workflow.
Editing a Service LabelPrerequisite
The Access Screening Services configuration and the Access Administration user typepermissions are required.
Configuration > [Recruiting] Administration > Screening Services
Steps
1. Click on the name of a service.2. Click Edit next to Labels.3. Complete the fields as required.4. Click Save.
Result
When a screening request is sent to a candidate, labels will reflect changes in the e-mailsent to the candidate.
Next Step
Previewing a service label.
Previewing a Service LabelPrerequisite
The Access Screening Services configuration and the Access Administration user typepermissions are required.
Configuration > [Recruiting] Administration > Screening Services
Steps
1. Click on the name of a service.2. Click Preview next to Labels.
Result
The labels will be displayed as the candidate will see them.
Selecting a Message Template for a Screening ServicePrerequisite
The Access Screening Services configuration and the Access Administration user typepermissions are required.
Configuration > [Recruiting] Administration > Screening Services

Partner Services Screening Services
Configuration Guide Taleo 10 SP2 - Recruiting 416
Steps
1. Click on the name of a service.2. Click Edit next to Correspondence.3. Click select4. Select a Message template.5. Click Select.6. Click Save.
Result
The new templates will be used when requesting a screening service.
Deleting a Message Template from a Screening ServicePrerequisite
The Access Screening Services configuration and the Access Administration user typepermissions are required.
Configuration > [Recruiting] Administration > Screening Services
Steps
1. Click on the name of a service.2. Click Edit next to Correspondence.3. Click Delete next to a message template4. Click Save.
Result
The template can no longer be used when requesting a screening service.
Creating a PhasePrerequisite
The Access Screening Services configuration and the Access Administration user typepermissions are required.
Configuration > [Recruiting] Administration > Selections > Large Selections tab > Customtab
Steps
1. In the Custom tab, click the elements link located on the same row as the service forwhich you are creating a phase.
2. Select New.3. Complete the fields.4. Click Done.
Result
A new phase is now available in the drop down list under phase in the CSW Action sectionof the service.
Partner Services Screening Services
Configuration Guide Taleo 10 SP2 - Recruiting 417
Next Step
Adding an invitation phase to a requisition.

Approvals
• Approval............................................................................................................419
• Dynamic Approval Routing................................................................................. 426
• Dynamic Approval Routing Rule..........................................................................434
• Dynamic Approval Routing Sequence..................................................................444
• Functional Role.................................................................................................. 448
• Hierarchical Role................................................................................................452
• Assignee............................................................................................................ 456

Approvals Approval
Configuration Guide Taleo 10 SP2 - Recruiting 419
Approval
ApprovalAn approval is the act of a user approving an element or asking others to approve an element.
An approval can be requested for:
• requisitions• offers
When an approval is requested, the user must choose from a list the name of the userswho will be required to approve the requisition or the offer. The list of approvers can beconfigured or not by the system administrator depending on the type of approval chosen by anorganization.
• If the standard approval process is used within an organization, the user will selectapprovers from a list containing all of the active users of the database. The user will also beable to create a list of frequent approvers via the My Setup feature.
• If Dynamic Approval Routing is used within an organization, the list of approvers will be pre-populated upon clicking the Request Approval button. The list of approvers to be generatedis configured by the system administrator within the Dynamic Approval Routing feature.These approvers are displayed based on the configured rules and conditions.
Important Note: (ID 301) In the Request Approval window, there is a checkbox to addthe approvers as frequent collaborators. This function will only add these users as frequentcollaborators under My Setup > Preferences. It will not add these users as collaborators on therequisiton currently open. Also note that users will need to log out and log back in to see thechange applied to their list of frequent collaborators under My Setup > Preferences.
The approval path can be carried out in two ways:
• Sequential: When the first approver receives an approval request, he/she approves theelement. Once approved, the approval request goes to the next approver, and so on.
• Parallel: All approvers receive an approval request at the same time and they can allapprove the element at the same time
Settings allow the selection of the default approval model for a requisition or for an offer.
If the standard approval process is used within an organization, the system administrator mustactivate settings to enable sequential or parallel approval. If the dynamic approval routingis used within an organization, approval will be sequential unless there are more than oneapprover for the same role, then approval will be parallel.
Users have the ability to approve requisitions and offers either via the Tasks feature and/oreShare. System administrators can choose the method(s) of approval for different users:
• eShare e-mail: available to users when the Access response center user type permission isgranted (Configuration > [SmartOrg] Administration > User Types > Recruiting > General)and when the user's preference for Enable eShare Center E-mail is set to True (Recruiting >My Setup > Preferences).
• Tasks channel: Tasks are available to the user if the system administrator has configuredthe Tasks channel into the user's center stage and/or the system administrator has granted

Approvals Approval
Configuration Guide Taleo 10 SP2 - Recruiting 420
access to the Core Navigation Bar in the user's configuration profile. Also, an approvaltask might also appear to the user even if the user is no longer “authorized to view” therequisition, but accessing those tasks might generate undesired results. That means the userwould need to either be a collaborator on the requisition or authorized to view requisitionswithin his/her group.
• Either by eShare or the Tasks channel: if eShare and the Tasks channel are both configuredfor the user, the user can receive both eShare approval requests and also track them inthe Tasks channel. Users can decide on approval from either location. Tasks executedfrom the eShare center will be automatically updated in the user's Tasks channel as well. Ifan approval is executed from the Tasks channel, the eShare request will indicate that thedecision has already been made and the eShare is no longer active.
Configuration
Below are permissions related to approval.
User Type Permissions
Name Location
Manage approval paths Configuration > [SmartOrg] Administration> UserTypes > Configuration > Approval path
Requisition approval user type permissions are groupedunder the Requisitions Approval functional domain.
Configuration > [SmartOrg] Administration> UserTypes > Recruiting > Requisitions > Approval
Offer approval user type permissions are groupedunder the Offers Approval functional domain.
Configuration > [SmartOrg] Administration> UserTypes > Recruiting > Offers > Approval
Below are settings related to approval.
Settings
Name Possible Values Default Value Location
Enable Approval Models• No
• Yes
No Configuration> [Recruiting] Settings
Offer Default Approval Model Sequential orparallel
Sequential Configuration> [Recruiting] Settings
Requisition Default Approval Model Sequential orparallel
Sequential Configuration> [Recruiting] Settings
Important Note: (ID 287) For requisitions approval, there are two standard messagetemplates that behave as follows:
• Standard Notification of a Requisition Approval Request (E-share): Message sent toapprovers for both the initial request and any reminders, provided that the eShare center hasbeen activated.
• Standard Notification of a Requisition Approval Request: Message sent to approvers forboth the initial request and any reminders, in cases where the eShare center has not beenactivated. In this message, the Respond hyperlink does not appear by default (to preventcases where the eShare center is not available). If users are receiving this message forrequisition approval requests, it means that you are trying to use the eShare function but it isnot implemented. You should call support and ask to have the eShare Center activated.

Approvals Approval
Configuration Guide Taleo 10 SP2 - Recruiting 421
The above behavior does not exist for offer approval notifications. For offers, there is only oneoffer approval notification template; it is sent in all cases, regardless of whether or not theeShare center has been activated.
Important Note: (ID 235) Currently, the “View competitive offer details” and “Viewcandidate expectations” permissions are not honored during the approval process. Ifcompetitive offers and candidate expectations exist, they are always included in the offer filepresented to the approval decision maker(s) during the approval task/eShare response page.Customers having a concern about this should disable the use of competitive or expectationoffer types. This can be done by removing all user type permissions related to these offer types(Configuration > [SmartOrg] Administration> User Types > Recruiting > Offers).
Important Note: (ID 168) The Terminate Approval Process action under requisition is notconstrained by the permission “Amend an approval path created by this user”, while it is foroffers. This difference existed in version 7.5 and is expected behavior. Users can only terminatea requisition approval request if they are a requisition owner or the approval path initiator andcan edit requisitions. (Note that the edit permission check is currently not available but will bereinstated in an upcomming release.)
Important Note: (ID 296) Users who can “view” but not “view and manage” offers see theRequest Approval button even though they are not authorized to request an approval. If theyclick this button, they will not be able to complete the approval request; instead they will receivean “access control error” message.
ApproverAn approver is a Taleo Recruiting user who will approve requisitions and/or offers.
A list of approvers can be defined by the system administrator at the department level. A listof personal default approvers, called frequent approvers, can also be defined by the user inthe My Setup feature. When a requisition and/or offer is ready to be approved (by selecting theRequest Approval action), the approval path is selected by default as follows:
• If frequent approvers are selected under My Setup, these approvers will be automaticallyselected.
• If frequent approvers are not selected under My Setup, the approvers set for the departmentby the system administrator will be selected automatically.
When a user selects approvers, the selector only displays users who can be potentialapprovers. It is possible that no approvers are displayed if none of them are allowed to do theapproval. An approver must be an active user and have the user type permission to approverequisitions and/or offers.
Configuration
User Type Permissions
Name Location
Access the "Preferences" section in 'My Setup' menu Configuration > [SmartOrg] Administration > User Types >Recruiting > Other
Approve requisitions Configuration > [SmartOrg] Administration > User Types >Recruiting > Requisitions

Approvals Approval
Configuration Guide Taleo 10 SP2 - Recruiting 422
Settings
Name Possible Values Default Value Location
SmartOrg My Setup /iam/identitymanagement/mysetup.jsf
Configuration > [Recruiting] Settings
Approval via a BlackBerryUsers may have the ability to approve or decline requisitions and offers via a BlackBerry.
Users who have the required user type permissions can approve and decline requisitionsand offers using any BlackBerry model regardless of whether Java script is enabled. The onlyexception is if login authentication has been activated via eShare; in this case, Java script is stillrequired on the login page.
When creating a requisition or offer and then requesting its approval (via the Request Approvalaction), the user must select an approver. If the approver selected is an eShare user (as definedby the system administrator), an e-mail is sent and the user will receive an approval requestvia his/her BlackBerry. To approve the requisition or offer, the user must click Respond includedin the e-mail. Once the requisition or offer is approved, the History tab indicates that therequisition or offer was approved.
To use a BlackBerry to approve or decline requisitions and offers, the BlackBerry browser musthave the following configuration options activated:• Support Java script• Allow Java script Popups• Support HTML Tables• Use Foreground and Background Colors• Use Background Images• Support Style SheetsTo receive approvals via a BlackBerry, users must also have a valid e-mail address (set by thesystem administrator in the SmartOrg User Account Personal Information section). If the e-mail address entered is the same as the one configured on the user’s BlackBerry, the user willreceive approvals directly on his/her BlackBerry.
Benefits• Speeds up the hiring process, from requisition creation to hiring, as requisitions can be
posted faster and offers approved sooner.
ConfigurationUser Type Permissions
Name Location
Access the Response Center (used primarly byeShare users)
Configuration > [SmartOrg] Administration> User Types >Recruiting > Other > General
Approve requisitions Configuration > [SmartOrg] Administration> User Types >Recruiting > Requisition > Approval
Forego the approval process Configuration > [SmartOrg] Administration> User Types >Recruiting > Offers > Approval

Approvals Approval
Configuration Guide Taleo 10 SP2 - Recruiting 423
eShare Approval AcknowledgmenteShare users have the ability to receive a confirmation of their requisition or offer approvals.
This feature is automatically active on all eShares sent from the system. When a user receivesan eShare approval request, there is an available check box to trigger the receiving ofan approval acknowledgment. If the user chooses to receive the acknowledgment, uponcompleting his/her decision on the request, the user will receive an e-mail message confirminghis/her action.
Six system message templates have been created for this purpose. There is a standardmessage available and if desired, system administrators can modify the text of the messagesent. The acknowledgment sent will depend on the decision of the approver:
• Requisition Approved Acknowledgment• Requisition Rejected Acknowledgment• Requisition Passed Acknowledgment• Offer Approved Acknowledgment• Offer Rejected Acknowledgment• Offer Passed Acknowledgment
Note that approvals decided via the Tasks channel do not have an acknowledgment option;users can view their completed tasks in the Tasks channel by clearing the Hide completed tasksoption.
Requisition Approval Rerouting After ChangesConfiguration options when activated can force requisitions to automatically be rerouted forapproval when certain business scenarios occur.
The system administrator can configure certain settings to force requisitions to automatically bererouted for approval when certain business scenarios occur. The system administrator definewhich scenarios he/she wishes to activate. Each of the settings can be individually set to controlif that situation when it occurs will cause the requisition to be re-routed for approval:
Setting Name Description
Restart Approval Process After "Cancel" Step Restart the approval process when reopening arequisition after it has been canceled.
Restart Approval Process After "Fill" Step Restart the approval process when reopening arequisition after it has been filled.
Restart Approval Process After "On Hold" Step Restart the approval process when reopening arequisition after it has been placed on hold.
Restart Approval Process After Editing the Number ofPositions
Restart the approval process when editing the number ofpositions for the requisition.
Restart Approval Process After Editing the Salary Fields Restart the approval process when editing the salaryfields in the requisition file.
For example, if a user re-opens a canceled requisition and if the Restart Approval ProcessAfter "Cancel" Step setting has been activated, rather than the requisition reverting back to it'soriginal state, the requisition will revert back to the status of To be approved. The requisition
Approvals Approval
Configuration Guide Taleo 10 SP2 - Recruiting 424
must be approved before sourcing for the position can be restarted. The prior approval processwill still be visible from the tracking history, but the approval tab will reflect the most currentapproval cycle. If the requisition had originally been canceled during the approval process, theprior approval cycle that was in process will be terminated and will be replaced by the new onewhich must be initiated from the beginning.
Immediately upon a user has performed an action that makes true one of the above activatedsettings:
• The requisition status will return to "Draft".• The job will be unposted.
Setting a Default Approval Path for RequisitionsSetting a default approval path for requisitions allows you to specify, at the department level,which approvers will be selected by default when users are requesting the approval of arequisition. Such default approval path is used when no default approval path is set at the userlevel and when a department is selected while creating a requisition.
Prerequisite
The Enable Department setting must be activated.
A department must be created before defining approvers.
Configuration > [Recruiting] Administration > Department List
Steps
1. Click on the desired department.2. Under the Approver Preferences - Requisitions section, click .
3. Select one or several approvers from the user list then click Done.4. To change the order of the approvers, select a number from the list next to the approver,
then click Reorder.5. Click Done.
Result
The default approval path for requisitions has been created.
Next Step
Setting a default approval path for offers.
Setting a Default Approval Path for OffersPrerequisite
The Enable Department setting must be activated.
A department must be created.
Configuration > [Recruiting] Administration > Department List
Steps
1. Click on the desired department.
Approvals Approval
Configuration Guide Taleo 10 SP2 - Recruiting 425
2. Under the Approver Preferences - Offers section, click .
3. Select one or several approvers from the user list.4. Click Done.5. To change the order of the approvers, select a number from the list next to the approver,
then click Reorder.6. Click Done.
Result
The default approval path for offers has been created. The approvers selected by defaultwhen users are requesting the approval of an offer are selected at the department level.
Next Step
Setting a default approval path for requisitions.

Approvals Dynamic Approval Routing
Configuration Guide Taleo 10 SP2 - Recruiting 426
Dynamic Approval Routing
Dynamic Approval RoutingDynamic Approval Routing is an advanced tool that automatically populates requisition andoffer approvers through the use of inclusion and exclusion rules. These rules, based primarilyon functional and hierarchical roles, enable customers to enforce processes and simplify theapproval process for the initiator.
Once the Dynamic Approval Routing module has been purchased, the module must beactivated by Taleo and it becomes available in the Taleo Configuration menu. The systemadministrator is then responsible of configuring and activating the Dynamic Approval Routingfeature.
Basically, the Dynamic Approval Routing works as follows: When the Dynamic ApprovalRouting is activated and implemented, when a user routes a requisition or an offer forapproval, if the Dynamic Approval Routing is relevant for the context of the requisition or theoffer, it will predetermine the list and sequence order of approvers. The initial list of approversmay or may not be modified by the user routing the approval request (the user must have beengranted a user type permission). With the path already generated, the user can simply click torequest that the approval process be initiated. Approvers will receive approval requests just asthey do with the current approval functionality.
The configuration of the Dynamic Approval Routing involves many steps for the systemadministrator:
• defining the “reports to” structure and configuring users involved in the Dynamic ApprovalRouting process
• defining hierarchical and functional roles• defining inclusion and exclusion rules• configuring approval paths and sequences• granting related user type permissions
Once the Dynamic Approval Routing is configured, it is important to test the workflow prior tofull deployment with a small sample that can be easily controlled. This step is recommendedto ensure that the desired results are achieved prior to enrolling out to the entire employeepopulation.
Checklist prior to testing:
• Ensure that the users to be included as approvers on any requisition belong to the UserGroup of the requisition being routed for approval. If an inclusion rule wants to put aperson into the approval path, but the user does not belong to the requisition's or offersgroup, they will be omitted from the generated path.
• Ensure roles are activated and assigned properly to users.• Ensure all Dynamic Approval Routing components are active (approval paths, rules,
sequences).• Ensure inclusion rules are included on the active workflow for every role expected to be
included in the approval workflow.• Ensure sequences are defined for the desired Organizations-Locations-Job Fields contexts
and contain all possible approver roles.

Approvals Dynamic Approval Routing
Configuration Guide Taleo 10 SP2 - Recruiting 427
• To test, observe structure for active path and create entity (requisition or offer) within thatcategory.
• Observe the approval path presented to the initiating user and ensure it is as expected.Important Information: System changes after an object is routed for approval will notautomatically change the list of approvers. For example: If a new approval path is created andactivated, it will only impact newly created approval requests, it will not impact the approvalsthat are already in process. If a user replaces another user in a functional role, the update willonly affect new approval requests, not existing approvals in process where the prior user wasassigned. (Customers can still use the delegate feature for an approval task assigned to oneuser to be routed to a different user).
What happens when the system finds more than one appropriate match:• If a workflow has a rule invoking the inclusion of a functional role, it says “the best”
matching user will be assigned a task. Based on the configuration, it is possible that morethan one match would be equally suitable. In such case, if more then one user includedin a functional role matches the given Organization-Location-Job Field context, then allthose users are included within the same sequence in the approval path (that is, users willbe included in parallel).
• If a user matches more than one inclusion rule, the system removes duplicate and the firstappearance of user in the approval path is kept and all others are removed. For example, acompensation team has an opening and the director of compensation is pulled in for botha functional and hierarchical role. Once all roles are resolved (the same user is includedbecause its hierarchical role is included and its functional role is included), the systemremoves duplicate.
• If an approval request matches the context of more than one sequence, the system protectsitself. It is not possible to create two sequences in the same Organization-Location-Job Fieldcontext.
In cases where there may be more than one contextual match, the system does not containlogic to prevent a user from creating duplicate contexts that may conflict with one anotherwhen used except for contextualization of sequences.
Benefits• Reduces or eliminates manual effort and training for end users.• Enforces protocols and processes for requisitions.• Ensures compliance to standards (good for SOX).• In some cases, it can eliminate other 3rd party budgeting or approval systems used prior to
data entry into Taleo. Without the Dynamic Approval Routing, users must understand andmanually populate an approval flow. As a result, customers cannot enforce an approvalflow and users have the ability to do less than the minimum required. Many customers mustidentify and use an alternative to Taleo for these processes to enforce compliance.
ConfigurationUser Type Permissions
Name Location
Manage approval paths. Configuration > [SmartOrg] Administration > UserTypes > Configuration > Approval path
Access exclusion rules. Configuration > [SmartOrg] Administration > UserTypes > Recruiting >Administration
All requisition approval user type permissions aregrouped under the Approval functional domain.
Configuration > [SmartOrg] Administration > UserTypes > Recruiting > Requisitions > Approval

Approvals Dynamic Approval Routing
Configuration Guide Taleo 10 SP2 - Recruiting 428
Settings
Name Possible Values Default Value Location
Enable Approval Models• No
• Yes
No Configuration > [Recruiting] Settings
Dynamic Approval Routing Approval PathAn approval path is used for the Dynamic Approval Routing to determine how approvals willbehave for a an approval path category (offers or requisitions).
Only one approval path can be active per requisition type at any given time. The approval pathset for offers is reused for all offers being created.
For defining the approval path of a DAR, the system administrator defines:• Properties: Name and code used when referencing the path.• Notifications: There is one notification specific for Dynamic Approval Routing to help
with the scenario where there is an approver inserted into a path who does not have theauthorization to access or approve a requisition. When this scenario occurs, the usersspecified via the People notified of users without access notification setting will be sent acorrespondence informing them so that they can take action to fix the situation by eitherupdating roles in the system to ensure the user is granted the correct permissions, orsomeone else can go in an approve on this person's behalf. The message template for thiscorrespondence is available in the correspondence manager and is titled Approval processaccess error.
• Settings: Different settings used for the DAR, that is if comments will be mandatory whenrejecting an approval, if the sequence of approvers generated by DAR will be presented tothe approval initiator and/or subsequent approvers.
Dynamic Approval Routing Reports to StructureThe “Reports to” structure is used in the Dynamic Approval Routing module to define to whomeach user reports to.
The “Reports to” structure should be done via a user integration.
If a customer intends to use hierarchical roles or the reports to ("up # levels") to populate theflow, the "Reports to" structure must be implemented for the Dynamic Approval Routing. If acustomer intends to use only functional roles, the customer can still implement the DynamicApproval Routing but the "Reports to" structure does not need to be populated.
The “Reports to” structure should be done via a user integration. If an integration is not used,the system administrator can alternatively manually configure all users involved in a DynamicApproval Routing in the User Accounts section of SmartOrg.
Setting Up the Dynamic Approval RoutingPrerequisite
Purchase the Dynamic Approval Routing module and ask Taleo to activate it.
Configuration

Approvals Dynamic Approval Routing
Configuration Guide Taleo 10 SP2 - Recruiting 429
Steps
1. Define the Dynamic Approval Routing “Reports to” structure.2. Create and configure hierarchical roles.3. Create and configure functional roles.4. Under the user types of SmartOrg, Grant requisition approval user type permissions.5. Create and configure exclusions rules.6. Create and configure inclusion rules.7. Define the Dynamic Approval Routing approval path.8. Create and configure sequences.9. Test the workflow with a small sample.10.Activate the Dynamic Approval Routing approval path.
Defining the Dynamic Approval Routing Reports toStructure
Prerequisite
Configuration > [SmartOrg] Administration > User Accounts
Steps
1. Click on a user account.2. Click Edit next to Employee Information.3. Set the employee status to Current.
A user cannot be designated as someone's manager unless he/she is a "current"employee.
4. Specify the employee manager.
The manager is the person to whom the user reports to. Note that in order for a user tobe available in the Employee Manager field, he/she must be classified as “Current” inthe Employee Status field.
5. Select an Organization and a Location.
Note that these fields are not relevant to the functioning of Dynamic Approval Routing.They are required to support behaviors in Taleo Performance. These fields are notrequired to be specified if using Integration to update the employee information.
6. Click Save.
Activating an Approval Path CategoryPrerequisite
The Dynamic Approval Routing feature must be activated by Taleo Support.
The Manage approval paths user type permission must be granted in the SmartOrg UserTypes feature.
Configuration

Approvals Dynamic Approval Routing
Configuration Guide Taleo 10 SP2 - Recruiting 430
Steps
Under Dynamic Approval Routing, click Activate next to an approval path category.
Result
When an approval is requested by a user, if the approval path category is activated for theapproval being requested, then it is the dynamic approval routing process that will be usedin Taleo Recruiting.
Next Step
Creating an approval path.
Deactivating an Approval Path CategoryPrerequisite
The Dynamic Approval Routing module must be activated by Taleo support.
The Manage approval paths user type permission must be granted in the SmartOrg UserTypes feature.
Configuration
Steps
In the Configuration page, under Dynamic Approval Routing, click Deactivate next to anapproval path category.
Result
When an approval is requested by a user, if the approval path category is deactivated for theapproval being requested, then it is the standard approval process that will be used.
Creating an Approval PathPrerequisite
The Dynamic Approval Routing must be activated by Taleo Support.
The Manage approval paths user type permission must be granted in the SmartOrg UserTypes feature.
Configuration
Steps
1. Under Dynamic Approval Routing, click on an approval path category.2. Click Create next to Approval Paths.3. Complete the fields and selections.4. Click Save.
Result
A new approval path is available for the chosen approval path category.

Approvals Dynamic Approval Routing
Configuration Guide Taleo 10 SP2 - Recruiting 431
Next Step
Creating a sequence and adding inclusion and exclusion rules.
Deleting an Approval PathPrerequisite
The Dynamic Approval Routing module must be activated by Taleo Support.
The Manage approval paths user type permission must be granted in the SmartOrg UserTypes feature.
The approval path must be draft.
Configuration
Steps
1. Under Dynamic Approval Routing, click on an approval path category.2. Click Delete next to an approval path.
Result
The approval path is no longer available for the chosen approval path category.
Activating an Approval PathPrerequisite
The Dynamic Approval Routing must be activated by Taleo Support.
The Manage approval paths user type permission must be granted in the SmartOrg UserTypes feature.
The approval path must be inactive or draft and no other approval path must be active.
At least one sequence and one rule must be included in the path.
Configuration
Steps
1. Under Dynamic Approval Routing, click on an approval path category.2. Click on an approval path.3. Click Activate next to the name of the approval path.
Result
The activated approval path can no longer be assigned the draft status. The approval path isavailable to users when requesting an approval for the given category.
Editing an Approval PathPrerequisite
The Dynamic Approval Routing must be activated by Taleo Support.

Approvals Dynamic Approval Routing
Configuration Guide Taleo 10 SP2 - Recruiting 432
The Manage approval paths user type permission must be granted in the SmartOrg UserTypes feature.
Configuration
Steps
1. Under Dynamic Approval Routing, click on an approval path category.2. Click Edit next to the approval path.3. Make changes as required.4. Click Save.
Deactivating an Approval PathPrerequisite
The Dynamic Approval Routing module must be activated by Taleo support.
The Manage approval paths user type permission must be granted in the SmartOrg UserTypes feature.
The approval path must be active.
Configuration
Steps
1. Under Dynamic Approval Routing, click on an approval path category.2. Click on an approval path.3. Click Deactivate next to the name of the approval path.
Result
The approval path is no longer available to users when requesting an approval for the givenapproval path category.
Testing the Dynamic Approval Routing WorkflowBy narrowly constraining the Organization-Location-Job Field sequence contexts on the activeworkflow, it is possible to test your Dynamic Approval Routing workflow prior to full deploymentwith a small sample that can be easily controlled. This step is recommended to ensure that thedesired results are achieved prior to enrolling out to the entire employee population.
Prerequisite
Configuration
Steps
1. Ensure that the users to be included as approvers on any requisition belong to the UserGroup of the requisition being routed for approval. If an inclusion rule wants to put aperson into the approval path, but the user does not belong to the requisition's group,they will be omitted from the generated path.
2. Ensure roles are activated and assigned properly to users.3. Ensure all DAR components are active (approval paths, rules, sequences).

Approvals Dynamic Approval Routing
Configuration Guide Taleo 10 SP2 - Recruiting 433
4. Ensure inclusion rules are included on the active workflow for every role expected to beincluded in the approval workflow.
5. Ensure sequences are defined for the desired Organizations-Locations-Job Fieldscontexts and contain all possible approver roles.
6. Observe structure for active path and create entity (requisition) within that category.7. Observe the approval path presented to the initiating user and ensure it is as expected.

Approvals Dynamic Approval Routing Rule
Configuration Guide Taleo 10 SP2 - Recruiting 434
Dynamic Approval Routing Rule
Dynamic Approval Routing RulesRules are used to dynamically determine the circumstances whereby specific users/roles will beincluded in an approval path.
Rules are used in the Dynamic Approval Routing feature. Rules allow the approval path to bevery flexible and accommodate a myriad of business requirements. Every user and/or role tobe added to an approval path MUST be added by a rule.
Two types of rules are used for the Dynamic Approval Routing:• inclusion rules• exclusion rulesWhen configuring the Dynamic Approval Routing, it is recommended to create rules first, thencreate the approval paths because inclusion rules are required to populate paths. Once ruleshave been defined, the system administrator can configure the actual approval path.Configuration
User Type Permissions
Name Location
Manage Approval Paths Configuration > [SmartOrg] Administration > UserTypes > Configuration > Approval Path
Exclusion RuleExclusion rules define exceptional roles that may have been included in certain structure but anexception needs to be applied to remove that role in certain Organization-Location-Job Fieldcircumstances.
Rules are used to dynamically determine the circumstances whereby specific users/roles will beincluded in an approval path.
Exclusion rules are optional. When activated, unlike inclusion rules, they automatically applyto all approval paths for that requisition, they are not required to be inserted into the approvalpath definition to work. Exclusion rules will omit matching approvers to the approval path.
Example: Never include the Director when the Organization is Canadian Operations.
When defining exclusion rules, three options are available:
Option Description
From the manager role up to the number of specifieddirect reports, where the administrator then defines the# of direct reports
When this type of rule is used, the system will ignoreall roles in the system and pay attention only to theemployee reports to structure. The system will look atwho is the Manager of the Requisition/Offer and willgo up the number of specified direct reports from thatmanager.

Approvals Dynamic Approval Routing Rule
Configuration Guide Taleo 10 SP2 - Recruiting 435
Option Description
Only the selected role Allows the selection of a specific hierarchical orfunctional role in the approval path. Note: when ahierarchical role is used, the system will look at whois the Manager of the Requisition/Offer and will gothrough the “reports to” structure until it finds anemployee with the specified hierarchical role. It willthen include all matching employees in that hierarchicalrole. For example, if there were two directors in the“reports to” structure and the director hierarchical rolewas selected, both directors would be added to the flowand ordered by how they report to one another.
All roles included up to the specified number of levels,where the administrator specifies the role and the # ofupper levels.
Allows the selection of a series of employees usingthe hierarchical role structure in the approval path.The system will look at who is the Manager of theRequisition/Offer and will go through the “reports to”structure until it finds an employee with the specifiedhierarchical role. The system will look at all employeesin the reports to structure until it has gone up the # ofspecified hierarchical roles. All of the employees foundincluding and between the first and last employeesfound will be included as approvers.
It is recommended to create rules first, then create the approval paths because inclusion rulesare required to populate paths.
Inclusion RuleInclusion rules define the roles that will be included in the approval path.
Rules are used to dynamically determine the circumstances whereby specific users/roleswill be included in an approval path. Rules allow the approval path to be very flexible andaccommodate a myriad of business requirements. Every user and/or role to be added to anapproval path MUST be put there by a rule.
Once the inclusion rules are created, the system administrator determines what rules will beactivated for the active approval workflow. Any combination of active rules can be used.
At least one inclusion rule must be added to an approval path prior to activation.
There are two types of inclusion rules:• Unconditional• ConditionalUnconditional inclusion rules always includes the role in the approval path, regardless ofthe context of the requisition or the offer (other than the specified requisition type for whichthe path is defined). Example: Always include the job posting approver. When creating anunconditional rule, the only thing that needs to be specified is the roles to be included. Theoperators for including roles are outlined below.
Option Description
From the manager role up to the number of specifieddirect reports, where the administrator then defines the# of direct reports
When this type of rule is used, the system will ignoreall roles in the system and pay attention only to theemployee reports to structure. The system will look at

Approvals Dynamic Approval Routing Rule
Configuration Guide Taleo 10 SP2 - Recruiting 436
Option Description
who is the Manager of the Requisition/Offer and willgo up the number of specified direct reports from thatmanager.
Only the selected role Allows the selection of a specific hierarchical orfunctional role in the approval path. Note: when ahierarchical role is used, the system will look at whois the Manager of the Requisition/Offer and will gothrough the “reports to” structure until it finds anemployee with the specified hierarchical role. It willthen include all matching employees in that hierarchicalrole. For example, if there were two directors in the“reports to” structure and the director hierarchical rolewas selected, both directors would be added to the flowand ordered by how they report to one another.
All roles included up to the specified number of levels,where the administrator specifies the role and the # ofupper levels.
Allows the selection of a series of employees usingthe hierarchical role structure in the approval path.The system will look at who is the Manager of theRequisition/Offer and will go through the “reports to”structure until it finds an employee with the specifiedhierarchical role. The system will look at all employeesin the reports to structure until it has gone up the # ofspecified hierarchical roles. All of the employees foundincluding and between the first and last employeesfound will be included as approvers.
All roles between the following roles. Where two rolesare defined
Allows the selection of a series of employees usingthe hierarchical role structure in the approval path.The system will look at who is the Manager of theRequisition/Offer and will go through the “reports to”structure until it finds an employee with the first specifiedhierarchical role. The system will continue going upthrough the employees in the “reports to” structureuntil it has gone up the specified upper role. All of theemployees found including and between the first andlast employees found will be included as approvers.
Conditional inclusion rules include a role when certain conditions are met.
Example: Include the CFO on all requisitions where the base salary is > $100,000 and theLocation is United States.
For conditional inclusion rules, the rule operator process is the same as it is with unconditionalrules, but there is a another step involved where the user creates the conditions under whichthe specified roles will be included in the path. When creating a condition, the first step is todefine the fields to be used in the condition. For each field there are available operators todefine how the field condition will work. Conditions can be applied on requisition fields aswell as on offer fields. For a requisition approval path, conditions can be applied only onrequisition fields. For an offer approval path, conditions can be applied only on offer fields.All Offer and Requisition fields, either user-defined or system defined, can be used to createconditions. Conditional rules used within approval paths for offers may also contain a uniquecondition that compares the offer salary to the maximum salary on the requisition.
Approvals Dynamic Approval Routing Rule
Configuration Guide Taleo 10 SP2 - Recruiting 437
For example, for numeric fields, operator options include: is equal to, is less than, is greaterthan, is not equal to, is less than or equal to, is great than or equal to. Once the operator isset, the value is determined for the condition. An example of a condition might be: Salary isgreater than or equal to 100,000K US.
Once a condition is created it can be added to the formula builder. The system administratorcan add as many conditions as necessary to define the necessary rules. Once the conditionshave been added, they can be strung together using boolean operator logic: And, Or, (,) andNot are supported functions. The conditions and formula functions can be moved around inthe formula area by highlighting the item (represented in orange) using the < and > keys.
Creating an Exclusion RulePrerequisite
The Dynamic Approval Routing must be activated by Taleo Support.
The Manage approval paths user type permission must be granted in the SmartOrg UserTypes feature.
Configuration
Steps
1. Under Dynamic Approval Routing, click on an approval path category.2. Click Create next to Exclusion Rules.3. Complete fields as required.4. Click Save.5. Click Add next to Roles.6. Select from the drop-down list how roles will be included in the approval process.7. To select a role, click Search.8. Click Save.
Result
The role to be excluded appears in the Roles section. Recruiters associated to the role, andwith a matching Organization, Location and Job Field, will not be requested for approval forthat category of approval path.
Next Step
Activating an exclusion rule.
Activating an Exclusion RuleAllows a system administrator to activate an exclusion rule so it can be used in an approvalpath to exclude users from approving requisitions or offers.
Prerequisite
The Advanced Approval Routing must be activated by Taleo support.
The Manage approval paths user type permission must be granted in the SmartOrg UserTypes feature.
The exclusion rule must be draft or inactive.

Approvals Dynamic Approval Routing Rule
Configuration Guide Taleo 10 SP2 - Recruiting 438
Configuration
Steps
1. Under Dynamic Approval Routing, click on an approval path category.2. Click on an exclusion rule.3. In the Exclusion Rule page, click Activate.
Result
The exclusion rule appears as active in the Exclusion Rules list.
Deactivating an Exclusion RulePrerequisite
The Advanced Approval Routing module must be activated by Taleo support.
The Manage approval paths user type permission must be granted in the SmartOrg UserTypes feature.
Configuration
Steps
1. Under Dynamic Approval Routing, click on an approval path category.2. Click on an exclusion rule.3. Click Deactivate.
Result
The exclusion rule appears as inactive in the Exclusion Rules list and can no longer be usedin an approval path.
Deleting an Exclusion RulePrerequisite
The Dynamic Approval Routing must be activated by Taleo Support.
The Manage approval paths user type permission must be granted in the SmartOrg UserTypes feature.
The exclusion rule must be draft.
Configuration
Steps
1. Under Dynamic Approval Routing, click on an approval path category.2. Click Delete next to the exclusion rule.
Result
The exclusion rule no longer appears in the Exclusion Rules list; it is permanently deleted. Ittherefore can no longer be used in an approval path.

Approvals Dynamic Approval Routing Rule
Configuration Guide Taleo 10 SP2 - Recruiting 439
Adding a Role to an Exclusion RulePrerequisite
The Dynamic Approval Routing feature must be activated by Taleo support.
The Manage approval paths user type permission must be granted in the SmartOrg UserTypes feature.
Configuration
Steps
1. Under Dynamic Approval Routing, click on an approval path category.2. Click on an exclusion rule.3. Click Add next to Roles.4. Select from the drop-down list how roles will be included in the approval process.5. To select a role, click Search.6. Click Save.
Result
The role appears in the Roles list of the Exclusion Rule page. Users associated to the role willbe excluded from the approval path.
Next Step
Activating an exclusion rule.
Removing a Role from an Exclusion RulePrerequisite
The Dynamic Approval Routing module must be activated by Taleo Support.
The Manage approval paths user type permission must be granted in the SmartOrg UserTypes feature.
Configuration
Steps
1. Under Dynamic Approval Routing, click on an approval path category.2. Click on an exclusion rule.3. Click Remove next to the role.
Result
The role will no longer appear in the Roles list of the Exclusion Rule page. Users associatedto the role can be selected in the approval process.
Creating a Conditional Inclusion RulePrerequisite
The Dynamic Approval Routing module must be activated by Taleo Support.

Approvals Dynamic Approval Routing Rule
Configuration Guide Taleo 10 SP2 - Recruiting 440
The Manage approval paths user type permission must be granted in the SmartOrg UserTypes feature.
Configuration
Steps
1. Under Dynamic Approval Routing, click on an approval path category.2. Click Conditional Rule next to Inclusion Rules.3. Complete fields as required.4. Click Save.5. Click Edit next to Conditions.6. Create a condition by completing the fields then click Add this criteria to formula.7. Click Save.8. Click Add next to Roles.9. Select from the drop-down list how roles will be included in the approval process.10.To select a role, click Search.11.Click Save.
Result
The rule appears in the Inclusion Rules list of the Approval Paths and Rules page.
Next Step
Activating an inclusion rule.
Creating an Unconditional Inclusion RulePrerequisite
The Dynamic Approval Routing module must be activated by Taleo Support.
The Manage approval paths user type permission must be granted in the SmartOrg UserTypes feature.
Configuration
Steps
1. Under Dynamic Approval Routing, click on an approval path category.2. Click Unconditional Rule next to Inclusion Rules.3. Complete fields as required.4. Click Save.5. Click Add next to Roles.6. Select from the drop-down list how roles will be included in the approval process.7. To select a role, click Search.8. Click Save.
Result
The rule appears in the Inclusion Rules list of the Approval Paths and Rules page. The role isadded to an approval path regardless of the Organization-Location-Job Field structure.

Approvals Dynamic Approval Routing Rule
Configuration Guide Taleo 10 SP2 - Recruiting 441
Next Step
Activating an inclusion rule.
Activating an Inclusion RulePrerequisite
The Dynamic Approval Routing feature must be activated by Taleo Support.
The Manage approval paths user type permission must be granted in the SmartOrg UserTypes feature.
Configuration
Steps
1. Under Dynamic Approval Routing, click on an approval path category.2. Click on an inclusion rule.3. Click Activate.
Result
The inclusion rule appears as active in the Inclusion Rules list so it can be used in anapproval path to include users from approving requisitions or offers.
Deactivating an Inclusion RulePrerequisite
The Dynamic Approval Routing module must be activated by Taleo support.
The Manage approval paths user type permission must be granted in the SmartOrg UserTypes feature.
Configuration
Steps
1. Under Dynamic Approval Routing, click on an approval path category.2. Click on an inclusion rule.3. Click Deactivate.
Result
The inclusion rule appears as inactive in the Inclusion Rules list and can no longer be used inan approval path.
Deleting an Inclusion RulePrerequisite
The Dynamic Approval Routing must be activated by Taleo support.
The Manage approval paths user type permission must be granted in the SmartOrg UserTypes feature.

Approvals Dynamic Approval Routing Rule
Configuration Guide Taleo 10 SP2 - Recruiting 442
The inclusion rule must be draft.
Configuration
Steps
1. Under Dynamic Approval Routing, click on an approval path category.2. Click Delete next to an inclusion rule.3. Click Yes to confirm the deletion.
Result
The inclusion rule no longer appears in the Inclusion Rules list and is permanently deletedfrom the database.
Next Step
Activating an inclusion rule.
Adding a Role to an Inclusion RulePrerequisite
The Dynamic Approval Routing must be activated by Taleo Support.
The Manage approval paths user type permission must be granted in the SmartOrg UserTypes feature.
Configuration
Steps
1. Click on an approval path category.2. Click on an inclusion rule.3. Click Add next to Roles.4. Select from the drop-down list how roles will be included in the approval process.5. To select a role, click Search.6. Click Save.
Result
The role appears in the Roles list of the Inclusion Rule page. Users associated to the role willbe requested for approval.
Next Step
Activating an inclusion rule.
Removing a Role from an Inclusion RulePrerequisite
The Dynamic Approval Routing must be activated by Taleo Support.
The Manage approval paths user type permission must be granted in the SmartOrg UserTypes feature.

Approvals Dynamic Approval Routing Rule
Configuration Guide Taleo 10 SP2 - Recruiting 443
Configuration
Steps
1. Under Dynamic Approval Routing, click on an approval path category.2. Click on an inclusion rule.3. Click Remove next to the role.
Result
The role no longer appears in the Roles list of the Inclusion Rule page.

Approvals Dynamic Approval Routing Sequence
Configuration Guide Taleo 10 SP2 - Recruiting 444
Dynamic Approval Routing Sequence
SequenceA sequence is the order in which the approvers will be displayed to the user when requestingapproval.
Sequences are used in the Dynamic Approval Routing feature. A sequence is part of theapproval path and determines the order of approvers (roles) for the assigned context. Rolesmay be set as “required” on a sequence so that progress is halted if selected roles are notincluded. If these approvers are not available when the path is generated, the user will notbe able to proceed in generating the approval request and will instead be required to contacttheir administrator to proceed. This will allow the system administrator to intervene and reviewconfiguration to ensure the appropriate approvers are in place for the requisition.
Multiple sequences may be active on a path at one time. The sequences are contextualized,so the sequence can be different for different Organizations, Locations and/or Job Fields. Ifa requisition is created in a context not referenced in the context of any defined sequence,then that requisition is considered to be out of the context of the activated Dynamic ApprovalRouting and will allow the user to route for approval manually, as if the module was notimplemented at all.
It is possible to create a sequence and not give it a specific context. In this case, the sequencewill reside at the root level and will apply as the default sequence to be used in any case wherea more specific context matching sequence is not found. Having a sequence with no context isa good practice if you want to ensure that Dynamic Approval Routing is always active for allrequisitions.
It is important when defining a sequence to include all possible roles that may ever beincluded in an approval path. Any invoked role that has no defined sequence will be randomlyappended to the end of the approval path. There is no need to include Onboarding specificroles such as New Hire or Process Owner as these roles never play a part in approval routingfor requisitions.
Note, when the From the manager role up to the number of specified direct reports inclusionrule option is used, these individuals will always appear first in the sequence before any otherapprovers.
ConfigurationUser Type Permissions
Name Location
Manage Approval Paths Configuration > [SmartOrg] Administration > UserTypes > Configuration > Approval Path
Creating a SequencePrerequisite
The Dynamic Approval Routing module must be activated by Taleo Support.

Approvals Dynamic Approval Routing Sequence
Configuration Guide Taleo 10 SP2 - Recruiting 445
The Manage approval paths user type permission must be granted in the SmartOrg UserTypes feature.
Configuration
Steps
1. Under Dynamic Approval Routing, click on an approval path category.2. Click on an approval path.3. Click Create next to Sequence.4. Complete fields as required.5. Click Save.
Result
The approvers will be requested for approval in the selected order.
Next Step
Adding a role to a sequence.
Deleting a SequencePrerequisite
The Dynamic Approval Routing must be activated by Taleo Support.
The Manage approval paths user type permission must be granted in the SmartOrg UserTypes feature.
Configuration
Steps
1. Under Dynamic Approval Routing, click on an approval path category.2. Click on an approval path.3. Click Delete next to the sequence.
Result
The sequence is removed of the Sequence list of the approval path page, and the sequencewill no longer be executed when the approval path is used in Taleo recruiting.
Next Step
If the approval has no sequence, a new sequence must be created to be able to activate theapproval path.
Adding a Role to a SequencePrerequisite
The Dynamic Approval Routing must be activated by Taleo Support.
The Manage approval paths user type permission must be granted in the SmartOrg UserTypes feature.

Approvals Dynamic Approval Routing Sequence
Configuration Guide Taleo 10 SP2 - Recruiting 446
Configuration
Steps
1. Click on an approval path category.2. Click on an approval path.3. Click on a sequence.4. Click Access the role selector.5. Select at least one role.6. Click Select.
Result
The role will appear in the Sequence list of the Sequence page of the approval path.
Removing a Role from a SequencePrerequisite
The Dynamic Approval Routing must be activated by Taleo Support.
The Manage approval paths user type permission must be granted in the SmartOrg UserTypes feature.
Configuration
Steps
1. Under Dynamic Approval Routing, click on an approval path category.2. Click on an approval path.3. Click on a sequence.4. Click Remove next to a role.
Result
The role no longer appears in the Sequence list of the Sequence page of the approval path.
Ordering Roles in a SequencePrerequisite
The Dynamic Approval Routing must be activated by Taleo Support.
The Manage approval paths user type permission must be granted in the SmartOrg UserTypes feature.
More than one role must be included in the sequence.
Configuration
Steps
1. Under Dynamic Approval Routing, click on an approval path category.2. Click on an approval path.3. Click on a sequence.

Approvals Dynamic Approval Routing Sequence
Configuration Guide Taleo 10 SP2 - Recruiting 447
4. Click Reorder.5. Select a role.6. Move the role with the arrows.7. Click Save.
Result
The roles are presented in the Sequence list in the chosen order so that the role appearing atthe top of the list is the first role to be requested for approval.
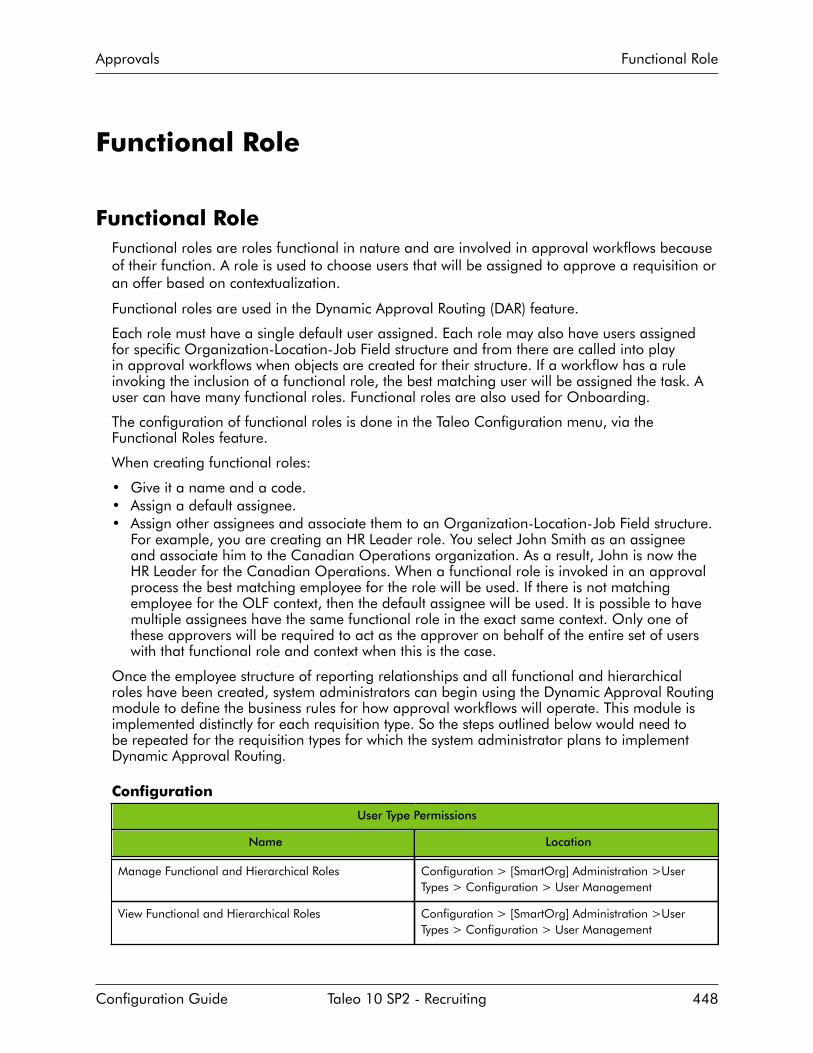
Approvals Functional Role
Configuration Guide Taleo 10 SP2 - Recruiting 448
Functional Role
Functional RoleFunctional roles are roles functional in nature and are involved in approval workflows becauseof their function. A role is used to choose users that will be assigned to approve a requisition oran offer based on contextualization.
Functional roles are used in the Dynamic Approval Routing (DAR) feature.
Each role must have a single default user assigned. Each role may also have users assignedfor specific Organization-Location-Job Field structure and from there are called into playin approval workflows when objects are created for their structure. If a workflow has a ruleinvoking the inclusion of a functional role, the best matching user will be assigned the task. Auser can have many functional roles. Functional roles are also used for Onboarding.
The configuration of functional roles is done in the Taleo Configuration menu, via theFunctional Roles feature.
When creating functional roles:
• Give it a name and a code.• Assign a default assignee.• Assign other assignees and associate them to an Organization-Location-Job Field structure.
For example, you are creating an HR Leader role. You select John Smith as an assigneeand associate him to the Canadian Operations organization. As a result, John is now theHR Leader for the Canadian Operations. When a functional role is invoked in an approvalprocess the best matching employee for the role will be used. If there is not matchingemployee for the OLF context, then the default assignee will be used. It is possible to havemultiple assignees have the same functional role in the exact same context. Only one ofthese approvers will be required to act as the approver on behalf of the entire set of userswith that functional role and context when this is the case.
Once the employee structure of reporting relationships and all functional and hierarchicalroles have been created, system administrators can begin using the Dynamic Approval Routingmodule to define the business rules for how approval workflows will operate. This module isimplemented distinctly for each requisition type. So the steps outlined below would need tobe repeated for the requisition types for which the system administrator plans to implementDynamic Approval Routing.
Configuration
User Type Permissions
Name Location
Manage Functional and Hierarchical Roles Configuration > [SmartOrg] Administration >UserTypes > Configuration > User Management
View Functional and Hierarchical Roles Configuration > [SmartOrg] Administration >UserTypes > Configuration > User Management

Approvals Functional Role
Configuration Guide Taleo 10 SP2 - Recruiting 449
Creating a Functional RolePrerequisite
The Manage roles user type permission must be granted in the SmartOrg User Type feature.
Configuration > Functional Roles
Steps
1. Click Create.2. Complete the fields.3. Click Save.
Result
The new role appears in the Functional Roles list.
Next Step
Activating a functional role.
Editing a Functional RolePrerequisite
The Manage roles user type permission must be granted in the SmartOrg User Type feature.
Configuration > Functional Roles
Steps
1. Click on a role.2. Click Edit next to properties.3. Change fields as required.4. Click Save.
Next Step
The name and description of the functional role is modified.
Activating a Functional RolePrerequisite
The functional role must be draft or inactive.
The Manage roles user type permission must be granted in the SmartOrg User Type feature.
Configuration > Functional Roles
Steps
1. Click on a role.2. Click Activate.

Approvals Functional Role
Configuration Guide Taleo 10 SP2 - Recruiting 450
Result
The role will be available in the role selector when creating an approval path. The role canno longer be deleted.
Deactivating a Functional RolePrerequisite
The functional role must be active.
The Manage roles user type permission must be granted in the SmartOrg User Type feature.
Configuration > Functional Roles
Steps
1. Click on a role.2. Click Deactivate.
Result
The role will no longer appear in the Role Selector page when creating or editing anapproval path.
Deleting a Functional RolePrerequisite
The functional role must be draft.
The Manage roles user type permission must be granted in the SmartOrg User Type feature.
Configuration > Functional Roles
Steps
Click Delete next to the role.
Result
The functional role is permanently deleted from the database and will no longer appear inthe Functional Role list.
Selecting a Default Assignee for a Functional RolePrerequisite
The Manage roles user type permission must be granted in the SmartOrg User Type feature.
Configuration > Functional Roles
Steps
1. Click on a role.2. Click Edit next to Properties.3. Select a default assignee.
Approvals Functional Role
Configuration Guide Taleo 10 SP2 - Recruiting 451
4. Click Save.
Result
When requesting an approval, if no other users are selected for the role, the defaultassignee will be called upon for an approval using this role.
Adding an Assignee to a Functional RolePrerequisite
The Manage roles user type permission must be granted in the SmartOrg User Type feature.
Configuration > Functional Roles
Steps
1. Click on a role.2. Click Create next to Assignees.3. Click Search.4. Select a user.5. Click Save.
Result
The selected user appears in the Assignees list of the role.

Approvals Hierarchical Role
Configuration Guide Taleo 10 SP2 - Recruiting 452
Hierarchical Role
Hierarchical RoleHierarchical roles are the explicitly defined roles in the organization and their order ofrelationships.
Hierarchical roles are used in the Dynamic Approval Routing (DAR) feature to define howhigh up in the organization hierarchy certain approval processes will need to reach. Only onehierarchical role can be assigned to a user.
Example: Senior Vice President > Vice President > Sr. Director > Director > Manager.
The creation of hierarchical roles is done in the Configuration menu, via the Hierarchical Rolesfeature. The system administrator can associate users to a hierarchical role via the HierarchicalRole feature. However, it is recommended to use an employee integration to associate users totheir hierarchical role so that this information stays current and synchronized with the HRMS.
When creating hierarchical roles:• Start from the top of the organization and go down. It will be easier to associate
subordinate roles if the highest level is active first.• Create codes that will allow to sort them in an order that represents their hierarchy. In this
example, the Team Leader reports to the Manager, the Manager reports to the Director andso on.
• Specify the superior role in the Hierarchy section. For example, if creating the Manager role,the hierarchy could be Director, meaning that the Manager will report to the Director.
• Several users can be associated to one hierarchical role, but a user may only be associatedto one hierarchical role.
ConfigurationUser Type Permissions
Name Location
Manage Functional and Hierarchical Roles Configuration > [SmartOrg] Administration >UserTypes > Configuration > User Management
View Functional and Hierarchical Roles Configuration > [SmartOrg] Administration >UserTypes > Configuration > User Management
Creating a Hierarchical RolePrerequisite
The Manage roles user type permission must be granted in the SmartOrg User Type feature.
Configuration > Hierarchical Roles
Steps1. Click Create.2. Complete i the fields.

Approvals Hierarchical Role
Configuration Guide Taleo 10 SP2 - Recruiting 453
3. Click Save.
Result
The new role appears in the Hierarchical Roles list and can be used to choose the superiorrole of a hierarchy.
Next Step
Selecting a superior role.
Activating a Hierarchical RolePrerequisite
The hierarchical role must be draft or inactive.
The Manage roles user type permission must be granted in the SmartOrg User Type feature.
Configuration > Hierarchical Roles
Steps
1. In the Hierarchical Roles list, click on a role.2. In the Hierarchical Role page, click Activate.
Result
The role will be available in the Role Selector page when creating an approval path. Therole can no longer be deleted.
Next Step
Selecting the superior role.
Editing a Hierarchical RoleAllows a system administrator to modify the name and description of a hierarchical role.
Prerequisite
The Manage roles user type permission must be granted in the SmartOrg User Type feature.
Configuration > Hierarchical Roles
Steps
1. In the Hierarchical Roles list, click on a role.2. In the Hierarchical Role page, click Edit next to Properties.3. In the Role Editor page, change fields as required.4. Click Save.
Deactivating a Hierarchical RolePrerequisite
The hierarchical role must be active.
The Manage roles user type permission must be granted in the SmartOrg User Type feature.

Approvals Hierarchical Role
Configuration Guide Taleo 10 SP2 - Recruiting 454
Configuration > Hierarchical Roles
Steps
1. In the Hierarchical Roles list, click on an role.2. In the Hierarchical Role page, click Deactivate.
Result
The role will no longer be available when creating an approval path and when selecting asuperior role.
Deleting a Hierarchical RolePrerequisite
The hierarchical role must be draft.
The Manage roles user type permission must be granted in the SmartOrg User Type feature.
Configuration > Hierarchical Roles
Steps
In the Hierarchical Roles list, click Delete next to a role.
Result
The hierarchical role is permanently deleted from the database and will no longer appear inthe Hierarchical Roles list.
Selecting a Superior RoleAllows a system administrator to select the role that will be at the top of the hierarchy.
Prerequisite
The hierarchical role must be inactive or draft.
The Manage roles user type permission must be granted in the SmartOrg User Type feature.
Configuration > Hierarchical Roles
Steps
1. In the Hierarchical Roles list, click on a role.2. In the Hierarchical Role page, click Select next to Hierarchy.3. In the Role Selector page, select a role.4. Click Select.
Result
The selected role will be the first one to be solicited in the approval path using this role.
Adding a User to a HierarchyPrerequisite
The Manage roles user type permission must be granted in the SmartOrg User Type feature.

Approvals Hierarchical Role
Configuration Guide Taleo 10 SP2 - Recruiting 455
Configuration > Hierarchical Roles
Steps
1. In the Hierarchical Roles list, click on a role.2. In the Hierarchical Role page, click Add next to Users.3. In the User Selector page, select a user.4. Click Select.
Result
The user will appear in the users list of the hierarchical role. The selected user will be calledupon when an approval path uses this role.
Removing a User from a HierarchyPrerequisite
The Manage roles user type permission must be granted in the SmartOrg User Type feature.
Configuration > Hierarchical Roles
Steps
1. In the Hierarchical Roles list, click on a role.2. In the Hierarchical Role page, click Remove next to a user.3. Click Yes to confirm the deletion.
Result
The user no longer appears in the users list of the hierarchical role. The selected user will nolonger be called upon when an approval path uses this role.

Approvals Assignee
Configuration Guide Taleo 10 SP2 - Recruiting 456
Assignee
Creating an AssigneeAllows a system administrator to add an assignee to a functional role.
Prerequisite
The Manage roles user type permission must be granted in the SmartOrg User Type feature.
Configuration > Functional Roles
Steps1. In the Functional Role page, click on a functional role.2. In the Role page, click Create next to Assignees.3. In the New Assignee page, click Search.4. In the User selector, select a user.5. Click Select.6. Click Save.Result
The selected user will appear in the Assignees list of the role.
Deleting an AssigneeAllows a system administrator to remove an assignee from a functional role.
Prerequisite
The Manage roles user type permission must be granted in the SmartOrg User Type feature.
Configuration > Functional Roles
Steps1. In the Functional Role page, select a functional role.2. In the Role page, click Delete next to the assignee.3. Click Yes to confirm the deletion.4. Click Save.Result
The deleted assignee no longer appears in the Assignees list of the role. The assignee will nolonger be called upon for approval when the role in which it was included will be used in anapproval path.
Associating an Assignee to an Organization, Location orJob Field
Allows a system administrator to contextualize the use of an assignee in a role.

Approvals Assignee
Configuration Guide Taleo 10 SP2 - Recruiting 457
Prerequisite
The assignee must be created.
The Manage roles user type permission must be granted in the SmartOrg User Type feature.
Configuration > Functional Roles
Steps
1. Click on a role.2. Click on an assignee.3. Click Add next to Organizaiton, Location or Job Field.4. Make a selection.5. Click Select.
Result
The assignee will be available in Taleo Recruiting only if the Organizaiton, Location or JobField matches the Organizaiton, Location or Job Field specified for the requisition or theoffer for which an approval is being requested.
Dissociating an Assignee from an Organization, Locationor Job Field
Prerequisite
The assignee must be created.
The Manage roles user type permission must be granted in the SmartOrg User Type feature.
Configuration > Functional Roles
Steps
1. Click on a role.2. Click on an assignee.3. Click Remove next to an organization, location or job field.
Result
The assignee will be available in Taleo Recruiting when requesting an approval for anyorganization, location or job field.

Data Archiving and Deletion
• Automated Task Configuration............................................................................459

Data Archiving and Deletion Automated Task Configuration
Configuration Guide Taleo 10 SP2 - Recruiting 459
Automated Task Configuration
Automated TaskAn automated task is an action the system automatically performs to delete and archiveinformation contained in the database.
An automated task allows the deletion of data from the database, that is candidates,requisitions, templates, questions and history of users, user groups and user types.
Users can schedule automated tasks to be run automatically, once or on a recurring basis, orthey can run them manually.
The automated task feature provides three types of actions:• Permanently delete: removes data from the database without the possibility of restoring
it.• Delete (all data can later be restored): removes data from the database but provides
the ability to restore it should the need arise. This action is available for candidate filesonly. The system administrator can restore a particular candidate file, several candidatefiles, or even all candidate files “deleted” by an iteration of the task if necessary. Systemadministrators, when creating a task, can limit the task's scope to files that meet specificcriteria. They can also specify when the task is to start and indicate whether the task is to berun on a recurring basis.
• Delete (non identifying data can later be used for reporting purposes):removes identifying data from the database with the possibility of retaining non identifyinginformation for reporting purposes. Deleted data cannot be restored afterward. This actionis available for candidate files only.
All three types of deletion can be performed on candidate files. However, only the permanentlydelete action can be performed on requisition files, templates, questions and history of users,user groups and user types.
If creating and running a task to delete (“all data can later be restored” or “non identifyingdata can later be used for reporting purposes”) candidate files, future candidate searcheswill not retrieve the deleted candidate files even if the candidates are recorded in OFCCPlogs. If creating a task to permanently delete candidate files, candidate files associated withcandidates entered in OFCCP logs will be deleted but not permanently deleted (in compliancewith OFCCP). Consequently, future candidate searches files will not retrieve the deletedcandidate files but the data contained in the OFCCP logs will be maintained.
Candidate permanent deletions are performed in two stage deletions. The first stage will be setto mark candidates to be erased (setting EntityStatusNo=2) and the second stage will actuallydelete the candidates. Note that the first and second stages cannot occur the same night.Therefore hard-deleting a single candidate will take as long as hard-deleting 1000 records.
Questions used in requisitions cannot be deleted manually nor through the Automated Taskfeature. Users can delete obsolete and unreferenced questions only after cleaning up thequestion library, that is:• Delete candidates (which will delete the answers associated to questions).• Delete requisitions and templates.When a candidate is deleted, it is as if the candidate never existed from a user point of view.Therefore, if a candidate applies for a second time, the candidate would need to create

Data Archiving and Deletion Automated Task Configuration
Configuration Guide Taleo 10 SP2 - Recruiting 460
a whole new candidate record. The old record would not be available (unless the systemadministrator would have reactivated it).
Automated tasks run from 7:00 PM to 7:00 AM (Eastern Time) during the week, and full-time(24 hours a day) during the weekend
Candidate deletions are done in batches of 1000 per hour. This means that a maximum of12,000 candidates are processed per evening.
Requisition deletions are done in batches of 100 per hour. This means that a maximum of1200 requisitions are processed per evening
From the Automated Tasks list, system administrators can perform a number of tasks:• view the list of existing automated tasks• create new tasks• edit existing tasks• delete existing tasksThe list of automated tasks includes two “system” tasks, that is, tasks created by Taleo:• Items deleted from the candidate search results (system task): This task is trigerred when
users perform candidate searches and then delete candidate files. The task deletes thecandidate files but the latter can later be restored if necessary (provided the files have notbeen deleted permanently in the interim by another task). To view and restore some or allof the candidate files deleted, system administrators can click the name of the task and clickView History.
• Restored items not permanently deleted (system task): System administrators can thistask when they want to restore some or all of the items deleted by a task of type “Deletecandidate files (all data can later be restored)” (provided the files have not been deletedpermanently in the interim by another task). To do so, systems administrators click thename of the task. All items that have been deleted (as opposed to those that have beenpermanently deleted) are displayed.
Benefits• When creating an automated task, it is possible to limit the task's scope to elements that
meet specific criteria. It is also possible to specify when the task is to start and whether thetask is to be run on a recurring basis.
• If selecting the Permanently delete candidate files action and the With archiving whilecreating an automated task option, the candidate files will be deleted permanently fromthe Taleo system when the task is run but users will be able to “pick up” the candidateinformation to be deleted permanently in the Taleo databases at a Taleo FTP location for apredetermined period of time (contact Taleo prior to using “With archiving” so that Taleocan activate the option). The candidate information will be in the form of XML files.
• As the number of candidate files, requisitions, templates, questions, and history tracking hasincreased, the size of Taleo clients’ databases has grown proportionally. The Permanentlydelete candidate files action provides a highly configurable tool that can result insignificantly improved system performance: faster candidate searches, quicker reportgeneration, pages and lists that are displayed more rapidly. All of these performanceimprovements will result in greater productivity with respect to users.
• Better compliance with regulations around the world. Some countries have strict lawsgoverning the length of time that personal information can be held in databases. Taleoclients who do business in such countries will be able to delete candidate informationin a manner that complies with such legislation. Taleo clients can create tasks that usethe Permanently delete candidate files action in particular to ensure that the personalinformation they have stored in Taleo’s databases conforms to the legislation in thecountries in which they do business.
• When a candidate is deleted, his/her user name becomes available to other users.

Data Archiving and Deletion Automated Task Configuration
Configuration Guide Taleo 10 SP2 - Recruiting 461
Configuration
To access this feature, users must be granted the following permission.
User Type Permission
Name Location
Access Automated Tasks Configuration > [SmartOrg] Administration> User Types >Recruiting > Administration
Creating an Automated TaskPrerequisite
The Automated Task feature must be activated by Taleo Web Support.
The Access Automated Tasks user type permission is required.
Candidates included in the processing of an automated task must not be locked by OFCCPfeature.
Requisitions included in the processing of an automated task must not be linked to anycandidates.
Configuration > [Recruiting] Administration > Automated Tasks
Steps1. Click New Task...2. Follow the on-screen instructions.Result
The automated task will appear in the Automated Tasks page.
Next Step
Activating an automated task.
Deleting an Automated TaskPrerequisite
The Automated Task feature must be activated by Taleo Web Support.
The Access Automated Tasks user type permission is required.
Configuration > [Recruiting] Administration > Automated Tasks
Steps1. Click Delete Task next to the task.2. Click Yes.Result
The automated task will no longer appear in the Automated Tasks page. An automated taskcan also be deleted with the Delete button under the Available Actions pane available whenclicking on the name of the task.

Data Archiving and Deletion Automated Task Configuration
Configuration Guide Taleo 10 SP2 - Recruiting 462
Modifying an Automated TaskPrerequisite
The Automated Task feature must be activated by Taleo Web Support.
The Access Automated Tasks user type permission is required.
Configuration > [Recruiting] Administration > Automated Tasks
Steps
1. Click a task.2. IClick Edit to modify properties or criteria.3. Click Done.
Activating an Automated TaskPrerequisite
Task must be an inactive user-defined task.
The Automated Task feature must be activated by Taleo Web Support.
The Access Automated Tasks user type permission is required.
Candidate files being deleting must not be locked by OFCCP feature.
Configuration > [Recruiting] Administration > Automated Tasks
Steps
1. Clickan inactive task.2. Click Edit next to Task Properties.3. Select the Active radio button.4. Click Done.
Result
The automated task will be carried out as scheduled.
Deactivating an Automated TaskPrerequisite
Task must be user-defined.
The Automated Task feature must be activated by Taleo Web Support.
The Access Automated Tasks user type permission is required.
Configuration > [Recruiting] Administration > Automated Tasks
Steps
1. Click an active user-defined task.2. Click Edit next to Task Properties.

Data Archiving and Deletion Automated Task Configuration
Configuration Guide Taleo 10 SP2 - Recruiting 463
3. Select the Inactive radio button.4. Click Done.
Result
The system will no longer carry out the execution of the user-defined task.
Executing Manually an Automated TaskPrerequisite
The Automated Task feature must be activated by Taleo Web Support.
The Access Automated Tasks user type permission is required.
Configuration > [Recruiting] Administration > Automated Tasks
Steps
1. Click a task.2. In the Available Actions pane, click Execute.
Result
The automated task is carried out at a time not specified in the schedule.
Stopping Manually an Automated TaskPrerequisite
The Automated Task feature must be activated by Taleo Web Support.
The Access Automated Tasks user type permission is required.
Configuration > [Recruiting] Administration > Automated Tasks
Steps
1. Click a task.2. Click Stop.
Result
The execution of the automated task being performed stopped.
Associating an Automated Task to a LocationPrerequisite
The Automated Task feature must be activated by Taleo Web Support.
The Access Automated Tasks user type permission is required.
Candidates included in the processing of an automated task must not be locked by OFCCPfeature.
Requisitions included in the processing of an automated task must not be linked to anycandidates.

Data Archiving and Deletion Automated Task Configuration
Configuration Guide Taleo 10 SP2 - Recruiting 464
Configuration > [Recruiting] Administration > Automated Tasks
Steps
1. Click a task.2. Click Edit in the Criteria section.3. Click Add.4. Select a location.5. Click Add.6. Click Done
Result
The automated task will be carried out only on files with matching location.
Dissociating an Automated Task from a LocationPrerequisite
The Automated Task feature must be activated by Taleo Web Support.
The Access Automated Tasks user type permission is required.
Candidates included in the processing of an automated task must not be locked by OFCCPfeature.
Requisitions included in the processing of an automated task must not be linked to anycandidates.
Configuration > [Recruiting] Administration > Automated Tasks
Steps
1. Click a task.2. Click Edit in the Criteria section.3. Click remove next to a location.4. Click Save.
Result
The location is removed and the automated task will no longer be carried out on filesassociated to the removed location.
Recovering Candidates Deleted by an Automated TaskPrerequisite
The Access Automated Tasks user type permission is required.
The candidate must not have been permanently deleted.
Configuration > [Recruiting] Administration > Automated Tasks
Steps
1. In the Automated Tasks list, click the tasks Items deleted from the candidate search results(system task) or Delete candidate files; all data can later be restored (system task).

Data Archiving and Deletion Automated Task Configuration
Configuration Guide Taleo 10 SP2 - Recruiting 465
The first task is for candidates who have been deleted from the search results in TaleoRecruiting and the second one is for candidates who used the Deactivate account featurefrom the career section.
2. In the overview section, click View History.3. Enter the candidate ID or name in the search file.4. Click Search.5. Click Recover.
Result
The candidate file is restored in Recruiting Center. Candidates who have not yet beenpermanently deleted from the system are identifed for user to be able to recover them. Whencandidates are deleted, they are not permanently deleted right away. They are kept in thesystem, a bit like a recycle bin, for 7 days before a system task is run to permanently deletethem.
Verifying the Status of an Automated TaskPrerequisite
The Automated Task feature must be activated by Taleo Web Support.
The Access Automated Tasks user type permission is required.
Configuration > [Recruiting] Administration > Automated Tasks
Steps
In the Automated Tasks page, locate the status of the task in the Processing column.
Result
User can view the status of an automated task, which may provide an explanation as whythe task was not executed.

Product Resources
• Product Resource Administration......................................................................... 467

Product Resources Product Resource Administration
Configuration Guide Taleo 10 SP2 - Recruiting 467
Product Resource Administration
Resource AdministrationResource administration allows the system administrator to modify element text that appears onpages in the New Hire Portal, Onboarding WebTop and Onboarding administration..
Each application resource that has an ID can have its text changed by the system administrator.
A resource is any alphanumerical string appearing in the application such as:
• a field• a button• a setting• a tooltip• a page title• an instruction• a link• etc.
A unique ID is associated to each standard resource of the application. IDs can be displayedin the application, in front of each resource. IDs allow users to precisely locate and identify aresource they need to modify or override in the application.
If an “X” appears at the right of the resource ID, this means that the label was alreadyoverridden.
To make a global change to a resource, contact your Taleo representative.
The value of a resource is the actual text of a standard field or button displayed in theapplication. The value can be composed of units, special characters and letters. The resourcevalue is not unique, therefore the same text can be used for different resources. Resourcevalues can be modified and updated in the application. To make a global change of the valueof a resource, i.e. for all zones, contact your Taleo representative.
Example: in the Resource Administration page, the name of the page and the Save buttonappearing in the page are resources.
Example: the Save button can be used on several pages of the application. Each Save buttonappearing in the application will have a specific ID, but the value of every Save button will betext Save.
Resource values can be refreshed. This enables the system administrator to apply any changesmade to the resource values for the customer's custom set of resources, to the Onboardingapplication (New Hire Portal, Onboarding Webtop and Adminstration) itself.
System administrators can block the refresh of the resource value. This allows systemadministrators to use a testing environment where the actual value of a resource is eitherchosen or not. This is usually done while performing some temporary testing in a staging zone.
Each Taleo Product has a specific Resource Administration link allowing the display of theproduct’s resource IDs.
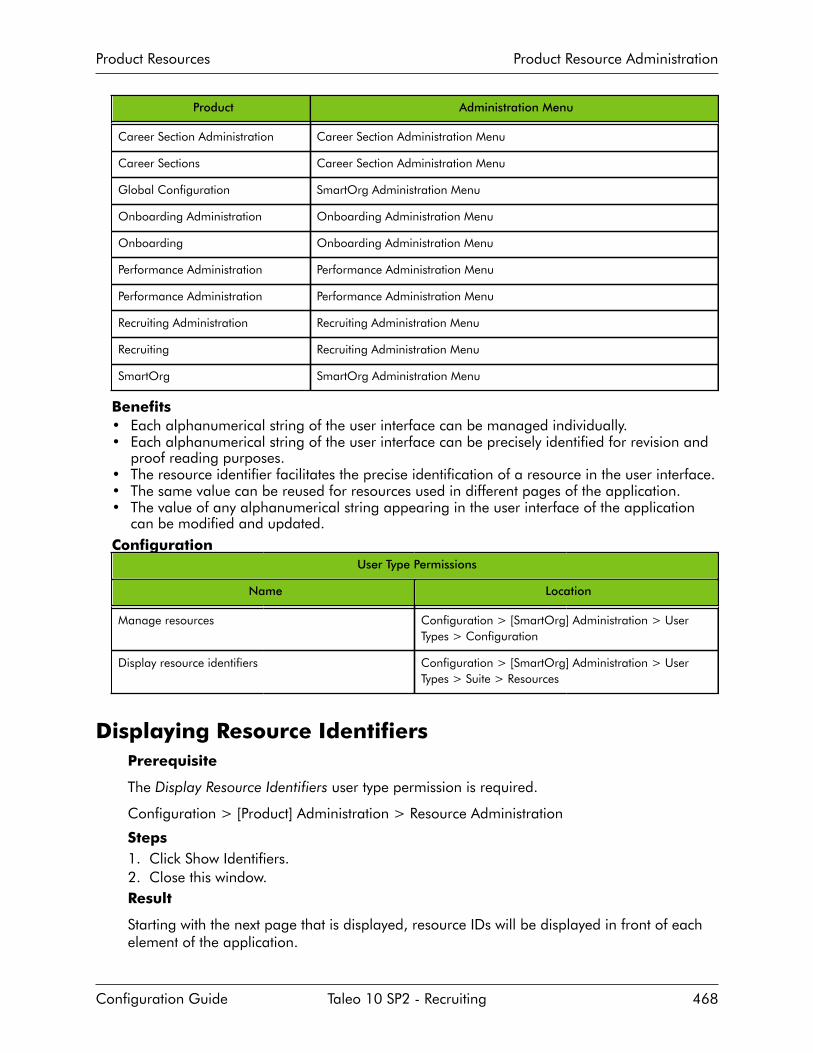
Product Resources Product Resource Administration
Configuration Guide Taleo 10 SP2 - Recruiting 468
Product Administration Menu
Career Section Administration Career Section Administration Menu
Career Sections Career Section Administration Menu
Global Configuration SmartOrg Administration Menu
Onboarding Administration Onboarding Administration Menu
Onboarding Onboarding Administration Menu
Performance Administration Performance Administration Menu
Performance Administration Performance Administration Menu
Recruiting Administration Recruiting Administration Menu
Recruiting Recruiting Administration Menu
SmartOrg SmartOrg Administration Menu
Benefits• Each alphanumerical string of the user interface can be managed individually.• Each alphanumerical string of the user interface can be precisely identified for revision and
proof reading purposes.• The resource identifier facilitates the precise identification of a resource in the user interface.• The same value can be reused for resources used in different pages of the application.• The value of any alphanumerical string appearing in the user interface of the application
can be modified and updated.Configuration
User Type Permissions
Name Location
Manage resources Configuration > [SmartOrg] Administration > UserTypes > Configuration
Display resource identifiers Configuration > [SmartOrg] Administration > UserTypes > Suite > Resources
Displaying Resource IdentifiersPrerequisite
The Display Resource Identifiers user type permission is required.
Configuration > [Product] Administration > Resource Administration
Steps1. Click Show Identifiers.2. Close this window.Result
Starting with the next page that is displayed, resource IDs will be displayed in front of eachelement of the application.

Product Resources Product Resource Administration
Configuration Guide Taleo 10 SP2 - Recruiting 469
Hiding Resource IdentifiersPrerequisite
Resource Identifiers must be displayed.
The Display Resource Identifiers user type permission is required.
Configuration > [Product] Administration > Resource Administration
Steps
1. Click Hide Identifiers.2. Close this window.
Result
Starting with the next page that is loaded, resource IDs will no longer be displayed in front ofeach element of the application.
Refreshing Resource ValuesPrerequisite
The Manage Resources and Display Resource Identifiers user type permissions are required.
Configuration > [Product] Administration > Resource Administration
Steps
1. Click Unblock Refresh.2. Select the desired type of refresh.3. Enter the name of the project if necessary.
The project name is associated with revisions made to the customer's custom set ofresource values, administered in Taleo's TexTool application.
4. Click Refresh Values.5. Close this window.
Result
The latest value of the resources is displayed.
Blocking Resource Value RefreshPrerequisite
The Manage Resources and Display Resource Identifiers user type permissions are required.
Configuration > [Product] Administration > Resource Administration
Steps
1. Click Block Refresh.2. Add a comment.

Product Resources Product Resource Administration
Configuration Guide Taleo 10 SP2 - Recruiting 470
3. Click Save.4. Close this window.
Result
It will no longer be possible to have the application reflect any changes applied to a value.
Unblocking Resource Value RefreshPrerequisite
The Manage Resources and Display Resource Identifiers user type permissions are required.
Configuration > [Product] Administration > Resource Administration
Steps
1. Click Unblock Refresh.2. Close this window.
Result
Any changes applied to resource values will be reflected in the application when refreshingthe values.
Next Step
Refreshing resource values.

Troubleshooting
• Troubleshooting..................................................................................................472

Troubleshooting Troubleshooting
Configuration Guide Taleo 10 SP2 - Recruiting 472
Troubleshooting
Before contacting Taleo Customer Support, first check available documentation. Informationlocated in the Prerequisites will often help solve problems.
Problem Solution Keywords
Cannot attach a file Storage limit may have been exceeded, contact Taleocustomer service.
Attachment
I received a Taleo (-1) error Record all the steps you took prior to receiving the error.Report the issue to Taleo customer service.
Error message
Cannot delete candidate files Candidate file is locked by OFCCP feature. ContactTaleo customer service.
Automated Task
Automated task is not carriedout
An error may cause a task to fail. If processing status ofthe task is Error, contact Taleo customer service.
Automated task,Candidate
Cannot delete requisitionfiles with the automated taskfeature
Verify if there are candidates linked to the requisition.All candidates linked to the requisition must first bepermanently deleted.
Automated task,Requisition
Automated task is not deletingthe proper elements
Verify the automated task criteria. Automated task
Unable to perform actions ona candidate file.
An error message will be displayed stated that thefile is being used by another user. When sendingcorrespondence, the message stipulates that therequested action cannot be performed. In both caseswait until other user is finished. If candidate file remainsbooked for more than an hour, contact Taleo customerservice.
Error message
Unable to perform actions ona candidate file.
If the error message Unable to perform Action isdisplayed when user tries to perform the Move orthe Change Status actions, but no error message isdisplayed when selecting the Send correspondenceaction for the More Actions menu, then the file iscorrupted. Contact Taleo customer service
Actions
Unable to hide fields in acandidate file.
Even if a field is set to not available it will be displayedto users in Read only mode. When editing a file, thesystem will take the field setting into account and willhide the field accordingly. To make sure fields are notdisplayed in read only mode, user type permissions canbe removed to the user, such as See dates of birth andsecurity numbers.
Fields
Properties and elements ofa field included in a blockdoes not display the sameinformation in all languages
If a field is not configured in a language, then baselanguage is displayed by default. Configure all fields inthe required language.
Fields
LUDs do not appear in theCareers section
The option Require Description in WebTopand content languages must be activated
LUD, field
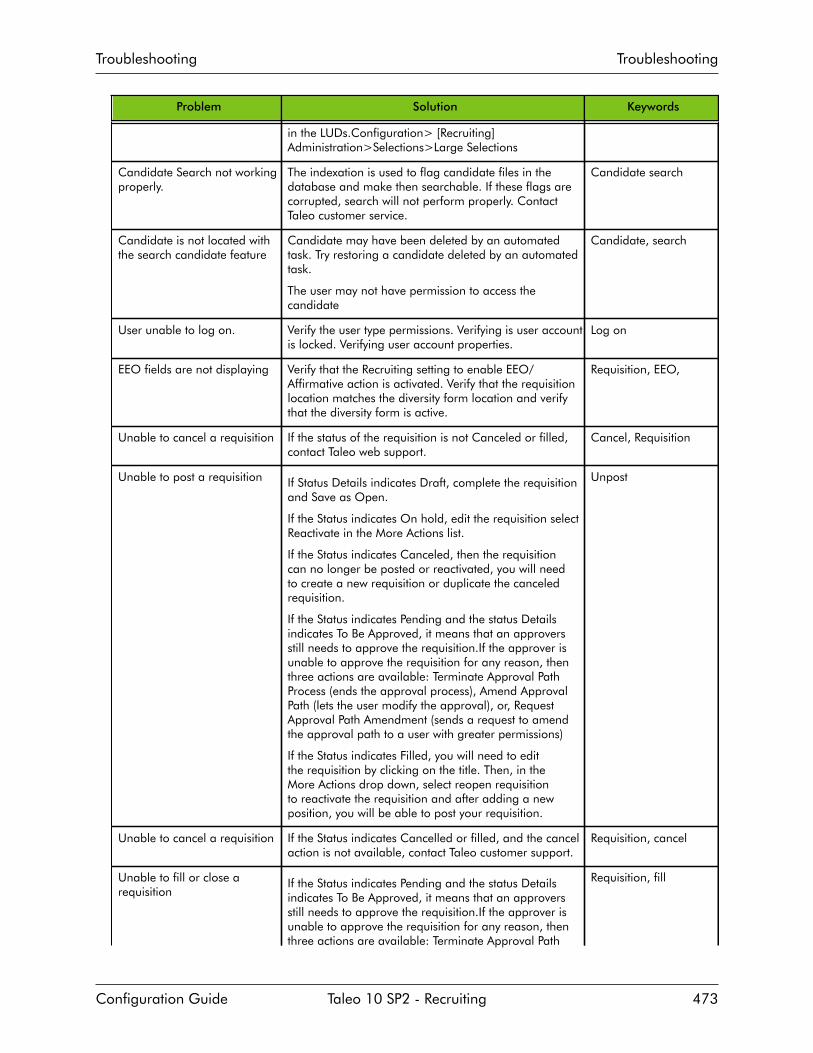
Troubleshooting Troubleshooting
Configuration Guide Taleo 10 SP2 - Recruiting 473
Problem Solution Keywords
in the LUDs.Configuration> [Recruiting]Administration>Selections>Large Selections
Candidate Search not workingproperly.
The indexation is used to flag candidate files in thedatabase and make then searchable. If these flags arecorrupted, search will not perform properly. ContactTaleo customer service.
Candidate search
Candidate is not located withthe search candidate feature
Candidate may have been deleted by an automatedtask. Try restoring a candidate deleted by an automatedtask.
The user may not have permission to access thecandidate
Candidate, search
User unable to log on. Verify the user type permissions. Verifying is user accountis locked. Verifying user account properties.
Log on
EEO fields are not displaying Verify that the Recruiting setting to enable EEO/Affirmative action is activated. Verify that the requisitionlocation matches the diversity form location and verifythat the diversity form is active.
Requisition, EEO,
Unable to cancel a requisition If the status of the requisition is not Canceled or filled,contact Taleo web support.
Cancel, Requisition
Unable to post a requisition If Status Details indicates Draft, complete the requisitionand Save as Open.
If the Status indicates On hold, edit the requisition selectReactivate in the More Actions list.
If the Status indicates Canceled, then the requisitioncan no longer be posted or reactivated, you will needto create a new requisition or duplicate the canceledrequisition.
If the Status indicates Pending and the status Detailsindicates To Be Approved, it means that an approversstill needs to approve the requisition.If the approver isunable to approve the requisition for any reason, thenthree actions are available: Terminate Approval PathProcess (ends the approval process), Amend ApprovalPath (lets the user modify the approval), or, RequestApproval Path Amendment (sends a request to amendthe approval path to a user with greater permissions)
If the Status indicates Filled, you will need to editthe requisition by clicking on the title. Then, in theMore Actions drop down, select reopen requisitionto reactivate the requisition and after adding a newposition, you will be able to post your requisition.
Unpost
Unable to cancel a requisition If the Status indicates Cancelled or filled, and the cancelaction is not available, contact Taleo customer support.
Requisition, cancel
Unable to fill or close arequisition
If the Status indicates Pending and the status Detailsindicates To Be Approved, it means that an approversstill needs to approve the requisition.If the approver isunable to approve the requisition for any reason, thenthree actions are available: Terminate Approval Path
Requisition, fill
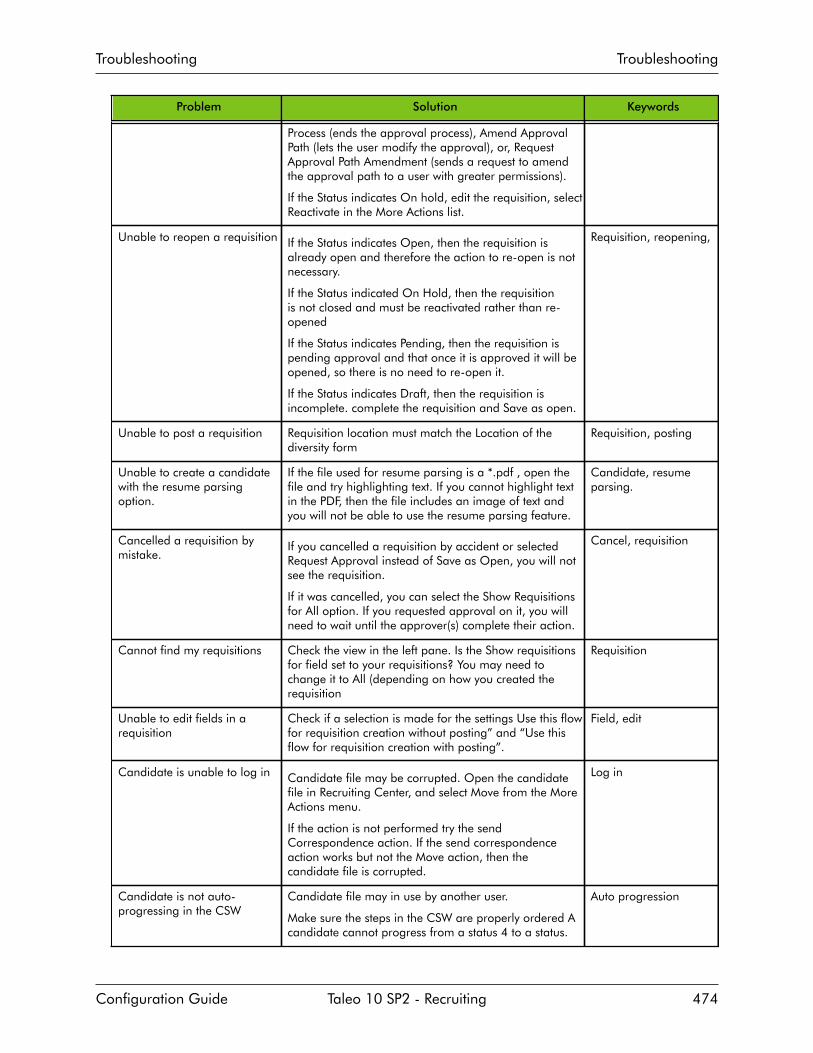
Troubleshooting Troubleshooting
Configuration Guide Taleo 10 SP2 - Recruiting 474
Problem Solution Keywords
Process (ends the approval process), Amend ApprovalPath (lets the user modify the approval), or, RequestApproval Path Amendment (sends a request to amendthe approval path to a user with greater permissions).
If the Status indicates On hold, edit the requisition, selectReactivate in the More Actions list.
Unable to reopen a requisition If the Status indicates Open, then the requisition isalready open and therefore the action to re-open is notnecessary.
If the Status indicated On Hold, then the requisitionis not closed and must be reactivated rather than re-opened
If the Status indicates Pending, then the requisition ispending approval and that once it is approved it will beopened, so there is no need to re-open it.
If the Status indicates Draft, then the requisition isincomplete. complete the requisition and Save as open.
Requisition, reopening,
Unable to post a requisition Requisition location must match the Location of thediversity form
Requisition, posting
Unable to create a candidatewith the resume parsingoption.
If the file used for resume parsing is a *.pdf , open thefile and try highlighting text. If you cannot highlight textin the PDF, then the file includes an image of text andyou will not be able to use the resume parsing feature.
Candidate, resumeparsing.
Cancelled a requisition bymistake.
If you cancelled a requisition by accident or selectedRequest Approval instead of Save as Open, you will notsee the requisition.
If it was cancelled, you can select the Show Requisitionsfor All option. If you requested approval on it, you willneed to wait until the approver(s) complete their action.
Cancel, requisition
Cannot find my requisitions Check the view in the left pane. Is the Show requisitionsfor field set to your requisitions? You may need tochange it to All (depending on how you created therequisition
Requisition
Unable to edit fields in arequisition
Check if a selection is made for the settings Use this flowfor requisition creation without posting” and “Use thisflow for requisition creation with posting”.
Field, edit
Candidate is unable to log in Candidate file may be corrupted. Open the candidatefile in Recruiting Center, and select Move from the MoreActions menu.
If the action is not performed try the sendCorrespondence action. If the send correspondenceaction works but not the Move action, then thecandidate file is corrupted.
Log in
Candidate is not auto-progressing in the CSW
Candidate file may in use by another user.
Make sure the steps in the CSW are properly ordered Acandidate cannot progress from a status 4 to a status.
Auto progression

Troubleshooting Troubleshooting
Configuration Guide Taleo 10 SP2 - Recruiting 475
Problem Solution Keywords
Candidate did not receiveemail notification
Check if the template used to send the notification isconfigured properly. email address, contents field etc.
Notification
When matching a candidateto a requisition, the automaticemail is not sent.
If the template used to send the email includes a fieldto redirect the candidate to a career site, then therequisition must be posted.
Match
Appendix
• Table Referencing Tips Included in the Document................................................ 477
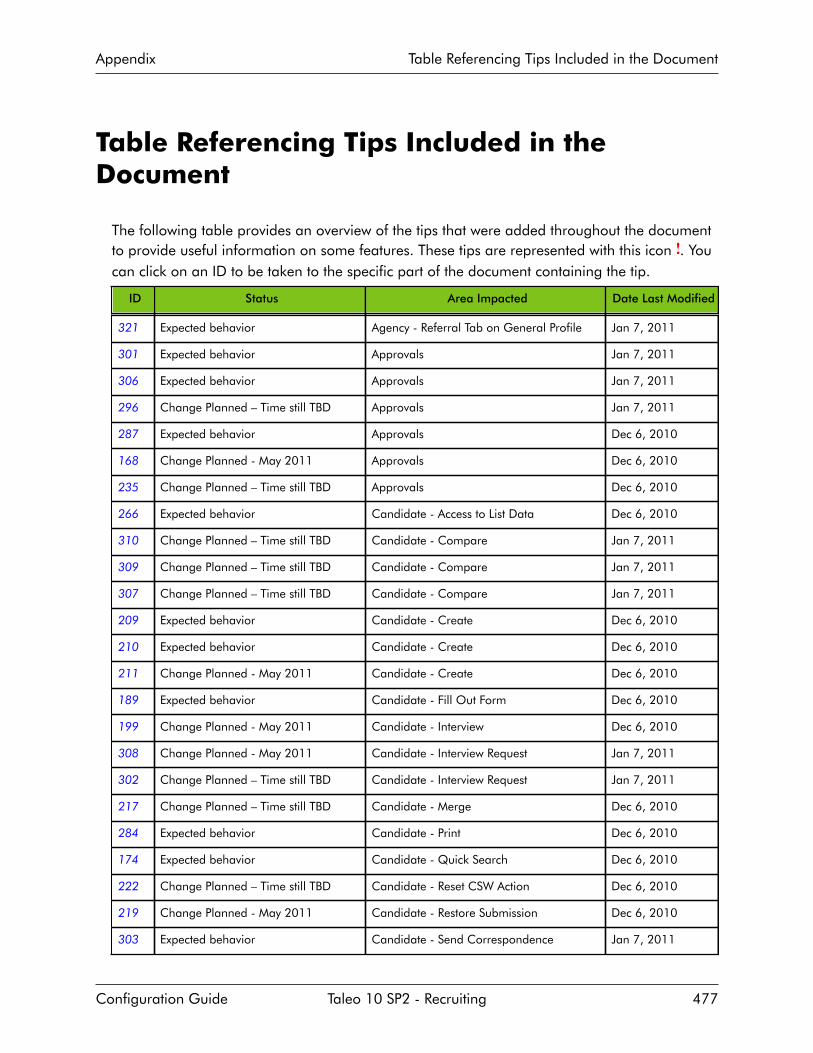
Appendix Table Referencing Tips Included in the Document
Configuration Guide Taleo 10 SP2 - Recruiting 477
Table Referencing Tips Included in theDocument
The following table provides an overview of the tips that were added throughout the documentto provide useful information on some features. These tips are represented with this icon . Youcan click on an ID to be taken to the specific part of the document containing the tip.
ID Status Area Impacted Date Last Modified
321 Expected behavior Agency - Referral Tab on General Profile Jan 7, 2011
301 Expected behavior Approvals Jan 7, 2011
306 Expected behavior Approvals Jan 7, 2011
296 Change Planned – Time still TBD Approvals Jan 7, 2011
287 Expected behavior Approvals Dec 6, 2010
168 Change Planned - May 2011 Approvals Dec 6, 2010
235 Change Planned – Time still TBD Approvals Dec 6, 2010
266 Expected behavior Candidate - Access to List Data Dec 6, 2010
310 Change Planned – Time still TBD Candidate - Compare Jan 7, 2011
309 Change Planned – Time still TBD Candidate - Compare Jan 7, 2011
307 Change Planned – Time still TBD Candidate - Compare Jan 7, 2011
209 Expected behavior Candidate - Create Dec 6, 2010
210 Expected behavior Candidate - Create Dec 6, 2010
211 Change Planned - May 2011 Candidate - Create Dec 6, 2010
189 Expected behavior Candidate - Fill Out Form Dec 6, 2010
199 Change Planned - May 2011 Candidate - Interview Dec 6, 2010
308 Change Planned - May 2011 Candidate - Interview Request Jan 7, 2011
302 Change Planned – Time still TBD Candidate - Interview Request Jan 7, 2011
217 Change Planned – Time still TBD Candidate - Merge Dec 6, 2010
284 Expected behavior Candidate - Print Dec 6, 2010
174 Expected behavior Candidate - Quick Search Dec 6, 2010
222 Change Planned – Time still TBD Candidate - Reset CSW Action Dec 6, 2010
219 Change Planned - May 2011 Candidate - Restore Submission Dec 6, 2010
303 Expected behavior Candidate - Send Correspondence Jan 7, 2011
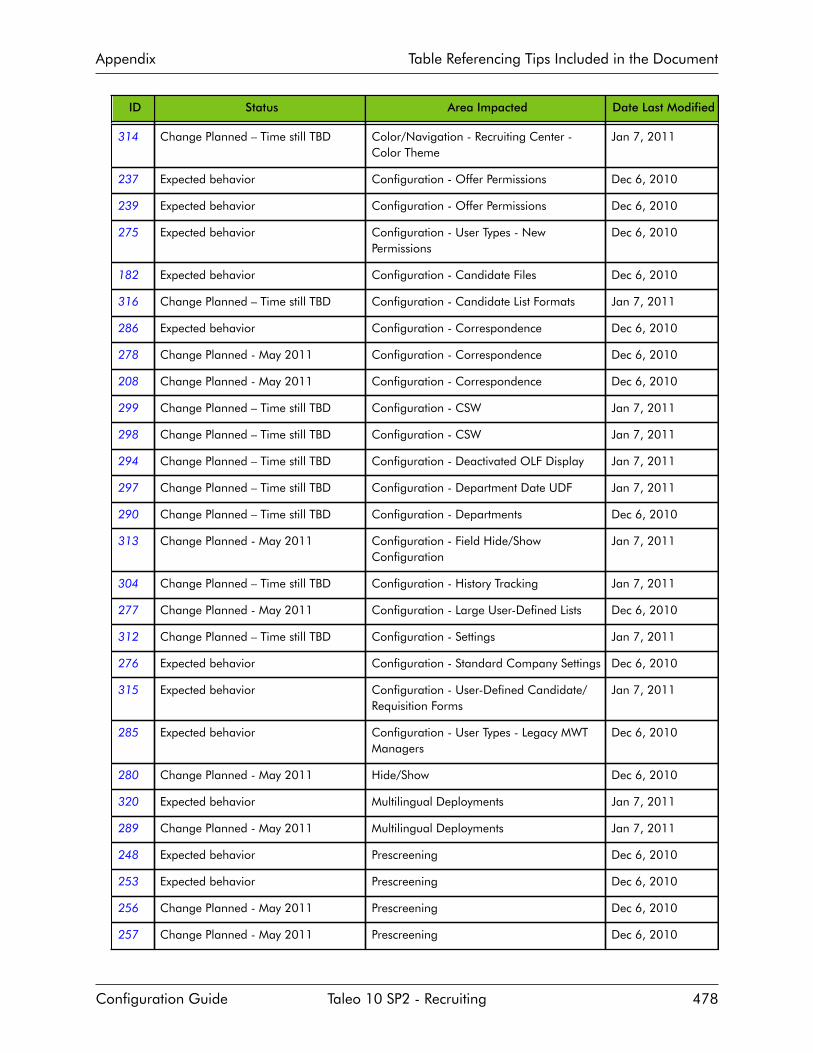
Appendix Table Referencing Tips Included in the Document
Configuration Guide Taleo 10 SP2 - Recruiting 478
ID Status Area Impacted Date Last Modified
314 Change Planned – Time still TBD Color/Navigation - Recruiting Center -Color Theme
Jan 7, 2011
237 Expected behavior Configuration - Offer Permissions Dec 6, 2010
239 Expected behavior Configuration - Offer Permissions Dec 6, 2010
275 Expected behavior Configuration - User Types - NewPermissions
Dec 6, 2010
182 Expected behavior Configuration - Candidate Files Dec 6, 2010
316 Change Planned – Time still TBD Configuration - Candidate List Formats Jan 7, 2011
286 Expected behavior Configuration - Correspondence Dec 6, 2010
278 Change Planned - May 2011 Configuration - Correspondence Dec 6, 2010
208 Change Planned - May 2011 Configuration - Correspondence Dec 6, 2010
299 Change Planned – Time still TBD Configuration - CSW Jan 7, 2011
298 Change Planned – Time still TBD Configuration - CSW Jan 7, 2011
294 Change Planned – Time still TBD Configuration - Deactivated OLF Display Jan 7, 2011
297 Change Planned – Time still TBD Configuration - Department Date UDF Jan 7, 2011
290 Change Planned – Time still TBD Configuration - Departments Dec 6, 2010
313 Change Planned - May 2011 Configuration - Field Hide/ShowConfiguration
Jan 7, 2011
304 Change Planned – Time still TBD Configuration - History Tracking Jan 7, 2011
277 Change Planned - May 2011 Configuration - Large User-Defined Lists Dec 6, 2010
312 Change Planned – Time still TBD Configuration - Settings Jan 7, 2011
276 Expected behavior Configuration - Standard Company Settings Dec 6, 2010
315 Expected behavior Configuration - User-Defined Candidate/Requisition Forms
Jan 7, 2011
285 Expected behavior Configuration - User Types - Legacy MWTManagers
Dec 6, 2010
280 Change Planned - May 2011 Hide/Show Dec 6, 2010
320 Expected behavior Multilingual Deployments Jan 7, 2011
289 Change Planned - May 2011 Multilingual Deployments Jan 7, 2011
248 Expected behavior Prescreening Dec 6, 2010
253 Expected behavior Prescreening Dec 6, 2010
256 Change Planned - May 2011 Prescreening Dec 6, 2010
257 Change Planned - May 2011 Prescreening Dec 6, 2010

Appendix Table Referencing Tips Included in the Document
Configuration Guide Taleo 10 SP2 - Recruiting 479
ID Status Area Impacted Date Last Modified
258 Change Planned - May 2011 Prescreening Dec 6, 2010
251 Expected behavior Prescreening Dec 6, 2010
318 Change Planned – Time still TBD Quick Filters Jan 7, 2011
317 Expected behavior Quick Filters Jan 7, 2011
295 Change Planned – Time still TBD Requisition - Cancel Jan 7, 2011
305 Expected behavior Requisition - Collaborators Jan 7, 2011
292 Expected behavior Requisition - Default Manager Dec 6, 2010
155 Expected behavior Requisition - Delegation Dec 6, 2010
164 Change Planned – Time still TBD Requisition - Edit "but not" Conditions Dec 6, 2010
148 Expected behavior Requisition - File Administration Dec 6, 2010
149 Expected behavior Requisition - List Format Dec 6, 2010
322 Change Planned – Time still TBD Requisition - List Format Jan 7, 2011
293 Expected behavior Requisition - Template Jan 7, 2011
279 Change Planned - May 2011 Requisition - Template Dec 6, 2010
169 Change Planned - May 2011 Requisition - Template Dec 6, 2010
247 Change Planned - May 2011 Requisition - Template - List Dec 6, 2010
243 Expected behavior Requisition - Template - Owner/Group Dec 6, 2010
152 Expected behavior Tasks - Request Sourcing Strategy Dec 6, 2010
311 Change Planned – Time still TBD Tasks - Self-Assigned Jan 7, 2011
291 Change Planned - May 2011 Time Zone Dec 6, 2010
Related Documents