Welcome message from author
This document is posted to help you gain knowledge. Please leave a comment to let me know what you think about it! Share it to your friends and learn new things together.
Transcript

������� ���� ����� ���
� � � � � � � � � � � � � �
����������������
��� ��� ��
����� �� �
������� �����
�������� �������
���������� ���
����������������
��� ����������
������
�������� �����
�����
����� ������ !�� !"�������#!$%!&
� '()���*(+(,(-.()./���,�*�'
���
����� ������ !�� !"�������#!$%!&
� '()���01(-.()./���,�*�'
������������
� '()����(.)+('��)*(-.()./���,�*�'
���������
� '()���(01.�(�)(-.()./���,�*�'
�����������
� '()���2�(,�33)*�-.*��.().�*��+4
������
� '()���1(��1-.().�*��05
�����6���
� '()���2�+75�+7-.()./���,�*�'
���8���
� '()���9�):)+7-.()./���,�*�'
���������
� '()���1)+7(;���-.()./���,�*�'
��������
� '()���.2()�(+,-.()./���,�*�'
��
���
���
��
���
���
�
��
���
���
��
�
� � � � � � �
�().����*.��+)*1��.,�)1�(+�����"������7)1.���,�10;;�)������.)3)*(.�����%<��
������0.2��)1�,���(����0701.�$������� ����% ��
� � � � � � � � �
��������������� ��
�����������
�().����*.��+)*1��.,
������=��<%��2�)1.*20�*2
� '()���.().-.()./���,�*��+4
���������������
������������������������������ �������
��
��
��
�����
�����
������������� �!������������������ ����������������
��!��!!��������������������
������!�� �����"����!�#$��%�
� � � � � � � � �
���������
�����
� ����
�������� �������
� ������������
��������������
��������� !���������
�""����#������"��"���$
%&��'�� �����
��� ����
%�(�����������
) ��� ��������
) ��� �������*
) ��� �������+
,�������� �������
�����
������� ��� ������
���������������������� ������� ��� �������������������� ���������� �������������������������������
��������������� ��� � �������������������������������������� ��� � ���������������������������������������������������� ����� ��� ������������! ������� ���"���������������������������� ����� ��� ������� ���"�������������"������
��������������� �������#� ���"������������������� ������
�������������������"�������� ��� ��������"��#�����������������������������������$������������������������������������������� ������� ������������
�����������% � ���������������������"���������������&�'(��������)�� ���������������������������������*�������� ��+���,�#�"������������������������
��������������'�-� � �������� ������������������������������ "�������� ����������������� �����������
*�������� ��+���,�#�"������������������������
�������� � �������������������������������� �����������������#��������������������������� �
������������ � �������� �������������������#����������������������� ��� ��������������� �������"�������������
����������� ���"������������������������� ���"���������������
�������������*�� *�����������,�������������������������������� �������������������������������������� .�����#����������������������������������� /����������������������
������� 0����� ���������� ���"��������������0����� ���������� ���"���������������
��������������� 1���������������� ��������������������
������������������������� ��� �������������#�-� � ��"�����#���������*�� ������������������������������� � ��"�����#�����������������"���
������� � ��"�����#������������������������ ������������������ ��������������� ���������������� ��"�����#�
������� � ��������������������� �� ������ ��������������������������������� ����������
� ��������������������� � ����������������������������#����������*�2&3�2&0�4 .2 ������� ������������������� � �������� ���"��������������
�� ����������#������������#����������#����������������
!� ������������������������������� ������������������������������������������� �������������#��������������������������
���� ���������# ���� 5 �� ������ ������� ��� ��������5 � ��� ���� �������������
2�����#��������������� �������� ��+0)��������
���
����
���
����
����
����
���
���
���
����
���
����
��
�������������

To our European customersTait Electronics Limited is an environmentally responsible company which supports waste minimization and material recovery. The European Union’s Waste Electrical and Electronic Equipment Directive requires that this product be disposed of separately from the general waste stream when its service life is over. Please be environmentally responsible and dispose through the original supplier, your local municipal waste “separate collection” service, or contact Tait Electronics Limited.
Important Charging Information� Turn your radio off before charging.
� New batteries must be fully charged before first use.
� Replace or recharge your battery as soon as the radio indicates the battery is low.
Tait Electronics Ltd has made every effort to ensure the accuracy of the information in this manual. However, Tait Electronics Ltd reserves the right to update the radio and/or this manual without notice.
© Copyright Tait Electronics Limited August 2005. All rights reserved.
1

Menu Map
Note: Some menu options may not be available on your radio, depending on how it has been programmed.
QueueSelect ChannelSelect BankSend Selcall
Dial SelcallSelect Status
Send DTMFAlpha SymbolsSend SDM [Short Data Message]User Settings
Low Pwr [Low Power Transmit]Handset
KeylockDTMFEconomySquelchMonitorSq Ovrd [Squelch Override]
Alert Settings
LevelTones
Keytone
Display Settings
RSSI [Received Signal Strength Indicator]Night
Adjust Contrast
Advanced Settings
Program SignalProgram FS-Group [Flexiscan]
HW Ver [Hardware Version]FW Ver [Firmware Version]
Main DB
Version Info
Cal DB [Calibration Database]
Program Group
Main Menu
2

Co
nte
nts
Contents
Menu Map ....................................................................... 2
Before Using Your Radio ........................................... 7About Your Radio .............................................................. 8For Your Safety .................................................................. 9Preparing Your Radio for First Use ........................................................................... 10
Installing and Removing the Battery Pack .................. 10Installing a Belt Clip .................................................. 10Removing a Belt Clip ................................................. 11
Getting Started ......................................................... 13Using the Radio Controls ................................................. 14
Turning the Radio On and Off ................................... 14Adjusting the Volume ............................................... 14Entering Your Personal Identification Number (PIN) ... 15Using the 16-way Channel/Bank Selector .................. 15Using the Press-To-Talk Key (PTT) .............................. 15Using the Function Keys ............................................ 15Using the Keypad ..................................................... 16
Understanding the Radio Indicators .................................. 18LED Indicators ........................................................... 18Audible Tones ........................................................... 19
Understanding Display Messages ..................................... 20Active Modes ............................................................ 20Current Operation .................................................... 20Display Icons ............................................................. 20
Using the Menu ............................................................... 22Entering Menu Mode ................................................ 23Selecting and Exiting Menu Options .......................... 23Scrolling through the Menu ...................................... 23Changing Settings .................................................... 24Exiting Menu Mode .................................................. 24
Making and Receiving Calls ..................................... 25Accessing Channels and Channel Banking ....................... 26
About Channel Banking ............................................ 26Selecting Channels and Channel Banks ..................... 26
Making a Call .................................................................. 29Transmitting after Timing Out ................................... 29
Receiving a Call ................................................................ 30Scanning for Channel Activity .......................................... 31
Scanning for a Busy Channel .................................... 31Scanning Priority Channels ........................................ 31Scanning for the Strongest Signal (Voting) ................ 32Background Scanning (Flexiscan) ............................... 32
3

Co
nte
nts
Deleting a Channel from a Scan Group ..................... 32(Nuisance Delete)
Improving Your Radio’s Reception (Squelch) ..................... 33Selecting a Factory Setting (City or Country) ............. 33Hearing All Activity on a Channel (Squelch Override) . 34
Checking That a Channel Is Clear (Monitor) ..................... 35Using the Menu ........................................................ 35Using Other Ways to Activate/Deactivate Monitor ..... 36
Making and Receiving Different Types of Calls ..... 37Making an Individual or Group Call (Selcall) ..................... 38
Making a Preset Call ................................................. 38Dialling ..................................................................... 38Receiving an Auto Acknowledge Message ................ 39
Resending Calls Automatically .......................................... 40Deferred Calling ....................................................... 40No Acknowledgement Retries ................................... 40
Receiving an Individual or Group Call ............................... 41Responding to Missed Calls .............................................. 42
Using Immediate Callback ......................................... 42Using Call Queuing ................................................... 42Understanding How Calls Are Queued ...................... 43
Sending a Status Message ................................................ 45About Status Messages ............................................. 45Assigning a Status Message ...................................... 45
Calling a Telephone or a Remote Device (DTMF) .............. 47Making a Preset Call ................................................. 47Dialling ..................................................................... 47
Making an Emergency Call ............................................... 49About Emergency calls .............................................. 49Making an Emergency Call ....................................... 49Activating the Automated Emergency Call Feature .... 50(Lone Worker)
Making Calls from a Predefined List (Alphanumeric Labels) 51Using an Alphanumeric Sequence ............................. 51Searching for a label ................................................. 52
Sending and Receiving Short Data Messages ........ 55Reading Short Data Messages .......................................... 56
Exiting SDM Mode .................................................... 56Sending Short Data Messages ......................................... 57
Entering a Message .................................................. 58Sending a Short Data Message Using a Selcall Channel .... 60
Changing Your Radio’s Settings ............................. 61Changing Display Settings ................................................ 62
Activating Backlighting (Night Operation) ................. 62Adjusting Contrast .................................................... 62
Changing Operation Settings ........................................... 65
4

Co
nte
nts
Extending Battery Life ............................................... 65(Economy and Low Power Transmit Modes) Choosing a Radio Microphone Setting ...................... 66Locking the Keypad .................................................. 67Choosing a DTMF Dialling Mode ............................... 68Bypassing Repeater Stations ...................................... 69(Communicating Directly with Other Radios)
Changing Audible Tone Settings ...................................... 70About Audible Tones ................................................ 70Turning Key Tones On and Off .................................. 70Turning Audible Tones On and Off ........................... 71Adjusting the Level of Audible Tones ........................ 71
Changing Scanning and Voting Group Settings ............... 72Configuring Scan Groups .......................................... 72
Changing Flexiscan Scan Group Settings .......................... 75Configuring Flexiscan Scan Groups ........................... 75
Changing Subaudible Signalling Settings ......................... 77
Maintaining Your Radio .......................................... 79Battery Charging and Conditioning .................................. 80
Using the Charger .................................................... 80Charging the Battery ................................................ 81Short Conditioning the Battery ................................. 82Long Conditioning the Battery .................................. 83Troubleshooting ....................................................... 83Warning: Disposing of Used NiCd Batteries ............... 84
Preserving Battery Life ...................................................... 85Caring for Your Radio ...................................................... 86
General Care ............................................................ 86Troubleshooting ....................................................... 86
Options and Accessories .................................................. 87Removing the Accessory Cover ................................. 87D-Clip and Accessory Connectors ............................. 88
Specifications ................................................................... 89
Function Key Options ................................................... 91
5

Co
nte
nts
6

Bef
ore
Usi
ng
Yo
ur
Rad
io
This section covers:
� About Your Radio
� For Your Safety
� Preparing Your Radio for First Use
Before Using Your Radio
Before Using Your Radio 7

Bef
ore
Usi
ng
Yo
ur
Rad
io
About Your RadioYour radio is programmed to suit your communication needs. If you are unsure which features described in this manual are available on your radio, consult your system manager or the person who programmed your radio.
The custom features programmed for your radio can be listed on the ‘Custom Settings’ page on the inside back cover of this manual.
When you receive your radio, make sure all items you ordered are included.
Typically, you should receive the following:
� Tait Orca portable radio unit.
� Battery pack.
� Antenna.
� User’s Manual (this document).
� Compliance Information (separate document).
Your Orca may also be supplied with accessory compo-nents (see ‘Options and Accessories’ on page 87).
If any parts are damaged or missing, report this to your local Tait dealer immediately.
8 Before Using Your Radio

Bef
ore
Usi
ng
Yo
ur
Rad
io
For Your Safety Please observe the following warnings and cautions to ensure safe operation of your radio:
� When transmitting, do not hold the radio with its antenna close to or touching any part of your body, especially your face and eyes.
� Turn the radio off at petrol filling stations.
� Turn the radio off in the vicinity of explosive devices, such as at a quarry that uses blasting techniques.
� Do not use a handheld microphone or radio while driving, or operating machinery.
� Only use Tait Orca battery chargers to charge the radio’s battery.
� Avoid using unnecessarily high volume levels if using the radio with an earphone or headset.
� Do not transmit within the frequency band 406 to 406.1 MHz. This band is reserved for use by distress beacons.
� Do not immerse your Tait Orca radio in water.
Before Using Your Radio 9

Bef
ore
Usi
ng
Yo
ur
Rad
io
Preparing Your Radio for First UseBefore using your radio:
1 Connect the antenna to the socket at the top of the radio.
2 Fully charge the battery (see ‘Using the Charger’ on page 80).
Caution: It is highly recommended that the battery also be put through a long condi-tioning cycle after the initial charge and before use.
3 Install the battery pack (see ‘Installing and Removing the Battery Pack’ on page 10).
4 Install the belt clip if included with your radio (see ‘Installing a Belt Clip’ on page 10).
Installing and Removing the Battery PackTo fit the battery pack to the radio:
1 Insert the bottom edge of the battery pack into the two slots at the back of the radio.
2 Push the battery pack towards the radio. It should snap into place.
To remove the battery pack:
1 Push the battery catch down
2 From the sides, pull the battery away from the radio.
Installing a Belt ClipMost Tait Orca batteries are designed to be fitted with belt clips.
10 Before Using Your Radio

Bef
ore
Usi
ng
Yo
ur
Rad
io
Two types of belt clip are available:
� 38 mm belt clip.
� 55 mm spring-loaded belt clip.
For both types of belt clip, slide the belt clip into the two slots on the top of the battery. Push down until the clip snaps into place.
Removing a Belt ClipBoth belt clips have been designed so as to avoid accidental removal. However, they can be replaced if required.
To remove the 38 mm belt clip:
1 Insert the end of a flat-blade screwdriver under the edge of the release tab (right) without forcing it.
2 Gently lift the release tab up, then slide the belt clip away from the battery.
To remove the 55 mm belt clip:
1 Lie the battery on a flat surface.
2 Insert the end of a flat-blade screwdriver under the release tab (shown below) and lift.
3 Slide the belt clip away from the battery.
Battery ClipBelt Clip
Battery
SlotSlot
ReleaseTab
Before Using Your Radio 11

Bef
ore
Usi
ng
Yo
ur
Rad
io
Note: Should the small battery clip come loose while removing either belt clip, it can easily be refitted by sliding it into the slot at the top of the battery until it snaps into place.
Belt Clip
Release Tab
Battery Clip
Battery
12 Before Using Your Radio

Get
tin
g S
tart
ed
This section covers:
� Using the Radio Controls
� Understanding the Radio Indicators
� Understanding Display Messages
� Using the Menu
Getting Started
Getting Started 13

Get
tin
g S
tart
ed
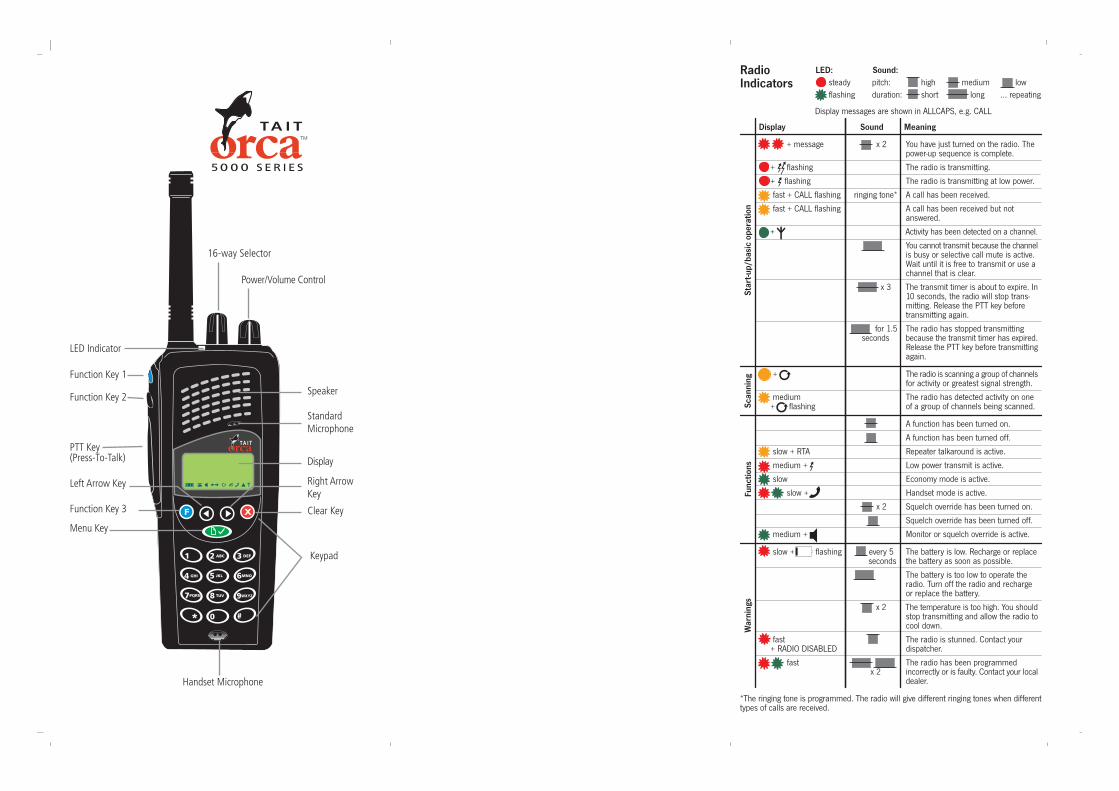
Using the Radio ControlsYour radio controls include the power/volume control, 16-way selector, function keys, keypad, menu, and various radio indicators.
Some keys have more than one function assigned, which can be accessed by a short or long keypress:
� A short keypress is defined as less than 1 second.
� A long keypress is defined as more than 1 second.
You may need to experiment to become familiar with the duration of short and long keypresses.
Turning the Radio On and OffTo turn the radio on, rotate the power/volume control clockwise. To turn the radio off, rotate the control counter-clockwise.
Once the power-up sequence is complete, the LED flashes red at fast flash rate twice, and the radio gives two short, medium-pitched beeps.
Adjusting the VolumeOnce the radio is on, rotate the power/volume control clockwise to increase volume. To decrease volume, rotate the control counter-clockwise. Turning the power/volume control also adjusts the level of the audible tones (see ‘Audible Tones’ on page 19).
The volume may also be able to be adjusted using the function keys when in handset mode (see ‘Adjusting Handset Volume’ on page 67).
Note: To preserve battery life, it is recom-mended that you turn off the radio when it is not in use.
14 Getting Started

Get
tin
g S
tart
ed
Entering Your Personal Identification Number (PIN)If your radio requires a personal identification number (PIN) you will get the message ENTER CODE, when you turn on your radio.
1 Enter your assigned PIN, which will be up to five digits long.
2 Press the menu key ( ).
If you do not know your PIN, consult your system manager or the person who programmed your radio.
Using the 16-way Channel/Bank SelectorThe 16-way selector accesses channels, scan groups or channel banks, depending on how the radio has been programmed. See ‘Selecting Channels and Channel Banks’ on page 26 for more information.
Note: The 16-way selector may have been disabled when the radio was programmed. In this case, channels can only be accessed using the menu and keypad.
Using the Press-To-Talk Key (PTT)The PTT (press-to-talk) key is located on the side panel. Press this key to transmit each time you talk. To receive, release the PTT key.
Using the Function Keys The function keys provide quick access to selected functions. The functions will have been assigned to a function key when your radio was programmed (see ‘Function Key Options’ on page 91 for a list of features that can be assigned to the function keys).
Each function key can have a function assigned to a short and long press.
Getting Started 15

Get
tin
g S
tart
ed
The function keys are:
� Function keys 1 and 2, located on the side panel.
� Function key 3, located on the front panel, under-neath the display (far left).
� External keys 1 and 2, located on the external microphone.
Use the panel provided in the back of this manual to record the function that has been assigned to each keypress on your radio’s function keys.
The F3 key may alternatively be programmed to provide quick access to up to three user setting menu options. In this case, the F3 key will not have a short and long press option. See ‘Changing Operation Settings (User Settings Menu)’ on page 65.
To access menu options using the F3 key:
� Press the F3 key. Pressing once accesses the last selected option, while each subsequent press accesses the next option, moving in a continuous loop.
Using the KeypadKeys 0 to 9 and A to Z are used for dialling numbers and entering data. Additional characters can be accessed using the 0 key. Other key functions are outlined in the following table.
Symbol Key Name Function
F F3 (function key)
Short and long press: Accesses programmed functions.Single press: Provides a ‘shortcut’ to up to three user setting menu options (see ‘Using the Function Keys’ on page 15 above).
Left arrow Short: Scroll left.Long: Scroll left continuously.
Right arrow
Short: Scroll right.Long: Scroll right continuously.
16 Getting Started

Get
tin
g S
tart
ed
Clear Short: Cancel or back (menu mode); delete single character; cancel call.Long: Delete (menu mode); exit without saving (menu mode); cancel call.
Enter Short: Select a function, or toggle a function on/off (menu mode); dial or send a message.Long: Enter/exit mode or menu.
* Star Group and DTMF dialling.
# Hash Group and DTMF dialling.
Symbol Key Name Function
Getting Started 17

Get
tin
g S
tart
ed
Understanding the Radio IndicatorsThe radio’s LED indicator and audible tones provide you with information on the radio’s status.
The meaning of the radio indicators is summarised on the ‘Radio Indicators’ page on the inside back cover of this manual.
LED IndicatorsThe radio’s LED is the main indicator for displaying the state the radio is in.
In this manual, one flash every 2 seconds is referred to as ‘slow flash rate’, one flash every second as ‘medium flash rate’, and four flashes every second as ‘fast flash rate’.
Colour Flash Rate Meaning
Red Steady Transmitting.
Red Slow Battery low. Radio will also emit low-pitched beeps. Recharge or replace as soon as possible.
Red Medium Low power transmit mode active.
Red Fast Radio is stunned. Radio will also emit high-pitched beeps. Contact your despatcher.
Red Two fast flashes The power-up sequence is complete. Radio will also emit two medium-pitched beeps.
Green Steady Channel busy.
Green Slow Economy mode active.
Green Medium Monitor or squelch override active.
18 Getting Started

Get
tin
g S
tart
ed
Audible Tones Your radio uses a variety of beeps and tones to supplement the information provided by the LED.
The most common audible tones are summarised on the ‘Radio Indicators’ page on the inside back cover of this manual.
Your radio may also have been programmed so that whenever you press a key, the radio beeps to indicate whether or not the action is permitted:
� Permitted: Short, medium-pitched beep.
� Not permitted: Long, low-pitched beep.
Note: Audible tones may have been disabled when your radio was programmed, and a function key assigned to turn audible tones on and off.
Amber Steady Radio is scanning or voting a group of channels for activity or greatest signal strength.
Amber Slow Repeater talkaround active.
Amber Medium Activity detected on one of a group of channels being scanned.
Amber Fast A Selcall call has been received.
Red/Green
Slow Handset mode active.
Red/Green
Fast Radio programmed incor-rectly or faulty. Contact your Tait dealer.
Colour Flash Rate Meaning
Getting Started 19

Get
tin
g S
tart
ed
Understanding Display Messages
Note: Throughout this user’s manual, messages that appear in the display are shown in BOLD ALLCAPS.
The radio display provides you with information on a number of aspects of the radio’s operation.
A typical display is shown below:
Active ModesYour radio has a number of operating modes, such as CHAN (channel), MENU (menu), and CONT (contrast).
The active mode appears in the upper left-hand corner of the display.
The lower left-hand corner gives additional information on the current status of the radio. In this example, RTA indicates the radio is in repeater talkaround mode.
Current OperationThe panel on the right-hand side shows data for the current radio operation. In this example, CHAN9 indicates what channel the radio is currently operating on. When you enter data for a specific function, such as dialling a call, the information appears in this panel.
Display Icons The bottom line of the display shows a series of icons that give additional information on the state of the radio, including information on current settings, the battery charge level and operational status.
Current
Active modesoperationdata Icon display
bar
20 Getting Started

Get
tin
g S
tart
ed
The meaning of these icons is outlined in the following table.
Icon Meaning
Flashing: Recharge the battery.
Steady: The battery is charged.
Steady: The radio is in DTMF dialling mode.
Steady: Monitor or squelch override is active.
Steady: Scrolling is permitted.
Steady: The radio is scanning a group of channels for activity.Flashing: Activity has been found on a group of channels being scanned.
Flashing: The radio is transmitting at normal power.
Steady: Low power transmit mode is active.Flashing: The radio is transmitting at low power.
Steady: Handset mode is active.
Steady: An auxiliary device is operating.Flashing: Lone worker mode is active.
Steady: The selected channel is busy.
Getting Started 21

Get
tin
g S
tart
ed
Using the MenuThe radio menu allows you to:
� Customise your radio’s settings.
� Access specific features and functions of the radio.
The table below summarises the options that can be accessed through the main menu. The available options vary depending on how your radio was programmed.
Display Operation
QUEUE (Queued calls) View and return missed calls. Up to 10 calls can be stored (queued), depending on how the radio was programmed. See ‘Using Call Queuing’ on page 42.
SELECT CHANNEL Change channels using the keypad. See ‘Selecting Channels and Channel Banks’ on page 26.
SELECT BANK Change channel banks using the keypad. See ‘Selecting Channels and Channel Banks’ on page 26 .
SEND SELCALL Make a call to a selected individual or group. See ‘Making an Individual or Group Call (Selcall)’ on page 38.
SEND DTMF Make a call using the telephone network. See ‘Calling a Telephone or a Remote Device (DTMF)’ on page 47.
ALPHA SYMBOLS Perform single or multiple tasks with a single keypress. See ‘Using an Alphanu-meric Sequence’ on page 51.
SEND SDM Enter and send a short data message. See ‘Sending and Receiving Short Data Messages (SDMs)’ on page 55.
USER SETTINGS Personalise settings for a range of features. See ‘Changing Operation Settings (User Settings Menu)’ on page 65.
ALERT SETTINGS Disable or adjust the level of warning beeps and tones. See ‘Changing Audible Tone Settings (Alert Settings Menu)’ on page 70.
22 Getting Started

Get
tin
g S
tart
ed
Entering Menu ModeTo enter menu mode:� Long press the menu key ( ). The radio displays MENU in the top right of screen, together with the last selected menu or submenu item.
Selecting and Exiting Menu OptionsTo select a menu or submenu option:
� Short press the menu key ( ). The radio displays the menu item in the top right of screen. Sometimes, selecting a menu option will take you into a new operating mode: this will be displayed in the top left of screen.
To exit a menu or submenu option:
� Press the clear key ( ).
Scrolling through the MenuTo scroll through the available menu options:
� Press the left and right arrow keys ( ) to scroll through the menu options one at a time.
OR
� Press and hold the left and right arrow keys ( ) to scroll through the menu options quickly.
DISPLAY SETTINGS Turn night operation on/off, adjust the contrast display or turn the received signal strength indicator on/off. See ‘Changing Display Settings (Display Menu)’ on page 62.
ADVANCED SETTINGS
Modify the make-up of scanning, voting and Flexiscan scan groups; change subaudible channel settings or check radio version information. See page 72, 75 and 77.
Display Operation
Getting Started 23

Get
tin
g S
tart
ed
Changing SettingsTo toggle between available settings (such as high and low, or on and off):
� Short press the menu key.
Exiting Menu ModeTo exit menu mode:
� Long press the menu key ( ).
24 Getting Started

Mak
ing
an
d R
ecei
vin
g C
alls
This section covers:
� Accessing Channels and Channel Banking
� Making a Call
� Receiving a Call
� Scanning for Channel Activity
� Improving Your Radio’s Reception (Squelch)
� Checking That a Channel Is Clear (Monitor)
Making and Receiving Calls
Making and Receiving Calls 25

Mak
ing
an
d R
ecei
vin
g C
alls
Accessing Channels and Channel BankingIn order to make and receive calls you first need to select a channel. The procedure for selecting a channel varies depending on how your radio has been programmed.
About Channel BankingChannel banking is an optional feature that allows easy access to large numbers of channels by grouping them into ‘banks’. This feature will be of benefit if you regularly access a large number of channels, or frequently change repeaters.
Selecting Channels and Channel BanksChannels and channel banks can be accessed in different ways, depending on how your radio has been programmed.
Note: You cannot change channels while transmitting.
Using the 16-way selectorNote: The 16-way selector does not operate in menu mode.
The 16-way selector may be programmed to either:
� Select channels.
OR
� Select channel banks.
To select a channel or channel bank using the 16-way selector:
� Turn the 16-way selector dial clockwise or counter-clockwise. Each position on the 16-way selector denotes a channel/scan group, or channel bank, depending on the radio’s configuration.
26 Making and Receiving Calls

Mak
ing
an
d R
ecei
vin
g C
alls
Note: On some radios the 16-way selector is disabled. In this case channels can only be selected using the menu.
Using the MenuTo select a channel using the menu:
Note: Skip to step 4 if the radio is already in channel mode.
1 Long press the menu key to enter menu mode (if the radio displays a submenu option, press the clear key to enter the main menu).
2 Scroll through the main menu options using the arrow keys until SELECT CHANNEL is displayed.
3 Short press the menu key to enter CHAN mode.
4 Scroll through the channels to select the one you want.
OR
Key in the desired channel number using the key-pad, then short press the menu key. A low warning beep will sound if the keyed number is not a valid channel.
5 Long press the menu key to exit CHAN if channel mode is not the default mode.
Note: If channel banking is programmed, only channels in the currently selected bank will be available.
To select a channel bank using the menu:
1 Long press the menu key to enter menu mode.
2 Scroll through the main menu options to find SELECT BANK using the arrow keys.
3 Short press the menu key to enter BANK mode.
Making and Receiving Calls 27

Mak
ing
an
d R
ecei
vin
g C
alls
4 Scroll through the available channel banks using the arrow keys, then short press the menu key to confirm a selection.
OR
Key in the desired channel bank number using the keypad, then short press the menu key to confirm a selection. A low warning beep will sound if the keyed number is not a valid channel bank.
5 Long press the menu key to exit menu mode. You will not be able to exit the bank mode until a valid channel bank has been selected.
Understanding Channel Numbering and Display The number of channels in each bank differs according to the radio’s configuration:
When a new channel or channel bank is selected, the radio’s channel will change to the channel number specified within the newly selected bank, and the channel name or number will appear in the display.
Note: The channel bank number does not appear in the display – only the selected channel.
Configuration Number of Channels Per Bank
16-way selector selects channels.
Up to 16 channels in each bank.
16-way selector selects channel banks.
Up to 32 channels in each bank.
28 Making and Receiving Calls

Mak
ing
an
d R
ecei
vin
g C
alls
Making a CallTo make a call:
1 Select the desired channel as described in ‘Selecting Channels and Channel Banks’ on page 26.
2 Hold down the PTT key, once the channel is free, and speak clearly into the radio.
3 Identify yourself and the party you are calling using the call signs you have been assigned.
4 Release the PTT key when you have finished talking.
Note: If you try to transmit when the radio is busy, a low-pitched warning beep will sound. You may not be able to hear the activity, but the LED glows green. You can activate the monitor function to listen to channel activity. See ‘Checking That a Channel Is Clear (Monitor)’ on page 35.
Transmitting after Timing OutYour radio is programmed with a transmit timer that limits the amount of time you can transmit continu-ously.
If the radio gives three medium-pitched beeps, the transmit timer is about to expire. Ten seconds later, the radio automatically stops transmitting.
To transmit again, release, then press and hold the PTT key.
Note: The radio may also have been programmed to prevent transmission for a period after the transmit timer has expired.
Making and Receiving Calls 29
Mak
ing
an
d R
ecei
vin
g C
alls
Receiving a CallYour radio remains quiet until there is valid activity on the channel your radio is currently on.
To receive a call:
� Select the desired channel as described in ‘Selecting Channels and Channel Banks’ on page 26.
To respond to a call:
� Press the PTT key and talk.
30 Making and Receiving Calls

Mak
ing
an
d R
ecei
vin
g C
alls
Scanning for Channel ActivityA series of channels can be grouped together so that the radio can scan through them looking for activity automatically. Scan groups are selected in the same way as channels (see ‘Selecting Channels and Channel Banks’ on page 26).
Scan group channels can be set up to scan in three different ways.
They can scan for:
� Busy channels.
� Priority channels.
� The strongest signal (vote).
When the radio is scanning for activity the LED glows amber and the group name and scanning icon ( ) will be displayed in the icon bar as shown below:
Scanning for a Busy ChannelIn this setup, the radio looks for any activity on the channels within the scan group. When valid activity is detected the scanning icon ( ) flashes, and the radio will stop on that channel. Scanning resumes when the channel is no longer busy or the signalling is no longer valid.
Scanning Priority ChannelsOne or two priority channels may also have been programmed. These channels are scanned more often than other channels, and are scanned periodically when a non-priority or lower priority channel is busy.
Scanning icon
Making and Receiving Calls 31

Mak
ing
an
d R
ecei
vin
g C
alls
Scanning for the Strongest Signal (Voting)With this type of scanning the scan group’s member channels carry the same traffic, and the radio searches for the channel with the strongest signal.
Background Scanning (Flexiscan)The Flexiscan scanning feature allows you to commu-nicate on a selected channel, while a group of channels is scanned for valid activity in the background.
A Flexiscan scan group can contain up to 15 member channels.
To activate Flexiscan:
� Press the assigned function key.
Your radio may be programmed so that Flexiscan is turned off when the PTT key is released after making a call when Flexiscan is active.
Deleting a Channel from a Scan Group (Nuisance Delete)If a channel is busy for a long time and you do not wish to hear the conversation, you can temporarily delete it from the scan group if one of the function key settings is programmed for nuisance delete.
To temporarily delete a channel from a scan group:
� Press the assigned function key. When the scan group is next selected, the deleted channel is again part of the scan group.
32 Making and Receiving Calls

Mak
ing
an
d R
ecei
vin
g C
alls
Improving Your Radio’s Reception (Squelch)Your radio will normally be programmed to minimise unwanted noise or interference from other channels (known as ‘squelch’). Without squelch, the radio would ‘chatter’ on and off in low signal strength areas.
However, it may sometimes to be necessary to adjust the squelch settings when you are having difficulty hearing a call, or when entering a low signal strength area.
Your radio provides two means to adjust the squelch (noise and interference) levels: squelch override, and squelch ‘city’ and ‘country’ preset settings.
Selecting a Factory Setting (City or Country)There are two preset squelch settings: city and country.
The city setting is designed for high signal strength areas and minimises noise and ‘chatter’ on a channel.
The country setting is designed for low signal strength areas, and allows the radio to pick up more channel activity.
To choose a squelch setting:
1 Long press the menu key to enter menu mode (if the radio displays a submenu option, press the clear key to enter the main menu).
2 Scroll through the main menu options using the arrow keys until USER SETTINGS is displayed.
3 Scroll through the user setting menu options until SQUELCH is displayed (the radio will display CITY or COUNTRY as the current setting).
4 Short press the menu key to select CITY or COUNTRY.
5 Long press the menu key to exit menu mode.
Making and Receiving Calls 33
Mak
ing
an
d R
ecei
vin
g C
alls
Hearing All Activity on a Channel (Squelch Override)Squelch override allows you to hear all activity on a channel no matter how faint or noisy. This setting is useful when a caller is very hard to hear.
To turn squelch override on and off:
� Press the assigned function key.
OR
1 Long press the menu key to enter menu mode (if the radio displays a submenu option, press the clear key to enter the main menu).
2 Scroll through the main menu options using the arrow keys until USER SETTINGS is displayed.
3 Scroll through the user setting menu options until SQ OVRD is displayed (the radio will display OFF or ON as the current setting).
4 Short press the menu key to turn squelch override on and off.
5 Long press the menu key menu to exit menu mode.
Note: Squelch override cannot be activated when a scan group is selected, and is automat-ically turned off when you change to a scan group channel.
34 Making and Receiving Calls

Mak
ing
an
d R
ecei
vin
g C
alls
Checking That a Channel Is Clear (Monitor)Your radio is capable of segregating individuals or groups of users by means of audible or subaudible tones (known as signalling). This means that in normal operation you may not be able to hear all calls being transmitted on a channel.
However, your radio may be programmed with the monitor function which, when activated, allows you to hear all activity on a channel. This is useful if you want to check whether a channel is clear before making a call.
Note: The monitor function may not have been programmed to override all signalling.
Using the Menu To activate or deactivate the monitor function:
1 Long press the menu key to enter menu mode (if the radio displays a submenu option, press the clear key to enter the main menu).
2 Scroll through the main menu options to find USER SETTINGS, and short press the menu key.
3 Scroll to find MONITOR (the radio will display OFF or ON as the current setting).
4 Short press the menu key to turn monitor on and off.
5 Long press the menu key to exit menu mode.
When the Monitor is on, the Monitor icon ( ) appears in the display icon bar.
Making and Receiving Calls 35

Mak
ing
an
d R
ecei
vin
g C
alls
Using Other Ways to Activate/Deactivate MonitorYour radio may be programmed to activate monitor mode when you:
� Turn on the radio.
� Send specific types of calls.
� Press a function key (if assigned).
The monitor may be deactivated by:
� Your despatcher.
� Receiving specific types of calls.
� Pressing a function key (if assigned).
� Automatically, after a preset deactivation period.
36 Making and Receiving Calls

Mak
ing
an
d R
ecei
vin
g D
iffe
ren
t Ty
pes
of
Cal
ls
This section covers:
� Making an Individual or Group Call (Selcall)
� Resending Calls Automatically
� Receiving an Individual or Group Call
� Responding to Missed Calls
� Sending a Status Message
� Calling a Telephone or a Remote Device (DTMF)
� Making an Emergency Call
� Making Calls from a Predefined List (Alphanumeric Labels)
Making and Receiving Different Types of Calls
Making and Receiving Different Types of Calls 37

Mak
ing
an
d R
ecei
vin
g D
iffe
ren
t Ty
pes
of
Cal
ls
Making an Individual or Group Call (Selcall)You can use your radio to make calls to an individual or a specific group using Selcall (selective calling).
There are two ways to make an individual or group call:
� Using a preset call (if programmed).
� Dialling.
Making a Preset CallTwo preset individual or group calls can be assigned to each channel that has Selcall. If programmed, a preset call will be assigned to a function key.
To make a preset call:
1 Change to the desired channel.
2 Press the assigned function key.
One-Touch Preset CallsA single one-touch call may also be assigned to one of the function keys.
To make a one-touch preset call:
� Press the assigned function key.
DiallingTo call a group or individual using dialling:
1 Select a channel that has Selcall programmed.
2 Long press the menu key to enter menu mode (if the radio displays a submenu option, short press the clear key to enter the main menu).
3 Scroll through the main menu options using the arrow keys until SEND SELCALL is displayed.
4 Short press the menu key to enter DIAL SELCALL, and again to enter CALL mode. The last number dialled is displayed.
38 Making and Receiving Different Types of Calls

Mak
ing
an
d R
ecei
vin
g D
iffe
ren
t Ty
pes
of
Cal
ls
5 Short press the menu key to call the last number dialled.
OR
Dial the desired number using the keypad (press the clear key to delete a character; press and hold to delete a series of characters), then short press the menu key to send.
6 Long press the menu key to exit menu mode.
Receiving an Auto Acknowledge MessageWhen you call another radio, it may automatically generate a ringing tone sequence or beep to let you know that the radio you have called is on and able to receive. The tone sequence will vary depending on how your radio has been programmed.
The auto acknowledge message may also contain a status message that will appear in your radio’s display (see ‘About Status Messages’ on page 45).
Making and Receiving Different Types of Calls 39

Mak
ing
an
d R
ecei
vin
g D
iffe
ren
t Ty
pes
of
Cal
ls
Resending Calls AutomaticallyYour radio may have been programmed to resend individual and group calls when they are not answered.
Your radio has two automatic callback features:
� Deferred calling.
� No acknowledgement retries.
Deferred CallingWhen you attempt to make a call on a channel that is busy, the radio can store and send the call once the channel is free. The radio will give a low-pitched beep if the channel is busy, and will then give two long, medium-pitched beeps at regular intervals until the channel is free, and the call can be resent.
To cancel a deferred call:
� Press any key.
No Acknowledgement RetriesWhen you send a call and there is no reply, NO ACKNOWLEDGE will be displayed, and the call will be resent up to 15 times.
To cancel a call that is being resent:
� Press any key.
40 Making and Receiving Different Types of Calls

Mak
ing
an
d R
ecei
vin
g D
iffe
ren
t Ty
pes
of
Cal
ls
Receiving an Individual or Group CallWhen a call is received that contains your radio’s identity, CALL will flash in the display. The radio also gives a ringing tone and the LED indicator flashes amber at fast flash rate. Different ringing tones will sound when different types of calls are received.
To accept a call:
� Press the PTT key and begin speaking. If the call is a group call, there is usually no need to respond.
The caller’s identity and status may also be displayed (top right-hand corner):
The caller’s identity can be a name or a number, depending on how your radio was programmed.
The caller’s status is displayed underneath the caller’s identity. It can also be a name or number.
Caller identity Caller status
Making and Receiving Different Types of Calls 41

Mak
ing
an
d R
ecei
vin
g D
iffe
ren
t Ty
pes
of
Cal
ls
Responding to Missed CallsYour radio may be programmed with two features to help you manage missed individual and group calls:
� Immediate callback.
� Call queuing.
Using Immediate CallbackWhen you miss a call the LED will flash amber at fast flash rate, the display will flash CALL, and the caller’s identity and status may be displayed.
The immediate callback feature can only be used when the caller’s identity is displayed, and is useful when queue call is disabled (see “Using Call Queuing” below).
To call back the missed caller:
� Short press the menu key.
Using Call QueuingCall queuing allows you to store up to 10 missed incoming calls so that you can return the calls later.
Accessing a Missed CallTo access a missed call:
1 Long press the menu key to enter menu mode.
2 Scroll through the list of options using the arrow keys until the QUEUE option is displayed, then press the menu key.
Note: the QUEUE option will not be available if there are no missed calls. If a call has been missed, the radio will automatically display the call queue option after a period of inactivity.
42 Making and Receiving Different Types of Calls

Mak
ing
an
d R
ecei
vin
g D
iffe
ren
t Ty
pes
of
Cal
ls
The first call in the queue will be displayed:
The meaning of each element in the display message (above) is as follows:
� DAVEW: The caller’s identity.
� P: A priority call is queued.
� 01: The current queued call.
� 07: The number of calls in the queue.
Returning a Missed CallTo return a call:
� Short press the menu key. The radio will automati-cally switch to the channel the call was received on and send the call.
Deleting a Missed CallTo delete a call:
� Press the clear key. If the deleted call was the only call in the queue, the radio will automatically leave the call queue menu.
Exiting Queued CallsTo exit:
� Long press the menu key.
Understanding How Calls Are QueuedCalls are queued in the following ways:
� The call queue list starts with the most recent call and moves backwards, but priority calls will be placed in the queue ahead of individual calls.
Caller identity Call details
Making and Receiving Different Types of Calls 43

Mak
ing
an
d R
ecei
vin
g D
iffe
ren
t Ty
pes
of
Cal
ls
� Calls will be queued until the queue is full. However, if a priority call is received when the queue is full, the most recent individual call will be discarded to allow the priority call to be saved.
44 Making and Receiving Different Types of Calls

Mak
ing
an
d R
ecei
vin
g D
iffe
ren
t Ty
pes
of
Cal
ls
Sending a Status MessageYour radio may be programmed with the capability to attach a status message when you send an individual or group call.
About Status MessagesA status message contains information about your current activity or location, which is sent to the called radio. Status messages are defined when your radio is programmed. Each message is assigned a number from 0 to 99, and an 8-character name (for example, AT LUNCH or AT HOME).
Your radio may be programmed to automatically send a status message when you send a selcall, or you may be able to assign a status message.
Assigning a Status MessageTo assign a status message to a call:
1 Long press the menu key to enter menu mode (if the radio displays a submenu option, press the clear key to enter the main menu).
2 Scroll through the main menu options using the arrow keys until SEND SELCALL is displayed.
3 Short press the menu key to enter the Selcall submenu and scroll using the arrow keys until SELECT STATUS is displayed.
4 Select the desired status message from the available list using the arrow keys.
OR
Enter a number from 0 to 99 using the keypad.
5 Long press the menu key to confirm your choice and exit.
Making and Receiving Different Types of Calls 45

Mak
ing
an
d R
ecei
vin
g D
iffe
ren
t Ty
pes
of
Cal
ls
Note: The currently selected status message will also be assigned if the menu mode times out (that is, the radio returns to default mode of operation, often channel mode).
When you next send a selcall, a status message will be attached. To send a selcall, see ‘Making an Individual or Group Call (Selcall)’ on page 38.
46 Making and Receiving Different Types of Calls

Mak
ing
an
d R
ecei
vin
g D
iffe
ren
t Ty
pes
of
Cal
ls
Calling a Telephone or a Remote Device (DTMF)You can call a telephone or send control codes to a remote device using a feature called DTMF (the tone-based system used by the world telephone network).
There are two ways to make a DTMF call:
� Using a preset call.
� Dialling.
Making a Preset CallA preset DTMF call will be assigned to one of the function keys (if programmed).
To make a call:
1 Select the channel the DTMF call is assigned to.
2 Press the assigned function key.
Different preset calls may be available on different channels.
One-Touch Preset CallsA single one-touch call may also be assigned to one of the function keys.
To make a one-touch preset call:
� Press the assigned function key.
DiallingDTMF call strings can use numbers 0 to 9, letters A to D, and the * and # keys.
Entering Tones A to DIf you wish to dial tones A to D, your radio must be programmed so that you can use the PTT key as a ‘shift’ key in conjunction with the numeric keys as follows:
� PTT + = A
Making and Receiving Different Types of Calls 47

Mak
ing
an
d R
ecei
vin
g D
iffe
ren
t Ty
pes
of
Cal
ls
� PTT + = B
� PTT + = C
� PTT + = D
To enter the tone A, for example:
� Press and hold the PTT key, then press the on the keypad.
Entering a Pause To enter a pause:
� Press and hold the PTT key, then press the key. A hyphen (pause) will be entered in the display.
Dialling a NumberTo dial a number:
1 Long press the menu key to enter menu mode (if the radio displays a submenu option, press the clear key to enter the main menu).
2 Scroll through the main menu options using the arrow keys until SEND DTMF is displayed.
3 Short press the menu key to enter DTMF dialling mode. DTMF will appear in the top right-hand corner of the display.
4 Short press the menu key to send the last call dialled (if available, it will appear in the display).
OR
Dial the desired number using the keypad (press the clear key to delete a character; press and hold to delete a series of characters). The radio may dial as you press each number, or you may need to press the menu key to confirm, depending on the radio’s configuration.
5 Long press the menu key to exit menu mode.
48 Making and Receiving Different Types of Calls

Mak
ing
an
d R
ecei
vin
g D
iffe
ren
t Ty
pes
of
Cal
ls
Making an Emergency CallYour radio may be programmed with an emergency call function.
About Emergency callsThere are two different types of emergency call that may be programmed for your radio, both of which are activated using an assigned function key:
� Selective emergency call (Selcall): Sends an emergency call sequence to a group or individual.
� DTMF emergency call: Sends an emergency call sequence to a telephone or remote device.
When an emergency call has been made, the radio enters emergency mode and cycles between receiving and transmitting so that your operator can hear activity near the radio. For your safety, the radio displays no signs that an emergency call has been made.
Making an Emergency CallNote: It is not necessary to change channels to send an emergency call.
Your radio may be configured to use either a single press or double keypress to send an emergency call.
Using a Single KeypressTo make an emergency call with a single keypress:
� Short or long press the assigned function key (depending on the configuration of your radio).
Using a Double KeypressTo avoid accidental use of the emergency function, the emergency call may have been programmed with a Double Keypress Activation option.
The double keypress activation option will have been programmed to be used with a short or long press.
Making and Receiving Different Types of Calls 49

Mak
ing
an
d R
ecei
vin
g D
iffe
ren
t Ty
pes
of
Cal
ls
To make an emergency call using a double short press:
� Short press the assigned function key twice within 3 seconds.
To make an emergency call using a double long press:
� Long press the assigned function key twice within 5 seconds.
Exiting Emergency ModeTo reset the radio to normal operation:
� Turn the radio off, then on again.
Note: Your despatcher or operator can also reset your radio to normal operation remotely.
Activating the Automated Emergency Call Feature (Lone Worker)Your radio has an automated emergency feature called ‘lone worker’. Lone worker enables an emergency call to be sent if you become incapacitated while working alone.
The lone worker feature works by monitoring your activity. If no keypress is detected within a specified period, a warning tone will sound (also for a specified period), after which an emergency call will be made.
To turn the lone worker feature on and off:
� Press the assigned function key.
To stop an emergency call from being sent (once the warning tone has been activated):
� Press any key.
Note: The time between when a key is pressed and the warning tone is activated, and the duration of the warning tone before an emergency call is made, vary depending on how your radio was programmed.
50 Making and Receiving Different Types of Calls

Mak
ing
an
d R
ecei
vin
g D
iffe
ren
t Ty
pes
of
Cal
ls
Making Calls from a Prede-fined List (Alphanumeric Labels) You can use your radio to make up to 20 preset calls known as alphanumeric labels (if programmed). These calls can be accessed in much the same way as an electronic phone book. Each preset call has a label using numbers and/or letters. The label might be a person’s name, a radio ID, or a telephone number.
Alphanumeric labels allow you to simplify more complex or repetitive tasks by incorporating them into a single operation.
An alphanumeric label can be used to perform any of the following actions (or a combination of these actions):
� Select a specific channel.
� Make a specific individual or group call.
� Call a telephone.
� Change the radio’s status.
Using an Alphanumeric SequenceTo use an alphanumeric sequence:
1 Long press the menu key to enter menu mode (if the radio displays a submenu option, press the clear key to enter the main menu).
2 Scroll through the main menu options using the arrow keys until ALPHA SYMBOLS is displayed, then short press the menu key (ALPH is displayed in the top left-hand corner, with the alphanumeric label on the right).
3 Scroll through the alphanumeric labels using the arrow keys, until the one you want is displayed.
4 Short press the menu key to send the call sequence.
5 Long press the menu key to exit menu mode.
Making and Receiving Different Types of Calls 51

Mak
ing
an
d R
ecei
vin
g D
iffe
ren
t Ty
pes
of
Cal
ls
Searching for a labelThe alphanumeric mode also has a search function that you can use to find an alphanumeric label. This provides a shortcut to using the scrolling arrows.
To find an alphanumeric label using the search function:
1 Enter the ALPHA SYMBOLS menu as described in steps 1 to 2 on page 51.
2 Key in the numbers that match the alphanumeric label in sequential order until the radio finds the label. The first keypress searches for the first letter, the second keypress for the second letter, and so on.
Use the following example:
If you were searching for the label BASE, you would key-in the letters in this order: B - A - S - E. One press of a key searches for all numbers and letters accessed by that key. Labels will be displayed in alphabetic order when there is a common letter sequence.
Use the table below to see how searching for the word ‘base’ would work:
Pressing the Wrong KeyIf you press the wrong key or need to move back a letter position, use the clear key. Each press of the clear key moves back one position.
LabelList
Press Key Radio Displays
Explanation
BANKBASEHOME
2 (searches for 2, A,B, C)
BANK displays
‘B’ is the first letter in both words. Bank is the first label alpha-betically.
2 (searches for 2, A,B, C)
BANK displays
‘A’ is the second letter in both words.
7 (searches for 7, P, Q, R, S)
BASEdisplays
‘S’ only occurs in the word ‘base’.
52 Making and Receiving Different Types of Calls

Mak
ing
an
d R
ecei
vin
g D
iffe
ren
t Ty
pes
of
Cal
ls
Between each press of the clear key the radio displays question marks to indicate the current position in the sequence: ? indicates the first letter is in place, ?? indicates the second letter is in place and so on.
To get back to the ‘start’ or ‘zero’ position:
� Long press the clear key.
OR
� Press the clear key once more after the ? is displayed.
Making and Receiving Different Types of Calls 53

Mak
ing
an
d R
ecei
vin
g D
iffe
ren
t Ty
pes
of
Cal
ls
54 Making and Receiving Different Types of Calls
Sen
din
g a
nd
Rec
eivi
ng
Sh
ort
Dat
a M
essa
ges
This section covers:
� Reading Short Data Messages
� Sending Short Data Messages
� Sending a Short Data Message Using a Selcall Channel
Your radio may be programmed with the capability to send and receive short data messages called SDMs.
When your radio receives a message, SDM flashes in the lower left-hand corner of the display and the radio gives three short, medium-pitched beeps.
Sending and Receiving Short Data Messages (SDMs)
Sending and Receiving Short Data Messages (SDMs) 55

Sen
din
g a
nd
Rec
eivi
ng
Sh
ort
Dat
a M
essa
ges
Reading Short Data MessagesTo read a message:
� Long press the menu key. The message appears across both rows of the display.
To scroll through a message:
� Use the arrow keys.
To display a message from the start:
� Hold down PTT and press the left arrow key.
To display a message from the end:
� Hold down PTT and press the right arrow key.
Exiting SDM ModeWhen you have finished reading a message:
� Long press the menu key to exit.
OR
� Press the clear key to delete the message (the radio reverts to the mode it was in before you viewed the message).
56 Sending and Receiving Short Data Messages (SDMs)

Sen
din
g a
nd
Rec
eivi
ng
Sh
ort
Dat
a M
essa
ges
Sending Short Data Messages Note: If you want to send a message on a Selcall channel, see ‘Sending a Short Data Message Using a Selcall Channel’ on page 60.
To send a message:
1 Long press the menu key to enter menu mode (if the radio displays a submenu option, press the clear key to enter the main menu).
2 Scroll through the main menu options using the arrow keys until SEND SDM is displayed, then short press the menu key to display ENTER SDM.
3 Enter a new message using the keypad (see ‘Entering a Message’ on page 58)
OR
Press an arrow key to begin editing an existing mes-sage, then proceed in the same way as for entering a new message.
4 Short press the menu key. The message, ENTER ID will be displayed, along with the receiver’s identity for the last SDM transmission.
5 Short press the menu key again to send the message using the existing ID.
OR
Enter a new ID using the keypad if you are calling a different radio (the receiver’s identity must be 8 characters long), then short press the menu key to send.
Note: Once the message has been sent, the radio will return to the SDM entry mode in preparation for sending another message.
6 Long press the menu key to exit menu mode.
Sending and Receiving Short Data Messages (SDMs) 57

Sen
din
g a
nd
Rec
eivi
ng
Sh
ort
Dat
a M
essa
ges
Entering a MessageShort data messages can contain up to 32 characters.
To enter a character:
� Press a key once to enter the first character on that key. Repeat the process to enter the other characters on the same key: for example, with the key , one press enters 7, two presses enters P and so on.
Note: The 0 key toggles between 0 and a space.
To select a character or entry position:
� Use the left and right arrow keys.
Note: After a short time the flashing cursor moves on to the next letter automatically.
To move to the next entry position:
� Press another key.
OR
� Use the arrow keys.
OR
� Wait for the flashing cursor to move automatically after a short duration.
To delete a character:
1 Select the character using the arrow keys (the flashing cursor highlights the selected character).
2 Press the clear key to delete.
To replace a character:
1 Select the character using the arrow keys.
2 Press and hold the PTT key, then press any numeric key to create a space (press more than once to insert multiple characters).
3 Press the character you wish to insert.
58 Sending and Receiving Short Data Messages (SDMs)
Sen
din
g a
nd
Rec
eivi
ng
Sh
ort
Dat
a M
essa
ges
To move between lines:
� Hold down the PTT key and press the arrow keys.
Sending and Receiving Short Data Messages (SDMs) 59

Sen
din
g a
nd
Rec
eivi
ng
Sh
ort
Dat
a M
essa
ges
Sending a Short Data Message Using a Selcall ChannelIn normal circumstances a short data message cannot be received on a Selcall channel. However, a Selcall channel can receive a short data message if a selcall status message is sent first, thereby ensuring that the data message can be decoded.
Sending a data message on a Selcall channel involves four stages:
1 Entering a message.
2 Assigning a status message.
3 Sending a Selcall (with a status message assigned)
4 Sending an SDM message (within 10 seconds of having sent the status Selcall message)
If you need to send a short data message using a Selcall channel, please contact Tait Customer Support for assistance (http://support.taitworld.com).
60 Sending and Receiving Short Data Messages (SDMs)

Ch
ang
ing
Yo
ur
Rad
io’s
Set
tin
gs
This section covers:
� Display Settings (Display Menu)
� Operation Settings (User Settings Menu)
� Audible Tone Settings (Alert Settings Menu)
� Scanning and Voting Group Settings (Advanced Menu)
� Flexiscan Scan Group Settings (Advanced Menu)
� Subaudible Signalling Settings (Advanced Menu)
Changing Your Radio’s Settings
Changing Your Radio’s Settings 61

Ch
ang
ing
Yo
ur
Rad
io’s
Set
tin
gs
Changing Display Settings (Display Menu)
Note: Some display features may not be available or modifiable on your radio.
Display settings can be modified using a function key (if assigned) or the display settings menu.
To access the display settings menu:
1 Long press the menu key to enter menu mode (if the radio displays a submenu option, press the clear key to enter the main menu).
2 Scroll through the main menu options using the arrow keys until DISPLAY SETTINGS is displayed.
Activating Backlighting (Night Operation)When backlighting is turned on, the display and keypad will light up for a few seconds when a key is pressed, a call is received or the 16-way selector is turned.
To turn backlighting on and off:
� Press the assigned function key.
OR
1 Enter the display settings menu as described at the beginning of this section.
2 Short press the menu key, then scroll through the available menu options until NIGHT is displayed.
3 Short press the menu key to turn NIGHT ON and OFF.
4 Long press the menu key to exit menu mode.
Adjusting ContrastIf the radio’s display is too light or too dark, you can adjust the LCD contrast using the contrast adjustment function.
The contrast can be adjusted using a function key or the menu. After making the adjustment, the radio will
62 Changing Your Radio’s Settings

Ch
ang
ing
Yo
ur
Rad
io’s
Set
tin
gs
automatically return to its previous mode of operation after a few seconds of inactivity.
Using a Function KeyTo use a function key:
1 Press the assigned function key. The message CONTRAST ADJUSTMENT is displayed.
2 Use the arrow keys to adjust the contrast to the desired level.
Using the MenuTo use the menu:
1 Enter the display settings menu as described at the beginning of this section.
2 Short press the menu key, then scroll through the available menu options until ADJUST CONTRAST is displayed.
3 Use the arrow keys to adjust the contrast to the desired level.
4 Long press the menu key to exit menu mode.
Resetting Contrast to DefaultYour radio may be programmed so that you can reset the contrast to the factory’s default setting using function key 2.
To reset the contrast to the radio’s default setting:
� Press and hold function key 2 while turning the radio off then on again.
Changing Your Radio’s Settings 63

Ch
ang
ing
Yo
ur
Rad
io’s
Set
tin
gs
Displaying the Received Signal Strength Indicator (RSSI)When this option is turned on, the strength of the received signal is displayed in the lower left-hand corner of the menu display.
To turn RSSI on and off:
1 Enter the display settings menu as described at the beginning of this section.
2 Short press the menu key, then scroll through the available menu options until RSSI is displayed.
3 Short press the menu key to turn RSSI ON and OFF.
4 Long press the menu key to exit menu mode.
64 Changing Your Radio’s Settings

Ch
ang
ing
Yo
ur
Rad
io’s
Set
tin
gs
Changing Operation Settings(User Settings Menu)
Note: Some operation features may not be available or modifiable on your radio.
Operation settings can be modified by using a function key (if assigned) or the user settings menu.
To access the user settings menu:
1 Long press the menu key to enter menu mode (if the radio displays a submenu option, press the clear key to enter the main menu).
2 Scroll through the main menu options using the arrow keys until USER SETTINGS is displayed.
For information on modifying squelch or monitor settings, see ‘Improving Your Radio’s Reception (Squelch)’ on page 33 and ‘Checking That a Channel Is Clear (Monitor)’ on page 35
Extending Battery Life (Economy and Low Power Transmit Modes)Your radio has two features which allow you to extend the life of the battery between charging:
� Economy mode: Use this feature when there is little or no activity on the radio. When in economy mode, the radio cycles between the receive state and a stand-by state, once there has been no activity for a preset period. Receiving or sending a call returns the radio to the fully active state.
� Low Power Transmit mode: Use this feature in conditions where signal strength is high. While low power transmit is active, transmissions are made at low power rather than at the preset power level.
Changing Your Radio’s Settings 65

Ch
ang
ing
Yo
ur
Rad
io’s
Set
tin
gs
Turning Economy Mode On and OffTo turn economy mode on and off:
� Press the assigned function key.
OR
1 Enter the user settings menu as described at the beginning of this section.
2 Short press the menu key, then scroll through the available menu options until ECONOMY is displayed.
3 Short press the menu key to turn economy mode on and off.
4 Long press the menu key to exit menu mode.
Turning Low Power Transmit On and OffTo turn low power transmit on and off:
� Press the assigned function key.
OR
1 Enter the user settings menu as described at the beginning of this section.
2 Short press the menu key, then scroll through the available menu options until LOW PWR is displayed.
3 Short press the menu key to turn low power on and off.
4 Long press the menu key to exit menu mode.
Note: Some channels may have been programmed to always transmit at low power.
Choosing a Radio Microphone SettingThe radio microphone has two modes of operation:
� Normal mode: The radio microphone is held about 15 cm away from the mouth.
� Handset mode: The radio is operated like a telephone handset. This is particularly useful in noisy environments or when privacy is required.
66 Changing Your Radio’s Settings

Ch
ang
ing
Yo
ur
Rad
io’s
Set
tin
gs
When handset mode is turned on, the radio’s handset microphone operates.
Note: The radio may have been programmed so that handset microphone is the default setting.
Caution: While using the handset micro-phone, do not hold the speaker pressed against your ear, or allow the antenna to touch your body.
Turning Handset Mode On and OffTo turn handset mode on and off:
� Press the assigned function key. The radio may have been programmed so that handset mode automati-cally turns off after a period of inactivity.
Adjusting Handset VolumeThe radio may have been programmed so that the function keys can be used as volume up and down keys while in handset mode. Which keys act as volume control keys can be listed on the ‘custom settings’ page on the inside back cover of this manual.
Locking the KeypadThe keypad lock prevents you from pressing a key accidentally. Which keys are locked depends on how your radio was programmed, but the clear key can never be locked.
To activate or deactivate the keypad lock:
� Press the assigned function key.
OR
1 Enter the user settings menu as described at the beginning of this section.
2 Short press the menu key, then scroll through the available menu options until KEYLOCK is displayed.
Changing Your Radio’s Settings 67

Ch
ang
ing
Yo
ur
Rad
io’s
Set
tin
gs
The current status (LOCKED or UNLOCKED) is displayed underneath.
3 Short press the menu key to lock and unlock the keypad. The keypad lock can also be deactivated by a long press the clear key.
4 Long press the menu key to exit menu mode .
When a locked key is pressed, the radio will give a long, low-pitched beep and display the message KEYPAD LOCKED.
Answering a Call If a call is received while the keypad is locked, press any key to answer.
Choosing a DTMF Dialling ModeDTMF dialling has two modes: normal and buffered:
� Normal: Each character in DTMF string is trans-mitted as the key is pressed.
� Buffered: The DTMF string is transmitted after all the characters in the string have been entered.
To select normal or buffered dialling:
1 Enter the user settings menu as described at the beginning of this section.
2 Short press the menu key, then scroll through the available menu options until DTMF is displayed. The current status (NORMAL or UBUFFERED) is displayed underneath.
3 Short press the menu key to select normal or buffered dialling.
4 Long press the menu key to exit menu mode.
68 Changing Your Radio’s Settings

Ch
ang
ing
Yo
ur
Rad
io’s
Set
tin
gs
Bypassing Repeater Stations (Communicating Directly with Other Radios)If you are out of range of a repeater you can commu-nicate directly with another radio by using a feature called ‘repeater talkaround’.
To activate repeater talkaround:
� Press the assigned function key.
To deactivate repeater talkaround:
� Press the function key again or change to another channel.
Note: Repeater talkaround is not accessible through the menu.
Changing Your Radio’s Settings 69

Ch
ang
ing
Yo
ur
Rad
io’s
Set
tin
gs
Changing Audible Tone Settings (Alert Settings Menu)
Note: Some or all audible tone features may not be available or modifiable on your radio.
Key tone settings (see below) can be modified using the alert settings menu. Audible tones can be modified using the alert settings menu or a function key (if assigned).
To access the alert settings menu:
1 Long press the menu key to enter menu mode (if the radio displays a submenu option, press the clear key to enter the main menu).
2 Scroll through the main menu options using the arrow keys until ALERT SETTINGS is displayed.
About Audible TonesYour radio has two features for controlling which audible tones you hear:
� Key tones: This feature controls the tones you hear when you press a function key, or a key on the keypad. Key tones can be turned on and off.
� Audible tones: This feature provides overall control for all audible tones, including key tones, receive call tones, warning tones and so on. Audible tones can be turned on and off. If audible tones is turned off, key tones will also be off.
Turning Key Tones On and OffTo turn keypress tones on and off:
1 Enter the alert settings menu as described at the beginning of this section.
2 Short press the menu key, then scroll through the available menu options until KEYTONES is displayed.
3 Short press the menu key to select on or off.
4 Long press the menu key to exit menu mode.
70 Changing Your Radio’s Settings

Ch
ang
ing
Yo
ur
Rad
io’s
Set
tin
gs
Turning Audible Tones On and OffTo turn audible tones on and off:
� Press the assigned function key.
OR
1 Enter the user settings menu as described at the beginning of this section.
2 Short press the menu key, then scroll through the available menu options until TONES is displayed.
3 Short press the menu key to turn audible tones on and off.
4 Long press the menu key to exit menu mode.
Adjusting the Level of Audible TonesAudible tones have two settings: high and low.
To change between the high and low setting:
1 Enter the user settings menu as described at the beginning of this section.
2 Short press the menu key, then scroll through the available menu options until LEVEL is displayed. The current status (HIGH or LOW) is displayed underneath.
3 Short press the menu key to select high or low.
4 Long press the menu key to exit menu mode.
Changing Your Radio’s Settings 71

Ch
ang
ing
Yo
ur
Rad
io’s
Set
tin
gs
Changing Scanning and Voting Group Settings (Advanced Menu)
Note: Scan group features may not be available or modifiable on your radio.
Configuring Scan GroupsYou can modify the mix of channels in your radio’s scan groups in the following ways by:
� Removing channels.
� Adding new channels.
� Altering the characteristic of a channel (for example, setting a channel as a priority channel).
Scan groups can be modified using the advanced menu. Before modifying a scan group you need to understand the various types of channel membership status:
� Y: The channel is currently a member of the group.
� N: The channel does not belong to the current group.
� P1: The channel is the first priority channel.
� P2: The channel is the second priority channel.
� T: The channel is the default transmit channel for the group.
To modify the status of a channel in a scan group:
1 Long press the menu key to enter menu mode (if the radio displays a submenu option, press the clear key to enter the main menu).
2 Scroll through the main menu options using the arrow keys until ADV SETTINGS is displayed.
3 Scroll through the main menu options using the arrow keys until PROGRAM GROUP is displayed.
72 Changing Your Radio’s Settings

Ch
ang
ing
Yo
ur
Rad
io’s
Set
tin
gs
4 Press the menu key to enter group programming mode. GPGM is displayed in the top left-hand corner.
5 Scroll through the available scan groups using the arrow keys until the desired group is displayed.
6 Press the menu key to select the chosen group. The name of the first channel in the group will be displayed:
P1 in the lower left-hand corner indicates the current membership status of the channel.
7 Use the arrow keys to select the channel whose membership you want to alter.
8 Short press the menu key to move between the available options, then scroll to the next channel (moving to the next channel confirms the previous selection).
9 Long press the menu key to exit the menu with saved changes.
OR
Short press the clear key to exit the program group menu without saving changes.
Note: After 10 seconds of inactivity the radio will save the new group information and exit group programming.
Channel statusMode Channel
Changing Your Radio’s Settings 73

Ch
ang
ing
Yo
ur
Rad
io’s
Set
tin
gs
Membership RulesThere are several rules which govern the make-up of scan groups.
When modifying the settings a prompt message will be displayed if an action is not permitted.
Message Rule Meaning/Action
CANNOT DELETE
A scan group must have a minimum of two channels.
No more channels can be deleted, without first adding another channel.
GROUP FULL A scan group can have up to 16 channels.
No more channels can be added, without first deleting an existing channel.
CANNOT CHANGE
Priority groups must have a P1 channel assigned. Dual priority groups must have a P1 and P2 channel assigned.
Changing the value of a P1 or P2 channel is not permitted. To assign a new priority channel, scroll to the desired channel and set its value as P1 or P2. The previous P1 or P2 channel will revert to the value Y.
CANNOT CHANGE
A group that has a default transmit channel assigned must have one channel set to T.
Changing the value of the default transmit channel is not permitted. To assign a new default transmit channel, scroll to the desired channel and set its value to T. The previous default transmit channel will revert to the value Y.
74 Changing Your Radio’s Settings

Ch
ang
ing
Yo
ur
Rad
io’s
Set
tin
gs
Changing Flexiscan Scan Group Settings (Advanced Menu)
Note: Flexiscan scan group features may not be available or modifiable on your radio.
Configuring Flexiscan Scan GroupsFlexiscan scan groups can be modified in the same ways as Scanning and Voting groups (see ‘Configuring Scan Groups’ on page 72), using the advanced menu.
Before modifying a Flexiscan scan group you need to understand the various types of channel membership status:
� S: The channel is currently a member of the Flexiscan scan group.
� NS: The channel does not belong to the current Flexiscan scan group.
� P1: The channel is the first priority channel.
� P2: The channel is the second priority channel.
To modify the status of a channel in a scan group:
1 Long press the menu key to enter menu mode (if the radio displays a submenu option, press the clear key to enter the main menu).
2 Scroll through the main menu options using the arrow keys until ADV SETTINGS is displayed.
3 Scroll through the main menu options using the arrow keys until PROGRAM FS-GROUP is displayed.
4 Press the menu key to enter group programming mode. FSPR is displayed in the top left-hand corner.
5 Scroll through the available scan groups using the arrow keys until the desired group is displayed.
Changing Your Radio’s Settings 75

Ch
ang
ing
Yo
ur
Rad
io’s
Set
tin
gs
6 Press the menu key to select the chosen group. The name of the first channel in the group will be displayed:
NS in the lower left-hand corner indicates the current membership status of the channel.
7 Use the arrow keys to select the channel whose membership you want to alter.
8 Short press the menu key to move between the available options, then scroll to the next channel (moving to the next channel confirms the previous selection).
9 Long press the menu key to exit the menu with saved changes.
OR
Short press the clear key to exit the program group menu without saving changes.
Note: After 10 seconds of inactivity the radio will save the new group information and exit group programming.
Membership RulesFor membership rules, see ‘Membership Rules’ on page 74.
Channel statusMode Channel
76 Changing Your Radio’s Settings

Ch
ang
ing
Yo
ur
Rad
io’s
Set
tin
gs
Changing Subaudible Signalling Settings (Advanced Menu)
Note: Subaudible signalling may not be available or modifiable on your radio.
To change the signalling used on a channel:
1 Long press the menu key to enter menu mode (if the radio displays a submenu option, press the clear key to enter the main menu).
2 Scroll through the main menu options using the arrow keys until ADV SETTINGS is displayed.
3 Scroll through the advanced menu options using the arrow keys until PROGRAM SIGNAL is displayed
4 Press the menu key to enter signal programming mode. SPGM is displayed in the top left-hand corner.
5 Scroll through the available channels using the arrow keys until the channel you wish to change is displayed, then short press the menu key.
The display will show the first in a series of signal labels, for example SIG 1:
Your system manager or the person who pro-grammed your radio will know what values corre-spond to these labels.
6 Scroll through the available signal labels until you find the one you want, then short press the menu key to confirm your selection. The next channel will then be displayed.
7 Long press the menu key to exit the menu.
Status labelMode
Changing Your Radio’s Settings 77

Ch
ang
ing
Yo
ur
Rad
io’s
Set
tin
gs
Note: After 10 seconds of inactivity the radio will automatically leave signal programming mode.
78 Changing Your Radio’s Settings

Mai
nta
inin
g Y
ou
r R
adio
This section covers:
� Battery Charging and Conditioning
� Preserving Battery Life
� Caring for Your Radio
� Options and Accessories
� Specifications
Maintaining Your Radio
Maintaining Your Radio 79

Mai
nta
inin
g Y
ou
r R
adio
Battery Charging and Conditioning
There are two types of chargers available for your radio: A desktop fast charger (shown left) and a multi-charger (see page 87). Instructions for using the fast charger also apply to the multi-charger.
A vehicle charging kit is also available, allowing the radio to be charged from a vehicle’s power supply. Installation and user information are supplied with the vehicle kit.
Using the ChargerThe battery charger can be used to:
� Charge batteries.
� Short condition batteries.
� Long condition batteries.
Before First UseBefore using the radio for the first time:
� Fully charge the battery (see ‘Charging the Battery’ on page 81).
� Long condition the battery (see ‘Long Conditioning the Battery’ on page 83).
After First UseCharge the battery as soon as the radio indicates the battery is low (the low battery icon ( ) flashes, the radio gives a low-pitched beep every 5 seconds and the LED flashes red at slow flash rate).
LED
ConditioningButton
80 Maintaining Your Radio

Mai
nta
inin
g Y
ou
r R
adio
Note: If the message BATTERY IS FLAT displays, the battery is too low, and the radio will stop operating. Turn off the radio immediately and recharge.
Short condition the radio’s battery:
� Weekly.
Long condition the radio’s battery:
� When battery performance has deteriorated.
� Following prolonged storage.
Charging the BatteryDo not press the blue conditioning button when charging the battery – this button is only used for conditioning the battery.
To charge the battery:
1 Turn off the radio.
2 Insert the battery/radio into the charger (the charger LED glows red).
When the charger LED glows steady green, the battery is charged.
Note: For up to 30 minutes after removing the battery from the charger, the battery indicator will not accurately reflect the battery’s charge.
Battery charging involves three stages:
Stage Function LED Indicator
Fast charge
Brings the battery up to near full capacity.
Glows red.
Trickle charge
Slowly tops up the battery until it is at its full capacity.
Flashes green.
Stand-by charge
Keeps the battery at its full capacity, as long as the radio is turned off.
Glows steady green.
Maintaining Your Radio 81

Mai
nta
inin
g Y
ou
r R
adio
Charge TimesCharge times vary according to the battery type.
Charging LED StatesThe table below shows the battery charging LED states.
Short Conditioning the BatteryThe short conditioning cycle discharges the battery, then charges it. Regularly recharging a battery that has not been completely discharged will eventually affect the battery’s ability to hold a full charge.
Battery Type Fast Charge Time Trickle Charge Time
1100 mAh NiCd (TOPB100)
Up to 1½ hours 1½ hours
1500 mAh NiCd (TOPB200)
Up to 2 hours 1½ hours
1500 mAh NiMH (TOPB700)
Up to 2 hours 1½ hours
2000 mAh NiMH (TOPB500)
Up to 2½ hours 1½ hours
LED colour and state Meaning
Red Steady Battery charging.
Red Flashing Battery not seated properly in charger, battery or charger contacts dirty, or battery faulty. If this occurs at the end of a long condition, consult your Tait dealer.
Green Steady Battery charged.
Green Flashing Battery trickle charging.
Amber Steady Charge suspended until battery temperature is within correct range.
Amber Flashing Battery being short or long condi-tioned.
82 Maintaining Your Radio

Mai
nta
inin
g Y
ou
r R
adio
Caution: Do not use the short conditioning cycle on a new battery if it has not been fully charged previously.
To short condition the battery:
1 Turn off the radio.
2 Insert the battery/radio into the charger.
3 When the charger LED glows red, press and hold the blue conditioning button until the indicator flashes amber.
4 Release the conditioning button.
The battery is ready to be used again when the charger LED glows steady green.
Long Conditioning the BatteryThe long conditioning cycle discharges and charges the battery a number of times.
Long conditioning will take about 24 hours. To long condition the battery:
1 Turn off the radio.
2 Press and hold the blue conditioning button while inserting the battery/radio into the charger.
3 Continue holding the conditioning button until the charger LED flashes amber.
4 Release the conditioning button.
The battery is ready for use when the indicator glows steady green. If the charger LED flashes red at the end of a long conditioning cycle, consult your Tait dealer.
TroubleshootingProblem: When inserting the battery/radio in the charger, the state indicated by the charger LED is not as expected.
Maintaining Your Radio 83

Mai
nta
inin
g Y
ou
r R
adio
� Make sure the battery/radio is seated properly in the charger.
� Check that the charger is properly plugged in.
� Check that the battery and charger contacts are clean. To clean, wipe the battery contacts with a dry lint-free cloth to remove any dirt, oil or grease.
Problem: The charger LED glows amber.
� The radio battery is too hot or too cold for charging.
The safe range for charging is 5°C to 40°C, and optimum battery performance will be obtained between 15°C and 25°C. The battery will start charging when the battery temperature is within the range 5°C to 40°C.
Warning: Disposing of Used NiCd BatteriesWarning: NiCd batteries contain a small amount of cadmium, a potentially toxic substance that must be disposed of properly. When no longer in use, contact your Tait dealer for recycling details.
84 Maintaining Your Radio

Mai
nta
inin
g Y
ou
r R
adio
Preserving Battery LifeTo preserve battery life, take the following precautions:
� Replace or recharge the battery as soon as the radio indicates that the battery is low.
� Avoid recharging a full battery that has had little or no use. Overcharging the battery will reduce the life of the battery.
� Avoid leaving the battery in a charger for more than a few days.
� Turn the radio off when it is unattended for long periods.
� Use Tait-recommended chargers only.
� Maintain an ambient temperature of between 5°C and 40°C during recharging. Optimum battery performance will be obtained between 15°C and 25°C.
� Do not allow the battery contacts to become short-circuited. This may happen if a metallic object such as a coin or paper clip comes into contact with both battery contacts.
� The battery pack is a sealed unit and is not serviceable. Do not attempt to open it.
Maintaining Your Radio 85

Mai
nta
inin
g Y
ou
r R
adio
Caring for Your RadioYour radio requires no regular maintenance other than ensuring that the battery has sufficient charge and that no damage has occurred to the antenna or the battery pack.
General CareTo ensure your radio is maintained in good working order:
� Wipe the battery contacts, accessory connector contacts and radio display with a dry lint-free cloth to remove any dirt, oil or grease.
� Use a cloth dampened with clean water to clean the radio’s case and display lens, but do not immerse the radio in fluids.
� Do not allow the radio to come into contact with detergents, alcohol, aerosol sprays or petroleum-based products, as these substances may permanently damage the case.
� Avoid high temperatures. If the radio overheats you will hear two short high-pitched beeps and the radio will cease to function.
TroubleshootingIf you are experiencing difficulty operating your radio, review ‘Getting Started’ on page 13 and check the following:
� Is the battery firmly attached to the radio?
� Is the battery sufficiently charged?
� Does the battery need conditioning?
� Is the battery charger working properly?
� Is the radio or antenna damaged?
If all appears to be in order but your radio still fails to operate properly, consult your local Tait dealer for assistance.
86 Maintaining Your Radio

Mai
nta
inin
g Y
ou
r R
adio
Options and AccessoriesTait offers a large range of radio accessories. Contact your local dealer for more information.
Removing the Accessory CoverTo fit some accessories to the radio, you will need to remove the radio cover by first removing the battery, then using the end of a key to prise off the accessory cover.
����������� ��������������������
��������������
������������������
�������
�������
��������������������
������
���������
��������������
���!������������
"��������� ��#���������������� �������
$�����
���������
Maintaining Your Radio 87

Mai
nta
inin
g Y
ou
r R
adio
D-Clip and Accessory ConnectorsThe D-clip connector enables the radio to be installed on the belt loop. The accessory connector enables acces-sories to be installed on the radio.
Installing the Connector
1 Place the two connector pegs into the bottom holes on the radio.
2 Push the connector into position and hold.
3 Use a coin (D-clip only) or thumb or finger to turn the lever counter-clockwise.
4 Turn the lever until it clicks into position.
Removing the Connector
1 Press the small metal clip firmly and hold.
2 Use a coin (D-clip only) or thumb to turn the lever clockwise 90°.
3 Remove the connector.
88 Maintaining Your Radio

Mai
nta
inin
g Y
ou
r R
adio
Specifications
Note: For full details of the technical specifi-cations of the radio, refer to the Service Manual or to your local dealer.
Size H x W x D (including 1500 mAh NiMH battery)
154 mm x 66 mm x 41 mm
Typical weight (including 1500 mAh NiMH battery)
535 g
Battery voltage 7.5 V nominal
Receive sensitivity better than -117 dBm
Audio power >0.5 W into 16 Ohms
Antenna connector SMA
Maintaining Your Radio 89

Mai
nta
inin
g Y
ou
r R
adio
90 Maintaining Your Radio

Function Key Options
Note: Some functions are not permitted in some countries.
The features below can be assigned to the function keys when the radio is programmed. If you do not know which features have been programmed for your radio, see you system administrator.
For information on function keys, see ‘Using the Function Keys’ on page 15.
Function Description
Audible Tones Turns audible tones on and off.
Backlighting Turns backlighting on. Backlighting will turn off after a programmed period.
Channel’s DTMF Preset
Sends the DTMF preset call assigned to the current channel.
Contrast Adjustment Allows you to adjust the display contrast.
Disable Monitor Disables the monitor facility if it is active. This may also be achieved by a short press of the clear key depending on the radio’s programming. See ‘Using the Keypad’ on page 16.
Economy Mode Turns economy mode on and off.
Emergency DTMF Activates DTMF emergency mode.
Emergency Selcall Activates Selcall emergency mode.
Handset Mode Turns handset mode on and off.
Keypad Lock Locks the keypad so the keys cannot be activated accidentally; a long press of the clear key deactivates the keypad lock. What keys are locked depends on how the radio was programmed; however, the clear key cannot be locked.
Lone Worker Monitors radio activity so that an emergency call can be sent if a worker becomes incapacitated.
91

Low Power Transmit Changes the transmit power from medium or high to low. Pressing the key again returns the transmit power to the programmed level. Channels can also be programmed for low power.
Night Use Turns night operation mode on and off.
Nuisance Delete Temporarily deletes the current channel from the scanning regime.
One Touch Call Sends a preset Selcall call or DTMF call, or selects a channel.
Preset Selcall Sends the preset Selcall call assigned to the current channel.
Program Flexiscan Allows you to enter Flexiscan programming mode. You can now change group membership and change priority channels.
Repeater Access Tone
Sends the repeater access tone to key up the transmitter.
Repeater Talkaround Allows you to bypass normal repeater operation and communicate directly with another radio. Pressing the key again or changing to another channel turns off repeater talkaround.
Squelch Override Turns the squelch override on and off so the user can hear all activity on a channel, including noise. The radio may be programmed so that a long press of the clear key turns squelch override on and off.
Toggle Flexiscan Turns Flexiscan on and off. Your radio may be programmed so that Flexiscan is turned off when the PTT key is released after making a call when Flexiscan is active.
Toggle Monitor Toggles monitor on and off, so that the user can hear all traffic on a channel. This may also be achieved by a short press of the clear key, depending on the radio’s programming. (See ‘Using the Keypad’ on page 16.)
Volume Control Controls volume in handset mode.
Function Description
92
Related Documents