p. 1 What is a Tagtool? The Tagtool is a live performance instrument for drawing and animation. It’s similar to a music instrument, only it plugs into a projector instead of the sound system. It is operated collaboratively by an artist drawing the pictures and an animator adding movement to the artwork with a gamepad. What is a Tagtool Mini? The Mini is a separate device with the Tagtool controls that is used together with a computer and a graphics tablet. With this setup, you don’t have a compact instrument, but it is nonetheless fully functional. This is recommended for people that don’t need a dedicated Tagtool but want to use it with their computer and graphics tablet. What else do I need to run a Tagtool Mini? To play with a Tagtool Mini you also need a graphics tablet, a gamepad and a Windows PC with the open source software Nodekit on the tagtool site. The Tagtool is typically used with a projector, although any monitor will suffice for playing around with it. How to use the Tagtool? Usually it is controlled by two people - an illus- trator (who draws and uses the Tagtool controls) and an animator (using the gamepad to move the drawings around). The Tagtool controls consist of 6 faders and a pushbutton. The pushbutton re- leases a drawing so the animator can move them with the gamepad. Find detailed instructions on how to use the controls on tagtool.org D.I .Y. - Tagtool Mini This step shows how to build the case of the Tagtool Mini. You can choose any size you want. Any materials any anything! Please send us pics of you If you are just into the electronic part of the Tagtool skip to page 13! NOTE Step 3-4 shows how to build the tag- tool case. We are just suggesting. Do your own box in a fake rabbit, an old VHS deck or in your hiking shoe. Don't forget to send us your pics! Steps: 1 Materials 2 Tools 3 Base of the box 4 Top Panel 5 Electronics 6 Schematics

Tagtool
Mar 22, 2016
Instrucciones para crear tu propia herramienta Tagtool
Welcome message from author
This document is posted to help you gain knowledge. Please leave a comment to let me know what you think about it! Share it to your friends and learn new things together.
Transcript

p. 1
What is a Tagtool?
The Tagtool is a live performance instrument for drawing and animation. It’s similar to a music instrument, only it plugs into a projector instead of the sound system. It is operated collaboratively by an artist drawing the pictures and an animator adding movement to the artwork with a gamepad.
What is a Tagtool Mini?
The Mini is a separate device with the Tagtool controls that is used together with a computer and a graphics tablet. With this setup, you don’t have a compact instrument, but it is nonetheless fully functional. This is recommended for people that don’t need a dedicated Tagtool but want to use it with their computer and graphics tablet.
What else do I need to run a Tagtool Mini?
To play with a Tagtool Mini you also need a graphics tablet, a gamepad and a Windows PC with the open source software Nodekit on the tagtool site. The Tagtool is typically used with a projector, although any monitor will suffice for playing around with it.
How to use the Tagtool?
Usually it is controlled by two people - an illus-trator (who draws and uses the Tagtool controls) and an animator (using the gamepad to move the drawings around). The Tagtool controls consist of 6 faders and a pushbutton. The pushbutton re-leases a drawing so the animator can move them with the gamepad. Find detailed instructions on how to use the controls on tagtool.org
D.I.Y. -Tagtool Mini
This step shows how to build
the case of the Tagtool Mini.
You can choose any size
you want. Any materials any
anything! Please send us pics
of you If you are just into the
electronic part of the Tagtool
skip to page 13!
NOTEStep 3-4 shows how to build the tag-tool case. We are just suggesting. Do your own box in a fake rabbit, an old VHS deck or in your hiking shoe.Don't forget to send us your pics!
Steps:
1 Materials
2 Tools
3 Base of the box
4 Top Panel
5 Electronics
6 Schematics

p. 2
Materials1
A B C D
G
H KI
1 x Arduino Diecimila 6 x Slide Potentiometers 6 x Slider Knobs 1 x Pushbutton Ribbon cable Some stranded wire 1 x Resistor (10k Ohm/ for the pushbutton) Some screws: 3x10mm for the sliders, 3x20mm for the wood 2 x Spacers for the Arduino board Plywood board, the measurements we used: 2 pieces - 26 x 20 x 0.5 cm, 2 pieces - 26 x 4 x 0.5 cm, 2 pieces - 19 x 4 x 0.5 cm, + 1 piece for mounting the Arduino (sized to fit the Arduino) Slats (1x1cm) 4 x 16.7 cm + 4 x 24.6 cm
A B
C D E
F G
H
I
J
K
J
E F

p. 3
Tools2
saw stapler drill plyer soldering gun and solder screwdriver file ruler and pen glue shrink tube and lighter tape sandpaper
L M N
O P Q R
S T U V W
S
M N
O P Q
T U V
W
L
R

p. 4
Base of the Box 3
What you need:
wood, slats, stapler, glue, sanding paper
d Pay attention to the gap of the slats on one of the sidepieces, to accommodate the Arduino (see also Arduino preperation on page 10)
sand wood, glue and staple slats A
B
C
USB port
assemble base and drill screw holes
a Sand all measured and cut wooden parts. b Glue and...
c ... staple the slats to the sideboards.
A sand wood, glue andstaple slats
p. 5
Base of the Box 3
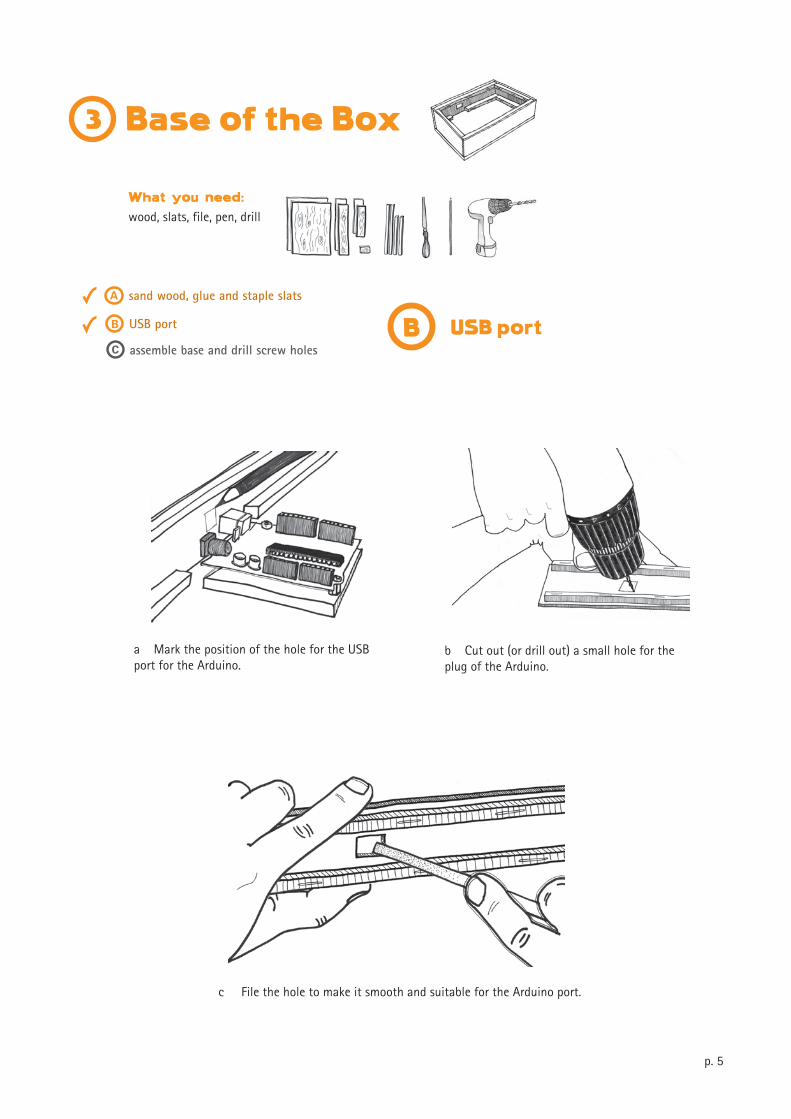
What you need:wood, slats, file, pen, drill
USB port
sand wood, glue and staple slats A
B
C
USB port
assemble base and drill screw holesB
b Cut out (or drill out) a small hole for the plug of the Arduino.
a Mark the position of the hole for the USB port for the Arduino.
c File the hole to make it smooth and suitable for the Arduino port.
p. 6
Base of the Box 3
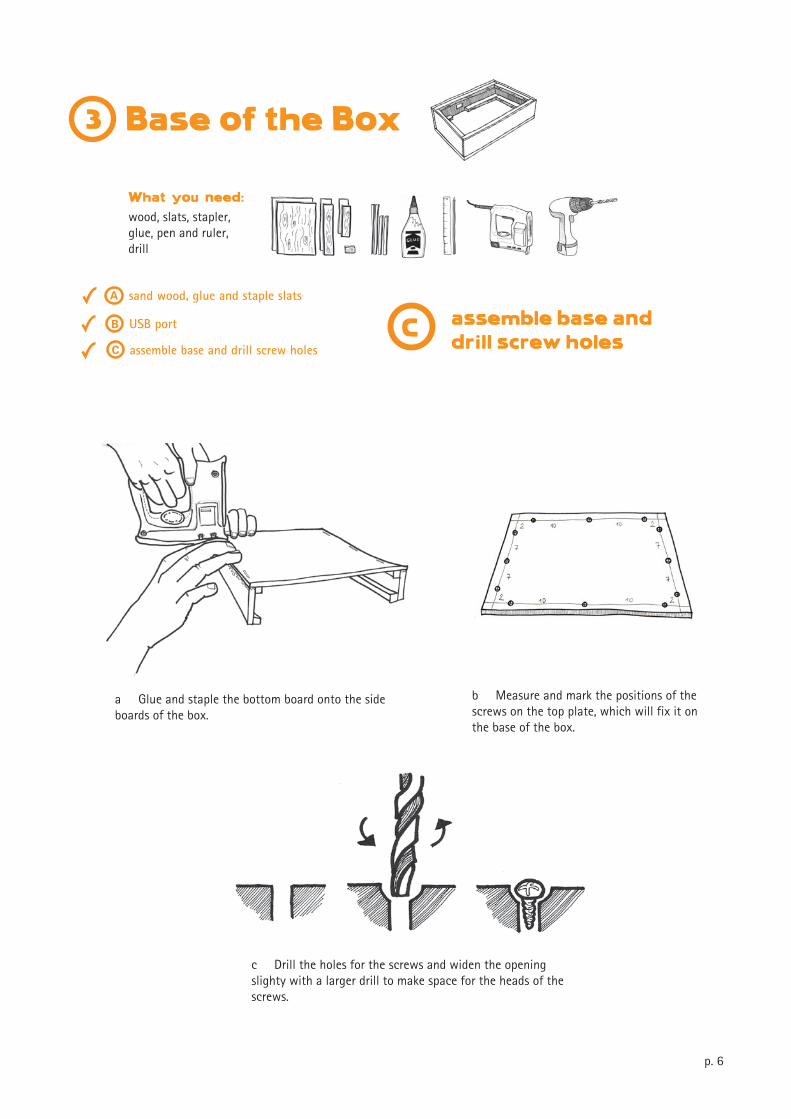
What you need:wood, slats, stapler, glue, pen and ruler, drill
sand wood, glue and staple slats A
B
C
USB port
assemble base and drill screw holesC
b Measure and mark the positions of the screws on the top plate, which will fix it on the base of the box.
a Glue and staple the bottom board onto the side boards of the box.
c Drill the holes for the screws and widen the opening slighty with a larger drill to make space for the heads of the screws.
assemble base and drill screw holes
p. 7
Top Panel4
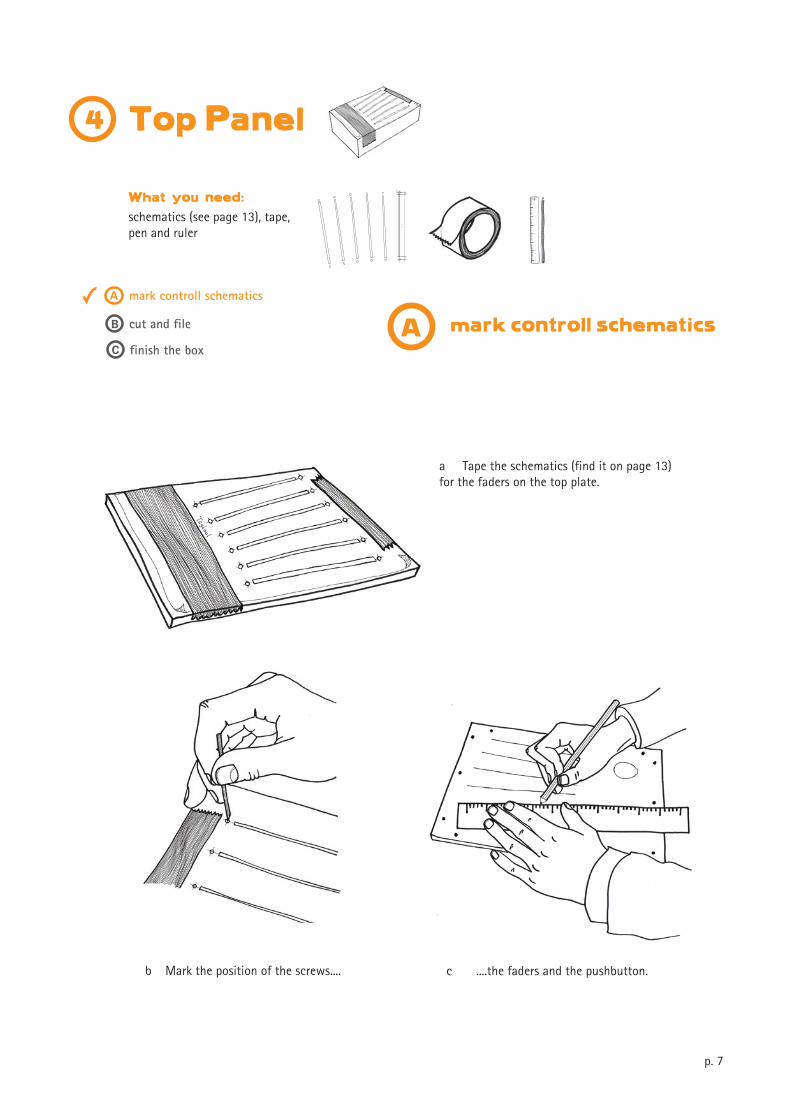
What you need:schematics (see page 13), tape,pen and ruler
mark controll schematics
mark controll schematicsA
B
C
cut and file
finish the boxA
b Mark the position of the screws....
a Tape the schematics (find it on page 13) for the faders on the top plate.
c ....the faders and the pushbutton.

p. 8
Top Panel4
What you need:saw, file, drill
cut and file
mark controll schematicsA
B
C
cut and file
finish the boxB
a Cut and ...
d Cut out the hole for the push-button. We used the drill to roughly cut out the hole for the pushbutton. Then file it to make it a nice circle.
c Drill the holes for the screws that fix the faders.
b ... file the slots for the faders.

p. 9
Top Panel4
What you need:sanding paper, file, pen and ruler, drill, screws, paint
mark controll schematicsA
B
C
cut and file
finish the box
d Paint the box and let it dry for some hours before you move on to the next step.
c Make room for the screw heads.
b Polish things off with a little more sanding and make room for the screw heads.
a Fix the top plate with just some of the screws, so you can sand the whole box, but easly remove the plate afterwards to place the electronics.
finish the boxC

p. 10
Electronics 5
What you need:arduino, spacers, screws, screwdriver, plyer, arduino-wood piece
prepare the Arduino
prepare the ArduinoA
B
C
attach components to top panel
solderA
a Screw the spacers....
d Pull off the plastic bits off the Arduino contacts so you can directly solder the cables to the pins.
c ....then mount the Arduino on it.
b ...onto the piece of plywood...

p. 11
Electronics 5
What you need:pushbutton, arduino, faders, screwdriver, glue
attach components to top panel
prepare the ArduinoA
B
C
attach components to top panel
solderB
c ...and screw the six faders- and the pushbutton to the top panel.
b ....so you can glue the Arduino on its wooden piece to the top panel.
a Remove the top panel...
x6

p. 12
Electronics 5
What you need:stranded wire, ribbon cable, resistor, shrinking tubes, lighter, soldering gun, solder
solder
prepare the ArduinoA
B
C
attach components to top panel
solderC
Solder the wires to the connectors according to the solder plan, which shows how to connect the Arduino to the faders and the pushbutton. Note the 10 kOhm/Watt resistor that is added to the connection to the pushbutton.
a Solder the six wires of the ribbon cable to the Arduino Analog Ins (use plenty of shrink tube, to lag the solder joint).
b Solder the two prepared strings of stranded wire to the potentiometers and the Arduino.
c Solder Ground, Voltage 5V and Digital Input #7 to the Arduino.
d Attach Resistor at the 5V wire between Arduino and contact block.
e Attach the 5V, the Digital In 7 and the Ground to the Contact block.

p. 13
Schematics
Note: Double-check if the measurements are exactly right for your faders before you use the schematics.
6