TAC Xenta © Operating TAC Xenta 511

Welcome message from author
This document is posted to help you gain knowledge. Please leave a comment to let me know what you think about it! Share it to your friends and learn new things together.
Transcript

TAC
Xen
ta©
Operating TAC Xenta 511


TAC
Xen
ta©
Operating TAC Xenta 511
Copyright © 2005 TAC AB. All rights reserved.
This document, as well as the product it refers to, is only intended for licensed users. TAC AB owns the copyright of this document and reservesthe right to make changes, additions or deletions. TAC AB assumes no responsibility for possible mistakes or errors that might appear in thisdocument.
Do not use the product for other purposes than those indicated in this document.
Only licensed users of the product and the document are permitted to use the document or any information therein. Distribution, disclosure,copying, storing or use of the product, the information or the illustrations in the document on the part of non-licensed users, in electronic ormechanical form, as a recording or by other means, including photo copying or information storage and retrieval systems, without the expresswritten permission of TAC AB, will be regarded as a violation of copyright laws and is strictly prohibited.
Trademarks and registered trademarks are the property of their respective owners. Microsoft® and Windows® are registered trademarks ofThe Microsoft Corporation.
Trademarks and registered trademarks are the property of their respective owners.
TAC Vista®, TAC Menta®, TAC Xenta® and TAC I-talk® are registered trademarks of TAC AB.

Presentation Systems, Operating TAC Xenta 511 Contents
Contents
INTRODUCTION
1 About this Manual 91.1 Structure ..................................................................................................................... 91.2 Typographic Conventions .......................................................................................... 101.3 New in This Edition ................................................................................................... 10
OPERATING
2 Connecting to the TAC Xenta 511 132.1 Accessing the TAC Xenta 511................................................................................... 132.1.1 Navigator Display in TAC Xenta 511........................................................................ 152.1.2 Online Help ................................................................................................................ 162.1.3 Changing Password.................................................................................................... 162.1.4 Logging Out ............................................................................................................... 17
3 Direct Supervision 193.1 General ....................................................................................................................... 193.2 The Graphics Viewer ................................................................................................. 193.2.1 Changing a Value ....................................................................................................... 203.2.2 Link Areas.................................................................................................................. 223.3 Tables with Dynamic Contents .................................................................................. 233.3.1 Values Pages .............................................................................................................. 233.4 HTML Variable Pages ............................................................................................... 243.4.1 HTML Variable Pages ............................................................................................... 243.4.2 The Submit Button ..................................................................................................... 24
4 Alarm and Event Monitoring 254.1 The Alarm Viewer...................................................................................................... 254.1.1 Alarm Stack View ...................................................................................................... 254.1.2 Filtering and Sorting Alarms...................................................................................... 264.1.3 The Alarm Symbols ................................................................................................... 274.1.4 Alarm History View................................................................................................... 284.1.5 The Static Alarm Page ............................................................................................... 284.2 How Alarm States Change ......................................................................................... 304.3 The Event Viewer ...................................................................................................... 314.3.1 Event View................................................................................................................. 314.3.2 The Toolbar ................................................................................................................ 324.3.3 Filtering Dynamic Events .......................................................................................... 334.3.4 Find ............................................................................................................................ 344.3.5 Customize................................................................................................................... 35
TAC AB, Feb 2005 5 (80)0-004-7846-2 (EN)

Contents Presentation Systems, Operating TAC Xenta 511
4.4 The Static Event Page................................................................................................. 36
5 Trend Charts 375.1 The Trend Viewer....................................................................................................... 375.1.1 The Chart Area ........................................................................................................... 375.1.2 The Configure Dialog Box ......................................................................................... 415.1.3 Viewing Logged Data in Tables................................................................................. 44
6 Time Schedules 476.1 The Time Object Editor.............................................................................................. 476.2 Creating and Editing Time Events ............................................................................. 496.3 The Events Dialog Box .............................................................................................. 52
7 Error Indications 557.1 Indication on the Web Page........................................................................................ 557.2 Indicators on the TAC Xenta 511............................................................................... 557.2.1 LEDs........................................................................................................................... 557.2.2 Fail-safe Mode............................................................................................................ 57
ADMINISTERING
8 Wireless Equipment 618.1 Inovonics Alarms........................................................................................................ 618.2 Inovonics Receiver ID ................................................................................................ 62
9 Trend Logs 639.1 Trend Log Configuration............................................................................................ 639.1.1 Trend Object Administration...................................................................................... 639.1.2 Trend Log Start Time ................................................................................................. 64
10 Users and Authority System 6510.1 User Administration ................................................................................................... 6510.1.1 Overview .................................................................................................................... 6510.1.2 Authorization Essentials ............................................................................................. 6610.1.3 User Profiles ............................................................................................................... 6610.1.4 Access Rights ............................................................................................................. 6710.2 User Administration Pages ......................................................................................... 6710.2.1 The User Administration Page ................................................................................... 6710.2.2 The Create User Page ................................................................................................. 6810.2.3 Creating a User ........................................................................................................... 7010.2.4 The User Properties Page ........................................................................................... 7110.2.5 The Change Password Page........................................................................................ 7110.2.6 The Access Rights Page ............................................................................................. 7210.2.7 Granting Access Rights .............................................................................................. 72
11 Web Browser Requirements 75
Index 77
6 (80) TAC AB, Feb 20050-004-7846-2 (EN)

INTRODUCTION
1 About this Manual


Presentation Systems, Operating TAC Xenta 511 1 About this Manual
1 About this ManualThis manual describes a particular process. For information on certain products, we refer you to the manual or the Help for the product in ques-tion.
For information on how to install software, we refer you to the instruc-tions delivered with the software.
For information on third party products, we refer you to the instructions delivered with the third party product.
If you discover errors and/or unclear descriptions in this manual, please contact your TAC representative.
1.1 StructureThe manual is divided into the following parts:
• IntroductionThe Introduction section contains information on how this manual is structured and how it should be used to find information in the most efficient way.
• OperatingThe Operating section contains step-by-step descriptions of how to carry out different tasks for daily operation.
• AdministeringThe Administering section contains step-by-step descriptions of system configuration. These tasks are less frequent than daily operation tasks and often performed by an appointed system administrator.
Note
We are continuously improving and correcting our documentation. This manual may have been updated.
Please check our Docnet site at www.tac.com for the latest version.
TAC AB, Feb 2005 9 (80)0-004-7846-2 (EN)

1 About this Manual Presentation Systems, Operating TAC Xenta 511
1.2 Typographic ConventionsThroughout the manual the following specially marked texts may occur.
1.3 New in This Edition• New Event Viewer for displaying system events.
• New Trend Viewer for displaying trend log data.
! Warning
Alerts you that failure to take, or avoid, a specific action might result in physical harm to you or to the hardware.
Caution
Alerts you to possible data loss, breaches of security, or other more serious problems.
Important
Alerts you to supplementary information that is essential to the com-pletion of a task.
Note
Alerts you to supplementary information.
Tip
Alerts you to supplementary information that is not essential to the completion of the task at hand.
10 (80) TAC AB, Feb 20050-004-7846-2 (EN)

OPERATING
2 Connecting to the TAC Xenta 511
3 Direct Supervision
4 Alarm and Event Monitoring
5 Trend Charts
6 Time Schedules
7 Error Indications
8 Wireless Equipment

Presentation Systems, Operating TAC Xenta 511 2 Connecting to the TAC Xenta 511
2 Connecting to the TAC Xenta 511
2.1 Accessing the TAC Xenta 511To access the TAC Xenta 511
1 Start Internet Explorer.
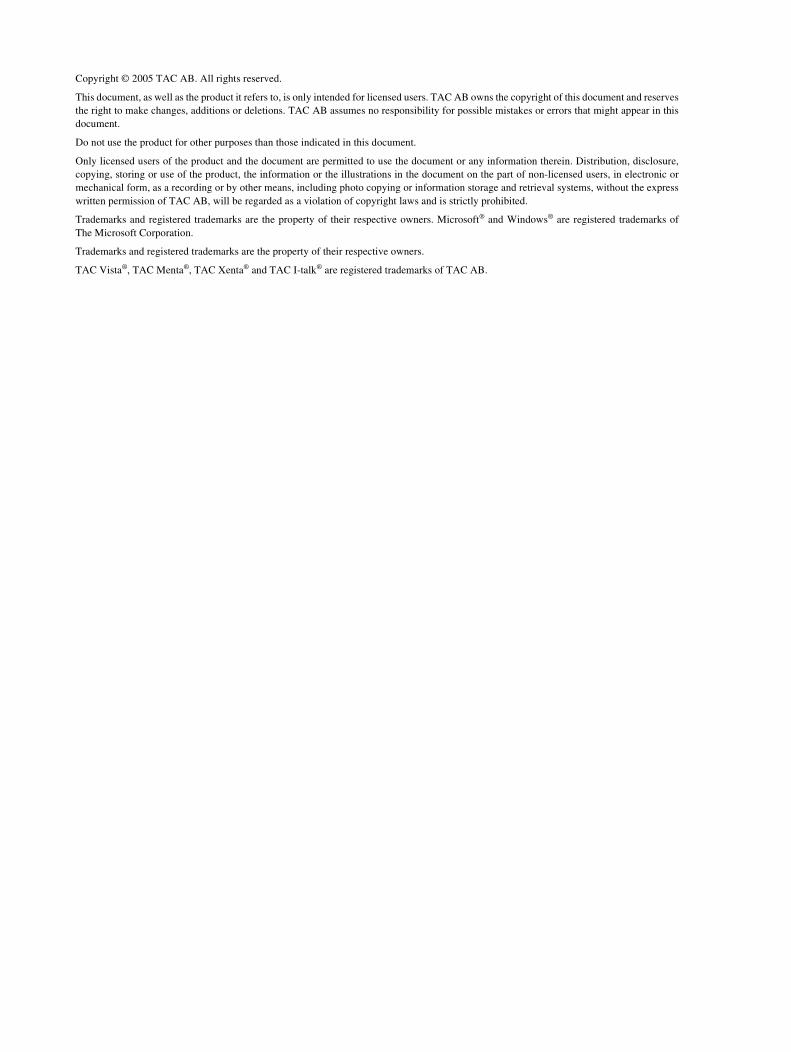
2 In the Address box, type the IP address of the Xenta 511, in our example 172.20.20.64, and then press Enter.
A security alert appears, similar to the one below, with information about the security certificate of the web site.
3 Click Yes.
The login page appears. You need a username and a password to log in. These are provided by your system manager.
4 In the Username box, type your username, in our example “acme”.
TAC AB, Feb 2005 13 (80)0-004-7846-2 (EN)
2 Connecting to the TAC Xenta 511 Presentation Systems, Operating TAC Xenta 511
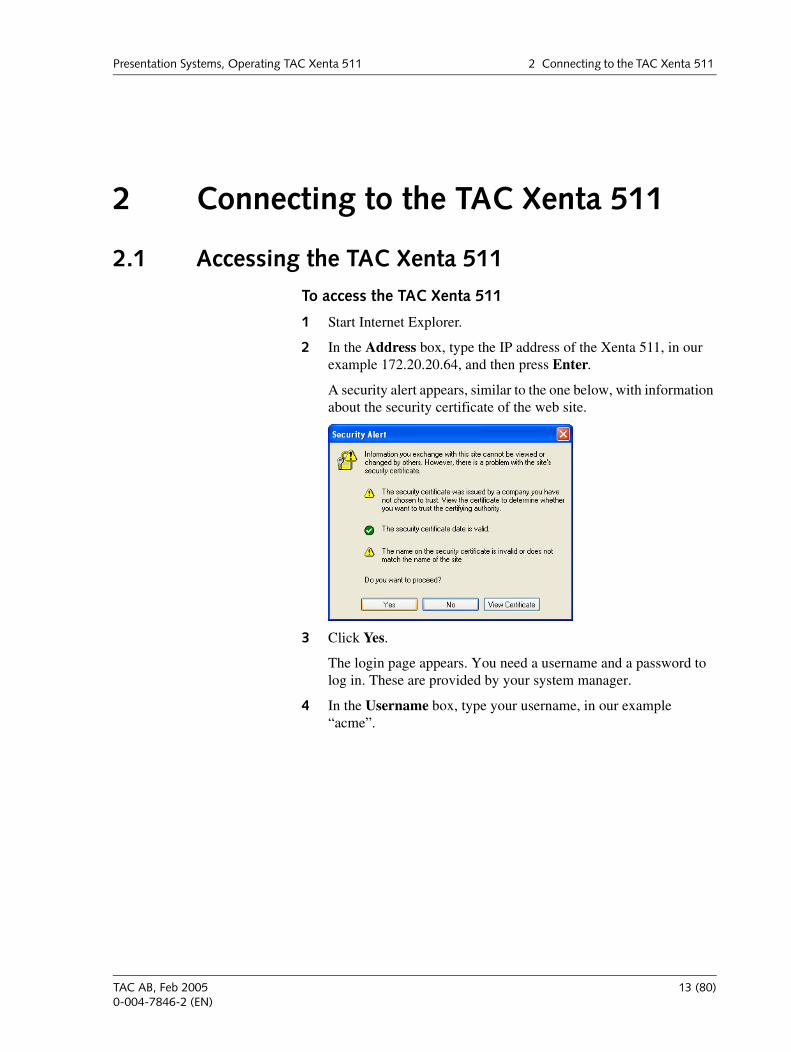
5 In the Password box type your password, in our example, type “acme77”.
6 Click Login.
The default web page for the user in the Xenta 511 appears in the browser.
Note
A java applet security dialog warning may be displayed. Click Yes in the dialog.
14 (80) TAC AB, Feb 20050-004-7846-2 (EN)

Presentation Systems, Operating TAC Xenta 511 2 Connecting to the TAC Xenta 511
2.1.1 Navigator Display in TAC Xenta 511
The navigator in the Xenta 511 can be displayed in two ways, either as a tree structure or as a menu. The setting is made in TAC Xbuilder, the Xenta 511 programming tool. This is usually the responsibility of the system administrator.
As most people prefer to use the tree structure, we have used it for dis-play purposes throughout the manual.
For more information about the different menus, please see the Engineering TAC Xenta 511 manual.
The different pages are reached by clicking on the menus, which lead to submenus and pages.
In common with standard web browsers, you can return to a previous page by clicking on the Back arrow in the top-left of your browser.
In the top-right of the Xenta 511 web frame there are three buttons:
• Click Home to return to the startpage.
• Click Refresh to reload current page.
• Click Logout to log out from Xenta 511.
The Navigator Setting Tree displays the site as a standard folder structure.
The Navigator Setting Menu is a more graphic pre-sentation.
Note
Depending on your access rights, set by the system administrator, some menus and pictures will be accessible and others will not.
TAC AB, Feb 2005 15 (80)0-004-7846-2 (EN)
2 Connecting to the TAC Xenta 511 Presentation Systems, Operating TAC Xenta 511
2.1.2 Online Help
• Click Help to open the online help.
• Close the Help window by clicking on the X-button in the upper right-hand corner of the window.
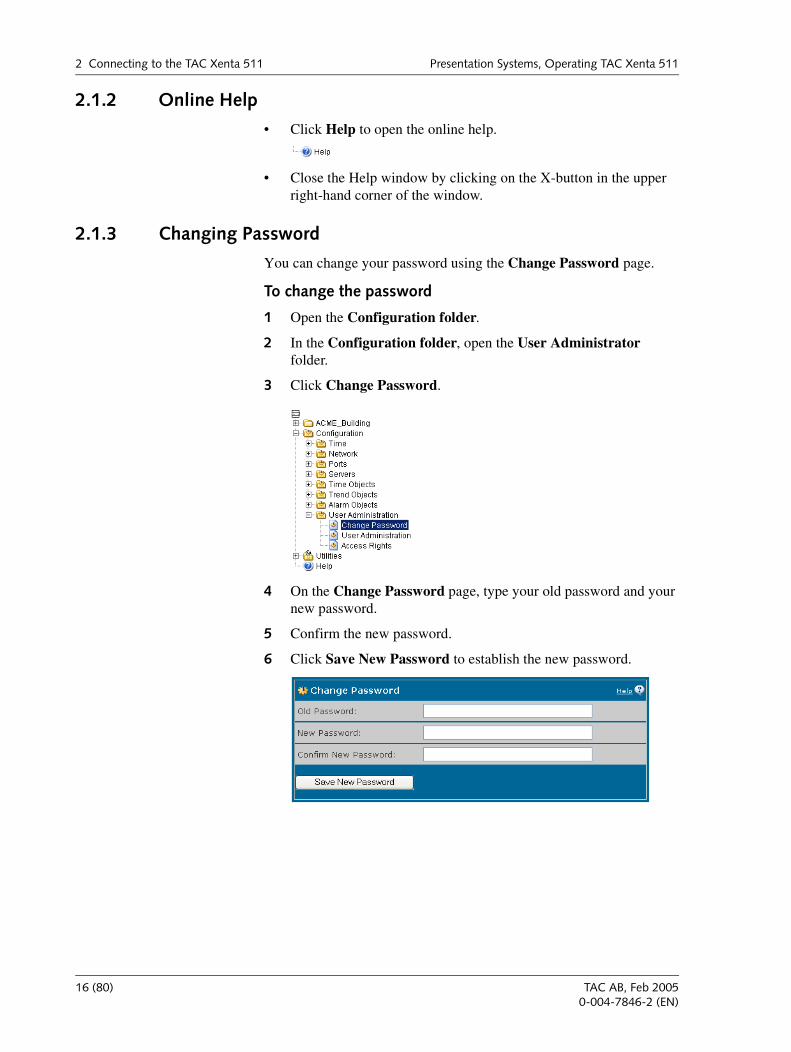
2.1.3 Changing Password
You can change your password using the Change Password page.
To change the password
1 Open the Configuration folder.
2 In the Configuration folder, open the User Administrator folder.
3 Click Change Password.
4 On the Change Password page, type your old password and your new password.
5 Confirm the new password.
6 Click Save New Password to establish the new password.
16 (80) TAC AB, Feb 20050-004-7846-2 (EN)

Presentation Systems, Operating TAC Xenta 511 2 Connecting to the TAC Xenta 511
2.1.4 Logging Out
• Click Logout to log out of the Xenta 511.
If you do not access the Xenta 511 within a given time frame (set by the system administrator) you are automatically logged out.
• Click Click here to login to log in to the Xenta 511 again.
TAC AB, Feb 2005 17 (80)0-004-7846-2 (EN)

2 Connecting to the TAC Xenta 511 Presentation Systems, Operating TAC Xenta 511
18 (80) TAC AB, Feb 20050-004-7846-2 (EN)
Presentation Systems, Operating TAC Xenta 511 3 Direct Supervision
3 Direct Supervision
3.1 GeneralBy selecting pages from the menus and submenus you can see different aspects of the site. These aspects include a floor overview, individual rooms, the entire process flow, or selected values displayed in tables. Depending on what your system administrator included in your web site, you may or may not have access to some of these pages.
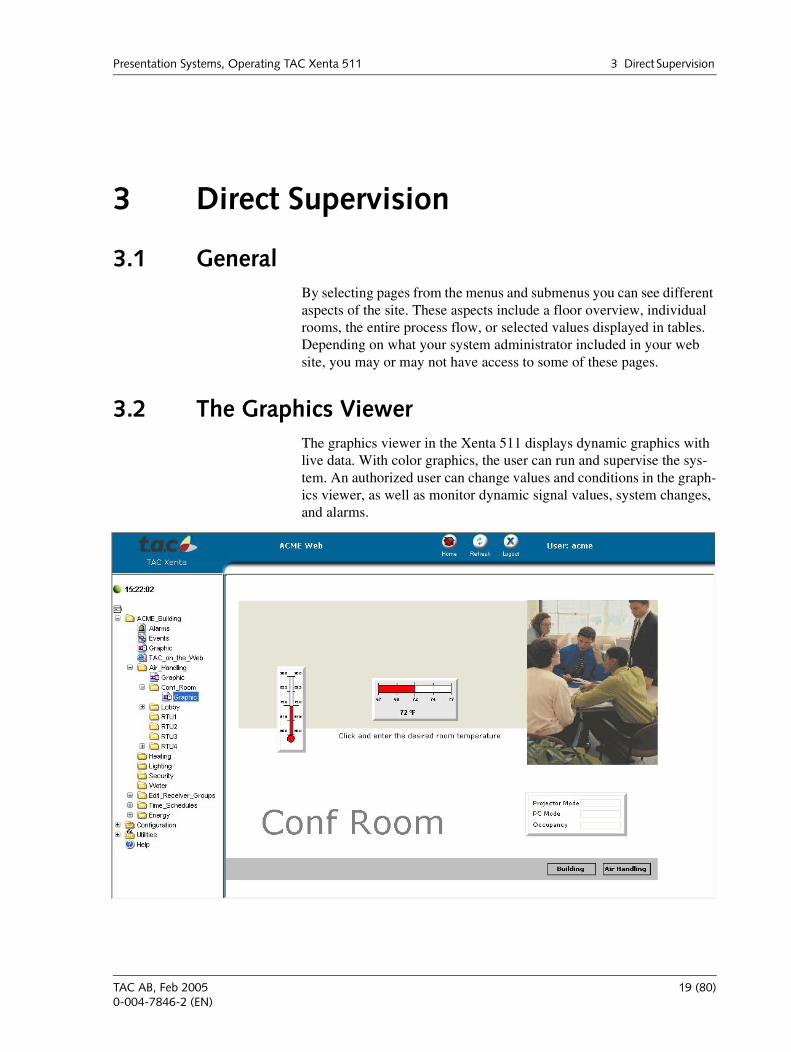
3.2 The Graphics ViewerThe graphics viewer in the Xenta 511 displays dynamic graphics with live data. With color graphics, the user can run and supervise the sys-tem. An authorized user can change values and conditions in the graph-ics viewer, as well as monitor dynamic signal values, system changes, and alarms.
TAC AB, Feb 2005 19 (80)0-004-7846-2 (EN)
3 Direct Supervision Presentation Systems, Operating TAC Xenta 511
3.2.1 Changing a Value
An authorized user can change a value or a condition in the color graph-ics (see example). Use the mouse pointer to see which values and con-ditions you can change.
The mouse pointer will change its appearance when moving across an object such as a link area or a value in the graphics viewer.
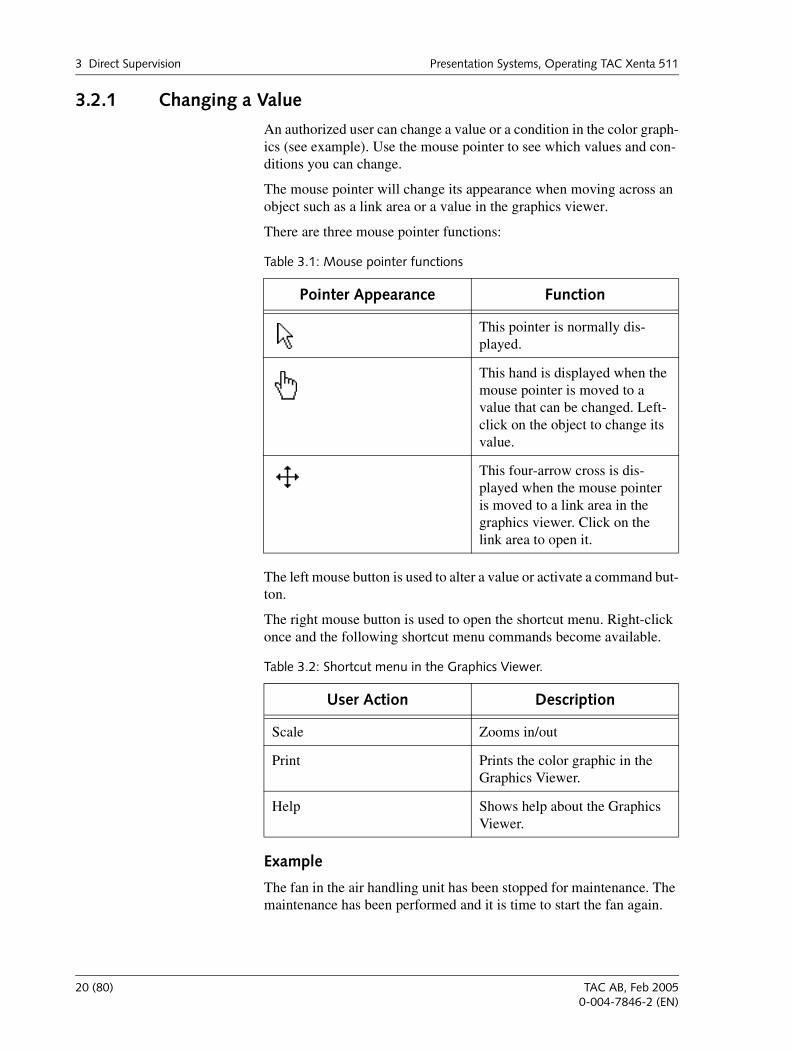
There are three mouse pointer functions:
The left mouse button is used to alter a value or activate a command but-ton.
The right mouse button is used to open the shortcut menu. Right-click once and the following shortcut menu commands become available.
Example
The fan in the air handling unit has been stopped for maintenance. The maintenance has been performed and it is time to start the fan again.
Table 3.1: Mouse pointer functions
Pointer Appearance Function
This pointer is normally dis-played.
This hand is displayed when the mouse pointer is moved to a value that can be changed. Left-click on the object to change its value.
This four-arrow cross is dis-played when the mouse pointer is moved to a link area in the graphics viewer. Click on the link area to open it.
Table 3.2: Shortcut menu in the Graphics Viewer.
User Action Description
Scale Zooms in/out
Print Prints the color graphic in the Graphics Viewer.
Help Shows help about the Graphics Viewer.
20 (80) TAC AB, Feb 20050-004-7846-2 (EN)
Presentation Systems, Operating TAC Xenta 511 3 Direct Supervision
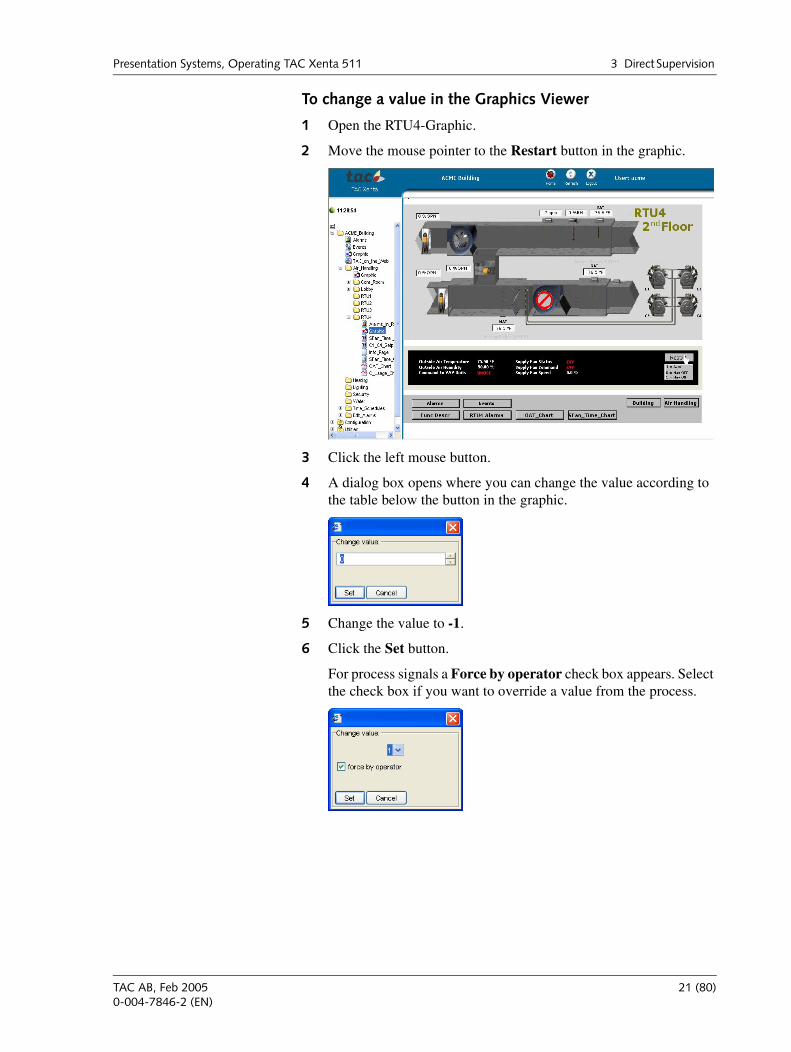
To change a value in the Graphics Viewer
1 Open the RTU4-Graphic.
2 Move the mouse pointer to the Restart button in the graphic.
3 Click the left mouse button.
4 A dialog box opens where you can change the value according to the table below the button in the graphic.
5 Change the value to -1.
6 Click the Set button.
For process signals a Force by operator check box appears. Select the check box if you want to override a value from the process.
TAC AB, Feb 2005 21 (80)0-004-7846-2 (EN)

3 Direct Supervision Presentation Systems, Operating TAC Xenta 511
The fan starts and the graphics viewer shows that the fan is running.
3.2.2 Link Areas
Link areas link to other HTML pages or viewers such as the Alarm Viewer and the Trend Viewer. When the mouse pointer is moved over a link area in the graphic viewer, it changes to the four-arrow cross.
• Click the link area to open it.
22 (80) TAC AB, Feb 20050-004-7846-2 (EN)
Presentation Systems, Operating TAC Xenta 511 3 Direct Supervision
3.3 Tables with Dynamic Contents
3.3.1 Values Pages
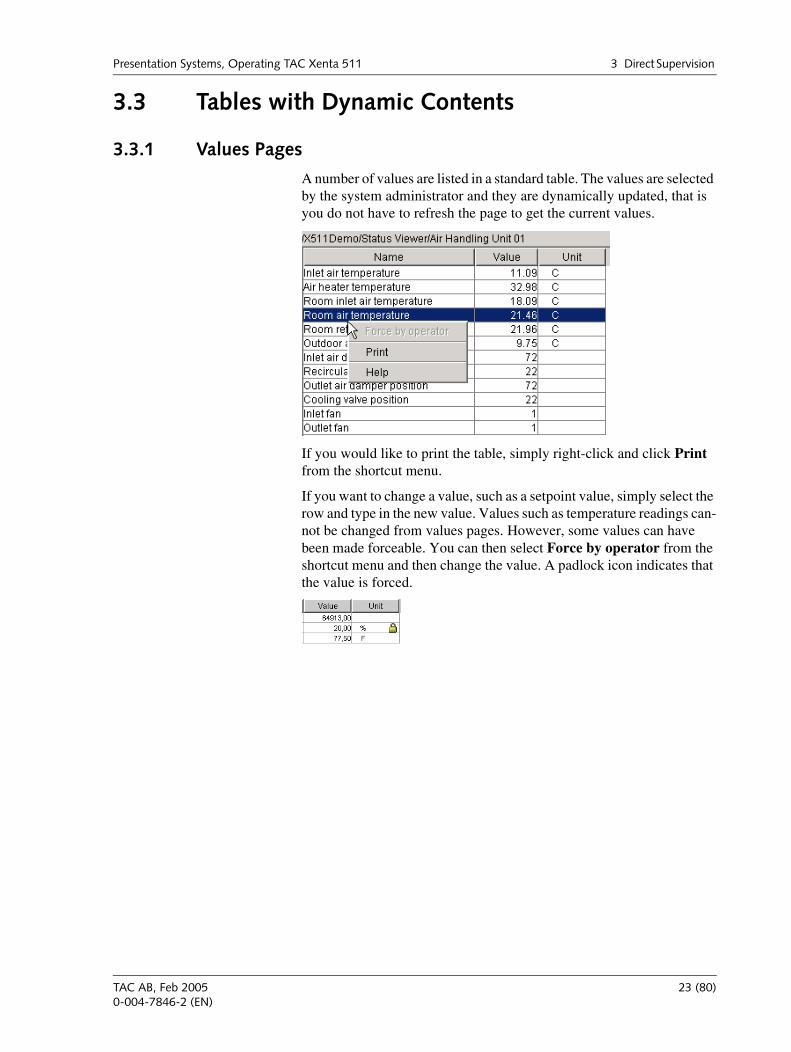
A number of values are listed in a standard table. The values are selected by the system administrator and they are dynamically updated, that is you do not have to refresh the page to get the current values.
If you would like to print the table, simply right-click and click Print from the shortcut menu.
If you want to change a value, such as a setpoint value, simply select the row and type in the new value. Values such as temperature readings can-not be changed from values pages. However, some values can have been made forceable. You can then select Force by operator from the shortcut menu and then change the value. A padlock icon indicates that the value is forced.
TAC AB, Feb 2005 23 (80)0-004-7846-2 (EN)
3 Direct Supervision Presentation Systems, Operating TAC Xenta 511
3.4 HTML Variable Pages
3.4.1 HTML Variable Pages
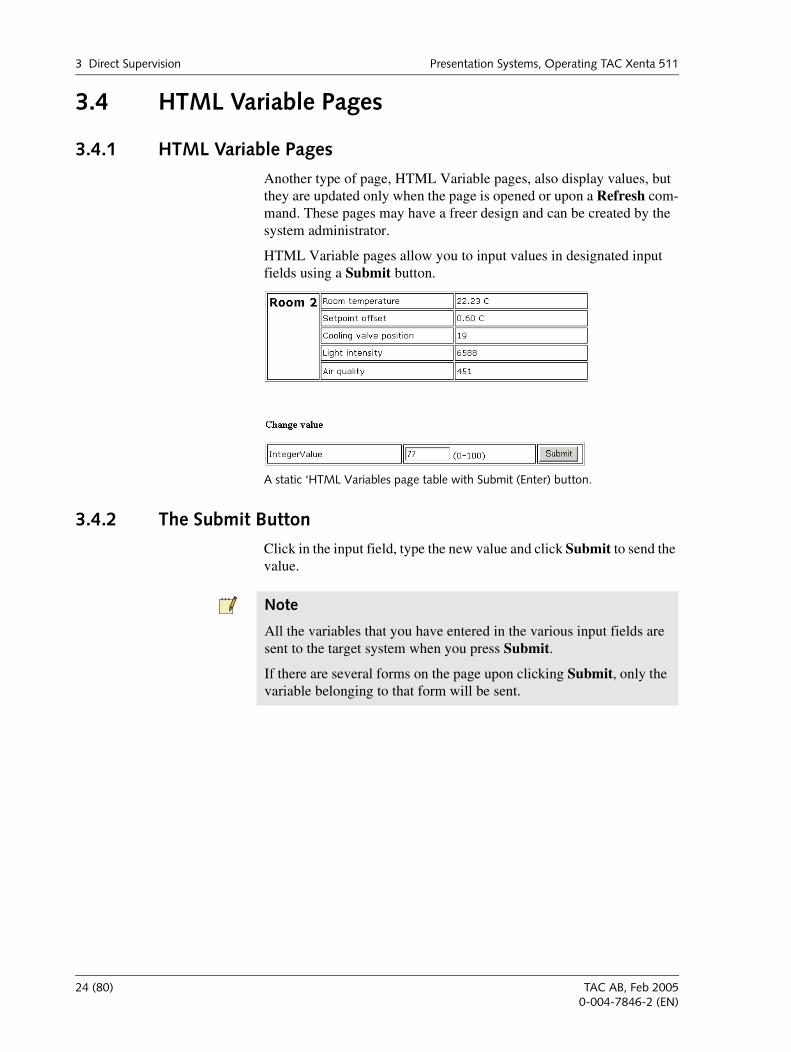
Another type of page, HTML Variable pages, also display values, but they are updated only when the page is opened or upon a Refresh com-mand. These pages may have a freer design and can be created by the system administrator.
HTML Variable pages allow you to input values in designated input fields using a Submit button.
3.4.2 The Submit Button
Click in the input field, type the new value and click Submit to send the value.
A static ‘HTML Variables page table with Submit (Enter) button.
Note
All the variables that you have entered in the various input fields are sent to the target system when you press Submit.
If there are several forms on the page upon clicking Submit, only the variable belonging to that form will be sent.
24 (80) TAC AB, Feb 20050-004-7846-2 (EN)

Presentation Systems, Operating TAC Xenta 511 4 Alarm and Event Monitoring
4 Alarm and Event Monitoring
4.1 The Alarm ViewerThe Alarm Viewer displays the status of alarms in the system. Alarm conditions, alarm texts and other alarm specific data must be pro-grammed by an engineer using TAC XBuilder. Typical alarms include high temperature, low temperature and device offline.
The alarms are presented in a table. The user can read, acknowledge, block, sort and view the history of the alarms. The Alarm Viewer con-sists of two different views: Alarm Stack and Alarm History.
4.1.1 Alarm Stack View
The following figure shows an example of the Alarm Stack View.
The column widths of the table are adjustable. Move the cursor to the line between the columns in the table header. When the cursor changes to a double arrow, hold down the left mouse button and drag the column to the required size.
Note
The time it takes for the Alarm Viewer to open is dependant on the number of alarms active in the system.
TAC AB, Feb 2005 25 (80)0-004-7846-2 (EN)

4 Alarm and Event Monitoring Presentation Systems, Operating TAC Xenta 511
4.1.2 Filtering and Sorting Alarms
The alarms in the Alarm Viewer are displayed in rows. Alarm states are further explained in Section 4.2, “How Alarm States Change”, on page 30. The alarm list can be set to show selected categories of alarms. A shortcut menu is available for accessing other Alarm Viewer com-mands. Right-click anywhere in the Alarm Viewer to open the shortcut menu. The menu includes the following commands:
Table 4.1: Shortcut menu commands
Selecting Result
Acknowledge Acknowledges the selected alarm.
Block Disables the selected alarm from reoccurring.
Unblock Enables the selected alarm.
Sort (the alarms) • By state
• By priority
• By identification time
• By ID
Show (the indicated items) • Active unacknowledged
• Passive unacknowledged
• Active acknowledged
• Blocked
• Not active
• Row number
• Grid
Print Prints the alarm stack view.
Help Opens the Help about the Alarm Viewer.
Alarm History Displays the Alarm History log view.
26 (80) TAC AB, Feb 20050-004-7846-2 (EN)

Presentation Systems, Operating TAC Xenta 511 4 Alarm and Event Monitoring
4.1.3 The Alarm Symbols
A summary of the Alarm Viewer symbols and their meaning is given below:
Table 4.2: The alarm symbols in the Alarm Viewer
Alarm Symbol Alarm Description
The active, unacknowledged alarms are shown in red in the State column. They are identified with their Identification time, that is, the time when they are tripped.
The passive (reset), unacknowledged, alarms are shown in red in the State column. If the event that caused the alarm is corrected (natu-rally or by manually correcting the issue) before the alarm has been acknowledged, it becomes passive and unacknowledged (red, with a dash).
The active, acknowledged alarms are shown in green in the State column. After viewing the alarm information, the user can acknowl-edge the active alarm and it becomes active and acknowledged (green, with checkmark). The Identification time now shows the time when the alarm was acknowledged.
Blocked alarms are shown as a red x on a white background in the State column. When the event that caused the alarm has been cor-rected (the alarm is passive) and the alarm has been acknowledged, the alarm will disappear from the alarm stack. Under special circum-stances it may be necessary to temporarily block an alarm (for example, during commis-sioning). The Identification time displays the time when the alarm was blocked.
A blocked alarm will not re-occur in the Alarm Stack. The alarm must be unblocked to be activated again.
Caution
Blocking alarms is not recommended, as vital information may be missed.
TAC AB, Feb 2005 27 (80)0-004-7846-2 (EN)

4 Alarm and Event Monitoring Presentation Systems, Operating TAC Xenta 511
4.1.4 Alarm History View
The Alarm History view uses the Event Viewer to display a log of all alarms, resets, acknowledgements, blockings and unblockings of the alarm that has been selected.
For information about the Event Viewer, see Section 4.3.1, “Event View”, on page 31.
4.1.5 The Static Alarm Page
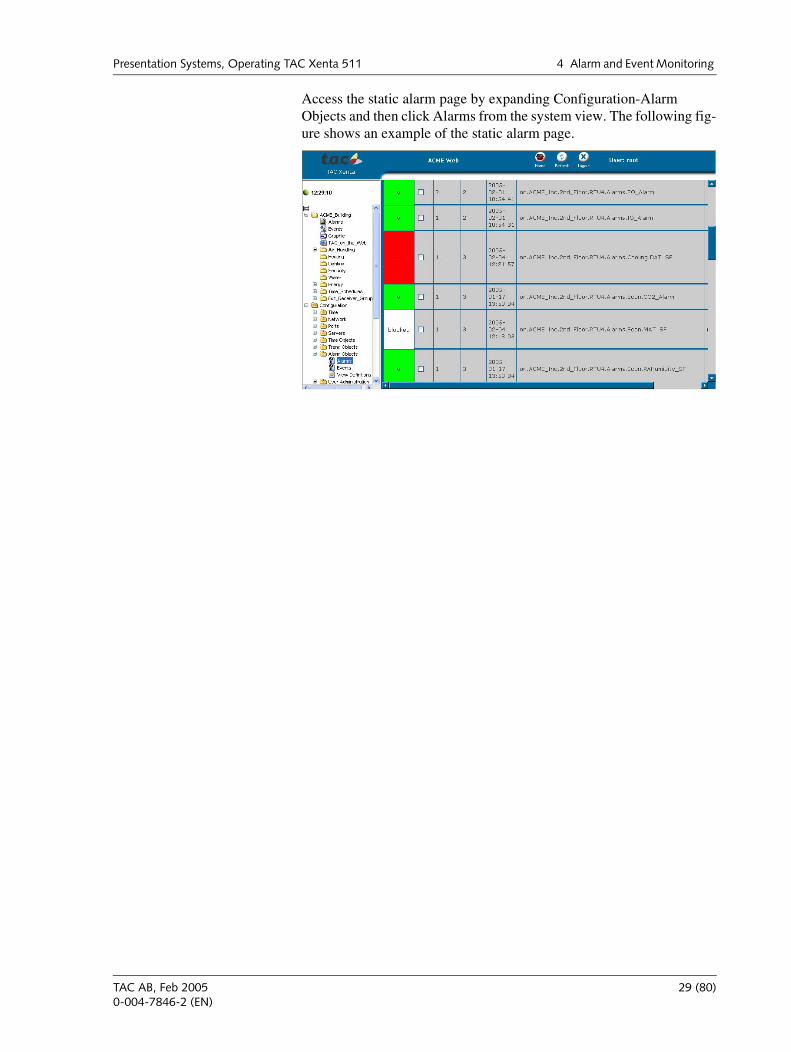
The static alarm page displays a snapshot of system alarms. The static information is created when you first load the page, and it will be rebuilt each time you refresh the page. You can read and acknowledge alarms from within the static alarm page, however, sorting, and filtering func-tions are not available.
Tip
If an alarm is deleted from the XBuilder project, for example, during commissioning, and the alarm is still present in the Alarm Stack, it cannot be removed by acknowledging the alarm. Blocking and then unblocking the alarm removes it from the Alarm Stack.
Important
The static alarm page is only available to the system administrator and users with “Operator” privileges. Users with “Web User” privileges cannot access the static event page.
28 (80) TAC AB, Feb 20050-004-7846-2 (EN)
Presentation Systems, Operating TAC Xenta 511 4 Alarm and Event Monitoring
Access the static alarm page by expanding Configuration-Alarm Objects and then click Alarms from the system view. The following fig-ure shows an example of the static alarm page.
TAC AB, Feb 2005 29 (80)0-004-7846-2 (EN)

4 Alarm and Event Monitoring Presentation Systems, Operating TAC Xenta 511
4.2 How Alarm States ChangeOne way to understand the different types of alarm is to study how the state of an alarm can change.
An event is in a Normal state when no alarm has tripped. When an alarm trips, the state changes from Normal to Alarm, and the alarm is dis-played in red in the Alarm Viewer.
When the alarm is acknowledged, the row stays red and a dash appears in the alarm viewer. If an active alarm is reset before acknowledgement, the row will turn green and a check mark well appear. Acknowledged alarms disappear from the alarm viewer when reset.
In the Xenta 511, it is also possible to set the alarm so that it is automat-ically acknowledged when tripped. It will then appear in red with a dash.
Whatever the active state, alarms can always be blocked. The alarm is disabled while blocked, which means notification of that alarm will not reoccur. You must unblock the alarm to re-enable it. Right-click any-where in the Alarm Stack window and select Block/Unblock in the shortcut menu.
������
����������
���������������������� ��
������������������ ��
�������������
�����������
���������� ��������
������� ��
����������
��������������� ��
����
����
����
�������������������������� ��
Alarm state transitions.
30 (80) TAC AB, Feb 20050-004-7846-2 (EN)

Presentation Systems, Operating TAC Xenta 511 4 Alarm and Event Monitoring
4.3 The Event ViewerDynamic event pages displays the Event Viewer which displays a peri-odically-updated table of events in the system. You can use different conditions to filter the events in the table.
4.3.1 Event View
The following figure shows an example of the Event Viewer.
The column widths of the table are adjustable. Move the cursor to the line between the columns in the table header. When the cursor changes to a double arrow, hold down the left mouse button and drag the column to the required size.
TAC AB, Feb 2005 31 (80)0-004-7846-2 (EN)
4 Alarm and Event Monitoring Presentation Systems, Operating TAC Xenta 511
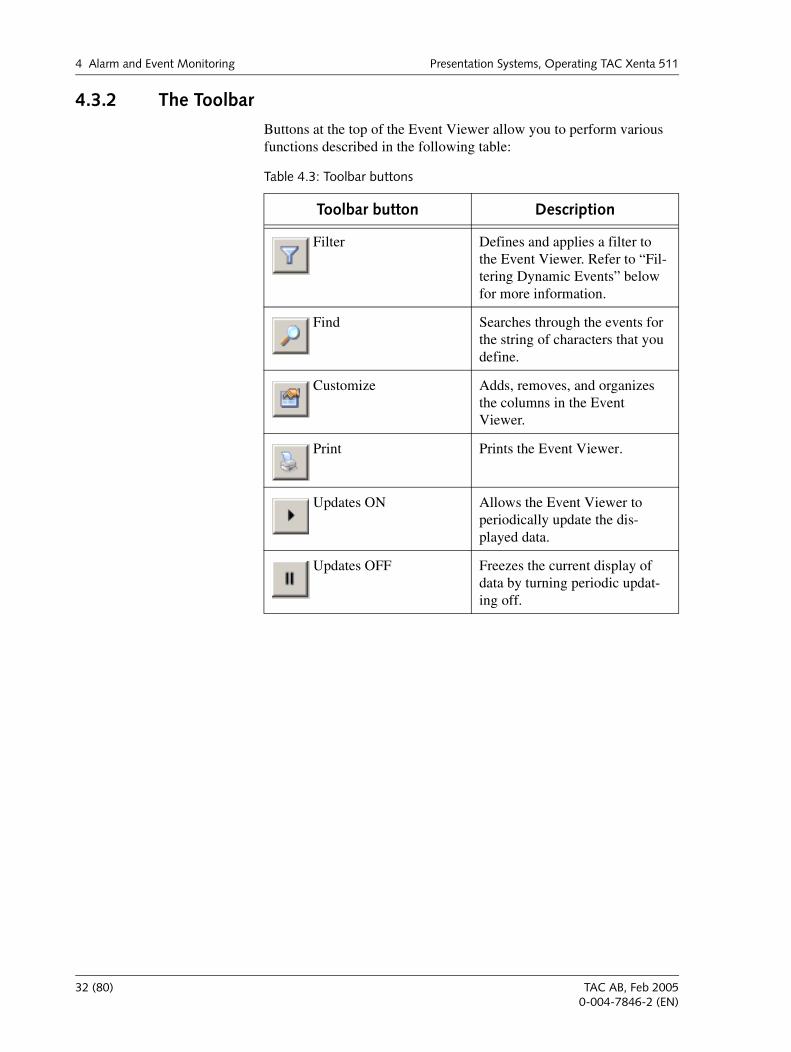
4.3.2 The Toolbar
Buttons at the top of the Event Viewer allow you to perform various functions described in the following table:
Table 4.3: Toolbar buttons
Toolbar button Description
Filter Defines and applies a filter to the Event Viewer. Refer to “Fil-tering Dynamic Events” below for more information.
Find Searches through the events for the string of characters that you define.
Customize Adds, removes, and organizes the columns in the Event Viewer.
Print Prints the Event Viewer.
Updates ON Allows the Event Viewer to periodically update the dis-played data.
Updates OFF Freezes the current display of data by turning periodic updat-ing off.
32 (80) TAC AB, Feb 20050-004-7846-2 (EN)
Presentation Systems, Operating TAC Xenta 511 4 Alarm and Event Monitoring
4.3.3 Filtering Dynamic Events
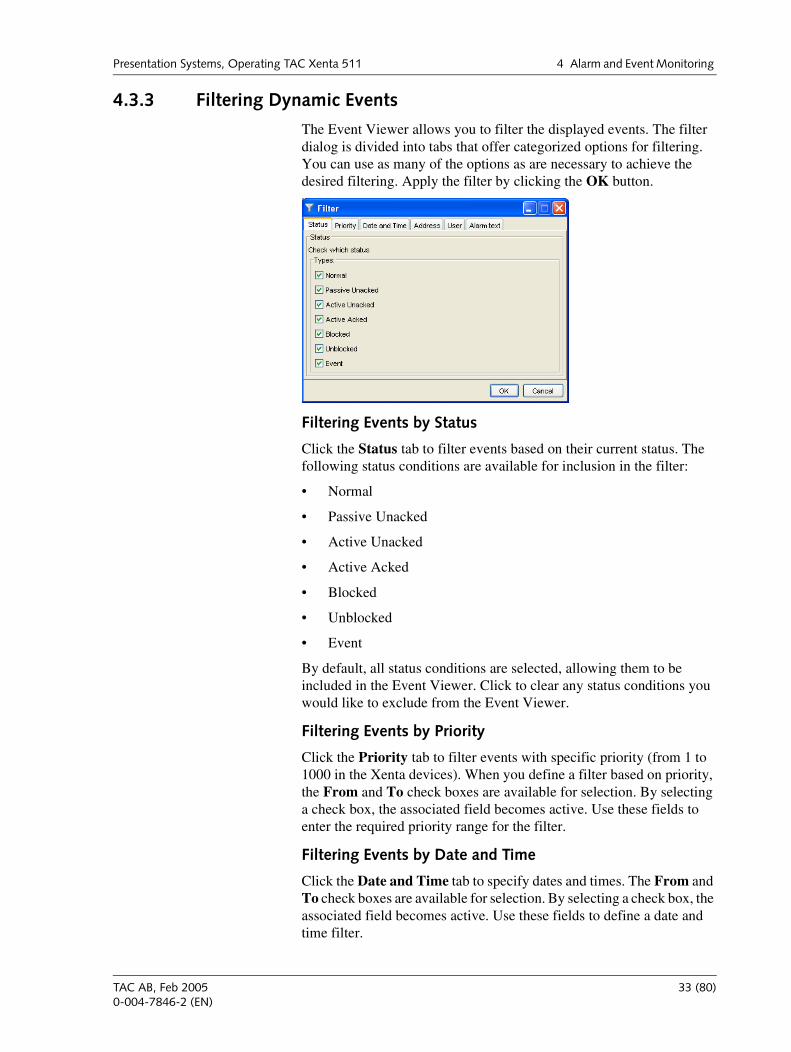
The Event Viewer allows you to filter the displayed events. The filter dialog is divided into tabs that offer categorized options for filtering. You can use as many of the options as are necessary to achieve the desired filtering. Apply the filter by clicking the OK button.
Filtering Events by Status
Click the Status tab to filter events based on their current status. The following status conditions are available for inclusion in the filter:
• Normal
• Passive Unacked
• Active Unacked
• Active Acked
• Blocked
• Unblocked
• Event
By default, all status conditions are selected, allowing them to be included in the Event Viewer. Click to clear any status conditions you would like to exclude from the Event Viewer.
Filtering Events by Priority
Click the Priority tab to filter events with specific priority (from 1 to 1000 in the Xenta devices). When you define a filter based on priority, the From and To check boxes are available for selection. By selecting a check box, the associated field becomes active. Use these fields to enter the required priority range for the filter.
Filtering Events by Date and Time
Click the Date and Time tab to specify dates and times. The From and To check boxes are available for selection. By selecting a check box, the associated field becomes active. Use these fields to define a date and time filter.
TAC AB, Feb 2005 33 (80)0-004-7846-2 (EN)
4 Alarm and Event Monitoring Presentation Systems, Operating TAC Xenta 511
By default, the current date and time are displayed in each field. To define your own dates and times you highlight and adjust portions of the current settings.
Filtering Events by Address
Click the Address tab to create a filter that is based on a string of text appearing within the Address column (the ID column in the Alarm Viewer). Filter for an address by specifying all or part of the desired address.
Wildcard characters can be used when filtering text strings. Type a question mark (?) to match any single character, or type an asterisk (*) to match any number of characters.
For example, *A? will show all events that have the text “AI” or “AO” and so on at the end of the address and *5?4* will show all events con-taining a string such as 504, 514, 524, 534, 544, …, 594.
Filtering Events by User
Click the User tab to filter events with a specific user involved. Wild-card characters can be used. For example, the filter F* displays all events involving users that begin with the letter F.
Filtering Events by Alarm Text
Click the Alarm text tab to filter specific alarm texts. Wildcard charac-ters can be used. For example, the filter *RTU4* displays all events concerning the RTU4 (roof-top unit 4) device.
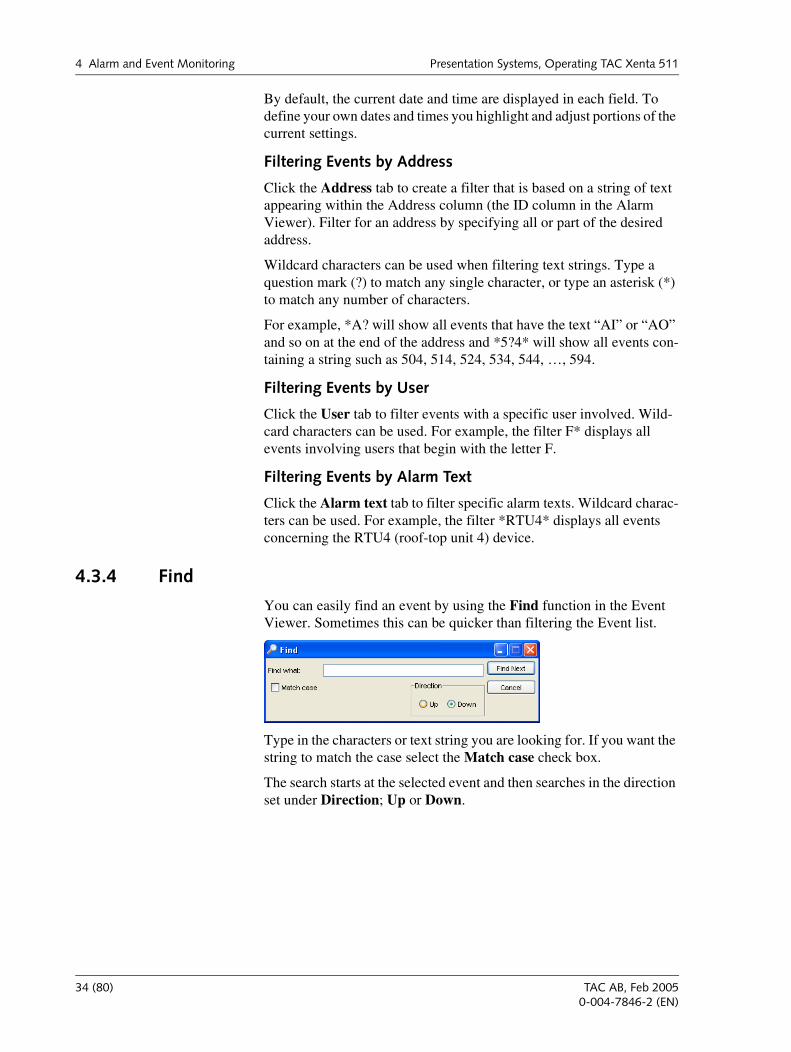
4.3.4 Find
You can easily find an event by using the Find function in the Event Viewer. Sometimes this can be quicker than filtering the Event list.
Type in the characters or text string you are looking for. If you want the string to match the case select the Match case check box.
The search starts at the selected event and then searches in the direction set under Direction; Up or Down.
34 (80) TAC AB, Feb 20050-004-7846-2 (EN)
Presentation Systems, Operating TAC Xenta 511 4 Alarm and Event Monitoring
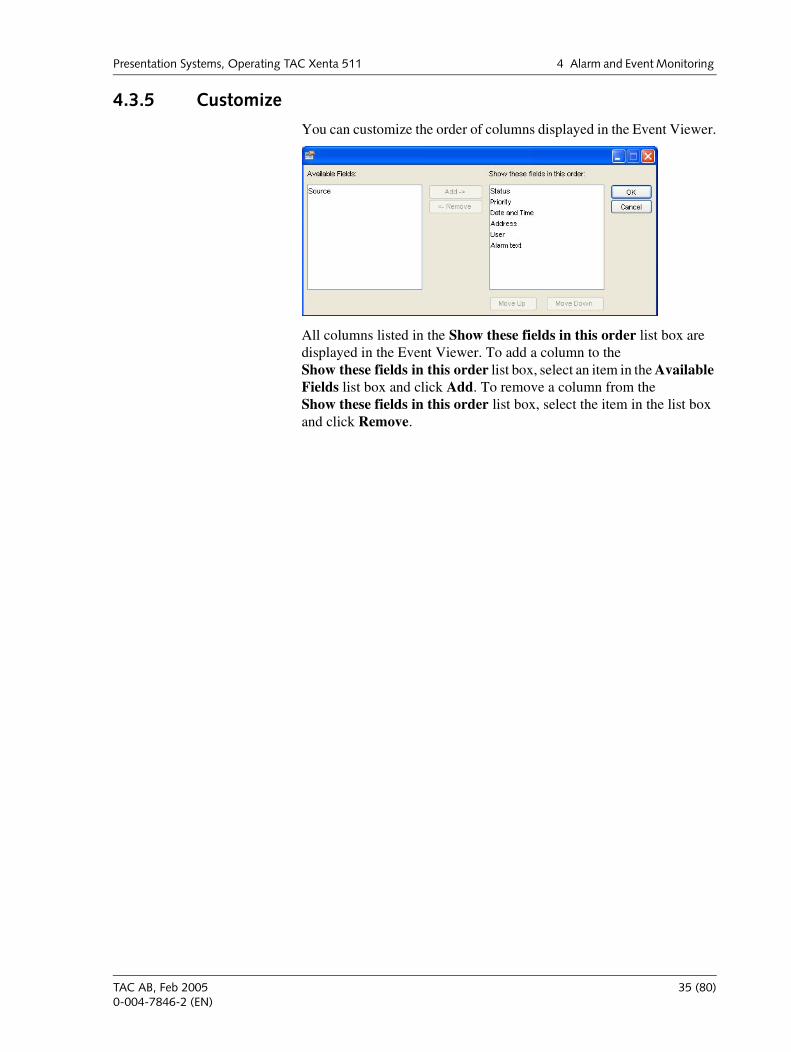
4.3.5 Customize
You can customize the order of columns displayed in the Event Viewer.
All columns listed in the Show these fields in this order list box are displayed in the Event Viewer. To add a column to the Show these fields in this order list box, select an item in the Available Fields list box and click Add. To remove a column from the Show these fields in this order list box, select the item in the list box and click Remove.
TAC AB, Feb 2005 35 (80)0-004-7846-2 (EN)

4 Alarm and Event Monitoring Presentation Systems, Operating TAC Xenta 511
4.4 The Static Event PageThe static event page displays a snapshot of system events. The static information is created when you first load the page, and is rebuilt each time you refresh the page. You can read events from within the static event page, but sorting and filtering functions are not available.
Access the static event page by expanding Configuration-Alarm Objects and then click Events from the system view. The following fig-ure shows an example of the static event page.
Important
The static event page is only available to the system administrator and users with “Operator” privileges. Users with “Web User” privileges cannot access the static event page.
36 (80) TAC AB, Feb 20050-004-7846-2 (EN)

Presentation Systems, Operating TAC Xenta 511 5 Trend Charts
5 Trend Charts
5.1 The Trend ViewerThe Trend Viewer in Xenta 511 displays historical logged data from the defined trend log objects in the system. The user can change the scale of the x-axis and the y-axis, select which trends to display, zoom in and out, reload data, print the overview, list the trend log data in a table, and activate or deactivate the grid in the Trend Viewer.
There are three parts available in the Trend Viewer:
• Chart area
• Toolbar
• Table data
5.1.1 The Chart Area
The chart area shows the logged data as a trend chart.
TAC AB, Feb 2005 37 (80)0-004-7846-2 (EN)
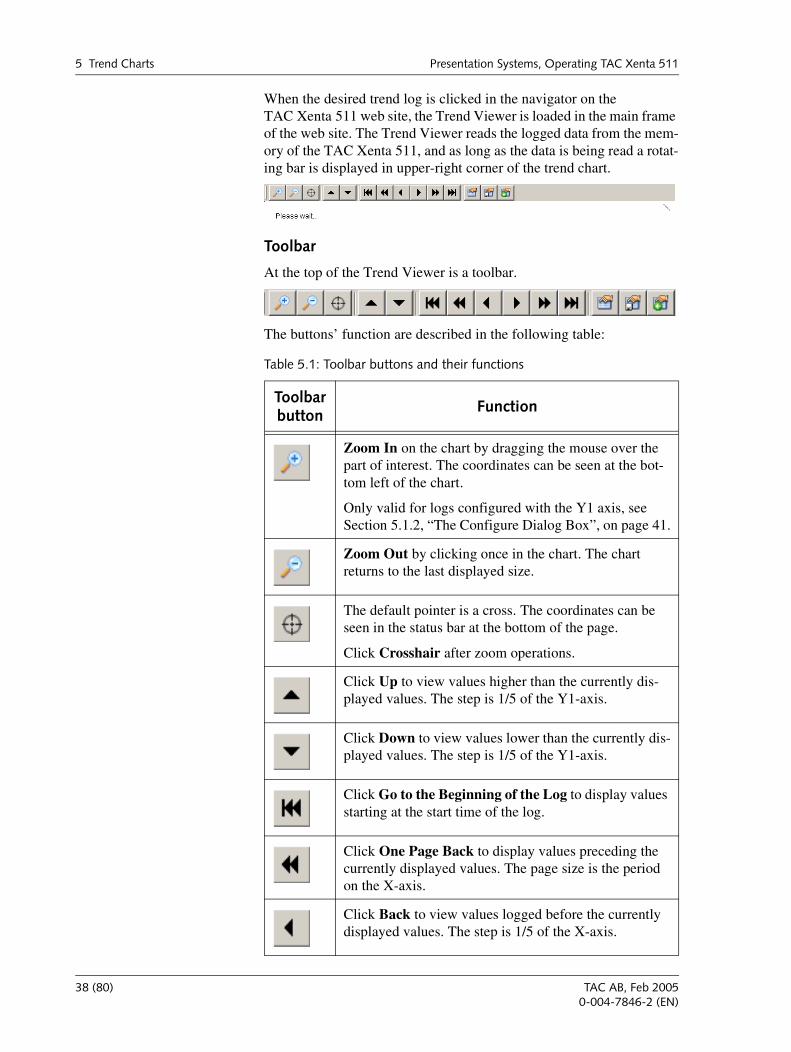
5 Trend Charts Presentation Systems, Operating TAC Xenta 511
When the desired trend log is clicked in the navigator on the TAC Xenta 511 web site, the Trend Viewer is loaded in the main frame of the web site. The Trend Viewer reads the logged data from the mem-ory of the TAC Xenta 511, and as long as the data is being read a rotat-ing bar is displayed in upper-right corner of the trend chart.
Toolbar
At the top of the Trend Viewer is a toolbar.
The buttons’ function are described in the following table:
Table 5.1: Toolbar buttons and their functions
Toolbar button Function
Zoom In on the chart by dragging the mouse over the part of interest. The coordinates can be seen at the bot-tom left of the chart.
Only valid for logs configured with the Y1 axis, see Section 5.1.2, “The Configure Dialog Box”, on page 41.
Zoom Out by clicking once in the chart. The chart returns to the last displayed size.
The default pointer is a cross. The coordinates can be seen in the status bar at the bottom of the page.
Click Crosshair after zoom operations.
Click Up to view values higher than the currently dis-played values. The step is 1/5 of the Y1-axis.
Click Down to view values lower than the currently dis-played values. The step is 1/5 of the Y1-axis.
Click Go to the Beginning of the Log to display values starting at the start time of the log.
Click One Page Back to display values preceding the currently displayed values. The page size is the period on the X-axis.
Click Back to view values logged before the currently displayed values. The step is 1/5 of the X-axis.
38 (80) TAC AB, Feb 20050-004-7846-2 (EN)

Presentation Systems, Operating TAC Xenta 511 5 Trend Charts
Mouse Pointers
There are three mouse pointer functions, which appear when you click the Zoom and Cross buttons on the toolbar.
Click Forward to view values logged later than the cur-rently displayed values. The step is 1/5 of the X-axis.
Click One Page Forward to display values following the currently displayed values. The page size is the period on the X-axis.
Click Go to the End of the Log to display the last logged value and the preceding values.
Click Configure to change the appearance of the trend chart. The configured view remains as long as the cur-rent trend chart is displayed. Click Refresh in the browser to reload the trend chart with the saved config-uration.
Click Save Current Configuration to save the current appearance of the trend chart. The trend chart opens with this appearance the next time the trend chart is reloaded.
Click Restore Configured View to restore the configu-ration set in the Configure dialog box. You typically use this after the zoom or stepping functions have been used.
Table 5.2: Pointer appearances
Pointer appearances Function
The coordinates can be seen in the status bar at the bottom of the page.
Zoom in by dragging the mouse over the part of interest.
Zoom out by clicking once in the chart
Table 5.1: Toolbar buttons and their functions (Contd.)
Toolbar button
Function
TAC AB, Feb 2005 39 (80)0-004-7846-2 (EN)

5 Trend Charts Presentation Systems, Operating TAC Xenta 511
Shortcut Menu
Right-click anywhere in the chart area to get the following shortcut menu commands:
Table 5.3: Trend chart shortcut menu commands
Command Function
Configure Same as for the toolbar button described in Table 5.1, “Toolbar buttons and their functions”.
Save Current Configuration Same as for the toolbar button described in Table 5.1, “Toolbar buttons and their functions”.
Restore Configured View Same as for the toolbar button described in Table 5.1, “Toolbar buttons and their functions”.
Show Boolean Reference Lines Displays a reference line in the Trend Chart for every boolean trend log to facilitate the read-ability of the chart.
Show Grid Displays a grid in the Trend Chart to facilitate the readabil-ity of the chart.
Print Prints the trend chart.
Help Displays help about the Trend Viewer.
40 (80) TAC AB, Feb 20050-004-7846-2 (EN)

Presentation Systems, Operating TAC Xenta 511 5 Trend Charts
5.1.2 The Configure Dialog Box
The Configure dialog box is used to customize the Trend Chart proper-ties.
X-Axis Part of Log Being Viewed
• Number of periods – Type the number of periods to be displayed on the x-axis, for example 5 days (if days is selected in the Period property).
• Periods – Select the period to be displayed on the x-axis. Com-bined with the Number of periods value above, the x-axis can display trend data ranging from one minute to several years.
• Show full period – Typically used if you want the x-axis to dis-play the last unit of the period as a whole or not. For example, if a trend log is viewed on a Wednesday and the trend chart is set to display one week, selecting the Show full period check box makes the x-axis display the whole week including the remaining days of the week (where, of course, no log data has as yet been recorded).
Bar Graph Settings
• X axis (time) scale – For bar graph presentation you can present bars for hours, days, weeks, months, or years, depending on the log interval of the trend log.
TAC AB, Feb 2005 41 (80)0-004-7846-2 (EN)
5 Trend Charts Presentation Systems, Operating TAC Xenta 511
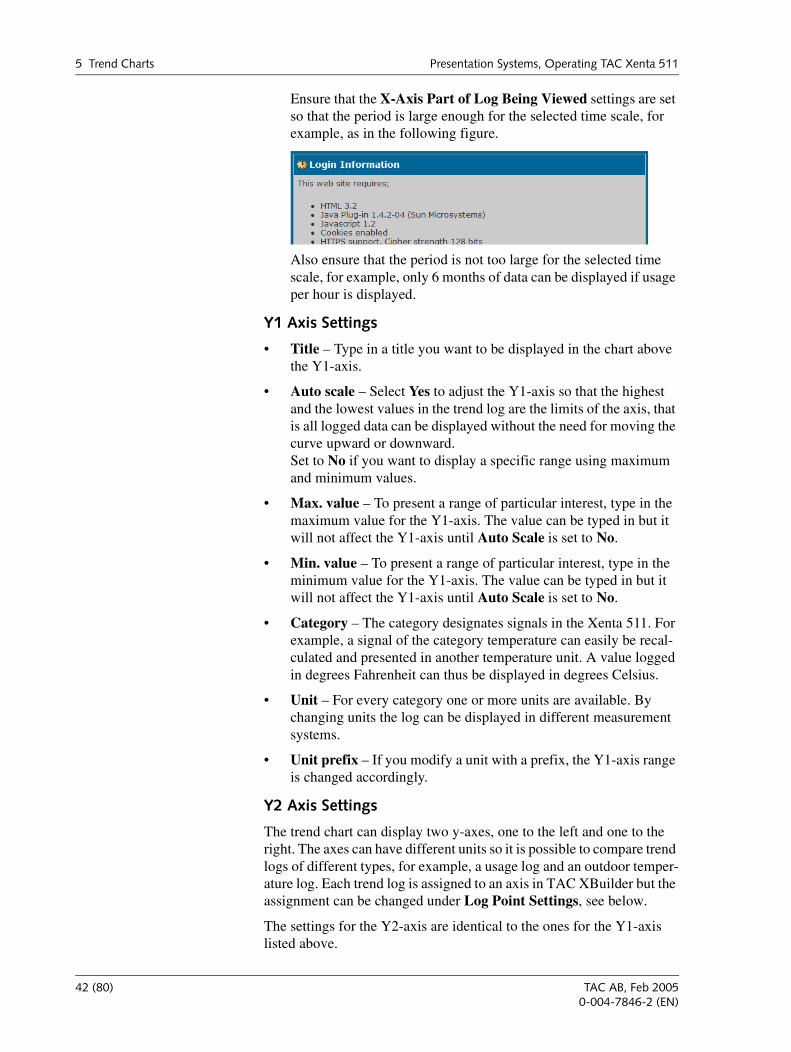
Ensure that the X-Axis Part of Log Being Viewed settings are set so that the period is large enough for the selected time scale, for example, as in the following figure.
Also ensure that the period is not too large for the selected time scale, for example, only 6 months of data can be displayed if usage per hour is displayed.
Y1 Axis Settings
• Title – Type in a title you want to be displayed in the chart above the Y1-axis.
• Auto scale – Select Yes to adjust the Y1-axis so that the highest and the lowest values in the trend log are the limits of the axis, that is all logged data can be displayed without the need for moving the curve upward or downward.Set to No if you want to display a specific range using maximum and minimum values.
• Max. value – To present a range of particular interest, type in the maximum value for the Y1-axis. The value can be typed in but it will not affect the Y1-axis until Auto Scale is set to No.
• Min. value – To present a range of particular interest, type in the minimum value for the Y1-axis. The value can be typed in but it will not affect the Y1-axis until Auto Scale is set to No.
• Category – The category designates signals in the Xenta 511. For example, a signal of the category temperature can easily be recal-culated and presented in another temperature unit. A value logged in degrees Fahrenheit can thus be displayed in degrees Celsius.
• Unit – For every category one or more units are available. By changing units the log can be displayed in different measurement systems.
• Unit prefix – If you modify a unit with a prefix, the Y1-axis range is changed accordingly.
Y2 Axis Settings
The trend chart can display two y-axes, one to the left and one to the right. The axes can have different units so it is possible to compare trend logs of different types, for example, a usage log and an outdoor temper-ature log. Each trend log is assigned to an axis in TAC XBuilder but the assignment can be changed under Log Point Settings, see below.
The settings for the Y2-axis are identical to the ones for the Y1-axis listed above.
42 (80) TAC AB, Feb 20050-004-7846-2 (EN)
Presentation Systems, Operating TAC Xenta 511 5 Trend Charts
Log Point Settings
Each trend log assigned to the trend chart, has the following settings:
• Log point – The log point assigned to the trend chart. This is con-figured in TAC XBuilder and cannot be changed in the trend chart.
• Description – At the bottom of the trend chart are the logs assigned to the chart listed. The listed name of a log can be changed in the Description box. Any change takes affect after the configuration is saved and the trend chart is reloaded.
• Unit – The unit in which the trend log data is saved is displayed in a read-only box. To display the log in another unit, see Y1 Axis Settings above.
• Axis – Select which of the two y-axes that is used to present the trend log.
• Chart type – The chart type, Line or Bar, is decided in TAC XBuilder and depends on the type of trend log. For a value log the type cannot be changed in the trend chart. For a meter read-ing log the data can be displayed either as bars (default) or as a line.
• Log type – The log type, Logged value or Meter reading, is set in TAC XBuilder and depends on the type of trend log and cannot be changed in the trend chart.
• Show value markers – Display a marker on the line for every logged value. Only available for logged values (not for bar graphs).
• Show log – This setting is the same as the check box for the log point at the bottom of the trend chart. Clicking Yes in the Show log list has the same effect as selecting the check box in the trend chart; it presents the line in the chart. Clicking No in the list removes the line from the chart.
• Color – You can change the color of the line for each trend log. Pick a color from the color palette or type in values for the RGB components. Save the configuration and then reload the trend chart for the change to take affect.
TAC AB, Feb 2005 43 (80)0-004-7846-2 (EN)
5 Trend Charts Presentation Systems, Operating TAC Xenta 511
5.1.3 Viewing Logged Data in Tables
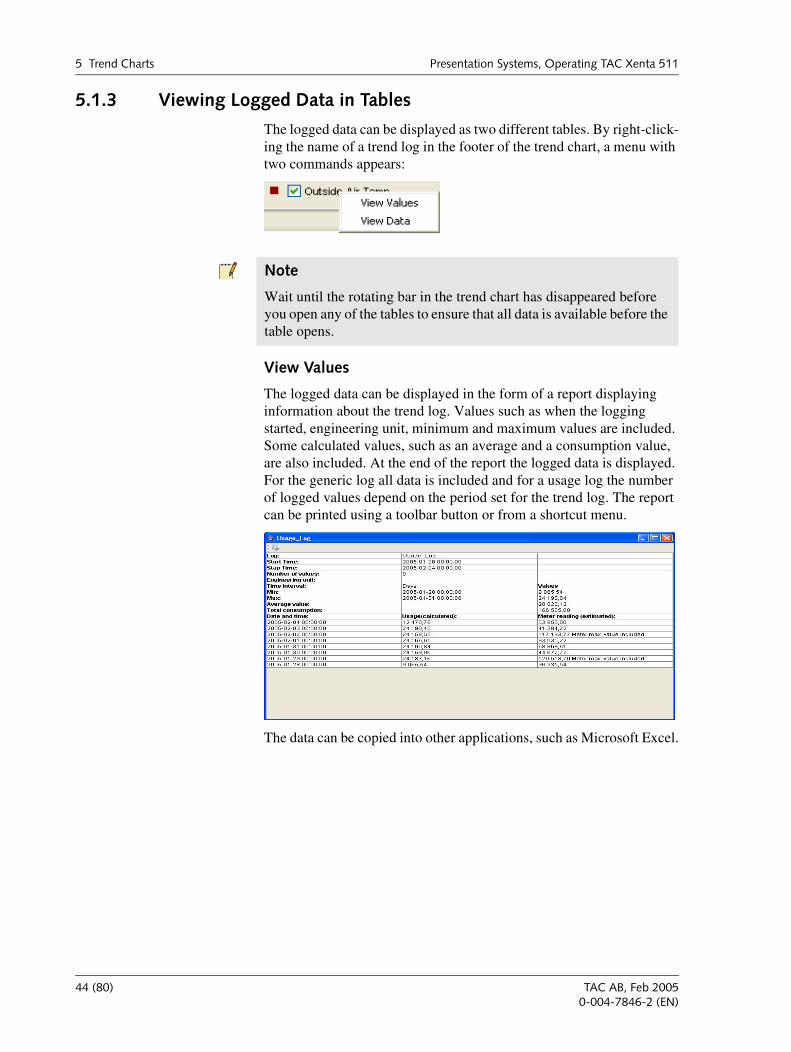
The logged data can be displayed as two different tables. By right-click-ing the name of a trend log in the footer of the trend chart, a menu with two commands appears:
View Values
The logged data can be displayed in the form of a report displaying information about the trend log. Values such as when the logging started, engineering unit, minimum and maximum values are included. Some calculated values, such as an average and a consumption value, are also included. At the end of the report the logged data is displayed. For the generic log all data is included and for a usage log the number of logged values depend on the period set for the trend log. The report can be printed using a toolbar button or from a shortcut menu.
The data can be copied into other applications, such as Microsoft Excel.
Note
Wait until the rotating bar in the trend chart has disappeared before you open any of the tables to ensure that all data is available before the table opens.
44 (80) TAC AB, Feb 20050-004-7846-2 (EN)

Presentation Systems, Operating TAC Xenta 511 5 Trend Charts
View Data
All the logged data in the trend log can be displayed in its stored format. The data is displayed using the Event Viewer and therefor the informa-tion can be sorted in several ways. For more information about the Event Viewer, see Section 4.3.1, “Event View”, on page 31.
The data can be copied into other applications, such as Microsoft Excel.
TAC AB, Feb 2005 45 (80)0-004-7846-2 (EN)

5 Trend Charts Presentation Systems, Operating TAC Xenta 511
46 (80) TAC AB, Feb 20050-004-7846-2 (EN)
Presentation Systems, Operating TAC Xenta 511 6 Time Schedules
6 Time Schedules
6.1 The Time Object EditorTime Schedules are used to change certain values at specified times. For example, a device may be started/stopped or a setpoint can be changed at the beginning and end of each workday.
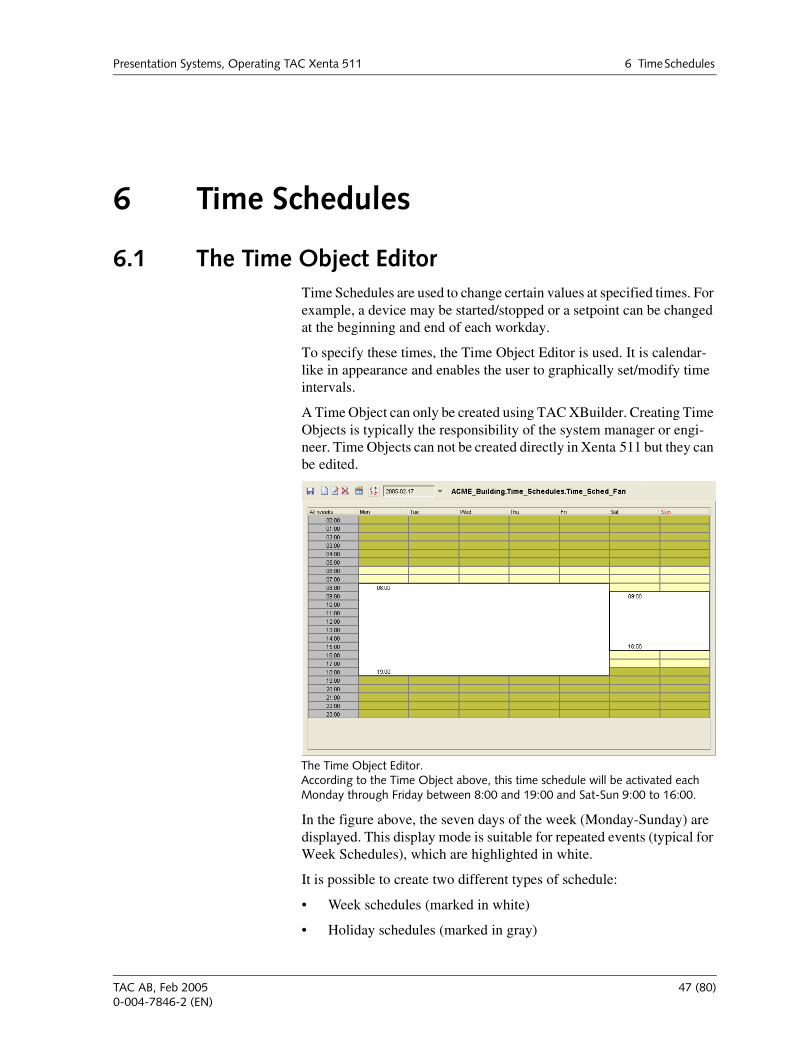
To specify these times, the Time Object Editor is used. It is calendar-like in appearance and enables the user to graphically set/modify time intervals.
A Time Object can only be created using TAC XBuilder. Creating Time Objects is typically the responsibility of the system manager or engi-neer. Time Objects can not be created directly in Xenta 511 but they can be edited.
In the figure above, the seven days of the week (Monday-Sunday) are displayed. This display mode is suitable for repeated events (typical for Week Schedules), which are highlighted in white.
It is possible to create two different types of schedule:
• Week schedules (marked in white)
• Holiday schedules (marked in gray)
The Time Object Editor.According to the Time Object above, this time schedule will be activated each Monday through Friday between 8:00 and 19:00 and Sat-Sun 9:00 to 16:00.
TAC AB, Feb 2005 47 (80)0-004-7846-2 (EN)
6 Time Schedules Presentation Systems, Operating TAC Xenta 511
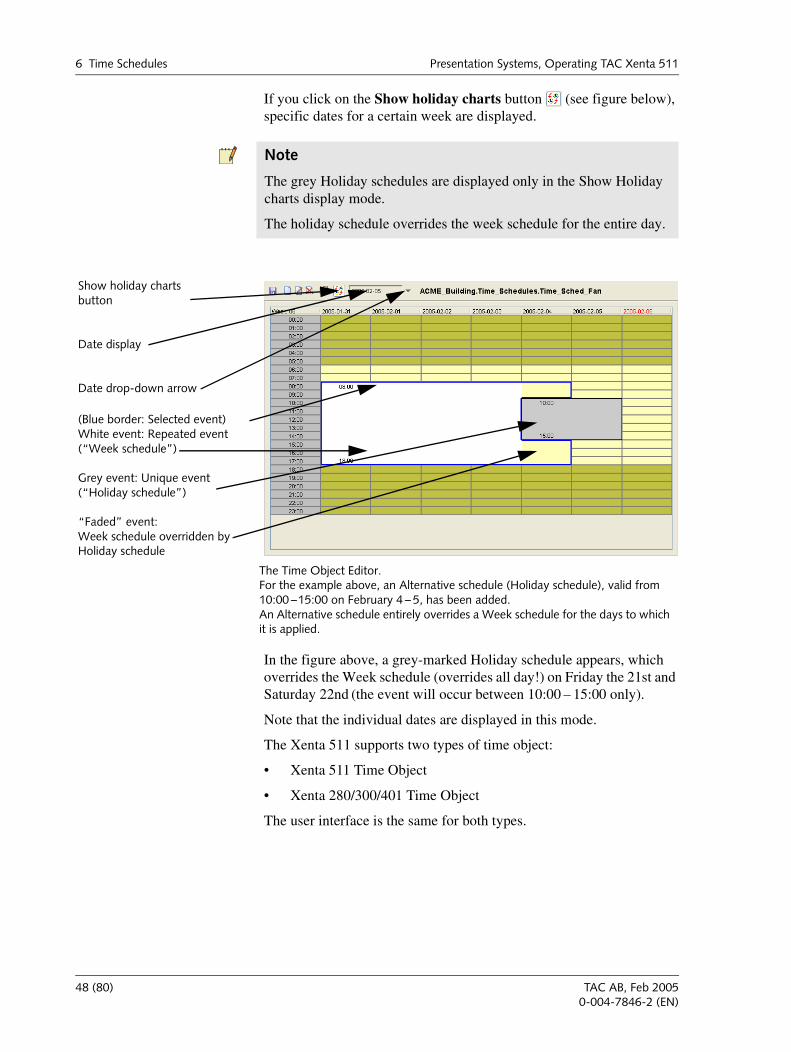
If you click on the Show holiday charts button (see figure below), specific dates for a certain week are displayed.
In the figure above, a grey-marked Holiday schedule appears, which overrides the Week schedule (overrides all day!) on Friday the 21st and Saturday 22nd (the event will occur between 10:00 – 15:00 only).
Note that the individual dates are displayed in this mode.
The Xenta 511 supports two types of time object:
• Xenta 511 Time Object
• Xenta 280/300/401 Time Object
The user interface is the same for both types.
Note
The grey Holiday schedules are displayed only in the Show Holiday charts display mode.
The holiday schedule overrides the week schedule for the entire day.
The Time Object Editor.For the example above, an Alternative schedule (Holiday schedule), valid from 10:00 –15:00 on February 4 – 5, has been added.An Alternative schedule entirely overrides a Week schedule for the days to which it is applied.
Show holiday chartsbutton
Date display
Date drop-down arrow
(Blue border: Selected event)White event: Repeated event(“Week schedule”)
Grey event: Unique event(“Holiday schedule”)
“Faded” event:Week schedule overridden byHoliday schedule
48 (80) TAC AB, Feb 20050-004-7846-2 (EN)
Presentation Systems, Operating TAC Xenta 511 6 Time Schedules
6.2 Creating and Editing Time EventsCreating and modifying existing events is made using the Time Object Editor for each time object.
To create an Event
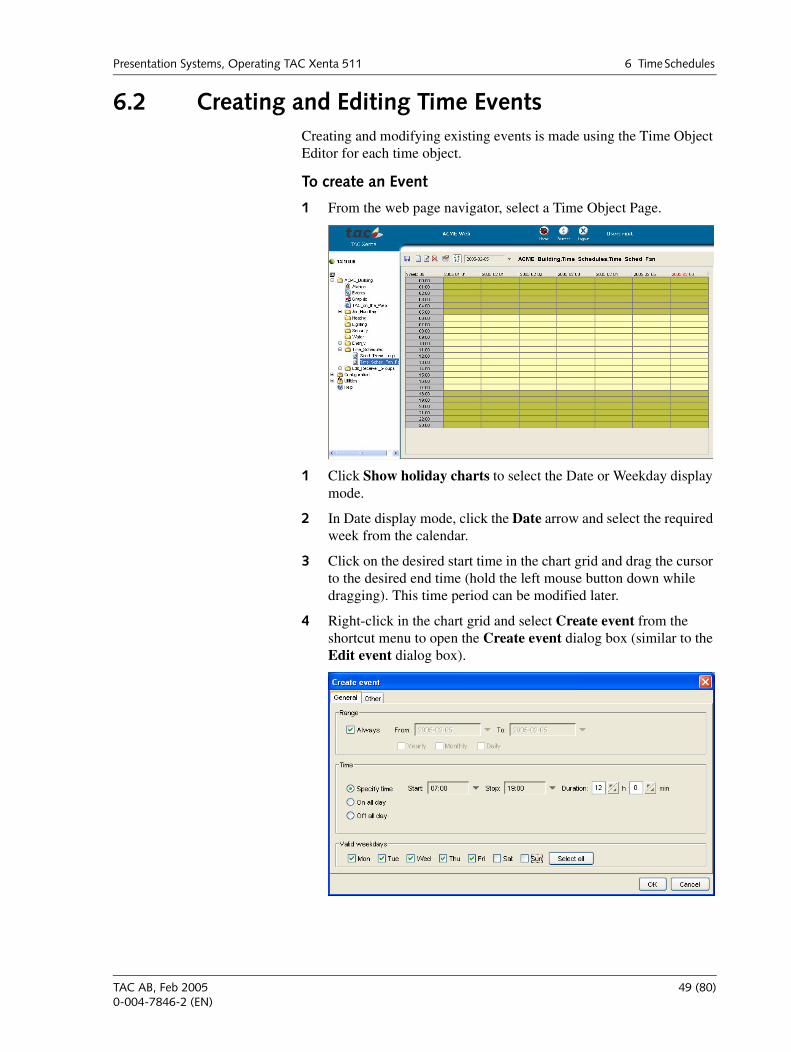
1 From the web page navigator, select a Time Object Page.
1 Click Show holiday charts to select the Date or Weekday display mode.
2 In Date display mode, click the Date arrow and select the required week from the calendar.
3 Click on the desired start time in the chart grid and drag the cursor to the desired end time (hold the left mouse button down while dragging). This time period can be modified later.
4 Right-click in the chart grid and select Create event from the shortcut menu to open the Create event dialog box (similar to the Edit event dialog box).
TAC AB, Feb 2005 49 (80)0-004-7846-2 (EN)
6 Time Schedules Presentation Systems, Operating TAC Xenta 511
If an event is being created or edited, the boxes are pre-set accord-ing to the schedule area defined or selected by the user just prior to opening the dialog box.
5 In the Range area, selecting the Always check box will indicate an event that is to be repeated (Week schedule) as specified in the Time and Valid weekdays areas.
If the Always check box is empty, a unique event (Holiday sched-ule) will be defined for the date and time that is specified.
In the Create/Edit event dialog box, it is also possible to set the event On all day (shown in white) or Off all day (black).
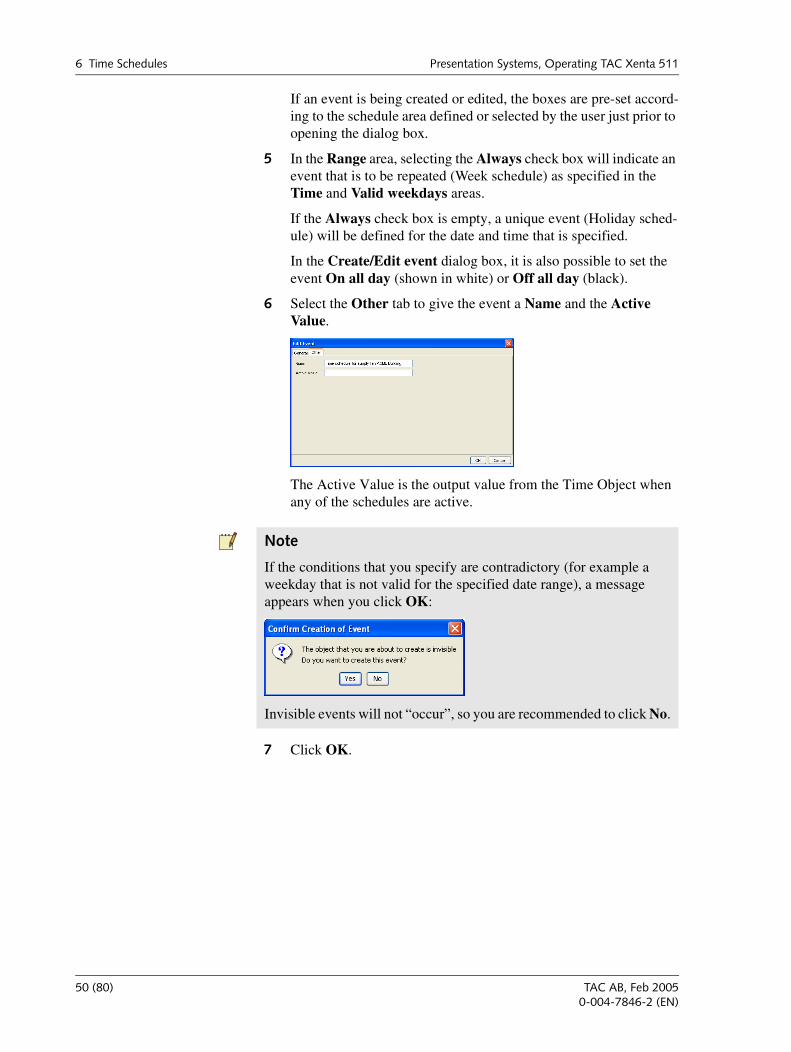
6 Select the Other tab to give the event a Name and the Active Value.
The Active Value is the output value from the Time Object when any of the schedules are active.
7 Click OK.
Note
If the conditions that you specify are contradictory (for example a weekday that is not valid for the specified date range), a message appears when you click OK:
Invisible events will not “occur”, so you are recommended to click No.
50 (80) TAC AB, Feb 20050-004-7846-2 (EN)

Presentation Systems, Operating TAC Xenta 511 6 Time Schedules
8 Click the Show other properties button and enter suitable values.
9 Click OK.
10 Click the Save button (top left) to save this Time Object and its settings.
Table 6.1: Time object properties
Property Description
Name Object ID (read-only).
Description A general description of the object.
Xenta Types Determines which kind of time object it is (read-only).
Output Time Left The time (in minutes) until the next change will occur (read-only).
Default Value If a Xenta 511 time object is used, this value is the output value when no schedule is active.
Output Value The signal connected to the time object (read-only).
Unit The engineering unit of the out-put signal (read-only).
TAC AB, Feb 2005 51 (80)0-004-7846-2 (EN)
6 Time Schedules Presentation Systems, Operating TAC Xenta 511
6.3 The Events Dialog BoxAnother way to check and edit events is to open the Events dialog box.
This is particularly useful if you want to find and correct “invisible events” (as mentioned above).
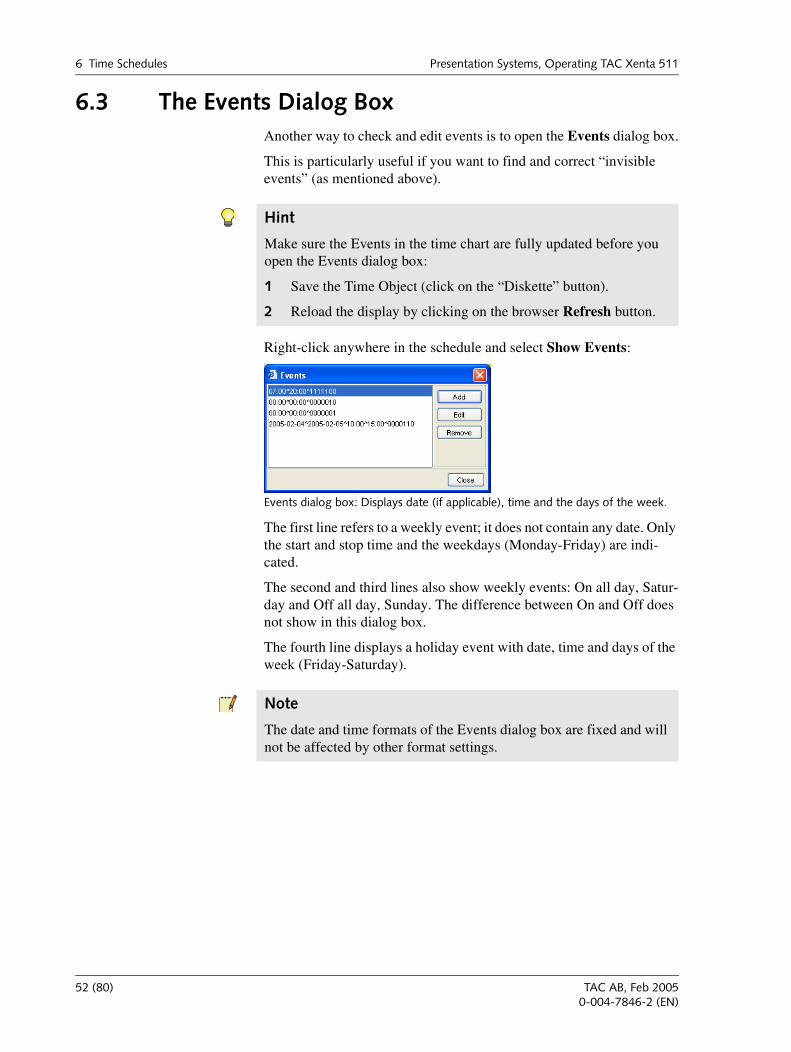
Right-click anywhere in the schedule and select Show Events:
The first line refers to a weekly event; it does not contain any date. Only the start and stop time and the weekdays (Monday-Friday) are indi-cated.
The second and third lines also show weekly events: On all day, Satur-day and Off all day, Sunday. The difference between On and Off does not show in this dialog box.
The fourth line displays a holiday event with date, time and days of the week (Friday-Saturday).
Hint
Make sure the Events in the time chart are fully updated before you open the Events dialog box:
1 Save the Time Object (click on the “Diskette” button).
2 Reload the display by clicking on the browser Refresh button.
Events dialog box: Displays date (if applicable), time and the days of the week.
Note
The date and time formats of the Events dialog box are fixed and will not be affected by other format settings.
52 (80) TAC AB, Feb 20050-004-7846-2 (EN)
Presentation Systems, Operating TAC Xenta 511 6 Time Schedules
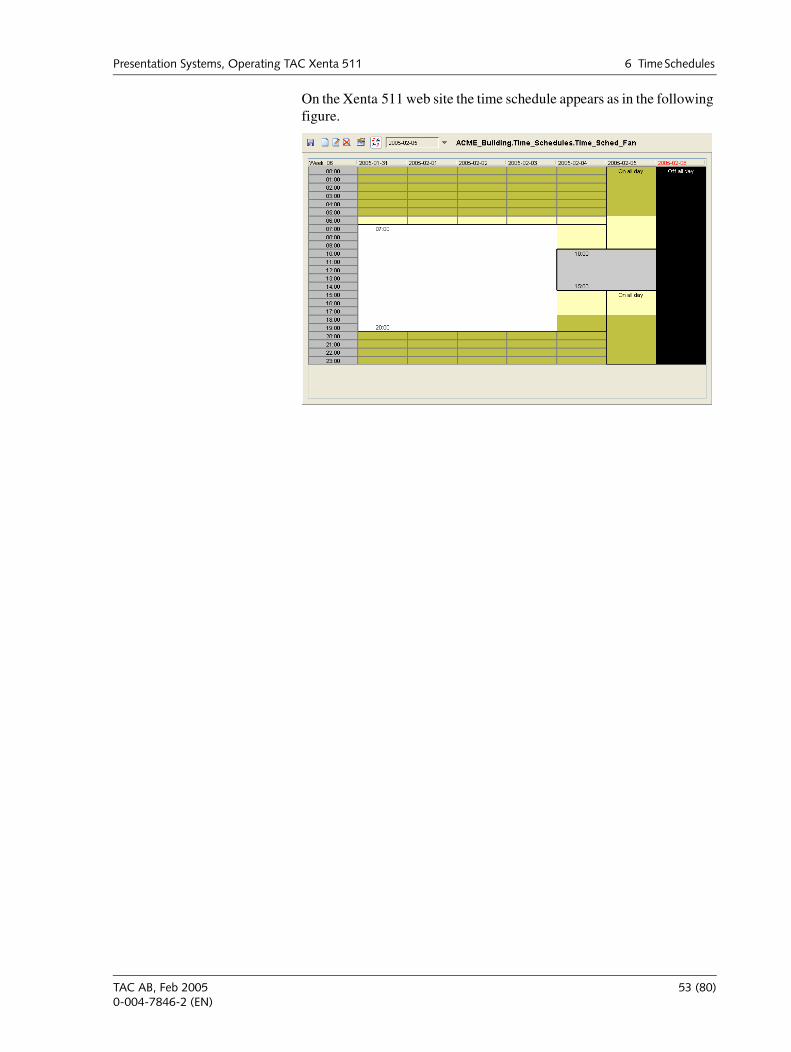
On the Xenta 511 web site the time schedule appears as in the following figure.
TAC AB, Feb 2005 53 (80)0-004-7846-2 (EN)

6 Time Schedules Presentation Systems, Operating TAC Xenta 511
54 (80) TAC AB, Feb 20050-004-7846-2 (EN)
Presentation Systems, Operating TAC Xenta 511 7 Error Indications
7 Error Indications
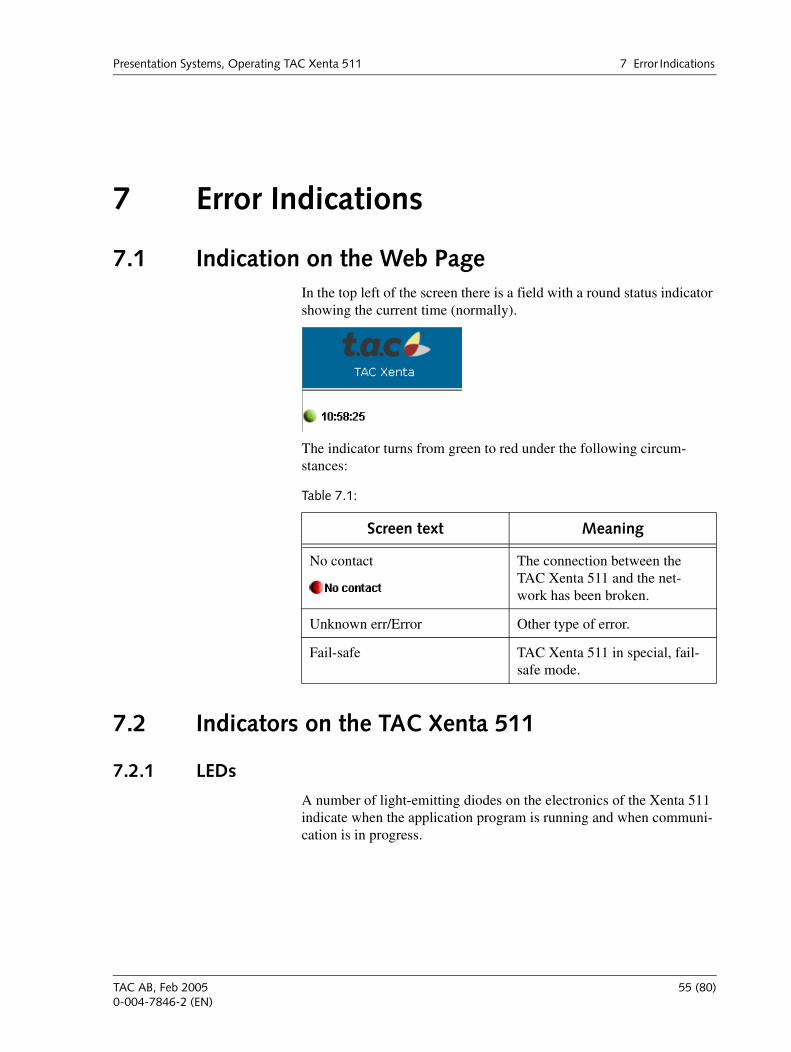
7.1 Indication on the Web PageIn the top left of the screen there is a field with a round status indicator showing the current time (normally).
The indicator turns from green to red under the following circum-stances:
7.2 Indicators on the TAC Xenta 511
7.2.1 LEDs
A number of light-emitting diodes on the electronics of the Xenta 511 indicate when the application program is running and when communi-cation is in progress.
Table 7.1:
Screen text Meaning
No contact The connection between the TAC Xenta 511 and the net-work has been broken.
Unknown err/Error Other type of error.
Fail-safe TAC Xenta 511 in special, fail-safe mode.
TAC AB, Feb 2005 55 (80)0-004-7846-2 (EN)

7 Error Indications Presentation Systems, Operating TAC Xenta 511
MMC
10Base-TA RS232 B
LON
Fail-safe
Rx/Tx
9 10
Neuron status (red)Off: Normal modeRed, blinking:unconfigured nodeRed, steady:hardware fault
Overall Run indicator (red/green)
Tx indicator RS232 A (yellow)Tx indicator RS232 B (yellow)
Socket for MMC card and activity indicator (yellow)
Ethernet activity(yellow)
Ethernet connector
Overall Run indicator—green, steady: Program in normal modegreen, blinking: Program in start modered, steady: Fail-safe modered, blinking: Device error
The TAC Xenta 511: LED indicators
56 (80) TAC AB, Feb 20050-004-7846-2 (EN)
Presentation Systems, Operating TAC Xenta 511 7 Error Indications
7.2.2 Fail-safe Mode
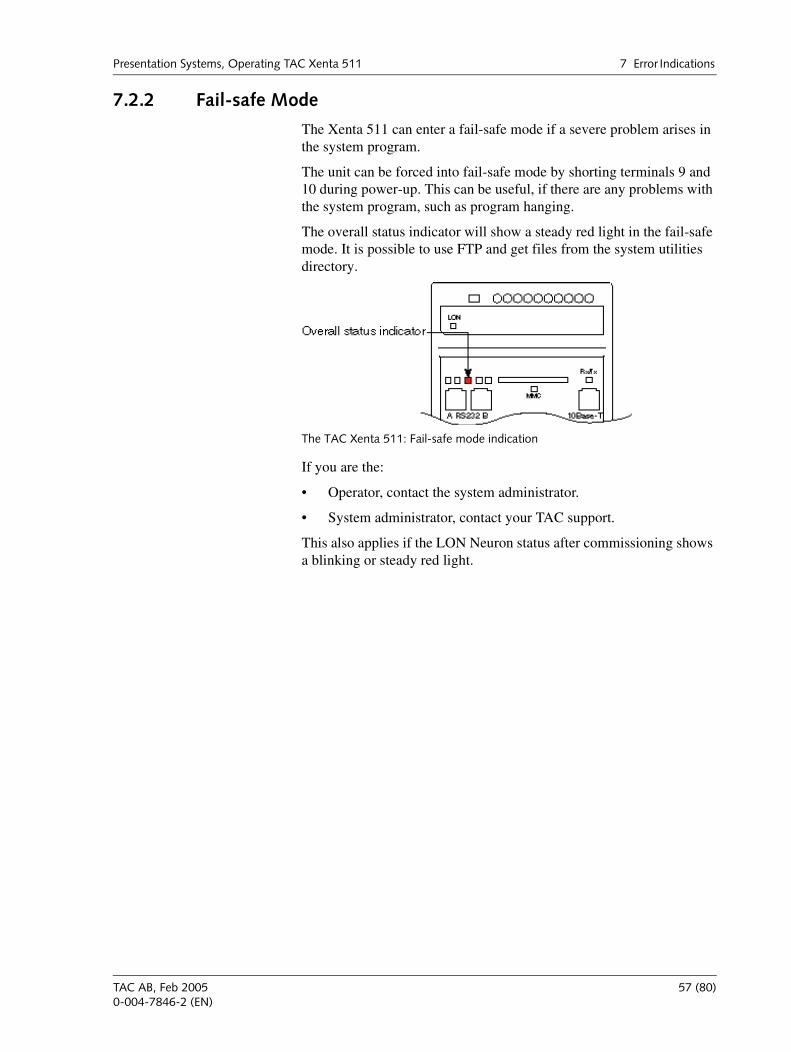
The Xenta 511 can enter a fail-safe mode if a severe problem arises in the system program.
The unit can be forced into fail-safe mode by shorting terminals 9 and 10 during power-up. This can be useful, if there are any problems with the system program, such as program hanging.
The overall status indicator will show a steady red light in the fail-safe mode. It is possible to use FTP and get files from the system utilities directory.
If you are the:
• Operator, contact the system administrator.
• System administrator, contact your TAC support.
This also applies if the LON Neuron status after commissioning shows a blinking or steady red light.
The TAC Xenta 511: Fail-safe mode indication
TAC AB, Feb 2005 57 (80)0-004-7846-2 (EN)

7 Error Indications Presentation Systems, Operating TAC Xenta 511
58 (80) TAC AB, Feb 20050-004-7846-2 (EN)
ADMINISTERING
9 Trend Logs
10 Users and Authority System

Presentation Systems, Operating TAC Xenta 511 8 Wireless Equipment
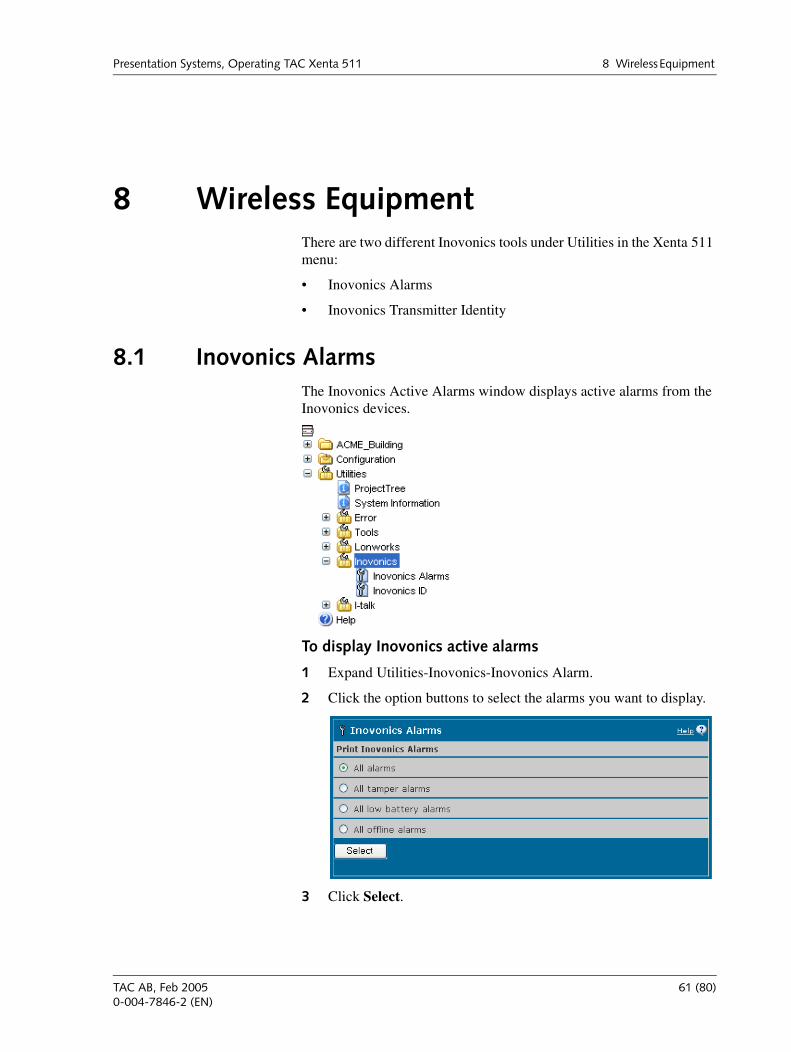
8 Wireless EquipmentThere are two different Inovonics tools under Utilities in the Xenta 511 menu:
• Inovonics Alarms
• Inovonics Transmitter Identity
8.1 Inovonics AlarmsThe Inovonics Active Alarms window displays active alarms from the Inovonics devices.
To display Inovonics active alarms
1 Expand Utilities-Inovonics-Inovonics Alarm.
2 Click the option buttons to select the alarms you want to display.
3 Click Select.
TAC AB, Feb 2005 61 (80)0-004-7846-2 (EN)

8 Wireless Equipment Presentation Systems, Operating TAC Xenta 511
The Inovonics alarm is displayed with the identity, name, type and description.
8.2 Inovonics Receiver IDThe Last Received Transmitter Identity is used for collecting identities.
To collect an Inovonics receiver ID
1 Press the reset button on the Inovonics device for which you want to know the ID.
The ID is displayed in the dialog.
If you want to collect the identity for another device, click Clear Identity. Or press the reset button on the device and the current identity will be overwritten by the new one.
62 (80) TAC AB, Feb 20050-004-7846-2 (EN)
Presentation Systems, Operating TAC Xenta 511 9 Trend Logs
9 Trend LogsTrend logs show the variation of specified values over a period of time. You can start and stop logging in a number of ways. Only the system administrator and “Operator-profile” users can perform the administra-tive tasks of configuring trend logs, so if you are a day-to-day user, please go to Chapter 5, “Trend Charts”, on page 37.
9.1 Trend Log ConfigurationTrend log configurations will effect the behavior of the trend logs.
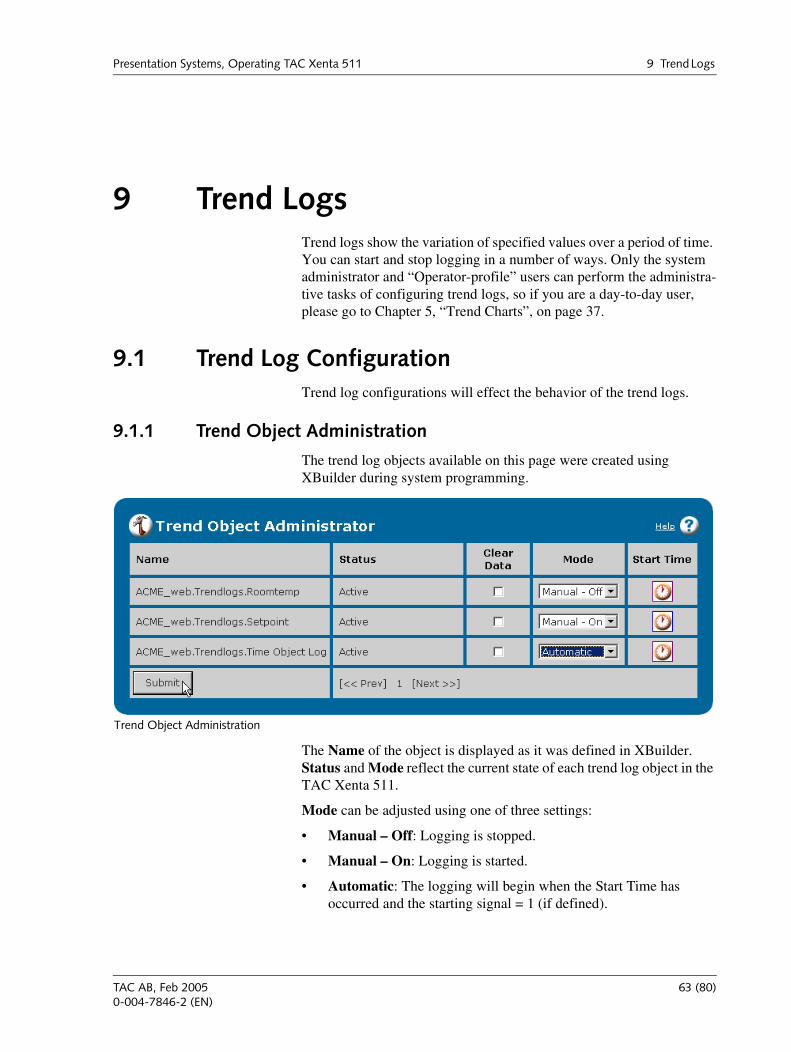
9.1.1 Trend Object Administration
The trend log objects available on this page were created using XBuilder during system programming.
The Name of the object is displayed as it was defined in XBuilder.Status and Mode reflect the current state of each trend log object in the TAC Xenta 511.
Mode can be adjusted using one of three settings:
• Manual – Off: Logging is stopped.
• Manual – On: Logging is started.
• Automatic: The logging will begin when the Start Time has occurred and the starting signal = 1 (if defined).
Trend Object Administration
TAC AB, Feb 2005 63 (80)0-004-7846-2 (EN)
9 Trend Logs Presentation Systems, Operating TAC Xenta 511
Clear Log Data
To clear the trend log of data, select the Clear Data check box in the same row and click the Submit button in the left hand corner.
The arrows and numbers at the bottom of the page are links to additional pages. A maximum of 10 trend log objects are shown on each page.
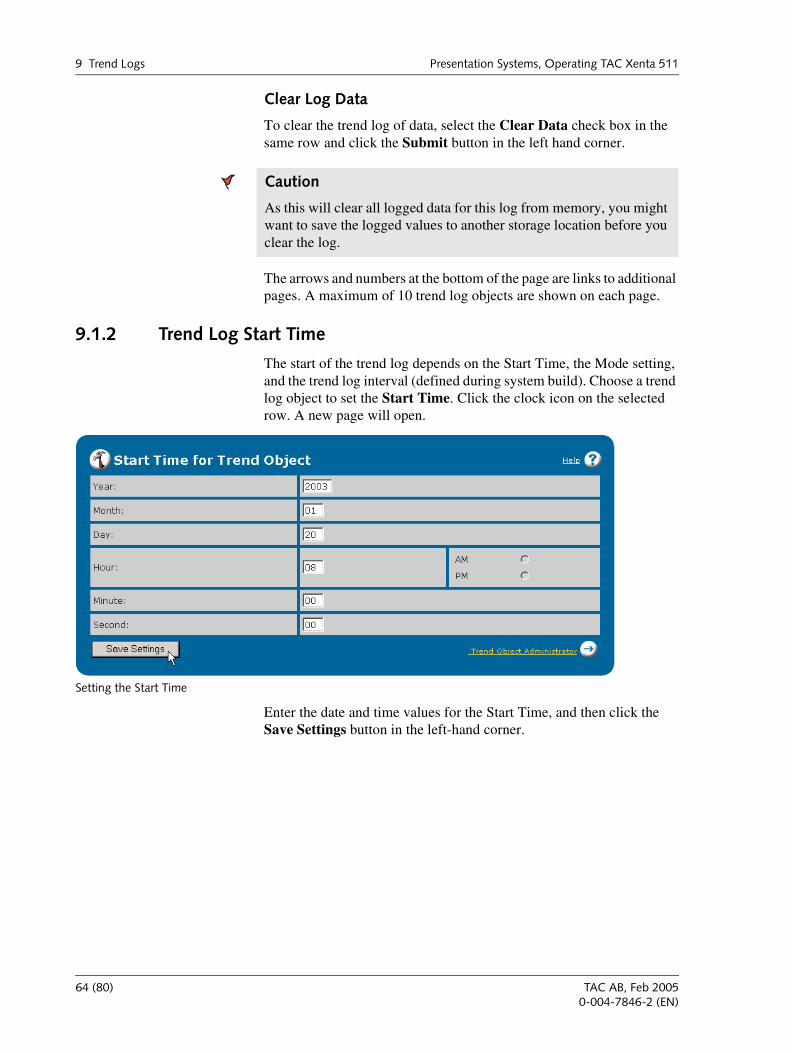
9.1.2 Trend Log Start Time
The start of the trend log depends on the Start Time, the Mode setting, and the trend log interval (defined during system build). Choose a trend log object to set the Start Time. Click the clock icon on the selected row. A new page will open.
Enter the date and time values for the Start Time, and then click the Save Settings button in the left-hand corner.
Caution
As this will clear all logged data for this log from memory, you might want to save the logged values to another storage location before you clear the log.
Setting the Start Time
64 (80) TAC AB, Feb 20050-004-7846-2 (EN)
Presentation Systems, Operating TAC Xenta 511 10 Users and Authority System
10 Users and Authority System
10.1 User AdministrationThe Xenta 511 is a multi-user system and each user can have tailored access rights to different parts of the system.
10.1.1 Overview
All traffic can be encrypted so no one outside can read the information sent between the Xenta 511 and the web browser. The login informa-tion, user names and passwords are always encrypted.
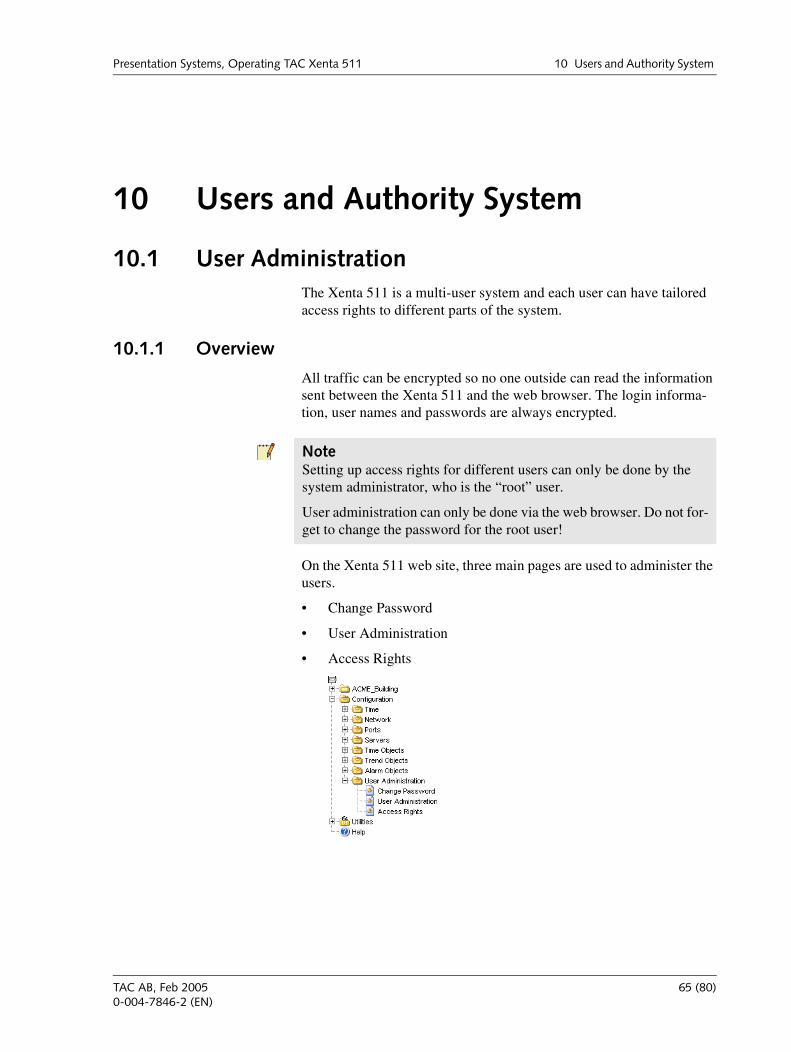
On the Xenta 511 web site, three main pages are used to administer the users.
• Change Password
• User Administration
• Access Rights
NoteSetting up access rights for different users can only be done by the system administrator, who is the “root” user.
User administration can only be done via the web browser. Do not for-get to change the password for the root user!
TAC AB, Feb 2005 65 (80)0-004-7846-2 (EN)
10 Users and Authority System Presentation Systems, Operating TAC Xenta 511
10.1.2 Authorization Essentials
• The system is based on folder access.
• The structure of the folders that users can access is set up using XBuilder.
• Every user has a user name, password, description, settings regarding the default display of the web site, and access rights to read and write.
• Access rights to read and write are assigned at the folder level. The rights are set recursively, all subdirectories (subfolders) become accessible with the same authorization to read/write as the folder itself.
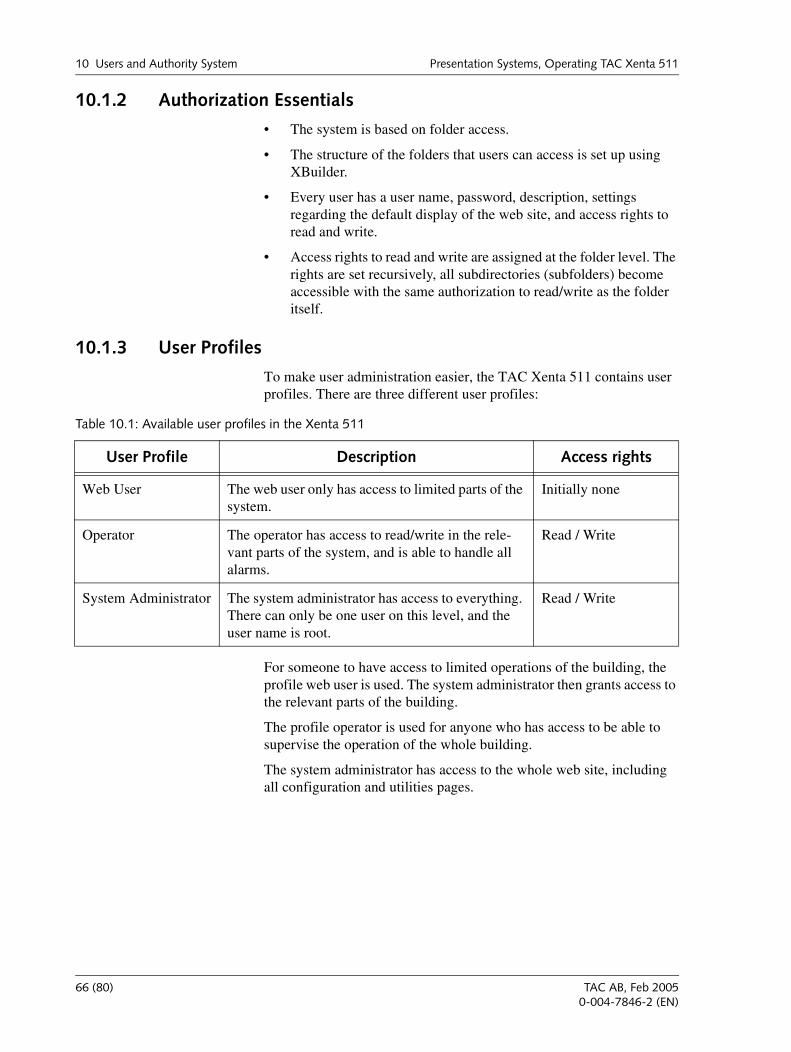
10.1.3 User Profiles
To make user administration easier, the TAC Xenta 511 contains user profiles. There are three different user profiles:
For someone to have access to limited operations of the building, the profile web user is used. The system administrator then grants access to the relevant parts of the building.
The profile operator is used for anyone who has access to be able to supervise the operation of the whole building.
The system administrator has access to the whole web site, including all configuration and utilities pages.
Table 10.1: Available user profiles in the Xenta 511
User Profile Description Access rights
Web User The web user only has access to limited parts of the system.
Initially none
Operator The operator has access to read/write in the rele-vant parts of the system, and is able to handle all alarms.
Read / Write
System Administrator The system administrator has access to everything. There can only be one user on this level, and the user name is root.
Read / Write
66 (80) TAC AB, Feb 20050-004-7846-2 (EN)
Presentation Systems, Operating TAC Xenta 511 10 Users and Authority System
10.1.4 Access Rights
After setting up the profile of the user, the system administrator can make modifications to the access rights manually.
• By granting a user the Read access right on a folder, the user will be able to see everything in the folder and its subfolders.
• By granting a user the Read / Write access right on a folder, the user will be able to see everything in the folder and its subfolders, and to be able to change values in graphics, values pages and so on.
10.2 User Administration PagesIn the navigator on the Xenta 511 web site, the logged in user can access user administration pages. The system administrator has access to all pages, all other users can only access the Change Password page.
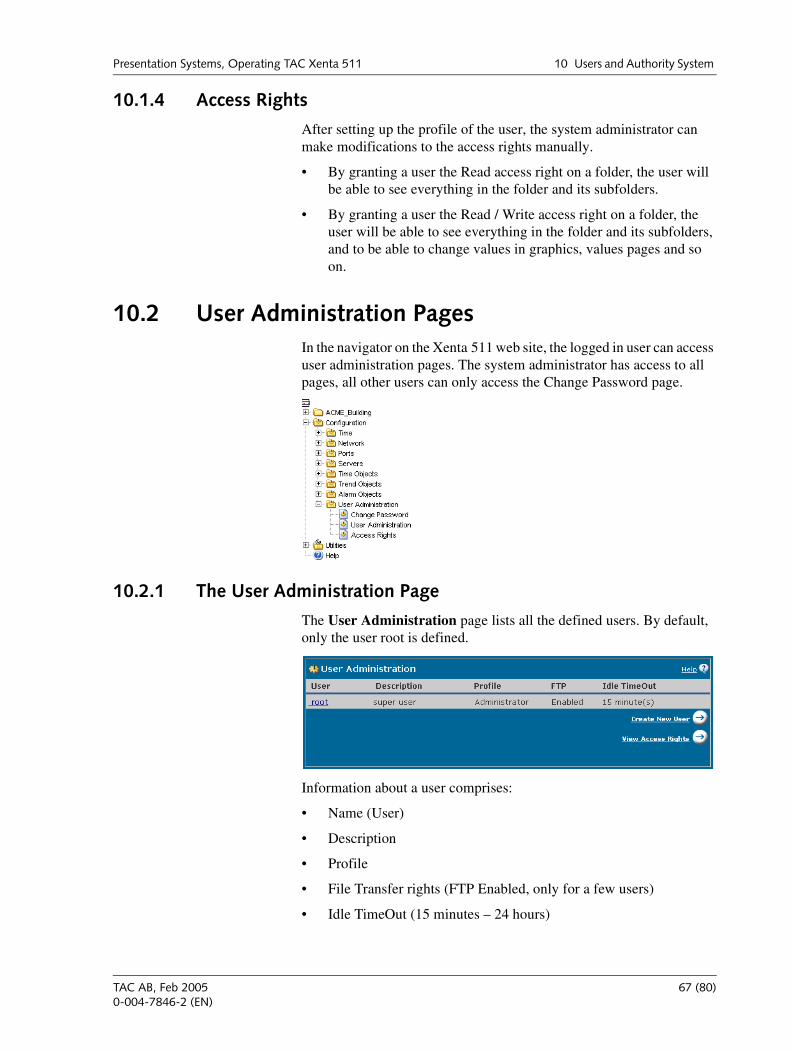
10.2.1 The User Administration Page
The User Administration page lists all the defined users. By default, only the user root is defined.
Information about a user comprises:
• Name (User)
• Description
• Profile
• File Transfer rights (FTP Enabled, only for a few users)
• Idle TimeOut (15 minutes – 24 hours)
TAC AB, Feb 2005 67 (80)0-004-7846-2 (EN)

10 Users and Authority System Presentation Systems, Operating TAC Xenta 511
10.2.2 The Create User Page
On the Create User page you create a new user and assign the user set-tings.
Password Options
The system administrator defines the password for each new user. Users can then change their passwords.
User Settings
• Profile (as in Table 10.1, “Available user profiles in the Xenta 511”)
• Idle TimeOut is used for logging inactive users out of a Xenta 511 system. When a user has been inactive for the time period set, the user will automatically be logged out.
• FTP enabled allows the user to connect to the Xenta 511 using the FTP protocol. The user can access the Xenta 511 file system for sending and uploading files using FTP.
Note
User names and passwords are case sensitive.
68 (80) TAC AB, Feb 20050-004-7846-2 (EN)
Presentation Systems, Operating TAC Xenta 511 10 Users and Authority System
Frame Settings
Under Frame Settings you specify what is loaded into the different frames on the Xenta 511 web site when a user logs in. The web site con-sists of three frames.
• Main Frame specifies which page opens when the user logs in to the Xenta 511. Different users can have different pages. For exam-ple, a security overview page can open for a user responsible for the security system.
• Headline Frame
• Menu Frame
! Warning
TAC’s recommendation is to only change the Main Frame if neces-sary. If you change, for example, the Menu Frame, the default naviga-tion tree or menu will disappear for that particular user.
TAC AB, Feb 2005 69 (80)0-004-7846-2 (EN)

10 Users and Authority System Presentation Systems, Operating TAC Xenta 511
10.2.3 Creating a User
When you click Create User the new user is created and appears on the User Administration page.
To create a user
1 Log in to the Xenta 511 as system administrator.
2 In the navigator, expand Configuration-User Administration, and click User Administration.
3 On the User Administration page, click the Create New User link.
4 Type the name of the user, in our example “Frank”.
5 Type the descriptive text, in our example “Supervisor of the HVAC system”.
6 Type the password, in our example “Frank”.
7 Confirm the password by typing it once again.
8 Ensure that the profile is set to Web user.
Note
User names and passwords are case sensitive.
70 (80) TAC AB, Feb 20050-004-7846-2 (EN)

Presentation Systems, Operating TAC Xenta 511 10 Users and Authority System
9 Click Create User.
After the user has been created access can be granted to different parts of the system.
10.2.4 The User Properties Page
The User Properties page appears when you click a user on the User Administration page.
This page lets the system administrator change details of an existing user.
10.2.5 The Change Password Page
On the Change Password page the user can change his/her password. The system administrator can change all the passwords in the system, using the User Properties page for each user.
TAC AB, Feb 2005 71 (80)0-004-7846-2 (EN)
10 Users and Authority System Presentation Systems, Operating TAC Xenta 511
10.2.6 The Access Rights Page
Access Rights are set as the right to read or read/write in the files belonging to a specified folder and all its subfolders.
When a new user is given a user profile, the user automatically obtains default access to a number of folders suitable for that type of user. The access may be changed by the system administrator.
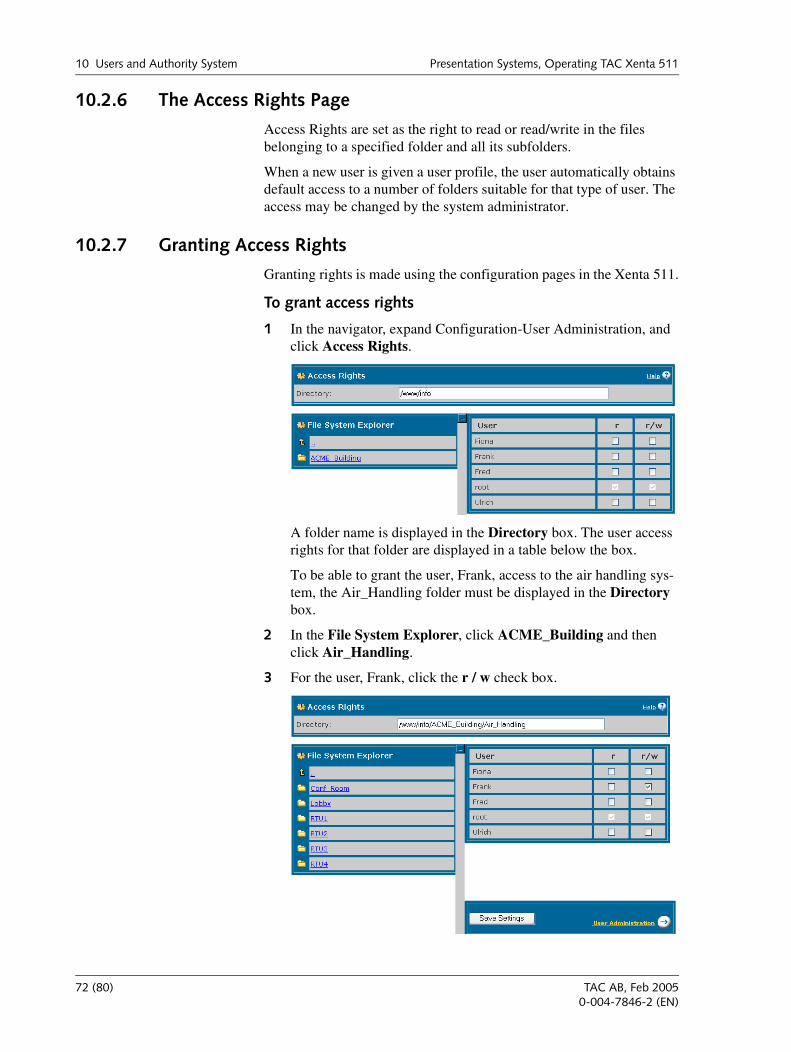
10.2.7 Granting Access Rights
Granting rights is made using the configuration pages in the Xenta 511.
To grant access rights
1 In the navigator, expand Configuration-User Administration, and click Access Rights.
A folder name is displayed in the Directory box. The user access rights for that folder are displayed in a table below the box.
To be able to grant the user, Frank, access to the air handling sys-tem, the Air_Handling folder must be displayed in the Directory box.
2 In the File System Explorer, click ACME_Building and then click Air_Handling.
3 For the user, Frank, click the r / w check box.
72 (80) TAC AB, Feb 20050-004-7846-2 (EN)
Presentation Systems, Operating TAC Xenta 511 10 Users and Authority System
4 Click Save Settings.
5 Repeat the steps above for all the folders Frank can access.
After logging in Frank can navigate and change settings in the HVAC system.
Checking the Access Rights
Check the access rights by logging in as each of the users.
Note
After granting access rights on a folder, you must click Save Settings before changing to another folder.
TAC AB, Feb 2005 73 (80)0-004-7846-2 (EN)

10 Users and Authority System Presentation Systems, Operating TAC Xenta 511
74 (80) TAC AB, Feb 20050-004-7846-2 (EN)
Presentation Systems, Operating TAC Xenta 511 11 Web Browser Requirements
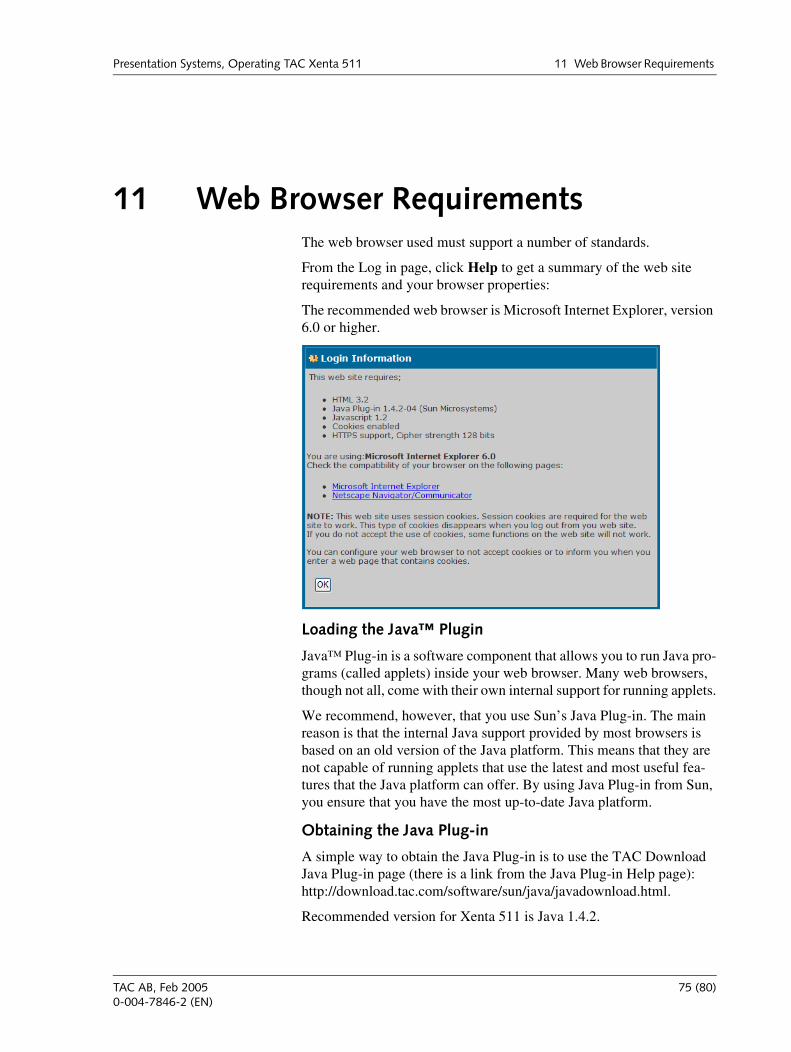
11 Web Browser RequirementsThe web browser used must support a number of standards.
From the Log in page, click Help to get a summary of the web site requirements and your browser properties:
The recommended web browser is Microsoft Internet Explorer, version 6.0 or higher.
Loading the Java™ Plugin
Java™ Plug-in is a software component that allows you to run Java pro-grams (called applets) inside your web browser. Many web browsers, though not all, come with their own internal support for running applets.
We recommend, however, that you use Sun’s Java Plug-in. The main reason is that the internal Java support provided by most browsers is based on an old version of the Java platform. This means that they are not capable of running applets that use the latest and most useful fea-tures that the Java platform can offer. By using Java Plug-in from Sun, you ensure that you have the most up-to-date Java platform.
Obtaining the Java Plug-in
A simple way to obtain the Java Plug-in is to use the TAC Download Java Plug-in page (there is a link from the Java Plug-in Help page):http://download.tac.com/software/sun/java/javadownload.html.
Recommended version for Xenta 511 is Java 1.4.2.
TAC AB, Feb 2005 75 (80)0-004-7846-2 (EN)

11 Web Browser Requirements Presentation Systems, Operating TAC Xenta 511
Configuring the Java Plug-in
In most cases, no further configuration is necessary. The Java Plug-in will smoothly handle the Java programs in your browser, without any appreciable delay.
However, the Java Plug-in provides a Java Plug-in Control Panel, should you need to do further configurations. Launch the Java Plug-in Control Panel in the following way.
1 In the Windows Start menu, select Settings and then Control Panel. This will open up the Windows Control Panel.
2 Look for the Java coffee-cup icon with the label Java Plug-in fol-lowed by a version number. If you do not find the Java Plug-in icon, the plug-in is probably not installed on your computer.
3 Double-click the icon to launch the Java Plug-in Control Panel.
The Java Plug-in Control Panel enables you to adjust how the Java Plug-in runs Java programs in your browser.
Recommended Settings of the Java Plug-in
It is possible to have the Java Plug-in installed on your PC, without it being the default Java support for running programs in your browser.
Make sure that the Java Plug-in will be used in your browser by select-ing the appropriate browser check boxes in the Java Control panel.
For more information about the Java Plug-in, visit the Java Plug-in home page: http://java.sun.com/products/plugin/
76 (80) TAC AB, Feb 20050-004-7846-2 (EN)
Presentation Systems, Operating TAC Xenta 511 Index
IndexAaccess rights 15, 65active (time object) 47alarm history 28alarm states 30alarm viewer 25alarms, Inovonics 61applets 75authorized user 20
Bbrowser 75
Cclear Log data 64coffee-cup icon 76configure view 41coordinates (trend graph) 38–39
Ddate drop-down 48days of the week 47Docnet 9dynamic contents 23
Eerror indications 55event viewer 31
Ffail-safe 57Fail-safe (error) 55filtering (alarms) 26FTP 57
Ggraphics viewer 19
HHelp menu 16holiday charts 48holiday schedule 50
HTML Variables page 24
Iindividual dates 48Inovonics 61Inovonics wireless equipment 61
JJava™ plug-in 75
LLEDs 55light-emitting diodes 55link area 20logging out 17
Mmenus 15mouse pointer 20
NNo contact (error) 55
Ppassword 71plug-in 75program hanging 57
Rreceiver ID, Inovonics 62refresh 24
Ssorting (alarms) 26standards 75static alarm page 28static event page 36status indicator 57Submit button 24
Tterminals 9 and 10 57time object editor 47time schedules 47trend log configuration 63
TAC AB, Feb 2005 77 (80)0-004-7846-2 (EN)

Index Presentation Systems, Operating TAC Xenta 511
trend log start time 64trend viewer 37
UUnknown err (error) 55user administration 65
Wweb browser 75week schedule 50Wireless Equipment 61
XXenta 511 time object 51
78 (80) TAC AB, Feb 20050-004-7846-2 (EN)


TAC helps people feel and function better, as a direct result of greater indoor climate. This ismade possible by TAC’s concept of Open Systems for Building IT®, which utilizes informationtechnology to provide clients with advantages such as indoor climate optimization, energysavings, flexibility, security, reduced expenses and user-friendly operation.
Last Manual Page
Related Documents