@TOYOTA T-SB-0041-13 March 15, 2013 Technical Service Bulletin Brief Engine Knock/Rattle Noise at Cold Startup (1AR/2AR) Service Category Engi ne/Hybrid System Toyota Supports ASE Section Engine Mechanical Market USA Applicability YEAR(S) MODEL(S) ADDITIONAL INFORMATION Introduction 2010 - 2012 Ca mry 2009 - 2013 Hi ghlander 2009 - 201 2 RAV4 201 1 - 2013 Sienna 2009 - 2013 Venza SUPERSESSION NOTICE VDS(s): BF1 FK, BF3EK WMl(s): 4T1 , 4T4, JTN VDS(s): DA41A, ZA3 EH WM l(s): 5TD VDS(s): BF31V, BF32V, BF33V, BF34V, BF35V, BF4DV, BF9DV, DF4DV, DF9D V, EF4DV,JF4 DV, KF4DV, KF9D V,RF4DV, WF4D V,XF4 DV,YF4 DV, YK9DV,ZF31V, ZF32V, ZF33V,ZF34V, ZF35V, ZF4 DV,ZF9 DV WMl(s): 2T3, JTM VDS(s): KA3DC WMl(s): 5TD VDS(s): BA3BB, BE 11 A, ZA3BB WMl(s): 4T3 The information contained in this bulletin supersedes SB No. T-SB-0146-10 . • Applicability has been updated to include 2012 - 2013 model year vehicles. Service Bulletin No. T-SB-0146-10 is Obsolete and any printed versions should be discarded. Be sure to review the entire content of this bulletin before proceeding. Immed iately followi ng a cold soa k startup, some 2009 - 201 3 mode l year vehicl es equipped with the 1AR- FE and 2AR-FE engi nes may exhibit a bri ef knock/rattle noise from the engine co mpartme nt for approximately one second. Foll ow the repa ir proce d ure below to address this condition. © 2013 Toyota Motor Sales, USA Page 1 of 16

Welcome message from author
This document is posted to help you gain knowledge. Please leave a comment to let me know what you think about it! Share it to your friends and learn new things together.
Transcript

@TOYOTA T-SB-0041-13 March 15, 2013 Technical Service Bulletin
Brief Engine Knock/Rattle Noise at Cold Startup (1AR/2AR)
Service Category Engine/Hybrid System
Toyota Supports ~ ASE Certification~ Section Engine Mecha nical Market USA
Applicability
YEAR(S) MODEL(S) ADDITIONAL INFORMATION
Introduction
2010 - 2012 Camry
2009 - 2013 Highlander
2009 - 201 2 RAV4
201 1 - 2013 Sienna
2009 - 2013 Venza
SUPERSESSION NOTICE
VDS(s): BF1 FK, BF3EK WMl(s): 4T1 , 4T4, JTN
VDS(s): DA41A, ZA3EH WMl(s): 5TD
VDS(s): BF31V, BF32V, BF33V, BF34V, BF35V, BF4DV, BF9DV, DF4DV, DF9DV, EF4DV,JF4DV, KF4DV, KF9DV,RF4DV, WF4DV,XF4DV,YF4DV, YK9DV,ZF31V, ZF32V, ZF33V,ZF34V, ZF35V, ZF4DV,ZF9DV WMl(s): 2T3, JTM
VDS(s): KA3DC WMl(s): 5TD
VDS(s): BA3BB, BE11 A, ZA3BB WMl(s): 4T3
The information contained in this bulletin supersedes SB No. T-SB-0146-10.
• Applicability has been updated to include 2012 - 2013 model year vehicles.
Service Bulletin No. T-SB-0146-10 is Obsolete and any printed versions should be discarded. Be sure to review the entire content of this bulletin before proceeding.
Immediately following a cold soak startup, some 2009 - 201 3 model year vehicles equipped with the 1AR-FE and 2AR-FE engines may exhibit a brief knock/rattle noise from the engine compartment for approximately one second. Follow the repair procedure below to address this condition.
© 2013 Toyota Motor Sales, USA Page 1 of 16

@TOYOTA T-S B-0041-13 March 15, 2013 Page 2 o f 16
Brief Engine Knock/Rattle Noise at Cold Startup (1AR/2AR)
Production Change Information
This bulletin applies to :
• A ll 2010 - 201 2 MY Tsutsumi produced Camry vehicles.
• Vehicles produced BEFORE the Production Change Effective VINs shown below.
MODEL PLANT DRIVETRAIN PRODUCTION CHANGE EFFECTIVE VIN
TMMK Line 1 4T1BF1FK#CU193768
Camry TMMK Line 2 4T1BF1FK#CU631600 2WO
SIA 4T4BF1FK#CR267530
Highlander TMMI 5TDKA3DC#DS016895
2WD JTMZF4DV#BD031671 Shokki
4WD JTMBF4DV#BD043071
2WD JTMWF4DV#B5042326 RAV4 Tahara
4WO JTMRF4DV#B5048712
2WD 2T3YF4DV#CW153020 TMMC
4WD 2T3BF4DV#CW264373
Sienna TMMI 2WD 5TDZA3EH#DS035562
2WD 4T3ZA3BB#DU070721 Venza TMMK
4WD 4T3BA3BB#DU039056
Warranty Information
OP CODE DESCRIPTION MODEL MODEL YEAR TIME OFP T1
Camry 2010 - 2012 2.6
Highlander 2009 - 2013 2.6
140021 R & R Camshaft Timing RAV4 2009 - 2012 2.4 13050-0V010 06 Gear Assembly Sienna 2011 - 2013 2.8
Venza 2009 - 2013 2.7
APPLICABLE WARRANTY
• This repair is covered under the Toyota Powertrain Warranty. This warranty is in effect for 60 months or 60,000 miles, whichever occurs first, from the vehicle's in-service date.
• Warranty application is l imited to occurrence of the specified condition described in this bulletin .
© 201 3 Toyota Motor Sales, USA
T2
40

@TOYOTA T-SB-0041-13 March 15, 2013 Page 3 of 16
Brief Engine Knock/Rattle Noise at Cold Startup (1AR/2AR)
Parts Information
MODEL PREVIOUS PART CURRENT PART PART NAME QTY NUMBER NUMBER
Camry 1 -Highlander 13050-0V010 1
13050-0V011 -RAV4 13050-36010 13050-0V040 1
{from April '1 1) 13050-3601 1 -Sienna 13050-0V030 Gear Assembly, Camshaft Timing 1 -Venza 1 -RAV4 13050-0V010
(from '09 MY until 13050-36010 13050-0VO 11 1 end of March '11) 13050-3601 1
11213-36020 Same Gasket, Cylinder Head Cover 1
111 59-36010 Gasket, Camshaft Bearing Cap 11159-3601 1 11159-0V011 2
111 59-0V010 Oil Hole No. 1
ALL 90430-10024 90430-A0001 Gasket, Camshaft Bearing Cap 1 Oil Hole No. 2
11328-36020 11328-0V010 Gasket, Timing Chain Tensioner 1
11329-36010 Same Gasket, Timing Chain Cover, No. 2 1
13552-36010 13552-0V010 Gasket (for Chain Tensioner) 1
© 2013 Toyota Motor Sales, USA

@TOYOTA T-SB-0041-13 March 15, 2013 Page 4of16
Brief Engine Knock/Rattle Noise at Cold Startup (1AR/2AR)
Required Tools & Equipment
REQUIRED EQUIPMENT SUPPLIER PART NUMBER QTY
Techstream 2.0* TS2UNIT
TIS Techstream ADE TSPKG1 1
Techstream Lite TSLITEDLR01
SPECIAL SERVICE TOOLS (SST) PART NUMBER QTY
Torque Wrench Adapter* 09249-63010-01 1
REQUIRED MATERIALS QTY
FIPG Sealant: Three Bond 12078, or Equivalent As Needed
NOTE
• Only ONE of the Techstream units listed above is required.
• Software version 8.00.034 or later is required .
• Additional Techstream units may be ordered by calling Approved Dealer Equipment (ADE) at 1-800-368-6787.
• Additional SSTs may be ordered by calling 1-800-933-8335.
• Essential SST.
© 2013 Toyota Motor Sales, USA

@TOYOTA T-SB-0041-13 March 15, 2013 Page 5of16
Brief Engine Knock/Rattle Noise at Cold Startup (1AR/2AR)
Repair Procedure
1. Confirm the brief knock/rattle noise condition. See attached video for an example of the engine knock/rattle noise: Engine Knock/Rattle Noise Example (1AR/2AR)
2. Remove the cylinder head cover.
A. Relocate the engine harness that lies across the top of the cylinder head cover.
B. Remove the ignition coils.
C. Remove the 16 bolts and cylinder head cover.
3. Remove the chain tensioner.
A. Remove the right front wheel.
B. Remove the front fender apron seal RH.
C. Remove the V-ribbed belt for the vane pump.
Figure 1.
D. Rotate the crankshaft clockwise and set the No. 1 cylinder at +10° from the TDC/compression.
E. After the timing marks are aligned on the VVT Figure 2.
gear, place paint marks on the chain and both ~--------------~ gears.
1 I P•iot M"''
2 Timing Marks
© 2013 Toyota Motor Sales, USA
@TOYOTA T-SB-0041-13 March 15, 2013 Page 6 of 16
Brief Engine Knock/Rattle Noise at Cold Startup (1AR/2AR)
Repair Procedure (Continued)
F. Rotate the crankshaft counterclockwise by 10° and loosen the tension of the chain .
G. Remove the timing chain cover plate.
H. Al ign the holes of the stopper plate and tensioner, and insert a pin into the stopper plate hole to lock the tensioner.
I. Remove the 2 bolts and chain tensioner.
Figure 3.
1 Stopper Plate
2 Timing Tensioner
4 . Remove the timing chain guide by removing the Figure 4. bolt. ~--------------~
© 2013 Toyota Motor Sales, USA

@TOYOTA T-SB-0041-13 March 15, 2013
Brief Engine Knock/Rattle Noise at Cold Startup (1AR/2AR)
Repair Procedure (Continued)
5. Remove the intake side W T gear.
A. For Camry ONLY: Remove the 2 bolts and the No. 2 timing chain cover.
B. Remove the service hole plug.
Figure 5.
Figure 6.
1 I Service Hole Plug
© 2013 Toyota Motor Sales, USA
Page 7 of 16

@TOYOTA T-SB-0041-13 March 15, 2013 Page 8 of 16
Brief Engine Knock/Rattle Noise at Cold Startup (1AR/2AR)
Repair Procedure (Continued)
C. Insert the tool through the service hole and Figure 1.
remove the bolt of the intake VVT gear while ~--------------~
holding the camshaft stationary with a wrench.
NOTICE
• Be careful NOT to damage the cylinder head or spark plug tube with the wrench.
• Do NOT disassemble the camshaft timing gear.
D. After the VVT gear is slid in the arrow direction Figure a. as shown in Figure 8, lower the WT gear and ~--------------~ remove the chain from the VVT gear.
© 2013 Toyota Motor Sales, USA

@TOYOTA T-SB-0041-13 March 15, 2013 Page 9 of 16
Brief Engine Knock/Rattle Noise at Cold Startup (1AR/2AR)
Repair Procedure (Continued)
E. Remove the W T gear from the cam housing.
F. Tie the timing chain to ensure it stays properly aligned with the exhaust and crankshaft timing gear pulleys.
NOTICE
The WT gear bolts may interfere with the Figure 9. housing during remova l. After the WT ~--------------~
gear slides out from the camshaft, carefully rotate the WT gear to the position shown in Figure 9 to avoid interference and remove it in the arrow direction shown.
© 2013 Toyota Motor Sales, USA

@TOYOTA T-SB-0041-13 March 15, 2013
Brief Engine Knock/Rattle Noise at Cold Startup (1AR/2AR)
Repair Procedure (Continued)
6. Install the intake side VVT gear.
A. Transfer the paint marks from the old gear to the new gear.
B. Confirm the new gear is in the unlocked position prior to installation.
NOTE
The camshaft timing gear MUST be in the unlocked position when installing on the camshaft to prevent damage to the lock pin during tightening . Please see step E for instructions to unlock the camshaft timing gear.
C. Remove the tie from the timing chain.
Figure 10.
©
0
1 Advanced (Unlocked) Position
2 Retarded (Locked) Position
3 Knock Pin Hole
4 Alignment Mark
© 2013 Toyota Motor Sales, USA
Page 10 of 16

@TOYOTA T-SB-0041-13 March 15, 2013
Brief Engine Knock/Rattle Noise at Cold Startup (1AR/2AR)
Repair Procedure (Continued)
D. Insert the tool from the service hole and install Figure 11.
the bolt of the intake VVT gear.
NOTICE
Make sure NOT to lock the camshaft timing gear. If the camshaft timing gear is locked, release the lock according to the following procedure (step E).
E. Inspect the camshaft timing gear lock.
Page 11 of 16
If the camshaft timing gear is locked, release the lock according to the following procedure.
(1) After cleaning and degreasing the intake Figure 12.
side VVT oil hole on the No. 1 camshaft ....---------------------. bearing cap, completely seal the oil hole with adhesive tape or equivalent as shown in Figure 12 to prevent air from leaking.
NOTICE
Be sure to seal the oil hole completely because air leaks due to insufficient sealing will prevent the lock pin from being released .
1
2
3
Adhesive Tape
Adhesive Tape Sealing Area
Poke a Hole
(2) Make a hole in the adhesive tape covering the oil hole as shown in Figure 12.
© 2013 Toyota Motor Sales, USA
@TOYOTA T-SB-0041-13 March 15, 2013 Page 12 of 16
Brief Engine Knock/Rattle Noise at Cold Startup (1AR/2AR)
Repair Procedure (Continued)
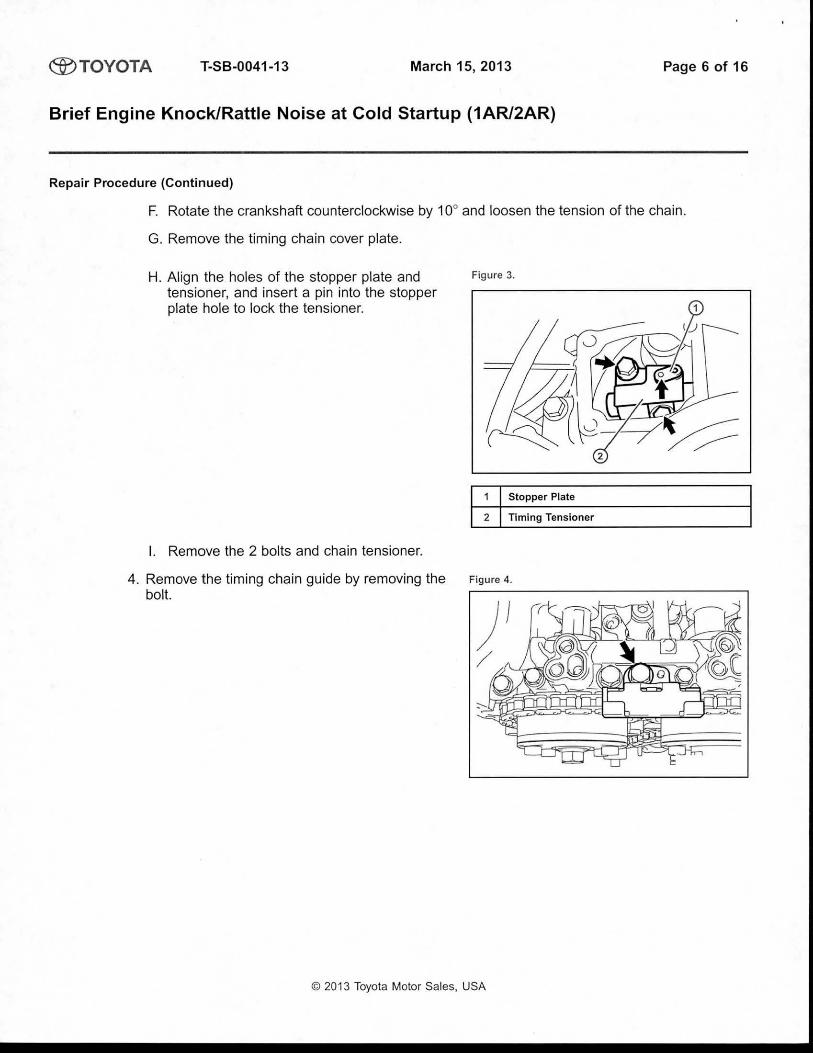
(3) Apply approximately 200 kPa Figure 13.
(2.0 kgf/cm2, 29 psi) of air pressure to .--- - -----------------, the hole made in the preceding step, then forcibly turn the camshaft timing gear assembly in the advance direction (counterclockwise).
CAUTION
Cover the oil passages with a piece of cloth when applying pressure to keep oil from splashing.
NOTICE
• If air leaks out, reattach the adhesive tape.
• Do NOT allow the camshaft timing gear assembly to lock. If it locks, release the lock pin again.
HINT
• The camshaft timing gear assembly may be turned in the advance direction without applying any force.
• If enough air pressure cannot be applied because of air leakage from the port, releasing the lock pin may be difficult.
(4) Remove the adhesive tape on the W T hole.
F. Tighten the bolt of the intake W T gear. Torque: 85 N*m (867 kgf*cm, 63 ft*lbf)
1 I Compressed A ir
G. Lock the gear by rotating the camshaft timing gear assembly clockwise.
© 2013 Toyota Motor Sales, USA

@TOYOTA T-SB-0041-13 March 15, 2013
Brief Engine Knock/Rattle Noise at Cold Startup (1AR/2AR)
Repair Procedure (Continued)
7. Install the service hole plug with a new gasket. Torque: 30 N*m (306 kgf*cm, 22 ft*lbf)
8. For Camry ONLY: Install the No. 2 timing chain cover with the 2 bolts.
Torque: 10 N*m (102 kgf*cm, 7 ft*lbf)
9. Install the chain to the W T gear.
NOTICE
Align the marks that were placed on the gears and chain.
Figure 14.
1 I Service Hole Plug
Figure 15.
Figure 16.
1 I P•lot M"''
2 Timing Marks
© 2013 Toyota Motor Sales, USA
Page 13 of 16

@TOYOTA T-SB-0041-13 March 15, 2013
Brief Engine Knock/Rattle Noise at Cold Startup (1AR/2AR)
Repair Procedure (Continued)
10. Install the timing chain guide with the bolt.
Torque: 21 N*m (214 kgf*cm, 15 ft*lbf)
11 . Install the chain tensioner.
A. Install a new gasket and the chain tensioner to the service hole.
Torque: 10 N*m (102 kgf*cm, 7 ft*lbf)
B. When installing the tensioner, pull out the pin and release the tensioner.
C. Install the timing chain cover plate.
Install a new gasket and the tim ing chain cover plate with the 4 bolts.
Torque: 10 N*m (102 kgf*cm, 7 ft*lbf)
12. Install the cylinder head cover sub-assembly.
Figure 17.
Figure 18.
1 Stopper Plate
2 Timing Tensioner
A. Apply a light coat of engine oil to 3 new gaskets.
© 2013 Toyota Motor Sales, USA
Page 14 of 16

@TOYOTA T-SB-0041-13 March 15, 2013
Brief Engine Knock/Rattle Noise at Cold Startup (1AR/2AR)
Repair Procedure (Continued)
B. Install the 3 gaskets to the camshaft bearing caps.
C. Install a new gasket to the cylinder head cover.
NOTICE
Remove any oil from the contact surface.
D. Apply FIPG sealant as shown in Figure 20.
FIPG Sealant: Three Bond 12078, or equivalent
Standard Seal Diameter: 3.0 to 6.0 mm (0.118 to 0.236 in.)
Application Width A : 5.0 mm (0.197 in .)
NOTICE
• Remove any oil from the contact surface.
• Install the cylinder head cover wi thin 3 minutes and tighten the bolts within 15 minutes after applying FIPG sealant.
Figure 19.
Figure 20.
1 FIPG Sealant
2 Timing Chain Cover
3 Camshaft Housing
4 3.0 to 6.0 mm
A Application Width "A"
© 2013 Toyota Motor Sales, USA
Page 15 of 16

@TOYOTA T-SB-0041-13 March 15, 2013 Page 16 of 16
Brief Engine Knock/Rattle Noise at Cold Startup (1AR/2AR)
Repair Procedure (Continued)
E. Align the cylinder head cover with pin A. Figure 21. Then align the cylinder head cover with pin B .--------------------. and install the cylinder head cover.
6 5, 18 17
A Ip;, A
B Pin B
F. Install the 16 bolts and then tighten the bolts in the order shown in Figure 21.
Torque: 12 N*m (122 kgf"'cm, 9 ft*lbf)
NOTICE
Do NOT apply oil for at least 4 hours after the installation.
13. Confirm the repair.
© 2013 Toyota Motor Sales, USA
Related Documents