Symantec™ Data Loss Prevention Data Insight Implementation Guide Version 15.5

Welcome message from author
This document is posted to help you gain knowledge. Please leave a comment to let me know what you think about it! Share it to your friends and learn new things together.
Transcript

Symantec™ Data LossPrevention Data InsightImplementation Guide
Version 15.5

Symantec Data Loss Prevention Data InsightImplementation Guide
Documentation version: 15.5
Legal NoticeCopyright © 2018 Symantec Corporation. All rights reserved.
Symantec, the Symantec Logo and the Checkmark Logo are trademarks or registered trademarks ofSymantec Corporation or its affiliates in the U.S. and other countries. Other names may be trademarksof their respective owners.
This Symantec product may contain third party software for which Symantec is required to provide attributionto the third party (“Third Party Programs”). Some of the Third Party Programs are available under opensource or free software licenses. The License Agreement accompanying the Software does not alter anyrights or obligations you may have under those open source or free software licenses. Please see theThird Party Legal Notice Appendix to this Documentation or TPIP ReadMe File accompanying this Symantecproduct for more information on the Third Party Programs.
The product described in this document is distributed under licenses restricting its use, copying, distribution,and decompilation/reverse engineering. No part of this document may be reproduced in any form by anymeans without prior written authorization of Symantec Corporation and its licensors, if any.
THE DOCUMENTATION IS PROVIDED "AS IS" AND ALL EXPRESS OR IMPLIED CONDITIONS,REPRESENTATIONS AND WARRANTIES, INCLUDING ANY IMPLIED WARRANTY OFMERCHANTABILITY, FITNESS FOR A PARTICULAR PURPOSE OR NON-INFRINGEMENT, AREDISCLAIMED, EXCEPT TO THE EXTENT THAT SUCH DISCLAIMERS ARE HELD TO BE LEGALLYINVALID. SYMANTECCORPORATIONSHALLNOTBELIABLEFOR INCIDENTALORCONSEQUENTIALDAMAGES IN CONNECTION WITH THE FURNISHING, PERFORMANCE, OR USE OF THISDOCUMENTATION. THE INFORMATION CONTAINED IN THIS DOCUMENTATION IS SUBJECT TOCHANGE WITHOUT NOTICE.
The Licensed Software and Documentation are deemed to be commercial computer software as definedin FAR 12.212 and subject to restricted rights as defined in FAR Section 52.227-19 "Commercial ComputerSoftware - Restricted Rights" and DFARS 227.7202, et seq. "Commercial Computer Software andCommercial Computer Software Documentation," as applicable, and any successor regulations, whetherdelivered by Symantec as on premises or hosted services. Any use, modification, reproduction release,performance, display or disclosure of the Licensed Software and Documentation by the U.S. Governmentshall be solely in accordance with the terms of this Agreement.

Symantec Corporation350 Ellis StreetMountain View, CA 94043
http://www.symantec.com

Chapter 1 Introducing Data Insight for Data LossPrevention ........................................................................ 6
About this guide ............................................................................. 6About Data Insight .......................................................................... 7Components of the Symantec Data Loss Prevention integration with
Veritas Data Insight .................................................................. 8How Data Insight works with Data Loss Prevention ............................... 9What you can do with Veritas Data Insight and Symantec Data Loss
Prevention ............................................................................ 10Where to get more information about Veritas Data Insight ..................... 11
Chapter 2 Enabling Data Insight to manage risk ............................. 13
Locating and managing data at risk .................................................. 13Implementing Data Insight for Data Loss Prevention to manage data
at risk ................................................................................... 14Configuring the connection between the Enforce Server and Data
Insight .................................................................................. 18About the Data Insight lookup plug-in ............................................... 19Configuring Data Loss Prevention to retrieve attribute values from Data
Insight .................................................................................. 20Mapping attributes to Data Insight data fields ..................................... 22Enabling the Data Insight lookup plug-in ............................................ 24Chaining the Data Insight lookup plug-in ........................................... 25Enabling lookup plug-in parameter keys ............................................ 25Testing the Data Insight lookup plug-in configuration ............................ 27Troubleshooting the Data Insight lookup plug-in .................................. 28Changing Data Insight refresh intervals ............................................. 29Best practices for finding and reporting on data at risk .......................... 30
Chapter 3 Finding data users and accesses in incidentreports ............................................................................. 31
Accessing reports of folders at risk ................................................... 31Configuring the risk score and timeframes for the report of folders at
risk ...................................................................................... 33
Contents

Viewing folders ranked by risk, path, or folder exposure ....................... 34Viewing details of a folder at risk ...................................................... 36Filtering the information in the report of folders at risk .......................... 37Saving a report of folders at risk ...................................................... 39Finding data users and accesses in incident reports ............................ 40Viewing Data Insight incident details ................................................. 42Accessing the history of a file in the Veritas Data Insight console ............ 43Selecting custom attributes for data user details ................................. 43Creating summary reports for Data Insight ......................................... 44Creating and distributing aggregated incident reports to data
owners ................................................................................. 45
Chapter 4 Working with the Veritas Data Insight Self-ServicePortal ............................................................................... 49
About the Veritas Data Insight Self-Service Portal ............................... 49Configuring Symantec Data Loss Prevention for use with the Veritas
Data Insight Self-Service Portal ................................................. 50Configuring the Response Rule Execution Service ........................ 51
Operational logs for the Response Rule Execution Service ................... 53
5Contents

Introducing Data Insight forData Loss Prevention
This chapter includes the following topics:
■ About this guide
■ About Data Insight
■ Components of the Symantec Data Loss Prevention integration with Veritas Data Insight
■ How Data Insight works with Data Loss Prevention
■ What you can do with Veritas Data Insight and Symantec Data Loss Prevention
■ Where to get more information about Veritas Data Insight
About this guideThe Symantec Data Loss Prevention Data Insight Implementation Guide describes how VeritasData Insight can be integrated with Symantec Data Loss Prevention to locate and managedata at risk in your enterprise. This guide describes how to connect the Enforce Server to theData Insight Management Server, how to configure the Data Insight Lookup Plug-in to retrievepertinent data and populate incident attributes, and how to configure the risk score andtime-frames to report data at risk. This guide also describes how to configure Symantec DataLoss Prevention for use with the Veritas Data Insight Self-Service Portal.
This guide does not address topics related to installing or configuring Veritas Data Insight(including the Self-Service Portal), or topics involving Symantec Data Loss Prevention thatare not specific to Veritas Data Insight integration with Symantec Data Loss Prevention.
See “Where to get more information about Veritas Data Insight” on page 11.
1Chapter

Veritas Data Insight is sold and supported by Veritas. For more information about Veritas DataInsight, see www.veritas.com/product/information-governance/data-insight.
About Data InsightMany organizations struggle with identifying data users and owners for their unstructured data.This challenge is compounded with the fact that organizations lack visibility into the types ofcontent and data that is spread across their computing environment.
With Veritas Data Insight, users can monitor file access to automatically identify the data userof a file based on the access history. The usage information then automatically enters into theincident detail of files that violate Symantec Data Loss Prevention policies. This method enablesusers to identify sensitive data along with the responsible users to enable more efficientremediation and data management.
Veritas Data Insight scans unstructured data systems and collects the full access history ofusers across the data. Veritas Data Insight helps organizations monitor and report on accessto sensitive information.
Veritas Data Insight helps organizations solve the problem of identifying data owners andresponsible parties for information in spite of incomplete or inaccurate metadata or trackinginformation. This helps support large-scale business owner-driven remediation processes andworkflows.
See “What you can do with Veritas Data Insight and Symantec Data Loss Prevention”on page 10.
Veritas Data Insight can provide the following information:
■ Who owns the data
■ Who is responsible for remediation
■ Who has seen the data
■ Who has access to the data
■ What data is most at risk
■ Frequency of usage of data
The Veritas Data Insight information that contains the access history of data users is availableto Symantec Data Loss Prevention. If the access history on a file is recorded, a data user canbe identified in a Network Discover incident.
The Folder Risk Report ranks folders based on number of files with policy violations, severityweightings, folder exposure, and actual user accesses on sensitive data. This report providesa mechanism to focus on the folder assets with the largest volume of data and highest risk ofdata exposure. The report helps Symantec Data Loss Prevention remediators drive down riskin the fastest possible manner.
7Introducing Data Insight for Data Loss PreventionAbout Data Insight

See “Accessing reports of folders at risk” on page 31.
Symantec Data Loss Prevention queries Veritas Data Insight for the data user of a file andother access history attributes like the last modifying user. This access history information isavailable in the Symantec Data Loss Prevention incident snapshot as custom attributes.
The data user information from Veritas Data Insight can also be assigned to the Data OwnerName field, to enable the automatic distribution of aggregated incident reports to data ownersfor remediation.
See “Creating and distributing aggregated incident reports to data owners” on page 45.
Data owners and custodians can remediate Symantec Data Loss Prevention Network Discoverfile-system and SharePoint incidents directly using the Self-Service Portal in Veritas DataInsight. You can configure a workflow in Veritas Data Insight to send email alerts to data ownersor custodians about policy violations. They can then log in to the Self-Service Portal to viewthe policy violations and remediate Symantec Data Loss Prevention incidents using SmartResponse rules.
See “About the Veritas Data Insight Self-Service Portal” on page 49.
Components of the Symantec Data Loss Preventionintegration with Veritas Data Insight
Veritas Data Insight monitors file access to automatically identify the data user of a file basedon the access history. The summary of access history information then automatically feedsinto the incident detail of files that violate Symantec Data Loss Prevention policies.
These components are integrated to provide data user information for the Network Discoverincidents.
See “How Data Insight works with Data Loss Prevention” on page 9.
The following components are integrated to provide data user information for incidentremediation.
8Introducing Data Insight for Data Loss PreventionComponents of the Symantec Data Loss Prevention integration with Veritas Data Insight

Table 1-1 Data Insight integration components
DescriptionComponent
Veritas Data Insight scans unstructured data systems (Network AttachedStorage (NAS) filers, Windows file servers, SharePoint). It reports on theaccess history of various users across files and folders. Support forSharePoint is available beginning with Veritas Data Insight version 4.0.
Using the Self-Service Portal provided by Veritas Data Insight, data ownersand custodians can remediate incidents directly, without needing access tothe Symantec Data Loss Prevention Enforce Server administration console.The Self-Service Portal is available beginning with Veritas Data Insight version4.5.
Veritas Data Insight
Network Discover scans file shares on the unstructured data systems. Itidentifies confidential information as Network Discover incidents.
Symantec Data LossPrevention NetworkDiscover
Symantec Data Loss Prevention queries Veritas Data Insight for the datauser of a file and other access history attributes like the last modifying user.
Symantec Data Loss Prevention provides users of the Veritas Data InsightSelf-Service Portal with the ability to view and execute incident remediationresponse rules.
Symantec Data LossPrevention Enforce Server
How Data Insight works with Data Loss PreventionVeritas Data Insight scans unstructured data systems and stores information about the accesshistory across files and folders.
A Network Discover Server scans the files and folders in unstructured data systems to exposeconfidential data. Information about the exposed confidential data is stored on the SymantecData Loss Prevention Enforce Server. With the activation of a license for Veritas Data Insight,a lookup plug-in on the Enforce Server pulls data user information from the Veritas Data InsightManagement Server. This data user information populates custom attributes for a NetworkDiscover incident at the time the incident is generated.
A process table specifies the installation and configuration of the required components.
See “Locating and managing data at risk” on page 13.
9Introducing Data Insight for Data Loss PreventionHow Data Insight works with Data Loss Prevention

What you can do with Veritas Data Insight andSymantec Data Loss Prevention
Table 1-2 describes the use cases of Veritas Data Insight to enable more efficient incidentremediation. You use the Network Discover incident report options to identify the data ownersto notify about these incidents.
See “Finding data users and accesses in incident reports” on page 40.
Table 1-2 What you can do with Veritas Data Insight
DescriptionTasks
The Folder Risk Report ranks folders based on number of files with policyviolations, severity weightings, folder exposure, and actual user accesseson sensitive data. This report provides a mechanism to focus on the folderassets with the largest volume of data and highest risk of data exposure.The report helps Symantec Data Loss Prevention remediators drive downrisk in the fastest possible manner. The Folder Risk Report is only availablefor file system Discover targets.
Prioritize remediation offolders.
Data-owner remediation reports provide a scalable method of remediatinglarge numbers of incidents. You can aggregate incidents into a singleincident report for each data owner on an ad hoc or scheduled basis andthen email the remediation reports (as a CSV or HTML attachment) to therespective custodians or data owners.
Create and automaticallydistribute aggregatedincident reports to dataowners for remediation.
File owner information may not reflect the responsible party. The responsibleparty or data owner can be a line manager in the business unit, the headof a department, or an information security officer. Veritas Data Insightprovides information to tie the most active user of a file to a manager orresponsible party for remediation steps.
Identify the data owner.
The Data Owner field may return an unresolvable account for an individualthat has left the organization. For example, in Windows Active Directory,every user has an underlying unique identifier that is associated with theiraccount. This identifier is sometimes an unidentifiable string of information.Veritas Data Insight provides information to drop down to the next resolvableaccount that names an individual.
Identify the next-bestowner.
Veritas Data Insight enables assignment of one or more users as custodiansof a data repository. Custodian tagging is typically used to determine theperson responsible for remediation. The assigned custodian need not haveaccessed the files and folders. Support for custodian information is availablebeginning with Veritas Data Insight version 4.0.
Identify the data custodian.
10Introducing Data Insight for Data Loss PreventionWhat you can do with Veritas Data Insight and Symantec Data Loss Prevention

Table 1-2 What you can do with Veritas Data Insight (continued)
DescriptionTasks
In the event of a data leak, you may want to know who saw a particular file.You can run a Symantec Data Loss Prevention summary report by the datauser custom attribute. Also, incident snapshots provide information to tiethe incident back to the Veritas Data Insight Management Server. On theVeritas Data Insight Management Server, you can view detailed informationand an audit history of who accessed the data. You can also viewcorrelations to similar incidents. Additional remediation steps can then betaken to report on those individuals or launch subsequent targeted scanson their assets.
Investigate a data leak.
The Veritas Data Insight Self-Service Portal allows you to distribute theremediation workflow directly to data owners and custodians. TheSelf-Service Portal allows data owners and custodians to view policyviolations and apply Smart Response rules without requiring access to theSymantec Data Loss Prevention Enforce Server administration console.The Self-Service Portal is available beginning with Veritas Data Insightversion 4.5.
Create and automaticallydistribute remediationworkflows to data ownersand custodians.
Where to get more information about Veritas DataInsight
You must target a file share on a filer that is supported for both Veritas Data Insight andSymantec Data Loss Prevention. The supported filers and supported client protocols (suchas CIFS) are listed in the following documentation:
■ Veritas Data Insight supports specific filers.For a list of the supported filers, see the Veritas Data Insight Installation Guide.
■ Network Discover scans of file systems support specific client protocols.For a list of the supported client protocols, see the Symantec Data Loss PreventionAdministration Guide, in the section "Supported file share targets."
Veritas Data Insight only scans SharePoint Document and Picture Libraries. Support forSharePoint data is available beginning with Veritas Data Insight version 4.0.
The following documentation provides more information about Veritas Data Insight:
■ Veritas Data Insight Installation GuideExplains how to install Veritas Data Insight.
■ Veritas Data Insight Administrator's Guide
11Introducing Data Insight for Data Loss PreventionWhere to get more information about Veritas Data Insight

Explains how to configure and administer Veritas Data Insight using the managementconsole. Explains how to gather the access history of the data users. Explains how toconfigure and customize the Self-Service Portal.
■ Veritas Data Insight User's GuideExplains the Veritas Data Insight views that display data access information on folders andby users or groups. Explains how to set up Veritas Data Insight reports. Explains how touse the Self-Service Portal to remediate Symantec Data Loss Prevention incidents.
The following documentation provides information about the setup to identify data users in theSymantec Data Loss Prevention product using the information from Veritas Data Insight:
■ Symantec Data Loss Prevention System Requirements GuideProvides the requirements for the disk space for the Veritas Data Insight information onthe Enforce Server.
■ Symantec Data Loss Prevention Installation GuideExplains how to install the Symantec Data Loss Prevention product.
■ Symantec Data Loss Prevention Administration GuideExplains how to configure and run the scan of a Network Discover Box cloud storage, filesystem, or SharePoint target, and how to set up reports.Explains how to configure other lookup plug-ins, including CSV, LDAP, and Script LookupPlug-ins.
12Introducing Data Insight for Data Loss PreventionWhere to get more information about Veritas Data Insight

Enabling Data Insight tomanage risk
This chapter includes the following topics:
■ Locating and managing data at risk
■ Implementing Data Insight for Data Loss Prevention to manage data at risk
■ Configuring the connection between the Enforce Server and Data Insight
■ About the Data Insight lookup plug-in
■ Configuring Data Loss Prevention to retrieve attribute values from Data Insight
■ Mapping attributes to Data Insight data fields
■ Enabling the Data Insight lookup plug-in
■ Chaining the Data Insight lookup plug-in
■ Enabling lookup plug-in parameter keys
■ Testing the Data Insight lookup plug-in configuration
■ Troubleshooting the Data Insight lookup plug-in
■ Changing Data Insight refresh intervals
■ Best practices for finding and reporting on data at risk
Locating and managing data at riskTo locate and manage data at risk using Veritas Data Insight, use the following processes:
2Chapter

■ Set up, create, and automatically distribute aggregated incident reports to data owners forremediation.See “Creating and distributing aggregated incident reports to data owners” on page 45.See “Finding data users and accesses in incident reports” on page 40.
■ Retrieve the data user from the Veritas Data Insight Management Server into the DataOwner Name field in Discover incidents. Then use the Discover reports to locate andmanage the incidents.See Table 2-1 on page 14.See Table 2-2 on page 16.
■ Retrieve details about file use from the Veritas Data Insight Management Server into thecustom attributes in the Discover incidents, to provide additional fields in the Discoverreports to locate and manage the incidents.See Table 2-1 on page 14.See Table 2-3 on page 17.
Implementing Data Insight for Data Loss Preventionto manage data at risk
To set up the connection to the Veritas Data Insight Management Server, complete the followingprocess:
Table 2-1 Configuring a Data Insight connection
DescriptionActionStep
Make sure that the Veritas Data InsightManagement Server has access to the files or filesystems of interest.
See the following Veritas Data Insightdocumentation:
■ Veritas Data Insight Installation Guide■ Veritas Data Insight Administrator's Guide
Install and configure the Veritas Data InsightManagement Server.
1
You must install and configure at least one NetworkDiscover Server. See the Symantec Data LossPrevention Installation Guide.
Install and configure Symantec Data LossPrevention.
2
14Enabling Data Insight to manage riskImplementing Data Insight for Data Loss Prevention to manage data at risk

Table 2-1 Configuring a Data Insight connection (continued)
DescriptionActionStep
Veritas Data Insight is a separately licensed option.If Veritas Data Insight is not licensed on the EnforceServer, the menu option to configure the connectionto the Veritas Data Insight Management Server doesnot appear.
If you add the Veritas Data Insight license onto anexisting Enforce Server, you must restart theIncident Persister service to enable incident lookup.
See “Configuring the connection between theEnforce Server and Data Insight” on page 18.
Configure a connection between the EnforceServer and Veritas Data Insight.
3
Verify the connection between the Enforce Serverand the Veritas Data Insight Management Server.
See “Troubleshooting the Data Insight lookupplug-in” on page 28.
Test the connection to Veritas Data Insight.4
Install and configure the Self-Service Portal on theVeritas Data Insight side. The Self-Service Portalis available beginning with Veritas Data Insightversion 4.5.
See the following Veritas Data Insightdocumentation:
■ Veritas Data Insight Administrator's Guide
Configure Symantec Data Loss Prevention forintegration with the Self-Service Portal.
See “About the Veritas Data Insight Self-ServicePortal” on page 49.
Install and configure the Self-Service Portal.5
To retrieve details about file use into the Data Owner Name field, first complete the setup inTable 2-1, then complete the following steps:
15Enabling Data Insight to manage riskImplementing Data Insight for Data Loss Prevention to manage data at risk

Table 2-2 Configuring the Data Insight lookup plug-in to retrieve data owner details fromData Insight
DescriptionActionStep
Configure the Data Insight lookup plug-in to retrievethe Veritas Data Insight data user directly into theData Owner Name field in the Discover incidents.
See “Configuring Data Loss Prevention to retrieveattribute values from Data Insight” on page 20.
Configure the Data Insight lookup plug-in toretrieve Data Owner details.
1
Configure other lookup plug-ins as necessary to setthe Data Owner Email Address field, or othercustom attributes.
You can chain the LDAP, the CSV, or Script lookupplug-ins with the Data Insight lookup plug-in to setthe Data Owner Email Address field.
Refer to the Symantec Data Loss PreventionAdministration Guide for details on configuring theseplug-ins.
Configure other lookup plug-ins to populatethe Data Owner Email field.
2
To set up a Network Discover scan of the filesystems or SharePoint servers of interest, see theSymantec Data Loss Prevention AdministrationGuide. Support for SharePoint targets is availablewith Veritas Data Insight version 4.0 or later.
Scan the file systems or SharePoint serversof interest.
3
Test that the details from the Veritas Data InsightManagement Server populate the Data OwnerName field.
View the incident reports to verify that the expectedinformation is present.
See “Finding data users and accesses in incidentreports” on page 40.
Test the plug-ins.4
To retrieve details from Veritas Data Insight about file use into custom attributes, complete thesetup in Table 2-1, then complete the following steps:
16Enabling Data Insight to manage riskImplementing Data Insight for Data Loss Prevention to manage data at risk

Table 2-3 Configuring the Data Insight lookup plug-in to retrieve custom attribute valuesfrom Data Insight
DescriptionActionStep
On the Enforce Server, create custom attributes foreach file detail that you want retrieved from theVeritas Data Insight Management Server.
See “About the Data Insight lookup plug-in”on page 19.
Refer to the Symantec Data Loss PreventionAdministration Guide for details on configuringcustom attributes.
Create custom attributes.1
Configure the Data Insight lookup plug-in as wellas any other lookup plug-ins you want to implement.
See “Configuring Data Loss Prevention to retrieveattribute values from Data Insight” on page 20.
Refer to the Symantec Data Loss PreventionAdministration Guide for details on configuring theCSV, LDAP, and Script lookup plug-ins.
Configure the Data Insight lookup plug-in andothers you want to implement.
2
Map the details from the Veritas Data InsightManagement Server to the custom attributes thatyou created.
See “Mapping attributes to Data Insight data fields”on page 22.
Map the attributes.3
Set up a Network Discover/Cloud Storage Discoverscan of the file systems or SharePoint servers ofinterest. Support for SharePoint targets is availablewith Veritas Data Insight version 4.0 or later.
See the Symantec Data Loss PreventionAdministrationGuide for configuring Discover scans.
Scan the file systems, SharePoint servers,or Box accounts you want to protect.
4
Test that the details from the Veritas Data InsightManagement Server populate your customattributes. View the incident reports to verify thatthe expected information is present.
See “Finding data users and accesses in incidentreports” on page 40.
Test the plug-ins.5
17Enabling Data Insight to manage riskImplementing Data Insight for Data Loss Prevention to manage data at risk

Configuring the connection between the EnforceServer and Data Insight
Before you can use the information from Veritas Data Insight, you need to configure theconnection to the Veritas Data Insight Management Server.
You can also optionally configure the risk score and other options for the report of folders atrisk. The risk score is based on relevant information from the Symantec Data Loss Preventionincidents plus the information from the Veritas Data Insight Management Server.
To configure the connection to the Veritas Data Insight Management Server
1 Click System > Settings > Data Insight from the Enforce Server administration console.
If Veritas Data Insight is not licensed on the Enforce Server, this menu option does notappear.
If you add the Veritas Data Insight license onto an existing Enforce Server, you mustrestart the Incident Persister service to enable the Veritas Data Insight lookups and thedata owner lookups for incidents.
2 Click Configure.
3 Enter the Host Name of the Veritas Data Insight Management Server. The Host Namemay need to match the host name in the certificate.
4 Enter the Port number of the Veritas Data Insight Management Server. The default is443.
5 Click Retrieve Certificate.
This retrieval sends a request to the specified Veritas Data Insight Management Serverto obtain its SSL certificate.
6 Click Yes to trust the certificate.
Verify that the certificate is returned from the Veritas Data Insight Management Serverand that is the correct certificate.
7 Enter the log on information to the Veritas Data Insight Management Server.
■ SelectUse Saved Credentials to use a credential that is saved in the credential store.Then enter the name of the saved credential.
■ Select Use These Credentials to enter the credentials here.
■ Enter the Username and Password, and Re-enter Password.
18Enabling Data Insight to manage riskConfiguring the connection between the Enforce Server and Data Insight

8 Click Test Connection to verify the connection to the Veritas Data Insight ManagementServer.
This tests the connection to the Veritas Data Insight Management Server using the specifiedcredentials. This Test Connection operation is available only after the server certificateis verified. If the test is successful, the system displays the message: "The test connectionsucceeded." If the test is not successful, verify the connection parameters and credentials.
9 Optionally, you can configure the risk score and timeframes for the report of folders atrisk. Generally, the defaults are acceptable.
See “Configuring the risk score and timeframes for the report of folders at risk” on page 33.
10 Optionally, you can also configure the data refresh schedule to retrieve the informationfrom the Data Insight Management Server.
See “Changing Data Insight refresh intervals” on page 29.
About the Data Insight lookup plug-inThe Data Insight lookup plug-in pulls data from a Veritas Data Insight Management Server. Itthen uses that data to populate custom attributes for a Network Discover incident at the timethe incident is generated. The Data Insight lookup plug-in connects Symantec Data LossPrevention with Veritas Data Insight to retrieve attribute values. Data Insight can be used toprovide granular context to incidents, including up-to-date data owner information.
Note: The Data Insight lookup plug-in requires a Data Insight license separate from SymantecData Loss Prevention licensing. If your system is not licensed for Data Insight, the Data Insightlookup plug-in is not available.
See “About Data Insight” on page 7.
You must create custom attributes for each attribute you want populated from the Veritas DataInsight Management Server. You create only the custom attributes that you need. When anincident is created, the Enforce Server retrieves data regarding that incident. Some of thatdata is in the form of "attributes." Custom attributes capture and store supplemental data thatis related to the incident, such as the name of a relevant manager or department. Refer to theSymantec Data Loss Prevention Administration Guide for details on creating custom attributes.
To populate custom attributes with the incident-related data, the Enforce Server uses the DataInsight lookup plug-in to retrieve the additional data from the Veritas Data Insight ManagementServer. You can chain the Data Insight lookup plug-in with other plug-ins, such as the LDAPlookup plug-in, CSV lookup plug-in, or Script lookup plug-in. For example, you may want todo this to set the Data Owner Email Address field. If the new lookup returns null or emptyvalues for any custom attribute fields, those empty values overwrite the existing values.
19Enabling Data Insight to manage riskAbout the Data Insight lookup plug-in

The values for the custom attributes are updated by clicking Lookup in the Attribute sectionof the Incident Snapshot screen. This action replaces the existing values that are stored inthe custom attribute fields with the values returned by the new lookup. Refer to the SymantecData Loss Prevention Administration Guide for details on using lookup plug-ins to remediateincidents.
The Veritas Data Insight lookup plug-in can retrieve the following information from the VeritasData Insight Management Server:
■ Data user. The data user is the user who most frequently accessed the file.
■ Business owner as defined in the Veritas Data Insight product.
■ Custodian. The custodian is the user who is responsible for remediation of the file. (Supportfor custodian information is available with Veritas Data Insight version 4.0 or later.)
■ Custodian Folder. The URI of the file system or SharePoint folder to which the custodianis assigned. (Support for custodian folder information is available with Veritas Data Insightversion 4.0 or later.)
■ Data user last access time. The last time the data user accessed the file.
■ Data user access count. The number of times the data user accessed the file.
■ Most active users.
■ Most active readers.
■ Most active writers.
■ Read and write counts for each of the most active users, readers, or writers.
■ Last modified by.
■ Last accessed time.
■ Number of read accesses across all users.
■ Number of write accesses across all users.
■ The first time that access history was collected for this incident.
See “Configuring Data Loss Prevention to retrieve attribute values from Data Insight”on page 20.
ConfiguringData LossPrevention to retrieve attributevalues from Data Insight
The System > Incident Data > Lookup Plugins page in the Enforce Server administrationconsole is where you configure the Data Insight lookup plug-in. You can configure one DataInsight lookup plug-in per Enforce Server instance.
20Enabling Data Insight to manage riskConfiguring Data Loss Prevention to retrieve attribute values from Data Insight

Table 2-4 Configuring the Data Insight lookup plug-in
DescriptionActionStep
Configure attribute status values and create custom attributes at the System >Incident Data > Attributes page. Refer to the Symantec Data Loss PreventionAdministration Guide for details.
Note: If you use only the data-owner-name attribute, you do not have to create acustom attribute. The data-owner-name attribute is generated by the system.
Create customattributes.
1
Set the host name, credentials, and parameters to connect to Data Insight.
See “Configuring the connection between the Enforce Server and Data Insight”on page 18.
Configure aconnection to DataInsight.
2
From the Enforce Server administration console, navigate to the System > IncidentData > Lookup Plugins page and select New Plugin > Data Insight.
Create a new DataInsight lookupplug-in.
3
If you leave this field empty, the system sets this field to oldest date for historypossible, which is 1/1/1970.
Enter a Start Date.4
You can specify between 0 and 10 active users. The default is 1.Select the ActiveUser Count.
5
You can specify between 0 and 10 active readers. The default is 1.Select the ActiveReader Count.
6
You can specify between 0 and 10 active writers. The default is 1.Select the ActiveWriter Count.
7
The system provides you with an attribute mapping template for all the informationexposed by Data Insight. A separate entry is made for each custom attribute to bepopulated. You enter the custom attribute to the right of the equals sign for eachentry you want to map. For example, Data_User=attr.data-owner-namewhichis configured for you.
See “Mapping attributes to Data Insight data fields” on page 22.
Configure theAttribute Mapping.
8
See “Enabling the Data Insight lookup plug-in” on page 24.
If you deploy multiple plug-ins, chain them as well.
See “Chaining the Data Insight lookup plug-in” on page 25.
Enable the plug-in.9
For example, if you use the data-owner-name attribute, select the Incident key.You can select more than one key, but since each attribute group is a separate hitagainst the Symantec Data Loss Prevention database, you should only select thosekeys you need.
See “Enabling lookup plug-in parameter keys” on page 25.
Enable the lookupparameter keys.
10
21Enabling Data Insight to manage riskConfiguring Data Loss Prevention to retrieve attribute values from Data Insight

Table 2-4 Configuring the Data Insight lookup plug-in (continued)
DescriptionActionStep
See “Testing the Data Insight lookup plug-in configuration” on page 27.
See “Troubleshooting the Data Insight lookup plug-in” on page 28.
Test andtroubleshoot theplug-in.
11
Mapping attributes to Data Insight data fieldsCustom attributes are mapped to Veritas Data Insight information with entries in the AttributeMapping field for the Data Insight lookup plug-in. Each mapping is entered on a separate linein the field. The order in which these mapping entries appear in the field does not matter.
If you use the Data Insight lookup plug-in to retrieve the data owner, this attribute is mappedfor you (Data_User=attr.data-owner-name). You can also define a mapping for an arbitrarycustom attribute that a subsequent plug-in in the lookup plug-in chain uses. Thus, for all otherdata fields except data-owner-name, you need to create custom attributes.
The syntax for Data Insight attribute mapping is as follows:
Veritas Data Insight property = attr.Custom Attribute Name
Where:
■ Veritas Data Insight propertyThe Veritas Data Insight property whose data value is returned to the Enforce Server. Thisvalue is used to populate the custom attribute that is specified in the attribute mapping.
■ Custom Attribute NameThe name of the custom attribute as it is defined in the Enforce Server.
Note: If the name of the attribute contains white-space characters, you must precede eachinstance of the white space with a backslash. A white-space character is a space or a tab.For example, you need to enter the Total Writes custom attribute as: attr.Total\Writes.
Here are some additional mapping examples:
File_Total_Writes = attr.Total\ Writes
File_Total_Reads = attr.Total\ Reads
File_Total_Writes = attr.Total\ Writes
File_Last_Modified_By = attr.Last\ Modified\ By
File_Last_Access_Date = attr.Last\ Accessed
22Enabling Data Insight to manage riskMapping attributes to Data Insight data fields

All dates are in the YYYY-MM-DD hh:mm format (ISO 8601). The date is displayed in the timezone of the Enforce Server.
All names and users are in the format domain\username.
The following table describes the attribute mapping details for the Data Insight lookup plug-in.
Note: For more than two users, replace "n" with the user number. For example, enterMost_Active_Reader_3.
Table 2-5 Data Insight attribute mappings
DescriptionAttribute
Attribute that corresponds to the data user. This person uses the file most frequently.The person who uses the file most frequently may not be the person who created thefile.
Data_User
Custom attribute that corresponds to the business owner of the data user as definedin the Veritas Data Insight Management Server.
Business_Owner
Custom attribute that corresponds to the remediator of the file. (Support for custodianinformation is available with Veritas Data Insight version 4.0 or later.)
Custodian_1
Custom attribute that corresponds to the URI of the file system or SharePoint folderto which the custodian is assigned. (Support for custodian folder information is availablewith Veritas Data Insight version 4.0 or later.)
Custodian_Folder_1
Custom attribute that corresponds to the last time that the data user accessed a file.The format is YYYY-MM-DD hh:mm UTC+/-hh.
Data_User_Last_Access
Custom attributes that correspond to the read access count of the data user.Data_User_Reads
Custom attributes that correspond to the write access count of the data user.Data_User_Writes
Custom attribute that corresponds to the first time that access history for the file wascollected.
File_Access_History_Start_Date
Custom attribute that corresponds to the last time the file was accessed.File_Last_Access_Date
Custom attribute that corresponds to the last user who modified the file.File_Last_Modified_By
Custom attribute that corresponds to the total number of read accesses.File_Total_Reads
Custom attribute that corresponds to the total number of write accesses.File_Total_Writes
Custom attributes that correspond to the most active readers. You can add any numberof active readers to the mapping.
Most_Active_Reader_1
Most_Active_Reader_2
Most_Active_Reader_n
23Enabling Data Insight to manage riskMapping attributes to Data Insight data fields

Table 2-5 Data Insight attribute mappings (continued)
DescriptionAttribute
Number of reads from the most active readers. You can add any number of activereaders to the mapping.
Most_Active_Reader_Reads_1
Most_Active_Reader_Reads_2
Most_Active_Reader_Reads_n
Number of writes from the most active readers. You can add any number of activereaders to the mapping.
Most_Active_Reader_Writes_1
Most_Active_Reader_Writes_2
Most_Active_Reader_Writes_n
Custom attributes that correspond to the most active user. You can add any numberof active readers to the mapping.
Most_Active_User_1
Most_Active_User_2
Most_Active_User_n
Number of reads from the most active users. You can add any number of activereaders to the mapping.
Most_Active_User_Reads_1
Most_Active_User_Reads_2
Most_Active_User_Reads_n
Number of writes from the most active users. You can add any number of activereaders to the mapping.
Most_Active_User_Writes_1
Most_Active_User_Writes_2
Most_Active_User_Writes_n
Custom attributes that correspond to the most active writers. You can add any numberof active readers to the mapping.
Most_Active_Writer_1
Most_Active_Writer_2
Most_Active_Writer_n
Number of reads from the most active writers. You can add any number of activereaders to the mapping.
Most_Active_Writer_Reads_1
Most_Active_Writer_Reads_2
Most_Active_Writer_Reads_n
Number of writes from the most active writers. You can add any number of activereaders to the mapping.
Most_Active_Writer_Writes_1
Most_Active_Writer_Writes_2
Most_Active_Writer_Writes_n
Enabling the Data Insight lookup plug-inTo deploy the Data Insight lookup plug-in you must enable it.
24Enabling Data Insight to manage riskEnabling the Data Insight lookup plug-in

To enable the Data Insight lookup plug-in
1 Navigate to System > Incident Data > Lookup Plugins in the Enforce Serveradministration console.
2 Click Modify Plugin Chain at the Lookup Plugins List Page.
3 In the Dedicated Actions field, select (check) the On option.
4 Click Save to apply the configuration.
If the plug-in cannot be loaded the system reports an error and the plug-in state remainsOff.
Chaining the Data Insight lookup plug-inThe Veritas Data Insight lookup plug-in can be used in combination with other types of lookupplug-ins. When multiple lookup plug-ins are chained together, output from a previous lookupplug-in can be used as a key to retrieve additional information.
The Data Insight lookup plug-in can be used in combination with other Data Loss Preventionlookup plug-ins. This is known as "chaining." When multiple lookup plug-ins are chainedtogether, output from a previous lookup plug-in is used as a key to retrieve additionalinformation. For example, commonly Data Insight is used to populate the data-owner-nameattribute. Another lookup plug-in, such as the LDAP lookup plug-in, is then chained to look upthe data-owner-email value which is based on the data-owner-name value. As another example,the Veritas Data Insight lookup plug-in provides the most active user as a custom attribute inthe Incident Snapshot. Another lookup plug-in (such as the LDAP lookup plug-in ) can thenretrieve related information for that user, such as the department or the manager's email.
See the Symantec Data Loss Prevention Administration Guide for additional information aboutchaining lookup plug-ins.
To chain the Data Insight lookup plug-in
1 Navigate to System > Incident Data > Lookup Plugins in the Enforce Serveradministration console.
2 Click Modify Plugin Chain at the Lookup Plugins List Page.
3 In the Execution Sequence field, select the execution order from the drop-down menu.
4 Click Save to apply the chaining configuration.
Enabling lookup plug-in parameter keysThe System > Incident Data > Lookup Plugins > Edit Lookup Plugin Parameters pagelists the Lookup Parameter Keys that you select to trigger the look up of attribute values.
25Enabling Data Insight to manage riskChaining the Data Insight lookup plug-in

Lookup parameter keys are organized into attribute groups. The selections made at this screenapply to all the lookup plug-ins deployed on the Enforce Server.
To perform a lookup, you must map at least one lookup parameter key to a field in your externaldata source. Each lookup parameter group that you enable is a separate database query forthe Enforce Server to perform. All database queries are executed for each incident beforelookup. To avoid the performance impact of unnecessary database queries, you should onlyenable attribute groups that your lookup plug-ins require.
Because the plug-in stops searching after it finds the first matching lookup parameter key-valuepair, the order in which you list the keys in your attribute map is significant. Refer to the attributemapping examples for the specific type of plug-in you implement for details.
Note:Refer to the Symantec Data Loss Prevention Administration Guide for details on lookupplug-in parameter keys.
To enable one or more lookup parameter keys
1 Navigate to System > Incident Data > Lookup Plugins in the Enforce Serveradministration console.
2 Click Lookup Parameters at the Lookup Plugins List Page.
3 Select (check) one or more attribute groups at the Edit Lookup Plugin Parameters page.
Click View Properties to view all of the keys for that attribute group.
See Table 2-6 on page 26.
4 Save the configuration.
Verify the success message indicating that all enabled plug-ins were reloaded.
Table 2-6 Lookup parameter keys
Lookup parameter keysAttributegroup
attachment-nameX, attachment-sizeXAttachment
date-detected, incident-id, protocol, data-owner-name, data-owner-emailIncident
date-sent, subject, file-create-date, file-access-date, file-created-by,file-modified-by, file-owner, discover-content-root-path, discover-location,discover-name, discover-extraction-date, discover-server,discover-notes-database, discover-notes-url, endpoint-volume-name,endpoint-dos-volume-name, endpoint-application-name,endpoint-application-path, endpoint-file-name, endpoint-file-path
Message
policy-namePolicy
26Enabling Data Insight to manage riskEnabling lookup plug-in parameter keys

Table 2-6 Lookup parameter keys (continued)
Lookup parameter keysAttributegroup
recipient-emailX, recipient-ipX, recipient-urlXRecipient
sender-email, sender-ip, sender-port, endpoint-user-name,endpoint-machine-name
Sender
server-nameServer
monitor-name, monitor-host, monitor-idMonitor
incident-statusStatus
acl-principalX, acl-typeX, acl-grant-or-denyX, acl-permissionXACL
Testing theData Insight lookupplug-in configurationFollow these steps to test the Data Insight lookup plug-in.
Table 2-7 Testing the Data Insight lookup plug-in
DescriptionActionStep
Set up the Discover Target to scan a Data Insight file share.
Refer to the Symantec Data Loss Prevention Administration Guide for instructions.
Create a file shareDiscover Target.
1
For example, you can create a keyword policy that uses the word "secret" as thekeyword.
Refer to the Symantec Data Loss Prevention Administration Guide for instructions.
Create a testpolicy.
2
Run the DiscoverTarget.
4
Check the Incident Snapshot for the Discover incident. Verify that for any attributesyou mapped, you should see that they are populated. For example, if you mapped thedata-owner-name attribute, you should that the Data Owner Name field is populated.
Verify attributelookup.
5
To troubleshoot, check the log fileSymantecDLP\Protect\logs\tomcat\localhost.latest_date.log.
Troubleshoot theplug-in asnecessary.
6
27Enabling Data Insight to manage riskTesting the Data Insight lookup plug-in configuration

Troubleshooting the Data Insight lookup plug-inIf the Data Insight lookup plug-in is not working, troubleshoot it as follows.
To test the connection to the Data Insight Management Server
1 Configure the connection from the Enforce Server to the Veritas Data Insight ManagementServer.
See “Configuring the connection between the Enforce Server and Data Insight” on page 18.
2 On the System > Settings > Data Insight page, click Test Connection to verify theconnection to the Veritas Data Insight Management Server.
This tests the connection to the specified Veritas Data Insight Management Server usingthe specified credentials. This connection is available only after the server certificate isverified.
3 Configure and enable all the lookup plug-ins.
4 ClickReload Lookup Plugins to reload all the lookup plug-ins from theCustomAttributestab of the System > Incident Data > Attributes screen.
5 View an existing incident snapshot. Click the Lookup option on the incident snapshot.
6 Make sure that no connection errors are recorded in the Incident History section.
To verify that the custom attributes are correctly populated
1 Verify that the custom attributes have been created.
Select System > Incident Data > Attributes > Custom Attributes.
Verify that all the custom attributes exist in the list of custom attributes in the user interface.
2 Click Reload Lookup Plugins to reload the plug-in from the Custom Attributes tab ofthe System > Incident Data > Attributes screen.
3 Click the Lookup option for an existing Incident Snapshot.
4 When the page returns, view the Attributes area from the Incident Snapshot page.
■ The Custom Attributes should be filled with entries retrieved from the Veritas DataInsight lookup.
■ If the correct values are not populated, or there is no value in a custom attribute youhave defined, check the Tomcat log file for mismatched items.
28Enabling Data Insight to manage riskTroubleshooting the Data Insight lookup plug-in

To check the log files
1 Open the log file SymantecDLP\Protect\logs\tomcat\localhost.latest_date.log.
2 If the plug-in failed to load, search for a message in the log file similar to the following:
SEVERE [com.vontu.enforce.workflow.attributes.AttributeLookupLoader] Error
loading plugin [Plugin_Name].
Note the "Cause" section that follows this type of error message. Any such entries explainwhy the plug-in failed to load.
3 If the plug-in loads but attributes are not populated, look in the log for the attribute map.Verify that values are being populated, including for the lookup parameters that youenabled. To do this, search for a lookup parameter key that you have enabled, such asdata-owner-name.
Changing Data Insight refresh intervalsTo change the schedule for the data refresh from the Veritas Data Insight Management Server,update the properties in the DataInsightDataRefresh.properties file on the Enforce Server.
The DataInsightDataRefresh.properties file is located in folderSymantecDLP\Protect\config in a default Windows installation.
By default, the start time for the data refresh is daily at 1:00 A.M. If the data refresh does notfinish by 7:00 A.M. (default), then the data refresh process is interrupted and the reports arebuilt. On the weekends, no cutoff is set by default, to allow the data refresh process to completeover a weekend. The defaults are set to have the reports available at the start of each workday.
If the start value is "none" then no data refresh starts on that day.
The following example contains data refresh start lines in the properties file:
data_refresh.start.sunday = none
data_refresh.start.monday = 1:00 AM
To specify no cutoff, set the value to "none" in the cutoff lines in the file.
The following example contains data refresh cutoff lines in the properties file:
data_refresh.cutoff.sunday = none
data_refresh.cutoff.monday = 7:00 AM
29Enabling Data Insight to manage riskChanging Data Insight refresh intervals

Best practices for finding and reporting on data atrisk
The following best practices provide guidelines for implementation:
■ Set up the Veritas Data Insight system and allow it to gather user information for a periodof time.See the Veritas Data Insight Administrator's Guide.See “Where to get more information about Veritas Data Insight” on page 11.
■ Make sure that the Enforce Server is connected to the Veritas Data Insight ManagementServer.See “Configuring the connection between the Enforce Server and Data Insight” on page 18.
■ Configure your schedule to refresh the data from Veritas Data Insight to the Enforce Server.See “Changing Data Insight refresh intervals” on page 29.
■ Configure lookup plug-ins to look up and populate attributes in the Discover incidents.Lookup plug-ins can be scripted and chained.See the Symantec Data Loss Prevention Administration Guide.
30Enabling Data Insight to manage riskBest practices for finding and reporting on data at risk

Finding data users andaccesses in incident reports
This chapter includes the following topics:
■ Accessing reports of folders at risk
■ Configuring the risk score and timeframes for the report of folders at risk
■ Viewing folders ranked by risk, path, or folder exposure
■ Viewing details of a folder at risk
■ Filtering the information in the report of folders at risk
■ Saving a report of folders at risk
■ Finding data users and accesses in incident reports
■ Viewing Data Insight incident details
■ Accessing the history of a file in the Veritas Data Insight console
■ Selecting custom attributes for data user details
■ Creating summary reports for Data Insight
■ Creating and distributing aggregated incident reports to data owners
Accessing reports of folders at riskThe Folder Risk Report helps information security analysts identify the top folders forinvestigation. Each folder is assigned a risk score. The risk score is based on the relevantinformation from the Symantec Data Loss Prevention incidents plus the information from theVeritas Data Insight Management Server. In the default display, the folders are ranked with
3Chapter

prioritized risk. The risk calculation is relative to the other folders in the list after the currentfilters are applied. The highest risk folder always has a value of 100.
Some setup is required for all the information to appear in the report of folders at risk. Severaloptions are also available to configure the flow of information and parameters.
See “Configuring the risk score and timeframes for the report of folders at risk” on page 33.
To display the folders at risk
1 Click Incidents > Discover.
2 In the Discover Reports on the left side, click Folder Risk Report.
3 If the Folder Risk Report does not appear on the left side, verify that the role for youruser name allows access.
4 To display the Folder Risk Report, Adobe Flash Player 10.1 or later is required as aplug-in for the Web browser. You are prompted to install it when you first access theFolder Risk Report, if it is not already installed.
5 Table 3-1 shows the information in the report of folders at risk.
Table 3-1 Information in the report of folders at risk
DescriptionInformation and Options
See “Filtering the information in the report of foldersat risk” on page 37.
Filters
On the left is a list of folders with by the highest riskat the top.
See “Viewing folders ranked by risk, path, or folderexposure” on page 34.
Folders with risk score
For the selected folder on the left, the top dataowners are listed.
See “Viewing details of a folder at risk” on page 36.
The data owners in this report are from the DataOwner Name field in the incident detail. Setup of alookup plug-in, or a manual process of setting thisfield, is required to place values into this field. Bydefault, this field does not have values.
See “Configuring Data Loss Prevention to retrieveattribute values from Data Insight” on page 20.
Top Data Owners
32Finding data users and accesses in incident reportsAccessing reports of folders at risk

Table 3-1 Information in the report of folders at risk (continued)
DescriptionInformation and Options
For the selected folder on the left, the trend for thepast 12 months is listed.
See “Viewing details of a folder at risk” on page 36.
The number of days for this trend report can beconfigured.
See “Configuring the risk score and timeframes forthe report of folders at risk” on page 33.
Sensitive Files Access Trend
For the selected folder on the left, all groups whohave access to the folder and their usage.
See “Viewing details of a folder at risk” on page 36.
User/Group Activity View
See “Viewing folders ranked by risk, path, or folder exposure” on page 34.
See “Filtering the information in the report of folders at risk” on page 37.
See “Viewing details of a folder at risk” on page 36.
See “Saving a report of folders at risk” on page 39.
See “Locating and managing data at risk” on page 13.
Configuring the risk score and timeframes for thereport of folders at risk
You can configure the risk score for the report of folders at risk. The risk score is based on therelevant information from the Symantec Data Loss Prevention incidents plus the informationfrom the Veritas Data Insight Management Server. You can also configure the timeframes thatare in the details of the report.
To configure the risk score
1 Navigate to the System > Settings > Data Insight screen.
2 Click Configure.
3 Configure the risk score parameters as described in the following table.
33Finding data users and accesses in incident reportsConfiguring the risk score and timeframes for the report of folders at risk

Table 3-2 Folder risk report configuration options
DescriptionDefaultParameter
The number of days in the timeframe for user access in the risk scoreformula.
365Access History Timeframe
The number of days that is the timeframe for the user access in theformula.
7Unique Users Timeframe
Select one of the following choices for the components in the riskscore formula:
■ SeverityThe severity level of the incident in the Symantec Data LossPrevention incident report.
■ Severity and folder exposureFolder exposure is the number of users who can read from thefolder where the incidents were found.
■ Severity, folder exposure and user accessUser access is the number of users who have accessed the itemat risk in the past. The timeframe for the past is the number ofdays in the Unique Users Timeframe parameter.
Severity andfolderexposure
Formula
The severity weight of the item at risk. The maximum value of anyweight is 100.
Weights (0-100):
Weight of a high severity item at risk.100.0High Severity
Weight of a medium severity item at risk.10.0Medium Severity
Weight of a low severity item at risk.2.0Low Severity
Weight of an informational severity item at risk.1.0Info Severity
Viewing folders ranked by risk, path, or folderexposure
Click Incidents > Discover, and click the link to the Folder Risk Report.
In the list pane, you can view the folders at risk, and sort them by risk score, path, or folderexposure.
The risk score is based on the relevant information from the Symantec Data Loss Preventionincidents plus the information from the Veritas Data Insight Management Server.
You can filter the information in the display by status, policy, location, and data owner.
See “Filtering the information in the report of folders at risk” on page 37.
34Finding data users and accesses in incident reportsViewing folders ranked by risk, path, or folder exposure

A folder is not visible in the list pane if all its incidents are filtered out of the report.
If you click View Detail, detailed information for that folder appears in the detail pane.
See “Viewing details of a folder at risk” on page 36.
You can use the arrow controls to jump to the first page, previous page, next page, or lastpage.
The following fields are visible in the list pane:
■ The folder name and the full path of the folder.
■ Top Policies by File CountThe top five policies that are violated and the number of files that are violated for eachpolicy is listed in a chart, subject to the filter criteria. The policies are listed in descendingorder by the number of sensitive files.Click Incidents Summarized by Policy to open a new browser window or tab with theSymantec Data Loss Prevention incident summary by policy. When you are finished viewingthe information in the new browser window or tab, then close it.
■ Total Sensitive FilesThe total sensitive files include all sensitive files in this folder, including those in the topfive policies that are violated.
■ Folder ExposureThe folder exposure is the number of users in the ACL that have read access to this folder.See the details in the User/Group Activity View in the detail pane on the right side.See “Viewing details of a folder at risk” on page 36.
To sort the folders at risk
1 To display the folders at risk, click Incidents > Discover. In the Discover Reports onthe left side, click Folder Risk Report.
2 In the Folder Risk Report, click one of the following items for the sort:
■ RiskThis sort option is the default. The folders are listed with the most risk at the top.The risk score is based on the relevant information from the Symantec Data LossPrevention incidents plus the information from the Veritas Data Insight ManagementServer.You can configure the weights in the risk score formula.See “Configuring the risk score and timeframes for the report of folders at risk”on page 33.
■ PathThe folders are listed in alphabetical order.
■ Folder Exposure
35Finding data users and accesses in incident reportsViewing folders ranked by risk, path, or folder exposure

The folder exposure is a count of the number of users who have read access to thefolder.The folders are listed in descending order.
Viewing details of a folder at riskThe left detail pane provides details of the folders at risk.
The following related reports are links to details in a new browser window or tab:
■ DLP: Folder Incident ReportThe Folder Incident Report links to a new browser window or tab with the list of theSymantec Data Loss Prevention incidents for the selected folder at risk.
■ Data Insight: Top 5 UsersData Insight: Monthly AccessData Insight: PermissionsAll of the Veritas Data Insight report links open a new browser window or tab to the VeritasData Insight management console.You must log into theVeritas Data Insight management console before you can view thesereports.See “Where to get more information about Veritas Data Insight” on page 11.
To view the details of a specific folder
1 To display the folders at risk, click Incidents > Discover. In the Discover Reports onthe left side, click Folder Risk Report.
2 For a folder in the list pane, click View Detail to show the details of that folder in the rightpane.
The name of the folder is displayed at the top of the right pane.
The list pane (left) and details pane (right) have separate scrollbars, so that they can bepositioned for the relevant folder to be visible in each pane.
The right pane shows the following details of a folder at risk:
Table 3-3 Details of a folder at risk
DescriptionReport detail
Top five sensitive file data owners, ranked by the number of sensitive filesowned (if data owners have been specified in the incidents).
Top 5 Data Owners
36Finding data users and accesses in incident reportsViewing details of a folder at risk

Table 3-3 Details of a folder at risk (continued)
DescriptionReport detail
Trend on a monthly basis over the past 12 months.
The time period can be configured, for a custom period.
See “Configuring the risk score and timeframes for the report of folders at risk”on page 33.
This table represents the number of unique users accessing sensitive files inthe folder. The list is broken down by month.
Sensitive Files AccessTrend
File activity of groups in the folder’s ACL.User/Group ActivityView
Filtering the information in the report of folders atrisk
To focus on specific folders at risk, you can filter the information in the report of folders at riskbased on the status, policy, location, and data owner.
To filter the information in the report of folders at risk
1 To display the folders at risk, click Incidents > Discover. In the Discover Reports onthe left side, click Folder Risk Report.
2 Click Edit Filters to open the list of filter options.
3 Select the filter options for your report.
Table 3-4 lists the filter options.
4 At the bottom of the Filters window, click Apply Filters.
5 After you have a custom report that is set up with selected filters, you can save it.
See “Saving a report of folders at risk” on page 39.
The following filters can be set for the report of folders at risk:
37Finding data users and accesses in incident reportsFiltering the information in the report of folders at risk

Table 3-4 Filters for the folder risk report
DescriptionFilter
Based on the status filters, individual incidents are filtered out of the data and therisk score, but the folder is still visible. If all the incidents in a folder are filtered out,it is not visible.
To filter by incident status:
■ Use the drop-down to select Include or Exclude. The remainder of the stepsassumes that you have selected Include which is the default.
■ Select one of the status entries from the All Statuses list.■ Click the plus sign to move it to the Included Statuses list.■ Repeat for any other status entries to include.■ If you want to remove a status entry out of the Included Statuses, click the
minus sign.■ You can search for a status entry by typing a string in the box underneath the
Include label. Initially, this box says "Search statuses."
Incident Statuses
Based on the policy filters, individual incidents are filtered out of the data and therisk score, but the folder is still visible. If all the incidents in a folder are filtered out,it is not visible.
To filter by policies:
■ Use the drop-down to select Include or Exclude. The remainder of the stepsassumes that you have selected Include which is the default.
■ Select one of the policies from the All Policies list.■ Click the plus sign to move it to the Included Policies list.■ Repeat for any other policies to include.■ If you want to remove a policy out of the Included Policies, click the minus sign.■ You can search for a policy by typing a string in the box underneath the Include
label. Initially, this box says "Search policies."
Policies
38Finding data users and accesses in incident reportsFiltering the information in the report of folders at risk

Table 3-4 Filters for the folder risk report (continued)
DescriptionFilter
The location filter selects the folders to include or exclude from the display. The riskscore of a folder does not change.
An Include section specifies the locations to include.
An Exclude section specifies the locations to exclude.
The method of selecting the locations to include or exclude is the same for bothsections.
To filter by locations:
■ Choose whether you want an Exact Match, Contains, or Starts with the stringin the box.
■ Enter a string in the box, which can be a full path or a partial path.■ Click the plus sign to move the selection to the list of locations to be included
or excluded.■ If you want to remove a location entry out of the list, click the minus sign.
Locations
The data owner filter selects the folders to include or exclude from the display. Therisk score of a folder does not change.
Note: If the folder contains other data owners, it remains in the report. An excludeddata owner may appear in the top data owners list.
An Include section specifies the data owners to include.
An Exclude section specifies the data owners to exclude.
The method of selecting the data owners to include or exclude is the same for bothsections.
To filter by data owners:
■ Choose whether you want an Exact Match, Contains, or Starts with the stringin the box.
■ Enter a string in the box.■ Click the plus sign to move the selection to the list of data owners to be included
or excluded.■ If you want to remove a data owner entry out of the list, click the minus sign.
Data Owners
Saving a report of folders at riskAfter you filter a report, you can save it for continued use. When you save a customized report,Symantec Data Loss Prevention displays the report title in Incidents > Discover under SavedReports on the left side. If you choose to share the report, Symantec Data Loss Preventiondisplays it for any user that is logged on under your role.
39Finding data users and accesses in incident reportsSaving a report of folders at risk

To save a custom report of folders at risk
1 Set up a customized report with a set of custom filters and optional sort order.
See “Filtering the information in the report of folders at risk” on page 37.
See “Viewing folders ranked by risk, path, or folder exposure” on page 34.
2 In the display of the report of folders at risk, click Save > Save As.
3 Enter a unique report name and describe the report. The report name can include up to50 characters.
4 In the Sharing section, users other than the administrator can share a custom report.
Note: This section does not appear for the administrator.
The Sharing section lets you specify whether to keep the report private or share it withother role members. Role members are other users who are assigned to the same role.To share the report, select Share Report. All role members now have access to thisreport, and all can edit or delete the report. If your account is deleted from the system,shared reports remain in the system. After a report is shared, sharing cannot be disabledfor that report. Shared reports are associated with the role, not with any specific useraccount. If you do not share a report, you are the only user who can access it. If youraccount is deleted from the system, your private reports are deleted as well.
5 Click Save.
6 To edit a saved report, click Save > Save after you have edited the filters or changed thesort order.
7 To delete a saved report, click Delete.
Finding data users and accesses in incident reportsThe Data Insight Lookup Plug-in populates the custom attributes that were defined andmappedduring the configuration.
See “About the Data Insight lookup plug-in” on page 19.
See “Mapping attributes to Data Insight data fields” on page 22.
The names of these custom attributes may be different in your configuration. General namesfor the custom attributes are in the examples and explanation of possible reports in this section.
Table 3-5 shows use cases with suggestions for reports.
40Finding data users and accesses in incident reportsFinding data users and accesses in incident reports

Table 3-5 Use cases for reports
ReportsDescriptionUse case
Use the summary reports and filters to determine the incidents of interest.
See “Creating summary reports for Data Insight” on page 44.
The LDAP Lookup Plug-in, CSV Lookup Plug-in, or a Script LookupPlug-in can locate the manager or department of the file owner.
See “Enabling the Data Insight lookup plug-in” on page 24.
Use the incident snapshot report to determine the responsible party.Use the Attributes section to view the information from the lookupplug-ins. Use the attributes Lookup option to retrieve the information, ifit is not present.
See “Viewing Data Insight incident details” on page 42.
File owner information maynot reflect the responsibleparty. The responsible partyor data owner can be a linemanager in the business unit,the head of a department, oran information security officer.Veritas Data Insight providesinformation to tie the mostactive user of a file to amanager or responsible partyfor remediation steps.
Data owner
Use the summary reports and filters to determine the incidents of interest.
See “Creating summary reports for Data Insight” on page 44.
Use the incident snapshot report to determine the File Owner. If thatowner is not identifiable, use the Attributes section to determine thenext-best owner. The Attributes section contains the information fromthe Veritas Data Insight Management Server.
See “Viewing Data Insight incident details” on page 42.
See “Selecting custom attributes for data user details” on page 43.
The File Owner field mayreturn an unresolvableaccount for an individual thathas left the organization. Forexample, in Windows ActiveDirectory, every user has anunderlying unique identifierthat is associated with theiraccount. This identifier issometimes an unidentifiablestring of information. VeritasData Insight providesinformation to drop down tothe next resolvable accountthat names an individual.
Veritas Data Insight providesseveral data user fields.
See “About the Data Insightlookup plug-in” on page 19.
Next-bestowneridentification
41Finding data users and accesses in incident reportsFinding data users and accesses in incident reports

Table 3-5 Use cases for reports (continued)
ReportsDescriptionUse case
Use the summary reports and filters to determine the incidents of interest.
See “Creating summary reports for Data Insight” on page 44.
Use the incident snapshot report to view details of an incident.
See “Viewing Data Insight incident details” on page 42.
Click the go to Data Insight option in the Incident Details section toview additional details.
See “Accessing the history of a file in the Veritas Data Insight console”on page 43.
In the incident snapshot, click the Correlations tab to view a list of theincidents that share attributes with the current incident.
In the event of a data leak,customers want to know whosaw a particular file.Symantec Data LossPrevention incident snapshotsprovide information to tie theincident back to the VeritasData Insight ManagementServer. On the Veritas DataInsight Management Server,you can view detailedinformation and an audithistory of who accessed thedata. Additional remediationsteps can then be taken toreport on those individuals orlaunch subsequent targetedscans on their assets.
Data leakinvestigation
Viewing Data Insight incident detailsSymantec Data Loss Prevention incident lists display the individual incident records withinformation about the incidents. You can click on any incident to see a snapshot containingmore details. You can select specific incidents or groups of incidents to modify or remediate.
To view incidents
1 In the Enforce Server administration console, on the Incidents menu, select one of thetypes of reports. For example, select Discover. In the left navigation panel, clickIncidents-All Scans.
The incident list displays the individual incident records that contain information such asseverity, associated policy, number of matches, and status.
2 Optionally, use report filters to narrow down the incident list. Select the custom attributesfrom the Veritas Data Insight Management Server to filter or summarize the incident list.
All custom attributes are all alphabetic fields. Sorting is alphabetic for the summaryinformation for any custom attribute. For example, in a summary of the read values, thevalue "15" comes after "1" and before "2." Numeric filters, such as greater-than or less-thanare not available for the custom attribute values that seem to be numbers or dates.
See the Symantec Data Loss Prevention Administration Guide.
42Finding data users and accesses in incident reportsViewing Data Insight incident details

3 To view more details of a particular incident, click the incident.
The incident snapshot appears, displaying general incident information, matches detectedin the intercepted text, and details about policy, attributes, and incident history. You canalso search for similar incidents from the Correlations tab.
4 Optionally, click through the incident snapshot to view more information about the incident.
The data user information from Veritas Data Insight is in the Attributes section.
5 When you finish viewing incidents, you can exit the incident snapshot or incident list, oryou can choose one or more incidents to remediate.
6 To view additional details about file access, you can jump directly to the Veritas DataInsight console.
See “Accessing the history of a file in the Veritas Data Insight console” on page 43.
Accessing the history of a file in the Veritas DataInsight console
To view additional details about file access, you can jump directly to the Veritas Data Insightconsole from a Symantec Data Loss Prevention incident snapshot.
To view additional details about accesses for a particular file
1 Navigate to the incident snapshot for the file of interest.
2 In theKey Info tab, in the Incident Details section, File Location, click go to Data Insightconsole.
A browser screen opens with file access details for that particular file. The data userinformation includes an access summary of the primary users of this file. The audit logsprovide details about each access of the file, and a chart of the access pattern.
For information about navigating in the Veritas Data Insight console, see the Veritas DataInsight Administrator's Guide.
Selecting custom attributes for data user detailsYou must define and configure a set of custom attributes before you can get information aboutdata users.
See “About the Data Insight lookup plug-in” on page 19.
See “Mapping attributes to Data Insight data fields” on page 22.
Initially, you can define the data user, the read count, write count, and one or two active readersand writers.
43Finding data users and accesses in incident reportsAccessing the history of a file in the Veritas Data Insight console

For a particular file of interest, the incident snapshot and Veritas Data Insight details providethe information to determine who uses a file.
For example, to determine the data users of a cluster of files, perform the suggested steps inthe following procedure. If all the files in a folder do not have appropriate access permissions,you can determine who has accessed those files.
To determine the data users of a cluster of files
1 Define a set of custom attributes for the Data Insight Lookup Plug-in.
See “About the Data Insight lookup plug-in” on page 19.
See “Mapping attributes to Data Insight data fields” on page 22.
2 Set up and run a Network Discover scan of the folder of interest in the file share.
See the Symantec Data Loss Prevention Administration Guide.
3 After the scan has run, display the incident list. The File Owner is one of the columns.However, this field does not provide the access pattern for these files.
4 You can select Advanced Filters & Summarization. Then run a summary by the VeritasData Insight data user. This summary lists the users who most frequently accessed thefiles in the folder of interest.
5 After an analysis of incidents, you can determine if additional custom attributes are neededfrom the information that Veritas Data Insight provides. Then new custom attributes canbe defined, configured, and looked up.
See “About the Data Insight lookup plug-in” on page 19.
6 After you define any new custom attributes, click the Lookup option on the incidentsnapshot. Then make sure that no connection errors are recorded in the Incident Historysection.
The values that appear in the incident snapshot Attributes section are the new ones.
Any deleted custom attributes and values are no longer present.
If the mapping of any custom attribute is changed and a new lookup is run, the newmapping overrides any old values in the reports.
Creating summary reports for Data InsightYou can create a summary report for a summary of the data user activity for the files identifiedin an incident report.
44Finding data users and accesses in incident reportsCreating summary reports for Data Insight

To create a summary report from an incident list
1 In the Enforce Server administration console, on the Incidents menu, select one of thetypes of reports, and then click an incident list. For example, select Discover, and thenthe report Incidents-All Scans.
2 Click the Advanced Filters & Summarization bar (near the top of the report).
In Summarize By section, a primary listbox and secondary listbox appear. SymantecData Loss Prevention displays all Symantec-provided criteria in alphabetical order. Thesecriteria precede any custom criteria the administrator has defined.
3 Select a criterion from the primary listbox, and an optional criterion from the secondarylistbox. For example, select the custom attribute for the Veritas Data Insight parameterfor Data User and then Total Reads. This report shows the read activity by user.
Options in the secondary listbox appear only after you choose an option from the primarylistbox.
4 To create the summary report, click Apply.
Summary reports take their name from the primary summary criterion. If you rerun a reportwith new criteria, the report name changes accordingly.
5 Save the report.
Creating anddistributing aggregated incident reportsto data owners
You can create and automatically distribute aggregated incident reports to data owners forremediation.
An automatic workflow can be set up for the following use cases:
■ Automatically or manually set the Data Owner Name and Data Owner Email Addressfor new incidents.
■ Set a custom status value or custom attribute to mark that the Data Owner Name for anincident has been verified. Custom attributes and custom status values can also markincidents for other workflow steps.
■ Set up a recurring email schedule.Reports can be configured to be sent on a recurring schedule, sending only the incidentsthat have not yet been distributed.
■ Mark the incident as sent.After the report is sent, the status attributes and custom attributes can optionally be set, toflag the incidents for the next stage of the workflow.
45Finding data users and accesses in incident reportsCreating and distributing aggregated incident reports to data owners

■ Automate the tasks.Lookup plug-in scripts and chained lookup plug-ins can automate the tasks in the workflowsequence.
The following process describes a complex use case that includes the setup tasks, andsuggestions to automate some steps in the process.
Table 3-6 Setting up, creating, and distributing aggregated incident reports to data owners
DescriptionActionStep
See the following Veritas Data Insightdocumentation:
■ Veritas Data Insight Installation Guide■ Veritas Data Insight Administrator's Guide
Install and set up the Veritas Data InsightManagement Server.
Make sure that the Veritas Data InsightManagement Server has access to the filesor file systems of interest.
1
See theSymantec Data Loss Prevention InstallationGuide.
Install the Symantec Data Loss Preventionproduct, including at least one NetworkDiscover Server.
2
See “Configuring the connection between theEnforce Server and Data Insight” on page 18.
Note: Veritas Data Insight is a separately licensedoption. If Veritas Data Insight is not licensed on theEnforce Server, the menu option to configure theconnection to the Veritas Data Insight ManagementServer does not appear.
Set up the connection between the EnforceServer and the Veritas Data InsightManagement Server.
3
See “Troubleshooting the Data Insight lookupplug-in” on page 28.
Test the connection from the Enforce Serverto the Veritas Data Insight ManagementServer.
4
See “About the Data Insight lookup plug-in”on page 19.
On the Enforce Server, create a customstatus value or custom attribute for the DataOwner Name verification, and any workflowstatus attributes.
5
Edit the properties file for Veritas Data Insight onthe Enforce Server, to map the details from theVeritas Data Insight Management Server into thecustom attributes that you created.
See “Mapping attributes to Data Insight data fields”on page 22.
Map the details from the Veritas Data InsightManagement Server into the customattributes that you created.
6
46Finding data users and accesses in incident reportsCreating and distributing aggregated incident reports to data owners

Table 3-6 Setting up, creating, and distributing aggregated incident reports to data owners(continued)
DescriptionActionStep
To map the Veritas Data Insight data user (theperson who uses the file most frequently) to theData Owner Name, set the Data_User parameter.
See “Configuring Data Loss Prevention to retrieveattribute values from Data Insight” on page 20.
Map any of the Veritas Data Insight attributesdirectly into the Data Owner Name field.
7
For example, you may want to chain the LDAPLookup Plug-in to take the Data Owner Name andset the Data Owner Email Address as either thedata owner or the manager of the data owner.
No built-in capability provides consistency betweenthe data owner and email address. This action mustbe customized.
TheData Owner Email Address can have multipleemail addresses that are separated with commas.
Note: If duplicate attribute names exist betweenthese names and custom attributes, then both fieldsare updated.
See “Configuring Data Loss Prevention to retrieveattribute values from Data Insight” on page 20.
Set up all your lookup plug-ins.8
Set up the SMTP notification settings.
Set the option Send report data with emails.
Verify that the Enforce Server generalsettings are set up to send email notifications.
9
The Remediate Incidents privilege is required toconfigure and run the reports.
The Lookup Attributes privilege is required to setattributes from the lookup plug-ins.
The User Privilege CSV Attachment in EmailReports is required to attach the CSV report to theemail.
Verify that the incident responder has theprivileges to run the reports.
10
Set up a Network Discover and run a samplescan of the file systems of interest.
11
47Finding data users and accesses in incident reportsCreating and distributing aggregated incident reports to data owners

Table 3-6 Setting up, creating, and distributing aggregated incident reports to data owners(continued)
DescriptionActionStep
Set up a filtered report, or set up any report that youwant to distribute. For example, you can filter basedon the new incidents.
Select the option Change Incident Status /Attributes of the reports scheduling to set incidentstatus or attributes when the email is sent.
You can also manually set the custom attribute thatindicates these incidents were verified. Select anyor all incidents in the list. Use the drop-downIncident Actions and select Set Attributes. Youcan also set a custom status from this drop-downmenu.
Set up any custom reports.12
Save the custom reports and set up adistribution schedule.
13
48Finding data users and accesses in incident reportsCreating and distributing aggregated incident reports to data owners

Working with the VeritasData Insight Self-ServicePortal
This chapter includes the following topics:
■ About the Veritas Data Insight Self-Service Portal
■ Configuring Symantec Data Loss Prevention for use with the Veritas Data InsightSelf-Service Portal
■ Operational logs for the Response Rule Execution Service
About the Veritas Data Insight Self-Service PortalThe Self-Service Portal allows your central information security team to distribute the DataLoss Prevention remediation workflow directly to data owners and data custodians. Using theportal, data owners and custodians can take Network Discover Box cloud storage, file-system,and SharePoint incident remediation actions at the file or the folder level without needingaccess to the Enforce Server administration console. These remediation actions are SmartResponse rules that are executed by Symantec Data Loss Prevention on behalf of theSelf-Service Portal user. For detailed information about the configuration and use of theSelf-Service Portal, see the Veritas Data Insight Administration Guide and the Veritas DataInsight User Guide. For detailed information about Smart Response rules, see the SymantecData Loss Prevention Administration Guide. The Self-Service Portal is available beginningwith Veritas Data Insight version 4.5.
Symantec Data Loss Prevention provides two web services to Veritas Data Insight for incidentremediation: the Response Rule Listing Service and the Response Rule Execution Service.The Response Rule Listing Service provides a list of the available response rules for a given
4Chapter
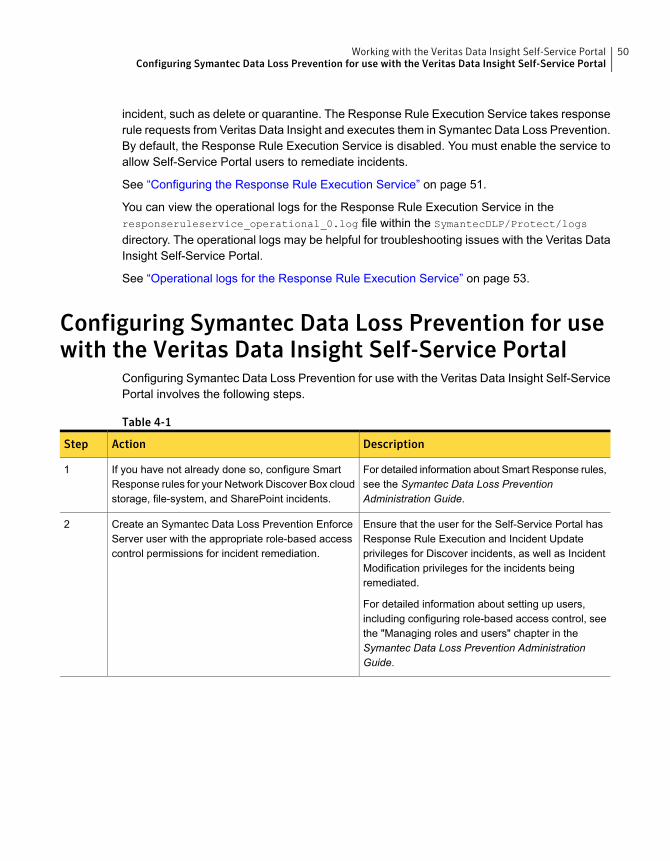
incident, such as delete or quarantine. The Response Rule Execution Service takes responserule requests from Veritas Data Insight and executes them in Symantec Data Loss Prevention.By default, the Response Rule Execution Service is disabled. You must enable the service toallow Self-Service Portal users to remediate incidents.
See “Configuring the Response Rule Execution Service” on page 51.
You can view the operational logs for the Response Rule Execution Service in theresponseruleservice_operational_0.log file within the SymantecDLP/Protect/logs
directory. The operational logs may be helpful for troubleshooting issues with the Veritas DataInsight Self-Service Portal.
See “Operational logs for the Response Rule Execution Service” on page 53.
Configuring Symantec Data Loss Prevention for usewith the Veritas Data Insight Self-Service Portal
Configuring Symantec Data Loss Prevention for use with the Veritas Data Insight Self-ServicePortal involves the following steps.
Table 4-1
DescriptionActionStep
For detailed information about Smart Response rules,see the Symantec Data Loss PreventionAdministration Guide.
If you have not already done so, configure SmartResponse rules for your Network Discover Box cloudstorage, file-system, and SharePoint incidents.
1
Ensure that the user for the Self-Service Portal hasResponse Rule Execution and Incident Updateprivileges for Discover incidents, as well as IncidentModification privileges for the incidents beingremediated.
For detailed information about setting up users,including configuring role-based access control, seethe "Managing roles and users" chapter in theSymantec Data Loss Prevention AdministrationGuide.
Create an Symantec Data Loss Prevention EnforceServer user with the appropriate role-based accesscontrol permissions for incident remediation.
2
50Working with the Veritas Data Insight Self-Service PortalConfiguring Symantec Data Loss Prevention for use with the Veritas Data Insight Self-Service Portal

Table 4-1 (continued)
DescriptionActionStep
By default, the Response Rule Execution Service isdisabled. To enable and configure the Response RuleExecution Service, modify the appropriate parametersin theSymantecDLP/Protect/config/manager.propertiesfile.
See “Configuring the Response Rule ExecutionService” on page 51.
Configure the Response Rule Execution Service.3
Configuring the Response Rule Execution ServiceBy default, the Response Rule Execution Service is disabled. To enable and configure theResponse Rule Execution Service, modify the appropriate parameters in the C:\Program
Files\Symantec\DataLossPrevention\EnforceServer\15.5\Protect\config\manager.properties
file. After you have modified the parameters in the manager.properties file, restart theSymantecDLP Manager service.
The only parameter you are required to configure iscom.vontu.enforcewebservices.responserules.execution.service.schedule. Thisparameter is set to NEVER by default, which means that Symantec Data Loss Prevention neverprocesses response rule requests from Veritas Data Insight.
To schedule the Response Rule Execution Service, specify a start and end time in QuartzCron format. The Quartz Cron format differs from the standard Cron format slightly. For detailsabout the Quartz Cron format, see the Quartz Cron tutorial page.
51Working with the Veritas Data Insight Self-Service PortalConfiguring Symantec Data Loss Prevention for use with the Veritas Data Insight Self-Service Portal

Table 4-2 Configuration parameters for the Response Rule Execution Service
DescriptionMinimumvalue
Defaultvalue
Parameter
Specifies the schedule on whichSymantec Data Loss Preventionexecutes response rule requests fromthe Veritas Data Insight Self-ServicePortal. Possible values are:
■ NEVER: Symantec Data LossPrevention Does not executeresponse rule requests from theVeritas Data Insight Self-ServicePortal.
■ ALWAYS: Symantec Data LossPrevention executes response rulerequests from the Veritas Data InsightSelf-Service Portal immediately uponreceipt of the request.
■ BY_SCHEDULE: Symantec DataLoss Prevention executes responserules from the Veritas Data InsightSelf-Service Portal according to theschedule specified in the startHourand endHour parameters.
N/ANEVERcom.vontu.enforcewebservices.responserules.execution.service.schedule
Specifies the start time of the responserule execution process in Quartz Cronformat.
N/A0 0 2 ? * *com.vontu.enforcewebservices.responserules.execution.service.startHour
Specifies the end time of the responserule execution process in Quartz Cronformat.
N/A0 0 7 ? * *com.vontu.enforcewebservices.responserules.execution.service.endHour
The maximum number of incidents heldin the waiting queue.
15,000,000com.vontu.enforcewebservices.responserules.execution.request.maxIncidentsInWaitingQueue
The maximum number of incidents perresponse rule execution request.
110,000com.vontu.enforcewebservices.responserules.execution.request.maxIncidentsPerRequest
The maximum number of response ruleexecution requests held in the requestqueue.
110,000com.vontu.enforcewebservices.responserules.execution.request.maxRequestQueueSize
52Working with the Veritas Data Insight Self-Service PortalConfiguring Symantec Data Loss Prevention for use with the Veritas Data Insight Self-Service Portal

Operational logs for the Response Rule ExecutionService
The operational logs for the Response Rule Execution Service are useful for troubleshootingany issues you might experience. All messages are logged at the INFO level, with the exceptionof RESPONSE_RULE_SERVICES_LOG_23, which is logged at the FINE level.
You can set the Response Rule Execution Service operational log levels in theSymantecDLP/Protect/config/ManagerLogging.properties file:
com.vontu.enforcewebservices.
domain.responserules.logging.
ResponseRulesServicesLogHandler.level = INFO
Table 4-3
DescriptionLog messageLog code
This message is logged when the servicestarts at its scheduled time.
The Response RuleRequest ProcessingService has started.
RESPONSE_RULE_SERVICES_LOG_1
This message is logged when the servicestops at its scheduled time.
The Response RuleRequest ProcessingService has stopped.
RESPONSE_RULE_SERVICES_LOG_2
This message is logged if the databaseconnection is lost while the service isexecuting response rules.
Database connection islost while the service isexecuting the requests.The Response RuleRequest ProcessingService will stopprocessing the requestsuntil the databaseconnection is restored.
RESPONSE_RULE_SERVICES_LOG_3
This message is logged if the databaseconnection is lost before the scheduledresponse rule execution start time.
Database connection islost. The Response RuleRequest ProcessingService will not processthe requests as per theschedule until thedatabase connection isrestored.
RESPONSE_RULE_SERVICES_LOG_4
53Working with the Veritas Data Insight Self-Service PortalOperational logs for the Response Rule Execution Service

Table 4-3 (continued)
DescriptionLog messageLog code
This message is logged if the databaseconnection is restored before the end of thescheduled response rule execution period.
Database connection isrestored. The ResponseRule Execution RequestProcessing Service willstart processing therequests now.
RESPONSE_RULE_SERVICES_LOG_5
This message is logged if the databaseconnection is restored before the responserule execution service is started.
Database connection isrestored. The ResponseRule Execution RequestProcessing Service willstart processing therequests as per theschedule.
RESPONSE_RULE_SERVICES_LOG_6
This message is logged during the shutdownof the service, usually as part of theSymantecDLP Manager shutdown.
The Response RuleExecution RequestProcessing Service hasshutdown.
RESPONSE_RULE_SERVICES_LOG_7
This message is logged during the shutdownof the service if an error occurs duringshutdown.
Error encountered whileshutting down theResponse RuleExecution RequestProcessing Service.Reason: Error Message
RESPONSE_RULE_SERVICES_LOG_8
This message is logged during the scheduledstart of the service if the database connectionis not available.
Database connection islost. The Response RuleExecution RequestProcessing Service willnot process the requestsuntil the databaseconnection is restored.
RESPONSE_RULE_SERVICES_LOG_9
This message is logged by the service if theuser an invalid value for the propertycom.vontu.enforcewebservices.responserules.execution.service.schedule.
The new schedule modeprovided is invalid.Execution schedule willnot be updated. Willremain with currentschedule type as"NEVER".
RESPONSE_RULE_SERVICES_LOG_12
54Working with the Veritas Data Insight Self-Service PortalOperational logs for the Response Rule Execution Service

Table 4-3 (continued)
DescriptionLog messageLog code
This message is logged by the service duringstartup. The user entered an invalid value forthe propertycom.vontu.enforcewebservices.responserules.execution.service.schedule.
The schedule modeprovided is invalid.Execution schedule willbe set to default type"NEVER".
RESPONSE_RULE_SERVICES_LOG_13
The user does not have RBAC permissionsfor the response rules provided in therequest. Change the user credentials to auser that has appropriate permissions for theincidents. Returns a 403: ForbiddenHTTP status.
The Response RulesExecution RequestResource received aGET request from theuser "USER" and IPaddress "IP Address"and UUID "UUID" with noRBAC permission forresponse rule IDs [1,2].
RESPONSE_RULE_SERVICES_LOG_14
The user made the POST request with aninvalid set of parameters, causing a 400:Bad Request HTTP return status. TheReason section explains the cause of theproblem. Possible reasons are missingresponse rule IDs, non-existent response ruleIDs, missing incidents IDs, or invalid orduplicate UUIDs
The Response RulesExecution RequestResource received aBAD request from theuser "USER" and IPaddress "IP Address"and UUID "UUID".Reason "Reason"
RESPONSE_RULE_SERVICES_LOG_15
The user does not have RBAC permissionsfor the incidents provided in the responserule ID. Change the user credentials to a userthat has appropriate permissions for theincidents.
The Response RulesExecution RequestResource received aPOST request from theuser "USER" and IPaddress "IP Address"and UUID "UUID" with noRBAC permission forresponse rule IDs [1,2].
RESPONSE_RULE_SERVICES_LOG_16
This message indicates that the serviceencountered an error in creating the request.The Reason section explains the cause ofthe error.
Error encountered increating the ResponseRules ExecutionRequestfor the POST requestfrom the user "USER"and IP address "IPAddress" and UUID"UUID". Reason"Reason".
RESPONSE_RULE_SERVICES_LOG_19
55Working with the Veritas Data Insight Self-Service PortalOperational logs for the Response Rule Execution Service

Table 4-3 (continued)
DescriptionLog messageLog code
This message is logged by the service afterthe service mode changed when the servicewas running.
The schedule mode ischanged from NEVER toALWAYS.
RESPONSE_RULE_SERVICES_LOG_21
This message is logged when the service hasrun the response rule on the incident with IDprovided in the message. This message islogged in verbose/fine mode only.
The Response Rule withID "ID" is executed onthe incident with ID "ID"for the Response RuleExecution Request withthe ID "ID" as requestedby the user "USER".
RESPONSE_RULE_SERVICES_LOG_23
56Working with the Veritas Data Insight Self-Service PortalOperational logs for the Response Rule Execution Service
Related Documents