Sygic GPS navigation http://www.sygic.com/manuals/manual_en.html#useful[4/05/2009 10:36:45 AM] Overview Products Download About us Jobs Help Basics of Sygic Navigation | Useful function | Settings Sygic navigation is very easy to use and it takes you just few steps to understand how it works. There are also some new features in the latest version which we would like to show you and you may not already know. We hope this would be an useful reference for you. For any other questions please contact us. Basic of Sygic Navigation First launch | Main menu | Menu items First launch After successful launch, you would probably see your current valid GPS position on the map. If you tap anywhere on the map area, the Main menu is showed. On the bottom of the screen you can see useful information about your current position - street name with number. If you have already planned your route, you should also see information about your next turning point on the left side and its distance from your current position. There are also several other useful route features - time of your presumed arrival, your current speed and distance to finish.

Welcome message from author
This document is posted to help you gain knowledge. Please leave a comment to let me know what you think about it! Share it to your friends and learn new things together.
Transcript

Sygic GPS navigation
http://www.sygic.com/manuals/manual_en.html#useful[4/05/2009 10:36:45 AM]
Overview Products Download About us Jobs Help
Basics of Sygic Navigation | Useful function | Settings
Sygic navigation is very easy to use and it takes you just few steps to understand how it works. There are also somenew features in the latest version which we would like to show you and you may not already know. We hope thiswould be an useful reference for you. For any other questions please contact us.
Basic of Sygic NavigationFirst launch | Main menu | Menu items
First launch
After successful launch, you would probably see your current valid GPS position on the map. If you tap anywhere onthe map area, the Main menu is showed. On the bottom of the screen you can see useful information about yourcurrent position - street name with number. If you have already planned your route, you should also see informationabout your next turning point on the left side and its distance from your current position. There are also several otheruseful route features - time of your presumed arrival, your current speed and distance to finish.

Sygic GPS navigation
http://www.sygic.com/manuals/manual_en.html#useful[4/05/2009 10:36:45 AM]
* These information are showed only if you have already computed a route
If you see only grey screen after launch instead of your current map position, you should probably check your GPSstatus first and wait for valid GPS signal. It takes some time to get valid signal from available satellites. First of alltap on the grey screen to open the Main menu and find GPS status button.For more information about GPS status and proper Hardware settings go to Useful functions and subchapters GPSstatus and Hardware settings.
Main menu
If you tap anywhere on the screen, the main menu will be showed immediately. Main menu is divided into twoseperate parts and contains various functions which we will present in later chapters. If you want to use particularfunction, click on the icon which represents this function. There's also Menu title bar in the left top corner andCurrent local time on the right side.

Sygic GPS navigation
http://www.sygic.com/manuals/manual_en.html#useful[4/05/2009 10:36:45 AM]
This is the first screen of the main menu.
Menu Items
In this part you will learn about each Sygic Menu item and briefly about its specific function.
1) Navigate to - you will be asked to enter your target point. You can write directly the address, or choose fromseveral options like point on map, history, points of interests or enter GPS position. After successful entering thetarget point you will have to choose your departure. (up)
2) Browse map - you will be able to browse the entire map and search for your target destinations. By simpledragging you will be able to scroll through the map and explore new areas. Browse map cursor shows informationabout the map objects like street names additional information about chosen point of interest. You can also usezoom bar by dragging the cursor up and down you can zoom in or zoom out the map. You can also use otherfunctions in the options menu like find position on the map, show current position, show nearby points of interestand many more. (up)
3) Alternative route - perfect tool if you want to make the same route using alternative ways or roads. You canset which roads should be added or avoided, you can also avoid the traffic delays and much more. As in the case

Sygic GPS navigation
http://www.sygic.com/manuals/manual_en.html#useful[4/05/2009 10:36:45 AM]
with the route button, alternative route button is also available after you'll plan your main route. (up)
4) Settings - you can easily modify user interface with plenty of settings options – turn of/on the sounds, switch tonight colors, swtich from 3D view to view from top, backlight settings, rotate display, set different languages, setkeyboard or load other maps and many more. (up)
5) Manage POI - Sygic Drive 5 shows on the map plenty types of POIs (point of interests) – airports, banks, busstations, hotels, parking garages, shopping centres. Now you can easily manage them and add your own POIs orthere is also a function which warns you when you'll be crossing the nearby POI. (up)
6) Route - you have to first planned your route to get access to route options. If you haven't planned your route,the route button isn't available. Here you can find all the further information about your route, you can view thewhole route in image slides or even watch the route preview by using the route demonstration option. (up)
7) Itinerary - itinerary allows you to plan your business journey, comfortably from your home. (up)
8) GPS status - check your GPS status - valid satellites or your valid position. (up)
9) Memorize position - this would automatically save your current position into History. (up)
10) World clock - shows current time accros the world. (up)
11) Exit - tap this button if you want to close down Sygic DRIVE. (up)
Useful functionsNavigate to function step by step | Browse map function | Route and its options | How to plan a route usingItinerary function | How to use Alternative route function | How to manage Points Of Interest (POI) | Useful tipsusing Memorize position function | GPS status | Hardware settings | World clock
Navigate to function step by step
(Step1) Navigate to is the basic Sygic function and also the easiest way to get to your target location and also toplan a route - address, favorite, history, point of interest, zip code, point on map, city center, last valid position orGPS position. Navigate to button is the vey first icon on the main menu screen, by clicking on it you'll get access toits options where you can choose your target.
Step 1. Click on the Navigate to button on the Main menu screen.
(Step2) If you see the Navigate to menu, you have to choose where you want to be navigated – there are lotdifferent options that give you great opportunity to choose just the perfect one for you. In this tutorial we will show

Sygic GPS navigation
http://www.sygic.com/manuals/manual_en.html#useful[4/05/2009 10:36:45 AM]
how does the Navigate To function work using the Point on Map option.
Step 2. Now it's just up to you which option to choose.
(Step3) Find the Point on Map button and simply just click on it.
Step 3. Click on the button with chosen option (in this case Point on Map).
(Step4) You are turned on the browse map mode immediately and you are able to scroll the entire map by tappingon it. There's also a zoom in/out scroolbar on the right side of the screen for better view. Orange colored cursorshows you also the information about current target - street name, information about POI (for example - if there's ashopping center, after clicking on its icon, cursor will show the name of it). In the left bottom corner you see theoptions button that offers several additional features like finding the definite location, show or hide POIs and lotmore.

Sygic GPS navigation
http://www.sygic.com/manuals/manual_en.html#useful[4/05/2009 10:36:45 AM]
Step 4. Browse the map and find your target - POI, street name, location etc.
(Step5) If you have already find the location or target where you want to be navigated, simply just tap on the Donebutton. Right now you are asked to select your departure place from where your navigation will get started. You canchoose from three options - wait for valid signal, last valid position or select from map. In this case we use the Selectfrom map option.
(Step6) We've chosen the Select from map option, so that you are able to scroll through the map once again andselect your departure. If you select any other option instead of Select from map option final result is the same. Waitfor valid signal and Last valid position work properly when the GPS is turned on. Navigate to is very helpful tool andalso first step to build up your route.
Browse map function
Browse map is basic function that allows you to scroll the entire map and search for your desired locations or POI(Point Of Interest). There are also several other map options that are featured in the latest Sygic Navigation. Forviewing whole map simply tap on the Broese map button in the Main menu.
Browse map window consists of the main map window and the zoom bar on the right side. You can also find hereOptions button and Context button that contain more features for easiest navigation. Browse the map by draggingMap cursor through the area. Also use the Zoom bar to get better view from top or zoom in for detailed information

Sygic GPS navigation
http://www.sygic.com/manuals/manual_en.html#useful[4/05/2009 10:36:45 AM]
of selected location. Use Map cursor as a useful informer on selected street, POI or whatever.
Map options - Map options menu offers several useful features. You can enter valid address and SygicNavigation finds its position on the map, or you can easily set which POIs to show on map and which not and manymore.
1) Find... - you will be asked to enter your target point. You can write directly the address, or choose from severaloptions like point on map, history, points of interests or enter GPS position. After successful entering the target pointyou will have to choose your departure. (up)
2) Show current position - useful function for when you get lost in the map and you can't find your actualposition. (up)
3) Show whole route - this option will show you your whole planned route on map. (up)
4) Show city (up)
5) Show/Hide POIs - here you can select which POIs you want to be showed on map. For example, disable allexpect Hotel or motel if you are looking for some accommodation on your route, so that only hotels would be visibleon map. (up)

Sygic GPS navigation
http://www.sygic.com/manuals/manual_en.html#useful[4/05/2009 10:36:45 AM]
Context menu - context menu contains several options for target that is currently selected by Map cursor.
1) Navigate there - tap this button if you want to be navigated to the selected target on map. Select yourdeparture and Sygic navigation will compute your route.(up)
2) Travel via - function is available only if you have already computed a route. It's ideal for when you want to goto some specific locations which are not presented on your route yet. (up)
3) Continue - your already planned route would continue to the the selected target from map, it also automaticallyadds a Finish waypoint type into your route so that Sygic Navigation would always informs you when you reach it.(up)
4) Avoid - select which area to avoid and Sygic Navigation will compute route without using avoided locations. (up)
5) Add as POI - selected target on map would be added as POI - you can choose which category it should be putinto, name etc. From this time, saved POI would be also visible on map. (up)
6) Find nearby POI - choose which POI type you want to search and Sygic Navigation will offer you list ofnearby POIs with accurate distance from your current position. (up)
Route and its options
Successful completing of the Navigate to function is first step to plan your basic route. If you tap on the grey screenright now, there is a new button called Route available in the second slide of the Main menu. Now. You are going tolearn about Route, its options and see how useful tool it is.
Route menu with six different functions
Route menu consists of six different icons - show route instructions, show route as images, show on map, showroute demo, show route summary and cancel route. Click on the icon you've chosen to see more options.
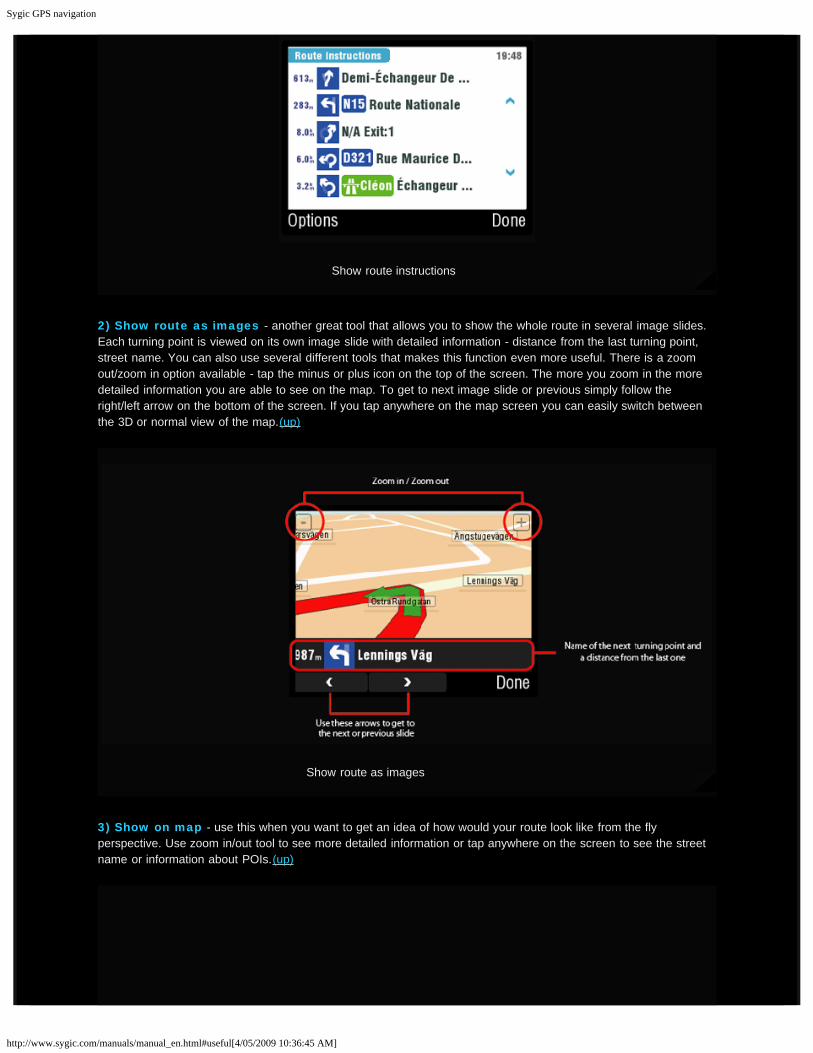
1) Show route instructions - very useful tool that shows you the most important turning points (whether to turnleft or right) on your route and distances between them.(up)
Sygic GPS navigation
http://www.sygic.com/manuals/manual_en.html#useful[4/05/2009 10:36:45 AM]
Show route instructions
2) Show route as images - another great tool that allows you to show the whole route in several image slides.Each turning point is viewed on its own image slide with detailed information - distance from the last turning point,street name. You can also use several different tools that makes this function even more useful. There is a zoomout/zoom in option available - tap the minus or plus icon on the top of the screen. The more you zoom in the moredetailed information you are able to see on the map. To get to next image slide or previous simply follow theright/left arrow on the bottom of the screen. If you tap anywhere on the map screen you can easily switch betweenthe 3D or normal view of the map.(up)
Show route as images
3) Show on map - use this when you want to get an idea of how would your route look like from the flyperspective. Use zoom in/out tool to see more detailed information or tap anywhere on the screen to see the streetname or information about POIs.(up)

Sygic GPS navigation
http://www.sygic.com/manuals/manual_en.html#useful[4/05/2009 10:36:45 AM]
Show on map
4) Show route demo - demonstration allows you to simulate your own route. You can make route preview in full3D view and see how does the route information change while driving. First of all click on the Show route demobutton in the Route menu. Then you will see the Route demonstration screen with several options -demonstrationspeed, automatic replay, play/stop/pause functions. Set your optimum speed and simply tap on the Startdemonstration button. (up)
Route demonstration options | Route demonstration
Demonstration starts automatically after you tap on the Start demonstration button. Demonstration is in full 3D viewand you can modify the demo speed if turn back to Route demonstration options. You can again use the zoomin/out buttons to get better idea of the whole route. Route can be stopped or paused anytime and also viewedseveral times again.(up)
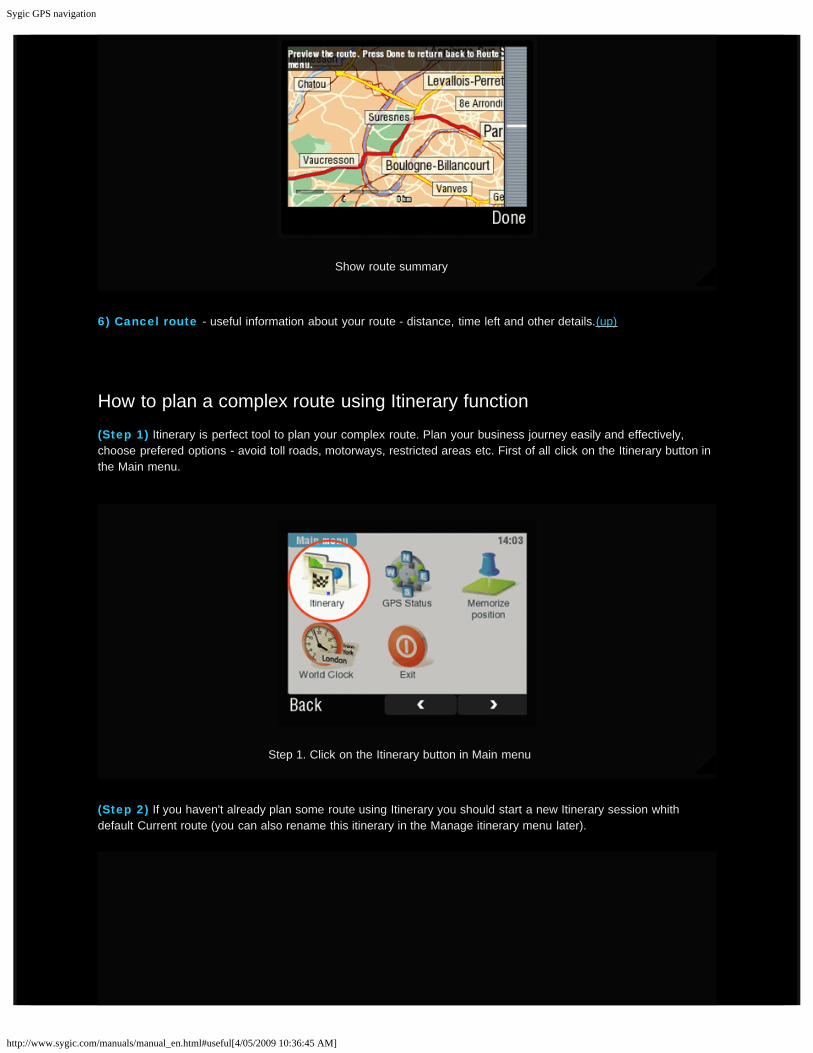
5) Show route summary - useful information about your route - distance, time left and other details.(up)
Sygic GPS navigation
http://www.sygic.com/manuals/manual_en.html#useful[4/05/2009 10:36:45 AM]
Show route summary
6) Cancel route - useful information about your route - distance, time left and other details.(up)
How to plan a complex route using Itinerary function
(Step 1) Itinerary is perfect tool to plan your complex route. Plan your business journey easily and effectively,choose prefered options - avoid toll roads, motorways, restricted areas etc. First of all click on the Itinerary button inthe Main menu.
Step 1. Click on the Itinerary button in Main menu
(Step 2) If you haven't already plan some route using Itinerary you should start a new Itinerary session whithdefault Current route (you can also rename this itinerary in the Manage itinerary menu later).

Sygic GPS navigation
http://www.sygic.com/manuals/manual_en.html#useful[4/05/2009 10:36:45 AM]
Step 2. Click on the current route to start managing your Itinerary items - waypoints
(Step 3) Manage itinerary allows you to insert waypoints into your Itinerary plan and also modify them usingItinerary options menu. First of all you should type a name of your first Itinerary. So tap the Options button in theManage itinerary menu and then in the Itinerary options menu tap the Save itinerary buttion.
Step 3. Tap on the Options button and then save your Itinerary
(Step 4) You have already saved your Itinerary (for example - Business journey 1) and now you can insert yourdesired waypoints into it. Tap on the Add button in the Manage itinerary menu.
Step 4. Tap on the Add button to insert waypoints into your Itinerary
Sygic GPS navigation
http://www.sygic.com/manuals/manual_en.html#useful[4/05/2009 10:36:45 AM]
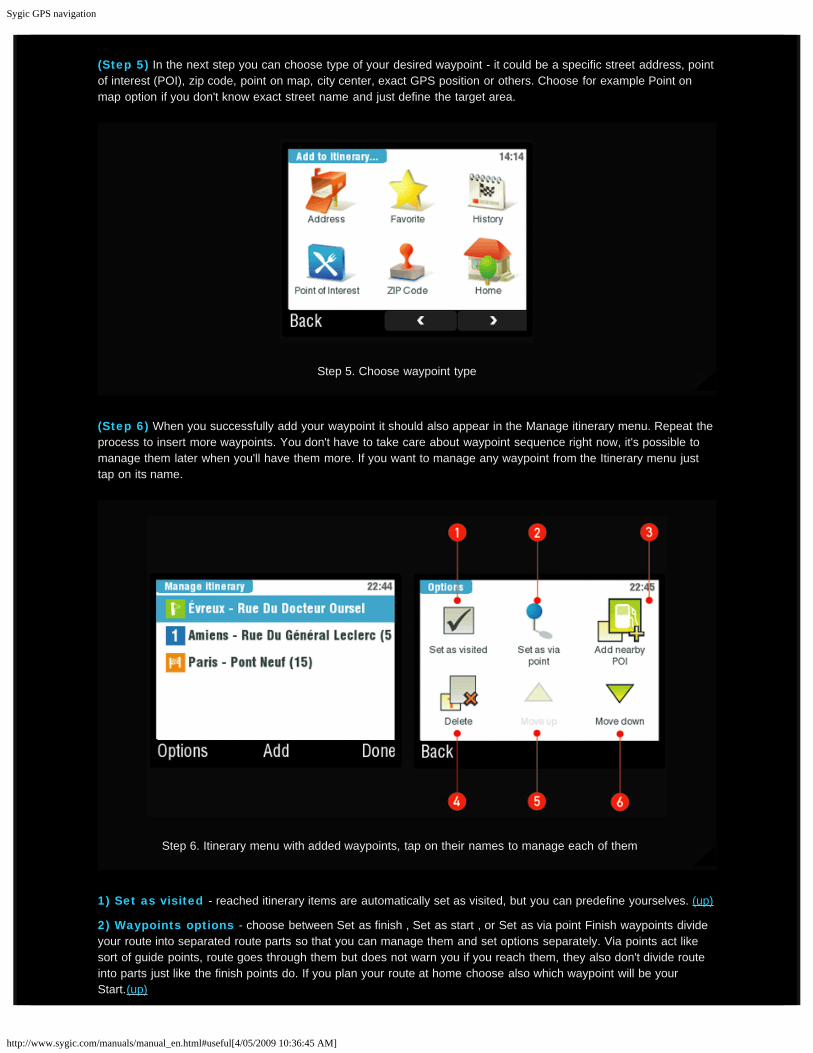
(Step 5) In the next step you can choose type of your desired waypoint - it could be a specific street address, pointof interest (POI), zip code, point on map, city center, exact GPS position or others. Choose for example Point onmap option if you don't know exact street name and just define the target area.
Step 5. Choose waypoint type
(Step 6) When you successfully add your waypoint it should also appear in the Manage itinerary menu. Repeat theprocess to insert more waypoints. You don't have to take care about waypoint sequence right now, it's possible tomanage them later when you'll have them more. If you want to manage any waypoint from the Itinerary menu justtap on its name.
Step 6. Itinerary menu with added waypoints, tap on their names to manage each of them
1) Set as visited - reached itinerary items are automatically set as visited, but you can predefine yourselves. (up)
2) Waypoints options - choose between Set as finish , Set as start , or Set as via point Finish waypoints divideyour route into separated route parts so that you can manage them and set options separately. Via points act likesort of guide points, route goes through them but does not warn you if you reach them, they also don't divide routeinto parts just like the finish points do. If you plan your route at home choose also which waypoint will be yourStart.(up)

Sygic GPS navigation
http://www.sygic.com/manuals/manual_en.html#useful[4/05/2009 10:36:45 AM]
3) Add nearby POI - add to your waypoint nearby Points Of Interests - nearest hotel, restaurant, petrol stationmany others.(up)
4) Delete - if you don't want current waypoint in Itinerary just tap on Delete button.(up)
5) Move up - move selected waypoint up in the Itinerary sequence. Function works only if you have more than oneitinerary item. (up)
6) Move down - move selected waypoint down in the Itinerary sequence.(up)
How to use Alternative route function
While driving, there are plenty of unpredictable things that could have negative effects and changing your route planwould be necessary . Function of Alternative route is easy to handle and offers several options how to change yourcomplete route plan within a few seconds.
Click on Alternative route icon in the main menu to show up its options.
Compute alternativeroute - tapping thisbutton wouldautomaticallyregenerate yourroute using differentroads.
Avoid next... - greatfunction when suddenroadblocks occur, youcan choose how longpart of the originalroute you want toavoid - from 500 m upto 20 km.
Travel via... - addnew waypoints intoyour original routeand travel via themto your finish.
Reset to original -tapping this woulderase every newAlternative route.

Sygic GPS navigation
http://www.sygic.com/manuals/manual_en.html#useful[4/05/2009 10:36:45 AM]
Click on Manage POI icon in the Main menu to show up its options.
Add POI - insert your personal POIs into map. Choose from several options - type exact street address, point onmap, home location, history and so on. Very useful is while driving to memorize current position and then add thisposition as POI from History.
Edit POI name - rename your own saved POIs.
Delete POI - to erase your saved POIs individually.
Delete POI category - this will erase whole POI category with all POIs in it.
Show/hide POIs - you can define which POIs will be showed on map and which ones to ignore.
Warn when near POI - set up warning sound for desired POIs, sound will automatically notice if you reachedcertain distance from the POI. It's possible to choose from three different sound types - signal, ring and beep.
Useful tips using Memorize position function
Memorize position function is the easiest way how to remember your current map position in Sygic Navigation.There are also several useful features of how to use this function for improving your navigation.

Sygic GPS navigation
http://www.sygic.com/manuals/manual_en.html#useful[4/05/2009 10:36:45 AM]
Click on Manage POI icon in the Main menu to show up its options.
While driving you can save all your current positions into History(memory of History is limited for 30 saved items). This is very helpfulin the future when you will don't have to spend time searching thisposition on map or typing its exact street address while navigating.Remember that Memorize position is avialable only when you havevalid GPS position or during Route demonstration, otherwise it'sblocked and cannot be used.
Tip nr.1 you can easily add your current position on map using Memorize position function and then simply add itas a new POI. Tap on the Memorize position button and Sygic Navigation will automatically save your current routeposition into History. Now, tap on the Manage POI button in the Main menu.
Click on Manage POI icon in the Main menu to show up its options.
Tip nr.2 another possibility of how to use saved position from Historyis while using the Navigate to function. By taping just few buttons, itsaves your time and you don't have to waste time searching for yourchosen location. First tap the Navigate to button in the Main menu a

Sygic GPS navigation
http://www.sygic.com/manuals/manual_en.html#useful[4/05/2009 10:36:45 AM]
then select History option and search for your Memorized position inthe list.
GPS status
GPS status screen informs you about available satellites and their validity. Satellites marked with green color arevalid for computing your GPS position and, grey satellites are blocked or don't have any valid signal.
Hardware settings
Properly configured Hardware settings are necessary for proper running your GPS machine. Hardware settings areavailable in the main Settings menu, simply tap the Hardware settings button and get access to its options.

Sygic GPS navigation
http://www.sygic.com/manuals/manual_en.html#useful[4/05/2009 10:36:45 AM]
1) COM port - set your COM port depending on your hardware configuration, if you don't know which COM port touse, contact your hardware manufacturer or local hardware dealer. COM port depends on your hardware device andnot on navigation software.
2) Baud rate - configure your baud rate (transfer speed), default baud rates are 4800 or 9600. If you haveproblem with configuring your baud rate you should contact your hardware manufacturer or local hardware dealer.Just as with COM port, Baud rate depends on your hardware device and doesn't have anything to do with navigationsoftware.
3) Turn GPS module On/Off - tap this button for activating GPS module with configured COM port and Baudrate settings.
4) Synchronize time - tap this button if you wish to change your hardware time for time provided by GPSmodule.
World clock
You can easily preset three different cities and their current time. Choose from more than 20 different cities. To setthe clock, just tap on the clock icon and then just manually choose your desired city. Use the same technique to setnext two cities.
Settings

Sygic GPS navigation
http://www.sygic.com/manuals/manual_en.html#useful[4/05/2009 10:36:45 AM]
This chapter is dedicated to Settings menu where you can modify Sygic Navigation and user's preferences. You willlearn how to manage GPS, switch between day & night colors, set language and how to use many other usefulfunctions and options.
Click on the Settings icon in the Main menu.
View from top - youwill see the map fromthe air perspective.
3D view - switch from airview to full 3Dperspective for bettermap details.
Daylight colors - whiledriving during day,switch to daylightcolors.
Night colors -while drivingduring night,switch to nightcolors.
Automatic colors -depending on time,colors will beautomaticallyswitched.
Enable sounds - forturning all sounds on.
Disable sounds - forturning all sound off.
GPS Hardware - setyour COM port, Baudrate properlyaccording to yourHardwareparameters.

Sygic GPS navigation
http://www.sygic.com/manuals/manual_en.html#useful[4/05/2009 10:36:45 AM]
GPS Logs - you canrecord your GPSpositions and playthem again.
Planning preferences -you can set how yourroute will be computed- wheter to always planthe fastest route, avoidmotorways etc.
Toll charge settings -set wheter to avoidtoll roads everytime,never or to askeverytime.
Set vehicle type -select from 4 options- passenger car, taxi,transport truck ordelivery truck.
Volume settings -set your preferedsound loudness,also able to setdefault soundvolume during hightspeeds.
Backlight settings -easily by using scrollbar customize the lightcontrast of backlightfor day mode.
Rotate display-depending on yourhardware, you caneasily rotate thewhole screen forperfect fit on yourdisplay.
Left or right handed -wheter you're right orleft handed, thisfeature solves yourproblems with userinterface.
Keyboard settings-set your keyboardtype for propertyping.
Regional settings -modify distance units,preferred time format,format of longitudesand latitudes.
Set language -choose yourlanguage softwaremutation.
Switch map - setproper way to yourmaps folder.
Set home location -define your defaulthome location andsave your timesearching for it onthe map.
Quick guides - usefulhelp for beginner userswho don't know yethow to properly useSygic DRIVE.
About Sygic DRIVE -information aboutyour Sygic DRIVEversion, your devicecode and map
Back

Sygic GPS navigation
http://www.sygic.com/manuals/manual_en.html#useful[4/05/2009 10:36:45 AM]
Contacts \\ Activate my product \\ About Sygic \\ Press \\ Terms of useCopyright (c) 2002-2007 Sygic, s.r.o. All rights reserved.
Related Documents