Agilent Technologies SureSelect Target Enrichment System Illumina Single-End Sequencing Platform Library Prep Protocol Version 1.2, April 2009 SureSelect platform manufactured with Agilent SurePrint Technology Research Use Only. Not for use in Diagnostic Procedures.

Welcome message from author
This document is posted to help you gain knowledge. Please leave a comment to let me know what you think about it! Share it to your friends and learn new things together.
Transcript

SureSelect Target Enrichment System
Illumina Single-End Sequencing Platform Library Prep
ProtocolVersion 1.2, April 2009
SureSelect platform manufactured with Agilent SurePrint Technology
Research Use Only. Not for use in Diagnostic Procedures.
Agilent Technologies

Notices© Agilent Technologies, Inc. 2009
No part of this manual may be reproduced in any form or by any means (including elec-tronic storage and retrieval or translation into a foreign language) without prior agree-ment and written consent from Agilent Technologies, Inc. as governed by United States and international copyright laws.
Manual Part NumberG3360-90010
EditionVersion 1.2, April 2009
Printed in USA
Agilent Technologies, Inc.5301 Stevens Creek Rd
WarrantyThe material contained in this document is provided “as is,” and is subject to being changed, with-out notice, in future editions. Fur-ther, to the maximum extent permitted by applicable law, Agi-lent disclaims all warranties, either express or implied, with regard to this manual and any information contained herein, including but not limited to the implied warranties of merchant-ability and fitness for a particular purpose. Agilent shall not be lia-ble for errors or for incidental or consequential damages in con-nection with the furnishing, use, or performance of this document or of any information contained herein. Should Agilent and the user have a separate written agreement with warranty terms covering the material in this doc-ument that conflict with these terms, the warranty terms in the separate agreement shall control.
Technology Licenses The hardware and/or software described in this document are furnished under a license and may be used or copied only in accor-dance with the terms of such license.
Restricted Rights LegendU.S. Government Restricted Rights. Soft-ware and technical data rights granted to the federal government include only those rights customarily provided to end user cus-tomers. Agilent provides this customary commercial license in Software and techni-cal data pursuant to FAR 12.211 (Technical Data) and 12.212 (Computer Software) and, for the Department of Defense, DFARS 252.227-7015 (Technical Data - Commercial Items) and DFARS 227.7202-3 (Rights in Commercial Computer Software or Com-puter Software Documentation).
Safety Notices
CAUTION
A CAUTION notice denotes a haz-ard. It calls attention to an operat-ing procedure, practice, or the like that, if not correctly performed or adhered to, could result in damage to the product or loss of important data. Do not proceed beyond a CAUTION notice until the indicated conditions are fully understood and met.
WARNING
A WARNING notice denotes a hazard. It calls attention to an operating procedure, practice, or the like that, if not correctly per-formed or adhered to, could result in personal injury or death. Do not proceed beyond a WARNING notice until the indicated condi-tions are fully understood and met.
Santa Clara, CA 95051 USA
AcknowledgementOligonucleotide sequences © 2006 and 2008 Illumina, Inc. All rights reserved. Only for use with the Illumina Genome Analyzer and associated assays.
Technical SupportTechnical product support may be obtained by contacting your local Agilent Support Services representative. Agilent’s world-wide sales and support center telephone numbers can be obtained at the following Web site: www.agilent.com/chem/contactus
or send an email to: [email protected]
Notice to PurchaserResearch Use Only. Not for use in diagnostic procedures.
2 Sureselect Target Enrichment System Protocol

In this Guide...
Sureselect Target Enrichment Syste
This guide describes Agilent's recommended operational procedures to capture genomic regions of interest using Agilent's SureSelect Target Enrichment System Kit and sample preparation kits for next- generation sequencing. This protocol is specifically developed and optimized to use Biotinylated RNA oligomer libraries, or Bait, to enrich targeted regions of the genome from repetitive sequences and sequences unrelated to the research focus.
This guide uses the Illumina single- end sequencing platform for library preparation.
If you have comments about this protocol, send an e- mail to [email protected].
1
Before You BeginThis chapter contains information (such as procedural notes, safety information, required reagents and equipment) that you should read and understand before you start an experiment.
3
HybridizationThis chapter describes the steps to prepare and hybridize samples.
4
Post-Hybridization AmplificationThis chapter describes the steps to amplify, purify, and assess quality of the sample library.
m Protocol 3

4
Sureselect Target Enrichment System Protocol
Content
1 Before You Begin 7
Procedural Notes 8Safety Notes 8Required Reagents 9Optional Reagents 10Required Equipment 11Optional Equipment 12
2 Sample Preparation 13
Step 1. Shear DNA 16Step 2. Purify the sample with the QIAquick PCR Purification Kit 17Step 3. Assess quality with Agilent 2100 Bioanalyzer 18Step 4. Repair the ends 19Step 5. Purify the repaired DNA with the QIAquick PCR Purification Kit 20Step 6. Add ‘A’ Bases to the 3' end of the DNA fragments 21Step 7. Purify the sample with a Qiagen MinElute PCR Purification Column 22Step 8. Ligate the adapter 23Step 9. Purify the sample with the QIAquick PCR Purification Kit 24Step 10. Select size using a gel 25Step 11. Purify the gel 26Step 12. Amplify prepped library 28Step 13. Purify the sample 29Step 14. Check gDNA quantity and quality 30Step 15. Assess quality with Agilent 2100 Bioanalyzer 31
3 Hybridization 33
Step 1. Hybridize the library 36Step 2. Prepare magnetic beads 40Step 3. Select hybrid capture with SureSelect 41Step 4. Desalt capture solution 42
Sureselect Target Enrichment System Protocol 5

Contents
4 Post-Hybridization Amplification 43
Step 1. Amplify the sample 44Step 2. Purify PCR 46Step 3. Assess quality with Agilent 2100 Bioanalyzer 47
5 Reference 49
Alternative Capture Equipment Combinations 50
6 Sureselect Target Enrichment System Protocol

SureSelect Target EnrichmentProtocol
1Before You Begin
Procedural Notes 8
Safety Notes 8
Required Reagents 9
Optional Reagents 10
Required Equipment 11
Make sure you read and understand the information in this chapter and have the necessary equipment and reagents listed before you start an experiment.
NOTE Agilent cannot guarantee the Target Enrichment Kit and cannot provide technical support for the use of non-Agilent protocols to process samples for enrichment.
7Agilent Technologies

1 Before You Begin Procedural Notes
Procedural Notes
8
• To prevent contamination of reagents by nucleases, always wear powder- free laboratory gloves, and use dedicated solutions and pipettors with nuclease- free aerosol- resistant tips.
• Maintain a clean work area.
• Do not mix stock solutions and reactions containing gDNA on a vortex mixer. Instead, gently tap the tube with your finger to mix the sample.
• Avoid repeated freeze- thaw cycles of stock and diluted gDNA solutions.
• When preparing frozen reagent stock solutions for use:
1 Thaw the aliquot as rapidly as possible without heating above room temperature.
2 Mix briefly on a vortex mixer, then spin in a centrifuge for 5 to 10 seconds to drive the contents off of walls and lid.
3 Store on ice or in a cold block until use.
• In general, follow Biosafety Level 1 (BL1) safety rules.
Safety Notes
CAUTION • Wear appropriate personal protective equipment (PPE) when working in the laboratory.
Sureselect Target Enrichment System Protocol

Before You Begin 1Required Reagents
Required Reagents
Sureselect Target E
Table 1 Required Reagents for Library Prep and Post-Hybridization Amplification
Description Vendor and part number
Agilent DNA 1000 Kit Agilent p/n 5067-1504
Nuclease-free Water (not DEPC-treated) Ambion, Cat # AM9930
MinElute PCR Purification Kit Qiagen, Cat # 28004
Illumina Genomic DNA Sample Prep Kit Illumina, Cat # FC-102-1001
Sybr-Gold Invitrogen p/n S-11494
Trackit Cyan/Orange Loading Dye(50 mM Tris pH 8.0, 40 mM EDTA, 40% (w/v) sucrose)
Invitrogen p/n 10482-028
Trackit 50 BP DNA ladder Invitrogen p/n 10488-043
NuSeive GTG Agarose Lonza p/n 50080
QIAquick PCR Purification Kit Qiagen, Cat # 28104
QIAquick or MinElute Gel Extraction Kit Qiagen p/n 28704 orQiagen p/n 28604
Herculase II Fusion DNA Polymerase Stratagene p/n 600677
50x TAE buffer
Distilled water
100% Ethanol, molecular biology grade
Isopropanol
nrichment System Protocol 9

1 Before You Begin Optional Reagents
10
Table 2 Required Reagents for Hybridization
Description Vendor and part number
SureSelect Target Enrichment, 10 reactionsSureSelect Target Enrichment, 25 reactionsSureSelect Target Enrichment, 50 reactionsSureSelect Target Enrichment, 100 reactionsSureSelect Target Enrichment, 250 reactionsSureSelect Target Enrichment, 500 reactionsSureSelect Target Enrichment, 1000 reactionsSureSelect Target Enrichment, 2000 reactionsSureSelect Target Enrichment, 5000 reactions
Agilent p/n G3360AAgilent p/n G3360BAgilent p/n G3360CAgilent p/n G3360DAgilent p/n G3360EAgilent p/n G3360FAgilent p/n G3360GAgilent p/n G3360HAgilent p/n G3360J
Nuclease-free Water (not DEPC-treated) Ambion, Cat # AM9930
Dynabeads® M-280 Streptavidin Invitrogen, Cat # 112-05D
Optional Reagents
Table 3 Optional Reagents
Description Vendor and part number
SureSelect Target Enrichment, Demo Agilent p/n G4459A
Sureselect Target Enrichment System Protocol

Before You Begin 1Required Equipment
Required Equipment
Sureselect Target E
Table 4 Required Equipment for Library Prep and Post-Hybridization Amplification
Description Vendor and part number
Agilent 2100 Bioanalyzer Agilent p/n G2938C
Nuclease-free 1.5 mL microfuge tubes (sustainable at 95°C)
Ambion p/n AM12400 or equivalent
Dark Reader transilluminator Clare Chemical Research, Inc. p/n DR45M
Covaris S-series Single Tube Sample Preparation System, Model S2
Covaris
Covaris microTUBE with AFA fiber and snap cap Covaris p/n 520045
Nuclease-free 0.2 mL PCR tubes, thin-walled Eppendorf p/n 951010006 or equivalent
Microcentrifuge Eppendorf Microcentrifuge Model 5417C
UV-VIS spectrophotometer NanoDrop p/n ND-1000 or equivalent
P10, P20, P200 and P1000 pipettes Pipetman P10, P20, P200, P1000 or equivalent
Stratagene Gradient Cycler Stratagene p/n G5100B
Disposable scalpels or razor blades
Electrophoresis unit
Electrophoresis power supply
Gel trays and tank
Ice bucket
Powder-free gloves
Sterile, nuclease-free aerosol barrier pipette tips
Timer
Vortex mixer
nrichment System Protocol 11

1 Before You Begin Optional Equipment
12
Table 5 Required Equipment for Hybridization
Description Vendor and part number
Mx3000P/Mx3005P 96-well tube plates Agilent p/n 410088
Mx3000P/Mx3005P optical strip caps Agilent p/n 401425
BD Clay Adams Nutator Mixer BD Diagnostics p/n 421105 or equivalent
Dynal DynaMag-2 Invitrogen p/n 123-21D or equivalent
P10, P20, P200 and P1000 pipettes Pipetman P10, P20, P200, P1000 or equivalent
Pipet-Light Multichannel Pipette, 12 channels Rainin p/n L12-20 or equivalent
Stratagene Gradient Cycler Stratagene p/n G5100B
Sterile, nuclease-free aerosol barrier pipette tips
Timer
Vortex mixer
Water bath
Optional Equipment
Table 6 Optional for Equipment Hybridization
Description Vendor and part number
Tube-stirp capping tool Agilent p/n 410099
Sureselect Target Enrichment System Protocol

SureSelect Target EnrichmentProtocol
2Sample Preparation
Step 1. Shear DNA 16
Step 2. Purify the sample with the QIAquick PCR Purification Kit 17
Step 3. Assess quality with Agilent 2100 Bioanalyzer 18
Step 4. Repair the ends 19
Step 5. Purify the repaired DNA with the QIAquick PCR Purification Kit 20
Step 6. Add ‘A’ Bases to the 3' end of the DNA fragments 21
Step 7. Purify the sample with a Qiagen MinElute PCR Purification Column 22
Step 8. Ligate the adapter 23
Step 9. Purify the sample with the QIAquick PCR Purification Kit 24
Step 10. Select size using a gel 25
Step 11. Purify the gel 26
Step 12. Amplify prepped library 28
Step 13. Purify the sample 29
Step 14. Check gDNA quantity and quality 30
Step 15. Assess quality with Agilent 2100 Bioanalyzer 31
This section contains instructions for prepped library production specific to the Illumina single- read sequencing platform. It is intended for use with the Illumina prep kit (p/n FC- 102- 1001). The steps in this section differ from the Illumina protocol in the shear size, the use of the Covaris sample preparation system for gDNA shearing, and the gel purification. Other methods of gDNA shearing have not been validated.
Refer to the Illumina protocol Preparing Samples for Sequencing Genomic DNA (p/n 11251892 Rev. A) for more information.
NOTE Make sure genomic DNA samples are of high quality with an OD 260/280 ratio ranging from 1.8 to 2.0.
13Agilent Technologies

2 Sample Preparation
14
Figure 1 Overall sequencing sample preparation workflow.
DNA fragments with a base pair peak of 200
Blunt-ended fragments with 5'-phosphorylated
ends
3'-dA overhang
Adapter-modified ends
Removal of unligated adapters
Prepped Library
Library Hybridization
Hybrid Capture Selection
Amplification
Quality Assessment
Sequencing
Genomic Locations
SureSelect Oligo Capture Library
Probe Design in eArray
Shear Genomic DNA
Repair ends
Add Klenow and dATP
Ligate adapters
Gel purify ligation product
PCR
24 hours at 65°C
Magnetic bead selection
PCR and purification
Bioanalyzer and Quantitation
Genomic DNA
Sureselect Target Enrichment System Protocol

Sample Preparation 2
Sureselect Target E
Table 7 Overview and time requirements
Step Time
Illumina Prepped library Production 2 days
Library Hybridization 25 hours (optional 72 hours)
Bead preparation 30 minutes
Capture Selection and Washing 2 hours
DNA purification 30 minutes
Post-Hybridization Amplification 1 hour
PCR purification 30 minutes
Nanodrop and Bioanalyzer QC 1 hour
nrichment System Protocol 15

2 Sample Preparation Step 1. Shear DNA
Step 1. Shear DNA
16
1 For every 3 µg DNA, add enough 1X Low TE Buffer in a LoBind tube for a total volume of 100 µL to dilute the genomic DNA.
2 Put a Covaris microTube into the loading station.
Keep the cap on the tube.
3 Set up the Covaris system.
Refer to the Covaris instrument user guide.
4 Use a tapered pipette tip to slowly transfer the 100 µL DNA sample through the pre- split septa.
Be careful not to introduce a bubble into the bottom of the tube.
5 Shear with the settings in Table 8. The target peak for base pair size is 200.
Table 8 Covaris shear settings
Setting Value
Duty Cycle 10%
Intensity 5
Cycles per Burst 200
Time 180 seconds
Set Mode Frequency sweeping
Temperature 4°C
Sureselect Target Enrichment System Protocol

Sample Preparation 2Step 2. Purify the sample with the QIAquick PCR Purification Kit
Step 2. Purify the sample with the QIAquick PCR Purification Kit
Sureselect Target E
1 Add 500 µL of PB to the sample and mix well by pipetting.
2 Place a QIAquick spin column in a 2 mL collection tube.
3 Transfer the 600 µL sample to the QIAquick column. Spin the sample in a centrifuge for 60 seconds at 17,900 x g (13,000 rpm). Discard the flow- through.
4 Add 750 µL of buffer PE to the column. Spin the sample in a centrifuge for 60 seconds at 17,900 x g (13,000 rpm). Discard the flow- through.
5 Place the QIAquick column back in the 2 mL collection tube and spin in a centrifuge for 60 seconds at 17,900 x g (13,000 rpm).
6 Transfer the QIAquick column to a new 1.5 mL collection tube to elute the cleaned sample. Add 30 µL of buffer EB (10 mM Tris·Cl, pH 8.5) directly onto the QIAquick filter membrane. Wait 60 seconds, then centrifuge for 60 seconds at 17,900 x g (13,000 rpm).
7 Collect the eluate.
nrichment System Protocol 17

2 Sample Preparation Step 3. Assess quality with Agilent 2100 Bioanalyzer
Step 3. Assess quality with Agilent 2100 Bioanalyzer
18
Use a Bioanalyzer DNA 1000 chip and reagent kit.
1 Check that the 2100 Bioanalyzer electrodes have been cleaned as instructed in the reagent kit guide.
2 Open the Agilent 2100 expert software (version B.02.02 or higher), turn on the 2100 Bioanalyzer and check communication.
3 Prepare the chip, samples and ladder as instructed in the reagent kit guide.
4 Load the prepared chip into the 2100 Bioanalyzer and start the run within five minutes after preparation.
5 Within the instrument context, choose the appropriate assay from the drop down list.
6 Start the run. Enter sample names and comments in the Data and Assay context.
7 Verify the results.
Figure 2 Analysis of sheared DNA using a DNA 1000 Bioanalyzer assay. The electropherogram shows a distribution with a peak size of 200 nucleotides.
Sureselect Target Enrichment System Protocol

Sample Preparation 2Step 4. Repair the ends
Step 4. Repair the ends
Sureselect Target E
1 In PCR tubes, strip tubes, or plates, prepare the reaction mix in Table 9 for each prepped library, on ice. Mix well by gently pipetting up and down.
NOTE If a precipitate forms in the T4 DNA ligase buffer with 10mM ATP, heat at 37°C for 5 minutes, and mix on a vortex mixer.
2 Incubate in a thermal cycler for 30 minutes at 20°C.
If you use a heated lid, make sure that the lid temperature does not exceed 50°C.
Table 9 End Repair
Reagent Volume for 1 Library
DNA sample 29 µL
Nuclease-free water 46 µL
T4 DNA ligase buffer with 10mM ATP 10 µL
dNTP mix 4 µL
T4 DNA polymerase 5 µL
Klenow enzyme 1 µL
T4 PNK 5 µL
Total Volume 100 µL
nrichment System Protocol 19

2 Sample Preparation Step 5. Purify the repaired DNA with the QIAquick PCR Purification Kit
Step 5. Purify the repaired DNA with the QIAquick PCR Purification Kit
20
1 Add 500 µL of PB to the sample and mix well by pipetting.
2 Place a QIAquick spin column in a 2 mL collection tube.
3 Transfer the 600 µL sample to the QIAquick column Spin the sample in a centrifuge for 60 seconds at 17,900 x g (13,000 rpm). Discard the flow- through.
4 Add 750 µL of buffer PE to the column. Spin the sample in a centrifuge for 60 seconds at 17,900 x g (13,000 rpm). Discard the flow- through.
5 Place the QIAquick column back in the 2 mL collection tube and spin in a centrifuge for 60 seconds at 17,900 x g (13,000 rpm).
6 Transfer the QIAquick column to a new 1.5 mL collection tube to elute the cleaned sample.
7 Add 32 µL of buffer EB directly onto the QIAquick filter membrane. Wait 60 seconds, then spin in a centrifuge for 60 seconds at 17,900 x g (13,000 rpm).
8 Collect the eluate.
Sureselect Target Enrichment System Protocol

Sample Preparation 2Step 6. Add ‘A’ Bases to the 3' end of the DNA fragments
Step 6. Add ‘A’ Bases to the 3' end of the DNA fragments
Sureselect Target E
1 In PCR tubes, strip tubes, or plates, prepare the reaction mix in Table 10 for each prepped library, on ice. Mix well by gently pipetting up and down.
2 Incubate in a thermal cycler for 30 minutes at 37°C.
Table 10 Adding “A” Bases
Reagent Volume for 1 Library
DNA sample 32 µL
Klenow buffer 5 µL
dATP 10 µL
Klenow exo (3’ to 5’ exo minus) 3 µL
Total Volume 50 µL
nrichment System Protocol 21

2 Sample Preparation Step 7. Purify the sample with a Qiagen MinElute PCR Purification Column
Step 7. Purify the sample with a Qiagen MinElute PCR Purification Column
22
1 Allow the MinElute columns (stored at 4°C) to come to room temperature.
2 Add 250 µL of PB to the sample and mix well by pipetting.
3 Place a MinElute spin column in a 2 mL collection tube.
4 Transfer the 300 µL sample to the MinElute column. Spin the sample in a centrifuge for 60 seconds at 17,900 x g (13,000 rpm). Discard the flow- through.
5 Add 750 µL of buffer PE to the column. Spin the sample in a centrifuge for 60 seconds at 17,900 x g (13,000 rpm). Discard the flow- through.
6 Place the MinElute column back in the 2 mL collection tube and spin in a centrifuge for 60 seconds at 17,900 x g (13,000 rpm).
7 Transfer the MinElute column to a new 1.5 mL collection tube to elute the cleaned sample. Add 10 µL buffer EB directly onto the MinElute filter membrane. Wait 60 seconds, then spin in a centrifuge for 60 seconds at 17,900 x g (13,000 rpm).
8 Collect the eluate, which can be stored at 4°C.
Sureselect Target Enrichment System Protocol

Sample Preparation 2Step 8. Ligate the adapter
Step 8. Ligate the adapter
Sureselect Target E
This step uses a 10:1 molar ratio of adapter to genomic DNA insert, based on a starting quantity of 3 µg of DNA before fragmentation.
1 Prepare the reaction mix in Table 11 on ice. Mix well by gently pipetting up and down.
2 Incubate for 15 minutes at room temperature.
Table 11 Ligation master mix
Reagent Volume for 1 Library
DNA sample 10 µL
Nuclease-free water 4 µL
DNA ligase buffer 25 µL
Genomic Adapter oligo mix 6 µL
DNA ligase 5 µL
Total Volume 50 µL
nrichment System Protocol 23

2 Sample Preparation Step 9. Purify the sample with the QIAquick PCR Purification Kit
Step 9. Purify the sample with the QIAquick PCR Purification Kit
24
1 Add 250 µL of PB to the sample and mix well by pipetting.
2 Place a QIAquick spin column in a 2 mL collection tube.
3 Transfer the 300 µL sample to the QIAquick column. Spin the sample in a centrifuge for 60 seconds at 17,900 x g (13,000 rpm). Discard the flow- through.
4 Add 750 µL of buffer PE to the column. Spin the sample in a centrifuge for 60 seconds at 17,900 x g (13,000 rpm). Discard the flow- through.
5 Place the QIAquick column back in the 2 mL collection tube and spin in a centrifuge for 60 seconds at 17,900 x g (13,000 rpm).
6 Transfer the QIAquick column to a new 1.5 mL collection tube to elute the cleaned sample. Add 30 µL of buffer EB directly onto the QIAquick filter membrane. Wait 60 seconds, then centrifuge for 60 seconds at 17,900 x g (13,000 rpm).
7 Collect the eluate.
Sureselect Target Enrichment System Protocol

Sample Preparation 2Step 10. Select size using a gel
Step 10. Select size using a gel
WARNING Prolonged exposure to UV light can damage your DNA.
Sureselect Target E
Excise as narrow a band as possible from the gel during gel purification.
CAUTION Do not purify multiple samples on a single gel. Cross-contamination between libraries can occur.
1 Prepare a 4% NuSeive agarose gel with distilled water and TAE. Final concentration of TAE should be 1X. Use a large well comb to prevent overloading.
2 Add 3 µL of loading buffer to 8 µL of the low molecular weight DNA ladder.
3 Add 10 µL loading buffer to 30 µL of the DNA from the purified ligation reaction.
4 Load all of the ladder solution to one lane of the gel.
5 Load the entire sample in another lane of the gel, leaving at least a gap of one empty lane between ladder and sample. Electrophoresis parameters may need to be optimized.
6 Run the gel at 25 V for 17 hours.
7 Incubate the gel in SYBR Gold solution for 60 minutes.
8 View the gel on a Dark Reader transilluminator, which is a safer alternative to a UV transilluminator.
9 Use a clean scalpel or razor blade to excise the region of gel that contains DNA fragments in the 200 to 300 bp range.
Make sure you trim the gel slice to avoid the need to use two purification columns.
nrichment System Protocol 25

2 Sample Preparation Step 11. Purify the gel
Step 11. Purify the gel
26
Use a Qiagen Gel Extraction Kit (Qiagen, p/n 28704) to purify the DNA from the agarose slices.
1 Weigh the gel slice. If the gel slice exceeds 400 mg, use 2 Qiagen QIAquick spin columns for purification.
2 Add 6 volumes of Buffer QG to 1 volume of gel (100 mg = 100 µL).
You may need to do this in a 15 mL conical tube or in two tubes.
3 Incubate at room temperature for 10 minutes (or until the gel slice has completely dissolved). To help dissolve gel, mix the tube in a vortex mixer every 2 to 3 minutes during the incubation.
4 After the gel slice has dissolved completely, check that the color of the mixture is yellow (similar to Buffer QG without dissolved agarose).
5 Add 1 gel volume of isopropanol to the sample and mix.
For example, if the agarose gel slice is 100 mg, add 100 µL isopropanol.
Do not spin the sample in a centrifuge at this time.
6 Place a QIAquick spin column in a provided 2 mL collection tube.
7 To bind DNA, apply the sample to the QIAquick column, and spin in a centrifuge for 1 minute at 17,900 x g (13,000 rpm).
The maximum volume of the column reservoir is 800 µL. For sample volumes of more than 800 µL, simply load and spin again.
8 Discard flow- through and place QIAquick column back in the same collection tube.
9 To wash, add 750 µL of Buffer PE to QIAquick column and spin in a centrifuge for 2 minutes at 17,900 x g (13,000 rpm).
10 Discard the flow- through and spin the QIAquick column in a centrifuge for an additional 1 minute at 17,900 x g (13,000 rpm).
Residual ethanol from Buffer PE will not be completely removed unless the flow- through is discarded before this additional centrifugation.
11 Place QIAquick column into a clean 1.5 mL microcentrifuge tube.
Sureselect Target Enrichment System Protocol

Sample Preparation 2Step 11. Purify the gel
Sureselect Target E
12 To elute DNA, add 30 µL of Buffer EB to the center of the QIAquick membrane. Wait 60 seconds, then spin the column in a centrifuge for 1 minute.
If 2 Qiagen MinElute columns were used for a single sample, elute each one in 15 µL of EB, for a total of 30 µL per DNA sample.
nrichment System Protocol 27

2 Sample Preparation Step 12. Amplify prepped library
Step 12. Amplify prepped library
28
This step uses PCR to selectively enrich those DNA fragments that have adapter molecules on both ends, and to amplify the amount of DNA in the library. The PCR is done with two primers that anneal to the ends of the adapters. Fourteen cycles of PCR are used.
1 Prepare the PCR reaction mix in Table 12, on ice. Mix well by gently pipetting up and down.
2 Amplify using the following PCR program:
Table 12 PCR Components
Reagent Volume for 1 Library
DNA 1 µL
Nuclease-free Water 22 µL
PCR primer 1.1 1 µL
PCR primer 2.1 1 µL
DNA Polymerase (from Illumina Kit) 25 µL
Total Volume 50 µL
Table 13 PCR protocol
Step Temperature Time
Step 1 98°C 30 seconds
Step 2 98°C 10 seconds
Step 3 65°C 30 seconds
Step 4 72°C 30 seconds
Step 5 Repeat Step 2 through Step 4 for a total of 14 times.
Step 6 72°C 5 minutes
Step 7 4°C Hold
Sureselect Target Enrichment System Protocol

Sample Preparation 2Step 13. Purify the sample
Step 13. Purify the sample
Sureselect Target E
1 Add 250 µL of PB to the sample and mix well by pipetting.
2 Place a QIAquick spin column in a 2 mL collection tub.
3 Transfer the 300 µL sample to the QIAquick column. Spin the sample in a centrifuge for 60 seconds at 17,900 x g (13,000 rpm). Discard the flow- through.
4 Add 750 µL of buffer PE to the column. Spin the sample in a centrifuge for 60 seconds at 17,900 x g (13,000 rpm). Discard the flow- through.
5 Place the QIAquick column back in the 2 mL collection tube and spin in a centrifuge for 60 seconds at 17,900 x g (13,000 rpm).
6 Transfer the QIAquick column to a new 1.5 mL collection tube to elute the cleaned sample. Add 50 µL of buffer EB directly onto the QIAquick filter membrane. Wait 60 seconds, then spin in a centrifuge for 60 seconds at 17,900 x g (13,000 rpm).
7 Collect the eluate, which can be stored at 4°C.
nrichment System Protocol 29

2 Sample Preparation Step 14. Check gDNA quantity and quality
Step 14. Check gDNA quantity and quality
30
Use the NanoDrop ND- 1000 UV- VIS Spectrophotometer (or equivalent) to assess gDNA concentration and purity.
1 1 Select Nucleic Acid Measurement, then select Sample Type to be DNA- 50.
2 Use 1.5 µL of EB buffer to blank the instrument.
3 Use 1.5 µL of each gDNA sample to measure DNA concentration. Record the gDNA concentration (ng/µL) for each sample. Calculate the yield (µg) by multiplying DNA concentration (ng/µL) by the sample volume and dividing by 1000.
4 Record the A260/A280 and A260/A230 ratios. High- quality gDNA samples should have an A260/A280 ratio of 1.8 to 2.0, indicating the absence of contaminating proteins, and an A260/A230 ratio of >2.0, indicating the absence of other organic compounds such as guanidinium isothiocyanate, alcohol and phenol as well as cellular contaminants such as carbohydrates.
NOTE A minimum of 500 ng of library is required for hybridization.
Sureselect Target Enrichment System Protocol

Sample Preparation 2Step 15. Assess quality with Agilent 2100 Bioanalyzer
Step 15. Assess quality with Agilent 2100 Bioanalyzer
Sureselect Target E
Use a Bioanalyzer DNA 1000 chip and reagent kit to assess the quality and size distribution of the PCR products.
1 Check that the 2100 Bioanalyzer electrodes have been cleaned as instructed in the reagent kit guide.
2 Open the Agilent 2100 expert software (version B.02.02 or higher), turn on the 2100 Bioanalyzer and check communication.
3 Prepare the chip, samples and ladder as instructed in the reagent kit guide.
4 Load the prepared chip into the 2100 Bioanalyzer and start the run within five minutes after preparation.
5 Within the instrument context, choose the appropriate assay from the drop down list.
6 Start the run. Enter sample names and comments in the Data and Assay context.
7 Verify the results.
Figure 3 Analysis of amplified prepped library DNA using a DNA 1000 Bioanalyzer assay. The electropherogram shows single peak in the size range of 200 to 300 nucleotides.
nrichment System Protocol 31

2 Sample Preparation Step 15. Assess quality with Agilent 2100 Bioanalyzer
32
Sureselect Target Enrichment System Protocol
SureSelect Target EnrichmentProtocol
3Hybridization
Step 1. Hybridize the library 36
Step 2. Prepare magnetic beads 40
Step 3. Select hybrid capture with SureSelect 41
Step 4. Desalt capture solution 42
In this step, you combine the prepped library with the blocking agents and the SureSelect Oligo Capture Library.
CAUTION The ratio of SureSelect Oligo Capture Library to prepped library is critical for successful capture.
33Agilent Technologies

3 Hybridization
34
Figure 4 SureSelect Target Enrichment System Capture Process
Sureselect Target Enrichment System Protocol

Hybridization 3
Sureselect Target E
ct Reagent Kit Components
Table 14 SureSeleKit Component 250 RXN Kit 50 RXN Kit Storage
SureSelect Hyb # 1 bottle tube with orange cap Room Temperature
SureSelect Hyb # 2 tube with red cap tube with red cap Room Temperature
SureSelect Hyb # 4 bottle tube with black cap Room Temperature
3M Sodium Acetate tube with clear cap tube with clear cap Room Temperature
SureSelect Binding buffer bottle bottle Room Temperature
SureSelect Wash Buffer #1 bottle bottle Room Temperature
SureSelect Wash Buffer #2 bottle bottle Room Temperature
SureSelect Elution Buffer bottle bottle Room Temperature
SureSelect Neutralization Buffer bottle bottle Room Temperature
SureSelect Hyb # 3 tube with yellow cap tube with yellow cap -20°C
SureSelect Block #1 tube with green cap tube with green cap -20°C
SureSelect Block #2 tube with blue cap tube with blue cap -20°C
SureSelect Block #3 tube with brown cap tube with brown cap -20°C
Rnase Block tube with purple cap tube with purple cap -20°C
SureSelect GA PCR Primers tube with clear cap tube with clear cap -20°C
CAUTION You must avoid evaporation from the small volumes of the capture during the 24 hour or greater incubation.
If you want to use a different combination of thermocycler, lid temperature, plates or strips, and sealing method (strip caps or sealing tape), first test the conditions. Incubate 27 µL of SureSelect Hybridization Buffers (without DNA) at 65°C for 24 hours (or longer, if applicable) as a test. Include buffer in each well that you might use, including those in the center and those on the edges. Check that you do not get extensive evaporation. Evaporation should not exceed 3 to 4 µL.
For a partial list of tested options showing minimal evaporation, refer to “Alternative Capture Equipment Combinations” on page 50.
nrichment System Protocol 35

3 Hybridization Step 1. Hybridize the library
Step 1. Hybridize the library
36
1 If prepped library concentration is below 147 ng/µL, use a vacuum concentrator to concentrate the sample.
2 Mix the components in Table 15 at room temperature to prepare the hybridization buffer.
3 If precipitate forms, warm the hybridization buffer at 65°C for 5 minutes.
4 Load 40 µL of hybridization buffer per well into the “A” row of the PCR plate.
The number of wells filled in Row A is the number of libraries prepared. This example is for 12 captures.
Figure 5 Hybridization Buffer shown in Blue
Table 15 Hybridization Buffer
Reagent Volume for 1 capture (µL)
Volume for 5 captures (µL)
Volume for 12 captures (µL)
SureSelect Hyb # 1 25 125 275
SureSelect Hyb # 2 (red cap) 1 5 11
SureSelect Hyb # 3 (yellow cap) 10 50 110
SureSelect Hyb # 4 13 65 143
Total 49 245 539
Hybridization Buffer
Sureselect Target Enrichment System Protocol

Hybridization 3Step 1. Hybridize the library
Sureselect Target E
5 In a PCR plate, prepare prepped library for target enrichment:
a Adjust prepped library concentration to 500 ng in 3.4 µL and add this to the “B” row in the PCR plate. Place each sample into a separate well.
b Add 2.5 µL of SureSelect Block #1 (green cap) to row B.
c Add 2.5 µL of SureSelect Block #2 (blue cap) to row B.
d Add 0.6 µL of SureSelect Block #3 (brown cap) to row B.
e Mix by pipetting.
f Seal the wells of rows “A” and “B” with caps and place the PCR plate in the thermocycler.
g Run the following thermocycler program in Table 16.
h Incubate the prepped library and blockers at 95°C for 5 minutes.
i Use a heated lid on the thermocycler at 105°C to hold the temperature of the plate on the thermocycler at 65°C.
Make sure that the plate is at 65°C for a minimum of 5 minutes before you get to step 7.
Figure 6 Prepped library shown in red
Table 16 PCR program
Step Temperature Time
Step 1 95°C 5 minutes
Step 2 65°C
Hybridization Buffer
Prepped Library
nrichment System Protocol 37

3 Hybridization Step 1. Hybridize the library
38
6 In a separate PCR plate, strip tubes, or tubes, prepare SureSelect Oligo Capture Library Mix for target enrichment:
a Add 5 µL of SureSelect Oligo Capture Library.
b Add 1 µL of nuclease- free water to the Capture Library.
c Use nuclease- free water to prepare a 1:1 dilution of the RNase Block (purple cap).
d Add 1 µL of diluted RNase Block to each Capture Library, and mix by pipetting.
e Add the Capture Library mix to the “C” row in the PCR plate.
f For multiple samples, use a multi- channel pipette to load the Capture Library samples into the “C” row in the PCR plate (see Figure 7 for positions).
Keep the plate at 65°C during this time.
g Seal the wells with strip caps. Use a capping tool to make sure the fit is tight.
h Incubate the samples at 65°C for 2 minutes.
Sureselect Target Enrichment System Protocol
Hybridization 3Step 1. Hybridize the library
Sureselect Target E
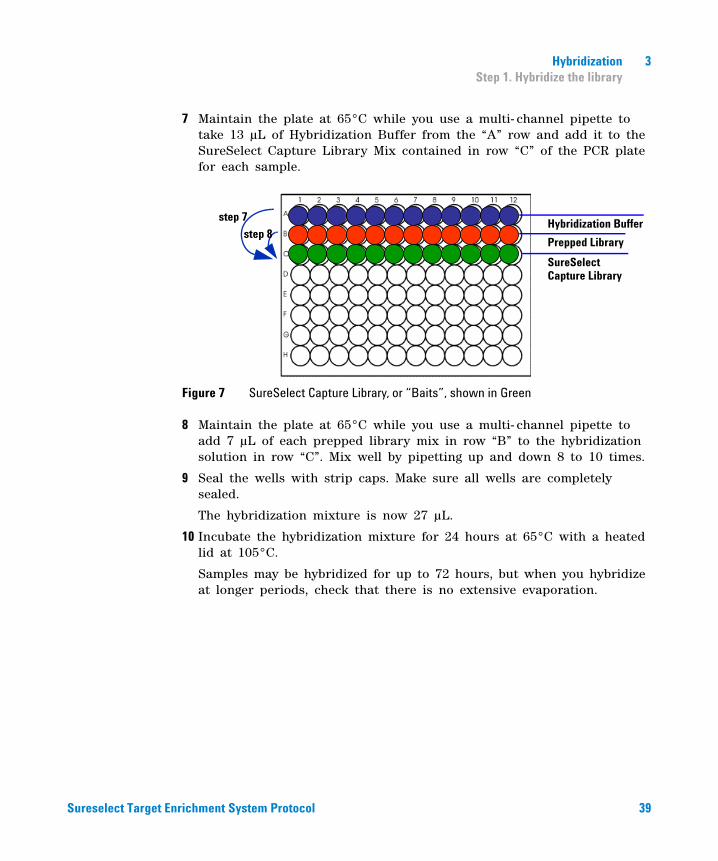
7 Maintain the plate at 65°C while you use a multi- channel pipette to take 13 µL of Hybridization Buffer from the “A” row and add it to the SureSelect Capture Library Mix contained in row “C” of the PCR plate for each sample.
Figure 7 SureSelect Capture Library, or “Baits”, shown in Green
8 Maintain the plate at 65°C while you use a multi- channel pipette to add 7 µL of each prepped library mix in row “B” to the hybridization solution in row “C”. Mix well by pipetting up and down 8 to 10 times.
9 Seal the wells with strip caps. Make sure all wells are completely sealed.
The hybridization mixture is now 27 µL.
10 Incubate the hybridization mixture for 24 hours at 65°C with a heated lid at 105°C.
Samples may be hybridized for up to 72 hours, but when you hybridize at longer periods, check that there is no extensive evaporation.
Hybridization Buffer
Prepped Library
SureSelect
step 7
step 8
Capture Library
nrichment System Protocol 39

3 Hybridization Step 2. Prepare magnetic beads
Step 2. Prepare magnetic beads
40
1 Prewarm SureSelect Wash Buffer #2 at 65°C in a circulating water bath for use in “Step 3. Select hybrid capture with SureSelect”.
2 Vigorously resuspend the Dynal (Invitrogen) magnetic beads on a vortex mixer. Dynal beads settle during storage.
3 For each hybridization, add 50 µL Dynal magnetic beads to a 1.5 mL microfuge tube.
4 Wash the beads:
a Add 200 µL SureSelect Binding buffer.
b Mix the beads on a vortex mixer for 5 seconds.
c Put tubes into a magnetic device, such as the Dynal magnetic separator (Invitrogen).
d Remove and discard the supernatant.
e Repeat step a through step d for a total of 3 washes.
5 Resuspend the beads in 200 µL of SureSelect Binding buffer.
Sureselect Target Enrichment System Protocol

Hybridization 3Step 3. Select hybrid capture with SureSelect
Step 3. Select hybrid capture with SureSelect
Sureselect Target E
1 Add the hybridization mixture directly from the thermocycler to the bead solution, and invert the tube to mix 3 to 5 times.
2 Incubate the hybrid- capture/bead solution on a Nutator for 30 minutes at room temperature.
Make sure the sample is properly mixing in the tube.
3 Separate the beads and buffer on a Dynal magnetic separator and remove the supernatant.
4 Resuspend the beads in 500 µL SureSelect Wash Buffer #1 by mixing on a vortex mixer for 5 seconds.
5 Incubate the samples for 15 minutes at room temperature.
6 Wash the beads:
a Separate the beads and buffer on a Dynal magnetic separator and remove the supernatant.
b Mix the beads in prewarmed 500 µL SureSelect Wash Buffer #2 on a vortex mixer for 5 seconds to resuspend the beads.
c Incubate the samples for 10 minutes at 65°C.
d Invert the tube to mix. (The beads may have settled.)
e Repeat entire step a through step d for a total of 3 washes.
Make sure all of the wash buffer has been removed.
7 Mix the beads in 50 µL SureSelect Elution Buffer on a vortex mixer for 5 seconds to resuspend the beads.
8 Incubate the samples for 10 minutes at room temperature.
9 Separate the beads and buffer on a Dynal magnetic separator.
10 Use a pipette to move the supernatant to a new 1.5 mL microcentrifuge tube.
11 Add 50 µL of SureSelect Neutralization Buffer.
nrichment System Protocol 41

3 Hybridization Step 4. Desalt capture solution
Step 4. Desalt capture solution
42
In this step you desalt the capture solution with a Qiagen minElute PCR purification column.
1 Allow the MinElute columns (stored at 4°C) to come to room temperature.
2 Add 500 µL of PB to the sample and mix well by pipetting.
3 If pH indicator I was added to the PB buffer, check for the yellow color to make sure buffer PB pH is correct.
For more information on how to check buffer pH, refer to the Qiagen MinElute Handbook to check for proper pH. If needed, use 5 µL of the 3M Sodium Acetate (included in the kit) to adjust the pH to the proper range.
4 Place a MinElute spin column in a 2 mL collection tube.
5 Transfer the 600 µL sample to the MinElute column. Spin the sample in a centrifuge for 60 seconds at 17,900 x g (13,000 rpm). Discard the flow- through.
6 Add 750 µL of buffer PE to the column. Spin the sample in a centrifuge for 60 seconds at 17,900 x g (13,000 rpm). Discard the flow- through.
7 Place the MinElute column back in the 2 mL collection tube and spin in a centrifuge for 60 seconds at 17,900 x g (13,000 rpm).
8 Transfer the MinElute column to a new 1.5 mL collection tube to elute the cleaned sample. Add 15 µL buffer EB directly onto the MinElute filter membrane. Wait 60 seconds, then spin in a centrifuge for 60 seconds at 17,900 x g (13,000 rpm).
9 Collect the eluate (captured library), which can be stored at - 20°C.
Sureselect Target Enrichment System Protocol

SureSelect Target EnrichmentProtocol
4Post-Hybridization Amplification
Step 1. Amplify the sample 44
Step 2. Purify PCR 46
Step 3. Assess quality with Agilent 2100 Bioanalyzer 47
This chapter describes the steps to amplify, purify, and assess quality of the sample library.
43Agilent Technologies

4 Post-Hybridization Amplification Step 1. Amplify the sample
Step 1. Amplify the sample
CAUTION Do not use amplification enzymes other than Herculase II Fusion DNA Polymerase. Other enzymes have not been validated.
44
1 For each hybrid capture, prepare 2 amplification reactions. Mix the components in Table 17 on ice, to create the amplification reactions. Mix well by gently pipetting up and down.
2 Add 49 µL of the mixture into a PCR plate or tubes for each capture.
3 Add 1 µL of the Captured library to each Master Mix.
Table 17 Herculase Master Mix
Reagent Volume for 2 reactions (including excess)
Volume for 10 reactions (including excess)
Volume for 24 reactions (including excess)
Nuclease-free water 91.25 µL 401.5 µL 912.5 µL
5X Herculase II Reaction Buffer 25 µL 110 µL 250 µL
dNTP mix (25 mM each) 1.25 µL 5.5 µL 12.5 µL
SureSelect GA PCR Primers 2.5 µL 11 µL 25 µL
Herculase II Fusion DNA Polymerase
2.5 µL 11 µL 25 µL
Total 122.5 µL 539 µL 1,225 µL
Sureselect Target Enrichment System Protocol

Post-Hybridization Amplification 4Step 1. Amplify the sample
Sureselect Target E
4 Place the tubes in a thermal cycler and run the program in Table 18.
Table 18 PCR program
Step Temperature Time
Step 1 98°C 30 seconds
Step 2 98°C 10 seconds
Step 3 57°C 30 seconds
Step 4 72°C 30 seconds
Step 5 Repeat Step 2 through Step 4 for a total of 18 times.
Step 6 72°C 7 minutes
Step 7 4°C Hold
nrichment System Protocol 45

4 Post-Hybridization Amplification Step 2. Purify PCR
Step 2. Purify PCR
46
1 Combine duplicate amplifications for a total of 100 µL.
2 Add 500 µL of PB to the sample and mix well by pipetting.
3 Place a QIAquick spin column in a 2 mL collection tube.
4 Transfer the 600 µL sample to the QIAquick column. Spin the sample in a centrifuge for 60 seconds at 17,900 x g (13,000 rpm). Discard the flow- through.
5 Add 750 µL of buffer PE to the column. Spin the sample in a centrifuge for 60 seconds at 17,900 x g (13,000 rpm). Discard the flow- through.
6 Place the QIAquick column back in the 2 mL collection tube and spin in a centrifuge for 60 seconds at 17,900 x g (13,000 rpm).
7 Transfer the QIAquick column to a new 1.5 mL collection tube to elute the cleaned sample. Add 30 µL of buffer EB directly onto the QIAquick filter membrane. Wait 60 seconds, then spin in a centrifuge for 60 seconds at 17,900 x g (13,000 rpm).
8 Collect the eluate, which can be stored at - 20°C.
9 Measure DNA concentration with a spectrophotometer (NanoDrop Technologies).
Sureselect Target Enrichment System Protocol

Post-Hybridization Amplification 4Step 3. Assess quality with Agilent 2100 Bioanalyzer
Step 3. Assess quality with Agilent 2100 Bioanalyzer
Sureselect Target E
Use a Bioanalyzer DNA 1000 chip and reagent kit.
1 Check that the 2100 Bioanalyzer electrodes have been cleaned as instructed in the reagent kit guide.
2 Open the Agilent 2100 expert software (version B.02.02 or higher), turn on the 2100 Bioanalyzer and check communication.
3 Prepare the chip, samples and ladder as instructed in the reagent kit guide.
4 Load the prepared chip into the 2100 Bioanalyzer and start the run within five minutes after preparation.
5 Within the instrument context, choose the appropriate assay from the drop down list.
6 Start the run. Enter sample names and comments in the Data and Assay context.
7 Verify the results.
8 Continue to sequencing.
Figure 8 Analysis of Amplified Capture DNA using a DNA 1000 Bioanalyzer assay. The electropherogram shows a single peak in the size range of 200 to 300 nucleotides.
nrichment System Protocol 47

4 Post-Hybridization Amplification Step 3. Assess quality with Agilent 2100 Bioanalyzer
48
Sureselect Target Enrichment System Protocol
SureSelect Target EnrichmentProtocol
5Reference
Alternative Capture Equipment Combinations 50
This chapter contains reference information.
49Agilent Technologies

5 Reference Alternative Capture Equipment Combinations
Alternative Capture Equipment Combinations
50
Table 19 lists combinations of thermocycler, lid temperature, plates or strips, and sealing method (strip caps or sealing tape) other than those used in this protocol that have shown minimal evaporation.
Refer to this list for additional of equipment combination options for hybridization. Note that minimal evaporation is needed to ensure good capture results.
Table 19 Tested options that show minimal evaporation
PCR Machine Plate/Strips Cover Comments
Stratagene Mx3005P QPCR
Mx3000P Strip Tubes (401428)
MX3000P Optical Strip Caps (401425)
Heated Lid
Stratagene Mx3005P QPCR
MicroAmp Optical 96-well reaction plate (N801-0560)
MicroAmp Clear Adhesive Film (4306311)
Heated Lid;ABI compression pad (4312639)
Use two layers of film.
ABI GeneAmp 9700
MicroAmp Optical 96-well Reaction Plate (N801-0560)
MicroAmp Caps (8caps/strip) (N801-0535)
Heated Lid
ABI Veriti (4375786)
MicroAmp Optical 96-well Reaction Plate (N801-0560)
MicroAmp Clear Adhesive Film (4306311)
Heated Lid;ABI compression pad (4312639)
Use two layers of film.
Eppendorf Mastercycler
Eppendorf 8-Tube PCR Tubes
Attached lids Lid heating set to 75C
ABI Veriti (4375786)
Stratagene strip tubes 410022 (Mx4000)
Stratagene Strip cap domed 410096 (Robocycler)
Heated Lid
ABI Veriti (4375786)
Stratagene strip tubes 410022 (Mx4000)
Stratagene Optical cap 401425 (Mx3000/3005)
Heated Lid
MJ Research PTC-200
Stratagene strip tubes 410022 (Mx4000)
Stratagene Optical cap 410024 (Mx4000)
Heated Lid
MJ Research PTC-200
Stratagene strip tubes 410022 (Mx4000)
Stratagene Optical cap 401425 (Mx3000/3005)
Heated Lid
Sureselect Target Enrichment System Protocol

Reference 5Alternative Capture Equipment Combinations
Sureselect Target E
MJ Research PTC-200
Stratagene 96-well Plate 410088 (Mx3000/3005)
Stratagene Optical cap 401425 (Mx3000/3005)
Heated Lid
MJ Research PTC-200
Stratagene 96-well Plate 410088 (Mx3000/3005)
Stratagene Plate sealers 400774-15
Heated Lid2 layers of plate sealer
Table 19 Tested options that show minimal evaporation (continued)
PCR Machine Plate/Strips Cover Comments
nrichment System Protocol 51

5 Reference Alternative Capture Equipment Combinations
52
Sureselect Target Enrichment System Protocol

www.agilent.com
In This Book
This guide contains information to run the SureSelect Target Enrichment protocol.
Agilent Technologies, Inc. 2009
Printed in USA Version 1.2, April 2009
*G3360-90010*G3360-90010
Agilent Technologies
Related Documents