1 Supplies for Sterile Compounding: Tools of the Trade ©2020 Surgent PharmCon, LLC 341 Wellness Drive • Myrtle Beach, South Carolina 29579 • (843) 488.5550 Phone. (843) 488-5550 • Web. www.CE-PRN.com • Email. [email protected] • Fax. (843) 488.5554 Supplies for Sterile Compounding: Tools of the Trade Faculty Mary E Fredrickson, PharmD, BCPS Assistant Professor of Pharmacy Practice Northeast Ohio Medical University Sterile compounding is a unique and critical skill of both pharmacists and pharmacy technicians. In order to become proficient in such skills, it is crucial to have a thorough understanding of the supplies and materials utilized when compounding sterile products. Not every pharmacist responsible for compounding sterile products or overseeing the sterile compounding process may have the necessary level of foundational knowledge or experience needed, thus a foundational review of compounding supplies will be beneficial to those who find themselves in these roles. Similarly, many pharmacy technicians responsible for compounding sterile products but are who inexperienced in this area will likely benefit from a thorough review of available compounding supplies. This activity is designed to introduce the learner to the some of the supplies used to compound sterile products. It will provide thorough descriptions of these supplies and aid the learner in understanding how to both select and use the appropriate supplies when engaging in sterile compounding activities. Additionally, it will address pertinent safety concerns that arise when working with such supplies. Learning Objectives Pharmacist 1. Describe supplies used to compound sterile products 2. Recognize if supplies have been appropriately selected and used to compound sterile products 3. Describe appropriate safety measures to take when working with supplies used to compound sterile products Pharmacy Technician 1. Describe supplies used to compound sterile products 2. Recognize the appropriate selection and use of sterile compounding supplies 3. Identify safety measures for working with supplies used to compound sterile products

Welcome message from author
This document is posted to help you gain knowledge. Please leave a comment to let me know what you think about it! Share it to your friends and learn new things together.
Transcript

1 Supplies for Sterile Compounding: Tools of the Trade
©2020 Surgent PharmCon, LLC
341 Wellness Drive • Myrtle Beach, South Carolina 29579 • (843) 488.5550
Phone. (843) 488-5550 • Web. www.CE-PRN.com • Email. [email protected] • Fax. (843) 488.5554
Supplies for Sterile Compounding: Tools of the Trade
Faculty
Mary E Fredrickson, PharmD, BCPS Assistant Professor of Pharmacy Practice
Northeast Ohio Medical University Sterile compounding is a unique and critical skill of both pharmacists and pharmacy technicians. In order
to become proficient in such skills, it is crucial to have a thorough understanding of the supplies and
materials utilized when compounding sterile products. Not every pharmacist responsible for
compounding sterile products or overseeing the sterile compounding process may have the necessary
level of foundational knowledge or experience needed, thus a foundational review of compounding
supplies will be beneficial to those who find themselves in these roles. Similarly, many pharmacy
technicians responsible for compounding sterile products but are who inexperienced in this area will
likely benefit from a thorough review of available compounding supplies. This activity is designed to
introduce the learner to the some of the supplies used to compound sterile products. It will provide
thorough descriptions of these supplies and aid the learner in understanding how to both select and use
the appropriate supplies when engaging in sterile compounding activities. Additionally, it will address
pertinent safety concerns that arise when working with such supplies.
Learning Objectives
Pharmacist 1. Describe supplies used to compound sterile
products 2. Recognize if supplies have been appropriately
selected and used to compound sterile products
3. Describe appropriate safety measures to take when working with supplies used to compound sterile products
Pharmacy Technician 1. Describe supplies used to compound sterile
products 2. Recognize the appropriate selection and use
of sterile compounding supplies 3. Identify safety measures for working with
supplies used to compound sterile products
2 Supplies for Sterile Compounding: Tools of the Trade
©2020 Surgent PharmCon, LLC
Accreditation
PharmCon, Inc. is accredited by the Accreditation Council for Pharmacy Education as a provider of continuing pharmacy education. PharmCon, Inc. reports CPE credits to CPE Monitor automatically after credit is earned. Your NABP ePID and birthdate must be in your online profile for successful credit submission. PharmCon, Inc. reports CPE credits to CE Broker automatically after credit is earned. Your license number must be in your online professional profile for successful credit submission.
PharmCon, Inc. is approved by the California Board of Registered Nursing (Provider Number CEP 13649) and the Florida Board of Nursing (Provider Number 50-3515). Activities approved by the CA BRN and the FL BN are accepted by most State Boards of Nursing. CE hours provided by PharmCon, Inc. meet the ANCC criteria for formally approved continuing education hours. The ACPE is listed by the AANP as an acceptable, accredited continuing education organization for applicants seeking renewal through continuing education credit.
Target Audience
Pharmacists, Pharmacy Technicians, Nurses
Universal Activity Number
Pharmacist 0798-0000-20-230-H07-P
Pharmacy Technician 0798-0000-20-230-H07-T
Credit Hours 1.0 Hour
Activity Type Knowledge-Based
CE Broker Tracking Number 20-713091
Activity Release Date September 1, 2020
Activity Offline Date March 1, 2023
ACPE Expiration Date August 31, 2023
Educational Support Provided By
Surgent PharmCon, LLC
All opinions expressed by the author(s) are strictly their own and not necessarily approved or endorsed by Surgent
PharmCon, LLC.
Consult full prescribing information on any drugs or devices discussed.
FreeCE is a division of Surgent PharmCon, LLC.
341 Wellness Drive, Myrtle Beach, South Carolina 29579
© 2020 Surgent PharmCon, LLC
All rights reserved.
None of the contents of this publication may be reproduced in any form
without the written permission of the publisher.

3 Supplies for Sterile Compounding: Tools of the Trade
©2020 Surgent PharmCon, LLC
Key Abbreviations API active pharmaceutical ingredient
CSP compounded sterile preparation
IPA isopropyl alcohol
IV intravenous
MDV multidose vial
PVC polyvinyl choride
SDV single dose vial
USP United States Pharmacopeial Convention
Key Definitions
Coring the process which occurs when a needle shears out or “cores” a piece of the rubber stopper of a vial
Critical Site
a location that includes any component or fluid pathway surfaces or openings exposed and at risk of direct contact with air, moisture, or touch contamination
Lyophilized freeze-dried
Reconstitution adding fluid to a powdered drug to result in a desired concentration

4 Supplies for Sterile Compounding: Tools of the Trade
©2020 Surgent PharmCon, LLC
Introduction Compounding personnel includes both pharmacists and pharmacy technicians.
These individuals have the unique and critical obligation to prepare compounded
sterile preparations (CSPs) for patients in a variety of health care settings.
Numerous organizations have assisted in developing standards and guidelines to
optimize the effectiveness and safety of the sterile compounding process. One of
these is the United States Pharmacopeial Convention (USP), an independent, not-
for-profit organization whose mission is to ensure the quality and safety of
medications.1 USP develops standards for drug substances, products, and
excipients and publishes these within the United States Pharmacopeia and
National Formulary (USP-NF).1 USP-NF is composed of a number of general
chapters, including USP Chapter <797> Pharmaceutical Compounding: Sterile
Preparations. This chapter details the minimum practices and quality standards to
utilize when compounding sterile products. The objective of USP <797> is to
describe conditions and practices needed to prevent harm that may result from
issues such as microbial contamination and variability in the intended strength of
ingredients used for sterile compounding.2
Per USP <797>, all compounding personnel have the responsibility to make sure
CSPs are accurately measured, diluted, and mixed, in addition to being properly
packaged and labeled.2 One key to ensuring these tasks are carried out in an
appropriate manner is a thorough understanding and correct utilization of
compounding supplies. For each type of supply, there is an array of available
options from which to choose, and selecting the correct supplies assists
compounding personnel in accurately compounding sterile preparations. Firm
knowledge of these supplies is crucial, as working with incorrect supplies may lead
to errors in measurement and potential loss of time and product.
The following review describes some of the supplies commonly used in the
preparation of CSPs:
• Container systems (vials, ampules, bottles, and bags)
• Supplies used to transfer medications to and from containers (needles and
syringes)
• Miscellaneous supplies (isopropyl alcohol, caps, IVA seals, stickers, light
protective bags, and sharps containers)

5 Supplies for Sterile Compounding: Tools of the Trade
©2020 Surgent PharmCon, LLC
Containers The sterile compounding process involves the use of basic containers, including
vials, ampules, bottles, and bags. The role of containers is to house various
products, including diluents and active pharmaceutical ingredients (APIs).
Compounding personnel may also utilize empty sterile containers, into which
solutions can be transferred. These are useful for containing abnormal volumes
and concentrations of drugs.3 Vials account for approximately 50% of all small-
volume injectable packaging, while ampules account for 10%, and bags and bottles
together account for 10%.4 Considerations for selection of containers includes
their compatibility with the product as well as their ability to maintain sterility of
the product throughout its shelf life.4
Vials
Vials are the most common container utilized for both liquid and lyophilized
(freeze-dried) injectable products.4 They may contain single or multiple doses of
medications and are available in sizes ranging from 1 mL to 100 mL.5 Vials are
made of glass or in some instances, plastic, and have a rubber stopper secured to
the top with a metal ring. While glass vials are typically clear or colorless, those
that contain light-sensitive APIs must be made of amber glass to prevent
decomposition of the product.
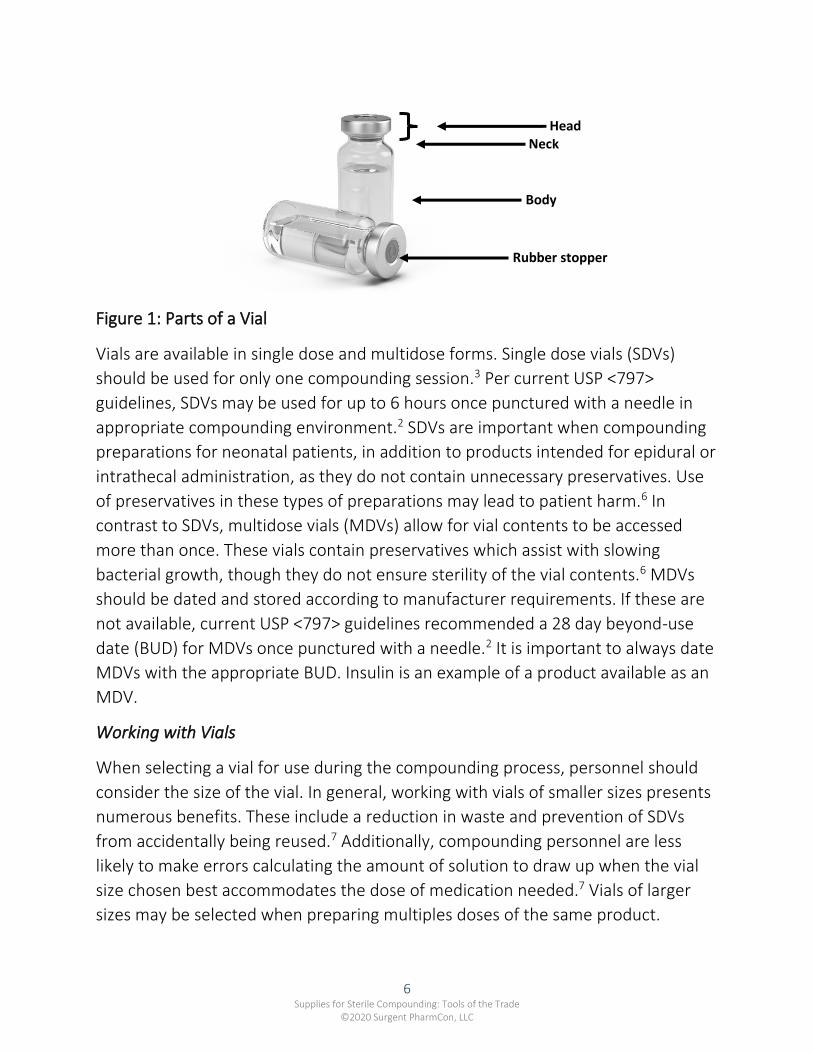
The parts of a vial include the head, neck, and body (Figure 1). The head consists of
a plastic cap or aluminum cover and a rubber stopper. The plastic cap prevents the
rubber stopper from being accidentally being punctured.3 It does not guarantee
sterility of the vial contents and should be removed prior to entering into the vial
with a needle.3 The rubber stopper is accessed by a needle to either add or remove
fluid and prevents air and fluid from freely passing in and out of the vial.3 The
rubber stopper is considered a critical site and must be disinfected with sterile 70%
isopropyl alcohol (IPA) prior to withdrawing contents from the vial. To be properly
disinfected, the rubber stopper should be wetted with an alcohol pad. The alcohol
should remain wet for 10 seconds and allowed to dry completely before being
pierced with a needle.5 The neck of the vial is an indentation below the head and
the body contains the vial contents and is the area on which the vial label is
located.
6 Supplies for Sterile Compounding: Tools of the Trade
©2020 Surgent PharmCon, LLC
Figure 1: Parts of a Vial
Vials are available in single dose and multidose forms. Single dose vials (SDVs)
should be used for only one compounding session.3 Per current USP <797>
guidelines, SDVs may be used for up to 6 hours once punctured with a needle in
appropriate compounding environment.2 SDVs are important when compounding
preparations for neonatal patients, in addition to products intended for epidural or
intrathecal administration, as they do not contain unnecessary preservatives. Use
of preservatives in these types of preparations may lead to patient harm.6 In
contrast to SDVs, multidose vials (MDVs) allow for vial contents to be accessed
more than once. These vials contain preservatives which assist with slowing
bacterial growth, though they do not ensure sterility of the vial contents.6 MDVs
should be dated and stored according to manufacturer requirements. If these are
not available, current USP <797> guidelines recommended a 28 day beyond-use
date (BUD) for MDVs once punctured with a needle.2 It is important to always date
MDVs with the appropriate BUD. Insulin is an example of a product available as an
MDV.
Working with Vials
When selecting a vial for use during the compounding process, personnel should
consider the size of the vial. In general, working with vials of smaller sizes presents
numerous benefits. These include a reduction in waste and prevention of SDVs
from accidentally being reused.7 Additionally, compounding personnel are less
likely to make errors calculating the amount of solution to draw up when the vial
size chosen best accommodates the dose of medication needed.7 Vials of larger
sizes may be selected when preparing multiples doses of the same product.
Neck Head
Rubber stopper
Body

7 Supplies for Sterile Compounding: Tools of the Trade
©2020 Surgent PharmCon, LLC
When compounding personnel access the
rubber stopper of a vial with a needle, the “non-
coring” method should be utilized. This
technique prevents coring of the rubber
stopper, which could result in rubber fragments
being present in the final preparation.5 When employing the non-coring method,
the needle should be angled at 45 degrees with the bevel facing up as the needle is
inserted into the vial.5
Figure 2: Non-coring Method
Vials are considered closed-system containers as air and fluid cannot freely pass in
and out of them.5 If air or fluid is added to a vial, this will cause positive pressure to
develop within the vial which can lead to leakage or spraying of fluid.5 Removing air
or fluid from a vial causes negative pressure to develop, creating a vacuum inside
the vial that makes it challenging to remove the contents.5 When withdrawing
liquid contents from a vial, it is important to equalize the pressure within the vial.
To accomplish this, the amount of fluid to be withdrawn from the vial should be
replaced with an approximately equal amount air before the contents are
removed.5 Steps to withdraw liquid from a vial are detailed below.
What advantages do multidose
vials have over single dose vials?
Disadvantages?

8 Supplies for Sterile Compounding: Tools of the Trade
©2020 Surgent PharmCon, LLC
Steps to Withdraw Liquid from a Vial7
1. Attach the needle to a syringe.
2. Remove the plastic vial cap, swab the rubber stopper with an alcohol pad,
and allow the alcohol to dry.
3. Remove the needle cap.
4. Draw up a volume of air equal to the amount of fluid needed to be removed
from the vial.
5. Insert the needle into the rubber stopper at a 45-degree angle with the
bevel side up and push the needle through.
6. Inject the air into the vial.
7. Invert the syringe and vial and release the plunger.
8. If required, pull back on the syringe without touching the plunger until the
correct amount of solution is obtained.
9. Gently tap the syringe to remove any air bubbles.
10. Expel any air or excess volume.
11. Withdraw the needle from the vial.
Vials containing medication in a powdered or
lyophilized form require reconstitution in order to
create a solution. The vial label or medication package
insert will contain information regarding the
recommended amount of diluent to add to the vial for
reconstitution. To prevent spraying of vial contents
after the diluent has been added, an equal volume of
air should be removed from the vial.5 Compounding personnel should refer to the
vial label or package insert to determine how to appropriately mix the diluent with
the vial contents, for example shaking vs. rolling or swirling the vial in order to
dissolve the lyophilized powder.5
Ampules
Ampules are sealed, glass containers that contain sterile injectable solutions.6
These containers provide advantages over vials in that they are made entirely of
glass, as opposed to plastic and rubber, and are thus associated with a decreased
potential for interactions between themselves and the drug products they
contain.4 Two disadvantages associated with ampules are the potential for glass
What problems does a vial
with positive pressure pose for
compounding? How is this
complicated when working with
hazardous drugs?

9 Supplies for Sterile Compounding: Tools of the Trade
©2020 Surgent PharmCon, LLC
fragments to enter the solution when the ampule is broken and the risk of
compounding personnel cutting themselves when accessing ampule contents.3
Ampules range in size from 1 mL to 50 mL.3 The parts of an ampule include the
head, neck, shoulder, and body (Figure 3). The head is the portion broken off to
access the contents of the ampule and the neck is the critical site of the ampule
where breaking occurs.3 The shoulder designates the point beyond which the
ampule can accommodate no further volume, and the body is the portion that
holds the medication and on which the ampule label is found.3
Figure 3: Parts of an Ampule
Working with Ampules
Prior to accessing an ampule, personnel should visually verify that the entire
contents are contained within the body. If solution is located within the head, it
may be gently tapped with a finger to move the contents into the body.5 The neck
of the ampule should then be disinfected. This can be done by wrapping an alcohol
pad around the neck and cleaning all surfaces using a twisting motion. The neck
should be allowed to dry for 10 seconds before being broken.5 Compounding
personnel by choose to break the neck by wrapping an alcohol pad around the
neck to protect themselves from cuts. They may also use an ampule breaker,
which is a round piece of plastic that is placed over the head of the ampule to
assist with the breaking process.3 To note, ampule breakers are not sterile and
must be completely disinfected prior to use.5 Many ampules have a scored or weak
point in the neck, which assists with easily breaking the ampule open. The
following procedure can be used to break open an ampule.
Head
Body
Neck
Shoulder

10 Supplies for Sterile Compounding: Tools of the Trade
©2020 Surgent PharmCon, LLC
Procedure to Break an Ampule Open5
Note: Caution should be taken to avoid opening the ampule toward the HEPA filter
or other sterile products located in the work area
1. Hold the head of the ampule between the thumb and index finger of one
hand.
2. Hold the body of the ampule with the thumb and index finger of the other
hand.
3. Using both thumbs to exert pressure, push away from yourself in a quick
motion to snap the ampule open at the neck.
4. Discard the ampule head into a sharps container.
Once the neck is broken, a filter needle should be used to withdraw the contents
of the ampule.8 After removal of contents, the ampule should be discarded into a
sharps container. Ampules should not be reused or saved at any time during the
preparation of a CSP.8 Once opened ampules are considered open-system
containers. This means no pressure differential is present that requires the
addition of air prior to removal of fluid, such as with a vial.5 The following
procedure can be followed to remove contents from an ampule.
Procedure to Remove Ampule Contents7
1. Attach a needle to a syringe.
2. Hold the ampule upright and gently tap the head or invert the ampule
quickly to ensure all solution is in the body of the ampule.
3. Swab the neck of the ampule with an alcohol swab.
4. Grip the head with the thumb and fingers of one hand and the body of the
ampule with the thumb and fingers of the other hand.
5. Bend the neck until it cracks, and the head is separated from the body of the
ampule.
6. Tilt the ampule and insert the bevel of the needle into upper corner space or
shoulder near the opening. (Note: surface tension will keep the contents of
the ampule from spilling out.)
7. Withdraw the solution of the ampule by pulling back on the syringe.
8. Remove any air bubbles by tapping the syringe or moving the bubbles to the
top and expelling additional fluid.
9. Change needles.

11 Supplies for Sterile Compounding: Tools of the Trade
©2020 Surgent PharmCon, LLC
Bottles and Bags
Bottles are prefilled, sterile glass or plastic containers that are used to hold
medication solutions (Figure 4). They are typically 100 mL or larger in size and are
the preferred containers for large-volume solutions.4 While glass bottles have an
associated risk of breaking, they are particularly useful for storing medications that
have adsorption concerns when stored in plastic, which could lead to loss of
product. Examples of medications commonly stored in glass bottles include
nitroglycerin and propofol.
Figure 4: Glass Bottle of Nitroglycerin
Bags are sterile empty or pre-filled containers made of plastic (most commonly
PVC plastic). They are used to administer both small- and large-volume intravenous
(IV) medications. Bag sizes typically range in size from 25 mL to greater than 1000
mL and typically have a 10 percent overfill, depending on the manufacturer and
specific product.4 Bags have several advantages over glass bottles including being
lighter in weight, easier to see through in order to detect possible contamination
or incompatibilities, less easily broken, and less expensive.6 Bags are also easier to
dispose of and can be frozen if needed.6 The parts of a bag include the injection
port, which is an opening used to inject additives and as a critical site should be

12 Supplies for Sterile Compounding: Tools of the Trade
©2020 Surgent PharmCon, LLC
disinfected prior to being accessed. Other parts include an administration set port,
which is used to connect to the patient’s main IV line, and an eyehole or hanging
loop, which is used to hang the bag on an IV pole when needed. Bags come
contained in a protective outer wrap which should be removed and discarded
before placing the bag in the work area.5
Some bags have vial adapters in place of the injection port, which allows for vials
to be directly attached to the bag.5 The vial is attached to the adapter under sterile
conditions, and the seal between the bag and the vial is later broken and contents
mixed prior to administration of the product.5
Figure 5: IV Bag
Set Port
Injection Port
Eyehole

13 Supplies for Sterile Compounding: Tools of the Trade
©2020 Surgent PharmCon, LLC
Needles and Syringes Needles and syringes are essential to the sterile compounding process. These
supplies are used in tandem to assist in manipulating and transferring ingredients
to accurately prepare the final CSP. There are various types of needles and syringes
from which to choose and they are available in a wide variety of sizes. The different
characteristics of these supplies lend to the individual functionality of each type.
The process utilized to prepare each CSP will determine the specific types and sizes
of needles and syringes to be used.6 For example, compounding a CSP using a 10
mL ampule will require a different combination of needles and syringes than
preparing a CSP using a 2 mL vial.
Needles
Needles are disposable devices made of either stainless steel or aluminum (Figure
6). They are attached to syringes and used to enter medication containers such as
vials and ampules.6 Needles arrive from the manufacturer individually packaged in
either a plastic or paper overwrap. As long as needles remain within this protective
covering, they are considered sterile until the manufacturer’s expiration date is
exceeded.6 However, once the packaging has been opened or somehow
compromised, the sterility of the needle can no longer be guaranteed.6
Appropriate handling of needles begins with removing them correctly from this
packaging. To appropriately unpackage a needle, compounding personnel should
peel back the overwrap and then carefully remove the needle. Needles should
never be accessed by pushing them through the overwrap.
A needle has five basic components (hub, shaft, lumen, bevel, and cap), which are
defined in Table 1. Compounding personnel should be familiar with each part of
the needle, including the critical sites.

14 Supplies for Sterile Compounding: Tools of the Trade
©2020 Surgent PharmCon, LLC
Table 1: Parts of a Needle6
Component Description
Hub The base of the needle that attaches to the syringe
Shaft The long, slender stem of the needle that comes to a point at one
end
Lumen The inner portion of the needle through which fluid moves
Bevel The slanted portion that exposes the opening of the needle
Bevel Tip The sharp, pointed end of needle that enters the vial or other
container
Bevel Heel The short end of the bevel opposite the bevel tip
Cap The covering of the needle
Figure 6: Parts of a Needle
Hub
Shaft
Bevel
Bevel Tip
Bevel Heel
Lumen

15 Supplies for Sterile Compounding: Tools of the Trade
©2020 Surgent PharmCon, LLC
Except for the cap, all parts of the needle are considered critical sites. The
protective overwrap must be disinfected with a product that does not leave a
residue, such as sterile 70% IPA, before placing the needles into the work area.5
However, needles themselves do not require disinfection prior to use. Attempting
to disinfect the shaft of a needle by cleaning it with alcohol may cause the removal
of its silicone coating, which can make it challenging to enter into containers.6
Should any part of the needle become contaminated during the compounding
process, compounding personnel should safely discard the needle and select a new
needle for use.
Needle Sizes
Needles are available in a wide variety of sizes and selecting the correct needle size
is important. There are two considerations of size: needle length and needle
gauge. Needle length is a measure of the distance from the hub of the needle to
the tip of the needle, and it is measured in inches.6 Common needle lengths range
between 3/8 inch to 3 inches.5 Needle gauge is a measure of the diameter of the
needle lumen.4 Typical gauge sizes range from 13 to 31. The larger the needle
gauge, the smaller the diameter of the needle lumen. For example, a 16-gauge
needle has a larger lumen diameter than a 27-gauge needle. Needle hubs are
color-coded based on gauge size. For example, 18-gauge needles have hubs that
are pink in color. Needle size is specified by specific labeling. Needles are labeled
with a number, followed by the letter G, followed by a second number.6 The first
number refers to the gauge and the second number refers to the length of the
needle in inches. For example, a needle labeled “20G1/2” is a 20-gauge needle that
is half an inch in length.6
Sixteen-gauge and 18-gauge needles are commonly used during the sterile
compounding process. Needles with smaller gauge sizes, such as 27-gauge, can be
used when withdrawing solutions from MDVs, as this will help to prevent leakage
caused by multiple reentries into the vial.3 The type of solution that will be
transferred during compounding can dictate the needle gauge selected. When
working with a thick or viscous solution, compounding personnel should select a
needle with a smaller gauge (i.e. 19-gauge or 20-gauge).6 The type of vial closure
should also be considered when selecting a needle. A needle with a smaller gauge
size will aid in penetrating thick rubber vial stoppers.6

16 Supplies for Sterile Compounding: Tools of the Trade
©2020 Surgent PharmCon, LLC
Types of Needles
Depending on the compounding task, personnel can choose many types of needles
with which to work. These include filter needles, double-ended needles, and
vented needles. Filter needles have a filter embedded into the hub. They are
longer than regular 18-gauge needles and essential when working with ampules.3 It
is critical to remember that filter needles should only be used one time and in one
direction. Using the same filter needle to both withdraw and expel a solution may
cause the glass particles trapped in the filter to be expelled into the final
preparation.6 This can lead to serious patient harm and potentially death when the
solution is infused into the patient.6 Once the solution has been drawn from the
ampule into the syringe, the filter needle should be replaced with a regular needle
prior to injecting the solution into the next container. When the compounding task
is complete, the cap that covers the filter needle hub can be safely discarded while
the cap covering the shaft end of the needle should be kept for the verification
process. 3
Figure 7: Filter Needle
A second type of needle is a double-ended needle. Double-ended needles are two
needles joined by a plastic hub, and they cannot be attached to a syringe. 3
Because no syringe is utilized, it is not possible to measure the volume of the
contents that are transferred between two containers, so this type of needle
should only be used when transferring the entire contents of one container into
another. Compounding personnel should be cautious to touch only the center hub
of the double-ended needle; touching the metal portion will result in
contamination. 6 A double-ended needle can be utilized by first inserting one end
of the needle into a container. The other end is then inserted a second container,
with the container the solution is being transferred into kept on the bottom.6

17 Supplies for Sterile Compounding: Tools of the Trade
©2020 Surgent PharmCon, LLC
Figure 8: Double-ended Needle
A third type of needle is a vented needle. Vented needles are plastic spikes thicker
than typical needles in diameter, and they are useful for situations in which there
are concerns related to the pressure within a vial, such as when working with
multidose vials. 3 These needles have features that include a large lumen diameter,
an opening in the needle shaft which helps to relieve pressure, and a razor-like tip,
heel, and bevel. 3 Vented needles prevent pressure differences from occurring
when withdrawing solutions from vials and minimize spraying and foaming during
reconstitution. 6
Figure 9: Vented Needle

18 Supplies for Sterile Compounding: Tools of the Trade
©2020 Surgent PharmCon, LLC
Working with Needles
Needles should be reused no more than three times
during the compounding process. The outer coating
of the needle will become worn when used multiple
times. This can not only make it challenging to insert
the needle into a vial, but also increases the risk of
coring. 3
Syringes
Syringes are sterile, single-use supplies whose purpose is to house solutions that
will be transferred from one container to another (Figure 11). 6 Almost all syringes
are made of plastic, though glass syringes may be used when compounding for a
patient with an allergy to plastic or when compounding a medication that is
directly incompatible with plastic. 6 Plastic syringes are typically preferred as they
are disposable, less expensive, and less likely to break. 5 Similar to needles, syringes
are packaged individually and remain sterile as long as they are contained within
their original packaging.
Compounding personnel should be familiar with the various parts of a syringe,
including all critical sites. These components are described in Table 2. The main
parts of a syringe are the barrel and plunger. The plunger is the inner component
of the syringe that fits inside the barrel, and it is composed of the flange (which is
shaped like a flat disk), the ribs, and the piston, which is made of rubber or silicone.
The tip of the syringe is where the needle attaches. 5 Critical sites of the syringe
include the tip, ribs, and piston. As is the case with needles, the critical sites of a
syringe do not require disinfection prior to use. However, if the syringe becomes
contaminated at any point during the compounding process, it should be discarded
appropriately, and a new syringe should be used to make the preparation.
Contamination can be avoided by taking caution not to touch or shadow critical
sites while compounding.
When would it be appropriate
to use a filter needle? A double-ended
needle? A vented needle?

19 Supplies for Sterile Compounding: Tools of the Trade
©2020 Surgent PharmCon, LLC
Figure 11: Parts of a Syringe
Piston
Ribs Flange
Plunger
Tip
Calibration mark
Flange
Piston
Barrel
Collar

20 Supplies for Sterile Compounding: Tools of the Trade
©2020 Surgent PharmCon, LLC
Table 2: Parts of a Syringe6
Component Description
Barrel Holds the solution to be transferred
Plunger Piston-type rod with a cone-shaped top that passes the point
of attachment for a needle
Piston Comes in direct contact with solution being transferred and is
used to measure syringe contents
Ribs Located between flange and tip and comes into contact with
the inside of the barrel when the plunger is fully pushed in
Flange Flat end of plunger that facilitates manipulation of the syringe
Tip Pointed end of syringe where the needle attaches
Calibration
marks
Mark the volume of solution inside the syringe
Two types of syringes are luer-lock and slip tip. Luer-lock syringes are the most
common type and have tips that are threaded to accept a needle. This design
minimizes leaks and maintains a secure attachment to the needle. 3 In contrast, slip
tip syringes have a smooth surface which utilizes friction to help the needle to stay
in place. Slip tip syringes are more likely to cause the needle to disengage if not
assembled appropriately and are more commonly used for processes including
irrigation.3 For medical safety purposes, traditional slip tip syringes intended for
the addition of a needle should NEVER be used to dispense oral medications due
to the potential for accidental injection. Special oral syringes should be used that
are designed not to accommodate the attachment of a needle.
Syringe Sizes
The volume of a syringe can range anywhere from 0.5 mL to 60 mL, and the length
and diameter of the syringe will increase as the volume of the syringe increases.3
Compounding personnel generally use the following syringe sizes when
compounding sterile preparations: 1 mL, 3 mL, 5 mL, 10 mL, 20 mL, 30 mL, and 60

21 Supplies for Sterile Compounding: Tools of the Trade
©2020 Surgent PharmCon, LLC
mL. The barrel of the syringe is marked in increments called calibration (or
graduation) marks that increase as the size of the syringe increases.5 Different sizes
of syringes are calibrated differently. For example, the calibration marks on a 3 mL
syringe represent one tenth of a milliliter. The marks on 5 mL and 10 mL syringes
reflect every two tenths (for example, 3.2 mL, 3.4 mL). Twenty milliliter, 30 mL, and
60 mL syringes are marked in whole numbers, with lines representing 1 mL
increments (1 mL, 2 mL, etc.).5
During the compounding process, it is important to take into consideration the
accuracy of the chosen syringe to ensure the final preparation is made correctly.
To determine accuracy of a syringe, the smallest increment of its calibration marks
is divided in half. 6 For example, a syringe calibrated in 1 mL increments is accurate
up to 0.5 mL. In some instances, it may be necessary to use two syringes of
appropriate sizes when compounding very small doses. 3 A study by Erstad and
colleagues investigated the accuracy of small-volume injections using syringes of
various sizes. The authors determined that as the syringe size increased from 1 mL
to 5 mL, the accuracy of measuring 0.5 mL of volume decreased.9
Working with Syringes
There are a few general rules to be followed when working with syringes. First,
compounding personnel should select the smallest syringe that will accommodate
the volume needed to be measured.3 For example, if measuring 4 mL of a solution,
a 5 mL syringe should be selected. Using a smaller or larger syringe may cause
errors in measurement and increases the possibility that more or less solution will
be withdrawn. Second, the syringe should never be filled to capacity, as the
plunger could dislodge, leading to loss of product. 5 Finally, the volume measured
into a syringe should be at least 20% of the syringe’s normal capacity. 6 For
example, if a 1 mL syringe is being used, 0.2 mL is the smallest volume that could
be accurately measured (1 mL x 20% = 0.2 mL).
To appropriately measure a solution into a syringe, compounding personnel should
line up the final edge of the plunger piston to the desired calibration mark on the
barrel.5 Before injecting the contents of the syringe into a container, personnel
should ensure that all air bubbles have been removed. Air bubbles take up space
within a syringe, and the presence of air bubbles indicates that the full volume
required for the preparation has not been measured accurately. This may lead to

22 Supplies for Sterile Compounding: Tools of the Trade
©2020 Surgent PharmCon, LLC
large errors in dosing, especially when compounding products for certain
populations like neonates. In order to remove air bubbles from a syringe, the
following procedure can be used. 6
Procedure to Remove Air Bubbles from a Syringe6
1. Hold the syringe in a vertical position
2. Pull back the plunger a short distance
3. Firmly tap the barrel of the syringe
4. Expel all the air in the syringe
Compounding personnel can utilize the following steps to appropriately attach a
needle to the syringe.7
Procedure to Attach a Needle to a Syringe7
1. Remove the syringe from packaging, being careful not to touch any critical
sites
2. If the syringe has a protective cap, remove this carefully
3. Hold the syringe by the barrel to avoid contamination
4. Remove the needle carefully from the outer wrap
5. Insert the tip of syringe into the needle hub
6. Twist to secure the needle
7. Leave the plastic cover on the needle until use
Miscellaneous Supplies Isopropyl Alcohol
Sterile isopropyl alcohol in a strength of 70% is commonly used for disinfecting
purposes during the compounding process. This product is not only used to clean
the work surface prior to compounding but to disinfect the critical sites of vials,
ampules, and bags. 3 Sterile isopropyl alcohol swabs are presoaked 1x1 sheets
often used for disinfecting critical sites. 3 Sterile gauze (typically 4x4 in size) can
also soaked with isopropyl alcohol and used to disinfect the workspace and items
used for compounding. 3 It should be noted that not all alcohol wipes are sterile. It
is important to check the labeling before proceeding.

23 Supplies for Sterile Compounding: Tools of the Trade
©2020 Surgent PharmCon, LLC
Caps
In some instances, a compounded preparation will be administered to as patient
via the intramuscular, subcutaneous, or intradermal route. In these cases, a syringe
may be transported to the patient without an attached needle and thus must be
sealed with a syringe cap. 3 This keeps the contents of the syringe sterile. 3 There
are two types of syringe caps that may be used for this purpose. The first is a
rubber cap, which is pushed down onto the syringe tip. The second is a plastic cap,
which is twisted on the end of the syringe and locked into place. 3
Figure 13: Syringe Caps
IV Admixture (IVA) Seals
IVA seals are coverings that can be placed over the critical sites of vials, syringes,
and bags during transfer in order to keep their contents sterile. Vial IVA seals are
round with a white dot on the underside and are placed over the rubber stopper of
the vial until later use.3 IVA seals used for syringes are thin and long with a white
dot on the underside. They are placed over the end of a syringe cap.3
Figure 14: IVA Seals

24 Supplies for Sterile Compounding: Tools of the Trade
©2020 Surgent PharmCon, LLC
Stickers
Auxiliary stickers may be placed on the patient label of CSPs to provide information
such as storage conditions and administration warnings. Examples include “Protect
from Light”, “Refrigerate”, and “Chemotherapy”. Triplicate stickers are placed on
large volume solutions. They include three rows of stickers with the name of a high
alert drug. The individual who administers the medication will place one sticker on
the patient label, one on the end of the patient’s tube set, and one on the back of
the fluid bag.3
Figure 15: Sticker
Light Protective Bags
Light-protective bags (available in brown, green and black plastic) are placed over
compounded preparations that require protection from light sources, such as
morphine. These bags are tinted dark, which protects the product from light and
prevents a decrease in potency of the medication to be administered. 3
Figure 16: Light Protective Bag

25 Supplies for Sterile Compounding: Tools of the Trade
©2020 Surgent PharmCon, LLC
Sharps Containers
Sharps containers are typically red, plastic bins with a cover that prevents someone
from accessing the contents of the bin. 3 They are a type of disposal equipment for
any items considered to be “sharps”. These include needles (and anything attached
to them), ampules, and any other glass materials. Syringes, vials, and other non-
glass items can be disposed of in regular trash bins.
Figure 17: Sharps Container
Safety Considerations All compounding personnel must take appropriate steps to ensure the safe use of
needles when preparing CSPs. As many go unreported, the exact number of
needlestick injuries that occur during sterile compounding is unknown. Fortunately
the majority of injuries are preventable.10 While the risk is low, there is the
potential for the transmission of bloodborne pathogens whenever compounding
personnel are working with needles.6 Additionally, if a needlestick injury occurs
while compounding a chemotherapy preparation, there is a risk of pain, ulceration,
and potential tissue death.11 A number of factors may increase the risk of
needlestick injuries including failure to adopt universal precautions, not following
an established safety protocol, and using needles that lack safety features.11
Should a needlestick injury occur, the affected personnel should follow the
associated institution’s policies and procedures regarding such injuries. In general,
the injured individual should first attend to the injury.11 Next, the compounding

26 Supplies for Sterile Compounding: Tools of the Trade
©2020 Surgent PharmCon, LLC
area should be cleaned and disinfected, and any product that may have been
compromised at the time of the injury should be discarded.11 Finally, the incident
should be reported and recorded per the institution’s policy. An investigation into
the cause of the injury may also be warranted and action steps taken, such as
additional training, in order to prevent future injuries.11
There are several steps compounding personnel can take in order to reduce the
risk of needlestick injuries. The first is with regard to recapping needles. In general,
recapping needles is an unnecessary task that may introduce the unnecessary risk
of needlestick injury. Thus, it is recommended to not recap needles prior to
disposal in an appropriate container.5 However, if a needle needs to be recapped,
compounding personnel should avoid recapping the needle using two hands, as
this greatly increases the risk of injury. Instead, the “scoop method” should be
employed. This method involves laying the needle flat on the surface of the work
area and picking up the cap with one hand. The compounder then places the cap
onto the tip of the needle using a scooping motion. The cap can then be “clicked”
down firmly over the needle and the entire device disposed of appropriately.
Compounding personnel can also consider utilizing
safety needles and syringes, as these devices aid in the
prevention of needlestick injuries. Safety needles have
plastic covers that can slide and lock over the end of
the needle once the compounding task has been
completed. These types of needles prevent the need
for recapping.3 One type of available safety syringe inactivates the plunger of the
syringe once it is fully depressed. This prevents compounding personnel from
reusing the syringe. A second type of safety syringe shields the needle by retracting
it into the syringe barrel when the plunger is depressed.6
Conclusion Sterile compounding is a unique and critical skill of both pharmacists and pharmacy
technicians. In order to become proficient in such skills, it is crucial to have a
thorough understanding of the supplies utilized when compounding sterile
products. A foundational understanding of commonly used compounding supplies
will assist those who find themselves in these roles.
What are some advantages
of safety syringes? Disadvantages in
sterile compounding?

27 Supplies for Sterile Compounding: Tools of the Trade
©2020 Surgent PharmCon, LLC
References 1. Whitaker, W. (2015, August). What is the U.S. Pharmacopeia? USP Quality
Matters. https://qualitymatters.usp.org/what-us-pharmacopeia.
2. United States Pharmacopeial Convention. (2019). United States
Pharmacopeia and National Formulary (USP 797).
https://online.uspnf.com/uspnf/document/1_GUID-A4CAAA8B-6F02-4AB8-
8628-09E102CBD703_5_en-US?source=TOC.
3. Jordan, Z. (2018). Aseptic Compounding Technique: Learning and Mastering
the Ritual. American Society of Health-System Pharmacists.
4. Akers, M. (2015). Sterile product packaging and delivery systems.
International Journal of Pharmaceutical Compounding.19 (6), 491-500.
5. Buchanan, E. (2017). Compounding Sterile Preparations. (4th ed.). American
Society of Health-System Pharmacists.
6. Ochoa, P and Vega, J. (2014). Concepts in Sterile Preparations and Aseptic
Technique. Jones and Bartlett Learning.
7. Malacos, K. (2014). Sterile Compounding for Pharmacy Technicians. McGraw-
Hill Education.
8. American Society of Health-System Pharmacists. ASHP Guidelines on
Compounding Sterile Preparations. Am J Health-Syst Pharm. 2014; 71:145–
66.
9. Erstad, A, Erstad B, and Nix, D. (2006). Accuracy and reproducibility of small-
volume injections from various-sized syringes. Am J Health-Syst Pharm. 63,
748-50.
10. King, K and Strony, R. (2020). Needle Stick. In: StatsPearls
[Internet].StatsPearls Publishing.
11. Stone, M and Harrison, T. (2011). How to deal with a needle-stick injury. The
Pharmaceutical Journal.

28 Supplies for Sterile Compounding: Tools of the Trade
©2020 Surgent PharmCon, LLC
CE-PRN Fax. (843) 488-5554
341 Wellness Drive Email. [email protected]
Myrtle Beach, SC 29579
WHEN YOU SEND IN QUIZZES, ALWAYS KEEP A COPY. YOU MAY EMAIL OR FAX THEM.
FAX. (843) 488-5554 • EMAIL. [email protected] ALL PHARMACISTS AND PHARMACY TECHNICIANS:
Check your CE activity or print a statement of credit from your CPE Monitor eProfile Account. To login, go to https://nabp.pharmacy Enter your username (your email address) & your password.
Click on “CE Activity” to view your history and print a CE report.
Supplies for Sterile Compounding: Tools of the Trade
Faculty
Mary E Fredrickson, PharmD, BCPS
Assistant Professor of Pharmacy Practice
Northeast Ohio Medical University
CE-PRN is a publication of PharmCon. PharmCon is accredited by the Accreditation Council for Pharmacy Education (ACPE) as a provider of continuing pharmacy education. Providers who are accredited by ACPE are recognized by ALL states for fulfilling CE requirements.
Participants completing this activity by March 1, 2023 may receive full credit.
Release Date: September 1, 2020
This lesson furnishes 1.0 (0.1 CEUs) contact hours of credit.
Universal Activity Number for this activity:
Pharmacist 0798-0000-20-230-H07-P
Pharmacy Technician 0798-0000-20-230-H07-H07-T
CE Provider Registered # with CE Broker is 20-713091
TO DOWNLOAD LESSONS FROM OUR WEBSITE:
• Go to website www.ce-prn.com
• Click on COURSES
• Click on YEAR
• Click on the UAN # “0798-0000-…” for your lesson of interest
FLORIDA PARTICIPANTS – READ THIS!
Place your Florida license # on every quiz.

29 Supplies for Sterile Compounding: Tools of the Trade
©2020 Surgent PharmCon, LLC
QUIZ – September 2020 • Supplies for Sterile Compounding: Tools of the Trade In order to receive credit for this activity, fill in the information below, answer all questions, and return
Quiz Only for certification of participation to:
CE-PRN
341 Wellness Drive
Myrtle Beach, South Carolina 29579
WHEN YOU SEND IN QUIZZES, ALWAYS KEEP A COPY. YOU MAY MAIL, EMAIL, OR FAX THEM. FAX #. (843) 488-5554 • EMAIL [email protected]
NAME ___________________________________________________________________________ ADDRESS _________________________________________________________________________ CITY _________________________________ STATE __________ ZIP ____________
PHARMACIST PHARMACY TECHNICIAN
CPE Monitor ePID ____________________ BIRTHDATE (MM/DD) ____________________
IF LICENSED IN FLORIDA, FL LICENSE # __________________________________________________ EMAIL ADDRESS ____________________________________________________________________
LESSON EVALUATION
Please fill out this section as a means of evaluating this lesson. The information will aid us in improving
future efforts. Either circle the appropriate evaluation answer, or rate the item from 1 to 7 (1 is the
lowest rating; 7 is the highest).
1a. PHARMACISTS AND TECHNICIANS ONLY: Does this lesson meet the learning objectives? (Circle
choice).
Describe supplies used to compound sterile products
YES
NO
Recognize the appropriate selection and use of sterile compounding supplies
YES NO
Identify safety measures for working with supplies used to compound sterile products
YES
NO
2. Was the program independent & non-commercial? YES NO
3. Relevance of topic Low Relevance Very Relevant 1 2 3 4 5 6 7
4. What did you like MOST about this lesson? _____________________________________________

30 Supplies for Sterile Compounding: Tools of the Trade
©2020 Surgent PharmCon, LLC
___________________________________________________________________________________
5. What did you like LEAST about this lesson? _____________________________________________
___________________________________________________________________________________
6. How would you improve this lesson? __________________________________________________
___________________________________________________________________________________
Activity Test
Supplies for Sterile Compounding: Tools of the Trade A passing grade of 70 or higher are required to earn credit.
ALWAYS CHECK YOUR CPE MONITOR® or CEBROKER ACCOUNT. TYPICALLY, CREDITS APPEAR IN THAT ACCOUNT WITHIN 7 DAYS AFTER WE RECEIVE QUIZ ANSWERS.
WHEN YOU SEND IN QUIZZES. ALWAYS KEEP A COPY. YOU MAY MAIL, EMAIL OR FAX THEM.
FAX # IS 843-488-5554. OR SEND A CONVENTIONAL EMAIL WITH YOUR ANSWERS TO [email protected] PLEASE MARK THE CORRECT ANSWER(S)
CE-PRN will be ending support in the year 2021, for immediate CE submissions please visit www.freece.com to complete renewal requirements
1. Which of the following is a critical site that must be disinfected during the sterile compounding
process?
a. The body of a vial
b. The shaft of a needle
c. The tip of a syringe
d. The neck of an ampule
2. Which of the following requires disposal within a sharps container?
a. An empty vial
b. A broken ampule
c. A syringe without an attached needle
d. A used alcohol swab
3. Which of the following parts of a needle attaches to the syringe?
a. Lumen
b. Hub
c. Shaft
d. Cap
4. Which of the following is the correct label for a needle with a 27-gauge diameter and length of
1/2 inch?
a. 27G1/2
b. 1/2G27
c. 271/2G
d. G271/2

31 Supplies for Sterile Compounding: Tools of the Trade
©2020 Surgent PharmCon, LLC
5. Which of the following is a safety consideration when working with needles and syringes?
a. Compounding personnel should always recap needles after use
b. Compounding personnel should avoid use of the “scoop method” when recapping
needles
c. Compounding personnel should utilize safety needles and syringes when available
d. Compounding personnel should only report needlestick injuries when compounding
chemotherapy products
6. Which of the following types of needles should be used when compounding a sterile preparation
involving an ampule?
a. Insulin needle
b. Vented needle
c. Filter needle
d. Double-ended needle
7. Which of the following parts of a syringe is considered a critical site?
a. Barrel
b. Calibration marks
c. Tip
d. Flange
8. Which of the following syringe sizes should be used to withdraw 2 mL of solution from a vial?
a. 1 mL syringe
b. 3 mL syringe
c. 5 mL syringe
d. 10 mL syringe
9. Which of the following needles is the smallest in diameter?
a. 18G
b. 20G
c. 25G
d. 27G
10. Which of the following is considered a best practice when working with needles and syringes?
a. Do not reuse needles more than six times during the sterile compounding process
b. Always disinfect the shaft of the needle prior to use
c. Select the largest syringe size that will accommodate the volume you need to withdraw
d. Never fill the syringe to capacity in order to avoid dislodging the plunger
Related Documents