SuperOrca MSI Editor User Manual version 1.0 Version: 1.0 July 8, 2008 www.pantaray.com Pantaray Research LTD.

SuperOrca Manual
Oct 22, 2015
SuperOrca Manual
Welcome message from author
This document is posted to help you gain knowledge. Please leave a comment to let me know what you think about it! Share it to your friends and learn new things together.
Transcript
SuperOrcaMSI Editor
User Manual
version 1.0
Version: 1.0July 8, 2008www.pantaray.com Pantaray Research LTD.
Table of Contents
Introduction . . . . . . . . . . . . . . . . . . . . . . . . . . . . . . . . . . . . . . . . . . . . . . 1SuperOrca advantages compared to Orca . . . . . . . . . . . . . . . . . . . 1
Application Screen . . . . . . . . . . . . . . . . . . . . . . . . . . . . . . . . . . . . . . . 1
File Menu . . . . . . . . . . . . . . . . . . . . . . . . . . . . . . . . . . . . . . . . . . . . . . . . 2Open.. . . . . . . . . . . . . . . . . . . . . . . . . . . . . . . . . . . . . . . . . . . . . . . . 2Save As.. . . . . . . . . . . . . . . . . . . . . . . . . . . . . . . . . . . . . . . . . . . . . . 2New . . . . . . . . . . . . . . . . . . . . . . . . . . . . . . . . . . . . . . . . . . . . . . . . . 2Exit . . . . . . . . . . . . . . . . . . . . . . . . . . . . . . . . . . . . . . . . . . . . . . . . . . 2
Edit Menu . . . . . . . . . . . . . . . . . . . . . . . . . . . . . . . . . . . . . . . . . . . . . . . . 3Find.. . . . . . . . . . . . . . . . . . . . . . . . . . . . . . . . . . . . . . . . . . . . . . . . . 3Find Next . . . . . . . . . . . . . . . . . . . . . . . . . . . . . . . . . . . . . . . . . . . . . 3Search All Tables.. . . . . . . . . . . . . . . . . . . . . . . . . . . . . . . . . . . . . . . 3Search All Clear . . . . . . . . . . . . . . . . . . . . . . . . . . . . . . . . . . . . . . . . 3Refresh . . . . . . . . . . . . . . . . . . . . . . . . . . . . . . . . . . . . . . . . . . . . . . 3
Table Menu . . . . . . . . . . . . . . . . . . . . . . . . . . . . . . . . . . . . . . . . . . . . . . 4Add System Table.. . . . . . . . . . . . . . . . . . . . . . . . . . . . . . . . . . . . . . 4Add Custom Table.. . . . . . . . . . . . . . . . . . . . . . . . . . . . . . . . . . . . . . 5Update Table Schema.. . . . . . . . . . . . . . . . . . . . . . . . . . . . . . . . . . . 6Drop Table.. . . . . . . . . . . . . . . . . . . . . . . . . . . . . . . . . . . . . . . . . . . . 6Duplicate Table.. . . . . . . . . . . . . . . . . . . . . . . . . . . . . . . . . . . . . . . . 6Add Row.. . . . . . . . . . . . . . . . . . . . . . . . . . . . . . . . . . . . . . . . . . . . . . 7Export Table.. . . . . . . . . . . . . . . . . . . . . . . . . . . . . . . . . . . . . . . . . . . 7Import Table.. . . . . . . . . . . . . . . . . . . . . . . . . . . . . . . . . . . . . . . . . . . 7
Tools Menu . . . . . . . . . . . . . . . . . . . . . . . . . . . . . . . . . . . . . . . . . . . . . . 8Preview Dialogs.. . . . . . . . . . . . . . . . . . . . . . . . . . . . . . . . . . . . . . . . 8Compare MSI Files.. . . . . . . . . . . . . . . . . . . . . . . . . . . . . . . . . . . . . 9Summary Information.. . . . . . . . . . . . . . . . . . . . . . . . . . . . . . . . . . . 11Validate.. . . . . . . . . . . . . . . . . . . . . . . . . . . . . . . . . . . . . . . . . . . . . 12Merge MSM File.. . . . . . . . . . . . . . . . . . . . . . . . . . . . . . . . . . . . . . . 13Run MSI . . . . . . . . . . . . . . . . . . . . . . . . . . . . . . . . . . . . . . . . . . . . . 14Install MSI (/i) . . . . . . . . . . . . . . . . . . . . . . . . . . . . . . . . . . . . . . . . . 14UnInstall MSI (/x) . . . . . . . . . . . . . . . . . . . . . . . . . . . . . . . . . . . . . . 14Rebuild MSI File . . . . . . . . . . . . . . . . . . . . . . . . . . . . . . . . . . . . . . . 14

Table List - Popup Menu . . . . . . . . . . . . . . . . . . . . . . . . . . . . . . . . 15Update Table Schema.. . . . . . . . . . . . . . . . . . . . . . . . . . . . . . . . . . 15Drop Table.. . . . . . . . . . . . . . . . . . . . . . . . . . . . . . . . . . . . . . . . . . . 15Duplicate Table.. . . . . . . . . . . . . . . . . . . . . . . . . . . . . . . . . . . . . . . 15Display System Tables . . . . . . . . . . . . . . . . . . . . . . . . . . . . . . . . . . 15Add Row.. . . . . . . . . . . . . . . . . . . . . . . . . . . . . . . . . . . . . . . . . . . . . 15Export Table.. . . . . . . . . . . . . . . . . . . . . . . . . . . . . . . . . . . . . . . . . . 15Import Table.. . . . . . . . . . . . . . . . . . . . . . . . . . . . . . . . . . . . . . . . . . 15
Table Content - Popup Menu . . . . . . . . . . . . . . . . . . . . . . . . . . . . 16Find.. . . . . . . . . . . . . . . . . . . . . . . . . . . . . . . . . . . . . . . . . . . . . . . . 16Search All Tables.. . . . . . . . . . . . . . . . . . . . . . . . . . . . . . . . . . . . . . 16Goto . . . . . . . . . . . . . . . . . . . . . . . . . . . . . . . . . . . . . . . . . . . . . . . . 16Cut Cell . . . . . . . . . . . . . . . . . . . . . . . . . . . . . . . . . . . . . . . . . . . . . 17Copy Cell . . . . . . . . . . . . . . . . . . . . . . . . . . . . . . . . . . . . . . . . . . . . 17Paste Cell . . . . . . . . . . . . . . . . . . . . . . . . . . . . . . . . . . . . . . . . . . . . 17Alter Cell.. . . . . . . . . . . . . . . . . . . . . . . . . . . . . . . . . . . . . . . . . . . . 17Clear Cell . . . . . . . . . . . . . . . . . . . . . . . . . . . . . . . . . . . . . . . . . . . . 17Paste GUID . . . . . . . . . . . . . . . . . . . . . . . . . . . . . . . . . . . . . . . . . . 17Import Text File.. . . . . . . . . . . . . . . . . . . . . . . . . . . . . . . . . . . . . . . 17Read Binary from file.. . . . . . . . . . . . . . . . . . . . . . . . . . . . . . . . . . . 17Write Binary to file.. . . . . . . . . . . . . . . . . . . . . . . . . . . . . . . . . . . . . 17Copy Row . . . . . . . . . . . . . . . . . . . . . . . . . . . . . . . . . . . . . . . . . . . . 17Paste Row . . . . . . . . . . . . . . . . . . . . . . . . . . . . . . . . . . . . . . . . . . . 17Add Row.. . . . . . . . . . . . . . . . . . . . . . . . . . . . . . . . . . . . . . . . . . . . . 18Alter Row.. . . . . . . . . . . . . . . . . . . . . . . . . . . . . . . . . . . . . . . . . . . . 18Drop Row.. . . . . . . . . . . . . . . . . . . . . . . . . . . . . . . . . . . . . . . . . . . . 18
Contact Information . . . . . . . . . . . . . . . . . . . . . . . . . . . . . . . . . . . . . 19

- 1 -
Introduction
SuperOrca from "Pantaray Research Ltd." is a direct replacement to the "Orca" utilityfrom Microsoft. SuperOrca may be used to examine and modify an MSI database.
SuperOrca Highlights:
� Can be freely downloaded from the internet, no need to download and install thecomplete Microsoft SDK.
� Will allow you to scan and manipulate all MSI database table in an intuitive anduser friendly manner.
� SuperOrca will not lock the MSI file, so you can test it with other tools or even installit while the file is open in SuperOrca.
� A powerful "Compare" function that will compare two MSI files.� A "Search all" function that will search a text literal across all database tables in one
operation.
Application Screen
The SuperOrca screen contains the following 4 elements:
1. Main Menu - Most of the operations of the application are accessible from thismenu.
2. Table List - The left area of the screen will contain a list of all the tables containedin the current MSI file. Clicking a table name will select this table, the name of thetable will appear at the top of the list and the table content will be displayed on theright area.
3. Table content - The right area of the screen will display the content of selectedtable. This display is composed of columns and rows. The header of each columnwill contain the name of the column. An asterisk in front of the name will indicate aKey column. Each column name include a description of the column type inparenthesis.
Type Regular NullableInteger 16 bit i2 I2
Integer 32 bit i4 I4
String (1..255) characters snn Snn
Localizable String (1..255) characters lnn Lnn
Binary Data v V
* nn - indicates number of bytes.
4. Status Bar - Located at the bottom of the screen, the status bar will indicate thenumber of tables in the current database and the number of rows in the selectedtable.

- 2 -
File Menu
Open...
Use Open... to open an existing MSI file. Using this option you can open a regular MSIOpen...file as well as a Merge Module file (*.MSM). The names of the files you open will beadded to the history list at the bottom of the "File" menu, so you can easily reopen themin the future.
Save As...
Use Save As... to save the existing MSI file under a new name, thus creating a copy ofSave As...the old file.
New
Use New to create a completely new MSI or MSM file. When you select New you willNewbe prompted to select a starting template. The following template are available:
� Empty.Msi� Schema.Msi� Sequence.Msi� UISample.Msi� Schema.Msm
Exit
Select Exit to close the program.Exit
IMPORTANT - Every operation made with SuperOrca that modify the database isimmediately written to the MSI file, so when you close the program you will not beprompted to save any changes made to the database.
- 3 -
Edit Menu
Find...
Use Find... to find a certain text literal inside any table fields.Find...After entering the text literal the program will search the current table starting from thecurrent location. If a match is found the relevant cell will be highlighted. If a match is notfound the application will search the next table. When all tables are searched theapplication will prompt for a search starting from the first table.
Find Next
Click Find Next to find the next occurrence of the text literal.Find Next
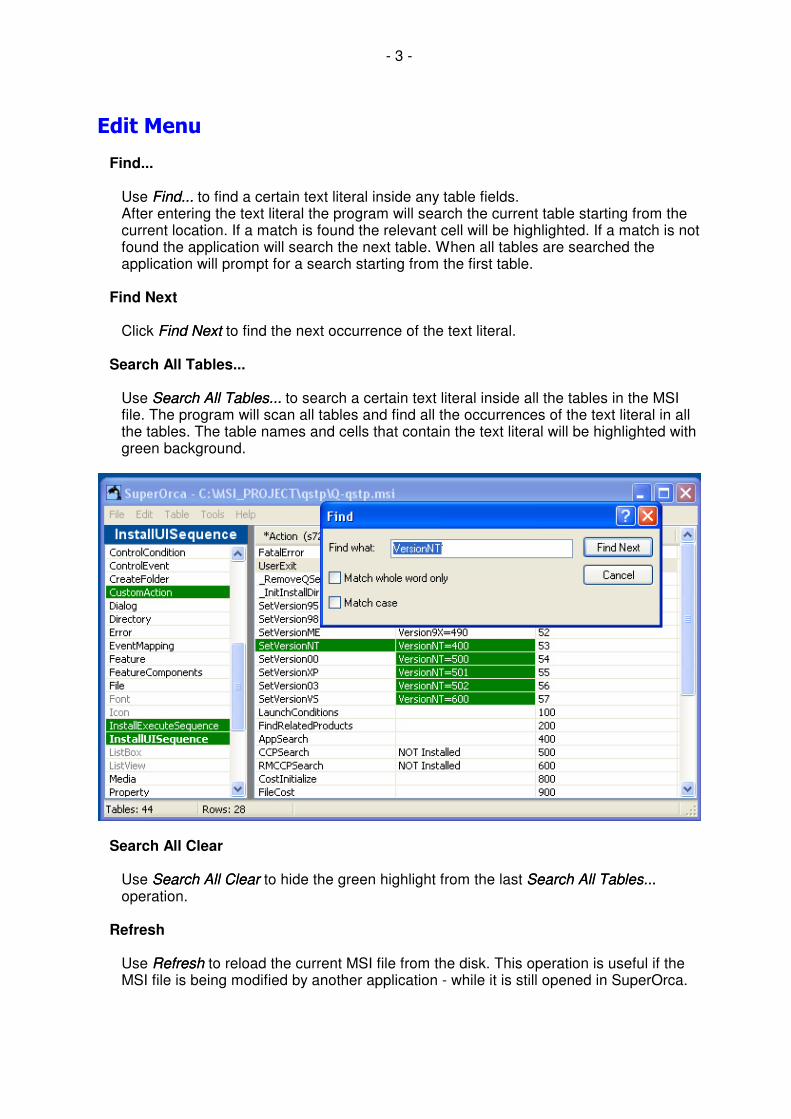
Search All Tables...
Use Search All Tables... to search a certain text literal inside all the tables in the MSISearch All Tables...file. The program will scan all tables and find all the occurrences of the text literal in allthe tables. The table names and cells that contain the text literal will be highlighted withgreen background.
Search All Clear
Use Search All Clear to hide the green highlight from the last Search All Clear Search All Tables...Search All Tables...operation.
Refresh
Use Refresh to reload the current MSI file from the disk. This operation is useful if theRefreshMSI file is being modified by another application - while it is still opened in SuperOrca.

- 4 -
Table Menu
Add System Table...
Use Add System Table... to add one of the MSI predefined tables to the database.Add System Table...The program will display a list of all System Tables. The gray colored names arealready present in your database, so you can only add the black colored names. Youcan select several tables and add them in one click.

- 5 -
Add Custom Table...
Use Add Custom Table... to add a table of your own design to the database.Add Custom Table...When you select this option the following dialog will appear:
Adding a new table involves the following sequence of operations:
1. Enter a name for the table in the field Table Name.Table Name2. Click the Add Column button, and add as many columns as you wish.Add Column3. In the table Click the names of the columns just added and for each column
define the following:� Type of the field.Type� Length (in bytes) of the field.Length� Nullable (Yes/No).Nullable
You can use the Up & Down button to set the order of the columns in the table.4. Set the number of the Primary Keys in the table. According to the MSI standard,Primary Keys
primary keys are always the first fields of the table.
- 6 -
Update Table Schema...
Use Update Table Schema... to modify the structure of existing table. This operationUpdate Table Schema...can be performed on system tables as well as custom tables.
Updating a table is done using a dialog and techniques similar to the ones used for AddCustom Table.Custom Table
Drop Table...
Use Drop Table... to delete the currently selected table from the database.Drop Table...
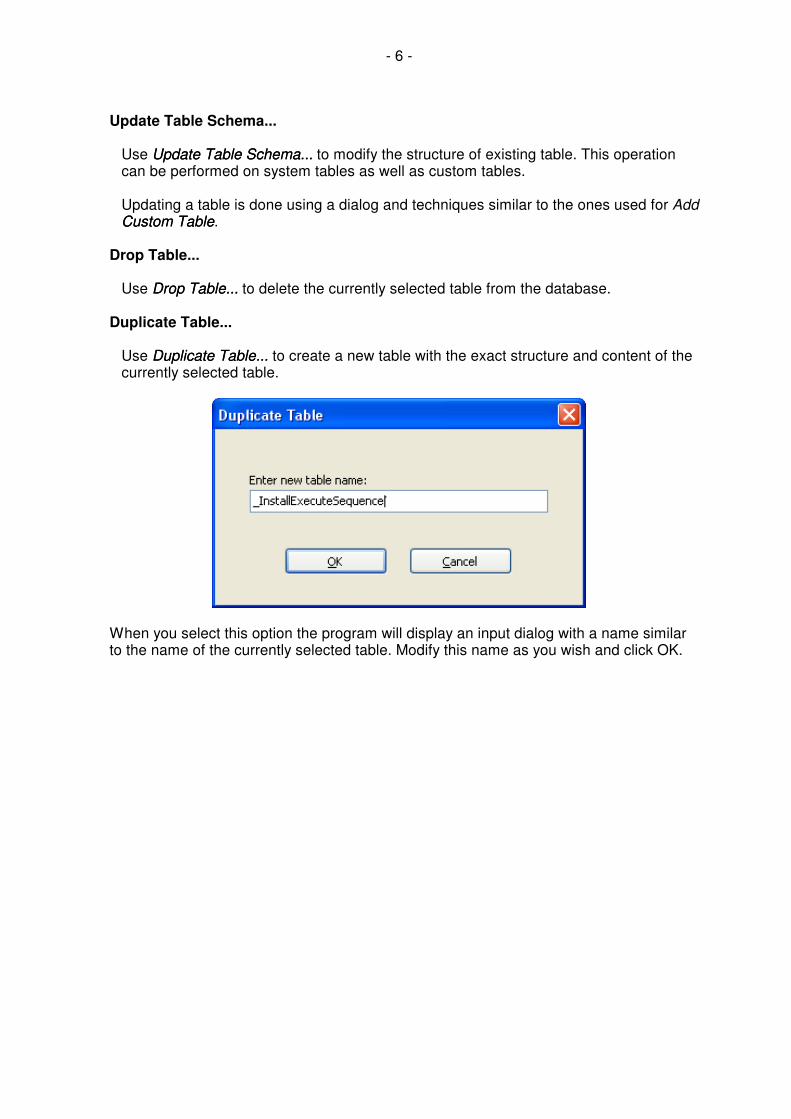
Duplicate Table...
Use Duplicate Table... to create a new table with the exact structure and content of theDuplicate Table...currently selected table.
When you select this option the program will display an input dialog with a name similarto the name of the currently selected table. Modify this name as you wish and click OK.
- 7 -
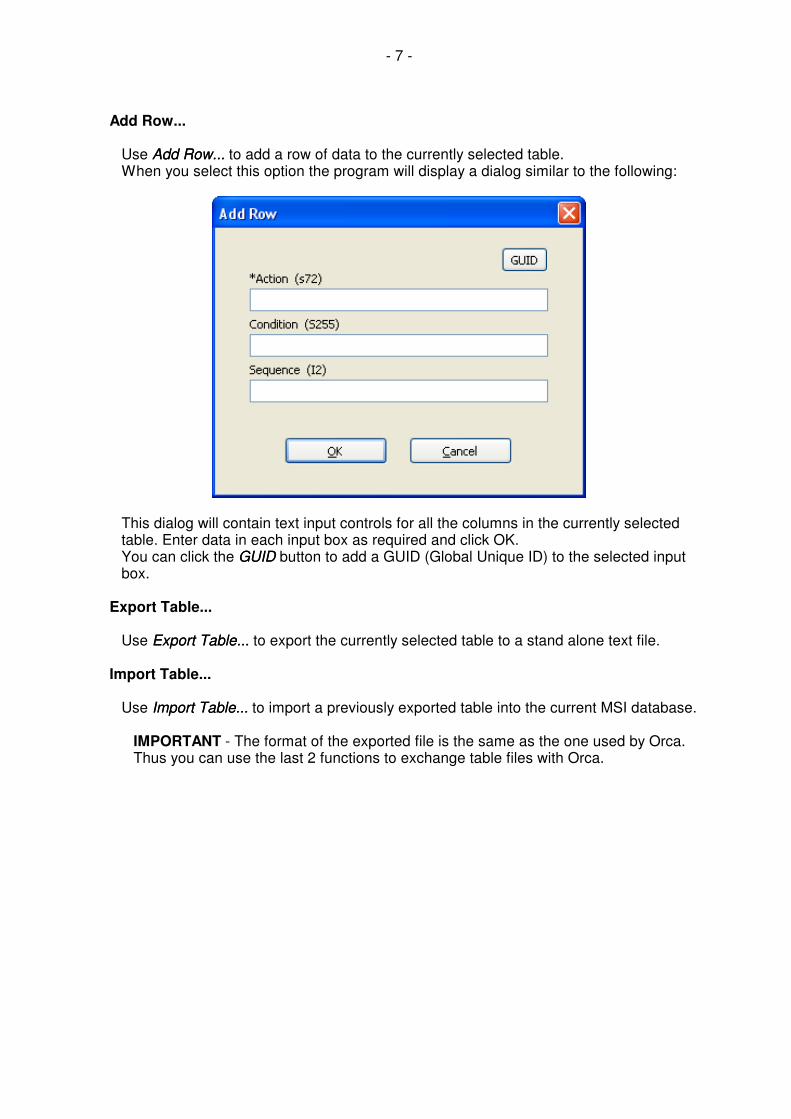
Add Row...
Use Add Row... to add a row of data to the currently selected table.Add Row...When you select this option the program will display a dialog similar to the following:
This dialog will contain text input controls for all the columns in the currently selectedtable. Enter data in each input box as required and click OK.You can click the GUID button to add a GUID (Global Unique ID) to the selected inputGUIDbox.
Export Table...
Use Export Table... to export the currently selected table to a stand alone text file.Export Table...
Import Table...
Use Import Table... to import a previously exported table into the current MSI database.Import Table...
IMPORTANT - The format of the exported file is the same as the one used by Orca.Thus you can use the last 2 functions to exchange table files with Orca.

- 8 -
Tools Menu
Preview Dialogs...
Use Preview Dialogs... to get a preview off all the dialogs defined in your setup.Preview Dialogs...When you click Preview Dialogs... the following dialog will display:Preview Dialogs...
When you select a certain dialog from the list on the left side, the relevant dialog imagewill display on the screen. Also the list of controls in this dialog will display on theTop/Right area. When you click a control in the list it's properties will display on theBottom/Right area.
- 9 -
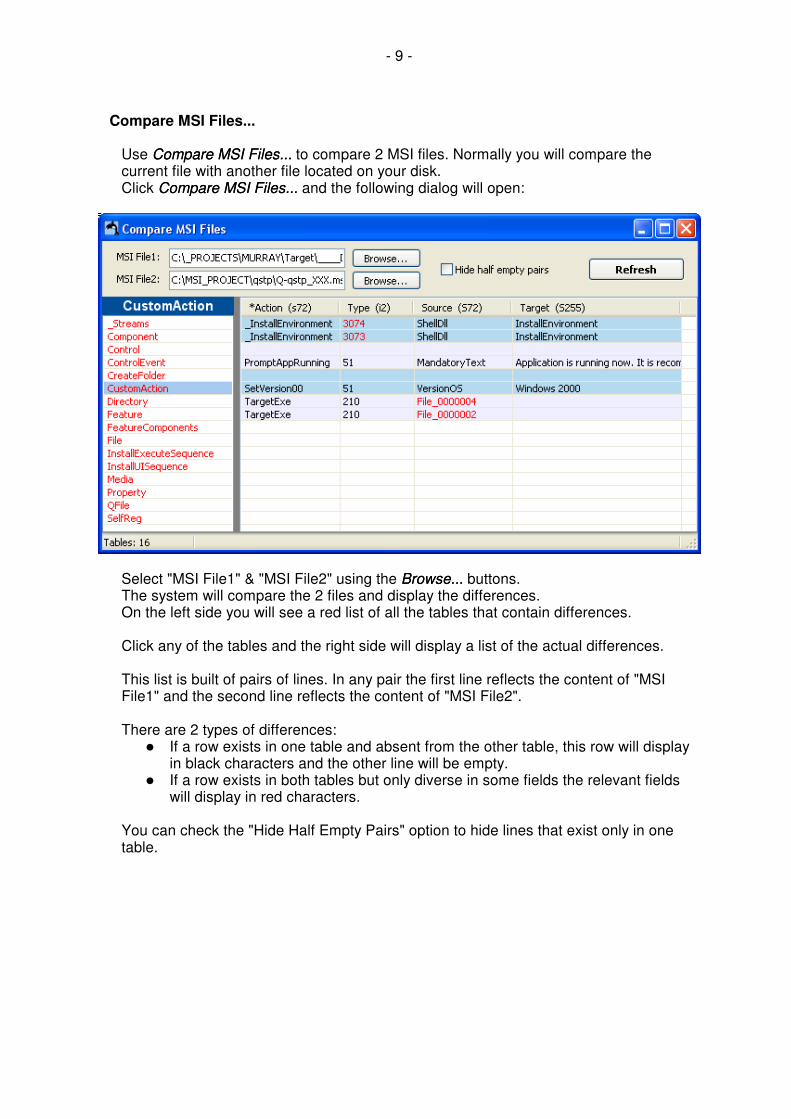
Compare MSI Files...
Use Compare MSI Files... to compare 2 MSI files. Normally you will compare theCompare MSI Files...current file with another file located on your disk.Click Compare MSI Files... and the following dialog will open:Compare MSI Files...
Select "MSI File1" & "MSI File2" using the Browse... buttons. Browse...The system will compare the 2 files and display the differences.On the left side you will see a red list of all the tables that contain differences.
Click any of the tables and the right side will display a list of the actual differences.
This list is built of pairs of lines. In any pair the first line reflects the content of "MSIFile1" and the second line reflects the content of "MSI File2".
There are 2 types of differences:� If a row exists in one table and absent from the other table, this row will display
in black characters and the other line will be empty.� If a row exists in both tables but only diverse in some fields the relevant fields
will display in red characters.
You can check the "Hide Half Empty Pairs" option to hide lines that exist only in onetable.

- 10 -
If you click a line in the list the relevant table and location in the current MSI file willhighlight with red background.

- 11 -
Summary Information...
Use Summary Information... to display and edit the "Summary Information" of theSummary Information...current MSI file.
- 12 -
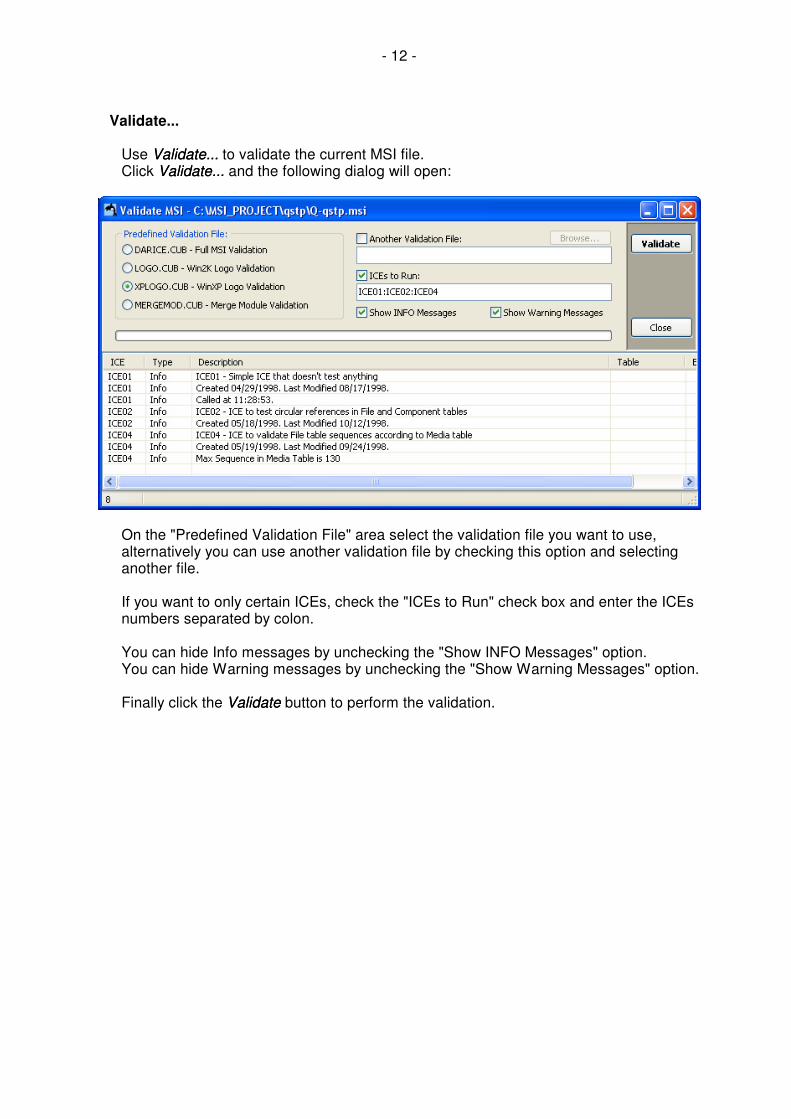
Validate...
Use Validate... to validate the current MSI file.Validate...Click Validate... and the following dialog will open:Validate...
On the "Predefined Validation File" area select the validation file you want to use,alternatively you can use another validation file by checking this option and selectinganother file.
If you want to only certain ICEs, check the "ICEs to Run" check box and enter the ICEsnumbers separated by colon.
You can hide Info messages by unchecking the "Show INFO Messages" option.You can hide Warning messages by unchecking the "Show Warning Messages" option.
Finally click the Validate button to perform the validation.Validate

- 13 -
Merge MSM File...
Use Merge MSM File... to merge a Merge Module in to the current MSI file.Merge MSM File...Click Merge MSM File... and the following dialog will open:Merge MSM File...
Click the Browse... button to select the MSM file you want to merge into the current MSIBrowse...file. Set data as needed in the different dialog and click Merge.Merge
- 14 -
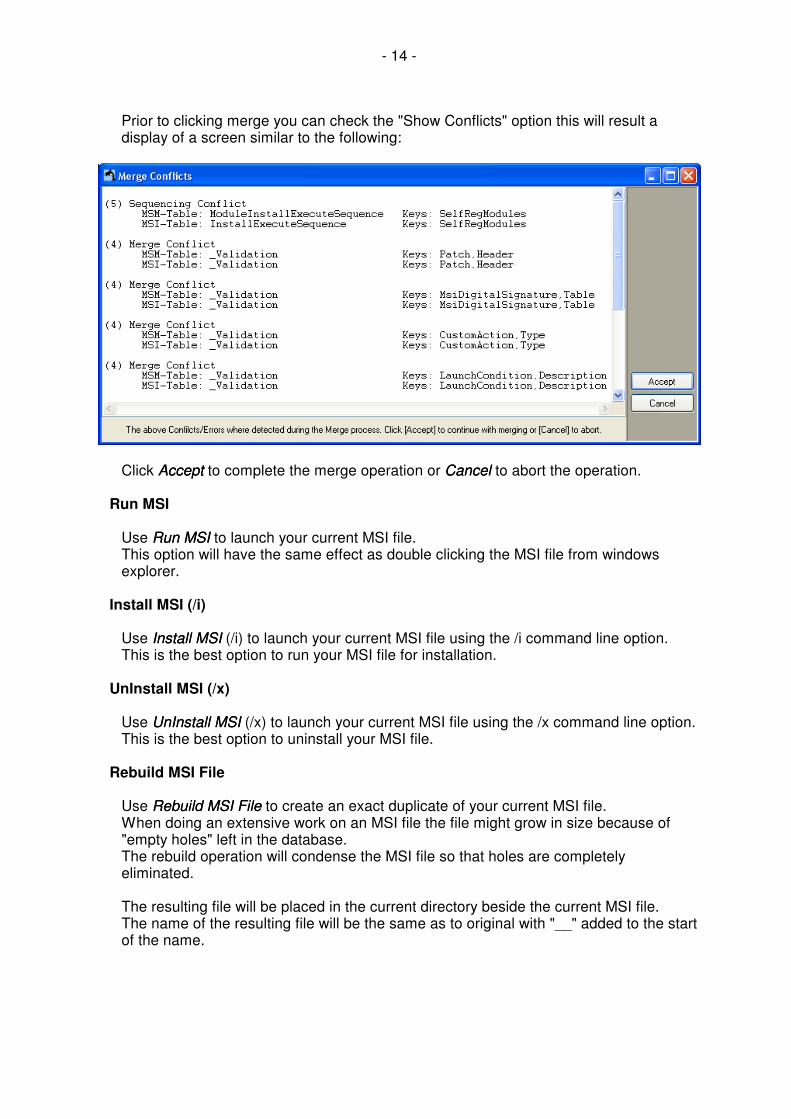
Prior to clicking merge you can check the "Show Conflicts" option this will result adisplay of a screen similar to the following:
Click Accept to complete the merge operation or Accept Cancel to abort the operation.Cancel
Run MSI
Use Run MSI to launch your current MSI file.Run MSIThis option will have the same effect as double clicking the MSI file from windowsexplorer.
Install MSI (/i)
Use Install MSI (/i) to launch your current MSI file using the /i command line option.Install MSIThis is the best option to run your MSI file for installation.
UnInstall MSI (/x)
Use UnInstall MSI (/x) to launch your current MSI file using the /x command line option.UnInstall MSIThis is the best option to uninstall your MSI file.
Rebuild MSI File
Use Rebuild MSI File to create an exact duplicate of your current MSI file.Rebuild MSI FileWhen doing an extensive work on an MSI file the file might grow in size because of"empty holes" left in the database.The rebuild operation will condense the MSI file so that holes are completelyeliminated.
The resulting file will be placed in the current directory beside the current MSI file.The name of the resulting file will be the same as to original with "__" added to the startof the name.

- 15 -
Table List - Popup Menu
When you right click the table list area a special menu will popup. Use this menu toperform certain table oriented operation. Most of the operations in this menu refers to thecurrently selected table. Some of the operations are also accessible from the Main Menu.
Update Table Schema...
See explanation to this item under Table Menu/Update Table Schema...
Drop Table...
Use Drop Table... to delete the currently selected table from the database.Drop Table...
Duplicate Table...
See explanation to this item under Table Menu/Duplicate Table...
Display System Tables
The MSI database contains the following 3 system tables:� _Columns� _Streams� _Tables
Normally those tables are hidden. You may check this option to add those table to thetable list. Some operations are not allowed on System tables.
Add Row...
See explanation to this item under Table Menu/Add Row...
Export Table...
See explanation to this item under Table Menu/Export Table...
Import Table...
See explanation to this item under Table Menu/Import Table...
- 16 -
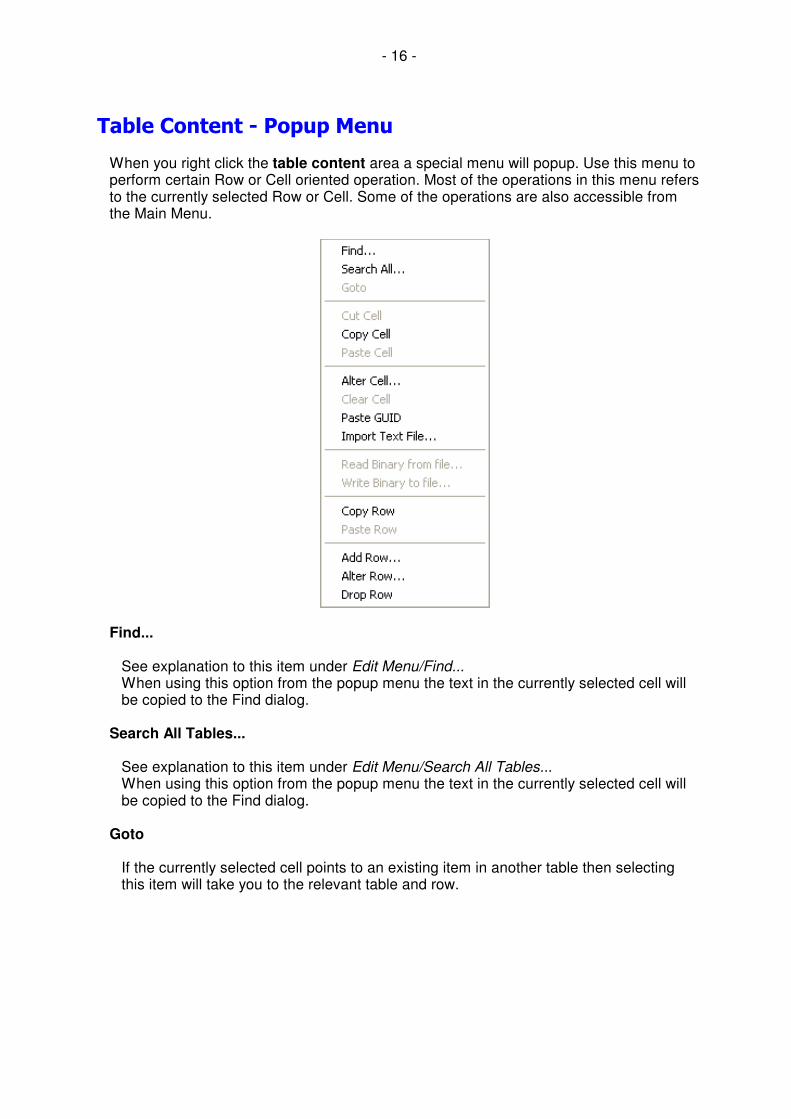
Table Content - Popup Menu
When you right click the table content area a special menu will popup. Use this menu toperform certain Row or Cell oriented operation. Most of the operations in this menu refersto the currently selected Row or Cell. Some of the operations are also accessible fromthe Main Menu.
Find...
See explanation to this item under Edit Menu/Find...When using this option from the popup menu the text in the currently selected cell willbe copied to the Find dialog.
Search All Tables...
See explanation to this item under Edit Menu/Search All Tables...When using this option from the popup menu the text in the currently selected cell willbe copied to the Find dialog.
Goto
If the currently selected cell points to an existing item in another table then selectingthis item will take you to the relevant table and row.
- 17 -
Cut Cell
Use this option the copy the content of the currently selected cell to the clipboard andthen clear the cell. This option can be executed only on a nullable cell.
Copy Cell
Use this option the copy the content of the currently selected cell to the clipboard.
Paste Cell
Use this option the copy the content of the clipboard to the currently selected cell.
Alter Cell...
Use this option the change the content of the currently selected cell.
Clear Cell
Use this option to clear the currently selected cell. This option can be executed only ona nullable cell.
Paste GUID
Use this option to add a GUID (Global Unique ID) string to the currently selected cell.
Import Text File...
Use this option to read the content of a text file to the currently selected cell.
Read Binary from file...
Use this option to read the content of a binary file to the currently selected cell. Thisoption can be executed only on a Binary cell.
Write Binary to file...
Use this option to write the content of the currently selected cell to a binary file. Thisoption can be executed only on a Binary cell.
Copy Row
Copy the content of the currently selected row to the clipboard.
Paste Row
Paste the content of the clipboard to the current table. This option can be executedonly if a valid row of identical structure was placed in the clipboard using the "CopyRow" operation.
- 18 -
Add Row...
See explanation to this item under Table Menu/Add Row...
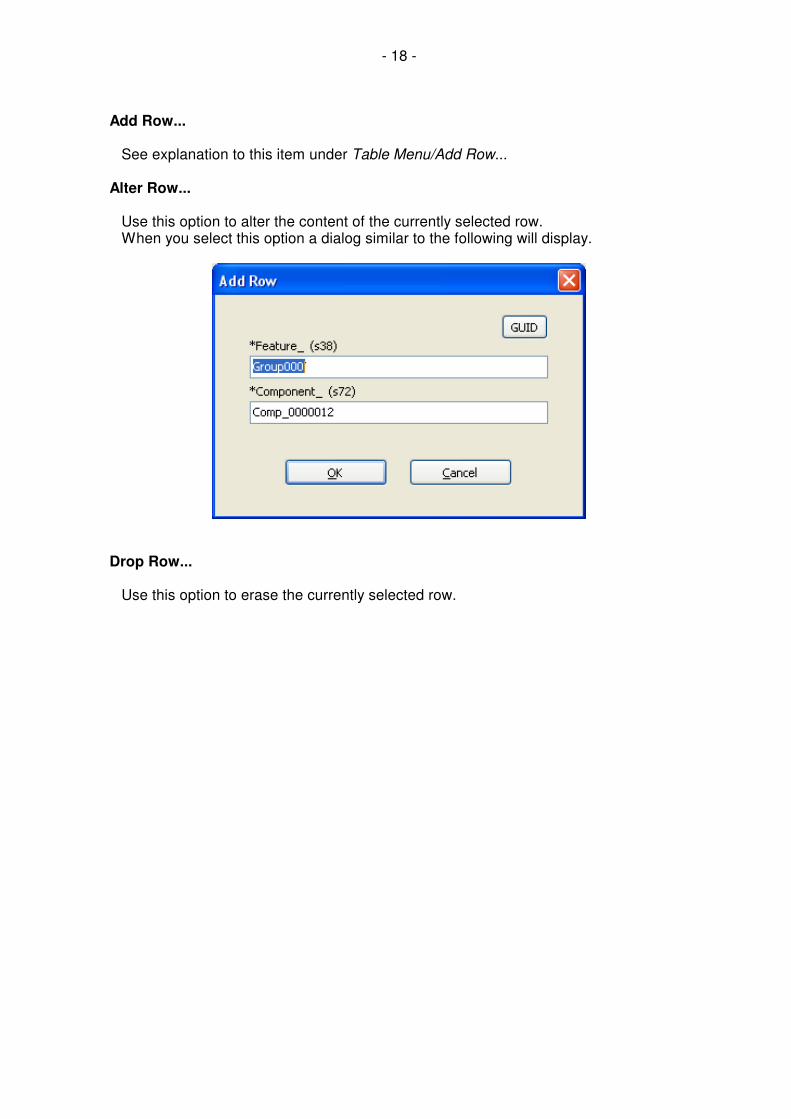
Alter Row...
Use this option to alter the content of the currently selected row.When you select this option a dialog similar to the following will display.
Drop Row...
Use this option to erase the currently selected row.

- 19 -
Contact Information
Please send us any comment and request concerning this product.Email: [email protected]
Pantaray Research Ltd.Kibbutz DvirD.N.HanegevISRAEL
Phone: +972-8-9111326Fax: +972-8-9111372Email: [email protected]
Related Documents