Sundance Supply®, LLC Greca Corrugated Polycarbonate Design & Install To order Polycarbonate see > http://www.sundancesupply.com Corrugated polycarbonate is sold in 1 ft. Increments. (1)

Welcome message from author
This document is posted to help you gain knowledge. Please leave a comment to let me know what you think about it! Share it to your friends and learn new things together.
Transcript

Sundance Supply®, LLC Greca Corrugated Polycarbonate Design & Install
To order Polycarbonate see > http://www.sundancesupply.com
Corrugated polycarbonate is sold in 1 ft. Increments.
(1)

(2)

30ʼ x 48ʼ Greenhouse or Pool Enclosure Plan: Steel Truss, Corrugated Polycarbonate
(3)

Corrugated Storage & Install Storage: Store in dry, shaded, well ventilated area. Supported, sloped stacking best, but not necessary. Store sheets in covered areas, but not under flexible PVC coverings. Sheet Orientation: One side of sheet has protective U.V. surface, which must face to to exterior. Sheet covered with plastic film, marked exterior. Prior to install peel film off. Cutting: Circular saw with plywood blade or jig saw with fine tooth blade. Clamp to avoid vibration. Leave film on sheet until ready to install. Sheet Positioning: Install polycarbonate sheets with corrugated ribs running vertically on walls, and with slope on the roof. Overlap: Overlap of 1 corrugation recommended and yields an overall coverage of 48". If an overlap is needed in the sheet length, we recommend a 4" overlap. Pop Rivets may be used to achieve a even fitting and watertight joint. Position Pop Rivets every 12" along the overlap. Do not apply sealants between overlapping panels, as this will cause unsightly dirt streaks. See Layout Close-up, p 6. Procedure: Begin by installing roof sheet. Wall sheets installed butt against roof panels. Use horizontal closures as specified in various drawings. Sheet metal flashing is installed after sheet is in place. Corner Trim may be used (see Layout Close-up, p 6). Attachment: Fasten screws and washers as shown in Details. Predrill with 1/4" bit to allow for expansion. See Screw Layout, p 9, and Install Notes to determine screw count. Cleaning: Clean with warm, soapy water. If dirt remains wipe with soft cloth. Do not scrub, scrape or use solvents. Rinse and dry with soft cloth. Corrugated Installation Notes: Roof Purlin spaced every 36" at ridge & gutter, 48" mid spans. See Layout & Load, p 5. Wall Purlins (girts) spaced every 4-5 ft. (Closer in high wind areas.) Overlap: When joining sheets in a horizontal run, an overlap of one corrugation is recommended and yields an overall coverage of 48", see Sheet Close-up, p6. When doing a long roof, or vertical run, with more than 1 sheet, the upper sheet in the overlap should be in the up-wind direction. If an overlap is needed in the sheet length, such as this, we recommend a 4" overlap. Pop Rivets may be used to achieve a even fitting and more watertight joint. Position Pop Rivets every 12" along the overlap. Sealants: Do not apply sealants between overlapping panels, as this will cause unsightly dirt streaks. Silicone may be used in areas where two sheets meet at an angle, such as the intersection of vertical sheets and roof sheets. Screws: See Screw Layout, p 9, and notes below to determine screw count. Ridge Flashing: To seal the pitched roof from the elements, install a ridge cap. This cap may may be fabricated from sheet aluminum or galvanized steel. Horizontal closures required when using sheet metal flashings. See Ridge Details, p 7. Horizontal Closures: These foam rubber closures should be used at the upper and lower edge of the sheet (in heated spaces), to seal from the weather and air infiltration.
(4)

Corrugated Poly Layout & Load - Purlin & Girt Frame: Typical Roof Layout
Girts on walls spaced every 4 ft. See load info below, and wind chart on next page. Layout above will support a 25 lb. load. For 30 lb. load position mid purlins every 3 ft. For 35 lb. load position all purlins every 2 ft. In wind areas increase screw attachment pattern so wind does not pull sheet off frame. Best to use our Screws with 3/4" sealing washers. Consult with Sundance Supply, LLC and building dept. if in hurricane zone.
Structural Loads are stresses to structure from external or internal forces. • Dead loads are gravity loads that are constant throughout structure's life. These include equipment such as fans, heaters and plants suspended from frame. • Live loads are temporary, such as snow loads and wind loads. • Snow loads determined by factors influencing snow & ice accumulation on the structure. Snow loads vary considerably by geographic location. Ask your local bldg. dept. for snow load in your area. ( 12 inches of light, fluffy snow or 2 to 4 inches of heavy, wet snow = about 5 lbs per sq. ft.)
(5)
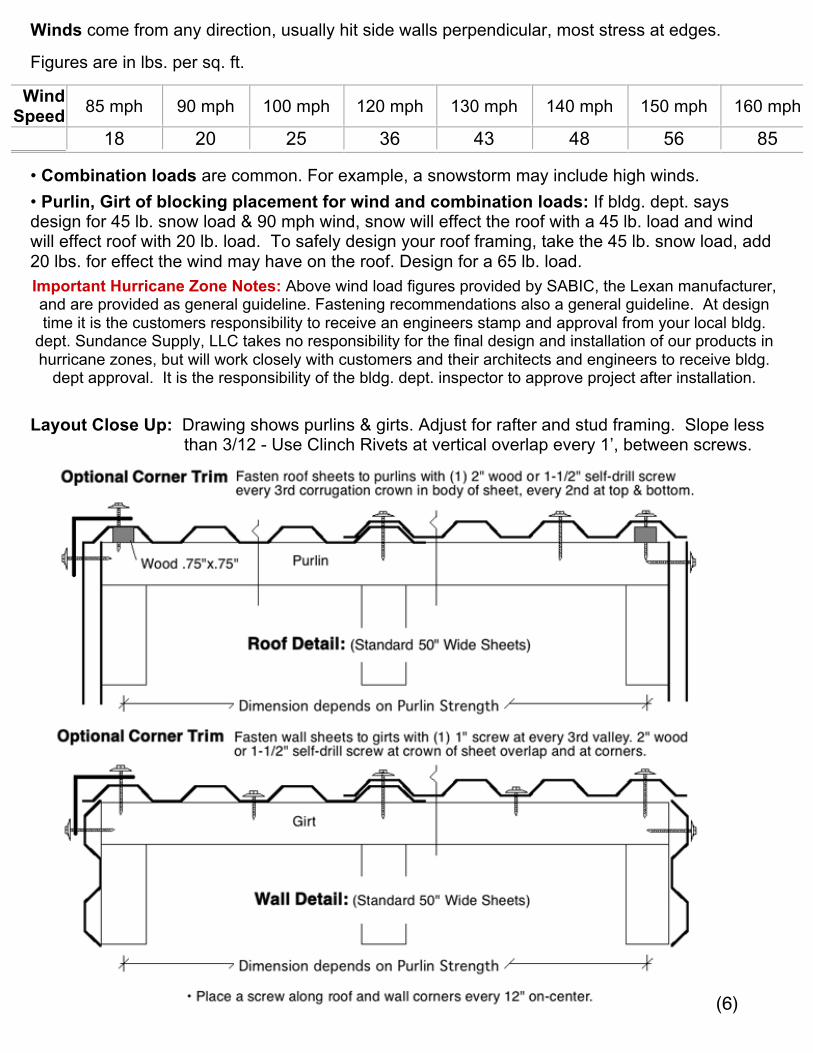
Winds come from any direction, usually hit side walls perpendicular, most stress at edges.
Figures are in lbs. per sq. ft.
Wind Speed 85 mph 90 mph 100 mph 120 mph 130 mph 140 mph 150 mph 160 mph
18 20 25 36 43 48 56 85
• Combination loads are common. For example, a snowstorm may include high winds.
• Purlin, Girt of blocking placement for wind and combination loads: If bldg. dept. says design for 45 lb. snow load & 90 mph wind, snow will effect the roof with a 45 lb. load and wind will effect roof with 20 lb. load. To safely design your roof framing, take the 45 lb. snow load, add 20 lbs. for effect the wind may have on the roof. Design for a 65 lb. load.
Important Hurricane Zone Notes: Above wind load figures provided by SABIC, the Lexan manufacturer, and are provided as general guideline. Fastening recommendations also a general guideline. At design time it is the customers responsibility to receive an engineers stamp and approval from your local bldg.
dept. Sundance Supply, LLC takes no responsibility for the final design and installation of our products in hurricane zones, but will work closely with customers and their architects and engineers to receive bldg.
dept approval. It is the responsibility of the bldg. dept. inspector to approve project after installation. Layout Close Up: Drawing shows purlins & girts. Adjust for rafter and stud framing. Slope less than 3/12 - Use Clinch Rivets at vertical overlap every 1’, between screws.
(6)

Corrugated Ridge Detail: Note - Sundance Supply, LLC does not provide flashing.
Ridge Flashing: Seal roof from elements, install ridge flashing. Fabricate from sheet aluminum or galvanized steel. Metal building flashing may be used. Or, have sheet metal shop fabricate. Horizontal closures required when using sheet metal flashings. Sundance Supply does not provide flashing.
Ridge Flashing Purchase & Install Introduction
• Suggestions for purchasing ridge flashing. Use Detail Above as guideline. Print page if the detail is appropriate for your application. Do scale drawing of flashing needed for your ridge. Draw so the leg(s) of the flashing are tilted down 5° from the actual pitch of your roof. This will create a small amount of pressure against the polycarbonate sheet, useful in achieving a watertight installation. Sheet metal should be a minimum of .019" aluminum or 30 gauge steel. Aluminum is easy to fasten through, easy to cut, but is a little flimsy, care required in handling. Steel is more sturdy, harder to cut and requires pre drilling prior to fastening. Availability at your local sheet metal shop may be the limiting factor. Look in the Yellow Pages under Sheet Metal Work. Some shops, especially those that cater to glass installation contractors, will inventory bright glossy white and medium architectural bronze in the thickness you will be looking for. In high wind areas use Sikaflex 295 UV, not silicone, to bond tip of Ridge Flashing to poly.
• Home Depot & Lowes stock freestanding flashing sections, in white. Bend as required for your roof. Rust-Oleum, Bright Coat, Metallic Finish - Dark Bronze #7713 paint will match our bronze aluminum.
• Flashing Installation: Flashing sections are typically fabricated in 8 ft. sections. There are two ways to proceed with the installation of flashing, as sheets are installed, or after all sheets are installed.
The easiest is to set and screw down a section of flashing that covers the first sheet of polycarbonate (on freestanding greenhouses install sheets on both sides of greenhouse). Set screws so flashing presses against polycarbonate, place closure, a bead of sealant at this point and stop there. Lay the next sheet of polycarbonate. Now screw down the flashing, set closure and place a bead of sealant along the edge of flashing that comes in contact with the polycarbonate. Continue installing more polycarbonate and flashing. Overlap seams in flashing a minimum of 4". Do not cut to length as this will create a slight curl at cut & an uneven overlap. If the overlap ends up being 4 ft., so be it. This method provides a watertight installation, but care must be taken to lay a smooth bead of sealant on a cleaned surface.
Closures under flashing, at lower edge of roof sheets and at top & bottom of wall sheets.
At ridge closures are placed between ridge flashing and polycarbonate.
• Closures 3 ft. long. To determine needs take linear footage of top and bottom of sheets and divide by 3.
(7)

Corrugated Quonset -
* Corrugated polycarbonate sheets can be overlapped to cover frame (see below). On structures with min. 13' radius, corrugated polycarb. will bend right over the arch.
* Multi-wall polycarbonate will also bend over arches. Greater air tightness and higher insulation will result, but limit arch length to 24 ft. and use our Base & Cap System.
On small greenhouses save on crate and freight costs by overlapping as shown below.
(8)

Corrugated - Screw Layout - Purlin & Girt Frame
See Layout, p 5, for spacing of roof purlins & wall girts. Also see Closure Drawing, p 7. -
• Wall Sheets: At top, bottom & body of wall sheets fasten to Wall Girts with (1) 1" screw at every 3rd valley. At corners (see layout at left of drawing below) place blocking between girts (so there is a framing member to screw to) and position a 2" wood or 1-1/2" self-drill metal screw every 12" on-center. See Layout Close-up, p 6. • Roof Sheets: At top and bottom of roof sheets place screws every 2nd corrugation crown. In body of sheet fasten to Roof Purlins with (1) 2" wood or (1) 1-1/2" self-drill metal screw every 3rd corrugation crown. At corners (see layout at left of drawing below) place blocking between purlins (so there is a framing member to screw to) and position a 2" wood or 1-1/2" self-drill metal screw every 12" on-center. See Layout Close-up, p 6. Note: On steep slopes (8/12, etc.) one may use 1" screws in the valley of sheet. Best in high wind areas, for greater strength. • Sheet Overlaps: Use a 2" wood or 1-1/2" self-drill screw at crown of sheet overlap. To cinch sheet together between girts and purlins use Hy-Clinch Rivets. • To avoid sheet deforming fasten screws without excessive tension.
(9)

Corrugated - Screw Layout – 4 ft. & 2 ft. On-Center Rafters & Studs
• Wall Sheets: At top and bottom of wall sheets fasten to Top & Bottom Plates with (1) 1" screw at every 3rd valley. In body of sheet fasten to Wall Blocking with (1) 1" screw every 3rd corrugation valley, or at every other stud, see 2 ft. on-center framing. At corners place a 2" wood or 1-1/2" self-drill metal screw every 12" on-center. See Layout Close-up, p 6.
• Roof Sheets: At top & bottom of roof sheets place (1) 2" wood or (1) 1-1/2" self-drill metal screw every 2nd corrugation crown. In body of sheet fasten to blocking with (1) 2" wood or (1) 1-1/2" self-drill metal screw every 3rd corrugation crown, or every other rafter if 2’ framing. At Corner position a 2" wood or 1-1/2" self-drill metal screw every 12" on-center. See Layout Close-up, p 6.
Note: On steep slopes (8/12, etc.) one may use 1" screws in the valley of sheet. Best in high wind areas, for greater strength.
• Sheet Overlaps Use a 2" wood or 1-1/2" self-drill screw at crown of sheet overlap. To cinch sheet together between girts and purlins use Hy-Clinch Rivets.
• To avoid sheet deforming fasten screws without excessive tension.
(10)
Related Documents