Updated 12/10/2013 sunapsis®:International Office Module Technical Guide

Welcome message from author
This document is posted to help you gain knowledge. Please leave a comment to let me know what you think about it! Share it to your friends and learn new things together.
Transcript

Updated 12/10/2013
sunapsis®:International Office ModuleTechnical Guide

THE SUNAPSIS® 3 INTERNATIONAL OFFICE MODULE TECHNICAL GUIDE LAST REVISION 2013-12-10
TABLE OF CONTENTS
Table of Contents ....................................................................................................................................... 1 Table of Figures ......................................................................................................................................... 4 Introduction .............................................................................................................................................. 5 1.0 Distribution Files ................................................................................................................................... 6 2.0 System Requirements ............................................................................................................................ 7
2.1 Server Requirements ......................................................................................................................... 7 2.2 Client Workstation Requirements ........................................................................................................ 7
3.0 Database Installation ............................................................................................................................. 8 4.0 Server Installation ............................................................................................................................... 15
4.1 Configure Server for SSL and MIME Types ........................................................................................... 15 4.2 Install Server Files ............................................................................................................................ 15 4.3 Configure Read/Write/Execute Privileges ............................................................................................ 16
5.0 ColdFusion Administrator Settings ......................................................................................................... 17 5.1 Configure Java & JVM ...................................................................................................................... 17 5.2 Request Tuning for Performance ....................................................................................................... 17 5.3 Setup Mail Server Settings ................................................................................................................ 18 5.4 ColdFusion Database Configuration.................................................................................................... 19 5.5 Create Scheduled Tasks .................................................................................................................... 19
6.0 Configure for Multi-Server Environment ................................................................................................. 21 7.0 Authentication Process ........................................................................................................................ 22
7.1 Single-Sign On ................................................................................................................................. 22 7.2 LDAP Authentication ........................................................................................................................ 22
8.0 User Setup ......................................................................................................................................... 23 8.1 Create New Records in Database ....................................................................................................... 23 8.2 Create Initial User Accounts .............................................................................................................. 23
Edit Your User Profile ................................................................................................................................................. 23 Create A New Profile .................................................................................................................................................. 24
8.3 Edit System User Account ................................................................................................................. 25 9.0 Encryption Configuration ..................................................................................................................... 27
9.1 Background .................................................................................................................................... 27 How Encryption Looks to Users ................................................................................................................................ 28
9.2 Initial Setup .................................................................................................................................... 29 Key Management ....................................................................................................................................................... 29 Review E-Forms .......................................................................................................................................................... 30 Server Configuration .................................................................................................................................................. 30
9.3 Encryption Configuration .................................................................................................................. 31 Key Generation........................................................................................................................................................... 31 Placement of Keys ...................................................................................................................................................... 32 Configuration ............................................................................................................................................................. 33 Verification of Configuration ..................................................................................................................................... 35
9.4 Test and Verification of Encryption .................................................................................................... 35 9.5 Updating Encrypted Fields ................................................................................................................ 36 9.6 Re-Keying ....................................................................................................................................... 36
Table of Contents 1
THE SUNAPSIS® 3 INTERNATIONAL OFFICE MODULE TECHNICAL GUIDE LAST REVISION 2013-12-10
10.0 Data Feed ........................................................................................................................................ 37 10.1 Create Valid XML File ..................................................................................................................... 37 10.2 Test the Data feed ......................................................................................................................... 37
11.0 Application Configuration ................................................................................................................... 39 11.1 Campus Information ...................................................................................................................... 39 11.2 Term Information .......................................................................................................................... 40 11.3 SEVIS Configuration ....................................................................................................................... 41 11.4 Alert Configuration ........................................................................................................................ 42 11.5 Note Import Configuration .............................................................................................................. 43 11.6 Edit Online Services Header & Footer ............................................................................................... 43
12.0 SEVIS Batch Setup if New to Batch Processing ........................................................................................ 44 12.1 Create F-1 Program in SEVIS Test Environment (if applicable) ............................................................... 44 12.2 Create J-1 Program in SEVIS Test Environment (if applicable) ............................................................... 44 12.3 Send a Test Batch .......................................................................................................................... 45 12.4 Setup Batch Processing in SEVIS Production Environment .................................................................... 46
13.0 Configure The International Office Module to Communicate with SEVIS Batch ........................................... 47 13.1 Acquire a Digital Certificate ............................................................................................................. 47 13.2 Export Digital Certificate ................................................................................................................. 47 13.3 Convert .pfx Certificate to .pem Certificate ........................................................................................ 48
Install OpenSSL ........................................................................................................................................................... 48 Convert to .pem ......................................................................................................................................................... 49
13.4 Upload the .pem Certificate to SEVIS ................................................................................................ 49 13.5 Update the Application With the New Certificate Information .............................................................. 49 13.6 Create PDSO / RO Account .............................................................................................................. 50 13.7 Troubleshooting SEVIS Batching ....................................................................................................... 50
14.0 Data Conversion ................................................................................................................................ 52 15.0 sunapsis® Team Site Visit .................................................................................................................... 58 16.0 Voluntary Product Accessibility Template (VPAT) ................................................................................... 59
16.1 Software Applications and Operating Systems – Detail ........................................................................ 59 16.2 Web-based Internet Information and Applications – Detail .................................................................. 61
17.0 Service Level Agreement .................................................................................................................... 65 17.1 On-Going Support.......................................................................................................................... 65 17.2 Technical Support Contact Information ............................................................................................. 65
Appendix A .............................................................................................................................................. 66 A.1 DataSetType ................................................................................................................................... 66 A.1.a. RecordType ................................................................................................................................ 66 A.1.a.1. AssociatedIDNumbersListType .................................................................................................... 68 A.1.a.2. BiographicalType....................................................................................................................... 68 A.1.a.3. VisaCitizenshipType ................................................................................................................... 70 A.1.a.4. AdmissionListType/AdmissionType .............................................................................................. 71 A.1.a.5. ProgramListType/ProgramType ................................................................................................... 73 A.1.a.6 TermListType/TermType ............................................................................................................. 75 A.1.a.7. CourseListType/CourseType ....................................................................................................... 76 A.1.a.8. SAAType .................................................................................................................................. 77
Table of Contents 2

THE SUNAPSIS® 3 INTERNATIONAL OFFICE MODULE TECHNICAL GUIDE LAST REVISION 2013-12-10
A.1.a.11. StudentGroupListType/StudentGroupType .................................................................................. 77 A.1.a.10. StudentHoldListType/StudentHoldType ...................................................................................... 78 A.1.a.11 StudentVisitListType/StudentVisitType ........................................................................................ 78 A.1.a.12. ToeflListType/ToeflType ........................................................................................................... 79 A.1.a.13. EmployeeListType/EmployeeType .............................................................................................. 79 A.1.a.14. PaycheckListType/PaycheckType ............................................................................................... 81 A.1.b. EmailType .................................................................................................................................. 82
Appendix B .............................................................................................................................................. 83 B.1 Academic Career ............................................................................................................................. 83 B.2 Academic Level ............................................................................................................................... 83 B.3 Academic Program Status ................................................................................................................. 84 B.4 Country ......................................................................................................................................... 85 B.5 Gender .......................................................................................................................................... 98 B.6 Enrollment Status ............................................................................................................................ 98 B.7 Employee Status ............................................................................................................................. 98 B.8 Employee Regular / Temporary ......................................................................................................... 99 B.9 Employee Time ............................................................................................................................... 99 B.10 Ethnicity ....................................................................................................................................... 99 B.11 Marital Status .............................................................................................................................100 B.12 Institutional Major - CIP Major ......................................................................................................100 B.13 Residency Status .........................................................................................................................100 B.14 Visa 100
Table of Contents 3

THE SUNAPSIS® 3 INTERNATIONAL OFFICE MODULE TECHNICAL GUIDE LAST REVISION 2013-12-10
TABLE OF FIGURES
Table 1 - Distribution files ..................................................................................................................... 6 Table 2 - Server Requirements ............................................................................................................. 7 Table 3 - Client Workstation Requirements ........................................................................................ 8 Table 4 - Scheduled Tasks ................................................................................................................... 20 Table 5 - Campus Information Configurations .................................................................................. 40 Table 6 - Alert Configurations ............................................................................................................. 43 Table 7 - Section 1194.21 VPAT ......................................................................................................... 61 Table 8 - Section 1194.22 VPAT ......................................................................................................... 64 Table 9 - Contact Information ............................................................................................................ 65
Table of Figures 4
THE SUNAPSIS® 3 INTERNATIONAL OFFICE MODULE TECHNICAL GUIDE LAST REVISION 2013-12-10
INTRODUCTION
This is the International Office Module (Powered by sunapsis®) Technical Guide. This guide provides a step-by-step process on how to install and configure the application. Most of this guide needs to be completed by an IT staff member, though specific parts (especially those regarding the data feed) will require collaboration between the IT staff and the international office. Although we have strived to create an exhaustive guide that details every step sufficiently, please feel free to contact our support team anytime you have questions or need clarification on any of the steps.
Introduction 5
THE SUNAPSIS® 3 INTERNATIONAL OFFICE MODULE TECHNICAL GUIDE LAST REVISION 2013-12-10
1.0 DISTRIBUTION FILES
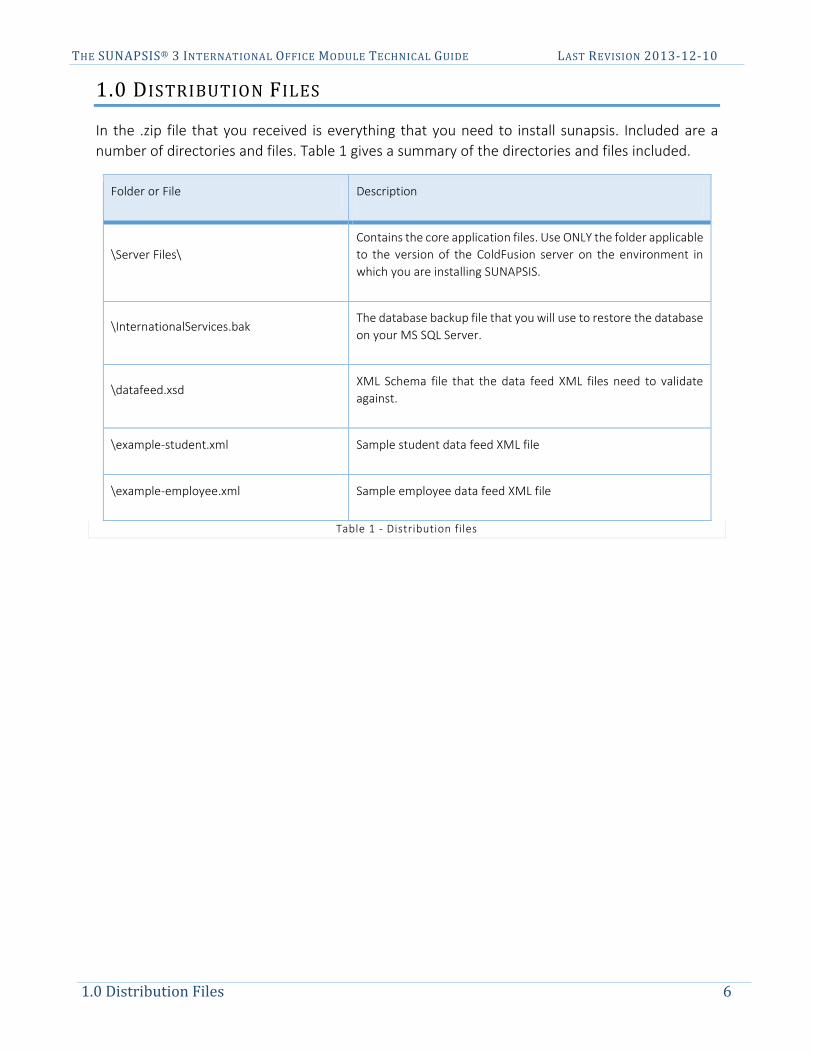
In the .zip file that you received is everything that you need to install sunapsis. Included are a number of directories and files. Table 1 gives a summary of the directories and files included.
Folder or File Description
\Server Files\ Contains the core application files. Use ONLY the folder applicable to the version of the ColdFusion server on the environment in which you are installing SUNAPSIS.
\InternationalServices.bak The database backup file that you will use to restore the database on your MS SQL Server.
\datafeed.xsd XML Schema file that the data feed XML files need to validate against.
\example-student.xml Sample student data feed XML file
\example-employee.xml Sample employee data feed XML file
Table 1 - Distribution files
1.0 Distribution Files 6
THE SUNAPSIS® 3 INTERNATIONAL OFFICE MODULE TECHNICAL GUIDE LAST REVISION 2013-12-10
2.0 SYSTEM REQUIREMENTS
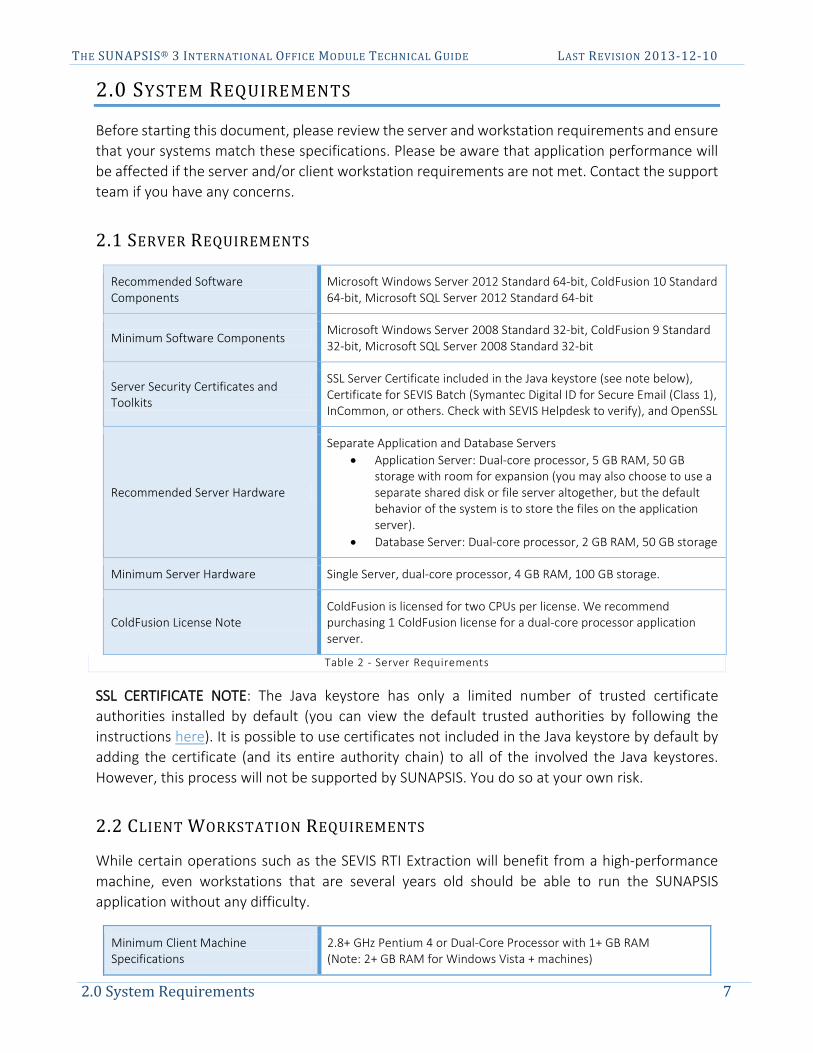
Before starting this document, please review the server and workstation requirements and ensure that your systems match these specifications. Please be aware that application performance will be affected if the server and/or client workstation requirements are not met. Contact the support team if you have any concerns.
2.1 SERVER REQUIREMENTS
Recommended Software Components
Microsoft Windows Server 2012 Standard 64-bit, ColdFusion 10 Standard 64-bit, Microsoft SQL Server 2012 Standard 64-bit
Minimum Software Components Microsoft Windows Server 2008 Standard 32-bit, ColdFusion 9 Standard 32-bit, Microsoft SQL Server 2008 Standard 32-bit
Server Security Certificates and Toolkits
SSL Server Certificate included in the Java keystore (see note below), Certificate for SEVIS Batch (Symantec Digital ID for Secure Email (Class 1), InCommon, or others. Check with SEVIS Helpdesk to verify), and OpenSSL
Recommended Server Hardware
Separate Application and Database Servers • Application Server: Dual-core processor, 5 GB RAM, 50 GB
storage with room for expansion (you may also choose to use a separate shared disk or file server altogether, but the default behavior of the system is to store the files on the application server).
• Database Server: Dual-core processor, 2 GB RAM, 50 GB storage
Minimum Server Hardware Single Server, dual-core processor, 4 GB RAM, 100 GB storage.
ColdFusion License Note ColdFusion is licensed for two CPUs per license. We recommend purchasing 1 ColdFusion license for a dual-core processor application server.
Table 2 - Server Requirements
SSL CERTIFICATE NOTE: The Java keystore has only a limited number of trusted certificate authorities installed by default (you can view the default trusted authorities by following the instructions here). It is possible to use certificates not included in the Java keystore by default by adding the certificate (and its entire authority chain) to all of the involved the Java keystores. However, this process will not be supported by SUNAPSIS. You do so at your own risk.
2.2 CLIENT WORKSTATION REQUIREMENTS
While certain operations such as the SEVIS RTI Extraction will benefit from a high-performance machine, even workstations that are several years old should be able to run the SUNAPSIS application without any difficulty.
Minimum Client Machine Specifications
2.8+ GHz Pentium 4 or Dual-Core Processor with 1+ GB RAM (Note: 2+ GB RAM for Windows Vista + machines)
2.0 System Requirements 7

THE SUNAPSIS® 3 INTERNATIONAL OFFICE MODULE TECHNICAL GUIDE LAST REVISION 2013-12-10
Client Software Requirements Windows XP+, Mac OS 10.7.3+, Java Runtime (JRE) 7_u25+ (use 32-bit version ONLY), Adobe Acrobat Reader
Required Plug-in for Mac OSX Support
If running Mac OSX, the Schubert-It PDF Browser Plugin is required for SEVIS RTI use. Please download at: http://www.schubert-it.com/pluginpdf/
Table 3 - Client Workstation Requirements
3.0 DATABASE INSTALLATION
This process installs the database structure used for the application onto your database server. These steps assume that you already have installed Microsoft SQL Server 2008, 2008R2 or 2012 Standard on the server. If you have not installed it yet, please do so before continuing with this section (screenshots are from SQL Server 2012, but 2008 is similar).
Database Backup File: InternationalServices.bak Database File Type: SQL Server Database Backup
1. Launch the SQL Server Management Studio.
2. Connect to Server Database Engine using SQL Server Authentication.
3. Right click on ‘Databases’ and select ‘Restore Database…’
3.0 Database Installation 8

THE SUNAPSIS® 3 INTERNATIONAL OFFICE MODULE TECHNICAL GUIDE LAST REVISION 2013-12-10
4. Source Device: <path to InternationalServices.bak>. Destination Database: InternationalServices
3.0 Database Installation 9
THE SUNAPSIS® 3 INTERNATIONAL OFFICE MODULE TECHNICAL GUIDE LAST REVISION 2013-12-10
5. Click ‘OK’ and the database is restored.
6. Press F5 to refresh your database listing on the server.
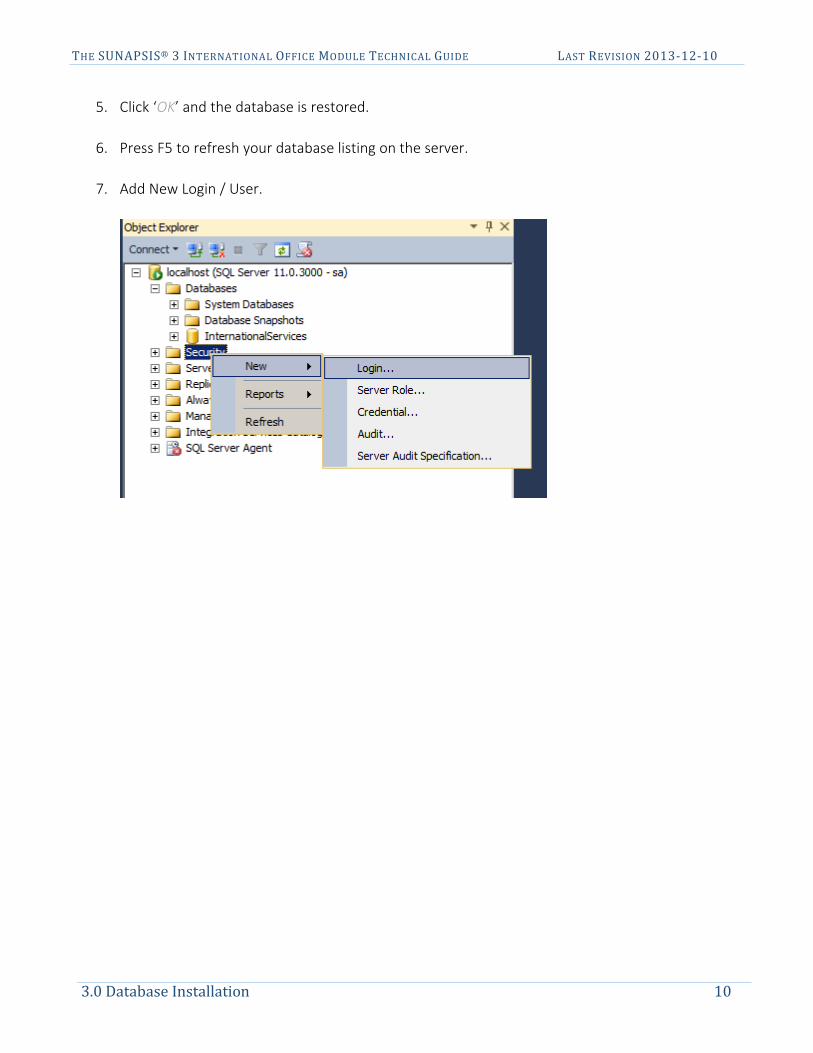
7. Add New Login / User.
3.0 Database Installation 10

THE SUNAPSIS® 3 INTERNATIONAL OFFICE MODULE TECHNICAL GUIDE LAST REVISION 2013-12-10
a. Login Name: InternationalServices-User b. Select SQL Server Authentication and create a password. c. Uncheck “Enforce password policy.” d. Default Database: InternationalServices e. Do not click OK yet!
8. Go to ‘User Mapping’ and select the database ‘InternationalServices.’
3.0 Database Installation 11

THE SUNAPSIS® 3 INTERNATIONAL OFFICE MODULE TECHNICAL GUIDE LAST REVISION 2013-12-10
9. Select ‘db_datareader,’ ‘db_datawriter,’ and ‘db_ddladmin’ roles. You can leave “public” checked. Click OK.
3.0 Database Installation 12

THE SUNAPSIS® 3 INTERNATIONAL OFFICE MODULE TECHNICAL GUIDE LAST REVISION 2013-12-10
10. Open the InternationalServices-User profile inside the InternationalServices database, and go to ‘Securables’ to grant the user access to execute the stored procedures used by the application which include the following: dataFeedCore dataFeedCoreChecklist dataFeedReindex spCreateEFormGroup spGeneratePIN
a. Click on ‘Search…’ ‘Specific objects…’, ‘OK’ ‘Object Types…’ ‘Stored Procedures’ ‘Browse’ Select the above stored procedures:
3.0 Database Installation 13
THE SUNAPSIS® 3 INTERNATIONAL OFFICE MODULE TECHNICAL GUIDE LAST REVISION 2013-12-10
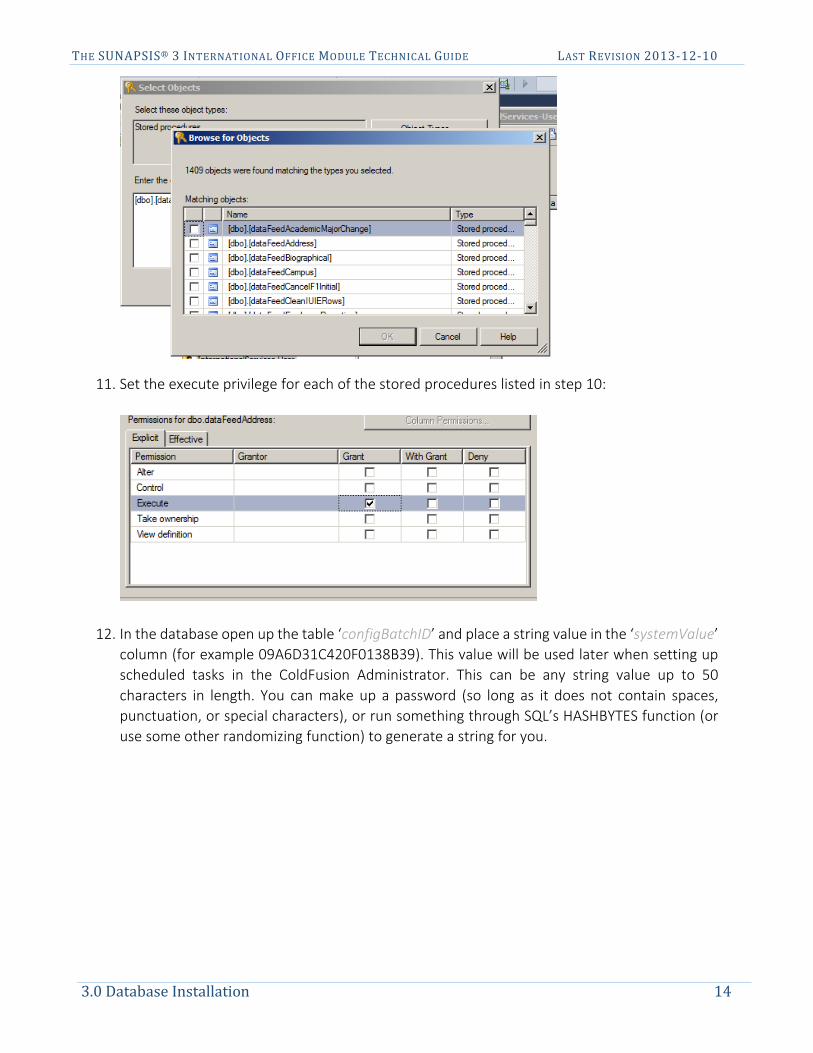
11. Set the execute privilege for each of the stored procedures listed in step 10:
12. In the database open up the table ‘configBatchID’ and place a string value in the ‘systemValue’ column (for example 09A6D31C420F0138B39). This value will be used later when setting up scheduled tasks in the ColdFusion Administrator. This can be any string value up to 50 characters in length. You can make up a password (so long as it does not contain spaces, punctuation, or special characters), or run something through SQL’s HASHBYTES function (or use some other randomizing function) to generate a string for you.
3.0 Database Installation 14

THE SUNAPSIS® 3 INTERNATIONAL OFFICE MODULE TECHNICAL GUIDE LAST REVISION 2013-12-10
4.0 SERVER INSTALLATION
This process installs the server files used by the application and configures the server SSL and MIME types.
4.1 CONFIGURE SERVER FOR SSL AND MIME TYPES
1. Set up the website on the web server. Be sure to set up the initial server infrastructure so that this will be run as an independent website and not a directory of an existing site. Therefore a URL should look something like https://istart.iu.edu/ and not something like https://intl.iu.edu/istart/. This is important because ColdFusion will need to locate files based upon the given structure being applied to a root site.
2. Install a standard SSL server certificate that is in the default Java keystore, like VeriSign or Thawte. (Please see SSL Certificate Note in Section 2.1 for more details)
3. Install the OpenSSL binary distribution at http://www.openssl.org/related/binaries.html or
http://www.slproweb.com/products/Win32OpenSSL.html and download the latest version of OpenSSL (currently v1.0.1e). Make sure to download the appropriate version for your system architecture (Win32 for 32-bit Windows, Win64 for 64-bit Windows).
4. To test if OpenSSL was installed correctly, open a command prompt and type ‘openssl.’
5. If your prompt changes to ‘OpenSSL>’ it was installed properly. If you receive an error,
download and install the appropriate version of ‘Visual C++ 2008 Redistributables’ for your computer (x64 for 64-bit Windows). Links for this download are found on the same page as OpenSSL. Also, ensure that the openssl directory is in the PATH.
6. Ensure that the IIS server has the MIME types for file serving. Go to ‘Admin Tools’ ‘Internet
Services Manager’ Select the website properties ‘HTTP headers’ ‘MIME types’ and enter the following:
a. .jnlp application/x-java-jnlp-file b. .swf application/x-shockwave-flash
4.2 INSTALL SERVER FILES
Copy the contents under the ‘Server Files’ directory (not including that directory) into the root for the website. These include the following directories: dashboard\, ioffice\, istart\, jre\, and orient\, and also all of the standalone files (index.cfm, review.cfm, etc.).
4.0 Server Installation 15

THE SUNAPSIS® 3 INTERNATIONAL OFFICE MODULE TECHNICAL GUIDE LAST REVISION 2013-12-10
4.3 CONFIGURE READ/WRITE/EXECUTE PRIVILEGES
1. Enable write access to the following directories and their sub-directories for the user that ColdFusion is running as (if you are using the default ColdFusion installation, this is SYSTEM, and you shouldn’t need to do anything here):
a. \ioffice\batch\ b. \ioffice\pdfs\
2. Verify that CGI execute access to the following directories is enabled (this is the default setting in IIS):
a. \jre\ b. \ioffice\batch\datafeed\
3. Disable CGI execute access to the following directory and sub-directories:
a. \ioffice\pdfs\content\
4.0 Server Installation 16

THE SUNAPSIS® 3 INTERNATIONAL OFFICE MODULE TECHNICAL GUIDE LAST REVISION 2013-12-10
5.0 COLDFUSION ADMINISTRATOR SETTINGS
This process uses the ColdFusion Administrator to configure settings, create scheduled tasks, and setup a database connection. These steps assume that you already have installed ColdFusion 9 or 10 Standard on the server. If you have not installed it yet, please do so before continuing with this section.
Note: If you run the ColdFusion server on the same machine as a .NET framework there may be issues with web services conflicts. This was encountered at Indiana University about 2 years ago. There have been upgrades by ColdFusion and .NET since that time that may render this warning irrelevant, but we have not tested it again because we moved onto a virtual server space. If you install .NET on your server, you do so at your own risk.
5.1 CONFIGURE JAVA & JVM
1. Open the ColdFusion Administrator website (<baseURL>/CFIDE/administrator/index.cfm)
2. Click on ‘Server Settings’ ‘Java and JVM.’
3. Update ‘Minimum JVM Heap Size (MB)’ to 3072 (64-bit servers) or 1024 (32-bit servers).
4. Update ‘Maximum JVM Heap Size (MB)’ to 3072 (64-bit servers) or 1280 (32-bit servers).
5. The default JVM arguments for ColdFusion 9 and 10 are different from each other. Starting with the default set, make adjustments to the arguments as follows. Make sure that when you are done, there are no line break characters in the text, and that there is a space before each hyphen (unless it is at the beginning of a line). Copying the original block into Notepad can help with this. Getting these parameters wrong will result in an inability to run the ColdFusion Application Server. If you are unsure of these steps, please contact SUNAPSIS Support for assistance.
1. Remove –Xbatch 2. Add -Dsun.io.useCanonCaches=false 3. Add -Dsun.rmi.dgc.client.gcInterval=600000 4. Add -Dsun.rmi.dgc.server.gcInterval=600000 5. On 64-bit servers, set –XX:MaxPermSize=256m (this parameter should already exist,
you just need to change the number at the end)
5.2 REQUEST TUNING FOR PERFORMANCE
1. Expand the ‘Server Settings’ menu item.
2. Click on ‘Settings’ and ensure ‘Enable Global Script Protection’ is checked.
5.0 ColdFusion Administrator Settings 17

THE SUNAPSIS® 3 INTERNATIONAL OFFICE MODULE TECHNICAL GUIDE LAST REVISION 2013-12-10
3. If you’re using ColdFusion 10, set the ‘Maximum number of POST request parameters’ to 750. If you are using ColdFusion 9, you will need to edit this setting in an XML file instead. Please follow the instructions below:
In the ColdFusion installation directory (C:\ColdFusion\), go to \lib, and open neo-runtime.xml as an Administrator. Search for the text <var name='postSizeLimit'><number>100.0</number></var> Immediately after that line, add the following: <var name='postParametersLimit'><number>750</number></var> and save the file.
4. Click on ‘Request Tuning’ and update the fields in the Request Limits section to the following
values:
Maximum number of simultaneous Template requests: 40 Maximum number of simultaneous Flash Remoting requests: 5 Maximum number of simultaneous Web Service requests: 5 Maximum number of simultaneous CFC function requests: 10 Note: These are guidelines based on the recommended server specifications in Section 2.1. If your server setup differs, or if you have an exceptionally large international population to manage and you are experiencing performance issues, please contact the Support Team to discuss possible solutions or adjustments to these guidelines.
5. Click on ‘Caching’ and ensure that ‘Save class files’ and ‘Trusted cache’ are checked and ‘Cache web server paths’ is unchecked. Component cache should be checked by default, and that’s fine. It will cache a copy of the ColdFusion files on the server. Under normal circumstances this is desirable, especially in a production environment. However, if you are developing your own alerts, e-form extensions, or other custom ColdFusion components, you will need to come back to this page and clear the component cache in order to test those files out – otherwise, the original, possibly broken, version of your custom component will be cached on the server. Keep in mind that clearing the cache can cause temporary (albeit significant) performance hits that will affect both the web services and Java application. Therefore, it is recommended that you wait until after business hours to clear the component cache.
5.3 SETUP MAIL SERVER SETTINGS
1. Click on ‘Mail.’
2. Input the settings for your mail server in ‘Mail Server,’ ‘User name,’ and ‘Password.’
5.0 ColdFusion Administrator Settings 18

THE SUNAPSIS® 3 INTERNATIONAL OFFICE MODULE TECHNICAL GUIDE LAST REVISION 2013-12-10
5.4 COLDFUSION DATABASE CONFIGURATION
1. Click on ‘Data & Services’ ‘Data Sources’ and create a new data source using the following information (Note: the CF Data Source Name is required to be the one listed below. The application will not know which database to connect to if you call it something else):
CF Data Source Name: LocalInternationalServicesMssql Database: InternationalServices Server: <Your database server’s hostname or IP Address> Port: 1433 Username: InternationalServices-User Password: ***********************
2. Click ‘Show Advanced Settings.’
3. Check the box for ‘-- Enable long text retrieval (CLOB)’
4. Ensure under ‘Allowed SQL’ that all checkboxes are checked (SELECT, INSERT, UPDATE, etc.).
5.5 CREATE SCHEDULED TASKS
For Coldfusion9, click on ‘Debugging & Logging’ ‘Scheduled Tasks’ ‘Schedule New Task.’ For Coldfusion10, ‘Scheduled Tasks’ is under ‘Server Settings.’ You will need to click on ‘Schedule New Task’ to setup each task. Table 5 lists the information you need to setup each task (<configBatchID> is the value you entered into the database on step 14 of Section 3.0 Database Install; this provides a basic level of security for the execution requests):
Task Name Frequency URL Examples (Change the baseURL and configBatchID value for each necessary path)
Institutional XML Data Feed
Recurring Daily at TBA <baseURL>/ioffice/batch/DataFeedXMLImportApplication.cfm?id=<configBatchID>
SEVIS Download Batch
Daily every 55 minutes from 5:00 AM to 7:00 AM
<baseURL>/ioffice/batch/SEVISDownloadApplication.cfm?id=<configBatchID>
SEVIS Upload Batch Daily every 55 minutes from 8:00 PM to 10:00 PM
<baseURL>/ioffice/batch/SEVISUploadApplication.cfm?id=<configBatchID>
5.0 ColdFusion Administrator Settings 19

THE SUNAPSIS® 3 INTERNATIONAL OFFICE MODULE TECHNICAL GUIDE LAST REVISION 2013-12-10
Build Alert History Recurring Daily at 1:00 AM <baseURL>ioffice/batch/ProcessAlertHistoryApplication.cfm?id=<configBatchID>
Read International Office Module Email
Recurring Daily at 12:15 AM <baseURL>/ioffice/batch/ReadIOfficeEmailApplication.cfm?id=<configBatchID>
Send Queued Communications
Set this to about 15 minutes after your data feed normally finishes (check the DataFeedXMLImportApplication.done file in \ioffice\batch\bat\ once you have scheduled the data feed and it has run with a good sample size of data several days in a row). This task is only important after your office has configured checklists (and specifically, checklist communication rules) which will happen later in the implementation process—just remember to come back to this eventually!)
<baseURL>/ioffice/batch/SendQueuedCommunicationsApplication.cfm?id=<configBatchID>
Table 4 - Scheduled Tasks
PLEASE NOTE: Ensure that you have properly set up the folder permissions in Subsection 4.1 or these scheduled tasks will not run properly. Also be sure that <baseURL> is the exact same URL for which your SSL certificate was created.
5.0 ColdFusion Administrator Settings 20

THE SUNAPSIS® 3 INTERNATIONAL OFFICE MODULE TECHNICAL GUIDE LAST REVISION 2013-12-10
6.0 CONFIGURE FOR MULTI-SERVER ENVIRONMENT
There are two main parts of the application: the online services for students, scholars, and university departments; and the administrative application. If desired, these two different pieces of the application can be set up to run on different servers. The reason this is sometimes desired is that the online services are of most use when they can be accessed outside the university firewall, i.e. accessed from anywhere in the world. For some institutions this public access is unacceptable on a server that houses student data. Please follow the below steps to set up the multi-server environment.
1. Setup the website on the new web server. Be sure to setup the initial server infrastructure so that this will be run as an independent website and not a directory of an existing site. Therefore a URL should look something like https://istart.iu.edu/ and not like https://intl.iu.edu/istart/. This is important because ColdFusion will need to locate files based upon the given structure being applied to a root site.
2. Install a SSL server certificate. Please note, that for this additional server it does not have to be a standard certificate from VeriSign or Thawte as the other server requires.
3. Ensure that the IIS server has the MIME types for file serving. Go to ‘Admin Tools’ ‘Internet Services Manager’ Select the website properties ‘HTTP headers’ ‘MIME types’ and enter the following: a. .swf application/x-shockwave-flash
4. Install the necessary server files. a. Copy the /istart/ directory to the client server. b. Create an /ioffice/ directory on the client server. c. Copy /ioffice/contego/ onto the client server. d. (Optional) There are a set of public online charts and graphs. To enable access to these
outside the university firewall, also copy the /dashboard directory onto the root of the server.
5. Apply all the settings found in Sections 5.1, 5.2, 5.3, and 5.4 to the new server.
6. In the database, update the table ‘configIOfficeBasePath’ with the URL for the server for the admin online services. Exclude the protocol from this URL. (ex., sunapsis.iu.edu, NOT https://sunapsis.iu.edu)
6.0 Configure for Multi-Server Environment 21

THE SUNAPSIS® 3 INTERNATIONAL OFFICE MODULE TECHNICAL GUIDE LAST REVISION 2013-12-10
7.0 AUTHENTICATION PROCESS
Before you can run the application or use the online protected web services, an authentication layer must be implemented. The authentication process is different at each institution. Some institutions authenticate against an LDAP server, while others use a single-sign on service such as Central Authentication Service (CAS) or CoSign. We will work closely with you to develop a solution that meets your institution’s requirements.
7.1 SINGLE-SIGN ON
If your institution uses a single-sign on solution such as CAS, Shibboleth, or CoSign, we will work with you to decide how best to move forward implementing your sign on with the online services. Please inform the support team that you would like to use this method of authentication and which SSO your institution uses. We will then be able to tell you what information (if any) we require.
7.2 LDAP AUTHENTICATION
Below is a sample LDAP query. If you want to use an LDAP query, please replace the highlighted information with the appropriate values for your institution and email the query to the support team. We will create a login script for you to test. If your LDAP server requires a bind query first, please let us know that, and the information for that query as well. You do not need to share your password with us – we will tell you where to put it in the file instead.
<cfldap action="query" server="ldap.indiana.edu" port="636" secure="CFSSL_BASIC" scope="subtree" name="results" start="dc=indiana,dc=edu" filter="sAMAccountName=#FORM.username#" username="sAMAccountName=#FORM.username#,ou=People,dc=indiana,dc=edu" password="#FORM.password#" attributes = "sAMAccountName">
Port 636 is the standard port for secure communication with an LDAP server. If you do not require a secure connection to your LDAP server, the standard port is 389.
In the login files that will be sent to you, there will be a very basic HTML form with username and password fields. You can edit this page as needed to match your institution’s visual identity.
7.0 Authentication Process 22

THE SUNAPSIS® 3 INTERNATIONAL OFFICE MODULE TECHNICAL GUIDE LAST REVISION 2013-12-10
8.0 USER SETUP
After the authentication process is working correctly, you need to launch the application to set up the first user account for the international office.
8.1 CREATE NEW RECORDS IN DATABASE
1. From the database, execute the stored procedure ‘spIOfficeRoleUpdate’.
2. From the database, open the table, ‘IOfficeUsers.’
3. Create a new record. In the ‘username’ field, insert the username that your authentication system is passing to sunapsis after logging in (generally your LDAP or Single-sign on username, but perhaps something else).
4. In the ‘name’ field, put in your name. In the rest of the fields, you can insert a blank space
(nulls are not allowed).
5. Open the ‘IOfficeUsersRoles’ table.
6. Create a new record. In the ‘username’ field, insert the same username as above. In the ‘role’ field, insert ‘R000’.
8.2 CREATE INITIAL USER ACCOUNTS
Now you can launch the application and use the User Management tool inside the program to edit your own user profile and to create a new account for the person who will be managing users in the international office.
EDI T YOU R US ER PRO FI LE
1. Go to <baseURL>/istart/controllers/admin/AdminEngine.cfm to login. After logging in, click on ‘Launch the sunapsis®: International Office Module’ in the middle of the page.
2. If you do not have the correct version of Java (Java 7) installed, the application will fail to
launch. You will have to install it now. Please see Section 2.2 for additional instructions.
3. If asked if you want to trust the program or run the application, say yes.
4. After the program launches, click on ‘Administrative Management’ ‘User Profile Management’. This will open the User Profile Management tool. Double-click on NA to expand that subtree, and then Double-click on your name to open your profile.
8.0 User Setup 23

THE SUNAPSIS® 3 INTERNATIONAL OFFICE MODULE TECHNICAL GUIDE LAST REVISION 2013-12-10
5. The first tab that it opens up to is your user profile. Input your information and click ‘Save Profile.’ Session ID and End Date will be automatically populated.
6. After this process is complete, close your user profile.
CR EAT E A NEW PRO FI LE
Normally, the person going through this document is not the person who will be managing users in the application. If that is the case, you can now create a profile for the person who will be managing users. If you will be the one managing users, you can skip this subsection.
1. Click on the green plus icon to add a new user.
2. In the dialog box that pops up, type the username value for the user and click ‘OK.’
8.0 User Setup 24

THE SUNAPSIS® 3 INTERNATIONAL OFFICE MODULE TECHNICAL GUIDE LAST REVISION 2013-12-10
3. Fill out the information on the ‘Profile’ tab and click the save icon on that tab.
4. On the ‘Role’ tab, select ‘Basic Permissions Required for All Users’. Click the save icon. Click the
New icon (on that tab) to add another role. Select ‘User Management’, and click Save. This set of roles will allow the user to launch the application, and to edit user permissions, but nothing else. Add additional roles as necessary.
The standard set of roles for a DSO is ‘Basic Permissions Required for All Users’, ‘Core Student Records’, ‘Embedded Browser’, and ‘SEVIS Records’.
5. After the process is complete, you can close the user profile.
8.3 EDIT SYSTEM USER ACCOUNT
1. In the User Profile Management Tool, expand the ‘SYSTEM’ tree, and double-click on the ‘System Admin’ account.
2. In the ‘E-mail Address’ field, input an email address (normally a group-accessible email account, or a distribution list email address). An email will be sent to this address when there are certain errors with the application (such as the data feed process).
8.0 User Setup 25

THE SUNAPSIS® 3 INTERNATIONAL OFFICE MODULE TECHNICAL GUIDE LAST REVISION 2013-12-10
3. On the ‘Roles’ tab, select the ‘Full Privileges’ role, and click the save button.
4. After this process is complete, you can close the user profile and the User Profile Management
Tool.
8.0 User Setup 26

THE SUNAPSIS® 3 INTERNATIONAL OFFICE MODULE TECHNICAL GUIDE LAST REVISION 2013-12-10
9.0 ENCRYPTION CONFIGURATION
These instructions are only intended for clients performing an initial install.
If you are currently are running sunapsis in production and want to use encryption, contact the sunapsis support team for assistance with this. The instructions below do not detail the extra steps involved in preforming a conversion
As with any encryption method, there exists the possibility to lose all encrypted data; great care must be given to a key management strategy and testing before use.
9.1 BACKGROUND
Encryption in sunapsis is set to use AES 128 bit encryption. When configured and enabled, sunapsis will encrypt all files that are uploaded into the system as well as a number pre-defined fields in the database (Passport Numbers, Social Security Numbers, etc.).
These are listed in the table below.
Table Field
configEmailPassword password
formI129 individualTaxNumber
formI129 employerSSN
formI129 passportNumber
formI129 ssn
formI129DataCollection ssn
formI140 ssn
formI140 alienSSN
IOfficeEmailAccount password
IStartGeneralSetup orientationLoginPassword
IStartOrientationSetup orientationLoginPassword
jbPassport passnum
jbVisaInfo visastamp
jbVisaInfo Controlnumber
9.0 Encryption Configuration 27

THE SUNAPSIS® 3 INTERNATIONAL OFFICE MODULE TECHNICAL GUIDE LAST REVISION 2013-12-10
sevisCertPhrase certPhrase
In addition, for any E-Form that one may create in the system, one can specify which fields to encrypt for them as well.
Additionally by enabling encryption, an extra feature is available in the Java application, which is the ability to upload a wider range of documents in to the system than just image files. In particular one is able to upload the following:
File Type File Extension(s)
Microsoft Word doc, docx
Microsoft Excel xls, xlsx
Microsoft PowerPoint ppt, pptx
Microsoft Outlook Messages Msg
HTML Txt
Plain Text htm, html
HOW EN CRYP TION LOO KS TO US ERS
From an end user perspective, all the encryption and decryption is all done transparently. The unencrypted fields and files can only be viewed via sunapsis.
On the fileserver where the files are stored, the files are always stored encrypted. When uploading, the system copies the requested file to a ‘working’ directory (separate from where the files are stored) where it is then encrypted and moved to the file store; when viewing a file, the system copies the requested file to a ‘working’ directory (separate from where the files are stored), decrypted, and then served to the client, when no longer in use it is deleted.
The system is automatically configured to delete any file in this ‘working’ directory after 15 minutes, to account for cases in which it is not deleted as soon as it is no longer in use.
As a note, sunapsis will use this ‘working’ directory regardless if encryption is enabled or not.
It is important to note there is no method for viewing the encrypted data stored in the database when querying the database directly.
9.0 Encryption Configuration 28

THE SUNAPSIS® 3 INTERNATIONAL OFFICE MODULE TECHNICAL GUIDE LAST REVISION 2013-12-10
9.2 INITIAL SETUP
As with any encryption method, there exists the possibility to lose all encrypted data; great care must be given to a key management strategy.
KEY MAN A GEMEN T
For the key itself, we provide you with the option to keep it in once piece or be broken into several pieces.
For the option of having the encryption key in one piece, this option will store the key in the database.
For the option of having the encryption key in three pieces, this option will store
• Part one in a password protected and encrypted PDF file on the application server in a web inaccessible directory.
• Part two in a password protected and encrypted PDF file on the application server in a different web inaccessible directory.
• Part three in a database table.
Also, you will want to consider how many days you want sunapsis to keep processed SEVIS batch files and unprocessed SEVIS batch files before they are deleted.
During this time, it recommended to develop plans for changing the encryption keys on a regular basis, or in the case of the key becoming compromised.
• Plan to run a re-keying of both the files and the encrypted fields on a regular basis (e.g. every two years)
• Verification steps to ensure complete re-keying before purging of old keys.
• Policy in place to require re-keying in the event of any comprise of any key part.
It is also recommended during this time, work to develop plans for data retention policies paying attention to the key points of:
• Important to develop, and keep updated, data use and retention policies.
• Ensure policies identify clear requirements for highly critical data (i.e. federal regulations).
• Ensure policies identify clear requirements for the retention schedule.
• Implement process to review and purge sensitive data on that retention schedule.
9.0 Encryption Configuration 29

THE SUNAPSIS® 3 INTERNATIONAL OFFICE MODULE TECHNICAL GUIDE LAST REVISION 2013-12-10
REVI EW E-FOR MS
As sunapsis allows one to create their own E-Forms, which can be used to collect a wide range of data, one then needs to configure E-Forms in such a way so sunapsis is aware of which fields might contain sensitive information, such as Passport numbers.
In order to do this, for each E-Form in the system, go to ‘Form Design’ and then under each of ‘Client Form Design’, ‘Second Approver Form Design’ and ‘Internal Office Use Form Design’ inspect each field element in which you are collecting data.
For each field that is collecting sensitive information, ensure that the ‘conceal field view’ is checked. Any E-Form field with ‘conceal field view’ checked, will be encrypted.
It is important to note that for any E-Form made after encryption is enabled, any field that needs to be encrypted have ‘conceal field view’ checked in the E-Form design before making the E-Form available to clients.
If you forget to do so, or later decide that a field in an E-Form needs to be encrypted, the system will not automatically retroactively find previous E-Form submissions and encrypt that field. You will need to mark the field with the ‘conceal field view’ and then see section XXX for running a process to encrypt the previously unencrypted fields.
SERV ER CON FI G UR ATIO N
As sunapsis will use the ‘working’ directory it will automatically delete files from this directory as long as they are no longer in use, or in 15 minutes.
In rare cases, we have noticed that some files have file locks on them after several days for no apparent reason, thus we recommend daily/weekly server reboots to remove any file locks in order to allow files to be deleted.
If you have decided to use the option of splitting the key in the three parts, this next portion applies to you.
As noted above, this option stores two parts of the key in encrypted PDF files stored in two different locations. You will need to verify these directories exist, or create if needed.
The first directory is fixed and cannot be changed. You should have a directory ‘\ioffice\batch\contego\’ with one file in it, namely ‘web.config’. This will be where part 1 of the key will be stored eventually.
As this is an initial install of sunapsis for the first time at your organization, then you should have the directory structure ‘\ioffice\pdfs\content\’ already. In this ‘content’ directory you will need to create the directory named ‘000’, then copy the ‘contego’ directory from ‘\ioffice\batch\’ to the ‘000’ directory. It is this ‘ioffice\pdfs\content\000\contego\’ directory that part 2 of the key will be stored eventually.
9.0 Encryption Configuration 30

THE SUNAPSIS® 3 INTERNATIONAL OFFICE MODULE TECHNICAL GUIDE LAST REVISION 2013-12-10
9.3 ENCRYPTION CONFIGURATION
Configuration of encryption consists of three major portions
1. Generation of the encryption key(s) 2. Placement of the key(s) in the appropriate palaces 3. Configuration of encryption itself
KEY GEN ER ATIO N
To assist you in generating encryption keys for the method that you have decided on, we have provided a utility to generate the needed keys and/or encrypted PDF files.
Each time you go to this utility and generate a set of keys, new keys are generated. The keys that are displayed are not stored by Indiana University. There is no method we have to recover any key generated by this utility. It is your responsibility to safe guard and store all needed keys for your organization.
We highly recommend that you generate separate keys for your test and production environments.
This utility is accessed by going to the ‘Upgrade / Installation Procedures’ section of the sidebar in iStart and selecting ‘Generate Encryption Keys.’
Under the ‘Upgrade / Installation Procedures’ there is a menu item ‘Generate Encryption Keys’.
Once you have selected the number of key parts you want, the page that follows (in this example, the use of 3 key parts was selected) will show the key(s) and/or links to encrypted PDFs depending on the option you selected.
9.0 Encryption Configuration 31

THE SUNAPSIS® 3 INTERNATIONAL OFFICE MODULE TECHNICAL GUIDE LAST REVISION 2013-12-10
Also note, that this page contains a ‘verify’ link with will open in a new page which you can use to verify things are configured correctly, once the keys have been placed and encryption has been configured.
PLACEMEN T O F KEYS
The output of the utility generating the key(s) will specify what and where to place the key(s) depending on the method selected.
In either method, you will have to insert either the whole key or a key part in to the database. The utility will specify what will need to be stored in the database.
For the placement in to the database, you can use the following SQL code, with ‘KEY’ replaced with the utility specifies goes in to the configContego table.
For the ‘version’ field, we recommend using the 4 digit year as a version number.
INSERT INTO dbo.configContego ( systemValue, version, deprecated ) VALUES ( N' foobar ', -- systemValue - key N' 2020 ', -- version 0 -- indicator for old key )
If you selected the option for breaking the key into three parts, the PDFs need to be saved on the file system and the ColdFusion file needs to be modified to store the PDF Password.
9.0 Encryption Configuration 32

THE SUNAPSIS® 3 INTERNATIONAL OFFICE MODULE TECHNICAL GUIDE LAST REVISION 2013-12-10
CON FIG U RATI ON
The configuration options for encryption are found in ‘Encryption Management’ in the ‘Administrative Management’ menu.
The first section to verify is the ‘Security Key’ tab. From the steps above, you should have the key and the version already entered, which needs to match the output of the utility that generated your key.
The next section to configure is that of the ‘File Directory’, as shown below.
9.0 Encryption Configuration 33
THE SUNAPSIS® 3 INTERNATIONAL OFFICE MODULE TECHNICAL GUIDE LAST REVISION 2013-12-10
For this configuration, you must enter the full path to the directory in with files will be stored in the system. When configured you path should be similar to the following, where the highlighted portion will be specific to your server.
X:\InternationalServices\ioffice\pdfs
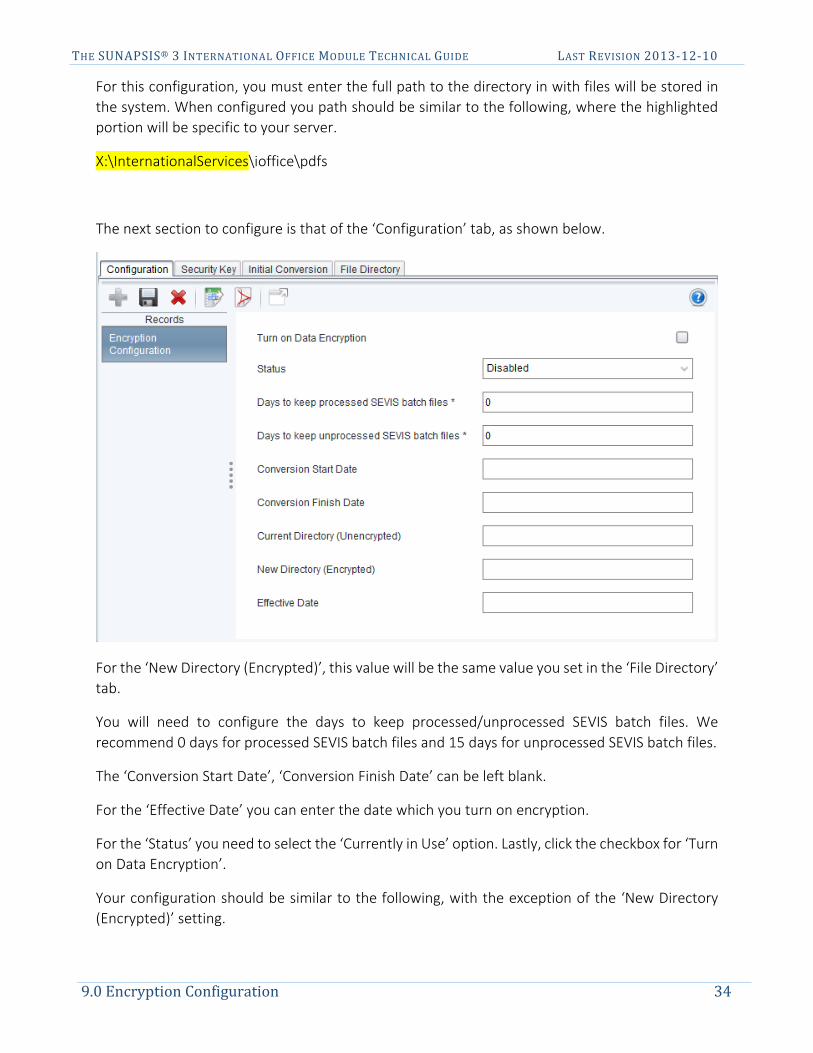
The next section to configure is that of the ‘Configuration’ tab, as shown below.
For the ‘New Directory (Encrypted)’, this value will be the same value you set in the ‘File Directory’ tab.
You will need to configure the days to keep processed/unprocessed SEVIS batch files. We recommend 0 days for processed SEVIS batch files and 15 days for unprocessed SEVIS batch files.
The ‘Conversion Start Date’, ‘Conversion Finish Date’ can be left blank.
For the ‘Effective Date’ you can enter the date which you turn on encryption.
For the ‘Status’ you need to select the ‘Currently in Use’ option. Lastly, click the checkbox for ‘Turn on Data Encryption’.
Your configuration should be similar to the following, with the exception of the ‘New Directory (Encrypted)’ setting.
9.0 Encryption Configuration 34

THE SUNAPSIS® 3 INTERNATIONAL OFFICE MODULE TECHNICAL GUIDE LAST REVISION 2013-12-10
VERI FI CA TION O F CON FIGU R ATION
Once all the configuration changes are made, we now can check the configuration using the ‘verify’ link provided in the utility that generated the encryption keys.
On this page one will see a number of checks that are performed. All checks not marked as optional should say ‘Yes’. If they do not, please double check the configuration.
This page will also perform a simple test of encrypting a string.
9.4 TEST AND VERIFICATION OF ENCRYPTION
Now that encryption is turned on and configured additional testing should be performed.
For this testing, you will need to create a test person in sunapsis. Once this record has been created you will want to test several things, namely
• Entering information into a record that encrypted fields, such as the passport number in the Passport Information. In sunapsis, you should be able to save this information, close and re-open it, and see the number you entered. In the database, looking at the passport number in jbPassport, one not see the passport number, but another string of letters and numbers.
9.0 Encryption Configuration 35

THE SUNAPSIS® 3 INTERNATIONAL OFFICE MODULE TECHNICAL GUIDE LAST REVISION 2013-12-10
• Uploading PDFs onto this record. In sunapsis, you should be able to open the PDF that you just uploaded with no issue. On the server where the files are stored, attempting to open the PDF directly should fail.
If this did not work as expected, please contact the sunapsis support team for assistance with this.
9.5 UPDATING ENCRYPTED FIELDS
If you forget to do so, or later decide that a field in an E-Form needs to be encrypted, the system will not automatically retroactively find previous E-Form submissions and encrypt that field.
As this process involves retroactively fining previously submitted E-Forms, please contact the sunapsis support team for assistance with this.
9.6 RE-KEYING
Sunapsis also has the ability to allow you to change the encryption keys currently in use.
As this process involves decrypting every file/database field with the old deprecated key and re-encrypting file/database field with the new key, please contact the sunapsis support team for assistance with this.
9.0 Encryption Configuration 36

THE SUNAPSIS® 3 INTERNATIONAL OFFICE MODULE TECHNICAL GUIDE LAST REVISION 2013-12-10
10.0 DATA FEED
The International Office Module pulls information from the institutional system via a daily data feed process. This is accomplished by generating an XML file from the institutional system that the application reads. For this process to work the system user account must be configured appropriately, the XML file needs to be in the correct folder with the correct name, and the XML files needs to validate against the schema file included in the distribution files, ‘datafeed.xsd.’
10.1 CREATE VALID XML FILE
Included in the distribution files are two example XML files, ‘example-student.xml’ and ‘example-employee.xml,’ and the XML schema, ‘datafeed.xsd.’ You need to create a data extraction process that will pull information from the institutional system into an XML file that will validate against the schema. This process varies widely from institution to institution, therefore writing a step-by-step process is not possible. Contact the support team if you have any questions about this process.
The XML files need to be placed on the server in the directory \ioffice\batch\datafeed\ with the file names specified in the database table, ‘configDataFeedXMLFileName.’ The defaults are ‘student.xml,’ ‘employee.xml,’ and ‘admission.xml.’ but you may add or remove filenames as required.
When the data feed process runs, if the file fails the schema, it will append ‘failure-’ to the front of the file name and an email will be sent to the email address specified in Section 8.3. If you do not have access to an XML editor that can test the validity of a file against a schema, you can send the file to the support team and we will run a validation test and inform you of the results. Please reference Appendix A for the data feed schema layout.
In addition, there is a mapping structure between the application and your institutional system that needs to be updated. Please reference Appendix B for the maps. You need to update this information in the application by clicking on ‘System Setup’ ‘Institutional System Mappings.’ Each of the individual mapping structures must be updated.
10.2 TEST THE DATA FEED
After you have created a valid XML file, placed it in the correct directory (\ioffice\batch\data feed\) with the correct file names (as referenced in ‘configDataFeedXMLFileName’), you can begin the testing process.
1. Launch the ColdFusion Administrator (found at <baseURL>/CFIDE/administrator/index.cfm).
2. Click on ‘Debugging & Logging’ ‘Scheduled Tasks.’
10.0 Data Feed 37

THE SUNAPSIS® 3 INTERNATIONAL OFFICE MODULE TECHNICAL GUIDE LAST REVISION 2013-12-10
3. On the ‘Institutional XML Data Feed’ process, click on the ‘Run Scheduled Task’ icon ( or) (left-most icon on the row). Note: A message saying “The scheduled task was completed successfully” means that ColdFusion successfully launched the Java application that runs the data feed. It does not mean that the data feed has actually finished, or will run successfully.)
The process can take several minutes or several hours, depending on how much data is being loaded. You can check the progress of the feed by looking on the server in the /ioffice/batch/bat/ directory. There you will find log files for the various scheduled tasks, including the data feed. The “Last Modified” dates for the DataFeedXMLImportApplica-tion.start and DataFeedXMLImportApplication.done files indicate when the feed last started and finished, respectively. Any activity that happens in between is recorded in DataFeed-XMLImportApplication.log, and can be viewed in any standard text editor.
4. Check the XML directory (\ioffice\batch\datafeed\). If the files you placed in there were removed, the data feed successfully processed.
5. You can check the application to make sure by clicking on ‘Application’ ‘Search International
Profiles’ and searching for a student that you had in the XML file.
6. If the file in the XML directory is still there, with the word ‘failure’ prepended to the file name, your file failed schematically. Please double check to make sure the XML file validates against the schema.
10.0 Data Feed 38

THE SUNAPSIS® 3 INTERNATIONAL OFFICE MODULE TECHNICAL GUIDE LAST REVISION 2013-12-10
11.0 APPLICATION CONFIGURATION
There are several settings in the application that need to be configured for your institution. This section outlines the settings that you need to configure. Open the application to complete the following steps.
11.1 CAMPUS INFORMATION
This setting sets the campus information in sunapsis. If you have multiple campuses, ensure that you input information for all of the campuses. The settings in this section can be found by clicking ‘General Configurations’ ‘Campus Configuration.’ If you only have one campus, you still need to complete this configuration. The campus code needs to match the value being sent in your data feed.
1. Click ‘Campus Code Configuration.’
2. Input the campus description and code (i.e. description: Bloomington and code: IUBLA for the IU Bloomington campus).
3. Click ‘Save.’
4. If you have multiple campuses, click ‘New’ and repeat the process for each campus.
5. After you have completed the ‘Campus Code Configuration,’ close the display.
6. Complete these steps for each configuration in the ‘General Configurations’ ‘Campus
Configuration’ menu structure. Table 6 lists a description of each configuration.
Campus / Office Information This sets information about each campus to be displayed online and in emails.
Map Campus Application Area
This sets the mapping of application area to campus. This is used to allocate certain application area responsibilities to particular campuses. If you have a single campus, you should have only one row in this configuration with the same campus for each area (i.e. F-1 Students, J-1 Students, J-1 Scholars, etc.). If you have multiple campuses, you should have a row for each campus. Each area (i.e. F-1 Students, J-1 Students, J-1 Scholars, etc.) should be mapped to the campus that will handle that area. For example, the IU South Bend Campus looks like the following: Specific Campus: South Bend Map for F-1 Students: South Bend Map for J-1 Students: South Bend Map for J-1 Scholars: South Bend Map for H-1B Employees: Bloomington
11.0 Application Configuration 39

THE SUNAPSIS® 3 INTERNATIONAL OFFICE MODULE TECHNICAL GUIDE LAST REVISION 2013-12-10
Map for Permanent Residency: Bloomington Map for Other: South Bend Map for Student Open Doors: South Bend
Total Campus Enrollment Information
This lists the total enrollment for the entire campus (domestic and international students) and is used for the online charts and graphs.
Table 5 - Campus Information Configurations
11.2 TERM INFORMATION
These settings configure the application with your institution’s term information. These settings can be found by clicking ‘General Configurations’ ‘Term Configuration.’
1. Click on ‘Term Type Configuration.’
2. Sunapsis comes with reasonable defaults for Term Types. (PeopleSoft schools – this is not the same as Term Type in PeopleSoft. The use of similar language is an unhappy coincidence). Please adjust these term types as needed for your institution.
If you want under enrollment alerts to display for a particular term type, check the box for “Trigger Enrollment Alerts.” If you’d like sunapsis to automatically build registration batches for continuing students, check the “Report Enrollment to SEVIS” box. If you’d like to count a particular type toward the IIE Open Doors Census report, check that box. Only 1 of these term types should be checked. Having multiples introduces the possibility of double counting students for Open Doors.
3. Once done with Term Types, click on Term Code Configuration. Input information for each term. The Term Code is the value that is being sent in your data feed. The Term Type ties back to the Term Type Configuration. The Report Code is the value of the term code in your institutional system. In most cases, this will be the same as the Term Code itself, but if you are deriving special term codes inside your data feed logic, you can use this field to tie that data back to your institutional system. Description is a supplemental description value for your term. It is not required. The actual term description will be built with a combination of the <term type> <description> <year>.
11.0 Application Configuration 40

THE SUNAPSIS® 3 INTERNATIONAL OFFICE MODULE TECHNICAL GUIDE LAST REVISION 2013-12-10
Year is the calendar year during which the term takes place. Fall 2013 will have 2013 as a year, even though it is part of the 2013-2014 academic year. Show in Online Services makes this term available for students to choose in the Term drop downs on electronic forms.
4. When you’re done with Term Code Configurations, open Term Campus and Dates Configuration. Campus is the campus for which this term applies. Term is the term code (defined in the previous screen). Start Date is the first day of that term, at that campus. End Date is the last day of that term, at that campus. This now allows you to have multiple simultaneous terms, and also have different start dates for different campuses, as needed. Note: This information needs to be updated for every new term. You can load as many terms as you wish in this initial setup, but future terms will have to be inserted as they come up for the application to work appropriately.
11.3 SEVIS CONFIGURATION
These settings configure the application to use your information when communicating with SEVIS via the batch-file transfer process. These settings can be found by clicking on ‘SEVIS Management’ ‘Configuration for Batch.’
1. Click on ‘SEVIS School / Program Information.’
2. Input the information for each school / program that the application will use.
3. ‘School / Program’ is the SEVIS organization code.
4. Ensure that ‘Short Description’ is the ‘Name of Campus’ that is listed in SEVIS RTI under the Listing of Schools (Student System) or ‘Name of Program’ under the Listing of Programs (Employee System) menu.
5. ‘Full Description’ should be set to the value in ‘Short Description’ with the visa type appended
to the front of it (i.e. ‘F-1: Indiana University Bloomington’).
6. Input the PDSO / RO and Primary Campus.
11.0 Application Configuration 41

THE SUNAPSIS® 3 INTERNATIONAL OFFICE MODULE TECHNICAL GUIDE LAST REVISION 2013-12-10
7. In the ‘Associated Campus Codes’ field, input the campus code for the primary campus, and if there are multiple campuses this organization code is associated with, input them as a comma separated list, without spaces (i.e. ‘IUBLA,IUSBA,IUEAA’ etc.).
8. Click ‘Save.’
9. Click ‘New’ as needed for each SEVIS organization code and repeat the process. After finishing,
close the display.
10. Open ‘SEVIS Term Information for Registration.’
11. This sets term information that the application will use to handle the automatic creation of batches for F-1 student registration.
12. Input term information for each campus and each term. After finishing, close the display.
Batch registrations are, by default, generated for students who have an Active or Initial SEVIS status only. If you wish to have batch registrations generated for another status (i.e. Transfers), complete the following steps:
1. Click on ‘SEVIS Management’ ‘Configuration for Batch’ ‘SEVIS Batch Statuses for
Registration.’
2. Create a new row for each desired SEVIS status.
11.4 ALERT CONFIGURATION
These settings configure the Alerts infrastructure in the application. These settings can be found by clicking on ‘General Configurations’ ‘Alert Configuration.’
1. Click ‘Alert Group Configuration.’
2. The application comes with one alert group, the ‘default’ alert group.
3. Update the ‘Description’ field of the default alert group (i.e. ‘Bloomington - International Services (OIS)’), and the primary campus.
4. The application has the ability to send mass emails to students. The email addresses that you
input into the ‘E-mails’ field define the list of emails that the application can send from.
5. Once complete, click ‘Save.’
6. Finish configuring the alert information. Table 8 lists a description of each configuration.
11.0 Application Configuration 42

THE SUNAPSIS® 3 INTERNATIONAL OFFICE MODULE TECHNICAL GUIDE LAST REVISION 2013-12-10
Assigned Campus by Alert Group This maps the alert groups to the appropriate campus.
Assigned SEVIS School / Program by Alert Group
This maps the alert groups to the appropriate SEVIS school / program code.
Assigned Alert Services by Alert Group
This maps individual alerts to an alert group.
Schedule Automation of Alert Based Emails This allows you to schedule automatic emails based on alerts.
Table 6 - Alert Configurations
11.5 NOTE IMPORT CONFIGURATION
You can optionally choose to set up the application with its own email account. This enables the international office to email students from their normal email client and Bcc the application. It will match the email address in the “To” line to an email address stored in the application or by matching an ID number either in the subject or body of the email to an ID number in the application.
If you choose to create an email address, you need to update the application with the email settings. They can be found in ‘General Configurations’ ‘Notes Grouping and Import Configuration’ ‘Email Account to Check for Note Importation.’
In addition, configure ‘General Configurations’ ‘Notes Grouping and Import Configuration’ ‘Email Account Reader Patterns’ with the information that will match your university id number.
11.6 EDIT ONLINE SERVICES HEADER & FOOTER
When you view the website now, you will see --- INSTITUTIONAL HEADER GOES HERE ---. This is the area where you can add in HTML to create a header and footer for the online services that will match your institution. There are two files that need to be edited: ‘/istart/ui/layout/HeaderInstitutionLogo.html’ and ‘/istart/ui/layout/FooterInstitutionLogo.html.’ Within these files you can add your own HTML to customize the page.
Only the content from the ‘BEGIN INSTITUTIONAL BRANDING BAR’ HTML comment to the ‘END INSTITUTIONAL HEADING’ HTML comment can be edited (or the ‘BEGIN / END INSTITUTIONAL FOOTER’ HTML comments in the case of the footer file). This means that you can only include tags that can be wrapped inside a <div> tag. For instance, <html>, <head>, <title>, and <body> tags are NOT allowed as they will interfere with the online services.
To ensure that any CSS styles you define do not interfere with the CSS style sheets used in the online services, the preferred method of styling is to use inline styles.
11.0 Application Configuration 43

THE SUNAPSIS® 3 INTERNATIONAL OFFICE MODULE TECHNICAL GUIDE LAST REVISION 2013-12-10
12.0 SEVIS BATCH SETUP IF NEW TO BATCH PROCESSING
This is a one-time process needed ONLY for schools that have never communicated with SEVIS via the batch-file transfer process. If your school has used the SEVIS Batch-File Transfer process, you can skip this entire section and move on to Section 13, ‘Configure the International Office Module to Communicate with SEVIS Batch’. You need to complete this process for both the F-1 and J-1 Programs at your institution.
This section needs to be completed by the Primary Designated School Official (PDSO) and/or the Responsible Officer (RO).
12.1 CREATE F-1 PROGRAM IN SEVIS TEST ENVIRONMENT (IF APPLICABLE)
Create an F-1 Program in the SEVIS Test environment that mirrors the F-1 Program in the SEVIS Production environment by completing the following steps:
1. Go to https://egov.ice.gov/sbtsevis and click on ‘Register for New Account.’
2. Fill in the required information, including a real email address.
3. Choose ‘Apply for Certification by DHS to admit F and/or M Students.’
4. You will receive an email from SEVIS shortly. Click on the hyperlink in the second email to create a temporary password.
5. After you create the temporary password, you will be taken to the login screen again. Login
with the temporary username (in the email from SEVIS) and the temporary password you just created.
6. Complete the I-17 form (this needs to mirror the information that you have in the SEVIS
Production environment).
7. When the I-17 form is processed, you will receive an email with a permanent username and a hyperlink to create a permanent password.
12.2 CREATE J-1 PROGRAM IN SEVIS TEST ENVIRONMENT (IF APPLICABLE)
Create a J-1 Program in the SEVIS Test environment that mirrors the J-1 Program in the SEVIS Production environment by completing the following steps:
1. Go to https://egov.ice.gov/sbtsevis and click on ‘Register for New Account.’
2. Fill in the required information, including a real email address.
12.0 SEVIS Batch Setup if New to Batch Processing 44

THE SUNAPSIS® 3 INTERNATIONAL OFFICE MODULE TECHNICAL GUIDE LAST REVISION 2013-12-10
3. Choose ‘Apply for Designation by the DoS to admit J Exchange Visitors.’
4. You will receive an email from SEVIS shortly. Click on the hyperlink in the second email to create a temporary password.
5. After you create the temporary password, you will be taken to the login screen again. Login
with the temporary username (in the email from SEVIS) and the temporary password you just created.
6. Complete the DS-3036 form (this needs to mirror the information that you have in the SEVIS
Production environment).
7. When the DS-3036 form is processed, you will receive an email with a permanent username and a hyperlink to create a permanent password.
12.3 SEND A TEST BATCH
1. In sunapsis, go to the SEVIS Management menu, select Configuration for Batch, and open SEVIS Batch Upload Path. Change the path to: https://egov.ice.gov/sbtsevisbatch/action/batchUpload
2. In the same menu, open SEVIS Batch Download Path, and change the path to: https://egov.ice.gov/sbtsevisbatch/action/batchDownload
3. Complete Section 13. In 13.4, upload the certificate to https://egov.ice.gov/sbtsevis instead of https://egov.ice.gov/sevis.
4. Open a test record that you loaded into sunapsis (either manually, or with the data feed in Section 10). On the left menu, click on “Create a SEVIS Batch” and double click on Create New I-20, under F-1 Student -> Create New Document.
5. Fill in all of the required information on all of the tabs, and then approve the batch with the
button in the top left.
6. If your SEVIS Batch Upload and Download tasks are scheduled to run in your test environment, then you can wait until the next day, and see if the record is updated with a SEVIS number. If the scheduled tasks are not running, then you will need to run the Upload process twice manually. Then wait for SEVIS to process the batch, and run the Download process manually, again twice. Please note that the time it takes for batches to get processed on the SEVIS Test site can vary. It usually takes about half an hour, but if you notices that the batches are not downloading properly, you may need to call the SEVIS helpdesk and ask if they have changed their processing schedule.
12.0 SEVIS Batch Setup if New to Batch Processing 45

THE SUNAPSIS® 3 INTERNATIONAL OFFICE MODULE TECHNICAL GUIDE LAST REVISION 2013-12-10
7. Once you have successfully received a batch from SEVIS, then you can proceed to the next
session, to get approval to batch in SEVIS Production.
12.4 SETUP BATCH PROCESSING IN SEVIS PRODUCTION ENVIRONMENT
Please do not complete this Subsection until after successfully submitting a batch to Test SEVIS. Please see Section 11 for details on how to do that.
This subsection is derived from the Department of Homeland Security (DHS) document Process for Using the SEVIS Batch-File Transfer.
1. Contact the SEVIS Help Desk to report that Batch testing has been successfully completed in the SEVIS Test environment and that you are ready to begin Batch processing in the Production environment.
2. Print the Customer Agreement for Using the SEVIS Batch-File Transfer Process (CA) and have
it signed by the appropriate representative for your organization.
3. Fax the completed CA to (202) 414-8299.
4. The SEVIS Help Desk will provide confirmation of the receipt of the CA to the email address specified in the CA.
5. A DHS representative will verify the CA and approve it. If the DHS representative has any
questions regarding the CA, they will contact the requestor immediately.
6. Upon approving the CA, the DHS representative will direct the SEVIS Help Desk to send an e-mail message to the requestor that states the requestor has been approved.
12.0 SEVIS Batch Setup if New to Batch Processing 46

THE SUNAPSIS® 3 INTERNATIONAL OFFICE MODULE TECHNICAL GUIDE LAST REVISION 2013-12-10
13.0 CONFIGURE THE INTERNATIONAL OFFICE MODULE TO COMMUNICATE WITH SEVIS BATCH
To communicate with SEVIS via the Batch process, you will need a security certificate in .pem format. If you already have a .pfx certificate, you may skip to Section 13.3.
13.1 ACQUIRE A DIGITAL CERTIFICATE
You can purchase a digital certificate for use in email communication from Symantec for $22.95. There are other options available, such as InCommon and Comodo. Please contact the SEVIS helpdesk if you have questions about whether or not a certain certificate vendor will work with their system. Thawte no longer issues certificates for use in email. Please make sure to use Internet Explorer as there have been numerous issues with purchasing and exporting a certificate from Firefox.
1. Using Internet Explorer, go to the Symantec website to request a ‘Digital ID for Secure Email.’
2. Choose ‘Microsoft Internet Explorer’ as your browser.
3. Follow Symantec’s process for requesting the certificate.
4. In the ‘Cryptographic Service Provider Name’ select ‘Microsoft Enhanced Cryptographic Provider v1.0.’
5. Do not check the box labeled ‘Check this Box to Protect Your Private Key.’
6. Now you can download your certificate. Click ‘Install.’
13.2 EXPORT DIGITAL CERTIFICATE
This process exports the certificate information from Internet Explorer into a file that can be uploaded to SEVIS.
1. In Internet Explorer click ‘Tools’ ‘Internet Options’ then click the ‘Content’ tab and then click ‘Certificates.’
2. Select the new certificate (the ‘Issued By’ column will say VeriSign) and then click ‘Export…’
3. Click ‘Next’ to start the ‘Certificate Export Wizard.’
4. Select ‘Yes, export the private key’ and click ‘Next.’
5. Ensure that ‘Personal Information Exchange - PKCS #12 (.PFX)’ is selected, that none of the checkboxes underneath this option are selected and click ‘Next.’
13.0 Configure The International Office Module to Communicate with SEVIS Batch 47

THE SUNAPSIS® 3 INTERNATIONAL OFFICE MODULE TECHNICAL GUIDE LAST REVISION 2013-12-10
6. Type and retype a password for your certificate and click ‘Next.’ PLEASE NOTE: Do not use
spaces in the password.
7. Choose a place to save the file and a filename and click ‘Next.’
13.3 CONVERT .PFX CERTIFICATE TO .PEM CERTIFICATE
You now should have a certificate with the file extension .pfx. We need to convert the file to a .pem certificate. You can do this using any number of programs, but these directions detail how to accomplish it using the free program OpenSSL.
IN ST ALL OP ENSSL
2. Download and install OpenSSL. You can find the latest release at this website.
3. Ensure that the OpenSSL environment variable was set by opening the command prompt and typing ‘openssl.’
4. If your prompt changes to ‘OpenSSL>’, skip steps 4 and 5 and go directly to the ‘Convert to
.pem’ subsection. If you receive an error message, continue to step 5.
5. For Windows XP: a. Open the Control Panel and click ‘System.’ b. Click the ‘Advanced’ tab. c. Click ‘Environment Variables.’ d. Under the list of ‘System Variables’, find the ‘Path’ variable. e. Highlight it and click ‘Edit.’ f. Under ‘Variable Value’ add ‘;c:\openssl\bin\’ to the end. IMPORTANT: Do not forget the
semi-colon. g. Click ‘Ok’ until you are back to the Control Panel. Close the Control Panel.
6. For Windows Vista:
a. Open the Control Panel. b. Double click ‘System.’ c. Click ‘Advanced system settings’ from the left column (under Tasks). d. Click the ‘Environment Variables’ button. e. Under the list of ‘System Variables,’ find the ‘Path’ variable. f. Highlight it, then click ‘Edit.’ g. Under ‘Variable Value,’ add ‘;c:\openssl\bin\’ to the end. IMPORTANT: Do not forget
the semi-colon. h. Click ‘OK’ until you are back to the Control Panel.
13.0 Configure The International Office Module to Communicate with SEVIS Batch 48
THE SUNAPSIS® 3 INTERNATIONAL OFFICE MODULE TECHNICAL GUIDE LAST REVISION 2013-12-10
CONV ER T TO .P EM
1. Open the Command Prompt and change the directory to the directory where you saved your .pfx certificate.
2. Type ‘openssl pkcs12 -in mycert.pfx -out mycert.pem -nodes’ (where ‘mycert.pfx’ is the name you gave the certificate, and ‘mycert.pem’ is the name you wish to give the .pem certificate).
3. Type in the password you assigned to the certificate when exporting it from Internet Explorer.
4. Type in the same password again when it asks for a passphrase for the .pem certificate.
13.4 UPLOAD THE .PEM CERTIFICATE TO SEVIS
Once you have a .pem format certificate, you need to upload it to SEVIS. The certificate needs to be uploaded for each SEVIS school code and it must be done while logged in as the PDSO/RO for the school.
1. Go to https://egov.ice.gov/sevis/ and log in as the PDSO or RO.
2. From the main page, click on the appropriate school (if there is more than one, this needs to be repeated for all the schools).
3. On the left side, click on ‘Register for Batch.’
4. Accept the terms.
5. Click on ‘Browse…’ to locate the .pem certificate.
6. Click on ‘Upload Certificate.’
13.5 UPDATE THE APPLICATION WITH THE NEW CERTIFICATE INFORMATION
Once the certificate has been uploaded to SEVIS, you need to update the information in the application.
1. Move the certificate (both the .pfx and the .pem) to \ioffice\batch\sevis\certs.
2. In the application, from the toolbar, click on ‘SEVIS Management’ ‘Configuration for Batch’ ‘SEVIS Certificate Phrase.’
3. Update the ‘Certificate File Name’ to the name of your certificate (include the .pem file
extension in the file name, i.e. ‘sunapsis.pem’) and ‘Certificate Pass Phrase’ to the passphrase you set for the .pem certificate and click ‘Save.’
13.0 Configure The International Office Module to Communicate with SEVIS Batch 49

THE SUNAPSIS® 3 INTERNATIONAL OFFICE MODULE TECHNICAL GUIDE LAST REVISION 2013-12-10
13.6 CREATE PDSO / RO ACCOUNT
For batches to be built correctly there needs to be a Primary Designated School Official (PDSO) and/or a Responsible Officer (RO). The PDSO is required if batching for F students and the RO is required if batching for J exchange visitors. Refer to Section 7.2 on how to create a user account, and create one now for the PDSO and/or RO.
1. In the ‘Profile’ tab, input the user’s PDSO and/or RO username(s).
2. In the ‘SEVIS Accounts’ tab, select the appropriate SEVIS organization from the list
3. Input the PDSO/RO username
4. Choose either ‘Primary Designated School Official’ or ‘Responsible Officer’ for the Status
13.7 TROUBLESHOOTING SEVIS BATCHING
If after following all the steps in this section you are unable to successfully communicate with SEVIS via the batch process, you may use the following command line script to further diagnose the issue.
If not using a proxy:
If using a proxy:
<Drive letter>:\ioffice\batch\sevis\curl\curl.exe -k -v -L -E <Drive letter>:\ioffice\batch\sevis\certs\<certificate name>.pem:”<certificate password>“-F orgid=<SEVIS organization code> -F batchid=<batch id> -F userid=<PDSO username> -F xml=@<drive letter>:\ioffice\batch\sevis\<SEVIS organization code>\<batch id>\<batch id>.xml -o <drive letter>:\ioffice\batch\sevis\<SEVIS organization code>\<batch id>\<batch id>Upload.xml https://egov.ice.gov/sevisbatch/action/batchUpload -k -v -L
<Drive letter>:\ioffice\batch\sevis\curl\curl.exe -k -v -L -E <Drive letter>:\ioffice\batch\sevis\certs\<certificate name>.pem:”<certificate password>” -F orgid=<SEVIS organization code> -F batchid=<Batch ID> -F userid=<PDSO/RO username> -F xml=@<path/to/xml/file> -o <path/to/output/file> -x <proxy server>:<port> <sevis site>
13.0 Configure The International Office Module to Communicate with SEVIS Batch 50

THE SUNAPSIS® 3 INTERNATIONAL OFFICE MODULE TECHNICAL GUIDE LAST REVISION 2013-12-10
You will need to replace the highlighted values as described below:
Drive letter: The physical drive on the server where the application files are stored Certificate Name: The file name of the certificate Certificate Password: The passphrase assigned to the certificate when exporting it from Internet Explorer SEVIS Organization Code: The SEVIS code for the school or program that is being tested Batch ID: The batch ID (found in the XML file to be tested) PDSO Username: The SEVIS username for the Primary Designated School Official (PDSO) or the Responsible Office (RO) for the school / program being tested
13.0 Configure The International Office Module to Communicate with SEVIS Batch 51

THE SUNAPSIS® 3 INTERNATIONAL OFFICE MODULE TECHNICAL GUIDE LAST REVISION 2013-12-10
14.0 DATA CONVERSION
The data conversion is the process where the application database is populated with information about all active and initial students and/or scholars. This is done by extracting the information from SEVIS. The majority of this process will be done when the support team visits your institution. We provide instructions for the entire process for your review, but please do ONLY steps 1 and 2.
1. In the application, click on ‘SEVIS Management’ ‘Configuration for Batch’ ‘SEVIS School / Program Information’ to ensure that all SEVIS organization codes are defined with accurate information and that the short descriptions properly match the Name of Campus (or Program) as listed in SEVIS RTI. You should not have more than one entry in this menu using the same Organization Code. To separate campuses that use a single Organization Code, use the campus code you have configured for each of your campuses to fill the “Associated Campus Codes” box at the bottom of this menu. Be sure to separate these campus codes with commas. See the below example:
2. Populate the ‘SEVIS ID - University ID Mapping.’ Populate the ‘mapIDNumbers’ table in the production database with the SEVIS numbers and corresponding University ID numbers. If you can export the values to a CSV spreadsheet, then sunapsis has provided an online service for uploading this mapping. Log into the online services, just as you would to launch the sunapsis application. In the left hand menu is an entry for “Initial Conversion Mapping.” Click on that, and follow the instructions on the page. This information can also be manually entered via the application user interface at ‘SEVIS Management’ ‘Configuration for RTI’ ‘Initial Load: SEVIS ID - University ID Map.’ Be sure that all initial and active F-1 and J-1 records are in this mapping table with corresponding SEVIS ID and University ID values. If you have J-1 scholars that do not have any University ID number then you can assign temporary University ID values in the format of TEMP000000 in which you define a unique temporary number for each case.
3. Modify the Application for Additional Memory Allocation Within the application, go to General Configurations -> Tuning the System -> Application Memory Usage. Change the Minimum and Maximum Memory values on that screen to 384. Set the Permanent Memory size to 64.
14.0 Data Conversion 52

THE SUNAPSIS® 3 INTERNATIONAL OFFICE MODULE TECHNICAL GUIDE LAST REVISION 2013-12-10
4. Launch the application and the RTI Embedded Browser Be sure to use users that have at least the Core Biographical, SEVIS Records, and Extract Form Data roles. Obtain the necessary login credentials for SEVIS RTI from staff in the international services office.
5. Run the Extraction Process on a Set of Records The extraction process should be run for all schools or programs and you would need to click on Student or Exchange Visitor Lists for a given SEVIS organization…
…and then click on the Initial Status or Active Status to get a list of records.
14.0 Data Conversion 53

THE SUNAPSIS® 3 INTERNATIONAL OFFICE MODULE TECHNICAL GUIDE LAST REVISION 2013-12-10
From this view you will see a list of records.
14.0 Data Conversion 54

THE SUNAPSIS® 3 INTERNATIONAL OFFICE MODULE TECHNICAL GUIDE LAST REVISION 2013-12-10
Click on the Extract Data button and select the appropriate Extract F-1 or J-1 Form Data.
Then provide a starting page index and then an ending page index for this extraction (no more than 5 pages at a time). The indices would be something like 1 and 5. Check the “Extract for Direct Update / Data Conversion” box.
14.0 Data Conversion 55

THE SUNAPSIS® 3 INTERNATIONAL OFFICE MODULE TECHNICAL GUIDE LAST REVISION 2013-12-10
Once the process starts, the system will look at each record in that page range in the RTI website and populate the database with that information. When the 5 pages have extracted (which takes between 30 and 40 minutes), close the application and relaunch it before running the next 5 pages (our third party browser component has a memory leak which makes this a necessary step).
6. Log out and then Run the Other Schools and Programs Repeat step 5 as necessary for other schools and programs. Once you have run all the extracts for F students as a (P)DSO, log out of SEVIS RTI, and rerun the process for the J students and scholars as an (A)RO, if necessary.
7. Verification of the Process To verify that no records were missed either by user or machine issue you can run an extract list process on a given initial or active status list of records. Go to that list in RTI and click on the Extract Data button. Select Extract RTI Table Data, confirm that decision, click yes to append default columns, and give it a unique name like f1-initial-list. This will pull out the RTI list and run a table analysis to append additional information which will include the University ID numbers and once done it will display in the main window in a table format. You can then review the rows to see if any groups of records do not have a corresponding University ID which will indicate they were skipped in the data conversion process. For those groups you can identify the index range from the RTI list and then run tasks 3 - 6 on those records.
14.0 Data Conversion 56

THE SUNAPSIS® 3 INTERNATIONAL OFFICE MODULE TECHNICAL GUIDE LAST REVISION 2013-12-10
8. Restore Original Settings Within the application, go to General Configurations -> Tuning the System -> Application Memory Usage. Change the Minimum and Maximum Memory values on that screen back to 512, and the Permanent Memory back to 96. In the user management tool make sure to remove any access to the Extract Form Data role as this should only be available during this conversion process.
9. OPT / CPT / Academic Training / Off-Campus Employment Unlike the core data conversion tools this step involves a status update tool for OPT and CPT that can be used throughout the life cycle use of the application. The employment based data is not automatically converted in the main data extraction process. To capture this information for the OPT and CPT employment periods the following list extraction can be run. Go to the RTI list of those on OPT or CPT and then click the Extract Data button selecting the appropriate option for either OPT Update or CPT Update. This functionality runs an update of the status, dates, and the receipt numbers to update the application with that information. Therefore this can populate the system with that core information on the first load of data. However this does not include the employer information. If you want to capture that information then you will need to make individual RTI edits (i.e. lookup OPT / CPT record on an individual’s record and click update to get the employer address to flow over). Please note that the academic training and off-campus employment must be individually either data entered into the application or an RTI edit action must be made on those elements to capture that information in the application.
10. Other Data Conversion Any other non-SEVIS data marked for conversion will need to be handled separately from this process.
14.0 Data Conversion 57

THE SUNAPSIS® 3 INTERNATIONAL OFFICE MODULE TECHNICAL GUIDE LAST REVISION 2013-12-10
15.0 SUNAPSIS® TEAM SITE VISIT
The final step in the implementation of the application is a site visit by a member of the sunapsis® team for data conversion, training, and the go-live of the application. The site visit will normally last 3-5 days. The approximate outline is as follows:
Data Conversion (1-2 days) Training (1 day) Technical meetings, follow-up with users, etc. (1-2 days)
The sunapsis® team will work in conjunction with the IT staff and the international office to plan the details of the site visit.
15.0 sunapsis® Team Site Visit 58

THE SUNAPSIS® 3 INTERNATIONAL OFFICE MODULE TECHNICAL GUIDE LAST REVISION 2013-12-10
16.0 VOLUNTARY PRODUCT ACCESSIBILITY TEMPLATE (VPAT)
The sunapsis® team desires to create a product that is accessible for everyone to use. We provide here our VPAT for your review.
Date: February 16, 2011 Name of Product: sunapsis®: International Office Module Contact for more Information: http://sunapsis.iu.edu/
16.1 SOFTWARE APPLICATIONS AND OPERATING SYSTEMS – DETAIL
This section covers the sunapsis: International Office module, used by the International Office. It is an application launched via Java Web Start, and runs on the desktop in a normal window.
SECTION 1194.21 SOFTWARE APPLICATIONS AND OPERATING SYSTEMS – DETAIL VOLUNTARY PRODUCT
ACCESSIBILITY TEMPLATE
CRITERIA SUPPORTING FEATURES REMARKS AND EXPLANATIONS
(a) When software is designed to run on a system that has a keyboard, product functions shall be executable from a keyboard where the function itself or the result of performing a function can be discerned textually.
Menus and form items can be navigated via the tab and/or arrow keys.
All accessibility features require the Java Access Bridge to be installed on the client computer.
(b) Applications shall not disrupt or disable activated features of other products that are identified as accessibility features, where those features are developed and documented according to industry standards. Applications also shall not disrupt or disable activated features of any operating system that are identified as accessibility features where the application programming interface for those accessibility features has been documented by the manufacturer of the operating system and is available to the product developer.
The application has no effect on the behavior of the operating system or other applications, accessibility-related or otherwise.
(c) A well-defined on-screen indication of the current focus shall be provided that moves among interactive interface elements as the input focus changes. The focus shall be
The active window is always on top, and has focus. Active form elements contain a blinking cursor. Active
16.0 Voluntary Product Accessibility Template (VPAT) 59

THE SUNAPSIS® 3 INTERNATIONAL OFFICE MODULE TECHNICAL GUIDE LAST REVISION 2013-12-10
SECTION 1194.21 SOFTWARE APPLICATIONS AND OPERATING SYSTEMS – DETAIL VOLUNTARY PRODUCT
ACCESSIBILITY TEMPLATE
CRITERIA SUPPORTING FEATURES REMARKS AND EXPLANATIONS
programmatically exposed so that Assistive Technology can track focus and focus changes.
buttons have a dotted highlight around them.
(d) Sufficient information about a user interface element including the identity, operation and state of the element shall be available to Assistive Technology. When an image represents a program element, the information conveyed by the image must also be available in text.
Elements have titles and labels accessible to assistive technologies. Icon buttons also have alternate title text.
(e) When bitmap images are used to identify controls, status indicators, or other programmatic elements, the meaning assigned to those images shall be consistent throughout an application's performance.
Icons are uniform across the application.
(f) Textual information shall be provided through operating system functions for displaying text. The minimum information that shall be made available is text content, text input caret location, and text attributes.
All this information is available through the use of the Java Access Bridge.
(g) Applications shall not override user selected contrast and color selections and other individual display attributes.
The application does not support color and font changes within the application, and does not use operating system defaults.
The system uses default Java UI elements, which differ in look and feel from operating system UI elements, in order to be similar across all platforms.
(h) When animation is displayed, the information shall be displayable in at least one non-animated presentation mode at the option of the user.
The animation within the application is for presentational purposes only, and provides no additional information
(i) Color coding shall not be used as the only means of conveying information, indicating an
All color coding within the application is
16.0 Voluntary Product Accessibility Template (VPAT) 60

THE SUNAPSIS® 3 INTERNATIONAL OFFICE MODULE TECHNICAL GUIDE LAST REVISION 2013-12-10
SECTION 1194.21 SOFTWARE APPLICATIONS AND OPERATING SYSTEMS – DETAIL VOLUNTARY PRODUCT
ACCESSIBILITY TEMPLATE
CRITERIA SUPPORTING FEATURES REMARKS AND EXPLANATIONS
action, prompting a response, or distinguishing a visual element.
accompanied by unique, meaningful text so that the color is not a necessary part of the application.
(j) When a product permits a user to adjust color and contrast settings, a variety of color selections capable of producing a range of contrast levels shall be provided.
N/A The application does not permit the user to adjust color settings
(k) Software shall not use flashing or blinking text, objects, or other elements having a flash or blink frequency greater than 2 Hz and lower than 55 Hz.
The application contains no blinking or flashing elements, except for the cursor, which has a blink frequency of ~1Hz.
(l) When electronic forms are used, the form shall allow people using Assistive Technology to access the information, field elements, and functionality required for completion and submission of the form, including all directions and cues.
Depending on the definition of a form, either all information in the application is submitted via an electronic form, or none of it is. In either case, all fields, action, and help options are accessible via assistive technology.
Table 7 - Section 1194.21 VPAT
16.2 WEB-BASED INTERNET INFORMATION AND APPLICATIONS – DETAIL
This section covers the iStart Online Services component of the sunapsis platform. These online services are accessible to the institution at large via the World Wide Web.
16.0 Voluntary Product Accessibility Template (VPAT) 61

THE SUNAPSIS® 3 INTERNATIONAL OFFICE MODULE TECHNICAL GUIDE LAST REVISION 2013-12-10
SECTION 1194.22 WEB-BASED INTERNET INFORMATION AND APPLICATIONS – DETAIL VOLUNTARY PRODUCT ACCESSIBILITY TEMPLATE
CRITERIA SUPPORTING FEATURES REMARKS AND EXPLANATIONS
(a) A text equivalent for every non-text element shall be provided (e.g., via "alt", "longdesc", or in element content).
All non-textual elements feature descriptive alt attributes.
(b) Equivalent alternatives for any multimedia presentation shall be synchronized with the presentation.
N/A iStart does not contain any multimedia presentations
(c) Web pages shall be designed so that all information conveyed with color is also available without color, for example from context or markup.
Color is not necessary for portraying information. Color text offers both descriptive text, and semantic class names
(d) Documents shall be organized so they are readable without requiring an associated style sheet.
iStart is completely useable with CSS turned off inside of a web browser.
(e) Redundant text links shall be provided for each active region of a server-side image map.
N/A iStart contains no image maps
(f) Client-side image maps shall be provided instead of server-side image maps except where the regions cannot be defined with an available geometric shape.
N/A iStart contains no image maps
(g) Row and column headers shall be identified for data tables.
iStart uses the <thead> and <th> XHTML tags to define headers for table columns and rows.
(h) Markup shall be used to associate data cells and header cells for data tables that have two or more logical levels of row or column headers.
iStart uses <th> and <td> XHTML tags to associate headings and data.
16.0 Voluntary Product Accessibility Template (VPAT) 62
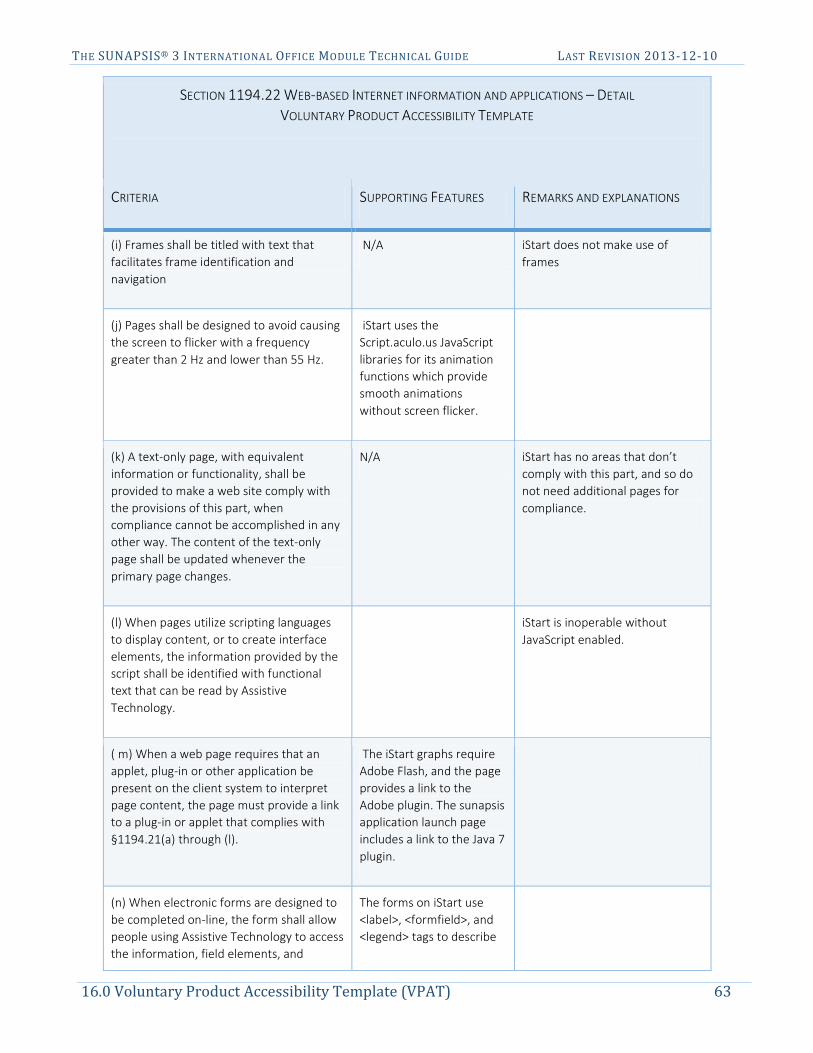
THE SUNAPSIS® 3 INTERNATIONAL OFFICE MODULE TECHNICAL GUIDE LAST REVISION 2013-12-10
SECTION 1194.22 WEB-BASED INTERNET INFORMATION AND APPLICATIONS – DETAIL VOLUNTARY PRODUCT ACCESSIBILITY TEMPLATE
CRITERIA SUPPORTING FEATURES REMARKS AND EXPLANATIONS
(i) Frames shall be titled with text that facilitates frame identification and navigation
N/A iStart does not make use of frames
(j) Pages shall be designed to avoid causing the screen to flicker with a frequency greater than 2 Hz and lower than 55 Hz.
iStart uses the Script.aculo.us JavaScript libraries for its animation functions which provide smooth animations without screen flicker.
(k) A text-only page, with equivalent information or functionality, shall be provided to make a web site comply with the provisions of this part, when compliance cannot be accomplished in any other way. The content of the text-only page shall be updated whenever the primary page changes.
N/A iStart has no areas that don’t comply with this part, and so do not need additional pages for compliance.
(l) When pages utilize scripting languages to display content, or to create interface elements, the information provided by the script shall be identified with functional text that can be read by Assistive Technology.
iStart is inoperable without JavaScript enabled.
( m) When a web page requires that an applet, plug-in or other application be present on the client system to interpret page content, the page must provide a link to a plug-in or applet that complies with §1194.21(a) through (l).
The iStart graphs require Adobe Flash, and the page provides a link to the Adobe plugin. The sunapsis application launch page includes a link to the Java 7 plugin.
(n) When electronic forms are designed to be completed on-line, the form shall allow people using Assistive Technology to access the information, field elements, and
The forms on iStart use <label>, <formfield>, and <legend> tags to describe
16.0 Voluntary Product Accessibility Template (VPAT) 63

THE SUNAPSIS® 3 INTERNATIONAL OFFICE MODULE TECHNICAL GUIDE LAST REVISION 2013-12-10
SECTION 1194.22 WEB-BASED INTERNET INFORMATION AND APPLICATIONS – DETAIL VOLUNTARY PRODUCT ACCESSIBILITY TEMPLATE
CRITERIA SUPPORTING FEATURES REMARKS AND EXPLANATIONS
functionality required for completion and submission of the form, including all directions and cues.
the form elements to make them accessible.
(o) A method shall be provided that permits users to skip repetitive navigation links.
iStart includes a “Skip to Content” link when CSS is turned off.
Table 8 - Section 1194.22 VPAT
16.0 Voluntary Product Accessibility Template (VPAT) 64

THE SUNAPSIS® 3 INTERNATIONAL OFFICE MODULE TECHNICAL GUIDE LAST REVISION 2013-12-10
17.0 SERVICE LEVEL AGREEMENT
This section details what support you may expect from the sunapsis® team and what support is not performed outside of a separate services agreement.
17.1 ON-GOING SUPPORT
Please refer to the Services Agreement, Section 1.2 ‘ON-GOING SUPPORT.’
17.2 TECHNICAL SUPPORT CONTACT INFORMATION
Website http://sunapsis.iu.edu
Email Address [email protected]
Hours of Operation Monday - Friday, 8:00 AM - 12:00 PM & 1:00 PM - 05:00 PM ET
Phone Number 812.855.0490
Fax Number 812.855.4118
Table 9 - Contact Information
17.0 Service Level Agreement 65

THE SUNAPSIS® 3 INTERNATIONAL OFFICE MODULE TECHNICAL GUIDE LAST REVISION 2013-12-10
APPENDIX A
This Appendix is the data feed schema layout. The Type column below for each field closely aligns with SQL data types. Please format the datetime fields like ‘YYYY-MM-DD.’ Please use true/false for the Boolean values.
A.1 DATASETTYPE
XML Data Feed Structure: DataSetType
Element Name: data
Database Table Populated: -
The DataSetType is the root element for the data feed. Neither of the elements is required allowing RecordTypes and EmailTypes to be in separate data feed files if desired.
Element Name Type Description Required
record RecordType The record contains information about international student/scholars.
emailMap EmailType The emailMap contains a mapping of network ID’s and email addresses to allow academic advisors and department heads to use LDAP/Single Sign-On authentication for routed requests.
A.1.A. RECORDTYPE
XML Data Feed Structure: RecordType
Element Name: record
Database Table Populated: -
The record is the information from the institutional SIS or HR systems for a given individual identified by their institution specific university id. This information can be any combination of the following structures that define the record. The University ID is required and if any element structure is included then please review those particular structures for required fields, field types, and field sizes.
Element Name Type Size Description Required
prsn_univ_id varchar 11 University ID
associatedIDNumbers AssociatedIDNumbersType - This identifies additional ID numbers associated with this record.
Appendix A 66

THE SUNAPSIS® 3 INTERNATIONAL OFFICE MODULE TECHNICAL GUIDE LAST REVISION 2013-12-10
biographical BiographicalType - The core biographical and address information with SEVIS batch implications.
visaCitizenship VisaCitizenshipType - The immigration status and citizenship information with SEVIS batch implications.
admissions [admission] AdmissionListType [AdmissionType]
- List of current and future admission rows.
programs [program] ProgramListType [ProgramType]
- List of active and completed academic programs with SEVIS batch implications.
terms [term] TermListType
[TermType]
- List of current enrollment information used for SEVIS registrations and enrollment analysis.
courses [course] CourseListType [CourseType]
- List of current term courses for enrolled students used for enrollment analysis.
saa SAAType - The amount of FTE on a student academic appointment used for enrollment analysis.
studentGroups [studentGroup]
StudentGroupListType
[StudentGroupType]
- Any identifying groups a student may be a part of in the SIS – for information only.
studentHolds [studentHold] StudentHoldListType [StudentHoldType]
- List of holds on a student’s record. Can be a list of past, current, and future holds.
studentVisits [studentVisits] StudentVisitListType
[StudentVisitType]
- Information about a visiting student.
toefls [toefl] ToeflListType
[ToeflType]
- List of TOEFL scores. Can be a list of all TOEFL tests on record for the person.
employees [employee] EmployeeListType
[EmployeeType]
- List of most recent employment records (currently active and recently terminated) used for H-1B and J-1 analysis.
paychecks [paycheck] PaycheckListType [PaycheckType]
- Last 3-5 years of payroll paycheck data used for complete verification of H-1B salary.
Appendix A 67

THE SUNAPSIS® 3 INTERNATIONAL OFFICE MODULE TECHNICAL GUIDE LAST REVISION 2013-12-10
A.1.A.1. ASSOCIATEDIDNUMBERSLISTTYPE
XML Data Feed Structure: AssociatedIDNumbersListType
Element Name: associatedIDNumbers
Database Table Populated: jbAssociatedIDNumbers
A list collection of associated string University ID numbers tied to this account. The primary number must be defined in the RecordType and those defined in this structure will be used to determine if a record already exists in sunapsis.
Element Name Type Size Description Notes Required
associatedIDNumber varchar 11 Associated ID Number
String listing of ID numbers to be mapped to this primary record.
A.1.A.2. BIOGRAPHICALTYPE
XML Data Feed Structure: BiographicalType
Element Name: biographical
Database Table Populated: iuieBio
This is the core biographical information for all international student or scholar records which will populate and update the various biographical and address elements in the application. This will also generate SEVIS batch records for biographical or local address changes as required by SEVIS.
Element Name Type Size Description Notes Required
prsn_prm_sfx_nm varchar 15 Primary Name Suffix
prsn_prm_last_nm varchar 60 Primary Last Name The primary last name and first name is required from the institutional system for the biographical update.
prsn_prm_1st_nm varchar 60 Primary First Name
prsn_prm_mid_nm varchar 60 Primary Middle Name
prsn_gndr_cd varchar 1 Gender Code mapGender which maps to codeGender
prsn_martl_stat_cd varchar 1 Marital Status mapMaritalStatus which maps to codeMaritalStatus
prsn_prm_ethnic_cd varchar 5 Ethnicity mapEthnicity which maps to codeEthnicity
prsn_ofcl_res_cd varchar 5 Residency Status mapResidencyStatus which maps to codeResidencyStatus
Appendix A 68

THE SUNAPSIS® 3 INTERNATIONAL OFFICE MODULE TECHNICAL GUIDE LAST REVISION 2013-12-10
prsn_birth_dt datetime 10 Date of Birth
prsn_birth_plc_nm varchar 30 City of Birth
prsn_birth_cntry_cd varchar 3 Country of Birth mapCountry which maps to viewCodeCompleteCountryList
prsn_other_email_id varchar 150 Non-University Email Address
Updated only if blank in sunapsis
prsn_gds_cmp_email_addr varchar 150 University Email Address
This email address is used by the email services, alerts, and e-forms to communicate.
prsn_ntwrk_id varchar 150 Client’s Username Authenticated by an institutional central login service for online services (i.e. iStart).
prsn_lcl_ln1_addr varchar 60 Local Address Line 1
The local U.S. address information drives the SEVIS Batch update address action. This information should be updated whenever the institution receives a new U.S. address for a client due to the 21 day SEVIS reporting requirement. Note: the state code values align with codeStates (all standard values for U.S. states)
prsn_lcl_ln2_addr varchar 60 Local Address Line 2
prsn_lcl_cty_nm varchar 60 Local City
prsn_lcl_st_cd varchar 30 Local State Code
prsn_lcl_zip_cd varchar 20 Local Zip Code
prsn_lcl_phn_nbr varchar 25 Local Phone
prsn_lcl_subtype varchar 10 Local Address Subtype
Institutional specific information *
(Table: codeAddressSubtype)
prsn_frgn_cntry_cd varchar 3 Foreign Address Country
The foreign address information is required for creating initial SEVIS documents, which is primarily at the admissions stage. This information can be helpful for the population of those RTI fields in creating a SEVIS document. Note that the foreign country value uses the mapCountry which maps to viewCodeCompleteCountryList with SEVIS country values.
prsn_frgn_ln1_addr varchar 60 Foreign Address Line 1
prsn_frgn_ln2_addr varchar 60 Foreign Address Line 2
prsn_frgn_cty_nm varchar 60 Foreign City
prsn_frgn_st_cd varchar 30 Foreign State or Province
prsn_frgn_zip_cd varchar 20 Foreign Postal Code
prsn_frgn_phn_nbr varchar 25 Foreign Phone
Appendix A 69

THE SUNAPSIS® 3 INTERNATIONAL OFFICE MODULE TECHNICAL GUIDE LAST REVISION 2013-12-10
prsn_frgn_subtype varchar 10 Foreign Address Subtype
Institutional specific information *
(Table: codeAddressSubtype)
prsn_hm_ln1_addr varchar 55 Home Address Line 1
prsn_hm_ln2_addr varchar 55 Home Address Line 2
prsn_hm_cty_nm varchar 30 Home City
prsn_hm_st_cd varchar 6 Home State or Province
prsn_hm_zip_cd varchar 12 Home Postal Code
prsn_hm_cntry_cd varchar 3 Home Country
prsn_hm_phn_nbr varchar 24 Home Phone Number
pic_url
varchar 250 Picture URL
* Update the sunapsis: IOM with the code/description values found in ‘General Configurations’ -> ‘Institutional Specific Codes’
A.1.A.3. VISACITIZENSHIPTYPE
XML Data Feed Structure: VisaCitizenshipType Element Name: visaCitizenship Database Table Populated: iuieVisaCitizenship
This should be populated with the most effective dated citizenship and immigration status for the international population. The immigration status will help drive some of the alerts, reporting, and filters for online services. The citizenship value may produce a SEVIS batch biographical update for changes of that value. These fields are optional because a new student may only have a one of the values, like citizenship, before the other value is assigned in the institutional system.
Element Name Type Size Description Notes Required
prsn_vprmt_typ_cd Text 3 Immigration Status mapVisa which maps to codeVisa
prsn_ctzn_cntry_cd Text 3 Citizenship Country Code
mapCountry which maps to viewCodeCompleteCountryList with SEVIS country values
Appendix A 70

THE SUNAPSIS® 3 INTERNATIONAL OFFICE MODULE TECHNICAL GUIDE LAST REVISION 2013-12-10
prsn_ctzn_status_cd Text 10 Citizenship Status Code
Institutional specific information *
(Table: codeCitizenshipStatus)
* Update the application with the code/description values found in ‘General Configurations’ -> ‘Institutional Specific Codes’
A.1.A.4. ADMISSIONLISTTYPE/ADMISSIONTYPE
XML Data Feed Structure: AdmissionListType Element Name: admissions XML Data Feed Substructure: AdmissionType
Child Element Name: admission Database Table Populated: iuieAdmissions
This should be populated with admission records for current and future admission rows for international students (all visa types). This information drives alerts tied to records in the admission queue and provides for online services for newly admitted students (i.e. access to the SEVIS transfer-in e-form). There is no automatic SEVIS batch process tied to this information. This information will update or insert rows based on the campus, admitted term, and academic career.
Element Name Type Size Description Notes Required
inst_cd varchar 6 Campus Values must align with codeCampus which are determined and populated by each institution
stu_admt_term_cd varchar 10 Term Code Values must align with codeSemesters which are determined and populated by each institution
acad_career_cd varchar 6 Academic Career mapAcademicCareer which maps to codeAcademicCareer (i.e. UGRD, GRAD)
appl_acad_lvl_cd varchar 3 Academic Level mapAcademicLevel which maps to codeAcademicLevel (10 - Freshman)
appl_pgm_stat_cd varchar 4 Program Status mapAcademicProgramStatus which maps to codeAcademicProgramStatus
acad_plan_cd varchar 10 Major the mapping of this field to the SEVIS CIP code assigns the cip_code value
acad_plan_desc varchar 100 Major Description
cip_code varchar 10 SEVIS CIP Code CIP code can be directly populated or based on the mapping to the acad_plan_cd
Appendix A 71

THE SUNAPSIS® 3 INTERNATIONAL OFFICE MODULE TECHNICAL GUIDE LAST REVISION 2013-12-10
appl_cntr_cd varchar 4 Application Center
institutional specific information only * (Table: codeApplicationCenter)
acad_pgm_cd varchar 6 Academic Program
institutional specific information only * (Table: codeAcademicProgram)
acad_grp_cd varchar 6 Academic Program Groups
institutional specific information only * (Table: codeAcademicGroup)
acad_deg_cd varchar 10 Academic Degree
institutional specific information only * (Table: codeAcademicDegree)
acad_dept_cd varchar 10 Academic Department
institutional specific information only * (Table: codeAcademicDepartment)
stu_admt_typ_cd varchar 3 Admit Type institutional specific information only * (Table: codeAdmitType)
appl_pgm_actn_cd varchar 5 Program Action Coding
institutional specific information only * (Table: codeProgramAction)
ext_org_name varchar 50 Name of Previous School
stu_admt_term_beg_dt datetime 10 Term Start Date
stu_admt_term_end_dt datetime 10 Term End Date
appl_pgm_actn_dt datetime 10 Datestamp of Last Action on File
If this value is not provided then it will default to the current timestamp value upon insert
school_funds int 4 School Funding Amount
school_funds_desc varchar 500 School Funding Description
appl_plan_seq_nbr int 4 Sequence Number
used to identify different admissions so the system can handle dual-degrees (default: 1)
appl_nbr varchar 8 Application Number
used to identify different admission records – should be unique per person
appl_pgm_reas_cd varchar 4 Program Action Reason Coding
institutional specific information only *
(Table: codeProgramReason)
stu_hs_grad_dt datetime 10 High School Graduation Date
stu_hs_sum_gpa_typ_cd varchar 4 High School GPA Type
institutional specific information only *
(Table: codeGPAType)
Appendix A 72

THE SUNAPSIS® 3 INTERNATIONAL OFFICE MODULE TECHNICAL GUIDE LAST REVISION 2013-12-10
stu_hs_sum_gpa_nbr decimal(9,3) 13 High School GPA
appl_rcvd_mthd_cd varchar 3 Application Received Method
institutional specific information only *
doc_id string 50 Document ID institutional specific information only
* Update the application with the code/description values found in ‘General Configurations’ -> ‘Institutional Specific Codes’
A.1.A.5. PROGRAMLISTTYPE/PROGRAMTYPE
XML Data Feed Structure: ProgramListType Element Name: programs XML Data Feed Substructure: ProgramType
Child Element Name: program Database Table Populated: iuieProgram
This should be populated with active and completed programs for international students. Information from the iuieAdmissions is also appended (by the application) into this table. This information drives template usage for CIP codes in creating SEVIS documents and SEVIS batch major changes. It also is used to alert to program completions, possible change in program, etc. This information will update or insert rows based on the campus, admitted term, academic career, and sequence number.
Element Name Type Size Description Notes Required
inst_cd varchar 6 Campus values align with codeCampus which are determined at each institution
stu_admt_term_cd varchar 10 Admitted Term values align with codeSemesters which are determined by each institution
acad_career_cd varchar 6 Academic Career
mapAcademicCareer which maps to codeAcademicCareer (i.e. UGRD, GRAD)
acad_lvl_cd varchar 3 Academic Level mapAcademicLevel which maps to codeAcademicLevel (10 - Freshman)
stu_pgm_stat_cd varchar 2 Program Status mapAcademicProgramStatus which maps to codeAcademicProgramStatus
acad_plan_cd varchar 10 Major the mapping of this field to the SEVIS CIP code assigns the cip_code value
acad_plan_desc varchar 100 Major Description
Appendix A 73

THE SUNAPSIS® 3 INTERNATIONAL OFFICE MODULE TECHNICAL GUIDE LAST REVISION 2013-12-10
cip_code varchar 10 SEVIS CIP Code CIP code can be directly populated or based on the mapping to the acad_plan_cd
struc_declare_dt datetime 10 Date of Program Declared
acad_grp_cd varchar 6 Academic Program Groups
institutional specific information only * (Table: codeAcademicGroup)
acad_pgm_cd varchar 6 Academic Program
institutional specific information only * (Table: codeAcademicProgram)
acad_deg_cd varchar 10 Academic Degree
institutional specific information only * (Table: codeAcademicDegree)
acad_dept_cd varchar 10 Academic Department
institutional specific information only * (Table: codeAcademicDepartment)
stu_pgm_actn_cd varchar 5 Program Action Coding
institutional specific information only * (Table: codeProgramAction)
acad_plan_typ_cd varchar 3 Academic Plan Type Code
institutional specific information only * (Table: codeAcademicPlanType)
stu_cum_gpa_nbr numeric 9 Cumulative GPA
stu_expct_grad_term_cd varchar 10 Expected Term for Graduation
this drives the email service for students near graduation; aligns with codeSemesters
stu_degr_ckot_stat_cd varchar 2 Degree Check-out Status
institutional specific information only * (Table: codeDegreeCheckoutStatus)
acad_plan_dplm_desc varchar 100 Degree Awarded
i.e. Bachelor of Science, Master of Science in Computer Science (used by online graphs)
stu_degr_cnfr_dt datetime 10 Degree Conferred Date
acad_plan_seq_nbr int 4 Sequence Number
used to identify different programs so the system can handle dual-degrees (default: 1)
acad_pgm_actn_dt datetime 10 Datestamp of Last Action on File
For completed students records this marker is used to denote the 30 day reporting for SEVIS
row_eff_dt datetime 10 Effective Date the date this information goes/went into effect (last updated date)
* Update the application with the code/description values found in ‘General Configurations’ -> ‘Institutional Specific Codes’
Appendix A 74

THE SUNAPSIS® 3 INTERNATIONAL OFFICE MODULE TECHNICAL GUIDE LAST REVISION 2013-12-10
A.1.A.6 TERMLISTTYPE/TERMTYPE
XML Data Feed Structure: TermListType Element Name: terms XML Data Feed Substructure: TermType
Child Element Name: term Database Table Populated: iuieTerm
This should be populated with the current term for the enrolled international student population with the primary academic career, major, level, and CIP values associated with this term. There needs to be unique rows for an individual's term and campus so any multiple rows for the same campus and term will need to be condensed into a primary row with a sum of the credits. This information drives the SEVIS batch registration processes and builds term history data managed within the application. This information will update or insert rows based on the campus and term. This information will only stay in the application on the iuieTerm for the duration of the given term. The jbStudentTerm will retain history.
Element Name Type Size Description Notes Required
inst_cd varchar 6 Campus values align with codeCampus which are determined at each institution
acad_term_cd varchar 10 Term Code values align with codeSemesters which are determined by each institution
acad_term_beg_dt datetime 10 Term Begin Date
acad_term_end_dt datetime 10 Term End Date
stu_drv_enrl_stat_ind varchar 2 Enrollment Status
mapEnrollmentStatus which maps to codeEnrollmentStatus (i.e. E - enrolled)
stu_drv_enrl_substatus varchar 10 Enrollment Sub-Status
institutional specific information only * (Table: codeEnrollmentSubstatus)
stu_drvd_tot_term_unt_nbr numeric 9 Total Credits
acad_career_cd varchar 6 Academic Career
mapAcademicCareer which maps to codeAcademicCareer (i.e. UGRD, GRAD)
acadlvl_beg_term_cd varchar 5 Academic Level
mapAcademicLevel which maps to codeAcademicLevel (10 - Freshman)
acad_prm_plan_1_cd varchar 12 Primary Major
only report one major per campus and academic career so condense dual-degrees
cip_code varchar 10 SEVIS CIP Code
CIP code can be directly populated or based on the mapping to the acad_prm_plan_1_cd
ft_flag boolean 1 Full-Time Flag
Marker for automatic override from institution system about full-time
Appendix A 75

THE SUNAPSIS® 3 INTERNATIONAL OFFICE MODULE TECHNICAL GUIDE LAST REVISION 2013-12-10
enrollment status (1 is full-time, 0 is part-time)
census_marker Boolean 1 Census Marker
Marker to indicate data is official institutional census data
* Update the application with the code/description values found in ‘General Configurations’ -> ‘Institutional Specific Codes’
A.1.A.7. COURSELISTTYPE/COURSETYPE
XML Data Feed Structure: CourseListType Element Name: courses XML Data Feed Substructure: CourseType
Child Element Name: course Database Table Populated: iuieCourses
This should be populated with course information for enrolled international students in the current term. This information is primarily used for the under-enrollment analysis and for general information lookup as part of the student record. If the iuieTerm is populated with the ft_flag then the population of this view would be optional as that flag would handle the full-time verification. If that flag is not populated then this view can identify possible courses that may reduce the minimum hours for the enrollment analysis. This information will update or insert rows based on the term, course catalog number, and department. This information will only stay in the application for the duration of the given term.
Column Name Type Size Description Notes Required
pplsft_acad_org_lvl_2_cd varchar 10 Campus values align with codeCampus which are determined at each institution
acad_term_cd varchar 10 Term Code values align with codeSemesters which are determined by each institution
crs_title Varchar 100 Course Title
crs_subj_dept_cd varchar 6 Course Department Code
crs_catlg_nbr varchar 10 Course Catalog Number
crn_nbr varchar 10 Course Number
stu_enrl_stat_cd varchar 2 Enrollment Status mapEnrollmentStatus which maps to codeEnrollmentStatus (i.e. E - enrolled)
acad_unt_tkn_nbr numeric 9 Course Credits
Appendix A 76

THE SUNAPSIS® 3 INTERNATIONAL OFFICE MODULE TECHNICAL GUIDE LAST REVISION 2013-12-10
stu_enrl_add_dt datetime 10 Date Course Added
stu_enrl_drp_dt datetime 10 Date Course Dropped
A.1.A.8. SAATYPE
XML Data Feed Structure: SAAType Database Table Populated: iuieSAA
This should be populated with FTE for the international students on student academic appointments (associate instructors, teaching assistants, research assistants, etc.) for the current term. This information is used to help determine the under-enrollment analysis for the international graduate student population. This table would only be of interest if similar rules for full-time enrollment status of student academic appointments apply to the given institution. This information is updated or inserted with one row per individual. The information is wiped out at the end of each given term.
Column Name Type Size Description Notes Required
job_pct_tm numeric 9 Percentage of SAA in FTE
A.1.A.11. STUDENTGROUPLISTTYPE/STUDENTGROUPTYPE
XML Data Feed Structure: StudentGroupListType Element Name: studentGroups XML Data Feed Substructure: StudentGroupType
Child Element Name: studentGroup Database Table Populated: iuieStudentGroup This should be populated with information about particular groups students are in (Athletes, sponsored students, other miscellaneous meta data that may be in your institutional system). This information is not used by sunapsis, but may be useful for custom alerts or checklist task extensions, or just as information for staff to have available on a record.
Column Name Type Size Description Notes Required
inst_cd varchar 6 Campus
stu_grp_cd varchar 4 Student Group Code
stu_grp_desc varchar 30 Student Group Description
row_eff_dt datetime 10 Effective date
Appendix A 77

THE SUNAPSIS® 3 INTERNATIONAL OFFICE MODULE TECHNICAL GUIDE LAST REVISION 2013-12-10
A.1.A.10. STUDENTHOLDLISTTYPE/STUDENTHOLDTYPE
XML Data Feed Structure: StudentHoldListType Element Name: studentHolds XML Data Feed Substructure: StudentHoldType
Child Element Name: studentHold Database Table Populated: iuieStudentHold
This should be populated with information concerning service indicators such as holds on a student record.
Column Name Type Size Description Notes Required
sprhold_hldd_code varchar 5 Hold code
sprhold_user varchar 20 Hold creator username
sprhold_from_date datetime 10 Hold from date
sprhold_to_date datetime 10 Hold to date
sprhold_release_ind varchar 5 Hold release indicator
sprhold_reason varchar 100 Hold reason
sprhold_amount_owed numeric 9 Hold amount owed
sprhold_activity_date datetime 10 Hold activity date
sprhold_remove_user varchar 20 Hold remover username
A.1.A.11 STUDENTVISITLISTTYPE/STUDENTVISITTYPE
XML Data Feed Structure: StudentVisitListType Element Name: studentVisit XML Data Feed Substructure: StudentVisitType
Child Element Name: studentVisit Database Table Populated: iuieStudentVisit
This should be populated with information concerning a visiting student.
Column Name Type Size Description Notes Required
Appendix A 78
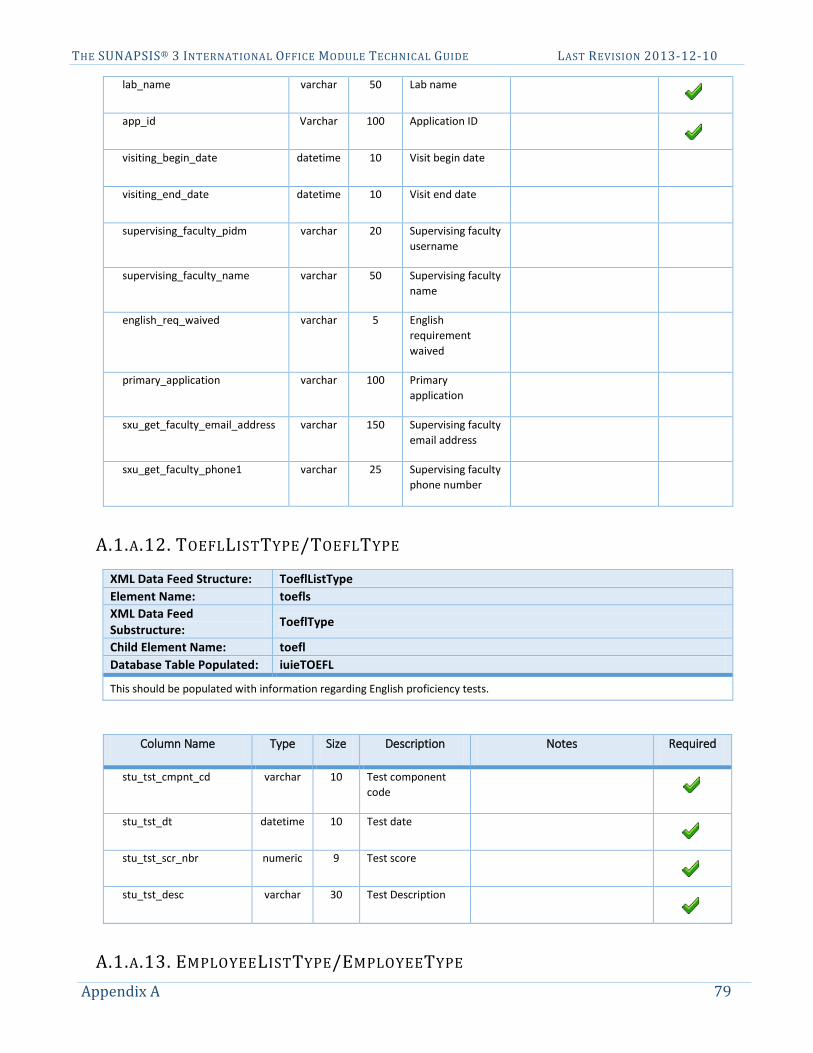
THE SUNAPSIS® 3 INTERNATIONAL OFFICE MODULE TECHNICAL GUIDE LAST REVISION 2013-12-10
lab_name varchar 50 Lab name
app_id Varchar 100 Application ID
visiting_begin_date datetime 10 Visit begin date
visiting_end_date datetime 10 Visit end date
supervising_faculty_pidm varchar 20 Supervising faculty username
supervising_faculty_name varchar 50 Supervising faculty name
english_req_waived varchar 5 English requirement waived
primary_application varchar 100 Primary application
sxu_get_faculty_email_address varchar 150 Supervising faculty email address
sxu_get_faculty_phone1 varchar 25 Supervising faculty phone number
A.1.A.12. TOEFLLISTTYPE/TOEFLTYPE
XML Data Feed Structure: ToeflListType Element Name: toefls XML Data Feed Substructure: ToeflType
Child Element Name: toefl Database Table Populated: iuieTOEFL
This should be populated with information regarding English proficiency tests.
Column Name Type Size Description Notes Required
stu_tst_cmpnt_cd varchar 10 Test component code
stu_tst_dt datetime 10 Test date
stu_tst_scr_nbr numeric 9 Test score
stu_tst_desc varchar 30 Test Description
A.1.A.13. EMPLOYEELISTTYPE/EMPLOYEETYPE Appendix A 79

THE SUNAPSIS® 3 INTERNATIONAL OFFICE MODULE TECHNICAL GUIDE LAST REVISION 2013-12-10
XML Data Feed Structure: EmployeeListType Element Name: employees XML Data Feed Substructure: EmployeeType
Child Element Name: employee Database Table Populated: iuieEmployee
This should be populated with the most recent (currently active or recently terminated) employment information for the international so that the system could notify about H-1B or J-1 issues because of position termination, annual compensation review, possible change in position (based on position number), identification of scholar employees (based on salary plan and grade codes), etc. This table should only be required if the institution plans to utilize audits against the H-1B and J-1 data. This information would be core HR data.
Element Name Type Size Description Notes Required
pos_nbr varchar 8 Position Number value used to determine if possible change to new position and to align position to LCA
pos_desc varchar 30 Position Description
useful for verification if a change of position number alert is activated
emp_stat_cd varchar 2 Employee Status Code
mapEmployeeStatus which maps to codeEmployeeStatus (i.e. A - Active)
job_pos_entry_dt datetime 10 Position Entry Date
job_emp_typ_desc varchar 30 Employment Type Description
informational only and at IU it is info like salaried, hourly, etc.
job_slry_plan_cd varchar 4 Salary Plan Code specific institutional codes for salary plans (i.e. academic); informational only
job_slry_grd_cd varchar 3 Salary Grade Code
specific institutional codes for salary grades (i.e. various faculty levels); informational only
job_comp_rt numeric 9 Compensation Pay Rate
rate by hourly, bi-weekly, monthly, etc.
job_comp_annl_rt numeric 9 Compensation Annual Pay Rate
value is audited for the H-1B to ensure salary on file complies with salary on file with DOL
job_reg_temp_ind varchar 1 Regular or Temporary
mapEmployeeRegTemp which maps to codeEmployeeRegTemp (i.e. R - regular)
job_full_pt_tm_ind varchar 2 Full-Time or Part-Time Status
mapEmployeeTime which maps to codeEmployeeTime (i.e. FT - fulltime)
Appendix A 80
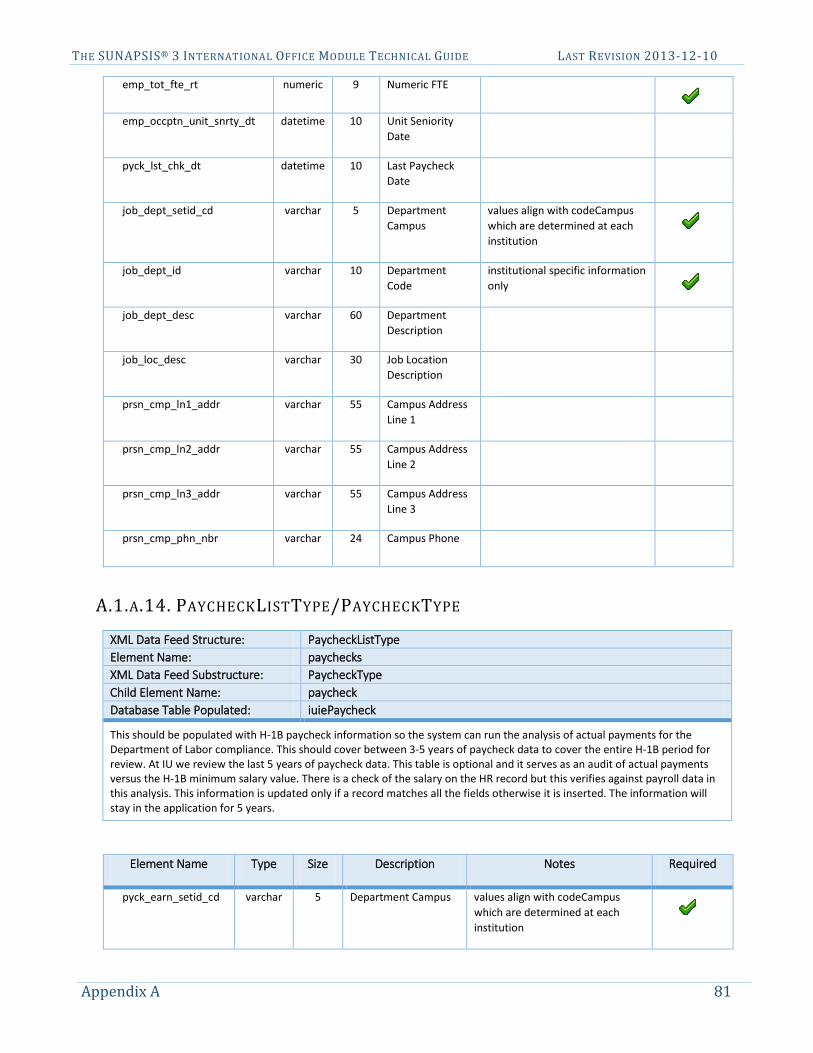
THE SUNAPSIS® 3 INTERNATIONAL OFFICE MODULE TECHNICAL GUIDE LAST REVISION 2013-12-10
emp_tot_fte_rt numeric 9 Numeric FTE
emp_occptn_unit_snrty_dt datetime 10 Unit Seniority Date
pyck_lst_chk_dt datetime 10 Last Paycheck Date
job_dept_setid_cd varchar 5 Department Campus
values align with codeCampus which are determined at each institution
job_dept_id varchar 10 Department Code
institutional specific information only
job_dept_desc varchar 60 Department Description
job_loc_desc varchar 30 Job Location Description
prsn_cmp_ln1_addr varchar 55 Campus Address Line 1
prsn_cmp_ln2_addr varchar 55 Campus Address Line 2
prsn_cmp_ln3_addr varchar 55 Campus Address Line 3
prsn_cmp_phn_nbr varchar 24 Campus Phone
A.1.A.14. PAYCHECKLISTTYPE/PAYCHECKTYPE
XML Data Feed Structure: PaycheckListType Element Name: paychecks XML Data Feed Substructure: PaycheckType Child Element Name: paycheck Database Table Populated: iuiePaycheck
This should be populated with H-1B paycheck information so the system can run the analysis of actual payments for the Department of Labor compliance. This should cover between 3-5 years of paycheck data to cover the entire H-1B period for review. At IU we review the last 5 years of paycheck data. This table is optional and it serves as an audit of actual payments versus the H-1B minimum salary value. There is a check of the salary on the HR record but this verifies against payroll data in this analysis. This information is updated only if a record matches all the fields otherwise it is inserted. The information will stay in the application for 5 years.
Element Name Type Size Description Notes Required
pyck_earn_setid_cd varchar 5 Department Campus values align with codeCampus which are determined at each institution
Appendix A 81
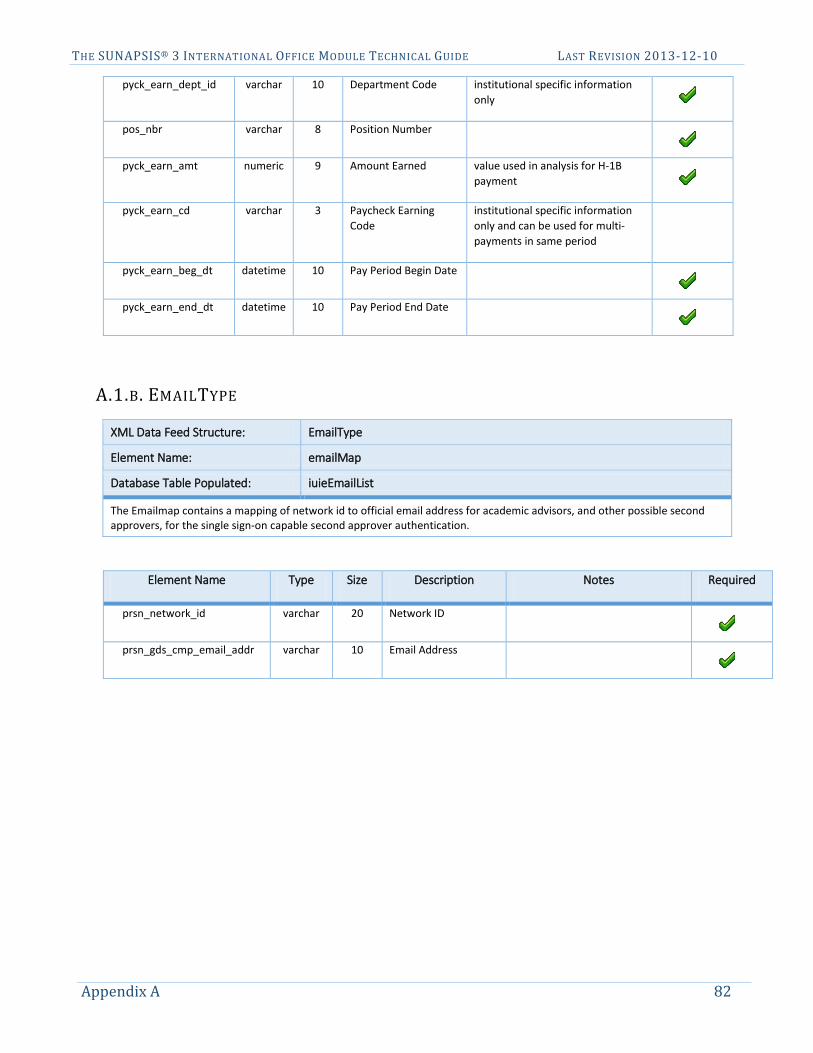
THE SUNAPSIS® 3 INTERNATIONAL OFFICE MODULE TECHNICAL GUIDE LAST REVISION 2013-12-10
pyck_earn_dept_id varchar 10 Department Code institutional specific information only
pos_nbr varchar 8 Position Number
pyck_earn_amt numeric 9 Amount Earned value used in analysis for H-1B payment
pyck_earn_cd varchar 3 Paycheck Earning Code
institutional specific information only and can be used for multi-payments in same period
pyck_earn_beg_dt datetime 10 Pay Period Begin Date
pyck_earn_end_dt datetime 10 Pay Period End Date
A.1.B. EMAILTYPE
XML Data Feed Structure: EmailType
Element Name: emailMap
Database Table Populated: iuieEmailList
The Emailmap contains a mapping of network id to official email address for academic advisors, and other possible second approvers, for the single sign-on capable second approver authentication.
Element Name Type Size Description Notes Required
prsn_network_id varchar 20 Network ID
prsn_gds_cmp_email_addr varchar 10 Email Address
Appendix A 82

THE SUNAPSIS® 3 INTERNATIONAL OFFICE MODULE TECHNICAL GUIDE LAST REVISION 2013-12-10
APPENDIX B
This Appendix is the International Office Module Mapping structure.
B.1 ACADEMIC CAREER
Table Type: mapAcademicCareer
sunapsis® Value sunapsis® Description Institutional Value
GRAD Graduate Student
UGRD Undergraduate Student
PROF Professional Student
B.2 ACADEMIC LEVEL
Table Type: mapAcademicLevel
sunapsis® Value sunapsis® Description Institutional Value
00 Associates
10 Freshman
20 Sophomore
30 Junior
40 Senior
50 Masters
70 Professional
60 Doctoral
NDG Non-degree Graduate
NDU Non-degree Undergraduate
NDP Non-degree Professional
UG Bachelors, Unspecified
Appendix B 83

THE SUNAPSIS® 3 INTERNATIONAL OFFICE MODULE TECHNICAL GUIDE LAST REVISION 2013-12-10
GR Graduate, Unspecified
IEP Intensive English (Open Doors)
OPT OPT (Open Doors)
ND Non-degree (Open Doors)
CRT Certificate
B.3 ACADEMIC PROGRAM STATUS
Table Type: mapAcademicProgramStatus
sunapsis® Value sunapsis® Description Institutional Value
AC Active in Program
AD Admitted
AP Applicant
CD Conditional Admit
CM Completed Program
CN Cancelled
DC Discontinued
DE Deceased
DF Deferred
DS Dismissed
LE On Leave
PM Prematriculant
Appendix B 84

THE SUNAPSIS® 3 INTERNATIONAL OFFICE MODULE TECHNICAL GUIDE LAST REVISION 2013-12-10
B.4 COUNTRY
Table Type: mapCountry sunapsis® / SEVIS
Value sunapsis®
Description Institutional Value
AA Aruba
AC Antigua and Barbuda
AE United Arab Emirates
AF Afghanistan
AG Algeria
AJ Azerbaijan
AL Albania
AM Armenia
AN Andorra
AO Angola
AR Argentina
AS Australia
AT Ashmore and Cartier Islands
AU Austria
AV Anguilla
AX Akrotiri
BA Bahrain
BB Barbados
BC Botswana
BD Bermuda
BE Belgium
BF Bahamas
Appendix B 85

THE SUNAPSIS® 3 INTERNATIONAL OFFICE MODULE TECHNICAL GUIDE LAST REVISION 2013-12-10
BG Bangladesh
BH Belize
BK Bosnia and Herzegovina
BL Bolivia
BM Burma
BN Benin
BO Belarus
BP Solomon Islands
BR Brazil
BS Bassas Da India
BT Bhutan
BU Bulgaria
BV Bouvet Island
BX Brunei
BY Burundi
CA Canada
CB Cambodia
CD Chad
CE Sri Lanka
CF Congo (Brazzaville)
CG Congo (Kinshasa)
CH China
CI Chile
CJ Cayman Islands
Appendix B 86

THE SUNAPSIS® 3 INTERNATIONAL OFFICE MODULE TECHNICAL GUIDE LAST REVISION 2013-12-10
CK Cocos (Keeling) Islands
CM Cameroon
CN Comoros
CO Colombia
CR Coral Sea Islands
CS Costa Rica
CT Central African Republic
CU Cuba
CV Cape Verde
CW Cook Islands
CY Cyprus
DA Denmark
DJ Djibouti
DO Dominica
DR Dominican Republic
DX Dhekelia
EC Ecuador
EG Egypt
EI Ireland
EK Equatorial Guinea
EN Estonia
ER Eritrea
ES El Salvador
ET Ethiopia
Appendix B 87

THE SUNAPSIS® 3 INTERNATIONAL OFFICE MODULE TECHNICAL GUIDE LAST REVISION 2013-12-10
EU Europa Island
EZ Czech Republic
FG French Guiana
FI Finland
FJ Fiji
FK Falkland Islands (Islas Malvinas)
FM Micronesia, Federated States of
FO Faroe Islands
FP French Polynesia
FR France
FS French Southern and Antarctic Lands
GA Gambia
GB Gabon
GG Georgia
GH Ghana
GI Gibraltar
GJ Grenada
GK Guernsey
GL Greenland
GM Germany
GO Glorioso Islands
GP Guadeloupe
GR Greece
GT Guatemala
Appendix B 88

THE SUNAPSIS® 3 INTERNATIONAL OFFICE MODULE TECHNICAL GUIDE LAST REVISION 2013-12-10
GV Guinea
GY Guyana
GZ Gaza Strip
HA Haiti
HK Hong Kong
HM Heard and McDonald Islands
HO Honduras
HR Croatia
HU Hungary
IC Iceland
ID Indonesia
IM Isle of Man
IN India
IO British Indian Ocean Territory
IP Clipperton Island
IR Iran
IS Israel
IT Italy
IV Cote D Ivoire
IZ Iraq
JA Japan
JE Jersey
JM Jamaica
JN Jan Mayen
Appendix B 89

THE SUNAPSIS® 3 INTERNATIONAL OFFICE MODULE TECHNICAL GUIDE LAST REVISION 2013-12-10
JO Jordan
JU Juan De Nova Island
KE Kenya
KG Kyrgyzstan
KN North Korea
KR Kiribati
KS South Korea
KT Christmas Island
KU Kuwait
KV Kosovo
KZ Kazakhstan
LA Laos
LE Lebanon
LG Latvia
LH Lithuania
LI Liberia
LO Slovakia
LS Liechtenstein
LT Lesotho
LU Luxembourg
LY Libya
MA Madagascar
MB Martinique
MC Macau
Appendix B 90

THE SUNAPSIS® 3 INTERNATIONAL OFFICE MODULE TECHNICAL GUIDE LAST REVISION 2013-12-10
MD Moldova
MF Mayotte
MG Mongolia
MH Montserrat
MI Malawi
MJ Montenegro
MK Macedonia
ML Mali
MN Monaco
MO Morocco
MP Mauritius
MR Mauritania
MT Malta
MU Oman
MV Maldives
MX Mexico
MY Malaysia
MZ Mozambique
NC New Caledonia
NE Niue
NF Norfolk Island
NG Niger
NH Vanuatu
NI Nigeria
Appendix B 91

THE SUNAPSIS® 3 INTERNATIONAL OFFICE MODULE TECHNICAL GUIDE LAST REVISION 2013-12-10
NL Netherlands
NN Sint Maarten
NO Norway
NP Nepal
NR Nauru
NS Suriname
NU Nicaragua
NZ New Zealand
OD South Sudan
PA Paraguay
PC Pitcairn Islands
PE Peru
PF Paracel Islands
PG Spratly Islands
PJ Etorofu, Hamomai, Kunashiri, and Shikotan Islands
PK Pakistan
PL Poland
PM Panama
PO Portugal
PP Papua New Guinea
PS Palau
PU Guinea-Bissau
QA Qatar
RE Reunion
Appendix B 92

THE SUNAPSIS® 3 INTERNATIONAL OFFICE MODULE TECHNICAL GUIDE LAST REVISION 2013-12-10
RI Serbia
RM Marshall Islands
RN Saint Martin
RO Romania
RP Philippines
RS Russia
RW Rwanda
SA Saudi Arabia
SB St Pierre and Miquelon
SC St Kitts and Nevis
SE Seychelles
SF South Africa
SG Senegal
SH Saint Helena, Ascension, and Tristan Da Cunha
SI Slovenia
SL Sierra Leone
SM San Marino
SN Singapore
SO Somalia
SP Spain
ST Saint Lucia
SU Sudan
SV Svalbard
SW Sweden
Appendix B 93

THE SUNAPSIS® 3 INTERNATIONAL OFFICE MODULE TECHNICAL GUIDE LAST REVISION 2013-12-10
SX South Georgia and the South Sandwich Islands
SY Syria
SZ Switzerland
TB Saint Barthelemy
TD Trinidad and Tobago
TE Tromelin Island
TH Thailand
TI Tajikistan
TK Turks and Caicos Islands
TL Tokelau
TN Tonga
TO Togo
TP Sao Tome and Principe
TS Tunisia
TT Timor-Leste
TU Turkey
TV Tuvalu
TW Taiwan
TX Turkmenistan
TZ Tanzania
U2 Neutral Zone
U3 Stateless
U5 Unknown
UC Curacao
Appendix B 94

THE SUNAPSIS® 3 INTERNATIONAL OFFICE MODULE TECHNICAL GUIDE LAST REVISION 2013-12-10
UG Uganda
UK United Kingdom
UP Ukraine
US United States
UV Burkina Faso
UY Uruguay
UZ Uzbekistan
VC St Vincent and the Grenadines
VE Venezuela
VI British Virgin Islands
VM Vietnam
VT Vatican City
WA Namibia
WE West Bank
WF Wallis and Futuna Islands
WI Western Sahara
WS Samoa
WZ Swaziland
YM Yemen
ZA Zambia
ZI Zimbabwe
The following are valid only for birth countries
AQ American Samoa
AY Antarctica
Appendix B 95

THE SUNAPSIS® 3 INTERNATIONAL OFFICE MODULE TECHNICAL GUIDE LAST REVISION 2013-12-10
BQ Navassa Island
BZ Germany, Berlin
CL Central and Southern Line Islands
CQ Northern Mariana Islands
CZ Czechoslovakia
DQ Jarvis Island
EQ Canton and Enderbury
FQ Baker Island
FT French Territory of the Afars and Issas
GC German Democratic Republic
GE Federal Republic of Germany
GN Gilbert and Ellice Islands
GQ Guam
GS Gilbert Islands
HQ Howland Island
IQ United States Misc. Pacific Islands
IU Israel-Syria Demilitarized Zone
IW Israel-Jordan Demilitarized Zone
IY Iraq-Saudi Arabia Neutral Zone
JQ Johnston Atoll
JS Svalbard and Jan Mayen
KQ Kingman Reef
LQ Palmyra Atoll
ME Spanish North Africa
Appendix B 96
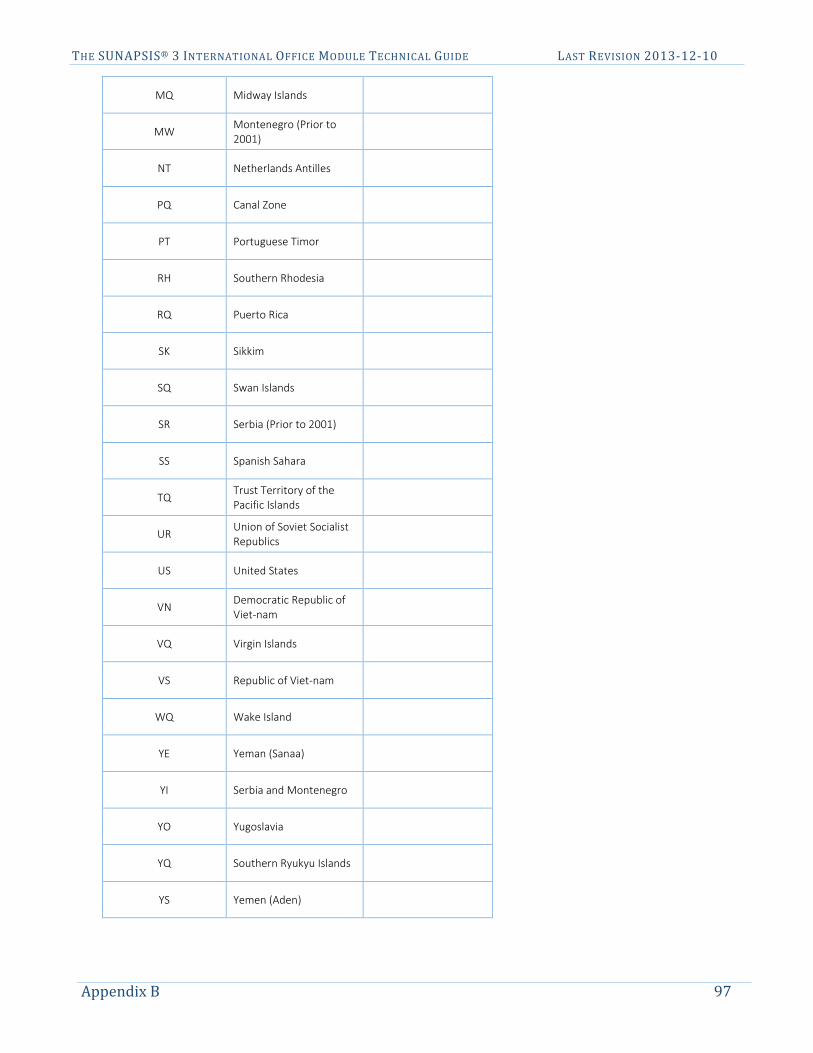
THE SUNAPSIS® 3 INTERNATIONAL OFFICE MODULE TECHNICAL GUIDE LAST REVISION 2013-12-10
MQ Midway Islands
MW Montenegro (Prior to 2001)
NT Netherlands Antilles
PQ Canal Zone
PT Portuguese Timor
RH Southern Rhodesia
RQ Puerto Rica
SK Sikkim
SQ Swan Islands
SR Serbia (Prior to 2001)
SS Spanish Sahara
TQ Trust Territory of the Pacific Islands
UR Union of Soviet Socialist Republics
US United States
VN Democratic Republic of Viet-nam
VQ Virgin Islands
VS Republic of Viet-nam
WQ Wake Island
YE Yeman (Sanaa)
YI Serbia and Montenegro
YO Yugoslavia
YQ Southern Ryukyu Islands
YS Yemen (Aden)
Appendix B 97

THE SUNAPSIS® 3 INTERNATIONAL OFFICE MODULE TECHNICAL GUIDE LAST REVISION 2013-12-10
B.5 GENDER
Table Type: mapGender
sunapsis® Value sunapsis® Description Institutional Value
F Female
M Male
U Unknown
B.6 ENROLLMENT STATUS
Table Type: mapEnrollmentStatus
sunapsis® Value sunapsis® Description Institutional Value
A Audit
D Dropped
E Enrolled
S Scheduled - Not Enrolled
W Waitlist
B.7 EMPLOYEE STATUS
Table Type: mapEmployeeStatus
sunapsis® Value sunapsis® Description Institutional Value
A Active
NT Unclear Employment
O On Leave
P Leave With Pay
T Terminated
Appendix B 98

THE SUNAPSIS® 3 INTERNATIONAL OFFICE MODULE TECHNICAL GUIDE LAST REVISION 2013-12-10
B.8 EMPLOYEE REGULAR / TEMPORARY
Table Type: mapEmployeeRegTemp
sunapsis® Value sunapsis® Description Institutional Value
R Regular Employee
T Temporary Employee
B.9 EMPLOYEE TIME
Table Type: mapEmployeeTime
sunapsis® Value sunapsis® Description Institutional Value
FT Full-Time Employment
PT Part-Time Employment
B.10 ETHNICITY
Table Type: mapEthnicity
sunapsis® Value sunapsis® Description Institutional Value
1 White
2 Black/African American
3 Hispanic/Latino
4 Asian
5 American Indian/Alaska Native
6 NR-Alien
7 Native Hawaiian/Other Pacific Islander
8 Two or More Races
Appendix B 99

THE SUNAPSIS® 3 INTERNATIONAL OFFICE MODULE TECHNICAL GUIDE LAST REVISION 2013-12-10
B.11 MARITAL STATUS
Table Type: mapMaritalStatus
sunapsis® Value sunapsis® Description Institutional Value
S Single
M Married
U Unknown
B.12 INSTITUTIONAL MAJOR - CIP MAJOR
This is the mapping between institutional academic major codes and the SEVIS CIP codes. We did not include the full list because there are in excess of 2,000 in the SEVIS CIP majors. If the application is pulling CIP codes from the institutional system, this table does not need to be updated.
B.13 RESIDENCY STATUS
Table Type: mapResidencyStatus
sunapsis® Value sunapsis® Description Institutional Value
NR Non-Resident
R Resident
B.14 VISA
Table Type: mapVisa sunapsis® / SEVIS
Value sunapsis® Description Institutional Value
485 I-485 Appl for Adj of Status
A1 A-1 Embasy/Consul Employe/Dep
A2 A-2 Govt Official/Employe/Dep
A3 A-3 Personal Empl/Deps A1-A2
AA Alien Abroad
AR1 Alien Registration
Appendix B 100

THE SUNAPSIS® 3 INTERNATIONAL OFFICE MODULE TECHNICAL GUIDE LAST REVISION 2013-12-10
ASY Asylee (Political asylum)
B1 B-1 Temporary Visitor Business
B2 B-2 Temporary Visitor Pleasure
BU1 Business Traveller
C1 C-1 Alien in Transit
C2 C-2 Alien in Transit to UN HQ
C3 C-3 Govt Official in Transit
D D: Crewman (seaman or airman)
DL Distance Learning
DW1 Distinguished Temporary Worker
E1 E-1 Treaty Trader Dependents
E2 E-2 Treaty Investor/Dependents
E3 E-3 Temporary Australian Worker
F-1 F-1 Student
F-2 F-2 Dependent of Student
F-3 F-3 Canadian / Mexican Commuter Student
G1 G-1 Principal Govt Rep/Deps
G2 G-2 Othr Residnt Govt Rep/Deps
G3 G-3 nonrec/nonmbr Gov Rep/Deps
G4 G-4 Intl Org Officer/Empl/Dep
G5 G-5 Personal Empl/Deps G1-G4
H1A H-1A Temp Worker Nursing
H1B H-1B Temp Worker Specialty Occ
H1C H-1C Temp Worker Reg Nurse
Appendix B 101

THE SUNAPSIS® 3 INTERNATIONAL OFFICE MODULE TECHNICAL GUIDE LAST REVISION 2013-12-10
H2A H-2A Temp Worker Agriculture
H2B H-2B Temp Worker Non-Agricult
H3 H-3 Trainee
H4 H-4 Spouse/Child of H1-H3
I I: Foreign Media Rep/Deps
I-9 I-9 (Employment Eligibility)
J1 J-1 Exchange Visitor
J2 J-2 Spouse/Child of J-1
K1 K-1 Fiance(e) of US Citizen
K2 K-2 Child of K1 Alien
K3 K-3 Spouse of US Citizen
K4 K-4 Minor Child of K3 Alien
L1 L-1 Intracompany Transferee
L2 L-2 Spouse/Child of L1 Alien
LPR Permanent Resident
M-1 M-1 Student Rec Nonacadem Inst
M-2 M-2 Spouse/Child of M1 Alien
N8 N-8 Parent of Child w/spl Stat
N9 N-9 Child of Parent w/spl Stat
NLR Now US Citizen-No Visa Reqd
NT1 NATO-1 Principal NATO Rep
NT2 NATO-2 Other NATO State Rep
NT3 NATO-3 Clerical Staff NATO/Dep
NT4 NATO-4 Official of NATO/Deps
Appendix B 102

THE SUNAPSIS® 3 INTERNATIONAL OFFICE MODULE TECHNICAL GUIDE LAST REVISION 2013-12-10
NT5 NATO-5 NATO Experts NATO/Deps
NT6 NATO-6 Civiln Employ NATO/Deps
NT7 NATO-7 Personl Empl NT1-6/Deps
O Other
O1 O-1 Worker w/Extraord Ability
O2 O-2 Assistant of O1 Alien
O3 O-3 Family of O1 and O2 Alien
OX Status in Transition
P1 P-1 Intl Recog Entertain/Athl
P2 P-2 Exchng Entertainer/Artist
P3 P-3 Unique Entertainer/Artist
P4 P-4 Family of P1-P3
PIP Public Interest Parolee
Q1 Q-1 Cultural Exchange Visitor
Q2 Q-2 Irish Cultr Exchng Visitor
R R: Religious Worker
R2 R-2 Religious Worker Dependent
REF Refugee
S S: Federal Witness
SD1 Sponsored Domestic Helper
TD TD Dependent of TN Alien
TN TN NAFTA Professional
TPS Temporary Protected Status
U-1 Victims of qualifying criminal activity
Appendix B 103

THE SUNAPSIS® 3 INTERNATIONAL OFFICE MODULE TECHNICAL GUIDE LAST REVISION 2013-12-10
U-2 Victims of qualifying criminal activity: spouse of victim
U-3 Victims of qualifying criminal activity: children of victim
U-4 Victims of qualifying criminal activity: parents of victim who are children
U-5
Victims of qualifying criminal activity: siblings (of minor age) of victim who are children
V1 V-1 Permanent Resident Spouse
V2 V-2 Child of V-1
V3 V-3 Child of V-1 or V-2
WB Visa Waiver Business
WT Visa Waiver Tourist
Appendix B 104
Related Documents