Sun Server X3-2 (formerly Sun Fire X4170 M3) Administration Guide Part No.: E22365-11 April 2014

Welcome message from author
This document is posted to help you gain knowledge. Please leave a comment to let me know what you think about it! Share it to your friends and learn new things together.
Transcript

Sun Server X3-2 (formerly Sun Fire X4170 M3)
Administration Guide
Part No.: E22365-11April 2014

Copyright © 2013, 2014, Oracle and/or its affiliates. All rights reserved.This software and related documentation are provided under a license agreement containing restrictions on use and disclosure and are protected byintellectual property laws. Except as expressly permitted in your license agreement or allowed by law, you may not use, copy, reproduce, translate,broadcast, modify, license, transmit, distribute, exhibit, perform, publish, or display any part, in any form, or by any means. Reverse engineering,disassembly, or decompilation of this software, unless required by law for interoperability, is prohibited.The information contained herein is subject to change without notice and is not warranted to be error-free. If you find any errors, please report them to usin writing.If this is software or related software documentation that is delivered to the U.S. Government or anyone licensing it on behalf of the U.S. Government, thefollowing notice is applicable:U.S. GOVERNMENT END USERS. Oracle programs, including any operating system, integrated software, any programs installed on the hardware,and/or documentation, delivered to U.S. Government end users are "commercial computer software" pursuant to the applicable Federal AcquisitionRegulation and agency-specific supplemental regulations. As such, use, duplication, disclosure, modification, and adaptation of the programs, includingany operating system, integrated software, any programs installed on the hardware, and/or documentation, shall be subject to license terms and licenserestrictions applicable to the programs. No other rights are granted to the U.S. Government.This software or hardware is developed for general use in a variety of information management applications. It is not developed or intended for use in anyinherently dangerous applications, including applications which may create a risk of personal injury. If you use this software or hardware in dangerousapplications, then you shall be responsible to take all appropriate fail-safe, backup, redundancy, and other measures to ensure its safe use. OracleCorporation and its affiliates disclaim any liability for any damages caused by use of this software or hardware in dangerous applications.Oracle and Java are registered trademarks of Oracle and/or its affiliates. Other names may be trademarks of their respective owners.Intel and Intel Xeon are trademarks or registered trademarks of Intel Corporation. All SPARC trademarks are used under license and are trademarks orregistered trademarks of SPARC International, Inc. AMD, Opteron, the AMD logo, and the AMD Opteron logo are trademarks or registered trademarks ofAdvanced Micro Devices. UNIX is a registered trademark of The Open Group.This software or hardware and documentation may provide access to or information on content, products, and services from third parties. OracleCorporation and its affiliates are not responsible for and expressly disclaim all warranties of any kind with respect to third-party content, products, andservices. Oracle Corporation and its affiliates will not be responsible for any loss, costs, or damages incurred due to your access to or use of third-partycontent, products, or services.
Copyright © 2013, 2014, Oracle et/ou ses affiliés. Tous droits réservés.Ce logiciel et la documentation qui l’accompagne sont protégés par les lois sur la propriété intellectuelle. Ils sont concédés sous licence et soumis à desrestrictions d’utilisation et de divulgation. Sauf disposition de votre contrat de licence ou de la loi, vous ne pouvez pas copier, reproduire, traduire,diffuser, modifier, breveter, transmettre, distribuer, exposer, exécuter, publier ou afficher le logiciel, même partiellement, sous quelque forme et parquelque procédé que ce soit. Par ailleurs, il est interdit de procéder à toute ingénierie inverse du logiciel, de le désassembler ou de le décompiler, excepté àdes fins d’interopérabilité avec des logiciels tiers ou tel que prescrit par la loi.Les informations fournies dans ce document sont susceptibles de modification sans préavis. Par ailleurs, Oracle Corporation ne garantit pas qu’ellessoient exemptes d’erreurs et vous invite, le cas échéant, à lui en faire part par écrit.Si ce logiciel, ou la documentation qui l’accompagne, est concédé sous licence au Gouvernement des Etats-Unis, ou à toute entité qui délivre la licence dece logiciel ou l’utilise pour le compte du Gouvernement des Etats-Unis, la notice suivante s’applique :U.S. GOVERNMENT END USERS. Oracle programs, including any operating system, integrated software, any programs installed on the hardware,and/or documentation, delivered to U.S. Government end users are "commercial computer software" pursuant to the applicable Federal AcquisitionRegulation and agency-specific supplemental regulations. As such, use, duplication, disclosure, modification, and adaptation of the programs, includingany operating system, integrated software, any programs installed on the hardware, and/or documentation, shall be subject to license terms and licenserestrictions applicable to the programs. No other rights are granted to the U.S. Government.Ce logiciel ou matériel a été développé pour un usage général dans le cadre d’applications de gestion des informations. Ce logiciel ou matériel n’est pasconçu ni n’est destiné à être utilisé dans des applications à risque, notamment dans des applications pouvant causer des dommages corporels. Si vousutilisez ce logiciel ou matériel dans le cadre d’applications dangereuses, il est de votre responsabilité de prendre toutes les mesures de secours, desauvegarde, de redondance et autres mesures nécessaires à son utilisation dans des conditions optimales de sécurité. Oracle Corporation et ses affiliésdéclinent toute responsabilité quant aux dommages causés par l’utilisation de ce logiciel ou matériel pour ce type d’applications.Oracle et Java sont des marques déposées d’Oracle Corporation et/ou de ses affiliés.Tout autre nom mentionné peut correspondre à des marquesappartenant à d’autres propriétaires qu’Oracle.Intel et Intel Xeon sont des marques ou des marques déposées d’Intel Corporation. Toutes les marques SPARC sont utilisées sous licence et sont desmarques ou des marques déposées de SPARC International, Inc. AMD, Opteron, le logo AMD et le logo AMD Opteron sont des marques ou des marquesdéposées d’Advanced Micro Devices. UNIX est une marque déposée d’The Open Group.Ce logiciel ou matériel et la documentation qui l’accompagne peuvent fournir des informations ou des liens donnant accès à des contenus, des produits etdes services émanant de tiers. Oracle Corporation et ses affiliés déclinent toute responsabilité ou garantie expresse quant aux contenus, produits ouservices émanant de tiers. En aucun cas, Oracle Corporation et ses affiliés ne sauraient être tenus pour responsables des pertes subies, des coûtsoccasionnés ou des dommages causés par l’accès à des contenus, produits ou services tiers, ou à leur utilisation.
PleaseRecycle

Contents
Using This Documentation ix
Planning the System Management Environment 1
Choosing Tools for Single System Management 2
Choosing Tools for Multiple System Management 3
System Management Tools Overview 3
Oracle System Assistant 4
Oracle Integrated Lights Out Manager (Oracle ILOM) 5
Oracle Hardware Management Pack 6
Common System Management Tasks 8
Common System Administrative Tasks 9
Evaluating the Server Environment 12
Planning for Operating System Installation 12
Planning for System Component Updating and Monitoring 13
Planning for Modular System Management 14
Installing System Management Tools 15
System Management Documentation 15
Accessing System Management Tools 17
Accessing Oracle System Assistant 17
▼ Enable Oracle System Assistant From BIOS 18
▼ Access Oracle System Assistant at Startup 19
iii

▼ Access Oracle System Assistant From Oracle ILOM Using the WebInterface 21
▼ Access Oracle System Assistant Using the Oracle ILOM CLI 23
Accessing Oracle ILOM 24
▼ Access Oracle ILOM Using the Web Interface 24
▼ Access Oracle ILOM Using the CLI 25
Accessing Oracle Hardware Management Pack 26
▼ Access Oracle Hardware Management Pack From Oracle SystemAssistant 26
▼ Access Oracle Hardware Management Pack From My OracleSupport 27
Setting Up Software and Firmware 29
▼ Set Up Software and Firmware Using Oracle System Assistant 29
▼ Set Up Software and Firmware Using Oracle ILOM 30
▼ Set Up Software and Firmware Using Oracle Hardware ManagementPack 32
Setting Up the Server Using Oracle System Assistant 35
Organization of Oracle System Assistant 37
Configure the Server Using Oracle System Assistant 39
▼ View Oracle System Assistant ReadMe File 40
▼ Exit From Oracle System Assistant 40
▼ View System Information 41
▼ View System Inventory Information 43
▼ Configure Network Settings 44
▼ Get Platform Software Release Updates 45
▼ Configure MOS to Enable Oracle System Assistant Updates 47
▼ Update Firmware 49
▼ Configure Hardware for RAID 54
▼ Configure Hardware for the Oracle ILOM SP 56
iv Sun Server X3-2 Administration Guide • April 2014

▼ Install an Operating System 64
▼ Set Preferences to Disable Oracle System Assistant 67
▼ Set Preferences for Keyboard Language 68
▼ Perform Advanced Tasks to Access Oracle System Assistant Shell 70
▼ Perform Advanced Tasks to Check Media Integrity 71
▼ View Files on the Oracle System Assistant USB Flash Drive 73
▼ View Documentation From Oracle System Assistant 74
Mounting the Oracle System Assistant USB Flash Drive 75
▼ Mount the Oracle System Assistant USB Flash Drive on Oracle VM3.0 75
▼ Mount the Oracle System Assistant USB Flash Drive on a LinuxOperating System 77
▼ Mount the Oracle System Assistant USB Flash Drive on an OracleSolaris 10 Operating System 78
Troubleshooting Oracle System Assistant 80
▼ Verify Oracle System Assistant Is Installed 80
▼ Troubleshoot Oracle System Assistant Launch From Oracle ILOM 82
▼ Restore Oracle System Assistant 83
Accessing the Oracle System Assistant Filesystem 87
▼ Access the Oracle System Asistant Filesystem 89
Managing the Server Using Oracle ILOM 91
Oracle ILOM Features 91
Oracle ILOM Features for Oracle x86 Servers 92
Sideband Management 94
Power Control Policies 94
Power Management Policy 95
Local Host Interconnect Management Connection 96
Diagnostics Using Pc-Check and NMI 96
Control Next Boot Device 97
Contents v

FRU TLI Auto-Update 97
Switch Serial Port Output to Host Management Console 98
Back Up and Restore BIOS Configuration 98
Set PCIe Cooling Mode 98
Administer Open Problems and Clear Server Faults 99
Configuring RAID 101
Supported HBA Disk Controllers 101
RAID Configuration Options 102
Creating a RAID Volume Before Installing an Operating System 103
Creating a RAID Volume After Installing an Operating System 103
Using Oracle ILOM to Monitor Storage Devices 104
Setting Up BIOS Configuration Parameters 107
Managing the BIOS Configuration 107
Accessing the BIOS Setup Utility 108
BIOS Setup Utility Menus 108
BIOS Key Mappings 109
▼ Access BIOS Setup Utility Menus 110
▼ Navigate BIOS Setup Utility Menus 111
Using Legacy BIOS or UEFI 112
Selecting Legacy BIOS or UEFI Boot Mode 113
Switching Between Legacy BIOS and UEFI 114
UEFI Boot Mode Advantages 114
Configuration Utilities for Add-In Cards 115
Using BIOS for Resource Allocation 116
Legacy Option ROM Allocation 116
IO Resource Allocation 117
Common BIOS Setup Utility Tasks 118
vi Sun Server X3-2 Administration Guide • April 2014

▼ Verify BIOS Factory Default Settings 118
▼ Select Legacy BIOS or UEFI Boot Mode 119
▼ Select the Boot Device 121
▼ Configure iSCSI Virtual Drives 122
▼ Enable or Disable Oracle System Assistant 130
▼ Configure TPM Support 131
▼ Configure SP Network Settings 134
▼ Configure Option ROM Settings 136
▼ Configure IO Resource Allocation 138
▼ Exit BIOS Setup Utility 138
BIOS Setup Utility Menu Options 141
BIOS Main Menu Selections 142
BIOS Advanced Menu Selections 147
BIOS IO Menu Selections 158
BIOS Boot Menu Selections 162
UEFI Driver Control Menu Selections 166
BIOS Save & Exit Menu Selections 168
Monitoring Components and Identifying SNMP Messages 171
Monitoring Component Health and Faults Using Oracle ILOM 171
Monitoring System Components 172
System Chassis Components 173
Cooling Unit Components 175
Disk Backplane Components 176
Memory Device Components 176
Power Unit Components 177
Processor Components 178
System Board Components 179
Contents vii

System Firmware Components 181
Hard Disk Drive Components 181
Identifying SNMP Trap Messages 183
Getting Server Firmware and Software 197
Firmware and Software Updates 197
Firmware and Software Access Options 198
Software Releases 199
Getting Firmware and Software from MOS or PMR 200
▼ Download Firmware and Software Using My Oracle Support 200
Requesting Physical Media 201
Gathering Information for the Physical Media Request 202
▼ Request Physical Media (Online) 202
▼ Request Physical Media (By Phone) 204
Installing Updates Using Other Methods 204
Index 205
viii Sun Server X3-2 Administration Guide • April 2014

Using This Documentation
This administration guide describes the tools that are available to manage the SunServer X3-2 from Oracle, and the Oracle ILOM features specific to the server.
Note – The Sun Server X3-2 was formerly named the Sun Fire X4170 M3 server. Thisformer name might still appear in the software. The new product name does notindicate any change in system features or functionality.
This document is written for technicians, system administrators, authorized serviceproviders, and users who have experience configuring and administering servers.
This section describes how to obtain the latest software and firmware, documentationand feedback, and support and accessibility information.
■ “Getting the Latest Software and Firmware” on page ix
■ “About This Documentation” on page x
■ “Related Documentation” on page x
■ “Feedback” on page x
■ “Access to Oracle Support” on page xi
Getting the Latest Software andFirmwareFirmware, drivers and other hardware-related software for each Oracle x86 server,server module (blade), and blade chassis are updated periodically.
You can obtain the latest version in one of three ways:
ix
■ Oracle System Assistant – This is a new factory-installed option for Oracle x86servers. It has all the tools and drivers you need and is built into the server.
■ My Oracle Support: http://support.oracle.com
■ Physical media request
For more information, see “Getting Server Firmware and Software” on page 197.
About This DocumentationThis documentation set is available in both PDF and HTML formats. The informationis presented in topic-based organization (similar to online help) and therefore doesnot include chapters, appendices, or section numbering.
A PDF version that includes all information on a particular topic subject (such ashardware installation or product notes) can be generated by clicking the PDF buttonin the upper left corner of the HTML page.
Related Documentation
FeedbackYou can provide feedback on this documentation at:
Documentation Link
All Oracle documentation http://www.oracle.com/documentation
Sun Server X3-2 http://www.oracle.com/pls/topic/lookup?ctx=SunServerX3-2
Oracle Integrated Lights OutManager (Oracle ILOM) 3.1
http://www.oracle.com/pls/topic/lookup?ctx=ilom31
Oracle HardwareManagement Pack 2.2
http://www.oracle.com/pls/topic/lookup?ctx=ohmp
x Sun Server X3-2 Administration Guide • April 2014

http://www.oracle.com/goto/docfeedback
Access to Oracle SupportOracle customers have access to electronic support through My Oracle Support. Forinformation, visit http://www.oracle.com/pls/topic/lookup?ctx=acc&id=infoor visit http://www.oracle.com/pls/topic/lookup?ctx=acc&id=trsifyou are hearing impaired.
Using This Documentation xi

xii Sun Server X3-2 Administration Guide • April 2014
Planning the System ManagementEnvironment
Note – The Sun Server X3-2 was formerly named the Sun Fire X4170 M3 server. Thisformer name might still appear in the software. The new product name does notindicate any change in system features or functionality.
This section includes information about the management tools that are available tomanage a single Oracle server or multiple Oracle servers, and how to select the besttool to use.
The following topics are discussed.
Description Links
Review descriptions of the tools availableto manage a single server.
“Choosing Tools for Single SystemManagement” on page 2
Review descriptions of tools available tomanage multiple servers.
“Choosing Tools for Multiple SystemManagement” on page 3
Review advantages of the systemmanagement tools.
“System Management Tools Overview” onpage 3
View a list of common systemmanagement tasks to see which tool youcan use.
“Common System Management Tasks” onpage 8
View a list of common systemadministrative tasks to see which tool youcan use.
“Common System Administrative Tasks” onpage 9
Evaluate which tool fits your serverenvironment.
“Evaluating the Server Environment” onpage 12
Review how system management tools areinstalled.
“Installing System Management Tools” onpage 15
Locate system managementdocumentation.
“System Management Documentation” onpage 15
1

Related Information
■ “Accessing System Management Tools” on page 17
Choosing Tools for Single SystemManagementA data center administrator can use single system management tools for localmanagement or for remote access management over a network. In addition, singlesystem management tools provide interfaces for integrating with other Oracleenterprise tools, as well as third-party management applications.
Use the following system management tools to manage Oracle servers.
Related Information
■ “System Management Tools Overview” on page 3
■ “Evaluating the Server Environment” on page 12
■ “Accessing System Management Tools” on page 17
Tool Description See:
Oracle SystemAssistant
Embedded setup tool that helps you tolocally or remotely configure andupdate server firmware and software,and to install supported operatingsystems.
“Oracle SystemAssistant” on page 4
Oracle IntegratedLights Out Manager(Oracle ILOM)
Embedded service processor utilityused to configure and manage servercomponents. Oracle ILOM enables youto locally or remotely connect to adedicated network port, a sidebandport, or a local serial port.
“Oracle IntegratedLights Out Manager(Oracle ILOM)” onpage 5
Oracle HardwareManagement Pack
Add-on software pack that enables youto monitor hardware through the hostoperating system either remotely usingSNMP, or locally using command-lineinterface tools.
“Oracle HardwareManagement Pack” onpage 6
2 Sun Server X3-2 Administration Guide • April 2014

Choosing Tools for Multiple SystemManagementIf you need to perform system management functions across multiple systemssimultaneously, you should consider using Oracle Enterprise Manager Ops Center.Oracle Enterprise Manager Ops Center might be included with your server as part ofa server support contract. You also can order Oracle Enterprise Manager Ops Centersoftware from Oracle.
Oracle Enterprise Manager Ops Center is a highly scalable, unified managementplatform for physical and virtual environments. Use Oracle Enterprise Manager OpsCenter to manage multiple Oracle x86 and SPARC systems that are distributedthroughout a global data center, and to integrate those systems with existing toolssets. Oracle Enterprise Manager Ops Center facilitates many aspects of compliancereporting (ITIL) and data center automation, enabling you to manage thousands ofsystems simultaneously.
Refer to the Oracle Enterprise Manager Ops Center product information at:
http://www.oracle.com/technetwork/oem/ops-center/index.html
Related Information
■ “System Management Tools Overview” on page 3
System Management Tools OverviewThese sections briefly describe the following system management tools:
■ “Oracle System Assistant” on page 4
■ “Oracle Integrated Lights Out Manager (Oracle ILOM)” on page 5
■ “Oracle Hardware Management Pack” on page 6
Related Information
■ “Common System Management Tasks” on page 8
■ “Common System Administrative Tasks” on page 9
■ “Evaluating the Server Environment” on page 12
Planning the System Management Environment 3

■ “Installing System Management Tools” on page 15
Oracle System AssistantOracle System Assistant allows you to get the latest software and firmware updates,update firmware, configure hardware, and install supported operating systems.Oracle System Assistant is a management tool that integrates Oracle’s systemmanagement products and related software.
It is highly recommended that you use Oracle System Assistant to update yoursystem to the latest software release before you use the system. You can get the latestavailable system BIOS, Oracle ILOM, firmware, and drivers from Oracle byperforming the Get Updates task in Oracle System Assistant. For instructions on howto use the Get Updates task, see “Get Platform Software Release Updates” onpage 45. An Internet connection is required.
You also can download the latest firmware and software updates from My OracleSupport at http://support.oracle.com. For information about downloadingfirmware and software from My Oracle Support, see “Getting Server Firmware andSoftware” on page 197.
You can start Oracle System Assistant from the BIOS or from Oracle ILOM. OracleSystem Assistant then displays a graphical user interface application from which youcan access features and complete tasks with or without an operating system installedon the server. After the operating system is running on the server, the tools, drivers,and documentation appear as files on a typical storage device, allowing you to useOracle System Assistant as resource media.
With Oracle System Assistant, you can:
■ Get the latest available system BIOS, Oracle ILOM, firmware, and drivers fromOracle (an Internet connection is required).
■ Update system BIOS, Oracle ILOM, and Oracle-certified device drivers foroptional accessory cards and other system hardware.
■ Configure RAID 0 or RAID 1 for servers that contain a supported disk controller.
■ Configure the Oracle ILOM service processor, including modifying identificationinformation; configuring network settings (IPv4 and IPv6) and DNS; adding,deleting, or modifying users; and setting the service processor clock.
■ Install supported operating systems with the latest drivers and supported tools.
■ Display system overview and hardware inventory information.
■ Set the keyboard language.
■ Access the Oracle System Assistant (Linux) shell terminal window allowing use ofthe runtime environment.
4 Sun Server X3-2 Administration Guide • April 2014

■ Access Oracle Hardware Management Pack (using the Oracle System Assistantshell).
■ Access product documentation.
Oracle System Assistant is delivered on a storage device embedded in the system asan integral part of your server, and is ready to use as soon as you power on. Thisembedded storage device includes everything you need to start using the server withyour choice of supported operating system and hardware. You provide the operatingsystem installation media, Oracle System Assistant provides everything else.
Oracle System Assistant components are updated online. The embedded storagedrive is factory configured with a server-specific version of Oracle System Assistantthat you maintain as such by using an online update feature for all components. Inaddition, the components can be updated using an UPDATER ISO image that youcan obtain from the My Oracle Support web site.
The components of Oracle System Assistant include:
■ Oracle System Assistant application
■ Operating system-specific software, drivers, and tools
■ Server-specific firmware
■ Oracle Hardware Management Pack
■ Oracle System Assistant (Linux) command-line environment
■ Server-specific and related documentation
Oracle continually strives to improve its products. To send comments about OracleSystem Assistant, contact [email protected].
Related Information
■ “Setting Up the Server Using Oracle System Assistant” on page 35
Oracle Integrated Lights Out Manager (OracleILOM)Oracle Integrated Lights Out Manager (Oracle ILOM) is system managementfirmware that is preinstalled on an embedded service processor on Oracle’sx86-based servers and SPARC-based servers. Oracle ILOM enables you to activelymanage and monitor components in your server. Using Oracle ILOM, you canremotely manage and monitor the server as if you were using a locally attachedkeyboard, monitor, and mouse, regardless of the state of the host system. The OracleILOM firmware automatically initializes when standby power is applied to theserver.
Planning the System Management Environment 5

Oracle ILOM firmware allows you to choose either a full-featured browser-basedweb interface or an equivalent command-line interface (CLI).
With Oracle ILOM, you can:
■ View graphical and text-based consoles for the host.
■ View Oracle ILOM using a web-based interface or a command-line interface.
■ Monitor the current status of server sensors and indicators.
■ Monitor server hardware errors and faults as they occur.
■ Send events using SNMP traps or email alerts when faults occur.
■ Remotely control the power state of the server.
■ Configure the server hardware.
The service processor (SP) has a dedicated Ethernet port. The SP runs its own OracleILOM embedded operating system and provides out-of-band management capability.In addition, you can access Oracle ILOM from the server’s host operating system(Oracle Solaris, Oracle Linux, other variants of Linux, or Windows).
You can also configure Oracle ILOM to integrate with other management tools inyour data center. You can easily integrate the Oracle ILOM SNMP interface and IPMImanagement interfaces with other management tools and processes that you mighthave working already with your servers, such as Oracle Enterprise Manager OpsCenter. For more information about Oracle Enterprise Manager Ops Center, go to:
http://www.oracle.com/technetwork/oem/ops-center/index.html
In addition, you can integrate Oracle ILOM with several enterprise management,third-party tools, such as CA Unicenter, HP OpenView Operations, BMC Patrol, andIBM Tivoli. For more information about which tools are supported, go to:
http://www.oracle.com/technetwork/server-storage/servermgmt/tech/isv-hardware-connectors/index.html
Related Information
■ Oracle Integrated Lights Out Manager (ILOM) 3.1 Documentation Library at:http://www.oracle.com/pls/topic/lookup?ctx=ilom31
Oracle Hardware Management PackOracle Hardware Management Pack is available for your server, and for many otherOracle x86-based servers and some SPARC-based servers. Oracle HardwareManagement Pack features two components: an SNMP monitoring agent and afamily of cross-operating system command-line interface tools (CLI Tools) formanaging your servers.
6 Sun Server X3-2 Administration Guide • April 2014

With the Hardware Management Agent SNMP Plugins, you can use SNMP tomonitor Oracle servers and server modules in your data center with the advantage ofnot having to connect to two management points, the host and Oracle ILOM. Thisfunctionality enables you to use a single IP address (the host’s IP) to monitormultiple servers and server modules.
Hardware Management Agent SNMP Plugins run on the host operating system ofOracle servers. The SNMP Plugins use the Oracle Hardware Storage Access Librariesto communicate with the service processor. Information about the current state of theserver is fetched automatically by the Hardware Management Agent.
You can use the Oracle Server CLI Tools to configure Oracle servers. The CLI Toolswork with Oracle Solaris, Oracle Linux, Oracle VM, other variants of Linux, andWindows operating systems. The following table describes the tasks that you canperform using the CLI Tools.
Related Information
■ Oracle Hardware Management Pack Documentation Library at:http://www.oracle.com/pls/topic/lookup?ctx=ohmp
System Management Task From Host OS CLI Tool
Configure BIOS settings, device boot order, and some SPsettings.
ubiosconfig
Update Oracle ILOM and BIOS.Query, update, and validate firmware versions on supportedSAS storage devices, embedded SAS storage controllers, SASstorage expanders, and storage drives.
fwupdate
Restore, set, and view Oracle ILOM configuration settings, aswell as view and set Oracle ILOM properties that are associatedwith network management, clock configuration, and usermanagement.
ilomconfig
View or create RAID volumes on storage drives that areattached to RAID controllers, including storage arrays.
raidconfig
Monitor the health of the system. hwmgmtcli
Planning the System Management Environment 7

Common System Management TasksEach system management tool has unique capabilities, but some of the functions ofthe tools overlap. You can use each tool independently, or, depending on yourplatform, you can use the tools together for more comprehensive systemmanagement. Each system management tool is freely available.
The following table gives examples of common system management tasks that youcan perform with the available system management tools.
Related Information
■ “System Management Tools Overview” on page 3
■ “Evaluating the Server Environment” on page 12
■ “Installing System Management Tools” on page 15
TaskOracle SystemAssistant Oracle ILOM
OracleHardwareManagementPack
Update BIOS firmware. Yes Yes Yes
Update Oracle ILOM firmware. Yes Yes Yes
Configure Oracle ILOM. Yes Yes Yes
Update HBA firmware. Yes No Yes
Update expander firmware. Yes No Yes
Install Windows operating system anddrivers.
Yes No No
Install Linux operating system and drivers. Yes No No
Install Oracle VM software and drivers. Yes No No
Monitor hardware components. No Yes Yes
Configure RAID. Yes No Yes
8 Sun Server X3-2 Administration Guide • April 2014

Common System Administrative TasksThe following table includes information about common administrative tasks thatyou can perform using the system management tools.
TaskOracle SystemAssistant Oracle ILOM
Oracle HardwareManagement Pack Other
Set up software andfirmware.
“Set Up Softwareand Firmware UsingOracle SystemAssistant” onpage 29
“Set Up Software andFirmware UsingOracle ILOM” onpage 30
“Set Up Software andFirmware Using OracleHardwareManagement Pack” onpage 32
Not applicable
Set power-on andcooling policies.
Not applicable “Managing theServer Using OracleILOM” on page 91
Not applicable Not applicable
Update BIOS orOracle ILOMfirmware.
Update Firmware CLI: loadWeb interface: ILOMAdministration >Maintenance >Firmware Upgrade
fwupdate Not applicable
Update HBA andexpander firmware.
Update Firmware Not applicable fwupdate Not applicable
Configure apreinstalled OS.
Not applicable Not applicable Not applicable Sun Server X3-2Installation Guide,“About theInstallationProcedure” onpage 1
Install Linux OS. Install OS Not applicable Not applicable Sun Server X3-2Installation Guidefor Linux OperatingSystems, “AboutLinux OperatingSystem Installs” onpage 1
Planning the System Management Environment 9

Install WindowsOS.
Install OS Not applicable Not applicable Sun Server X3-2Installation Guidefor WindowsOperating Systems,“About MicrosoftWindows ServerOperating SystemInstalls” on page 1
Install Oracle VMsoftware.
Install OS Not applicable Not applicable Sun Server X3-2Installation Guidefor Oracle VM,“About Oracle VMInstalls” on page 1
Install OracleSolaris OS.
Not applicable Not applicable Not applicable Sun Server X3-2Installation Guidefor Oracle SolarisOperating System,“About OracleSolaris OperatingSystem Installs” onpage 1
Install VMwareESXi software.
Not applicable Not applicable Not applicable Sun Server X3-2Installation Guidefor VMware ESXi,“About VMwareESXi Installs” onpage 1
Display server SPIP address.
System Overview CLI:show /Systemilom_address
Web interface:System Information >Summary
Not applicable Not applicable
Display the hostMAC address.
System Overview CLI: show /Systemhost_primary_mac_address
Web interface:System Information >Summary
Not applicable Not applicable
TaskOracle SystemAssistant Oracle ILOM
Oracle HardwareManagement Pack Other
10 Sun Server X3-2 Administration Guide • April 2014

Related Information
■ Oracle Integrated Lights Out Manager (ILOM) 3.1 Documentation Library at:http://www.oracle.com/pls/topic/lookup?ctx=ilom31
■ Oracle Hardware Management Pack Documentation Library at:http://www.oracle.com/pls/topic/lookup?ctx=ohmp
Configure OracleILOM networksettings.
Configure Hardware> Service ProcessorConfiguration
CLI:set /SP/network<property>=<value>Web interface:ILOMAdministration >Network Settings
ilomconfig Not applicable
Configure RAID. Configure Hardware> RAIDConfiguration
Not applicable raidconfig “ConfiguringRAID” onpage 101
Power on the serverremotely.
Not applicable CLI:start /System
Web interface:System Information >Summary
Not applicable Not applicable
Power off the serverremotely.
Not applicable CLI:stop /System
Web interface:System Information >Summary
Not applicable Not applicable
Reset the SP todefault values.
Not applicable CLI:set /SPreset_to_defaults=all
Web interface:ILOMAdministration >ConfigurationManagement > ResetDefaults
ilomconfig Not applicable
Monitor hardwarecomponents forfaults.
Not applicable CLI:show/System/Open_Problems
Web interface:System Information
hwmgmtcli
HardwareManagement Agent
Not applicable
TaskOracle SystemAssistant Oracle ILOM
Oracle HardwareManagement Pack Other
Planning the System Management Environment 11

■ Sun Server X3-2 Installation Guide, “About the Installation Procedure” on page 1
Evaluating the Server EnvironmentThis section can help you to decide which type of system management tool orcombination of tools is best for your server environment.
The evaluation covers the following information:
■ “Planning for Operating System Installation” on page 12
■ “Planning for System Component Updating and Monitoring” on page 13
■ “Planning for Modular System Management” on page 14
Related Information
■ “System Management Tools Overview” on page 3
■ “Common System Management Tasks” on page 8
■ “Common System Administrative Tasks” on page 9
■ “Installing System Management Tools” on page 15
Planning for Operating System InstallationMost of the system management tools will work with most operating systems thatare supported for Oracle servers. However, there are some exceptions that areimportant to note. See the following table for detailed information.
For a list of the supported operating systems for your server, refer to the Sun ServerX3-2 Product Notes at: http://www.oracle.com/pls/topic/lookup?ctx=SunServerX3-2.
12 Sun Server X3-2 Administration Guide • April 2014

Related Information
■ “System Management Tools Overview” on page 3
Planning for System Component Updating andMonitoringUse the system management tools to update or monitor server software orcomponents.
The easiest way to obtain and update firmware and software is by using OracleSystem Assistant. See “Set Up Software and Firmware Using Oracle SystemAssistant” on page 29.
Alternatively, you can obtain the latest firmware and software from the My OracleSupport web site or by requesting physical media. For more information, see“Getting Server Firmware and Software” on page 197.
The following table lists the main functions of each tool.
System Management Tool Operating System Limitations
Oracle System Assistant Using Oracle System Assistant, you can installWindows and Linux (Oracle Linux, Red HatEnterprise Linux, SUSE Linux EnterpriseServer) operating systems, as well as OracleVM software.If you have Oracle Solaris or VMware ESXiinstalled on the server, you can updatefirmware and perform additional systemmanagement tasks.
Oracle Integrated Lights Out Manager(Oracle ILOM)
There are no operating system limitationswith Oracle ILOM, because the software runson the system service processor, not on theoperating system.
Oracle Hardware Management Pack To confirm which operating systems aresupported with the Oracle HardwareManagement Pack components, refer to theSupport Matrix at:http://www.oracle.com/technetwork/server-storage/servermgmt/tech/hardware-management-pack/index.html.
Planning the System Management Environment 13

Related Information
■ “System Management Tools Overview” on page 3
Planning for Modular System ManagementYou can use all of the system management tools to manage modular systems (blades)or rack servers. However, only Oracle ILOM can be used to manage blade servermodules from both the chassis monitoring module (CMM) of the modular systemand blade server interfaces.
Related Information
■ “System Management Tools Overview” on page 3
System Management Tool Update Functions Monitoring Functions
Oracle System Assistant Updates and configuresOracle ILOM and BIOSfirmware.Updates and configures HBAand expander firmware.Assists in operating systemand driver installation.Configures RAID.
Provides minimal systemstatus information.
Oracle Integrated LightsOut Manager (OracleILOM)
Updates Oracle ILOM andBIOS firmware.
Monitors component statusand reports faults.
Oracle HardwareManagement Pack
Updates and configuresOracle ILOM and BIOSfirmware.Updates HBA and expanderfirmware.Configures RAID.
Monitors component statusand reports faults.
14 Sun Server X3-2 Administration Guide • April 2014

Installing System Management ToolsThe following table describes how you can install the system management softwaretools.
Related Information
■ “Accessing System Management Tools” on page 17
■ “Getting Server Firmware and Software” on page 197
System Management DocumentationThe following table describes where you can find additional documentation for thesystem management tools.
System Management Tool How to Access the Tool
Oracle System Assistant Preinstalled. Embedded in the server. Noinstallation required.
Oracle Integrated Lights Out Manager(Oracle ILOM)
Preinstalled. Embedded on system serviceprocessor. No installation required.
Oracle Hardware Management Pack Get from Oracle System Assistant ordownload fromhttp://www.oracle.com/goto/system-management.
System Management Tool Documentation Location
Oracle System Assistant Refer to the Oracle System Assistant online Help.Documentation for Oracle System Assistant is withinthis Administration Guide and other guides that arepart of the server Documentation Library.“View Documentation From Oracle SystemAssistant” on page 74
Oracle Integrated Lights OutManager (Oracle ILOM)
http://www.oracle.com/pls/topic/lookup?ctx=ilom31
Planning the System Management Environment 15

Related Information
■ “Accessing System Management Tools” on page 17
Oracle Hardware ManagementPack
http://www.oracle.com/pls/topic/lookup?ctx=ohmp
System Management Tool Documentation Location
16 Sun Server X3-2 Administration Guide • April 2014

Accessing System ManagementTools
This section describes how to access each of the system management tools.
The following topics are discussed.
Related Information
■ Oracle Integrated Lights Out Manager (ILOM) 3.1 Documentation Library at:http://www.oracle.com/pls/topic/lookup?ctx=ilom31
■ Oracle Hardware Management Pack Documentation Library at:http://www.oracle.com/pls/topic/lookup?ctx=ohmp
Accessing Oracle System AssistantChoose one of the following methods to access Oracle System Assistant:
■ “Enable Oracle System Assistant From BIOS” on page 18
■ “Access Oracle System Assistant at Startup” on page 19
■ “Access Oracle System Assistant From Oracle ILOM Using the Web Interface” onpage 21
■ “Access Oracle System Assistant Using the Oracle ILOM CLI” on page 23
Description Links
Learn how to access Oracle SystemAssistant.
“Accessing Oracle System Assistant” onpage 17
Learn how to access Oracle ILOM. “Accessing Oracle ILOM” on page 24
Learn how to access Oracle HardwareManagement Pack.
“Accessing Oracle Hardware ManagementPack” on page 26
17

▼ Enable Oracle System Assistant From BIOSTo enable the Oracle System Assistant USB storage device in an online state(available to the operating system), use the Configure OSA setting in the server BIOSSetup Utility Boot menu.
You can also use the Configure OSA setting in BIOS to disable the USB storage devicein an offline state, so that it is unavailable to the server operating system. Thisprotects the device from accidental erasure and overwrite. When the device is offline,it is not bootable, and the tools, drivers, and files that reside on the Oracle SystemAssistant device are inaccessible. You can also disable Oracle System Assistant fromthe application’s task screens.
Use the following procedure to enable Oracle System Assistant from BIOS.
1. Access the Server BIOS Setup Utility.
See “Access BIOS Setup Utility Menus” on page 110.
2. Navigate to the BIOS Boot menu screen.
3. Navigate to the OSA Configuration screen.
18 Sun Server X3-2 Administration Guide • April 2014

4. Choose Enabled (or Disabled) for the OSA Internal Support setting, then pressEnter.
5. To save your settings and to exit from the BIOS Setup Utility, press F10.
See “Exit BIOS Setup Utility” on page 138.
Related Information■ “BIOS Main Menu Selections” on page 142
▼ Access Oracle System Assistant at StartupUse the following procedure to access Oracle System Assistant after you have startedthe server.
1. Verify that the server is in standby power mode or full power mode.
2. Verify that a monitor, keyboard, and mouse are attached either locally to theserver or remotely to the server using the Oracle ILOM KVMS (keyboard,video, mouse, storage) feature.
For more information, refer to the Sun Server X3-2 Installation Guide, “Setting UpSoftware and Firmware Using Oracle System Assistant” on page 85.
Accessing System Management Tools 19
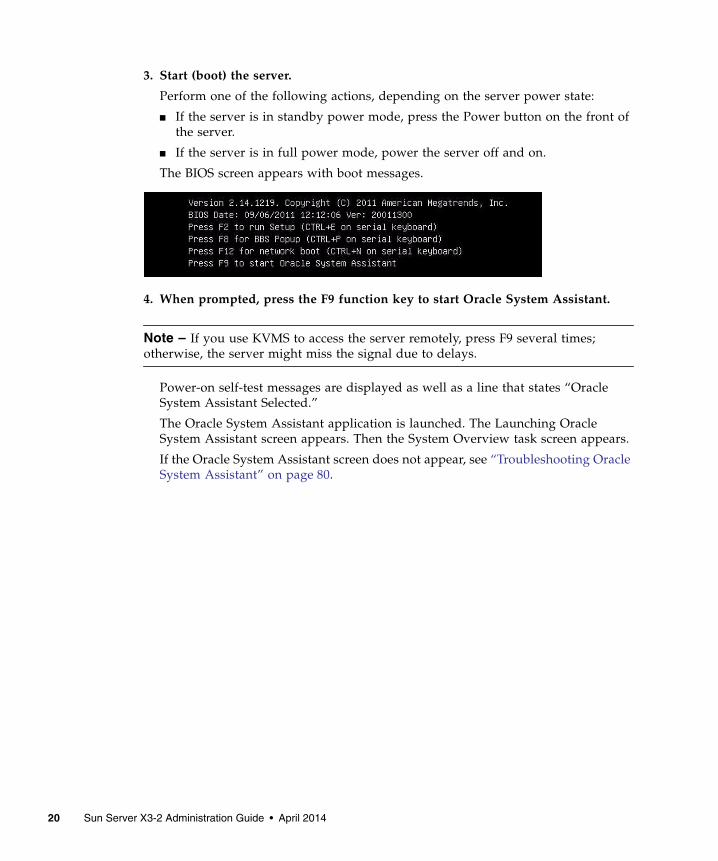
3. Start (boot) the server.
Perform one of the following actions, depending on the server power state:
■ If the server is in standby power mode, press the Power button on the front ofthe server.
■ If the server is in full power mode, power the server off and on.
The BIOS screen appears with boot messages.
4. When prompted, press the F9 function key to start Oracle System Assistant.
Note – If you use KVMS to access the server remotely, press F9 several times;otherwise, the server might miss the signal due to delays.
Power-on self-test messages are displayed as well as a line that states “OracleSystem Assistant Selected.”
The Oracle System Assistant application is launched. The Launching OracleSystem Assistant screen appears. Then the System Overview task screen appears.
If the Oracle System Assistant screen does not appear, see “Troubleshooting OracleSystem Assistant” on page 80.
20 Sun Server X3-2 Administration Guide • April 2014

5. Perform tasks using Oracle System Assistant, as required.
Related Information■ “Oracle System Assistant” on page 4
■ “Setting Up the Server Using Oracle System Assistant” on page 35
▼ Access Oracle System Assistant From OracleILOM Using the Web InterfaceWhen launching Oracle System Assistant from the Oracle ILOM web interface, youwill be prompted to open a new Oracle ILOM Remote System Console session.Therefore, prior to launching Oracle System Assistant, ensure that the setuprequirement for using the Oracle ILOM Remote System Console (JDK version,browser Java Plug-in, and KVMS settings) are met. For information about theserequirements, refer to the Oracle Integrated Lights Out Manager (ILOM) 3.1Configuration and Maintenance Guide.
The Admin (a) role is required in Oracle ILOM to launch Oracle System Assistance.The Console (c) role is required to launch the Oracle ILOM Remote SystemConsole.
Accessing System Management Tools 21

Use the following procedure to access Oracle System Assistant from Oracle ILOM.
1. Power off the host.
a. Select Host Management > Power Control.
b. In the Select Action drop-down list, select Graceful Shutdown and PowerOff.
c. Click Save.
Note – The host operating system must have power shutdown enabled.
2. Go to the Oracle ILOM web interface System Information > Summary page.
See “Access Oracle ILOM Using the Web Interface” on page 24.
22 Sun Server X3-2 Administration Guide • April 2014

3. Click the Launch button for Oracle System Assistant.
The Launching Oracle System Assistant screen appears. Then, the Oracle SystemAssistant System Overview task screen appears.
If the Oracle System Assistant screen does not appear, see “Troubleshooting OracleSystem Assistant” on page 80.
4. Perform tasks using Oracle System Assistant, as required.
Related Information■ “Oracle System Assistant” on page 4
■ “Setting Up the Server Using Oracle System Assistant” on page 35
■ Oracle Integrated Lights Out Manager (ILOM) 3.1 Documentation Library at:http://www.oracle.com/pls/topic/lookup?ctx=ilom31.
▼ Access Oracle System Assistant Using the OracleILOM CLIUse the following procedure to access Oracle System Assistant using the OracleILOM command-line interface (CLI).
1. Access the Oracle ILOM CLI.
See “Access Oracle ILOM Using the CLI” on page 25
2. Type stop /System to power off the host.
3. In the Oracle ILOM CLI, type:
start /HOST/provisioning/system-assistant
The following prompt appears:
Are you sure that you want to start/HOST/provisioning/system-assistant (y/n)?
4. Type y to launch Oracle System Assistant (or type n to cancel the operation).
Oracle ILOM launches Oracle System Assistant. The Oracle System AssistantSystem Overview task screen appears.
5. Perform the tasks using Oracle System Assistant, as required.
Related Information■ “Oracle System Assistant” on page 4
■ “Setting Up the Server Using Oracle System Assistant” on page 35
■ Oracle Integrated Lights Out Manager (ILOM) 3.1 Documentation Library at:http://www.oracle.com/pls/topic/lookup?ctx=ilom31.
Accessing System Management Tools 23

Accessing Oracle ILOMChoose one of the following methods to access Oracle ILOM:
■ “Access Oracle ILOM Using the Web Interface” on page 24
■ “Access Oracle ILOM Using the CLI” on page 25
▼ Access Oracle ILOM Using the Web InterfaceUse the following procedure to log in to the Oracle ILOM web interface.
1. Connect the server cables and set up the IP addresses for the server.
See the Sun Server X3-2 Installation Guide, “About the Installation Procedure” onpage 1.
2. Type the IP address of the server’s service processor (SP) into the web browser’saddress field.
3. Type your user name and password at the prompt.
The default user name is root and the default password is changeme.
4. Click the Log In button.
The Oracle ILOM System Information > Summary page appears.
24 Sun Server X3-2 Administration Guide • April 2014

5. Perform Oracle ILOM tasks using the web interface, or launch Oracle SystemAssistant, as required.
Related Information■ “Oracle Integrated Lights Out Manager (Oracle ILOM)” on page 5
■ Oracle Integrated Lights Out Manager (ILOM) 3.1 Documentation Library at:http://www.oracle.com/pls/topic/lookup?ctx=ilom31
▼ Access Oracle ILOM Using the CLIUse the following procedure to log in to the Oracle ILOM command-line interface(CLI).
1. Connect the server cables and set up the IP addresses for the server.
See the Sun Server X3-2 Installation Guide, “About the Installation Procedure” onpage 1.
Accessing System Management Tools 25

2. Open a terminal window.
3. Log in to the server’s service processor (SP) using a Secure Shell (SSH) session.
For example, type the following command:
$ ssh username@SP_IPaddress
Where: username is a user account with administrative privileges; and SP_IPaddressis the IP address of the Oracle ILOM SP.
4. Enter your user name and password at the prompt.
The default user name is root and the default password is changeme.
After you have successfully logged in to Oracle ILOM, the default CLI promptappears (->).
5. Perform Oracle ILOM tasks using the CLI, as required.
Related Information■ “Oracle Integrated Lights Out Manager (Oracle ILOM)” on page 5
■ Oracle Integrated Lights Out Manager (ILOM) 3.1 Documentation Library at:http://www.oracle.com/pls/topic/lookup?ctx=ilom31
Accessing Oracle HardwareManagement PackChoose one of the following methods to access Oracle Hardware Management Pack:
■ “Access Oracle Hardware Management Pack From Oracle System Assistant” onpage 26
■ “Access Oracle Hardware Management Pack From My Oracle Support” onpage 27
▼ Access Oracle Hardware Management PackFrom Oracle System AssistantThe Oracle Hardware Management Pack files are within the operating system (OS)directories in the Oracle System Assistant filesystem. Browse to the applicable OSdirectory in the filesystem, then to the subdirectory for drivers and tools, where theOracle Hardware Management Pack files are located. Then run the Oracle HardwareManagement Pack installer application.
26 Sun Server X3-2 Administration Guide • April 2014
To install the Oracle Hardware Management Pack, perform the following steps:
1. After your OS is installed, access the Oracle Hardware Management Pack fileson the Oracle System Assistant device from your filesystem.
Note – If you are running the Oracle VM 3.0 virtual machine software, a Linuxoperating system, or the Oracle Solaris 10 Operating System, you must mount theOracle System Assistant USB flash drive before you can access it using yourfilesystem. For mounting instructions, see “Mounting the Oracle System AssistantUSB Flash Drive” on page 75.
2. Run the Oracle Hardware Management Pack installer application from theOracle System Assistant USB flash drive.
For installation instructions, refer to the Oracle Hardware Management Pack 2.2.xDocumentation Library at:http://www.oracle.com/pls/topic/lookup?ctx=ohmp.
Related Information■ “Oracle Hardware Management Pack” on page 6
■ Oracle Hardware Management Pack installation instructions at:http://www.oracle.com/goto/system-management/
■ Oracle Hardware Management Pack Documentation Library at:http://www.oracle.com/pls/topic/lookup?ctx=ohmp
▼ Access Oracle Hardware Management PackFrom My Oracle SupportUse the following procedure to download Oracle Hardware Management Pack fromthe My Oracle Support web site.
1. Download Oracle Hardware Management Pack by following the instructions in“Getting Server Firmware and Software” on page 197.
2. Install Oracle Hardware Management Pack by following the instructions in theOracle Hardware Management Pack library.
After Oracle Hardware Management Pack is installed, you can access all of theOracle Hardware Management Pack tools.
3. Perform tasks using Oracle Hardware Management Pack by typing commands,as required.
Accessing System Management Tools 27

Related Information■ “Oracle Hardware Management Pack” on page 6
■ Oracle Hardware Management Pack installation instructions at:http://www.oracle.com/goto/system-management/
■ Oracle Hardware Management Pack Documentation Library at:http://www.oracle.com/pls/topic/lookup?ctx=ohmp
28 Sun Server X3-2 Administration Guide • April 2014

Setting Up Software and Firmware
This section includes information about using Oracle System Assistant, Oracle ILOM,and Oracle Hardware Management Pack to set up the server software and firmware.
In most cases, use Oracle System Assistant to set up your server’s software andfirmware. Alternatively, you can update firmware for your server using either OracleILOM or Oracle Hardware Management Pack.
The following topics are discussed.
Related Information
■ Oracle Integrated Lights Out Manager (ILOM) 3.1 Documentation Library at:http://www.oracle.com/pls/topic/lookup?ctx=ilom31
■ Oracle Hardware Management Pack Documentation Library at:http://www.oracle.com/pls/topic/lookup?ctx=ohmp
▼ Set Up Software and Firmware UsingOracle System Assistant1. Connect to Oracle System Assistant.
See “Accessing Oracle System Assistant” on page 17.
Description Links
Set up software and firmware using OracleSystem Assistant.
“Set Up Software and Firmware Using OracleSystem Assistant” on page 29
Set up software and firmware using OracleILOM.
“Set Up Software and Firmware Using OracleILOM” on page 30
Set up software and firmware using OracleHardware Management Pack.
“Set Up Software and Firmware Using OracleHardware Management Pack” on page 32
29

2. Perform setup tasks using Oracle System Assistant.
See “Configure the Server Using Oracle System Assistant” on page 39.
For example:
a. Configure the server network settings.
See “Configure Network Settings” on page 44.
b. Get updates for server firmware, drivers, software, and documentation.
See “Get Platform Software Release Updates” on page 45.
c. Update server firmware.
See “Update Firmware” on page 49.
d. Configure the server SP network settings, user accounts, and clock settings,
See “Configure Hardware for the Oracle ILOM SP” on page 56.
e. Configure RAID volumes.
See “Configure Hardware for RAID” on page 54.
f. Install an operating system.
See “Install an Operating System” on page 64.
Related Information■ “Setting Up the Server Using Oracle System Assistant” on page 35
▼ Set Up Software and Firmware UsingOracle ILOM1. Ensure that the server is in standby power mode.
In standby mode, the Power/OK LED on the server illuminates the standby blink(approximately every three seconds). In standby power mode, the server is not yetinitialized or powered on.
2. Connect to Oracle ILOM.
For instructions, see “Accessing Oracle ILOM” on page 24.
Also refer to the Sun Server X3-2 Installation Guide, “Connecting to Oracle ILOM”on page 65.
3. Apply full power to the server using the Oracle ILOM web interface orcommand-line interface (CLI).
30 Sun Server X3-2 Administration Guide • April 2014

■ To apply power using the Oracle ILOM web interface, on the SystemInformation > Summary screen, next to Power State, click Turn On.
■ To apply power using the Oracle ILOM CLI, from the server SP CLI, typestart /System.
The Power/OK LED on the front panel of the server illuminates a slow blinkwhile the server is booting. The LED then illuminates a steady-on green light afterthe server has successfully powered on, indicating that the host is fully bootedinto the operating system.
4. Update and configure Oracle ILOM and BIOS.
Refer to the Oracle Integrated Lights Out Manager (ILOM) 3.1 DocumentationLibrary.
5. Perform additional setup tasks that are not available from Oracle ILOM.
a. Update disk expander or HBA firmware.
Refer to “Update Firmware” on page 49.
b. Configure RAID.
See “Configuring RAID” on page 101.
c. Install an operating system or configure a preinstalled operating system.
Refer to:
■ Sun Server X3-2 Installation Guide for Oracle Solaris Operating System, “AboutOracle Solaris Operating System Installs” on page 1
■ Sun Server X3-2 Installation Guide for Linux Operating Systems, “About LinuxOperating System Installs” on page 1
■ Sun Server X3-2 Installation Guide for Oracle VM, “About Oracle VM Installs”on page 1
■ Sun Server X3-2 Installation Guide for Windows Operating Systems, “AboutMicrosoft Windows Server Operating System Installs” on page 1
■ Sun Server X3-2 Installation Guide for VMware ESXi, “About VMware ESXiInstalls” on page 1
Related Information■ Oracle Integrated Lights Out Manager (ILOM) 3.1 Documentation Library at:
http://www.oracle.com/pls/topic/lookup?ctx=ilom31
Setting Up Software and Firmware 31

▼ Set Up Software and Firmware UsingOracle Hardware Management PackThis procedure assumes that you have:
■ Installed the operating system and optionally configured RAID. See “ConfiguringRAID” on page 101.
■ Installed Oracle Hardware Management Pack. See “Accessing Oracle HardwareManagement Pack” on page 26.
1. If not already done, connect data and network cables to the server.
For instructions, refer to the Sun Server X3-2 Installation Guide, “About theInstallation Procedure” on page 1.
2. If the server is not powered on, press the Power button on the server front panelto power on the server to full power mode.
The Power/OK LED on the front panel of the server illuminates a steady-on greenlight after the server has successfully powered on, indicating that the host is readyfor normal operation.
3. Install or configure the host operating system, and install any required drivers.
See the installation guide for the operating system you want to install:
■ Sun Server X3-2 Installation Guide for Oracle Solaris Operating System, “AboutOracle Solaris Operating System Installs” on page 1
■ Sun Server X3-2 Installation Guide for Linux Operating Systems, “About LinuxOperating System Installs” on page 1
■ Sun Server X3-2 Installation Guide for Oracle VM, “About Oracle VM Installs” onpage 1
■ Sun Server X3-2 Installation Guide for Windows Operating Systems, “AboutMicrosoft Windows Server Operating System Installs” on page 1
■ Sun Server X3-2 Installation Guide for VMware ESXi, “About VMware ESXiInstalls” on page 1
4. If not already installed, install Oracle Hardware Management Pack.
See “Accessing Oracle Hardware Management Pack” on page 26.
Also refer to the instructions at the following site:http://www.oracle.com/goto/system-management.
5. Update Oracle ILOM and BIOS firmware.
Use the fwupdate tool, as required.
32 Sun Server X3-2 Administration Guide • April 2014

Note – Alternative methods to update Oracle ILOM and BIOS firmware includeusing: Oracle System Assistant, Oracle ILOM (CLI and web browser), and ipmiflash.
6. Configure Oracle ILOM.
Use the ilomconfig tool, as required.
Note – Alternative methods to update Oracle ILOM and BIOS firmware includeusing: Oracle System Assistant and Oracle ILOM (CLI and web browser).
7. (Optional) Configure BIOS.
Use the ubiosconfig tool, as required.
Note – Alternative methods to update BIOS include using: Oracle System Assistantand Oracle ILOM (CLI and web browser).
8. (Optional) Explore and configure RAID.
Use the raidconfig tool, as required.
Note – Alternative methods to configure RAID include using: Oracle SystemAssistant and Oracle ILOM (CLI and web browser), LSI MegaRAID Storage Managerapplication, and LSI HBA BIOS utilities (WebBIOS, configuration utility, MegaCLI,and sas2ircu).
9. Query, update, and validate firmware versions on supported SAS storage drives,embedded SAS storage controllers, LSI SAS storage expanders, and storagedrives.
Use the fwupdate tool, as required.
Related Information■ Oracle Hardware Management Pack Documentation Library at:
http://www.oracle.com/pls/topic/lookup?ctx=ohmp.
Setting Up Software and Firmware 33

34 Sun Server X3-2 Administration Guide • April 2014

Setting Up the Server Using OracleSystem Assistant
This section describes the organization of Oracle System Assistant and how to set upyour server using Oracle System Assistant.
The following topics are discussed.
Description Link
Review the organization of Oracle SystemAssistant.
“Organization of Oracle System Assistant” onpage 37
Review procedures to configure the server. “Configure the Server Using Oracle SystemAssistant” on page 39
View the Oracle System Assistant ReadMeFile.
“View Oracle System Assistant ReadMe File”on page 40
Exit from the Oracle System Assistantapplication.
“Exit From Oracle System Assistant” onpage 40
View system summary information. “View System Information” on page 41
View system inventory information. “View System Inventory Information” onpage 43
Configure network settings for the serverthat are used to get updates for OracleSystem Assistant.
“Configure Network Settings” on page 44
Update to the latest software release,including firmware, drivers, software, anddocumentation.
“Get Platform Software Release Updates” onpage 45
Update supported hardware to the latestfirmware version.
“Update Firmware” on page 49
Configure RAID for the server. “Configure Hardware for RAID” on page 54
Configure settings for the Oracle ILOM SP. “Configure Hardware for the Oracle ILOMSP” on page 56
Install Linux or Windows operatingsystems, or Oracle VM software.
“Install an Operating System” on page 64
35

Related Information
■ “Accessing Oracle System Assistant” on page 17
Disable Oracle System Assistant. “Set Preferences to Disable Oracle SystemAssistant” on page 67
Set the keyboard language for OracleSystem Assistant.
“Set Preferences for Keyboard Language” onpage 68
Access the Oracle System Assistant shell. “Perform Advanced Tasks to Access OracleSystem Assistant Shell” on page 70
Check the integrity of the Oracle SystemAssistant media.
“Perform Advanced Tasks to Check MediaIntegrity” on page 71
View and access the firmware andsoftware on the Oracle System AssistantUSB Flash drive.
“View Files on the Oracle System AssistantUSB Flash Drive” on page 73
View product documentation. “View Documentation From Oracle SystemAssistant” on page 74
Review requirements for mounting theOracle System Assistant USB flash drive.
“Mounting the Oracle System Assistant USBFlash Drive” on page 75
Mount the USB flash drive on Oracle VM3.0.
“Mount the Oracle System Assistant USBFlash Drive on Oracle VM 3.0” on page 75
Mount the USB flash drive on a Linuxoperating system.
“Mount the Oracle System Assistant USBFlash Drive on a Linux Operating System” onpage 77
Mount the USB flash drive on an OracleSolaris 10 operating system.
“Mount the Oracle System Assistant USBFlash Drive on an Oracle Solaris 10 OperatingSystem” on page 78
Troubleshoot Oracle System Assistantinstallation.
“Troubleshooting Oracle System Assistant” onpage 80
Check whether Oracle System Assistant isavailable on the server.
“Verify Oracle System Assistant Is Installed”on page 80
Troubleshoot issues when launchingOracle System Assistant from OracleILOM.
“Troubleshoot Oracle System AssistantLaunch From Oracle ILOM” on page 82
Restore Oracle System Assistant. “Restore Oracle System Assistant” on page 83
Review the directory structure of theOracle System Assistant filesystem.
“Accessing the Oracle System AssistantFilesystem” on page 87
Access the filesystem. “Access the Oracle System AsistantFilesystem” on page 89
Description Link
36 Sun Server X3-2 Administration Guide • April 2014

■ “Common System Management Tasks” on page 8
■ “Common System Administrative Tasks” on page 9
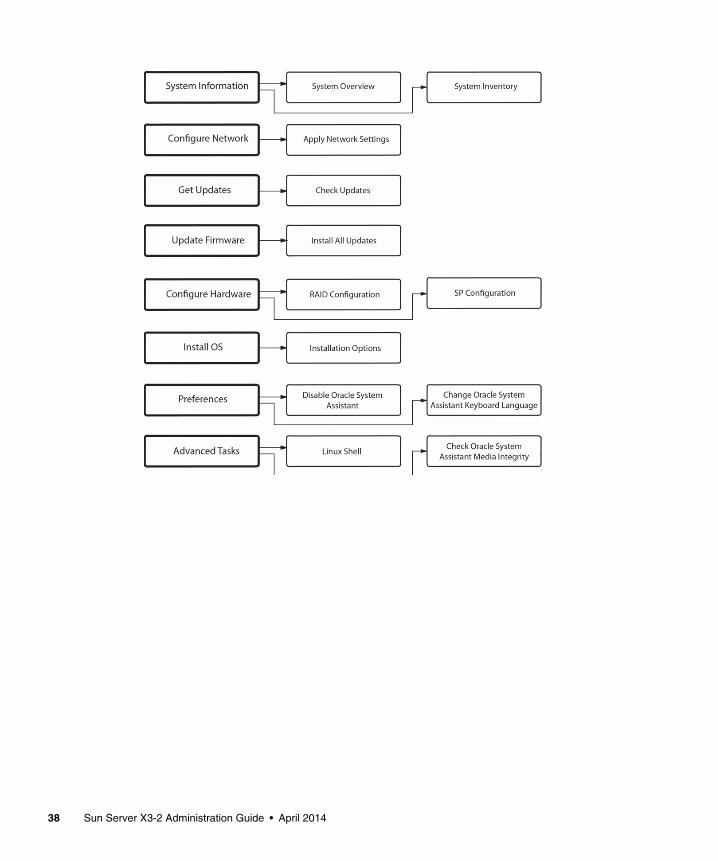
Organization of Oracle System AssistantThe following figure shows the Oracle System Assistant System Overview taskscreen. The task buttons for Oracle System Assistant are located in the left panel.
The following figure shows the organization of the Oracle System Assistantfunctions.
Setting Up the Server Using Oracle System Assistant 37
38 Sun Server X3-2 Administration Guide • April 2014

Configure the Server Using OracleSystem AssistantYou can configure your new system easily using Oracle System Assistant:
1. Power on the system.
2. Boot to Oracle System Assistant. For information, see “Accessing Oracle SystemAssistant” on page 17.
3. From the Oracle System Assistant System Overview task screen, click the Helpbutton to display the ReadMe file (Release Notes) for the installed platformsoftware release.
4. Use Oracle System Assistant to set configure the server.
Use the following procedures for initial setup and configuration of the server:
■ “View Oracle System Assistant ReadMe File” on page 40
■ “Exit From Oracle System Assistant” on page 40
■ “View System Information” on page 41
■ “View System Inventory Information” on page 43
■ “Configure Network Settings” on page 44
■ “Get Platform Software Release Updates” on page 45
■ “Update Firmware” on page 49
■ “Configure Hardware for RAID” on page 54
■ “Configure Hardware for the Oracle ILOM SP” on page 56
■ “Install an Operating System” on page 64
■ “Set Preferences to Disable Oracle System Assistant” on page 67
■ “Set Preferences for Keyboard Language” on page 68
■ “Perform Advanced Tasks to Access Oracle System Assistant Shell” on page 70
■ “Perform Advanced Tasks to Check Media Integrity” on page 71
■ “View Files on the Oracle System Assistant USB Flash Drive” on page 73
■ “View Documentation From Oracle System Assistant” on page 74
Setting Up the Server Using Oracle System Assistant 39

▼ View Oracle System Assistant ReadMe FileFollow these steps to view the Oracle System Assistant ReadMe file (Release Notes)for the installed platform software release.
1. Access Oracle System Assistant.
See “Accessing Oracle System Assistant” on page 17.
The System Overview task screen appears.
2. At the bottom of the System Overview task screen, click the Help button.
The ReadMe file appears, with information about Oracle System Assistant andyour platform software release.
Related Information■ “Accessing Oracle System Assistant” on page 17
▼ Exit From Oracle System AssistantFollow these steps to exit from Oracle System Assistant.
40 Sun Server X3-2 Administration Guide • April 2014

1. From within Oracle System Assistant, click the Exit button to quit theapplication session.
The Exit dialog appears.
2. Choose whether you want to reboot or power off the system.
Related Information■ “Accessing Oracle System Assistant” on page 17
▼ View System InformationFollow these steps to view system information using Oracle System Assistant.
1. Click the System Information task button, then select the System Overview tab.
The System Overview screen appears.
Setting Up the Server Using Oracle System Assistant 41

2. Click the Help button to display the ReadMe file (Release Notes) for theinstalled platform software release.
3. From the System Overview screen, review information about the system.
4. If desired, click Exit to quit Oracle System Assistant and reboot or power off theserver.
Related Information■ “Accessing Oracle System Assistant” on page 17
42 Sun Server X3-2 Administration Guide • April 2014

▼ View System Inventory InformationFollow these steps to view system inventory information using Oracle SystemAssistant.
1. Click the System Information task button, then select the System Inventory tab.
The System Inventory screen appears.
2. Click on one of the entries to view detailed information.
3. Click the Expand All button to view information for all entries.
4. Click the Collapse button to contract the system information.
5. If desired, click Exit to quit Oracle System Assistant and reboot or power off theserver.
Related Information■ “Accessing Oracle System Assistant” on page 17
Setting Up the Server Using Oracle System Assistant 43

▼ Configure Network SettingsThe Configure Network task enables you to configure network settings for OracleSystem Assistant. Perform this task to ensure that Oracle System Assistant can accessthe most up-to-date tools and drivers during initial server installation and setup.
Note – You must configure the network settings before you can use the Get Updatestask in Oracle System Assistant.
Before you begin, obtain your system’s network information, such as a name serveror a static IP, as required.
Follow these steps to configure the network settings using Oracle System Assistant.
1. Click the Configure Network task button.
The Configure Network screen appears.
2. Select the network device to configure.
The drop-down list identifies the devices that are visible to the server.
44 Sun Server X3-2 Administration Guide • April 2014

3. Configure the network address settings.
Select the method for determining the IP address of the server. Choose one of thefollowing:
■ Disabled – Do not allow network access for this device.
■ DHCP – Automatically assign an IP address to the server using Dynamic HostConfiguration Protocol (DHCP). When this option is selected, you can choosethe Auto DNS via DHCP option to automatically assign the Name Server IPaddress and Search Domain. If you do not choose the Auto DNS via DHCPoption, you must also provide the following information:
■ Name Server IP address
■ (Optional) Search Domain
■ Static – Assign a fixed IP address to the server. You must provide the followinginformation:
■ Server IP address
■ Netmask
■ Gateway
■ HTTP Proxy Configuration – Select this option if you want to use a proxyserver. You must provide the following information:
■ Proxy host
■ Proxy port
4. Click the Apply Network Settings button.
The system prompts for confirmation to apply the network settings.
5. In the confirmation dialog, click Yes to proceed.
6. If desired, click Exit to quit Oracle System Assistant and reboot or power off theserver.
Related Information■ “Accessing Oracle System Assistant” on page 17
▼ Get Platform Software Release UpdatesOracle System Assistant enables you to download updates of platform software. Theupdated components include firmware, drivers, and tools. With Oracle SystemAssistant, you no longer need to download and unpack firmware and softwarepackages from a download site or use a Tools and Drivers CD/DVD or ISO image.
Use this procedure to update Oracle System Assistant.
Ensure that the server has:
Setting Up the Server Using Oracle System Assistant 45

■ External web access to enable downloading of a new platform software release.
■ Download entitlement at My Oracle Support (MOS). See “Configure MOS toEnable Oracle System Assistant Updates” on page 47.
1. Click the Get Updates task button.
The Get Updates screen appears.
Note – To automatically check for updates each time the system is started, click thecheck box.
2. To check for a new software release, click the Check for Updates button.
If an update is available, the update’s ReadMe file appears.
3. To get the update, click the Download and Apply Updates button.
The Get Updates Sign In screen appears.
4. Provide your MOS credentials.
Enter your MOS credentials (username and password).
46 Sun Server X3-2 Administration Guide • April 2014

Note – The server must have download entitlement with MOS. If the sign-in processhalts because Oracle System Assistant cannot verify entitlement, you need toconfigure MOS to enable Oracle System Assistant updates. See “Configure MOS toEnable Oracle System Assistant Updates” on page 47.
After the updates are downloaded, the system reboots.
Related Information■ “Organization of Oracle System Assistant” on page 37
▼ Configure MOS to Enable Oracle SystemAssistant UpdatesBefore allowing the server to download a platform software release update, OracleSystem Assistant first verifies that the server has download entitlement with MyOracle Support (MOS). A server has entitlement when the server serial number hasan association with a valid MOS Customer Support Identifier (CSI). If this associationhas not been made prior to attempting the Get Updates task, Oracle System Assistantwill not be able to verify entitlement, and the update process halts at the Get UpdatesSign In screen, disallowing server access to MOS.
Setting Up the Server Using Oracle System Assistant 47

Use this procedure to associate the server with the CSI at MOS.
You must have one of the following:
■ Customer Support Identifier (CSI), which is printed on the Oracle Premier Supportfor Systems purchase confirmation letter or available in the server warrantycontract documents.
■ Server serial number, which is available on the Oracle System Assistant in theSystem Overview tab.
1. Log in to MOS at:
http://support.oracle.com.
2. Select the Settings tab from the More drop-down list.
3. In the left-side pane under Personal, click Accounts/Privileges.
4. Click the Request Access button in the Support Identifiers window.
The Request Access to a Support Identifier window appears.
5. Do one of the following:
■ If you have the CSI, enter it in the Support Identifier field of the Request Accesstab and click Request Access.
Approval might be required, but once access is granted, the Oracle SystemAssistant Get Updates capability is enabled for all servers associated with theCSI.
Note – If you cannot obtain the CSI access or are unable to download updates forthe server using Oracle System Assistant, contact Oracle Support.
■ If you have the server serial number but do not have the CSI, do the following:
a. Click the Find a Support Identifier tab.
48 Sun Server X3-2 Administration Guide • April 2014

b. Type the server serial number in the System Serial Number field.
c. Type the organization name in the Organization field.
d. Click Search.
e. Highlight the CSI in the search results table and click Request Access.
Approval might be required, but, once access is granted, the Oracle SystemAssistant Get Updates capability is enabled for all servers associated withthe CSI.
Note – If you cannot obtain the CSI access or are unable to download updates forthe server using Oracle System Assistant, contact Oracle Support.
▼ Update FirmwareThe Update Firmware task allows you to update system firmware (BIOS and OracleILOM SP) and device firmware.
The Update Firmware task determines whether an update is available by comparingthe firmware versions in the most recent platform software release to the currentlyinstalled server system and device firmware. You can preview the changes, compareversion numbers, manually select which components to update, or choose to updateall firmware components. It is highly recommended that you choose to update allfirmware components.
Some firmware components require a server reboot immediately following afirmware update. If required, the server might automatically reboot when the updateprocess finishes.
Setting Up the Server Using Oracle System Assistant 49

For updates to Oracle ILOM, the actual time it takes to perform the update dependson the Local Host Interconnect setting in Oracle ILOM. A quicker method using aninternal USB Ethernet connection is used by Oracle System Assistant when the LocalHost Interconnect setting in Oracle ILOM is configured as host managed (true),which is the default. If the Oracle ILOM Local Host Interconnect setting is notconfigured as host managed, a slower method is used by Oracle System Assistant forthe update.
Note – Before you begin the firmware update, use the Get Updates task to downloadthe most recent platform software release from Oracle.
Follow these steps to update firmware using Oracle System Assistant.
1. In Oracle System Assistant, click the Update Firmware task button.
The Update Firmware screen appears.
2. To view the hardware components that can be updated using Oracle SystemAssistant, click the Check for Firmware Updates button.
The system performs the firmware update check and the Firmware Update Checkprogress box appears.
50 Sun Server X3-2 Administration Guide • April 2014

3. (Optional) Click the Preview Changes button.
The Firmware Update Install Changes dialog box appears.
Setting Up the Server Using Oracle System Assistant 51

4. View a list of firmware components that need updates and compare current andavailable version numbers.
You can also review the Component Type, Device Name, Firmware/BIOSInstalled, and Firmware/BIOS Available.
5. To proceed, do one of the following:
■ To perform a selective firmware update, select the firmware updates that youwant to install, then click the Install Updates button.
Note – Components that are up to date cannot be updated and, therefore, are notselectable.
■ To install all firmware updates (if you did not click the Preview Changesbutton), click the Install All Updates button on the Update Firmware screen.
52 Sun Server X3-2 Administration Guide • April 2014

6. If you are prompted to log in to Oracle ILOM to perform the update, you mustlog in using an account with full administrator or root privileges, such as:
■ The Oracle ILOM root account.
■ A user account assigned the Administrator role (which includes the aurcoroles).
■ A user account customized with the aurco roles.
Note – A user account with only the admin (a) role will not provide enoughprivileges to perform the update from Oracle System Assistant.
Note – If the update process proceeds without prompting you to log in to OracleILOM, a different update method is used which can take longer to complete (up to 40minutes).
7. Wait while the system updates the firmware.
The Update Firmware progress bar appears.
If a system reboot is required for the firmware updates to take effect, the systemwill reboot automatically.
Setting Up the Server Using Oracle System Assistant 53

Related Information■ “Accessing Oracle System Assistant” on page 17
▼ Configure Hardware for RAIDThe RAID Configuration task allows you to configure RAID 0 or RAID 1 for theserver.
Note – Perform this task before installing an operating system.
Follow these steps to configure RAID using Oracle System Assistant.
1. Click the Configure Hardware task button, then select the RAID Configurationtab.
The RAID Configuration screen appears.
54 Sun Server X3-2 Administration Guide • April 2014

2. In the HBA list box, verify that the host bus adapter (HBA) disk controller iscorrect.
For example, the server supports the SGX-SAS6-INT-Z HBA or theSGX-SAS6-R-INT-Z HBA (if you want to create a bootable volume). For moreinformation about these HBAs, refer to the Sun Server X3-2 Installation Guide,“Configuring Server Drives for OS Installation” on page 91.
3. In the Select RAID Level list box, select the RAID level, either RAID-0, RAID-1,or RAID-10.
You can use Oracle System Assistant to set only these three RAID levels. To setother RAID levels, you need to use the HBA BIOS Setup Utility.
The number of disks allowed in an array is dependent on the controller.
■ The SGX-SAS6-R-INT-Z HBA requires one or more disks.
■ The SGS-SAS6-INT-Z HBA requires two or more disks.
4. In the Available Disks table, select the storage drives that you want to add tothe RAID configuration.
If a volume already exists on the disk, it appears in the Created Volumes section.If necessary, highlight and delete the existing volume.
5. Click the Create Volume button.
The Creating RAID Volume information box appears.
6. Wait for the RAID Volume to be created.
The Volume Details dialog box appears. Information about the highlighted volumeis displayed.
7. In the Volume Details dialog box, enter the volume name in the Volume Namebox, then click the Save Changes button.
The RAID Configuration screen appears. This completes the RAID configuration.
8. Continue with the next steps if you want to delete a RAID volume or configurea bootable volume.
■ If you want to delete a RAID volume, in the RAID Configuration screen, selectthe RAID volume, then click the Delete Volume button.
This action deletes all data on the existing volume.
■ If you want to create a bootable volume, in the RAID Configuration screen,select the RAID volume, then click the Set Volume for Boot button.
The RAID Configuration screen now indicates the bootable volume. The serverthen boots from this volume if selected to boot from the RAID controller.
Note – Your disk controller might not support this feature.
Setting Up the Server Using Oracle System Assistant 55

9. Click Save Settings.
10. If desired, click Exit to quit Oracle System Assistant and reboot or power off theserver.
Related Information■ “Accessing Oracle System Assistant” on page 17
■ “RAID Configuration Options” on page 102
▼ Configure Hardware for the Oracle ILOM SPYou can view or modify a subset of the Oracle ILOM service processor (SP) settings.
Follow these steps to view or modify the Oracle ILOM SP settings using OracleSystem Assistant.
1. Click the Configure Hardware task button, then click the Service ProcessorConfiguration tab.
The Server Processor Configuration screen appears.
56 Sun Server X3-2 Administration Guide • April 2014

2. From the Select Task drop-down list, select a task:
■ Identification Information – See Step 3.
■ Network Information – See Step 4.
■ User Accounts – See Step 5.
■ Clock Settings – See Step 6.
■ DNS Settings – See Step 7.
3. To view or modify Identification Information, complete the followinginformation:
a. SP Hostname
Type the Oracle ILOM SP hostname.
The hostname must start with a letter and can contain up to 60 alphanumericcharacters, hyphens, and underscores.
b. SP System Identifier
Type the name that identifies the system. Use any characters except quotationmarks.
Setting Up the Server Using Oracle System Assistant 57

c. SP System Contact
Type the name of the person to contact. Use any characters except quotationmarks.
d. SP System Location
Type the name of the physical location of the system. Use any characters exceptquotation marks.
4. To view or modify Network Information, complete the following information:
a. IP Discovery Mode (IPv4)
Select whether the system uses Dynamic Host Configuration Protocol (DHCP)or a static IP assignment.
b. IP Address (IPv4)
If you selected a static IP assignment, provide the IP address of the SP.
c. Netmask (IPv4)
If you selected a static IP assignment, provide the netmask for the SP.
d. Gateway (IPv4)
If you selected a static IP assignment, provide the gateway address for the SP.
58 Sun Server X3-2 Administration Guide • April 2014

e. State (IPv6)
Click the Enabled check box to enable IPv6 network settings.
f. Autoconfig (IPv6)
When enabled, the IPv6 Stateless autoconfiguration is run to learn the IPv6address.
g. DHCPv6 Autoconfig (IPv6)
When enabled, the DHCPv6 Stateless autoconfiguration is run to learn the DNSand domain information.
When enabled, the DHCPv6 Stateful autoconfiguration is run to learn the IPv6addresses and DNS information.
When enabled, the None state will only set the Link Local address in OracleILOM.
h. Static IP Address (IPv6)
This is the static IP address for the SP.
i. Link-Local IP Address (IPv6)
This is a non-routable address that you can use to connect to the SP fromanother IPv6 enabled node on the same network.
Setting Up the Server Using Oracle System Assistant 59

j. Gateway (IPv6)
This is the gateway address for IPv6.
k. Dynamic IP List
This field is read-only. Oracle System Assistant gets these values from OracleILOM.
5. To view or modify local Oracle ILOM User Accounts, complete the followinginformation:
a. Add User
Click the Add User button to add a new local user account. Type a unique username, select the role (Basic or Advanced) from the drop-down list, setprivileges, and type the password.
Note – If you want to choose specific privileges (not pre-set) for the user, chooseAdvanced.
b. Modify user
Highlight a user account in the list and click Modify User to review or changethe local user account settings.
c. Delete User
Highlight a user account in the list and click Delete User to delete a local useraccount.
60 Sun Server X3-2 Administration Guide • April 2014

6. To view or modify Clock Settings, complete the following information:
a. Date
Use the drop-down list to select the month, day, and year.
b. Time
Use the drop-down list to set the time using 24-hour format.
c. Timezone
Use the drop-down list to select the timezone.
d. Synchronize Time Using NTP
Click the check box to enable synchronization with a Network Time Protocol(NTP) server.
e. Server 1, Server 2
Enter the information for the NTP servers.
Setting Up the Server Using Oracle System Assistant 61

7. To view or modify DNS settings, complete the following information.
a. Auto DNS via DHCP.
Check enabled or disabled.
b. DNS Server Name
Edit this only if Auto DNS is disabled.
Enter up to three comma-separated name server IP addresses in preferredorder. For example, 1.2.3.4.5.6.7.8.
c. DNS Search Path
Edit this only if Auto DNS is disabled.
Enter up to six comma-separated search suffixes in preferred order. Forexample, abc.efg.com,efg.com.
d. DNS Timeout
Enter a value between 1 and 10. The default is 5.
62 Sun Server X3-2 Administration Guide • April 2014

e. DNS Retries
Enter a value between 0 and 4. The default is 1.
8. Click Save Settings.
9. If desired, click Exit to quit Oracle System Assistant and reboot or power off theserver.
Related Information■ “Accessing Oracle System Assistant” on page 17
Setting Up the Server Using Oracle System Assistant 63

▼ Install an Operating SystemYou must supply the operating system (OS) media and license.
Note – The Oracle System Assistant Install OS task is available for supportedversions of Microsoft Windows and Linux operating systems and Oracle VMsoftware.
It is highly recommended that you perform the following tasks before you begin thisprocedure:
■ Click Get Updates to get the latest tools and drivers. See “Get Platform SoftwareRelease Updates” on page 45.
■ Click Update Firmware to update firmware. See “Update Firmware” on page 49.
■ Click Configure Hardware > RAID Configuration to configure RAID. See“Configure Hardware for RAID” on page 54.
Follow these steps to install an operating system using Oracle System Assistant.
1. Click the Install OS task button.
The Install Operating System screen appears.
64 Sun Server X3-2 Administration Guide • April 2014

2. From the Supported OS drop-down list, select the OS to install.
The list contains only the supported operating systems that can be installed usingthe Install OS task.
3. In the Select the desired BIOS mode for booting OS portion of the screen, selectthe BIOS mode (UEFI or Legacy BIOS) that you want to use for the OSinstallation.
The choice of BIOS modes is available only if the target OS supports booting inUEFI mode. See “Selecting Legacy BIOS or UEFI Boot Mode” on page 113.
4. In the Select your install media location portion of the screen, indicate thelocation of the installation media.
This is the location of the OS distribution media. Options are CD/DVD devices.Click the Refresh button to update the list of devices.
Note – If you are installing the OS remotely using KVM, choose the KVM menuoption Devices and click CD-ROM to get the remote CD-ROM to appear. Then on theOracle System Assistant screen, click Refresh and select the CD/DVD location.
5. In the Select the boot disk portion of the screen, select the boot device from theBoot disk drop-down list.
This is the device on which you install the OS.
If you chose a Linux distribution, the Select the boot disk portion of the screenappears. If you chose a Windows distribution, the Select the boot disk portion ofthe screen does not appear.
Caution – Loss of data. The OS installation erases the contents of the disk. All dataon the selected disk is erased.
6. To confirm your selection of the boot device, click Yes.
7. Click View Installation Options.
The Operating System Installation Details dialog appears. The OS and Driverssoftware components are listed. Deselect any components that you do not want toinstall. For most operating systems, all components that are listed are required.
Setting Up the Server Using Oracle System Assistant 65

8. Click Close to exit the dialog.
The Install Operating system screen appears.
9. Click the Install OS button.
10. Follow the process and respond to the prompts until the process finishes.
After the installation is complete, the server boots.
Related Information■ “Accessing Oracle System Assistant” on page 17
■ “Using Legacy BIOS or UEFI” on page 112
66 Sun Server X3-2 Administration Guide • April 2014

▼ Set Preferences to Disable Oracle SystemAssistantIf you are already booted into Oracle System Assistant, you can use the DisableOracle System Assistant task to put the Oracle System Assistant USB device in anoffline state, so that it is unavailable to the server operating system (OS). Thisprotects the device from accidental erasure and overwrite. When the device is offline,it is not bootable, and the tools, drivers, and files that reside on the Oracle SystemAssistant device are inaccessible.
Note – To enable Oracle System Assistant, see “Enable or Disable Oracle SystemAssistant” on page 130.
To put the device in an online state (available to the OS), use the Configure OSAsetting in the server BIOS Setup Utility Boot menu.
To disable Oracle System Assistant when you are booted into Oracle SystemAssistant, do the following.
1. Click the Preferences task button, then click the Disable Oracle SystemAssistant tab.
The Disable Oracle System Assistant screen appears.
Setting Up the Server Using Oracle System Assistant 67

2. Click the Disable Oracle System Assistant button.
A confirmation dialog box appears.
3. Click Yes to confirm that you want to disable Oracle System Assistant.
The Oracle System Assistant application quits and the server reboots.
4. To re-enable Oracle System Assistant, use the BIOS Setup Utility.
See “Enable or Disable Oracle System Assistant” on page 130.
Related Information■ “Accessing Oracle System Assistant” on page 17
▼ Set Preferences for Keyboard LanguageThe Keyboard Language task enables you to configure the keyboard language forOracle System Assistant.
Follow these steps to set the keyboard language using Oracle System Assistant.
1. Click the Preferences task button, then click the Keyboard Language tab.
The Keyboard Language screen appears.
68 Sun Server X3-2 Administration Guide • April 2014

2. From the drop-down list, select the keyboard language.
Options include: English (US), French, German, Italian, Spanish, and Swedish.
3. Click Save Settings.
4. If desired, click Exit to quit Oracle System Assistant and reboot or power off theserver.
Related Information■ “Accessing Oracle System Assistant” on page 17
Setting Up the Server Using Oracle System Assistant 69

▼ Perform Advanced Tasks to Access OracleSystem Assistant ShellThis task provides Linux root-level access to the Oracle System Assistant filesystem.Use the command-line shell to access tools and files that reside on the internal OracleSystem Assistant USB device.
Caution – Possible loss of data or loss of Oracle System Assistant functionality. Onlyadvanced users or system administrators should access and use the Oracle SystemAssistant shell.
Follow these steps to access the command-line shell using Oracle System Assistant.
1. Click the Advanced Tasks task button, then click the Shell tab.
The Shell screen appears.
2. Click the Start Shell button.
The Oracle System Assistant command-line shell window appears.
70 Sun Server X3-2 Administration Guide • April 2014

3. To leave the shell and return to Oracle System Assistant user interface, typeexit at the shell command-line prompt.
4. If desired, click Exit to quit Oracle System Assistant and reboot or power off theserver.
Related Information■ “Accessing Oracle System Assistant” on page 17
▼ Perform Advanced Tasks to Check MediaIntegrityThe Media Integrity Check task verifies the integrity of the internal Oracle SystemAssistant media files and displays a report. You should perform this task when theUSB device produces errors or when requested by Oracle Service personnel.
If your version of Oracle System Assistant is damaged, download the Updater ISOimage file for your server from the My Oracle Support site. For more information, see“Restore Oracle System Assistant” on page 83.
Follow these steps to verify that the USB media for Oracle System Assistant isworking properly.
1. Click the Advanced Tasks task button, then click the Media Integrity Check tab.
The Media Integrity Check screen appears.
Setting Up the Server Using Oracle System Assistant 71

2. Click the Check Integrity button.
The system tests the internal Oracle System Assistant USB device and generates areport. The test provides an estimated run time. You can cancel the test at anytime.
3. If desired, click Exit to quit Oracle System Assistant and reboot or power off theserver.
Related Information■ “Accessing Oracle System Assistant” on page 17
■ “View Files on the Oracle System Assistant USB Flash Drive” on page 73
■ “View Documentation From Oracle System Assistant” on page 74
72 Sun Server X3-2 Administration Guide • April 2014

▼ View Files on the Oracle System Assistant USBFlash DriveThe Oracle System Assistant USB flash drive contains firmware and software foryour server. The USB flash drive is accessible through the operating system or virtualmachine software filesystem. Updated firmware and software are downloaded withevery software release update using the Get Updates task within Oracle SystemAssistant.
This procedure describes how to access the firmware and software that resides on theOracle System Assistant USB flash drive.
1. Ensure that the server is powered on and the operating system is running.
2. Mount the Oracle System Assistant USB flash drive.
■ For Oracle VM, see “Mount the Oracle System Assistant USB Flash Drive onOracle VM 3.0” on page 75.
■ For Linux operating systems, see “Mount the Oracle System Assistant USBFlash Drive on a Linux Operating System” on page 77.
■ For Oracle Solaris 10, see “Mount the Oracle System Assistant USB Flash Driveon an Oracle Solaris 10 Operating System” on page 78.
3. Use a filesystem browser to navigate to the internal Oracle System AssistantUSB flash drive.
The label for the USB flash drive is: ORACLE SSM on Oracle VM and Linuxoperating systems and ORACLE_SSM on the Oracle Solaris operating system.
Note – If the Oracle System Assistant USB flash drive is mounted but is still is notvisible, Oracle System Assistant might be disabled. To enable Oracle SystemAssistant, from the BIOS Setup Utility, access the Boot > OSA Configuration screenand change the setting to Enabled. For instructions for enabling Oracle SystemAssistant, see “Enable or Disable Oracle System Assistant” on page 130.
4. To view the contents of the ORACLE_SSM or ORACLE SSM drive, double-clickon the drive.
The Oracle System Assistant USB flash drive directory appears and lists thecontents of the drive.
Related Information■ “Mounting the Oracle System Assistant USB Flash Drive” on page 75
■ “Accessing Oracle System Assistant” on page 17
■ “Organization of Oracle System Assistant” on page 37
Setting Up the Server Using Oracle System Assistant 73

▼ View Documentation From Oracle SystemAssistantOracle System Assistant contains product documentation for your server. Thedocumentation is accessible through the filesystem. Updated documentation isdownloaded with every software release update using the Get Updates task withinOracle System Assistant.
Note – The latest and most up-to-date documentation for your server also isavailable online at the Oracle documentation library page at:http://www.oracle.com/pls/topic/lookup?ctx=SunServerX3-2.
This procedure describes how to access the HTML documentation that resides withinOracle System Assistant. To view the documentation, you need a web browser or anHTML viewer.
1. Ensure that the server is powered on and the operating system is running.
2. Use a filesystem browser to navigate to the internal Oracle System AssistantUSB device.
The label for the device is ORACLE_SSM on Oracle Solaris and Linux operatingsystems, and ORACLE SSM on Oracle VM systems.
See “View Files on the Oracle System Assistant USB Flash Drive” on page 73.
Note – If the USB device is not visible, Oracle System Assistant might be disabled.To enable Oracle System Assistant, from the BIOS Setup Utility, access the Boot >OSA Configuration screen and change the setting to Enabled. For more information,see “Enable or Disable Oracle System Assistant” on page 130.
3. Navigate to the Documentation/ directory.
The documentation directory is at the top level on the USB device. See “Accessingthe Oracle System Assistant Filesystem” on page 87.
4. To view the library page, right-click on the index.html file and select OpenWith.
5. View the documentation using an HTML viewer or browser.
The documentation library page appears.
Related Information■ “Accessing Oracle System Assistant” on page 17
■ “Organization of Oracle System Assistant” on page 37
74 Sun Server X3-2 Administration Guide • April 2014

Mounting the Oracle System AssistantUSB Flash DriveBefore you can access the Oracle System Assistant USB flash drive on the Oracle VM3.0 or the Oracle Solaris 10 and Linux operating systems, you must first mount theUSB flash drive.
If you are using the Windows Server operating system or the Oracle Solaris 11operating system, you do not need to mount the USB flash drive because Windowsand Oracle Solaris 11 will auto-mount this drive so that it is visible using thefilesystem browser.
Note – Currently you cannot mount the Oracle System Assistant USB flash driveusing the VMware ESXi 5.0 virtual machine software. Go to My Oracle Support toretrieve the required drivers for VMware ESXi software.
The procedures for mounting the drive are provided in the following sections:
■ “Mount the Oracle System Assistant USB Flash Drive on Oracle VM 3.0” onpage 75
■ “Mount the Oracle System Assistant USB Flash Drive on a Linux OperatingSystem” on page 77
■ “Mount the Oracle System Assistant USB Flash Drive on an Oracle Solaris 10Operating System” on page 78
Related Information
■ “View Files on the Oracle System Assistant USB Flash Drive” on page 73
▼ Mount the Oracle System Assistant USB FlashDrive on Oracle VM 3.0If the server is running Oracle VM 3.0 software, you must mount the Oracle SystemAssistant USB flash drive before you use the filesystem to display or access itscontents.
This procedure shows how to mount the Oracle System Assistant USB flash drive ona server running Oracle VM software.
1. Connect to your Oracle VM 3.0 server as the root user.
Setting Up the Server Using Oracle System Assistant 75

2. To determine the device mapping of the Oracle System Assistant USB flashdrive, enter the lsscsi command.
An example of how this command displays the storage devices on the server isshown below.
The Oracle System Assistant USB flash drive is the disk labelled ORACLE SSM andin this example is mapped to /dev/sdo.
3. To determine the name of the partition on the Oracle System Assistant USBdevice, enter the fdisk -l /dev/sdo command.
An example of the output produced by this command is shown below.
4. (Optional) Create a mount point to use when mounting the Oracle SystemAssistant USB flash drive.
For example:
# lsscsi[0:0:0:0] disk SEAGATE ST360057SSUN600G 0805 /dev/sda[0:0:1:0] disk SEAGATE ST32000SSSUN2.0T 0313 /dev/sdb[0:0:2:0] disk SEAGATE ST32000SSSUN2.0T 0313 /dev/sdc[0:0:3:0] disk ATA INTEL SSDSA2BZ30 0362 /dev/sdd[0:0:4:0] enclosu ORACLE CONCORD14 0903 -[7:0:0:0] disk SUN StorEdge 3511 421F /dev/sde[7:0:0:1] disk SUN StorEdge 3511 421F /dev/sdf[7:0:0:2] disk SUN StorEdge 3511 421F /dev/sdg[7:0:0:3] disk SUN StorEdge 3511 421F /dev/sdh[9:0:0:0] disk SUN CSM200_R 0660 /dev/sdi[9:0:0:1] disk SUN CSM200_R 0660 /dev/sdj[9:0:0:2] disk SUN CSM200_R 0660 /dev/sdk[9:0:0:3] disk SUN CSM200_R 0660 /dev/sdl[9:0:0:4] disk SUN CSM200_R 0660 /dev/sdm[9:0:0:5] disk SUN CSM200_R 0660 /dev/sdn[11:0:0:0] disk ORACLE SSM PMAP /dev/sdo
# fdisk -l /dev/sdoDisk /dev/sdo: 3880 MB, 3880452096 bytes4 heads, 32 sectors/track, 59211 cylindersUnits = cylinders of 128 * 512 = 65536 bytes
Device Boot Start End Blocks Id System/dev/sdo1 * 17 57344 3668992 ef EFI (FAT-12/16/32)
# mkdir /mnt/OSA
76 Sun Server X3-2 Administration Guide • April 2014

5. To mount the Oracle System Assistant USB device, use the partition namedetermined in Step 3 and an existing mount point or the mount point that youcreated in Step 4.
Here is an example of a mount command:
The Oracle System Assistant USB flash drive is now mounted at the mountlocation specified.
▼ Mount the Oracle System Assistant USB FlashDrive on a Linux Operating SystemIf the server is running a Linux operating system, you must mount the Oracle SystemAssistant USB flash drive before you use the filesystem to display or access itscontents.
This procedure shows how to mount the Oracle System Assistant USB flash drive ona Linux operating system.
# mount -t vfat -o codepage=850 /dev/sdo1 /mnt/OSA# ls /mnt/OSAboot Firmware LiveOS OracleVM syslinux.cfgDocumentation ldlinux.sys manifest.xml readme.html Versions.txtEFI Linux Oracle Solaris Windows#
Setting Up the Server Using Oracle System Assistant 77

● To mount the Oracle System Assistant USB flash drive enter the commandsshown below:
The Oracle System Assistant USB flash drive is now mounted at the locationspecified.
▼ Mount the Oracle System Assistant USB FlashDrive on an Oracle Solaris 10 Operating SystemIf the server is running the Oracle Solaris 10 operating system, you must mount theOracle System Assistant USB flash drive before you use the filesystem to display oraccess its contents.
This procedure shows how to mount the Oracle System Assistant USB flash drive onan Oracle Solaris 10 operating system.
1. To turn off the volfs service, enter the following command:
# svcadm disable volfs
#>mkdir /mnt/OSA#>mount LABEL=ORACLE_SSM /mnt/OSA#>cd /mnt/OSA#>ls -ltotal 916drwxr-xr-x 2 root root 4096 Nov 21 07:42 bootdrwxr-xr-x 3 root root 4096 Nov 21 07:42 Documentationdrwxr-xr-x 3 root root 4096 Oct 26 21:05 EFIdrwxr-xr-x 16 root root 4096 Nov 21 07:42 Firmware-r-xr-xr-x 1 root root 15218 Oct 26 19:10 ldlinux.sysdrwxr-xr-x 5 root root 4096 Nov 21 07:41 Linuxdrwxr-xr-x 2 root root 4096 Oct 26 21:05 LiveOS-rwxr-xr-x 1 root root 787672 Nov 21 08:17 manifest.xmldrwxr-xr-x 2 root root 4096 Nov 21 08:00 Oracle-rwxr-xr-x 1 root root 78879 Nov 21 07:42 readme.htmldrwxr-xr-x 4 root root 4096 Nov 21 07:41 Solaris-rwxr-xr-x 1 root root 263 Oct 26 21:05 syslinux.cfg-rwxr-xr-x 1 root root 3755 Nov 21 07:42 Versions.txtdrwxr-xr-x 3 root root 4096 Nov 21 07:42 VMwaredrwxr-xr-x 4 root root 4096 Nov 21 07:42 Windows#>
78 Sun Server X3-2 Administration Guide • April 2014

2. To identify the Oracle System Assistant USB flash drive, enter the followingcommand:
# rmformat -l
The system responds with the following output:
3. To mount the USB flash drive as read only, enter the following command:
# mount -F pcfs -o ro /dev/dsk/clt0d0p1 /mnt
The Oracle System Assistant USB flash drive is now mounted.
4. To access the content of the USB flash drive, enter the following commands:
5. To unmount the USB flash drive and restart the volfs service, enter thefollowing commands:
Looking for devices...1. Logical Node: /dev/rdsk/c1t0d0p0Physical Node: /pci@0,0/pci108e,484e@1a/hub@1/storage@2/disk@0,0Connected Device: ORACLE SSM PMAPDevice Type: Removable#
# cd /mnt/Solaris# ls10U10 11#
# cd /# umount /mnt# svcadm enable volfs
Setting Up the Server Using Oracle System Assistant 79

Troubleshooting Oracle System AssistantBy default, Oracle System Assistant is installed with each supported server. It is notnecessary to download the Oracle System Assistant software because it ispreinstalled on the server. However, an Updater image is available for download inthe event that it is needed.
Note – Oracle System Assistant is not available as a download for initial installation;however, you can recover the Oracle System Assistant image if it was installed onyour server.
■ If the version of Oracle System Assistant on your server is corrupted, erased, oroverwritten, you will need to download the Updater ISO image file from the MyOracle Support web site and then restore Oracle System Assistant onto the internalUSB device. For more information, see “Restore Oracle System Assistant” onpage 83.
■ If you opt out of having Oracle System Assistant as part of your serverconfiguration, you can get the latest updates for your server through the MyOracle Support web site, or submit a request for physical media. See “GettingServer Firmware and Software” on page 197.
This section contains the following procedures:
■ “Verify Oracle System Assistant Is Installed” on page 80
■ “Troubleshoot Oracle System Assistant Launch From Oracle ILOM” on page 82
■ “Restore Oracle System Assistant” on page 83
▼ Verify Oracle System Assistant Is InstalledYour Sun Server X3-2 supports Oracle System Assistant as a default option, which ispreinstalled in the server. If Oracle System Assistant is physically installed in yourserver, but it is not visible from the filesystem, it could be offline, corrupted, oroverwritten. Use this procedure to determine whether Oracle System Assistant isinstalled in your server and is working properly.
To check the Oracle System Assistant installation, do the following:
1. Verify Oracle System Assistant installation using Oracle ILOM.
In the Oracle ILOM web interface, go to the Summary page to check whetherOracle System Assistant is installed in the server. See “Access Oracle ILOM Usingthe Web Interface” on page 24.
80 Sun Server X3-2 Administration Guide • April 2014

2. Verify Oracle System Assistant installation from the operating system.
Open a filesystem browser or command-line terminal, navigate to the computer ordevices directory, and check whether the Oracle System Assistant USB device ispresent.
The Oracle System Assistant USB device is labeled: ORACLE_SSM or ORACLESSM. Double-click the device to ensure that it is accessible.
■ If the device is present and accessible, launch the application, see “AccessingOracle System Assistant” on page 17.
■ If the device is not present to the OS, perform a physical check of the server.
■ If the device is present but not accessible, it might contain corrupt data. See“Restore Oracle System Assistant” on page 83.
3. Verify whether Oracle System Assistant appears in the BIOS Boot Priority list.
Access the server BIOS Setup Utility and navigate to the Boot Menu. Forinformation about accessing your server BIOS Setup Utility, see “Setting Up BIOSConfiguration Parameters” on page 107.
■ The Oracle System Assistant device label is ORACLE _SSM or ORACLE SSM.
■ If the correctly labeled device appears on the boot list, then your server hasOracle System Assistant. To launch the application, see “Accessing OracleSystem Assistant” on page 17.
■ If the device is physically present in the server, but does not appear in the bootlist, then Oracle System Assistant might be disabled and offline. Use the nextstep to check whether Oracle System Assistant is disabled and offline.
4. Check whether Oracle System Assistant is disabled and offline.
See “Enable or Disable Oracle System Assistant” on page 130.
If Oracle System Assistant is disabled and offline, enable it to make it visible andbootable.
5. Perform a physical check of the server.
Oracle System Assistant is installed on an USB device inside the server. For thelocation of the internal USB ports for your server, refer to the Sun Server X3-2Service Manual, “Servicing the Internal USB Flash Drives (CRU)” on page 99.
■ If the device is present, try to launch the application, see “Accessing OracleSystem Assistant” on page 17.
■ If the device is present, but cannot be seen from the operating system, it mightbe disabled and offline. See “Enable or Disable Oracle System Assistant” onpage 130.
■ If the application does not launch, it might contain corrupt data. See “RestoreOracle System Assistant” on page 83.
Setting Up the Server Using Oracle System Assistant 81

▼ Troubleshoot Oracle System Assistant LaunchFrom Oracle ILOMWhen you launch Oracle System Assistant from the Oracle ILOM web interface, youmight encounter the following prompts when you click the Launch button for OracleSystem Assistant in the Oracle ILOM Summary page:
■ Power off host prompt – This prompt appears only if the power on the host serverwas not powered off prior to starting the Oracle System Assistant launchprocedure. Click OK to power off the host server.
■ Launch a new Oracle ILOM Remote System Console prompt – This promptappears prior to launching the Oracle ILOM Remote System Console.
You might also encounter the following behavior:
■ An alert message appears stating "cannot get power state."
■ A powered-off state is shown for Power in the Actions panel.
If this behavior occurs, it is because Oracle ILOM is temporarily unable to obtain thehost server information. To continue the Oracle System Assistant launch operation,do the following:
1. Click OK in the alert message to continue launching Oracle System Assistant.
The Oracle ILOM System Information Summary page reappears.
2. In the Summary page, click Refresh to update the host power state shown in theActions panel.
Oracle ILOM will then launch Oracle System Assistant in the Oracle ILOMRemote System Console.
Related Information■ “Access Oracle System Assistant From Oracle ILOM Using the Web Interface” on
page 21
82 Sun Server X3-2 Administration Guide • April 2014
▼ Restore Oracle System AssistantIf Oracle System Assistant has been erased, overwritten, or corrupted, you candownload the image file that is available from the My Oracle Support web site torestore an update image of Oracle System Assistant to the USB device.
1. Download the appropriate image file from the My Oracle Support web site.
The package name for the update image for the server is:
■ Sun Server X3-2 (X4170 M3) SWversion – Oracle System Assistant
Download the image that is specific to your server. For example, you coulddownload the image:
Sun_Server_X3-2(Sun_Fire_X4170_M3)-x.x.x.yyyyy-ORACLE_SYSTEM_ASSISTANT_UPDATER.iso
Where x.x.x is the release number and yyyyy is the build number of Oracle SystemAssistant.
For information about accessing My Oracle Support and downloading this image,see “Download Firmware and Software Using My Oracle Support” on page 200.
2. Make the update image available to the server in either of the following ways:
■ Use the image file to burn a physical DVD image. Install the DVD in theserver’s DVD drive or in a DVD drive attached to the server. You can also makethe DVD available to the server as a redirected DVD by using the Oracle ILOMRemote System Console application.
■ Make the update image file available to the server as an ISO image using theOracle ILOM Remote System Console application.
3. Reset or power on the server.
For example:
■ From the local server, press the Power button (approximately 1 second) on theserver front panel to power off the server, then press the Power button again topower on the server.
■ From the Oracle ILOM web interface, click Host Management > PowerControl and select Reset from the Select Action list box.
■ From the Oracle ILOM CLI on the server SP, type reset /System
The BIOS screen appears.
Setting Up the Server Using Oracle System Assistant 83

Note – The next events occur very quickly; therefore, focused attention is needed forthe following steps. Please watch carefully for these messages as they appear onlybriefly on the screen.
4. In the BIOS screen, press F8 to specify a temporary boot device for the OracleSystem Assistant installation.
The Please Select Boot Device screen appears.
5. Depending on the method you used to make the update image available to theserver, perform one of the following steps:
Note – The items listed in the Please Select Boot Device menu might differ,depending on whether the system was booted in Legacy BIOS or UEFI Boot Mode.The following screens reflect a Legacy BIOS boot.
■ If you chose to burn a DVD and placed the DVD into the server’s DVD drive orinto an attached DVD drive, select SATA:HDD:P4:TSSTcorp CDDVDWTS-T633C as shown in the following Please Select Boot Device menu, thenpress Enter.
84 Sun Server X3-2 Administration Guide • April 2014

■ If you chose to use the Oracle ILOM Remote System Console application tomake the image available to the server as a redirected DVD or as an ISO image,select USB:VIRTUAL:AMI Virtual CDROM 1.00 as shown in the followingPlease Select Boot Device menu, then press Enter.
A message appears and a prompt asks whether you want to continue the restoreprocess.
Setting Up the Server Using Oracle System Assistant 85

6. To restore the Oracle System Assistant image, type yes, then press Enter.
The following message appears, indicating the progress of the restore process,and, when the process completes, asks whether the restored Oracle SystemAssistant USB flash drive should be verified to ensure that it was programmedcorrectly.
7. If you want to perform an integrity check of the USB device, type yes, thenpress Enter. If you do not want to perform an integrity check, proceed to Step 8.
It is recommended that you perform this integrity check of the USB device.
The following screen appears, indicating that the Oracle System Assistant USBdevice was verified successfully. The system then reboots and launches the OracleSystem Assistant application.
8. If you do not want to perform an integrity verification of the USB device, typeno, then press Enter.
The following screen appears, indicating that the restore process is complete. Thesystem then reboots and launches the Oracle System Assistant application.
86 Sun Server X3-2 Administration Guide • April 2014

Related Information■ “Getting Server Firmware and Software” on page 197
Accessing the Oracle System AssistantFilesystemThe following table shows the directory structure of Oracle System Assistant on theinternal USB drive.
To access the Oracle System Assistant filesystem, see
■ “Access the Oracle System Asistant Filesystem” on page 89
Top-Level Directory File Information or Directory Contents
boot/ • Oracle Linux Runtime• boot files• Oracle System Assistant application
Oracle/ The platform.xml file
Common/ Content not appropriate for other directories
Documentation/ Server-related documentation
Firmware/ Firmware for Oracle ILOM, BIOS, HBAs, etc.
Linux/ Tools and drivers specific to Linux
Oracle_VM/ Tools and drivers specific to Oracle VM
readme.html HTML formatted ReadMe file
Setting Up the Server Using Oracle System Assistant 87

Related Information
■ “Organization of Oracle System Assistant” on page 37
Solaris/ Tools and drivers specific to Oracle Solaris
Versions.txt List of driver and tool versions for alloperating systems
VMware/ Tools and drivers specific to VMware
Windows/ Tools and drivers specific to Windows
Legal_notices/ Content required by Oracle Legal
Top-Level Directory File Information or Directory Contents
88 Sun Server X3-2 Administration Guide • April 2014

▼ Access the Oracle System Asistant FilesystemTo access the Oracle System Assistant files, use the following procedure.
1. Click the Advanced Task button, and click the Shell tab.
2. Click the Start Shell button.
The Oracle System Assistant command-line shell window appears.
3. Go to the root directory by typing: cd \sysroot
4. To exit the shell, type: exit.
Related Information■ “Accessing the Oracle System Assistant Filesystem” on page 87
■ “Perform Advanced Tasks to Access Oracle System Assistant Shell” on page 70
Setting Up the Server Using Oracle System Assistant 89

90 Sun Server X3-2 Administration Guide • April 2014

Managing the Server Using OracleILOM
The Sun Server X3-2 supports all standard features in Oracle Integrated Lights OutManager (Oracle ILOM) 3.1 firmware. In addition, Oracle ILOM 3.1 provides featuresthat are designed specifically for Oracle x86 servers.
This following topics are discussed.
Related Information
■ “Accessing Oracle ILOM” on page 24
■ Oracle Integrated Lights Out Manager (ILOM) 3.1 Documentation Library at:http://www.oracle.com/pls/topic/lookup?ctx=ilom31
■ Oracle Hardware Management Pack Documentation Library at:http://www.oracle.com/pls/topic/lookup?ctx=ohmp
■ Oracle x86 Servers Diagnostics, Applications, and Utilities Guide for Servers with OracleILOM 3.1 at: http://www.oracle.com/pls/topic/lookup?ctx=x86diag
Oracle ILOM FeaturesOracle ILOM offers a full set of features, functions, and protocols that you can use tomonitor and manage Oracle x86-based servers and SPARC-based servers. Some ofthese features include:
■ Browser-based web interface and SSH command-line interface
Description Links
Learn about Oracle ILOM features for allOracle servers.
“Oracle ILOM Features” on page 91
Learn about Oracle ILOM featuresspecifically for Oracle x86 servers
“Oracle ILOM Features for Oracle x86Servers” on page 92
91

■ Downloadable firmware updates
■ Remote hardware monitoring
■ Hardware field-replaceable unit (FRU) inventory and presence detection
■ Remote keyboard, video, mouse, and storage (KVMS) redirection
■ System power control and monitoring
■ Configuration and management of user accounts
■ Error and fault management
■ System alerts, including SNMP traps, IPMI PETs, remote syslog, and email alerts
For complete information about these features, and for information about how toperform procedures using Oracle ILOM, refer to the Oracle ILOM 3.1 DocumentationLibrary at http://www.oracle.com/pls/topic/lookup?ctx=ilom31.
The Oracle ILOM 3.1 Documentation Library includes the following documents:
■ Oracle ILOM 3.1 Quick Start Guide
■ Oracle ILOM 3.1 Feature Updates and Release Notes
■ Oracle ILOM 3.1 User’s Guide
■ Oracle ILOM 3.1 Configuration and Maintenance Guide
■ Oracle ILOM 3.1 Protocol Management Reference Guide
■ Oracle ILOM 3.1 Basic CLI Command Reference
Related Information
■ “Oracle Integrated Lights Out Manager (Oracle ILOM)” on page 5
■ “Common System Management Tasks” on page 8
■ “Common System Administrative Tasks” on page 9
Oracle ILOM Features for Oracle x86ServersThe following table identifies the Oracle ILOM 3.1 features and functions that aresupported on Oracle x86 servers. For complete information about these features andfunctions, refer to the documents in the Oracle ILOM 3.1 Documentation Library.
92 Sun Server X3-2 Administration Guide • April 2014

For information about these features, see these sections:
TABLE: Oracle ILOM 3.1 Features Supported for Oracle x86 Servers
Oracle ILOM 3.1 Feature For Complete Information and Procedures, See:
Sideband management • “Setting Up a Management Connection to OracleILOM and Logging In” in the Oracle ILOM 3.1Configuration and Maintenance Guide
Power control policies • “Controlling Host Server Management Actions” inthe Oracle ILOM 3.1 Configuration and MaintenanceGuide
Power management policy • “Setting SP Power Target Limit Properties” in theOracle ILOM 3.1 Configuration and Maintenance Guide
• “Set Advanced Power Capping Policy” in the OracleILOM 3.1 Configuration and Maintenance Guide
Local host interconnectmanagement connection
• “Establishing a Management Connection to OracleILOM” in the Oracle ILOM 3.1 Configuration andMaintenance Guide
• “Enabling the Local Interconnect Interface” in theOracle Hardware Management Pack 2.2 InstallationGuide
Diagnostics using Pc_Check andnon-maskable interrupt
• “Troubleshooting Oracle ILOM Managed Devices”in the Oracle ILOM 3.1 User’s Guide
• “Performing Pc-Check Diagnostics Tests in theOracle x86 Servers Diagnostics, Applications, andUtilities Guide for Servers with Oracle ILOM 3.1
Control next boot device • “Setting Next Boot Device on x86 Host Server” in theOracle ILOM 3.1 Configuration and Maintenance Guide
FRU top-level indicator auto-update • “FRU TLI Auto-Update” on page 97
Switch serial port output to hostmanagement console
• “Serial Management Port Owner” in the OracleILOM 3.1 Configuration and Maintenance Guide
Back up and restore BIOSconfiguration
• “Maintaining x86 BIOS Configuration Parameters”in the Oracle ILOM 3.1 Configuration and MaintenanceGuide
Set PCIe cooling mode policy • “Power-On and Cooling-Down Policies ConfigurableFrom the Server SP” in the Oracle ILOM 3.1Configuration and Maintenance Guide
Administer open problems andclear server faults
• “Administering Open Problems” in the Oracle ILOM3.1 User’s Guide
• “Managing Oracle Hardware Faults Through theOracle ILOM Fault Management Shell” in the OracleILOM 3.1 User’s Guide
Managing the Server Using Oracle ILOM 93
■ “Sideband Management” on page 94
■ “Power Control Policies” on page 94
■ “Local Host Interconnect Management Connection” on page 96
■ “Diagnostics Using Pc-Check and NMI” on page 96
■ “Control Next Boot Device” on page 97
■ “FRU TLI Auto-Update” on page 97
■ “Switch Serial Port Output to Host Management Console” on page 98
■ “Back Up and Restore BIOS Configuration” on page 98
■ “Set PCIe Cooling Mode” on page 98
■ “Administer Open Problems and Clear Server Faults” on page 99
Sideband ManagementThe sideband management feature is one of four ways you can establish amanagement connection to Oracle ILOM. By default, Oracle ILOM is set to transmitall traffic through the secure dedicated management port (NET MGT) on the Oraclex86 server chassis. However, if you prefer to support only one network connection toOracle ILOM for both management and host traffic, you can configure a sidebandmanagement connection.
For more information about special considerations, requirements, and instructionsfor configuring a sideband management connection in Oracle ILOM, refer to “SettingUp a Management Connection to Oracle ILOM and Logging In” in the Oracle ILOM3.1 Configuration and Maintenance Guide.
Power Control PoliciesIn Oracle ILOM 3.1, the following power features are enabled for Oracle x86 servers.
94 Sun Server X3-2 Administration Guide • April 2014

Power Management PolicyThe Power Management Policy is enabled in Software Release 1.1 on the Sun ServerX3-2. This policy controls the power consumption (or power usage) for the server.Oracle ILOM provides configurable properties for power limiting and powergranting on the server. Oracle ILOM provides power capping policy properties thathelp enforce the system target power limit by enabling system administrators to setsoft caps with grace period and violation actions, or to set hard caps to keep the peakpermitted power consumption under the target power limit.
For further information, refer to the power management topics in the Oracle ILOM 3.1Configuration and Maintenance Guide.
TABLE: Power Control Policies for Oracle x86 Servers
Power Feature Description
Remote PowerControl
Configure the power state for the server remotely from an Oracle ILOMinterface. Available power states include:• Removing power from the system• Shutting down the system gracefully• Powering on the system with full powerFor instructions on performing these operations, see “Configuring HostServer Management Actions” in the Oracle ILOM 3.1 Configuration andMaintenance Guide.
Power-OnPolicies
The service processor (SP) power-on policies determine the power state ofthe server when AC power is applied to the server (cold boot). Serviceprocessor power-on policies are mutually exclusive, so that if one policy isenabled, the other policy is disabled by default. If both policies aredisabled, then the server SP will not apply main power to the server atboot time.The two power-on policies are:• Auto Power-On Host on Boot – When this option is enabled, the SP
automatically applies main power to the server. When disabled(default), main power is not applied to the server.
• Set Host Power to Last Power State on Boot – When this option isenabled, the SP automatically tracks the last power state and restoresthe server to this last power state following a power state change of atleast 10 seconds. When disabled (default) the last power state is notapplied to the server.
For instructions on how to set the power-on policies, refer to “Power-Onand Cooling-Down Policies Configurable From the Server SP” in theOracle ILOM 3.1 Configuration and Maintenance Guide.
Managing the Server Using Oracle ILOM 95

Local Host Interconnect Management ConnectionThe Local Host Interconnect property in Oracle ILOM enables you to optionallyestablish a dedicated and secure communication channel between the managedserver host operating system and the Oracle ILOM service processor. It isrecommended that you use the Oracle Hardware Management Pack, version 2.2 orlater, to automatically configure this optional management connection for you.
For further information, refer to “Establishing a Management Connection to OracleILOM” in the Oracle ILOM 3.1 Configuration and Maintenance Guide, and also refer to“Enabling the Local Interconnect Interface” in the Oracle Hardware Management Pack2.2 Installation Guide.
Diagnostics Using Pc-Check and NMIPc-Check is a DOS-based diagnostic utility that is integrated into Oracle ILOM thatenables you to detect and test all motherboard components, ports, and slots.Pc-Check has four operating modes that you can run from Oracle ILOM:
■ Enabled – Run a predefined set of diagnostics when the server starts up.
■ Extended – Run a comprehensive test suite of diagnostics when the server startsup.
■ Manual – Run only the diagnostics that you specify when the server starts up.
■ Disabled – Do not run Pc-Check diagnostics when the server starts up.
You can also send a non-maskable interrupt (NMI) to the host operating systemusing Oracle ILOM. Note that sending an NMI to the host operating system couldcause the host to stop responding and wait for input from an external debugger.Therefore, you should use this feature only when instructed to do so by OracleServices personnel.
For more information about Pc-Check diagnostics, refer to the Oracle x86 ServersDiagnostics, Applications, and Utilities Guide for Servers with Oracle ILOM 3.1 at:http://www.oracle.com/pls/topic/lookup?ctx=x86diag.
For instructions on how to run Pc-Check and how to generate an NMI from OracleILOM, refer to “Troubleshooting Oracle ILOM Managed Devices” in the Oracle ILOM3.1 User’s Guide.
96 Sun Server X3-2 Administration Guide • April 2014

Control Next Boot DeviceUsing Oracle ILOM, you can remotely control what the next boot device will be atthe next power-on. Available states for the Next Boot Device setting include thefollowing. These settings take effect at the next host boot and will bypass the currentBIOS boot order settings.
■ No Override (default) – No override in the BIOS setting. Also clears anypreviously chosen selection.
■ PXE – Host will boot from the network, following the PXE specification.
■ Disk – Host will boot from the first disk as determined by BIOS.
■ Diagnostic – Host will boot into the diagnostic partition, if configured.
■ CD-ROM – Host will boot from the attached CD-ROM or DVD device.
■ BIOS – Host will boot into the BIOS Setup screen.
For information on how to configure the Next Boot Device setting in Oracle ILOM,refer to “Setting Next Boot Device on x86 Host Server” in the Oracle ILOM 3.1Configuration and Maintenance Guide.
FRU TLI Auto-UpdateOracle ILOM includes a top-level indicator (TLI) auto-update feature that ensuresthat the TLI stored in the server’s field-replaceable units (FRUs) is always correct.The TLI, which is unique to each server, is used to track the server’s serviceentitlement and warranty coverage. When a server requires service, the server’s TLIis used to verify that the server’s warranty has not expired.
The TLI is stored in the FRUID (field-replaceable unit identifiers) of thesecomponents: power supply 0 (PS0), motherboard (MB), and disk backplane 0 (DBP0).
The TLI components stored in each component FRUID include:
■ Product name
■ PPN (product part number)
■ PSN (product serial number)
When a server FRU that contains the TLI is removed and a replacement moduleinstalled, the TLI of the replacement module is programmed by Oracle ILOM tocontain the same TLI as the other two modules.
Managing the Server Using Oracle ILOM 97

Switch Serial Port Output to Host ManagementConsoleOracle ILOM, by default, streams local management traffic through the serialmanagement port (SER MGT). However, you can configure Oracle ILOM to streamthe console output directly to the host console port (COM1). This feature is beneficialto Windows kernel debugging, as it enables you to view non-ASCII character trafficfrom the host console.
For more information about prerequisites and instructions for switching the serialport output between the serial port and host console, refer to “Serial ManagementPort Owner” in the Oracle ILOM 3.1 Configuration and Maintenance Guide.
Back Up and Restore BIOS ConfigurationThe BIOS configuration back up and restore feature in Oracle ILOM makes it easy formaintaining your host data store BIOS configuration parameters. Use this feature toback up the BIOS parameters from the host data store to Oracle ILOM or to restorethe saved parameters from Oracle ILOM to the host data store. Additionally, you cansync the BIOS parameters between the host data store and Oracle ILOM, and resetthe BIOS parameters in the host data store to their factory defaults.
For more information about this feature and instructions on how to perform theseoperations in Oracle ILOM, refer to “Maintaining x86 BIOS ConfigurationParameters” in the Oracle ILOM 3.1 Configuration and Maintenance Guide.
Set PCIe Cooling ModeThe Enhanced PCIe Cooling Mode Policy setting is provided to satisfy the cooleroperating temperature requirement for certain PCIe cards. Enabling this policylowers the chassis’ output temperature sensor thresholds that are used by thesystem’s fan control algorithm to keep the PCIe cards operating within their requiredtemperature range. Enable this policy when it is desirable to keep the chassis evencooler than necessary.
For information about how to set the PCIe Cooling Mode Policy, refer to “Power-Onand Cooling-Down Policies Configurable From the Server SP” in the Oracle ILOM 3.1Configuration and Maintenance Guide.
98 Sun Server X3-2 Administration Guide • April 2014

Administer Open Problems and Clear ServerFaultsOracle ILOM automatically detects system hardware faults and environmentalconditions on a managed system. If a problem occurs on a managed system, OracleILOM will automatically:
■ Illuminate the Service Action indicator (LED) on the managed device.
■ Identify the faulted condition in an easy-to-read Open Problems table.
■ Record system information about the fault condition in the event log.
After the component is repaired or replaced, Oracle ILOM automatically clears thefault state from the Open Problems table.
For further information about administering hardware faults that are detected andreported in the Oracle ILOM interfaces, refer to “View Open Problems Detected on aManaged Device” and “Manage Sun Hardware Faults Through Oracle ILOM FaultManagement Shell” in Oracle ILOM 3.1 User’s Guide.
For the Sun Server X3-2, the following types of faults must be cleared manually afterthe faulty component is replaced:
■ PCIe faults (network ports and PCIe cards)
■ Processor (CPU) faults
For instructions, refer to “Managing Sun Hardware Faults Through the Oracle ILOMFault Management Shell” in the Oracle ILOM 3.1 User’s Guide.
In addition, the following fault does not require replacement of a faulty component;however, user action is required to clear the fault:
■ fault.security.integrity-compromised@/sys/sp
This fault is generated when the server’s top cover is removed while the AC powercords are still connected to the power supply and standby power is still applied tothe server service processor. To clear thefault.security.integrity-compromised@/sys/sp fault, replace the server’stop cover and then either reboot the Oracle ILOM SP, or remove the AC power cordsand then reconnect the power cords.
Managing the Server Using Oracle ILOM 99

100 Sun Server X3-2 Administration Guide • April 2014

Configuring RAID
This section contains information about configuring redundant array of independentdisks (RAID) volumes for the server.
The following topics are discussed.
Related Information
■ “Accessing Oracle System Assistant” on page 17
Supported HBA Disk ControllersThe following table lists the available host bust adapter (HBA) disk controllers forthe Sun Server X3-2 and the RAID levels available for each controller. These HBAdisk controllers can be ordered with the server or ordered separately. For instructionson installing the disk controllers and connecting storage drives, see the Sun ServerX3-2 Service Manual, “Servicing PCIe Cards (CRU)” on page 88.
Description Links
Review which HBA disk controllers aresupported.
“Supported HBA Disk Controllers” onpage 101
Review RAID configuration options andrequirements.
“RAID Configuration Options” on page 102
Create a RAID volume before installing anoperating system.
“Creating a RAID Volume Before Installing anOperating System” on page 103
Create a RAID volume after installing anoperating system.
“Creating a RAID Volume After Installing anOperating System” on page 103
Monitor storage devices using OracleILOM
“Using Oracle ILOM to Monitor StorageDevices” on page 104
101

Note – If you are using Oracle System Assistant to configure RAID for a diskcontroller, you can configure only RAID volumes 0 and 1. To configure other RAIDvolumes, you must use the BIOS Setup Utility.
For more information about the supported disk controllers, refer to:
■ Sun Storage 6 GB SAS PCIe HBA, Internal Installation Guide For HBA ModelsSGX-SAS6-INT-Z and SG-SAS6-INT-Z at:http://docs.oracle.com/cd/E19337-01/index.html
■ Sun Storage 6 GB SAS PCIe RAID HBA, Internal Installation Guide For HBA ModelsSGX-SAS6-R-INT-Z and SG-SAS6-R-INT-Z at:http://docs.oracle.com/cd/E19221-01/index.html
RAID Configuration OptionsConfiguring storage drives into RAID volumes is an optional task. It is recommendedthat you use Oracle System Assistant to configure RAID on the server. If your serverdoes not have Oracle System Assistant, you can use the Oracle HardwareManagement Pack raidconfig command to configure RAID on the server.
For more information, see the Sun Server X3-2 Installation Guide, “Configuring ServerDrives for OS Installation” on page 91.
You have the following options with respect to RAID:
■ Option 1 – If you intend to use the preinstalled version of Oracle Solaris operatingsystem, you cannot configure RAID on the boot disk because the preinstalledoperating system (OS) does not support RAID configurations.
■ Option 2 – If you are going to do a fresh OS installation and you want toconfigure the server’s storage drives into RAID volumes, you must configure thestorage drives into RAID volumes before you install the operating system.
Disk Controller HBA Part Number RAID Levels Supported
Sun Storage 6 Gb SAS PCIeHBA, Internal: 8 port
SGX-SAS6-INT-Z Hardware 0, 1, 10
Sun Storage 6 Gb SAS PCIeRAID HBA, Internal: 8 portand 512 MB memory
SGX-SAS6-R-INT-Z Hardware 0, 1, 5, 6, 10, 50, 60
102 Sun Server X3-2 Administration Guide • April 2014

■ Option 3 – If you are going to do a fresh OS installation, but you do not want toconfigure the storage drives into RAID volumes, you can proceed to install yourselected OS.
■ Option 4 – If the server has the Sun Storage 6 Gb SAS PCIe HBA, Internal(SGX-SAS6-INT-Z) installed and you are going to do a fresh OS install, but you donot want to configure the server’s storage drives into RAID volumes, you canproceed to install your selected OS.
Related Information
■ “Configure Hardware for RAID” on page 54
■ Oracle Hardware Management Pack Documentation Library at:http://www.oracle.com/pls/topic/lookup?ctx=ohmp
Creating a RAID Volume BeforeInstalling an Operating SystemThe following guidelines apply when using a storage drive connected to a supporteddisk controller to install an operating system (OS).
■ For SGX-SAS6-INT-Z – You can install an OS on a drive without creating a RAIDvolume. However, if you want to install the OS from an OS install disk, you willneed to create the RAID volume before installing the OS.
■ For SGX-SAS6-R-INT-Z – You must create a RAID volume before installing an OSon a drive. You must also make the drive bootable.
For information on creating RAID volumes and making drives bootable, see the SunServer X3-2 Installation Guide, “Configuring Server Drives for OS Installation” onpage 91.
Creating a RAID Volume After Installingan Operating SystemRAID configuration is most often completed before installing an operating systemand for the boot disk. However, it is possible to create a RAID volume on othernon-boot disks after installing an operating system.
Configuring RAID 103

To create RAID volumes after an OS is installed, you can choose from among thesetools for creating and managing the RAID resources in your server.
■ Oracle System Assistant – You can use Oracle System Assistant to create RAID 0or 1 level volumes and prepare drives for OS installation. See “ConfigureHardware for RAID” on page 54 and refer to the Sun Server X3-2 Installation Guide,“Configuring Server Drives for OS Installation” on page 91.
■ Oracle Hardware Management Pack – You can use the raidconfig commandscontained in this software’s Oracle Server CLI Tools component to create andmanage RAID volumes on your server. See “Accessing Oracle HardwareManagement Pack” on page 26 and refer to the Oracle Hardware ManagementPack documentation at http://www.oracle.com/pls/topic/lookup?ctx=ohmp.
■ (SGX-SAS6-INT-Z only) LSI SAS2 Integration RAID Configuration Utility – Youcan use the sas2ircu commands contained in the LSI SAS2 Integrated RAIDConfiguration Utility to configure and manage RAID volumes on your server.
You can download the SAS2IRCU software for your operating system from theUtilities section at the following location:http://www.lsi.com/sep/Pages/oracle/sg_x_sas6-int-z.aspx
■ (SGX-SAS6-R-INT-Z only) LSI MegaCLI or MegaRAID Storage Manager – Youcan use the LSI MegaCLI command-line tool or the MegaRAID Storage Managergraphical interface to configure and manage RAID volumes for theSGX-SAS6-R-INT-Z disk controller.
You can download the LSI MegaCLI and MegaRAID Storage Manager software foryour operating system from the Utilities section at following location:http://www.lsi.com/sep/Pages/oracle/sg_x_sas6-r-int-z.aspx
Using Oracle ILOM to Monitor StorageDevicesYou can use Oracle ILOM 3.1 to view information and health status for installedstorage devices. To view information and health details for system storage in theOracle ILOM web interface, click System Information > Storage. To view similarinformation in the Oracle ILOM command-line interface, type show/System/Storage. System information presented in the Oracle ILOM interfacesincludes: number of installed storage devices, storage size, health status, configureddisks, controllers, volumes, and expanders.
104 Sun Server X3-2 Administration Guide • April 2014

For further information about viewing system component activity, refer to“Collecting System Information, Monitoring Health Status, and Initiating HostManagement Actions” in the Oracle ILOM 3.1 User’s Guide.
Related Information
■ Oracle Integrated Lights Out Manager (ILOM) Documentation Library at:http://www.oracle.com/pls/topic/lookup?ctx=ilom31.
Configuring RAID 105

106 Sun Server X3-2 Administration Guide • April 2014

Setting Up BIOS ConfigurationParameters
This section provides an overview of BIOS configuration management, Legacy BIOS,UEFI BIOS, and the BIOS Setup utility.
The following topics are discussed.
Related Information
■ “BIOS Setup Utility Menu Options” on page 141
Managing the BIOS ConfigurationThe BIOS configuration parameters on an Oracle x86 server are manageable from theBIOS Setup Utility and Oracle ILOM. You can also download the BIOS firmwareusing Oracle System Assistant. For information about using these tools to managethe BIOS configuration, see:
■ Oracle System Assistant – “Update Firmware” on page 49
Description Links
Learn about the tools available to managethe BIOS configuration.
“Managing the BIOS Configuration” onpage 107
Learn how to access the BIOS Setup Utility. “Accessing the BIOS Setup Utility” onpage 108
Learn about Legacy BIOS and UEFI BIOS. “Using Legacy BIOS or UEFI” on page 112
Learn how BIOS allocates Option ROMand I/O resources.
“Using BIOS for Resource Allocation” onpage 116
Learn how to perform common BIOS setupprocedures.
“Common BIOS Setup Utility Tasks” onpage 118
107
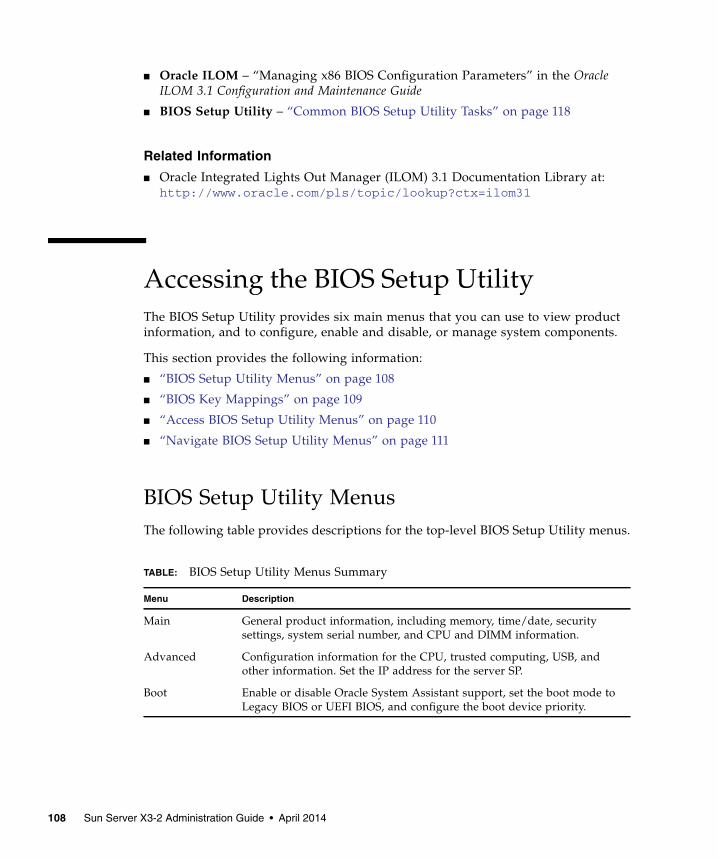
■ Oracle ILOM – “Managing x86 BIOS Configuration Parameters” in the OracleILOM 3.1 Configuration and Maintenance Guide
■ BIOS Setup Utility – “Common BIOS Setup Utility Tasks” on page 118
Related Information
■ Oracle Integrated Lights Out Manager (ILOM) 3.1 Documentation Library at:http://www.oracle.com/pls/topic/lookup?ctx=ilom31
Accessing the BIOS Setup UtilityThe BIOS Setup Utility provides six main menus that you can use to view productinformation, and to configure, enable and disable, or manage system components.
This section provides the following information:
■ “BIOS Setup Utility Menus” on page 108
■ “BIOS Key Mappings” on page 109
■ “Access BIOS Setup Utility Menus” on page 110
■ “Navigate BIOS Setup Utility Menus” on page 111
BIOS Setup Utility MenusThe following table provides descriptions for the top-level BIOS Setup Utility menus.
TABLE: BIOS Setup Utility Menus Summary
Menu Description
Main General product information, including memory, time/date, securitysettings, system serial number, and CPU and DIMM information.
Advanced Configuration information for the CPU, trusted computing, USB, andother information. Set the IP address for the server SP.
Boot Enable or disable Oracle System Assistant support, set the boot mode toLegacy BIOS or UEFI BIOS, and configure the boot device priority.
108 Sun Server X3-2 Administration Guide • April 2014

See “BIOS Setup Utility Menu Options” on page 141 for examples of each of thesescreens.
Related Information
■ “BIOS Setup Utility Menu Options” on page 141
■ “Navigate BIOS Setup Utility Menus” on page 111
BIOS Key MappingsWhen viewing the BIOS output from a terminal using the serial console redirectionfeature, some terminals do not support function keys. BIOS supports the mapping offunction keys to Control key sequences when serial redirection is enabled. Thefollowing table provides a description of the function key to Control key mappings.
IO Manage configuration settings for I/O devices, such as I/O virtualizationsettings, and enable and disable Option ROMs.
UEFI DriverControl
Manage PCIe drivers for all configurable devices. Menu is only availablewhen operating in UEFI Boot Mode.
Save & Exit Save changes and exit, discard changes and exit, discard changes, orrestore the default BIOS settings.
TABLE: Function Key to Control Key Sequence Mapping
FunctionKey
Control KeySequence BIOS POST Function BIOS Setup Function
F1 Ctrl+Q Not applicable Activate the Setup Utility Helpmenu.
F2 Ctrl+E Enter BIOS Setup Utility whilethe system is performing thepower-on self-test (POST).
Not applicable
F7 Ctrl+D Not applicable Discard changes. (Notapplicable to UEFI DriverControl menu)
F8 Ctrl+P Activate the BIOS Boot Menu. Not applicable
TABLE: BIOS Setup Utility Menus Summary (Continued)
Menu Description
Setting Up BIOS Configuration Parameters 109

Related Information
■ “Access BIOS Setup Utility Menus” on page 110
■ “Navigate BIOS Setup Utility Menus” on page 111
▼ Access BIOS Setup Utility MenusYou can access BIOS Setup Utility screens from the following interfaces:
■ Use a USB keyboard and VGA monitor connected directly to the server. (A mouseis not required to access the BIOS Setup Utility.)
■ Use a terminal (or terminal emulator connected to a computer) through the serialport on the back panel of the server.
■ Connect to the server using the Oracle ILOM Remote System Console application.
1. Reset or power on the server.
■ From the local server, press the Power button on the front panel of the server topower off the server, then press the Power button again to power on the server.
■ From the Oracle ILOM web interface, click Host Management > PowerControl and select Reset from the Select Action list box.
■ From the Oracle ILOM CLI on the server SP, type reset /System
The power-on self-test (POST) sequence begins.
2. To enter the BIOS Setup Utility, press the F2 key (Ctrl+E from a serialconnection) when prompted and while the BIOS is running the power-onself-tests (POST).
The BIOS Setup Utility Main Menu screen appears.
F9 Ctrl+O Launches Oracle SystemAssistant. BIOS boots to OracleSystem Assistant, bypassing thecurrent Boot Priority List for thisone-time boot method.
Activate Load Optimal Valuespop-up menu. (Not applicableto UEFI Driver Control menu)
F10 Ctrl+S Not applicable Activate Save and Exit pop-upmenu. (Not applicable to UEFIDriver Control menu)
F12 Ctrl+N Activate Network boot. Not applicable
TABLE: Function Key to Control Key Sequence Mapping (Continued)
FunctionKey
Control KeySequence BIOS POST Function BIOS Setup Function
110 Sun Server X3-2 Administration Guide • April 2014

Related Information■ “BIOS Setup Utility Menus” on page 108
■ “BIOS Key Mappings” on page 109
■ “BIOS Setup Utility Menu Options” on page 141
▼ Navigate BIOS Setup Utility MenusTo navigate the menus or options listed on a menu, use the arrow keys. The currentlyselected option or sub-menu is highlighted. For further instructions on how tonavigate and change settings in the BIOS Setup Utility, refer to the online informationprovided on the menu.
1. Access the BIOS Setup Utility.
See “Access BIOS Setup Utility Menus” on page 110.
2. Use the left and right arrow keys to select the different primary menu options.
As you select each menu option, the top-level screen for that menu optionappears.
Setting Up BIOS Configuration Parameters 111

3. To select an option on a top-level screen, use the up and down arrow keys tonavigate the options presented.
Only options that can be modified are highlighted when you press the up anddown arrow keys.
■ If a field can be modified, as you select the option, user instructions formodifying the option appear in the right column of the screen.
■ If a field is a link to a sub-screen, a description of the sub-menu content appearsin the right column.
4. Modify the setup field by pressing the + or - keys (plus or minus keys) or bypressing Enter and selecting the desired option from the pop-up menus.
5. Press the Esc key to return from a sub-menu to the previous menu screen.
Pressing Esc from a top-level menu is equivalent to selecting the Discard Changesand Exit option from the Save & Exit Menu.
6. Modify parameters as needed.
7. Press F10 to save your changes and exit the BIOS Setup Utility.
Alternatively, you can select the Save & Exit Menu and then select the SaveChanges and Reset to save your changes and exit the BIOS Setup Utility.
Note – After modifying any BIOS settings and selecting Save Changes and Resetfrom the Save & Exit Menu, the subsequent reboot might take longer than a typicalreboot where no settings were modified. The additional delay is required to ensurethat changes to the BIOS settings are synchronized with Oracle ILOM.
Related Information■ “BIOS Setup Utility Menus” on page 108
■ “BIOS Key Mappings” on page 109
■ “BIOS Setup Utility Menu Options” on page 141
Using Legacy BIOS or UEFIThe BIOS firmware controls the system from power-on until an operating system isbooted. The BIOS supports booting from both Legacy BIOS and Unified ExtensibleFirmware Interface (UEFI), depending on which operating system you are using.
This section includes the following information:
■ “Selecting Legacy BIOS or UEFI Boot Mode” on page 113
112 Sun Server X3-2 Administration Guide • April 2014

■ “Switching Between Legacy BIOS and UEFI” on page 114
■ “UEFI Boot Mode Advantages” on page 114
■ “Configuration Utilities for Add-In Cards” on page 115
Selecting Legacy BIOS or UEFI Boot ModeBIOS supports two boot modes: Legacy BIOS and UEFI. You can set the boot modeusing the Boot Menu in the BIOS Setup Utility. Boot mode selection depends on theoperating system type and configuration that is installed in the system. Some devicesand operating systems do not yet support UEFI and can only boot from Legacy BIOS.Depending on your situation, you might have to specify which mode of BIOS youwant to use.
Choose Legacy BIOS Boot Mode to allow host bus adapters (HBAs) to use OptionROMs. Choose UEFI Boot Mode to use UEFI drivers.
When using operating systems that support booting only from Legacy BIOS, theLegacy BIOS Boot Mode must be used. When using operating systems that supportbooting from Legacy BIOS or UEFI, either mode can be used. However, once a modeis chosen, and an operating system is installed, the installation can be booted onlyusing the same mode that was used for the installation.
The following operating systems do not support UEFI:
■ Oracle Linux 5.x
■ Red Hat Enterprise Linux 5.x
■ Oracle VM 3.0 and 3.1
For updates to this list, refer to the Sun Server X3-2 Product Notes at:http://www.oracle.com/pls/topic/lookup?ctx=SunServerX3-2.
Only devices that support the selected mode are listed on the BIOS Boot screen. Ifyou select UEFI Boot Mode, only boot candidates that support UEFI are listed in theBoot Options Priority list. If you select Legacy BIOS Boot Mode, only boot candidatesthat support Legacy BIOS are listed in the Boot Options Priority list.
■ When an operating system is installed using Legacy BIOS Boot Mode, theoperating system can be booted only in Legacy BIOS Boot Mode.
■ When an operating system is installed using UEFI Boot Mode, the operatingsystem can be booted only in UEFI Boot Mode.
Related Information
■ “Switching Between Legacy BIOS and UEFI” on page 114
■ “UEFI Boot Mode Advantages” on page 114
Setting Up BIOS Configuration Parameters 113

■ “Configuration Utilities for Add-In Cards” on page 115
Switching Between Legacy BIOS and UEFIWhen switching between Legacy BIOS Boot Mode and UEFI Boot Mode (eitherdirection), BIOS settings that affect the Boot Options Priority list settings will bechanged. If the boot mode is changed, the boot candidates from the previous bootmode disappear. The boot candidates for the newly changed boot mode appear afteryou save your changes and reset the host and in the next boot to the BIOS SetupUtility.
Note – When switching between Legacy and UEFI modes, Boot Options Priority listsettings will not be preserved. Typically, once a boot mode is selected, there is noneed to switch boot modes. However, there is one notable exception: the Pc-Checkutility must be run in Legacy BIOS Boot Mode. If boot settings are customized whilein UEFI Boot Mode, and you need to run Pc-Check, you should use the BIOS Backupand Restore feature to capture the customized settings prior to switching the bootmode to Legacy BIOS Boot Mode to run Pc-Check. When you return to UEFI BootMode, you can use the Oracle ILOM Backup and Restore feature to reinstate yoursaved settings.
Because the settings for a given mode do not persist after a transition betweenmodes, you should use the BIOS Backup and Restore feature to capture and preservethe BIOS configuration if you intend to switch back to the previous BIOS mode andwant to retain your previous BIOS settings. For information about the BIOS Backupand Restore feature, refer to the Oracle Integrated Lights Out Manager (ILOM) 3.1Documentation Library at http://www.oracle.com/pls/topic/lookup?ctx=ilom31.
Related Information
■ “Selecting Legacy BIOS or UEFI Boot Mode” on page 113
■ “UEFI Boot Mode Advantages” on page 114
■ “Configuration Utilities for Add-In Cards” on page 115
UEFI Boot Mode AdvantagesWhen the option is available to choose between a Legacy BIOS or UEFI Boot Modeoperating system installation, the advantages to choosing a UEFI Boot Modeinstallation include the following:
114 Sun Server X3-2 Administration Guide • April 2014

■ Avoids Legacy Option ROM address constraints. For more information, see“Legacy Option ROM Allocation” on page 116.
■ Supports operating system boot partitions greater than 2 terabytes (2 TB) in size.For more information about limitations for supported operating systems, refer tothe Sun Server X3-2 Product Notes at:http://www.oracle.com/pls/topic/lookup?ctx=SunServerX3-2.
■ PCIe device configuration utilities are integrated within the BIOS Setup Utilitymenus. For more information, see “BIOS Setup Utility Menu Options” onpage 141.
■ Bootable operating system images will appear in the boot list as labeled entities,for example Windows boot manager label versus raw device labels.
Related Information
■ “Selecting Legacy BIOS or UEFI Boot Mode” on page 113
■ “Select the Boot Device” on page 121
Configuration Utilities for Add-In CardsThe method for interacting with configuration utilities for add-in cards (and systemresident) I/O adapters differs depending on whether Legacy BIOS Mode or UEFIBoot Mode is used.
In Legacy BIOS Mode, I/O adapter utilities are invoked during BIOS POSTprogression using hot keys identified by the adapter’s Option ROM during POST.When the hot key is pressed, the adapter’s specific configuration utility interface ispresented. Often the interface will have a vendor-specific design.
In UEFI Boot Mode, the configuration screens for the add-in cards will appear asmenu items in the BIOS UEFI Driver Control Menu as part of the standard BIOSSetup Utility screens. For example, if the Oracle Sun Storage 6Gb SAS PCIe RAIDhost bus adapter is installed in the server, its configuration utility appears as a menuselection on the BIOS UEFI Driver Control Menu.
Related Information
■ “Selecting Legacy BIOS or UEFI Boot Mode” on page 113
Setting Up BIOS Configuration Parameters 115

Using BIOS for Resource AllocationThis section explains how the BIOS allocates Option ROM and I/O resources.
■ “Legacy Option ROM Allocation” on page 116
■ “IO Resource Allocation” on page 117
Legacy Option ROM AllocationIn Legacy BIOS Mode, there are PC architecture constraints that are placed on LegacyOption ROM allocation. These constraints are not placed on UEFI Option ROMs,which are often referred to as UEFI drivers.
Choose Legacy BIOS Mode to allow host bus adapters (HBAs) to use Option ROMs.Choose UEFI Boot Mode to use UEFI drivers.
The system BIOS allocates 128 Kbytes of address space for Legacy Option ROMs.This address space is shared between on-board devices and PCIe add-in cards. Thisfixed address space limitation is imposed by the PC architecture and not by the BIOSitself. It is possible to exhaust the available address space when installing PCIeadd-in cards. When the address space is exhausted, Oracle ILOM displays an OptionROM Space Exhausted message, which means that one or more devices cannotload Option ROMs.
For example, if you install a SAS PCIe card, you might encounter the followingmessage in the Oracle ILOM event log:
Option ROM Space Exhausted - Device XXX Disabled
By default, all on-board Legacy Options ROMs are enabled in the BIOS. However,you can disable most of these Option ROMs, unless they are required to supportbooting from the associated device or to provide some other boot-time function. Forexample, it is not necessary to load the Option ROM for the on-board network portsunless you want to boot from one or more network ports (even then, you can disablethe Options ROMs for the remaining ports).
To minimize server boot time and reduce the likelihood of exhausting the availableOption ROM address space, disable the Option ROMs for all devices that you do notintend to boot from. Enable Option ROMs only for those devices from which youintend to boot. If Option ROMs are enabled for more than one boot device, youmight encounter an Option ROM space exhausted condition.
116 Sun Server X3-2 Administration Guide • April 2014
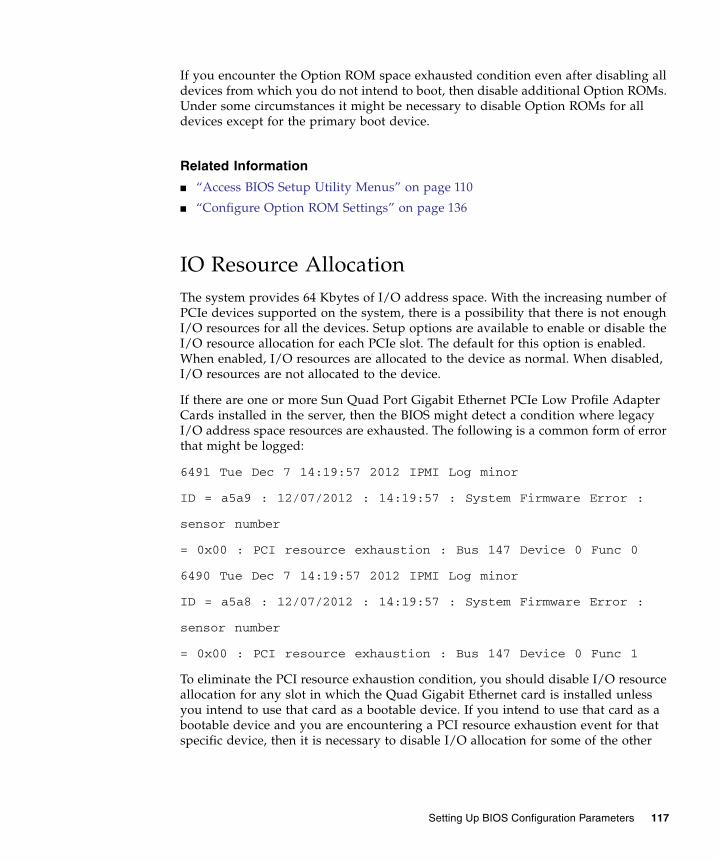
If you encounter the Option ROM space exhausted condition even after disabling alldevices from which you do not intend to boot, then disable additional Option ROMs.Under some circumstances it might be necessary to disable Option ROMs for alldevices except for the primary boot device.
Related Information
■ “Access BIOS Setup Utility Menus” on page 110
■ “Configure Option ROM Settings” on page 136
IO Resource AllocationThe system provides 64 Kbytes of I/O address space. With the increasing number ofPCIe devices supported on the system, there is a possibility that there is not enoughI/O resources for all the devices. Setup options are available to enable or disable theI/O resource allocation for each PCIe slot. The default for this option is enabled.When enabled, I/O resources are allocated to the device as normal. When disabled,I/O resources are not allocated to the device.
If there are one or more Sun Quad Port Gigabit Ethernet PCIe Low Profile AdapterCards installed in the server, then the BIOS might detect a condition where legacyI/O address space resources are exhausted. The following is a common form of errorthat might be logged:
6491 Tue Dec 7 14:19:57 2012 IPMI Log minor
ID = a5a9 : 12/07/2012 : 14:19:57 : System Firmware Error :
sensor number
= 0x00 : PCI resource exhaustion : Bus 147 Device 0 Func 0
6490 Tue Dec 7 14:19:57 2012 IPMI Log minor
ID = a5a8 : 12/07/2012 : 14:19:57 : System Firmware Error :
sensor number
= 0x00 : PCI resource exhaustion : Bus 147 Device 0 Func 1
To eliminate the PCI resource exhaustion condition, you should disable I/O resourceallocation for any slot in which the Quad Gigabit Ethernet card is installed unlessyou intend to use that card as a bootable device. If you intend to use that card as abootable device and you are encountering a PCI resource exhaustion event for thatspecific device, then it is necessary to disable I/O allocation for some of the other
Setting Up BIOS Configuration Parameters 117
card slots in the system. In general, it is safe, but not typically required, to disableI/O resource allocation for any cards not intended to be used as bootable devices,similar to the disabling of Option ROMs.
Related Information
■ “Access BIOS Setup Utility Menus” on page 110
■ “Configure IO Resource Allocation” on page 138
Common BIOS Setup Utility TasksThis section presents the procedures for some of the BIOS setup tasks that you willtypically perform when setting up and managing the server.
■ “Verify BIOS Factory Default Settings” on page 118
■ “Select Legacy BIOS or UEFI Boot Mode” on page 119
■ “Select the Boot Device” on page 121
■ “Configure iSCSI Virtual Drives” on page 122
■ “Enable or Disable Oracle System Assistant” on page 130
■ “Configure TPM Support” on page 131
■ “Configure SP Network Settings” on page 134
■ “Configure Option ROM Settings” on page 136
■ “Configure IO Resource Allocation” on page 138
■ “Exit BIOS Setup Utility” on page 138
▼ Verify BIOS Factory Default SettingsIn the BIOS Setup Utility, you can restore factory defaults, as well as view and editsettings as needed. Any changes that you make in the BIOS Setup Utility (using theF2 key) are permanent until the next time you change the settings.
Before you begin, ensure that the following requirements are met:
■ A hard disk drive or solid state drive is properly installed in the server.
■ A console connection is established to the server.
1. Reset or power on the server.
118 Sun Server X3-2 Administration Guide • April 2014

■ From the local server, press the Power button on the front panel of the server topower off the server, and then press the Power button again to power on theserver.
■ From the Oracle ILOM web interface, click Host Management > PowerControl and select Reset from the Select Action list box.
■ From the Oracle ILOM CLI on the server SP, type reset /System
The server resets.
2. When prompted, press the F2 key to access the BIOS Setup Utility.
3. To ensure that the factory defaults are set, do the following:
a. Press the F9 key to automatically load the factory default settings.
A message appears prompting you to continue this operation by selecting OKor to cancel the operation by selecting Cancel.
b. In the message, highlight OK, then press Enter.
The BIOS Setup Utility screen appears with the cursor highlighting the firstvalue on the screen.
4. Press F10 to save the changes and exit the BIOS Setup Utility.
Alternatively, you can save the changes and exit the BIOS Setup Utility bynavigating to the Save & Exit menu and selecting Save Changes and Reset.
Related Information■ “Access BIOS Setup Utility Menus” on page 110
■ “BIOS Setup Utility Menus” on page 108
■ “BIOS Key Mappings” on page 109
▼ Select Legacy BIOS or UEFI Boot ModeThe BIOS firmware supports both Legacy BIOS Boot Mode and UEFI Boot Mode. Thedefault setting is Legacy BIOS Boot Mode. Because some operating systems (OS)support both Legacy BIOS and UEFI, and some operating systems support onlyLegacy BIOS, you have the following options:
■ If the OS being installed supports only Legacy BIOS, you must ensure that theboot mode is set to Legacy BIOS before you do the OS installation.
■ If the OS being installed supports both Legacy BIOS and UEFI, you can set theboot mode to either Legacy BIOS or UEFI before you do the OS installation.
The following operating systems do not support UEFI:
■ Oracle Linux 5.x
Setting Up BIOS Configuration Parameters 119

■ Red Hat Enterprise Linux 5.x
■ Oracle VM 3.0 and 3.1
1. Access the BIOS Setup Utility menus.
See “Access BIOS Setup Utility Menus” on page 110.
2. From the BIOS Main menu screen, select Boot.
The Boot Menu screen appears.
3. From the Boot Menu screen, use the up and down arrow keys to selectUEFI/Legacy BIOS Boot Mode, then press Enter.
The UEFI/BIOS dialog appears.
Note – You cannot configure the boot device priority after switching the boot mode.A system reboot is required to properly populate the Boot Device Priority list withdevices that support the chosen boot mode.
4. Use the up and down arrow keys to select the appropriate Legacy or UEFI mode,then press Enter.
5. Press F10 to save the changes and exit the BIOS Setup Utility.
120 Sun Server X3-2 Administration Guide • April 2014

Related Information■ “BIOS Setup Utility Menus” on page 108
■ “BIOS Key Mappings” on page 109
▼ Select the Boot DeviceThe Boot Options Priority list contents depend on which BIOS mode is selected.When UEFI Boot Mode is selected, only UEFI boot candidates will be initialized anddisplayed in the Boot Options Priority list. When Legacy BIOS is selected, onlyLegacy BIOS boot candidates are initialized and displayed.
In addition to using the F2 key to view or edit the system BIOS settings, you can usethe F8 key during the BIOS startup to specify a temporary boot device. This selectedboot device is in effect only for the current system boot. The permanent boot devicespecified using the F2 key will be in effect after booting from the temporary bootdevice.
1. Reset or power on the server.
■ From the local server, press the Power button on the front panel of the server topower off the server, then press the Power button again to power on the server.
■ From the Oracle ILOM web interface, click Host Management > PowerControl and select Reset from the Select Action list box.
■ From the Oracle ILOM CLI on the server SP, type reset /System
The server resets.
2. Press the F8 key (or Ctrl+P from a serial connection) when prompted while theBIOS is running the power-on self-test (POST).
The Please Select Boot Device dialog appears.
3. In the dialog, select the boot device option according to the operating systemand BIOS mode you elected to use, then press Enter.
Use the up and down arrow keys to select the boot device. Based on the bootmode you selected (UEFI Boot Mode or Legacy BIOS Boot Mode), the Please SelectBoot Device dialog displays only the applicable devices. For example, when theUEFI Boot Mode is elected, only UEFI boot devices are displayed in the dialog.
4. Press F10 to save the changes and exit the BIOS Setup Utility.
Related Information■ “BIOS Setup Utility Menus” on page 108
■ “BIOS Key Mappings” on page 109
Setting Up BIOS Configuration Parameters 121

▼ Configure iSCSI Virtual DrivesiSCSI virtual drives are used primarily to run supported operating systems thatreside on an external server that function as the Sun Server X3-2 host operatingsystem.
iSCSI virtual drives must be configured in the iSCSI BIOS Setup Utility screens. Youmust set the iSCSI parameters on the selected port.
Before you begin:
■ You should be familiar with iSCSI theory of operation for the selected OS.
■ Refer to the OS documentation to verify that iSCSI targets can be mounted on aclient.
■ You will need access to an external iSCSI server running on any supported OS.
■ The Sun Server X3-2 must be in UEFI Boot Mode, not Legacy BIOS Boot Mode.
See “Select Legacy BIOS or UEFI Boot Mode” on page 119.
■ You must provide the following information from the iSCSI target server. Thefollowing items are entered into the iSCSI BIOS Setup Utility screens.
1. Access the BIOS Setup Utility menus.
See “Access BIOS Setup Utility Menus” on page 110.
2. In the BIOS Setup Utility menus, navigate to the UEFI Driver Control Menu.
Options displayed include iSCSI booting and all controllable devices.
Item Number Name Example
1 Target name iqn.198812.com.oracle:x4170-M3-target
Note - iSCSI requires an iqn format for this item.
2 iSCSI initiator name iqn.198812.com.oracle:002222de444e
Note - iSCSI requires an iqn format for this item.
3 Virtual device Virtual Disk 0
4 Logical Unit Number LUN 0
Additional Information:
5 IP address of iSCSIserver
192.0.2.11 (ipv4)
6 Port number 3210
122 Sun Server X3-2 Administration Guide • April 2014

Note – The selection for iSCSI will always be an option in UEFI Boot mode;however, other menu options might change depending on which cards are installedin the system.
3. Select iSCSI to access the iSCSI screen.
Setting Up BIOS Configuration Parameters 123

4. Select iSCSI Initiator Name, type the desired iSCSI Qualified Name (IQN)into the dialog box, then press Enter to accept the changes.
The IQN identifies:
■ The string “iqn”
■ A date code that specifies the year and month in which the organizationregistered the domain or subdomain name used as the naming authority string
■ The organizational naming authority string, which consists of a valid, reverseddomain or subdomain name
■ Optionally, a “:” (colon) followed by a string that the assigning organizationcan choose, which must make each assigned iSCSI name unique
The iSCSI Initiator Name must conform to the IQN naming scheme (see RFC 3271– Internet Small Computer Systems Interface (iSCSI) Naming and Discovery). Forexample: iqn.1988-2.com.oracle:000000000000
124 Sun Server X3-2 Administration Guide • April 2014

5. Press Enter to accept the changes.
6. Select the NIC port MAC address that corresponds to your chosen iSCSI boottarget, then press Enter.
For example, Port 00-21-28-E7-71-06.
The Port Configuration screen appears, and iSCSI is disabled by default.
Setting Up BIOS Configuration Parameters 125

7. Select Enable iSCSI, then press the + or - key (plus or minus key) to toggleEnable iSCSI to Enabled to enable the iSCSI port for iSCSI boot.
126 Sun Server X3-2 Administration Guide • April 2014
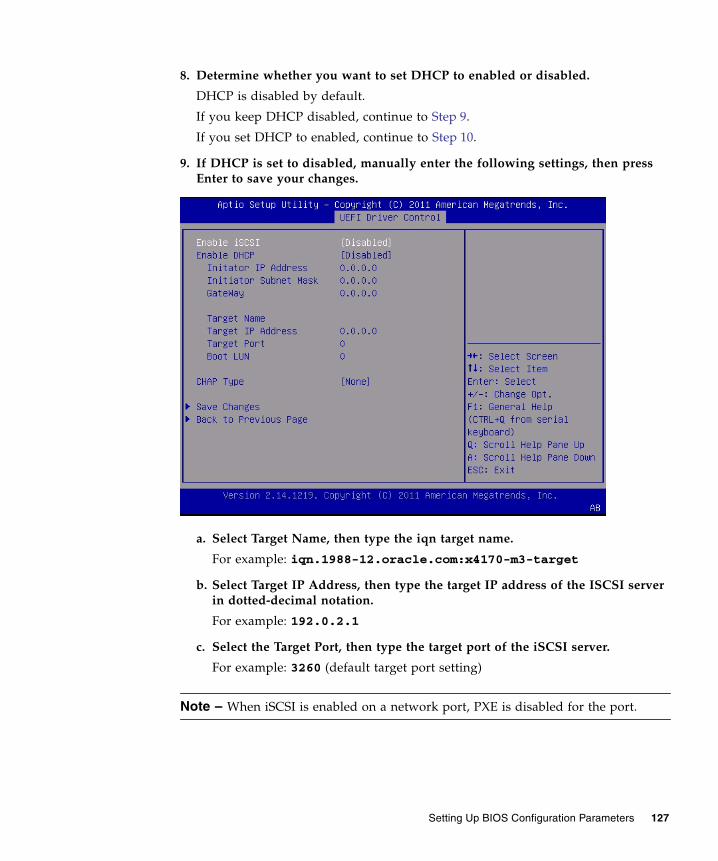
8. Determine whether you want to set DHCP to enabled or disabled.
DHCP is disabled by default.
If you keep DHCP disabled, continue to Step 9.
If you set DHCP to enabled, continue to Step 10.
9. If DHCP is set to disabled, manually enter the following settings, then pressEnter to save your changes.
a. Select Target Name, then type the iqn target name.
For example: iqn.1988-12.oracle.com:x4170-m3-target
b. Select Target IP Address, then type the target IP address of the ISCSI serverin dotted-decimal notation.
For example: 192.0.2.1
c. Select the Target Port, then type the target port of the iSCSI server.
For example: 3260 (default target port setting)
Note – When iSCSI is enabled on a network port, PXE is disabled for the port.
Setting Up BIOS Configuration Parameters 127

d. Select the Boot LUN, then type the hexadecimal representation of the logicalunit number (LUN).
For example: 0
10. To set DHCP to enabled, do the following, then press Enter to save yourchanges.
a. Select the DHCP setting, then press the + or - key (plus or minus key) tochange the setting to Enabled.
You do not need to enter the settings for the Initiator and the related fields arehidden.
b. Select the Get target info via DHCP setting, and toggle the setting toEnabled.
The Target information is retrieved from the DHCP service and the relatedfields are hidden.
11. Select a Challenge-Handshake Authentication Protocol (CHAP) Type to enablepassword security.
■ None – Default setting; CHAP disabled and not required.
■ One Way – Also known as unidirectional; required information is CHAP Nameand CHAP Secret.
■ CHAP Name – User configurable. Typically the name of the Initiator, but canbe any name. Must also be set at the target to authenticate the Initiator.
128 Sun Server X3-2 Administration Guide • April 2014

■ CHAP Secret – User configurable password. Must be set on the target andthe initiator.
■ Mutual – Also known as bidirectional; required information is CHAP Name,CHAP Secret, Reverse CHAP Name, and Reverse CHAP Secret.
■ Reverse CHAP Name – Set a CHAP name for the target as a parameter ofthe target.
■ Reverse CHAP Secret – Set a password for the target.
Note – The target must be configured to acknowledge a CHAP and the parametersused.
12. Verify that your settings match the iSCSI target server information.
13. Save the changes and exit the BIOS Setup Utilities.
See “Exit BIOS Setup Utility” on page 138.
14. Restart the server.
15. Press the F8 key (or Ctrl+P from a serial console) when prompted while theBIOS is running the power-on-self-test (POST) checkpoints.
The Please Select Boot device dialog appears.
16. Verify that the iSCSI target appears in the boot list.
Setting Up BIOS Configuration Parameters 129

17. Refer to the supported operating systems (OS) documentation for instructionson installing an OS on an iSCSI drive.
Related Information■ “Access BIOS Setup Utility Menus” on page 110
■ “Exit BIOS Setup Utility” on page 138
▼ Enable or Disable Oracle System AssistantIf you have disabled Oracle System Assistant, you can use the BIOS Setup UtilityBoot Menu to put the USB device in an online state, so that Oracle System Assistantbecomes available to the operating system.
1. Access the BIOS Setup Utility.
See “Access BIOS Setup Utility Menus” on page 110.
2. In the BIOS Setup Utility menus, navigate to the Boot Menu.
The Boot Menu screen appears.
3. Select the OSA Configuration option.
The OSA Configuration screen appears. The setting for OSA Internal Support iseither Enabled or Disabled.
130 Sun Server X3-2 Administration Guide • April 2014

4. To change the setting, use the + or - key (plus of minus), then press Enter toselect either Enabled or Disabled.
5. Press F10 to save the changes and exit the BIOS Setup Utility.
Related Information■ “BIOS Main Menu Selections” on page 142
▼ Configure TPM SupportIf you intend to use the Windows Server Trusted Platform Module (TPM) feature set,you must configure the server to support this feature.
Note – TPM enables you to administer the TPM security hardware in your server.For additional information about implementing this feature, refer to the WindowsTrusted Platform Module Management documentation provided by Microsoft.
1. Access the BIOS Setup Utility menus.
See “Access BIOS Setup Utility Menus” on page 110.
Setting Up BIOS Configuration Parameters 131

2. In the BIOS Setup Utility menus, navigate to the Advanced Menu.
The Advanced Settings screen appears.
3. In the Advanced Settings screen, select Trusted Computing.
The TPM Configuration screen appears.
4. If the TPM State is listed as Disabled, select TPM Support and press Enter.
A TPM Support dialog appears.
132 Sun Server X3-2 Administration Guide • April 2014

5. In the dialog, set TPM Support to Enable, then press Enter.
The updated TPM Configuration screen appears.
Setting Up BIOS Configuration Parameters 133

6. Press F10 to save the changes and exit the BIOS Setup Utility.
Related Information■ “BIOS Setup Utility Menus” on page 108
■ “Exit BIOS Setup Utility” on page 138
■ Microsoft’s Windows Trusted Platform Module Management documentation
▼ Configure SP Network SettingsChoose one of the following methods to specify service processor (SP) networksettings:
■ BIOS – Assign the IP address for the server SP from the BIOS Setup Utility on theAdvanced Menu.
■ Oracle ILOM – For instructions on setting the IP address for the server SP usingOracle ILOM, refer to the Oracle Integrated Lights Out Manager (ILOM) 3.1Documentation Library at:http://www.oracle.com/pls/topic/lookup?ctx=ilom31
■ Oracle System Assistant – For instructions on using Oracle System Assistant toconfigure SP network settings, see “Configure Network Settings” on page 44.
1. Access the BIOS Setup Utility menus.
See “Access BIOS Setup Utility Menus” on page 110.
2. In the BIOS Setup Utility menus, navigate to the Advanced Menu.
The Advanced Settings screen appears.
134 Sun Server X3-2 Administration Guide • April 2014

3. In the Advanced Menu, select BMC Network.
The BMC Network Configuration screen appears.
The BMC is the Baseboard Management Controller.
4. In the BMC Network Configuration screen, you can view and configure networksettings for IPv4 Assignment or IPv6 Assignment.
Setting Up BIOS Configuration Parameters 135

5. Select Refresh to display the current BMC network settings.
6. Select Commit to update the BMC network settings with the latest values.
7. Press F10 to save the changes and exit the BIOS Setup Utility.
Related Information■ “BIOS Setup Utility Menus” on page 108
■ “Exit BIOS Setup Utility” on page 138
▼ Configure Option ROM Settings1. Access the BIOS Setup Utility menus.
See “Access BIOS Setup Utility Menus” on page 110.
2. In the BIOS Setup Utility menus, navigate to the IO Menu.
The IO Menu screen appears.
136 Sun Server X3-2 Administration Guide • April 2014

3. Select the internal device or add-in card slot for which you want to enable ordisable Option ROM.
The Option ROM screen for that device or add-in card slot appears.
Setting Up BIOS Configuration Parameters 137

4. Do one of the following:
■ Select Enabled to enable the Option ROM setting.
■ Select Disabled to disable the Option ROM setting.
5. Press the F10 key to save the changes and exit the BIOS Setup Utility.
Related Information■ “Legacy Option ROM Allocation” on page 116
■ “Access BIOS Setup Utility Menus” on page 110
■ “BIOS Setup Utility Menus” on page 108
■ “Exit BIOS Setup Utility” on page 138
▼ Configure IO Resource Allocation1. Access the BIOS Setup Utility menus.
See “Access BIOS Setup Utility Menus” on page 110.
2. In the BIOS Setup Utility menus, navigate to the IO Menu.
The IO Menu screen appears.
3. Select the desired add-in card.
4. Do one of the following:
■ Select Enabled to enable I/O resource allocation for the add-in card.
■ Select Disabled to disable the I/O resource allocation for the add-in card.
5. Press F10 to save the changes and exit the BIOS Setup Utility.
Related Information■ “IO Resource Allocation” on page 117
■ “Access BIOS Setup Utility Menus” on page 110
■ “BIOS Setup Utility Menus” on page 108
■ “Exit BIOS Setup Utility” on page 138
▼ Exit BIOS Setup Utility1. Use the left and right arrow keys to navigate to the top-level Save & Exit menu.
2. Use the up and down arrow keys to select the desired action.
138 Sun Server X3-2 Administration Guide • April 2014

3. Press the Enter key to select the option.
A confirmation dialog box appears.
4. In the confirmation dialog box, select OK to proceed and exit the BIOS SetupUtility, or select Cancel to stop the exit process.
Note – After modifying any BIOS settings and selecting Save Changes and Resetfrom the Save & Exit Menu, the subsequent reboot might take longer than a typicalreboot where no settings were modified. The additional delay is required to ensurethat changes to the BIOS settings are synchronized with Oracle ILOM.
Related Information■ “Access BIOS Setup Utility Menus” on page 110
■ “BIOS Setup Utility Menus” on page 108
Setting Up BIOS Configuration Parameters 139

140 Sun Server X3-2 Administration Guide • April 2014

BIOS Setup Utility Menu Options
This section includes searchable text-based representations and on-screen images ofthe main menus in the BIOS Setup Utility for the Sun Server X3-2. Following the textand on-screen menus is a table of the options available from that menu.
The following topics are discussed.
Related Information
■ “Setting Up BIOS Configuration Parameters” on page 107
Description Links
Review the BIOS Main Menu selections. “BIOS Main Menu Selections” on page 142
Review the BIOS Advanced Menuselections.
“BIOS Advanced Menu Selections” onpage 147
Review the BIOS IO Menu selections. “BIOS IO Menu Selections” on page 158
Review the Boot Menu selections. “BIOS Boot Menu Selections” on page 162
Review the BIOS UEFI Driver ControlMenu selections.
“UEFI Driver Control Menu Selections” onpage 166
Review the BIOS Save & Exit Menuselections.
“BIOS Save & Exit Menu Selections” onpage 168
141

BIOS Main Menu SelectionsThis section includes a searchable text-based representation and an on-screen imageof the BIOS Main Menu. The options that are available from the Main Menu aredescribed in the table that follows. Options in the table that are marked as “(R/O)”are read-only information and cannot be changed.
Aptio Setup Utility - Copyright (C) 2012 American Megatrends, Inc. Main Advanced IO Boot UEFI Driver Control Save & Exit/----------------------------------------------------+-----------------------\| Project Version 18.1.6.25 |Set the Date. Use Tab || System Date [Sat 07/16/2011] |to switch between Data || System Time [19:58:46] |elements. || | || CPU Thread Count 32 | || QPI Link Speed 8.0 GT/s | || Total Memory 16 GB (DDR3) | || Current Memory Speed 1333 MHz | || USB Devices: | || 1 Drive, 1 Keyboard, 1 Mouse, 3 Hubs | || | || BMC Status Healthy | || BMC Firmware Revision 3.1.2.42 r84477 |-------------------------|| |><: Select Screen ||> Product Information |^v: Select Item ||> CPU Information |Enter: Select ||> DIMM Information |+/-: Change Opt. || |F1: General Help || |F7: Discard Changes || |F9: Optimized Defaults ||> Security Setting |F10: Save & Exit || |ESC: Exit |---------------------------------------------------+-------------------------/ Version 2.15.1229. Copyright (C) 2012 American Megatrends, Inc.
142 Sun Server X3-2 Administration Guide • April 2014

TABLE: BIOS Main Menu Options
Setup Options Options Defaults Description
Product Version (R/O) BIOS version is displayed. Thisstring is a unique identifier usedto reference a specific BIOSrelease. Format is XXYYZZPP,which decodes to:• XX - Unique project/platform
code.• YY - BIOS major release.• ZZ - BIOS minor release.• PP - Build number.Example: 18.01.04.01
System Date Current date is displayed. Youcan change the date setting.Example: [Thu 10/20/2011]
System Time Current time is displayed. Youcan change the time setting.Example: [13:38:27]
CPU Thread Count (R/O) Number of logical processorthreads is displayed.
BIOS Setup Utility Menu Options 143

QPI Link Speed (R/O) SLOW,6.4GT/s7.2GT/s8.0GT/s
Intel Quick Path Interconnect(QPI) operational speed isdisplayed.
Total Memory (R/O) Memory in gigabytes isdisplayed.Example: 16GB (DDR3)
Current Memory Speed(R/O)
Memory speed is displayed.Example: 1333 MHz
USB Devices (R/O) Detected USB devices aredisplayed.Example: 1 keyboard, 1 mouse, 3hubs
BMC Status (R/O) Displays the service processorhealth status.Example: Healthy
BMC Firmware Revision(R/O)
Displays the service processorfirmware version.Example: 3.1.00r6933
PRODUCTINFORMATION (R/O)
Product information isdisplayed.
Product Name Product name is displayed.Example: Sun Server X3-2
Product Serial Number Product serial number isdisplayed.Example: 1134FML00V
Board Serial Number Board serial number isdisplayed.Example: 0328MSL-1132U900
CPU INFORMATION(R/O)
Defines the attributes of a singleprocessor (CPU). A separateinformation structure isprovided for each processorsupported in the system. Most ofthe values are dependent on theprocessor.
TABLE: BIOS Main Menu Options (Continued)
Setup Options Options Defaults Description
144 Sun Server X3-2 Administration Guide • April 2014

Socket 0 CPU Information If CPU socket 0 is populated,displays the options listed.Otherwise, displays “NotPresent.”
Intel CPU @ 2.70 GHz Processor’s ID brand isdisplayed.
CPU Signature Processor (CPU) information isdisplayedExample: 206d5
Microcode Patch Software update (microcodepatch) information is displayed.Example: 512
Max CPU Speed Maximum non-turbo speed ofthe processor is displayed.Example: 2700 MHz
Min CPU Speed Minimum speed of the processoris displayed.Example: 1200 MHz
Processor Cores Number of available processorcores is displayed.Example: 8
Intel HT Technology Indicates whether Intel HyperThreading is supported.
Intel VT-x Technology Indicates whether IntelVirtualization Technology issupported.
L1 Data Cache Example: 32 kB x 8
L1 Code Cache Example: 32 kB x 8
L2 Cache Example: 256 kB x 8
L3 Cache Example: 20480 kB
Socket 1 CPU Information If CPU socket 1 is populated,displays the same options asSocket 0 CPU Information.Otherwise, displays “NotPresent.”
DIMM INFORMATION(R/O)
Memory module (DIMM)presence and size information isdisplayed.
TABLE: BIOS Main Menu Options (Continued)
Setup Options Options Defaults Description
BIOS Setup Utility Menu Options 145

Related Information
■ “BIOS Advanced Menu Selections” on page 147
■ “BIOS IO Menu Selections” on page 158
■ “BIOS Boot Menu Selections” on page 162
■ “UEFI Driver Control Menu Selections” on page 166
■ “BIOS Save & Exit Menu Selections” on page 168
CPU Socket 0 DIMMInformation
If DIMM is present, displaysmemory size in gigabytes.Otherwise, displays “NotPresent.”
D0...D7 Displays memory size ingigabytes. Example:Socket 0 DIMMsD0 - 4 GBD1 - 4 GBD2 - 4 GBD3 - 4 GBD4 - 2 GBD5 - 2 GBD6 - Not presentD7 - Not present
CPU Socket 1 DIMMInformation
If DIMM is present, displaysmemory size in gigabytes.Otherwise, displays “NotPresent.”
D0...D7 See previous DIMM informationexample.
SECURITY SETTING Configure the security setting.
Administrator Password Set the Administrator password.
TABLE: BIOS Main Menu Options (Continued)
Setup Options Options Defaults Description
146 Sun Server X3-2 Administration Guide • April 2014

BIOS Advanced Menu SelectionsThis section includes a searchable text-based representation and an on-screen imageof the BIOS Advanced Menu. The options that are available from the AdvancedMenu are described in the table that follows. Options in the table that are marked as“(R/O)” are read-only information and cannot be changed.
Aptio Setup Utility - Copyright (C) 2012 American Megatrends, Inc. Main Advanced IO Boot UEFI Driver Control Save & Exit/----------------------------------------------------+-----------------------\|> Processors |CPU Configuration ||> USB Ports |Parameters ||> Serial Port Console Redirection | ||> Trusted Computing | ||> Network Stack | ||> UEFI Configuration Synchronization | ||> BMC Network | || | || | || |-------------------------|| |><: Select Screen || |^v: Select Item || |Enter: Select || |+/-: Change Opt. || |F1: General Help || |F7: Discard Changes || |F9: Optimized Defaults || |F10: Save & Exit || |ESC: Exit |---------------------------------------------------+-------------------------/ Version 2.14.1219. Copyright (C) 2011 American Megatrends, Inc.
BIOS Setup Utility Menu Options 147

TABLE: BIOS Advanced Menu Options
Setup Options Options Defaults Description
PROCESSORS Enable or disable processor(CPU) features.
Hyper-threading Disabled/Enabled Enabled When enabled, two threads areavailable per enabled core. Whendisabled, only one thread perenabled core is available.
Execute Disable Bit Disabled/Enabled Enabled When enabled, execute disablebit can prevent certain classes ofmalicious buffer overflow attackswhen combined with asupporting OS (for example,Windows Server 2003 SP1,Windows XP SP2, SUSE Linux9.2, Red Hat Enterprise Linux 3Update 3).
Hardware Prefetcher Disabled/Enabled Enabled Enable the mid-level cache (L2)streamer prefetcher.
Adjacent Cache LinePrefetcher
Disabled/Enabled Enabled Enable the mid-level cache (L2)prefetching of adjacent cachelines.
148 Sun Server X3-2 Administration Guide • April 2014

DCU Streamer Prefetcher Disabled/Enabled Enabled Enable prefetch of next L1 dataline based on multiple loads insame cache line.
DCP IP Prefetcher Disabled/Enabled Enabled Enable prefetch of next L1 linebased on sequential load history.
Intel VirtualizationTechnology
Disabled/Enabled Enabled When enabled, a Virtual MachineManager (VMM) can utilize theadditional hardware capabilitiesprovided by Intel VanderpoolTechnology.
CPU Power ManagementConfiguration
Displays processor (CPU)information. BIOS providesC-states, P-states, and T-statessupport in order for the OS tomanage the power utilization ofthe system. Power managementis also controlled by the serviceprocessor based on systempolicies.
Power Technology Disabled/EnabledEfficient/Custom
Efficient Enable the power managementfeatures. The following optionsare not displayed if PowerTechnology is set to Disabled.
Intel SpeedStep Disabled/Enabled Enabled Displays only if PowerTechnology is set to Custom.Enable or disable IntelSpeedStep. The Intel technologyused to support P-statetransitions is referred to as IntelSpeedStep.
Turbo Mode Disabled/Enabled Enabled Displays only if PowerTechnology is set to Custom andIntel SpeedStep is set to enabledand Turbo Mode is supported inthe CPU. Enable or disable TurboMode.
CPU C3 Report Disabled/Enabled Disabled Displays only if PowerTechnology is set to Custom andpower state (C3) is supported inthe CPU. Enable or disable CPUC3 (ACPI C2) report to operatingsystem.
TABLE: BIOS Advanced Menu Options (Continued)
Setup Options Options Defaults Description
BIOS Setup Utility Menu Options 149

CPU C6 Report Disabled/Enabled Enabled Displays only if PowerTechnology is set to Custom andpower state (C6) is supported inthe CPU. Enable or disable CPUC6 (ACPI C3) report to operatingsystem.
CPU C7 Report Disabled/Enabled Enabled Displays only if PowerTechnology is set to Custom andpower state (C7) is supported inthe CPU. Enable or disable CPUC7 (ACPI C3) report to operatingsystem.
Package C-States Disabled/Enabled Enabled Displays only if PowerTechnology is set to Custom. Thepower state control is referred toas C-State. Enable or disable thePackage C-State limit.
Energy Performance PerformanceBalancedPerformanceBalanced EnergyEnergy Efficient
BalancedPerformance
Optimize between performanceand power savings. Windows2008 and later operating systemsoverride this value according toits power plan.
USB PORTS Set USB port configurationparameters.
EHCI Hand-off Disabled/Enabled Disabled Enable or disable Enhanced HostController Interface (EHCI)hand-off support.
Port 60/64 Emulation Disabled/Enabled Enabled Enable I/O port 60h/64hemulation support. Enable thissetting for the complete USBkeyboard legacy support fornon-USB aware operatingsystems.
All USB Devices Disabled/Enabled Enabled Enable or disable all USBdevices.
Rear Port 0 Disabled/Enabled Enabled Enable or disable USB Port 0.
Rear Port 1 Disabled/Enabled Enabled Enable or disable USB Port 1.
Front Port 0 Disabled/Enabled Enabled Enable or disable USB Port 2.
Front Port 1 Disabled/Enabled Enabled Enable or disable USB Port 3.
Internal Port 0 Disabled/Enabled Enabled Enable or disable USB Port 4.
TABLE: BIOS Advanced Menu Options (Continued)
Setup Options Options Defaults Description
150 Sun Server X3-2 Administration Guide • April 2014

Internal Port 1 Disabled/Enabled Enabled Enable or disable USB Port 9.
SERIAL PORT CONSOLEREDIRECTION
Provides the capability toredirect console output/input tothe serial port. Graphic output isnot redirected. BIOS serialconsole redirection lets youmonitor BIOS POST messagesand navigate the BIOS Setupmenus and Option ROMs from aterminal connected to the serverusing a serial connection.
External Serial Port System/BMC System Control whether the externalserial port connects to theBaseboard ManagementController (BMC) or directly tothe system. Set to BMC for seriallink management.
EMS Console Redirection Disabled/Enabled Disabled Enable or disable consoleredirection for WindowsEmergency Management Service(EMS) administration.
Console Redirection Disabled/Enabled Enabled Enable or disable consoleredirection.
Terminal Type VT100VT100+VT-UTF8ANSI
VT100+ Select the emulation for theterminal:• VT100: ASCII character set.• VT100+: Extends VT100 to
support color, function keys,etc.
• VT-UTF8: Uses UTF8 encodingto map Unicode charactersonto one or more bytes.
• ANSI: Extended ASCIIcharacter set.
Bits per Second 96001020057600115200
9600 Select the serial porttransmission speed. The speedmust be matched on theconnecting serial device. Long ornoisy lines require lower speeds.
Data Bits 07/08/11 8 Select the data bits.
TABLE: BIOS Advanced Menu Options (Continued)
Setup Options Options Defaults Description
BIOS Setup Utility Menu Options 151

Parity NoneEvenOddMarkSpace
None A parity bit can be sent with thedata bits to detect sometransmission errors.• None: No parity bits are sent.• Even: Parity bit is 0 if the
number of 1’s in the data bitsis even.
• Odd: Parity bit is 0 if thenumber of 1’s in the data bitsis odd.
• Mark: Parity bit is always 1.• Space: Parity bit is always 0.Mark and Space parity do notallow for error detection. Theycan be used as an additional databit.
Stop Bits 01/02/11 1 Stop bits indicate the end of aserial data packet. (A start bitindicates the beginning of aserial packet.) The standardsetting is 1 stop bit.Communication with slowdevices may require more than 1stop bit.
Flow Control None/HardwareRTS/CTS
None Flow control can prevent dataloss from buffer overflow. Whensending data, if the receivingbuffers are full, a “stop” signalcan be sent to stop the data flow.Once the buffers are empty, a“start” signal can be sent torestart the flow. Hardware flowcontrol uses two wires to sendstart and stop signals.
TRUSTED COMPUTING If you intend to use the WindowsServer Trusted Platform Module(TPM) feature set, you mustconfigure the server to supportTPM. The TPM feature is usedby the OS for proof that BIOScode has not been tamperedwith.
TABLE: BIOS Advanced Menu Options (Continued)
Setup Options Options Defaults Description
152 Sun Server X3-2 Administration Guide • April 2014

TPM Support Disabled/Enabled Enabled Enable or disable TPM support.Only UEFI BIOS implements thissetup option. If disabled, the OSwill not show TPM. Reset of theplatform is required.
TPM State Disabled/Enabled Disabled Displays if TPM Support isenabled.
Current TPM StatusInformation (R/O)
If TPM Support is disabled,Current TPM Status displays“TPM SUPPORT OFF.”If TPM Support is enabled,Current TPM Status displays:• TPM Enabled Status:• TPM Active Status:• TPM Owner Status:
NETWORK STACK Configure network stacksettings.
Network Stack Disabled/Enabled Enabled Enable or disable the networkstack (PXE and UEFI).
IPv4 PXE Support Disabled/Enabled Enabled Enabled or disable IPv4 PXEboot support.
IPv6 PXE Support Disabled/Enabled Disabled Enabled or disable IPv6 PXEboot support.
UEFI CONFIGURATIONSYNCHRONIZATION
Change the BIOS configurationsynchronization setting.
Synchronization Late Disabled/Enabled Enabled If Synchronization Late isenabled, the BIOS configurationstored in Oracle ILOM isupdated before BIOS passescontrol to the host OS or afterexiting the BIOS menu.
BMC NETWORK Configure BaseboardManagement Controller (BMC)network parameters.
BMC Network: CurrentActive Management Port(R/O)
Active management port settingsare displayed.
TABLE: BIOS Advanced Menu Options (Continued)
Setup Options Options Defaults Description
BIOS Setup Utility Menu Options 153

Refresh Refresh current BMC networkinformation with the latestinformation from the serviceprocessor.
Active Management Port NETMGTNET0NET1NET2NET3
Change the management portthat is currently active.
Commit Commit the current BMCnetwork information.
IPv4 Configuration (R/O) Current configuration of the IPv4settings is displayed.
Channel Number (R/O) 1 Current channel number isdisplayed.
IPv4 Assignment Static/Dynamic Static View whether the serviceprocessor is assigned a staticIPv4 address or assigned adynamic IPv4 address usingDynamic Host Control Protocol(DHCP).
Current IPv4 Address inBMC (R/O)
Current IPv4 address of theservice processor is displayed.Example: 192.0.2.86
Current IPv4 MACAddress in BMC (R/O)
Current IPv4 MAC address forthe service processor isdisplayed.Example: 00:12:46:BE:0A:02
Current IPv4 Subnet Maskin BMC (R/O)
Current IPv4 subnet maskaddress for the service processoris displayed.Example: 255.255.255.0
Refresh Select Refresh to update to thecurrent settings.
IPv4 Address If IPv4 Assignment is set toStatic, set the IPv4 address forthe service processor.Example: 192.0.2.86
TABLE: BIOS Advanced Menu Options (Continued)
Setup Options Options Defaults Description
154 Sun Server X3-2 Administration Guide • April 2014

IPv4 Subnet Mask If the IPv4 Assignment is set toStatic, set the IPv4 subnet mask.Example: 255.255.255.0
IPv4 Default Gateway If the IP Assignment is set toStatic, set the IPv4 defaultgatewayExample: 192.0.2.254
Commit Commit the IPv4 configurationsettings.
IPv6 Configuration (R/O) Current configuration of the IPv6settings is displayed.IPv6 addresses are written withhexadecimal digits and colonseparators. For example:2001:db8:000:82a1:0000:0000:1234:abcd. IPv6 addresses arecomposed of two parts: a 64-bitsubnet prefix and a 64-bit hostinterface ID. To shorten the IPv6address, you can (1) omit allleading zeros, and (2) replaceone consecutive group of zeroswith a double colon (::). Forexample:2001:db8:0:82a1::1234:abcd
Channel Number (R/O) 1 Current channel number isdisplayed.
Current IPv6 State (R/O) Current IPv6 state is displayed.
Current IPv6 AutoConfiguration (R/O)
Current IPv6 autoconfigurationparameters are displayed.
Link Local IPv6 Address(R/O)
Current link local IPv6 address isdisplayed.Example:fe80::214:4fff:feca:5f7e/64
Static IPv6 Address (R/O) Current static IPv6 address isdisplayed.Example:2001:db8:000:82a1:0000:0000:1234:abcd
TABLE: BIOS Advanced Menu Options (Continued)
Setup Options Options Defaults Description
BIOS Setup Utility Menu Options 155
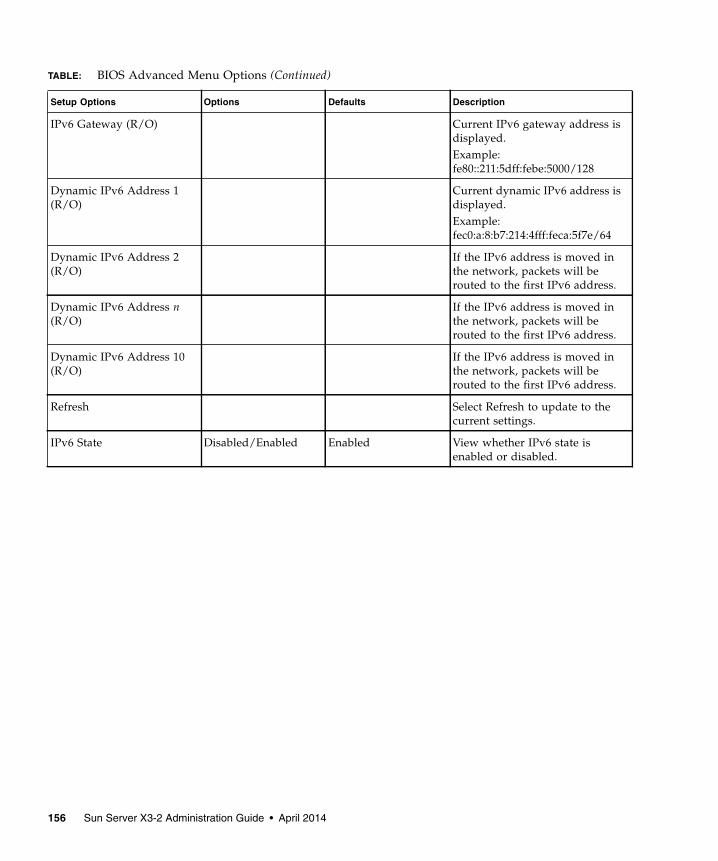
IPv6 Gateway (R/O) Current IPv6 gateway address isdisplayed.Example:fe80::211:5dff:febe:5000/128
Dynamic IPv6 Address 1(R/O)
Current dynamic IPv6 address isdisplayed.Example:fec0:a:8:b7:214:4fff:feca:5f7e/64
Dynamic IPv6 Address 2(R/O)
If the IPv6 address is moved inthe network, packets will berouted to the first IPv6 address.
Dynamic IPv6 Address n(R/O)
If the IPv6 address is moved inthe network, packets will berouted to the first IPv6 address.
Dynamic IPv6 Address 10(R/O)
If the IPv6 address is moved inthe network, packets will berouted to the first IPv6 address.
Refresh Select Refresh to update to thecurrent settings.
IPv6 State Disabled/Enabled Enabled View whether IPv6 state isenabled or disabled.
TABLE: BIOS Advanced Menu Options (Continued)
Setup Options Options Defaults Description
156 Sun Server X3-2 Administration Guide • April 2014

Related Information
■ “BIOS Main Menu Selections” on page 142
■ “BIOS IO Menu Selections” on page 158
■ “BIOS Boot Menu Selections” on page 162
■ “UEFI Driver Control Menu Selections” on page 166
■ “BIOS Save & Exit Menu Selections” on page 168
Auto IPv6 Configuration DisabledStatelessDhcpv6_statelessDhcpv6_stateful
Stateless Autoconfiguration options are:• Disabled: When
autoconfiguration is disabled,only the Link Local address isset. None of theautoconfiguration options toconfigure an IPv6 address arerun.
• Stateless: When enabled, theIPv6 Statelessautoconfiguration is run tolearn the IPv6 addresses forthe device.
• Dhcpv6_stateless: Whenenabled, the Dhcpv6_statelessautoconfiguration is run tolearn the DNS and domaininformation for the device.
• Dhcpv6_stateful: Whenenabled, the Dhcpv6_statefulautoconfiguration is run tolearn the IP addresses andDNS information for thedevice.
Static IPv6 Address Set the static IPv6 address.Example:2001:db8:000.82a1:0000:0000:1234:abcd
Commit Commit the IPv6 configurationsettings.
TABLE: BIOS Advanced Menu Options (Continued)
Setup Options Options Defaults Description
BIOS Setup Utility Menu Options 157

BIOS IO Menu SelectionsThis section includes a searchable text-based representation and an on-screen imageof the BIOS IO Menu. The options that are available from the IO Menu are describedin the table that follows.
Note – NET 2, NET 3 and Slot 1 are nonfunctional in single-processor systems.
Aptio Setup Utility - Copyright (C) 2012 American Megatrends, Inc. Main Advanced IO Boot UEFI Driver Control Save & Exit/----------------------------------------------------+-----------------------\|> PCI Subsystem Settings |PCI, PCI-X and PCI ||> IO Virtualization |Express Settings. ||> IOAT | || | || Internal Devices | ||> NET0/1 | ||> NET2/3 | || | || Add-In Cards | ||> Slot 1 |-------------------------||> Slot 2 |><: Select Screen ||> Slot 3 |^v: Select Item ||> Slot Internal |Enter: Select || |+/-: Change Opt. || |F1: General Help || |F7: Discard Changes || |F9: Optimized Defaults || |F10: Save & Exit || |ESC: Exit |---------------------------------------------------+-------------------------/ Version 2.15.1229. Copyright (C) 2012 American Megatrends, Inc.
158 Sun Server X3-2 Administration Guide • April 2014

Note – NET 2, NET 3, and Slot 1 are nonfunctional in single-processor systems.
TABLE: BIOS IO Menu Options
Setup Options Options Defaults Description
PCI SUBSYSTEMSETTINGS
Configure PCI, PCI-X and PCIExpress settings.
PCI 64 Bit ResourcesAllocation
Disabled/Enabled Enabled Enable or disable 64-bit capabledevices to be decoded in above4G address space. This setting isavailable only if system supports64-bit decoding.
IO VIRTUALIZATION Configure single root I/Ovirtualization settings.
VT-d Disabled/Enabled Enabled Enable or disable IntelVirtualization Technology (VT-d)for directed I/O. If enabled,ensures improved isolation ofI/O resources for greaterreliability, security, andavailability.
BIOS Setup Utility Menu Options 159

SR-IOV Disabled/Enabled Enabled Single Root I/O Virtualization(SR-IOV) is used to configuredevices into multiple virtualdevices that can be used onvirtual OS installation. Ifsupported by hardware and setto enabled, all devices within thesystem that are SR-IOV capablewill be configured to supportSR-IOV and I/O resources areallocated to the device as normal.If set to disabled, I/O resourcesare not allocated to the device.
ARI Disabled/Enabled Disabled If Alternate Routing ID (ARI) issupported by hardware and setto enabled, devices are permittedto locate virtual functions (VFs)in function numbers 8 to 255 ofthe captured bus number,instead of normal functionnumbers 0 to 7.
I/OAT Configure settings for the IntelI/O Acceleration Technology(I/OAT).
Intel I/OAT Disabled/Enabled Enabled Enable or disable Intel I/OAT.
DCA Support Disabled/Enabled Enabled Enable or disable direct cacheaccess (DCA) support.
INTERNAL DEVICES Configure settings for theembedded network controller.
NET 0/1 OpROM Enable Disabled/Enabled Enabled Enable or disable Option ROM.If set to enabled, Option ROMfor the card executes as normal.If set to disabled, Option ROMfor the card is not copied intomemory and the execution of theOption ROM is inhibited.
NET 2/3 OpROM Enable(Nonfunctional insingle-processor systems.)
Disabled/Enabled Enabled Enable or disable Option ROM.If set to enabled, Option ROMfor the card executes as normal.If set to disabled, Option ROMfor the card is not copied intomemory and the execution of theOption ROM is inhibited.
TABLE: BIOS IO Menu Options (Continued)
Setup Options Options Defaults Description
160 Sun Server X3-2 Administration Guide • April 2014

Related Information
■ “BIOS Main Menu Selections” on page 142
■ “BIOS Advanced Menu Selections” on page 147
■ “BIOS Boot Menu Selections” on page 162
■ “UEFI Driver Control Menu Selections” on page 166
■ “BIOS Save & Exit Menu Selections” on page 168
ADD-IN CARDS Enable or disable the add-incards.
Slot 1(Nonfunctional insingle-processor systems.)
IO Enable Disabled/Enabled Enabled Enable or disable I/O for theadd-in card.
OpROM Enable Disable/Enable Enabled Enable or disable Option ROM.
Slot 2
IO Enable Disabled/Enabled Enabled Enable or disable I/O for theadd-in card.
OpROM Enable Disable/Enable Enabled Enable or disable Option ROM.
Slot 3
IO Enable Disabled/Enabled Enabled Enable or disable I/O for theadd-in card.
OpROM Enable Disable/Enable Enabled Enable or disable Option ROM.
Slot Internal Disabled/enabled Enabled
IO Enable Disabled/Enabled Enabled Enable or disable the I/O for theadd-in card.
OpROM Enable Disable/Enable Enabled Enable or disable Option ROM.
TABLE: BIOS IO Menu Options (Continued)
Setup Options Options Defaults Description
BIOS Setup Utility Menu Options 161

BIOS Boot Menu SelectionsThis section includes a searchable text-based representation and an on-screen imageof the BIOS Boot Menu. The options that are available from the Boot Menu aredescribed in the table that follows.
Aptio Setup Utility - Copyright (C) 2011 American Megatrends, Inc. Main Advanced IO Boot UEFI Driver Control Save & Exit/----------------------------------------------------+-----------------------\| UEFI/BIOS Boot Mode [Legacy BIOS] |UEFI: Only UEFI Boot || |options are initialized || Retry Boot List [Disabled] |and present to user. || Network Boot Retry [Enabled] |Legacy BIOS: Only ||> OSA Configuration |legacy boot options are || |initialized and present || Boot Option Priority |to user. || [PXE:NET0:IBA XE Slot 4000 v2193] | || [PXE:NET1:IBA XE Slot 4001 v2193] | || [PXE:NET2:IBA XE Slot 8800 v2193] |-------------------------|| [PXE:NET3:IBA XE Slot 8801 v2193] |><: Select Screen || |^v: Select Item || |Enter: Select || |+/-: Change Opt. || |F1: General Help || |F7: Discard Changes || |F9: Optimized Defaults || |F10: Save & Exit || |ESC: Exit |---------------------------------------------------+-------------------------/ Version 2.14.1219. Copyright (C) 2011 American Megatrends, Inc.
162 Sun Server X3-2 Administration Guide • April 2014

BIOS Setup Utility Menu Options 163

TABLE: BIOS Boot Menu Options
Setup Options Options Defaults Description
UEFI/BIOS Boot Mode Legacy BIOS/UEFI Legacy BIOS Select either Legacy BIOS orUEFI as the boot mode.• Enable UEFI: Only UEFI boot
options are initialized andpresent to user.
• Enable Legacy BIOS: OnlyLegacy BIOS boot options areinitialized and present to user.
Retry Boot List Disabled/Enabled Enabled If enabled, BIOS automaticallyretries to boot from the top of theBoot Priority List when alldevices have been attempted andfailed.
Network Boot Retry Disabled/Enabled Enabled If enabled, BIOS automaticallyretries the PXE list present in thesystem when all PXE attemptshave failed. If set to disabled, thesystem halts and displays theerror message “Network BootFailed” when all PXE bootsfailed. If set to Boot List, fail overto the main Boot Option Prioritylist.
164 Sun Server X3-2 Administration Guide • April 2014

Related Information
■ “BIOS Main Menu Selections” on page 142
■ “BIOS Advanced Menu Selections” on page 147
■ “BIOS IO Menu Selections” on page 158
■ “UEFI Driver Control Menu Selections” on page 166
■ “BIOS Save & Exit Menu Selections” on page 168
OSA Configuration Configure whether the operatingsystem recognizes Oracle SystemAssistant at boot.
OSA Internal Support Disabled/Enabled Enabled Enable or disable internal USBport for Oracle System Assistantboot. If enabled, the OracleSystem Assistant media isrecognized by the system. Ifdisabled, the Oracle SystemAssistant media will not be seenby the system.
Boot Option Priority Set the system boot order.Example:[PXE:NET0:IBA XESlot 2000v2193][PXE:NET0:IBA XESlot 2001v2193][PXE:NET0:IBA XESlot 8800v2193][PXE:NET0:IBA XESlot 8801v2193][Disabled]
TABLE: BIOS Boot Menu Options (Continued)
Setup Options Options Defaults Description
BIOS Setup Utility Menu Options 165

UEFI Driver Control Menu SelectionsThis section includes a searchable text-based representation and an on-screen imageof the UEFI Driver Control Menu. The options that are available from the UEFIDriver Control Menu are described in the table that follows.
Aptio Setup Utility - Copyright (C) 2011 American Megatrends, Inc. Main Advanced IO Boot UEFI Driver Control Save & Exit/----------------------------------------------------+-----------------------\| iSCSI - ***************************************** |Configure the iSCSI || Intel(R) Ethernet Controller 10 Gigabit X - |parameters || 00:21:28:E7:74:CC || Intel(R) Ethernet Controller 10 Gigabit X - || 00:21:28:E7:74:CD | || LSI SAS2 MPT Controller SAS2008 | || (PCIDevId:0x72, PCIVendorId:0x1000, | || PCIBus:0x50, PCIDevice:0x0, PCIFunc:0x0, | || PCISlot:0x4) | || Intel(R) Ethernet Controller 10 Gigabit X - | || 00:21:28:E7:74:CE |-------------------------|| Intel(R) Ethernet Controller 10 Gigabit X - |><: Select Screen || 00:21:28:E7:74:CF |^v: Select Item || |Enter: Select || |+/-: Change Opt. || |F1: General Help || |F7: Discard Changes || |F9: Optimized Defaults || |F10: Save & Exit || |ESC: Exit |---------------------------------------------------+-------------------------/ Version 2.14.1219. Copyright (C) 2011 American Megatrends, Inc.
166 Sun Server X3-2 Administration Guide • April 2014

TABLE: BIOS UEFI Driver Control Menu Options
Setup Options Options Default Description
iSCSI Select to configure the iSCSIparameters. Only available inUEFI mode.
Controller Management Select to manage controllerproperties, to create or clearcontroller configurations, and tosave or clear controller events.
View Controller Properties Select to view controllerproperties.
Change ControllerProperties
Select to change controllerproperties.
Save Controller Events Select to save controller events.
Port Configuration Menu Port configuration information isdisplayed.
NIC Configuration Select to view the networkdevice port setting.
FCoE Configuration Select to view the Fibre Channelover Ethernet port setting.
BIOS Setup Utility Menu Options 167

Related Information
■ “BIOS Main Menu Selections” on page 142
■ “BIOS Advanced Menu Selections” on page 147
■ “BIOS IO Menu Selections” on page 158
■ “BIOS Boot Menu Selections” on page 162
■ “BIOS Save & Exit Menu Selections” on page 168
BIOS Save & Exit Menu SelectionsThis section includes a searchable text-based representation and an on-screen imageof the BIOS Save & Exit Menu. The options that are available from the Save & ExitMenu are described in the table that follows.
Aptio Setup Utility - Copyright (C) 2011 American Megatrends, Inc. Main Advanced IO Boot UEFI Driver Control Save & Exit/----------------------------------------------------+-----------------------\| Save Changes and Reset |Reset the system after || Discard Changes and Exit |saving the changes. || Discard Changes | || Restore Defaults | || | || | || | || | || | || |-------------------------|| |><: Select Screen || |^v: Select Item || |Enter: Select || |+/-: Change Opt. || |F1: General Help || |F7: Discard Changes || |F9: Optimized Defaults || |F10: Save & Exit || |ESC: Exit |---------------------------------------------------+-------------------------/ Version 2.14.1219. Copyright (C) 2011 American Megatrends, Inc.
168 Sun Server X3-2 Administration Guide • April 2014

Related Information
■ “BIOS Main Menu Selections” on page 142
■ “BIOS Advanced Menu Selections” on page 147
■ “BIOS IO Menu Selections” on page 158
■ “BIOS Boot Menu Selections” on page 162
■ “UEFI Driver Control Menu Selections” on page 166
TABLE: BIOS Save & Exit Menu Options
Setup Options Description
Save Changes and Reset Save changes and then reset the system.
Discard Changes and Exit Exit the BIOS Setup Utility without saving anychanges.
Discard Changes Discard changes made to the setup options so far.
Restore Defaults Restore and load all default setup options for BIOS.
BIOS Setup Utility Menu Options 169

170 Sun Server X3-2 Administration Guide • April 2014

Monitoring Components andIdentifying SNMP Messages
This section includes information about monitoring components and identifyingSNMP messages for the Sun Server X3-2.
The following topics are discussed.
Related Information
■ Oracle Integrated Lights Out Manager (ILOM) 3.1 Documentation Library at:http://www.oracle.com/pls/topic/lookup?ctx=ilom31
Monitoring Component Health andFaults Using Oracle ILOMOracle ILOM 3.1 interfaces provide easy-to-view access to information about thehealth status of system components. From the web interface or the Oracle ILOM/System target, you can collect system-specific information about the server,determine the health state of discrete components, and view open problems, ifdetected on the server. Oracle ILOM automatically detects system hardware faultsand environmental conditions on the server. If a problem occurs on the server, OracleILOM will automatically do the following:
Description Links
Review how Oracle ILOM monitorscomponent health and faults.
“Monitoring Component Health and FaultsUsing Oracle ILOM” on page 171
Review information about systemcomponents and nomenclature.
“Monitoring System Components” onpage 172
Review SNMP traps generated by theserver.
“Identifying SNMP Trap Messages” onpage 183
171

■ Illuminate the Service Action Required LED indicator on the server front and backpanels.
■ Identify the faulted component in the Open Problems table.
■ Record system information about the faulted component or condition in the eventlog.
For further information about administering open problems that are detected andreported by Oracle ILOM, refer to “Administering Open Problems” in the OracleILOM 3.1 User’s Guide.
Related Information
■ Oracle Integrated Lights Out Manager (ILOM) 3.1 Documentation Collection at:http://www.oracle.com/pls/topic/lookup?ctx=ilom31
Monitoring System ComponentsThe tables in this section identify the system components and describe the namingconventions applied to the components of the Sun Server X3-2.
Each section corresponds to an IPMI entity ID and lists sensors, indicators, andfield-replaceable units (FRUs) related to that entity. The tables contain the followingfields:
■ Component Name – The user-visible component name used in managementinterfaces to refer to a specific sensor, indicator, or FRU. The IPMI name is ashortened form of the component name, and is indicated by the boldface portionof the component name.
■ IPMI Type – Indicates the type of sensor, indicator, or FRU represented.
■ Description – Textual description of this particular component name reference.
■ Values – Defines the states of the sensor, indicator or FRU entity, and any specificunits or values that are expected, if applicable.
Some component names are hidden from the Oracle ILOM user interfaces. Thesenames are marked as hidden in the tables.
This section includes information for the following server components:
■ “System Chassis Components” on page 173
■ “Cooling Unit Components” on page 175
■ “Disk Backplane Components” on page 176
■ “Memory Device Components” on page 176
172 Sun Server X3-2 Administration Guide • April 2014

■ “Power Unit Components” on page 177
■ “Processor Components” on page 178
■ “System Board Components” on page 179
■ “System Firmware Components” on page 181
■ “Hard Disk Drive Components” on page 181
System Chassis ComponentsThe following table lists the system chassis components.
Component Name(Oracle ILOM CLITargets) IPMI Type Description
Values(if applicable)
/SYS FRU General host FRU
/SYS/UUID FRU Unique system ID Derived from host MACaddress. Use for PXE bootand licensing.
/SYS/ACPI Statesensor
Precondition for sensorsthat need to know if thehost is on
(hidden)01h-ACPI_ON_WORKING20h-ACPI_SOFT_OFF
/SYS/PWRBS Discretesensor
Power budget status 01h-DEASSERTED02h-ASSERTED
/SYS/VPS Thresholdsensor
Virtual power sensor Watts
/SYS/VPS_CPUS Thresholdsensor
Virtual power sensor(CPUs)
Watts
/SYS/VPS_MEMORY
Thresholdsensor
Virtual power sensor(Memory)
Watts
/SYS/VPS_FANS Thresholdsensor
Virtual power sensor(Fans)
Watts
/SYS/INTSW Discretesensor
Chassis intrusion switch 01h-DEASSERTED02h-ASSERTED
/SYS/T_AMB Thresholdsensor
System ambienttemperature
Degrees C
/SYS/TEMP_FAULT
Indicator Temperature Fault LED Color: AmberLocation: MainboardOff: NormalOn: Chassis overtemp fault
Monitoring Components and Identifying SNMP Messages 173

Related Information
■ “Cooling Unit Components” on page 175
■ “Disk Backplane Components” on page 176
■ “Memory Device Components” on page 176
■ “Power Unit Components” on page 177
■ “Processor Components” on page 178
/SYS/OK Indicator OK LED Color: GreenLocation: Front panelOff: Power is off.Fast blink: SP is booting.Slow blink: Host is in BIOS.On: Host is booting OS.
/SYS/SERVICE Indicator Service LED Color: AmberLocation: Front panelOff: Server is OK.On: Server requires service.
/SYS/LOCATE Indicator Locate LED Color: WhiteLocation: Front and rearpanelsOff: NormalFast blink: Locate functionis activated.Self-extinguishes after 30minutes.
/SYS/HOST_ERR Discretesensor
Writable digital, OEMreserved sensor type,per IPMI
0x02: asserts SYS/SERVICE0x01: deassertsSYS/SERVICE
/SYS/PS_FAULT Indicator Power Supply ServiceLED
Color: AmberLocation: MainboardOff: NormalOn: General power supplyfault
/SYS/FAN_FAULT Indicator Top Fan Fault LED Color: AmberLocation: MainboardOff: NormalOn: General fan fault
Component Name(Oracle ILOM CLITargets) IPMI Type Description
Values(if applicable)
174 Sun Server X3-2 Administration Guide • April 2014

■ “System Board Components” on page 179
■ “System Firmware Components” on page 181
■ “Hard Disk Drive Components” on page 181
Cooling Unit ComponentsThe system has 1.57-inch (40-mm) fan modules with two fans in each module. Thefollowing table lists the system cooling unit components.
Related Information
■ “System Chassis Components” on page 173
■ “Disk Backplane Components” on page 176
■ “Memory Device Components” on page 176
■ “Power Unit Components” on page 177
■ “Processor Components” on page 178
■ “System Board Components” on page 179
■ “System Firmware Components” on page 181
■ “Hard Disk Drive Components” on page 181
Component Name (OracleILOM CLI Targets) IPMI Type Description
Values(if applicable)
/SYS/MB/FM[0-3] FRU Fan module FRU
/SYS/MB/FM[0-3]/PRSNT Discretesensor
Fan module ispresent.
01h-ENTITY_PRESENT,02h-ENTITY_ABSENT
/SYS/MB/FM[0-3]/F[0-1]/TACH
Thresholdsensor
Fan module fanspeed
RPM
/SYS/MB/FM[0-3]/SERVICE
Indicator
Fan Module FaultLED
Color: AmberLocation: MainboardOff: NormalOn: Fan module wasdiagnosed as faulty.
/SYS/MB/FM[0-3]/OK Indicator
Fan Module OK LED Color: GreenLocation: MainboardOn: NormalOff: Fan module is offline.
Monitoring Components and Identifying SNMP Messages 175

Disk Backplane ComponentsThe following table lists the disk backplane (DBP) components.
Related Information
■ “System Chassis Components” on page 173
■ “Cooling Unit Components” on page 175
■ “Memory Device Components” on page 176
■ “Power Unit Components” on page 177
■ “Processor Components” on page 178
■ “System Board Components” on page 179
■ “System Firmware Components” on page 181
■ “Hard Disk Drive Components” on page 181
Memory Device ComponentsThe following table lists the memory device components.
Component Name(Oracle ILOM CLITargets) IPMI Type Description
/SYS/DBP[0-2] FRU Disk backplane FRUs for a multiple DBP configuration
/SYS/DBP FRU Disk backplane FRU for a single DBP configuration
Component Name (Oracle ILOM CLITargets) IPMI Type Description
Values(if applicable)
/SYS/MB/P[0-1]/D[0-7] FRU Host CPUDIMM FRU
/SYS/MB/P[0-1]/D[0-7]/PRSNT Discretesensor
Host CPUDIMM ispresent.
01h-ENTITY_PRESENT,02h-ENTITY_ABSENT
/SYS/MB/P[0-1]/D[0-7]/SERVICE Indicator Host CPUDIMM ServiceLED
Color: AmberLocation: MainboardOff: NormalOn: DIMM wasdiagnosed as faulty.
176 Sun Server X3-2 Administration Guide • April 2014

Related Information
■ “System Chassis Components” on page 173
■ “Cooling Unit Components” on page 175
■ “Disk Backplane Components” on page 176
■ “Power Unit Components” on page 177
■ “Processor Components” on page 178
■ “System Board Components” on page 179
■ “System Firmware Components” on page 181
■ “Hard Disk Drive Components” on page 181
Power Unit ComponentsThe following table lists the power unit components.
Component Name(Oracle ILOM CLITargets) IPMI Type Description
Values(if applicable)
/SYS/PS[0-1] FRU Power supply FRU
/SYS/PS[0-1]/PRSNT
Discretesensor
Power supply is present. 01h-ENTITY_PRESENT,02h-ENTITY_ABSENT
/SYS/PS[0-1]/STATE
Discretesensor
Multistate, power supplysensor type, per IPMI
Presence detectedFailure detectedPredictive failurePower supply input lostPower supply input lostor out-of-rangePower supply inputout-of-rangeConfiguration error
/SYS/PS[0-1]/P_IN
Powersensor
Input power draw Watts
/SYS/PS[0-1]/P_OUT
Powersensor
Output power Watts
/SYS/PS[0-1]/V_IN
Voltagesensor
Input voltage Volts
/SYS/PS[0-1]/V_12V
Voltagesensor
12V rail voltage Volts
Monitoring Components and Identifying SNMP Messages 177

Related Information
■ “System Chassis Components” on page 173
■ “Cooling Unit Components” on page 175
■ “Disk Backplane Components” on page 176
■ “Memory Device Components” on page 176
■ “Processor Components” on page 178
■ “System Board Components” on page 179
■ “System Firmware Components” on page 181
■ “Hard Disk Drive Components” on page 181
Processor ComponentsThe following table lists the processor (CPU) components.
/SYS/PS[0-1]/V_3V3
Voltagesensor
3.3V rail voltage Volts
/SYS/PS[0-1]/T_OUT
Temperaturesensor
Ambient temperature Degrees C
Component Name (OracleILOM CLI Targets) IPMI Type Description
Values(if applicable)
/SYS/MB/P[0-1] FRU Host CPU FRU
/SYS/MB/P[0-1]/PRSNT
Discretesensor
Host CPU is present. 01h-ENTITY_PRESENT,02h-ENTITY_ABSENT
/SYS/MB/P[0-1]/SERVICE
Indicator Host CPU ServiceLED
Color: AmberLocation: MainboardOff: NormalOn: Processor wasdiagnosed as faulty.
/SYS/MB/P[0-1]/V_DIMM
Staticsensor
CPU’s DIMM bankoperating voltage
LVDIMM = 1.3Vnon-LVDIMM = 1.5V
Component Name(Oracle ILOM CLITargets) IPMI Type Description
Values(if applicable)
178 Sun Server X3-2 Administration Guide • April 2014

Related Information
■ “System Chassis Components” on page 173
■ “Cooling Unit Components” on page 175
■ “Disk Backplane Components” on page 176
■ “Memory Device Components” on page 176
■ “Power Unit Components” on page 177
■ “System Board Components” on page 179
■ “System Firmware Components” on page 181
■ “Hard Disk Drive Components” on page 181
System Board ComponentsThe following table lists the system board components.
Component Name (Oracle ILOMCLI Targets) IPMI Type Description
Values(if applicable)
/SYS/MB FRU General host systemboard FRU
/SYS/MB/NET[0-3] FRU Host Ethernet FRU
/SYS/MB/PCIE[1-6]/PRSNT
Discretesensor
Option card insertedinto PCIe slot
01h-ENTITY_PRESENT,02h-ENTITY_PRESENT
/SYS/MB/T_OUT_ZONE[0-2]
Thresholdsensor
Cooling zone exhausttemperature
Degrees C
/SYS/MB/T_IN_ZONE[0-2]
Thresholdsensor
Cooling zone inlettemperature
Degrees C
/SYS/MB/T_CORE_NET01,/SYS/MB/T_CORE_NET23
Thresholdsensor
Gigabit Ethernetcontroller dietemperature
Degrees C
/SYS/MB/T_IN_PS[0,1] Thresholdsensor
PSU inlet temperature Degrees C
/SYS/MB/SASEXP FRU SAS expander FRU
/SYS/MB/SASEXP/PRSNT
Discretesensor
SAS expander boardpresence
01h-ENTITY_PRESENT,02h-ENTITY_PRESENT
Monitoring Components and Identifying SNMP Messages 179

Related Information
■ “System Chassis Components” on page 173
■ “Cooling Unit Components” on page 175
■ “Disk Backplane Components” on page 176
■ “Memory Device Components” on page 176
■ “Power Unit Components” on page 177
■ “Processor Components” on page 178
■ “System Firmware Components” on page 181
■ “Hard Disk Drive Components” on page 181
/SYS/MB/SASEXP/T_CORE
Thresholdsensor
SAS expander boardtemperature
Degrees C
/SYS/MB/RIO FRU Rear IO board
/SYS/MB/RIO/PRSNT Discretesensor
Rear IO board presence 01h-ENTITY_PRESENT,02h-ENTITY_PRESENT
/SYS/MB/CONNBD FRU Connector board onQPI bridge
/SYS/MB/CONNBD/PRSNT
Discretesensor
Connector boardpresence
01h-ENTITY_PRESENT,02h-ENTITY_PRESENT
/SYS/SP FRU Service processor FRU
/SYS/SP/OK Indicator SP OK LED Color: GreenLocation: FrontpanelOn: SP is operating.
/SYS/SP/SERVICE Indicator SP Service LED Color: AmberLocation: FrontpanelOff: SP is workingproperly.On: SP requiresservice.
/SYS/SP/NET[0-1] FRU SP Ethernet FRU
Component Name (Oracle ILOMCLI Targets) IPMI Type Description
Values(if applicable)
180 Sun Server X3-2 Administration Guide • April 2014

System Firmware ComponentsThe following table lists the system firmware components.
Related Information
■ “System Chassis Components” on page 173
■ “Cooling Unit Components” on page 175
■ “Disk Backplane Components” on page 176
■ “Memory Device Components” on page 176
■ “Power Unit Components” on page 177
■ “Processor Components” on page 178
■ “System Board Components” on page 179
■ “Hard Disk Drive Components” on page 181
Hard Disk Drive ComponentsThe following table lists the hard disk drive (HDD) components.
Component Name(Oracle ILOM CLITarget) IPMI Type Description
/SYS/MB/BIOS FRU BIOS FRU
Component Name (Oracle ILOM CLITargets) IPMI Type Description
Values(if applicable)
/SYS/MB/RHDD[0-1] FRU Rear harddisk driveFRU
From host
/SYS/MB/RHDD[0-1]/PRSNT Discretesensor
Rear harddisk drivepresence
01h-ENTITY_PRESENT,02h-ENTITY_ABSENT
/SYS/MB/RHDD[0-1]/SERVICE Indicator Rear harddisk driveService LED
Color: AmberLocation: Rear HDDOn: Hard disk drivewas diagnosed asfaulty.
Monitoring Components and Identifying SNMP Messages 181

Related Information
■ “System Chassis Components” on page 173
■ “Cooling Unit Components” on page 175
■ “Disk Backplane Components” on page 176
■ “Memory Device Components” on page 176
■ “Power Unit Components” on page 177
/SYS/MB/RHDD[0-1]/OK2RM Indicator Rear harddisk driveOK toRemove LED
Color: BlueLocation: Rear HDDOff: NormalOn: Ready to remove
/SYS/MB/RHDD[0-1]/STATE Discretesensor
Writablemultistate,slot/connector sensortype, perIPMI
FAULT: AssertsSERVICEIDENTIFY: BlinksOK2RMOK2RM: AssertsOK2RM
/SYS/DBP[0-2]/HDD[0-x] FRU Hard diskdrive FRU
From host
/SYS/DBP[0-2]/HDD[0-y]/PRSNT Discretesensor
Hard diskdrivepresence
01h-ENTITY_PRESENT,02h-ENTITY_ABSENT
/SYS/DBP[0-2]/HDD[0-y]/SERVICE Indicator Hard diskdrive ServiceLED
Color: AmberLocation: HDDOff: NormalOn: Hard disk drivewas diagnosed asfaulty.
/SYS/DBP[0-2]/HDD[0-y]/OK2RM Indicator Hard diskdrive OK toRemove LED
Color: BlueLocation: HDDOff: NormalOn: Ready to remove
/SYS/DBP[0-2]/HDD[0-y]/STATE Discretesensor
Writablemultistate,slot/connector sensortype, perIPMI
FAULT: AssertsSERVICEIDENTIFY: BlinksOK2RMOK2RM: AssertsOK2RM
Component Name (Oracle ILOM CLITargets) IPMI Type Description
Values(if applicable)
182 Sun Server X3-2 Administration Guide • April 2014

■ “Processor Components” on page 178
■ “System Board Components” on page 179
■ “System Firmware Components” on page 181
Identifying SNMP Trap MessagesIt is possible to configure Oracle ILOM to generate Simple Network ManagementProtocol (SNMP) traps when hardware problems occur. For information about howto configure SNMP alert rule destinations to start receiving these traps, refer to theOracle Integrated Lights Out Manager (ILOM) 3.1 Documentation Library at:
http://www.oracle.com/pls/topic/lookup?ctx=ilom31
The following table lists the set of SNMP traps that are generated from Oracle ILOM.
Messages and Descriptions Sensor Name
GENERIC HOST EVENTS
SNMP Message: sunHwTrapComponentErrorOracle ILOM Message: AssertSeverity and Description: Major; A sensor has detected an error. Thisgeneric ’component’ trap is generated when the SNMP agent does notrecognize the component type.
/SYS/HOST_ERR
SNMP Message: sunHwTrapComponentErrorOracle ILOM Message: DeassertSeverity and Description: Major; A sensor has detected an error. Thisgeneric ’component’ trap is generated when the SNMP agent does notrecognize the component type.
/SYS/HOST_ERR
ENVIRONMENTAL EVENTS
SNMP Message: sunHwTrapTempFatalThresholdExceededOracle ILOM Message: Lower fatal threshold exceededSeverity and Description: Critical; A temperature sensor has reported thatits value has gone above an upper fatal threshold setting or below a lowerfatal threshold setting.The sunHwTrapThresholdType object indicates whether the threshold wasan upper or lower.
/SYS/PS0/T_OUT/SYS/PS1/T_OUT/SYS/MB/T_IN_ZONE0/SYS/MB/T_OUT_ZONE0/SYS/MB/T_IN_ZONE1/SYS/MB/T_OUT_ZONE1/SYS/MB/T_IN_ZONE2/SYS/MB/T_OUT_ZONE2
Monitoring Components and Identifying SNMP Messages 183

SNMP Message: sunHwTrapTempFatalThresholdDeassertedOracle ILOM Message: Lower fatal threshold no longer exceededSeverity and Description: Informational; A temperature sensor hasreported that its value has gone below an upper fatal threshold setting orabove a lower fatal threshold setting.The sunHwTrapThresholdType object indicates whether the threshold wasan upper or lower.
/SYS/PS0/T_OUT/SYS/PS1/T_OUT/SYS/MB/T_IN_ZONE0/SYS/MB/T_OUT_ZONE0/SYS/MB/T_IN_ZONE1/SYS/MB/T_OUT_ZONE1/SYS/MB/T_IN_ZONE2/SYS/MB/T_OUT_ZONE2
SNMP Message: sunHwTrapTempFatalThresholdExceededOracle ILOM Message: Upper fatal threshold exceededSeverity and Description: Critical; A temperature sensor has reported thatits value has gone above an upper fatal threshold setting or below a lowerfatal threshold setting.The sunHwTrapThresholdType object indicates whether the threshold wasan upper or lower.
/SYS/PS0/T_OUT/SYS/PS1/T_OUT/SYS/MB/T_IN_ZONE0/SYS/MB/T_OUT_ZONE0/SYS/MB/T_IN_ZONE1/SYS/MB/T_OUT_ZONE1/SYS/MB/T_IN_ZONE2/SYS/MB/T_OUT_ZONE2
SNMP Message: sunHwTrapTempFatalThresholdDeassertedOracle ILOM Message: Upper fatal threshold no longer exceededSeverity and Description: Informational; A temperature sensor hasreported that its value has gone below an upper fatal threshold setting orabove a lower fatal threshold setting.The sunHwTrapThresholdType object indicates whether the threshold wasan upper or lower.
/SYS/PS0/T_OUT/SYS/PS1/T_OUT/SYS/MB/T_IN_ZONE0/SYS/MB/T_OUT_ZONE0/SYS/MB/T_IN_ZONE1/SYS/MB/T_OUT_ZONE1/SYS/MB/T_IN_ZONE2/SYS/MB/T_OUT_ZONE2
SNMP Message: sunHwTrapTempFatalThresholdExceededOracle ILOM Message: Lower fatal threshold exceededSeverity and Description: Critical; A temperature sensor has reported thatits value has gone above an upper fatal threshold setting or below a lowerfatal threshold setting.The sunHwTrapThresholdType object indicates whether the threshold wasan upper or lower.
/SYS/T_AMB/SYS/MB/T_CORE_NET01/SYS/MB/T_CORE_NET23/SYS/MB/T_IN_PS0/SYS/MB/T_IN_PS1
SNMP Message: sunHwTrapTempFatalThresholdDeassertedOracle ILOM Message: Lower fatal threshold no longer exceededSeverity and Description: Informational; A temperature sensor hasreported that its value has gone below an upper fatal threshold setting orabove a lower fatal threshold setting.The sunHwTrapThresholdType object indicates whether the threshold wasan upper or lower.
/SYS/T_AMB/SYS/MB/T_CORE_NET01/SYS/MB/T_CORE_NET23/SYS/MB/T_IN_PS0/SYS/MB/T_IN_PS1
Messages and Descriptions Sensor Name
184 Sun Server X3-2 Administration Guide • April 2014

SNMP Message: sunHwTrapTempFatalThresholdExceededOracle ILOM Message: Upper fatal threshold exceededSeverity and Description: Critical; A temperature sensor has reported thatits value has gone above an upper fatal threshold setting or below a lowerfatal threshold setting.The sunHwTrapThresholdType object indicates whether the threshold wasan upper or lower.
/SYS/MB/T_CORE_NET01/SYS/MB/T_CORE_NET23/SYS/MB/T_IN_PS0/SYS/MB/T_IN_PS1
SNMP Message: sunHwTrapTempFatalThresholdDeassertedOracle ILOM Message: Upper fatal threshold no longer exceededSeverity and Description: Informational; A temperature sensor hasreported that its value has gone below an upper fatal threshold setting orabove a lower fatal threshold setting.The sunHwTrapThresholdType object indicates whether the threshold wasan upper or lower.
/SYS/MB/T_CORE_NET01/SYS/MB/T_CORE_NET23/SYS/MB/T_IN_PS0/SYS/MB/T_IN_PS1
HARD DISK DRIVE EVENTS
SNMP Message: sunHwTrapSlotOrConnectorErrorOracle ILOM Message: AssertSeverity and Description: Major; A sensor associated with a slot orconnector has detected an error.
/SYS/DBP/HDD0/STATE/SYS/DBP/HDD1/STATE/SYS/DBP/HDD2/STATE/SYS/DBP/HDD3/STATE/SYS/DBP/HDD4/STATE/SYS/DBP/HDD5/STATE/SYS/DBP/HDD6/STATE/SYS/DBP/HDD7/STATE
SNMP Message: sunHwTrapSlotOrConnectorOkOracle ILOM Message: DeassertSeverity and Description: Informational; A sensor associated with a slot orconnector has returned to its normal state.
/SYS/DBP/HDD0/STATE/SYS/DBP/HDD1/STATE/SYS/DBP/HDD2/STATE/SYS/DBP/HDD3/STATE/SYS/DBP/HDD4/STATE/SYS/DBP/HDD5/STATE/SYS/DBP/HDD6/STATE/SYS/DBP/HDD7/STATE
POWER EVENTS
SNMP Message: sunHwTrapPowerSupplyErrorOracle ILOM Message: AssertSeverity and Description: Major; A power supply sensor has detected anerror.
/SYS/PS0/POLL/SYS/PS1/POLL
Messages and Descriptions Sensor Name
Monitoring Components and Identifying SNMP Messages 185

SNMP Message: sunHwTrapPowerSupplyOkOracle ILOM Message: DeassertSeverity and Description: Informational; A power supply sensor hasreturned to its normal state.
/SYS/PS0/POLL/SYS/PS1/POLL
SNMP Message: sunHwTrapPowerSupplyErrorOracle ILOM Message: PS_PRESENCE ASSERTSeverity and Description: Major; A power supply sensor has detected anerror.
/SYS/PS0/STATE/SYS/PS1/STATE
SNMP Message: sunHwTrapPowerSupplyErrorOracle ILOM Message: PS_PRESENCE DEASSERTSeverity and Description: Major; A power supply sensor has detected anerror.
/SYS/PS0/STATE/SYS/PS1/STATE
SNMP Message: sunHwTrapPowerSupplyErrorOracle ILOM Message: PS_FAILURE ASSERTSeverity and Description: Major; A power supply sensor has detected anerror.
/SYS/PS0/STATE/SYS/PS1/STATE
SNMP Message: sunHwTrapPowerSupplyErrorOracle ILOM Message: PS_FAILURE DEASSERTSeverity and Description: Major; A power supply sensor has detected anerror.
/SYS/PS0/STATE/SYS/PS1/STATE
SNMP Message: sunHwTrapPowerSupplyErrorOracle ILOM Message: PS_PREDICTIVE_FAILURE ASSERTSeverity and Description: Major; A power supply sensor has detected anerror.
/SYS/PS0/STATE/SYS/PS1/STATE
SNMP Message: sunHwTrapPowerSupplyErrorOracle ILOM Message: PS_PREDICTIVE_FAILURE DEASSERTSeverity and Description: Major; A power supply sensor has detected anerror.
/SYS/PS0/STATE/SYS/PS1/STATE
SNMP Message: sunHwTrapPowerSupplyErrorOracle ILOM Message: PS_INPUT_LOST ASSERTSeverity and Description: Major; A power supply sensor has detected anerror.
/SYS/PS0/STATE/SYS/PS1/STATE
SNMP Message: sunHwTrapPowerSupplyErrorOracle ILOM Message: PS_INPUT_LOST DEASSERTSeverity and Description: Major; A power supply sensor has detected anerror.
/SYS/PS0/STATE/SYS/PS1/STATE
SNMP Message: sunHwTrapPowerSupplyErrorOracle ILOM Message: PS_INPUT_ERROR ASSERTSeverity and Description: Major; A power supply sensor has detected anerror.
/SYS/PS0/STATE/SYS/PS1/STATE
Messages and Descriptions Sensor Name
186 Sun Server X3-2 Administration Guide • April 2014

SNMP Message: sunHwTrapPowerSupplyErrorOracle ILOM Message: PS_INPUT_ERROR DEASSERTSeverity and Description: Major; A power supply sensor has detected anerror.
/SYS/PS0/STATE/SYS/PS1/STATE
SNMP Message: sunHwTrapPowerSupplyErrorOracle ILOM Message: PS_INPUT_RANGE_ERROR ASSERTSeverity and Description: Major; A power supply sensor has detected anerror.
/SYS/PS0/STATE/SYS/PS1/STATE
SNMP Message: sunHwTrapPowerSupplyErrorOracle ILOM Message: PS_INPUT_RANGE_ERROR DEASSERTSeverity and Description: Major; A power supply sensor has detected anerror.
/SYS/PS0/STATE/SYS/PS1/STATE
SNMP Message: sunHwTrapPowerSupplyErrorOracle ILOM Message: PS_CONFIG_ERROR ASSERTSeverity and Description: Major; A power supply sensor has detected anerror.
/SYS/PS0/STATE/SYS/PS1/STATE
SNMP Message: sunHwTrapPowerSupplyErrorOracle ILOM Message: PS_CONFIG_ERROR DEASSERTSeverity and Description: Major; A power supply sensor has detected anerror.
/SYS/PS0/STATE/SYS/PS1/STATE
SNMP Message: sunHwTrapSensorNonCritThresholdExceededOracle ILOM Message: Upper noncritical threshold exceededSeverity and Description: Minor; A sensor has reported that its value hasgone above an upper non-critical threshold setting or below a lowernon-critical threshold setting. The generic ’sensor’ trap is generated whenthe SNMP agent does not recognize the component type.The sunHwTrapThresholdType object indicates whether the threshold wasan upper or lower.
/SYS/VPS
SNMP Message: sunHwTrapSensorThresholdOkOracle ILOM Message: Upper noncritical threshold no longer exceededSeverity and Description: Informational; A sensor has reported that itsvalue is in the normal operating range. The generic ’sensor’ trap isgenerated when the SNMP agent does not recognize the component type.
/SYS/VPS
SNMP Message: sunHwTrapPowerSupplyErrorOracle ILOM Message: AssertSeverity and Description: Major; A power supply sensor has detected anerror.
/SYS/PWRBS
SNMP Message: sunHwTrapPowerSupplyOkOracle ILOM Message: DeassertSeverity and Description: Informational; A power supply sensor hasreturned to its normal state.
/SYS/PWRBS
Messages and Descriptions Sensor Name
Monitoring Components and Identifying SNMP Messages 187
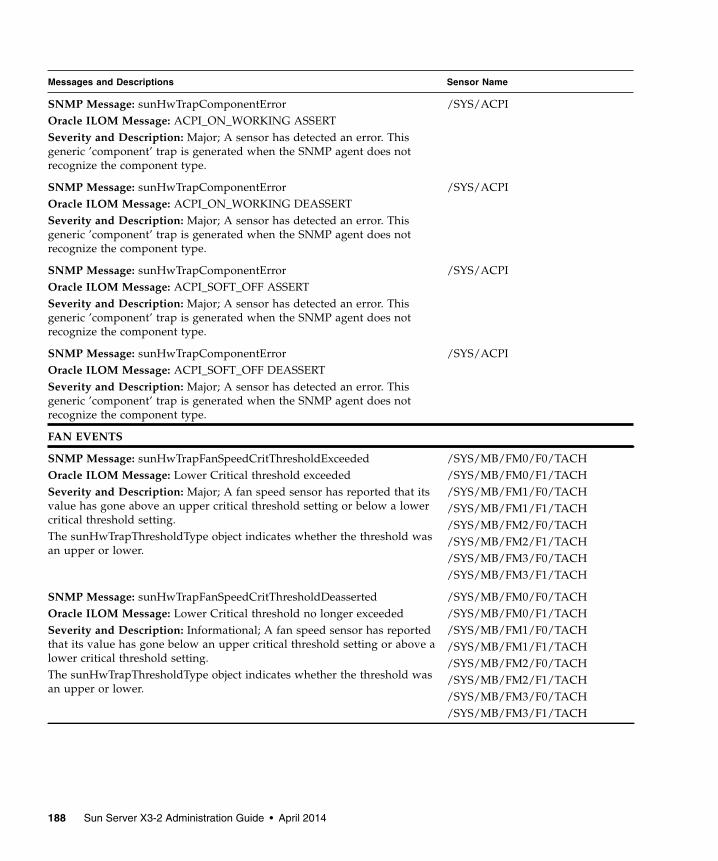
SNMP Message: sunHwTrapComponentErrorOracle ILOM Message: ACPI_ON_WORKING ASSERTSeverity and Description: Major; A sensor has detected an error. Thisgeneric ’component’ trap is generated when the SNMP agent does notrecognize the component type.
/SYS/ACPI
SNMP Message: sunHwTrapComponentErrorOracle ILOM Message: ACPI_ON_WORKING DEASSERTSeverity and Description: Major; A sensor has detected an error. Thisgeneric ’component’ trap is generated when the SNMP agent does notrecognize the component type.
/SYS/ACPI
SNMP Message: sunHwTrapComponentErrorOracle ILOM Message: ACPI_SOFT_OFF ASSERTSeverity and Description: Major; A sensor has detected an error. Thisgeneric ’component’ trap is generated when the SNMP agent does notrecognize the component type.
/SYS/ACPI
SNMP Message: sunHwTrapComponentErrorOracle ILOM Message: ACPI_SOFT_OFF DEASSERTSeverity and Description: Major; A sensor has detected an error. Thisgeneric ’component’ trap is generated when the SNMP agent does notrecognize the component type.
/SYS/ACPI
FAN EVENTS
SNMP Message: sunHwTrapFanSpeedCritThresholdExceededOracle ILOM Message: Lower Critical threshold exceededSeverity and Description: Major; A fan speed sensor has reported that itsvalue has gone above an upper critical threshold setting or below a lowercritical threshold setting.The sunHwTrapThresholdType object indicates whether the threshold wasan upper or lower.
/SYS/MB/FM0/F0/TACH/SYS/MB/FM0/F1/TACH/SYS/MB/FM1/F0/TACH/SYS/MB/FM1/F1/TACH/SYS/MB/FM2/F0/TACH/SYS/MB/FM2/F1/TACH/SYS/MB/FM3/F0/TACH/SYS/MB/FM3/F1/TACH
SNMP Message: sunHwTrapFanSpeedCritThresholdDeassertedOracle ILOM Message: Lower Critical threshold no longer exceededSeverity and Description: Informational; A fan speed sensor has reportedthat its value has gone below an upper critical threshold setting or above alower critical threshold setting.The sunHwTrapThresholdType object indicates whether the threshold wasan upper or lower.
/SYS/MB/FM0/F0/TACH/SYS/MB/FM0/F1/TACH/SYS/MB/FM1/F0/TACH/SYS/MB/FM1/F1/TACH/SYS/MB/FM2/F0/TACH/SYS/MB/FM2/F1/TACH/SYS/MB/FM3/F0/TACH/SYS/MB/FM3/F1/TACH
Messages and Descriptions Sensor Name
188 Sun Server X3-2 Administration Guide • April 2014
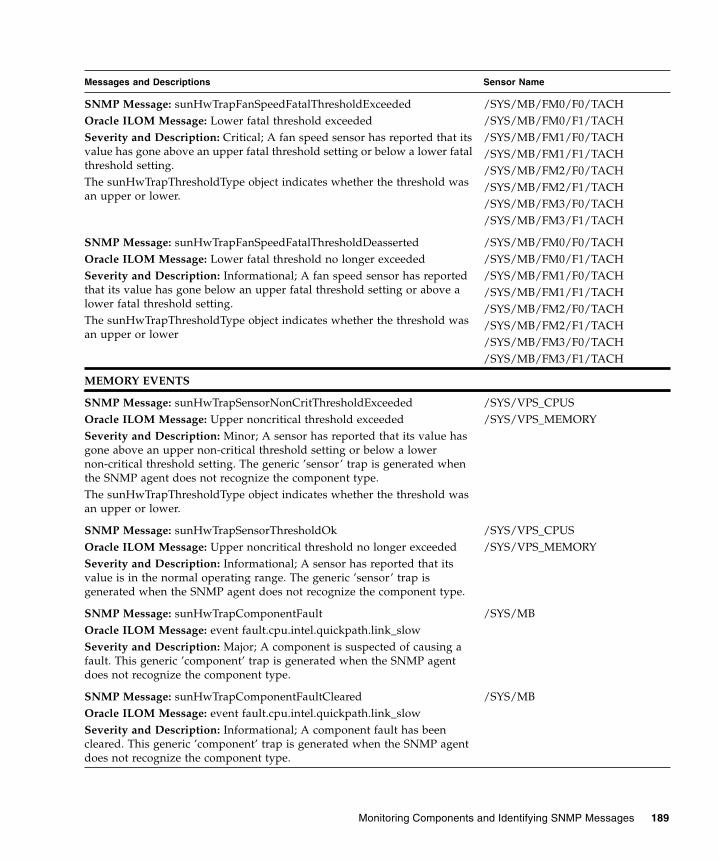
SNMP Message: sunHwTrapFanSpeedFatalThresholdExceededOracle ILOM Message: Lower fatal threshold exceededSeverity and Description: Critical; A fan speed sensor has reported that itsvalue has gone above an upper fatal threshold setting or below a lower fatalthreshold setting.The sunHwTrapThresholdType object indicates whether the threshold wasan upper or lower.
/SYS/MB/FM0/F0/TACH/SYS/MB/FM0/F1/TACH/SYS/MB/FM1/F0/TACH/SYS/MB/FM1/F1/TACH/SYS/MB/FM2/F0/TACH/SYS/MB/FM2/F1/TACH/SYS/MB/FM3/F0/TACH/SYS/MB/FM3/F1/TACH
SNMP Message: sunHwTrapFanSpeedFatalThresholdDeassertedOracle ILOM Message: Lower fatal threshold no longer exceededSeverity and Description: Informational; A fan speed sensor has reportedthat its value has gone below an upper fatal threshold setting or above alower fatal threshold setting.The sunHwTrapThresholdType object indicates whether the threshold wasan upper or lower
/SYS/MB/FM0/F0/TACH/SYS/MB/FM0/F1/TACH/SYS/MB/FM1/F0/TACH/SYS/MB/FM1/F1/TACH/SYS/MB/FM2/F0/TACH/SYS/MB/FM2/F1/TACH/SYS/MB/FM3/F0/TACH/SYS/MB/FM3/F1/TACH
MEMORY EVENTS
SNMP Message: sunHwTrapSensorNonCritThresholdExceededOracle ILOM Message: Upper noncritical threshold exceededSeverity and Description: Minor; A sensor has reported that its value hasgone above an upper non-critical threshold setting or below a lowernon-critical threshold setting. The generic ’sensor’ trap is generated whenthe SNMP agent does not recognize the component type.The sunHwTrapThresholdType object indicates whether the threshold wasan upper or lower.
/SYS/VPS_CPUS/SYS/VPS_MEMORY
SNMP Message: sunHwTrapSensorThresholdOkOracle ILOM Message: Upper noncritical threshold no longer exceededSeverity and Description: Informational; A sensor has reported that itsvalue is in the normal operating range. The generic ’sensor’ trap isgenerated when the SNMP agent does not recognize the component type.
/SYS/VPS_CPUS/SYS/VPS_MEMORY
SNMP Message: sunHwTrapComponentFaultOracle ILOM Message: event fault.cpu.intel.quickpath.link_slowSeverity and Description: Major; A component is suspected of causing afault. This generic ’component’ trap is generated when the SNMP agentdoes not recognize the component type.
/SYS/MB
SNMP Message: sunHwTrapComponentFaultClearedOracle ILOM Message: event fault.cpu.intel.quickpath.link_slowSeverity and Description: Informational; A component fault has beencleared. This generic ’component’ trap is generated when the SNMP agentdoes not recognize the component type.
/SYS/MB
Messages and Descriptions Sensor Name
Monitoring Components and Identifying SNMP Messages 189

SNMP Message: sunHwTrapComponentFaultOracle ILOM Message: event fault.cpu.intel.quickpath.unknown-errcodeSeverity and Description: Major; A component is suspected of causing afault. This generic ’component’ trap is generated when the SNMP agentdoes not recognize the component type.
/SYS/MB
SNMP Message: sunHwTrapComponentFaultClearedOracle ILOM Message: event fault.cpu.intel.quickpath.unknown-errcodeSeverity and Description: Informational; A component fault has beencleared. This generic ’component’ trap is generated when the SNMP agentdoes not recognize the component type.
/SYS/MB
SNMP Message: sunHwTrapComponentFaultOracle ILOM Message: event fault.memory.intel.dimm.noneSeverity and Description: Major; A component is suspected of causing afault. This generic ‘component’ trap is generated when the SNMP agentdoes not recognize the component type.
/SYS/MB
SNMP Message: sunHwTrapComponentFaultClearedOracle ILOM Message: event fault.memory.intel.dimm.noneSeverity and Description: Informational; A component fault has beencleared. This generic ’component’ trap is generated when the SNMP agentdoes not recognize the component type.
/SYS/MB
SNMP Message: sunHwTrapComponentFaultOracle ILOM Message: event fault.memory.intel.dimm.memtest-failedSeverity and Description: Major; A component is suspected of causing afault. This generic ’component’ trap is generated when the SNMP agentdoes not recognize the component type.
/SYS/MB
SNMP Message: sunHwTrapComponentFaultClearedOracle ILOM Message: event fault.memory.intel.dimm.memtest-failedSeverity and Description: Informational; A component fault has beencleared. This generic ’component’ trap is generated when the SNMP agentdoes not recognize the component type.
/SYS/MB
SNMP Message: sunHwTrapComponentFaultOracle ILOM Message: event fault.memory.intel.dimm.quadrank-3rd-slotSeverity and Description: Major; A component is suspected of causing afault. This generic ’component’ trap is generated when the SNMP agentdoes not recognize the component type.
/SYS/MB
SNMP Message: sunHwTrapComponentFaultClearedOracle ILOM Message: event fault.memory.intel.dimm.quadrank-3rd-slotSeverity and Description: Informational; A component fault has beencleared. This generic ’component’ trap is generated when the SNMP agentdoes not recognize the component type.
/SYS/MB
Messages and Descriptions Sensor Name
190 Sun Server X3-2 Administration Guide • April 2014

SNMP Message: sunHwTrapComponentFaultOracle ILOM Message: event fault.memory.intel.dimm.ddr3u-unsupportedSeverity and Description: Major; A component is suspected of causing afault. This generic ’component’ trap is generated when the SNMP agentdoes not recognize the component type.
/SYS/MB
SNMP Message: sunHwTrapComponentFaultClearedOracle ILOM Message: event fault.memory.intel.dimm.ddr3u-unsupportedSeverity and Description: Informational; A component fault has beencleared. This generic ’component’ trap is generated when the SNMP agentdoes not recognize the component type.
/SYS/MB
SNMP Message: sunHwTrapComponentFaultOracle ILOM Message: event fault.memory.intel.mrc.unknown-errcodeSeverity and Description: Major; A component is suspected of causing afault. This generic ‘component’ trap is generated when the SNMP agentdoes not recognize the component type.
/SYS/MB
SNMP Message: sunHwTrapComponentFaultClearedOracle ILOM Message: event fault.memory.intel.mrc.unknown-errcodeSeverity and Description: Informational; A component fault has beencleared. This generic ’component’ trap is generated when the SNMP agentdoes not recognize the component type.
/SYS/MB
SNMP Message: sunHwTrapMemoryFaultOracle ILOM Message: eventfault.memory.intel.dimm.udimm-unsupportedSeverity and Description: Major; A memory component is suspected ofcausing a fault.
/SYS/MB/P/D
SNMP Message: sunHwTrapMemoryFaultClearedOracle ILOM Message: eventfault.memory.intel.dimm.udimm-unsupportedSeverity and Description: Informational; A memory component fault hasbeen cleared.
/SYS/MB/P/D
SNMP Message: sunHwTrapMemoryFaultOracle ILOM Message: eventfault.memory.intel.dimm.sodimm-unsupportedSeverity and Description: Major; A memory component is suspected ofcausing a fault.
/SYS/MB/P/D
SNMP Message: sunHwTrapMemoryFaultClearedOracle ILOM Message: eventfault.memory.intel.dimm.sodimm-unsupportedSeverity and Description: Informational; A memory component fault hasbeen cleared.
/SYS/MB/P/D
Messages and Descriptions Sensor Name
Monitoring Components and Identifying SNMP Messages 191

SNMP Message: sunHwTrapMemoryFaultOracle ILOM Message: event fault.memory.intel.dimm.4gb-fusedSeverity and Description: Major; A memory component is suspected ofcausing a fault.
/SYS/MB/P/D
SNMP Message: sunHwTrapMemoryFaultClearedOracle ILOM Message: event fault.memory.intel.dimm.4gb-fusedSeverity and Description: Informational; A memory component fault hasbeen cleared
/SYS/MB/P/D
SNMP Message: sunHwTrapMemoryFaultOracle ILOM Message: event fault.memory.intel.dimm.8gb-fusedSeverity and Description: Major; A memory component is suspected ofcausing a fault.
/SYS/MB/P/D
SNMP Message: sunHwTrapMemoryFaultClearedOracle ILOM Message: event fault.memory.intel.dimm.8gb-fusedSeverity and Description: Informational; A memory component fault hasbeen cleared.
/SYS/MB/P/D
SNMP Message: sunHwTrapMemoryFaultOracle ILOM Message: event fault.memory.intel.dimm.incompatibleSeverity and Description: Major; A memory component is suspected ofcausing a fault.
/SYS/MB/P/D
SNMP Message: sunHwTrapMemoryFaultClearedOracle ILOM Message: event fault.memory.intel.dimm.incompatibleSeverity and Description: Informational; A memory component fault hasbeen cleared.
/SYS/MB/P/D
SNMP Message: sunHwTrapMemoryFaultOracle ILOM Message: eventfault.memory.intel.dimm.incompatible-maxranksSeverity and Description: Major; A memory component is suspected ofcausing a fault.
/SYS/MB/P/D
SNMP Message: sunHwTrapMemoryFaultClearedOracle ILOM Message: eventfault.memory.intel.dimm.incompatible-maxranksSeverity and Description: Informational; A memory component fault hasbeen cleared.
/SYS/MB/P/D
SNMP Message: sunHwTrapMemoryFaultOracle ILOM Message: eventfault.memory.intel.dimm.incompatible-quadrankSeverity and Description:Major; A memory component is suspected ofcausing a fault.
/SYS/MB/P/D
Messages and Descriptions Sensor Name
192 Sun Server X3-2 Administration Guide • April 2014

SNMP Message: sunHwTrapMemoryFaultClearedOracle ILOM Message: eventfault.memory.intel.dimm.incompatible-quadrankSeverity and Description: Informational; A memory component fault hasbeen cleared.
/SYS/MB/P/D
SNMP Message: sunHwTrapMemoryFaultOracle ILOM Message: eventfault.memory.intel.dimm.numranks-unsupportedSeverity and Description: Major; A memory component is suspected ofcausing a fault.
/SYS/MB/P/D
SNMP Message: sunHwTrapMemoryFaultClearedOracle ILOM Message: eventfault.memory.intel.dimm.numranks-unsupportedSeverity and Description: Informational; A memory component fault hasbeen cleared.
/SYS/MB/P/D
SNMP Message: sunHwTrapMemoryFaultOracle ILOM Message: event fault.memory.intel.dimm.speed-slowSeverity and Description: Major; A memory component is suspected ofcausing a fault.
/SYS/MB/P/D
SNMP Message: sunHwTrapMemoryFaultClearedOracle ILOM Message: event fault.memory.intel.dimm.speed-slowSeverity and Description: Informational; A memory component fault hasbeen cleared.
/SYS/MB/P/D
SNMP Message: sunHwTrapMemoryFaultOracle ILOM Message: event fault.memory.intel.dimm.disable-quadrankSeverity and Description: Major; A memory component is suspected ofcausing a fault.
/SYS/MB/P/D
SNMP Message: sunHwTrapMemoryFaultClearedOracle ILOM Message: event fault.memory.intel.dimm.disable-quadrankSeverity and Description: Informational; A memory component fault hasbeen cleared.
/SYS/MB/P/D
SNMP Message: sunHwTrapMemoryFaultOracle ILOM Message: event fault.memory.intel.dimm.population-invalidSeverity and Description: Major; A memory component is suspected ofcausing a fault.
/SYS/MB/P/D
SNMP Message: sunHwTrapMemoryFaultClearedOracle ILOM Message: event fault.memory.intel.dimm.population-invalidSeverity and Description: Informational; A memory component fault hasbeen cleared.
/SYS/MB/P/D
Messages and Descriptions Sensor Name
Monitoring Components and Identifying SNMP Messages 193

SNMP Message: sunHwTrapMemoryFaultOracle ILOM Message: event fault.memory.intel.dimm.out-of-orderSeverity and Description: Major; A memory component is suspected ofcausing a fault.
/SYS/MB/P/D
SNMP Message: sunHwTrapMemoryFaultClearedOracle ILOM Message: event fault.memory.intel.dimm.out-of-orderSeverity and Description: Informational; A memory component fault hasbeen cleared.
/SYS/MB/P/D
SNMP Message: sunHwTrapMemoryFaultOracle ILOM Message: event fault.memory.intel.dimm.category-unknownSeverity and Description: Major; A memory component is suspected ofcausing a fault.
/SYS/MB/P/D
SNMP Message: sunHwTrapMemoryFaultClearedOracle ILOM Message: event fault.memory.intel.dimm.category-unknownSeverity and Description: Informational; A memory component fault hasbeen cleared.
/SYS/MB/P/D
ENTITY PRESENCE EVENTS
SNMP Message: sunHwTrapComponentErrorOracle ILOM Message: ENTITY_PRESENT ASSERTSeverity and Description: Major; A sensor has detected an error. Thisgeneric ’component’ trap is generated when the SNMP agent does notrecognize the component type.
/SYS/MB/P0/PRSNT/SYS/MB/P1/PRSNT
SNMP Message: sunHwTrapComponentErrorOracle ILOM Message: ENTITY_PRESENT DEASSERTSeverity and Description: Major; A sensor has detected an error. Thisgeneric ’component’ trap is generated when the SNMP agent does notrecognize the component type.
/SYS/MB/P0/PRSNT/SYS/MB/P1/PRSNT
SNMP Message: sunHwTrapComponentErrorOracle ILOM Message: ENTITY_ABSENT ASSERTSeverity and Description: Major; A sensor has detected an error. Thisgeneric ’component’ trap is generated when the SNMP agent does notrecognize the component type.
/SYS/MB/P0/PRSNT/SYS/MB/P1/PRSNT
SNMP Message: sunHwTrapComponentErrorOracle ILOM Message: ENTITY_ABSENT DEASSERTSeverity and Description: Major; A sensor has detected an error. Thisgeneric ’component’ trap is generated when the SNMP agent does notrecognize the component type.
/SYS/MB/P0/PRSNT/SYS/MB/P1/PRSNT
Messages and Descriptions Sensor Name
194 Sun Server X3-2 Administration Guide • April 2014

SNMP Message: sunHwTrapComponentErrorOracle ILOM Message: ENTITY_DISABLED ASSERTSeverity and Description: Major; A sensor has detected an error. Thisgeneric ’component’ trap is generated when the SNMP agent does notrecognize the component type.
/SYS/MB/P0/PRSNT/SYS/MB/P1/PRSNT
SNMP Message: sunHwTrapComponentErrorOracle ILOM Message: ENTITY_DISABLED DEASSERTSeverity and Description: Major; A sensor has detected an error. Thisgeneric ’component’ trap is generated when the SNMP agent does notrecognize the component type.
/SYS/MB/P0/PRSNT/SYS/MB/P1/PRSNT
PHYSICAL SECURITY EVENTS
SNMP Message: sunHwTrapSecurityIntrusionOracle ILOM Message: AssertSeverity and Description: Major; An intrusion sensor has detected thatsomeone may have physically tampered with the system.
/SYS/INTSW/SYS/SP/SP_NEEDS_REBOOT
SNMP Message: sunHwTrapSecurityIntrusionOracle ILOM Message: DeassertSeverity and Description: Major; An intrusion sensor has detected thatsomeone may have physically tampered with the system.
/SYS/INTSW/SYS/SP/SP_NEEDS_REBOOT
Messages and Descriptions Sensor Name
Monitoring Components and Identifying SNMP Messages 195

196 Sun Server X3-2 Administration Guide • April 2014

Getting Server Firmware andSoftware
This section explains the options for accessing server firmware and software.
Firmware and Software UpdatesFirmware and software for your server are updated periodically. These updates aremade available as a software release. The software releases are a set of downloadablefiles (patches) that includes all available firmware, hardware drivers, tools, andutilities for the server. All these files have been tested together and verified to workwith your server.
You should update your server firmware and software as soon as possible after anew software release becomes available. Software releases often include bug fixes,and updating your server ensures that your server has the latest firmware andsoftware.
Description Links
Learn about server firmware and softwareupdates.
“Firmware and Software Updates” onpage 197
Learn about the options for accessingfirmware and software.
“Firmware and Software Access Options” onpage 198
View the available firmware and softwarepackages.
“Software Releases” on page 199
Access the firmware and softwarepackages through Oracle System Assistant,My Oracle Support, or Physical MediaRequest.
“Getting Firmware and Software from MOS orPMR” on page 200
Install firmware and software updates. “Installing Updates Using Other Methods” onpage 204
197

The ReadMe document that is included with each patch in a software releasecontains information about the patch, such as what has changed or not changed fromthe prior software release, as well as bugs that are fixed within the current release.
The product notes that are part of the server documentation identify which serversoftware release is the latest release supported on your server.
Firmware and Software Access OptionsUse one of the following options to obtain the latest set of firmware and software foryour server:
■ Oracle System Assistant – Oracle System Assistant is a new factory-installedoption for Oracle servers that allows you to easily download and install serverfirmware and software.
For more information about using Oracle System Assistant, see “Setting Up theServer Using Oracle System Assistant” on page 35.
■ My Oracle Support – All system firmware and software are available from MyOracle Support at http://support.oracle.com.
For more information about what is available on the My Oracle Support web site,see “Software Releases” on page 199.
For instructions on how to download software releases from My Oracle Support,see “Download Firmware and Software Using My Oracle Support” on page 200.
■ Physical Media Request (PMR) – You can request a DVD that contains any of thedownloads (patches) that are available from My Oracle Support.
For information see, “Software Releases” on page 199.
■ Other methods – You can use Oracle Enterprise Manager Ops Center, OracleHardware Management Pack, or Oracle ILOM to update your server software andfirmware.
For information, see “Installing Updates Using Other Methods” on page 204.
198 Sun Server X3-2 Administration Guide • April 2014

Software ReleasesSoftware releases on My Oracle Support are grouped by product family (such as SunFire), then the product (the specific server or blade), and finally the software releaseversion. A software release contains all the updated software or firmware for yourserver or blade as a set of downloadable files (patches), including firmware, drivers,tools, and utilities, all tested together to be compatible with your server.
Each path is a zip file that contains a ReadMe file and a set of subdirectoriescontaining firmware or software files. The ReadMe file provides details on thecomponents that have changed since the prior software release and bugs that arefixed.
My Oracle Support provides the set of software releases for your server as describedin the following table. You can obtain these software releases by downloading thefiles from My Oracle Support or by submitting to Oracle a physical media request(PMR). Alternatively, you can download the firmware and software for your serverusing Oracle System Assistant.
Package Name Description When to Download This Package
Sun Server X3-2 (X4170M3) SWversion – FirmwarePack
All the system firmware,including Oracle ILOM,BIOS, and option cardfirmware.
You need the latest firmware.
Sun Server X3-2 (X4170M3) SWversion – OS Pack
An OS Pack is available foreach supported operatingsystem version. Each OSPack includes a package ofall tools, drivers, and utilitiesfor that version of the OS.Software includes OracleHardware Management Packand LSI MegaRAID software.For the Windows OS, this OSPack also includes IntelNetwork Teaming and InstallPack.
You need to updateOS-specific drivers, tools, orutilities.
Sun Server X3-2 (X4170M3) SWversion – All Packs
Includes the Firmware Pack,all OS Packs, and alldocuments.This pack does not includeOracle VTS or the OracleSystem Assistant image.
You need to update acombination of systemfirmware and OS-specificsoftware.
Getting Server Firmware and Software 199

Getting Firmware and Software fromMOS or PMRYou can use Oracle System Assistant to easily download and use the latest softwarerelease. For further information, see “Setting Up the Server Using Oracle SystemAssistant” on page 35.
You can also obtain updated firmware and software by using My Oracle Support(MOS) or by submitting to Oracle a physical media request (PMR). For information,see:
■ “Download Firmware and Software Using My Oracle Support” on page 200
■ “Requesting Physical Media” on page 201
▼ Download Firmware and Software Using MyOracle Support1. Go to the following web site: http://support.oracle.com.
2. Sign in to My Oracle Support.
3. At the top of the page, click the Patches & Updates tab.
The Patch search pane appears at the right of the screen.
4. Within the Search tab area, click Product or Family (Advanced Search).
The Search tab area appears with search fields.
Sun Server X3-2 (X4170M3) SWversion –Diagnostics
Oracle VTS diagnosticsimage.
You need the Oracle VTSdiagnostics image.
Sun Server X3-2 (X4170M3) SWversion – OracleSystem Assistant
Oracle System Assistantrecovery and ISO updateimage.
You need to manuallyrecover or update OracleSystem Assistant.
Package Name Description When to Download This Package
200 Sun Server X3-2 Administration Guide • April 2014

5. In the Product field, select the product from the drop-down list.
Alternatively, type a full or partial product name until a match appears, forexample, Sun Server X3-2 (formerly Sun Fire X4170 M3).
6. In the Release field, select a software release from the drop-down list.
Expand the list to see all available software releases.
7. Click Search.
The Patch Advanced Search Results screen appears, listing the patches for thesoftware release.
See “Software Releases” on page 199 for a description of the available downloads.
8. To select a patch for a software release, click the patch number next to thesoftware release version.
You can use the Shift key to select more than one patch).
A pop-up action panel appears. The pop-up panel contains several action options,including the ReadMe, Add to Plan, and Download options. For informationabout the Add to Plan option, click on the associated drop-down button and select“Why use a plan?”
9. To review the ReadMe file for the patch, click ReadMe.
10. To download the patch for the software release, click Download.
The File Download dialog box appears.
11. In the File Download dialog box, click the patch zip file name.
The patch for the software release downloads.
Requesting Physical MediaIf your processes do not allow downloads from Oracle web sites, you can receive thelatest software release packages by submitting to Oracle a physical media request(PMR). The preferred method for submitting a PMR is through the My OracleSupport (MOS) web site.
The high-level tasks for submitting a physical media request are described in thesesections:
■ “Gathering Information for the Physical Media Request” on page 202
■ “Request Physical Media (Online)” on page 202
■ “Request Physical Media (By Phone)” on page 204
Getting Server Firmware and Software 201

Gathering Information for the Physical Media RequestYou must have a warranty or support contract for your server in order to make aphysical media request (PMR).
Before you make the PMR, gather the following information:
■ Obtain product name, software release version, and patches required. It will beeasier to make the request if you know the latest software release and the name ofthe download packages (patches) that you are requesting.
■ If you have access to My Oracle Support – Follow the instructions in “DownloadFirmware and Software Using My Oracle Support” on page 200 to determinethe latest software release version and view available software release packages(patches). After viewing the list of patches, you can navigate away from thePatch Advanced Search Results page, if you do not want to continue with thedownload steps.
■ If you do not have access to My Oracle Support – Use the information in “SoftwareReleases” on page 199 to determine which packages you want, and then requestthose packages for the latest software release.
■ Have the shipping information ready. You will need to provide a contact, phonenumber, email address, company name, and shipping address as part of therequest.
▼ Request Physical Media (Online)Gather the information described in “Gathering Information for the Physical MediaRequest” on page 202 before making the request.
1. Go to the following web site: http://support.oracle.com.
2. Sign in to My Oracle Support.
3. Click on the Contact Us link in the upper right corner of the page.
The Create Service Request: Problem screen appears.
4. Describe your request as follows:
a. In the Problem Summary field, type: PMR for latest software releasefor Sun Server X3-2.
b. From the Problem Type drop-down list, select Software & OS Media Request.
c. In the Support Identifier field, type the Customer Support Identifierassociated with your support contract.
202 Sun Server X3-2 Administration Guide • April 2014

5. Skip the Create Service Request: Selections screen by clicking the Next buttonin the upper right corner of the screen twice.
The Create Service Request: More Details screen appears.
6. Provide more information about your request as follows:
a. In the Additional Information section, answer the questions listed in thefollowing table:
b. Fill in the Ship-To contact information, which includes a contact name,phone number, email address, company name, and shipping address.
7. Click the Next button.
The Create Service Request: Severity/Contact screen appears.
8. Enter your contact phone number and preferred method of contact.
9. Click the Submit button.
This completes the physical media request. It can take up to seven business daysto receive the physical media.
Question Your Answer
Is this a physical software media shipmentrequest?
Yes
Which product line does the media requestinvolve?
Sun Products
Are you requesting a required passwordfor a patch download?
No
Are you requesting a patch on CD/DVD? Yes
If requesting a patch on CD/DVD, pleaseprovide the patch number andOS/platform?
Enter the patch number for each downloadthat you want from the software release.
List the product name and versionrequested for the physical mediashipment?
Product Name: Sun Server X3-2.Version: Latest software release number.
What is the OS/platform for the requestedmedia?
If you are requesting OS-specific downloads,specify the OS here. If you are requestingsystem firmware only, enter Generic.
Are any languages required for thisshipment?
No
Getting Server Firmware and Software 203

▼ Request Physical Media (By Phone)Gather the information described in “Gathering Information for the Physical MediaRequest” on page 202 before making the request.
1. Call Oracle support, using the appropriate number from the Oracle GlobalCustomer Support Contacts Directory at:
http://www.oracle.com/us/support/contact-068555.html
2. Tell Oracle support that you want to make a physical media request (PMR) forthe Sun Server X3-2.
■ If you are able to access the specific software release and patch numberinformation from My Oracle Support, provide this information to the supportrepresentative.
■ If you are unable to access the software release information, request the latestsoftware release for the Sun Server X3-2.
Installing Updates Using Other MethodsIn addition to using Oracle System Assistant and My Oracle Support, you can installupdated firmware and software using one of the following methods:
■ Oracle Enterprise Manager Ops Center – You can use Ops Center EnterpriseController to automatically download the latest firmware from Oracle, orfirmware can be loaded manually into the Enterprise Controller. In either case,Ops Center can install the firmware onto one or more servers, blades, or bladechassis.
For more information, go to:http://www.oracle.com/technetwork/oem/ops-center/index.html.
■ Oracle Hardware Management Pack – You can use the fwupdate CLI Tool withinthe Oracle Hardware Management Pack to update firmware within the system.
For more information, refer to the Oracle Hardware Management PackDocumentation Library at: http://www.oracle.com/goto/OHMP/docs.
■ Oracle ILOM – You can use the Oracle ILOM web interface or command-lineinterface to update Oracle ILOM and BIOS firmware.
For more information, refer to the Oracle Integrated Lights Out Manager (ILOM)3.1 Documentation Library at:http://www.oracle.com/pls/topic/lookup?ctx=ilom31.
204 Sun Server X3-2 Administration Guide • April 2014

Index
Aaccessing management tools, 17add-in cards
configuration utilities in Legacy BIOS BootMode, 115
configuration utilities in UEFI BIOS BootMode, 115
Advanced BIOS screen, 147
BBIOS boot mode, switching between Legacy BIOS
and UEFI BIOS modes, 114BIOS factory defaults, verifying, 118BIOS Setup Utility
accessing, 110Advanced screen, 147boot mode, 113Boot screen, 162exiting from, 138function keys, 109IO screen, 158legacy boot mode, 113Main screen, 142menus, accessing, 110navigating menu options, 111Save & Exit screen, 168service processor network settings, 134setup screens summary, 108shortcut key sequences, 109TPM support, 131UEFI boot mode, 113UEFI Driver Control screen, 166UEFI-compliant, description, 112
board components, 173Boot BIOS screen
checking for Oracle System Assistantinstallation, 81
options available, 162boot device, selecting, 121boot mode
preserving settings when switching modes, 114selecting, 119
Cchassis components, 173choosing multiple-system tools, 3CLI Tools, in Hardware Management Pack, 7components and nomenclature, 173cooling unit components, 175
Ddefault boot mode, 119directory structure, of Oracle System Assistant, 87disk backplane components, 176disk components, 181disk controllers, supported, 101documentation
for server management tools, 15Oracle Hardware Management Pack, xOracle ILOM, xserver, xviewing from Oracle system Assistant, 73, 74
Eevaluating server environment, 12
Ffeedback, for documentation, xfirmware components, 173function keys within BIOS Setup Utility, 109
205

Hhard disk drive components, 181
IIO allocation
address space, 117enabling and disabling resources, 138minimizing resource exhaustion, 117
IO BIOS screen, 158IP address, assigning using Oracle System
Assistant, 45IP address, setting, 134IPMI type, 172
Kkeyboard language, setting for Oracle System
Assistant, 68
LLegacy BIOS boot mode
selecting, 113switching between UEFI boot mode, 114
LSI utilities, used to create RAID volumes, 104
MMain BIOS screen, 142management policies
configuring PCIe cooling mode, 98management strategy, determining, 1management tasks
administrative, which tools support, 9common, which tools support, 8
management toolsaccessing, 17choosing single system tools, 2documentation for, 15installing, 15managing modular chassis systems, 14using to update and monitor components, 13
memory device components, 176menus, BIOS Setup Utility, 110
Nnetwork settings, service processor, 134
Ooperating system
choosing a management tool for installation, 12installing with Oracle System Assistant, 64
Option ROMsenabling and disabling, 122, 136legacy BIOS allocation, 116minimizing resource exhaustion, 116
Oracle Enterprise Manager Ops Centerproduct information, 3
Oracle Hardware Management Packadvantages, 6instructions for installing, 32setting up software and firmware, 32using the CLI Tools, 7using to create RAID volumes, 104
Oracle Integrated Lights Out Manager (OracleILOM)advantages, 5backing up and restoring BIOS configuration, 98configuring SP settings using Oracle System
Assistant, 56controlling next boot device, 97detecting server problems and clearing faults, 99diagnostics for x86 Oracle servers, 96documents, 92features supported on x86 Oracle servers, 92integrating with third-party products, 6local host interconnect property, 96monitoring storage devices, 104power management policy for x86 Sun
servers, 95power policies supported for x86 Oracle
servers, 94setting enhanced PCIe cooling mode, 98setting up software and firmware, 30sideband management, 94switching serial port output to host console, 98top-level indicator for FRUID auto-update
feature, 97Oracle System Assistant
advantages, 5checking for disabled or offline status, 81checking for installation, 80configuring RAID, 102directory structure of, 87disabling the application, 67managing the server with, 35
206 Sun Server X3-2 Administration Guide • April 2014

organization of, 37ReadMe file, 39, 42setting up software and firmware, 29using to access the command-line shell, 70using to check the media integrity, 71using to configure network settings, 44using to configure the server, 39using to create a RAID volume, 54, 104using to install an operating system, 64using to modify service processor settings, 56using to restore image, 83using to set keyboard language, 68using to update firmware, 49using to update to a new release, 45using to view documentation, 73, 74using to view system information, 41verifying installation, 80
Oracle System Assistant shell, accessing from OracleSystem Assistant, 70
Ppower on, server, 110power unit components, 177processor components, 178
Qquick reference
for common administrative tasks, 9for common management tasks, 8
RRAID
configuration options, 102configuring for server, 101configuring using Oracle System Assistant, 54,
102creating after operating system installation, 104creating before operating system
installation, 103support for HBA disk controllers, 101using LSI utilities to create RAID volumes, 104
restore Oracle System Assistant image, 83
SSave & Exit BIOS screen, 168screens, BIOS Setup Utility, 108, 110server environment, evaluating, 12
server management tools. See management toolsserver, power on, 110service processor
configuring settings using Oracle SystemAssistant, 56
network settings, configuring, 134setting up software and firmware
using Oracle Hardware Management Pack, 32using Oracle ILOM, 30using Oracle System Assistant, 29
setting up the server, using Oracle SystemAssistant, 44
shortcut key sequences in BIOS Setup Utility, 109Simple Network Management Protocol (SNMP)
Trapsentity presence events, 194environmental events, 183fan events, 188generated by system, 183generic host events, 183hard disk drive events, 185memory events, 189physical security events, 195power events, 185
software and firmwareaccess options, ixsetting up using Oracle ILOM, 30updating using Oracle System Assistant, 49
system board components, 179system chassis components, 173system components and nomenclature, 172system firmware components, 181system information, viewing from Oracle System
Assistant, 41
Ttools and documentation, downloading, 15tools and drivers, updating using Oracle System
Assistant, 45Trusted Platform Module (TPM), configuring
support for, 131
UUEFI boot mode
advantages of using, 114selecting, 113
Index 207

UEFI Driver Control BIOS screen, 166UEFI driver control, enabling and disabling, 122
UEFI-compliant BIOS, description, 112
208 Sun Server X3-2 Administration Guide • April 2014
Related Documents