Sun Microsystems, Inc. www.sun.com Submit comments about this document by clicking the Feedback[+] link at: http://docs.sun.com Sun ™ Installation Assistant for Windows and Linux User’s Guide For x64 Sun Fire ™ and Sun Blade ™ Series Servers Part No. 820-3357-19 November 2009, Revision A

Welcome message from author
This document is posted to help you gain knowledge. Please leave a comment to let me know what you think about it! Share it to your friends and learn new things together.
Transcript
Sun Microsystems, Inc.www.sun.com
Submit comments about this document by clicking the Feedback[+] link at: http://docs.sun.com
Sun™ Installation Assistant forWindows and Linux User’s Guide
For x64 Sun Fire™ and Sun Blade™
Series Servers
Part No. 820-3357-19November 2009, Revision A

PleaseRecycle
Copyright © 2009 Sun Microsystems, Inc., 4150 Network Circle, Santa Clara, California 95054, U.S.A. All rights reserved.
Sun Microsystems, Inc. has intellectual property rights relating to technology embodied in the product that is described in this document. Inparticular, and without limitation, these intellectual property rights may include one or more of the U.S. patents listed athttp://www.sun.com/patents and one or more additional patents or pending patent applications in the U.S. and in other countries.
U.S. Government Rights - Commercial software. Government users are subject to the Sun Microsystems, Inc. standard license agreement andapplicable provisions of the FAR and its supplements.
This distribution may include materials developed by third parties.
Parts of the product may be derived from Berkeley BSD systems, licensed from the University of California. UNIX is a registered trademark inthe U.S. and in other countries, exclusively licensed through X/Open Company, Ltd.
Sun, Sun Microsystems, the Sun logo, Java, Solaris, Sun Blade, Sun Fire and the Solaris logo are trademarks or registered trademarks of SunMicrosystems, Inc., or its subsidiaries, in the U.S. and other countries.
Microsoft is a trademark or registered trademark of Microsoft Corporation or its subsidiaries in the United States and Other countries. Windowsis a trademark or registered trademark of Microsoft Corporation or its subsidiaries in the United States and Other countries. The Adobe logo is aregistered trademark of Adobe Systems, Incorporated.
Products covered by and information contained in this service manual are controlled by U.S. Export Control laws and may be subject to theexport or import laws in other countries. Nuclear, missile, chemical biological weapons or nuclear maritime end uses or end users, whetherdirect or indirect, are strictly prohibited. Export or reexport to countries subject to U.S. embargo or to entities identified on U.S. export exclusionlists, including, but not limited to, the denied persons and specially designated nationals lists is strictly prohibited.
DOCUMENTATION IS PROVIDED "AS IS" AND ALL EXPRESS OR IMPLIED CONDITIONS, REPRESENTATIONS AND WARRANTIES,INCLUDING ANY IMPLIED WARRANTY OF MERCHANTABILITY, FITNESS FOR A PARTICULAR PURPOSE OR NON-INFRINGEMENT,ARE DISCLAIMED, EXCEPT TO THE EXTENT THAT SUCH DISCLAIMERS ARE HELD TO BE LEGALLY INVALID.
Copyright © 2009 Sun Microsystems, Inc., 4150 Network Circle, Santa Clara, California 95054, Etats-Unis. Tous droits réservés.
Sun Microsystems, Inc. détient les droits de propriété intellectuels relatifs à la technologie incorporée dans le produit qui est décrit dans cedocument. En particulier, et ce sans limitation, ces droits de propriété intellectuelle peuvent inclure un ou plus des brevets américains listés àl’adresse http://www.sun.com/patents et un ou les brevets supplémentaires ou les applications de brevet en attente aux Etats - Unis et dans lesautres pays.
Cette distribution peut comprendre des composants développés par des tierces parties.
Des parties de ce produit pourront être dérivées des systèmes Berkeley BSD licenciés par l’Université de Californie. UNIX est une marquedéposée aux Etats-Unis et dans d’autres pays et licenciée exclusivement par X/Open Company, Ltd.
Sun, Sun Microsystems, le logo Sun, Java, Solaris, Sun Blade, Sun Fire et le logo Solaris sont des marques de fabrique ou des marques déposéesde Sun Microsystems, Inc., ou ses filiales, aux Etats-Unis et dans d’autres pays.
Microsoft sont est marques de fabrique ou des marques déposées de Microsoft Corporation ou de sa filiale aux Etats-Unis et dans d’autres pays.Windows est une marque de fabrique ou une marques déposée de Microsoft Corporation ou de sa filiale aux Etats-Unis et dans d’autres pays.Le logo Adobe est une marque déposée de Adobe Systems, Incorporated.
Les produits qui font l’objet de ce manuel d’entretien et les informations qu’il contient sont regis par la legislation americaine en matiere decontrole des exportations et peuvent etre soumis au droit d’autres pays dans le domaine des exportations et importations. Les utilisationsfinales, ou utilisateurs finaux, pour des armes nucleaires, des missiles, des armes biologiques et chimiques ou du nucleaire maritime,directement ou indirectement, sont strictement interdites. Les exportations ou reexportations vers des pays sous embargo des Etats-Unis, ouvers des entites figurant sur les listes d’exclusion d’exportation americaines, y compris, mais de maniere non exclusive, la liste de personnes quifont objet d’un ordre de ne pas participer, d’une facon directe ou indirecte, aux exportations des produits ou des services qui sont regi par lalegislation americaine en matiere de controle des exportations et la liste de ressortissants specifiquement designes, sont rigoureusementinterdites.
LA DOCUMENTATION EST FOURNIE "EN L’ETAT" ET TOUTES AUTRES CONDITIONS, DECLARATIONS ET GARANTIES EXPRESSESOU TACITES SONT FORMELLEMENT EXCLUES, DANS LA MESURE AUTORISEE PAR LA LOI APPLICABLE, Y COMPRIS NOTAMMENTTOUTE GARANTIE IMPLICITE RELATIVE A LA QUALITE MARCHANDE, A L’APTITUDE A UNE UTILISATION PARTICULIERE OU AL’ABSENCE DE CONTREFACON.
Contents
Preface vii
1. Getting Started 1
About the Sun Installation Assistant 1
SIA Features and Benefits 2
SIA Task List 3
Server Support and SIA Media Availability 3
Supported Operating Systems 4
Before You Begin 4
What’s Next 5
2. Starting SIA and Preparing for Deployment or Recovery Tasks 7
Local and Remote Media Options 8
Mouse Settings When Using SIA with ILOM Remote Console 9
Starting SIA and Preparing for Tasks Using Local or Remote Media 10
▼ To Start SIA and Prepare for Tasks Using Local or Remote Media 10
3. Using SIA to Install an Operating System 17
Install an OS With SIA 18
Prerequisites 18
▼ To Install an OS With SIA Using Local or Remote Media 18
iii
4. Using SIA to Upgrade System Firmware 31
Upgrading System Firmware With SIA 32
▼ To Upgrade System Firmware 32
Upgrading the System BIOS and ILOM 33
▼ To Upgrade the System BIOS and ILOM 34
Upgrading HBA Firmware 35
▼ To Upgrade HBA Firmware 35
Upgrading Expander Firmware 37
▼ To Upgrade Expander Firmware 38
5. Using SIA to Recover a Service Processor 41
Recovering a Service Processor With SIA 42
▼ To Recover a Service Processor 42
6. Using SIA In PXE-Based Network Installations 45
Perform an SIA PXE-Based Attended Installation 46
▼ To Create the SIA Image and Prepare for PXE Boot 46
▼ To Boot SIA From a PXE Server for an Attended Installation 47
Perform an SIA PXE-Based Unattended Installation 49
Contents of the SIA State File 49
Preparing for an Unattended SIA Installation of Linux 55
Creating the SIA Unattended State File for Linux 56
Setting Up an Unattended Configuration File and PXE OS Install Imagefor Linux 57
Preparing for an Unattended SIA Installation of Windows Server 2003 57
Creating the SIA Unattended State File for Windows 58
Preparing for an Unattended SIA Firmware Upgrade 59
Creating the SIA Unattended State File for Firmware Upgrade 60
▼ To Create the SIA Image and Prepare for PXE Boot 61
▼ To Boot SIA From a PXE Server 62
iv Sun Installation Assistant for Windows and Linux User’s Guide • November 2009
Observe the SIA PXE-Based Unattended Installation Progress 64
Set Up Passwords for Root and Virtual Access 64
Using a System Console 65
Using a Virtual Console or Secure Shell (SSH) Connection 65
Using a VNC Viewer 66
▼ To Establish Connection Using a VNC Viewer 66
▼ To Establish Connection Using a Serial Console 66
7. Troubleshooting SIA 69
SIA Error Messages 69
SIA Installation Log File 70
ILOM Remote Console Mouse Issue With SIA 70
Debugging Unattended Installation Problems 70
PXE Image Does Not Boot 71
SIA Boot Starts, Then Stops 71
VNC Password Does Not Get Set 72
A. Creating a Bootable SIA USB Flash Drive 73
Requirements 73
Getting the Software 74
▼ To Get the Syslinux and SIA Software 74
Preparing the USB Flash Drive 74
▼ To Prepare the USB Flash Drive on a Windows XP System 75
▼ To Prepare the USB Flash Drive on a Linux (Red Hat/SUSE) System 76
Setting BIOS Parameters and Booting Off the SIA USB Flash Drive 80
▼ To Set the BIOS Parameters and Boot Off the SIA USB Flash Drive 80
B. Identifying the Linux Boot Device on a Sun Fire X4500 Server 83
Requirements 83
Contents v
How to Identify the Boot Device on a Sun Fire X4500 During Linux Installation83
▼ To Identify the Boot Device on a Sun Fire X4500 During LinuxInstallation 84
Index 87
vi Sun Installation Assistant for Windows and Linux User’s Guide • November 2009

Preface
This document provides detailed information about using the Sun InstallationAssistant (SIA) versions 1.0 through 2.2 to install supported operating systems,upgrade system firmware, and recover a non-functional service processor on an x64architecture Sun Blade Server Module or Sun Fire rack-mounted server.
This guide is written for system installers who are familiar with installing computerhardware, as well as for system administrators who are experienced with installingand configuring various operating systems.
For more information about related product documentation, technical support, ortraining, refer to these sections:
■ “Related Documentation” on page vii
■ “Documentation, Support, and Training” on page viii
■ “Sun Welcomes Your Comments” on page viii
Related DocumentationAll Sun Blade and Sun Fire series documentation is available at the following websites.
■ For the Sun Blade Modular Servers:
http://docs.sun.com/app/docs/prod/blade.srvr
■ For the Sun Fire Servers:
http://docs.sun.com/app/docs/prod/server.x64
vii
Documentation, Support, and Training
Sun Welcomes Your CommentsSun is interested in improving its documentation and welcomes your comments andsuggestions. You can submit your comments by going to:
http://www.sun.com/hwdocs/feedback
Please include the title and part number of your document with your feedback. Forexample:
Sun Installation Assistant for Windows and Linux User’s Guidepart number 820-3357-19.
Sun Function URL
Documentation http://docs.sun.com/
Support http://www.sun.com/support/
Training http://www.sun.com/training/
viii Sun Installation Assistant for Windows and Linux User’s Guide • November 2009

CHAPTER 1
Getting Started
This chapter introduces the Sun Installation Assistant (SIA) features and describeshow to get started using SIA to perform deployment or recovery tasks on your Sunserver. This document applies to SIA versions 1.0 through 2.2.
Topics discussed in this chapter include:
■ “About the Sun Installation Assistant” on page 1
■ “SIA Features and Benefits” on page 2
■ “SIA Task List” on page 3
■ “Server Support and SIA Media Availability” on page 3
■ “Supported Operating Systems” on page 4
■ “Before You Begin” on page 4
■ “What’s Next” on page 5
About the Sun Installation AssistantThe Sun Installation Assistant (SIA) is a tool designed to be used with x64 Sun Fireand Sun Blade servers to assist in the deployment of supported Linux and MicrosoftWindows operating systems (OS), as well as system firmware upgrades. With SIA,your deployment tasks can be completed using the graphical wizard-based interfaceor in unattended mode.
■ For operating system installation, when used in interactive mode by booting theSIA interface, SIA assists in the OS installation process. You will need to providea retail version of OS distribution media and SIA will hand you off to the OSnative installer as required. SIA will automatically inventory your systemhardware and download the latest device drivers supported by Sun. This meansyou will not need to create a separate drivers disk. SIA does that work for you.
1
If you decide that you do not want to use SIA to assist in the installation of yourserver’s operating system, information about manually installing an operatingsystem may be found in the following documents included with your server:
■ The installation guide for your server.
■ The operating system installation guide for your server.
■ For system firmware upgrades, SIA can be used to selectively upgrade the systemBIOS, service processor, an optional HBA (host bus adapter used for disk control),or disk expander firmware with the latest fixes and enhancements.
■ For automated deployment, SIA can be used in unattended mode to automate theprocess of OS installation or system firmware upgrades. A special text-based SIAstate file is used to automatically answer prompts you would have answered ininteractive (attended) mode.
SIA Features and BenefitsSIA provides the following features and benefits:
■ Bootable SIA media from either a local drive attached to the server (CD/DVD orUSB flash drive), a remote redirected network drive (virtual CD-ROM or ISOimage), or a PXE network boot.
■ Remote update option that updates the SIA software from the Sun download siteto ensure your SIA session has the latest features and enhancements.
■ Identification of your platform hardware and installed option cards.
■ Identification of the operating system media and the inclusion of the most recentSun-supported device drivers required for your system. Note that SIA does notprovide the operating system software. You must have a licensed retail version ofthe operating system software available during the SIA installation.
■ Assisted operating system installation on platform-supported bootable media(hard disk, compact flash).
■ System BIOS and device firmware upgrade capabilities. Upgrade options areserver-specific.
■ Recovery from a non-functional (corrupt or inaccessible) service processor. Thisfeature is server-specific.
■ Unattended installations using PXE-based SIA.
■ Intuitive error messages if an error or unexpected condition occurs during theinstallation.
■ Readily available event log file, if required, located at the /root for Linux, or C:\for Windows on the newly installed server.
2 Sun Installation Assistant for Windows and Linux User’s Guide • November 2009
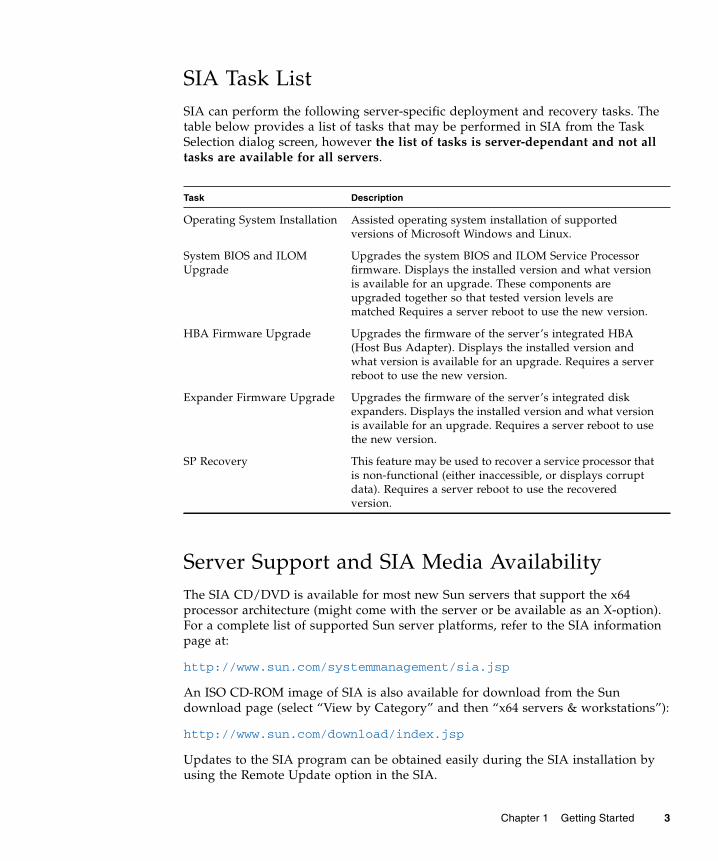
SIA Task ListSIA can perform the following server-specific deployment and recovery tasks. Thetable below provides a list of tasks that may be performed in SIA from the TaskSelection dialog screen, however the list of tasks is server-dependant and not alltasks are available for all servers.
Server Support and SIA Media AvailabilityThe SIA CD/DVD is available for most new Sun servers that support the x64processor architecture (might come with the server or be available as an X-option).For a complete list of supported Sun server platforms, refer to the SIA informationpage at:
http://www.sun.com/systemmanagement/sia.jsp
An ISO CD-ROM image of SIA is also available for download from the Sundownload page (select “View by Category” and then “x64 servers & workstations”):
http://www.sun.com/download/index.jsp
Updates to the SIA program can be obtained easily during the SIA installation byusing the Remote Update option in the SIA.
Task Description
Operating System Installation Assisted operating system installation of supportedversions of Microsoft Windows and Linux.
System BIOS and ILOMUpgrade
Upgrades the system BIOS and ILOM Service Processorfirmware. Displays the installed version and what versionis available for an upgrade. These components areupgraded together so that tested version levels arematched Requires a server reboot to use the new version.
HBA Firmware Upgrade Upgrades the firmware of the server’s integrated HBA(Host Bus Adapter). Displays the installed version andwhat version is available for an upgrade. Requires a serverreboot to use the new version.
Expander Firmware Upgrade Upgrades the firmware of the server’s integrated diskexpanders. Displays the installed version and what versionis available for an upgrade. Requires a server reboot to usethe new version.
SP Recovery This feature may be used to recover a service processor thatis non-functional (either inaccessible, or displays corruptdata). Requires a server reboot to use the recoveredversion.
Chapter 1 Getting Started 3

Supported Operating SystemsSIA is available for supported Microsoft Windows and Linux installations. A list ofsupported operating systems is available on the SIA information page:
http://www.sun.com/systemmanagement/sia.jsp
Before You BeginThe following prerequisites must be met before using SIA and the OS installationmedia.
■ You must have the SIA distribution media (on CD/DVD, USB flash drive, or ISOCD-ROM image).
■ If you perform the installation from a virtual redirected CD/DVD or ISO CD-ROM image, you should have some knowledge or experience with your server’sservice processor Lights Out Manager (Integrated LOM or Embedded LOM).
■ You must have supported operating system distribution media (CD/DVD or ISOCD-ROM image). See http://www.sun.com/systemmanagement/sia.jspfor more information.
■ For Microsoft Windows installations, you must have the product key informationavailable during the SIA installation.
■ If your server uses mass storage connected to a RAID controller and you want toinclude your boot drive as part of a RAID configuration, you will need toconfigure a RAID volume(s) on it using the controller’s BIOS configuration utility(accessible by entering a control key sequence when prompted during serverboot) before you install the operating system.
Note – If you have a Sun StorageTek RAID disk controller (Adaptec-based), youmust configure an array volume through the Adaptec RAID Configuration Utility(accessible by pressing Ctrl-A when prompted during server boot) before it can bemade available to SIA. This must be done whether you intend to use RAID or not.Please consult your platform installation documentation for instructions on how todo this.
■ You should review late breaking information and updates about the SunInstallation Assistant in your server’s Product Notes. You can view or downloadthe Product Notes for your server at http://docs.sun.com.
4 Sun Installation Assistant for Windows and Linux User’s Guide • November 2009
What’s Next■ To start and prepare SIA for deployment or recovery tasks from local or remote
media, see Chapter 2.
■ To perform an assisted operating system installation, see Chapter 3.
■ To perform a system firmware upgrade (BIOS/ILOM, disk controller HBA or diskexpander), see Chapter 4.
■ To recover from a corrupt or inaccessible service processor, see Chapter 5.
■ To perform PXE-based SIA installations, see Chapter 6.
■ To troubleshoot an SIA installation, see Chapter 7.
Chapter 1 Getting Started 5

6 Sun Installation Assistant for Windows and Linux User’s Guide • November 2009
CHAPTER 2
Starting SIA and Preparing forDeployment or Recovery Tasks
This chapter explains how to start the Sun Installation Assistant (SIA) and prepare itto perform deployment tasks, such as operating system installation or systemfirmware upgrades (BIOS/ILOM, HBA or disk expander), or a service processorrecovery.
An SIA CD/DVD is available for supported Sun servers. It might be shipped withthe server or available as an X-option. An ISO CD-ROM image of the SunInstallation Assistant is also available for download from the Sun download page(select “View by Category” and then “x64 servers & workstations”):
http://www.sun.com/download/index.jsp
Note – SIA has a Remote Update feature that allows you to remotely update yourcurrent SIA session with the latest server drivers, firmware and SIA versionenhancements.
Topics in this chapter include:
■ “Local and Remote Media Options” on page 8
■ “Mouse Settings When Using SIA with ILOM Remote Console” on page 9
■ “Starting SIA and Preparing for Tasks Using Local or Remote Media” on page 10
7

Local and Remote Media OptionsThis section describes the different methods for using SIA on supported x64 Sun Fireor Sun Blade servers. Choose a method that best matches your server type andinstallation environment.
TABLE 2-1 SIA Installation Methods for Sun Fire and Sun Blade Servers
Supported Methods for Sun Fire Servers Supported Methods for Sun Blade Servers
Use SIA to install an operating system orupgrade system firmware on supported Sun Fireservers using one of the following methods:• Locally at the server using the SIA CD/DVD
or a USB flash drive prepared with SIAsoftware. Boot SIA from a CD/DVD in theserver’s CD/DVD drive, or via USB flash driveprepared with SIA software (as described inAppendix A) directly connected to one of theserver’s USB ports.
• Remotely using a remote console through theserver’s service processor. This method allowsyou to boot SIA from a virtual CD/DVD-ROM.Refer to your server’s Lights Out Manager(Integrated LOM or Embedded LOM)documentation for information on the LOMremote console. (Note that there are multipleversions of LOM, be sure to refer to the guidethat matches your server’s installed version).Also see “Mouse Settings When Using SIAwith ILOM Remote Console” on page 9.
• Remotely over the network using a PXEnetwork boot image. Using this method cansignificantly reduce the installation time.Instructions for configuring PXE network bootcan be found in Chapter 6.
Using SIA with supported Sun Blade server modules issimilar to Sun Fire servers, however the boot setup isdifferent. On a Sun Blade server module, SIA can install anoperating system or upgrade system firmware using one ofthe following methods:• Locally at the server using the SIA CD/DVD or USB
flash drive prepared with SIA software. Server modulesdo not have internal CD/DVD drives. Boot SIA from aUSB CD/DVD drive, or a USB flash drive prepared withSIA software (as described in Appendix A) that is directlyconnected to the server module’s USB dongle port. Thismethod assumes you have set up a VGA console withkeyboard and mouse as described in your Sun Bladeserver module installation documentation.
• Remotely using the server module remote console eitherthrough the chassis CMM or directly through the servermodule’s service processor. This method allows you toboot SIA from a virtual CD/DVD-ROM. Refer to yourserver’s Lights Out Manager (Integrated LOM orEmbedded LOM) documentation for information on theLOM remote console. (Note that there are multipleversions of LOM, be sure to refer to the guide thatmatches your server’s installed version). Also see “MouseSettings When Using SIA with ILOM Remote Console” onpage 9.
• Remotely over the network using a PXE network bootimage. The network ports for the server modules areprovided either through a network express module(NEM) or PCI ExpressModule (PCI EM) installed on theback of the chassis. Refer to the chassis documentation forinformation on how the NEM and PCI EM portscorrespond to the server modules. Instructions forconfiguring PXE network boot can be found in Chapter 6.
8 Sun Installation Assistant for Windows and Linux User’s Guide • November 2009
Mouse Settings When Using SIA with ILOMRemote ConsoleThe ILOM Remote Console feature allows an administrator to redirect a server’skeyboard, video, and mouse to their management system. This feature is veryconvenient when the server and management system are not at the same location.
The ILOM Remote Console has a mouse mode setting that configures ILOM to sendmouse events to the remote system using either “absolute” or “relative” mode. Forthe ILOM Remote Console to work properly with SIA, you must configure themouse setting to relative mode. If your mouse is set to absolute mode, your mousewill not work when using SIA.
After using SIA, you may consider switching your ILOM Remote Console mousesetting to absolute mode; it provides a smoother mouse experience when using aSolaris or Windows host OS. However, if you are using a Linux host OS, absolutemode may not work properly and you should use the relative mode setting.
Your mouse mode settings can be set using the ILOM web interface in the MouseMode settings tab under the Remote Control tab. Note that some versions of ILOMrequire the service processor (SP) to be reset before the change will take effect. Youwill be prompted by an ILOM message if your SP needs to be reset.
Chapter 2 Starting SIA and Preparing for Deployment or Recovery Tasks 9
Starting SIA and Preparing for TasksUsing Local or Remote MediaThis section guides you through the initial steps of identifying the system hardware,setting up network access, updating SIA software, and preparing you for adeployment task (such as assisted operating system installation or system firmwareupgrade) or recovery task (such as service processor recovery).
▼ To Start SIA and Prepare for Tasks Using Localor Remote MediaFollow these steps when booting SIA from local or remote media.
Note – In the instructions that follow, example dialog screen shots have beenprovided as a reference. Information displayed in each dialog may differ dependingon your server model.
1. Start SIA using one of the methods described in the previous section:
■ Locally using a CD/DVD: Insert the SIA CD/DVD into the server’s CD/DVDdrive and power on or reboot the server.
■ Locally using a USB flash drive: Plug the USB flash drive prepared with SIAsoftware directly into one of the server’s USB ports. Redirect the server to bootfrom the USB flash drive as described in Appendix A.
■ Remotely from a CD/DVD or image file: Log in to the server’s serviceprocessor from a remote console (or KVMS) using its LOM (Lights OutManager) interface and use the Remote Control Launch Redirection feature toredirect the server to the virtual CD/DVD-ROM that contains the SIACD/DVD image. Then, reboot the server and direct it to boot from your virtualCD/DVD-ROM (typically done using the F8 menu available during serverboot).
■ Remotely using a PXE-based image: If you are using PXE network booting toload the Sun Installation Assistant image from a Linux-based PXE server,proceed to Chapter 6.
10 Sun Installation Assistant for Windows and Linux User’s Guide • November 2009

Note – The instructions below assume local CD/DVD drive access. Be sure tomodify the instructions accordingly if you are using a local USB flash drive preparedwith SIA software, or if you are running SIA from a remote console (or KVMS) withCD-ROM redirection.
As SIA starts, you will see various start up messages and then the SoftwareLicense Agreement dialog will be displayed.
2. In the Software License Agreement dialog (see example below), do thefollowing:
a. Read the license agreement and scroll down to the bottom of the textwindow to activate the Accept radio button.
b. Click Accept to accept the license agreement, and then click Next.
The SIA Welcome dialog appears identifying the tasks that the Sun InstallationAssistant performs.
3. In the SIA Welcome dialog, click Next to proceed with the installation.
Chapter 2 Starting SIA and Preparing for Deployment or Recovery Tasks 11
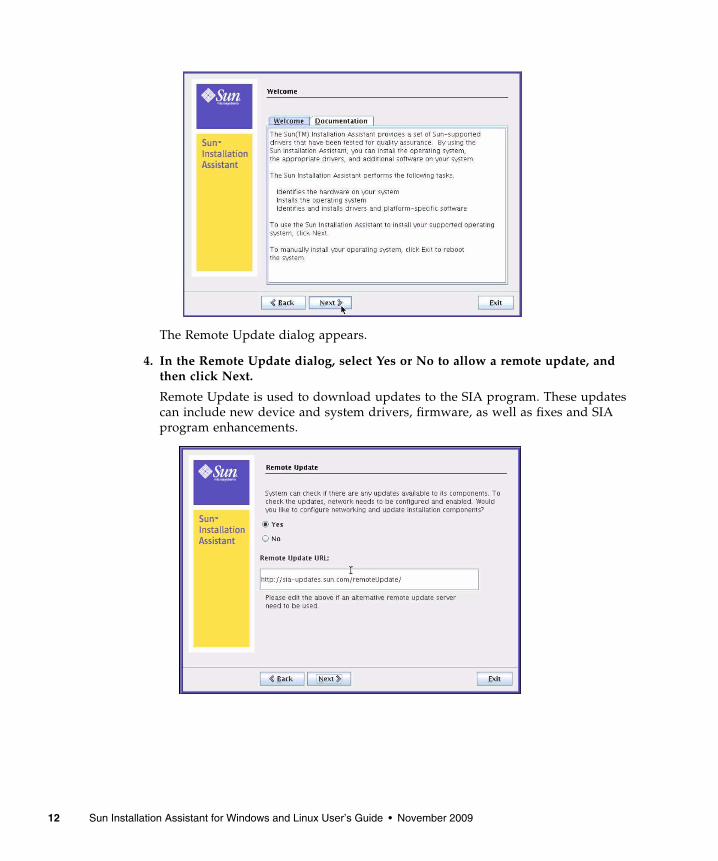
The Remote Update dialog appears.
4. In the Remote Update dialog, select Yes or No to allow a remote update, andthen click Next.
Remote Update is used to download updates to the SIA program. These updatescan include new device and system drivers, firmware, as well as fixes and SIAprogram enhancements.
12 Sun Installation Assistant for Windows and Linux User’s Guide • November 2009

5. If you selected No for remote update, skip to Step 6, but note that you might beprompted later for information about your network configuration if thedeployment task you select requires network access.
If you selected Yes for remote update, the Gather Information dialog appears.You must configure network connectivity for your server to perform a remoteupdate or any other deployment task that requires network access. Perform thefollowing sub-steps.
a. Select the active network interface on your server (for example: eth0).
This will enable the network interface used to access the update image. If yourserver has multiple network cards, be sure to use the network-connectedinterface that enables access to the host where the update image files reside(whether this is the Sun remote update Internet site, or an internally mountedimage on your company intranet).
b. Select the network interface configuration method (DHCP or Static IP).
If static method is selected, provide the necessary information (for example,your server’s IP address, netmask address, gateway address, and so on).
c. Provide proxy information if an HTTP proxy is needed for Internet access(proxy host and port for client connections), for example:
Proxy Host: webproxy.mycompany.com
Proxy Port: 8088
d. Click Next to establish a connection to the Sun SIA Remote Update web site.
The remote update process checks for updates to the SIA program (seeexample below). If updates are available the update components are listed.
Chapter 2 Starting SIA and Preparing for Deployment or Recovery Tasks 13
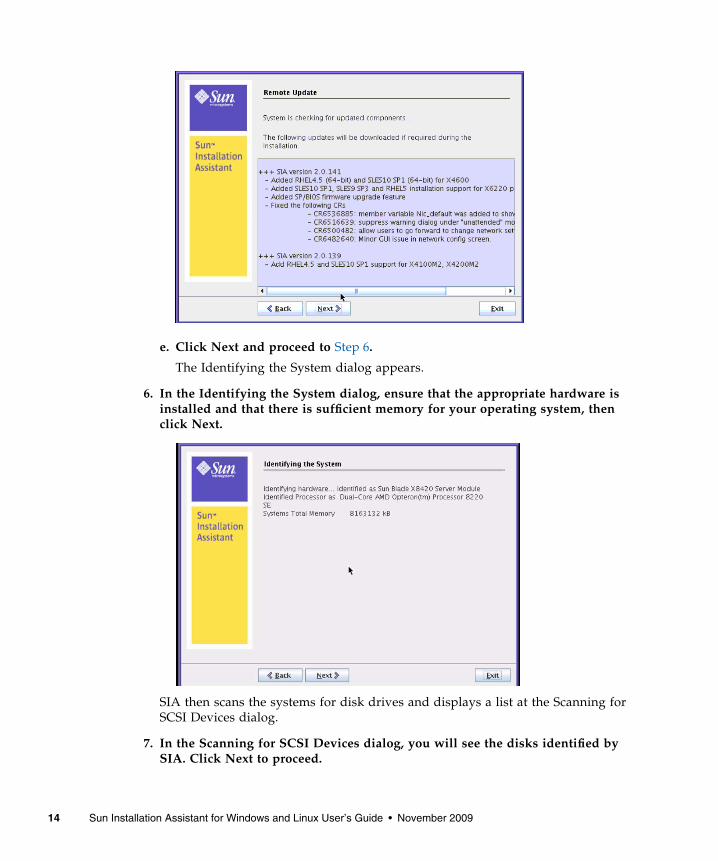
e. Click Next and proceed to Step 6.
The Identifying the System dialog appears.
6. In the Identifying the System dialog, ensure that the appropriate hardware isinstalled and that there is sufficient memory for your operating system, thenclick Next.
SIA then scans the systems for disk drives and displays a list at the Scanning forSCSI Devices dialog.
7. In the Scanning for SCSI Devices dialog, you will see the disks identified bySIA. Click Next to proceed.
14 Sun Installation Assistant for Windows and Linux User’s Guide • November 2009

The Supported Option Cards dialog then appears.
8. In the Supported Option Cards dialog, if you plan on using SIA to install anoperating system select the option cards for which you want SIA to installdrivers. Click Next when done.
SIA automatically selects option cards it finds installed in your system. If youwant to install operating system drivers for other option cards, you will need toselect them.
The Task Selection dialog appears.
Chapter 2 Starting SIA and Preparing for Deployment or Recovery Tasks 15

Note – The Task Selection dialog will only appear if your server supports more SIAtasks than OS installation. If it does not, SIA will proceed to OS installation.
9. In the Task Selection dialog, choose a deployment or recovery task to performand proceed to the appropriate chapter, described below, for more information.
The dialog lists only task options supported for your server. For example, yourlist may include operating system installation, server BIOS/ILOM upgrade, orother tasks.
■ If you need to install a supported operating system for your server, proceedto Chapter 3.
■ If you need to upgrade system firmware (BIOS/ILOM, HBA or diskexpander), proceed to Chapter 4.
■ If you need to recover from a corrupt or inaccessible ILOM service processor,proceed to Chapter 5.
16 Sun Installation Assistant for Windows and Linux User’s Guide • November 2009
CHAPTER 3
Using SIA to Install an OperatingSystem
This chapter explains how to install a supported Microsoft Windows or Linuxoperating system using the Sun Installation Assistant (SIA). SIA assists in theinstallation of supported operating systems and requires a licensed retail version ofthe operating system distribution media to be available locally or remotely tocomplete the task.
SIA provides OS-level device drivers that are certified by Sun for optional accessorycards and other system hardware. Using SIA eliminates the need to obtain andprepare OS-level device drivers on separate media before installing the operatingsystem.
Note – For a complete list of system and OS-level device drivers that are providedand installed by SIA, refer to the SIA CD/DVD README.html file and the ProductNotes for your server.
Topics in this chapter include:
■ “Install an OS With SIA” on page 18
■ “To Install an OS With SIA Using Local or Remote Media” on page 18
17
Install an OS With SIAThe SIA installation program provides a graphical user interface that guides youthrough the initial steps of identifying the system hardware, generating theoperating system installation from customer-provided retail OS media, andcompleting the installation by installing the device drivers that are certified by Sun.
Prerequisites■ If your server ships with a Sun-supported integrated RAID controller and you
want to include your boot drive as part of a RAID configuration, you will need toconfigure a RAID volume on it using the controller’s setup utility (accessibleduring server boot) before you install the operating system. Consult yourplatform installation guide for instructions on how to do this.
■ If you have a Sun StorageTek RAID disk controller (Adaptec-based), you mustconfigure an array volume through the Adaptec RAID Configuration Utility(accessible by pressing Ctrl-A when prompted during server boot) before it can beaccessed by SIA. This must be done whether you intend to use RAID or not.Consult your platform installation guide for instructions on how to do this.
▼ To Install an OS With SIA Using Local orRemote MediaFollow these steps when booting the SIA and OS installation from local or remotemedia.
Note – In the instructions that follow, example dialog screen shots have beenprovided as a reference. Information displayed in each dialog may differ dependingon your server model.
1. You should have already started SIA and prepared it for tasks as described inChapter 2. When you reach the Task Selection dialog, proceed to Step 2.
Note – The instructions below assume local CD/DVD drive access. Be sure tomodify the instructions accordingly if you are using a local USB flash drive preparedwith SIA software, or if you are running SIA from a remote console (or KVMS) withCD-ROM redirection.
18 Sun Installation Assistant for Windows and Linux User’s Guide • November 2009
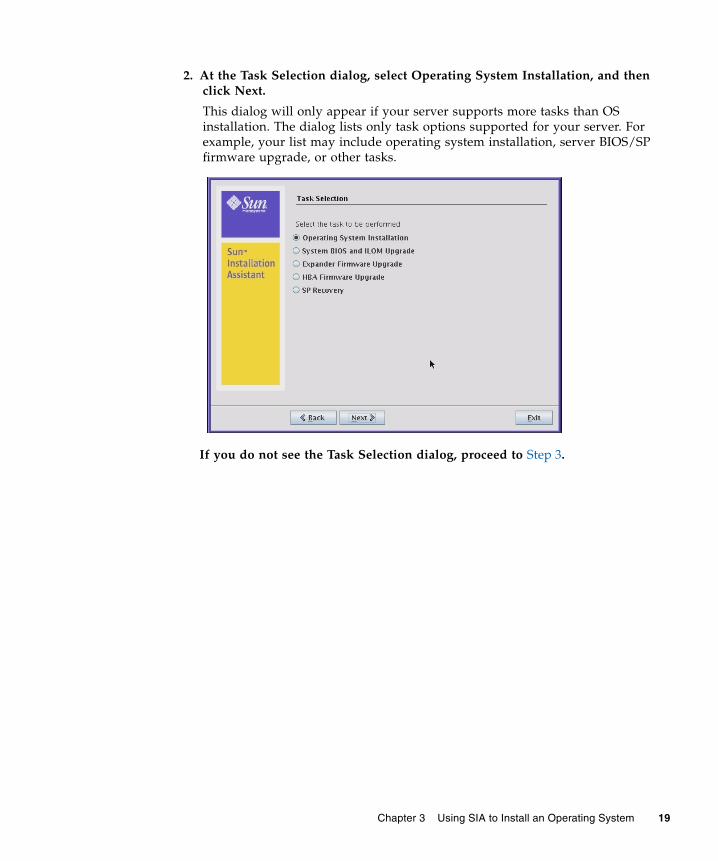
2. At the Task Selection dialog, select Operating System Installation, and thenclick Next.
This dialog will only appear if your server supports more tasks than OSinstallation. The dialog lists only task options supported for your server. Forexample, your list may include operating system installation, server BIOS/SPfirmware upgrade, or other tasks.
If you do not see the Task Selection dialog, proceed to Step 3.
Chapter 3 Using SIA to Install an Operating System 19
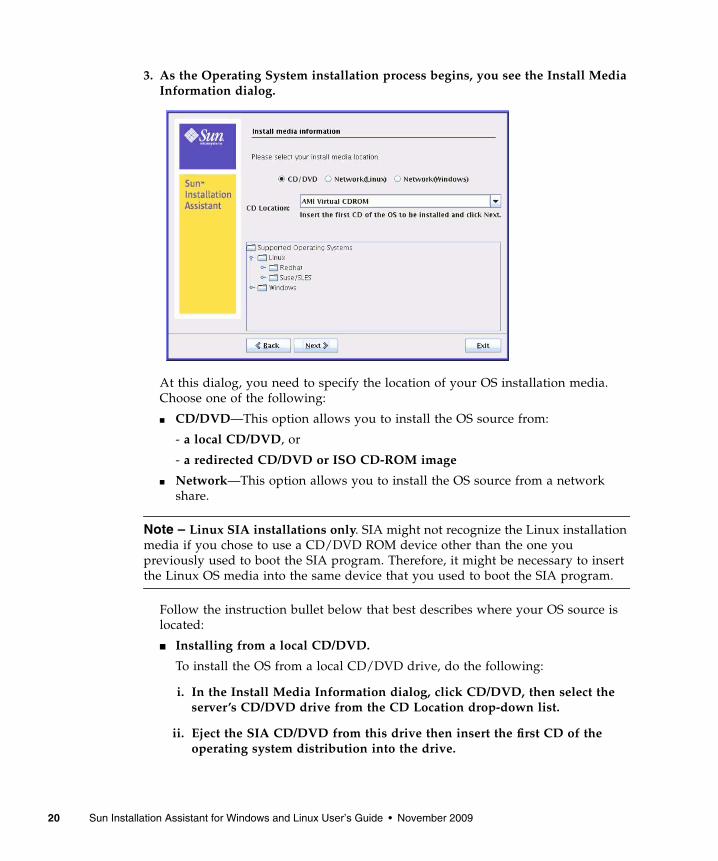
3. As the Operating System installation process begins, you see the Install MediaInformation dialog.
At this dialog, you need to specify the location of your OS installation media.Choose one of the following:
■ CD/DVD—This option allows you to install the OS source from:
- a local CD/DVD, or
- a redirected CD/DVD or ISO CD-ROM image
■ Network—This option allows you to install the OS source from a networkshare.
Note – Linux SIA installations only. SIA might not recognize the Linux installationmedia if you chose to use a CD/DVD ROM device other than the one youpreviously used to boot the SIA program. Therefore, it might be necessary to insertthe Linux OS media into the same device that you used to boot the SIA program.
Follow the instruction bullet below that best describes where your OS source islocated:
■ Installing from a local CD/DVD.
To install the OS from a local CD/DVD drive, do the following:
i. In the Install Media Information dialog, click CD/DVD, then select theserver’s CD/DVD drive from the CD Location drop-down list.
ii. Eject the SIA CD/DVD from this drive then insert the first CD of theoperating system distribution into the drive.
20 Sun Installation Assistant for Windows and Linux User’s Guide • November 2009
iii. In the Install Media Information dialog, click Next to continue.
The Identifying Distribution dialog appears.
iv. Proceed to Step 4.
-or-
■ Installing from a redirected CD/DVD or ISO CD-ROM image.To install the OS from a redirected CD/DVD or redirected ISO CD-ROM imageusing the server’s LOM (Lights Out Manager) Remote Console, do thefollowing:
i. In the SIA Install Media Information dialog, click CD/DVD.
ii. Select the virtual CD-ROM from the CD Location drop-down list.
iii. In the server’s LOM (Lights Out Manager) Remote Console, redirect theoperating system installation media (CD-ROM or CD-ROM Image) usingone of the following methods.
For example, in Step 1 of this procedure if you booted:
-- SIA from a CD/DVD drive, eject the SIA CD from this drive and insertthe first disk of the operating system into the drive. In the serviceprocessor LOM Remote Console, select the CD-ROM option from theappropriate menu (see graphic below for embedded and integrated LOMexamples).
-- SIA from an ISO CD-ROM image, unmount the SIA ISO CD-ROM imagefrom the service processor LOM Remote Console by deselecting CD-ROMImage from the appropriate menu (see graphic below for embedded andintegrated LOM examples), then select CD-ROM Image and specify thelocation of the ISO OS CD-ROM image.
Chapter 3 Using SIA to Install an Operating System 21

iv. In the SIA Install Media Information dialog, click Next to continue.The Identifying Distribution dialog appears.
v. Proceed to Step 4.
-or-
■ Installing from a Network share (Linux or Windows).
To install the OS from a network share, do the following in the Install MediaInformation dialog:
i. In the SIA Install Media Information dialog, click Network (Linux orWindows).
Figure Legend
1 From an ILOM Remote Console, use the Devices menu to mount and unmount devicessuch as a CD or ISO CD image.
2 From an eLOM Remote Console, use the Storage menu to mount, unmount or changedevices such as a CD or ISO CD image.
22 Sun Installation Assistant for Windows and Linux User’s Guide • November 2009
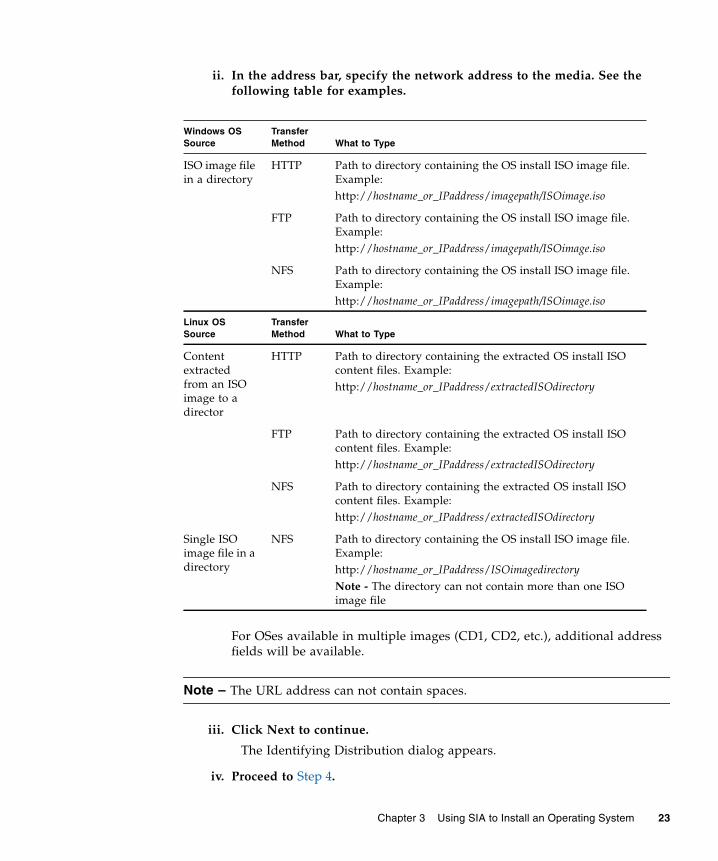
ii. In the address bar, specify the network address to the media. See thefollowing table for examples.
For OSes available in multiple images (CD1, CD2, etc.), additional addressfields will be available.
Note – The URL address can not contain spaces.
iii. Click Next to continue.
The Identifying Distribution dialog appears.
iv. Proceed to Step 4.
Windows OSSource
TransferMethod What to Type
ISO image filein a directory
HTTP Path to directory containing the OS install ISO image file.Example:http://hostname_or_IPaddress/imagepath/ISOimage.iso
FTP Path to directory containing the OS install ISO image file.Example:http://hostname_or_IPaddress/imagepath/ISOimage.iso
NFS Path to directory containing the OS install ISO image file.Example:http://hostname_or_IPaddress/imagepath/ISOimage.iso
Linux OSSource
TransferMethod What to Type
Contentextractedfrom an ISOimage to adirector
HTTP Path to directory containing the extracted OS install ISOcontent files. Example:http://hostname_or_IPaddress/extractedISOdirectory
FTP Path to directory containing the extracted OS install ISOcontent files. Example:http://hostname_or_IPaddress/extractedISOdirectory
NFS Path to directory containing the extracted OS install ISOcontent files. Example:http://hostname_or_IPaddress/extractedISOdirectory
Single ISOimage file in adirectory
NFS Path to directory containing the OS install ISO image file.Example:http://hostname_or_IPaddress/ISOimagedirectoryNote - The directory can not contain more than one ISOimage file
Chapter 3 Using SIA to Install an Operating System 23
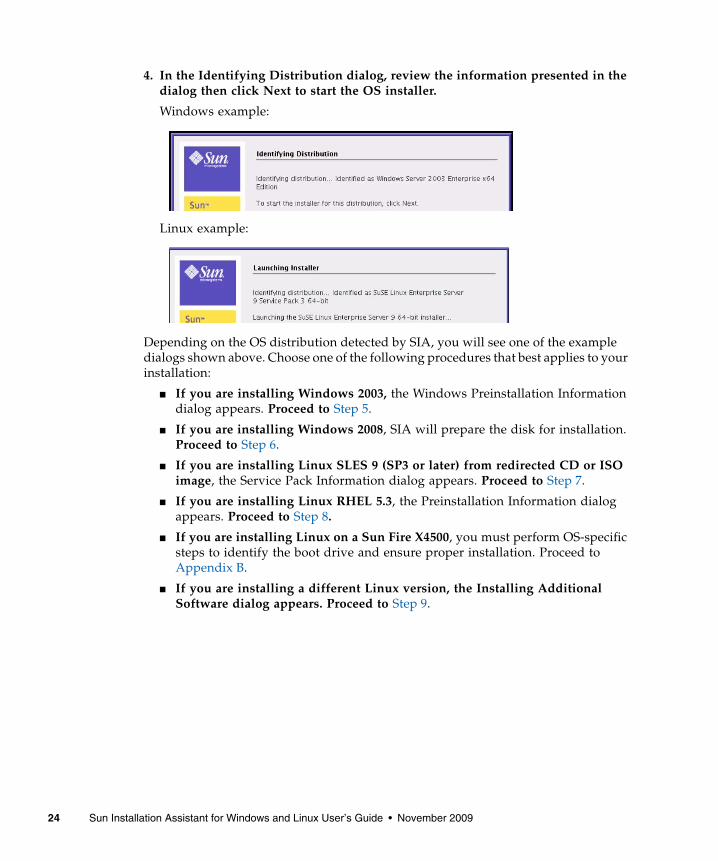
4. In the Identifying Distribution dialog, review the information presented in thedialog then click Next to start the OS installer.
Windows example:
Linux example:
Depending on the OS distribution detected by SIA, you will see one of the exampledialogs shown above. Choose one of the following procedures that best applies to yourinstallation:
■ If you are installing Windows 2003, the Windows Preinstallation Informationdialog appears. Proceed to Step 5.
■ If you are installing Windows 2008, SIA will prepare the disk for installation.Proceed to Step 6.
■ If you are installing Linux SLES 9 (SP3 or later) from redirected CD or ISOimage, the Service Pack Information dialog appears. Proceed to Step 7.
■ If you are installing Linux RHEL 5.3, the Preinstallation Information dialogappears. Proceed to Step 8.
■ If you are installing Linux on a Sun Fire X4500, you must perform OS-specificsteps to identify the boot drive and ensure proper installation. Proceed toAppendix B.
■ If you are installing a different Linux version, the Installing AdditionalSoftware dialog appears. Proceed to Step 9.
24 Sun Installation Assistant for Windows and Linux User’s Guide • November 2009
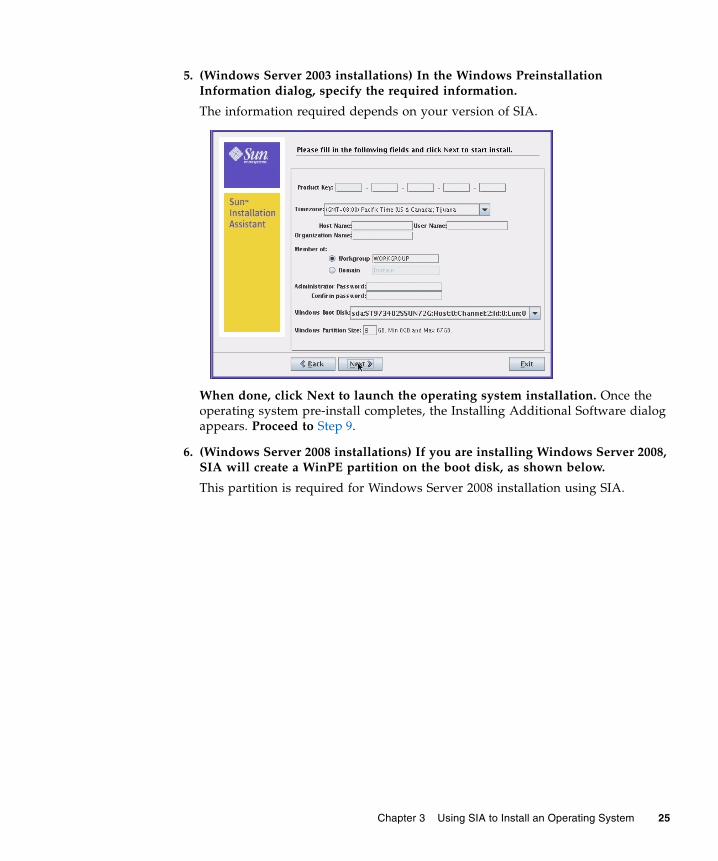
5. (Windows Server 2003 installations) In the Windows PreinstallationInformation dialog, specify the required information.
The information required depends on your version of SIA.
When done, click Next to launch the operating system installation. Once theoperating system pre-install completes, the Installing Additional Software dialogappears. Proceed to Step 9.
6. (Windows Server 2008 installations) If you are installing Windows Server 2008,SIA will create a WinPE partition on the boot disk, as shown below.
This partition is required for Windows Server 2008 installation using SIA.
Chapter 3 Using SIA to Install an Operating System 25
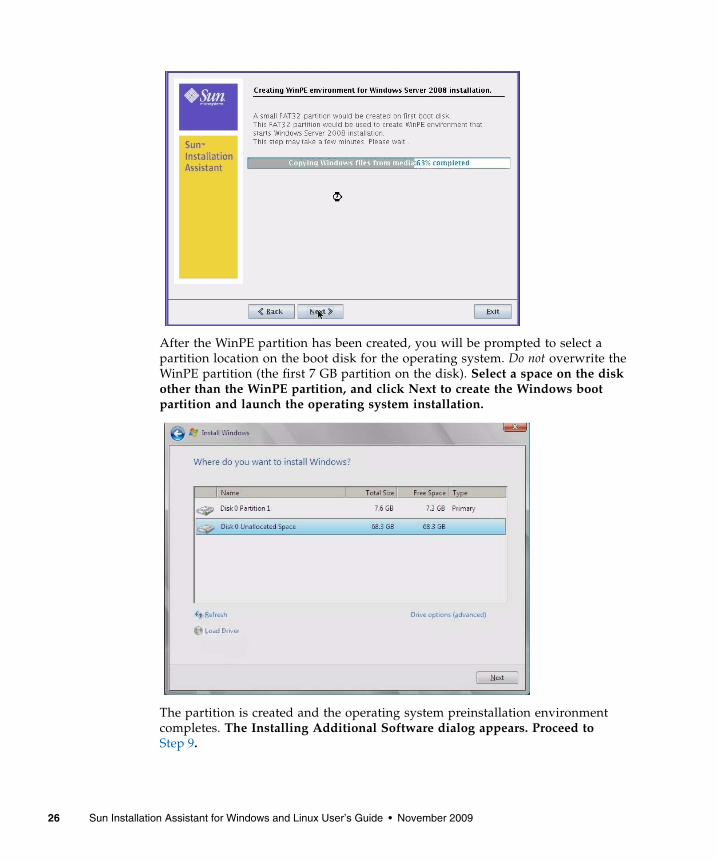
After the WinPE partition has been created, you will be prompted to select apartition location on the boot disk for the operating system. Do not overwrite theWinPE partition (the first 7 GB partition on the disk). Select a space on the diskother than the WinPE partition, and click Next to create the Windows bootpartition and launch the operating system installation.
The partition is created and the operating system preinstallation environmentcompletes. The Installing Additional Software dialog appears. Proceed toStep 9.
26 Sun Installation Assistant for Windows and Linux User’s Guide • November 2009
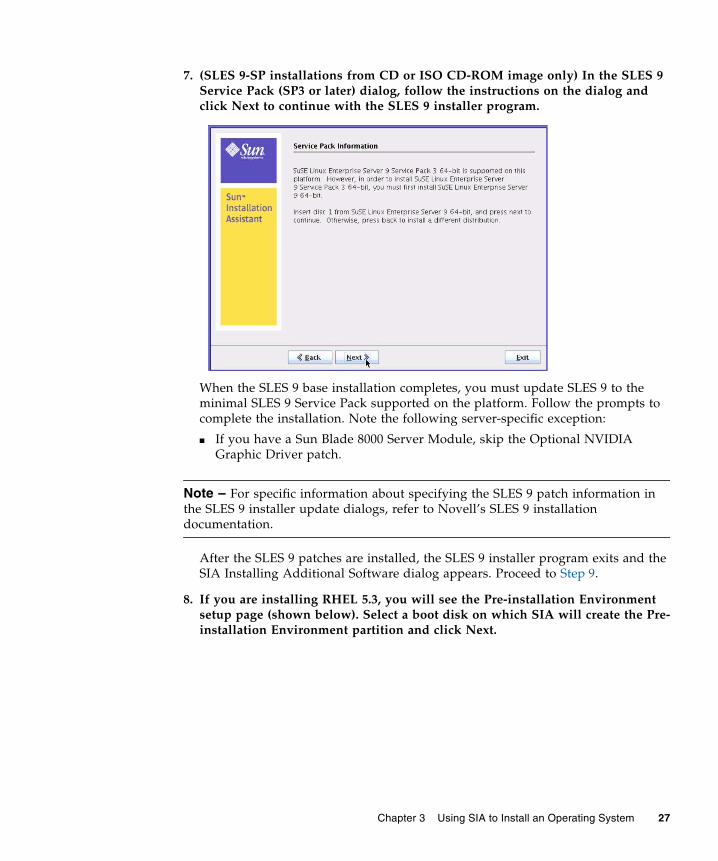
7. (SLES 9-SP installations from CD or ISO CD-ROM image only) In the SLES 9Service Pack (SP3 or later) dialog, follow the instructions on the dialog andclick Next to continue with the SLES 9 installer program.
When the SLES 9 base installation completes, you must update SLES 9 to theminimal SLES 9 Service Pack supported on the platform. Follow the prompts tocomplete the installation. Note the following server-specific exception:
■ If you have a Sun Blade 8000 Server Module, skip the Optional NVIDIAGraphic Driver patch.
Note – For specific information about specifying the SLES 9 patch information inthe SLES 9 installer update dialogs, refer to Novell’s SLES 9 installationdocumentation.
After the SLES 9 patches are installed, the SLES 9 installer program exits and theSIA Installing Additional Software dialog appears. Proceed to Step 9.
8. If you are installing RHEL 5.3, you will see the Pre-installation Environmentsetup page (shown below). Select a boot disk on which SIA will create the Pre-installation Environment partition and click Next.
Chapter 3 Using SIA to Install an Operating System 27

After the RHEL preinstallation environment is set up, the SIA InstallingAdditional Software dialog appears. Proceed to Step 9.
28 Sun Installation Assistant for Windows and Linux User’s Guide • November 2009
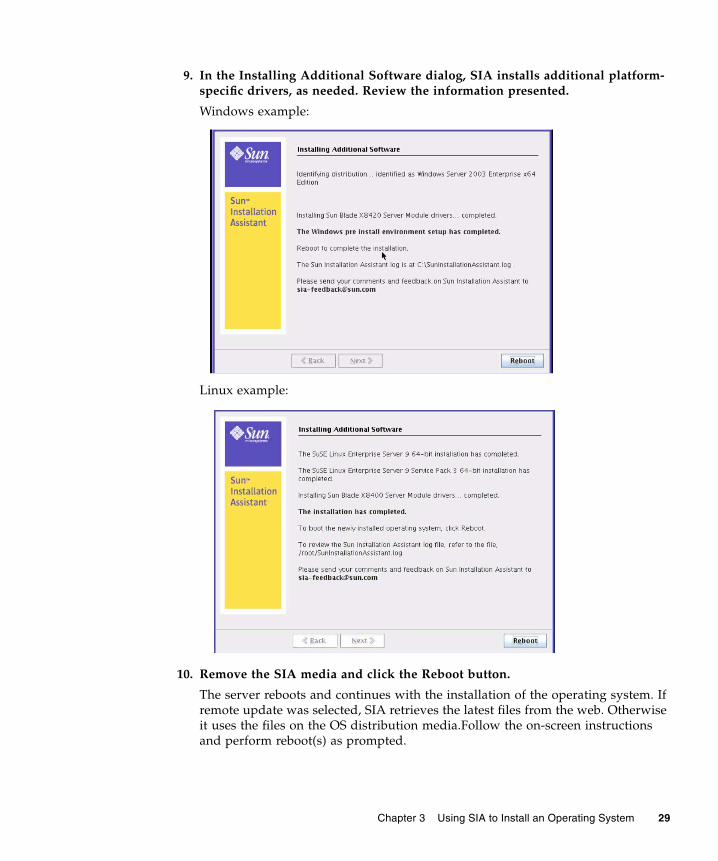
9. In the Installing Additional Software dialog, SIA installs additional platform-specific drivers, as needed. Review the information presented.
Windows example:
Linux example:
10. Remove the SIA media and click the Reboot button.
The server reboots and continues with the installation of the operating system. Ifremote update was selected, SIA retrieves the latest files from the web. Otherwiseit uses the files on the OS distribution media.Follow the on-screen instructionsand perform reboot(s) as prompted.
Chapter 3 Using SIA to Install an Operating System 29
11. After completing the OS installation, do the following:
■ For Linux installations:
■ Install and configure additional drivers and utilities for your server notinstalled by SIA. This provides you the supported feature set for installedserver components (for example, additional drivers may include ACPI,video, network and mass storage).
■ Install Sun-specific optional software available on your server’s Tools andDrivers (also known as Resource) CD/DVD as described in your server OSinstallation and Product Notes documentation.
■ Download and install the latest Linux operating system updates and fixesfrom the Linux operating system vendor’s web site.
■ For Windows installations:
■ Install drivers not installed by SIA (for example, additional drivers mayinclude ACPI, video, network and mass storage). SIA automatically copiesthese drivers to the target hard drive (for example, c:\drivers) but it doesnot automatically install them. This can be done using the Windows DeviceManager.
■ Install Sun-specific optional software available on your server’s Tools andDrivers (also known as Resource) CD/DVD as described in your server OSinstallation and Product Notes documentation.
■ If you have Sun Blade Modular System chassis with EM (Express Module)or NEM (Network Express Module) hardware installed, download andinstall the drivers. For more information about obtaining these drivers forinstallation, refer to the Sun Blade Modular Systems - I/O Modules web site at:http://www.sun.com/servers/blades/optioncards.jsp
30 Sun Installation Assistant for Windows and Linux User’s Guide • November 2009
CHAPTER 4
Using SIA to Upgrade SystemFirmware
This chapter explains how to upgrade system firmware (including system BIOS,ILOM service processor, disk controller HBA and disk expander) using the SunInstallation Assistant (SIA).
SIA provides system BIOS and firmware certified by Sun for your Sun x64 server.Using SIA eliminates the need to obtain and run separate packages and programs tokeep your system firmware up-to-date.
Note – For a complete list of systems that support the firmware upgrade capabilitiesof SIA, refer to the SIA CD/DVD README.html file and the Product Notes for yourserver.
Topics in this chapter include:
■ “Upgrading System Firmware With SIA” on page 32
■ “To Upgrade System Firmware” on page 32
31
Upgrading System Firmware With SIAThe SIA installation program provides a graphical user interface that guides youthrough the initial steps of identifying the system hardware and completing thefirmware upgrade of system hardware certified by Sun.
▼ To Upgrade System FirmwareFollow these steps when booting the SIA and performing a firmware upgrade fromlocal or remote SIA media.
Note – In the instructions that follow, example dialog screen shots have beenprovided as a reference. Information displayed in each dialog may differ dependingon your server model.
1. You should have already started SIA and prepared it for tasks as described inChapter 2. When you reach the Task Selection dialog, proceed to Step 2.
Note – The instructions below assume local CD/DVD drive access. Be sure tomodify the instructions accordingly if you are using a local USB flash drive preparedwith SIA software, or if you are running SIA from a remote console (or KVMS) withCD-ROM redirection.
2. At the Task Selection dialog, choose one of the firmware upgrade tasks listedbelow and then follow the instructions.
32 Sun Installation Assistant for Windows and Linux User’s Guide • November 2009
■ “Upgrading the System BIOS and ILOM” on page 33
■ “Upgrading HBA Firmware” on page 35
■ “Upgrading Expander Firmware” on page 37
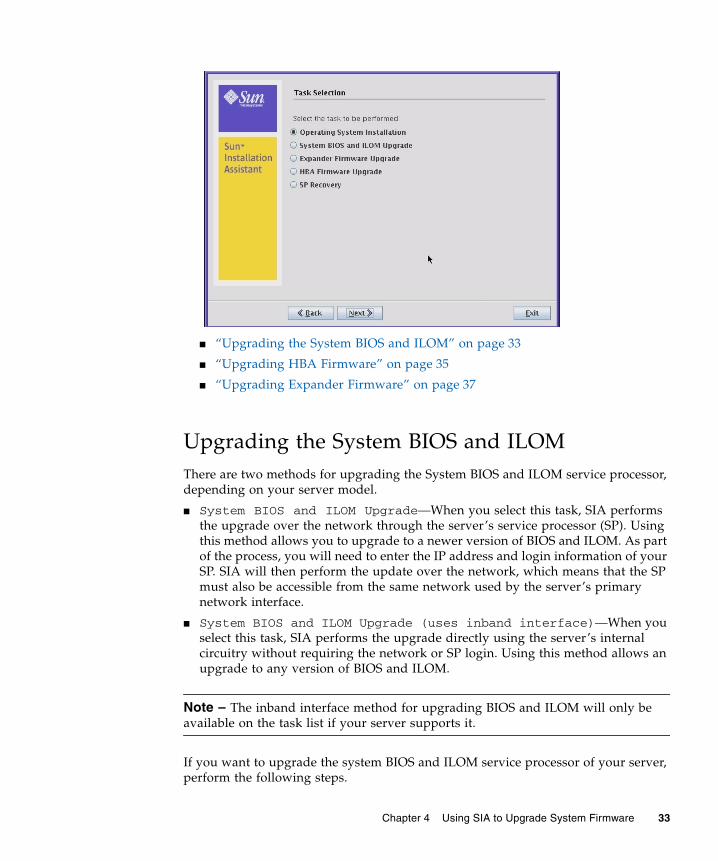
Upgrading the System BIOS and ILOMThere are two methods for upgrading the System BIOS and ILOM service processor,depending on your server model.
■ System BIOS and ILOM Upgrade—When you select this task, SIA performsthe upgrade over the network through the server’s service processor (SP). Usingthis method allows you to upgrade to a newer version of BIOS and ILOM. As partof the process, you will need to enter the IP address and login information of yourSP. SIA will then perform the update over the network, which means that the SPmust also be accessible from the same network used by the server’s primarynetwork interface.
■ System BIOS and ILOM Upgrade (uses inband interface)—When youselect this task, SIA performs the upgrade directly using the server’s internalcircuitry without requiring the network or SP login. Using this method allows anupgrade to any version of BIOS and ILOM.
Note – The inband interface method for upgrading BIOS and ILOM will only beavailable on the task list if your server supports it.
If you want to upgrade the system BIOS and ILOM service processor of your server,perform the following steps.
Chapter 4 Using SIA to Upgrade System Firmware 33
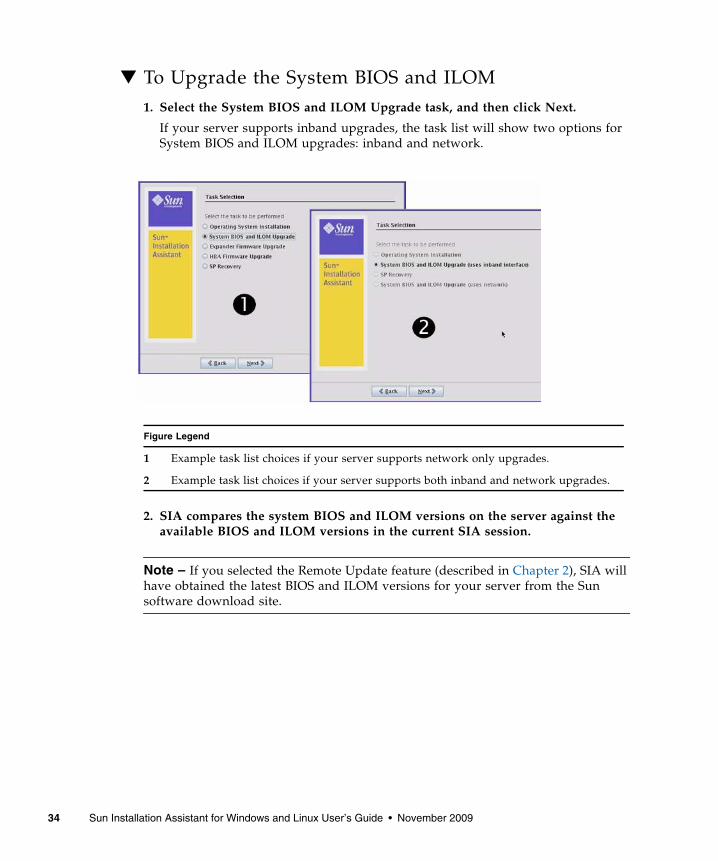
▼ To Upgrade the System BIOS and ILOM1. Select the System BIOS and ILOM Upgrade task, and then click Next.
If your server supports inband upgrades, the task list will show two options forSystem BIOS and ILOM upgrades: inband and network.
2. SIA compares the system BIOS and ILOM versions on the server against theavailable BIOS and ILOM versions in the current SIA session.
Note – If you selected the Remote Update feature (described in Chapter 2), SIA willhave obtained the latest BIOS and ILOM versions for your server from the Sunsoftware download site.
Figure Legend
1 Example task list choices if your server supports network only upgrades.
2 Example task list choices if your server supports both inband and network upgrades.
34 Sun Installation Assistant for Windows and Linux User’s Guide • November 2009
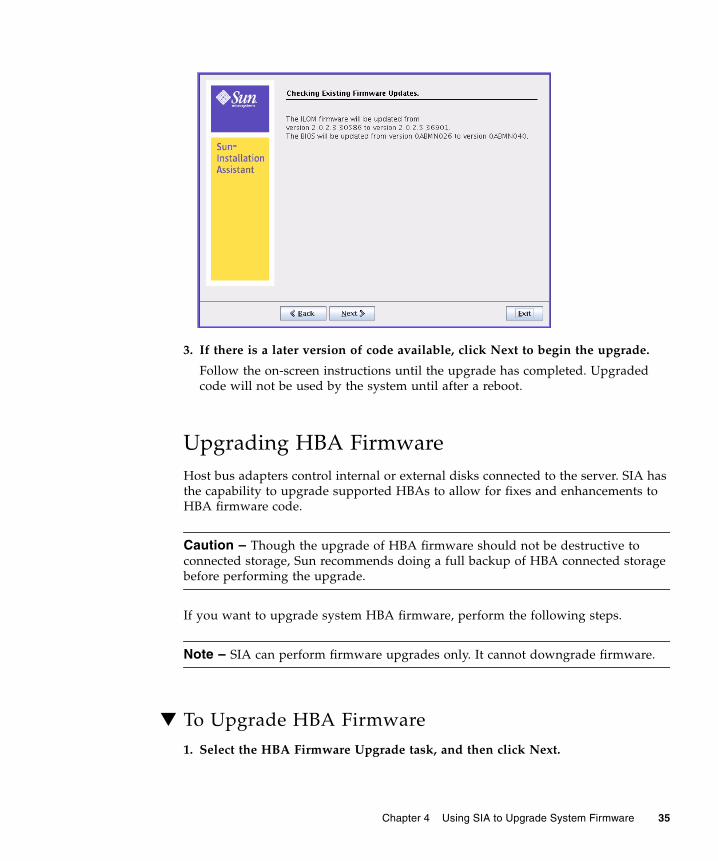
3. If there is a later version of code available, click Next to begin the upgrade.
Follow the on-screen instructions until the upgrade has completed. Upgradedcode will not be used by the system until after a reboot.
Upgrading HBA FirmwareHost bus adapters control internal or external disks connected to the server. SIA hasthe capability to upgrade supported HBAs to allow for fixes and enhancements toHBA firmware code.
Caution – Though the upgrade of HBA firmware should not be destructive toconnected storage, Sun recommends doing a full backup of HBA connected storagebefore performing the upgrade.
If you want to upgrade system HBA firmware, perform the following steps.
Note – SIA can perform firmware upgrades only. It cannot downgrade firmware.
▼ To Upgrade HBA Firmware1. Select the HBA Firmware Upgrade task, and then click Next.
Chapter 4 Using SIA to Upgrade System Firmware 35

SIA displays the current version(s) and the available upgrade version fordiscovered HBAs.
Note – If you selected the Remote Update feature (described in Chapter 2), SIA willhave obtained the latest code from the Sun software download site.
2. Select the identified controller(s)/HBAs to upgrade by placing a check mark inthe Upgrade box.
For a multi-controller system, such as the X4540, you can choose to upgrade someor all of the controllers at one time. For example, you could decide to upgradenon-boot controllers first, see how the system reacts after reboot, and thenupgrade the rest.
36 Sun Installation Assistant for Windows and Linux User’s Guide • November 2009
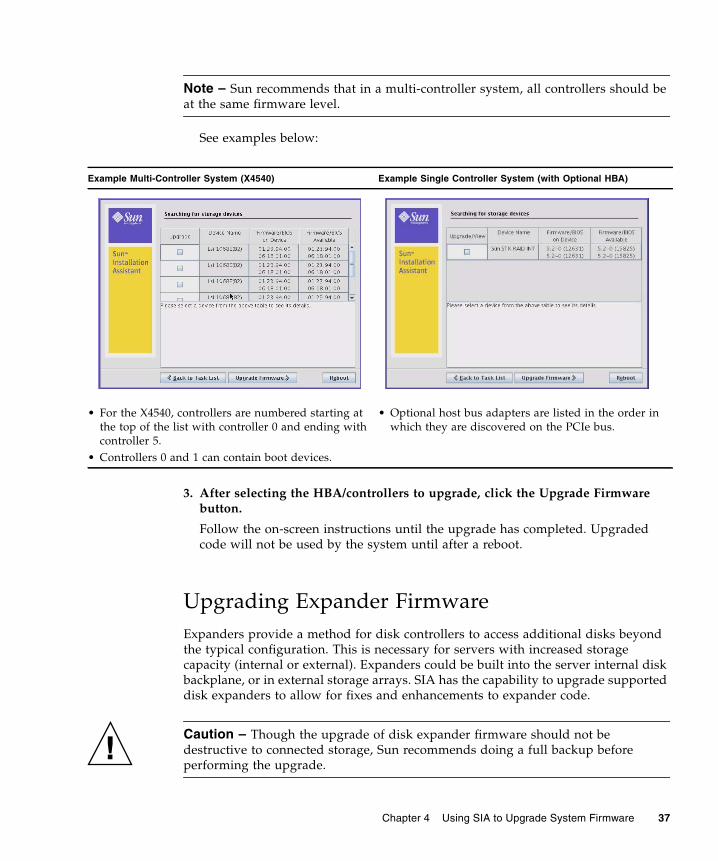
Note – Sun recommends that in a multi-controller system, all controllers should beat the same firmware level.
See examples below:
3. After selecting the HBA/controllers to upgrade, click the Upgrade Firmwarebutton.
Follow the on-screen instructions until the upgrade has completed. Upgradedcode will not be used by the system until after a reboot.
Upgrading Expander FirmwareExpanders provide a method for disk controllers to access additional disks beyondthe typical configuration. This is necessary for servers with increased storagecapacity (internal or external). Expanders could be built into the server internal diskbackplane, or in external storage arrays. SIA has the capability to upgrade supporteddisk expanders to allow for fixes and enhancements to expander code.
Caution – Though the upgrade of disk expander firmware should not bedestructive to connected storage, Sun recommends doing a full backup beforeperforming the upgrade.
Example Multi-Controller System (X4540) Example Single Controller System (with Optional HBA)
• For the X4540, controllers are numbered starting atthe top of the list with controller 0 and ending withcontroller 5.
• Controllers 0 and 1 can contain boot devices.
• Optional host bus adapters are listed in the order inwhich they are discovered on the PCIe bus.
Chapter 4 Using SIA to Upgrade System Firmware 37
If you want to upgrade expander firmware, perform the following steps.
Note – SIA can perform firmware upgrades only. It cannot downgrade firmware.
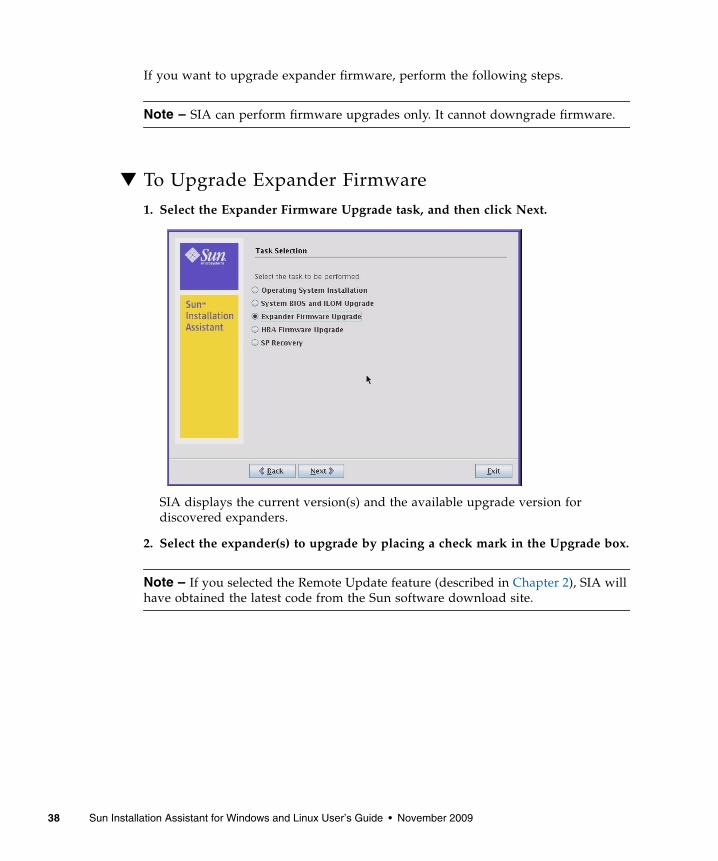
▼ To Upgrade Expander Firmware1. Select the Expander Firmware Upgrade task, and then click Next.
SIA displays the current version(s) and the available upgrade version fordiscovered expanders.
2. Select the expander(s) to upgrade by placing a check mark in the Upgrade box.
Note – If you selected the Remote Update feature (described in Chapter 2), SIA willhave obtained the latest code from the Sun software download site.
38 Sun Installation Assistant for Windows and Linux User’s Guide • November 2009
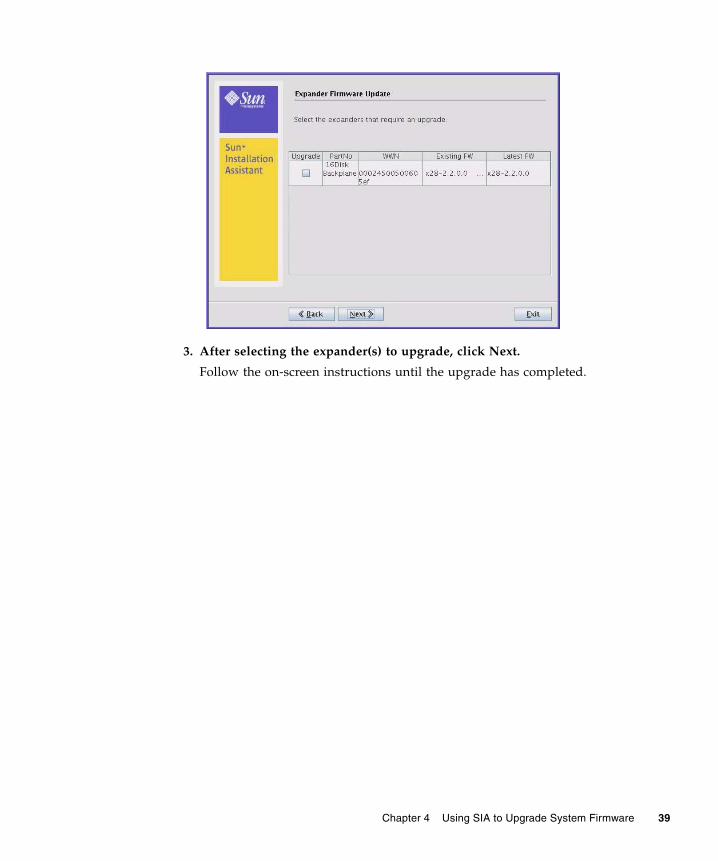
3. After selecting the expander(s) to upgrade, click Next.
Follow the on-screen instructions until the upgrade has completed.
Chapter 4 Using SIA to Upgrade System Firmware 39

40 Sun Installation Assistant for Windows and Linux User’s Guide • November 2009
CHAPTER 5
Using SIA to Recover a ServiceProcessor
This chapter explains how to recover a corrupt or inaccessible service processor (SP)using the Sun Installation Assistant (SIA). On supported servers, SIA can recoverservice processor firmware. This is a two step process that includes:
1. SP firmware recovery (to regain access to the SP)
2. System BIOS/ILOM firmware upgrade (to re-sync BIOS/ILOM versions)
Note – For a complete list of systems that support the SP recovery capabilities ofSIA, refer to the SIA CD/DVD README.html file and the Product Notes for yourserver.
Topics in this chapter include:
■ “Recovering a Service Processor With SIA” on page 42
■ “To Recover a Service Processor” on page 42
41
Recovering a Service Processor With SIAThe SIA installation program provides a graphical user interface that guides youthrough the initial steps of identifying the system hardware and completing thefirmware upgrade of system hardware certified by Sun.
▼ To Recover a Service ProcessorFollow these steps when booting the SIA and performing the SP recovery task fromlocal or remote SIA media.
Note – In the instructions that follow, example dialog screen shots have beenprovided as a reference. Information displayed in each dialog may differ dependingon your server model.
1. You should have already started SIA and prepared it for tasks as described inChapter 2. When you reach the Task Selection dialog, proceed to Step 2.
Note – The instructions below assume local CD/DVD drive access. Be sure tomodify the instructions accordingly if you are using a local USB flash drive preparedwith SIA software, or if you are running SIA from a remote console (or KVMS) withCD-ROM redirection.
2. At the Task Selection dialog, choose the SP Recovery task and then click Next.
42 Sun Installation Assistant for Windows and Linux User’s Guide • November 2009

The ILOM Recovery information dialog appears.
3. At the ILOM Recovery dialog, click Next to start the recovery.
Follow the on-screen instructions to complete the recovery. When done, you willneed to reboot the server.
4. After the server reboots, launch SIA again.
Follow the on-screen instructions until you reach the Task Selection dialog.
5. You next need to upgrade the system BIOS/ILOM to sync versions. Proceed toChapter 4 for more information on performing this task.
Chapter 5 Using SIA to Recover a Service Processor 43

44 Sun Installation Assistant for Windows and Linux User’s Guide • November 2009
CHAPTER 6
Using SIA In PXE-Based NetworkInstallations
This chapter explains how to boot the Sun Installation Assistant (SIA) from aPreboot Execution Environment (PXE) and run it in attended (interactive) mode orunattended mode.
SIA is a Linux-based program that can be booted from a Linux-based PXE server.You can create an SIA image on your Linux-based PXE server, boot from it, and useSIA to perform deployment tasks in attended or unattended mode. In attendedmode, you use SIA as you normally would to perform tasks using the interactivegraphical interface. In unattended mode, SIA will automatically perform serverinstallation tasks, such as operating system installation or firmware upgrades,without user intervention.
Note – For the Microsoft Windows operating system, only Windows Server 2003 iscurrently supported for an unattended installation using SIA.
Topics discussed in this chapter include:
■ “Perform an SIA PXE-Based Attended Installation” on page 46
■ “Perform an SIA PXE-Based Unattended Installation” on page 49
■ “Observe the SIA PXE-Based Unattended Installation Progress” on page 64
45
Perform an SIA PXE-Based AttendedInstallationThese instructions describe how to boot the Sun Installation Assistant from a PXEboot server. This section includes the following procedures:
■ “To Create the SIA Image and Prepare for PXE Boot” on page 46
■ “To Boot SIA From a PXE Server for an Attended Installation” on page 47
Note – The SIA program files are Linux-based and must be configured to boot froma Linux PXE server. However, the SIA program when booted from a Linux-basedPXE server supports booting the Windows or Linux installation from physical mediaor an ISO CD image accessible from the network.
▼ To Create the SIA Image and Prepare for PXEBoot1. Preconfigure your network to support a Linux-based PXE server network
installation.
You may refer to the Linux distribution documentation for more information onconfiguring a PXE server.
2. In the PXE Linux directory, create a new subdirectory for the SIA image(s).
On a Linux system, for example, the following command line creates asubdirectory for suninstall images:
# mkdir /home/pxeboot/suninstall
3. Insert the SIA CD/DVD into a CD/DVD drive of a Linux-based PXE server andmount the CD/DVD.
4. Copy the vmlinuz (the bootable Linux kernel) and initrd (initial ram disk)files from the SIA CD/DVD to the suninstall subdirectory that you created.
Use the correct path to the mounted CD image. This example uses /mnt/cdrom:
# cp /mnt/cdrom/boot/isolinux/vmlinuz /home/pxeboot/suninstall# cp /mnt/cdrom/boot/isolinux/initrd.img /home/pxeboot/suninstall
46 Sun Installation Assistant for Windows and Linux User’s Guide • November 2009
5. Use an editor to add the following SIA references to thepxelinux.cfg/default file that is stored in the /home/pxeboot directory.
6. Save the file, and then unmount and remove the SIA CD/DVD from theCD/DVD drive.
7. To boot the SIA PXE image from the PXE server, follow the steps presented inthe following procedure.
▼ To Boot SIA From a PXE Server for an AttendedInstallationThe following procedure explains the initial steps you must perform to boot SIAfrom a PXE Linux-based server. After SIA boots, you perform your installation tasksinteractively using the graphical user interface (GUI).
1. Ensure that the target Sun server is configured on the same network as the PXEserver, and then reset the Sun server. For example:
■ From the service processor (Lights Out Manager) Remote Console web interface,click Remote Control->Remote Power Control then select Reset to reset thehost server.
-or-
■ Press the Power button on the front panel of the server to turn it off (hold thebutton in until the server powers off), then press the Power button to turn onthe server.
The BIOS screen appears. An example is shown below (your server’s BIOS screenmight look different).
default suninstalllabel suninstallkernel suninstall/vmlinuzappend initrd=suninstall/initrd.img vga=0x314 ramdisk_size=900000root=/dev/ram netboot
Note - Type the append command line from append initrd= to netboot as onecontinuous string with no returns.
Chapter 6 Using SIA In PXE-Based Network Installations 47
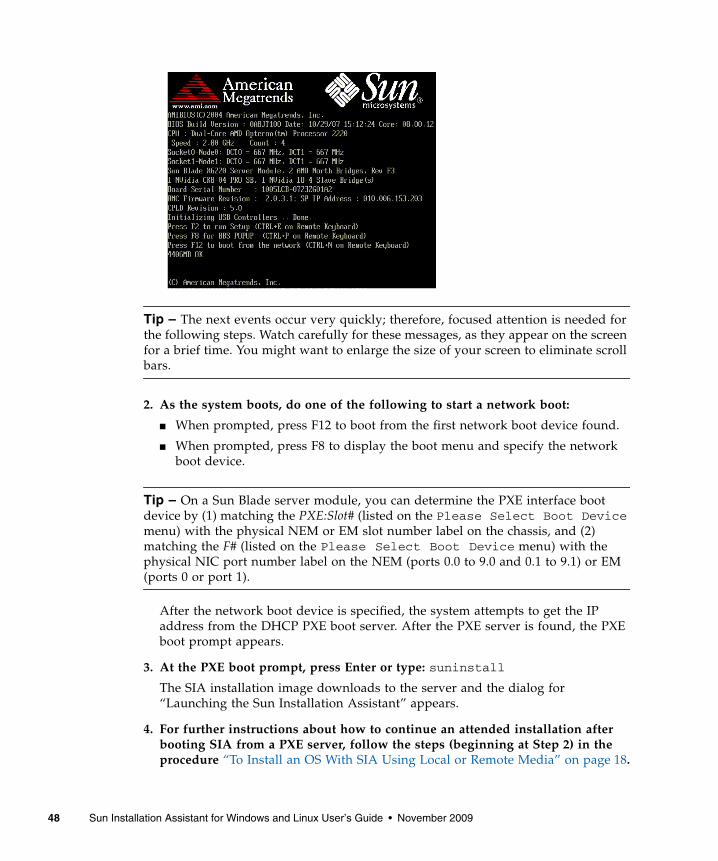
Tip – The next events occur very quickly; therefore, focused attention is needed forthe following steps. Watch carefully for these messages, as they appear on the screenfor a brief time. You might want to enlarge the size of your screen to eliminate scrollbars.
2. As the system boots, do one of the following to start a network boot:
■ When prompted, press F12 to boot from the first network boot device found.
■ When prompted, press F8 to display the boot menu and specify the networkboot device.
Tip – On a Sun Blade server module, you can determine the PXE interface bootdevice by (1) matching the PXE:Slot# (listed on the Please Select Boot Devicemenu) with the physical NEM or EM slot number label on the chassis, and (2)matching the F# (listed on the Please Select Boot Device menu) with thephysical NIC port number label on the NEM (ports 0.0 to 9.0 and 0.1 to 9.1) or EM(ports 0 or port 1).
After the network boot device is specified, the system attempts to get the IPaddress from the DHCP PXE boot server. After the PXE server is found, the PXEboot prompt appears.
3. At the PXE boot prompt, press Enter or type: suninstall
The SIA installation image downloads to the server and the dialog for“Launching the Sun Installation Assistant” appears.
4. For further instructions about how to continue an attended installation afterbooting SIA from a PXE server, follow the steps (beginning at Step 2) in theprocedure “To Install an OS With SIA Using Local or Remote Media” on page 18.
48 Sun Installation Assistant for Windows and Linux User’s Guide • November 2009

Perform an SIA PXE-Based UnattendedInstallationThis section describes how to perform unattended (no user interaction required)installation tasks, such as firmware upgrades or operating system installations,utilizing a PXE-based image of SIA. Support for PXE-based installations areavailable as follows:
■ SIA v2.0.1 (and later versions) added the ability to do an SIA PXE-basedunattended installation of a supported Linux operating system.
■ SIA v2.1.0 (and later versions) added the ability to do an SIA PXE-basedunattended installation of a supported Windows Server 2003 operating system.
This section contains the following topics. Refer to the topics that apply to yourinstallation:
■ “Contents of the SIA State File” on page 49
■ “Preparing for an Unattended SIA Installation of Linux” on page 55“
■ “Preparing for an Unattended SIA Installation of Windows Server 2003” onpage 57
■ “Preparing for an Unattended SIA Firmware Upgrade” on page 59
■ “To Create the SIA Image and Prepare for PXE Boot” on page 61
Contents of the SIA State FileThe SIA state file provides the scripting variables required for carrying out anunattended session of SIA and performing the specified SIA tasks automaticallywithout user intervention. A copy of the state file with all of the possible parameterscan be found at the root level on the SIA CD and is accessible by command promptduring an SIA session.
To access the command prompt from SIA, do the following:
1. Boot SIA (locally or through the remote console).
2. At the first screen, press Ctrl-Alt-F2.
A command prompt will be displayed.
3. At the command prompt enter the command:
# cd /root# ls
Look for the externalStateVariables.txt file.
Chapter 6 Using SIA In PXE-Based Network Installations 49
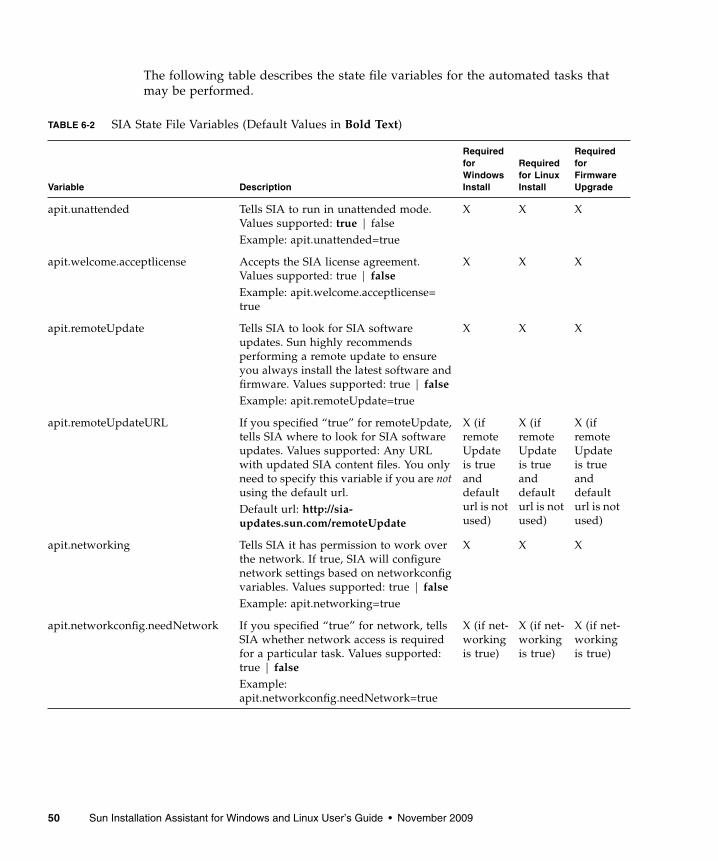
The following table describes the state file variables for the automated tasks thatmay be performed.
TABLE 6-2 SIA State File Variables (Default Values in Bold Text)
Variable Description
RequiredforWindowsInstall
Requiredfor LinuxInstall
RequiredforFirmwareUpgrade
apit.unattended Tells SIA to run in unattended mode.Values supported: true | falseExample: apit.unattended=true
X X X
apit.welcome.acceptlicense Accepts the SIA license agreement.Values supported: true | falseExample: apit.welcome.acceptlicense=true
X X X
apit.remoteUpdate Tells SIA to look for SIA softwareupdates. Sun highly recommendsperforming a remote update to ensureyou always install the latest software andfirmware. Values supported: true | falseExample: apit.remoteUpdate=true
X X X
apit.remoteUpdateURL If you specified “true” for remoteUpdate,tells SIA where to look for SIA softwareupdates. Values supported: Any URLwith updated SIA content files. You onlyneed to specify this variable if you are notusing the default url.Default url: http://sia-updates.sun.com/remoteUpdate
X (ifremoteUpdateis trueanddefaulturl is notused)
X (ifremoteUpdateis trueanddefaulturl is notused)
X (ifremoteUpdateis trueanddefaulturl is notused)
apit.networking Tells SIA it has permission to work overthe network. If true, SIA will configurenetwork settings based on networkconfigvariables. Values supported: true | falseExample: apit.networking=true
X X X
apit.networkconfig.needNetwork If you specified “true” for network, tellsSIA whether network access is requiredfor a particular task. Values supported:true | falseExample:apit.networkconfig.needNetwork=true
X (if net-workingis true)
X (if net-workingis true)
X (if net-workingis true)
50 Sun Installation Assistant for Windows and Linux User’s Guide • November 2009
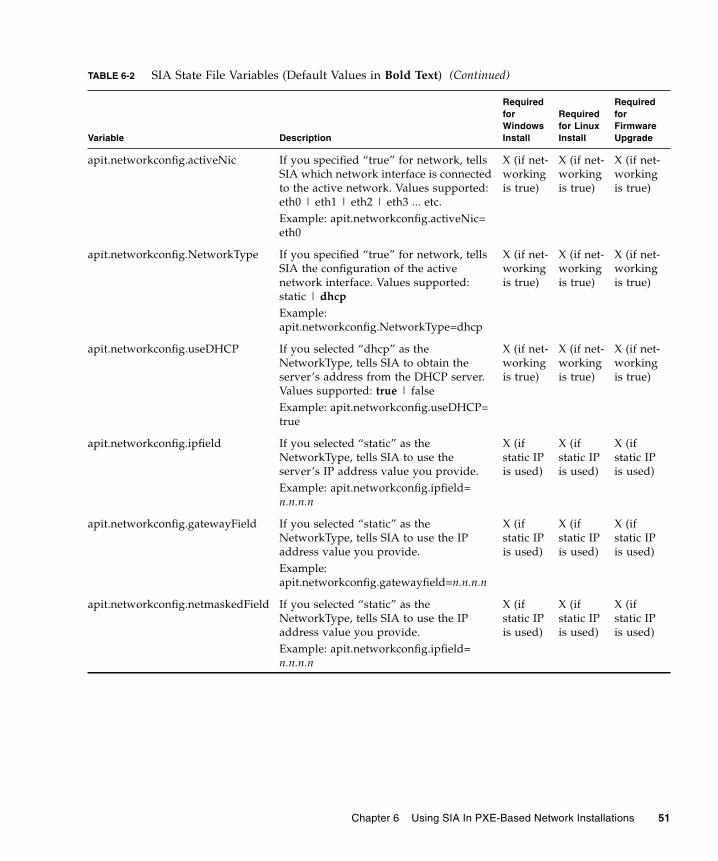
apit.networkconfig.activeNic If you specified “true” for network, tellsSIA which network interface is connectedto the active network. Values supported:eth0 | eth1 | eth2 | eth3 ... etc.Example: apit.networkconfig.activeNic=eth0
X (if net-workingis true)
X (if net-workingis true)
X (if net-workingis true)
apit.networkconfig.NetworkType If you specified “true” for network, tellsSIA the configuration of the activenetwork interface. Values supported:static | dhcpExample:apit.networkconfig.NetworkType=dhcp
X (if net-workingis true)
X (if net-workingis true)
X (if net-workingis true)
apit.networkconfig.useDHCP If you selected “dhcp” as theNetworkType, tells SIA to obtain theserver’s address from the DHCP server.Values supported: true | falseExample: apit.networkconfig.useDHCP=true
X (if net-workingis true)
X (if net-workingis true)
X (if net-workingis true)
apit.networkconfig.ipfield If you selected “static” as theNetworkType, tells SIA to use theserver’s IP address value you provide.Example: apit.networkconfig.ipfield=n.n.n.n
X (ifstatic IPis used)
X (ifstatic IPis used)
X (ifstatic IPis used)
apit.networkconfig.gatewayField If you selected “static” as theNetworkType, tells SIA to use the IPaddress value you provide.Example:apit.networkconfig.gatewayfield=n.n.n.n
X (ifstatic IPis used)
X (ifstatic IPis used)
X (ifstatic IPis used)
apit.networkconfig.netmaskedField If you selected “static” as theNetworkType, tells SIA to use the IPaddress value you provide.Example: apit.networkconfig.ipfield=n.n.n.n
X (ifstatic IPis used)
X (ifstatic IPis used)
X (ifstatic IPis used)
TABLE 6-2 SIA State File Variables (Default Values in Bold Text) (Continued)
Variable Description
RequiredforWindowsInstall
Requiredfor LinuxInstall
RequiredforFirmwareUpgrade
Chapter 6 Using SIA In PXE-Based Network Installations 51
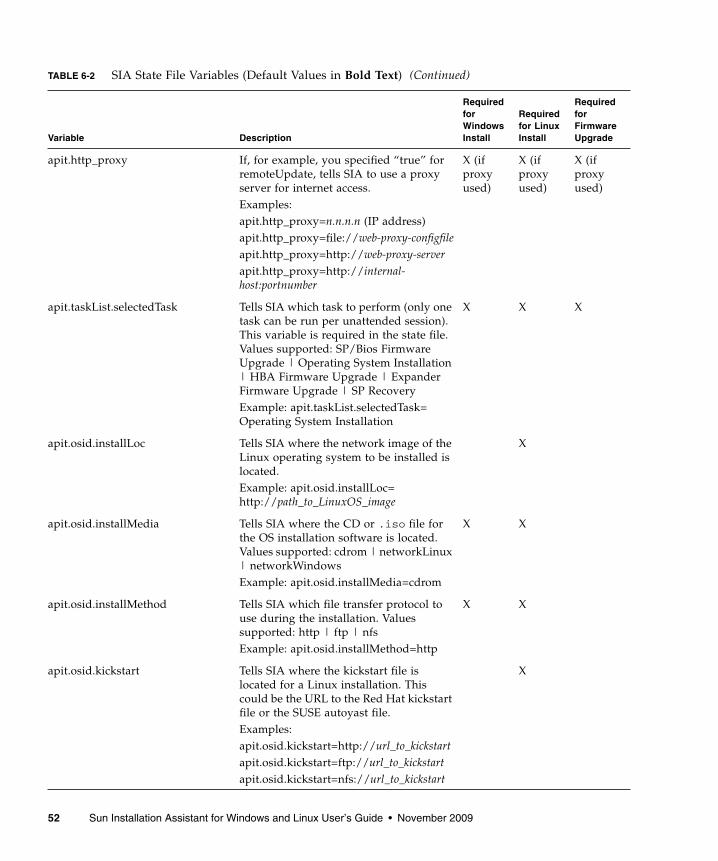
apit.http_proxy If, for example, you specified “true” forremoteUpdate, tells SIA to use a proxyserver for internet access.Examples:apit.http_proxy=n.n.n.n (IP address)apit.http_proxy=file://web-proxy-configfileapit.http_proxy=http://web-proxy-serverapit.http_proxy=http://internal-host:portnumber
X (ifproxyused)
X (ifproxyused)
X (ifproxyused)
apit.taskList.selectedTask Tells SIA which task to perform (only onetask can be run per unattended session).This variable is required in the state file.Values supported: SP/Bios FirmwareUpgrade | Operating System Installation| HBA Firmware Upgrade | ExpanderFirmware Upgrade | SP RecoveryExample: apit.taskList.selectedTask=Operating System Installation
X X X
apit.osid.installLoc Tells SIA where the network image of theLinux operating system to be installed islocated.Example: apit.osid.installLoc=http://path_to_LinuxOS_image
X
apit.osid.installMedia Tells SIA where the CD or .iso file forthe OS installation software is located.Values supported: cdrom | networkLinux| networkWindowsExample: apit.osid.installMedia=cdrom
X X
apit.osid.installMethod Tells SIA which file transfer protocol touse during the installation. Valuessupported: http | ftp | nfsExample: apit.osid.installMethod=http
X X
apit.osid.kickstart Tells SIA where the kickstart file islocated for a Linux installation. Thiscould be the URL to the Red Hat kickstartfile or the SUSE autoyast file.Examples:apit.osid.kickstart=http://url_to_kickstartapit.osid.kickstart=ftp://url_to_kickstartapit.osid.kickstart=nfs://url_to_kickstart
X
TABLE 6-2 SIA State File Variables (Default Values in Bold Text) (Continued)
Variable Description
RequiredforWindowsInstall
Requiredfor LinuxInstall
RequiredforFirmwareUpgrade
52 Sun Installation Assistant for Windows and Linux User’s Guide • November 2009

apit.osid.windows.iso.url1 Based on the installMethod you chose(http, ftp or nfs), tells SIA where thelocation of the first Windows OS installdisk .iso image file is located.Examples:apit.osid.windows.iso.url1=http://path_to_disk1.isoapit.osid.windows.iso.url1=ftp://path_to_disk1.isoapit.osid.windows.iso.url1=nfs://path_to_disk1.iso
X
apit.osid.windows.iso.url2 Based on the installMethod you chose(http, ftp or nfs), tells SIA where thelocation of the second Windows OSinstall disk .iso image file is located.Examples:apit.osid.windows.iso.url2=http://path_to_disk2.isoapit.osid.windows.iso.url2=ftp://path_to_disk2.isoapit.osid.windows.iso.url2=nfs://path_to_disk2.iso
X
apit.enclosureID.oldEnclosureID Used as part of a two-step process thatallows you to replace a Sun Blade 6000disk module. The value for this variablemust be the old enclosure ID number(also called WWN) that can be found onthe circuit board of the blade beingreplaced.
apit.enclosureID.newEnclosureID Used as part of a two-step process thatallows you to replace a Sun Blade 6000disk module. This value for this variablemust be the new enclosure ID number(also called WWN) that can be found onthe circuit board of the replacementblade.
TABLE 6-2 SIA State File Variables (Default Values in Bold Text) (Continued)
Variable Description
RequiredforWindowsInstall
Requiredfor LinuxInstall
RequiredforFirmwareUpgrade
Chapter 6 Using SIA In PXE-Based Network Installations 53
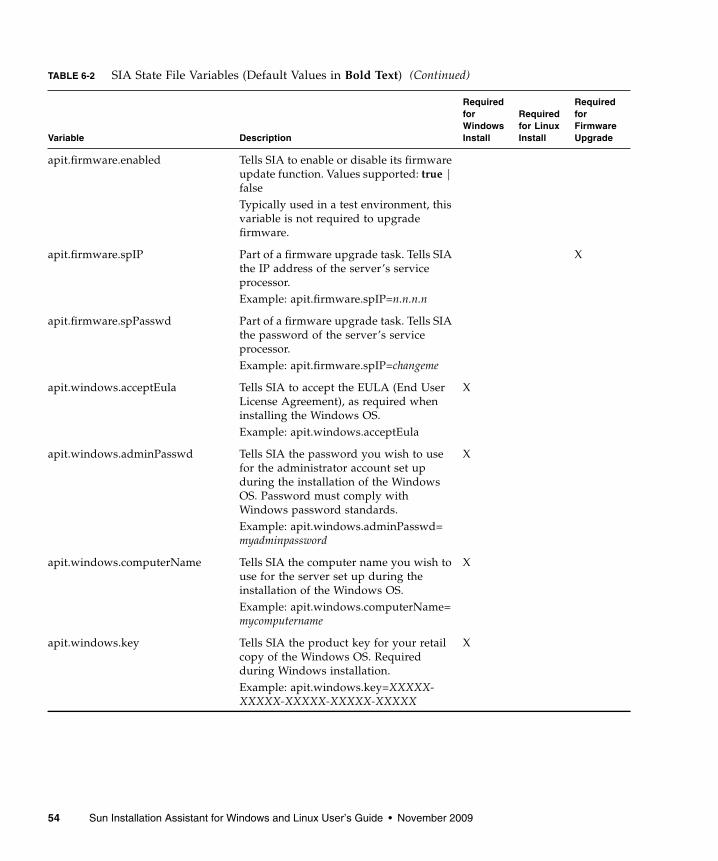
apit.firmware.enabled Tells SIA to enable or disable its firmwareupdate function. Values supported: true |falseTypically used in a test environment, thisvariable is not required to upgradefirmware.
apit.firmware.spIP Part of a firmware upgrade task. Tells SIAthe IP address of the server’s serviceprocessor.Example: apit.firmware.spIP=n.n.n.n
X
apit.firmware.spPasswd Part of a firmware upgrade task. Tells SIAthe password of the server’s serviceprocessor.Example: apit.firmware.spIP=changeme
apit.windows.acceptEula Tells SIA to accept the EULA (End UserLicense Agreement), as required wheninstalling the Windows OS.Example: apit.windows.acceptEula
X
apit.windows.adminPasswd Tells SIA the password you wish to usefor the administrator account set upduring the installation of the WindowsOS. Password must comply withWindows password standards.Example: apit.windows.adminPasswd=myadminpassword
X
apit.windows.computerName Tells SIA the computer name you wish touse for the server set up during theinstallation of the Windows OS.Example: apit.windows.computerName=mycomputername
X
apit.windows.key Tells SIA the product key for your retailcopy of the Windows OS. Requiredduring Windows installation.Example: apit.windows.key=XXXXX-XXXXX-XXXXX-XXXXX-XXXXX
X
TABLE 6-2 SIA State File Variables (Default Values in Bold Text) (Continued)
Variable Description
RequiredforWindowsInstall
Requiredfor LinuxInstall
RequiredforFirmwareUpgrade
54 Sun Installation Assistant for Windows and Linux User’s Guide • November 2009

Preparing for an Unattended SIA Installation ofLinuxThe basic steps for setting up an unattended installation include:
■ “Creating the SIA Unattended State File for Linux” on page 56
■ “Setting Up an Unattended Configuration File and PXE OS Install Image forLinux” on page 57
■ “To Create the SIA Image and Prepare for PXE Boot” on page 61
The procedures presented in this section assumes the following:
■ You are familiar with RHEL or SLES Linux unattended installations.
■ You have created a RHEL Kickstart file or SLES AutoYaST file.
■ You have configured the RHEL Kickstart or SLES AutoYaST PXE image with thefollowing options:
■ Additional drivers for your server not installed by SIA. This provides you thefull supported feature set for installed server components (such as ACPI,video, network and mass storage) as described in your server installation andProduct Notes documentation.
■ Latest operating system installation patches available from the Linux vendor.
apit.windows.orgName Tells SIA the organization name you wishto use for the server set up during theinstallation of the Windows OS.Example: apit.windows.orgName=myorganization
X
apit.windows.userName Tells SIA the user name you wish to usefor the initial user account set up duringthe installation of the Windows OS.Example: apit.windows.userName=myusername
X
apit.done.notifyUrl Tells SIA to access the specified URLfollowing the completion of enabled SIAtasks. This is currently only supported forSun N1 System Manager.Example: apit.done.notifyUrl=http://my_destination_url
TABLE 6-2 SIA State File Variables (Default Values in Bold Text) (Continued)
Variable Description
RequiredforWindowsInstall
Requiredfor LinuxInstall
RequiredforFirmwareUpgrade
Chapter 6 Using SIA In PXE-Based Network Installations 55
■ Required SIA display resolution. SIA should always boot with vga=0x314 fromCD-ROM or PXE.
■ The Kickstart or AutoYaST file is accessible through an FTP, HTTP, or NFS server.
Creating the SIA Unattended State File for LinuxThe SIA state file is a text file that directs the unattended installation of your Linuxoperating system and other SIA tasks to be performed (such as BIOS/SP firmwareupgrade).
SIA State File Requirements for Linux
Consider these requirements when creating an SIA state file:
■ When SIA boots from PXE, the state file must identify the location of the OSmedia to be installed and the transfer protocol method (FTP, NFS, or HTTP).
■ The state file must not contain extraneous spaces or punctuation of any kind.
■ The lines specified in the SIA state file must correspond to the steps you wouldsee if you performed the interactive version of the SIA installation program(described in Chapter 2 and Chapter 3).
■ The install location must be specified as a boot argument in the configuration file(described in“To Create the SIA Image and Prepare for PXE Boot” on page 61).
Sample SIA State File for Linux
An SIA state file for an unattended Linux installation looks like the followingsample, see TABLE 6-2 for an explanation of each variable.
Note – Not all servers support the taskList and firmware options in the SIAstate file. Refer to the SIA feature list for your server found on the Sun download siteif you are in doubt about support for these options.
56 Sun Installation Assistant for Windows and Linux User’s Guide • November 2009

Setting Up an Unattended Configuration File and PXEOS Install Image for LinuxTo set up an unattended configuration file and PXE install image of the OS, refer tothe following OS documentation for creating an unattended configuration file andPXE install image, for example:
■ Novell AutoYaST unattended installation documentation athttp://www.novell.com
■ Red Hat’s Kickstart unattended installation documentation athttp://www.redhat.com/docs
When done, proceed to “To Create the SIA Image and Prepare for PXE Boot” onpage 61.
Preparing for an Unattended SIA Installation ofWindows Server 2003As of SIA software version 2.1.0 (and later versions), you can PXE-boot SIA to do anunattended installation of Window Server 2003 on your Sun server. The basic stepsfor setting up an unattended installation include:
■ “Creating the SIA Unattended State File for Windows” on page 58
■ “To Create the SIA Image and Prepare for PXE Boot” on page 61
[STATE_BEGIN noname apit]apit.unattended=trueapit.welcome.acceptlicense=trueapit.networking=trueapit.networkconfig.needNetwork=trueapit.networkconfig.useDHCP=trueapit.networkconfig.needProxy=falseapit.remoteUpdate=trueapit.remoteupdateURL=http://sia-updates.sun.com/remoteUpdateapit.http_proxy=path_to_my_http_proxyapit.taskList.selectedTask=Operating System Installationapit.osid.installMedia=networkLinuxapit.osid.installMethod=http, ftp or nfsapit.osid.installLoc=path_to_PXE_fileapit.osid.kickstart=path_to_configuration file[STATE_DONE noname apit]
Chapter 6 Using SIA In PXE-Based Network Installations 57
Note – For the Microsoft Windows operating system, only Windows Server 2003 iscurrently supported for an unattended installation using SIA.
Creating the SIA Unattended State File for WindowsThe SIA state file is a text file that directs the unattended installation of yourWindows operating system and other SIA tasks to be performed (such as BIOS/SPfirmware upgrade).
SIA State File Requirements for Windows
Consider these requirements when creating an SIA state file:
■ When SIA boots from PXE, the state file must identify location of the OS media tobe installed and the transfer protocol method (FTP, NFS, or HTTP).
■ The state file must not contain extraneous spaces or punctuation of any kind.
■ The lines specified in the SIA state file must correspond to the steps you wouldsee if you performed the interactive version of the SIA installation program(described in Chapter 2 and Chapter 3).
Sample SIA State File for Windows
An SIA state file for an unattended Windows installation looks like the followingsample, see TABLE 6-2 for an explanation of each variable
Note – Not all servers support the taskList and firmware options in the SIAstate file. Refer to the SIA feature list for your server found on the Sun download siteif you are in doubt about support for these options.
58 Sun Installation Assistant for Windows and Linux User’s Guide • November 2009
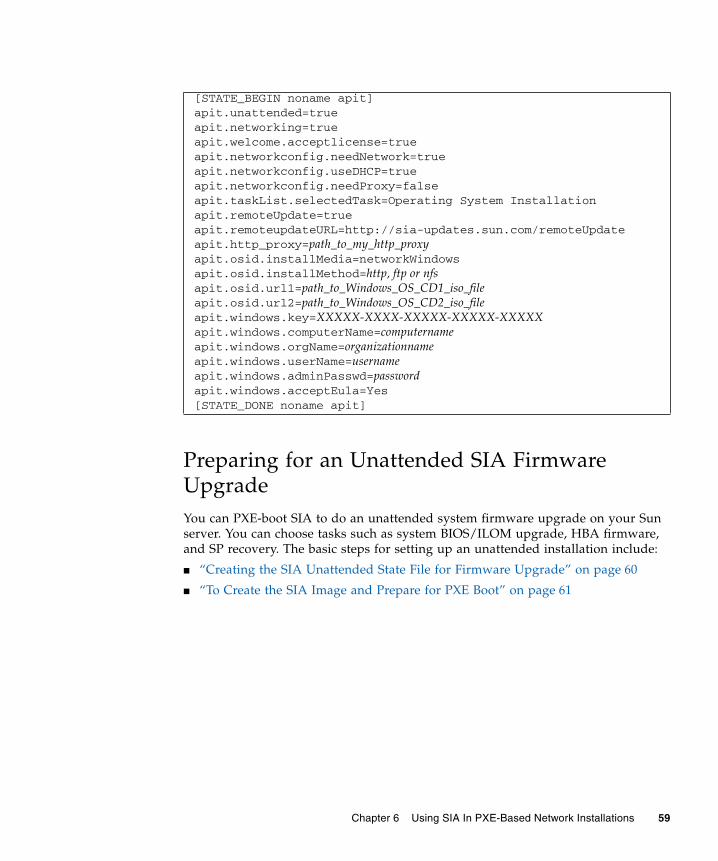
Preparing for an Unattended SIA FirmwareUpgradeYou can PXE-boot SIA to do an unattended system firmware upgrade on your Sunserver. You can choose tasks such as system BIOS/ILOM upgrade, HBA firmware,and SP recovery. The basic steps for setting up an unattended installation include:
■ “Creating the SIA Unattended State File for Firmware Upgrade” on page 60
■ “To Create the SIA Image and Prepare for PXE Boot” on page 61
[STATE_BEGIN noname apit]apit.unattended=trueapit.networking=trueapit.welcome.acceptlicense=trueapit.networkconfig.needNetwork=trueapit.networkconfig.useDHCP=trueapit.networkconfig.needProxy=falseapit.taskList.selectedTask=Operating System Installationapit.remoteUpdate=trueapit.remoteupdateURL=http://sia-updates.sun.com/remoteUpdateapit.http_proxy=path_to_my_http_proxyapit.osid.installMedia=networkWindowsapit.osid.installMethod=http, ftp or nfsapit.osid.url1=path_to_Windows_OS_CD1_iso_fileapit.osid.url2=path_to_Windows_OS_CD2_iso_fileapit.windows.key=XXXXX-XXXX-XXXXX-XXXXX-XXXXXapit.windows.computerName=computernameapit.windows.orgName=organizationnameapit.windows.userName=usernameapit.windows.adminPasswd=passwordapit.windows.acceptEula=Yes[STATE_DONE noname apit]
Chapter 6 Using SIA In PXE-Based Network Installations 59

Note – Your server must support firmware upgrades through SIA to use the firmwareupgrade option. If you enable an unattended firmware upgrade and an upgrade is notrequired on the target server (because the upgrade firmware image is either the sameor earlier than what’s on the server being upgraded), the unattended install will stopat that point, prompting user intervention to continue. To avoid this, confirm thatthe firmware image you are using for the upgrade is later than what is already onthe target server(s). The firmware version (build number) of the upgrade image isincluded in the README file. The firmware version (build number) on a targetserver can be viewed by logging into the server’s service processor and viewing theinformation through the LOM web interface, or by entering the version commandthrough the CLI.
Creating the SIA Unattended State File for FirmwareUpgradeThe SIA state file is a text file that directs the unattended installation of yourupgraded firmware. See TABLE 6-2 for a description of variables.
SIA State File Requirements for Firmware Upgrade
Consider these requirements when creating an SIA state file:
■ An SIA PXE boot image must already exist on a Linux-based PXE server, see “ToCreate the SIA Image and Prepare for PXE Boot” on page 46.
■ The state file must not contain extraneous spaces or punctuation of any kind.
■ The lines specified in the SIA state file must correspond to the steps you wouldsee if you performed the interactive version of the SIA installation program(described in Chapter 2 and Chapter 4).
Sample SIA State File for Firmware Upgrade
An SIA state file for an unattended firmware upgrade looks like the followingsample, see TABLE 6-2 for an explanation of each variable.
Note – Not all servers support the taskList and firmware options in the SIAstate file. Refer to the SIA feature list for your server found on the Sun download siteif you are in doubt about support for these options.
60 Sun Installation Assistant for Windows and Linux User’s Guide • November 2009
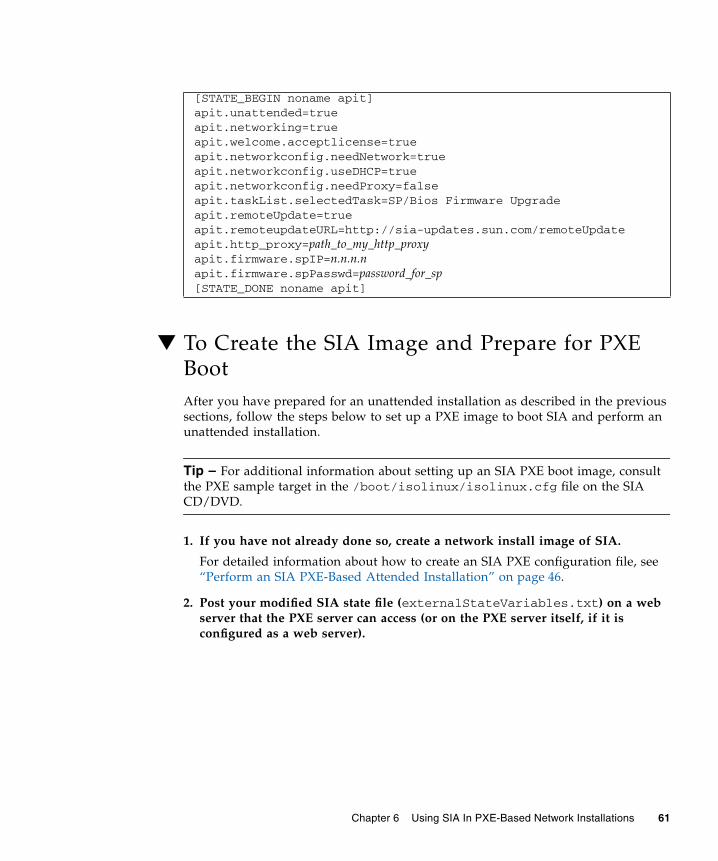
▼ To Create the SIA Image and Prepare for PXEBootAfter you have prepared for an unattended installation as described in the previoussections, follow the steps below to set up a PXE image to boot SIA and perform anunattended installation.
Tip – For additional information about setting up an SIA PXE boot image, consultthe PXE sample target in the /boot/isolinux/isolinux.cfg file on the SIACD/DVD.
1. If you have not already done so, create a network install image of SIA.
For detailed information about how to create an SIA PXE configuration file, see“Perform an SIA PXE-Based Attended Installation” on page 46.
2. Post your modified SIA state file (externalStateVariables.txt) on a webserver that the PXE server can access (or on the PXE server itself, if it isconfigured as a web server).
[STATE_BEGIN noname apit]apit.unattended=trueapit.networking=trueapit.welcome.acceptlicense=trueapit.networkconfig.needNetwork=trueapit.networkconfig.useDHCP=trueapit.networkconfig.needProxy=falseapit.taskList.selectedTask=SP/Bios Firmware Upgradeapit.remoteUpdate=trueapit.remoteupdateURL=http://sia-updates.sun.com/remoteUpdateapit.http_proxy=path_to_my_http_proxyapit.firmware.spIP=n.n.n.napit.firmware.spPasswd=password_for_sp[STATE_DONE noname apit]
Chapter 6 Using SIA In PXE-Based Network Installations 61
3. Use an editor to include the following SIA references in thepxelinux.cfg/default file that is stored in the /home/pxeboot directory:
You can also boot the installer from the network and perform a manual (attended)installation by removing the siaurl= argument from the PXE target.
4. To boot the SIA PXE image from the PXE server and begin the unattendedinstallation, follow the steps presented in “To Boot SIA From a PXE Server foran Attended Installation” on page 47.
▼ To Boot SIA From a PXE ServerThe following procedure explains the initial steps you must perform to boot SIAfrom a PXE Linux-based server to initiate the unattended installation.
1. Ensure that the target Sun server is configured on the same network as the PXEserver, and then reset the target Sun server. For example:
■ From the service processor (Lights Out Manager) Remote Console web interface,click Remote Control->Remote Power Control then select Reset to reset thehost server.
-or-
■ Press the Power button on the front panel of the server to turn it off (hold thebutton in until the server powers off), then press the Power button to turn onthe server.
The BIOS screen appears. An example is shown below (your server’s BIOS screenmight look different).
default suninstalllabel suninstallkernel suninstall/vmlinuzappend initrd=suninstall/initrd.img vga=0x314 ramdisk_size=900000root=/dev/ram0 splash=silent siaurl=http://URL_to_ externalStateVariables.txtsplash=silent
Note - Type the append command line from append initrd= to siaurl= as onecontinuous string with no returns. initrd= must point to the location of the initrd.imgon your PXE server that you copied from the SIA CD/DVD and siaurl= must point tothe URL for the state file.
62 Sun Installation Assistant for Windows and Linux User’s Guide • November 2009
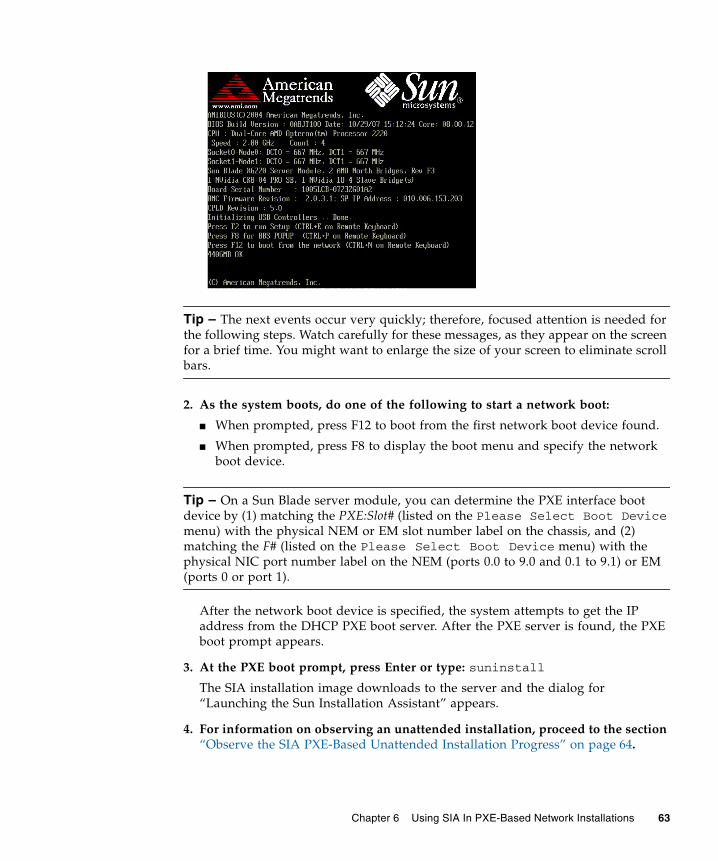
Tip – The next events occur very quickly; therefore, focused attention is needed forthe following steps. Watch carefully for these messages, as they appear on the screenfor a brief time. You might want to enlarge the size of your screen to eliminate scrollbars.
2. As the system boots, do one of the following to start a network boot:
■ When prompted, press F12 to boot from the first network boot device found.
■ When prompted, press F8 to display the boot menu and specify the networkboot device.
Tip – On a Sun Blade server module, you can determine the PXE interface bootdevice by (1) matching the PXE:Slot# (listed on the Please Select Boot Devicemenu) with the physical NEM or EM slot number label on the chassis, and (2)matching the F# (listed on the Please Select Boot Device menu) with thephysical NIC port number label on the NEM (ports 0.0 to 9.0 and 0.1 to 9.1) or EM(ports 0 or port 1).
After the network boot device is specified, the system attempts to get the IPaddress from the DHCP PXE boot server. After the PXE server is found, the PXEboot prompt appears.
3. At the PXE boot prompt, press Enter or type: suninstall
The SIA installation image downloads to the server and the dialog for“Launching the Sun Installation Assistant” appears.
4. For information on observing an unattended installation, proceed to the section“Observe the SIA PXE-Based Unattended Installation Progress” on page 64.
Chapter 6 Using SIA In PXE-Based Network Installations 63
Observe the SIA PXE-Based UnattendedInstallation ProgressObserving an unattended network installation enables you to view the progress ofthe installation, as well as any diagnostic messages that might appear if problemsare encountered during the installation.
The four ways of observing an unattended network installation include:
■ Viewing messages from a system console
■ Viewing messages from a virtual console or secure shell connection
■ Viewing messages from a virtual network computing (VNC) viewer
■ Viewing messages from a serial console
If you plan to use a virtual console or VNC viewer to observe the unattendednetwork installation, you must establish passwords for root and VNC.
Topics discussed in the section include:
■ “Set Up Passwords for Root and Virtual Access” on page 64
■ “Using a System Console” on page 65
■ “Using a Virtual Console or Secure Shell (SSH) Connection” on page 65
■ “Using a VNC Viewer” on page 66
■ “To Establish Connection Using a VNC Viewer” on page 66
■ “To Establish Connection Using a Serial Console” on page 66
Set Up Passwords for Root and Virtual AccessPasswords are provided as boot arguments to the installer, either manually whenbooting from CD or through PXE, or in the PXE boot target:
/home/pxeboot/pxelinux.cfg/default
You will need to set passwords to observe the installation using a virtual console orvirtual network computing (VNC) viewer.
Note – When booting from CD, watch for the boot: prompt, as it is displayed foronly five seconds. Press any key when the boot: prompt is displayed to allow timeto enter the password arguments.
64 Sun Installation Assistant for Windows and Linux User’s Guide • November 2009

For maximum security, use the following password arguments at the CD boot:prompt:
■ rootpw=des-crypted-password
The rootpw=des-crypted-password argument enables SSH remote access on a PXEboot without passing a plain text password across the network.
Create des-crypted-password using the following perl script:
# perl -e 'print crypt("password","42"). "\n"'
The string output is what to supply after the rootpw=argument.
■ vncauth=hex-string
This argument enables a password for VNC access.
The remote VNC authorization file is eight binary bytes. You create those eightbytes with vncpasswd and then convert them to a hex-string to be entered here.
Create the hex-string using the following commands:
The string output is what to supply after the vncauth=argument.
■ ptextpass=password
The ptextpass=password argument provides a way of passing a plain textpassword that is to be used for both the root password and the VNC password.
Using a System ConsoleTypically the system console displays a splash screen during an unattended networkinstallation that prevents you from viewing the console messages. To dismiss thesplash screen and view the console messages, press the Esc key.
Using a Virtual Console or Secure Shell (SSH)ConnectionThe installation interface runs a Linux kernel and provides virtual console access. Toaccess the virtual console, press Ctrl-Alt-F2. You can also use Ctrl-Alt-F3 and Ctrl-Alt-F4 for additional console screens.
# vncpasswd /tmp/vncauth# od -t x1 /tmp/vncauth | awk '/0000000/ \{print $2 $3 $4 $5 $6 $7 $8 $9}'
Chapter 6 Using SIA In PXE-Based Network Installations 65

Before logging into a virtual console, you must set a root password as a bootargument to the installer. For more information see “Set Up Passwords for Root andVirtual Access” on page 64.
After you have established a connection to a virtual console, you can determine theVNC server IP address and view the standard log files. Alternatively, you can alsoestablish a SSH connection through a serial console using the VNC IP address.
Using a VNC ViewerWhen you perform an unattended network installation, virtual network computing(VNC) is enabled by default. If you perform an unattended network installation, youcan enable VNC by adding display=vnc as a boot argument.
▼ To Establish Connection Using a VNC ViewerFollow these steps to establish a connection using a VNC viewer.
1. Set a password as shown in “Set Up Passwords for Root and Virtual Access” onpage 64.
2. Press the Esc key shortly after the SIA splash screen appears.
Console messages appear. After the VNC server has started, a message appearsproviding the IP address to connect using VNC.
3. Connect to the VNC viewer using the IP address displayed in Step 2.
For example:
# vncviewer IP_address:1.0
4. When prompted, enter the password that you set in Step 1 and VNC starts.
The installer interface appears when performing a manual installation. Thescreens automatically move forward as the installation progresses. The VNCscreens are active for input and you will disrupt the installation if you doanything in the VNC window.
▼ To Establish Connection Using a Serial ConsoleFollow these steps to establish a connection using a serial console.
66 Sun Installation Assistant for Windows and Linux User’s Guide • November 2009
1. Use the boot argument console=ttyS0,9600 to have console outputredirected to the serial console.
This is helpful when debugging and you want to be able to scroll back to seemessages. This will disable output to the VGA console.
2. Set up the serial console through the serial port.
For more information about using a serial console, see the service processor(Lights Out Manager) documentation. The default setup is for the service processorto be available through the serial port.
3. Log in to the service processor and enter the following command to start theconsole:
# start /SP/console
4. Reboot the system.
5. Select the Network Boot option.
6. Select your SIA target, and then observe the progress of the unattendednetwork installation.
After booting SIA, the serial console is sometimes left in a state where it is writingblack text on a black background. If this occurs, reset your terminal to view thetext.
For additional information about debugging an unattended network installation,see “Debugging Unattended Installation Problems” on page 70.
Chapter 6 Using SIA In PXE-Based Network Installations 67

68 Sun Installation Assistant for Windows and Linux User’s Guide • November 2009

CHAPTER 7
Troubleshooting SIA
This chapter provides information about Sun Installation Assistant (SIA) errormessages, the SIA installation log file, as well as procedures for debugging anunattended PXE-based network installation.
Topics in this chapter include:
■ “SIA Error Messages” on page 69
■ “SIA Installation Log File” on page 70
■ “ILOM Remote Console Mouse Issue With SIA” on page 70
■ “Debugging Unattended Installation Problems” on page 70
SIA Error MessagesIf SIA encounters an error or an unexpected condition, it generates an error message.You might encounter a number of straightforward error messages such as thefollowing:
You have inserted Disc 3 but the system requires Disc 2. Please insertDisc 2.
You might also attempt to use SIA with versions of Linux or Microsoft Windows thatare not supported. In that case you might see error messages such as the following:
The media you have provided is not a release that is supported by SunMicrosystems, Inc. on this platform. You cannot use the SunInstallation Assistant to install this product and associatedsoftware.
In this case, choose one of the following options:
■ To install a supported product, click Back and then insert the appropriate media.
69

■ To install a product not supported by SIA, click Exit to exit the Sun InstallationAssistant and reboot the system. You can now install the unsupported product asyou normally would without SIA.
For a list of supported operating systems, see “Supported Operating Systems” onpage 4.
SIA Installation Log FileAn SIA log file is written to the root directory of the newly installed system.
To review this log file, refer to the file SunInstallationAssistant.log (locatedat /root for Linux, or C:\ for Windows).
ILOM Remote Console Mouse IssueWith SIAThe ILOM Remote Console has a mouse mode setting that configures ILOM to sendmouse events to the remote system using either “absolute” or “relative” mode. Forthe ILOM Remote Console to work properly with SIA, you must configure themouse setting to relative mode. If your mouse is set to absolute mode, your mousewill not work when using SIA. For more information, see “Mouse Settings WhenUsing SIA with ILOM Remote Console” on page 9.
Debugging Unattended InstallationProblemsThis section includes procedures for debugging common problems that might occurwhen setting up an unattended network installation:
■ “PXE Image Does Not Boot” on page 71
■ “SIA Boot Starts, Then Stops” on page 71
■ “VNC Password Does Not Get Set” on page 72
70 Sun Installation Assistant for Windows and Linux User’s Guide • November 2009
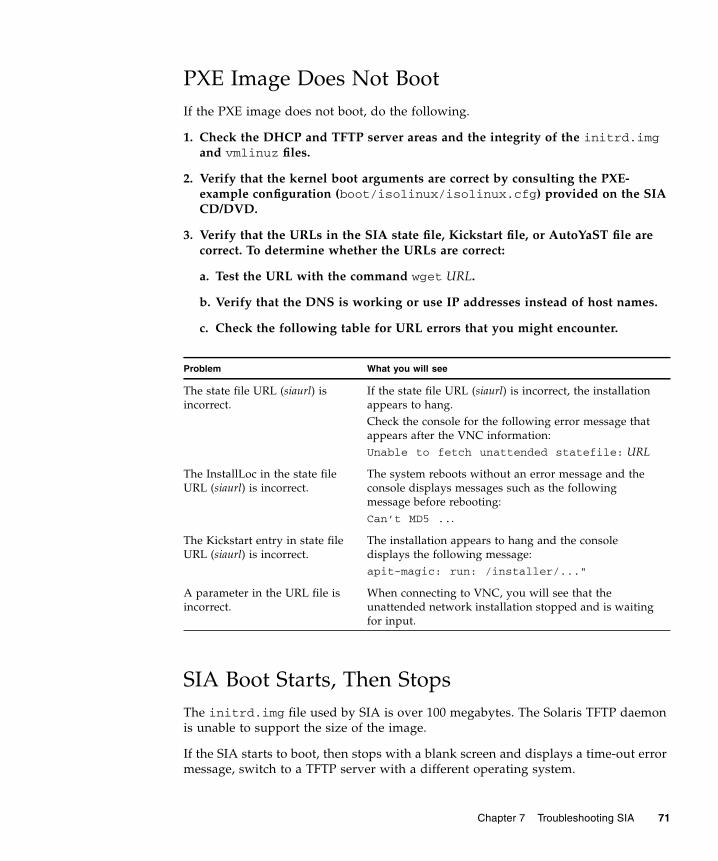
PXE Image Does Not BootIf the PXE image does not boot, do the following.
1. Check the DHCP and TFTP server areas and the integrity of the initrd.imgand vmlinuz files.
2. Verify that the kernel boot arguments are correct by consulting the PXE-example configuration (boot/isolinux/isolinux.cfg) provided on the SIACD/DVD.
3. Verify that the URLs in the SIA state file, Kickstart file, or AutoYaST file arecorrect. To determine whether the URLs are correct:
a. Test the URL with the command wget URL.
b. Verify that the DNS is working or use IP addresses instead of host names.
c. Check the following table for URL errors that you might encounter.
SIA Boot Starts, Then StopsThe initrd.img file used by SIA is over 100 megabytes. The Solaris TFTP daemonis unable to support the size of the image.
If the SIA starts to boot, then stops with a blank screen and displays a time-out errormessage, switch to a TFTP server with a different operating system.
Problem What you will see
The state file URL (siaurl) isincorrect.
If the state file URL (siaurl) is incorrect, the installationappears to hang.Check the console for the following error message thatappears after the VNC information:Unable to fetch unattended statefile: URL
The InstallLoc in the state fileURL (siaurl) is incorrect.
The system reboots without an error message and theconsole displays messages such as the followingmessage before rebooting:Can’t MD5 ...
The Kickstart entry in state fileURL (siaurl) is incorrect.
The installation appears to hang and the consoledisplays the following message:apit-magic: run: /installer/..."
A parameter in the URL file isincorrect.
When connecting to VNC, you will see that theunattended network installation stopped and is waitingfor input.
Chapter 7 Troubleshooting SIA 71
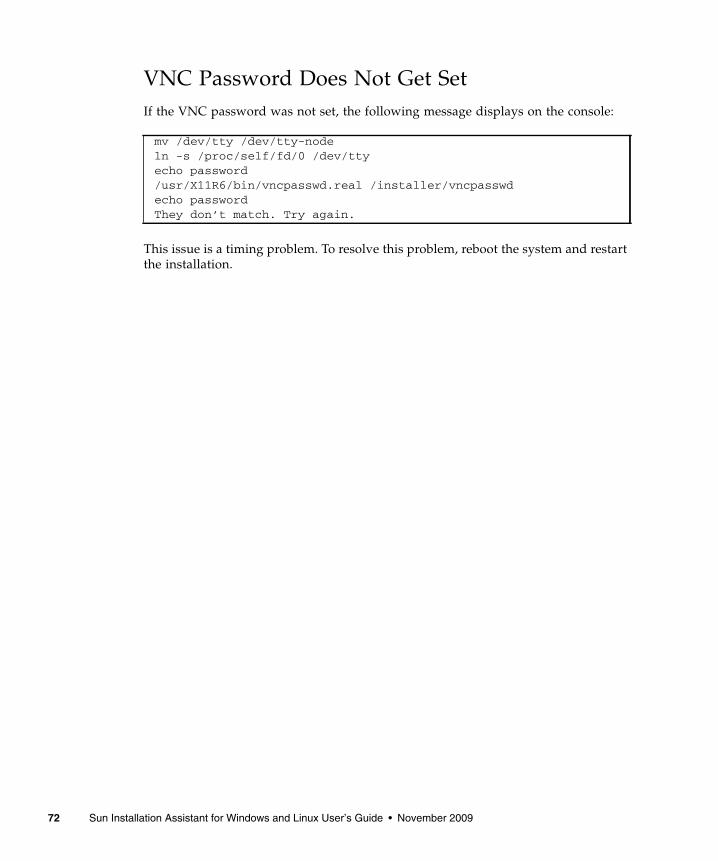
VNC Password Does Not Get SetIf the VNC password was not set, the following message displays on the console:
This issue is a timing problem. To resolve this problem, reboot the system and restartthe installation.
mv /dev/tty /dev/tty-nodeln -s /proc/self/fd/0 /dev/ttyecho password/usr/X11R6/bin/vncpasswd.real /installer/vncpasswdecho passwordThey don’t match. Try again.
72 Sun Installation Assistant for Windows and Linux User’s Guide • November 2009
APPENDIX A
Creating a Bootable SIA USB FlashDrive
This appendix describes how to prepare a USB flash drive (also known as USB thumbdrive, USB key drive, etc.) for booting SIA and how to boot the SIA USB flash driveto perform SIA deployment and recovery tasks.
Preparing and booting an SIA USB flash drive is described in the following sections:
■ “Requirements” on page 73
■ “Getting the Software” on page 74
■ “Preparing the USB Flash Drive” on page 74
■ “Setting BIOS Parameters and Booting Off the SIA USB Flash Drive” on page 80
Requirements■ SIA version 2.0.144 or later (USB flash drive support is not available on earlier
versions of SIA)
■ Syslinux utility version 3.52 or later
■ 1 GB or larger USB 2.0 flash drive
■ A system running Windows XP or Linux with a USB 2.0 compatible port
■ Internet access (to download the necessary software)
■ Sun server that you will be using SIA on must have USB 2.0 compatible ports
73

Getting the SoftwareThis section describes where to get the syslinux and SIA software. You must have thesyslinux software to prepare the USB flash drive in order to boot SIA. You can useeither a Windows or Linux machine to download the syslinux and SIA software andprepare the USB flash drive for booting.
▼ To Get the Syslinux and SIA Software
Note – Support for creating a USB flash drive version of SIA was introduced withSIA version 2.0.144 and is provided as a downloadable package from the Sundownload site. Earlier versions of SIA will not support running SIA from USB flashdrive media.
1. Go to the SIA main page on the Sun web site:
http://www.sun.com/systemmanagement/sia.jsp
2. Navigate to your server’s download page.
3. Select and download the following files to a convenient file folder on aWindows XP or Linux (Red Hat or SUSE) system.
■ syslinux-version.zip (where version is 3.52 or later)
■ sia-version.zip (where version is 2.0.144 or later)
Note – These files may be available separately or bundled in a single package.
Preparing the USB Flash DriveThis section describes how to prepare the USB flash drive in order to use it to run theSIA software on your server. You can use either a Windows or a Linux system toprepare the USB flash drive. The procedure is different for Windows and Linuxsystems; both procedures are described below.
74 Sun Installation Assistant for Windows and Linux User’s Guide • November 2009
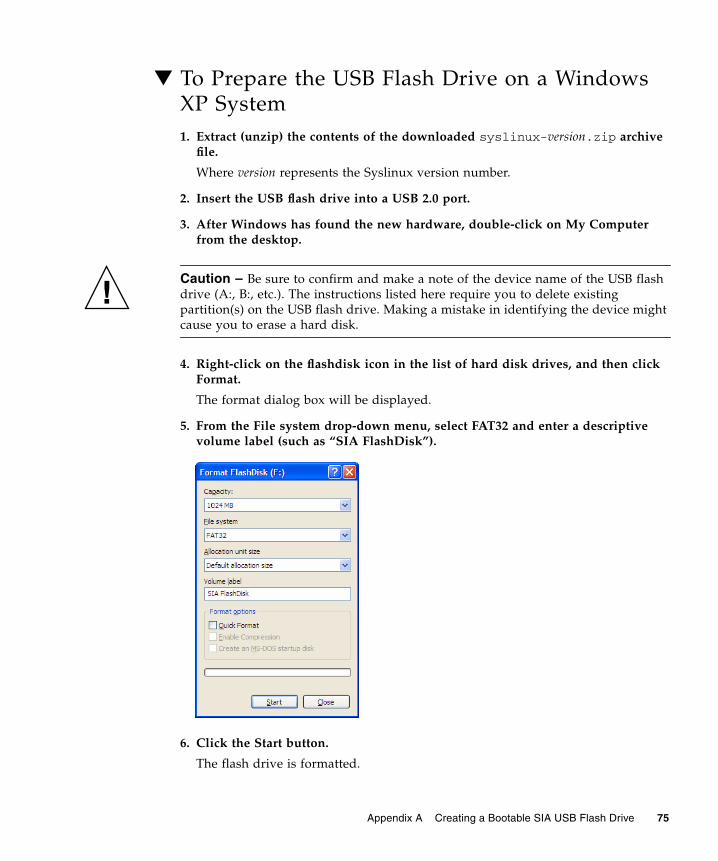
▼ To Prepare the USB Flash Drive on a WindowsXP System1. Extract (unzip) the contents of the downloaded syslinux-version.zip archive
file.
Where version represents the Syslinux version number.
2. Insert the USB flash drive into a USB 2.0 port.
3. After Windows has found the new hardware, double-click on My Computerfrom the desktop.
Caution – Be sure to confirm and make a note of the device name of the USB flashdrive (A:, B:, etc.). The instructions listed here require you to delete existingpartition(s) on the USB flash drive. Making a mistake in identifying the device mightcause you to erase a hard disk.
4. Right-click on the flashdisk icon in the list of hard disk drives, and then clickFormat.
The format dialog box will be displayed.
5. From the File system drop-down menu, select FAT32 and enter a descriptivevolume label (such as “SIA FlashDisk”).
6. Click the Start button.
The flash drive is formatted.
Appendix A Creating a Bootable SIA USB Flash Drive 75
7. After the formatting has completed, click the Close button.
The Format dialog box closes.
8. Click the Start button from the Windows taskbar, and then click Run.
The Run dialog box is displayed.
9. Run the syslinux executable using the -ma option to make the drive bootableby entering the following command:
path\syslinux\win32\syslinux.exe -ma X:
Where path is the folder to which you extracted syslinux and X is the drive letterfor your USB flash drive (for example, A:, B:, etc.)
This creates a file ldlinux.sys onto the drive and make it bootable.
10. Extract (unzip) the contents of the downloaded SIA-version.zip archive file tothe USB flash drive.
Where version represents the SIA version number.
11. To remove the USB flash drive, click the Safe to Remove Hardware icon andremove the flash drive from the system.
The USB flash drive is now ready to boot SIA. To begin the OS installation usingthe SIA USB flash drive, see “Setting BIOS Parameters and Booting Off the SIAUSB Flash Drive” on page 80.”
▼ To Prepare the USB Flash Drive on a Linux (RedHat/SUSE) System
Before You Begin
This procedure requires the use of parted utility version 1.8.6 or later. Do not useearlier versions of parted.
1. Extract (unzip) the contents of the syslinux-version.zip archive file.
# unzip syslinux-version.zip
Where version represents the Syslinux version number.
2. Insert the USB flash drive into a working USB 2.0 port.
76 Sun Installation Assistant for Windows and Linux User’s Guide • November 2009
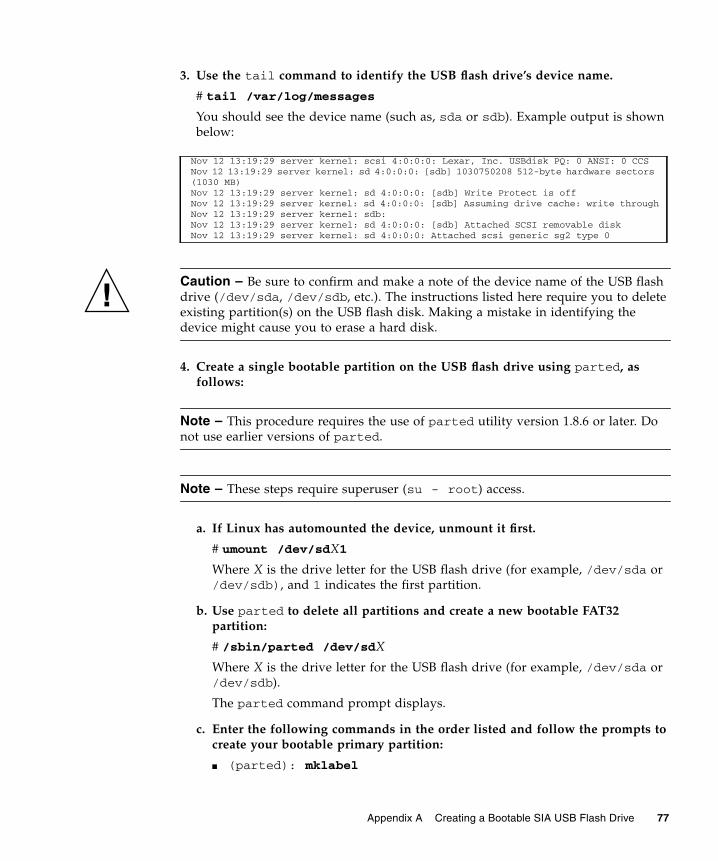
3. Use the tail command to identify the USB flash drive’s device name.
# tail /var/log/messages
You should see the device name (such as, sda or sdb). Example output is shownbelow:
Caution – Be sure to confirm and make a note of the device name of the USB flashdrive (/dev/sda, /dev/sdb, etc.). The instructions listed here require you to deleteexisting partition(s) on the USB flash disk. Making a mistake in identifying thedevice might cause you to erase a hard disk.
4. Create a single bootable partition on the USB flash drive using parted, asfollows:
Note – This procedure requires the use of parted utility version 1.8.6 or later. Donot use earlier versions of parted.
Note – These steps require superuser (su - root) access.
a. If Linux has automounted the device, unmount it first.
# umount /dev/sdX1
Where X is the drive letter for the USB flash drive (for example, /dev/sda or/dev/sdb), and 1 indicates the first partition.
b. Use parted to delete all partitions and create a new bootable FAT32partition:
# /sbin/parted /dev/sdX
Where X is the drive letter for the USB flash drive (for example, /dev/sda or/dev/sdb).
The parted command prompt displays.
c. Enter the following commands in the order listed and follow the prompts tocreate your bootable primary partition:
■ (parted): mklabel
Nov 12 13:19:29 server kernel: scsi 4:0:0:0: Lexar, Inc. USBdisk PQ: 0 ANSI: 0 CCSNov 12 13:19:29 server kernel: sd 4:0:0:0: [sdb] 1030750208 512-byte hardware sectors(1030 MB)Nov 12 13:19:29 server kernel: sd 4:0:0:0: [sdb] Write Protect is offNov 12 13:19:29 server kernel: sd 4:0:0:0: [sdb] Assuming drive cache: write throughNov 12 13:19:29 server kernel: sdb:Nov 12 13:19:29 server kernel: sd 4:0:0:0: [sdb] Attached SCSI removable diskNov 12 13:19:29 server kernel: sd 4:0:0:0: Attached scsi generic sg2 type 0
Appendix A Creating a Bootable SIA USB Flash Drive 77
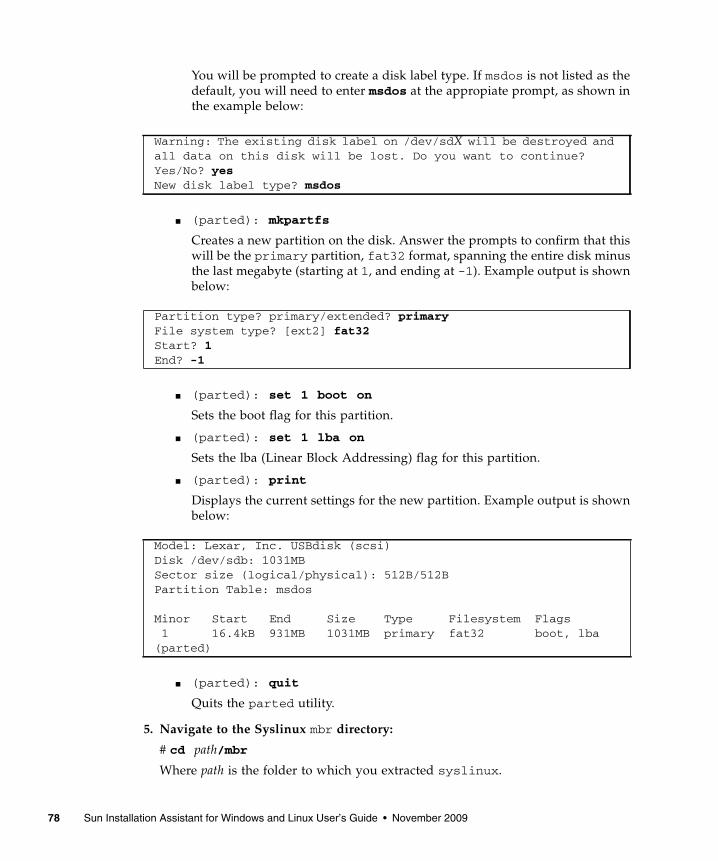
You will be prompted to create a disk label type. If msdos is not listed as thedefault, you will need to enter msdos at the appropiate prompt, as shown inthe example below:
■ (parted): mkpartfs
Creates a new partition on the disk. Answer the prompts to confirm that thiswill be the primary partition, fat32 format, spanning the entire disk minusthe last megabyte (starting at 1, and ending at -1). Example output is shownbelow:
■ (parted): set 1 boot on
Sets the boot flag for this partition.
■ (parted): set 1 lba on
Sets the lba (Linear Block Addressing) flag for this partition.
■ (parted): print
Displays the current settings for the new partition. Example output is shownbelow:
■ (parted): quit
Quits the parted utility.
5. Navigate to the Syslinux mbr directory:
# cd path/mbr
Where path is the folder to which you extracted syslinux.
Warning: The existing disk label on /dev/sdX will be destroyed andall data on this disk will be lost. Do you want to continue?Yes/No? yesNew disk label type? msdos
Partition type? primary/extended? primaryFile system type? [ext2] fat32Start? 1End? -1
Model: Lexar, Inc. USBdisk (scsi)Disk /dev/sdb: 1031MBSector size (logical/physical): 512B/512BPartition Table: msdos
Minor Start End Size Type Filesystem Flags 1 16.4kB 931MB 1031MB primary fat32 boot, lba(parted)
78 Sun Installation Assistant for Windows and Linux User’s Guide • November 2009

6. Locate the Syslinux master boot record file mbr.bin in the mbr directory andwrite it to the disk using the following command:
# cat mbr.bin > /dev/sdX
Where X is the drive letter for the USB flash drive (for example, /dev/sda or/dev/sdb).
7. Navigate to the Syslinux unix directory:
# cd path/unix
Where path is the folder to which you extracted syslinux.
Note – For later versions of Syslinux, the unix directory might be replaced with alinux directory. If so, replace the unix directory name with linux.
8. Run syslinux:
# ./syslinux /dev/sdX1
Where X is the drive letter for the USB flash drive (for example, /dev/sda or/dev/sdb), and 1 indicates the first partition.
Note – In the next step you will need to specify the mount point. If autofs isrunning, it might have auto-mounted the drive partition to some other mount point.If this happens, unmount it by entering the command: umount /dev/sdX1
9. Mount the drive onto your desired mount point:
# mount -t vfat /dev/sdX1 /mnt
Where X is the drive letter for the USB flash drive (for example, /dev/sda or/dev/sdb), and 1 indicates the first partition. For this example, the mount pointis /mnt.
10. Extract the contents of the SIA-version.zip archive file to the USB flash driveby entering the following command:
# unzip -d /mnt ~/path/SIA-version.zip -x “source/*”
Where path represents the path to the directory where the .zip file is located, andversion represents the SIA version number. The “source/*” parameter excludesthe source files from the extraction to save time and disk space.
11. Unmount the USB flash drive:
# umount /mnt
Appendix A Creating a Bootable SIA USB Flash Drive 79
12. Remove the flash drive from client machine.
The USB flash drive is now ready to boot SIA. To begin the OS installation usingthe SIA USB flash drive, see the next section, “Setting BIOS Parameters andBooting Off the SIA USB Flash Drive” on page 80.”
Setting BIOS Parameters and Booting Offthe SIA USB Flash DriveThis section describes how to set the BIOS parameters on your server and boot SIAoff the USB flash drive. The procedures in this section refer to the server upon whichyou are installing an OS.
Note – You must be set up to view the system console boot messages.
▼ To Set the BIOS Parameters and Boot Off the SIAUSB Flash Drive
Before You Begin
Check the Product Notes for your server for any issues related to USB support. Noteany restrictions before attempting this procedure.
1. Insert the SIA USB flash drive into an available USB 2.0 port.
Note – Some servers might not have USB 2.0 support on all of their USB ports. Toensure the best performance, check your server documentation to make sure you usea port that supports USB 2.0.
2. Reboot the system, watch the display for the BIOS prompt, and when promptedenter the BIOS setup.
The BIOS Setup screen appears.
3. Navigate to the Advanced -> USB Configuration -> USB controller setup screen,and configure the controller for USB 2.0 (high speed) mode.
80 Sun Installation Assistant for Windows and Linux User’s Guide • November 2009

4. Navigate to the Boot -> Hard Disk setup screen, and make your USB flash drivethe first boot device.
The USB flash drive must be the first listed boot device.
5. To save your changes and boot SIA, select Save and Exit.
The system exits the BIOS setup and will then boot from the SIA USB flash drive.
Note – If you use the SIA USB flash drive for operating system installation, once theOS is initially installed from OS distribution media on the server hard disk, a rebootis required to finish the installation. At that point, the USB flash drive must be eitherunplugged or its boot priority lowered in the BIOS settings to ensure the server bootsfrom the hard disk to finish the installation.
6. Proceed to Chapter 2 for instructions on how to use SIA.
Appendix A Creating a Bootable SIA USB Flash Drive 81

82 Sun Installation Assistant for Windows and Linux User’s Guide • November 2009
APPENDIX B
Identifying the Linux Boot Device on aSun Fire X4500 Server
This appendix describes how to identify the boot drive on a Sun Fire X4500 serverwhen installing Linux using SIA. If you do not have a Sun Fire X4500, skip thisappendix.
RequirementsYou should have already completed the steps described in Chapter 3 up to the pointwhere SIA launches the Linux native OS installer.
How to Identify the Boot Device on a SunFire X4500 During Linux InstallationOnce SIA launches the Linux native OS installer, you need to identify the boot devicefor your Sun Fire X4500 server.
83
▼ To Identify the Boot Device on a Sun Fire X4500During Linux Installation1. If you are installing Linux (RHEL or SLES) on a Sun Fire X4500, you must
perform one of the following OS-specific steps (either for RHEL or SLES) toensure proper installation:
■ For RHEL Linux installation: Configuring the GRUB Boot Loader.
i. At the Boot Loader Configuration dialog, select the Configure advancedboot loader options checkbox, then click Next.
ii. At the Advanced Bootloader Configuration dialog, click the Change DriveOrder button.
iii. At the Edit Drive Order dialog, select /dev/sdy and move it up to the topof the list using the up arrow key (this requires approximately 96 clicks),then click OK.
iv. Select “/dev/sdy Master Boot Record (MBR)” and click Next.
v. Proceed through the OS installer until it is done. Once the installerprogram exits and the SIA Installing Additional Software dialog appears,go to Step 2.
■ For SLES Linux installation: Changing Installation Settings.
i. At the Installation Settings dialog, click the Expert tab.
ii. Under the Expert tab, click the Change button.
iii. At the Boot Loader Setting dialog, select the Boot Loader Installation tab.
iv. In the “Boot Loader Location” section, select Other. In the entry field type:/dev/sdy
v. Click the Boot Loader Installation Details button.
vi. At the “Disk Order” list box, select /dev/sdy and move it to the top of thelist using the Up button. Click OK when done.
vii. Click the Finish button (bottom right of screen).
viii. Proceed through the OS installer until it is done. Once the installerprogram exits and the SIA Installing Additional Software dialog appears,go to Step 2.
84 Sun Installation Assistant for Windows and Linux User’s Guide • November 2009
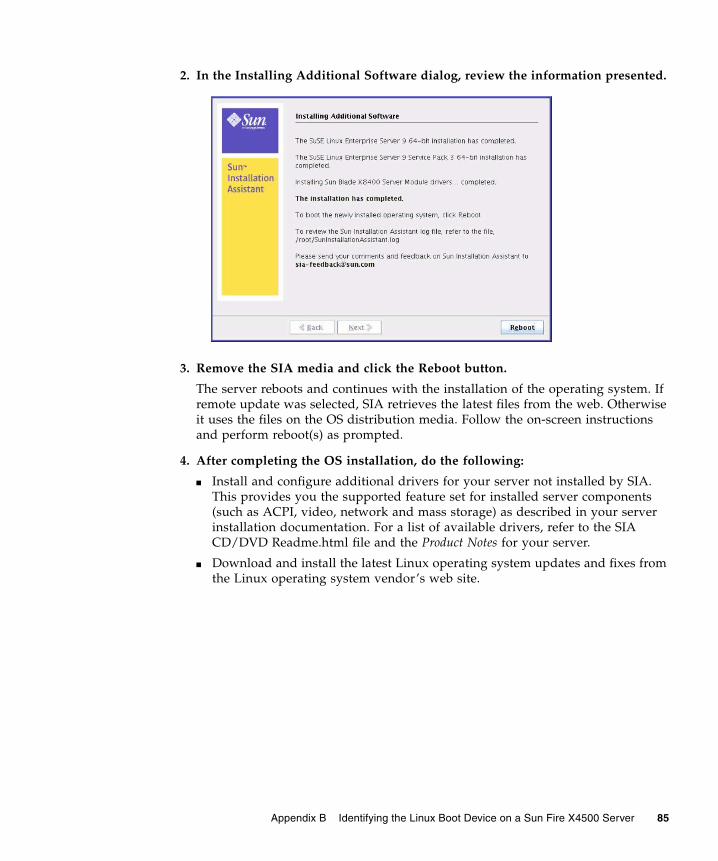
2. In the Installing Additional Software dialog, review the information presented.
3. Remove the SIA media and click the Reboot button.
The server reboots and continues with the installation of the operating system. Ifremote update was selected, SIA retrieves the latest files from the web. Otherwiseit uses the files on the OS distribution media. Follow the on-screen instructionsand perform reboot(s) as prompted.
4. After completing the OS installation, do the following:
■ Install and configure additional drivers for your server not installed by SIA.This provides you the supported feature set for installed server components(such as ACPI, video, network and mass storage) as described in your serverinstallation documentation. For a list of available drivers, refer to the SIACD/DVD Readme.html file and the Product Notes for your server.
■ Download and install the latest Linux operating system updates and fixes fromthe Linux operating system vendor’s web site.
Appendix B Identifying the Linux Boot Device on a Sun Fire X4500 Server 85

86 Sun Installation Assistant for Windows and Linux User’s Guide • November 2009

Index
BBIOS firmware upgrade, 2, 32
Ccompact flash, OS installation on, 2configuring SIA to use the network, 13
Ddevice driver updates, 3
Eerror messages, 69expander firmware upgrade, 32
Ffirmware upgrade, 2, 32flash drive support for SIA, 73
Ggathering network information, 13
HHBA firmware upgrade, 32
IILOM firmware upgrade, 32inband firmware upgrade, 33installation CD/DVD, 3installation media, local and remote
prerequisites, 4
installation methods, Sun Fire and Sun Bladeservers, 8
LLinux installation, 18Linux unattended installation using SIA, 55local media installation, 8logfile for SIA, 70
Mmedia installation options (remote or local), 8mouse issue when using ILOM with SIA, 70
Nnetwork configuration screen, 13
Ooperating system installation using SIA, 18operating systems
installationadditional drivers and software, 30using local or remote media, 18
supported with SIA, 4
PPXE installation
RHEL or SLES Linuxprocedure, 47
RRAID, configuring boot drive for RAID, 4
87
Red Hat Enterprise Linux, installationusing remote media from a PXE-based network
procedure, 47remote installation, 8
Sservers, supported with SIA, 3service processor recovery, 42SIA
BIOS upgrade, 32configuring network information, 13description, 1features and benefits, 2media and updates, 3obtaining the latest version, 3OS installation prerequisites, 18server support, 3service processor recovery, 42starting and preparing for tasks, 10starting using local or remote media, 10supplemental instructions for identifying the
Linux boot device on a Sun Fire X4500server, 83
supported OSes, 4tasks, 3upgrading system firmware, 32USB flash drive support, 73
supported servers, 3SUSE Enterprise Linux Server, installation
using remote media from a PXE-based networkprocedure, 47
Ttask list for SIA, 3tasks
installing an OS using SIA, 18preparing for SIA tasks, 10recovering a service processor, 42unattended installations using SIA, 46upgrading system firmware, 32
troubleshooting, 69debugging unattended installs, 70error messages in SIA, 69mouse problems when using SIA and ILOM
remote console, 70SIA logfile, 70
Uunattended firmware upgrade using PXE-based
SIA, 49unattended installation troubleshooting, 70unattended OS installation using PXE-based SIA, 49updates
for drivers, 3, 15for SIA, 3, 12
upgradesfirmware upgrade using inband method, 33firmware upgrade using network method, 33system BIOS and device firmware, 2, 32
WWindows installation, 18Windows unattended installation using SIA, 57
XX4500 server instructions for identifying the Linux
boot device during OS installation, 83
88 Sun Installation Assistant for Windows and Linux User’s Guide • November 2009
Related Documents