In order to achieve optimum results in any shear connector or headed anchor weld, it is imperative that the following procedures be followed: 1. Top Flange of Beam The top flange of all beams or plates to be welded should be free of paint, excessive rust or mill scale, dirt moisture and all other foreign material. These materials are contaminants to any welding process, buts especially stud welding due to the short duration of the weld. 2. Structural Ground It is always recommended that the welding ground be attached to a spot on a beam that has been ground clean. Poor or inadequate ground connections can result in a loss of weld current and, therefore, affect weld quality. 3. Power Requirement for Operating Power Source Consult the power source manual or manufacturer for the recommended incoming power requirements prior to energizing the power source. This includes proper fuse selection, and primary cable size and length for the power source being used. Inadequate incoming primary power or incorrect conductor size or length can contribute to a reduction in the required weld current. 4. Welding Current It is essential to have the correct weld current for each application. The normal ranges are listed below. When excessive cable lengths are used, the result will be a reduction in weld current. This can contribute to weld inconsistency or even weld failure. Always use 4/0 cables in the welding circuit, when excessive length is required. The amount of cable totally depends upon the power source being used. It may be necessary in some cases to parallel cable when long runs are necessary. STUD WELDING PRODUCTS, INC. Procedure For Stud Welding Shear Connectors, Headed Anchors 1/4” = 350 to 450 amps 3/4” = 1450 to 1750 3/8” = 525 to 700 amps 7/8” = 1700 to 1950 amps 1/2” = 750 to 925 amps 1” = 2000 to 2200 amps 5/8” = 1100 to 1400 amps 5. Weld Setting Exact weld settings cannot be given because no two jobs are the same. Actual settings will depend upon job site Conditions. Listed on the next page are approximate settings. 6. Testing of Welded Studs At least two studs should be bent in any direction to a 30 degree angle from weld position striking with a hammer or bending with a pipe. For deformed bar anchors, bend around a pin the diameter that is equal to twice the diameter of the specimen. If a failure occurs, re-adjust settings and repeat test. Once the setup has been approved, production may be started. It is a good idea to test two or three studs every half hours to assure that the set-up has not changed. This can be accomplished by bending several studs to a 15 degree angle from weld position. If a failure does not occur, the weld should be considered good. It is not necessary to straighten a stud that is bent. Testing should be carried ut at the beginning of each day, after nay change in operator, or if the set-up is changed in any way. Procedure For Stud Welding Shear Connectors, Headed Anchors, Deformed Bar Anchors and Threaded Studs

Welcome message from author
This document is posted to help you gain knowledge. Please leave a comment to let me know what you think about it! Share it to your friends and learn new things together.
Transcript

In order to achieve optimum results in any shear connector or headed anchor weld, it is imperativethat the following procedures be followed:
1. Top Flange of BeamThe top flange of all beams or plates to be welded should be free of paint, excessive rust or mill scale, dirt moisture and all other foreign material. These materials are contaminants to anywelding process, buts especially stud welding due to the short duration of the weld.
2. Structural GroundIt is always recommended that the welding ground be attached to a spot on a beam that has beenground clean. Poor or inadequate ground connections can result in a loss of weld current and,therefore, affect weld quality.
3. Power Requirement for Operating Power SourceConsult the power source manual or manufacturer for the recommended incoming power requirementsprior to energizing the power source. This includes proper fuse selection, and primary cable sizeand length for the power source being used. Inadequate incoming primary power or incorrectconductor size or length can contribute to a reduction in the required weld current.
4. Welding CurrentIt is essential to have the correct weld current for each application. The normal ranges are listedbelow. When excessive cable lengths are used, the result will be a reduction in weld current.This can contribute to weld inconsistency or even weld failure. Always use 4/0 cables in the weldingcircuit, when excessive length is required. The amount of cable totally depends upon the powersource being used. It may be necessary in some cases to parallel cable when long runs are necessary.
STUD WELDING PRODUCTS, INC.Procedure For Stud Welding Shear Connectors, Headed Anchors
and Deformed Bar Anchors
1/4” = 350 to 450 amps 3/4” = 1450 to 1750
3/8” = 525 to 700 amps 7/8” = 1700 to 1950 amps
1/2” = 750 to 925 amps 1” = 2000 to 2200 amps
5/8” = 1100 to 1400 amps
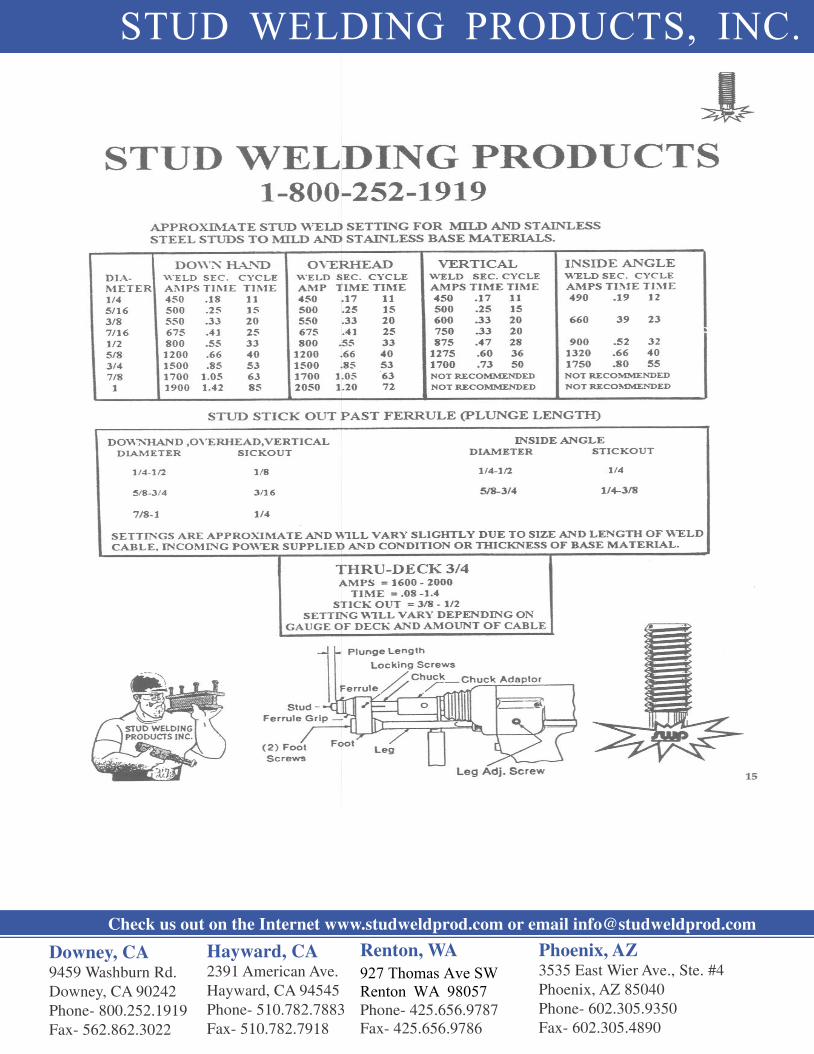
5. Weld SettingExact weld settings cannot be given because no two jobs are the same. Actual settings will depend upon job siteConditions. Listed on the next page are approximate settings.
6. Testing of Welded StudsAt least two studs should be bent in any direction to a 30 degree angle from weld position striking with a hammer orbending with a pipe. For deformed bar anchors, bend around a pin the diameter that is equal to twice the diameterof the specimen. If a failure occurs, re-adjust settings and repeat test. Once the setup has been approved, productionmay be started. It is a good idea to test two or three studs every half hours to assure that the set-up has not changed.This can be accomplished by bending several studs to a 15 degree angle from weld position. If a failure does not occur,the weld should be considered good. It is not necessary to straighten a stud that is bent. Testing should be carriedut at the beginning of each day, after nay change in operator, or if the set-up is changed in any way.
Procedure For Stud Welding Shear Connectors, Headed Anchors, Deformed Bar Anchors and Threaded Studs

Gun lift should be measured with a stud and ferrule in place and the gun compressed as if to weld, using an insulatedpiece of material, such as a piece of wood.
Weld current should also be checked by using an amp meter and should be checked periodically due to cable heating which can cause a reduction in weld current.
NOTE: For 3/4” weld thur deck application settings, consult your local Stud Welding Products Representative.
7. Visual InspectionVisual inspection should show a full 360 degree weld fillet, although not necessarily the same fillet height around thecircumference of the stud. An under cut at the weld interface will be cause for rejection. If the fillet is somethingless than 360 degrees complete the fillet by hand welding. The studs should then be tested by bending 15 degreesfrom their original axis either by striking with a hammer or placing a pipe over the stud and manually or mechanicallybending the stud. If a failure does not occur, the weld should be considered good. If the weld fails, the studs shouldbe replaced. (See AWS D1.1,Section 7.8.1)
8. General InformationA) Keep ferrules dry; wet ferruled cannot be usedB) Keep stud dry; rusty studs cause welding problems and premature chuck failureC) Do not weld when the temperature of the bas material is below 0 degrees F per AWS D1.1, Section 7.5.4D) Do not attempt to weld through more than 2 thickness of galvanized deckingE) Don not weld where water is present on the weld surface.F) Do not weld through dirt, sand or other foreign material.G) Beam flanges should be free of paint, rust and any other foreign material.H) If welding thru deck, deck must be tight against beam flange.I) Weld studs in the center of beam flange whenever possible to eliminate arc blow.J) Hod gun perpendicular to base material.K) Test weld set-up at the start of each day and every half hour.
STUD WELDING PRODUCTS, INC.
9. CertificationCertification of personnel for stud welding applications is available from SWP personnel upon Request.

STUD WELDING PRODUCTS, INC.
STUD WELDING PRODUCTS, INC.
Check us out on the Internet www.studweldprod.com or email [email protected]
Downey, CA9459 Washburn Rd.Downey, CA 90242Phone- 800.252.1919Fax- 562.862.3022
Hayward, CA2391 American Ave.Hayward, CA 94545Phone- 510.782.7883Fax- 510.782.7918
Renton, WA927 Thomas Ave SWRenton WA 98057Phone- 425.656.9787Fax- 425.656.9786
Phoenix, AZ3535 East Wier Ave., Ste. #4Phoenix, AZ 85040Phone- 602.305.9350Fax- 602.305.4890
Related Documents