Stored Procedures and Triggers Microsoft SQL Server 2000 Professional Skills Development 11-1 Copyright © by Application Developers Training Company and AppDev Products Company, LLC All rights reserved. Reproduction is strictly prohibited. Stored Procedures and Triggers Objectives • Learn about the features and benefits of stored procedures. • Create useful stored procedures. • Understand input and output parameters. • Learn how to validate input and handle errors in stored procedures. • Use the Transact-SQL Debugger to debug stored procedures. • Use temp tables in your stored procedures. • Understand the uses for triggers and learn how to write one. • Use an INSTEAD OF trigger with a view.

Welcome message from author
This document is posted to help you gain knowledge. Please leave a comment to let me know what you think about it! Share it to your friends and learn new things together.
Transcript

Stored Procedures and Triggers
Microsoft SQL Server 2000 Professional Skills Development 11-1 Copyright © by Application Developers Training Company and AppDev Products Company, LLC All rights reserved. Reproduction is strictly prohibited.
Stored Procedures and Triggers
Objectives
• Learn about the features and benefits of stored procedures.
• Create useful stored procedures.
• Understand input and output parameters.
• Learn how to validate input and handle errors in stored procedures.
• Use the Transact-SQL Debugger to debug stored procedures.
• Use temp tables in your stored procedures.
• Understand the uses for triggers and learn how to write one.
• Use an INSTEAD OF trigger with a view.
Stored Procedures and Triggers
11-2 Microsoft SQL Server 2000 Professional Skills Development Copyright © by Application Developers Training Company and AppDev Products Company, LLC All rights reserved. Reproduction is strictly prohibited.
Building Stored Procedures A stored procedure is a batch of Transact-SQL (T-SQL) code that is saved internally in SQL Server. Stored procedures can be used to mask complex SQL tasks from clients, improve the performance of your application, enforce data and business rules, increase multi-user concurrency, and reduce locking and blocking conflicts.
Stored Procedure Features
Unlike scripts, which are saved outside of your database as text files, stored procedures are saved as objects inside your database. You can execute a stored procedure from a client application, a batch or script, or from other stored procedures. Stored procedures are parsed and syntax-checked when they are created and compiled on first execution. The execution plan is then cached, and shared among all users of the database. In other words, subsequent calls to the stored procedure can re-use the cached plan, even if different users call the stored procedure. This compilation, caching, and sharing of execution plans gives stored procedures a significant performance advantage over running ad hoc Transact-SQL statements.
Unlike views, which are also saved as database objects, stored procedures support the full capabilities of Transact-SQL. A single stored procedure can contain up to 250 megabytes of text, a limit you’re not going to run up against any time soon. Stored procedures can accept input parameters and can return more than one result set, and they can also return data in the form of output parameters and a return value.
TIP: SQL Server uses stored procedures in most of its internal operations. System stored procedures starting with the db_ prefix are located in each user database, and system stored procedures starting with the sp_ prefix are located in the master database. You can read the Transact-SQL of these stored procedures by opening them in the Enterprise Manager or by running the sp_helptext system stored procedure in the Query Analyzer and supplying the stored procedure name. You’ll even find that most of them contain explanatory comments.
The only tasks that cannot be completed with a stored procedure are the creation of triggers, defaults, rules, other stored procedures, and views. A stored procedure can do everything from executing a basic SELECT statement to enforcing complex business logic and explicit transactions.
Building Stored Procedures
Microsoft SQL Server 2000 Professional Skills Development 11-3 Copyright © by Application Developers Training Company and AppDev Products Company, LLC All rights reserved. Reproduction is strictly prohibited.
Why Stored Procedures Are Faster
To understand why stored procedures are faster than direct SQL commands, you need to understand how SQL Server processes the commands that it receives. When you submit any command for SQL Server to execute, it goes through the following stages:
1. The command is parsed for syntax. Any commands that are syntactically incorrect are rejected.
2. The command is then translated into an internal format known as a sequence tree or query tree.
3. The command is optimized based on estimated performance costs, and an execution plan is generated from the sequence tree that contains all the necessary steps to check constraints and carry out the command.
4. The command is executed.
If you send direct SQL statements one at a time from your application, then each statement requires all four stages for each single statement. Contrary to common belief, the execution plan is not saved with the stored procedure when it is created. For a stored procedure, stages 1 and 2 happen only once, when you save the stored procedure. Step 3 occurs only if the execution plan is not already in the memory cache. Subsequent executions only need step 4 (execution).
Stored Procedures and Plan Caching
Compiling and caching stored procedure execution plans allows the optimization of stored procedures to be much more dynamic than if the plans were saved when the stored procedure was created. A saved plan would quickly become obsolete as the distribution of data and database statistics changed over time.
Stored procedure execution plans are held in a memory cache and are shared among multiple connections. However, there are certain conditions that will cause SQL Server to compile a new execution plan:
• If a copy of the plan isn’t in memory yet.
• If an index on one of the tables is dropped.
• If statistics on one of the tables are updated.
• If a table has been modified with an ALTER TABLE statement.
• If the sp_recompile system stored procedure is run on one of the tables.
• If the stored procedure was created using the WITH RECOMPILE option.
Stored Procedures and Triggers
11-4 Microsoft SQL Server 2000 Professional Skills Development Copyright © by Application Developers Training Company and AppDev Products Company, LLC All rights reserved. Reproduction is strictly prohibited.
If the stored procedure is not used for a while, the plan is flushed from the cache, and the next time the stored procedure is called, a fresh plan is created based on the latest statistics. The ability of SQL Server to recompile stored procedure plans is a good thingan obsolete or inefficient plan is worse than no plan at all.
Uses for Stored Procedures
There are other good reasons to use stored procedures besides speed:
• Reduced utilization of network bandwidth. Stored procedures can optimize data access by returning limited result sets. Users can be prevented from executing queries that choke the server or the network.
• Errors can be handled at the server, in the stored procedure, and not at the client.
• Security permissions can be removed from tables, preventing direct table access. Users can execute stored procedures that work with tables they do not have permissions on as long as both stored procedure and table have the same owner.
• A stored procedure is written once, and can be accessed from many client applications.
• Stored procedures reduce the complexity of client coding.
• Stored procedures divorce the client application from the table structure. Clients don’t need to know anything about the database except the input and output structure of the stored procedure. Thus, changes can be made to database structures without breaking client code.
Creating Stored Procedures
You can create stored procedures using the same tools you used to create views: The Enterprise Manager, the Query Analyzer, and the visual data tools shipped with many other applications. In SQL Server 2000, you’ll probably find that the Query Analyzer is your best choicenot only can you create stored procedures, but you can also debug them, as you’ll see later in this chapter.

Building Stored Procedures
Microsoft SQL Server 2000 Professional Skills Development 11-5 Copyright © by Application Developers Training Company and AppDev Products Company, LLC All rights reserved. Reproduction is strictly prohibited.
Stored Procedure Syntax
Here’s the syntax for creating a stored procedure:
CREATE PROC[EDURE] procedure_name [; number]
[{@parameter data_type}
[VARYING] [= default] [OUTPUT]
] [,...n]
[WITH
{RECOMPILE | ENCRYPTION | RECOMPILE , ENCRYPTION}]
[FOR REPLICATION]
AS sql_statement [...n]
Stored procedure names must conform to the rules for identifiers, and must be unique within the database for each owner. You can optionally add a number after a semicolon—this allows you to create a group of procedures with the same name and different numbers. You would need to use name;number to call those procedure, but you could drop a group of procedures by using just the name without a number.
The @parameter argument specifies the parameters for the stored procedure and must be declared with a data type. You’re allowed up to 2,100 parameters–more than you’ll ever need. You’ll learn about input and output parameters later in this chapter.
If you set the RECOMPILE option, SQL Server will not cache a plan. The ENCRYPTION option will encrypt the definition of the stored procedure.
Creating Useful Stored Procedures
One of the most important reasons to use stored procedures is their support for both input and output parameters. This section covers creating stored procedures and handling parameters.
See StoredProcedures.SQL

Stored Procedures and Triggers
11-6 Microsoft SQL Server 2000 Professional Skills Development Copyright © by Application Developers Training Company and AppDev Products Company, LLC All rights reserved. Reproduction is strictly prohibited.
A Simple Stored Procedure
This stored procedure will select columns from the Employees table. When you execute the CREATE PROCEDURE statement, SQL Server checks your Transact-SQL syntax, but will defer the resolution of the names of objects until it is run the first time. This allows procedures to be created for tables that may not yet exist, but that will eventually exist before the procedure is run the first time. This also means that if you spell a name incorrectly, you won’t find out about it until you try to run the procedure.
CREATE PROC procEmployeeList
AS
SELECT EmployeeID, LastName, FirstName, Address,
City, State, ZipCode, HomePhone, url_EmailAddress
FROM tblEmployee
The easiest way to get a stored procedure to return a value is to use a SELECT statement. This stored procedure returns the results from the SELECT statement, but it is very different from a view containing the same statement. You cannot SELECT just certain rows or columns from the result set of a stored procedure the way you can with a view. Also, you cannot INSERT, UPDATE, or DELETE rows from the result set of a stored procedure. Those actions must all take place within the stored procedure.
NOTE You don’t need to spell out PROCEDUREPROC will do. Transact-SQL generally allows you to get away with typing the first four letters of long words. Other examples include TRAN for TRANSACTION and EXEC for EXECUTE. When in doubt, consult Books Online to see what is allowed.
Executing Stored Procedures
Use EXECUTE (or EXEC) to run the stored procedure. If the stored procedure is called in the first statement in a batch, you can get away without using EXEC:
procEmployeeList
Building Stored Procedures
Microsoft SQL Server 2000 Professional Skills Development 11-7 Copyright © by Application Developers Training Company and AppDev Products Company, LLC All rights reserved. Reproduction is strictly prohibited.
However, it’s probably a good idea to get into the habit of explicitly executing your stored procedures. Either of the following two statements will execute the stored procedure:
EXECUTE procEmployeeList
EXEC procEmployeeList
A Simple Stored Procedure with Input Parameter
Input parameter values can be passed to a stored procedure when you execute it, as long as the stored procedure has declared them and set their data type. If you have more than one input parameter, separate the values with commas. The following procedure uses the input parameter @City in its WHERE clause to limit the number of employee records returned:
CREATE PROC procEmployeeListByCity
@City varchar(25)
AS
SELECT EmployeeID, LastName, FirstName, Address,
City, State, ZipCode, HomePhone, url_EmailAddress
FROM tblEmployee
WHERE City = @City
Executing Stored Procedures with Parameters
You can execute the stored procedure by supplying the parameter value by name:
EXEC procEmployeeListByCity @City = 'Seattle'
or by position:
EXECUTE procEmployeeListByCity 'Seattle'
If you have more than one parameter, separate them with commas. If you execute the stored procedure by position, the parameters must be supplied in the order in which they are declared. If you execute the stored procedure by name, the order is unimportant. Passing parameters by name makes your code easier to read and maintain. On the other hand, passing values by position is
Stored Procedures and Triggers
11-8 Microsoft SQL Server 2000 Professional Skills Development Copyright © by Application Developers Training Company and AppDev Products Company, LLC All rights reserved. Reproduction is strictly prohibited.
slightly faster. In the following case where you forget to supply the parameter entirely, you’ll get a run-time error:
EXEC procEmployeeListByCity
Optional Parameters and Default Values
Declaring a default value for a parameter makes it optional:
@ParamName datatype [(length)] = defaultvalue
Code calling the stored procedure won’t necessarily bomb if the parameter is not supplied, if you have specified a default value. The following example uses the ALTER PROC syntax to revise the original stored procedure. In this case, NULL is supplied as the default value for the @City parameter. The stored procedure code then tests the parameter value, branching to execute a different query based on whether the input parameter is NULL or has actually been supplied:
ALTER PROC procEmployeeListByCity
@City varchar(25) = NULL
AS
IF @City IS NULL
SELECT TOP 3
EmployeeID, LastName, FirstName, Address,
City, State, ZipCode
FROM tblEmployee
ELSE
SELECT EmployeeID, LastName, FirstName, Address,
City, State, ZipCode
FROM tblEmployee
WHERE City = @City
NOTE Uninitialized variables are always NULL in Transact-SQL.
When you execute the stored procedure without supplying a parameter, only three rows are returned, since the TOP clause has limited the result set, as shown in Figure 1.

Building Stored Procedures
Microsoft SQL Server 2000 Professional Skills Development 11-9 Copyright © by Application Developers Training Company and AppDev Products Company, LLC All rights reserved. Reproduction is strictly prohibited.
EXEC procEmployeeListByCity
Figure 1. The result set from executing the parameterized stored procedure without passing a parameter truncates the output at three rows.
When you execute the stored procedure with a parameter, then the WHERE clause is applied and the matching rows are returned, as shown in Figure 2.
EXEC procEmployeeListByCity @City = 'Seattle'
Figure 2. The result set for employees who match the @City input parameter.

Stored Procedures and Triggers
11-10 Microsoft SQL Server 2000 Professional Skills Development Copyright © by Application Developers Training Company and AppDev Products Company, LLC All rights reserved. Reproduction is strictly prohibited.
Finding Null Values
Sometimes it is convenient to be able to test for Null values without having to use the special IS NULL syntax. You can do this in a stored procedure if you SET ANSI_NULLS OFF before creating the procedure. Changing that setting allows Nulls to be checked using the equal sign, just like other values, and the setting will be saved with the stored procedure, even if it isn’t in effect for the rest of your database. The following procedure would allow you to find all employees where City is Null by passing a Null value to the @City parameter:
SET ANSI_NULLS OFF
GO
CREATE PROC procEmployeeListByCityNullsOK
@City varchar(25)
AS
SELECT EmployeeID, LastName, FirstName, Address,
City, State, ZipCode, HomePhone, url_EmailAddress
FROM tblEmployee
WHERE City = @City
GO
SET ANSI_NULLS ON
GO
Output Parameters
Output parameters are used when you want to return a valuesuch as the new identity column for an inserted record. Declare them normally, with the OUTPUT keyword at the end of the declaration statement:
@EmployeeID int OUTPUT
Building Stored Procedures
Microsoft SQL Server 2000 Professional Skills Development 11-11 Copyright © by Application Developers Training Company and AppDev Products Company, LLC All rights reserved. Reproduction is strictly prohibited.
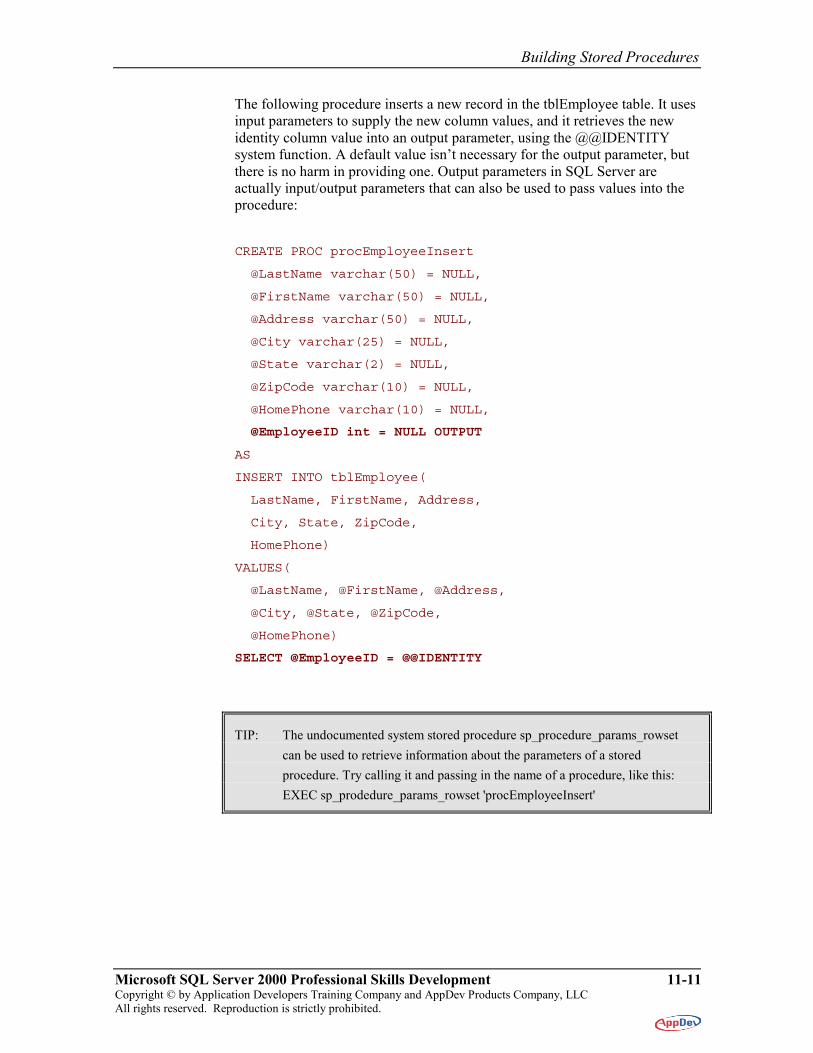
The following procedure inserts a new record in the tblEmployee table. It uses input parameters to supply the new column values, and it retrieves the new identity column value into an output parameter, using the @@IDENTITY system function. A default value isn’t necessary for the output parameter, but there is no harm in providing one. Output parameters in SQL Server are actually input/output parameters that can also be used to pass values into the procedure:
CREATE PROC procEmployeeInsert
@LastName varchar(50) = NULL,
@FirstName varchar(50) = NULL,
@Address varchar(50) = NULL,
@City varchar(25) = NULL,
@State varchar(2) = NULL,
@ZipCode varchar(10) = NULL,
@HomePhone varchar(10) = NULL,
@EmployeeID int = NULL OUTPUT
AS
INSERT INTO tblEmployee(
LastName, FirstName, Address,
City, State, ZipCode,
HomePhone)
VALUES(
@LastName, @FirstName, @Address,
@City, @State, @ZipCode,
@HomePhone)
SELECT @EmployeeID = @@IDENTITY
TIP: The undocumented system stored procedure sp_procedure_params_rowset can be used to retrieve information about the parameters of a stored procedure. Try calling it and passing in the name of a procedure, like this: EXEC sp_prodedure_params_rowset 'procEmployeeInsert'

Stored Procedures and Triggers
11-12 Microsoft SQL Server 2000 Professional Skills Development Copyright © by Application Developers Training Company and AppDev Products Company, LLC All rights reserved. Reproduction is strictly prohibited.
To get the new identity column value using @@IDENTITY when executing the stored procedure from within a Transact-SQL statement, you need to declare a variable to hold the new identity column value. In addition, you need to add the word OUTPUT when you pass your variable to the output parameter of the stored procedure:
DECLARE @NewID int
EXEC procEmployeeInsert
@LastName = 'Badenov',
@FirstName = 'Boris',
@Address = '1 Rotten Row',
@City = 'Frostbite Falls',
@State = 'MN',
@EmployeeID = @NewID OUTPUT
SELECT @NewID AS NewEmpID
An alternate way is to return the new identity column in your stored procedure as a result set, and not as an output parameter. The advantage to simply returning it as a result set is that you don’t have to declare and initialize an output parameter, as shown in the following statement. However, output parameters are slightly more efficient than creating a result set.
SELECT @@IDENTITY As NewID
TIP: The @@IDENTITY function can only be relied upon if it immediately follows the INSERT statement. The value returned by @@IDENTITY is always the identity value that was generated by the last statement executed in that connection. In addition, it will not work correctly if there are triggers that perform cascading inserts on other tables—you’ll get the identity value from the last table that had data inserted. SQL Server 2000 introduces the new SCOPE_IDENTITY() and IDENT_CURRENT(tablename) functions to work around these problems. SCOPE_IDENTITY, returns the last identity value generated for any table in the current session and the current scope—values inserted by triggers aren’t considered part of the current scope. IDENT_CURRENT allows you to retrieve the last identity value inserted in a specified table, regardless of the session or scope where that last insert occurred.
Building Stored Procedures
Microsoft SQL Server 2000 Professional Skills Development 11-13 Copyright © by Application Developers Training Company and AppDev Products Company, LLC All rights reserved. Reproduction is strictly prohibited.
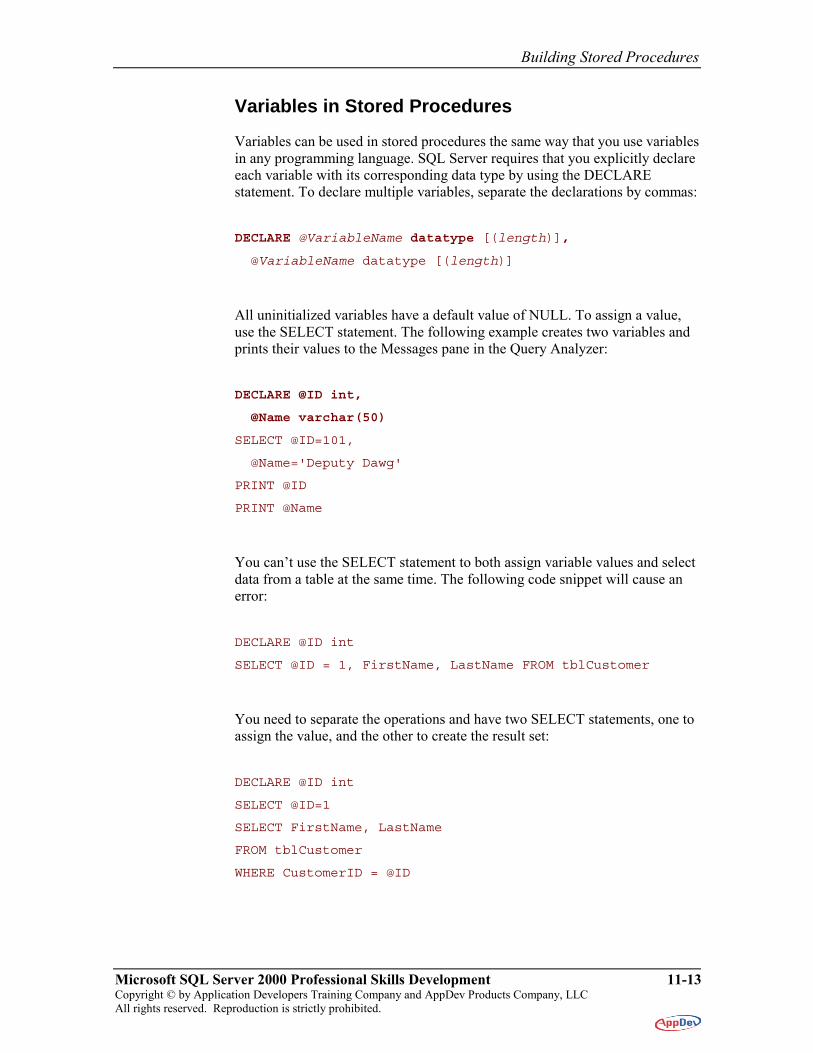
Variables in Stored Procedures
Variables can be used in stored procedures the same way that you use variables in any programming language. SQL Server requires that you explicitly declare each variable with its corresponding data type by using the DECLARE statement. To declare multiple variables, separate the declarations by commas:
DECLARE @VariableName datatype [(length)],
@VariableName datatype [(length)]
All uninitialized variables have a default value of NULL. To assign a value, use the SELECT statement. The following example creates two variables and prints their values to the Messages pane in the Query Analyzer:
DECLARE @ID int,
@Name varchar(50)
SELECT @ID=101,
@Name='Deputy Dawg'
PRINT @ID
PRINT @Name
You can’t use the SELECT statement to both assign variable values and select data from a table at the same time. The following code snippet will cause an error:
DECLARE @ID int
SELECT @ID = 1, FirstName, LastName FROM tblCustomer
You need to separate the operations and have two SELECT statements, one to assign the value, and the other to create the result set:
DECLARE @ID int
SELECT @ID=1
SELECT FirstName, LastName
FROM tblCustomer
WHERE CustomerID = @ID

Stored Procedures and Triggers
11-14 Microsoft SQL Server 2000 Professional Skills Development Copyright © by Application Developers Training Company and AppDev Products Company, LLC All rights reserved. Reproduction is strictly prohibited.
Dealing with Syntax Errors
Most syntax errors result from spelling errors or from forgetting simple things such as using CREATE PROC when you should have used ALTER PROC. The Query Analyzer makes it easy for you to locate your bad syntax when you do hit a run-time error. For example, let’s say you use incorrect syntax and the following message appears in the Messages pane in the Query Analyzer:
Server: Msg 2714, Level 16, State 5, Procedure
procEmployeeListByCity, Line 1
There is already an object named 'procEmployeeListByCity'
in the database.
Simply double-click on the message and you’ll jump to the offending line of code. This comes in handy when you have written a lot of code and aren’t sure where the problem line is located.
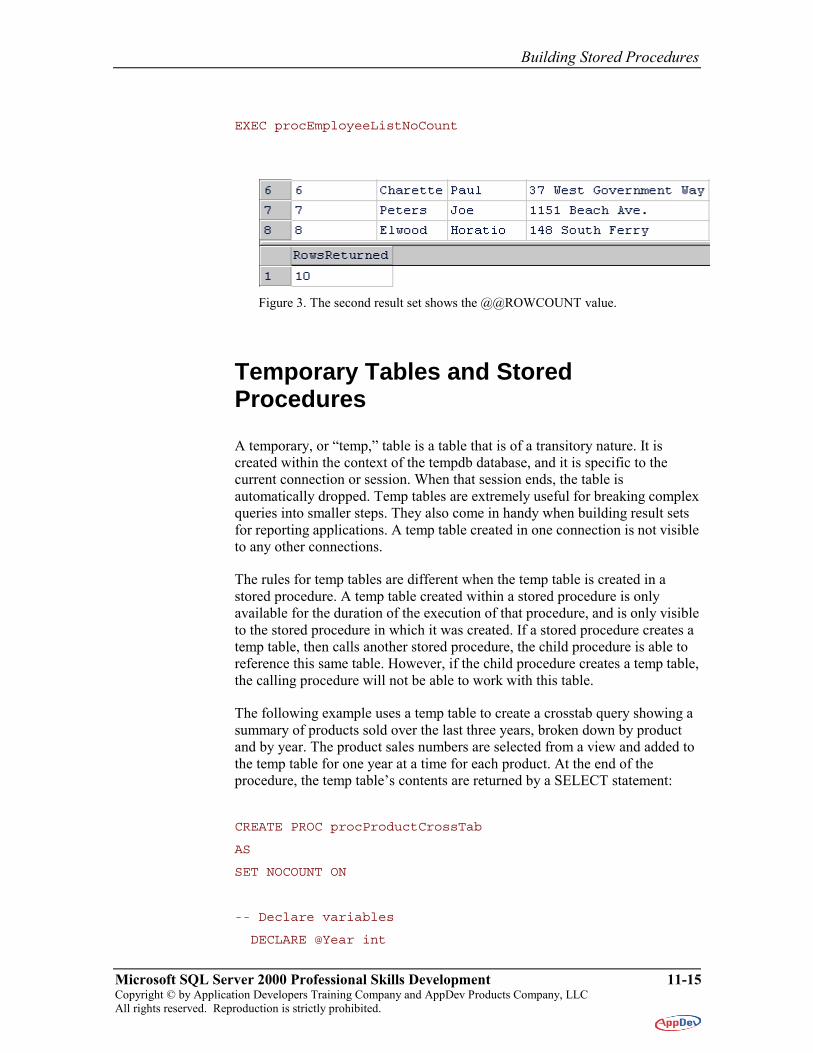
SET NOCOUNT ON
Use SET NOCOUNT ON as the first line after AS within your stored procedure. This eliminates the printed message of (xx rows(s) affected) in the Query Analyzer window. It also eliminates a message of DONE_IN_PROC that is communicated from SQL Server to the client application, which causes another round trip across the network. Setting this option will not have any impact on the value of @@ROWCOUNT.
The following example uses SET NOCOUNT ON and also returns the number of rows affected by the query as a second result set:
CREATE PROC procEmployeeListNoCount
AS
SET NOCOUNT ON
SELECT EmployeeID, LastName, FirstName, Address,
City, State, ZipCode, HomePhone, url_EmailAddress
FROM tblEmployee
SELECT @@ROWCOUNT AS RowsReturned
Execute the procedure, and note the second result set shown in Figure 3.
Building Stored Procedures
Microsoft SQL Server 2000 Professional Skills Development 11-15 Copyright © by Application Developers Training Company and AppDev Products Company, LLC All rights reserved. Reproduction is strictly prohibited.
EXEC procEmployeeListNoCount
Figure 3. The second result set shows the @@ROWCOUNT value.
Temporary Tables and Stored Procedures
A temporary, or “temp,” table is a table that is of a transitory nature. It is created within the context of the tempdb database, and it is specific to the current connection or session. When that session ends, the table is automatically dropped. Temp tables are extremely useful for breaking complex queries into smaller steps. They also come in handy when building result sets for reporting applications. A temp table created in one connection is not visible to any other connections.
The rules for temp tables are different when the temp table is created in a stored procedure. A temp table created within a stored procedure is only available for the duration of the execution of that procedure, and is only visible to the stored procedure in which it was created. If a stored procedure creates a temp table, then calls another stored procedure, the child procedure is able to reference this same table. However, if the child procedure creates a temp table, the calling procedure will not be able to work with this table.
The following example uses a temp table to create a crosstab query showing a summary of products sold over the last three years, broken down by product and by year. The product sales numbers are selected from a view and added to the temp table for one year at a time for each product. At the end of the procedure, the temp table’s contents are returned by a SELECT statement:
CREATE PROC procProductCrossTab
AS
SET NOCOUNT ON
-- Declare variables
DECLARE @Year int

Stored Procedures and Triggers
11-16 Microsoft SQL Server 2000 Professional Skills Development Copyright © by Application Developers Training Company and AppDev Products Company, LLC All rights reserved. Reproduction is strictly prohibited.
DECLARE @SQL nvarchar(500)
DECLARE @Counter tinyint
-- Create temp table
CREATE TABLE #Crosstab
(Product varchar(40),
Y1 int NULL,
Y2 int NULL,
Y3 int NULL)
--Insert Product into temp table
INSERT #Crosstab(Product)
SELECT DISTINCT Product
FROM tblProduct
ORDER BY Product
-- Create a unique clustered index
CREATE UNIQUE CLUSTERED INDEX ixCross
ON #Crosstab (Product)
-- Initialize start year
SET @Year = DATEPART(year, GETDATE()) -2
-- Initialize counter
SET @Counter = 1
-- Loop through to the current year
-- executing multiple updates to temp table
WHILE @Counter <=3
BEGIN
SET @SQL = 'UPDATE #Crosstab '
+ 'SET [Y' + CAST(@Counter AS char(2))
+ '] = (SELECT Quantity FROM
vwProductSalesYearly AS p '
+ 'WHERE p.Product = c.Product AND '
+ 'p.Year = ' + CAST(@Year AS char(4)) + ') '
+ 'FROM #Crosstab AS c'
Building Stored Procedures
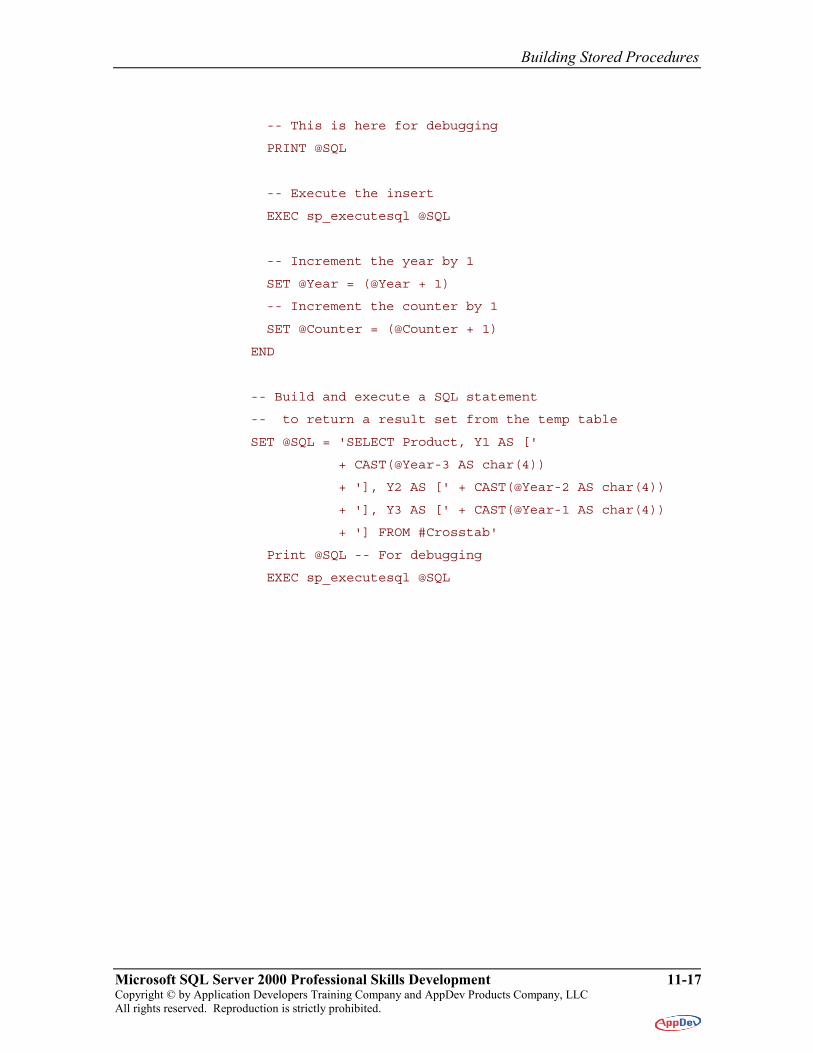
Microsoft SQL Server 2000 Professional Skills Development 11-17 Copyright © by Application Developers Training Company and AppDev Products Company, LLC All rights reserved. Reproduction is strictly prohibited.
-- This is here for debugging
PRINT @SQL
-- Execute the insert
EXEC sp_executesql @SQL
-- Increment the year by 1
SET @Year = (@Year + 1)
-- Increment the counter by 1
SET @Counter = (@Counter + 1)
END
-- Build and execute a SQL statement
-- to return a result set from the temp table
SET @SQL = 'SELECT Product, Y1 AS ['
+ CAST(@Year-3 AS char(4))
+ '], Y2 AS [' + CAST(@Year-2 AS char(4))
+ '], Y3 AS [' + CAST(@Year-1 AS char(4))
+ '] FROM #Crosstab'
Print @SQL -- For debugging
EXEC sp_executesql @SQL
Stored Procedures and Triggers
11-18 Microsoft SQL Server 2000 Professional Skills Development Copyright © by Application Developers Training Company and AppDev Products Company, LLC All rights reserved. Reproduction is strictly prohibited.
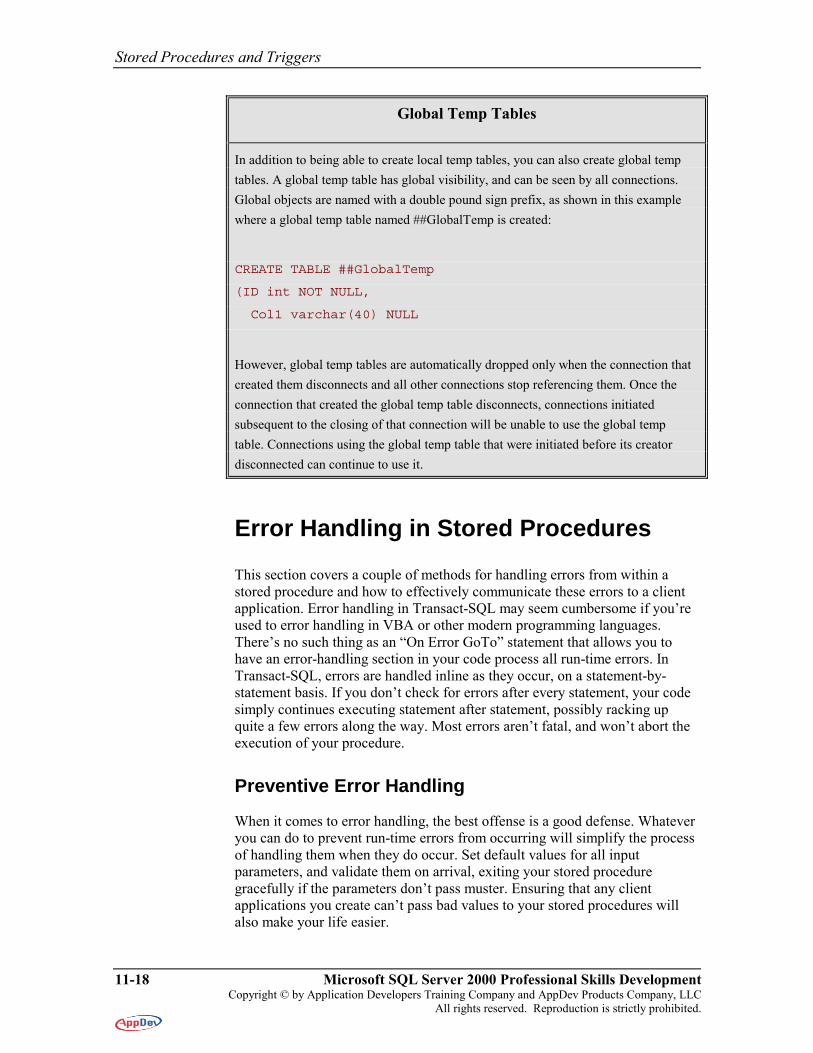
Global Temp Tables
In addition to being able to create local temp tables, you can also create global temp tables. A global temp table has global visibility, and can be seen by all connections. Global objects are named with a double pound sign prefix, as shown in this example where a global temp table named ##GlobalTemp is created:
CREATE TABLE ##GlobalTemp
(ID int NOT NULL,
Col1 varchar(40) NULL
However, global temp tables are automatically dropped only when the connection that created them disconnects and all other connections stop referencing them. Once the connection that created the global temp table disconnects, connections initiated subsequent to the closing of that connection will be unable to use the global temp table. Connections using the global temp table that were initiated before its creator disconnected can continue to use it.
Error Handling in Stored Procedures
This section covers a couple of methods for handling errors from within a stored procedure and how to effectively communicate these errors to a client application. Error handling in Transact-SQL may seem cumbersome if you’re used to error handling in VBA or other modern programming languages. There’s no such thing as an “On Error GoTo” statement that allows you to have an error-handling section in your code process all run-time errors. In Transact-SQL, errors are handled inline as they occur, on a statement-by-statement basis. If you don’t check for errors after every statement, your code simply continues executing statement after statement, possibly racking up quite a few errors along the way. Most errors aren’t fatal, and won’t abort the execution of your procedure.
Preventive Error Handling
When it comes to error handling, the best offense is a good defense. Whatever you can do to prevent run-time errors from occurring will simplify the process of handling them when they do occur. Set default values for all input parameters, and validate them on arrival, exiting your stored procedure gracefully if the parameters don’t pass muster. Ensuring that any client applications you create can’t pass bad values to your stored procedures will also make your life easier.

Building Stored Procedures
Microsoft SQL Server 2000 Professional Skills Development 11-19 Copyright © by Application Developers Training Company and AppDev Products Company, LLC All rights reserved. Reproduction is strictly prohibited.
Trapping Errors Using @@ERROR
A statement that tests to see if an error has occurred should immediately follow any statement in your stored procedure that could possibly trigger an error. @@ERROR is very fragilelet another statement go by and its value is reset to zero.
Returning Information to the Client
In addition to handling errors, it’s also nice to send back information to the client application about what went wrong. Every stored procedure that modifies data should return a success/failure code and some kind of message. The code can be either:
• An integer value indicating success or failure, for example, 1 for success and 0 for failure.
• An integer value 0 indicating success, and a non-zero error code indicating failure. This allows you to pass back a SQL Server error number in the failure value.
Whichever you choose, you should be consistent. In addition, it’s a good idea to pass back a message in the form of a varchar output parameter that returns more detailed information.
Error Handling Example
The following example builds on the stored procedure created earlier in this chapter to insert a record in the tblEmployee table. In addition to the input parameters covering the columns in the table, two additional parameters have been added to return information to the client:
CREATE PROC procEmployeeInsertValidate1
@LastName varchar(50) = NULL,
@FirstName varchar(50) = NULL,
@Address varchar(50) = NULL,
@City varchar(25) = NULL,
@State varchar(2) = NULL,
@ZipCode varchar(10) = NULL,
@HomePhone varchar(10) = NULL,
@EmployeeID int = NULL OUTPUT,
@RetCode int = NULL OUTPUT,
@RetMsg int = NULL OUTPUT
AS
Stored Procedures and Triggers
11-20 Microsoft SQL Server 2000 Professional Skills Development Copyright © by Application Developers Training Company and AppDev Products Company, LLC All rights reserved. Reproduction is strictly prohibited.
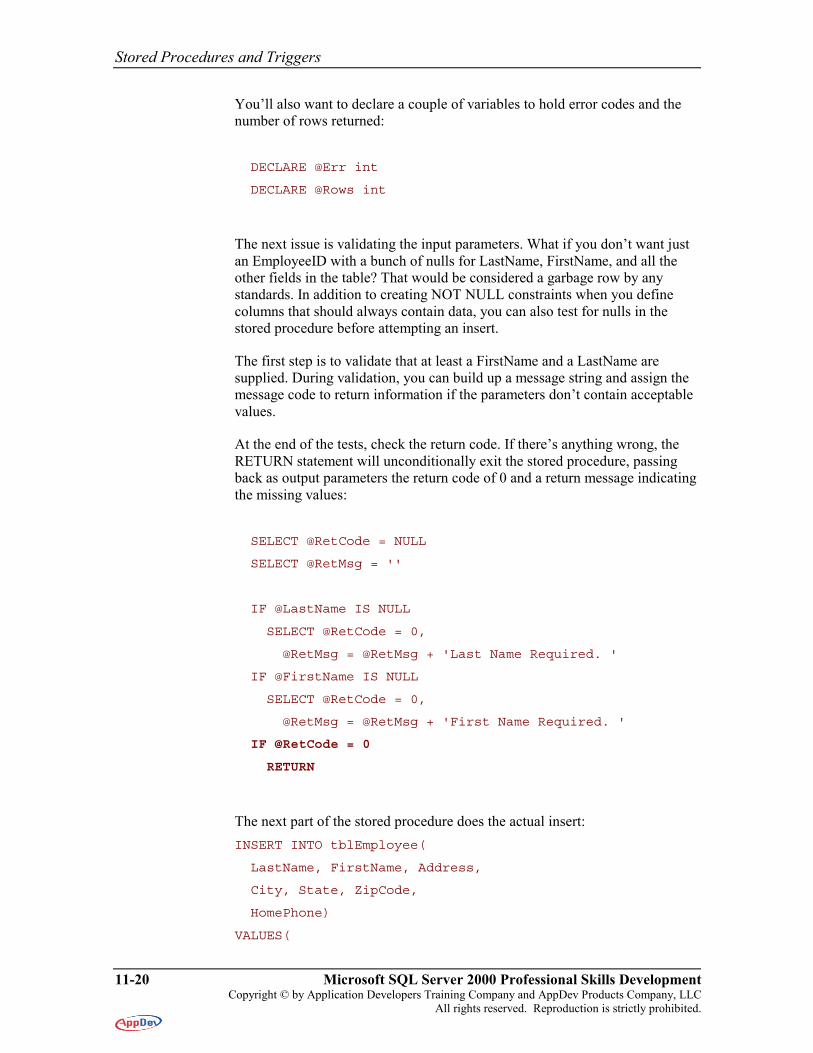
You’ll also want to declare a couple of variables to hold error codes and the number of rows returned:
DECLARE @Err int
DECLARE @Rows int
The next issue is validating the input parameters. What if you don’t want just an EmployeeID with a bunch of nulls for LastName, FirstName, and all the other fields in the table? That would be considered a garbage row by any standards. In addition to creating NOT NULL constraints when you define columns that should always contain data, you can also test for nulls in the stored procedure before attempting an insert.
The first step is to validate that at least a FirstName and a LastName are supplied. During validation, you can build up a message string and assign the message code to return information if the parameters don’t contain acceptable values.
At the end of the tests, check the return code. If there’s anything wrong, the RETURN statement will unconditionally exit the stored procedure, passing back as output parameters the return code of 0 and a return message indicating the missing values:
SELECT @RetCode = NULL
SELECT @RetMsg = ''
IF @LastName IS NULL
SELECT @RetCode = 0,
@RetMsg = @RetMsg + 'Last Name Required. '
IF @FirstName IS NULL
SELECT @RetCode = 0,
@RetMsg = @RetMsg + 'First Name Required. '
IF @RetCode = 0
RETURN
The next part of the stored procedure does the actual insert: INSERT INTO tblEmployee(
LastName, FirstName, Address,
City, State, ZipCode,
HomePhone)
VALUES(
Building Stored Procedures
Microsoft SQL Server 2000 Professional Skills Development 11-21 Copyright © by Application Developers Training Company and AppDev Products Company, LLC All rights reserved. Reproduction is strictly prohibited.
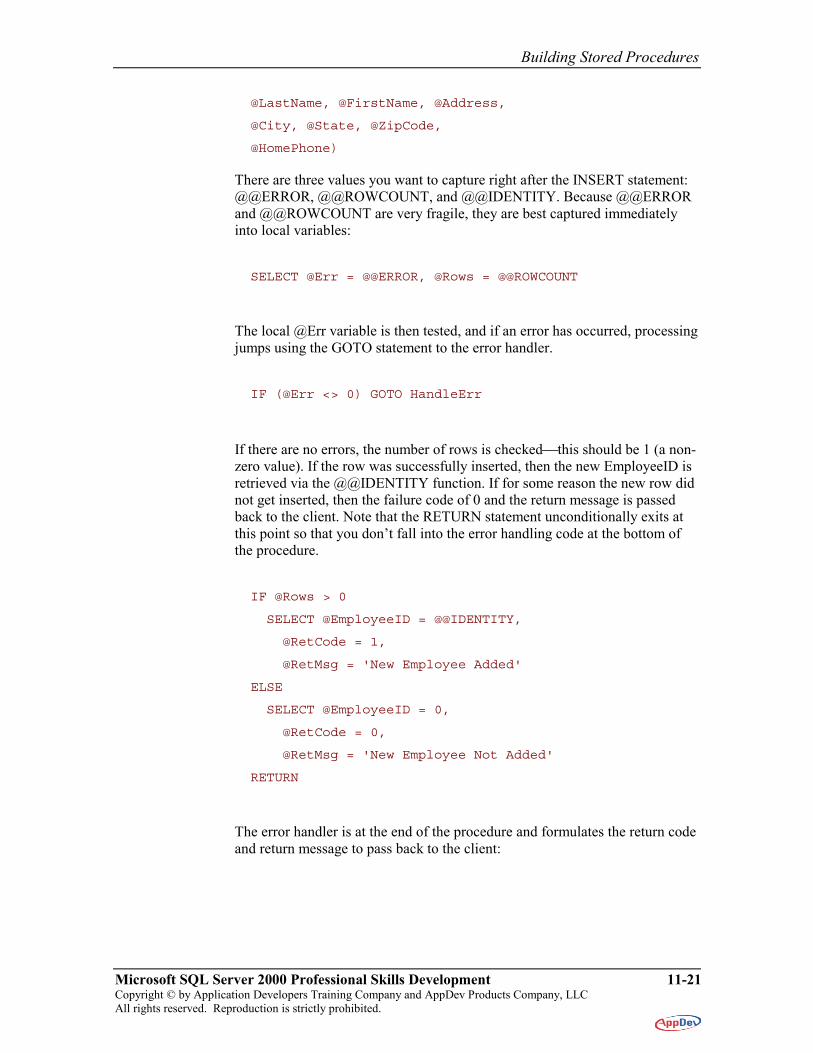
@LastName, @FirstName, @Address,
@City, @State, @ZipCode,
@HomePhone)
There are three values you want to capture right after the INSERT statement: @@ERROR, @@ROWCOUNT, and @@IDENTITY. Because @@ERROR and @@ROWCOUNT are very fragile, they are best captured immediately into local variables:
SELECT @Err = @@ERROR, @Rows = @@ROWCOUNT
The local @Err variable is then tested, and if an error has occurred, processing jumps using the GOTO statement to the error handler.
IF (@Err <> 0) GOTO HandleErr
If there are no errors, the number of rows is checkedthis should be 1 (a non-zero value). If the row was successfully inserted, then the new EmployeeID is retrieved via the @@IDENTITY function. If for some reason the new row did not get inserted, then the failure code of 0 and the return message is passed back to the client. Note that the RETURN statement unconditionally exits at this point so that you don’t fall into the error handling code at the bottom of the procedure.
IF @Rows > 0
SELECT @EmployeeID = @@IDENTITY,
@RetCode = 1,
@RetMsg = 'New Employee Added'
ELSE
SELECT @EmployeeID = 0,
@RetCode = 0,
@RetMsg = 'New Employee Not Added'
RETURN
The error handler is at the end of the procedure and formulates the return code and return message to pass back to the client:
Stored Procedures and Triggers
11-22 Microsoft SQL Server 2000 Professional Skills Development Copyright © by Application Developers Training Company and AppDev Products Company, LLC All rights reserved. Reproduction is strictly prohibited.
HandleErr:
SELECT @EmployeeID = 0,
@RetCode = 0,
@RetMsg = 'Runtime Error: ' + CONVERT(VarChar, @Err)
RETURN
Testing the Error Handler
To test your procedure, pass in variables to retrieve the OUTPUT parameter values. The following code snippet declares the variables, and executes the stored procedure, passing in a value to only the last name parameter. Note that the OUTPUT keyword is used each time a variable is passed to an output parameter:
DECLARE @EmpID int
DECLARE @RetC int
DECLARE @RetM varchar(255)
EXEC procEmployeeInsertValidate @LastName='Moose',
@FirstName = NULL, @EmployeeID = @EmpID OUTPUT,
@RetCode = @RetC OUTPUT, @RetMsg = @RetM OUTPUT
SELECT @RetC AS ReturnCode,
@RetM AS ReturnMsg, @EmpID AS NewEmpID
Figure 4 shows the result set displaying the return information from the stored procedure.
Figure 4. The result set returning information from the stored procedure.
Using RETURN Values and RAISERROR
So far, you have only used the RETURN statement to terminate processing, but this statement can also be used to return a value to the client. One way to make use of this capability is to return an error value, when an error has occurred, or to return zero when there's been no error. You can also use
Building Stored Procedures
Microsoft SQL Server 2000 Professional Skills Development 11-23 Copyright © by Application Developers Training Company and AppDev Products Company, LLC All rights reserved. Reproduction is strictly prohibited.
RAISERROR to create your own custom error messages. The following stored procedure uses RETURN and RAISERROR, rather than output parameters, to return error information to the client: CREATE PROC procEmployeeInsertValidate2
@LastName varchar(50) = NULL,
@FirstName varchar(50) = NULL,
@Address varchar(50) = NULL,
@City varchar(25) = NULL,
@State varchar(2) = NULL,
@ZipCode varchar(10) = NULL,
@HomePhone varchar(10) = NULL,
@EmployeeID int = NULL OUTPUT
AS
DECLARE @Err int
DECLARE @Rows int
DECLARE @ErrMsg varchar (100)
-- Validate @LastName and @FirstName
-- Initialize @ErrMsg
SELECT @ErrMsg = ''
IF @LastName IS NULL
SELECT @ErrMsg = 'Last Name Required. '
IF @FirstName IS NULL
SELECT @ErrMsg = @ErrMsg + 'First Name Required. '
-- Test for problems
IF Len(@ErrMsg) > 0
BEGIN
-- Raise an error with severity level of 16
-- and a state of 1
RAISERROR (@ErrMsg, 16, 1)
-- Terminate the procedure
-- and return a value of 1 for failure
RETURN 1
END
INSERT INTO tblEmployee(
LastName, FirstName, Address,
City, State, ZipCode,
Stored Procedures and Triggers
11-24 Microsoft SQL Server 2000 Professional Skills Development Copyright © by Application Developers Training Company and AppDev Products Company, LLC All rights reserved. Reproduction is strictly prohibited.
HomePhone)
VALUES(
@LastName, @FirstName, @Address,
@City, @State, @ZipCode,
@HomePhone)
-- Capture any error that was raised
SELECT @Err = @@ERROR, @Rows = @@ROWCOUNT
-- Test to see if the row got inserted
IF @Rows > 0
BEGIN
SELECT @EmployeeID = @@IDENTITY
RETURN 0
END
ELSE
BEGIN
RAISERROR ('The new Employee, %s %s, was NOT
added.', 16, 1, @FirstName, @LastName)
RETURN @ERR
END
To retrieve the return value, declare a variable and use EXEC to assign the return value of the procedure to that variable:
DECLARE @EmpID int
DECLARE @RetC int
EXEC @RetC = procEmployeeInsertValidate2
@LastName='Moose',
@FirstName = Null, @EmployeeID = @EmpID OUTPUT
You can then use a SELECT statement to display the return value, along with the new EmployeeID (if one was successfully created): SELECT @RetC AS SuccessCode, @EmpID as NewEmployeeID
Rather than forcing you to use string concatenation to build your error message, RAISERROR allows you to embed tokens in the message and to supply values that will automatically be substituted for those tokens at runtime. This follows the same pattern as the printf function in C or C++. In this
Building Stored Procedures
Microsoft SQL Server 2000 Professional Skills Development 11-25 Copyright © by Application Developers Training Company and AppDev Products Company, LLC All rights reserved. Reproduction is strictly prohibited.
example, the first and last names of the employee are automatically included in the error message.
To test the error message, try opening tblEmployee in design view in the Enterprise Manager, and remove the default value for the required column url_EmailAddress. Then run the following code, which doesn't supply a value for this required column:
DECLARE @EmpID int
DECLARE @RetC int
EXEC @RetC = procEmployeeInsertValidate2
@LastName='Moose',
@FirstName = 'Bullwinkle', @EmployeeID = @EmpID OUTPUT
SELECT @RetC AS SuccessCode, @EmpID as NewEmployeeID
The error message that is returned automatically includes the values passed in for FirstName and LastName:
"The new employee, Bullwinkle Moose, was NOT added."
Be sure to restore the default value of '' (a zero-length string) for url_EmailAddress in tblEmployee, once you have tested the procedure.
The Transact-SQL Debugger
As your procedures become more complex, debugging them becomes more difficult. The Query Analyzer in SQL Server 2000 comes with a new Transact-SQL Debugger. The debugger allows you to set breakpoints, define watch expressions, and single step through your stored procedures. If you just browse through the menus and toolbar buttons in the Query Analyzer user interface, you’ll probably never stumble across how to launch the debuggerit’s pretty well buried. There are actually two different ways, one from the Object Search menu, which is really buried, and the other from the Object Browser, which isn’t quite as obscure:
Launch from the Object Search Menu
Choose Tools|Object Search|New Search from the menu. Select the database the stored procedure lives in from the Database drop-down list. Click the stored procedure checkbox and click the Find Now button. Right-click on the stored procedure you’re interested in debugging and select Debug from the menu.
Stored Procedures and Triggers
11-26 Microsoft SQL Server 2000 Professional Skills Development Copyright © by Application Developers Training Company and AppDev Products Company, LLC All rights reserved. Reproduction is strictly prohibited.
Launch from the Object Browser
Press F8 to load the Object Browser. Expand the Stored Procedure node in the database. Right-click on the stored procedure and select Debug from the menu.
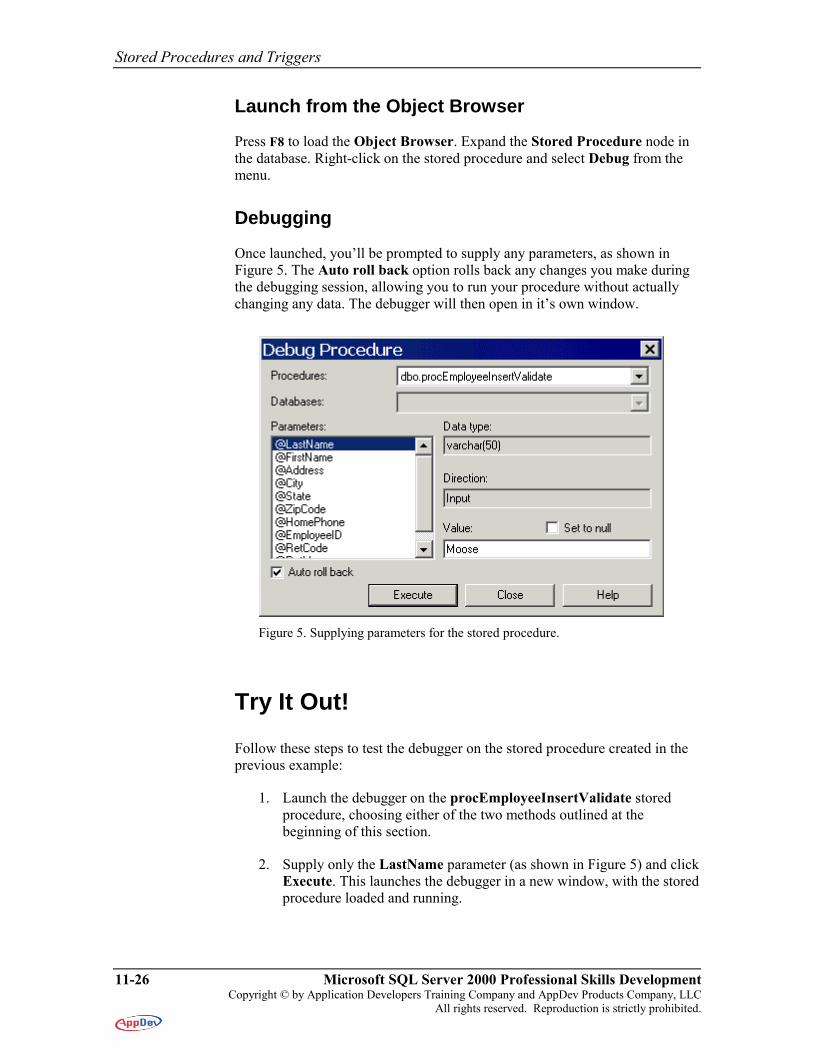
Debugging
Once launched, you’ll be prompted to supply any parameters, as shown in Figure 5. The Auto roll back option rolls back any changes you make during the debugging session, allowing you to run your procedure without actually changing any data. The debugger will then open in it’s own window.
Figure 5. Supplying parameters for the stored procedure.
Try It Out!
Follow these steps to test the debugger on the stored procedure created in the previous example:
1. Launch the debugger on the procEmployeeInsertValidate stored procedure, choosing either of the two methods outlined at the beginning of this section.
2. Supply only the LastName parameter (as shown in Figure 5) and click Execute. This launches the debugger in a new window, with the stored procedure loaded and running.
Building Stored Procedures
Microsoft SQL Server 2000 Professional Skills Development 11-27 Copyright © by Application Developers Training Company and AppDev Products Company, LLC All rights reserved. Reproduction is strictly prohibited.
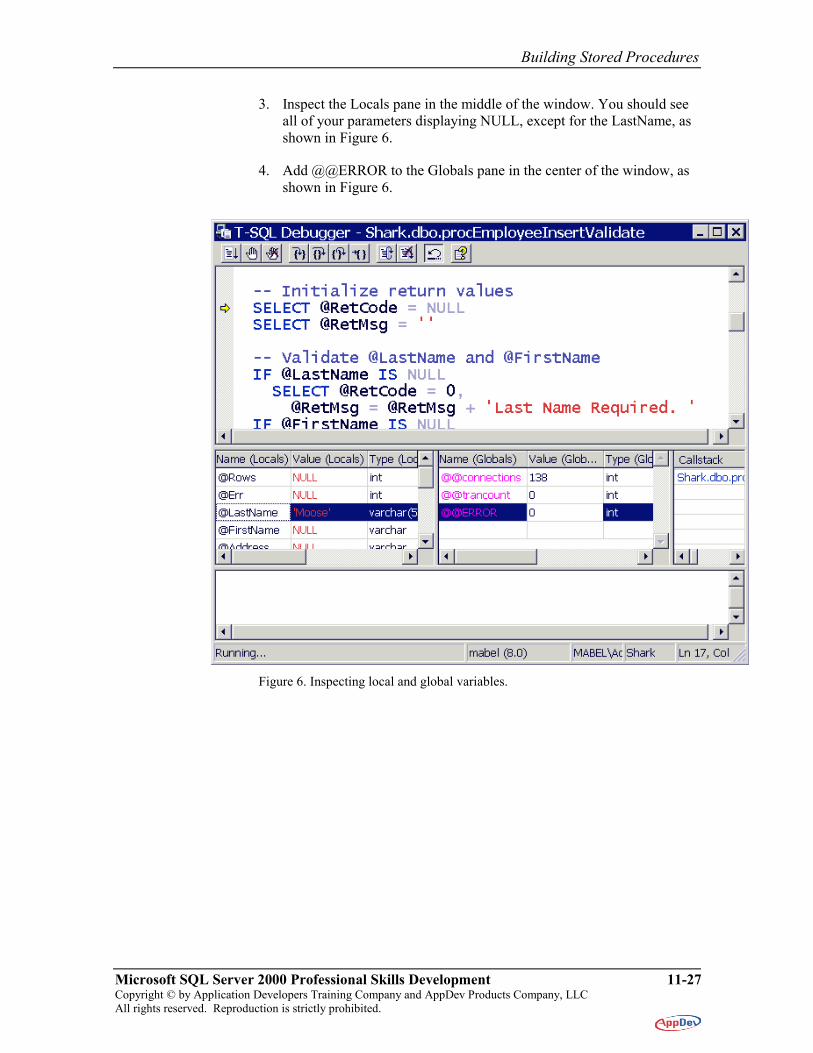
3. Inspect the Locals pane in the middle of the window. You should see all of your parameters displaying NULL, except for the LastName, as shown in Figure 6.
4. Add @@ERROR to the Globals pane in the center of the window, as shown in Figure 6.
Figure 6. Inspecting local and global variables.
Stored Procedures and Triggers
11-28 Microsoft SQL Server 2000 Professional Skills Development Copyright © by Application Developers Training Company and AppDev Products Company, LLC All rights reserved. Reproduction is strictly prohibited.
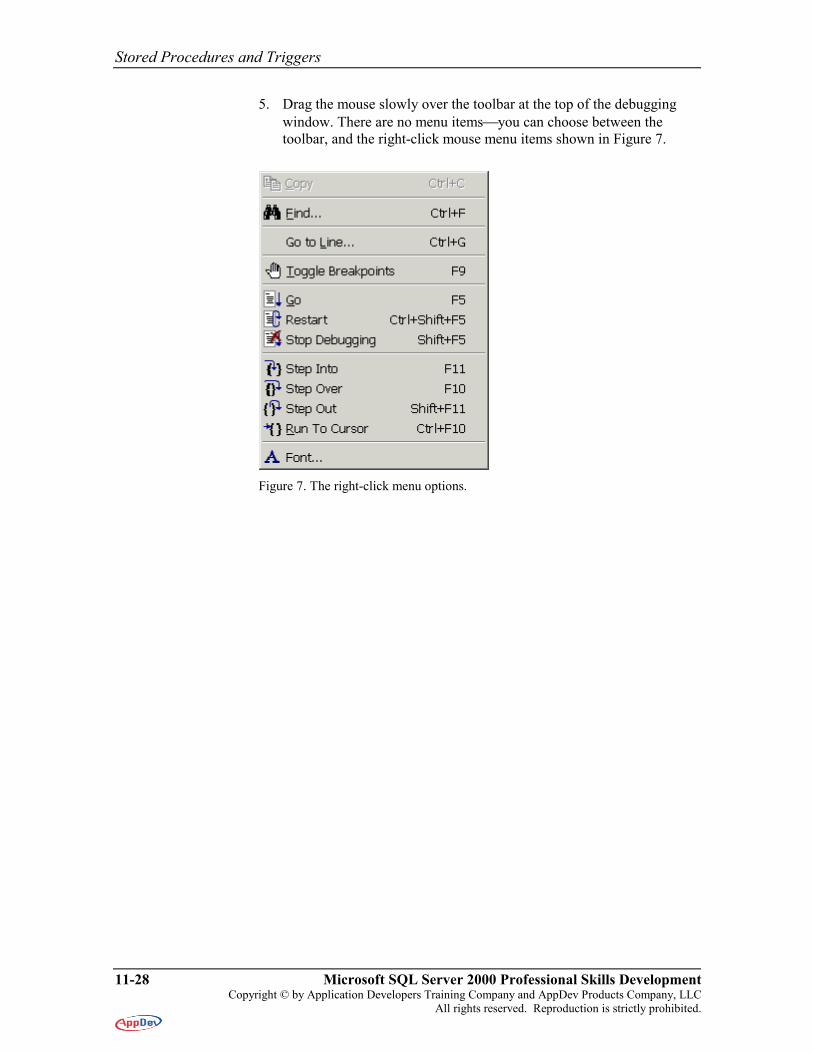
5. Drag the mouse slowly over the toolbar at the top of the debugging window. There are no menu itemsyou can choose between the toolbar, and the right-click mouse menu items shown in Figure 7.
Figure 7. The right-click menu options.
Building Stored Procedures
Microsoft SQL Server 2000 Professional Skills Development 11-29 Copyright © by Application Developers Training Company and AppDev Products Company, LLC All rights reserved. Reproduction is strictly prohibited.
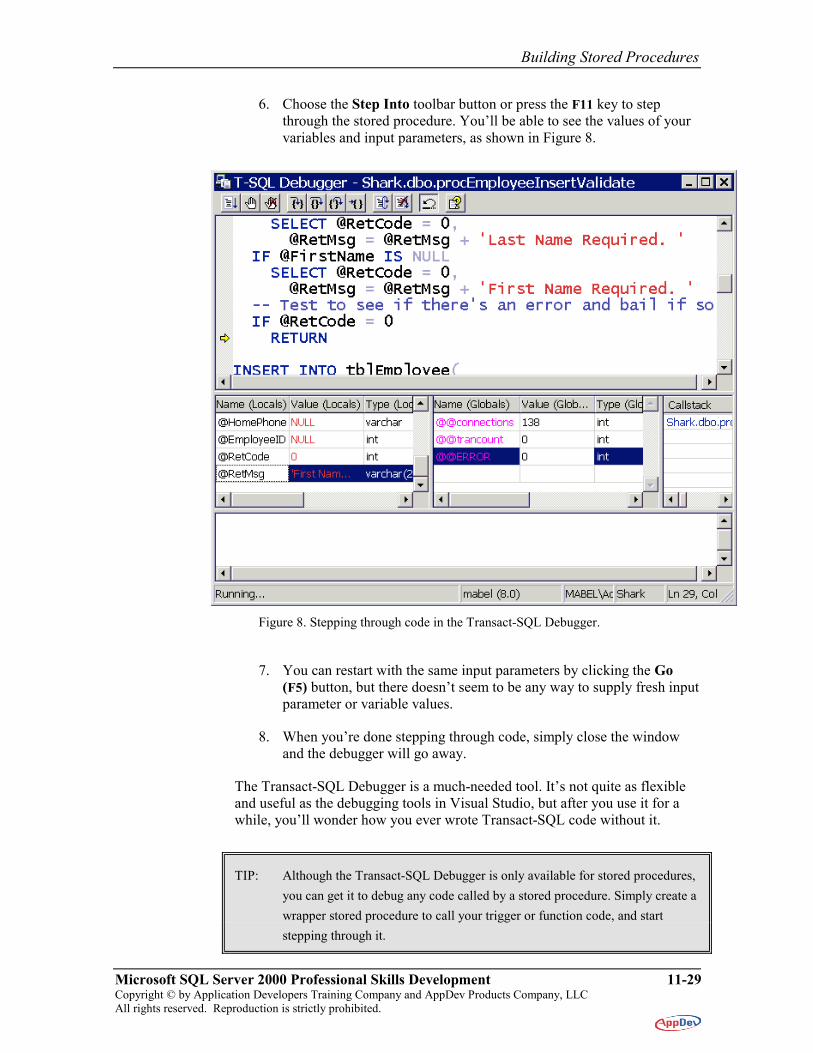
6. Choose the Step Into toolbar button or press the F11 key to step through the stored procedure. You’ll be able to see the values of your variables and input parameters, as shown in Figure 8.
Figure 8. Stepping through code in the Transact-SQL Debugger.
7. You can restart with the same input parameters by clicking the Go (F5) button, but there doesn’t seem to be any way to supply fresh input parameter or variable values.
8. When you’re done stepping through code, simply close the window and the debugger will go away.
The Transact-SQL Debugger is a much-needed tool. It’s not quite as flexible and useful as the debugging tools in Visual Studio, but after you use it for a while, you’ll wonder how you ever wrote Transact-SQL code without it.
TIP: Although the Transact-SQL Debugger is only available for stored procedures, you can get it to debug any code called by a stored procedure. Simply create a wrapper stored procedure to call your trigger or function code, and start stepping through it.
Stored Procedures and Triggers
11-30 Microsoft SQL Server 2000 Professional Skills Development Copyright © by Application Developers Training Company and AppDev Products Company, LLC All rights reserved. Reproduction is strictly prohibited.
Building Triggers Triggers are always associated with tables or views, and can’t be found as independent objects in the Enterprise Manager. They can be found, however, in the Object Browser, in a Triggers folder that appears for every table or view.
What Is a Trigger?
Triggers are procedures that run automatically in response to changes to your data. The primary purpose of a trigger is to make a decision as to whether these data changes should be committed to the database, but they can perform any type of data manipulation action. There are three standard types of triggers: INSERT, UPDATE, and DELETE. In SQL Server 2000, a new type was added—INSTEAD OF. While earlier versions of SQL Server only supported a single trigger of each type per table, SQL Server 7.0 supports multiple triggers on the same table, and in SQL Server 2000 you can even control which triggers fire first and last.
NOTE There is no such thing as a SELECT trigger. Triggers only exist for data modification operations such as insert, update, and delete.
In SQL Server 4.x, triggers were the only method available to enforce primary key/foreign key relationships, also known as referential integrity. When SQL Server 6.x was introduced, so was the ability to create foreign key constraints that enforced referential integrity without triggers, called declarative referential integrity (DRI). The role of the trigger moved primarily from enforcing relationships to enforcing business rules that were too complex to be enforced in a CHECK constraint. Some developers continued to use triggers for referential integrity, because they were the only means for implementing cascading updates and deletes in older versions of SQL Server. Now that SQL Server 2000 can enforce the primary/foreign key relationships as well as cascading updates and deletes, there is no need to use triggers to enforce referential integrity.
Many developers try to avoid using triggers at all, because their hidden actions can make maintenance and debugging very difficult, especially if the triggers make changes to tables other than the one being explicitly updated. By forcing all data changes to be made using stored procedures, you can avoid the need to use triggers at all. If, however, you allow users and client applications to directly update, insert, or delete data using ad hoc queries, then triggers are one way to maintain control over your data.

Building Triggers
Microsoft SQL Server 2000 Professional Skills Development 11-31 Copyright © by Application Developers Training Company and AppDev Products Company, LLC All rights reserved. Reproduction is strictly prohibited.
Uses for Triggers
Triggers are often used to enforce business rules that can’t be expressed as a constraint, and to raise alerts. There are some business rules that are too complex to be implemented within the expressions available for constraints or rules. Triggers can reference values from any other column in the affected record, including the original and the changed values, and triggers can also reference data in other tables or other databases. One reason to use a trigger is if you need to enforce a relationship between tables that are in separate databases, since DRI cannot be used for this.
Like stored procedures, triggers can contain complex logic, variables, error handling, and almost the full range of Transact-SQL programming. The only limitation on your Transact-SQL code in triggers is that you cannot create objects or modify their design, and you cannot perform administrative tasks like backups.
NOTE SQL Server 2000 introduces a new type of trigger, the INSTEAD OF trigger. INSTEAD OF triggers are executed instead of the action that raised the trigger. INSTEAD OF triggers can also be created on views. AFTER is synonymous with FOR, which is used in earlier versions of SQL Server. An AFTER (FOR) trigger can only be created on a table, not a view. AFTER triggers fire after the INSERT, UPDATE, or DELETE triggering action, and after any constraints and referential actions have been processed.
How Triggers Work
A trigger uses two virtual tables named inserted and deleted to do most of its work. When SQL Server fires an INSERT trigger, it copies the new values into the inserted table. For an UPDATE trigger, the new value is also copied to inserted, and the old value is copied to deleted. And of course for a DELETE trigger, the value being deleted is copied to deleted.
Triggers can also reference other objects, and you can join other tables to the inserted and deleted tables. For example, to create an audit trail, you could create a trigger that inserts the values contained in the deleted table into a backup table and perhaps adds the name of the current user and the current date and time. Since the trigger fires each time a row is deleted, no further action is necessary.
You can create triggers for both tables and views. Triggers created for tables will fire whenever the data in the table is modified. Triggers on views, however, only fire if the data modification is done through that view, and the only kinds of triggers you can create for views are INSTEAD OF triggers.
Stored Procedures and Triggers
11-32 Microsoft SQL Server 2000 Professional Skills Development Copyright © by Application Developers Training Company and AppDev Products Company, LLC All rights reserved. Reproduction is strictly prohibited.
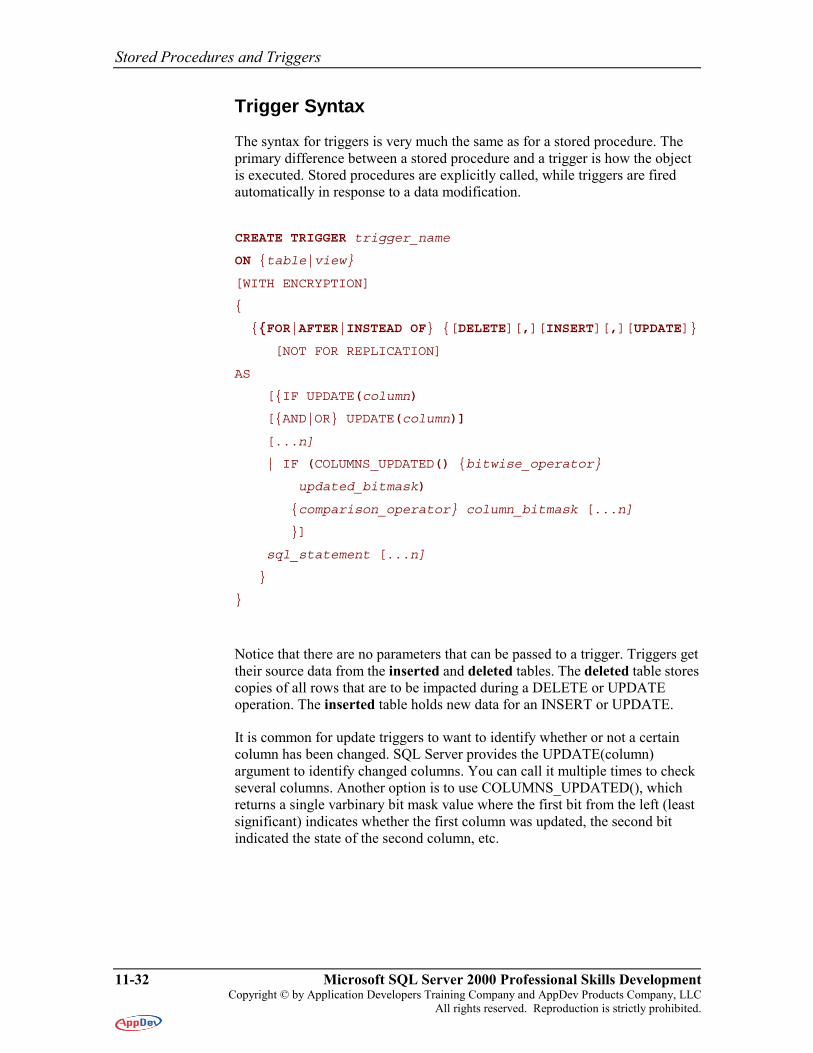
Trigger Syntax
The syntax for triggers is very much the same as for a stored procedure. The primary difference between a stored procedure and a trigger is how the object is executed. Stored procedures are explicitly called, while triggers are fired automatically in response to a data modification.
CREATE TRIGGER trigger_name
ON {table|view}
[WITH ENCRYPTION]
{
{{FOR|AFTER|INSTEAD OF} {[DELETE][,][INSERT][,][UPDATE]}
[NOT FOR REPLICATION]
AS
[{IF UPDATE(column)
[{AND|OR} UPDATE(column)]
[...n]
| IF (COLUMNS_UPDATED() {bitwise_operator}
updated_bitmask)
{comparison_operator} column_bitmask [...n]
}]
sql_statement [...n]
}
}
Notice that there are no parameters that can be passed to a trigger. Triggers get their source data from the inserted and deleted tables. The deleted table stores copies of all rows that are to be impacted during a DELETE or UPDATE operation. The inserted table holds new data for an INSERT or UPDATE.
It is common for update triggers to want to identify whether or not a certain column has been changed. SQL Server provides the UPDATE(column) argument to identify changed columns. You can call it multiple times to check several columns. Another option is to use COLUMNS_UPDATED(), which returns a single varbinary bit mask value where the first bit from the left (least significant) indicates whether the first column was updated, the second bit indicated the state of the second column, etc.
Building Triggers
Microsoft SQL Server 2000 Professional Skills Development 11-33 Copyright © by Application Developers Training Company and AppDev Products Company, LLC All rights reserved. Reproduction is strictly prohibited.
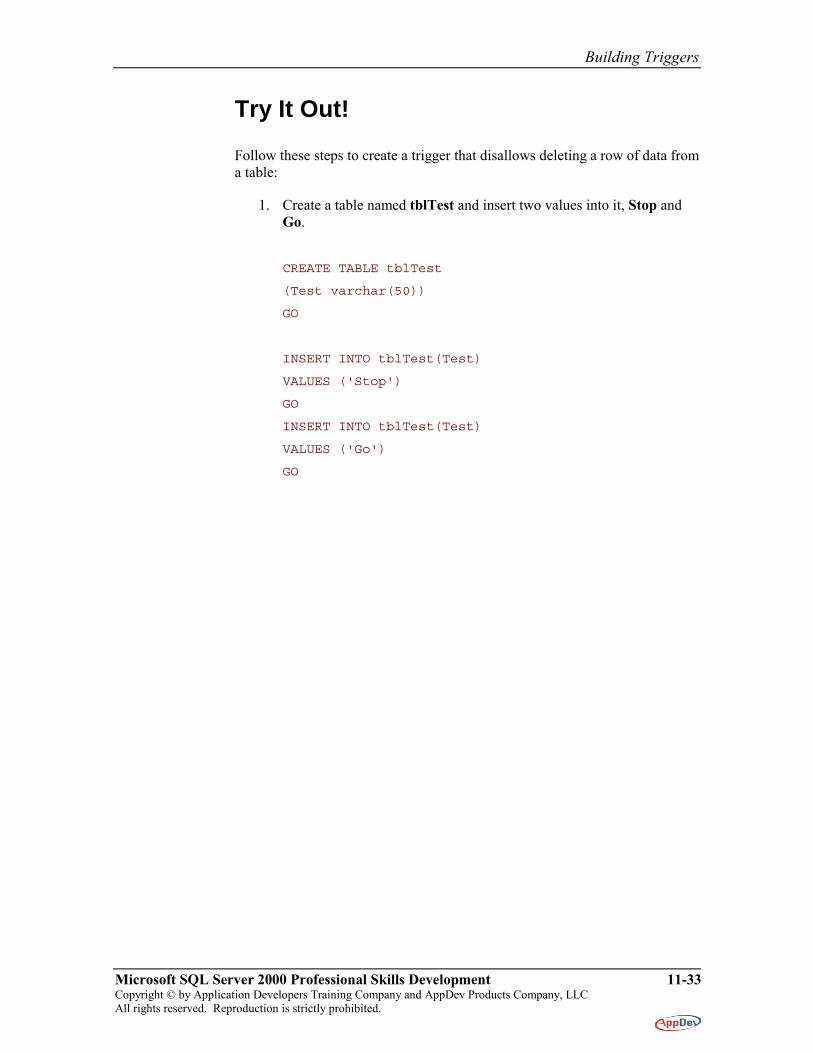
Try It Out!
Follow these steps to create a trigger that disallows deleting a row of data from a table:
1. Create a table named tblTest and insert two values into it, Stop and Go.
CREATE TABLE tblTest
(Test varchar(50))
GO
INSERT INTO tblTest(Test)
VALUES ('Stop')
GO
INSERT INTO tblTest(Test)
VALUES ('Go')
GO
Stored Procedures and Triggers
11-34 Microsoft SQL Server 2000 Professional Skills Development Copyright © by Application Developers Training Company and AppDev Products Company, LLC All rights reserved. Reproduction is strictly prohibited.
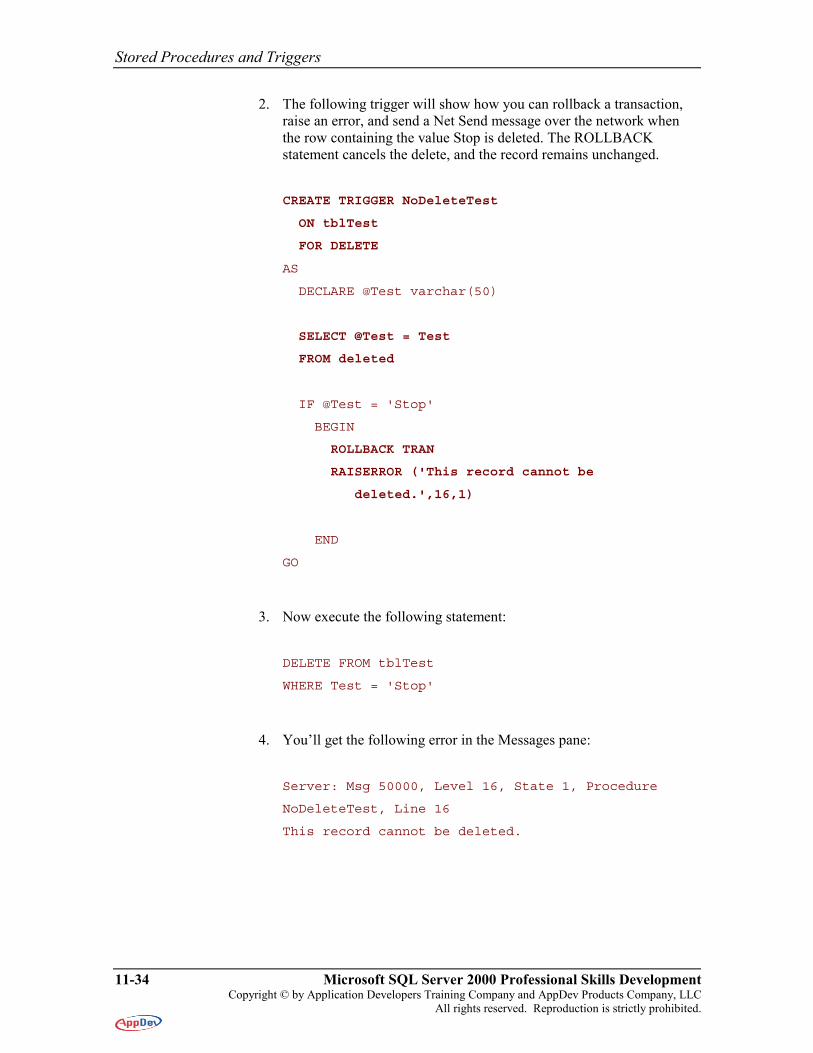
2. The following trigger will show how you can rollback a transaction, raise an error, and send a Net Send message over the network when the row containing the value Stop is deleted. The ROLLBACK statement cancels the delete, and the record remains unchanged.
CREATE TRIGGER NoDeleteTest
ON tblTest
FOR DELETE
AS
DECLARE @Test varchar(50)
SELECT @Test = Test
FROM deleted
IF @Test = 'Stop'
BEGIN
ROLLBACK TRAN
RAISERROR ('This record cannot be
deleted.',16,1)
END
GO
3. Now execute the following statement:
DELETE FROM tblTest
WHERE Test = 'Stop'
4. You’ll get the following error in the Messages pane:
Server: Msg 50000, Level 16, State 1, Procedure
NoDeleteTest, Line 16
This record cannot be deleted.
Building Triggers
Microsoft SQL Server 2000 Professional Skills Development 11-35 Copyright © by Application Developers Training Company and AppDev Products Company, LLC All rights reserved. Reproduction is strictly prohibited.
5. Drop the table when you’re done:
DROP TABLE tblTest
Controlling the Order of Multiple Triggers
It is generally not recommended that you have multiple AFTER triggers for one action on one table, but it is supported and you may encounter it. SQL Server 2000 added a system stored procedure that allows you to specify which trigger will fire first and which will fire last. If there are more than three triggers firing, you have no control over the order of the middle ones.
The syntax for calling sp_settriggerorder is very straightforward and relies on the fact that triggers, like stored procedures, are always given a name:
sp_settriggerorder 'MyTrigger' 'First'
sp_settriggerorder 'MyOtherTrigger' 'Last'
If an ALTER TRIGGER statement changes a first or last trigger, the order attribute is automatically dropped, and you need to call sp_settriggerorder again.
Stored Procedures and Triggers
11-36 Microsoft SQL Server 2000 Professional Skills Development Copyright © by Application Developers Training Company and AppDev Products Company, LLC All rights reserved. Reproduction is strictly prohibited.
The Trouble with Triggers
The biggest risk involved with using triggers is that users and developers may be firing data operations without even being aware of them.
Triggers are a relic of older versions of SQL Server. The need for triggers to enforce referential integrity or cascading deletes has largely passed. Stored procedures now contain all of the features necessary to do everything a trigger can do. Implementing all rules in stored procedures and disallowing direct table access provides improved data security and better performance.
Because triggers consist of additional Transact-SQL code, they add overhead to data operations and negatively impact performance. In addition, trigger code is buried deep within a table definition. Other than designating a first and last AFTER trigger, you have no control over the firing of triggers. Complex business rules implemented in stored procedures rather than triggers will improve performance and simplify code maintenance.
Since triggers execute code that extends a transaction, they can potentially extend the duration of a transaction for a longer period of time, especially when they access other tables. This performance penalty has the potential to lower multi-user concurrency to unacceptable levels by prolonging the amount of time that locks are held for.
Using INSTEAD OF Triggers
Microsoft SQL Server 2000 Professional Skills Development 11-37 Copyright © by Application Developers Training Company and AppDev Products Company, LLC All rights reserved. Reproduction is strictly prohibited.
Using INSTEAD OF Triggers The new INSTEAD OF trigger available in SQL Server 2000 can also be defined on a table, but its primary use is with views.
Views and INSTEAD OF Triggers
In earlier versions of SQL Server, triggers could be defined on tables only. The trigger code would execute whenever its triggering action occurred. The idea behind an INSTEAD OF trigger is that it fires instead of the INSERT, UPDATE, or DELETE statement that triggers it. Plus, you can define these triggers on views. In other words, views that would normally not be updatable can have their underlying tables updated in an INSTEAD OF trigger. An INSTEAD OF trigger can support inserts, updates, and deletes that reference data in more than one table, and can also allow you to code more complex logic that will be applied whenever the view or table is modified. You could present a friendly interface through a view and behind the scenes any updates to that simple view could be propagated to many different underlying tables.
For example, a view containing a join between the products and the categories tables would normally only allow you to update either one or the other in a single UPDATE statement, not both:
CREATE VIEW vwProductByCategoryItrig
AS
SELECT C.Category,
P.ProductID, P.Product
FROM tblProduct AS P INNER JOIN
tblCategory AS C ON
P.CategoryID = C.CategoryID
Try executing this update and you’ll get an error:
UPDATE vwProductByCategoryItrig
SET Product = 'Shark Thingys', Category = 'Thingys'
WHERE ProductID = 1

Stored Procedures and Triggers
11-38 Microsoft SQL Server 2000 Professional Skills Development Copyright © by Application Developers Training Company and AppDev Products Company, LLC All rights reserved. Reproduction is strictly prohibited.
The following INSTEAD OF trigger independently updates each table anytime an attempt is made to update the view. The trigger takes over and performs two separate updates instead of letting things take their course and attempting a single illegal update:
CREATE TRIGGER trigUpdateBoth
ON vwProductByCategoryItrig
INSTEAD OF UPDATE
AS
SET NOCOUNT ON
UPDATE tblProduct
SET tblProduct.Product =
(SELECT inserted.Product
FROM inserted)
WHERE tblProduct.ProductID =
(SELECT inserted.ProductID FROM inserted)
UPDATE tblCategory
SET tblCategory.Category =
(SELECT inserted.Category
FROM inserted)
WHERE tblCategory.Category =
(SELECT deleted.Category FROM deleted)
Although a single UPDATE statement that tried to update both the Product and the Category tables through a view would otherwise fail, the INSTEAD OF trigger fires instead of the normal UPDATE statement and explicitly writes changes back to both tables. The user or client application doesn’t even have to know what the underlying tables are or how they are related. The update statement will now succeed.
UPDATE vwProductByCategoryItrig
SET Product = 'Shark Thingys', Category = 'Thingys'
WHERE ProductID = 1
As you can see, INSTEAD OF triggers can make views very powerful indeed, allowing actions that would not normally be permitted. You could also use INSTEAD OF triggers to call stored procedures to perform the requested data modification. This useful feature in SQL Server 2000 may tempt developers who have been dead set against using triggers in the past to take a second look.

Using INSTEAD OF Triggers
Microsoft SQL Server 2000 Professional Skills Development 11-39 Copyright © by Application Developers Training Company and AppDev Products Company, LLC All rights reserved. Reproduction is strictly prohibited.
Summary • Stored procedures deliver the best performance because a query plan is
cached on first execution.
• Stored procedures minimize network resources and can be used as a security mechanism to prevent direct access to tables.
• Stored procedures support parameters, variables, control-of-flow, error handling, and other Transact-SQL programming language features.
• SET NOCOUNT ON eliminates an unnecessary network round trip and the done-in-proc message.
• Temporary tables provide a way to break up complex processing.
• The Transact-SQL Debugger is a useful new tool for debugging and testing stored procedures.
• Triggers can be fired automatically on INSERT, UPDATE, and DELETE statements.
• Triggers extend transactions and can negatively impact performance and maintainability.
• An INSTEAD OF trigger can allow views that are not normally updatable to be updated.

Stored Procedures and Triggers
11-40 Microsoft SQL Server 2000 Professional Skills Development Copyright © by Application Developers Training Company and AppDev Products Company, LLC All rights reserved. Reproduction is strictly prohibited.
(Review questions and answers on the following pages.)

Using INSTEAD OF Triggers
Microsoft SQL Server 2000 Professional Skills Development 11-41 Copyright © by Application Developers Training Company and AppDev Products Company, LLC All rights reserved. Reproduction is strictly prohibited.
Questions 1. When does a stored procedure get compiled?
2. How can you prevent users from directly modifying data in tables?
3. How can you eliminate an extra network round-trip and the done-in-proc message?
4. When do you have to trap errors in your stored procedures?
5. Can you write a trigger on a SELECT statement?
6. What does an INSTEAD OF trigger do?
Stored Procedures and Triggers
11-42 Microsoft SQL Server 2000 Professional Skills Development Copyright © by Application Developers Training Company and AppDev Products Company, LLC All rights reserved. Reproduction is strictly prohibited.
Answers 1. When does a stored procedure get compiled? On first execution
2. How can you prevent users from directly modifying data in tables? Remove all permissions from tables, and use stored procedures, granting EXECUTE permissions on the stored procedures.
3. How can you eliminate an extra network round-trip and the done-in-proc message? Use SET NOCOUNT ON as the first statement in your stored procedure.
4. When do you have to trap errors in your stored procedures? On the line immediately after the statement that may have caused the error.
5. Can you write a trigger on a SELECT statement? No. Only on an INSERT, UPDATE, or DELETE statement.
7. What does an INSTEAD OF trigger do? An INSTEAD OF trigger fires instead of the normal triggering action (an INSERT, UPDATE, or DELETE statement). It allows you to update views that would not normally be updatable.

Using INSTEAD OF Triggers
Microsoft SQL Server 2000 Professional Skills Development 11-43 Copyright © by Application Developers Training Company and AppDev Products Company, LLC All rights reserved. Reproduction is strictly prohibited.
Lab 11: Stored Procedures
and Triggers
TIP: Because this lab includes a great deal of typed code, we’ve tried to make it simpler for you. You’ll find all the code in StoredProceduresLab.SQL, in the same directory as the sample project. To avoid typing the code, you can cut/paste it from the text file instead, or open the file as a script in the Query Analyzer.
Lab 11: Stored Procedures and Triggers
11-44 Microsoft SQL Server 2000 Professional Skills Development Copyright © by Application Developers Training Company and AppDev Products Company, LLC All rights reserved. Reproduction is strictly prohibited.
Lab 11 Overview In this lab you’ll learn how to create a stored procedure and how to debug it using the Transact-SQL Debugger.
To complete this lab, you’ll need to work through two exercises:
• Creating a Stored Procedure
• Using the Transact-SQL Debugger
Each exercise includes an “Objective” section that describes the purpose of the exercise. You are encouraged to try to complete the exercise from the information given in the Objective section. If you require more information to complete the exercise, the Objective section is followed by detailed step-by-step instructions.
Creating a Stored Procedure
Microsoft SQL Server 2000 Professional Skills Development 11-45 Copyright © by Application Developers Training Company and AppDev Products Company, LLC All rights reserved. Reproduction is strictly prohibited.
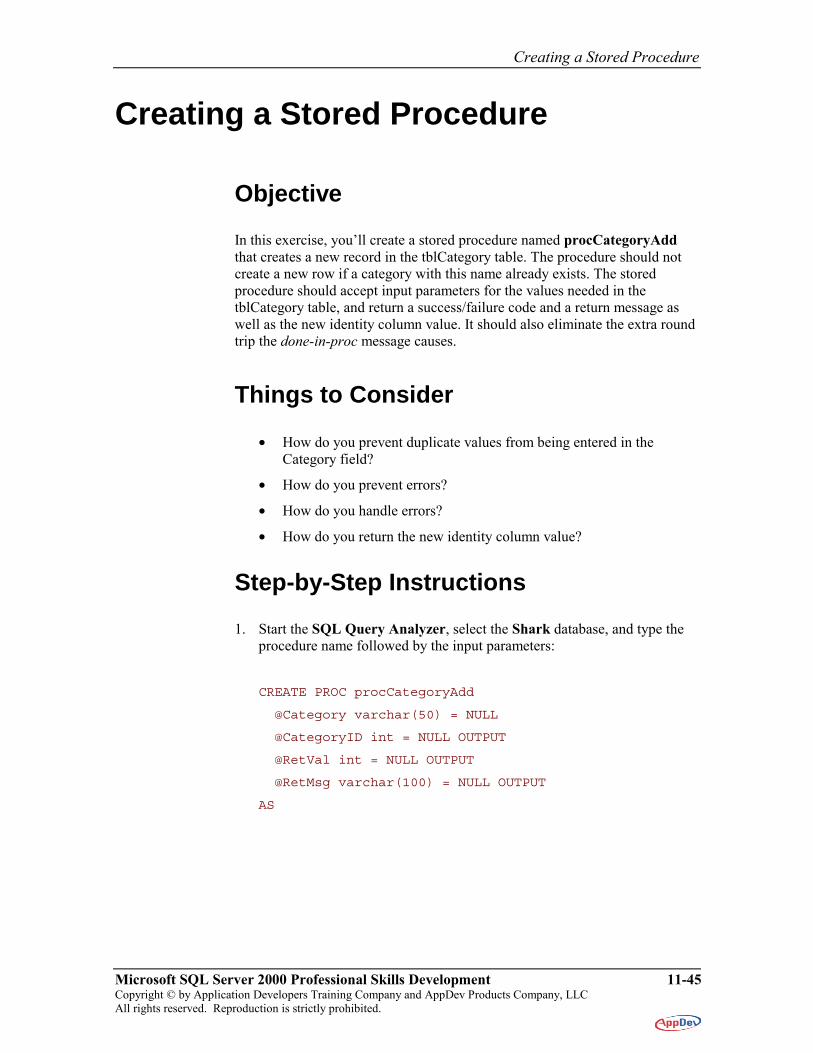
Creating a Stored Procedure
Objective
In this exercise, you’ll create a stored procedure named procCategoryAdd that creates a new record in the tblCategory table. The procedure should not create a new row if a category with this name already exists. The stored procedure should accept input parameters for the values needed in the tblCategory table, and return a success/failure code and a return message as well as the new identity column value. It should also eliminate the extra round trip the done-in-proc message causes.
Things to Consider
• How do you prevent duplicate values from being entered in the Category field?
• How do you prevent errors?
• How do you handle errors?
• How do you return the new identity column value?
Step-by-Step Instructions
1. Start the SQL Query Analyzer, select the Shark database, and type the procedure name followed by the input parameters:
CREATE PROC procCategoryAdd
@Category varchar(50) = NULL
@CategoryID int = NULL OUTPUT
@RetVal int = NULL OUTPUT
@RetMsg varchar(100) = NULL OUTPUT
AS
Lab 11: Stored Procedures and Triggers
11-46 Microsoft SQL Server 2000 Professional Skills Development Copyright © by Application Developers Training Company and AppDev Products Company, LLC All rights reserved. Reproduction is strictly prohibited.
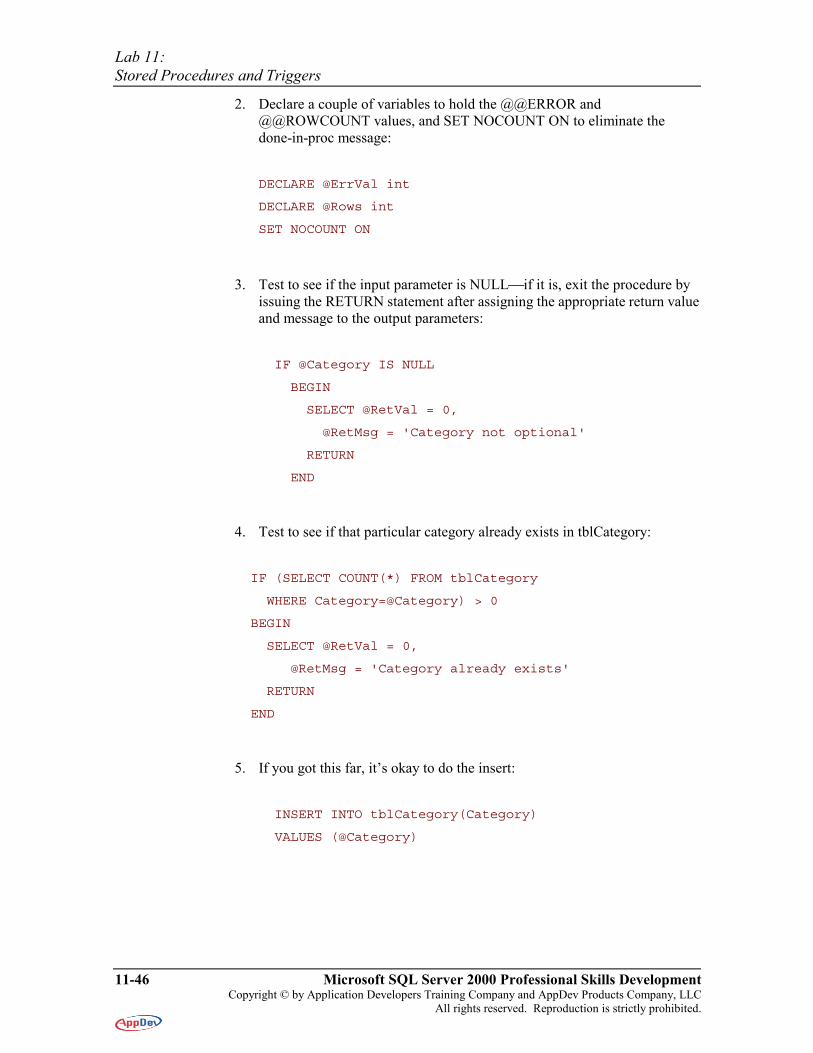
2. Declare a couple of variables to hold the @@ERROR and @@ROWCOUNT values, and SET NOCOUNT ON to eliminate the done-in-proc message:
DECLARE @ErrVal int
DECLARE @Rows int
SET NOCOUNT ON
3. Test to see if the input parameter is NULLif it is, exit the procedure by issuing the RETURN statement after assigning the appropriate return value and message to the output parameters:
IF @Category IS NULL
BEGIN
SELECT @RetVal = 0,
@RetMsg = 'Category not optional'
RETURN
END
4. Test to see if that particular category already exists in tblCategory:
IF (SELECT COUNT(*) FROM tblCategory
WHERE Category=@Category) > 0
BEGIN
SELECT @RetVal = 0,
@RetMsg = 'Category already exists'
RETURN
END
5. If you got this far, it’s okay to do the insert:
INSERT INTO tblCategory(Category)
VALUES (@Category)

Creating a Stored Procedure
Microsoft SQL Server 2000 Professional Skills Development 11-47 Copyright © by Application Developers Training Company and AppDev Products Company, LLC All rights reserved. Reproduction is strictly prohibited.
6. Now test to see if there was an error, and check to see if a row got inserted. Send back the appropriate return code, message, and @@IDENTITY value:
SELECT @ErrVal=@@ERROR, @Rows = @@ROWCOUNT
IF @ErrVal <> 0
BEGIN
SELECT @RetVal = 0,
@RetMsg = 'An error occurred'
RETURN
END
IF @Rows = 0
BEGIN
SELECT @RetVal = 0,
@RetMsg = 'Category was not inserted'
RETURN
END
ELSE
SELECT @CategoryId=@@IDENTITY,
@RetVal = 1, @RetMsg = 'Category inserted'
7. Check the syntax, and if everything’s okay, press F5 to create the stored procedure.
Lab 11: Stored Procedures and Triggers
11-48 Microsoft SQL Server 2000 Professional Skills Development Copyright © by Application Developers Training Company and AppDev Products Company, LLC All rights reserved. Reproduction is strictly prohibited.
Using the Transact-SQL Debugger
Objective
In this exercise, you’ll work with the Transact-SQL Debugger to test the stored procedure you wrote in the first exercise. You’ll add the global @@ERROR function to see if any run-time errors occur. You’ll test the stored procedure with a missing input parameter to see that the code is working properly.
Things to Consider
• How do you specify the stored procedure you want to debug?
• How do you launch the Transact-SQL Debugger?
• How do you step through the code?
Step-by-Step Instructions
1. Press F8 to load the Object Browser. Expand the Stored Procedure node in the database.
2. Right-click on the procCategoryAdd stored procedure and select Debug from the menu.
Using the Transact-SQL Debugger
Microsoft SQL Server 2000 Professional Skills Development 11-49 Copyright © by Application Developers Training Company and AppDev Products Company, LLC All rights reserved. Reproduction is strictly prohibited.
3. For the first run, do not fill in any parameter values, as shown in Figure 9. Click Execute to launch the debugger.
Figure 9. Don’t fill in an input parameter for @Category.
4. Type in @@ERROR in the Globals window. Click the Step Into (F11) button to step to the next statement in the code.

Lab 11: Stored Procedures and Triggers
11-50 Microsoft SQL Server 2000 Professional Skills Development Copyright © by Application Developers Training Company and AppDev Products Company, LLC All rights reserved. Reproduction is strictly prohibited.
5. As you step through the procedure, you should execute the RETURN statement for not supplying an input parameter, as shown in Figure 10.
Figure 10. You should hit the RETURN statement because the @Category input parameter was not supplied.

Using the Transact-SQL Debugger
Microsoft SQL Server 2000 Professional Skills Development 11-51 Copyright © by Application Developers Training Company and AppDev Products Company, LLC All rights reserved. Reproduction is strictly prohibited.
6. Close the debugger window. Execute steps 1 and 2 again, this time typing the parameter value Shark Wear for @Category, as shown in Figure 11. This category already exists in the Shark databaseyou want to test to ensure that a duplicate cannot be entered. Click Execute.
Figure 11. Enter a duplicate category, Shark Wear.
Lab 11: Stored Procedures and Triggers
11-52 Microsoft SQL Server 2000 Professional Skills Development Copyright © by Application Developers Training Company and AppDev Products Company, LLC All rights reserved. Reproduction is strictly prohibited.
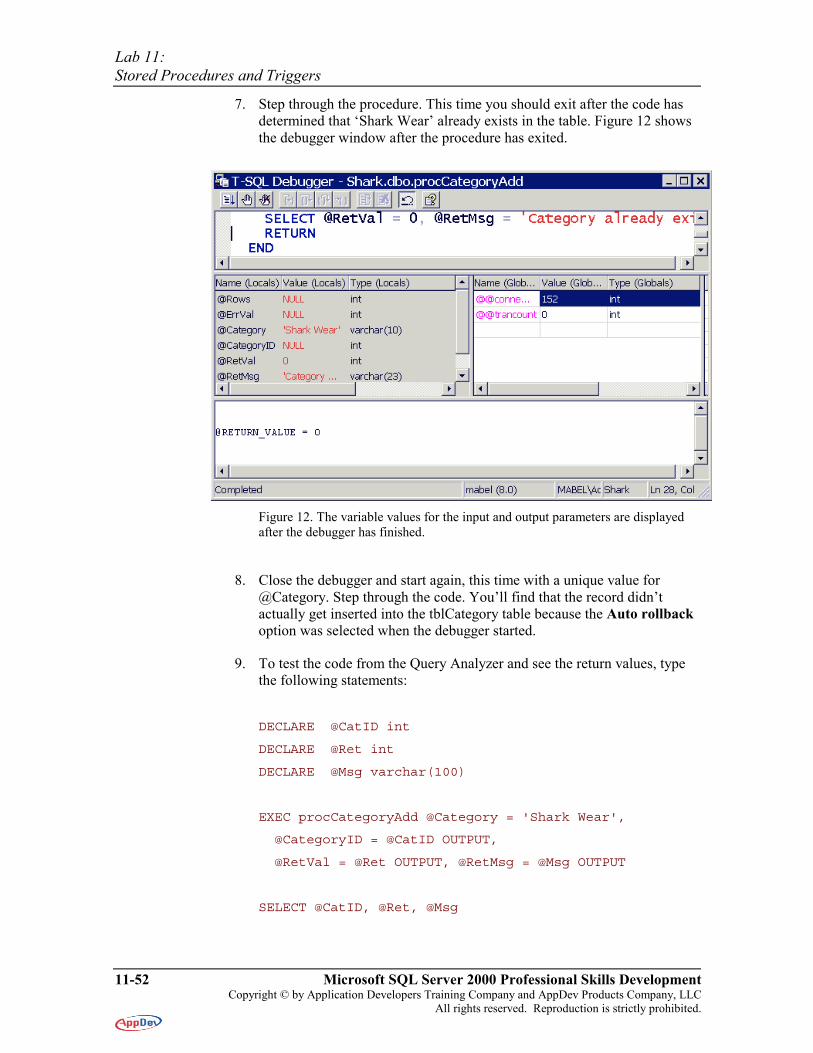
7. Step through the procedure. This time you should exit after the code has determined that ‘Shark Wear’ already exists in the table. Figure 12 shows the debugger window after the procedure has exited.
Figure 12. The variable values for the input and output parameters are displayed after the debugger has finished.
8. Close the debugger and start again, this time with a unique value for @Category. Step through the code. You’ll find that the record didn’t actually get inserted into the tblCategory table because the Auto rollback option was selected when the debugger started.
9. To test the code from the Query Analyzer and see the return values, type the following statements:
DECLARE @CatID int
DECLARE @Ret int
DECLARE @Msg varchar(100)
EXEC procCategoryAdd @Category = 'Shark Wear',
@CategoryID = @CatID OUTPUT,
@RetVal = @Ret OUTPUT, @RetMsg = @Msg OUTPUT
SELECT @CatID, @Ret, @Msg
Using the Transact-SQL Debugger
Microsoft SQL Server 2000 Professional Skills Development 11-53 Copyright © by Application Developers Training Company and AppDev Products Company, LLC All rights reserved. Reproduction is strictly prohibited.
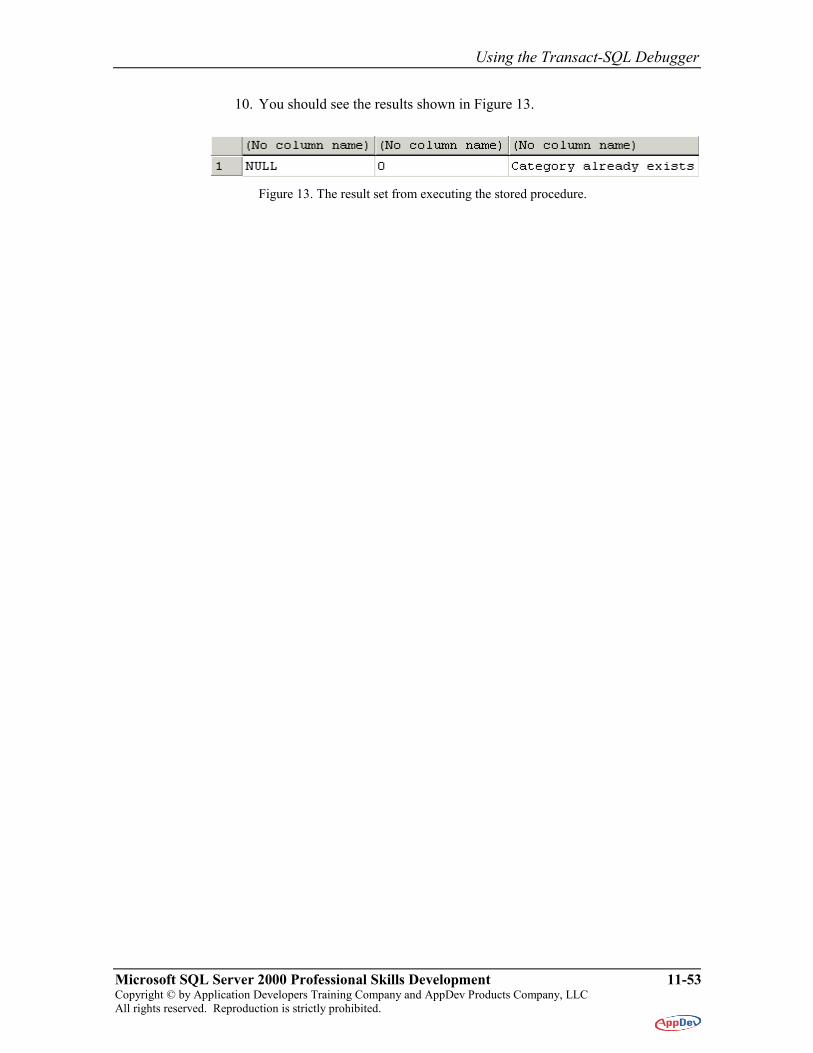
10. You should see the results shown in Figure 13.
Figure 13. The result set from executing the stored procedure.

Lab 11: Stored Procedures and Triggers
11-54 Microsoft SQL Server 2000 Professional Skills Development Copyright © by Application Developers Training Company and AppDev Products Company, LLC All rights reserved. Reproduction is strictly prohibited.
Related Documents